FIRE & EMERGENCY SERVICES Business Plan 2017

Welcome message from author
This document is posted to help you gain knowledge. Please leave a comment to let me know what you think about it! Share it to your friends and learn new things together.
Transcript

Changing Photos: 1.Click on the View tab 2.Select Slide Master 3.Find the slide that holds the photo you’d like to change 4.Hover over photo until you see a black cross under the white pointer 5.Double click on the photo 6.Right click and select Format Picture… 7.Select Fill from the left-hand menu 8.Select Picture or texture fill 9.Select the File… button and choose a new photo from your files 10.To prevent stretching and warping of the new image, choose only wide photos that are approximately 3:2 ratio (most wide/landscape photos are this ratio) 11.When you are finished changing the photo, click on the Slide Master tab 12.Click the Close Master View red X button
FIRE & EMERGENCY SERVICES
Business Plan 2017

Changing Photos: 1.Click on the View tab 2.Select Slide Master 3.Find the slide that holds the photo you’d like to change 4.Hover over photo until you see a black cross under the white pointer 5.Double click on the photo 6.Right click and select Format Picture… 7.Select Fill from the left-hand menu 8.Select Picture or texture fill 9.Select the File… button and choose a new photo from your files 10.To prevent stretching and warping of the new image, choose only wide photos that are approximately 3:2 ratio (most wide/landscape photos are this ratio) 11.When you are finished changing the photo, click on the Slide Master tab 12.Click the Close Master View red X button
Agenda
• Department Overview
• Our Challenges and Solutions
• 2017 Budget

FIRE & EMERGENCY
SERVICES
Changing Photos: 1.Click on the View tab 2.Select Slide Master 3.Find the slide that holds the photo you’d like to change 4.Hover over photo until you see a black cross under the white pointer 5.Double click on the photo 6.Right click and select Format Picture… 7.Select Fill from the left-hand menu 8.Select Picture or texture fill 9.Select the File… button and choose a new photo from your files 10.To prevent stretching and warping of the new image, choose only wide photos that are approximately 3:2 ratio (most wide/landscape photos are this ratio) 11.When you are finished changing the photo, click on the Slide Master tab 12.Click the Close Master View red X button
Department Overview
Service Delivery Model •Integrated Fire, Medical, and Community Risk Reduction
Emergency Calls •74,497 in 2015, 75% are Medical Calls
2016 Capital/Human Resources •30 Stations, 11 Ladder Trucks, 27 Medical Units, 5 Specialty Teams, 898 Authorized Staff

Changing Photos: 1.Click on the View tab 2.Select Slide Master 3.Find the slide that holds the photo you’d like to change 4.Hover over photo until you see a black cross under the white pointer 5.Double click on the photo 6.Right click and select Format Picture… 7.Select Fill from the left-hand menu 8.Select Picture or texture fill 9.Select the File… button and choose a new photo from your files 10.To prevent stretching and warping of the new image, choose only wide photos that are approximately 3:2 ratio (most wide/landscape photos are this ratio) 11.When you are finished changing the photo, click on the Slide Master tab 12.Click the Close Master View red X button
Department Overview
Department Divisions •Business Services •Community Risk Reduction •Employee Support and Initiatives •Operations
2016 Budget • $99.5 Million Operating • SPLOST (Capital)

Changing Photos: 1.Click on the View tab 2.Select Slide Master 3.Find the slide that holds the photo you’d like to change 4.Hover over photo until you see a black cross under the white pointer 5.Double click on the photo 6.Right click and select Format Picture… 7.Select Fill from the left-hand menu 8.Select Picture or texture fill 9.Select the File… button and choose a new photo from your files 10.To prevent stretching and warping of the new image, choose only wide photos that are approximately 3:2 ratio (most wide/landscape photos are this ratio) 11.When you are finished changing the photo, click on the Slide Master tab 12.Click the Close Master View red X button
Department Overview
Employees •Fire, Medical, Risk Reduction Personnel •Highly Trained, Young/Educated Department •Quality Service Delivery •Flat Management Structure Citizen Surveys – 4.83 out of a score of 5
Volunteers Contributed Over 7,000 Hours

Changing Photos: 1.Click on the View tab 2.Select Slide Master 3.Find the slide that holds the photo you’d like to change 4.Hover over photo until you see a black cross under the white pointer 5.Double click on the photo 6.Right click and select Format Picture… 7.Select Fill from the left-hand menu 8.Select Picture or texture fill 9.Select the File… button and choose a new photo from your files 10.To prevent stretching and warping of the new image, choose only wide photos that are approximately 3:2 ratio (most wide/landscape photos are this ratio) 11.When you are finished changing the photo, click on the Slide Master tab 12.Click the Close Master View red X button
Department Overview
• 63 Firemedic Graduates, 99 in Recruit School • Hybrid Paramedic Class • NACo Award – Firefighter/Paramedic Program • American Heart Association Mission: Lifeline® EMS – Gold Award • Law Enforcement Collaboration
Achievements

Changing Photos: 1.Click on the View tab 2.Select Slide Master 3.Find the slide that holds the photo you’d like to change 4.Hover over photo until you see a black cross under the white pointer 5.Double click on the photo 6.Right click and select Format Picture… 7.Select Fill from the left-hand menu 8.Select Picture or texture fill 9.Select the File… button and choose a new photo from your files 10.To prevent stretching and warping of the new image, choose only wide photos that are approximately 3:2 ratio (most wide/landscape photos are this ratio) 11.When you are finished changing the photo, click on the Slide Master tab 12.Click the Close Master View red X button
Department Overview
County/City Population Sq.
Miles Fire
Stations
Sq. Miles Covered
per Station
Cost per Citizen
Gwinnett 918,132 437 31 14.10 $87 Atlanta 463,878 133 30 4.43 $177 Cobb 730,981 344 42 8.19 $134 Clayton 367,542 144 21 6.76 $108 DeKalb 722,161 270 28 9.57 $101

Changing Photos: 1.Click on the View tab 2.Select Slide Master 3.Find the slide that holds the photo you’d like to change 4.Hover over photo until you see a black cross under the white pointer 5.Double click on the photo 6.Right click and select Format Picture… 7.Select Fill from the left-hand menu 8.Select Picture or texture fill 9.Select the File… button and choose a new photo from your files 10.To prevent stretching and warping of the new image, choose only wide photos that are approximately 3:2 ratio (most wide/landscape photos are this ratio) 11.When you are finished changing the photo, click on the Slide Master tab 12.Click the Close Master View red X button
Department Overview
BSC Performance Measurements 2015 2016 (Jan-Jun)
CPSE Emergency response from dispatched to on scene: 6 mins 30 seconds 66% 67%
ALS dispatched to on scene: 8 mins 82% 82% AHA 30 minutes to hospital for chest pains 36 36 CDC Major trauma off scene <10 minutes 81% 82% CSC Avg. scene time for strokes 12 11

FIRE & EMERGENCY
SERVICES
Changing Photos: 1.Click on the View tab 2.Select Slide Master 3.Find the slide that holds the photo you’d like to change 4.Hover over photo until you see a black cross under the white pointer 5.Double click on the photo 6.Right click and select Format Picture… 7.Select Fill from the left-hand menu 8.Select Picture or texture fill 9.Select the File… button and choose a new photo from your files 10.To prevent stretching and warping of the new image, choose only wide photos that are approximately 3:2 ratio (most wide/landscape photos are this ratio) 11.When you are finished changing the photo, click on the Slide Master tab 12.Click the Close Master View red X button
Our Challenges
Future Demand
• Call Volume • Future Growth and Development • Risk Reduction Strategy
Demand for Services

Changing Photos: 1.Click on the View tab 2.Select Slide Master 3.Find the slide that holds the photo you’d like to change 4.Hover over photo until you see a black cross under the white pointer 5.Double click on the photo 6.Right click and select Format Picture… 7.Select Fill from the left-hand menu 8.Select Picture or texture fill 9.Select the File… button and choose a new photo from your files 10.To prevent stretching and warping of the new image, choose only wide photos that are approximately 3:2 ratio (most wide/landscape photos are this ratio) 11.When you are finished changing the photo, click on the Slide Master tab 12.Click the Close Master View red X button
Our Challenges Demands for Services

Changing Photos: 1.Click on the View tab 2.Select Slide Master 3.Find the slide that holds the photo you’d like to change 4.Hover over photo until you see a black cross under the white pointer 5.Double click on the photo 6.Right click and select Format Picture… 7.Select Fill from the left-hand menu 8.Select Picture or texture fill 9.Select the File… button and choose a new photo from your files 10.To prevent stretching and warping of the new image, choose only wide photos that are approximately 3:2 ratio (most wide/landscape photos are this ratio) 11.When you are finished changing the photo, click on the Slide Master tab 12.Click the Close Master View red X button
Our Challenges
Demand for Services
Future Growth and Development
•Vision for Gwinnett County •Service Delivery

Changing Photos: 1.Click on the View tab 2.Select Slide Master 3.Find the slide that holds the photo you’d like to change 4.Hover over photo until you see a black cross under the white pointer 5.Double click on the photo 6.Right click and select Format Picture… 7.Select Fill from the left-hand menu 8.Select Picture or texture fill 9.Select the File… button and choose a new photo from your files 10.To prevent stretching and warping of the new image, choose only wide photos that are approximately 3:2 ratio (most wide/landscape photos are this ratio) 11.When you are finished changing the photo, click on the Slide Master tab 12.Click the Close Master View red X button
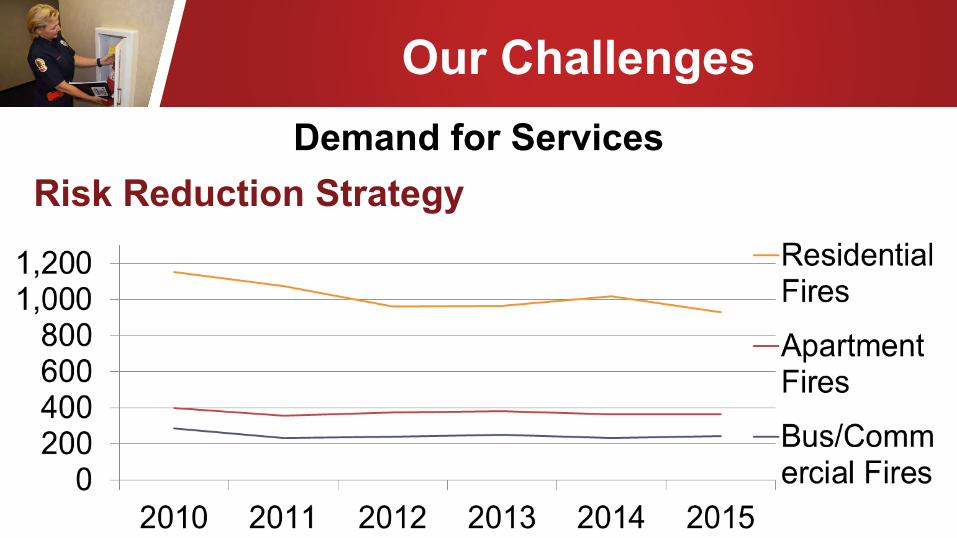
Our Challenges
Demand for Services
Balance Response with Risk Reduction Strategy •Fire and Life Safety Inspections •Fire Investigations •Education
Changing Photos: 1.Click on the View tab 2.Select Slide Master 3.Find the slide that holds the photo you’d like to change 4.Hover over photo until you see a black cross under the white pointer 5.Double click on the photo 6.Right click and select Format Picture… 7.Select Fill from the left-hand menu 8.Select Picture or texture fill 9.Select the File… button and choose a new photo from your files 10.To prevent stretching and warping of the new image, choose only wide photos that are approximately 3:2 ratio (most wide/landscape photos are this ratio) 11.When you are finished changing the photo, click on the Slide Master tab 12.Click the Close Master View red X button
Our Challenges Demand for Services
Risk Reduction Strategy

Changing Photos: 1.Click on the View tab 2.Select Slide Master 3.Find the slide that holds the photo you’d like to change 4.Hover over photo until you see a black cross under the white pointer 5.Double click on the photo 6.Right click and select Format Picture… 7.Select Fill from the left-hand menu 8.Select Picture or texture fill 9.Select the File… button and choose a new photo from your files 10.To prevent stretching and warping of the new image, choose only wide photos that are approximately 3:2 ratio (most wide/landscape photos are this ratio) 11.When you are finished changing the photo, click on the Slide Master tab 12.Click the Close Master View red X button
Our Challenges
Current Demand
• Increase in Medical Transports • Aging Population • Territory Response Time • Advancements in Emergency Care
Demand for Services

Changing Photos: 1.Click on the View tab 2.Select Slide Master 3.Find the slide that holds the photo you’d like to change 4.Hover over photo until you see a black cross under the white pointer 5.Double click on the photo 6.Right click and select Format Picture… 7.Select Fill from the left-hand menu 8.Select Picture or texture fill 9.Select the File… button and choose a new photo from your files 10.To prevent stretching and warping of the new image, choose only wide photos that are approximately 3:2 ratio (most wide/landscape photos are this ratio) 11.When you are finished changing the photo, click on the Slide Master tab 12.Click the Close Master View red X button
Our Challenges
Demands for Services Medical Transports

Changing Photos: 1.Click on the View tab 2.Select Slide Master 3.Find the slide that holds the photo you’d like to change 4.Hover over photo until you see a black cross under the white pointer 5.Double click on the photo 6.Right click and select Format Picture… 7.Select Fill from the left-hand menu 8.Select Picture or texture fill 9.Select the File… button and choose a new photo from your files 10.To prevent stretching and warping of the new image, choose only wide photos that are approximately 3:2 ratio (most wide/landscape photos are this ratio) 11.When you are finished changing the photo, click on the Slide Master tab 12.Click the Close Master View red X button
Our Challenges Demands for Services
Transports by Age Group

Changing Photos: 1.Click on the View tab 2.Select Slide Master 3.Find the slide that holds the photo you’d like to change 4.Hover over photo until you see a black cross under the white pointer 5.Double click on the photo 6.Right click and select Format Picture… 7.Select Fill from the left-hand menu 8.Select Picture or texture fill 9.Select the File… button and choose a new photo from your files 10.To prevent stretching and warping of the new image, choose only wide photos that are approximately 3:2 ratio (most wide/landscape photos are this ratio) 11.When you are finished changing the photo, click on the Slide Master tab 12.Click the Close Master View red X button
Our Challenges
Demands for Services Age 55 and Over Group
2015 2012

Changing Photos: 1.Click on the View tab 2.Select Slide Master 3.Find the slide that holds the photo you’d like to change 4.Hover over photo until you see a black cross under the white pointer 5.Double click on the photo 6.Right click and select Format Picture… 7.Select Fill from the left-hand menu 8.Select Picture or texture fill 9.Select the File… button and choose a new photo from your files 10.To prevent stretching and warping of the new image, choose only wide photos that are approximately 3:2 ratio (most wide/landscape photos are this ratio) 11.When you are finished changing the photo, click on the Slide Master tab 12.Click the Close Master View red X button
Our Challenges
Legend
Minutes =< 8.5 =< 9 =< 9.5 =< 10 > 10
Medical Unit Response Times
Demands for Services

Changing Photos: 1.Click on the View tab 2.Select Slide Master 3.Find the slide that holds the photo you’d like to change 4.Hover over photo until you see a black cross under the white pointer 5.Double click on the photo 6.Right click and select Format Picture… 7.Select Fill from the left-hand menu 8.Select Picture or texture fill 9.Select the File… button and choose a new photo from your files 10.To prevent stretching and warping of the new image, choose only wide photos that are approximately 3:2 ratio (most wide/landscape photos are this ratio) 11.When you are finished changing the photo, click on the Slide Master tab 12.Click the Close Master View red X button
Our Challenges
Demands for Services
Advancements in Emergency Care
Rapid transport and life-saving care •Trauma •STEMI/Chest Pains •Stroke

FIRE & EMERGENCY
SERVICES
Changing Photos: 1.Click on the View tab 2.Select Slide Master 3.Find the slide that holds the photo you’d like to change 4.Hover over photo until you see a black cross under the white pointer 5.Double click on the photo 6.Right click and select Format Picture… 7.Select Fill from the left-hand menu 8.Select Picture or texture fill 9.Select the File… button and choose a new photo from your files 10.To prevent stretching and warping of the new image, choose only wide photos that are approximately 3:2 ratio (most wide/landscape photos are this ratio) 11.When you are finished changing the photo, click on the Slide Master tab 12.Click the Close Master View red X button
Solutions
Proposed Medical Units
Med 22
Med 21

FIRE & EMERGENCY
SERVICES
Changing Photos: 1.Click on the View tab 2.Select Slide Master 3.Find the slide that holds the photo you’d like to change 4.Hover over photo until you see a black cross under the white pointer 5.Double click on the photo 6.Right click and select Format Picture… 7.Select Fill from the left-hand menu 8.Select Picture or texture fill 9.Select the File… button and choose a new photo from your files 10.To prevent stretching and warping of the new image, choose only wide photos that are approximately 3:2 ratio (most wide/landscape photos are this ratio) 11.When you are finished changing the photo, click on the Slide Master tab 12.Click the Close Master View red X button
Budget

Changing Photos: 1.Click on the View tab 2.Select Slide Master 3.Find the slide that holds the photo you’d like to change 4.Hover over photo until you see a black cross under the white pointer 5.Double click on the photo 6.Right click and select Format Picture… 7.Select Fill from the left-hand menu 8.Select Picture or texture fill 9.Select the File… button and choose a new photo from your files 10.To prevent stretching and warping of the new image, choose only wide photos that are approximately 3:2 ratio (most wide/landscape photos are this ratio) 11.When you are finished changing the photo, click on the Slide Master tab 12.Click the Close Master View red X button
2017 Budget Personal Services Base $ 81,753,129 GOE Base $ 11,989,670 Contributions $ 8,071,518 Capital Outlay $ 55,293 1 Decision Package (18 Personnel, 2 Med Units) $ 1,334,951 Total Expenses $ 103,204,561 Total Revenues $ 107,923,609 Funds Remaining $ 4,719,048

Changing Photos: 1.Click on the View tab 2.Select Slide Master 3.Find the slide that holds the photo you’d like to change 4.Hover over photo until you see a black cross under the white pointer 5.Double click on the photo 6.Right click and select Format Picture… 7.Select Fill from the left-hand menu 8.Select Picture or texture fill 9.Select the File… button and choose a new photo from your files 10.To prevent stretching and warping of the new image, choose only wide photos that are approximately 3:2 ratio (most wide/landscape photos are this ratio) 11.When you are finished changing the photo, click on the Slide Master tab 12.Click the Close Master View red X button
FIRE & EMERGENCY SERVICES
How May We Help You?
Related Documents