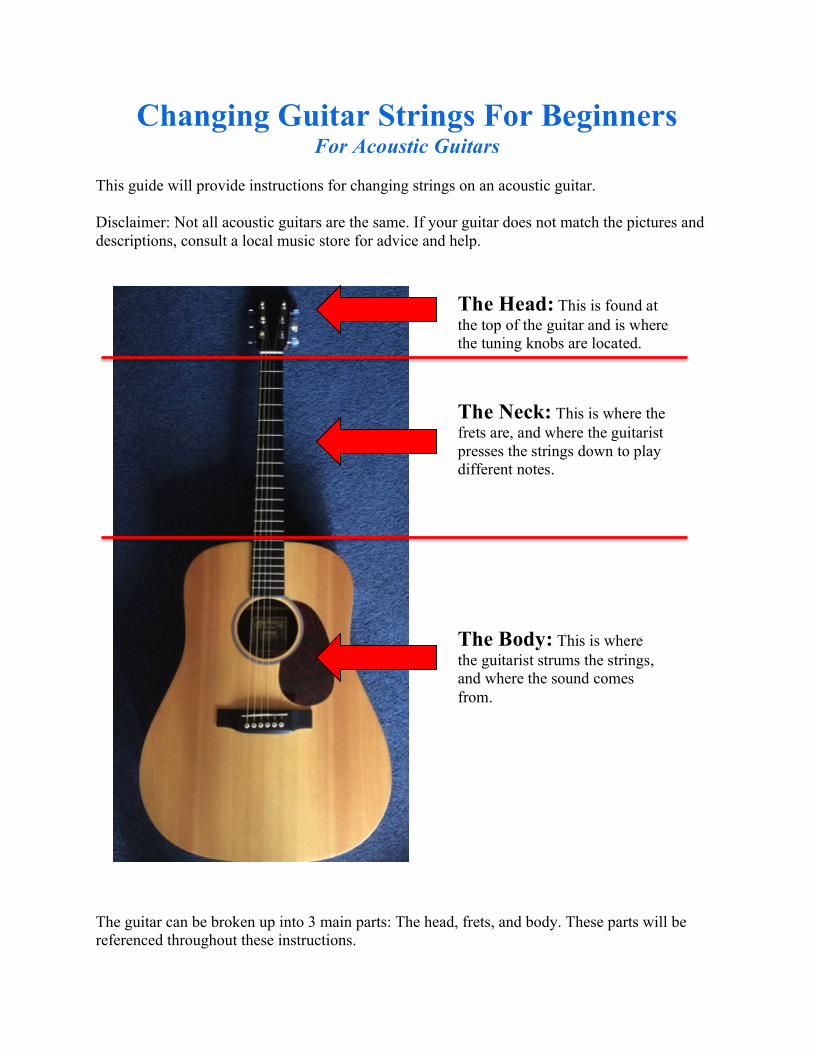
Changing Guitar Strings For Beginners For Acoustic Guitars This guide will provide instructions for changing strings on an acoustic guitar. Disclaimer: Not all acoustic guitars are the same. If your guitar does not match the pictures and descriptions, consult a local music store for advice and help. The guitar can be broken up into 3 main parts: The head, frets, and body. These parts will be referenced throughout these instructions. The Head: This is found at the top of the guitar and is where the tuning knobs are located. The Neck: This is where the frets are, and where the guitarist presses the strings down to play different notes. The Body: This is where the guitarist strums the strings, and where the sound comes from.

Welcome message from author
This document is posted to help you gain knowledge. Please leave a comment to let me know what you think about it! Share it to your friends and learn new things together.
Transcript
Changing Guitar Strings For Beginners For Acoustic Guitars
This guide will provide instructions for changing strings on an acoustic guitar. Disclaimer: Not all acoustic guitars are the same. If your guitar does not match the pictures and descriptions, consult a local music store for advice and help.
The guitar can be broken up into 3 main parts: The head, frets, and body. These parts will be referenced throughout these instructions.
The Head: This is found at the top of the guitar and is where the tuning knobs are located.
The Neck: This is where the frets are, and where the guitarist presses the strings down to play different notes.
The Body: This is where the guitarist strums the strings, and where the sound comes from.
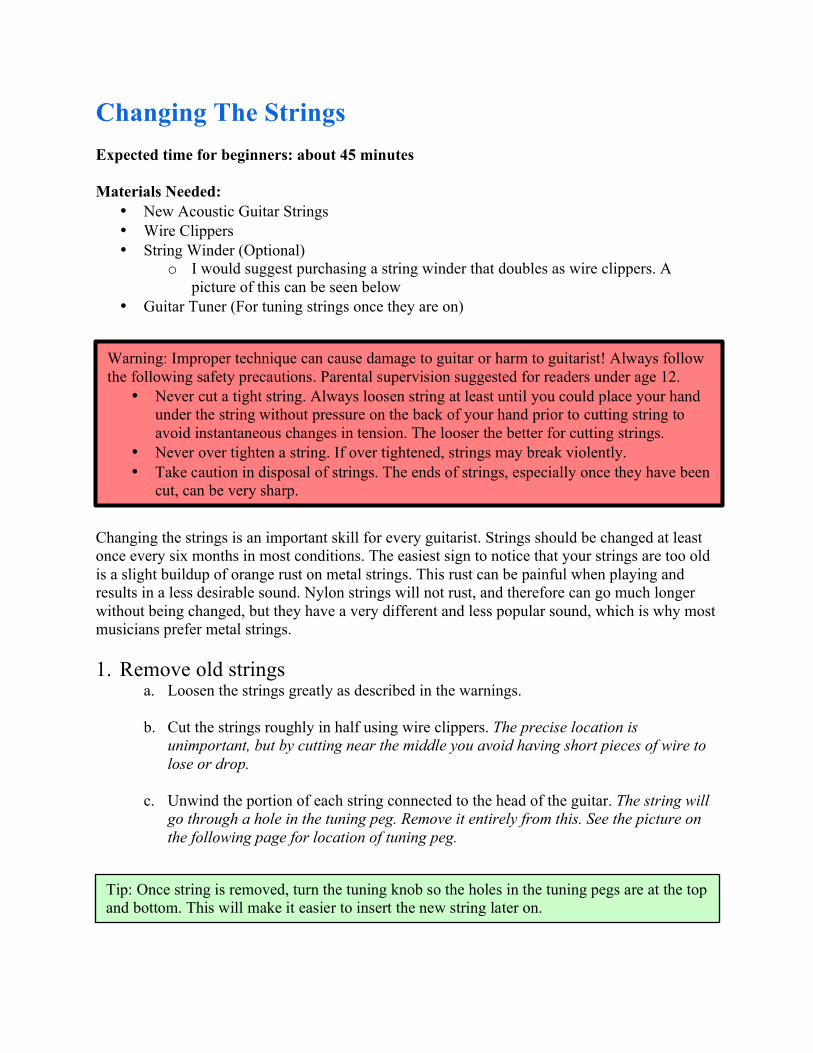
Changing The Strings Expected time for beginners: about 45 minutes Materials Needed:
• New Acoustic Guitar Strings • Wire Clippers • String Winder (Optional)
o I would suggest purchasing a string winder that doubles as wire clippers. A picture of this can be seen below
• Guitar Tuner (For tuning strings once they are on)
Changing the strings is an important skill for every guitarist. Strings should be changed at least once every six months in most conditions. The easiest sign to notice that your strings are too old is a slight buildup of orange rust on metal strings. This rust can be painful when playing and results in a less desirable sound. Nylon strings will not rust, and therefore can go much longer without being changed, but they have a very different and less popular sound, which is why most musicians prefer metal strings. 1. Remove old strings
a. Loosen the strings greatly as described in the warnings.
b. Cut the strings roughly in half using wire clippers. The precise location is unimportant, but by cutting near the middle you avoid having short pieces of wire to lose or drop.
c. Unwind the portion of each string connected to the head of the guitar. The string will
go through a hole in the tuning peg. Remove it entirely from this. See the picture on the following page for location of tuning peg.
Warning: Improper technique can cause damage to guitar or harm to guitarist! Always follow the following safety precautions. Parental supervision suggested for readers under age 12.
• Never cut a tight string. Always loosen string at least until you could place your hand under the string without pressure on the back of your hand prior to cutting string to avoid instantaneous changes in tension. The looser the better for cutting strings.
• Never over tighten a string. If over tightened, strings may break violently. • Take caution in disposal of strings. The ends of strings, especially once they have been
cut, can be very sharp.
Tip: Once string is removed, turn the tuning knob so the holes in the tuning pegs are at the top and bottom. This will make it easier to insert the new string later on.
d. Reach your hand inside the hole in the center of the body of the guitar to pop out the
bridge pins. To do this, push on the back of the pins until they are loose and come out the front. The pins go straight into the guitar and are just wedged in and will pop out with pressure.
e. Remove the pins and strings from the bridge, and dispose of the strings. Do not throw
away the pins.
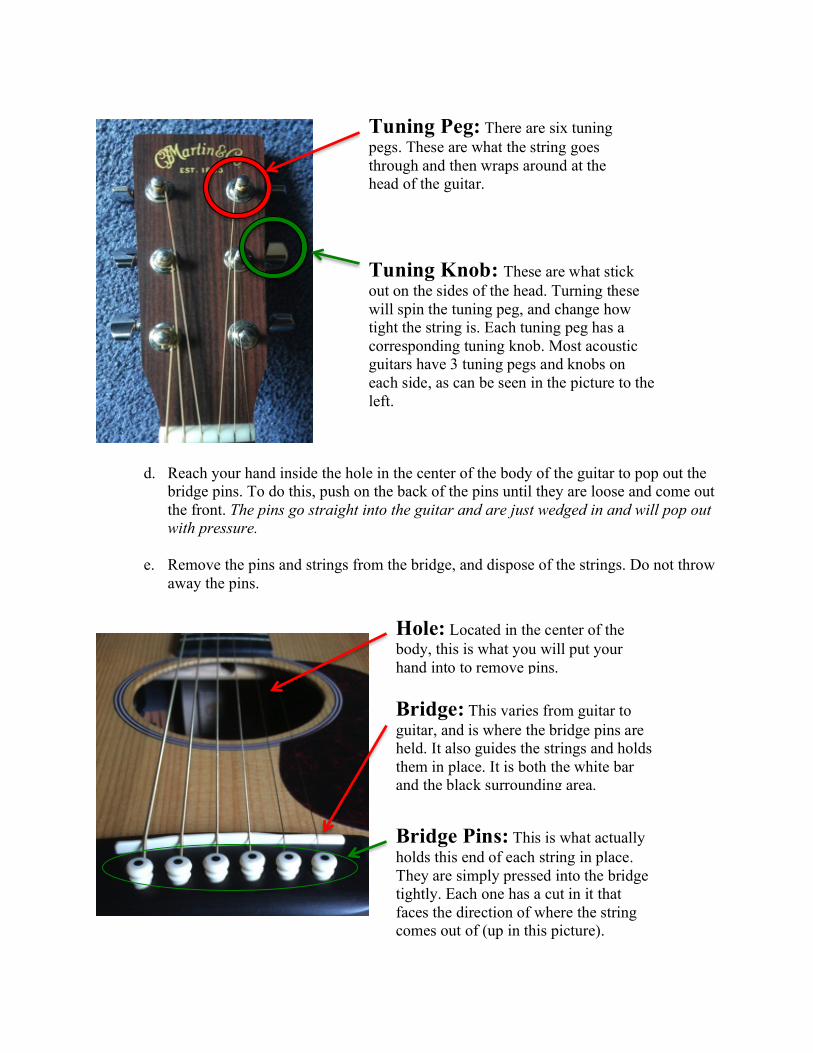
Hole: Located in the center of the body, this is what you will put your hand into to remove pins.
Bridge: This varies from guitar to guitar, and is where the bridge pins are held. It also guides the strings and holds them in place. It is both the white bar and the black surrounding area.
Bridge Pins: This is what actually holds this end of each string in place. They are simply pressed into the bridge tightly. Each one has a cut in it that faces the direction of where the string comes out of (up in this picture).
Tuning Peg: There are six tuning pegs. These are what the string goes through and then wraps around at the head of the guitar.
Tuning Knob: These are what stick out on the sides of the head. Turning these will spin the tuning peg, and change how tight the string is. Each tuning peg has a corresponding tuning knob. Most acoustic guitars have 3 tuning pegs and knobs on each side, as can be seen in the picture to the left.
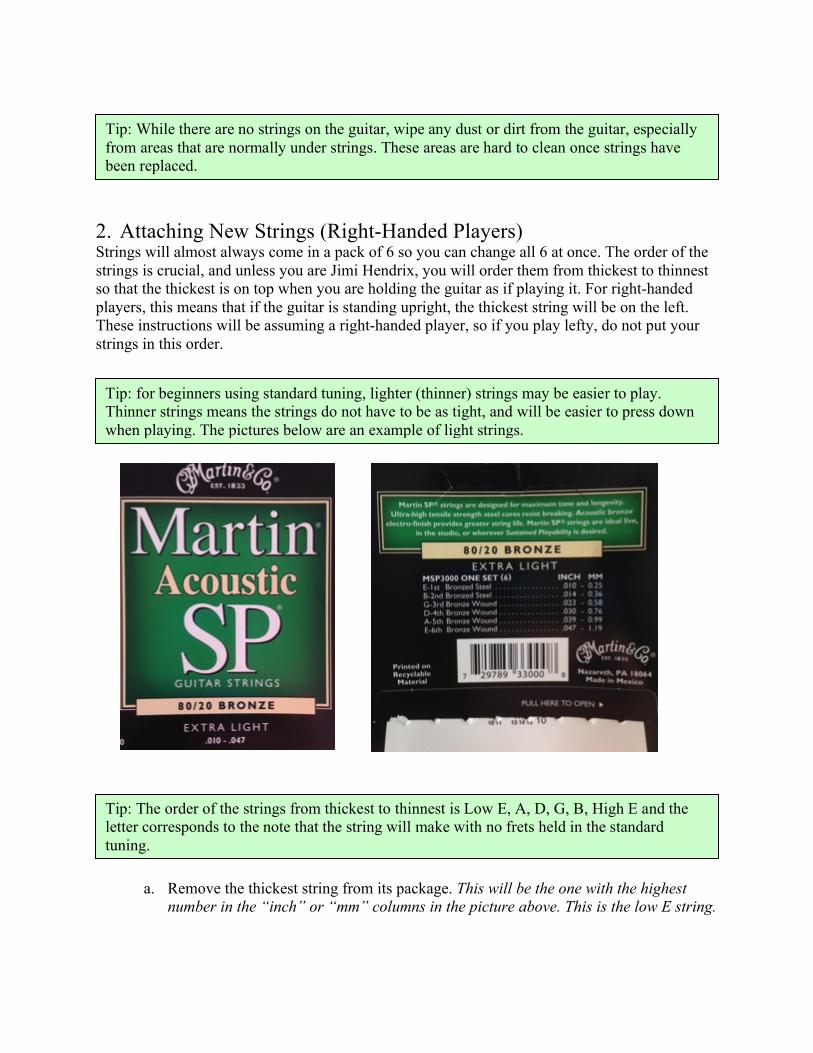
2. Attaching New Strings (Right-Handed Players) Strings will almost always come in a pack of 6 so you can change all 6 at once. The order of the strings is crucial, and unless you are Jimi Hendrix, you will order them from thickest to thinnest so that the thickest is on top when you are holding the guitar as if playing it. For right-handed players, this means that if the guitar is standing upright, the thickest string will be on the left. These instructions will be assuming a right-handed player, so if you play lefty, do not put your strings in this order.
a. Remove the thickest string from its package. This will be the one with the highest number in the “inch” or “mm” columns in the picture above. This is the low E string.
Tip: While there are no strings on the guitar, wipe any dust or dirt from the guitar, especially from areas that are normally under strings. These areas are hard to clean once strings have been replaced.
Tip: The order of the strings from thickest to thinnest is Low E, A, D, G, B, High E and the letter corresponds to the note that the string will make with no frets held in the standard tuning.
Tip: for beginners using standard tuning, lighter (thinner) strings may be easier to play. Thinner strings means the strings do not have to be as tight, and will be easier to press down when playing. The pictures below are an example of light strings.
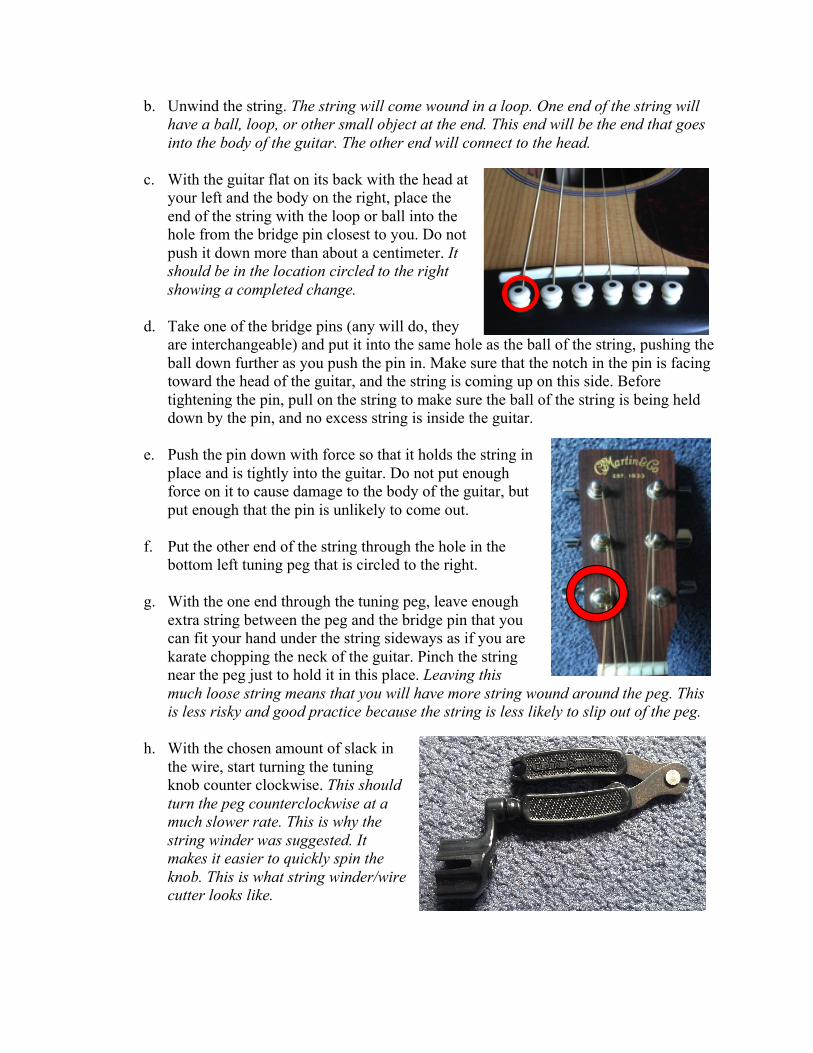
b. Unwind the string. The string will come wound in a loop. One end of the string will have a ball, loop, or other small object at the end. This end will be the end that goes into the body of the guitar. The other end will connect to the head.
c. With the guitar flat on its back with the head at
your left and the body on the right, place the end of the string with the loop or ball into the hole from the bridge pin closest to you. Do not push it down more than about a centimeter. It should be in the location circled to the right showing a completed change.
d. Take one of the bridge pins (any will do, they
are interchangeable) and put it into the same hole as the ball of the string, pushing the ball down further as you push the pin in. Make sure that the notch in the pin is facing toward the head of the guitar, and the string is coming up on this side. Before tightening the pin, pull on the string to make sure the ball of the string is being held down by the pin, and no excess string is inside the guitar.
e. Push the pin down with force so that it holds the string in
place and is tightly into the guitar. Do not put enough force on it to cause damage to the body of the guitar, but put enough that the pin is unlikely to come out.
f. Put the other end of the string through the hole in the
bottom left tuning peg that is circled to the right.
g. With the one end through the tuning peg, leave enough extra string between the peg and the bridge pin that you can fit your hand under the string sideways as if you are karate chopping the neck of the guitar. Pinch the string near the peg just to hold it in this place. Leaving this much loose string means that you will have more string wound around the peg. This is less risky and good practice because the string is less likely to slip out of the peg.
h. With the chosen amount of slack in
the wire, start turning the tuning knob counter clockwise. This should turn the peg counterclockwise at a much slower rate. This is why the string winder was suggested. It makes it easier to quickly spin the knob. This is what string winder/wire cutter looks like.

i. Make sure the string is being tightly pressed against the knob using your hand that is not turning the knob, and spin the knob 180 degrees. At this point, the side of the string that is connected to the body should be coming out of the peg on the opposite side, and the extra string coming out of the other side of the peg should be approaching where your finger is holding the string against the peg. Your left hand should be turning the knob while your right index finger is pressing the string tightly against the peg as seen below.
j. Keep turning the knob, and make sure that the excess string goes under the string that is attached to the body. Once the excess string has gone under the other part of the string, bend the excess string straight up away from the guitar so it is out of the way.
k. Now as you keep spinning the knob, make sure that the side of the string keeps going
under the previous winding around the peg, as seen in the picture below. The picture has been enlarged to attempt to show this intricate step. In the picture, the excess string has been cut off already. Ideally, winds of strings will never be stacked. This is what the final result should look like. One winding going over the bent up string, then the rest going continuously lower.
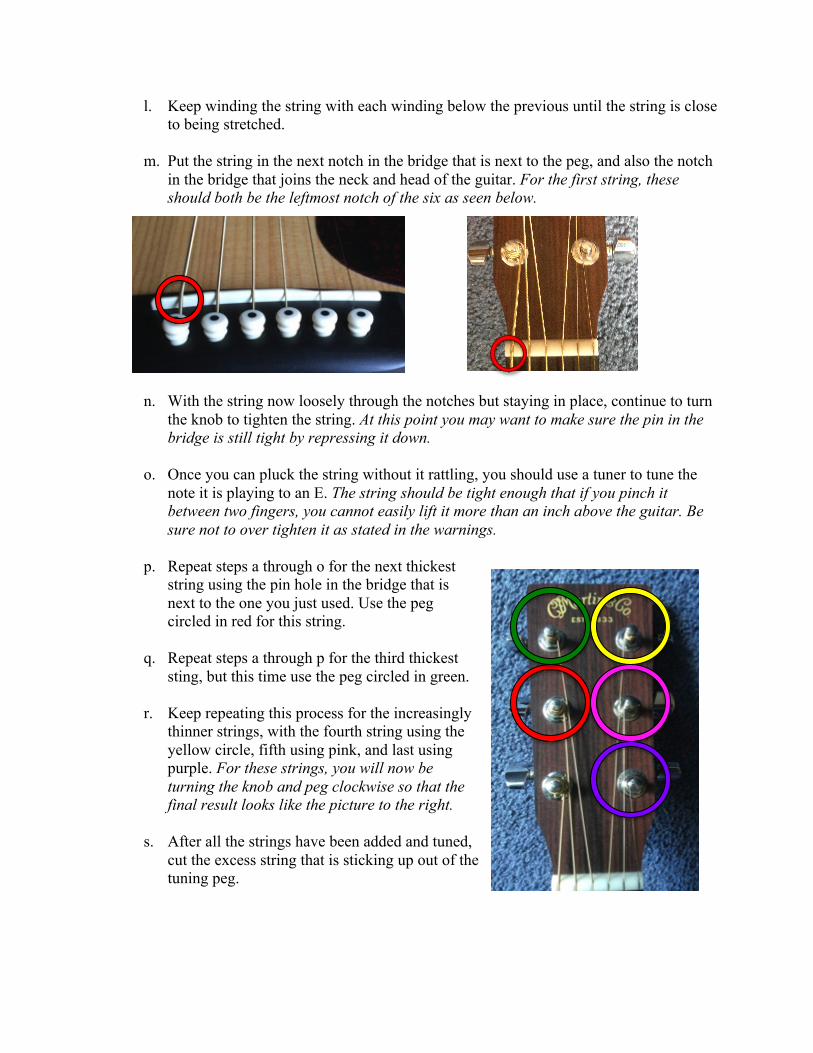
l. Keep winding the string with each winding below the previous until the string is close to being stretched.
m. Put the string in the next notch in the bridge that is next to the peg, and also the notch
in the bridge that joins the neck and head of the guitar. For the first string, these should both be the leftmost notch of the six as seen below.
n. With the string now loosely through the notches but staying in place, continue to turn
the knob to tighten the string. At this point you may want to make sure the pin in the bridge is still tight by repressing it down.
o. Once you can pluck the string without it rattling, you should use a tuner to tune the
note it is playing to an E. The string should be tight enough that if you pinch it between two fingers, you cannot easily lift it more than an inch above the guitar. Be sure not to over tighten it as stated in the warnings.
p. Repeat steps a through o for the next thickest
string using the pin hole in the bridge that is next to the one you just used. Use the peg circled in red for this string.
q. Repeat steps a through p for the third thickest
sting, but this time use the peg circled in green.
r. Keep repeating this process for the increasingly thinner strings, with the fourth string using the yellow circle, fifth using pink, and last using purple. For these strings, you will now be turning the knob and peg clockwise so that the final result looks like the picture to the right.
s. After all the strings have been added and tuned,
cut the excess string that is sticking up out of the tuning peg.
Congratulations! Your guitar should now be ready to play with brand new strings! Take advantage of these new strings and start playing right away! There’s no actual benefit to that, but the strings will sound and feel their best immediately after they have been changed. If this process took a long time for you, don’t worry. As you become more familiar with the process, you will take much less time to change the strings until it only takes you a few minutes from start to finish.
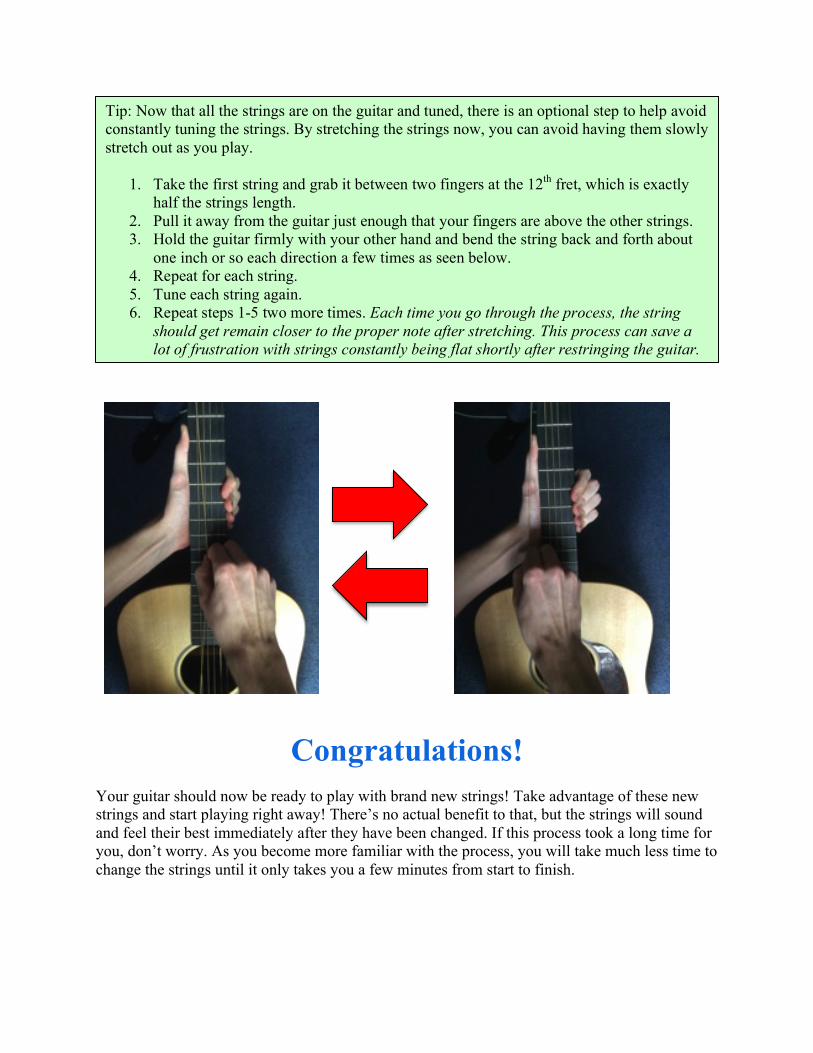
Tip: Now that all the strings are on the guitar and tuned, there is an optional step to help avoid constantly tuning the strings. By stretching the strings now, you can avoid having them slowly stretch out as you play.
1. Take the first string and grab it between two fingers at the 12th fret, which is exactly half the strings length.
2. Pull it away from the guitar just enough that your fingers are above the other strings. 3. Hold the guitar firmly with your other hand and bend the string back and forth about
one inch or so each direction a few times as seen below. 4. Repeat for each string. 5. Tune each string again. 6. Repeat steps 1-5 two more times. Each time you go through the process, the string
should get remain closer to the proper note after stretching. This process can save a lot of frustration with strings constantly being flat shortly after restringing the guitar.

Audience and Scope The target audience for this instruction manual is beginners to guitar. This manual will walk the reader through changing the strings on their acoustic guitar for the first time. It assumes very little understanding of the guitar, which is why it is so detailed with numerous labeled diagrams. All ages are encouraged to use this manual from children to the elderly, but I included that parental supervision was suggested for young children because the strings are sharp and so are wire clippers. I attempted to make the format very easy to follow because it is a very long and intricate process and it would be easy to get confused.
Related Documents