Page 246 Chapter 4: The RadASM IDE for HLA 4.1: Integrated Development Environments An integrated development environment (IDE) traditionally incorporates a text editor, a compiler/assembler, a linker, a debugger, a project manager, and other development tools under the control of a single main applica- tion. Integrated doesn t necessarily mean that a single program provides all these functions. However, the IDE does automatically run each of these applications as needed. An application developer sees a single user inter- face to all these tools and doesn t have to learn different sets of commands for each of the components needed to build an application. The central component of most IDEs is the editor and project manager. A project in a typical IDE is a related collection of files that contain information needed to build a complete application. This could, for example, include assembly language source files, header files, object files, libraries, resource files, and binary data files. The point of an IDE project is to collect and manage these files to make it easy to keep track of them. Most IDEs manage the files specific to a given project by placing those files in a single subdirectory. Shared files (such as library and shared object code files) may appear elsewhere but the files that are only used for the project generally appear within the project directory. This makes manipulation of the project as a whole a bit eas- ier. RadASM, created by Ketil Olsen, is a relatively generic integrated development environment. Many IDEs only work with a single language or a single compiler. RadASM, though designed specifically for assembly lan- guage development, works with a fair number of different assemblers. The nice thing about this approach is that you may continue to use RadASM when you switch from one assembler to another. This spares you the effort of having to learn a completely new IDE should you want to switch from one assembler to another (e.g., switching between FASM, MASM, NASM, TASM, and HLA is relatively painless because RadASM supports all of these assemblers; however, were you to switch from SpASM to one of these assemblers you d have to relearn the IDE because SpASM has it s own unique IDE). One drawback to generic IDEs is that they aren t as well integrated with the underlying toolset as an IDE designed around a specific toolset. RadASM, however, is extremely cus- tomizable, allowing you to easily set it up with different assemblers/compilers or even modify it according to your own personal tastes. By properly setting up RadASM to work with HLA, you can speed up the development of assembly language software under Windows. A fair percentage of this chapter deals with setting up and cus- tomizing the RadASM environment to suit your preferences and typical Windows assembly development. 4.2: Traditional (Command Line) Development in Assembly RadASM isn t a integrated development environment in the sense that it integrates all of its functionality into the same program. Instead, RadASM is a shell program that invokes other applications in response to requests or commands within the IDE. For example, to compile an HLA program, RadASM does not include a copy of the HLA compiler within RadASM - it simply runs the HLA.EXE compiler in response to an assemble/compile command. Part of the work involved in customizing RadASM is to define the command line parameters to send to various tools like the HLA.EXE compiler. Therefore, in order to properly set up RadASM to operate HLA, you need to understand how to use HLA (and other tools) from a command line interface. Indeed, there are many times when it s much more convenient to use HLA from the command line rather than from an IDE. For these two reasons, it s important to first begin the discussion of using RadASM by describing how to use HLA without RadASM - straight from the command line.

Ch04657657
Dec 21, 2015
5676756
Welcome message from author
This document is posted to help you gain knowledge. Please leave a comment to let me know what you think about it! Share it to your friends and learn new things together.
Transcript

Chapter 4: The RadASM IDE for HLA
4.1: Integrated Development Environments
An integrated development environment (IDE) traditionally incorporates a text editor, a compiler/assembler,a linker, a debugger, a project manager, and other development tools under the control of a single main applica-tion. Integrated doesn t necessarily mean that a single program provides all these functions. However, the IDEdoes automatically run each of these applications as needed. An application developer sees a single user inter-face to all these tools and doesn t have to learn different sets of commands for each of the components neededto build an application.
The central component of most IDEs is the editor and project manager. A project in a typical IDE is a relatedcollection of files that contain information needed to build a complete application. This could, for example,include assembly language source files, header files, object files, libraries, resource files, and binary data files.The point of an IDE project is to collect and manage these files to make it easy to keep track of them.
Most IDEs manage the files specific to a given project by placing those files in a single subdirectory. Sharedfiles (such as library and shared object code files) may appear elsewhere but the files that are only used for theproject generally appear within the project directory. This makes manipulation of the project as a whole a bit eas-ier.
RadASM, created by Ketil Olsen, is a relatively generic integrated development environment. Many IDEsonly work with a single language or a single compiler. RadASM, though designed specifically for assembly lan-guage development, works with a fair number of different assemblers. The nice thing about this approach is thatyou may continue to use RadASM when you switch from one assembler to another. This spares you the effort ofhaving to learn a completely new IDE should you want to switch from one assembler to another (e.g., switchingbetween FASM, MASM, NASM, TASM, and HLA is relatively painless because RadASM supports all of theseassemblers; however, were you to switch from SpASM to one of these assemblers you d have to relearn the IDEbecause SpASM has it s own unique IDE). One drawback to generic IDEs is that they aren t as well integratedwith the underlying toolset as an IDE designed around a specific toolset. RadASM, however, is extremely cus-tomizable, allowing you to easily set it up with different assemblers/compilers or even modify it according toyour own personal tastes. By properly setting up RadASM to work with HLA, you can speed up the developmentof assembly language software under Windows. A fair percentage of this chapter deals with setting up and cus-tomizing the RadASM environment to suit your preferences and typical Windows assembly development.
4.2: Traditional (Command Line) Development in Assembly
RadASM isn t a integrated development environment in the sense that it integrates all of its functionality intothe same program. Instead, RadASM is a shell program that invokes other applications in response to requests orcommands within the IDE. For example, to compile an HLA program, RadASM does not include a copy of theHLA compiler within RadASM - it simply runs the HLA.EXE compiler in response to an assemble/compilecommand. Part of the work involved in customizing RadASM is to define the command line parameters to sendto various tools like the HLA.EXE compiler. Therefore, in order to properly set up RadASM to operate HLA,you need to understand how to use HLA (and other tools) from a command line interface. Indeed, there are manytimes when it s much more convenient to use HLA from the command line rather than from an IDE. For thesetwo reasons, it s important to first begin the discussion of using RadASM by describing how to use HLA withoutRadASM - straight from the command line.
Page 246

In this book, we ll take the approach of always supporting both RadASM and command-line projects. Thisapproach has the disadvantage of negating some of the benefits of using an IDE (i.e., automatic project mainte-nance) but it has the bigger advantage of being more flexible and not tying you down to using RadASM (shouldyou prefer not to use RadASM for any reason, temporary or permanent). Fortunately, RadASM is flexibleenough to support just about any command-line based development scheme you can throw at it, so supportingboth schemes is not all that difficult.
This book assumes that you re already comfortable using the HLA compiler from the command line. This isnot an unreasonable assumption because this book also assumes that you already know HLA and using HLAgenerally involves compiling files using command line tools. If you re not already comfortable with HLA com-mand-line options, please take a moment to review these options in the HLA reference manual.
For very simple projects, those involving only a single code file (and, possibly, a few include files), buildingan HLA project into an executable is fairly trivial - simply specify the program s name on the HLA commandline and let HLA take care of all the rest of the work for you, e.g.,
hla ProgramToCompile
Assuming ProgramToCompile.hla is a complete, compilable, HLA source file, this command will produce theProgramToCompile.exe executable file. For many trivial projects (including many of those projects appearingearly in this text), this is actually the most convenient way to produce an executable file from the HLA sourcefile(s). However, as your projects grow more complex and wind up consisting of multiple source files that youcompile separately and then link together, attempting to build the final executable by manually issuing a series ofcommands from the command line becomes rather tedious. Therefore, most programmers use the make sub-system to build their projects and they create make files to control the compilation of their projects. We ll usethat same approach in this book.
4.3: HLA Project Organization
This book will adopt the (reasonable) convention of placing each HLA project in its own subdirectory. Agiven project directory will contain the following files and directories:
¥ All source files specific to the project (this includes make files, .hla, .hhf, .rc, .rap [RadASM project] andother files created specifically for this project, but does not include any standard library header or genericlibrary files that all projects use).
¥ A makefile file that follows the template given in Chapter One.
¥ A Tmp subdirectory where HLA can place temporary files it creates during compilation (normallythese files wind up in the same directory as the HLA source files; placing them in the Tmp directoryprevents clutter of the main project directory).
¥ A Bak subdirectory where backup files can be kept.
¥ A Doc directory where project-related documentation can be found.
Every project in this book will have a makefile associated with it. You can either build the project by typingmake from a command prompt window or you can build the project by selecting an appropriate option fromthe RadASM make menu (which processes this very same makefile). The WPA (Windows Programming inAssembly) subdirectory that holds all the projects associated with this book also has a makefile that will auto-matically build all projects associated with this text (this is useful, for example, for easily verifying that modifi-
cations to the HLA compiler don t break any of the example programs in this book)1.
Page 247
The RadASM IDE provides the ability to maintain projects itself. The examples in this book will not use thebuilt-in RadASM project make facility for a couple of reasons: (1) the make program is more powerful, espe-cially for larger projects involving many files; (2) this book has to create a makefile anyway (for command lineprocessing of HLA projects) and maintaining (and keeping consistent) two different project management sys-tems is problematic; and, finally, (3) the makefile scheme is a little more flexible.
The drawback to using makefiles to maintain the project is that you ve got to manually create the makefile;RadASM won t do this for you automatically (as it does with its own projects). Fortunately, 90% of your make-file creations will simply be copying an existing makefile to your project s directory, editing the file, and chang-ing the filenames from the previous project to the current project (indeed, this operation is so common that you llfind a generic makefile in the sniplets RadASM directory provide with the accompanying CD-ROM. You caneasily create a copy of this generic makefile from RadASM s Tools > Sniplets menu, as you ll see soonenough).
4.4: Setting Up RadASM to Work With HLA
RadASM is a relatively generic integrated development environment for assembly language development.This single programs supports the HLA, MASM, TASM, NASM, and FASM assemblers. Each of these differentassemblers feature different tool sets (executable programs), command line parameters, and ancillary tools. Inorder to control the execution of these different programs, the RadASM system uses .INI files to let you specif-ically configure RadASM for the assembler(s) you re using. HLA users will probably want to make modifica-tions to two different .INI files that RadASM reads: radasm.ini and hla.ini. You ll find these two files in thesubdirectory containing the radasm.exe executable file. Both files are plain ASCII text files that you can editwith any regular text editor (including the editor that is built into RadASM).
The RadASM package includes an .RTF (Word/Wordpad) documentation file that explains the basic for-mat of these .INI files that RadASM uses. Readers interested in making major changes to these .INI files, orthose attempting to adopt RadASM to a different assembler, will want to read that document. In this chapter,we ll explore the modifications to a basic set of .INI files that a typical HLA user might want to make. Theassumption is that you re starting with the stock radasm.ini and hla.ini files that come with RadASM and you rewanting to customize them to support the development paradigm that this book proposes.
4.4.1: The RADASM.INI Initialization File
The radasm.ini file specifies all the generic parameters that RadASM uses. In particular, this .INI file spec-ifies initial window settings, file histories, OS and language information, and menu entries for certain user modi-fiable menus. RadASM, itself, actually modifies most of the information in this .ini file. However, there are afew entries an HLA user will need to change and a couple of entries an HLA user may want to change. We ll dis-cuss those sections here.
Note: there is a preconfigured radasm.ini file found in the WPA samples subdirectory. This initialization fileis compatible with all the sample programs found in this book and is a good starting point should you decide tomake your own customizations to RadASM.
The first item of interest in the radasm.ini file is the [Assembler] section. This section in the .INI filespecifies which assemblers RadASM supports and which assembler is the default assembler it will use when cre-ating new projects. By default, the [Assembler] section takes the following form:
1. The WPA subdirectory is found in the Examples module of the HLA download on Webster.
Page 248

[Assembler]Assembler=masm,fasm,tasm,nasm,hla
The first assembler in this list is the default assembler RadASM will use when creating a new project. The stan-dard radasm.ini file is set up to assume that MASM is the default assembler (the first assembler in the list is thedefault assembler). HLA users will probably want to tell RadASM to use HLA as the default assembler, this iseasily achieved by changing the Assembler= statement to the following:
[Assembler]Assembler=hla,masm,fasm,tasm,nasm
Changing the default assembler is the only necessary change that you ll need to make. However, there area few additional changes you ll probably want that will make using RadASM a little nicer. Again, by default,RadASM assumes that you re developing MASM32 programs. Therefore, the help menu contains several entriesthat bring up help information for MASM32 users. While some of this information is, arguably, of interest toHLA users, a good part of the default help information doesn t apply at all to HLA. Fortunately, RadASM sradasm.ini file lets you specify the entries in RadASM s help menu and where to locate the help files for thosemenu entries. The [MenuHelp] and [F1-Help] sections specify where RadASM will look when the userrequests help information (by selecting an item from the Help menu or by pressing the F1 key, respectively).The default radasm.ini file specifies these two sections as follows:
[MenuHelp]1=&Win32 Api,0,H,$H\Win32.hlp2=&X86 Op Codes,0,H,$H\x86eas.hlp3=&Masm32,0,H,$H\Masm32.hlp4=$Resource,0,H,$H\Rc.hlp5=A&gner,0,H,$H\Agner.hlp
[F1-Help]F1=$H\Win32.hlpCF1=$H\x86eas.hlpSH1=$H\Masm32.hlpCSF1=$H\Rc.hlp
Each numbered line in the [MenuHelp] section corresponds to an entry in RadASM s Help menu. Theseentries must be have sequential numbers starting from one and these numbers specify the order of the item in theHelp menu (the order in the radasm.ini file does not specify the order of the entries in the Help menu, you donot have to specify the [MenuHelp] entries in numeric order, RadASM will rearrange them according to thenumbers you specify). Entry entry in the [MenuHelp] section takes the following form:
menu# = Menu Text, accelerator, H, helpfile
where menu# is a numeric value (these values must start from one and there can be no gaps in the set), MenuText is the text that RadASM will display in the menu for that particular item, accelerator is a Windows accel-erator key value (generally, this is zero, meaning no accelerator value), H is required by RadASM to identifythis as a Help entry, and helpfile is the path to the help file to display (or a program that will bring up a helpfile).
You may have noticed the ampersand character ( & ) in the menu text. The ampersand precedes the charac-ter you can press on the keyboard to select a menu item when the menu is opened. For example, pressing Xwhen the menu is open (with the [HelpMenu] items in this example) selects the X86 Op Codes menu entry.
Page 249

You will note that the paths in the [MenuHelp] section all begin with $H . This is a RadASM shorthandfor the path where RadASM can find all the help files. There is no requirement that you use this shortcut oreven place all your help files in the same directory. You could just also specify the path to a particular help fileusing a fully qualified pathname like c:\hla\doc\Win32.hlp. However, it s often convenient to specify paths usingthe various shortcuts that RadASM provides. RadASM supplies the shortcuts found in Table 4-1.
Table 4-1: Path Shortcuts for Use in RadASM “.INI” Files
You can define several of these variables in the hla.ini file. See the next section for details.
As noted earlier, the default help entries are really intended for MASM32 users and do not particularly applyto HLA users. Therefore, it s a good idea to change the [MenuHelp] entries to reflect the location of someHLA-related help files. Here are the [MenuHelp] entries that might be more appropriate for an HLA installa-tion (assuming, of course, you ve placed all these help files in a common directory on your system):
[MenuHelp]1=&Win32 Api,0,H,$H\Win32.hlp2=&Resource,0,H,$H\Rc.hlp3=A&gner,0,H,$H\Agner.hlp4=&HLA Reference,0,H,$H\PDF\HLARef.pdf5=HLA Standard &Library,0,H,$H\pdf\HLAStdlib.pdf6=&Kernel32 API,0,H,$H\pdf\kernelref.pdf7=&User32 API,0,H,$H\pdf\userRef.pdf8=&GDI32 API,0,H,$H\pdf\GDIRef.pdf
Here s a suggestion for the F1, Ctrl-F1, Shift-F1, and Ctrl-Shift-F1 help items:
Shortcut Meaning
$A= Path to where RadASM is installed
$B= Where RadASM finds binaries and executables (e.g., c:\hla)
$D= Where RadASM finds “Addin” modules. Usually $A\AddIns.
$H= Where RadASM finds “Help” files. Default is $A\Help, but you’ll probably want to change this to $B\Doc.
$I= Where RadASM finds include files. Default is $A\Include, but you’ll probably want to change this to $B\include.
$L= Where RadASM finds library files. Default is $A\Lib but you’ll probably want to change this to $B\hlalib.
$R= Path where RadASM is started (e.g., c:\RadASM).
$P= Where RadASM finds projects. This is usually $R\Projects.
$S= Where RadASM find snippets. This is usually $R\Snippets.
$T= Where RadASM finds templates. This is usually $R\Templates
$M= Where RadASM finds keyboard macros. This is usually $R\Macro
Page 250

[F1-Help]F1=$H\Win32.hlpCF1=$H\PDF\HLARef.pdfSF1=$H\pdf\HLAStdlib.pdfCSF1=$H\Rc.hlp
These are probably the extent of the changes you ll want to make to the radasm.ini file for HLA use; thereare, however, several other options you can change in this file, please see the radASMini.rtf file that accompaniesthe RadASM package for more details on the contents of this file.
4.4.2: The HLA.INI Initialization File
The hla.ini file is actually where most of the customization for HLA takes place inside RadASM. This file
lets you customize RadASM s operation specifically for HLA2. The hla.ini file appearing in the WPA subdi-rectory (on the accompanying CD-ROM or in the Webster HLA/Examples download file) contains a set ofdefault values that provide a good starting point for your own customizations.
Note: although hla.ini provides a good starting point for a system, you will probably need to make changes tothis file in order for it to work on your specific system. Without these changes, RadASM may not work on yoursystem.
Without question, the first section to look at in the hla.ini file is the section that begins with [Paths] . Thisis where you tell RadASM the paths to various directories where it expects to find various files it needs (seeTable 4-1 for the meaning of these various path values). A typical [Paths] section might look like the follow-ing:
[Paths]$A=C:\Hla$B=$A$D=$R\AddIns$H=$A\Doc$I=$A\Include$L=$A\hlalib$P=$R\Hla\Projects$S=$R\Hla\Sniplets$T=$R\Hla\Templates$M=$R\Hla\Macro
Note that the $A prefix specifies the path where RadASM can find the executables for HLA. In fact, RadASMdoes not run HLA directly (remember, we re going to have the make program run HLA for us), but the applica-tion path ($A) becomes a prefix directory we ll use for defining other directory prefixes. Be sure to check thispath in your copy of the hla.ini file and verify that it points at your main HLA subdirectory (usually C:\HLAthough this may be different if you ve installed HLA elsewhere).
The $R prefix specifies the path to the subdirectory containing RadASM. RadASM automatically sets up thisprefix, you don t have to explicitly set its value. The remaining subdirectory paths are based off either the $Aprefix or the $R prefix.
The [Project] section of the hla.ini file is where the fun really begins. This section takes the following formin the default file provided in the WPA subdirectory:
2. There are comparable initialization files for MASM, TASM, NASM, FASM, and other assemblers that RadASM supports.
Page 251

[Project]Type=Console App,Dialog App,Windows App,DLLFiles=hla,hhf,rc,defFolders=Bak,Res,Tmp,DocMenuMake=Build,Build All,Compile RC,Check Syntax,RunGroup=1GroupExpand=1
The line beginning with Type= specifies the type of projects RadASM supports for HLA. The default con-figuration supports console applications ( Console App ), dialog applications ( Dialog App ), Windows applica-tions ( Windows App ), and dynamic linked library ( DLL ). The names are arbitrary, though other sections ofthe hla.ini file will use these names. Whenever you create a new project in HLA, it will create a list of ProjectType names based on the list of names appearing after Type= in the [Project] section. Adding a string tothis comma-separated list will add a new name to the project types that the RadASM user can select from (note,however, that to actually support these project types requires some extra work later on in the hla.ini file). Figure4-1 shows what the New Project dialog box in RadASM displays in response to the entries on the Type=... line.
Figure 4-1: RadASM Project Types
The line beginning with Files= in the [Project] section specifies the suffixes for the files that RadASMwill associate with this project. The hla and hhf entries, of course, are the standard file types that HLA uses.The .rc file type is for resource compiler files (we ll talk about the resource compiler in a later chapter). If youwant to be able to create additional file types and include them in a RadASM project, you would add their suffixhere.
The Folders=... statement tells RadASM what subdirectories it should allow the user to create when theystart a new project. The make file system we re going to use will assume the presence of a Tmp directory,
Page 252

hence that option needs to be present in the list. the bak , res , and doc directories let the user create thosesubdirectories.
Figure 4-2 shows the dialog box that displays the information found on the Files= and Folders= lines. Bychecking the appropriate boxes in the File Creation group, the RadASM user can tell RadASM to create a filewith the project s name and the appropriate suffix as part of the project. Similarly, by checking the appropriateboxes in the Folder Creation group, the RadASM user can tell RadASM to create the appropriate directories.
Figure 4-2: File and Folder Creation Dialog Box in RadASM
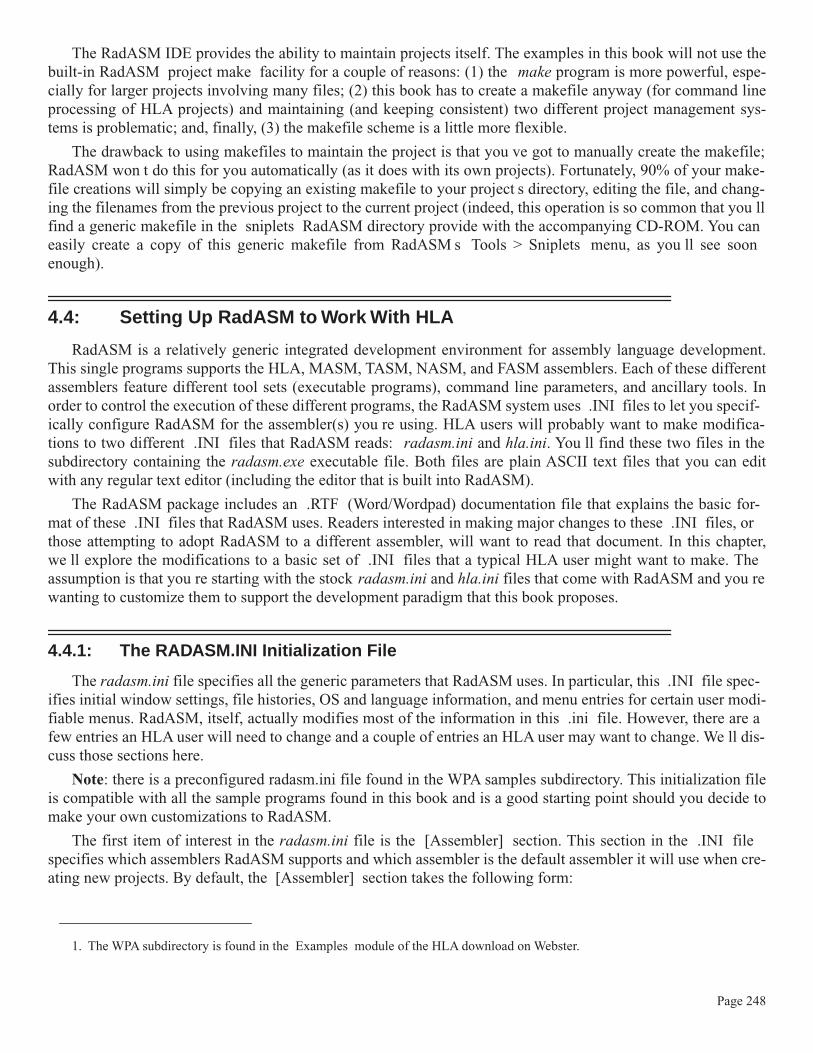
The MenuMake=... line specifies the IDE options that will be available for processing the files in thisproject. Unlike the other options, you cannot specify an arbitrary list of commands here. RadASM provides fiveitems in the Make menu that you can modify, you don t have the option of adding additional items here (you candisable options if you want fewer, though). Originally, these five slots were intended for the following com-mands:
¥ Compile RC (compile a resource file)
¥ Assemble (assemble the currently open file)
¥ Link (create an EXE from the object files)
¥ Run (execute the EXE file, building it if necessary)
¥ Res To Obj (convert a resource file to an object file)
Because these options aren t as applicable to HLA projects as they are to MASM projects (on which the originallist was built), the default hla.ini file co-opts these make items for operations that make more sense for the waywe re going to be building HLA applications in this book. You can actually turn these make items on or off on aproject by project basis (for certain types of projects, certain make objects may not make sense). Figure 4-3shows the dialog box that RadASM displays and presents this information. Note that in the version used here,RadASM only displays the correct labels for the check boxes in the Make Menu group. The labels on the text
Page 253
entry boxes should also be Build , Build All , Compile RC , Check Syntax , and Run (in that order), butthese labels turn out to be hard-coded to the original MASM specifications. Fortunately, you won t normally usethese text entry boxes (the default text appearing in them appears in the hla.ini file), so you can ignore the factthat they are mis-labelled here.
Figure 4-3: RadASM Make Menu Selection Dialog Box
For each of the project types you specify on the Type=... line in the [Project] section, you must add asection to the hla.ini file, using that project type s name, that tells RadASM how to deal with projects of thattype. In the hla.ini file we re discussing here, the project types are Console App , Dialog App , WindowsApp , and DLL so we will need to have sections names [Console App] , [Dialog App] , [Windows
App] , and [DLL] . It also turns out that RadASM requires one additional section named [MakeDefNo-
Project] that RadASM uses to process files in the IDE that are not associated with a specific project.
When running RadASM, you can have exactly one project open (or no project at all open, just some arbitraryfiles) at a time. This project will be one of the types specified on the Type=... line in the [Project] sec-tion. Based on the open project, RadASM may execute a different set of commands for each of the items in theMake menu; the actual commands selected are specified in the project-specific sections of the hla.ini file. Here swhat the [MakeDefNoProject] section looks like:
[MakeDefNoProject]MenuMake=1,1,1,1,11=0,O,make build,2=0,O,make buildall,3=0,O,make compilerc,4=0,O,make syntax,5=0,O,make run,11=0,O,make dbg_build,12=0,O,make dbg_buildall,
Page 254

13=0,O,make dbg_compilerc,14=0,O,make dbg_syntax,15=0,C,make dbg_run,
The MenuMake=... line specifies which items in the RadASM Make menu will be active when a project ofthis type is active in RadASM (or, in the case of MakeDefNoProject, when no project is loaded). This is a list ofboolean values (true=1, false=0) that specify whether the menu items in the Make menu will be active or deacti-vated. Each of these values correspond to the items on the MenuMake line in the [Project] section (in our case,this corresponds to Build , Build All , Compile RC , Syntax Check , and Run , in that order). A 1 acti-vates the corresponding menu item, a zero deactivates it. For most HLA project types, we ll generally leave all ofthese options enabled. The exception is DLL; normally you don t run DLLs so we ll disable the run optionwhen building DLL projects.
The remaining lines specify the actions RadASM will take whenever you select one of the items from theMake menu. To understand how these items work, let s first take a look at another section in the hla.ini file, the[MenuMake] section:
[MenuMake]1=&Build,55,M,12=Build &All,31,M,23=&Compile RC,91,M,34=&Syntax,103,M,45=-,0,M,6=&Run,67,M,5
Each item in the [MenuMake] section corresponds to a menu entry in the Make menu. The numbers specify theindex to the menu entry (e.g., 1= specifies the first menu item, 2= specifies the second menu item, etc.). Thefirst item after the n= prefix specifies the actual text that will appear in the Make menu. If this text is just thecharacter - then RadASM displays a menu separator for that particular entry. As you can see, the default menuentries are Build , Build All , Compile RC , Syntax , and Run .
The next item, following the menu item text, is the accelerator value. These are magic values that specifykeystrokes that do the same job as selecting items from the menu. For example, 55 (in the Build item) corre-sponds to Shift+F5, 31 (in Build All ) corresponds to F5. We ll discuss accelerators in a later chapter. So justignore (and copy verbatim) these files for right now.
The third item on each line is always the letter M . This tells RadASM that this is a make menu item.
The fourth entry on each line is probably the most important. This is the command to execute when someoneselects this particular menu item. This is either some text containing the command line to execute or a numericindex into the current project type. As you can see in this example, each of the commands use an index value(one through five in this example). These numbers correspond to the lines in each of the project sections. Forexample, if you select the Build option from the Make menu, RadASM notes that it is to execute command #1.It goes to the current project type section and locates the line that begins with 1=... and executes that operation,e.g.,
1=0,O,make build,
In a similar vein, selecting Build All from the Make menu instructs RadASM to execute the command thatbegins with 2=... in the current project type s section (i.e., 2=0,O,make buildall, ). And so on.
The lines in the project type section are divided into two groups, those that begin with 1, 2, 3, 4, or 5 andthose that begin with 11, 12, 13, 14, or 15. The [MenuMake] command index selects one of the commands
Page 255

from these two groups based on whether RadASM is producing a release build or a debug build . Releasebuilds always execute the command specified by the [MenuMake] command index (i.e. 1-5). If you re build-ing a debug version, then RadASM executes the commands in the range 11-15 in response to command indexes1-5. We ll ignore debug builds for the time being (we ll discuss them in a later chapter on debugging). So forright now, we ll always assume that we re building a release image.
The fields of each of the indexed commands in the project type section have the following meanings:
index = delete_option, output_option, command, files
The delete_option item specifies which files to delete before doing the build. If this entry is zero, then RadASMwill not delete any files before the build. Because we re having a make file do the actual build for us, and it cantake care of cleaning up any files that need to be deleted first, we ll always put a zero here when using RadASMwith HLA.
The output_option item is either C , O (that s an oh not a zero ), or zero. This specifies whether theoutput of the command will go to a Windows console window ( C ), the RadASM output window ( O , which isoh ), or the output will simply be thrown away (zero). We ll usually want the output sent to RadASM s outputwindow, so most of the time you ll see the letter O ( oh ) here.
The command entry is the command line text that RadASM will pass on to windows whenever you executethis command. This can be any valid command prompt operation. For our purposes, we ll always use a makecommand with a single parameter to specify the type of make operation to perform. Here are the commandswe re going to support in RadASM:
¥ Build - make build
¥ Build All - make buildall
¥ Compile RC - make compilerc
¥ Syntax - make syntax
¥ Run - make run
Now it s up to the makefile to handle each of these various commands properly (using the standard makefilescheme we defined in the first chapter).
This may seem like a considerable amount of indirection -- why not just place the commands directly in the[MenuMake] section? However, this scheme is quite flexible and makes it easy to adjust the options on a
project type by project type basis (in fact, it s even possible to set these options on a project by project basis).
With this discussion out of the way, it s time to look at the various project type sections. Without further ado,here they are:
[Console App]Files=1,1,1,1,0,0Folders=1,0,1,0MenuMake=1,1,1,1,1,0,0,01=0,O,make build,2=0,O,make buildall,3=0,O,make compilerc,4=0,O,make syntax,5=0,C,make run,11=0,O,make build,12=0,O,make buildall,13=0,O,make compilerc,
Page 256

14=0,O,make syntax,15=0,C,make run,
Console applications, by default, want to create an .HLA file and a .HHF file, a BAK folder and a TMP folder.All menu items are active for building and running console apps (that is, there are five ones after MenuMake ).Finally, the commands ( 1=... 2=... , etc.) are all the standard build commands.
[Dialog App]Files=1,1,1,0,0Folders=1,1,1MenuMake=1,1,1,1,1,0,0,01=0,O,make build,2=0,O,make buildall,3=0,O,make compilerc,4=0,O,make syntax,5=0,C,make run,11=0,O,make build,12=0,O,make buildall,13=0,O,make compilerc,14=0,O,make syntax,15=0,C,make run,
By default, dialog applications will create HLA, HHF, RC, and DEF files and they will create a BAK and a TMPsubdirectory. All five menu items will be active and dialog apps use the standard command set.
[Windows App]Files=1,1,1,1,0Folders=1,1,1,1MenuMake=1,1,1,1,1,0,0,01=0,O,make build,2=0,O,make buildall,3=0,O,make compilerc,4=0,O,make syntax,5=0,C,make run,11=0,O,make build,12=0,O,make buildall,13=0,O,make compilerc,14=0,O,make syntax,15=0,C,make run,
By default, window applications will create HLA, HHF, RC, and DEF files and they will create a BAK, RES,DOC, and a TMP subdirectory. All five menu items will be active and dialog apps use the standard command set.
The hla.ini file allows you to control several other features in RadASM. The options we ve discussed in thischapter are the crucial ones you must set up, most of the remaining options are of an aesthetic or non-crucialnature, so we won t bother discussing them here. Please see the RadASM documentation (the RTF file men-tioned earlier) for details on these other options.
Once you ve made the appropriate changes to the hla.ini file (and, of course, you ve made a backup of youroriginal file, right?), then you can copy the file to the RadASM subdirectory and replace the existing hla.ini filewith your new one. After doing this, RadASM should operate with the new options when you run RadASM..
Page 257

4.4.3: Additional Support for RadASM on the CD-ROM
In addition to the hla.ini and radasm.ini files, there are several additional files of interest to RadASM usersprovided on the accompanying CD-ROM (or in the WPA\RadASM subdirectory of the Examples moduledownload on the HLA download page at http://webster.cs.ucr.edu). This section will describe these additionalfiles.
To install most of the auxiliary files appearing in the WPA\RadASM directory all you have to do is copy themto the corresponding folders in your RadASM folders. For example, you d normally just copy the hla.ini andradasm.ini files directly from the WPA\RadASM folder to your RadASM folder (or whatever folder contains theRadASM installation). In the WPA\RadASM folder you ll find a help folder. This folder contains several addi-tional help files (to which the new radasm.ini file refers), so you ll want to copy these files into your RadASM s
help folder3. The WPA\RadASM folder contains several API files and two subdirectories (Sniplets and Tem-plates). You should copy the API files to your RadASM\HLA folder (after verifying that the api files are newer),you should copy the files in the Templates directory to the RadASM\HLA\Templates directory, and you shouldcopy the files from the Sniplets\Code directory into your RadASM\HLA\Sniplets\Code subdirectory.
The Templates folder contains project templates you might find useful (for example, there is a template forcreating a generic Win32 assembly application that is a great tool for starting new projects). The Sniplets\Codefolder contains a generic makefile and a generic win32 application whose code you can cut and paste into a fileto create customized versions of these files.
Note that because RadASM is under continuous development, it s quite possible that a version of RadASMyou re downloading contains newer versions of the help, template, or sniplet files. Therefore, it s a good idea tomake backups of the old files first, rather than simply replacing them with the files from the WPA\RadASM sub-directory. That way, should it turn out that RadASM ships with a new file, you can easily recover without down-loading the RadASM package again. For the most part, however, you ll find that the files appearing in theWPA\RadASM subdirectory are new files that aren t part of the standard RadASM distribution.
4.5: Running RadASM
Like most Windows applications, you can run RadASM by double-clicking on its icon or by double clickingon a RadASM Project file ( .rap suffix). Simply double-clicking on the RadASM icon brings up a windowsimilar to the one appearing in Figure 4-4.
3. It might not be a bad idea to check the dates on any of the original files you re replacing to make sure that they re older than the files you re replacing them with.
Page 258

Figure 4-4: RadASM Opening Screen
The main portion of the RadASM window is broken down into three panes. The larger of the three panes iswhere text editing takes place. The upper right hand pane is the project management window. The pane in thelower right hand corner lists the properties of the currently opened project.
4.5.1: The RadASM Project Management Window
The project management window initially lists the project folders you ve created; you can select an existingproject by double-clicking on the project s folder in this window. For example, RadASM ships with two sampleprojects, Dialog (that creates a small dialog box application) and hw (that creates a small Hello World console
Page 259

application). Assuming you re running RadASM prior to creating any new projects beyond these two defaultprojects, the Project pane will look something like Figure 4-5.
Figure 4-5: Default RadASM Project Pane
Double-clicking on the hw folder opens the folder containing that project. This changes the pane to looksomething like that appearing in Figure 4-6.
Figure 4-6: RadASM Project Pane With hw Folder Opened
By default, RadASM does not show all the files present in the folder you ve opened. Instead, RadASM filtersout files that don t have a certain file suffix. By default, RadASM only displays files with the following suffixes:
¥ .asm
¥ .inc
¥ .rc
Page 260
¥ .txt
¥ .doc
¥ .rtf
¥ .dlg
¥ .mnu
¥ .rap
¥ .bmp
¥ .ico
¥ .cur
¥ .hla
¥ .hhf
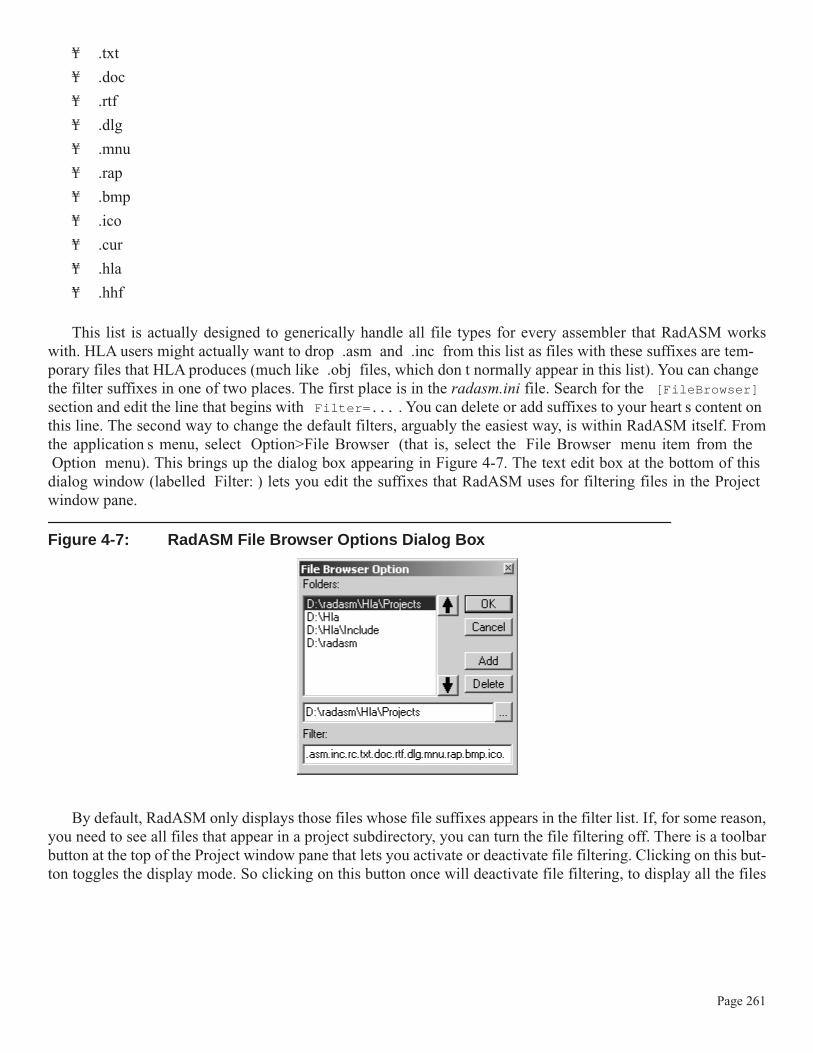
This list is actually designed to generically handle all file types for every assembler that RadASM workswith. HLA users might actually want to drop .asm and .inc from this list as files with these suffixes are tem-porary files that HLA produces (much like .obj files, which don t normally appear in this list). You can changethe filter suffixes in one of two places. The first place is in the radasm.ini file. Search for the [FileBrowser]
section and edit the line that begins with Filter=... . You can delete or add suffixes to your heart s content onthis line. The second way to change the default filters, arguably the easiest way, is within RadASM itself. Fromthe application s menu, select Option>File Browser (that is, select the File Browser menu item from theOption menu). This brings up the dialog box appearing in Figure 4-7. The text edit box at the bottom of thisdialog window (labelled Filter: ) lets you edit the suffixes that RadASM uses for filtering files in the Projectwindow pane.
Figure 4-7: RadASM File Browser Options Dialog Box
By default, RadASM only displays those files whose file suffixes appears in the filter list. If, for some reason,you need to see all files that appear in a project subdirectory, you can turn the file filtering off. There is a toolbarbutton at the top of the Project window pane that lets you activate or deactivate file filtering. Clicking on this but-ton toggles the display mode. So clicking on this button once will deactivate file filtering, to display all the files
Page 261

in the directory, clicking on this button a second time reactivates file filtering. Figure 4-8 shows the effects ofclicking on this button.
Figure 4-8: File Filtering in RadASM’s Project Pane
If you ve descended into a subdirectory by double-clicking on it s folder icon and you decide to return to anupper level directory, you can move to that upper level directory by clicking on the Up One Level button in theRadASM Project pane (see Figure 4-9).
Figure 4-9: RadASM “Up One Level” Directory Navigation Button
Up OneDirectoryLevel
Page 262

The left and right arrow buttons allow you to quickly scan through several different directories in the system(see Figure 4-10). By default, RadASM displays a couple of interesting (HLA-related) subdirectories in theProject pane when you scan through the list using the left and right arrows in the Project pane. In general, how-ever, you ll want to customize the directories RadASM visits when you press these two arrow buttons. You canadd (or change) directory paths in the [FileBrowser] section of the radasm.ini file, though it s probably eas-ier to select the Option>File Browser menu item to open up the File Browser Option dialog box and make yourchanges there (see Figure 4-7). The Folders: list in the File Browser Option dialog box lists all the directoriesthat RadASM will rotate through when you press the left and right buttons in the Project window pane. You canadd, delete, edit, and rearrange the items in this list.
Figure 4-10: Project Folder Selection Arrows
To edit an existing entry, click on that entry with the mouse and then edit the directory path appearing in thetext edit box immediately below the Folders: list (see Figure 4-7). You may either type in the path directly, or
Project Folder SelectionArrows
Page 263

browse for the path by pressing the browse button immediately to the right of the text entry box (see Figure 4-11).
Figure 4-11: The RadASM File Browser Option “Browse” Button
To delete an entry from the File Browser Option list, select that item with the mouse and then press theDelete button appearing in the File Browser Option Window. To add a new entry to the list, press the Addbutton and then type the path into the text edit box (or use the browse button to locate the subdirectory you wantto add). Note: do not type the new entry in and then press Add . This sequence will change the currentlyselected item and then add a new, blank, entry. The correct sequence is to first press the Add button, and thenedit the blank entry that RadASM creates.
The remaining buttons in the Project window are only applicable to open projects. Note that opening aproject folder is not the same thing as opening a RadASM project. To open a RadASM project you must eithercreate a new project or open an existing .rap file. For example, you can open the Hello World project in thehw directory by double-clicking on the hw.rap file that appears in the project window. Opening the hw.rap filedoes two things to the RadASM windows: first, it displays the hw.hla source file in the editor window and, sec-ond, it switches the Project window pane from File Browser mode to Project Browser mode. In projectbrowser mode RadASM displays only the files you ve explicitly added to the project. Any incidental or gener-ated files will not appear here (unless you explicitly add them). For example, whereas the File Browser modedisplays several .inc and .asm files (assuming you ve not removed these suffixes from the file filter), theProject Browser mode only displays the hw.hla file because this is the only file that was originally added to theproject. Another difference between the file browser and project browser modes is the fact that RadASM displaysthe files in pseudo-directories according to the file s type. For example, it displays the hw.hla file under thesub-heading Assembly (see Figure 4-12). The hw.rap project is a relatively simple project, only having a singleassembly file. The Dialog.rap project (that appears in the Dialog project folder) is a slightly more complexapplication, having a couple of resource files in addition to an assembly file (see Figure 4-13). Note that you canflatten RadASM s view of these files by pressing the Project Groups button in the Project window pane (seeFigure 4-14). Pressing this button a second time restores the project groups display.
Page 264

Figure 4-12: Project Window “Project Browser Mode”
Figure 4-13: Dialog.rap Project Browser Display
Page 265

Figure 4-14: Effect of Pressing the “Project Groups” Button
When you ve got a project loaded, RadASM displays the project view by default. By pressing the FileBrowser and Project Browser buttons in the Project window pane, you can switch between these two views ofyour files (see Figure 4-15).
Figure 4-15: The Project Browser and File Browser Buttons
Page 266

4.5.2: Creating a New Project in RadASM
While the two default projects that RadASM supplies are useful for demonstrating the RadASM Project win-dow pane, you re probably far more interested in creating your own RadASM/HLA projects. Creating your ownproject is a relatively straight-forward process using RadASM s project creation wizard. To begin this process,select the File>New Project menu item. This opens the project wizard dialog box (see Figure 4-16).
Figure 4-16: RadASM Project Wizard Dialog Box
The Assembler pop-up menu list lets you select the assembler that you want to use for this project.Remember, RadASM supports a variety of different assemblers and the rules are different for each one.Because you re probably using HLA (if you re reading this book), you ll want to select the HLA assembler fromthis list. HLA should be the default assembler in this list assuming you ve placed hla at the front of the list inthe [Assembler] section of the radasm.ini file. If you re not using the radasm.ini file supplied on the CD-ROM accompanying this book (or in the WPA\RadASM subdirectory in the HLA Examples download packageon Webster), then you should make sure that HLA appears first in this list in the radasm.ini file.
The Project Type group is a set of radio buttons that let you select the type of project you re creating.RadASM populates this list of radio buttons from the [Project] section of the hla.ini file. The Type=...
statement in this section specifies the valid projects that RadASM will create. RadASM creates the radio buttonitems in the order the project type names appear in the Type=... list; the first item in the list is the one that willhave the default selection. If you re going to be developing Windows GUI applications most of the time, you llprobably want to change this list so that Windows App appears first in the list. This will slightly streamline theuse of the Project Wizard because you won t have to explicitly select Windows App every time you create anew Windows application.
The Project Name: text entry box is where you specify the name of the project you re creating. RadASMwill create a folder by this name and any other default files it creates (within the project folder) will also have thisname as their filename prefix. The text you enter at this point must be a valid Windows filename. Note that this
Page 267

should be a simple file name (directory name), not a path. You ll supply the path to this file/directory in amoment.
The Project Description: text entry box allows you to place a descriptive comment that describes theproject. This is any arbitrary text you choose. It should be a brief (one-line) description of the project.
The Projects Folder: text entry box is where you select the path to the spot in the file system whereRadASM will create the project folder. You can type the path in directly, or you can press the browse button tothe right of this text entry box and use a Windows dialog box to select the subdirectory that will hold theproject s folder.
The Template: text entry box and browse button lets you select a template for your project. If you don tselect a template, then RadASM will create an empty project for you (i.e., the main .hla file will be empty). Ifyou select one of the templates (e.g., the .tpl files found in the RadASM\Hla\Templates directory) thenRadASM will create a skeletal project based on the project template you ve chosen. For example, theWPA\RadASM directory on the accompanying CD-ROM contains a win32app.tpl file that you can select. Thisautomatically supplies a skeletal Win32 application from which you can build your Windows programs.
Once you ve selected the assembler type, project type, entered the project name and description, and option-ally selected the folder and a template, press the Next> button to move on to the next window of the ProjectWizard dialog. This dialog box appears in Figure 4-17. In this dialog box you select the initial set of files andfolders that RadASM will create in the project s folder for you. At the very least, you re going to want a .hlafile and a Tmp subdirectory. It s probably a good idea to create a BAK subdirectory as well (RadASM willmaintain backup files in that subdirectory, if it is present). More complex Windows applications will probablyneed a header file ( .HHF ) and a resource file ( .RC ) as well. If you re creating a dynamically linked library(DLL), you ll probably want a definition file ( .DEF ) as well. If you plan on writing documentation, you mightwant to create a DOC subdirectory - the choice is yours. Check the files and folders you want to create and pressthe Next > button in the dialog box.
Figure 4-17: Project Wizard Dialog Box #2
Page 268

The last dialog box of the Project Wizard lets you specify the options present in the Make menu and the com-mands each of these options executes (see Figure 4-18). RadASM initializes each of the items appearing in thisdialog box from the values appearing in the hla.ini file. For the most part, you shouldn t have to change any ofthese options. RadASM properly initializes each item based upon the project type you ve chosen (Windows App,Console App, Dialog App, DLL, etc.). However, it is quite possible to customize how RadASM works on aproject by project basis. This dialog box is where you do that customization. Because we ll be using the makefilescheme to build executables, most of the customization you ll do will actually take place in the makefile, not inthe RadASM Project Wizard Dialog. Therefore, most of the time you ll just press the Finish > button to con-clude the construction your new RadASM/HLA project. Figure 4-19 shows what the RadASM window lookslike after create a sample Windows App application based on the win32app template found on the CD-ROM(this project was given the name MyApp ).
Figure 4-18: Project Wizard Dialog Box #3
Page 269

Figure 4-19: Typical RadASM Window After Project Creation
4.5.3: Working With RadASM Projects
Of course, once you ve created a RadASM project, you can open up that project and continue work on it atsome later point. RadASM saves all the project information in a .rap (RadAsm Project) file. This .rap filekeeps track of all the files associated with the project, project-specific options, and so on. These project files areactually text files, you can load them into a text editor (e.g., RadASM s editor) if you want to see their format. Asa general rule, however, you should not modify this file directly. Instead, let RadASM take care of this file smaintenance.
There are several ways to open an existing RadASM project file - you can double-click on the file s iconwithin Windows and RadASM will begin running and automatically load that project. Another way to open aRadASM project is to select the File>Open Project menu item and open some .rap file via this open com-mand. A third way to open a RadASM project is to use the File Browser to find a .rap file in one of yourproject directories and double-click on the project file s icon (the .rap file) that appears in the project browser.Any one of these schemes will open the project file you ve specified.
RadASM only allows one open project at a time. If you have a currently open project and you open a secondproject, RadASM will first close the original project. You can also explicitly close a project, without concurrentlyopening another project, by selecting the File>Close Project menu item.
Once you ve opened a RadASM project, RadASM s Project menu becomes a lot more interesting. Whenyou create a project, RadASM gives you the option of adding certain stock files to the project (either empty
Page 270

files, or files with data if you select a template when creating the project). All of the files that RadASM createsbear the project s name (with differing suffixes). As a result, you can only create one .hla file (and likewise,only one .hhf file, only one .rc file, etc.). For smaller assembly projects, this is all you ll probably need.However, as you begin writing more complex applications, you ll probably want additional assembly source files( .hla files), additional header files ( .hhf ), and so on. RadASM s Project menu is where you ll handle thesetasks (and many others). Figure 4-20 shows the entries that are present in the Project menu.
Figure 4-20: The RadASM Project Menu
To add new, empty, files to a RadASM project, you use the Project > Add New menu item. This opens up anew submenu that lets you select an assembly file ( .hla file), an include file ( .hhf ), a resource compiler file( .rc ), a text file, and so on. Selecting one of these submenu items opens up an Add New File dialog box thatlets you specify the filename for the file. Enter the filename and RadASM will create an empty text file with thename you ve specified. Later on, you can edit this source file with RadASM and add whatever text is necessaryto that file. Note that RadASM will automatically add that file to the appropriate group based on the file s type(i.e., it s suffix).
The Project > Add Existing sub-menu lets you add a pre-existing file to a project. This is a useful option forcreating a RadASM project out of an existing HLA (non-RadASM) project or adding files from some otherproject (e.g., library routines) into the current project. Note that this option does not create a copy of the files youspecify, it simply notes (in the .rad file) that the current project includes that file. To avoid problems, youshould make a copy of the actual source file to the current project s folder before adding it to the project; thenadd the version you ve just copied to your project. It s generally unwise to add the same source file to several dif-ferent projects. If you change that source file in one project, the changes are automatically reflected in everyother project that links this file in. Sometimes this is desirable, but most of the time programmers expect changesto a source file to be localized to the current project. That s why it s always best to make a copy of a source file
Page 271
when adding that file to a new project. In those cases where you do want the changes reflect to every applicationthat includes the file, it s better to build a library module project and link the resulting .lib file with your projectrather than recompile the source file in.
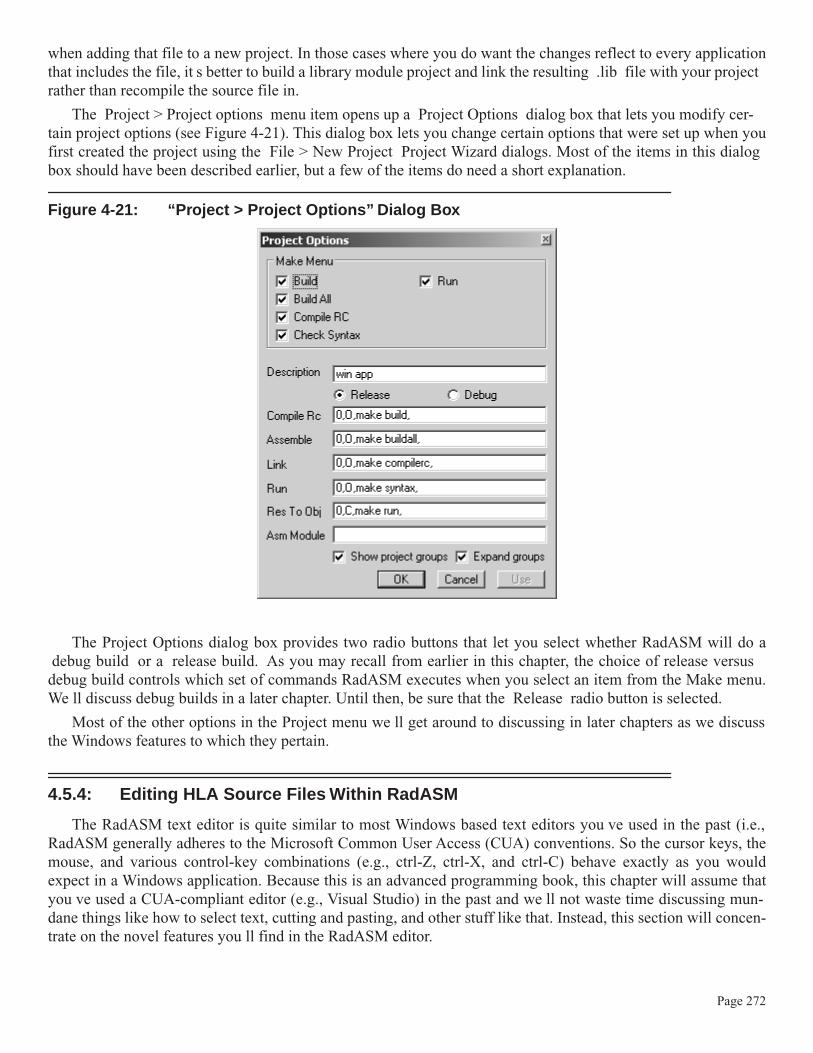
The Project > Project options menu item opens up a Project Options dialog box that lets you modify cer-tain project options (see Figure 4-21). This dialog box lets you change certain options that were set up when youfirst created the project using the File > New Project Project Wizard dialogs. Most of the items in this dialogbox should have been described earlier, but a few of the items do need a short explanation.
Figure 4-21: “Project > Project Options” Dialog Box
The Project Options dialog box provides two radio buttons that let you select whether RadASM will do adebug build or a release build. As you may recall from earlier in this chapter, the choice of release versusdebug build controls which set of commands RadASM executes when you select an item from the Make menu.We ll discuss debug builds in a later chapter. Until then, be sure that the Release radio button is selected.
Most of the other options in the Project menu we ll get around to discussing in later chapters as we discussthe Windows features to which they pertain.
4.5.4: Editing HLA Source Files Within RadASM
The RadASM text editor is quite similar to most Windows based text editors you ve used in the past (i.e.,RadASM generally adheres to the Microsoft Common User Access (CUA) conventions. So the cursor keys, themouse, and various control-key combinations (e.g., ctrl-Z, ctrl-X, and ctrl-C) behave exactly as you wouldexpect in a Windows application. Because this is an advanced programming book, this chapter will assume thatyou ve used a CUA-compliant editor (e.g., Visual Studio) in the past and we ll not waste time discussing mun-dane things like how to select text, cutting and pasting, and other stuff like that. Instead, this section will concen-trate on the novel features you ll find in the RadASM editor.
Page 272
Of course, the first file navigation aid to consider is the Project Browser pane. We ve already discussed thisRadASM feature in earlier sections of this chapter, but it s worth repeating that the Project Browser pane lets youquickly switch between the files you re editing in a RadASM project. Just double-click on the icon of the file youwant to edit and that file will appear in the RadASM editor window pane.
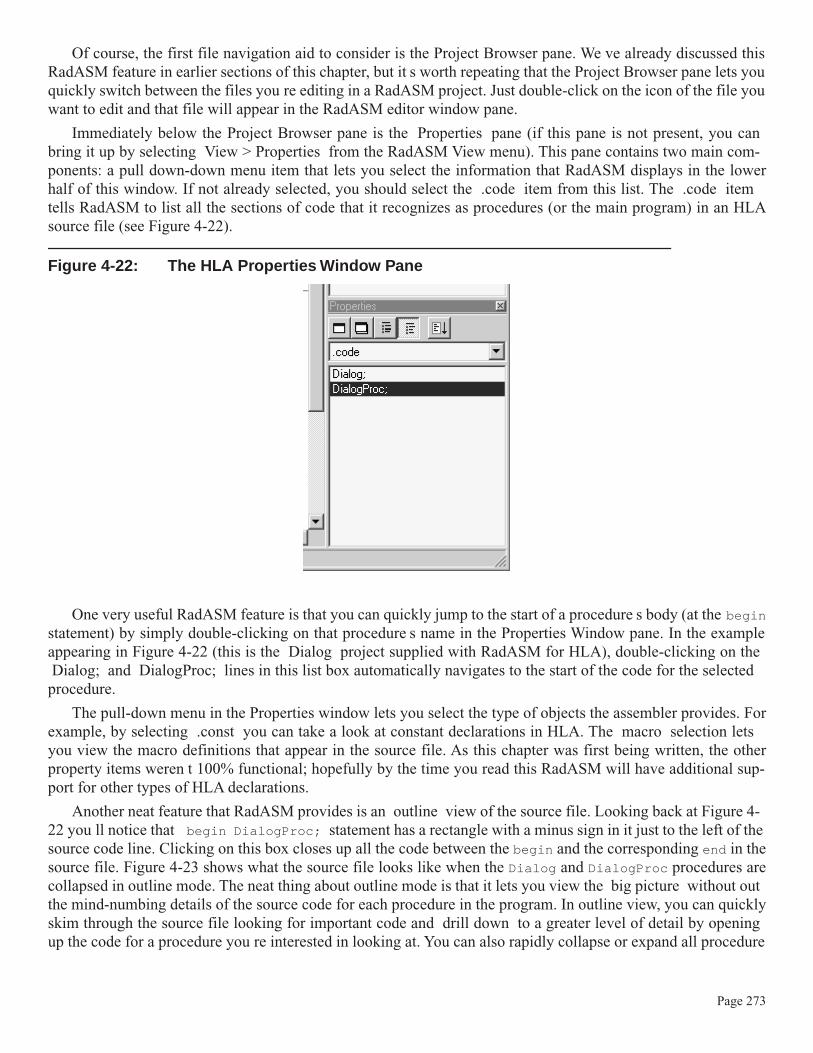
Immediately below the Project Browser pane is the Properties pane (if this pane is not present, you canbring it up by selecting View > Properties from the RadASM View menu). This pane contains two main com-ponents: a pull down-down menu item that lets you select the information that RadASM displays in the lowerhalf of this window. If not already selected, you should select the .code item from this list. The .code itemtells RadASM to list all the sections of code that it recognizes as procedures (or the main program) in an HLAsource file (see Figure 4-22).
Figure 4-22: The HLA Properties Window Pane
One very useful RadASM feature is that you can quickly jump to the start of a procedure s body (at the beginstatement) by simply double-clicking on that procedure s name in the Properties Window pane. In the exampleappearing in Figure 4-22 (this is the Dialog project supplied with RadASM for HLA), double-clicking on theDialog; and DialogProc; lines in this list box automatically navigates to the start of the code for the selectedprocedure.
The pull-down menu in the Properties window lets you select the type of objects the assembler provides. Forexample, by selecting .const you can take a look at constant declarations in HLA. The macro selection letsyou view the macro definitions that appear in the source file. As this chapter was first being written, the otherproperty items weren t 100% functional; hopefully by the time you read this RadASM will have additional sup-port for other types of HLA declarations.
Another neat feature that RadASM provides is an outline view of the source file. Looking back at Figure 4-22 you ll notice that begin DialogProc; statement has a rectangle with a minus sign in it just to the left of thesource code line. Clicking on this box closes up all the code between the begin and the corresponding end in thesource file. Figure 4-23 shows what the source file looks like when the Dialog and DialogProc procedures arecollapsed in outline mode. The neat thing about outline mode is that it lets you view the big picture without outthe mind-numbing details of the source code for each procedure in the program. In outline view, you can quicklyskim through the source file looking for important code and drill down to a greater level of detail by openingup the code for a procedure you re interested in looking at. You can also rapidly collapse or expand all procedure
Page 273

levels by pressing the expand or collapse buttons appearing on the lower left hand corner of the text editorwindow (see Figure 4-23).
Figure 4-23: RadASM Outline View (with Collapsed Procedures)
Another useful feature RadASM provides is the ability to display line numbers with each line of source code.Pressing on the line number icon in the lower-left hand corner of the text editor window (the icon with the 123in it) toggles the display of line numbers in the editor s window. See Figure 4-24 to see what the source file lookslike with line numbers displayed. The line number display mode is quite useful when searching for a line con-taining a syntax error (as reported by HLA). Note that you can also navigate to a given line number by pressingctrl-G and entering the line number (you can also select Edit > Goto line from the Edit menu).
Page 274

Figure 4-24: Displaying Line Numbers in RadASM’s Editor
Another useful navigation feature in RadASM is support for bookmarks. A bookmark is just a point in thesource file that you can mark. You can create a bookmark by selecting a line of text (by clicking the mouse on thegray bar next to the line) and selecting Edit > Toggle BookMark or by pressing shift-F8. You can navigatebetween the bookmarks by pressing F8 or ctrl-F8 (these move to the next or previous bookmarks in the sourcefile). RadASM (by default) provides several icons on it s toolbar to toggle bookmarks, navigate to the previousor next bookmark, or clear all the bookmarks. Which method (edit menu, function keys, or toolbar) is most con-venient simply depends on where your hands and the mouse cursor currently sits.
The RadASM Format menu also provides some useful features for editing HLA programs. The Format >Indent and Format > Outdent items (also accessible by pressing F9 and ctrl-F9) move a selected block of textin or out four spaces (so you can indent text between an if and endif, for example). You can also convert tabs ina document to spaces (or vice versa) from the Format > Convert > Spaces To Tab and Format > Convert > TabTo Spaces menu selections.
You ll notice that RadASM provides syntax coloring in the editor window (that is, it sets the text color forvarious classes of reserved words and symbols to different colors, making them easy to identify with a quick
Page 275

glance in the editor window). The hla.ini file appearing on the CD-ROM accompanying this book contains a setof reasonable color definitions for HLAs different reserved word types. However, if you don t particularly agreewith this color scheme, it s really easy to change the colors that RadASM uses for syntax highlighting. Just selectthe Options > Colors & Keywords menu item and select an item from the Syntax/Group list box (Figure 4-25shows what this dialog box looks like with the Group #00 item selected). By double-clicking on an item withinthe Group list box, you can change the color for all the items in that particular group (e.g., see Figure 4-26).RadASM automatically updates the hla.ini file to remember your choice of colors the next time you runRadASM.
Figure 4-25: Option>Colors & Keywords Dialog Box with Group#00 Selected
Page 276
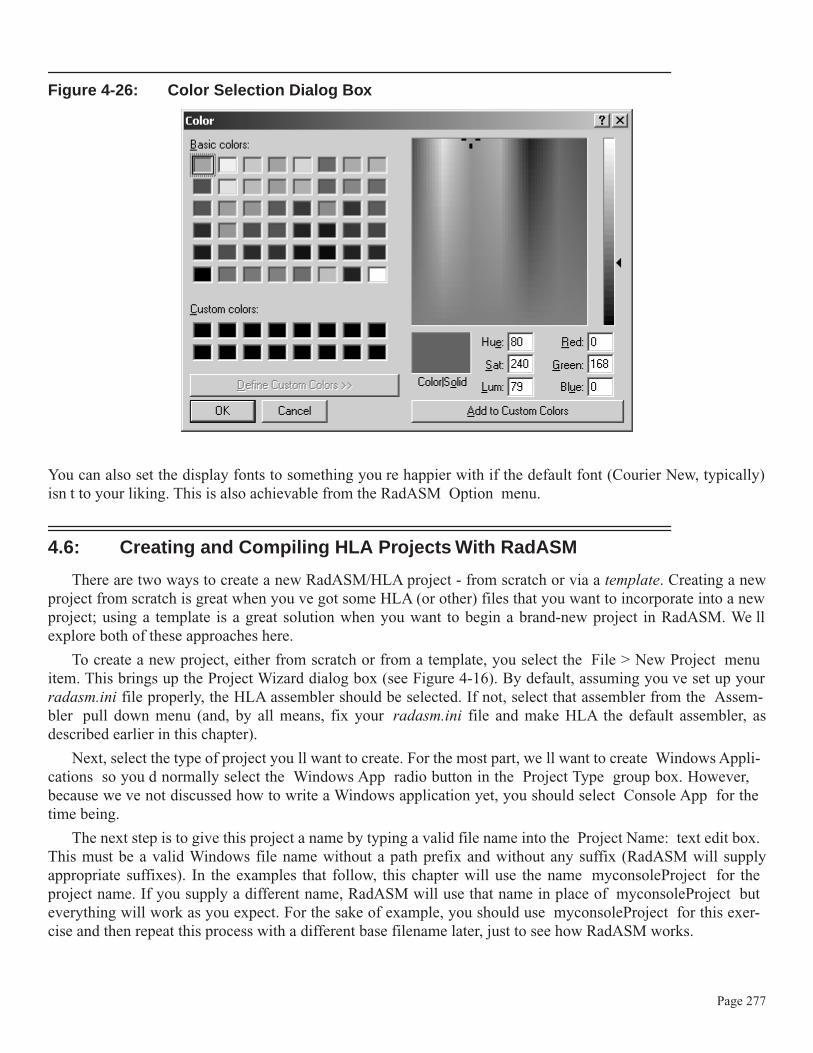
Figure 4-26: Color Selection Dialog Box
You can also set the display fonts to something you re happier with if the default font (Courier New, typically)isn t to your liking. This is also achievable from the RadASM Option menu.
4.6: Creating and Compiling HLA Projects With RadASM
There are two ways to create a new RadASM/HLA project - from scratch or via a template. Creating a newproject from scratch is great when you ve got some HLA (or other) files that you want to incorporate into a newproject; using a template is a great solution when you want to begin a brand-new project in RadASM. We llexplore both of these approaches here.
To create a new project, either from scratch or from a template, you select the File > New Project menuitem. This brings up the Project Wizard dialog box (see Figure 4-16). By default, assuming you ve set up yourradasm.ini file properly, the HLA assembler should be selected. If not, select that assembler from the Assem-bler pull down menu (and, by all means, fix your radasm.ini file and make HLA the default assembler, asdescribed earlier in this chapter).
Next, select the type of project you ll want to create. For the most part, we ll want to create Windows Appli-cations so you d normally select the Windows App radio button in the Project Type group box. However,because we ve not discussed how to write a Windows application yet, you should select Console App for thetime being.
The next step is to give this project a name by typing a valid file name into the Project Name: text edit box.This must be a valid Windows file name without a path prefix and without any suffix (RadASM will supplyappropriate suffixes). In the examples that follow, this chapter will use the name myconsoleProject for theproject name. If you supply a different name, RadASM will use that name in place of myconsoleProject buteverything will work as you expect. For the sake of example, you should use myconsoleProject for this exer-cise and then repeat this process with a different base filename later, just to see how RadASM works.
Page 277
After entering the project s name, type an English (or other natural language) description of the project intothe Project Description: text edit box. RadASM will display this description in the Project pane when you openthe project.
By default, RadASM assumes that you want to create a new project directory in the ....\RadASM\Hla\Projectssubdirectory. If this is fine, you can ignore the Projects Folder: box. If you want to place the project foldersomewhere else, then click on the browse button to the right of the Projects Folder: text entry box and selectthe folder where you want RadASM to put your project directory (you can also type the path in if you prefer).Note that you do not include the project s directory name in this path; RadASM will create the project folder inthe subdirectory you specify.
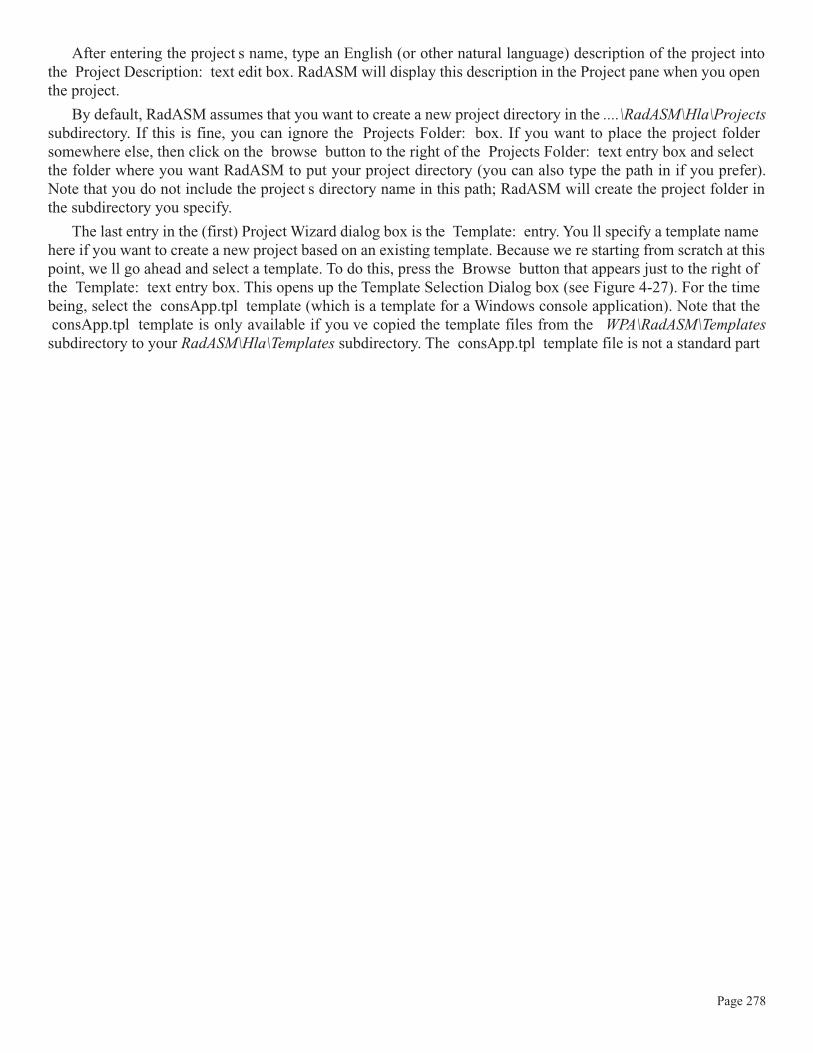
The last entry in the (first) Project Wizard dialog box is the Template: entry. You ll specify a template namehere if you want to create a new project based on an existing template. Because we re starting from scratch at thispoint, we ll go ahead and select a template. To do this, press the Browse button that appears just to the right ofthe Template: text entry box. This opens up the Template Selection Dialog box (see Figure 4-27). For the timebeing, select the consApp.tpl template (which is a template for a Windows console application). Note that theconsApp.tpl template is only available if you ve copied the template files from the WPA\RadASM\Templatessubdirectory to your RadASM\Hla\Templates subdirectory. The consApp.tpl template file is not a standard part
Page 278
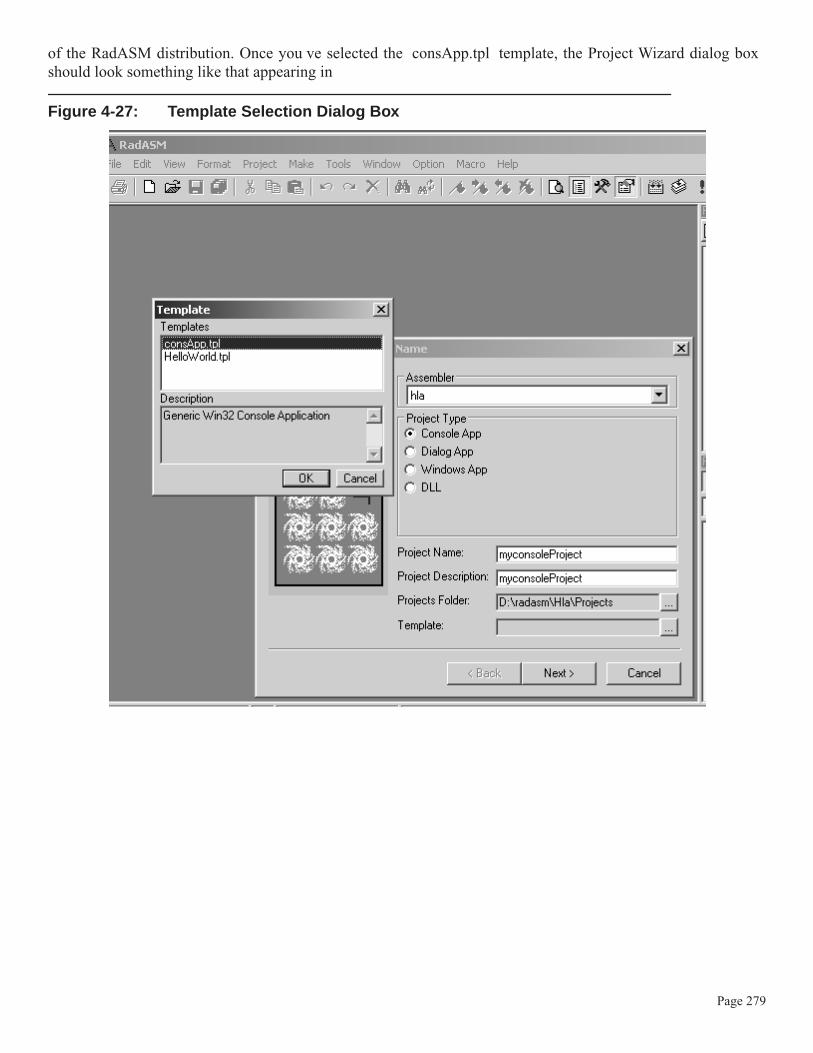
of the RadASM distribution. Once you ve selected the consApp.tpl template, the Project Wizard dialog boxshould look something like that appearing in
Figure 4-27: Template Selection Dialog Box
Page 279

Figure 4-28: Project Wizard Dialog Box - consApp.tpl Template
At this point, press the Next button to continue with the project creation. This brings up the second ProjectWizard dialog box (see Figure 4-17). We only need an HLA file and BAK and TMP subdirectories, somake sure these checkboxes contain checks and all the other checkboxes are empty. Once you ve done this, pressthe Next button to continue.
At this point you should be looking at the third Project Wizard dialog box (see Figure 4-18). Because we renot working with any .rc files in this application, you can uncheck the check box next to Compile RC . Allthe other checkboxes should be checked and the text entry boxes should all be filled in except for Asm Mod-
Page 280
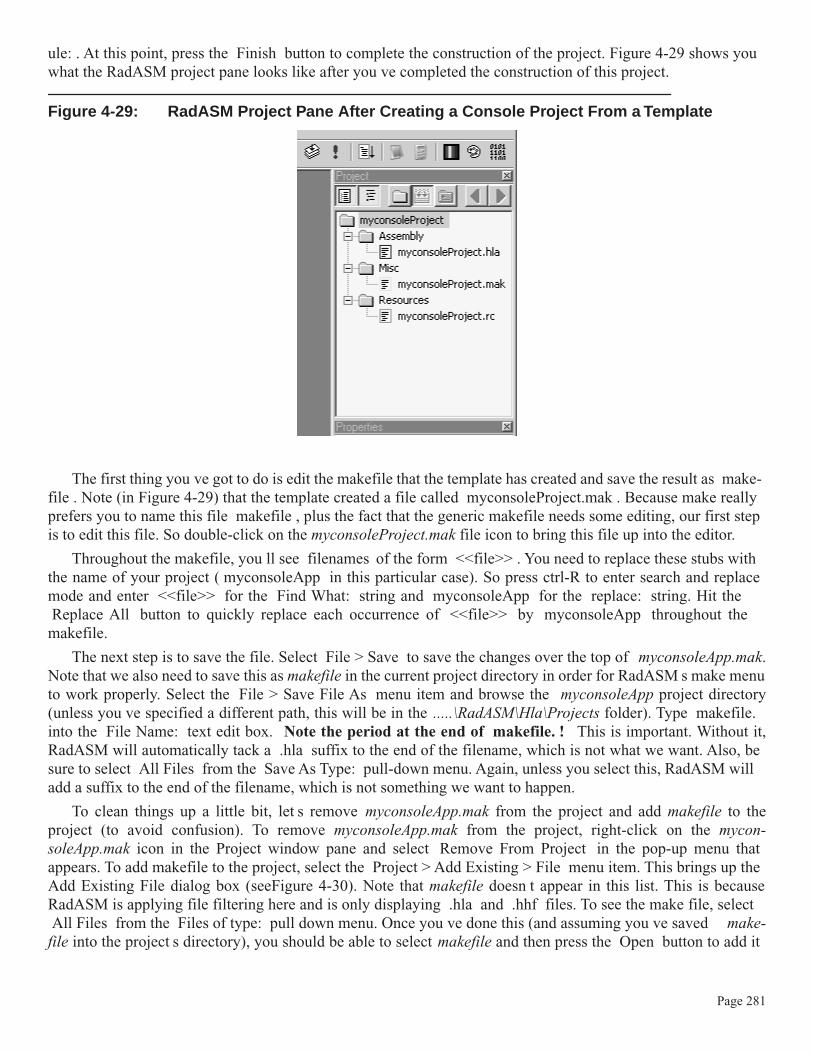
ule: . At this point, press the Finish button to complete the construction of the project. Figure 4-29 shows youwhat the RadASM project pane looks like after you ve completed the construction of this project.
Figure 4-29: RadASM Project Pane After Creating a Console Project From a Template
The first thing you ve got to do is edit the makefile that the template has created and save the result as make-file . Note (in Figure 4-29) that the template created a file called myconsoleProject.mak . Because make reallyprefers you to name this file makefile , plus the fact that the generic makefile needs some editing, our first stepis to edit this file. So double-click on the myconsoleProject.mak file icon to bring this file up into the editor.
Throughout the makefile, you ll see filenames of the form <<file>> . You need to replace these stubs withthe name of your project ( myconsoleApp in this particular case). So press ctrl-R to enter search and replacemode and enter <<file>> for the Find What: string and myconsoleApp for the replace: string. Hit theReplace All button to quickly replace each occurrence of <<file>> by myconsoleApp throughout themakefile.
The next step is to save the file. Select File > Save to save the changes over the top of myconsoleApp.mak.Note that we also need to save this as makefile in the current project directory in order for RadASM s make menuto work properly. Select the File > Save File As menu item and browse the myconsoleApp project directory(unless you ve specified a different path, this will be in the .....\RadASM\Hla\Projects folder). Type makefile.into the File Name: text edit box. Note the period at the end of makefile. ! This is important. Without it,RadASM will automatically tack a .hla suffix to the end of the filename, which is not what we want. Also, besure to select All Files from the Save As Type: pull-down menu. Again, unless you select this, RadASM willadd a suffix to the end of the filename, which is not something we want to happen.
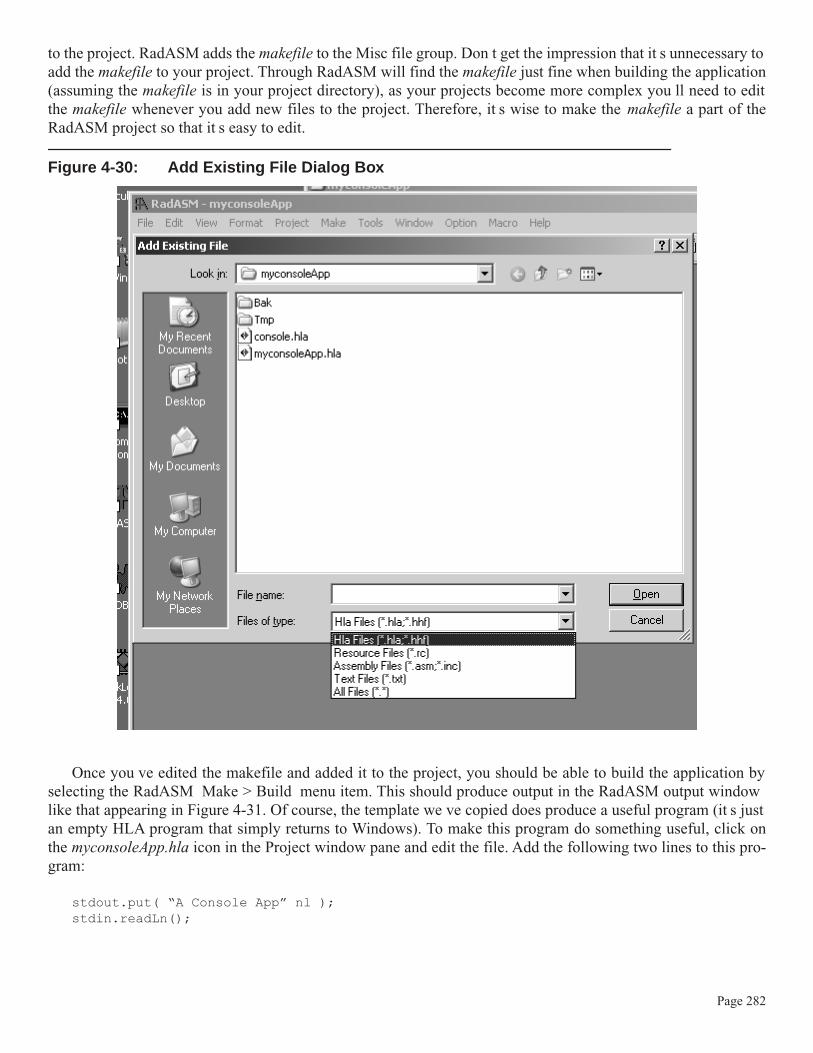
To clean things up a little bit, let s remove myconsoleApp.mak from the project and add makefile to theproject (to avoid confusion). To remove myconsoleApp.mak from the project, right-click on the mycon-soleApp.mak icon in the Project window pane and select Remove From Project in the pop-up menu thatappears. To add makefile to the project, select the Project > Add Existing > File menu item. This brings up theAdd Existing File dialog box (seeFigure 4-30). Note that makefile doesn t appear in this list. This is becauseRadASM is applying file filtering here and is only displaying .hla and .hhf files. To see the make file, selectAll Files from the Files of type: pull down menu. Once you ve done this (and assuming you ve saved make-file into the project s directory), you should be able to select makefile and then press the Open button to add it
Page 281
to the project. RadASM adds the makefile to the Misc file group. Don t get the impression that it s unnecessary toadd the makefile to your project. Through RadASM will find the makefile just fine when building the application(assuming the makefile is in your project directory), as your projects become more complex you ll need to editthe makefile whenever you add new files to the project. Therefore, it s wise to make the makefile a part of theRadASM project so that it s easy to edit.
Figure 4-30: Add Existing File Dialog Box
Once you ve edited the makefile and added it to the project, you should be able to build the application byselecting the RadASM Make > Build menu item. This should produce output in the RadASM output windowlike that appearing in Figure 4-31. Of course, the template we ve copied does produce a useful program (it s justan empty HLA program that simply returns to Windows). To make this program do something useful, click onthe myconsoleApp.hla icon in the Project window pane and edit the file. Add the following two lines to this pro-gram:
stdout.put( “A Console App” nl );stdin.readLn();
Page 282

Save the file (by selecting the File > Save menu item or by pressing the little disk icon on the toolbar).Then build the application by selecting the Make > Build All menu item. Finally, run the application by select-ing the Make > Run menu item. When the application runs, press the Enter key to close the window that opensup. Congratulations! You ve just created, edited, and run your first application from within RadASM.
Figure 4-31: Building myconsoleApp
Creating a new project from scratch follows this same process, except you don t select a template file in thefirst dialog box of the Project Wizard. Rather than create HLA and make files that contain generic information,this process will create empty files (based on your selections in the second Project Wizard dialog box, see Figure4-17). You ll edit these empty files to create the programs you want. If you want to add new files to the project,you can do so by selecting Project > Add New > File and specifying the filename. For example, creating a newproject without a template does not create a makefile for you, so it s probably a good idea to create a makefileright away for this project. Rather than type in the entire makefile from scratch, you can take advantage ofanother neat RadASM feature - sniplets. A sniplet is simply a small text file containing a short sequence of code(or other data) that you often use. You can open up a sniplet and cut and paste it into a file in your current project.For example, if your makefile is currently open for editing, Select the Tools > Sniplets menu item. In the left-most pane of the window that opens up, you see a selection of files you can copy data from. Select the console-makefile item and this will display the contents of that sniplet file in the right-most pane of the sniplet window
Page 283

(see Figure 4-32). Press the Select All button and then the clipboard button to copy all the selected text to theclipboard and then press the Close button to close the Sniplets Browser window. Now select Edit > Paste topaste this text into your makefile (which, presumably, is the open file in the RadASM editor window). Of course,this is a generic console makefile, requiring the same editing as before, so make those changes and then saveyour makefile to disk.
Figure 4-32: The Sniplet Browser Window
4.7: Developing Small Projects with RadASM
RadASM, by itself, supports the ability to drive HLA. If you select the Project > Project Options menuitem and edit the make commands (or edit these corresponding commands in the hla.ini file), you can tellRadASM to call HLA directly to assemble your files. The only problem with this approach is that RadASM willassemble all files rather than just the ones that require changing. For small HLA-based applications, recompilingall the source files on each build is no big deal. But as the project gets larger and more complex, the compiletimes will start to become annoying if you recompile the entire application on every build. As you ve seen, byusing a make file, you can recompile only those modules that need to be recompiled. This is one of the primaryreasons for running make from RadASM rather than running HLA directly. Another advantage of having themake files is that it s easy to recompile from the command line (e.g., by typing make build ) and produce thesame results you get inside RadASM.
However, if you re developing small Windows applications, you may find the use of make files a bit toocomplex for your tastes. In particular, RadASM can automatically maintain projects for you so that you don thave to edit a make file every time you want to add or remove a file from the project. This can solve some consis-tency problems you might run into if you re not careful about properly maintaining your make files. This bookassumes the use of, and always provides, make files. However, for your own projects it s quite possible to edit
Page 284

the hla.ini file to run HLA directly rather than run make to run HLA. This book will not spend any more timedescribing how to do this (though this chapter does provide the basic information you ll need); please see theRadASM documentation for details on this technique.
4.8: Plus More!
This chapter barely begins to scratch the surface with respect to the features that RadASM supports. Somethings (like Rapid Application Development features) will have to wait for a later chapter when we ve coveredsome Windows programming. Other features are simply to numerous to describe here. Your best bet is to sitdown with RadASM and play around with it. Note that some features are not applicable to HLA users, so don tbe disappointed if some feature doesn t work for you. If you ve got questions about features in RadASM oryou re unsure how to do something, you should
Page 285