20914 G2 143863044 The 550/560 REFERENCE SERIES 6 PRICE CHANGEGIVER POCKET GUIDE ROUTINE MAINTENANCE, SAFETY, INSTALLATION & TROUBLESHOOTING CashFlow ® CashFlow ® CashFlow ® C ashFlow ® CashFlow ® CashFlow ® Cas hFlow ® CashFlow ® CashFlow ® Cash Flow ® CashFlow ® CashFlow ® CashFl ow ® CashFlow ® CashFlow ® CashFlo w ® CashFlow ® CashFlow ® CashFlow ® CashFlow ® CashFlow ® CashFlow ® CashFlow ® CashFlow ® CashFlow ® C ashFlow ® CashFlow ® CashFlow ® Cas hFlow ® CashFlow ® CashFlow ® Cash Flow ® CashFlow ® CashFlow ® CashFl ow ® CashFlow ® CashFlow ® CashFlo w ® CashFlow ® CashFlow ® CashFlow ® CashFlow ® CashFlow ® CashFlow ® CashFlow ® CashFlow ® CashFlow ® C ashFlow ® CashFlow ® CashFlow ® Cas hFlow ® CashFlow ® CashFlow ® Cash Flow ® CashFlow ® CashFlow ® CashFl ow ® CashFlow ® CashFlow ® CashFlo w ® CashFlow ® CashFlow ® CashFlow

Welcome message from author
This document is posted to help you gain knowledge. Please leave a comment to let me know what you think about it! Share it to your friends and learn new things together.
Transcript

20914 G2 143863044
The
550/560REFERENCE SERIES
6 PRICECHANGEGIVER
POCKET GUIDEROUTINE MAINTENANCE,SAFETY, INSTALLATION &
TROUBLESHOOTING
CashFlow®CashFlow®CashFlow®CashFlow®CashFlow®CashFlow®CashFlow®CashFlow®CashFlow®CashFlow®CashFlow®CashFlow®CashFlow®CashFlow®CashFlow®CashFlow®CashFlow®CashFlow®CashFlow®CashFlow®CashFlow®CashFlow®
CashFlow®CashFlow®CashFlow®CashFlow®CashFlow®CashFlow®CashFlow®CashFlow®CashFlow®CashFlow®CashFlow®CashFlow®CashFlow®CashFlow®CashFlow®CashFlow®CashFlow®CashFlow®CashFlow®CashFlow®CashFlow®CashFlow®
CashFlow®CashFlow®CashFlow®CashFlow®CashFlow®CashFlow®CashFlow®CashFlow®CashFlow®CashFlow®CashFlow®CashFlow®CashFlow®CashFlow®CashFlow®CashFlow®CashFlow®CashFlow®CashFlow

CashFlow® 550/560 6-Price changegiver Pocket Guide
ii , MEI., 1994
Published by :
MEI
Internet: http://www.meigroup.com
For information on translations in your country, please write to theTechnical Communications Manager at the above address.
CashFlow ® 550/560 6-Price changegiver Pocket Guide
©, MEI UK International Ltd., 1994. All rights reserved.
Except as permitted under the relevant local legislation, no part of thispublication may be copied, transmitted, transcribed, or distributed in anyform or by any means, or stored in a database or retrieval system, ortranslated into any language (natural or computer), without the prior writtenpermission of MEI.
MEI®, CashFlow® and the MEI device are registered trademarks.©, MEI., 1994.
MEI reserves the right to change the product or the product specifications at any time. While every effort has been made to ensure that the information in this publication is accurate, MEI disclaims any liabilityfor any direct or indirect losses (howsoever caused) arising out of use or reliance on this information.
This document does not necessarily imply product availability.
Part Number: 143863044
This Edition ( October 1994 )

, MEI., 1994 iii
CashFlow® 550/560 6-Price changegiver Pocket Guide
CONTENTS
Routine Maintenance
Replacing a Fuse
Using the Keypad
Troubleshooting CashFlow 550/560
Setting a Unit’s Functions with theMEI Route Alpha 250 Terminal
Address Settings for theMEI Route Alpha 250 Terminal
Coin, Tube and Designator Options
Changing Between European andJapanese Vending Mode
Product Compatibility and LoomColour Functions
Installing, Starting and Testing a Unit
Product Manuals andProduct Technical Training
Addresses of Regional Offices

CashFlow® 550/560 6-Price changegiver Pocket Guide
iv , MEI., 1994

, MEI., 1994 1
CashFlow® 550/560 6-Price changegiver Pocket Guide
User Safety Notices
WARNINGBefore cleaning, servicing, removing or replacingCashFlow® units, ALWAYS SWITCH OFF orISOLATE the ELECTRICITY SUPPLY to the hostmachine.
CAUTIONThis guide is for use only by personnel trained tocarry out electrical installation.
Maximum Operating Voltage
Do not apply more than the voltage specified on theunit.
Dangerous Environments
Do not operate the unit in the presence offlammable gases or fumes, or after the entry of fluidinto the machine.
Disposal of Product
If necessary, always dispose of defective unitsaccording to local regulations.
Conformance toInternational Standards
When installed and operated according to theinstructions provided for the particular unit,CashFlow® products meet the applicableinternational and national Safety and ElectroMechanical Conformance standards for any countryin which they are used.

CashFlow® 550/560 6-Price changegiver Pocket Guide
2 , MEI., 1994
Par
ked
disp
ense
r ar
ms
show
her
e
Rej
ect l
ever
Coi
n fla
p fo
r m
anua
l filli
ng
Exi
t for
rej
ecte
d co
ins
Key
pad
and
LED
s
Coi
n en
try
cup
Acc
epto
r m
odul
e
Acc
epto
r op
enin
g ta
b
Labe
ls s
how
ing
the
coin
tube
pos
ition
s
Coi
n st
orag
e ca
sset
tere
leas
e ca
tche
s
Coi
n st
orag
e ca
sset
te
Mov
able
floa
t ind
icat
or
Labe
l sho
win
g ke
ypad
func
tions
and
oper
atin
g vo
ltage
of u
nit
Hin
ge p
in o
f acc
epto
ran
d se
para
tor
asse
mbl
y
Con
nect
ion
port
for
the
ME
IR
oute
Alp
ha 2
50te
rmin
al
Cas
hFlo
w
550/
560
Mod
el n
umbe
r an
dse
rial n
umbe
r of
uni
t
Exi
t at r
ear
for
cash
box
coin
s
Coi
n sl
ots
for
man
ual fi
lling
Inte
rfac
e lo
omA
ccep
tor
and
sepa
rato
ras
sem
bly
rele
ase
clip
Top
cove
r fla
p
Dis
pens
er b
ase
, MEI., 1994 3
CashFlow® 550/560 6-Price changegiver Pocket Guide
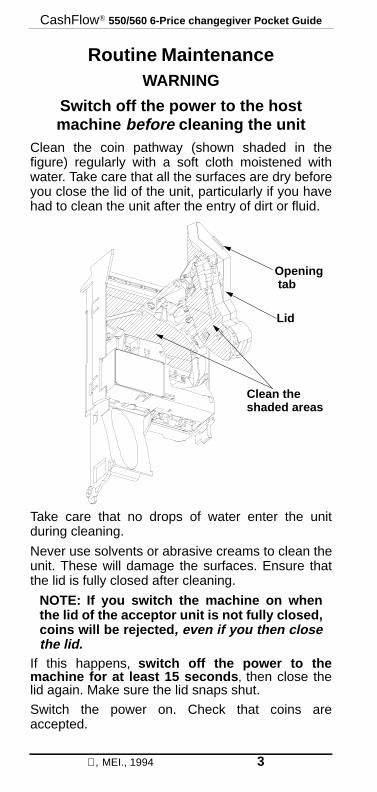
Routine MaintenanceWARNING
Switch off the power to the hostmachine before cleaning the unit
Clean the coin pathway (shown shaded in thefigure) regularly with a soft cloth moistened withwater. Take care that all the surfaces are dry beforeyou close the lid of the unit, particularly if you havehad to clean the unit after the entry of dirt or fluid.
Take care that no drops of water enter the unitduring cleaning.
Never use solvents or abrasive creams to clean theunit. These will damage the surfaces. Ensure thatthe lid is fully closed after cleaning.
NOTE: If you switch the machine on whenthe lid of the acceptor unit is not fully closed,coins will be rejected , even if you then closethe lid.
If this happens, switch off the power to themachine for at least 15 seconds , then close thelid again. Make sure the lid snaps shut.
Switch the power on. Check that coins areaccepted.
Clean theshaded areas
Lid
Opening tab
CashFlow® 550/560 6-Price changegiver Pocket Guide
4 , MEI., 1994
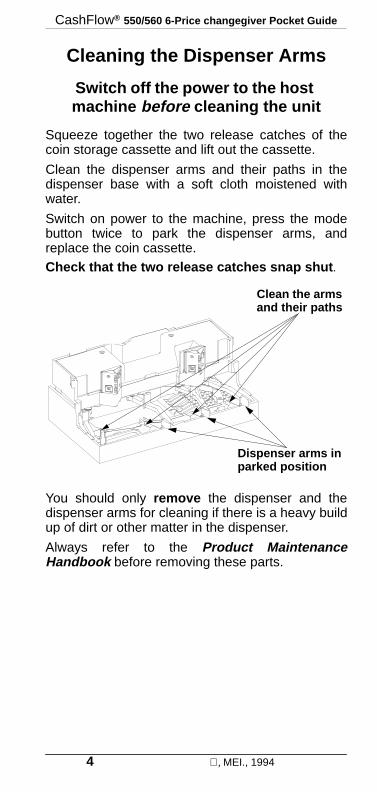
Cleaning the Dispenser Arms
Switch off the power to the hostmachine before cleaning the unit
Squeeze together the two release catches of thecoin storage cassette and lift out the cassette.
Clean the dispenser arms and their paths in thedispenser base with a soft cloth moistened withwater.
Switch on power to the machine, press the modebutton twice to park the dispenser arms, andreplace the coin cassette.Check that the two release catches snap shut .
You should only remove the dispenser and thedispenser arms for cleaning if there is a heavy buildup of dirt or other matter in the dispenser.
Always refer to the Product MaintenanceHandbook before removing these parts.
Dispenser arms inparked position
Clean the armsand their paths
, MEI., 1994 5
CashFlow® 550/560 6-Price changegiver Pocket Guide
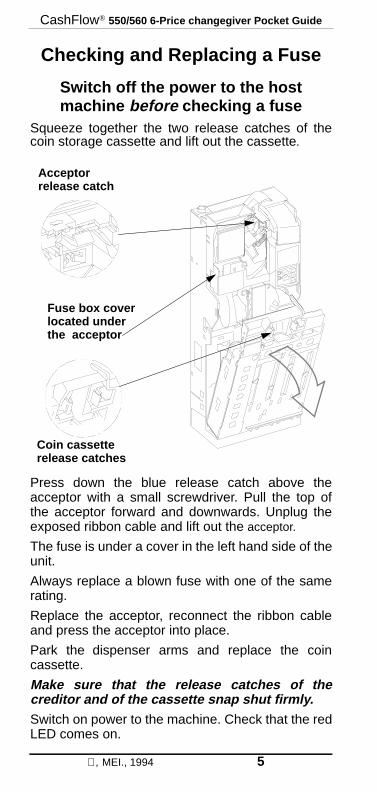
Checking and Replacing a Fuse
Switch off the power to the hostmachine before checking a fuse
Squeeze together the two release catches of thecoin storage cassette and lift out the cassette.
Press down the blue release catch above theacceptor with a small screwdriver. Pull the top ofthe acceptor forward and downwards. Unplug theexposed ribbon cable and lift out the acceptor.
The fuse is under a cover in the left hand side of theunit.
Always replace a blown fuse with one of the samerating.
Replace the acceptor, reconnect the ribbon cableand press the acceptor into place.
Park the dispenser arms and replace the coincassette.
Make sure that the release catches of thecreditor and of the cassette snap shut firmly.Switch on power to the machine. Check that the redLED comes on.
Acceptorrelease catch
Coin cassetterelease catches
Fuse box coverlocated underthe acceptor

CashFlow® 550/560 6-Price changegiver Pocket Guide
6 , MEI., 1994
Using the KeypadUse the keypad to park the dispenser arms,dispense coins, set prices, float the coin tubes up ordown, and to re-set the tube counts to their pre-setlevels.
The keypad label summarises keypad functions.
▲ Not applicable with BDV product.
★If an audit FEM is fitted, Mode+A+B is notavailable to reset tubes to pre-set levels.
◆ Not applicable with MDB product.
Function Buttons
Dispense coins from tubes ▲
Park the dispenser arms
Float up tubes automatically
Float down tube automatically
Reset tubes to pre-set levels ★
Set the vend prices ◆
Cancel the accumulated credit +
+
Red LED
Tube Adispense
Tube Bdispense
Mode button(YELLOW)
Tube Cdispense
Tube Ddispense
Correct voltagefor unit
No function
Dispense coins
Float up tube
Set vendprices
Re-set tubesautomaticallyto pre-set level
Yellow LED A B
C D
+
+
A C+
A
A
C
AA
B
B C D, or
+
++
+
A , ▲
◆
★

, MEI., 1994 7
CashFlow® 550/560 6-Price changegiver Pocket Guide
Using the KeypadDispense Coins / Empty Tubes
Press a button once to dispense a coin from acorresponding tube. If you press and hold for morethan three seconds, coins are dispensedautomatically until only a sufficient minimum (thesafe count) are left to operate the dispensemechanism. To empty a tube or a cassette, youmay have to take out the last coins by hand.
Float-Up Tube Counts Automatically
Press the buttons, then feed tube coins through theacceptor to refill the tubes to their pre-set floatlevel. When float levels are reached, further coinsare rejected. If automatic float is left by pressing B,tube counts re-set to pre-programmed float levels.
Re-set the Tube Counts
Press the buttons to force tube counts to re-set topre-set float levels. If there are not enough tubecoins to meet the pre-set levels, coin counts remainincorrect until recalibration takes place. ★ If anaudit FEM is fitted, reset via Mode+A+B is notavailable.
Automatic Float Down to Pre-set Levels
If the unit is programmed for this function ,press the buttons to dispense coins until tubecounts reach their pre-set float levels. If thenumbers of coins already in the tubes are equal toor below the float levels, no coins are dispensed.
Set the Vend Prices
Press the buttons. Insert coins equal to the lowestprice. Make a selection. A 45-second time-outstarts after each coin. More selections at the sameprice can be made without inserting extra coins.Add coins for the next highest price, and make aselection. Continue until all prices are set. Press Cto cancel credit and to exit price teach.◆ Not applicable with MDB product.
B C D, orA
A+
,
C+◆
A B++ ★
A C++

CashFlow® 550/560 6-Price changegiver Pocket Guide
8 , MEI., 1994
FLASHING? OFF?
• Remove cassette, checkfor coins covering top-levelsensors
• Check acceptor coin path• Check for jams in separator• Press Mode+Mode and
replace the cassette
• Blocker signal fromVMC not present.
• Check for blockerfrom VMC to unit.Is signal present?
• Feed change coinsinto acceptor
• Are coins routed tothe correct tubes?
• Does the red LEDstop flashing?
• Float up tubes to therequired levels
• Make a trial vend tocheck the unit
• Is the unit’sinterface loomfirmly connected?
• Press A, B, C, D• Are correct coins
dispensed?
Y
N
Y
Y
Y
Y
N
N
N• Press Mode+Mode• Does the yellow
LED flash?
• Press A, B, C, D todispense coins
• Insert change coins• Are change coins
accepted?
• Check fuses,replace if blown
• Re-connect loom and re-start unit
N
• Make a trial vend tocheck the unit
• Check for sufficient changecoins in tubes, and for jamsin dispenser and tubes
• Remove cassette and pressMode+Mode to checkdispenser arm movement
• Check reject lever clearance
• Refer to thetroubleshootingtable in this Guide
• Are all coins acceptedand the red LED lit?
Y N
• Make a trial vendto check the unit
Troubleshooting the CashFlow Unit
N
Is the red LED...
• Check Route Alpha addresses340 to 349 for error description

CashFlow® 550/560 6-Price changegiver Pocket Guide
, MEI., 1994 9
Pro
blem
Cau
ses
Act
ions
No
coin
s ac
cept
edB
lock
ed a
ccep
t ga
te o
pto’
s, o
r bu
ildup
of d
irt in
the
unit
Pow
er lo
om n
ot in
sert
ed c
orre
ctly
Sw
itch
off p
ower
to m
achi
ne, c
heck
if th
e op
to’s
are
blo
cked
,an
d cl
ean
the
unit.
Ref
er to
the
Pro
duct
Mai
nten
ance
Han
dboo
k’s
cle
anin
g se
ctio
n be
fore
cle
anin
g th
e op
to’s
.
Sw
itch
off p
ower
to th
e m
achi
ne, a
nd c
heck
the
loom
.
Poo
r co
in a
ccep
tanc
eC
hang
egiv
er u
nit i
s no
t lev
el
Mod
ules
are
not
mou
nted
and
alig
ned
corr
ectly
Bui
ld-u
p of
dirt
in th
e ac
cept
or
Che
ck a
nd r
e-le
vel t
he u
nit i
f nec
essa
ry.
Che
ck th
at th
e co
in e
ntry
and
exi
t chu
tes
of th
e m
achi
ne a
real
igne
d w
ith th
e co
in e
ntry
cup
on
the
unit
and
the
cash
box
onth
e m
achi
ne.
Adj
ust t
he m
odul
es u
ntil
they
are
alig
ned
accu
rate
ly.
Sw
itch
off p
ower
to m
achi
ne, c
heck
and
cle
an a
ccep
tor.
Coi
ns a
re a
ccep
ted
but n
ocr
edit
is g
iven
Pow
er lo
om is
not
inse
rted
cor
rect
ly
Coi
n ja
m in
the
sepa
rato
r m
odul
e(p
ost g
ate
stro
bes
are
cove
red)
Acc
ept g
ate
stro
bes
mec
hani
smbl
ocke
d or
dirt
y
Sw
itch
off p
ower
to th
e m
achi
ne, a
nd c
heck
the
loom
.
Sw
itch
off p
ower
to th
e m
achi
ne, a
nd c
heck
the
sepa
rato
r for
jam
s.
Ref
er to
the
Pro
duct
Mai
nten
ance
Han
dboo
k b
efor
eat
tem
ptin
g to
cle
an th
e st
robe
s or
the
opto
’s.
Trou
bles
hoot
ing
the
Cas
hFlo
w U
nit

CashFlow® 550/560 6-Price changegiver Pocket Guide
10 , MEI., 1994
Uni
t rej
ects
one
type
of
coin
or
toke
n
N.B
.W
ith M
DB
app
licat
ions
the
coin
mec
hani
sm is
con
trol
led
by th
eve
ndin
g m
achi
ne c
ontr
olle
r.
Coi
n or
toke
n is
inhi
bite
d
Coi
n or
toke
n is
dam
aged
or
wo
rn
A
tube
ha
s re
ache
d pr
e-se
t flo
atle
vel,
furt
her
coin
s ar
e re
ject
edbe
caus
e th
e un
it is
inflo
at m
ode
Che
ck th
e co
in/to
ken
is in
the
coin
set
, and
has
bee
n en
able
d.U
se th
eR
oute
Alp
ha25
0 te
rmin
al to
ena
ble
the
coin
Dis
card
the
wo
rn o
r da
mag
ed c
oin/
toke
n.
Pre
ssA
to le
ave
float
mod
ean
d to
cle
ar a
ny c
redi
t.
Che
ck th
e tu
be le
vels
, the
n m
ake
a ve
nd to
che
ck th
at th
eco
rrec
t cha
nge
is d
ispe
nsed
.
Coi
ns a
re n
ot r
outin
gco
rrec
tlyT
he
leve
l of
co
ins
in
a tu
be
isco
verin
g a
top-
leve
l sen
sor
The
to
p-le
vel
sens
or
loom
or
th
ese
para
tor
loom
is
no
t co
nnec
ted
corr
ectly
Wro
ng a
ccep
tor
or s
epar
ator
is fi
tted
A tu
be is
dis
able
d
Che
ck tu
be c
ount
s. If
they
are
abo
ve th
e pr
e-se
t floa
t lev
els
and
auto
mat
ic tu
be in
vent
ory
is s
et, p
ress
Mod
e+A
+C to
float
-dow
n th
e co
ins
in th
e tu
bes.
Sw
itch
off t
he p
ower
, rem
ove
the
cass
ette
and
rel
ease
the
acce
ptor
. Che
ck th
at th
e to
p-le
vel s
enso
r an
d se
para
tor
loom
sar
e fit
ted
corr
ectly
. Rep
lace
the
acce
ptor
and
cas
sette
. S
witc
hon
pow
er to
the
unit,
inse
rt c
oins
and
che
ck r
outin
g.
Che
ck th
at th
e ac
cept
or a
nd s
epar
ator
are
the
corr
ect v
ersi
ons.
Ref
er to
you
r au
thor
ised
ME
I dis
trib
utor
.
Use
the
Rou
te A
lpha
250
term
inal
to e
nabl
e th
e tu
be.
Pro
blem
Cau
ses
Act
ions

CashFlow® 550/560 6-Price changegiver Pocket Guide
, MEI., 1994 11
Hig
h-va
lue
coin
s ar
ere
ject
ed a
nd e
xact
cha
nge
light
isO
N
Too
few
coi
ns in
the
chan
ge tu
bes,
leav
ing
the
low
-leve
l sen
sors
unco
vere
d
Uni
t is
inN
o ov
erpa
y m
ode.
N.B
.D
oes
not a
pply
to M
DB
app
licat
ions
Re-
float
the
coin
tube
s th
roug
h th
e ac
cept
or u
ntil
the
low
-leve
lse
nsor
mirr
ors
are
cove
red.
Che
ckR
oute
Alp
ha 2
50 a
ddre
ss 2
42.
Inco
rrec
t cha
nge
isdi
spen
sed
Insu
ffici
ent c
hang
e co
ins
are
avai
labl
e
Inco
rrec
t coi
n va
lues
are
set
.In
corr
ect p
rices
are
set
for
requ
ired
sele
ctio
ns.
N.B
. Pric
e co
ntro
l is
held
in th
e ve
ndin
g m
achi
ne in
MD
Bap
plic
atio
ns, a
nd a
reno
rmal
ly h
eld
in th
e ve
ndin
g m
achi
ne in
Exe
cutiv
ean
d B
DV
app
licat
ions
.
If re
quire
d, fl
oat u
p th
roug
h ac
cept
or w
ith c
orre
ct c
hang
e co
ins.
Che
ck c
oin
valu
es a
nd p
rices
, res
et if
nec
essa
ry u
sing
the
Rou
te A
lpha
250
term
inal
. P
ress
A, B
,Can
dD
to c
heck
ifch
ange
coi
ns a
re d
ispe
nsed
.
Che
ck th
at c
oins
are
bei
ng r
oute
d to
the
tube
s co
rrec
tly.
Pro
blem
Cau
ses
Act
ions
CashFlow® 550/560 6-Price changegiver Pocket Guide
12 , MEI., 1994
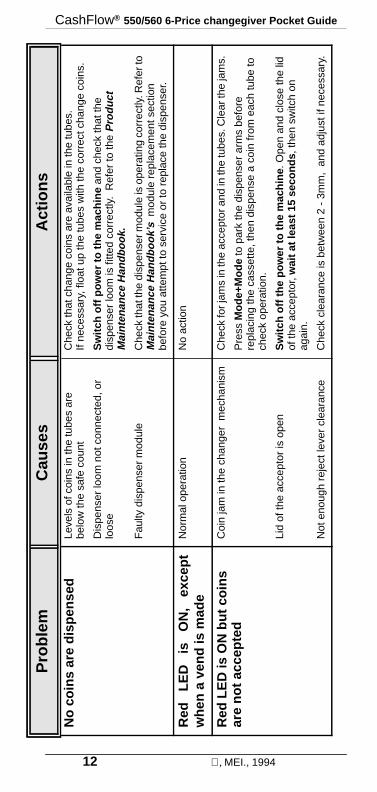
No
coin
s ar
e di
spen
sed
Leve
ls o
f coi
ns in
the
tube
s ar
ebe
low
the
safe
cou
nt
Dis
pens
er lo
om n
ot c
onne
cted
, or
loos
e
Fau
lty d
ispe
nser
mod
ule
Che
ck th
at c
hang
e co
ins
are
avai
labl
e in
the
tube
s.If
nece
ssar
y, fl
oat u
p th
e tu
bes
with
the
corr
ect c
hang
e co
ins.
Sw
itch
off p
ower
to th
e m
achi
nean
d ch
eck
that
the
disp
ense
r lo
om is
fitte
d co
rrec
tly.
Ref
er to
the
Pro
duct
Mai
nten
ance
Han
dboo
k.
Che
ck th
at th
e di
spen
ser m
odul
e is
ope
ratin
g co
rrec
tly. R
efer
toM
aint
enan
ce H
andb
ook’
s m
odul
e re
plac
emen
t sec
tion
befo
re y
ou a
ttem
pt to
ser
vice
or
to r
epla
ce th
e di
spen
ser.
Red
LE
D
is
ON
, ex
cept
whe
n a
vend
is m
ade
Nor
mal
ope
ratio
nN
o ac
tion
Red
LE
D is
ON
but
coi
nsar
e no
t acc
epte
dC
oin
jam
in th
e ch
ange
r m
echa
nism
Lid
of th
e ac
cept
or is
ope
n
Not
eno
ugh
reje
ct le
ver
clea
ranc
e
Che
ck fo
r jam
s in
the
acce
ptor
and
in th
e tu
bes.
Cle
ar th
e ja
ms.
Pre
ssM
ode+
Mod
e to
par
k th
e di
spen
ser
arm
s be
fore
repl
acin
g th
e ca
sset
te, t
hen
disp
ense
a c
oin
from
eac
h tu
be to
chec
k op
erat
ion.
Sw
itch
off t
he p
ower
to th
e m
achi
ne. O
pen
and
clos
e th
e lid
of th
e ac
cept
or,w
ait a
t lea
st 1
5 se
cond
s, t
hen
switc
h on
agai
n.
Che
ck c
lear
ance
is b
etw
een
2 -
3mm
, an
d ad
just
if n
eces
sary
.
Pro
blem
Cau
ses
Act
ions

CashFlow® 550/560 6-Price changegiver Pocket Guide
, MEI., 1994 13
Red
LE
D s
tays
OF
FN
o po
wer
to th
e un
it, o
r vo
ltage
not
corr
ect
No
pow
er to
the
unit
- lo
ose
loom
or
blow
n fu
se
Che
ck th
at th
e po
wer
sup
ply
to th
e ch
ange
give
r is
at t
hevo
ltage
sho
wn
in th
e w
indo
w o
n th
e ke
ypad
labe
l.
Test
the
pow
er s
uppl
y by
pre
ssin
g th
eM
ode
but
ton.
If th
e ye
llow
LE
D fl
ashe
s, th
e po
wer
is O
N.
If ye
llow
LE
D s
tays
off,
switc
h of
f pow
er to
the
mac
hine
, and
chec
k al
l pow
er lo
oms
and
fuse
s.
Rep
lace
any
blo
wn
fuse
s.
Res
tart
the
mac
hine
and
che
ck th
at th
e re
d LE
D is
on.
Pro
blem
Cau
ses
Act
ions

CashFlow® 550/560 6-Price changegiver Pocket Guide
14 , MEI., 1994
Red
LE
D is
FLA
SH
ING
Fau
lt w
ith th
e ch
ange
give
r un
it
A c
oin
has
cove
red
the
top-
leve
lse
nsor
mirr
ors
A c
oin
is ja
mm
ed in
the
disp
ense
rm
odul
e
Fau
lt w
ith th
e au
dit m
odul
e
Coi
n ca
sset
te is
unc
lippe
d
Che
ckR
oute
Alp
ha25
0 a
ddre
sses
340
-34
9. P
ress
A,B
,C &
D to
che
ck if
coi
ns a
re d
ispe
nsed
. If t
he r
ed L
ED
is s
till fl
ashi
ng,
switc
h of
f the
pow
er to
the
mac
hine
, wai
t at l
east
15
seco
nds
and
switc
h on
aga
in. C
heck
that
coi
ns a
re d
ispe
nsed
.
Rem
ove
the
coin
cas
sette
and
che
ck th
e to
ps o
f the
coi
n tu
bes.
Sw
itch
off t
he p
ower
to th
e m
achi
ne, r
emov
e th
e ca
sset
tean
d ch
eck
the
disp
ense
r fo
r ja
ms.
Cle
ar a
ny b
lock
ages
and
che
ck fo
r da
mag
ed c
oins
.
Che
ck th
eR
oute
Alp
ha25
0 a
udit
addr
esse
s.
Ret
urn
the
unit
to y
our
ME
I dis
trib
utor
for
repa
ir if
nece
ssar
y.
Pre
ss c
oin
cass
ette
into
pla
cefir
mly
, ens
ure
clip
s sn
ap s
hut.
Pro
blem
Cau
ses
Act
ions

CashFlow® 550/560 6-Price changegiver Pocket Guide
, MEI., 1994 15
Red
LE
D s
tays
OF
Fan
d al
lco
ins
are
reje
cted
No
stoc
k av
aila
ble
for
vend
ing
No
bloc
ker
sign
al fr
om th
e m
achi
neN
o po
lling
by
VN
C -
MD
B o
nly
Fau
lty tr
ansf
orm
er
Res
tock
mac
hine
if n
eces
sary
.
Che
ck fo
r a
full
was
te b
ucke
t. C
heck
if m
achi
ne is
pau
sed
halfw
ay th
roug
h a
vend
cyc
le. C
ompl
ete
the
cycl
e if
nece
ssar
y.
Che
ck th
e tr
ansf
orm
er. I
f fau
lty, r
efer
to y
our
ME
I dis
trib
utor
.
Red
LE
Dpe
rman
ently
OF
F. N
o ot
her
prob
lem
s.F
aulty
LE
D o
r ke
ypad
mod
ule
Che
ck th
e ke
ypad
mod
ule.
If it
is fa
ulty
, ref
er to
you
r au
thor
ised
ME
I dis
trib
utor
.
Red
LE
D is
flas
hing
and
no
coin
s ar
e ac
cept
edC
heck
Rou
te A
lpha
add
ress
es 3
40to
349
for
a de
scrip
tion
of th
e er
ror
The
lid
of th
e ac
cept
or is
not
clo
sed
firm
ly
The
acc
epto
r lo
om is
not
con
nect
ed
The
coi
n pa
th in
the
acce
ptor
is d
irty
Use
the
tabl
e of
Rou
te A
lpha
250
err
or a
ddre
sses
in th
ism
anua
l
Sw
itch
off p
ower
to th
e m
achi
ne a
nd o
pen
and
clos
e th
e lid
of th
e un
it. M
ake
sure
the
lid s
naps
shu
t firm
ly.W
ait
at l
east
15 s
econ
ds a
nd s
witc
h th
e po
wer
on
agai
n.
Che
ck th
e ac
cept
or lo
om a
nd r
econ
nect
it if
nec
essa
ry.
Sw
itch
off p
ower
to th
e m
achi
ne a
nd c
lean
the
acce
ptor
.
Yel
low
LE
D is
OF
FN
orm
al o
pera
tion
No
actio
n
Pro
blem
Cau
ses
Act
ions

CashFlow® 550/560 6-Price changegiver Pocket Guide
16 , MEI, 1994
Yel
low
LE
Dfla
shes
whe
nco
ins
are
acce
pted
Nor
mal
ope
ratio
nN
o ac
tion
Yel
low
LE
D r
emai
ns O
FF
whe
n M
ode
butto
n is
pres
sed
No
pow
er s
uppl
y to
the
vend
ing
mac
hine
Sw
itch
off p
ower
to th
e m
achi
ne, c
heck
all
loom
s an
d ch
eck
all f
uses
.
Rep
lace
blo
wn
fuse
s, fo
llow
ing
the
inst
ruct
ions
in th
is m
anua
l.
Yel
low
LE
D is
flash
ing
The
cha
ngeg
iver
is in
shift
ed m
ode
beca
use
the
Mod
e b
utto
n ha
s be
enpr
esse
d
The
key
pad
is a
vaila
ble
to c
hang
e th
e fu
nctio
ns o
f the
uni
t.
(To
exit
from
shi
fted
mod
e, p
ress
Mod
eor
wai
t for
45
seco
nds
)
Yel
low
LE
D is
OF
Fpe
rman
ently
.N
o ot
her
prob
lem
s.
Fau
lty L
ED
or
faul
ty k
eypa
d m
odul
eC
heck
the
keyp
ad m
odul
e.
If fa
ulty
, ref
er to
you
r M
EI d
istr
ibut
or.
Pro
blem
s in
han
dlin
g co
ins
pers
ist a
fter
all s
olut
ions
have
bee
n tr
ied
Fau
lty u
nit,
or fa
ulty
mod
ules
Con
tact
you
r M
EI d
istr
ibut
or.T
o he
lp d
iagn
osis
, not
e th
esy
mpt
oms,
and
the
mod
el a
nd s
eria
l num
ber
of th
e un
it fo
rre
fere
nce.
The
se n
umbe
rs a
re o
n a
labe
l on
the
side
of t
he u
nit.
Pro
blem
Cau
ses
Act
ions

, MEI., 1994 17
CashFlow® 550/560 6-Price changegiver Pocket Guide
Add
ress
Par
amet
erR
ange
Mea
ning
and
Act
ions
Not
es
340
Ful
l tub
e se
nsor
err
ors
ontu
be p
ositi
on A
, B,C
orD
0 -
255
Ran
ge v
alue
= th
e su
m o
f the
cod
es, w
here
:
1 / 2
/ 4
/ 8 =
tube
A /
B /
C /
D
128
= p
ost g
ate
stro
be e
rror
. Val
ues
are
addi
tive
- fo
rex
ampl
e, a
val
ue o
f 6 m
eans
faul
ts o
n tu
bes
B &
C.
Sw
itch
off p
ower
to th
e m
achi
ne.
Che
ck th
e to
ps o
fth
e tu
bes
for
coin
s co
verin
g th
e se
nsor
s. C
heck
and
clea
r a
ny ja
ms
in th
e ac
cept
or.
Clo
se th
e lid
of t
he a
ccep
tor
firm
ly,
pow
er u
p an
din
sert
a c
oin
to te
st th
e un
it.
RE
AD
ON
LY
341
Dis
able
d tu
be a
t pos
ition
A, B
,Cor
D0
- 31
Ran
ge v
alue
= th
e su
m o
f the
cod
es, w
here
:
1 / 2
/ 4
/ 8 =
tube
A /
B /
C /
D
If ne
cess
ary,
use
the
Rou
te A
lpha
250
term
inal
toen
able
the
tube
.
RE
AD
ON
LY
Trou
bles
hoot
ing
the
Uni
t with
the
ME
I R
oute
Alp
ha T
erm
inal
CashFlow® 550/560 6-Price changegiver Pocket Guide
18 , MEI., 1994
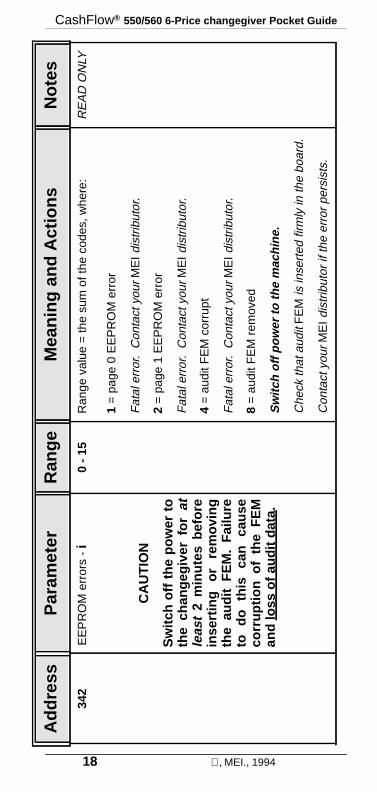
342
EE
PR
OM
err
ors
-i
0 -
15R
ange
val
ue =
the
sum
of t
he c
odes
, whe
re:
1 =
pag
e 0
EE
PR
OM
err
or
Fat
al e
rror
. C
onta
ct y
our
ME
I dis
trib
utor
.
2 =
pag
e 1
EE
PR
OM
err
or
Fat
al e
rror
. C
onta
ct y
our
ME
I dis
trib
utor
.
4 =
aud
it F
EM
cor
rupt
Fat
al e
rror
. C
onta
ct y
our
ME
I dis
trib
utor
.
8 =
aud
it F
EM
rem
oved
Sw
itch
off p
ower
to th
e m
achi
ne.
Che
ck th
at a
udit
FE
M is
inse
rted
firm
ly in
the
boar
d.
Con
tact
you
rM
EI d
istr
ibut
or if
the
erro
r pe
rsis
ts.
RE
AD
ON
LY
Add
ress
Par
amet
erR
ange
Mea
ning
and
Act
ions
Not
es
Sw
itch
off t
he p
ower
toth
e ch
ange
give
r fo
rat
leas
t 2
min
utes
bef
ore
inse
rtin
g or
re
mov
ing
the
audi
t F
EM
. F
ailu
reto
do
th
is
can
caus
eco
rrup
tion
of t
he F
EM
and
loss
of a
udit
data
.
CA
UT
ION
, MEI., 1994 19
CashFlow® 550/560 6-Price changegiver Pocket Guide
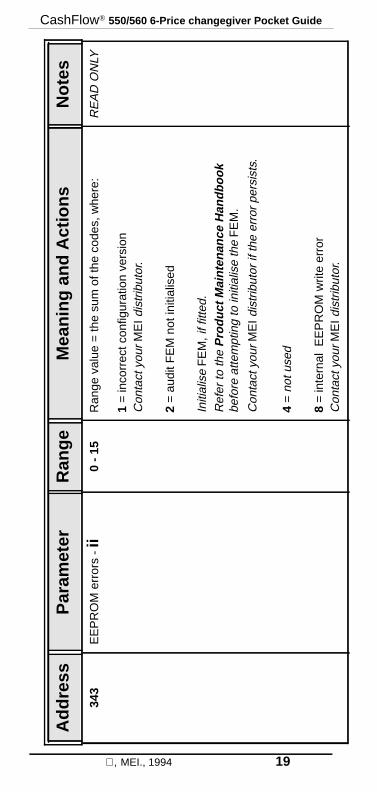
343
EE
PR
OM
err
ors
-ii
0 -
15R
ange
val
ue =
the
sum
of t
he c
odes
, whe
re:
1=
inco
rrec
t con
figur
atio
n ve
rsio
nC
onta
ctyo
urM
EId
istr
ibut
or.
2 =
aud
it F
EM
not
initi
alis
ed
Initi
alis
eF
EM
, if fi
tted.
Ref
er to
the
Pro
duct
Mai
nten
ance
Han
dboo
kbe
fore
atte
mpt
ing
to in
itial
ise
the
FE
M.
Con
tact
you
rM
EI d
istr
ibut
or if
the
erro
r pe
rsis
ts.
4 =
not u
sed
8 =
inte
rnal
EE
PR
OM
writ
e er
ror
Con
tact
you
rM
EId
istr
ibut
or.
RE
AD
ON
LY
Add
ress
Par
amet
erR
ange
Mea
ning
and
Act
ions
Not
es

CashFlow® 550/560 6-Price changegiver Pocket Guide
20 , MEI., 1994
344
Ope
ratio
nal e
rror
s - i
0 -
15R
ange
val
ue =
the
sum
of t
he c
odes
, whe
re:
1 =
not u
sed
2 =
acc
epto
r in
itial
isat
ion
erro
r
Sw
itch
off p
ower
to th
e m
achi
ne.
Ope
n th
e lid
of
the
acce
ptor
then
clo
se it
aga
in fi
rmly
. Wai
t for
15
seco
nds,
then
pow
er u
p th
e un
it.
Con
tact
you
rM
EI d
istr
ibut
or if
the
erro
r pe
rsis
ts
4 =
HI2
hard
war
e er
ror
Set
Rou
te A
lpha
add
ress
349
to1.
Con
tact
you
r M
EI d
istr
ibut
or if
the
erro
r pe
rsis
ts.
8 =
HI2
tran
smis
sion
err
or
Set
Rou
te A
lpha
add
ress
349
to1.
Con
tact
you
rM
EI d
istr
ibut
or if
the
erro
r pe
rsis
ts.
RE
AD
ON
LY
Add
ress
Par
amet
erR
ange
Mea
ning
and
Act
ions
Not
es
, MEI., 1994 21
CashFlow® 550/560 6-Price changegiver Pocket Guide
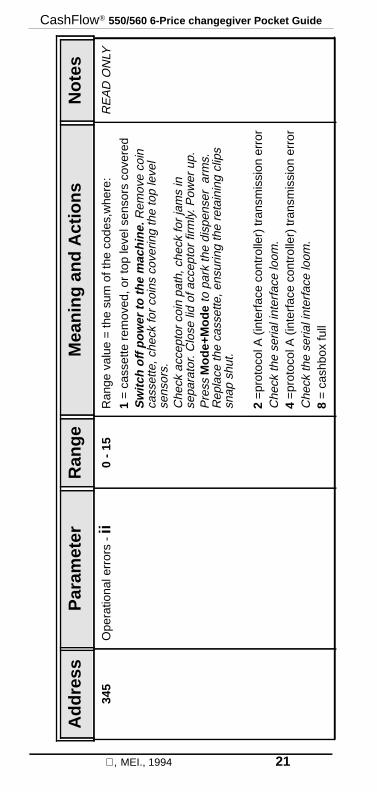
345
Ope
ratio
nal e
rror
s -ii
0 -
15R
ange
val
ue =
the
sum
of t
he c
odes
,whe
re:
1 =
cas
sette
rem
oved
, or
top
leve
l sen
sors
cov
ered
Sw
itch
off p
ower
to th
e m
achi
ne.
Rem
ove
coin
cass
ette
, che
ck fo
r co
ins
cove
ring
the
top
leve
lse
nsor
s.C
heck
acc
epto
r co
in p
ath,
che
ck fo
r ja
ms
inse
para
tor.
Clo
se li
d of
acc
epto
r fir
mly
. Pow
er u
p.P
ress
Mod
e+M
ode
to p
ark
the
disp
ense
r a
rms.
Rep
lace
the
cass
ette
, ens
urin
g th
e re
tain
ing
clip
ssn
ap s
hut.
2 =
prot
ocol
A (
inte
rfac
e co
ntro
ller)
tran
smis
sion
err
orC
heck
the
seria
l int
erfa
ce lo
om.
4 =
prot
ocol
A (
inte
rfac
e co
ntro
ller)
tran
smis
sion
err
orC
heck
the
seria
l int
erfa
ce lo
om.
8 =
cas
hbox
full
RE
AD
ON
LY
Add
ress
Par
amet
erR
ange
Mea
ning
and
Act
ions
Not
es

CashFlow® 550/560 6-Price changegiver Pocket Guide
22 , MEI., 1994
346
BD
V e
rror
s (i)
opt
ions
0 -
151
= a
udit
timed
out
2 =
vm
c tim
ed o
ut4
= c
pc ti
med
out
BD
V o
nly
347
BD
V e
rror
s (ii
) op
tions
0 -1
51
= a
udit
inco
mpa
tible
2 =
vm
c in
com
patib
le4
= c
pc in
com
patib
leB
DV
onl
y
349
Res
et e
rror
flag
s0
- 1
0 =
do
not r
eset
err
or fl
ags
1 =
res
et e
rror
flag
s
Add
ress
Par
amet
erR
ange
Mea
ning
and
Act
ions
Not
es

, MEI., 1994 23
CashFlow® 550/560 6-Price changegiver Pocket Guide
Setting a Unit’s Functions with aMEI Route Alpha 250 Terminal
Each piece of data which determines the unit’sfunctions is stored in a separate address. Use theterminal to read an address and to check or set theunit’s functions.
Setting FunctionsInsert the plug on the Route Alpha 250 terminalinto the six-way connector in the acceptor unit.
The acceptor must be powered up, as the RouteAlpha 250 terminal takes its power through theunit. A half-size zero is displayed when the terminalpowers up, followed by the software versionnumber and then the first address number with adot , or a dot and dash (1. or 1.-)Functions can be changed only if a dash showsafter the address number.
Press UP or DOWN slowly to display addressesone after the other. Hold down a key to displayaddresses at an increasing speed. Press a keytwice quickly to jump large blocks of addresses.
To set a function, press ENTER to show the currentvalue in the selected address, then change thevalue by pressing UP or DOWN.
Press ENTER again to return to the addressdisplay. Press RESET to store the new value.
NOTE: If an error occurs, four half-size zerosappear. Press RESET to clear this display and toreturn to the current address.
LEFT UPRIGHT
DOWN
ENTERSix-wayconnector
RESETDisplay
CashFlow® 550/560 6-Price changegiver Pocket Guide
24 , MEI., 1994
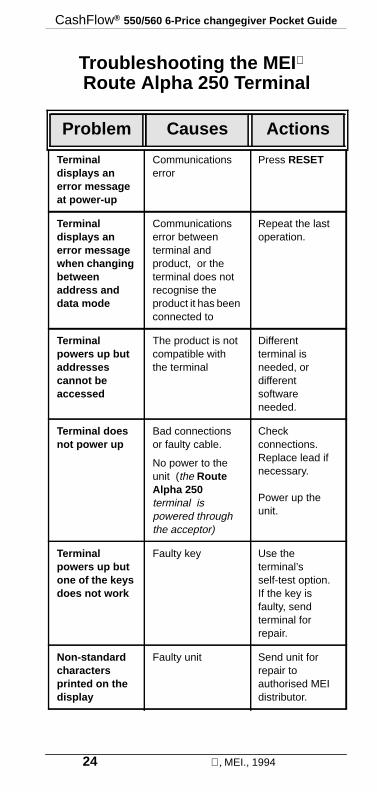
Problem Causes Actions
Terminaldisplays anerror messageat power-up
Communicationserror
Press RESET
Terminaldisplays anerror messagewhen changingbetweenaddress anddata mode
Communicationserror betweenterminal andproduct, or theterminal does notrecognise theproduct it has beenconnected to
Repeat the lastoperation.
Terminalpowers up butaddressescannot beaccessed
The product is notcompatible withthe terminal
Differentterminal isneeded, ordifferentsoftwareneeded.
Terminal doesnot power up
Bad connectionsor faulty cable.
No power to theunit (the RouteAlpha 250terminal ispowered throughthe acceptor)
Checkconnections.Replace lead ifnecessary.
Power up theunit.
Terminalpowers up butone of the keysdoes not work
Faulty key Use theterminal’sself-test option.If the key isfaulty, sendterminal forrepair.
Non-standardcharactersprinted on thedisplay
Faulty unit Send unit forrepair toauthorised MEIdistributor.
Troubleshooting the MEI
Route Alpha 250 Terminal
, MEI., 1994 25
CashFlow® 550/560 6-Price changegiver Pocket Guide
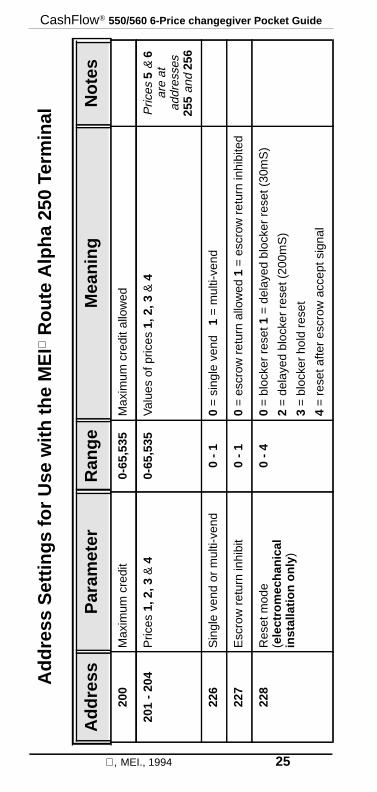
Add
ress
Par
amet
erR
ange
Mea
ning
Not
es
200
Max
imum
cre
dit
0-65
,535
Max
imum
cre
dit a
llow
ed
201
- 20
4P
rices
1, 2
, 3&
40-
65,5
35V
alue
s of
pric
es1,
2, 3
& 4
Pric
es5
&6
are
atad
dres
ses
255
and
256
226
Sin
gle
vend
or
mul
ti-ve
nd0
- 1
0 =
sin
gle
vend
1=
mul
ti-ve
nd
227
Esc
row
ret
urn
inhi
bit
0 -
10
= e
scro
w r
etur
n al
low
ed 1
= e
scro
w r
etur
n in
hibi
ted
228
Res
et m
ode
(ele
ctro
mec
hani
cal
inst
alla
tion
only
)
0 -
40
= b
lock
er r
eset
1 =
del
ayed
blo
cker
res
et (
30m
S)
2 =
del
ayed
blo
cker
res
et (
200m
S)
3 =
blo
cker
hol
d re
set
4 =
res
et a
fter
escr
ow a
ccep
t sig
nal
Add
ress
Set
tings
for
Use
with
the
ME
I
Rou
te A
lpha
250
Ter
min
al

CashFlow® 550/560 6-Price changegiver Pocket Guide
26 , MEI., 1994
229
Inhi
bitc
oin
: coi
ns 1
to 4
0 -
15A
ddre
ss v
alue
= th
e su
m o
f the
cod
es w
here
:
Cod
e0
= n
o co
ins
inhi
bite
d
Cod
e1
= in
hibi
t coi
n 1
Cod
e4
= in
hibi
t coi
n 3
Cod
e2
= in
hibi
t coi
n 2
Cod
e8
= in
hibi
t coi
n 4
To in
hibi
t mor
e th
an o
ne c
oin
at th
e sa
me
time,
add
thei
rco
des
toge
ther
.F
or e
xam
ple,
cod
es1
+8
=9.
If y
ou c
hoos
e9
for
this
addr
ess
rang
e va
lue,
coi
ns 1
and
4 w
ill b
e in
hibi
ted.
230
Inhi
bitc
oin
: coi
ns 5
to 8
0 -
15A
ddre
ss v
alue
= th
e su
m o
f the
cod
es w
here
:
Cod
e0
= n
o co
ins
inhi
bite
d
Cod
e1
/2 /
4 /8
= in
hibi
t coi
n 5
/ 6 /
7 / 8
231
Inhi
bitc
oin
: coi
ns 9
to 1
20
- 15
Add
ress
val
ue =
the
sum
of t
he c
odes
whe
re:
Cod
e0
= n
o co
ins
inhi
bite
d
Cod
e 1
/2
/4 /
8 =
inhi
bit c
oin
9 / 1
0 / 1
1 / 1
2
Add
ress
Par
amet
erR
ange
Mea
ning
Not
es
, MEI., 1994 27
CashFlow® 550/560 6-Price changegiver Pocket Guide
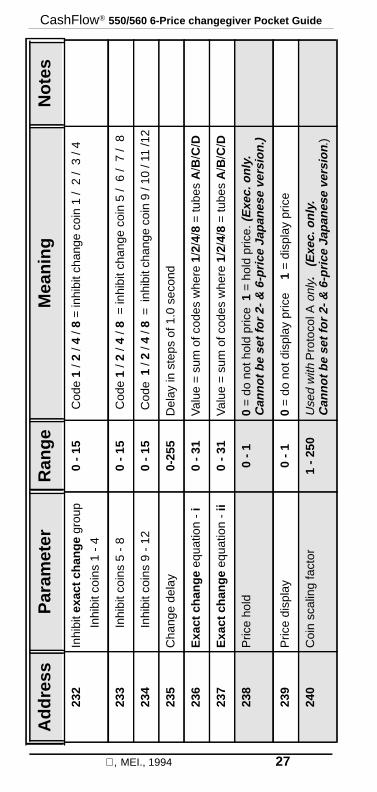
232
Inhi
bite
xact
cha
nge
gro
up
Inhi
bit c
oins
1 -
4
0 -
15 C
ode
1/2
/4
/8 =
inhi
bit c
hang
e co
in 1
/ 2
/ 3
/ 4
233
Inhi
bit c
oins
5 -
80
- 15
Cod
e 1
/2 /
4 /8
= in
hibi
t cha
nge
coin
5 /
6 /
7 /
8
234
Inhi
bit c
oins
9 -
12
0 -
15 C
ode
1 /
2 /4
/8
= i
nhib
it ch
ange
coi
n 9
/ 10
/ 11
/12
235
Cha
nge
dela
y0-
255
Del
ay in
ste
ps o
f 1.0
sec
ond
236
Exa
ct c
hang
e e
quat
ion
-i
0 -
31V
alue
= s
um o
f cod
es w
here
1/2/
4/8
= tu
bes
A/B
/C/D
237
Exa
ct c
hang
e e
quat
ion
-ii
0 -
31V
alue
= s
um o
f cod
es w
here
1/2/
4/8
= tu
bes
A/B
/C/D
238
Pric
e ho
ld0
- 1
0 =
do
not h
old
pric
e1
= h
old
pric
e.(E
xec.
onl
y.C
anno
t be
set f
or 2
- &
6-p
rice
Japa
nese
ver
sion
.)
239
Pric
e di
spla
y0
- 1
0 =
do
not d
ispl
ay p
rice
1 =
dis
play
pric
e
240
Coi
n sc
alin
g fa
ctor
1 -
250
Use
d w
ithP
roto
col A
onl
y.
(Exe
c. o
nly.
Can
not b
e se
t for
2-
& 6
-pric
e Ja
pane
se v
ersi
on.)
Add
ress
Par
amet
erR
ange
Mea
ning
Not
es

CashFlow® 550/560 6-Price changegiver Pocket Guide
28 , MEI., 1994
241
Dec
imal
poi
nt p
ositi
on0
- 3
0 /1
/2
/3=
mov
e po
int p
ositi
on0,
1, 2
, or
3 sp
aces
242
Ove
rpay
men
t inh
ibit
0 -
10
= o
verp
aym
ent a
llow
ed1
= o
verp
aym
ent i
nhib
ited
Not
MD
B
243
Cle
ar o
verp
aym
ent i
nhib
it0
- 1
0 =
cle
ardo
wn
allo
wed
1 =
cle
ardo
wn
inhi
bite
dN
ot M
DB
244
Key
pad
inhi
bit
0 -
10
= k
eypa
d en
able
d 1
= k
eypa
d di
sabl
edN
ot M
DB
245
Pric
e te
ach
inhi
bit
0 -
10
= p
rice
teac
h al
low
ed 1
= p
rice
teac
h in
hibi
ted
Not
MD
B
246
Fas
t sen
se0
- 1
0 =
nor
mal
1 =
fast
(el
ectr
omec
hani
cal o
nly)
Not
MD
B
247
Flo
at d
own
(aut
o tu
be in
vent
ory)
0 -
10
= fl
oat-
dow
n di
sabl
ed
1 =
floa
t-do
wn
enab
led
248
Ven
ding
mod
e0
- 1
0 =
EU
RO
PE
AN
mod
e
1 =
JA
PA
NE
SE
mod
e
To a
lter
the
vend
ing
mod
e, m
ove
the
two-
posi
tion
link
(loca
ted
on th
e co
ntro
l boa
rd b
ehin
d th
e fu
sebo
x) b
etw
een
the
pins
labe
lled
E a
nd J
.
Add
ress
Par
amet
erR
ange
Mea
ning
Not
es

, MEI., 1994 29
CashFlow® 550/560 6-Price changegiver Pocket Guide
249
6-pr
ice
or 2
-pric
e m
ode
0 -
10
= 6
-pric
e m
ode
1
= 2
-pric
e m
ode
Can
be
set i
n Ja
pane
se m
ode
only
.
250
Exa
ct c
hang
e di
spla
y op
tion
0 -
10
= n
orm
al
1 =
exa
ct c
hang
e on
cre
dit d
ispl
ay
251
- 25
4Fl
oat l
evel
for t
ube
A, B
,Cor
D0
- 25
5Se
t the
num
ber o
f coi
ns to
be
float
ed to
in tu
beA
,B,C
or
D
255
Val
ue o
f pric
e 5
0 -
65,5
356-
pric
e on
ly
256
Val
ue o
f pric
e6
0 -
65,5
356-
pric
e on
ly
261
- 26
4Fu
ll co
unt f
or tu
beA
, B, C
orD
0 -
255
Set n
umbe
r of c
oins
in tu
be th
at a
ctiv
ates
full
sen
sor
271
- 27
4Lo
w c
ount
for t
ube
A, B
, C o
r D
0 -
255
Set n
umbe
r of c
oins
in tu
be th
at a
ctiv
ates
low
sen
sor
281
- 28
4Sa
fe c
ount
for t
ube
A, B
, C o
r D
0 -
255
Min
imum
num
ber
of c
oins
tha
t m
ust
be l
eft
in a
tub
e( t
his
num
ber
is m
ultip
lied
by tw
o in
the
chan
ger)
291
1st c
oin
type
in tu
beA
0 -
120
=no
coi
n,1
= c
oin
1,2
= c
oin
2,3
= c
oin
3...
Add
ress
Par
amet
erR
ange
Mea
ning
Not
es

CashFlow® 550/560 6-Price changegiver Pocket Guide
30 , MEI., 1994
292
1st c
oin
type
in tu
beB
0 -
120
= n
o co
in, 1
= c
oin
1,2
= c
oin
2,3
= c
oin
3...
293
1st c
oin
type
in tu
beC
0 -
120
= n
o co
in, 1
= c
oin
1,2
= c
oin
2,3
= c
oin
3...
294
1st c
oin
type
in tu
beD
0 -
120
= n
o co
in, 1
= c
oin
1,2
= c
oin
2,3
= c
oin
3...
301
2nd
coin
type
in tu
beA
0 -1
20
=no
coi
n,1
= c
oin
1,2
= c
oin
2,3
= c
oin
3...
302
2nd
coin
type
in tu
beB
0 -
120
= n
o co
in,1
= c
oin
1,2
= c
oin
2,3
= c
oin
3...
303
2nd
coin
type
in tu
beC
0 -
120
= n
o co
in,1
= c
oin
1,2
= c
oin
2,3
= c
oin
3...
304
2nd
coin
type
in tu
beD
0 -
120
= n
o co
in,1
= c
oin
1,2
= c
oin
2,3
= c
oin
3...
310
Val
ue o
f coi
ns in
tube
s0
- 65
,535
Val
ue o
f coi
ns in
ALL
tube
sR
EA
D O
NLY
311
- 31
4C
oin
coun
t for
tube
A, B
, Cor
D0
- 25
5C
urre
nt n
umbe
r of
coi
ns in
tube
A,B
,C o
rD
RE
AD
ON
LY
321
- 33
2V
alue
of c
oins
1 -
12
0 -
65,5
35V
alue
of a
n in
divi
dual
coi
n
Add
ress
Par
amet
erR
ange
Mea
ning
Not
es
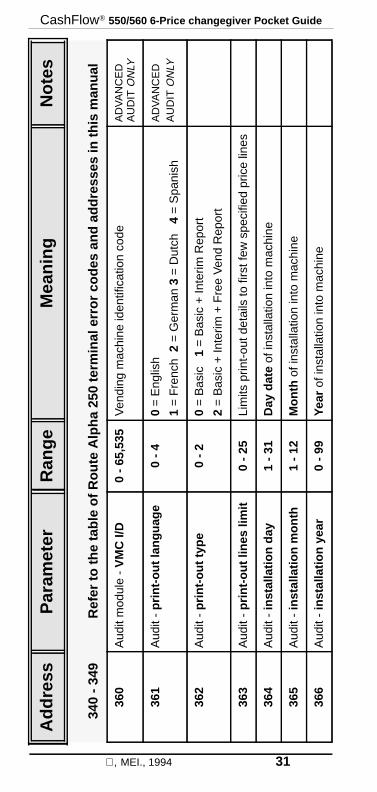
, MEI., 1994 31
CashFlow® 550/560 6-Price changegiver Pocket Guide
340
- 34
9
Ref
er to
the
tabl
e of
Rou
te A
lpha
250
term
inal
err
or c
odes
and
add
ress
es in
this
man
ual
360
Aud
it m
odul
e -
VM
C I/
D0
- 65
,535
Ven
ding
mac
hine
iden
tifica
tion
code
AD
VA
NC
ED
AU
DIT
ON
LY
361
Aud
it -
prin
t-ou
t lan
guag
e0
- 4
0 =
Eng
lish
1=
Fre
nch
2 =
Ger
man
3 =
Dut
ch 4
= S
pani
sh
AD
VA
NC
ED
AU
DIT
ON
LY
362
Aud
it -
prin
t-ou
t typ
e0
- 2
0 =
Bas
ic 1
= B
asic
+ In
terim
Rep
ort
2 =
Bas
ic +
Inte
rim +
Fre
e V
end
Rep
ort
363
Aud
it -
prin
t-ou
t lin
es li
mit
0 -
25Li
mits
prin
t-ou
t det
ails
to fi
rst f
ew s
peci
fied
pric
e lin
es
364
Aud
it -
inst
alla
tion
day
1 -
31D
ay d
ate
of i
nsta
llatio
n in
to m
achi
ne
365
Aud
it -
inst
alla
tion
mon
th1
- 12
Mon
th o
f ins
talla
tion
into
mac
hine
366
Aud
it -
inst
alla
tion
year
0 -
99Y
ear
of i
nsta
llatio
n in
to m
achi
ne
Add
ress
Par
amet
erR
ange
Mea
ning
Not
es

CashFlow® 550/560 6-Price changegiver Pocket Guide
32 , MEI, 1994
385
Aud
it un
it is
BD
V0
- 1
0 =
aud
it un
it is
not
BD
V ty
pe1
= a
udit
unit
isB
DV
type
AD
VA
NC
ED
AU
DIT
ON
LY
386
VM
C u
nit i
s B
DV
0 -
10
= V
MC
uni
t is
not B
DV
1 =
VM
C is
BD
VA
DV
AN
CE
DA
UD
ITO
NLY
387
CP
C u
nit i
s B
DV
0 -
10
= C
PC
is n
ot B
DV
1 =
CP
C u
nit i
s B
DV
AD
VA
NC
ED
AU
DIT
ON
LY
388
Car
d re
valu
atio
n0
- 1
0 =
rev
alua
tion
not a
llow
ed
1 =
rev
alua
tion
allo
wed
AD
VA
NC
ED
AU
DIT
ON
LY
389
Aud
it un
it fit
ted
0 -
10
= a
udit
unit
not fi
tted
1 =
aud
it un
it fit
ted
BD
Von
ly
390
VM
C u
nit fi
tted
0 -
10
= V
MC
uni
t not
fitte
d
1
= V
MC
uni
t fitte
dB
DV
only
391
CP
C u
nit fi
tted
0 -
10
= C
PC
uni
t not
fitte
d
1 =
CP
C u
nit fi
tted
BD
Von
ly
392
BD
V e
xact
cha
nge
equa
tion
0 -
10
= n
orm
al o
pera
tion
1 =
use
BD
V e
xact
cha
nge
equa
tion
BD
Von
ly
Add
ress
Par
amet
erR
ange
Mea
ning
Not
es
, MEI., 1994 33
CashFlow® 550/560 6-Price changegiver Pocket Guide
Cou
ntry
,co
untr
y co
de&
coi
n se
tTu
be T
ypes
OLD
NE
W
Des
igna
tors
Pos
ition
F U
L L
Tube
Cou
ntad
dres
ses
261
- 2
64
L O
WTu
be C
ount
addr
esse
s27
1 -
274
OLD
N
EW
S A
F E
Tube
Cou
ntad
dres
ses
281
- 2
84O
LD
NEW
U K
(GB)
1 pe
nce
55
F -
VIO
LET
A95
13
144
2
1 pe
nce
55
F -
VIO
LET
B95
13
134
2
1 pe
nce
55
F -
VIO
LET
C95
14
144
2
2 pe
nce
33
E -
BLU
EB
7510
11
2
2
2 pe
nce
33
E -
BLU
EC
7511
11
2
2
2 pe
nce
33
E -
BLU
ED
7510
10
2
2
5 pe
nce
66.
5E
- B
LUE
A/C
8412
12
6
2
Coi
n, T
ube
and
Des
igna
tor
Opt
ions

CashFlow® 550/560 6-Price changegiver Pocket Guide
34 , MEI., 1994
10 p
ence
33.
5D
- G
RE
EN
A/C
7611
11
4
2
10 p
ence
33.
5D
- G
RE
EN
B/D
7610
10
4
2
20 p
ence
44.
5E
- B
LUE
A/C
8111
12
6
2
20 p
ence
44.
5E
- B
LUE
B/D
8110
11
6
2
50 p
ence
11
D -
GR
EE
NB
547
7
6
6
£1 p
ound
44
B -
OR
AN
GE
A/C
386
7
2
2
£1 p
ound
44
B-
OR
AN
GE
B/D
386
6
2
2
Cou
ntry
,co
untr
y co
de&
coi
n se
tTu
be T
ypes
OLD
NE
W
Des
igna
tors
Pos
ition
F U
L L
Tube
Cou
ntad
dres
ses
261
- 2
64
L O
WTu
be C
ount
addr
esse
s27
1 -
274
OLD
N
EW
S A
F E
Tube
Cou
ntad
dres
ses
281
- 2
84O
LD
NEW
, MEI., 1994 35
CashFlow® 550/560 6-Price changegiver Pocket Guide
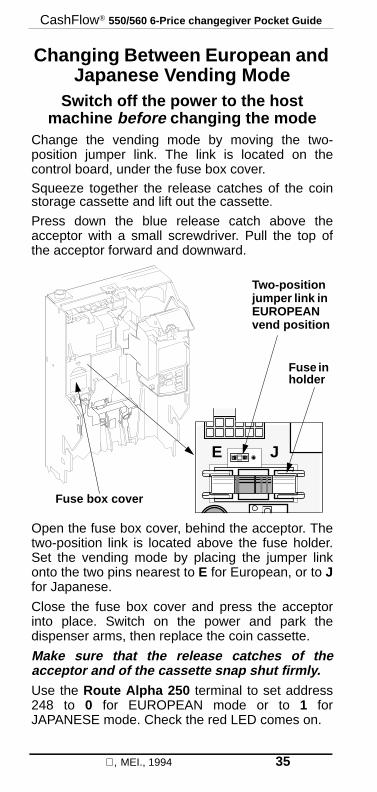
Changing Between European andJapanese Vending Mode
Switch off the power to the hostmachine before changing the mode
Change the vending mode by moving the two-position jumper link. The link is located on thecontrol board, under the fuse box cover.Squeeze together the release catches of the coinstorage cassette and lift out the cassette.
Press down the blue release catch above theacceptor with a small screwdriver. Pull the top ofthe acceptor forward and downward.
Open the fuse box cover, behind the acceptor. Thetwo-position link is located above the fuse holder.Set the vending mode by placing the jumper linkonto the two pins nearest to E for European, or to Jfor Japanese.
Close the fuse box cover and press the acceptorinto place. Switch on the power and park thedispenser arms, then replace the coin cassette.
Make sure that the release catches of theacceptor and of the cassette snap shut firmly.Use the Route Alpha 250 terminal to set address248 to 0 for EUROPEAN mode or to 1 forJAPANESE mode. Check the red LED comes on.
E J
Two-positionjumper link inEUROPEANvend position
Fuse inholder
Fuse box cover
CashFlow® 550/560 6-Price changegiver Pocket Guide
36 , MEI., 1994
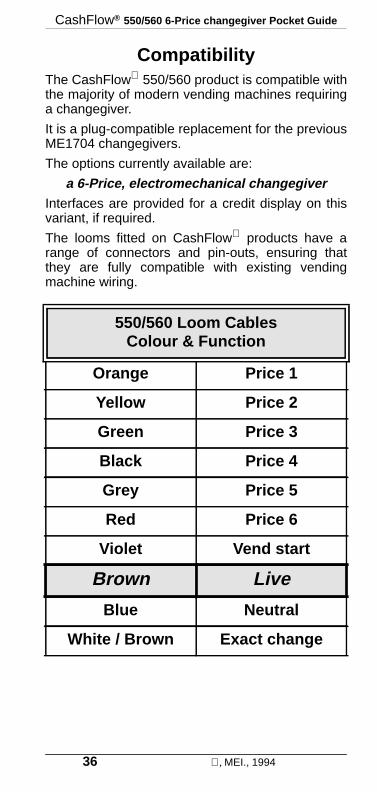
CompatibilityThe CashFlow 550/560 product is compatible withthe majority of modern vending machines requiringa changegiver.
It is a plug-compatible replacement for the previousME1704 changegivers.
The options currently available are:
a 6-Price, electromechanical changegiverInterfaces are provided for a credit display on thisvariant, if required.
The looms fitted on CashFlow products have arange of connectors and pin-outs, ensuring thatthey are fully compatible with existing vendingmachine wiring.
550/560 Loom CablesColour & Function
Orange Price 1
Yellow Price 2
Green Price 3
Black Price 4
Grey Price 5
Red Price 6
Violet Vend start
Brown Live
Blue Neutral
White / Brown Exact change

CashFlow® 550/560 6-Price changegiver Pocket Guide
37 , MEI., 1994
Installing, Starting and Testinga CashFlow Unit
Before installation...1. Check that the unit’s specifications are correctfor the host machine.
2. Ensure that the unit’s modules are assembledsecurely.
3. Check that the connector on the unit’s loommatches the one on the host machine.
4. Confirm that the voltage of the power supply tothe changegiver is the same as that shown in thekeypad window of the changegiver.
Fit the 6-Price changegiver onto thelocating screws in the machine
1. Ensure that the unit is level on its three keyholemounting slots.
2. Check that the right-hand mounting screw is atthe top of the keyhole slot, and that the unit is level .
3. Press down the top cover flap and tighten theright-hand mounting screw to secure the unit inplace in the machine.
Tighten the screw in theright-hand keyhole slotto secure the unit in thehost machine
Note the modelnumber and serialnumber beforeyou contact yourMEI distributor
Mounting points

CashFlow® 550/560 6-Price changegiver Pocket Guide
38 , MEI., 1994
Connect the looms and secure themin their correct positions
1. Check that the looms cannot be trapped by theunit or by the door of the machine.
2. Check that the unit’s lid opens fully when thereject button is pressed, and that the lever has2mm - 3mm of clearance from the rejectmechanism of the machine. Adjust the clearance ifnecessary.
3. Ensure that the unit’s coin entry cup isaligned with the machine’s coin entry chute,and that the coin exit chutes are lined up.
4. With the power off, insert ten of the largest andsmallest coins to check the coin routing to the coinreturn cup.
Switch on the power to the unit1. Check that the red LED comes on.
2. Set the vend prices with the keypad or with theRoute Alpha 250 terminal.
NOTE: The keypad is suitable if theinstallation has an electromechanical orExecutive interface. If the installation has anelectronic serial interface such as MDB,where prices are normally held in thevending machine, it is not appropriate.
Push open the topcover flap to getaccess to thefixing screw andto tighten it

, MEI., 1994 39
CashFlow® 550/560 6-Price changegiver Pocket Guide
Float the coin tubes
Floating the tubes through the creditor
1. Press Mode + A , and insert change coins. Whenthe tubes reach the pre-set maximum float level,further coins are routed to the cashbox.
Use the coin entry slots to replace any coin thatfalls inadvertently through a tube, so that it is notcounted twice by the creditor.
2. Press A to return to normal operation.
Floating the tubes by hand
NOTE: Do not attempt to float up the tubes byhand if the unit has an audit module fitted.Float the tubes through the creditor.
1. Insert a full coin cassette, or remove the unit’scassette and fill the tubes to the float levels.
If the cassette is difficult to remove, release it andtilt it forward. Push in the coin filling flap, and filltube A through the gap. Fill tubes B, C and Dthrough the coin entry slots.
2. Press Mode + Mode , replace the cassette, thenpress Mode + A + B .
3. Insert samples of non-change coins to check thatthey route to the cashbox.
4. Press A, B, C and D in turn to check that coinsare dispensed.
5. Press Mode + A and refloat the tubes throughthe creditor.
When the pre-set float level is reached, furthercoins are routed to the cashbox.
6. Press A to return the unit to normal operation.
The unit is now ready for use

CashFlow® 550/560 6-Price changegiver Pocket Guide
40 , MEI., 1994
MEI Product ManualsFull technical details of this product areincluded in the CashFlow 550/560 6-Price changegiver ProductMaintenance Handbook , a copy of whichis available, with other handbooks relatedto the product, from your MEI ApprovedDistributor, or your regionalMEI sales office.
MEI Product TrainingProduct training courses are available forCashFlow and other MEI products.
The courses cover the technical featuresand the maintenance of the product, andgive you hands-on experience inservicing CashFlow products quicklyand efficiently.Contact your regional MEISales Office for moreinformation.

CashFlow® 550/560 6-Price changegiver Pocket Guide
, MEI., 1994 41
REGIONAL OFFICES
, MEI., 1994 41
WWW.MEIGROUP.COM

™
YO
UR
ME
I RE
PR
ES
EN
TATIV
E
Related Documents