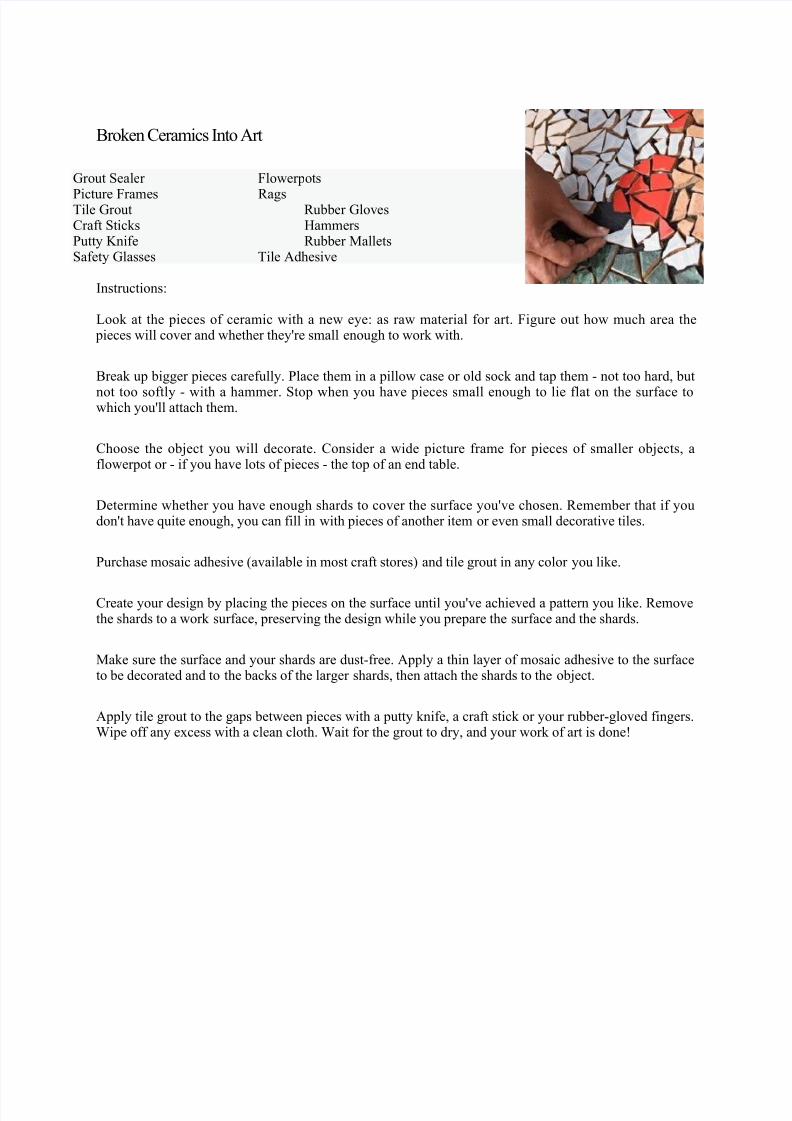
Broken Ceramics Into Art Grout Sealer Flowerpots Picture Frames Rags Tile Grout Rubber Gloves Craft Sticks Hammers Putty Knife Rubber Mallets Safety Glasses Tile Adhesive Instructions: Look at the pieces of ceramic with a new eye: as raw material for art. Figure out how much area the pieces will cover and whether they're small enough to work with. Break up bigger pieces carefully. Place them in a pillow case or old sock and tap them - not too hard, but not too softly - with a hammer. Stop when you have pieces small enough to lie flat on the surface to which you'll attach them. Choose the object you will decorate. Consider a wide picture frame for pieces of smaller objects, a flowerpot or - if you have lots of pieces - the top of an end table. Determine whether you have enough shards to cover the surface you've chosen. Remember that if you don't have quite enough, you can fill in with pieces of another item or even small decorative tiles. Purchase mosaic adhesive (available in most craft stores) and tile grout in any color you like. Create your design by placing the pieces on the surface until you've achieved a pattern you like. Remove the shards to a work surface, preserving the design while you prepare the surface and the shards. Make sure the surface and your shards are dust-free. Apply a thin layer of mosaic adhesive to the surface to be decorated and to the backs of the larger shards, then attach the shards to the object. Apply tile grout to the gaps between pieces with a putty knife, a craft stick or your rubber-gloved fingers. Wipe off any excess with a clean cloth. Wait for the grout to dry, and your work of art is done!

Welcome message from author
This document is posted to help you gain knowledge. Please leave a comment to let me know what you think about it! Share it to your friends and learn new things together.
Transcript
8/3/2019 Ceramics and Mosaics Craft (Middle Adulthood)
http://slidepdf.com/reader/full/ceramics-and-mosaics-craft-middle-adulthood 1/27
Broken Ceramics Into Art
Grout Sealer Flowerpots
Picture Frames RagsTile Grout Rubber GlovesCraft Sticks HammersPutty Knife Rubber MalletsSafety Glasses Tile Adhesive
Instructions:
Look at the pieces of ceramic with a new eye: as raw material for art. Figure out how much area the pieces will cover and whether they're small enough to work with.
Break up bigger pieces carefully. Place them in a pillow case or old sock and tap them - not too hard, but
not too softly - with a hammer. Stop when you have pieces small enough to lie flat on the surface towhich you'll attach them.
Choose the object you will decorate. Consider a wide picture frame for pieces of smaller objects, aflowerpot or - if you have lots of pieces - the top of an end table.
Determine whether you have enough shards to cover the surface you've chosen. Remember that if youdon't have quite enough, you can fill in with pieces of another item or even small decorative tiles.
Purchase mosaic adhesive (available in most craft stores) and tile grout in any color you like.
Create your design by placing the pieces on the surface until you've achieved a pattern you like. Removethe shards to a work surface, preserving the design while you prepare the surface and the shards.
Make sure the surface and your shards are dust-free. Apply a thin layer of mosaic adhesive to the surfaceto be decorated and to the backs of the larger shards, then attach the shards to the object.
Apply tile grout to the gaps between pieces with a putty knife, a craft stick or your rubber-gloved fingers.Wipe off any excess with a clean cloth. Wait for the grout to dry, and your work of art is done!

8/3/2019 Ceramics and Mosaics Craft (Middle Adulthood)
http://slidepdf.com/reader/full/ceramics-and-mosaics-craft-middle-adulthood 2/27
MOSAIC TILES
For an indoor project not subjected to moisture, it is very simple:
1. Draw a simple "cartoon" (outline) on the mosaic surface. You can copy a mosaic pattern from acoloring book or your favorite pattern of china or fabric.
2. Decide what size mosaic tiles are most appropriate for the level of detail in the design (don't use1" tiles to make details that are 1/2"). Lay a few tiles down just to make sure the colors look right
together.3. Glue the tiles to the surface one at a time. Make sure the gaps between the tiles are about 1/8 inch
or less.
4. After the glue cures for 24 hours, grout the mosaic with regular tile grout.
5. For more complicated designs, you can lay the project up on mesh (by gluing sparingly withWeldbond adhesive), or you can pick up the tiles with clear contact paper. In either case, the nextstep would be to spread glue or cement on the surface and press the sheet of mosaic onto the glueor cement.
8/3/2019 Ceramics and Mosaics Craft (Middle Adulthood)
http://slidepdf.com/reader/full/ceramics-and-mosaics-craft-middle-adulthood 3/27
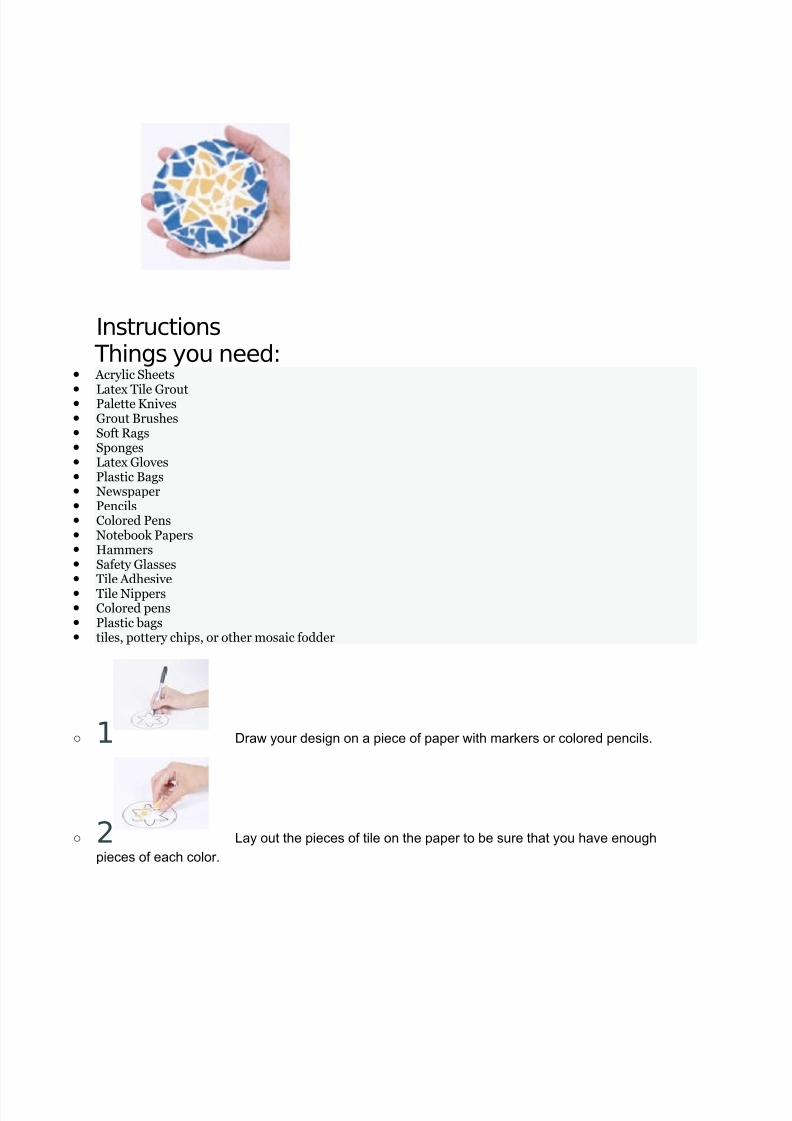
Instructions Things you need:
• Acrylic Sheets•
Latex Tile Grout• Palette Knives• Grout Brushes• Soft Rags• Sponges• Latex Gloves• Plastic Bags• Newspaper• Pencils• Colored Pens• Notebook Papers• Hammers• Safety Glasses• Tile Adhesive• Tile Nippers• Colored pens• Plastic bags• tiles, pottery chips, or other mosaic fodder
○ 1 Draw your design on a piece of paper with markers or colored pencils.
○ 2 Lay out the pieces of tile on the paper to be sure that you have enough
pieces of each color.

8/3/2019 Ceramics and Mosaics Craft (Middle Adulthood)
http://slidepdf.com/reader/full/ceramics-and-mosaics-craft-middle-adulthood 4/27
○ 3 Remove the tiles and lay a sheet of clear acrylic over the design.
○ 4 Apply a layer of adhesive to the back of each tile using a palette knife, and
place it in the correct position.
○
5 Try to keep less than a 1/8-inch space between the tiles.
○ 6 Spread grout over the entire project after you have all the tiles in place. Make
sure you get the grout down between all the tiles, and make it level with the tile tops.
○ 7 Use a damp sponge to wipe off the excess grout from the tile faces while the
grout is still wet.
○ 8 Let the grout dry and polish the tiles with a clean, damp cloth.
○ 9 Glue protective felt pads on the back of the piece when it's dry if you plan to
use it as a trivet or coaster.
8/3/2019 Ceramics and Mosaics Craft (Middle Adulthood)
http://slidepdf.com/reader/full/ceramics-and-mosaics-craft-middle-adulthood 5/27
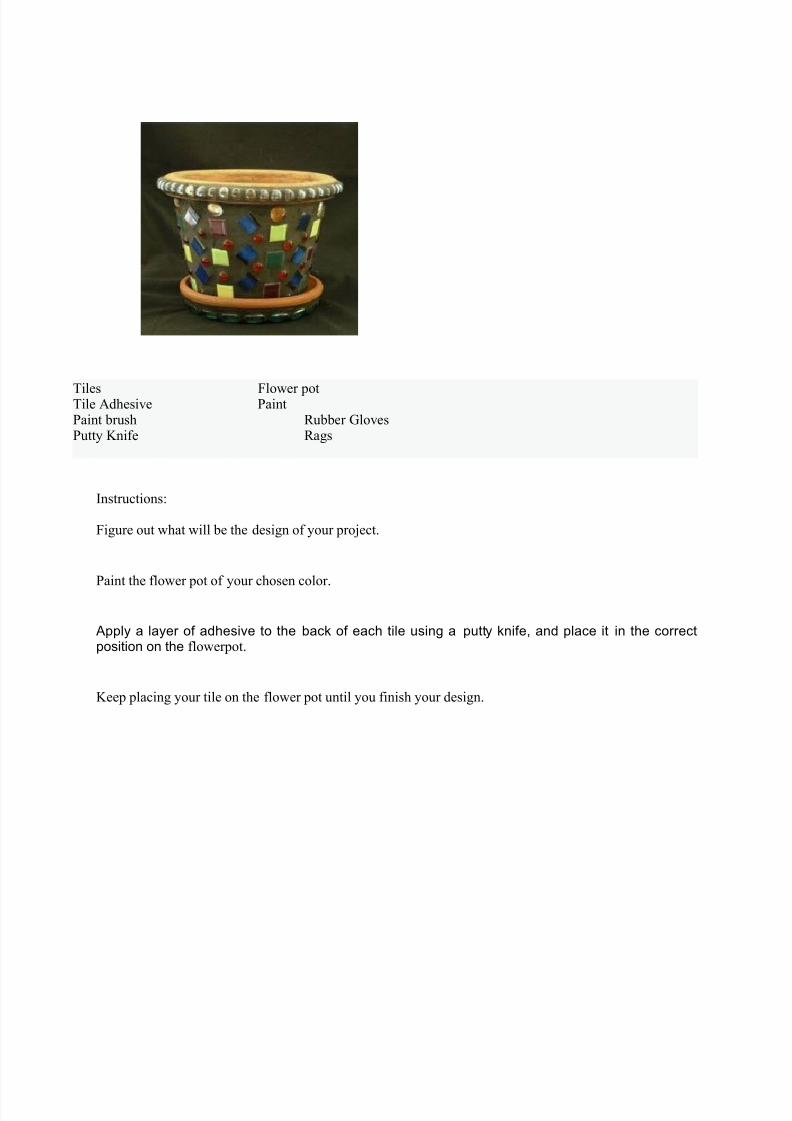
Tiles Flower potTile Adhesive PaintPaint brush Rubber GlovesPutty Knife Rags
Instructions:
Figure out what will be the design of your project.
Paint the flower pot of your chosen color.
Apply a layer of adhesive to the back of each tile using a putty knife, and place it in the correctposition on the flowerpot.
Keep placing your tile on the flower pot until you finish your design.
8/3/2019 Ceramics and Mosaics Craft (Middle Adulthood)
http://slidepdf.com/reader/full/ceramics-and-mosaics-craft-middle-adulthood 6/27
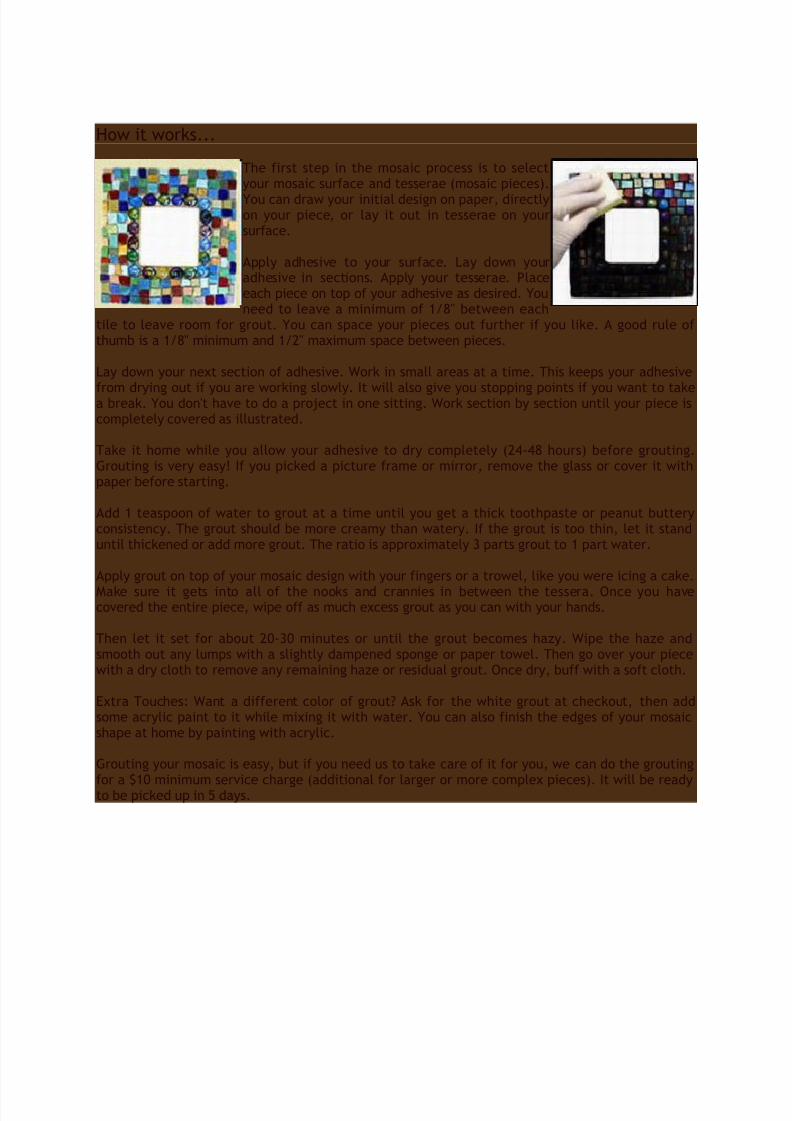
How it works...
The first step in the mosaic process is to selectyour mosaic surface and tesserae (mosaic pieces).
You can draw your initial design on paper, directlyon your piece, or lay it out in tesserae on yoursurface.
Apply adhesive to your surface. Lay down youradhesive in sections. Apply your tesserae. Placeeach piece on top of your adhesive as desired. Youneed to leave a minimum of 1/8" between each
tile to leave room for grout. You can space your pieces out further if you like. A good rule ofthumb is a 1/8" minimum and 1/2" maximum space between pieces.
Lay down your next section of adhesive. Work in small areas at a time. This keeps your adhesive
from drying out if you are working slowly. It will also give you stopping points if you want to takea break. You don't have to do a project in one sitting. Work section by section until your piece iscompletely covered as illustrated.
Take it home while you allow your adhesive to dry completely (24-48 hours) before grouting.Grouting is very easy! If you picked a picture frame or mirror, remove the glass or cover it withpaper before starting.
Add 1 teaspoon of water to grout at a time until you get a thick toothpaste or peanut butteryconsistency. The grout should be more creamy than watery. If the grout is too thin, let it standuntil thickened or add more grout. The ratio is approximately 3 parts grout to 1 part water.
Apply grout on top of your mosaic design with your fingers or a trowel, like you were icing a cake.
Make sure it gets into all of the nooks and crannies in between the tessera. Once you havecovered the entire piece, wipe off as much excess grout as you can with your hands.
Then let it set for about 20-30 minutes or until the grout becomes hazy. Wipe the haze andsmooth out any lumps with a slightly dampened sponge or paper towel. Then go over your piecewith a dry cloth to remove any remaining haze or residual grout. Once dry, buff with a soft cloth.
Extra Touches: Want a different color of grout? Ask for the white grout at checkout, then addsome acrylic paint to it while mixing it with water. You can also finish the edges of your mosaicshape at home by painting with acrylic.
Grouting your mosaic is easy, but if you need us to take care of it for you, we can do the grouting
for a $10 minimum service charge (additional for larger or more complex pieces). It will be readyto be picked up in 5 days.
8/3/2019 Ceramics and Mosaics Craft (Middle Adulthood)
http://slidepdf.com/reader/full/ceramics-and-mosaics-craft-middle-adulthood 7/27
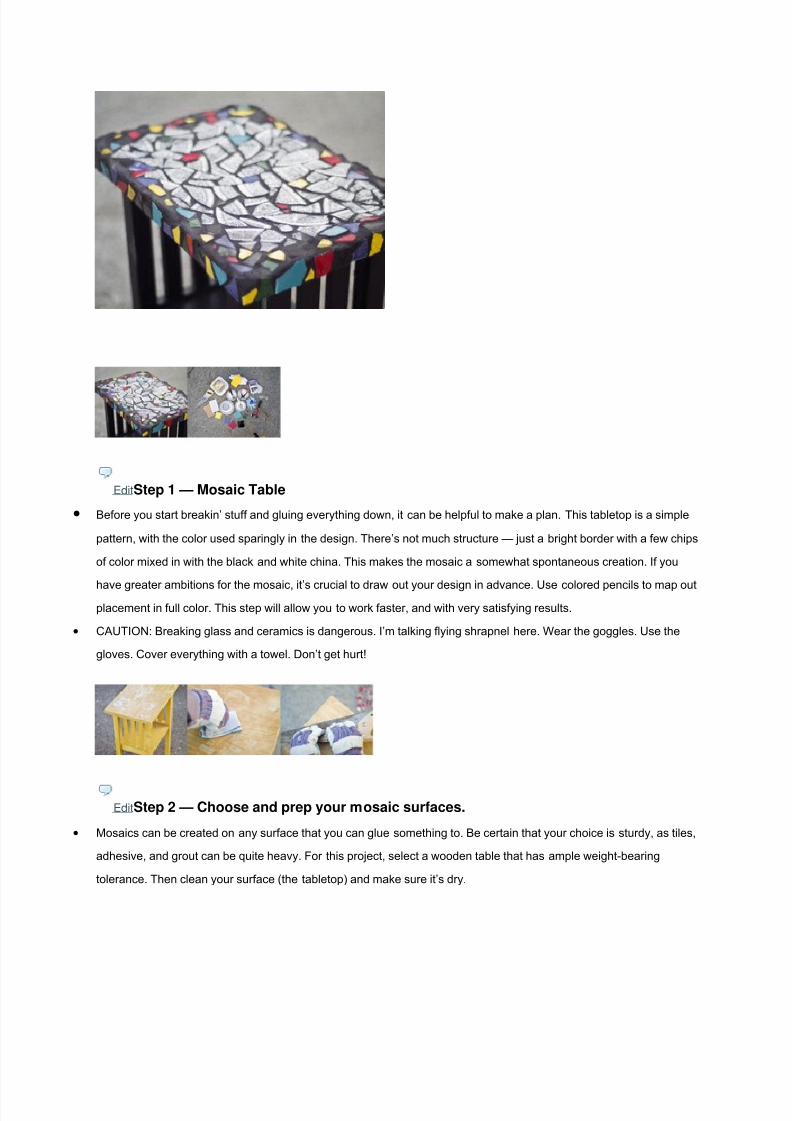
EditStep 1 — Mosaic Table
• Before you start breakin’ stuff and gluing everything down, it can be helpful to make a plan. This tabletop is a simple
pattern, with the color used sparingly in the design. There’s not much structure — just a bright border with a few chips
of color mixed in with the black and white china. This makes the mosaic a somewhat spontaneous creation. If you
have greater ambitions for the mosaic, it’s crucial to draw out your design in advance. Use colored pencils to map out
placement in full color. This step will allow you to work faster, and with very satisfying results.
• CAUTION: Breaking glass and ceramics is dangerous. I’m talking flying shrapnel here. Wear the goggles. Use the
gloves. Cover everything with a towel. Don’t get hurt!
EditStep 2 — Choose and prep your mosaic surfaces.
• Mosaics can be created on any surface that you can glue something to. Be certain that your choice is sturdy, as tiles,
adhesive, and grout can be quite heavy. For this project, select a wooden table that has ample weight-bearing
tolerance. Then clean your surface (the tabletop) and make sure it’s dry.
8/3/2019 Ceramics and Mosaics Craft (Middle Adulthood)
http://slidepdf.com/reader/full/ceramics-and-mosaics-craft-middle-adulthood 8/27
• If the tabletop is smooth, it will need some roughing up. Sanding and gouging will help the adhesive bond well to the
wood. Use 80-grit sandpaper to scuff the wood. Don’t be concerned with unevenness. With an old saw, score the
tabletop. Drag the saw horizontally across the table to grate it further.
EditStep 3 — Choose your tile.
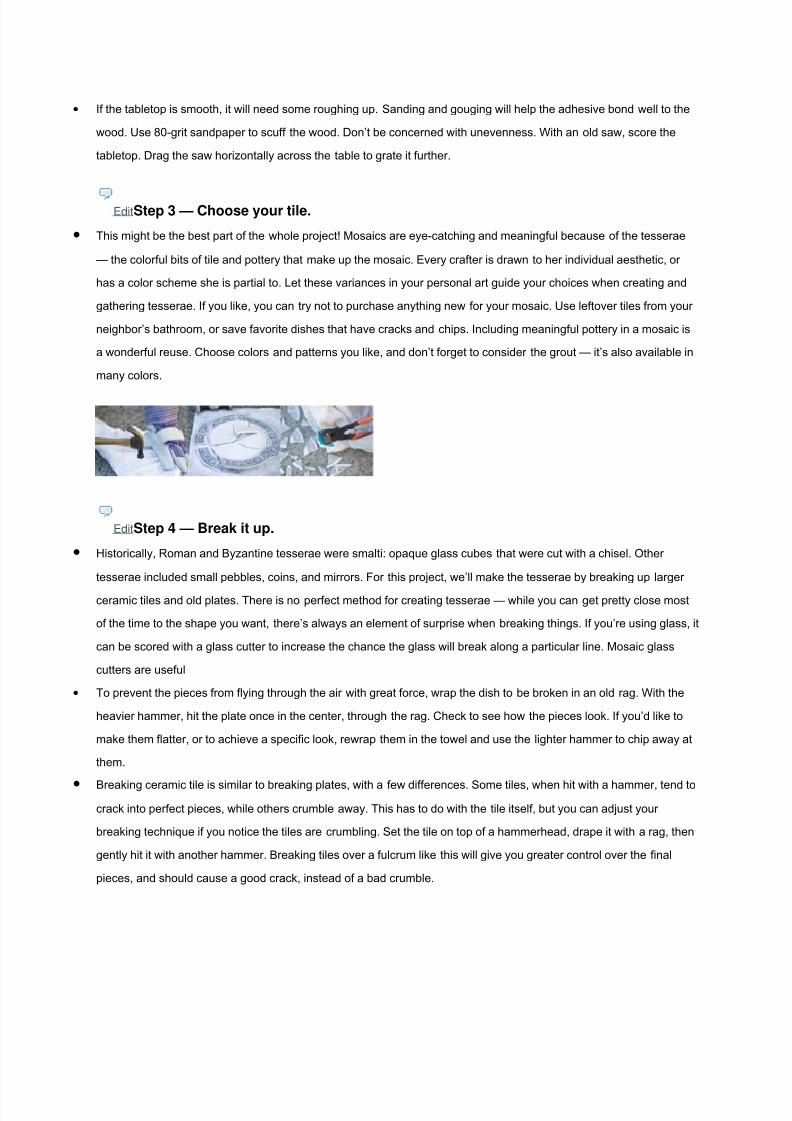
• This might be the best part of the whole project! Mosaics are eye-catching and meaningful because of the tesserae
— the colorful bits of tile and pottery that make up the mosaic. Every crafter is drawn to her individual aesthetic, or
has a color scheme she is partial to. Let these variances in your personal art guide your choices when creating and
gathering tesserae. If you like, you can try not to purchase anything new for your mosaic. Use leftover tiles from your
neighbor’s bathroom, or save favorite dishes that have cracks and chips. Including meaningful pottery in a mosaic is
a wonderful reuse. Choose colors and patterns you like, and don’t forget to consider the grout — it’s also available in
many colors.
EditStep 4 — Break it up.
• Historically, Roman and Byzantine tesserae were smalti: opaque glass cubes that were cut with a chisel. Other
tesserae included small pebbles, coins, and mirrors. For this project, we’ll make the tesserae by breaking up larger
ceramic tiles and old plates. There is no perfect method for creating tesserae — while you can get pretty close most
of the time to the shape you want, there’s always an element of surprise when breaking things. If you’re using glass, it
can be scored with a glass cutter to increase the chance the glass will break along a particular line. Mosaic glass
cutters are useful
• To prevent the pieces from flying through the air with great force, wrap the dish to be broken in an old rag. With the
heavier hammer, hit the plate once in the center, through the rag. Check to see how the pieces look. If you’d like to
make them flatter, or to achieve a specific look, rewrap them in the towel and use the lighter hammer to chip away at
them.
• Breaking ceramic tile is similar to breaking plates, with a few differences. Some tiles, when hit with a hammer, tend to
crack into perfect pieces, while others crumble away. This has to do with the tile itself, but you can adjust your
breaking technique if you notice the tiles are crumbling. Set the tile on top of a hammerhead, drape it with a rag, then
gently hit it with another hammer. Breaking tiles over a fulcrum like this will give you greater control over the final
pieces, and should cause a good crack, instead of a bad crumble.
8/3/2019 Ceramics and Mosaics Craft (Middle Adulthood)
http://slidepdf.com/reader/full/ceramics-and-mosaics-craft-middle-adulthood 9/27
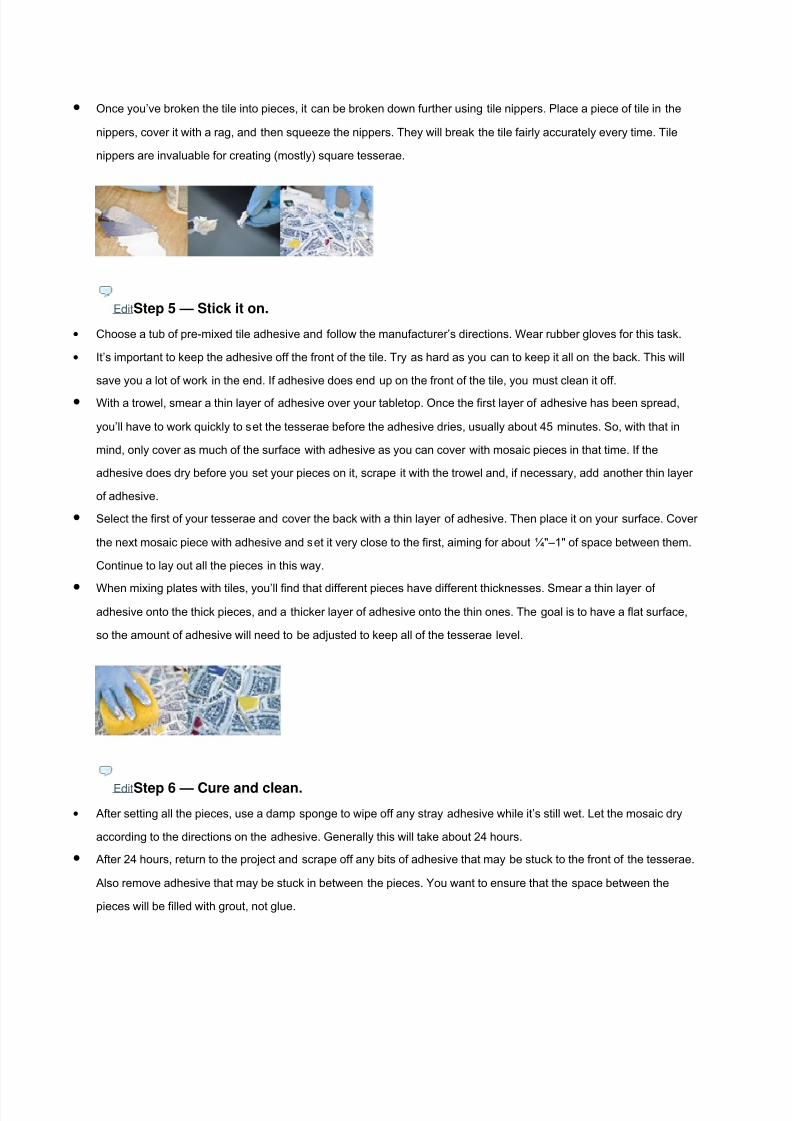
• Once you’ve broken the tile into pieces, it can be broken down further using tile nippers. Place a piece of tile in the
nippers, cover it with a rag, and then squeeze the nippers. They will break the tile fairly accurately every time. Tile
nippers are invaluable for creating (mostly) square tesserae.
EditStep 5 — Stick it on.
• Choose a tub of pre-mixed tile adhesive and follow the manufacturer’s directions. Wear rubber gloves for this task.
• It’s important to keep the adhesive off the front of the tile. Try as hard as you can to keep it all on the back. This will
save you a lot of work in the end. If adhesive does end up on the front of the tile, you must clean it off.
• With a trowel, smear a thin layer of adhesive over your tabletop. Once the first layer of adhesive has been spread,
you’ll have to work quickly to set the tesserae before the adhesive dries, usually about 45 minutes. So, with that in
mind, only cover as much of the surface with adhesive as you can cover with mosaic pieces in that time. If the
adhesive does dry before you set your pieces on it, scrape it with the trowel and, if necessary, add another thin layer
of adhesive.
• Select the first of your tesserae and cover the back with a thin layer of adhesive. Then place it on your surface. Cover
the next mosaic piece with adhesive and set it very close to the first, aiming for about ¼"–1" of space between them.
Continue to lay out all the pieces in this way.
• When mixing plates with tiles, you’ll find that different pieces have different thicknesses. Smear a thin layer of
adhesive onto the thick pieces, and a thicker layer of adhesive onto the thin ones. The goal is to have a flat surface,
so the amount of adhesive will need to be adjusted to keep all of the tesserae level.
EditStep 6 — Cure and clean.
• After setting all the pieces, use a damp sponge to wipe off any stray adhesive while it’s still wet. Let the mosaic dry
according to the directions on the adhesive. Generally this will take about 24 hours.
• After 24 hours, return to the project and scrape off any bits of adhesive that may be stuck to the front of the tesserae.
Also remove adhesive that may be stuck in between the pieces. You want to ensure that the space between the
pieces will be filled with grout, not glue.
8/3/2019 Ceramics and Mosaics Craft (Middle Adulthood)
http://slidepdf.com/reader/full/ceramics-and-mosaics-craft-middle-adulthood 10/27
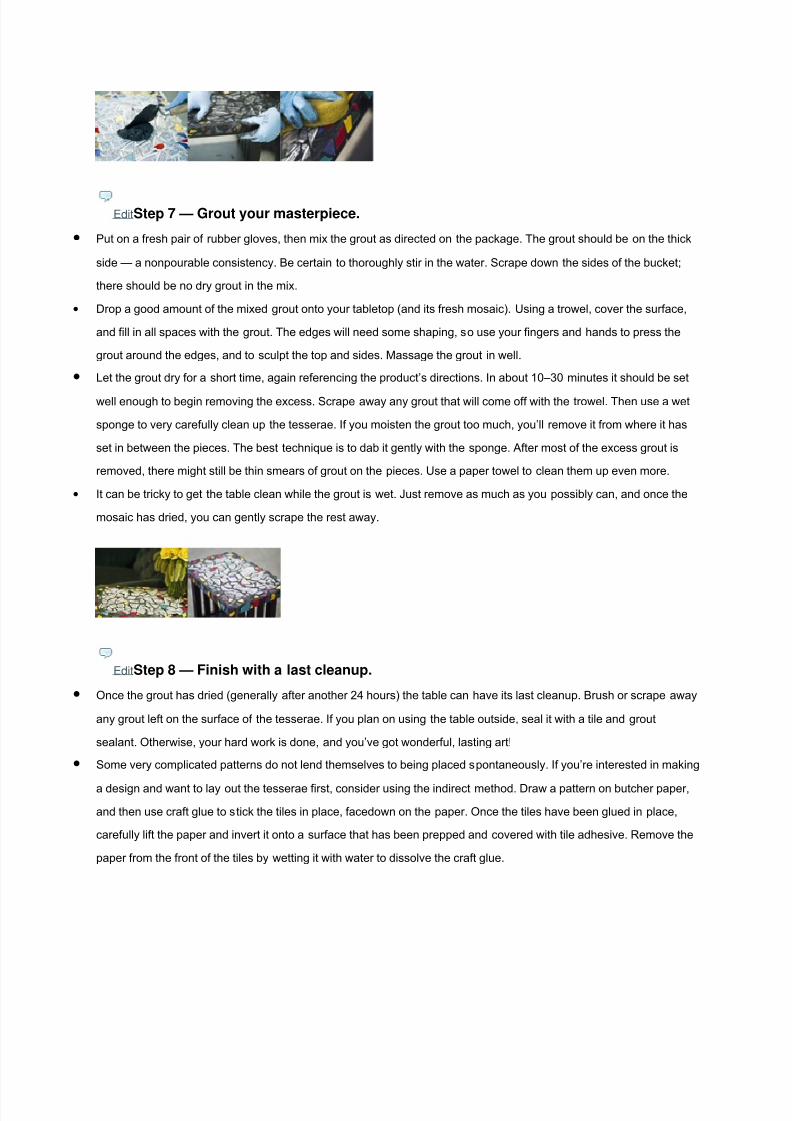
EditStep 7 — Grout your masterpiece.
• Put on a fresh pair of rubber gloves, then mix the grout as directed on the package. The grout should be on the thick
side — a nonpourable consistency. Be certain to thoroughly stir in the water. Scrape down the sides of the bucket;
there should be no dry grout in the mix.
• Drop a good amount of the mixed grout onto your tabletop (and its fresh mosaic). Using a trowel, cover the surface,
and fill in all spaces with the grout. The edges will need some shaping, so use your fingers and hands to press the
grout around the edges, and to sculpt the top and sides. Massage the grout in well.
• Let the grout dry for a short time, again referencing the product’s directions. In about 10–30 minutes it should be set
well enough to begin removing the excess. Scrape away any grout that will come off with the trowel. Then use a wet
sponge to very carefully clean up the tesserae. If you moisten the grout too much, you’ll remove it from where it has
set in between the pieces. The best technique is to dab it gently with the sponge. After most of the excess grout is
removed, there might still be thin smears of grout on the pieces. Use a paper towel to clean them up even more.
• It can be tricky to get the table clean while the grout is wet. Just remove as much as you possibly can, and once the
mosaic has dried, you can gently scrape the rest away.
EditStep 8 — Finish with a last cleanup.
• Once the grout has dried (generally after another 24 hours) the table can have its last cleanup. Brush or scrape away
any grout left on the surface of the tesserae. If you plan on using the table outside, seal it with a tile and grout
sealant. Otherwise, your hard work is done, and you’ve got wonderful, lasting art!
• Some very complicated patterns do not lend themselves to being placed spontaneously. If you’re interested in making
a design and want to lay out the tesserae first, consider using the indirect method. Draw a pattern on butcher paper,
and then use craft glue to stick the tiles in place, facedown on the paper. Once the tiles have been glued in place,
carefully lift the paper and invert it onto a surface that has been prepped and covered with tile adhesive. Remove the
paper from the front of the tiles by wetting it with water to dissolve the craft glue.

8/3/2019 Ceramics and Mosaics Craft (Middle Adulthood)
http://slidepdf.com/reader/full/ceramics-and-mosaics-craft-middle-adulthood 11/27
Tile Mosaic Serving Tray
Materials
• A few leftover tiles
• Rimmed serving tray
• Tile cutter
• Hammer
• Tile adhesive
• Trowel
• Grout
• Rubber float
• Putty knife
The patterns chosen for a serving tray will vary depending on the size, shape, and colors of tiles
used as well as the size and shape of the tray. Crafters should start by selecting one tile or grouping
of tiles for the center and lay it out inside the tray without using adhesive. Next, they can measure
and study the remaining tiles determining how many to cut for the smaller pieces that will make arow around the central pattern. Finally, a fun method eliminating the need for exact measurement is
breaking the tiles up with a hammer and filling in the outer edges of the tray with the broken pieces.
It’s important to wear goggles when cutting tile to protect eyes from flying debris or dust.
for Laying a Tile Mosaic
1. Measure the tray and draw a line from top to bottom and side to side.
2. Use the trowel to coat the back of the tile for the center with adhesive and place on the tray.
3. Use the tile cutter to score and cut tiles to surround the central tile.
4. Lay out the next row to see if it looks right.
5. Apply adhesive and place in tray.
6. Smash tile with a hammer for the outer edges of the tray.
7. Spread adhesive with the trowel and place the broken tiles in a tight pattern that fills in the tray.
8. Scrape adhesive that has bulged from the cracks, and wipe it from the tiles’ surface.
9. Allow adhesive to dry according to the label’s directions.
Instructions for Finishing a Tile Mosaic with Grout
1. Be sure to wear rubber gloves for this part of the project.

8/3/2019 Ceramics and Mosaics Craft (Middle Adulthood)
http://slidepdf.com/reader/full/ceramics-and-mosaics-craft-middle-adulthood 12/27
2. Follow the instructions closely when mixing water and grout powder.
3. Hold back a little powder in case the mix is too watery.
4. The grout should be firm, but not crumbly. If crumbly, add a little water; if watery, add a little more powder.
5. Use a putty knife to dig out some grout and drop it on your project.
6. With the rubber float, push the grout into all the cracks.
7. Run the corner of the float along the cracks to even out the grout line.
8. Allow grout to harden, but not dry completely.
9. Before the grout dries, use a damp towel to wipe the film from the tiles.
10. When grout is dry, polish the tiles with a dry towel.
8/3/2019 Ceramics and Mosaics Craft (Middle Adulthood)
http://slidepdf.com/reader/full/ceramics-and-mosaics-craft-middle-adulthood 13/27
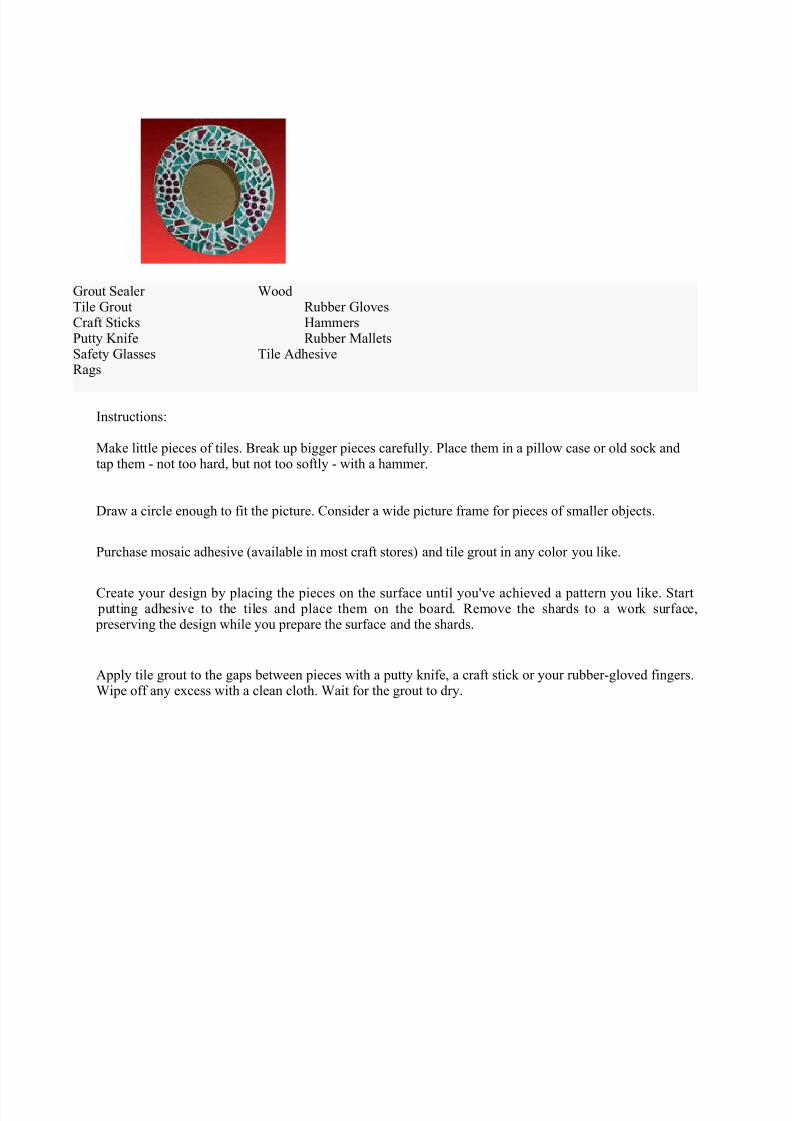
Grout Sealer WoodTile Grout Rubber GlovesCraft Sticks HammersPutty Knife Rubber MalletsSafety Glasses Tile AdhesiveRags
Instructions:
Make little pieces of tiles. Break up bigger pieces carefully. Place them in a pillow case or old sock andtap them - not too hard, but not too softly - with a hammer.
Draw a circle enough to fit the picture. Consider a wide picture frame for pieces of smaller objects.
Purchase mosaic adhesive (available in most craft stores) and tile grout in any color you like.
Create your design by placing the pieces on the surface until you've achieved a pattern you like. Start putting adhesive to the tiles and place them on the board. Remove the shards to a work surface, preserving the design while you prepare the surface and the shards.
Apply tile grout to the gaps between pieces with a putty knife, a craft stick or your rubber-gloved fingers.Wipe off any excess with a clean cloth. Wait for the grout to dry.
8/3/2019 Ceramics and Mosaics Craft (Middle Adulthood)
http://slidepdf.com/reader/full/ceramics-and-mosaics-craft-middle-adulthood 14/27
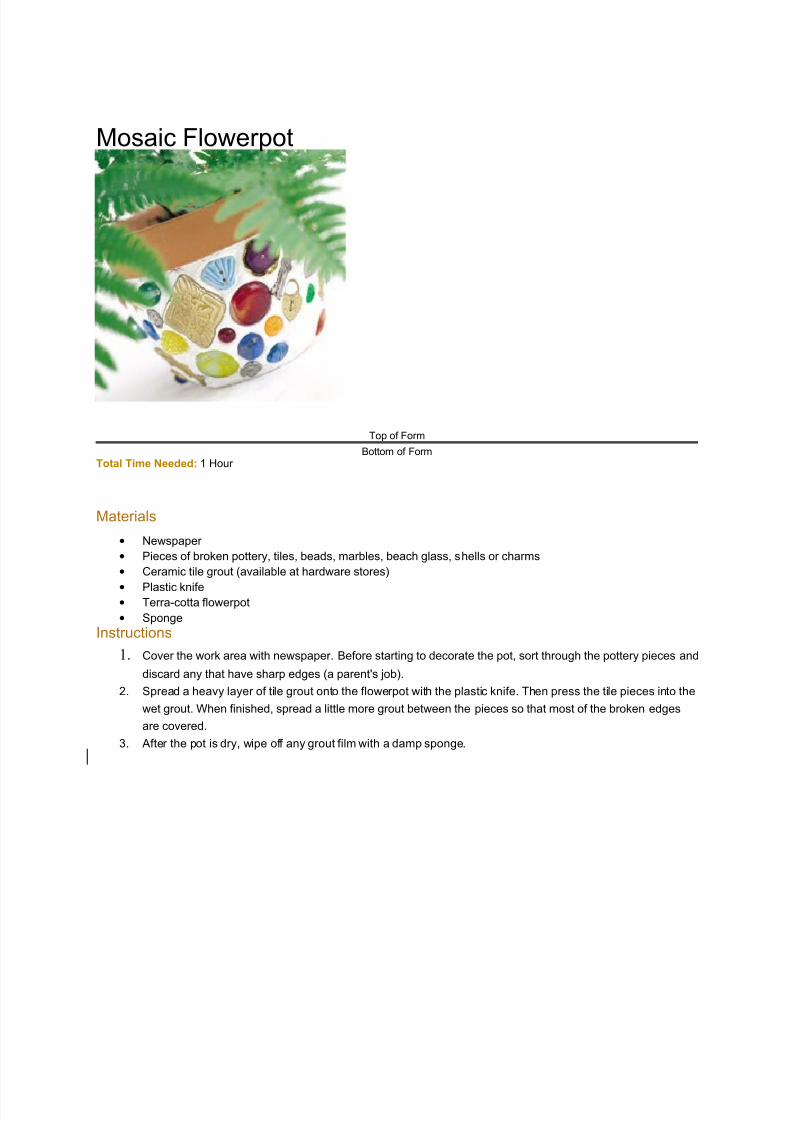
Mosaic Flowerpot
Top of Form
Bottom of Form
Total Time Needed: 1 Hour
Materials
• Newspaper
• Pieces of broken pottery, tiles, beads, marbles, beach glass, shells or charms
• Ceramic tile grout (available at hardware stores)
•Plastic knife
• Terra-cotta flowerpot
• Sponge
Instructions
1. Cover the work area with newspaper. Before starting to decorate the pot, sort through the pottery pieces and
discard any that have sharp edges (a parent's job).
2. Spread a heavy layer of tile grout onto the flowerpot with the plastic knife. Then press the tile pieces into the
wet grout. When finished, spread a little more grout between the pieces so that most of the broken edges
are covered.
3. After the pot is dry, wipe off any grout film with a damp sponge.

8/3/2019 Ceramics and Mosaics Craft (Middle Adulthood)
http://slidepdf.com/reader/full/ceramics-and-mosaics-craft-middle-adulthood 15/27
Pebble Mosaic
You've probably seen magnificent mosaic decorations made from glass and stone in a church or museum. Now you
can make your own pebble mosaic !
©2007 Publications International, Ltd.
Make a pebble mosaic.
What You'll Need:
• Plywood or particle board
• Craft glue or tile grout
• A variety of pebbles
Step 1: First collect lots of pretty pebbles in different colors and shapes to use to make your mosaic.
Step 2: If you like, first use a pencil to draw a design on a piece of plywood.
Step 3: Glue the pebbles on the design. Or, spread the plywood with grout, and push the pebbles into the grout.
A pebble mosaic makes a good trivet to use for holding hot pots. You can also make pebble mosaics to decorate
flower pots, vases, or lamps. What else could you decorate with pebbles?
8/3/2019 Ceramics and Mosaics Craft (Middle Adulthood)
http://slidepdf.com/reader/full/ceramics-and-mosaics-craft-middle-adulthood 16/27
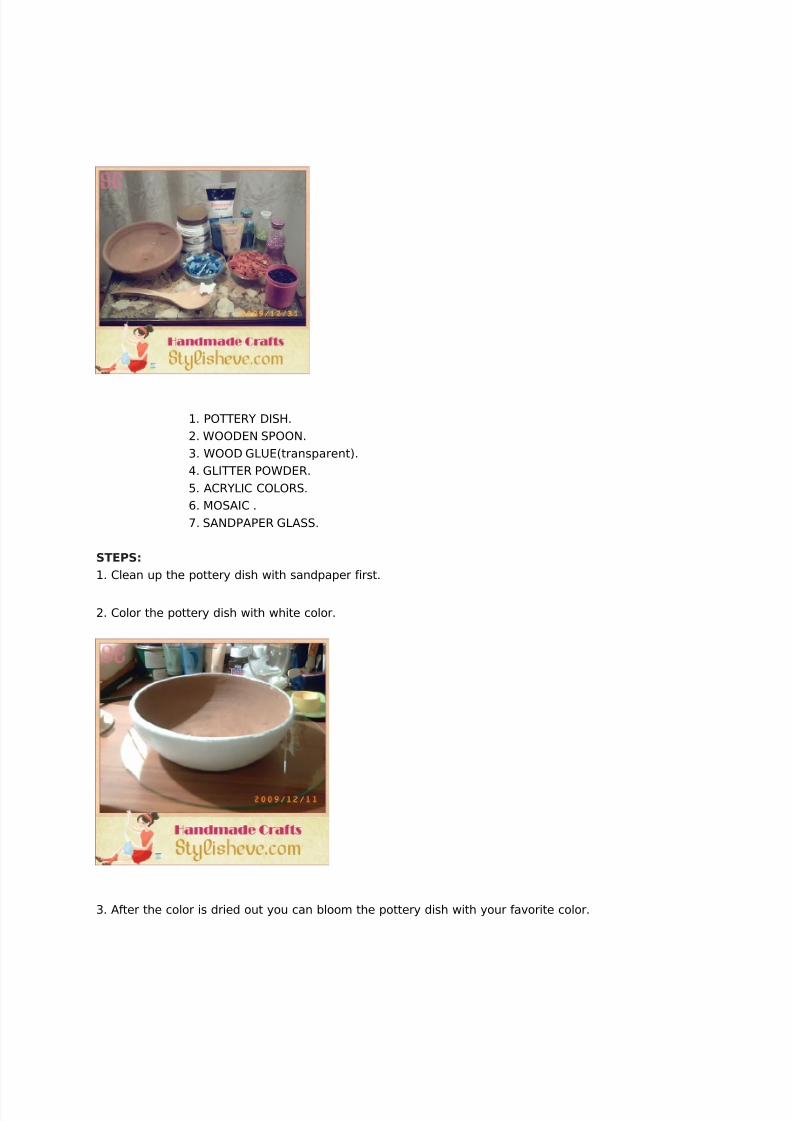
1. POTTERY DISH.
2. WOODEN SPOON.
3. WOOD GLUE(transparent).
4. GLITTER POWDER.
5. ACRYLIC COLORS.
6. MOSAIC .
7. SANDPAPER GLASS.
STEPS:
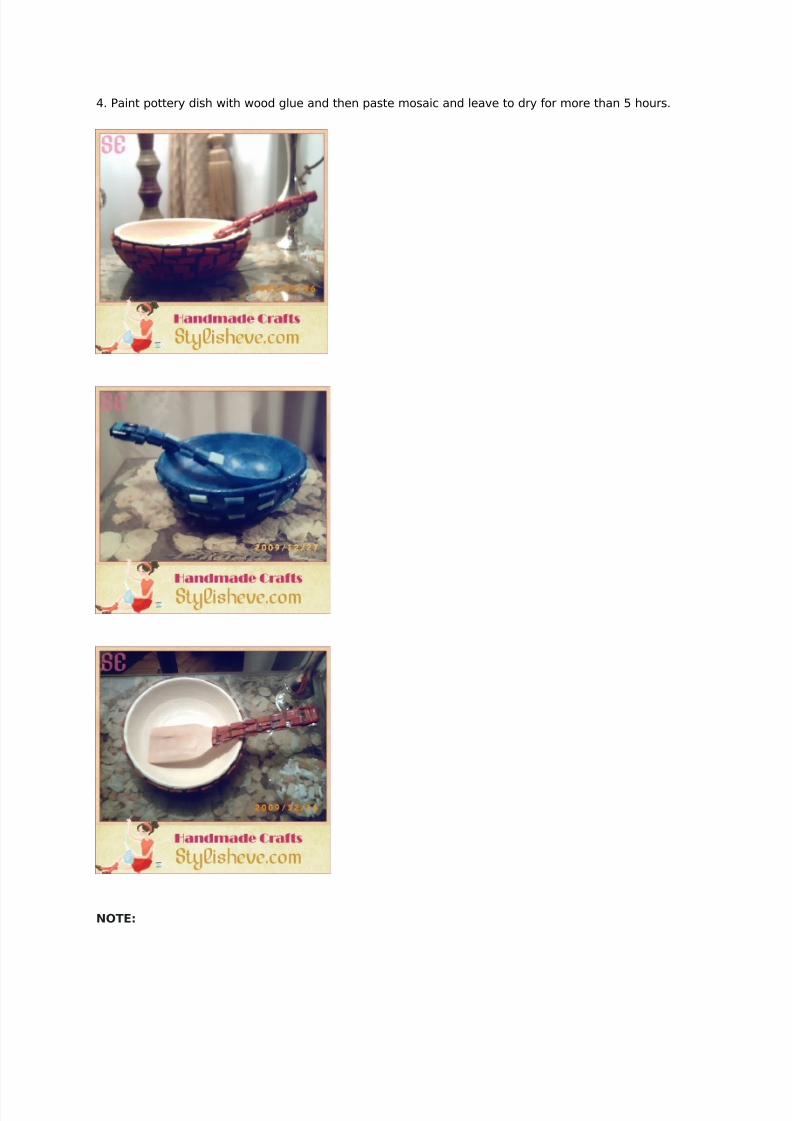
1. Clean up the pottery dish with sandpaper first.
2. Color the pottery dish with white color.
3. After the color is dried out you can bloom the pottery dish with your favorite color.
8/3/2019 Ceramics and Mosaics Craft (Middle Adulthood)
http://slidepdf.com/reader/full/ceramics-and-mosaics-craft-middle-adulthood 17/27
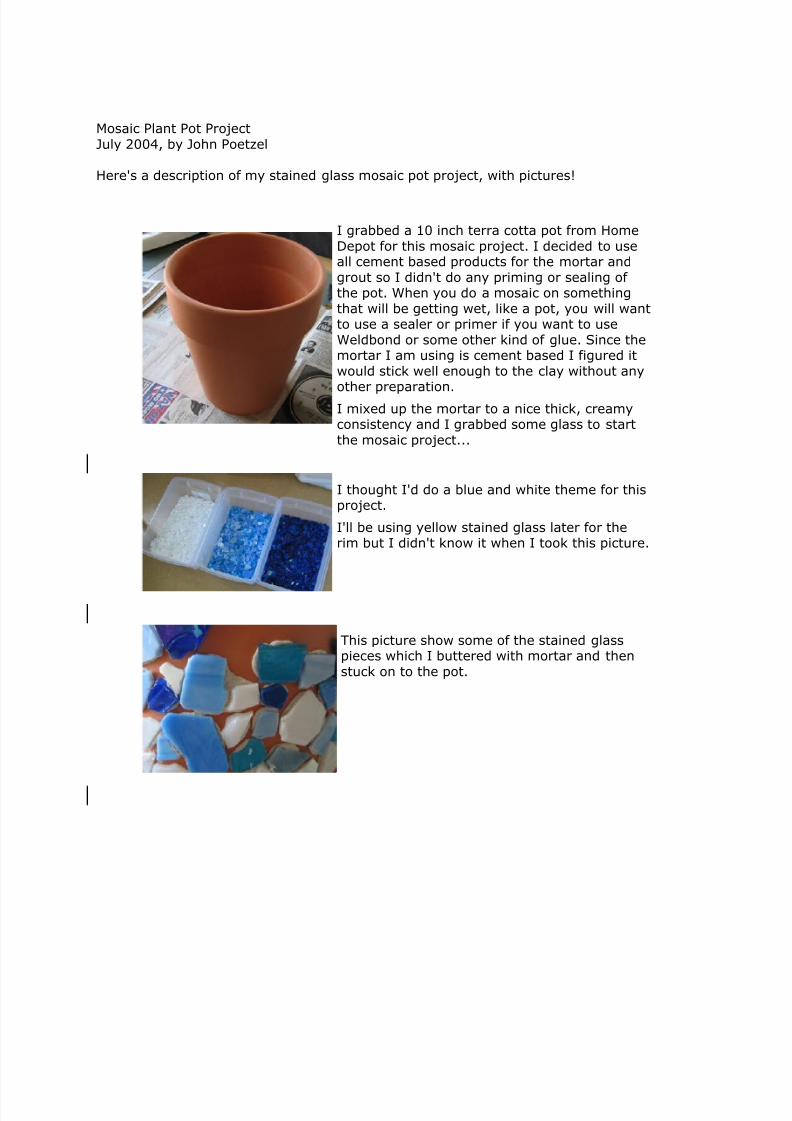
4. Paint pottery dish with wood glue and then paste mosaic and leave to dry for more than 5 hours.
NOTE:

8/3/2019 Ceramics and Mosaics Craft (Middle Adulthood)
http://slidepdf.com/reader/full/ceramics-and-mosaics-craft-middle-adulthood 18/27
You can replace mosaic and put glitter powder in step4
8/3/2019 Ceramics and Mosaics Craft (Middle Adulthood)
http://slidepdf.com/reader/full/ceramics-and-mosaics-craft-middle-adulthood 19/27
Mosaic Plant Pot Project
July 2004, by John Poetzel
Here's a description of my stained glass mosaic pot project, with pictures!
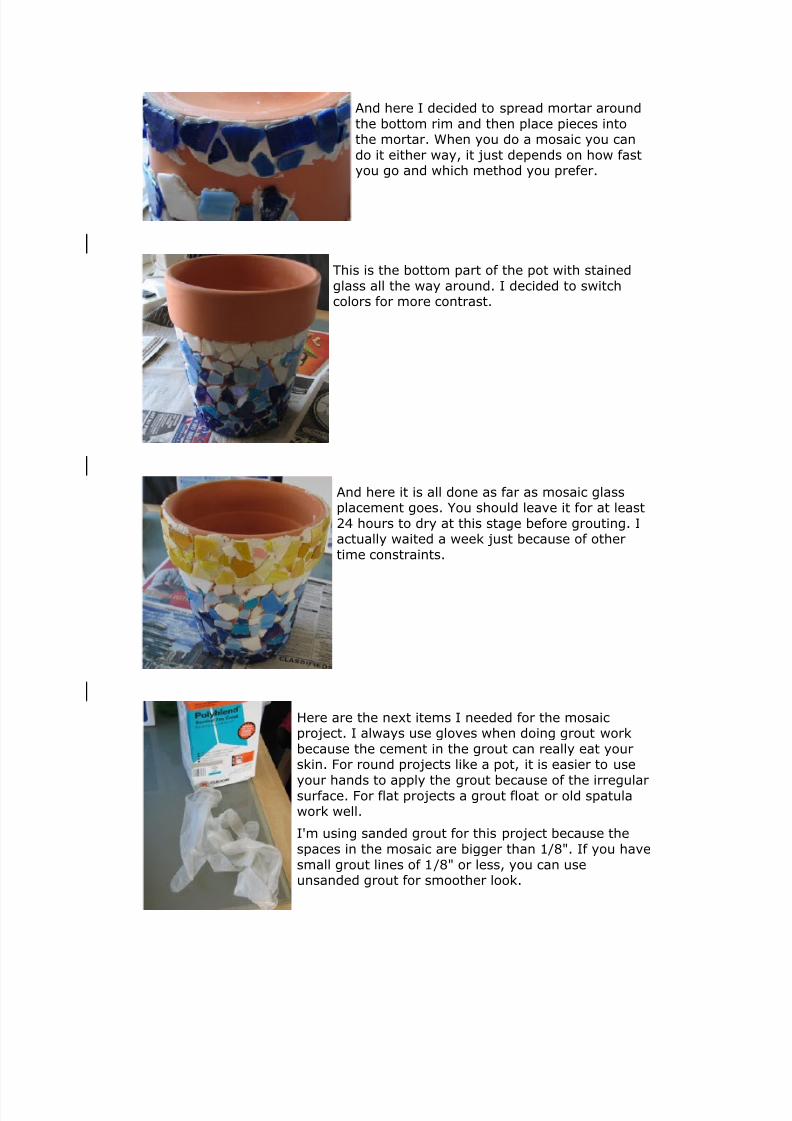
I grabbed a 10 inch terra cotta pot from Home
Depot for this mosaic project. I decided to useall cement based products for the mortar and
grout so I didn't do any priming or sealing of the pot. When you do a mosaic on something
that will be getting wet, like a pot, you will wantto use a sealer or primer if you want to use
Weldbond or some other kind of glue. Since themortar I am using is cement based I figured it
would stick well enough to the clay without any
other preparation.I mixed up the mortar to a nice thick, creamyconsistency and I grabbed some glass to start
the mosaic project...
I thought I'd do a blue and white theme for thisproject.
I'll be using yellow stained glass later for therim but I didn't know it when I took this picture.
This picture show some of the stained glasspieces which I buttered with mortar and then
stuck on to the pot.
8/3/2019 Ceramics and Mosaics Craft (Middle Adulthood)
http://slidepdf.com/reader/full/ceramics-and-mosaics-craft-middle-adulthood 20/27
And here I decided to spread mortar around
the bottom rim and then place pieces intothe mortar. When you do a mosaic you can
do it either way, it just depends on how fastyou go and which method you prefer.
This is the bottom part of the pot with stained
glass all the way around. I decided to switchcolors for more contrast.
And here it is all done as far as mosaic glassplacement goes. You should leave it for at least
24 hours to dry at this stage before grouting. Iactually waited a week just because of other
time constraints.
Here are the next items I needed for the mosaicproject. I always use gloves when doing grout work
because the cement in the grout can really eat yourskin. For round projects like a pot, it is easier to use
your hands to apply the grout because of the irregularsurface. For flat projects a grout float or old spatulawork well.
I'm using sanded grout for this project because the
spaces in the mosaic are bigger than 1/8". If you have
small grout lines of 1/8" or less, you can useunsanded grout for smoother look.
8/3/2019 Ceramics and Mosaics Craft (Middle Adulthood)
http://slidepdf.com/reader/full/ceramics-and-mosaics-craft-middle-adulthood 21/27
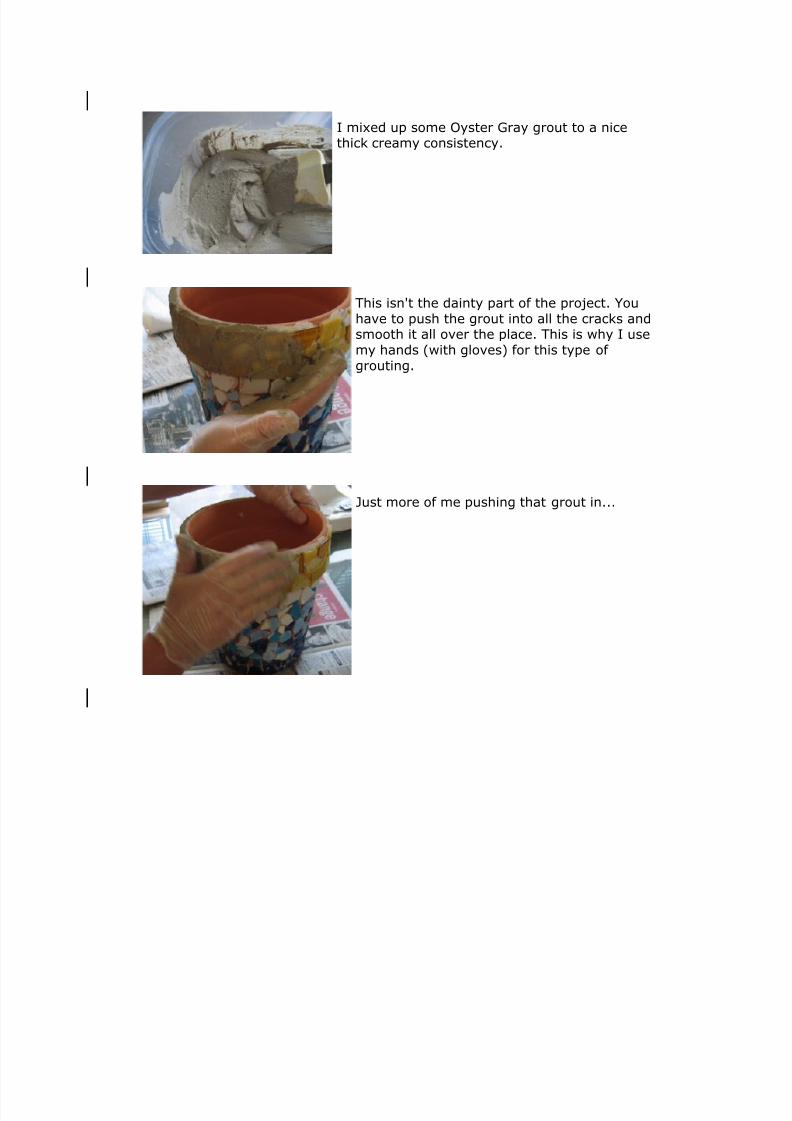
I mixed up some Oyster Gray grout to a nicethick creamy consistency.
This isn't the dainty part of the project. You
have to push the grout into all the cracks andsmooth it all over the place. This is why I use
my hands (with gloves) for this type of
grouting.
Just more of me pushing that grout in...
8/3/2019 Ceramics and Mosaics Craft (Middle Adulthood)
http://slidepdf.com/reader/full/ceramics-and-mosaics-craft-middle-adulthood 22/27
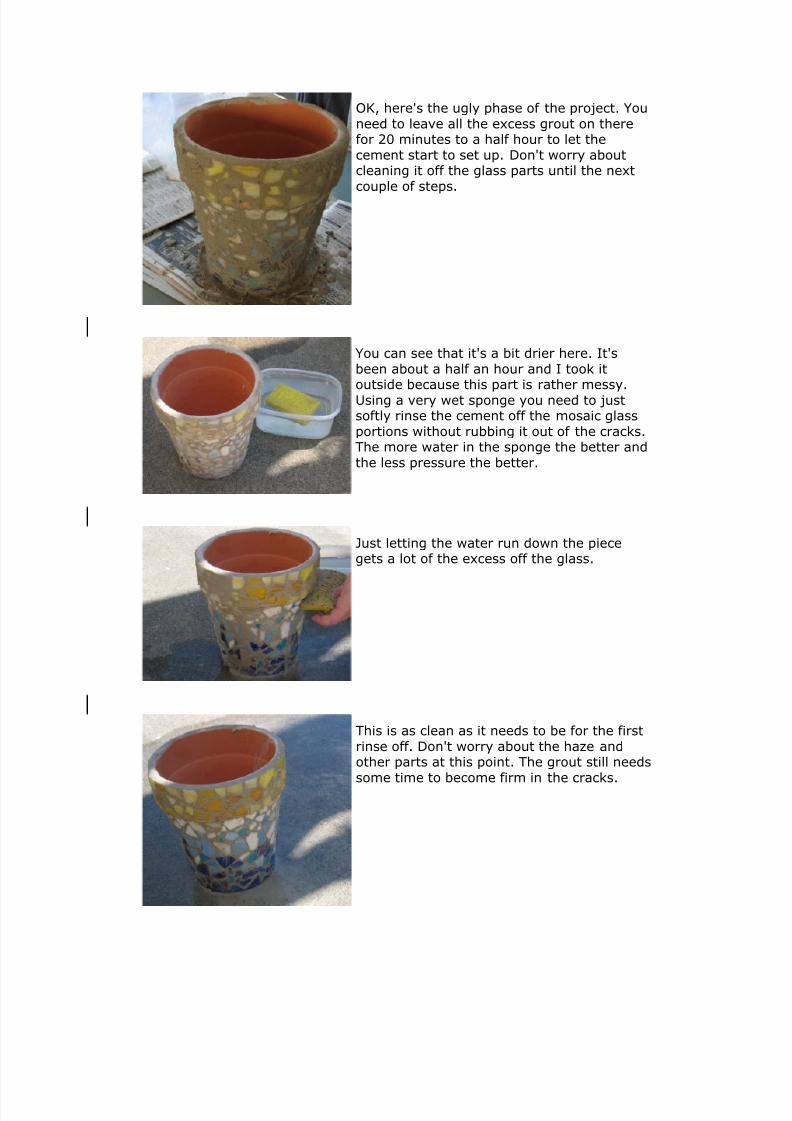
OK, here's the ugly phase of the project. You
need to leave all the excess grout on therefor 20 minutes to a half hour to let the
cement start to set up. Don't worry aboutcleaning it off the glass parts until the next
couple of steps.
You can see that it's a bit drier here. It's
been about a half an hour and I took itoutside because this part is rather messy.
Using a very wet sponge you need to justsoftly rinse the cement off the mosaic glass
portions without rubbing it out of the cracks.The more water in the sponge the better and
the less pressure the better.
Just letting the water run down the piecegets a lot of the excess off the glass.
This is as clean as it needs to be for the first
rinse off. Don't worry about the haze andother parts at this point. The grout still needs
some time to become firm in the cracks.
8/3/2019 Ceramics and Mosaics Craft (Middle Adulthood)
http://slidepdf.com/reader/full/ceramics-and-mosaics-craft-middle-adulthood 23/27
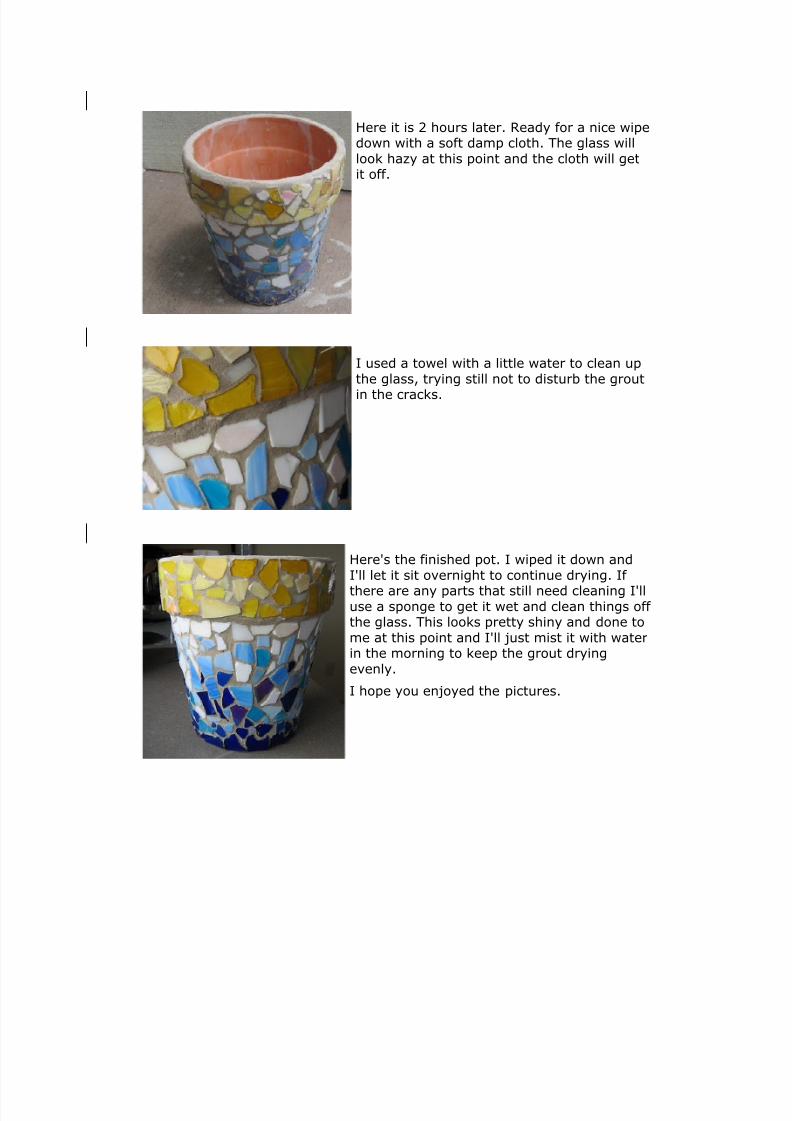
Here it is 2 hours later. Ready for a nice wipedown with a soft damp cloth. The glass will
look hazy at this point and the cloth will getit off.
I used a towel with a little water to clean up
the glass, trying still not to disturb the grout
in the cracks.
Here's the finished pot. I wiped it down and
I'll let it sit overnight to continue drying. If
there are any parts that still need cleaning I'lluse a sponge to get it wet and clean things off the glass. This looks pretty shiny and done to
me at this point and I'll just mist it with waterin the morning to keep the grout drying
evenly.
I hope you enjoyed the pictures.
8/3/2019 Ceramics and Mosaics Craft (Middle Adulthood)
http://slidepdf.com/reader/full/ceramics-and-mosaics-craft-middle-adulthood 24/27
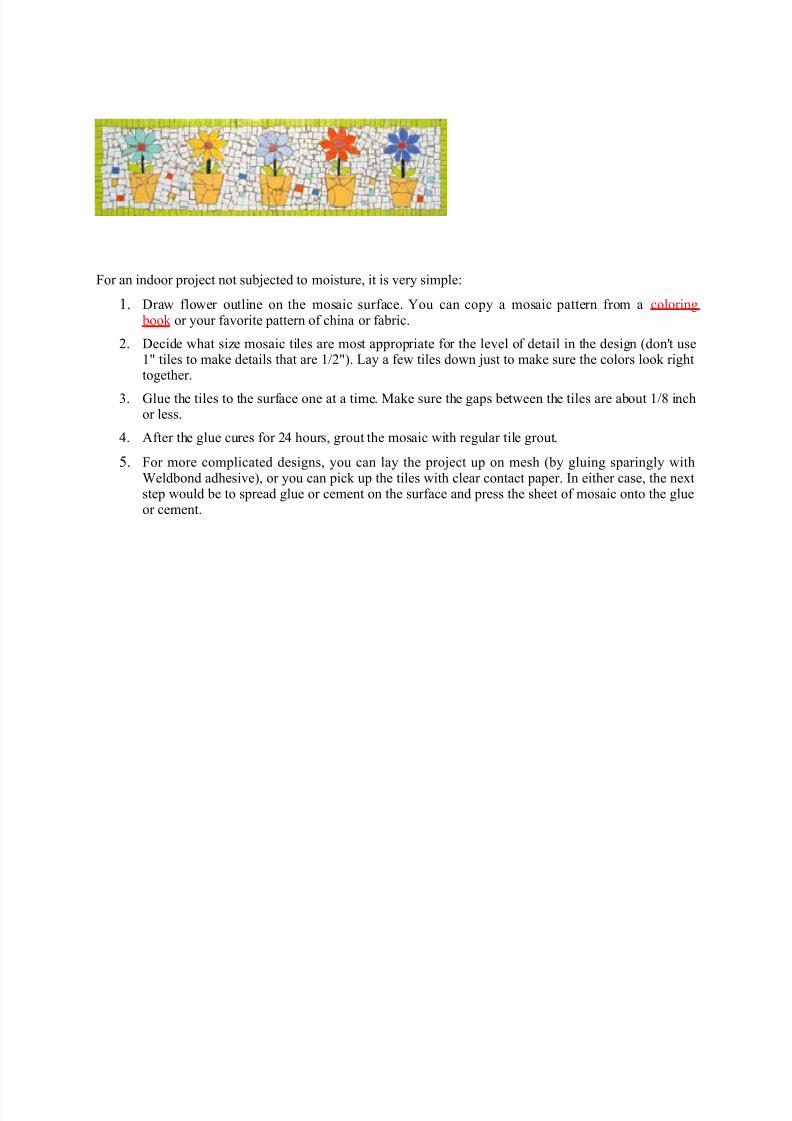
For an indoor project not subjected to moisture, it is very simple:
1. Draw flower outline on the mosaic surface. You can copy a mosaic pattern from a coloring book or your favorite pattern of china or fabric.
2. Decide what size mosaic tiles are most appropriate for the level of detail in the design (don't use1" tiles to make details that are 1/2"). Lay a few tiles down just to make sure the colors look righttogether.
3. Glue the tiles to the surface one at a time. Make sure the gaps between the tiles are about 1/8 inchor less.
4. After the glue cures for 24 hours, grout the mosaic with regular tile grout.
5. For more complicated designs, you can lay the project up on mesh (by gluing sparingly withWeldbond adhesive), or you can pick up the tiles with clear contact paper. In either case, the nextstep would be to spread glue or cement on the surface and press the sheet of mosaic onto the glueor cement.
8/3/2019 Ceramics and Mosaics Craft (Middle Adulthood)
http://slidepdf.com/reader/full/ceramics-and-mosaics-craft-middle-adulthood 25/27
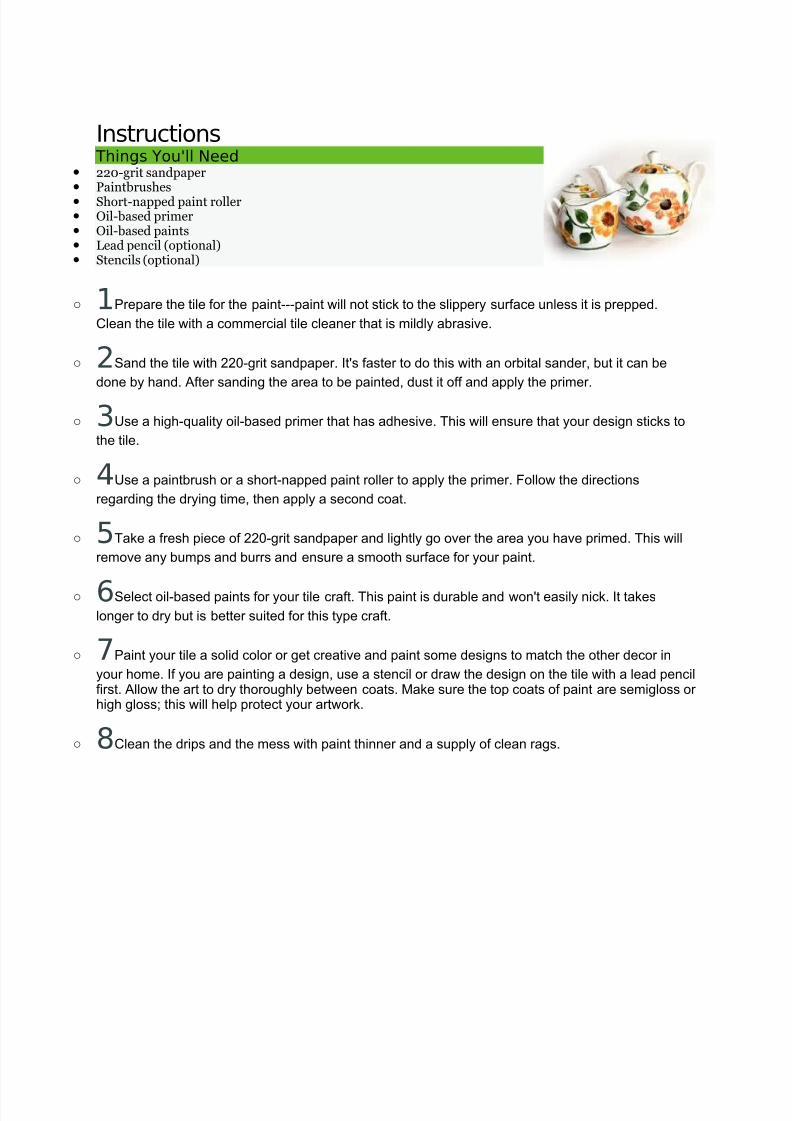
Instructions Things You'll Need
• 220-grit sandpaper• Paintbrushes• Short-napped paint roller• Oil-based primer• Oil-based paints• Lead pencil (optional)• Stencils (optional)
○ 1Prepare the tile for the paint---paint will not stick to the slippery surface unless it is prepped.
Clean the tile with a commercial tile cleaner that is mildly abrasive.
○ 2Sand the tile with 220-grit sandpaper. It's faster to do this with an orbital sander, but it can be
done by hand. After sanding the area to be painted, dust it off and apply the primer.
○ 3Use a high-quality oil-based primer that has adhesive. This will ensure that your design sticks to
the tile.
○ 4Use a paintbrush or a short-napped paint roller to apply the primer. Follow the directions
regarding the drying time, then apply a second coat.
○ 5Take a fresh piece of 220-grit sandpaper and lightly go over the area you have primed. This will
remove any bumps and burrs and ensure a smooth surface for your paint.
○ 6Select oil-based paints for your tile craft. This paint is durable and won't easily nick. It takes
longer to dry but is better suited for this type craft.
○ 7Paint your tile a solid color or get creative and paint some designs to match the other decor in
your home. If you are painting a design, use a stencil or draw the design on the tile with a lead pencilfirst. Allow the art to dry thoroughly between coats. Make sure the top coats of paint are semigloss or high gloss; this will help protect your artwork.
○ 8Clean the drips and the mess with paint thinner and a supply of clean rags.
8/3/2019 Ceramics and Mosaics Craft (Middle Adulthood)
http://slidepdf.com/reader/full/ceramics-and-mosaics-craft-middle-adulthood 26/27
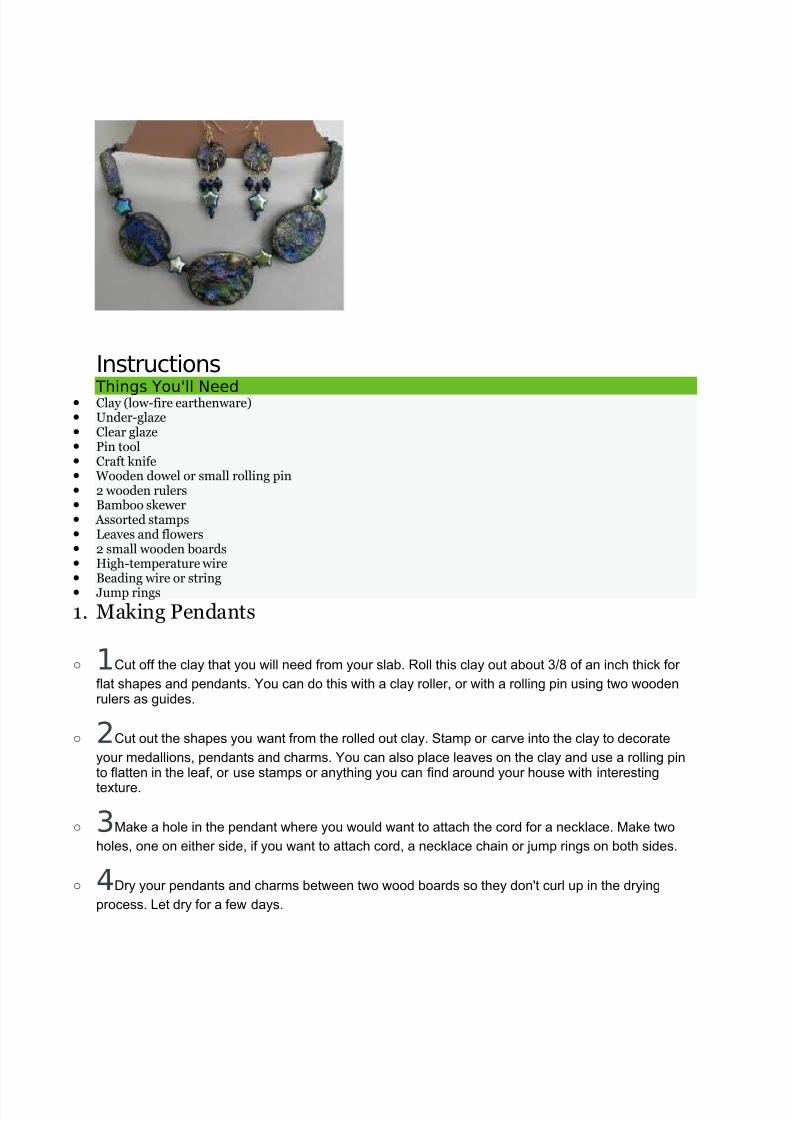
Instructions
Things You'll Need• Clay (low-fire earthenware)• Under-glaze• Clear glaze• Pin tool• Craft knife• Wooden dowel or small rolling pin• 2 wooden rulers• Bamboo skewer• Assorted stamps• Leaves and flowers• 2 small wooden boards• High-temperature wire• Beading wire or string• Jump rings
1. Making Pendants
○ 1Cut off the clay that you will need from your slab. Roll this clay out about 3/8 of an inch thick for
flat shapes and pendants. You can do this with a clay roller, or with a rolling pin using two woodenrulers as guides.
○ 2Cut out the shapes you want from the rolled out clay. Stamp or carve into the clay to decorate
your medallions, pendants and charms. You can also place leaves on the clay and use a rolling pinto flatten in the leaf, or use stamps or anything you can find around your house with interesting
texture.
○ 3Make a hole in the pendant where you would want to attach the cord for a necklace. Make two
holes, one on either side, if you want to attach cord, a necklace chain or jump rings on both sides.
○ 4Dry your pendants and charms between two wood boards so they don't curl up in the drying
process. Let dry for a few days.
8/3/2019 Ceramics and Mosaics Craft (Middle Adulthood)
http://slidepdf.com/reader/full/ceramics-and-mosaics-craft-middle-adulthood 27/27
2. Making Beads
○ 1Roll clay in long thing coils (or snakes) to the thickness that you want your bead to be. If you want
to imprint a pattern onto the beads, roll the coil into something with texture or draw designs with a
pin.
○ 2Cut the beads to the size you want them to be using a pin tool or craft knife.
○ 3Make a hole in the center of the bead with a bamboo skewer.
○ 4Place all beads on a wooden board and cover lightly with a piece of plastic. Let dry for a few
days.
3. Firing, Glazing and Using
○ 1Fire the beads and pendants in a kiln.
○ 2Paint the beads and pendants with underglaze. Let them dry well before painting with or dipping
in clear glaze, making sure to keep the holes free of glaze.
○ 3String the glazed beads on high-temperature wire to fire a second time. (Many ceramic artists
create a small ceramic structure with high temperature wire sticking out of it and use this to fire their beads every time). Fire flat ceramic pendants on kiln stilts so that they do not stick to the kilnshelves.
○ 4String the beads and pendants onto beading wire or string to create a basic necklace or bracelet.
Combine them with other beads, attach them to one another with jump rings or combine them withany other type of jewelry-making technique to create one-of-a-kind ceramic accessories.
Related Documents