© CedCommerce. All rights reserved. [email protected] [Multi-Vendor Marketplace] CedCommerce Multi-Vendor Marketplace is a powerful module for Magento 2 E-commerce platform, which will convert your online store into a rich featured Multi seller shopping mall. Multiple vendors can come across one platform and start their online shop in just a few simple steps. CedCommerce Multi- Vendor Marketplace fulfills most of the needs of the vendors/admin/customers and includes all the features which are required in a marketplace extension.

Welcome message from author
This document is posted to help you gain knowledge. Please leave a comment to let me know what you think about it! Share it to your friends and learn new things together.
Transcript
© CedCommerce. All rights reserved.
[Multi-Vendor Marketplace] CedCommerce Multi-Vendor Marketplace is a powerful module for Magento 2 E-commerce platform, which will convert your online store into a rich featured Multi seller shopping mall. Multiple vendors can come across one platform and start their online shop in just a few simple steps. CedCommerce Multi-Vendor Marketplace fulfills most of the needs of the vendors/admin/customers and includes all the features which are required in a marketplace extension.
© CedCommerce. All Rights Reserved.
1
Multi-Vendor Marketplace
Vendor User Manual
Version - 2.0
© CedCommerce. All Rights Reserved.
2
Table of Contents I. Overview ............................................................................................................................................... 4
II. Become Vendor ..................................................................................................................................... 4
III. Vendor Panel ..................................................................................................................................... 8
1) Dashboard Page ................................................................................................................................ 9
a) Total Pending Amount .................................................................................................................. 9
b) Total Earned Amount .................................................................................................................. 11
c) Total Orders Placed ..................................................................................................................... 11
d) Total Product Sold ....................................................................................................................... 11
e) Pending Products ........................................................................................................................ 11
f) Approved Products ..................................................................................................................... 11
g) Disapproved Products ................................................................................................................. 11
h) Sales Analytic Graph.................................................................................................................... 11
i) Latest Orders ............................................................................................................................... 11
j) Country Wise Order .................................................................................................................... 12
2) Vendor Navigation Panel ................................................................................................................ 12
3) Vendor Profile Page ........................................................................................................................ 14
a) Public Name ................................................................................................................................ 15
b) Name ........................................................................................................................................... 16
c) Gender ........................................................................................................................................ 16
d) Profile Logo ................................................................................................................................. 16
e) Contact Number .......................................................................................................................... 16
f) Company Name ........................................................................................................................... 16
g) Company Logo............................................................................................................................. 16
h) About ........................................................................................................................................... 16
i) Company Banner ......................................................................................................................... 16
j) Support Name / Email ................................................................................................................. 16
k) Company Address ....................................................................................................................... 16
4) New Product ................................................................................................................................... 16
a) Simple Product ............................................................................................................................ 17
© CedCommerce. All Rights Reserved.
3
b) Downloadable Product ............................................................................................................... 19
c) Virtual Product ............................................................................................................................ 21
5) Manage Products ............................................................................................................................ 21
a) Id ................................................................................................................................................. 22
b) Product Image ............................................................................................................................. 22
c) Product Name ............................................................................................................................. 22
d) Product Type ............................................................................................................................... 22
e) Status .......................................................................................................................................... 22
f) Price ............................................................................................................................................ 22
g) Quantity ...................................................................................................................................... 22
h) Action .......................................................................................................................................... 22
6) Manage Orders ............................................................................................................................... 23
a) Order Grid ................................................................................................................................... 23
b) Order View .................................................................................................................................. 23
c) Order Export ............................................................................................................................... 25
7) Transactions .................................................................................................................................... 25
a) Transaction Statistics .................................................................................................................. 26
b) Transaction List ........................................................................................................................... 26
c) Transaction View ......................................................................................................................... 27
8) Reports ............................................................................................................................................ 28
a) Order Reports ................................................................................................................................. 28
b) Product Reports .............................................................................................................................. 29
9) Settings ............................................................................................................................................ 29
a) Check/Money Order ................................................................................................................... 31
b) Paypal .......................................................................................................................................... 31
c) Bank Transfer .............................................................................................................................. 31
IV. Support................................................................................................................................................ 31
© CedCommerce. All Rights Reserved.
4
Overview CedCommerce Multi-Vendor Marketplace is a very powerful and rich featured open source
extension for Magento 2 E-Commerce platform which converts your online store into a Multi
Seller/Multi Vendor shopping platform, where the sellers get a very popular platform to sell
their products and also get to reach to a vast number of customers. Administrator will have
enormous number of features from where he can control the flow of the marketplace.
Vendors can create their shops in the main CedCommerce Multi-Vendor Marketplace and they
can control their store by the easy to handle dashboard. Vendor has the ability to add products
from his vendor panel, manage his products, see the orders placed in respect to his products,
see the transactions or commission paid by the admin to the vendor and also see the analysis
reports of the performance of his store.
Customers can come to the platform and they are able to see the products provided by
different sellers. So here the customers will have a feature of getting the product at a
competitive price by different sellers. Customers can place the orders for multiple vendors’
products. All the payments will be received by the admin and then the admin can transfer the
amount of commission to the respective vendors.
Become Vendor CedCommerce Multi-Vendor Marketplace extension is a feature rich extension for vendors.
Vendors can add their products on the site and those products can be reviewed by the admin.
After the review, if the admin thinks that the product is fulfilling all the policies of his store then
he can approve that product and that product will be available for sale on the site.
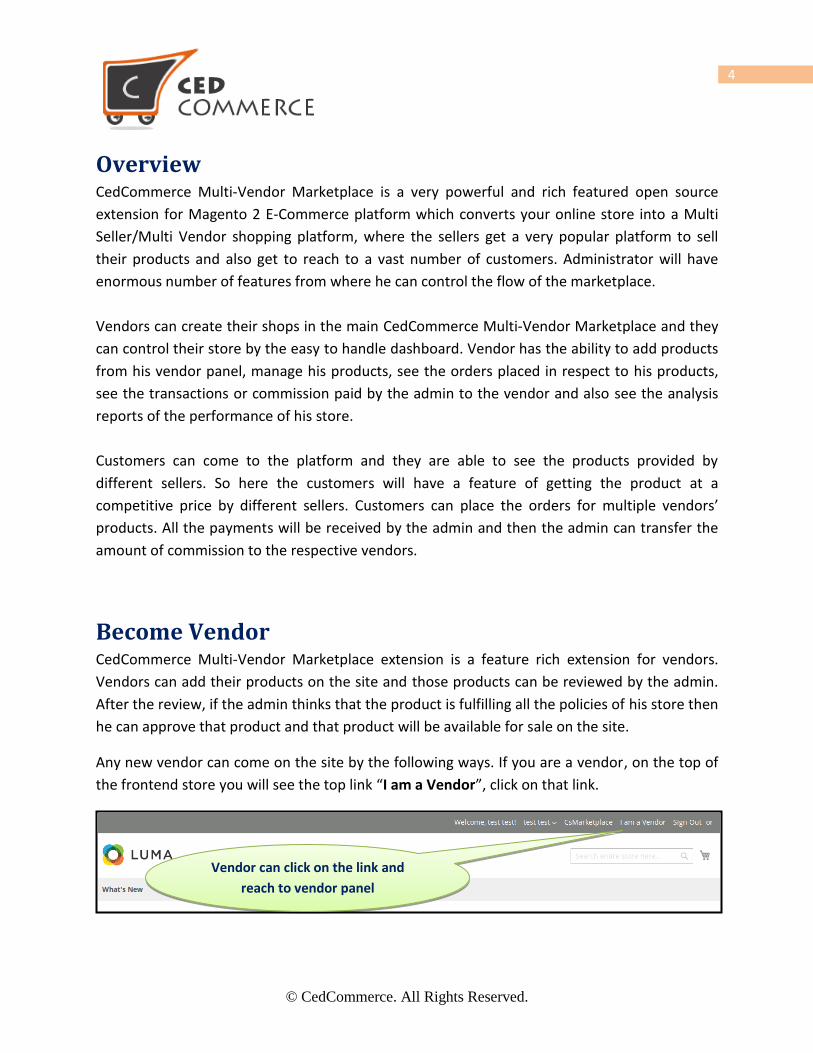
Any new vendor can come on the site by the following ways. If you are a vendor, on the top of
the frontend store you will see the top link “I am a Vendor”, click on that link.
Vendor can click on the link and
reach to vendor panel
© CedCommerce. All Rights Reserved.
5
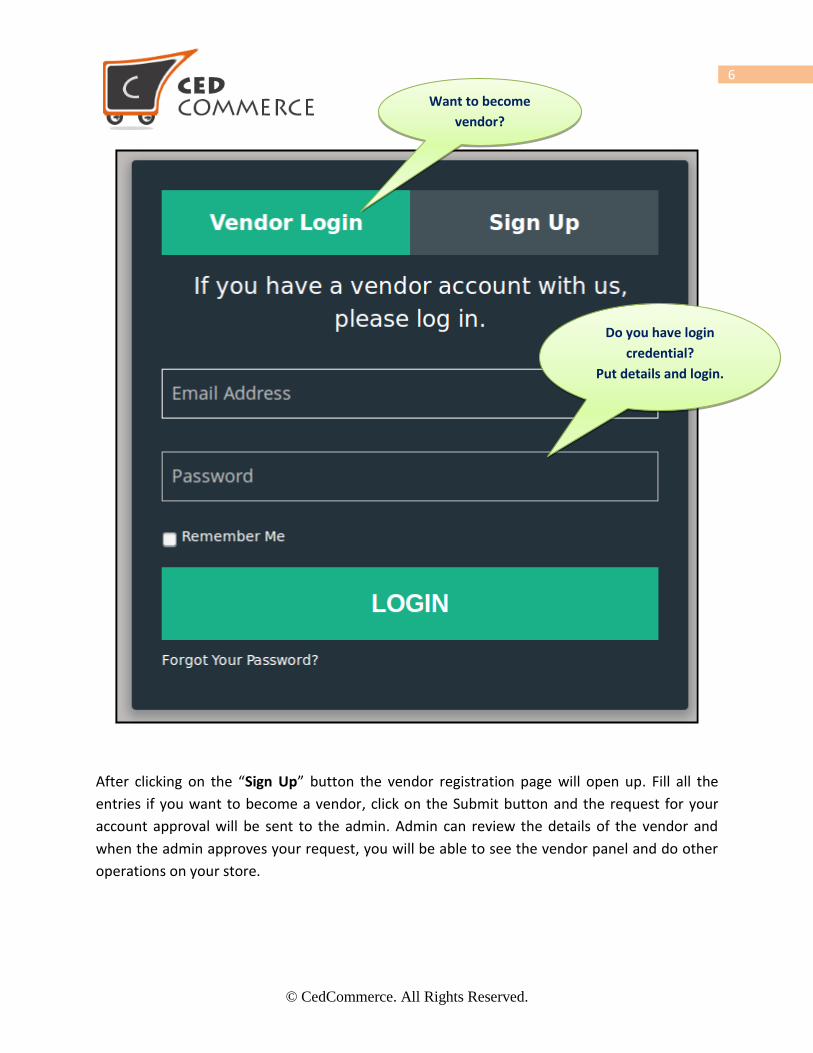
If the vendor clicks on the “I am a vendor” link and is in the login state then he will be
redirected to the vendor panel. If the vendor is not logged in then he will be redirected to the
login/registration page. If you are an existing vendor, just put your login credentials in the login
form and go to the vendor panel. If you want to become a new vendor, click on the “Sign Up”
button shown in the below image.
© CedCommerce. All Rights Reserved.
6
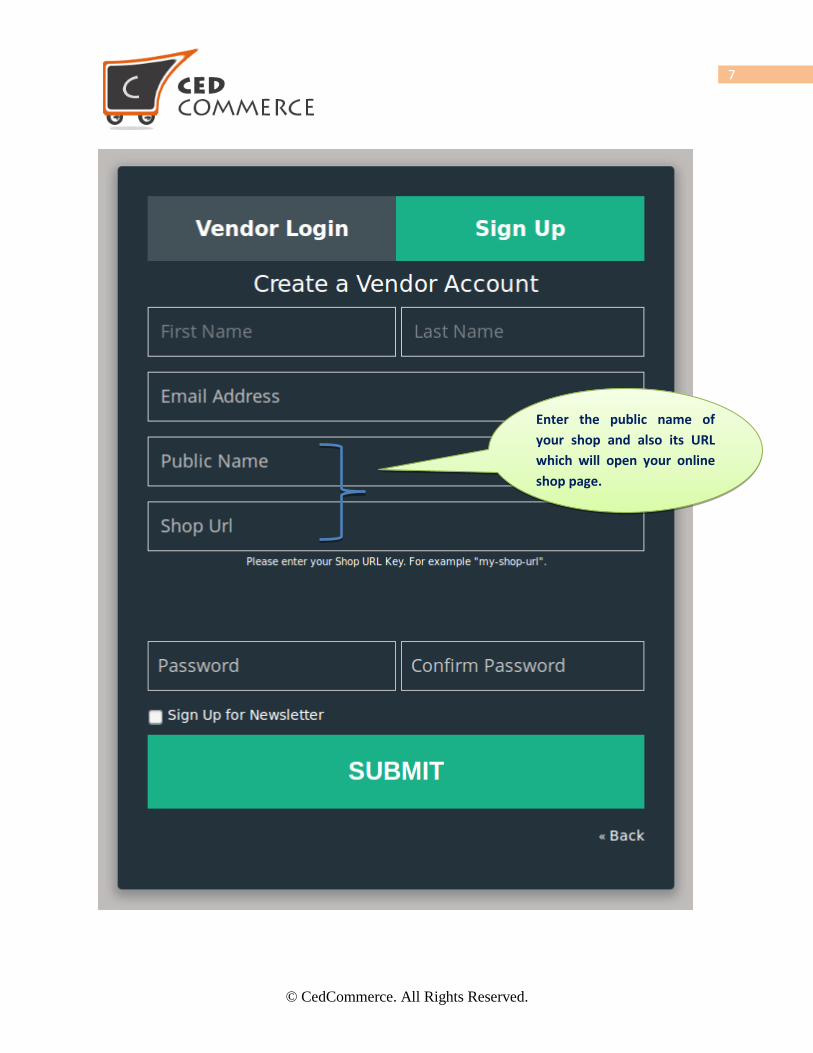
After clicking on the “Sign Up” button the vendor registration page will open up. Fill all the
entries if you want to become a vendor, click on the Submit button and the request for your
account approval will be sent to the admin. Admin can review the details of the vendor and
when the admin approves your request, you will be able to see the vendor panel and do other
operations on your store.
Do you have login
credential?
Put details and login.
Want to become
vendor?
Click here
© CedCommerce. All Rights Reserved.
7
Enter the public name of
your shop and also its URL
which will open your online
shop page.
© CedCommerce. All Rights Reserved.
8
The fields shown above have to be filled by the vendor to open up a new shop on the Magento
2 store.
- Public Name: It is the public name which will show on the vendor shop page.
- Shop URL: Vendor needs to enter the shop URL without any space. It is the vendor shop
page URL key.
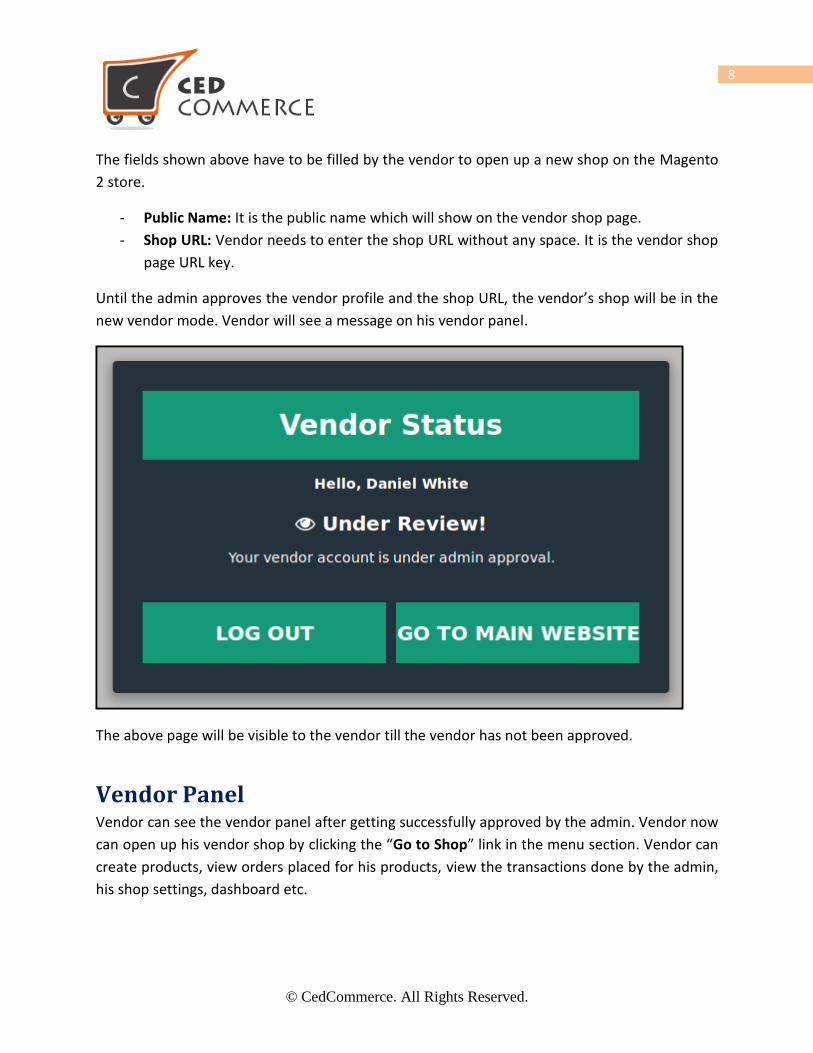
Until the admin approves the vendor profile and the shop URL, the vendor’s shop will be in the
new vendor mode. Vendor will see a message on his vendor panel.
The above page will be visible to the vendor till the vendor has not been approved.
Vendor Panel Vendor can see the vendor panel after getting successfully approved by the admin. Vendor now
can open up his vendor shop by clicking the “Go to Shop” link in the menu section. Vendor can
create products, view orders placed for his products, view the transactions done by the admin,
his shop settings, dashboard etc.
© CedCommerce. All Rights Reserved.
9
1) Dashboard Page Vendor can visit the dashboard page by clicking on the “I am a Vendor” link in top links.
If the vendor is a logged then he will be redirected to the vendor dashboard page.
Dashboard is literally the summary page of his shop where he can see the performance
of his shop and all the recent activities performed on the shop.
Categorization of the dashboard page information:-
a) Total Pending Amount
Total pending amount is the amount of the products for which the order has been
placed and invoiced by the admin but the payment is not yet received by the vendor.
When that amount will be paid by the admin, it will be removed from the total pending
amount section.
© CedCommerce. All Rights Reserved.
10
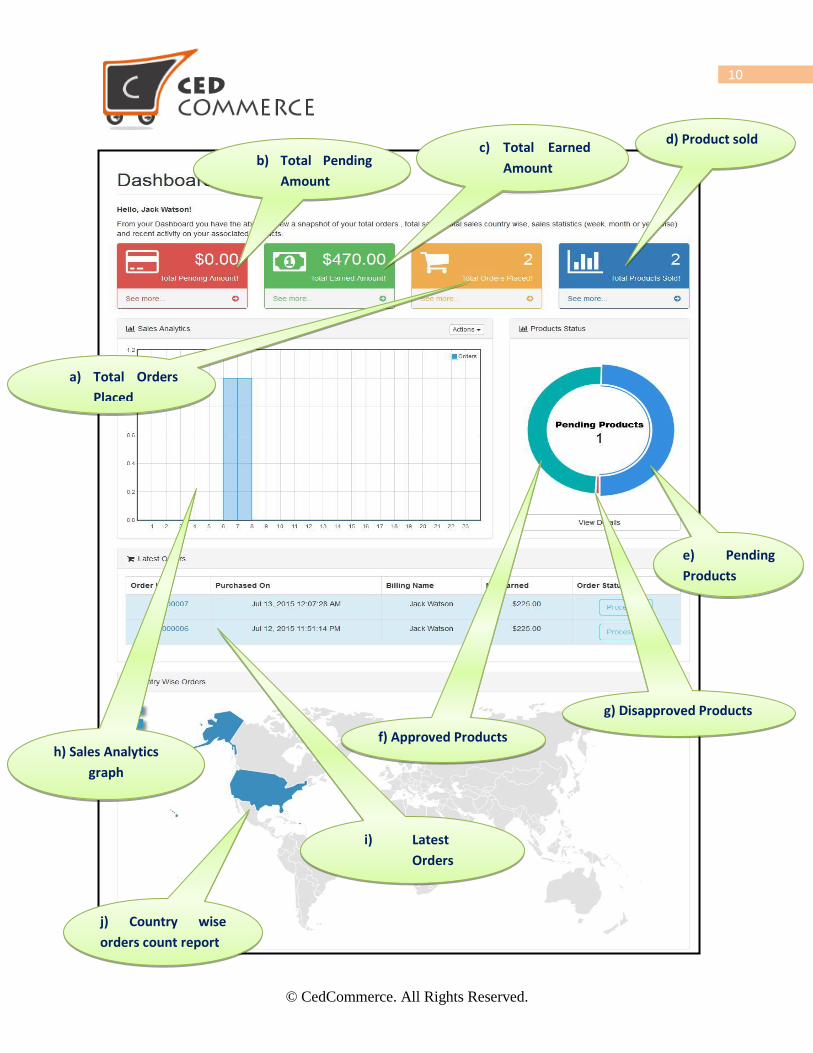
b) Total Pending
Amount
c) Total Earned
Amount
a) Total Orders
Placed
d) Product sold
e) Pending
Products
f) Approved Products
g) Disapproved Products
h) Sales Analytics
graph
i) Latest
Orders
j) Country wise
orders count report
© CedCommerce. All Rights Reserved.
11
b) Total Earned Amount
This amount is the total payment done to the vendor by the admin for his products sold
on the store.
c) Total Orders Placed
Total how many orders have been placed for vendor’s products will be shown here as a
count.
d) Total Product Sold
How many currently logged in vendor’s products have been sold from the Magento 2
store.
e) Pending Products
This block will show the total number of the products that have been created by the
vendor but not approved by the admin.
f) Approved Products
This will show the total number of vendor’s products approved by the admin. These
products will be visible on the vendor store on Magento 2 site.
g) Disapproved Products
This block will have the total number of products that have been disapproved by the
admin and these products will not show on the Magento 2 store any more.
h) Sales Analytic Graph
Sales analytics graph is a useful graph for the vendor to analyze the performance of his
store. This will show how many products are being sold on his site. Vendor can see the
store performance for different time intervals
- Today
- Weekly
- Monthly
- Yearly
The graph displays the time duration on the horizontal axis and the number of the
orders placed on the vertical axis.
i) Latest Orders
This block will show the latest five orders placed on the store for the vendor’s products.
Latest orders will have a different background color on the basis of the order status.
© CedCommerce. All Rights Reserved.
12
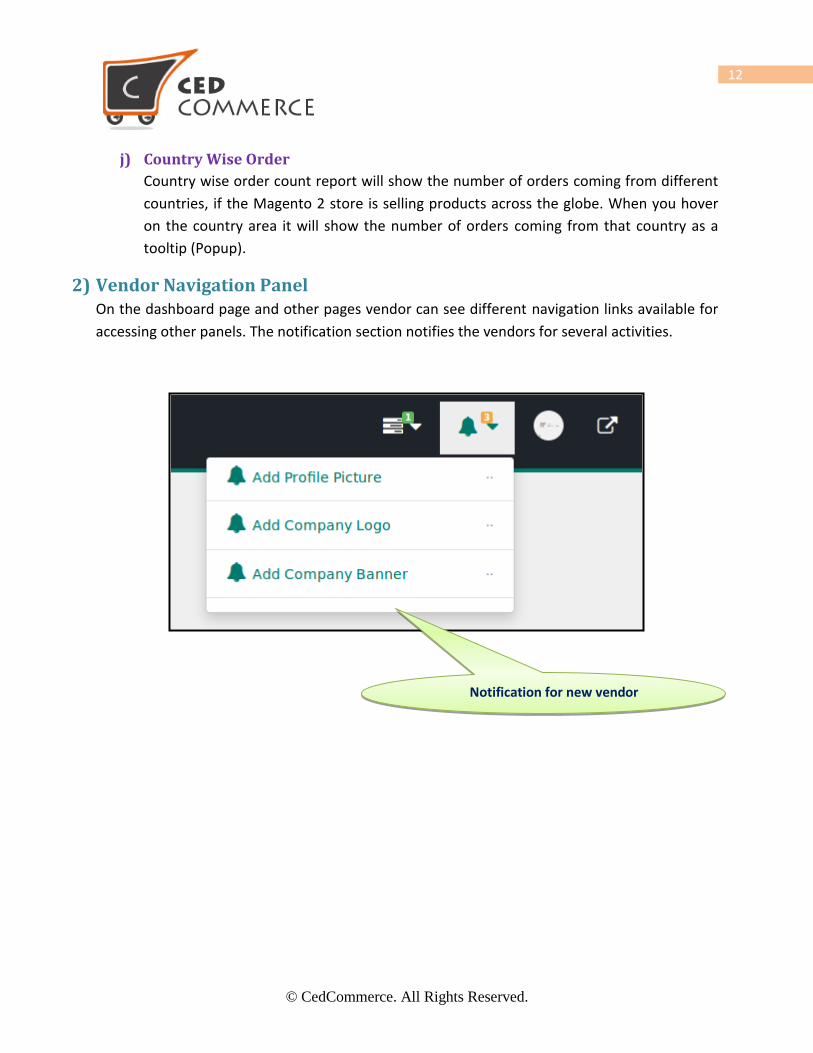
j) Country Wise Order
Country wise order count report will show the number of orders coming from different
countries, if the Magento 2 store is selling products across the globe. When you hover
on the country area it will show the number of orders coming from that country as a
tooltip (Popup).
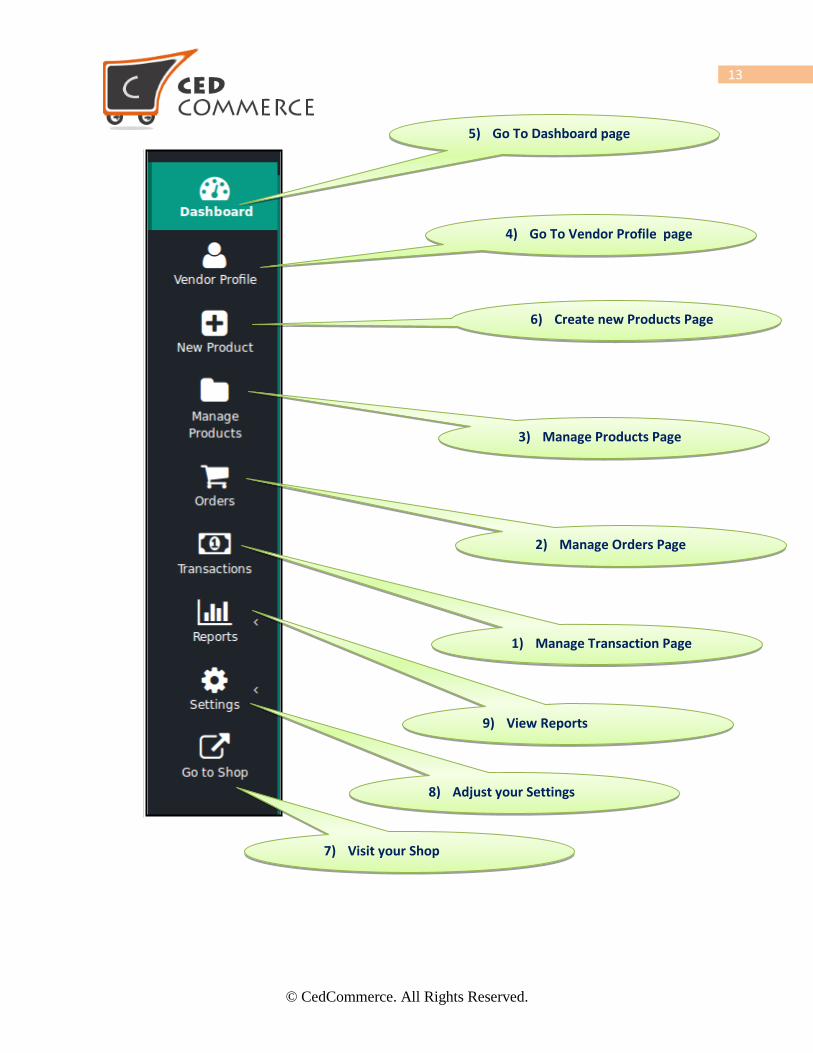
2) Vendor Navigation Panel On the dashboard page and other pages vendor can see different navigation links available for
accessing other panels. The notification section notifies the vendors for several activities.
Notification for new vendor
© CedCommerce. All Rights Reserved.
13
5) Go To Dashboard page
4) Go To Vendor Profile page
6) Create new Products Page
3) Manage Products Page
2) Manage Orders Page
1) Manage Transaction Page
9) View Reports
8) Adjust your Settings
7) Visit your Shop
© CedCommerce. All Rights Reserved.
14
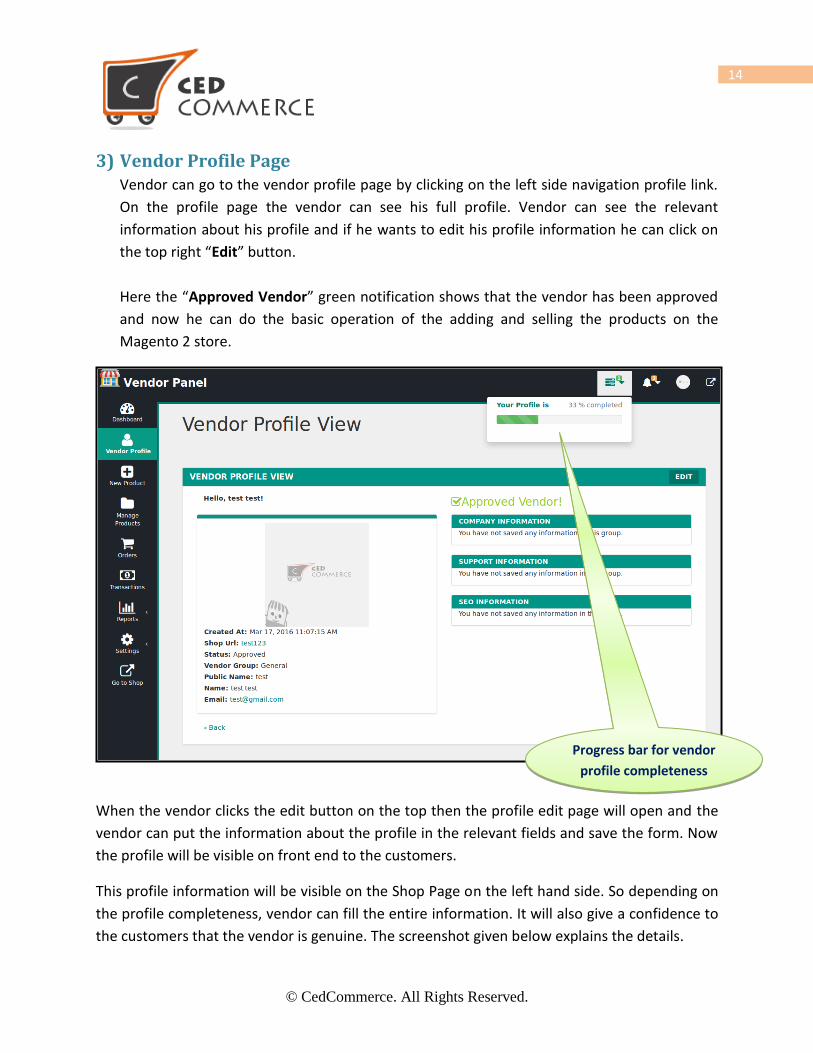
3) Vendor Profile Page Vendor can go to the vendor profile page by clicking on the left side navigation profile link.
On the profile page the vendor can see his full profile. Vendor can see the relevant
information about his profile and if he wants to edit his profile information he can click on
the top right “Edit” button.
Here the “Approved Vendor” green notification shows that the vendor has been approved
and now he can do the basic operation of the adding and selling the products on the
Magento 2 store.
When the vendor clicks the edit button on the top then the profile edit page will open and the
vendor can put the information about the profile in the relevant fields and save the form. Now
the profile will be visible on front end to the customers.
This profile information will be visible on the Shop Page on the left hand side. So depending on
the profile completeness, vendor can fill the entire information. It will also give a confidence to
the customers that the vendor is genuine. The screenshot given below explains the details.
Progress bar for vendor
profile completeness
© CedCommerce. All Rights Reserved.
15
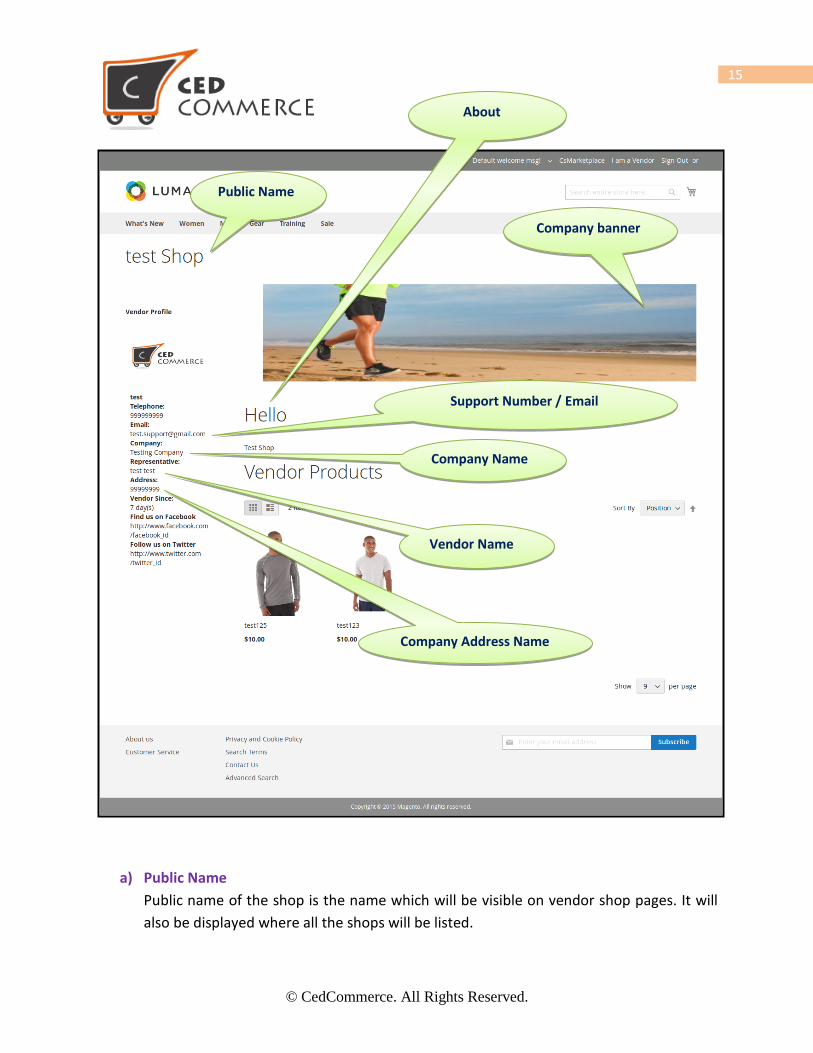
a) Public Name
Public name of the shop is the name which will be visible on vendor shop pages. It will
also be displayed where all the shops will be listed.
Public Name
About
Support Number / Email
Company Name
Vendor Name
Company Address Name
Company banner
© CedCommerce. All Rights Reserved.
16
b) Name
It is the name of the vendor/shop owner name.
c) Gender
It is quite common to show the gender i.e. male/female/common.
d) Profile Logo
Vendor can upload the profile picture.
e) Contact Number
Vendor can enter his contact number so that the customers/admin can contact him any
time
f) Company Name
It is the name of the company which will show on the vendor shop page.
g) Company Logo
Any company personal logo can be uploaded here that will be only for the trademark
purpose.
h) About
It will be the about information page for the vendor where he can explain about his
purpose of the business and other company related information.
i) Company Banner
Vendor can upload the shop banner on his vendor shop page. It can be any kind of
promotional banner which will be shown on the frontend page.
j) Support Name/Email
Vendor can fill the support name and email here so that any customer having a doubt
related to the product can contact the vendor.
k) Company Address
Vendor can add the company address which will show up on frontend.
4) New Product Any vendor can add a new product just by clicking the link “New Product” in the left
navigation panel. It will open up the form for creating a new product. Only the approved
vendor can create the new product on the Magento 2 store. Vendor needs to perform
© CedCommerce. All Rights Reserved.
17
several steps to create the new product. Right now with the basic version of CedCommerce
Multi-Vendor Marketplace only three types of products can be created by the vendor:-
- Simple Product
- Downloadable Product
- Virtual Product
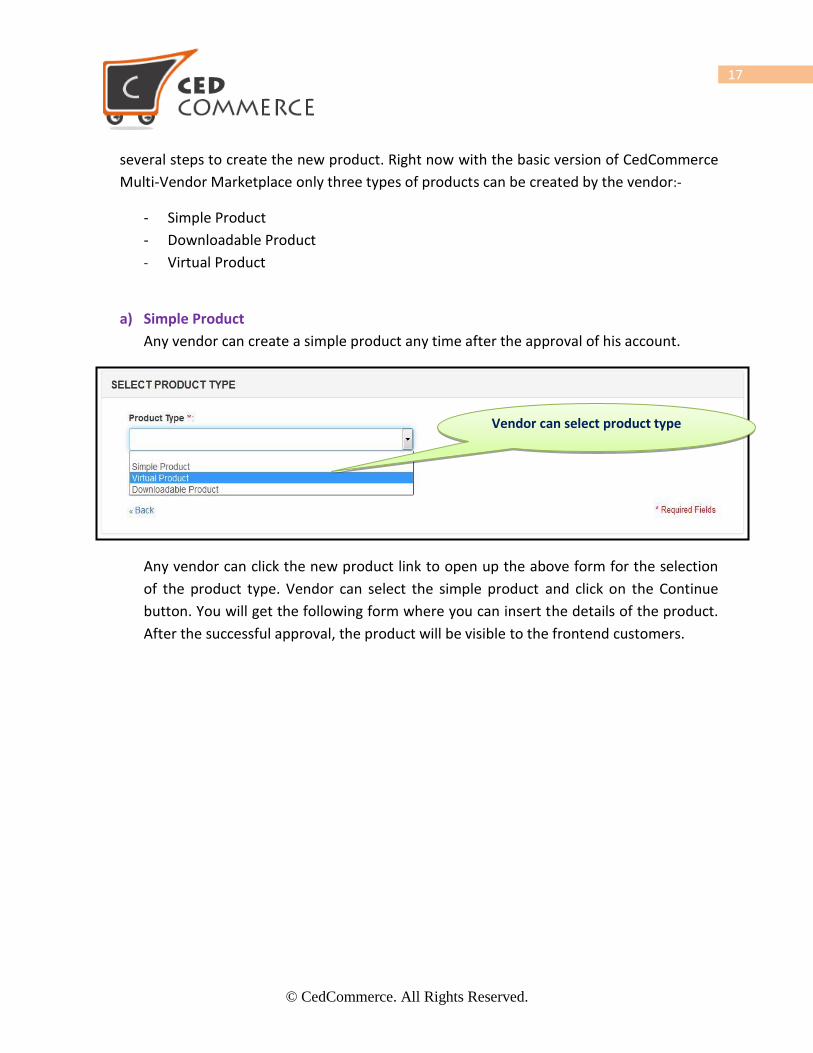
a) Simple Product
Any vendor can create a simple product any time after the approval of his account.
Any vendor can click the new product link to open up the above form for the selection
of the product type. Vendor can select the simple product and click on the Continue
button. You will get the following form where you can insert the details of the product.
After the successful approval, the product will be visible to the frontend customers.
Vendor can select product type
© CedCommerce. All Rights Reserved.
18
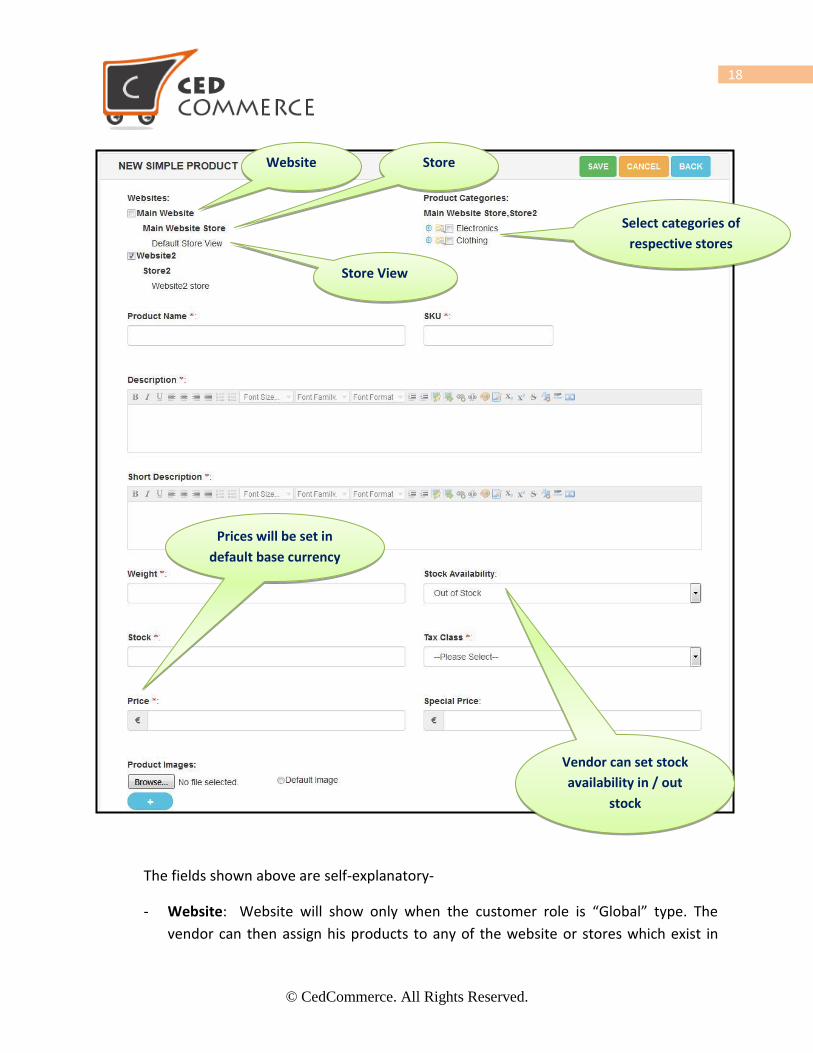
The fields shown above are self-explanatory-
- Website: Website will show only when the customer role is “Global” type. The
vendor can then assign his products to any of the website or stores which exist in
Website Store
Store View
Select categories of
respective stores
Vendor can set stock
availability in / out
stock
Prices will be set in
default base currency
© CedCommerce. All Rights Reserved.
19
the Magento 2 site. If the customer role is set to website then this will not show, the
products will be assigned only to the current website.
- Categories: Vendor can select multiple categories where he wants to show the
product on the site.
- Product Name: Vendor can insert the product name while he is creating a new
product on the store.
- Description: Full description of the product can be filled by the admin here.
- Short Description: Vendor can insert the short description here.
- Sku: It is the stock keeping unit; vendor has to enter a unique sku.
- Weight: Weight of the product can be inserted here.
- Stock Availability: Set the availability of the stock on the Magento 2 store i.e.
whether it is available or not.
- Stock: It is the quantity of the stock available on the site.
- Tax Class: It is quite an important thing, admin can create different rules for the tax
classes and the vendor can select any one of the tax class according to his needs.
- Price: It is the regular price available on the site. Vendor can also insert the special
price.
- Special Price: Special price is the discounted price that is available on the site. It is an
optional field.
b) Downloadable Product
Downloadable products are the products which can be purchased and downloaded at
the same time but these products are not shippable. It can be any type of the digital
media content or eBook etc.
Downloadable product form will be same as the simple product form but it will have
some sort of new fields to upload your sample and full digital content.
© CedCommerce. All Rights Reserved.
20
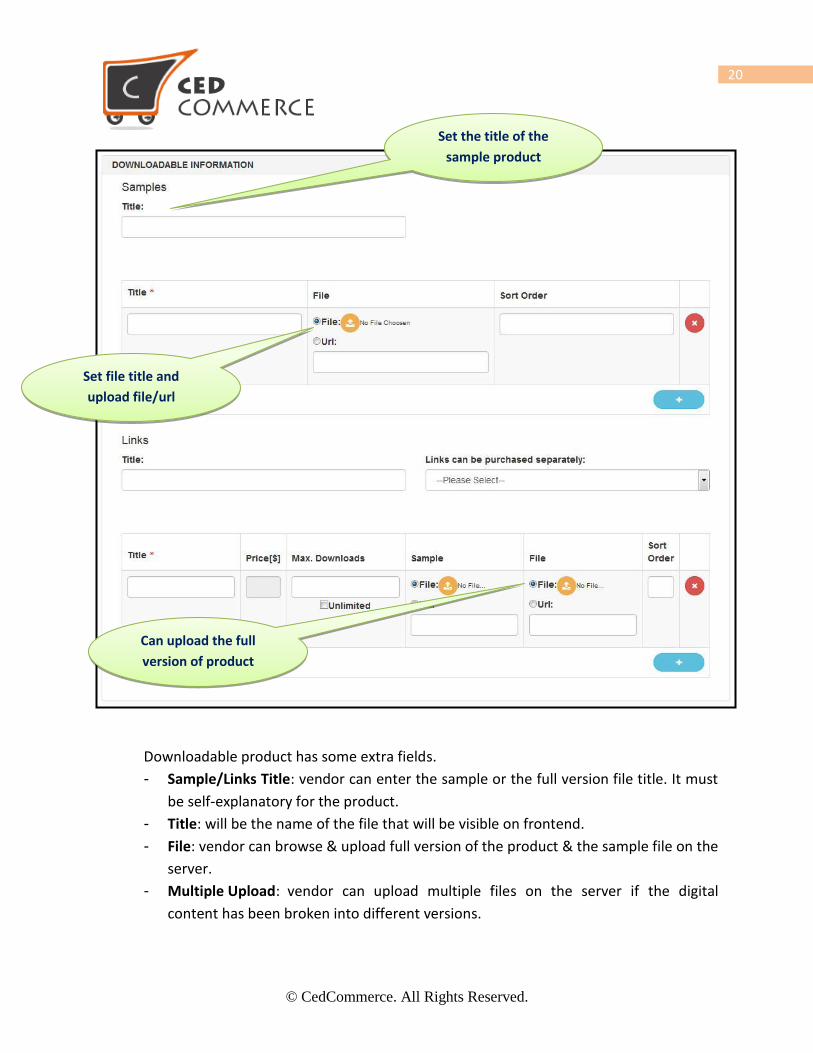
Downloadable product has some extra fields.
- Sample/Links Title: vendor can enter the sample or the full version file title. It must
be self-explanatory for the product.
- Title: will be the name of the file that will be visible on frontend.
- File: vendor can browse & upload full version of the product & the sample file on the
server.
- Multiple Upload: vendor can upload multiple files on the server if the digital
content has been broken into different versions.
Set the title of the
sample product
Set file title and
upload file/url
Can upload the full
version of product
© CedCommerce. All Rights Reserved.
21
c) Virtual Product
A Magento 2 virtual product should be used for a virtual (not touchable) item. Think about insurance, a reservation, an extra product guarantee or whatever. A virtual product does not allow selecting a shipping method at checkout simply because there's nothing to ship.
These products can be created by the vendor on the Magento 2 store. Virtual product
cannot be shipped. Virtual product’s form fields are the same as the simple product so please refer to the simple product section for the field information.
To create all types of products in the Magento 2 store please ask your Magento 2 store
administrator to install CedCommerce Vendor Product Addon. This addon will have all
types of Magneto 2 products support.
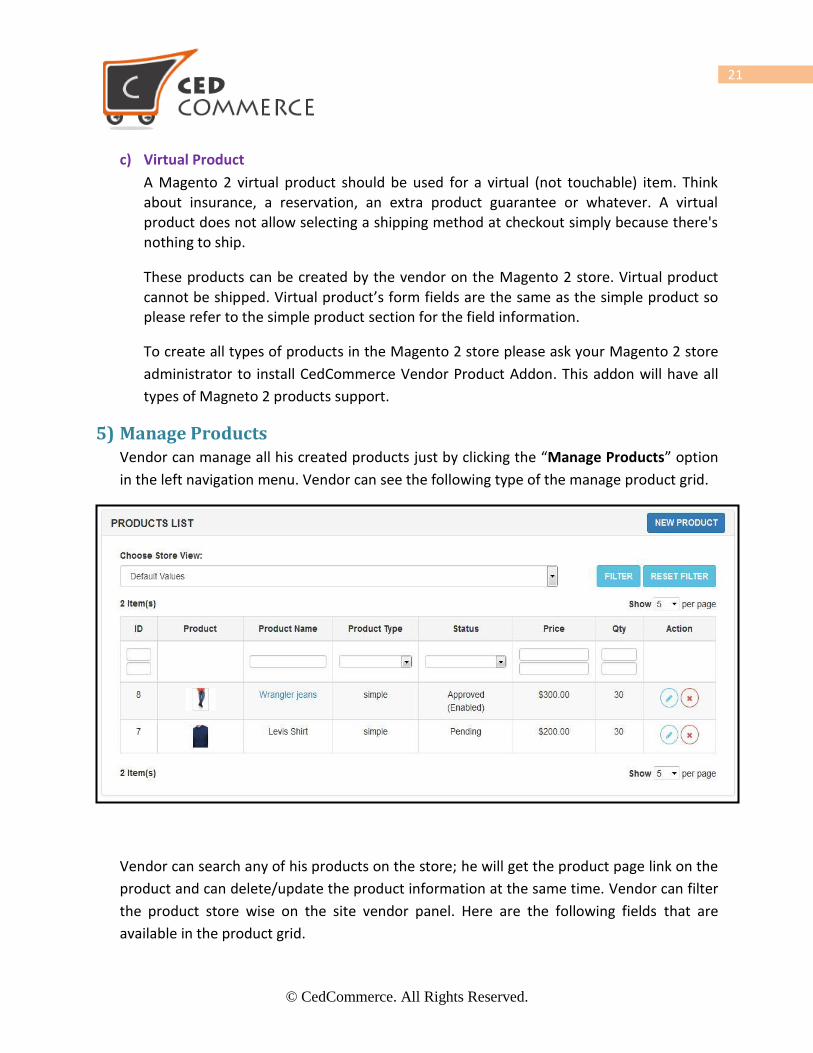
5) Manage Products Vendor can manage all his created products just by clicking the “Manage Products” option
in the left navigation menu. Vendor can see the following type of the manage product grid.
Vendor can search any of his products on the store; he will get the product page link on the
product and can delete/update the product information at the same time. Vendor can filter
the product store wise on the site vendor panel. Here are the following fields that are
available in the product grid.
© CedCommerce. All Rights Reserved.
22
a) Id
Id is the field for the product to uniquely identify it. It is related to the admin to easily
find the respective product.
b) Product Image
Vendor can see the product image that has been set for the product. Product image will
also link to the product view page on frontend.
c) Product Name
It will show the product name and the vendor can filter the product just by inputting the
product name and clicking on the search button.
d) Product Type
Product type will show the type of the product. Vendor can also filter the product listing
by clicking on the product type dropdown.
e) Status
Status will show the status of the product either is enabled or disabled.
- Approved: It will show that the product has been approved by the admin and if
the product is enabled then it will show on frontend.
- Disapproved: It will show that the product has been disapproved by the admin
and will not show on frontend.
- Enabled: It is the product’s global status. If the vendor does not wants to show
the product on the site he can disable the product and it will not show.
- Disabled: This type will not show the product anyhow on the site.
f) Price
It will show the general regular price of the product on the site.
g) Quantity
It will show that how much quantity of the product is left and can be sold on the site.
h) Action
Vendor either can edit or delete the product on the site.

© CedCommerce. All Rights Reserved.
23
6) Manage Orders Manage orders can be found in the left vendor navigation panel on “Orders” link. Orders
link will show the following grid and can be explored by clicking on the order view link.
a) Order Grid
Order grid will be available when the Manage Orders link in the left vendor panel navigation
menu is clicked.
- Order Id: Order id is the unique id available for the orders placed on the Magento 2
store. Vendor can also view the order by clicking on the order id.
- Purchased On: It will have the details when the order was placed.
- Bill to Name: It will show the name of the person who placed the order.
- G.T: It is the grand total value of the order.
- Commission Fee: It is the commission fee that has been paid to the admin.
- Net Earned: It is the amount which has been earned by the vendor.
- Order Payment Status: It is the order payment status i.e. either paid or pending.
- Vendor Payment Status: Vendor gets the payment or the status remains pending.
b) Order View
Order view page can be seen any time by clicking on the order id. It will show you the
details of the order.
Click here to export
the orders
Click here to view
order
© CedCommerce. All Rights Reserved.
24
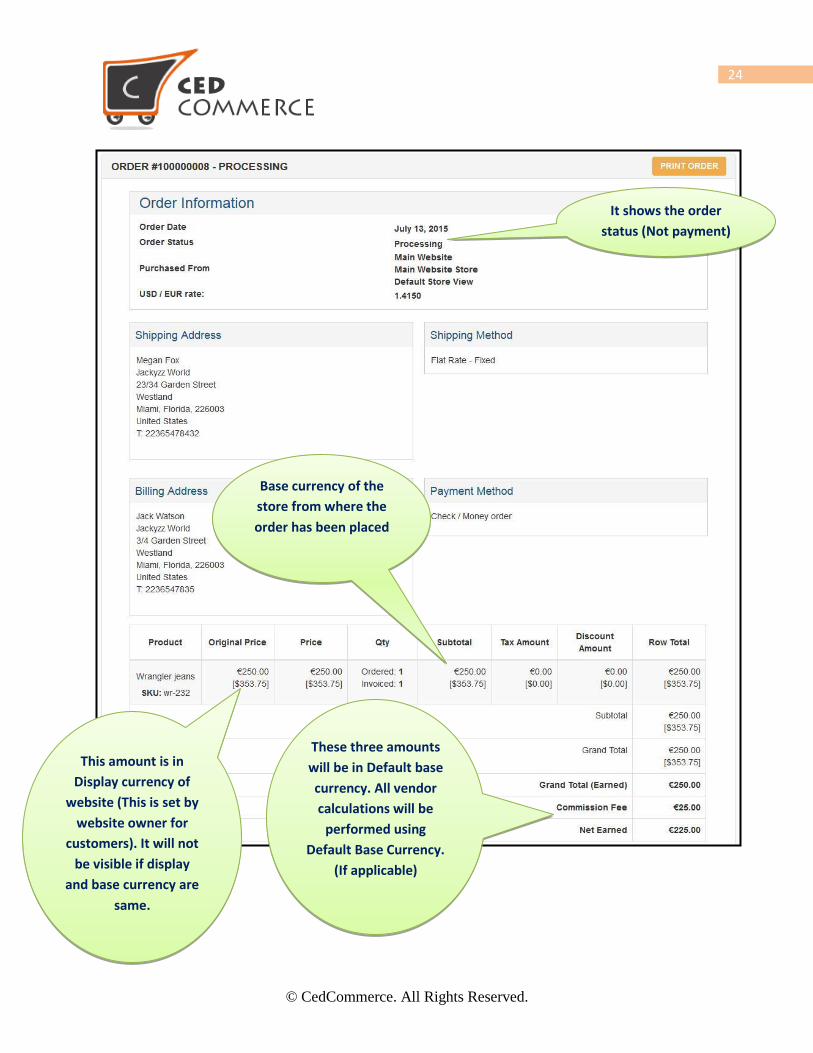
Figure 1 - Order View Page
It shows the order
status (Not payment)
Base currency of the
store from where the
order has been placed
This amount is in
Display currency of
website (This is set by
website owner for
customers). It will not
be visible if display
and base currency are
same.
These three amounts
will be in Default base
currency. All vendor
calculations will be
performed using
Default Base Currency.
(If applicable)
© CedCommerce. All Rights Reserved.
25
The order view page of the vendor is shown above. Here different block are available which
show all the information related to the order.
- Order Id: It will show the order status as pending/processing/canceled/completed.
- Order Date: The date on which the order was placed on the site.
- Order Store: From which store the order has been placed.
- IP: IP address and other details of the order.
- Billing Address: Name and address of the customer will show up in this block.
- Payment Method: The payment method selected to place the order.
- Product Item Information: This information will show how many products are ordered in
this order for this particular vendor. It will have the product information of the current
vendor’s products.
- Original Price Break: The original price will be broken as per the different settings done by
the admin.
- Base Currency: It is the currency in which the order has been placed and this is the same
currency in which the product prices were shown to the customer.
- Website Base Currency: It is the base currency for that website. It will only show when the
website base price and store base price will be different.
- Global Currency: All the admin to vendor transactions for product payment will be done in
the form of the global currency only.
- Grand Total: The grand total has been broken up into three parts.
- Grand Total: The total amount paid by the customer.
- Commission Fee: Admin commission fee as per the commission rule applied by the
admin.
- Net Earned: It will be the amount earned by the vendor for this order.
c) Order Export
Vendor can export all his orders in the csv format by going to the manage product page
where the order grid is displayed. On the top left corner of the grid there is an “export
button” from where the vendor can export the csv which will have grid columns.
7) Transactions Vendor can see the transaction list by clicking on the “transaction” link on the vendor
navigation menu. It will show the transaction list in the form of grid.
© CedCommerce. All Rights Reserved.
26
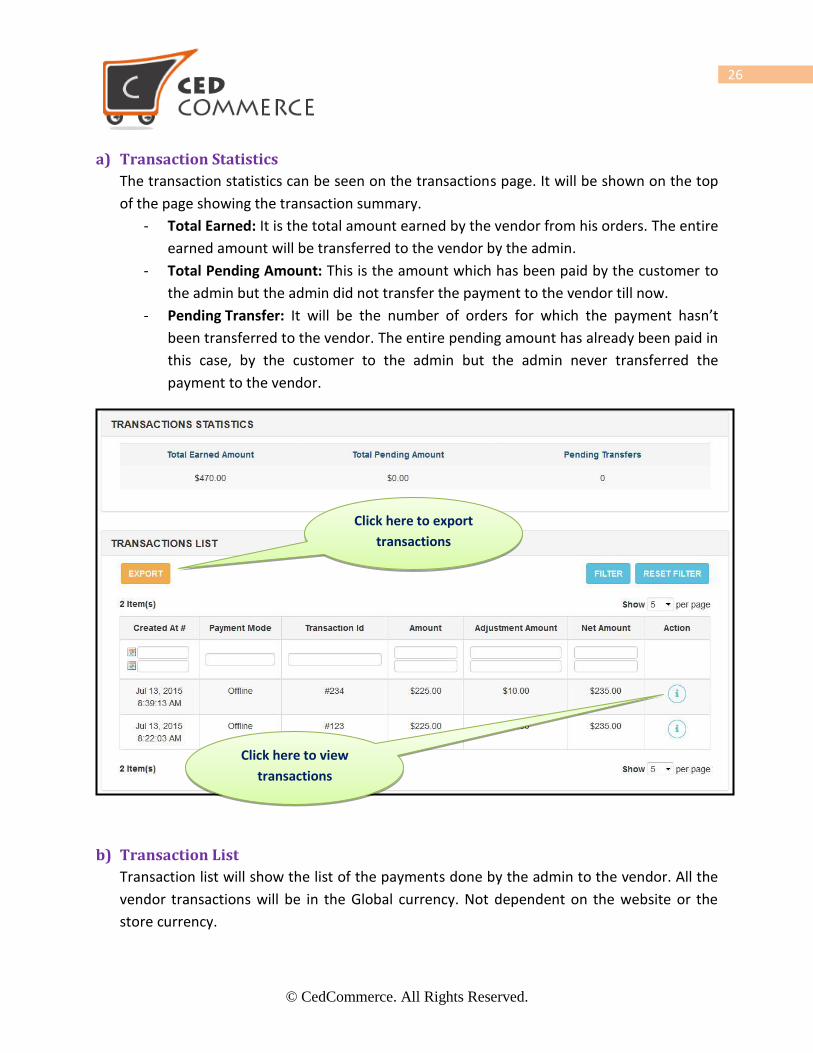
a) Transaction Statistics
The transaction statistics can be seen on the transactions page. It will be shown on the top
of the page showing the transaction summary.
- Total Earned: It is the total amount earned by the vendor from his orders. The entire
earned amount will be transferred to the vendor by the admin.
- Total Pending Amount: This is the amount which has been paid by the customer to
the admin but the admin did not transfer the payment to the vendor till now.
- Pending Transfer: It will be the number of orders for which the payment hasn’t
been transferred to the vendor. The entire pending amount has already been paid in
this case, by the customer to the admin but the admin never transferred the
payment to the vendor.
b) Transaction List
Transaction list will show the list of the payments done by the admin to the vendor. All the
vendor transactions will be in the Global currency. Not dependent on the website or the
store currency.
Click here to export
transactions
Click here to view
transactions
© CedCommerce. All Rights Reserved.
27
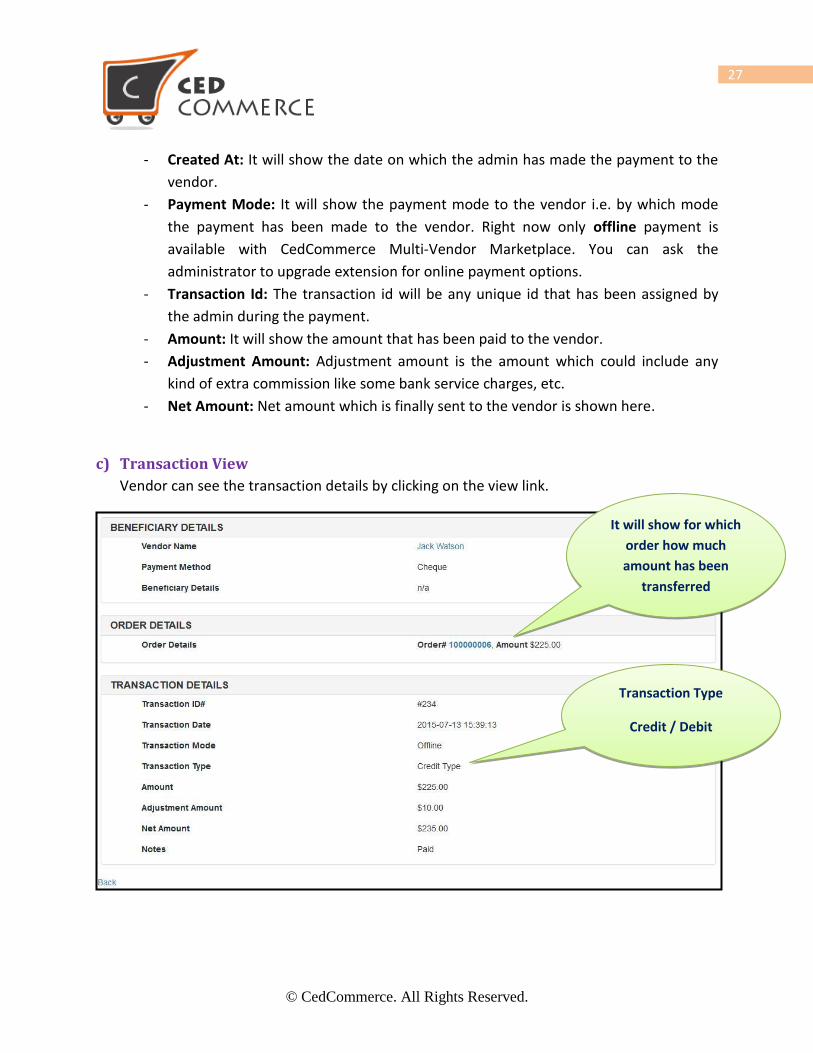
- Created At: It will show the date on which the admin has made the payment to the
vendor.
- Payment Mode: It will show the payment mode to the vendor i.e. by which mode
the payment has been made to the vendor. Right now only offline payment is
available with CedCommerce Multi-Vendor Marketplace. You can ask the
administrator to upgrade extension for online payment options.
- Transaction Id: The transaction id will be any unique id that has been assigned by
the admin during the payment.
- Amount: It will show the amount that has been paid to the vendor.
- Adjustment Amount: Adjustment amount is the amount which could include any
kind of extra commission like some bank service charges, etc.
- Net Amount: Net amount which is finally sent to the vendor is shown here.
c) Transaction View
Vendor can see the transaction details by clicking on the view link.
It will show for which
order how much
amount has been
transferred
Transaction Type
Credit / Debit
© CedCommerce. All Rights Reserved.
28
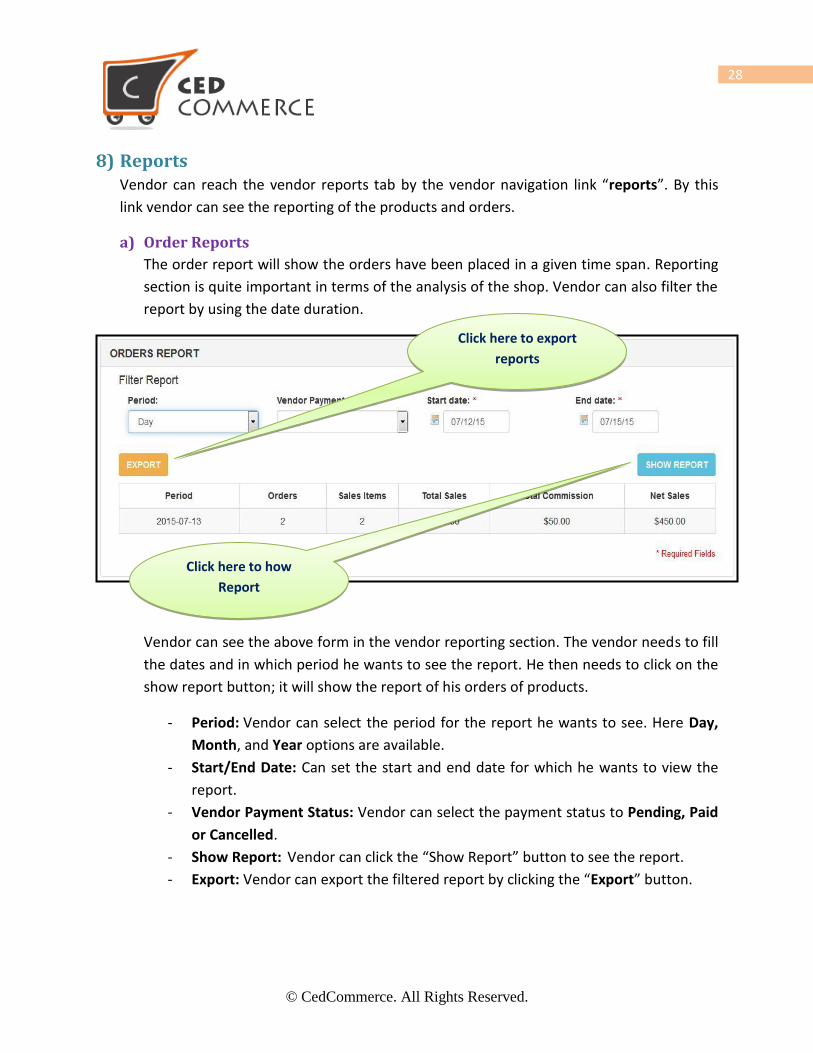
8) Reports Vendor can reach the vendor reports tab by the vendor navigation link “reports”. By this
link vendor can see the reporting of the products and orders.
a) Order Reports
The order report will show the orders have been placed in a given time span. Reporting
section is quite important in terms of the analysis of the shop. Vendor can also filter the
report by using the date duration.
Vendor can see the above form in the vendor reporting section. The vendor needs to fill
the dates and in which period he wants to see the report. He then needs to click on the
show report button; it will show the report of his orders of products.
- Period: Vendor can select the period for the report he wants to see. Here Day,
Month, and Year options are available.
- Start/End Date: Can set the start and end date for which he wants to view the
report.
- Vendor Payment Status: Vendor can select the payment status to Pending, Paid
or Cancelled.
- Show Report: Vendor can click the “Show Report” button to see the report.
- Export: Vendor can export the filtered report by clicking the “Export” button.
Click here to how
Report
Click here to export
reports
© CedCommerce. All Rights Reserved.
29
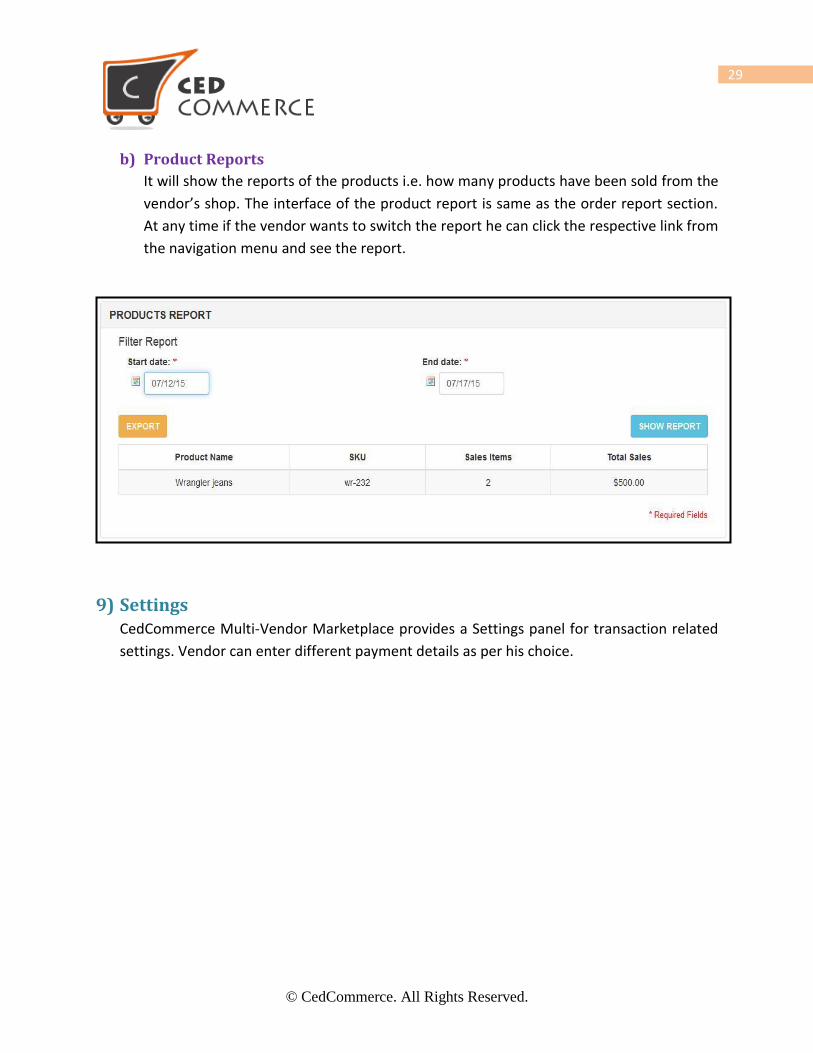
b) Product Reports
It will show the reports of the products i.e. how many products have been sold from the
vendor’s shop. The interface of the product report is same as the order report section.
At any time if the vendor wants to switch the report he can click the respective link from
the navigation menu and see the report.
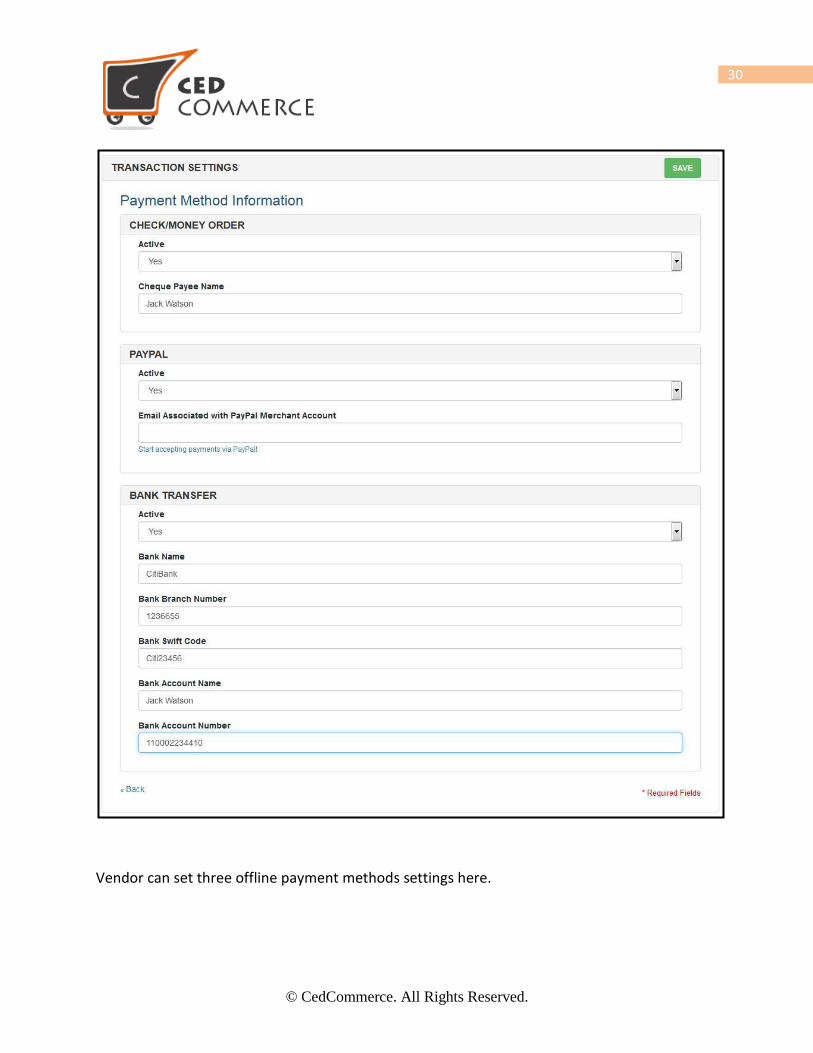
9) Settings CedCommerce Multi-Vendor Marketplace provides a Settings panel for transaction related
settings. Vendor can enter different payment details as per his choice.
© CedCommerce. All Rights Reserved.
30
Vendor can set three offline payment methods settings here.

© CedCommerce. All Rights Reserved.
31
a) Check/Money Order
Check/Money order offline payment method option is available with the CedCommerce
Multi-Vendor Marketplace Basic extension. In this setting vendor will get the field –
- Active: Vendor can enable/disable the payment method.
- Cheque Payee Name: The name of the person account to whom the payment will be
made.
b) PayPal
PayPal payment method has been included but it is not for the online transfer purpose.
Vendor can just fill the details of his PayPal account and save the settings.
- Active: Vendor can enable/disable the payment method.
- Email: Email Associated with the PayPal account can be set.
c) Bank Transfer
- Active: Vendor can enable/disable the payment method.
- Bank Name: Name of the Bank
- Branch Name: Name of the Bank Branch
- Swift Code: Bank Swift code.
- Bank Account Name: Account holder name.
- Account Number: Bank Account Number.
Support If you need any support or have questions directly related to CedCommerce Multi-Vendor
Marketplace, please use our Online Message Form to contact our support team or send us an
email at [email protected]
Best Regards,
CedCommerce Team
Related Documents

![[Vendor CMS Addon]Vendor CMS Addon for CedCommerce Multivendor Marketplace provides full control to all the vendors to manage his shop page content, add Additional Informational Links,](https://static.cupdf.com/doc/110x72/5ed19d54b67ae8796d0ef90b/vendor-cms-addon-vendor-cms-addon-for-cedcommerce-multivendor-marketplace-provides.jpg)

![CedCommerce. All rights reserved. [CedCommerce Marketplace] CedCommerce Multi-Vendor Marketplace is a powerful module for the Magento eCommerce platform, which will convert your online](https://static.cupdf.com/doc/110x72/5f50e85a0a8d3b543716c25e/cedcommerce-all-rights-cedcommerce-marketplace-cedcommerce-multi-vendor-marketplace.jpg)


![[Vendor Product Addon] · Vendor Product Addon for CedCommerce Multi-Vendor Marketplace is a powerful Magento extension that fulfills most of the needs of the vendors/admin and includes](https://static.cupdf.com/doc/110x72/5ec5b6b5b31df6345832cad3/vendor-product-addon-vendor-product-addon-for-cedcommerce-multi-vendor-marketplace.jpg)
