CDM Series ™ Professional Series Two-Way Mobile Radio Basic Service Manual

CDM Series Basic Service Manual
Nov 21, 2014
Welcome message from author
This document is posted to help you gain knowledge. Please leave a comment to let me know what you think about it! Share it to your friends and learn new things together.
Transcript

CDM Series™
Professional Series
Two-Way Mobile Radio
Basic Service Manual
online
Stamp

online
Stamp
CDM Series™Professional Series
Two-Way Mobile RadioBasic Service Manual
Motorola, Inc.8000 West Sunrise BoulevardFort Lauderdale, Florida 33322 6881091C62-D
ii
ForewordThis manual provides sufficient information to enable qualified service technicians to troubleshoot and repair CDM Series mobile radios to the component level.
Product Safety and RF Exposure Compliance
ATTENTION!
This radio is restricted to occupational use only to satisfy FCC RF energy exposure requirements. Before using this product, read the RF energy awareness information and operating instructions in the Product Safety and RF Exposure booklet (Motorola Publication part number 6881095C99) to ensure compliance with RF energy exposure limits.
For a list of Motorola-approved antennas, batteries, and other accessories, visit the following web site which lists approved accessories: http://www.motorola.com/cgiss/index.shtml.
Computer Software CopyrightsThe Motorola products described in this manual may include copyrighted Motorola computer programs stored in semiconductor memories or other media. Laws in the United States and other countries preserve for Motorola certain exclusive rights for copyrighted computer programs, including, but not limited to, the exclusive right to copy or reproduce in any form the copyrighted computer program. Accordingly, any copyrighted Motorola computer programs contained in the Motorola products described in this manual may not be copied, reproduced, modified, reverse-engineered, or distributed in any manner without the express written permission of Motorola. Furthermore, the purchase of Motorola products shall not be deemed to grant either directly or by implication, estoppel, or otherwise, any license under the copyrights, patents or patent applications of Motorola, except for the normal non-exclusive license to use that arises by operation of law in the sale of a product.
Document CopyrightsNo duplication or distribution of this document or any portion thereof shall take place without the express written permission of Motorola. No part of this manual may be reproduced, distributed, or transmitted in any form or by any means, electronic or mechanical, for any purpose without the express written permission of Motorola.
DisclaimerThe information in this document is carefully examined, and is believed to be entirely reliable. However, no responsibility is assumed for inaccuracies. Furthermore, Motorola reserves the right to make changes to any products herein to improve readability, function, or design. Motorola does not assume any liability arising out of the applications or use of any product or circuit described herein; nor does it cover any license under its patent rights nor the rights of others.
TrademarksMOTOROLA and the Stylized M logo are registered in the US Patent & Trademark Office. All other products or service names are the property of their respective owners.
© Motorola, Inc. 2002.
Before using this product, read the operating instructions for safe usage contained in the Product Safety and RF Exposure booklet.
!C a u t i o n

iii
Table of Contents
Foreword.........................................................................................................ii
Product Safety and RF Exposure Compliance ............................................................... iiComputer Software Copyrights....................................................................................... iiDocument Copyrights ..................................................................................................... iiDisclaimer ....................................................................................................................... iiTrademarks..................................................................................................................... ii
Chapter 1Introduction ................................................................................................ 1-1
1.1 Scope of Manual................................................................................................. 1-11.2 Warranty and Service Support............................................................................ 1-1
1.2.1 Warranty Period and Return Instructions.................................................. 1-11.2.2 After Warranty Period ............................................................................... 1-11.2.3 Piece Parts Availability.............................................................................. 1-21.2.4 Technical Support ..................................................................................... 1-3
1.3 Radio Model Information..................................................................................... 1-4
Chapter 2Maintenance ............................................................................................... 2-1
2.1 Introduction ......................................................................................................... 2-12.2 Preventive Maintenance ..................................................................................... 2-1
2.2.1 Inspection.................................................................................................. 2-12.2.2 Cleaning Procedures ................................................................................ 2-1
2.3 Safe Handling of CMOS and LDMOS Devices................................................... 2-22.4 Repair Procedures and Techniques — General................................................. 2-22.5 Disassembling and Reassembling the Radio — General................................... 2-32.6 Radio Disassembly — Detailed .......................................................................... 2-3
2.6.1 Control Head Removal.............................................................................. 2-32.6.2 Top Cover Removal .................................................................................. 2-42.6.3 Transceiver Board Removal ..................................................................... 2-5
2.6.3.1 LowBand Transceiver Board Removal............................................... 2-62.6.3.2. Removing and Replacing Defective LDMOS Devices (Q1402 and
Q1403) .............................................................................................. 2-62.6.4 CDM750 Control Head Disassembly ........................................................ 2-7

iv
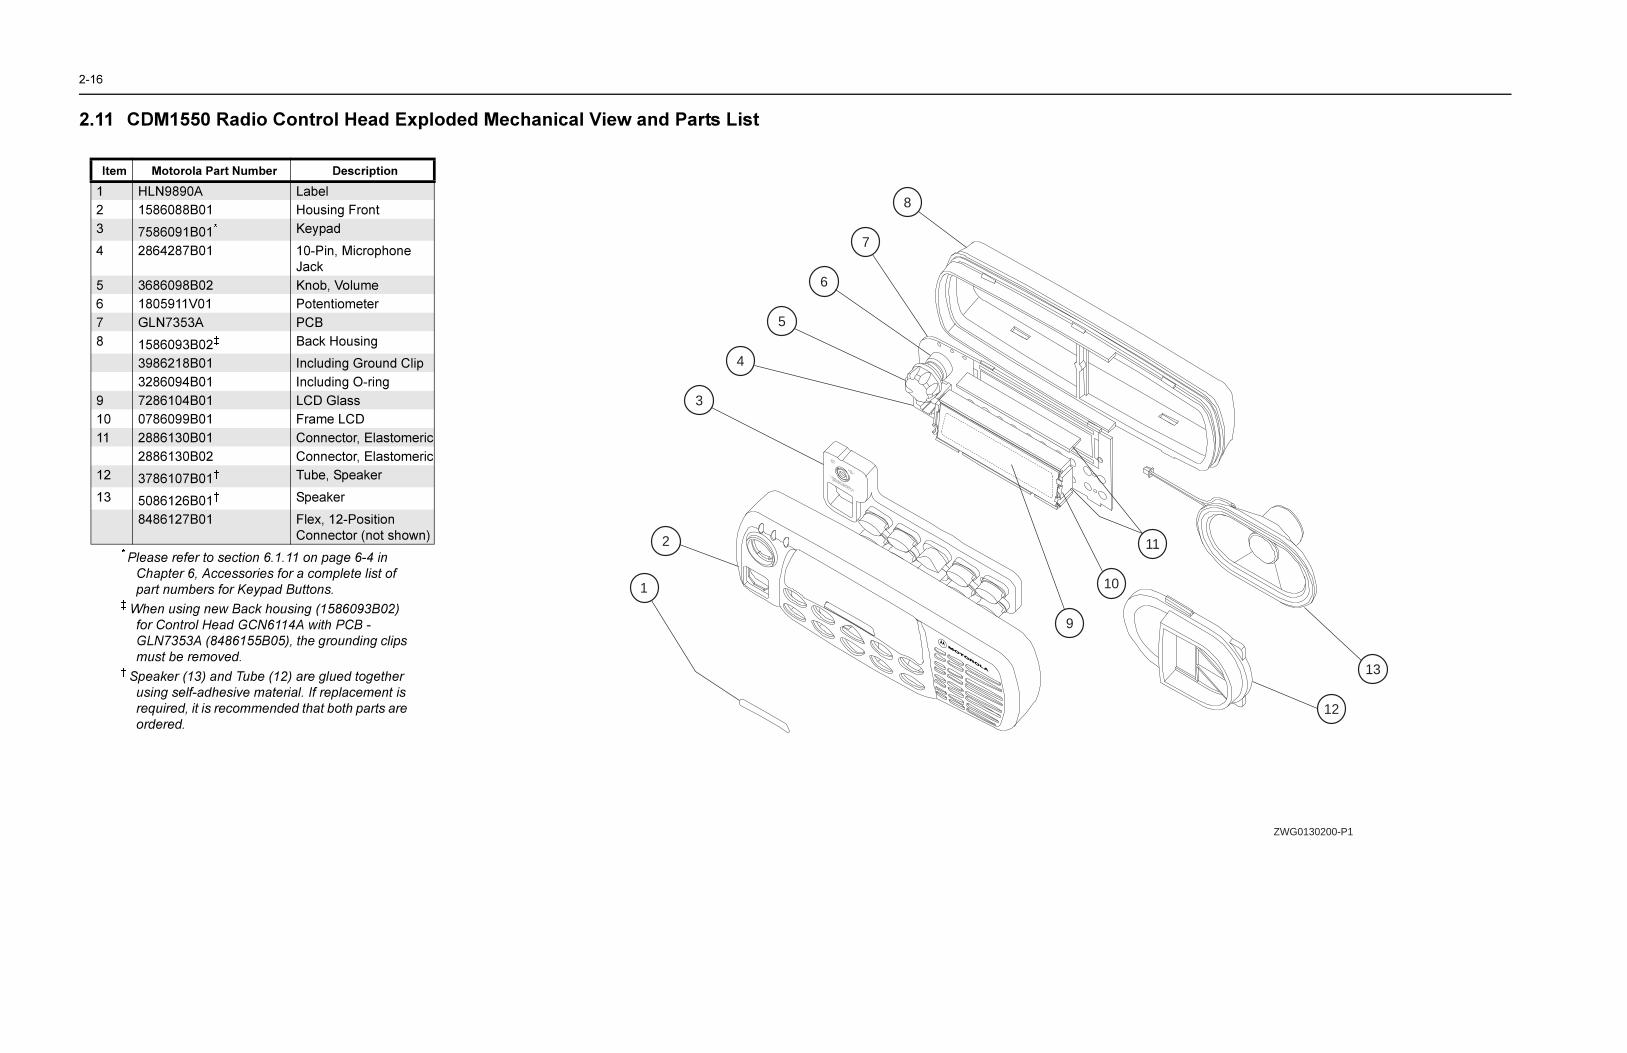
2.6.5 CDM1250, CDM1550, CDM1550•LS, and CDM1550•LS+ Control Head Disassembly ..............................................................................................2-9
2.7 Radio Assembly ................................................................................................ 2-102.7.1 CDM750 Control Head ............................................................................2-102.7.2 CDM1250, CDM1550, CDM1550•LS, and CDM1550•LS+
Control Heads .........................................................................................2-102.7.3 Radio Chassis and Transceiver Board....................................................2-10
2.7.3.1 LowBand Radio Chassis and Transceiver Board Assembly.............2-112.7.4 Control Head Fitting ................................................................................2-12
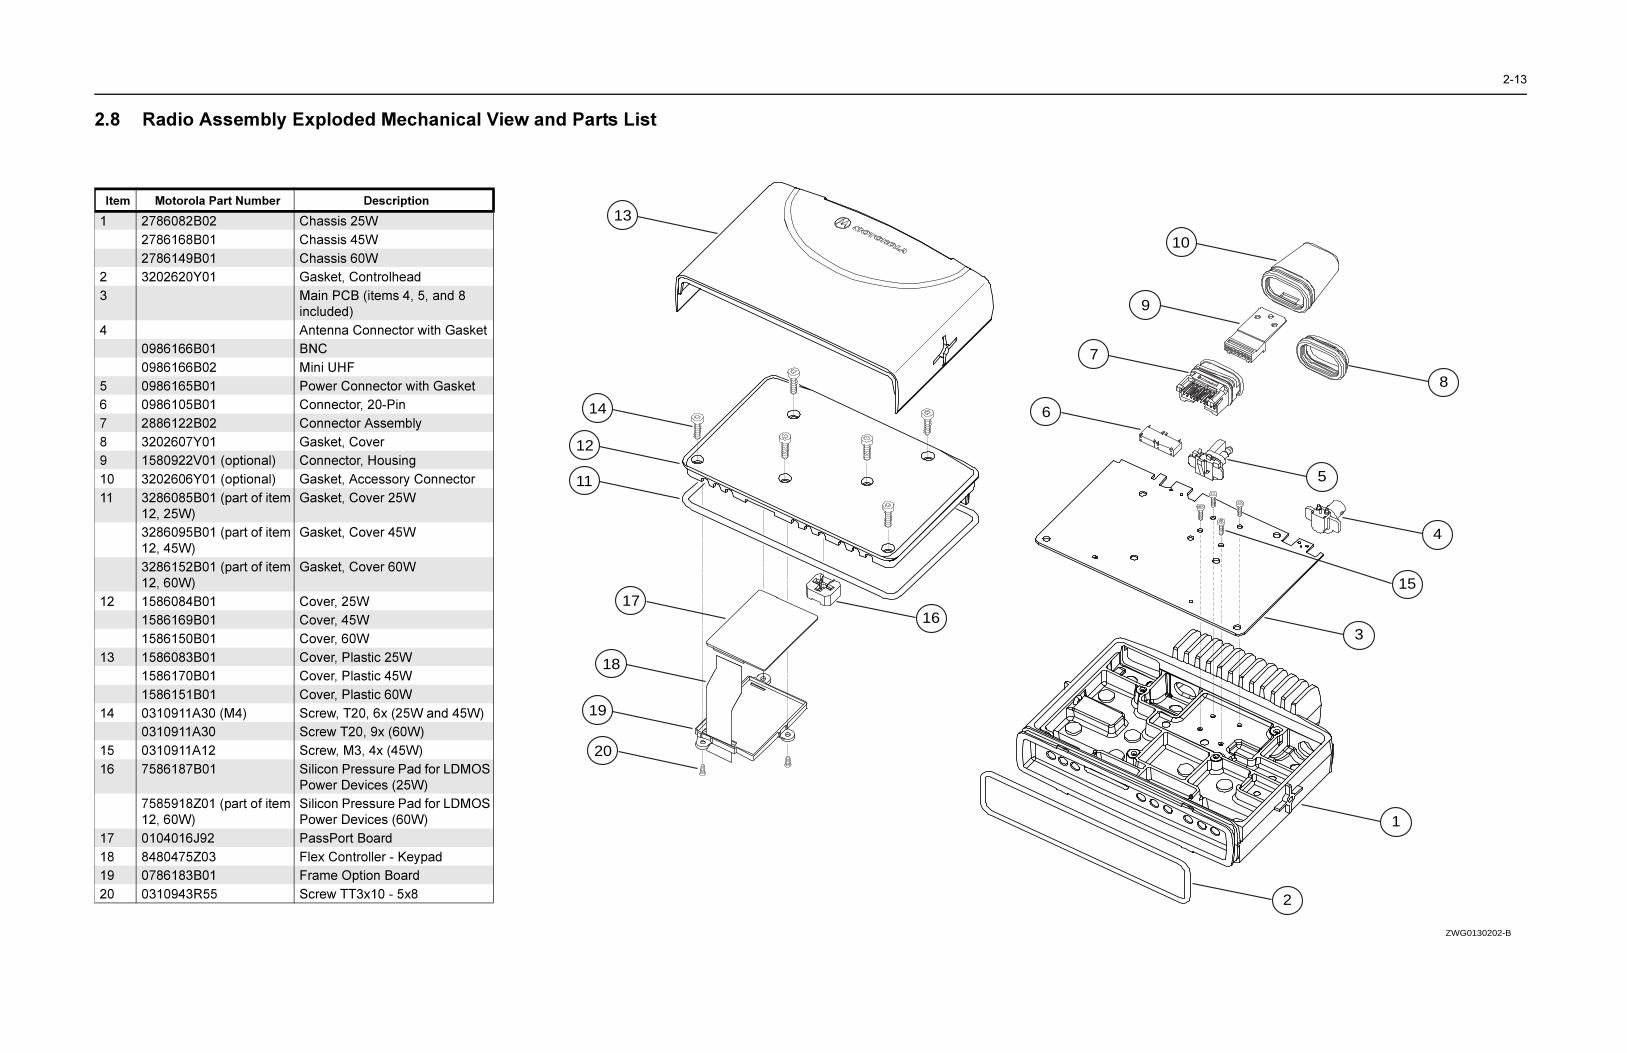
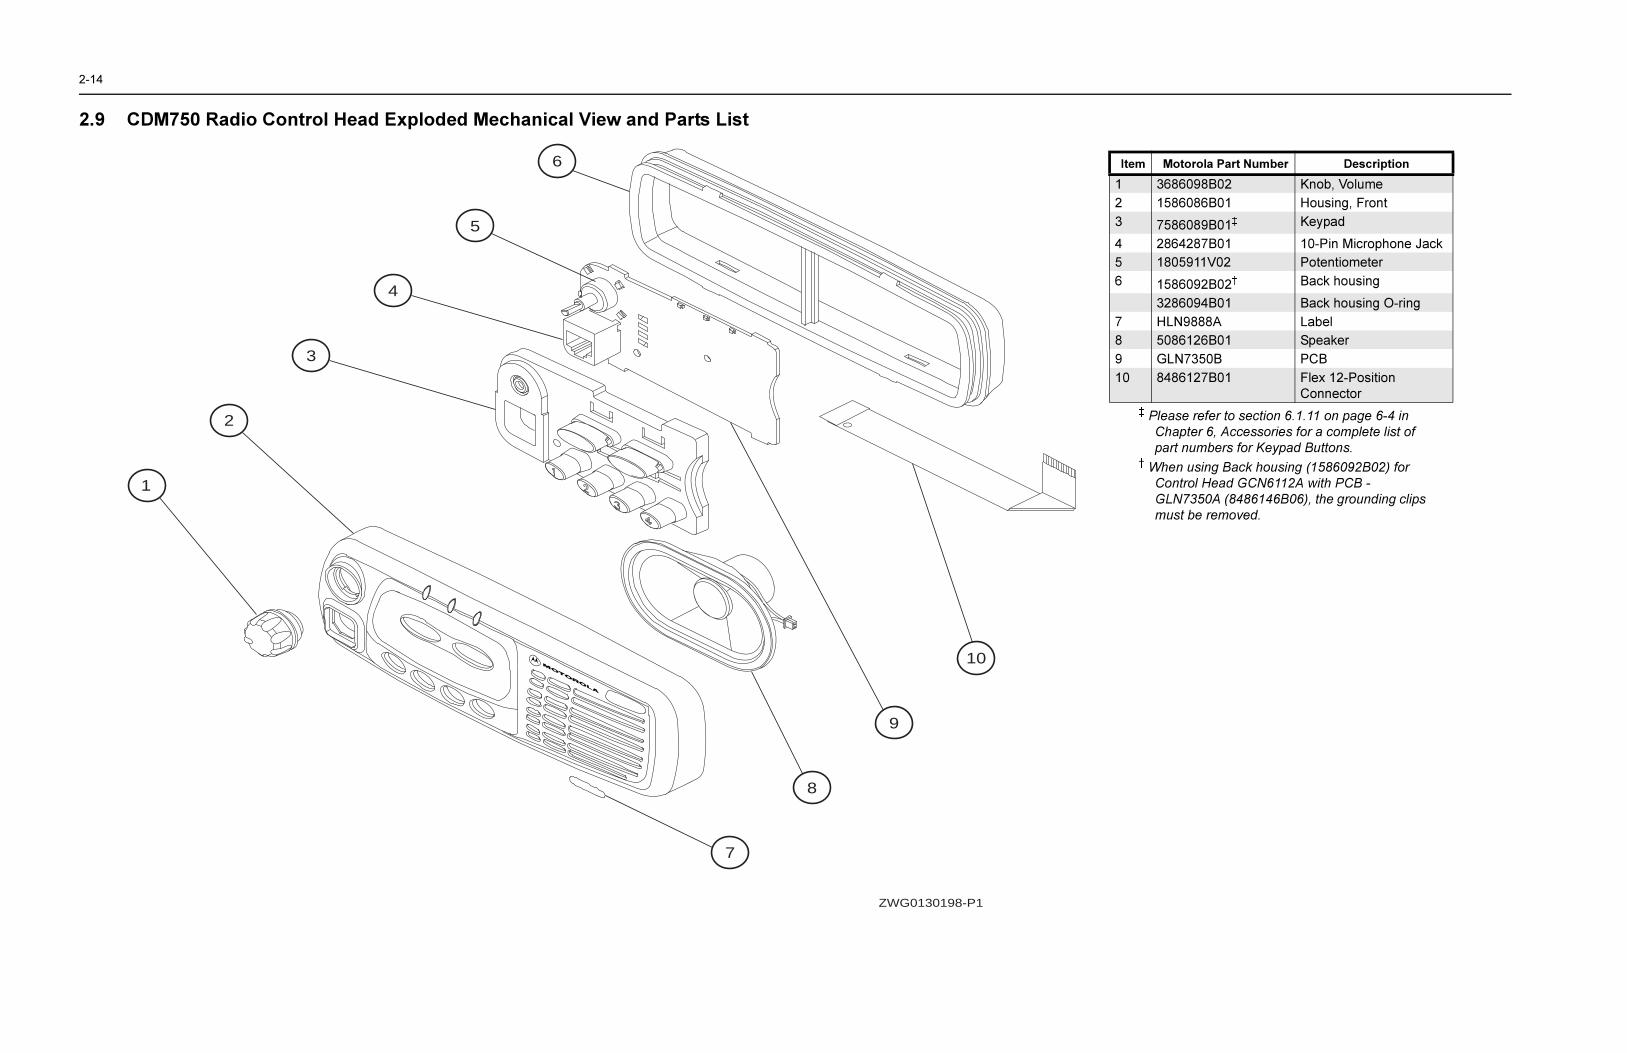
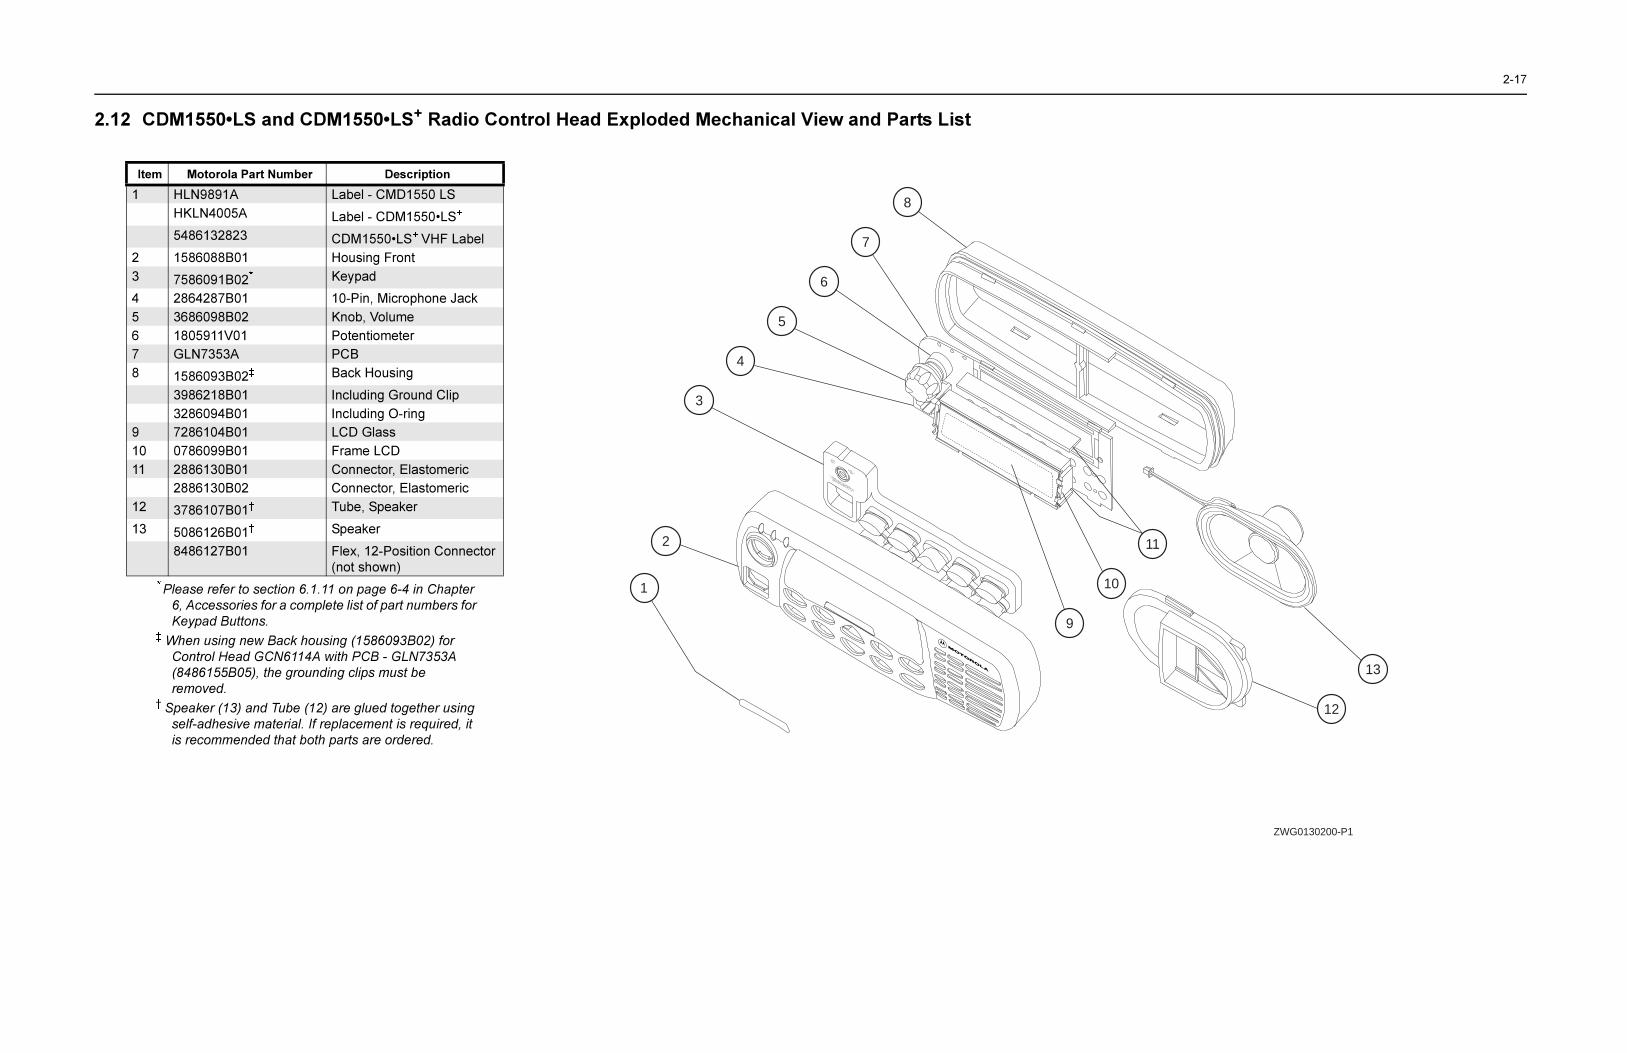
2.8 Radio Assembly Exploded Mechanical View and Parts List ............................. 2-132.9 CDM750 Radio Control Head Exploded Mechanical View and Parts List ........ 2-142.10 CDM1250 Radio Control Head Exploded Mechanical View and Parts List ...... 2-152.11 CDM1550 Radio Control Head Exploded Mechanical View and Parts List ...... 2-162.12 CDM1550•LS and CDM1550•LS+ Radio Control Head Exploded Mechanical View
and Parts List .................................................................................................... 2-172.13 Service Aids ...................................................................................................... 2-192.14 Test Equipment ................................................................................................. 2-202.15 Programming Test Cable Configuring and Wiring............................................. 2-21
Chapter 3Transceiver Performance Testing ............................................................ 3-1
3.1 General ............................................................................................................... 3-13.2 Setup................................................................................................................... 3-13.3 RF Test Mode ..................................................................................................... 3-2
Chapter 4Radio Programming and Tuning Procedures.......................................... 4-1
4.1 Introduction ......................................................................................................... 4-14.2 CPS Programming Setup.................................................................................... 4-14.3 Radio Tuning Setup ............................................................................................ 4-3
4.3.1 Initial Test Equipment Control Settings .....................................................4-34.4 Transmitter Tuning .............................................................................................. 4-4
4.4.1 Power Amplifier (PA) Bias Tuning .............................................................4-44.4.2 Reference Oscillator Warp ........................................................................4-54.4.3 DAC Tuning (LowBand radios only) ..........................................................4-64.4.4 Transmit Power Tuning .............................................................................4-7

v
4.4.5 Power Amplifier (PA) Voltage Limit Tuning (VHF 1-25W and UHF 1-25W LDMOS radios only).................................................................................. 4-7
4.4.6 Modulation Balance Attenuation ............................................................... 4-84.4.7 VCO Attenuation ....................................................................................... 4-94.4.8 VCO Attenuation (25 kHz) ........................................................................ 4-94.4.9 VCO Attenuation (20 kHz) ...................................................................... 4-104.4.10 VCO Attenuation (12.5 kHz) ................................................................... 4-104.4.11 DTMF Deviation Tuning .......................................................................... 4-114.4.12 MDC1200 Deviation Tuning (MDC radios only)...................................... 4-11
4.5 Receiver Tuning................................................................................................ 4-114.5.1 Front End Filter Tuning ........................................................................... 4-124.5.2 Rated Volume Tuning ............................................................................. 4-154.5.3 Squelch Tuning ....................................................................................... 4-16
Chapter 5Power Up Self-Test..................................................................................... 5-1
5.1 Error Codes - Conventional Radios .................................................................... 5-15.2 CDM1550•LS+ PassPort Tone Options.............................................................. 5-25.3 CDM1550•LS+ Special Diagnostic Functions..................................................... 5-35.4 CPS/PPCPS Programming Setup ....................................................................... 5-4
Chapter 6Accessories ................................................................................................ 6-1
6.1 Accessories ........................................................................................................ 6-16.1.1 Antennas................................................................................................... 6-16.1.2 Mounting ................................................................................................... 6-26.1.3 Remote Mount .......................................................................................... 6-26.1.4 Loudspeaker ............................................................................................. 6-26.1.5 Audio......................................................................................................... 6-26.1.6 Hands Free Operation .............................................................................. 6-36.1.7 Base Control ............................................................................................. 6-36.1.8 Desktop..................................................................................................... 6-46.1.9 Installation................................................................................................. 6-46.1.10 Option Boards ........................................................................................... 6-46.1.11 Buttons...................................................................................................... 6-4
6.2 Error Codes - PassPort....................................................................................... 6-7

vi
Chapter 7Model Chart and Test Specifications ....................................................... 7-1
7.1 UHF 403-470 MHz (Conventional) ...................................................................... 7-17.2 UHF 450-512 MHz (Conventional) ...................................................................... 7-27.3 UHF 403-470 MHz (Conventional, LTR) ............................................................. 7-37.4 UHF 450-512 MHz (Conventional, LTR) ............................................................. 7-37.5 UHF 403-470 MHz (Conventional, LTR/PassPort) ............................................. 7-47.6 UHF 450-512 MHz (Conventional, LTR/PassPort) ............................................. 7-57.7 LowBand 29.7-36 MHz........................................................................................ 7-67.8 LowBand 36-42 MHz........................................................................................... 7-67.9 LowBand 42-50 MHz........................................................................................... 7-77.10 VHF 136-174 MHz .............................................................................................. 7-87.11 VHF 136-174 MHz (LTR and PassPort).............................................................. 7-97.12 Specifications ................................................................................................... 7-10
Glossary.........................................................................................Glossary-1

1-1
Chapter 1
Introduction
1.1 Scope of ManualThis manual is intended for use by service technicians familiar with similar types of equipment. It contains service information required for the equipment described in this document and is current as of the printing date. Changes which occur after the printing date will be incorporated in a complete Manual Revision or alternatively as additions.
1.2 Warranty and Service SupportMotorola offers support which includes: full exchange and/or repair of the product during the warranty period; and service/repair or spare parts support out of warranty. Any “return for exchange” or “return for repair” to an authorized Motorola Dealer must be accompanied by a Warranty Claim Form. Warranty Claim Forms are available from Authorized Motorola Dealers.
1.2.1 Warranty Period and Return Instructions
The terms and conditions of warranty are defined fully in the Motorola Dealer, Distributor or Reseller contract. These conditions may change from time to time, and the following subsections are for guidance purposes only.In instances where the product is covered under a “return for replacement” or “return for repair” warranty, a check of the product should be performed prior to shipping the unit back to Motorola. This is to ensure that the product has been correctly programmed or has not been subjected to damage outside the terms of the warranty.Prior to shipping any radio back to the appropriate Motorola warranty depot, please contact Customer Resources. (See section 1.2.4 on page 1-3 of this chapter.) All returns must be accompanied by a Warranty Claim Form available from your Customer Resources representative. Products should be shipped back in the original packaging, or correctly packaged to ensure that no damage occurs in transit.
1.2.2 After Warranty PeriodAfter the Warranty period, Motorola continues to support its products in two ways:
1. Motorola's Radio Parts and Service Group offers repair service to users and dealers at competitive prices.
2. The Motorola Customer Care and Services Division (CCSD) supplies individual parts and mod-ules that can be purchased by dealers who are capable of performing fault analysis and repair.

1-2 Introduction
1.2.3 Piece Parts AvailabilitySome replacement parts, spare parts, and/or product information can be ordered directly.
Motorola Online:Motorola Online users can access our online catalog athttps://www.motorola.com/businessonlineTo register for online access, please call 800-814-0601.
Mail Orders:Send written orders to the following addresses:
Telephone OrdersCustomer Care and Services Division*7:00 AM to 7:00 PM (Central Standard Time)Monday through Friday (Chicago, U.S.A.)1-800-422-42101-847-538-8023 (International Orders)U.S. Federal Government Markets Division (USFGMD)1-800-826-1913 Federal Government Parts - Credit Cards Only8:30 AM to 5:00 PM (Eastern Standard Time)
If... It Means That...
A complete Motorola part number is assigned to the part, and it is not identified as Depot ONLY
The part is available from the Customer Care and Services Division.*
No part number is assigned The part is not normally available from Motorola.
The part number is appended with an asterisk
The part is serviceable by a Motorola Depot only.
A parts list is not included Generally, no user-serviceable parts are available for that kit or assembly.
*The Customer Care and Services Division (CCSD) was formerly known as the Accesso-ries and Aftermarket Division (AAD).
Replacement Parts/Test Equipment/Manuals/Crystal Service Items:
Motorola Inc.Customer Care and Services Division*(United States and Canada)Attention: Order Processing1307 E. Algonquin RoadSchaumburg, IL 60196
Federal Government Orders:
Motorola Inc.U.S. Federal Government Markets DivisionAttention: Order Processing7230 Parkway DriveLandover, MD 21076
International Orders:
Motorola Inc.Customer Care and Services Division*(United States and Canada)Attention: Order Processing1307 E. Algonquin RoadSchaumburg, IL 60196

Introduction 1-3
Fax OrdersCustomer Care and Services Division*1-800-622-6210847-576-3023 (International)USFGMD(Federal Government Orders)1-800-526-8641 (For Parts and Equipment Purchase Orders)
Parts IdentificationCustomer Care and Services Division*(United States and Canada)1-800-422-4210, menu 3
Product Customer ServiceCustomer Response Center*(Non-technical Issues)1-800-247-2346FAX:1-800-247-2347*The Customer Care and Services Division (CCSD) was formerly known as the Accessories and Aftermarket Division (AAD).
1.2.4 Technical SupportTechnical support is available to assist the dealer/distributor in resolving any malfunction which may be encountered. For service, contact the Service Depot in your area. If your area does not have a depot, please contact your Business Development Manager, Distributor, or contact Motorola Technical Support. When contacting Motorola Technical Support, keep the product model number and the unit’s serial number handy.For service, contact one of the following Depots. Please call and confirm your return before sending the unit to the depot for service.
Motorola Radio Support Center2200 Galvin Dr.Elgin, IL 601231-800-227-6772
Motorola Toronto Service Center3900 Victoria AvenueNorth York, Ontario, Canada M2H 3H71-800-543-3222 1-416-756-58411-888-331-9872 (Fax)
Motorola U.S. Federal Government Depot4395 Nicole DriveLanham, MD 207061-800-969-66801-301-731-6676

1-4 Introduction
1.3 Radio Model InformationThe model number and serial number are located on a label attached to the back of your radio. You can determine the RF output power, frequency band, protocols, and physical packages. The example below shows one mobile radio model number and its specific characteristics.Example: AAM25RHC9AA1AN
Table 1-1: Radio Model Number
Type of
Unit
Model Series
Freq. Band
Power Level
Physical Packages
Channel Spacing Protocol Feature
LevelModel
RevisionModel
Package
AA M 25 KVHF(136-
174MHz)
H1-
25W
ANo
Display, No Keypad
9 AA 14 Chan.
A N
RUHF1(403-
470MHz)
K25-
40W
CNo DisplayBasic Key-
pad
DULTR
264 Chan.
SUHF2(450-
512MHz)
D1-Line
Display, Limited Keypad
DPPassPort
5128
Chan.
BLow
Band, R1 (29.7-
36.0MHz)
F1-Line
Display, Standard Keypad
6160
Chan.LTR/
Passportw/MDC
on Conv.
CLow
Band, R2 (36.0-
42.0MHz)
8160
Chan.
DLow
Band, R3 (42.0-
50.0MHz)
AA
= M
otor
ola
Inte
rnal
Use
M =
Mob
ile
Pro
gram
mab
le
Con
vent
iona
l

2-1
Chapter 2
Maintenance
2.1 IntroductionThis chapter provides details about the following:
l Preventive maintenance (inspection and cleaning) l Safe handling of CMOS and LDMOS devicesl Disassembly and reassembly of the radiol Installation of optional retrofit kitl Installation of option boards
2.2 Preventive MaintenanceThe radios do not require a scheduled preventive maintenance program; however, periodic visual inspection and cleaning is recommended.
2.2.1 InspectionCheck that the external surfaces of the radio are clean, and that all external controls and switches are functional. It is not recommended to inspect the interior electronic circuitry.
2.2.2 Cleaning ProceduresThe following procedures describe the recommended cleaning agents and the methods to be used when cleaning the external and internal surfaces of the radio. External surfaces include the front cover, housing assembly, and battery case. These surfaces should be cleaned whenever a periodic visual inspection reveals the presence of smudges, grease, and/or grime.
The only recommended agent for cleaning the external radio surfaces is a 0.5% solution of a mild dishwashing detergent in water. The only factory recommended liquid for cleaning the printed circuit boards and their components is Isopropyl alcohol (100% by volume).
Cleaning External Plastic SurfaceApply the 0.5% detergent-water solution sparingly with a stiff, non-metallic, short-bristled brush to work all loose dirt away from the radio. Use a soft, absorbent, lintless cloth or tissue to remove the solution and dry the radio. Make sure that no water remains entrapped near the connectors, cracks, or crevices.
Cleaning Internal Circuit Boards and ComponentsIsopropyl alcohol (100%) may be applied with a stiff, non-metallic, short-bristled brush to dislodge embedded or caked materials located in hard-to-reach areas. The brush stroke should direct the
Note: Internal surfaces should be cleaned only when the radio is disassembled for service or repair.
CAUTION: Certain chemicals and their vapors can have harmful effects on certain plastics. Avoid using aerosol sprays, tuner cleaners, and other chemicals.!
C a u t i o n

2-2 Maintenance
dislodged material out and away from the inside of the radio. Make sure that controls or tunable components are not soaked with alcohol. Do not use high-pressure air to hasten the drying process since this could cause the liquid to collect in unwanted places. After completing the cleaning process, use a soft, absorbent, lintless cloth to dry the area. Do not brush or apply any Isopropyl alcohol to the frame, front cover, or back cover.
2.3 Safe Handling of CMOS and LDMOS Devices
Complementary metal-oxide semiconductor (CMOS) devices are used in this family of radios, and are susceptible to damage by electrostatic or high voltage charges. Damage can be latent, resulting in failures occurring weeks or months later. Therefore, special precautions must be taken to prevent device damage during disassembly, troubleshooting, and repair. Handling precautions are mandatory for CMOS circuits and are especially important in low humidity conditions. DO NOT attempt to disassemble the radio without first referring to the above CAUTION statement.
2.4 Repair Procedures and Techniques — GeneralParts Replacement and SubstitutionWhen damaged parts are replaced, identical parts should be used. If the identical replacement part is not locally available, check the parts list for the proper Motorola part number. Order parts from the nearest Motorola Communications parts center listed in Chapter 1, Introduction.
Note: Always use a fresh supply of alcohol and a clean container to prevent contamination by dissolved material (from previous usage).
CAUTION: This radio contains static-sensitive devices. Do not open the radio unless you are properly grounded. Take the following precautions when working on this unit:
l Store and transport all CMOS devices in conductive material so that all exposed leads are shorted together. Do not insert CMOS devices into conventional plastic “snow” trays used for storage and transportation of other semiconductor devices.
l Ground the working surface of the service bench to protect the CMOS device. We recommend using the Motorola Static Protection Assembly (part number 0180386A82), which includes a wrist strap, two ground cords, a table mat, and a floor mat.
l Wear a conductive wrist strap in series with a 100k resistor to ground. (Replace-ment wrist straps that connect to the bench top covering are Motorola part number RSX-4015.)
l Do not wear nylon clothing while handling CMOS devices.l Do not insert or remove CMOS devices with power applied. Check all power sup-
plies used for testing CMOS devices to be certain that there are no voltage tran-sients present.
l When straightening CMOS pins, provide ground straps for the apparatus used.l When soldering, use a grounded soldering iron.l If at all possible, handle CMOS devices by the package and not by the leads. Prior
to touching the unit, touch an electrical ground to remove any static charge that you may have accumulated. The package and substrate may be electrically com-mon. If so, the reaction of a discharge to the case would cause the same damage as touching the leads.
!C a u t i o n
Maintenance 2-3
Rigid Circuit BoardsThis family of radios uses bonded, multi-layer, printed circuit boards. Since the inner layers are not accessible, some special considerations are required when soldering and unsoldering components. The printed-through holes may interconnect multiple layers of the printed circuit. Therefore, exercise care to avoid pulling the plated circuit out of the hole.When soldering near the 20-pin and 40-pin connectors:
l Avoid accidentally getting solder in the connector. l Be careful not to form solder bridges between the connector pins. l Examine your work closely for shorts due to solder bridges.
2.5 Disassembling and Reassembling the Radio — GeneralSince these radios may be disassembled and reassembled with the use of only six (board to casting) screws (nine for LowBand), it is important to pay particular attention to the snaps and tabs, and how parts align with each other.The following tools are required for disassembling the radio:
l Small flat blade screwdriverl TORX™ T20 screwdriverl Dismantling Tool
If a unit requires more complete testing or service than is customarily performed at the basic level, send the unit to a Motorola Authorized Service Center. (See Chapter 1, Introduction for a list of regional service centers.)The following disassembly procedures should be performed only if necessary.
2.6 Radio Disassembly — DetailedThe procedure to remove and replace a control head is similar for all models of radio. A typical procedure is therefore shown followed by specific disassembly procedures for the different control heads.
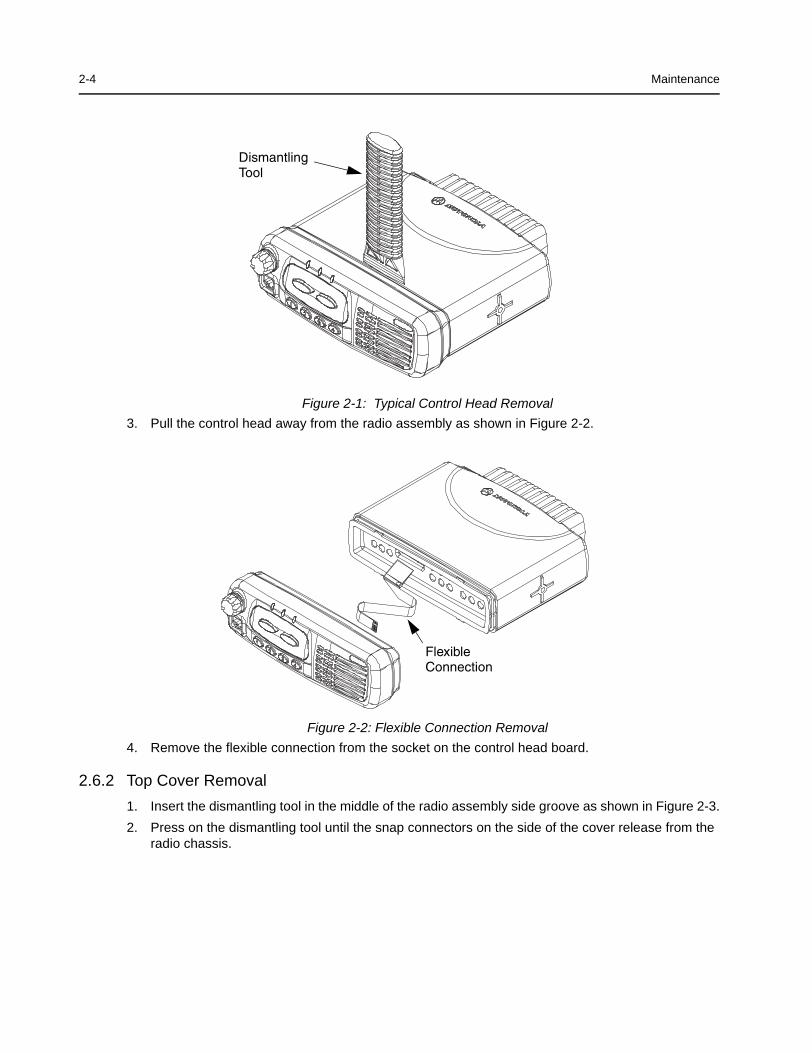
2.6.1 Control Head Removal1. Insert the dismantling tool in the groove between the control head and the radio assembly as
shown in Figure 2-1, on page 2-19.2. Press on the dismantling tool until the snap connectors on the side of the control head release
from the radio assembly.
2-4 Maintenance
Figure 2-1: Typical Control Head Removal3. Pull the control head away from the radio assembly as shown in Figure 2-2.
Figure 2-2: Flexible Connection Removal4. Remove the flexible connection from the socket on the control head board.
2.6.2 Top Cover Removal1. Insert the dismantling tool in the middle of the radio assembly side groove as shown in Figure 2-3.2. Press on the dismantling tool until the snap connectors on the side of the cover release from the
radio chassis.
Dismantling Tool
FlexibleConnection
Maintenance 2-5
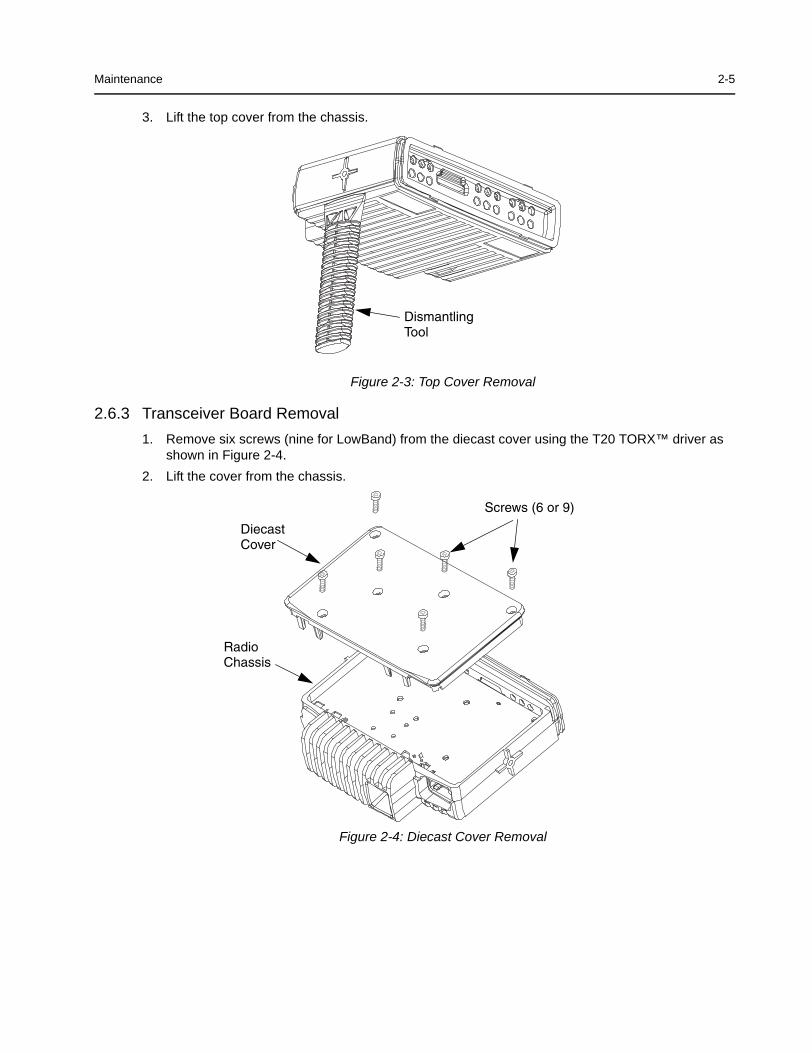
3. Lift the top cover from the chassis.
Figure 2-3: Top Cover Removal
2.6.3 Transceiver Board Removal1. Remove six screws (nine for LowBand) from the diecast cover using the T20 TORX™ driver as
shown in Figure 2-4.2. Lift the cover from the chassis.
Figure 2-4: Diecast Cover Removal
Dismantling Tool
DiecastCover
Screws (6 or 9)
Radio Chassis

2-6 Maintenance
3. Slowly lift the transceiver board on the edge at the front of the radio (the edge that mates with the control head) and pull gently toward the front of the radio as shown in Figure 2-5. Take care to slide the antenna connector and power connector out of the chassis towards the front.
Figure 2-5: Transceiver Board Removal
2.6.3.1 LowBand Transceiver Board Removal1. Remove the Control Head and Top Cover as directed in Sections 2.6.1 and 2.6.2 of this Manual.2. Using the T20 TORX™ driver, remove the nine screws holding the die cast cover to the radio
chassis.3. Remove the 20-pin accessory connector from the rear of the radio by pulling on it away from the
radio chassis with one hand while holding the radio chassis with the other.4. Remove the plastic protective cover over the opening at the front of the radio chassis that allows
access to the 18-pin flex connector.5. With the chassis sitting on the tabletop, insert one side of the dismantling tool, 6686119B01, into
the bottom of the opening at the front of the radio chassis. With the tool inserted between the bot-tom of the 18-pin flex connector and the radio chassis, use it to gently pry the transceiver board up from the radio chassis. The transceiver board may stick to the radio chassis as a result of the thermal material that is used between the heat dissipating devices and the radio chassis. Con-tinue applying an up and down force to the transceiver board until the various components become unstuck, and the transceiver board becomes loose enough to remove from the radio chassis.
6. Once the transceiver board is removed from the radio chassis, handle it per the procedure for “Safe Handling of CMOS and LDMOS Devices”, Section 2.3. In addition, take care not to disturb the thermal pad material that may adhere to the devices that mate with the thermal pads located on the radio chassis. Do not disturb the thermal pad on the radio chassis as well. Also, do not dis-rupt the conductive bead gasket that is applied to the radio chassis walls.
2.6.3.2. Removing and Replacing Defective LDMOS Devices (Q1402 and Q1403)1. Note that if one of the two Final stage devices (Q1402 or Q1403) is defective (i.e., TP1402 or
TP1403 resistance to ground is less than 25 kOhms), replace both devices, since the other
Note: If removing the transceiver board from the radio chassis causes the traces of the board to lift up away from the board, most noticeably around the final devices (Q1402, Q1403), the transceiver board must be scrapped and a new replacement transceiver board is required.
Lift
AntennaConnector

Maintenance 2-7
device may have been over-stressed as well. Handle the transceiver board per the procedure for “Safe Handling of CMOS and LDMOS Devices”, Section 2.3.
2. If removing the transceiver board, the thermal pad material under the two Final stage devices (Q1402 and Q1403) on the radio chassis has been pulled up such that the radio chassis is exposed through the thermal pad, then the defective thermal pads must be removed and replaced. This is only true for the case when the Final stage devices are being replaced. To remove the thermal pads, use a plastic scraper to prevent scratching of the radio chassis. Use a 0.5% detergent-water solution to remove any residue left on the radio chassis.
3. Remove the defective Final stage LDMOS devices from the transceiver board with a heat gun. Care should be taken not to cause displacement of any other parts.
4. Clean any excess solder from the device pads so that new devices can sit flush with the board.5. Hand solder on a replacement LDMOS device, with a suitable size soldering iron, by applying sol-
der to one lead and pad. Press the replacement LDMOS device with a dismantling tool from the top and reheat the lead and pad to cause the solder to reflow. Applying slight pressure on the device with the dismantling tool will avoid gaps between the lead and the board. Continue this approach and solder the remaining leads on one side of the LDMOS device. Once one side of the device leads are soldered continue with the other side while pressing the LDMOS device to the board with the dismantling tool. Finish soldering all leads taking care not to cause any shorts to nearby components or shorts across the device leads.
6. This step is necessary only if Step (2) from above was required, that is, if the thermal pad was required to be scraped off the radio chassis. If so, replace the thermal pad(s) from a 0.9 inch wide roll of Bergquist “Softface” replacement material, 3280384M34. Cut the material to a 0.25 inch length.
Remove the clear plastic backing from the replacement pad and stick the side from which the backing was removed to the bottom side of the Final device(s) requiring a new pad. Press the pad firmly to the bottom of the device making sure that it properly adheres to the device.
7. Reassemble the radio per Section 2.7.3.1, LowBand Radio Chassis and Transceiver Board Assembly.
8. Using the radio’s Customer Programming Software (CPS), reset the Bias Voltage for each of the Final devices and retune the radio’s power output.
2.6.4 CDM750 Control Head Disassembly1. To dismount the control head housing from the back housing, insert the dismantling tool in the
groove between the two housings as shown in Figure 2-6.
Note: DO NOT use a heat gun to solder a replacement LDMOS device to the board. This may cause damage to the LDMOS device.
Note: Exceeding the 0.25 inch length may result in an electrical short of any component that comes in contact with the thermal pad.

2-8 Maintenance
Figure 2-6: Control Head Back Housing Removal
2. Press the dismantling tool until the snap connectors on the side of the back housing release from the control head.
3. Disconnect the speaker socket.
Figure 2-7: Control Head Board Knob Removal4. Remove the board from the control head housing by stretching the control head housing and pull-
ing up on the board as shown in Figure 2-7 and Figure 2-8.5. Remove the keypad from the control head housing by lifting up the rubber keypad.
Note: DO NOT touch or contaminate the conductive pads on the under side of the keypad or the conductive contacts on the printed circuit board.

Maintenance 2-9
Figure 2-8: Board, Keypad and Speaker Removal6. Remove the speaker from the control head housing.
2.6.5 CDM1250, CDM1550, CDM1550•LS, and CDM1550•LS+ Control Head Disassembly1. Dismount the control head housing from the back housing as described for control head
CDM750, Figure 2-6.2. Disconnect the speaker socket and remove the speaker (Figure 2-9) with tube by stretching the
control head housing and pulling out the tube.
Figure 2-9: Speaker and Speaker Tube Removal3. Remove the board from the control head housing by stretching the control head housing and pull-
ing up on the board as described for control head CDM750, Figure 2-8.4. Remove the keypad from the control head housing by lifting up the rubber keypad.
2-10 Maintenance
5. Remove the display from the control head housing.
2.7 Radio Assembly
2.7.1 CDM750 Control Head 1. Locate the speaker in the control head and press it into place as shown in Figure 2-8.2. Insert the keypad into the control head ensuring that the keypad keys and connector cut-out fit
correctly.
3. On the board, rotate the on/off control spindle fully counter-clockwise.4. Rotate the volume knob on the housing fully counter-clockwise5. Align the board with the control head and insert the on/off control spindle through the hole in the
keypad.6. Locate the two snap tags on the board in the grooves in the control head and press the board into
place until all of the tags snap into place.7. Connect the speaker connector to the connector on the board.
2.7.2 CDM1250, CDM1550, CDM1550•LS, and CDM1550•LS+ Control Heads 1. Locate the display in the control head ensuring that the two cut-outs in the display are aligned
with their corresponding indentations, then press the display into place.
2. Fit the rubber keypad onto the board ensuring that the on/off control and accessory connector on the board locate correctly with the cut-outs in the keypad.
3. On the board, rotate the on/off control spindle fully counter-clockwise.4. Rotate the volume knob on the front housing counter-clockwise.5. Align the board (with the rubber keypad attached) with the control head, inserting the on/off con-
trol spindle and accessory connector through the holes in the control head.6. Ensure that the keypad, on/off control spindle and microphone connector are aligned with the
control head then press the board into place until it clicks.7. Insert the speaker and speaker tube with speaker into the control head and press it in until it
clicks.8. Connect the speaker connector to the board.
2.7.3 Radio Chassis and Transceiver Board1. Inspect the transceiver board and if required reapply thermal grease to the heatsink area on the
chassis and heat dissipating devices. You may have to scrap existing thermal pad from the chas-sis prior to applying the grease.
2. Insert the transceiver board at an angle (approximately 30°) into the chassis taking care to slide the antenna connector and accessory connector into their cut-outs in the chassis.
3. Lower the transceiver board onto the chassis and align the two locating holes in the board with the locating pins in the chassis.
4. Secure the cover to the chassis with the six screws previously removed.
Note: DO NOT touch or contaminate the conductive pads on the under side of the keypad or the conductive contacts on the printed circuit board.
Note: DO NOT touch or contaminate the conductive pads on the underside of the keypad.
Note: DO NOT touch or contaminate the conductive pads on the underside of the display.
Maintenance 2-11
5. Torque the six screws to 17 in lbs. (1.9 NM) using the T20 TORX™ driver. Begin with the two screws located in the middle of the chassis followed by the four outer screws. Since the screws usually take a set, torque the screws a second time (1.9 NM) in the same order.
6. Refit the top cover over the assembled radio chassis. Press the cover down until it snaps into place.
2.7.3.1 LowBand Radio Chassis and Transceiver Board Assembly1. Inspect the transceiver board. If the LDMOS final devices (Q1402 and Q1403) were replaced, see
Section 2.6.3.2 as how to replace the thermal pad if necessary.
2. Insert the transceiver board at an angle (approximately 30°) into the radio chassis taking care to slide the antenna connector and accessory connector into their cut-outs in the radio chassis.
3. Lower the transceiver board onto the radio chassis and align the two locating holes in the trans-ceiver board with the locating pins in the radio chassis.
4. Replace the 20-pin accessory connector. Make sure the connector is fully engaged in its opening before replacing the die cast cover.
5. Replace the die cast cover over the radio chassis making sure the black carbon on the bottom of the pressure pad is positioned properly over the switch printed on the transceiver board.
6. Secure the die cast cover to the radio chassis with the nine screws previously removed.7. Torque the nine screws to 17 in lbs (1.9 NM) using the T20 TORX™ driver. Tighten the die cast
cover screws in the sequence labeled on the top of the cover or as shown in Figure 2-10. Since the screws take a set it is importance to torque the screws a second time (17 in lbs) in the same order.
8. Insert the plastic protective cover into the 18-pin connector located at the front of the radio chas-sis.
9. Refit the top cover over the assembled radio chassis. Press the cover down until it snaps into place.
10. Replace the Control Head per Section 2.7.4.
Note: Thermal grease used with the chassis eliminator, 8180384J61, must be completely removed from all devices. DO NOT USE THERMAL GREASE on the radio chassis. This may cause instability of the transmitter under certain load conditions.
Note: The B02 version of the die cast cover will have locating pins to hold the pressure pad in place on the die cast cover. This will automatically align the pressure pad on the switch.

2-12 Maintenance
Figure 2-10: Top view of the LowBand radio chassis and die cast cover showing the screw sequence
2.7.4 Control Head Fitting1. Align the “0” mark on the flex with the “0” mark on the chassis to the socket on the radio assembly
as shown in Figure 2-2.2. Check that the back housing o-ring seal is undamaged and fitted in the groove. Replace the seal
if it is damaged (for more information, please see the exploded view diagrams and parts list beginning in section "2.9 CDM750 Radio Control Head Exploded Mechanical View and Parts List" on page 14 of this chapter).
3. Fit the back housing to the control head. Ensure that the tags on the back housing align with the snap catch grooves on the control head. Press the back housing into place until it snaps into place.
4. Check that the radio chassis o-ring seal is undamaged and fitted in the groove on the chassis assembly. Replace the seal if it is damaged.
1
2
3
4
5
7
6
8
9
8
ZWG0130202-B
6
5
4
3
15
1
2
7
9
10
!
!" #$%
&#' (
)*+
'#' #
#& ",-
./!0% #*$ 1
!0% &## -#
!02"%
.
!02"%
.
!02"%
.
. .
.
. # . #
. #
&!% 3#'45!%& 3#'45!%
& 3#'5!%
3# $ 26783 '7.# !%
9!02"%
3# $ 26783 '7.# !%
:
9 +5;-0 +"80
< 3#'4455
13
14
12
11
17
18
19
20
16
"
!
;,/$"
*$ 1+
;-0
#0:# / "
#$ 1
#$ 181
*6(& 6, 30
6(
+5 #
! "#$%&'%'( )*+',*-+./#%"$$%( 0
#!$%&#'
1
2
5
7
6
8
3
4
10
9
ZWG0130198-P1

10
11
12
13
ZWG0130199-P1
(& #!(%&#'
!
*6(& 6, *$ 1+
= ;-0
67 +"67
;,/$"
#0:# / "
6(&
#*$ 1
>#$1$0 >#$181
4$,30
#? "# #? "#
30
+5 #! '%
=
! "#$%&/%'( )*+/,*-+./#'"$$##%#( 0
1!"/( 2"( 03 4
1
2
5
7
6
8
9
3
4
(
10
12
13
9
11
ZWG0130200-P1
( #!(%%&#'
!
*6(& 6, *$ 1+
;-0
#0:#
;,/$"/ "
6(&
#*$ 1
>#$1$0
>#$181
67 +"67
#? "#
#? "# 4$,30
30
+5 #! '%
,! "#$%&/%'( )*+,*-+./#/"$$##%#( 0
1!"/( 2"'( 03 4
1
2
5
7
6
8
3
4
10
12
13
9
11
ZWG0130200-P1
( #!(%%&)*#!(%%&)*+#'
!
*6(& 6,763
*;6(& 6,7@63
7@63/*+6,
*$ 1+
;-0
#0:#
;,/$"
/ " 6(&
#*$ 1
>#$1$0
>#$181 67
+"67
#? "# #? "#
4$,30
30
+5 #! '%
,! "#$%&/%'( )*+,*-+./#/"$$##%#( 0
1!"/( 2"'( 03 4
1
2
5
7
6
8
3
4

Service Aids 2-19
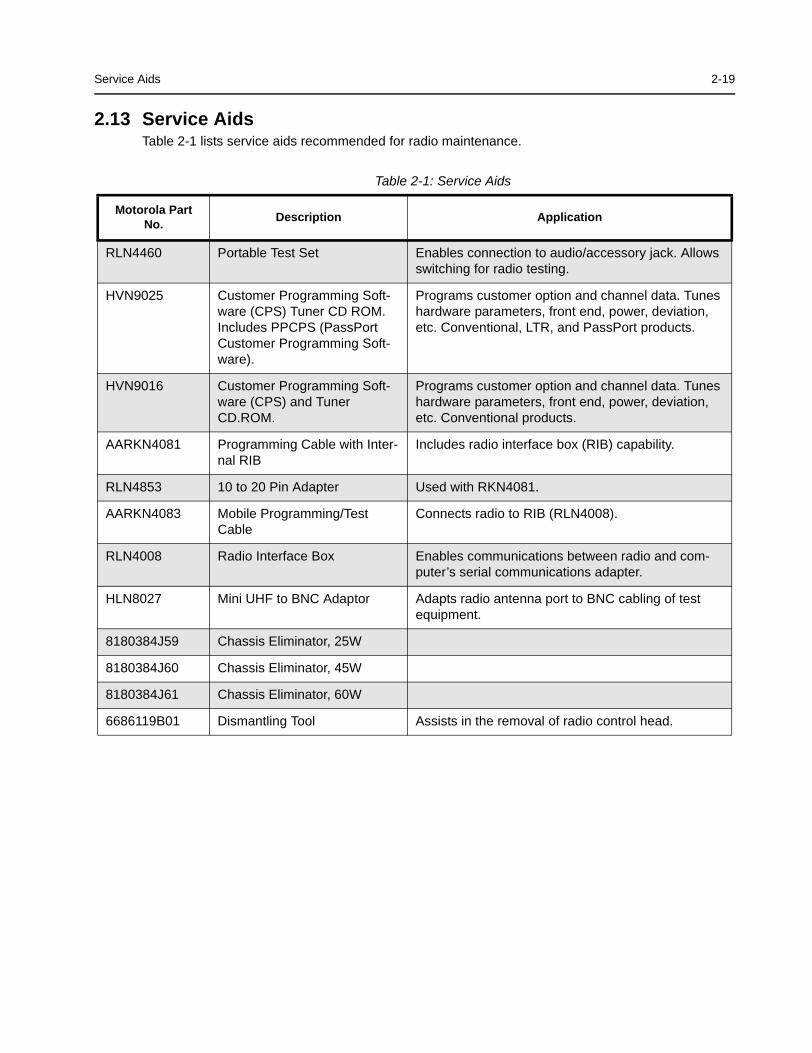
2.13 Service AidsTable 2-1 lists service aids recommended for radio maintenance.
Table 2-1: Service Aids
Motorola Part No. Description Application
RLN4460 Portable Test Set Enables connection to audio/accessory jack. Allows switching for radio testing.
HVN9025 Customer Programming Soft-ware (CPS) Tuner CD ROM. Includes PPCPS (PassPort Customer Programming Soft-ware).
Programs customer option and channel data. Tunes hardware parameters, front end, power, deviation, etc. Conventional, LTR, and PassPort products.
HVN9016 Customer Programming Soft-ware (CPS) and Tuner CD.ROM.
Programs customer option and channel data. Tunes hardware parameters, front end, power, deviation, etc. Conventional products.
AARKN4081 Programming Cable with Inter-nal RIB
Includes radio interface box (RIB) capability.
RLN4853 10 to 20 Pin Adapter Used with RKN4081.
AARKN4083 Mobile Programming/Test Cable
Connects radio to RIB (RLN4008).
RLN4008 Radio Interface Box Enables communications between radio and com-puter’s serial communications adapter.
HLN8027 Mini UHF to BNC Adaptor Adapts radio antenna port to BNC cabling of test equipment.
8180384J59 Chassis Eliminator, 25W
8180384J60 Chassis Eliminator, 45W
8180384J61 Chassis Eliminator, 60W
6686119B01 Dismantling Tool Assists in the removal of radio control head.
2-20 Service Aids
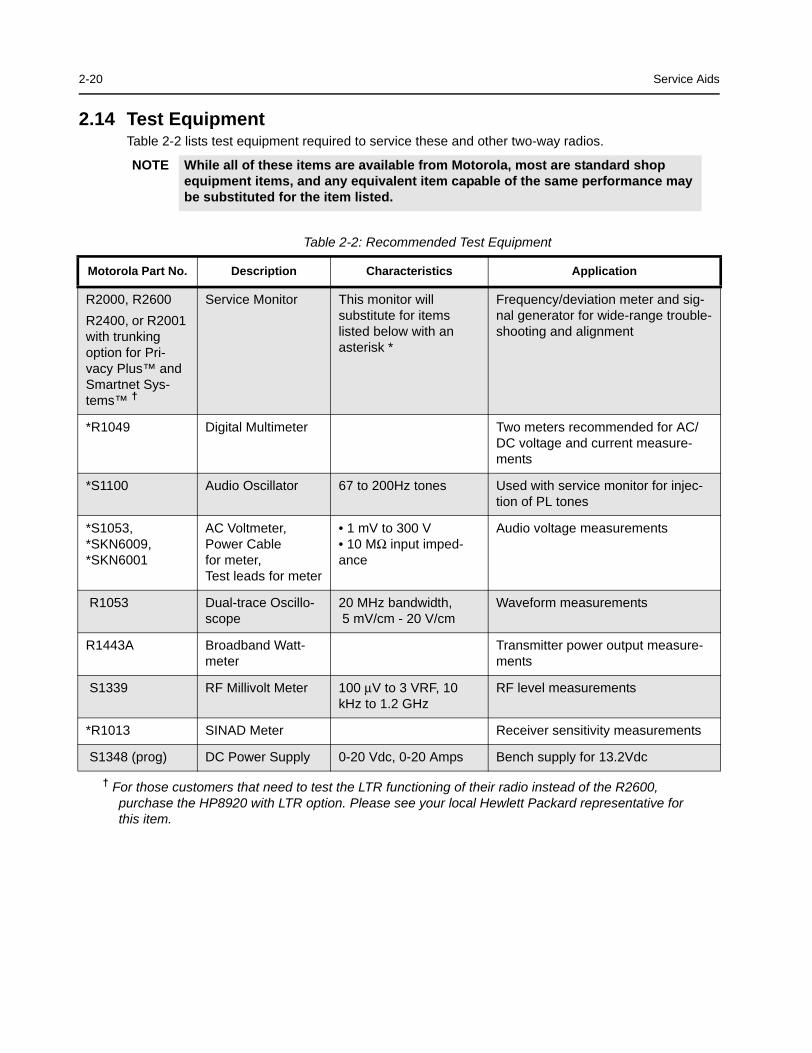
2.14 Test EquipmentTable 2-2 lists test equipment required to service these and other two-way radios.
† For those customers that need to test the LTR functioning of their radio instead of the R2600, purchase the HP8920 with LTR option. Please see your local Hewlett Packard representative for this item.
NOTE While all of these items are available from Motorola, most are standard shop equipment items, and any equivalent item capable of the same performance may be substituted for the item listed.
Table 2-2: Recommended Test Equipment
Motorola Part No. Description Characteristics Application
R2000, R2600R2400, or R2001 with trunking option for Pri-vacy Plus™ and Smartnet Sys-tems™ †
Service Monitor This monitor will substitute for items listed below with an asterisk *
Frequency/deviation meter and sig-nal generator for wide-range trouble-shooting and alignment
*R1049 Digital Multimeter Two meters recommended for AC/DC voltage and current measure-ments
*S1100 Audio Oscillator 67 to 200Hz tones Used with service monitor for injec-tion of PL tones
*S1053, *SKN6009, *SKN6001
AC Voltmeter, Power Cable for meter, Test leads for meter
• 1 mV to 300 V• 10 MΩ input imped-ance
Audio voltage measurements
R1053 Dual-trace Oscillo-scope
20 MHz bandwidth, 5 mV/cm - 20 V/cm
Waveform measurements
R1443A Broadband Watt-meter
Transmitter power output measure-ments
S1339 RF Millivolt Meter 100 µV to 3 VRF, 10 kHz to 1.2 GHz
RF level measurements
*R1013 SINAD Meter Receiver sensitivity measurements
S1348 (prog) DC Power Supply 0-20 Vdc, 0-20 Amps Bench supply for 13.2Vdc
Service Aids 2-21
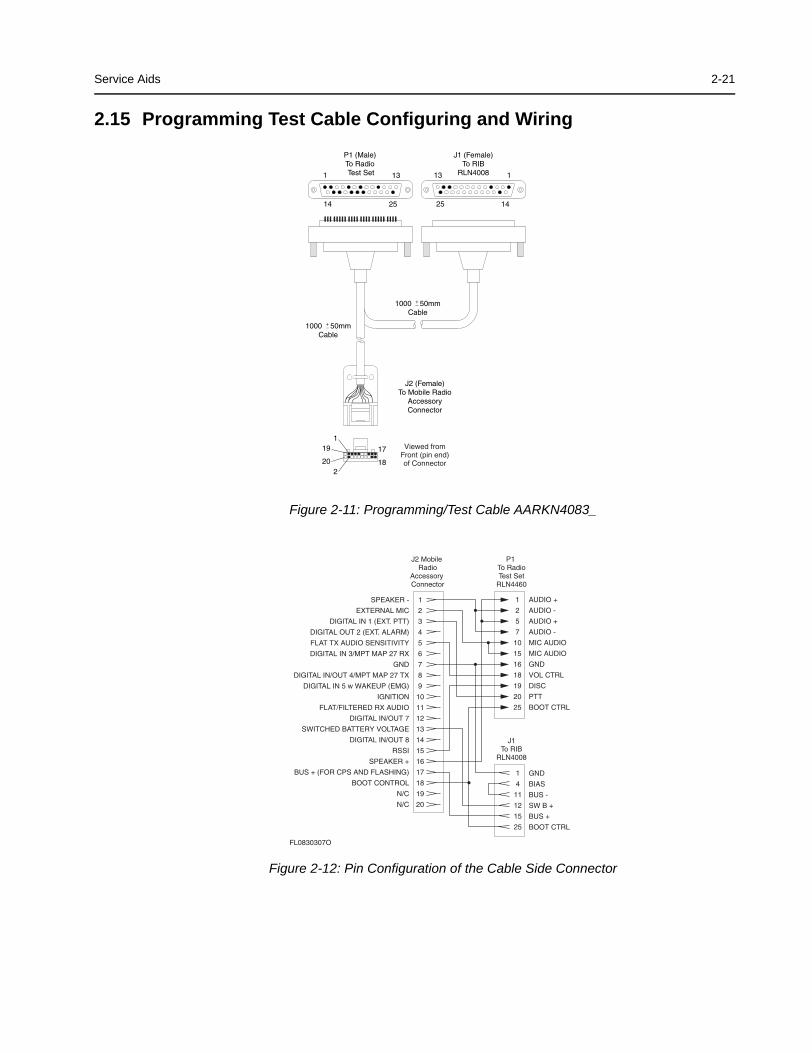
2.15 Programming Test Cable Configuring and Wiring
Figure 2-11: Programming/Test Cable AARKN4083_
Figure 2-12: Pin Configuration of the Cable Side Connector
P1 (Male)To Radio Test Set
J2 (Female)To Mobile Radio
AccessoryConnector
1 13 13 1
14252514
J1 (Female)To RIB
RLN4008
1000 50mmCable
+_
1000 50mmCable
+_
17
18
1
2
19
20
Viewed fromFront (pin end)of Connector
J2 Mobile Radio
Accessory Connector
SPEAKER -
EXTERNAL MIC
DIGITAL IN 1 (EXT. PTT)
DIGITAL OUT 2 (EXT. ALARM)
FLAT TX AUDIO SENSITIVITY
DIGITAL IN 3/MPT MAP 27 RX
GND
DIGITAL IN/OUT 4/MPT MAP 27 TX
DIGITAL IN 5 w WAKEUP (EMG)
IGNITION
FLAT/FILTERED RX AUDIO
DIGITAL IN/OUT 7
SWITCHED BATTERY VOLTAGE
DIGITAL IN/OUT 8
RSSI
SPEAKER +
BUS + (FOR CPS AND FLASHING)
BOOT CONTROL
N/C
N/C
1
2
3
4
5
6
7
8
9
10
11
12
13
14
15
16
17
18
19
20
AUDIO +
AUDIO -
AUDIO +
AUDIO -
MIC AUDIO
MIC AUDIO
GND
VOL CTRL
DISC
PTT
BOOT CTRL
1
2
5
7
10
15
16
18
19
20
25
P1 To RadioTest Set
RLN4460
GND
BIAS
BUS -
SW B +
BUS +
BOOT CTRL
1
4
11
12
15
25
J1To RIB
RLN4008
FL0830307O

2-22 Service Aids
Notes
3-1
Chapter 3
Transceiver Performance Testing
3.1 GeneralThese radios meet published specifications through their manufacturing process by utilizing high- accuracy, laboratory-quality test equipment. The recommended field service equipment approaches the accuracy of the manufacturing equipment with few exceptions. This accuracy must be maintained in compliance with the manufacturer’s recommended calibration schedule.
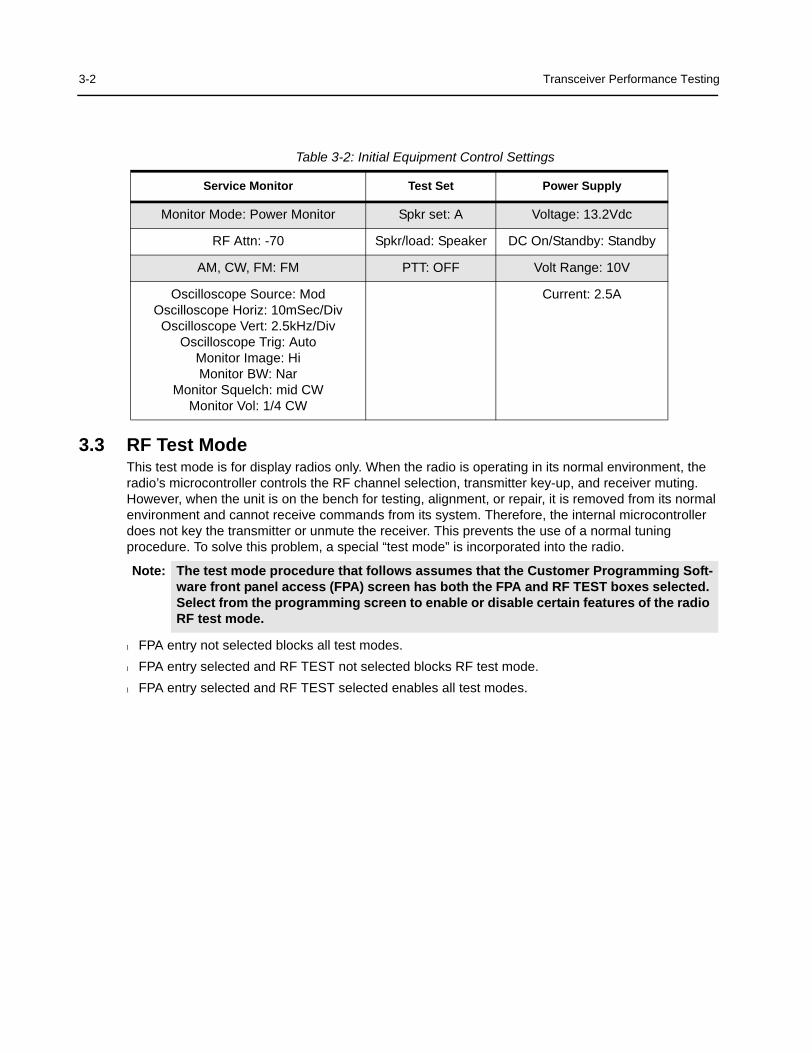
3.2 SetupSupply voltage is provided using a 13.2Vdc power supply. The equipment required for alignment procedures is connected as shown in the Radio Tuning Test Equipment Setup Diagram, Figure 4-4, on page 4-3.
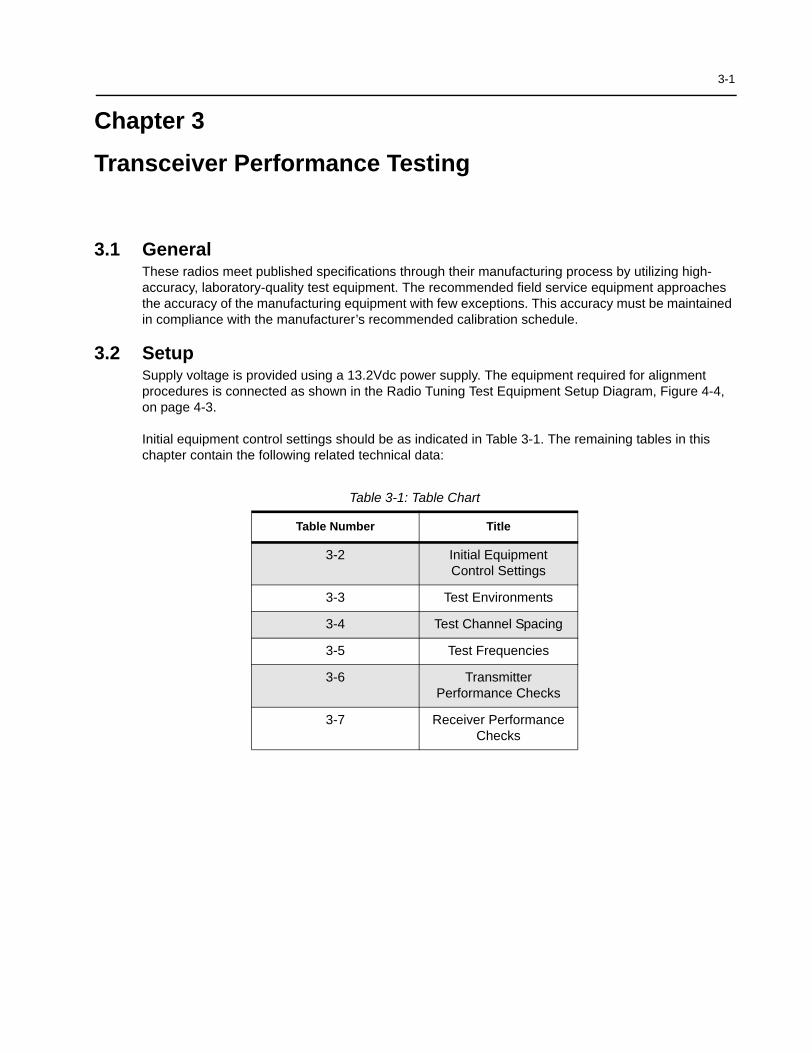
Initial equipment control settings should be as indicated in Table 3-1. The remaining tables in this chapter contain the following related technical data:
Table 3-1: Table Chart
Table Number Title
3-2 Initial EquipmentControl Settings
3-3 Test Environments
3-4 Test Channel Spacing
3-5 Test Frequencies
3-6 Transmitter Performance Checks
3-7 Receiver Performance Checks
3-2 Transceiver Performance Testing
3.3 RF Test ModeThis test mode is for display radios only. When the radio is operating in its normal environment, the radio’s microcontroller controls the RF channel selection, transmitter key-up, and receiver muting. However, when the unit is on the bench for testing, alignment, or repair, it is removed from its normal environment and cannot receive commands from its system. Therefore, the internal microcontroller does not key the transmitter or unmute the receiver. This prevents the use of a normal tuning procedure. To solve this problem, a special “test mode” is incorporated into the radio.
l FPA entry not selected blocks all test modes.l FPA entry selected and RF TEST not selected blocks RF test mode.l FPA entry selected and RF TEST selected enables all test modes.
Table 3-2: Initial Equipment Control Settings
Service Monitor Test Set Power Supply
Monitor Mode: Power Monitor Spkr set: A Voltage: 13.2Vdc
RF Attn: -70 Spkr/load: Speaker DC On/Standby: Standby
AM, CW, FM: FM PTT: OFF Volt Range: 10V
Oscilloscope Source: ModOscilloscope Horiz: 10mSec/Div
Oscilloscope Vert: 2.5kHz/DivOscilloscope Trig: Auto
Monitor Image: HiMonitor BW: Nar
Monitor Squelch: mid CWMonitor Vol: 1/4 CW
Current: 2.5A
Note: The test mode procedure that follows assumes that the Customer Programming Soft-ware front panel access (FPA) screen has both the FPA and RF TEST boxes selected. Select from the programming screen to enable or disable certain features of the radio RF test mode.

Transceiver Performance Testing 3-3
To enter test mode:
1. Turn the radio on.2. Within ten seconds after the self test is complete, press button P2, five times in succession.3. After “CSQ CHXX SP25” appears in the display, the radio is on channel XX*, carrier squelch
mode, 25 kHz channel spacing.4. Each additional press of P2 scrolls through to the next channel spacing and a corresponding set
of tones are sounded.5. Pressing P1 scrolls through and accesses test environments as shown in Table 3-2.6. Pressing P2 for three seconds switches the radio to the control head test mode. ‘LCD Test’
appears on the display.7. Pressing P1 causes the radio to turn on all the dots of the first character. Another P1 press turns
on all the dots of the next character and so on until the last character (character 14).8. Pressing P1 at the end of the LCD test activates the ‘Icon Test’. The next P1 press turns on the
first icon.9. Pressing P1 at the end of the Icon test activates the button test. Pressing any button (except P1)
or any keypad button during the LCD test or Icon test immediately activates this test.10. Pressing P2 for 3 seconds in the control head test mode causes the radio to return to the RF test
mode. *XX = channel number (01 - 14)

3-4 Transceiver Performance Testing
Table 3-3: Test Environments
Table 3-4: Test Channel Spacing
No. of Beeps Description Function
1 Carrier Squelch RX: if carrier detectedTX: mic audio
1 TonePrivate-Line
RX: unsquelch if carrier and tone (192.8Hz) detectedTX: mic audio + tone (192.8Hz)
2 DigitalPrivate-Line
RX: unsquelch if carrier and digital code (131) detectedTX: mic audio + digital code (131)
3 Dual-Tone multiple
frequency
RX: unsquelch if carrie detectedTX: selected DTMF tone pair
9 MDC1200HSS
RX: unsquelch if carrier detectedTX: 1500Hz tone
5 UnsquelchOpen
RX: constant unsquelchTX: mic audio
11 CMP RX: if carrier detectedTX: mic audio
12 LLE RX: if detectedTX: mic audio
Number of Beeps Channel Spacing
1 25 kHz
2 12.5 kHz
3 20 kHz

Transceiver Performance Testing 3-5
Table 3-5: Test Frequencies
Test Mode
Test Channel
Low Power
Test Channel
High Power
LowBandRange 1 29.7 - 36
MHz
LowBandRange 2
36 - 42 MHz
LowBandRange 3
42 - 50 MHzVHF UHF 403-
470 MHzUHF 450-520 MHz (VMOS)
UHF 450-527 MHz (LDMOS)
TX 1 8 29.725 36.025 42.025 136.025 403.025 450.025 450.025
RX 1 8 29.750 36.050 42.050 136.050 403.050 450.050 450.050
TX 2 9 30.225 37.125 43.225 142.325 414.150 461.650 462.825
RX 2 9 30.325 37.225 43.125 142.350 414.175 461.675 462.850
TX 3 10 31.025 38.225 44.525 148.625 425.325 473.325 475.650
RX 3 10 31.125 38.325 44.425 148.650 425.350 473.350 475.675
TX 4 11 32.125 39.125 46.125 154.975 436.475 484.975 488.475
RX 4 11 32.225 39.225 46.025 155.025 436.525 485.025 488.525
TX 5 12 33.025 40.225 47.525 161.225 447.650 496.650 501.325
RX 5 12 33.125 40.325 47.425 161.250 447.675 496.675 501.350
TX 6 13 34.225 41.025 48.125 167.525 458.825 508.325 514.125
RX 6 13 34.325 41.125 48.025 167.550 458.850 508.350 514.150
TX 7 14 35.950 41.950 49.950 173.950 469.950 519.950 526.950
RX 7 14 35.975 41.975 49.975 173.975 469.975 519.975 526.975
3-6 Transceiver Performance Testing
Table 3-6: Transmitter Performance Checks
Test Name Communications Analyzer Radio Test Set Comment
Reference Frequency
Mode: PWR MON4th channel test frequency*
Monitor: Frequency errorInput at RF In/Out
TEST MODE,Test Channel 4 carrier squelch
PTT to continuous (during the
performance check)
Frequency error: ±150 Hz VHF,±150 Hz UHF
±100 Hz LowBand
Power RF As above As above As above Low Power: 25-30W.High Power: 45-54W
(VHF).High Power: 40-47W
(403-470 MHz)60-70W (LowBand)
Voice Modulation
Mode: PWR MON4th channel test frequency*atten to -70, input to RF In/
OutMonitor: DVM, AC Volts
Set 1kHz Mod Out level for 800mVrms at test set,
800mVrms at AC/DC test set jack
As above As above, meter selector
to mic
Deviation:2.5 kHz Max. (12.5
kHz Ch. Sp).4 kHz Max. (20 kHz
Ch. Sp).5 kHz Max. (20 kHz Ch. Sp. LowBand)
5 kHz Max. (25 kHz Ch. Sp).
Voice Modulation (internal)
Mode: PWR MON4th channel test frequency*atten to -70, input to RF In/
Out
TEST MODE, Test Channel 4 carrier squelch
output at antenna
Remove modulation
input
Deviation:2.5 kHz Max. (12.5
kHz Ch. Sp.).4 kHz Max. (20 kHz
Ch. Sp.).5 kHz Max. (25 kHz
Ch. Sp.).
High-Speed Data
Modulation**
As above TEST MODE, Test Channel 4
high speed output at antenna
PTT to continuous (during the
performance check).
Deviation: 1.6-1.9 kHz (12.5
kHz Ch. Sp.).2.5-3.0 kHz (20 kHz
Ch. Sp.).3.2-3.8 kHz (25 kHz
Ch. Sp.).
DTMF Modulation
As above,4th channel test frequency*
TEST MODE, Test Channel 4 DTMF output at antenna
As above Deviation: 1.4-1.9 kHz (12.5 kHz Ch. Sp.).2.3-3.0 kHz (20 kHz Ch. Sp.).2.9-3.8 kHz (25 kHz Ch. Sp.).

Transceiver Performance Testing 3-7
* See Table 3-4** MDC
PL/DPL Modulation
As above4th channel test frequency*BW to narrow
TEST MODE, Test Channel 4TPLDPL
As above Deviation:0.25-0.5 kHz (12.5 kHz Ch. Sp.).0.4-0.8 kHz (20 kHz Ch. Sp.).0.5-1.0 kHz (25 kHz Ch. Sp.).
Table 3-6: Transmitter Performance Checks (Continued)
Test Name Communications Analyzer Radio Test Set Comment

3-8 Transceiver Performance Testing
* See Table 3-4
Table 3-7: Receiver Performance Checks
Test Name Communications Analyzer Radio Test Set Comment
Reference Frequency
Mode: PWR MON4th channel test frequency*
Monitor: Frequency errorInput at RF In/Out
TEST MODE,Test Channel 4 carrier squelch
output at antenna
PTT to continuous (during the
performance check)
Frequency error to be ±150 Hz VHF
±150 Hz UHF±100 Hz LowBand
Rated Audio Mode: GENOutput level: 1.0mV RF
4th channel test frequency*Mod: 1kHz tone at
3kHz deviationMonitor: DVM: AC Volts
TEST MODETest Channel 4 carrier squelch
PTT to OFF (center), meter
selector to Audio PA
Set volume control to 8.12Vrms
Distortion As above, except to distortion As above As above Distortion <5.0%
Sensitivity (SINAD)
As above, except SINAD, lower the RF level for 12dB
SINAD.
As above PTT to OFF (center)
RF input to be <0.3µV
Noise Squelch Threshold (only
radios with conventional
system need to be tested)
RF level set to 1mV RF As above PTT to OFF (center), meter
selection to Audio PA, spkr/ load to speaker
Set volume control to 3.16Vrms
As above, except change frequency to a conventional system. Raise RF level from zero until radio unsquelches.
out of TEST MODE; select a
conventional system
As above Unsquelch to occur at <0.25µV.Preferred SINAD =
9-10dB

4-1
Chapter 4
Radio Programming and Tuning Procedures
4.1 IntroductionThis chapter provides an overview of the Customer Programming Software (CPS) and tuner program designed for use in a Windows 95/98/NT environment. An installation instruction manual is also included with each kit.
Table 4-1: Software Installation Kit Radio Tuning Setup
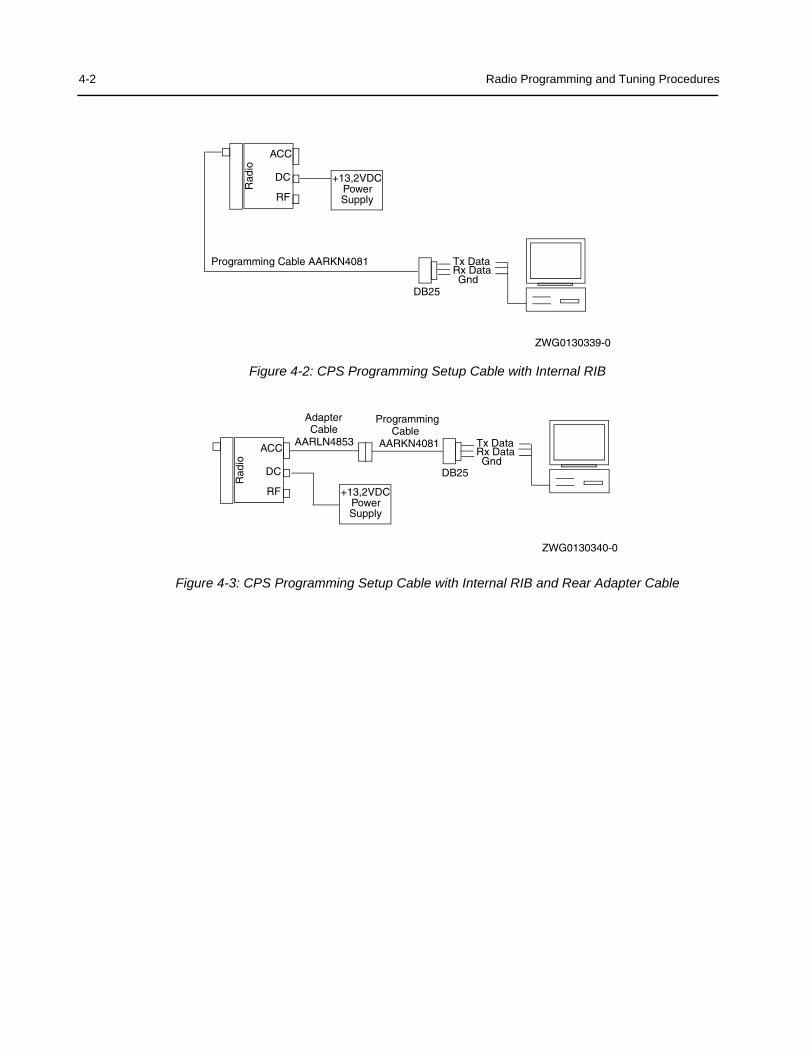
4.2 CPS Programming SetupThe CPS programming setups, shown in Figure 4-1 through Figure 4-3, are used to program the radio.
Description Kit Number
Customer Programming Software (CPS+) CDIncludes CPS and PPCPS
HVN9025_
Note: Refer to the appropriate program on-line help files for detailed programming proce-dures.
Figure 4-1: CPS Programming Setup with RIB
RIB
RLN-4008 Rx GndData
Tx Data
Cable 3080369B72 (9 PIN)
DB15
Cable 3080369B71 (25 PIN)
Power Supply
+13,2VDC
Programming
AARKN4081Cable
DB25
Rad
io
DC
RF
ACC
ZWG0130338-0
4-2 Radio Programming and Tuning Procedures
Figure 4-2: CPS Programming Setup Cable with Internal RIB
Figure 4-3: CPS Programming Setup Cable with Internal RIB and Rear Adapter Cable
Power Supply
+13,2VDC
Programming Cable AARKN4081 Rx Data
Gnd
Tx Data
DB25
Rad
io
DC
RF
ACC
ZWG0130339-0
Programming
AARKN4081Cable
Adapter
AARLN4853Cable
Rx DataGnd
Tx Data
DB25
Rad
io
DC
RF
ACC
Power Supply
+13,2VDC
ZWG0130340-0
Radio Programming and Tuning Procedures 4-3
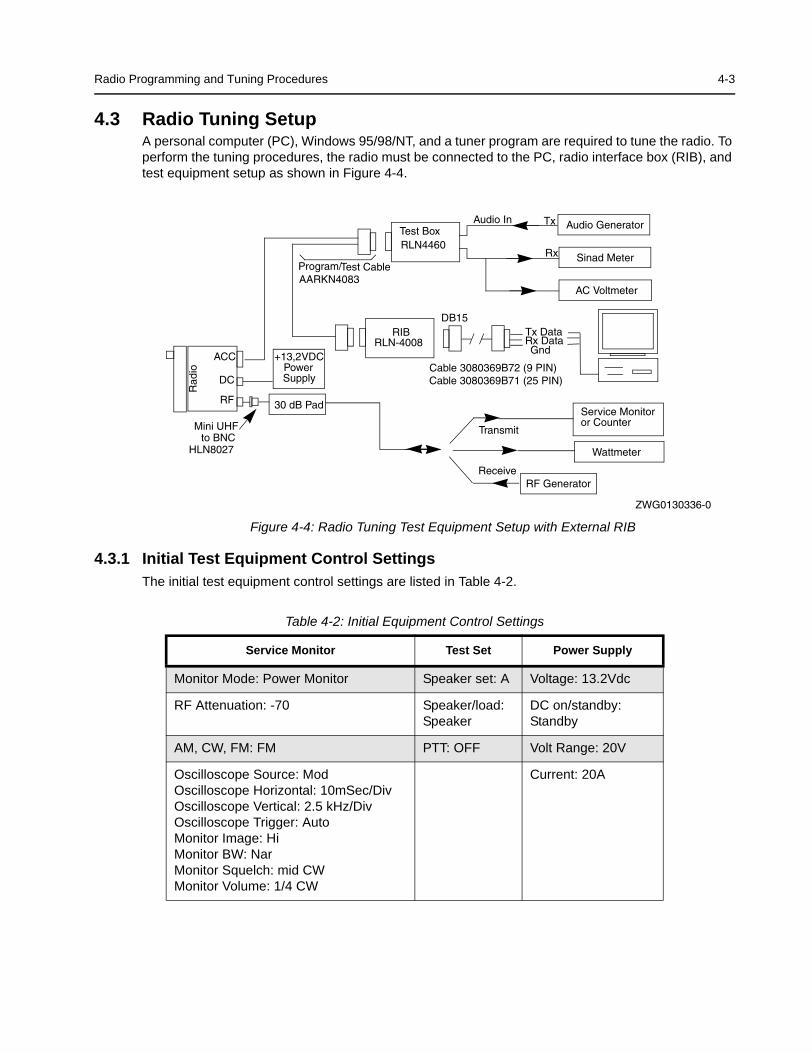
4.3 Radio Tuning SetupA personal computer (PC), Windows 95/98/NT, and a tuner program are required to tune the radio. To perform the tuning procedures, the radio must be connected to the PC, radio interface box (RIB), and test equipment setup as shown in Figure 4-4.
Figure 4-4: Radio Tuning Test Equipment Setup with External RIB
4.3.1 Initial Test Equipment Control SettingsThe initial test equipment control settings are listed in Table 4-2.
Table 4-2: Initial Equipment Control Settings
Service Monitor Test Set Power Supply
Monitor Mode: Power Monitor Speaker set: A Voltage: 13.2Vdc
RF Attenuation: -70 Speaker/load: Speaker
DC on/standby: Standby
AM, CW, FM: FM PTT: OFF Volt Range: 20V
Oscilloscope Source: ModOscilloscope Horizontal: 10mSec/DivOscilloscope Vertical: 2.5 kHz/DivOscilloscope Trigger: AutoMonitor Image: HiMonitor BW: NarMonitor Squelch: mid CWMonitor Volume: 1/4 CW
Current: 20A
Wattmeter
Audio Generator
Sinad Meter
AC Voltmeter
30 dB Pad
Audio In Tx
Rx
Receive
Transmit
RF Generator
RIBRLN-4008
RLN4460Test Box
Cable 3080369B72 (9 PIN)
Program/AARKN4083
Test Cable
Service Monitoror Counter
DB15
HLN8027
Mini UHF
Cable 3080369B71 (25 PIN) Power Supply
+13,2VDC
Rx DataGnd
Tx Data
to BNC
Rad
io
DC
RF
ACC
ZWG0130336-0
4-4 Radio Programming and Tuning Procedures
4.4 Transmitter TuningThe following sub-sections contain the procedures to tune the radio transmitter. These procedures include: l Power Amplifier (PA) Bias Tuningl Battery Threshold Tuning
l Reference Oscillator Warpl DAC Tuning (LowBand radios only)l Transmit Power Tuningl Power Amplifier (PA) Voltage Limit Tuning (VHF 1-25W and UHF 1-25W LDMOS radios only)l Modulation Balance Attenuationl VCO Attenuationl DTMF Deviationl MDC1200 Deviation
4.4.1 Power Amplifier (PA) Bias Tuning
Perform the PA Bias tuning procedure as follows:
1. Under the Tx Align menu, select PA Bias, and then High Power.2. Measure/read the DC current drawn from the radio (varies from radio to radio). This value should
typically range from 100-700mA. Record this value as X.3. Press Toggle Bias button for the first bias to enable the PA bias softpot.4. Increase softpot value to obtain Y until Y - X is within the range given for PA current in Table 4-3.5. Press Toggle Bias for the first bias again to disable the PA bias softpot.6. Repeat Steps 5-7 for the remaining Toggle Bias buttons.7. Program the bias softpot values into the radio by pressing the Program button.8. Exit the PA bias high power function.
Note: 1. If using the regulated power supply RLN4510 to measure the current drawn by the radio, remember that the current meter terminals only measure the voltage drop across a 0.1ohm shunt resistor. Calculate the actual current being drawn by the radio by dividing the voltage drop across the resistor by 0.1. (V= I*R).
2. Tuning must be performed only for High Power. The tuning screen will show up to three Toggle Bias buttons numbered 1, 2 and 3. Tuning must be started with the lowest bias number and continued until all bias points have been tuned.
CAUTION: To prevent damage to the PA, ensure that the antenna output is alwaysterminated into a 50 Ohm load!
C a u t i o n
Radio Programming and Tuning Procedures 4-5
Table 4-3: PA Bias Specifications*
*These values are up-to-date as of the print date. For the latest values and procedures, refer to the Tuner online help.
4.4.2 Reference Oscillator WarpThis procedure affects all deviation values such as DTMF and MDC1200 signaling as the frequency will drift if not warped properly.
Perform the oscillator warp procedure as follows:1. Under the Tx Align menu, select Reference Oscillator Warp.2. There is only one frequency point shown. This is always the last frequency point (F7). 3. Click on the slider thumb. Press PTT Toggle to key up the radio at the corresponding frequency
point. 4. Monitor the transmit frequency. 5. Adjust the slider, spin, or edit control until the frequency is as close as possible to the indicated
transmit frequency. Refer to values listed in Table 4-4. Press ENTER to confirm the selection.6. Dekey the radio by pressing PTT Toggle.7. Program the warp value into the radio by pressing the Program button.8. Exit the reference oscillator warp function.
RF Band PA Type Voltage Value
Bias 1 Current
Bias 2 Current
Bias 3 Current
UHF (403-470 MHz) 25-40W 95 100-150mA 130-170mA Not Used
UHF (403-470 MHz) 1-25W 95 Not Used 130-170mA Not Used
UHF (450-512 MHz) 25-40W 95 100-150mA 130-170mA Not Used
UHF (450-512 MHz) (VMOS)
1-25W 95 100-150mA 130-170mA Not Used
UHF (450-512 MHz) (LDMOS)
1-25W 22 Not Used 370-430mA Not Used
VHF (136-174 MHz) 25-45W 85 100-150mA 100-150mA Not Used
VHF (136-174 MHz) 1-25W 55 Not Used 80-120mA Not Used
LowBand (29.7-36 MHz)
40-60W 63 100-150mA 100-150mA 100-150mA
LowBand (36-42 MHz) 40-60W 63 100-150mA 100-150mA 100-150mA
LowBand (42-50 MHz) 40-60W 63 100-150mA 100-150mA 100-150mA
Note: 1. Tuning of the PA BIAS must be performed first.
2. This operation should be performed prior to all other transmit tuning operations to minimize heating and the impact of warp on signaling operations.
3. If the output power level is too low to measure the frequency, tune the transmit power for the highest frequency first. However, if this is done, a wait period is required to allow the radio chassis to cool down to approximately 25 °C before setting the Reference Oscillator Warp.
4-6 Radio Programming and Tuning Procedures
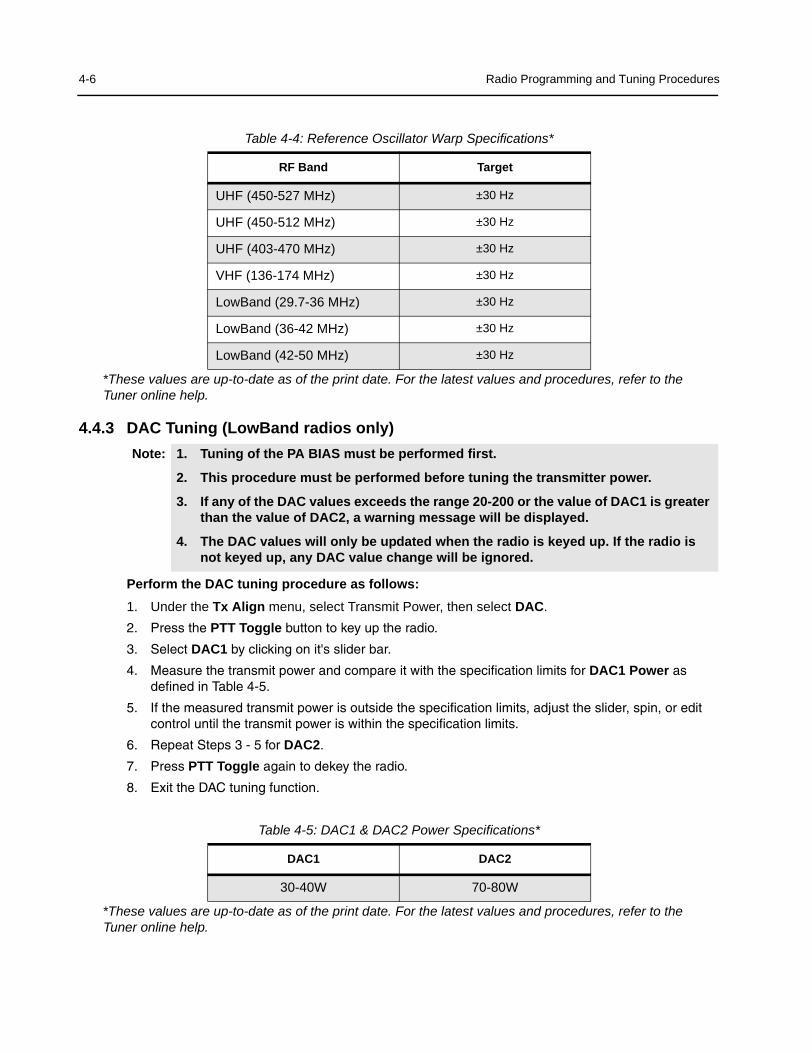
Table 4-4: Reference Oscillator Warp Specifications*
*These values are up-to-date as of the print date. For the latest values and procedures, refer to the Tuner online help.
4.4.3 DAC Tuning (LowBand radios only)
Perform the DAC tuning procedure as follows:1. Under the Tx Align menu, select Transmit Power, then select DAC.2. Press the PTT Toggle button to key up the radio.
3. Select DAC1 by clicking on it's slider bar.
4. Measure the transmit power and compare it with the specification limits for DAC1 Power as defined in Table 4-5.
5. If the measured transmit power is outside the specification limits, adjust the slider, spin, or edit control until the transmit power is within the specification limits.
6. Repeat Steps 3 - 5 for DAC2.
7. Press PTT Toggle again to dekey the radio.
8. Exit the DAC tuning function.
Table 4-5: DAC1 & DAC2 Power Specifications*
*These values are up-to-date as of the print date. For the latest values and procedures, refer to the Tuner online help.
RF Band Target
UHF (450-527 MHz) ±30 Hz
UHF (450-512 MHz) ±30 Hz
UHF (403-470 MHz) ±30 Hz
VHF (136-174 MHz) ±30 Hz
LowBand (29.7-36 MHz) ±30 Hz
LowBand (36-42 MHz) ±30 Hz
LowBand (42-50 MHz) ±30 Hz
Note: 1. Tuning of the PA BIAS must be performed first.
2. This procedure must be performed before tuning the transmitter power.
3. If any of the DAC values exceeds the range 20-200 or the value of DAC1 is greater than the value of DAC2, a warning message will be displayed.
4. The DAC values will only be updated when the radio is keyed up. If the radio is not keyed up, any DAC value change will be ignored.
DAC1 DAC2
30-40W 70-80W
Radio Programming and Tuning Procedures 4-7
4.4.4 Transmit Power Tuning
Perform the transmit high power tuning procedure as follows:1. Under the Tx Align menu, select Transmit Power, then select K and M Tuning.2. Select the Power 1 box for the first frequency (F1).3. Press PTT Toggle to key up the radio.4. Observe the power level (W) displayed on the power meter. Record this value as X.5. Key in the value X in the Power 1 box.6. Select the Power 2 box for the first frequency (F1).7. Observe the power level (W) displayed on the power meter. Record this value as Y.8. Key in the value Y in the Power 2 box.9. Press PTT Toggle again to dekey the radio.10. Repeat Steps 2-9 for frequency points 2 to 7.11. Press Program to store all keyed in values into the radio.12. Exit the K and M tuning function.
4.4.5 Power Amplifier (PA) Voltage Limit Tuning (VHF 1-25W and UHF 1-25W LDMOS radios only)
Perform the PA voltage limit tuning procedure as follows:1. Under the Tx Align menu, select PA Voltage Limit.2. Press Auto Tune and wait until all PA voltage limit softpots have been tuned.
3. Exit the PA voltage limit tuning function.
Note: 1. Tuning of the PA BIAS must be performed first.
2. DAC Tuning must be performed first (LowBand radios only).
3. IMPORTANT: To set the transmitter power for customer applications use the Cus-tomer Programming Software (CPS). The following procedure should only be per-formed if transmitter components have been changed or the radio does not transmit with the power set via the CPS. This tuning method is performed for mul-tiple Transmit Power Tuning Channels.
4. The power values displayed after opening the screen may have a small rounding offset.
5. When checking the RF power output of the radio with a test set, always use a pad of at least 30dB attached to the radio end of the RF cable. This will avoid any RF mismatch and ensure a stable RF reading that will not change with varying lengths of connecting cable.
Note: 1. Tuning of the transmit power must be performed first. 2. This method automatically tunes all PA Voltage Limit Tuning Channels.
4-8 Radio Programming and Tuning Procedures
4.4.6 Modulation Balance Attenuation
Perform the modulation balance attenuation procedure as follows:1. Under the Tx Align menu, select Mod Balance Attn.2. Begin with the lowest frequency, i.e., the first frequency point from the top. Press PTT Toggle
without selecting any slider control at the corresponding frequency point. This keys the radio up at the first frequency point.
3. Inject 80 Hz at 100mVrms.
4. Record the deviation obtained. Typical values should range from 3.5-5.5 kHz.
5. Inject 3 kHz at 100mVrms.
6. Change the modulation balance attenuation setting until the Tx deviation is as recorded in Step 4.
7. Inject 80 Hz at 100mVrms, and check the deviation again. If Tx deviation changes, note the read-ing and repeat Steps 5, 6, and 7 until the Tx deviation remains the same.
8. Press PTT Toggle to dekey the radio. Choose the next frequency, key up, then repeat Steps 3 to 7 until all seven tuning points are completed.
9. Program the softpot value by pressing the Program button.
10. Exit the modulation balance function.
Note: 1. When using test box RLN4460B/C, inject the signal into the radio at the METER IN terminal and set the METER IN selector switch to “VOL”.
2. Tuning of the transmit power and reference oscillator warp must be performed first.
3. This tuning method is performed for multiple Modulation Balance Attenuation Tuning Channels.
4. Compensation alignment balances the modulation sensitivity of the VCO and ref-erence modulation (synthesizer low frequency port) lines. The compensation algorithm is critical to the operation of signaling schemes that have very low fre-quency components (i.e. DPL) and could result in distorted waveforms, If not adjusted properly.

Radio Programming and Tuning Procedures 4-9
4.4.7 VCO Attenuation
Table 4-6: Deviation Specifications for UHF/VHF/LowBand Radios*
*These values are up-to-date as of the print date. For the latest values and procedures, refer to the Tuner online help.
4.4.8 VCO Attenuation (25 kHz)Perform the 25 kHz VCO attenuation procedure as follows:1. Under the Tx Align menu, select VCO Attn. 25 kHz. 2. Begin with the lowest frequency. Select the thumb of the slider at the lowest frequency point,
then press the PTT Toggle button to key up the radio at the corresponding frequency point. The spin control can also be toggled via its up/down arrow buttons. The softpot value can also be typed into the edit control. Press ENTER to confirm the selection.
3. Inject 1 kHz at 800mVrms to the external microphone audio path.
Note: 1. Tuning of the modulation balance must be accomplished first. The transmit devi-ation Limit softpot sets the maximum deviation of the carrier. Tuning is performed for 12.5 kHz, 20 kHz, and 25 kHz channel spacing. Tuning for 25 kHz channel must be done first for all frequency points. Tuning for 12.5 and 20 kHz channel spacing determines only the offset to the previously tuned deviation for 25 kHz tuning channel spacing. For 12.5, 20 kHz channel spacing, only F7 is used for tuning. The 30 kHz channel spacing which uses 5.0 kHz maximum system deviation are covered by the 25 kHz tuning.
2. When using test box RLN4460, set the METER OUT toggle switch to the “MIC PORT” position and METER OUT selector switch to “MIC”. Inject 1 kHz tone, and 800mVrms to AUDIO IN. The 800mVrms should be measured at the AC/DC METER.
3. Depending on the radio model and the customer settings, the signal injected in accessory connector Pin 5 or the signal from an option board may be transmitted simultaneously with other signals, for example from the microphone or internally generated signaling. In this case the peak signal level is the sum of the individual signal's peak levels and can exceed the maximum allowed transmit deviation level. To prevent over deviation, the maximum deviation must be measured with both signals present and if the deviation still exceeds the range defined in Table 4-6, the VCO Attenuation must be re-tuned, so that the deviation stays in the tun-ing range with both signals present.
4. Tuning of the modulation balance attenuation must be performed first.
Band Channel Spacing Rated System Deviation Deviation (kHz)
UHF/VHF/LowBand 25 kHz 5 kHz 4.4 – 4.6
LowBand (20 kHz sys-tems in North America)
20 kHz 5 kHz 4.4 – 4.6
UHF/VHF 20 kHz 4 kHz 3.4 – 3.6
UHF/VHF/LowBand 12.5 kHz 2.5 kHz 2.2 – 2.3

4-10 Radio Programming and Tuning Procedures
4. Note the deviation obtained.
5. Adjust the slider, adjust the spin control or key in softpot values for the frequency point until the deviation is within the range as defined in the Table 4-6 on page 4-9. Press ENTER to confirm the selection.
6. Press the PTT Toggle button to dekey radio. Choose the next frequency, key up, then repeat Steps 3-5 until all seven tuning points are completed.
7. Program the softpot value by pressing the Program button.
8. Exit the VCO attenuation 25 kHz function.
4.4.9 VCO Attenuation (20 kHz)
Perform the 20 kHz VCO attenuation procedure as follows:1. Under the Tx Align menu, select VCO Attn. 20 kHz.2. Press PTT Toggle to key up the radio at F7.3. Inject 1 kHz at 800mVrms to the external microphone audio path.4. Note the deviation obtained.5. Adjust the slider, adjust the spin control or key in softpot values for the frequency point until the
deviation is within the range as defined in Table 4-6 on page 4-9. Press ENTER to confirm the selection.
6. Press PTT Toggle to dekey the radio.7. Program the softpot value by pressing the Program button.8. Exit the VCO attenuation 20 kHz function.
4.4.10 VCO Attenuation (12.5 kHz)
Perform the 12.5 kHz VCO attenuation procedure as follows:1. Under the Tx Align menu, select VCO Attn. 12.5 kHz.2. Press PTT Toggle to key up the radio at F7.3. Inject 1 kHz at 800mVrms to the external microphone audio path.4. Note the deviation obtained.5. Adjust the slider, adjust the spin control or key in softpot values for the frequency point until the
deviation is within the range as defined in the Table 4-6. Press ENTER to confirm the selection.6. Press PTT Toggle to dekey the radio.7. Enter the softpot value into the radio by pressing the Program button.8. Exit the VCO attenuation 12.5 kHz function.
Note: Tuning of modulation balance attenuation and VCO attenuation for 25kHz channel spacing must be accomplished first.
Note: Tuning of modulation balance attenuation and VCO attenuation for 25kHz channel spacing must be accomplished first.
Radio Programming and Tuning Procedures 4-11
4.4.11 DTMF Deviation TuningThis tuning option controls the dual-tone, multi-frequency (DTMF) deviation.
Perform the DTMF deviation tuning procedure as follows:1. Under the Tx Align menu, select DTMF Deviation.2. Press PTT Toggle to key the radio up. Monitor the deviation obtained.3. Adjust the slider, spin, or edit control until a deviation of 3.1-3.4 kHz is obtained. Press ENTER to
confirm the selection.4. Press PTT Toggle again to dekey the radio.5. Program the softpot value into the radio by pressing the Program button.6. Exit the DTMF deviation function.
4.4.12 MDC1200 Deviation Tuning (MDC radios only)This tuning option controls the MDC1200 Signaling deviation.
Perform the MDC1200 deviation tuning procedure as follows:1. Under the Tx Align menu, select MDC1200 Signaling.2. Press PTT Toggle to key the radio up. Monitor the deviation obtained.3. Adjust the slider, spin or edit control until a deviation of about 3.3 – 3.7kHz is obtained. Press
ENTER to confirm the selection.4. Press PTT Toggle again to dekey the radio.5. Program the softpot value into the radio by pressing the Program button. 6. Exit the MDC1200 deviation function.
4.5 Receiver TuningThe following sub-sections contain the procedures to tune the radio receiver. These procedures include: l Front End Filter Tuningl Rated Volumel Squelch Tuning Front End Filter Tuning
Note: Modulation balancing and VCO attenuation must be performed prior to this tuning operation. Not doing so will result in the wrong deviation value being obtained while tuning the DTMF.
Note: Modulation balancing and VCO attenuation tuning must be performed prior to this tuning operation. Not doing so will result in the wrong deviation value being obtained while tuning this feature.
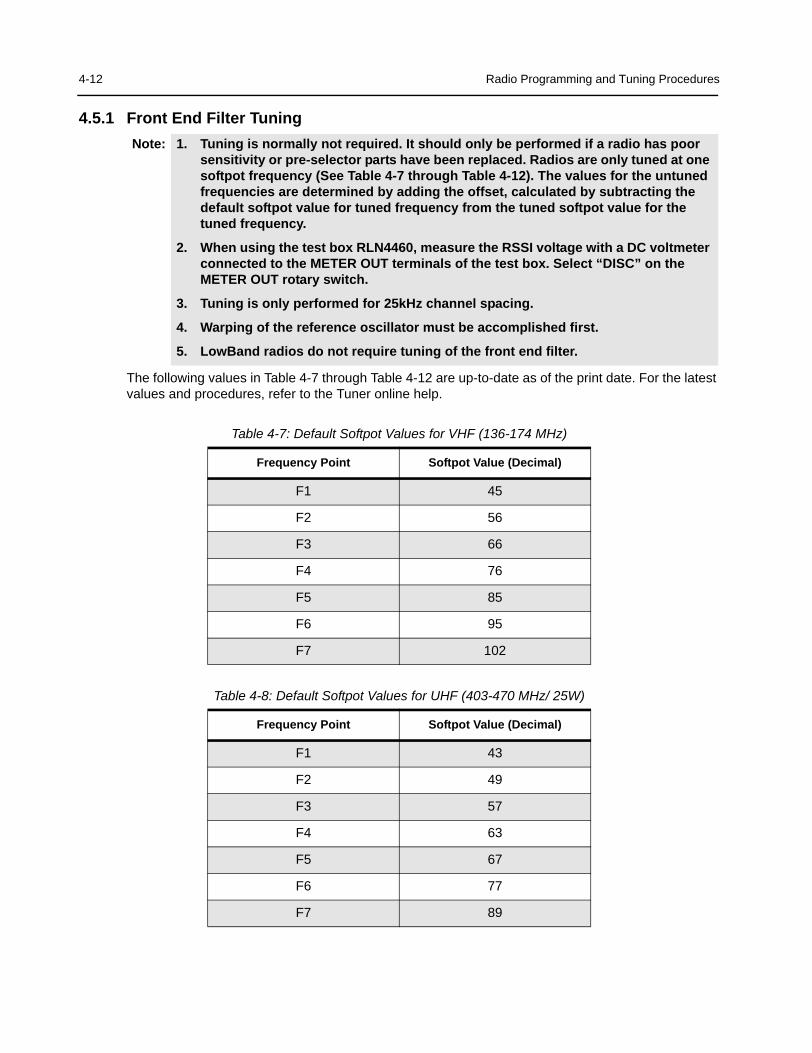
4-12 Radio Programming and Tuning Procedures
4.5.1 Front End Filter Tuning
The following values in Table 4-7 through Table 4-12 are up-to-date as of the print date. For the latest values and procedures, refer to the Tuner online help.
Note: 1. Tuning is normally not required. It should only be performed if a radio has poor sensitivity or pre-selector parts have been replaced. Radios are only tuned at one softpot frequency (See Table 4-7 through Table 4-12). The values for the untuned frequencies are determined by adding the offset, calculated by subtracting the default softpot value for tuned frequency from the tuned softpot value for the tuned frequency.
2. When using the test box RLN4460, measure the RSSI voltage with a DC voltmeter connected to the METER OUT terminals of the test box. Select “DISC” on the METER OUT rotary switch.
3. Tuning is only performed for 25kHz channel spacing.
4. Warping of the reference oscillator must be accomplished first.
5. LowBand radios do not require tuning of the front end filter.
Table 4-7: Default Softpot Values for VHF (136-174 MHz)
Frequency Point Softpot Value (Decimal)
F1 45
F2 56
F3 66
F4 76
F5 85
F6 95
F7 102
Table 4-8: Default Softpot Values for UHF (403-470 MHz/ 25W)
Frequency Point Softpot Value (Decimal)
F1 43
F2 49
F3 57
F4 63
F5 67
F6 77
F7 89
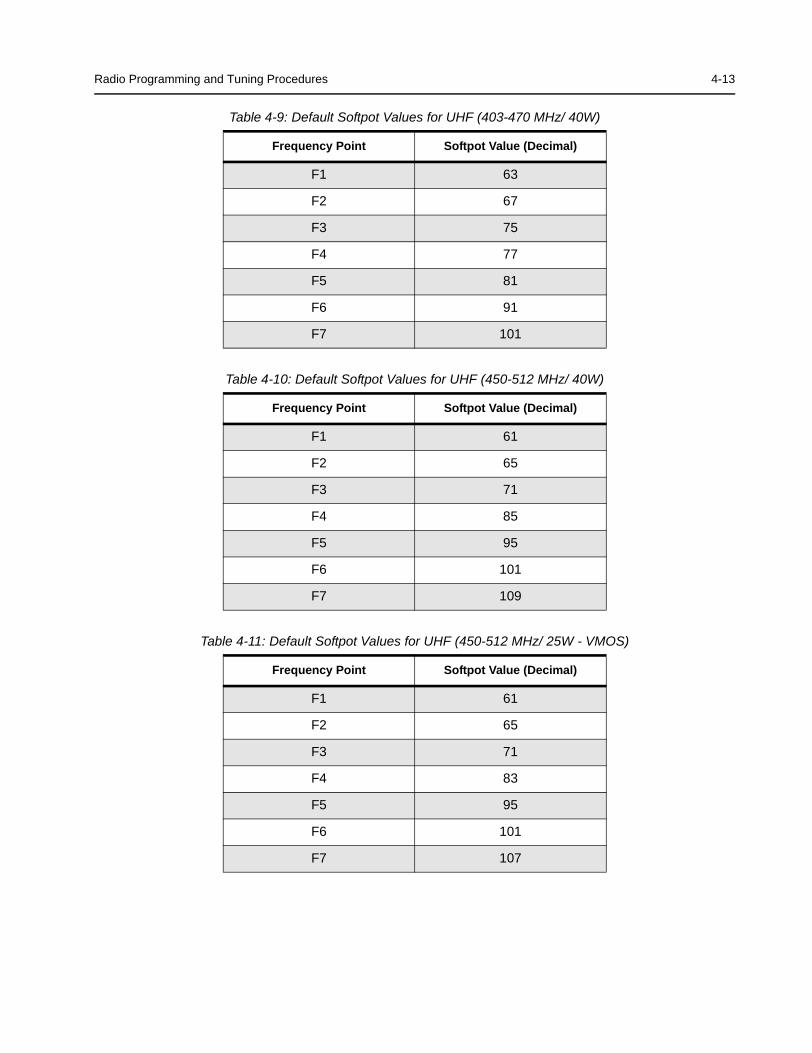
Radio Programming and Tuning Procedures 4-13
Table 4-9: Default Softpot Values for UHF (403-470 MHz/ 40W)
Table 4-10: Default Softpot Values for UHF (450-512 MHz/ 40W)
Table 4-11: Default Softpot Values for UHF (450-512 MHz/ 25W - VMOS)
Frequency Point Softpot Value (Decimal)
F1 63
F2 67
F3 75
F4 77
F5 81
F6 91
F7 101
Frequency Point Softpot Value (Decimal)
F1 61
F2 65
F3 71
F4 85
F5 95
F6 101
F7 109
Frequency Point Softpot Value (Decimal)
F1 61
F2 65
F3 71
F4 83
F5 95
F6 101
F7 107
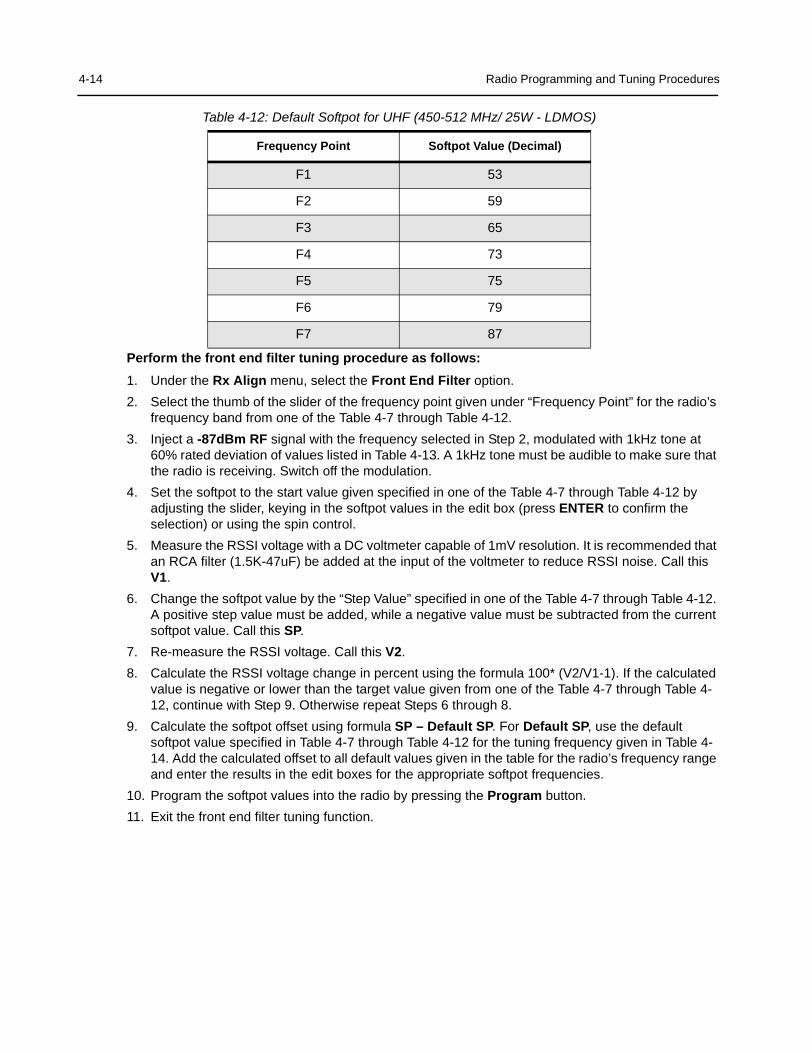
4-14 Radio Programming and Tuning Procedures
Table 4-12: Default Softpot for UHF (450-512 MHz/ 25W - LDMOS)
Perform the front end filter tuning procedure as follows:1. Under the Rx Align menu, select the Front End Filter option.2. Select the thumb of the slider of the frequency point given under “Frequency Point” for the radio’s
frequency band from one of the Table 4-7 through Table 4-12. 3. Inject a -87dBm RF signal with the frequency selected in Step 2, modulated with 1kHz tone at
60% rated deviation of values listed in Table 4-13. A 1kHz tone must be audible to make sure that the radio is receiving. Switch off the modulation.
4. Set the softpot to the start value given specified in one of the Table 4-7 through Table 4-12 by adjusting the slider, keying in the softpot values in the edit box (press ENTER to confirm the selection) or using the spin control.
5. Measure the RSSI voltage with a DC voltmeter capable of 1mV resolution. It is recommended that an RCA filter (1.5K-47uF) be added at the input of the voltmeter to reduce RSSI noise. Call this V1.
6. Change the softpot value by the “Step Value” specified in one of the Table 4-7 through Table 4-12. A positive step value must be added, while a negative value must be subtracted from the current softpot value. Call this SP.
7. Re-measure the RSSI voltage. Call this V2.8. Calculate the RSSI voltage change in percent using the formula 100* (V2/V1-1). If the calculated
value is negative or lower than the target value given from one of the Table 4-7 through Table 4-12, continue with Step 9. Otherwise repeat Steps 6 through 8.
9. Calculate the softpot offset using formula SP – Default SP. For Default SP, use the default softpot value specified in Table 4-7 through Table 4-12 for the tuning frequency given in Table 4-14. Add the calculated offset to all default values given in the table for the radio’s frequency range and enter the results in the edit boxes for the appropriate softpot frequencies.
10. Program the softpot values into the radio by pressing the Program button.11. Exit the front end filter tuning function.
Frequency Point Softpot Value (Decimal)
F1 53
F2 59
F3 65
F4 73
F5 75
F6 79
F7 87

Radio Programming and Tuning Procedures 4-15
*These values are up-to-date as of the print date. For the latest values and procedures, refer to the Tuner online help.
4.5.2 Rated Volume Tuning
Perform the rated volume tuning procedure as follows:1. Under the Rx Align menu, select Rated Volume.2. Inject a -47dBm rf signal modulated with 1 kHz tone at the 60% rated deviation listed in Table 4-
15.3. Adjust the softpot value by using the slider, keying in the edit box (press ENTER to confirm the
selection or send a softpot value), or via the spin controls. Repeat this until 3W(8Vrms) audio power is obtained. Press Program to commit the softpot value into the radio.
4. Exit the rated volume tuning function.
Table 4-13: Front End Filter Deviation Values
Channel Spacing Rated System Deviation
Signal Generator Deviation
12.5 kHz 2.5 kHz 1.5 kHz
20 kHz 4.0 kHz 2.4 kHz
25 kHz 5.0 kHz 3.0 kHz
30 kHz 5.0 kHz 3.0 kHz
Table 4-14: Front End Tuning Parameters*
RF Band Frequency Point RF Level Start Value Step Value Target Value
UHF (403-470 MHz) (40W)
F1 -87dBm 69 -2 0.17% of RSSI Voltage
UHF (403-470 MHz) (25W)
F1 -87dBm 61 -2 0.17% of RSSI Voltage
UHF (450-512 MHz)
F4 -87dBm 85 -2 0.20% of RSSI Voltage
UHF (450-512 MHz) (LDMOS)
F4 -87dBm 85 -2 0.20% of RSSI Voltage
VHF (136-174 MHz)
F4 -87dBm 64 +3 0.17% of RSSI Voltage
Note: When using test box RLN4460B/C, the received audio output is taken from the AC/DC METER OUT terminals with the METER OUT rotary switch set to RX.

4-16 Radio Programming and Tuning Procedures
4.5.3 Squelch Tuning
Perform the squelch tuning procedure as follows:1. Under the Rx Align menu, select Squelch Atten. Select either Squelch Atten 12.5 kHz,
Squelch Atten 20 kHz or Squelch Atten 25 kHz channel spacing variations. 2. Apply an RF signal modulated with a 1 kHz tone at 60% rated deviation listed in Table 4-16 for
current frequency point (F1 being the first) of 10dB SINAD. That is, adjust the reference signal level until 10dB SINAD is obtained at the SINAD meter. Squelch tuning can either be done manually (see page 17 for procedure) or by auto squelch (see page 17 for procedure). To obtain 10dB, unmute the radio first by dragging the corresponding slider value to 1.
Table 4-15: Rated Volume Deviation Values
Channel Spacing Rated System Deviation Signal Generator Deviation
12.5 kHz 2.5 kHz 1.5 kHz
20 kHz 4.0 kHz 2.4 kHz
20 kHz (LowBand 20 kHz systems in North America)
5.0 kHz 3.0 kHz
25 kHz 5.0 kHz 3.0 kHz
30 kHz 5.0 kHz 3.0 kHz
Note: 1. Squelch tuning can only be accomplished after front end filter tuning and refer-ence oscillator warping.
2. When using the test box RLN4460, the received audio output is taken from the AC/DC METER OUT terminals with the METER OUT rotary switch set to RX. It is recommended that rated volume tuning is performed so the correct 10dB SINAD level can be obtained.
3. This tuning method is performed for multiple squelch tuning channels and multi-ple channel spacings.
Table 4-16: Squelch Deviation Values
Channel Spacing Rated System Deviation Signal Generator Deviation
12.5 kHz 2.5 kHz 1.5 kHz
20 kHz 4.0 kHz 2.4 kHz
20 kHz (LowBand 20 kHz systems in North America)
5.0 kHz 3.0 kHz
25 kHz 5.0 kHz 3.0 kHz
30 kHz 5.0 kHz 3.0 kHz

Radio Programming and Tuning Procedures 4-17
Manual Squelch Tuning:1. Under the Rx Align menu, select Squelch Atten. Select either Squelch Atten 12.5 kHz,
Squelch Atten 20 kHz or Squelch Atten 25 kHz channel spacing variations. 2. Apply an RF signal modulated with a 1 kHz tone at 60% rated deviation listed in Table 4-16 for
current frequency point (F1 being the first) of 10dB SINAD. That is, adjust the reference signal level until 10dB SINAD is obtained at the SINAD meter. Squelch tuning can either be done manually (see page 17 for procedure) or by auto squelch (see page 17 for procedure). To obtain 10dB, unmute the radio first by dragging the corresponding slider value to 1.
3. Set softpot to its maximum value to mute the radio.4. Adjust the softpot value by using the slider, keying in the edit box or using the spin controls. Press
ENTER to confirm the selection. Do this until the radio is totally unmuted. Verify the squelch closing by inputting a signal level of 4dB lower than that of the 10dB SINAD level.
5. Repeat Step 2 and Steps 3-4 of Manual Squelch Tuning, for frequency points F2-F7.6. Press Program to commit the softpot values into the radio.7. Exit the squelch tuning function.Auto Tune:
When you press the Auto Tune button, the radio automatically returns an optimum squelch value.After you press the button, the radio may need time to produce an optimal setting for the squelch attenuation. The following steps describe the auto tune process:Auto Tuning:1. Under the Rx Align menu, select Squelch Atten. Select either Squelch Atten 12.5 kHz,
Squelch Atten 20 kHz or Squelch Atten 25 kHz channel spacing variations. 2. Apply an RF signal modulated with a 1 kHz tone at 60% rated deviation listed in Table 4-16 for
current frequency point (F1 being the first) of 10dB SINAD. That is, adjust the reference signal level until 10dB SINAD is obtained at the SINAD meter. Squelch tuning can either be done manually (see page 17 for procedure) or by auto squelch (see page 17 for procedure). To obtain 10dB, unmute the radio first by dragging the corresponding slider value to 1.
3. Select current frequency point (F1 being the first), then press Auto Tune.4. Repeat Steps 2 and 3 of the Auto Tune section for frequency points F2-F7.
Note: Proceed with caution since this procedure automatically programs the softpot value into your radio.

4-18 Radio Programming and Tuning Procedures
Notes
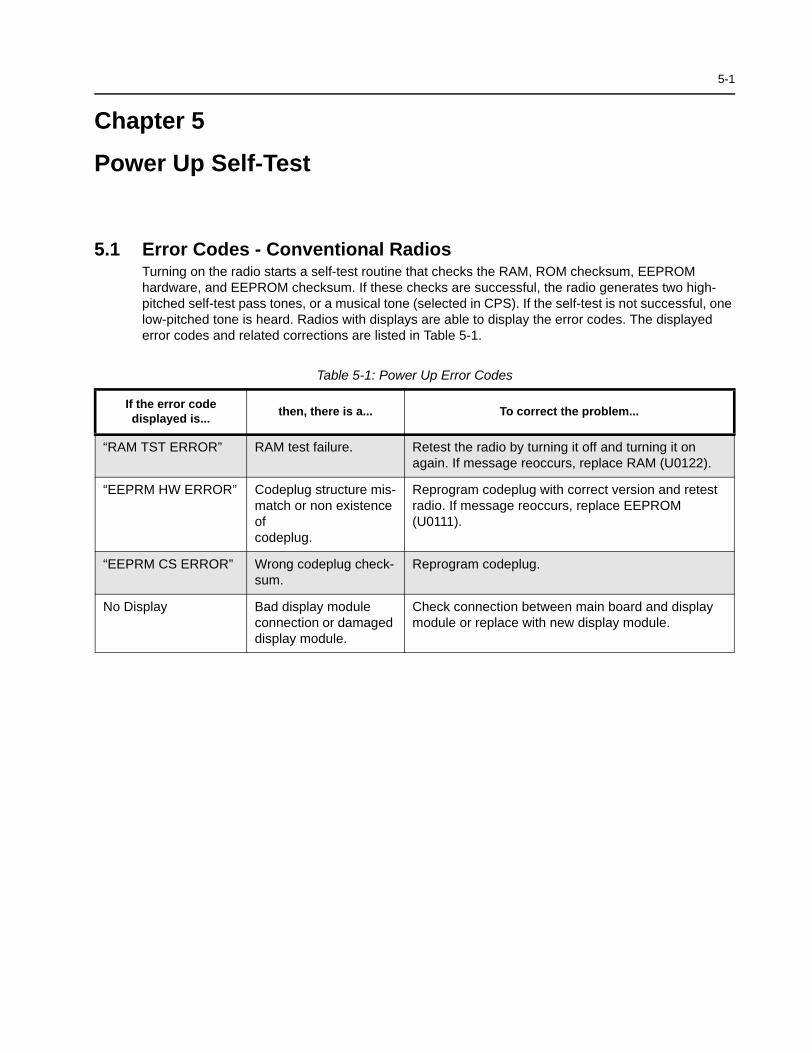
5-1
Chapter 5
Power Up Self-Test
5.1 Error Codes - Conventional RadiosTurning on the radio starts a self-test routine that checks the RAM, ROM checksum, EEPROM hardware, and EEPROM checksum. If these checks are successful, the radio generates two high-pitched self-test pass tones, or a musical tone (selected in CPS). If the self-test is not successful, one low-pitched tone is heard. Radios with displays are able to display the error codes. The displayed error codes and related corrections are listed in Table 5-1.
Table 5-1: Power Up Error Codes
If the error code displayed is... then, there is a... To correct the problem...
“RAM TST ERROR” RAM test failure. Retest the radio by turning it off and turning it on again. If message reoccurs, replace RAM (U0122).
“EEPRM HW ERROR” Codeplug structure mis-match or non existence of codeplug.
Reprogram codeplug with correct version and retest radio. If message reoccurs, replace EEPROM (U0111).
“EEPRM CS ERROR” Wrong codeplug check-sum.
Reprogram codeplug.
No Display Bad display module connection or damaged display module.
Check connection between main board and display module or replace with new display module.
5-2 Power Up Self-Test
5.2 CDM1550•LS+ PassPort Tone OptionsIn order to provide more detailed information about the radio’s state to a user or service technician various tones and display options are available.One Tone option is a short low pitched tone that sounds whenever the radio loses contact for any reason with its registered PassPort site and begins to search for another site. This tone is enabled by the "Enable LOS Search Start Tone" option.Service technicians who are determining system coverage and RSSI settings may want to be able to discriminate between the LOS (Loss of System) for complete loss of data from the site or when the site RSSI drops below required levels. A second tone following the first LOS Tone indicating that LOS was caused by complete LOS of PassPort data from the site and not low.RSSI can be activated with the "Enable LOS CRC Search start tone" option.Enable just the "Enable LOS Search start tone" option. Allow the radio to register. Turn off the Home repeater. The radio will sound a single tone and start to search. Turn on the Home repeater. Allow the radio to register. Remove the antenna. The radio will sound a single tone and start to search. Replace the antenna.Enable the "Enable LOS CRC Search start tone" option. Allow the radio to register. Turn off the Home repeater. The radio will sound two tones and start to search. Turn on the Home repeater. Allow the radio to register. Remove the antenna. The radio will sound a single tone and start to search.

Power Up Self-Test 5-3
5.3 CDM1550•LS+ Special Diagnostic FunctionsSome special diagnosis functions can be turned on "as needed" by accessing the "Service Menu". In order to enter this menu please proceed as follows1) Press the Menu Key. (You don't need to be registered).2) Quickly press the v then the w key. 3) Service Menu appears on the screen.4) Press ) to select it.A series of functions then become available to you as you scroll up and down. They are as follows:PassPort ESN: Enter the Service Menu and using the Up/Dn keys scroll to "PassPort ESN". Press the Select key. Use the Up/Dn and Select Keys to activate or deactivate this function. This function momentarily displays the radio's PassPort Electronic Serial Number.PassPort Information Report - Enter the Service Menu and using the Up/Dn keys scroll to "Report". Press the Select key. The display will sequentially show, the search method preference, the number of Near Neighbors from the last registered site neighbor list, All Neighbors, the total number of unique stored Neighbor frequencies and then display the known list of Neighbor Frequencies. The report will complete and the radio will search and re-register.Monitor - This Service Menu option defeats PassPort coded squelch and allows a technician to hear all transmissions on the system. This function can be enabled or disabled using the PassPort CPS (PPCPS).Show RSSI - Enter the Service Menu and using the Up/Dn keys scroll to "Show RSSI". Press the Select key. Use the Up/Dn and Select Keys to activate or deactivate this function. This diagnostic momentarily displays the ASID and RSSI of all received site IDLE messages in the format " WXXX-YYY-ZZZ " where W is a "-" on an Idle channel and a "+" on a busy one, XXX is the ASID of the site, YYY is the RSSI of the message just received and ZZZ is the current running average RSSI. This can be helpful in determining RSSI roaming settings. Also while this feature is enabled and the radio is searching, each new search frequency is momentarily displayed in order to track the radio's progress through the known frequencies. Search Freq-(Enter Search Frequencies) - Enter the Service Menu and using the Up/Dn keys scroll to "Search Freq". Press the Select key. Using the numeric keys and Left (P1) key for backup/delete and the "*" key for the decimal point, enter the desired Search Frequency in MHz. Press the Select key when the entry is complete or the Escape/Exit Key to exit the function without entering a search frequency. After pressing the Select key the radio will exit the Menu mode and begin searching the entered frequency for a period of time equal to twice the initial search delay. This utility allows a new radio or a radio with an empty Neighbor List Almanac to search an initial frequency other than its Home Frequency or a Seed List Frequency. This can be helpful when programming and delivering a new radio to a customer in an area not served by a site on his Home Frequency.Clear Almanac – (Clear Neighbor list Almanac): Enter the Service Menu and using the Up/ keys scroll to "Clear Almanac". Press the Select key. The stored Neighbor frequencies will be erased. This utility allows clearing obsolete Neighbor frequencies collected.
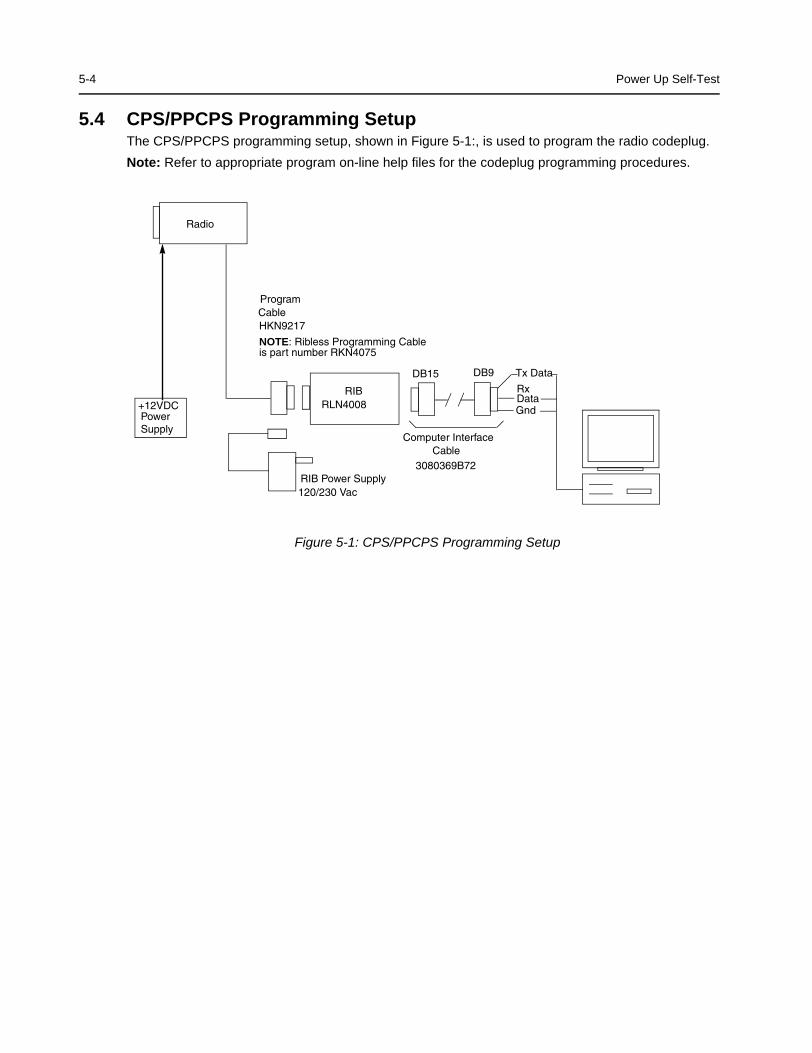
5-4 Power Up Self-Test
5.4 CPS/PPCPS Programming SetupThe CPS/PPCPS programming setup, shown in Figure 5-1:, is used to program the radio codeplug.Note: Refer to appropriate program on-line help files for the codeplug programming procedures.
Figure 5-1: CPS/PPCPS Programming Setup
RIBRLN4008
RIB Power Supply
Rx
GndData
Tx Data
Radio
Computer Interface Cable
Program
HKN9217Cable
3080369B72
DB15 DB9
120/230 Vac
Power Supply
+12VDC
NOTE: Ribless Programming Cableis part number RKN4075
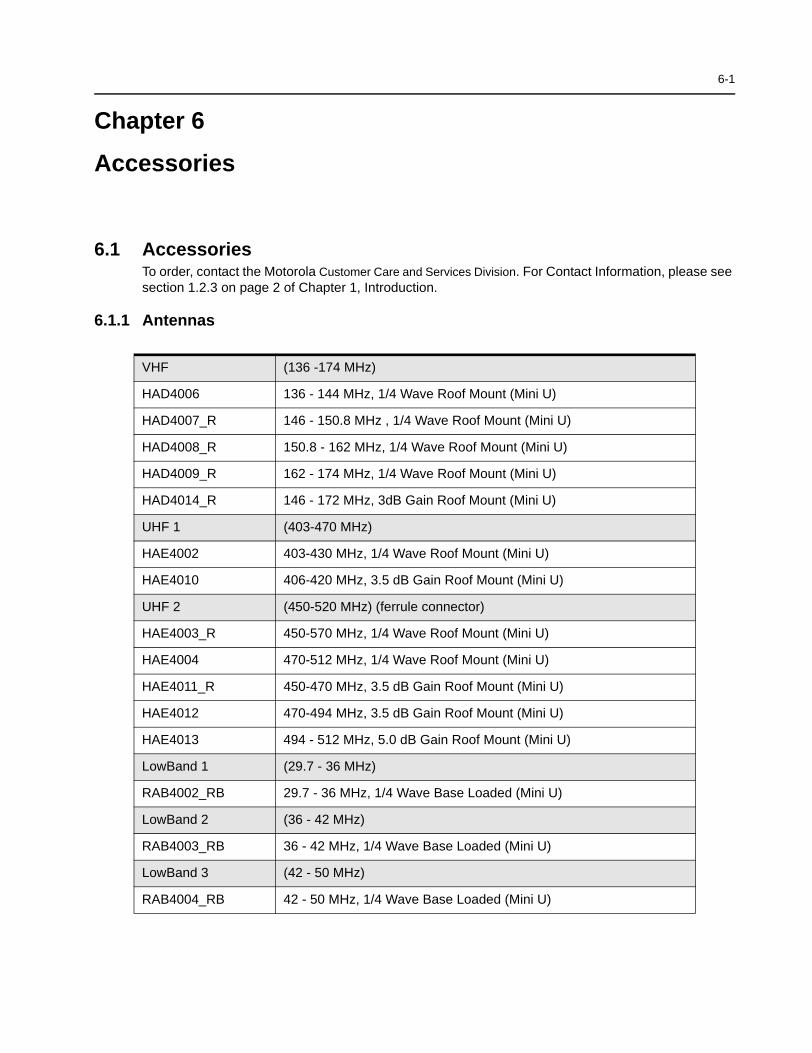
6-1
Chapter 6
Accessories
6.1 AccessoriesTo order, contact the Motorola Customer Care and Services Division. For Contact Information, please see section 1.2.3 on page 2 of Chapter 1, Introduction.
6.1.1 Antennas
VHF (136 -174 MHz)
HAD4006 136 - 144 MHz, 1/4 Wave Roof Mount (Mini U)
HAD4007_R 146 - 150.8 MHz , 1/4 Wave Roof Mount (Mini U)
HAD4008_R 150.8 - 162 MHz, 1/4 Wave Roof Mount (Mini U)
HAD4009_R 162 - 174 MHz, 1/4 Wave Roof Mount (Mini U)
HAD4014_R 146 - 172 MHz, 3dB Gain Roof Mount (Mini U)
UHF 1 (403-470 MHz)
HAE4002 403-430 MHz, 1/4 Wave Roof Mount (Mini U)
HAE4010 406-420 MHz, 3.5 dB Gain Roof Mount (Mini U)
UHF 2 (450-520 MHz) (ferrule connector)
HAE4003_R 450-570 MHz, 1/4 Wave Roof Mount (Mini U)
HAE4004 470-512 MHz, 1/4 Wave Roof Mount (Mini U)
HAE4011_R 450-470 MHz, 3.5 dB Gain Roof Mount (Mini U)
HAE4012 470-494 MHz, 3.5 dB Gain Roof Mount (Mini U)
HAE4013 494 - 512 MHz, 5.0 dB Gain Roof Mount (Mini U)
LowBand 1 (29.7 - 36 MHz)
RAB4002_RB 29.7 - 36 MHz, 1/4 Wave Base Loaded (Mini U)
LowBand 2 (36 - 42 MHz)
RAB4003_RB 36 - 42 MHz, 1/4 Wave Base Loaded (Mini U)
LowBand 3 (42 - 50 MHz)
RAB4004_RB 42 - 50 MHz, 1/4 Wave Base Loaded (Mini U)
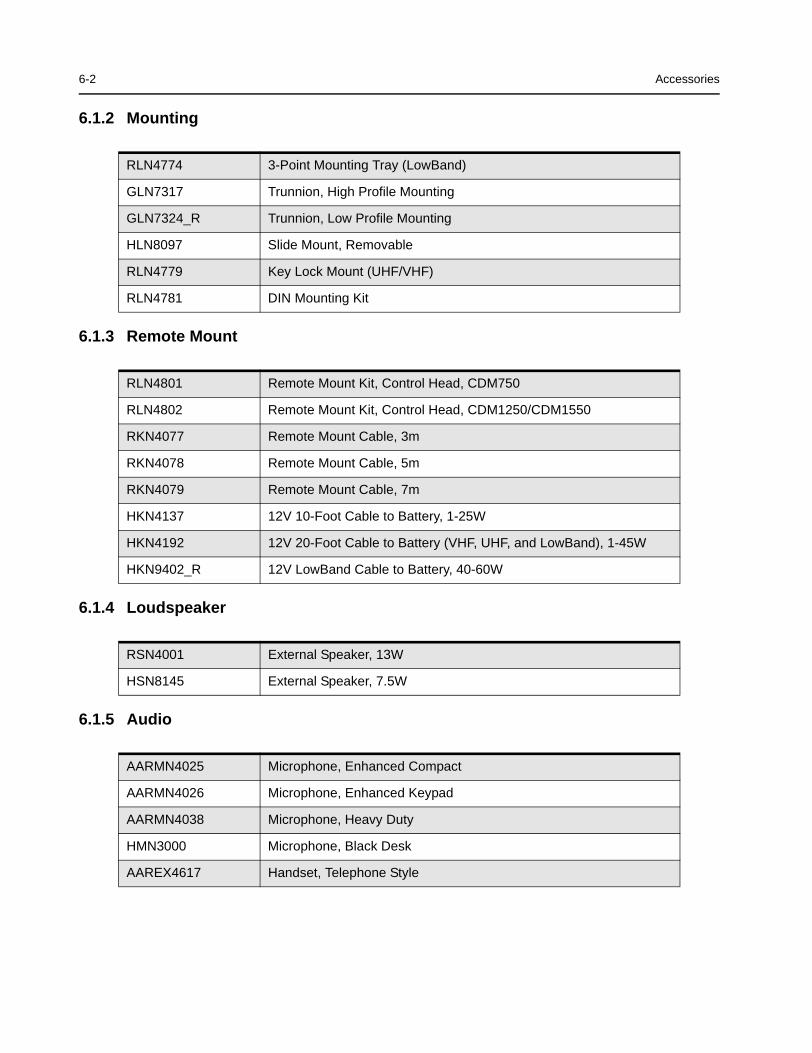
6-2 Accessories
6.1.2 Mounting
6.1.3 Remote Mount
6.1.4 Loudspeaker
6.1.5 Audio
RLN4774 3-Point Mounting Tray (LowBand)
GLN7317 Trunnion, High Profile Mounting
GLN7324_R Trunnion, Low Profile Mounting
HLN8097 Slide Mount, Removable
RLN4779 Key Lock Mount (UHF/VHF)
RLN4781 DIN Mounting Kit
RLN4801 Remote Mount Kit, Control Head, CDM750
RLN4802 Remote Mount Kit, Control Head, CDM1250/CDM1550
RKN4077 Remote Mount Cable, 3m
RKN4078 Remote Mount Cable, 5m
RKN4079 Remote Mount Cable, 7m
HKN4137 12V 10-Foot Cable to Battery, 1-25W
HKN4192 12V 20-Foot Cable to Battery (VHF, UHF, and LowBand), 1-45W
HKN9402_R 12V LowBand Cable to Battery, 40-60W
RSN4001 External Speaker, 13W
HSN8145 External Speaker, 7.5W
AARMN4025 Microphone, Enhanced Compact
AARMN4026 Microphone, Enhanced Keypad
AARMN4038 Microphone, Heavy Duty
HMN3000 Microphone, Black Desk
AAREX4617 Handset, Telephone Style
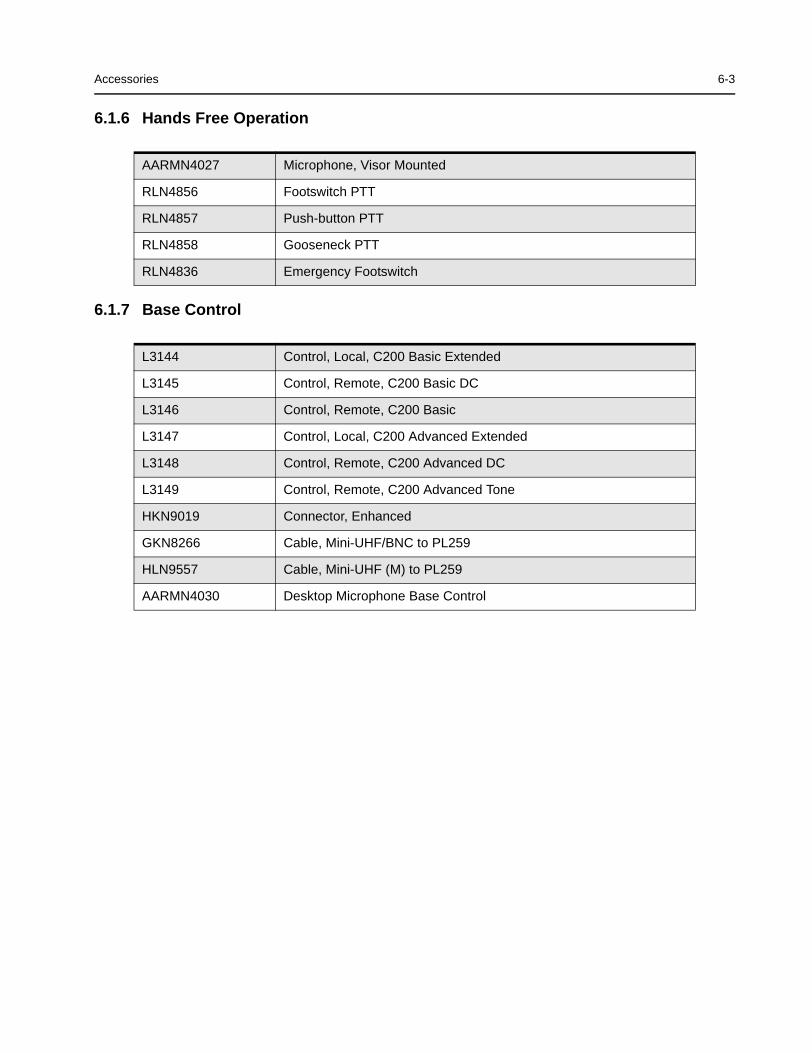
Accessories 6-3
6.1.6 Hands Free Operation
6.1.7 Base Control
AARMN4027 Microphone, Visor Mounted
RLN4856 Footswitch PTT
RLN4857 Push-button PTT
RLN4858 Gooseneck PTT
RLN4836 Emergency Footswitch
L3144 Control, Local, C200 Basic Extended
L3145 Control, Remote, C200 Basic DC
L3146 Control, Remote, C200 Basic
L3147 Control, Local, C200 Advanced Extended
L3148 Control, Remote, C200 Advanced DC
L3149 Control, Remote, C200 Advanced Tone
HKN9019 Connector, Enhanced
GKN8266 Cable, Mini-UHF/BNC to PL259
HLN9557 Cable, Mini-UHF (M) to PL259
AARMN4030 Desktop Microphone Base Control
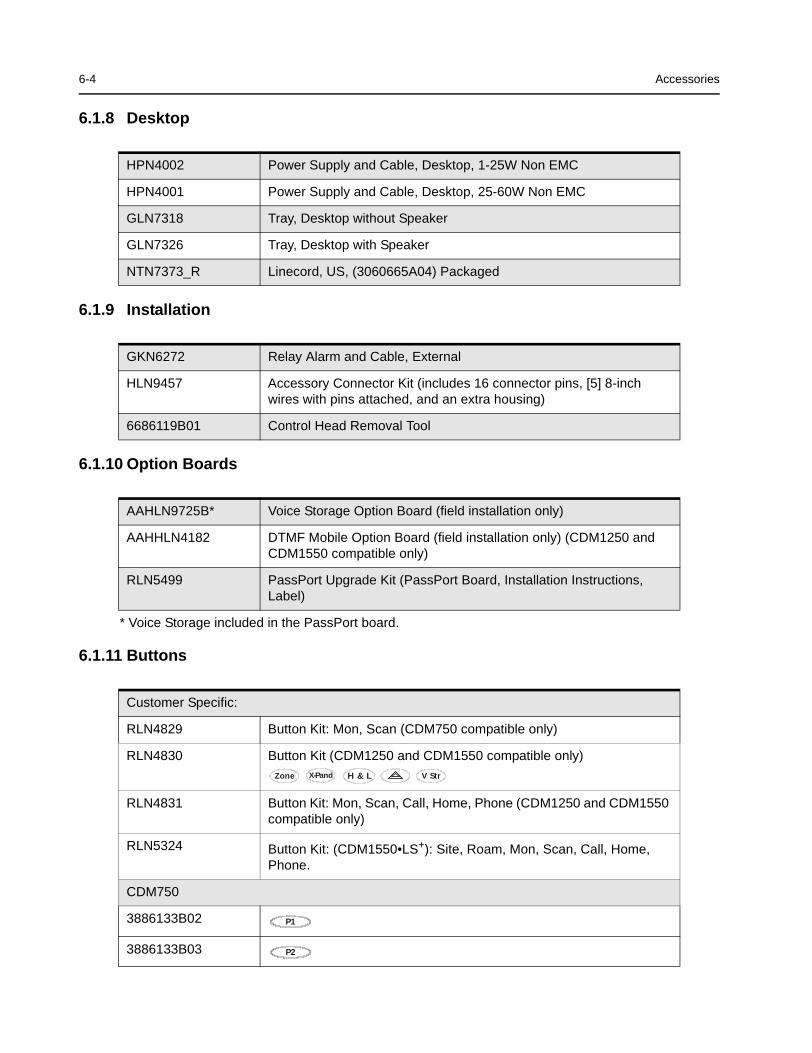
6-4 Accessories
6.1.8 Desktop
6.1.9 Installation
6.1.10 Option Boards
* Voice Storage included in the PassPort board.
6.1.11 Buttons
HPN4002 Power Supply and Cable, Desktop, 1-25W Non EMC
HPN4001 Power Supply and Cable, Desktop, 25-60W Non EMC
GLN7318 Tray, Desktop without Speaker
GLN7326 Tray, Desktop with Speaker
NTN7373_R Linecord, US, (3060665A04) Packaged
GKN6272 Relay Alarm and Cable, External
HLN9457 Accessory Connector Kit (includes 16 connector pins, [5] 8-inch wires with pins attached, and an extra housing)
6686119B01 Control Head Removal Tool
AAHLN9725B* Voice Storage Option Board (field installation only)
AAHHLN4182 DTMF Mobile Option Board (field installation only) (CDM1250 and CDM1550 compatible only)
RLN5499 PassPort Upgrade Kit (PassPort Board, Installation Instructions, Label)
Customer Specific:
RLN4829 Button Kit: Mon, Scan (CDM750 compatible only)
RLN4830 Button Kit (CDM1250 and CDM1550 compatible only)
RLN4831 Button Kit: Mon, Scan, Call, Home, Phone (CDM1250 and CDM1550 compatible only)
RLN5324 Button Kit: (CDM1550•LS+): Site, Roam, Mon, Scan, Call, Home, Phone.
CDM750
3886133B02
3886133B03
H & LZone X-Pand V Str
P1
P2

Accessories 6-5
3886133B05
3886133B06
3886133B11
3886133B12
3886133B14
3886133B15
3886133B16
3886133B35
CDM1250/CDM1550/CDM1550•LS/CDM1550•LS+
3886134B03
3886134B04
3886134B05
3886134B06
3886134B08
3886134B09
3886134B10
3886134B12
3886134B13
3886134B14
3886134B15
3886134B16
3886134B17
3886134B18
3886134B19
3886134B20
3886134B21
3886134B22
Mon
Scan
TA
Opt
Aux 1
Aux 2
Hi/Lo
Data
P1
P2
P3
P4
Mon
Home
Scan
H & L
TA
Opt
Light
Zone
Call
Aux 1
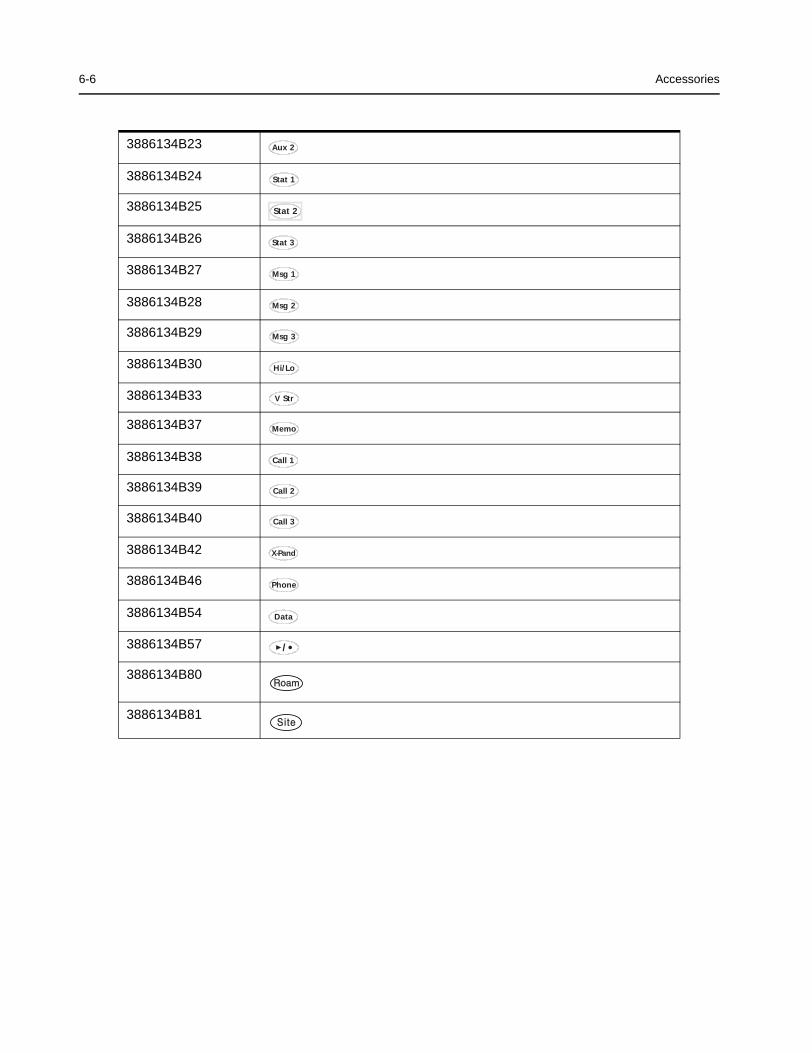
6-6 Accessories
3886134B23
3886134B24
3886134B25
3886134B26
3886134B27
3886134B28
3886134B29
3886134B30
3886134B33
3886134B37
3886134B38
3886134B39
3886134B40
3886134B42
3886134B46
3886134B54
3886134B57
3886134B80
3886134B81
Aux 2
Stat 1
Stat 2
Stat 3
Msg 1
Msg 2
Msg 3
Hi/Lo
V Str
Memo
Call 1
Call 2
Call 3
X-Pand
Phone
Data
/
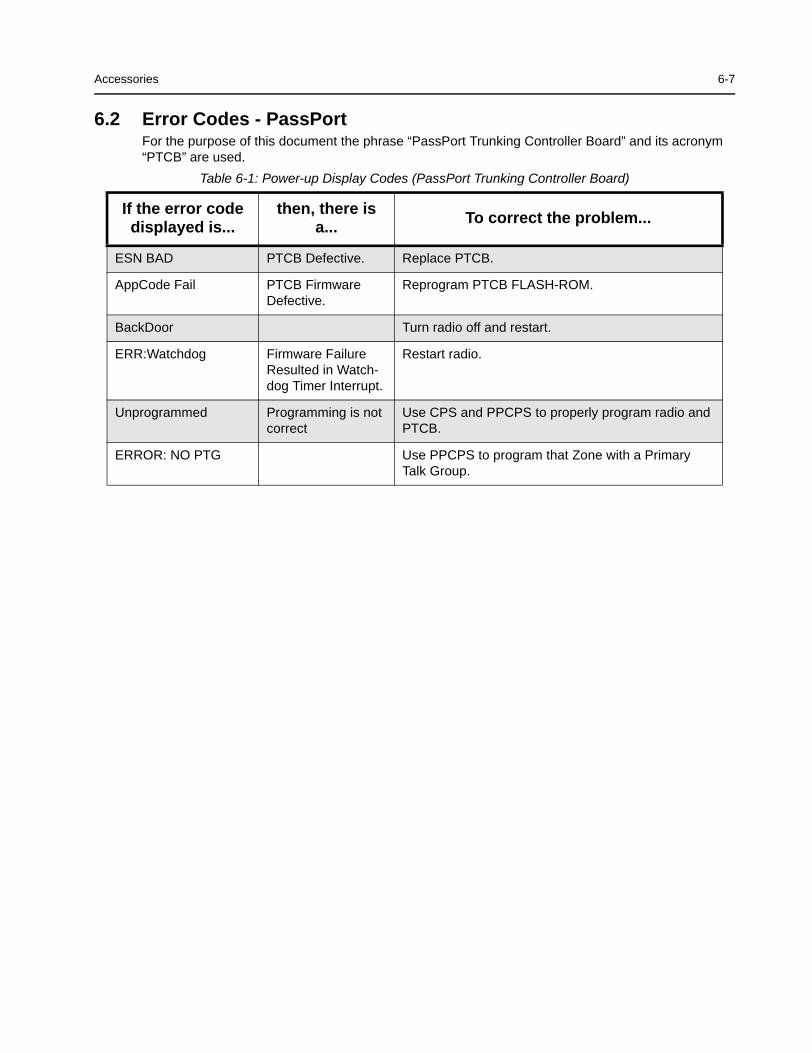
Accessories 6-7
6.2 Error Codes - PassPortFor the purpose of this document the phrase “PassPort Trunking Controller Board” and its acronym “PTCB” are used.
Table 6-1: Power-up Display Codes (PassPort Trunking Controller Board)
If the error code displayed is...
then, there is a... To correct the problem...
ESN BAD PTCB Defective. Replace PTCB.
AppCode Fail PTCB Firmware Defective.
Reprogram PTCB FLASH-ROM.
BackDoor Turn radio off and restart.
ERR:Watchdog Firmware Failure Resulted in Watch-dog Timer Interrupt.
Restart radio.
Unprogrammed Programming is not correct
Use CPS and PPCPS to properly program radio and PTCB.
ERROR: NO PTG Use PPCPS to program that Zone with a Primary Talk Group.

6-8 Accessories
Notes
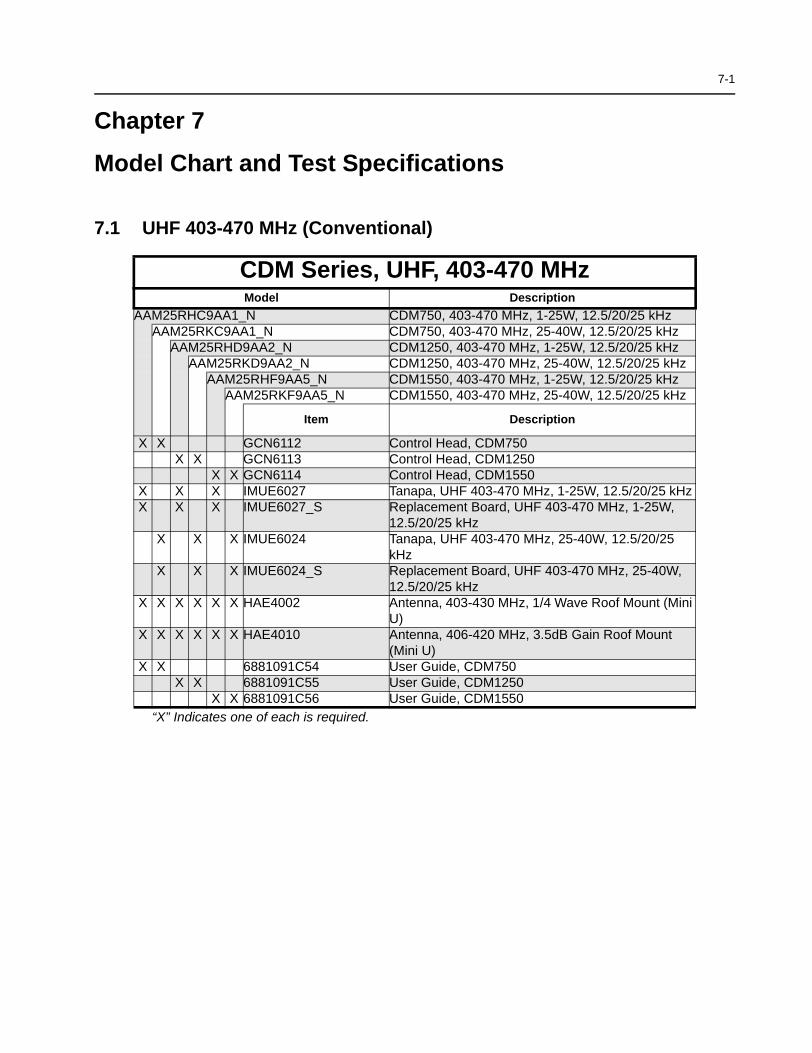
7-1
Chapter 7
Model Chart and Test Specifications
7.1 UHF 403-470 MHz (Conventional)
CDM Series, UHF, 403-470 MHzModel Description
AAM25RHC9AA1_N CDM750, 403-470 MHz, 1-25W, 12.5/20/25 kHzAAM25RKC9AA1_N CDM750, 403-470 MHz, 25-40W, 12.5/20/25 kHz
AAM25RHD9AA2_N CDM1250, 403-470 MHz, 1-25W, 12.5/20/25 kHz AAM25RKD9AA2_N CDM1250, 403-470 MHz, 25-40W, 12.5/20/25 kHz
AAM25RHF9AA5_N CDM1550, 403-470 MHz, 1-25W, 12.5/20/25 kHz AAM25RKF9AA5_N CDM1550, 403-470 MHz, 25-40W, 12.5/20/25 kHz
Item Description
X X GCN6112 Control Head, CDM750X X GCN6113 Control Head, CDM1250
X X GCN6114 Control Head, CDM1550X X X IMUE6027 Tanapa, UHF 403-470 MHz, 1-25W, 12.5/20/25 kHz X X X IMUE6027_S Replacement Board, UHF 403-470 MHz, 1-25W,
12.5/20/25 kHz X X X IMUE6024 Tanapa, UHF 403-470 MHz, 25-40W, 12.5/20/25
kHz X X X IMUE6024_S Replacement Board, UHF 403-470 MHz, 25-40W,
12.5/20/25 kHz X X X X X X HAE4002 Antenna, 403-430 MHz, 1/4 Wave Roof Mount (Mini
U)X X X X X X HAE4010 Antenna, 406-420 MHz, 3.5dB Gain Roof Mount
(Mini U)X X 6881091C54 User Guide, CDM750
X X 6881091C55 User Guide, CDM1250X X 6881091C56 User Guide, CDM1550
“X” Indicates one of each is required.
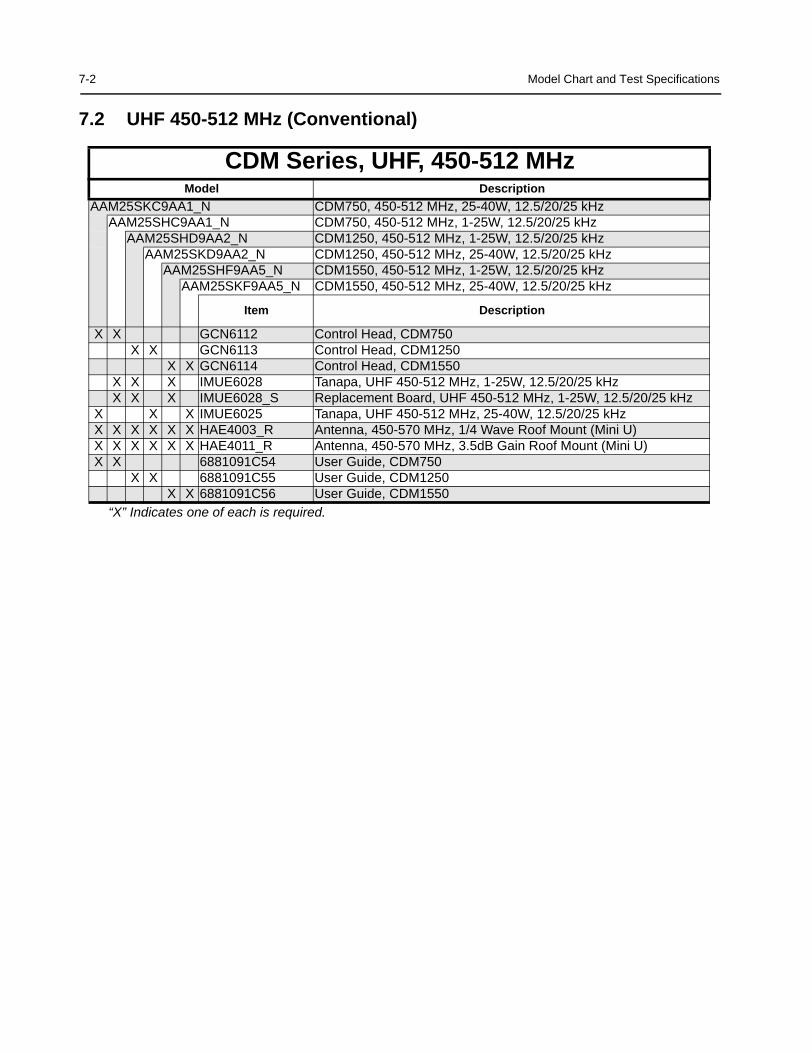
7-2 Model Chart and Test Specifications
7.2 UHF 450-512 MHz (Conventional)
CDM Series, UHF, 450-512 MHzModel Description
AAM25SKC9AA1_N CDM750, 450-512 MHz, 25-40W, 12.5/20/25 kHz AAM25SHC9AA1_N CDM750, 450-512 MHz, 1-25W, 12.5/20/25 kHz
AAM25SHD9AA2_N CDM1250, 450-512 MHz, 1-25W, 12.5/20/25 kHz AAM25SKD9AA2_N CDM1250, 450-512 MHz, 25-40W, 12.5/20/25 kHz
AAM25SHF9AA5_N CDM1550, 450-512 MHz, 1-25W, 12.5/20/25 kHz AAM25SKF9AA5_N CDM1550, 450-512 MHz, 25-40W, 12.5/20/25 kHz
Item Description
X X GCN6112 Control Head, CDM750X X GCN6113 Control Head, CDM1250
X X GCN6114 Control Head, CDM1550X X X IMUE6028 Tanapa, UHF 450-512 MHz, 1-25W, 12.5/20/25 kHz X X X IMUE6028_S Replacement Board, UHF 450-512 MHz, 1-25W, 12.5/20/25 kHz
X X X IMUE6025 Tanapa, UHF 450-512 MHz, 25-40W, 12.5/20/25 kHz X X X X X X HAE4003_R Antenna, 450-570 MHz, 1/4 Wave Roof Mount (Mini U)X X X X X X HAE4011_R Antenna, 450-570 MHz, 3.5dB Gain Roof Mount (Mini U)X X 6881091C54 User Guide, CDM750
X X 6881091C55 User Guide, CDM1250X X 6881091C56 User Guide, CDM1550
“X” Indicates one of each is required.

Model Chart and Test Specifications 7-3
7.3 UHF 403-470 MHz (Conventional, LTR)
7.4 UHF 450-512 MHz (Conventional, LTR)
CDM Series, UHF, 403-470 MHz (LTR)Model Description
AAM25RHF9DU5_N CDM1550•LS, 403-470 MHz, 1-25W, 12.5/20/25 kHzAAM25RKF9DU5_N CDM1550•LS, 403-470 MHz, 25-40W, 12.5/20/25 kHz
Item Description
X X GCN6114 Control Head, CDM1550•LSX IMUE6027 Tanapa, 403-470 MHz, 1-25W, 12.5/20/25 kHzX IMUE6027_S Replacement Board, UHF 403-470 MHz, 1-25W, 12.5/20/25 kHz
X IMUE6024 Tanapa, 403-470 MHz, 25-40W, 12.5/20/25 kHzX IMUE6024_S Replacement Board, UHF 403-470 MHz, 25-40W, 12.5/20/25
kHz X X HAE4002 Antenna, 403-430 MHz, 1/4 Wave Roof Mount (Mini U)X X HAE4010 Antenna, 406-420 MHz, 3.5dB Gain Roof Mount (Mini U)X X 6881093C32 User Guide, CDM1550•LS
“X” Indicates one of each is required.
CDM Series, UHF, 450-512 MHz (LTR)Model Description
AAM25SHF9DU5_N CDM1550•LS, 450-512 MHz, 1-25W, 12.5/20/25 kHzAAM25SKF9DU5_N CDM1550•LS, 450-512 MHz, 25-40W, 12.5/20/25 kHz
Item Description
X X GCN6114 Control Head, CDM1550X IMUE6028 Tanapa, 450-512 MHz, 1-25W, 12.5/20/25 kHzX IMUE6028_S Replacement Board, UHF 450-512 MHz, 1-25W, 12.5/20/25 kHz X X HAE4003_R Antenna, 450-470 MHz, 1/4 Wave Roof Mount (Mini U)X X HAE4004 Antenna, 470-512 MHz, 1/4 Wave Roof Mount (Mini U)X X 6881093C32 User Guide, CDM1550•LS
“X” Indicates one of each is required.

7-4 Model Chart and Test Specifications
7.5 UHF 403-470 MHz (Conventional, LTR/PassPort)
CDM Series, UHF, 403-470 MHz (LTR/PassPort)Model Description
AAM25RHF9DP6_N CDM1550•LS+, 403-470 MHz, MDC/Conventional,1-25WAAM25RKF9DP6_N CDM1550•LS+, 403-470 MHz, MDC/Conventional,25-40W
AAM25RHF9DP5_N CDM1550•LS+, 403-470 MHz, 1-25WAAM25RKF9DP5_N CDM1550•LS+, 403-470 MHz, 25-40W
Item Description
X X X X GCN6114 Control Head, CDM1550•LS+
X PMUE1754 Tanapa LS+, CDM1550•LS+, 403-470 MHz, 1-25W, 12.5/20/25 kHzX PMUE1754_S Service Kit CDM1550•LS+, 403-470 MHz, 1-25W
X PMUE1756 Tanapa LS+, CDM1550•LS+, 403-470 MHz, 25-40W, 12.5/20/25 kHz X PMUE1756_S Service Kit CDM1550•LS+, 403-470 MHz, 25-40W
X PMUE1939 Tanapa LS+, CDM1550•LS+, 403-470 MHz, MDC/Conventional, 1-25W, 12.5/20/25 kHz
X PMUE1940 Tanapa LS+, CDM1550•LS+, 403-470 MHz, MDC/Conventional, 25-40W, 12.5/20/25 kHz
X PMUE1939A_S Service Kit CDM1550•LS+, 403-470 MHz, MDC/Conventional, 1-25WX PMUE1940A_S Service Kit CDM1550•LS+, 403-470 MHz, MDC/Conventional, 25-40W
X X X X HAE4002 Antenna, 403-430 MHz, 1/4 Wave Roof MountX X X X HAE4010 Antenna, 406-420 MHz, 3.5dB Gain Roof MountX X X X 6881094C79 User Guide, CDM1550•LS+
“X” Indicates one of each is required.
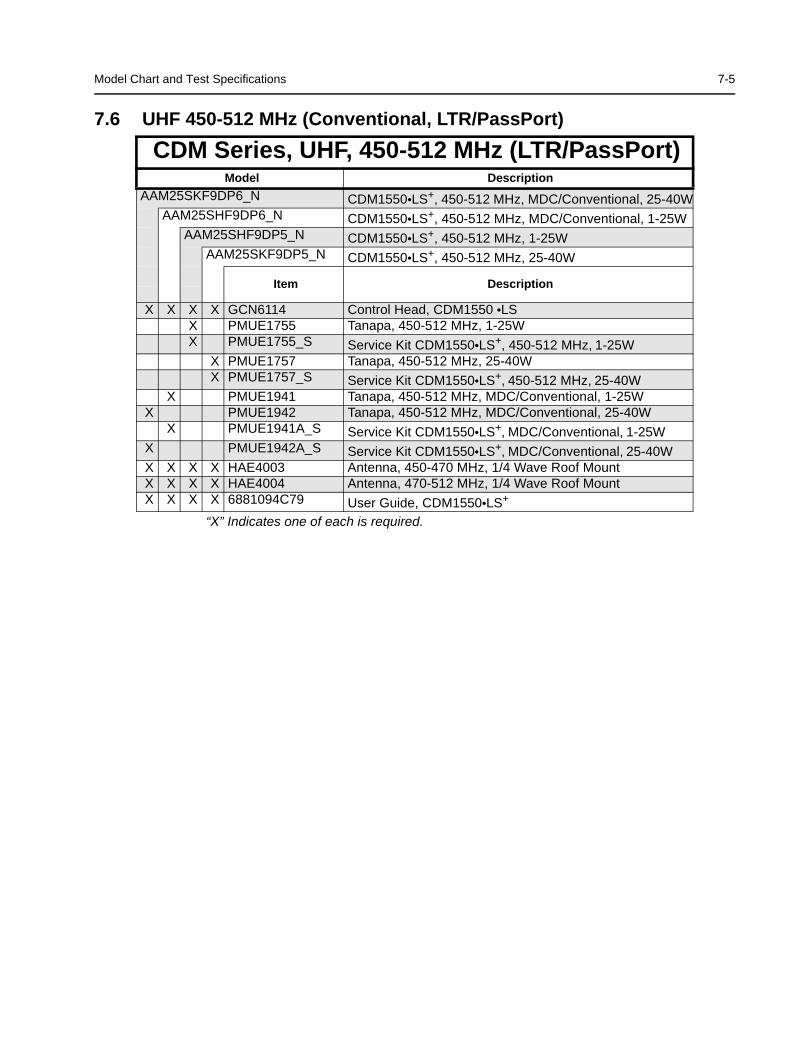
Model Chart and Test Specifications 7-5
7.6 UHF 450-512 MHz (Conventional, LTR/PassPort)
CDM Series, UHF, 450-512 MHz (LTR/PassPort)Model Description
AAM25SKF9DP6_N CDM1550•LS+, 450-512 MHz, MDC/Conventional, 25-40WAAM25SHF9DP6_N CDM1550•LS+, 450-512 MHz, MDC/Conventional, 1-25W
AAM25SHF9DP5_N CDM1550•LS+, 450-512 MHz, 1-25WAAM25SKF9DP5_N CDM1550•LS+, 450-512 MHz, 25-40W
Item Description
X X X X GCN6114 Control Head, CDM1550 •LSX PMUE1755 Tanapa, 450-512 MHz, 1-25WX PMUE1755_S Service Kit CDM1550•LS+, 450-512 MHz, 1-25W
X PMUE1757 Tanapa, 450-512 MHz, 25-40WX PMUE1757_S Service Kit CDM1550•LS+, 450-512 MHz, 25-40W
X PMUE1941 Tanapa, 450-512 MHz, MDC/Conventional, 1-25WX PMUE1942 Tanapa, 450-512 MHz, MDC/Conventional, 25-40W
X PMUE1941A_S Service Kit CDM1550•LS+, MDC/Conventional, 1-25WX PMUE1942A_S Service Kit CDM1550•LS+, MDC/Conventional, 25-40WX X X X HAE4003 Antenna, 450-470 MHz, 1/4 Wave Roof MountX X X X HAE4004 Antenna, 470-512 MHz, 1/4 Wave Roof MountX X X X 6881094C79 User Guide, CDM1550•LS+
“X” Indicates one of each is required.

7-6 Model Chart and Test Specifications
7.7 LowBand 29.7-36 MHz
“X” indicates one of each is required
7.8 LowBand 36-42 MHz
CDM Series, LowBand, 29.7-36 MHzModel Description
AAM25BKC9AA1_N CDM750, 29.7-36 MHz, 40-60W, 20 kHz AAM25BKD9AA2_N CDM1250, 29.7-36 MHz, 40-60W, 20 kHz
AAM25BKF9AA5_N CDM1550, 29.7-36 MHz, 40-60W, 20 kHz
Item Description
X GCN6112 Control Head, CDM750X GCN6113 Control Head, CDM1250
X GCN6114 Control Head, CDM1550X X X IMUB6000 Tanapa, 29.7-36 MHz, 40-60W, 20 kHzX X X IMUB6000_S Replacement Board, 29.7-36 MHz, 40-60 W, 20 kHzX X X RAB4002_RB Antenna, 29.7-36 MHz, 1/4 Wave Base Loaded (Mini U)X 6881091C54 User Guide, CDM750
X 6881091C55 User Guide, CDM1250X 6881091C56 User Guide, CDM1550
CDM Series, LowBand, 36-42 MHzModel Description
AAM25CKC9AA1_N CDM750, 36-42 MHz, 40-60W, 20 kHz AAM25CKD9AA2_N CDM1250, 36-42 MHz, 40-60W, 20 kHz
AAM25CKF9AA5_N CDM1550, 36-42 MHz, 40-60W, 20 kHz
Item Description
X GCN6112 Control Head, CDM750X GCN6113 Control Head, CDM1250
X GCN6114 Control Head, CDM1550X X X IMUB6001 Tanapa, 36-42 MHz, 40-60W, 20 kHzX X X IMUB6001_S Replacement Board, 36-42 MHz, 40-60 W, 20 kHzX X X RAB4003_RB Antenna, 36-42 MHz, 1/4 Wave Base Loaded (Mini U)X 6881091C54 User Guide, CDM750
X 6881091C55 User Guide, CDM1250X 6881091C56 User Guide, CDM1550
“X” Indicates one of each is required.

Model Chart and Test Specifications 7-7
7.9 LowBand 42-50 MHz
CDM Series, LowBand, 42-50 MHzModel Description
AAM25DKC9AA1_N CDM750, 42-50 MHz, 40-60W, 20 kHzAAM25DKD9AA2_N CDM1250, 42-50 MHz, 40-60W, 20 kHz
AAM25DKF9AA5_N CDM1550, 42-50 MHz, 40-60W, 20 kHz
Item Description
X GCN6112 Control Head, CDM750X GCN6113 Control Head, CDM1250
X GCN6114 Control Head, CDM1550X X X IMUB6002 Tanapa, 42-50 MHz, 40-60W, 20 kHzX X X RAB4004_RB Antenna, 42-50 MHz, 1/4 Wave Base Loaded (Mini U)X 6881091C54 User Guide, CDM750
X 6881091C55 User Guide, CDM1250X 6881091C56 User Guide, CDM1550
“X” Indicates one of each is required.
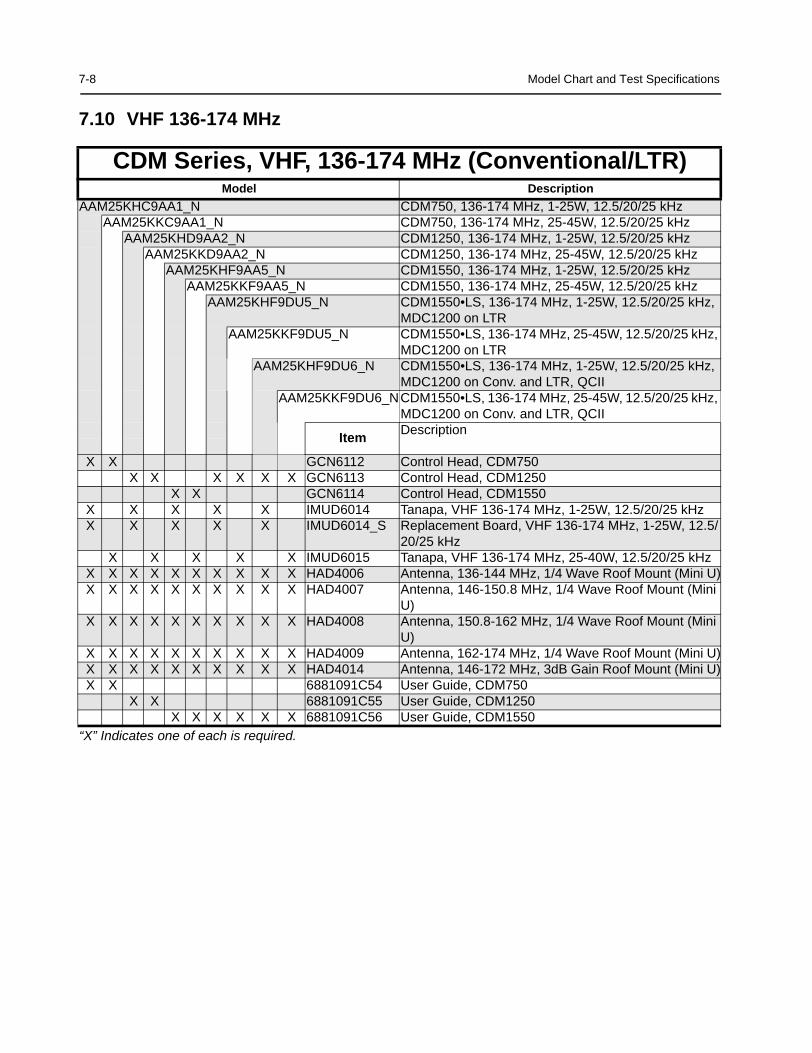
7-8 Model Chart and Test Specifications
7.10 VHF 136-174 MHz
CDM Series, VHF, 136-174 MHz (Conventional/LTR)Model Description
AAM25KHC9AA1_N CDM750, 136-174 MHz, 1-25W, 12.5/20/25 kHzAAM25KKC9AA1_N CDM750, 136-174 MHz, 25-45W, 12.5/20/25 kHz
AAM25KHD9AA2_N CDM1250, 136-174 MHz, 1-25W, 12.5/20/25 kHz AAM25KKD9AA2_N CDM1250, 136-174 MHz, 25-45W, 12.5/20/25 kHz
AAM25KHF9AA5_N CDM1550, 136-174 MHz, 1-25W, 12.5/20/25 kHz AAM25KKF9AA5_N CDM1550, 136-174 MHz, 25-45W, 12.5/20/25 kHz
AAM25KHF9DU5_N CDM1550•LS, 136-174 MHz, 1-25W, 12.5/20/25 kHz, MDC1200 on LTR
AAM25KKF9DU5_N CDM1550•LS, 136-174 MHz, 25-45W, 12.5/20/25 kHz, MDC1200 on LTR
AAM25KHF9DU6_N CDM1550•LS, 136-174 MHz, 1-25W, 12.5/20/25 kHz, MDC1200 on Conv. and LTR, QCII
AAM25KKF9DU6_NCDM1550•LS, 136-174 MHz, 25-45W, 12.5/20/25 kHz, MDC1200 on Conv. and LTR, QCII
Item Description
X X GCN6112 Control Head, CDM750X X X X X X GCN6113 Control Head, CDM1250
X X GCN6114 Control Head, CDM1550X X X X X IMUD6014 Tanapa, VHF 136-174 MHz, 1-25W, 12.5/20/25 kHzX X X X X IMUD6014_S Replacement Board, VHF 136-174 MHz, 1-25W, 12.5/
20/25 kHzX X X X X IMUD6015 Tanapa, VHF 136-174 MHz, 25-40W, 12.5/20/25 kHz
X X X X X X X X X X HAD4006 Antenna, 136-144 MHz, 1/4 Wave Roof Mount (Mini U)X X X X X X X X X X HAD4007 Antenna, 146-150.8 MHz, 1/4 Wave Roof Mount (Mini
U)X X X X X X X X X X HAD4008 Antenna, 150.8-162 MHz, 1/4 Wave Roof Mount (Mini
U)X X X X X X X X X X HAD4009 Antenna, 162-174 MHz, 1/4 Wave Roof Mount (Mini U)X X X X X X X X X X HAD4014 Antenna, 146-172 MHz, 3dB Gain Roof Mount (Mini U)X X 6881091C54 User Guide, CDM750
X X 6881091C55 User Guide, CDM1250X X X X X X 6881091C56 User Guide, CDM1550
“X” Indicates one of each is required.

Model Chart and Test Specifications 7-9
7.11 VHF 136-174 MHz (LTR and PassPort)
CDM Series, VHF, 136-174 MHz (LTR and Passport)Model Description
AAM25KHF9DP5_N CDM1550·LS+, 136-174 MHz, 25W, 16CH AAM25KHF9DP6_N CDM1550·LS+, 136-174 MHz, 25W, 160CH w/MDC
AAM25KKF9DP5_N CDM1550·LS+, 136-174 MHz, 45W, 16CHAAM25KKF9DP6_N CDM1550·LS+, 136-174 MHz, 45W, 160CH w/MDC
Item Description
X X X X GCN6114 CDM1550·LS / CDM1550·LS+, Control HeadX X X X PMLD4288 CDM1550·LS+, VHF R1 25W PASSPORT Main BoardX X X X PMLD4289 CDM1550·LS+, VHF R1 45W PASSPORT Main BoardX PMUD2076A Tanapa, VHF 136-174 MHz, 25W, 16CH
X PMUD2077A Tanapa, VHF 136-174 MHz, 25W, 160CH w/ MDCX PMUD2078A Tanapa, VHF 136-174 MHz, 45W, 16CH
X PMUD2079A Tanapa, VHF 136-174 MHz, 45W, 160CH w/ MDCX X X X HAD4006 Antenna, 136-144 MHz, ¼ Wave Roof Mount (Mini U)X X X X HAD4007 Antenna, 146-150.8 MHz, ¼ Wave Roof Mount (Mini U)X X X X HAD4008 Antenna, 150.8-162 MHz, ¼ Wave Roof Mount (Mini U)X X X X HAD4009 Antenna, 162-174 MHz, ¼ Wave Roof Mount (Mini U)X X X X HAD4014 Antenna, 146-172 MHz, 3dB Gain Roof Mount (Mini U)X X X X 6881094C79 User Guide, CDM1550.LS / CDM1550.LS+
“X” Indicates one of each is required.

7-10 Model Chart and Test Specifications
7.12 Specifications
GeneralSpecification LowBand VHF UHF
Model Numbers: AAM25BKC9AA1_NAAM25CKC9AA1_NAAM25DKC9AA1_NAAM25BKD9AA2_NAAM25CKD9AA2_NAAM25DKD9AA2_NAAM25BKF9AA5_NAAM25CKF9AA5_NAAM25DKF9AA5_N
AAM25KHC9AA1_NAAM25KKC9AA1_NAAM25KHD9AA2_NAAM25KKD9AA2_NAAM25KHF9AA5_NAAM25KKF9AA5_NAAM25KHF9DU6_NAAM25KKF9DU6_NAAM25KHF9DP5_NAAM25KHF9DP6_NAAM25KKF9DP6_NAAM25KKF9DP6_N
AAM25RHC9AA1_NAAM25RKC9AA1_NAAM25RHD9AA2_NAAM25RKD9AA2_NAAM25RHF9AA5_NAAM25RKF9AA5_NAAM25SHC9AA1_NAAM25SKC9AA1_NAAM25SHD9AA2_NAAM25SKD9AA2_NAAM25SHF9AA5_NAAM25SKF9AA5_NAAM25RHF9DU5_NAAM25RKF9DU5_NAAM25SHF9DU5_NAAM25SKF9DU5_NAAM25RHF9DP5_NAAM25SHF9DP5_NAAM25RKF9DP5_NAAM25SKF9DP5_NAAM25RHF9DP6_NAAM25RKF9DP6_NAAM25SHF9DP6_NAAM25SKF9DP6_N
Frequency Range: 29.7-36 MHz36-42 MHz42-50 MHz
136-174 MHz 403-470 MHz450-512 MHz
Frequency Stability(-30°C to +60°C, 25°C Ref.)
±5 PPM ±2 PPM
Channel Capacity: 4, 64, 128
Channel Spacing: 20 kHz 12.5/20/25 kHz
Power Supply: 13.2Vdc (10.8 - 15.6 Vdc) negative vehicle ground
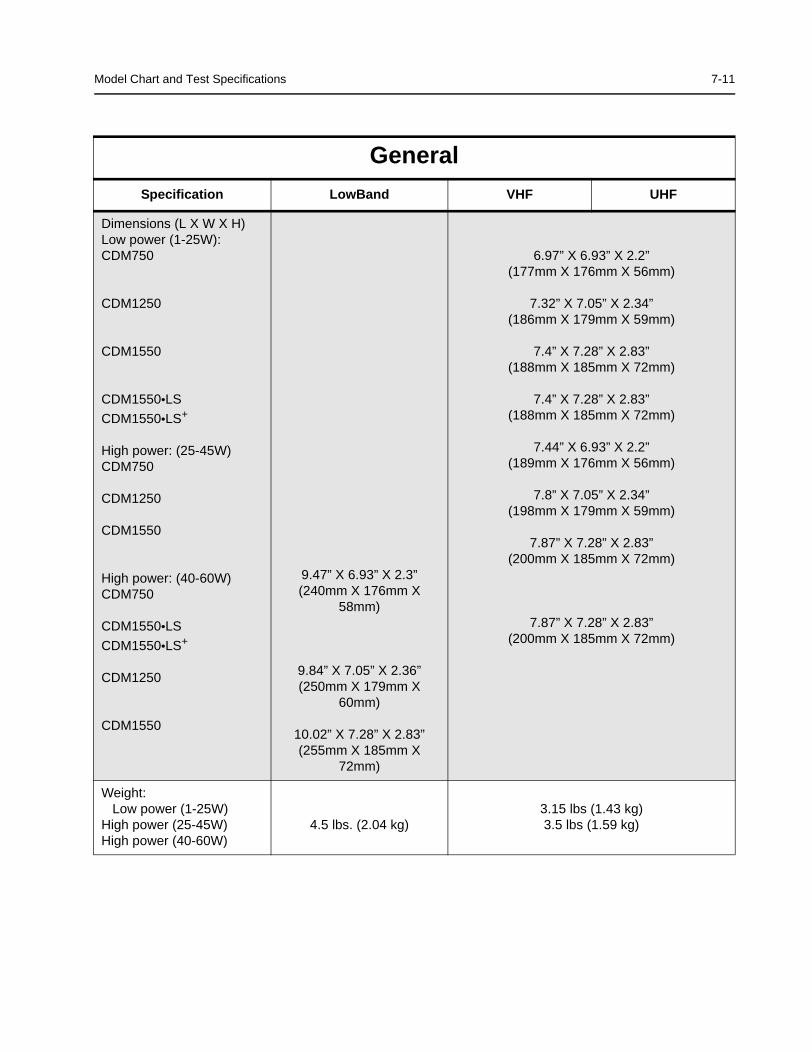
Model Chart and Test Specifications 7-11
Dimensions (L X W X H)Low power (1-25W):CDM750
CDM1250
CDM1550
CDM1550•LSCDM1550•LS+
High power: (25-45W)CDM750
CDM1250
CDM1550
High power: (40-60W)CDM750
CDM1550•LSCDM1550•LS+
CDM1250
CDM1550
9.47” X 6.93” X 2.3” (240mm X 176mm X
58mm)
9.84” X 7.05” X 2.36” (250mm X 179mm X
60mm)
10.02” X 7.28” X 2.83” (255mm X 185mm X
72mm)
6.97” X 6.93” X 2.2” (177mm X 176mm X 56mm)
7.32” X 7.05” X 2.34” (186mm X 179mm X 59mm)
7.4” X 7.28” X 2.83” (188mm X 185mm X 72mm)
7.4” X 7.28” X 2.83” (188mm X 185mm X 72mm)
7.44” X 6.93” X 2.2” (189mm X 176mm X 56mm)
7.8” X 7.05” X 2.34” (198mm X 179mm X 59mm)
7.87” X 7.28” X 2.83” (200mm X 185mm X 72mm)
7.87” X 7.28” X 2.83” (200mm X 185mm X 72mm)
Weight: Low power (1-25W)High power (25-45W)High power (40-60W)
4.5 lbs. (2.04 kg)3.15 lbs (1.43 kg)3.5 lbs (1.59 kg)
GeneralSpecification LowBand VHF UHF

7-12 Model Chart and Test Specifications
FCC Description: AZ492FT1627 (40-60W, 29.7-36 MHz)
AZ492FT1628 (40-60W, 36-42 MHz)
AZ492FT1626 (40-60W,42-50 MHz)
AZ492FT3796 (25W)AZ492FT3795 (45W)
AZ492FT4835 (25W, 403-470 MHz)
AZ492FT4830 (40W, 403-470 MHz)
AZ492FT4829 (25W, 450-512 MHz)
AZ492FT4836 (40W, 450-512 MHz)
Operating Temperature -30 to 60 o C
Storage Temperature -55 to 85 o C
Thermal Shock -40 to 85 o C
Humidity 95% RH @ 8 Hr.
ESD IEC 801-2 KV
Water Intrusion IP54
Packing Test Impact Test
TransmitterSpecification LowBand VHF UHF
Power Output: 40-60W 1-25W25-45W
1-25W25-40W
Conducted/Radiated Emissions:
-26 dBm -36 dBm < 1 GHz -30 dBm > 1 GHz
Audio Response: (from 6 dB/oct. Pre-Emphasis, 300 to 3000Hz)
TIA603 and ETS300 /CEPT 84 Annex 2
Audio Distortion:@ 1000 Hz, 60%Rated Maximum Deviation:
3% Typical
Modulation Limiting: ±5.0 kHz ±2.5 kHz @ 12.5 kHz±4.0 kHz @ 20 kHz±5.0 kHz @ 25 kHz
FM Hum and Noise: -45 dB -40 [email protected] kHz-45 dB@25 kHz
-40 [email protected] kHz-45 dB@25 kHz
GeneralSpecification LowBand VHF UHF
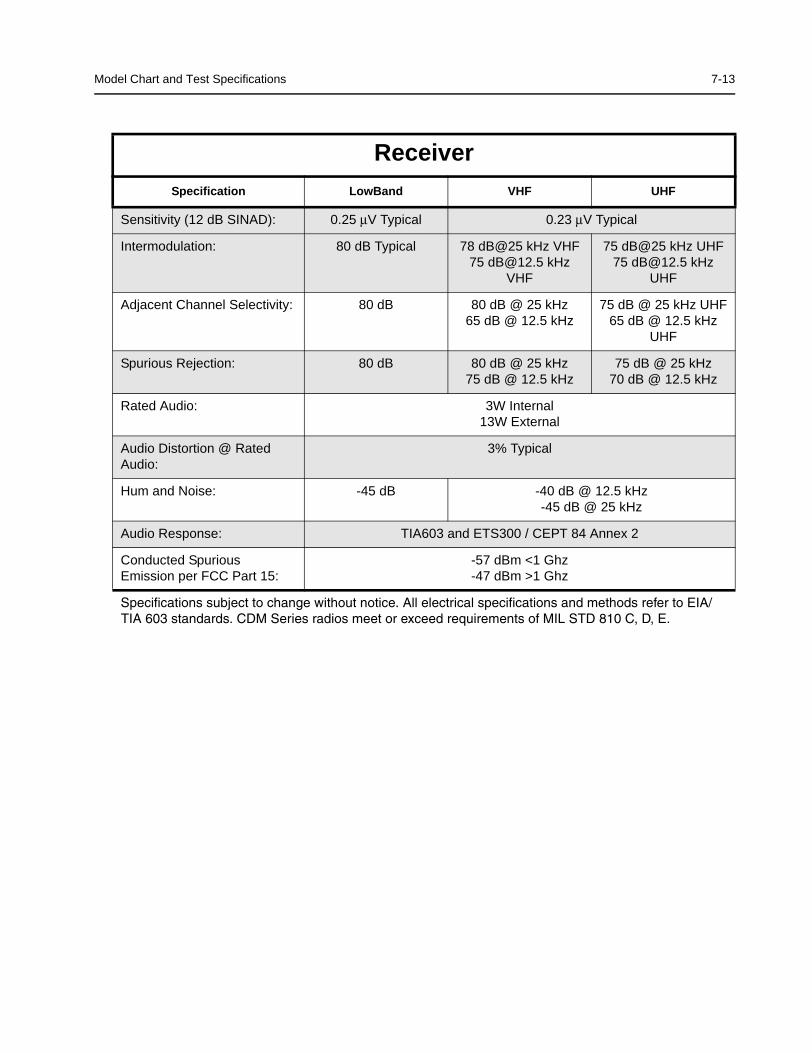
Model Chart and Test Specifications 7-13
ReceiverSpecification LowBand VHF UHF
Sensitivity (12 dB SINAD): 0.25 µV Typical 0.23 µV Typical
Intermodulation: 80 dB Typical 78 dB@25 kHz VHF75 [email protected] kHz
VHF
75 dB@25 kHz UHF75 [email protected] kHz
UHF
Adjacent Channel Selectivity: 80 dB 80 dB @ 25 kHz 65 dB @ 12.5 kHz
75 dB @ 25 kHz UHF65 dB @ 12.5 kHz
UHF
Spurious Rejection: 80 dB 80 dB @ 25 kHz 75 dB @ 12.5 kHz
75 dB @ 25 kHz 70 dB @ 12.5 kHz
Rated Audio: 3W Internal13W External
Audio Distortion @ Rated Audio:
3% Typical
Hum and Noise: -45 dB -40 dB @ 12.5 kHz-45 dB @ 25 kHz
Audio Response: TIA603 and ETS300 / CEPT 84 Annex 2
Conducted Spurious Emission per FCC Part 15:
-57 dBm <1 Ghz-47 dBm >1 Ghz
Specifications subject to change without notice. All electrical specifications and methods refer to EIA/TIA 603 standards. CDM Series radios meet or exceed requirements of MIL STD 810 C, D, E.

7-14 Model Chart and Test Specifications
NOTES

Glossary-1
Glossary
Glossary of Terms
Term Definition
ALC Automatic Level Control: a circuit in the transmit RF path that controls RF power amplifier output, provides leveling over frequency and voltage, and protects against high VSWR (voltage standing wave ration).
ASF IC Audio Signalling Filter Integrated Circuit with voice compander.
CD Compact Disk.
CMP Compression.
CPS Customer Programming Software.
CSQ Carrier Squelch.
DTMF Dual-Tone Multifrequency.
DPL Digital Private-Line™.
EEPROM Electronically Erasable/Programmable Read-Only Memory: used by the radio to store its personality.
Firmware Software, or a software/hardware combination of computer programs and data, with a fixed logic configuration stored in a read-only memory. Information cannot be altered or reprogrammed.
FGU Frequency Generation Unit.
GaAs Gallium Arsenide: a type of crystalline material used in some semiconductors.
ISW Inbound Signalling Word: data transmitted on the control channel from a subscriber unit to the central control unit.
LCD Liquid Crystal Display: a module used to display the radio’s current operating channel or system and scan status.
LDMOS Lateral Diffusion MOS.
LH DATA Longhorn Data: a bidirectional 0-5V, RS-232 line that uses the microcontroller’s integrated RS-232 asynchronous serial communications interface (SCI) peripheral.
LLE Low Level Expander: slight amount of volume expansion; used to improve the signal to noise ratio.
LSH Low-Speed Handshake: 150 baud digital data sent to the radio during trunked operation while receiving audio.
LTR Trunked Signaling Protocol using low-speed data. Registered trademark of E.F. Johnson Company.
MDC Motorola Data Communication.

Glossary-2 Glossary
MRTI Motorola Radio-Telephone Interconnect: a system that provides a repeater connection to the Public Switched Telephone Network (PSTN). The MRTI allows the radio to access the telephone network when the proper access code is received.
MSK Minimum-Shift Keying
OMPAC Over-Molded Pad-Array Carrier: a Motorola custom package, distinguished by the presence of solder balls on the bottom pads.
OSW Outbound Signalling Word: data transmitted on the control channel from the central controller to the subscriber unit.
PassPort™ Enhanced trunking protocol developed by Trident Micro Systems that links wide area dispatch networking.
PC Board Printed Circuit Board
PL Private-Line® tone squelch: a continuous sub-audible tone that is transmitted along with the carrier.
PLL Phase-Locked Loop: a circuit in which an oscillator is kept in phase with a reference, usually after passing through a frequency divider.
PPCPS PassPort Customer Programming Software.
PTT Push-To-Talk: the switch located on the left side of the radio which, when pressed, causes the radio to transmit.
RAM Random Access Memory: the radio’s RAM is loaded with a copy of the EEPROM data.
Registers Short-term data-storage circuits within the microcontroller.
Repeater Remote transmit/receive facility that retransmits received signals to improve communications coverage.
RESET Reset line: an input to the microcontroller that restarts execution.
RF PA Radio Frequency Power Amplifier
RIB Radio Interface Box
ROM Read Only Memory
RSSI Received Signal-Strength Indicator: a dc voltage proportional to the received RF signal strength.
RPT/TA Repeater/Talk-Around
Softpot Software Potentiometer: a computer-adjustable electronic attenuator
Software Computer programs, procedures, rules, documentation, and data pertaining to the operation of a system
SPI (clock and data lines)
Serial Peripheral Interface: how the microcontroller communicates to modules and ICs through the CLOCK and DATA lines.
Glossary of Terms

Glossary Glossary-3
Squelch Muting of audio circuits when received signal levels fall below a pre-determined value
Standby Mode An operating mode whereby the radio is muted but still continues to receive data
System Central Controller
Main control unit of the trunked dispatch system; handles ISW and OSW messages to and from subscriber units (see ISW and OSW).
System Select The act of selecting the desired operating system with the system-select switch (also, the name given to this switch).
TOT Time-Out Timer: a timer that limits the length of a transmission.
TPL Tone Private-line
µC Microcontroller
UHF Ultra High Frequency
µP Microprocessor
VCO Voltage-Controlled Oscillator: an oscillator whereby the frequency of oscillation can be varied by changing a control voltage.
VCOBIC Voltage-Controlled Oscillator Buffer Integrated Circuit
VHF Very High Frequency
VSWR Voltage Standing Wave Ratio
Glossary of Terms

Glossary-4 Glossary
Notes

online
Stamp

6881091C62-D*6881091C62*
MOTOROLA, the Stylized M Logo are registered in theU.S. Patent and Trademark Office. All other product orservice names are the property of their respective owners.© Motorola, Inc. 2005
Related Documents