CBN FORMS APPLICATION USER MANUAL (SUBMISSION) Handling Guidelines: (Tick all that apply) Do not forward or copy data in part or full without explicit permission of Webb Fontaine Limit access to individuals on Access List / Lock in a Drawer / Cabinet Password-protect when emailed outside WF Network / Send password separately Document Name CBN Forms Application User Manual(Submission) Document number WFN-EXT-CBNA00-05-EN-1.21 General Description This documented procedure describes how to use CBN Forms application module in submitting CBN Forms. Target Audience DTI Café(s), Importer(s), Agent(s), Bank(s) Security Notice: The information contained within this document is CONFIDENTIAL. Unauthorized disclosure is prohibited. Failure to observe Webb Fontaine guidelines regarding proprietary information can result in disciplinary action, including dismissal, and can subject you and/or third parties to legal liability.

Welcome message from author
This document is posted to help you gain knowledge. Please leave a comment to let me know what you think about it! Share it to your friends and learn new things together.
Transcript
CBN FORMS APPLICATION USER MANUAL (SUBMISSION)
Handling Guidelines: (Tick all that apply)
Do not forward or copy data in part or full without explicit permission of Webb Fontaine Limit access to individuals on Access List / Lock in a Drawer / Cabinet Password-protect when emailed outside WF Network / Send password separately
Document Name
CBN Forms Application User Manual(Submission)
Document number
WFN-EXT-CBNA00-05-EN-1.21
General Description This documented procedure describes how to use CBN Forms application module in submitting CBN Forms.
Target Audience
DTI Café(s), Importer(s), Agent(s), Bank(s)
Security Notice: The information contained within this document is CONFIDENTIAL. Unauthorized disclosure is prohibited. Failure to observe Webb Fontaine guidelines regarding proprietary information can result in disciplinary action, including dismissal, and can subject you and/or third parties to legal liability.

CBN FORMS APPLICATION USER MANUAL(SUBMISSION)
2
Copyright © WEBB FONTAINE WFN-EXT-CBNA00-05-EN-V1.21
This document, property of the issuing firm, cannot be
reproduced nor communicated without written authorization.
Table of Contents
1 PURPOSE .................................................................................................................................... 3
2 UNIFORM RESOURCE LOCATOR (URL) ......................................................................................... 4
3 FORM M OPERATIONS ................................................................................................................ 5 3.1 CREATE ......................................................................................................................................................... 5 3.2 VERIFY ........................................................................................................................................................ 15 3.3 STORE ......................................................................................................................................................... 18 3.4 SEARCH ....................................................................................................................................................... 18 3.5 UPDATE ....................................................................................................................................................... 20 3.6 SUBMIT ....................................................................................................................................................... 21 3.7 DELETING STORED CBN FORM ........................................................................................................................ 23 3.8 EXPORT XML ............................................................................................................................................... 24 3.9 IMPORT XML ............................................................................................................................................... 26 3.10 VIEW/PRINT PDF .......................................................................................................................................... 27 3.11 MODIFICATION OF REJECTED FORM M .............................................................................................................. 29 3.12 POST ENTRY MODIFICATION ............................................................................................................................ 30 3.13 FORM M VALIDITY EXTENSION......................................................................................................................... 32 3.14 FORM M’S C AND F VALUE EXCESS ALLOWANCE ................................................................................................. 33
4 FORM NXP OPERATIONS ........................................................................................................... 36 4.1 CREATE ....................................................................................................................................................... 36 4.2 VERIFY ........................................................................................................................................................ 37 4.3 STORE ......................................................................................................................................................... 38 4.4 UPDATE ....................................................................................................................................................... 38 4.5 DELETING STORED CBN FORM ........................................................................................................................ 39 4.6 SUBMIT ....................................................................................................................................................... 40
5 FORM NCX OPERATIONS ........................................................................................................... 41 5.1 CREATE ....................................................................................................................................................... 41 5.2 VERIFY ........................................................................................................................................................ 42 5.3 STORE ......................................................................................................................................................... 43 5.4 UPDATE ....................................................................................................................................................... 43 5.5 DELETING STORED CBN FORM ........................................................................................................................ 44 5.6 SUBMIT ....................................................................................................................................................... 45
6 FORM A OPERATIONS ............................................................................................................... 46 6.1 CREATE ....................................................................................................................................................... 46 6.2 VERIFY ........................................................................................................................................................ 48 6.3 STORE ......................................................................................................................................................... 48 6.4 UPDATE ....................................................................................................................................................... 49 6.5 DELETING STORED CBN FORM ........................................................................................................................ 50 6.6 SUBMIT ....................................................................................................................................................... 51
7 VIEW PROFILE ........................................................................................................................... 52
8 CHANGE PASSWORD ................................................................................................................ 52
9 LOGOUT ................................................................................................................................... 53
10 RESET PASSWORD .................................................................................................................... 54
11 TECHNICAL REQUIREMENTS ...................................................................................................... 55 11.1 HARDWARE .................................................................................................................................................. 55 11.2 OPERATING SYSTEM....................................................................................................................................... 55 11.3 INTERNET BROWSER ...................................................................................................................................... 55

CBN FORMS APPLICATION USER MANUAL(SUBMISSION)
3
Copyright © WEBB FONTAINE WFN-EXT-CBNA00-05-EN-V1.21
This document, property of the issuing firm, cannot be
reproduced nor communicated without written authorization.
1 PURPOSE
This documented procedure describes how to use CBN Forms Application module: a. Creating CBN Form b. Submitting CBN Form c. Searching for CBN record d. Viewing CBN Form information e. Deleting Stored CBN Form f. Updating CBN Form g. CBN Form Post Entry Modification h. Exporting CBN record to XML file i. Importing CBN XML File j. Viewing/Print PDF File k. Viewing Profile l. Changing Password m. Resetting Password n. Login/Logout from Application
CBN FORMS APPLICATION USER MANUAL(SUBMISSION)
4
Copyright © WEBB FONTAINE WFN-EXT-CBNA00-05-EN-V1.21
This document, property of the issuing firm, cannot be
reproduced nor communicated without written authorization.
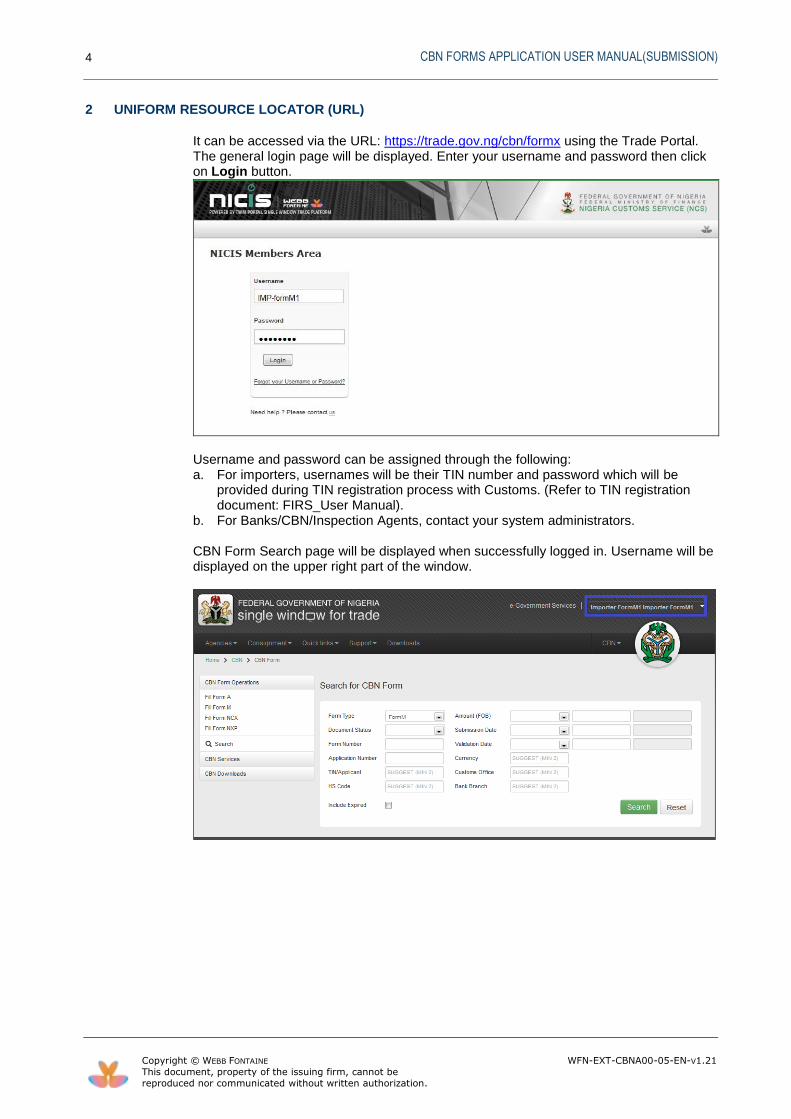
2 UNIFORM RESOURCE LOCATOR (URL)
It can be accessed via the URL: https://trade.gov.ng/cbn/formx using the Trade Portal. The general login page will be displayed. Enter your username and password then click on Login button.
Username and password can be assigned through the following: a. For importers, usernames will be their TIN number and password which will be
provided during TIN registration process with Customs. (Refer to TIN registration document: FIRS_User Manual).
b. For Banks/CBN/Inspection Agents, contact your system administrators.
CBN Form Search page will be displayed when successfully logged in. Username will be displayed on the upper right part of the window.
CBN FORMS APPLICATION USER MANUAL(SUBMISSION)
5
Copyright © WEBB FONTAINE WFN-EXT-CBNA00-05-EN-V1.21
This document, property of the issuing firm, cannot be
reproduced nor communicated without written authorization.
3 FORM M OPERATIONS
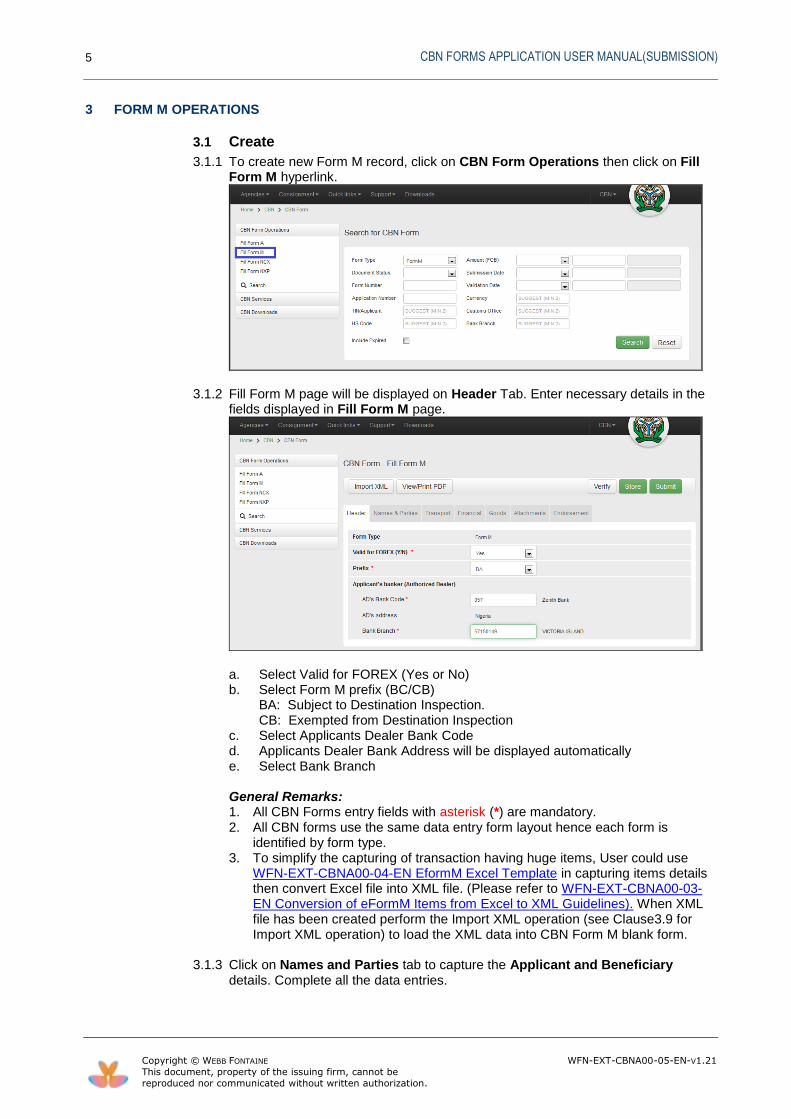
3.1 Create
3.1.1 To create new Form M record, click on CBN Form Operations then click on Fill Form M hyperlink.
3.1.2 Fill Form M page will be displayed on Header Tab. Enter necessary details in the fields displayed in Fill Form M page.
a. Select Valid for FOREX (Yes or No) b. Select Form M prefix (BC/CB)
BA: Subject to Destination Inspection. CB: Exempted from Destination Inspection
c. Select Applicants Dealer Bank Code d. Applicants Dealer Bank Address will be displayed automatically e. Select Bank Branch General Remarks: 1. All CBN Forms entry fields with asterisk (*) are mandatory. 2. All CBN forms use the same data entry form layout hence each form is
identified by form type. 3. To simplify the capturing of transaction having huge items, User could use
WFN-EXT-CBNA00-04-EN EformM Excel Template in capturing items details then convert Excel file into XML file. (Please refer to WFN-EXT-CBNA00-03-EN Conversion of eFormM Items from Excel to XML Guidelines). When XML file has been created perform the Import XML operation (see Clause3.9 for Import XML operation) to load the XML data into CBN Form M blank form.
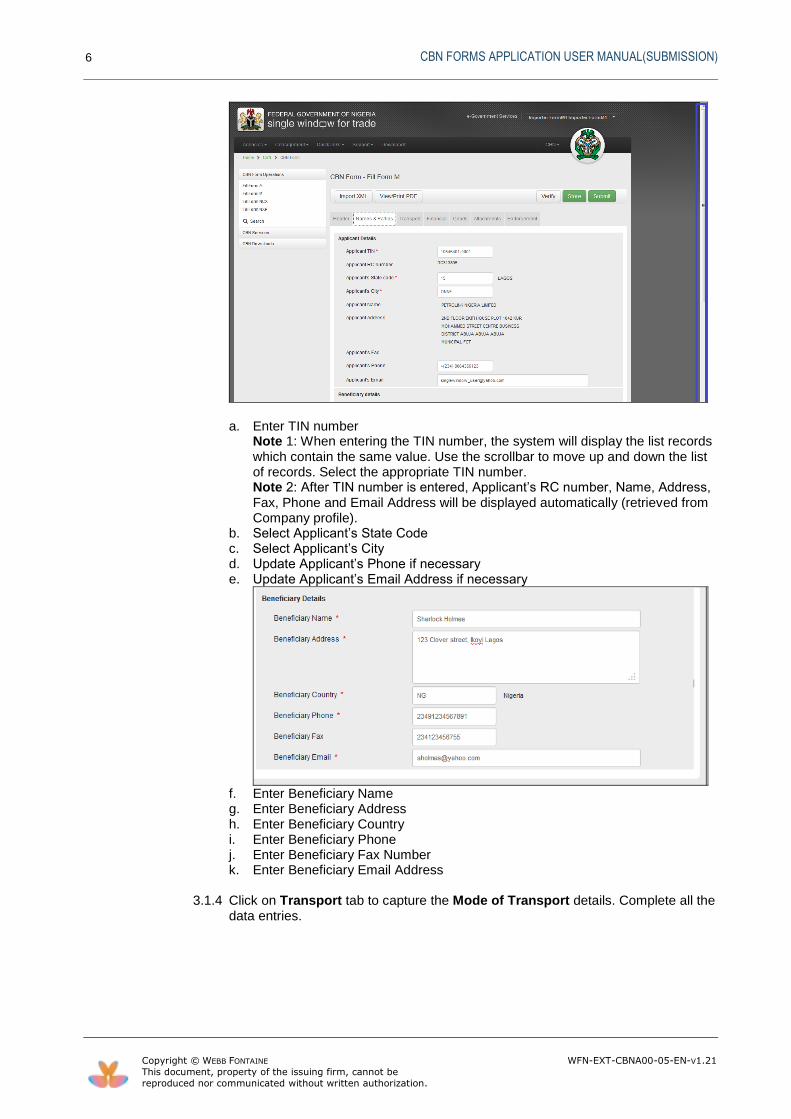
3.1.3 Click on Names and Parties tab to capture the Applicant and Beneficiary
details. Complete all the data entries.
CBN FORMS APPLICATION USER MANUAL(SUBMISSION)
6
Copyright © WEBB FONTAINE WFN-EXT-CBNA00-05-EN-V1.21
This document, property of the issuing firm, cannot be
reproduced nor communicated without written authorization.
a. Enter TIN number Note 1: When entering the TIN number, the system will display the list records which contain the same value. Use the scrollbar to move up and down the list of records. Select the appropriate TIN number. Note 2: After TIN number is entered, Applicant’s RC number, Name, Address, Fax, Phone and Email Address will be displayed automatically (retrieved from Company profile).
b. Select Applicant’s State Code c. Select Applicant’s City d. Update Applicant’s Phone if necessary e. Update Applicant’s Email Address if necessary
f. Enter Beneficiary Name g. Enter Beneficiary Address h. Enter Beneficiary Country i. Enter Beneficiary Phone j. Enter Beneficiary Fax Number k. Enter Beneficiary Email Address
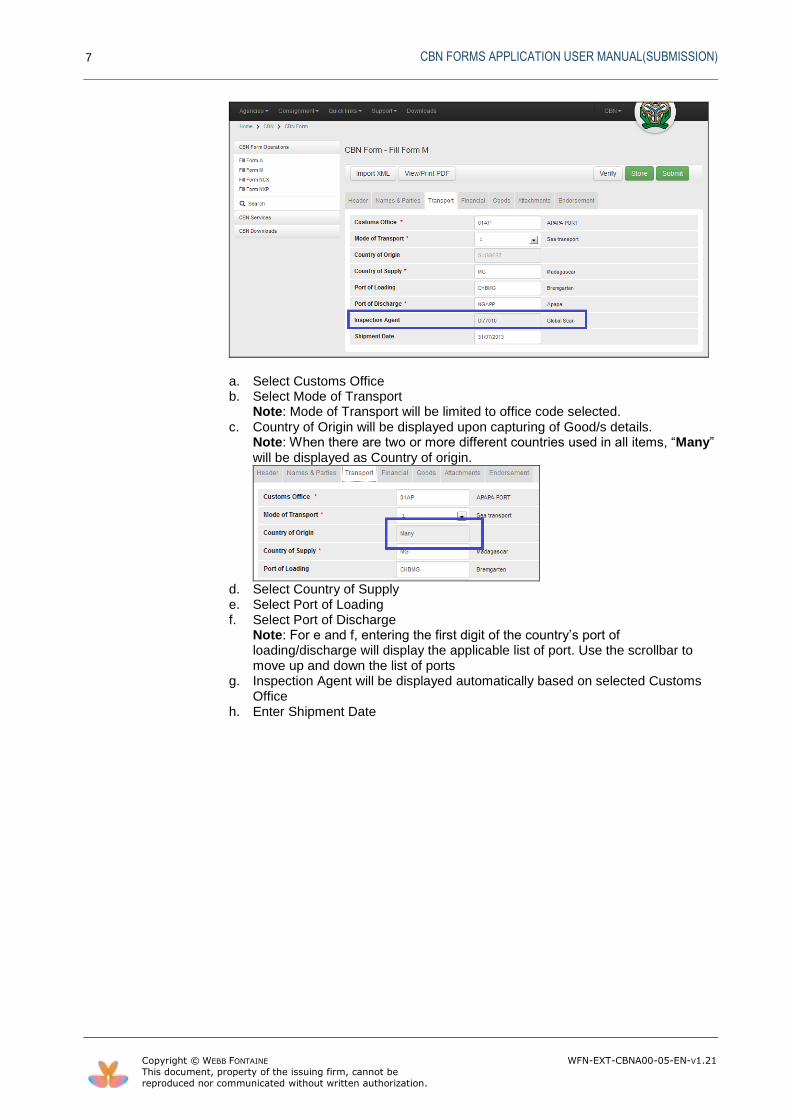
3.1.4 Click on Transport tab to capture the Mode of Transport details. Complete all the
data entries.
CBN FORMS APPLICATION USER MANUAL(SUBMISSION)
7
Copyright © WEBB FONTAINE WFN-EXT-CBNA00-05-EN-V1.21
This document, property of the issuing firm, cannot be
reproduced nor communicated without written authorization.
a. Select Customs Office b. Select Mode of Transport
Note: Mode of Transport will be limited to office code selected. c. Country of Origin will be displayed upon capturing of Good/s details.
Note: When there are two or more different countries used in all items, “Many” will be displayed as Country of origin.
d. Select Country of Supply e. Select Port of Loading f. Select Port of Discharge
Note: For e and f, entering the first digit of the country’s port of loading/discharge will display the applicable list of port. Use the scrollbar to move up and down the list of ports
g. Inspection Agent will be displayed automatically based on selected Customs Office
h. Enter Shipment Date
CBN FORMS APPLICATION USER MANUAL(SUBMISSION)
8
Copyright © WEBB FONTAINE WFN-EXT-CBNA00-05-EN-V1.21
This document, property of the issuing firm, cannot be
reproduced nor communicated without written authorization.
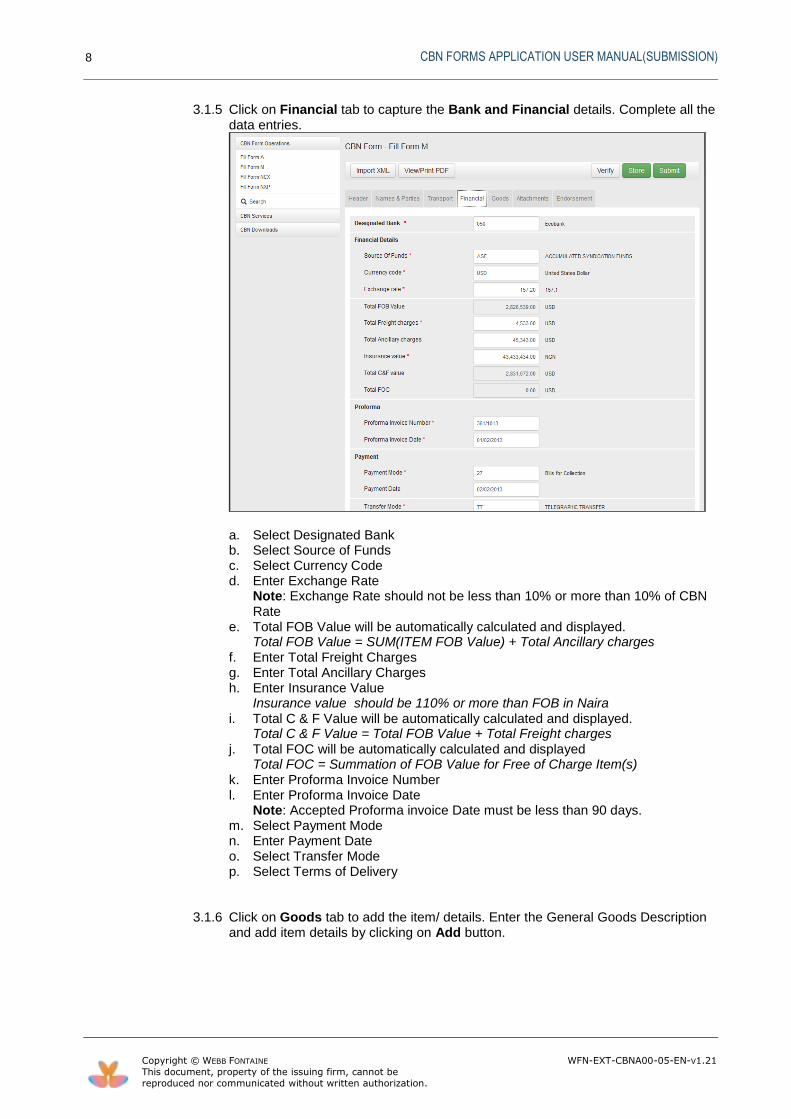
3.1.5 Click on Financial tab to capture the Bank and Financial details. Complete all the data entries.
a. Select Designated Bank b. Select Source of Funds c. Select Currency Code d. Enter Exchange Rate
Note: Exchange Rate should not be less than 10% or more than 10% of CBN Rate
e. Total FOB Value will be automatically calculated and displayed. Total FOB Value = SUM(ITEM FOB Value) + Total Ancillary charges
f. Enter Total Freight Charges g. Enter Total Ancillary Charges h. Enter Insurance Value
Insurance value should be 110% or more than FOB in Naira i. Total C & F Value will be automatically calculated and displayed.
Total C & F Value = Total FOB Value + Total Freight charges j. Total FOC will be automatically calculated and displayed
Total FOC = Summation of FOB Value for Free of Charge Item(s) k. Enter Proforma Invoice Number l. Enter Proforma Invoice Date
Note: Accepted Proforma invoice Date must be less than 90 days. m. Select Payment Mode n. Enter Payment Date o. Select Transfer Mode p. Select Terms of Delivery
3.1.6 Click on Goods tab to add the item/ details. Enter the General Goods Description and add item details by clicking on Add button.

CBN FORMS APPLICATION USER MANUAL(SUBMISSION)
9
Copyright © WEBB FONTAINE WFN-EXT-CBNA00-05-EN-V1.21
This document, property of the issuing firm, cannot be
reproduced nor communicated without written authorization.
3.1.7 Item description page will be displayed. Complete the data entries.
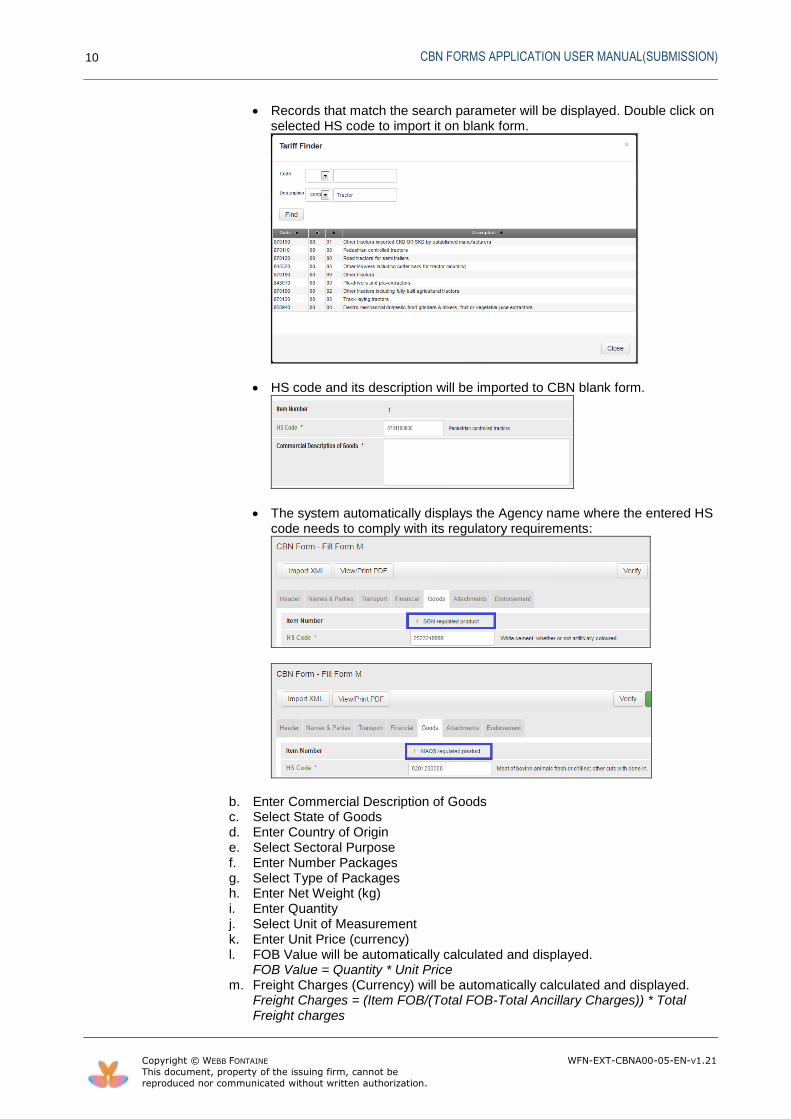
a. Enter HS code
Note that when entering the HS code, the system will display the list codes which contain the same value. Use the scrollbar to move up and down the list of codes.
To search for HS code, click on HS Code hyperlink.
Tariff Finder window will be displayed. Define Search parameters then click on Find button.
CBN FORMS APPLICATION USER MANUAL(SUBMISSION)
10
Copyright © WEBB FONTAINE WFN-EXT-CBNA00-05-EN-V1.21
This document, property of the issuing firm, cannot be
reproduced nor communicated without written authorization.
Records that match the search parameter will be displayed. Double click on selected HS code to import it on blank form.
HS code and its description will be imported to CBN blank form.
The system automatically displays the Agency name where the entered HS code needs to comply with its regulatory requirements:
b. Enter Commercial Description of Goods c. Select State of Goods d. Enter Country of Origin e. Select Sectoral Purpose f. Enter Number Packages g. Select Type of Packages h. Enter Net Weight (kg) i. Enter Quantity j. Select Unit of Measurement k. Enter Unit Price (currency) l. FOB Value will be automatically calculated and displayed.
FOB Value = Quantity * Unit Price m. Freight Charges (Currency) will be automatically calculated and displayed.
Freight Charges = (Item FOB/(Total FOB-Total Ancillary Charges)) * Total Freight charges

CBN FORMS APPLICATION USER MANUAL(SUBMISSION)
11
Copyright © WEBB FONTAINE WFN-EXT-CBNA00-05-EN-V1.21
This document, property of the issuing firm, cannot be
reproduced nor communicated without written authorization.
n. Tick Free of Charge tick box if necessary o. Click on Add button to add the item details; otherwise Cancel button p. To add another item, repeat steps 3.1.7 to 3.1.8.
3.1.8 List of items will be displayed.
Note: a. Click on Edit icon to edit item’s details.
b. Click on Delete icon to delete the item.
c. Once Good details have been added, Total FOB value, Total C&F value and Total FOC fields will be automatically calculated and displayed on Financial Page.

CBN FORMS APPLICATION USER MANUAL(SUBMISSION)
12
Copyright © WEBB FONTAINE WFN-EXT-CBNA00-05-EN-V1.21
This document, property of the issuing firm, cannot be
reproduced nor communicated without written authorization.
3.1.9 Click on Attachment tab to attached required document.
a. Uploading of required documents (e.g. Proforma Invoice. etc…)
Select document type
Enter the Document Reference
Enter the Document Date
Attach the required document(s)
Click on Upload button
Upload page will be displayed, click on Browse button to select the document then click on Upload button to upload the document. Allowed document format and size are displayed on Upload file window.

CBN FORMS APPLICATION USER MANUAL(SUBMISSION)
13
Copyright © WEBB FONTAINE WFN-EXT-CBNA00-05-EN-V1.21
This document, property of the issuing firm, cannot be
reproduced nor communicated without written authorization.
Notification message that “Upload is completed” will be displayed. Click on Add (+) icon to add the document.
Document will be added in the List of Attachments.
To attach an additional document, repeat steps a to g.
List of attached document/s will be displayed.
CBN FORMS APPLICATION USER MANUAL(SUBMISSION)
14
Copyright © WEBB FONTAINE WFN-EXT-CBNA00-05-EN-V1.21
This document, property of the issuing firm, cannot be
reproduced nor communicated without written authorization.
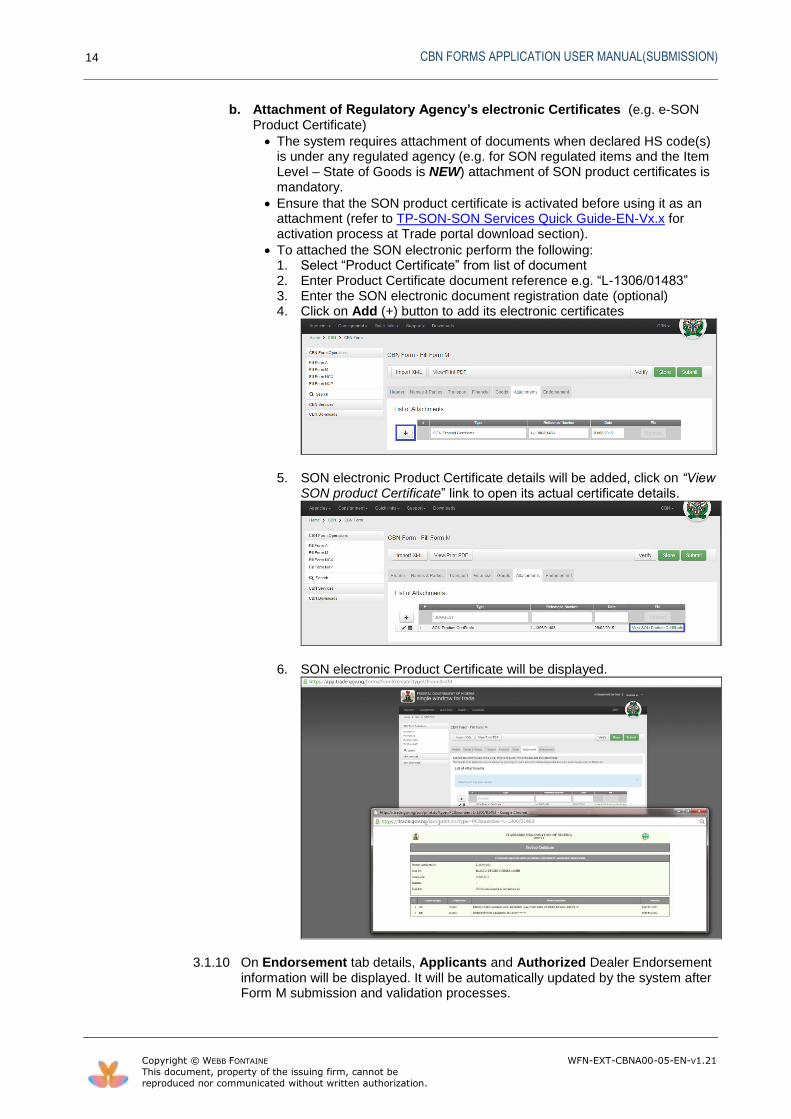
b. Attachment of Regulatory Agency’s electronic Certificates (e.g. e-SON Product Certificate)
The system requires attachment of documents when declared HS code(s) is under any regulated agency (e.g. for SON regulated items and the Item Level – State of Goods is NEW) attachment of SON product certificates is mandatory.
Ensure that the SON product certificate is activated before using it as an attachment (refer to TP-SON-SON Services Quick Guide-EN-Vx.x for activation process at Trade portal download section).
To attached the SON electronic perform the following: 1. Select “Product Certificate” from list of document 2. Enter Product Certificate document reference e.g. “L-1306/01483” 3. Enter the SON electronic document registration date (optional) 4. Click on Add (+) button to add its electronic certificates
5. SON electronic Product Certificate details will be added, click on “View SON product Certificate” link to open its actual certificate details.
6. SON electronic Product Certificate will be displayed.
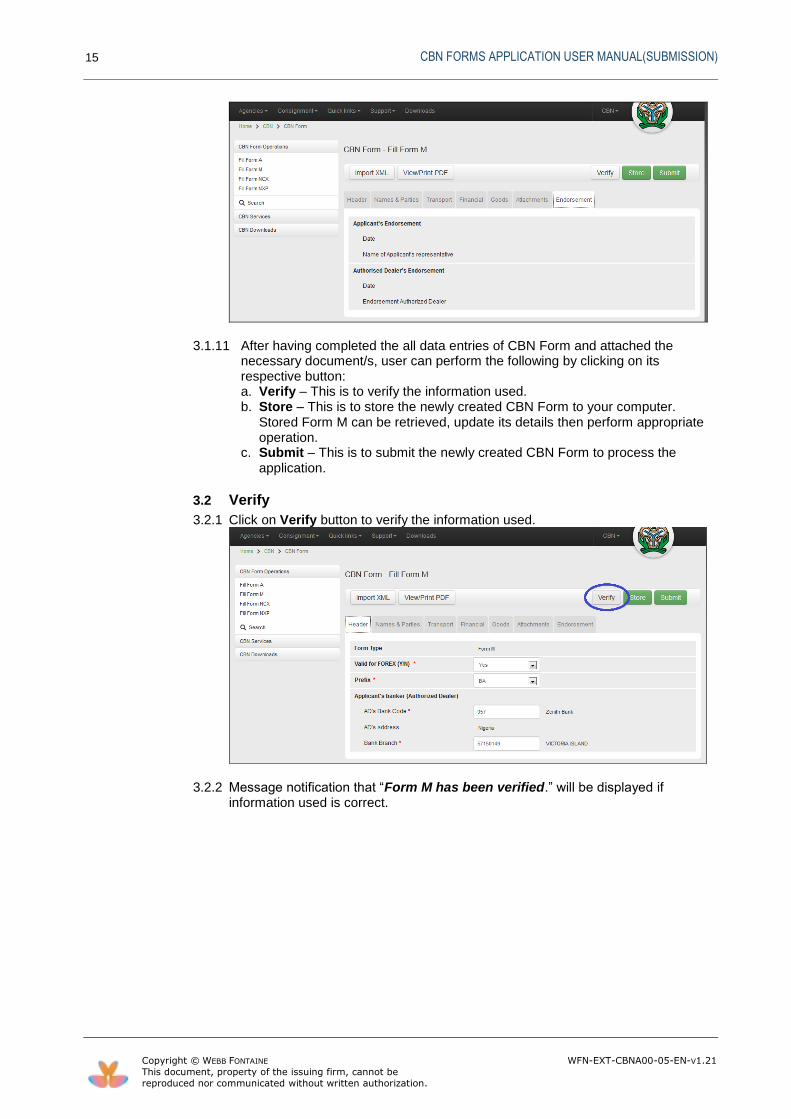
3.1.10 On Endorsement tab details, Applicants and Authorized Dealer Endorsement information will be displayed. It will be automatically updated by the system after Form M submission and validation processes.
CBN FORMS APPLICATION USER MANUAL(SUBMISSION)
15
Copyright © WEBB FONTAINE WFN-EXT-CBNA00-05-EN-V1.21
This document, property of the issuing firm, cannot be
reproduced nor communicated without written authorization.
3.1.11 After having completed the all data entries of CBN Form and attached the necessary document/s, user can perform the following by clicking on its respective button: a. Verify – This is to verify the information used. b. Store – This is to store the newly created CBN Form to your computer.
Stored Form M can be retrieved, update its details then perform appropriate operation.
c. Submit – This is to submit the newly created CBN Form to process the application.
3.2 Verify
3.2.1 Click on Verify button to verify the information used.
3.2.2 Message notification that “Form M has been verified.” will be displayed if information used is correct.

CBN FORMS APPLICATION USER MANUAL(SUBMISSION)
16
Copyright © WEBB FONTAINE WFN-EXT-CBNA00-05-EN-V1.21
This document, property of the issuing firm, cannot be
reproduced nor communicated without written authorization.
Note1: The system will display a Warning Message when: a. Selected Applicant’s Dealer Bank on Header Tab and Designated Bank on
Financial are different. To ignore the message, click on (Ignore warning).
b. HS code declared in the Form M is under the List of Prohibited Items.

CBN FORMS APPLICATION USER MANUAL(SUBMISSION)
17
Copyright © WEBB FONTAINE WFN-EXT-CBNA00-05-EN-V1.21
This document, property of the issuing firm, cannot be
reproduced nor communicated without written authorization.
Note2: For the transaction that has declared any SON regulated HS codes, the
system performs the following: 1. Notifies the specific required document(s) to be attached when there is no
attached document(s).
2. Checks if the TIN number declared in the transaction is matching with TIN number used in attached electronic document otherwise, the system displays error message.
3. Provides a Warning messages(There is no corresponding valid electronic SON Product Certificate (Ignore warning) ) during verification or submission process when a transaction has declared SON regulated item and its State of Goods is either Perishables, Refurbished, Scrap or Used Goods.
CBN FORMS APPLICATION USER MANUAL(SUBMISSION)
18
Copyright © WEBB FONTAINE WFN-EXT-CBNA00-05-EN-V1.21
This document, property of the issuing firm, cannot be
reproduced nor communicated without written authorization.
3.3 Store
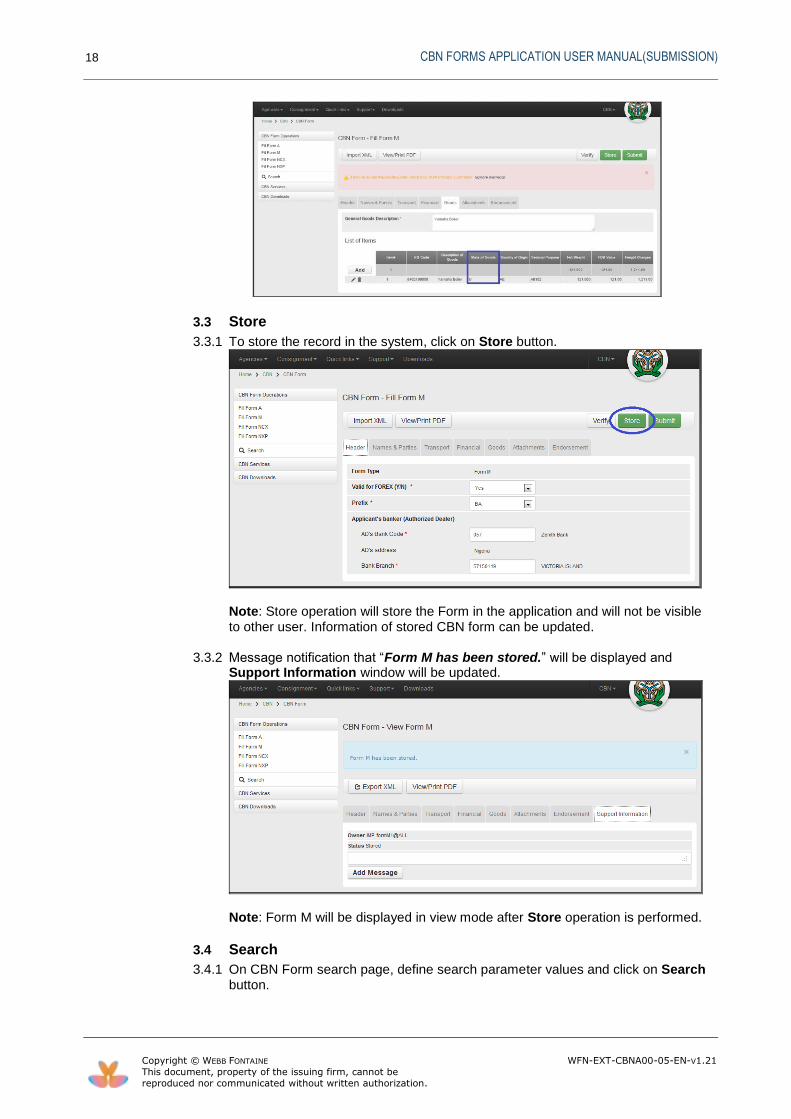
3.3.1 To store the record in the system, click on Store button.
Note: Store operation will store the Form in the application and will not be visible to other user. Information of stored CBN form can be updated.
3.3.2 Message notification that “Form M has been stored.” will be displayed and
Support Information window will be updated.
Note: Form M will be displayed in view mode after Store operation is performed.
3.4 Search
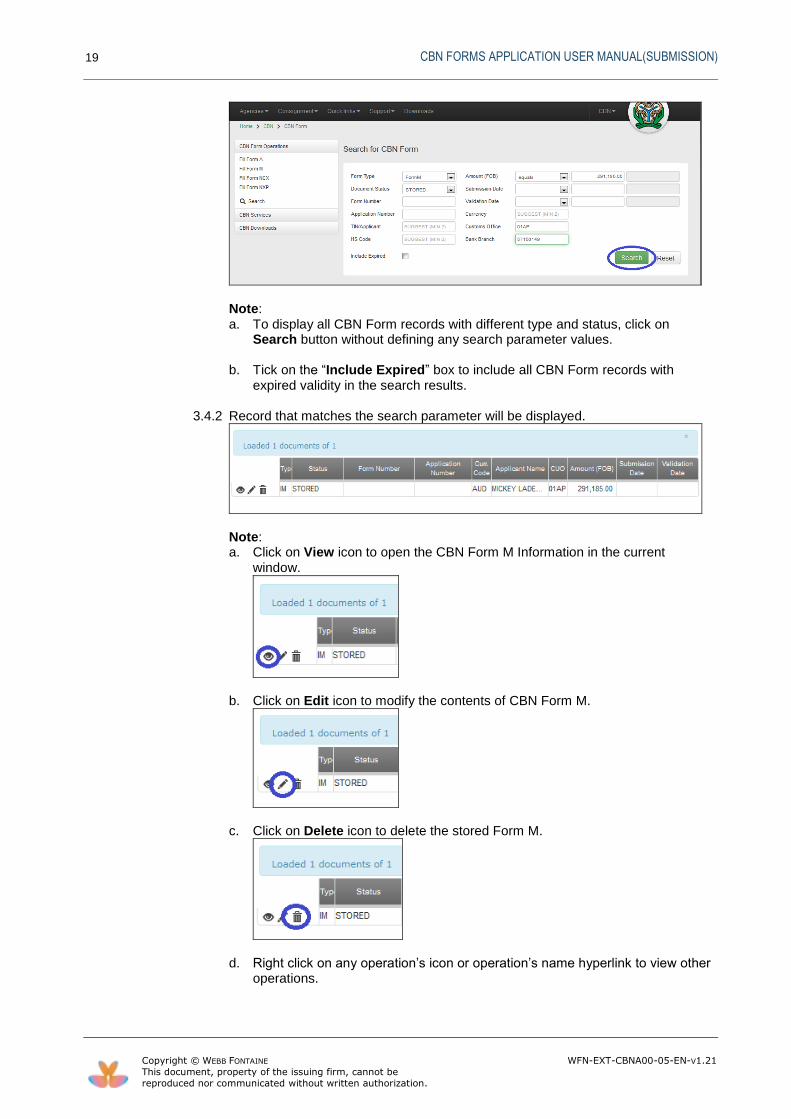
3.4.1 On CBN Form search page, define search parameter values and click on Search button.
CBN FORMS APPLICATION USER MANUAL(SUBMISSION)
19
Copyright © WEBB FONTAINE WFN-EXT-CBNA00-05-EN-V1.21
This document, property of the issuing firm, cannot be
reproduced nor communicated without written authorization.
Note: a. To display all CBN Form records with different type and status, click on
Search button without defining any search parameter values.
b. Tick on the “Include Expired” box to include all CBN Form records with expired validity in the search results.
3.4.2 Record that matches the search parameter will be displayed.
Note: a. Click on View icon to open the CBN Form M Information in the current
window.
b. Click on Edit icon to modify the contents of CBN Form M.
c. Click on Delete icon to delete the stored Form M.
d. Right click on any operation’s icon or operation’s name hyperlink to view other operations.
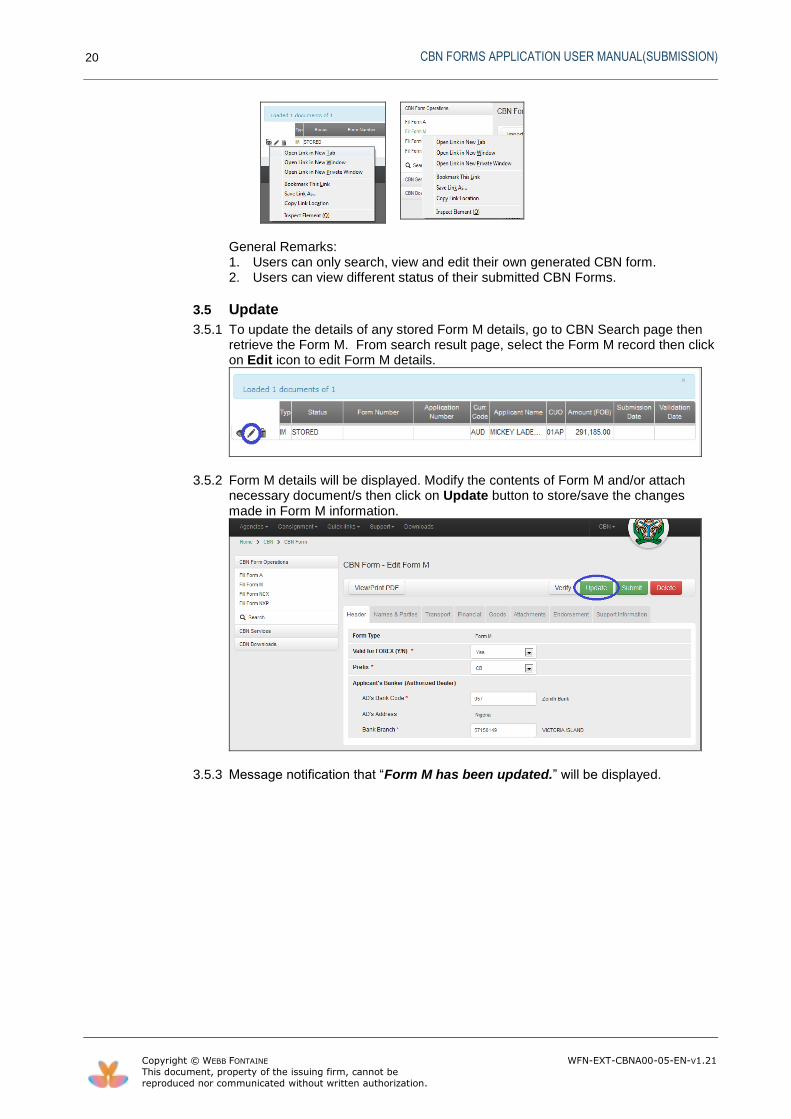
CBN FORMS APPLICATION USER MANUAL(SUBMISSION)
20
Copyright © WEBB FONTAINE WFN-EXT-CBNA00-05-EN-V1.21
This document, property of the issuing firm, cannot be
reproduced nor communicated without written authorization.
General Remarks: 1. Users can only search, view and edit their own generated CBN form. 2. Users can view different status of their submitted CBN Forms.
3.5 Update
3.5.1 To update the details of any stored Form M details, go to CBN Search page then retrieve the Form M. From search result page, select the Form M record then click on Edit icon to edit Form M details.
3.5.2 Form M details will be displayed. Modify the contents of Form M and/or attach necessary document/s then click on Update button to store/save the changes made in Form M information.
3.5.3 Message notification that “Form M has been updated.” will be displayed.

CBN FORMS APPLICATION USER MANUAL(SUBMISSION)
21
Copyright © WEBB FONTAINE WFN-EXT-CBNA00-05-EN-V1.21
This document, property of the issuing firm, cannot be
reproduced nor communicated without written authorization.
3.5.4 Status of Form M after update operation remains Stored.
3.6 Submit
3.6.1 The user has the option to immediately submit the newly created Form M by clicking on Submit Button.
3.6.2 Confirmation message will be displayed which includes a cautionary message that “Declarant shall be prosecuted for any false declaration in line with applicable laws and regulations of the Federal Government of Nigeria”. Click on Yes button to submit the Form M.

CBN FORMS APPLICATION USER MANUAL(SUBMISSION)
22
Copyright © WEBB FONTAINE WFN-EXT-CBNA00-05-EN-V1.21
This document, property of the issuing firm, cannot be
reproduced nor communicated without written authorization.
3.6.3 Message notification that “Form M has been submitted.” will be displayed. Application Number will be generated and displayed.
Note: a. Application Number - This is automatically generated after Importer has
submitted the CBN Form and will be rotated every year (i.e. start from 1 for every year). It has the following format: [ZZ][YYYY][XXXXXXX]: ZZ- (MF,AA,EX,NX)
Form M: MF, Form A: AA, Form NXP: EX, NCX: NX YYYY- Current Year XXXXXXX- Current Sequential no.
e.g. Form M: MF20130000105
b. Support Information tab will display historized details of Form M operations
information. This feature applies to all CBN Forms.
c. After Submit operation, Applicants details will be updated on Endorsement page as shown below:

CBN FORMS APPLICATION USER MANUAL(SUBMISSION)
23
Copyright © WEBB FONTAINE WFN-EXT-CBNA00-05-EN-V1.21
This document, property of the issuing firm, cannot be
reproduced nor communicated without written authorization.
d. Form M status will be changed from STORED to SUBMITTED.
3.7 Deleting Stored CBN Form
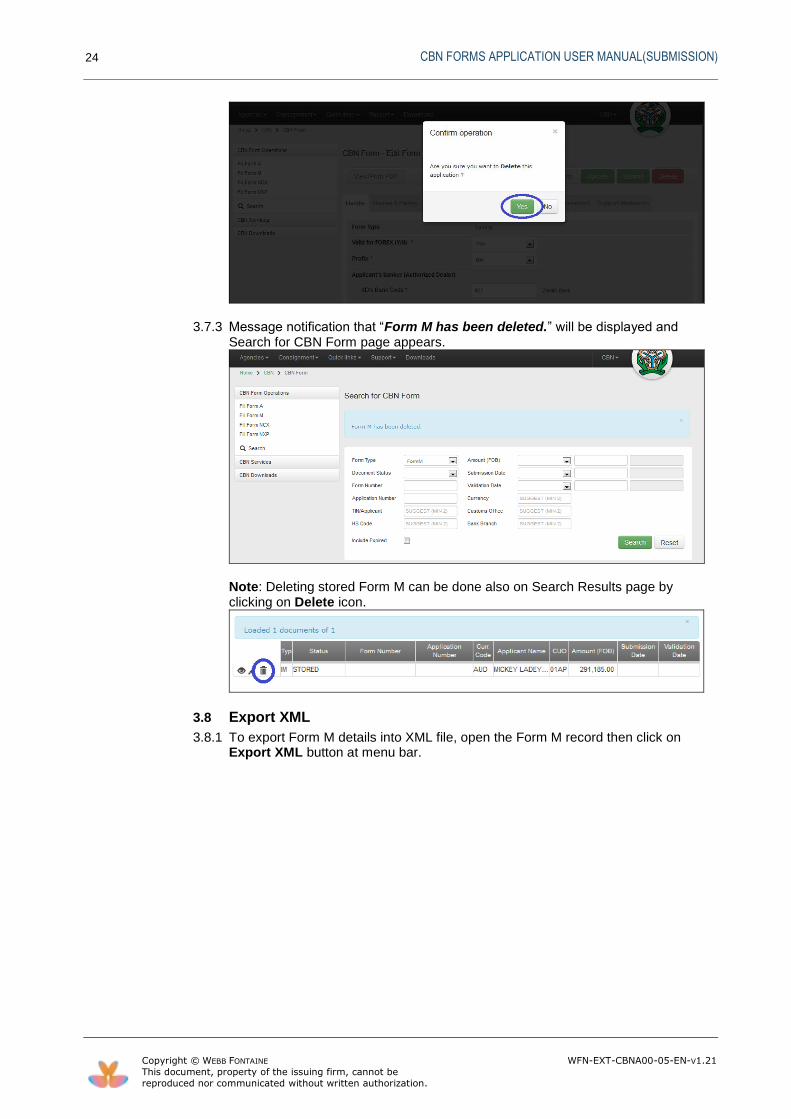
3.7.1 To delete stored CBN Form M from your computer, open the form then click on Delete button.
3.7.2 Confirmation message will be displayed. Click on Yes button to delete the stored Form M.
CBN FORMS APPLICATION USER MANUAL(SUBMISSION)
24
Copyright © WEBB FONTAINE WFN-EXT-CBNA00-05-EN-V1.21
This document, property of the issuing firm, cannot be
reproduced nor communicated without written authorization.
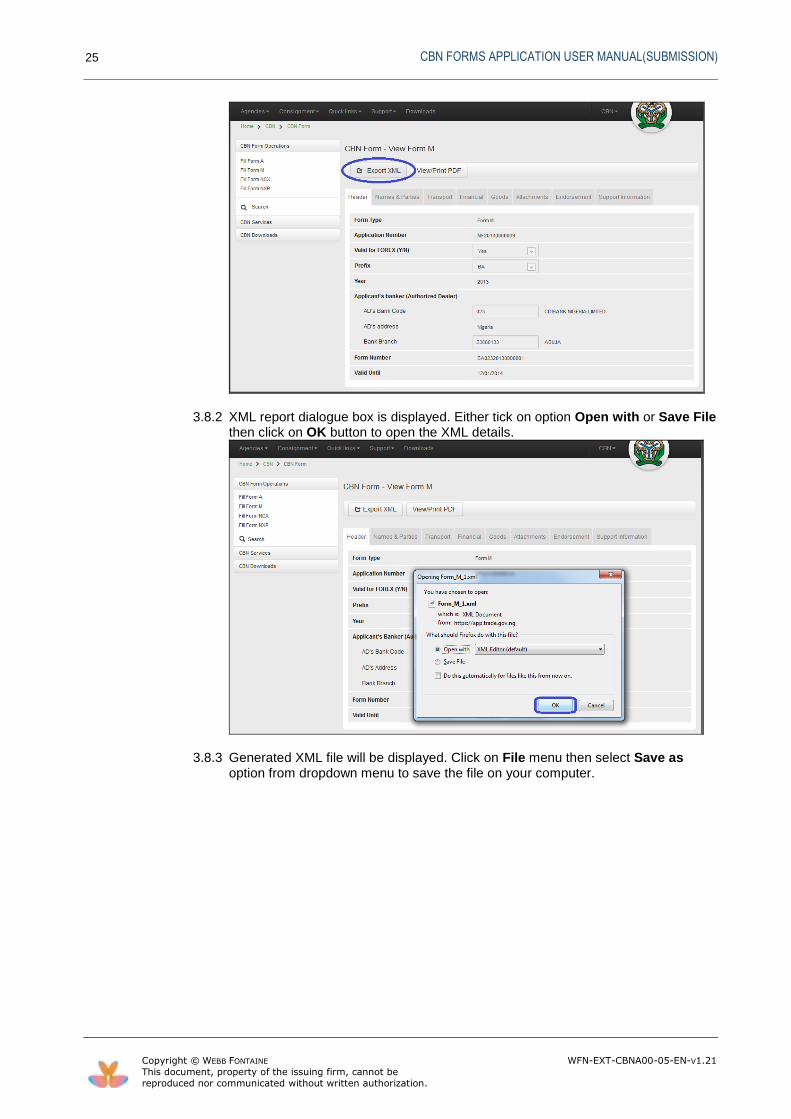
3.7.3 Message notification that “Form M has been deleted.” will be displayed and Search for CBN Form page appears.
Note: Deleting stored Form M can be done also on Search Results page by clicking on Delete icon.
3.8 Export XML
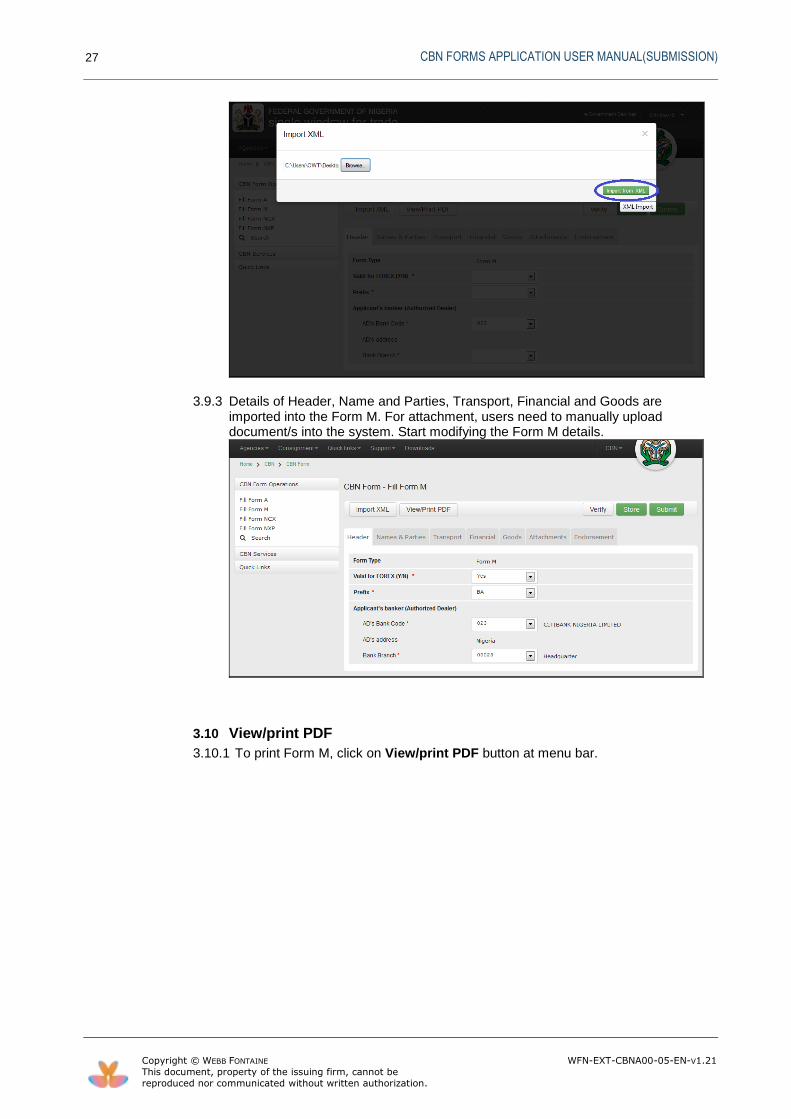
3.8.1 To export Form M details into XML file, open the Form M record then click on Export XML button at menu bar.
CBN FORMS APPLICATION USER MANUAL(SUBMISSION)
25
Copyright © WEBB FONTAINE WFN-EXT-CBNA00-05-EN-V1.21
This document, property of the issuing firm, cannot be
reproduced nor communicated without written authorization.
3.8.2 XML report dialogue box is displayed. Either tick on option Open with or Save File then click on OK button to open the XML details.
3.8.3 Generated XML file will be displayed. Click on File menu then select Save as
option from dropdown menu to save the file on your computer.

CBN FORMS APPLICATION USER MANUAL(SUBMISSION)
26
Copyright © WEBB FONTAINE WFN-EXT-CBNA00-05-EN-V1.21
This document, property of the issuing firm, cannot be
reproduced nor communicated without written authorization.
3.9 Import XML
3.9.1 To import XML file into Form M blank form, click on Import XML button at menu bar.
3.9.2 Import XML window will be displayed. Click on Browse button to select the XML file then click on XML import button.
CBN FORMS APPLICATION USER MANUAL(SUBMISSION)
27
Copyright © WEBB FONTAINE WFN-EXT-CBNA00-05-EN-V1.21
This document, property of the issuing firm, cannot be
reproduced nor communicated without written authorization.
3.9.3 Details of Header, Name and Parties, Transport, Financial and Goods are imported into the Form M. For attachment, users need to manually upload document/s into the system. Start modifying the Form M details.
3.10 View/print PDF
3.10.1 To print Form M, click on View/print PDF button at menu bar.

CBN FORMS APPLICATION USER MANUAL(SUBMISSION)
28
Copyright © WEBB FONTAINE WFN-EXT-CBNA00-05-EN-V1.21
This document, property of the issuing firm, cannot be
reproduced nor communicated without written authorization.
3.10.2 A PDF report dialogue box is displayed. Either tick on option Open with or Save File then click on OK button to download the report.
3.10.3 PDF file will be displayed. On PDF file window click on Print icon on toolbar to print the record.

CBN FORMS APPLICATION USER MANUAL(SUBMISSION)
29
Copyright © WEBB FONTAINE WFN-EXT-CBNA00-05-EN-V1.21
This document, property of the issuing firm, cannot be
reproduced nor communicated without written authorization.
General Remarks:
1. All CBN forms printouts are unified hence each form is identified by form type.
2. Entry labels not applicable in printed form will be in greyed out. 3. Application features are generic to all CBN forms.
3.11 Modification of Rejected Form M
3.11.1 To modify the rejected Form M, go to Search page then select the Form M record with Query status. Click on Edit button to modify the content of Form M.
3.11.2 Form M details will be displayed. Click on Support Information tab to check the details of rejection.
3.11.3 Start modifying the content of Form M then click on Submit button to submit the changes made in Form M.

CBN FORMS APPLICATION USER MANUAL(SUBMISSION)
30
Copyright © WEBB FONTAINE WFN-EXT-CBNA00-05-EN-V1.21
This document, property of the issuing firm, cannot be
reproduced nor communicated without written authorization.
3.11.4 Message notification that “Form M has been submitted.” will be displayed and Support Information tab will be updated.
Note: Status of Form M will be changed from “QUERY” to “SUBMITTED” after modification is made.
3.12 Post Entry Modification
3.12.1 From CBN Form search result page, select the Form M record then click on Edit icon to edit Form M details.
Note: a. Authorised Bank must first execute the post entry operation in order for the
importer to update the Form M content. b. Registered Form M on which Post Entry has been made by authorized bank
will have a “QUERY” status. c. Post entry can only be made on registered Form M.
CBN FORMS APPLICATION USER MANUAL(SUBMISSION)
31
Copyright © WEBB FONTAINE WFN-EXT-CBNA00-05-EN-V1.21
This document, property of the issuing firm, cannot be
reproduced nor communicated without written authorization.
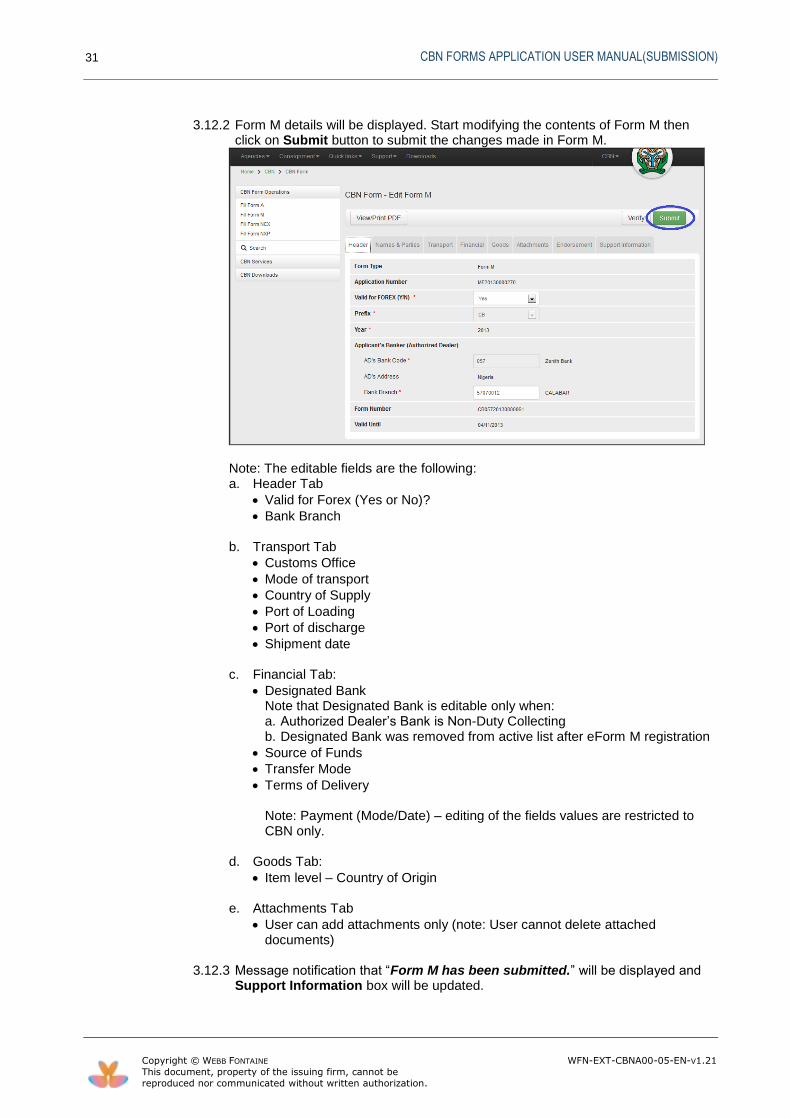
3.12.2 Form M details will be displayed. Start modifying the contents of Form M then
click on Submit button to submit the changes made in Form M.
Note: The editable fields are the following: a. Header Tab
Valid for Forex (Yes or No)?
Bank Branch b. Transport Tab
Customs Office
Mode of transport
Country of Supply
Port of Loading
Port of discharge
Shipment date c. Financial Tab:
Designated Bank Note that Designated Bank is editable only when: a. Authorized Dealer’s Bank is Non-Duty Collecting b. Designated Bank was removed from active list after eForm M registration
Source of Funds
Transfer Mode
Terms of Delivery Note: Payment (Mode/Date) – editing of the fields values are restricted to CBN only.
d. Goods Tab:
Item level – Country of Origin
e. Attachments Tab
User can add attachments only (note: User cannot delete attached documents)
3.12.3 Message notification that “Form M has been submitted.” will be displayed and
Support Information box will be updated.

CBN FORMS APPLICATION USER MANUAL(SUBMISSION)
32
Copyright © WEBB FONTAINE WFN-EXT-CBNA00-05-EN-V1.21
This document, property of the issuing firm, cannot be
reproduced nor communicated without written authorization.
Note: Status of Form M will be changed from “QUERY” to “SUBMITTED” after post entry modification has been made.
3.13 Form M Validity Extension
3.13.1 The user needs to request Form M Validity extension to designated Bank where he processed the Form M.
3.13.2 When request has been approved, Form M validity will be displayed as shown
below:
Note: a. Form M initial validity extension can only be made by the authorised bank:
- Validity extension for general merchandise is 180 days.
CBN FORMS APPLICATION USER MANUAL(SUBMISSION)
33
Copyright © WEBB FONTAINE WFN-EXT-CBNA00-05-EN-V1.21
This document, property of the issuing firm, cannot be
reproduced nor communicated without written authorization.
- Validity extension for plant and machinery is 360 days. b. Any subsequent validity extension will be made by CBN:
- There is no limit for the number of extension to be made by CBN and duration should be selected.
- Validity extension for general merchandise should be 1 to 180 days. - Validity extension for plant and machinery should be 1 to 360 days.
c. Form M Validity Extension can be done before or after the expiry of Validity
Date.
3.14 Form M’s C and F value Excess Allowance
3.14.1 The user needs to request an increase of Form M’s C & F value excess allowance to designated Bank where he processed the Form M.
3.14.2 Banks to request an increase of Form M’s C & F value excess allowance to CBN
when necessary.
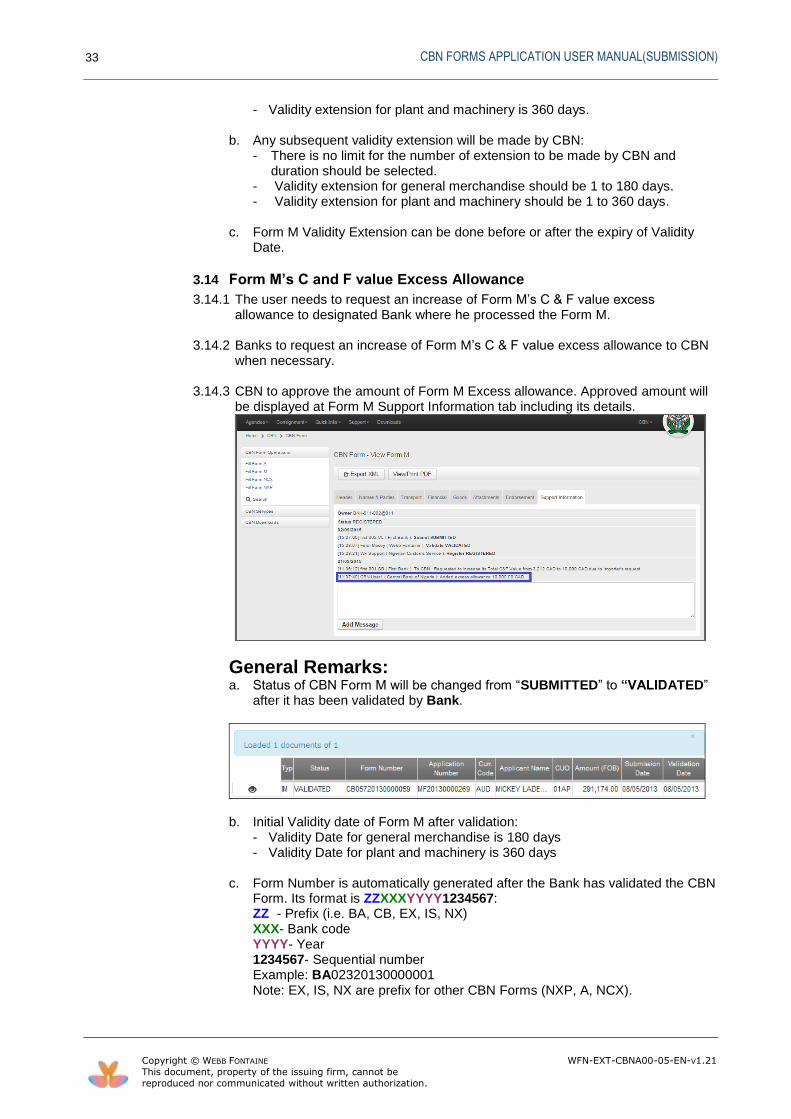
3.14.3 CBN to approve the amount of Form M Excess allowance. Approved amount will be displayed at Form M Support Information tab including its details.
General Remarks: a. Status of CBN Form M will be changed from “SUBMITTED” to “VALIDATED”
after it has been validated by Bank.
b. Initial Validity date of Form M after validation: - Validity Date for general merchandise is 180 days - Validity Date for plant and machinery is 360 days
c. Form Number is automatically generated after the Bank has validated the CBN
Form. Its format is ZZXXXYYYY1234567: ZZ - Prefix (i.e. BA, CB, EX, IS, NX) XXX- Bank code YYYY- Year 1234567- Sequential number Example: BA02320130000001 Note: EX, IS, NX are prefix for other CBN Forms (NXP, A, NCX).

CBN FORMS APPLICATION USER MANUAL(SUBMISSION)
34
Copyright © WEBB FONTAINE WFN-EXT-CBNA00-05-EN-V1.21
This document, property of the issuing firm, cannot be
reproduced nor communicated without written authorization.
d. Status of CBN Form M will be changed from “VALIDATED” to “REGISTERED” after it has been registered by Scanning Company.
e. Short Message Service (SMS) notification format to be sent by the system to Importer after registration, rejection and cancellation of Form M has been made:
Form M with application number {applicationNumber} (form number {formNumber}, ADB:{bankname}) has been {operationNameMade} by user {company} on {Date/Time}.
f. Electronic mail notification format to be sent by the system to Importer after
registration, rejection and cancellation of Form M has been made:
Dear User, Form M with application number {applicationNumber} (form number {formNumber}, ADB:{bankname}) has been {operationNameMade} by user {company} on {Date/Time}. message: Should you experience issues with the CBN electronic forms application, please contact the support at [email protected].
NSW Trade Portal team Information in this email intended solely for the use of the individual(s) to whom it is addressed or otherwise directed. The recipient should check this email for the presence of viruses.
The Government accepts no liability for any damage caused by any virus transmitted by this email. If you are not the addressee or have received this message in error, please delete it as well as all copies from your system.
g. Status of Form M will be changed from “REGISTERED” to “RAR LOCKED”
after its RAR has been registered. CBN Form M with RAR Locked status cannot be modified or cancelled.
h. After the validity date of Form M with “RAR LOCKED” status has been extended by Authorised Dealer Bank or CBN, its status remains “RAR LOCKED”.
i. Status of Form M will be changed from “QUERY” to “CANCELLED” or “REGISTERED” to “CANCELLED” after Form M has been cancelled by CBN.
CBN FORMS APPLICATION USER MANUAL(SUBMISSION)
35
Copyright © WEBB FONTAINE WFN-EXT-CBNA00-05-EN-V1.21
This document, property of the issuing firm, cannot be
reproduced nor communicated without written authorization.
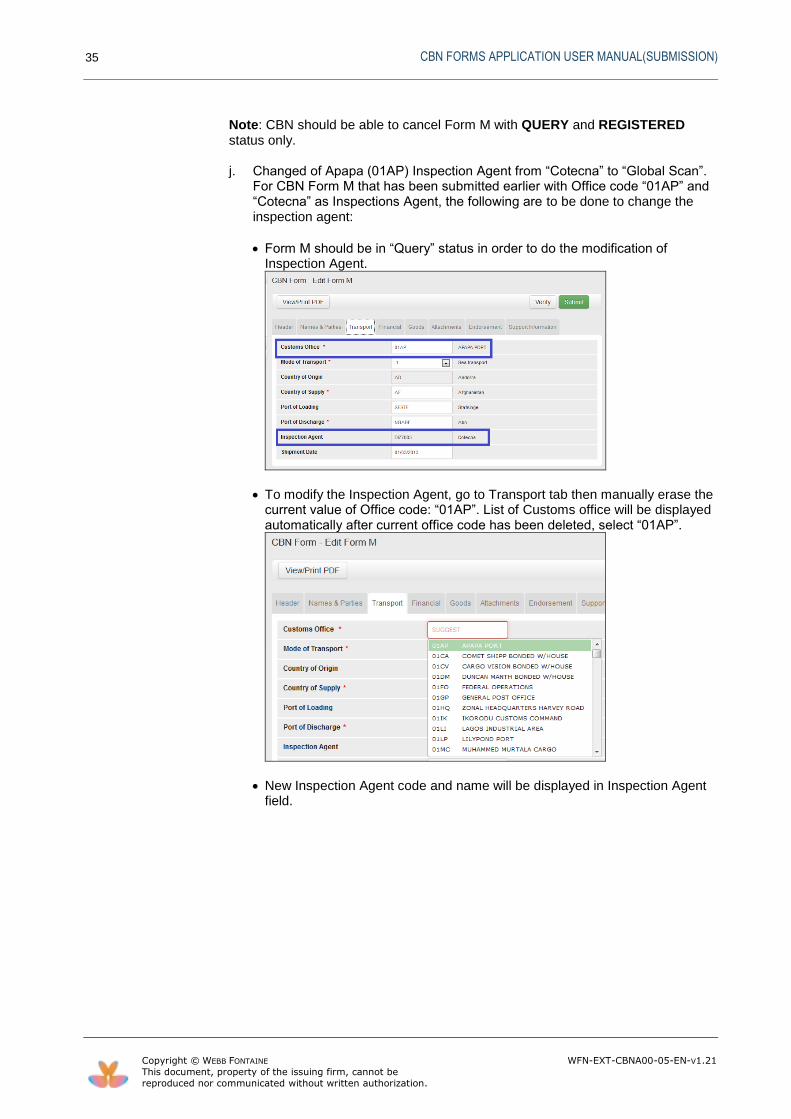
Note: CBN should be able to cancel Form M with QUERY and REGISTERED status only. j. Changed of Apapa (01AP) Inspection Agent from “Cotecna” to “Global Scan”.
For CBN Form M that has been submitted earlier with Office code “01AP” and “Cotecna” as Inspections Agent, the following are to be done to change the inspection agent:
Form M should be in “Query” status in order to do the modification of Inspection Agent.
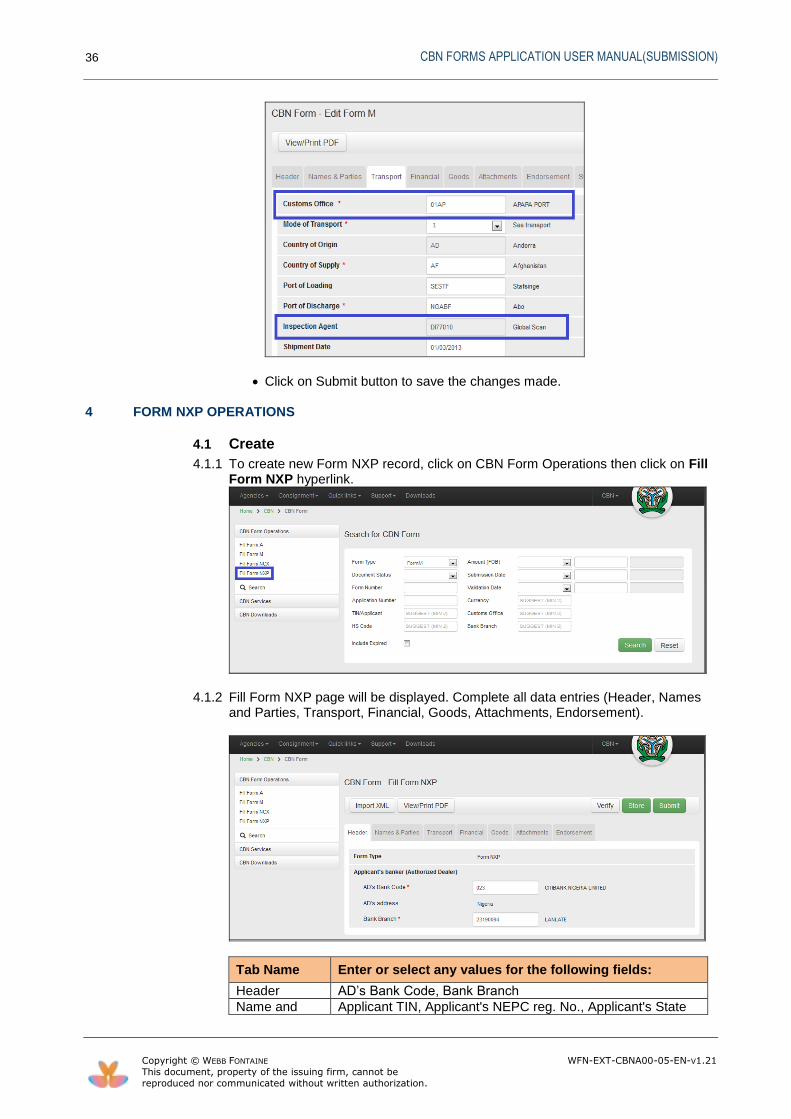
To modify the Inspection Agent, go to Transport tab then manually erase the current value of Office code: “01AP”. List of Customs office will be displayed automatically after current office code has been deleted, select “01AP”.
New Inspection Agent code and name will be displayed in Inspection Agent field.
CBN FORMS APPLICATION USER MANUAL(SUBMISSION)
36
Copyright © WEBB FONTAINE WFN-EXT-CBNA00-05-EN-V1.21
This document, property of the issuing firm, cannot be
reproduced nor communicated without written authorization.
Click on Submit button to save the changes made.
4 FORM NXP OPERATIONS
4.1 Create
4.1.1 To create new Form NXP record, click on CBN Form Operations then click on Fill Form NXP hyperlink.
4.1.2 Fill Form NXP page will be displayed. Complete all data entries (Header, Names and Parties, Transport, Financial, Goods, Attachments, Endorsement).
Tab Name Enter or select any values for the following fields:
Header AD’s Bank Code, Bank Branch
Name and Applicant TIN, Applicant's NEPC reg. No., Applicant's State
CBN FORMS APPLICATION USER MANUAL(SUBMISSION)
37
Copyright © WEBB FONTAINE WFN-EXT-CBNA00-05-EN-V1.21
This document, property of the issuing firm, cannot be
reproduced nor communicated without written authorization.
Tab Name Enter or select any values for the following fields:
Parties Code, Applicant's City, Applicant's Phone, Applicant's Email, Consignee's Name, Consignee's Address, Consignee's Country, Consignee's Phone, Consignee's Fax, Consignee's Email and By order of.
Transport Customs Office, Mode of Transport, Country of Origin, Country of Supply, Port of Loading, Port of Discharge, Inspection Agent and Shipment Date.
Financial Designated Bank, Currency Code, Exchange Rate, Total Ancillary charges, Insurance Value, Proforma Invoice Number, Proforma Invoice Date, Payment Mode, Payment Date, Transfer Mode and Term of Delivery. Note: Total FOB Value, Total Freight Charges and Total C&F Values are automatically calculated and displayed.
Goods General Goods Description, HS Code, Commercial Description of Goods, State of Goods, Sectoral Purpose, Type of Packages, No. of Packages, Gross Weight (kg), Net Weight (kg), Quantity, Unit of Measurement Code, Unit Price (currency), FOB Value and Freight charges (currency).
Attachment Type of Document, Reference Number and Date.
4.2 Verify
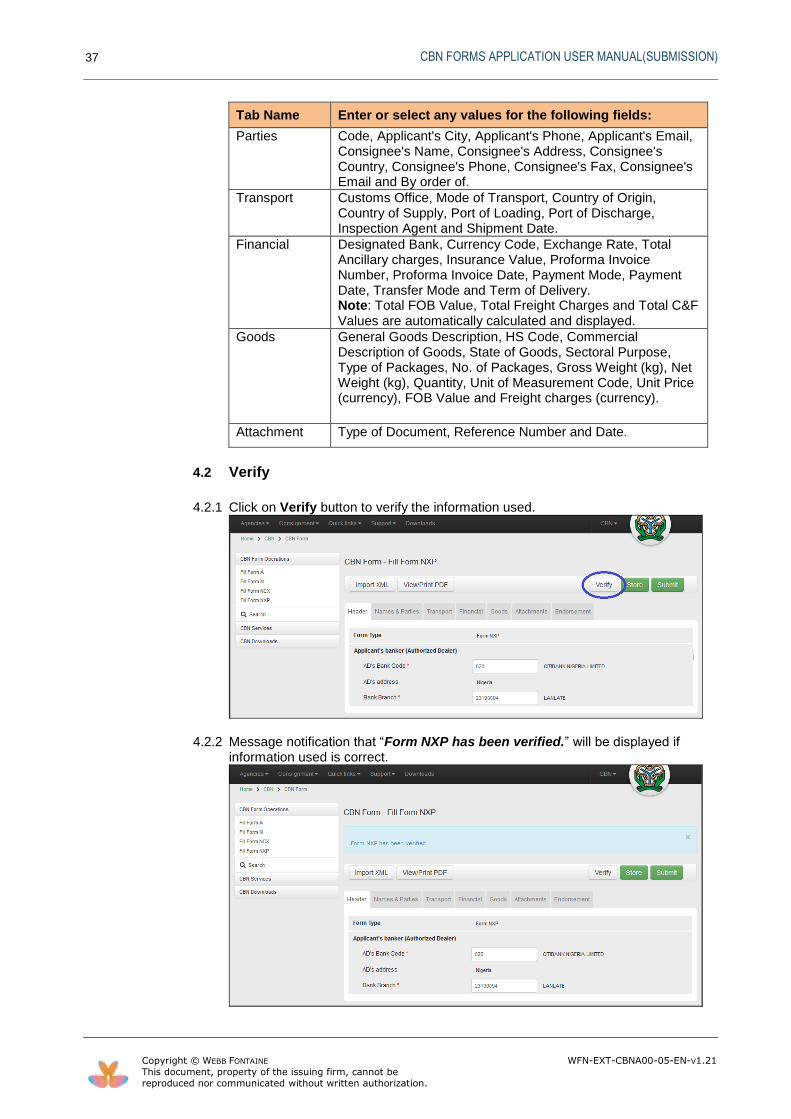
4.2.1 Click on Verify button to verify the information used.
4.2.2 Message notification that “Form NXP has been verified.” will be displayed if information used is correct.
CBN FORMS APPLICATION USER MANUAL(SUBMISSION)
38
Copyright © WEBB FONTAINE WFN-EXT-CBNA00-05-EN-V1.21
This document, property of the issuing firm, cannot be
reproduced nor communicated without written authorization.
4.3 Store
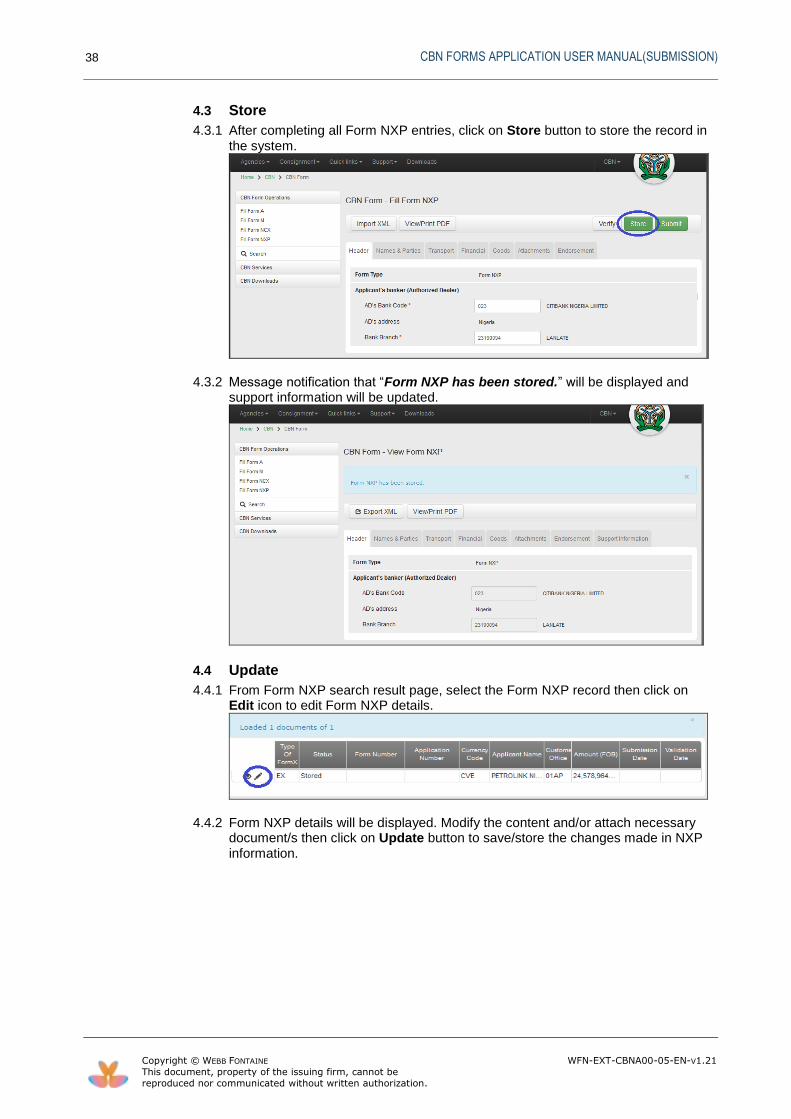
4.3.1 After completing all Form NXP entries, click on Store button to store the record in the system.
4.3.2 Message notification that “Form NXP has been stored.” will be displayed and support information will be updated.
4.4 Update
4.4.1 From Form NXP search result page, select the Form NXP record then click on Edit icon to edit Form NXP details.
4.4.2 Form NXP details will be displayed. Modify the content and/or attach necessary document/s then click on Update button to save/store the changes made in NXP information.
CBN FORMS APPLICATION USER MANUAL(SUBMISSION)
39
Copyright © WEBB FONTAINE WFN-EXT-CBNA00-05-EN-V1.21
This document, property of the issuing firm, cannot be
reproduced nor communicated without written authorization.
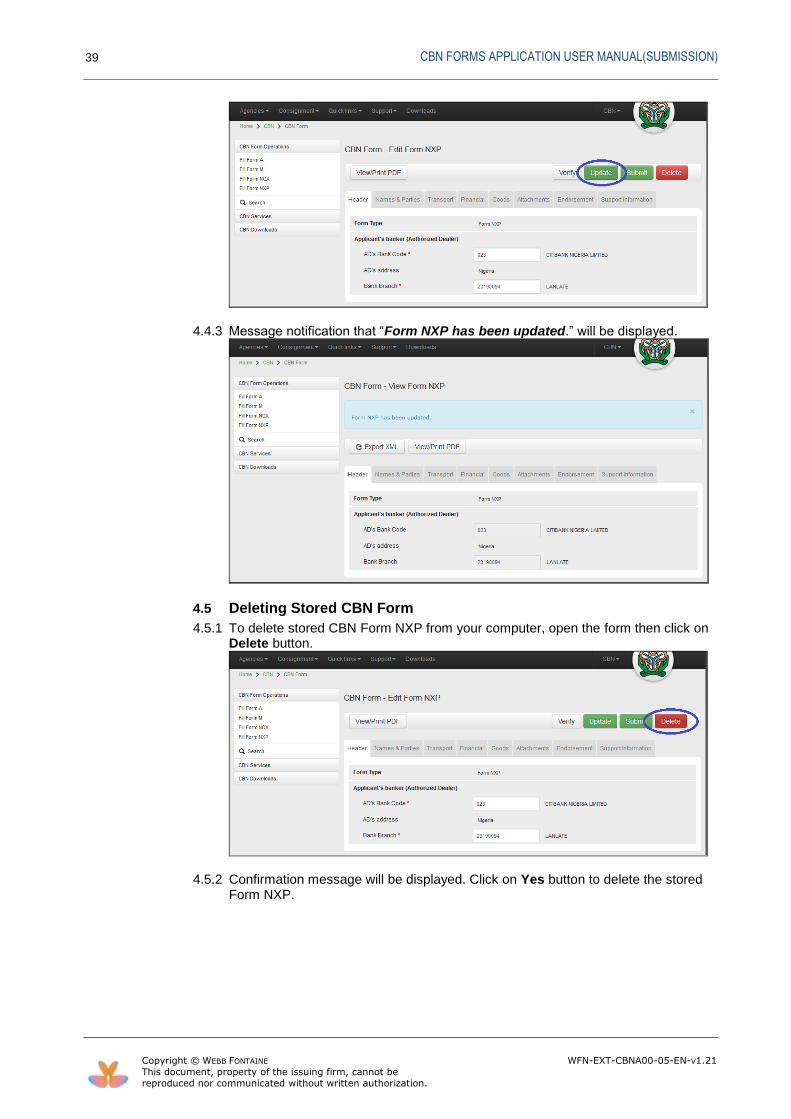
4.4.3 Message notification that “Form NXP has been updated.” will be displayed.
4.5 Deleting Stored CBN Form
4.5.1 To delete stored CBN Form NXP from your computer, open the form then click on Delete button.
4.5.2 Confirmation message will be displayed. Click on Yes button to delete the stored Form NXP.

CBN FORMS APPLICATION USER MANUAL(SUBMISSION)
40
Copyright © WEBB FONTAINE WFN-EXT-CBNA00-05-EN-V1.21
This document, property of the issuing firm, cannot be
reproduced nor communicated without written authorization.
4.5.3 Message notification that “Form NXP has been deleted.” will be displayed and Search for CBN Form page appears.
4.6 Submit
4.6.1 To submit Form NXP, click on Submit button.
4.6.2 Confirmation message will be displayed. Click on Yes button to submit the Form NXP.

CBN FORMS APPLICATION USER MANUAL(SUBMISSION)
41
Copyright © WEBB FONTAINE WFN-EXT-CBNA00-05-EN-V1.21
This document, property of the issuing firm, cannot be
reproduced nor communicated without written authorization.
4.6.3 Message notification that “Form NXP has been submitted.” will be displayed. Application Number will be generated and Support information will be updated.
5 FORM NCX OPERATIONS
5.1 Create
5.1.1 To create new Form NCX record, click on CBN Form Operation then click on Fill Form NCX hyperlink.
5.1.2 Fill Form NCX page will be displayed. Complete all data entries (Header, Names and Parties, Transport, Financial, Goods, Attachments, Endorsement).

CBN FORMS APPLICATION USER MANUAL(SUBMISSION)
42
Copyright © WEBB FONTAINE WFN-EXT-CBNA00-05-EN-V1.21
This document, property of the issuing firm, cannot be
reproduced nor communicated without written authorization.
Tab Name Enter or select any values for the following fields:
Header AD’s Bank Code, Bank Branch
Name and Parties
Applicant TIN, Applicant's State Code, Applicant's City, Consignee's Name, Consignee's Address, Consignee's country code, Consignee's Phone, Consignee's Fax and Consignee's email.
Transport Customs office, Mode of Transport, Country of Origin, Country of Supply, Port of Loading, Port of Discharge and Shipment date.
Financial Designated Bank
Goods General Goods Description, HS Code, Commercial Description of Goods, State of Goods, Country of Origin, Sectoral Purpose, Type of Packages, No. Of Packages, Gross Weight (kg), Net Weight (kg), Quantity, Unit of Measurement Code, Unit Price (Currency), FOB Value and Freight charges (Currency).
Attachment Type of Document, Reference Number and Date.
5.2 Verify
5.2.1 Click on Verify button to verify the information used in Form NCX.
5.2.2 Message notification that “Verification is Done.” will be displayed if information used is correct.
CBN FORMS APPLICATION USER MANUAL(SUBMISSION)
43
Copyright © WEBB FONTAINE WFN-EXT-CBNA00-05-EN-V1.21
This document, property of the issuing firm, cannot be
reproduced nor communicated without written authorization.
5.3 Store
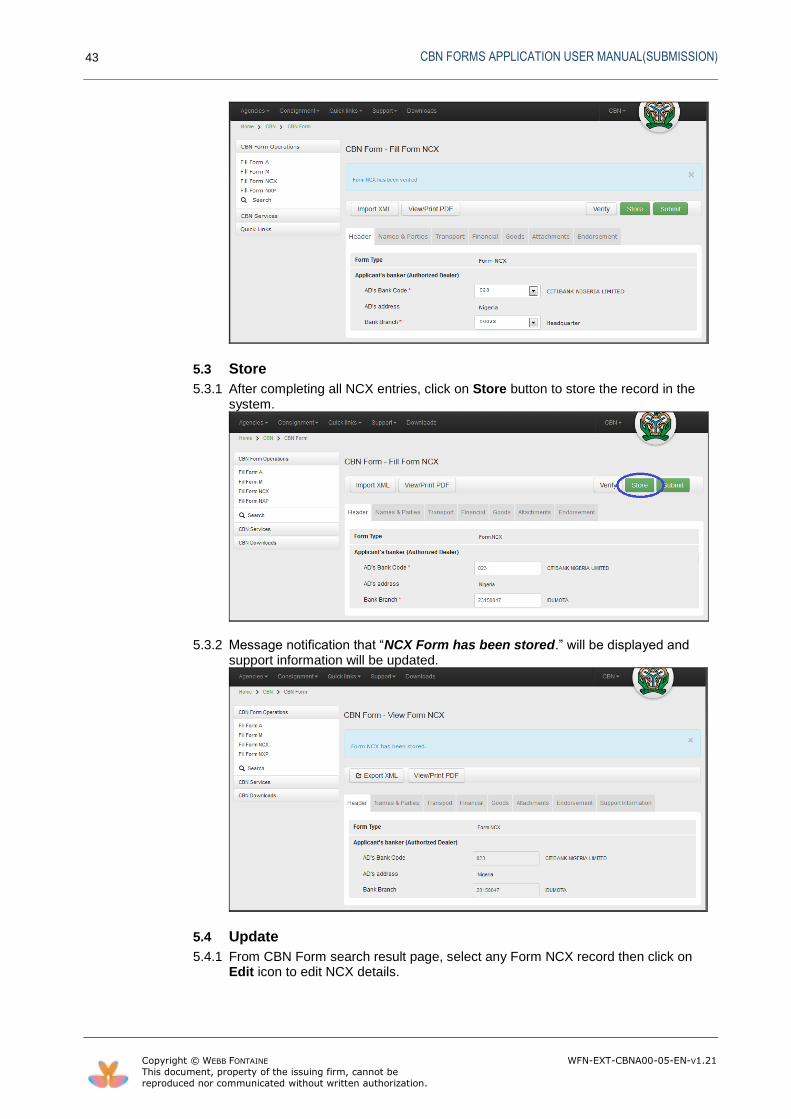
5.3.1 After completing all NCX entries, click on Store button to store the record in the system.
5.3.2 Message notification that “NCX Form has been stored.” will be displayed and support information will be updated.
5.4 Update
5.4.1 From CBN Form search result page, select any Form NCX record then click on Edit icon to edit NCX details.

CBN FORMS APPLICATION USER MANUAL(SUBMISSION)
44
Copyright © WEBB FONTAINE WFN-EXT-CBNA00-05-EN-V1.21
This document, property of the issuing firm, cannot be
reproduced nor communicated without written authorization.
5.4.2 Form NCX details will be displayed. Modify the content and/or attach necessary document/s then click on Update button to save/store the changes made in NCX information.
5.4.3 Message notification that “Form NCX has been updated.” will be displayed.
5.5 Deleting Stored CBN Form
5.5.1 To delete stored CBN Form NCX from your computer, open the form then click on Delete button.
CBN FORMS APPLICATION USER MANUAL(SUBMISSION)
45
Copyright © WEBB FONTAINE WFN-EXT-CBNA00-05-EN-V1.21
This document, property of the issuing firm, cannot be
reproduced nor communicated without written authorization.
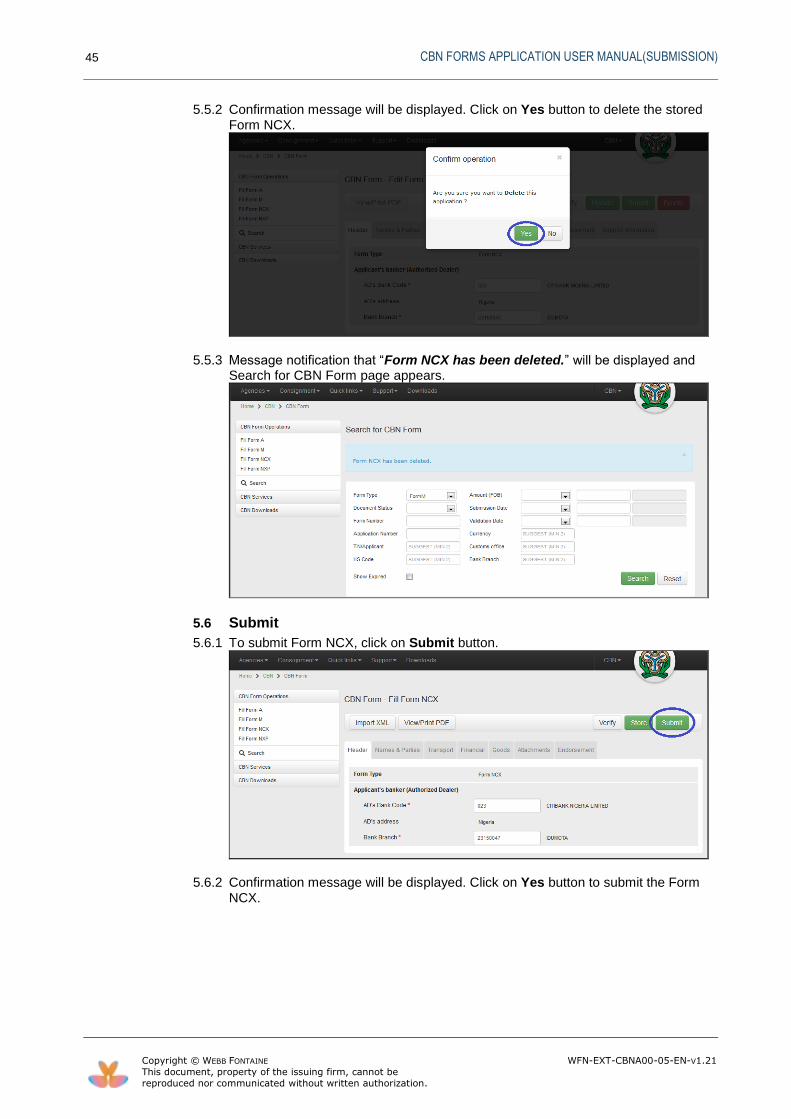
5.5.2 Confirmation message will be displayed. Click on Yes button to delete the stored Form NCX.
5.5.3 Message notification that “Form NCX has been deleted.” will be displayed and Search for CBN Form page appears.
5.6 Submit
5.6.1 To submit Form NCX, click on Submit button.
5.6.2 Confirmation message will be displayed. Click on Yes button to submit the Form NCX.

CBN FORMS APPLICATION USER MANUAL(SUBMISSION)
46
Copyright © WEBB FONTAINE WFN-EXT-CBNA00-05-EN-V1.21
This document, property of the issuing firm, cannot be
reproduced nor communicated without written authorization.
5.6.3 Message Confirmation that “Form NCX has been submitted.” and Application Number will be displayed. Support Information window will be updated.
6 FORM A OPERATIONS
6.1 Create
6.1.1 To create new Form A record, click on CBN Form Operation then click on Fill Form A hyperlink.
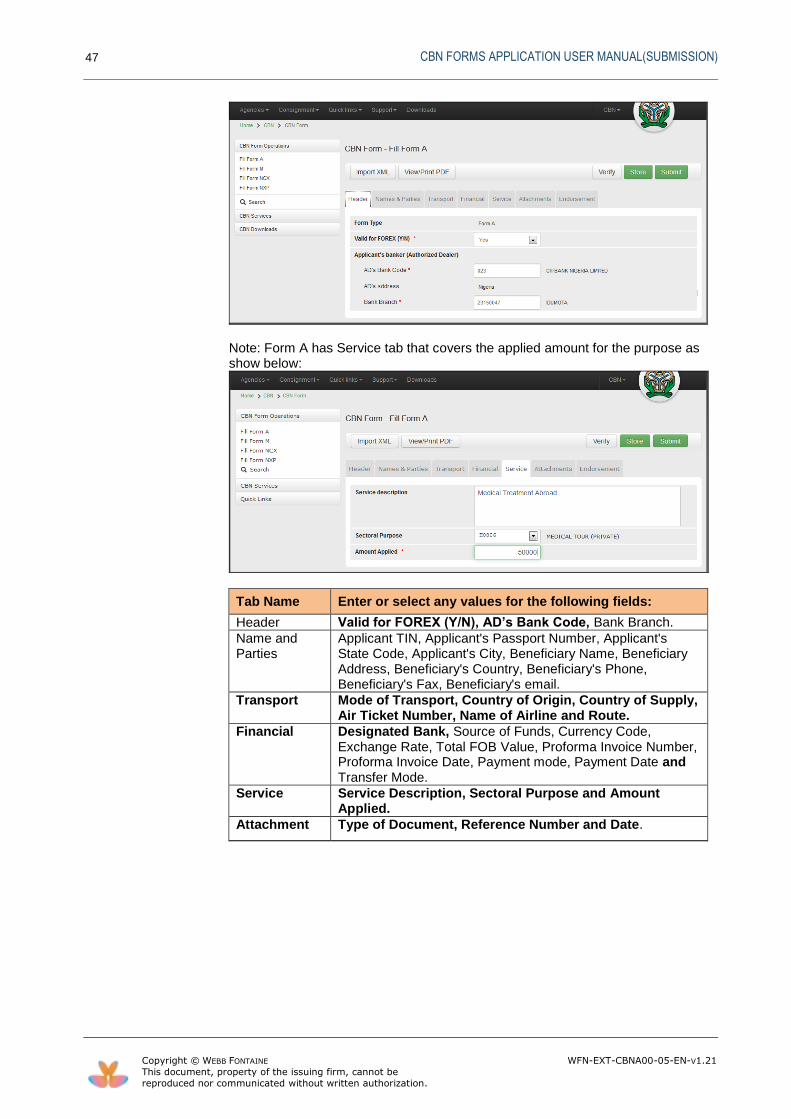
6.1.2 Fill Form A page will be displayed. Complete all data entries (Header, Names and Parties, Transport, Financial, Services, Attachments, Endorsement).
CBN FORMS APPLICATION USER MANUAL(SUBMISSION)
47
Copyright © WEBB FONTAINE WFN-EXT-CBNA00-05-EN-V1.21
This document, property of the issuing firm, cannot be
reproduced nor communicated without written authorization.
Note: Form A has Service tab that covers the applied amount for the purpose as show below:
Tab Name Enter or select any values for the following fields:
Header Valid for FOREX (Y/N), AD’s Bank Code, Bank Branch.
Name and Parties
Applicant TIN, Applicant's Passport Number, Applicant's State Code, Applicant's City, Beneficiary Name, Beneficiary Address, Beneficiary's Country, Beneficiary's Phone, Beneficiary's Fax, Beneficiary's email.
Transport Mode of Transport, Country of Origin, Country of Supply, Air Ticket Number, Name of Airline and Route.
Financial Designated Bank, Source of Funds, Currency Code, Exchange Rate, Total FOB Value, Proforma Invoice Number, Proforma Invoice Date, Payment mode, Payment Date and Transfer Mode.
Service Service Description, Sectoral Purpose and Amount Applied.
Attachment Type of Document, Reference Number and Date.
CBN FORMS APPLICATION USER MANUAL(SUBMISSION)
48
Copyright © WEBB FONTAINE WFN-EXT-CBNA00-05-EN-V1.21
This document, property of the issuing firm, cannot be
reproduced nor communicated without written authorization.
6.2 Verify
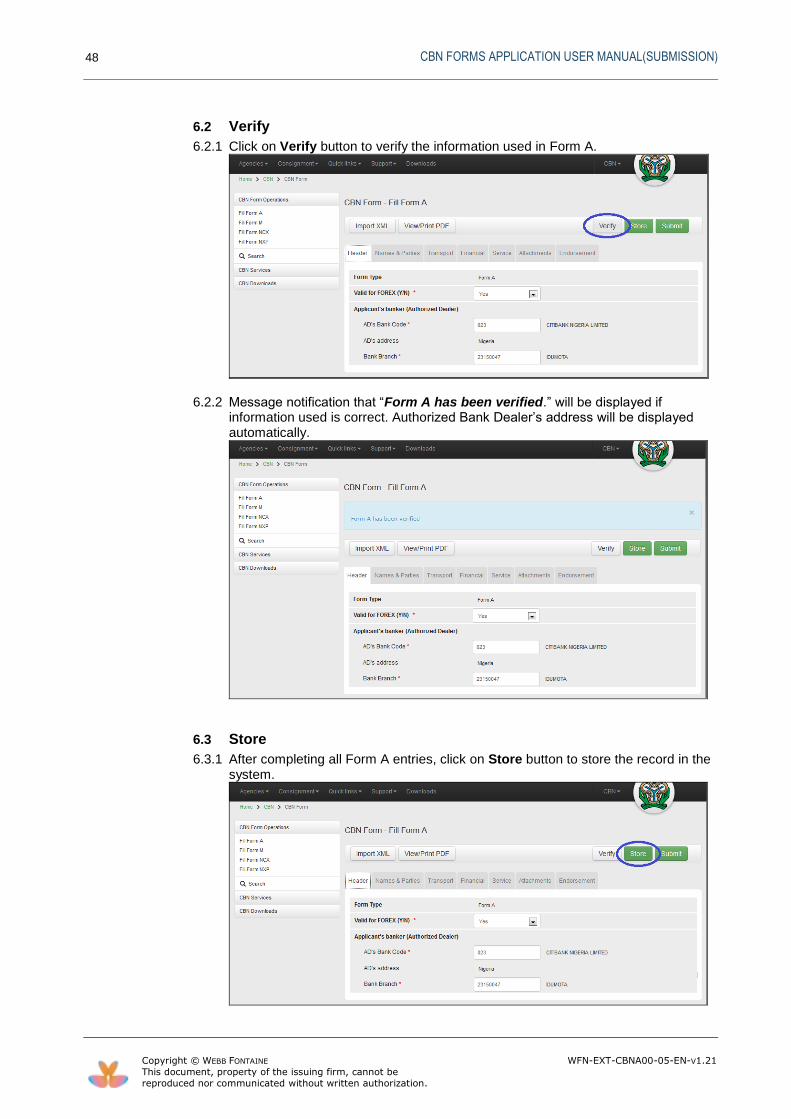
6.2.1 Click on Verify button to verify the information used in Form A.
6.2.2 Message notification that “Form A has been verified.” will be displayed if information used is correct. Authorized Bank Dealer’s address will be displayed automatically.
6.3 Store
6.3.1 After completing all Form A entries, click on Store button to store the record in the system.
CBN FORMS APPLICATION USER MANUAL(SUBMISSION)
49
Copyright © WEBB FONTAINE WFN-EXT-CBNA00-05-EN-V1.21
This document, property of the issuing firm, cannot be
reproduced nor communicated without written authorization.
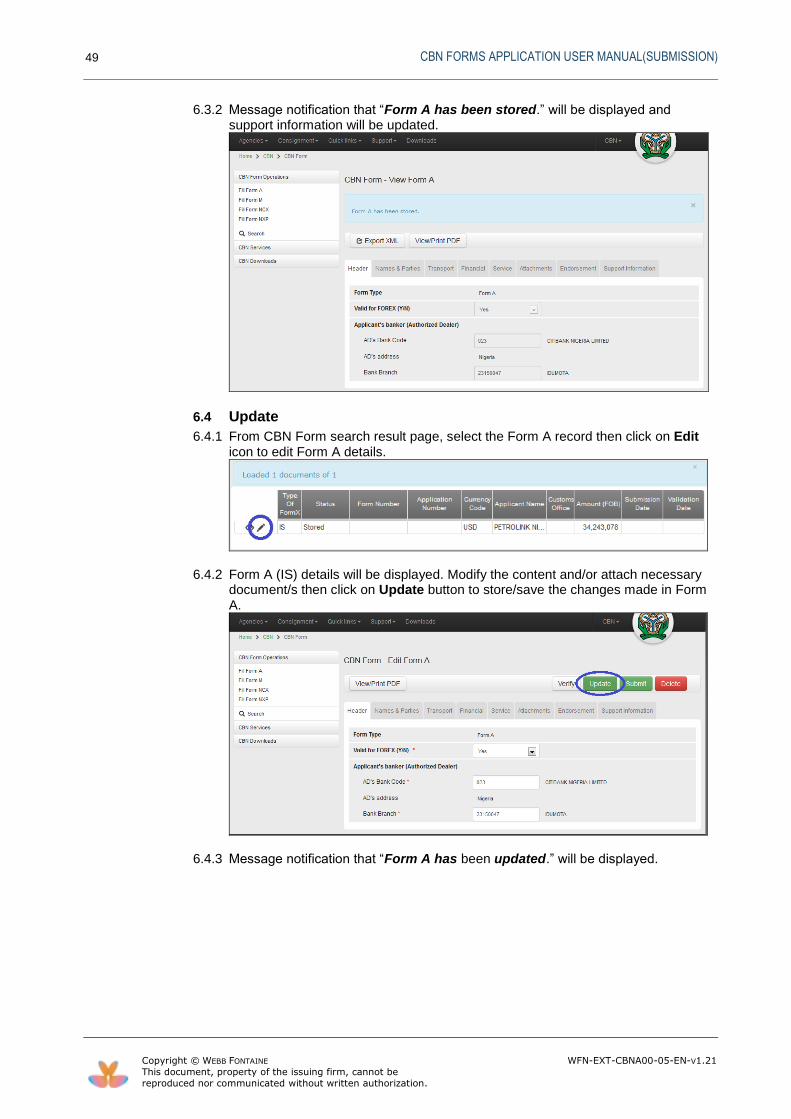
6.3.2 Message notification that “Form A has been stored.” will be displayed and support information will be updated.
6.4 Update
6.4.1 From CBN Form search result page, select the Form A record then click on Edit icon to edit Form A details.
6.4.2 Form A (IS) details will be displayed. Modify the content and/or attach necessary document/s then click on Update button to store/save the changes made in Form A.
6.4.3 Message notification that “Form A has been updated.” will be displayed.
CBN FORMS APPLICATION USER MANUAL(SUBMISSION)
50
Copyright © WEBB FONTAINE WFN-EXT-CBNA00-05-EN-V1.21
This document, property of the issuing firm, cannot be
reproduced nor communicated without written authorization.
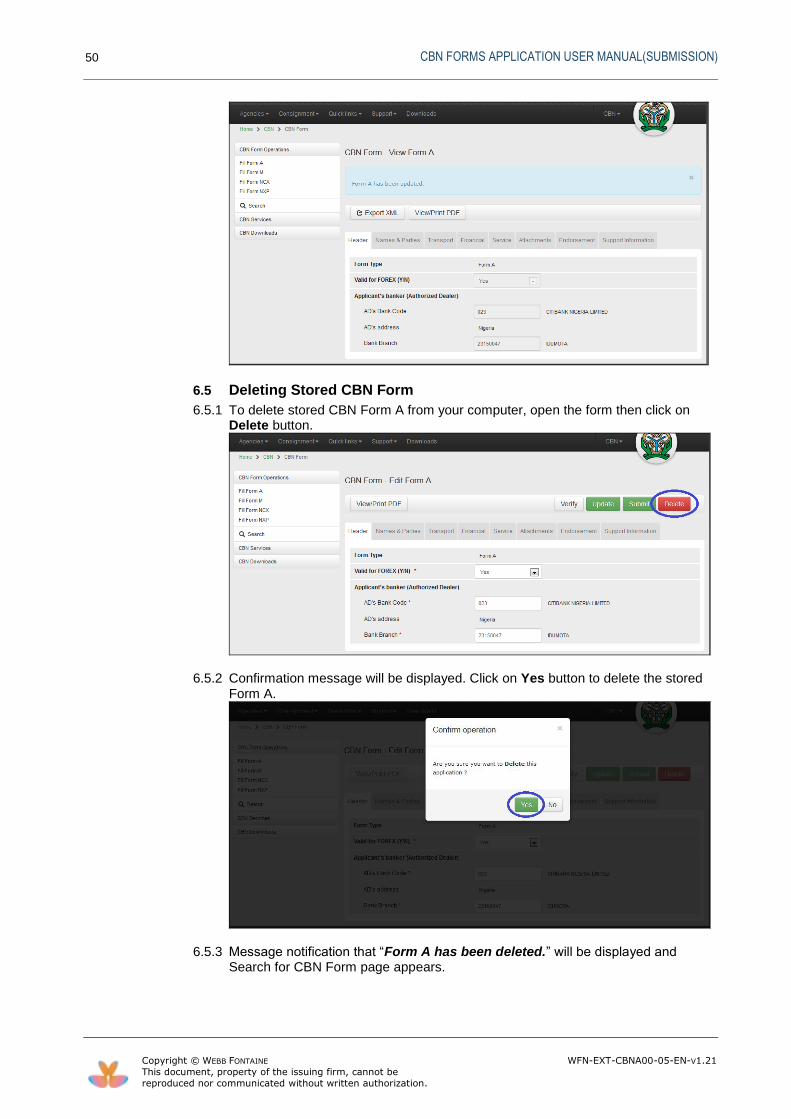
6.5 Deleting Stored CBN Form
6.5.1 To delete stored CBN Form A from your computer, open the form then click on Delete button.
6.5.2 Confirmation message will be displayed. Click on Yes button to delete the stored Form A.
6.5.3 Message notification that “Form A has been deleted.” will be displayed and Search for CBN Form page appears.
CBN FORMS APPLICATION USER MANUAL(SUBMISSION)
51
Copyright © WEBB FONTAINE WFN-EXT-CBNA00-05-EN-V1.21
This document, property of the issuing firm, cannot be
reproduced nor communicated without written authorization.
6.6 Submit
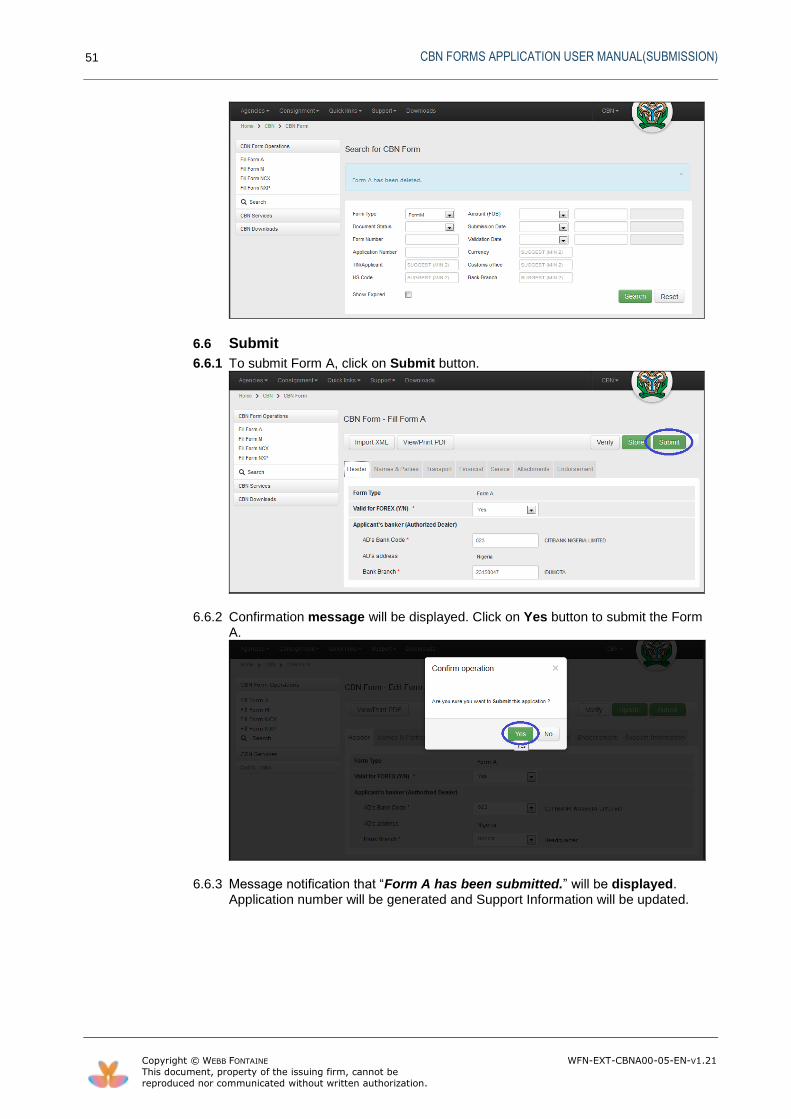
6.6.1 To submit Form A, click on Submit button.
6.6.2 Confirmation message will be displayed. Click on Yes button to submit the Form A.
6.6.3 Message notification that “Form A has been submitted.” will be displayed. Application number will be generated and Support Information will be updated.

CBN FORMS APPLICATION USER MANUAL(SUBMISSION)
52
Copyright © WEBB FONTAINE WFN-EXT-CBNA00-05-EN-V1.21
This document, property of the issuing firm, cannot be
reproduced nor communicated without written authorization.
7 VIEW PROFILE
7.1 To view the user profile, click on username to display user menu then select on View Profile from dropdown menu. View Profile page will be displayed.
8 CHANGE PASSWORD
8.1 To change the user password, click on username to display user menu then select Change Password from dropdown menu.
CBN FORMS APPLICATION USER MANUAL(SUBMISSION)
53
Copyright © WEBB FONTAINE WFN-EXT-CBNA00-05-EN-V1.21
This document, property of the issuing firm, cannot be
reproduced nor communicated without written authorization.
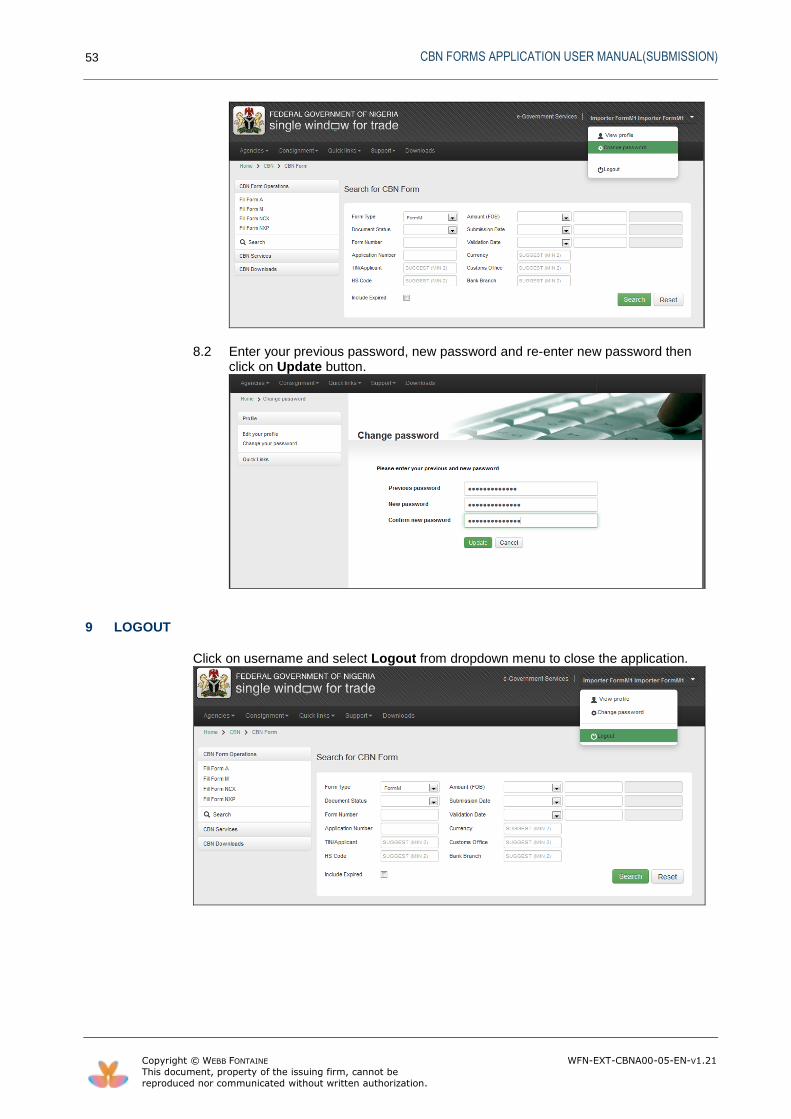
8.2 Enter your previous password, new password and re-enter new password then click on Update button.
9 LOGOUT
Click on username and select Logout from dropdown menu to close the application.

CBN FORMS APPLICATION USER MANUAL(SUBMISSION)
54
Copyright © WEBB FONTAINE WFN-EXT-CBNA00-05-EN-V1.21
This document, property of the issuing firm, cannot be
reproduced nor communicated without written authorization.
10 RESET PASSWORD
10.1 To reset forgotten or lost username and password, click on Forgot your username or password hyperlink on Login Community Services page.
10.2 Lost password page will be displayed. Enter your email address used in registration then click on Reset password button.
10.3 Message notification that “A new password has been sent to your email account with instruction to activate it” will be displayed.
10.4 Log in to your email provider. New password will be displayed. To activate new password, click on the activation hyperlink.

CBN FORMS APPLICATION USER MANUAL(SUBMISSION)
55
Copyright © WEBB FONTAINE WFN-EXT-CBNA00-05-EN-V1.21
This document, property of the issuing firm, cannot be
reproduced nor communicated without written authorization.
10.5 Message notification that new password has been confirmed. Click on login hyperlink to use the new password.
10.6 Login community Service page will be displayed. Enter your username and new password.
Note: To change the password, go to clause 8: Change Password.
11 TECHNICAL REQUIREMENTS
The following are the Technical requirements to be considered in using CBN Forms Application:
11.1 Hardware
Any modern PC which can browse Internet
11.2 Operating System
Windows XP and above
Mac OS X 10 and above
Any Linux distribution with Graphical desktop
11.3 Internet Browser
Any of the following:
Mozilla Firefox 12.0 and above
Google Chrome 18 and above
Internet Explorer 9 and above
Safari 5.1 and above
Related Documents