ENGLISH ESPAÑOL FRANÇAIS FM CORDLESS HEADPHONES CASQUE FM SANS FIL AURICULARES INALÁMBRICOS FM HA-W600RF-J/C INSTRUCTIONS MANUEL D’INSTRUCTIONS MANUAL DE INSTRUCCIONES For customer Use: Enter below the Model No. and Serial No. which are located on the top or bottom of the cabinet. Retain this information for future reference. Model No. Serial No. LNT0066-001A

Welcome message from author
This document is posted to help you gain knowledge. Please leave a comment to let me know what you think about it! Share it to your friends and learn new things together.
Transcript

EN
GL
ISH
ES
PA
ÑO
LF
RA
NÇ
AIS
FM CORDLESS HEADPHONES
CASQUE FM SANS FIL
AURICULARES INALÁMBRICOS FM
HA-W600RF-J/C
INSTRUCTIONS
MANUEL D’INSTRUCTIONS
MANUAL DE INSTRUCCIONES
For customer Use:
Enter below the Model No. and
Serial No. which are located on the
top or bottom of the cabinet. Retain
this information for future reference.
Model No.
Serial No.
LNT0066-001A
HAW600RF_J.indb 3HAW600RF_J.indb 3 06.6.16 11:11:29 AM06.6.16 11:11:29 AM

Warnings, cautions and othersMises en garde, precautions et indications diverses
Avisos, precauciones y otras notas
FCC INFORMATION
This device complies with Part 15 of the
FCC Rules. Operation is subject to the
following two conditions:
(1) This device may not cause harmful
interference
(2) This device must accept any
interference received, including
interference that may cause undesired
operation.
CAUTION: Changes or modifications
not approved by JVC could void user’s
authority to operate the equipment.
Contact
Address: JVC AMERICAS CORP.
JVC COMPANY OF AMERICA
1700 Valley Road, Wayne, N.J.
07470
Telephone: 1 (800) 252-5722
Note: This equipment has been tested and
found to comply with the limits for a Class
B digital device, pursuant to Part 15 of the
FCC rules. These limits are designed to
provide reasonable protection against harmful
interference in a residential installation.
This equipment generates, uses and can
radiate radio frequency energy and, if not
installed and used in accordance with the
instructions, it may cause harmful interference
to radio communications. However, there is
no guarantee that interference will not occur
in a particular installation. If this equipment
does cause harmful interference to radio or
television reception, which can be determined
by turning the equipment off and on, the user is
encouraged to try to correct the interference by
one or more of the following measures:
• Reorient or relocate the receiving antenna.
• Increase the separation between the
equipment and receiver.
• Connect the equipment into an outlet on
a circuit different from that to which the
receiver is connected.
• Consult the dealer or an experienced radio/
TV technician for help.
G-1
HAW600RF_J.indb 2HAW600RF_J.indb 2 06.6.16 11:11:30 AM06.6.16 11:11:30 AM

IC INFORMATION
This device complies with RSS-210 of
the IC Rules. Operation is subject to the
following two conditions:
(1) This device may not cause harmful
interference
(2) This device must accept any
interference received, including
interference that may cause
undesired operation of the device.
CAUTION: Changes or modifications
not approved by JVC could void user’s
authority to operate the equipment.
Contact
Address: JVC CANADA INC.
21 Finchdene Square,
Toronto, ON M1X 1A7
Telephone: (416) 293-1311
e-mail: [email protected]
Note: This equipment has been tested and
found to comply with the limits for a Class B
digital device, pursuant to Industry Canada’s
RSS-210. These limits are designed to
provide reasonable protection against harmful
interference in a residential installation. This
equipment generates, uses and can radiate
radio frequency energy and, if not installed
and used in accordance with the instructions,
it may cause harmful interference to radio
communications. However, there is no guarantee
that interference will not occur in a particular
installation. If this equipment does cause harmful
interference to radio or television reception,
which can be determined by turning the
equipment off and on, the user is encouraged to
try to correct the interference by one or more of
the following measures:
• Reorient or relocate the receiving antenna.
• Increase the separation between the
equipment and receiver.
• Connect the equipment into an outlet on a
circuit different from that to which the receiver
is connected.
• Consult the dealer or an experienced radio/TV
technician for help.
Remarque: L’appareil a été testé et jugé
conforme aux limites des appareils numériques
de classe B, aux termes de la réglementation
RSS-210 de l’industrie du Canada. Ces
limites ont pour but d’assurer une protection
raisonnable contre les interférences parasites
lorsque l’appareil est utilisé dans une installation
résidentielle. Cet appareil engendre, utilise et
peut émettre une énergie radioélectrique et, s’il
n’est pas installé et utilisé en stricte conformité
avec ces instructions, il peut provoquer des
interférences parasites dans les liaisons
radiophoniques. Ceci ne garantit pas pour
autant qu’une installation particulière n’émettra
aucune interférence. Si l’appareil engendre
des interférences parasites avec la réception
radio ou télévision, ce qui pourra être déterminé
en éteignant puis en rallumant l’appareil, il est
conseillé à l’utilisateur d’essayer de corriger
les interférences en prenant l’une des mesures
ci-dessous:
• Modifier l’orientation ou changer
l’emplacement de l’antenne de réception.
• Eloigner davantage l’appareil du récepteur.
• Brancher l’appareil dans une prise d’un circuit
différent de celui auquel le récepteur est
raccordé.
• Demander l’aide de son agent ou d’un
technicien radio/télévision qualifié.
INFORMATION SUR IC
Cet appareil est conforme à la RSS-210 du
réglement de la IC. Le fonctionnement est
sujet aux deux conditions suivantes:
(1) Cet appareil ne peut causer
d’interférences nuisi-bles
(2) Cet appareil reçoit toute interférence
même les interférences qui peuvent
occasioner un mauvais fonctionnement.
ATTENTION: Les changements ou les
modifications non approuvés par JVC
risquent de retirer à l’utilisateur le droit
d’utiliser l’appareil.
Contact
Adresse: JVC CANADA INC.
21 Finchdene Square, Toronto,
ON M1X 1A7
Téléphone: (416) 293-1311
e-mail: [email protected]
G-2
HAW600RF_J.indb 3HAW600RF_J.indb 3 06.6.16 11:11:32 AM06.6.16 11:11:32 AM

G-3
ENGLISH
This product’s performance would be
degraded under a strong electro-static
environment. And the function would be
self-recoverable after the above case.
This product’s performance would be
degraded since the disturbance from the
mains cord. And the function would be self-
recoverable after the above case.
FRANÇAIS
Les performances de ce produit se
détérioreront dans un environnement
fortement électro-statique. Par ailleurs, le
fonctionnement se restaurera de lui-même
dans le cas ci-dessus.
Les performances de ce produit se
détérioreront en cas de perturbations
du cordon d’alimentation. Par ailleurs, le
fonctionnement se restaurera de lui-même
dans le cas ci-dessus.
ESPAÑOL
El rendimiento de este producto puede
deteriorarse en un entorno con campos
electrostáticos fuertes. El funcionamiento se
repondrá a la normalidad después del caso
arriba mencionado.
El rendimiento de este producto puede
deteriorarse debido a las perturbaciones del
cable de la red eléctrica. El funcionamiento
se repondrá a la normalidad después del
caso arriba mencionado.
IMPORTANT
CAUTION:
TO PREVENT ELECTRIC SHOCK
DO NOT USE THIS PLUG WITH AN
EXTENSION CORD, RECEPTACLE
OR OTHER OUTLET UNLESS THE
BLADES CAN BE FULLY INSERTED TO
PREVENT BLADE EXPOSURE.
ATTENTION:
POUR PREVENIR LES CHOCS
ELECTRIQES NE PAS UTILISER
CETTER FICHE AVEC UN
PROLONGATEUR, UNE PRISE DE
COURANT OU UNE AUTRE SORTIE
DE COURANT, SAUF SI LES LAMES
PEUVENT ETRE INSEREES A FOND
SANS EN LAISSER AUCUNE PARTIE A
DECOUVERT.
(1) This device may not cause
interference.
(2) This device must accept any
interference, including interference
that may cause undesired operation
of the device.
(1) Ce produit ne cause pas
d’interférence.
(2) Ce produit doit accepte toute
interférence, incluant interférence
qui peut causé opération non désiré.
Hearing Comfort and Well-Being
• Do not play your personal audio at a high volume. Hearing experts advice against
continuous extended play.
• If you experience a ringing in your ears, reduce volume or discontinue use.
Traffic safety
• Do not use while operating a motorized vehicle. It may create a traffic hazard and is
illegal in many area.
• You should use extreme caution or temporarily discontinue use in potentially
hazardous situations.
• Even though your headphones are of the open-air type designed to let you hear
outside sounds, don’t turn up the volume so high that you can’t hear what’s around
you.
HAW600RF_J.indb 4HAW600RF_J.indb 4 06.6.16 11:11:37 AM06.6.16 11:11:37 AM

1
EN
GL
ISH
FEATURES• Call Function–Call headphone user with
“CALL” button on base station (transmitter)• Reception range up to 50 m/164 ft. (using
JVC measurement system)• Auto Tuning–Headphones automatically
tunes in to the base station (transmitter) as it turns on
• On Stand Charging–Rechargeable system with the exclusive Ni-MH battery that requires no charge cable
• Auto Power On/Off transmitter• “PLL” Stabilized Transmission Technology• Auto-level control circuit that automatically
adjusts signals to the appropriate modulation level
• Large 40 mm (1.63˝) dia. driver unit for high quality sound
• Adaptable to any audio/visual equipment which has the analog audio output.
ContentsPrecautions .......................................2
Parts identification ...........................3
Connection ........................................4
Battery installation ..........................5
Charging the battery ........................6
Basic operations ...............................7
Troubleshooting ...............................9
Specifications .................................10
Thank you for purchasing a JVC product. Please read all instructions carefully before operation, to ensure your complete
understanding and to obtain the best possible performance from the unit.
For your health and traffic safety• Be careful not to turn the sound volume up too high when using the headphones. Your
hearing can be damaged by listening to sounds at excessive volume for long periods.• Never use the headphones when driving a car, motorcycle, or bicycle. This could result in an
accident.• Pay close attention to traffic around you when using the headphones while walking. Not
doing so could result in an accident.
HAW600RF_J.indb 1HAW600RF_J.indb 1 06.6.16 11:11:40 AM06.6.16 11:11:40 AM

2
EN
GL
ISH
Important cautionsCAUTION
To reduce the risk of electrical shocks, fire, etc.: 1. Do not remove screws, cover or cabinet.2. Do not expose this appliance to rain or
moisture.
Precautions
Installation• Select a place which is level, dry and neither
too hot nor too cold (between 0°C and 35°C (32°F and 95°F)).
• Keep away from direct sunlight.• Do not put it too close to a heater.• Indoor use only.Power cord• Do not handle the power cord with wet
hands!• Do not bend the power cord sharply.• Do not connect the supplied AC adaptor to
any other equipment. It is exclusively for use with this unit.
Malfunctions, etc.• There are no serviceable parts inside. If
anything goes wrong, unplug the power cord and consult your dealer.
• Do not insert any metallic object.• Do not allow water to get inside.• Do not move or bend the ear cups or any
other part of the headphones with excessive force. It may damage the headphones.
• Stop using the headphones if they are causing discomfort on your skin. Otherwise inflammation or irritation may be caused on your skin.
• The ear pad will wear out earlier than the other parts even in normal use or in normal keeping due to the material characteristics.For replacement of the ear pads, please consult with the dealer where you purchased the headphones.
• If the headphone is not used for a prolonged time, unplug the AC adaptor from an AC outlet.
Battery precautions
• Be sure to use the supplied exclusive battery. Do not use any other rechargeable or dry cell battery.
• Use only the type of battery the manufacturer recommends when replacing the battery.
• Do not throw the battery in a fire or heat it.• Do not immerse or wet the battery in water.• Do not remove or damage the covering tube.• Do not subject the battery to strong shocks or
throw it.• If any liquid from the battery gets into your
eyes, it may cause blindness. If battery liquid does get into your eyes, do not rub them, but instead immediately wash them thoroughly with clean water, then consult a doctor at once. Also, should any liquid from the rechargeable battery get onto your skin or clothes, it may burn your skin. In this case, wash with clean water immediately.
• When discarding batteries, environmental problems must be considered and the local rules or laws governing the disposal of these batteries must be followed strictly.
Charging precautions
• Charge only with supplied Ni-MH type battery. Other types of battery may burst causing personal injury and damage.
• Use only the supplied base station to charge the battery.
• Be sure to use the supplied AC adaptor.
Supplied accessoriesCheck to be sure you have all of the supplied accessories.The number in parentheses is the quantity of the pieces supplied. If anything is missing, contact your dealer immediately.• Exclusive rechargeable batteries (2)• Exclusive AC adaptor (1)• Connection cord (1)• Conversion cord (1)• Plug adaptor (1)
Precautions
HAW600RF_J.indb 2HAW600RF_J.indb 2 06.6.16 11:11:41 AM06.6.16 11:11:41 AM

3
EN
GL
ISH
4 4 5
Parts identification
1 2 3 4 5
6 7 8
Base station (transmitter and battery charging unit)
Back side
2 31 6 7
Headphones
1 CHARGE indicator (6)2 Microphone (8)3 CALL button (8)4 POWER indicator (7)
See pages in parentheses for details.
5 Battery charging terminal (6)6 CHANNEL selector (8)7 AUDIO IN jack (4)8 DC IN jack (4)
Left Right
1 AUTO SCAN button (7, 8)2 AUTO SCAN indicator (7)3 VOL (volume) (7)4 Ear pad (5)5 Battery charging terminal (6)6 POWER button (6, 7)7 POWER indicator (6, 7)
* The battery charging terminal on the base station is covered with the protection cap when purchasing.Take off the cap before charging.
HAW600RF_J.indb 3HAW600RF_J.indb 3 06.6.16 11:11:41 AM06.6.16 11:11:41 AM

4
EN
GL
ISH
Connection
TV, audio amplifier, VCR,
DVD player, PC, etc.
1 Connect the base station to the AV equipment.
2 Connect the AC adaptor to the base station.
3 Connect the AC adaptor to the AC outlet.
1
12
3To AC outlet
(AC 120 V, 60 Hz)
Conversion cord for
stereo pin jack
(supplied)
Connection cord
(supplied)
Plug adaptor for 6.3 mm (0.24˝)
Phono jack (supplied)
Plug adaptor for monaural mini
jack (not supplied)
To stereo mini jack
Note: Do not use any other AC adaptor than the supplied AC adaptor. Otherwise, malfunctions may be caused.
Be sure to connect the AC adaptor after all other
connections are complete.
AV equipment
AC adaptor
(supplied)
HAW600RF_J.indb 4HAW600RF_J.indb 4 06.6.16 11:11:42 AM06.6.16 11:11:42 AM

5
EN
GL
ISH
1 Take off the ear pad of the right headphone.
2 Take off the battery covers.
3 Install the batteries.Match the polarity (+ and –) on the batteries with the + and – marking on the battery compartments.• Insert the – terminal of the battery at
first.
Be sure to use the supplied exclusive
battery. Do not use any other
rechargeable or dry cell battery, which
may cause malfunctions or damage
the unit.
Battery installation4 Put on the battery covers.
5 Put on the ear pad.1 Insert the hem of the ear pad into the slit
on the headphone.
2 Turn the ear pad anticlockwise to slide all the hem into the groove on the headphone.
• Be sure that all the hem is inserted fully. If not, turn the ear pad anticlockwise again until all the hem slides in.
HAW600RF_J.indb 5HAW600RF_J.indb 5 06.6.16 11:11:43 AM06.6.16 11:11:43 AM

6
EN
GL
ISH
Charging the batteryThe base station works as the battery charging unit. Charge the rechargeable battery before starting to use the headphones.You can continuously use the headphones for about 10 hours after full battery charge.
1 Make sure that the headphones are turned off.You cannot charge the battery of the
headphones when the headphones
are turned on. Press POWER to turn
the Power indicator off.
2 Put on the headphones on the base station so that their charging terminals contact firmly.• The battery charging terminal on
the base station is covered with the protection cap when purchasing.Take off the cap before charging.
• When putting the headphones on the base station, hold them and adjust their position with your both hands to assure the contact of the terminals.
3 Confirm the CHARGE indicator lights up.If the charge indicator does not light up, return steps 1 and 2 after checking the connection of the AC adaptor.• It takes about 30 hours to charge the
batteries fully.• 30-hour charging may not charge the
battery fully depending on the battery or other conditions.
• The cycle life of the rechargeable battery is approximately 500 times. (It varies depending on the conditions when charging.)
• The battery leaks its charge little by little even when the headphones’ power is off, due to its characteristics.
Notes on the battery and charging• To make battery life longer:
– charging the battery within the temperature range of 10ºC – 35ºC (50ºF – 95ºF).
– not using the headphones in excessively cold places. Low temperature decreases battery life.
– charging the battery after its complete discharging. Charging before complete discharge makes the battery life gradually shorter.
• Replace the batteries when their lives become about half or the playback sound become constantly noisy. Use the exclusive rechargeable Ni-MH battery J47958 only. When purchasing the battery, consult the dealer where you bought the product.
• Replace two batteries at the same time when replacing.
HAW600RF_J.indb 6HAW600RF_J.indb 6 06.6.16 11:11:44 AM06.6.16 11:11:44 AM

7
EN
GL
ISH
Basic operationsListening to the sound from the base stationThe base station works as the FM transmitter and send sound to the headphones.
PrecautionTurn down the volume of the headphones with the VOL dial before turning on its power to avoid excessive volume.
1 Start playback on the AV equipment connected with the base station.The base station turns on automatically and starts to transmit FM signals (Auto Power On function). The POWER indicator of the base station lights up.• In some situations, the power may not
be turned on automatically by the input sound (e. g. a song with a quiet opening or fade in). This is not a malfunction.
2 Press POWER on the headphones to turn on the power.The POWER indicator lights up and the headphones automatically starts to tune in to the signal from the base station (Auto Tuning function). The AUTO SCAN indicator lights up when tuned in.• Press the center of the button firmly
when pressing POWER. Pressing the edge may not turn on the power.
• Charge the battery in the following cases. The battery ran out:
– The POWER indicator does not light up after pressing POWER.
– The AUTO SCAN indicator does not light up though the POWER indicator lights up.
• No sound is heard while Auto Tuning. It takes a few seconds to tune in.
• Press AUTO SCAN when the sound does not come out properly.
3 Adjust the volumes of the AV equipment and the headphones.• Adjust the volumes within the area about
7 m (23 ft.) from the base station to get optimum signal reception.
• You can get better sound by setting the volume of the AV equipment as high as possible without causing distortion and that of the headphone lower (except when connecting the AV equipment through LINE OUT jacks).
To Turn off the unitsPress POWER on the headphones and stop playback on the AV equipment. The headphones’ POWER indicator goes off. • The base station automatically turns off if no
signals come in for about four minutes (Auto Power OFF function).
• The white noise may come out when the base station turns off. Take off and turns off the headphones after using.
HAW600RF_J.indb 7HAW600RF_J.indb 7 06.6.16 11:11:45 AM06.6.16 11:11:45 AM

8
EN
GL
ISH
Basic operationsSelecting a better reception channelWhen the playback sound is noisy, you can choose one of the other two channels to transmit signals on the base station.• The white noise may come out when
switching the channel. Take off the headphones when switching the channel.
1 Slide the CHANNEL selector on the back side of the base station to select another channel.
2 Press AUTO SCAN on the headphones to tune in to the new channel.
3 Repeat Steps 1 and 2 to select the best channel.
Call through the base stationYou can call the one using the headphones with the microphone on the base station.
1 Press and hold CALL on the base station.The playback sound is interrupted.
2 Speak to the microphone on the base station.Speak at least 10 cm (4 inches) away from the microphone. The speaking sound may be distorted.
3 Release CALL after finishing speaking.• Do not speak to the
microphone suddenly in too loud voice. The sudden excessive loud sound may damage the ears of the headphones user or may cause an accident to the user.
• Do not use the Call function when the headphones are near the base station. It may cause a howling sound and damage the headphone user or cause an accident.Listening area
The headphones can receive the FM signal of the base station 50 m (164 ft.) away from it at maximum (when no interference or obstacles exist between them). But the receivable range becomes shorter or reception quality becomes poorer in the following cases:– In places such as reinforced concrete
buildings– Obstacles such as steel-reinforced doors
exist between the base station and headphones
– Items such as metal furniture are situated nearby
– In places facing a street– Noise or interference sources exist nearby
(e.g. mobile ham, radio stations, high-voltage power lines, a microwave oven, cordless phones, cellular phones, etc.)
HAW600RF_J.indb 8HAW600RF_J.indb 8 06.6.16 11:11:45 AM06.6.16 11:11:45 AM

9
EN
GL
ISH
Troubleshooting
Symptom Cause/Remedy
No sound comes out at all. • Turns on the power of the headphones.• Start playback on the AV equipment connected to the base
station.• Check the connection between the base station and the AV
equipment.• Turns up the volume of the headphones or the connected AV
equipment to an appropriate level.• Fully charge the headphones’ battery.
No sound comes out from R-channel.
• Check the connection between the base station and the AV equipment.
• Sound comes out only of L-channel when the base station is connected to the monaural audio output. Convert the mini plug to the base station from stereo to monaural with the plug adaptor (not supplied).
Sound is distorted. • The headphones’ battery will soon run out. Fully charge the battery.
• The volume of the headphones and/or the connected AV equipment is too high. Adjust their volume to an appropriate level.
Sound is noisy. • The headphones’ battery will soon run out. Fully charge the battery.
• Switch the base station channel to another and press AUTO SCAN on the headphones.
• The volume of the connected AV equipment is too low. Adjust the volume as high as possible without causing distortion.
• Too far from the base station. Use the headphones within the range of the base station (see page 8).
Cannot charge the battery. • Check the contact of the charging terminals on the base station and the headphones.
• Check the polarity of the battery.• The cycle life of the battery ended. Replace with the new
battery (see page 6).
What appears to be trouble is not always serious. Check the following points before calling a service center.
HAW600RF_J.indb 9HAW600RF_J.indb 9 06.6.16 11:11:46 AM06.6.16 11:11:46 AM

10
EN
GL
ISH
SpecificationsGeneral Specifications
Modulation system: Stereo frequency modulation system
Carrier frequency: 912.0 MHz (Channel 1)912.5 MHz (Channel 2)913.0 MHz (Channel 3)
Usable area(distance to reach): Max. 50 m (164 ft.) (using JVC
measurement systems, under controlled ambient conditions)
Frequency response: 25 Hz – 13,000 HzDistortion: Less than 3% (at 1 kHz)
Transmitter (J22320-001)
Power requirements: DC 12 V (with the exclusive AC adaptor)
Audio input terminals: 3.5 mm (0.13˝) dia. stereo mini jack
Input impedance: 36 kΩReference input level: 350 mVDimensions: 159 (W) mm x 114 (D)
mm x 123 (H) mm (6.26˝ x 4.49˝ x 4.84˝)
Mass: 280 g (9.9 oz) (without connection cord and AC adaptor)
Headphones
Power requirements: Rechargeable Ni-MH battery (1.2 V) x 2
Battery running time: 10 hours (when charged for 30 hours)
Mass: 250 g (8.8 oz) (with rechargeable battery)
Supplied Accessories• Instructions x 1• Exclusive AC adaptor x 1 (J34675-001: AC 120 V, 60 Hz, 4 W)• Exclusive rechargeable Ni-MH battery x 2• Connection cord x 1 (3.5 mm (0.13˝) dia. stereo mini plug: 2.2 m
(7.22 ft))• Conversion cord x 1 (3.5 mm (0.13˝) dia. stereo mini jack — RCA
pin plug x 2: 0.1 m (0.33 ft))• Plug adaptor x 1 (converts 3.5 mm (0.13˝) dia. stereo mini
plug to a 6.3 mm (0.24˝) dia. standard stereo phone plug)
* Design and specifications subject to change without notice.
HAW600RF_J.indb 10HAW600RF_J.indb 10 06.6.16 11:11:47 AM06.6.16 11:11:47 AM

© 2006 Victor Company of Japan, Limited
Printed in China
LNT0066-001A
HA
-W6
00
RF
-J/C
FM
CO
RD
LE
SS
HE
AD
PH
ON
ES
HAW600RF_J.indb 2HAW600RF_J.indb 2 06.6.16 11:11:13 AM06.6.16 11:11:13 AM

EN
GL
ISH
NE
DE
RL
AN
DS
DE
UT
SC
H
FM CORDLESS HEADPHONES
FUNKKOPFHÖRER
DRAADLOZE FM-HOOFDTELEFOON
CASQUE FM SANS FIL
CUFFIE SENZA FILO FM
TRÅDLÖSA FM-HÖRLURAR
HA-W600RF-G
INSTRUCTIONS
BEDIENUNGSANLEITUNG
GEBRUIKSAANWIJZING
MANUEL D’INSTRUCTIONS
ISTRUZIONI
BRUKSANVISNINGLNT0067-001A
FR
AN
ÇA
ISIT
AL
IAN
OS
VE
NS
KA
HAW600_G.indb 3HAW600_G.indb 3 06.6.26 6:48:08 PM06.6.26 6:48:08 PM

G-1
FM CORDLESS HEADPHONES
863MHz — 865 MHZ
THIS DEVICE IS INTENDED FOR USE IN THESE COUNTRIES:
DIESES GERÄT IST FÜR DEN GEBRAUCH IN DEN FOLGENDEN LÄNDERN
VORGESEHEN:
DIT APPARAAT IS BEDOELD VOOR GEBRUIK IN DEZE LANDEN:
DISPOSITIF PREVU POUR ETRE UTILISE DANS LES PAYS SUIVANTS:
QUESTO DISPOSITIVO È DESTINATO PER L’USO IN QUESTI PAESI:
DENNA APPARAT ÄR AVSEDD FÖR BRUK I DESSA LÄNDER:
English Hereby, JVC, declares that this HA-W600RF is in compliance with the essential
requirements and other relevant provisions of Directive 1999/5/EC.
Finnish JVC vakuuttaa täten että HA-W600RF tyyppinen laite on direktiivin 1999/5/EY oleel-
listen vaatimusten ja sitä koskevien direktiivin muiden ehtojen mukainen.
Dutch Hierbij verklaart JVC dat het toestel HA-W600RF in overeenstemming is met de es-
sentiële eisen en de andere relevante bepalingen van richtlijn 1999/5/EG.
Bij deze verklaart JVC dat deze HA-W600RF voldoet aan de essentiële eisen en
aan de overige relevante bepalingen van Richtlijn 1999/5/EC.
French Par la présente JVC déclare que l’appareil HA-W600RF est conforme aux exigenc-
es essentielles et aux autres dispositions pertinentes de la directive 1999/5/CE.
Par la présente, JVC déclare que ce HA-W600RF est conforme aux exigences es-
sentielles et aux autres dispositions de la directive 1999/5/CE qui lui sont applica-
bles.
Swedish Härmed intygar JVC att denna HA-W600RF står i överensstämmelse med de
väsentliga egenskapskrav och övriga relevanta bestämmelser som framgår av
direktiv 1999/5/EG.
Danish Undertegnede JVC erklærer herved, at følgende udstyr HA-W600RF overholder de
væsentlige krav og øvrige relevante krav i direktiv 1999/5/EF.
German Hiermit erklärt JVC, dass sich dieser/diese/dieses HA-W600RF in Übereinstimmung
mit den grundlegenden Anforderungen und den anderen relevanten Vorschriften der
Richtlinie 1999/5/EG befindet. (BMWi)
Hiermit erklärt JVC die Übereinstimmung des Gerätes HA-W600RF mit den
grundlegenden Anforderungen und den anderen relevanten Festlegungen der
Richtlinie 1999/5/EG. (Wien)
Greek ME THN ΠAROTΣA JVC ∆HΛΩNEI OTI HA-W600RF ΣTMMORΦΩNETAI ΠROΣ
TIΣ OTΣIΩ∆EIΣ A ΠAITHΣEIΣ KAI TIΣ ΛOIΠEΣ ΣΧETIKEΣ ∆IATAΞEI Σ THΣ O∆HΓ
IAΣ 1999/5/EK.
Italian Con la presente JVC dichiara che questo HA-W600RF e conforme ai requisiti es-
senziali ed alle altre disposizioni pertinenti stabilite dalla direttiva 1999/5/CE.
Spanish Por medio de la presente JVC declara que el HA-W600RF cumple con los requisitos
esenciales y cualesquiera otras disposiciones aplicables o exigibles de la Directive
1999/5/CE.
Portuguese JVC declara que este HA-W600RF está conforme com os requisitos essenciais e
outras disposiçôes da Directiva 1999/5/CE.
HAW600_G.indb 2HAW600_G.indb 2 06.6.26 6:48:09 PM06.6.26 6:48:09 PM

Bästa kund!
Denna apparat överensstämmer med gällande
EU-direktiv och standarder beträffande
elektromagnetisk kompatibilitet och
elsäkerhet.
Europarepresentant för Victor Company of
Japan, Limited är:
JVC Technology Centre Europe GmbH
Postfach 10 05 52
61145 Friedberg
Tyskland
G-2
Dear Customer,
This apparatus is in conformance with the
valid European directives and standards
regarding electromagnetic compatibility and
electrical safety.
European representative of Victor Company of
Japan, Limited is:
JVC Technology Centre Europe GmbH
Postfach 10 05 52
61145 Friedberg
Germany
Sehr geehrter Kunde,
sehr geehrte Kundin,
dieses Gerät stimmt mit den gültigen
europäischen Richtlinien und Normen
bezüglich elektromagnetischer Verträglichkeit
und elektrischer Sicherheit überein.
Die europäische Vertretung für die Victor
Company of Japan, Limited ist:
JVC Technology Centre Europe GmbH
Postfach 10 05 52
61145 Friedberg
Deutschland
Geachte klant,
Dit apparaat voldoet aan de geldende
Europese normen en richtlijnen inzake
elektromagnetische compatibiliteit en
elektrische veiligheid.
De Europese vertegenwoordiger van Victor
Company of Japan, Limited is:
JVC Technology Centre Europe GmbH
Postfach 10 05 52
61145 Friedberg
Duitsland
Cher(e) client(e),
Cet appareil est conforme aux directives et
normes européennes en vigueur concernant
la compatibilité électromagnétique et à la
sécurité électrique.
Représentant européen de la société Victor
Company of Japan, Limited :
JVC Technology Centre Europe GmbH
Postfach 10 05 52
61145 Friedberg
Allemagne
Gentile Cliente,
Questa apparecchiatura è conforme alle
direttive e alle norme europee relative alla
compatibilità elettromagnetica e alla sicurezza
elettrica.
Il rappresentante europeo della Victor
Company of Japan, Limited è:
JVC Technology Centre Europe GmbH
Postfach 10 05 52
61145 Friedberg
Germania
ENGLISH
DEUTSCH
FRANÇAIS
ITALIANO
NEDERLANDS SVENSKA
HAW600_G.indb 3HAW600_G.indb 3 06.6.26 6:48:13 PM06.6.26 6:48:13 PM

G-3
Information for Users on Disposal of Old Equipment ENGLISH
Attention:
This symbol is
only valid in the
European Union.
[European Union]
This symbol indicates that the electrical and electronic equipment should not be disposed as
general household waste at its end-of-life. Instead, the product should be handed over to the
applicable collection point for the recycling of electrical and electronic equipment for proper
treatment, recovery and recycling in accordance with your national legislation.
By disposing of this product correctly, you will help to conserve natural resources and will help
prevent potential negative effects on the environment and human health which could otherwise
be caused by inappropriate waste handling of this product. For more information about
collection point and recycling of this product, please contact your local municipal office, your
household waste disposal service or the shop where you purchased the product.
Penalties may be applicable for incorrect disposal of this waste, in accordance with national
legislation.
(Business users)
If you wish to dispose of this product, please visit our web page www.jvc-europe.com to obtain
information about the take-back of the product.
[Other Countries outside the European Union]
If you wish to dispose of this product, please do so in accordance with applicable national
legislation or other rules in your country for the treatment of old electrical and electronic
equipment.
Benutzerinformationen zur Entsorgung alter Geräte DEUTSCH
Hinweis:
Dieses Symbol
ist nur in der
Europäischen
Union gültig.
[Europäische Union]
Dieses Symbol zeigt an, dass das elektrische bzw. elektronische Gerät nicht als normaler
Haushaltsabfall entsorgt werden soll. Stattdessen sollte das Produkt zur fachgerechten
Entsorgung, Weiterverwendung und Wiederverwertung in Übereinstimmung mit der
Landesgesetzgebung einer entsprechenden Sammelstelle für das Recycling elektrischer und
elektronischer Geräte zugeführt werden.
Die korrekte Entsorgung dieses Produkts dient dem Umweltschutz und verhindert mögliche
Schäden für die Umwelt und die menschliche Gesundheit, welche durch unsachgemäße
Behandlung des Produkts auftreten können. Weitere Informationen zu Sammelstellen und
dem Recycling dieses Produkts erhalten Sie bei Ihrer Gemeindeverwaltung, Ihrem örtlichen
Entsorgungsunternehmen oder in dem Geschäft, in dem Sie das Produkt gekauft haben.
Für die nicht fachgerechte Entsorgung dieses Abfalls können gemäß der Landesgesetzgebung
Strafen ausgesprochen werden.
(Geschäftskunden)
Wenn Sie dieses Produkt entsorgen möchten, besuchen Sie bitte unsere Webseite www.jvc-
europe.com um Informationen zur Rücknahme des Produkts zu erhalten.
[Andere Länder außerhalb der Europäischen Union]
Wenn Sie dieses Produkt entsorgen möchten, halten Sie sich dabei bitte an die
entsprechenden Landesgesetze und andere Regelungen in Ihrem Land zur Behandlung
elektrischer und elektronischer Geräte.
HAW600_G.indb 4HAW600_G.indb 4 06.6.26 6:48:16 PM06.6.26 6:48:16 PM

Informations relatives à l’élimination des appareils usagés, à
l’intention des utilisateurs FRANÇAIS
Attention:
Ce symbole
n’est reconnu
que dans l’Union
européenne.
[Union européenne]
Lorsque ce symbole figure sur un appareil électrique et électronique, cela signifie qu’il ne doit
pas être éliminé en tant que déchet ménager à la fin de son cycle de vie. Le produit doit être
porté au point de pré-collecte approprié au recyclage des appareils électriques et électroniques
pour y subir un traitement, une récupération et un recyclage, conformément à la législation
nationale.
En éliminant correctement ce produit, vous contriburez à la conservation des ressources
naturelles et à la prévention des éventuels effets négatifs sur l’environnement et la santé
humaine, pouvant être dus à la manipulation inappropriée des déchets de ce produit. Pour plus
d’informations sur le point de pré-collecte et le recyclage de ce produit, contactez votre mairie,
le service d’évacuation des ordures ménagères ou le magasin dans lequel vous avez acheté le
produit.
Des amendes peuvent être infligées en cas d’élimination incorrecte de ce produit,
conformément à la législation nationale.
(Utilisateurs professionnels)
Si vous souhaitez éliminer ce produit, visitez notre page Web www.jvc-europe.com afin
d’obtenir des informations sur sa récupération.
[Pays ne faisant pas partie de l’Union européenne]
Si vous souhaitez éliminer ce produit, faites-le conformément à la législation nationale ou
autres règles en vigueur dans votre pays pour le traitement des appareils électriques et
électroniques usagés.
G-4
Informatie voor gebruikers over het weggooien van oude apparatuur NEDERLANDS
Let op:
Dit symbool is
alleen geldig in
de Europese
Unie.
[Europese Unie]
Deze markering geeft aan dat de elektrische en elektronische apparatuur bij het einde van
de gebruiksduur niet bij het huishoudelijk afval mag worden gegooid. Het product moet in
plaats daarvan worden ingeleverd bij het relevante inzamelingspunt voor hergebruik van
elektrische en elektronische apparatuur, voor juiste verwerking, terugwinning en hergebruik in
overeenstemming met uw nationale wetgeving.
Door dit product naar het inzamelingspunt te brengen, werkt u mee aan het behoud van
natuurlijke hulpbronnen en met het voorkomen van potentiële negatieve effecten op het
milieu en de volksgezondheid, die anders veroorzaakt zouden kunnen worden door onjuiste
afvalverwerking van dit product. Neem voor meer informatie over inzamelingspunten
en hergebruik van dit product contact op met de gemeente in uw woonplaats, het
afvalverwerkingsbedrijf of de winkel waar u het product hebt aangeschaft.
Er kunnen boetes gelden voor een onjuiste verwijdering van dit afval, in overeenstemming met
de nationale wetgeving.
(Zakelijke gebruikers)
Bezoek als u dit product wilt weggooien onze website www.jvc-europe.com voor informatie
over het terugnemen van het product.
[Landen buiten de Europese Unie]
Wanneer u dit product wilt verwijderen, houdt u dan aan de geldende nationale wetgeving of
andere regels in uw land voor de verwerking van oude elektrische en elektronische apparatuur.
HAW600_G.indb 5HAW600_G.indb 5 06.6.26 6:48:20 PM06.6.26 6:48:20 PM

G-5
Informazioni per gli utenti sullo smaltimento delle apparecchiature
obsoleteITALIANO
Attenzione:
Questo simbolo
è valido solo
nell’Unione
Europea.
[Unione Europea]
Questo simbolo indica che l’apparecchiatura elettrica ed elettronica a cui è relativo non deve
essere smaltita tra i rifiuti domestici generici alla fine della sua vita utile. Il prodotto, invece, va
consegnato a un punto di raccolta appropriato per il riciclaggio di apparecchiature elettriche
ed elettroniche, per il trattamento, il recupero e il riciclaggio corretti, in conformità alle proprie
normative nazionali.
Mediante lo smaltimento corretto di questo prodotto, si contribuirà a preservare le risorse
naturali e a prevenire potenziali effetti negativi sull’ambiente e sulla salute umana che
potrebbero essere provocati, altrimenti, da uno smaltimento inappropriato del prodotto. Per
ulteriori informazioni sul punto di raccolta e il riciclaggio di questo prodotto, contattare la sede
comunale locale, il servizio di smaltimento rifiuti domestici o il negozio in cui si è acquistato il
prodotto.
L’utente è responsabile del conferimento dell’apparecchio a fina vita alle appropriate strutture
di raccolta, pena le sanzioni previste dalla vigente legislazione sui rifiuti.
(Per gli utenti aziendali)
Qualora si desideri smaltire questo prodotto, visitare la nostra pagina web www.jvc-europe.
com per ottenere informazioni sul ritiro del prodotto.
[Per altre nazioni al di fuori dell’Unione Europea]
Qualora si desideri smaltire questo prodotto, effettuare lo smaltimento in conformità alla
normativa nazionale applicabile o alle altre leggi della propria nazione relative al trattamento
delle apparecchiature elettriche ed elettroniche obsolete.
Information till användare gällande kassering av gammal utrustning SVENSKA
[Europeiska gemenskapen]
Denna symbol anger att elektrisk och elektronisk utrustning inte ska kasseras som vanligt
hushållsavfall, när de inte ska användas mer. Istället ska produkten lämnas in på lämplig
återvinningsstation för elektrisk eller elektronisk utrustning, så att den kan tas om hand och
återvinnas i enlighet med ert lands lagstiftning.
Genom att avyttra denna profukt på rätt sätt, bidrar du till att bevara naturen och förhindrar
potentiellt negativa effekter på miljön och den mänskiliga hälsan, som annars kan bli
resultatet vid felaktig hantering av denna produkt. Kontakta ditt kommunkontor, det företag
som hanterar dina hushållssopor eller butiken där du köpt produkten, för mer information om
återvinningscentraler.
Det kan hända att du bötfälls i enlighet med ert lands lagstiftning om detta avfall kasseras på
fel sätt.
(Företagsanvändare)
Om ni vill kassera denna produkt, besök vår webbsida www.jvc-europe.com för att få
information om returnering av produkten.
[Övriga länder utanför den Europeiska gemenskapen]
Om du vill kassera denna produkt, ska detta göras i enlighet med gällande lagstiftning i landet,
eller enligt andra bestämmelser i ditt land, för behandling av gammal elektrisk eller elektronisk
utrustning.
Tänk på:
Att denna
symbol endast
gäller inom den
Europeiska
gemenskapen.
HAW600_G.indb 6HAW600_G.indb 6 06.6.26 6:48:25 PM06.6.26 6:48:25 PM

ENGLISH
This product’s performance would be degraded
under a strong electro-static environment. And
the function would be self-recoverable after the
above case.
This product’s performance would be degraded
since the disturbance from the mains cord. And
the function would be self-recoverable after the
above case.
DEUTSCH
Die Leistung dieses Produkts würde sich in einer
stark elektrostatisch geladenen Umgebung
verschlechtern. Und die Funktion würde sich nach
dem obigen Fall selbst wiederherstellen.
Die Leistung dieses Produkts würde sich
aufgrund einer Störung durch das Netzkabel
verschlechtern. Und die Funktion würde sich nach
dem obigen Fall selbst wiederherstellen.
NEDERLANDS
De prestatie van dit product neemt af in een
omgeving met een sterk elektrostatisch veld.
De normale werking wordt echter automatisch
hersteld wanneer de storingsbron wordt
weggenomen.
De prestatie van dit product neemt af als het
netsnoer storingen oppikt. De normale werking
wordt echter automatisch hersteld wanneer de
storingsbron wordt weggenomen.
FRANÇAIS
Les performances de ce produit se détérioreront
dans un environnement fortement électro-
statique. Par ailleurs, le fonctionnement se
restaurera de lui-même dans le cas ci-dessus.
Les performances de ce produit se détérioreront
en cas de perturbations du cordon d’alimentation.
Par ailleurs, le fonctionnement se restaurera de
lui-même dans le cas ci-dessus.
ITALIANO
La prestazione di questo prodotto potrebbe
deteriorarsi in presenza di un forte ambiente
elettrostatico. La funzione dovrebbe ripristinarsi
automaticamente dopo il caso descritto sopra.
La prestazione di questo prodotto potrebbe
deteriorarsi a causa di disturbi provenienti dal
cavo di alimentazione. La funzione dovrebbe
ripristinarsi automaticamente dopo il caso
descritto sopra.
SVENSKA
Denna produkts prestanda kan försämras i en
starkt elektrostatisk miljö. Funktionen kan dock
återställas automatiskt i ovanstående fall.
Denna produkts prestanda kan försämras på
grund av störningar från nätkabeln. Funktionen
kan dock återställas automatiskt i ovanstående
fall.
Per l’Italia:
“Si dichiara che il questo prodotto di marca
JVC è conforme alle prescrizioni del Decreto
Ministeriale n.548 del 28/08/95 pubblicato
sulla Gazzetta Ufficiale della Repubblica
Italiana n.301 del 28/12/95.”
G-6
HAW600_G.indb 7HAW600_G.indb 7 06.6.26 6:48:29 PM06.6.26 6:48:29 PM

G-7
“SOME DO’S AND DON’TS ON THE SAFE USE OF EQUIPMENT”
This equipment has been designed and manufactured to meet international safety
standards but, like any electrical apparatus, care must be taken if you are to obtain the best
results and safety is to be assured.
•••••••••••••••••••••••••••••••••••••••••••••••••••••••••••••••••••
Do read the operating instructions before you attempt to use the equipment.
Do ensure that all electrical connections (including the plug, extension cord and inter-
connections between pieces of equipment) are properly made and in accordance with the
manufacturer’s instructions. Switch off and withdraw the plug when making or changing
connections.
Do consult your dealer if you are ever in doubt about the installation or operation or safety
of your equipment.
Do be careful with glass panels or doors on equipment.
•••••••••••••••••••••••••••••••••••••••••••••••••••••••••••••••••••
DON’T continue to operate the equipment if you are in any doubt about it working normally,
or if it is damaged in any way—switch off—withdraw the plug and consult your dealer.
DON’T remove any fixed cover as this may expose dangerous voltages.
DON’T leave equipment switched on when it is unattended unless it is specifically stated
that it is designed for unattended operation or has a standby mode.
Switch off using the switch on the equipment and make sure that your family know how to
do this.
Special arrangements may need to be made for infirm or handicapped people.
DON’T use equipment such as personal stereos or radios so that you are distracted from
the requirements of road safety. It is illegal to watch television when driving.
DON’T listen to headphones at high volume as such use can permanently damage your
hearing.
DON’T obstruct the ventilation of the equipment, for example with curtains or on soft
furnishings.
Overheating will cause damage and shorten the life of the equipment.
DON’T use makeshift stands and NEVER fix legs with wood screws. To ensure complete
safety always fit the manufacturer’s approved stand or legs with the fixing screws supplied
according to the instructions.
DON’T allow electrical equipment to be exposed to rain or moisture.
ABOVE ALL
NEVER let anyone especially children push anything into holes, slots or any other opening
in the case. This could result in a fatal electrical shock.
NEVER guess or make changes with electrical equipment of any kind. It is better to be safe
than sorry!
HAW600_G.indb 8HAW600_G.indb 8 06.6.26 6:48:33 PM06.6.26 6:48:33 PM

1
EN
GL
ISH
ContentsPrecautions .......................................2
Parts identification ...........................3
Connection ........................................4
Battery installation ..........................5
Charging the battery ........................6
Basic operations ...............................7
Troubleshooting ...............................9
Specifications .................................10
Thank you for purchasing a JVC product. Please read all instructions carefully before operation, to ensure your complete
understanding and to obtain the best possible performance from the unit.
For your health and traffic safety• Be careful not to turn the sound volume up too high when using the headphones. Your
hearing can be damaged by listening to sounds at excessive volume for long periods.• Never use the headphones when driving a car, motorcycle, or bicycle. This could result in an
accident.• Pay close attention to traffic around you when using the headphones while walking. Not
doing so could result in an accident.
FEATURES• Reception range up to 100 m (using JVC
measurement system)• Auto Tuning–Headphones automatically
tunes in to the base station (transmitter) as it turns on
• On Stand Charging–Rechargeable system with the exclusive Ni-MH battery that requires no charge cable
• Auto Power On/Off transmitter• “PLL” Stabilized Transmission Technology• Auto-level control circuit that automatically
adjusts signals to the appropriate modulation level
• Large 40 mm dia. driver unit for high quality sound
• Adaptable to any audio/visual equipment which has the analog audio output.
HAW600_G.indb 1HAW600_G.indb 1 06.6.26 6:48:36 PM06.6.26 6:48:36 PM

2
EN
GL
ISH
Important cautionsCAUTION
To reduce the risk of electrical shocks, fire, etc.: 1. Do not remove screws, cover or cabinet.2. Do not expose this appliance to rain or
moisture.
Precautions
Installation• Select a place which is level, dry and neither
too hot nor too cold (between 0°C and 35°C).• Keep away from direct sunlight.• Do not put it too close to a heater.• Indoor use only.Power cord• Do not handle the power cord with wet
hands!• Do not bend the power cord sharply.• Do not connect the supplied AC adaptor to
any other equipment. It is exclusively for use with this unit.
Malfunctions, etc.• There are no serviceable parts inside. If
anything goes wrong, unplug the power cord and consult your dealer.
• Do not insert any metallic object.• Do not allow water to get inside.• Do not move or bend the ear cups or any
other part of the headphones with excessive force. It may damage the headphones.
• Stop using the headphones if they are causing discomfort on your skin. Otherwise inflammation or irritation may be caused on your skin.
• The ear pad will wear out earlier than the other parts even in normal use or in normal keeping due to the material characteristics.For replacement of the ear pads, please consult with the dealer where you purchased the headphones.
• If the headphone is not used for a prolonged time, unplug the AC adaptor from an AC outlet.
PrecautionsBattery precautions
• Be sure to use the supplied exclusive battery. Do not use any other rechargeable or dry cell battery.
• Use only the type of battery the manufacturer recommends when replacing the battery.
• Do not throw the battery in a fire or heat it.• Do not immerse or wet the battery in water.• Do not remove or damage the covering tube.• Do not subject the battery to strong shocks or
throw it.• If any liquid from the battery gets into your
eyes, it may cause blindness. If battery liquid does get into your eyes, do not rub them, but instead immediately wash them thoroughly with clean water, then consult a doctor at once. Also, should any liquid from the rechargeable battery get onto your skin or clothes, it may burn your skin. In this case, wash with clean water immediately.
• When discarding batteries, environmental problems must be considered and the local rules or laws governing the disposal of these batteries must be followed strictly.
Charging precautions
• Charge only with supplied Ni-MH type battery. Other types of battery may burst causing personal injury and damage.
• Use only the supplied base station to charge the battery.
• Be sure to use the supplied AC adaptor.
Supplied accessoriesCheck to be sure you have all of the supplied accessories.The number in parentheses is the quantity of the pieces supplied. If anything is missing, contact your dealer immediately.• Exclusive rechargeable batteries (2)• Exclusive AC adaptor (1)• Connection cord (1)• Conversion cord (1)• Plug adaptor (1)
HAW600_G.indb 2HAW600_G.indb 2 06.6.26 6:48:36 PM06.6.26 6:48:36 PM
3
EN
GL
ISH
4 4 5
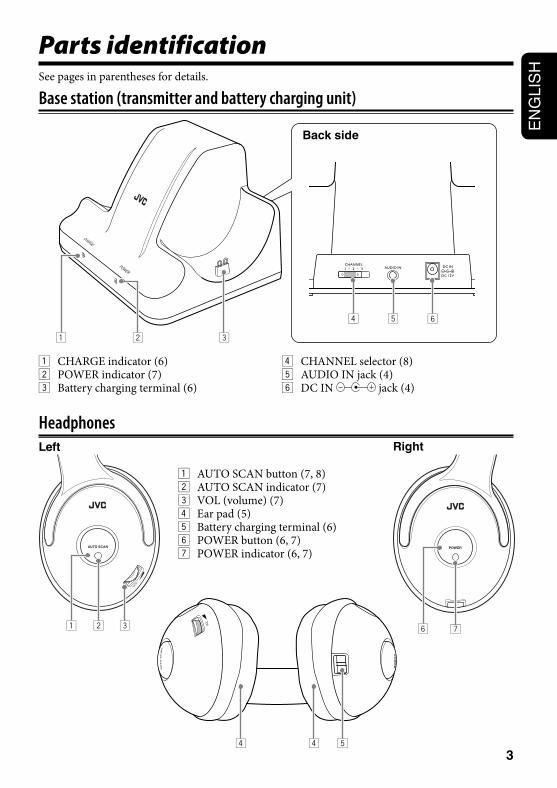
Parts identification
1 2 3
4 5 6
Base station (transmitter and battery charging unit)
Back side
2 31 6 7
Headphones
1 CHARGE indicator (6)2 POWER indicator (7)3 Battery charging terminal (6)
See pages in parentheses for details.
4 CHANNEL selector (8)5 AUDIO IN jack (4)6 DC IN jack (4)
Left Right
1 AUTO SCAN button (7, 8)2 AUTO SCAN indicator (7)3 VOL (volume) (7)4 Ear pad (5)5 Battery charging terminal (6)6 POWER button (6, 7)7 POWER indicator (6, 7)
HAW600_G.indb 3HAW600_G.indb 3 06.6.26 6:48:37 PM06.6.26 6:48:37 PM

4
EN
GL
ISH
Connection
TV, audio amplifier, VCR,
DVD player, PC, etc.
1 Connect the base station to the AV equipment.
2 Connect the AC adaptor to the base station.
3 Connect the AC adaptor to the AC outlet.
1
12
3To AC outlet
(AC 230 V, 50 Hz)
Conversion cord for
stereo pin jack
(supplied)
Connection cord
(supplied)
Plug adaptor for 6.3 mm Phono
jack (supplied)
Plug adaptor for monaural mini
jack (not supplied)
To stereo mini jack
Note: Do not use any other AC adaptor than the supplied AC adaptor. Otherwise, malfunctions may be caused.
Be sure to connect the AC adaptor after all other
connections are complete.
AV equipment
AC adaptor
(supplied)
HAW600_G.indb 4HAW600_G.indb 4 06.6.26 6:48:38 PM06.6.26 6:48:38 PM

5
EN
GL
ISH
1 Take off the ear pad of the right headphone.
2 Take off the battery covers.
3 Install the batteries.Match the polarity (+ and –) on the batteries with the + and – marking on the battery compartments.• Insert the – terminal of the battery at
first.
Be sure to use the supplied exclusive
battery. Do not use any other
rechargeable or dry cell battery, which
may cause malfunctions or damage
the unit.
Battery installation4 Put on the battery covers.
5 Put on the ear pad.1 Insert the hem of the ear pad into the slit
on the headphone.
2 Turn the ear pad anticlockwise to slide all the hem into the groove on the headphone.
• Be sure that all the hem is inserted fully. If not, turn the ear pad anticlockwise again until all the hem slides in.
HAW600_G.indb 5HAW600_G.indb 5 06.6.26 6:48:39 PM06.6.26 6:48:39 PM

6
EN
GL
ISH
Charging the batteryThe base station works as the battery charging unit. Charge the rechargeable battery before starting to use the headphones.You can continuously use the headphones for about 10 hours after full battery charge.
1 Make sure that the headphones are turned off.You cannot charge the battery of the
headphones when the headphones
are turned on. Press POWER to turn
the Power indicator off.
2 Put on the headphones on the base station so that their charging terminals contact firmly.When putting the headphones on the base station, hold them and adjust their position with your both hands to assure the contact of the terminals.
Notes on the battery and charging• To make battery life longer:
– charging the battery within the temperature range of 10ºC – 35ºC.
– not using the headphones in excessively cold places. Low temperature decreases battery life.
– charging the battery after its complete discharging. Charging before complete discharge makes the battery life gradually shorter.
• Replace the batteries when their lives become about half or the playback sound become constantly noisy. Use the exclusive rechargeable Ni-MH battery J47958 only. When purchasing the battery, consult the dealer where you bought the product.
• Replace two batteries at the same time when replacing.
3 Confirm the CHARGE indicator lights up.If the charge indicator does not light up, return steps 1 and 2 after checking the connection of the AC adaptor.• It takes about 30 hours to charge the
batteries fully.• 30-hour charging may not charge the
battery fully depending on the battery or other conditions.
• The cycle life of the rechargeable battery is approximately 500 times. (It varies depending on the conditions when charging.)
• The battery leaks its charge little by little even when the headphones’ power is off, due to its characteristics.
HAW600_G.indb 6HAW600_G.indb 6 06.6.26 6:48:40 PM06.6.26 6:48:40 PM

7
EN
GL
ISH
Basic operationsListening to the sound from the base stationThe base station works as the FM transmitter and send sound to the headphones.
PrecautionTurn down the volume of the headphones with the VOL dial before turning on its power to avoid excessive volume.
1 Start playback on the AV equipment connected with the base station.The base station turns on automatically and starts to transmit FM signals (Auto Power On function). The POWER indicator of the base station lights up.• In some situations, the power may not
be turned on automatically by the input sound (e. g. a song with a quiet opening or fade in). This is not a malfunction.
2 Press POWER on the headphones to turn on the power.The POWER indicator lights up and the headphones automatically starts to tune in to the signal from the base station (Auto Tuning function). The AUTO SCAN indicator lights up when tuned in.• Press the center of the button firmly
when pressing POWER. Pressing the edge may not turn on the power.
• Charge the battery in the following cases. The battery ran out:
– The POWER indicator does not light up after pressing POWER.
– The AUTO SCAN indicator does not light up though the POWER indicator lights up.
• No sound is heard while Auto Tuning. It takes a few seconds to tune in.
• Press AUTO SCAN when the sound does not come out properly.
3 Adjust the volumes of the AV equipment and the headphones.• Adjust the volumes within the area about
7 m from the base station to get optimum signal reception.
• You can get better sound by setting the volume of the AV equipment as high as possible without causing distortion and that of the headphone lower (except when connecting the AV equipment through LINE OUT jacks).
To Turn off the unitsPress POWER on the headphones and stop playback on the AV equipment. The headphones’ POWER indicator goes off. • The base station automatically turns off if no
signals come in for about four minutes (Auto Power OFF function).
• The white noise may come out when the base station turns off. Take off and turns off the headphones after using.
HAW600_G.indb 7HAW600_G.indb 7 06.6.26 6:48:41 PM06.6.26 6:48:41 PM

8
EN
GL
ISH
Basic operationsSelecting a better reception channelWhen the playback sound is noisy, you can choose one of the other two channels to transmit signals on the base station.• The white noise may come out when
switching the channel. Take off the headphones when switching the channel.
1 Slide the CHANNEL selector on the back side of the base station to select another channel.
2 Press AUTO SCAN on the headphones to tune in to the new channel.
3 Repeat Steps 1 and 2 to select the best channel.
Listening areaThe headphones can receive the FM signal of the base station 100 m away from it at maximum (when no interference or obstacles exist between them). But the receivable range becomes shorter or reception quality becomes poorer in the following cases:– In places such as reinforced concrete
buildings– Obstacles such as steel-reinforced doors
exist between the base station and headphones
– Items such as metal furniture are situated nearby
– In places facing a street– Noise or interference sources exist nearby
(e.g. mobile ham, radio stations, high-voltage power lines, a microwave oven, cordless phones, cellular phones, etc.)
HAW600_G.indb 8HAW600_G.indb 8 06.6.26 6:48:42 PM06.6.26 6:48:42 PM

9
EN
GL
ISH
Troubleshooting
Symptom Cause/Remedy
No sound comes out at all. • Turns on the power of the headphones.• Start playback on the AV equipment connected to the base
station.• Check the connection between the base station and the AV
equipment.• Turns up the volume of the headphones or the connected AV
equipment to an appropriate level.• Fully charge the headphones’ battery.
No sound comes out from R-channel.
• Check the connection between the base station and the AV equipment.
• Sound comes out only of L-channel when the base station is connected to the monaural audio output. Convert the mini plug to the base station from stereo to monaural with the plug adaptor (not supplied).
Sound is distorted. • The headphones’ battery will soon run out. Fully charge the battery.
• The volume of the headphones and/or the connected AV equipment is too high. Adjust their volume to an appropriate level.
Sound is noisy. • The headphones’ battery will soon run out. Fully charge the battery.
• Switch the base station channel to another and press AUTO SCAN on the headphones.
• The volume of the connected AV equipment is too low. Adjust the volume as high as possible without causing distortion.
• Too far from the base station. Use the headphones within the range of the base station (see page 8).
Cannot charge the battery. • Check the contact of the charging terminals on the base station and the headphones.
• Check the polarity of the battery.• The cycle life of the battery ended. Replace with the new
battery (see page 6).
What appears to be trouble is not always serious. Check the following points before calling a service center.
HAW600_G.indb 9HAW600_G.indb 9 06.6.26 6:48:42 PM06.6.26 6:48:42 PM

10
EN
GL
ISH
SpecificationsGeneral Specifications
Modulation system: Stereo frequency modulation system
Carrier frequency: 863.5 MHz (Channel 1)864.0 MHz (Channel 2)864.5 MHz (Channel 3)
Usable area(distance to reach): Max. 100 m (using JVC
measurement systems, under controlled ambient conditions)
Frequency response: 25 Hz – 13,000 HzDistortion: Less than 3% (at 1 kHz)
Transmitter (J22321-001)
Power requirements: DC 12 V (with the exclusive AC adaptor)
Audio input terminals: 3.5 mm dia. stereo mini jack
Input impedance: 36 kΩReference input level: 350 mVDimensions: 159 (W) mm x 114 (D)
mm x 123 (H) mmMass: 280 g
(without connection cord and AC adaptor)
Headphones
Power requirements: Rechargeable Ni-MH battery (1.2 V) x 2
Battery running time: 10 hours (when charged for 30 hours)
Mass: 250 g (with rechargeable battery)
Supplied Accessories• Instructions x 1• Exclusive AC adaptor x 1 (J34676-001: AC 230 V, 50 Hz, 7 W)• Exclusive rechargeable Ni-MH battery x 2• Connection cord x 1 (3.5 mm dia. stereo mini plug: 2.2 m)• Conversion cord x 1 (3.5 mm dia. stereo mini jack — RCA pin
plug x 2: 0.1 m)• Plug adaptor x 1 (converts 3.5 mm dia. stereo mini plug to a
6.3 mm dia. standard stereo phone plug)
* Design and specifications subject to change without notice.
HAW600_G.indb 10HAW600_G.indb 10 06.6.26 6:48:43 PM06.6.26 6:48:43 PM

© 2006 Victor Company of Japan, Limited
Printed in China
LNT0067-001A
HA
-W6
00
RF
-GF
M C
OR
DL
ES
S H
EA
DP
HO
NE
S
HAW600_G.indb 2HAW600_G.indb 2 06.6.26 6:47:52 PM06.6.26 6:47:52 PM

FM CORDLESS HEADPHONES
HA-W600RF-B
INSTRUCTIONS
LNT0068-001A
HAW600RF_B.indb 3HAW600RF_B.indb 3 06.6.26 6:08:24 PM06.6.26 6:08:24 PM

G-1G-1
FM CORDLESS HEADPHONES
863MHz — 865 MHZ
THIS DEVICE IS INTENDED FOR USE IN THESE COUNTRIES:
English Hereby, JVC, declares that this HA-W600RF is in compliance with the essential
requirements and other relevant provisions of Directive 1999/5/EC.
Finnish JVC vakuuttaa täten että HA-W600RF tyyppinen laite on direktiivin 1999/5/EY oleel-
listen vaatimusten ja sitä koskevien direktiivin muiden ehtojen mukainen.
Dutch Hierbij verklaart JVC dat het toestel HA-W600RF in overeenstemming is met de es-
sentiële eisen en de andere relevante bepalingen van richtlijn 1999/5/EG.
Bij deze verklaart JVC dat deze HA-W600RF voldoet aan de essentiële eisen en
aan de overige relevante bepalingen van Richtlijn 1999/5/EC.
French Par la présente JVC déclare que l’appareil HA-W600RF est conforme aux exigenc-
es essentielles et aux autres dispositions pertinentes de la directive 1999/5/CE.
Par la présente, JVC déclare que ce HA-W600RF est conforme aux exigences es-
sentielles et aux autres dispositions de la directive 1999/5/CE qui lui sont applica-
bles.
Swedish Härmed intygar JVC att denna HA-W600RF står i överensstämmelse med de
väsentliga egenskapskrav och övriga relevanta bestämmelser som framgår av
direktiv 1999/5/EG.
Danish Undertegnede JVC erklærer herved, at følgende udstyr HA-W600RF overholder de
væsentlige krav og øvrige relevante krav i direktiv 1999/5/EF.
German Hiermit erklärt JVC, dass sich dieser/diese/dieses HA-W600RF in Übereinstimmung
mit den grundlegenden Anforderungen und den anderen relevanten Vorschriften der
Richtlinie 1999/5/EG befindet. (BMWi)
Hiermit erklärt JVC die Übereinstimmung des Gerätes HA-W600RF mit den
grundlegenden Anforderungen und den anderen relevanten Festlegungen der
Richtlinie 1999/5/EG. (Wien)
Greek ME THN ΠAROTΣA JVC ∆HΛΩNEI OTI HA-W600RF ΣTMMORΦΩNETAI ΠROΣ
TIΣ OTΣIΩ∆EIΣ A ΠAITHΣEIΣ KAI TIΣ ΛOIΠEΣ ΣΧETIKEΣ ∆IATAΞEI Σ THΣ O∆HΓ
IAΣ 1999/5/EK.
Italian Con la presente JVC dichiara che questo HA-W600RF e conforme ai requisiti es-
senziali ed alle altre disposizioni pertinenti stabilite dalla direttiva 1999/5/CE.
Spanish Por medio de la presente JVC declara que el HA-W600RF cumple con los requisitos
esenciales y cualesquiera otras disposiciones aplicables o exigibles de la Directive
1999/5/CE.
Portuguese JVC declara que este HA-W600RF está conforme com os requisitos essenciais e
outras disposiçôes da Directiva 1999/5/CE.
HAW600RF_B.indb 2HAW600RF_B.indb 2 06.6.26 6:08:25 PM06.6.26 6:08:25 PM

G-2
Dear Customer,
This apparatus is in conformance with the valid European directives and
standards regarding electromagnetic compatibility and electrical safety.
European representative of Victor Company of Japan, Limited is:
JVC Technology Centre Europe GmbH
Postfach 10 05 52
61145 Friedberg
Germany
Information for Users on Disposal of Old Equipment
Attention:
This symbol
is only valid in
the European
Union.
[European Union]
This symbol indicates that the electrical and electronic equipment should
not be disposed as general household waste at its end-of-life. Instead,
the product should be handed over to the applicable collection point for
the recycling of electrical and electronic equipment for proper treatment,
recovery and recycling in accordance with your national legislation.
By disposing of this product correctly, you will help to conserve natural
resources and will help prevent potential negative effects on the
environment and human health which could otherwise be caused by
inappropriate waste handling of this product. For more information about
collection point and recycling of this product, please contact your local
municipal office, your household waste disposal service or the shop
where you purchased the product.
Penalties may be applicable for incorrect disposal of this waste, in
accordance with national legislation.
(Business users)
If you wish to dispose of this product, please visit our web page www.jvc-
europe.com to obtain information about the take-back of the product.
[Other Countries outside the European Union]
If you wish to dispose of this product, please do so in accordance with
applicable national legislation or other rules in your country for the
treatment of old electrical and electronic equipment.
This product’s performance would be degraded under a strong electro-static environment.
And the function would be self-recoverable after the above case.
This product’s performance would be degraded since the disturbance from the mains cord.
And the function would be self-recoverable after the above case.
HAW600RF_B.indb 3HAW600RF_B.indb 3 06.6.26 6:08:29 PM06.6.26 6:08:29 PM

G-3
“SOME DO’S AND DON’TS ON THE SAFE USE OF EQUIPMENT”
This equipment has been designed and manufactured to meet international safety
standards but, like any electrical apparatus, care must be taken if you are to obtain the best
results and safety is to be assured.
•••••••••••••••••••••••••••••••••••••••••••••••••••••••••••••••••••
Do read the operating instructions before you attempt to use the equipment.
Do ensure that all electrical connections (including the plug, extension cord and inter-
connections between pieces of equipment) are properly made and in accordance with the
manufacturer’s instructions. Switch off and withdraw the plug when making or changing
connections.
Do consult your dealer if you are ever in doubt about the installation or operation or safety
of your equipment.
Do be careful with glass panels or doors on equipment.
•••••••••••••••••••••••••••••••••••••••••••••••••••••••••••••••••••
DON’T continue to operate the equipment if you are in any doubt about it working normally,
or if it is damaged in any way—switch off—withdraw the plug and consult your dealer.
DON’T remove any fixed cover as this may expose dangerous voltages.
DON’T leave equipment switched on when it is unattended unless it is specifically stated
that it is designed for unattended operation or has a standby mode.
Switch off using the switch on the equipment and make sure that your family know how to
do this.
Special arrangements may need to be made for infirm or handicapped people.
DON’T use equipment such as personal stereos or radios so that you are distracted from
the requirements of road safety. It is illegal to watch television when driving.
DON’T listen to headphones at high volume as such use can permanently damage your
hearing.
DON’T obstruct the ventilation of the equipment, for example with curtains or on soft
furnishings.
Overheating will cause damage and shorten the life of the equipment.
DON’T use makeshift stands and NEVER fix legs with wood screws. To ensure complete
safety always fit the manufacturer’s approved stand or legs with the fixing screws supplied
according to the instructions.
DON’T allow electrical equipment to be exposed to rain or moisture.
ABOVE ALL
NEVER let anyone especially children push anything into holes, slots or any other opening
in the case. This could result in a fatal electrical shock.
NEVER guess or make changes with electrical equipment of any kind. It is better to be safe
than sorry!
HAW600RF_B.indb 4HAW600RF_B.indb 4 06.6.26 6:08:32 PM06.6.26 6:08:32 PM

1
FEATURES• Reception range up to 100 m (using JVC
measurement system)• Auto Tuning–Headphones automatically
tunes in to the base station (transmitter) as it turns on
• On Stand Charging–Rechargeable system with the exclusive Ni-MH battery that requires no charge cable
• Auto Power On/Off transmitter• “PLL” Stabilized Transmission Technology• Auto-level control circuit that automatically
adjusts signals to the appropriate modulation level
• Large 40 mm dia. driver unit for high quality sound
• Adaptable to any audio/visual equipment which has the analog audio output.
ContentsPrecautions .......................................2
Parts identification ...........................3
Connection ........................................4
Battery installation ..........................5
Charging the battery ........................6
Basic operations ...............................7
Troubleshooting ...............................9
Specifications .................................10
Thank you for purchasing a JVC product. Please read all instructions carefully before operation, to ensure your complete
understanding and to obtain the best possible performance from the unit.
For your health and traffic safety• Be careful not to turn the sound volume up too high when using the headphones. Your
hearing can be damaged by listening to sounds at excessive volume for long periods.• Never use the headphones when driving a car, motorcycle, or bicycle. This could result in an
accident.• Pay close attention to traffic around you when using the headphones while walking. Not
doing so could result in an accident.
HAW600RF_B.indb 1HAW600RF_B.indb 1 06.6.26 6:08:35 PM06.6.26 6:08:35 PM

2
Important cautionsCAUTION
To reduce the risk of electrical shocks, fire, etc.: 1. Do not remove screws, cover or cabinet.2. Do not expose this appliance to rain or
moisture.
Precautions
Installation• Select a place which is level, dry and neither
too hot nor too cold (between 0°C and 35°C).• Keep away from direct sunlight.• Do not put it too close to a heater.• Indoor use only.Power cord• Do not handle the power cord with wet
hands!• Do not bend the power cord sharply.• Do not connect the supplied AC adaptor to
any other equipment. It is exclusively for use with this unit.
Malfunctions, etc.• There are no serviceable parts inside. If
anything goes wrong, unplug the power cord and consult your dealer.
• Do not insert any metallic object.• Do not allow water to get inside.• Do not move or bend the ear cups or any
other part of the headphones with excessive force. It may damage the headphones.
• Stop using the headphones if they are causing discomfort on your skin. Otherwise inflammation or irritation may be caused on your skin.
• The ear pad will wear out earlier than the other parts even in normal use or in normal keeping due to the material characteristics.For replacement of the ear pads, please consult with the dealer where you purchased the headphones.
• If the headphone is not used for a prolonged time, unplug the AC adaptor from an AC outlet.
PrecautionsBattery precautions
• Be sure to use the supplied exclusive battery. Do not use any other rechargeable or dry cell battery.
• Use only the type of battery the manufacturer recommends when replacing the battery.
• Do not throw the battery in a fire or heat it.• Do not immerse or wet the battery in water.• Do not remove or damage the covering tube.• Do not subject the battery to strong shocks or
throw it.• If any liquid from the battery gets into your
eyes, it may cause blindness. If battery liquid does get into your eyes, do not rub them, but instead immediately wash them thoroughly with clean water, then consult a doctor at once. Also, should any liquid from the rechargeable battery get onto your skin or clothes, it may burn your skin. In this case, wash with clean water immediately.
• When discarding batteries, environmental problems must be considered and the local rules or laws governing the disposal of these batteries must be followed strictly.
Charging precautions
• Charge only with supplied Ni-MH type battery. Other types of battery may burst causing personal injury and damage.
• Use only the supplied base station to charge the battery.
• Be sure to use the supplied AC adaptor.
Supplied accessoriesCheck to be sure you have all of the supplied accessories.The number in parentheses is the quantity of the pieces supplied. If anything is missing, contact your dealer immediately.• Exclusive rechargeable batteries (2)• Exclusive AC adaptor (1)• Connection cord (1)• Conversion cord (1)• Plug adaptor (1)
HAW600RF_B.indb 2HAW600RF_B.indb 2 06.6.26 6:08:35 PM06.6.26 6:08:35 PM

3
4 4 5
Parts identification
1 2 3
4 5 6
Base station (transmitter and battery charging unit)
Back side
2 31 6 7
Headphones
1 CHARGE indicator (6)2 POWER indicator (7)3 Battery charging terminal (6)
See pages in parentheses for details.
4 CHANNEL selector (8)5 AUDIO IN jack (4)6 DC IN jack (4)
Left Right
1 AUTO SCAN button (7, 8)2 AUTO SCAN indicator (7)3 VOL (volume) (7)4 Ear pad (5)5 Battery charging terminal (6)6 POWER button (6, 7)7 POWER indicator (6, 7)
HAW600RF_B.indb 3HAW600RF_B.indb 3 06.6.26 6:08:36 PM06.6.26 6:08:36 PM

4
Connection
TV, audio amplifier, VCR,
DVD player, PC, etc.
1 Connect the base station to the AV equipment.
2 Connect the AC adaptor to the base station.
3 Connect the AC adaptor to the AC outlet.
1
12
3To AC outlet
(AC 230 V, 50 Hz)
Conversion cord for
stereo pin jack
(supplied)
Connection cord
(supplied)
Plug adaptor for 6.3 mm Phono
jack (supplied)
Plug adaptor for monaural mini
jack (not supplied)
To stereo mini jack
Note: Do not use any other AC adaptor than the supplied AC adaptor. Otherwise, malfunctions may be caused.
Be sure to connect the AC adaptor after all other
connections are complete.
AV equipment
AC adaptor
(supplied)
HAW600RF_B.indb 4HAW600RF_B.indb 4 06.6.26 6:08:37 PM06.6.26 6:08:37 PM

5
1 Take off the ear pad of the right headphone.
2 Take off the battery covers.
3 Install the batteries.Match the polarity (+ and –) on the batteries with the + and – marking on the battery compartments.• Insert the – terminal of the battery at
first.
Be sure to use the supplied exclusive
battery. Do not use any other
rechargeable or dry cell battery, which
may cause malfunctions or damage
the unit.
Battery installation4 Put on the battery covers.
5 Put on the ear pad.1 Insert the hem of the ear pad into the slit
on the headphone.
2 Turn the ear pad anticlockwise to slide all the hem into the groove on the headphone.
• Be sure that all the hem is inserted fully. If not, turn the ear pad anticlockwise again until all the hem slides in.
HAW600RF_B.indb 5HAW600RF_B.indb 5 06.6.26 6:08:38 PM06.6.26 6:08:38 PM

6
Charging the batteryThe base station works as the battery charging unit. Charge the rechargeable battery before starting to use the headphones.You can continuously use the headphones for about 10 hours after full battery charge.
1 Make sure that the headphones are turned off.You cannot charge the battery of the
headphones when the headphones
are turned on. Press POWER to turn
the Power indicator off.
2 Put on the headphones on the base station so that their charging terminals contact firmly.When putting the headphones on the base station, hold them and adjust their position with your both hands to assure the contact of the terminals.
3 Confirm the CHARGE indicator lights up.If the charge indicator does not light up, return steps 1 and 2 after checking the connection of the AC adaptor.• It takes about 30 hours to charge the
batteries fully.• 30-hour charging may not charge the
battery fully depending on the battery or other conditions.
• The cycle life of the rechargeable battery is approximately 500 times. (It varies depending on the conditions when charging.)
• The battery leaks its charge little by little even when the headphones’ power is off, due to its characteristics.
Notes on the battery and charging• To make battery life longer:
– charging the battery within the temperature range of 10ºC – 35ºC.
– not using the headphones in excessively cold places. Low temperature decreases battery life.
– charging the battery after its complete discharging. Charging before complete discharge makes the battery life gradually shorter.
• Replace the batteries when their lives become about half or the playback sound become constantly noisy. Use the exclusive rechargeable Ni-MH battery J47958 only. When purchasing the battery, consult the dealer where you bought the product.
• Replace two batteries at the same time when replacing.
HAW600RF_B.indb 6HAW600RF_B.indb 6 06.6.26 6:08:39 PM06.6.26 6:08:39 PM

7
Basic operationsListening to the sound from the base stationThe base station works as the FM transmitter and send sound to the headphones.
PrecautionTurn down the volume of the headphones with the VOL dial before turning on its power to avoid excessive volume.
1 Start playback on the AV equipment connected with the base station.The base station turns on automatically and starts to transmit FM signals (Auto Power On function). The POWER indicator of the base station lights up.• In some situations, the power may not
be turned on automatically by the input sound (e. g. a song with a quiet opening or fade in). This is not a malfunction.
2 Press POWER on the headphones to turn on the power.The POWER indicator lights up and the headphones automatically starts to tune in to the signal from the base station (Auto Tuning function). The AUTO SCAN indicator lights up when tuned in.• Press the center of the button firmly
when pressing POWER. Pressing the edge may not turn on the power.
• Charge the battery in the following cases. The battery ran out:
– The POWER indicator does not light up after pressing POWER.
– The AUTO SCAN indicator does not light up though the POWER indicator lights up.
• No sound is heard while Auto Tuning. It takes a few seconds to tune in.
• Press AUTO SCAN when the sound does not come out properly.
3 Adjust the volumes of the AV equipment and the headphones.• Adjust the volumes within the area about
7 m from the base station to get optimum signal reception.
• You can get better sound by setting the volume of the AV equipment as high as possible without causing distortion and that of the headphone lower (except when connecting the AV equipment through LINE OUT jacks).
To Turn off the unitsPress POWER on the headphones and stop playback on the AV equipment. The headphones’ POWER indicator goes off. • The base station automatically turns off if no
signals come in for about four minutes (Auto Power OFF function).
• The white noise may come out when the base station turns off. Take off and turns off the headphones after using.
HAW600RF_B.indb 7HAW600RF_B.indb 7 06.6.26 6:08:40 PM06.6.26 6:08:40 PM

8
Basic operationsSelecting a better reception channelWhen the playback sound is noisy, you can choose one of the other two channels to transmit signals on the base station.• The white noise may come out when
switching the channel. Take off the headphones when switching the channel.
1 Slide the CHANNEL selector on the back side of the base station to select another channel.
2 Press AUTO SCAN on the headphones to tune in to the new channel.
3 Repeat Steps 1 and 2 to select the best channel.
Listening areaThe headphones can receive the FM signal of the base station 100 m away from it at maximum (when no interference or obstacles exist between them). But the receivable range becomes shorter or reception quality becomes poorer in the following cases:– In places such as reinforced concrete
buildings– Obstacles such as steel-reinforced doors
exist between the base station and headphones
– Items such as metal furniture are situated nearby
– In places facing a street– Noise or interference sources exist nearby
(e.g. mobile ham, radio stations, high-voltage power lines, a microwave oven, cordless phones, cellular phones, etc.)
HAW600RF_B.indb 8HAW600RF_B.indb 8 06.6.26 6:08:41 PM06.6.26 6:08:41 PM

9
Troubleshooting
Symptom Cause/Remedy
No sound comes out at all. • Turns on the power of the headphones.• Start playback on the AV equipment connected to the base
station.• Check the connection between the base station and the AV
equipment.• Turns up the volume of the headphones or the connected AV
equipment to an appropriate level.• Fully charge the headphones’ battery.
No sound comes out from R-channel.
• Check the connection between the base station and the AV equipment.
• Sound comes out only of L-channel when the base station is connected to the monaural audio output. Convert the mini plug to the base station from stereo to monaural with the plug adaptor (not supplied).
Sound is distorted. • The headphones’ battery will soon run out. Fully charge the battery.
• The volume of the headphones and/or the connected AV equipment is too high. Adjust their volume to an appropriate level.
Sound is noisy. • The headphones’ battery will soon run out. Fully charge the battery.
• Switch the base station channel to another and press AUTO SCAN on the headphones.
• The volume of the connected AV equipment is too low. Adjust the volume as high as possible without causing distortion.
• Too far from the base station. Use the headphones within the range of the base station (see page 8).
Cannot charge the battery. • Check the contact of the charging terminals on the base station and the headphones.
• Check the polarity of the battery.• The cycle life of the battery ended. Replace with the new
battery (see page 6).
What appears to be trouble is not always serious. Check the following points before calling a service center.
HAW600RF_B.indb 9HAW600RF_B.indb 9 06.6.26 6:08:41 PM06.6.26 6:08:41 PM

10
SpecificationsGeneral Specifications
Modulation system: Stereo frequency modulation system
Carrier frequency: 863.5 MHz (Channel 1)864.0 MHz (Channel 2)864.5 MHz (Channel 3)
Usable area(distance to reach): Max. 100 m (using JVC
measurement systems, under controlled ambient conditions)
Frequency response: 25 Hz – 13,000 HzDistortion: Less than 3% (at 1 kHz)
Transmitter (J22321-001)
Power requirements: DC 12 V (with the exclusive AC adaptor)
Audio input terminals: 3.5 mm dia. stereo mini jack
Input impedance: 36 kΩReference input level: 350 mVDimensions: 159 (W) mm x 114 (D)
mm x 123 (H) mmMass: 280 g
(without connection cord and AC adaptor)
Headphones
Power requirements: Rechargeable Ni-MH battery (1.2 V) x 2
Battery running time: 10 hours (when charged for 30 hours)
Mass: 250 g (with rechargeable battery)
Supplied Accessories• Instructions x 1• Exclusive AC adaptor x 1 ( J34677-001: AC 230 V, 50 Hz, 7 W)• Exclusive rechargeable Ni-MH battery x 2• Connection cord x 1 (3.5 mm dia. stereo mini plug: 2.2 m)• Conversion cord x 1 (3.5 mm dia. stereo mini jack — RCA pin
plug x 2: 0.1 m)• Plug adaptor x 1 (converts 3.5 mm dia. stereo mini plug to a
6.3 mm dia. standard stereo phone plug)
* Design and specifications subject to change without notice.
HAW600RF_B.indb 10HAW600RF_B.indb 10 06.6.26 6:08:42 PM06.6.26 6:08:42 PM

HAW600RF_B.indb 11HAW600RF_B.indb 11 06.6.26 6:08:42 PM06.6.26 6:08:42 PM

© 2006 Victor Company of Japan, Limited Printed in China
LNT0068-001A
HA
-W6
00
RF
-BF
M C
OR
DL
ES
S H
EA
DP
HO
NE
S
HAW600RF_B.indb 2HAW600RF_B.indb 2 06.6.26 6:08:07 PM06.6.26 6:08:07 PM
Related Documents