User Guide THERAPY MANAGEMENT SOFTWARE FOR DIABETES

Welcome message from author
This document is posted to help you gain knowledge. Please leave a comment to let me know what you think about it! Share it to your friends and learn new things together.
Transcript

User Guide
THERAPY MANAGEMENT SOFTWARE FOR DIABETES

© 2010 Medtronic MiniMed, Inc. All rights reserved.
Paradigm® Veo™ is a trademark of Medtronic MiniMed, Inc.
Paradigm®, Paradigm Link®, Guardian REAL-Time®, CareLink®, and Bolus Wizard® are registered trademarks of Medtronic MiniMed.
BD Logic® is a registered trademark of Becton, Dickinson and Company.
LifeScan®, OneTouch® UltraLink®, OneTouch® Profile®, OneTouch® Ultra®, OneTouch® UltraSmart®, OneTouch® Basic®, OneTouch® FastTake®, OneTouch® SureStep®, OneTouch® Ultra®2, OneTouch® UltraMini®, and OneTouch® UltraEasy® are registered trademarks of LifeScan, Inc.
Bayer CONTOUR® LINK, Ascensia®, Glucometer®, Ascensia® DEX®, Glucometer® DEX®, Ascensia® DEX® 2, Glucometer® DEX® 2, Ascensia® DEXTER-Z® II, Glucometer® DEXTER-Z®, Ascensia®ESPRIT® 2, Glucometer® ESPRIT®, Glucometer® ESPRIT® 2,Ascensia ELITE® XL, Glucometer ELITE® XL, Bayer BREEZE™, Bayer BREEZE™ 2, and Bayer CONTOUR® are registered trademarksof Bayer Corporation, Diagnostics Division.
Precision Xtra™, Optium Xceed™, Precision Xceed™, Therasense FreeStyle®, FreeStyle® Flash, FreeStyle Mini®, and FreeStyle Papillon™ mini are trademarks of Abbott Laboratories, Inc.
ACCU-CHEK® Active, ACCU-CHEK® Aviva, ACCU-CHEK® Compact, and ACCU-CHEK® Compact Plus are registered trademarks of a member of the Roche Group.
Java™ is a trademark of Sun Microsystems, Inc.
Microsoft® and Windows® are registered trademarks of Microsoft Corporation.
Adobe® and Acrobat® Reader® are registered trademarks of Adobe Systems, Incorporated.
vandev1
Typewritten Text
6025179-025_a REF MMT-7335

Contacts:Africa:Medtronic Africa (Pty) Ltd.Tel: +27 (0) 11 677 4800
Australia:Medtronic Australasia Pty. Ltd.Tel: 1800 668 670 (product orders)Tel: 1800 777 808 (customer help)
BangladeshSonargaon Healthcare Pvt LtdMobile: (+91)-9903995417or (+880)-1714217131
België/Belgique:N.V. Medtronic Belgium S.A.Tel: 0800-90805
Brasil:Medtronic Comercial Ltda.Tel: +(11) 3707-3707
Canada:Medtronic of Canada Ltd.Tel: 1-800-284-4416 (toll free/sans-frais)
China:Medtronic (Shanghai) Ltd.Tel: +86 40 0820 1981 or 80 0820 1981
CroatiaMedtronic AdriaticTel: +385 1 488 11 20Fax: +385 1 484 40 60
Danmark:Medtronic Danmark A/STel: +45 32 48 18 00
Deutschland:Medtronic GmbHGeschäftsbereich DiabetesTelefon: +49 2159 8149-370Telefax: +49 2159 8149-11024-Stdn-Hotline: 0800 6464633
Eire:Accu-Science LTD.Tel: +353 45 433000
España:Medtronic Ibérica S.A.Tel: +34 91 625 05 42Fax: +34 91 625 03 9024 horas: +34 901 120 335
Europe:Medtronic Europe S.A. Europe, Middle East and AfricaHeadquartersTel: +41 (0) 21-802-7000
France:Medtronic France S.A.S.Tel: +33 (0) 1 55 38 17 00
Hellas:Medtronic Hellas S.A.Tel: +30 210677-9099
Hong Kong:Celki International Ltd.Tel: +852 2332-3366
India:India Medtronic Pvt. LtdTel: (+91)-80-22112245 / 32972359Mobile: (+91)-9611633007
Italia:Medtronic Italia S.p.A.Tel: +39 02 24137 261Fax: +39 02 24138 210Servizio assistenza tecnica: Nº verde24h: 800 712 712
Japan:Medtronic Japan Co. Ltd.Tel: +81-3-6430-2019
Latin America:Medtronic, Inc.Tel: 1(305) 500-9328Fax: 1(786) 709-4244
Latvija:Ravemma Ltd.Tel: +371 7273780
Magyarország:Medtronic Hungária Kft.Tel: +36 1 889 0697
Malaysia:Medtronic International Ltd.Tel: +60-3 7953 4800
Middle East and North Africa:Regional OfficeTel: +961-1-370 670
Nederland, Luxembourg:Medtronic B.V.Tel: +31 (0) 45-566-8291Toll Free: 0800-3422338
New Zealand:Medica PacificaTel: +0800 106 10024-hr After-Hours:+0800 633 487
Norge:Medtronic Norge A/STel: +47 67 10 32 00Fax: +47 67 10 32 10
POCCИЯ:Medtronic B. V.Tel: (+7-495) 5807377 x116524h: 8-800-200-76-36
Polska:Medtronic Poland Sp. Z.o.o.Tel: +48 22 465 6934
Portugal:Medtronic Portugal LdaTel: +351 21 7245100Fax: +351 21 7245199
Puerto Rico:Medtronic Puerto RicoTel: 787-753-5270
Republic of Korea:Medtronic Korea, Co., Ltd.Tel: +82.2.3404.3600
Schweiz:Medtronic (Schweiz) AGTel: +41 (0)31 868 016024-Stunden-Hotline: 0800 633333Fax Allgemein: +41 (0)318680199
Serbia & Montenegro:EpsilonTel: +381 11 311 8883

Singapore:Medtronic International Ltd.Tel: +65 6436-5097or +65 6436-5090
Slovenija:Zaloker & Zaloker d.o.o.Tel: +386 1 542 51 11Fax: +386 1 542 43 32
Slovenská republika:Medtronic Slovakia O.Z.Tel: +421 268 206 944Fax: +421 268 206 999
Sri LankaSwiss Biogenics Ltd.Mobile: (+91)-9003077499or (+94)-777256760
Suomi:Medtronic Finland OyTel: +358 20 7281 232Help line: +358 20 7281 200
Sverige:Medtronic ABTel: +46 8 568 585 10Fax: +46 8 568 585 11
Taiwan:Medtronic-Taiwan Ltd.Tel: +886.2.2183.6093Fax: +886.2.2501.7680Toll Free: 0800.082.999
Thailand:Medtronic (Thailand) Ltd.Tel: +66 2 232 7400 ext 1
Turkiye:Medtronic Medikal TeknolojiTicaret Ltd. Sirketi.Tel: +90 216 4694330
USA:Medtronic Diabetes Global HeadquartersTel: +1-800-826-209924 Hour HelpLine: +1-818-576-5555To order supplies: +1-800-843-6687
United Kingdom:Medtronic Ltd.Tel: +44 1923-205167
Yisrael:AgentekTel: +972 3649 3111
Österreich:Medtronic Österreich GmbHTel: +43 (0) 1 240 44-024 – Stunden – Hotline: 0820 820 190
Česká republika:Medtronic Czechia s.r.o.Tel: (+420-233) 059401

Contents
Chapter 1 1 Introduction1 Features2 Security2 Related documents2 Assistance2 Supported devices
4 Ordering5 How to use this guide5 User safety
Chapter 2 7 Getting started7 Before you begin7 Primary system tasks8 Navigating the system8 Opening CareLink Pro8 Workspaces8 Toolbar9 Patient tabs9 The Guide Me feature9 Turning Guide Me on and off10 Opening patient records10 Closing patient records11 Setting system preferences11 General preferences13 Patient profile preferences13 Choosing data fields13 Adding a custom field14 Changing the order of data fields14 Finalizing patient profile preferences14 Patient Lookup preferences15 Choosing data to display15 Changing the column order15 Finalizing patient lookup preferences
CareLink Pro User Guide Contents v

15 Report Generation preferences16 Choosing data to display17 Changing the column order17 Finalizing report generation preferences
Chapter 3 18 Profile workspace18 Before you begin19 Adding new profiles19 Editing patient profiles19 Deleting patient data from the system20 Linking to CareLink Personal
Chapter 4 23 Hardware setup23 Connecting devices
Chapter 5 26 Devices workspace27 Before you begin27 Adding a device27 Adding a Medtronic pump or Guardian monitor29 Adding a meter32 Making a device active or inactive
33 Reading device data
Chapter 6 35 Reports workspace35 Before you begin36 Creating reports36 Opening the Reports workspace36 Selecting the reporting period36 Data calendar37 Selecting source data to include37 Checking for device data38 Getting additional device data39 Verifying report settings40 Selecting report types and inclusion dates41 Generating reports41 About reports42 Adherence Report42 Sensor and Meter Overview Report42 Logbook Report42 Device Settings Snapshot42 Daily Detail Report43 Exporting data
Chapter 7 44 System administration44 Applying software updates45 Turning off automatic updates45 Manually checking for updates
CareLink Pro User Guide Contents vi

45 Backing up and restoring the database45 Backing up the database46 Restoring the database46 When the system is unavailable
Chapter 8 47 Troubleshooting47 General application use errors47 Not connected to the database48 Forgot the clinic password for CareLink Pro48 Device read errors49 Report creation errors49 Backup and restore errors49 Uninstalling the software
Chapter 9 51 Icon table
Appendix A 52 CSV data52 Column data definitions53 More about CSV files exported by CareLink Pro54 If data is not displaying as expected
Glossary 55
Index 58
CareLink Pro User Guide Contents vii

CareLink Pro User Guide Contents viii
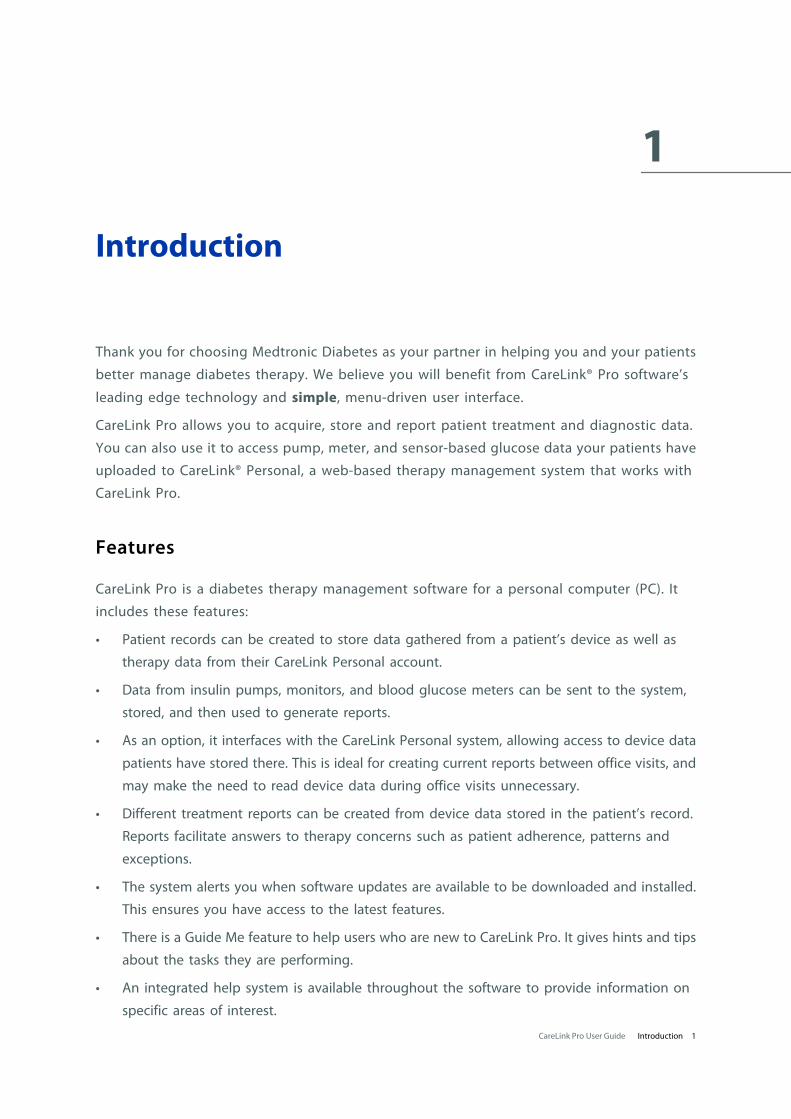
1
Introduction
Thank you for choosing Medtronic Diabetes as your partner in helping you and your patients
better manage diabetes therapy. We believe you will benefit from CareLink® Pro software’s
leading edge technology and simple, menu-driven user interface.
CareLink Pro allows you to acquire, store and report patient treatment and diagnostic data.
You can also use it to access pump, meter, and sensor-based glucose data your patients have
uploaded to CareLink® Personal, a web-based therapy management system that works with
CareLink Pro.
Features
CareLink Pro is a diabetes therapy management software for a personal computer (PC). It
includes these features:
• Patient records can be created to store data gathered from a patient’s device as well as
therapy data from their CareLink Personal account.
• Data from insulin pumps, monitors, and blood glucose meters can be sent to the system,
stored, and then used to generate reports.
• As an option, it interfaces with the CareLink Personal system, allowing access to device data
patients have stored there. This is ideal for creating current reports between office visits, and
may make the need to read device data during office visits unnecessary.
• Different treatment reports can be created from device data stored in the patient’s record.
Reports facilitate answers to therapy concerns such as patient adherence, patterns and
exceptions.
• The system alerts you when software updates are available to be downloaded and installed.
This ensures you have access to the latest features.
• There is a Guide Me feature to help users who are new to CareLink Pro. It gives hints and tips
about the tasks they are performing.
• An integrated help system is available throughout the software to provide information on
specific areas of interest.
CareLink Pro User Guide Introduction 1
Security
• CareLink Pro can be password protected.
• Transmission of patient data from CareLink Personal is encrypted using industry-standard
Secure Sockets Layer (SSL) technology.
Related documents
Each of these Medtronic MiniMed documents has device-specific information that is not
covered in detail in this user guide.
NOTE: For meters from other companies, see the instructions the manufacturer includedwith the meter.
• Paradigm Insulin Pump User Guide
• Guardian REAL-Time Monitor User Guide
• Sensor Features User Guide
• ComLink User Guide
• CareLink USB User Guide
Assistance
If you need further help with this system, contact your local country representative. Access
the following web site for international contact information:
http://www.medtronicdiabetes.com/help/contact/locations.html
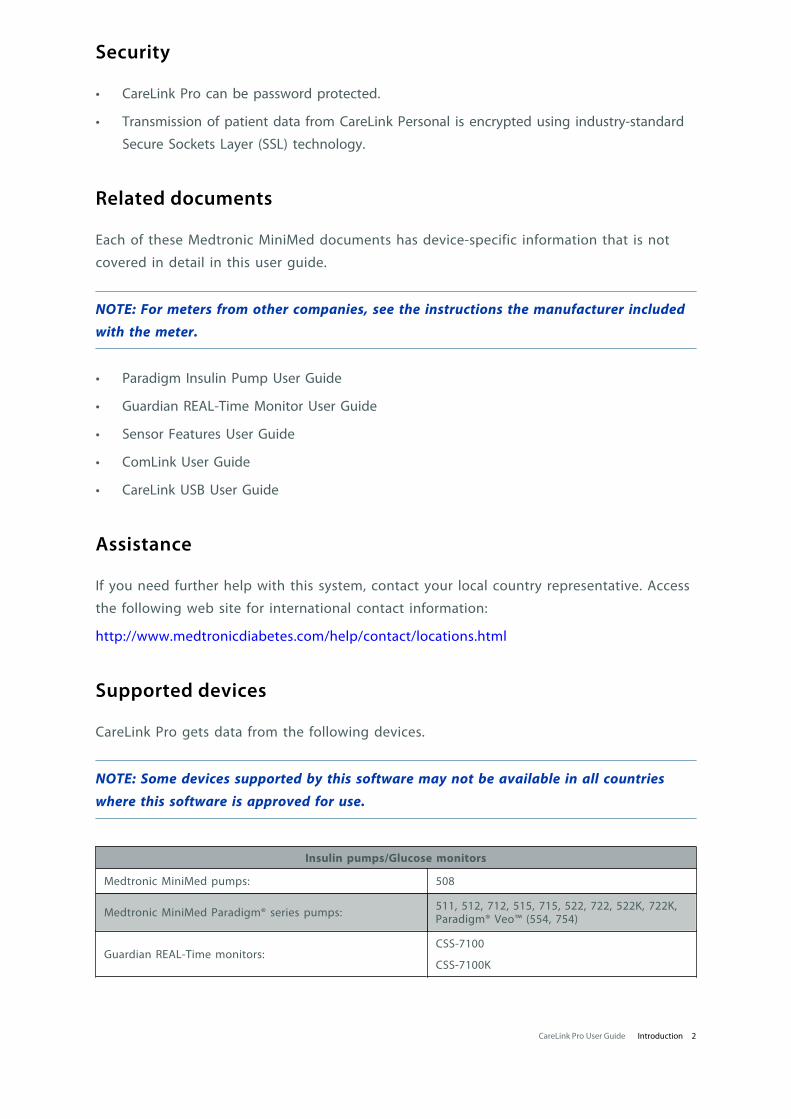
Supported devices
CareLink Pro gets data from the following devices.
NOTE: Some devices supported by this software may not be available in all countries
where this software is approved for use.
Insulin pumps/Glucose monitors
Medtronic MiniMed pumps: 508
Medtronic MiniMed Paradigm® series pumps: 511, 512, 712, 515, 715, 522, 722, 522K, 722K,Paradigm® Veo™ (554, 754)
Guardian REAL-Time monitors:CSS-7100
CSS-7100K
CareLink Pro User Guide Introduction 2

Manufacturer Blood glucose meters
Medtronic Diabetes partner devices:• Bayer CONTOUR® LINK
• BD Paradigm Link® Blood Glucose Monitor
LifeScan:
• OneTouch® UltraSmart®
• OneTouch® Profile®
• OneTouch® Ultra®
• OneTouch® Basic®
• OneTouch® FastTake®
• OneTouch® SureStep®
• OneTouch® Ultra® 2
• OneTouch® UltraMini®
• OneTouch® UltraEasy®
Bayer:
• Ascensia BREEZE®
• BREEZE® 2
• CONTOUR®
BD: • Logic®
Bayer Ascensia® DEX® family, including these compatiblemeters:
• Ascensia® DEX®
• Ascensia® DEX® 2
• Ascensia® DEXTER-Z® II
• Glucometer® DEXTER-Z®
• Ascensia® ESPRIT® 2
• Glucometer® ESPRIT®
• Glucometer® ESPRIT® 2
Bayer Ascensia ELITE™ family, including these compatiblemeters:
• Ascensia ® ELITE™
• Glucometer ELITE® XL
Abbott:
• FreeStyle®
• FreeStyle® Lite®
• FreeStyle® Freedom®
• FreeStyle® Freedom Lite®
• Precision Xtra™
• TheraSense FreeStyle®
• FreeStyle® Flash®
• FreeStyle® Papillon™ mini
• FreeStyle® Mini®
• Optium Xceed™
• Precision Xceed™
Roche:
• Accu-Chek® Aviva
• Accu-Chek® CompactPlus
• Accu-Chek® Compact
• Accu-Chek® Active
CareLink Pro User Guide Introduction 3
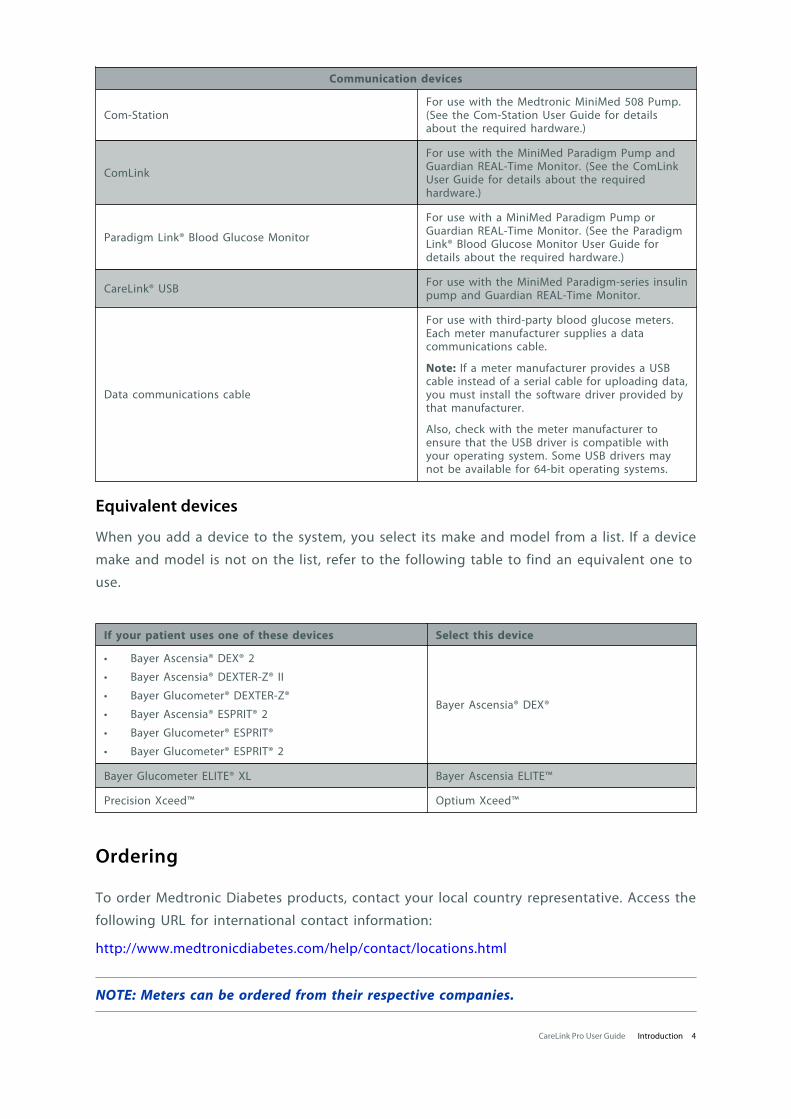
Communication devices
Com-StationFor use with the Medtronic MiniMed 508 Pump.(See the Com-Station User Guide for detailsabout the required hardware.)
ComLink
For use with the MiniMed Paradigm Pump andGuardian REAL-Time Monitor. (See the ComLinkUser Guide for details about the requiredhardware.)
Paradigm Link® Blood Glucose Monitor
For use with a MiniMed Paradigm Pump orGuardian REAL-Time Monitor. (See the ParadigmLink® Blood Glucose Monitor User Guide fordetails about the required hardware.)
CareLink® USB For use with the MiniMed Paradigm-series insulinpump and Guardian REAL-Time Monitor.
Data communications cable
For use with third-party blood glucose meters.Each meter manufacturer supplies a datacommunications cable.
Note: If a meter manufacturer provides a USBcable instead of a serial cable for uploading data,you must install the software driver provided bythat manufacturer.
Also, check with the meter manufacturer toensure that the USB driver is compatible withyour operating system. Some USB drivers maynot be available for 64-bit operating systems.
Equivalent devices
When you add a device to the system, you select its make and model from a list. If a device
make and model is not on the list, refer to the following table to find an equivalent one to
use.
If your patient uses one of these devices Select this device
• Bayer Ascensia® DEX® 2
• Bayer Ascensia® DEXTER-Z® II
• Bayer Glucometer® DEXTER-Z®
• Bayer Ascensia® ESPRIT® 2
• Bayer Glucometer® ESPRIT®
• Bayer Glucometer® ESPRIT® 2
Bayer Ascensia® DEX®
Bayer Glucometer ELITE® XL Bayer Ascensia ELITE™
Precision Xceed™ Optium Xceed™
Ordering
To order Medtronic Diabetes products, contact your local country representative. Access the
following URL for international contact information:
http://www.medtronicdiabetes.com/help/contact/locations.html
NOTE: Meters can be ordered from their respective companies.
CareLink Pro User Guide Introduction 4

How to use this guide
NOTE: This user guide shows samples of the software screens. The screens of the actualsoftware may be slightly different.
Refer to the Glossary for definitions of terms and functions. The conventions used in this
guide are defined in the following table.
Term/style Meaning
Click Press the left mouse button over an object on thescreen to select it
Double-click Press the left mouse button twice over an objecton the screen to open it
Right-click Press the right mouse button over an object onthe screen to display another window or menu
Bold textUsed for a button, screen name, field name, ormenu option. For example: Patient > NewPatient
NOTE: Provides additional information for a procedure orstep.
CAUTION:Alerts you of a potential hazard which, if notavoided, may result in minor or moderate damageto the software program or equipment.
WARNING:Notifies you of a potential hazard which, if notavoided, could result in death or a serious injury.It may also describe potential serious adversereactions and safety hazards.
User safety
Indications for use
The CareLink Pro system is intended for use as a tool to help manage diabetes. The purpose of
this system is to take information transmitted from insulin pumps, glucose meters and
continuous glucose monitoring systems, and turn it into CareLink Pro reports. The reports
provide information that can be used to identify trends and track daily activities—such as
carbohydrates consumed, meal times, insulin delivery, and glucose readings.
Warnings
• This system is intended to be used by a healthcare professional familiar with the
management of diabetes.
• System results are not intended to produce medical advice and should not be relied upon for
such purpose.
• This product should only be used with the supported devices listed in this document. (See
Supported devices on page 2.)
• Patients should be advised to monitor their blood glucose levels at least 4 – 6 times a day.
CareLink Pro User Guide Introduction 5

• Patients should be advised not to make any changes to their treatment without consulting
their healthcare professional.
• Patients should be advised to make treatment decisions based on healthcare professional
guidelines and meter BG results, not glucose sensor results.
Contraindications
This software should not be used with devices that are not listed in Supported devices on
page 2. Nor should this product be used for the treatment of medical conditions other than
diabetes.
Before opening this software, close any of the following software that is currently running on
your computer:
• CGMS® System Solutions™ Software (7310)
• Solutions® Pumps & Meters Software (7311)
• Guardian® Solutions® Software (7315)
• ParadigmPAL™ (7330)
• CareLink® Personal software (7333)
• Solutions® Software for CGMS®iPro (7319)
CareLink Pro User Guide Introduction 6

2
Getting started
The following information will guide you through starting the CareLink Pro software, opening
and closing patient records, and setting preferences that apply to all patients in the system.
Before you begin
If this is the first time you are using CareLink Pro, you should be sure to set the General
preferences (see General preferences on page 11). These preferences determine how certain
items display in the software and in reports, and how you want the system to communicate
with the Internet.
Preferences can be set at any time. You may want to wait until you are familiar with the
CareLink Pro software to set the other preferences.
Primary system tasks
The following table outlines the main tasks you will want to perform when first setting up and
using CareLink Pro. It also tells you which part of this user guide discusses each task.
Step Location
Familiarize yourself with the CareLink Pro userinterface. Navigating the system on page 8
Define the global system options your clinic will use. Setting system preferences on page 11
Create profiles for each of your patients. Adding new profiles on page 19
Link to your patients' CareLink Personal accounts. Linking to CareLink Personal on page 20
Add your patient's pump and meters to their profile. Adding a device on page 27
Read data from your patient's pump and meters. Reading device data on page 33
Set up and generate reports for each of your patients. Creating reports on page 36
Regularly back up the CareLink Pro database. Backing up the database on page 45
Update the CareLink Pro software. Applying software updates on page 44
CareLink Pro User Guide Getting started 7
Navigating the system
Before working with the CareLink Pro software, you should get acquainted with the user
interface. The user interface includes menus, a toolbar, a navigation bar, workspaces, and a
Guide Me window.
Opening CareLink Pro
1 Double-click the CareLink Pro icon on your computer desktop, or select Medtronic
CareLink Pro from the Programs list on your Windows Start menu.
If your clinic requires you to enter a password, the login screen is displayed.
a. Type your password into the Password field.
NOTE: Requiring a password is an optional feature that is set during theinstallation process.
b. Click LOGIN.
The startup screen is displayed.
2 To start a new patient record, click New Patient. To open a patient record from a list of
patients in the system, click Open Patient.
Workspaces
If you have a patient’s record open, you can click one of the buttons on the navigation bar to
display the corresponding workspace. Use these workspaces to enter or select information to
perform CareLink Pro tasks for that patient.
Profile: Allows you to maintain such patientinformation stored as name and date of birth.This workspace also allows you to link to apatient’s CareLink Personal account.
Devices: Allows you to store informationrequired to read a patient’s devices.
Reports: Allows you to select parameters andchoose reports to be generated for thepatient.
Until a profile is added and saved for a patient, only the Profile workspace is accessible for
that patient. Until devices are added for a patient, only the Profile and Devices workspaces are
accessible for that patient.
Toolbar
The CareLink Pro toolbar provides quick access to frequently used features. The toolbar
contains the following buttons.
CareLink Pro User Guide Getting started 8

Button Name Functionality
Add PatientOpens a Profile workspace soyou can add a new patientrecord to the system.
Open Patient
Opens the Patient Lookup tablewhere you can choose anexisting patient’s record toview.
Guide MeDisplays or hides the Guide Mewindow. Click for context-awaresystem hints.
Patient tabs
Once you open a patient record, a tab is displayed along the toolbar with the patient’s name
on it. When a tab is active, it means that patient record and workspace are active, and you can
perform CareLink Pro tasks for the patient.
To make a patient record active so that you can work with it, click on the tab for that patient.
To close a patient record, click the Close button on the tab.
The Guide Me feature
A Guide Me feature is provided throughout CareLink Pro. It opens a window with context-
aware hints and tips for actions you might take from the part of system that is active. Guide
Me windows might also include >>learn more links. When clicked, these links take you to the
relevant section in the online help for more details. The Guide Me feature is enabled by
default. However, you can turn it off at any time.
Turning Guide Me on and off
To turn Guide Me on or off, do one of the following:
CareLink Pro User Guide Getting started 9

• Click the Guide Me button.
• Select Help > Guide Me.
Opening patient records
As many as six patient records can be open at one time. If you have not yet created any
patient profiles, see Adding new profiles on page 19.
1 Select File > Open Patient, or click the Open Patient button. A patient list similar to the
following is displayed.
NOTE: If you receive a message that you have too many patient records open, click
OK, close a record, and continue.
2 Locate the patient’s listing by typing some or all of their name in the Find a Patient field.
When the patient’s listing is highlighted, click OPEN, double-click the listing, or press ENTER.
You can also navigate the list by using the up and down arrows on your keyboard.
The patient’s Devices (if devices have not yet been added) or Reports workspace is
displayed.
3 To see the patient’s Profile workspace, click the Profile button on the navigation bar.
Closing patient records
1 Make sure the patient record you want to close is active (the tab is highlighted).
2 Do one of the following:
a. Select File > Close Patient.
CareLink Pro User Guide Getting started 10

b. Click the Close button on the patient tab.
c. Press Ctrl+F4.
Setting system preferences
These preferences apply to all patients in the system. For preferences that affect only
individual patients, see Verifying report settings on page 39.
Preferences are displayed in the following groups:
• General
- Glucose units
- Carbohydrate units
- Communications
- Troubleshooting
• Patient Profile
- Select and arrange data fields on patient profiles.
• Patient Lookup
- Modify and change the order of fields displayed when you choose Open Patient to view
a list of patients.
• Report Generation
- Choose the data fields you want to display when selecting Daily Detail report input from
the Data table.
General preferences
Use the General tab to define how the software displays certain types of information, and to
establish your external communication preferences.
1 If it is not active already, click the General tab.
CareLink Pro User Guide Getting started 11

2 Select Tools > Options. The following window is displayed.
3 Click to select the option button for the value you want:
- Glucose Units: mg/dL or mmol/L
- Carbohydrate Units: grams or Exchanges
a. If you selected Exchanges for Carbohydrate Units, type the appropriate number in the
grams are equal to 1 Exchange field.
4 Click to select or clear the check box in the Chart Options > Overview Report section. If the
check box is selected, the application will connect the BG readings on the Meter Glucose
Overlay chart with lines. (This is a chart that appears in the Sensor and Meter Overview
Report.)
5 For the following Communications preferences, click to select the check box (enable), or to
clear the check box (disable):
NOTE: Make sure you follow the guidelines of your clinic or IT department when
setting communication preferences.
- Automatically check for software updates: if selected, a notification will be sent to
each system running CareLink Pro whenever a software update is available. The active
user will then have the opportunity to download and install the updates. To prevent this
from occurring and institute a controlled distribution of software updates, you can clear
this check box.
- Synchronize with Medtronic CareLink® Personal: If you want the system to
automatically synchronize your patients' CareLink Personal data each time you open
their profile, select this check box. If you clear this check box, you will have to manually
synchronize the CareLink Personal data for each patient.
6 Click to select or clear the check box in the Troubleshooting section. If the check box is
selected, the application will save a record of device reads for troubleshooting purposes.
CareLink Pro User Guide Getting started 12
7 Click OK to save the General preferences.
Patient profile preferences
This is a global setting that defines the content of your profiles. You can customize fields in
the Profiles workspace to include information that is most important to your clinic. You can
add or remove fields, create your own custom fields, and determine the order in which the
fields will appear in the window.
1 Select Tools > Options.
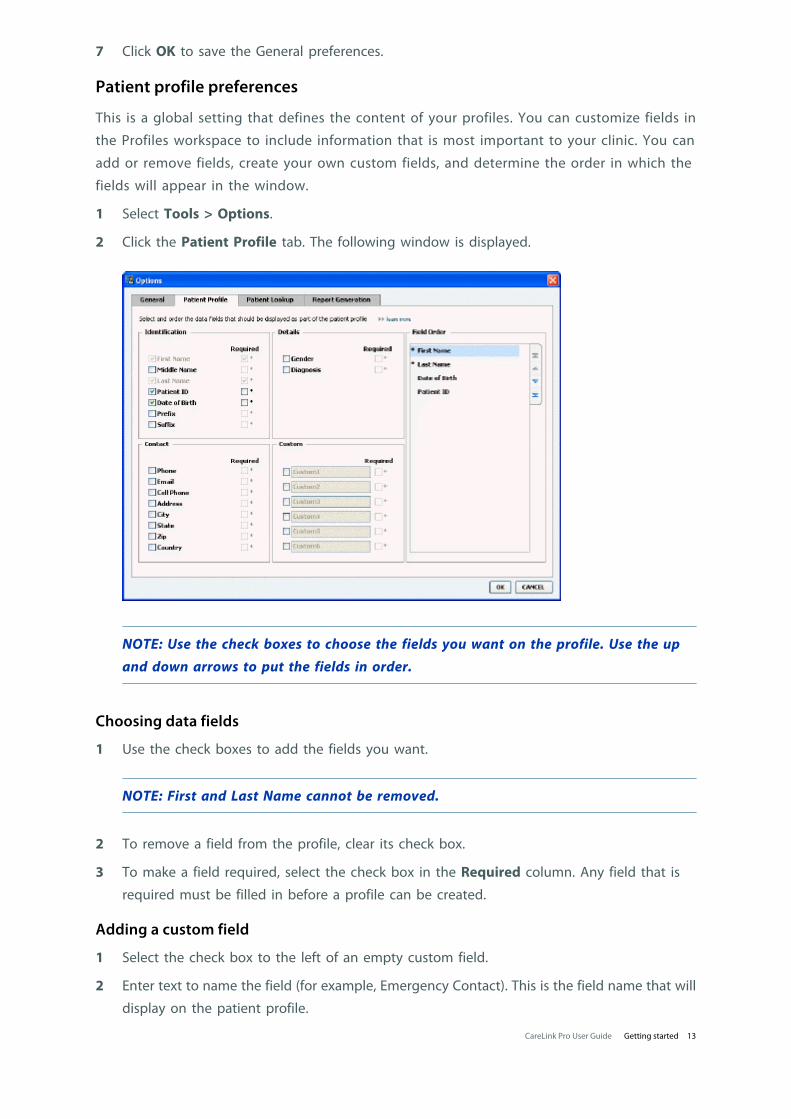
2 Click the Patient Profile tab. The following window is displayed.
NOTE: Use the check boxes to choose the fields you want on the profile. Use the upand down arrows to put the fields in order.
Choosing data fields
1 Use the check boxes to add the fields you want.
NOTE: First and Last Name cannot be removed.
2 To remove a field from the profile, clear its check box.
3 To make a field required, select the check box in the Required column. Any field that is
required must be filled in before a profile can be created.
Adding a custom field
1 Select the check box to the left of an empty custom field.
2 Enter text to name the field (for example, Emergency Contact). This is the field name that will
display on the patient profile.
CareLink Pro User Guide Getting started 13

3 To make the field required, select the check box in the Required column.
NOTE: To remove a custom field from the profile, clear the check box next to thefield(s) you want to remove.
Changing the order of data fields
Select the field you want to move, and click the up or down arrow to move it. (The arrows
at the top and bottom move a field all the way to the top or bottom of the list.)
Finalizing patient profile preferences
When the Field Order list has all the fields you want in the correct order, click OK.
Patient profiles now have the fields and field order you just selected.
Patient Lookup preferences
The Patient Lookup table is used to search for and open a patient record. The table includes
every patient in your database and provides identifying information from the patient's profile.
You have the option of customizing what information is displayed in this table, and the order
in which the columns appear. To customize the Patient Lookup table, complete the following
steps:
1 Select Tools > Options.
2 Click the Patient Lookup tab. The following window is displayed.
NOTE: Use the check boxes to choose the data you want on the Patient Lookup table.Use the up and down arrows to put the columns in order.
CareLink Pro User Guide Getting started 14

Choosing data to display
Use the check boxes to select the type of data you want to display, or to clear data you do not
want to display on the Patient Lookup table.
Changing the column order
To change the order of columns on the Patient Lookup table, select the column to move, and
click the up or down arrows. (The arrows at the top and bottom move a data column all
the way to the top or bottom of the list.)
The data column at the top of the Column Display Order list will display in the first column of
the Patient Lookup table. The data column at the bottom will be displayed in the last column
of the table.
Finalizing patient lookup preferences
When the Column Display Order list has all the data you want in the correct order, click OK.
The Patient Lookup table will now have the data and column order you just selected.
Report Generation preferences
The Data Table appears in the Select and Generate Reports window. This table is used
during reporting. It contains daily information derived from your patient’s devices and, if
applicable, their CareLink Personal software account. The data provided in this table helps
you determine which days require a Daily Detail report. It also helps you decide which of
the other reports you should run.
Your clinic can customize the data that displays in this table, including the order in which
it's presented, to reflect that which is of most relevance to your practice.
NOTE: To see how these preferences apply to the Data Table during report creation, see
Selecting report types and inclusion dates on page 40.
1 Select Tools > Options.
CareLink Pro User Guide Getting started 15

2 Click the Report Generation tab. The following window is displayed.
Choosing data to display
Use the check boxes to select the type of data you want to display or clear data you do not
want to display on the Data Table.
The following information is available for inclusion in the Data Table.
Column Name Definition
№ of Meter Readings The amount of readings for the specified date thatwere recorded by the included devices.
Meter Readings Average The average of the glucose readings recorded by theincluded devices.
Sensor DurationThe amount of time within the specified date forwhich sensor date was recorded. Values are --(none), 0:05 - 24:00.
Sensor Average The average of sensor readings recorded in thespecified date.
Highest Reading The highest glucose reading (derived from a sensoror meter) for the date.
Lowest Reading The lowest glucose reading (derived from a sensoror meter) for the date.
Avg AUC Below Target Avg Area Under the Curve below the patient's targetrange.
Avg AUC Above Target Avg Area Under the Curve above the patient's targetrange.
Total Carbs
The sum of all carbohydrate amounts (rounded tothe nearest gram or the nearest 0.1 exchange,depending on the unit of measure used) reportedduring the day through Bolus Wizard events orcarbohydrate markers on the pump or Guardianmonitor.
CareLink Pro User Guide Getting started 16
Column Name Definition
Suspend DurationThe amount of time the pump was suspended onthe specified date. Values are -- (no data), 0:01 - 24:00.
№ of Rewinds The number of rewind events for the specified date.
№ of Primes (or Fills) The number of prime events (or fill events) recordedfor the specified date.
Prime (or Fill) Volume (U) The total volume of insulin used for prime events(or fill events) on the specified date.
Total Insulin (U) The total volume of insulin given during thespecified date, as recorded by the pump.
Total Basal (U)The total volume of basal insulin given during thespecified date (the total insulin given, less the sumof all boluses given).
Total Bolus (U) The total volume of insulin given in boluses duringthe specified date, as recorded by the pump.
Basal % Shows the ratio (in whole % values) of basal insulinto total insulin.
Bolus % Shows the ratio (in whole % values) of bolus insulinto total insulin.
№ of Boluses The number of bolus events recorded for thespecified date.
Bolus Wizard Events The total number of bolus wizard events recordedon the specified date.
Bolus Wizard OverridesThe number of bolus wizard events where theamount of insulin delivered is different than theamount recommended.
№ of Meal BolusesThe number of bolus wizard events withcarbohydrate amounts greater than zero that wererecorded on the specified date.
№ of Correction BolusesThe number of bolus wizard events with correctionamounts greater than zero that were recorded onthe specified date.
№ of Manual Boluses The number of bolus events recorded during thedate, which were not bolus wizard events.
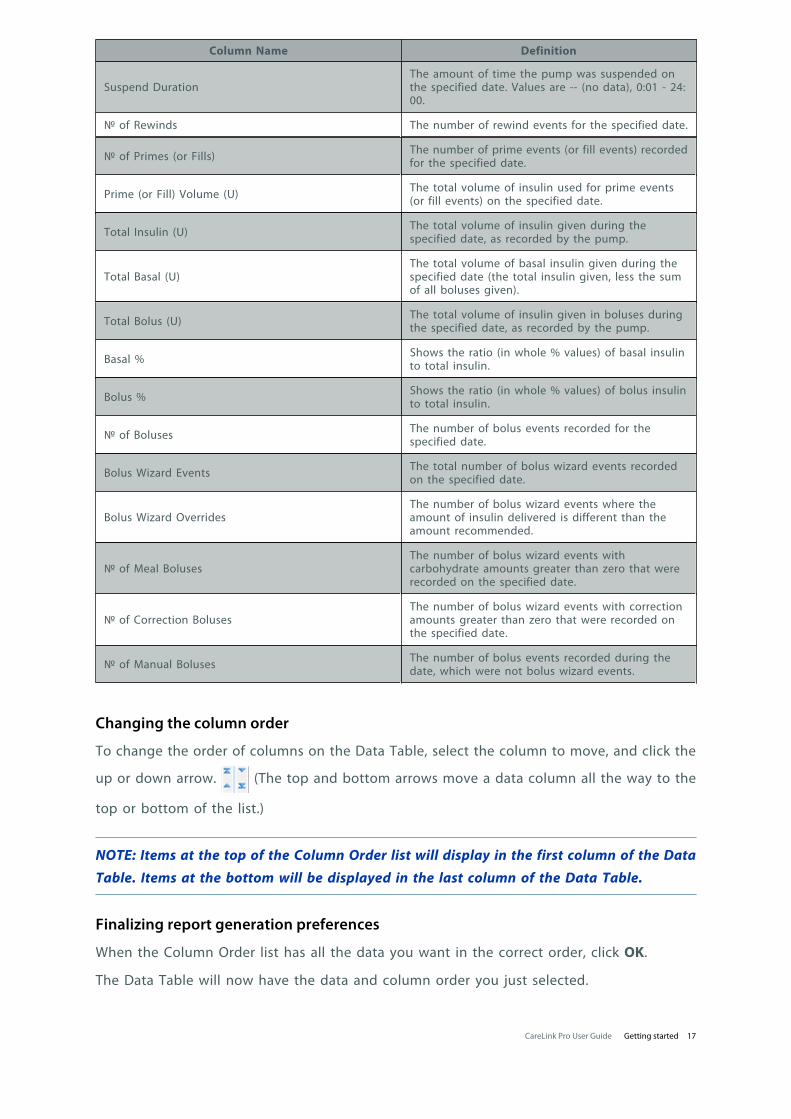
Changing the column order
To change the order of columns on the Data Table, select the column to move, and click the
up or down arrow. (The top and bottom arrows move a data column all the way to the
top or bottom of the list.)
NOTE: Items at the top of the Column Order list will display in the first column of the Data
Table. Items at the bottom will be displayed in the last column of the Data Table.
Finalizing report generation preferences
When the Column Order list has all the data you want in the correct order, click OK.
The Data Table will now have the data and column order you just selected.
CareLink Pro User Guide Getting started 17

3
Profile workspace
A profile is similar to the cover page of a medical chart. It stores patient data such as name
and date of birth. A profile is required before device data can be gathered and used for
therapy reports.
The Profile workspace also allows you set up a link to a patient’s CareLink Personal account.
Once the link is established, you can retrieve patient data stored on CareLink Personal anytime
—without the need to have the patient present.
Before you begin
You may want to customize your patient profiles so they contain only the type of information
you want to collect. To learn more, see Patient profile preferences on page 13.
Also, a username and password is required when you set up the link to a patient’s CareLink
Personal account. The patient must be present to supply this data.
CareLink Pro User Guide Profile workspace 18

Adding new profiles
Each time you add a patient to the CareLink Pro system, you must start by filling out a profile
for them.
1 Select File > New Patient, or click the Add Patient button.
The Profile workspace is displayed.
NOTE: To add or change fields on the patient profile, click customize fields. See
Patient profile preferences on page 13.
2 Fill in the fields in the Patient Profile section.
3 Click SAVE.
The new patient profile is added to the CareLink Pro database. A message is displayed that
confirms the profile was saved.
Completing required fields
1 If a required field is not complete when you save a patient profile, a message is displayed
next to that field. You will not be allowed to save the profile until you make an entry in the
field.
2 Complete the field.
3 Click SAVE.
4 When the confirmation message displays, click OK.
Editing patient profiles
1 Make sure the patient’s Profile workspace is open.
2 Click EDIT.
3 Edit the data in the Patient Profile section as needed.
4 Click SAVE.
A message is displayed that confirms the profile was saved.
Deleting patient data from the system
1 Make sure the patient’s Profile workspace is open.
2 Verify that this is the patient you want to delete. Deleting a patient profile also removes all of
their data from the CareLink Pro database and cannot be undone.
3 Click >> delete patient record above the synchronization section of the profile.
A message is displayed to alert you that all of the patient’s data will be erased when you
delete the record.
CareLink Pro User Guide Profile workspace 19

4 Click Yes to delete the patient’s record.
Linking to CareLink Personal
If your patient permits it, you can set up a link to their CareLink Personal account. This Web-
based tool allows patients to upload and store device-derived data, and to run various
therapy reports.
Once you link to the patient’s CareLink Personal account, you can retrieve the device data
they store there. This is ideal for creating CareLink Pro therapy reports between office visits. It
also reduces the need to read the patient’s device in the office.
If a patient does not yet have a CareLink Personal account, you can send them an e-mail
inviting them to establish one.
Linking to an existing account
NOTE: The patient must be present to complete these steps.
1 Make sure you are connected to the Internet.
2 Open the patient’s Profile workspace.
3 Make sure all required fields in the Patient Profile section are filled in.
4 Click LINK TO EXISTING ACCOUNT.
The CareLink Personal Log In screen is displayed.
5 Have the patient do the following:
a. Type in their Username and Password.
b. Click Sign In.
A Grant Access page is displayed, based on the patient’s enrollment settings for language
and region.
6 Have the patient do the following:
a. Read the Terms of Use.
b. Click to check the box next to I agree to the Terms of Use above...
c. Click Grant Access.
d. Let you know when the Thank You page is displayed.
7 If needed, print the Terms of Use for the patient by clicking the Print button. You are now
linked to the patient's CareLink Personal account.
Sending an e-mail invitation
To send an e-mail inviting a patient to establish a CareLink Personal account, follow these
steps:
1 Open the patient’s Profile workspace.
2 Make sure all required fields in the Patient Profile section are filled in.
CareLink Pro User Guide Profile workspace 20

3 Click SEND E-MAIL INVITATION TO PATIENT.
4 Make sure Patient Name, Email Address and Language are filled in correctly.
5 Click SEND.
The patient’s profile status area confirms the e-mail was sent.
Getting data from a linked account
If you are linked to a patient’s CareLink Personal account, any new data from this account is
automatically sent each time you open their patient profile in CareLink Pro.
NOTE: To ensure this happens, go to Tools > Options > General, and make sure there is acheck next to “Synchronize with CareLink Personal.”
Follow these steps to get a patient’s CareLink Personal data any time after you have opened
their patient profile:
1 Make sure the patient’s Profile workspace is open, and that you are connected to the
Internet.
2 Select Tools > Synchronize Patient Data.
The sync icon on the patient’s tab rotates. When the icon stops, the process is complete.
NOTE: If the patient no longer wants to share their CareLink Personal data, a messagedisplays to let you know.
3 Any additional data retrieved from CareLink Personal will show up in the patient’s reports.
CareLink Pro User Guide Profile workspace 21
Unlinking a patient’s CareLink Personal account from CareLink Pro
You can unlink a patient’s CareLink Personal account from CareLink Pro. This option is only
available after a patient has been linked. It prevents CareLink Pro from continuing to retrieve
data from the patient's CareLink Personal account. It does not affect the patient's personal
usage of their CareLink Personal account.
1 Open the patient's record and access the Profile workspace.
2 Click UNLINK ACCOUNT.
3 Click Yes at the confirmation message. The patient's personal profile is no longer linked to
CareLink Pro.
The status is changed to Not linked, and the LINK TO EXISTING ACCOUNT and SEND E-
MAIL INVITATION TO PATIENT buttons are now displayed.
CareLink Pro User Guide Profile workspace 22

4
Hardware setup
To read data directly from a device, you must have the patient's device, and any cables or
communications devices required to transfer the data to your computer.
Alternatively, if the patient has uploaded their device data to their CareLink Personal account,
you can obtain the data by linking to their account. To link to a patient's CareLink Personal
account, see Linking to CareLink Personal on page 20.
Connecting devices
Review the overview diagram to get a general idea of how devices should be set up to
communicate with the computer. The diagrams that follow illustrate specific aspects of device
communication.
For more details, follow the instructions CareLink Pro displays as you are reading devices.
CareLink Pro User Guide Hardware setup 23
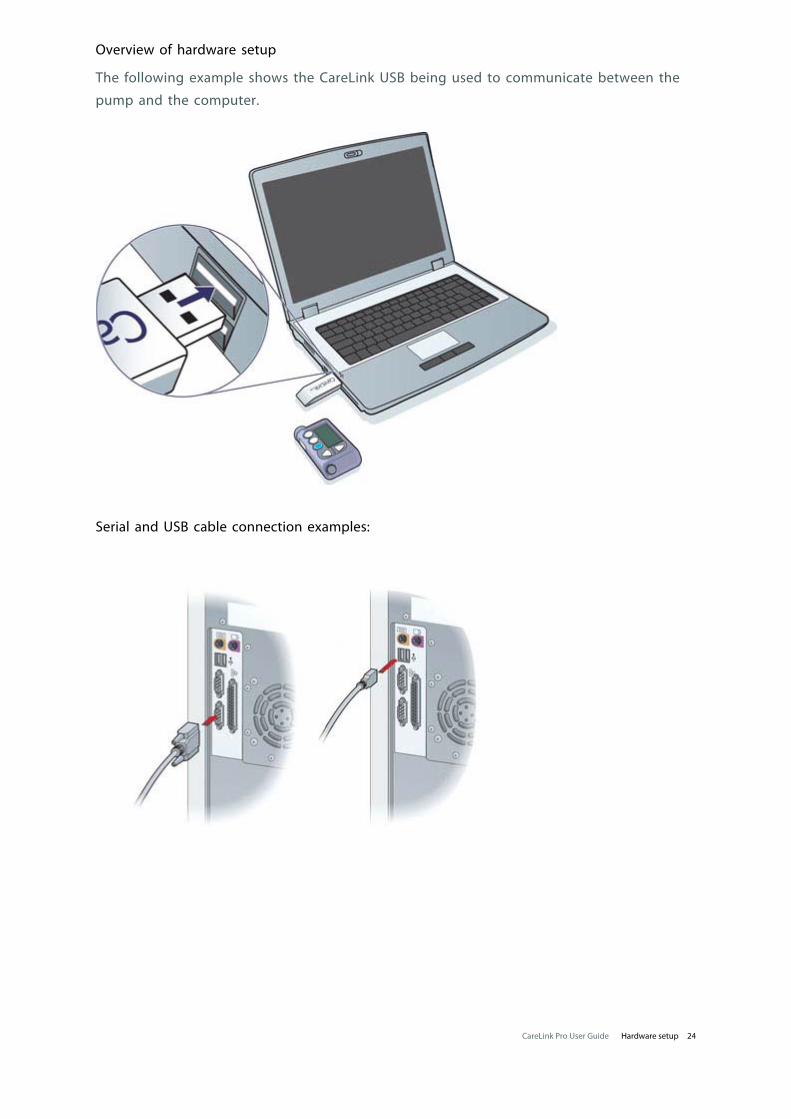
Overview of hardware setup
The following example shows the CareLink USB being used to communicate between the
pump and the computer.
Serial and USB cable connection examples:
CareLink Pro User Guide Hardware setup 24

Optional ComLink for use with the Paradigm series pump:
Optional Com-Station for use with the Medtronic MiniMed 508 pump
CareLink Pro User Guide Hardware setup 25

5
Devices workspace
Information that you will need to read a patient’s device, such as the make, model and serial
number, is stored in The Devices workspace. Thus, you do not have to supply it each time you
read data from the device.
Devices on the Devices workspace are stored in one of two lists—Active Devices or Inactive
Devices. When you add a device, it is automatically placed on the Active Devices list. You can
only read data from devices displayed in the Active Devices list. These will likely be the
devices your patient currently uses.
Other devices that belong to the patient, but are not currently used, can be stored in the
Inactive Devices list. This keeps the information on file. These devices can be made active at
any time.
CareLink Pro User Guide Devices workspace 26

Before you begin
Before you can open the Devices workspace for a patient, they must have a profile saved in
the system. See Adding new profiles on page 19.
To add a device or read data directly from it, the device must be communicating with the
computer. See Connecting devices on page 23 to learn how to set up devices to communicate
with the computer.
Adding a device
You can get data from the patient’s CareLink Personal account for a device not yet added.
Such devices will automatically be added when data is synchronized between CareLink
Personal and CareLink Pro.
NOTE: There can only be one active pump per patient. Adding a new pump will move theexisting one to the inactive list.
Adding a Medtronic pump or Guardian monitor
1 Make sure the device you are adding is set up to communicate with the computer. (See
Connecting devices on page 23 for connection steps.)
2 Click the patient’s tab or double-click their name on the Patient Lookup table.
3 Click Devices to access the patient’s Devices workspace.
4 Click ADD DEVICE.
5 Select Medtronic Pump/Guardian. The Add Medtronic Pump/Guardian Wizard is
displayed.
NOTE: The pump model is listed on the back of the pump or on the pump statusscreen.
CareLink Pro User Guide Devices workspace 27

6 Select the option button to specify the device you are adding.
If you selected the MiniMed 508 pump option, go to Step 9.
7 Click NEXT. The Serial Number page is displayed.
NOTE: An error message is displayed if you do not enter the correct serial number.Check the examples on this page, and verify that you are entering the correct
characters from the back of the pump. If necessary, re-type the six characters.
8 Use the examples on this page to help locate the six-character serial number on the device
you are adding. (If you need more help in locating it, click >>learn more.) Type the six
characters in the Device Serial Number field.
9 Click NEXT. A Communication Options page similar to the following is displayed.
10 Click the Choose Port drop-down menu, and select the port that the ComLink, Paradigm
Link®, CareLink USB, or Com-Station connects to on your computer. If you are not sure which
port to choose, select Auto Detect (or USB).
CareLink Pro User Guide Devices workspace 28

11 Click NEXT. The Test Connection page similar to the following is displayed.
12 Follow any device instructions, and click TEST.
A message displays to let you know if the connection was successful. If it was, go to the next
step.
NOTE: This Test does not read pump data, but verifies correct communications
between the pump and the computer.
If not, make sure the hardware between the device and the computer is connected properly.
Also, click BACK on the pages of the wizard to make sure the device data you have entered is
correct.
13 Click DONE.
The device is added to the patient’s Active Devices list.
Adding a meter
1 Click the patient’s tab or double-click their name on the Patient Lookup table.
2 Make sure the meter you are adding is in communication with the computer. (See Connecting
devices on page 23 for connection steps.)
3 Click the Devices button to access the patient’s Devices workspace.
4 Click the ADD DEVICE button.
CareLink Pro User Guide Devices workspace 29

5 Select Blood Glucose Meter. The Add Blood Glucose Meter Wizard is displayed.
6 Click the option button to select the correct brand of meter.
7 Click NEXT. The Meter Model page is displayed (this page differs depending on the meter
manufacturer).
8 Click to select the meter model you are adding.
CareLink Pro User Guide Devices workspace 30
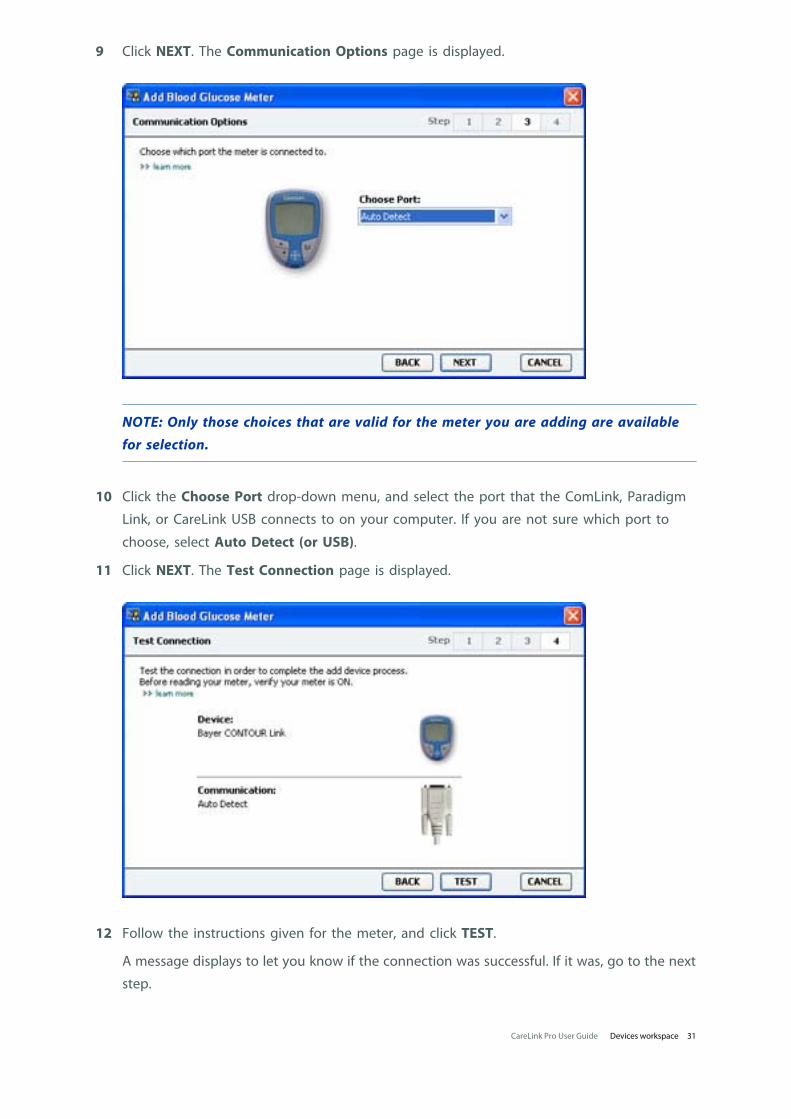
9 Click NEXT. The Communication Options page is displayed.
NOTE: Only those choices that are valid for the meter you are adding are availablefor selection.
10 Click the Choose Port drop-down menu, and select the port that the ComLink, Paradigm
Link, or CareLink USB connects to on your computer. If you are not sure which port to
choose, select Auto Detect (or USB).
11 Click NEXT. The Test Connection page is displayed.
12 Follow the instructions given for the meter, and click TEST.
A message displays to let you know if the connection was successful. If it was, go to the next
step.
CareLink Pro User Guide Devices workspace 31

If not, make sure the hardware between the device and the computer is connected properly.
Also, click BACK on the wizard to make sure the data you have entered is correct.
13 Click DONE.
The meter is added to the patient’s Active Devices list.
Making a device active or inactive
Patient devices can be moved between the Active Devices list and the Inactive Devices list as
needed. A device must be active in order to read data from it.
You can have as many meters as you want on the Active Devices list, but only one pump.
Make sure you want to inactivate the current active pump before you add a new one.
Inactivating a device
1 Click the patient’s tab or double-click their name on the Patient Lookup table.
2 Click the Devices button to access the patient’s Devices workspace. Devices may be listed
under an equivalent device name. See Supported devices on page 2.
3 Click >> make this device inactive under the device you want to make inactive. The device
moves to the Inactive Devices list.
Re-activating a device
1 Click the patient’s tab or double-click their name on the Patient Lookup table.
2 Click the Devices button. The patient’s Devices workspace is displayed.
Devices may be listed under an equivalent device name. See Supported devices on page 2.
3 Click >> activate this device under the device you want to make active.
The device moves to the Active Devices list.
Deleting a device
These steps will delete a device and its data from the Devices workspace and the CareLink Pro
system:
1 Click the patient’s tab or double-click their name on the Patient Lookup table.
2 Click the Devices button to access the patient’s Devices workspace.
Devices may be listed under an equivalent device name. See Supported devices on page 2.
3 Make sure the device is on the Inactive Devices list. If it is not, click >> Inactivate this
device under its current listing.
4 Click >> delete this device under the device you want to delete. A message is displayed to
alert you that the device and all of its data will be removed from the patient’s record.
5 Click YES to delete the device.
The device and its data is removed from the Devices workspace and from the CareLink Pro
system. Data from this device is no longer available for use in reports.
CareLink Pro User Guide Devices workspace 32

Reading device data
One way to get device data is to link to the patient’s existing CareLink Personal account. (See
Linking to CareLink Personal on page 20.) Another way is to read it directly from their device, as
described here.
Data from your patient’s device can be read by CareLink Pro if the device is on the Active
Devices list and it is in communication with the computer. Once you get this data, you can use
it to create reports that help assess the patient’s therapy management. See About reports on
page 41 for a brief description of the available reports.
CareLink Pro can gather the following data from an insulin pump:
• Various settings on the pump, such as the alert mode, the beep volume and the time display
• Basal insulin amounts delivered
• Bolus events and amounts delivered
• Bolus Wizard entries
• Priming amounts
• Suspend periods
• Sensor glucose readings over a period of time, on pumps with sensor capabilities
The system can also gather data from a Guardian REAL-Time system including:
• Sensor Glucose (SG) readings
• Sensor coefficient values
• Sensor calibration factors
• Meal markers
• Insulin injections
Additionally, various information stored in a blood glucose meter can be uploaded to the
system during a device read.
WARNING: Please cancel or finish any temp basals or active boluses, and clear any activealarms. The pump will be suspended for reading. Once the read is complete, please verifythe pump has resumed.
CAUTION: Do not use the pump remote when the pump is being read. If the pump batteryis low, the pump will not send data to the PC. Replace the battery if the status indicatesbattery power is low.
1 Click the patient’s tab or double-click their name on the Patient Lookup table.
2 Make sure the patient’s device is in communication with the computer. (See Connecting
devices on page 23.)
3 Click the Devices button to access the patient’s Devices workspace.
CareLink Pro User Guide Devices workspace 33
Devices may be listed under an equivalent device name. See Supported devices on page 2.
4 Find the device you want to get data from on the Active Devices list, and make sure the
Choose port data is correct.
For pumps, click the Amount of Data drop-down menu and select how much pump data
you want CareLink Pro to read.
5 Click the associated READ DEVICE button.
6 Follow device-specific instructions, and click OK.
7 CareLink Pro displays a progress bar that updates to show how much of the device read has
been completed.
If you click CANCEL as the device is being read, a message is displayed to alert you that
cancelling the action may result in the loss of all of the data read so far. You will need to click
the READ DEVICE button to restart the upload.
- To cancel, click YES.
- To continue reading device data, click NO.
When the system finishes reading data from the device, you will see a message that confirms
the device read is complete.
8 Click OK.
- For pumps, follow the instructions for taking it out of suspend mode.
If CareLink Pro is unable to get data from the device, see Troubleshooting for further
guidance.
CareLink Pro User Guide Devices workspace 34
6
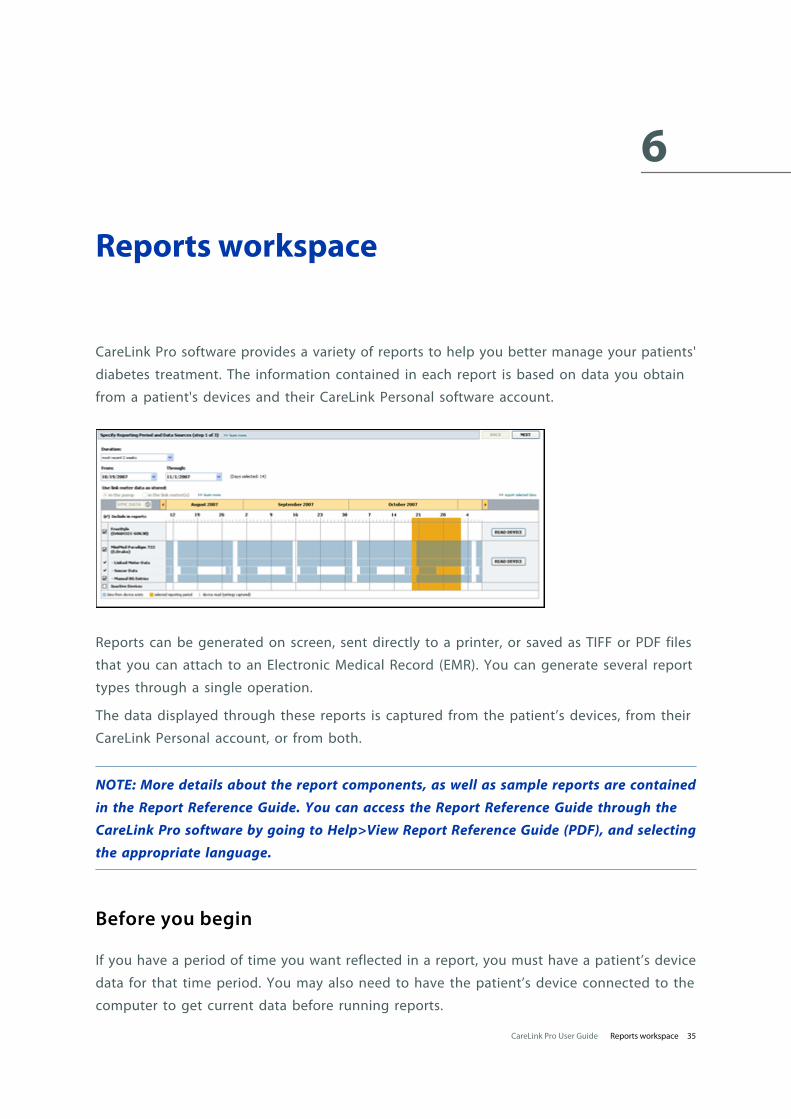
Reports workspace
CareLink Pro software provides a variety of reports to help you better manage your patients'
diabetes treatment. The information contained in each report is based on data you obtain
from a patient's devices and their CareLink Personal software account.
Reports can be generated on screen, sent directly to a printer, or saved as TIFF or PDF files
that you can attach to an Electronic Medical Record (EMR). You can generate several report
types through a single operation.
The data displayed through these reports is captured from the patient’s devices, from their
CareLink Personal account, or from both.
NOTE: More details about the report components, as well as sample reports are contained
in the Report Reference Guide. You can access the Report Reference Guide through theCareLink Pro software by going to Help>View Report Reference Guide (PDF), and selectingthe appropriate language.
Before you begin
If you have a period of time you want reflected in a report, you must have a patient’s device
data for that time period. You may also need to have the patient’s device connected to the
computer to get current data before running reports.
CareLink Pro User Guide Reports workspace 35
Be sure to take a close look at the Verify Report Settings step before running a report. This is
where you can fine tune a report to capture the patient data you want.
Creating reports
The following sections will help you better understand the reports that are available to you,
and the process you use to generate them.
If you are familiar with the reporting process and know what reports you would like to run,
you can begin generating reports.
Opening the Reports workspace
Click the patient’s tab or click the Open Patient button and double-click the patient’s
name.
The Reports workspace is displayed.
NOTE: To make sure you have the latest device data from the patient’s CareLink Personalaccount, click SYNC DATA.
Selecting the reporting period
1 To change how much time is reflected in the report(s), click the Duration drop-down menu
and select the amount of time. (The maximum duration is 12 weeks.)
2 From and through dates are automatically set, unless you choose the custom date rangeoption.
NOTE: If you select a date range longer than allowed, you get an error message.
Adjust the duration or dates.
If you want a custom date range, click the From or Through drop-down menus and select
the desired month, date or year.
Data calendar
The data calendar area of the Reports workspace shows a three-month window of reporting
information.
CareLink Pro User Guide Reports workspace 36

The blue bars represent device data. The orange bar represents the reporting period that you
selected. Overlap in the device data and reporting period means you have data for some or all
of the displayed reporting period.
The data calendar area initially displays the most current three months. To see other months,
click the arrow buttons on either end of the months.
Selecting source data to include
1 If the patient uses a BG meter that links to their pump, click to choose one of the following
options for reporting meter BG data:
- In the pump: Advantages of this selection include that you only have to read data from
the patient’s pump, BG readings are time stamped by the pump, and the readings are
tied directly to any Bolus Wizard calculations used. A disadvantage is that if there are
communication difficulties between the pump and the linked meter, BG readings during
that time may not get reported. Also, for MiniMed Paradigm pumps prior to the 522/722,
any BG readings from Bolus Wizard calculations that are not acted on do not get
reported.
- In the link meter(s): The advantage of this selection is that all readings stored in the linked
meter are reported. The disadvantage is that to correlate meter and pump data, you
must have made sure that the pump and meter clocks were synchronized with one
another. You must also read data from the pump and the linked meter separately.
2 To add device data to reports, select the check box next to the relevant device.
You cannot add devices that were excluded due to your selection in step 1. To change this,
select the other linked meter option.
3 To exclude device data from reports, clear the check box next to the relevant device.
You cannot clear check marks related to the option you selected in step 1. To change these,
select the other linked meter option.
Checking for device data
1 Look at the data calendar in the Reports workspace to see if the orange bar representing the
reporting period overlaps with the blue bars representing device data.
2 If the bars overlap for the entire reporting period, you have data for your report(s). You can
click NEXT and go to Verifying report settings on page 39.
3 If the bars do not overlap, or there is not enough overlap, you have a few choices:
CareLink Pro User Guide Reports workspace 37

- Adjust the reporting period.
- Get additional device data.
Getting additional device data
1 To get more data from a device, click the READ DEVICE button associated with the device.
The Read Device bar is displayed.
WARNING: Please cancel or finish any temp basals or active boluses, and clear anyactive alarms. The pump will be suspended for reading. Once the read is complete,please verify the pump has resumed.
CAUTION: Do not use the pump remote when the pump is being read. If the pumpbattery is low, the pump will not send data to the PC. Replace the battery if the
device status screen indicates battery power is low.
2 Verify that the data in the Choose port field is correct for this device.
To change this setting, click the drop-down menu for the field and select a different setting.
3 Make sure the device is connected to your computer.
4 If the device is a pump, you can specify how much data to get from it. Click the Amount of
Data drop-down menu and select an amount.
NOTE: If you select All available data, the system reads all data in the pump. This
overwrites any existing duplicate data in the system.
5 Click READ DEVICE. Be sure to read the message that is displayed carefully because it
provides specific instructions for reading the pump.
6 Follow the instructions and click OK.
The read device progress bar is displayed.
You can choose to cancel the read at any time by clicking CANCEL.
A message is displayed to confirm that the read is complete.
7 Click OK.
Device data is now visible within the data calendar.
8 Click NEXT at the top of the Reports workspace.
CareLink Pro User Guide Reports workspace 38

The Verify Report Settings step is displayed. This allows you to make sure the settings for this
patient are correct before you run the report(s).
Verifying report settings
1 Make sure the Glucose Target settings are at the desired values. Type in these values, or
click the up or down arrows in the Low and High fields to raise or lower the values.
NOTE: Meter reading markers (|| |) are displayed on the wake-up and bedtime
timeline, as well as on the meal markers timeline. Because some of the reports arebased on data found within defined meal times, wake-up or bedtime hours, it isimportant that a patient's Bolus Wizard event and meter reading markers are grouped
appropriately.
2 To add a new meal period, click ADD MEAL. To edit an existing meal period, click anywhere
within one of the meal periods along the timeline.
The Meal Period editor, located below the timeline, becomes active.
NOTE: You can have as many as five meal periods. The defaults are breakfast, lunchand dinner.
3 Enter text or click arrows to select the settings you want.
If you only want to use these settings for this meal, clear the check box Use these
parameters for all of this patient's meals.
- Meal Name: name you want to assign to the meal period.
- Meal Time Period: hours between which the meal occurs.
- Pre-Meal BG Target (mg/dL or mmol/L): low and high ends of the patient’s before-
meal glucose target range.
- Pre-Meal Analysis Period: time period that glucose will be analyzed prior to the start of
a meal. The glucose readings captured during this time are used in a detailed report
analysis.
- Post-Meal BG Target (mg/dL or mmol/L): low and high ends of the patient’s post-meal
glucose target range.
- Post-Meal Analysis Period: time period that glucose will be analyzed after a meal. The
glucose readings captured during this time are used in a detailed report analysis.
You can change the length of an existing meal period or the wake-up and bedtime
period by clicking on the start or end handles, and dragging and dropping them along
the timeline.
NOTE: Meal periods cannot overlap, but start and end lines can border one another.Meal periods must be at least 60 minutes in length.
CareLink Pro User Guide Reports workspace 39
4 To use the settings from this meal for all of the patient’s other meals, make sure the check
box next to Use these parameters for all of this patient’s meals is selected.
5 After you finish creating or editing a meal period, click SAVE.
6 To remove a meal period, click DELETE MEAL. Click DELETE when asked to confirm.
7 CareLink Pro can remember these settings for this patient the next time you run a report for
them. To save them for this patient, click SAVE SETTINGS.
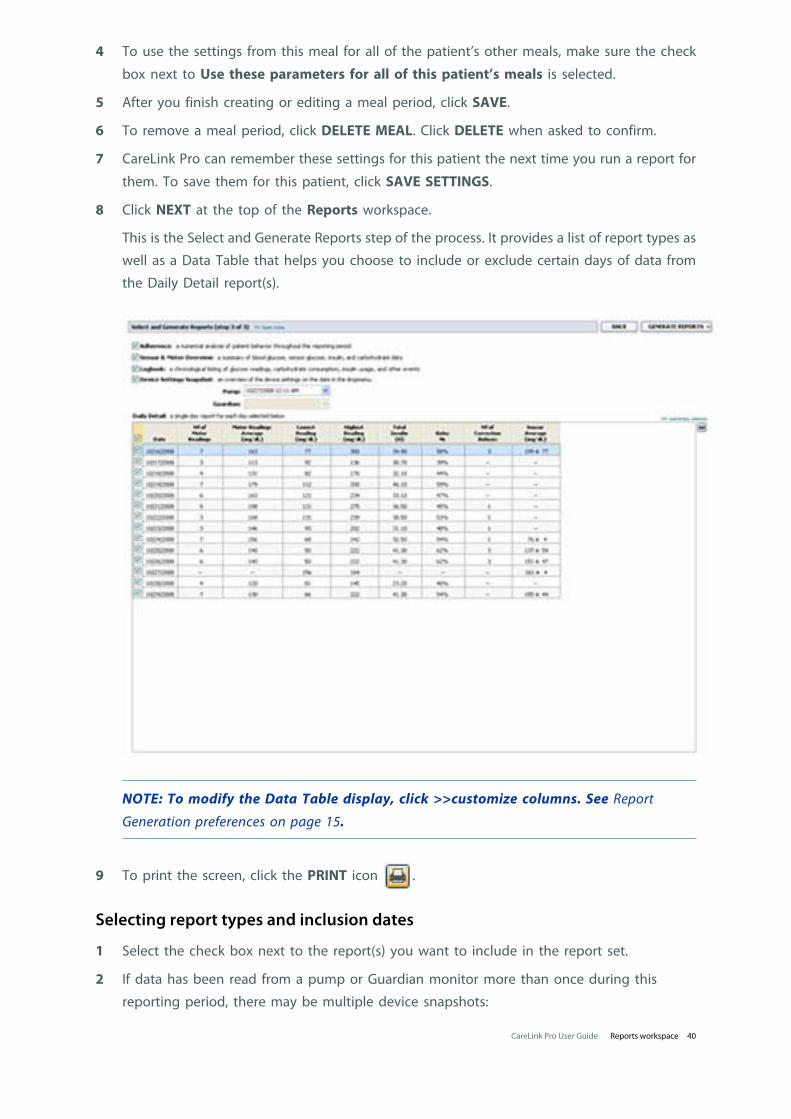
8 Click NEXT at the top of the Reports workspace.
This is the Select and Generate Reports step of the process. It provides a list of report types as
well as a Data Table that helps you choose to include or exclude certain days of data from
the Daily Detail report(s).
NOTE: To modify the Data Table display, click >>customize columns. See Report
Generation preferences on page 15.
9 To print the screen, click the PRINT icon .
Selecting report types and inclusion dates
1 Select the check box next to the report(s) you want to include in the report set.
2 If data has been read from a pump or Guardian monitor more than once during this
reporting period, there may be multiple device snapshots:
CareLink Pro User Guide Reports workspace 40

a. Make sure the check box is selected next to Device Settings Snapshot.
b. Click the drop-down arrow and select a snapshot date and time.
- Pumps: Select a snapshot from the patient’s pump.
- Guardian: Select a snapshot from the patient’s Guardian monitor.
If either field is dimmed, there are no snapshots available during the reporting period.
3 Scroll though the Data Table to review the available Daily Detail report information.
- You can sort the data in each column. Click the column heading to sort the data in
ascending order. Click the heading again to sort the data in descending order.
NOTE: If there is no data for a certain date, that date cannot be selected.
4 Select the check box in the Data Table rows for any date for which you want a Daily Detail
report.
- To include or exclude all Daily Detail report dates with one click, select the check box at
the top of the Data Table check box column.
Generating reports
1 After you verify your report selections, click GENERATE REPORTS at the top of the Reports
workspace.
A list of options is displayed.
2 Select an option to preview, print, or save the report(s).
If you selected Preview, the Preview window is displayed.
3 Click the arrow buttons to navigate through multi-page reports.
4 Click one of the other buttons at the top of the Preview window to save or print the
report(s).
5 To close this window, click the Close button in the upper right corner of the window.
About reports
This topic provides a description of each report. More details about the report components, as
well as sample reports are contained in the Report Reference Guide. You can access the
Report Reference Guide through the CareLink Pro software:
1 Help > View Report Reference Guide (PDF).
2 Select a language for the Report Reference Guide.
The CareLink Pro reports share these common elements:
• Report header — The report header contains identifying information, such as the name of
the report, the patient's name, and the source of the data.
CareLink Pro User Guide Reports workspace 41

• Carbohydrates and blood glucose levels — Within the graphs and charts, carbohydrate
units are displayed in italics and blood glucose levels are displayed in bold.
• Weekend data — Weekend days are in bold so you can easily identify them.
• Legends — A legend of symbols appears at the bottom of each report. While a symbol may
be used in multiple reports, the legends are unique to each report.
Adherence Report
The Adherence Report presents data that describes how insulin pumps and sensors are used
and the patient’s behavior relevant to their therapy. It answers the question, “Was there
enough data to provide an accurate picture of how the patient uses their insulin pump and
sensor, if applicable” It also answers the question, “Do patients adhere to the therapy as
instructed?” It also indicates whether you may need to speak to your patient about the way
they are managing their diabetes.
Sensor and Meter Overview Report
The Sensor and Meter Overview Report provides a graphical representation of the patient's
daily sensor and meter-derived glucose levels and averages, including hourly breakdowns
over 24 hours and as they relate to their meals and sleep patterns. Statistics on the patient's
glucose readings and insulin usage are also included.
A similar analysis of sensor data is generated as the first page of this report if sensor data is
available. When no sensor data is available, the meter data analysis page will be generated as
the first page.
The final page(s) of the report shows the day-to-day level and quality of your patient’s
glycemic, carbohydrate, and insulin control. Each page shows how that control varies during
each day across the entire reporting period up to a 14 day maximum per page.
Logbook Report
The Logbook Report provides meter glucose, carbohydrate, and insulin data for each day in
the reporting period. It provides a diary of events recorded hourly, as well as daily averages
and totals. Each page contains up to 14 days. If the reporting period exceeds 14 days, extra
pages are generated.
Device Settings Snapshot
The Device Settings Snapshot Report presents a snapshot of the settings for the patient's
pump or Guardian REAL-Time monitor for a specific date and time. This can help you
understand other reports or can simply document your patients' settings.
The pump or monitor settings are recorded only when the device is read. If the device was not
read during the reporting period, no settings will be available.
Daily Detail Report
The Daily Detail Report shows glucose data, carb amounts, and the patient’s insulin usage for
the selected day. A separate report is generated for each day you select from the Data Table.
CareLink Pro User Guide Reports workspace 42

The Daily Detail Report provides a detailed look at each day you select. It allows you to focus
on a particular day if you feel something of interest to the patient’s therapy was occurring.
Exporting data
You can export device data that is acquired and stored by CareLink Pro. This gives you all of a
patient’s device data to use for statistics or the creation of specialized reports or charts.
The .csv file can be imported into Microsoft Excel or certain clinical statistics programs where
you can further manipulate the data.
The .csv file contains data recording the actions of the device. For example, it lists the
recording of meter readings, the pump receiving the meter reading value, or change in basal
rate.
NOTE: This is an advanced feature, and requires you to be familiar with the raw devicedata. It also requires proficiency with any software into which you import the .csv file.
Follow these steps to use the CareLink Pro export feature:
1 Click the patient’s tab or click the Open Patient button and double click the patient’s
name.
2 Make sure the Reports workspace is displayed.
3 Use the Duration or From/Through fields to set the dates and length of the report.
The maximum duration you can select is 12 weeks.
4 Click the export selected data link.
The Export Data to CSV File dialog box is displayed.
5 Navigate to the location where you want to store the .csv file on your computer. If you want
to change the name of the file, type it into the File name box.
6 Click SAVE.
NOTE: For more information about the data displayed in CSV files, see the CSV dataappendix.
The .csv file is now saved on your computer in the location you selected. You can now
choose to import it into any program that supports this file type.
CareLink Pro User Guide Reports workspace 43

7
System administration
It is important that you regularly back up the CareLink Pro database. The database stores all
system data that has accumulated in your patient’s records, including profile information,
device-derived data, and report settings.
It is also important that you have the latest version of CareLink Pro. Updated versions are
available periodically, and may contain important enhancements. You can choose to search
for updates or to be notified when they are available.
Applying software updates
There will be occasional updates to the CareLink Pro software. When notice of an update is
displayed, take the following steps to download the latest software release.
NOTE: The database should be backed up before a software update is applied. See Backing
up the database on page 45.
1 Make sure an Internet connection is available and active on your computer.
2 The CareLink Pro Update message is displayed when there is an update to CareLink Pro. It
gives you the option to download the update.
3 Click DOWNLOAD. (If you click CANCEL, the update notice will close. You can download the
update at a later time.)
A warning message is displayed that recommends backing up your database.
4 Click YES to create a backup of your database (see Backing up the database on page 45 for
this procedure). Click NO if you have already backed up your data.
A message is displayed to confirm that the new version of CareLink Pro has been
downloaded.
5 To begin using the latest version of CareLink Pro, click YES to close and re-open the software
application. Click NO if you would prefer to wait before re-starting CareLink Pro.
CareLink Pro User Guide System administration 44

Turning off automatic updates
If you do not want to receive automatic notification of CareLink Pro updates, follow these
steps:
1 Select Tools > Options.
2 Click the General tab.
3 Under the Communications section, clear the check box next to Automatically check for
software updates.
Manually checking for updates
You can manually check for CareLink Pro updates at any time.
NOTE: The database should be backed up before a software update is applied. See Backing
up the database on page 45.
1 Make sure an Internet connection is available and active on your computer.
2 Select Tools > Check for Software Updates.
3 You will receive a message if no updates are currently available. If an update is available, a
CareLink Pro Update message is displayed.
4 Follow the procedure in Applying software updates on page 44.
Backing up and restoring the database
It is a good idea to establish a regular schedule by which to perform database backups. This
will help ensure that it is done regularly, and will minimize the risk of data loss.
If you are backing up or restoring the database, the system displays an alert message if there
are active users of the software on other computers.
Backing up the database
The following steps let you back up the current database to the location you select.
1 Make sure all patient records are closed.
2 Select Tools > Backup Database.
NOTE: Database backups can be saved on a network drive, or to removable storage(such as a DVD, CD, or USB drive).
3 Navigate to the location on your computer where you want to save the backup file. If you
want to change the name of the backup file, type it into the File name box.
4 Click Save. A progress bar is displayed while the database is saved.
A message is displayed when the backup is complete.
CareLink Pro User Guide System administration 45

5 Click OK to close the message.
Restoring the database
The current database may need to be replaced if it can no longer be accessed or used. The
more current your backup, the less data you will lose if you replace the database.
CAUTION: When you restore the database with a backup copy, you lose all the new datacreated in the current database since the selected backup copy was made.
The following steps let you select a backup copy to replace the current database.
1 Make sure all patient records are closed.
2 Select Tools > Restore Database.
3 Select the backup file you want to use to replace the current database (usually the most
recent).
4 Click Open. A warning message is displayed to remind you about the data that may be lost if
you continue the database restore.
5 To continue, click OK. A progress bar is displayed while the database is being restored.
A message is displayed when the database is restored.
6 Click OK to close the message.
When the system is unavailable
If you attempt to start the system while another user is performing a backup or restore, you
will receive a message notifying you that the system is not available. You will not be able to
access the system until the task is complete.
Do one of the following:
• Wait for the process to complete and for the system to become available.
• Click CANCEL to exit and try again later.
CareLink Pro User Guide System administration 46

8
Troubleshooting
This topic is designed to help you solve issues that may occur while using CareLink Pro
software. It also contains instructions for uninstalling the CareLink Pro software if necessary.
General application use errors
If you try to download a software upgrade over the Internet, you may receive the message that
you do not have sufficient privileges to do so. You must have administrative privileges to
download CareLink Pro software upgrades.
1 Close the CareLink Pro software application, and restart your computer system.
2 Have someone with administrative privileges log in to the computer.
3 Follow the instructions in Applying software updates on page 44.
Not connected to the database
An error message stating that you are not connected to the database indicates one of the
following:
• The database has been moved. The database must be located in the same place that was
selected during installation of the CareLink Pro software. If it has been moved, it must be
moved back to the location selected during installation.
• You are not connected to the network drive where the database is located. If the database is
located on a network drive, the network may occasionally experience problems that prevent
you from accessing the drive. Contact your computer support department for help in
reconnecting to the network drive where the database is located.
CareLink Pro User Guide Troubleshooting 47

Forgot the clinic password for CareLink Pro
If no one can remember the password your clinic uses to log in to CareLink Pro, the CareLink
Pro software must be re-installed, and a new database created. Once you re-install the
software, you will not be able to access any patient information that was in the previous
database. Store the password that you created during the new installation somewhere in the
office so that you will not lose future data.
Device read errors
Error Explanation
The selected serial port could not be opened. Anotheroperation might be in progress on that port. Pleasewait until the port is available, or select another port.
Please verify that the com port selected is not inuse by another program, or select a different port.Try rebooting the computer you are using and thentry the device read again. The hardware (such asthe cable) connected to the port or the port itselfmay be bad. Connect the hardware to another portand try the device read again to help determinethe problem.
Auto Detect could not find the device on any availableport. Please check the cable connection, device battery& status and try again, or try specifying a serial port.
Check the connection between the cable and thePC, and verify that the device battery status is fine.If so, try specifying the PC serial port to which thecable is connected, rather than selecting AutoDetect.
Device not found at selected serial port. Please checkthe cable connection, device battery & status and tryagain, try selecting a different port, or try to AutoDetect the device.
Check the connection between the cable and thePC, and verify that the device battery status is fine.If so, try either selecting a different PC serial portnumber, or choose the Auto Detect option.
Unable to communicate with the device. Please ensureyou’ve attached and selected the correct device, checkthe cable connection, device battery and status, and tryagain.
Verify all settings selected for the device read,including device name, serial number and type ofconnection. Also check to make sure that thedevice, cable and PC are connected properly. Verifythe battery and alarm status of the device is okay.Try the read again.
Unexpected response... retrying (n%)An unexpected value was read from the device. Thesystem retries communication until you cancel orcommunication succeeds.
The link device was found, but the device (<serial #>) isnot responding. Please verify the device’s serialnumber, place the device closer to the link device tominimize signal interference, check device battery andstatus.
Verify that the correct serial number was entered.If not, re-enter the correct serial number. If theserial number is correct, try moving the link devicecloser to the communication device. Move the linkdevice and communication device away frompossible interference (such as other RF devices).Check the device's battery strength and ifuploading an insulin pump, check the pumpdelivery status.
This pump is delivering a temp basal. Please cancel thetemp basal or wait until it completes, and then tryagain.
The pump you are attempting to read is deliveringa Temp basal. Either wait until the Temp basalcompletes to read the pump, or cancel the Tempbasal and then read the pump.
This device has active errors or alarms. Please clear thealarms and try again.
There are active alarms on the pump whichprevent it from being read. Read the alarminstructions for clearing the alarm. Clear the alarmand try the pump read again.
CareLink Pro User Guide Troubleshooting 48

Error Explanation
This pump is delivering a bolus. Please cancel the bolusor wait until it completes, and then try again.
The pump you are attempting to read is deliveringa bolus. Either wait until the bolus completes toread the pump, or cancel the bolus and then readthe pump.
The device returned invalid entries; all data read will bediscarded.
Contact your local country representative (seeAssistance on page 2).
Report creation errors
Multiple data entries for the same date
If multiple data entries exist for the same date and time for the same device, the system
considers this to be a conflict that it cannot resolve. Reports created using this device data will
omit the portion of data that overlaps.
You can try to adjust the reporting period to miss the overlapping data. Or, you can remove
the device from the system and then add it back again to clear the previous readings.
System is going to ignore data
If the time on a device has been changed causing overlaps or gaps in data of three hours or
longer, the system does not include that portion of data when creating reports.
Backup and restore errors
The database cannot be locked
This means that you are using the system in a multi-user environment, and other users are
logged in. The system will not allow a database backup to be performed while other users are
potentially performing tasks that may affect the database. Once all other users exit CareLink
Pro, you can perform the database backup.
A database backup or restore is not completing
Other users cannot log in and the backup or restore cannot complete. Please contact your
local country representative (see Assistance on page 2).
A restore database fails
The database backup file you are attempting to use in the restore process is corrupt. Try
restoring with a different backup file.
Uninstalling the software
If you need to uninstall CareLink Pro, complete the following steps:
1 Open the Control Panel through your Windows Start menu.
2 Select Add or Remove Programs.The Windows Add or Remove Programs window is
displayed.
CareLink Pro User Guide Troubleshooting 49

3 Scroll down to Medtronic CareLink Pro and click on it.
4 Click Remove. The Install Shield Wizard is displayed.
5 Click Next. A message is displayed asking you to confirm that you want to remove the
application.
6 Click Yes. The uninstall program runs and removes the program and all of its files from your
computer. When it is done, a message displays on the wizard screen confirming the uninstall.
7 Click Finish.
CareLink Pro User Guide Troubleshooting 50

9
Icon table
The icons and symbols on the packaging labels and the equipment are described in the
following table:
Description Icon
One per container/package (1X)
CD enclosed
Attention: Read all warnings and precautions ininstructions for use.
Date of manufacture (Year)
Catalogue number
Conformité Européene (European Conformity). Thissymbol means that the device fully complies with MDD93/42/EEC and R&TTE Directive 1999/5/EC.
CareLink Pro User Guide Icon table 51
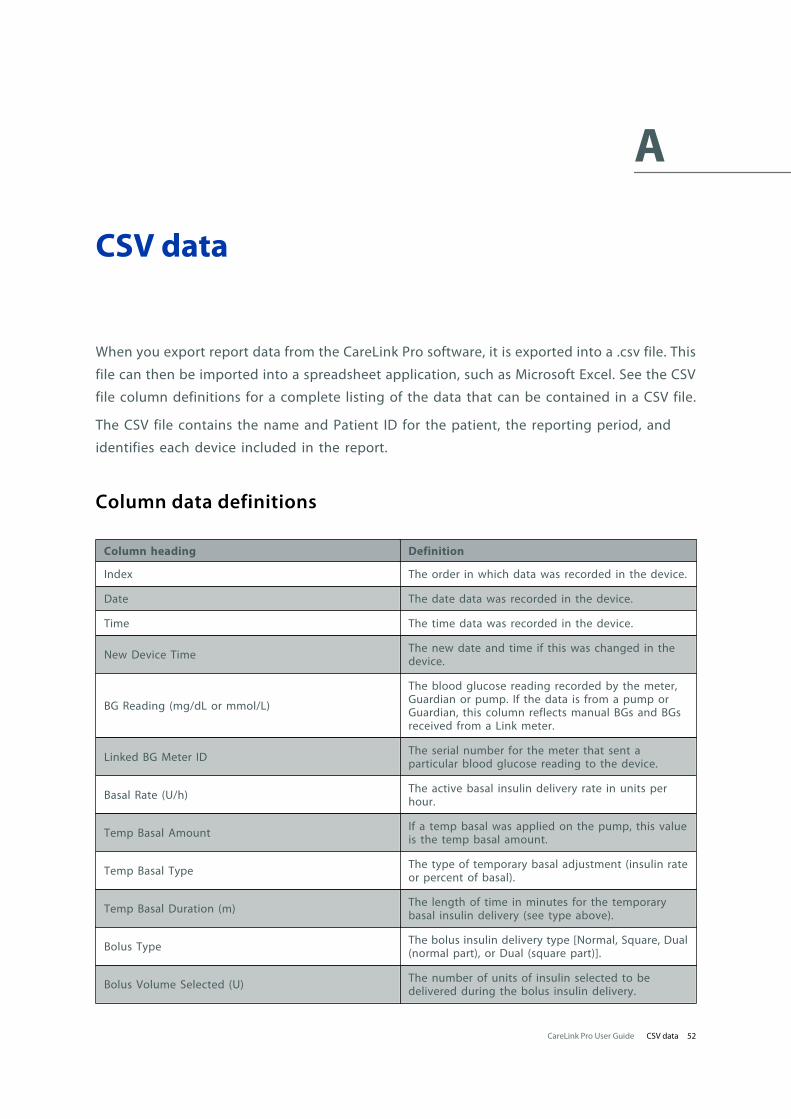
A
CSV data
When you export report data from the CareLink Pro software, it is exported into a .csv file. This
file can then be imported into a spreadsheet application, such as Microsoft Excel. See the CSV
file column definitions for a complete listing of the data that can be contained in a CSV file.
The CSV file contains the name and Patient ID for the patient, the reporting period, and
identifies each device included in the report.
Column data definitions
Column heading Definition
Index The order in which data was recorded in the device.
Date The date data was recorded in the device.
Time The time data was recorded in the device.
New Device Time The new date and time if this was changed in thedevice.
BG Reading (mg/dL or mmol/L)
The blood glucose reading recorded by the meter,Guardian or pump. If the data is from a pump orGuardian, this column reflects manual BGs and BGsreceived from a Link meter.
Linked BG Meter ID The serial number for the meter that sent aparticular blood glucose reading to the device.
Basal Rate (U/h) The active basal insulin delivery rate in units perhour.
Temp Basal Amount If a temp basal was applied on the pump, this valueis the temp basal amount.
Temp Basal Type The type of temporary basal adjustment (insulin rateor percent of basal).
Temp Basal Duration (m) The length of time in minutes for the temporarybasal insulin delivery (see type above).
Bolus Type The bolus insulin delivery type [Normal, Square, Dual(normal part), or Dual (square part)].
Bolus Volume Selected (U) The number of units of insulin selected to bedelivered during the bolus insulin delivery.
CareLink Pro User Guide CSV data 52

Column heading Definition
Bolus Volume Delivered (U) The number of insulin units actually delivered duringthe bolus insulin delivery.
Programmed Bolus Duration (h) Duration of a square bolus or the square portion of adual wave bolus.
Prime Type
Manual or fixed. Manual is used just after a rewind,to fill the infusion set tubing with insulin beforeinserting it. Fixed is used after infusion set insertionto fill the soft cannula with insulin after removingthe introducer needle.
Prime Volume Delivered (U) The number of units of insulin actually delivered forthe prime
Alarm The name of the alarm that occurred.
Suspend Identifies the suspended state of the pump.
Rewind Date and time the device was rewound.
BWZ Estimate (U) The bolus insulin estimate calculated by the BolusWizard feature on the Paradigm pump.
BWZ Target High BG (mg/dL or mmol/L) The setting for the high end of the blood glucosetarget range, used by the Bolus Wizard feature.
BWZ Target Low BG (mg/dL or mmol/L) The setting for the low end of the the blood glucosetarget range, used by the Bolus Wizard feature.
BWZ Carb Ratio
The setting for insulin-to-carbohydrate ratio. If gramsare used as the units, the ratio is the number ofgrams covered by one unit of insulin. If exchangesare used for units, the ratio is the number of insulinunits used to cover one exchange.
BWZ Insulin Sensitivity
The setting for insulin sensitivity. Insulin sensitivity isthe amount the blood glucose level is reduced byone unit of insulin. This is used by the Bolus Wizardfeature.
BWZ Carb Input Amount of carbohydrates entered into the BolusWizard and used to estimate a bolus.
BWZ BG Input (mg/dL or mmol/L) Blood glucose reading when entered into the BolusWizard and used to estimate a bolus.
BWZ Correction Estimate (U)Units of bolus insulin to give for blood glucose levelcorrection, as calculated by the Bolus Wizardfeature.
BWZ Food Estimate (U)The estimated units of bolus insulin to give to coverthe expected amount of carbohydrate consumption,as calculated through the Bolus Wizard feature.
BWZ Active Insulin (U)
The amount of active insulin calculated to be left inthe body from prior bolus insulin deliveries whendetermining the estimated bolus amount throughthe Bolus Wizard feature.
Sensor Calibration BG (mg/dL or mmol/L) The BG value used for calibrating the sensor in mg/dL or mmol/L).
Sensor Glucose (mg/dL or mmol/L) The sensor glucose value.
ISIG value Input signals (ISIG), being read from the sensor,measured in nanoamperes (nA).
More about CSV files exported by CareLink Pro
The title at the top of CSV file includes the following:
CareLink Pro User Guide CSV data 53
• patient’s name
• a list of selected devices and their serial numbers
• selected date range
Each block of columns has a title that includes the following:
• name of the device to which the block of data applies
• serial number of that device
If data is not displaying as expected
There are a number of different factors that can cause the CSV data to display differently than
expected.
• Date or time changes on the device can change the sequence or cause records outside the
selected date range to be shown.
• If there is a large gap between device reads, data for that device may be displayed in
multiple blocks.
CareLink Pro User Guide CSV data 54
Glossary
A1C - Glycosylated hemoglobin
A1C Test - Hemoglobin A1C test, used to interpret blood glucose level over a period of time.
Area Under the Curve (AUC) - Indicates the amount in high and low excursions as determined bypreset values. Excursion data indicates the frequency of highs or lows. AUC indicates themagnitude of events by showing how far out of range and for how long.
Audio bolus - The pump can be programmed so the user hears a beep when they select a bolusinsulin amount (0.5 or 1.0 units) to be delivered. This is useful for situations when it is difficult tosee the buttons on the pump.
Basal insulin - An hourly, continuous infusion of insulin delivered automatically by an insulin pumpbased on preprogrammed profiles and personalized rates set in the pump. The pump delivers adaily infusion of insulin that typically covers background insulin needs during periods of fasting(such as overnight and between meals).
Basal patterns - The user can program up to three different basal rate patterns into their pump forthe delivery of basal insulin: Standard, A, and B. For each pattern there is the option of setting upto 48 basal rates.
Basal profile - A basal rate with a start and stop time. The user can program several different profilesinto their pump, each with a different basal rate, during a 24 hour period of time to achieve betterglucose control.
Basal rate - The pump setting that provides a continuous infusion of insulin to keep the blood glucosestable between meals and during the night. Basal insulin mimics pancreatic insulin delivery—which meets all the body's non-food related insulin needs.
BG - Abbreviation for Blood Glucose
Bolus insulin - A dose of insulin given to cover an expected rise in blood glucose (such as the riseafter a meal or a snack) or to lower a high blood glucose down to target range.
Cal Reminder - The pump will trigger a Meter BG By HH:MM alarm automatically every 12 hours,signaling that the current calibration value is no longer valid. The value of the Cal Reminder is theamount of time before the current calibration value expires by which the user wants to bereminded to calibrate. For example, if the Cal Reminder is set to 2 hours, the Meter BG By HH:MMalarm will occur 2 hours before calibration is required.
Carb ratio (carbohydrate ratio) - The amount of carbohydrates covered by one unit of insulin. (Alsosee exch ratio.)
Carb units - The food entry when using the Bolus Wizard. Entered as (carbohydrate) grams orexchanges.
CareLink® Personal - An online service that allows management of diabetes data via the Internet.
CareLink Pro User Guide Glossary 55

CH - Carbohydrate
ComLink - A radio frequency (RF) transceiver device used to download Paradigm pump data to thecomputer.
Com-Station - A device used to download MiniMed 508 pump and pass-through third-party meterdata to the computer.
Correction bolus - The amount of insulin needed to return a high blood glucose level back down totarget range.
Correction bolus factor - How much 1.0 unit of insulin will lower your blood glucose. This factor isused to calculate a correction bolus amount when your blood sugar is high. (BG level) - (BG target)= X. X ÷ (correction bolus factor) = correction bolus amount
Dual Wave® bolus - Combination of a Normal bolus that is delivered immediately, then followed bya Square Wave bolus. The Square Wave portion is delivered evenly over a period of time.
Easy Bolus™ - Method of delivery for a Normal bolus by using the Easy Bolus button on the pump.
Exch ratio (exchange ratio) - The amount of insulin required to cover one (1) carbohydrate exchange.(Also see carb ratio.)
Express bolus - Method of delivery for any bolus type using the express bolus button on the pump.
Food bolus - A dose of insulin given to cover the expected rise in blood glucose that occurs aftereating.
HbA1c - Glycosylated hemoglobin
HbA1c Test - Hemoglobin A1C test, used to interpret blood glucose control or average of levels overa 2- to 3-month period of time.
High Glucose - The pump will alarm if the sensor indicates that the user’s sensor glucose is at orabove this value. You have the option to turn this feature on or off.
Hyperglycemic - Elevated blood glucose as seen by monitoring blood glucose levels with or withoutany or all of the following symptoms: nausea, vomiting, blurred vision, headache, gastric distress,frequent urination of large amounts, and lethargy.
Hypoglycemic - Low blood glucose as seen by monitoring blood glucose levels, with or without anyor all of the following symptoms: excessive hunger, shaking or tremors, perspiration, dancingvisions, light-headedness, headache, blurred speech, sudden mood swings or personality change.
Infusion set - The apparatus used for inserting and securing a cannula below the skin andtransporting insulin to the insertion site via tubing from the pump.
Insulin concentration - The strength or type of insulin the doctor has prescribed for the user. Thisaffects the rate of insulin the pump delivers. If the user’s insulin concentration changes, the basalpatterns and the maximum basal and bolus rates must be reprogrammed in the pump.
Insulin sensitivity - The amount of mg/dL (or mmol/L) that your blood glucose (BG) level is reducedby one unit of insulin. (Bolus Wizard data.)
ISIG - Sensor values that indicate whether the transmitter electronics in a sensor-augmented systemare working properly. If you see an ISIG value that is less than 24.00 nA or more than 29.00 nA, callfor product assistance. It may be time to replace your transmitter.
Ketone test - Ketone is a waste product that is produced when the body is forced to burn body fatinstead of glucose for energy. It may be a sign of lack of insulin in the body. The Ketone testmeasures the amount of ketone concentrated in the blood or urine.
Link(1) To turn on and setup the meter option that allows the pump to receive BG readings from ameter that communicates with your pump.(2) It is also used in this system to refer to hypertext links. When clicked on, hypertext links takeyou to another place in the system or to another Web site.
Low Glucose - The pump will alarm if the sensor indicates that the user’s sensor glucose is at or belowthis value. You have the option to turn this feature on or off.
CareLink Pro User Guide Glossary 56

Low reservoir warning - Programmable warning that notifies you with an alert when either aspecified number of units remain in the reservoir of your pump, or a specified amount of timeremains before the reservoir will be empty.
Manual bolus - Optional item available in the BOLUS MENU when the Bolus Wizard is active. Onemethod of programming a bolus without the Bolus Wizard.
Max basal insulin - The maximum amount of basal insulin that the pump will deliver at one time.(Set by the user).
Max bolus - The maximum amount of bolus insulin that the pump will deliver at one time. (Set bythe user).
Mean Absolute Difference % (MAD%) - Represents the level of accuracy in calibration of the sensorto BG meter readings. The lower this number, the greater the calibration accuracy. MAD% iscalculated by taking the difference between closely occurring pairs of sensor glucose and BGmeter readings, dividing by the BG meter reading and then averaging across all pairs.
Meter - a medical device for determining the approximate concentration of glucose in the blood. Asmall drop of blood is placed on a disposable test strip, which the meter reads and uses to calculatethe blood glucose level. The meter then displays the level in mg/dL or mmol/L.
Meter option - Feature that allows the pump to receive BG readings from a linked BG meter.
Normal bolus - An immediate delivery of a specified unit amount of insulin.
Pattern feature - Extended pump feature that allows you to program optional basals (Pattern A,Pattern B) that support activities or glucose patterns that are not a part of your day-to-day routine,but are usual in your lifestyle. Such activities could be a sport that you do once a week, a changein your sleep pattern over the weekend, or hormonal changes during a menstrual cycle.
Pattern, standard - Your normal basal that supports your usual day-to-day activity. When thePatterns feature is off, the pump uses your standard (basal) pattern.
RF - Radio frequency (RF).
Square Wave® bolus - Bolus delivered evenly over a specified time period (30 minutes to 8 hours).
Square Wave portion - (Sq) The second part of a Dual Wave bolus. The Square Wave portion deliversevenly over a period of time after the NOW portion delivers.
Step - Measurement of insulin that you set and use for Easy Bolus delivery.
Suspend - Function on the pump that stops all insulin delivery. Any current bolus and/or primedeliveries are canceled. The basal delivery is paused until restarted.
Temp - Temporary
Temp basal (tmp basal) - Temporary one-time basal insulin with a specified amount and duration.Used to support insulin needs for special activities or conditions that are not part of the normaldaily routine.
Transmtr ID - The serial number of the transmitter currently in use.
Upload - The process for transferring pump or meter data to the CareLink® Personal server.
CareLink Pro User Guide Glossary 57

Index
A
about reports 41Adherence report 42Daily Detail report 42Device Settings Snapshot 42Logbook report 42Sensor & Meter Overview report 42
activating devices 32adding a device to the system 27adding a Guardian monitor to the system 27adding a meter to the system 29
equivalent meter names to choose 4adding a patient 19adding a patient’s device to the system
Guardian monitor 27meters 29pumps 27
adding a pump to the system 27Adherence report
about 42
B
backing up the database 45basic CareLink Pro tasks 7Bayer Ascensia® DEX®
devices equivalent to 4Bayer Ascensia ELITE™ XL
devices equivalent to 4buttons on the toolbar 8
C
cables for connecting devices to computerserial 24USB 24
CareLink Personalgetting data 21linking to an account 20
email invitation 20existing account 20
checkingfor device data for reports 37
closing patient profiles 10ComLink 4, 25communication devices supported by
CareLink Pro 4communications devices supported 2Com-Station 4connecting devices to computer 23
cables 24computer connections 24
serial 24USB 24
meter options 23optional components 25
ComLink 25connecting devices to your computer
computer connections 24serial 24USB 24
overview 24contraindications 5copying the database for backup 45creating patient profiles 19creating reports 36
checking for device data 37getting new device data 38making your own report 43opening the reports workspace 36previewing 41printing 41saving 41selecting devices 37selecting report types and inclusion
dates 40selecting the reporting period 36verifying report settings 39
CSV filesexporting device data to 43
D
Daily Detail reportabout 42
CareLink Pro User Guide Index 58

data communications cable 4data communications cable supported 4database
copying for backup 45restoring with backup copy 46
deleting a patient’s device from the system 32device data
getting data from CareLink Personal 21getting it from a patient’s device 33linking to CareLink Personal 20
email invitation 20existing account 20
Device Settings Snapshotabout 42
devicesactivating 32adding to the system 27, 29
Guardian monitor 27meters 29pumps 27
checking for data for reports 37connecting to computer 23, 24, 25
computer connections, serial 24optional components, ComLink 25
connecting to your computer 24computer connections, serial 24overview 24
deleting 32deleting from the system 32exporting data 43getting data 33, 38
new data for reports 38inactivating 32ordering 4selecting for reports 37storing in the system 32
inactivating 32making active 32
supported 2, 3, 4ComLink 4Com-Station 4glucose meters 3insulin pumps 2meter data communications cable 4
supported by CareLink Pro 2devices workspace
adding devices 27, 29Guardian monitor 27meters 29pumps 27
deleting devices 32getting device data 33storing devices 32
inactivating 32making active 32
documents related to this user guide 2downloading software updates 44
E
editing patient profiles 19
email invitation to set up a CareLink Personalaccount 20
equivalent devicesalternative meter names to choose 4
existing CareLink Personal accountlinking to 20
exporting device data 43
F
features of CareLink Pro 1security 2
G
general preferencessetting 11
generating reports 41previewing 41printing 41saving 41
getting a patient’s device data 33getting device data
from CareLink Personal 21linking to CareLink Personal 20
email invitation 20existing account 20
new data for reports 38global system preferences
setting 11, 13, 14, 15, 16, 17general preferences 11open patient preferences, choosing
data 15patient lookup preferences 14patient lookup preferences, changing
column order 15patient profile preferences 13patient profile preferences, adding a
custom field 13patient profile preferences, changing
field order 14patient profile preferences, choosing
data fields 13report generation preferences,
changing column order 17report generation preferences,
choosing data 16understanding 11
glucose meters supported 2glucose meters supported by CareLink Pro 3Guardian monitor
adding to the system 27Guardian monitors
inactivating 32Guide Me feature 9
CareLink Pro User Guide Index 59

H
hardware connections 23cables 24computer connections 24
serial 24USB 24
meter options 23optional components 25
ComLink 25overview 24USB 24
HelpLine, contacting 2how to use this user guide 5
I
icons 51inactivating devices 32inclusion dates
selecting for reports 40indications for use 5insulin pumps supported 2insulin pumps supported by CareLink Pro 2
K
key features of CareLink Pro 1
L
linking to CareLink Personal accounts 20email invitation 20existing account 20getting data 21
Logbook reportabout 42
logging into CareLink Pro 8
M
Medtronic MiniMed productsordering 4
meter cable 4meter data communications cable
supported 4meter name
equivalent devices 4meters
activating 32adding to the system 29connecting to computer 23, 24, 25
computer connections, serial 24computer connections, USB 24optional components, ComLink 25
connecting to your computer 24computer connections, serial 24computer connections, USB 24
deleting 32getting data 33inactivating 32options for communicating with
computer 23ordering 4supported 3
N
navigatingworkspaces 8
navigating the CareLink Pro GUI 8navigation bar
workspaces 8notification of software updates 44
O
online device datagetting the data 21linking to CareLink Personal 20
email invitation 20existing account 20
open patient preferencessetting 15
choosing data 15opening
reports workspace 36opening CareLink Pro 8
entering your password 8logging in 8
opening patient profiles 10optional devices for communicating with
computer 25ordering
devices 4Medtronic MiniMed products 4meters 4Paradigm Link 4pumps 4
overview of CareLink Pro 1
P
Paradigm Linkordering 4
passwordentering for CareLink Pro 8
patient lookup preferencessetting 15
changing column order 15
CareLink Pro User Guide Index 60

patient profile preferencessetting 13, 14
adding a custom field 13changing field order 14choosing data fields 13
patient profilesclosing 10creating 19editing 19opening 10
PCconnecting devices 23, 24
computer connections, serial 24computer connections, USB 24
connecting devices to it 24, 25computer connections, serial 24computer connections, USB 24optional components, ComLink 25overview 24
preferencessystem 11, 13, 14, 15, 16, 17
setting 11setting, general preferences 11setting, open patient preferences,
choosing data 15setting, patient lookup preferences 14setting, patient lookup preferences,
changing column order 15setting, patient profile preferences 13setting, patient profile preferences,
adding a custom field 13setting, patient profile preferences,
changing field order 14setting, patient profile preferences,
choosing data fields 13setting, report generation
preferences 15setting, report generation
preferences, changing columnorder 17
setting, report generationpreferences, choosing data 16
understanding 11previewing
reports 41primary CareLink Pro tasks 7printing
reports 41product
overview 1profiles
closing 10creating 19editing 19opening 10
pumpsactivating 32adding to the system 27communicating with the computer 33, 38
guidelines 33, 38
connecting to computer 23, 24, 25computer connections, serial 24computer connections, USB 24optional components, ComLink 25
connecting to your computer 24computer connections, serial 24computer connections, USB 24example 24
deleting 32getting data 33inactivating 32ordering 4supported 2
R
related documents 2report generation preferences
setting 15, 16, 17changing column order 17choosing data 16
report settingsverifying 39
report typesselecting for reports 40
reporting periodselecting 36
reportsabout 42
Adherence report 42Daily Detail report 42Device Settings Snapshot 42Logbook report 42Sensor & Meter Overview report 42
creating 36, 37, 38, 39, 40, 41checking for device data 37getting new device data 38opening the reports workspace 36previewing 41printing 41saving 41selecting devices 37selecting report types and inclusion
dates 40selecting the reporting period 36verifying settings 39
creating your own 43previewing 41printing 41saving 41understanding 41
reports screenoverview 35
restoring the database 46
S
safety 5saving
reports 41
CareLink Pro User Guide Index 61

security features of CareLink Pro 2selecting
devices for reports 37report types and inclusion dates 40the reporting period 36
Sensor & Meter Overview reportabout 42
serial connections 24settings
verifying for reports 39software updates 44starting the software 8
entering your password 8logging in 8
storing a patient’s device on the system 32inactivating 32making active 32
supported communications devices 2supported devices 2
ComLink 4communication devices 4Com-Station 4glucose meters 3, 4
equivalent devices 4insulin pumps 2meter communications cable 4
supported meters 2supported pumps 2symbols 51system preferences
setting 11, 13, 14, 15, 16, 17general preferences 11open patient preferences, choosing
data 15patient lookup preferences 14patient lookup preferences, changing
column order 15patient profile preferences 13patient profile preferences, adding a
custom field 13patient profile preferences, changing
field order 14patient profile preferences, choosing
data fields 13report generation preferences 15report generation preferences,
changing column order 17report generation preferences,
choosing data 16understanding 11
T
toolbar for CareLink Probuttons 8
troubleshooting 47
U
understanding reports 41Adherence report 42Daily Detail report 42Device Settings Snapshot 42Logbook report 42Sensor & Meter Overview report 42
updating software 44USB connections 24user guide
conventions 5related documents 2
user interfaceGuide Me 9navigating 8toolbar 8
user safetycontraindications 5indications for use 5warnings 5
V
verifying report settings 39
W
warnings 5workspaces 8
CareLink Pro User Guide Index 62
Related Documents