CANVAS ACTIVITY WORKBOOK TCC ONLINE TALLAHASSEE COMMUNITY COLLEGE

Welcome message from author
This document is posted to help you gain knowledge. Please leave a comment to let me know what you think about it! Share it to your friends and learn new things together.
Transcript
CANVAS ACTIVITY WORKBOOK
TCC ONLINE TALLAHASSEE COMMUNITY COLLEGE

TCC Online 2018

Contents INTRODUCTION TO CANVAS ......................................................................................................................... 1
NAVIGATING THE CANVAS MENUS ............................................................................................................... 2
Global Navigation ...................................................................................................................................... 2
Log in to Canvas as an instructor .......................................................................................................... 2
Use the Global Navigation Menu as an instructor ................................................................................ 7
Use the Dashboard as an instructor.................................................................................................... 11
Use the Global Activity Stream as an instructor ................................................................................. 16
Log out of Canvas as an instructor ...................................................................................................... 20
Global Navigation: Try it ......................................................................................................................... 21
Course Navigation ................................................................................................................................... 22
Use the Course Navigation Menu as an instructor ............................................................................. 22
Manage Course Navigation links ......................................................................................................... 25
Use the Course Activity Stream as an instructor ................................................................................ 34
Course Navigation: Try it ......................................................................................................................... 37
COMMUNICATING WITH YOUR STUDENTS ................................................................................................ 38
Announcements ...................................................................................................................................... 38
View Announcements ......................................................................................................................... 38
Use the announcement index page .................................................................................................... 40
Create an announcement ................................................................................................................... 43
Edit an announcement in a course ..................................................................................................... 47
Delete an announcement ................................................................................................................... 50
Announcements: Try it ............................................................................................................................ 53
Inbox Email .............................................................................................................................................. 54
View Inbox ........................................................................................................................................... 54
Inbox: Try it ............................................................................................................................................. 55
Syllabus ................................................................................................................................................... 56
Use the Syllabus as an instructor ........................................................................................................ 56
Edit the Syllabus description in a course ............................................................................................ 61
Syllabus: Try it ......................................................................................................................................... 64
DELIVERING YOUR CONTENT ...................................................................................................................... 65
Modules .................................................................................................................................................. 65
View a Module .................................................................................................................................... 65
Add a Module ...................................................................................................................................... 66
Edit a Module ...................................................................................................................................... 69
Add assignment types, pages, and files as module items ................................................................... 73
Add an external URL as a module item ............................................................................................... 77
Edit module items ............................................................................................................................... 80
Move or reorder a module item ......................................................................................................... 83
Use the Modules Index Page .............................................................................................................. 89
Lock a module ..................................................................................................................................... 98
Delete a module ................................................................................................................................ 106
Modules: Try it ...................................................................................................................................... 107
Assignment............................................................................................................................................ 108
Create an assignment for all students .............................................................................................. 108
Assign an assignment to an individual student ................................................................................. 112
Add or edit details in an assignment................................................................................................. 120
Add or edit points for an assignment ............................................................................................... 124
Use the Assignments Index Page ...................................................................................................... 126
Understand the difference between assignment due dates and availability dates ......................... 131
Assignment: Try It ................................................................................................................................. 138
Turnitin Assignment .............................................................................................................................. 139
Create a Turnitin assignment ............................................................................................................ 139
Change Turnitin settings for an assignment ..................................................................................... 145
Manage Turnitin assignments ........................................................................................................... 151
Turnitin assignment: Try It .................................................................................................................... 157
Quiz ....................................................................................................................................................... 158
Create different quiz types in a course ............................................................................................. 158
Create a quiz with individual questions ............................................................................................ 159
Create a Multiple Choice quiz question ............................................................................................ 164
Create a True/False quiz question .................................................................................................... 171
Create a Fill-in-the-Blank quiz question ............................................................................................ 176
Create a Fill-in-Multiple-Blanks quiz question .................................................................................. 181
Create a Multiple Answers quiz question ......................................................................................... 188
Create a Multiple Dropdown quiz question ...................................................................................... 195
Create Likert scale quiz questions ..................................................................................................... 202
Create a Matching quiz question ...................................................................................................... 207
Create a Numerical Answer quiz question ........................................................................................ 212
Create a Simple Formula quiz question ............................................................................................ 224
Create an Essay quiz question .......................................................................................................... 229
Create a File Upload quiz question ................................................................................................... 232
Create a Text (no question) quiz question ........................................................................................ 236
Set options in a quiz .......................................................................................................................... 241
Create a quiz where students only see one question at a time........................................................ 252
Make a quiz available before or after the due date ......................................................................... 255
Assign a quiz to an individual student .............................................................................................. 260
Make additional changes once a quiz is published ........................................................................... 268
Use the Moderate Quiz page, after a quiz is published .................................................................... 271
Quiz statistics available once a quiz is published .............................................................................. 275
Give students extra attempts on quiz after it is published ............................................................... 280
Give students extra time on a timed quiz, once it’s published ......................................................... 286
View student results in a quiz ........................................................................................................... 292
View a quiz log for a student ............................................................................................................ 295
Create a survey in my course ............................................................................................................ 301
View survey results in a course ......................................................................................................... 307
View practice quiz results in a course ............................................................................................... 310
Quiz: Try It ............................................................................................................................................. 314
File ......................................................................................................................................................... 316
Upload a file to a course ................................................................................................................... 316
View your new file in the course ...................................................................................................... 319
Types of media files for upload in Canvas as an instructor .............................................................. 319
File: Try it............................................................................................................................................... 321
Content Page ......................................................................................................................................... 322
Content Pages ................................................................................................................................... 322
Create a new page in a course .......................................................................................................... 323
Use the Pages Index Page ................................................................................................................. 327
Set a Front Page in a course .............................................................................................................. 335
Edit a page in a course ...................................................................................................................... 339
Link to other Canvas pages in a course ............................................................................................. 342
Delete a page in a course .................................................................................................................. 345
Content Page: Try it .............................................................................................................................. 347
Discussion.............................................................................................................................................. 348
Create a discussion as an instructor ................................................................................................. 348
Edit a discussion in a course ............................................................................................................. 352
Attach a file to a discussion reply as an instructor ........................................................................... 355
Embed an image in a discussion reply as an instructor .................................................................... 358
Link to a YouTube video in a discussion reply as an instructor......................................................... 364
Assign a graded discussion to everyone in a course ......................................................................... 368
Allow students to edit and delete their own discussion posts in a course ....................................... 374
Delay posting a discussion until a specified date in a course ........................................................... 375
Close a discussion for comments in a course ................................................................................... 379
Open for comments .......................................................................................................................... 380
Delete a discussion in a course ......................................................................................................... 381
Use the Discussions Index Page ........................................................................................................ 383
Discussion: Try It ................................................................................................................................... 389
ASSESSING STUDENT PERFORMANCE ....................................................................................................... 390
Rubrics................................................................................................................................................... 390
Create a rubric in a course ................................................................................................................ 390
Rubric: Try it .......................................................................................................................................... 397
Gradebook ............................................................................................................................................ 398
Grades and the Gradebook ............................................................................................................... 398
Use the Gradebook ........................................................................................................................... 399
Create assignment columns for non-submission assignments in the Gradebook ............................ 408
Sort columns in the Gradebook ........................................................................................................ 412
Enter and edit grades in the Gradebook ........................................................................................... 417
Curve grades in the Gradebook ........................................................................................................ 421
Excuse an assignment for a student in the Gradebook .................................................................... 425
Give extra credit in a course ............................................................................................................. 426
Download all student submissions for an assignment in the Gradebook ........................................ 433
Download grades from the Gradebook ............................................................................................ 437
View a student's Grades page in a course ........................................................................................ 440
Gradebook: Try It .................................................................................................................................. 445
Speedgrader .......................................................................................................................................... 446
Access SpeedGrader from the Gradebook........................................................................................ 446
Access SpeedGrader from an assignment, quiz, or graded discussion ............................................. 447
Use SpeedGrader .............................................................................................................................. 450
View the details of a submission for a student in SpeedGrader ....................................................... 456
Use a rubric to grade submissions in SpeedGrader .......................................................................... 459
Leave feedback comments for student submissions in SpeedGrader .............................................. 462
Speedgrader: Try It ............................................................................................................................... 466
MAKING YOUR COURSE AVAILABLE .......................................................................................................... 468
Course Copy .......................................................................................................................................... 468
Copy content from another Canvas course ...................................................................................... 468
Course Copy: Try It ................................................................................................................................ 471
Publish your Course .............................................................................................................................. 472
Publish a course ................................................................................................................................ 472
Publish a course: Try it .......................................................................................................................... 475
1
INTRODUCTION TO CANVAS Welcome to the Canvas Activity Workbook! This workbook will give you a walk-through of the most important Canvas features that you will need to know to get you started as an online instructor at Tallahassee Community College and to help you be successful in teaching online. The workbook is broken into five sections: (1) Navigating the Canvas Menus, (2) Communicating with Your Students, (3) Delivering Your Content, (4) Assessing Student Performance, and Making Your Course Available. In each section, you will review a series of tutorials and then complete a Try It activity in your FirstName_LastName sandbox to assess your understanding of the features. We wish you success in this training! If you have any questions, please feel free to contact the Office of TCC Online via email at [email protected] .
2
NAVIGATING THE CANVAS MENUS There are two ways to navigate Canvas: through the Global navigation and through the Course Navigation.
Global Navigation
Log in to Canvas as an instructor This part of the lesson will show you how to log in to Canvas from an internet browser. You must have an account to log in to Canvas:
Log in to Canvas To start, open a browser window. Because it's built using web standards, Canvas runs on Windows, Mac, Linux, iOS, Android, or any other device with a modern web browser.
Supported Browsers Canvas supports the current and first previous major releases of the following browsers:
Chrome 65 and higher
Firefox 59 and higher (Extended Releases are not supported)
Flash 28 and higher (used for recording or viewing audio/video and uploading files)
Internet Explorer 11 (Windows only—functionally supported; may exhibit slight visual
differences from other browsers, but these differences do not restrict product functionality
or accessibility)
Edge 41 and higher (Windows only)
Safari 10 and higher (Macintosh only)
You should always use the most current version of your preferred browser. Your browser will notify you if there is a new version available. Some supported browsers may still produce a banner stating Your browser does not meet the minimum requirements for Canvas. If you have upgraded your browser but you are still seeing the warning banner, try logging out of Canvas and deleting your browser cookies. Note: If you are having trouble signing into Canvas, please see the troubleshooting section in this lesson. There are two ways to login in to Canvas: through the TCC web page and through a URL.
3
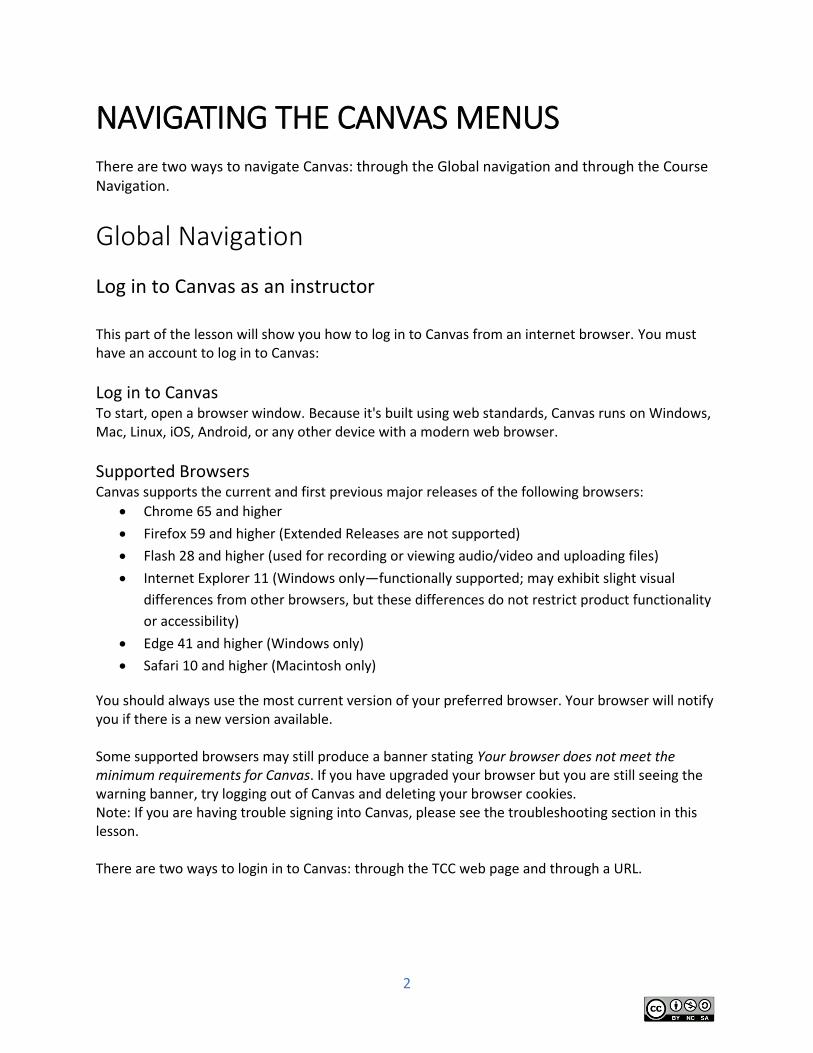
Access Canvas via the Tallahassee Community College homepage
Type https://www.tcc.fl.edu/. At the home page, select Resources
At the Resources page, scroll down until your see the resource icons. Click on Class Log-in (Canvas).
4
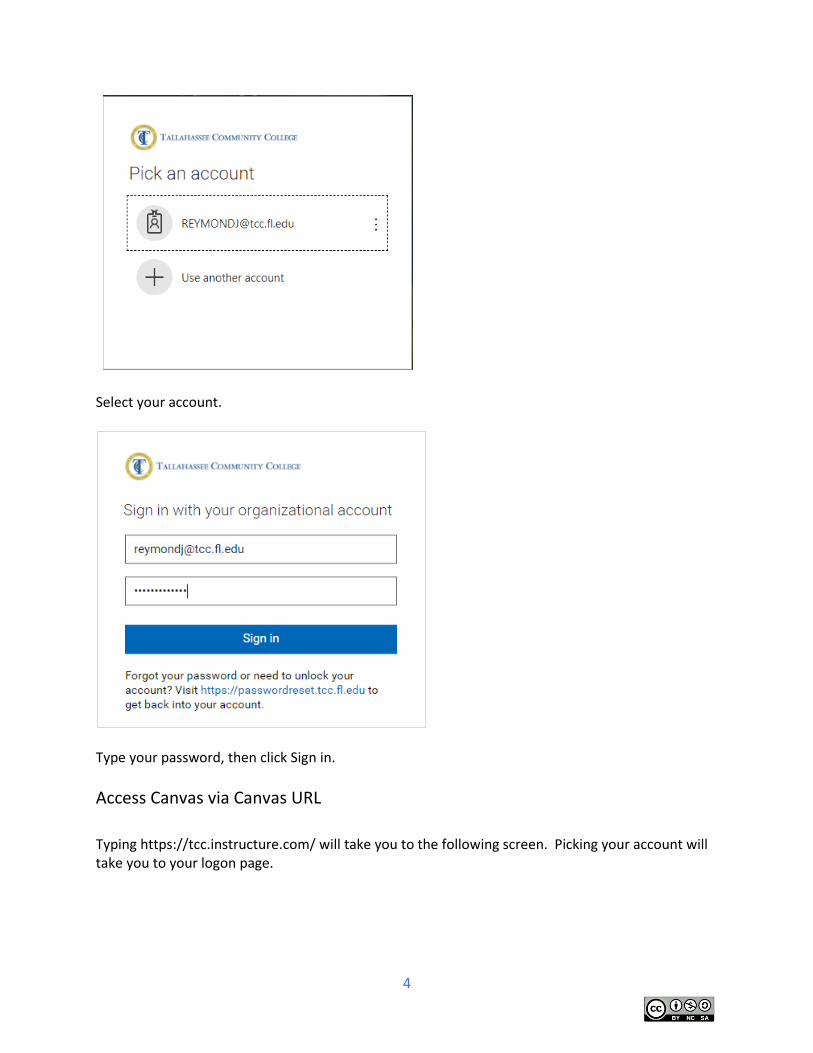
Select your account.
Type your password, then click Sign in.
Access Canvas via Canvas URL
Typing https://tcc.instructure.com/ will take you to the following screen. Picking your account will take you to your logon page.

5
Select your account.
Type your password, then click Sign in.
6
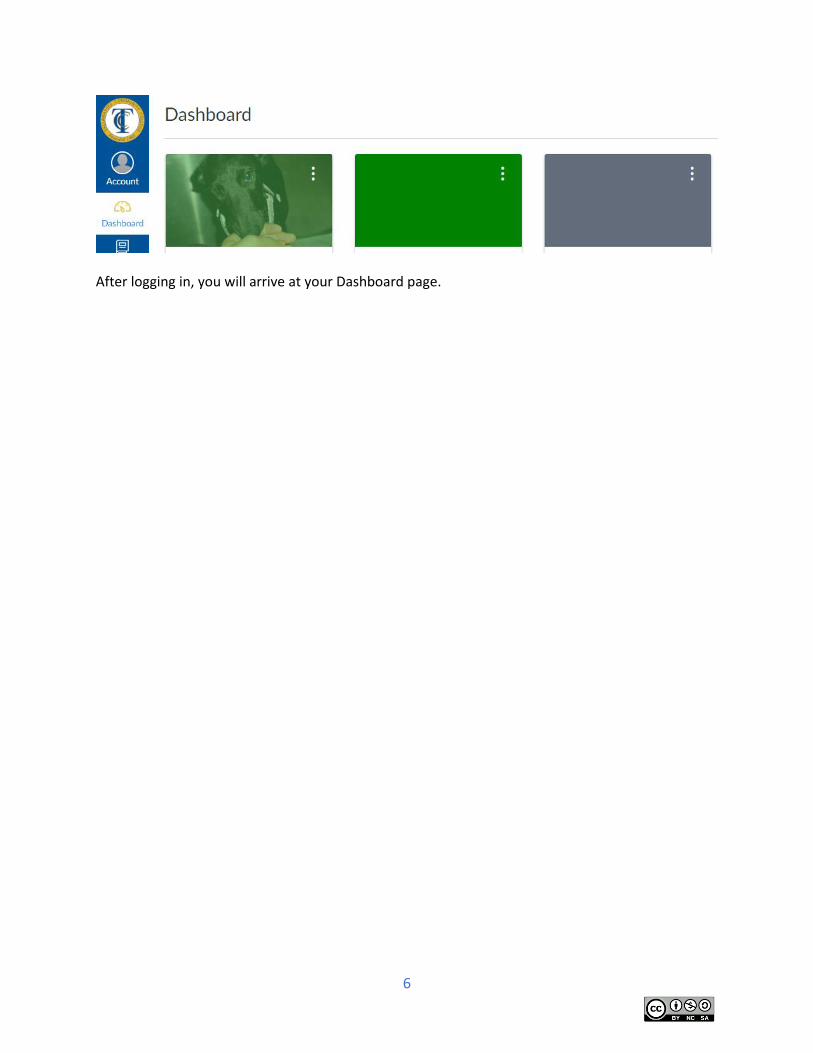
After logging in, you will arrive at your Dashboard page.
7
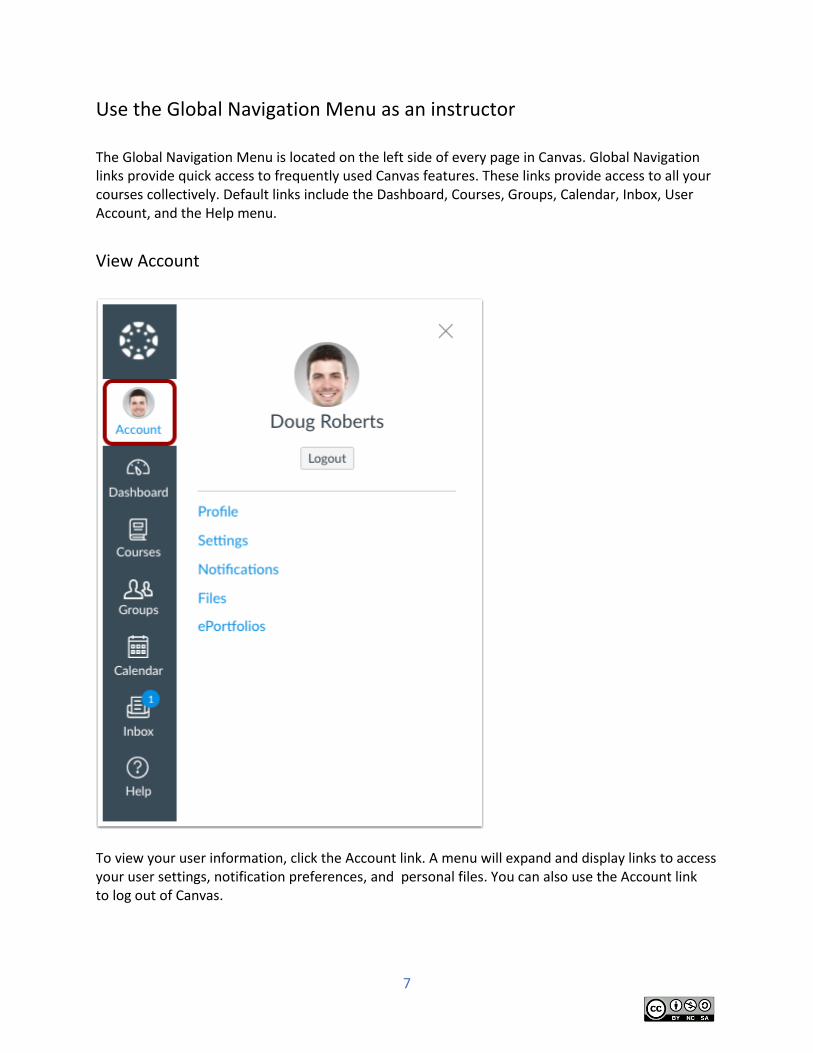
Use the Global Navigation Menu as an instructor The Global Navigation Menu is located on the left side of every page in Canvas. Global Navigation links provide quick access to frequently used Canvas features. These links provide access to all your courses collectively. Default links include the Dashboard, Courses, Groups, Calendar, Inbox, User Account, and the Help menu.
View Account
To view your user information, click the Account link. A menu will expand and display links to access your user settings, notification preferences, and personal files. You can also use the Account link to log out of Canvas.
8
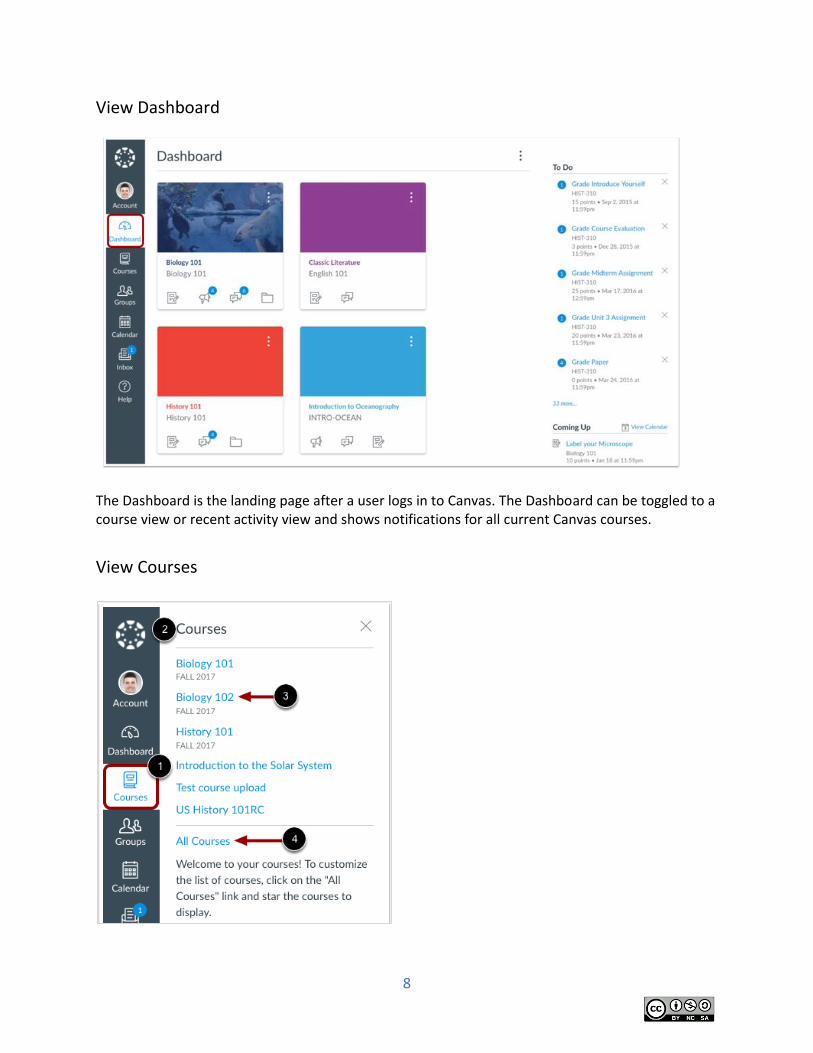
View Dashboard
The Dashboard is the landing page after a user logs in to Canvas. The Dashboard can be toggled to a course view or recent activity view and shows notifications for all current Canvas courses.
View Courses
9
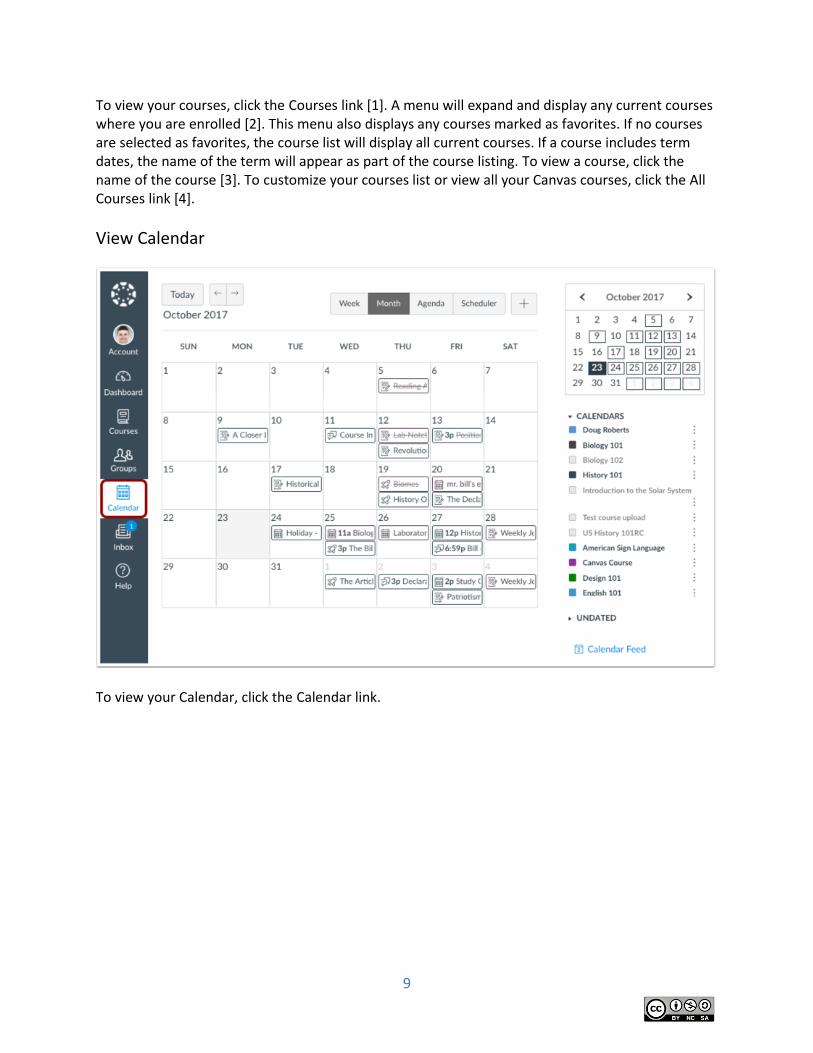
To view your courses, click the Courses link [1]. A menu will expand and display any current courses where you are enrolled [2]. This menu also displays any courses marked as favorites. If no courses are selected as favorites, the course list will display all current courses. If a course includes term dates, the name of the term will appear as part of the course listing. To view a course, click the name of the course [3]. To customize your courses list or view all your Canvas courses, click the All Courses link [4].
View Calendar
To view your Calendar, click the Calendar link.
10
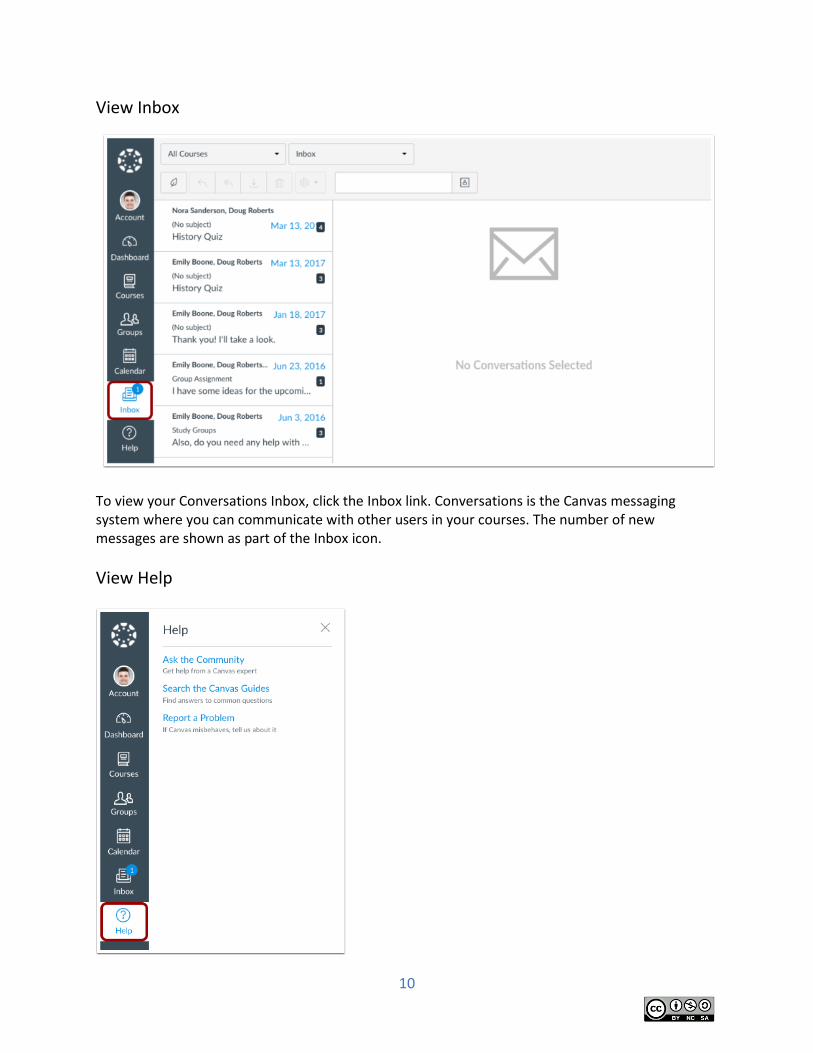
View Inbox
To view your Conversations Inbox, click the Inbox link. Conversations is the Canvas messaging system where you can communicate with other users in your courses. The number of new messages are shown as part of the Inbox icon.
View Help
11
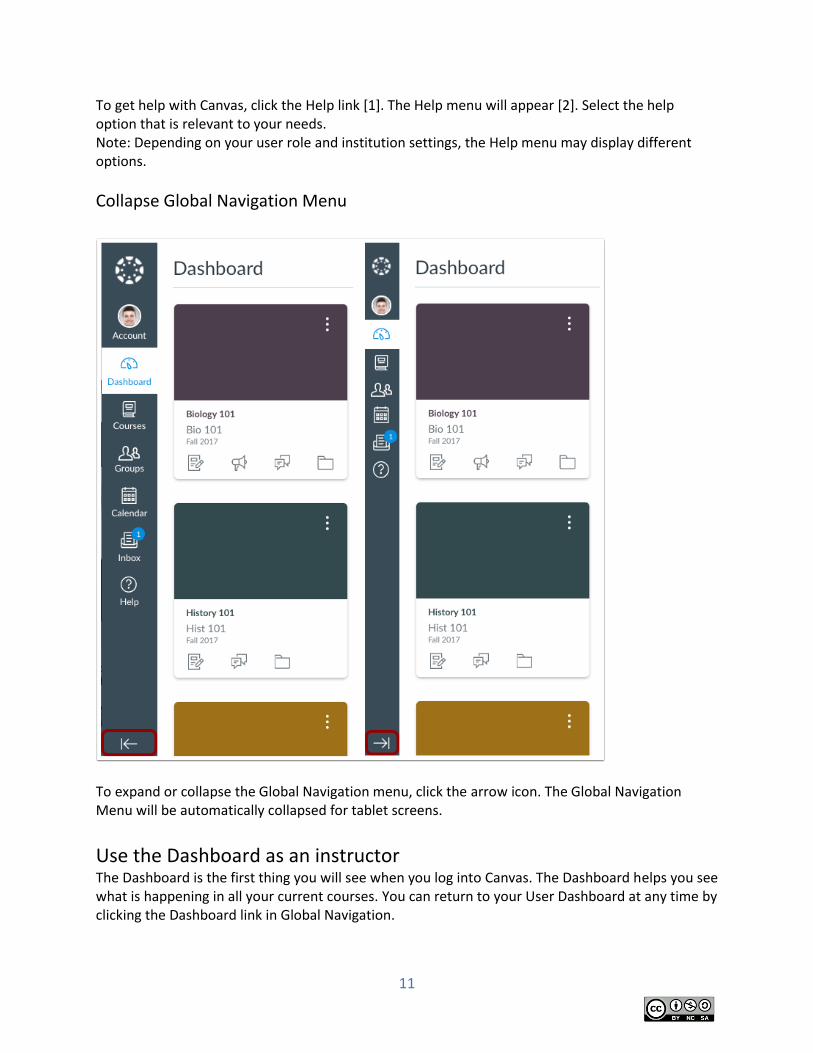
To get help with Canvas, click the Help link [1]. The Help menu will appear [2]. Select the help option that is relevant to your needs. Note: Depending on your user role and institution settings, the Help menu may display different options.
Collapse Global Navigation Menu
To expand or collapse the Global Navigation menu, click the arrow icon. The Global Navigation Menu will be automatically collapsed for tablet screens.
Use the Dashboard as an instructor The Dashboard is the first thing you will see when you log into Canvas. The Dashboard helps you see what is happening in all your current courses. You can return to your User Dashboard at any time by clicking the Dashboard link in Global Navigation.
12
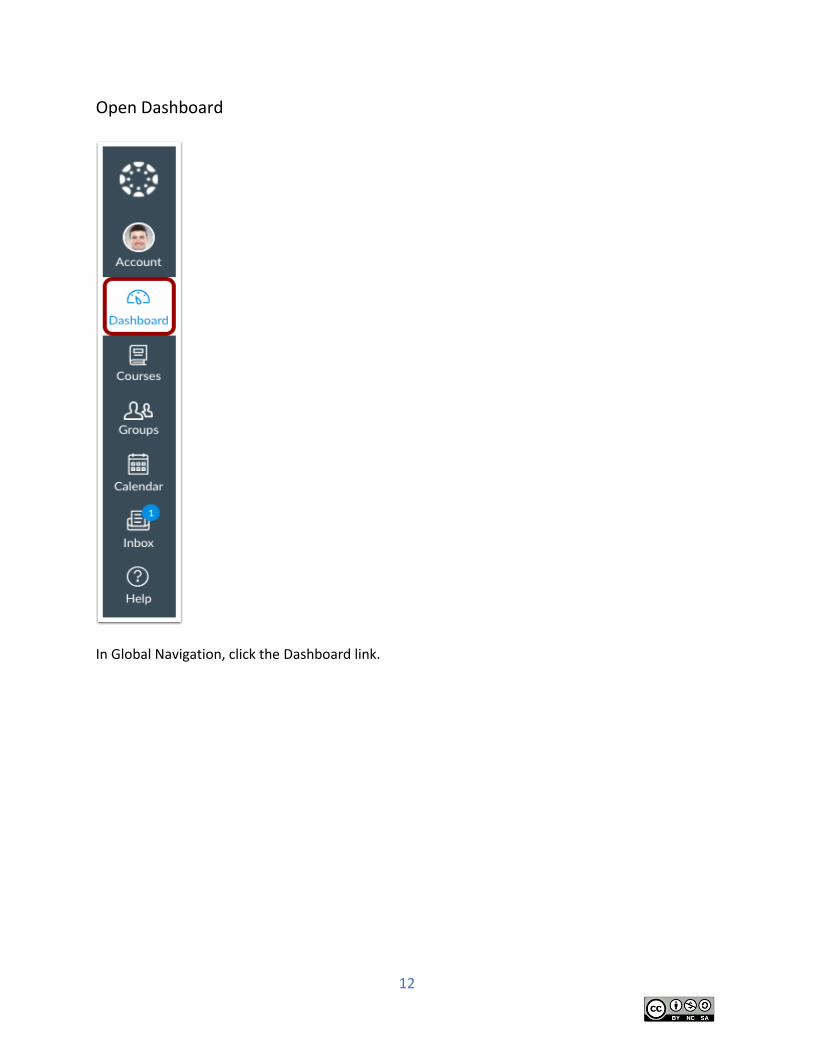
Open Dashboard
In Global Navigation, click the Dashboard link.
13
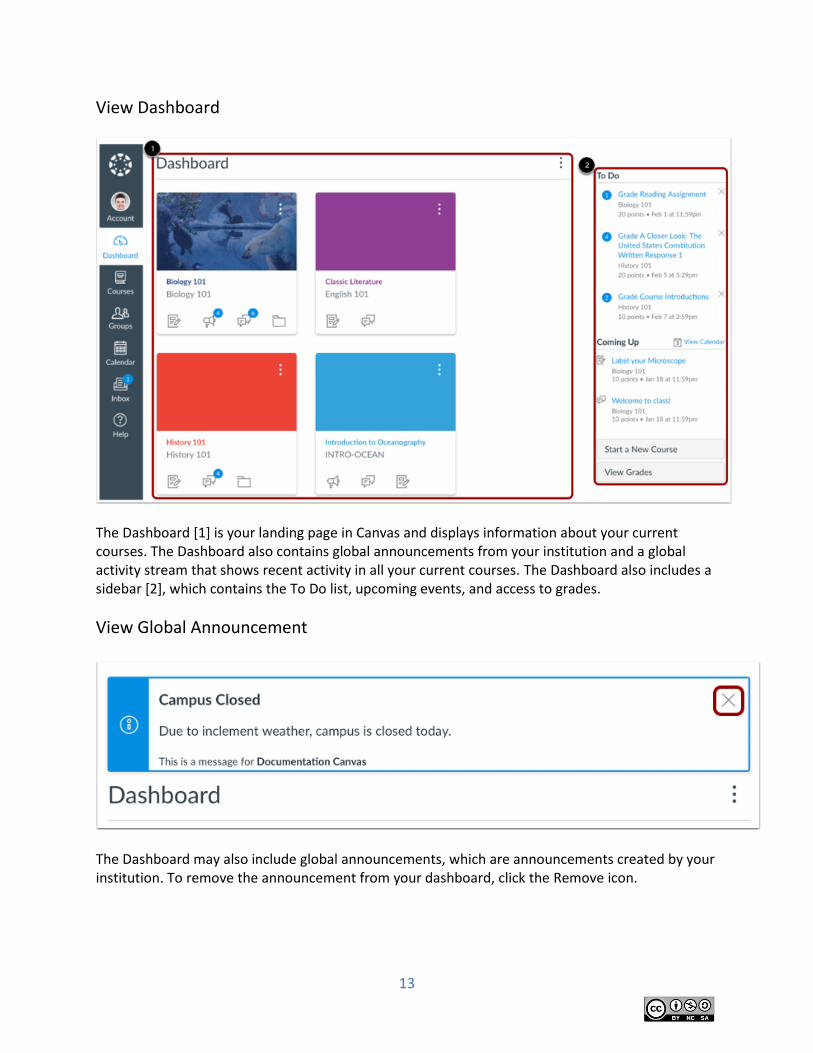
View Dashboard
The Dashboard [1] is your landing page in Canvas and displays information about your current courses. The Dashboard also contains global announcements from your institution and a global activity stream that shows recent activity in all your current courses. The Dashboard also includes a sidebar [2], which contains the To Do list, upcoming events, and access to grades.
View Global Announcement
The Dashboard may also include global announcements, which are announcements created by your institution. To remove the announcement from your dashboard, click the Remove icon.

14
Change Dashboard View
The Dashboard offers several views depending on your preference. The Dashboard defaults to the course card view, which displays course cards for all your favorite courses. To help manage Canvas activity, the Dashboard also supports the Global Activity Stream, which shows recent activity for all your Canvas courses. To change your Dashboard view, click the Options menu and select your preferred viewing option.
15
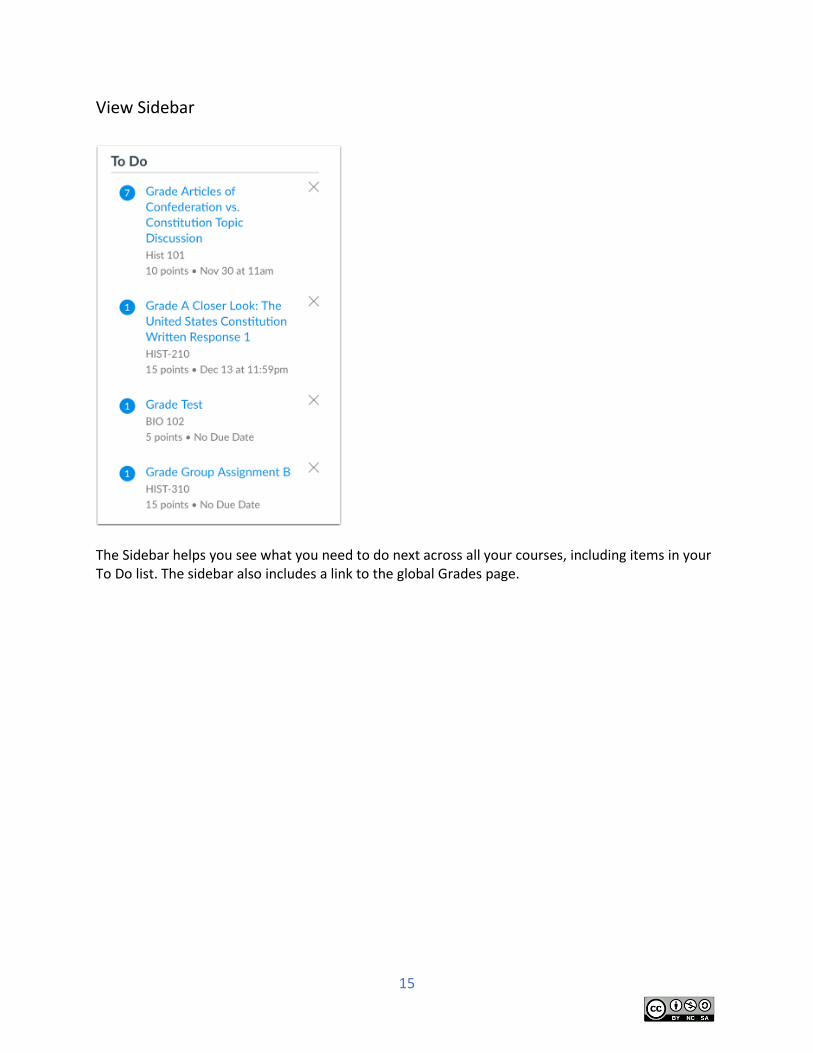
View Sidebar
The Sidebar helps you see what you need to do next across all your courses, including items in your To Do list. The sidebar also includes a link to the global Grades page.
16
Use the Global Activity Stream as an instructor The Global Activity Stream shows you important recent activities from all of your courses including announcements, discussions, assignments, and conversations. This stream is similar to the Course Activity Stream for an individual course. The following activities will cause notifications for each course to appear in the Global Activity Stream:
New Announcements
Replies to Announcements
New Discussions
New Discussion Posts
New Assignments
Assignments, Quizzes, or Discussions Changed from Ungraded to Graded
Due Date Changes to Assignments, Quizzes, and Discussions
New Graded Assignments
New Peer Review Assignments
New Conversation Messages
Notes: Notifications in the Global Activity Stream will not appear for activity in Files, Collaborations, Grades, Pages, or Conferences; ungraded quizzes and surveys; or edits to Discussions. Edits to Quizzes and Assignments will only appear in the Global Activity Stream when the Notify users that this content has changed button has been selected in a course. To receive notifications for Discussions, you must actively post in the discussions at least once every two weeks. If you stop participating in a discussion after two weeks, Canvas will no longer display discussion notifications.

17
Open Dashboard
In Global Navigation, click the Dashboard link.
18
Open Global Activity Stream
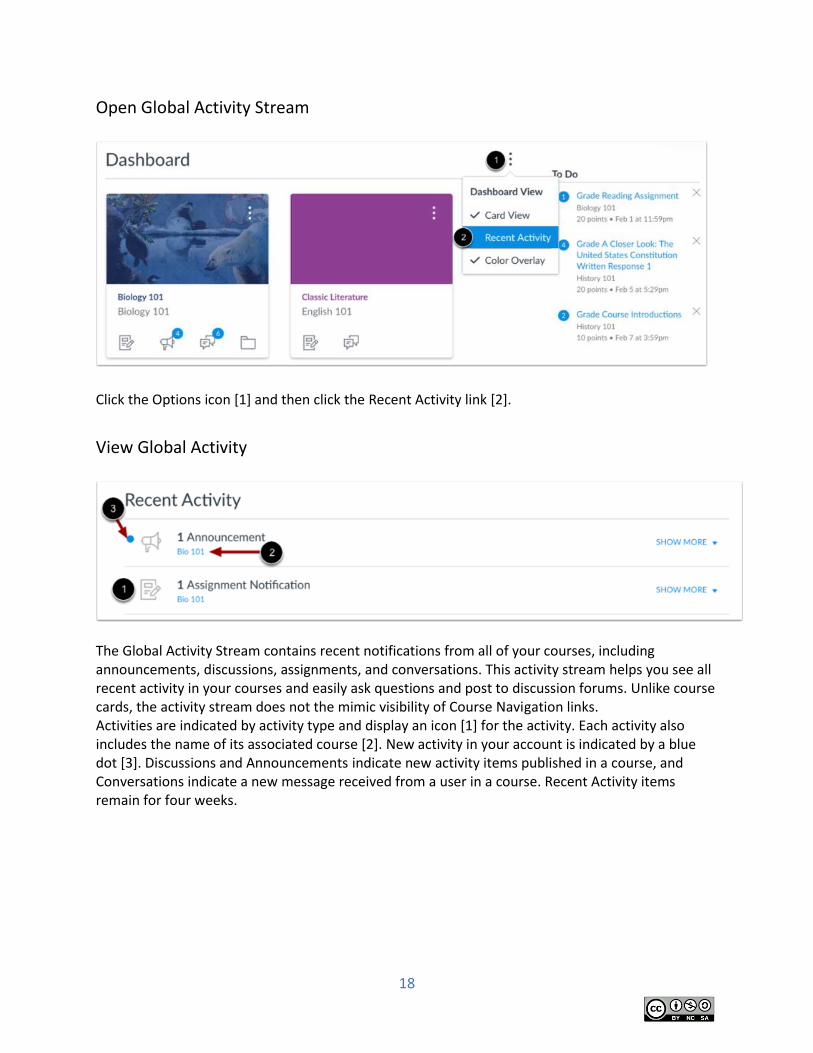
Click the Options icon [1] and then click the Recent Activity link [2].
View Global Activity
The Global Activity Stream contains recent notifications from all of your courses, including announcements, discussions, assignments, and conversations. This activity stream helps you see all recent activity in your courses and easily ask questions and post to discussion forums. Unlike course cards, the activity stream does not the mimic visibility of Course Navigation links. Activities are indicated by activity type and display an icon [1] for the activity. Each activity also includes the name of its associated course [2]. New activity in your account is indicated by a blue dot [3]. Discussions and Announcements indicate new activity items published in a course, and Conversations indicate a new message received from a user in a course. Recent Activity items remain for four weeks.
19
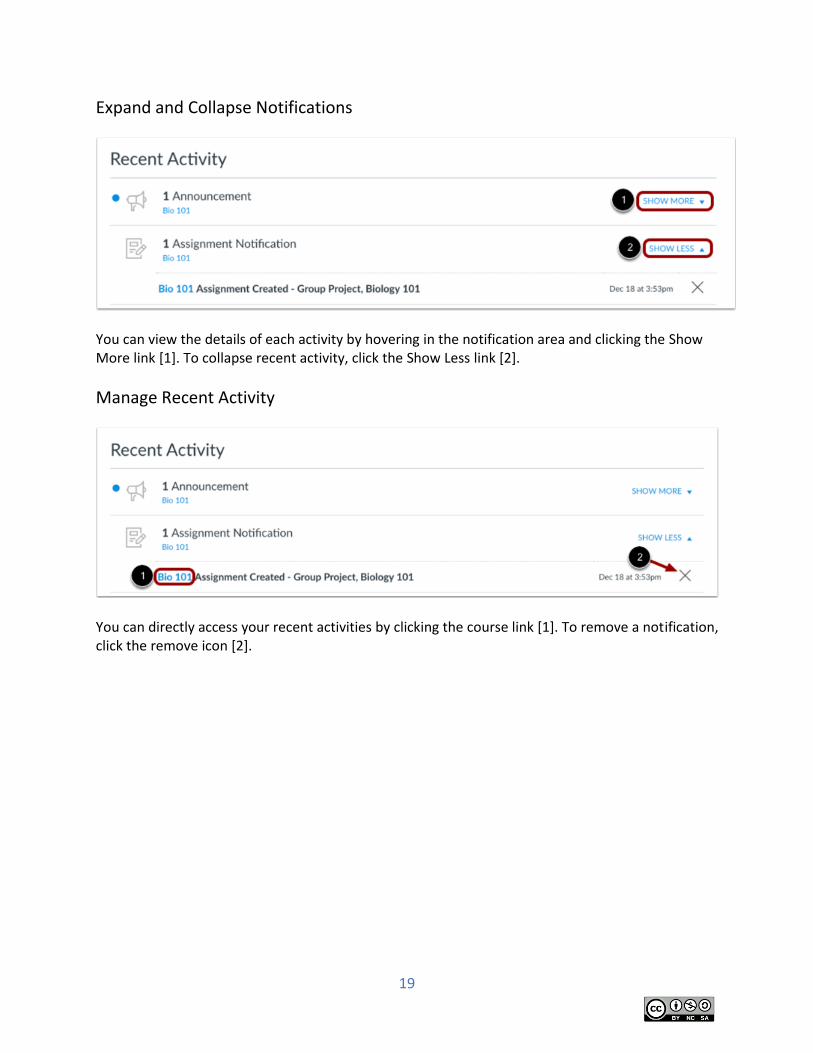
Expand and Collapse Notifications
You can view the details of each activity by hovering in the notification area and clicking the Show More link [1]. To collapse recent activity, click the Show Less link [2].
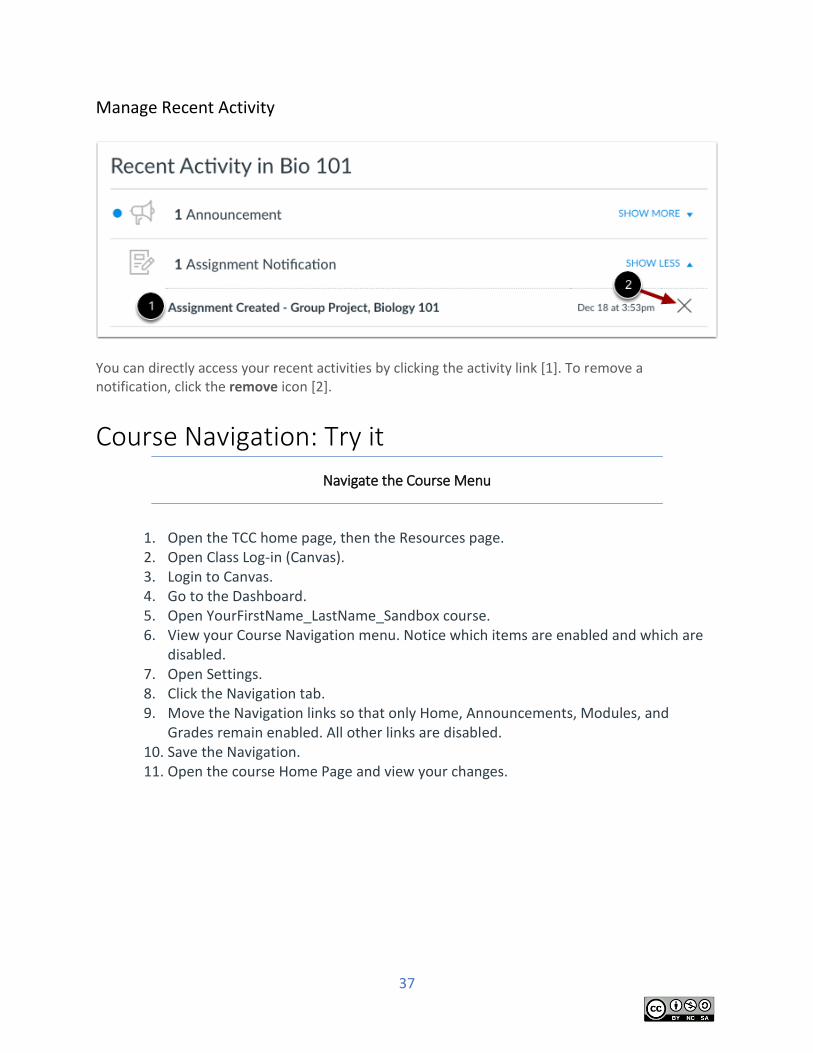
Manage Recent Activity
You can directly access your recent activities by clicking the course link [1]. To remove a notification, click the remove icon [2].
20
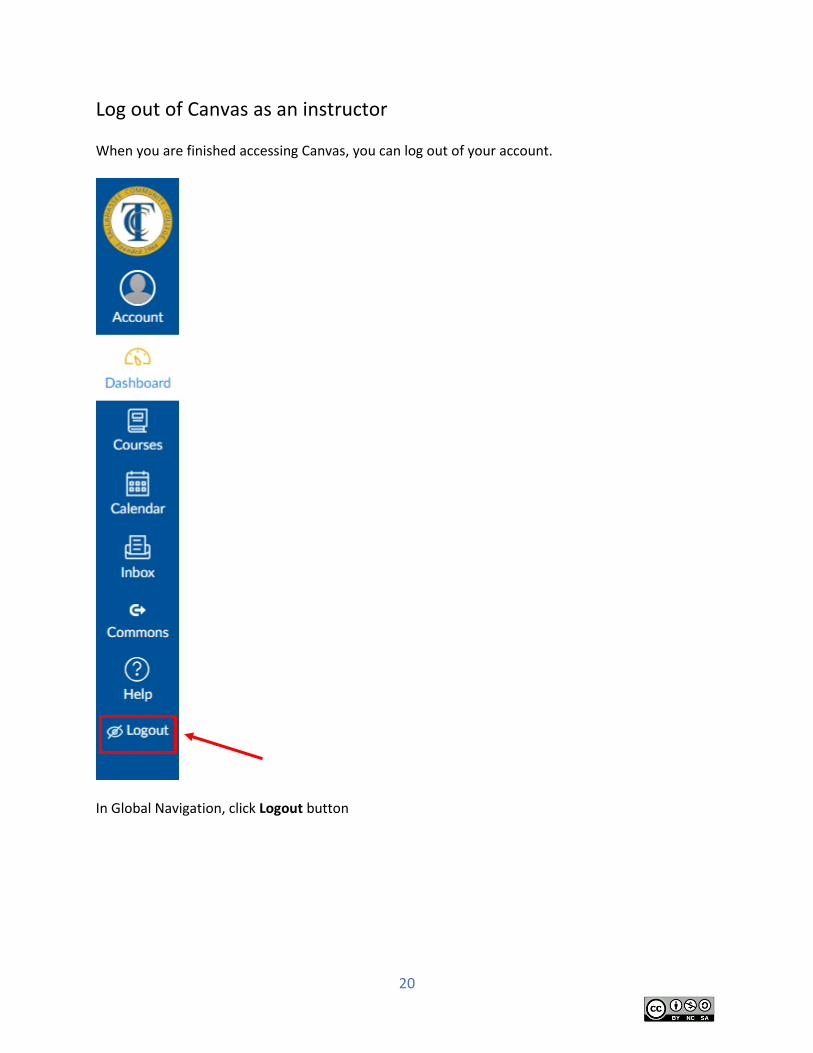
Log out of Canvas as an instructor When you are finished accessing Canvas, you can log out of your account.
In Global Navigation, click Logout button
21
Global Navigation: Try it
Navigate the Global Menu
1. Open a supported browser window.
2. Open the TCC home page, then the Resources page.
3. Open Class Log-in (Canvas)
4. Loin to Canvas.
5. Click each button in the Global Navigation menu to explore its functions.
6. Log out by clicking the Logout button on the Global Navigation menu.
22
Course Navigation
Use the Course Navigation Menu as an instructor
The Course Navigation Menu is a series of links on the left side of your course that help you and your students access different course areas.
Depending on the structure of your course, you can choose to reorder and hide course navigation links.
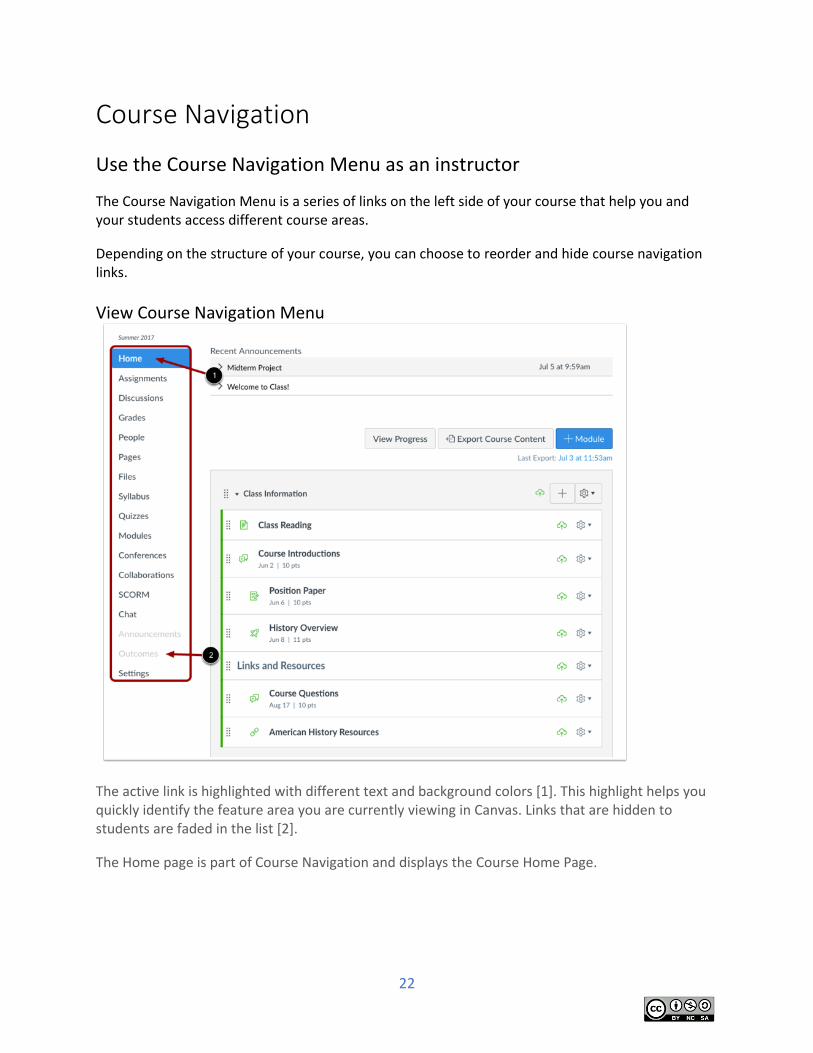
View Course Navigation Menu
The active link is highlighted with different text and background colors [1]. This highlight helps you quickly identify the feature area you are currently viewing in Canvas. Links that are hidden to students are faded in the list [2].
The Home page is part of Course Navigation and displays the Course Home Page.
23
By default, new courses show links leading to the index pages for the following fourteen areas:
Announcements
Assignments
Discussions
Grades
People
Pages
Files
Syllabus
Outcomes
Quizzes
Modules
Conferences
Collaborations
Settings
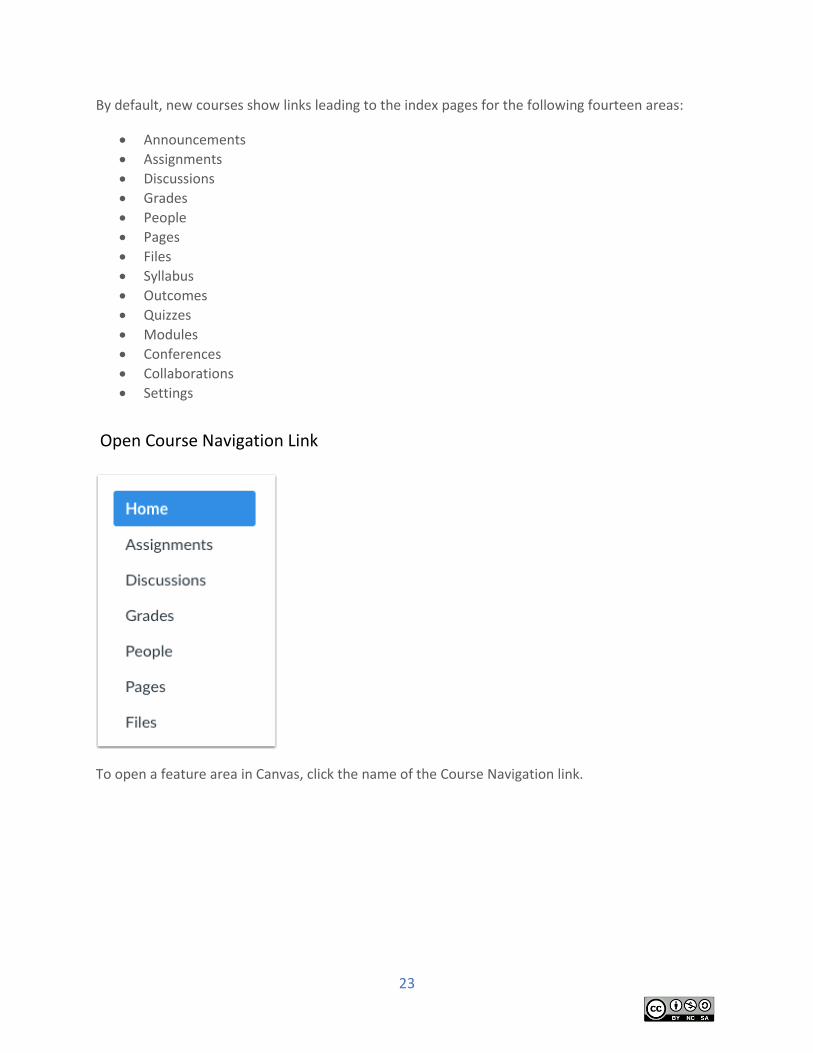
Open Course Navigation Link
To open a feature area in Canvas, click the name of the Course Navigation link.

24
Collapse Course Navigation Menu
To expand or collapse the Course Navigation Menu, click the Menu icon.
25
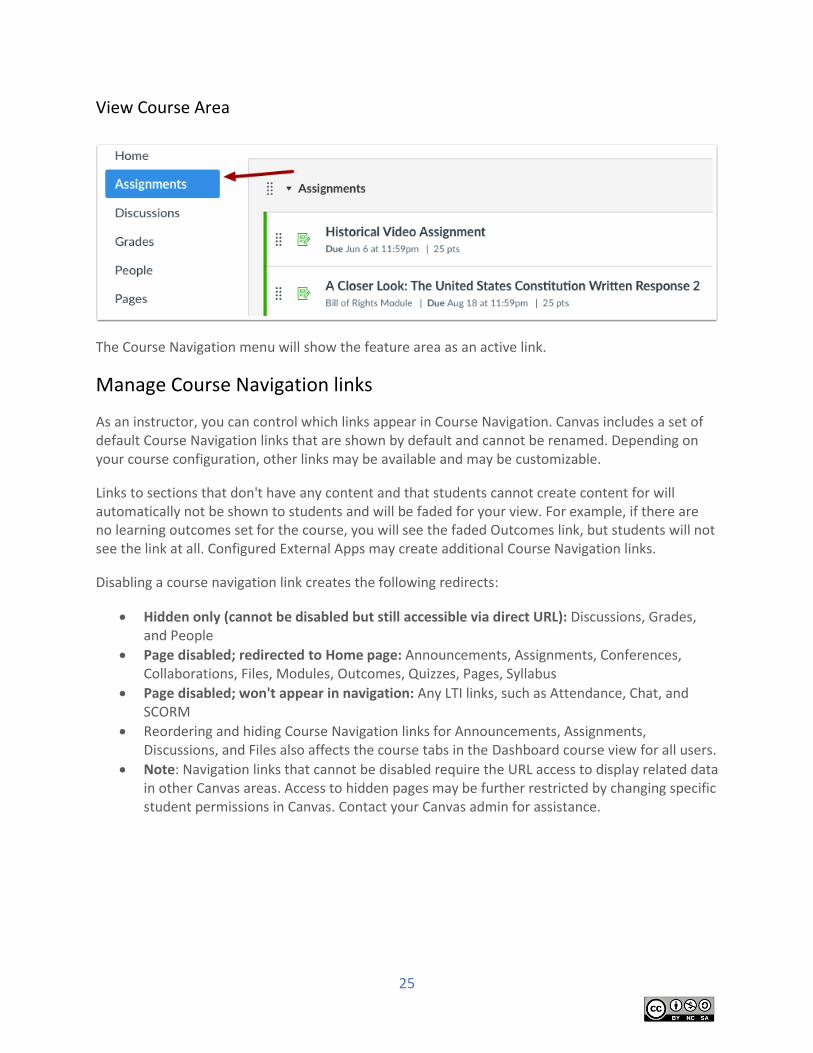
View Course Area
The Course Navigation menu will show the feature area as an active link.
Manage Course Navigation links
As an instructor, you can control which links appear in Course Navigation. Canvas includes a set of default Course Navigation links that are shown by default and cannot be renamed. Depending on your course configuration, other links may be available and may be customizable.
Links to sections that don't have any content and that students cannot create content for will automatically not be shown to students and will be faded for your view. For example, if there are no learning outcomes set for the course, you will see the faded Outcomes link, but students will not see the link at all. Configured External Apps may create additional Course Navigation links.
Disabling a course navigation link creates the following redirects:
Hidden only (cannot be disabled but still accessible via direct URL): Discussions, Grades, and People
Page disabled; redirected to Home page: Announcements, Assignments, Conferences, Collaborations, Files, Modules, Outcomes, Quizzes, Pages, Syllabus
Page disabled; won't appear in navigation: Any LTI links, such as Attendance, Chat, and SCORM
Reordering and hiding Course Navigation links for Announcements, Assignments, Discussions, and Files also affects the course tabs in the Dashboard course view for all users.
Note: Navigation links that cannot be disabled require the URL access to display related data in other Canvas areas. Access to hidden pages may be further restricted by changing specific student permissions in Canvas. Contact your Canvas admin for assistance.
26
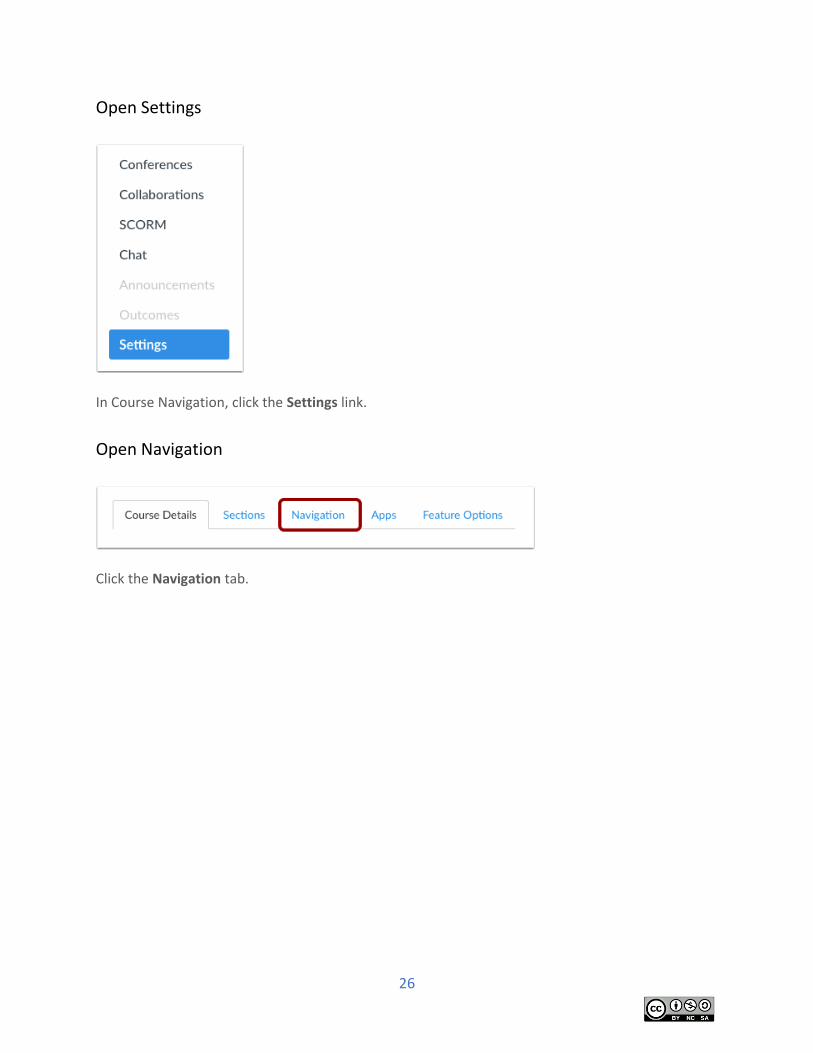
Open Settings
In Course Navigation, click the Settings link.
Open Navigation
Click the Navigation tab.
27
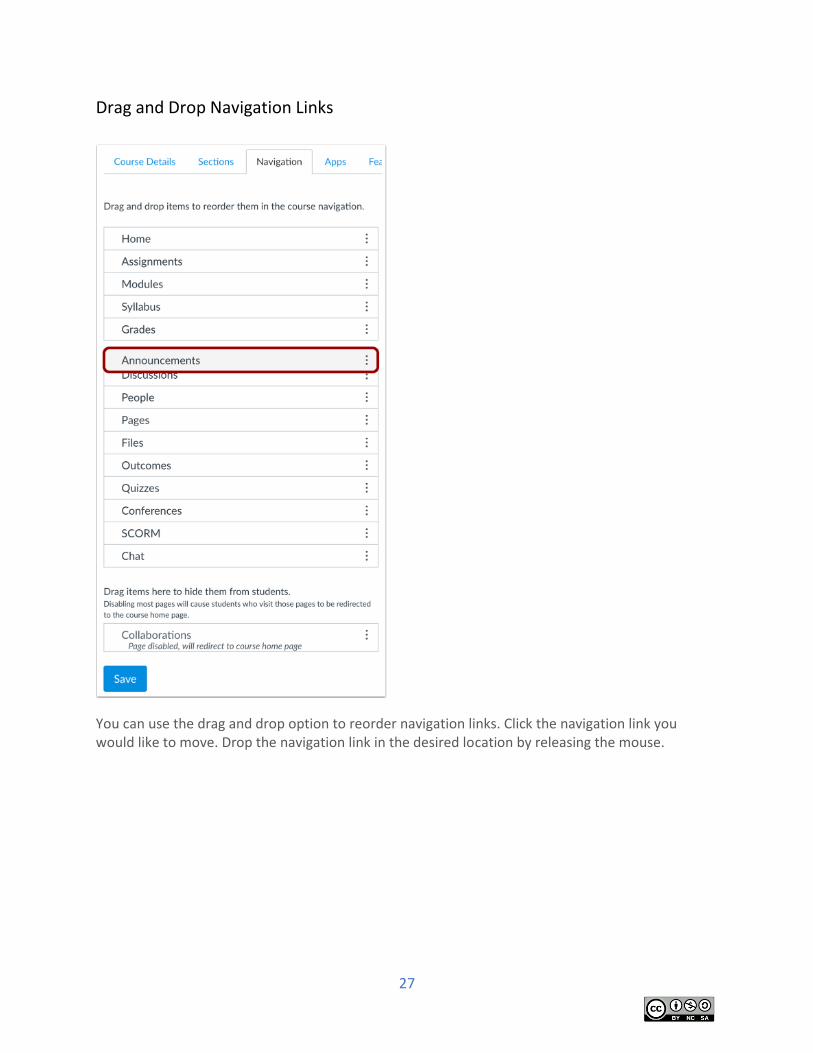
Drag and Drop Navigation Links
You can use the drag and drop option to reorder navigation links. Click the navigation link you would like to move. Drop the navigation link in the desired location by releasing the mouse.
28
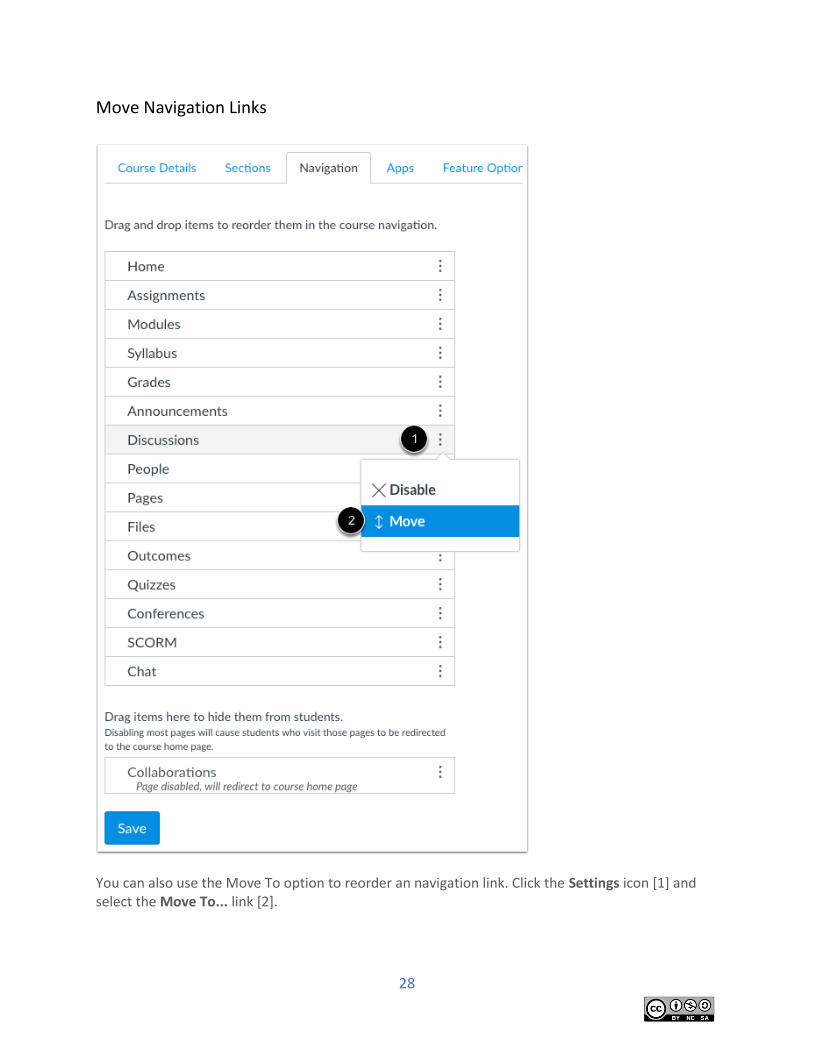
Move Navigation Links
You can also use the Move To option to reorder an navigation link. Click the Settings icon [1] and select the Move To... link [2].
29
Note: The Move To option only moves an navigation link within its respective section (visible or hidden). Hidden items must first be enabled before they can be ordered among visible navigation items. A hidden item cannot be moved directly to the enabled link section using the Move To option.
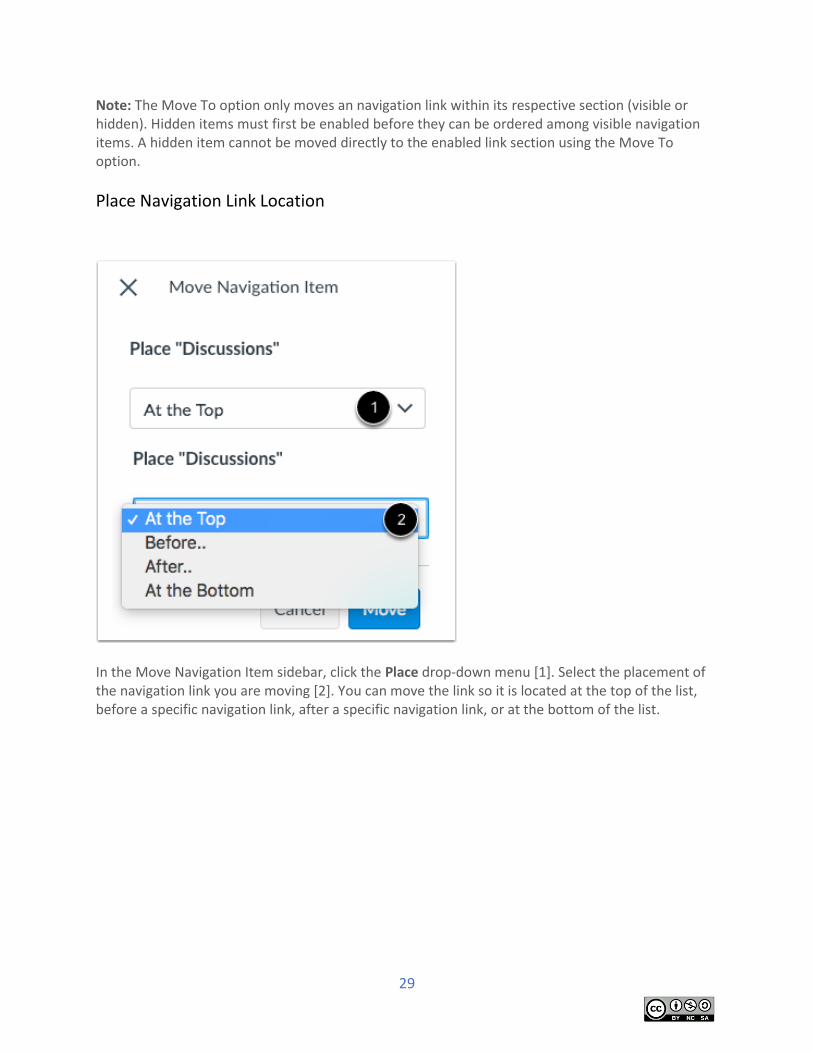
Place Navigation Link Location
In the Move Navigation Item sidebar, click the Place drop-down menu [1]. Select the placement of the navigation link you are moving [2]. You can move the link so it is located at the top of the list, before a specific navigation link, after a specific navigation link, or at the bottom of the list.
30
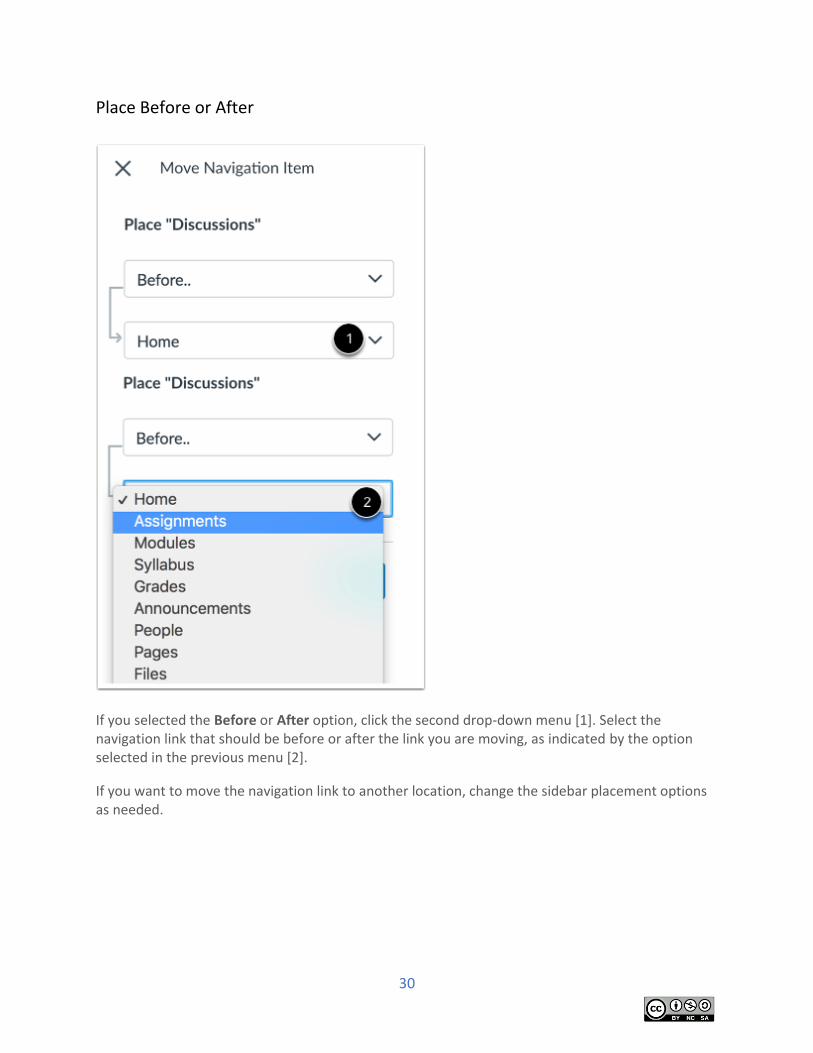
Place Before or After
If you selected the Before or After option, click the second drop-down menu [1]. Select the navigation link that should be before or after the link you are moving, as indicated by the option selected in the previous menu [2].
If you want to move the navigation link to another location, change the sidebar placement options as needed.
31
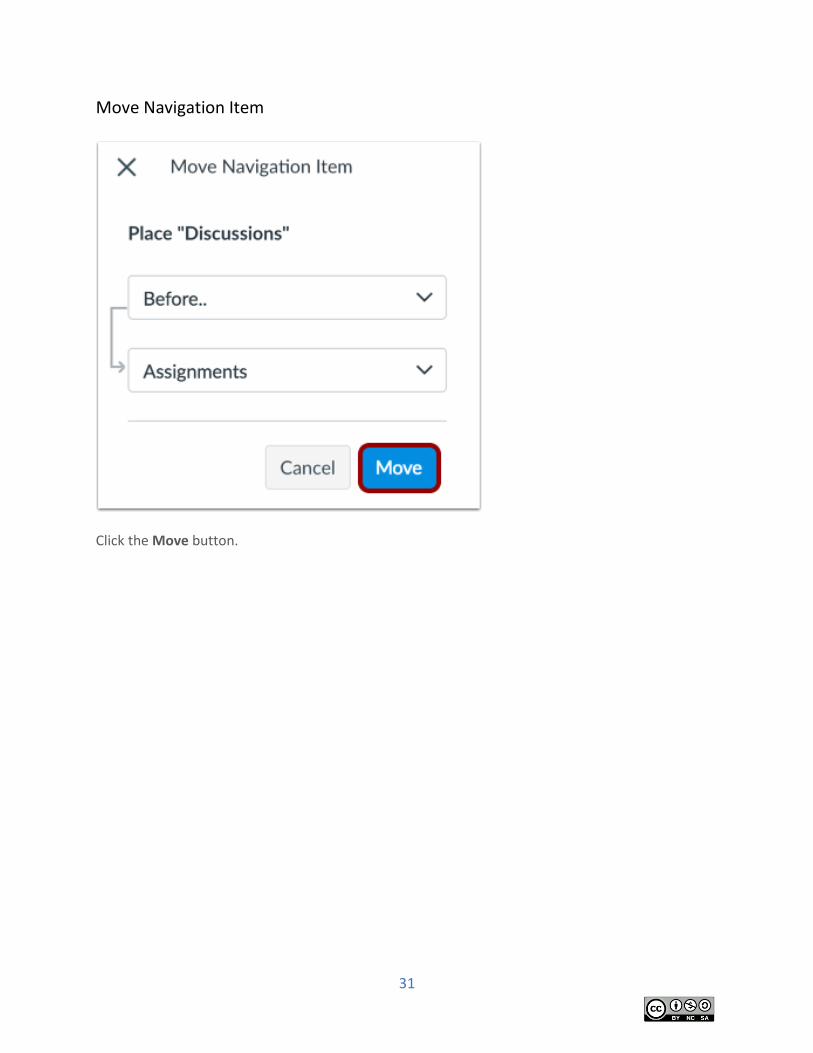
Move Navigation Item
Click the Move button.
32
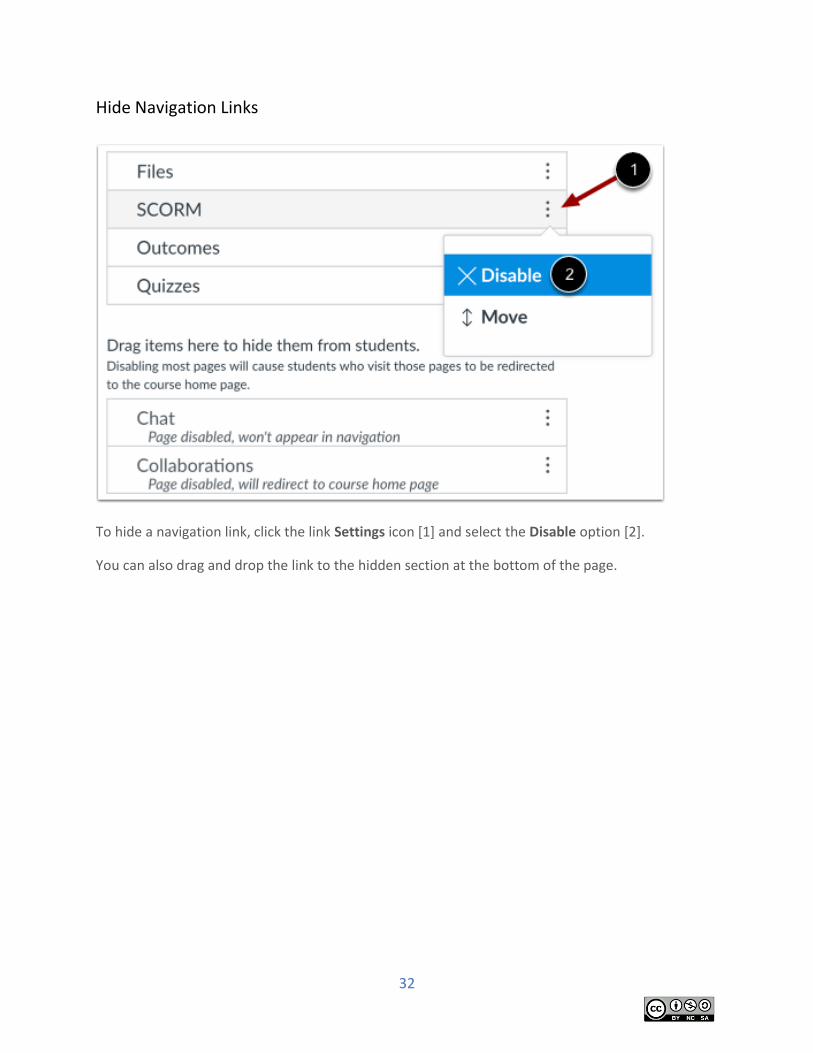
Hide Navigation Links
To hide a navigation link, click the link Settings icon [1] and select the Disable option [2].
You can also drag and drop the link to the hidden section at the bottom of the page.
33
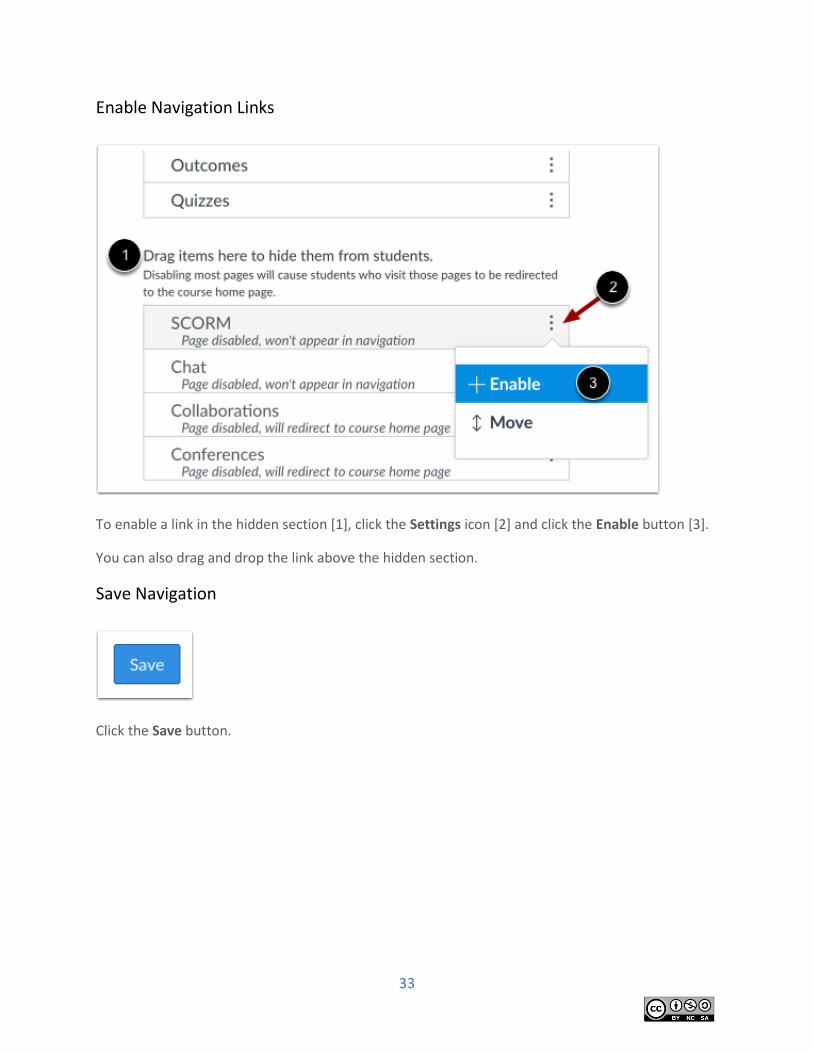
Enable Navigation Links
To enable a link in the hidden section [1], click the Settings icon [2] and click the Enable button [3].
You can also drag and drop the link above the hidden section.
Save Navigation
Click the Save button.
34
Use the Course Activity Stream as an instructor The Course Activity Stream shows you important recent activities from a single course including announcements, discussions, assignments, and conversations. This stream is similar to the Global Activity Stream in the Dashboard when you first log in to Canvas.
The following activities will cause notifications to appear in the Course Activity Stream:
New Announcements
Replies to Announcements
New Discussions
New Discussion Posts
New Assignments
Assignments, Quizzes, or Discussions Changed from Ungraded to Graded
Due Date Changes to Assignments, Quizzes, and Discussions
New Graded Assignments
New Peer Review Assignments
New Conversation Messages
Notes:
Notifications in the Course Activity Stream will not appear for activity in Files, Collaborations, Grades, Pages, or Conferences; ungraded quizzes and surveys; or edits to Discussions.
Edits to Quizzes and Assignments will only appear in the Course Activity Stream when the Notify users that this content has changed button has been selected.
If your Course Home Page is already set to view the course stream, the View Course Stream link does not appear in the course sidebar.

35
Open Course
In Global Navigation, click the Courses link [1], then click the name of the course [2].
Open Course Activity
In the Home Page sidebar, click the View Course Stream button. Note: If your Course Home Page is already set to view the course stream, the View Course Stream link does not appear in the course sidebar.
36
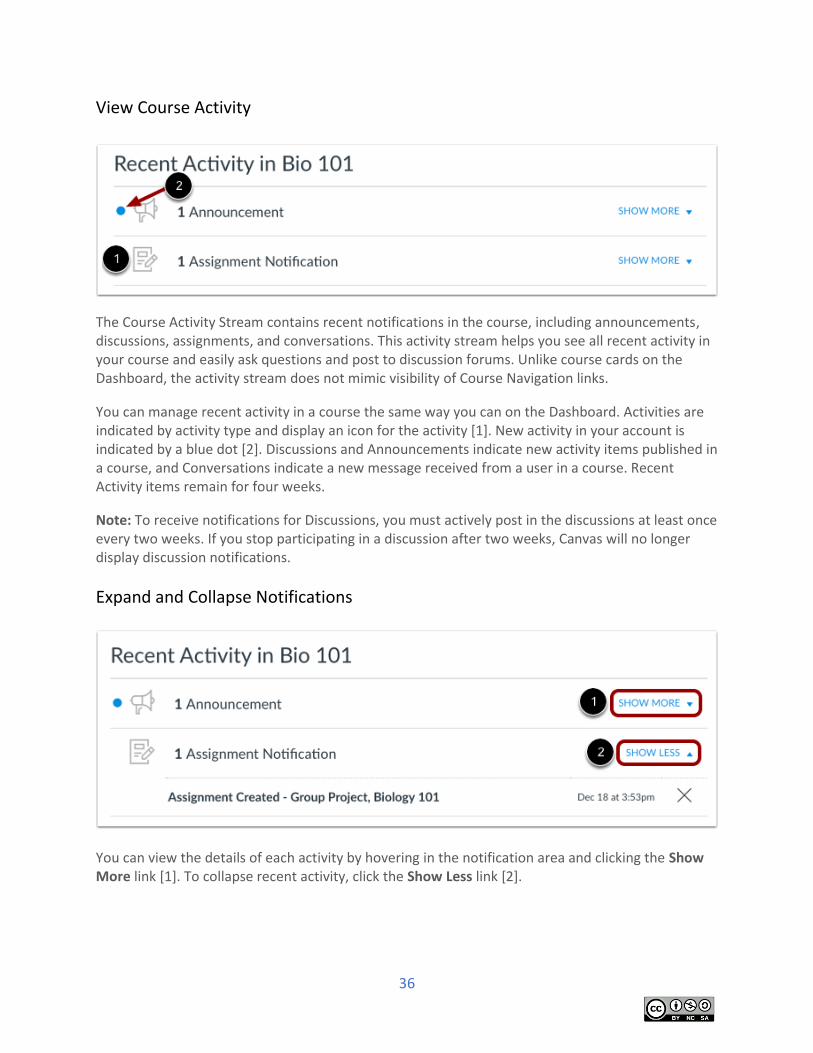
View Course Activity
The Course Activity Stream contains recent notifications in the course, including announcements, discussions, assignments, and conversations. This activity stream helps you see all recent activity in your course and easily ask questions and post to discussion forums. Unlike course cards on the Dashboard, the activity stream does not mimic visibility of Course Navigation links.
You can manage recent activity in a course the same way you can on the Dashboard. Activities are indicated by activity type and display an icon for the activity [1]. New activity in your account is indicated by a blue dot [2]. Discussions and Announcements indicate new activity items published in a course, and Conversations indicate a new message received from a user in a course. Recent Activity items remain for four weeks.
Note: To receive notifications for Discussions, you must actively post in the discussions at least once every two weeks. If you stop participating in a discussion after two weeks, Canvas will no longer display discussion notifications.
Expand and Collapse Notifications
You can view the details of each activity by hovering in the notification area and clicking the Show More link [1]. To collapse recent activity, click the Show Less link [2].
37
Manage Recent Activity
You can directly access your recent activities by clicking the activity link [1]. To remove a notification, click the remove icon [2].
Course Navigation: Try it
Navigate the Course Menu
1. Open the TCC home page, then the Resources page. 2. Open Class Log-in (Canvas). 3. Login to Canvas. 4. Go to the Dashboard. 5. Open YourFirstName_LastName_Sandbox course. 6. View your Course Navigation menu. Notice which items are enabled and which are
disabled. 7. Open Settings. 8. Click the Navigation tab. 9. Move the Navigation links so that only Home, Announcements, Modules, and
Grades remain enabled. All other links are disabled. 10. Save the Navigation. 11. Open the course Home Page and view your changes.
38
COMMUNICATING WITH YOUR STUDENTS
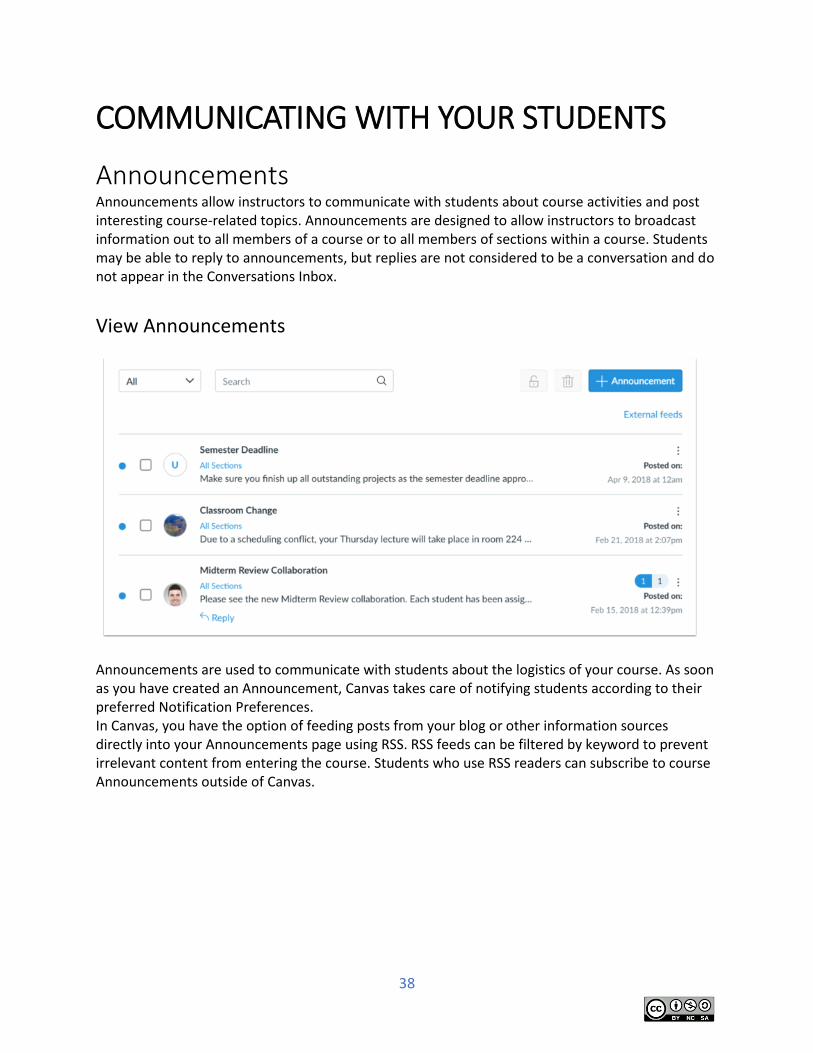
Announcements Announcements allow instructors to communicate with students about course activities and post interesting course-related topics. Announcements are designed to allow instructors to broadcast information out to all members of a course or to all members of sections within a course. Students may be able to reply to announcements, but replies are not considered to be a conversation and do not appear in the Conversations Inbox.
View Announcements
Announcements are used to communicate with students about the logistics of your course. As soon as you have created an Announcement, Canvas takes care of notifying students according to their preferred Notification Preferences. In Canvas, you have the option of feeding posts from your blog or other information sources directly into your Announcements page using RSS. RSS feeds can be filtered by keyword to prevent irrelevant content from entering the course. Students who use RSS readers can subscribe to course Announcements outside of Canvas.

39
When to use Announcements
Use Announcements to:
Remind your students what they need to accomplish to stay on track.
Point students to internal and external resources that will help them achieve course
Outcomes.
Leave a message for the entire class with video or audio comments.
Celebrate student success and important events that may be of interest to your students.
Feed a custom RSS feed related to the topic of the course to your students.
Automatically share blog posts written by your students on Wordpress, Blogger, etc. with
custom RSS feeds.
40
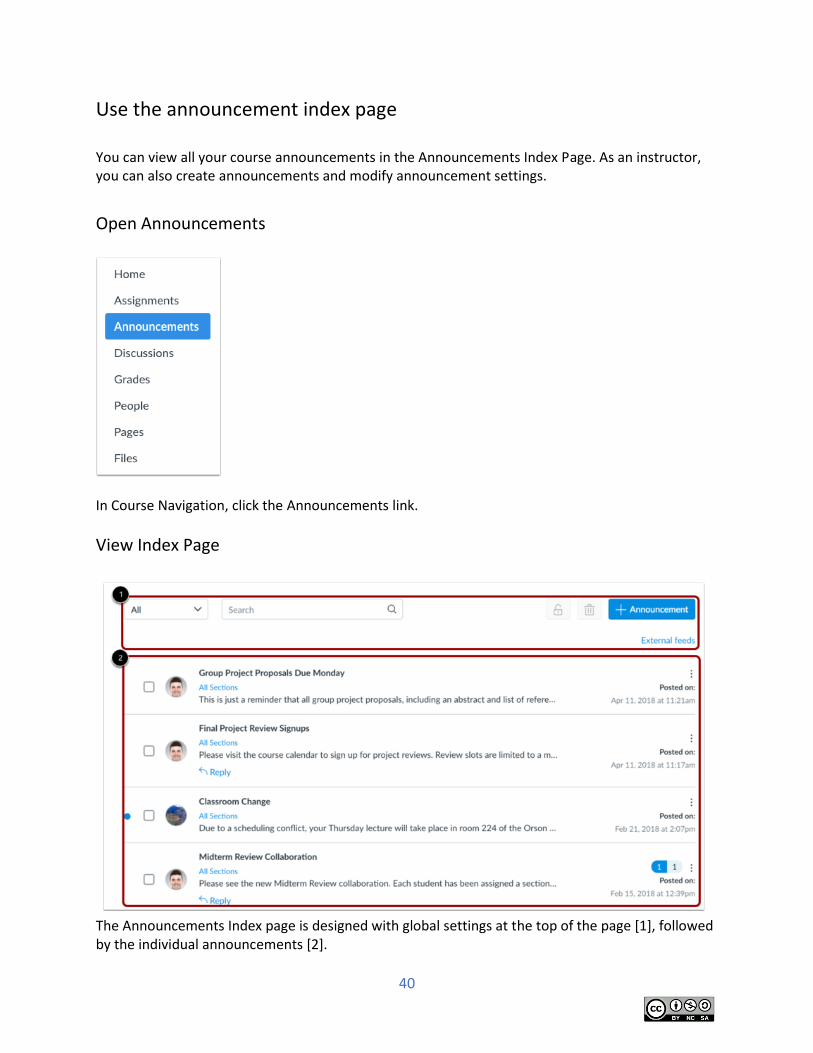
Use the announcement index page You can view all your course announcements in the Announcements Index Page. As an instructor, you can also create announcements and modify announcement settings.
Open Announcements
In Course Navigation, click the Announcements link.
View Index Page
The Announcements Index page is designed with global settings at the top of the page [1], followed by the individual announcements [2].
41
View Global Settings
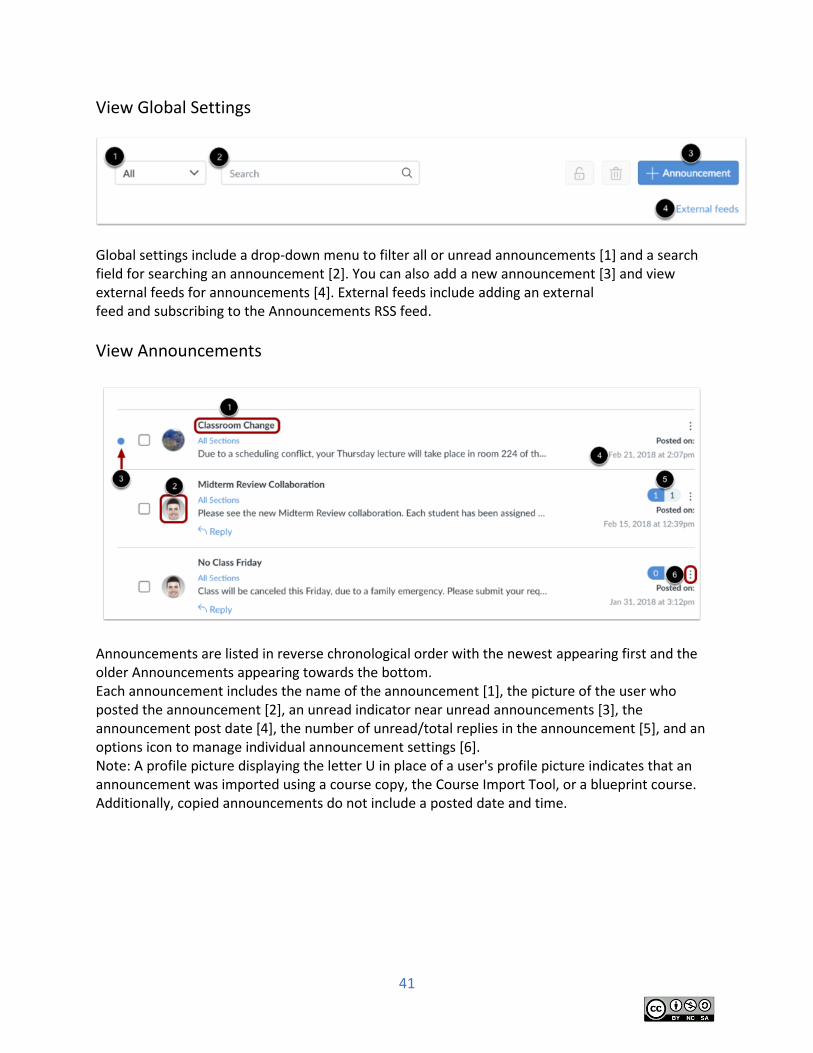
Global settings include a drop-down menu to filter all or unread announcements [1] and a search field for searching an announcement [2]. You can also add a new announcement [3] and view external feeds for announcements [4]. External feeds include adding an external feed and subscribing to the Announcements RSS feed.
View Announcements
Announcements are listed in reverse chronological order with the newest appearing first and the older Announcements appearing towards the bottom. Each announcement includes the name of the announcement [1], the picture of the user who posted the announcement [2], an unread indicator near unread announcements [3], the announcement post date [4], the number of unread/total replies in the announcement [5], and an options icon to manage individual announcement settings [6]. Note: A profile picture displaying the letter U in place of a user's profile picture indicates that an announcement was imported using a course copy, the Course Import Tool, or a blueprint course. Additionally, copied announcements do not include a posted date and time.
42
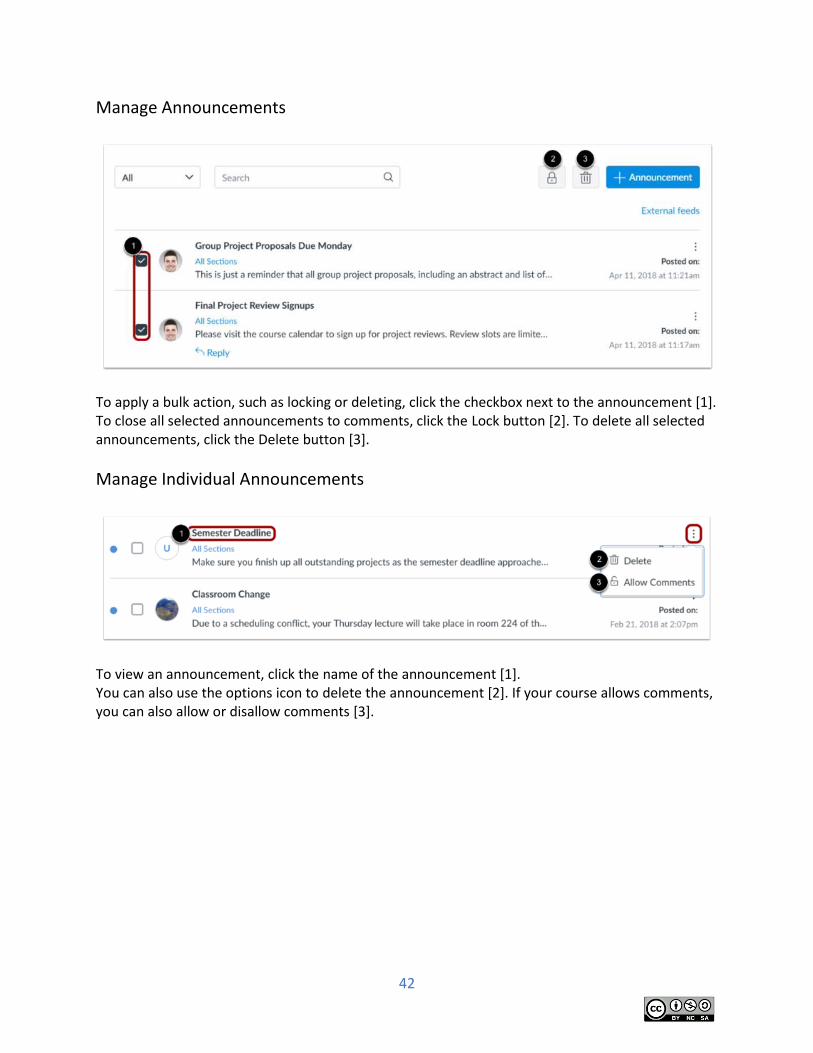
Manage Announcements
To apply a bulk action, such as locking or deleting, click the checkbox next to the announcement [1]. To close all selected announcements to comments, click the Lock button [2]. To delete all selected announcements, click the Delete button [3].
Manage Individual Announcements
To view an announcement, click the name of the announcement [1]. You can also use the options icon to delete the announcement [2]. If your course allows comments, you can also allow or disallow comments [3].
43
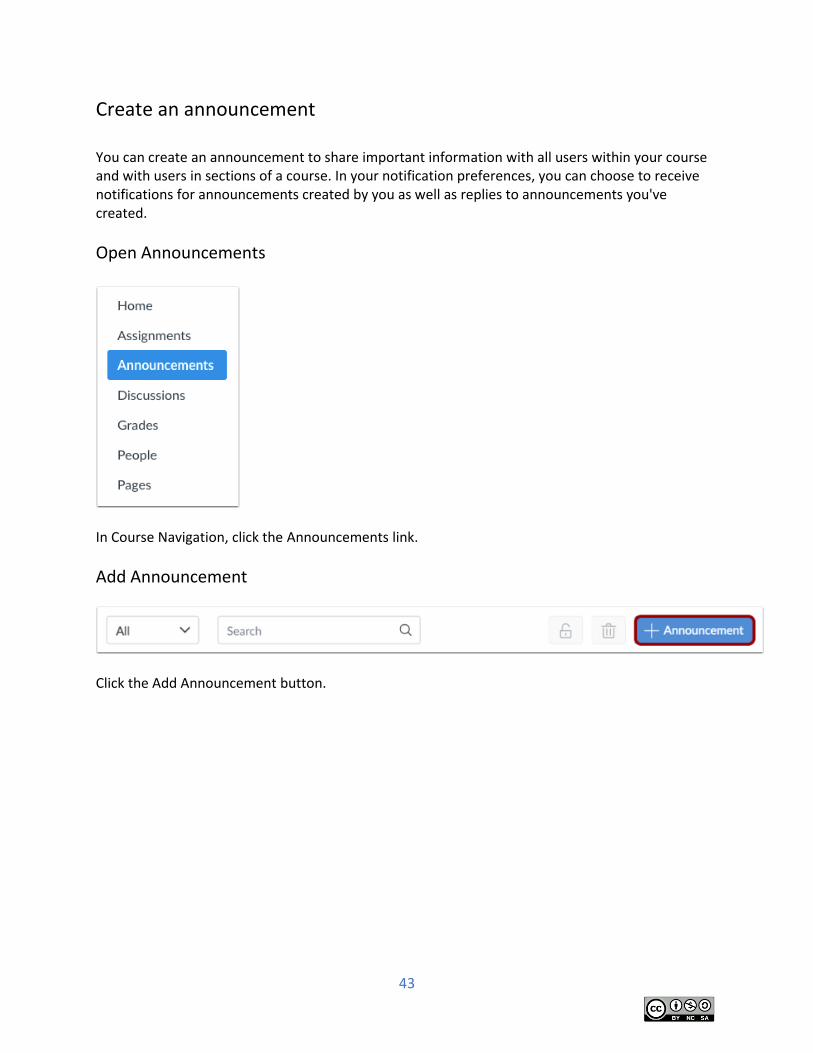
Create an announcement You can create an announcement to share important information with all users within your course and with users in sections of a course. In your notification preferences, you can choose to receive notifications for announcements created by you as well as replies to announcements you've created.
Open Announcements
In Course Navigation, click the Announcements link.
Add Announcement
Click the Add Announcement button.
44
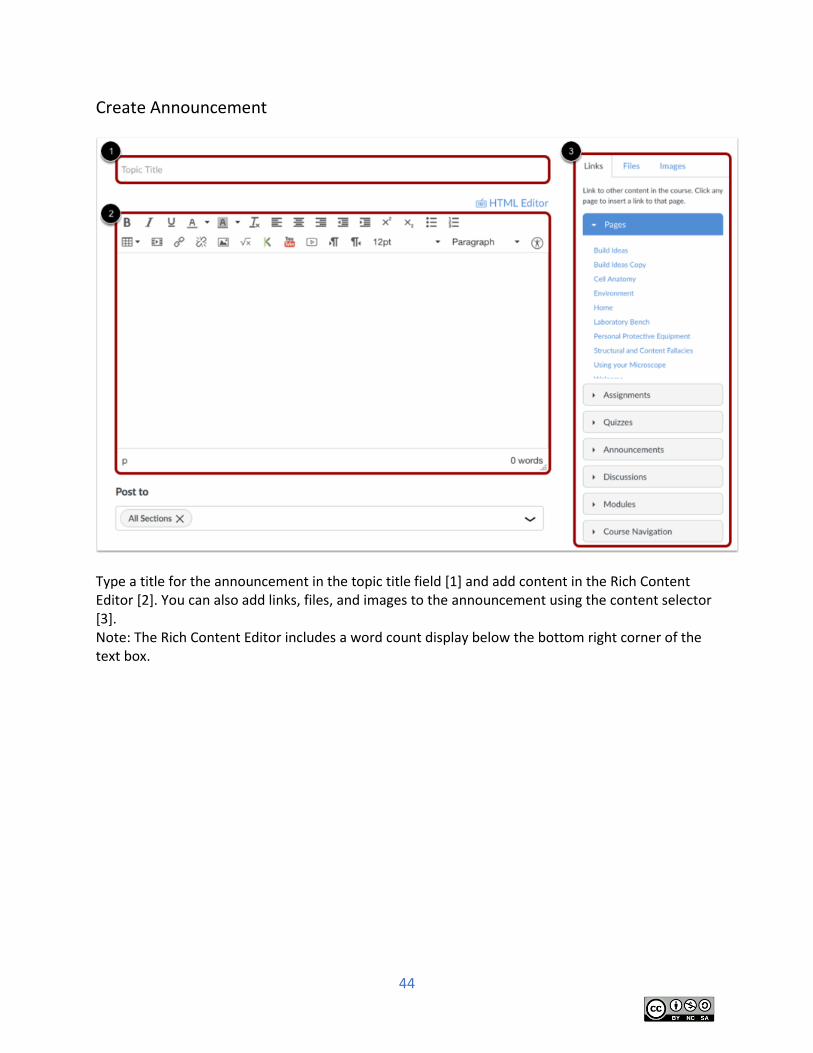
Create Announcement
Type a title for the announcement in the topic title field [1] and add content in the Rich Content Editor [2]. You can also add links, files, and images to the announcement using the content selector [3]. Note: The Rich Content Editor includes a word count display below the bottom right corner of the text box.
45
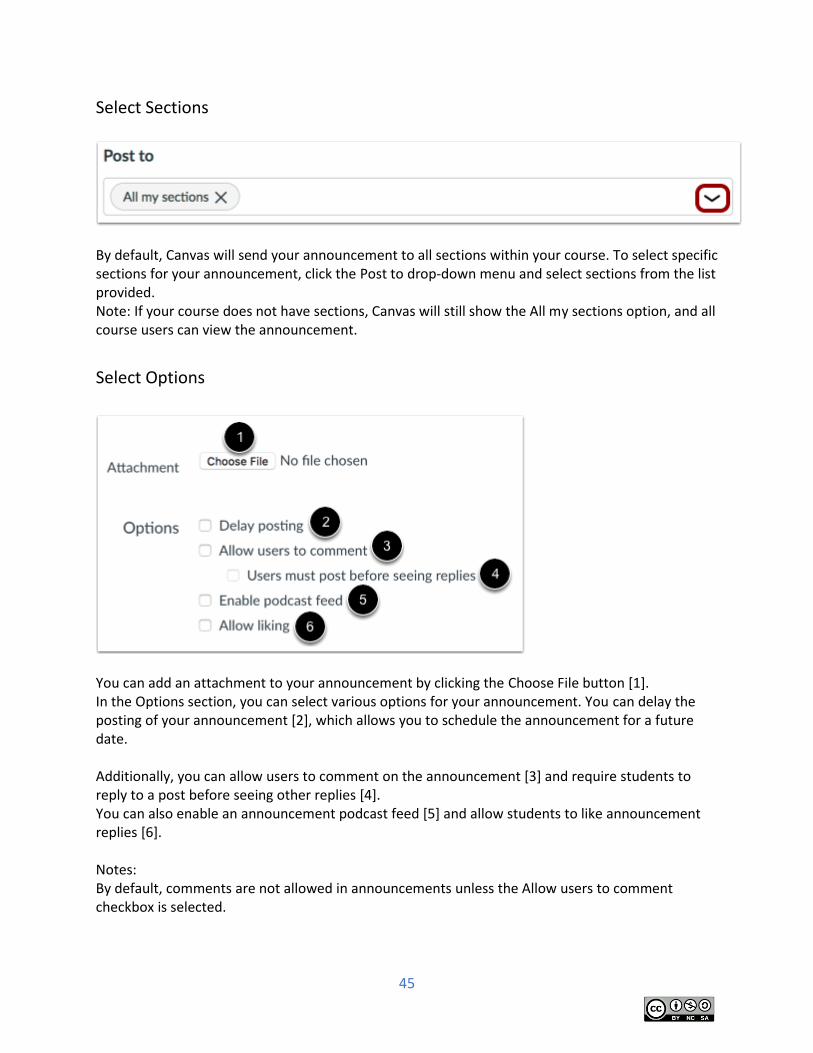
Select Sections
By default, Canvas will send your announcement to all sections within your course. To select specific sections for your announcement, click the Post to drop-down menu and select sections from the list provided. Note: If your course does not have sections, Canvas will still show the All my sections option, and all course users can view the announcement.
Select Options
You can add an attachment to your announcement by clicking the Choose File button [1]. In the Options section, you can select various options for your announcement. You can delay the posting of your announcement [2], which allows you to schedule the announcement for a future date. Additionally, you can allow users to comment on the announcement [3] and require students to reply to a post before seeing other replies [4]. You can also enable an announcement podcast feed [5] and allow students to like announcement replies [6]. Notes: By default, comments are not allowed in announcements unless the Allow users to comment checkbox is selected.
46
The Allow users to comment option is persistent, meaning the option you select when creating or editing an announcement will carry over when you create a new announcement in the course. However, the Users must post before seeing replies option is not persistent. Comment options may not be available to you if announcement comments are disabled in your course. Check your Course Settings if you cannot view these checkboxes.
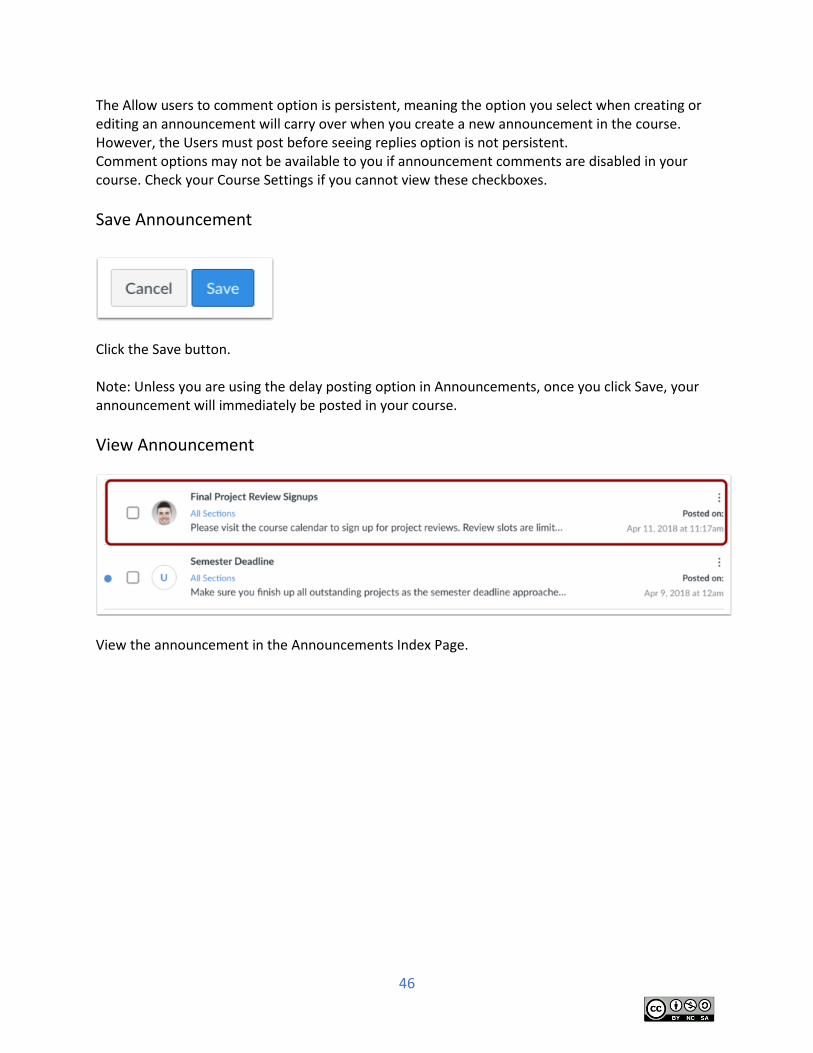
Save Announcement
Click the Save button. Note: Unless you are using the delay posting option in Announcements, once you click Save, your announcement will immediately be posted in your course.
View Announcement
View the announcement in the Announcements Index Page.

47
Edit an announcement in a course If you forgot to add something to your announcement, you can easily edit and add more information. Note: Editing an announcement will create a notification in the User Dashboard and Course Activity Stream. If you want users to receive the edited announcement via their notification preferences, you will need to create a new announcement.
Open Announcements
In Course Navigation, click the Announcements link.
Open Announcement
Click the name of the announcement.
48
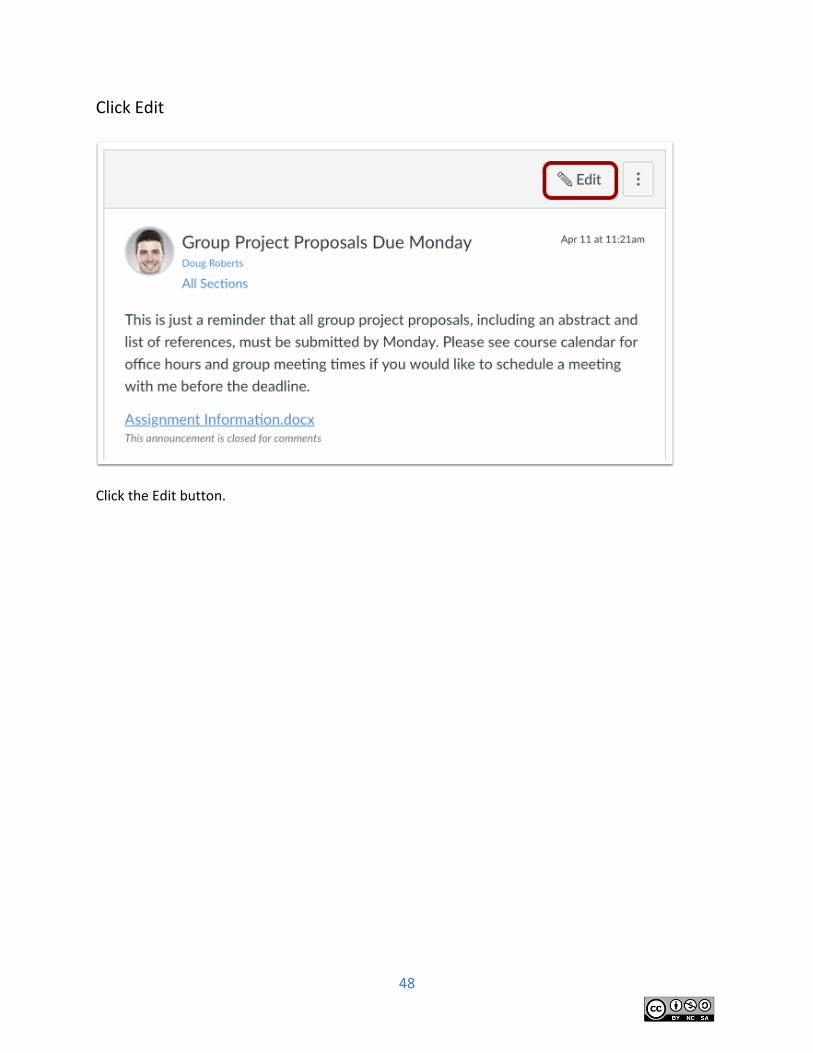
Click Edit
Click the Edit button.

49
Edit Announcement
Edit the necessary announcement fields. Click the Save button.

50
View Announcement
View the announcement.
Delete an announcement If you need to remove an announcement from your course, you can easily delete it in Canvas.
Open Announcements
In Course Navigation, click the Announcements link.
51
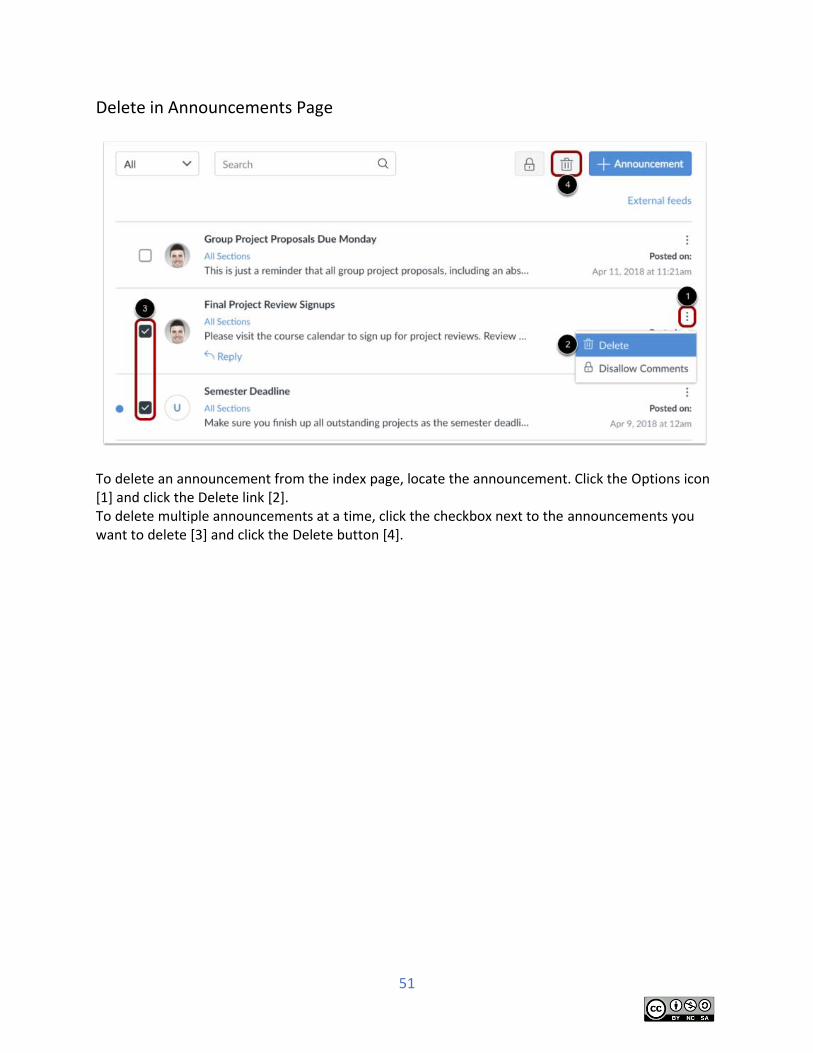
Delete in Announcements Page
To delete an announcement from the index page, locate the announcement. Click the Options icon [1] and click the Delete link [2]. To delete multiple announcements at a time, click the checkbox next to the announcements you want to delete [3] and click the Delete button [4].
52
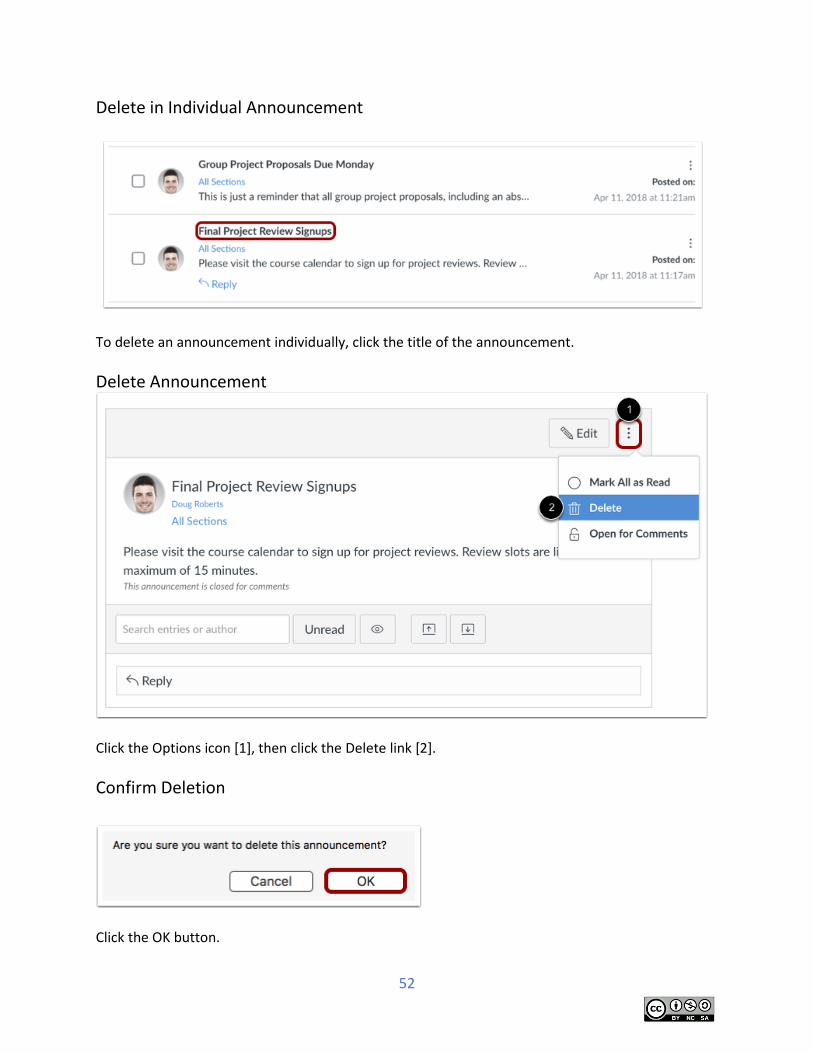
Delete in Individual Announcement
To delete an announcement individually, click the title of the announcement.
Delete Announcement
Click the Options icon [1], then click the Delete link [2].
Confirm Deletion
Click the OK button.
53
Announcements: Try it
Create an announcement
1. Create an announcement. Title the announcement “Research proposal.” In the text
editor, type “This is a reminder that your research paper proposal will be due in two
weeks.”
2. Do not delay posting. Do not enable comments or liking.
3. Save the announcement
4. Edit the announcement to say that the proposal will be due in one week.
5. Save the announcement.
54
Inbox Email
View Inbox
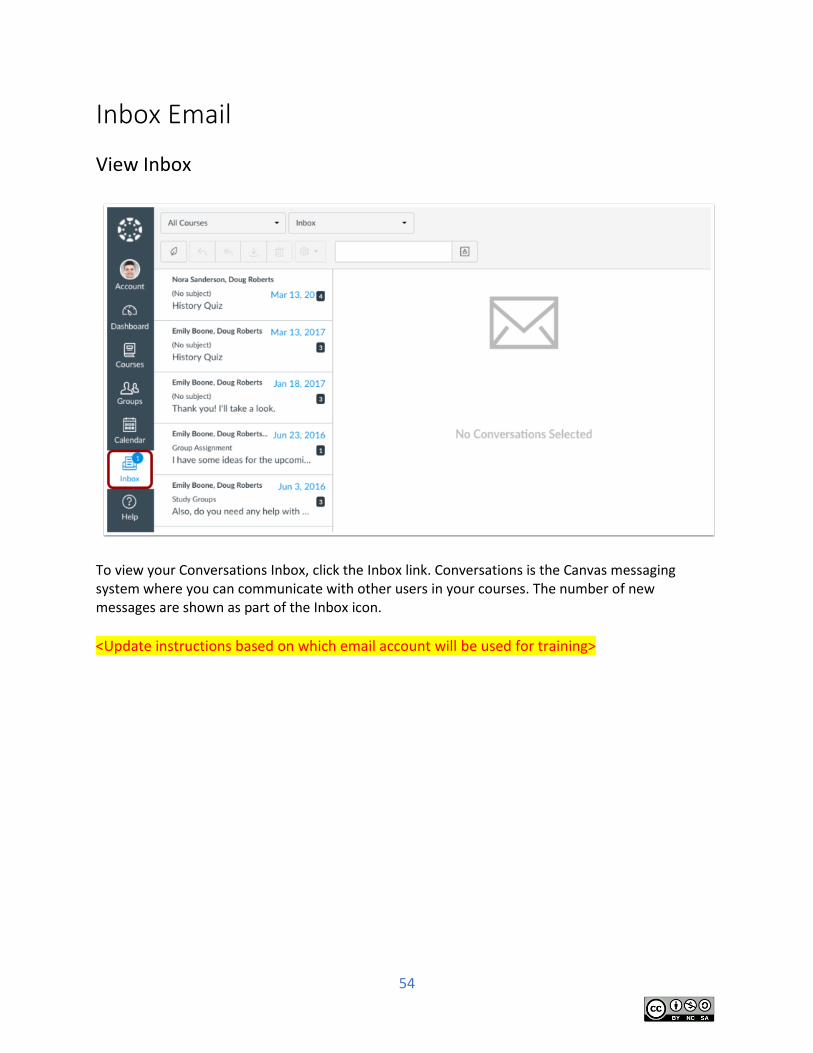
To view your Conversations Inbox, click the Inbox link. Conversations is the Canvas messaging system where you can communicate with other users in your courses. The number of new messages are shown as part of the Inbox icon.
<Update instructions based on which email account will be used for training>
55
Inbox: Try it
Create an email message
1. Open the Inbox 2. Create a new message that will be sent to future students in your course. 3. Name the message: First Day Tasks 4. In the description box, type:
Welcome to the Teaching Online Course. To get started, please complete the following tasks on Day 1 of the course:
Login to the course
Read the Syllabus
Read all items in the Getting Started section.
Complete the “Introduce Yourself” discussion.
Get your textbook.
Your name, instructor
5. Save the email.
56
Syllabus
Use the Syllabus as an instructor The Syllabus in Canvas makes it easy to communicate to your students exactly what will be required of them throughout the course in chronological order. You can also set the syllabus as your course home page. You can choose to make your syllabus public so that people who aren't enrolled in your course can view more information about the course. A public syllabus can be viewed as part of a private course when you send a link to a student, or if the course is listed in the public course index.
The Syllabus is automatically generated based on Assignments and Events within a course. It can only be changed by editing or deleting the Assignments or Events. All assignments (unpublished and published) are listed in the syllabus for instructors.
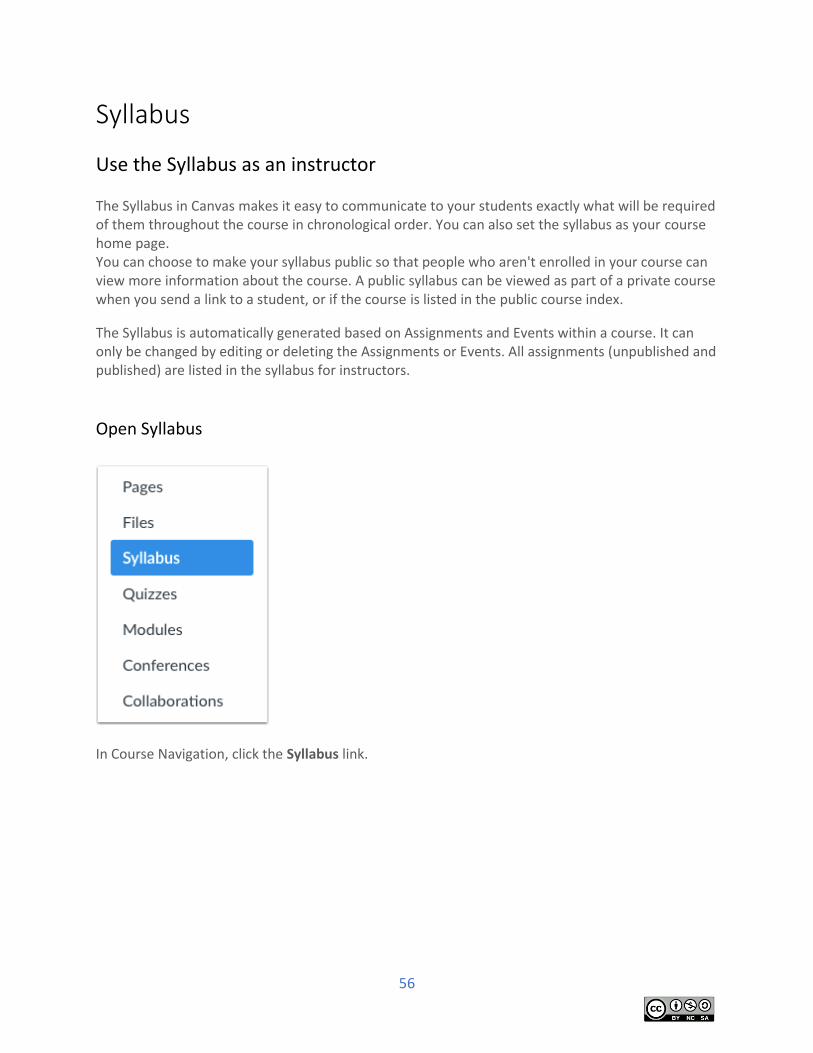
Open Syllabus
In Course Navigation, click the Syllabus link.
57
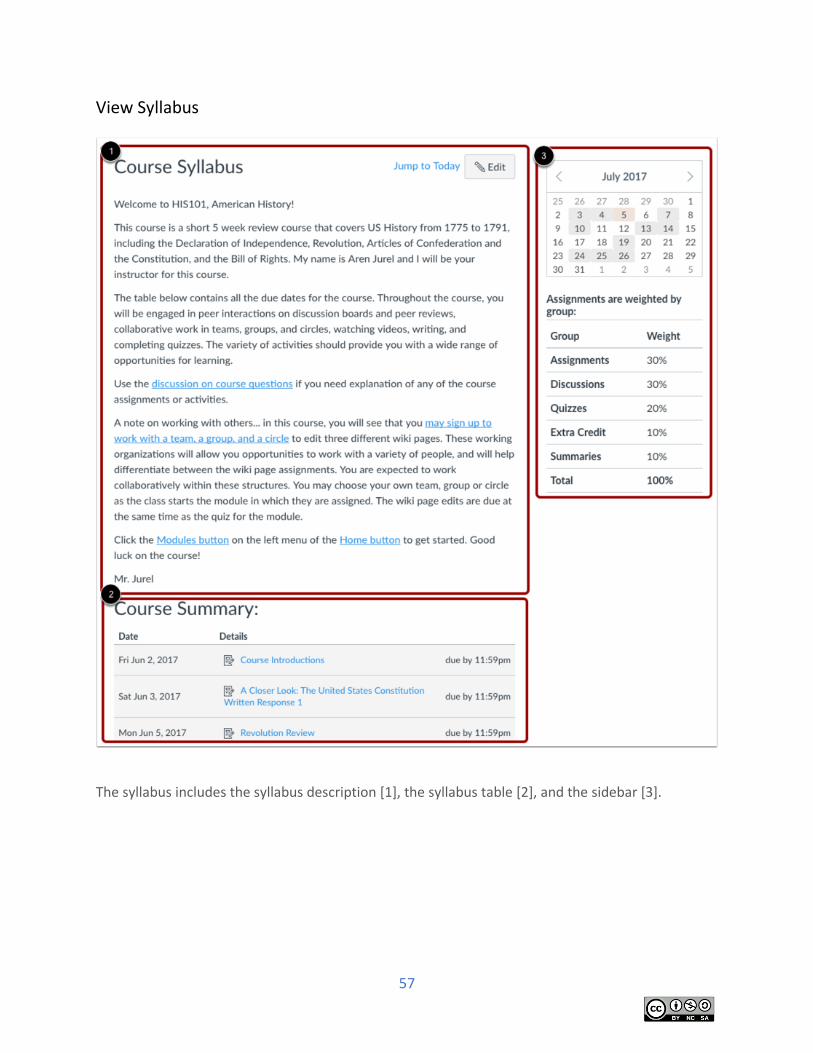
View Syllabus
The syllabus includes the syllabus description [1], the syllabus table [2], and the sidebar [3].
58
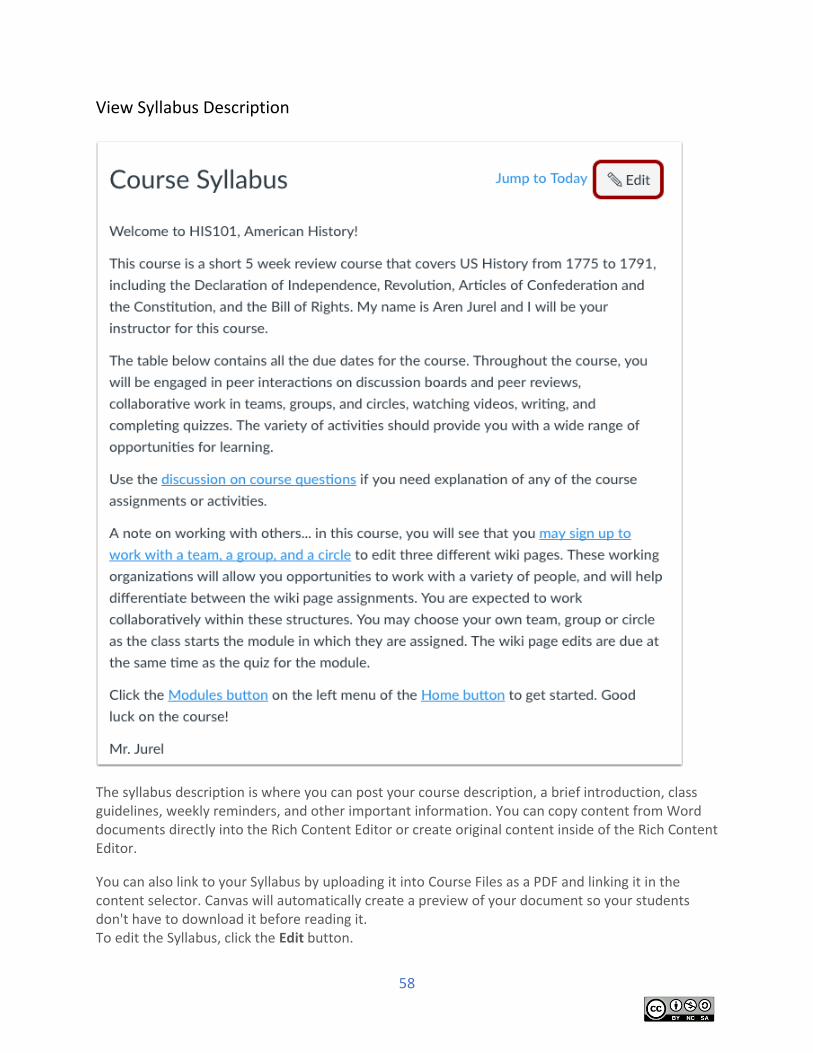
View Syllabus Description
The syllabus description is where you can post your course description, a brief introduction, class guidelines, weekly reminders, and other important information. You can copy content from Word documents directly into the Rich Content Editor or create original content inside of the Rich Content Editor.
You can also link to your Syllabus by uploading it into Course Files as a PDF and linking it in the content selector. Canvas will automatically create a preview of your document so your students don't have to download it before reading it. To edit the Syllabus, click the Edit button.
59
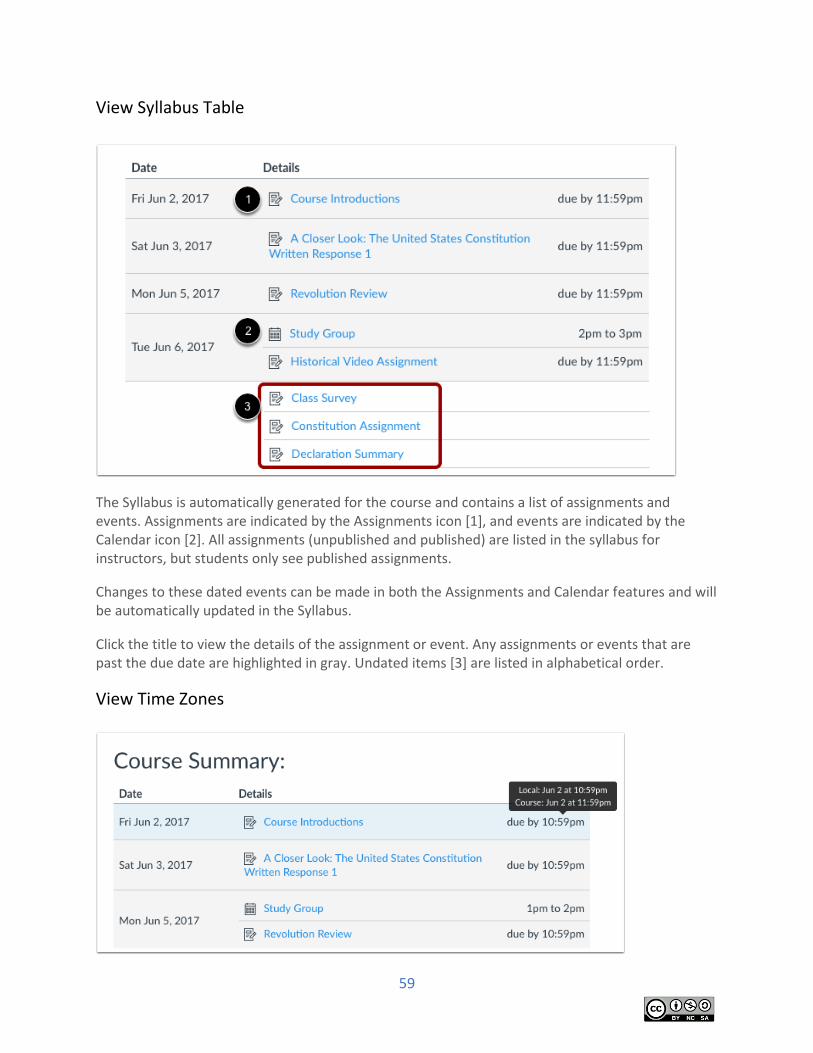
View Syllabus Table
The Syllabus is automatically generated for the course and contains a list of assignments and events. Assignments are indicated by the Assignments icon [1], and events are indicated by the Calendar icon [2]. All assignments (unpublished and published) are listed in the syllabus for instructors, but students only see published assignments.
Changes to these dated events can be made in both the Assignments and Calendar features and will be automatically updated in the Syllabus.
Click the title to view the details of the assignment or event. Any assignments or events that are past the due date are highlighted in gray. Undated items [3] are listed in alphabetical order.
View Time Zones
60
If you have set a specific time zone in your User Settings, all course dates and times will display in your local time, but if you hover over the time, you can also see the course date and time.
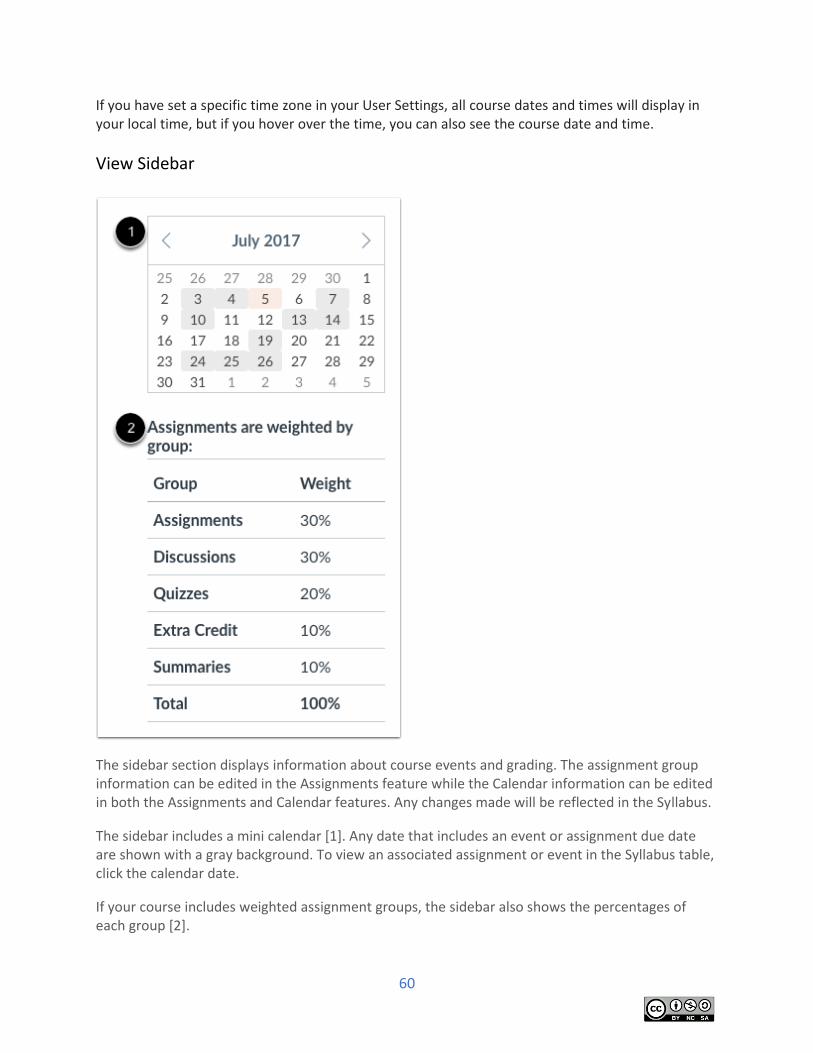
View Sidebar
The sidebar section displays information about course events and grading. The assignment group information can be edited in the Assignments feature while the Calendar information can be edited in both the Assignments and Calendar features. Any changes made will be reflected in the Syllabus.
The sidebar includes a mini calendar [1]. Any date that includes an event or assignment due date are shown with a gray background. To view an associated assignment or event in the Syllabus table, click the calendar date.
If your course includes weighted assignment groups, the sidebar also shows the percentages of each group [2].
61
Edit the Syllabus description in a course
Editing the Syllabus allows you to add text and link files, images, and other course content in your Syllabus Description.
Notes: Image files do not have a preview option when added as a file link through the Rich Content Editor.
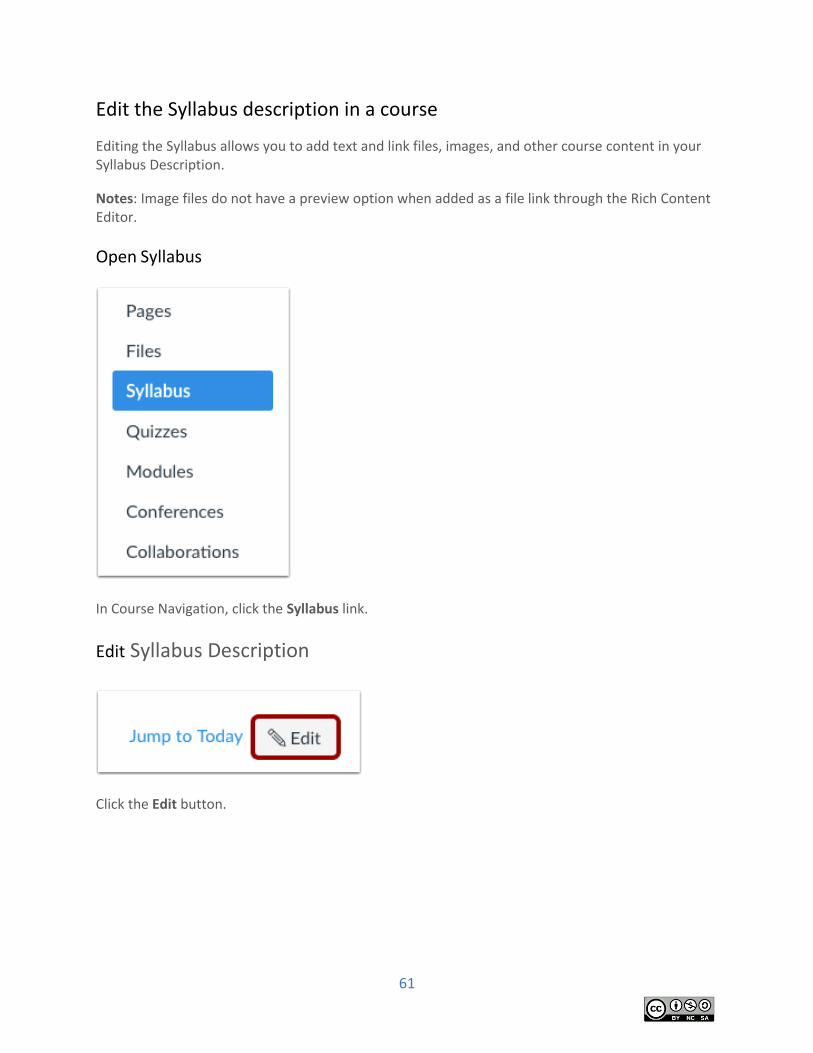
Open Syllabus
In Course Navigation, click the Syllabus link.
Edit Syllabus Description
Click the Edit button.
62
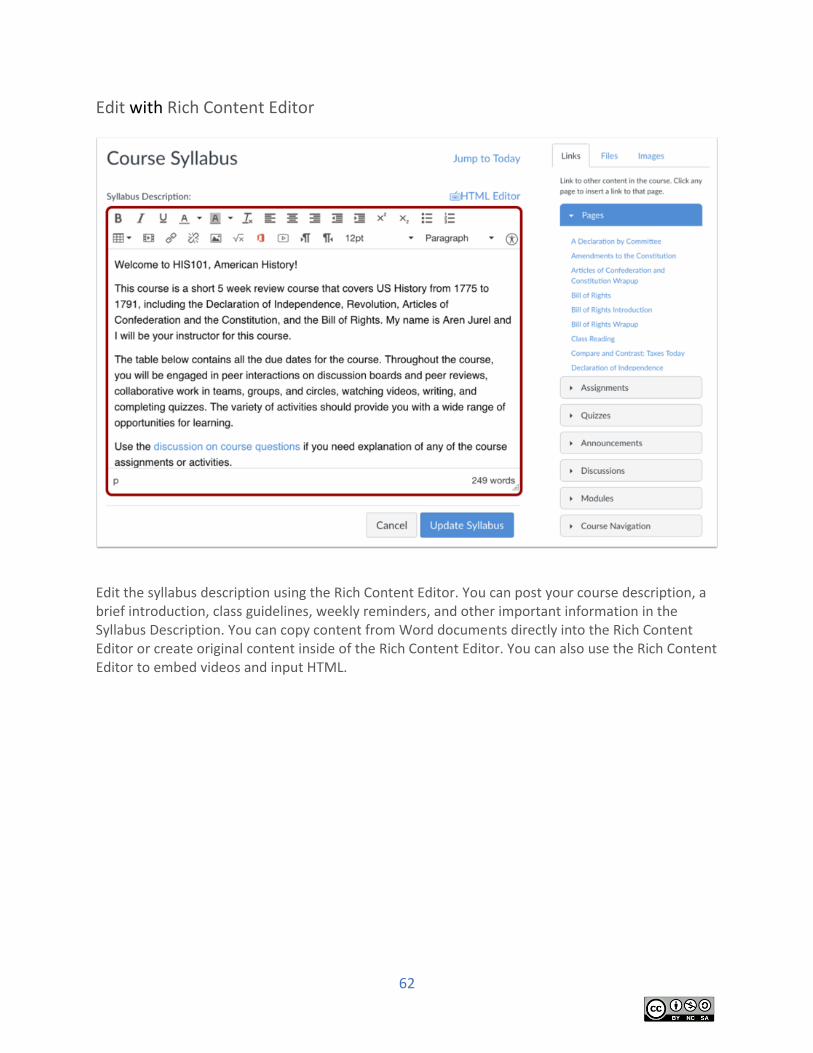
Edit with Rich Content Editor
Edit the syllabus description using the Rich Content Editor. You can post your course description, a brief introduction, class guidelines, weekly reminders, and other important information in the Syllabus Description. You can copy content from Word documents directly into the Rich Content Editor or create original content inside of the Rich Content Editor. You can also use the Rich Content Editor to embed videos and input HTML.
63
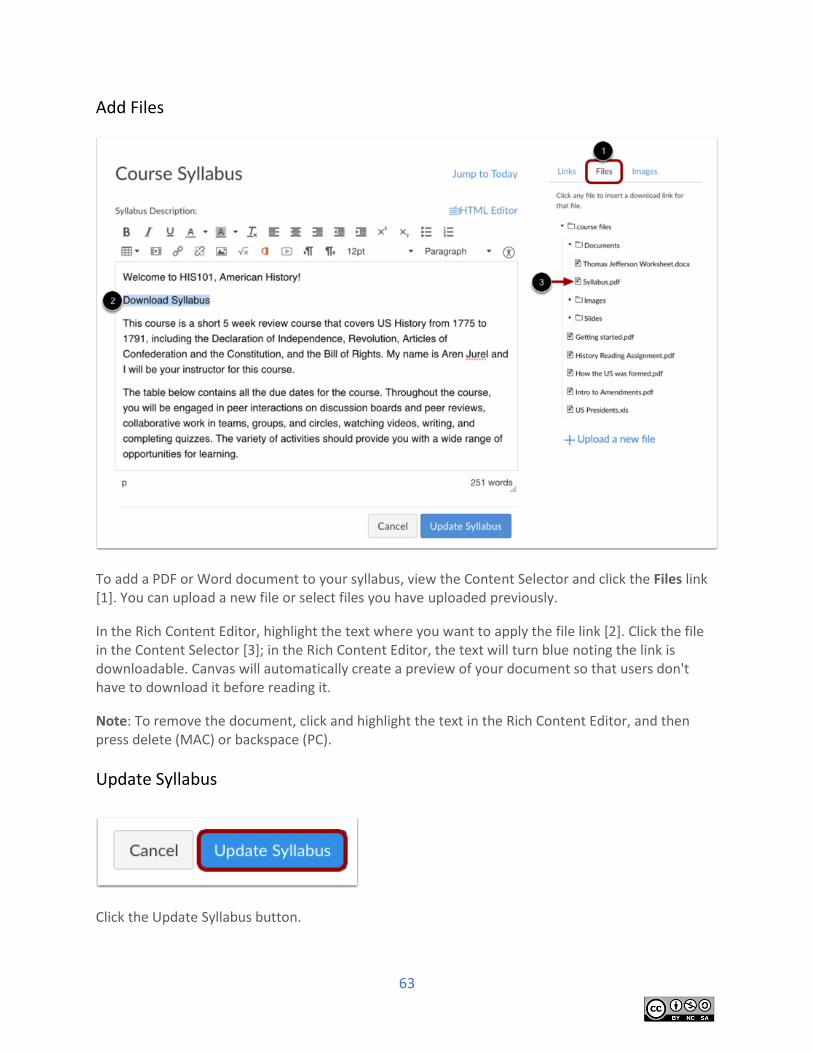
Add Files
To add a PDF or Word document to your syllabus, view the Content Selector and click the Files link [1]. You can upload a new file or select files you have uploaded previously.
In the Rich Content Editor, highlight the text where you want to apply the file link [2]. Click the file in the Content Selector [3]; in the Rich Content Editor, the text will turn blue noting the link is downloadable. Canvas will automatically create a preview of your document so that users don't have to download it before reading it.
Note: To remove the document, click and highlight the text in the Rich Content Editor, and then press delete (MAC) or backspace (PC).
Update Syllabus
Click the Update Syllabus button.
64
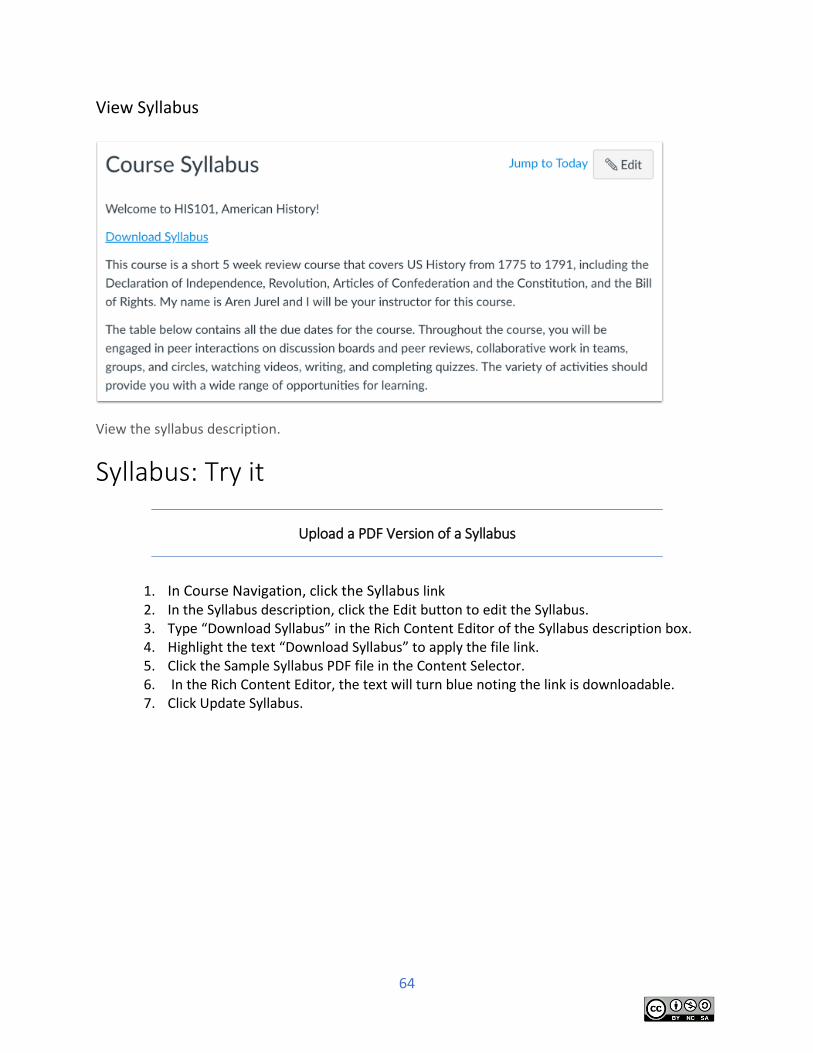
View Syllabus
View the syllabus description.
Syllabus: Try it
Upload a PDF Version of a Syllabus
1. In Course Navigation, click the Syllabus link 2. In the Syllabus description, click the Edit button to edit the Syllabus. 3. Type “Download Syllabus” in the Rich Content Editor of the Syllabus description box. 4. Highlight the text “Download Syllabus” to apply the file link. 5. Click the Sample Syllabus PDF file in the Content Selector. 6. In the Rich Content Editor, the text will turn blue noting the link is downloadable. 7. Click Update Syllabus.
65
DELIVERING YOUR CONTENT
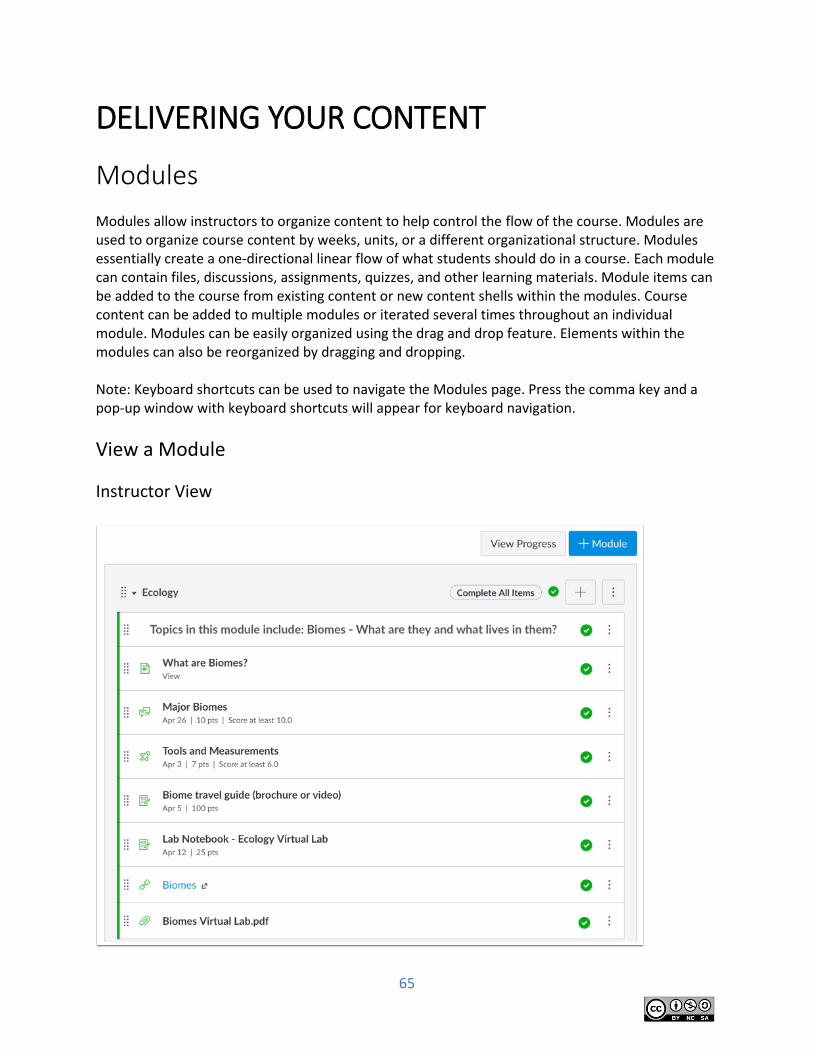
Modules Modules allow instructors to organize content to help control the flow of the course. Modules are used to organize course content by weeks, units, or a different organizational structure. Modules essentially create a one-directional linear flow of what students should do in a course. Each module can contain files, discussions, assignments, quizzes, and other learning materials. Module items can be added to the course from existing content or new content shells within the modules. Course content can be added to multiple modules or iterated several times throughout an individual module. Modules can be easily organized using the drag and drop feature. Elements within the modules can also be reorganized by dragging and dropping. Note: Keyboard shortcuts can be used to navigate the Modules page. Press the comma key and a pop-up window with keyboard shortcuts will appear for keyboard navigation.
View a Module
Instructor View
66
Instructors can add all course materials in modules, even if they are assigned to specific students, sections, or groups. Use Modules to:
Create prerequisite activities that students must complete before moving on in the course
Track student progress through a sequence of learning activities
Organize course content by unit, day, week, topic or Outcome
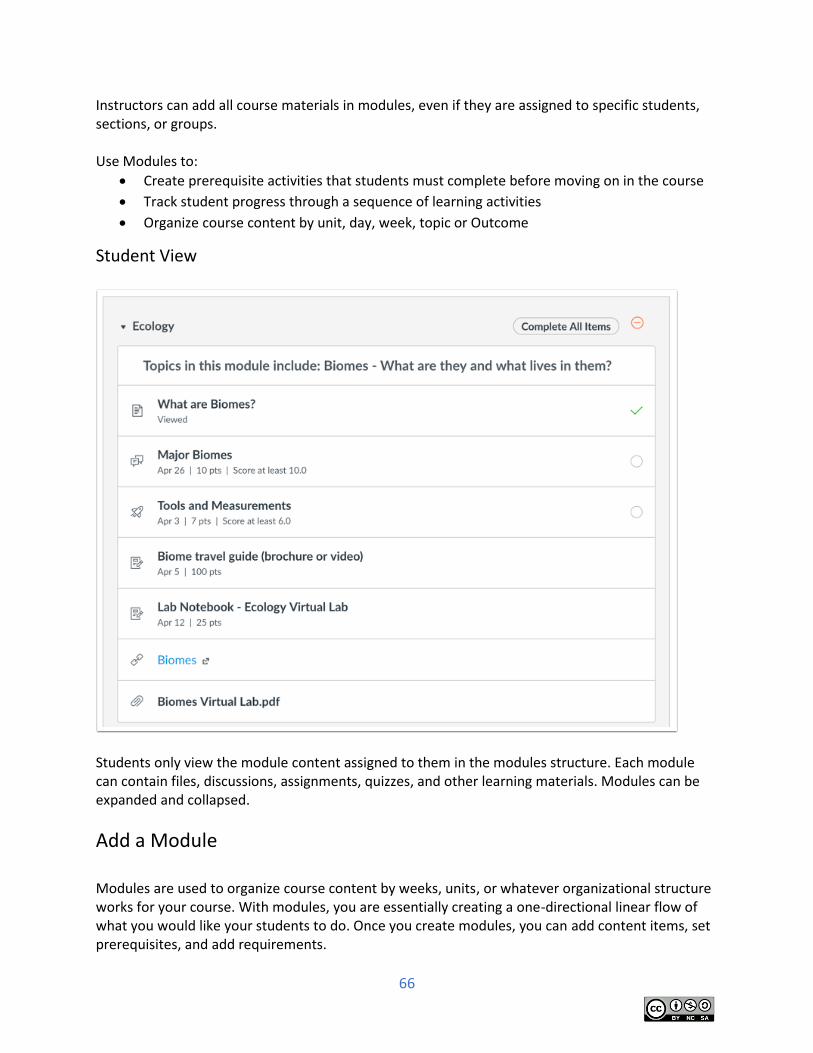
Student View
Students only view the module content assigned to them in the modules structure. Each module can contain files, discussions, assignments, quizzes, and other learning materials. Modules can be expanded and collapsed.
Add a Module Modules are used to organize course content by weeks, units, or whatever organizational structure works for your course. With modules, you are essentially creating a one-directional linear flow of what you would like your students to do. Once you create modules, you can add content items, set prerequisites, and add requirements.
67
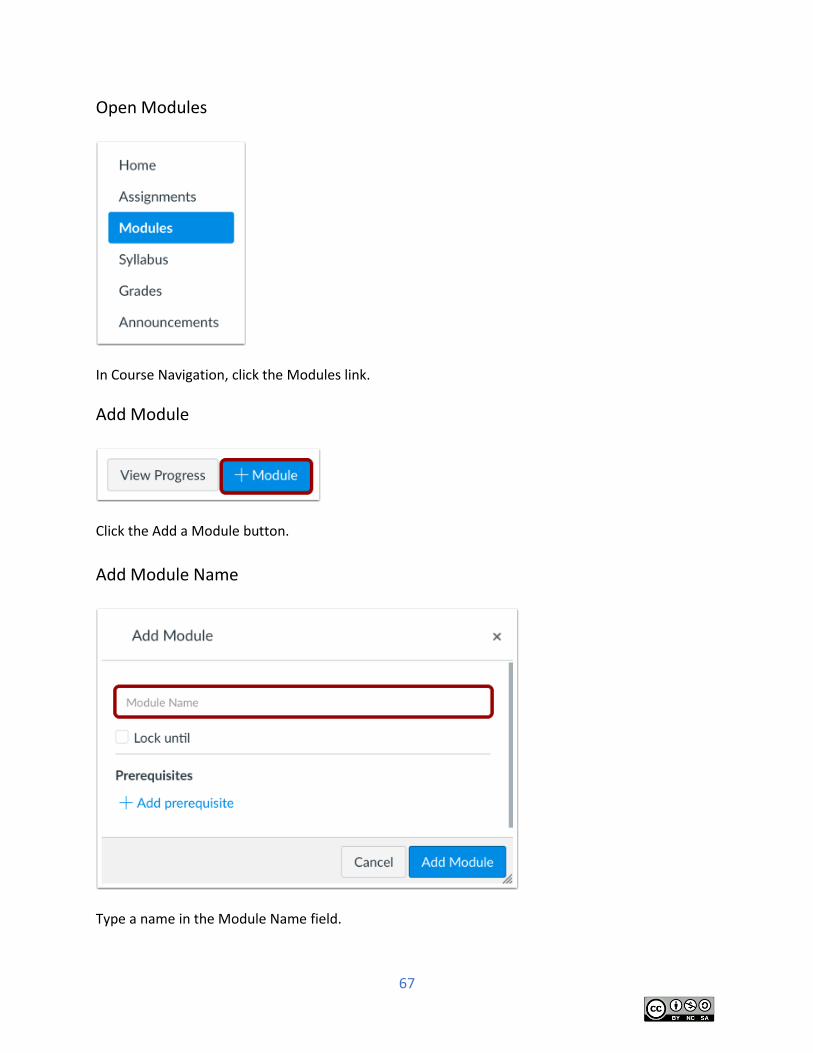
Open Modules
In Course Navigation, click the Modules link.
Add Module
Click the Add a Module button.
Add Module Name
Type a name in the Module Name field.
68
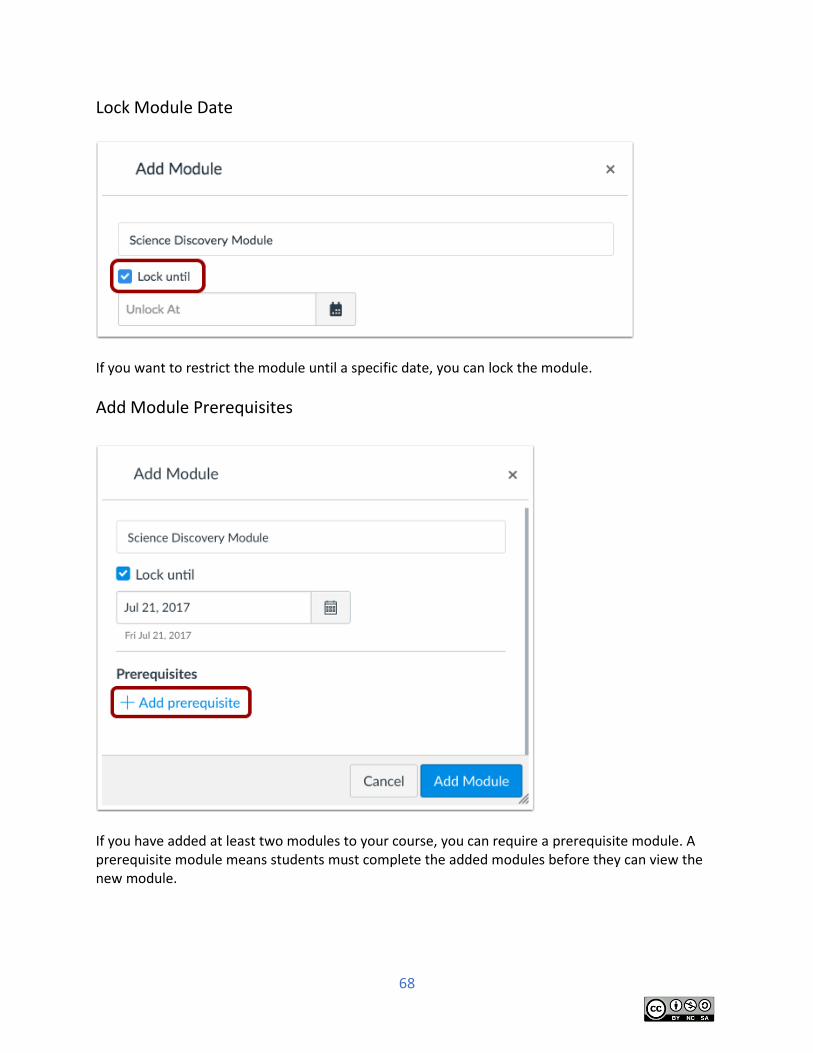
Lock Module Date
If you want to restrict the module until a specific date, you can lock the module.
Add Module Prerequisites
If you have added at least two modules to your course, you can require a prerequisite module. A prerequisite module means students must complete the added modules before they can view the new module.
69
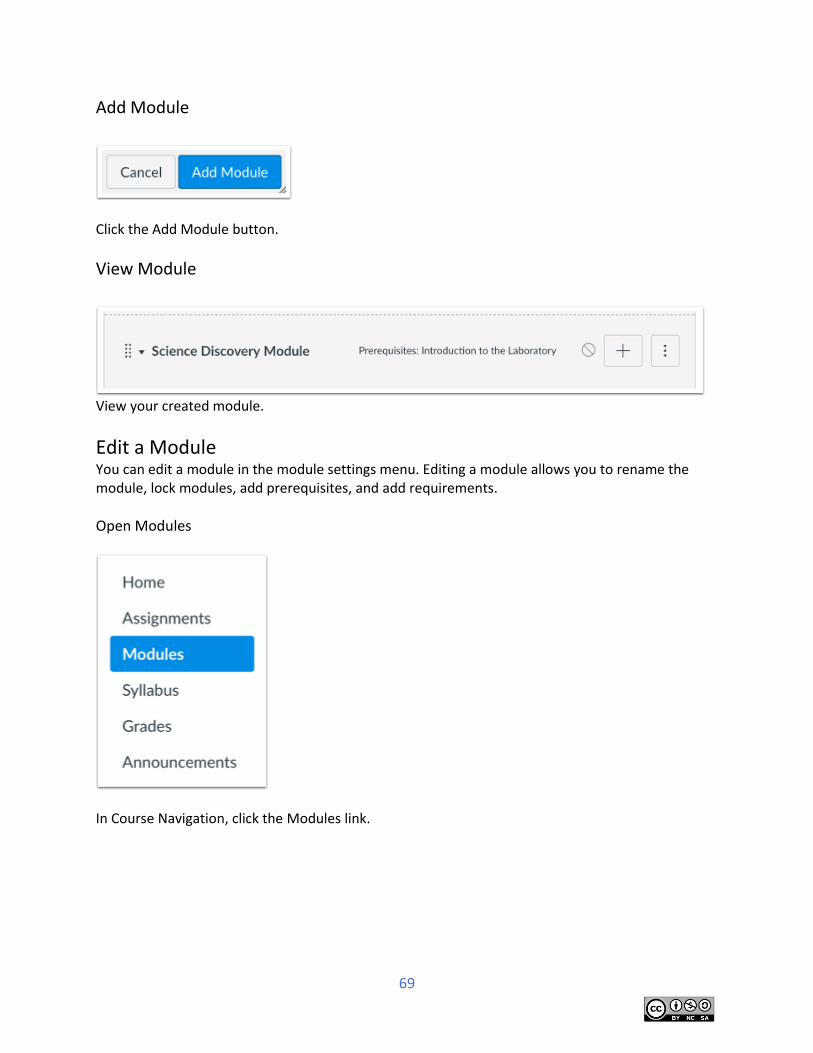
Add Module
Click the Add Module button.
View Module
View your created module.
Edit a Module You can edit a module in the module settings menu. Editing a module allows you to rename the module, lock modules, add prerequisites, and add requirements.
Open Modules
In Course Navigation, click the Modules link.
70
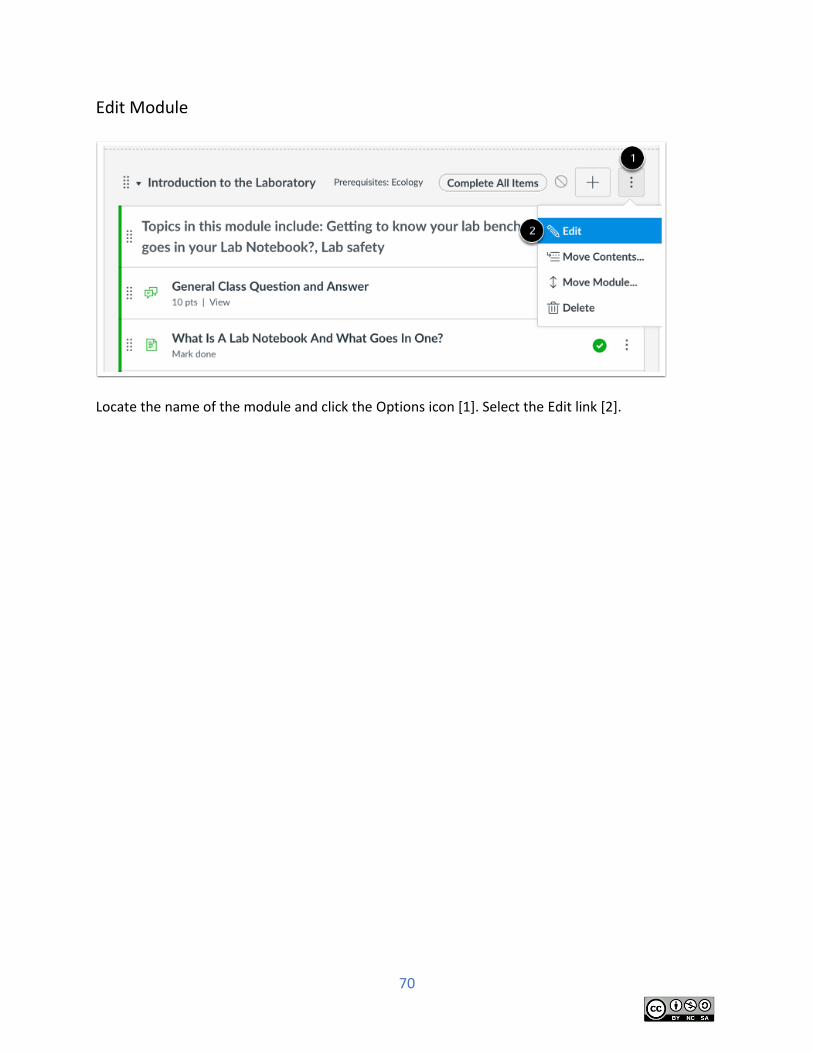
Edit Module
Locate the name of the module and click the Options icon [1]. Select the Edit link [2].
71
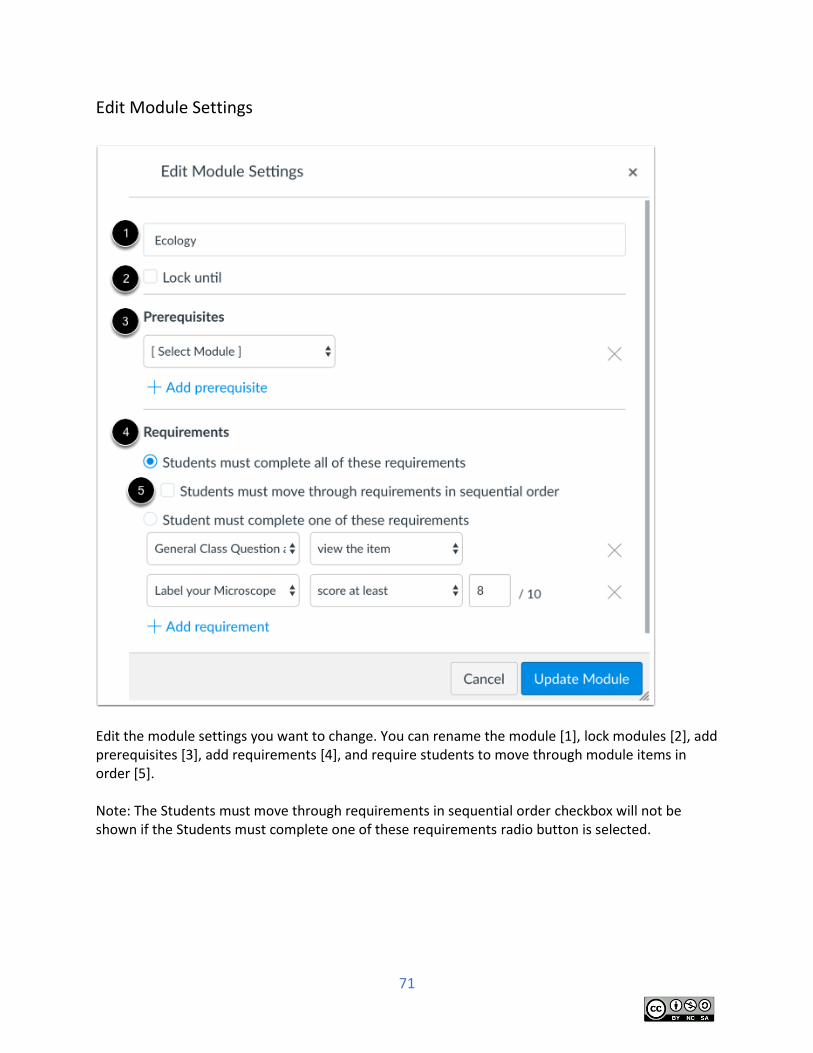
Edit Module Settings
Edit the module settings you want to change. You can rename the module [1], lock modules [2], add prerequisites [3], add requirements [4], and require students to move through module items in order [5]. Note: The Students must move through requirements in sequential order checkbox will not be shown if the Students must complete one of these requirements radio button is selected.
72
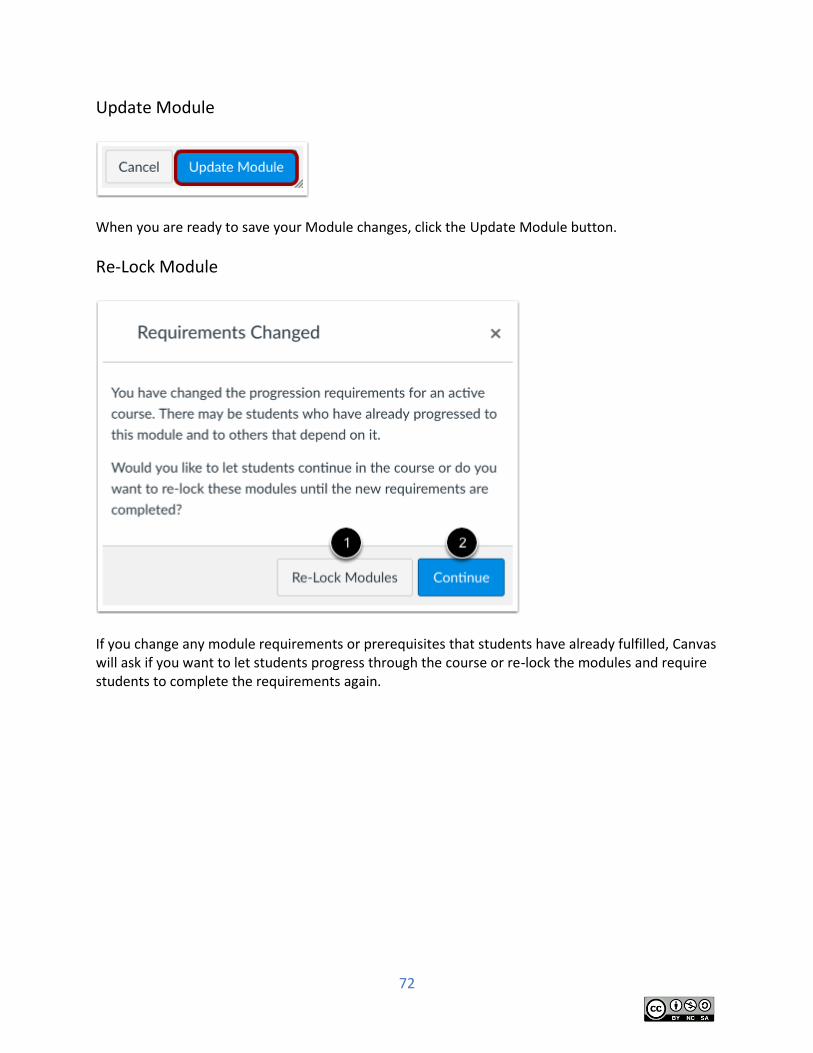
Update Module
When you are ready to save your Module changes, click the Update Module button.
Re-Lock Module
If you change any module requirements or prerequisites that students have already fulfilled, Canvas will ask if you want to let students progress through the course or re-lock the modules and require students to complete the requirements again.
73
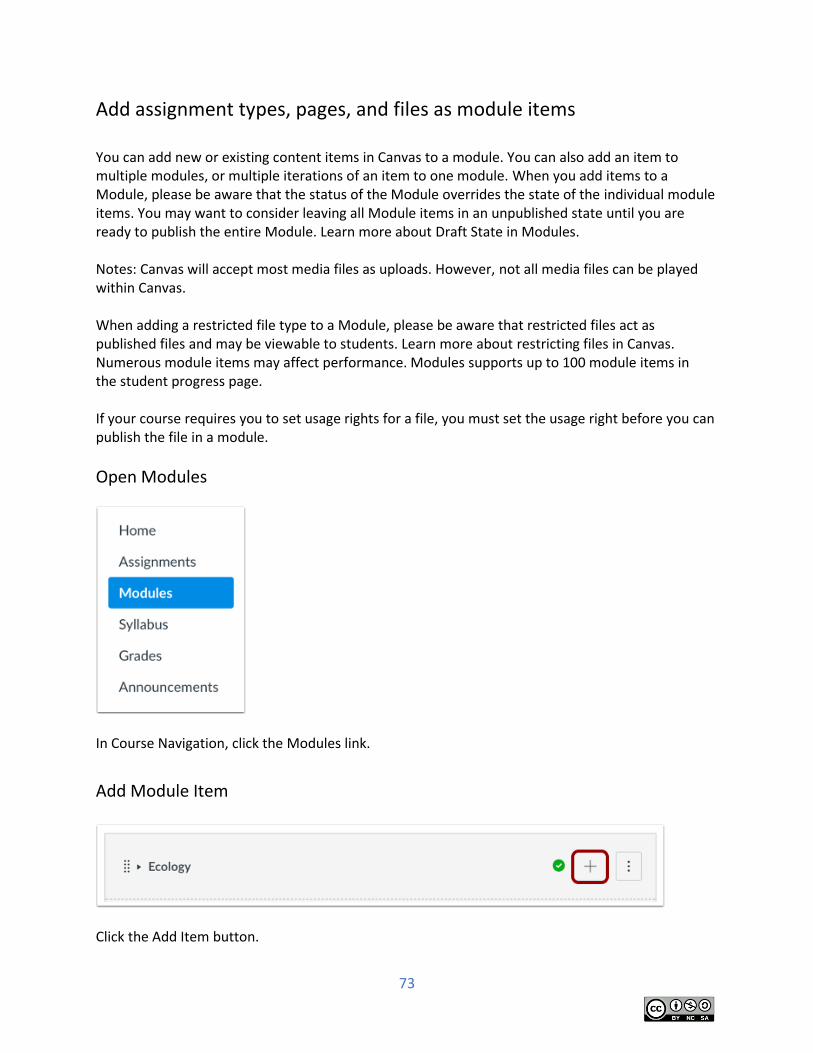
Add assignment types, pages, and files as module items You can add new or existing content items in Canvas to a module. You can also add an item to multiple modules, or multiple iterations of an item to one module. When you add items to a Module, please be aware that the status of the Module overrides the state of the individual module items. You may want to consider leaving all Module items in an unpublished state until you are ready to publish the entire Module. Learn more about Draft State in Modules. Notes: Canvas will accept most media files as uploads. However, not all media files can be played within Canvas. When adding a restricted file type to a Module, please be aware that restricted files act as published files and may be viewable to students. Learn more about restricting files in Canvas. Numerous module items may affect performance. Modules supports up to 100 module items in the student progress page. If your course requires you to set usage rights for a file, you must set the usage right before you can publish the file in a module.
Open Modules
In Course Navigation, click the Modules link.
Add Module Item
Click the Add Item button.
74
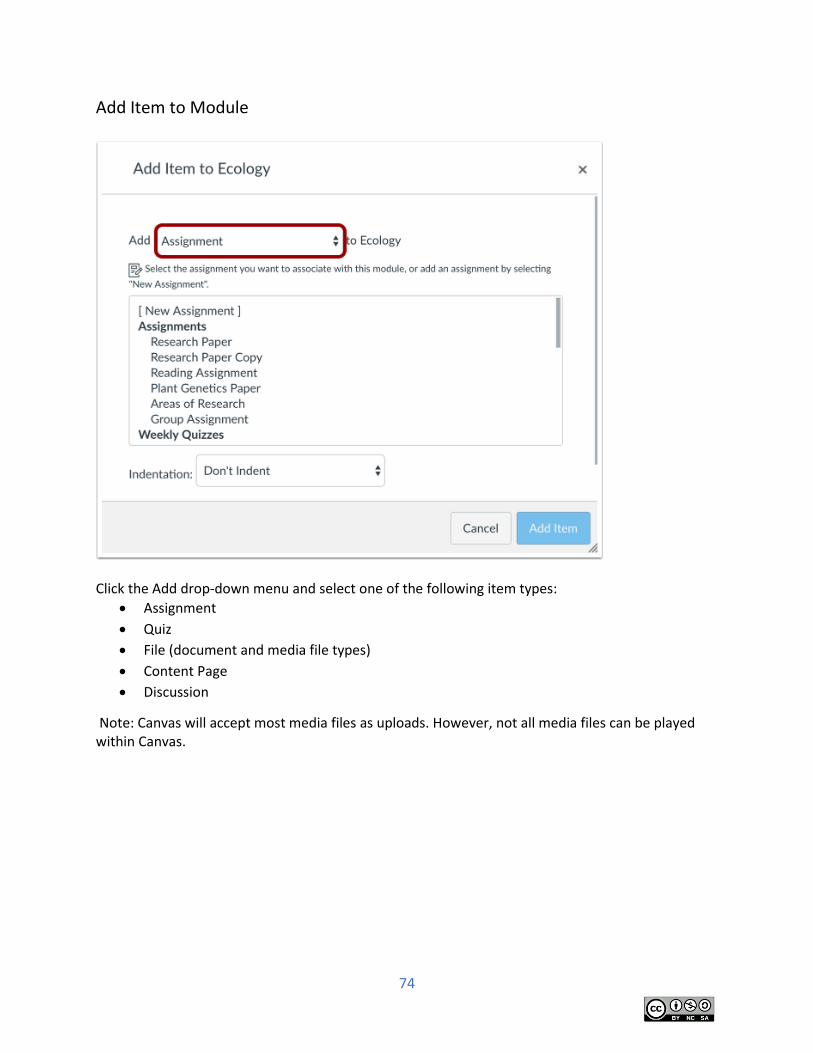
Add Item to Module
Click the Add drop-down menu and select one of the following item types:
Assignment
Quiz
File (document and media file types)
Content Page
Discussion
Note: Canvas will accept most media files as uploads. However, not all media files can be played within Canvas.
75
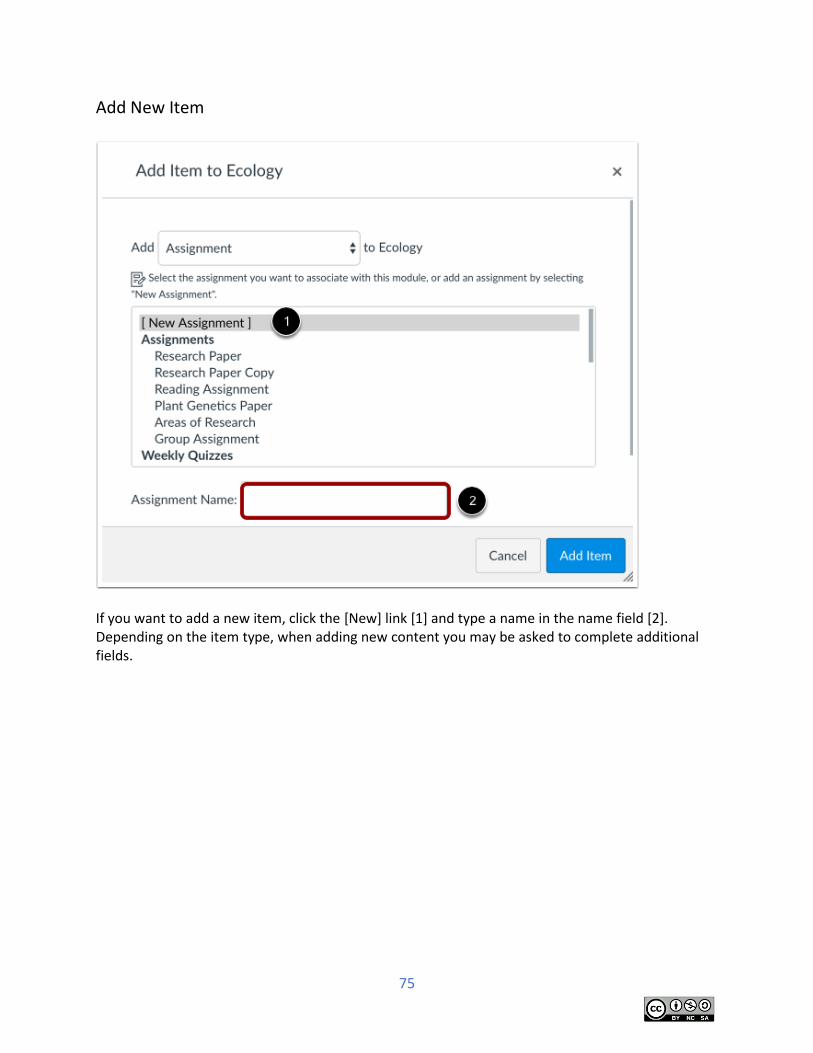
Add New Item
If you want to add a new item, click the [New] link [1] and type a name in the name field [2]. Depending on the item type, when adding new content you may be asked to complete additional fields.
76
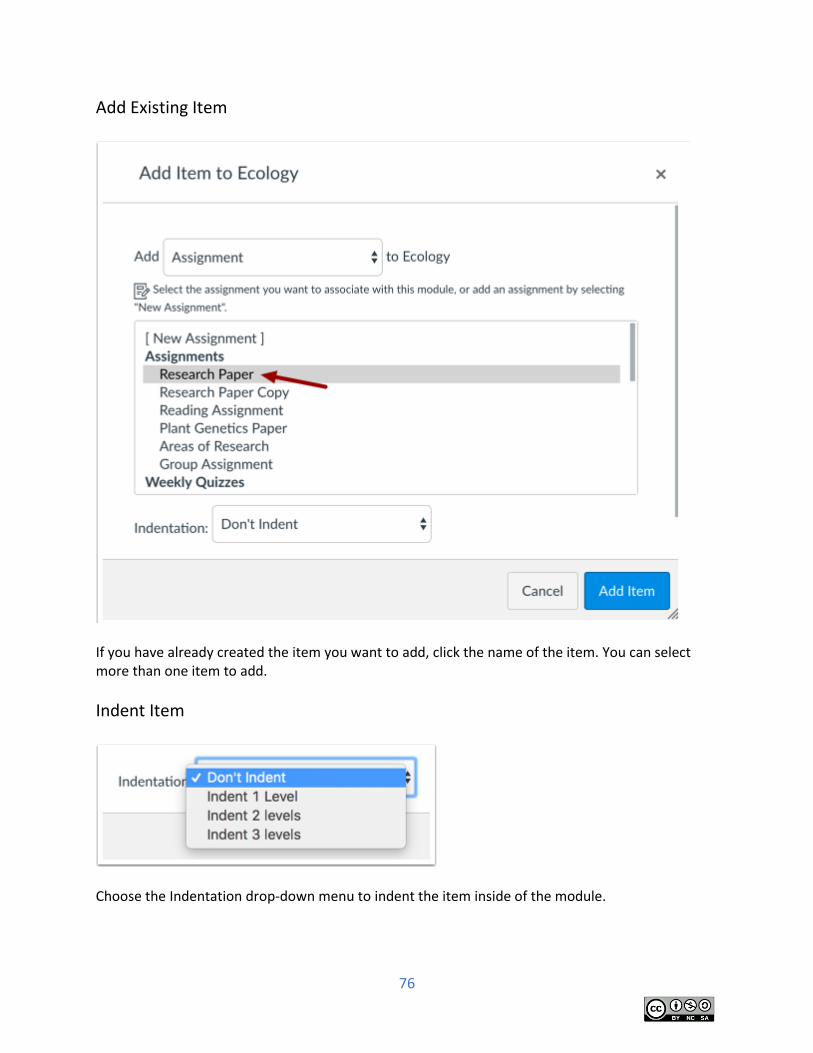
Add Existing Item
If you have already created the item you want to add, click the name of the item. You can select more than one item to add.
Indent Item
Choose the Indentation drop-down menu to indent the item inside of the module.
77
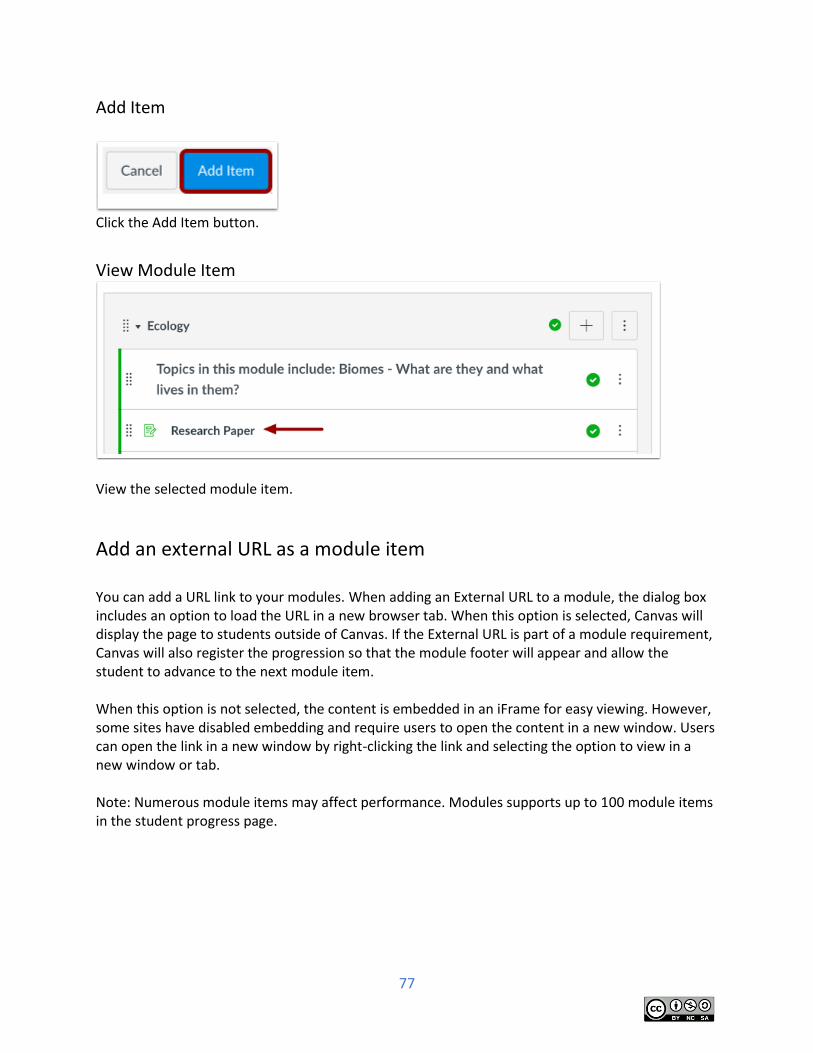
Add Item
Click the Add Item button.
View Module Item
View the selected module item.
Add an external URL as a module item You can add a URL link to your modules. When adding an External URL to a module, the dialog box includes an option to load the URL in a new browser tab. When this option is selected, Canvas will display the page to students outside of Canvas. If the External URL is part of a module requirement, Canvas will also register the progression so that the module footer will appear and allow the student to advance to the next module item. When this option is not selected, the content is embedded in an iFrame for easy viewing. However, some sites have disabled embedding and require users to open the content in a new window. Users can open the link in a new window by right-clicking the link and selecting the option to view in a new window or tab. Note: Numerous module items may affect performance. Modules supports up to 100 module items in the student progress page.
78
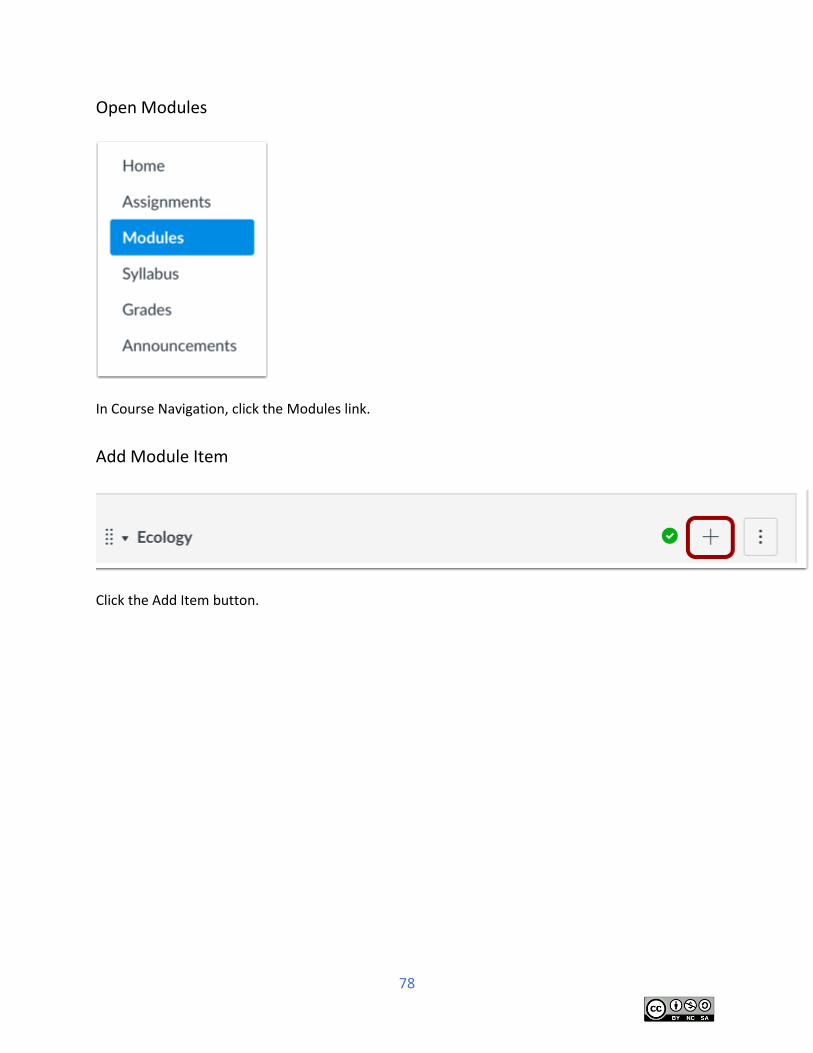
Open Modules
In Course Navigation, click the Modules link.
Add Module Item
Click the Add Item button.
79
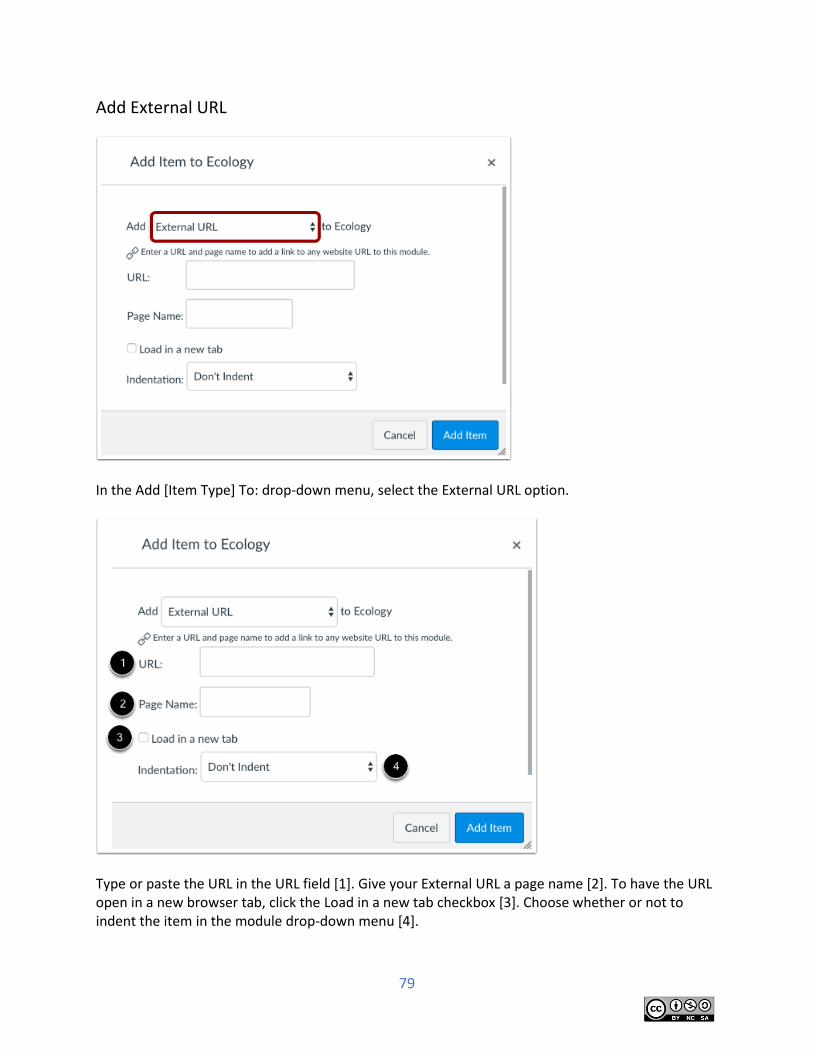
Add External URL
In the Add [Item Type] To: drop-down menu, select the External URL option.
Type or paste the URL in the URL field [1]. Give your External URL a page name [2]. To have the URL open in a new browser tab, click the Load in a new tab checkbox [3]. Choose whether or not to indent the item in the module drop-down menu [4].
80
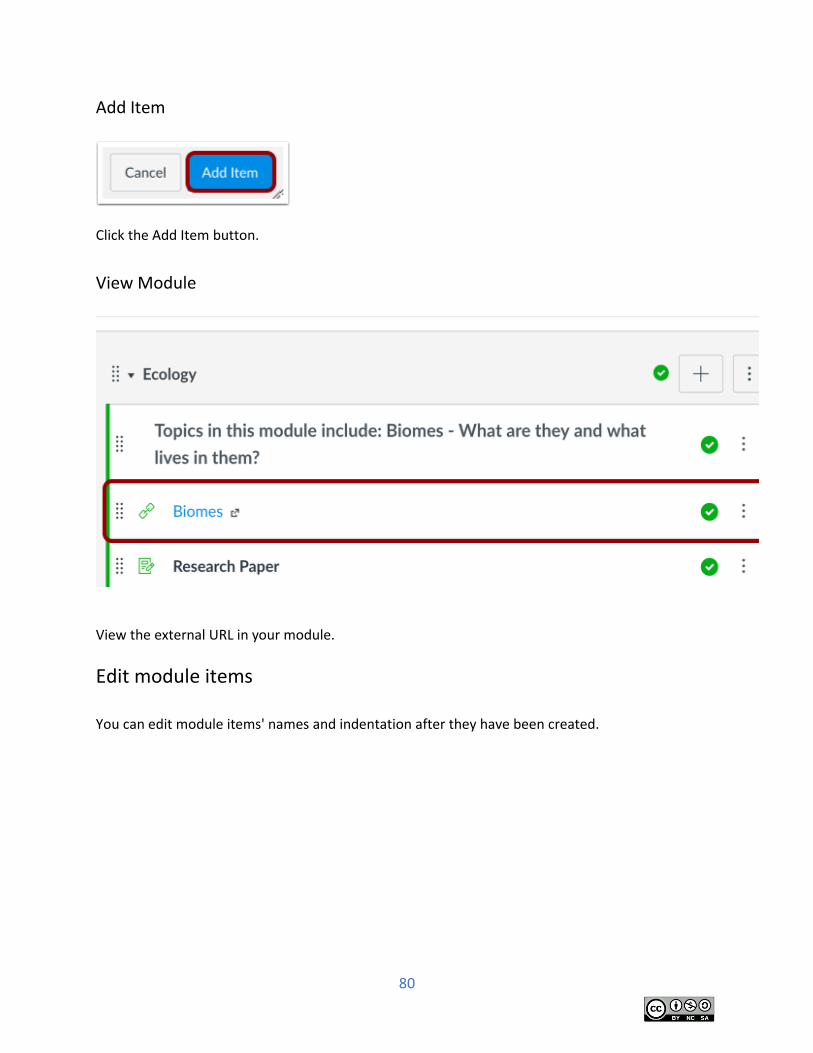
Add Item
Click the Add Item button.
View Module
View the external URL in your module.
Edit module items You can edit module items' names and indentation after they have been created.

81
Open Modules
In Course Navigation, click the Modules link.
Edit Module Item
Click the Options icon [1] and select the Edit link [2].
82
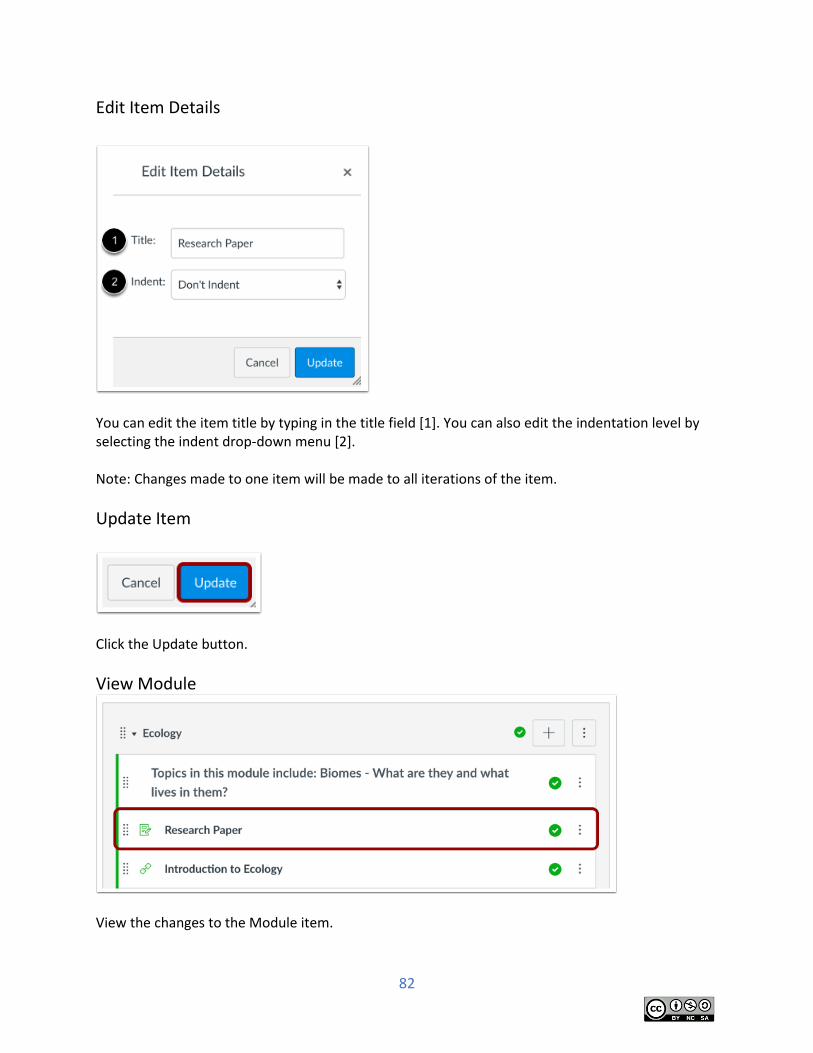
Edit Item Details
You can edit the item title by typing in the title field [1]. You can also edit the indentation level by selecting the indent drop-down menu [2]. Note: Changes made to one item will be made to all iterations of the item.
Update Item
Click the Update button.
View Module
View the changes to the Module item.
83
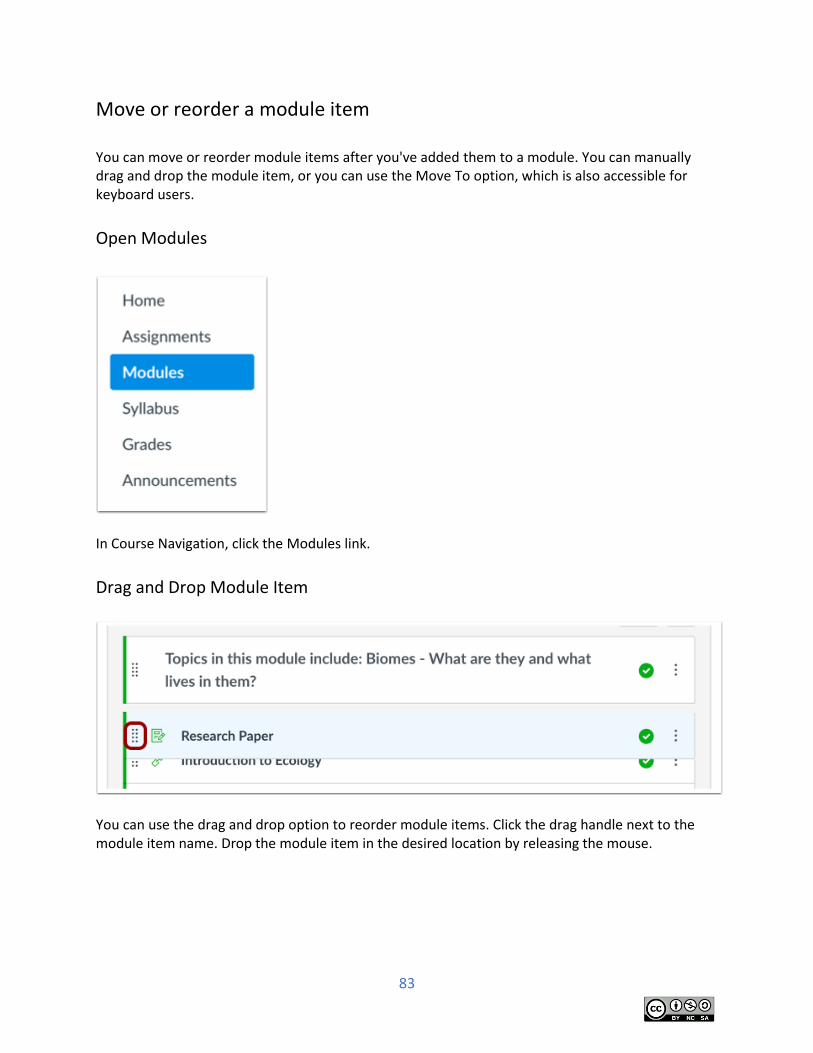
Move or reorder a module item You can move or reorder module items after you've added them to a module. You can manually drag and drop the module item, or you can use the Move To option, which is also accessible for keyboard users.
Open Modules
In Course Navigation, click the Modules link.
Drag and Drop Module Item
You can use the drag and drop option to reorder module items. Click the drag handle next to the module item name. Drop the module item in the desired location by releasing the mouse.
84
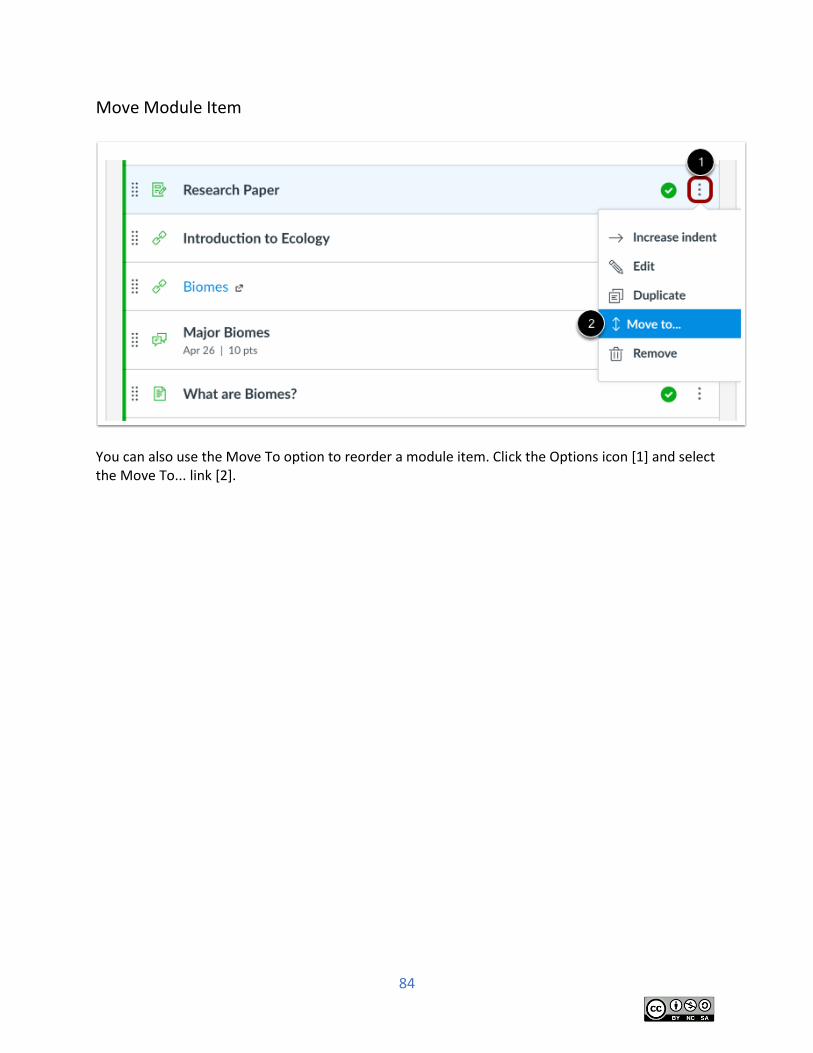
Move Module Item
You can also use the Move To option to reorder a module item. Click the Options icon [1] and select the Move To... link [2].
85
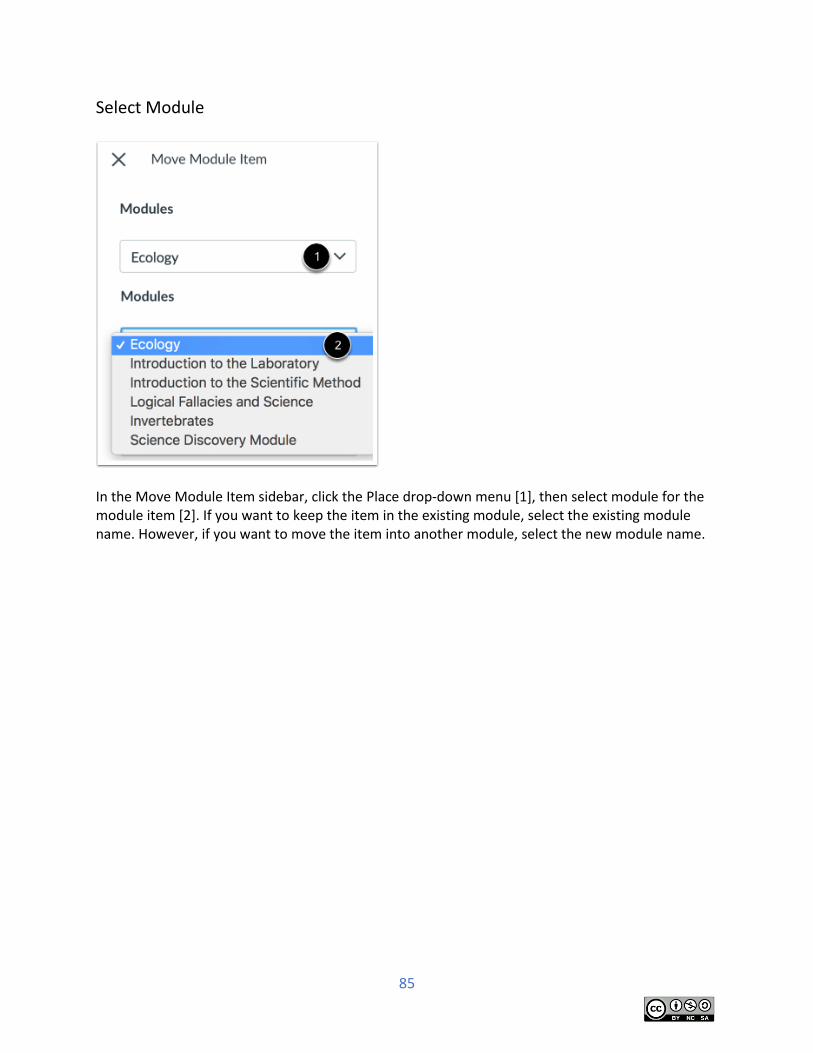
Select Module
In the Move Module Item sidebar, click the Place drop-down menu [1], then select module for the module item [2]. If you want to keep the item in the existing module, select the existing module name. However, if you want to move the item into another module, select the new module name.

86
Place Module Item
In the second drop-down menu [1], select the placement of the item you are moving [2]. You can move the module item so it is the first item module item, before a specific item, after a specific item, or the last module item.
87
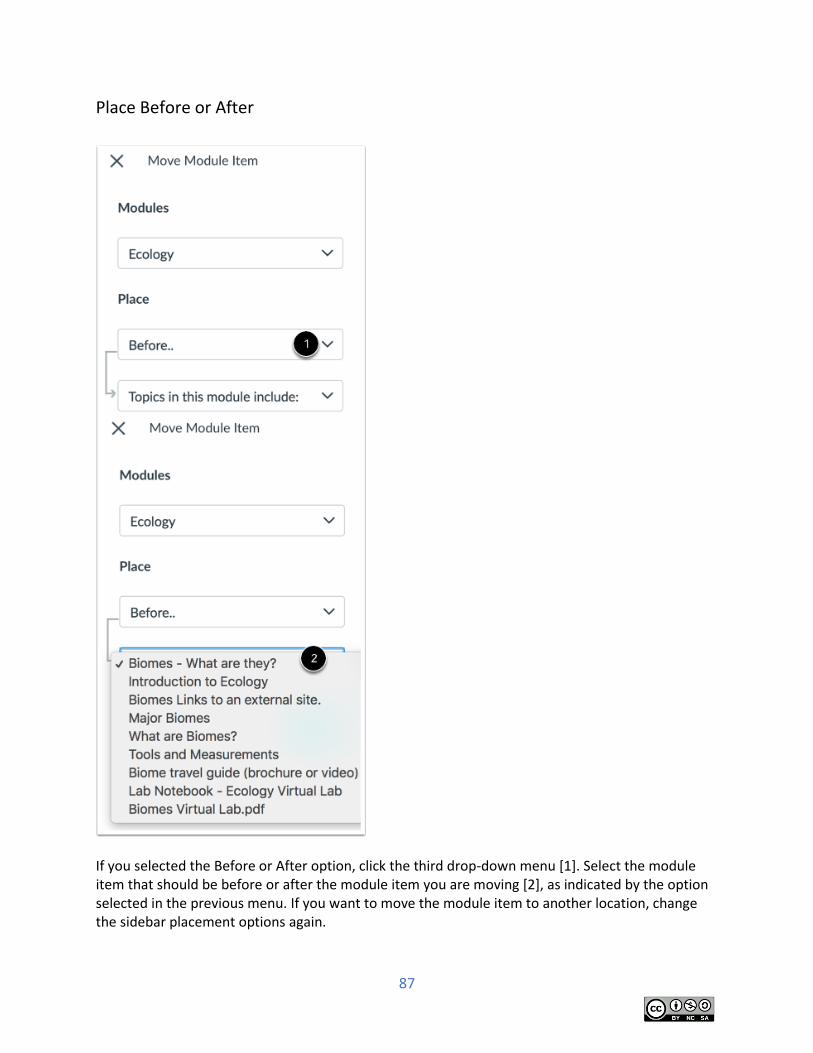
Place Before or After
If you selected the Before or After option, click the third drop-down menu [1]. Select the module item that should be before or after the module item you are moving [2], as indicated by the option selected in the previous menu. If you want to move the module item to another location, change the sidebar placement options again.
88
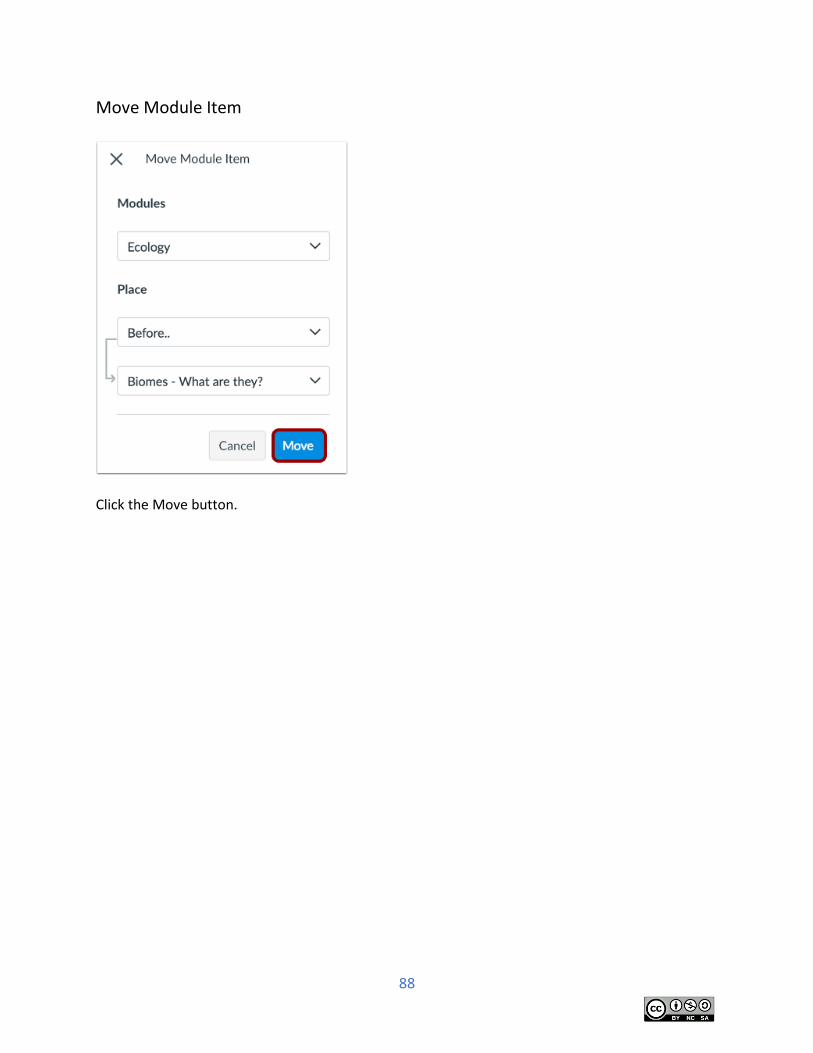
Move Module Item
Click the Move button.
89
Use the Modules Index Page Modules control the entire flow of your course and its content. As an instructor, you can add modules, add items to a module, and manage module settings. You can also reorder all modules and module items.
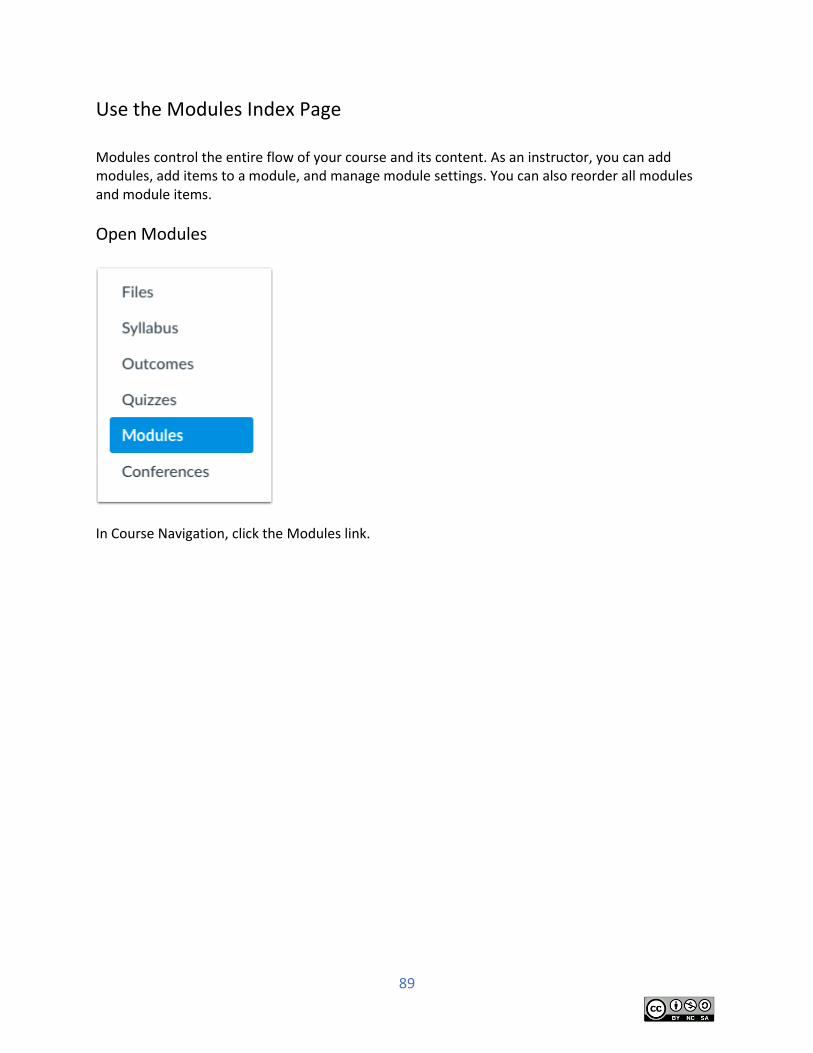
Open Modules
In Course Navigation, click the Modules link.
90
View Modules Index Page
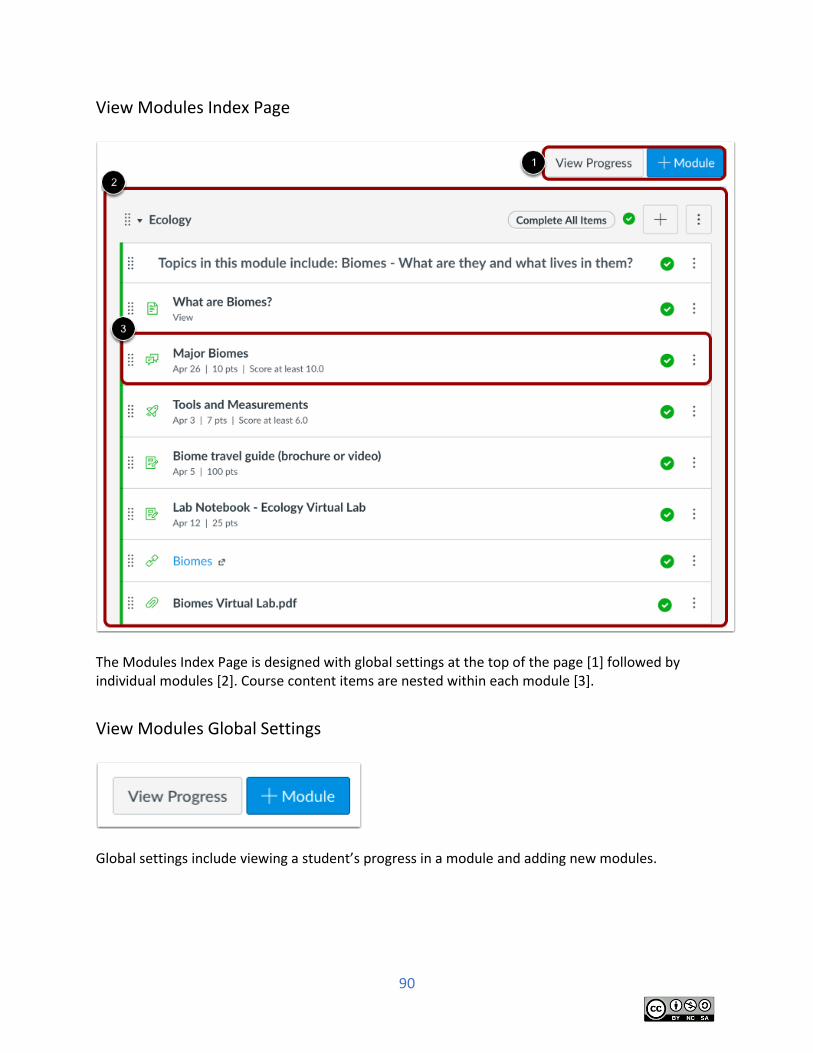
The Modules Index Page is designed with global settings at the top of the page [1] followed by individual modules [2]. Course content items are nested within each module [3].
View Modules Global Settings
Global settings include viewing a student’s progress in a module and adding new modules.
91
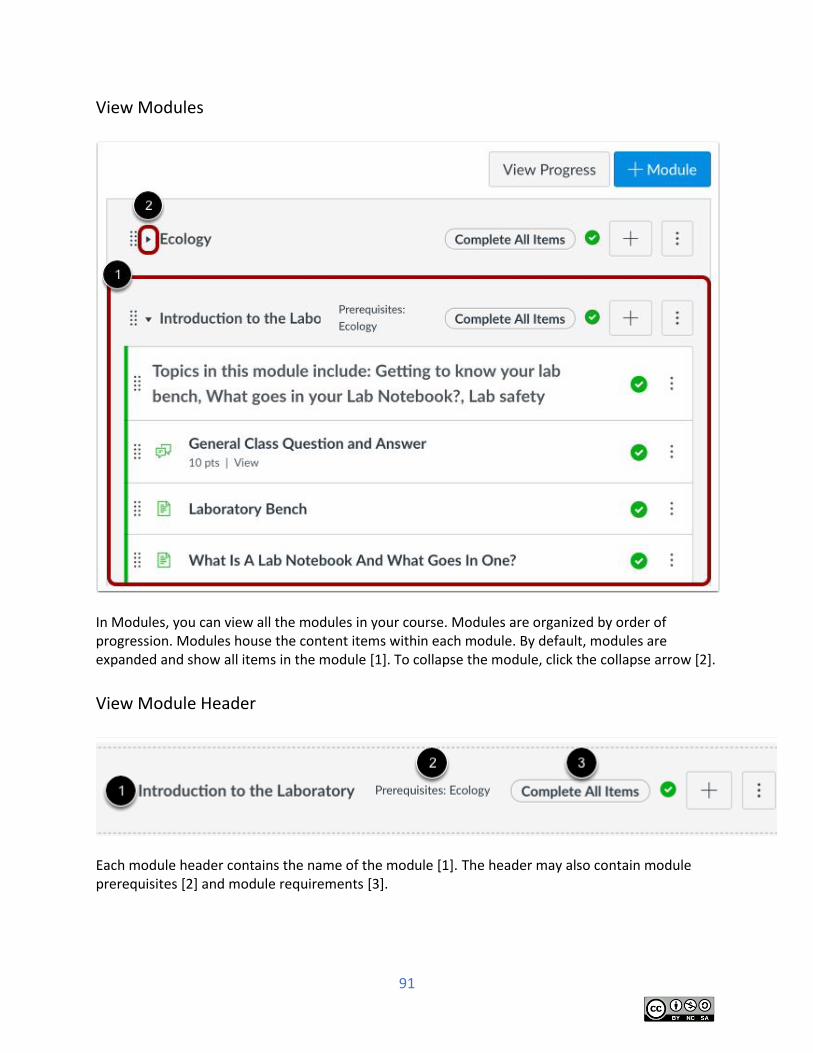
View Modules
In Modules, you can view all the modules in your course. Modules are organized by order of progression. Modules house the content items within each module. By default, modules are expanded and show all items in the module [1]. To collapse the module, click the collapse arrow [2].
View Module Header
Each module header contains the name of the module [1]. The header may also contain module prerequisites [2] and module requirements [3].
92
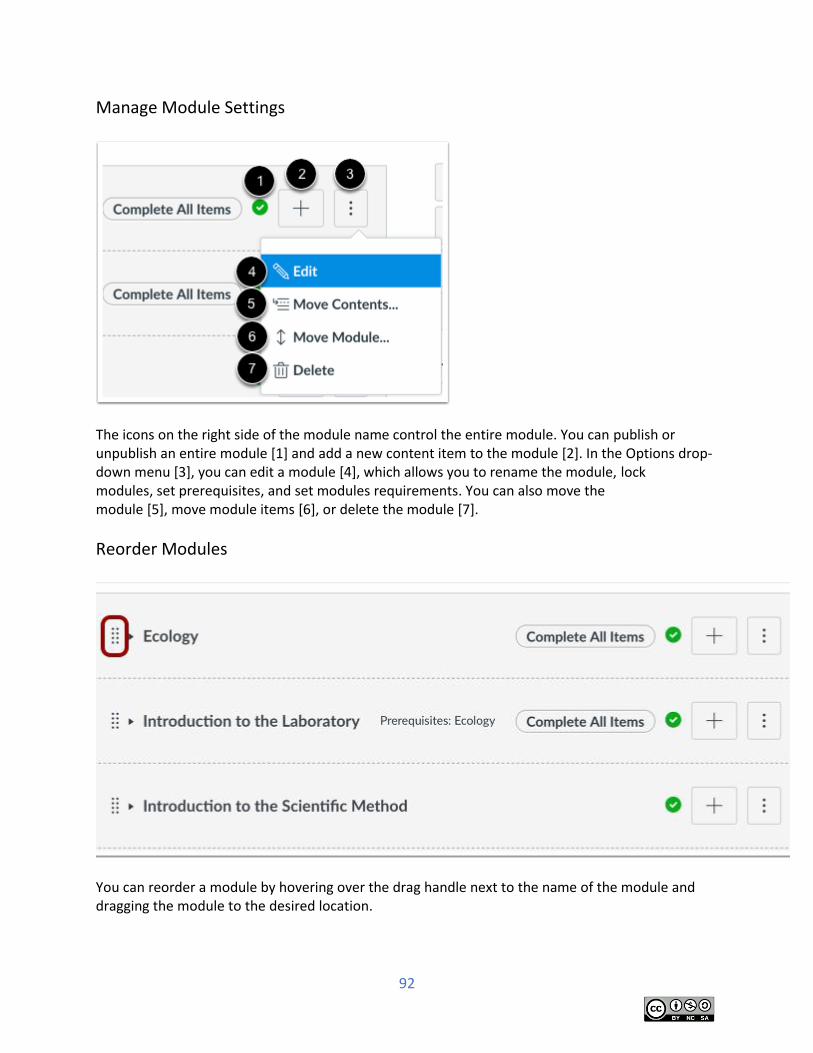
Manage Module Settings
The icons on the right side of the module name control the entire module. You can publish or unpublish an entire module [1] and add a new content item to the module [2]. In the Options drop-down menu [3], you can edit a module [4], which allows you to rename the module, lock modules, set prerequisites, and set modules requirements. You can also move the module [5], move module items [6], or delete the module [7].
Reorder Modules
You can reorder a module by hovering over the drag handle next to the name of the module and dragging the module to the desired location.
93
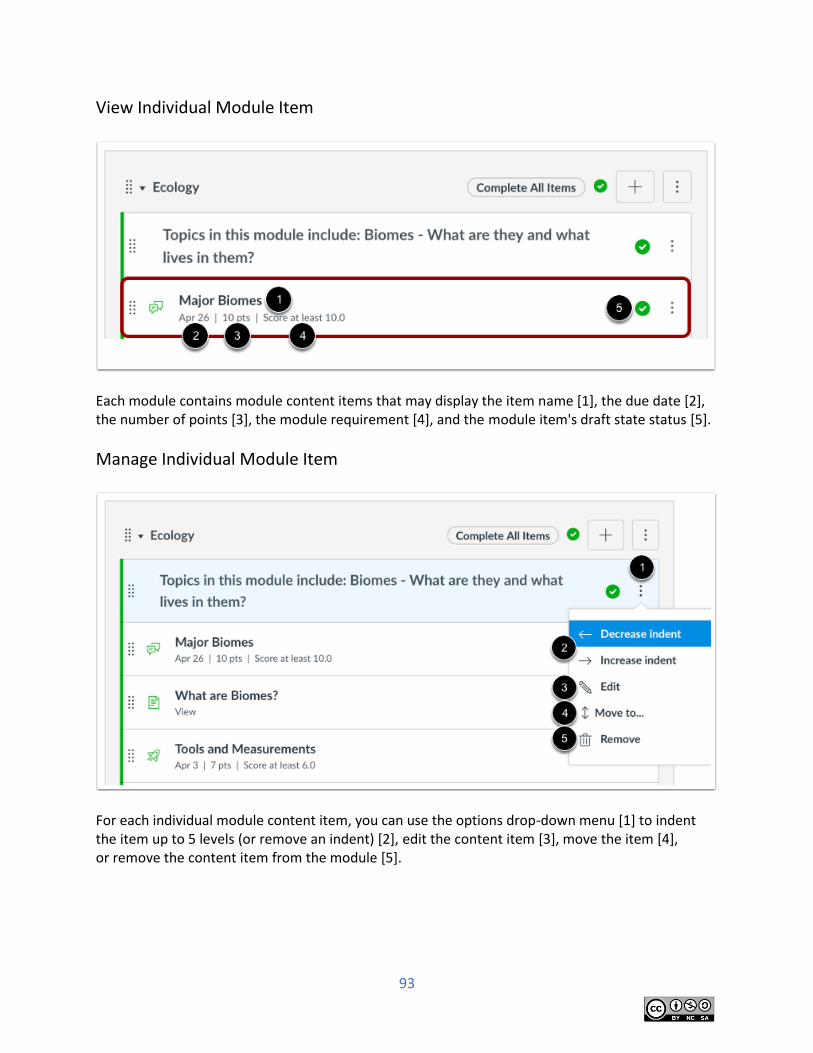
View Individual Module Item
Each module contains module content items that may display the item name [1], the due date [2], the number of points [3], the module requirement [4], and the module item's draft state status [5].
Manage Individual Module Item
For each individual module content item, you can use the options drop-down menu [1] to indent the item up to 5 levels (or remove an indent) [2], edit the content item [3], move the item [4], or remove the content item from the module [5].
94
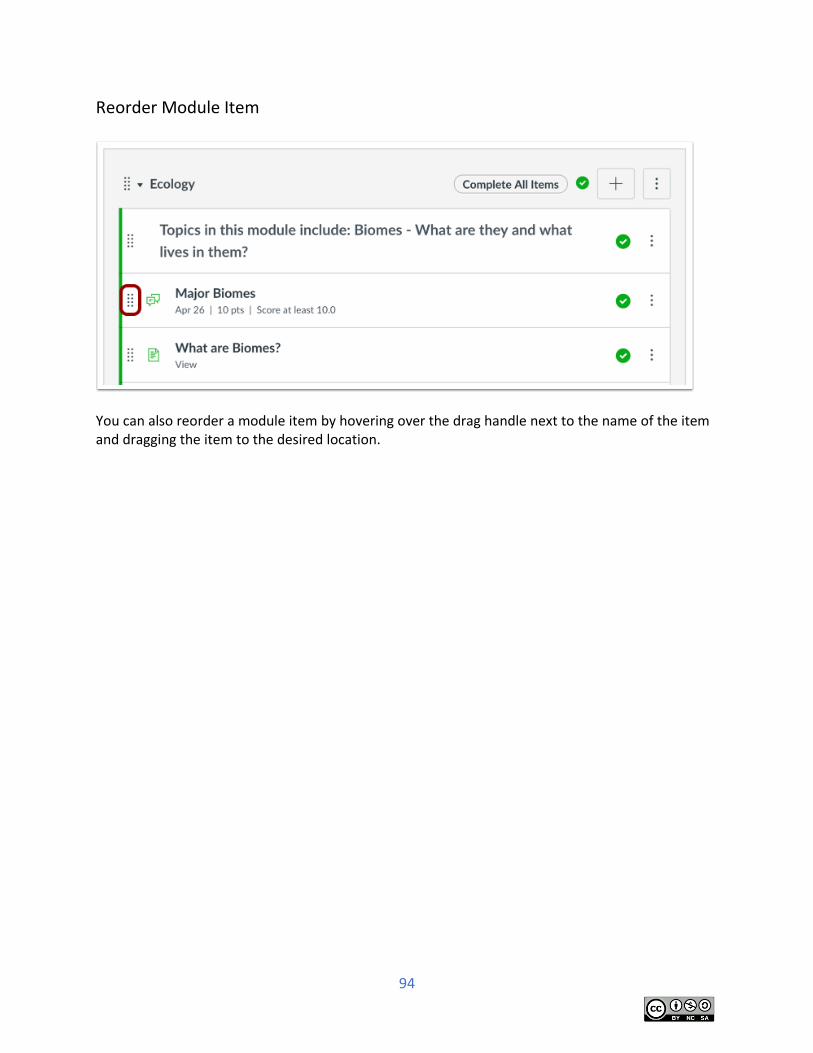
Reorder Module Item
You can also reorder a module item by hovering over the drag handle next to the name of the item and dragging the item to the desired location.
95
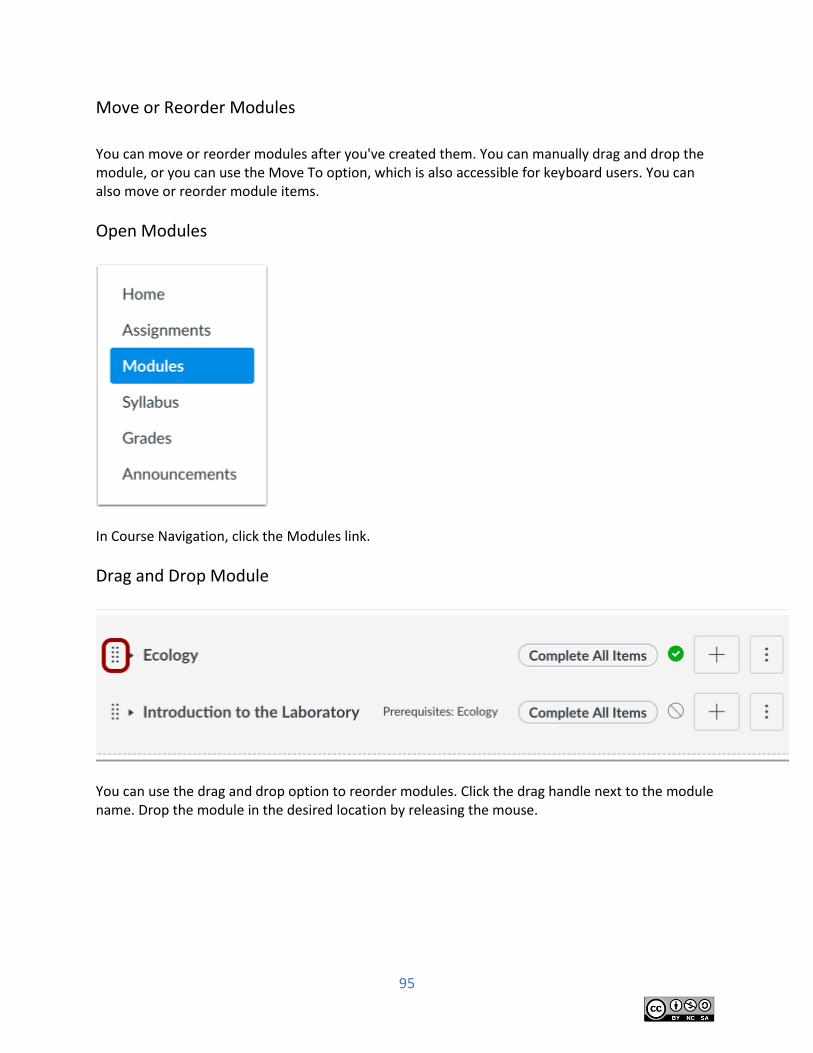
Move or Reorder Modules
You can move or reorder modules after you've created them. You can manually drag and drop the module, or you can use the Move To option, which is also accessible for keyboard users. You can also move or reorder module items.
Open Modules
In Course Navigation, click the Modules link.
Drag and Drop Module
You can use the drag and drop option to reorder modules. Click the drag handle next to the module name. Drop the module in the desired location by releasing the mouse.
96
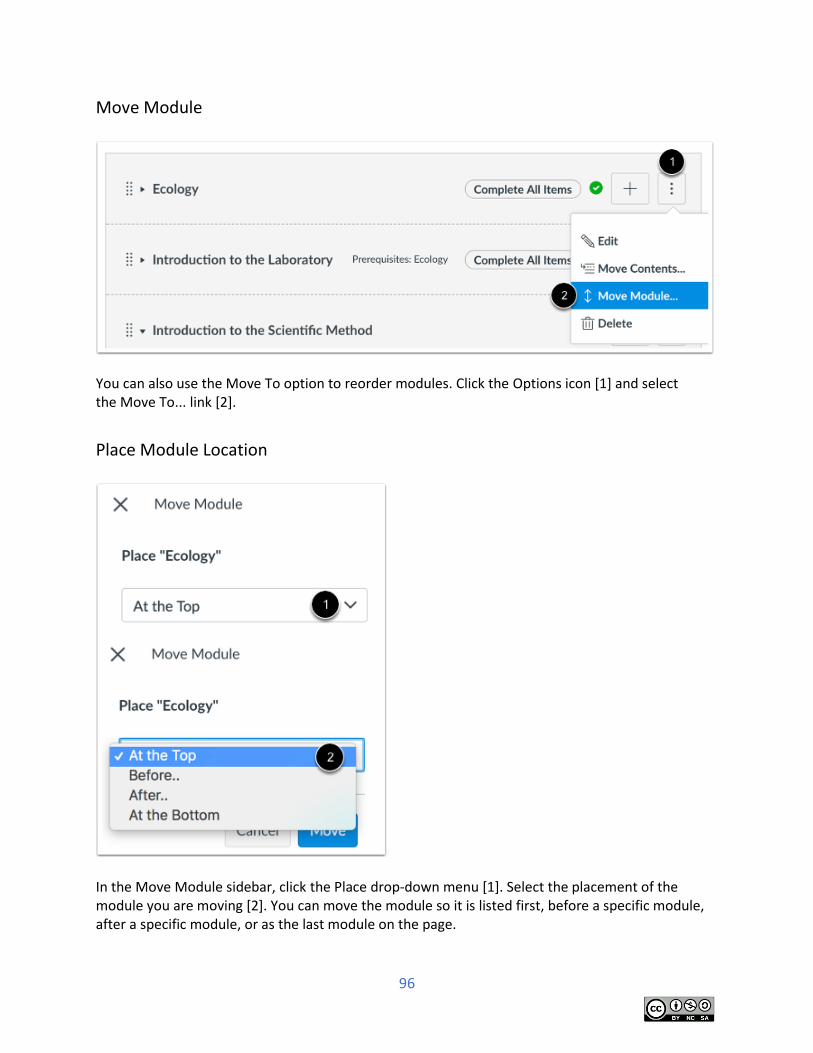
Move Module
You can also use the Move To option to reorder modules. Click the Options icon [1] and select the Move To... link [2].
Place Module Location
In the Move Module sidebar, click the Place drop-down menu [1]. Select the placement of the module you are moving [2]. You can move the module so it is listed first, before a specific module, after a specific module, or as the last module on the page.
97
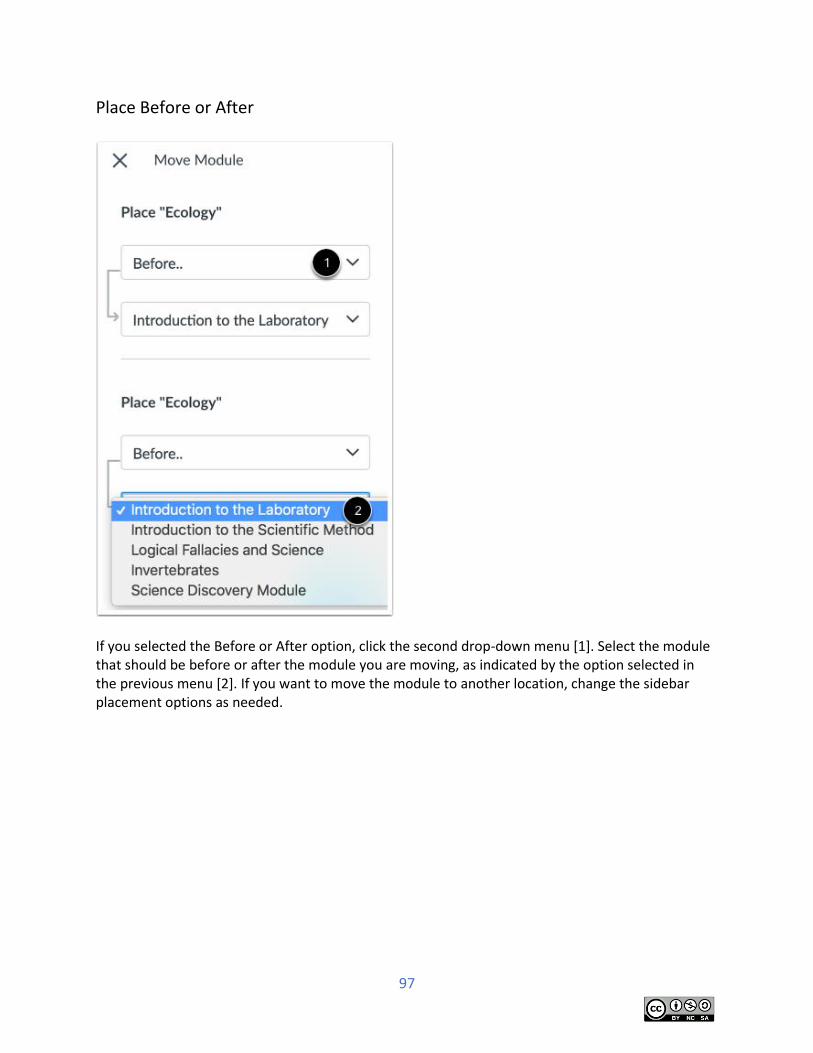
Place Before or After
If you selected the Before or After option, click the second drop-down menu [1]. Select the module that should be before or after the module you are moving, as indicated by the option selected in the previous menu [2]. If you want to move the module to another location, change the sidebar placement options as needed.
98
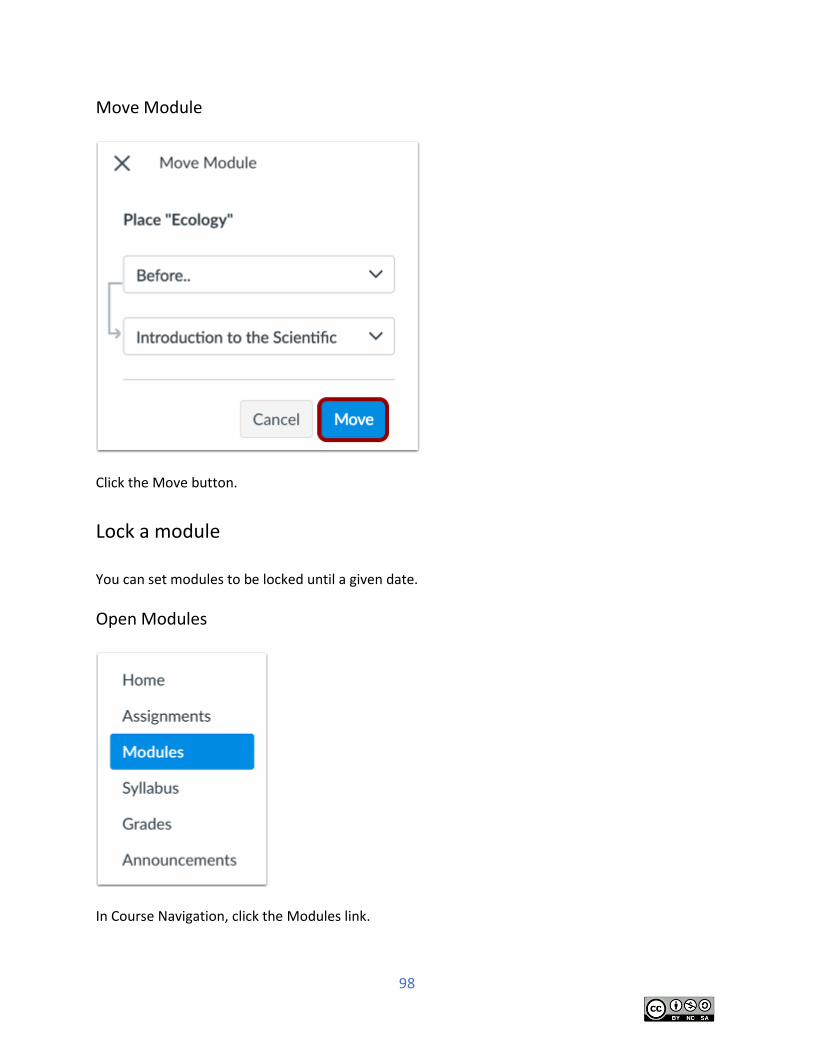
Move Module
Click the Move button.
Lock a module You can set modules to be locked until a given date.
Open Modules
In Course Navigation, click the Modules link.
99
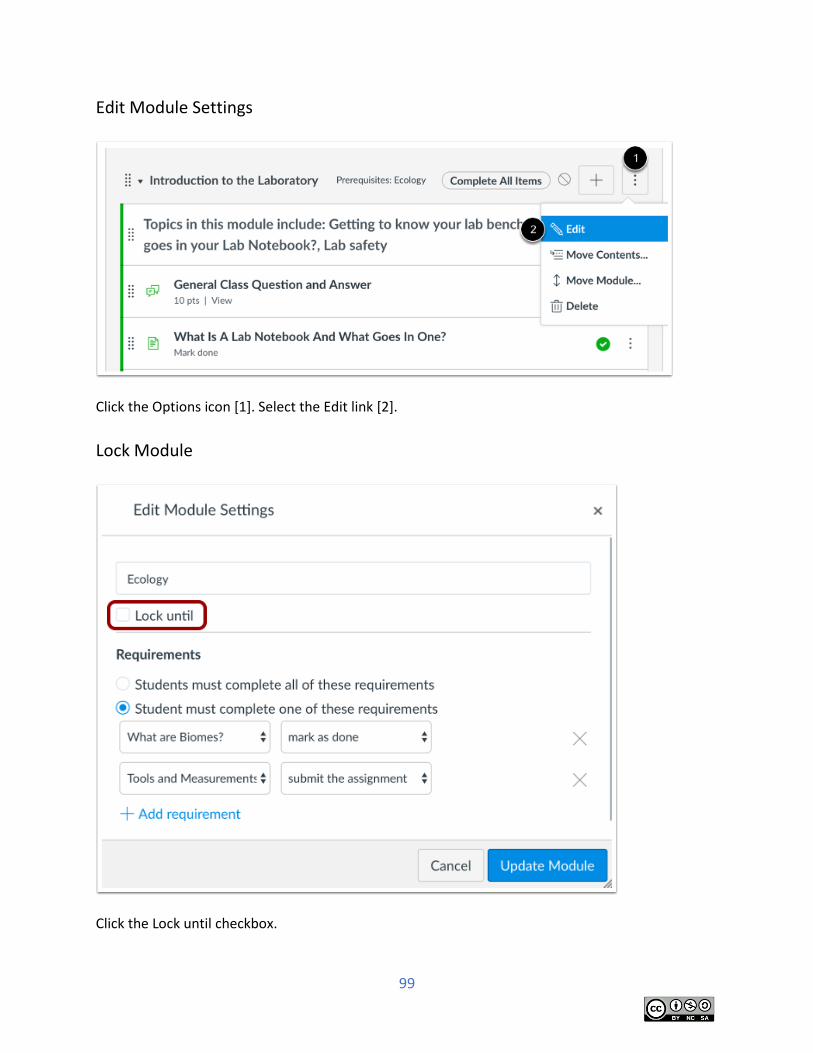
Edit Module Settings
Click the Options icon [1]. Select the Edit link [2].
Lock Module
Click the Lock until checkbox.

100
Set Date
In the Unlock field, enter a date that the module should unlock.
101
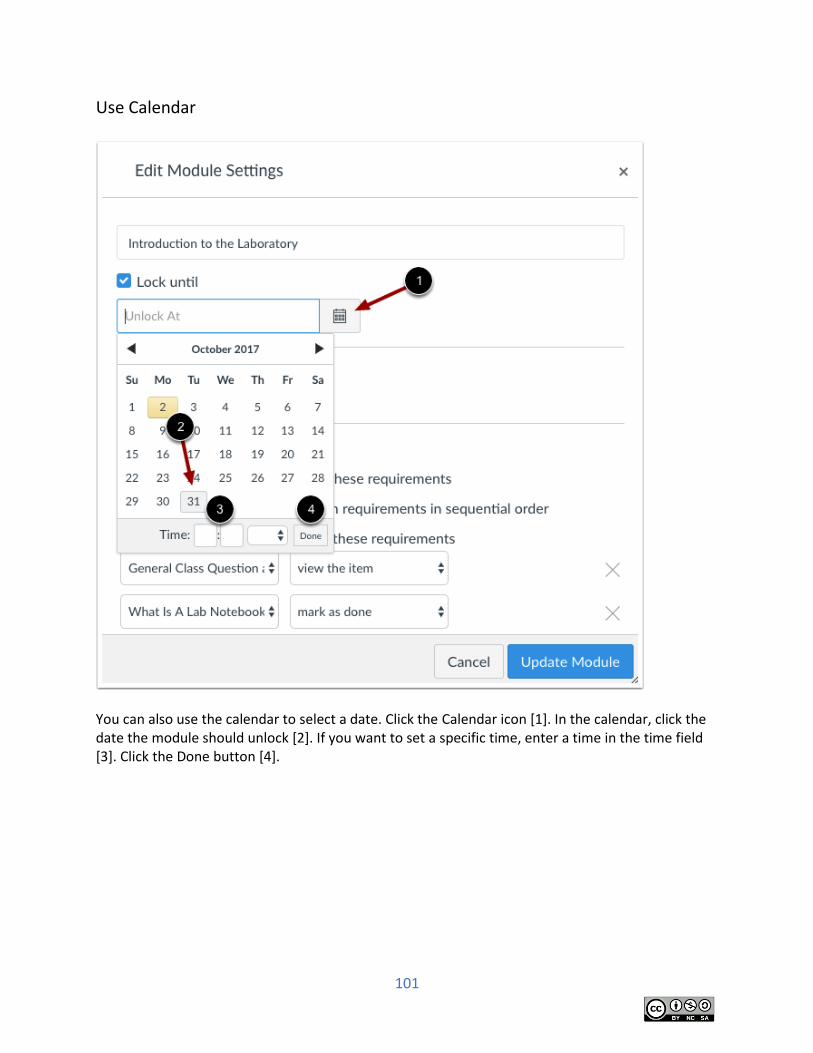
Use Calendar
You can also use the calendar to select a date. Click the Calendar icon [1]. In the calendar, click the date the module should unlock [2]. If you want to set a specific time, enter a time in the time field [3]. Click the Done button [4].
102
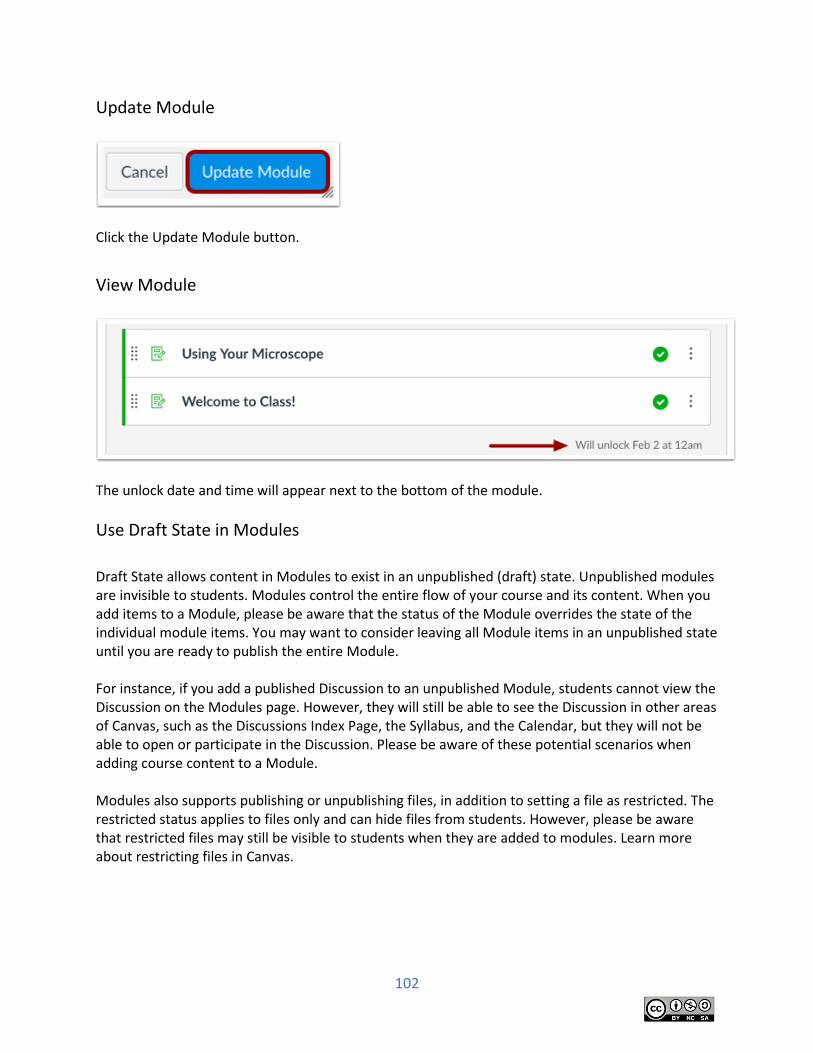
Update Module
Click the Update Module button.
View Module
The unlock date and time will appear next to the bottom of the module.
Use Draft State in Modules
Draft State allows content in Modules to exist in an unpublished (draft) state. Unpublished modules are invisible to students. Modules control the entire flow of your course and its content. When you add items to a Module, please be aware that the status of the Module overrides the state of the individual module items. You may want to consider leaving all Module items in an unpublished state until you are ready to publish the entire Module. For instance, if you add a published Discussion to an unpublished Module, students cannot view the Discussion on the Modules page. However, they will still be able to see the Discussion in other areas of Canvas, such as the Discussions Index Page, the Syllabus, and the Calendar, but they will not be able to open or participate in the Discussion. Please be aware of these potential scenarios when adding course content to a Module. Modules also supports publishing or unpublishing files, in addition to setting a file as restricted. The restricted status applies to files only and can hide files from students. However, please be aware that restricted files may still be visible to students when they are added to modules. Learn more about restricting files in Canvas.
103
Open Modules
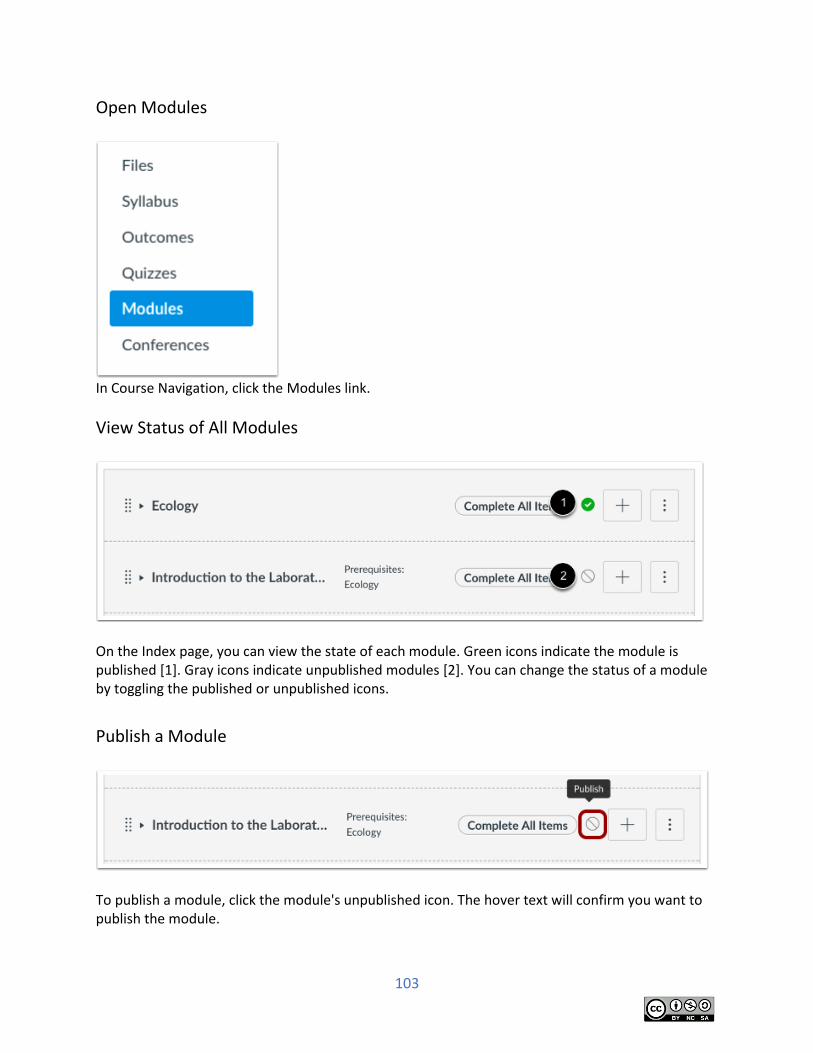
In Course Navigation, click the Modules link.
View Status of All Modules
On the Index page, you can view the state of each module. Green icons indicate the module is published [1]. Gray icons indicate unpublished modules [2]. You can change the status of a module by toggling the published or unpublished icons.
Publish a Module
To publish a module, click the module's unpublished icon. The hover text will confirm you want to publish the module.
104
Note: Publishing a module will automatically publish any unpublished content items within the module.
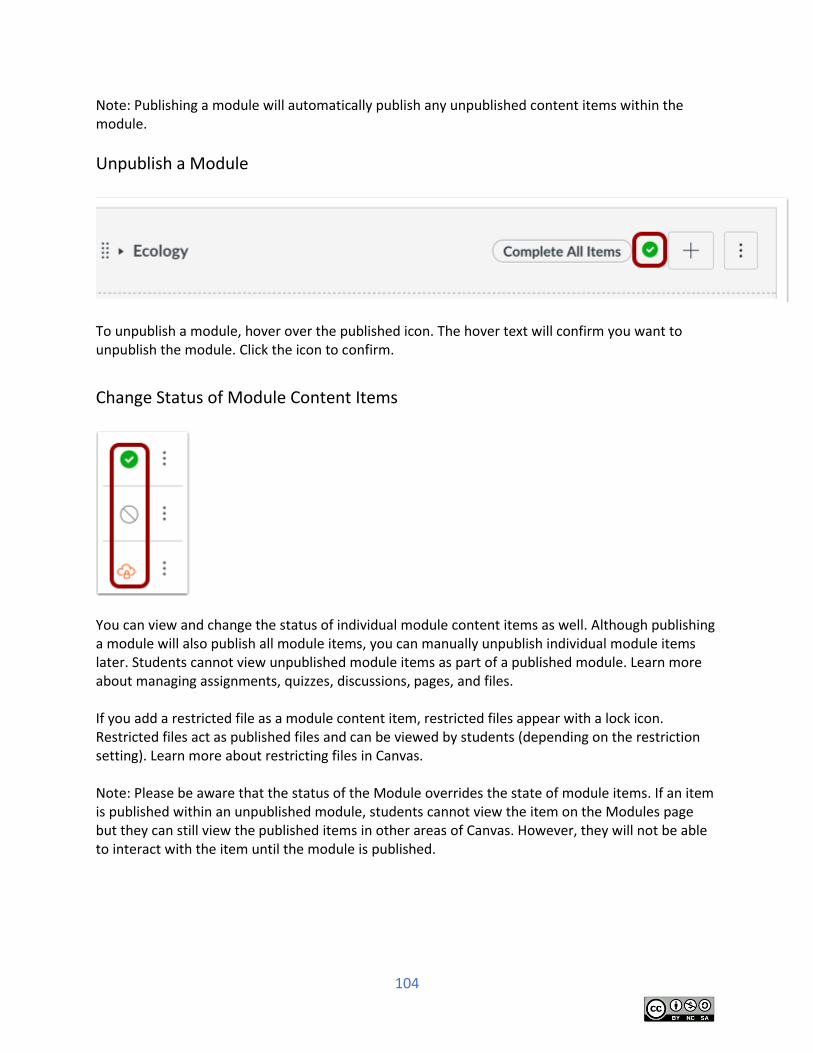
Unpublish a Module
To unpublish a module, hover over the published icon. The hover text will confirm you want to unpublish the module. Click the icon to confirm.
Change Status of Module Content Items
You can view and change the status of individual module content items as well. Although publishing a module will also publish all module items, you can manually unpublish individual module items later. Students cannot view unpublished module items as part of a published module. Learn more about managing assignments, quizzes, discussions, pages, and files. If you add a restricted file as a module content item, restricted files appear with a lock icon. Restricted files act as published files and can be viewed by students (depending on the restriction setting). Learn more about restricting files in Canvas. Note: Please be aware that the status of the Module overrides the state of module items. If an item is published within an unpublished module, students cannot view the item on the Modules page but they can still view the published items in other areas of Canvas. However, they will not be able to interact with the item until the module is published.

105
Modules Student View
Students cannot see any of the actions involved with Draft State, such as published and unpublished icons and setting icons. Students will only see published modules and available module content items, which are displayed in gray text.
106
Delete a module If necessary, you can delete a module in your course. Deleting a module also deletes all associated module items. When you delete a module, all of the items in that module are removed, but they are not deleted from the course.
Open Modules
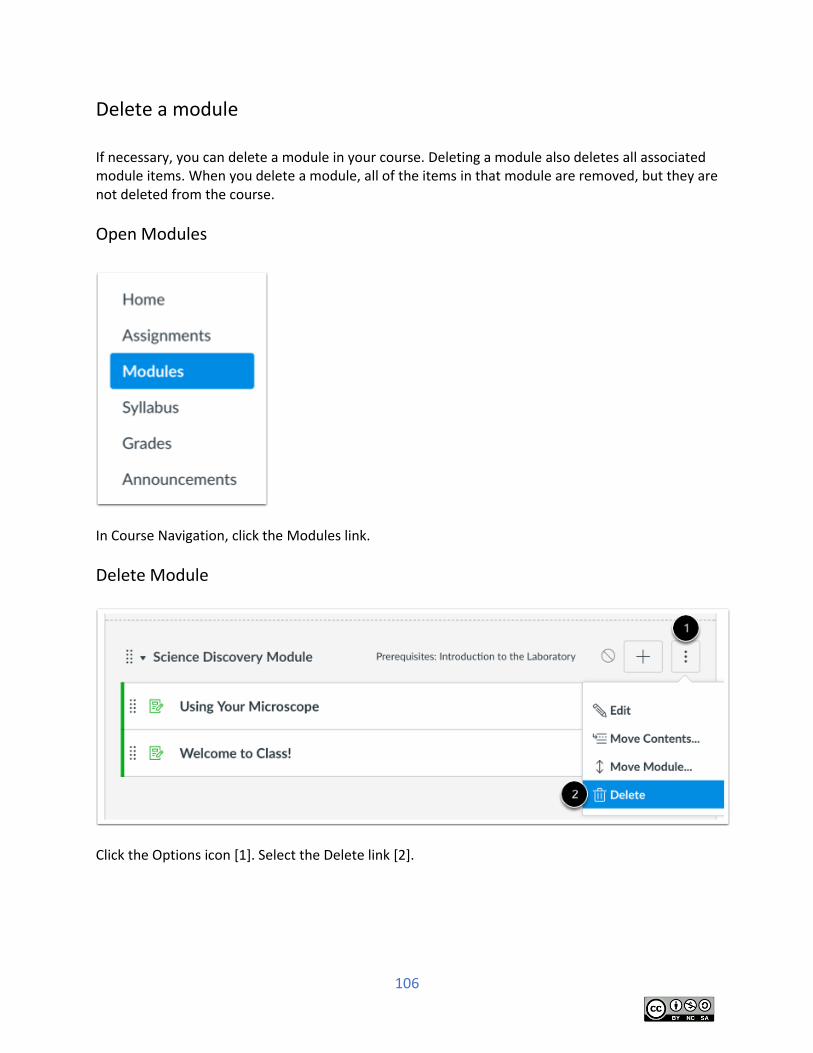
In Course Navigation, click the Modules link.
Delete Module
Click the Options icon [1]. Select the Delete link [2].
107
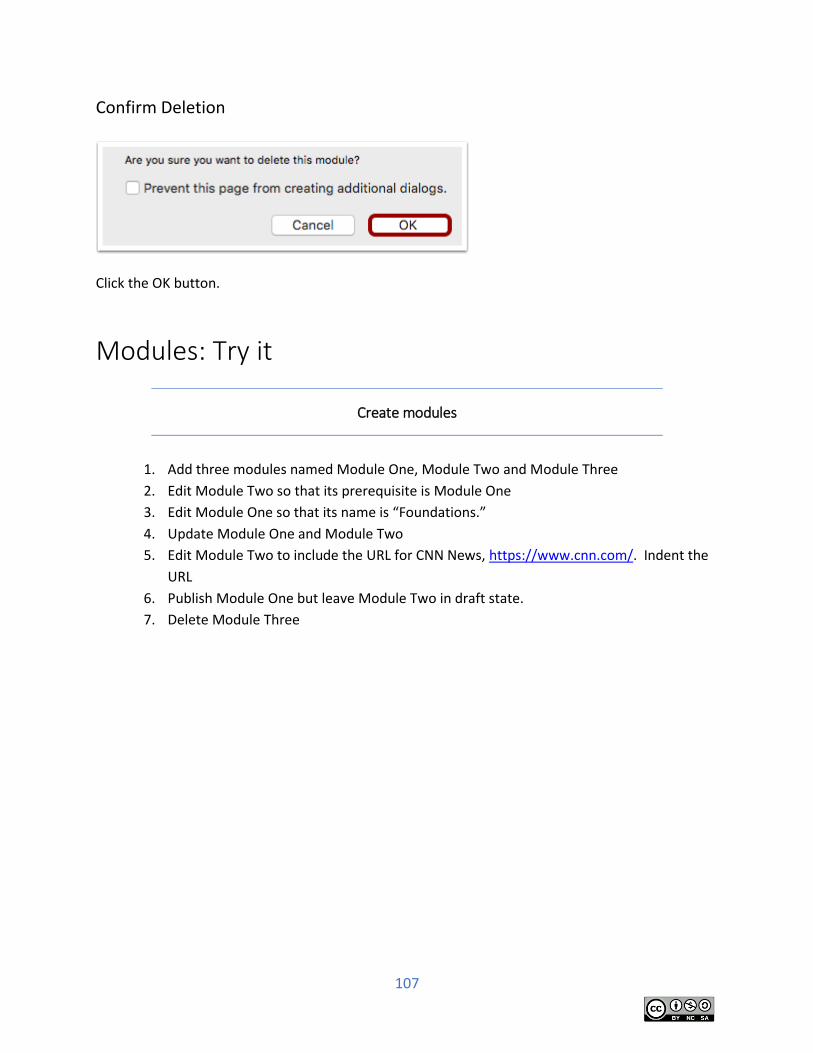
Confirm Deletion
Click the OK button.
Modules: Try it
Create modules
1. Add three modules named Module One, Module Two and Module Three
2. Edit Module Two so that its prerequisite is Module One
3. Edit Module One so that its name is “Foundations.”
4. Update Module One and Module Two
5. Edit Module Two to include the URL for CNN News, https://www.cnn.com/. Indent the
URL
6. Publish Module One but leave Module Two in draft state.
7. Delete Module Three
108
Assignment Create an assignment for all students By default, assignments you create in your course will be assigned to everyone. You can specify a due date and availability dates that apply to everyone. NOTE: You can also assign an assignment to an individual student or course group.
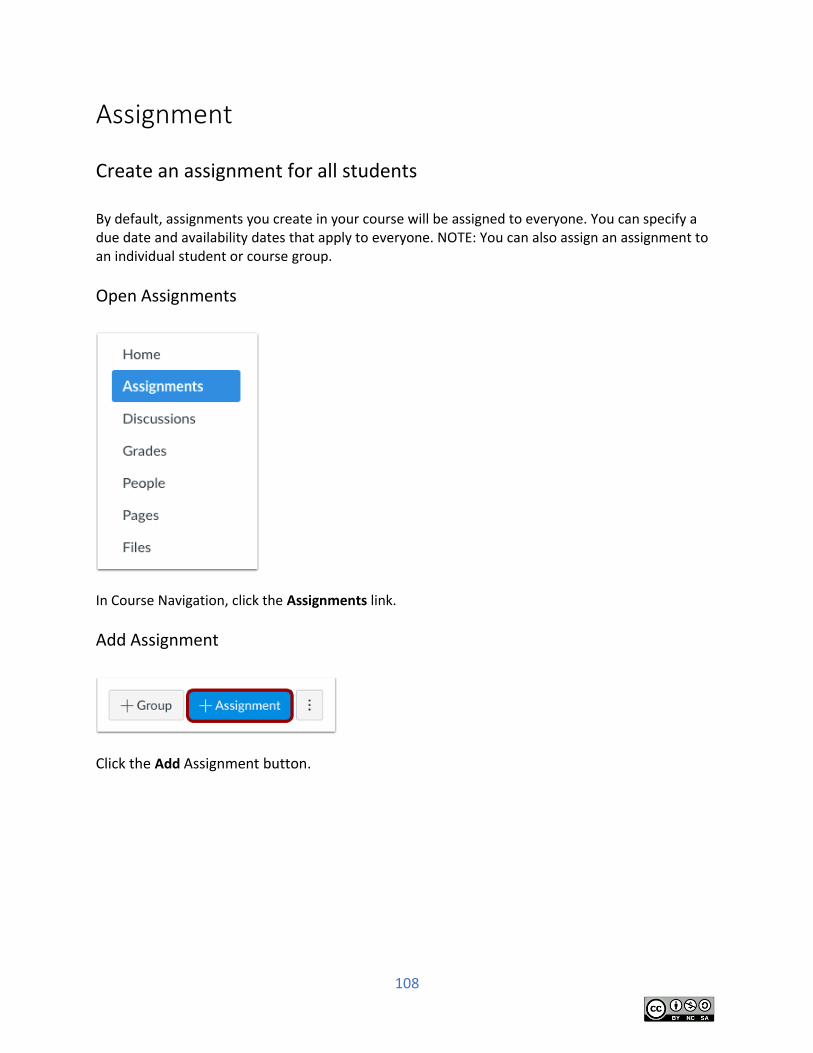
Open Assignments
In Course Navigation, click the Assignments link.
Add Assignment
Click the Add Assignment button.
109
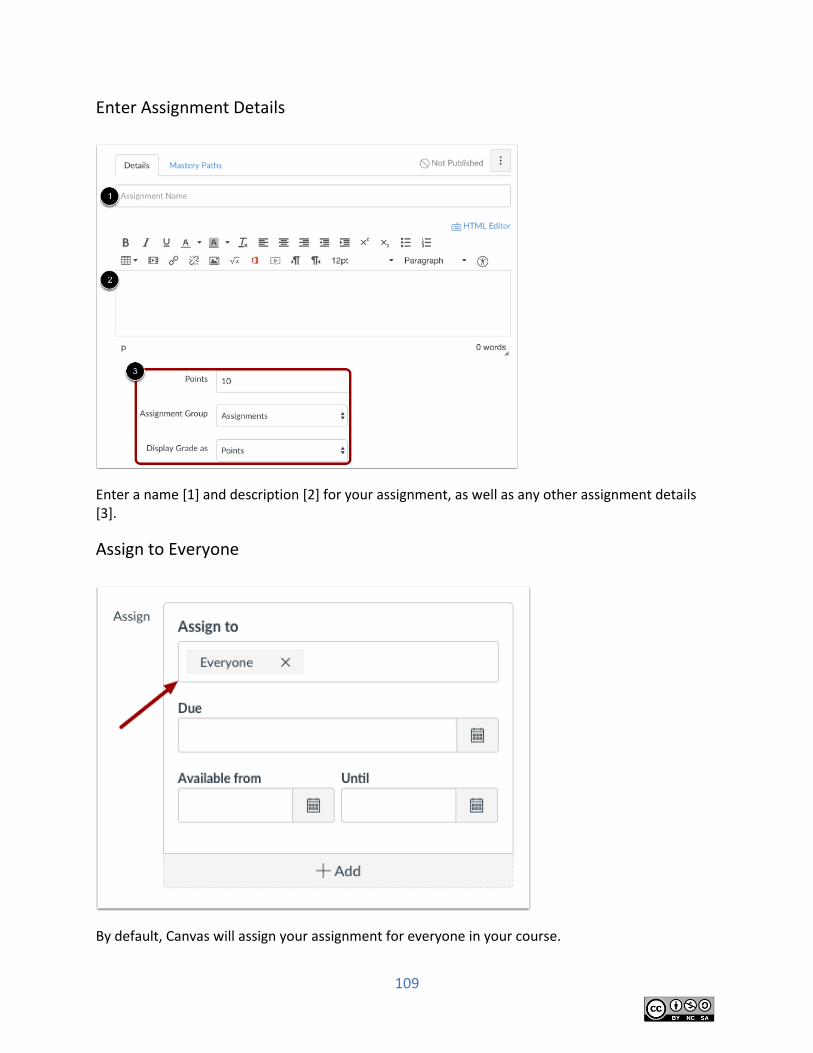
Enter Assignment Details
Enter a name [1] and description [2] for your assignment, as well as any other assignment details [3].
Assign to Everyone
By default, Canvas will assign your assignment for everyone in your course.
110
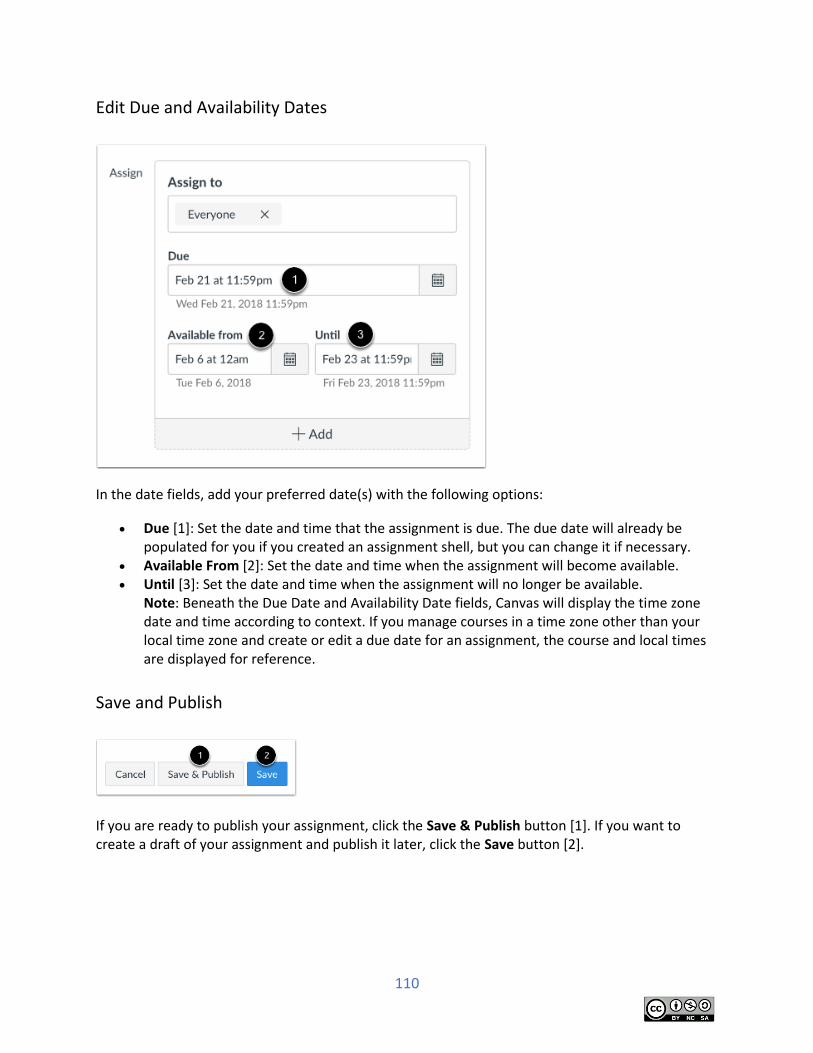
Edit Due and Availability Dates
In the date fields, add your preferred date(s) with the following options:
Due [1]: Set the date and time that the assignment is due. The due date will already be populated for you if you created an assignment shell, but you can change it if necessary.
Available From [2]: Set the date and time when the assignment will become available. Until [3]: Set the date and time when the assignment will no longer be available.
Note: Beneath the Due Date and Availability Date fields, Canvas will display the time zone date and time according to context. If you manage courses in a time zone other than your local time zone and create or edit a due date for an assignment, the course and local times are displayed for reference.
Save and Publish
If you are ready to publish your assignment, click the Save & Publish button [1]. If you want to create a draft of your assignment and publish it later, click the Save button [2].
111
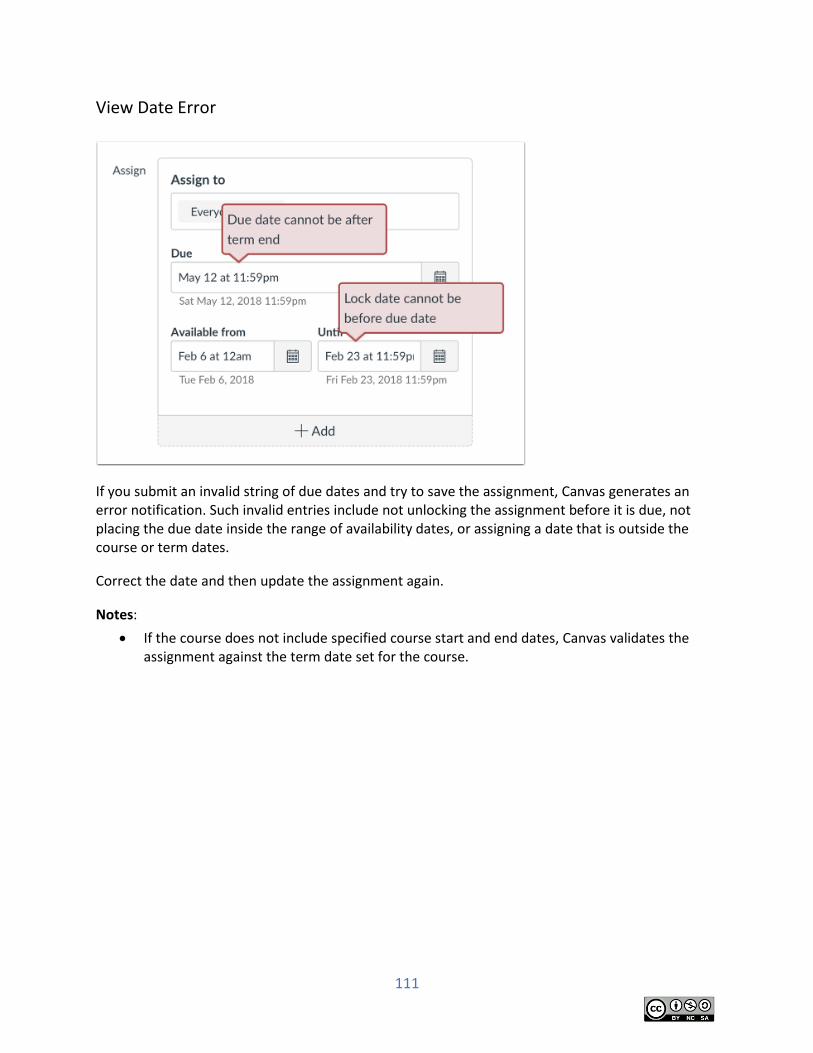
View Date Error
If you submit an invalid string of due dates and try to save the assignment, Canvas generates an error notification. Such invalid entries include not unlocking the assignment before it is due, not placing the due date inside the range of availability dates, or assigning a date that is outside the course or term dates.
Correct the date and then update the assignment again.
Notes:
If the course does not include specified course start and end dates, Canvas validates the assignment against the term date set for the course.
112
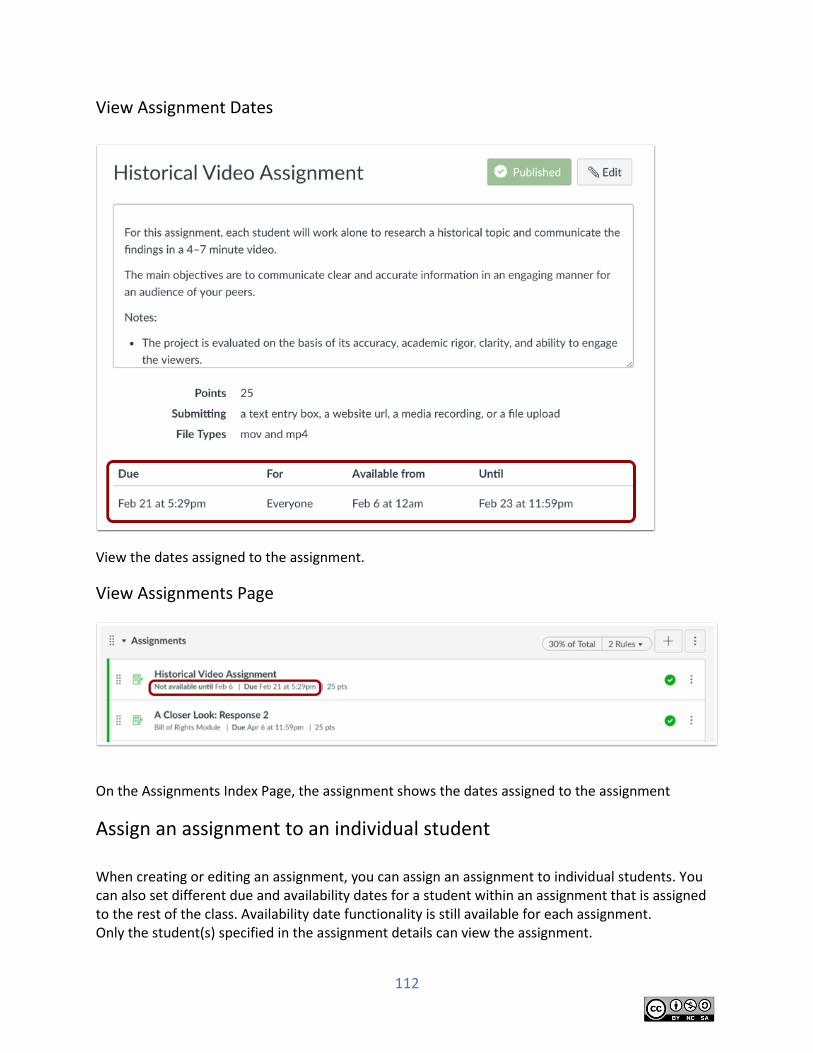
View Assignment Dates
View the dates assigned to the assignment.
View Assignments Page
On the Assignments Index Page, the assignment shows the dates assigned to the assignment
Assign an assignment to an individual student When creating or editing an assignment, you can assign an assignment to individual students. You can also set different due and availability dates for a student within an assignment that is assigned to the rest of the class. Availability date functionality is still available for each assignment. Only the student(s) specified in the assignment details can view the assignment.
113
When using differentiated assignments with the Gradebook, the assignment appears as a column for all students, but grade cells are grayed out for students who have not been included in the assignment. Grades cannot be assigned for students who have not been included in the assignment, and assignments that are not assigned to a student are not factored into overall grades. Notes: To allow a student access to an assignment past the assignment's initial Until date, you must modify the Until field in the assignment's initial date fields.
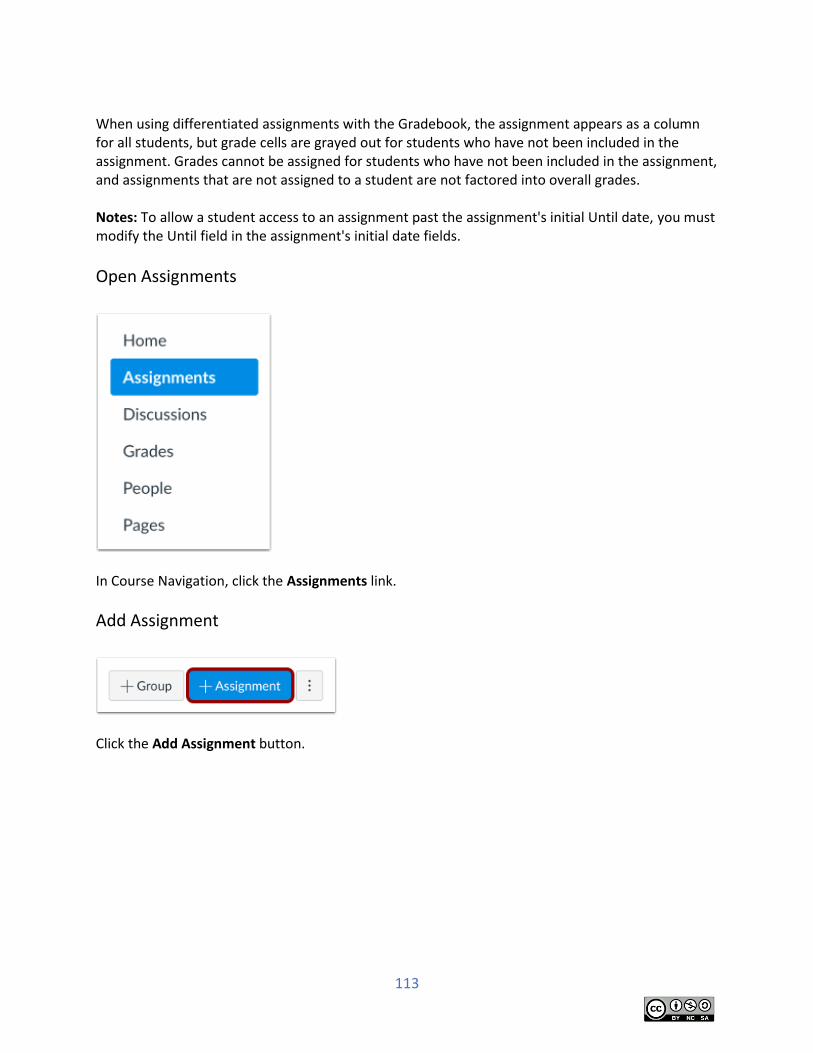
Open Assignments
In Course Navigation, click the Assignments link.
Add Assignment
Click the Add Assignment button.
114
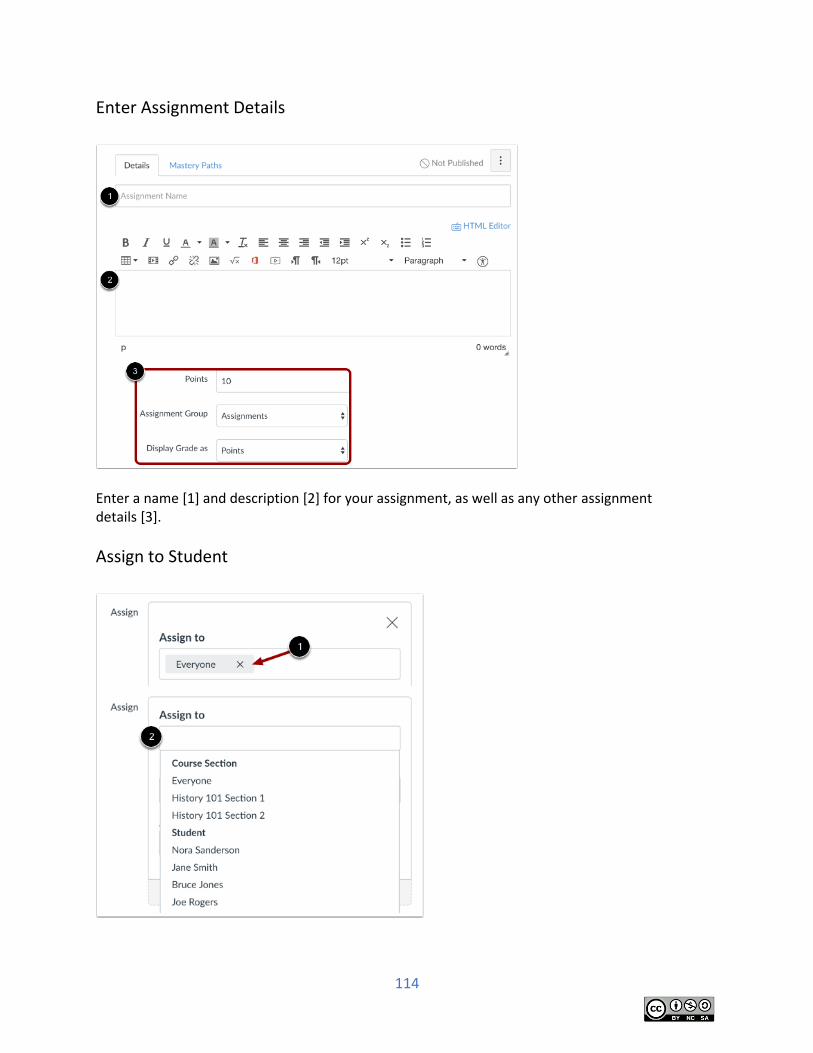
Enter Assignment Details
Enter a name [1] and description [2] for your assignment, as well as any other assignment details [3].
Assign to Student

115
By default, Canvas will assign your assignment for everyone in your course. To create an assignment that is assigned only to a specific student, click the Remove icon next to the Everyone label [1], then start to type the name of a student in the Assign to field [2]. Search fields are dynamic, and you can search for students by first or last name. When the full name appears, click the name. Lists are not scrollable.
You can include more than one student in the To field as long as the students are to be assigned the same due and availability dates.
Edit Due and Availability Dates
In the date fields, add your preferred date(s) with the following options:
116
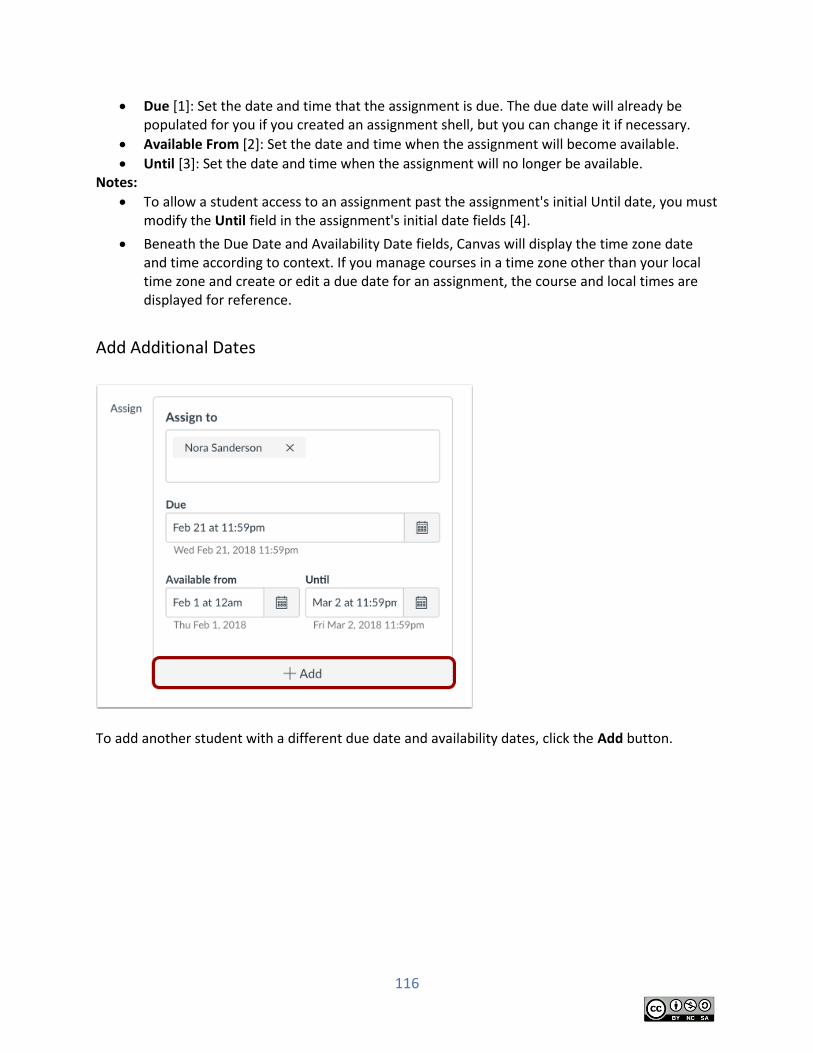
Due [1]: Set the date and time that the assignment is due. The due date will already be populated for you if you created an assignment shell, but you can change it if necessary.
Available From [2]: Set the date and time when the assignment will become available.
Until [3]: Set the date and time when the assignment will no longer be available. Notes:
To allow a student access to an assignment past the assignment's initial Until date, you must modify the Until field in the assignment's initial date fields [4].
Beneath the Due Date and Availability Date fields, Canvas will display the time zone date and time according to context. If you manage courses in a time zone other than your local time zone and create or edit a due date for an assignment, the course and local times are displayed for reference.
Add Additional Dates
To add another student with a different due date and availability dates, click the Add button.
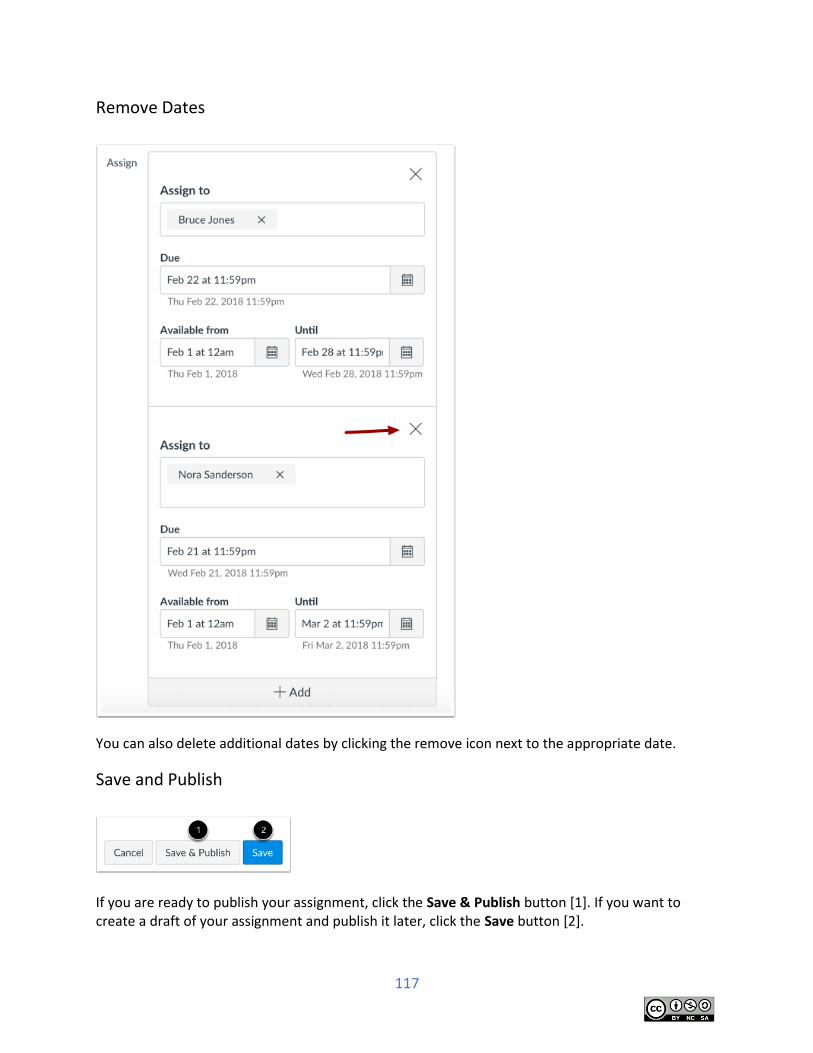
117
Remove Dates
You can also delete additional dates by clicking the remove icon next to the appropriate date.
Save and Publish
If you are ready to publish your assignment, click the Save & Publish button [1]. If you want to create a draft of your assignment and publish it later, click the Save button [2].

118
View Due Date Warning
If you do not add course sections to the assignment, you will see a warning message asking you if you want to add those sections.
You can click the Continue button [1] if you don't want to add any sections to the assignment, or click the Go Back button [2] to go back and add additional sections. Note: This warning message will not appear if everyone or all course sections are assigned to the assignment.
View Date Error
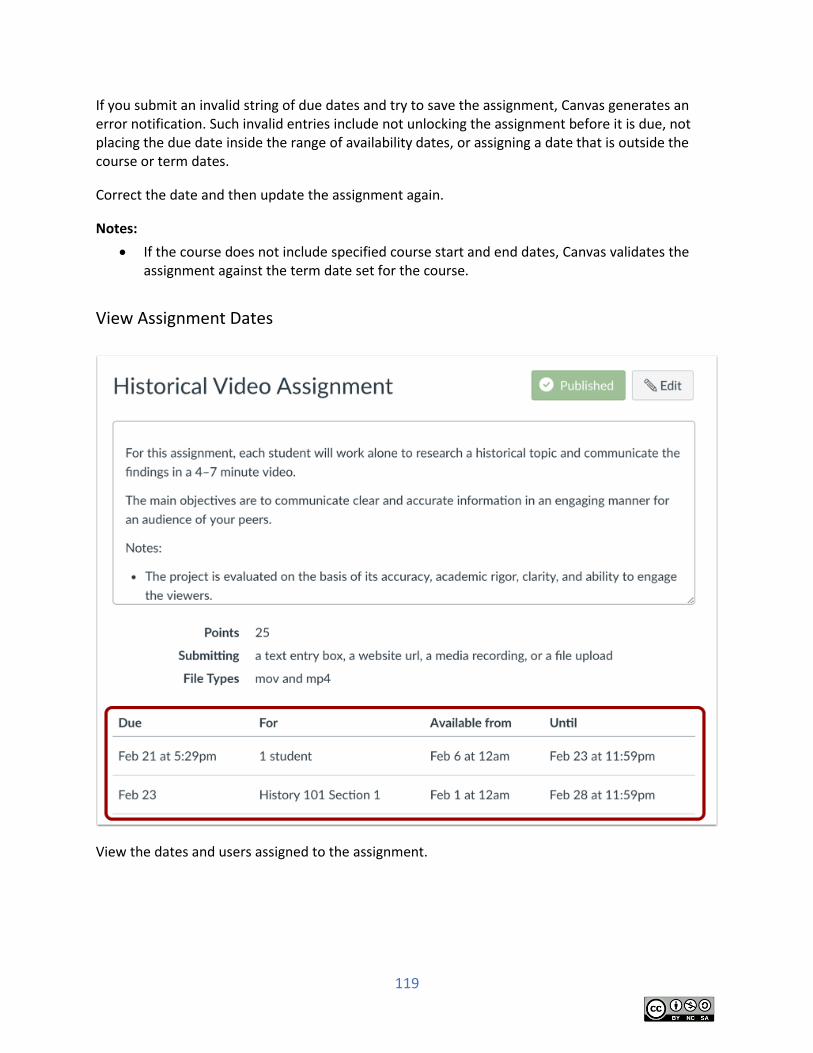
119
If you submit an invalid string of due dates and try to save the assignment, Canvas generates an error notification. Such invalid entries include not unlocking the assignment before it is due, not placing the due date inside the range of availability dates, or assigning a date that is outside the course or term dates.
Correct the date and then update the assignment again.
Notes:
If the course does not include specified course start and end dates, Canvas validates the assignment against the term date set for the course.
View Assignment Dates
View the dates and users assigned to the assignment.
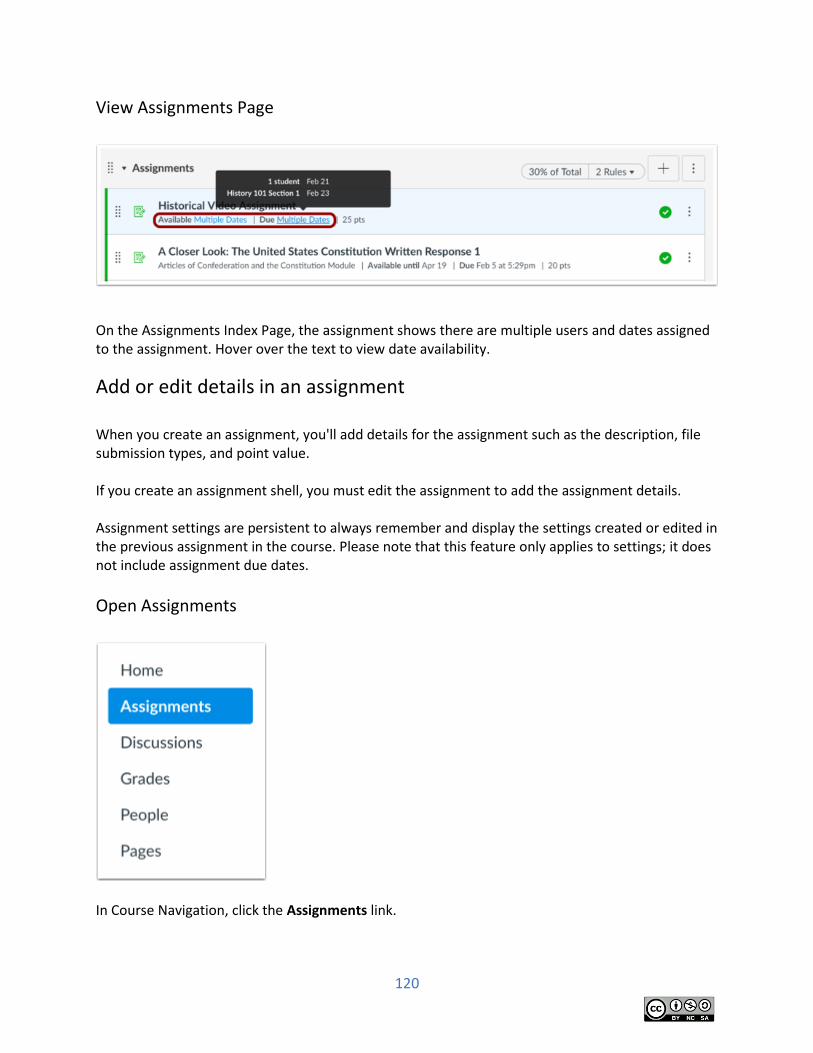
120
View Assignments Page
On the Assignments Index Page, the assignment shows there are multiple users and dates assigned to the assignment. Hover over the text to view date availability.
Add or edit details in an assignment When you create an assignment, you'll add details for the assignment such as the description, file submission types, and point value. If you create an assignment shell, you must edit the assignment to add the assignment details. Assignment settings are persistent to always remember and display the settings created or edited in the previous assignment in the course. Please note that this feature only applies to settings; it does not include assignment due dates.
Open Assignments
In Course Navigation, click the Assignments link.
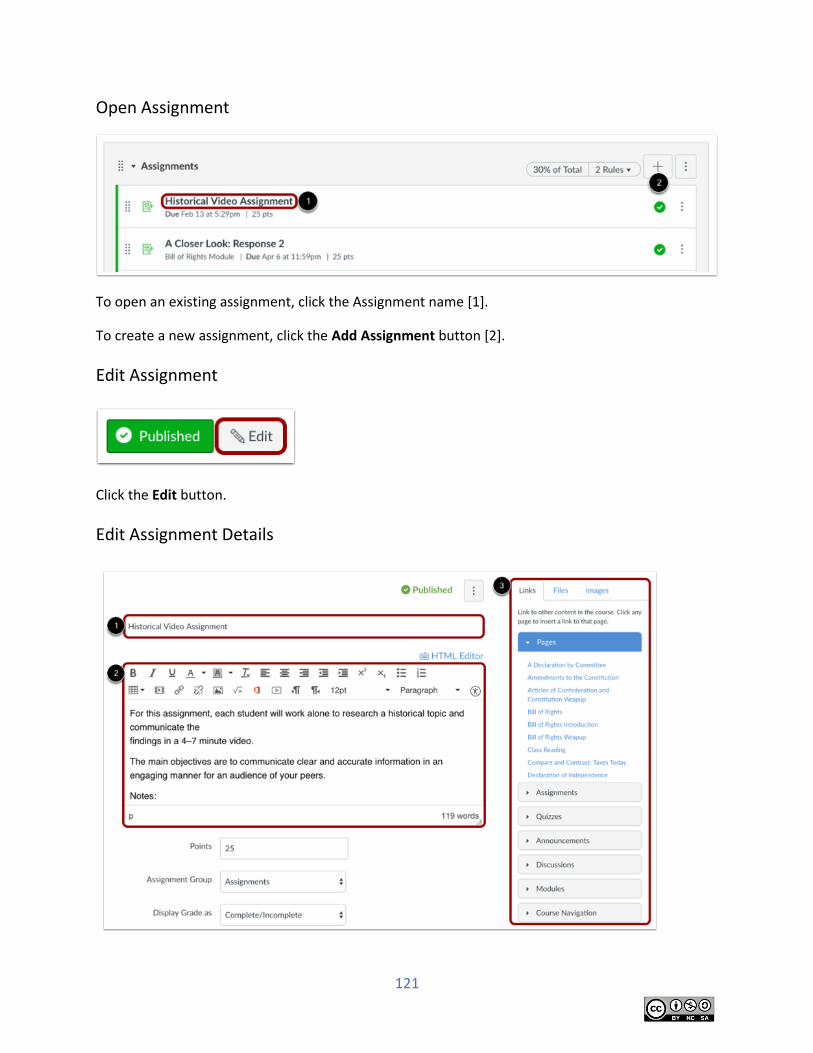
121
Open Assignment
To open an existing assignment, click the Assignment name [1].
To create a new assignment, click the Add Assignment button [2].
Edit Assignment
Click the Edit button.
Edit Assignment Details
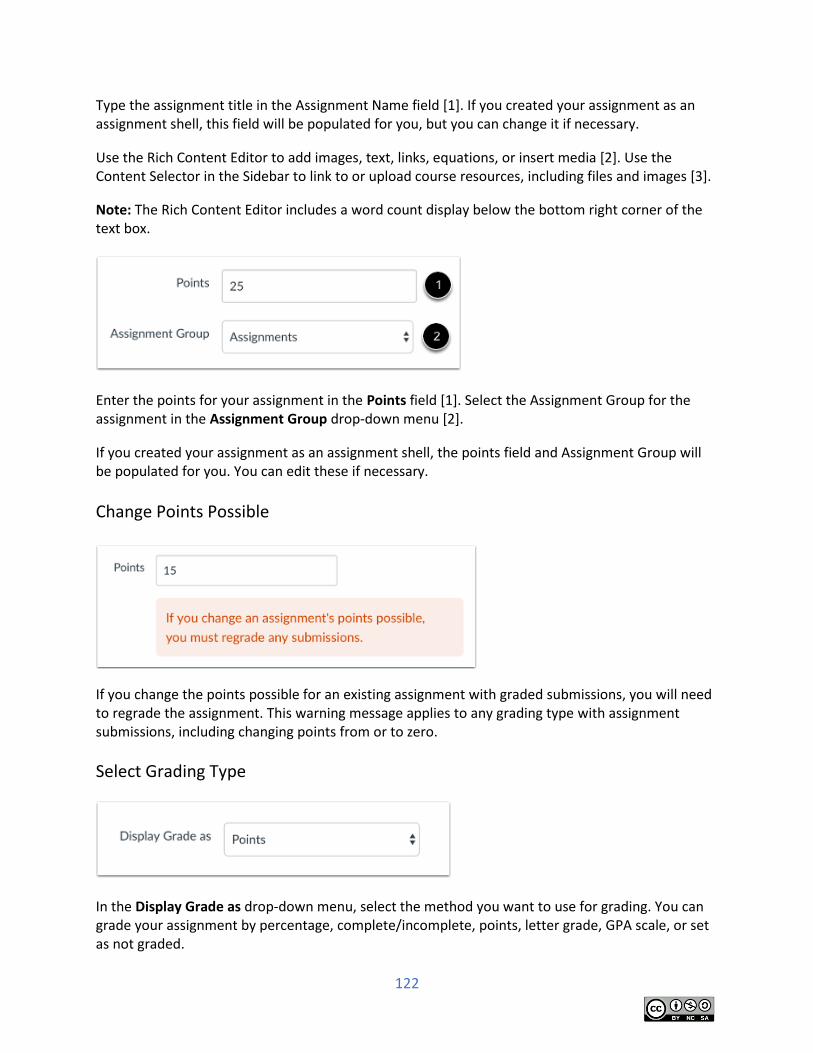
122
Type the assignment title in the Assignment Name field [1]. If you created your assignment as an assignment shell, this field will be populated for you, but you can change it if necessary.
Use the Rich Content Editor to add images, text, links, equations, or insert media [2]. Use the Content Selector in the Sidebar to link to or upload course resources, including files and images [3].
Note: The Rich Content Editor includes a word count display below the bottom right corner of the text box.
Enter the points for your assignment in the Points field [1]. Select the Assignment Group for the assignment in the Assignment Group drop-down menu [2].
If you created your assignment as an assignment shell, the points field and Assignment Group will be populated for you. You can edit these if necessary.
Change Points Possible
If you change the points possible for an existing assignment with graded submissions, you will need to regrade the assignment. This warning message applies to any grading type with assignment submissions, including changing points from or to zero.
Select Grading Type
In the Display Grade as drop-down menu, select the method you want to use for grading. You can grade your assignment by percentage, complete/incomplete, points, letter grade, GPA scale, or set as not graded.
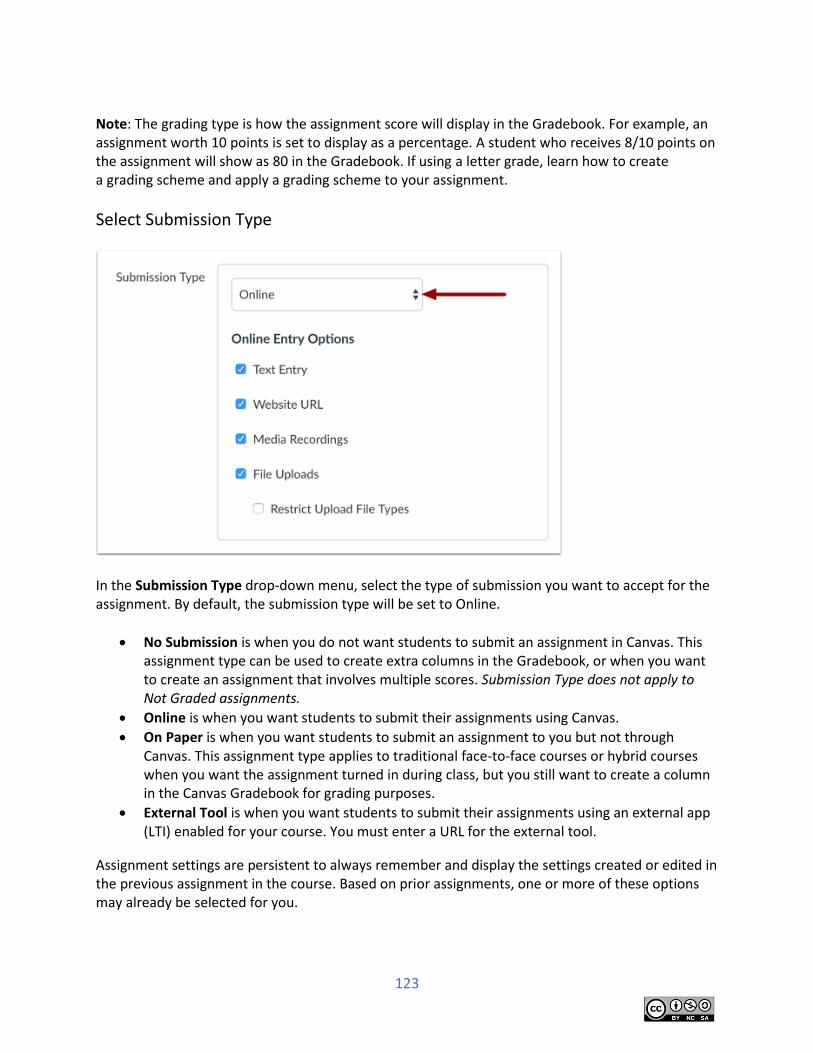
123
Note: The grading type is how the assignment score will display in the Gradebook. For example, an assignment worth 10 points is set to display as a percentage. A student who receives 8/10 points on the assignment will show as 80 in the Gradebook. If using a letter grade, learn how to create a grading scheme and apply a grading scheme to your assignment.
Select Submission Type
In the Submission Type drop-down menu, select the type of submission you want to accept for the assignment. By default, the submission type will be set to Online.
No Submission is when you do not want students to submit an assignment in Canvas. This assignment type can be used to create extra columns in the Gradebook, or when you want to create an assignment that involves multiple scores. Submission Type does not apply to Not Graded assignments.
Online is when you want students to submit their assignments using Canvas.
On Paper is when you want students to submit an assignment to you but not through Canvas. This assignment type applies to traditional face-to-face courses or hybrid courses when you want the assignment turned in during class, but you still want to create a column in the Canvas Gradebook for grading purposes.
External Tool is when you want students to submit their assignments using an external app (LTI) enabled for your course. You must enter a URL for the external tool.
Assignment settings are persistent to always remember and display the settings created or edited in the previous assignment in the course. Based on prior assignments, one or more of these options may already be selected for you.
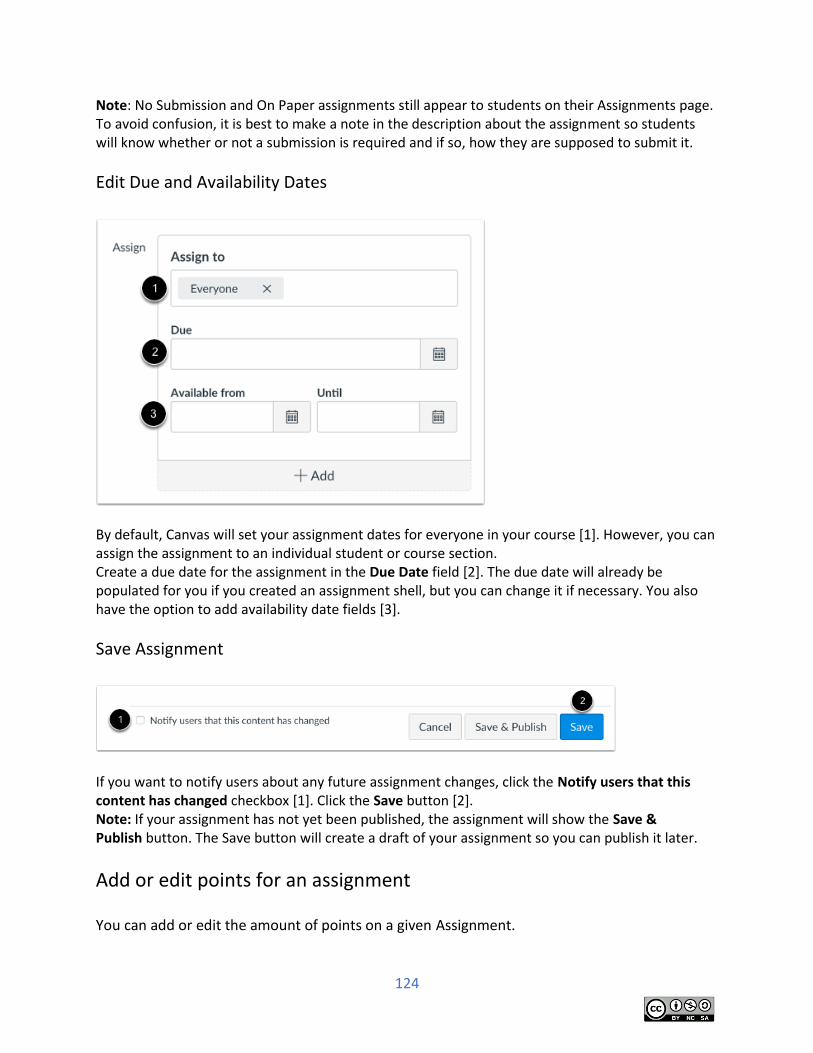
124
Note: No Submission and On Paper assignments still appear to students on their Assignments page. To avoid confusion, it is best to make a note in the description about the assignment so students will know whether or not a submission is required and if so, how they are supposed to submit it.
Edit Due and Availability Dates
By default, Canvas will set your assignment dates for everyone in your course [1]. However, you can assign the assignment to an individual student or course section. Create a due date for the assignment in the Due Date field [2]. The due date will already be populated for you if you created an assignment shell, but you can change it if necessary. You also have the option to add availability date fields [3].
Save Assignment
If you want to notify users about any future assignment changes, click the Notify users that this content has changed checkbox [1]. Click the Save button [2]. Note: If your assignment has not yet been published, the assignment will show the Save & Publish button. The Save button will create a draft of your assignment so you can publish it later.
Add or edit points for an assignment You can add or edit the amount of points on a given Assignment.
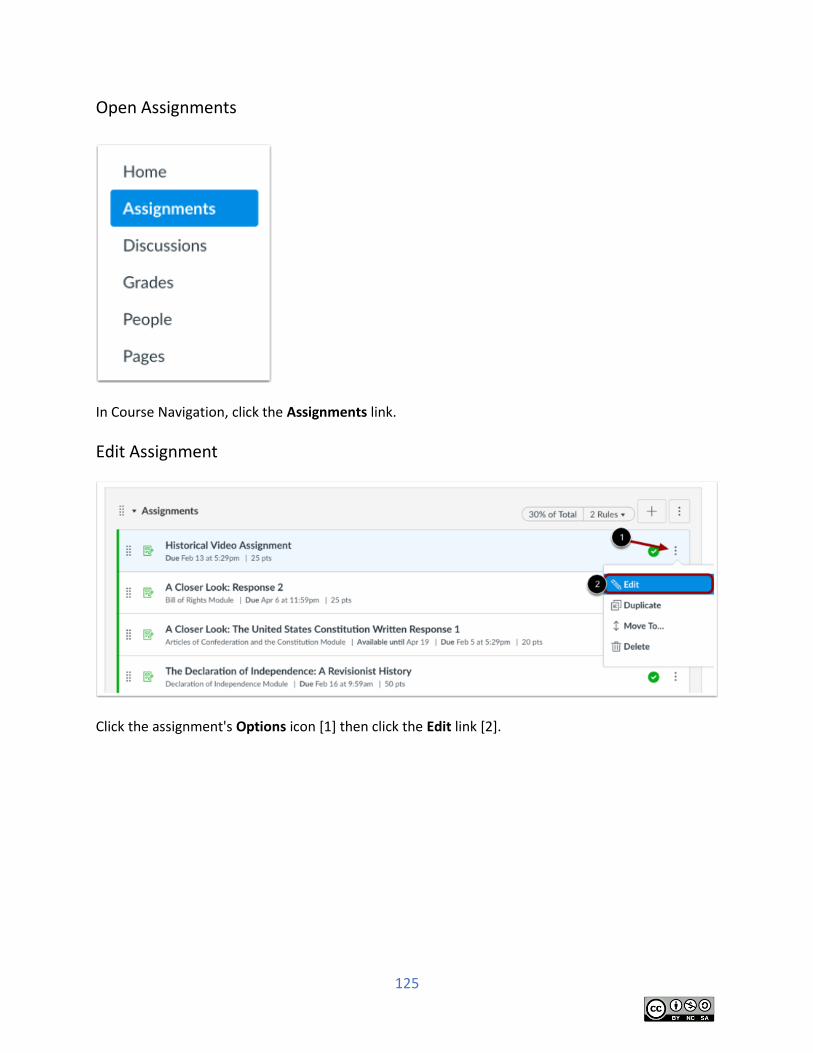
125
Open Assignments
In Course Navigation, click the Assignments link.
Edit Assignment
Click the assignment's Options icon [1] then click the Edit link [2].
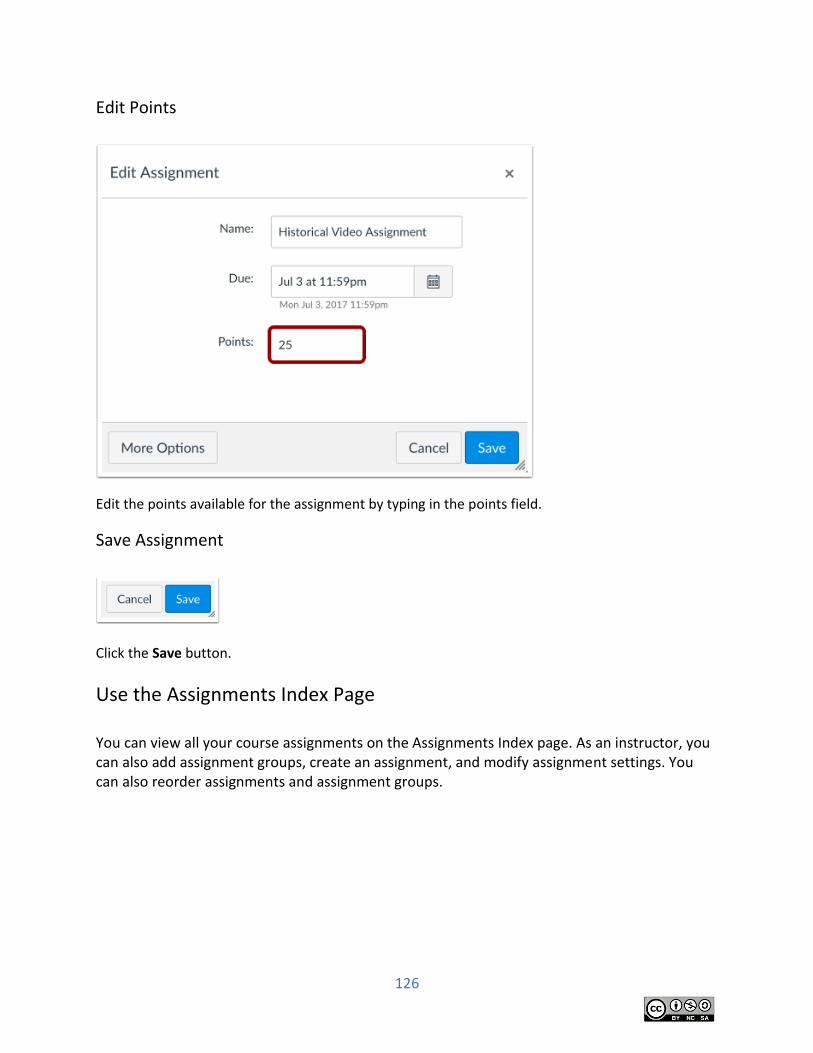
126
Edit Points
Edit the points available for the assignment by typing in the points field.
Save Assignment
Click the Save button.
Use the Assignments Index Page You can view all your course assignments on the Assignments Index page. As an instructor, you can also add assignment groups, create an assignment, and modify assignment settings. You can also reorder assignments and assignment groups.

127
Open Assignments
In Course Navigation, click the Assignments link.
View Assignments Index Page
The Assignments Index page is designed with global settings at the top of the page [1], followed by the Assignment groups [2]. Individual assignments are nested within each Assignment group [3].
View Assignment Global Settings

128
Global settings include searching for assignments [1], adding a new assignment group [2], and adding a new assignment [3]. To weight the final grade with assignment groups, click the Options icon [4].
View Assignment Groups
Assignment Groups house the assignments within each group. Groups can be expanded and collapsed by clicking the arrow next to the group name.
Manage Assignment Group Settings
The icons and links to the right of the assignment group control the entire assignment group.
If assignment groups have been weighted, Canvas will display the weighted percentage of the total assignment score [1]. Additionally, if rules are assigned to the group, Canvas will show the number of rules; hover over the link to view the rules [2]. You can add a new assignment to the group with the Add icon [3]. In the Options drop-down menu [4], you can edit, delete, or move the assignment group.
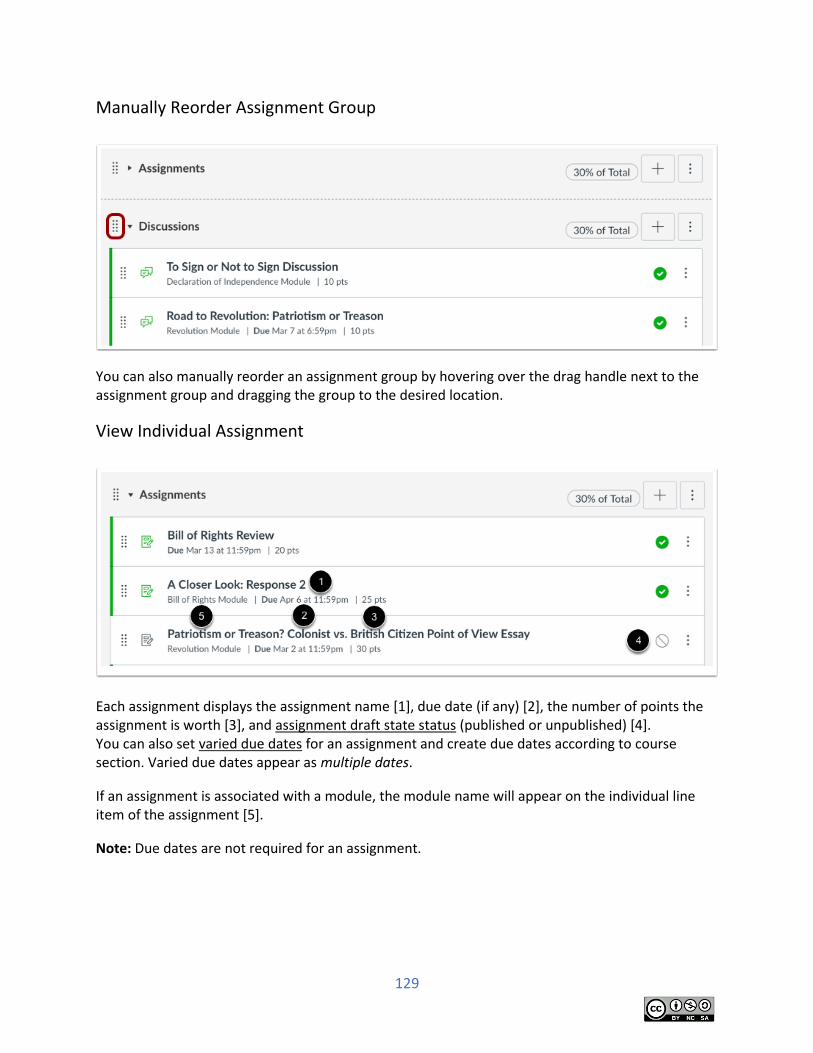
129
Manually Reorder Assignment Group
You can also manually reorder an assignment group by hovering over the drag handle next to the assignment group and dragging the group to the desired location.
View Individual Assignment
Each assignment displays the assignment name [1], due date (if any) [2], the number of points the assignment is worth [3], and assignment draft state status (published or unpublished) [4]. You can also set varied due dates for an assignment and create due dates according to course section. Varied due dates appear as multiple dates.
If an assignment is associated with a module, the module name will appear on the individual line item of the assignment [5].
Note: Due dates are not required for an assignment.
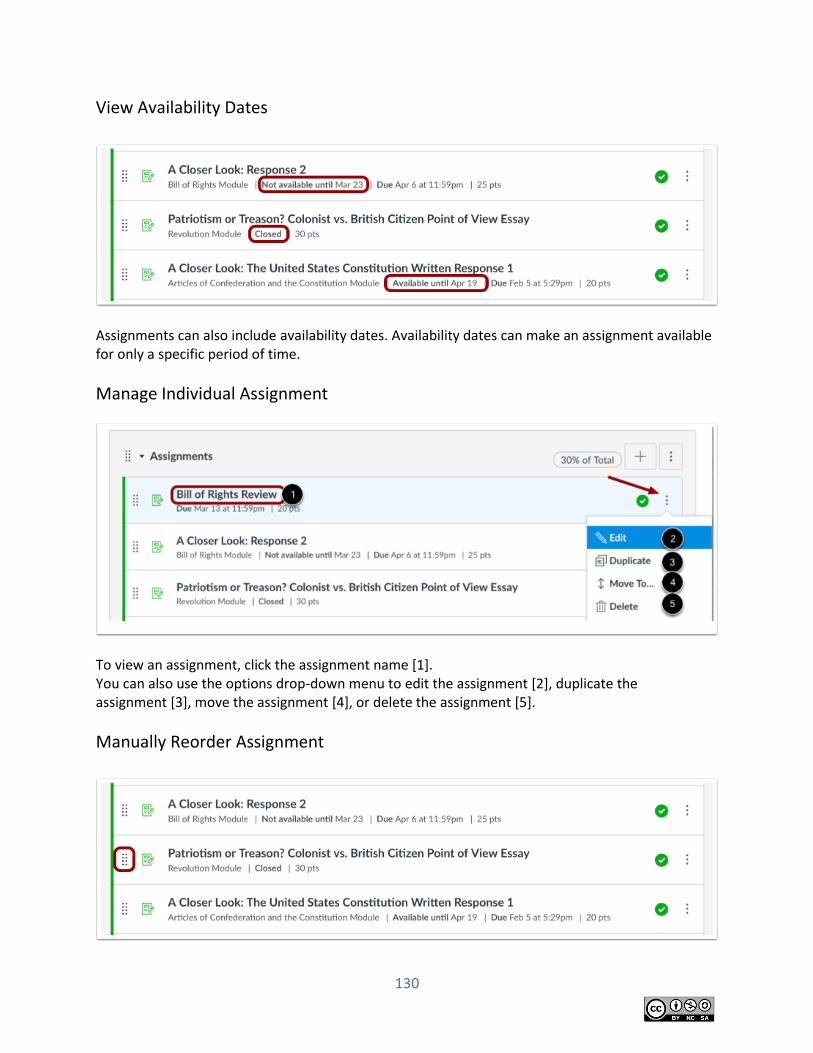
130
View Availability Dates
Assignments can also include availability dates. Availability dates can make an assignment available for only a specific period of time.
Manage Individual Assignment
To view an assignment, click the assignment name [1]. You can also use the options drop-down menu to edit the assignment [2], duplicate the assignment [3], move the assignment [4], or delete the assignment [5].
Manually Reorder Assignment
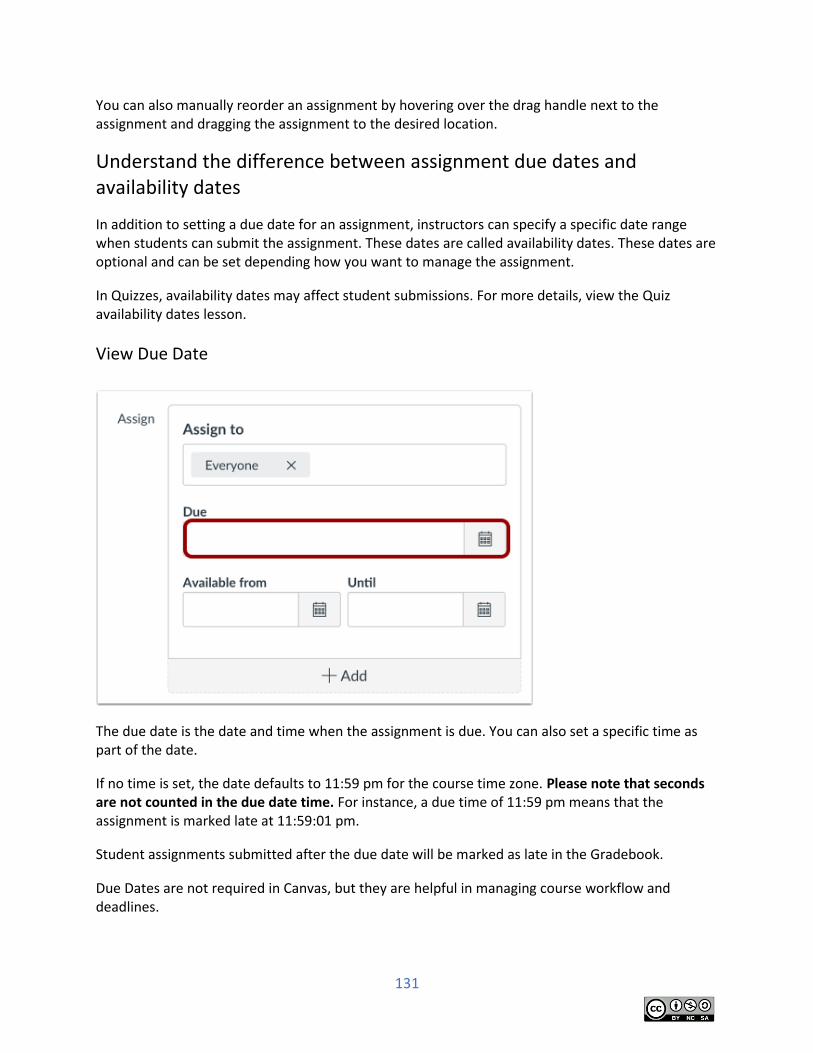
131
You can also manually reorder an assignment by hovering over the drag handle next to the assignment and dragging the assignment to the desired location.
Understand the difference between assignment due dates and availability dates
In addition to setting a due date for an assignment, instructors can specify a specific date range when students can submit the assignment. These dates are called availability dates. These dates are optional and can be set depending how you want to manage the assignment.
In Quizzes, availability dates may affect student submissions. For more details, view the Quiz availability dates lesson.
View Due Date
The due date is the date and time when the assignment is due. You can also set a specific time as part of the date.
If no time is set, the date defaults to 11:59 pm for the course time zone. Please note that seconds are not counted in the due date time. For instance, a due time of 11:59 pm means that the assignment is marked late at 11:59:01 pm.
Student assignments submitted after the due date will be marked as late in the Gradebook.
Due Dates are not required in Canvas, but they are helpful in managing course workflow and deadlines.
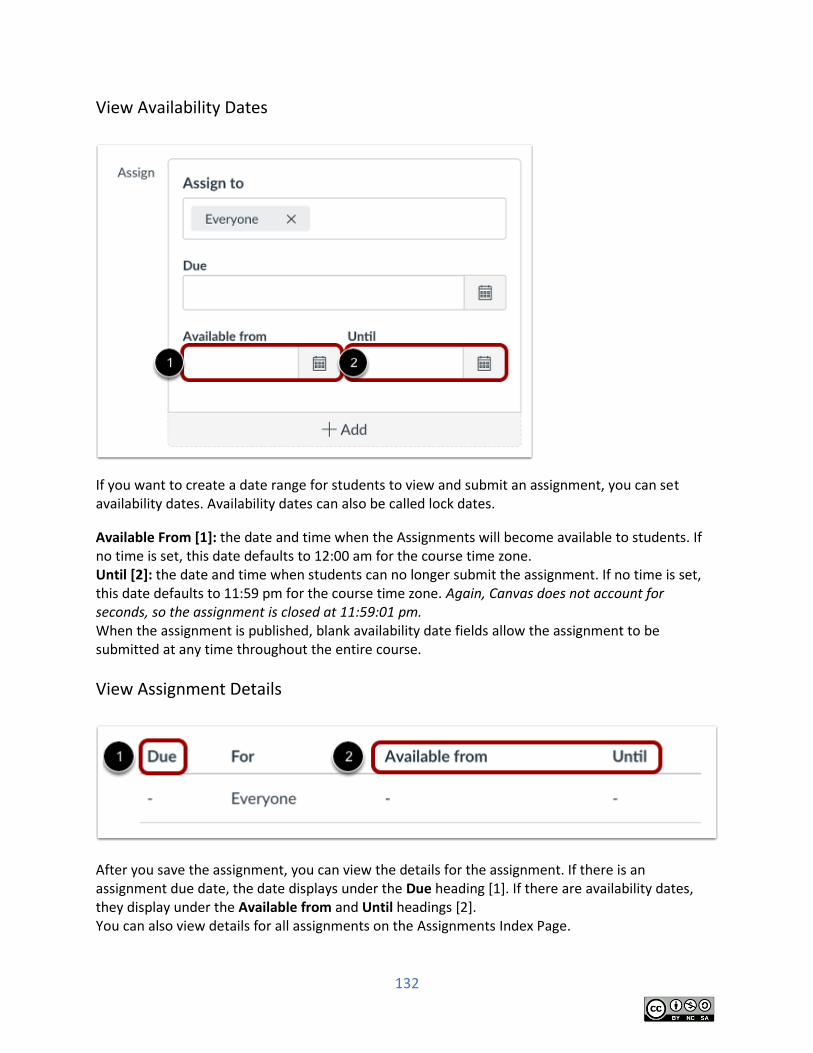
132
View Availability Dates
If you want to create a date range for students to view and submit an assignment, you can set availability dates. Availability dates can also be called lock dates.
Available From [1]: the date and time when the Assignments will become available to students. If no time is set, this date defaults to 12:00 am for the course time zone. Until [2]: the date and time when students can no longer submit the assignment. If no time is set, this date defaults to 11:59 pm for the course time zone. Again, Canvas does not account for seconds, so the assignment is closed at 11:59:01 pm. When the assignment is published, blank availability date fields allow the assignment to be submitted at any time throughout the entire course.
View Assignment Details
After you save the assignment, you can view the details for the assignment. If there is an assignment due date, the date displays under the Due heading [1]. If there are availability dates, they display under the Available from and Until headings [2]. You can also view details for all assignments on the Assignments Index Page.
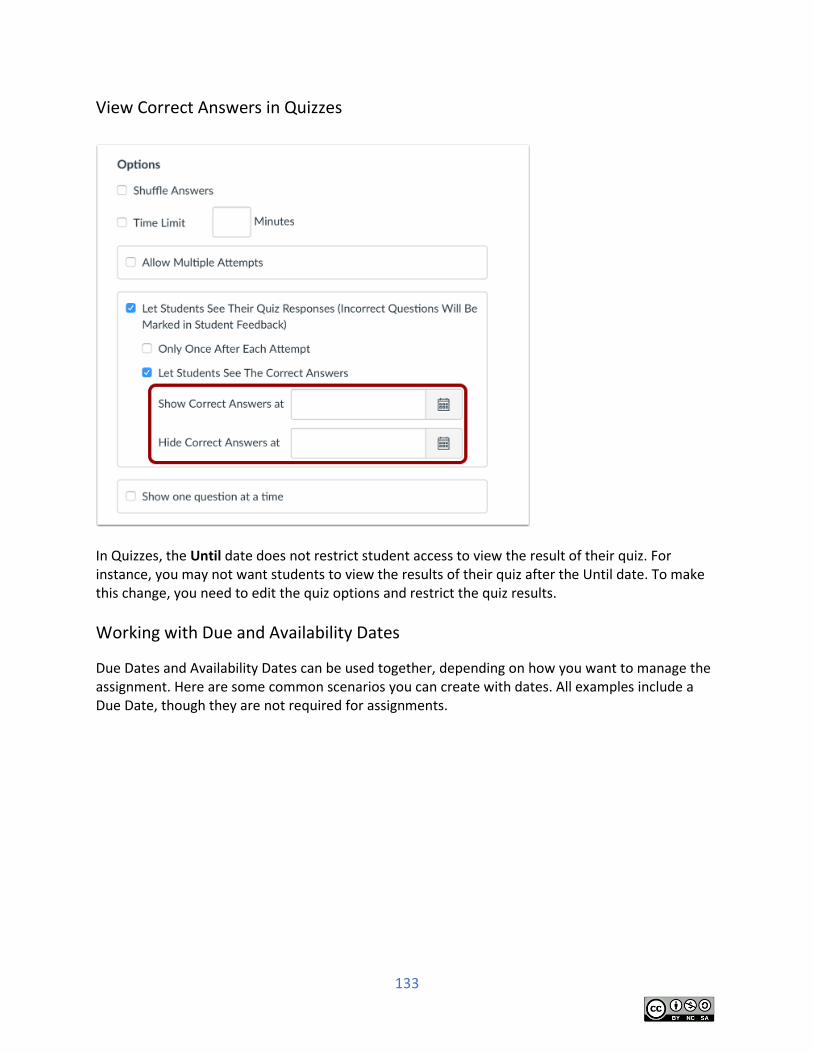
133
View Correct Answers in Quizzes
In Quizzes, the Until date does not restrict student access to view the result of their quiz. For instance, you may not want students to view the results of their quiz after the Until date. To make this change, you need to edit the quiz options and restrict the quiz results.
Working with Due and Availability Dates
Due Dates and Availability Dates can be used together, depending on how you want to manage the assignment. Here are some common scenarios you can create with dates. All examples include a Due Date, though they are not required for assignments.
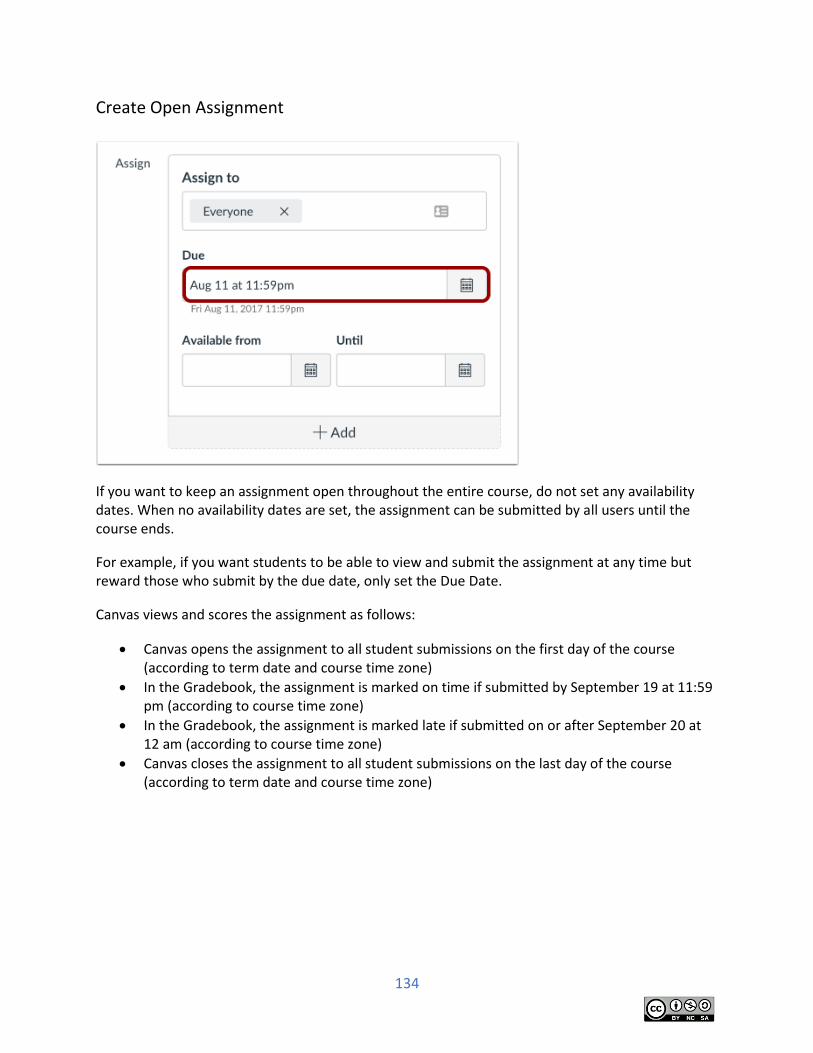
134
Create Open Assignment
If you want to keep an assignment open throughout the entire course, do not set any availability dates. When no availability dates are set, the assignment can be submitted by all users until the course ends.
For example, if you want students to be able to view and submit the assignment at any time but reward those who submit by the due date, only set the Due Date.
Canvas views and scores the assignment as follows:
Canvas opens the assignment to all student submissions on the first day of the course (according to term date and course time zone)
In the Gradebook, the assignment is marked on time if submitted by September 19 at 11:59 pm (according to course time zone)
In the Gradebook, the assignment is marked late if submitted on or after September 20 at 12 am (according to course time zone)
Canvas closes the assignment to all student submissions on the last day of the course (according to term date and course time zone)
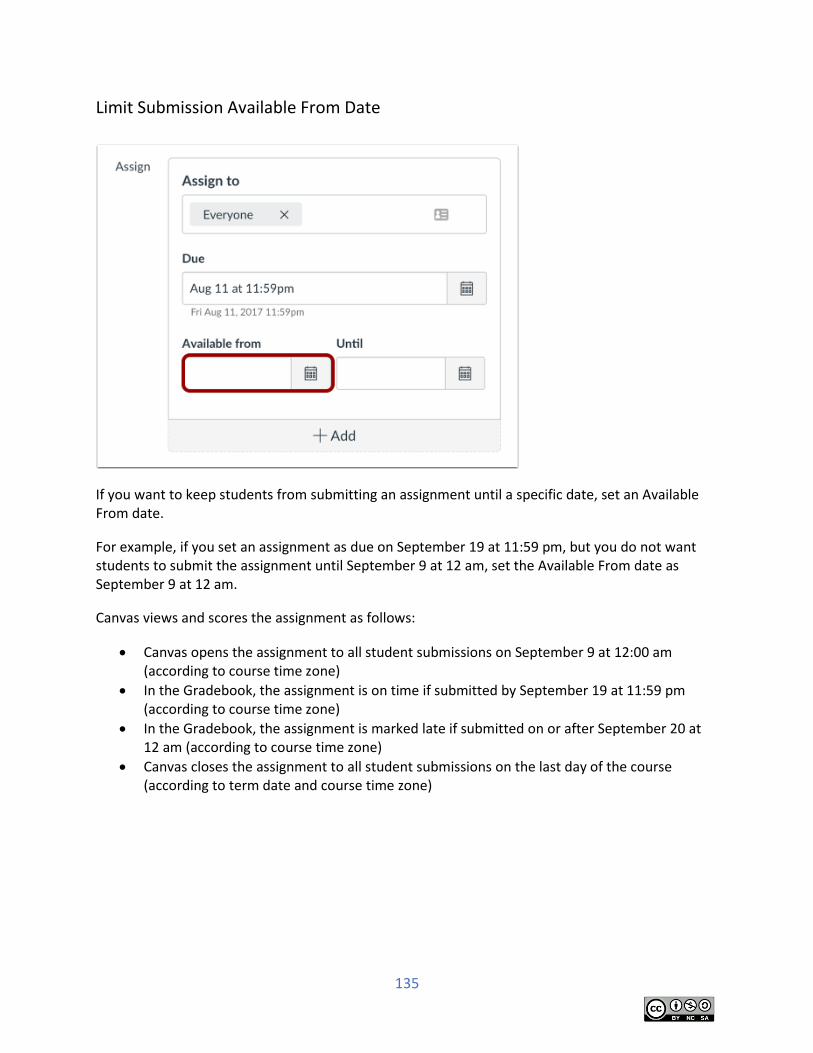
135
Limit Submission Available From Date
If you want to keep students from submitting an assignment until a specific date, set an Available From date.
For example, if you set an assignment as due on September 19 at 11:59 pm, but you do not want students to submit the assignment until September 9 at 12 am, set the Available From date as September 9 at 12 am.
Canvas views and scores the assignment as follows:
Canvas opens the assignment to all student submissions on September 9 at 12:00 am (according to course time zone)
In the Gradebook, the assignment is on time if submitted by September 19 at 11:59 pm (according to course time zone)
In the Gradebook, the assignment is marked late if submitted on or after September 20 at 12 am (according to course time zone)
Canvas closes the assignment to all student submissions on the last day of the course (according to term date and course time zone)
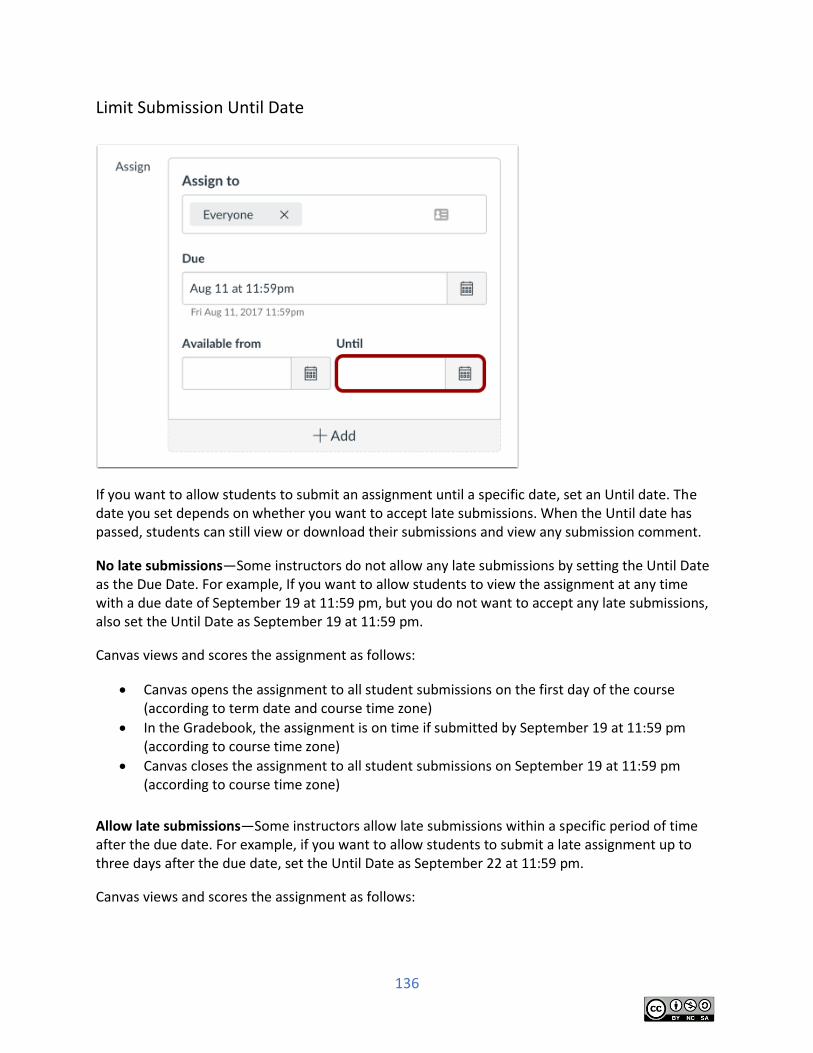
136
Limit Submission Until Date
If you want to allow students to submit an assignment until a specific date, set an Until date. The date you set depends on whether you want to accept late submissions. When the Until date has passed, students can still view or download their submissions and view any submission comment.
No late submissions—Some instructors do not allow any late submissions by setting the Until Date as the Due Date. For example, If you want to allow students to view the assignment at any time with a due date of September 19 at 11:59 pm, but you do not want to accept any late submissions, also set the Until Date as September 19 at 11:59 pm.
Canvas views and scores the assignment as follows:
Canvas opens the assignment to all student submissions on the first day of the course (according to term date and course time zone)
In the Gradebook, the assignment is on time if submitted by September 19 at 11:59 pm (according to course time zone)
Canvas closes the assignment to all student submissions on September 19 at 11:59 pm (according to course time zone)
Allow late submissions—Some instructors allow late submissions within a specific period of time after the due date. For example, if you want to allow students to submit a late assignment up to three days after the due date, set the Until Date as September 22 at 11:59 pm.
Canvas views and scores the assignment as follows:

137
Canvas opens the assignment to all student submissions on the first day of the course (according to term date and course time zone)
In the Gradebook, the assignment is on time if submitted by September 19 at 11:59 pm (according to course time zone)
In the Gradebook, the assignment is marked late if submitted between September 20 at 12 am and September 22 at 11:59 pm (according to course time zone)
Canvas closes the assignment to all student submissions on September 22 at 11:59 pm (according to course time zone)
Note: In Quizzes, the autosubmit feature is tied to the Until date, which may affect student submissions. For more details, view the Quiz availability dates lesson.
Limit Submission Date Range
If you want to allow students to submit an assignment only in a specific date range, set both availability dates for the assignment.
For example, if an assignment is due September 19 at 11:59 pm, but you only want students to be able to submit the assignment between September 9 and September 22, and you want to allow late assignments for 3 days, set the Available From date as September 9 at 12 am, and the Until date as September 22 at 11:59 pm.
Canvas views and scores the assignment as follows:
Canvas opens the assignment to all student submissions on September 9 at 12 am (according to course time zone)
138
In the Gradebook, the assignment is on time if submitted by September 19 at 11:59 pm (according to course time zone)
In the Gradebook, the assignment is marked late if submitted between September 20 at 12 am and September 22 at 11:59 pm (according to course time zone)
Canvas closes the assignment to all student submissions on September 22 at 11:59 pm (according to course time zone)
Assignment: Try It
Create an assignment
1. Create a graded assignment for students to submit online with a set due date. 2. Open Module 1 3. Add an assignment named Why I Want to Teach Online. 4. Add the following text to the description box:
Please type a 150 word essay in a Word document on why you want to teach online. Address how your desire to teach online relates to your academic, career, and personal goals in your response.
Save the Word document as Your Last Name_TeachOnline
Upload and submit your assignment through the Submit Assignment link above. 5. Assign 5 points. 6. Select Assignments for the Assignment Group. 7. Display Grade as Points. 8. Select Online as the Submission Type and File Uploads as the Online Entry Options. 9. Make the assignment due January 10, 2020 – January 17, 2020.
139
Turnitin Assignment
Create a Turnitin assignment
As of May 15, all Turnitin documentation will be maintained directly by Turnitin, and this document will be removed from the Canvas Guides on August 4. For assistance with Turnitin, please reference the Turnitin Canvas User Guides. As an instructor, you can enable Turnitin as part of a new Canvas assignment. Turnitin is enabled on a per-assignment basis in Canvas. Turnitin uses your user role for authentication and uses your Canvas account to create and manage assignments. TAs can also access Turnitin assignments. Creating a Turnitin assignment means creating the assignment in Canvas and confirming the Turnitin Settings. You may find that the best workflow is to create the assignment, manage Turnitin settings, and then publish the assignment. The Turnitin LTI currently includes a few limitations when creating assignments: You cannot use Turnitin with group assignments. Turnitin assignments cannot include more than one submission date; differentiated due dates are not supported. Turnitin submissions require a minimum of 20 words, a maximum of 400 pages, and a file size maximum of 40 MB. You cannot restrict student submission types. By default Turnitin always allows students to submit their assignment as a text entry or upload any supported file type: Text (.txt), Microsoft Word (.doc/.docx), Microsoft PowerPoint (.ppt/.pptx), Postcript (.ps), Portable Document Format (.pdf), Rich Text Format (.rtf), HyperText Markup Language (.html), WordPerfect (.wp), Hangul (.hwp), or Open Office (.odt/.ods/.odp). They can also upload an assignment from Google Drive or Dropbox. Turnitin does not allow students to submit unsupported file types. Students cannot submit multiple file uploads. If you want to use a Canvas rubric for the assignment, you must add the rubric before setting the External Tool submission type. Create the assignment with any other submission type, save the assignment, add the rubric, and then edit the assignment to select the External Tool. Students can only view Canvas rubrics for Turnitin assignments on the Submission Details page for that assignment (at any time) or their Grades page (after the rubric has been scored). If you want your assignment to be moderated, you must set up the moderated assignment before setting the External Tool submission type. If you need to return to the moderate page after the External Tool is added, open the assignment and add /moderate after the assignment URL.
Note: The first time you create an assignment, you need to review and agree to the Turnitin User Agreement.
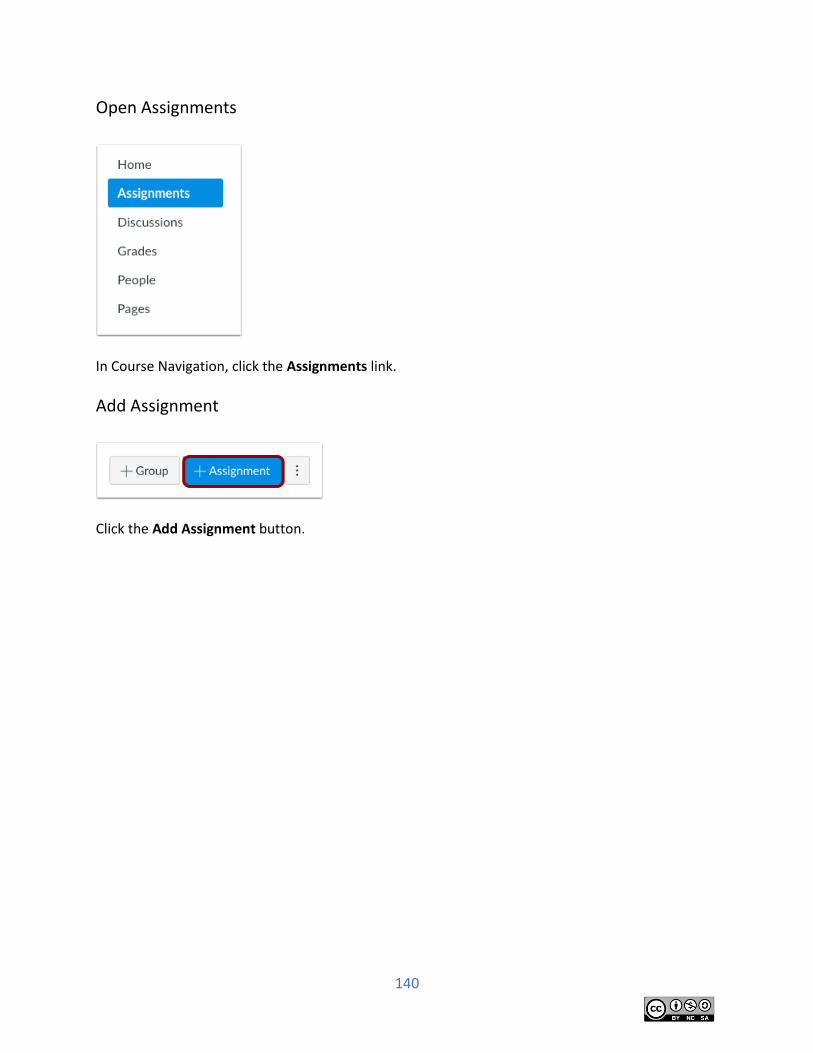
140
Open Assignments
In Course Navigation, click the Assignments link.
Add Assignment
Click the Add Assignment button.
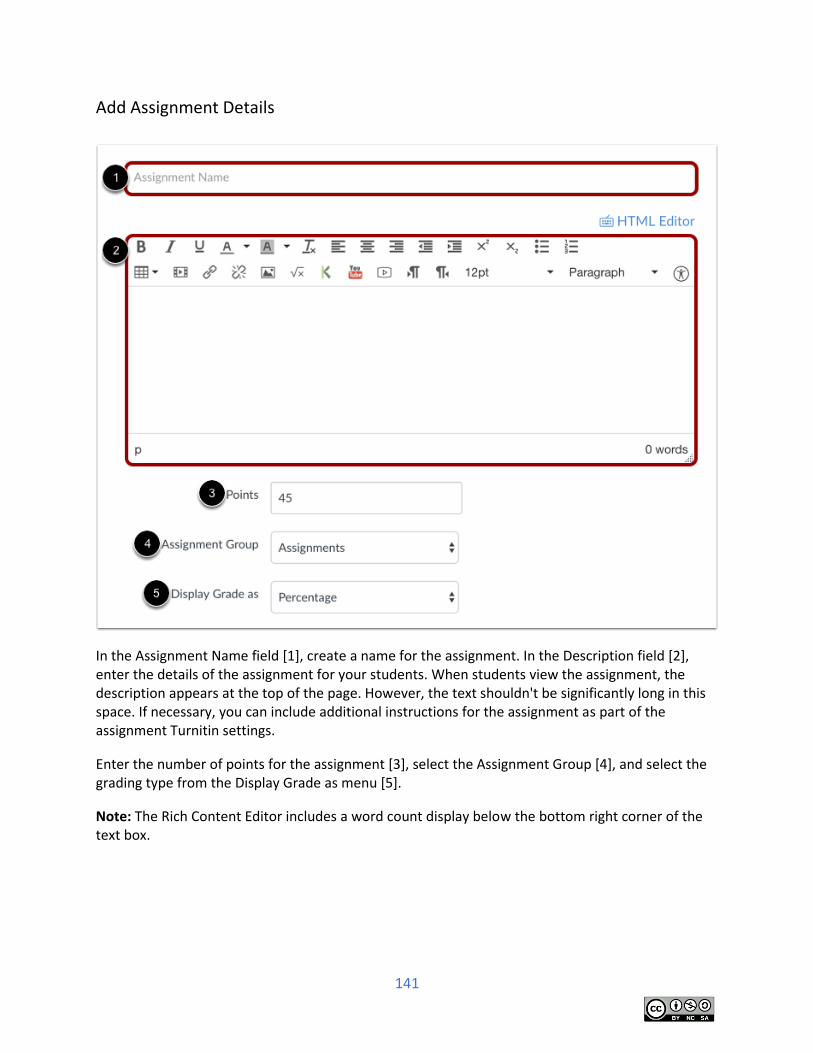
141
Add Assignment Details
In the Assignment Name field [1], create a name for the assignment. In the Description field [2], enter the details of the assignment for your students. When students view the assignment, the description appears at the top of the page. However, the text shouldn't be significantly long in this space. If necessary, you can include additional instructions for the assignment as part of the assignment Turnitin settings.
Enter the number of points for the assignment [3], select the Assignment Group [4], and select the grading type from the Display Grade as menu [5].
Note: The Rich Content Editor includes a word count display below the bottom right corner of the text box.
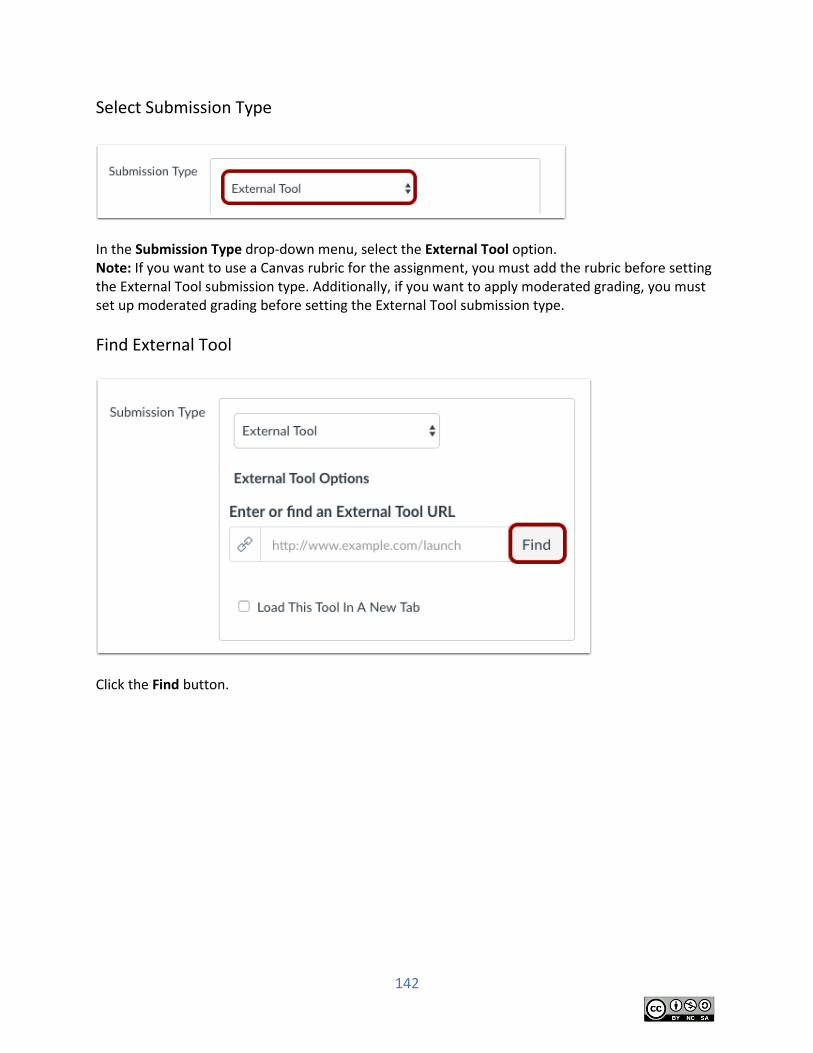
142
Select Submission Type
In the Submission Type drop-down menu, select the External Tool option. Note: If you want to use a Canvas rubric for the assignment, you must add the rubric before setting the External Tool submission type. Additionally, if you want to apply moderated grading, you must set up moderated grading before setting the External Tool submission type.
Find External Tool
Click the Find button.
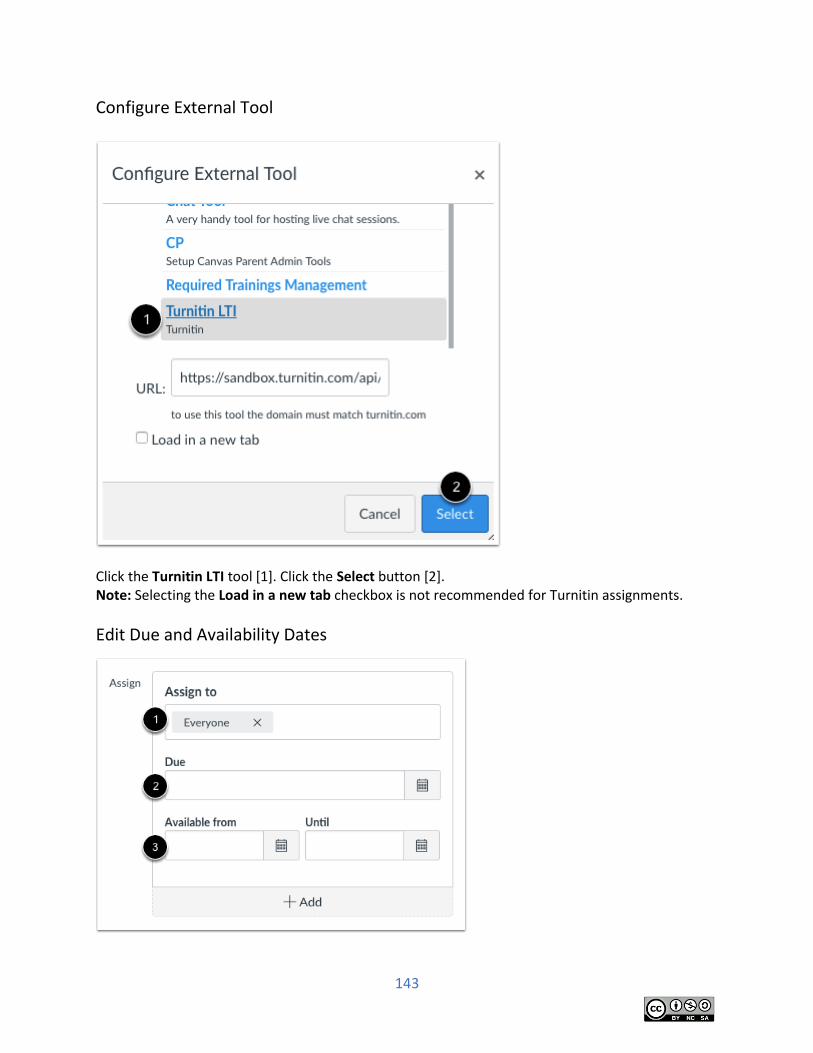
143
Configure External Tool
Click the Turnitin LTI tool [1]. Click the Select button [2]. Note: Selecting the Load in a new tab checkbox is not recommended for Turnitin assignments.
Edit Due and Availability Dates
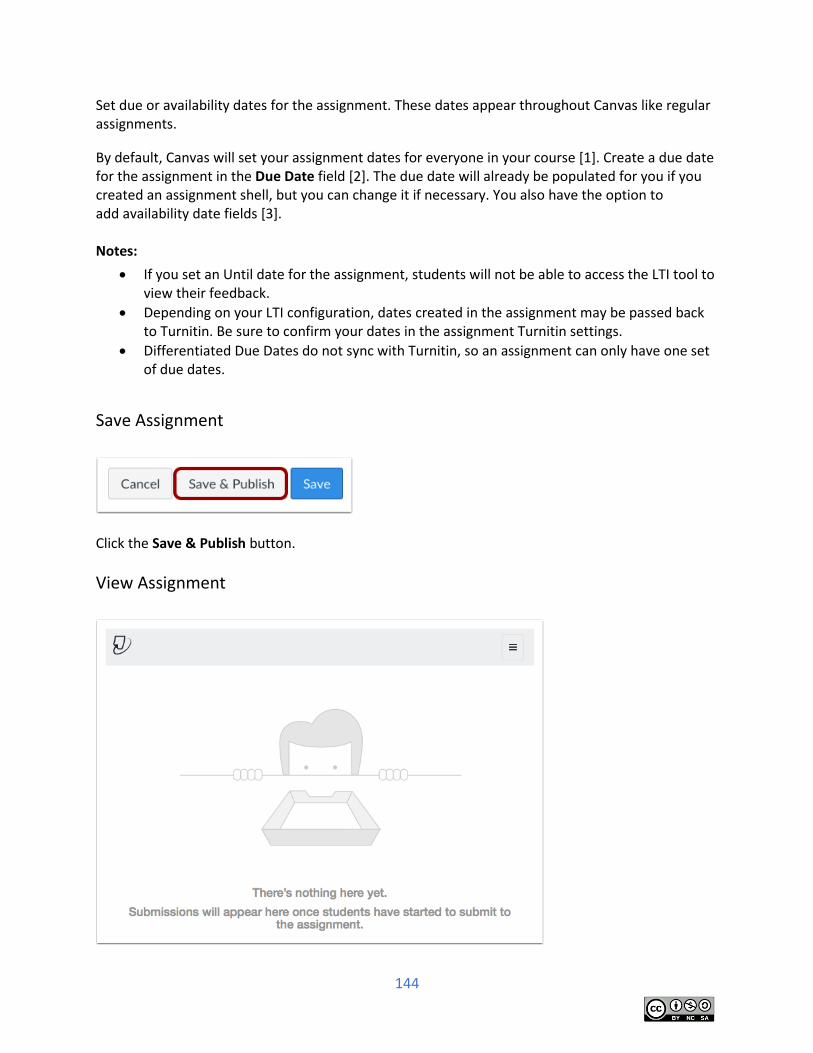
144
Set due or availability dates for the assignment. These dates appear throughout Canvas like regular assignments.
By default, Canvas will set your assignment dates for everyone in your course [1]. Create a due date for the assignment in the Due Date field [2]. The due date will already be populated for you if you created an assignment shell, but you can change it if necessary. You also have the option to add availability date fields [3]. Notes:
If you set an Until date for the assignment, students will not be able to access the LTI tool to view their feedback.
Depending on your LTI configuration, dates created in the assignment may be passed back to Turnitin. Be sure to confirm your dates in the assignment Turnitin settings.
Differentiated Due Dates do not sync with Turnitin, so an assignment can only have one set of due dates.
Save Assignment
Click the Save & Publish button.
View Assignment
145
View your assignment created with Turnitin. The assignment defaults to the Assignment Inbox.
Once your assignment has been created, you must also confirm the Turnitin Settings. Otherwise, students cannot access the assignment, even once the assignment is published in Canvas. Note: The Turnitin LTI is responsive to the size of your browser window. Your view of the Turnitin LTI may vary from the image shown in this step.
Change Turnitin settings for an assignment
As of May 15, all Turnitin documentation will be maintained directly by Turnitin, and this document will be removed from the Canvas Guides on August 4. For assistance with Turnitin, please reference the Turnitin Canvas User Guides. As part of a Turnitin assignment, you must specify the settings that are allowed for student submissions. Turnitin settings must be created or confirmed before students can view the assignment. The LTI currently includes a few limitations in Turnitin settings:
By default Turnitin always allows students to submit their assignment as a text entry or upload files that can generate Originality Reports: Text (.txt), Microsoft Word (.doc/.docx), Microsoft PowerPoint (.ppt/.pptx/.pps/.ppsx), Microsoft Excel (.xls/.xlsx), PostScript (.ps/.eps), Portable Document Format (.pdf), Rich Text Format (.rtf), HyperText Markup Language (.html), WordPerfect (.wpd), Hangul (.hwp), and Open Office Text (.odt). They can also upload an assignment from Google Drive or Dropbox. In Turnitin settings, you can also allow students to submit any file that is less than 40 MB, has a minimum of 20 words, and is less than 400 pages.
Assignments honor Turnitin resubmission settings; they do not automatically allow resubmissions like regular Canvas assignments.
Note: The Turnitin LTI is responsive to the size of your browser window. Your view of the Turnitin LTI may vary from the images shown in this lesson.
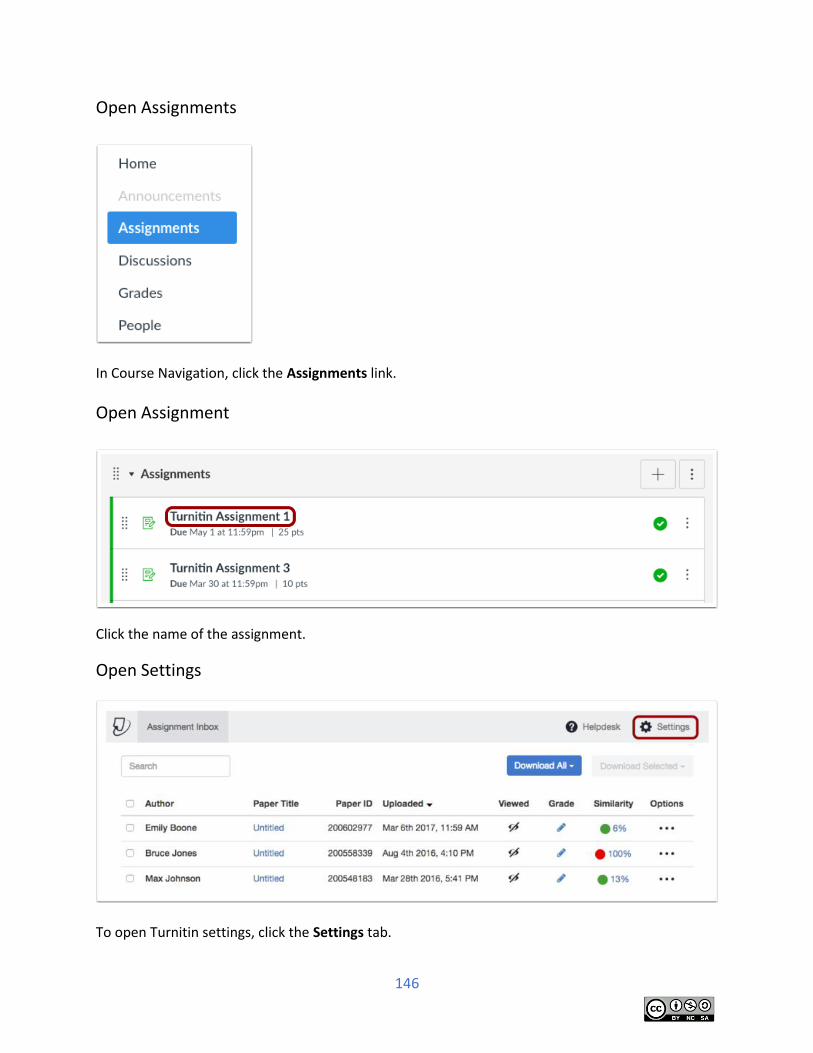
146
Open Assignments
In Course Navigation, click the Assignments link.
Open Assignment
Click the name of the assignment.
Open Settings
To open Turnitin settings, click the Settings tab.
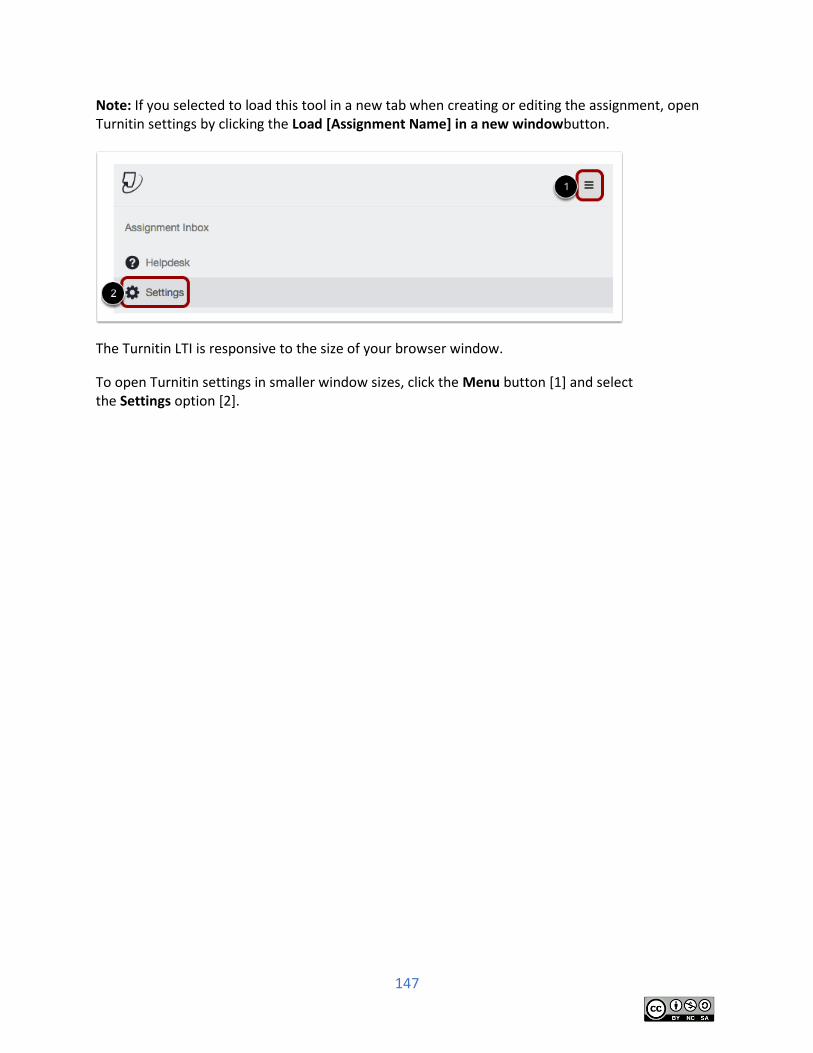
147
Note: If you selected to load this tool in a new tab when creating or editing the assignment, open Turnitin settings by clicking the Load [Assignment Name] in a new windowbutton.
The Turnitin LTI is responsive to the size of your browser window.
To open Turnitin settings in smaller window sizes, click the Menu button [1] and select the Settings option [2].
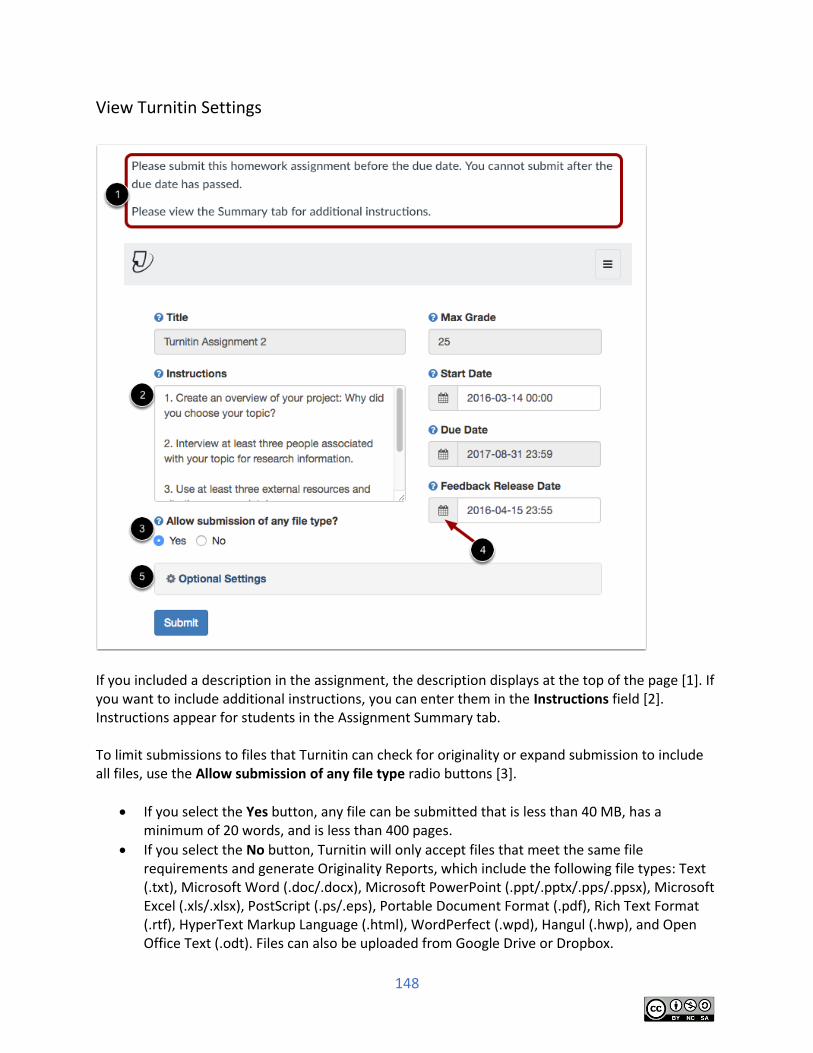
148
View Turnitin Settings
If you included a description in the assignment, the description displays at the top of the page [1]. If you want to include additional instructions, you can enter them in the Instructions field [2]. Instructions appear for students in the Assignment Summary tab. To limit submissions to files that Turnitin can check for originality or expand submission to include all files, use the Allow submission of any file type radio buttons [3].
If you select the Yes button, any file can be submitted that is less than 40 MB, has a minimum of 20 words, and is less than 400 pages.
If you select the No button, Turnitin will only accept files that meet the same file requirements and generate Originality Reports, which include the following file types: Text (.txt), Microsoft Word (.doc/.docx), Microsoft PowerPoint (.ppt/.pptx/.pps/.ppsx), Microsoft Excel (.xls/.xlsx), PostScript (.ps/.eps), Portable Document Format (.pdf), Rich Text Format (.rtf), HyperText Markup Language (.html), WordPerfect (.wpd), Hangul (.hwp), and Open Office Text (.odt). Files can also be uploaded from Google Drive or Dropbox.
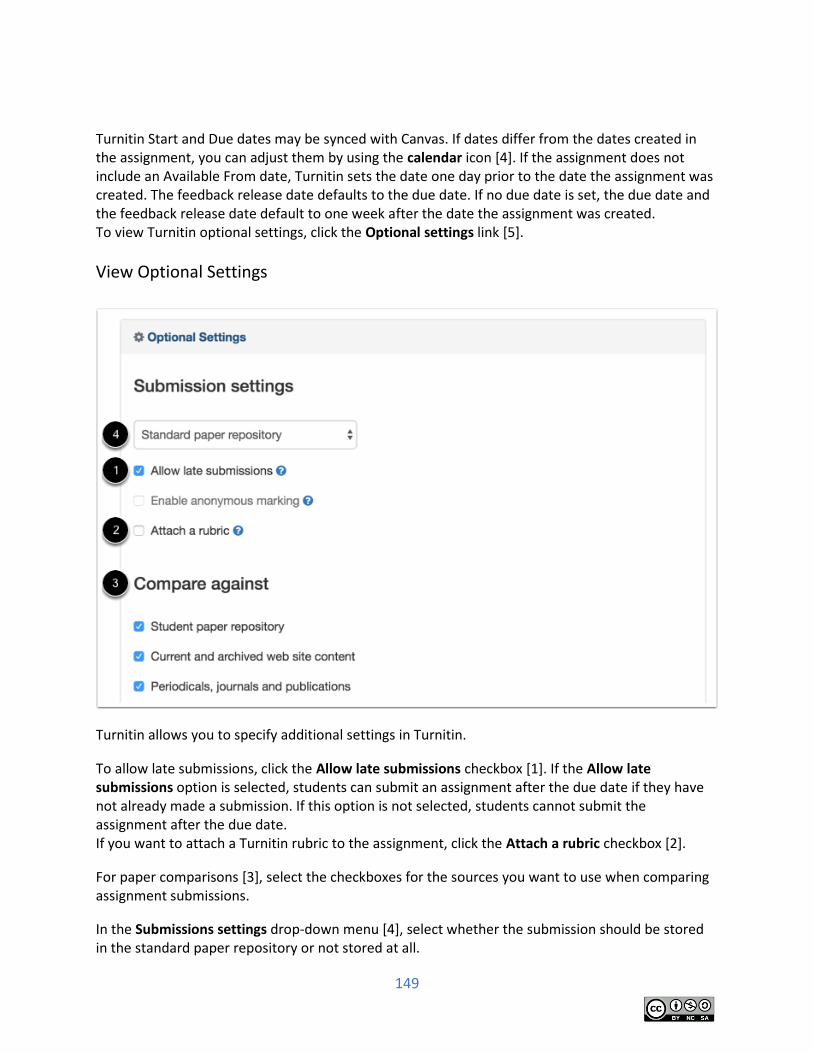
149
Turnitin Start and Due dates may be synced with Canvas. If dates differ from the dates created in the assignment, you can adjust them by using the calendar icon [4]. If the assignment does not include an Available From date, Turnitin sets the date one day prior to the date the assignment was created. The feedback release date defaults to the due date. If no due date is set, the due date and the feedback release date default to one week after the date the assignment was created. To view Turnitin optional settings, click the Optional settings link [5].
View Optional Settings
Turnitin allows you to specify additional settings in Turnitin.
To allow late submissions, click the Allow late submissions checkbox [1]. If the Allow late submissions option is selected, students can submit an assignment after the due date if they have not already made a submission. If this option is not selected, students cannot submit the assignment after the due date. If you want to attach a Turnitin rubric to the assignment, click the Attach a rubric checkbox [2].
For paper comparisons [3], select the checkboxes for the sources you want to use when comparing assignment submissions.
In the Submissions settings drop-down menu [4], select whether the submission should be stored in the standard paper repository or not stored at all.
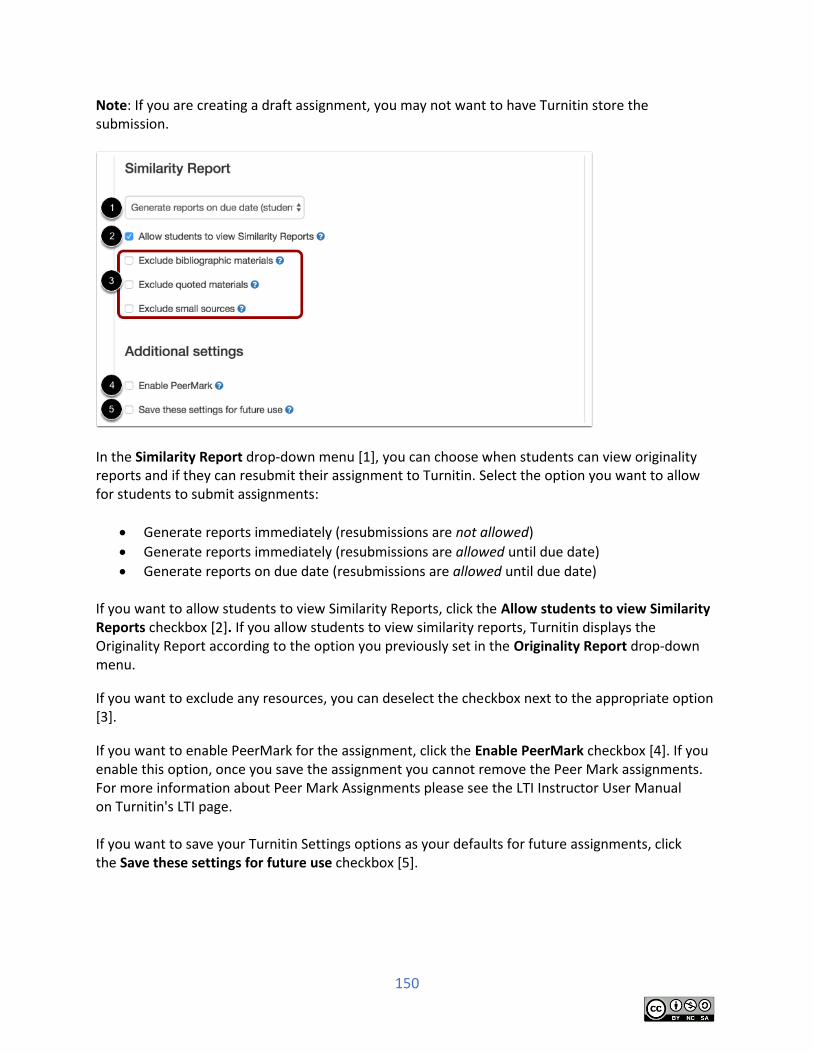
150
Note: If you are creating a draft assignment, you may not want to have Turnitin store the submission.
In the Similarity Report drop-down menu [1], you can choose when students can view originality reports and if they can resubmit their assignment to Turnitin. Select the option you want to allow for students to submit assignments:
Generate reports immediately (resubmissions are not allowed)
Generate reports immediately (resubmissions are allowed until due date)
Generate reports on due date (resubmissions are allowed until due date) If you want to allow students to view Similarity Reports, click the Allow students to view Similarity Reports checkbox [2]. If you allow students to view similarity reports, Turnitin displays the Originality Report according to the option you previously set in the Originality Report drop-down menu.
If you want to exclude any resources, you can deselect the checkbox next to the appropriate option [3].
If you want to enable PeerMark for the assignment, click the Enable PeerMark checkbox [4]. If you enable this option, once you save the assignment you cannot remove the Peer Mark assignments. For more information about Peer Mark Assignments please see the LTI Instructor User Manual on Turnitin's LTI page. If you want to save your Turnitin Settings options as your defaults for future assignments, click the Save these settings for future use checkbox [5].
151
Submit Settings
Click the Submit button.
Manage Turnitin assignments
As of May 15, all Turnitin documentation will be maintained directly by Turnitin, and this document will be removed from the Canvas Guides on August 4. For assistance with Turnitin, please reference the Turnitin Canvas User Guides. Turnitin is the leading academic plagiarism detector, utilized by teachers and students to avoid plagiarism and ensure academic integrity. Your institution may have a Turnitin account that you can use to create Turnitin assignments for your students. Canvas uses the Turnitin LTI for assignment submissions, which allows you to manage all Turnitin content and settings within Canvas. The LTI also supports OriginalityCheck, GradeMark, and PeerMark. For more details about the Turnitin LTI tool, please see the Instructor LTI Interface Manual in the Turnitin LTI page. Turnitin Login: In the Turnitin LTI, Canvas authenticates student, instructor, and TA roles. You do not need to create a separate Turnitin account to access Turnitin in Canvas. Turnitin's website is separate from the Turnitin LTI within Canvas. Submissions and features may vary between the tools. For example, if you choose to use the Turnitin website, you will need to use the password reset feature to create a password to the Turnitin web interface. Student Submissions: Once you have created and published the assignment, students submit their assignments directly in Canvas. Please note that the Student View does not support Turnitin assignments as the Test Student. Course Copies: If you copy a Turnitin assignment from another course, you will have to re-enable the External Tool Submission Type for each assignment, otherwise the assignment will not be connected to Turnitin. Error Messages: Turnitin may occasionally generate an error message about the status of a submission. If a submission includes an error, you can view the message by hovering over the Turnitin icon. If the file failed to resubmit to Turnitin, you can download the student submission and reupload it to Turnitin. If you have questions please contact your Canvas administrator. Note: The Turnitin LTI is responsive to the size of your browser window. Your view of the Turnitin LTI may vary from the images shown in this lesson.
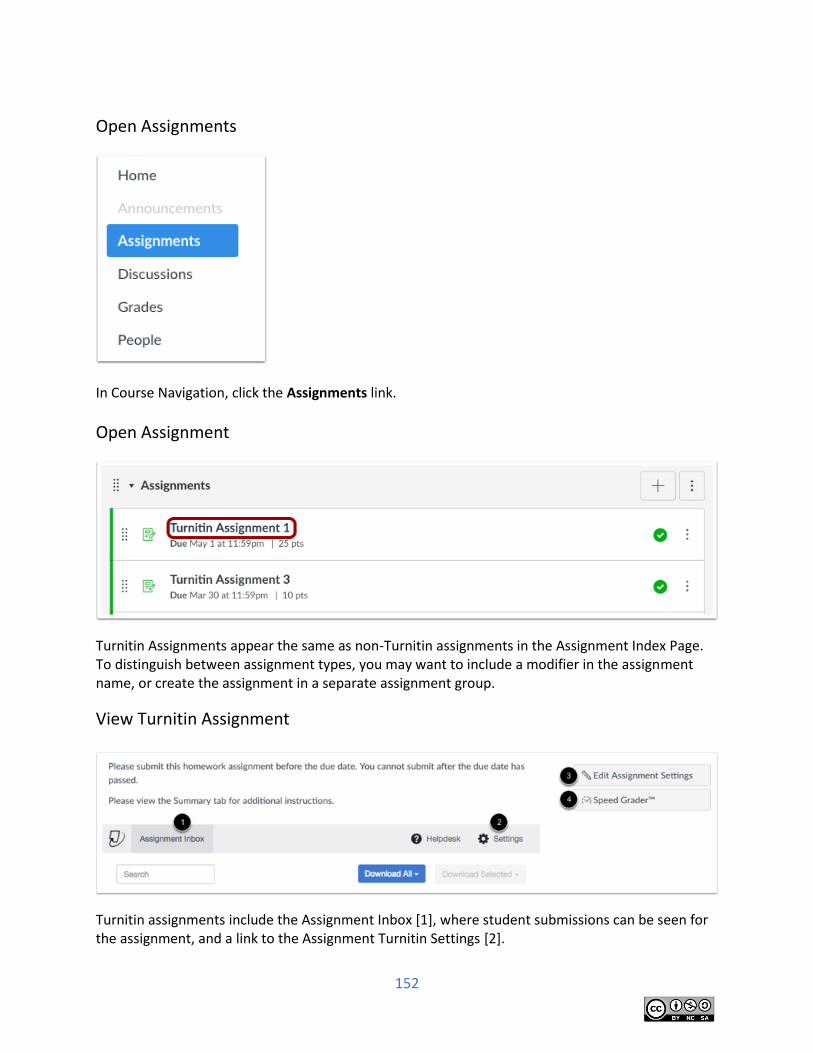
152
Open Assignments
In Course Navigation, click the Assignments link.
Open Assignment
Turnitin Assignments appear the same as non-Turnitin assignments in the Assignment Index Page. To distinguish between assignment types, you may want to include a modifier in the assignment name, or create the assignment in a separate assignment group.
View Turnitin Assignment
Turnitin assignments include the Assignment Inbox [1], where student submissions can be seen for the assignment, and a link to the Assignment Turnitin Settings [2].
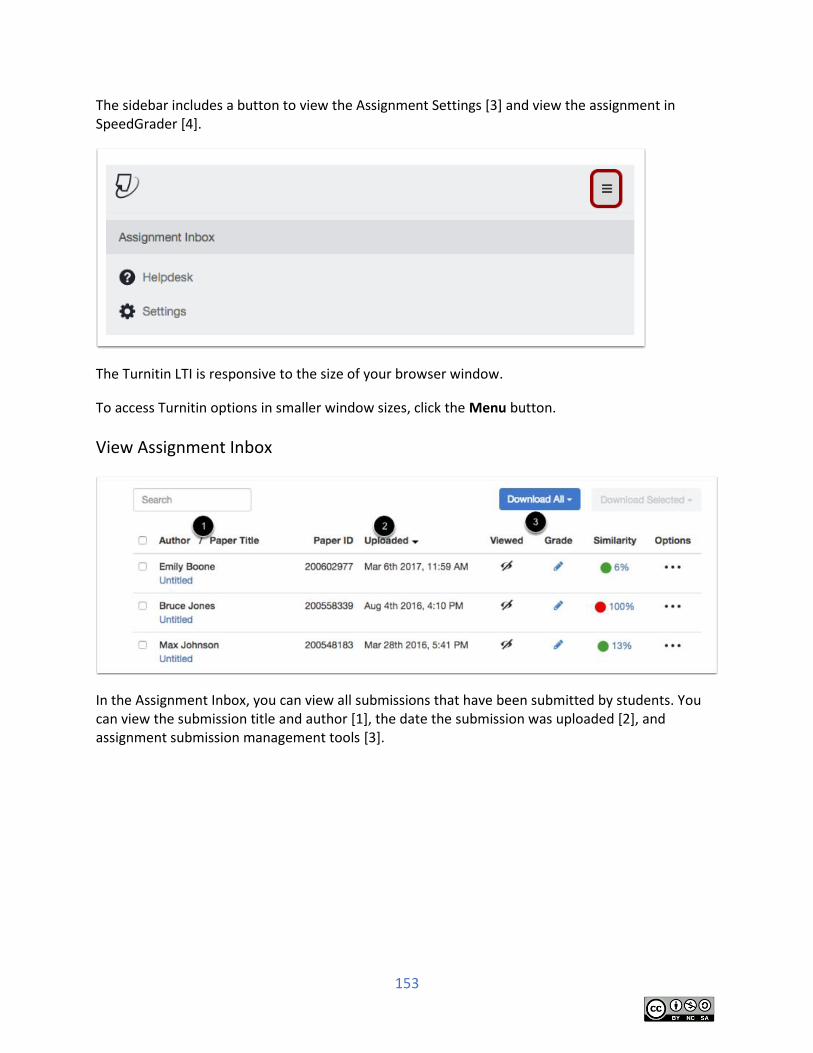
153
The sidebar includes a button to view the Assignment Settings [3] and view the assignment in SpeedGrader [4].
The Turnitin LTI is responsive to the size of your browser window.
To access Turnitin options in smaller window sizes, click the Menu button.
View Assignment Inbox
In the Assignment Inbox, you can view all submissions that have been submitted by students. You can view the submission title and author [1], the date the submission was uploaded [2], and assignment submission management tools [3].
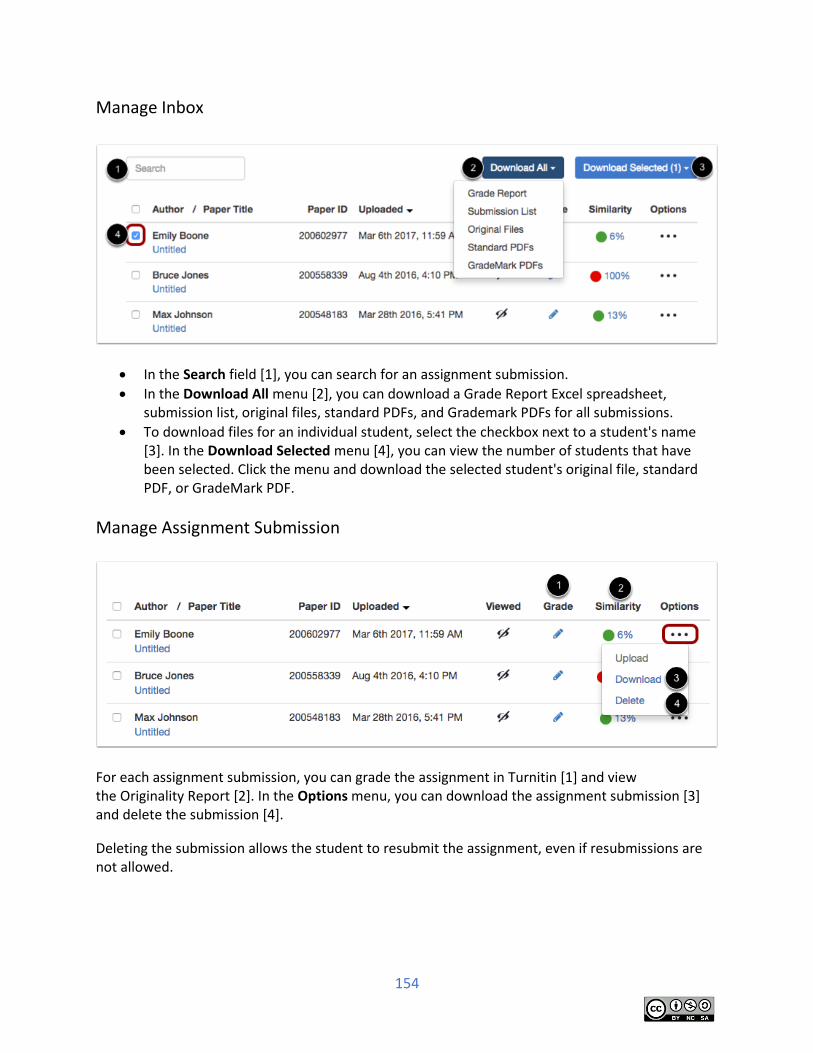
154
Manage Inbox
In the Search field [1], you can search for an assignment submission.
In the Download All menu [2], you can download a Grade Report Excel spreadsheet, submission list, original files, standard PDFs, and Grademark PDFs for all submissions.
To download files for an individual student, select the checkbox next to a student's name [3]. In the Download Selected menu [4], you can view the number of students that have been selected. Click the menu and download the selected student's original file, standard PDF, or GradeMark PDF.
Manage Assignment Submission
For each assignment submission, you can grade the assignment in Turnitin [1] and view the Originality Report [2]. In the Options menu, you can download the assignment submission [3] and delete the submission [4].
Deleting the submission allows the student to resubmit the assignment, even if resubmissions are not allowed.
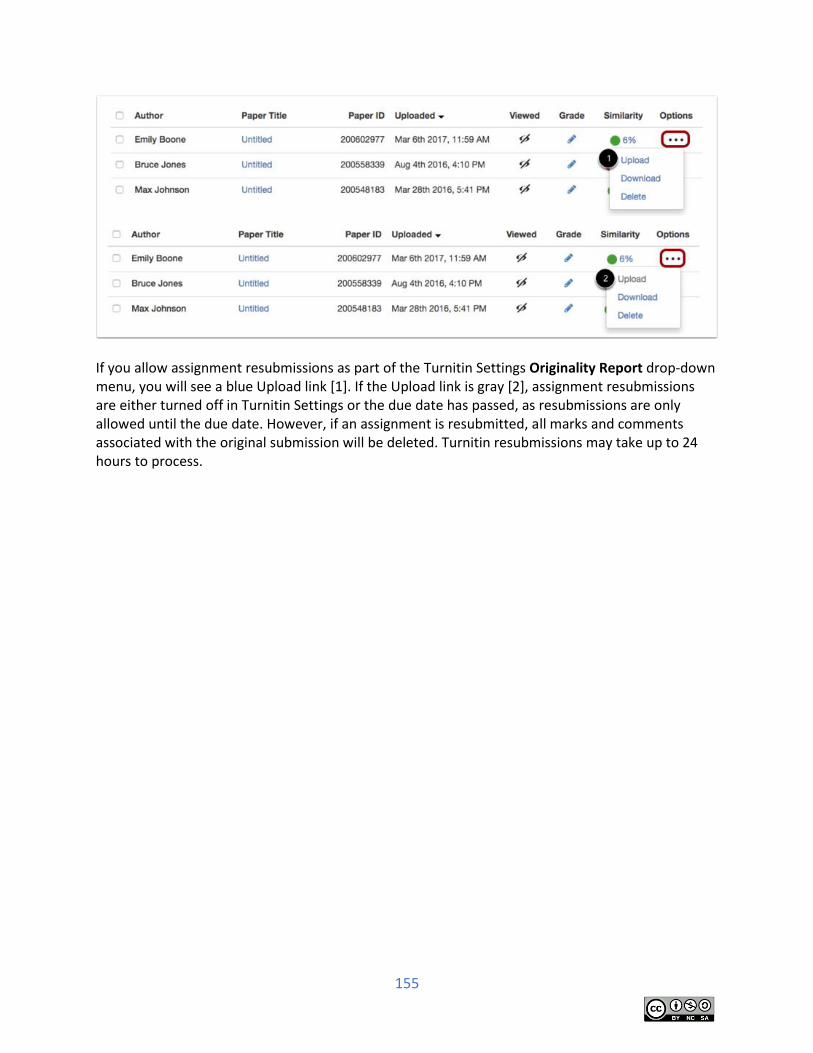
155
If you allow assignment resubmissions as part of the Turnitin Settings Originality Report drop-down menu, you will see a blue Upload link [1]. If the Upload link is gray [2], assignment resubmissions are either turned off in Turnitin Settings or the due date has passed, as resubmissions are only allowed until the due date. However, if an assignment is resubmitted, all marks and comments associated with the original submission will be deleted. Turnitin resubmissions may take up to 24 hours to process.
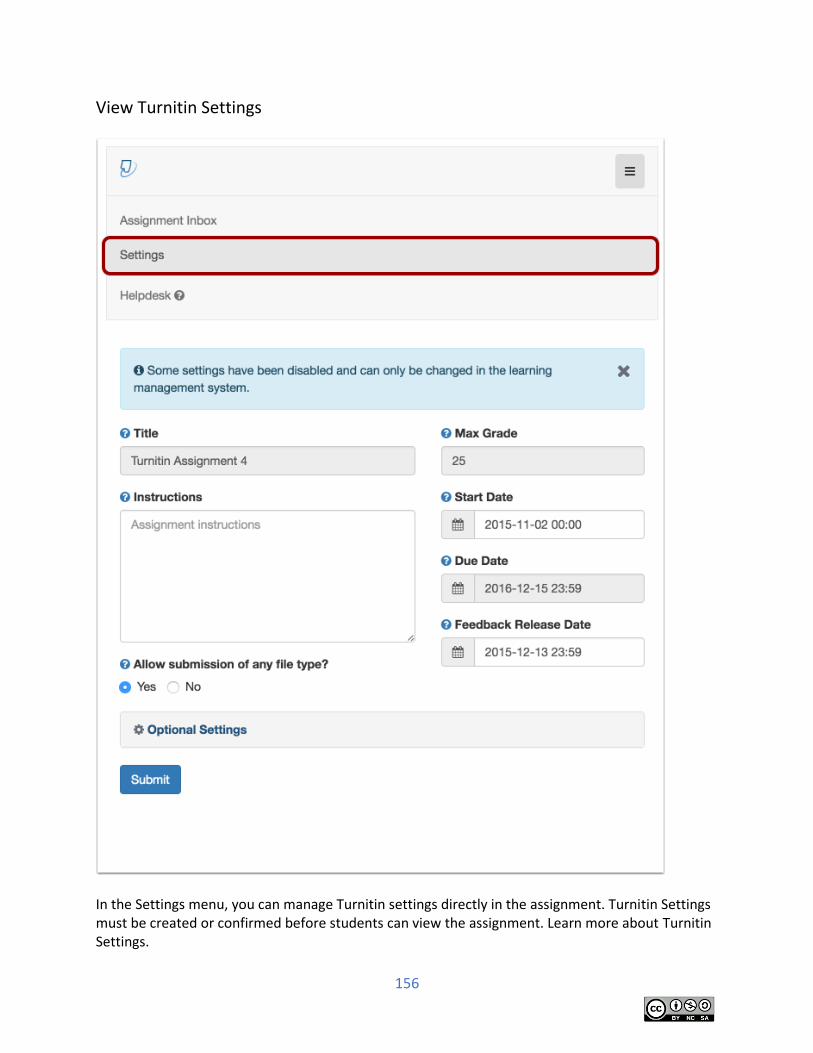
156
View Turnitin Settings
In the Settings menu, you can manage Turnitin settings directly in the assignment. Turnitin Settings must be created or confirmed before students can view the assignment. Learn more about Turnitin Settings.
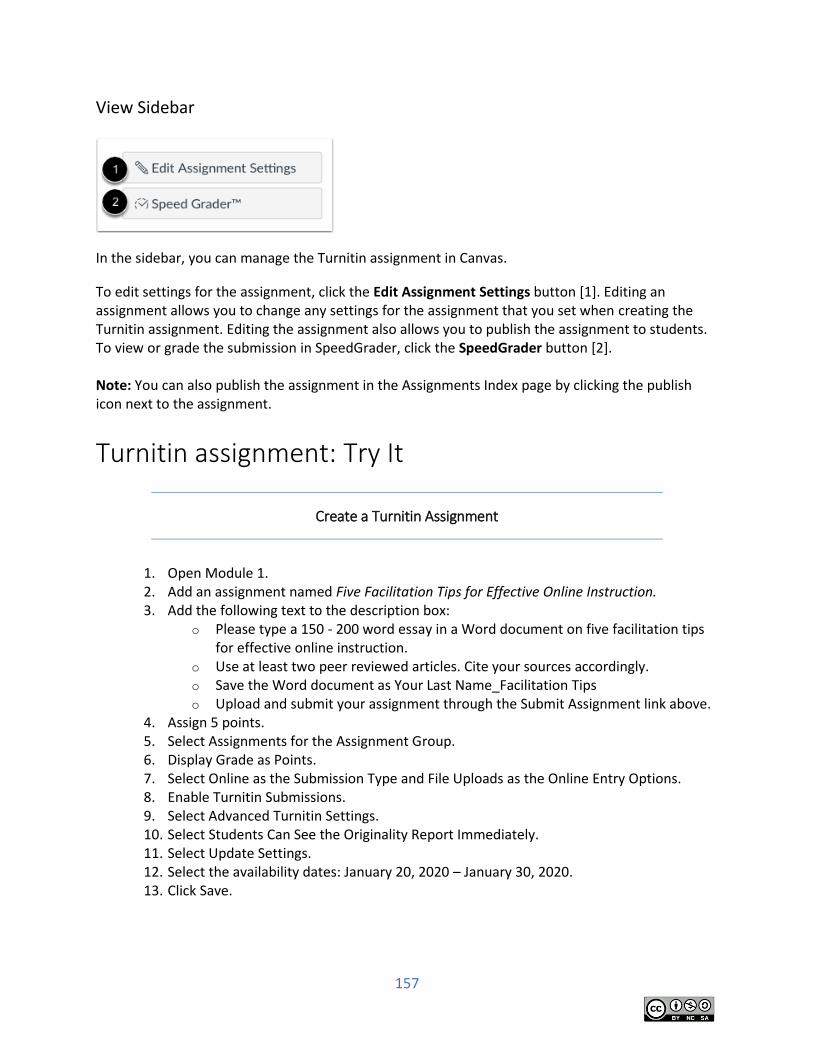
157
View Sidebar
In the sidebar, you can manage the Turnitin assignment in Canvas.
To edit settings for the assignment, click the Edit Assignment Settings button [1]. Editing an assignment allows you to change any settings for the assignment that you set when creating the Turnitin assignment. Editing the assignment also allows you to publish the assignment to students. To view or grade the submission in SpeedGrader, click the SpeedGrader button [2]. Note: You can also publish the assignment in the Assignments Index page by clicking the publish icon next to the assignment.
Turnitin assignment: Try It
Create a Turnitin Assignment
1. Open Module 1. 2. Add an assignment named Five Facilitation Tips for Effective Online Instruction. 3. Add the following text to the description box:
o Please type a 150 - 200 word essay in a Word document on five facilitation tips for effective online instruction.
o Use at least two peer reviewed articles. Cite your sources accordingly. o Save the Word document as Your Last Name_Facilitation Tips o Upload and submit your assignment through the Submit Assignment link above.
4. Assign 5 points. 5. Select Assignments for the Assignment Group. 6. Display Grade as Points. 7. Select Online as the Submission Type and File Uploads as the Online Entry Options. 8. Enable Turnitin Submissions. 9. Select Advanced Turnitin Settings. 10. Select Students Can See the Originality Report Immediately. 11. Select Update Settings. 12. Select the availability dates: January 20, 2020 – January 30, 2020. 13. Click Save.
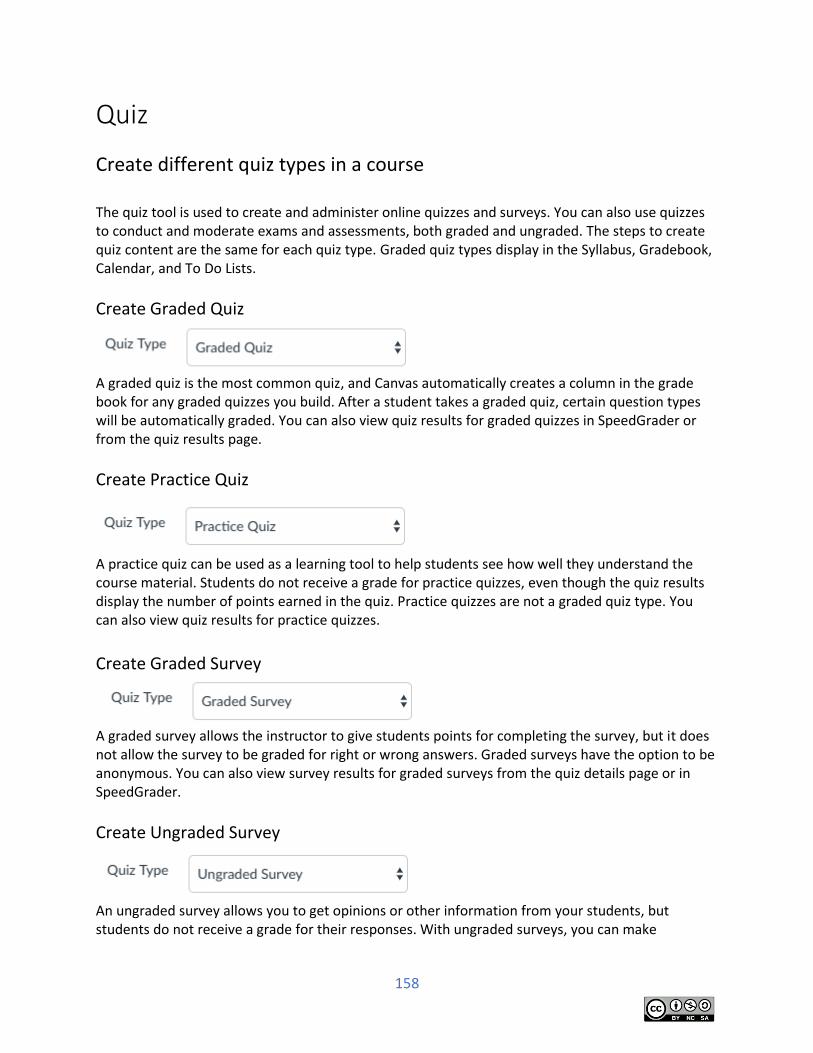
158
Quiz
Create different quiz types in a course The quiz tool is used to create and administer online quizzes and surveys. You can also use quizzes to conduct and moderate exams and assessments, both graded and ungraded. The steps to create quiz content are the same for each quiz type. Graded quiz types display in the Syllabus, Gradebook, Calendar, and To Do Lists.
Create Graded Quiz
A graded quiz is the most common quiz, and Canvas automatically creates a column in the grade book for any graded quizzes you build. After a student takes a graded quiz, certain question types will be automatically graded. You can also view quiz results for graded quizzes in SpeedGrader or from the quiz results page.
Create Practice Quiz
A practice quiz can be used as a learning tool to help students see how well they understand the course material. Students do not receive a grade for practice quizzes, even though the quiz results display the number of points earned in the quiz. Practice quizzes are not a graded quiz type. You can also view quiz results for practice quizzes.
Create Graded Survey
A graded survey allows the instructor to give students points for completing the survey, but it does not allow the survey to be graded for right or wrong answers. Graded surveys have the option to be anonymous. You can also view survey results for graded surveys from the quiz details page or in SpeedGrader.
Create Ungraded Survey
An ungraded survey allows you to get opinions or other information from your students, but students do not receive a grade for their responses. With ungraded surveys, you can make
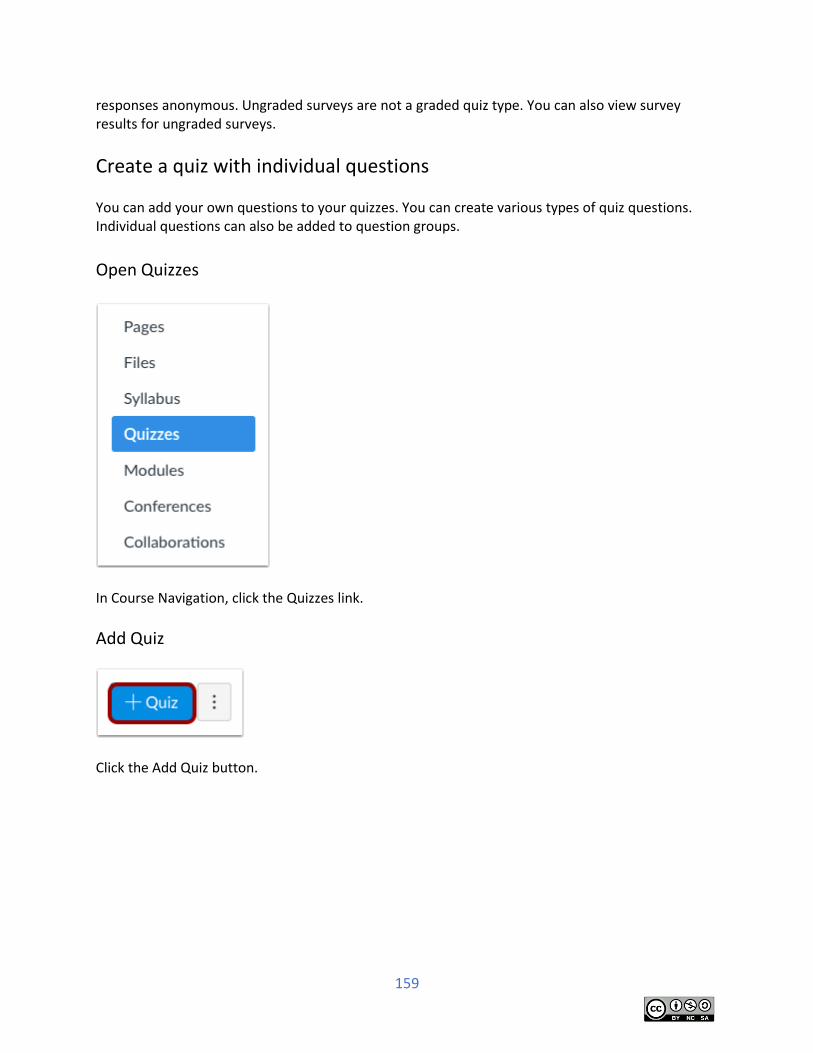
159
responses anonymous. Ungraded surveys are not a graded quiz type. You can also view survey results for ungraded surveys.
Create a quiz with individual questions You can add your own questions to your quizzes. You can create various types of quiz questions. Individual questions can also be added to question groups.
Open Quizzes
In Course Navigation, click the Quizzes link.
Add Quiz
Click the Add Quiz button.
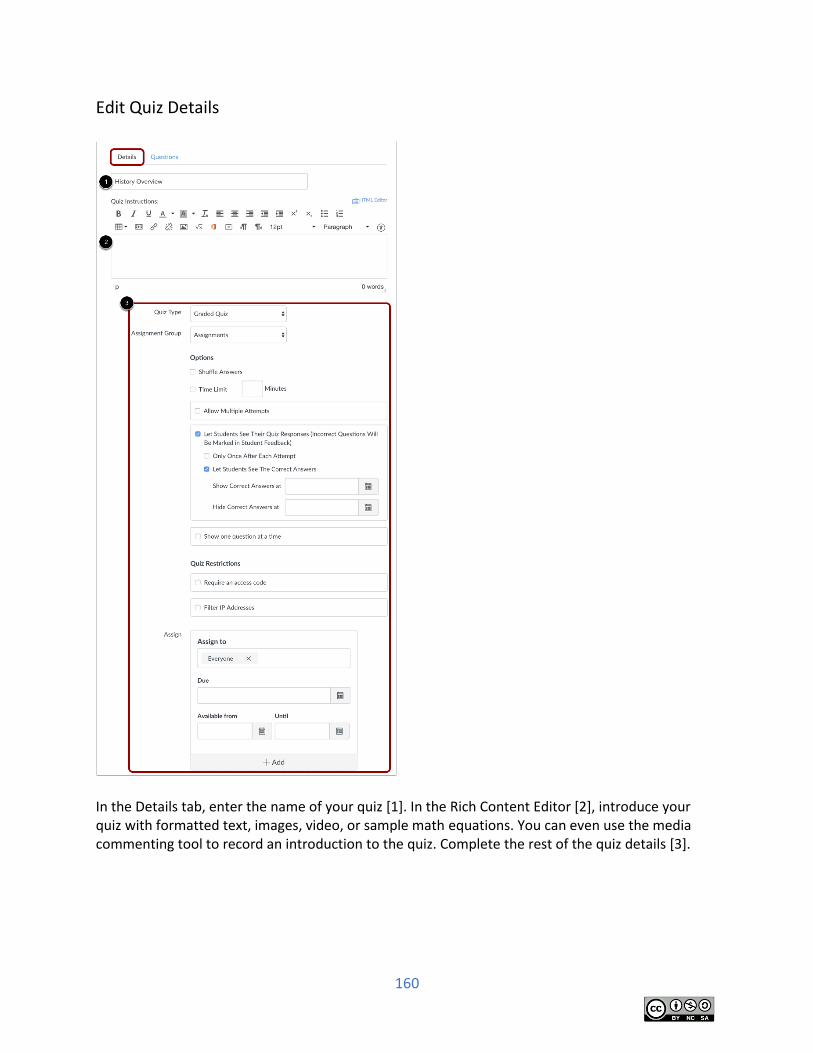
160
Edit Quiz Details
In the Details tab, enter the name of your quiz [1]. In the Rich Content Editor [2], introduce your quiz with formatted text, images, video, or sample math equations. You can even use the media commenting tool to record an introduction to the quiz. Complete the rest of the quiz details [3].
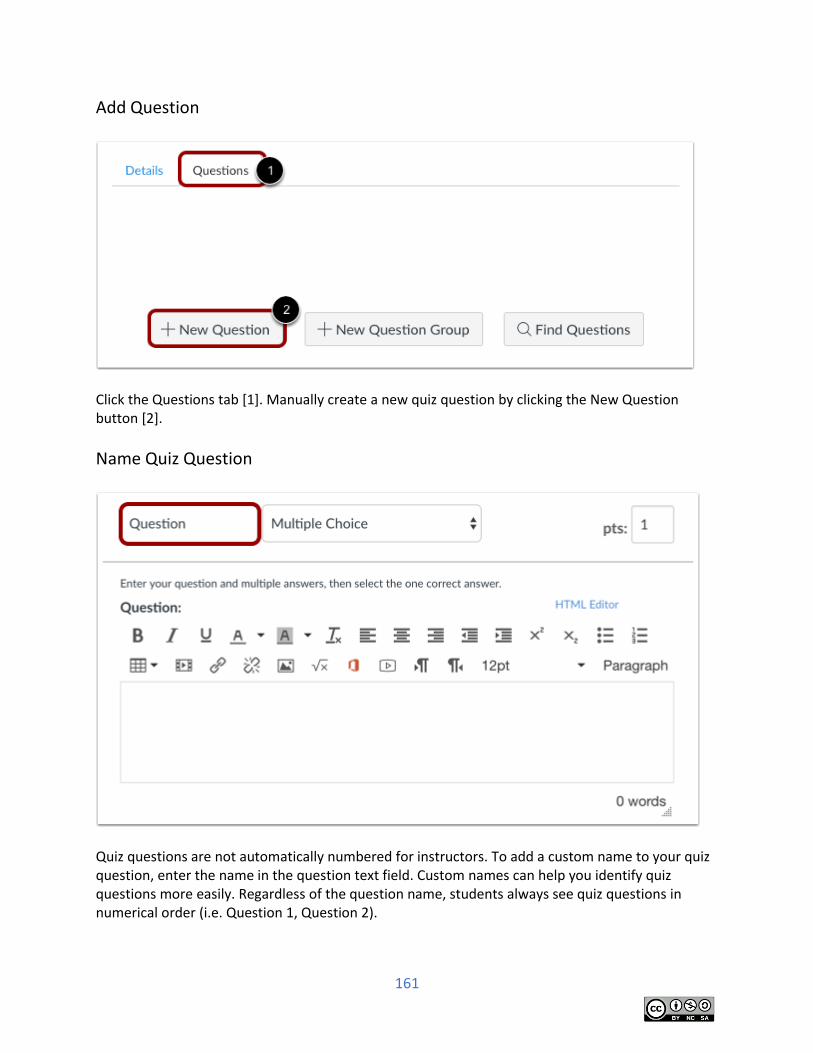
161
Add Question
Click the Questions tab [1]. Manually create a new quiz question by clicking the New Question button [2].
Name Quiz Question
Quiz questions are not automatically numbered for instructors. To add a custom name to your quiz question, enter the name in the question text field. Custom names can help you identify quiz questions more easily. Regardless of the question name, students always see quiz questions in numerical order (i.e. Question 1, Question 2).
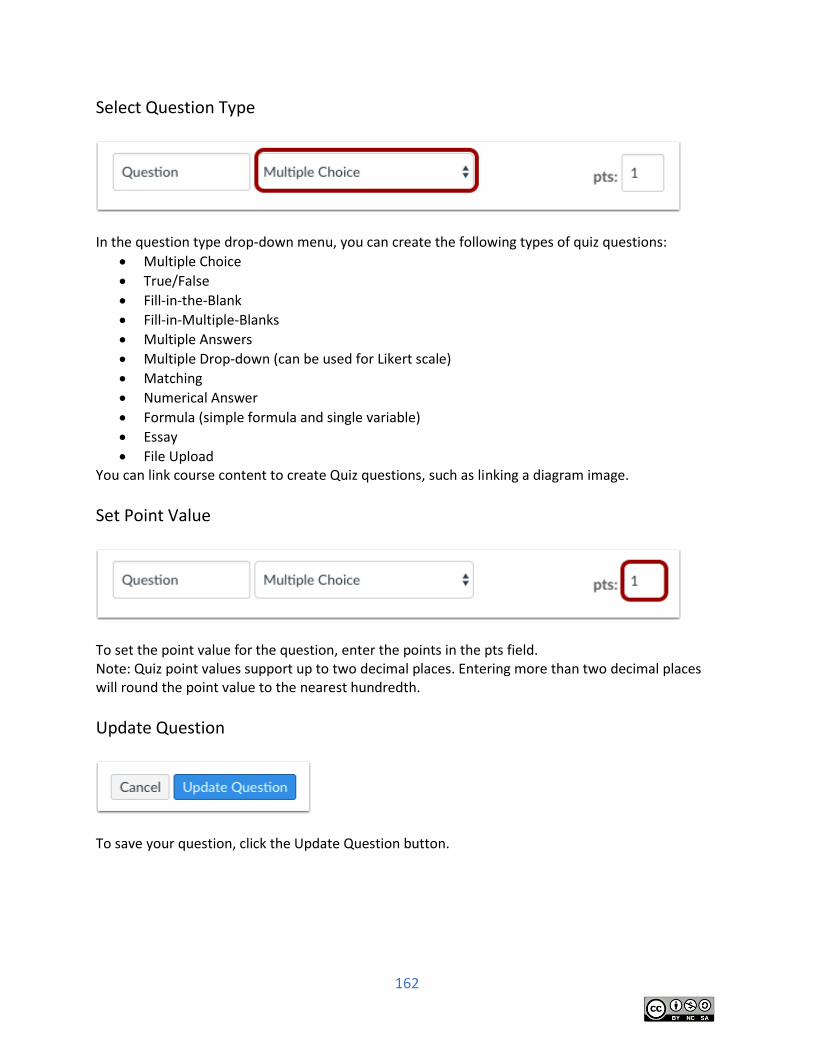
162
Select Question Type
In the question type drop-down menu, you can create the following types of quiz questions:
Multiple Choice
True/False
Fill-in-the-Blank
Fill-in-Multiple-Blanks
Multiple Answers
Multiple Drop-down (can be used for Likert scale)
Matching
Numerical Answer
Formula (simple formula and single variable)
Essay
File Upload You can link course content to create Quiz questions, such as linking a diagram image.
Set Point Value
To set the point value for the question, enter the points in the pts field. Note: Quiz point values support up to two decimal places. Entering more than two decimal places will round the point value to the nearest hundredth.
Update Question
To save your question, click the Update Question button.
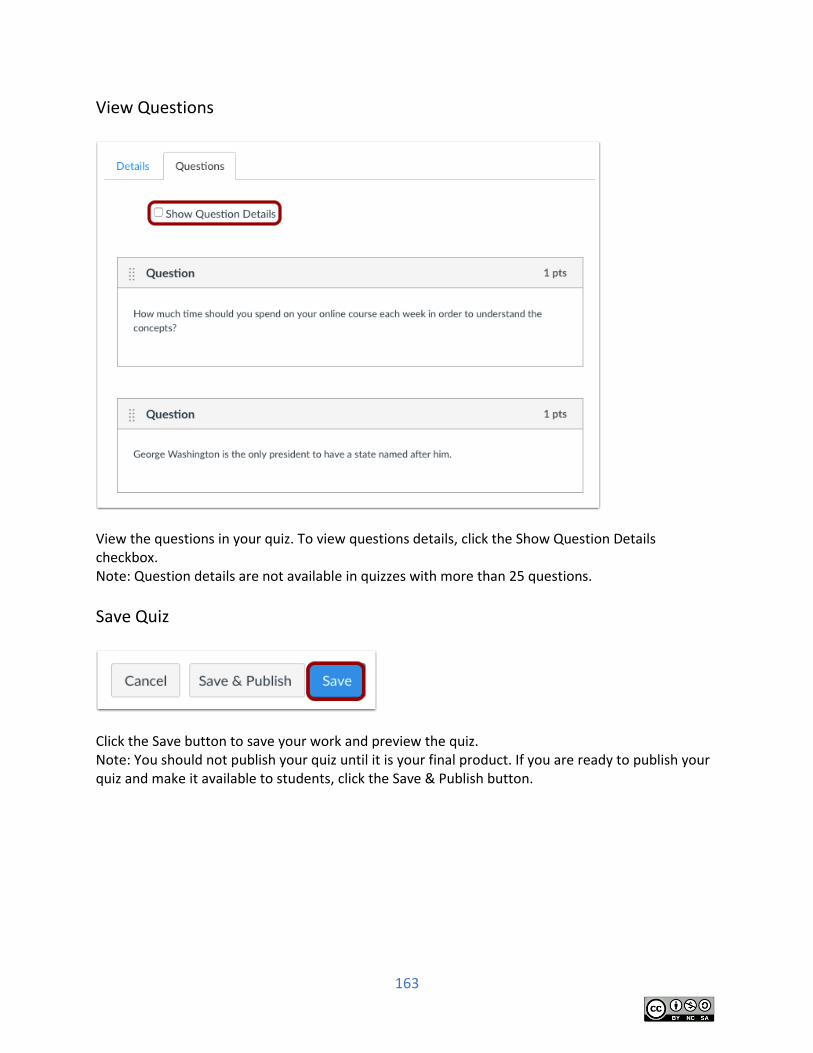
163
View Questions
View the questions in your quiz. To view questions details, click the Show Question Details checkbox. Note: Question details are not available in quizzes with more than 25 questions.
Save Quiz
Click the Save button to save your work and preview the quiz. Note: You should not publish your quiz until it is your final product. If you are ready to publish your quiz and make it available to students, click the Save & Publish button.
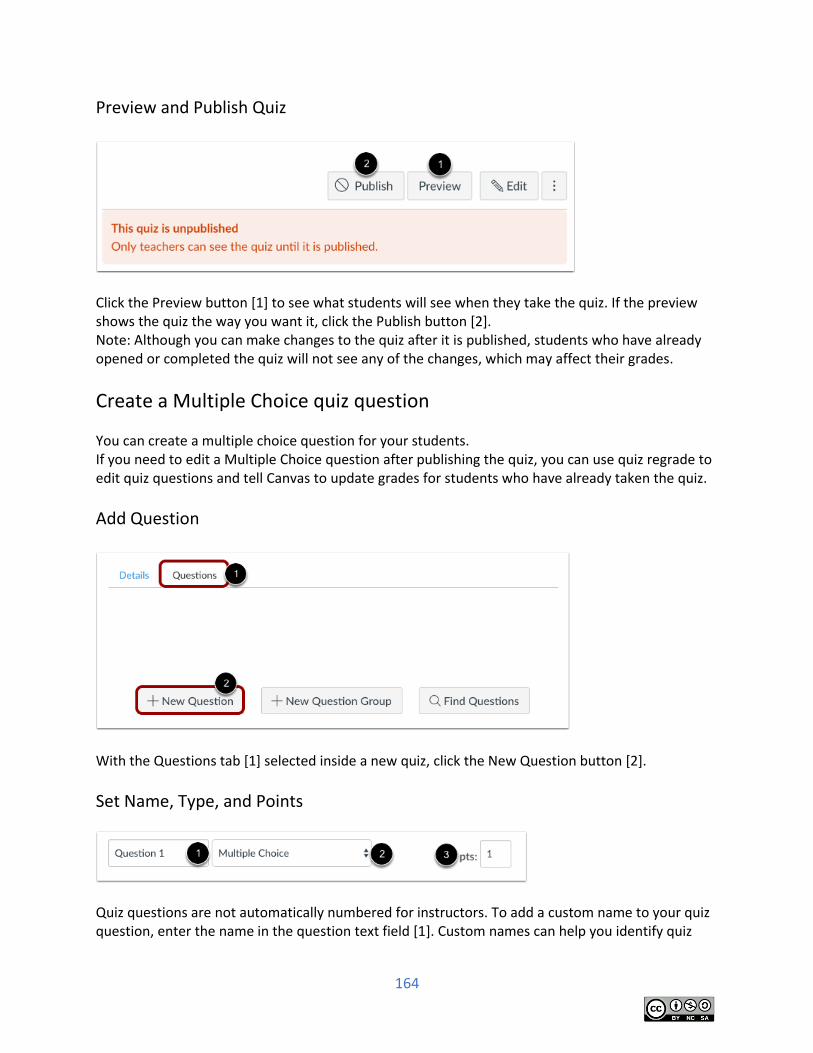
164
Preview and Publish Quiz
Click the Preview button [1] to see what students will see when they take the quiz. If the preview shows the quiz the way you want it, click the Publish button [2]. Note: Although you can make changes to the quiz after it is published, students who have already opened or completed the quiz will not see any of the changes, which may affect their grades.
Create a Multiple Choice quiz question
You can create a multiple choice question for your students. If you need to edit a Multiple Choice question after publishing the quiz, you can use quiz regrade to edit quiz questions and tell Canvas to update grades for students who have already taken the quiz.
Add Question
With the Questions tab [1] selected inside a new quiz, click the New Question button [2].
Set Name, Type, and Points
Quiz questions are not automatically numbered for instructors. To add a custom name to your quiz question, enter the name in the question text field [1]. Custom names can help you identify quiz
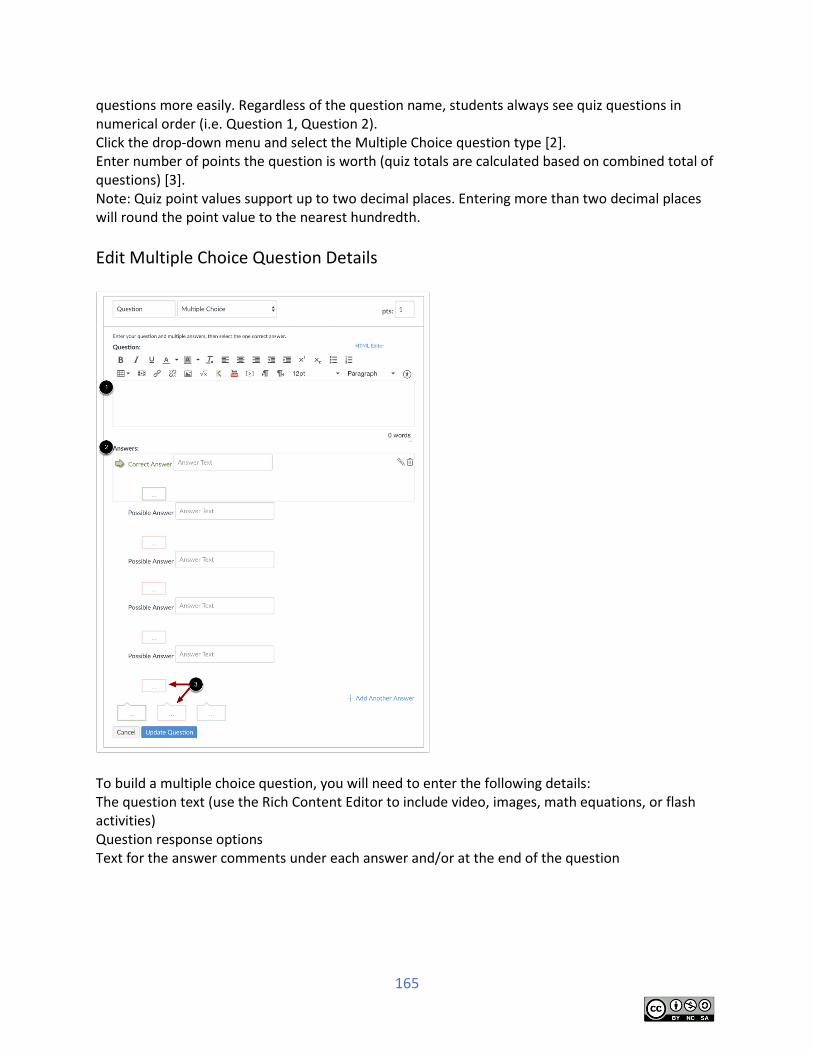
165
questions more easily. Regardless of the question name, students always see quiz questions in numerical order (i.e. Question 1, Question 2). Click the drop-down menu and select the Multiple Choice question type [2]. Enter number of points the question is worth (quiz totals are calculated based on combined total of questions) [3]. Note: Quiz point values support up to two decimal places. Entering more than two decimal places will round the point value to the nearest hundredth.
Edit Multiple Choice Question Details
To build a multiple choice question, you will need to enter the following details: The question text (use the Rich Content Editor to include video, images, math equations, or flash activities) Question response options Text for the answer comments under each answer and/or at the end of the question
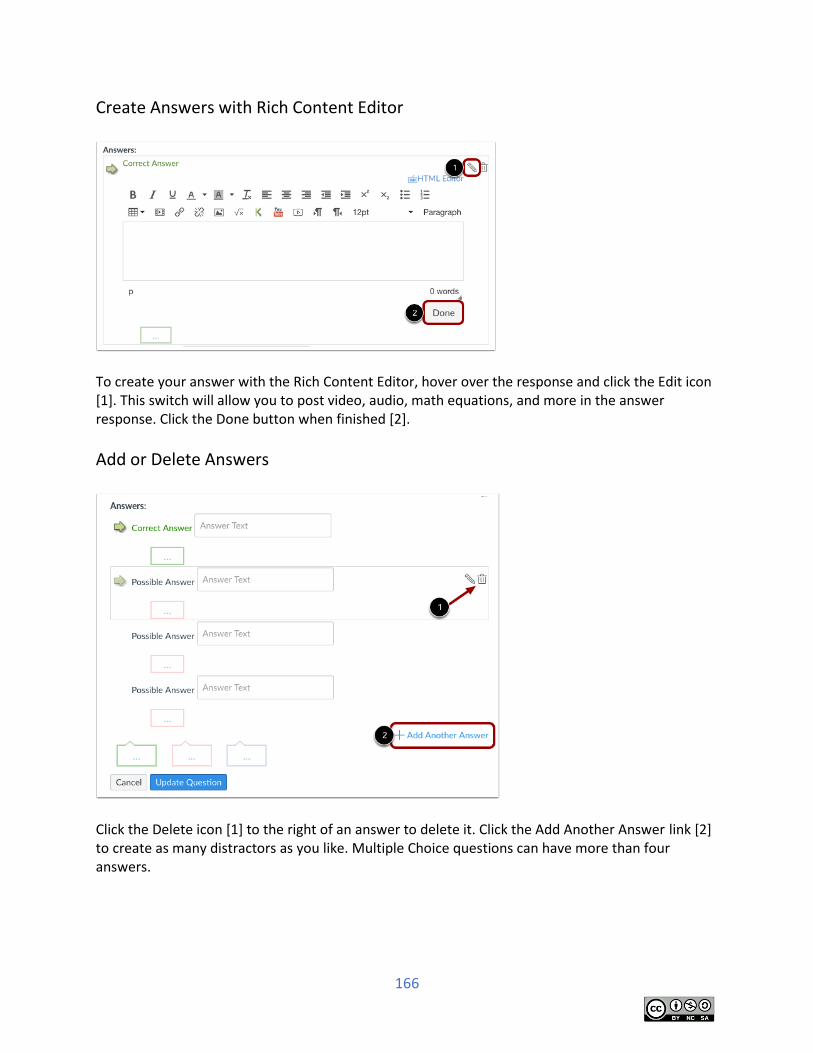
166
Create Answers with Rich Content Editor
To create your answer with the Rich Content Editor, hover over the response and click the Edit icon [1]. This switch will allow you to post video, audio, math equations, and more in the answer response. Click the Done button when finished [2].
Add or Delete Answers
Click the Delete icon [1] to the right of an answer to delete it. Click the Add Another Answer link [2] to create as many distractors as you like. Multiple Choice questions can have more than four answers.
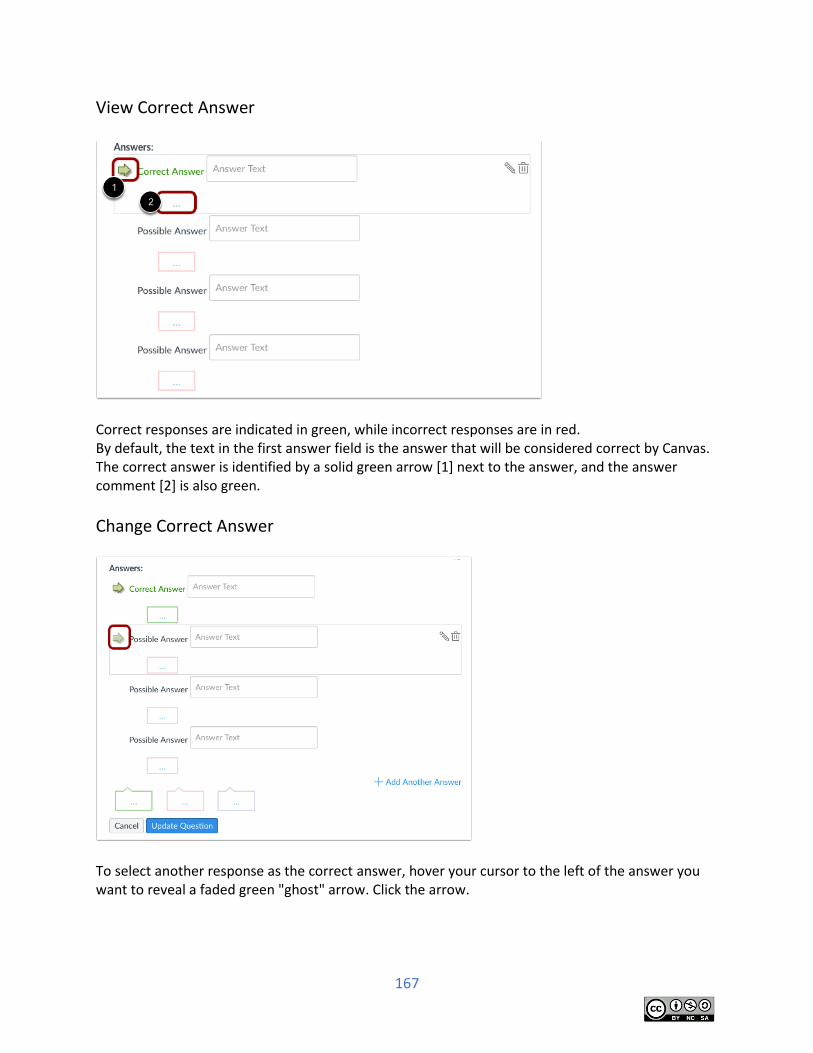
167
View Correct Answer
Correct responses are indicated in green, while incorrect responses are in red. By default, the text in the first answer field is the answer that will be considered correct by Canvas. The correct answer is identified by a solid green arrow [1] next to the answer, and the answer comment [2] is also green.
Change Correct Answer
To select another response as the correct answer, hover your cursor to the left of the answer you want to reveal a faded green "ghost" arrow. Click the arrow.
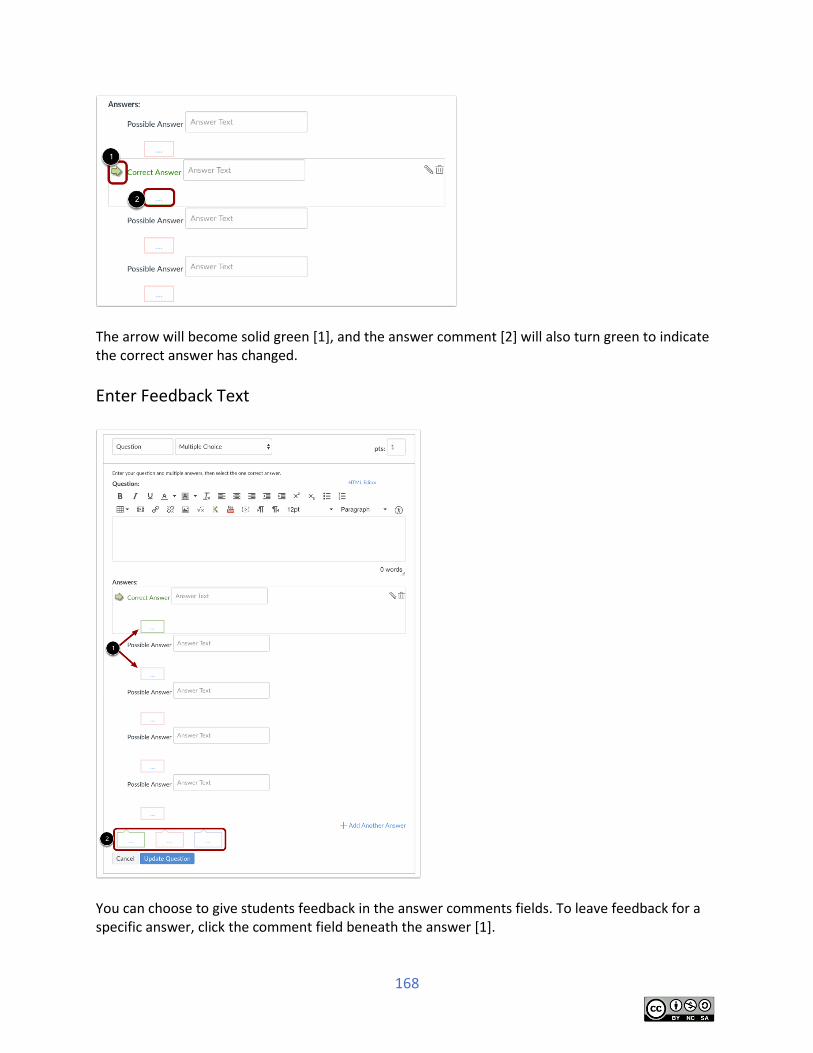
168
The arrow will become solid green [1], and the answer comment [2] will also turn green to indicate the correct answer has changed.
Enter Feedback Text
You can choose to give students feedback in the answer comments fields. To leave feedback for a specific answer, click the comment field beneath the answer [1].
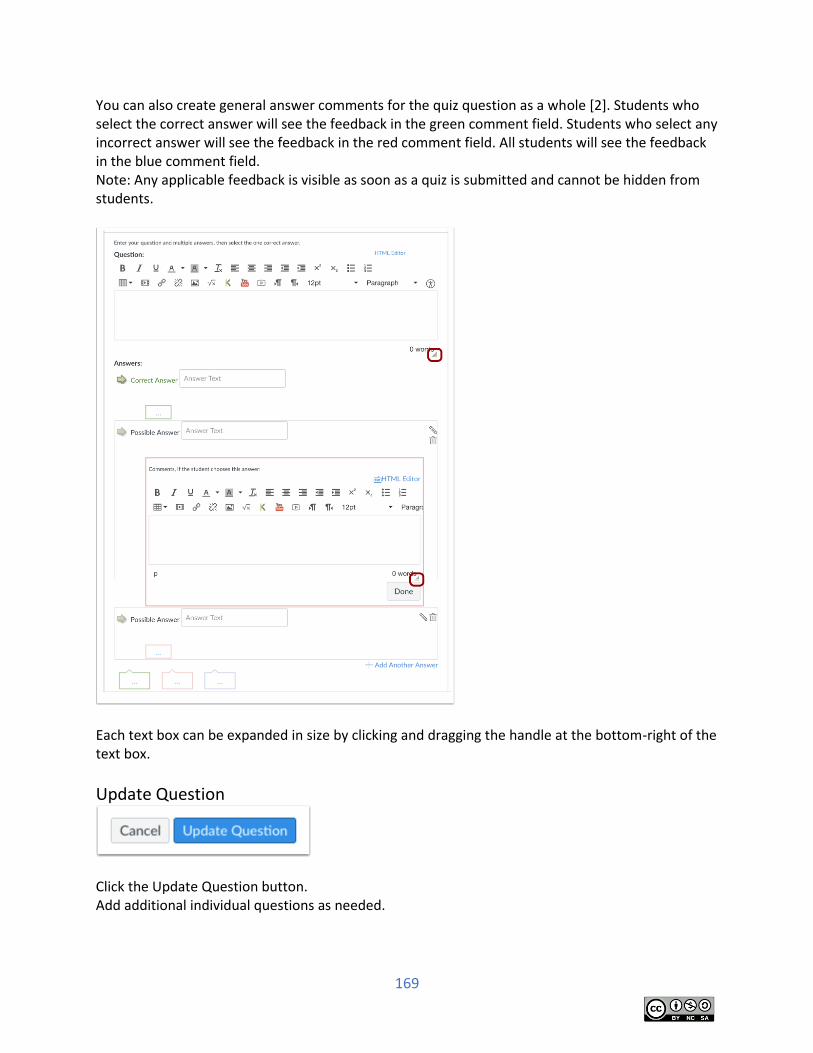
169
You can also create general answer comments for the quiz question as a whole [2]. Students who select the correct answer will see the feedback in the green comment field. Students who select any incorrect answer will see the feedback in the red comment field. All students will see the feedback in the blue comment field. Note: Any applicable feedback is visible as soon as a quiz is submitted and cannot be hidden from students.
Each text box can be expanded in size by clicking and dragging the handle at the bottom-right of the text box.
Update Question
Click the Update Question button. Add additional individual questions as needed.

170
Student View of Multiple Choice Question
This is what students see when they encounter a Multiple Choice question in a quiz.
Student View of Multiple Choice Correct Answer
This is what students see if they are allowed to see correct answers after submitting the quiz. Students can see which response was correct by viewing the green flag [1]. Credit is assigned if the student answers a Multiple Choice question correctly [2]. Notice that the blue answer comment appears whether or not the student answers this question correctly [3].
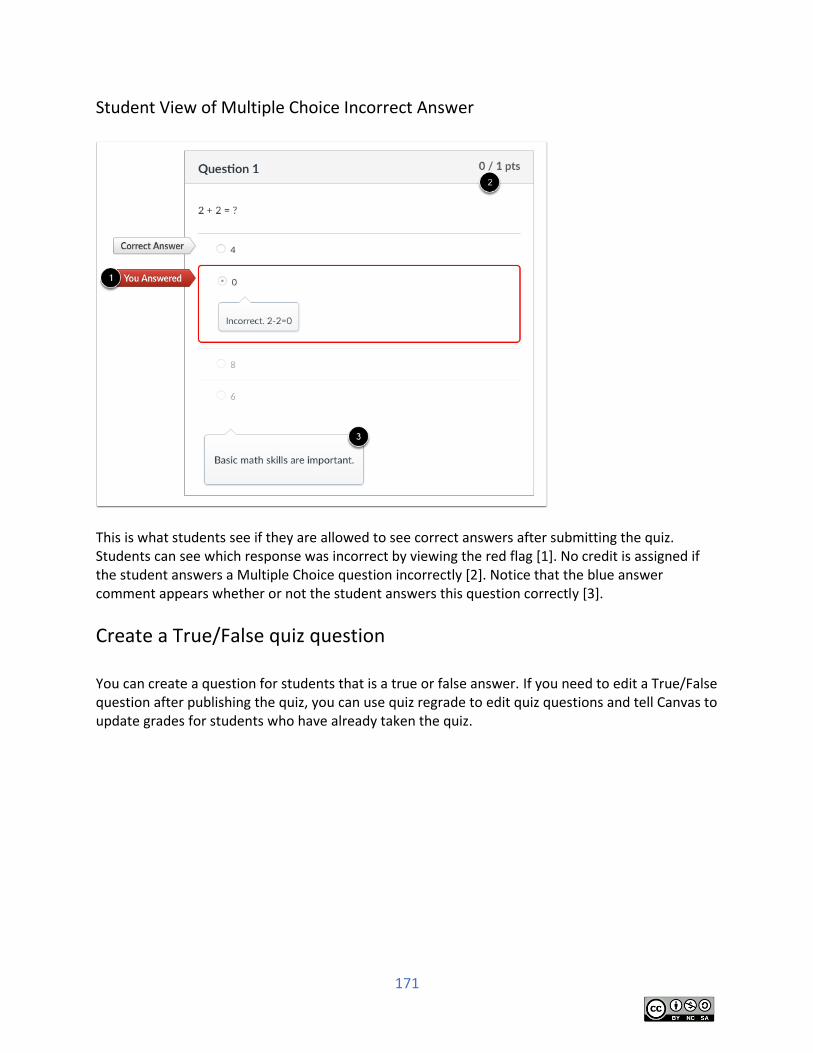
171
Student View of Multiple Choice Incorrect Answer
This is what students see if they are allowed to see correct answers after submitting the quiz. Students can see which response was incorrect by viewing the red flag [1]. No credit is assigned if the student answers a Multiple Choice question incorrectly [2]. Notice that the blue answer comment appears whether or not the student answers this question correctly [3].
Create a True/False quiz question You can create a question for students that is a true or false answer. If you need to edit a True/False question after publishing the quiz, you can use quiz regrade to edit quiz questions and tell Canvas to update grades for students who have already taken the quiz.
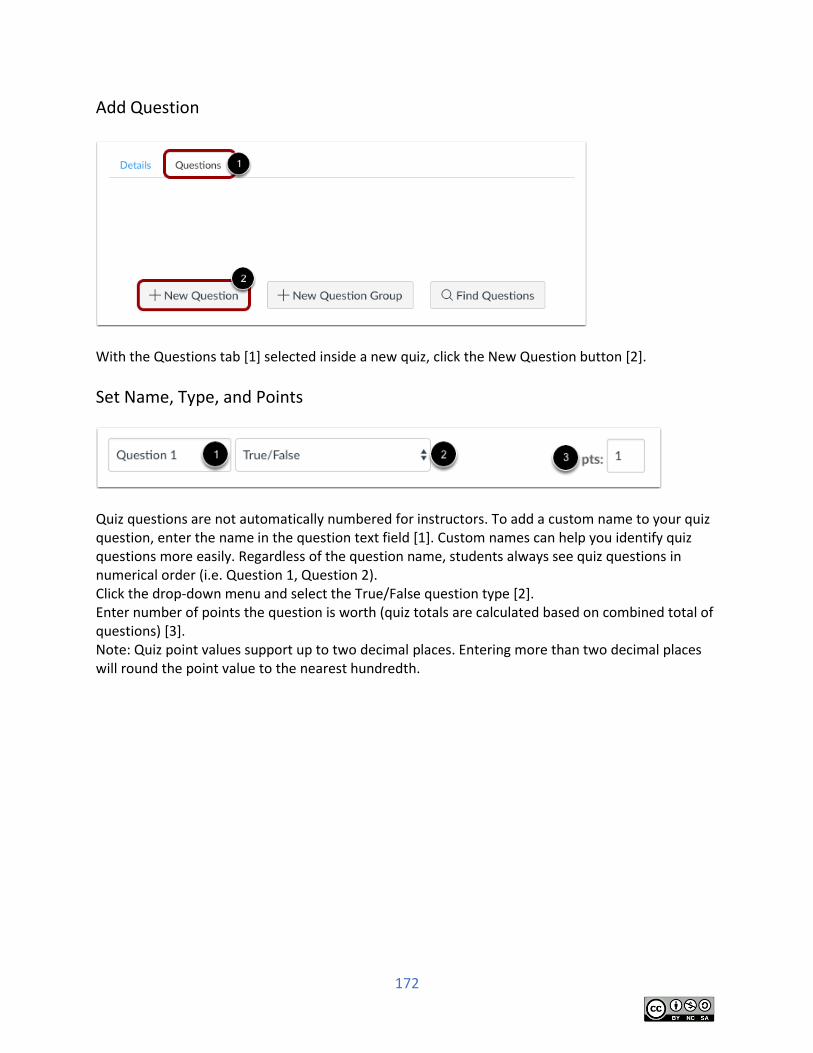
172
Add Question
With the Questions tab [1] selected inside a new quiz, click the New Question button [2].
Set Name, Type, and Points
Quiz questions are not automatically numbered for instructors. To add a custom name to your quiz question, enter the name in the question text field [1]. Custom names can help you identify quiz questions more easily. Regardless of the question name, students always see quiz questions in numerical order (i.e. Question 1, Question 2). Click the drop-down menu and select the True/False question type [2]. Enter number of points the question is worth (quiz totals are calculated based on combined total of questions) [3]. Note: Quiz point values support up to two decimal places. Entering more than two decimal places will round the point value to the nearest hundredth.

173
Edit True/False Question Details
To build a True/False question, you will need to enter the following details: The question text (use the Rich Content Editor to include video, images, math equations, or flash activities) Text for the answer comments at the end of the question
Select Correct Answer
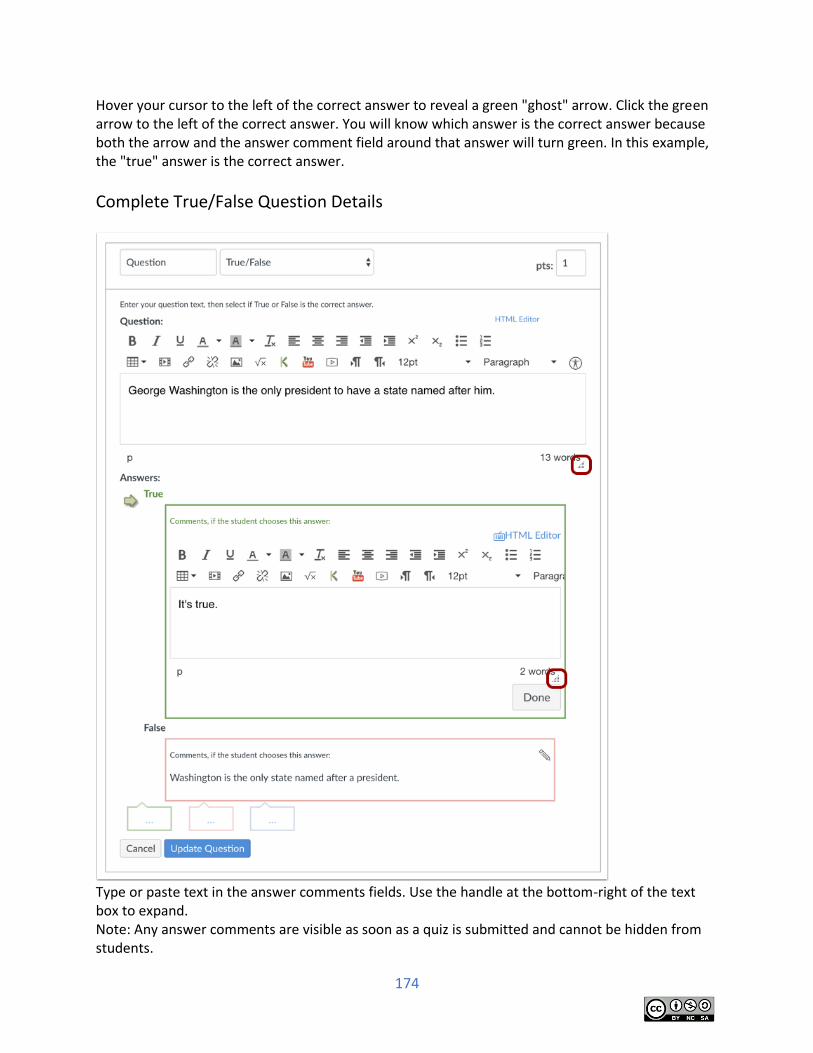
174
Hover your cursor to the left of the correct answer to reveal a green "ghost" arrow. Click the green arrow to the left of the correct answer. You will know which answer is the correct answer because both the arrow and the answer comment field around that answer will turn green. In this example, the "true" answer is the correct answer.
Complete True/False Question Details
Type or paste text in the answer comments fields. Use the handle at the bottom-right of the text box to expand. Note: Any answer comments are visible as soon as a quiz is submitted and cannot be hidden from students.
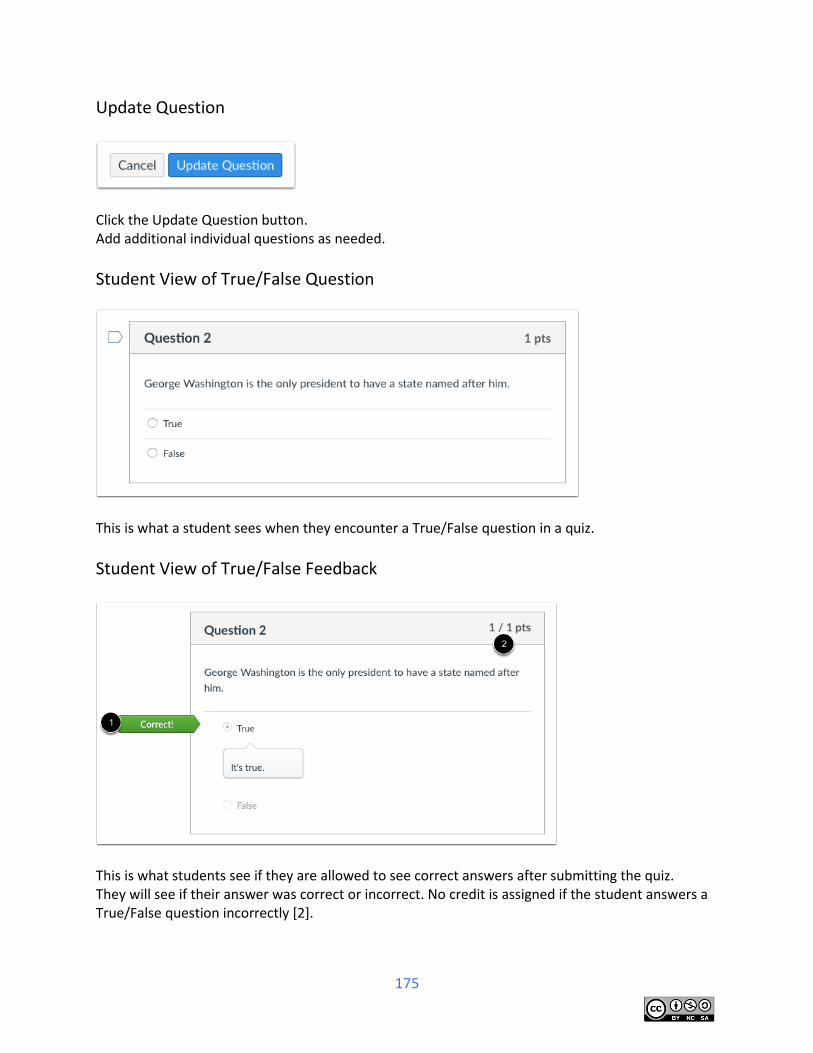
175
Update Question
Click the Update Question button. Add additional individual questions as needed.
Student View of True/False Question
This is what a student sees when they encounter a True/False question in a quiz.
Student View of True/False Feedback
This is what students see if they are allowed to see correct answers after submitting the quiz. They will see if their answer was correct or incorrect. No credit is assigned if the student answers a True/False question incorrectly [2].
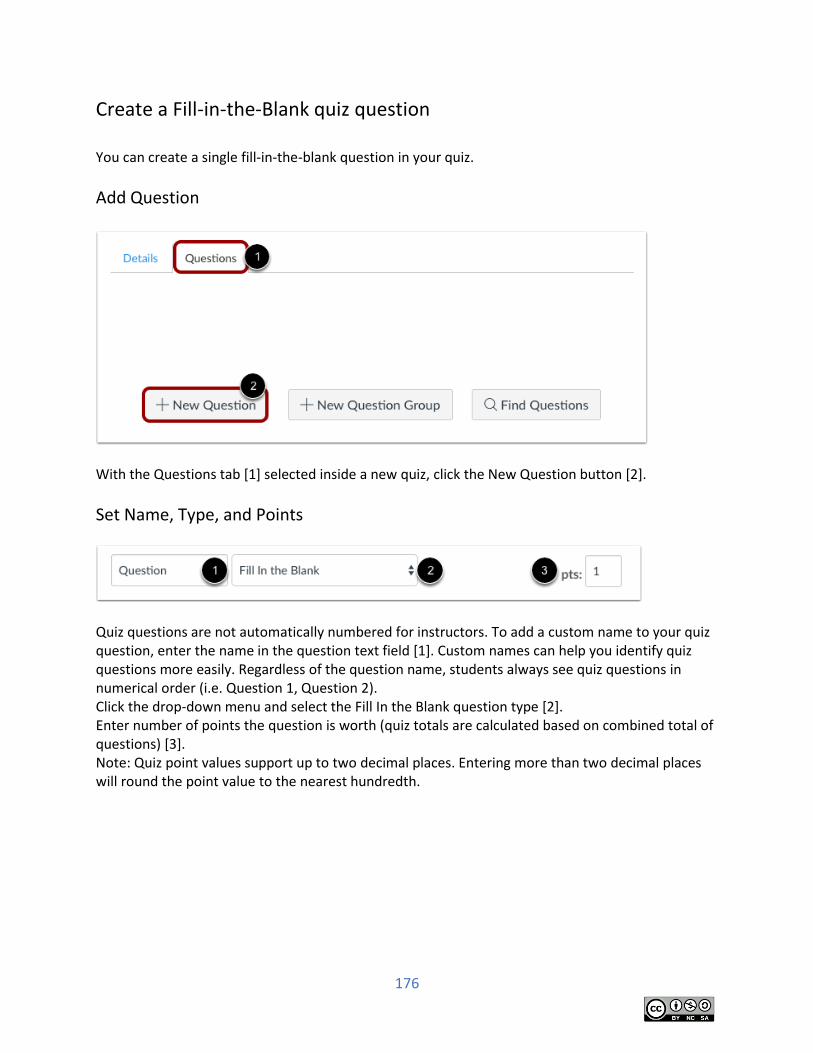
176
Create a Fill-in-the-Blank quiz question You can create a single fill-in-the-blank question in your quiz.
Add Question
With the Questions tab [1] selected inside a new quiz, click the New Question button [2].
Set Name, Type, and Points
Quiz questions are not automatically numbered for instructors. To add a custom name to your quiz question, enter the name in the question text field [1]. Custom names can help you identify quiz questions more easily. Regardless of the question name, students always see quiz questions in numerical order (i.e. Question 1, Question 2). Click the drop-down menu and select the Fill In the Blank question type [2]. Enter number of points the question is worth (quiz totals are calculated based on combined total of questions) [3]. Note: Quiz point values support up to two decimal places. Entering more than two decimal places will round the point value to the nearest hundredth.
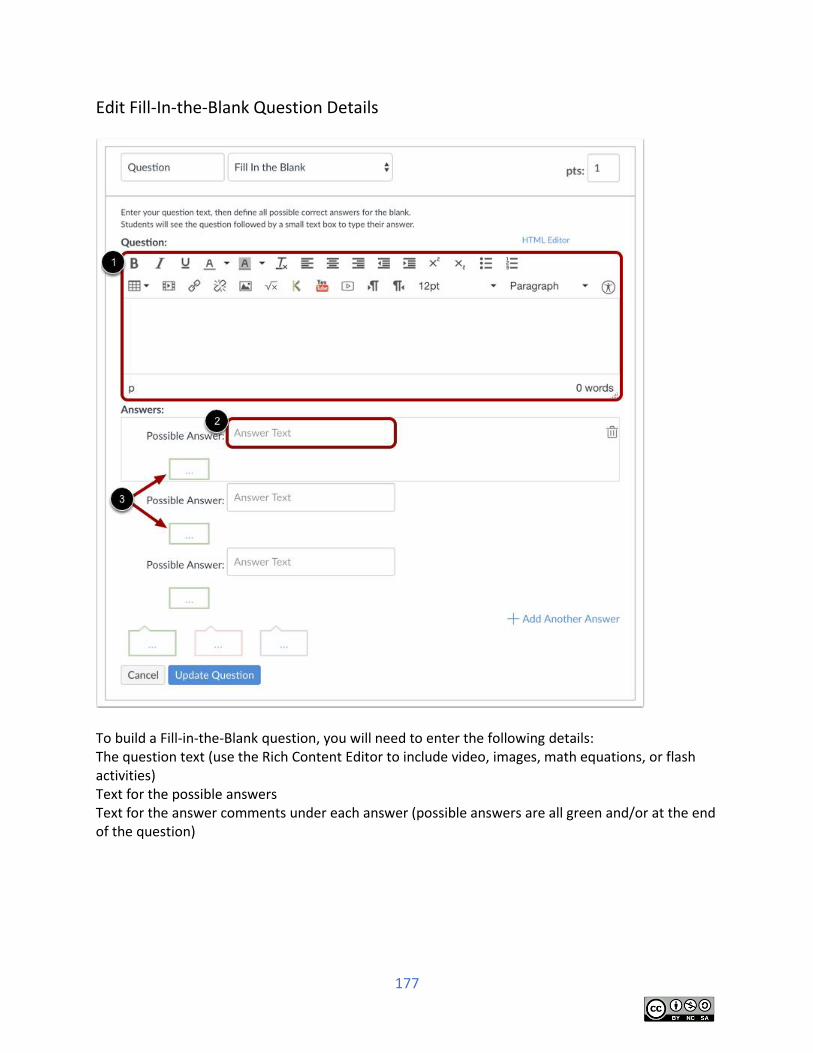
177
Edit Fill-In-the-Blank Question Details
To build a Fill-in-the-Blank question, you will need to enter the following details: The question text (use the Rich Content Editor to include video, images, math equations, or flash activities) Text for the possible answers Text for the answer comments under each answer (possible answers are all green and/or at the end of the question)
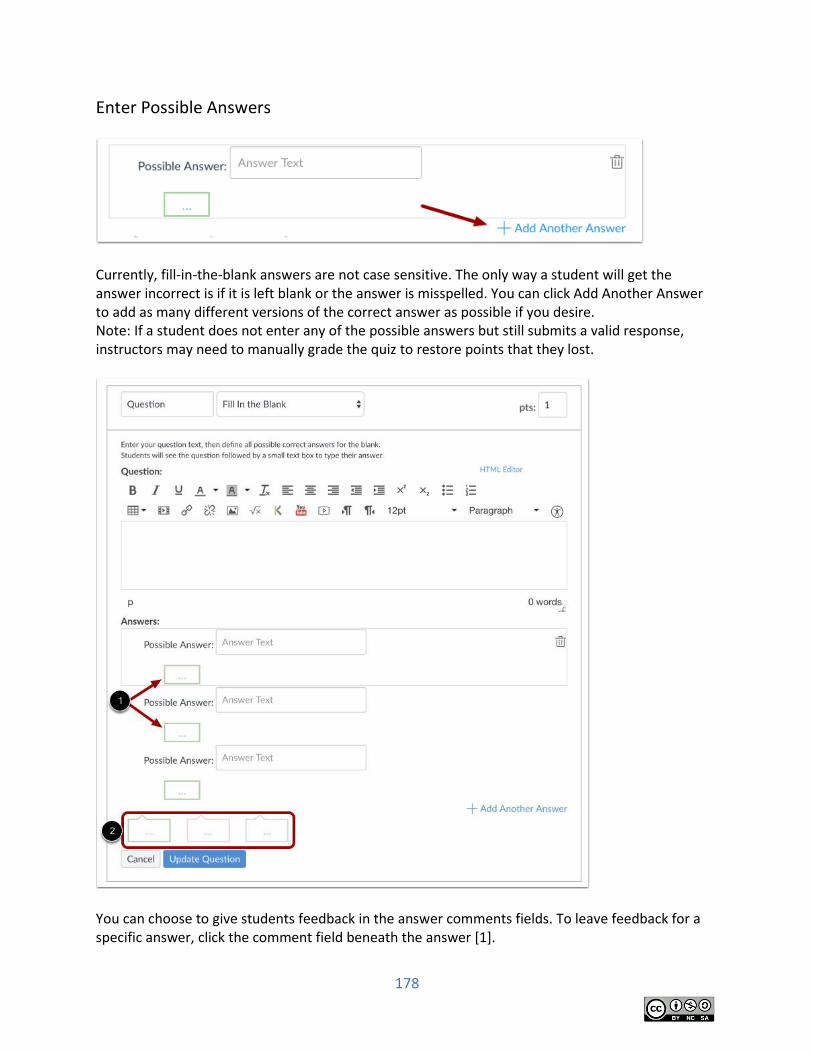
178
Enter Possible Answers
Currently, fill-in-the-blank answers are not case sensitive. The only way a student will get the answer incorrect is if it is left blank or the answer is misspelled. You can click Add Another Answer to add as many different versions of the correct answer as possible if you desire. Note: If a student does not enter any of the possible answers but still submits a valid response, instructors may need to manually grade the quiz to restore points that they lost.
You can choose to give students feedback in the answer comments fields. To leave feedback for a specific answer, click the comment field beneath the answer [1].
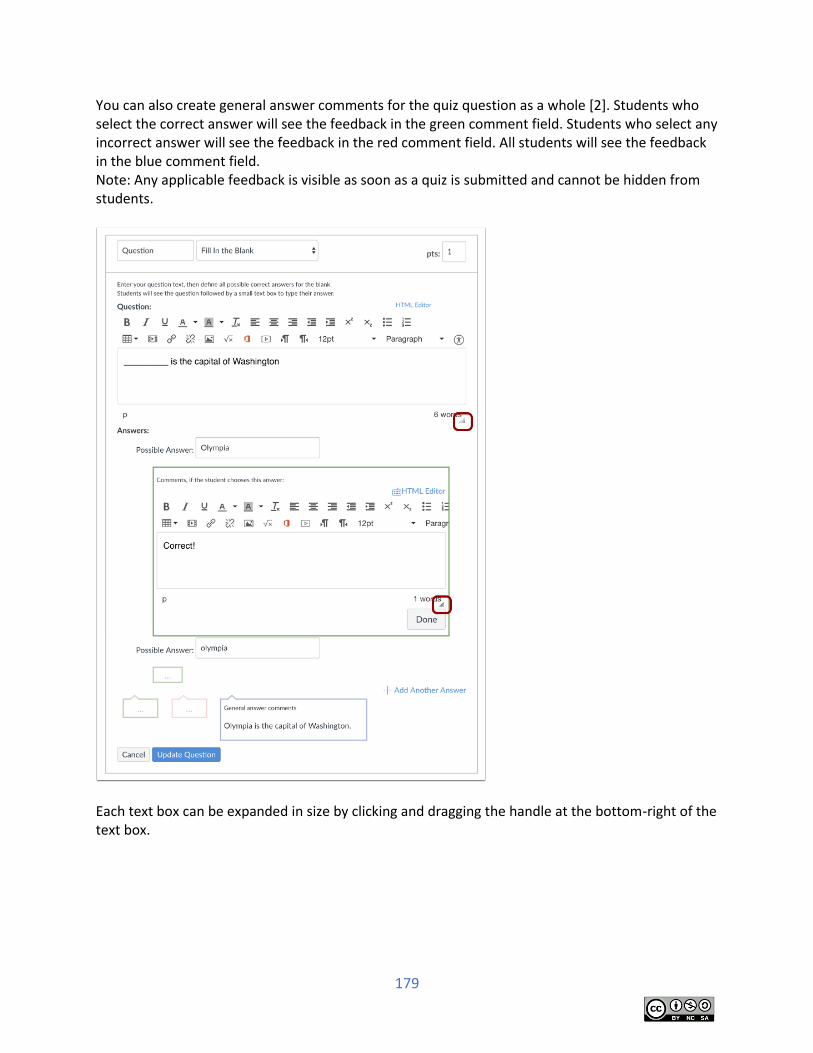
179
You can also create general answer comments for the quiz question as a whole [2]. Students who select the correct answer will see the feedback in the green comment field. Students who select any incorrect answer will see the feedback in the red comment field. All students will see the feedback in the blue comment field. Note: Any applicable feedback is visible as soon as a quiz is submitted and cannot be hidden from students.
Each text box can be expanded in size by clicking and dragging the handle at the bottom-right of the text box.
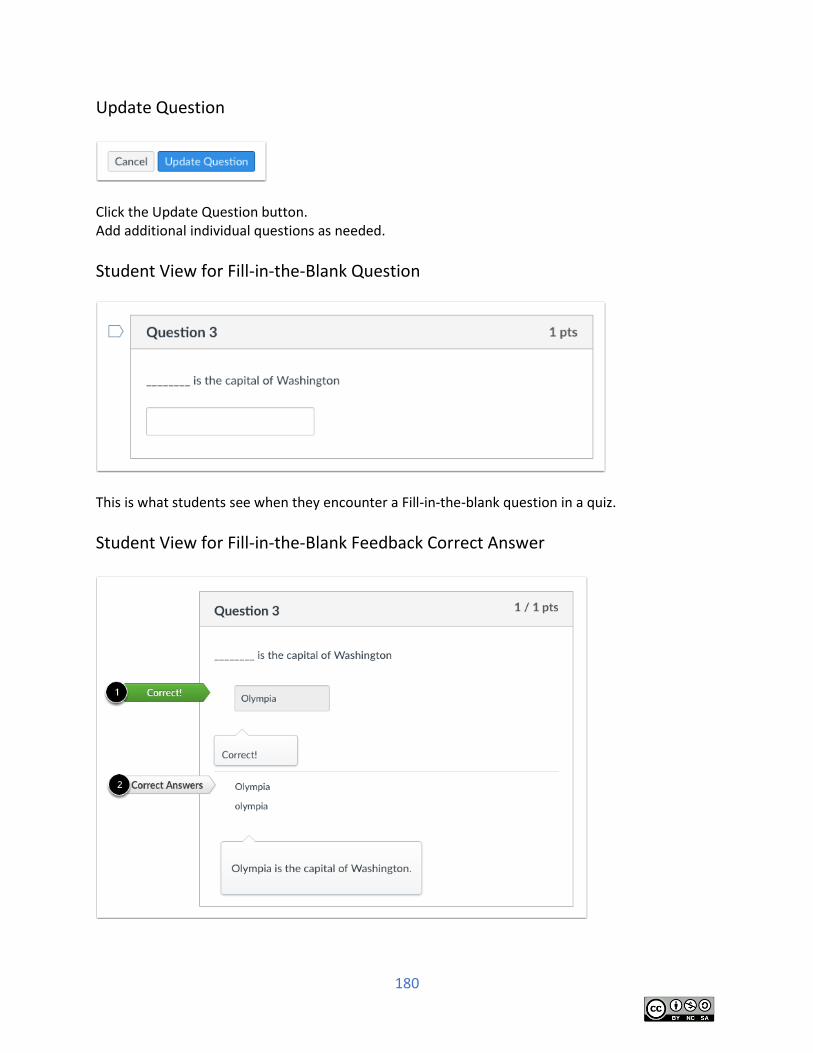
180
Update Question
Click the Update Question button. Add additional individual questions as needed.
Student View for Fill-in-the-Blank Question
This is what students see when they encounter a Fill-in-the-blank question in a quiz.
Student View for Fill-in-the-Blank Feedback Correct Answer
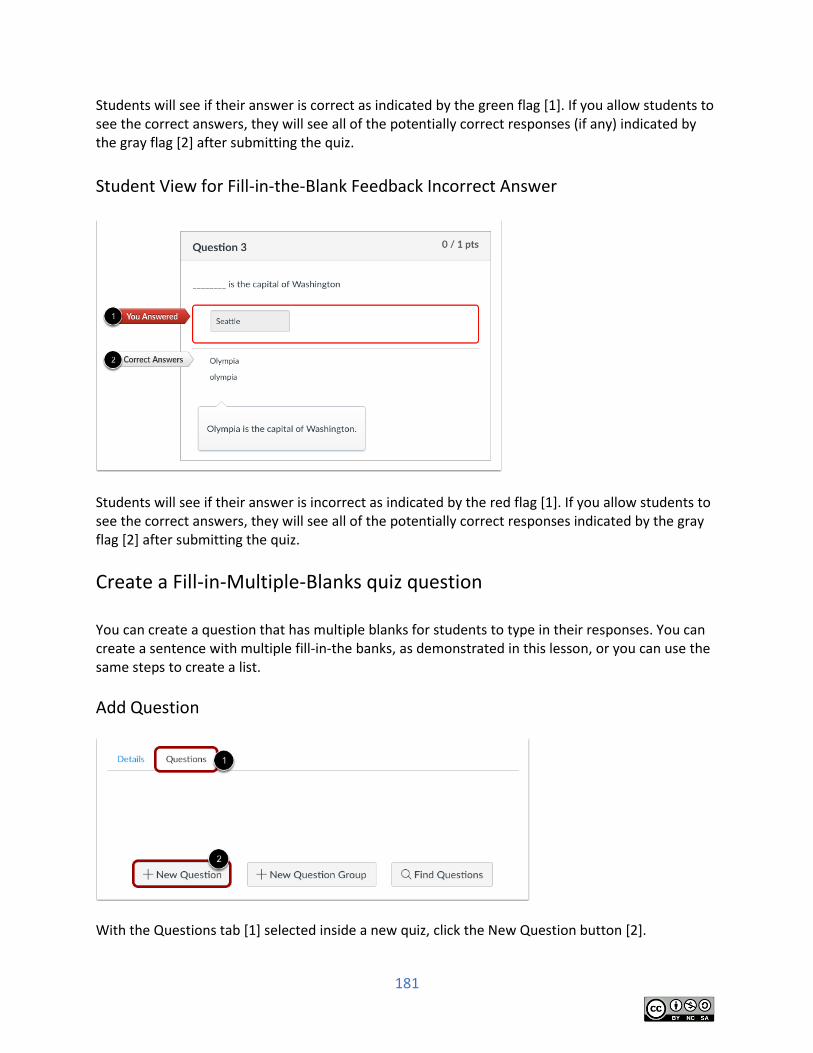
181
Students will see if their answer is correct as indicated by the green flag [1]. If you allow students to see the correct answers, they will see all of the potentially correct responses (if any) indicated by the gray flag [2] after submitting the quiz.
Student View for Fill-in-the-Blank Feedback Incorrect Answer
Students will see if their answer is incorrect as indicated by the red flag [1]. If you allow students to see the correct answers, they will see all of the potentially correct responses indicated by the gray flag [2] after submitting the quiz.
Create a Fill-in-Multiple-Blanks quiz question You can create a question that has multiple blanks for students to type in their responses. You can create a sentence with multiple fill-in-the banks, as demonstrated in this lesson, or you can use the same steps to create a list.
Add Question
With the Questions tab [1] selected inside a new quiz, click the New Question button [2].
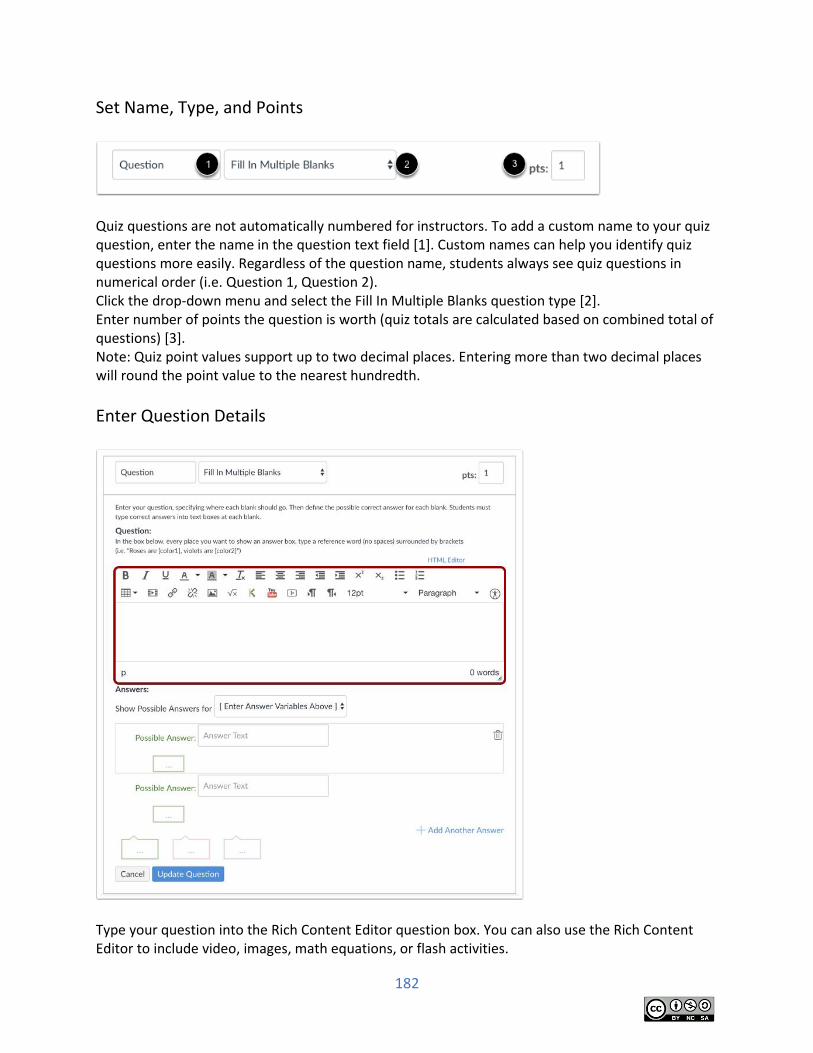
182
Set Name, Type, and Points
Quiz questions are not automatically numbered for instructors. To add a custom name to your quiz question, enter the name in the question text field [1]. Custom names can help you identify quiz questions more easily. Regardless of the question name, students always see quiz questions in numerical order (i.e. Question 1, Question 2). Click the drop-down menu and select the Fill In Multiple Blanks question type [2]. Enter number of points the question is worth (quiz totals are calculated based on combined total of questions) [3]. Note: Quiz point values support up to two decimal places. Entering more than two decimal places will round the point value to the nearest hundredth.
Enter Question Details
Type your question into the Rich Content Editor question box. You can also use the Rich Content Editor to include video, images, math equations, or flash activities.
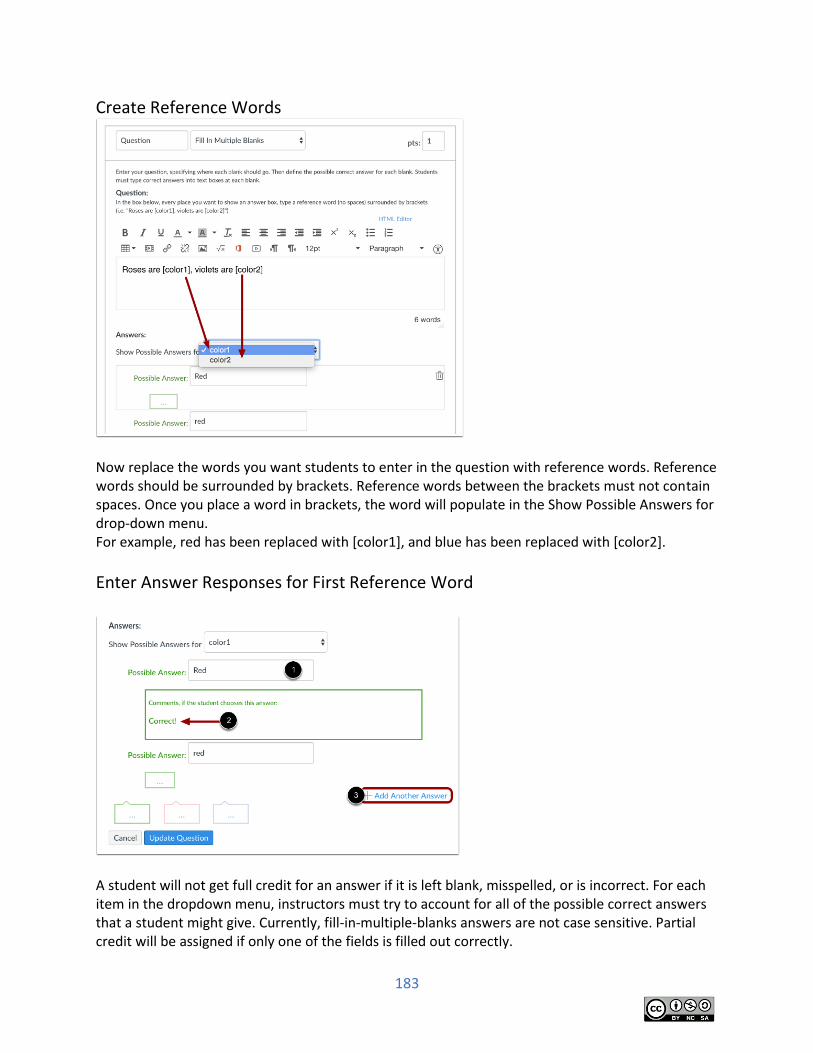
183
Create Reference Words
Now replace the words you want students to enter in the question with reference words. Reference words should be surrounded by brackets. Reference words between the brackets must not contain spaces. Once you place a word in brackets, the word will populate in the Show Possible Answers for drop-down menu. For example, red has been replaced with [color1], and blue has been replaced with [color2].
Enter Answer Responses for First Reference Word
A student will not get full credit for an answer if it is left blank, misspelled, or is incorrect. For each item in the dropdown menu, instructors must try to account for all of the possible correct answers that a student might give. Currently, fill-in-multiple-blanks answers are not case sensitive. Partial credit will be assigned if only one of the fields is filled out correctly.
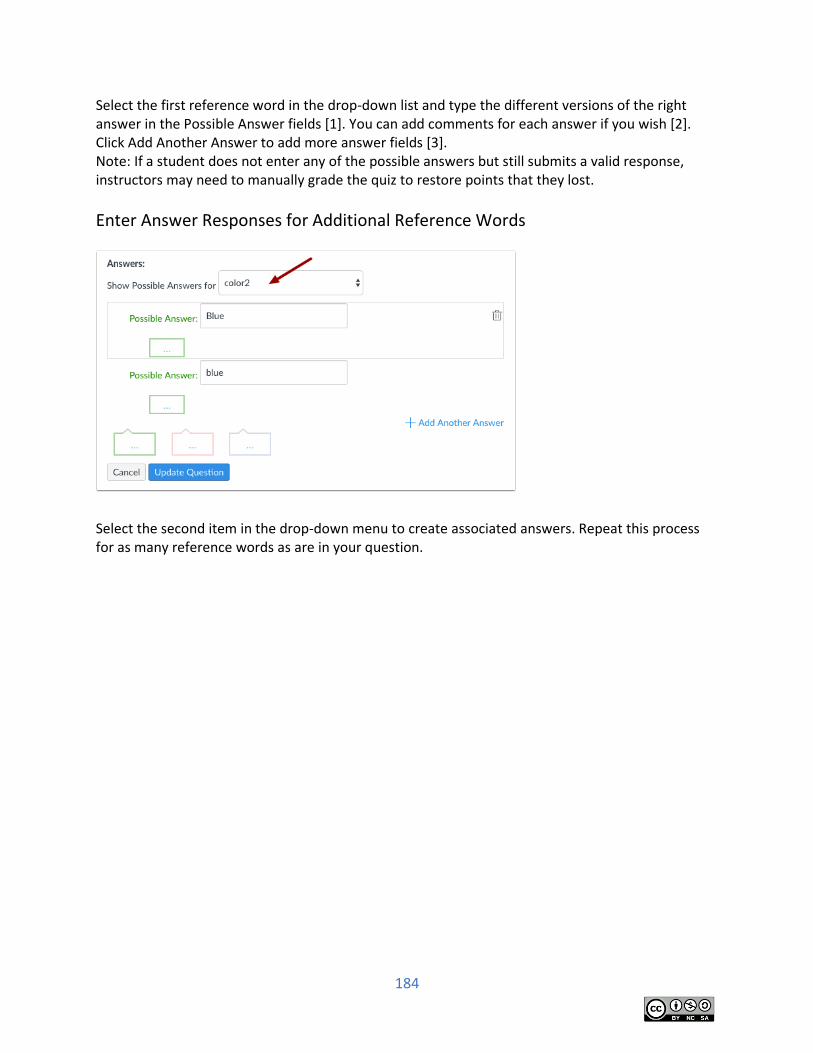
184
Select the first reference word in the drop-down list and type the different versions of the right answer in the Possible Answer fields [1]. You can add comments for each answer if you wish [2]. Click Add Another Answer to add more answer fields [3]. Note: If a student does not enter any of the possible answers but still submits a valid response, instructors may need to manually grade the quiz to restore points that they lost.
Enter Answer Responses for Additional Reference Words
Select the second item in the drop-down menu to create associated answers. Repeat this process for as many reference words as are in your question.
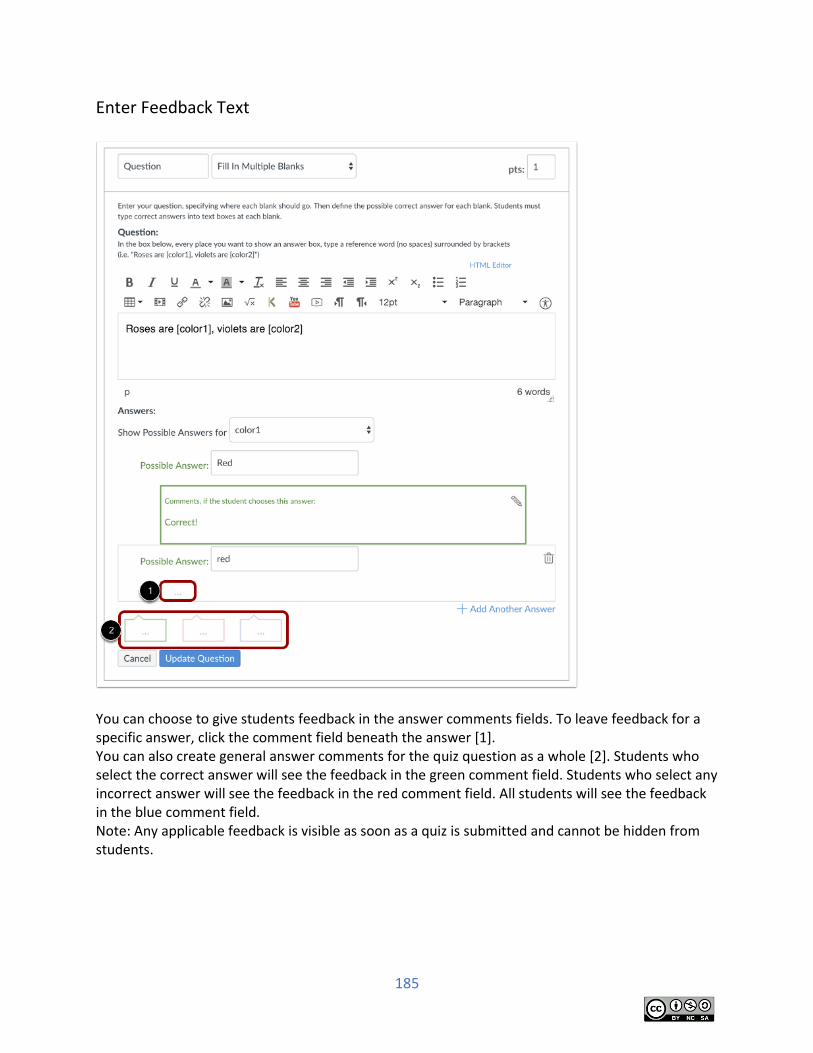
185
Enter Feedback Text
You can choose to give students feedback in the answer comments fields. To leave feedback for a specific answer, click the comment field beneath the answer [1]. You can also create general answer comments for the quiz question as a whole [2]. Students who select the correct answer will see the feedback in the green comment field. Students who select any incorrect answer will see the feedback in the red comment field. All students will see the feedback in the blue comment field. Note: Any applicable feedback is visible as soon as a quiz is submitted and cannot be hidden from students.
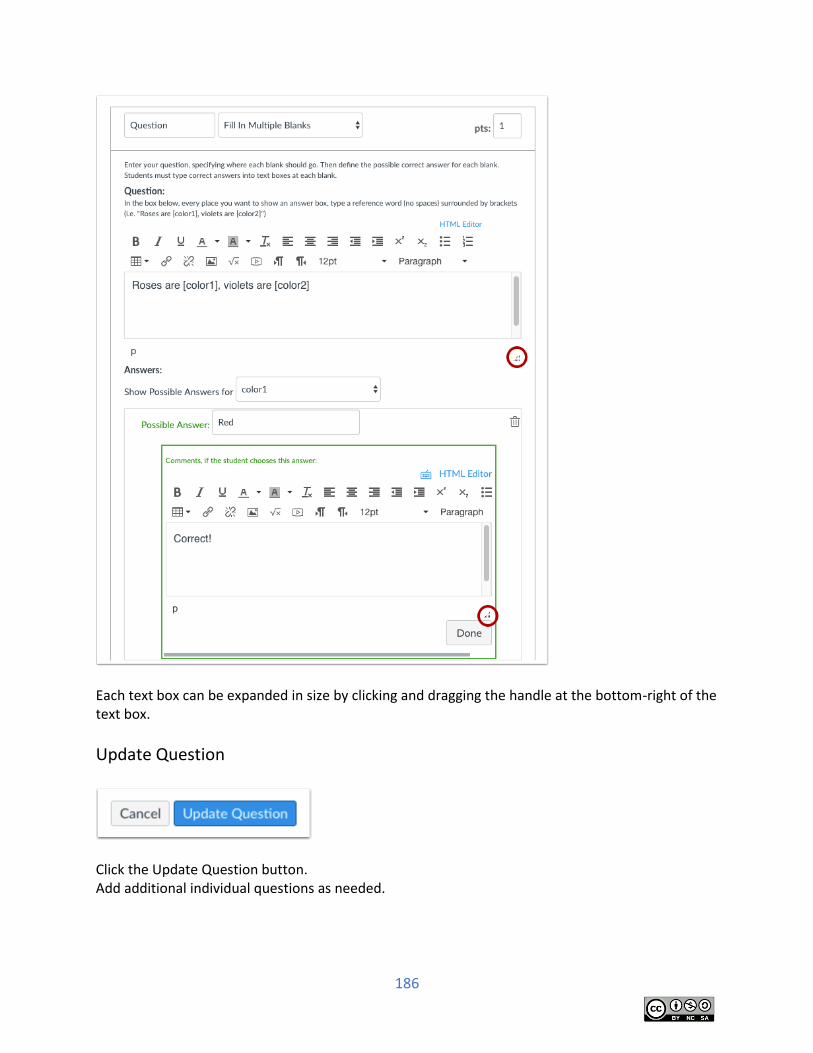
186
Each text box can be expanded in size by clicking and dragging the handle at the bottom-right of the text box.
Update Question
Click the Update Question button. Add additional individual questions as needed.
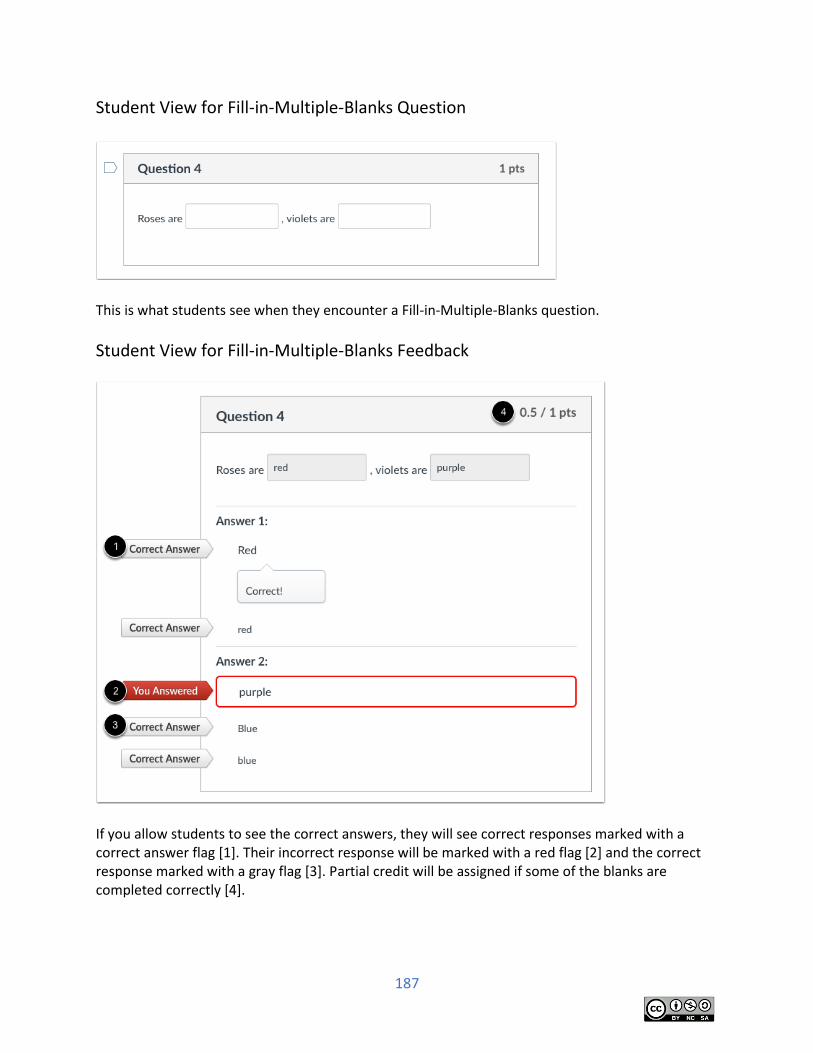
187
Student View for Fill-in-Multiple-Blanks Question
This is what students see when they encounter a Fill-in-Multiple-Blanks question.
Student View for Fill-in-Multiple-Blanks Feedback
If you allow students to see the correct answers, they will see correct responses marked with a correct answer flag [1]. Their incorrect response will be marked with a red flag [2] and the correct response marked with a gray flag [3]. Partial credit will be assigned if some of the blanks are completed correctly [4].
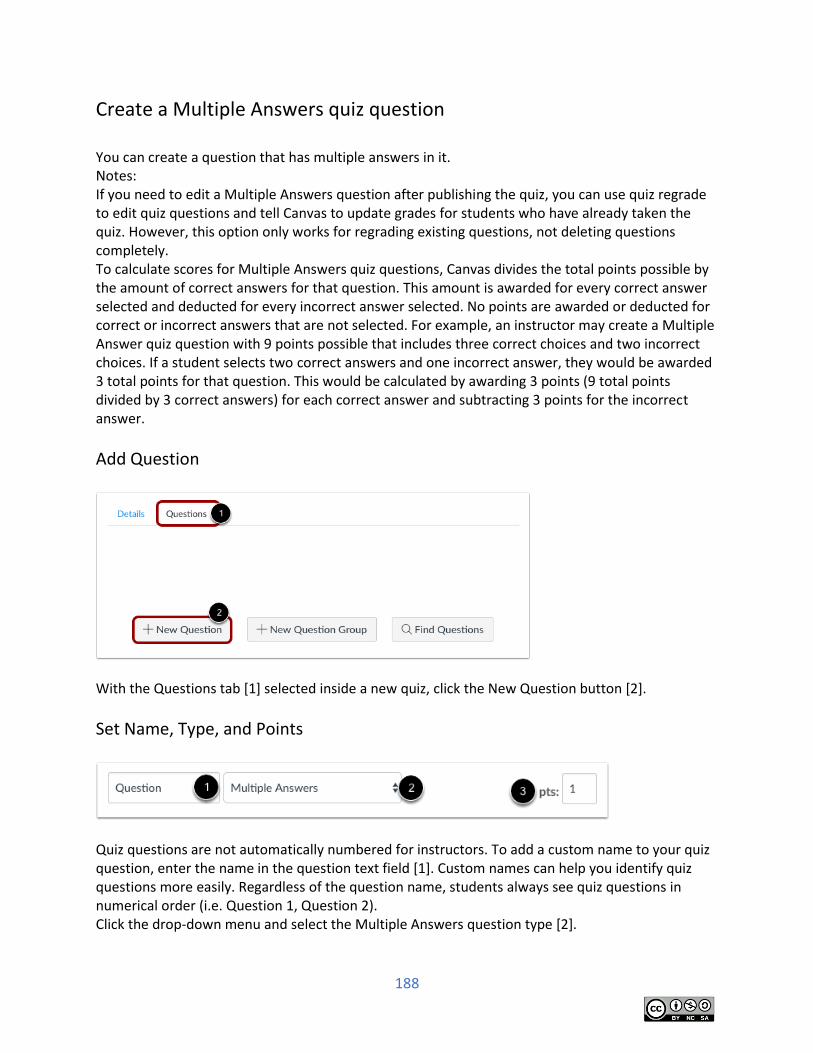
188
Create a Multiple Answers quiz question You can create a question that has multiple answers in it. Notes: If you need to edit a Multiple Answers question after publishing the quiz, you can use quiz regrade to edit quiz questions and tell Canvas to update grades for students who have already taken the quiz. However, this option only works for regrading existing questions, not deleting questions completely. To calculate scores for Multiple Answers quiz questions, Canvas divides the total points possible by the amount of correct answers for that question. This amount is awarded for every correct answer selected and deducted for every incorrect answer selected. No points are awarded or deducted for correct or incorrect answers that are not selected. For example, an instructor may create a Multiple Answer quiz question with 9 points possible that includes three correct choices and two incorrect choices. If a student selects two correct answers and one incorrect answer, they would be awarded 3 total points for that question. This would be calculated by awarding 3 points (9 total points divided by 3 correct answers) for each correct answer and subtracting 3 points for the incorrect answer.
Add Question
With the Questions tab [1] selected inside a new quiz, click the New Question button [2].
Set Name, Type, and Points
Quiz questions are not automatically numbered for instructors. To add a custom name to your quiz question, enter the name in the question text field [1]. Custom names can help you identify quiz questions more easily. Regardless of the question name, students always see quiz questions in numerical order (i.e. Question 1, Question 2). Click the drop-down menu and select the Multiple Answers question type [2].
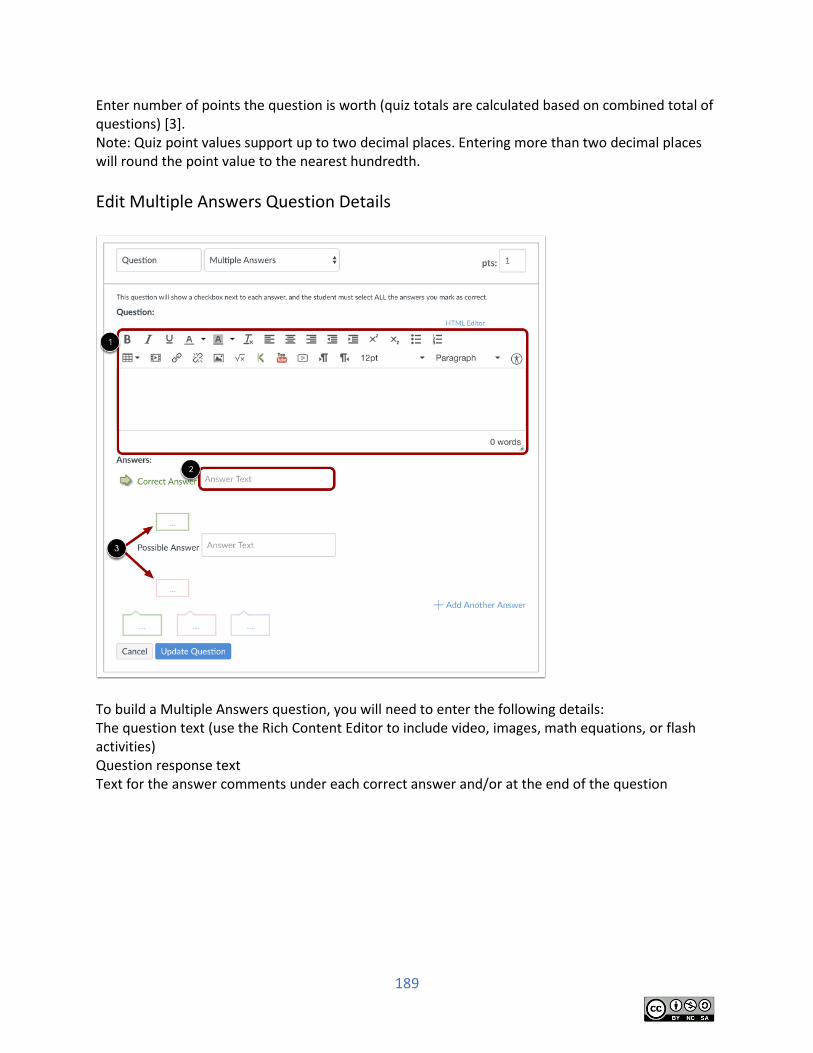
189
Enter number of points the question is worth (quiz totals are calculated based on combined total of questions) [3]. Note: Quiz point values support up to two decimal places. Entering more than two decimal places will round the point value to the nearest hundredth.
Edit Multiple Answers Question Details
To build a Multiple Answers question, you will need to enter the following details: The question text (use the Rich Content Editor to include video, images, math equations, or flash activities) Question response text Text for the answer comments under each correct answer and/or at the end of the question
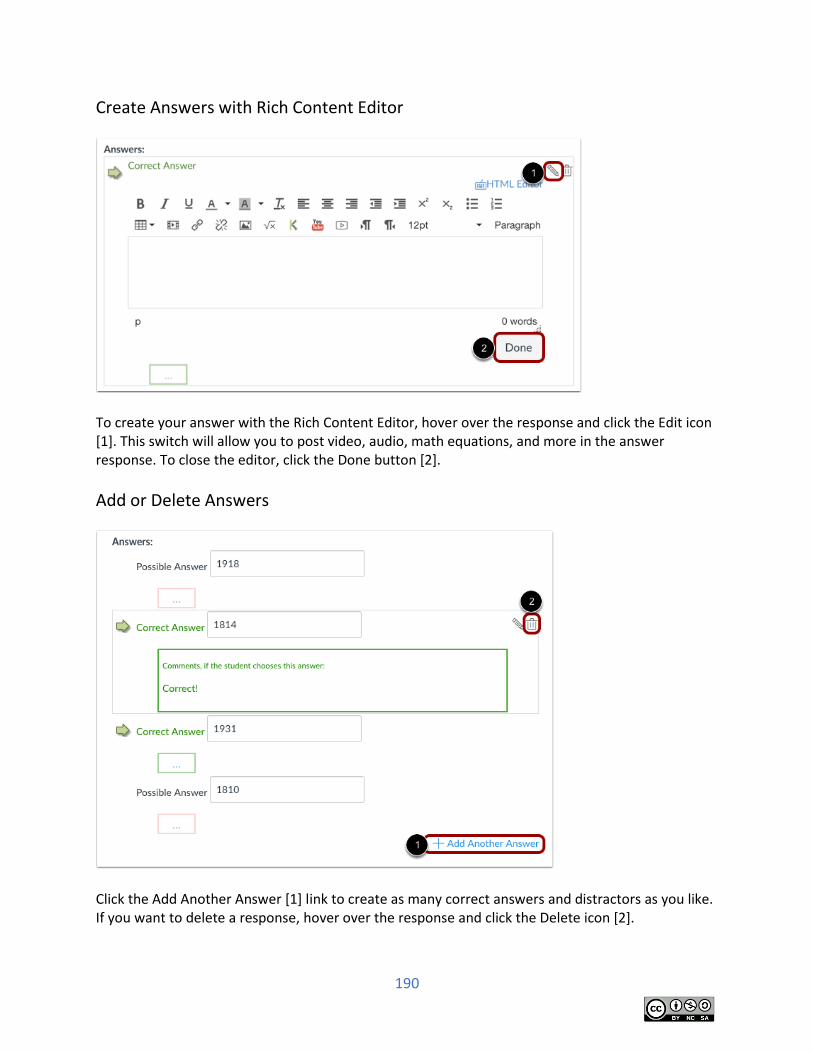
190
Create Answers with Rich Content Editor
To create your answer with the Rich Content Editor, hover over the response and click the Edit icon [1]. This switch will allow you to post video, audio, math equations, and more in the answer response. To close the editor, click the Done button [2].
Add or Delete Answers
Click the Add Another Answer [1] link to create as many correct answers and distractors as you like. If you want to delete a response, hover over the response and click the Delete icon [2].
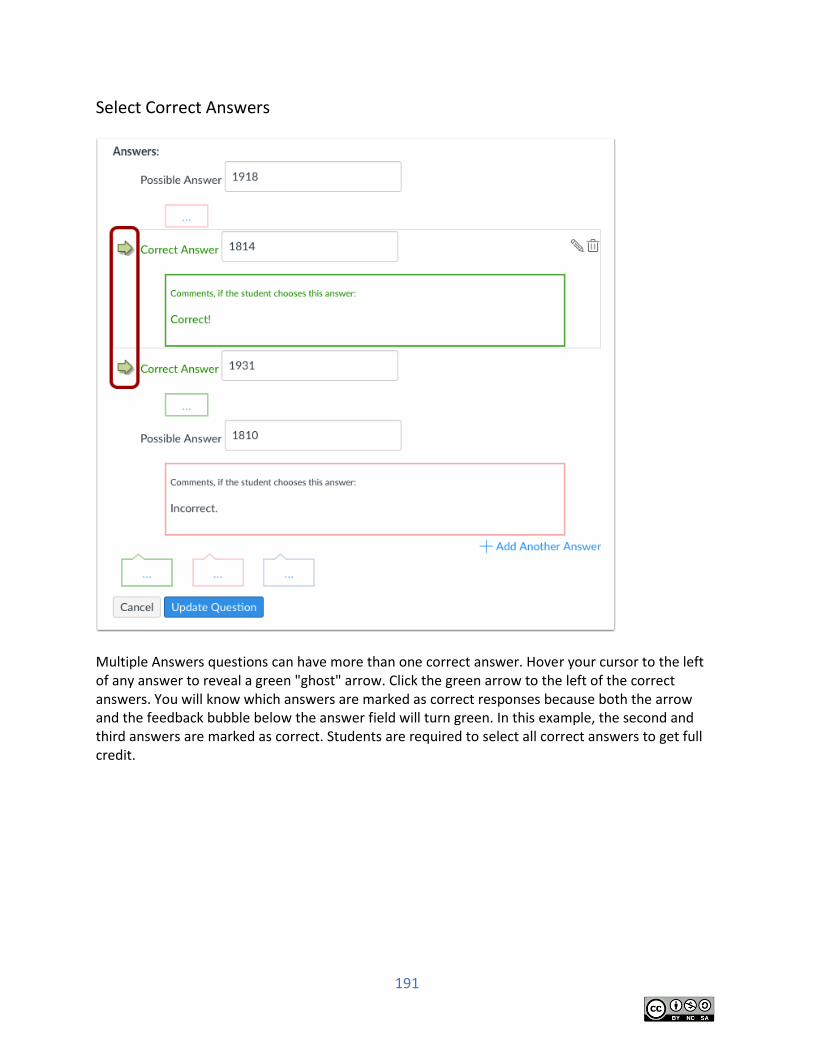
191
Select Correct Answers
Multiple Answers questions can have more than one correct answer. Hover your cursor to the left of any answer to reveal a green "ghost" arrow. Click the green arrow to the left of the correct answers. You will know which answers are marked as correct responses because both the arrow and the feedback bubble below the answer field will turn green. In this example, the second and third answers are marked as correct. Students are required to select all correct answers to get full credit.
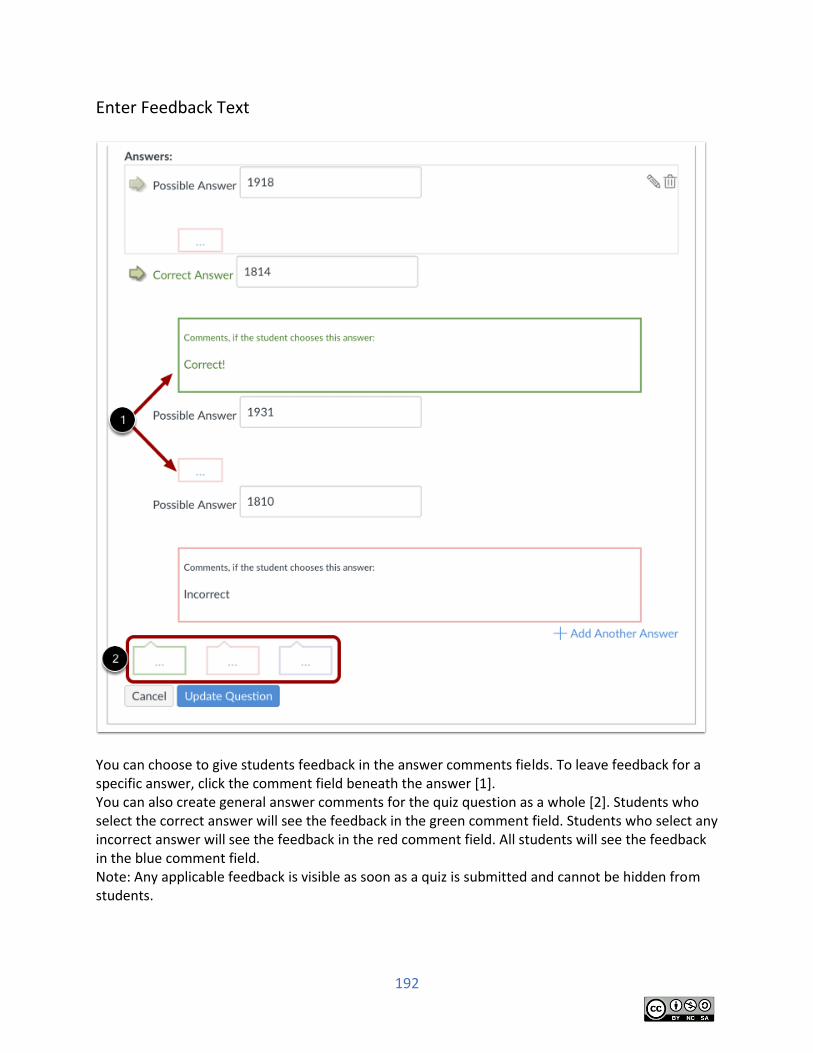
192
Enter Feedback Text
You can choose to give students feedback in the answer comments fields. To leave feedback for a specific answer, click the comment field beneath the answer [1]. You can also create general answer comments for the quiz question as a whole [2]. Students who select the correct answer will see the feedback in the green comment field. Students who select any incorrect answer will see the feedback in the red comment field. All students will see the feedback in the blue comment field. Note: Any applicable feedback is visible as soon as a quiz is submitted and cannot be hidden from students.
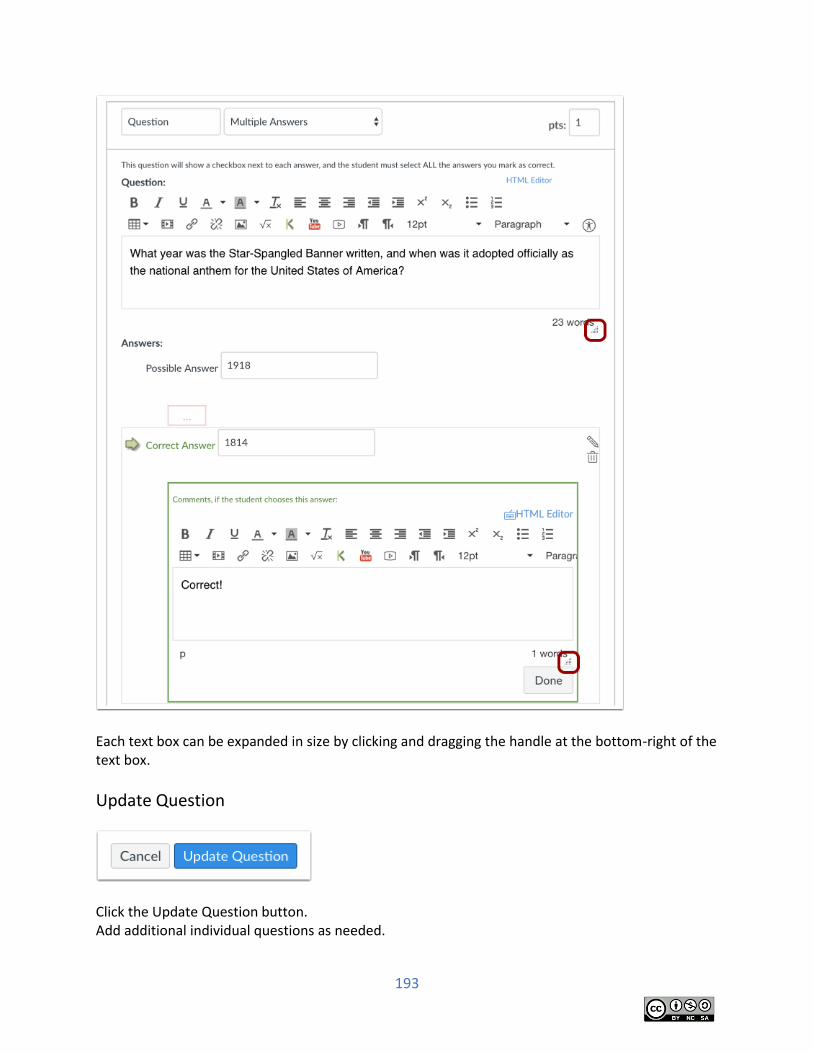
193
Each text box can be expanded in size by clicking and dragging the handle at the bottom-right of the text box.
Update Question
Click the Update Question button. Add additional individual questions as needed.
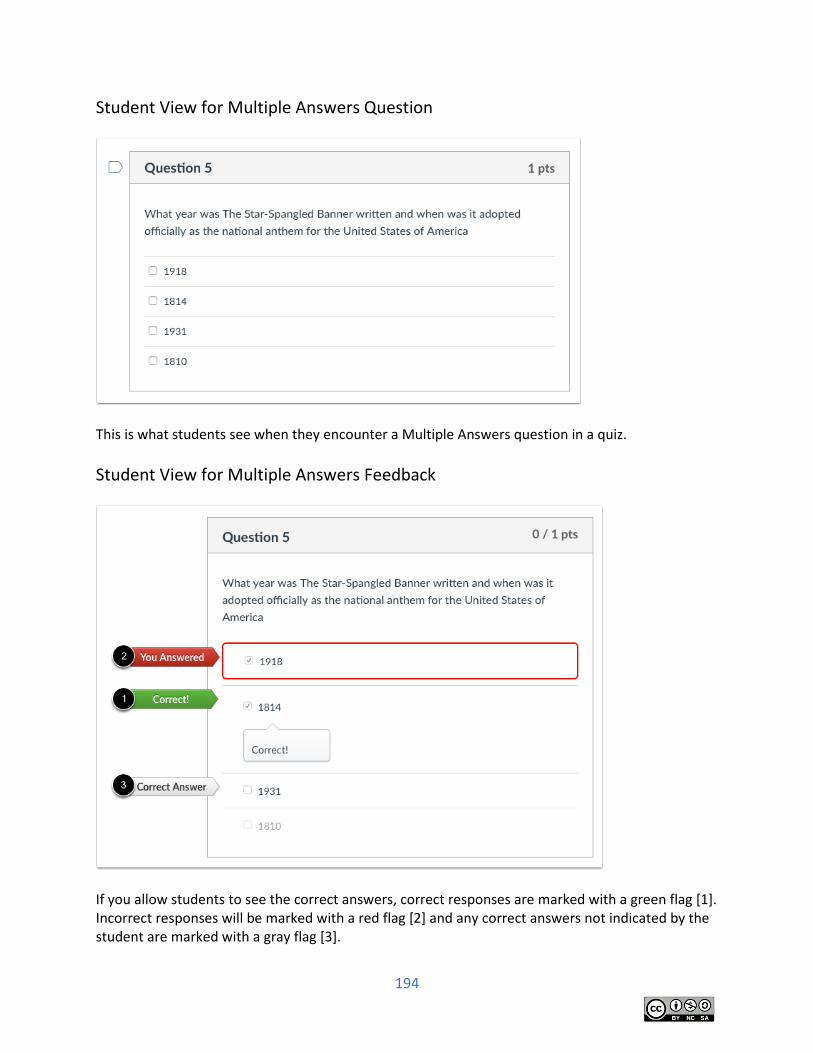
194
Student View for Multiple Answers Question
This is what students see when they encounter a Multiple Answers question in a quiz.
Student View for Multiple Answers Feedback
If you allow students to see the correct answers, correct responses are marked with a green flag [1]. Incorrect responses will be marked with a red flag [2] and any correct answers not indicated by the student are marked with a gray flag [3].
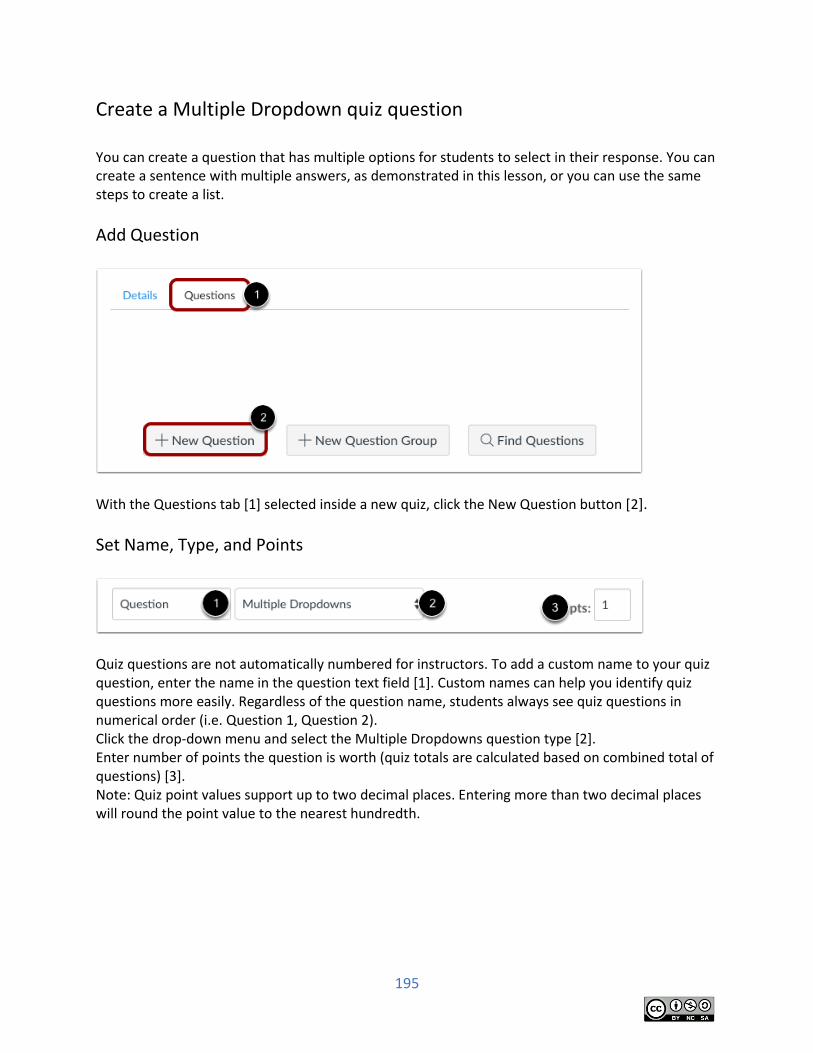
195
Create a Multiple Dropdown quiz question You can create a question that has multiple options for students to select in their response. You can create a sentence with multiple answers, as demonstrated in this lesson, or you can use the same steps to create a list.
Add Question
With the Questions tab [1] selected inside a new quiz, click the New Question button [2].
Set Name, Type, and Points
Quiz questions are not automatically numbered for instructors. To add a custom name to your quiz question, enter the name in the question text field [1]. Custom names can help you identify quiz questions more easily. Regardless of the question name, students always see quiz questions in numerical order (i.e. Question 1, Question 2). Click the drop-down menu and select the Multiple Dropdowns question type [2]. Enter number of points the question is worth (quiz totals are calculated based on combined total of questions) [3]. Note: Quiz point values support up to two decimal places. Entering more than two decimal places will round the point value to the nearest hundredth.
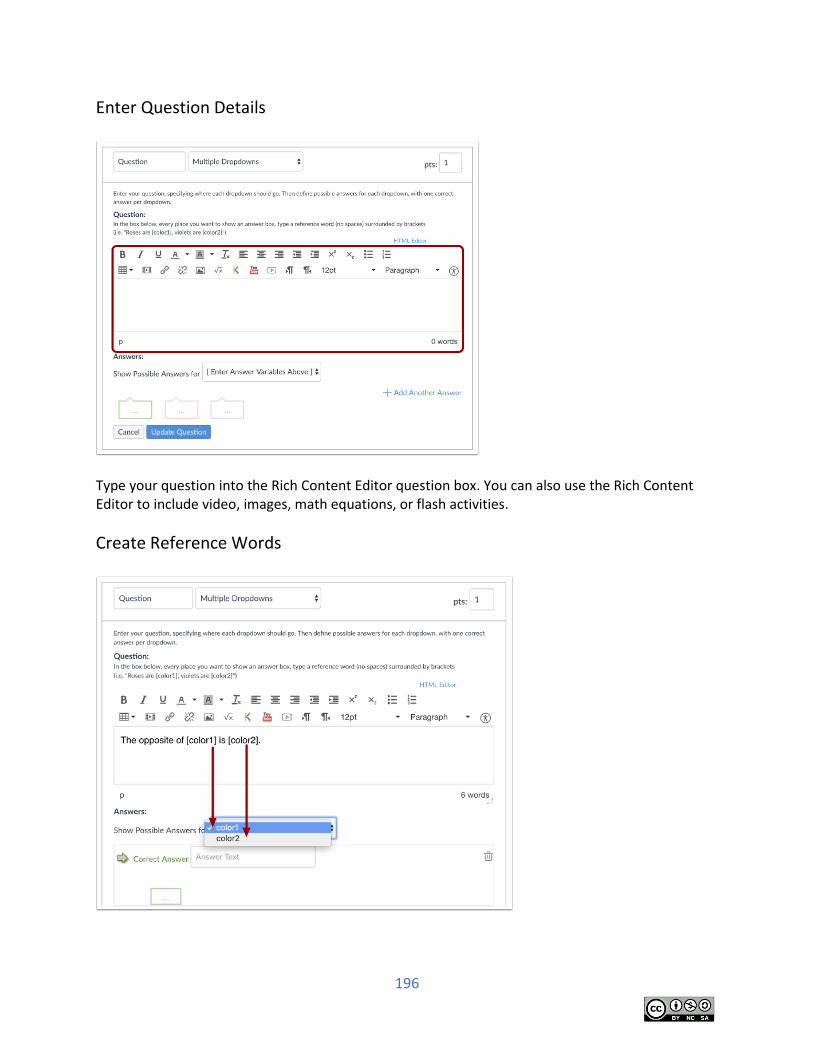
196
Enter Question Details
Type your question into the Rich Content Editor question box. You can also use the Rich Content Editor to include video, images, math equations, or flash activities.
Create Reference Words
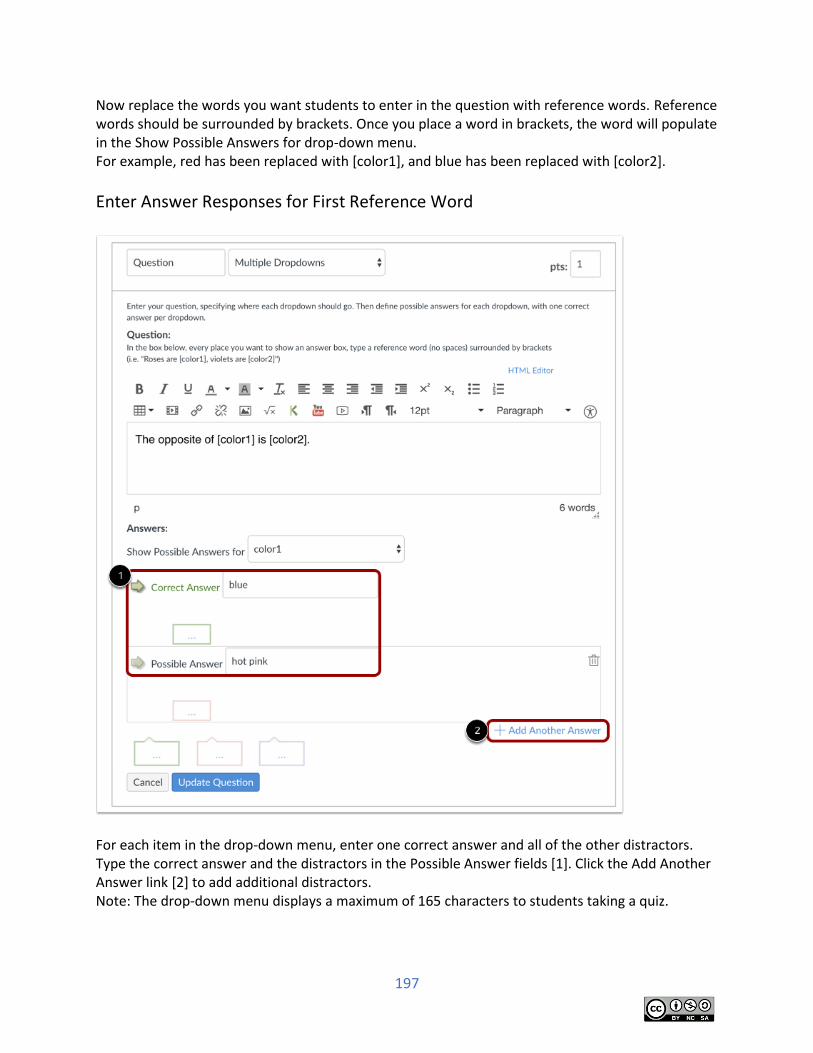
197
Now replace the words you want students to enter in the question with reference words. Reference words should be surrounded by brackets. Once you place a word in brackets, the word will populate in the Show Possible Answers for drop-down menu. For example, red has been replaced with [color1], and blue has been replaced with [color2].
Enter Answer Responses for First Reference Word
For each item in the drop-down menu, enter one correct answer and all of the other distractors. Type the correct answer and the distractors in the Possible Answer fields [1]. Click the Add Another Answer link [2] to add additional distractors. Note: The drop-down menu displays a maximum of 165 characters to students taking a quiz.
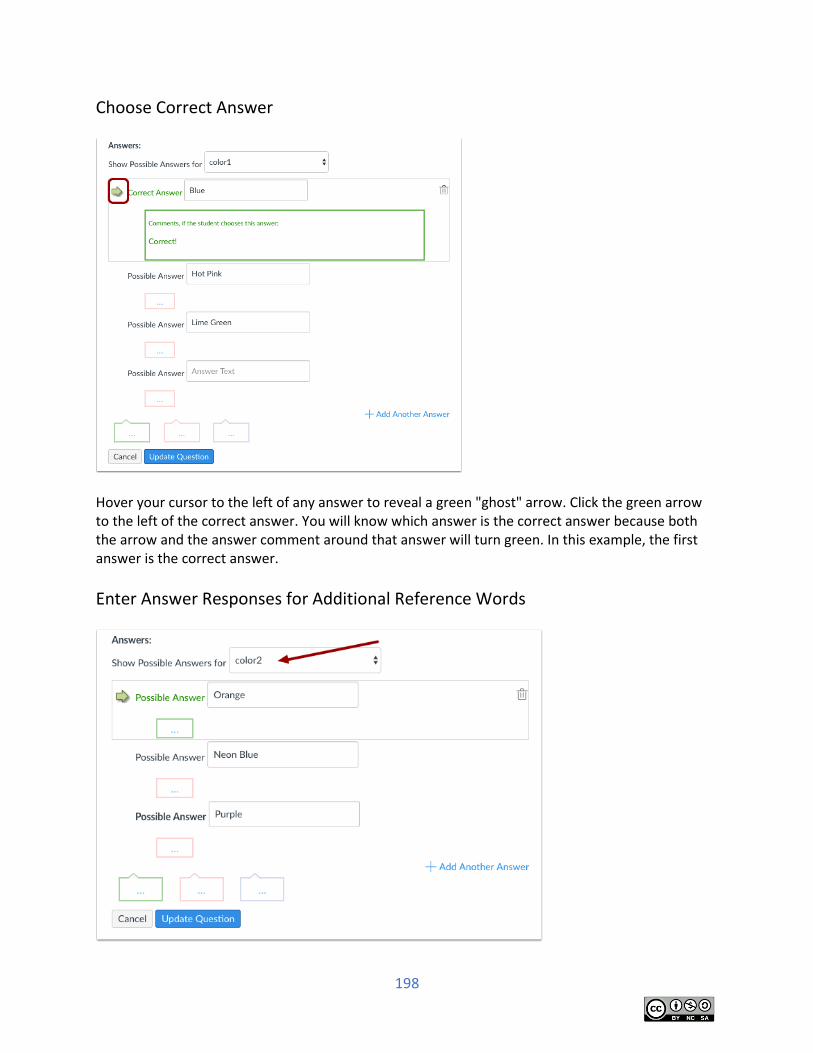
198
Choose Correct Answer
Hover your cursor to the left of any answer to reveal a green "ghost" arrow. Click the green arrow to the left of the correct answer. You will know which answer is the correct answer because both the arrow and the answer comment around that answer will turn green. In this example, the first answer is the correct answer.
Enter Answer Responses for Additional Reference Words
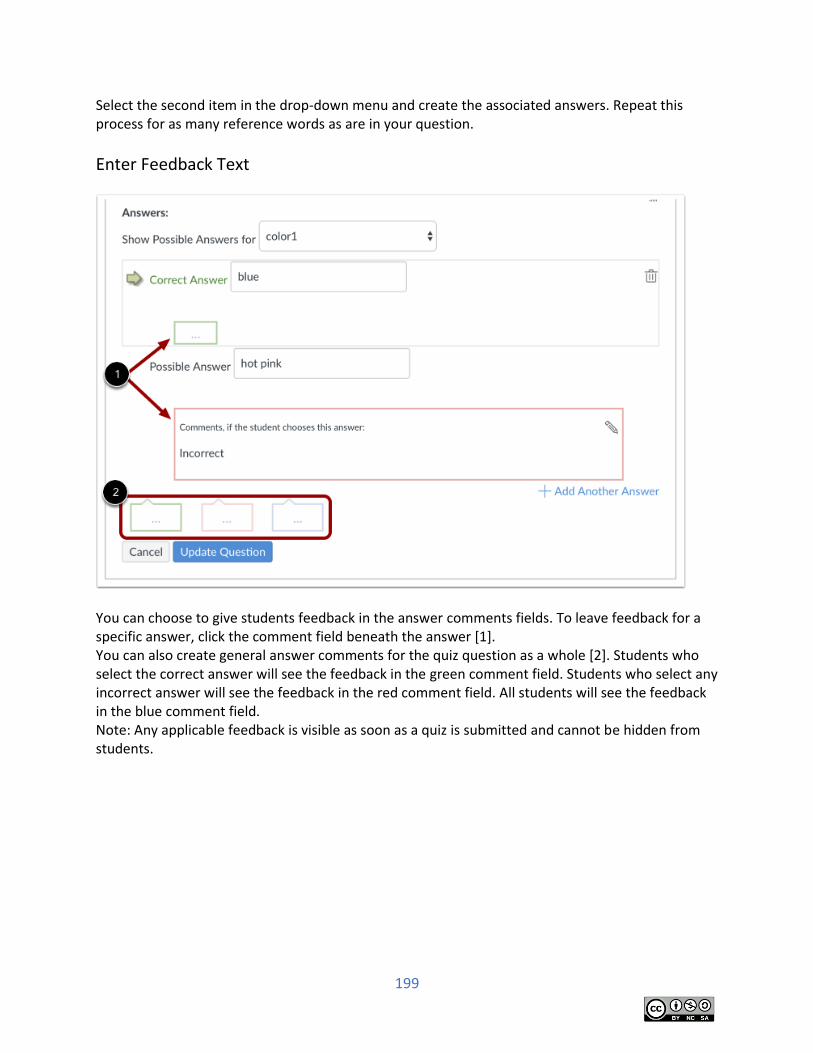
199
Select the second item in the drop-down menu and create the associated answers. Repeat this process for as many reference words as are in your question.
Enter Feedback Text
You can choose to give students feedback in the answer comments fields. To leave feedback for a specific answer, click the comment field beneath the answer [1]. You can also create general answer comments for the quiz question as a whole [2]. Students who select the correct answer will see the feedback in the green comment field. Students who select any incorrect answer will see the feedback in the red comment field. All students will see the feedback in the blue comment field. Note: Any applicable feedback is visible as soon as a quiz is submitted and cannot be hidden from students.
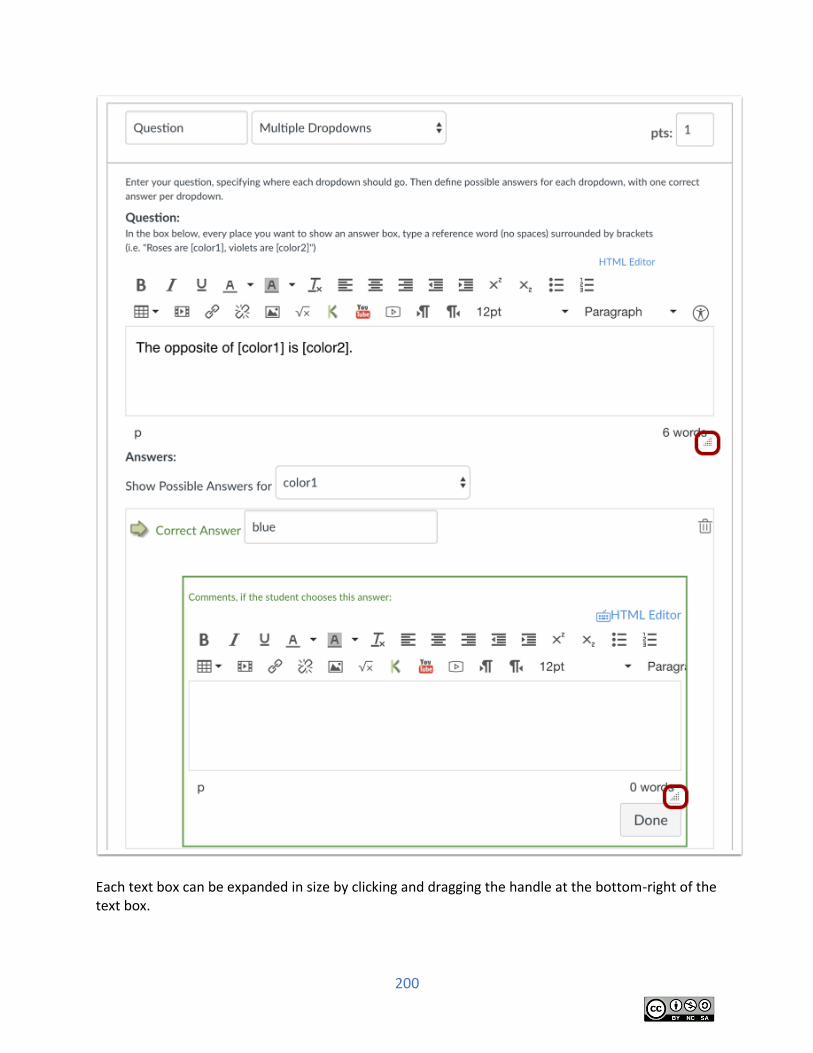
200
Each text box can be expanded in size by clicking and dragging the handle at the bottom-right of the text box.
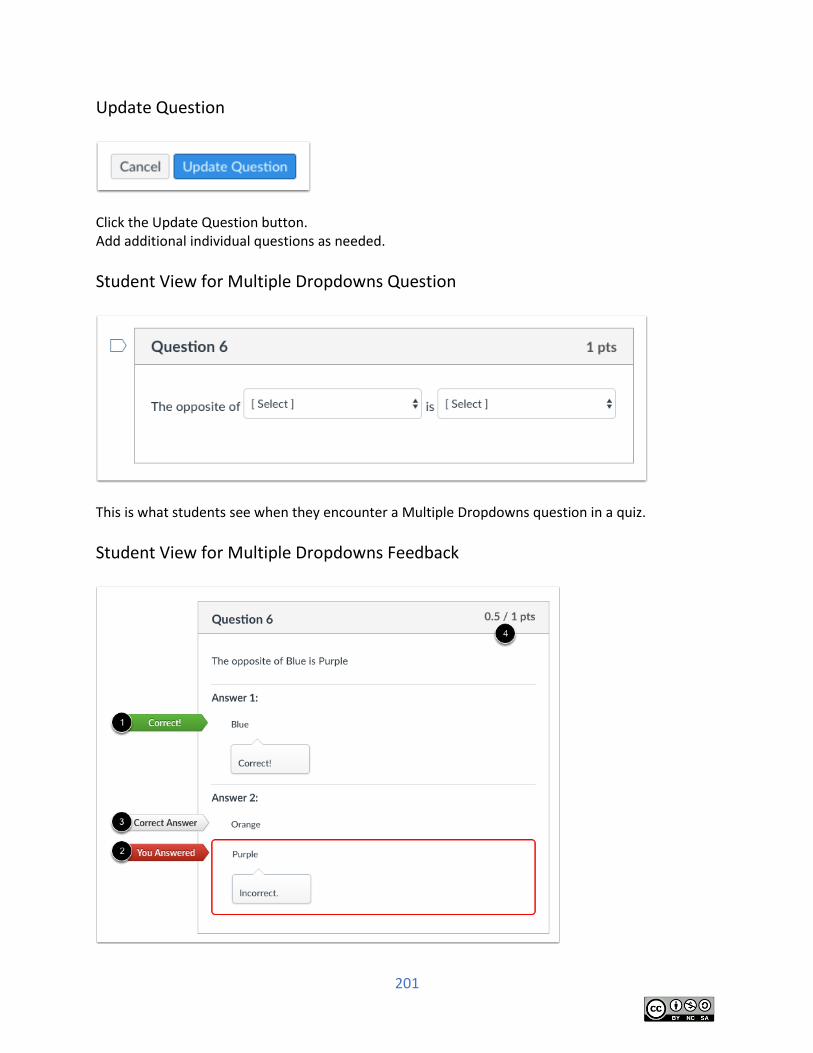
201
Update Question
Click the Update Question button. Add additional individual questions as needed.
Student View for Multiple Dropdowns Question
This is what students see when they encounter a Multiple Dropdowns question in a quiz.
Student View for Multiple Dropdowns Feedback
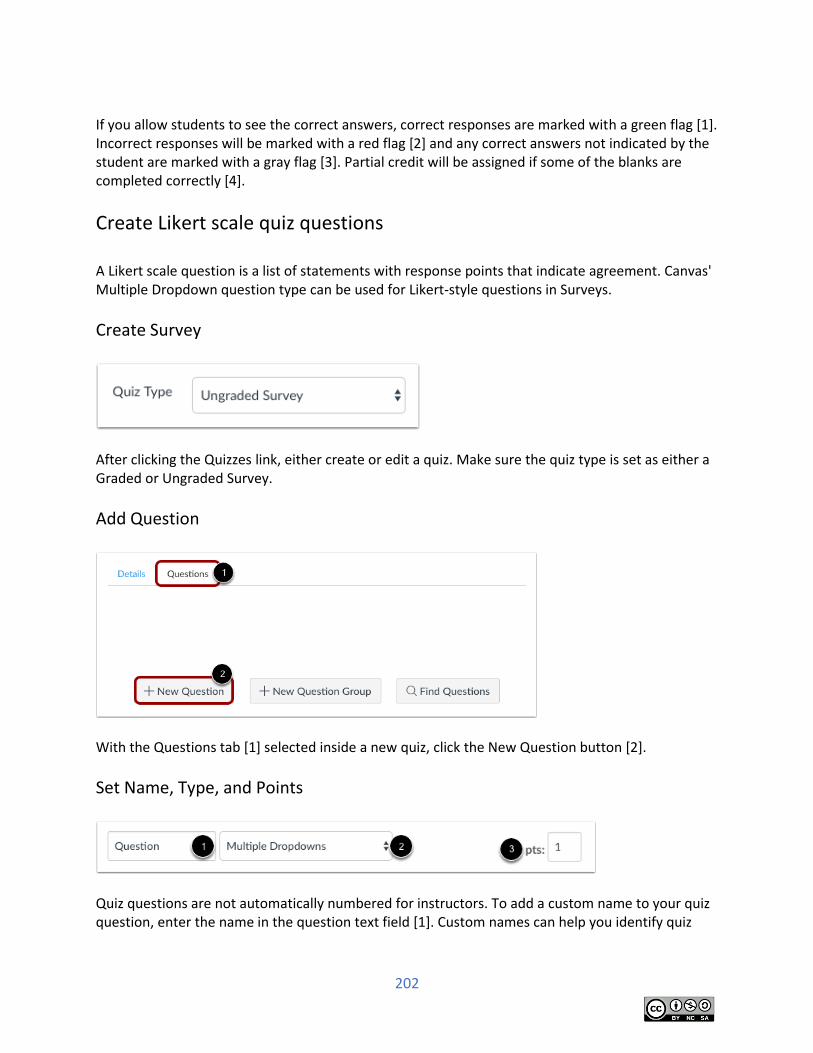
202
If you allow students to see the correct answers, correct responses are marked with a green flag [1]. Incorrect responses will be marked with a red flag [2] and any correct answers not indicated by the student are marked with a gray flag [3]. Partial credit will be assigned if some of the blanks are completed correctly [4].
Create Likert scale quiz questions A Likert scale question is a list of statements with response points that indicate agreement. Canvas' Multiple Dropdown question type can be used for Likert-style questions in Surveys.
Create Survey
After clicking the Quizzes link, either create or edit a quiz. Make sure the quiz type is set as either a Graded or Ungraded Survey.
Add Question
With the Questions tab [1] selected inside a new quiz, click the New Question button [2].
Set Name, Type, and Points
Quiz questions are not automatically numbered for instructors. To add a custom name to your quiz question, enter the name in the question text field [1]. Custom names can help you identify quiz
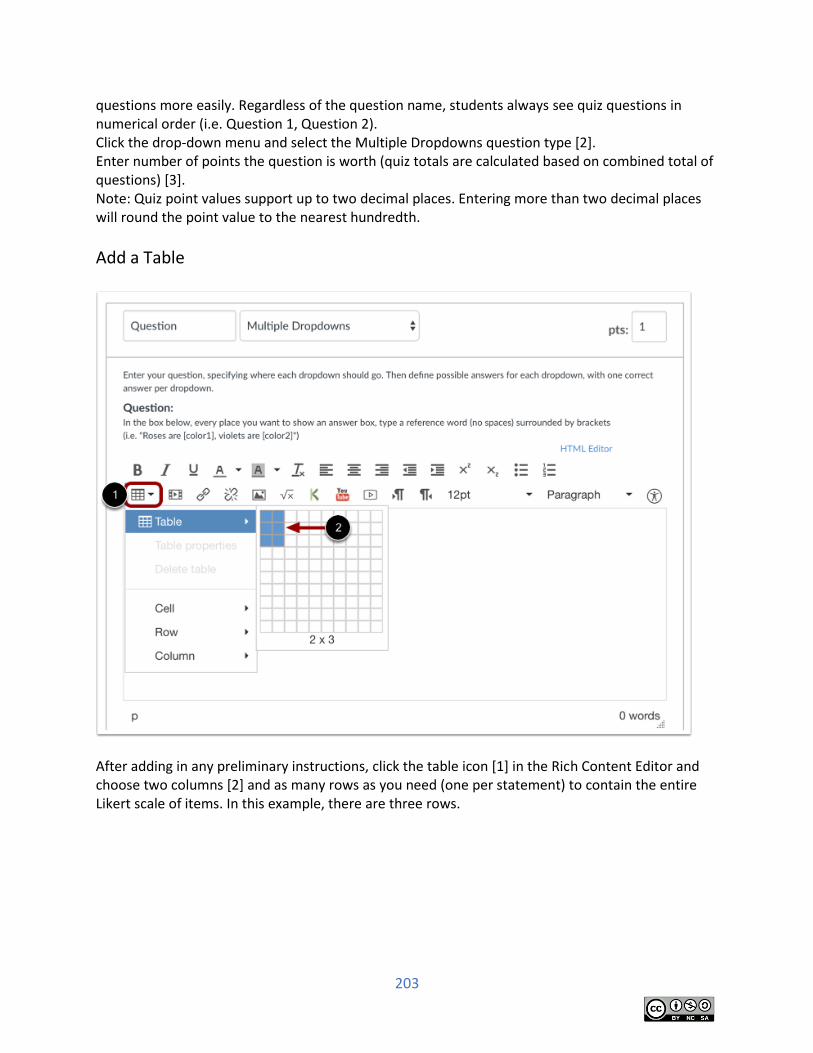
203
questions more easily. Regardless of the question name, students always see quiz questions in numerical order (i.e. Question 1, Question 2). Click the drop-down menu and select the Multiple Dropdowns question type [2]. Enter number of points the question is worth (quiz totals are calculated based on combined total of questions) [3]. Note: Quiz point values support up to two decimal places. Entering more than two decimal places will round the point value to the nearest hundredth.
Add a Table
After adding in any preliminary instructions, click the table icon [1] in the Rich Content Editor and choose two columns [2] and as many rows as you need (one per statement) to contain the entire Likert scale of items. In this example, there are three rows.
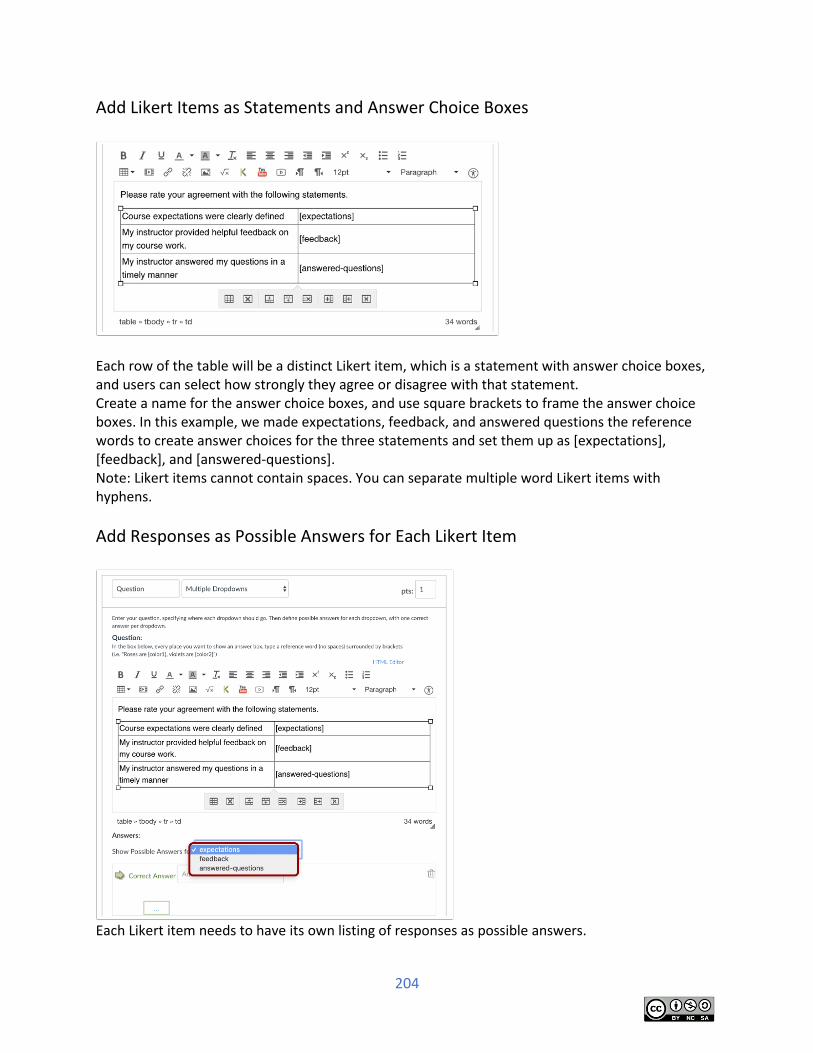
204
Add Likert Items as Statements and Answer Choice Boxes
Each row of the table will be a distinct Likert item, which is a statement with answer choice boxes, and users can select how strongly they agree or disagree with that statement. Create a name for the answer choice boxes, and use square brackets to frame the answer choice boxes. In this example, we made expectations, feedback, and answered questions the reference words to create answer choices for the three statements and set them up as [expectations], [feedback], and [answered-questions]. Note: Likert items cannot contain spaces. You can separate multiple word Likert items with hyphens.
Add Responses as Possible Answers for Each Likert Item
Each Likert item needs to have its own listing of responses as possible answers.
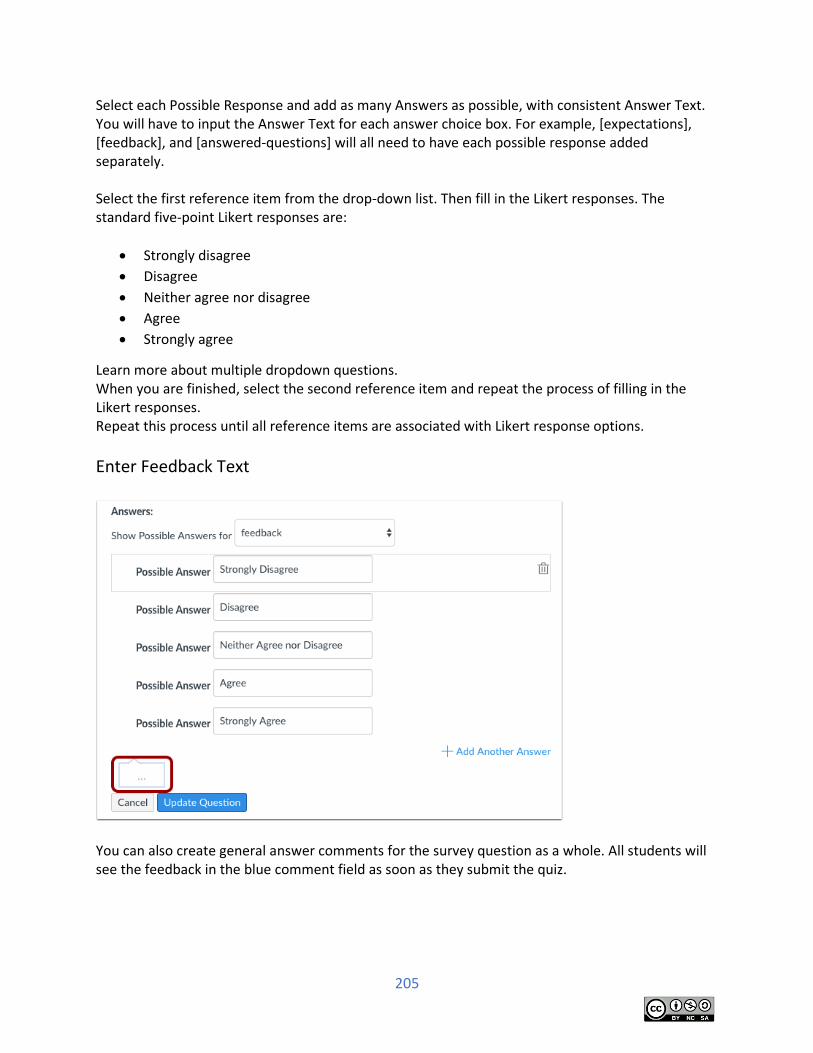
205
Select each Possible Response and add as many Answers as possible, with consistent Answer Text. You will have to input the Answer Text for each answer choice box. For example, [expectations], [feedback], and [answered-questions] will all need to have each possible response added separately. Select the first reference item from the drop-down list. Then fill in the Likert responses. The standard five-point Likert responses are:
Strongly disagree
Disagree
Neither agree nor disagree
Agree
Strongly agree
Learn more about multiple dropdown questions. When you are finished, select the second reference item and repeat the process of filling in the Likert responses. Repeat this process until all reference items are associated with Likert response options.
Enter Feedback Text
You can also create general answer comments for the survey question as a whole. All students will see the feedback in the blue comment field as soon as they submit the quiz.
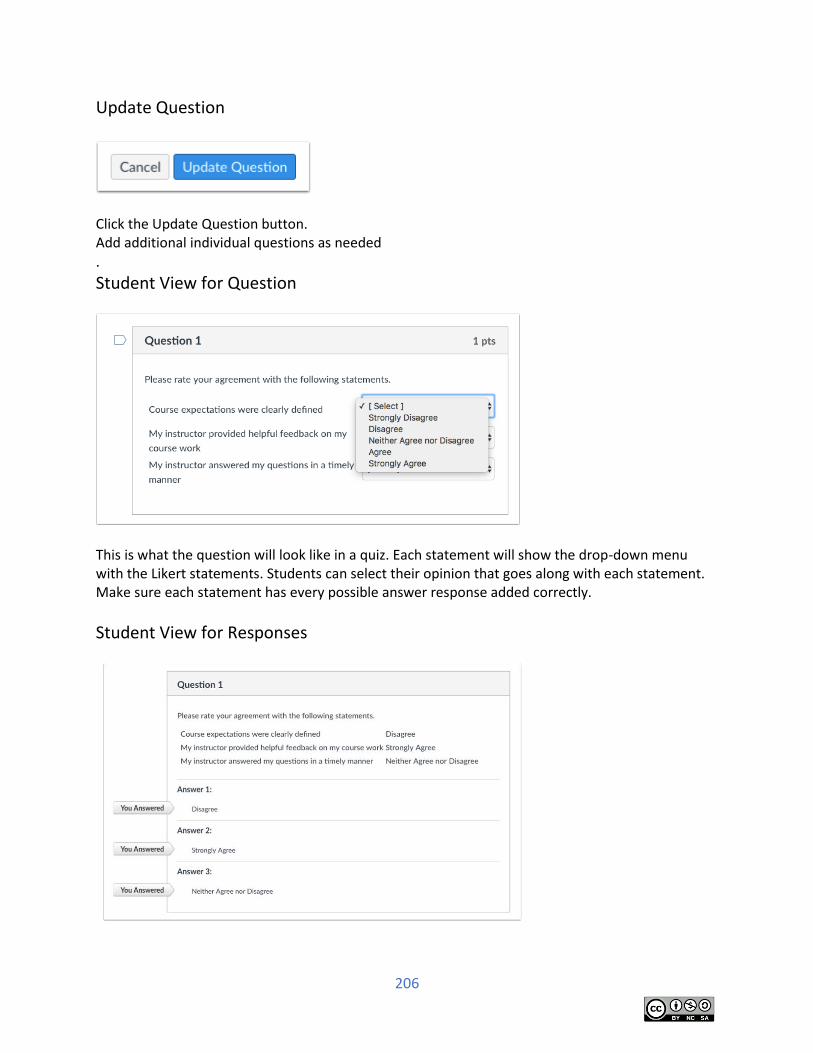
206
Update Question
Click the Update Question button. Add additional individual questions as needed
.
Student View for Question
This is what the question will look like in a quiz. Each statement will show the drop-down menu with the Likert statements. Students can select their opinion that goes along with each statement. Make sure each statement has every possible answer response added correctly.
Student View for Responses
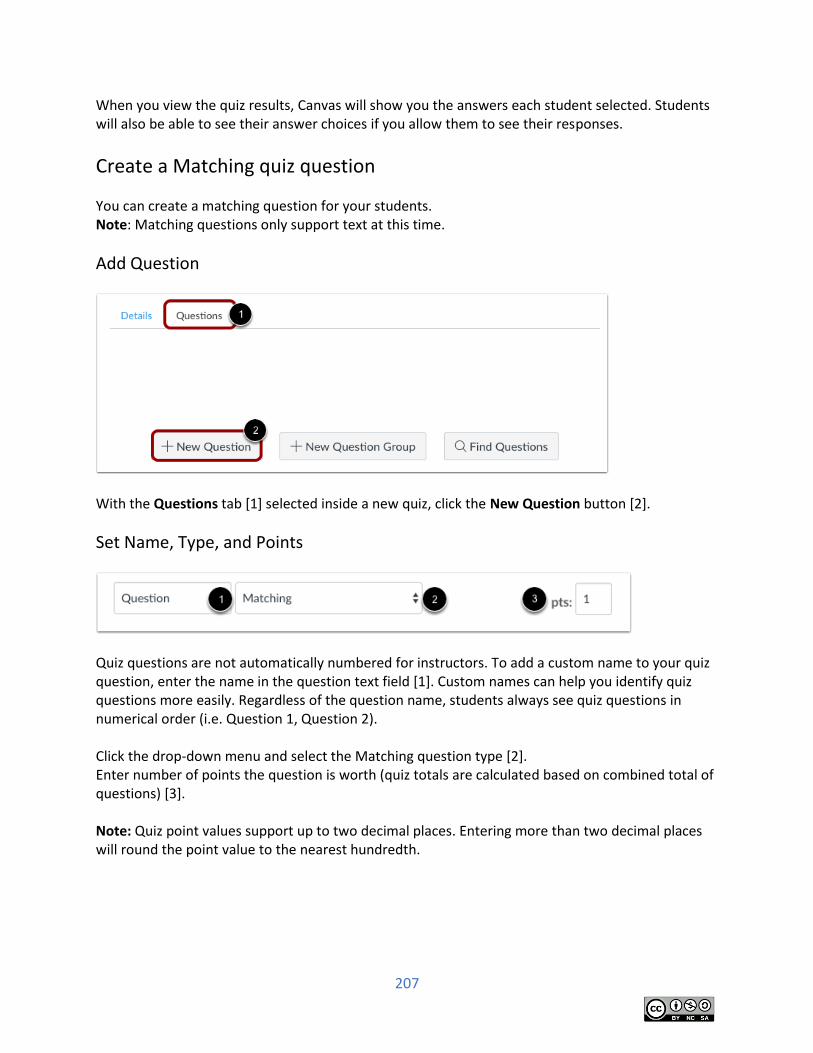
207
When you view the quiz results, Canvas will show you the answers each student selected. Students will also be able to see their answer choices if you allow them to see their responses.
Create a Matching quiz question
You can create a matching question for your students. Note: Matching questions only support text at this time.
Add Question
With the Questions tab [1] selected inside a new quiz, click the New Question button [2].
Set Name, Type, and Points
Quiz questions are not automatically numbered for instructors. To add a custom name to your quiz question, enter the name in the question text field [1]. Custom names can help you identify quiz questions more easily. Regardless of the question name, students always see quiz questions in numerical order (i.e. Question 1, Question 2). Click the drop-down menu and select the Matching question type [2]. Enter number of points the question is worth (quiz totals are calculated based on combined total of questions) [3]. Note: Quiz point values support up to two decimal places. Entering more than two decimal places will round the point value to the nearest hundredth.
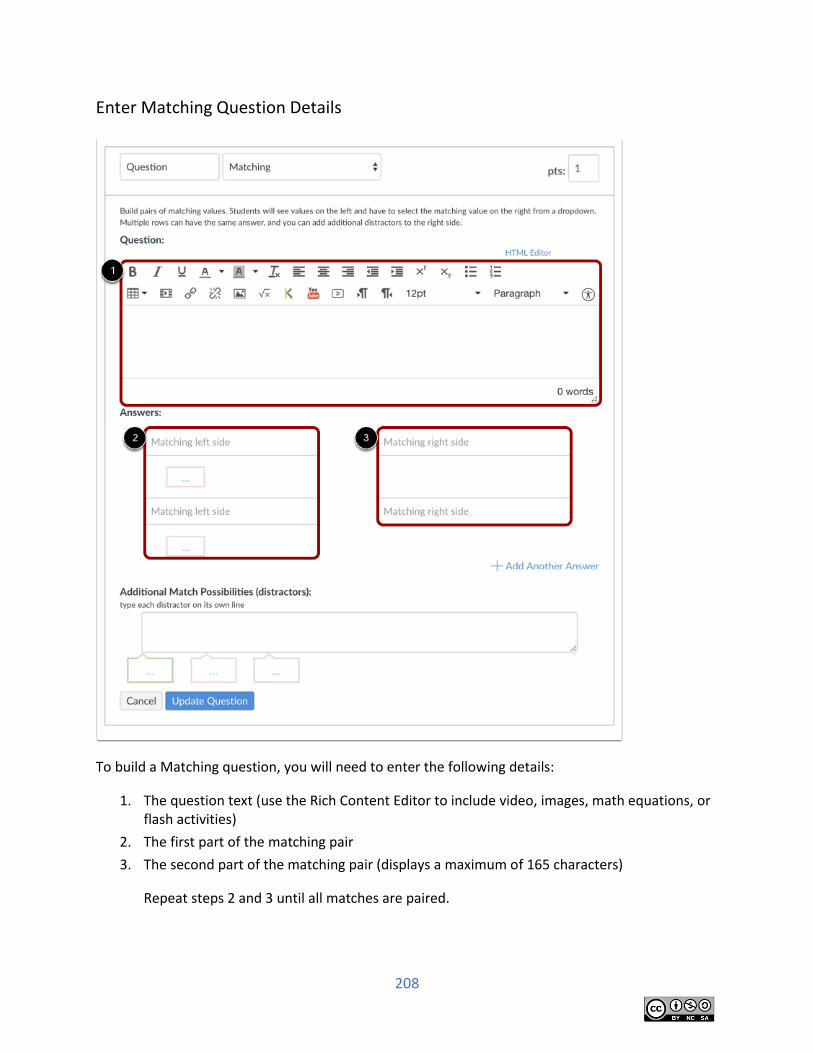
208
Enter Matching Question Details
To build a Matching question, you will need to enter the following details:
1. The question text (use the Rich Content Editor to include video, images, math equations, or flash activities)
2. The first part of the matching pair
3. The second part of the matching pair (displays a maximum of 165 characters)
Repeat steps 2 and 3 until all matches are paired.
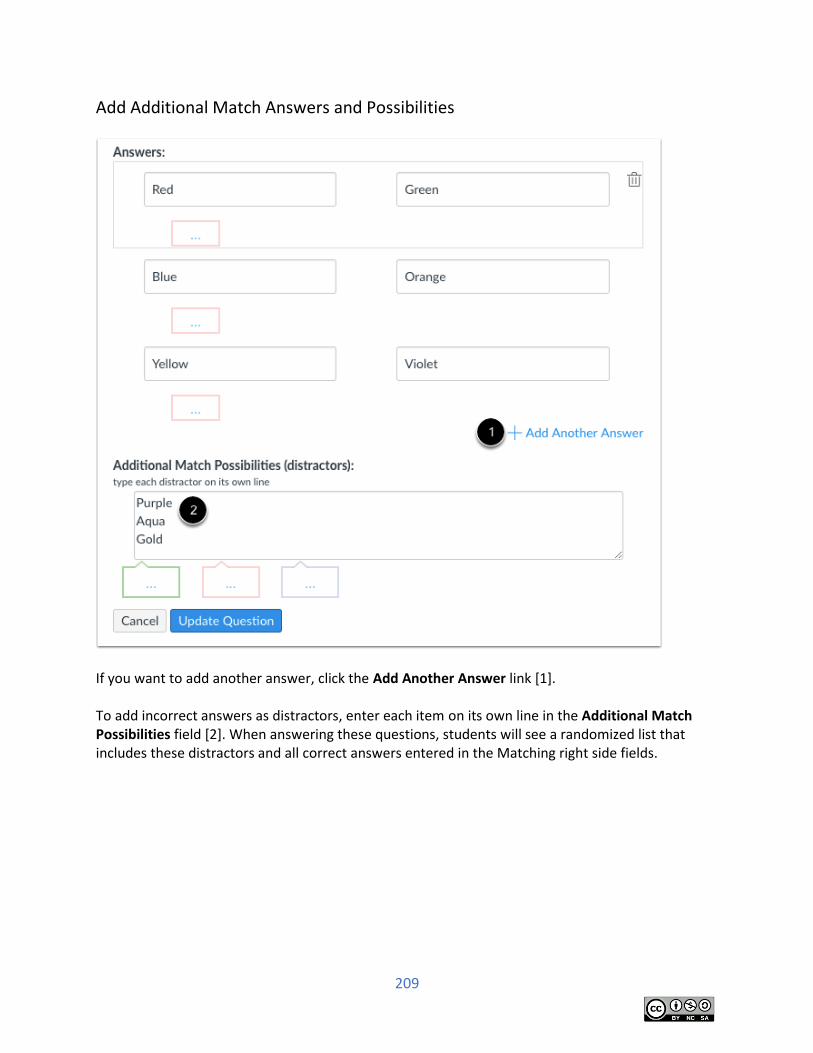
209
Add Additional Match Answers and Possibilities
If you want to add another answer, click the Add Another Answer link [1]. To add incorrect answers as distractors, enter each item on its own line in the Additional Match Possibilities field [2]. When answering these questions, students will see a randomized list that includes these distractors and all correct answers entered in the Matching right side fields.
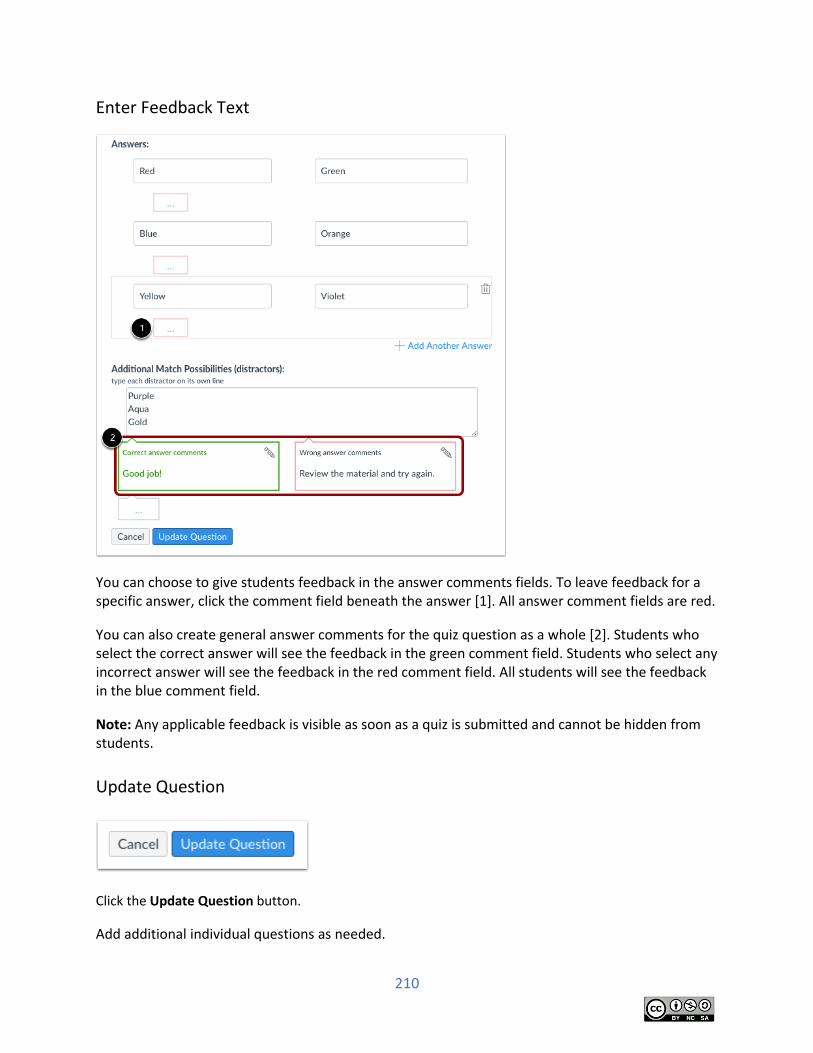
210
Enter Feedback Text
You can choose to give students feedback in the answer comments fields. To leave feedback for a specific answer, click the comment field beneath the answer [1]. All answer comment fields are red.
You can also create general answer comments for the quiz question as a whole [2]. Students who select the correct answer will see the feedback in the green comment field. Students who select any incorrect answer will see the feedback in the red comment field. All students will see the feedback in the blue comment field.
Note: Any applicable feedback is visible as soon as a quiz is submitted and cannot be hidden from students.
Update Question
Click the Update Question button.
Add additional individual questions as needed.

211
Student View for Matching Question
This is what students see when they encounter a Matching question in a quiz.
Student View for Matching Feedback
If you allow students to see the correct answers, correct responses are marked with a green flag [1]. Incorrect responses will be marked with a red flag [2] and any correct answers not indicated by the student are marked with a gray flag [3]. Partial credit will be assigned if some of the blanks are completed correctly [4].
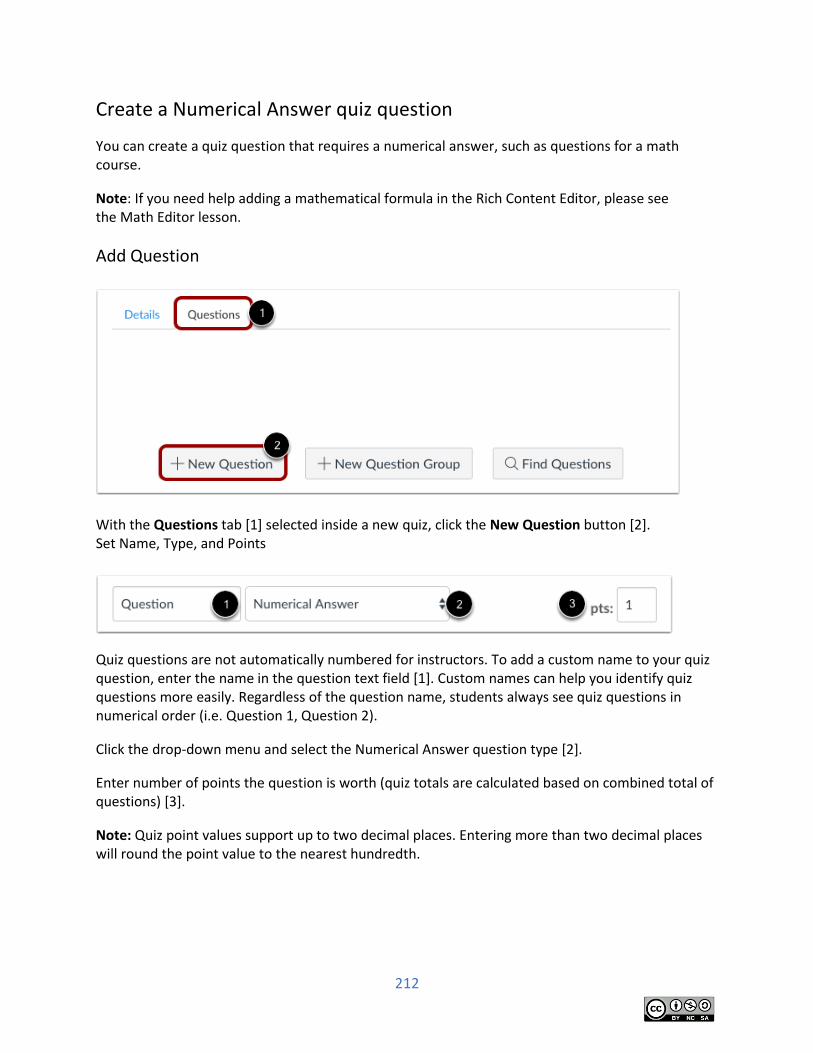
212
Create a Numerical Answer quiz question
You can create a quiz question that requires a numerical answer, such as questions for a math course.
Note: If you need help adding a mathematical formula in the Rich Content Editor, please see the Math Editor lesson.
Add Question
With the Questions tab [1] selected inside a new quiz, click the New Question button [2]. Set Name, Type, and Points
Quiz questions are not automatically numbered for instructors. To add a custom name to your quiz question, enter the name in the question text field [1]. Custom names can help you identify quiz questions more easily. Regardless of the question name, students always see quiz questions in numerical order (i.e. Question 1, Question 2).
Click the drop-down menu and select the Numerical Answer question type [2].
Enter number of points the question is worth (quiz totals are calculated based on combined total of questions) [3].
Note: Quiz point values support up to two decimal places. Entering more than two decimal places will round the point value to the nearest hundredth.
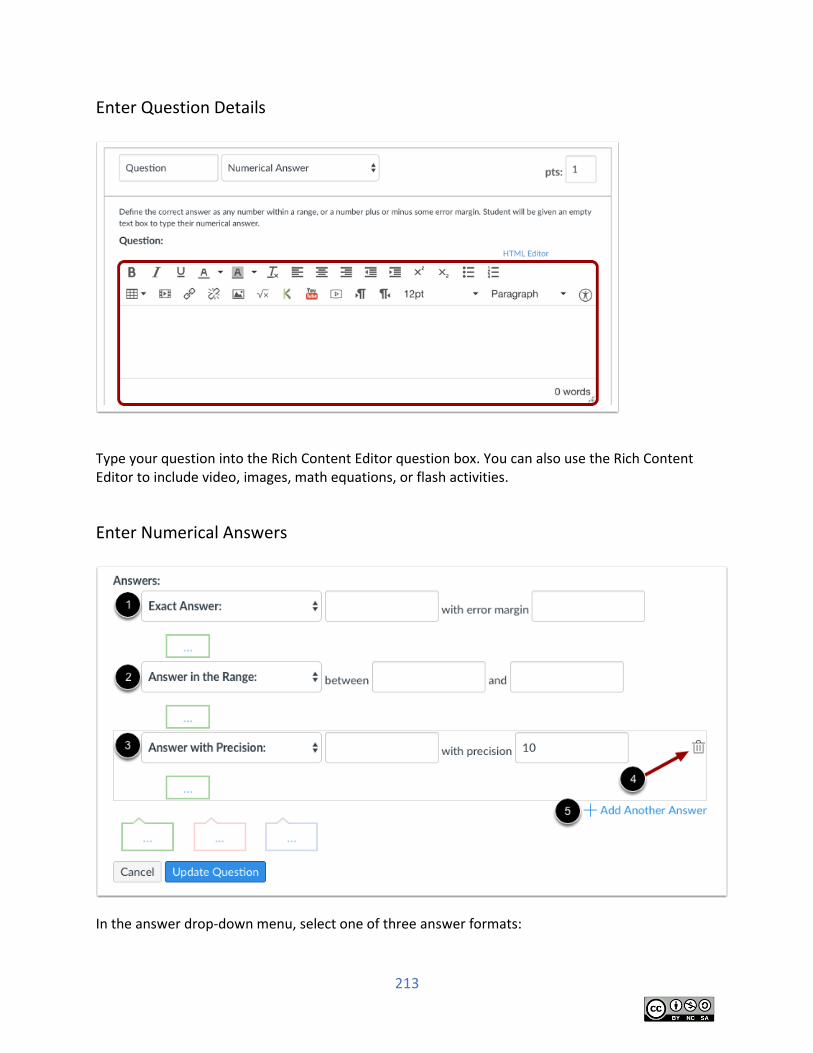
213
Enter Question Details
Type your question into the Rich Content Editor question box. You can also use the Rich Content Editor to include video, images, math equations, or flash activities.
Enter Numerical Answers
In the answer drop-down menu, select one of three answer formats:
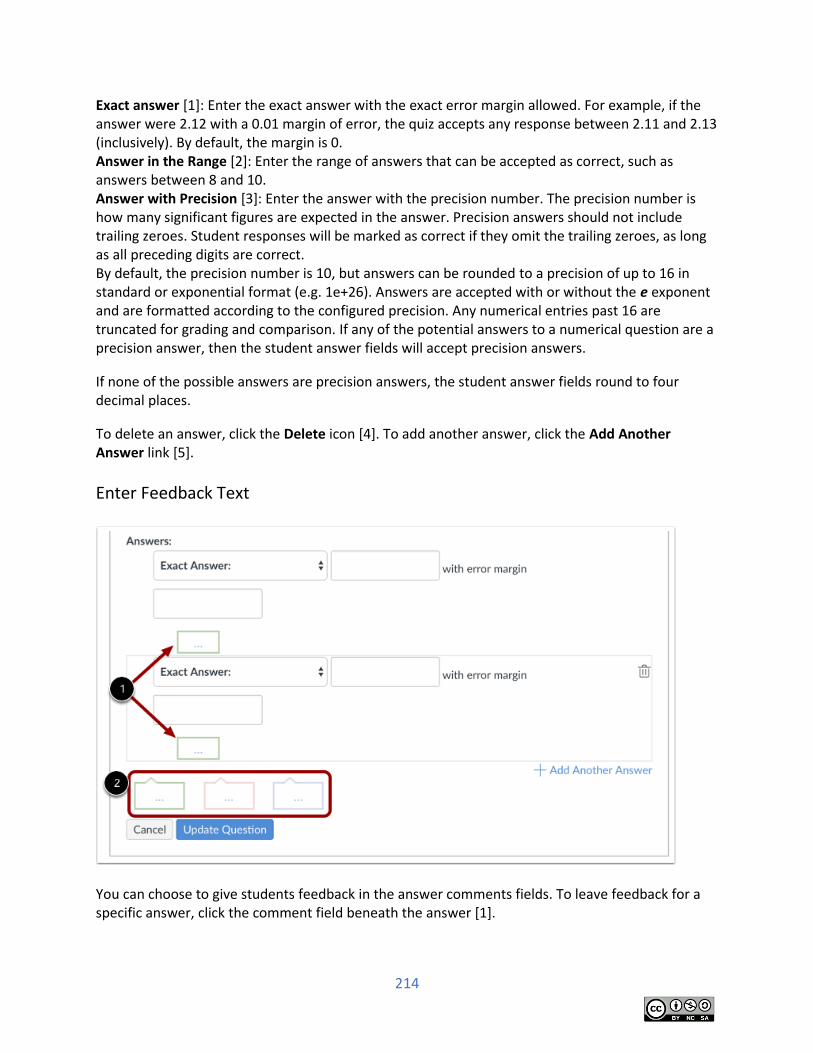
214
Exact answer [1]: Enter the exact answer with the exact error margin allowed. For example, if the answer were 2.12 with a 0.01 margin of error, the quiz accepts any response between 2.11 and 2.13 (inclusively). By default, the margin is 0. Answer in the Range [2]: Enter the range of answers that can be accepted as correct, such as answers between 8 and 10. Answer with Precision [3]: Enter the answer with the precision number. The precision number is how many significant figures are expected in the answer. Precision answers should not include trailing zeroes. Student responses will be marked as correct if they omit the trailing zeroes, as long as all preceding digits are correct. By default, the precision number is 10, but answers can be rounded to a precision of up to 16 in standard or exponential format (e.g. 1e+26). Answers are accepted with or without the e exponent and are formatted according to the configured precision. Any numerical entries past 16 are truncated for grading and comparison. If any of the potential answers to a numerical question are a precision answer, then the student answer fields will accept precision answers.
If none of the possible answers are precision answers, the student answer fields round to four decimal places.
To delete an answer, click the Delete icon [4]. To add another answer, click the Add Another Answer link [5].
Enter Feedback Text
You can choose to give students feedback in the answer comments fields. To leave feedback for a specific answer, click the comment field beneath the answer [1].
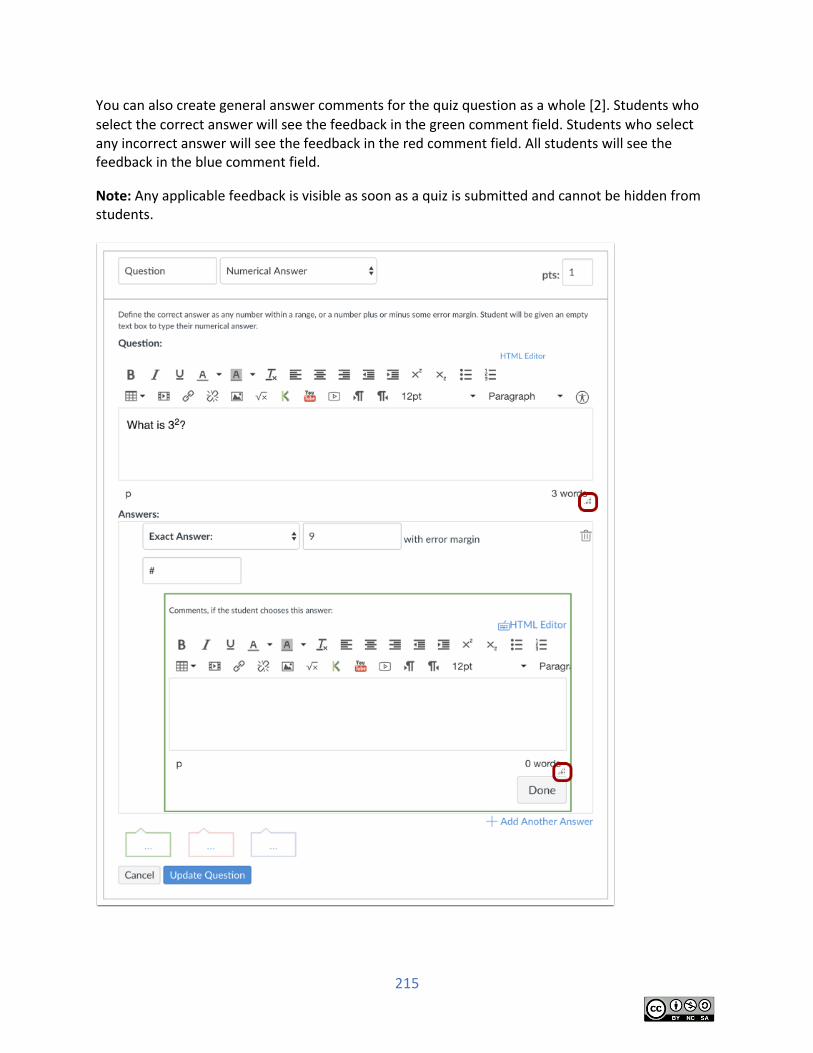
215
You can also create general answer comments for the quiz question as a whole [2]. Students who
select the correct answer will see the feedback in the green comment field. Students who select any incorrect answer will see the feedback in the red comment field. All students will see the feedback in the blue comment field.
Note: Any applicable feedback is visible as soon as a quiz is submitted and cannot be hidden from students.

216
Each text box can be expanded in size by clicking and dragging the handle at the bottom-right of the text box.
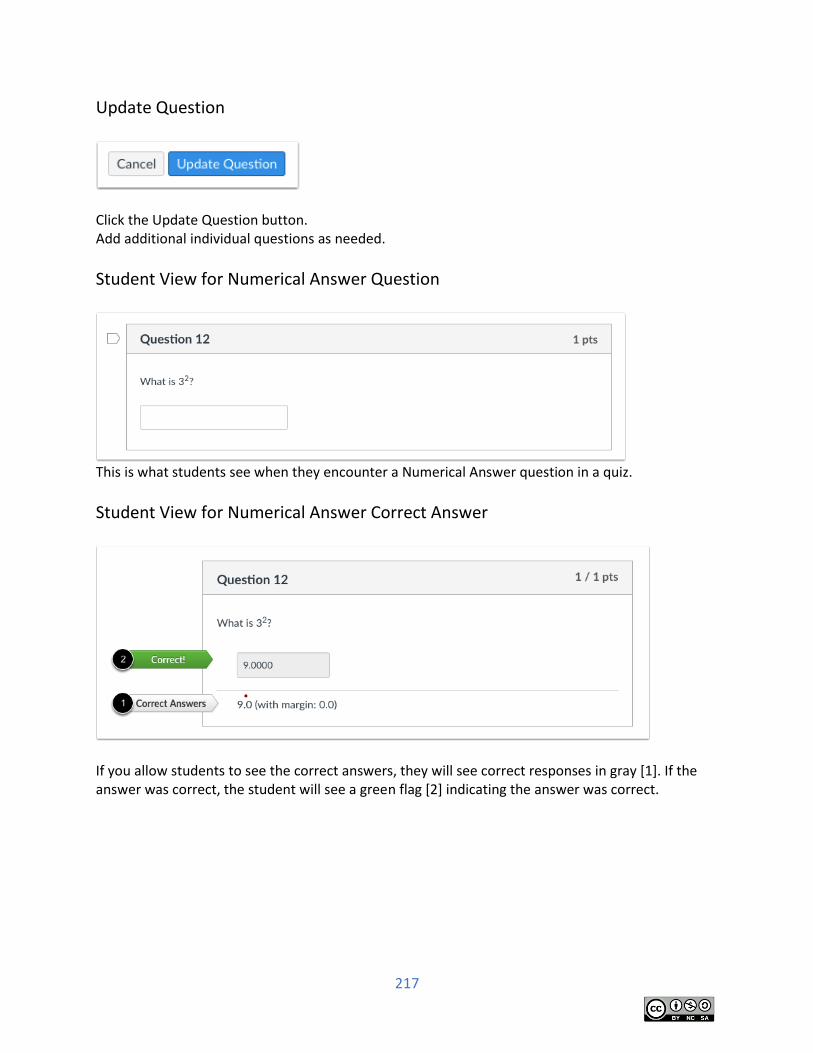
217
Update Question
Click the Update Question button. Add additional individual questions as needed.
Student View for Numerical Answer Question
This is what students see when they encounter a Numerical Answer question in a quiz.
Student View for Numerical Answer Correct Answer
If you allow students to see the correct answers, they will see correct responses in gray [1]. If the answer was correct, the student will see a green flag [2] indicating the answer was correct.
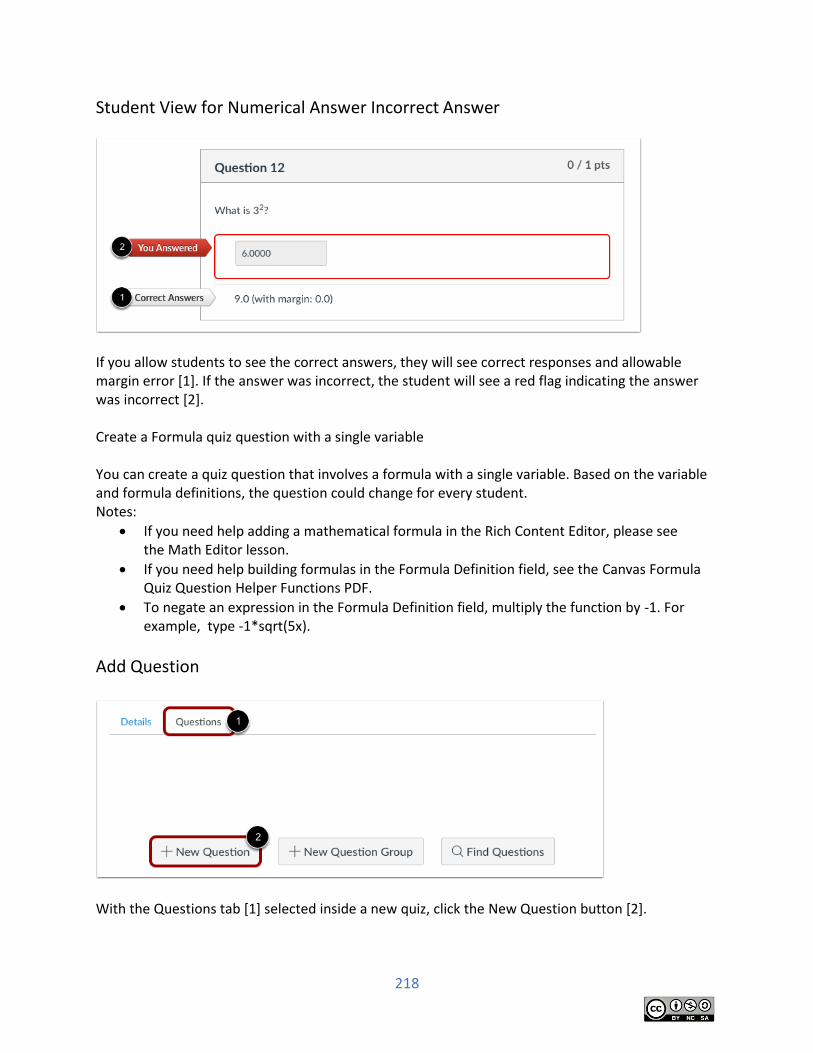
218
Student View for Numerical Answer Incorrect Answer
If you allow students to see the correct answers, they will see correct responses and allowable margin error [1]. If the answer was incorrect, the student will see a red flag indicating the answer was incorrect [2]. Create a Formula quiz question with a single variable You can create a quiz question that involves a formula with a single variable. Based on the variable and formula definitions, the question could change for every student. Notes:
If you need help adding a mathematical formula in the Rich Content Editor, please see the Math Editor lesson.
If you need help building formulas in the Formula Definition field, see the Canvas Formula Quiz Question Helper Functions PDF.
To negate an expression in the Formula Definition field, multiply the function by -1. For example, type -1*sqrt(5x).
Add Question
With the Questions tab [1] selected inside a new quiz, click the New Question button [2].
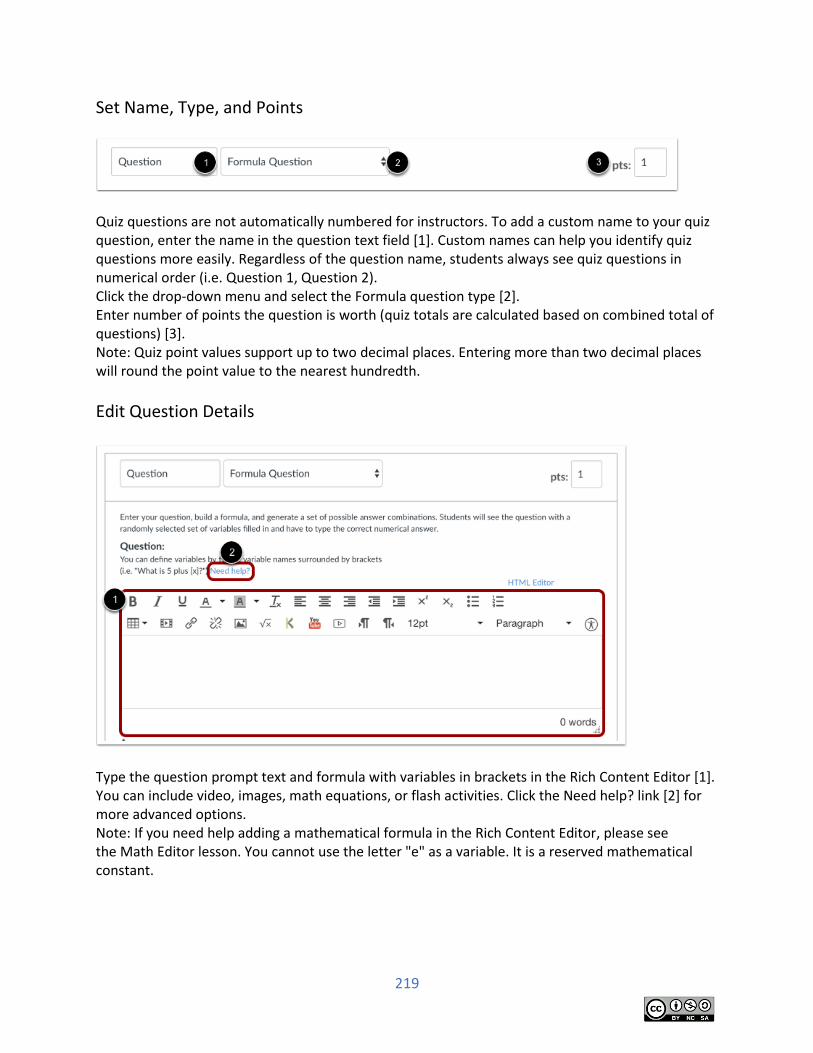
219
Set Name, Type, and Points
Quiz questions are not automatically numbered for instructors. To add a custom name to your quiz question, enter the name in the question text field [1]. Custom names can help you identify quiz questions more easily. Regardless of the question name, students always see quiz questions in numerical order (i.e. Question 1, Question 2). Click the drop-down menu and select the Formula question type [2]. Enter number of points the question is worth (quiz totals are calculated based on combined total of questions) [3]. Note: Quiz point values support up to two decimal places. Entering more than two decimal places will round the point value to the nearest hundredth.
Edit Question Details
Type the question prompt text and formula with variables in brackets in the Rich Content Editor [1]. You can include video, images, math equations, or flash activities. Click the Need help? link [2] for more advanced options. Note: If you need help adding a mathematical formula in the Rich Content Editor, please see the Math Editor lesson. You cannot use the letter "e" as a variable. It is a reserved mathematical constant.
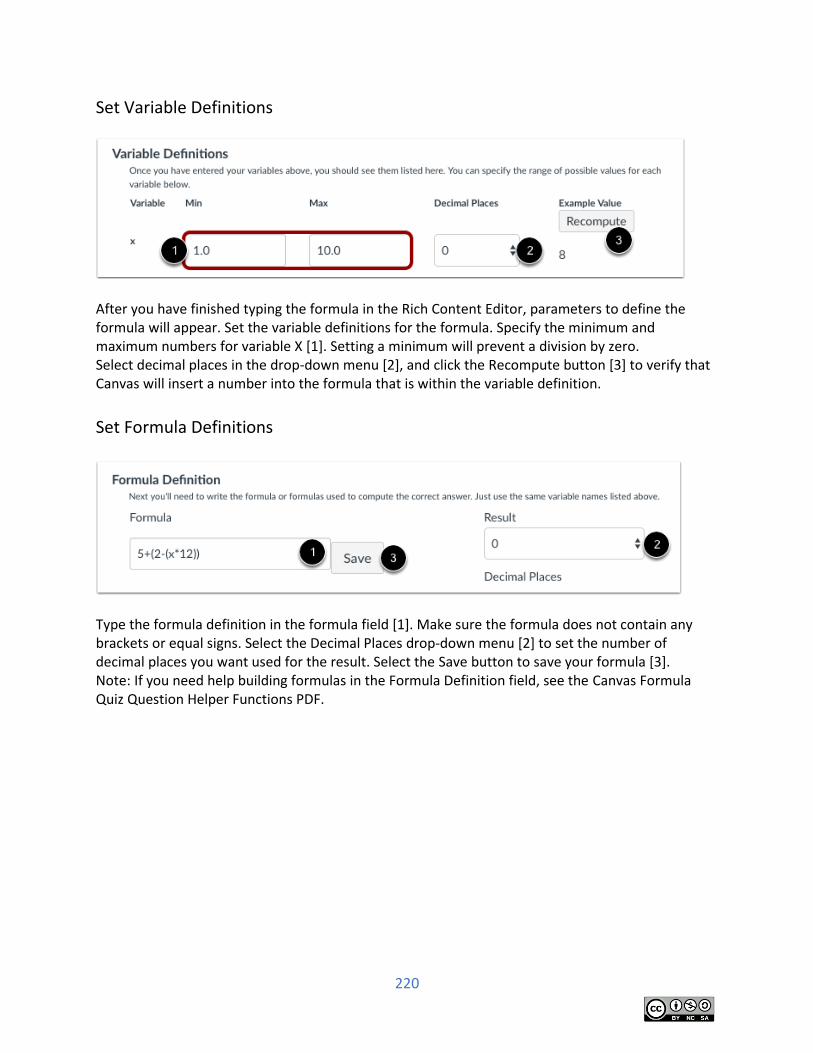
220
Set Variable Definitions
After you have finished typing the formula in the Rich Content Editor, parameters to define the formula will appear. Set the variable definitions for the formula. Specify the minimum and maximum numbers for variable X [1]. Setting a minimum will prevent a division by zero. Select decimal places in the drop-down menu [2], and click the Recompute button [3] to verify that Canvas will insert a number into the formula that is within the variable definition.
Set Formula Definitions
Type the formula definition in the formula field [1]. Make sure the formula does not contain any brackets or equal signs. Select the Decimal Places drop-down menu [2] to set the number of decimal places you want used for the result. Select the Save button to save your formula [3]. Note: If you need help building formulas in the Formula Definition field, see the Canvas Formula Quiz Question Helper Functions PDF.
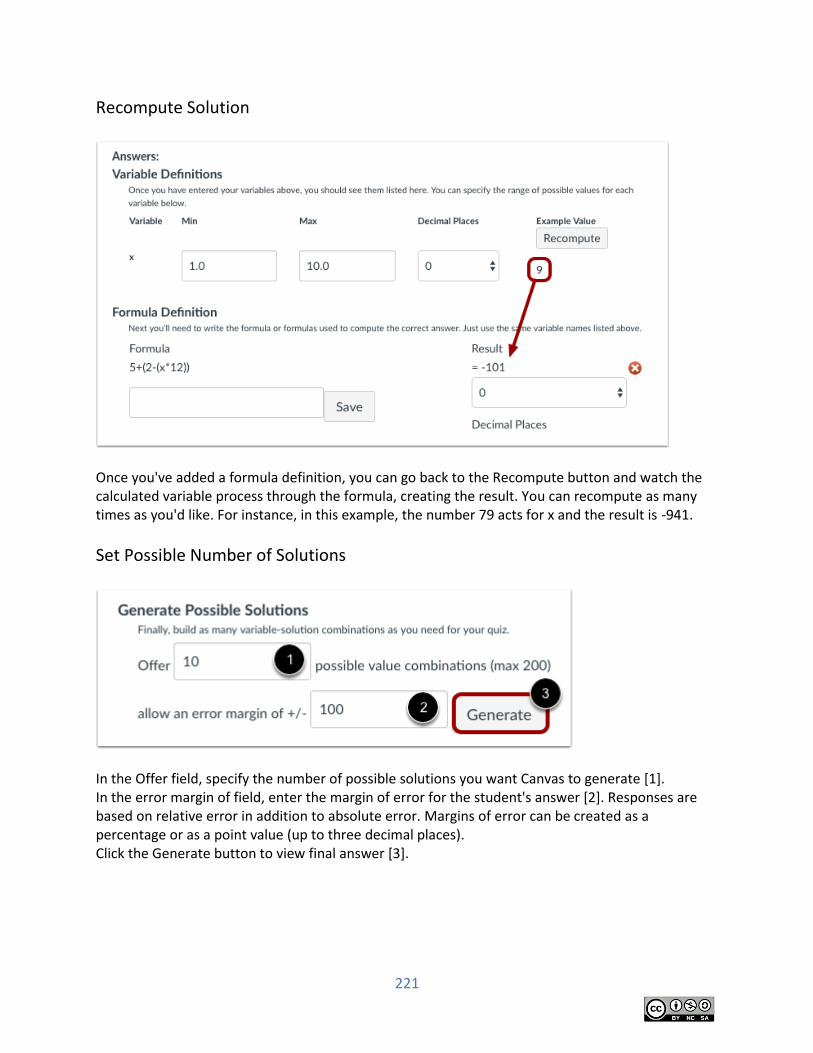
221
Recompute Solution
Once you've added a formula definition, you can go back to the Recompute button and watch the calculated variable process through the formula, creating the result. You can recompute as many times as you'd like. For instance, in this example, the number 79 acts for x and the result is -941.
Set Possible Number of Solutions
In the Offer field, specify the number of possible solutions you want Canvas to generate [1]. In the error margin of field, enter the margin of error for the student's answer [2]. Responses are based on relative error in addition to absolute error. Margins of error can be created as a percentage or as a point value (up to three decimal places). Click the Generate button to view final answer [3].

222
View Possible Solutions
Possible solutions will process according to the number of value combinations.
Provide Feedback
You can provide feedback for the question by clicking an answer comment field and entering text. The comment fields are color-coded to correspond with the type of answer the student provides. Green is for correct answer feedback [1], red is for incorrect answer feedback [2], and blue is for general question feedback [3]. Note: Any applicable feedback is visible as soon as a quiz is submitted and cannot be hidden from students.
Update Question
Click the Update Question button. Add additional individual questions as needed.
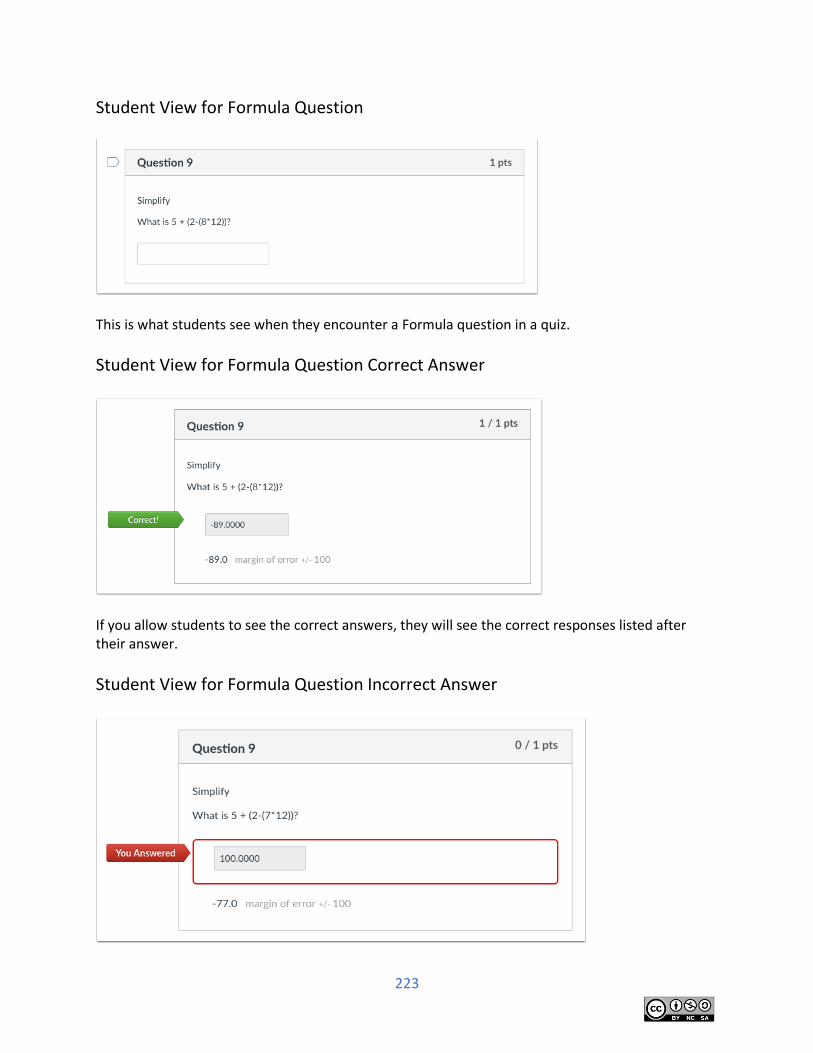
223
Student View for Formula Question
This is what students see when they encounter a Formula question in a quiz.
Student View for Formula Question Correct Answer
If you allow students to see the correct answers, they will see the correct responses listed after their answer.
Student View for Formula Question Incorrect Answer
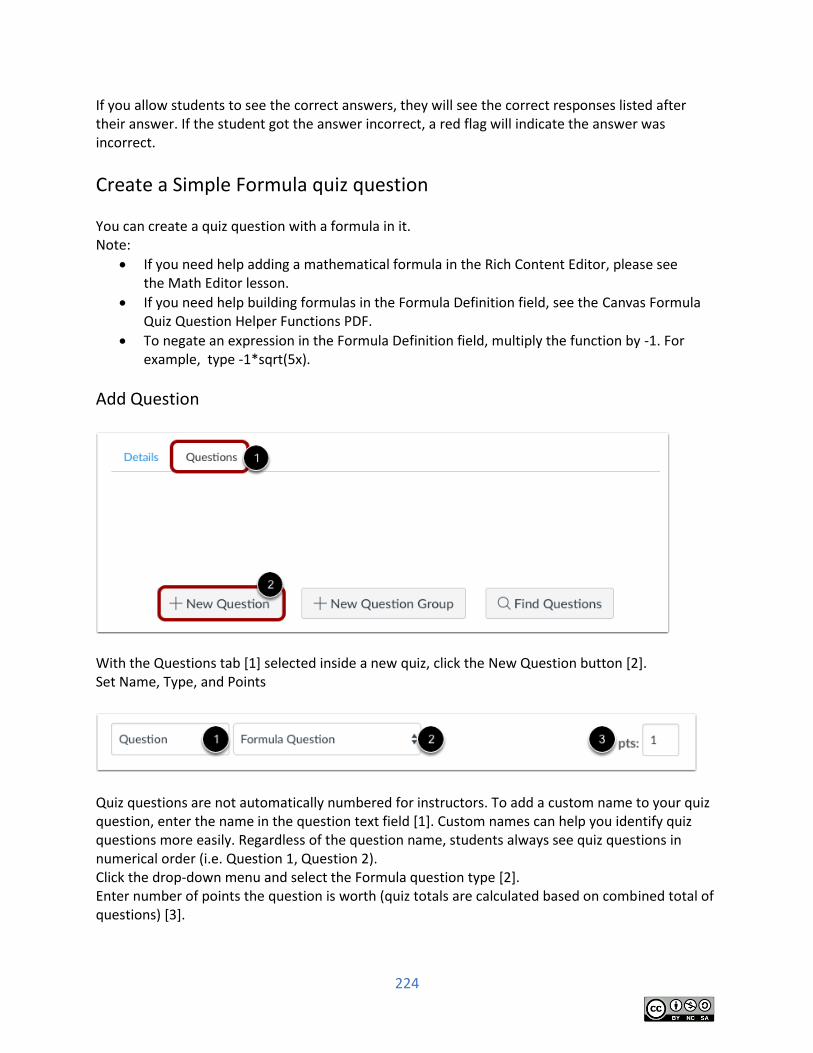
224
If you allow students to see the correct answers, they will see the correct responses listed after their answer. If the student got the answer incorrect, a red flag will indicate the answer was incorrect.
Create a Simple Formula quiz question You can create a quiz question with a formula in it. Note:
If you need help adding a mathematical formula in the Rich Content Editor, please see the Math Editor lesson.
If you need help building formulas in the Formula Definition field, see the Canvas Formula Quiz Question Helper Functions PDF.
To negate an expression in the Formula Definition field, multiply the function by -1. For example, type -1*sqrt(5x).
Add Question
With the Questions tab [1] selected inside a new quiz, click the New Question button [2]. Set Name, Type, and Points
Quiz questions are not automatically numbered for instructors. To add a custom name to your quiz question, enter the name in the question text field [1]. Custom names can help you identify quiz questions more easily. Regardless of the question name, students always see quiz questions in numerical order (i.e. Question 1, Question 2). Click the drop-down menu and select the Formula question type [2]. Enter number of points the question is worth (quiz totals are calculated based on combined total of questions) [3].
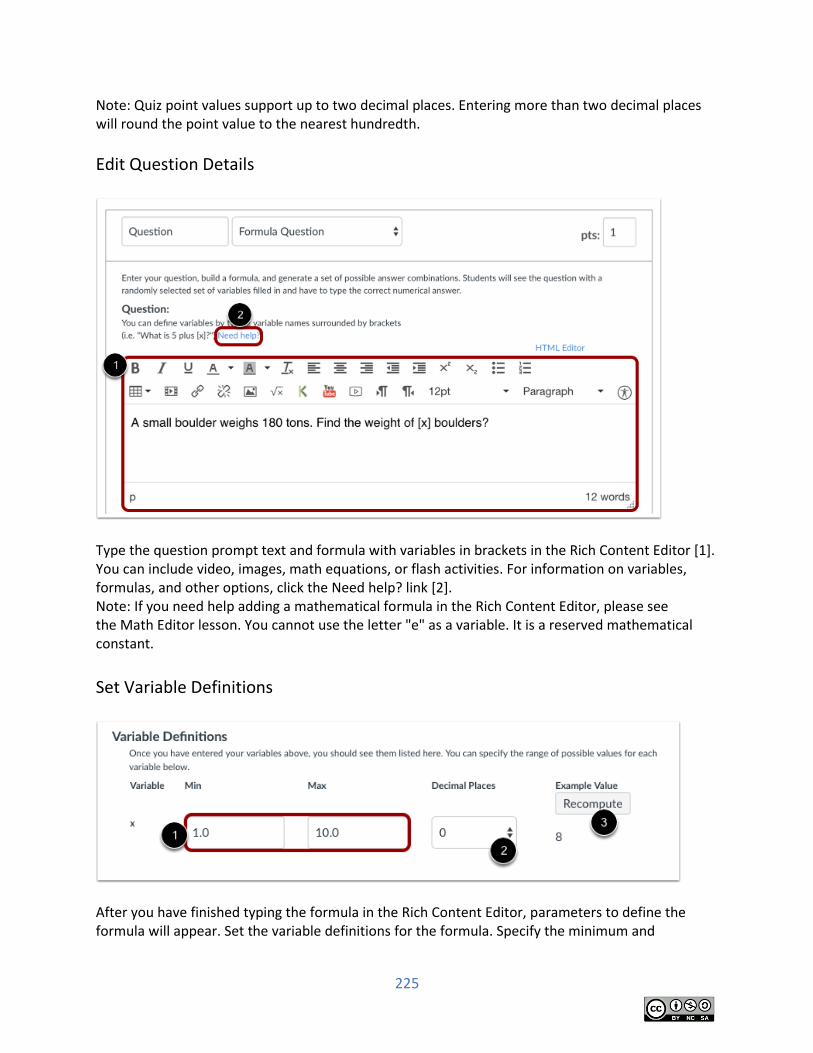
225
Note: Quiz point values support up to two decimal places. Entering more than two decimal places will round the point value to the nearest hundredth.
Edit Question Details
Type the question prompt text and formula with variables in brackets in the Rich Content Editor [1]. You can include video, images, math equations, or flash activities. For information on variables, formulas, and other options, click the Need help? link [2]. Note: If you need help adding a mathematical formula in the Rich Content Editor, please see the Math Editor lesson. You cannot use the letter "e" as a variable. It is a reserved mathematical constant.
Set Variable Definitions
After you have finished typing the formula in the Rich Content Editor, parameters to define the formula will appear. Set the variable definitions for the formula. Specify the minimum and
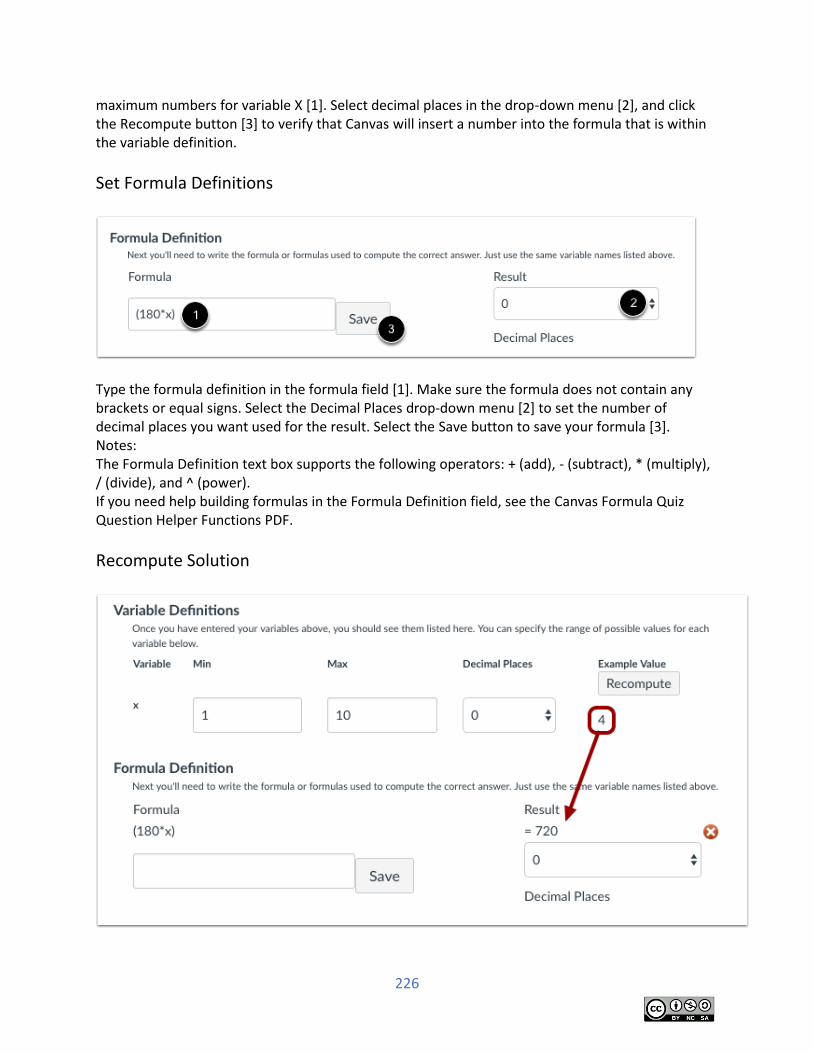
226
maximum numbers for variable X [1]. Select decimal places in the drop-down menu [2], and click the Recompute button [3] to verify that Canvas will insert a number into the formula that is within the variable definition.
Set Formula Definitions
Type the formula definition in the formula field [1]. Make sure the formula does not contain any brackets or equal signs. Select the Decimal Places drop-down menu [2] to set the number of decimal places you want used for the result. Select the Save button to save your formula [3]. Notes: The Formula Definition text box supports the following operators: + (add), - (subtract), * (multiply), / (divide), and ^ (power). If you need help building formulas in the Formula Definition field, see the Canvas Formula Quiz Question Helper Functions PDF.
Recompute Solution
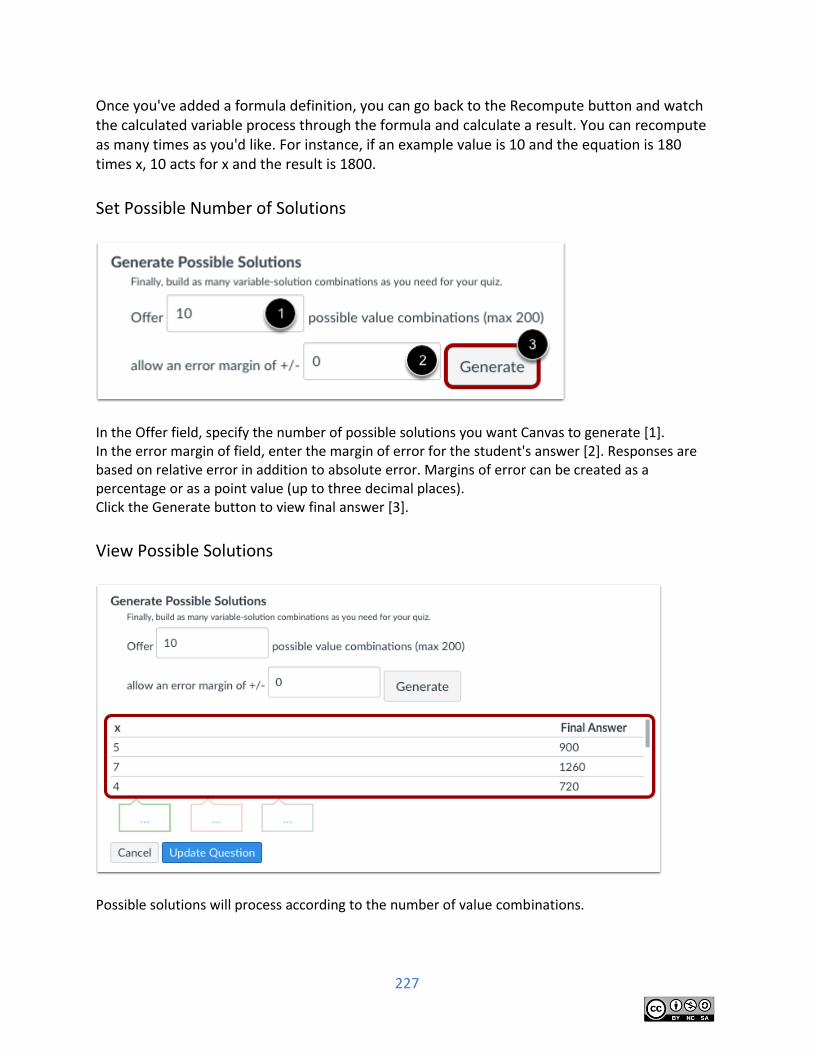
227
Once you've added a formula definition, you can go back to the Recompute button and watch the calculated variable process through the formula and calculate a result. You can recompute as many times as you'd like. For instance, if an example value is 10 and the equation is 180 times x, 10 acts for x and the result is 1800.
Set Possible Number of Solutions
In the Offer field, specify the number of possible solutions you want Canvas to generate [1]. In the error margin of field, enter the margin of error for the student's answer [2]. Responses are based on relative error in addition to absolute error. Margins of error can be created as a percentage or as a point value (up to three decimal places). Click the Generate button to view final answer [3].
View Possible Solutions
Possible solutions will process according to the number of value combinations.
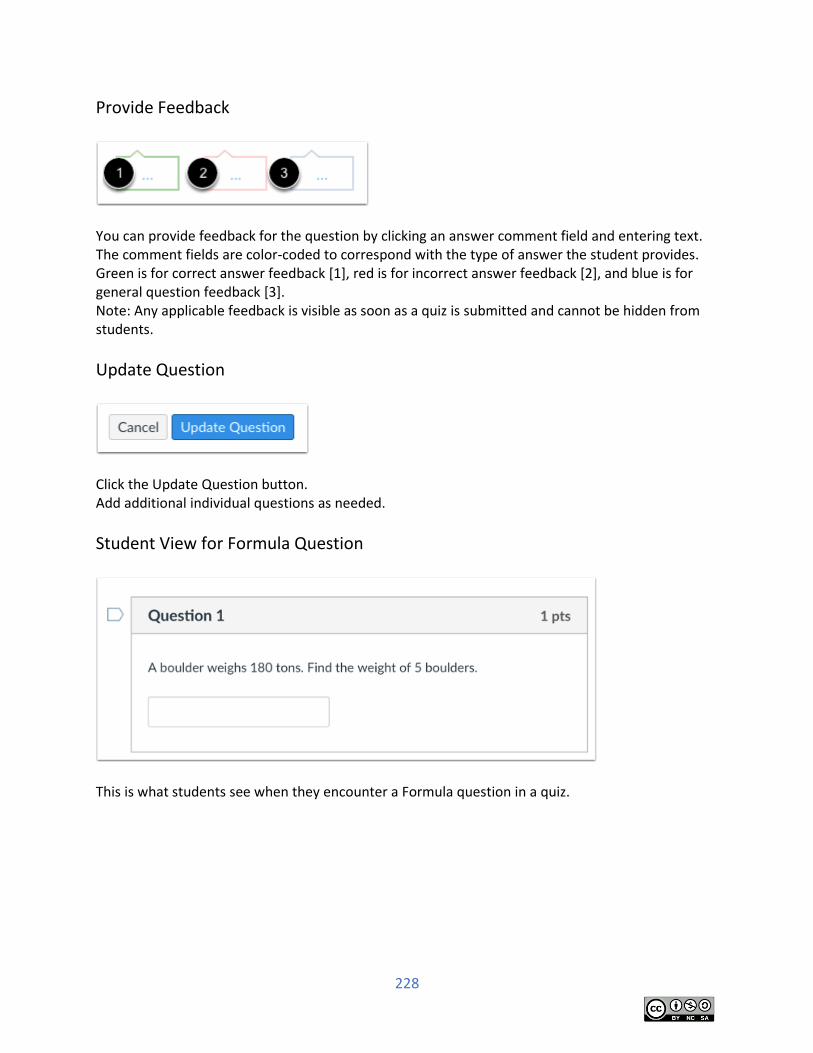
228
Provide Feedback
You can provide feedback for the question by clicking an answer comment field and entering text. The comment fields are color-coded to correspond with the type of answer the student provides. Green is for correct answer feedback [1], red is for incorrect answer feedback [2], and blue is for general question feedback [3]. Note: Any applicable feedback is visible as soon as a quiz is submitted and cannot be hidden from students.
Update Question
Click the Update Question button. Add additional individual questions as needed.
Student View for Formula Question
This is what students see when they encounter a Formula question in a quiz.
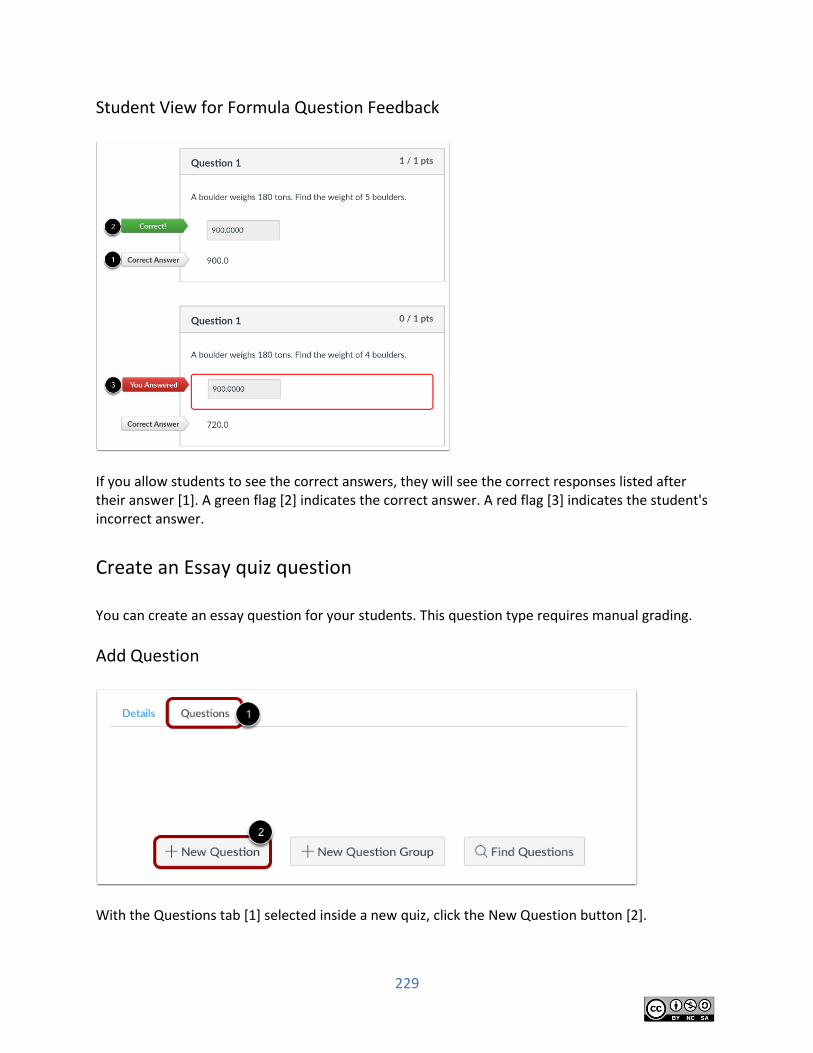
229
Student View for Formula Question Feedback
If you allow students to see the correct answers, they will see the correct responses listed after their answer [1]. A green flag [2] indicates the correct answer. A red flag [3] indicates the student's incorrect answer.
Create an Essay quiz question You can create an essay question for your students. This question type requires manual grading.
Add Question
With the Questions tab [1] selected inside a new quiz, click the New Question button [2].
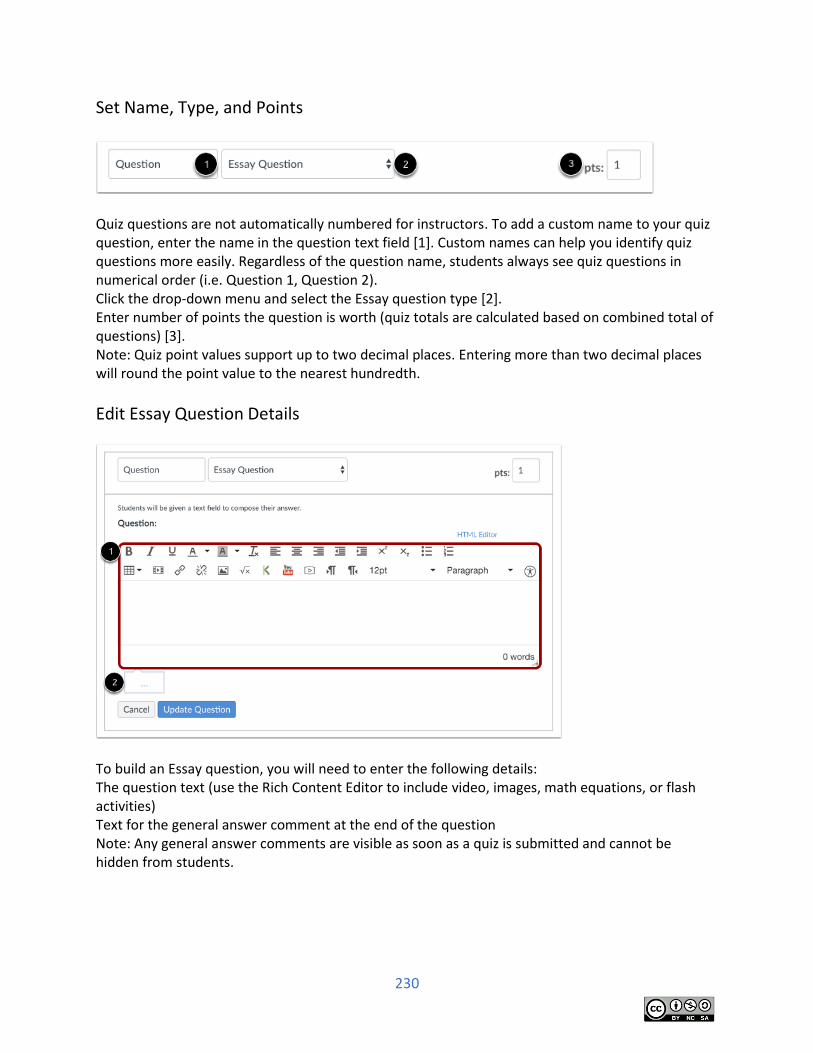
230
Set Name, Type, and Points
Quiz questions are not automatically numbered for instructors. To add a custom name to your quiz question, enter the name in the question text field [1]. Custom names can help you identify quiz questions more easily. Regardless of the question name, students always see quiz questions in numerical order (i.e. Question 1, Question 2). Click the drop-down menu and select the Essay question type [2]. Enter number of points the question is worth (quiz totals are calculated based on combined total of questions) [3]. Note: Quiz point values support up to two decimal places. Entering more than two decimal places will round the point value to the nearest hundredth.
Edit Essay Question Details
To build an Essay question, you will need to enter the following details: The question text (use the Rich Content Editor to include video, images, math equations, or flash activities) Text for the general answer comment at the end of the question Note: Any general answer comments are visible as soon as a quiz is submitted and cannot be hidden from students.
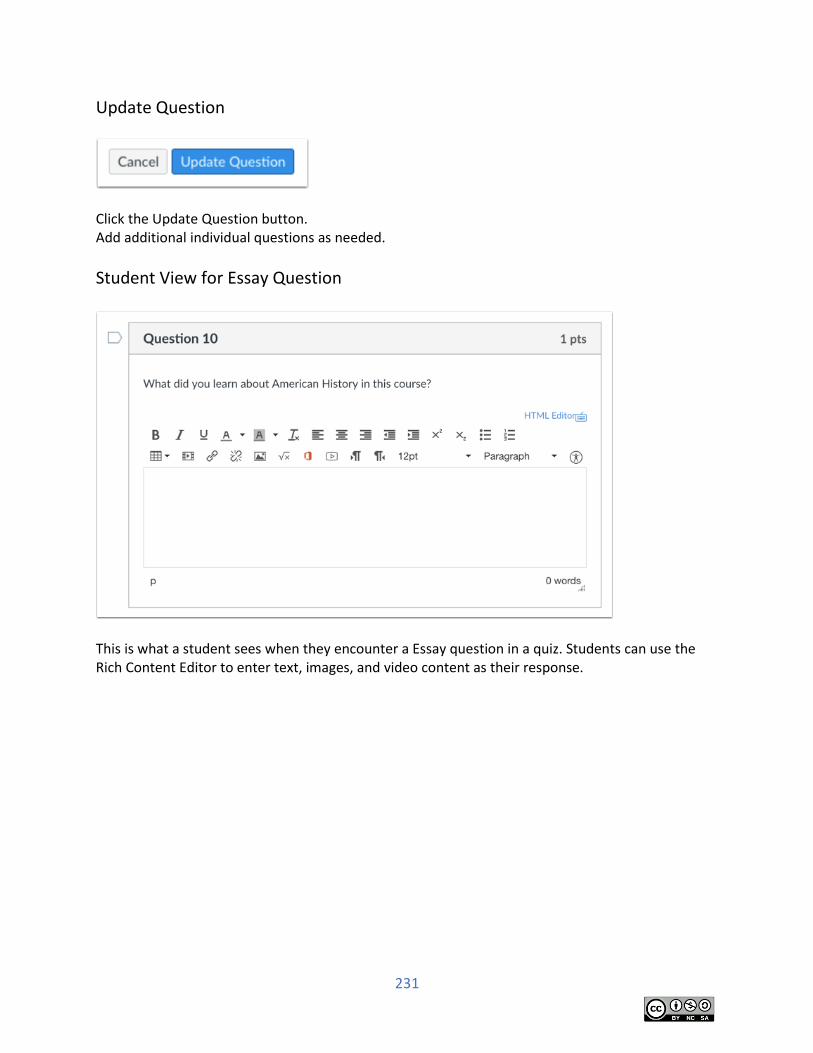
231
Update Question
Click the Update Question button. Add additional individual questions as needed.
Student View for Essay Question
This is what a student sees when they encounter a Essay question in a quiz. Students can use the Rich Content Editor to enter text, images, and video content as their response.
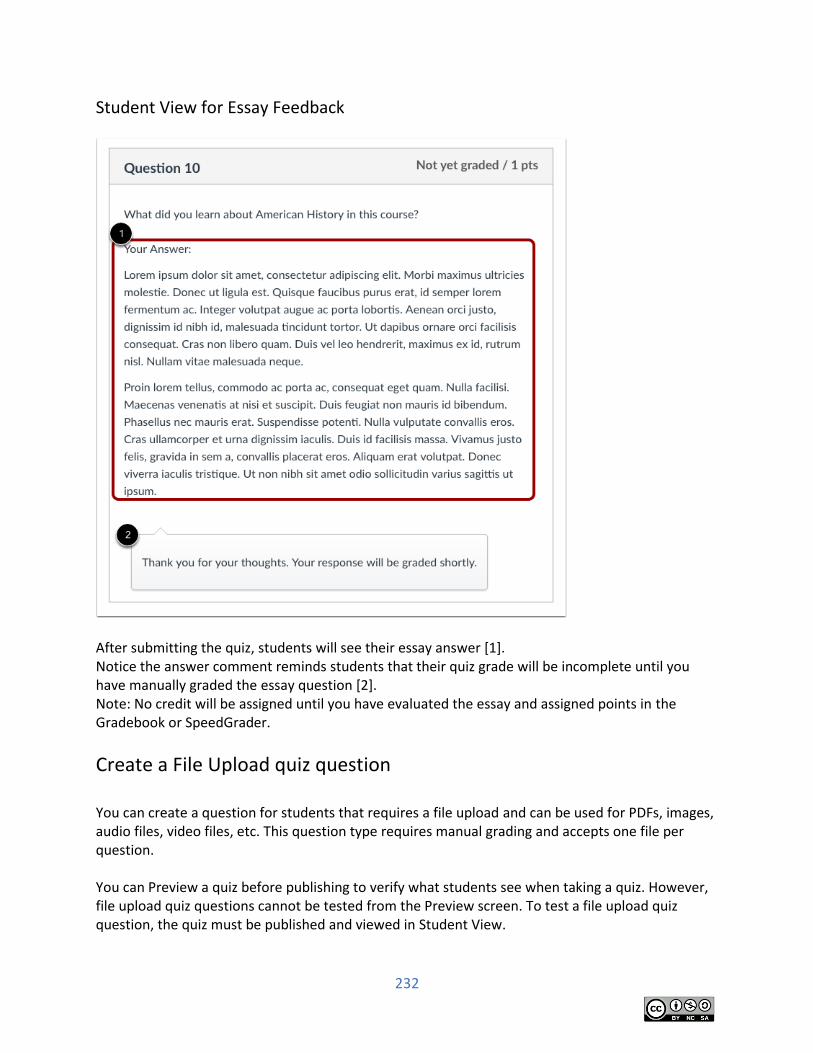
232
Student View for Essay Feedback
After submitting the quiz, students will see their essay answer [1]. Notice the answer comment reminds students that their quiz grade will be incomplete until you have manually graded the essay question [2]. Note: No credit will be assigned until you have evaluated the essay and assigned points in the Gradebook or SpeedGrader.
Create a File Upload quiz question You can create a question for students that requires a file upload and can be used for PDFs, images, audio files, video files, etc. This question type requires manual grading and accepts one file per question. You can Preview a quiz before publishing to verify what students see when taking a quiz. However, file upload quiz questions cannot be tested from the Preview screen. To test a file upload quiz question, the quiz must be published and viewed in Student View.
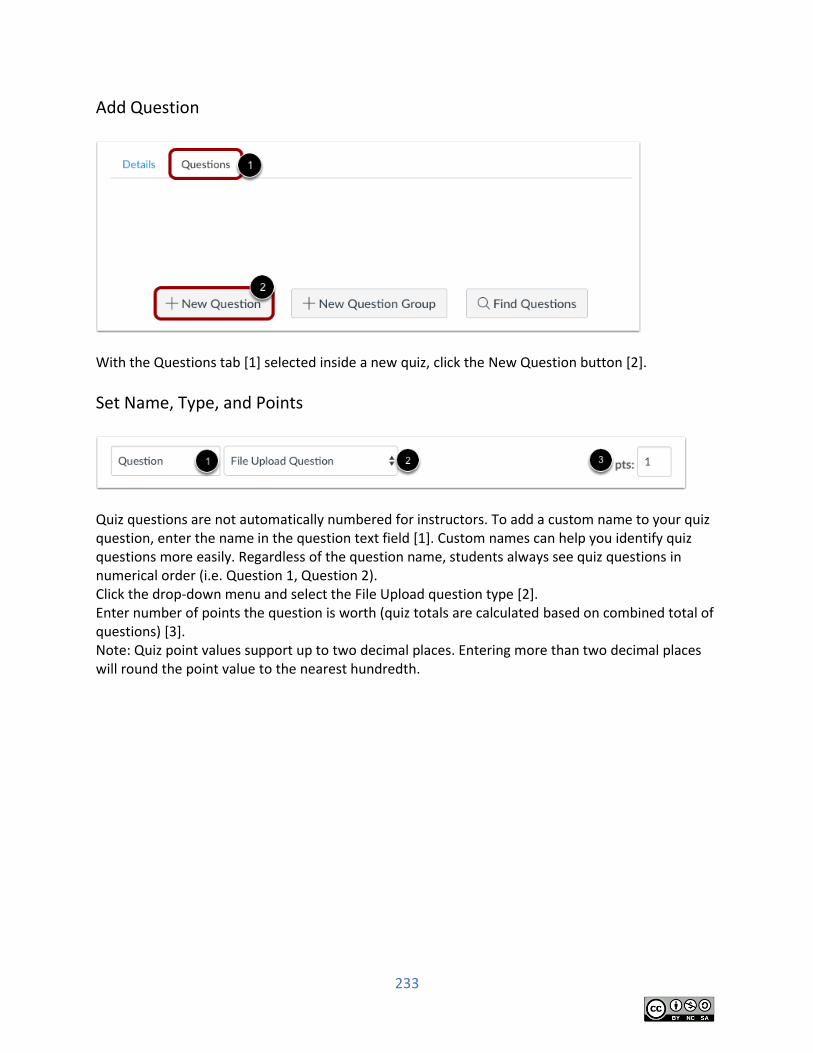
233
Add Question
With the Questions tab [1] selected inside a new quiz, click the New Question button [2].
Set Name, Type, and Points
Quiz questions are not automatically numbered for instructors. To add a custom name to your quiz question, enter the name in the question text field [1]. Custom names can help you identify quiz questions more easily. Regardless of the question name, students always see quiz questions in numerical order (i.e. Question 1, Question 2). Click the drop-down menu and select the File Upload question type [2]. Enter number of points the question is worth (quiz totals are calculated based on combined total of questions) [3]. Note: Quiz point values support up to two decimal places. Entering more than two decimal places will round the point value to the nearest hundredth.
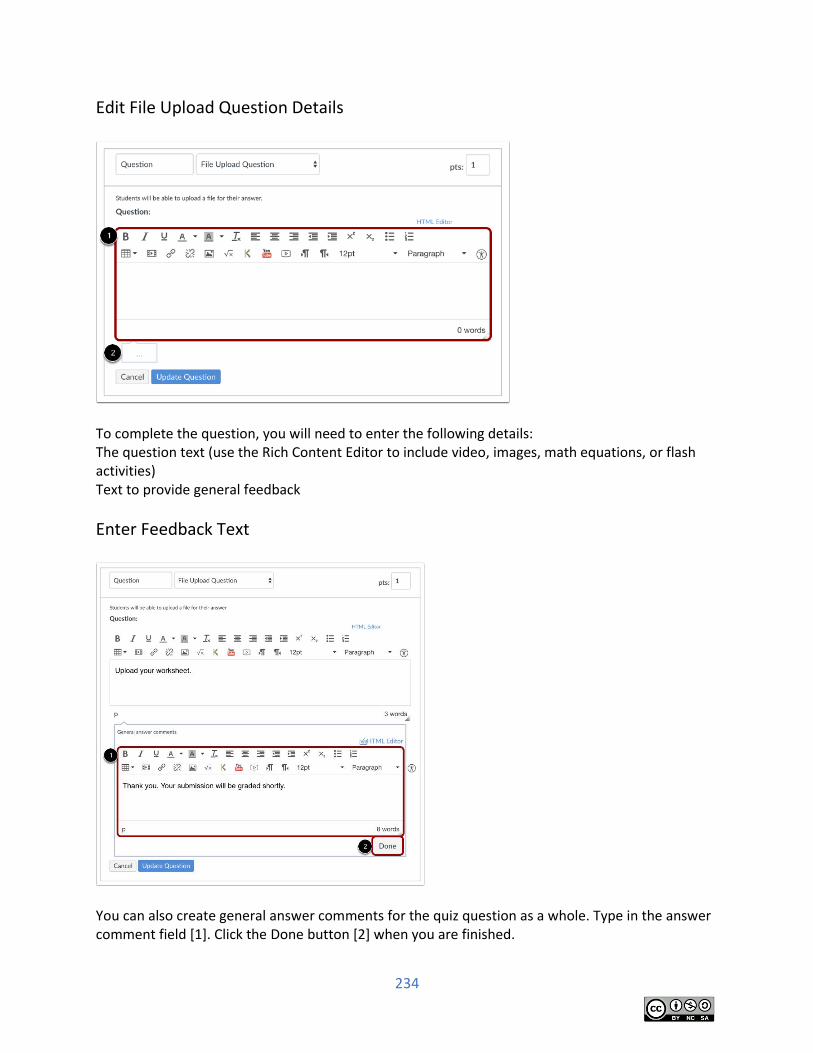
234
Edit File Upload Question Details
To complete the question, you will need to enter the following details: The question text (use the Rich Content Editor to include video, images, math equations, or flash activities) Text to provide general feedback
Enter Feedback Text
You can also create general answer comments for the quiz question as a whole. Type in the answer comment field [1]. Click the Done button [2] when you are finished.
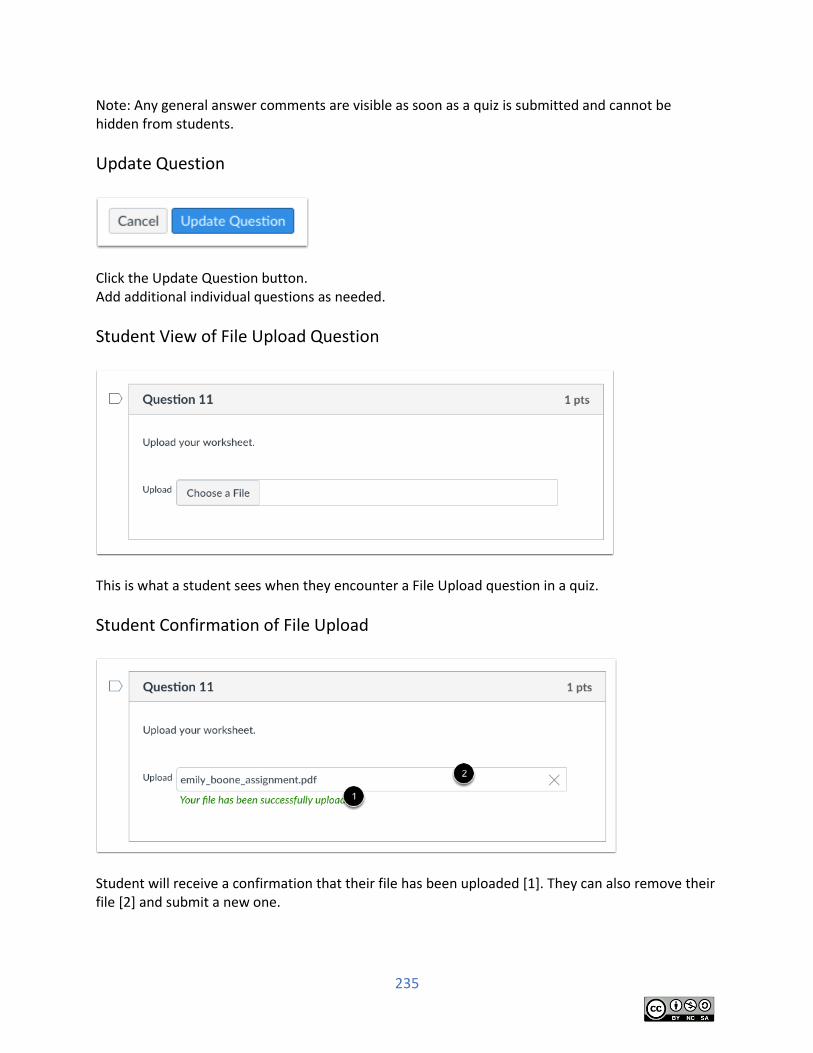
235
Note: Any general answer comments are visible as soon as a quiz is submitted and cannot be hidden from students.
Update Question
Click the Update Question button. Add additional individual questions as needed.
Student View of File Upload Question
This is what a student sees when they encounter a File Upload question in a quiz.
Student Confirmation of File Upload
Student will receive a confirmation that their file has been uploaded [1]. They can also remove their file [2] and submit a new one.
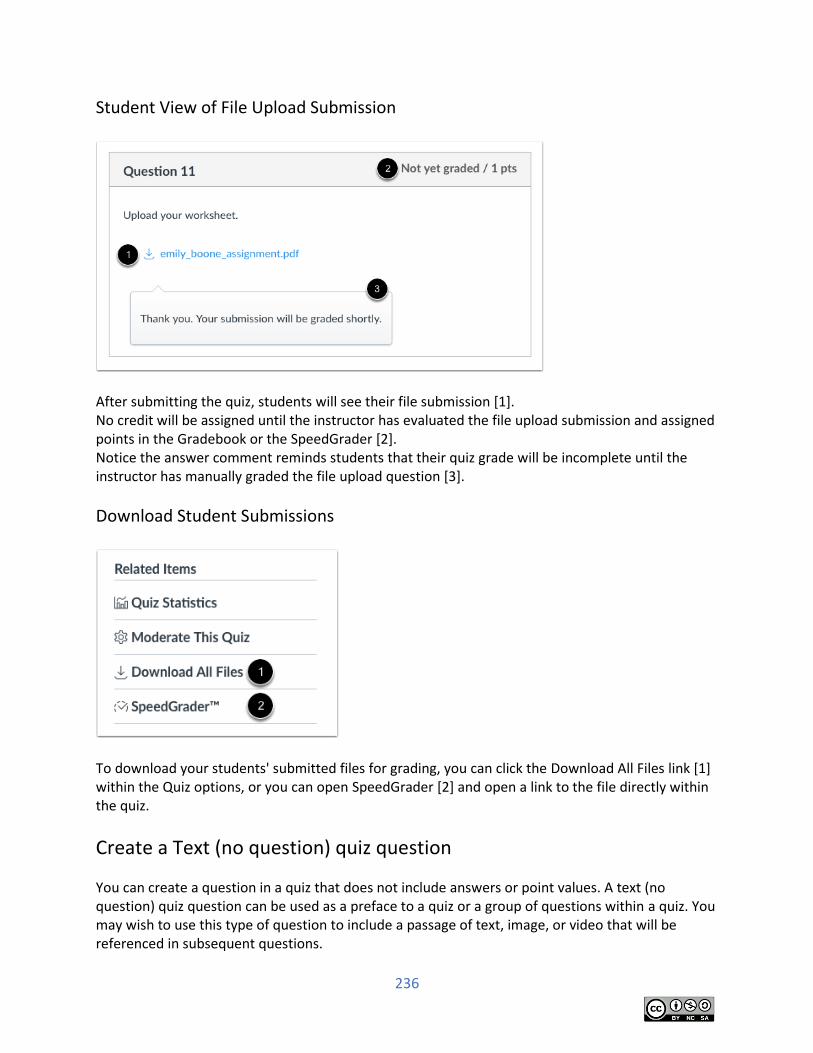
236
Student View of File Upload Submission
After submitting the quiz, students will see their file submission [1]. No credit will be assigned until the instructor has evaluated the file upload submission and assigned points in the Gradebook or the SpeedGrader [2]. Notice the answer comment reminds students that their quiz grade will be incomplete until the instructor has manually graded the file upload question [3].
Download Student Submissions
To download your students' submitted files for grading, you can click the Download All Files link [1] within the Quiz options, or you can open SpeedGrader [2] and open a link to the file directly within the quiz.
Create a Text (no question) quiz question
You can create a question in a quiz that does not include answers or point values. A text (no question) quiz question can be used as a preface to a quiz or a group of questions within a quiz. You may wish to use this type of question to include a passage of text, image, or video that will be referenced in subsequent questions.
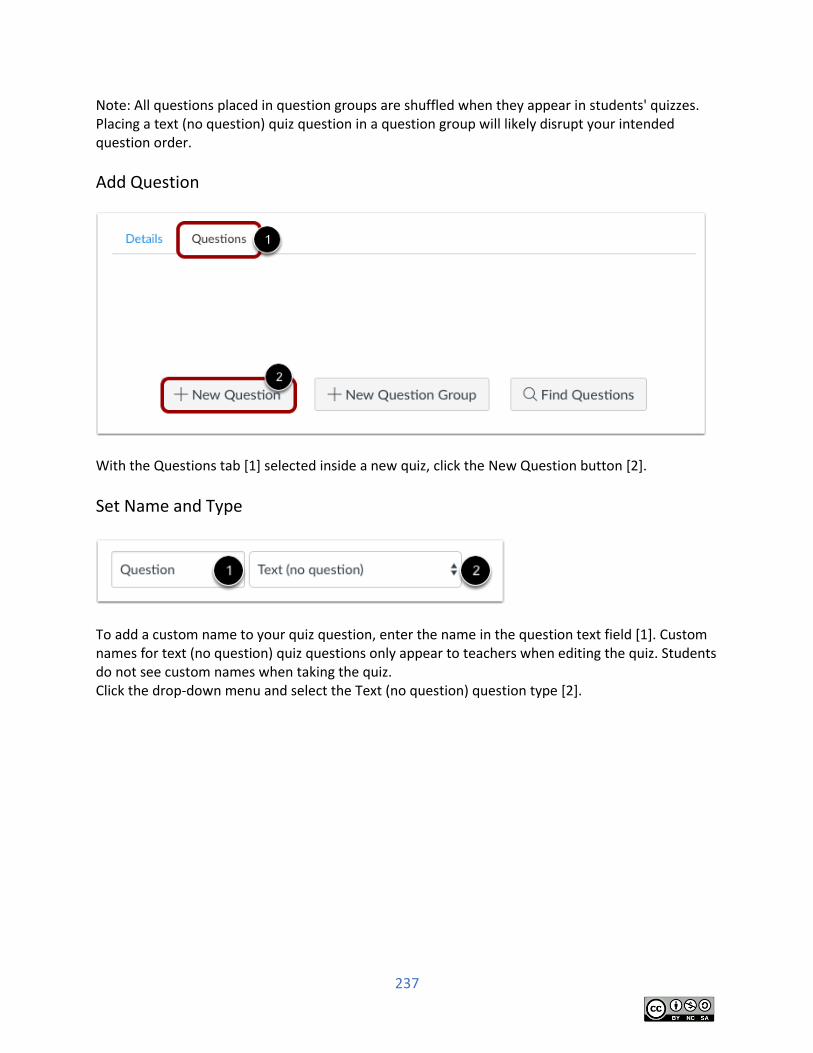
237
Note: All questions placed in question groups are shuffled when they appear in students' quizzes. Placing a text (no question) quiz question in a question group will likely disrupt your intended question order.
Add Question
With the Questions tab [1] selected inside a new quiz, click the New Question button [2].
Set Name and Type
To add a custom name to your quiz question, enter the name in the question text field [1]. Custom names for text (no question) quiz questions only appear to teachers when editing the quiz. Students do not see custom names when taking the quiz. Click the drop-down menu and select the Text (no question) question type [2].
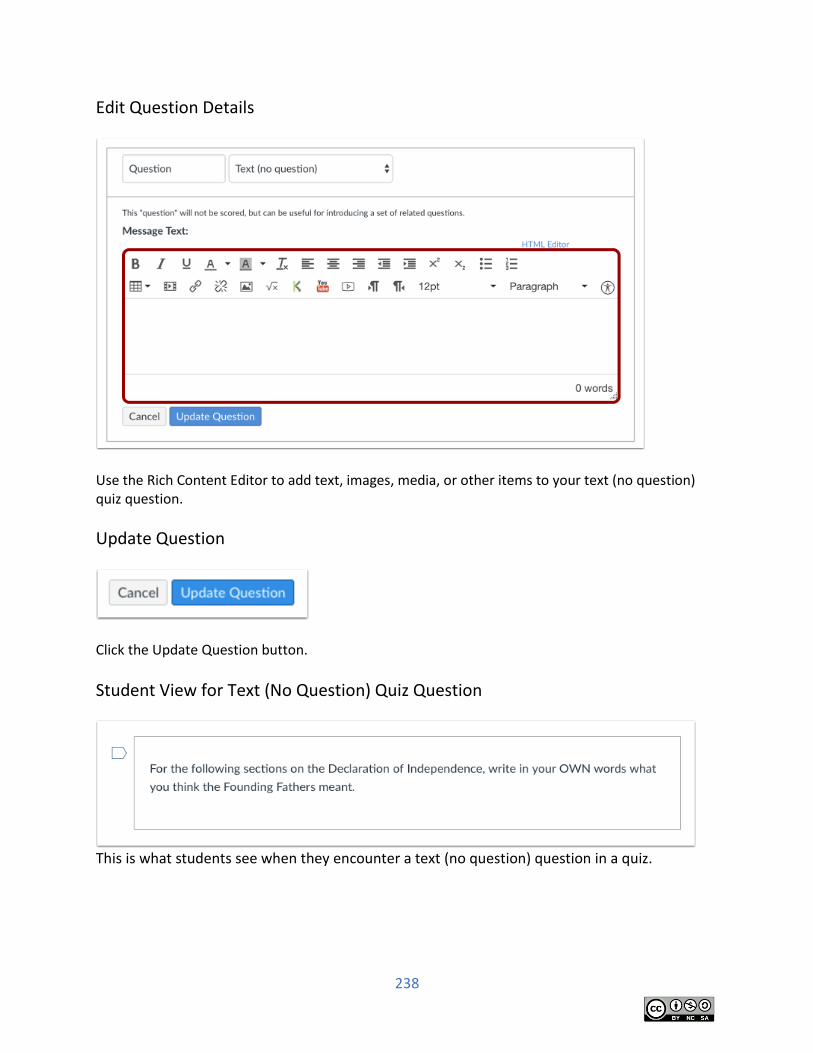
238
Edit Question Details
Use the Rich Content Editor to add text, images, media, or other items to your text (no question) quiz question.
Update Question
Click the Update Question button.
Student View for Text (No Question) Quiz Question
This is what students see when they encounter a text (no question) question in a quiz.

239
Use the Quizzes Index Page You can view all your quizzes in your course on the Quizzes Index page. As an instructor, you can also add quizzes and modify quiz settings.
Open Quizzes
In Course Navigation, click the Quizzes link.
View Quizzes Index Page
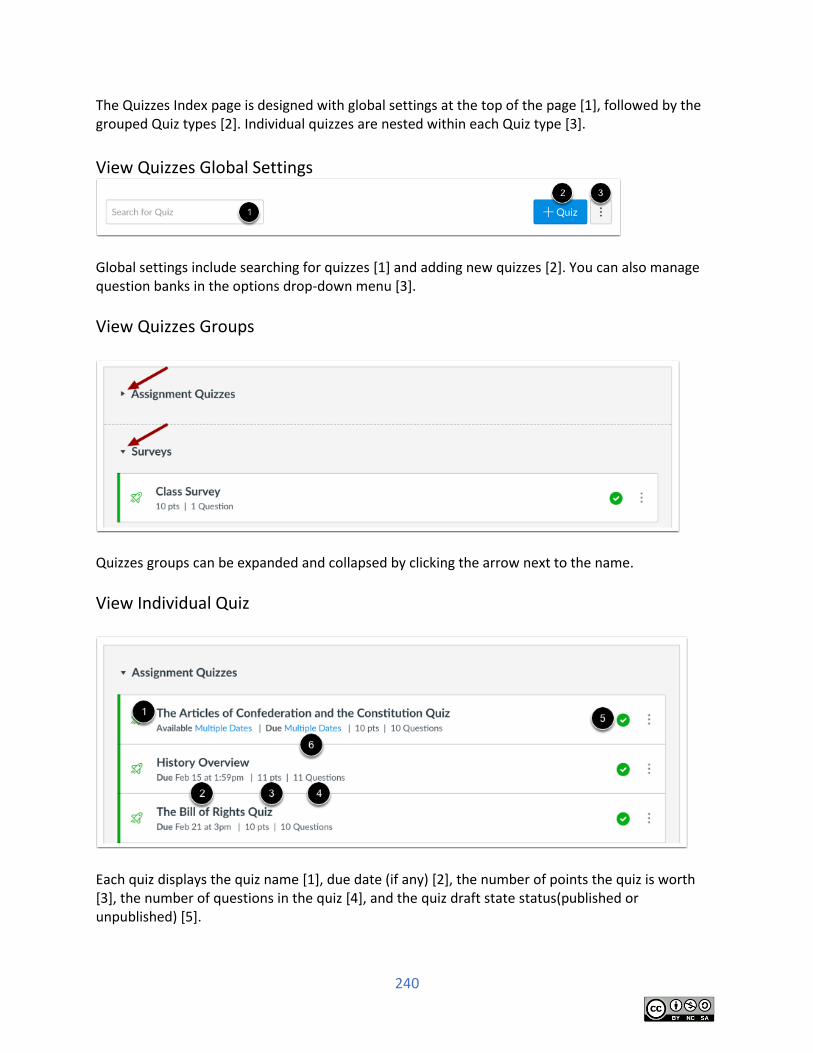
240
The Quizzes Index page is designed with global settings at the top of the page [1], followed by the grouped Quiz types [2]. Individual quizzes are nested within each Quiz type [3].
View Quizzes Global Settings
Global settings include searching for quizzes [1] and adding new quizzes [2]. You can also manage question banks in the options drop-down menu [3].
View Quizzes Groups
Quizzes groups can be expanded and collapsed by clicking the arrow next to the name.
View Individual Quiz
Each quiz displays the quiz name [1], due date (if any) [2], the number of points the quiz is worth [3], the number of questions in the quiz [4], and the quiz draft state status(published or unpublished) [5].
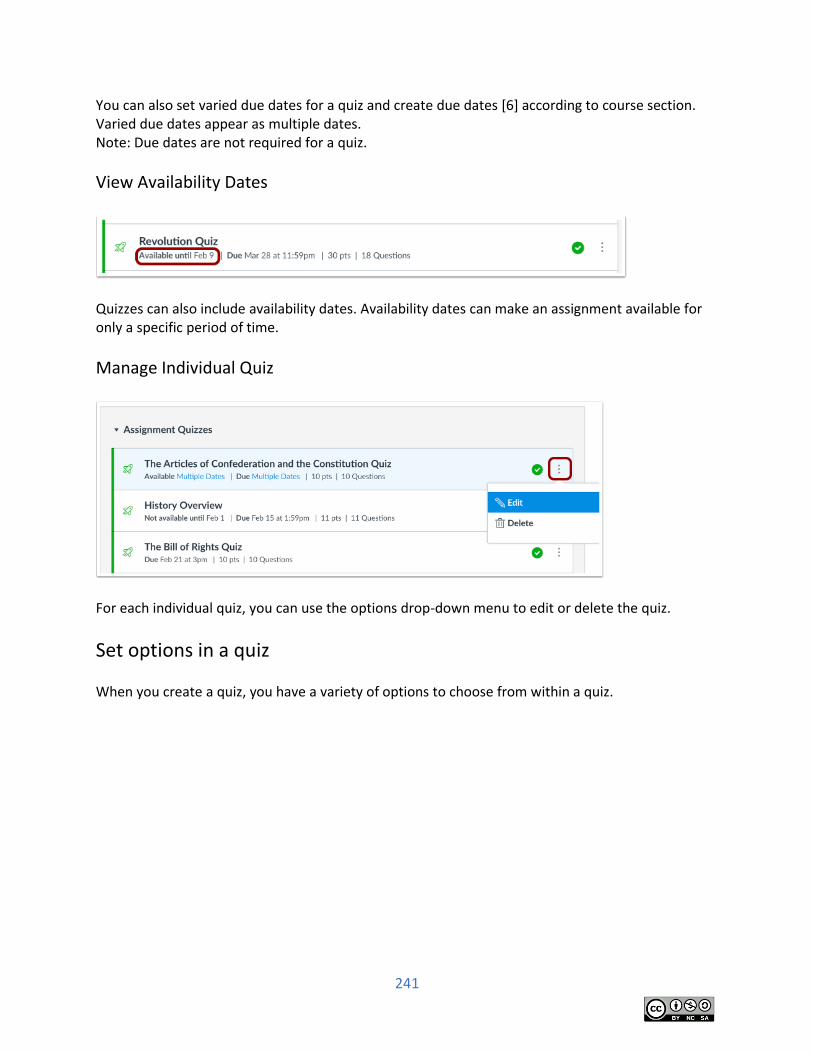
241
You can also set varied due dates for a quiz and create due dates [6] according to course section. Varied due dates appear as multiple dates. Note: Due dates are not required for a quiz.
View Availability Dates
Quizzes can also include availability dates. Availability dates can make an assignment available for only a specific period of time.
Manage Individual Quiz
For each individual quiz, you can use the options drop-down menu to edit or delete the quiz.
Set options in a quiz When you create a quiz, you have a variety of options to choose from within a quiz.
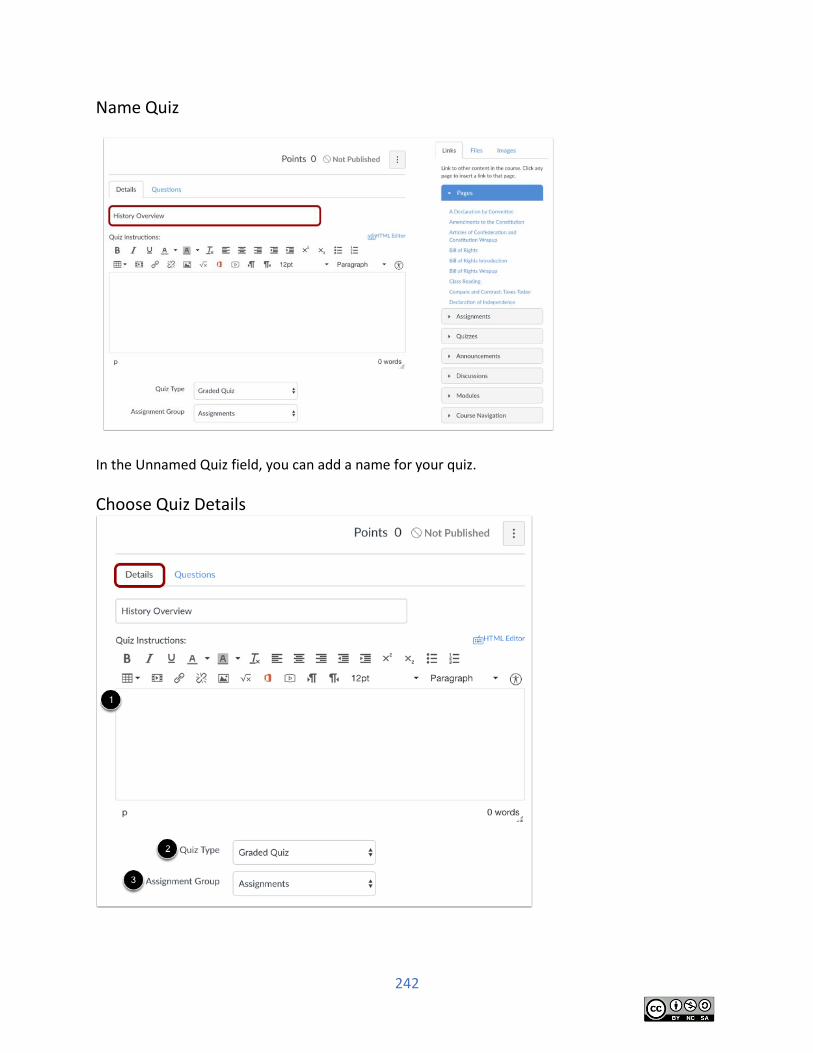
242
Name Quiz
In the Unnamed Quiz field, you can add a name for your quiz.
Choose Quiz Details
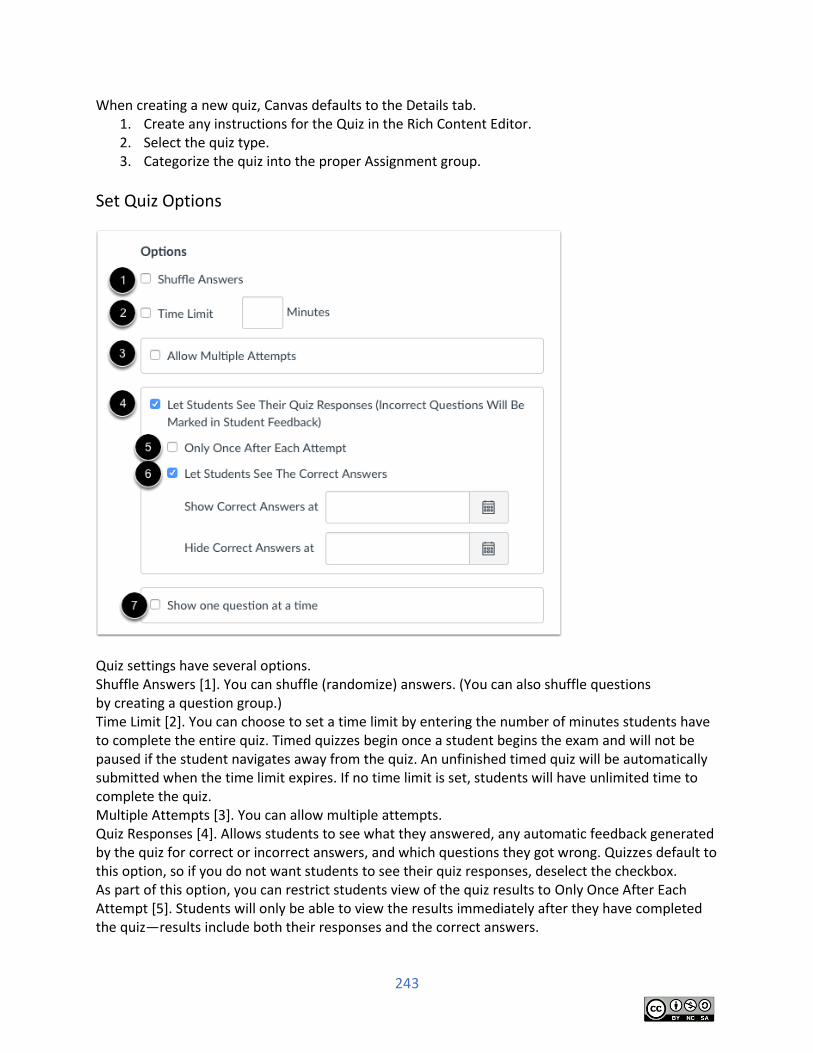
243
When creating a new quiz, Canvas defaults to the Details tab. 1. Create any instructions for the Quiz in the Rich Content Editor. 2. Select the quiz type. 3. Categorize the quiz into the proper Assignment group.
Set Quiz Options
Quiz settings have several options. Shuffle Answers [1]. You can shuffle (randomize) answers. (You can also shuffle questions by creating a question group.) Time Limit [2]. You can choose to set a time limit by entering the number of minutes students have to complete the entire quiz. Timed quizzes begin once a student begins the exam and will not be paused if the student navigates away from the quiz. An unfinished timed quiz will be automatically submitted when the time limit expires. If no time limit is set, students will have unlimited time to complete the quiz. Multiple Attempts [3]. You can allow multiple attempts. Quiz Responses [4]. Allows students to see what they answered, any automatic feedback generated by the quiz for correct or incorrect answers, and which questions they got wrong. Quizzes default to this option, so if you do not want students to see their quiz responses, deselect the checkbox. As part of this option, you can restrict students view of the quiz results to Only Once After Each Attempt [5]. Students will only be able to view the results immediately after they have completed the quiz—results include both their responses and the correct answers.
244
This option may not be appropriate for quizzes that require manual grading, such as essay questions, where students would require additional views to see the updated results. When a quiz is saved with the Only Once After Each Attempt option, you can use the Moderate Quiz feature to give students additional views to their quiz results. Correct Answers [6]. This setting enables a green Correct tab on every correct answer for the entire quiz. Quizzes default to this option, so if you do not want students to see the correct answers, deselect the checkbox. As a part of this option, you can also control when and for how long students can see the correct answers by setting dates (and specific times, if desired) in the Show and Hide fields. To show answers immediately after quiz is submitted, leave the Show and Hide fields blank. To create a date range to display the answers, set a start date in the Show field and an ending date in the Hide field. To always show answers after a specific date, set a date in the Show field. To hide answers after a specific date, set a date in the Hide field. Note: If the Only Once After Each Attempt option is selected, it will override any show or hide dates or times. If you want to show or hide correct answers on any specific date or time, the Only Once option should not be selected. One Question at a Time [7]. You can show one question at a time and lock questions after answering. Note: If your Canvas admin has restricted students from viewing quiz submissions after the course ends, options 4 and 6 will not be available after the course end date has passed.
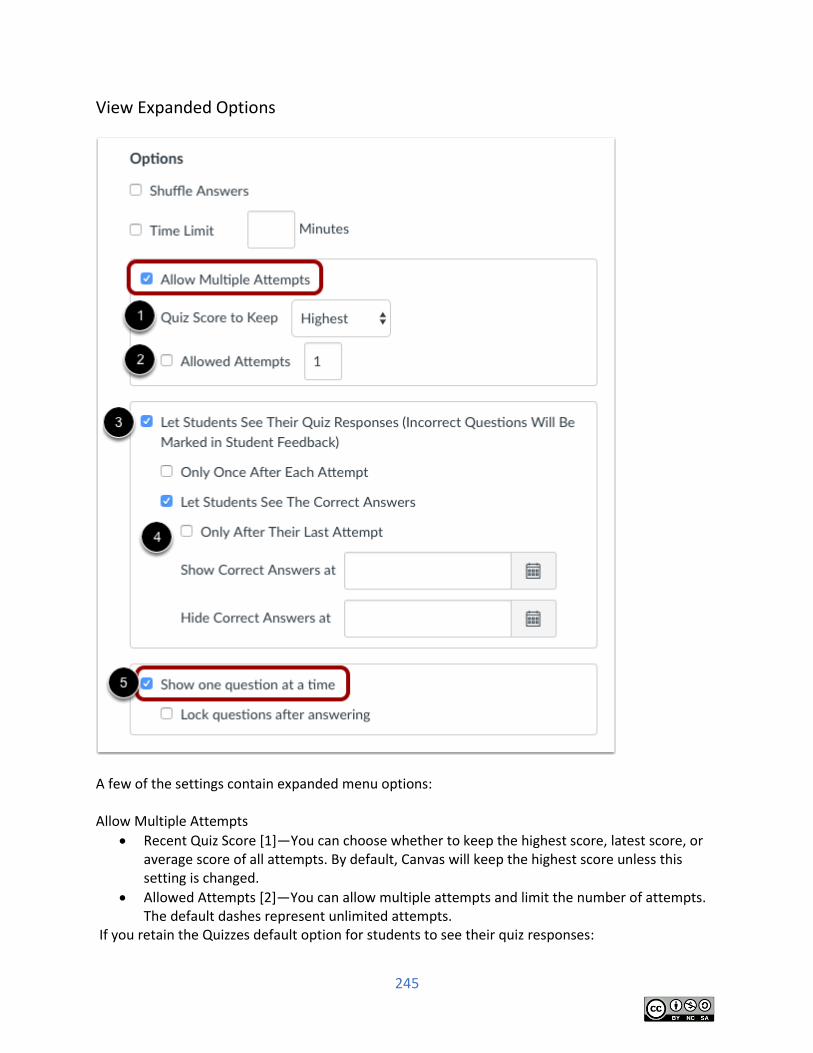
245
View Expanded Options
A few of the settings contain expanded menu options: Allow Multiple Attempts
Recent Quiz Score [1]—You can choose whether to keep the highest score, latest score, or average score of all attempts. By default, Canvas will keep the highest score unless this setting is changed.
Allowed Attempts [2]—You can allow multiple attempts and limit the number of attempts. The default dashes represent unlimited attempts.
If you retain the Quizzes default option for students to see their quiz responses:
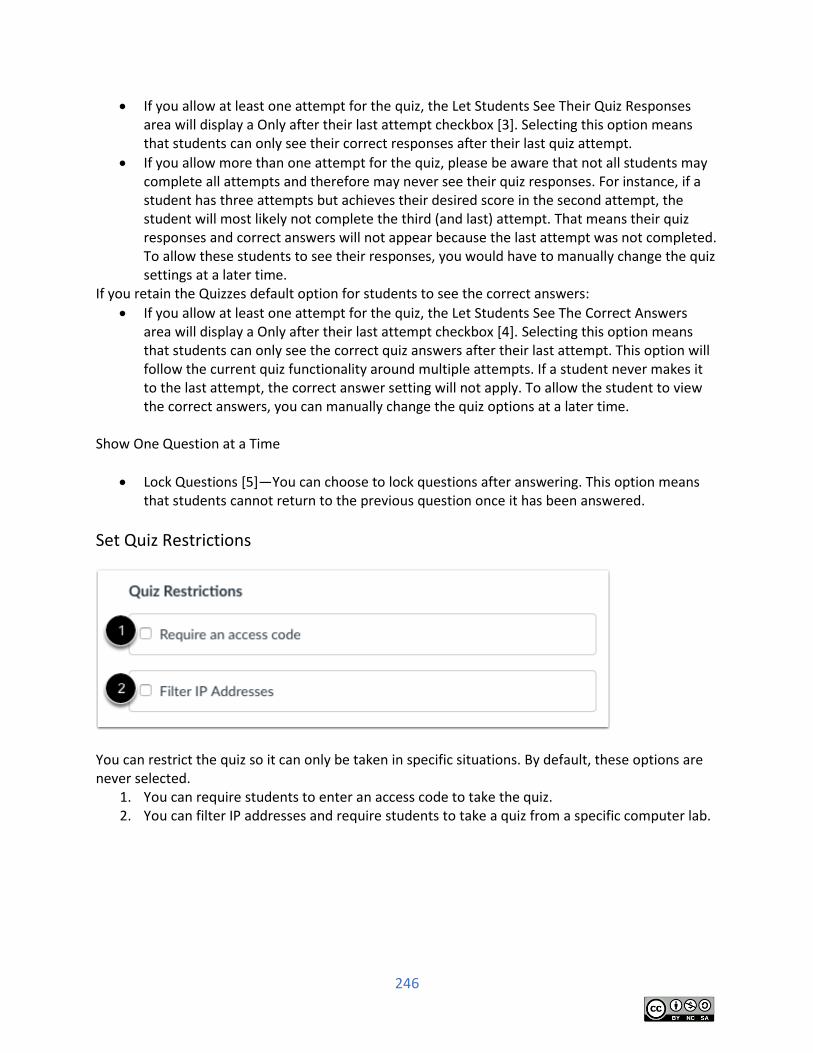
246
If you allow at least one attempt for the quiz, the Let Students See Their Quiz Responses area will display a Only after their last attempt checkbox [3]. Selecting this option means that students can only see their correct responses after their last quiz attempt.
If you allow more than one attempt for the quiz, please be aware that not all students may complete all attempts and therefore may never see their quiz responses. For instance, if a student has three attempts but achieves their desired score in the second attempt, the student will most likely not complete the third (and last) attempt. That means their quiz responses and correct answers will not appear because the last attempt was not completed. To allow these students to see their responses, you would have to manually change the quiz settings at a later time.
If you retain the Quizzes default option for students to see the correct answers:
If you allow at least one attempt for the quiz, the Let Students See The Correct Answers area will display a Only after their last attempt checkbox [4]. Selecting this option means that students can only see the correct quiz answers after their last attempt. This option will follow the current quiz functionality around multiple attempts. If a student never makes it to the last attempt, the correct answer setting will not apply. To allow the student to view the correct answers, you can manually change the quiz options at a later time.
Show One Question at a Time
Lock Questions [5]—You can choose to lock questions after answering. This option means that students cannot return to the previous question once it has been answered.
Set Quiz Restrictions
You can restrict the quiz so it can only be taken in specific situations. By default, these options are never selected.
1. You can require students to enter an access code to take the quiz. 2. You can filter IP addresses and require students to take a quiz from a specific computer lab.
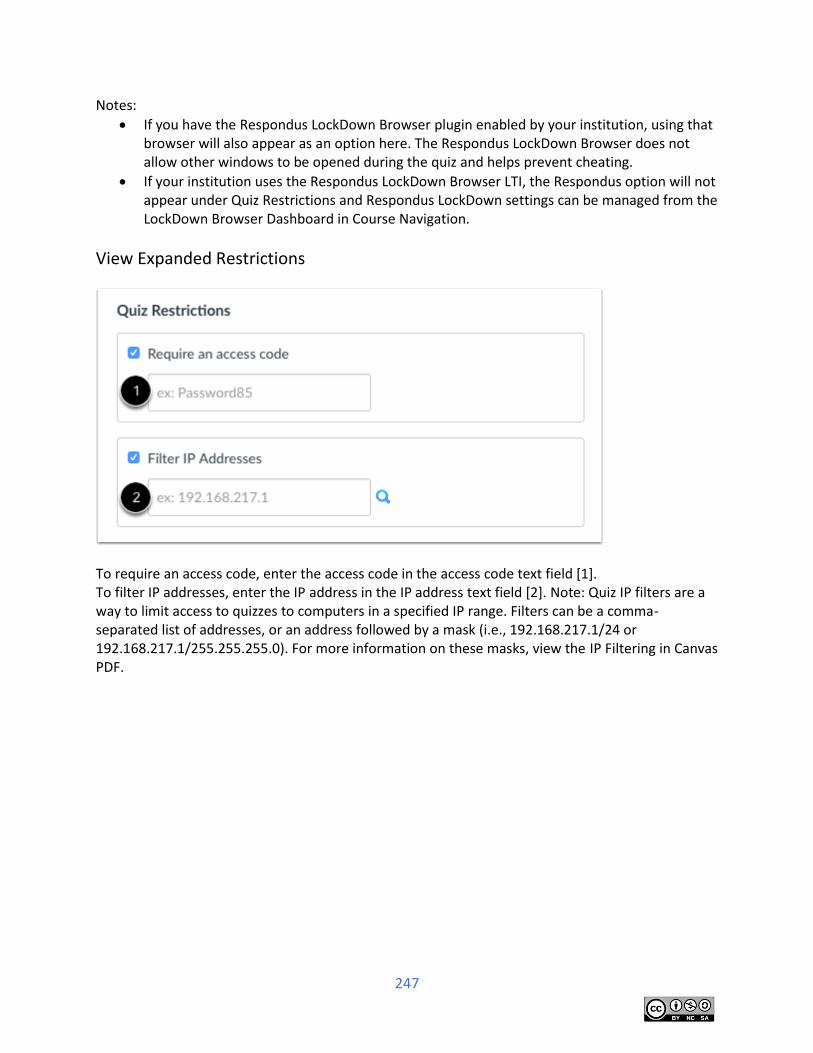
247
Notes:
If you have the Respondus LockDown Browser plugin enabled by your institution, using that browser will also appear as an option here. The Respondus LockDown Browser does not allow other windows to be opened during the quiz and helps prevent cheating.
If your institution uses the Respondus LockDown Browser LTI, the Respondus option will not appear under Quiz Restrictions and Respondus LockDown settings can be managed from the LockDown Browser Dashboard in Course Navigation.
View Expanded Restrictions
To require an access code, enter the access code in the access code text field [1]. To filter IP addresses, enter the IP address in the IP address text field [2]. Note: Quiz IP filters are a way to limit access to quizzes to computers in a specified IP range. Filters can be a comma-separated list of addresses, or an address followed by a mask (i.e., 192.168.217.1/24 or 192.168.217.1/255.255.255.0). For more information on these masks, view the IP Filtering in Canvas PDF.
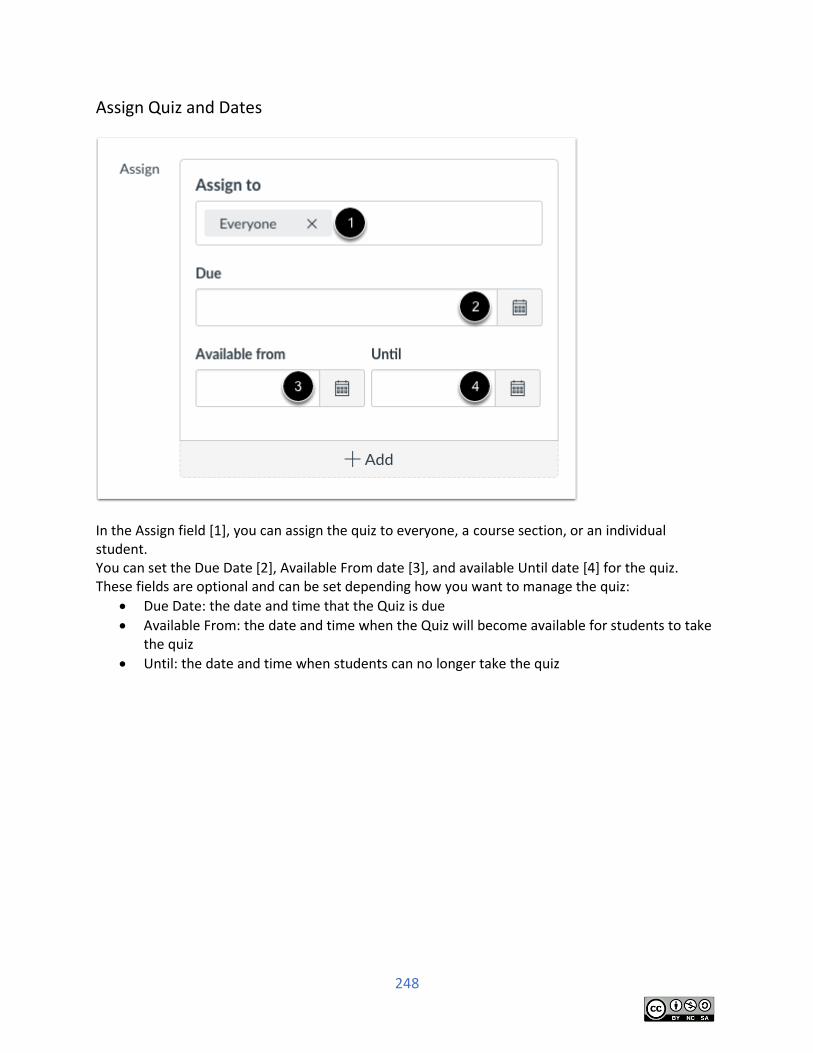
248
Assign Quiz and Dates
In the Assign field [1], you can assign the quiz to everyone, a course section, or an individual student. You can set the Due Date [2], Available From date [3], and available Until date [4] for the quiz. These fields are optional and can be set depending how you want to manage the quiz:
Due Date: the date and time that the Quiz is due
Available From: the date and time when the Quiz will become available for students to take the quiz
Until: the date and time when students can no longer take the quiz
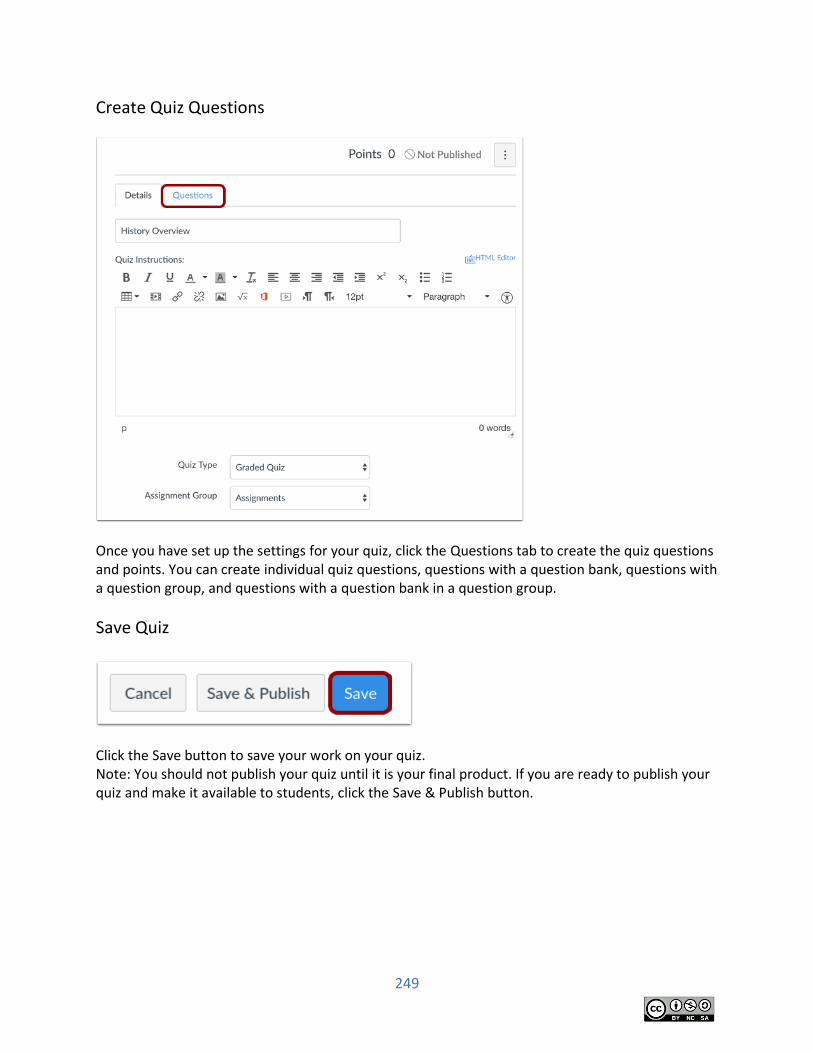
249
Create Quiz Questions
Once you have set up the settings for your quiz, click the Questions tab to create the quiz questions and points. You can create individual quiz questions, questions with a question bank, questions with a question group, and questions with a question bank in a question group.
Save Quiz
Click the Save button to save your work on your quiz. Note: You should not publish your quiz until it is your final product. If you are ready to publish your quiz and make it available to students, click the Save & Publish button.
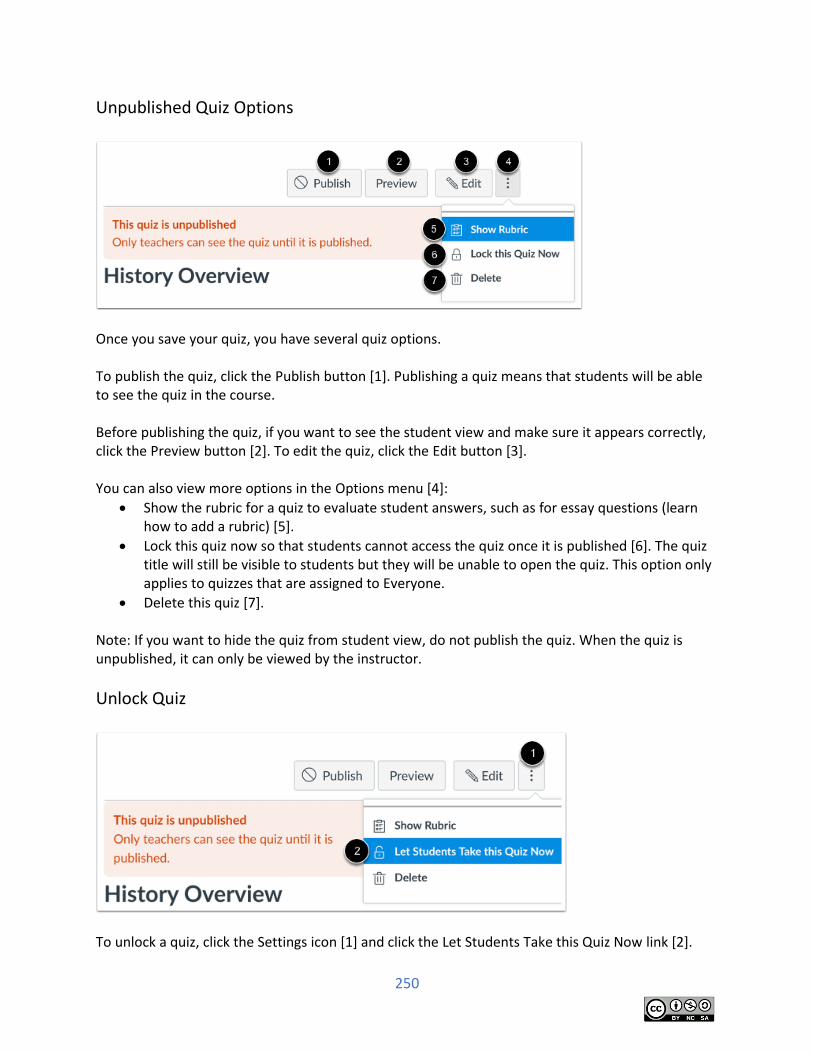
250
Unpublished Quiz Options
Once you save your quiz, you have several quiz options. To publish the quiz, click the Publish button [1]. Publishing a quiz means that students will be able to see the quiz in the course. Before publishing the quiz, if you want to see the student view and make sure it appears correctly, click the Preview button [2]. To edit the quiz, click the Edit button [3]. You can also view more options in the Options menu [4]:
Show the rubric for a quiz to evaluate student answers, such as for essay questions (learn how to add a rubric) [5].
Lock this quiz now so that students cannot access the quiz once it is published [6]. The quiz title will still be visible to students but they will be unable to open the quiz. This option only applies to quizzes that are assigned to Everyone.
Delete this quiz [7]. Note: If you want to hide the quiz from student view, do not publish the quiz. When the quiz is unpublished, it can only be viewed by the instructor.
Unlock Quiz
To unlock a quiz, click the Settings icon [1] and click the Let Students Take this Quiz Now link [2].
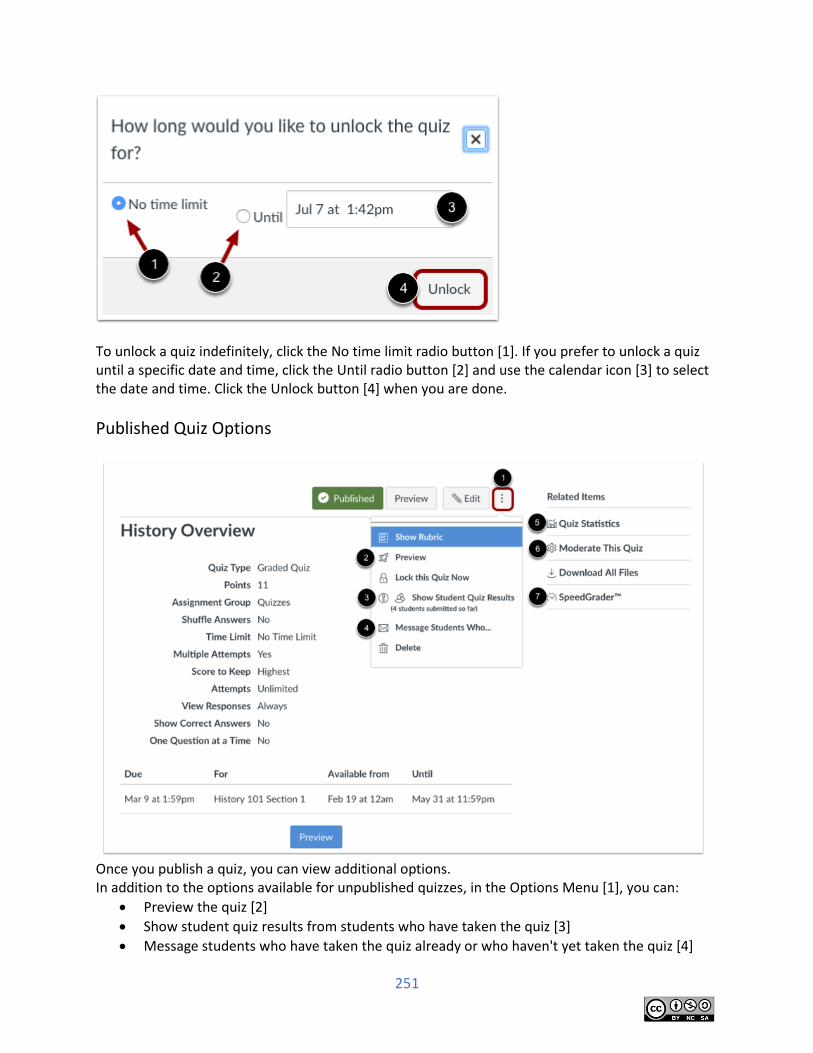
251
To unlock a quiz indefinitely, click the No time limit radio button [1]. If you prefer to unlock a quiz until a specific date and time, click the Until radio button [2] and use the calendar icon [3] to select the date and time. Click the Unlock button [4] when you are done.
Published Quiz Options
Once you publish a quiz, you can view additional options. In addition to the options available for unpublished quizzes, in the Options Menu [1], you can:
Preview the quiz [2]
Show student quiz results from students who have taken the quiz [3]
Message students who have taken the quiz already or who haven't yet taken the quiz [4]
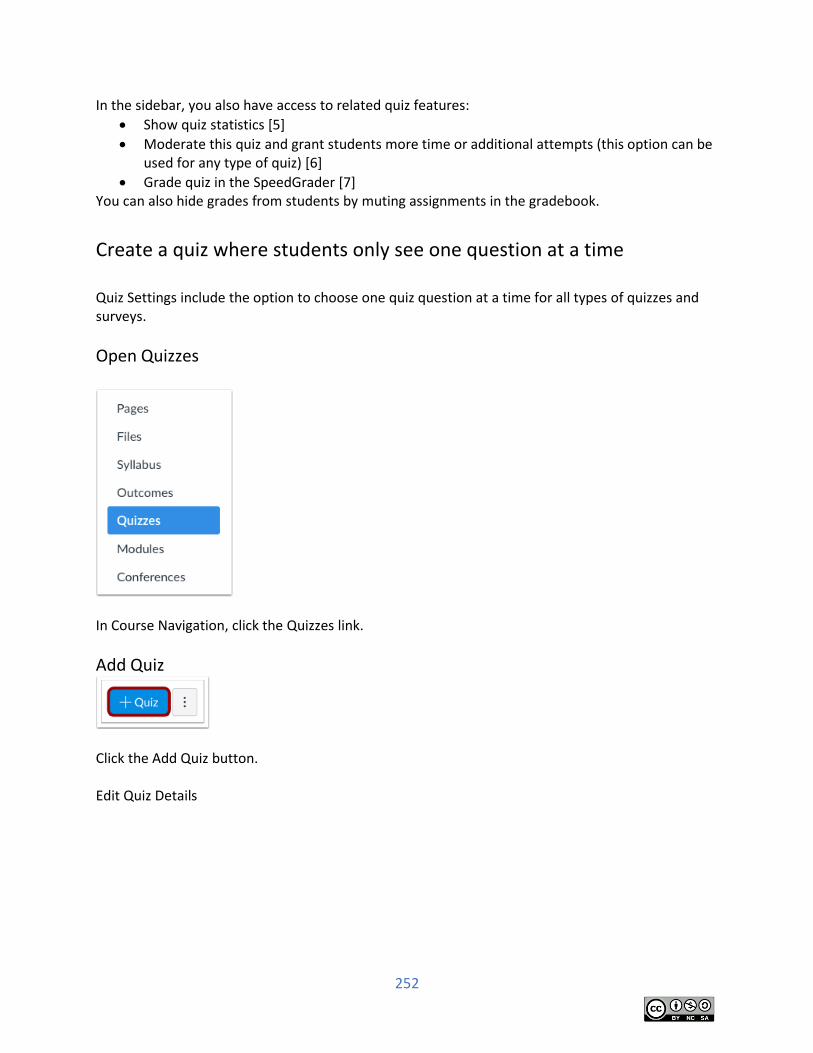
252
In the sidebar, you also have access to related quiz features:
Show quiz statistics [5]
Moderate this quiz and grant students more time or additional attempts (this option can be used for any type of quiz) [6]
Grade quiz in the SpeedGrader [7] You can also hide grades from students by muting assignments in the gradebook.
Create a quiz where students only see one question at a time Quiz Settings include the option to choose one quiz question at a time for all types of quizzes and surveys.
Open Quizzes
In Course Navigation, click the Quizzes link.
Add Quiz
Click the Add Quiz button. Edit Quiz Details
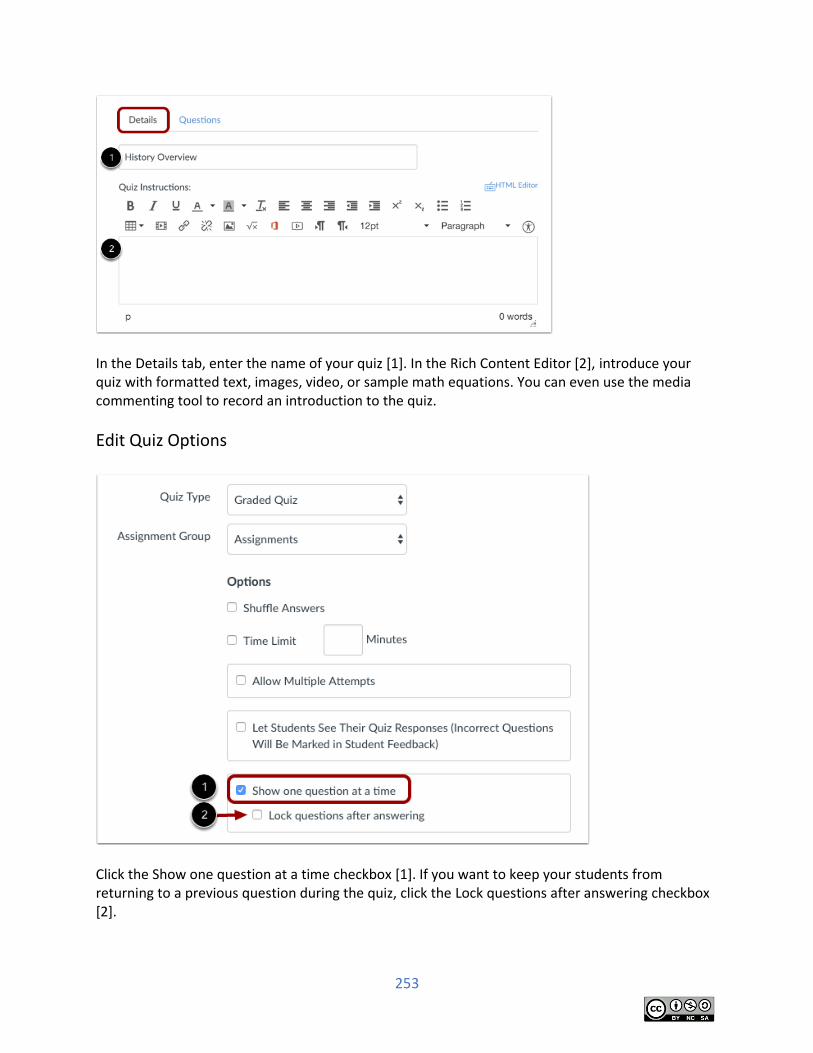
253
In the Details tab, enter the name of your quiz [1]. In the Rich Content Editor [2], introduce your quiz with formatted text, images, video, or sample math equations. You can even use the media commenting tool to record an introduction to the quiz.
Edit Quiz Options
Click the Show one question at a time checkbox [1]. If you want to keep your students from returning to a previous question during the quiz, click the Lock questions after answering checkbox [2].
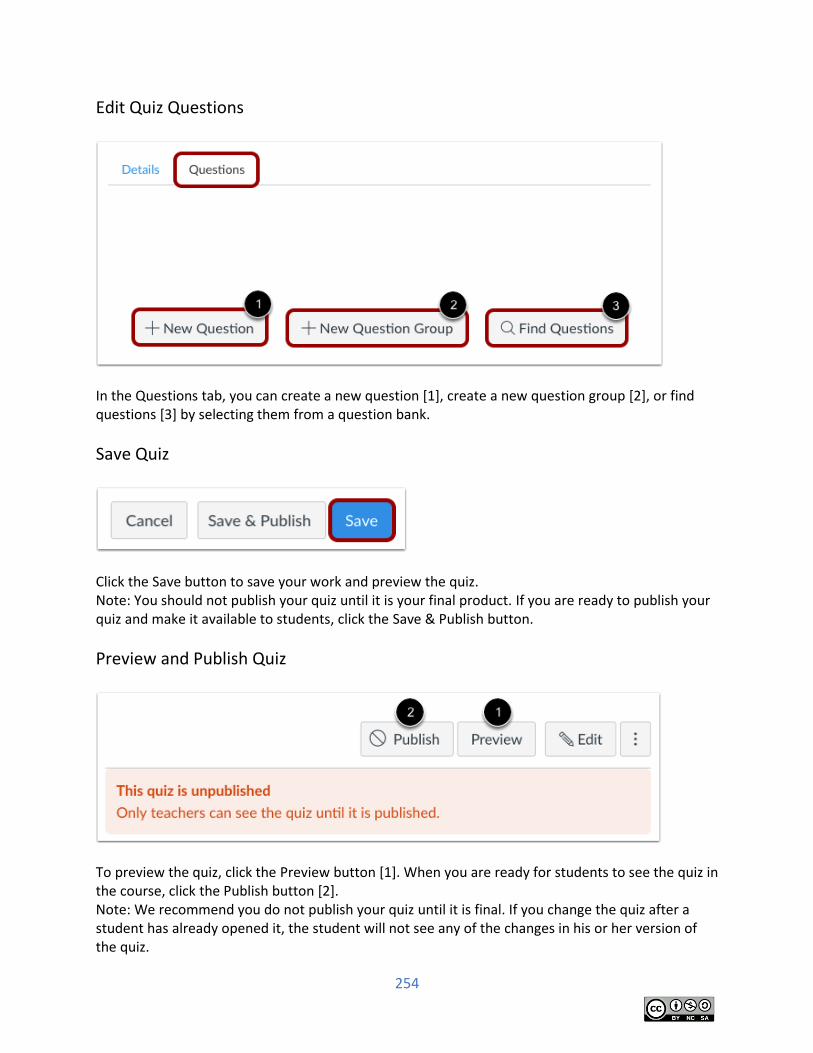
254
Edit Quiz Questions
In the Questions tab, you can create a new question [1], create a new question group [2], or find questions [3] by selecting them from a question bank.
Save Quiz
Click the Save button to save your work and preview the quiz. Note: You should not publish your quiz until it is your final product. If you are ready to publish your quiz and make it available to students, click the Save & Publish button.
Preview and Publish Quiz
To preview the quiz, click the Preview button [1]. When you are ready for students to see the quiz in the course, click the Publish button [2]. Note: We recommend you do not publish your quiz until it is final. If you change the quiz after a student has already opened it, the student will not see any of the changes in his or her version of the quiz.
255
Make a quiz available before or after the due date
You can make your quiz available to all your students before or after the due date by setting availability dates. Note: If you are looking to change quiz dates for individual students, you can assign a quiz to an individual student or assign a quiz to a course section. Quizzes have an autosubmit feature tied to the Until (lock) date, which may affect student submissions. Only quiz attempts that have been started are auto-submitted. Common quiz scenarios and date results include the following:
No dates: quiz is never marked late and autosubmitted at course conclude (see course settings)
Due date only: quiz is marked late at Due date and autosubmitted at course conclude (see course settings)
Due date with Until date: quiz is marked late at Due date and autosubmitted at Until date
Time limit: quiz is autosubmitted when time expires (only applies when students are actively taking a quiz)
Time limit with Until date: quiz is autosubmitted when time expires unless the Until date expires first
Student View When students view a quiz, they are able to see the details of the quiz. Quiz details do not show due and availability dates in relation to the current time. However, withinthe quiz, Canvas notifies students regarding any upcoming quiz deadlines:
For quizzes with a Due date, the browser displays a notification banner to let students know when the quiz will be marked late (30 minutes prior, 5 minutes prior, and 1 minute prior).
For quizzes that are close to autosubmitting (using an Until date or the natural course conclude date), the browser displays a notification banner to let students know when the quiz will autosubmit (30 minutes prior, 5 minutes prior, 1 minute prior, and 10 seconds prior).
For timed quizzes, the browser displays a notification banner if students are not able to complete the quiz in the full allotted time period. The quiz sidebar also displays a timer indicating how many minutes remain to complete the quiz. For example, if a 60-minute quiz has an Until date of 11:59 pm and a student begins the quiz at 11:30 pm, the student will only have 30 minutes to complete the quiz.
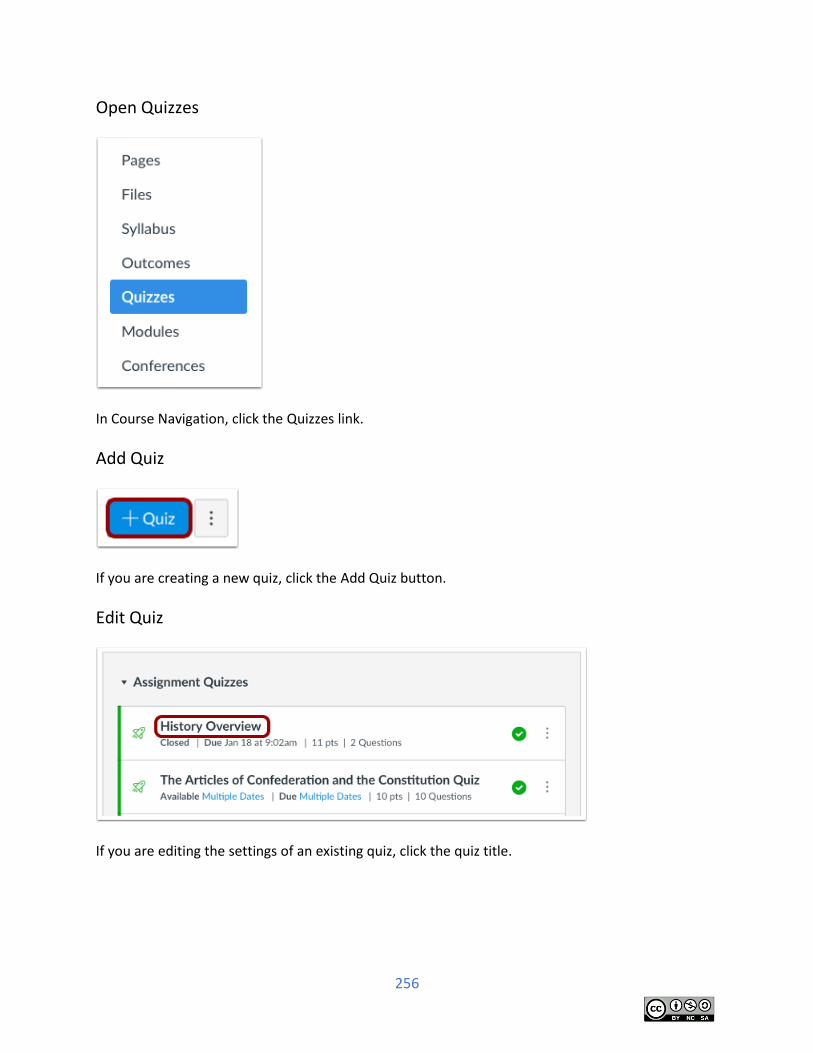
256
Open Quizzes
In Course Navigation, click the Quizzes link.
Add Quiz
If you are creating a new quiz, click the Add Quiz button.
Edit Quiz
If you are editing the settings of an existing quiz, click the quiz title.

257
Click the Edit button.
View Availability Dates
View the availability date options for your quiz:
Available From: the date and time when the Assignments will become available to students. If no time is set, this date defaults to 12:00 am for the course time zone.
Until: the date and time when students can no longer access the assignment. If no time is set, this date defaults to 11:59 pm for the course time zone.
When the assignment is published, blank availability date fields allow the assignment to be viewed throughout the entire course.
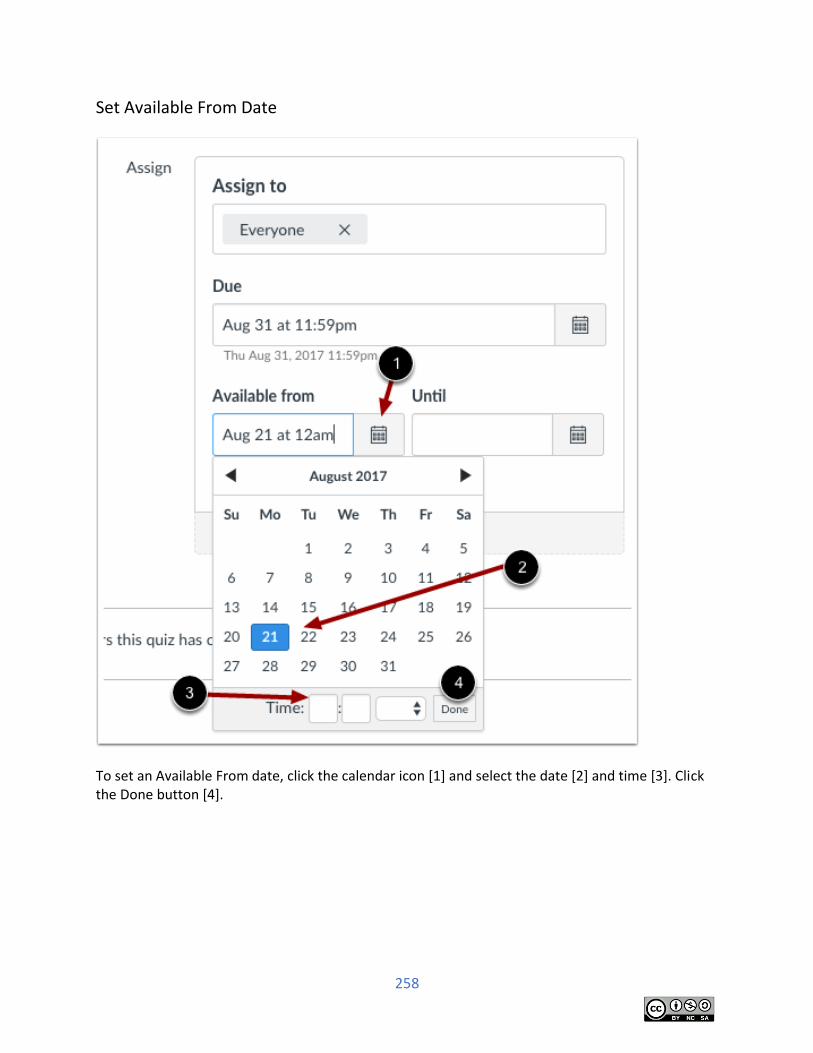
258
Set Available From Date
To set an Available From date, click the calendar icon [1] and select the date [2] and time [3]. Click the Done button [4].
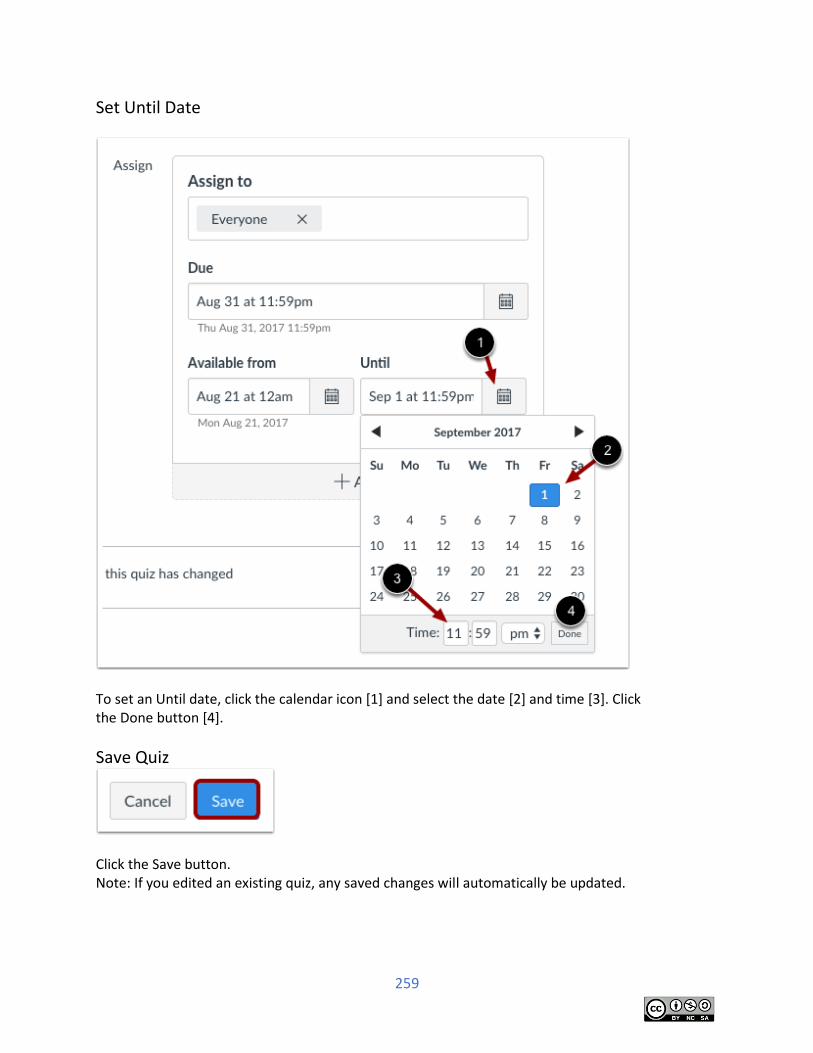
259
Set Until Date
To set an Until date, click the calendar icon [1] and select the date [2] and time [3]. Click the Done button [4].
Save Quiz
Click the Save button. Note: If you edited an existing quiz, any saved changes will automatically be updated.
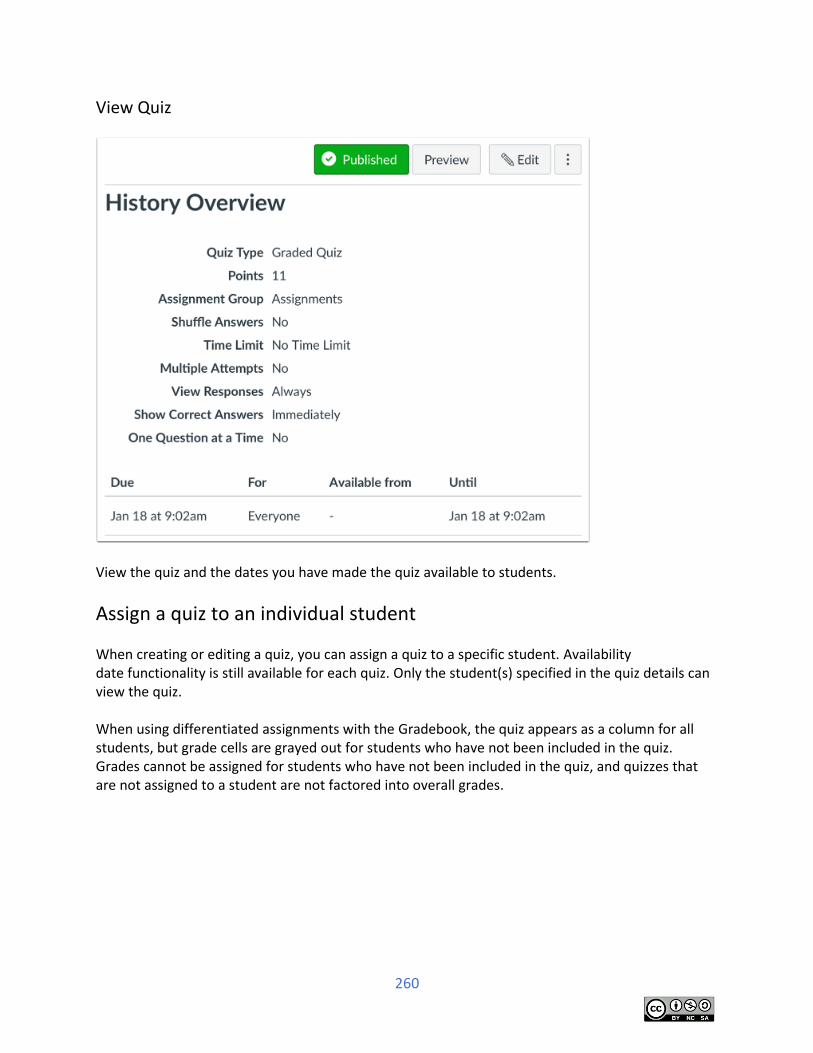
260
View Quiz
View the quiz and the dates you have made the quiz available to students.
Assign a quiz to an individual student When creating or editing a quiz, you can assign a quiz to a specific student. Availability date functionality is still available for each quiz. Only the student(s) specified in the quiz details can view the quiz. When using differentiated assignments with the Gradebook, the quiz appears as a column for all students, but grade cells are grayed out for students who have not been included in the quiz. Grades cannot be assigned for students who have not been included in the quiz, and quizzes that are not assigned to a student are not factored into overall grades.
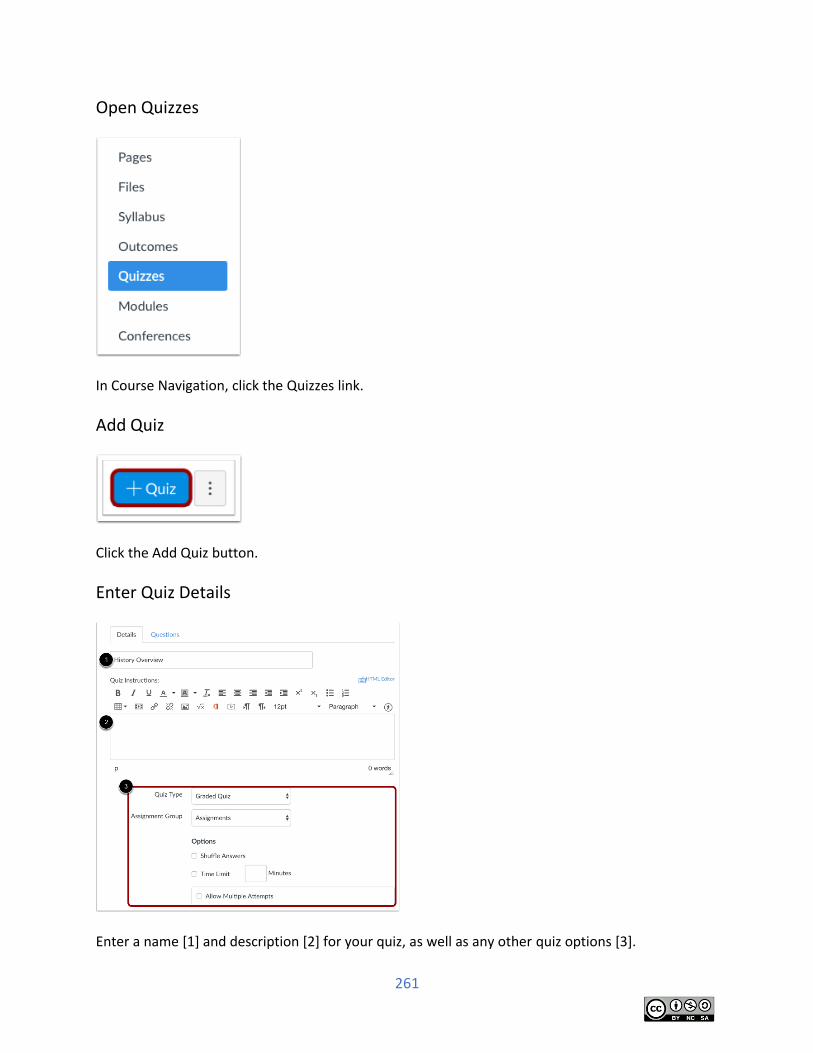
261
Open Quizzes
In Course Navigation, click the Quizzes link.
Add Quiz
Click the Add Quiz button.
Enter Quiz Details
Enter a name [1] and description [2] for your quiz, as well as any other quiz options [3].
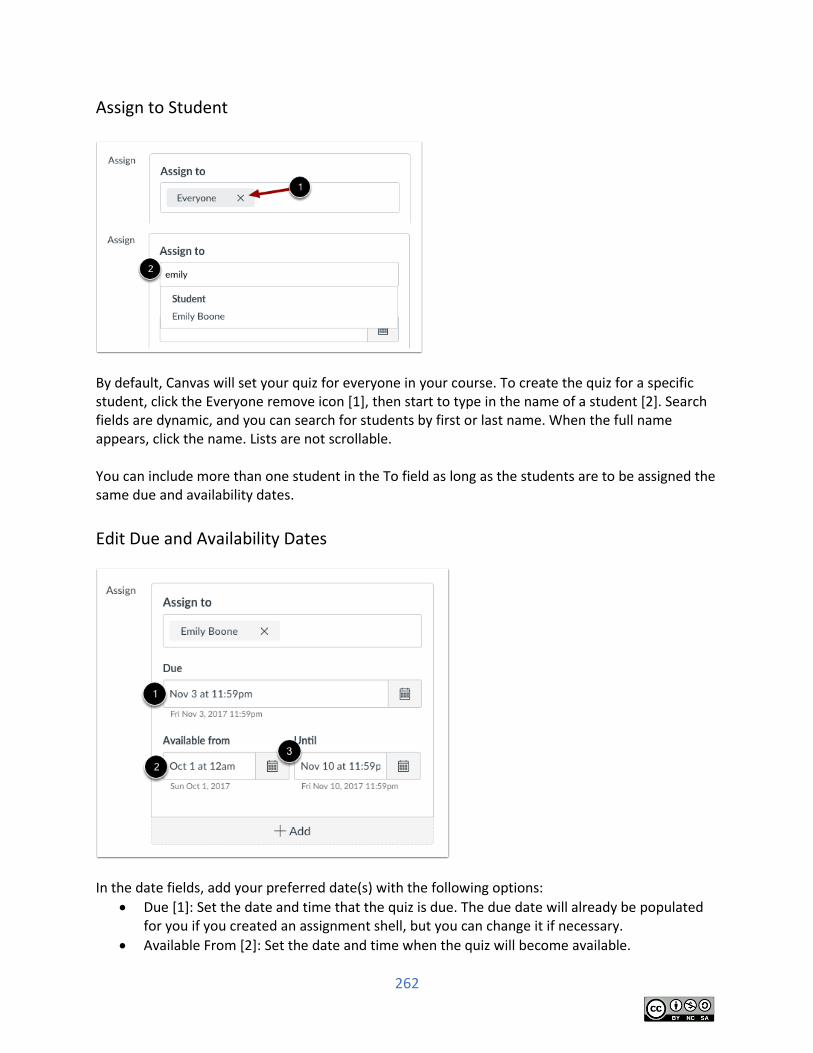
262
Assign to Student
By default, Canvas will set your quiz for everyone in your course. To create the quiz for a specific student, click the Everyone remove icon [1], then start to type in the name of a student [2]. Search fields are dynamic, and you can search for students by first or last name. When the full name appears, click the name. Lists are not scrollable. You can include more than one student in the To field as long as the students are to be assigned the same due and availability dates.
Edit Due and Availability Dates
In the date fields, add your preferred date(s) with the following options:
Due [1]: Set the date and time that the quiz is due. The due date will already be populated for you if you created an assignment shell, but you can change it if necessary.
Available From [2]: Set the date and time when the quiz will become available.
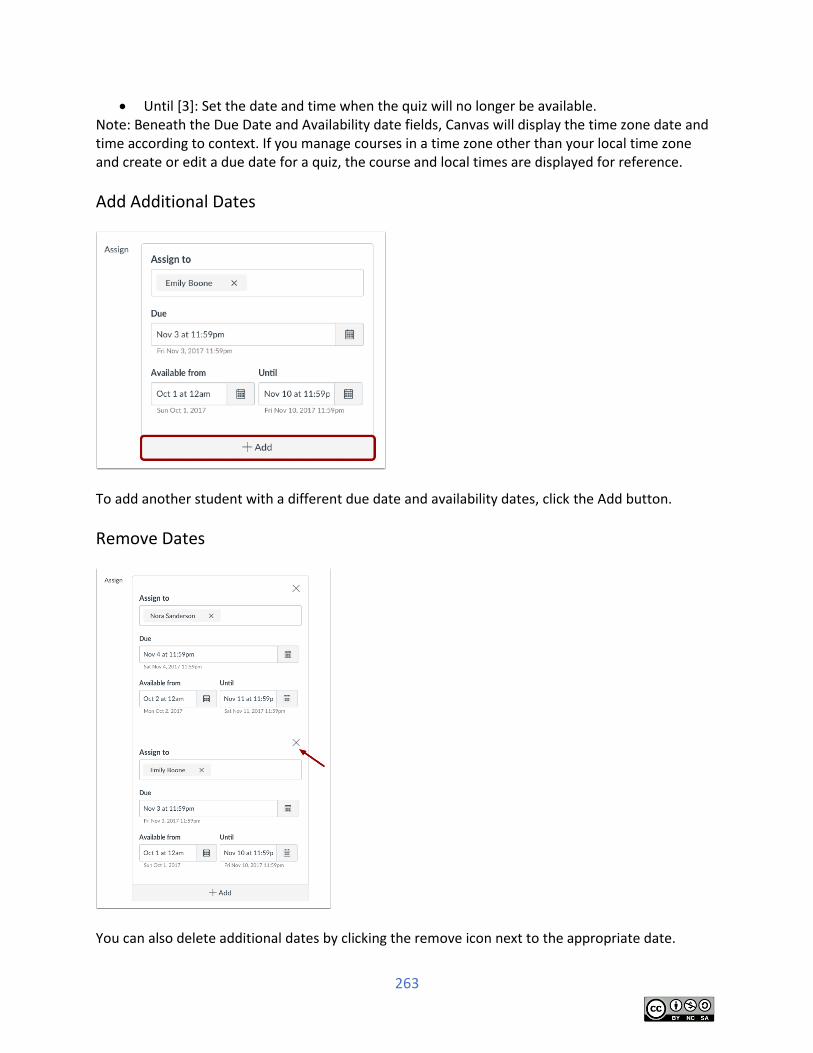
263
Until [3]: Set the date and time when the quiz will no longer be available. Note: Beneath the Due Date and Availability date fields, Canvas will display the time zone date and time according to context. If you manage courses in a time zone other than your local time zone and create or edit a due date for a quiz, the course and local times are displayed for reference.
Add Additional Dates
To add another student with a different due date and availability dates, click the Add button.
Remove Dates
You can also delete additional dates by clicking the remove icon next to the appropriate date.
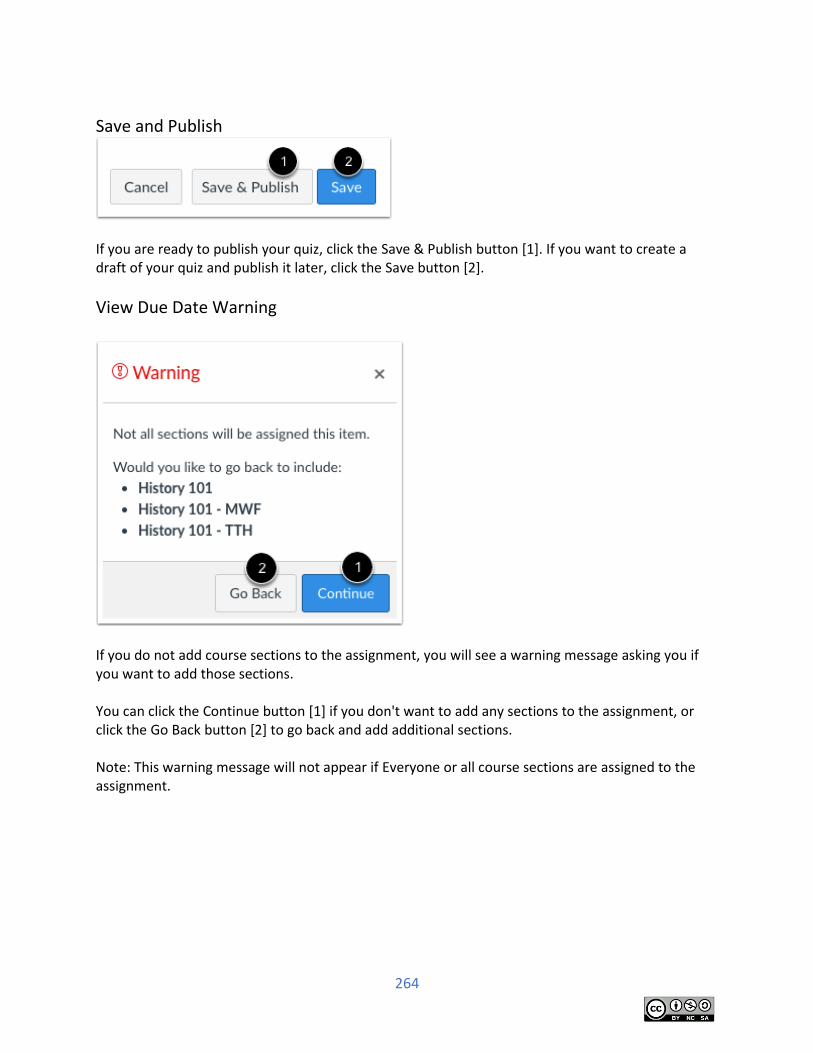
264
Save and Publish
If you are ready to publish your quiz, click the Save & Publish button [1]. If you want to create a draft of your quiz and publish it later, click the Save button [2].
View Due Date Warning
If you do not add course sections to the assignment, you will see a warning message asking you if you want to add those sections. You can click the Continue button [1] if you don't want to add any sections to the assignment, or click the Go Back button [2] to go back and add additional sections. Note: This warning message will not appear if Everyone or all course sections are assigned to the assignment.
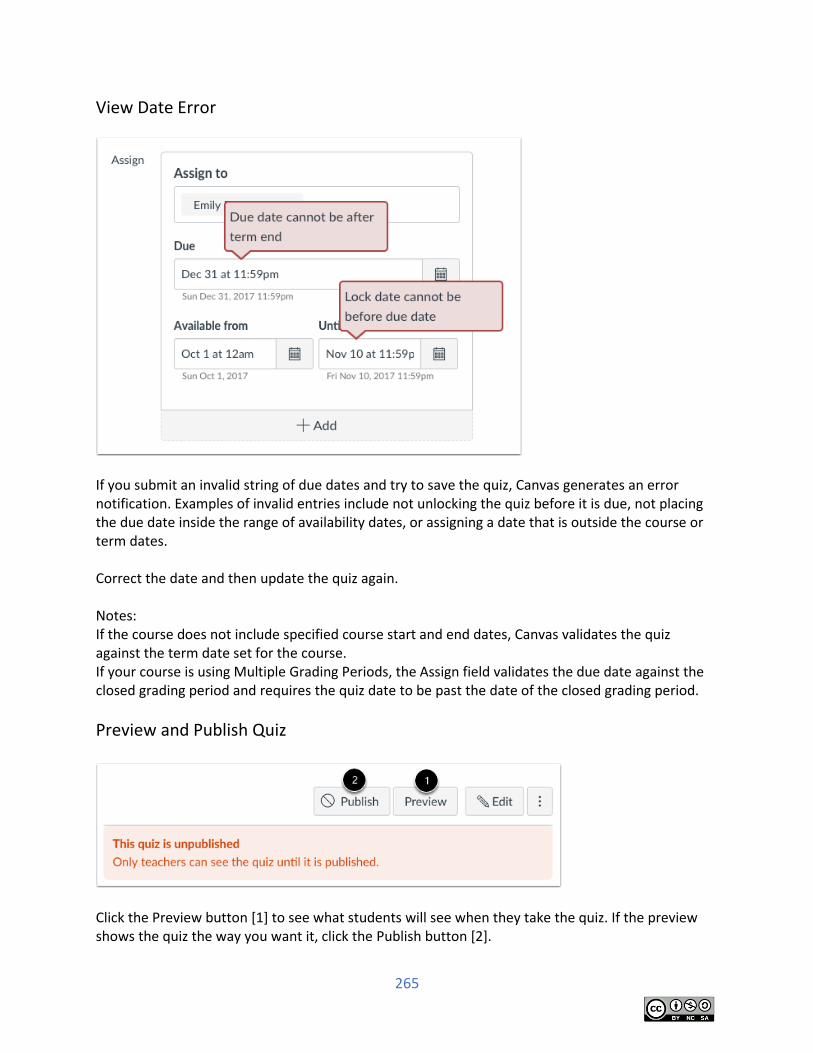
265
View Date Error
If you submit an invalid string of due dates and try to save the quiz, Canvas generates an error notification. Examples of invalid entries include not unlocking the quiz before it is due, not placing the due date inside the range of availability dates, or assigning a date that is outside the course or term dates. Correct the date and then update the quiz again. Notes: If the course does not include specified course start and end dates, Canvas validates the quiz against the term date set for the course. If your course is using Multiple Grading Periods, the Assign field validates the due date against the closed grading period and requires the quiz date to be past the date of the closed grading period.
Preview and Publish Quiz
Click the Preview button [1] to see what students will see when they take the quiz. If the preview shows the quiz the way you want it, click the Publish button [2].
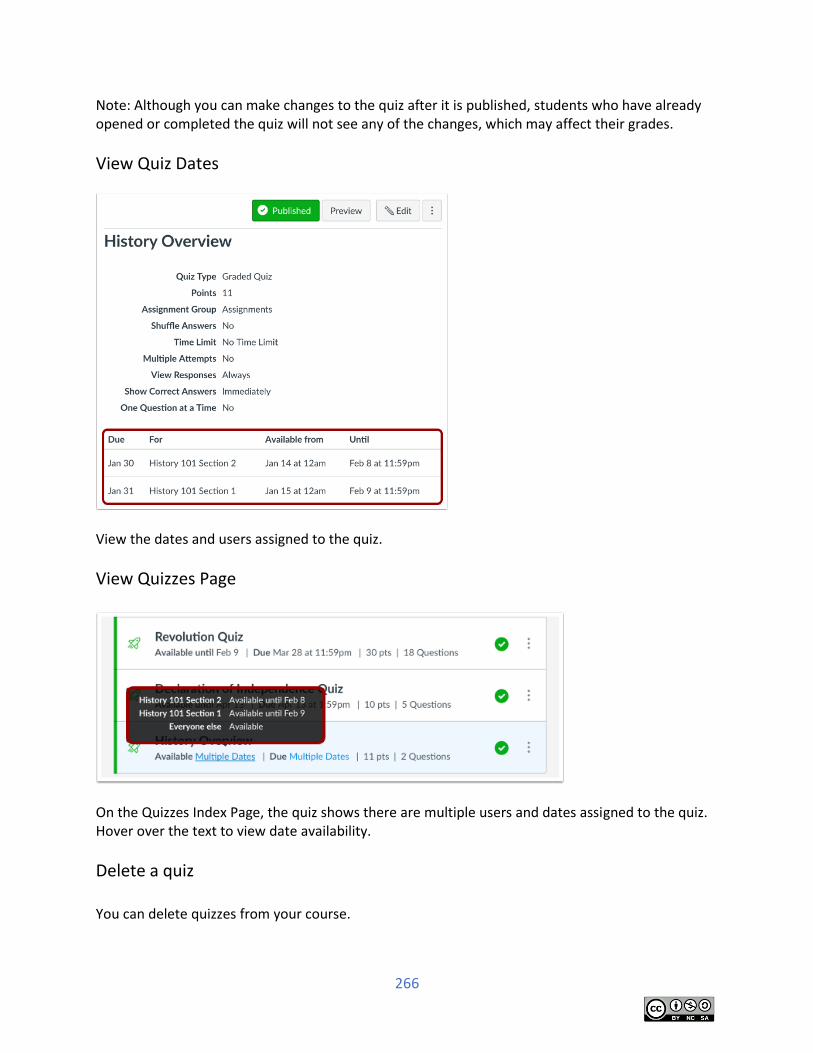
266
Note: Although you can make changes to the quiz after it is published, students who have already opened or completed the quiz will not see any of the changes, which may affect their grades.
View Quiz Dates
View the dates and users assigned to the quiz.
View Quizzes Page
On the Quizzes Index Page, the quiz shows there are multiple users and dates assigned to the quiz. Hover over the text to view date availability.
Delete a quiz You can delete quizzes from your course.
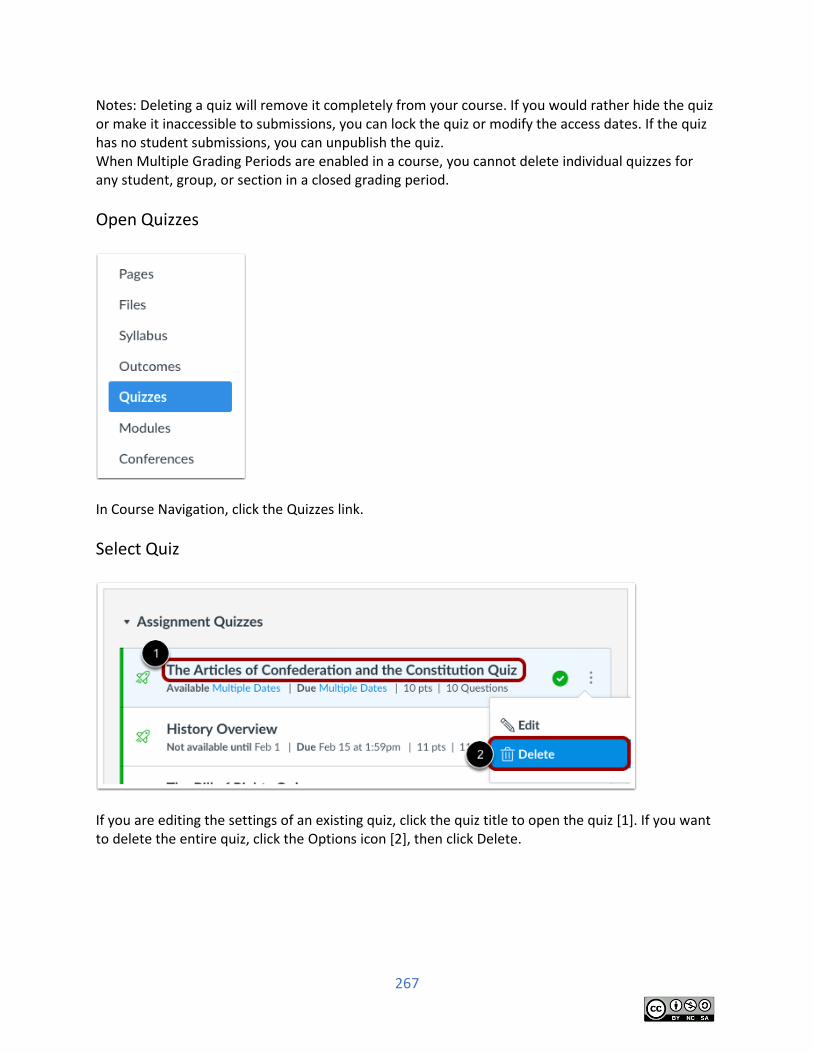
267
Notes: Deleting a quiz will remove it completely from your course. If you would rather hide the quiz or make it inaccessible to submissions, you can lock the quiz or modify the access dates. If the quiz has no student submissions, you can unpublish the quiz. When Multiple Grading Periods are enabled in a course, you cannot delete individual quizzes for any student, group, or section in a closed grading period.
Open Quizzes
In Course Navigation, click the Quizzes link.
Select Quiz
If you are editing the settings of an existing quiz, click the quiz title to open the quiz [1]. If you want to delete the entire quiz, click the Options icon [2], then click Delete.
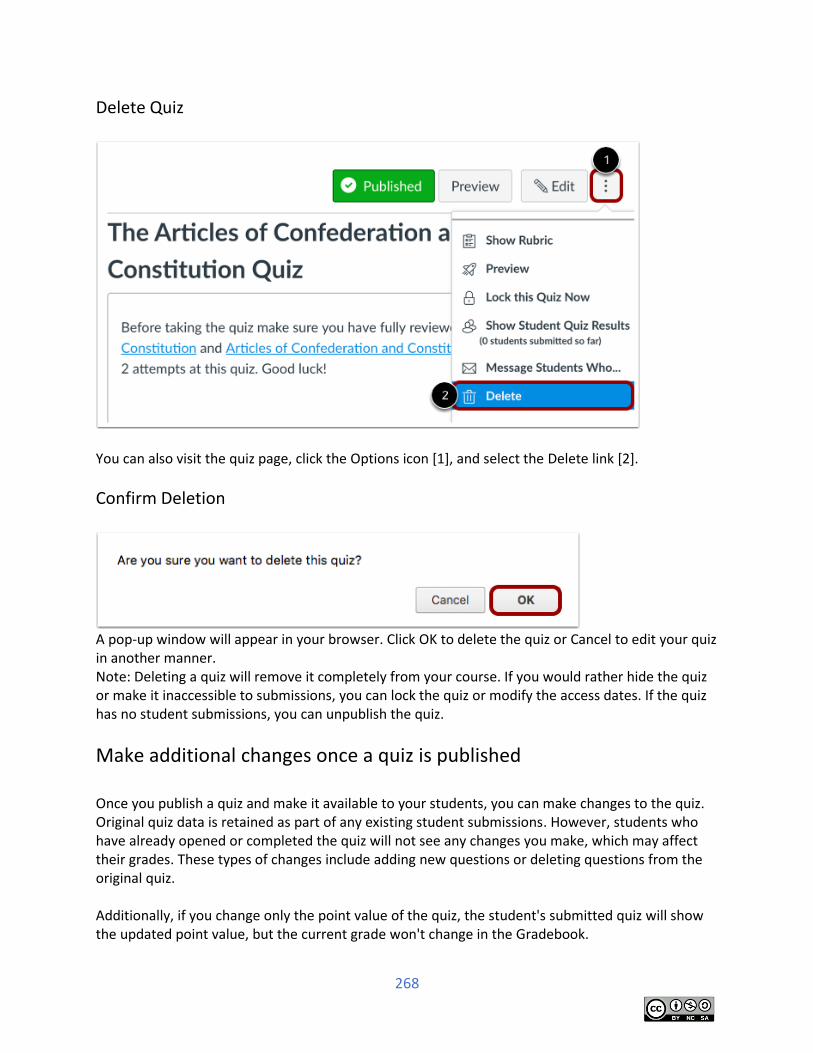
268
Delete Quiz
You can also visit the quiz page, click the Options icon [1], and select the Delete link [2].
Confirm Deletion
A pop-up window will appear in your browser. Click OK to delete the quiz or Cancel to edit your quiz in another manner. Note: Deleting a quiz will remove it completely from your course. If you would rather hide the quiz or make it inaccessible to submissions, you can lock the quiz or modify the access dates. If the quiz has no student submissions, you can unpublish the quiz.
Make additional changes once a quiz is published Once you publish a quiz and make it available to your students, you can make changes to the quiz. Original quiz data is retained as part of any existing student submissions. However, students who have already opened or completed the quiz will not see any changes you make, which may affect their grades. These types of changes include adding new questions or deleting questions from the original quiz. Additionally, if you change only the point value of the quiz, the student's submitted quiz will show the updated point value, but the current grade won't change in the Gradebook.
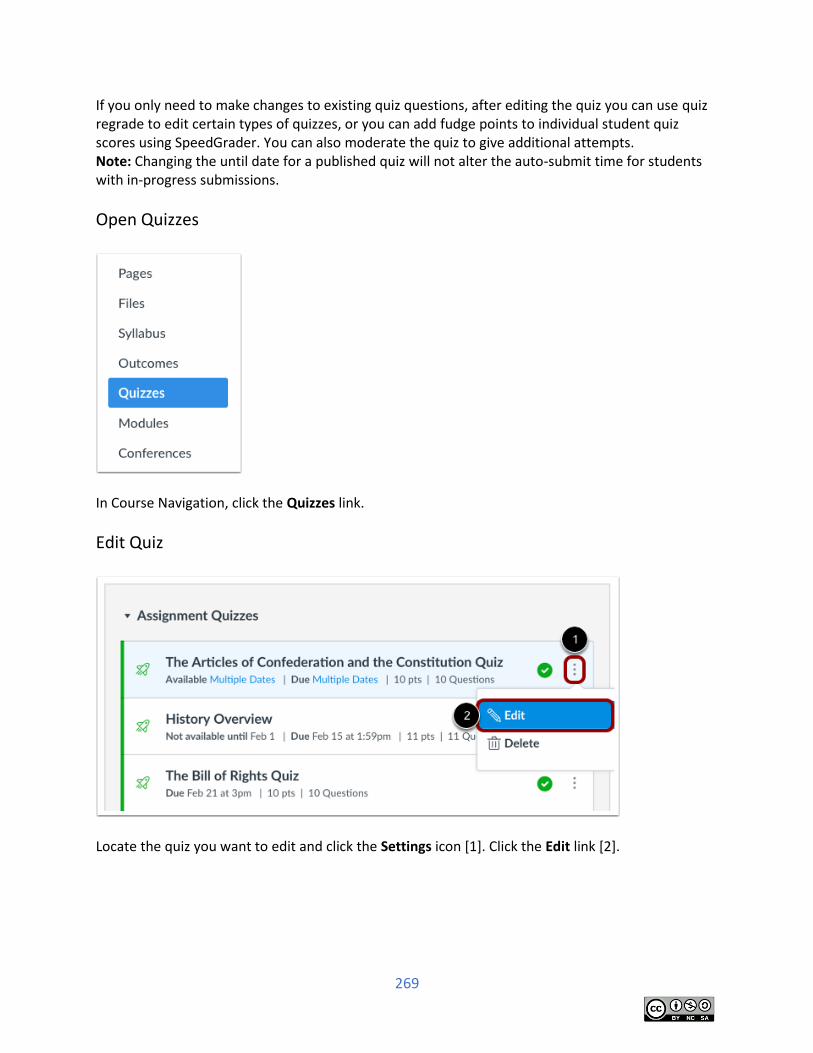
269
If you only need to make changes to existing quiz questions, after editing the quiz you can use quiz regrade to edit certain types of quizzes, or you can add fudge points to individual student quiz scores using SpeedGrader. You can also moderate the quiz to give additional attempts. Note: Changing the until date for a published quiz will not alter the auto-submit time for students with in-progress submissions.
Open Quizzes
In Course Navigation, click the Quizzes link.
Edit Quiz
Locate the quiz you want to edit and click the Settings icon [1]. Click the Edit link [2].
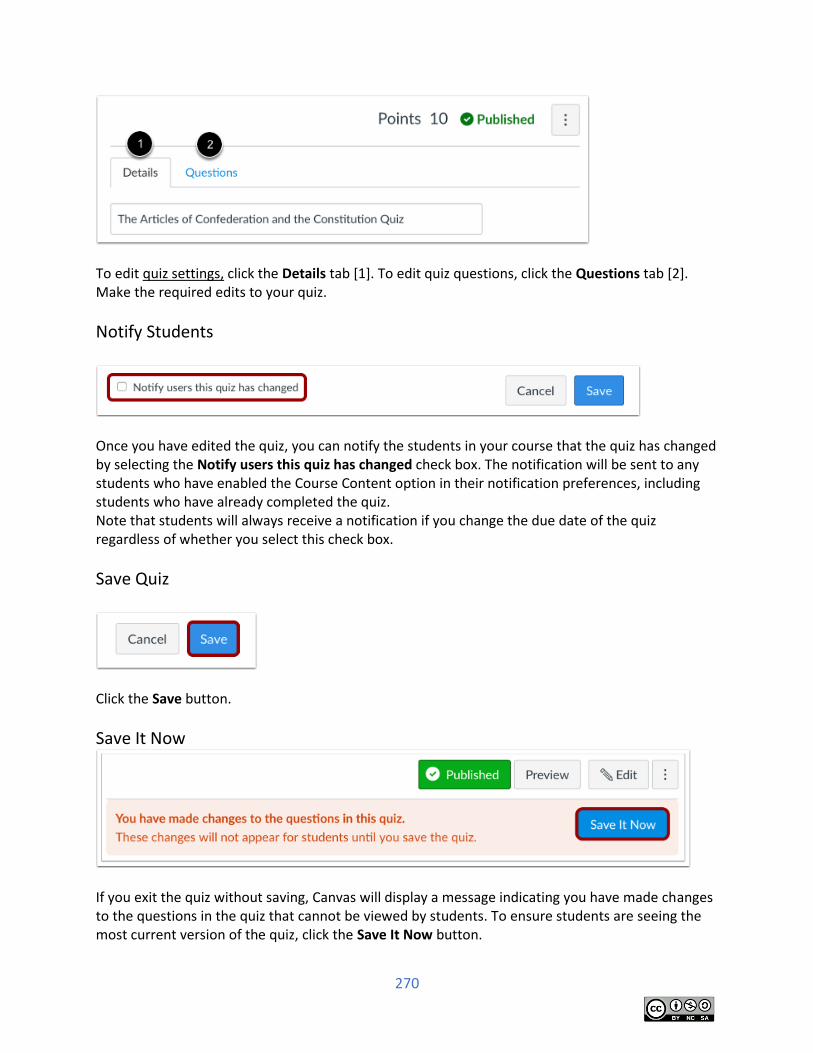
270
To edit quiz settings, click the Details tab [1]. To edit quiz questions, click the Questions tab [2]. Make the required edits to your quiz.
Notify Students
Once you have edited the quiz, you can notify the students in your course that the quiz has changed by selecting the Notify users this quiz has changed check box. The notification will be sent to any students who have enabled the Course Content option in their notification preferences, including students who have already completed the quiz. Note that students will always receive a notification if you change the due date of the quiz regardless of whether you select this check box.
Save Quiz
Click the Save button.
Save It Now
If you exit the quiz without saving, Canvas will display a message indicating you have made changes to the questions in the quiz that cannot be viewed by students. To ensure students are seeing the most current version of the quiz, click the Save It Now button.
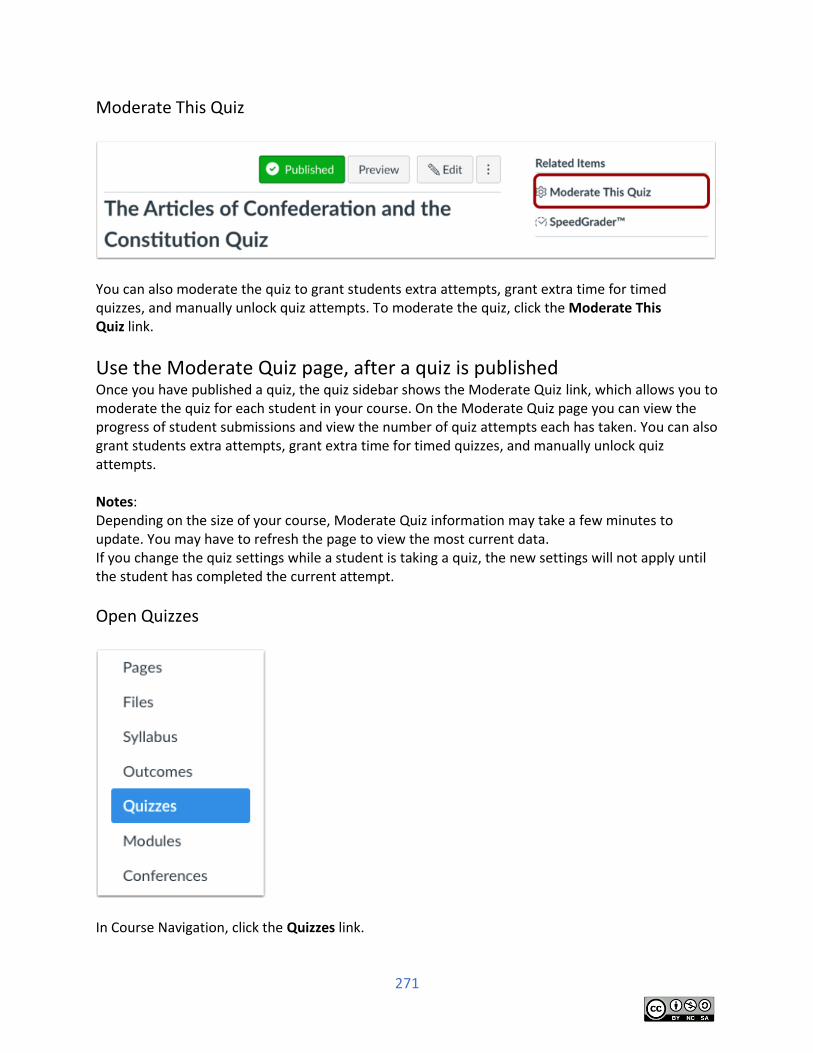
271
Moderate This Quiz
You can also moderate the quiz to grant students extra attempts, grant extra time for timed quizzes, and manually unlock quiz attempts. To moderate the quiz, click the Moderate This Quiz link.
Use the Moderate Quiz page, after a quiz is published Once you have published a quiz, the quiz sidebar shows the Moderate Quiz link, which allows you to moderate the quiz for each student in your course. On the Moderate Quiz page you can view the progress of student submissions and view the number of quiz attempts each has taken. You can also grant students extra attempts, grant extra time for timed quizzes, and manually unlock quiz attempts. Notes: Depending on the size of your course, Moderate Quiz information may take a few minutes to update. You may have to refresh the page to view the most current data. If you change the quiz settings while a student is taking a quiz, the new settings will not apply until the student has completed the current attempt.
Open Quizzes
In Course Navigation, click the Quizzes link.
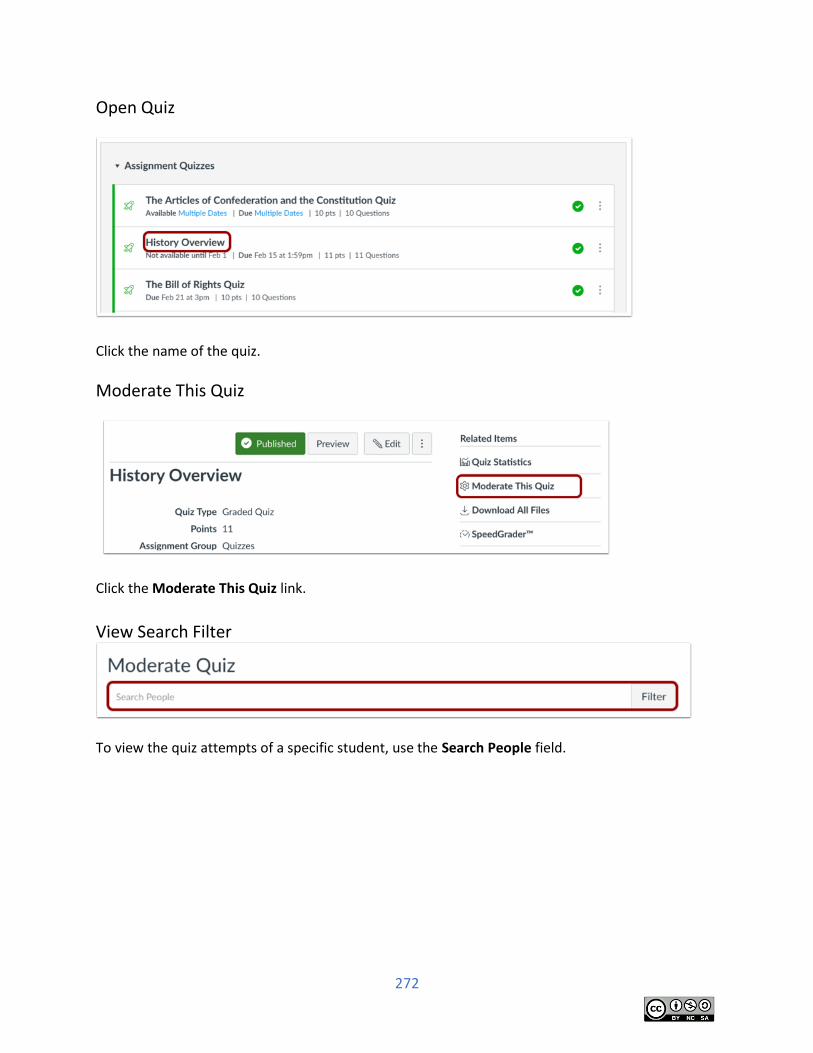
272
Open Quiz
Click the name of the quiz.
Moderate This Quiz
Click the Moderate This Quiz link.
View Search Filter
To view the quiz attempts of a specific student, use the Search People field.
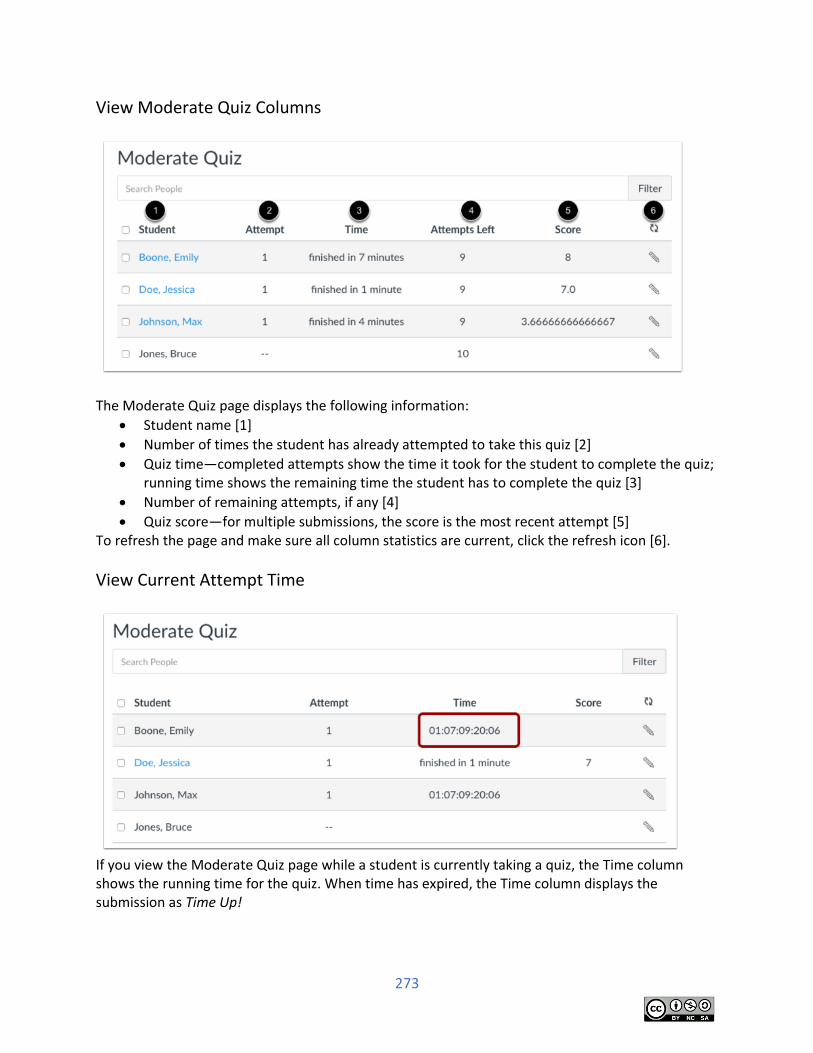
273
View Moderate Quiz Columns
The Moderate Quiz page displays the following information:
Student name [1]
Number of times the student has already attempted to take this quiz [2]
Quiz time—completed attempts show the time it took for the student to complete the quiz; running time shows the remaining time the student has to complete the quiz [3]
Number of remaining attempts, if any [4]
Quiz score—for multiple submissions, the score is the most recent attempt [5] To refresh the page and make sure all column statistics are current, click the refresh icon [6].
View Current Attempt Time
If you view the Moderate Quiz page while a student is currently taking a quiz, the Time column shows the running time for the quiz. When time has expired, the Time column displays the submission as Time Up!
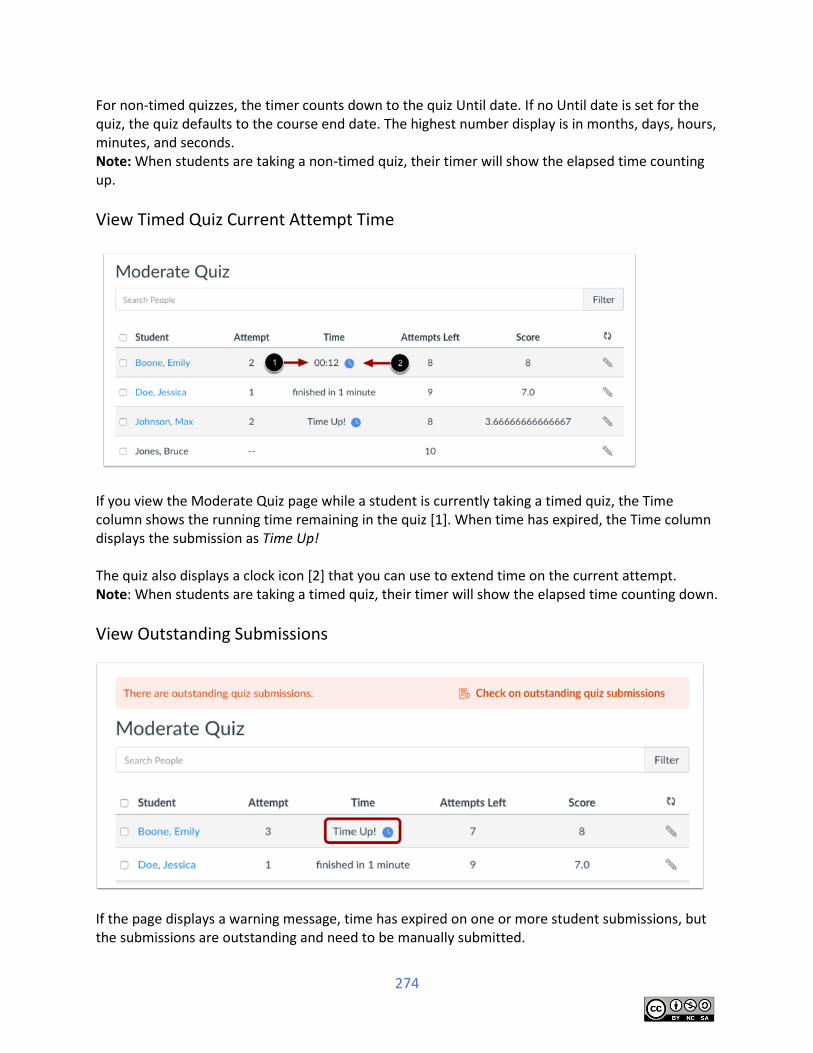
274
For non-timed quizzes, the timer counts down to the quiz Until date. If no Until date is set for the quiz, the quiz defaults to the course end date. The highest number display is in months, days, hours, minutes, and seconds. Note: When students are taking a non-timed quiz, their timer will show the elapsed time counting up.
View Timed Quiz Current Attempt Time
If you view the Moderate Quiz page while a student is currently taking a timed quiz, the Time column shows the running time remaining in the quiz [1]. When time has expired, the Time column displays the submission as Time Up! The quiz also displays a clock icon [2] that you can use to extend time on the current attempt. Note: When students are taking a timed quiz, their timer will show the elapsed time counting down.
View Outstanding Submissions
If the page displays a warning message, time has expired on one or more student submissions, but the submissions are outstanding and need to be manually submitted.
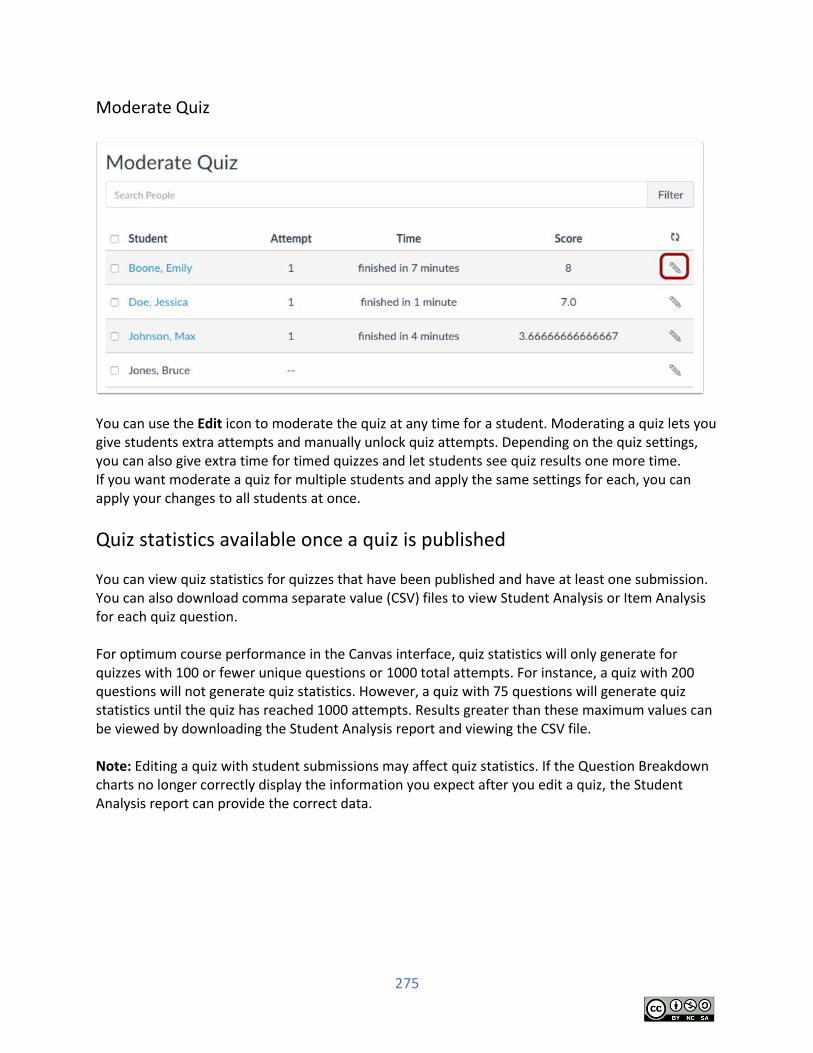
275
Moderate Quiz
You can use the Edit icon to moderate the quiz at any time for a student. Moderating a quiz lets you give students extra attempts and manually unlock quiz attempts. Depending on the quiz settings, you can also give extra time for timed quizzes and let students see quiz results one more time. If you want moderate a quiz for multiple students and apply the same settings for each, you can apply your changes to all students at once.
Quiz statistics available once a quiz is published
You can view quiz statistics for quizzes that have been published and have at least one submission. You can also download comma separate value (CSV) files to view Student Analysis or Item Analysis for each quiz question. For optimum course performance in the Canvas interface, quiz statistics will only generate for quizzes with 100 or fewer unique questions or 1000 total attempts. For instance, a quiz with 200 questions will not generate quiz statistics. However, a quiz with 75 questions will generate quiz statistics until the quiz has reached 1000 attempts. Results greater than these maximum values can be viewed by downloading the Student Analysis report and viewing the CSV file. Note: Editing a quiz with student submissions may affect quiz statistics. If the Question Breakdown charts no longer correctly display the information you expect after you edit a quiz, the Student Analysis report can provide the correct data.
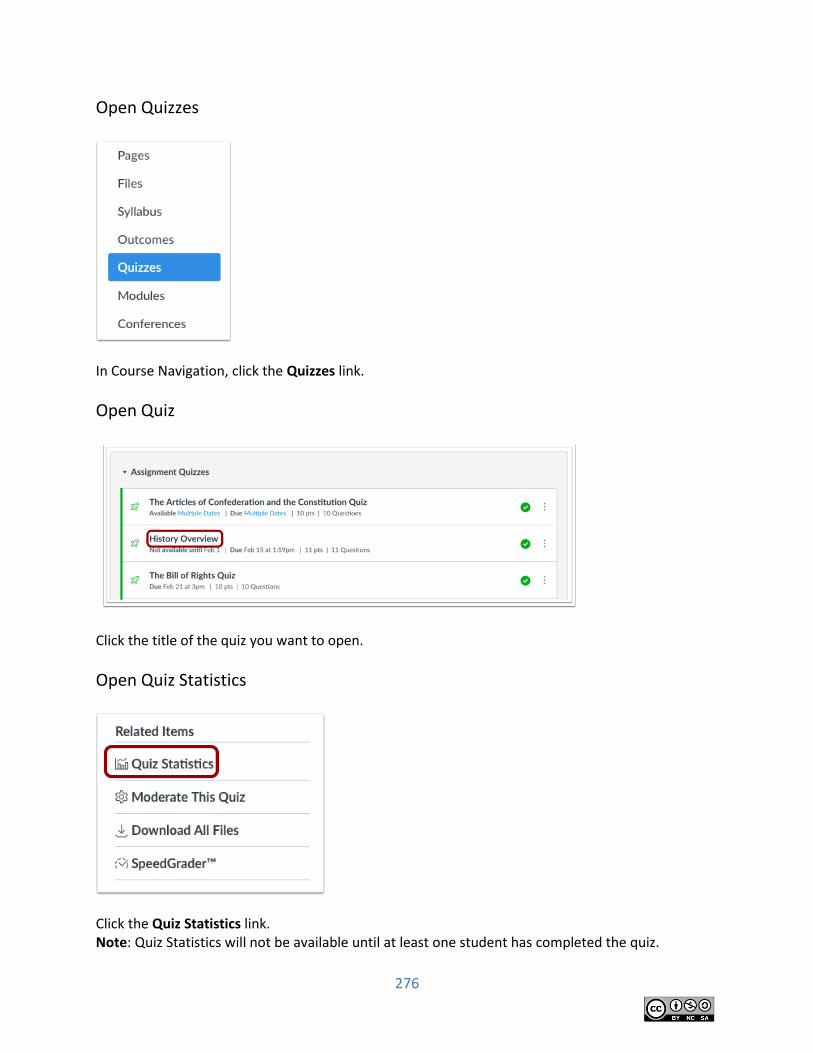
276
Open Quizzes
In Course Navigation, click the Quizzes link.
Open Quiz
Click the title of the quiz you want to open.
Open Quiz Statistics
Click the Quiz Statistics link. Note: Quiz Statistics will not be available until at least one student has completed the quiz.
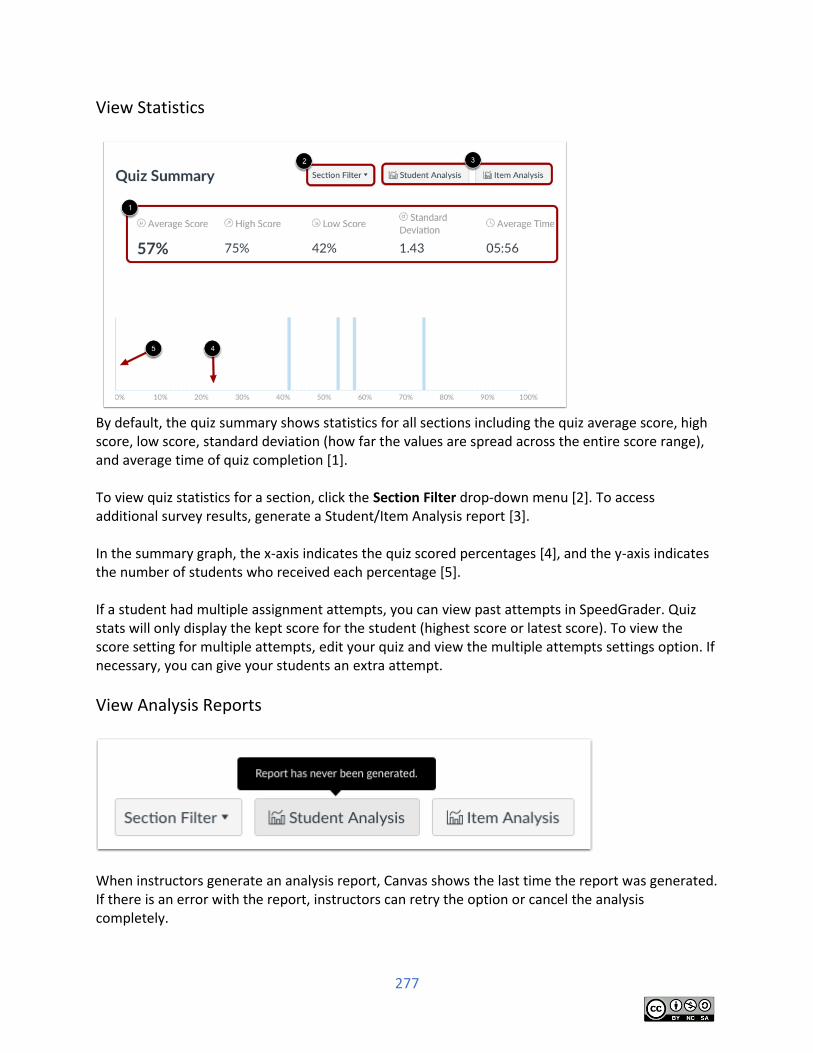
277
View Statistics
By default, the quiz summary shows statistics for all sections including the quiz average score, high score, low score, standard deviation (how far the values are spread across the entire score range), and average time of quiz completion [1]. To view quiz statistics for a section, click the Section Filter drop-down menu [2]. To access additional survey results, generate a Student/Item Analysis report [3]. In the summary graph, the x-axis indicates the quiz scored percentages [4], and the y-axis indicates the number of students who received each percentage [5]. If a student had multiple assignment attempts, you can view past attempts in SpeedGrader. Quiz stats will only display the kept score for the student (highest score or latest score). To view the score setting for multiple attempts, edit your quiz and view the multiple attempts settings option. If necessary, you can give your students an extra attempt.
View Analysis Reports
When instructors generate an analysis report, Canvas shows the last time the report was generated. If there is an error with the report, instructors can retry the option or cancel the analysis completely.
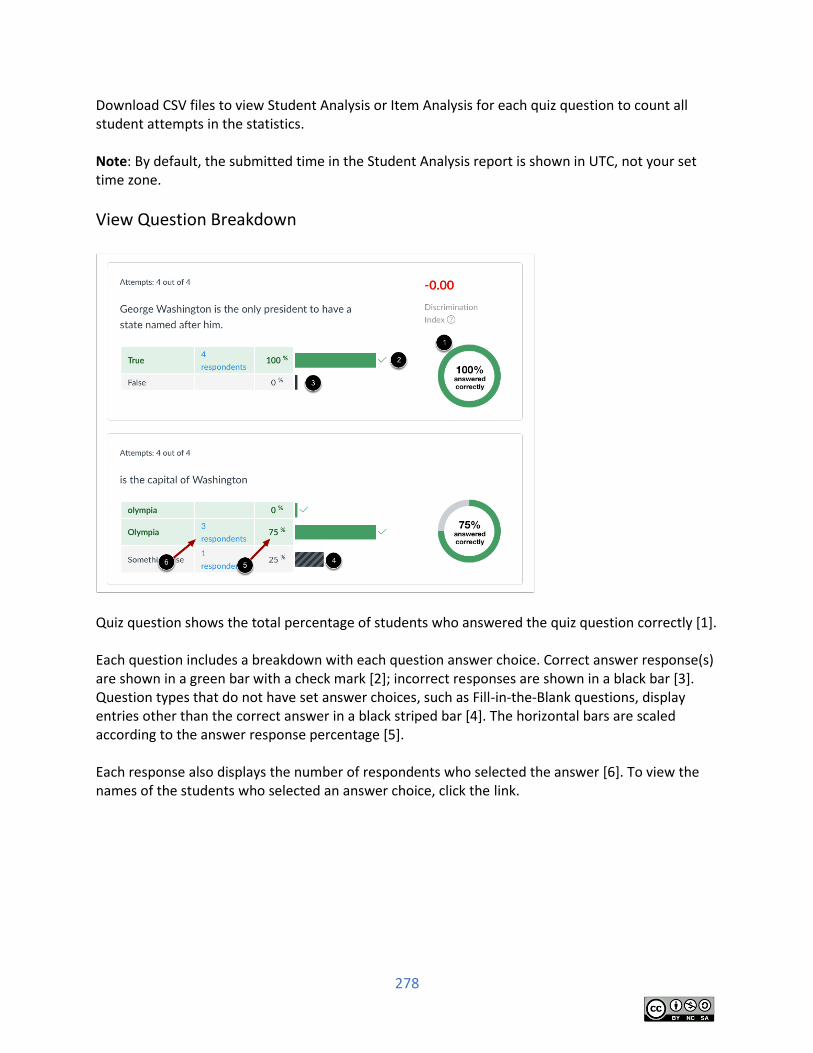
278
Download CSV files to view Student Analysis or Item Analysis for each quiz question to count all student attempts in the statistics. Note: By default, the submitted time in the Student Analysis report is shown in UTC, not your set time zone.
View Question Breakdown
Quiz question shows the total percentage of students who answered the quiz question correctly [1]. Each question includes a breakdown with each question answer choice. Correct answer response(s) are shown in a green bar with a check mark [2]; incorrect responses are shown in a black bar [3]. Question types that do not have set answer choices, such as Fill-in-the-Blank questions, display entries other than the correct answer in a black striped bar [4]. The horizontal bars are scaled according to the answer response percentage [5]. Each response also displays the number of respondents who selected the answer [6]. To view the names of the students who selected an answer choice, click the link.
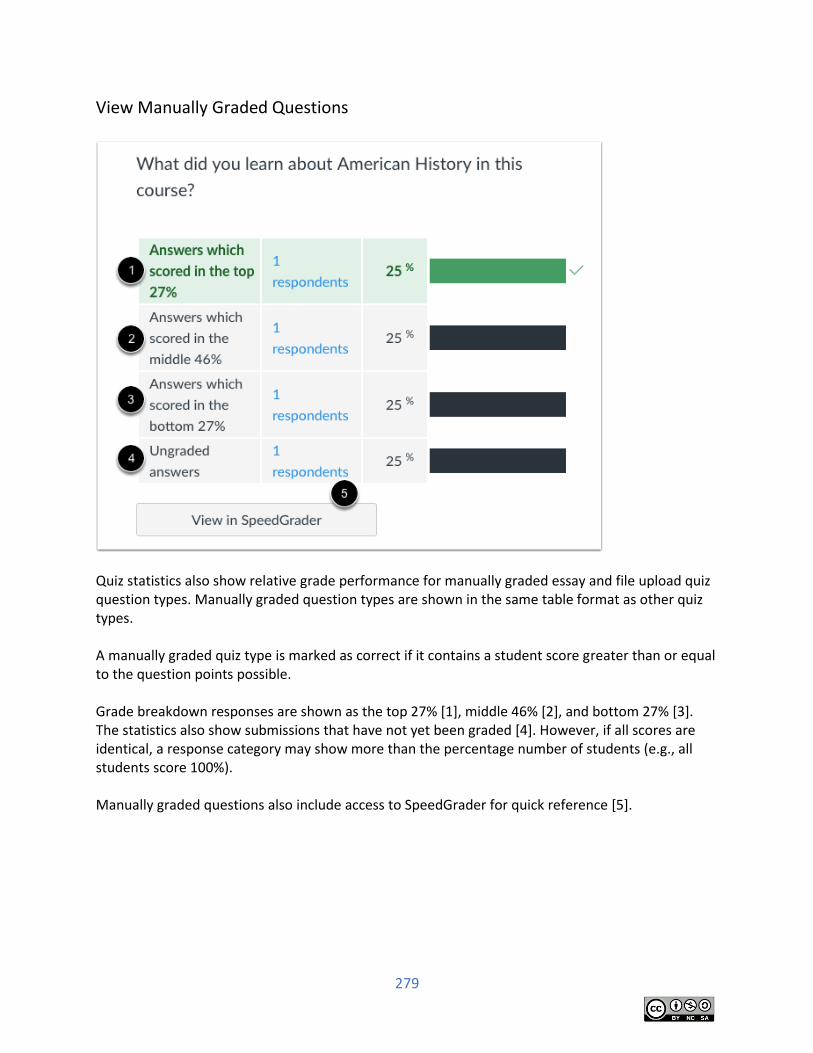
279
View Manually Graded Questions
Quiz statistics also show relative grade performance for manually graded essay and file upload quiz question types. Manually graded question types are shown in the same table format as other quiz types. A manually graded quiz type is marked as correct if it contains a student score greater than or equal to the question points possible. Grade breakdown responses are shown as the top 27% [1], middle 46% [2], and bottom 27% [3]. The statistics also show submissions that have not yet been graded [4]. However, if all scores are identical, a response category may show more than the percentage number of students (e.g., all students score 100%). Manually graded questions also include access to SpeedGrader for quick reference [5].
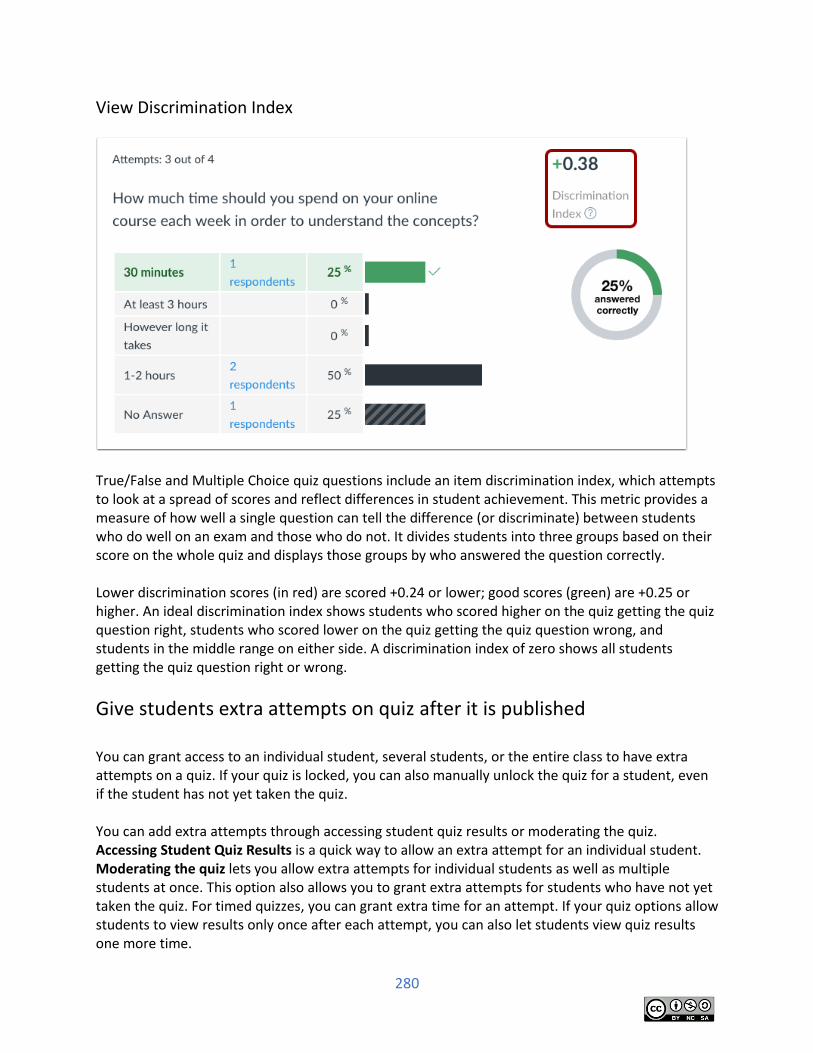
280
View Discrimination Index
True/False and Multiple Choice quiz questions include an item discrimination index, which attempts to look at a spread of scores and reflect differences in student achievement. This metric provides a measure of how well a single question can tell the difference (or discriminate) between students who do well on an exam and those who do not. It divides students into three groups based on their score on the whole quiz and displays those groups by who answered the question correctly. Lower discrimination scores (in red) are scored +0.24 or lower; good scores (green) are +0.25 or higher. An ideal discrimination index shows students who scored higher on the quiz getting the quiz question right, students who scored lower on the quiz getting the quiz question wrong, and students in the middle range on either side. A discrimination index of zero shows all students getting the quiz question right or wrong.
Give students extra attempts on quiz after it is published You can grant access to an individual student, several students, or the entire class to have extra attempts on a quiz. If your quiz is locked, you can also manually unlock the quiz for a student, even if the student has not yet taken the quiz. You can add extra attempts through accessing student quiz results or moderating the quiz. Accessing Student Quiz Results is a quick way to allow an extra attempt for an individual student. Moderating the quiz lets you allow extra attempts for individual students as well as multiple students at once. This option also allows you to grant extra attempts for students who have not yet taken the quiz. For timed quizzes, you can grant extra time for an attempt. If your quiz options allow students to view results only once after each attempt, you can also let students view quiz results one more time.
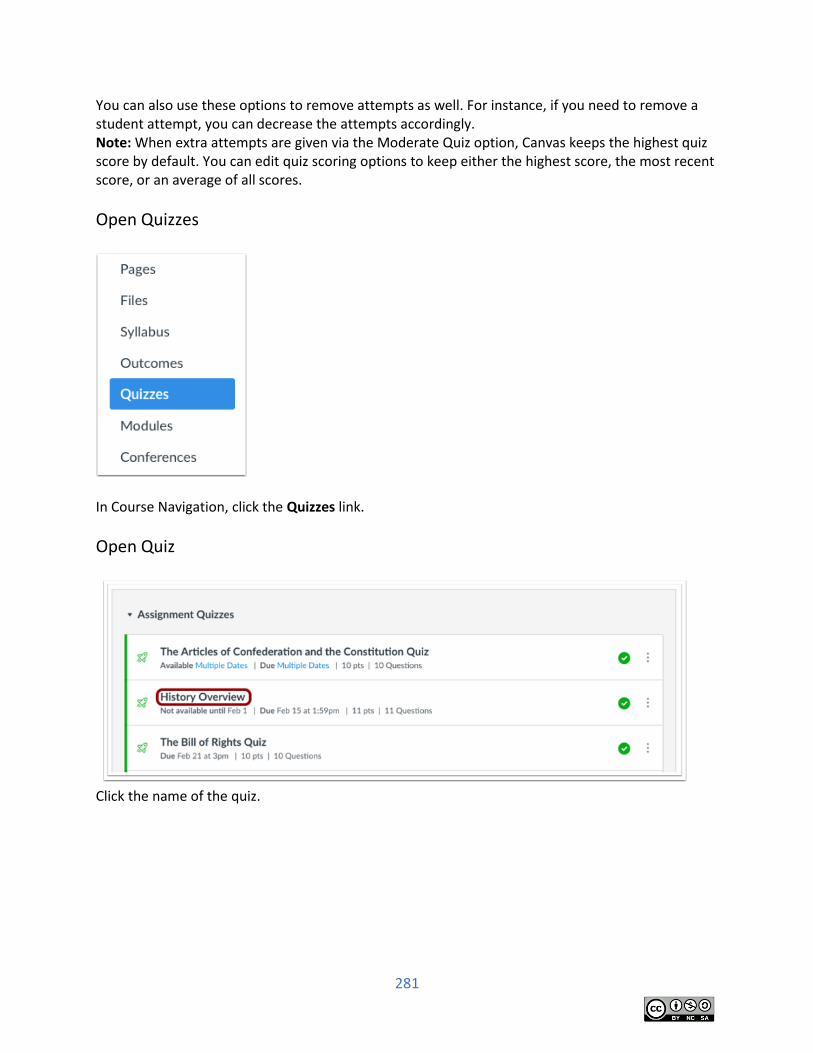
281
You can also use these options to remove attempts as well. For instance, if you need to remove a student attempt, you can decrease the attempts accordingly. Note: When extra attempts are given via the Moderate Quiz option, Canvas keeps the highest quiz score by default. You can edit quiz scoring options to keep either the highest score, the most recent score, or an average of all scores.
Open Quizzes
In Course Navigation, click the Quizzes link.
Open Quiz
Click the name of the quiz.
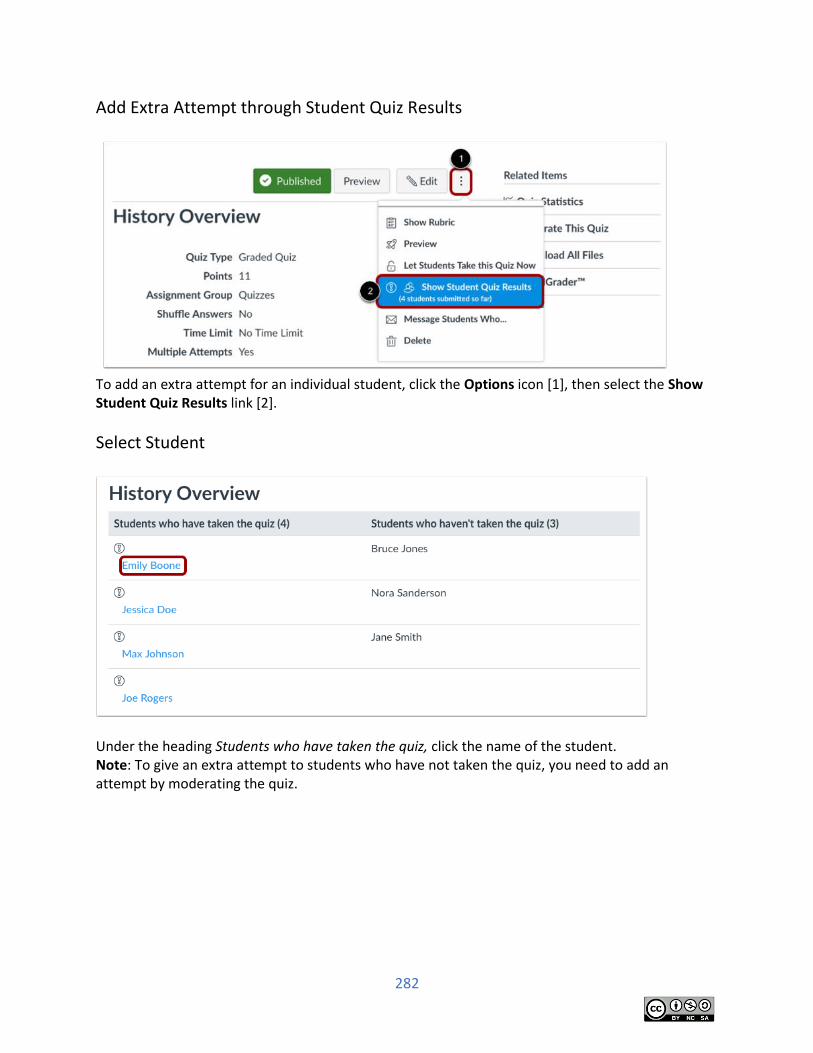
282
Add Extra Attempt through Student Quiz Results
To add an extra attempt for an individual student, click the Options icon [1], then select the Show Student Quiz Results link [2].
Select Student
Under the heading Students who have taken the quiz, click the name of the student. Note: To give an extra attempt to students who have not taken the quiz, you need to add an attempt by moderating the quiz.
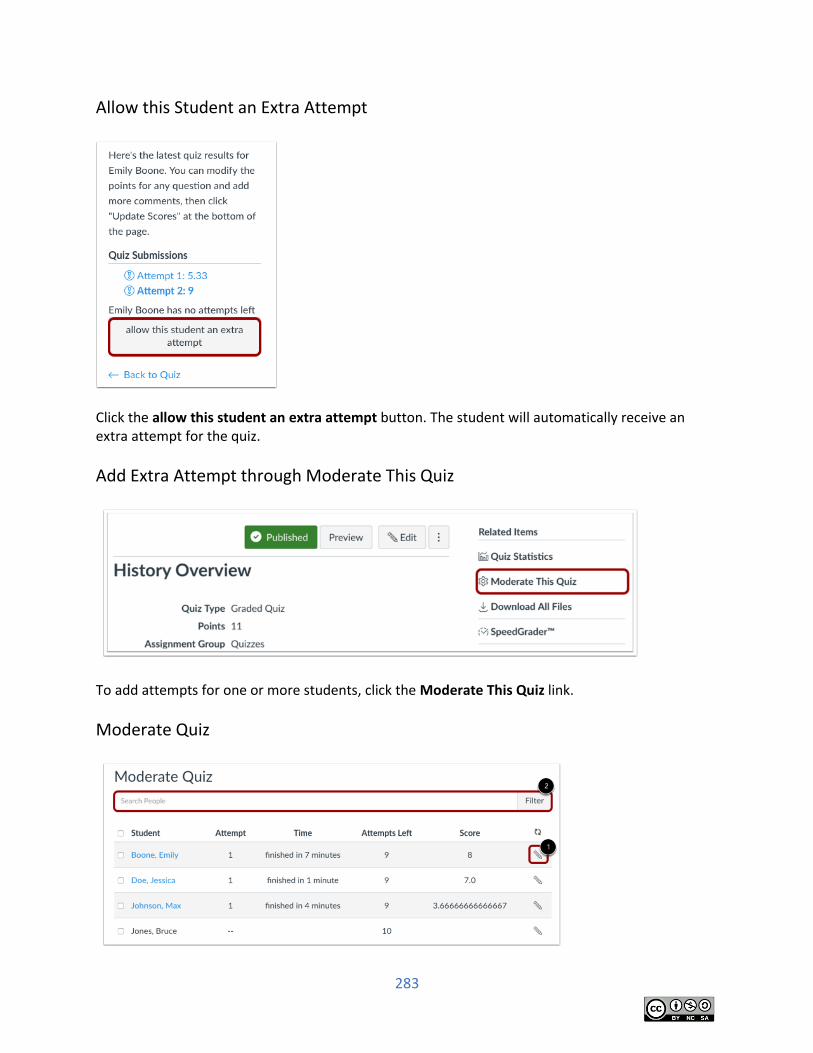
283
Allow this Student an Extra Attempt
Click the allow this student an extra attempt button. The student will automatically receive an extra attempt for the quiz.
Add Extra Attempt through Moderate This Quiz
To add attempts for one or more students, click the Moderate This Quiz link.
Moderate Quiz
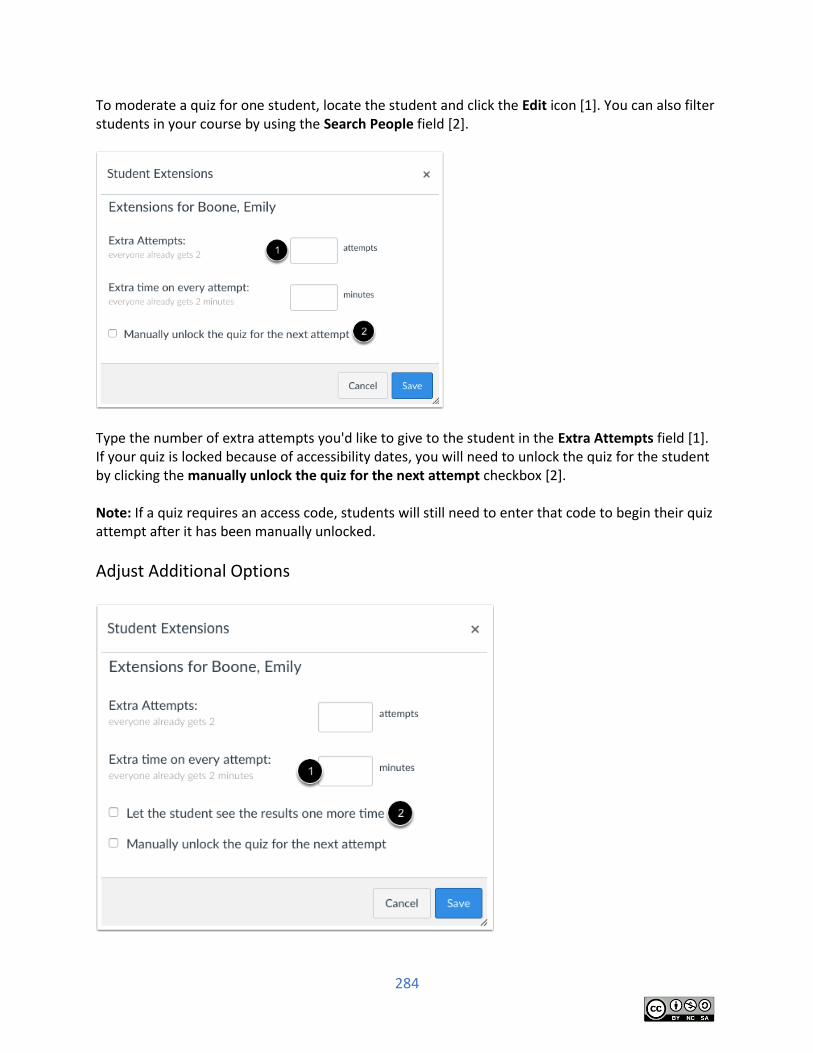
284
To moderate a quiz for one student, locate the student and click the Edit icon [1]. You can also filter students in your course by using the Search People field [2].
Type the number of extra attempts you'd like to give to the student in the Extra Attempts field [1]. If your quiz is locked because of accessibility dates, you will need to unlock the quiz for the student by clicking the manually unlock the quiz for the next attempt checkbox [2]. Note: If a quiz requires an access code, students will still need to enter that code to begin their quiz attempt after it has been manually unlocked.
Adjust Additional Options
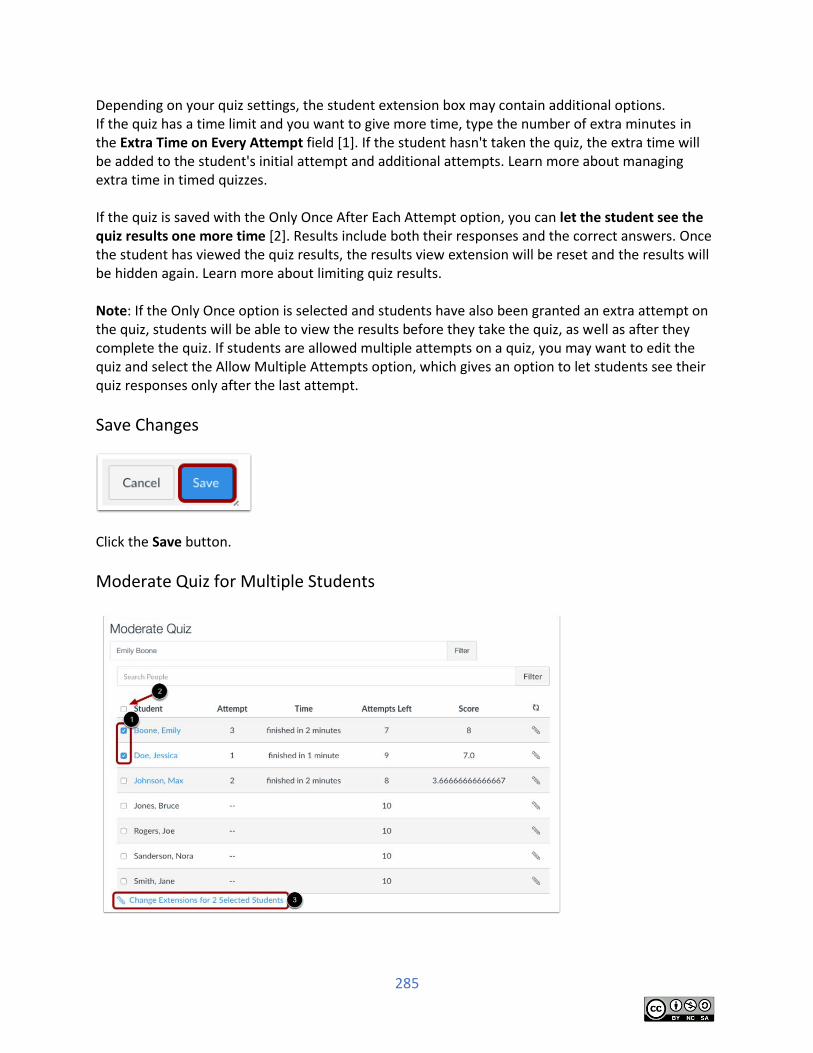
285
Depending on your quiz settings, the student extension box may contain additional options. If the quiz has a time limit and you want to give more time, type the number of extra minutes in the Extra Time on Every Attempt field [1]. If the student hasn't taken the quiz, the extra time will be added to the student's initial attempt and additional attempts. Learn more about managing extra time in timed quizzes. If the quiz is saved with the Only Once After Each Attempt option, you can let the student see the quiz results one more time [2]. Results include both their responses and the correct answers. Once the student has viewed the quiz results, the results view extension will be reset and the results will be hidden again. Learn more about limiting quiz results. Note: If the Only Once option is selected and students have also been granted an extra attempt on the quiz, students will be able to view the results before they take the quiz, as well as after they complete the quiz. If students are allowed multiple attempts on a quiz, you may want to edit the quiz and select the Allow Multiple Attempts option, which gives an option to let students see their quiz responses only after the last attempt.
Save Changes
Click the Save button.
Moderate Quiz for Multiple Students
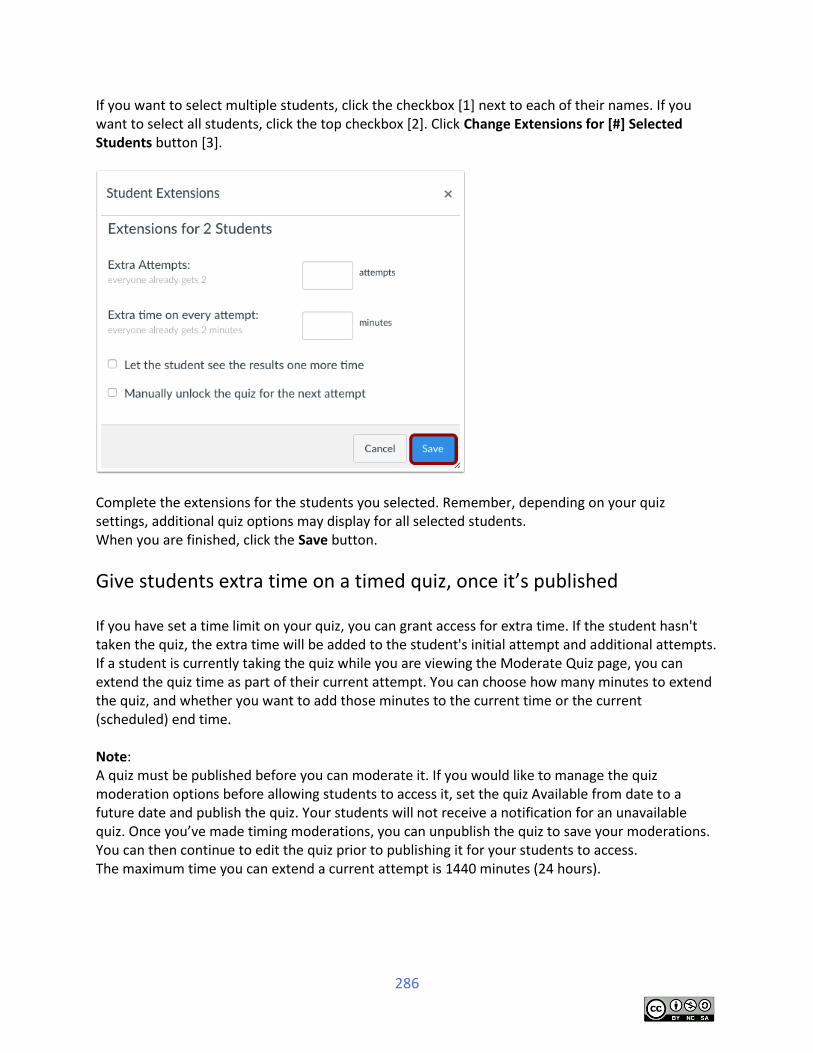
286
If you want to select multiple students, click the checkbox [1] next to each of their names. If you want to select all students, click the top checkbox [2]. Click Change Extensions for [#] Selected Students button [3].
Complete the extensions for the students you selected. Remember, depending on your quiz settings, additional quiz options may display for all selected students. When you are finished, click the Save button.
Give students extra time on a timed quiz, once it’s published If you have set a time limit on your quiz, you can grant access for extra time. If the student hasn't taken the quiz, the extra time will be added to the student's initial attempt and additional attempts. If a student is currently taking the quiz while you are viewing the Moderate Quiz page, you can extend the quiz time as part of their current attempt. You can choose how many minutes to extend the quiz, and whether you want to add those minutes to the current time or the current (scheduled) end time. Note: A quiz must be published before you can moderate it. If you would like to manage the quiz moderation options before allowing students to access it, set the quiz Available from date to a future date and publish the quiz. Your students will not receive a notification for an unavailable quiz. Once you’ve made timing moderations, you can unpublish the quiz to save your moderations. You can then continue to edit the quiz prior to publishing it for your students to access. The maximum time you can extend a current attempt is 1440 minutes (24 hours).
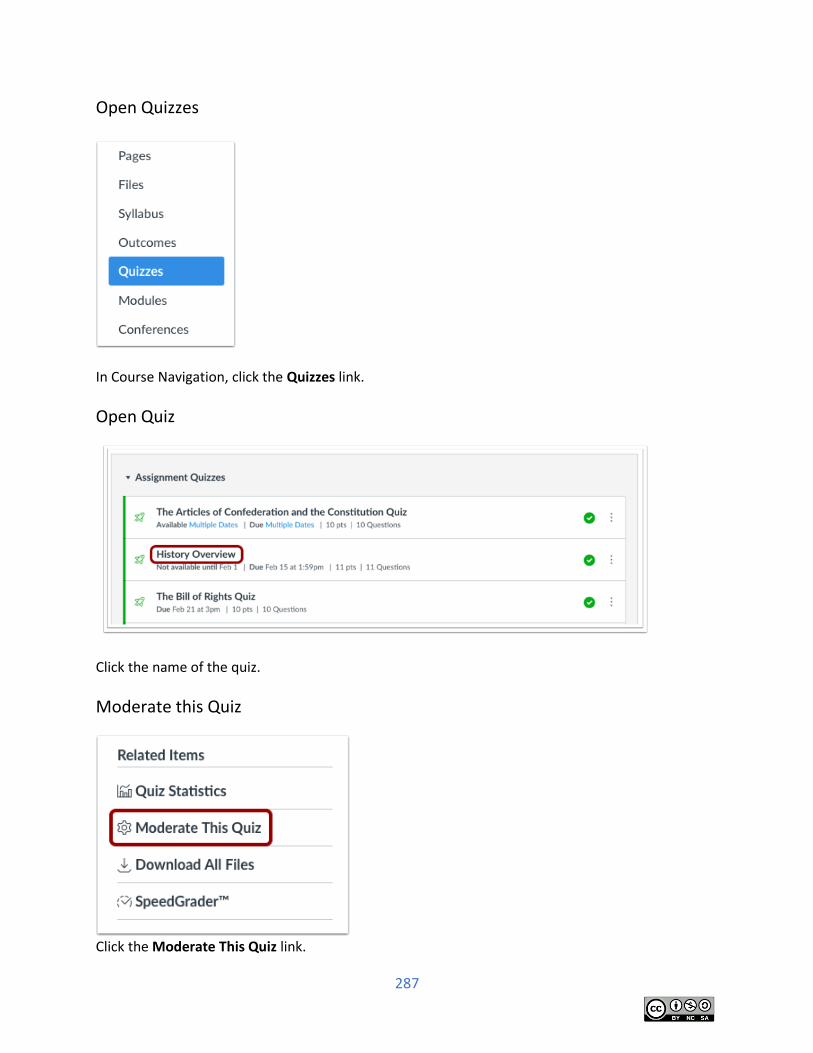
287
Open Quizzes
In Course Navigation, click the Quizzes link.
Open Quiz
Click the name of the quiz.
Moderate this Quiz
Click the Moderate This Quiz link.
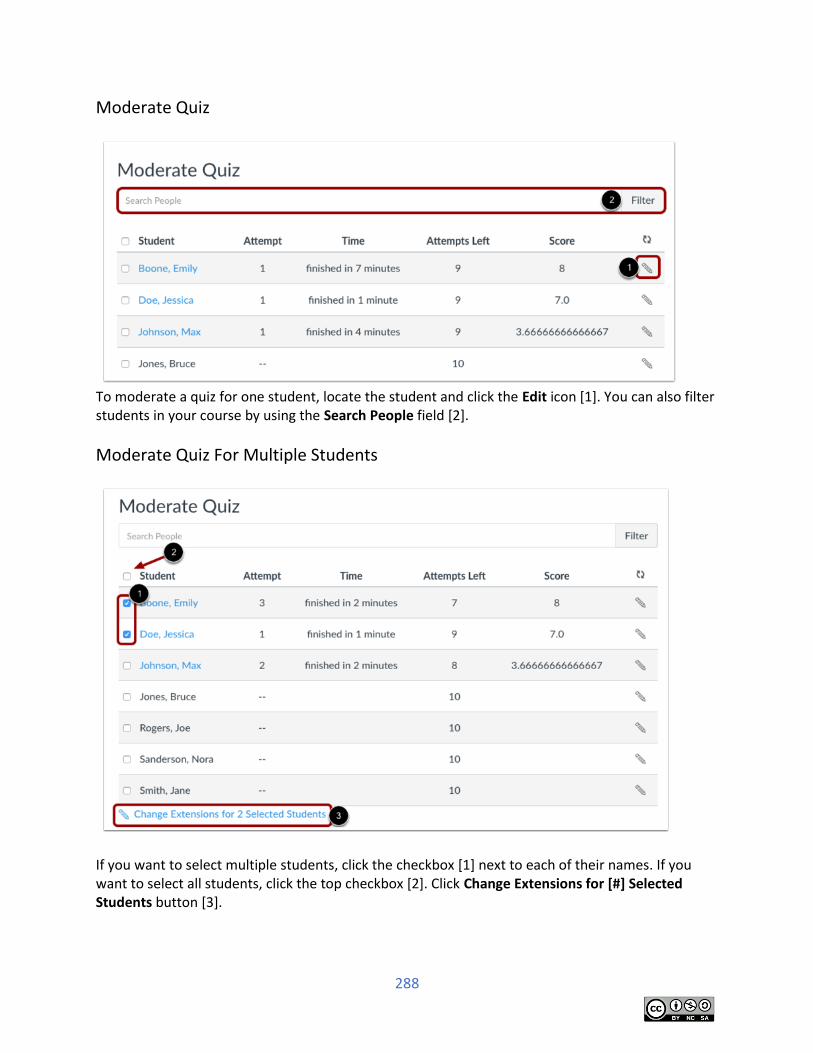
288
Moderate Quiz
To moderate a quiz for one student, locate the student and click the Edit icon [1]. You can also filter students in your course by using the Search People field [2].
Moderate Quiz For Multiple Students
If you want to select multiple students, click the checkbox [1] next to each of their names. If you want to select all students, click the top checkbox [2]. Click Change Extensions for [#] Selected Students button [3].
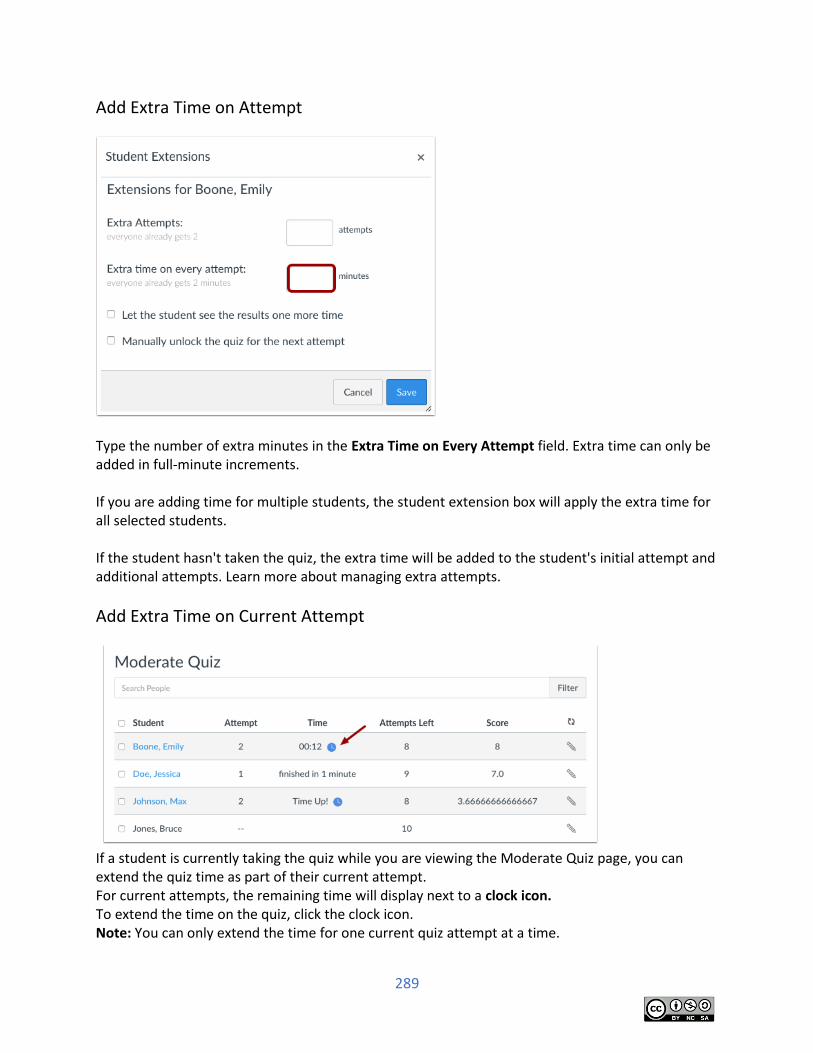
289
Add Extra Time on Attempt
Type the number of extra minutes in the Extra Time on Every Attempt field. Extra time can only be added in full-minute increments. If you are adding time for multiple students, the student extension box will apply the extra time for all selected students. If the student hasn't taken the quiz, the extra time will be added to the student's initial attempt and additional attempts. Learn more about managing extra attempts.
Add Extra Time on Current Attempt
If a student is currently taking the quiz while you are viewing the Moderate Quiz page, you can extend the quiz time as part of their current attempt. For current attempts, the remaining time will display next to a clock icon. To extend the time on the quiz, click the clock icon. Note: You can only extend the time for one current quiz attempt at a time.
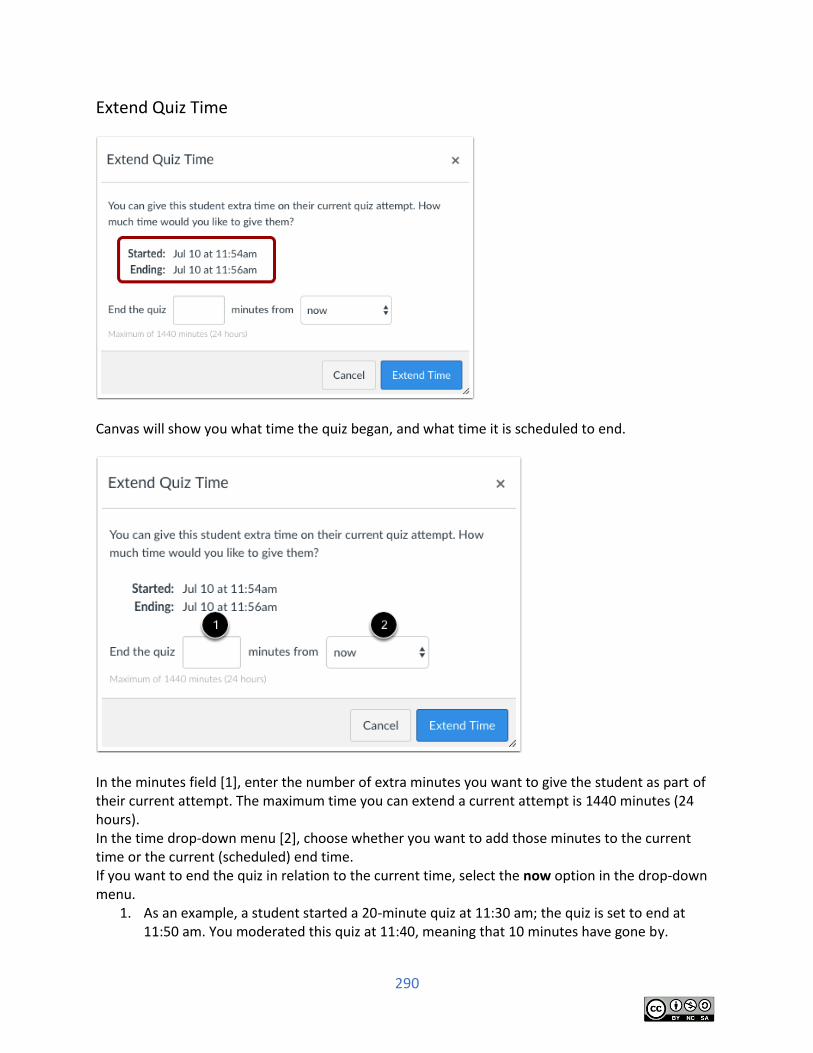
290
Extend Quiz Time
Canvas will show you what time the quiz began, and what time it is scheduled to end.
In the minutes field [1], enter the number of extra minutes you want to give the student as part of their current attempt. The maximum time you can extend a current attempt is 1440 minutes (24 hours). In the time drop-down menu [2], choose whether you want to add those minutes to the current time or the current (scheduled) end time. If you want to end the quiz in relation to the current time, select the now option in the drop-down menu.
1. As an example, a student started a 20-minute quiz at 11:30 am; the quiz is set to end at 11:50 am. You moderated this quiz at 11:40, meaning that 10 minutes have gone by.
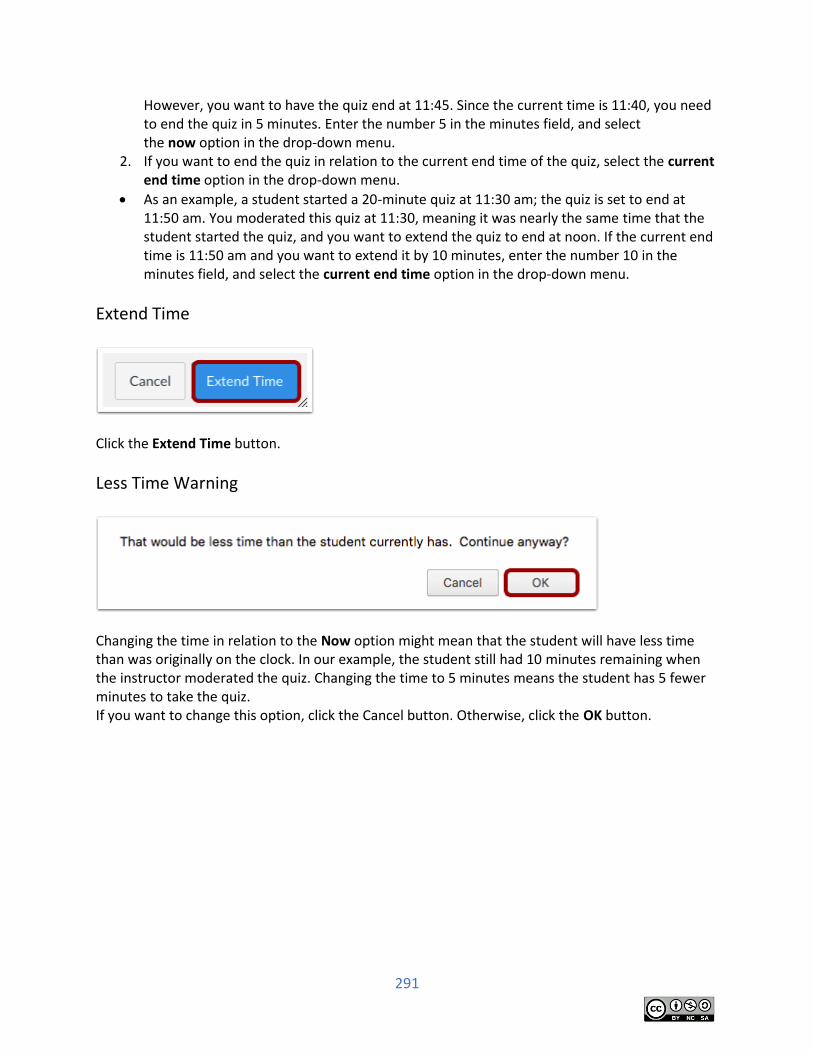
291
However, you want to have the quiz end at 11:45. Since the current time is 11:40, you need to end the quiz in 5 minutes. Enter the number 5 in the minutes field, and select the now option in the drop-down menu.
2. If you want to end the quiz in relation to the current end time of the quiz, select the current end time option in the drop-down menu.
As an example, a student started a 20-minute quiz at 11:30 am; the quiz is set to end at 11:50 am. You moderated this quiz at 11:30, meaning it was nearly the same time that the student started the quiz, and you want to extend the quiz to end at noon. If the current end time is 11:50 am and you want to extend it by 10 minutes, enter the number 10 in the minutes field, and select the current end time option in the drop-down menu.
Extend Time
Click the Extend Time button.
Less Time Warning
Changing the time in relation to the Now option might mean that the student will have less time than was originally on the clock. In our example, the student still had 10 minutes remaining when the instructor moderated the quiz. Changing the time to 5 minutes means the student has 5 fewer minutes to take the quiz. If you want to change this option, click the Cancel button. Otherwise, click the OK button.
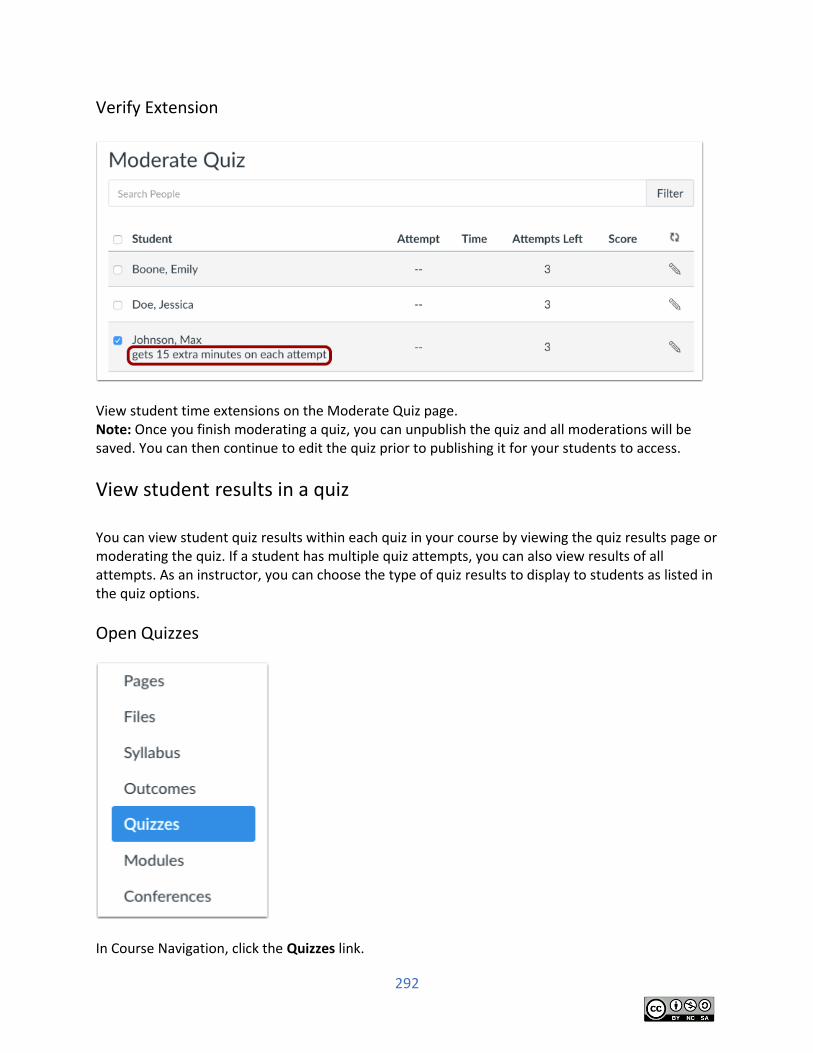
292
Verify Extension
View student time extensions on the Moderate Quiz page. Note: Once you finish moderating a quiz, you can unpublish the quiz and all moderations will be saved. You can then continue to edit the quiz prior to publishing it for your students to access.
View student results in a quiz You can view student quiz results within each quiz in your course by viewing the quiz results page or moderating the quiz. If a student has multiple quiz attempts, you can also view results of all attempts. As an instructor, you can choose the type of quiz results to display to students as listed in the quiz options.
Open Quizzes
In Course Navigation, click the Quizzes link.
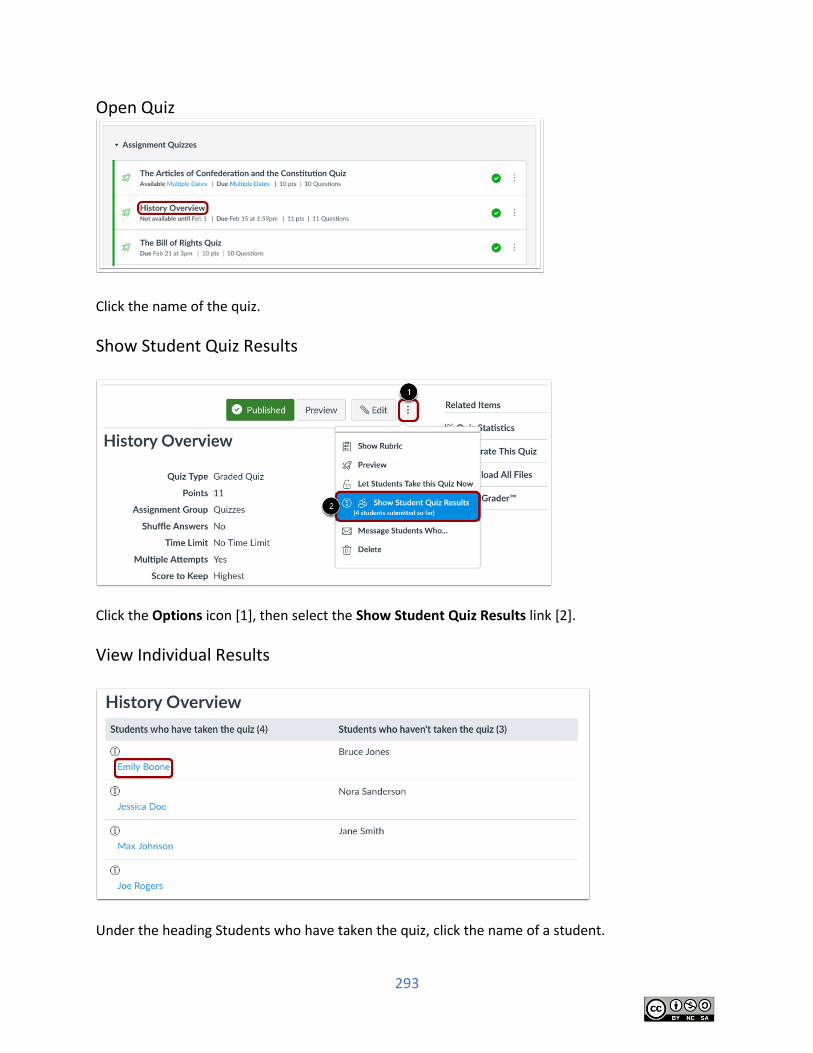
293
Open Quiz
Click the name of the quiz.
Show Student Quiz Results
Click the Options icon [1], then select the Show Student Quiz Results link [2].
View Individual Results
Under the heading Students who have taken the quiz, click the name of a student.
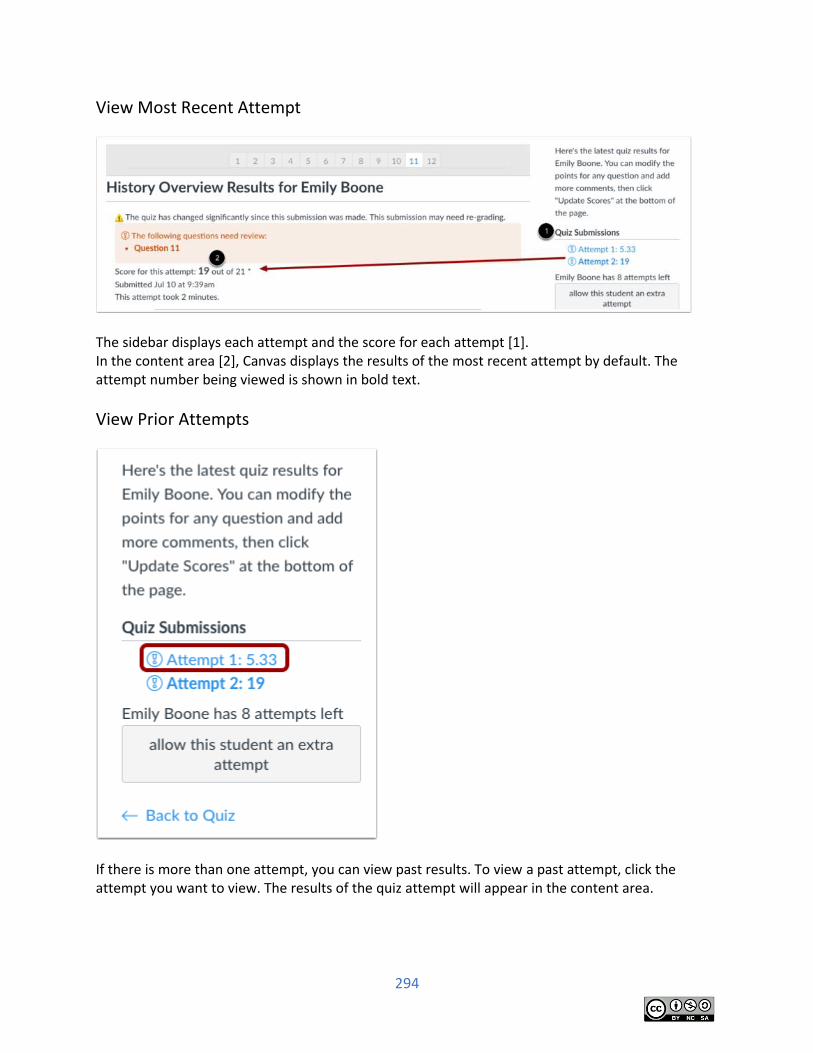
294
View Most Recent Attempt
The sidebar displays each attempt and the score for each attempt [1]. In the content area [2], Canvas displays the results of the most recent attempt by default. The attempt number being viewed is shown in bold text.
View Prior Attempts
If there is more than one attempt, you can view past results. To view a past attempt, click the attempt you want to view. The results of the quiz attempt will appear in the content area.
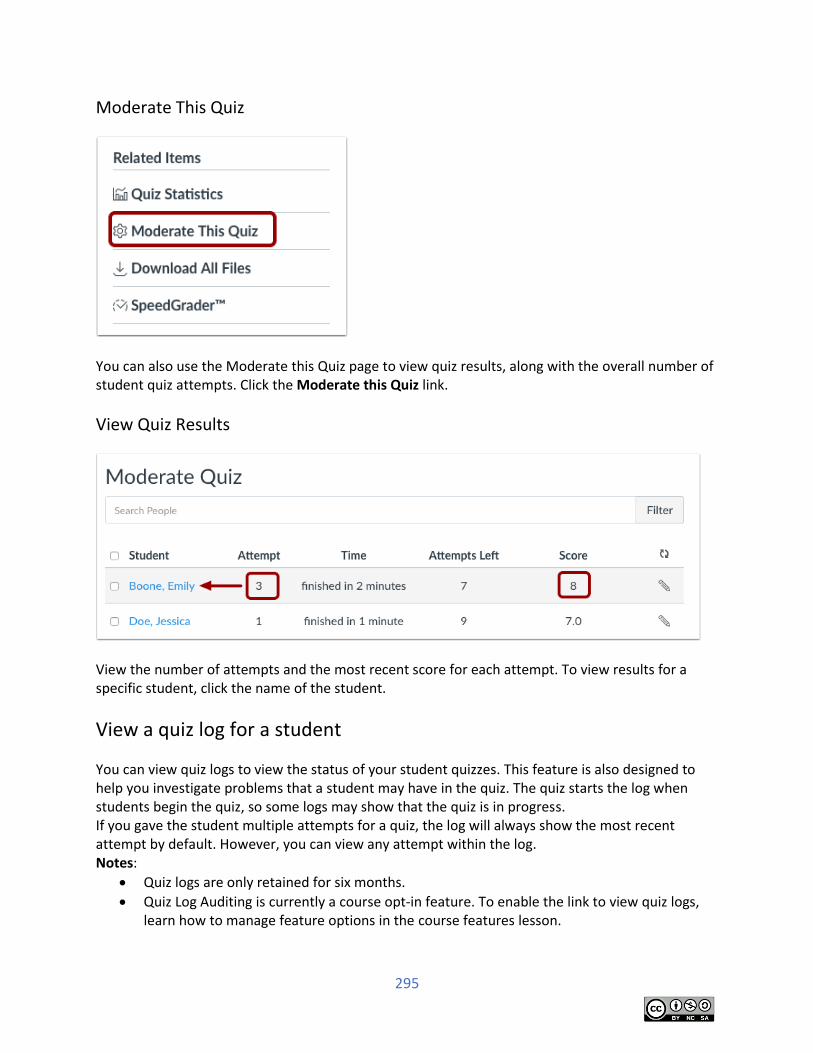
295
Moderate This Quiz
You can also use the Moderate this Quiz page to view quiz results, along with the overall number of student quiz attempts. Click the Moderate this Quiz link.
View Quiz Results
View the number of attempts and the most recent score for each attempt. To view results for a specific student, click the name of the student.
View a quiz log for a student
You can view quiz logs to view the status of your student quizzes. This feature is also designed to help you investigate problems that a student may have in the quiz. The quiz starts the log when students begin the quiz, so some logs may show that the quiz is in progress. If you gave the student multiple attempts for a quiz, the log will always show the most recent attempt by default. However, you can view any attempt within the log. Notes:
Quiz logs are only retained for six months.
Quiz Log Auditing is currently a course opt-in feature. To enable the link to view quiz logs, learn how to manage feature options in the course features lesson.
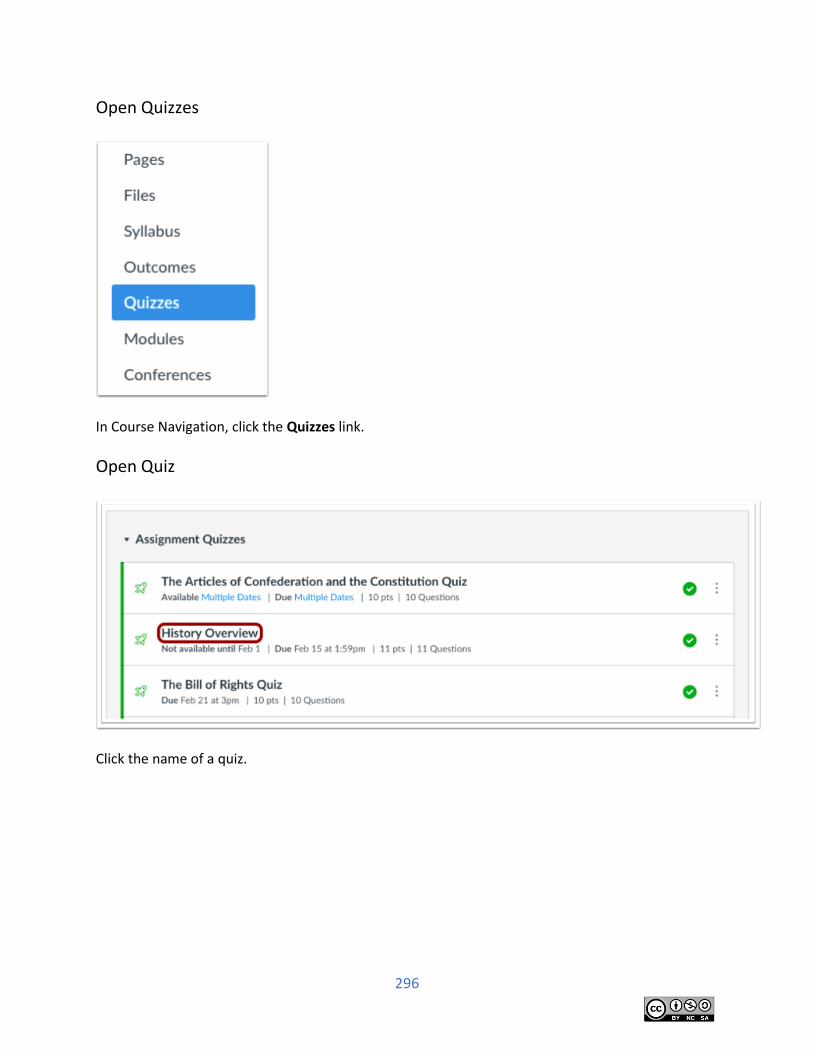
296
Open Quizzes
In Course Navigation, click the Quizzes link.
Open Quiz
Click the name of a quiz.
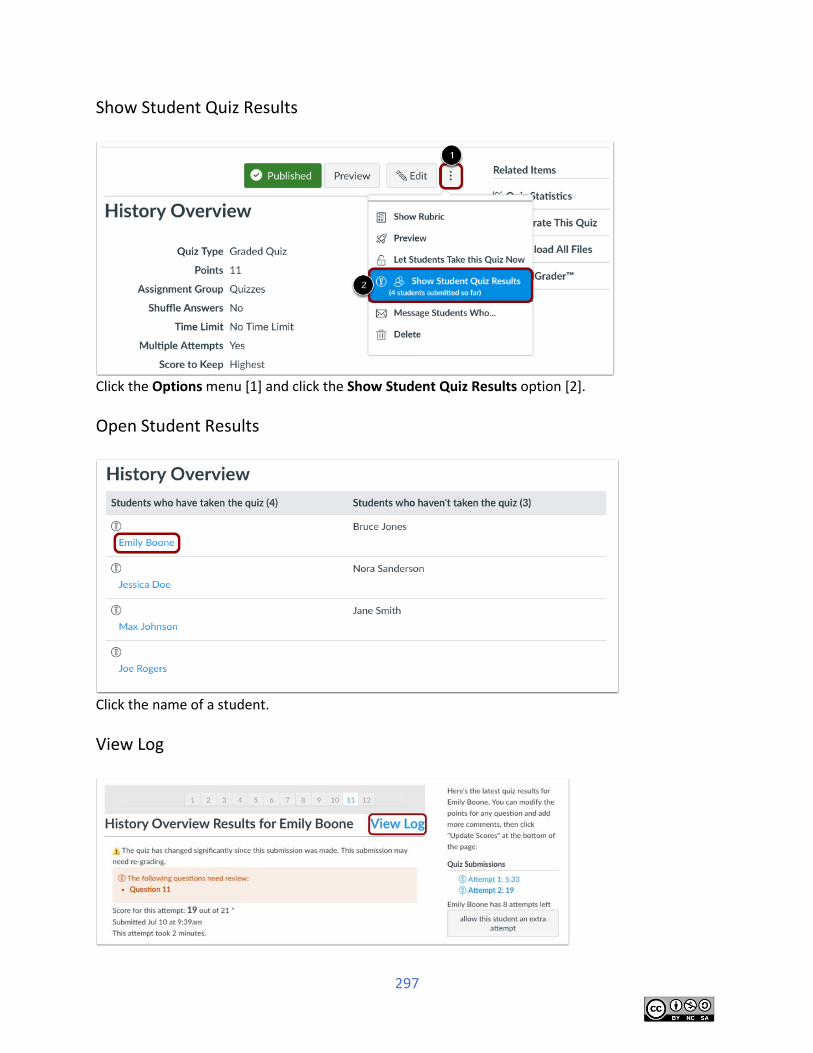
297
Show Student Quiz Results
Click the Options menu [1] and click the Show Student Quiz Results option [2].
Open Student Results
Click the name of a student.
View Log
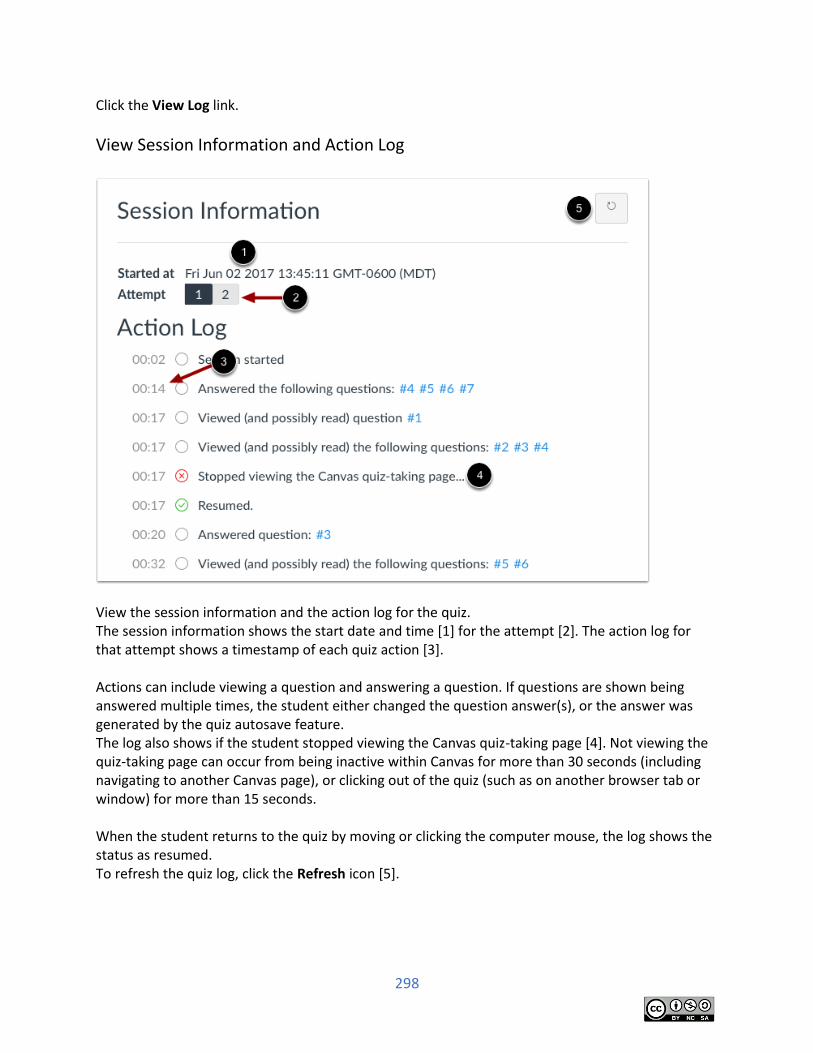
298
Click the View Log link.
View Session Information and Action Log
View the session information and the action log for the quiz. The session information shows the start date and time [1] for the attempt [2]. The action log for that attempt shows a timestamp of each quiz action [3]. Actions can include viewing a question and answering a question. If questions are shown being answered multiple times, the student either changed the question answer(s), or the answer was generated by the quiz autosave feature. The log also shows if the student stopped viewing the Canvas quiz-taking page [4]. Not viewing the quiz-taking page can occur from being inactive within Canvas for more than 30 seconds (including navigating to another Canvas page), or clicking out of the quiz (such as on another browser tab or window) for more than 15 seconds. When the student returns to the quiz by moving or clicking the computer mouse, the log shows the status as resumed. To refresh the quiz log, click the Refresh icon [5].
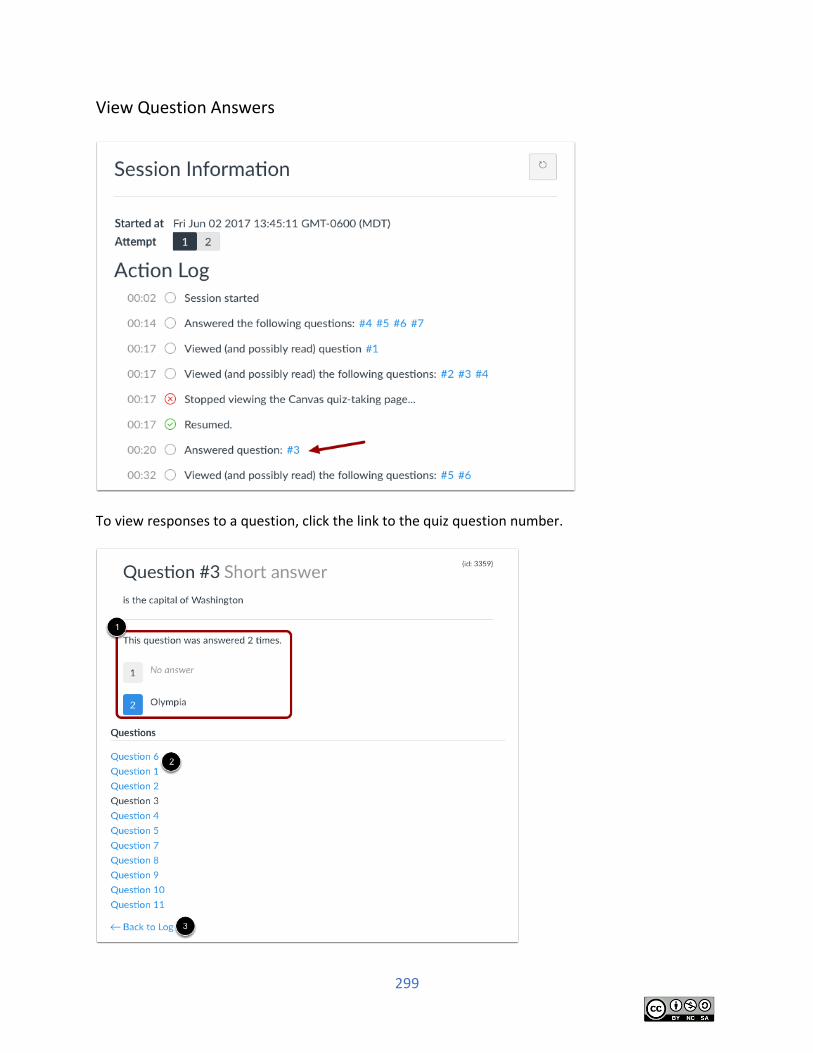
299
View Question Answers
To view responses to a question, click the link to the quiz question number.
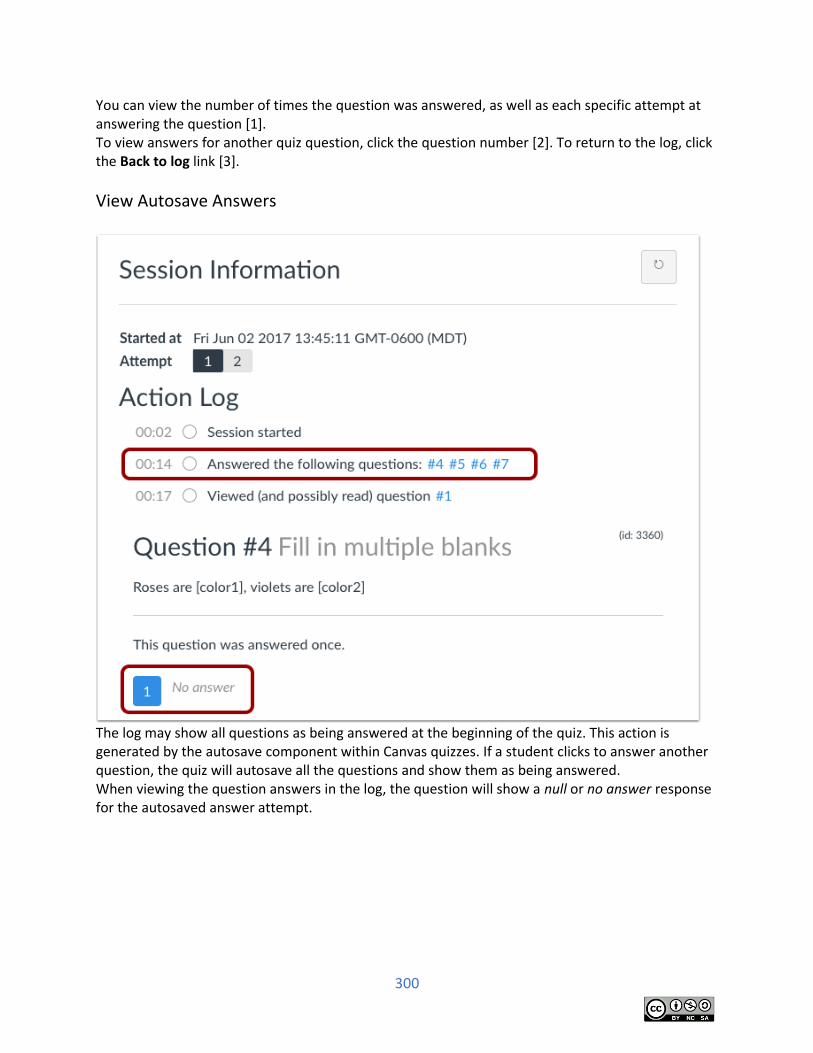
300
You can view the number of times the question was answered, as well as each specific attempt at answering the question [1]. To view answers for another quiz question, click the question number [2]. To return to the log, click the Back to log link [3].
View Autosave Answers
The log may show all questions as being answered at the beginning of the quiz. This action is generated by the autosave component within Canvas quizzes. If a student clicks to answer another question, the quiz will autosave all the questions and show them as being answered. When viewing the question answers in the log, the question will show a null or no answer response for the autosaved answer attempt.

301
View Additional Attempts
If the student has more than one quiz attempt, the log always shows the last attempt. Prior attempts can be viewed by clicking the number of the attempt.
Create a survey in my course You can use surveys to receive feedback from your students or give them some extra points by responding to a survey. Graded surveys appear in the Syllabus, Gradebook, Calendar, and To Do Lists. Notes:
Student Analysis for surveys must be downloaded as a CSV file. Item Analysis is not available for surveys.
The anonymous option can be enabled or disabled before or after a survey has received submissions, allowing a user with sufficient permissions to see a student's identity and responses. To collect fully anonymous survey responses, you may want to use a third-party survey tool
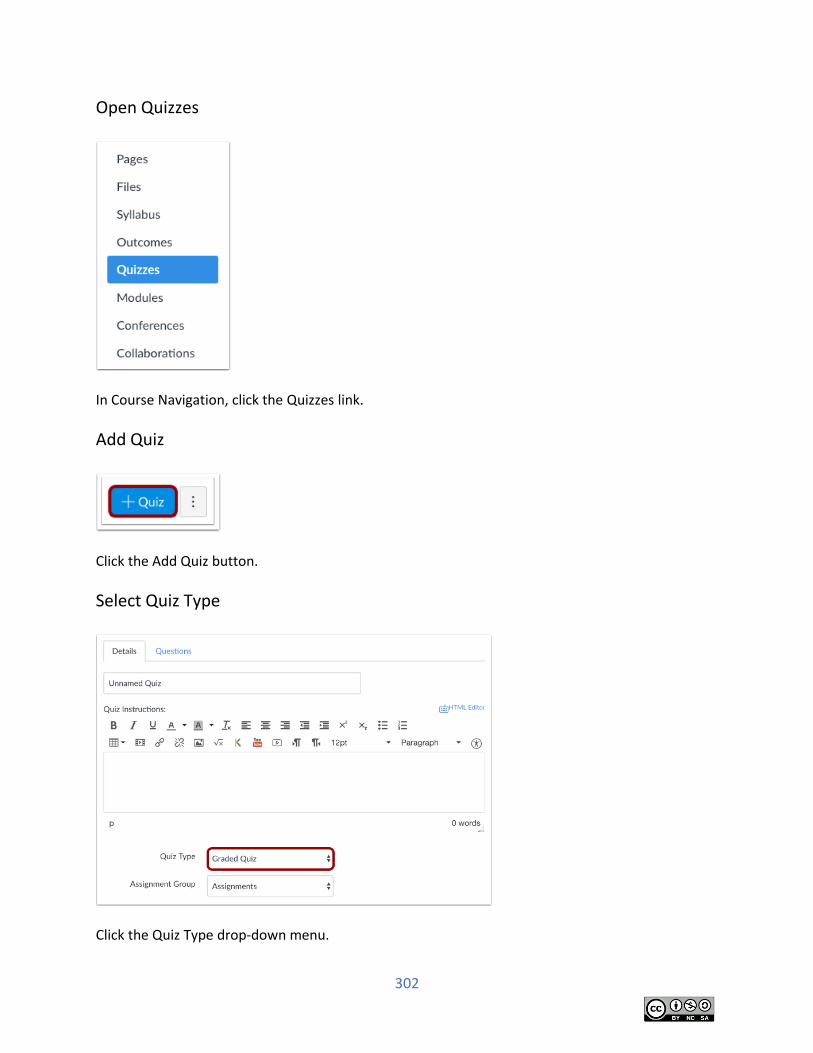
302
Open Quizzes
In Course Navigation, click the Quizzes link.
Add Quiz
Click the Add Quiz button.
Select Quiz Type
Click the Quiz Type drop-down menu.

303
Add Survey Details
Give your survey a name [1], and complete any survey instructions in the text box [2].
Select Survey Type
In the Quiz Type menu, select the survey type you want to create.
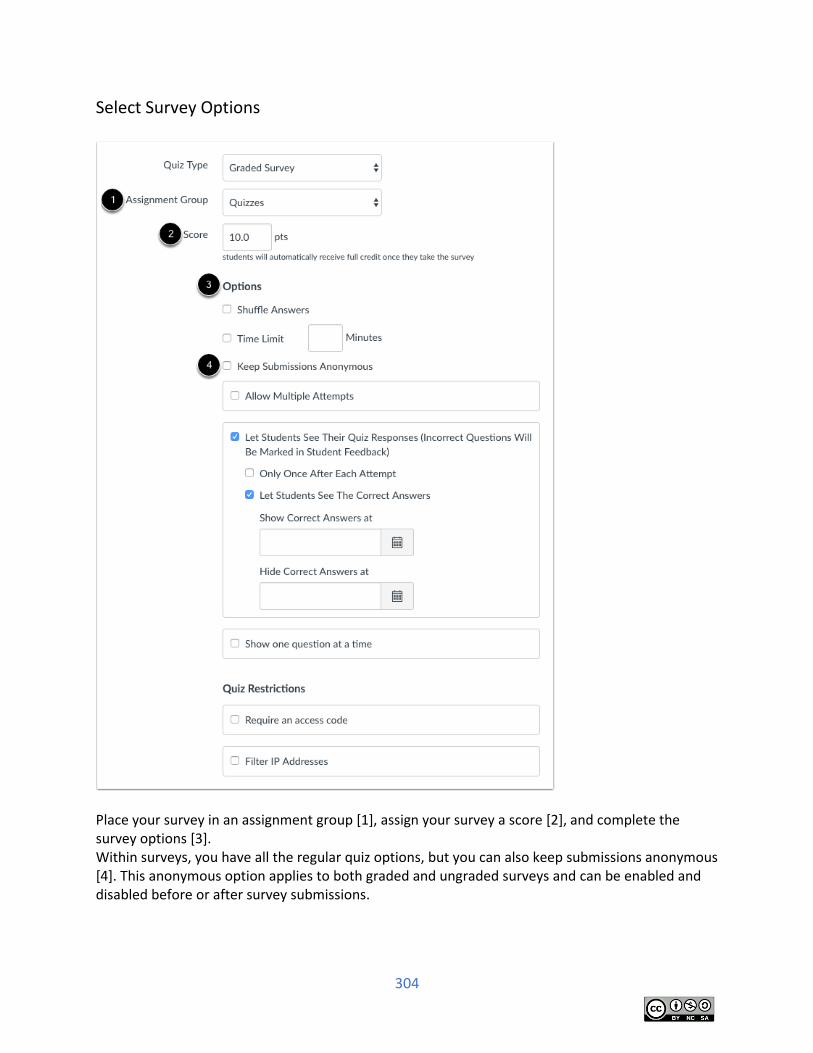
304
Select Survey Options
Place your survey in an assignment group [1], assign your survey a score [2], and complete the survey options [3]. Within surveys, you have all the regular quiz options, but you can also keep submissions anonymous [4]. This anonymous option applies to both graded and ungraded surveys and can be enabled and disabled before or after survey submissions.
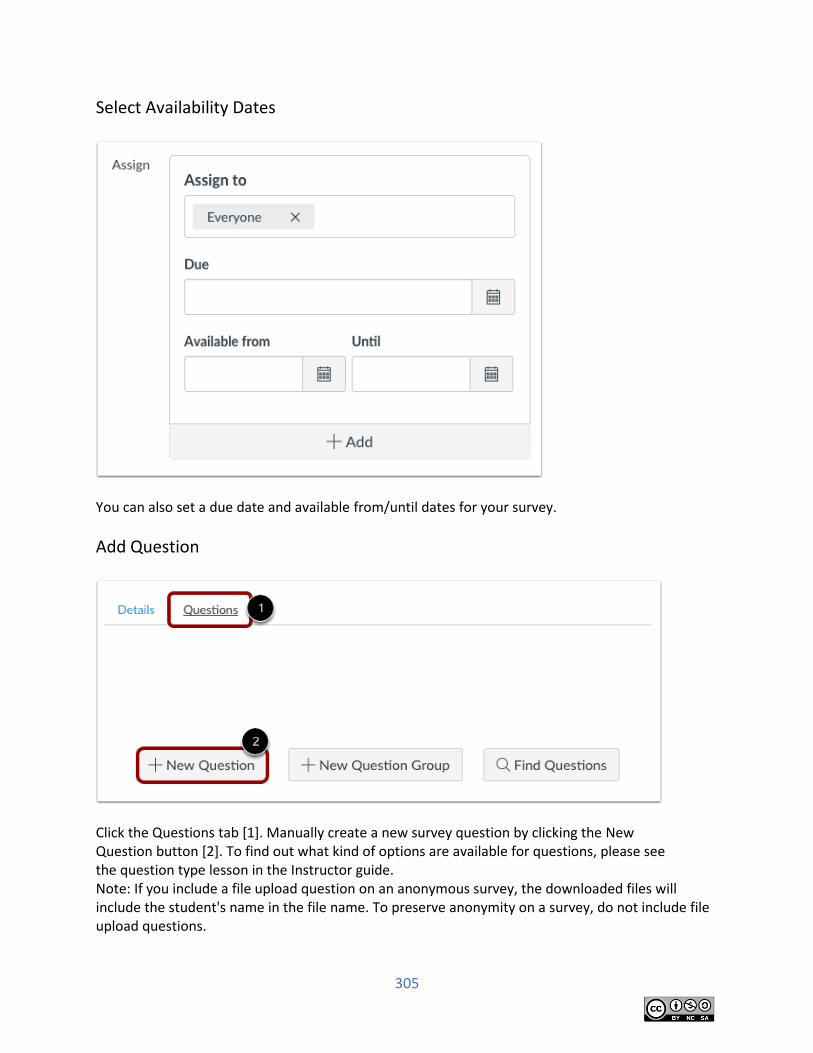
305
Select Availability Dates
You can also set a due date and available from/until dates for your survey.
Add Question
Click the Questions tab [1]. Manually create a new survey question by clicking the New Question button [2]. To find out what kind of options are available for questions, please see the question type lesson in the Instructor guide. Note: If you include a file upload question on an anonymous survey, the downloaded files will include the student's name in the file name. To preserve anonymity on a survey, do not include file upload questions.
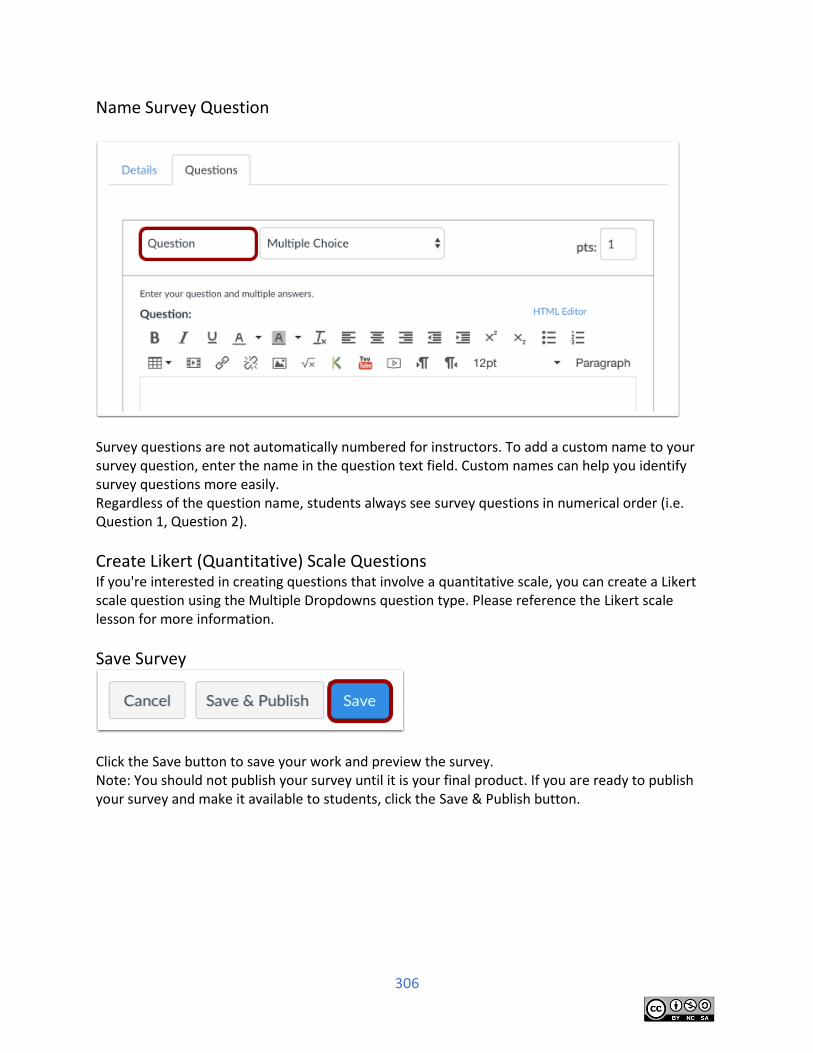
306
Name Survey Question
Survey questions are not automatically numbered for instructors. To add a custom name to your survey question, enter the name in the question text field. Custom names can help you identify survey questions more easily. Regardless of the question name, students always see survey questions in numerical order (i.e. Question 1, Question 2).
Create Likert (Quantitative) Scale Questions If you're interested in creating questions that involve a quantitative scale, you can create a Likert scale question using the Multiple Dropdowns question type. Please reference the Likert scale lesson for more information.
Save Survey
Click the Save button to save your work and preview the survey. Note: You should not publish your survey until it is your final product. If you are ready to publish your survey and make it available to students, click the Save & Publish button.
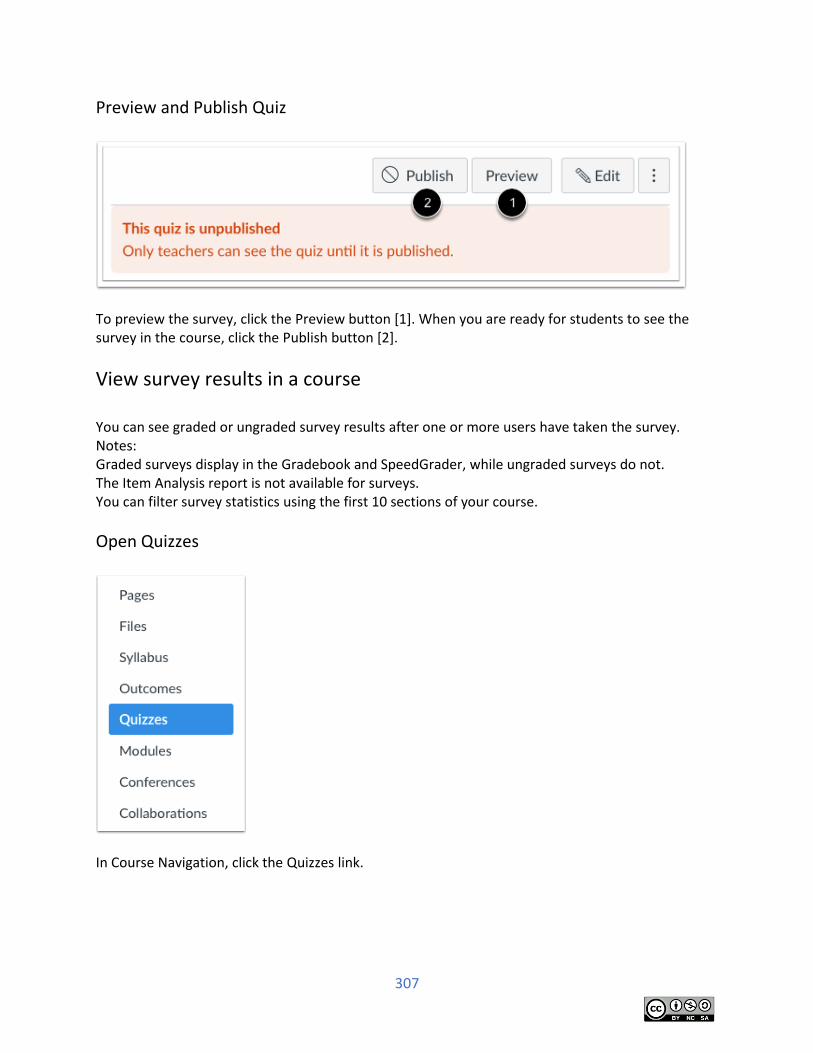
307
Preview and Publish Quiz
To preview the survey, click the Preview button [1]. When you are ready for students to see the survey in the course, click the Publish button [2].
View survey results in a course You can see graded or ungraded survey results after one or more users have taken the survey. Notes: Graded surveys display in the Gradebook and SpeedGrader, while ungraded surveys do not. The Item Analysis report is not available for surveys. You can filter survey statistics using the first 10 sections of your course.
Open Quizzes
In Course Navigation, click the Quizzes link.
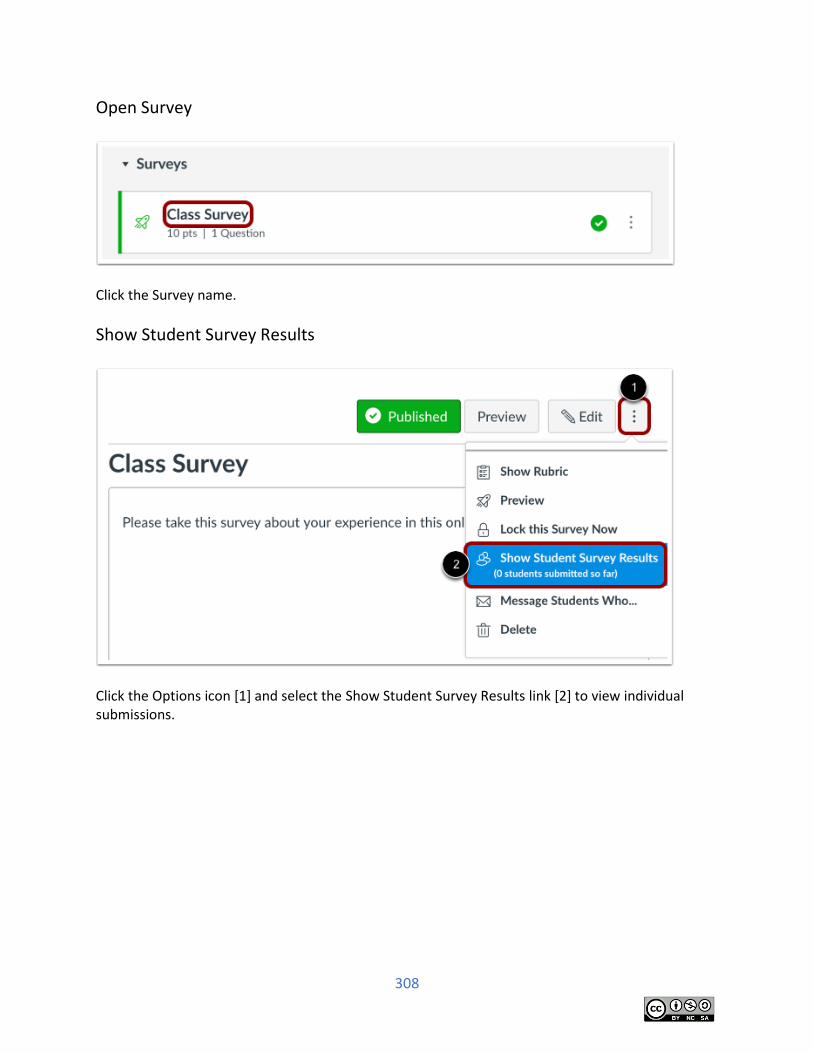
308
Open Survey
Click the Survey name.
Show Student Survey Results
Click the Options icon [1] and select the Show Student Survey Results link [2] to view individual submissions.
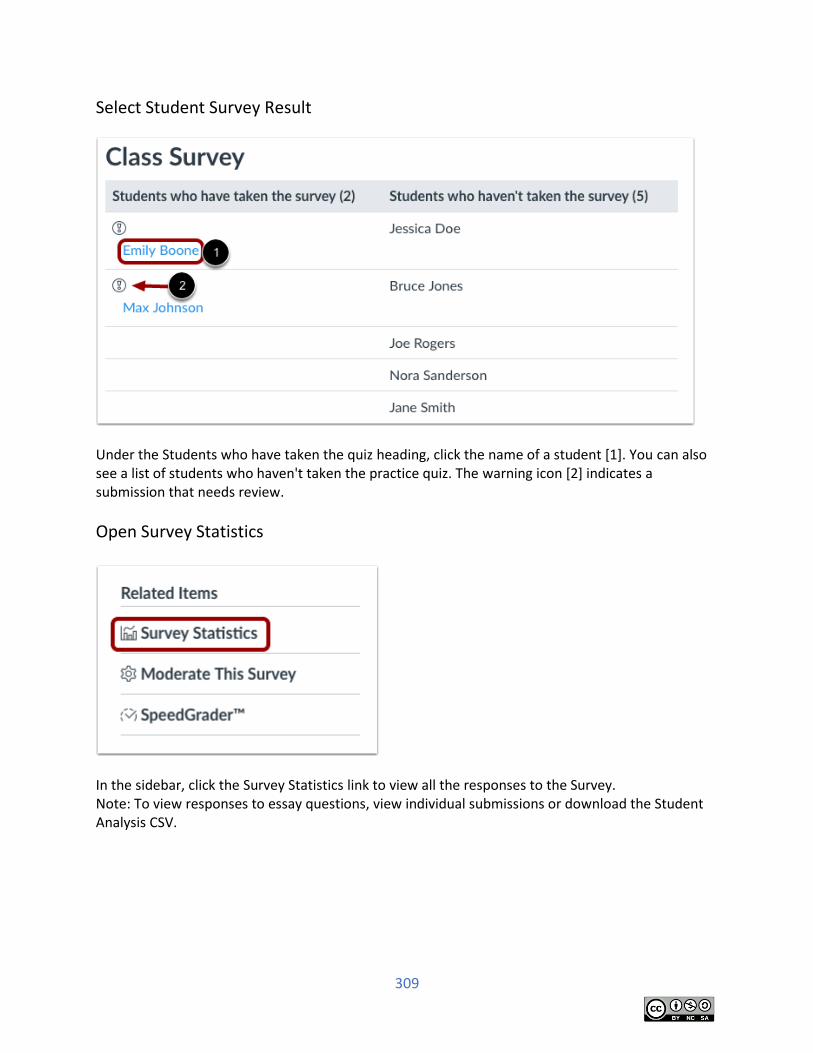
309
Select Student Survey Result
Under the Students who have taken the quiz heading, click the name of a student [1]. You can also see a list of students who haven't taken the practice quiz. The warning icon [2] indicates a submission that needs review.
Open Survey Statistics
In the sidebar, click the Survey Statistics link to view all the responses to the Survey. Note: To view responses to essay questions, view individual submissions or download the Student Analysis CSV.
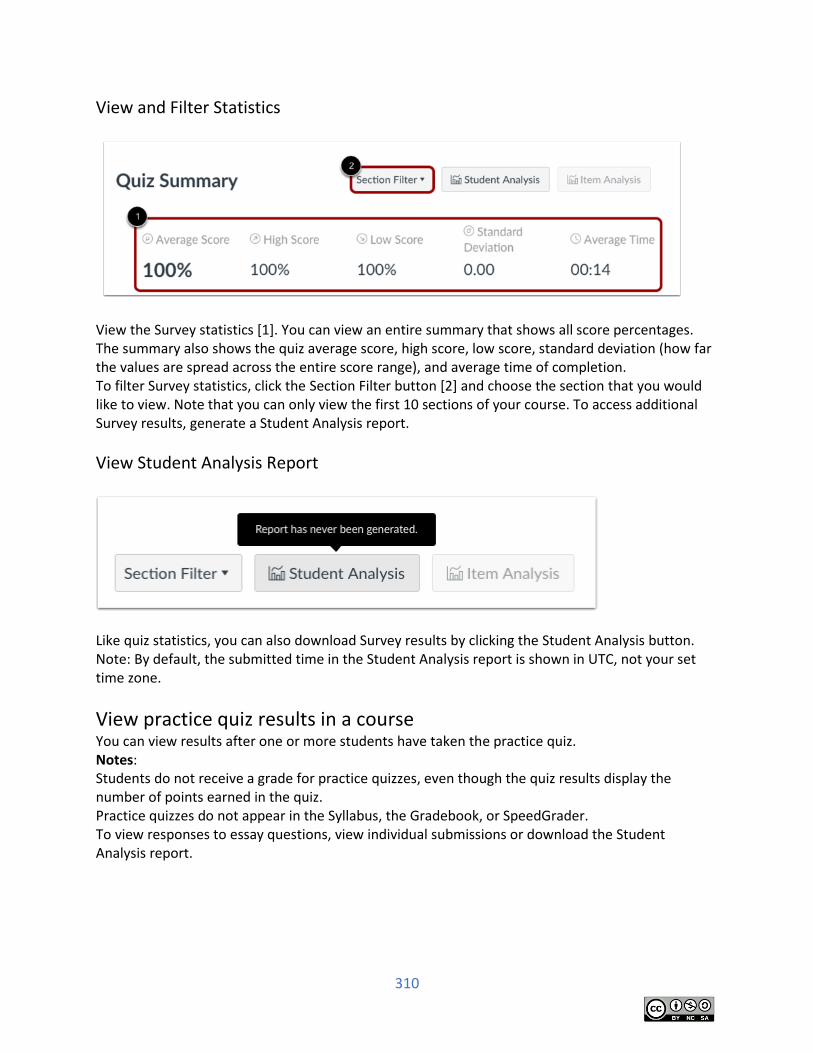
310
View and Filter Statistics
View the Survey statistics [1]. You can view an entire summary that shows all score percentages. The summary also shows the quiz average score, high score, low score, standard deviation (how far the values are spread across the entire score range), and average time of completion. To filter Survey statistics, click the Section Filter button [2] and choose the section that you would like to view. Note that you can only view the first 10 sections of your course. To access additional Survey results, generate a Student Analysis report.
View Student Analysis Report
Like quiz statistics, you can also download Survey results by clicking the Student Analysis button. Note: By default, the submitted time in the Student Analysis report is shown in UTC, not your set time zone.
View practice quiz results in a course You can view results after one or more students have taken the practice quiz. Notes: Students do not receive a grade for practice quizzes, even though the quiz results display the number of points earned in the quiz. Practice quizzes do not appear in the Syllabus, the Gradebook, or SpeedGrader. To view responses to essay questions, view individual submissions or download the Student Analysis report.
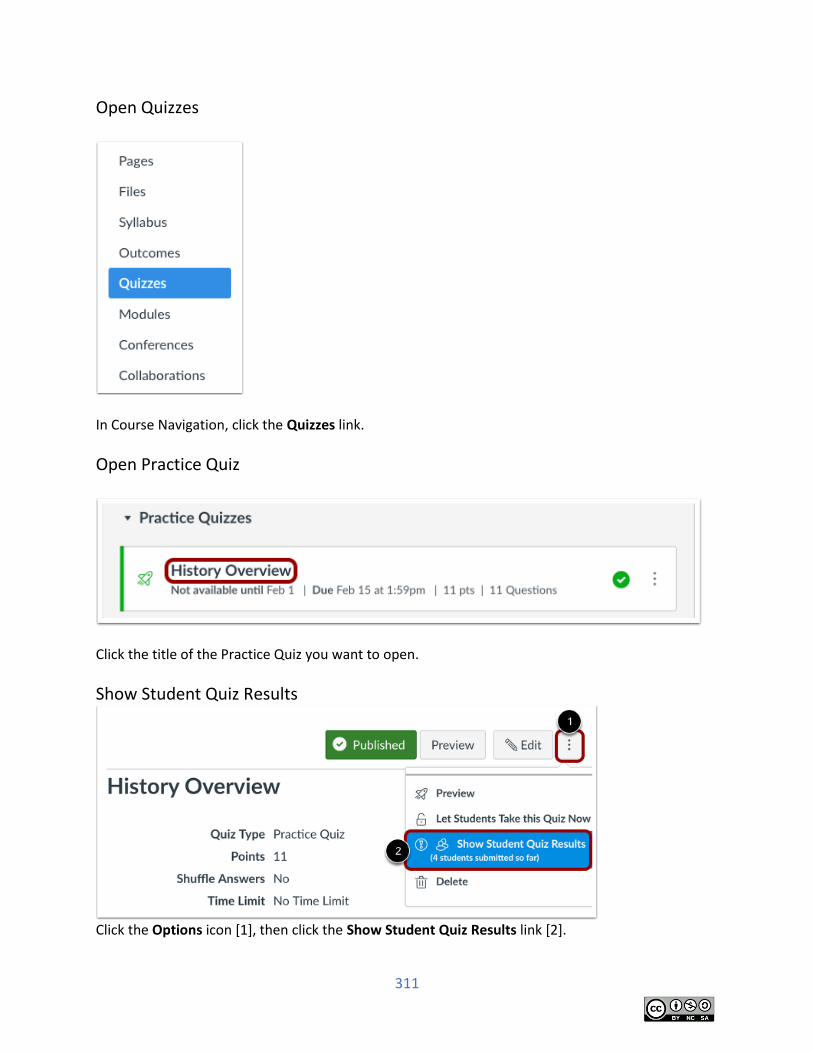
311
Open Quizzes
In Course Navigation, click the Quizzes link.
Open Practice Quiz
Click the title of the Practice Quiz you want to open.
Show Student Quiz Results
Click the Options icon [1], then click the Show Student Quiz Results link [2].
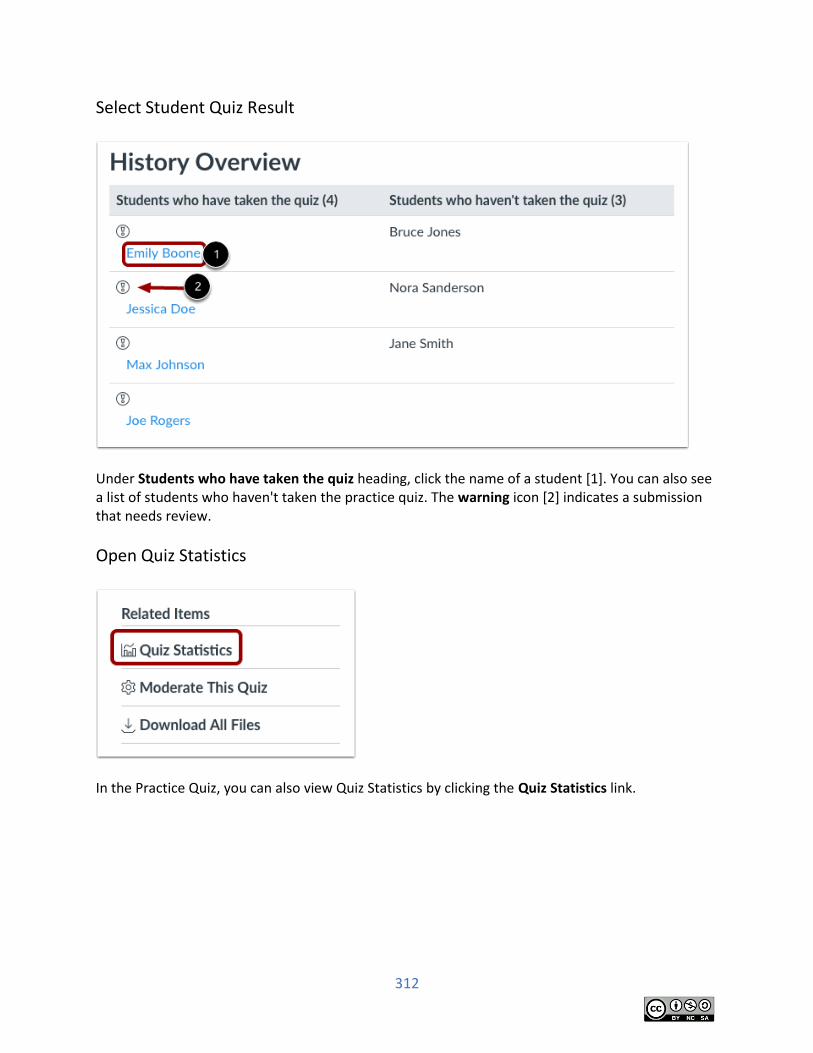
312
Select Student Quiz Result
Under Students who have taken the quiz heading, click the name of a student [1]. You can also see a list of students who haven't taken the practice quiz. The warning icon [2] indicates a submission that needs review.
Open Quiz Statistics
In the Practice Quiz, you can also view Quiz Statistics by clicking the Quiz Statistics link.
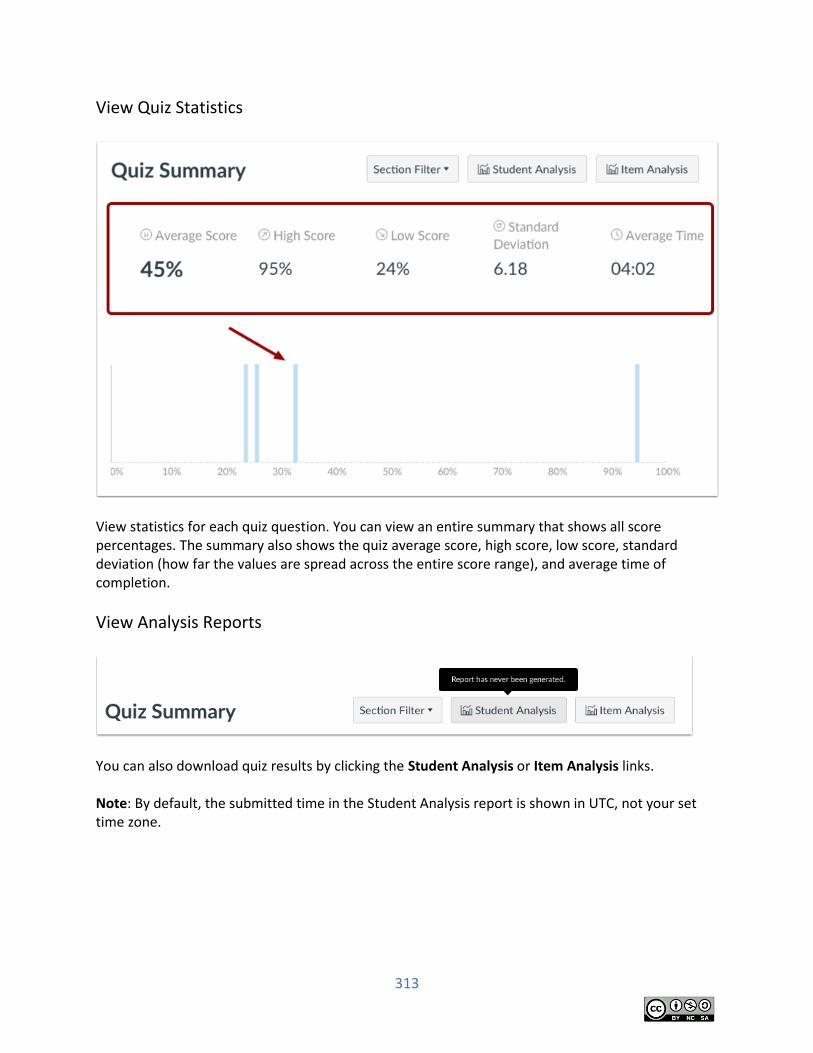
313
View Quiz Statistics
View statistics for each quiz question. You can view an entire summary that shows all score percentages. The summary also shows the quiz average score, high score, low score, standard deviation (how far the values are spread across the entire score range), and average time of completion.
View Analysis Reports
You can also download quiz results by clicking the Student Analysis or Item Analysis links. Note: By default, the submitted time in the Student Analysis report is shown in UTC, not your set time zone.
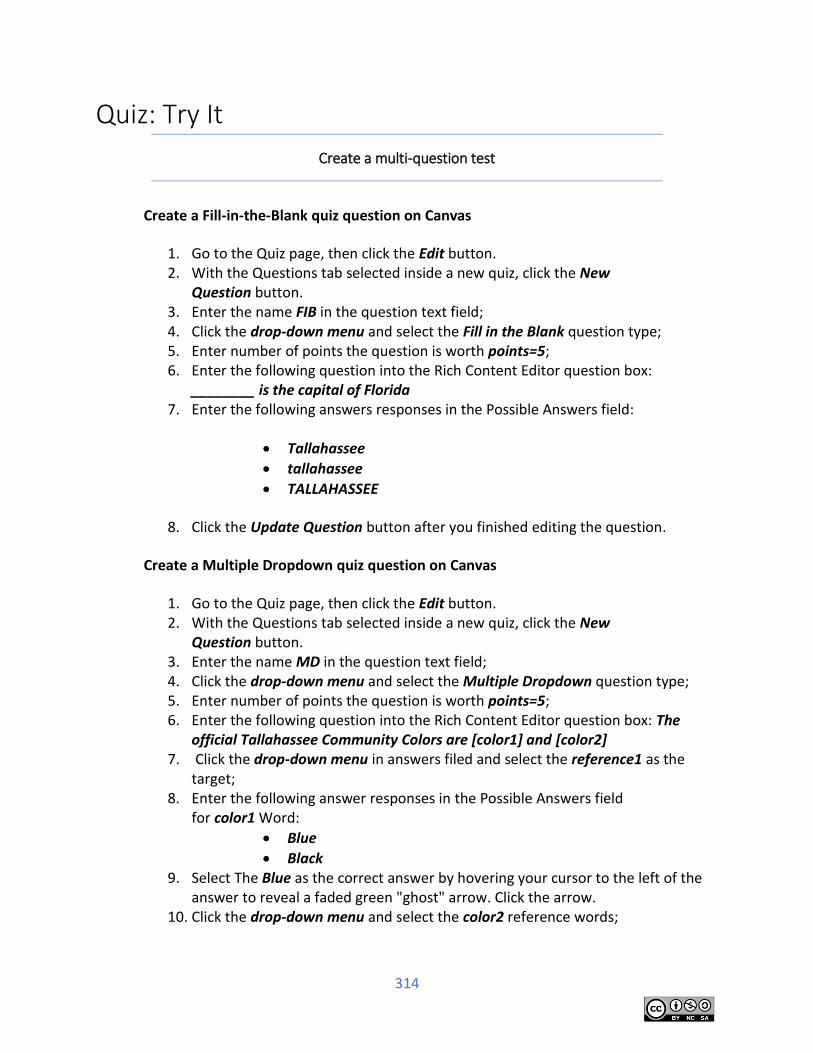
314
Quiz: Try It
Create a multi-question test
Create a Fill-in-the-Blank quiz question on Canvas
1. Go to the Quiz page, then click the Edit button. 2. With the Questions tab selected inside a new quiz, click the New
Question button. 3. Enter the name FIB in the question text field; 4. Click the drop-down menu and select the Fill in the Blank question type; 5. Enter number of points the question is worth points=5; 6. Enter the following question into the Rich Content Editor question box:
________ is the capital of Florida 7. Enter the following answers responses in the Possible Answers field:
Tallahassee
tallahassee
TALLAHASSEE
8. Click the Update Question button after you finished editing the question.
Create a Multiple Dropdown quiz question on Canvas
1. Go to the Quiz page, then click the Edit button. 2. With the Questions tab selected inside a new quiz, click the New
Question button. 3. Enter the name MD in the question text field; 4. Click the drop-down menu and select the Multiple Dropdown question type; 5. Enter number of points the question is worth points=5; 6. Enter the following question into the Rich Content Editor question box: The
official Tallahassee Community Colors are [color1] and [color2] 7. Click the drop-down menu in answers filed and select the reference1 as the
target; 8. Enter the following answer responses in the Possible Answers field
for color1 Word:
Blue
Black 9. Select The Blue as the correct answer by hovering your cursor to the left of the
answer to reveal a faded green "ghost" arrow. Click the arrow. 10. Click the drop-down menu and select the color2 reference words;
315
11. Enter the following answer responses in the Possible Answers field for color2 Word:
1. Yellow 2. Gold
12. Select The Gold as the correct answer by hovering your cursor to the left of the answer to reveal a faded green "ghost" arrow. Click the arrow.
13. Click the Update Question button after you finished editing the question.
Create a Multiple Choice quiz question on Canvas
1. Go to the Quiz page, then click the Edit button. 2. With the Questions tab selected inside a new quiz, click the New Question button. 3. Enter the name MC in the question text field; 4. Click the drop-down menu and select the Multiple Choice question type; 5. Enter number of points the question is worth points=5; 6. Enter the following question content in the question content field: What causes
night and day? 7. Enter the following answer responses in the Possible Answers field:
Clouds block out the sun's light.
The earth moves into and out of the sun's shadow.
The sun goes around the earth.
The earth moves around the sun.
8. Select The earth moves around the sun as the correct answer by hovering your cursor to the left of the answer to reveal a faded green "ghost" arrow. Click the arrow.
9. Click the Update Question button after you finished editing the question.
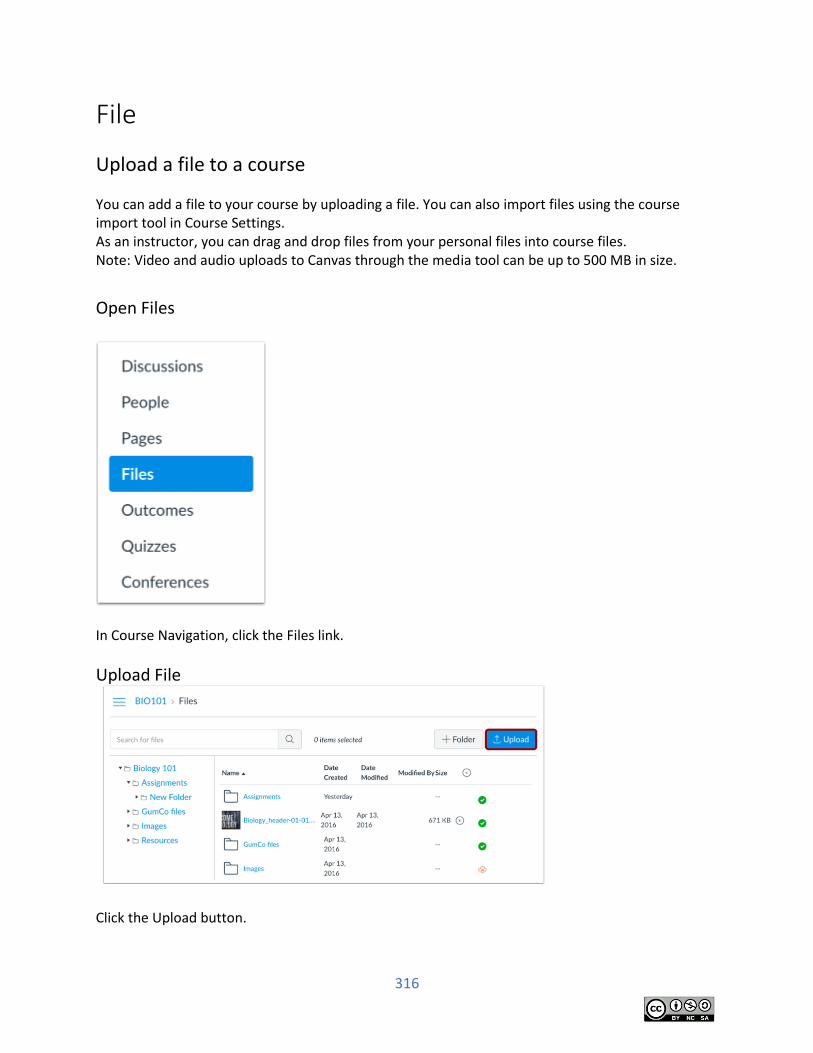
316
File
Upload a file to a course
You can add a file to your course by uploading a file. You can also import files using the course import tool in Course Settings. As an instructor, you can drag and drop files from your personal files into course files. Note: Video and audio uploads to Canvas through the media tool can be up to 500 MB in size.
Open Files
In Course Navigation, click the Files link.
Upload File
Click the Upload button.
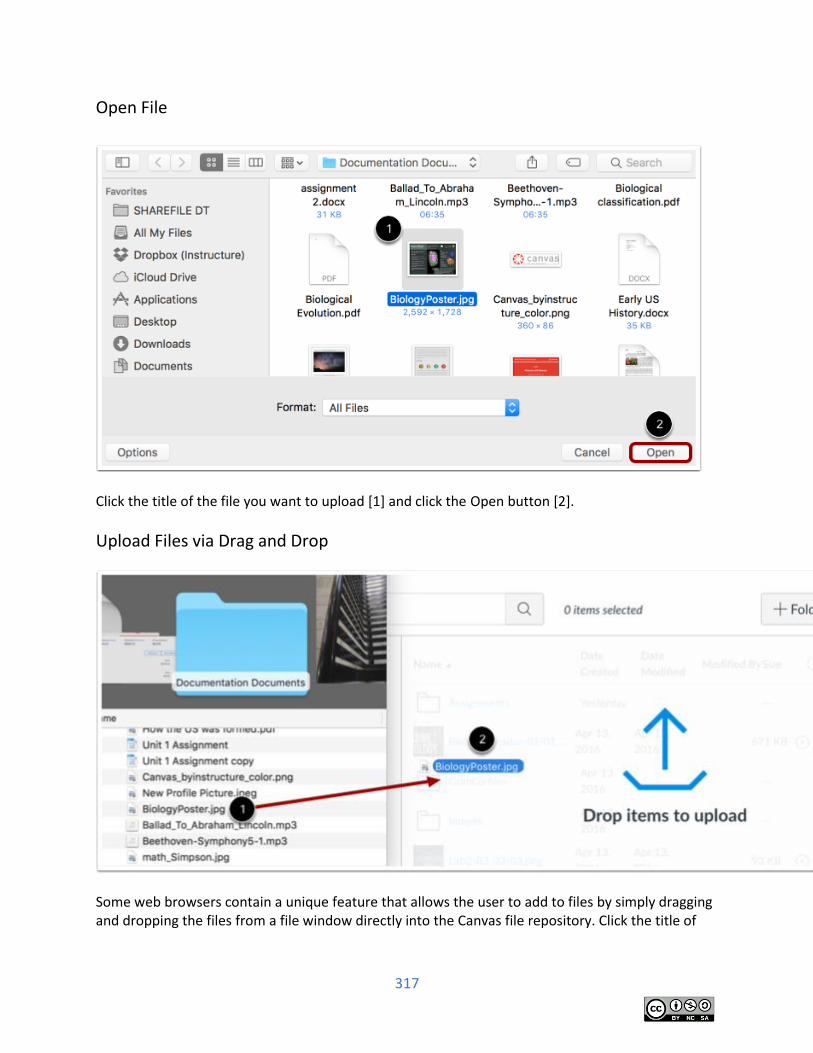
317
Open File
Click the title of the file you want to upload [1] and click the Open button [2].
Upload Files via Drag and Drop
Some web browsers contain a unique feature that allows the user to add to files by simply dragging and dropping the files from a file window directly into the Canvas file repository. Click the title of
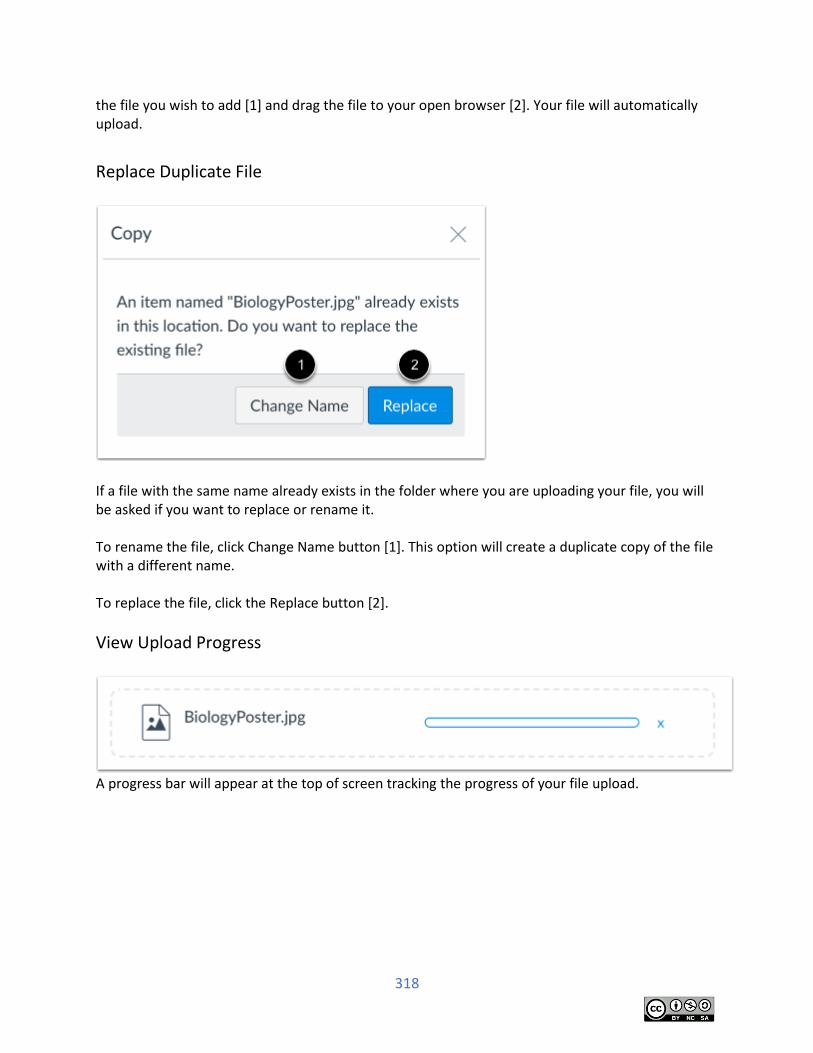
318
the file you wish to add [1] and drag the file to your open browser [2]. Your file will automatically upload.
Replace Duplicate File
If a file with the same name already exists in the folder where you are uploading your file, you will be asked if you want to replace or rename it. To rename the file, click Change Name button [1]. This option will create a duplicate copy of the file with a different name. To replace the file, click the Replace button [2].
View Upload Progress
A progress bar will appear at the top of screen tracking the progress of your file upload.
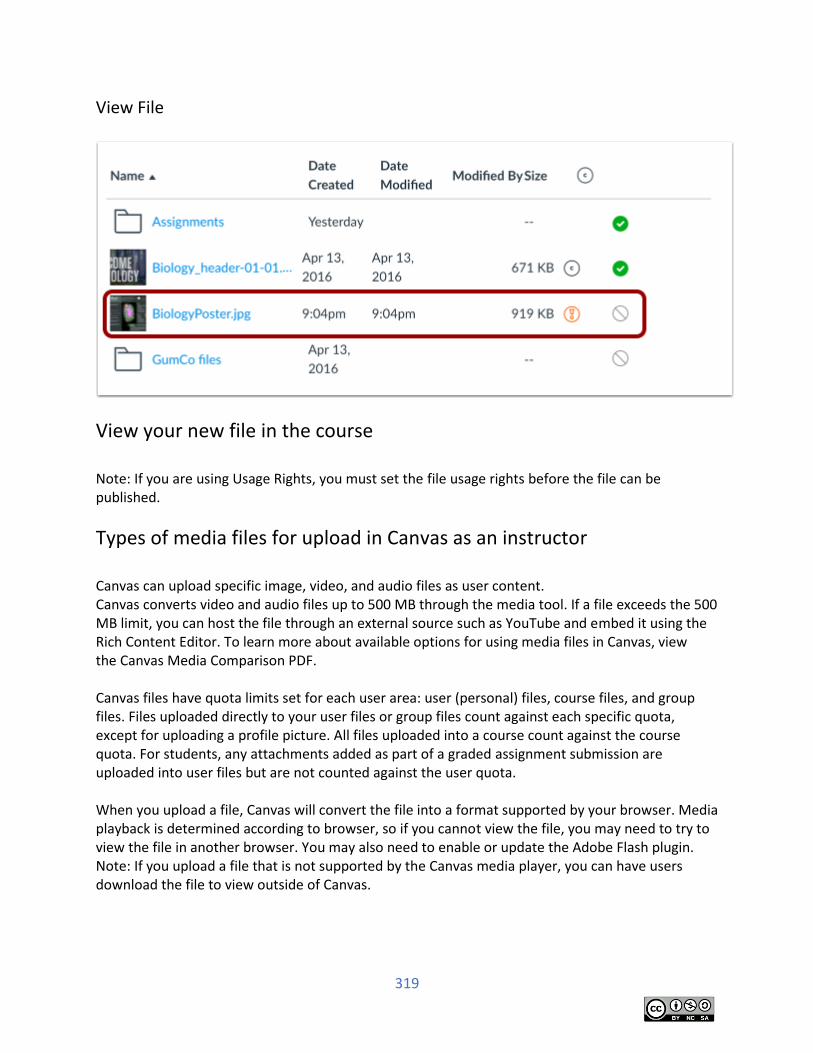
319
View File
View your new file in the course Note: If you are using Usage Rights, you must set the file usage rights before the file can be published.
Types of media files for upload in Canvas as an instructor Canvas can upload specific image, video, and audio files as user content. Canvas converts video and audio files up to 500 MB through the media tool. If a file exceeds the 500 MB limit, you can host the file through an external source such as YouTube and embed it using the Rich Content Editor. To learn more about available options for using media files in Canvas, view the Canvas Media Comparison PDF. Canvas files have quota limits set for each user area: user (personal) files, course files, and group files. Files uploaded directly to your user files or group files count against each specific quota, except for uploading a profile picture. All files uploaded into a course count against the course quota. For students, any attachments added as part of a graded assignment submission are uploaded into user files but are not counted against the user quota. When you upload a file, Canvas will convert the file into a format supported by your browser. Media playback is determined according to browser, so if you cannot view the file, you may need to try to view the file in another browser. You may also need to enable or update the Adobe Flash plugin. Note: If you upload a file that is not supported by the Canvas media player, you can have users download the file to view outside of Canvas.
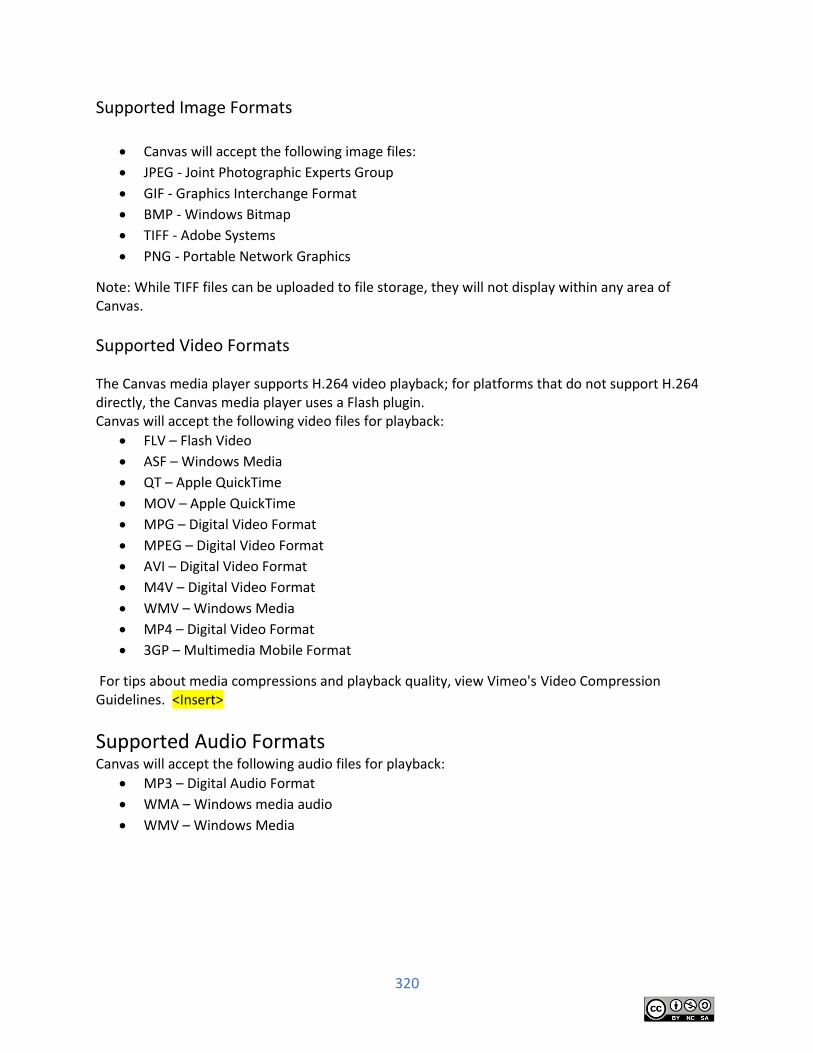
320
Supported Image Formats
Canvas will accept the following image files:
JPEG - Joint Photographic Experts Group
GIF - Graphics Interchange Format
BMP - Windows Bitmap
TIFF - Adobe Systems
PNG - Portable Network Graphics
Note: While TIFF files can be uploaded to file storage, they will not display within any area of Canvas.
Supported Video Formats
The Canvas media player supports H.264 video playback; for platforms that do not support H.264 directly, the Canvas media player uses a Flash plugin. Canvas will accept the following video files for playback:
FLV – Flash Video
ASF – Windows Media
QT – Apple QuickTime
MOV – Apple QuickTime
MPG – Digital Video Format
MPEG – Digital Video Format
AVI – Digital Video Format
M4V – Digital Video Format
WMV – Windows Media
MP4 – Digital Video Format
3GP – Multimedia Mobile Format
For tips about media compressions and playback quality, view Vimeo's Video Compression Guidelines. <Insert>
Supported Audio Formats Canvas will accept the following audio files for playback:
MP3 – Digital Audio Format
WMA – Windows media audio
WMV – Windows Media
321
File: Try it
Upload a file
1. Open a page in your course shell.
2. Click Edit
3. Select the Files Tab
4. Click Upload a New File.
5. Click Choose File
6. Select any file from the computer Desktop and double-click on it.
7. Click Upload
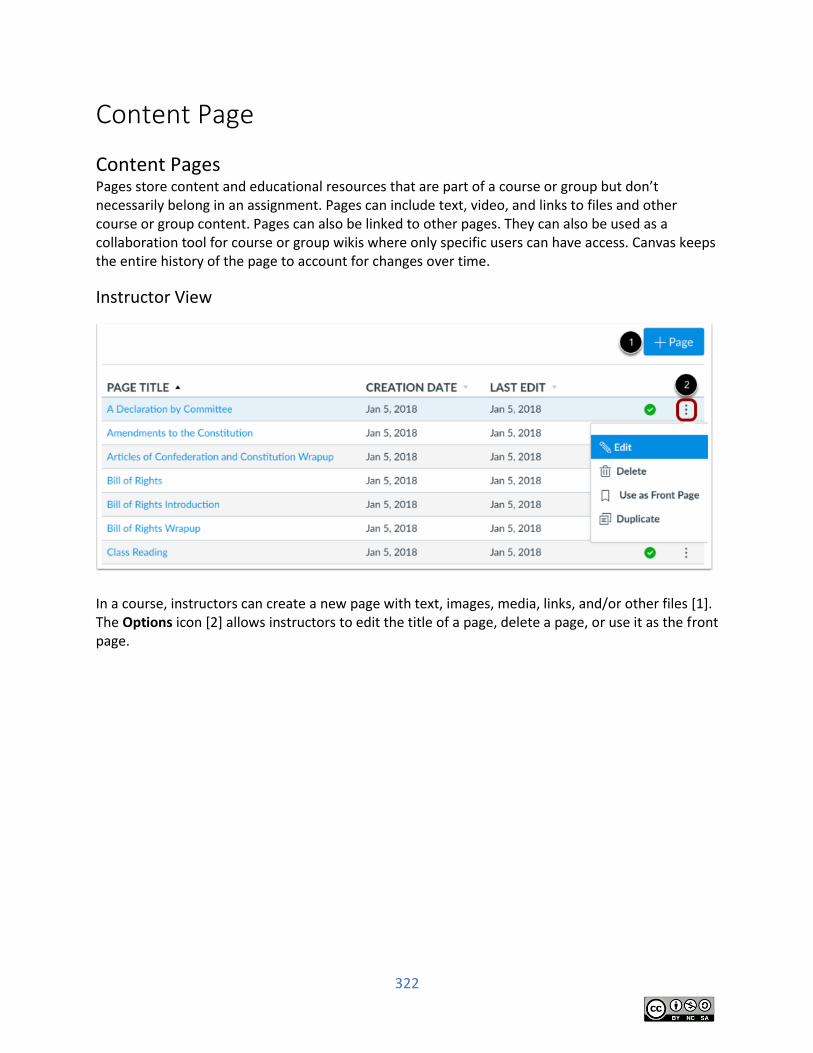
322
Content Page
Content Pages Pages store content and educational resources that are part of a course or group but don’t necessarily belong in an assignment. Pages can include text, video, and links to files and other course or group content. Pages can also be linked to other pages. They can also be used as a collaboration tool for course or group wikis where only specific users can have access. Canvas keeps the entire history of the page to account for changes over time.
Instructor View
In a course, instructors can create a new page with text, images, media, links, and/or other files [1]. The Options icon [2] allows instructors to edit the title of a page, delete a page, or use it as the front page.
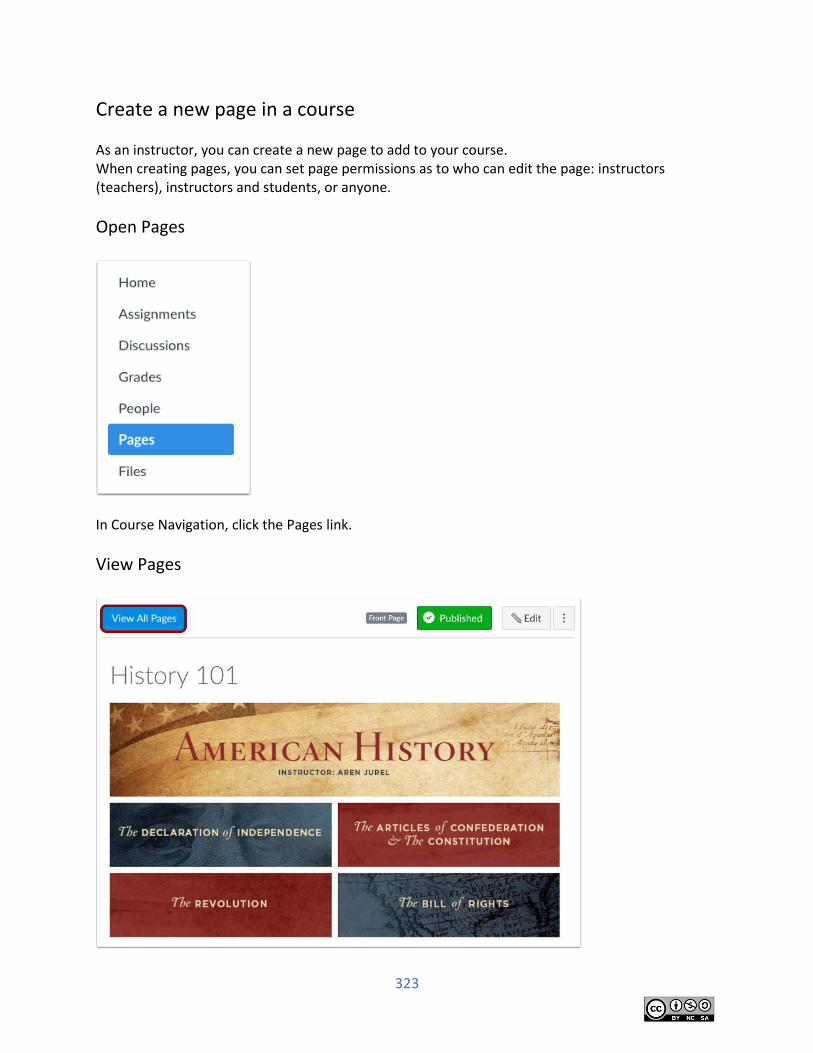
323
Create a new page in a course As an instructor, you can create a new page to add to your course. When creating pages, you can set page permissions as to who can edit the page: instructors (teachers), instructors and students, or anyone.
Open Pages
In Course Navigation, click the Pages link.
View Pages
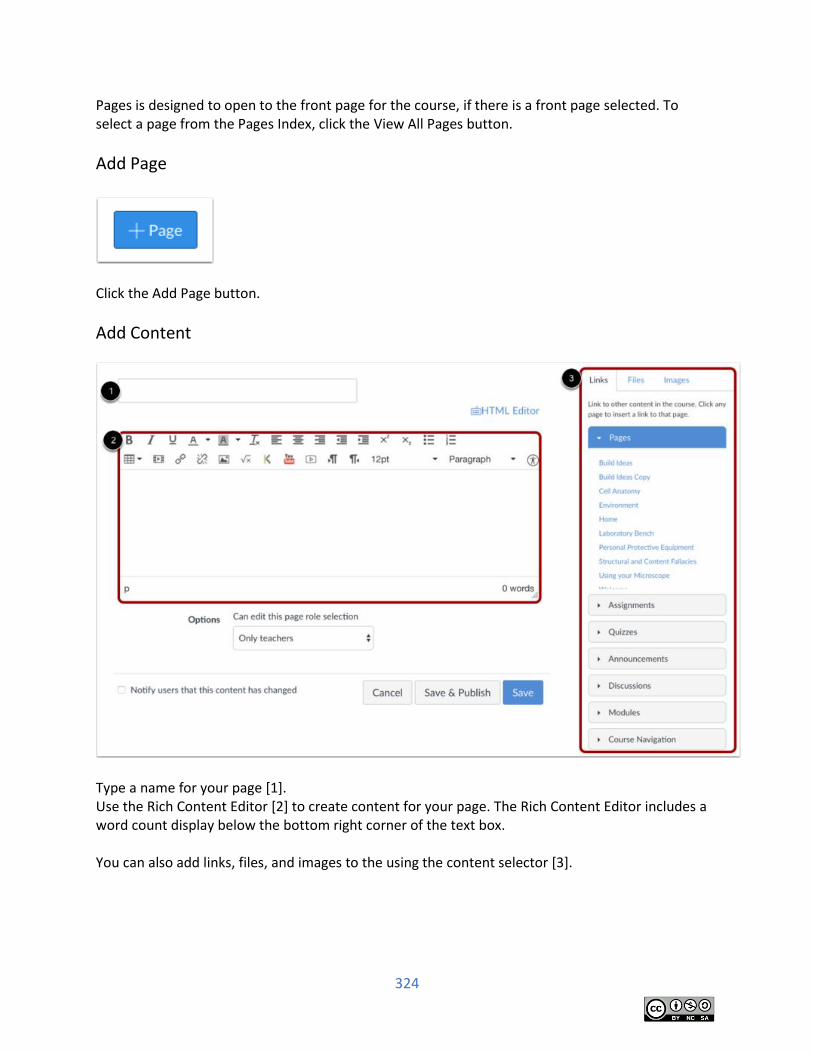
324
Pages is designed to open to the front page for the course, if there is a front page selected. To select a page from the Pages Index, click the View All Pages button.
Add Page
Click the Add Page button.
Add Content
Type a name for your page [1]. Use the Rich Content Editor [2] to create content for your page. The Rich Content Editor includes a word count display below the bottom right corner of the text box. You can also add links, files, and images to the using the content selector [3].
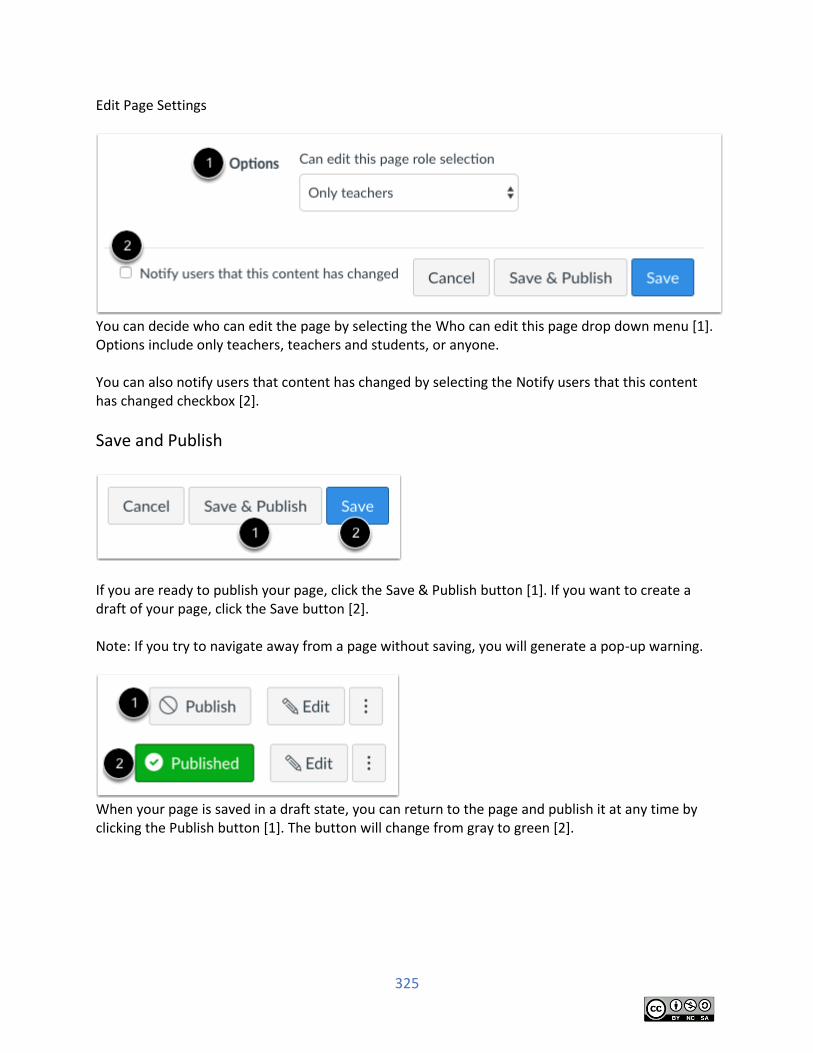
325
Edit Page Settings
You can decide who can edit the page by selecting the Who can edit this page drop down menu [1]. Options include only teachers, teachers and students, or anyone. You can also notify users that content has changed by selecting the Notify users that this content has changed checkbox [2].
Save and Publish
If you are ready to publish your page, click the Save & Publish button [1]. If you want to create a draft of your page, click the Save button [2]. Note: If you try to navigate away from a page without saving, you will generate a pop-up warning.
When your page is saved in a draft state, you can return to the page and publish it at any time by clicking the Publish button [1]. The button will change from gray to green [2].
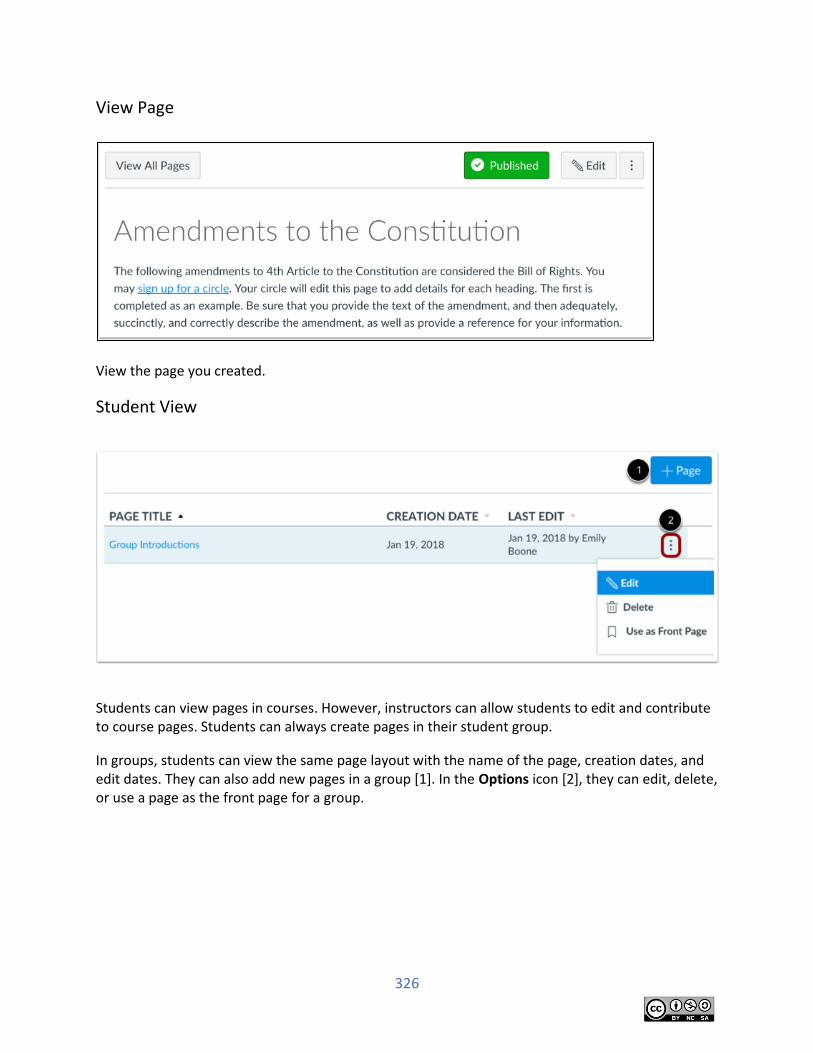
326
View Page
View the page you created.
Student View
Students can view pages in courses. However, instructors can allow students to edit and contribute to course pages. Students can always create pages in their student group.
In groups, students can view the same page layout with the name of the page, creation dates, and edit dates. They can also add new pages in a group [1]. In the Options icon [2], they can edit, delete, or use a page as the front page for a group.
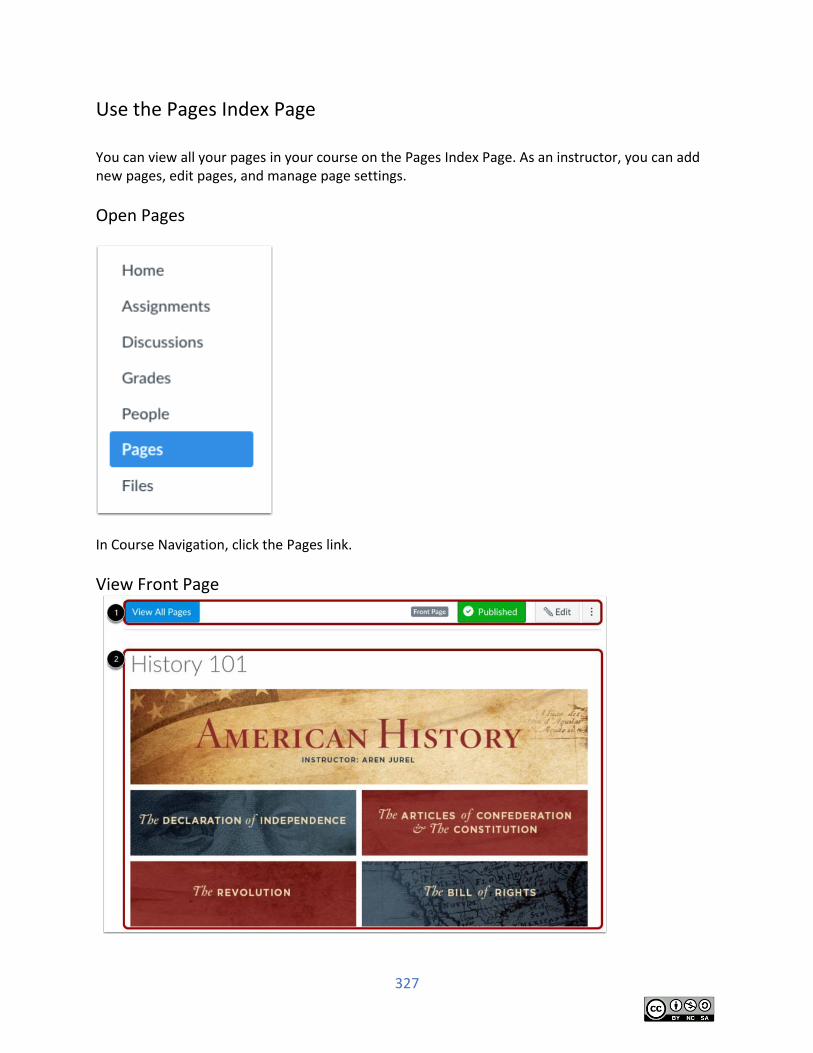
327
Use the Pages Index Page You can view all your pages in your course on the Pages Index Page. As an instructor, you can add new pages, edit pages, and manage page settings.
Open Pages
In Course Navigation, click the Pages link.
View Front Page
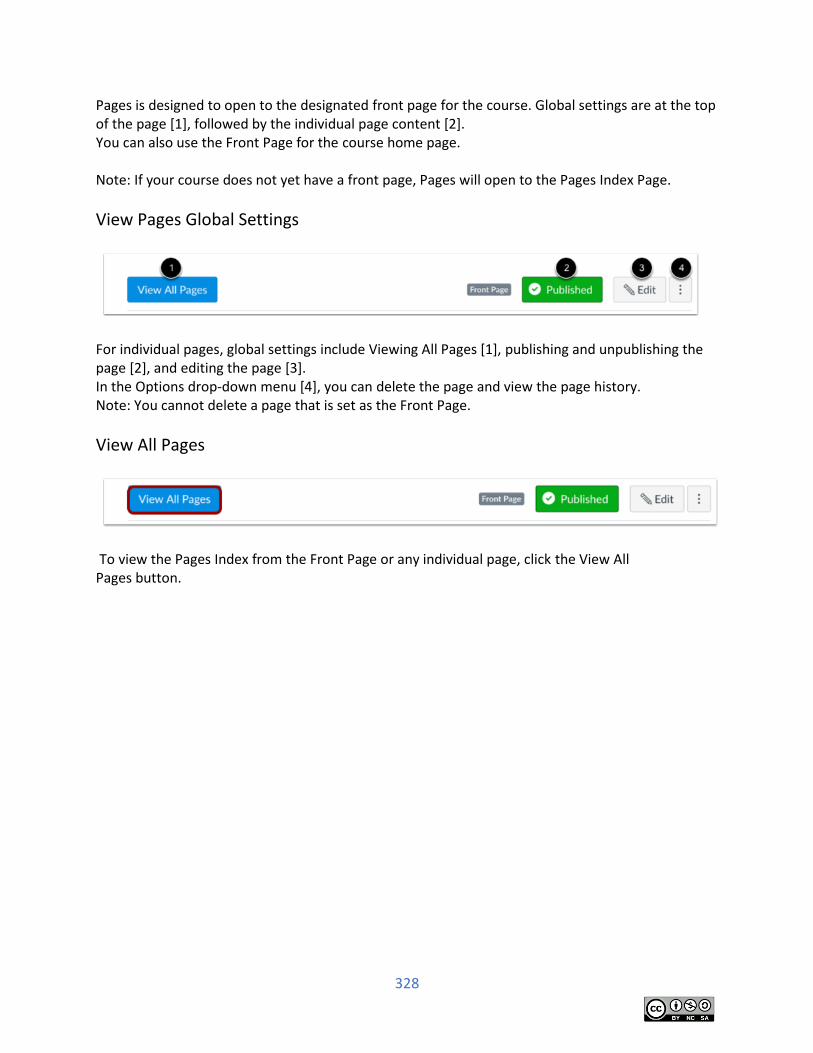
328
Pages is designed to open to the designated front page for the course. Global settings are at the top of the page [1], followed by the individual page content [2]. You can also use the Front Page for the course home page. Note: If your course does not yet have a front page, Pages will open to the Pages Index Page.
View Pages Global Settings
For individual pages, global settings include Viewing All Pages [1], publishing and unpublishing the page [2], and editing the page [3]. In the Options drop-down menu [4], you can delete the page and view the page history. Note: You cannot delete a page that is set as the Front Page.
View All Pages
To view the Pages Index from the Front Page or any individual page, click the View All Pages button.
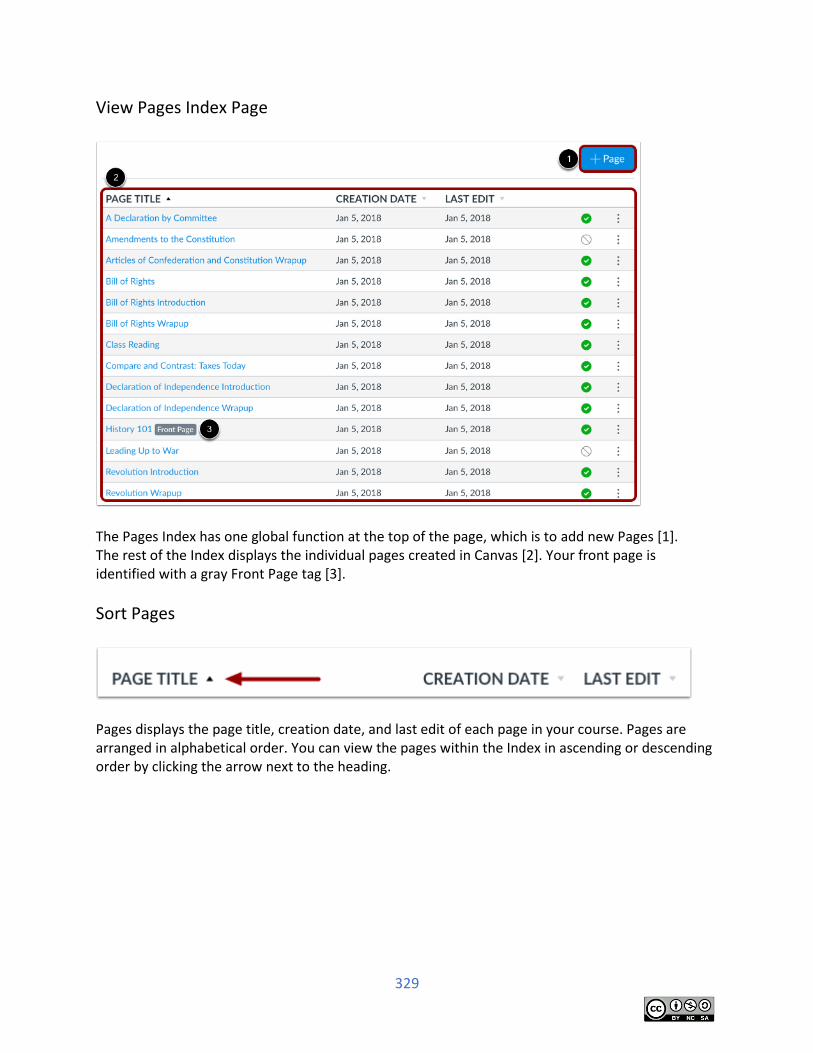
329
View Pages Index Page
The Pages Index has one global function at the top of the page, which is to add new Pages [1]. The rest of the Index displays the individual pages created in Canvas [2]. Your front page is identified with a gray Front Page tag [3].
Sort Pages
Pages displays the page title, creation date, and last edit of each page in your course. Pages are arranged in alphabetical order. You can view the pages within the Index in ascending or descending order by clicking the arrow next to the heading.
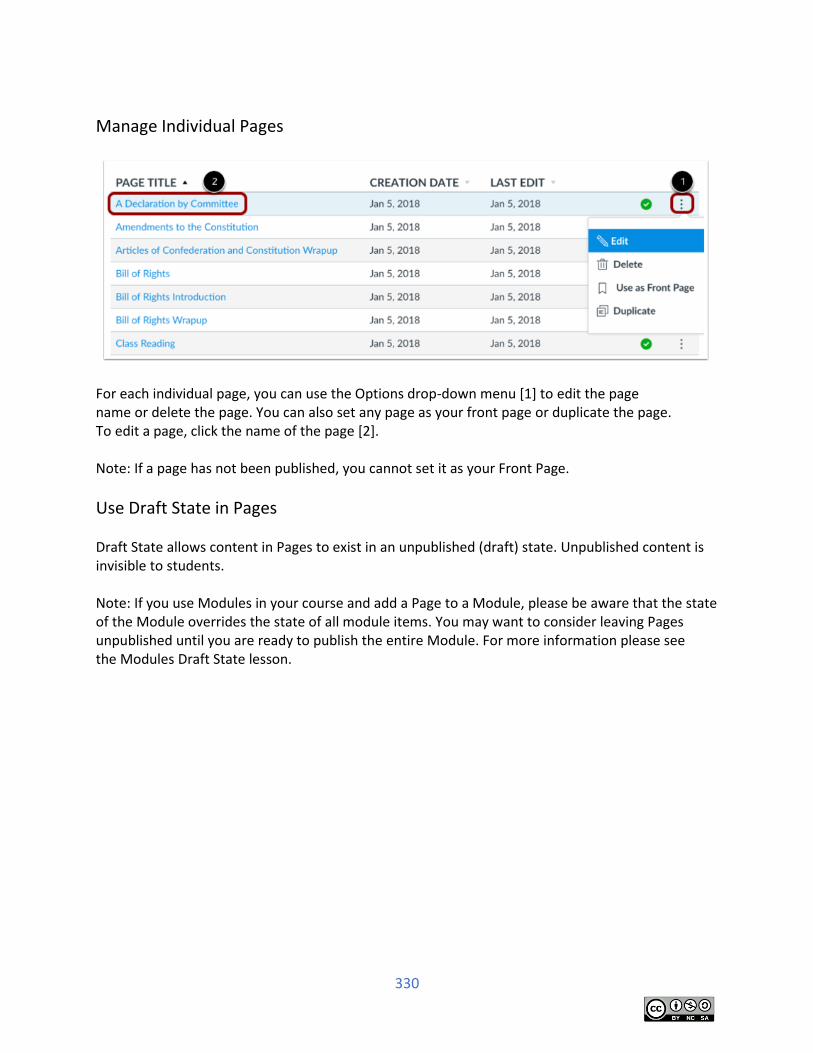
330
Manage Individual Pages
For each individual page, you can use the Options drop-down menu [1] to edit the page name or delete the page. You can also set any page as your front page or duplicate the page. To edit a page, click the name of the page [2]. Note: If a page has not been published, you cannot set it as your Front Page.
Use Draft State in Pages Draft State allows content in Pages to exist in an unpublished (draft) state. Unpublished content is invisible to students. Note: If you use Modules in your course and add a Page to a Module, please be aware that the state of the Module overrides the state of all module items. You may want to consider leaving Pages unpublished until you are ready to publish the entire Module. For more information please see the Modules Draft State lesson.
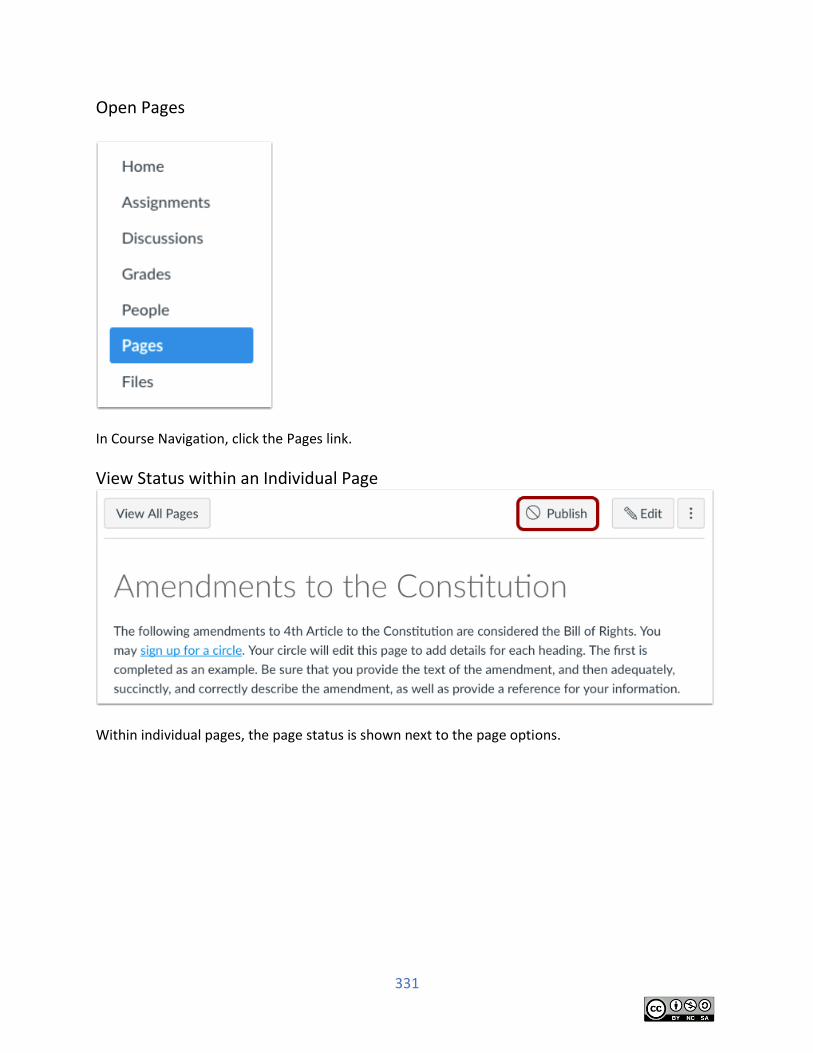
331
Open Pages
In Course Navigation, click the Pages link.
View Status within an Individual Page
Within individual pages, the page status is shown next to the page options.
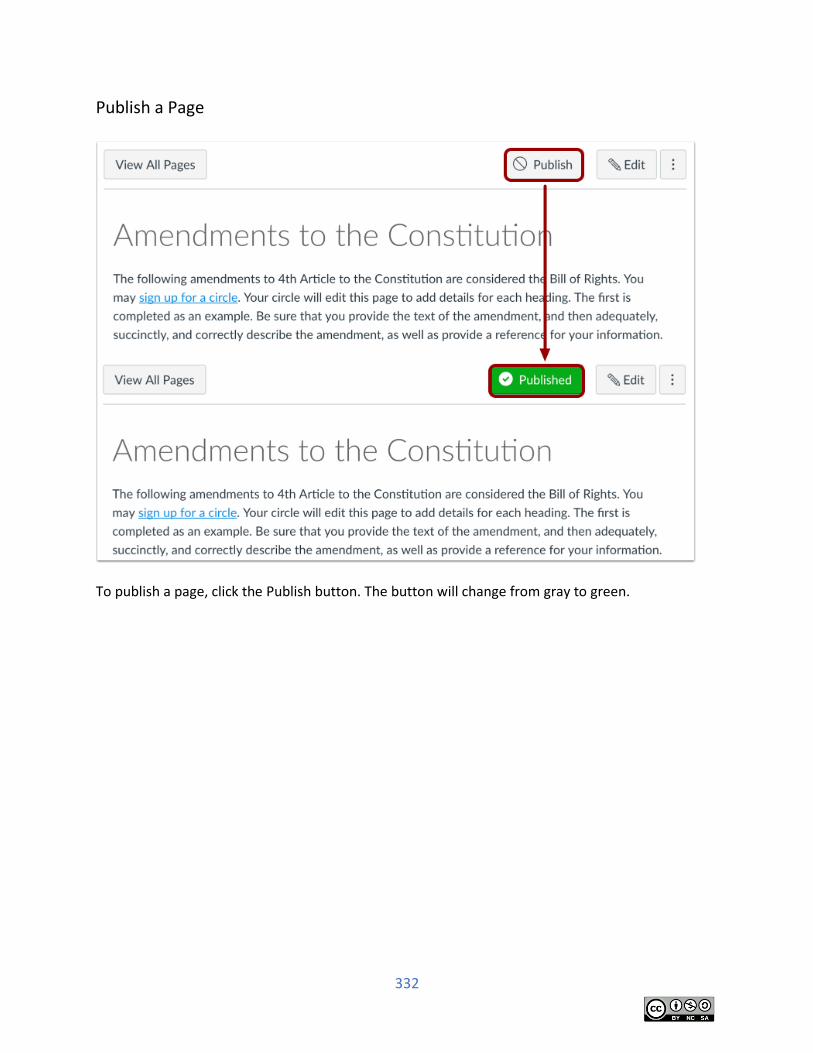
332
Publish a Page
To publish a page, click the Publish button. The button will change from gray to green.
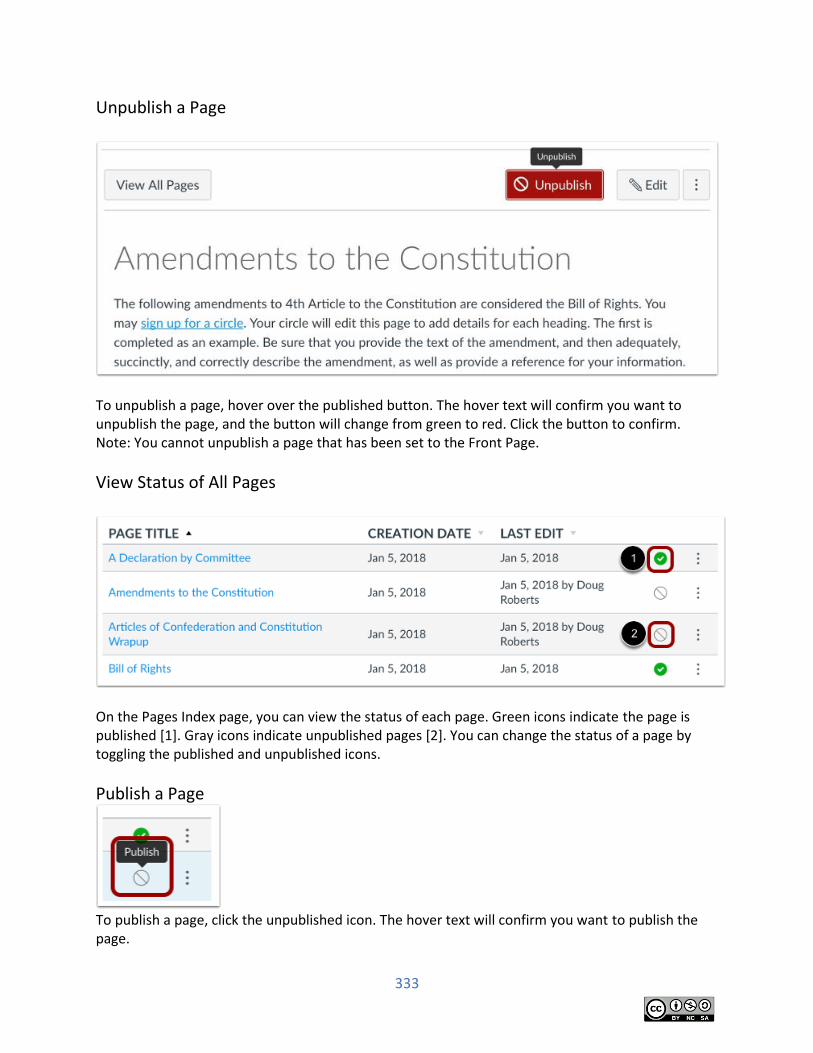
333
Unpublish a Page
To unpublish a page, hover over the published button. The hover text will confirm you want to unpublish the page, and the button will change from green to red. Click the button to confirm. Note: You cannot unpublish a page that has been set to the Front Page.
View Status of All Pages
On the Pages Index page, you can view the status of each page. Green icons indicate the page is published [1]. Gray icons indicate unpublished pages [2]. You can change the status of a page by toggling the published and unpublished icons.
Publish a Page
To publish a page, click the unpublished icon. The hover text will confirm you want to publish the page.
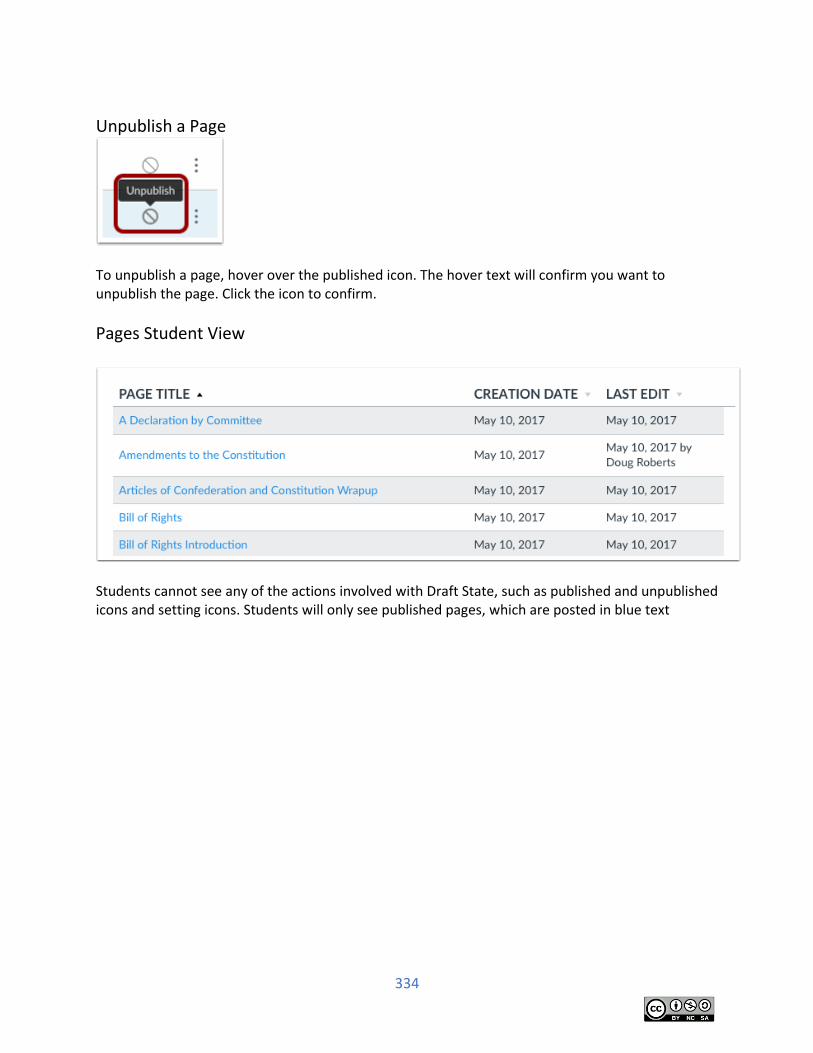
334
Unpublish a Page
To unpublish a page, hover over the published icon. The hover text will confirm you want to unpublish the page. Click the icon to confirm.
Pages Student View
Students cannot see any of the actions involved with Draft State, such as published and unpublished icons and setting icons. Students will only see published pages, which are posted in blue text
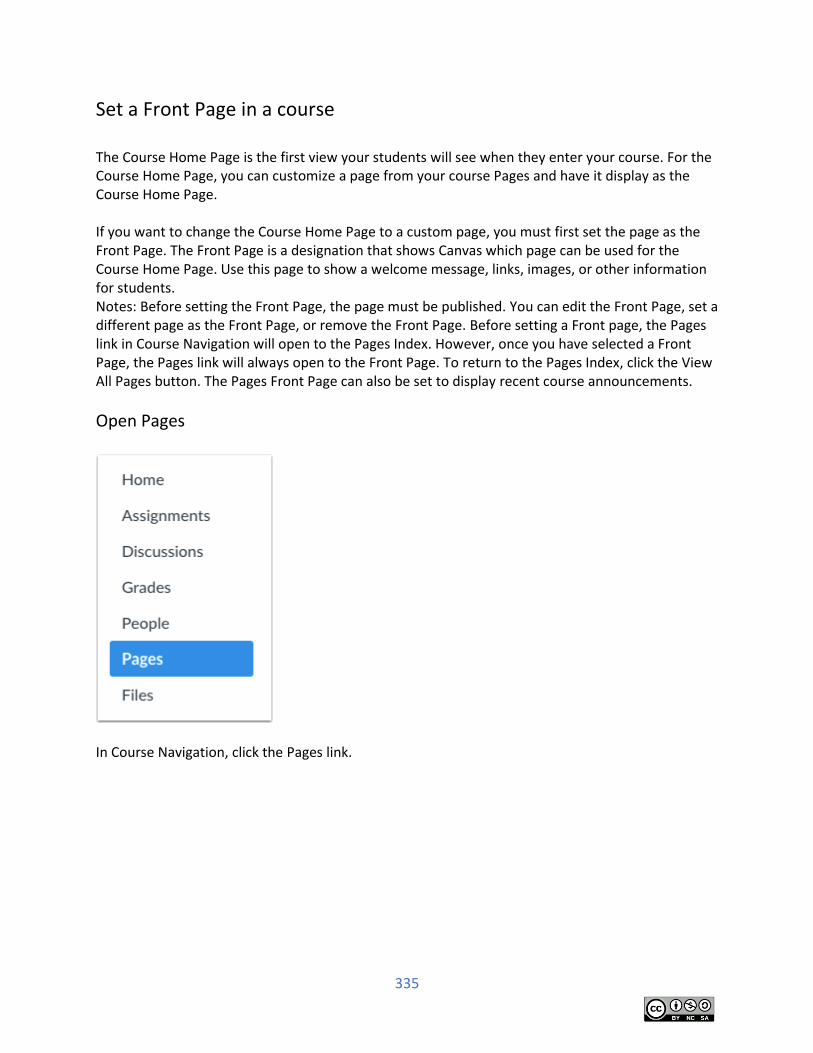
335
Set a Front Page in a course The Course Home Page is the first view your students will see when they enter your course. For the Course Home Page, you can customize a page from your course Pages and have it display as the Course Home Page. If you want to change the Course Home Page to a custom page, you must first set the page as the Front Page. The Front Page is a designation that shows Canvas which page can be used for the Course Home Page. Use this page to show a welcome message, links, images, or other information for students. Notes: Before setting the Front Page, the page must be published. You can edit the Front Page, set a different page as the Front Page, or remove the Front Page. Before setting a Front page, the Pages link in Course Navigation will open to the Pages Index. However, once you have selected a Front Page, the Pages link will always open to the Front Page. To return to the Pages Index, click the View All Pages button. The Pages Front Page can also be set to display recent course announcements.
Open Pages
In Course Navigation, click the Pages link.
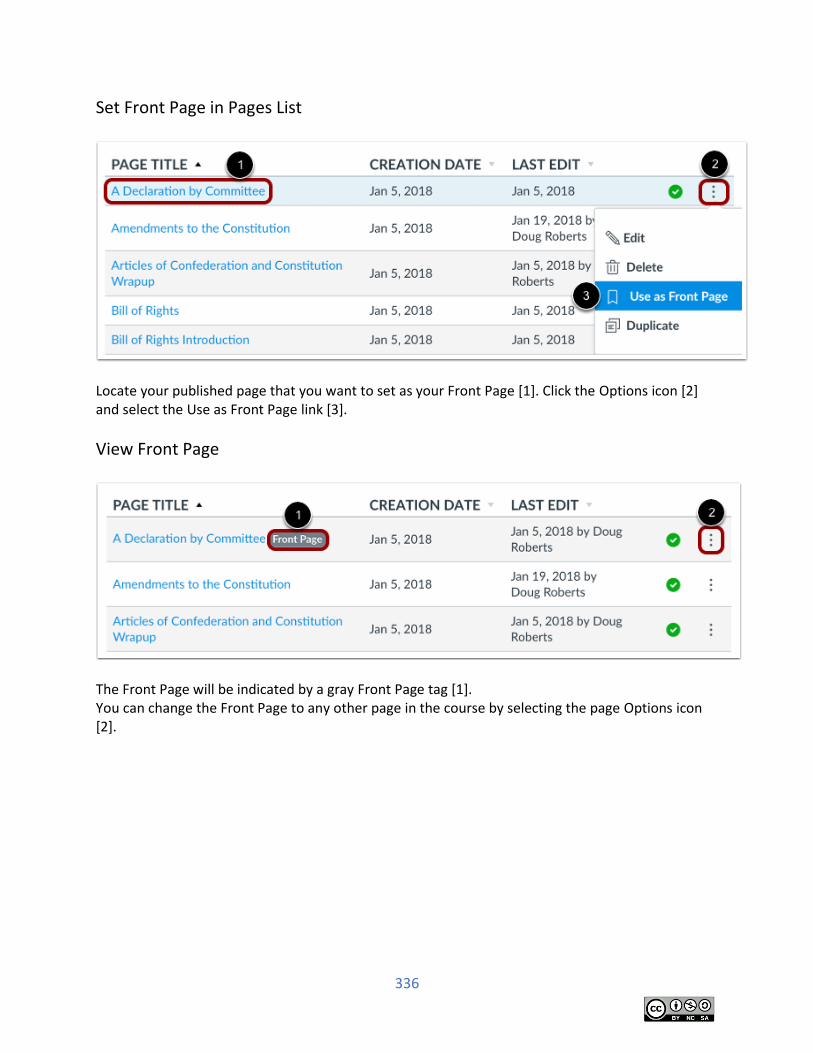
336
Set Front Page in Pages List
Locate your published page that you want to set as your Front Page [1]. Click the Options icon [2] and select the Use as Front Page link [3].
View Front Page
The Front Page will be indicated by a gray Front Page tag [1]. You can change the Front Page to any other page in the course by selecting the page Options icon [2].
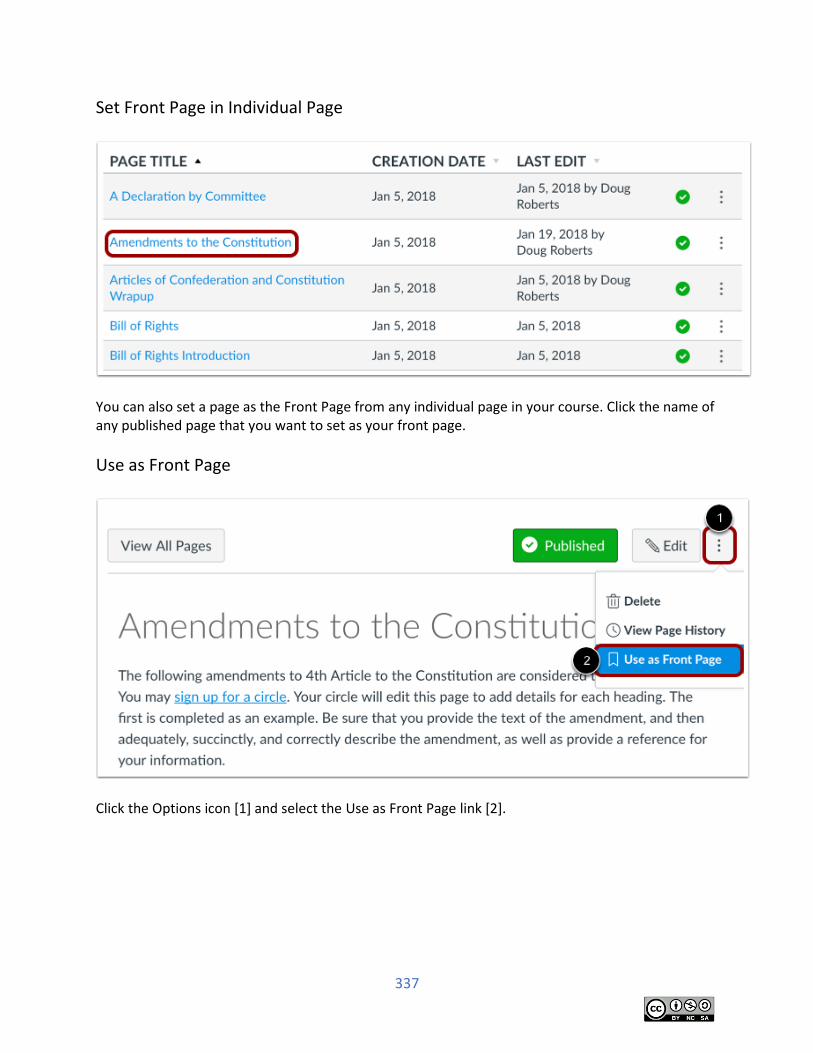
337
Set Front Page in Individual Page
You can also set a page as the Front Page from any individual page in your course. Click the name of any published page that you want to set as your front page.
Use as Front Page
Click the Options icon [1] and select the Use as Front Page link [2].
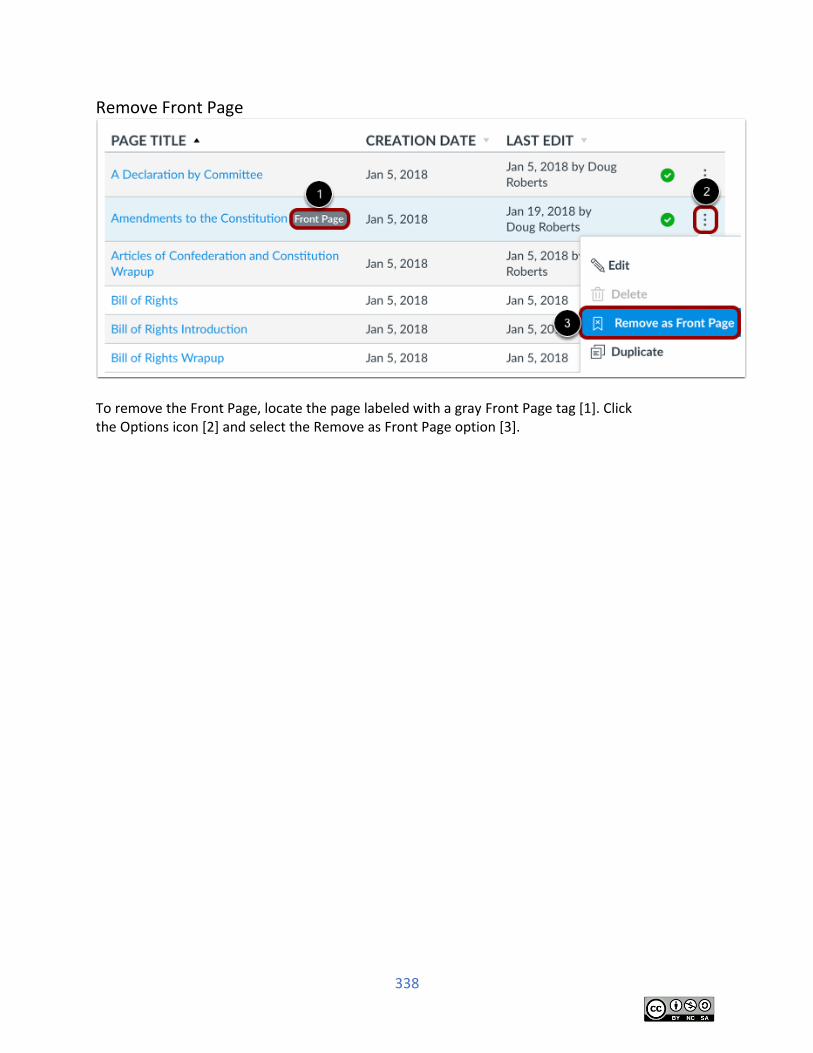
338
Remove Front Page
To remove the Front Page, locate the page labeled with a gray Front Page tag [1]. Click the Options icon [2] and select the Remove as Front Page option [3].
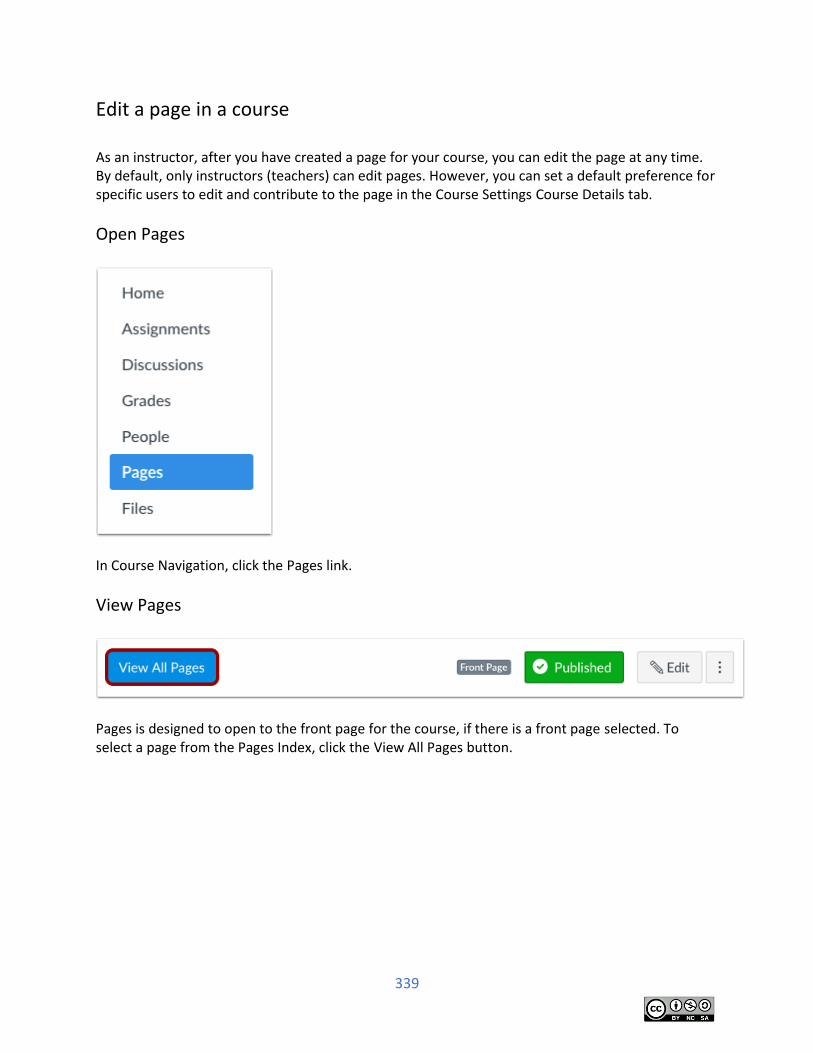
339
Edit a page in a course As an instructor, after you have created a page for your course, you can edit the page at any time. By default, only instructors (teachers) can edit pages. However, you can set a default preference for specific users to edit and contribute to the page in the Course Settings Course Details tab.
Open Pages
In Course Navigation, click the Pages link.
View Pages
Pages is designed to open to the front page for the course, if there is a front page selected. To select a page from the Pages Index, click the View All Pages button.
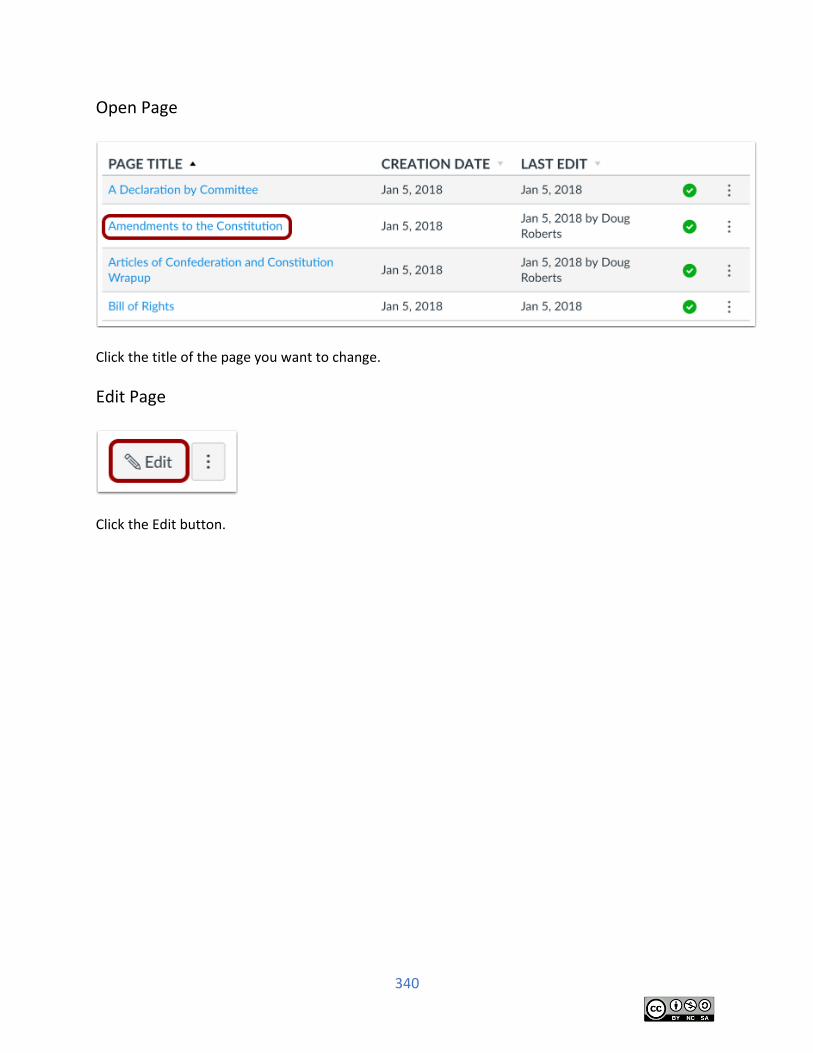
340
Open Page
Click the title of the page you want to change.
Edit Page
Click the Edit button.
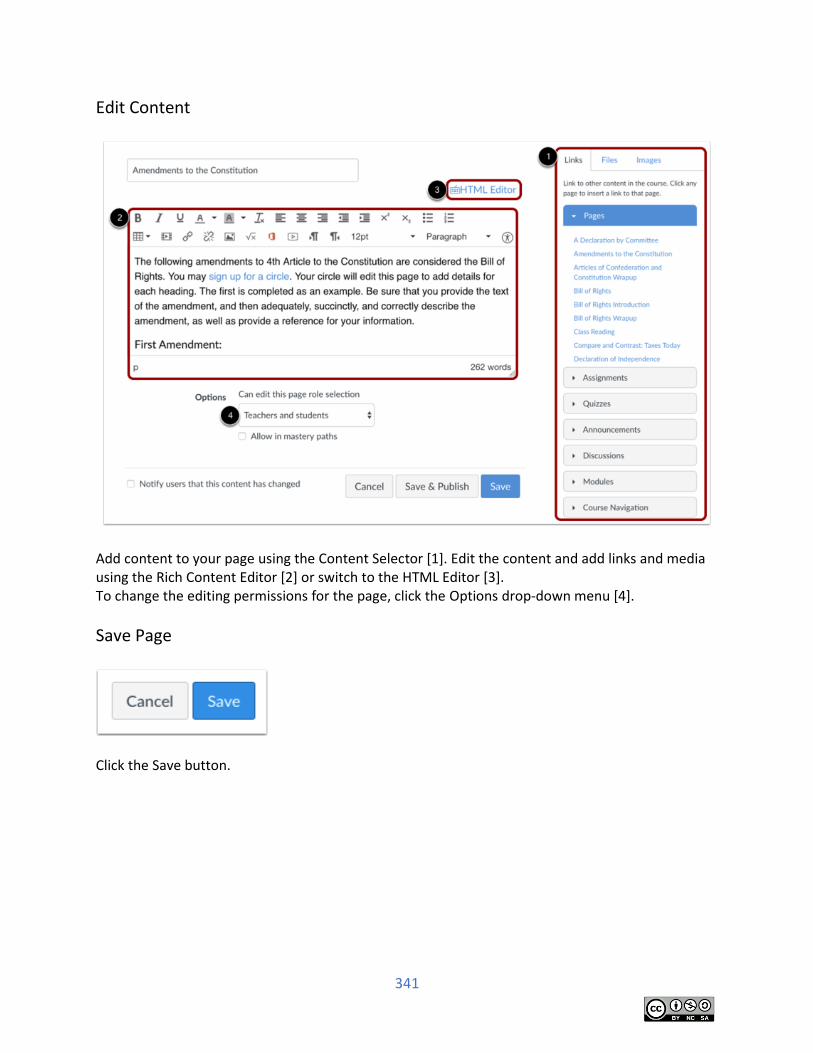
341
Edit Content
Add content to your page using the Content Selector [1]. Edit the content and add links and media using the Rich Content Editor [2] or switch to the HTML Editor [3]. To change the editing permissions for the page, click the Options drop-down menu [4].
Save Page
Click the Save button.
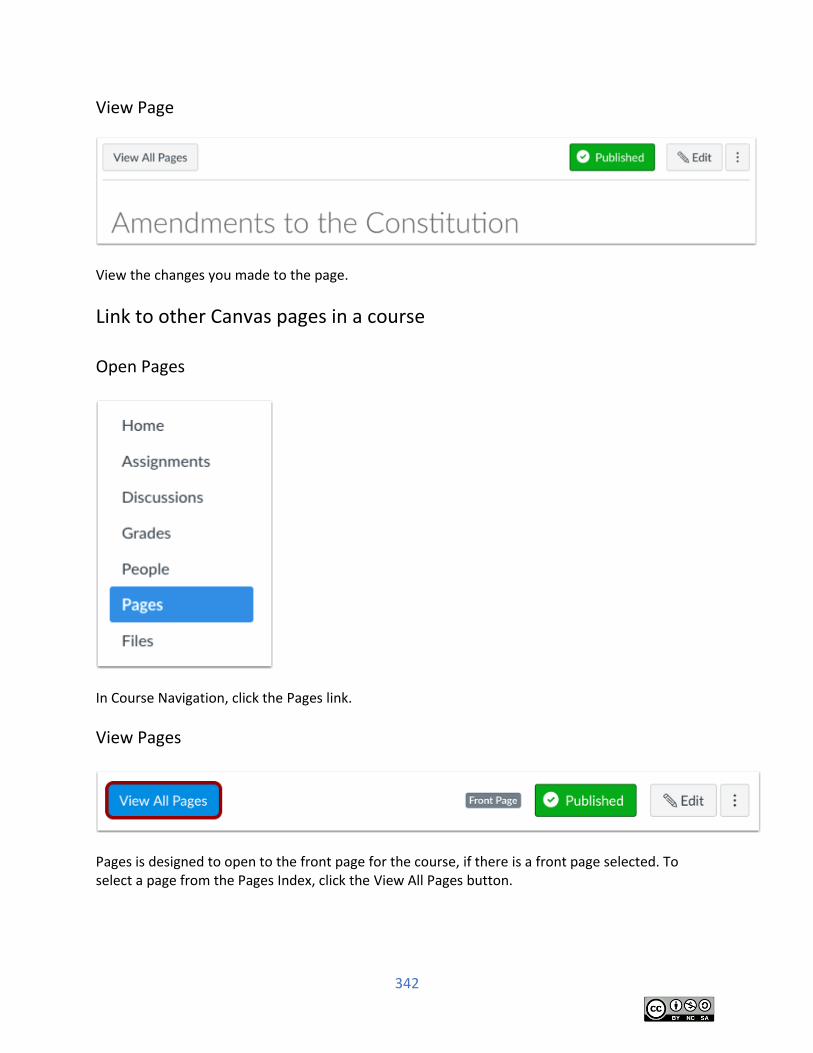
342
View Page
View the changes you made to the page.
Link to other Canvas pages in a course Open Pages
In Course Navigation, click the Pages link.
View Pages
Pages is designed to open to the front page for the course, if there is a front page selected. To select a page from the Pages Index, click the View All Pages button.
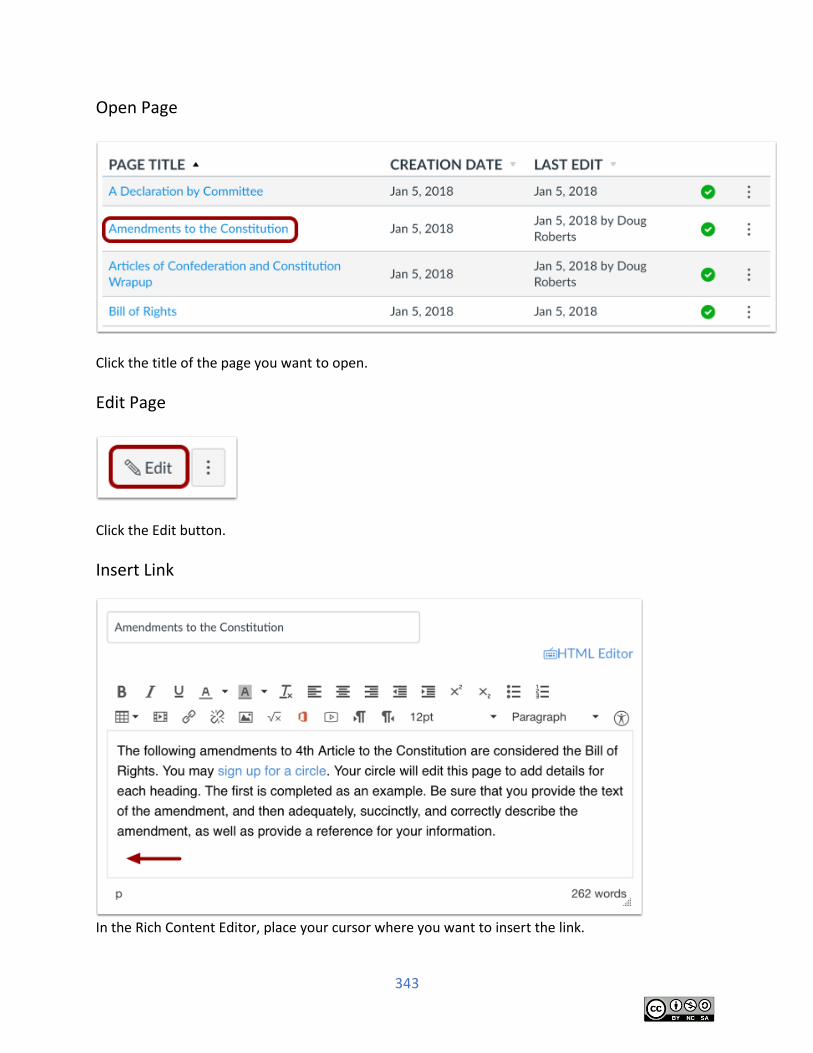
343
Open Page
Click the title of the page you want to open.
Edit Page
Click the Edit button.
Insert Link
In the Rich Content Editor, place your cursor where you want to insert the link.
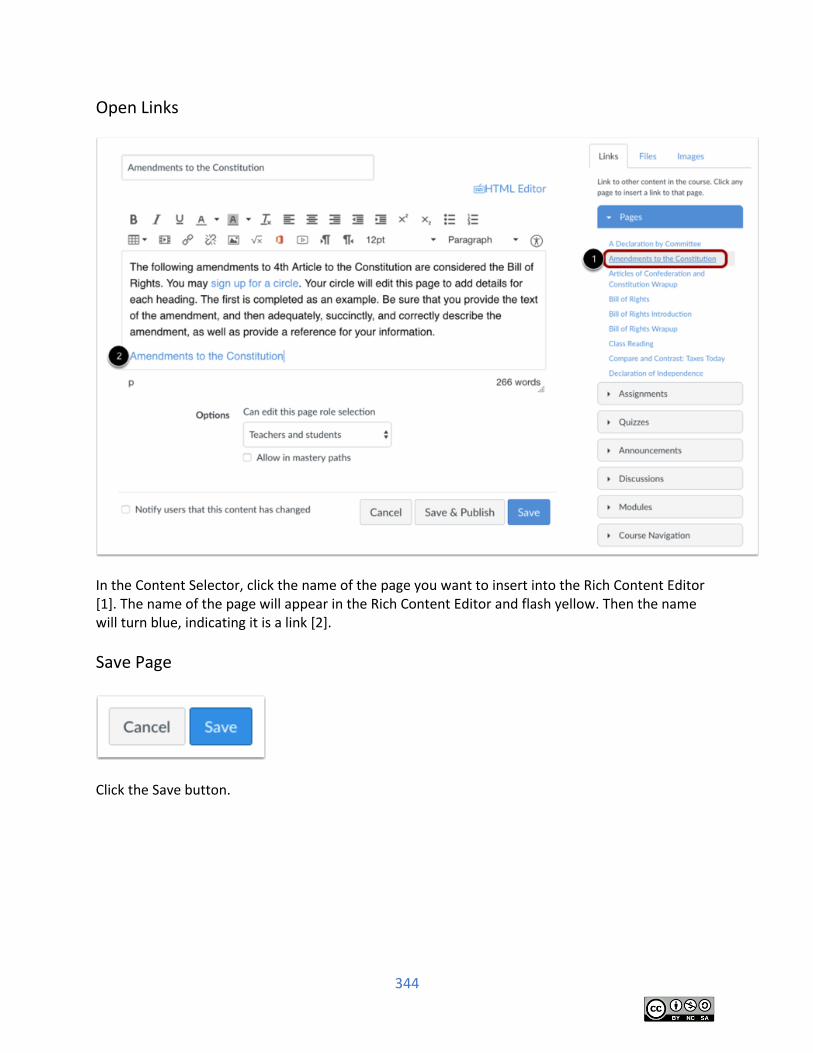
344
Open Links
In the Content Selector, click the name of the page you want to insert into the Rich Content Editor [1]. The name of the page will appear in the Rich Content Editor and flash yellow. Then the name will turn blue, indicating it is a link [2].
Save Page
Click the Save button.
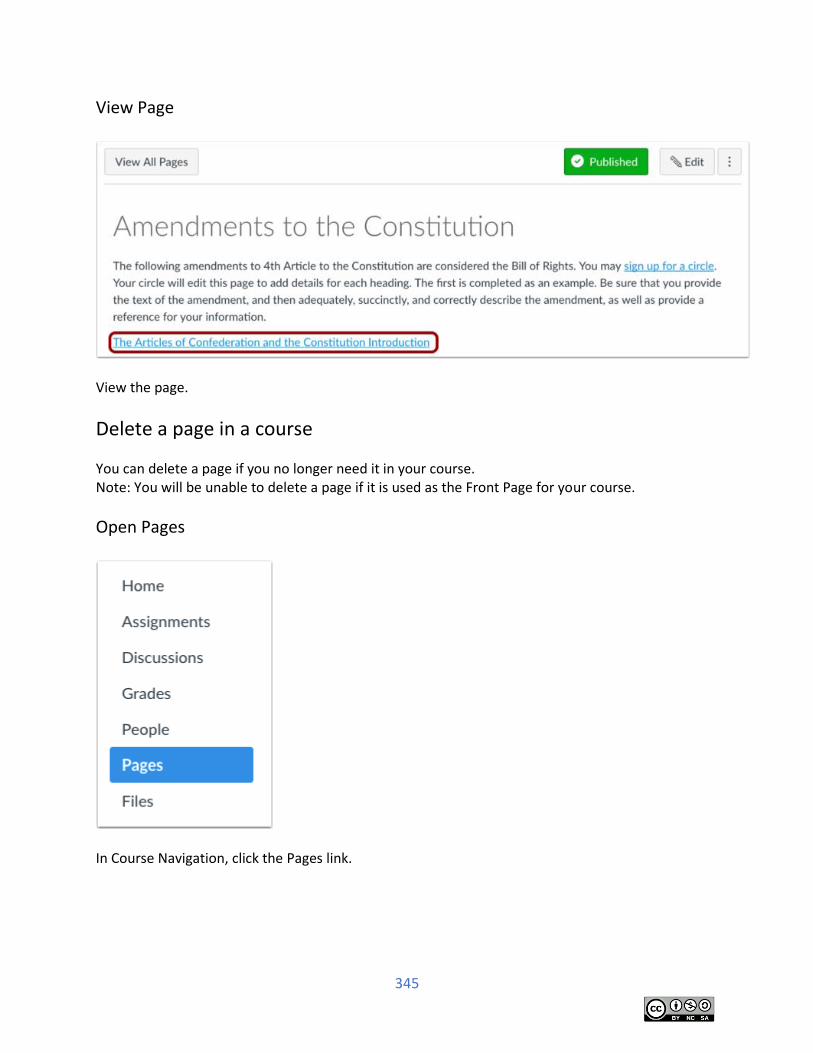
345
View Page
View the page.
Delete a page in a course
You can delete a page if you no longer need it in your course. Note: You will be unable to delete a page if it is used as the Front Page for your course.
Open Pages
In Course Navigation, click the Pages link.
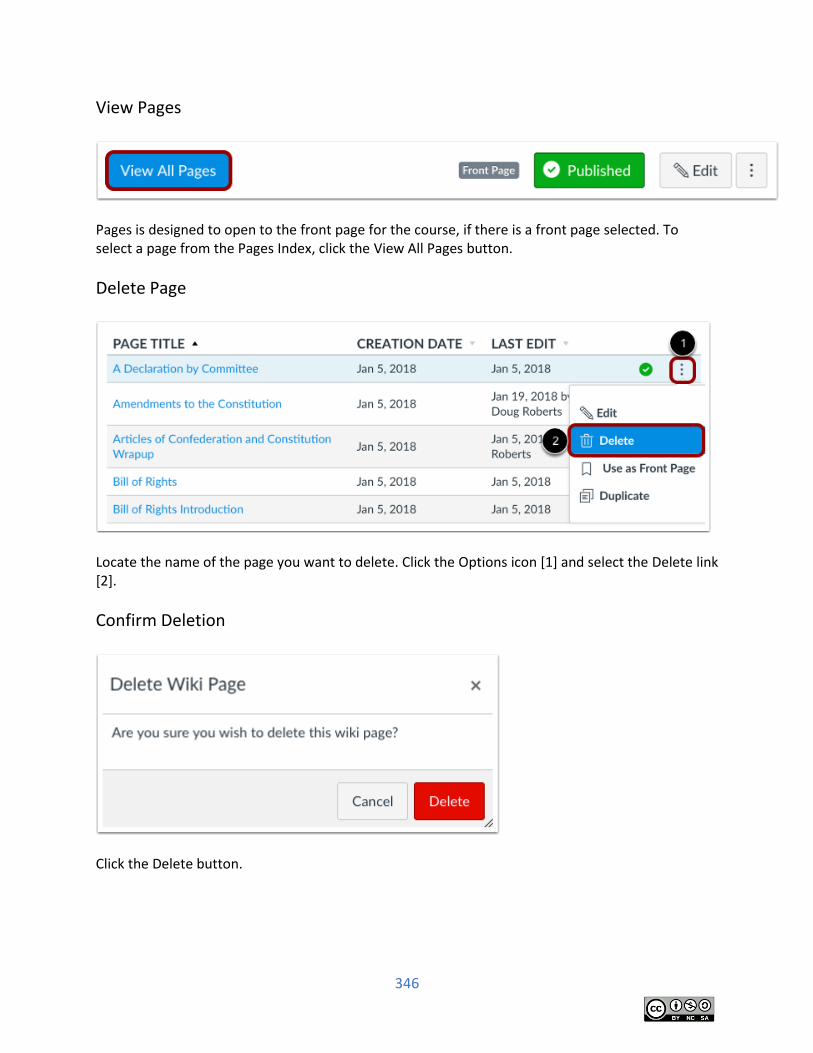
346
View Pages
Pages is designed to open to the front page for the course, if there is a front page selected. To select a page from the Pages Index, click the View All Pages button.
Delete Page
Locate the name of the page you want to delete. Click the Options icon [1] and select the Delete link [2].
Confirm Deletion
Click the Delete button.
347
Content Page: Try it
Create content pages
1. Create one page. Name it “Jack.” In the Rich Text Editor, type “Jack be nimble, Jack be
quick, Jack jumped over the candle stick.” Set the option that only teachers can edit this
page.
2. Create a second page. Name it “Mary.” In the Rich Text Editor, type “Mary, Mary, quite
contrary, how does your garden grow. Set the option that anyone can edit this page.
3. Publish both pages.
4. Link the page “Jack” to the page “Mary’”
5. Test the link
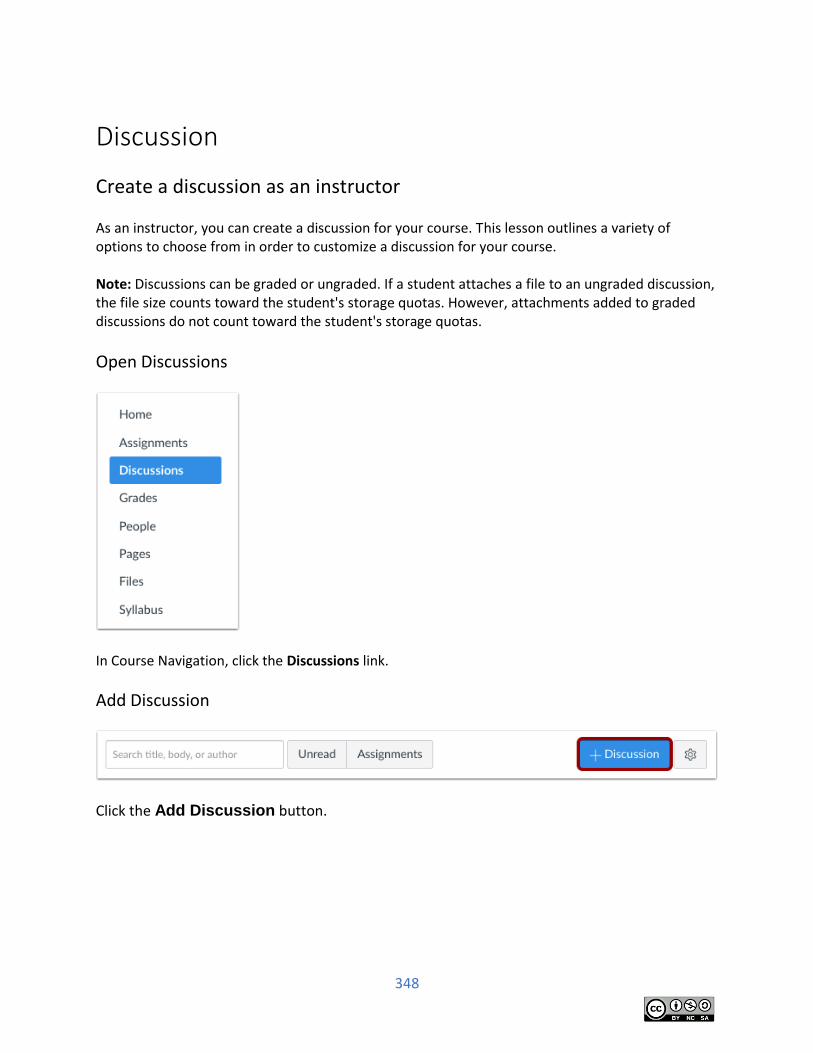
348
Discussion
Create a discussion as an instructor As an instructor, you can create a discussion for your course. This lesson outlines a variety of options to choose from in order to customize a discussion for your course. Note: Discussions can be graded or ungraded. If a student attaches a file to an ungraded discussion, the file size counts toward the student's storage quotas. However, attachments added to graded discussions do not count toward the student's storage quotas.
Open Discussions
In Course Navigation, click the Discussions link.
Add Discussion
Click the Add Discussion button.

349
Create Discussion
In the Title field [1], create a title for your discussion. Use the Rich Content Editor [2] to create content for your discussion. The Rich Content Editor includes a word count display below the bottom right corner of the text box. You can also add links, files, and images to the discussion using the content selector [3]. You can also add an attachment to your discussion by clicking the Choose File button [4].
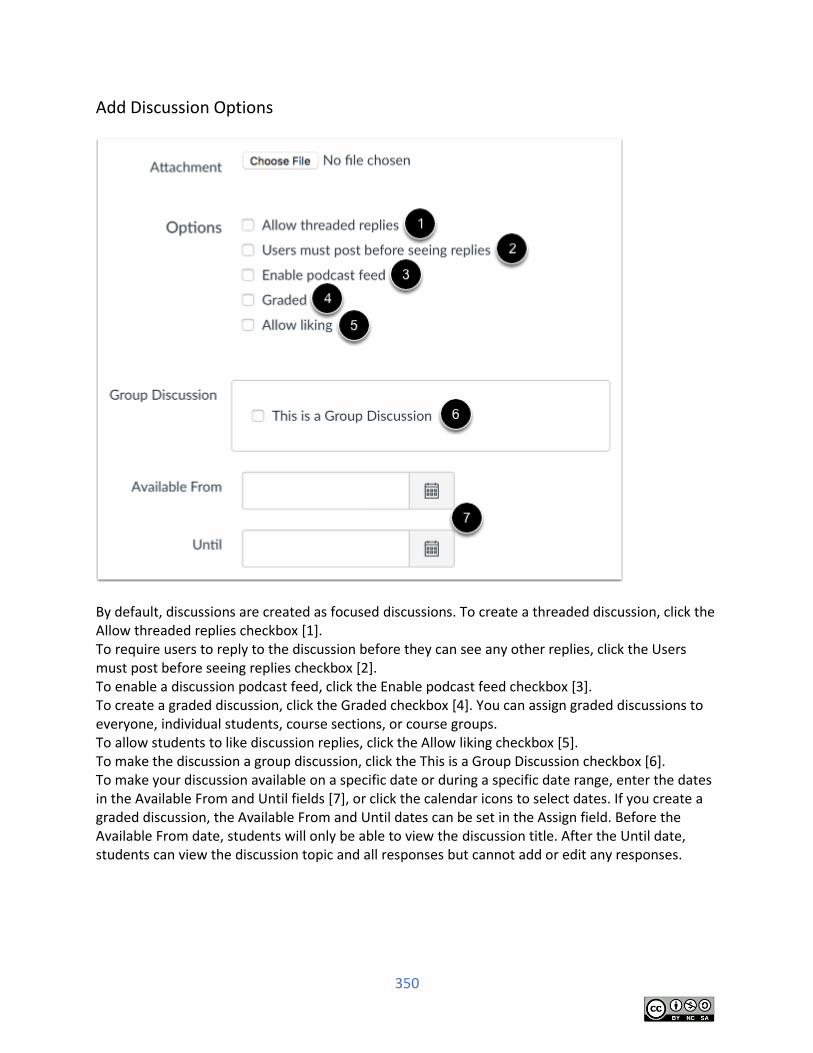
350
Add Discussion Options
By default, discussions are created as focused discussions. To create a threaded discussion, click the Allow threaded replies checkbox [1]. To require users to reply to the discussion before they can see any other replies, click the Users must post before seeing replies checkbox [2]. To enable a discussion podcast feed, click the Enable podcast feed checkbox [3]. To create a graded discussion, click the Graded checkbox [4]. You can assign graded discussions to everyone, individual students, course sections, or course groups. To allow students to like discussion replies, click the Allow liking checkbox [5]. To make the discussion a group discussion, click the This is a Group Discussion checkbox [6]. To make your discussion available on a specific date or during a specific date range, enter the dates in the Available From and Until fields [7], or click the calendar icons to select dates. If you create a graded discussion, the Available From and Until dates can be set in the Assign field. Before the Available From date, students will only be able to view the discussion title. After the Until date, students can view the discussion topic and all responses but cannot add or edit any responses.
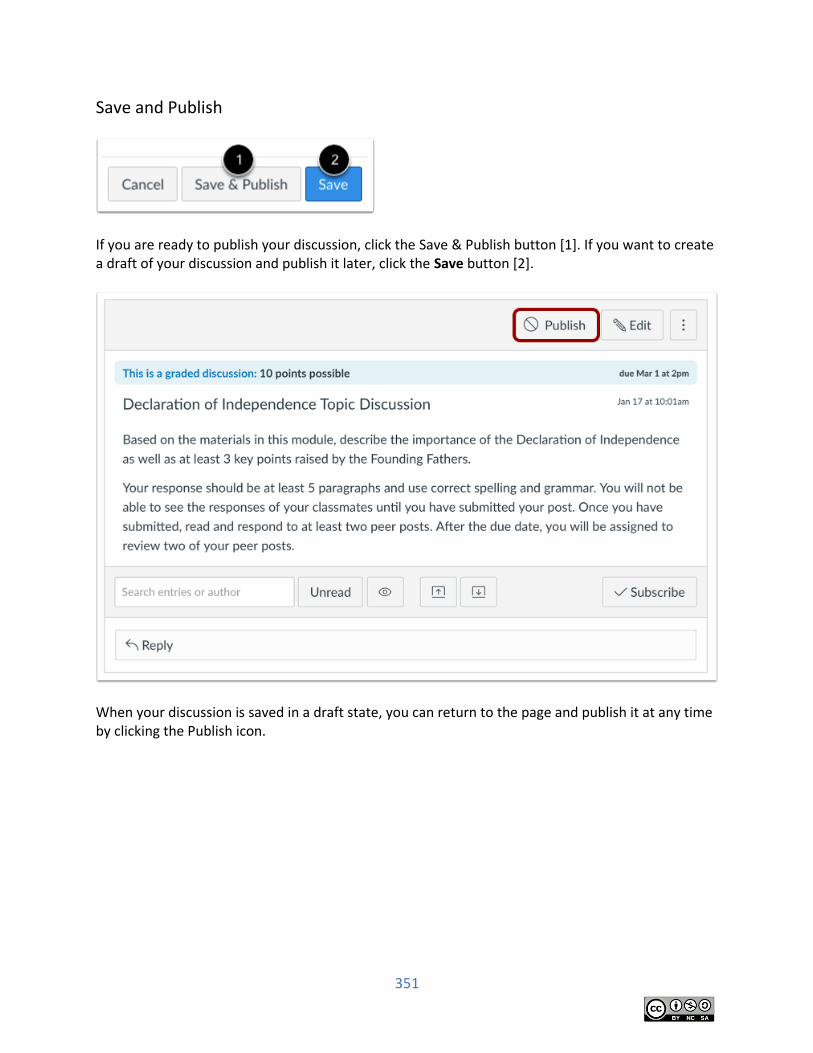
351
Save and Publish
If you are ready to publish your discussion, click the Save & Publish button [1]. If you want to create a draft of your discussion and publish it later, click the Save button [2].
When your discussion is saved in a draft state, you can return to the page and publish it at any time by clicking the Publish icon.
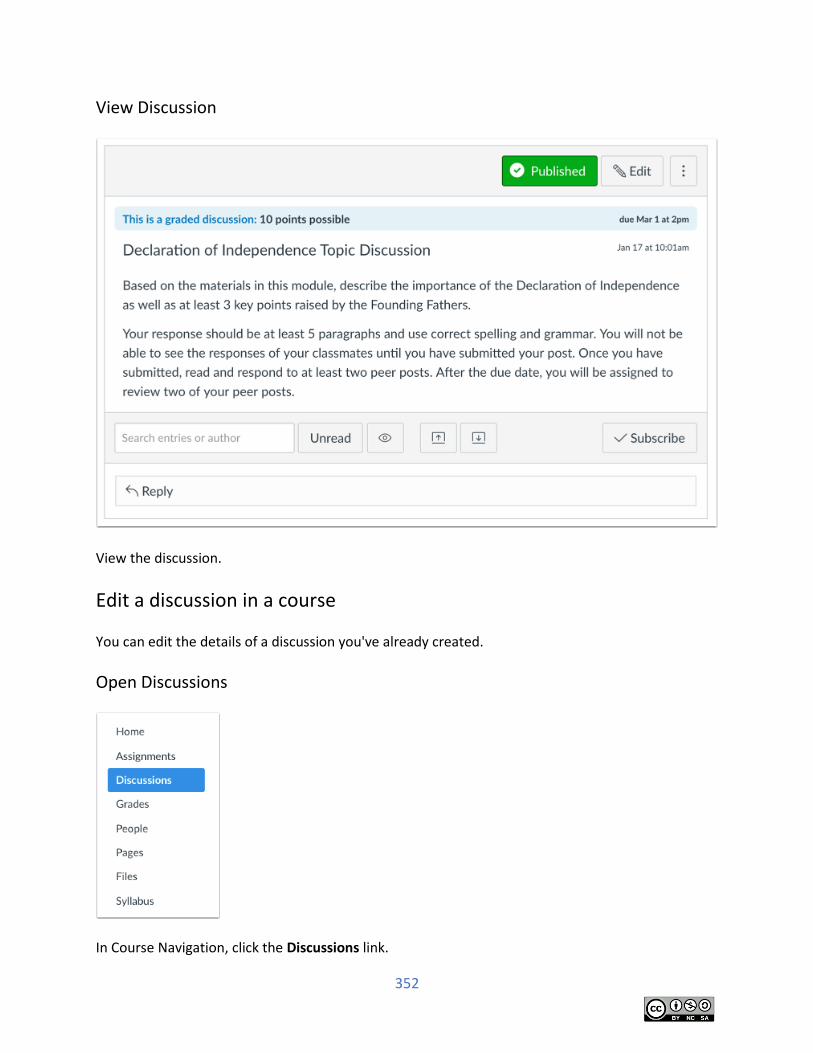
352
View Discussion
View the discussion.
Edit a discussion in a course You can edit the details of a discussion you've already created.
Open Discussions
In Course Navigation, click the Discussions link.
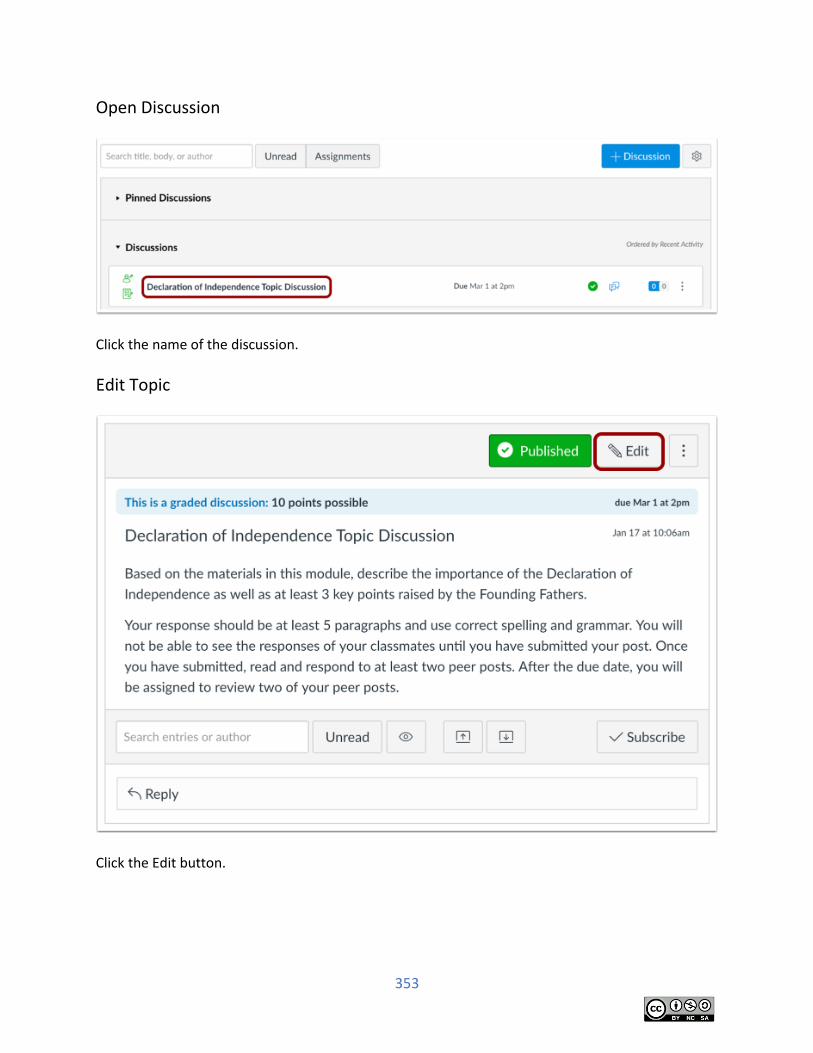
353
Open Discussion
Click the name of the discussion.
Edit Topic
Click the Edit button.
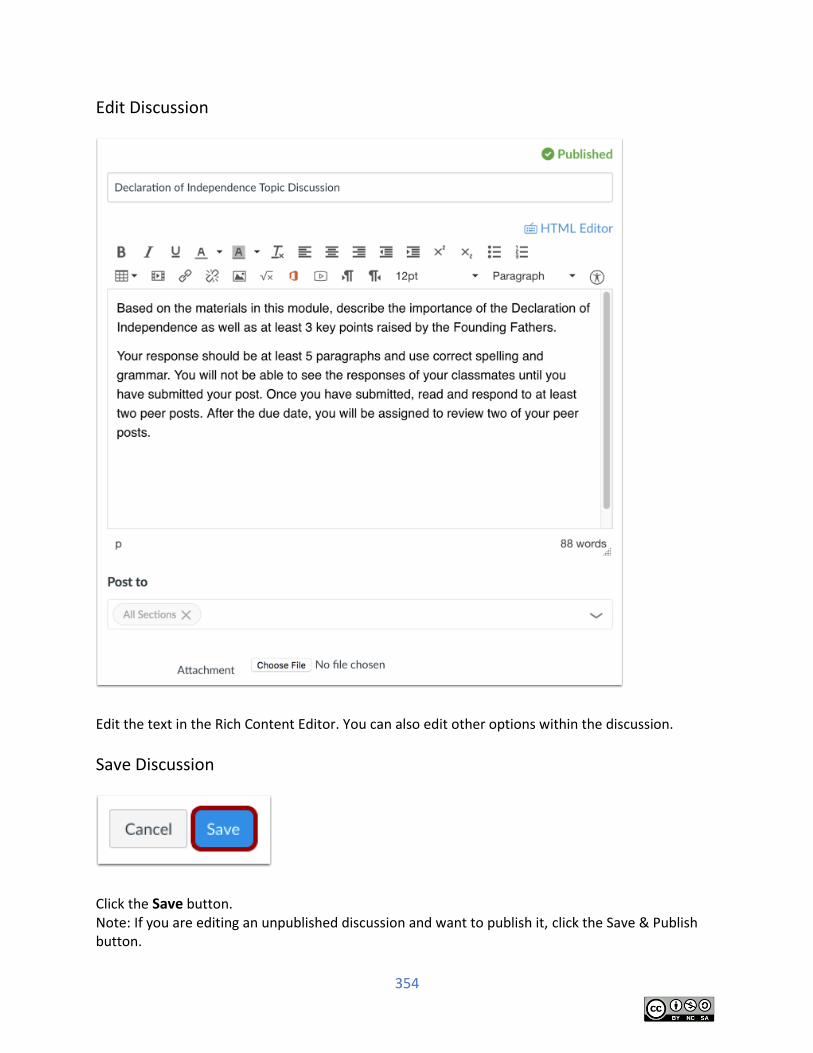
354
Edit Discussion
Edit the text in the Rich Content Editor. You can also edit other options within the discussion.
Save Discussion
Click the Save button. Note: If you are editing an unpublished discussion and want to publish it, click the Save & Publish button.
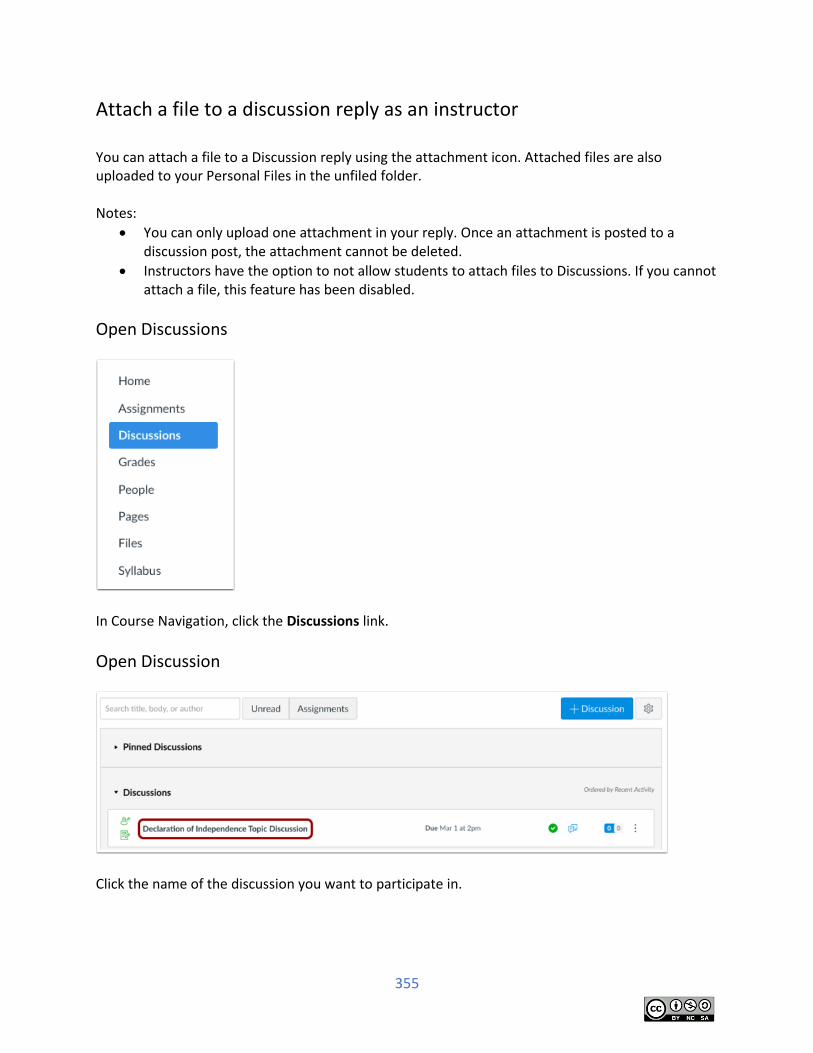
355
Attach a file to a discussion reply as an instructor You can attach a file to a Discussion reply using the attachment icon. Attached files are also uploaded to your Personal Files in the unfiled folder. Notes:
You can only upload one attachment in your reply. Once an attachment is posted to a discussion post, the attachment cannot be deleted.
Instructors have the option to not allow students to attach files to Discussions. If you cannot attach a file, this feature has been disabled.
Open Discussions
In Course Navigation, click the Discussions link.
Open Discussion
Click the name of the discussion you want to participate in.
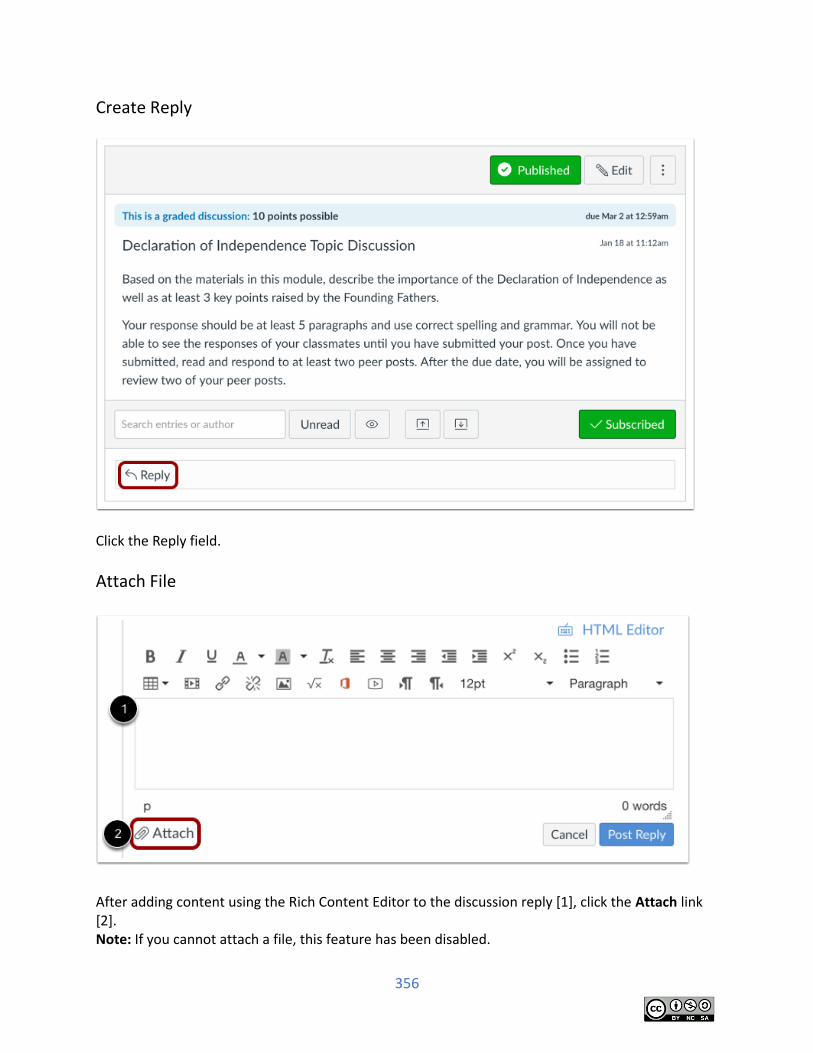
356
Create Reply
Click the Reply field.
Attach File
After adding content using the Rich Content Editor to the discussion reply [1], click the Attach link [2]. Note: If you cannot attach a file, this feature has been disabled.
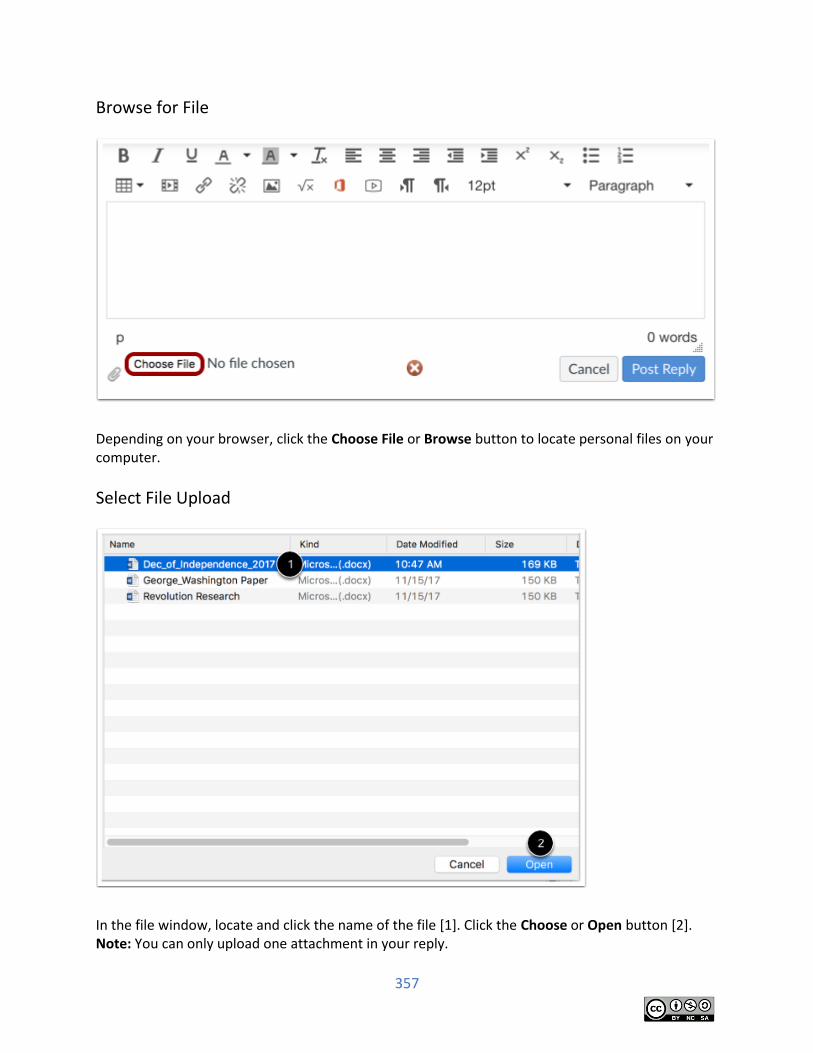
357
Browse for File
Depending on your browser, click the Choose File or Browse button to locate personal files on your computer.
Select File Upload
In the file window, locate and click the name of the file [1]. Click the Choose or Open button [2]. Note: You can only upload one attachment in your reply.
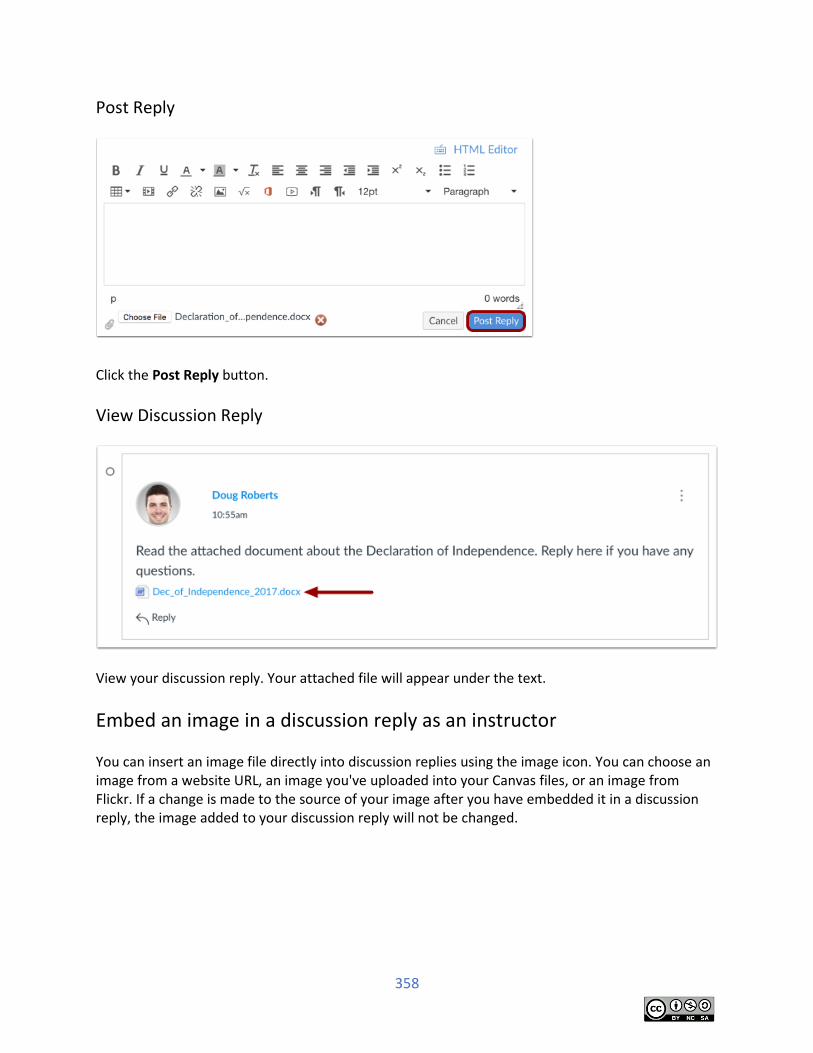
358
Post Reply
Click the Post Reply button.
View Discussion Reply
View your discussion reply. Your attached file will appear under the text.
Embed an image in a discussion reply as an instructor You can insert an image file directly into discussion replies using the image icon. You can choose an image from a website URL, an image you've uploaded into your Canvas files, or an image from Flickr. If a change is made to the source of your image after you have embedded it in a discussion reply, the image added to your discussion reply will not be changed.
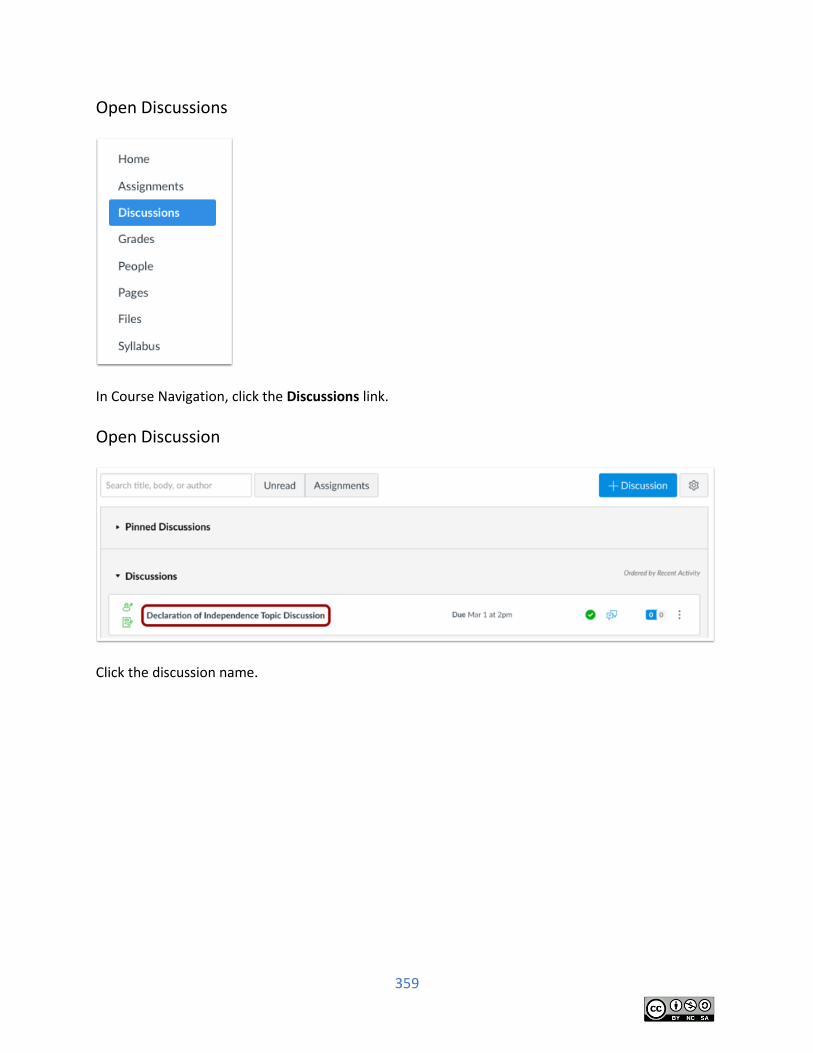
359
Open Discussions
In Course Navigation, click the Discussions link.
Open Discussion
Click the discussion name.
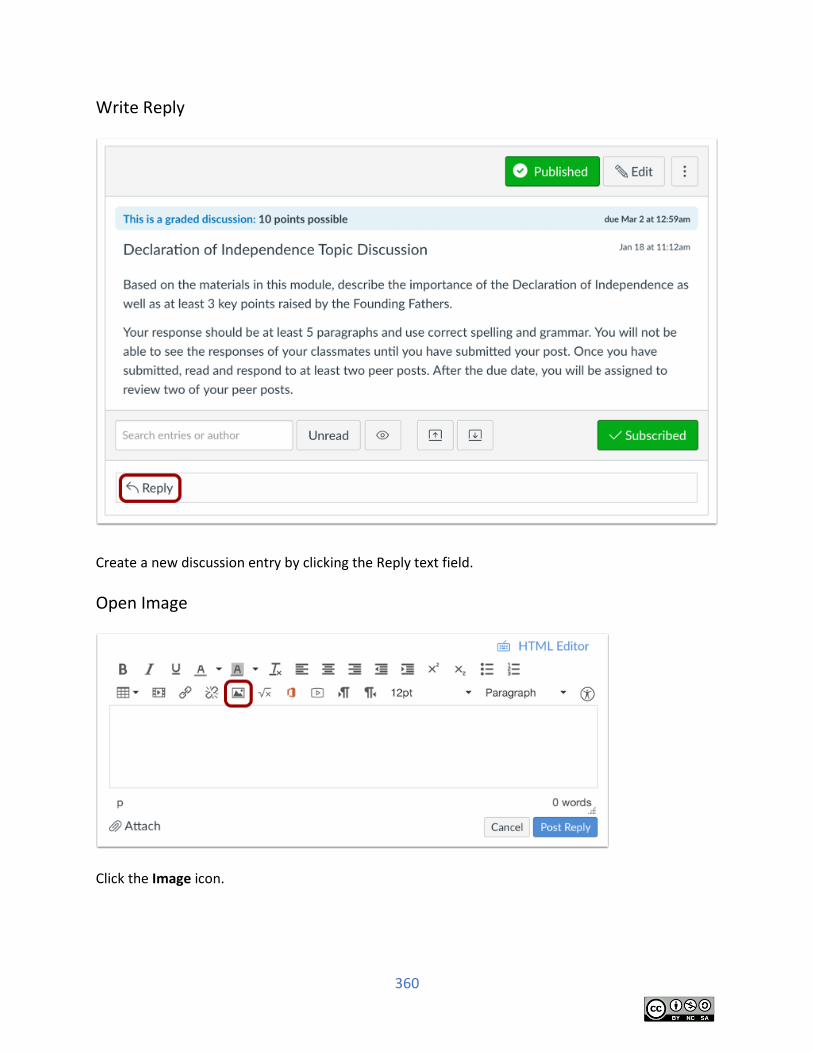
360
Write Reply
Create a new discussion entry by clicking the Reply text field.
Open Image
Click the Image icon.
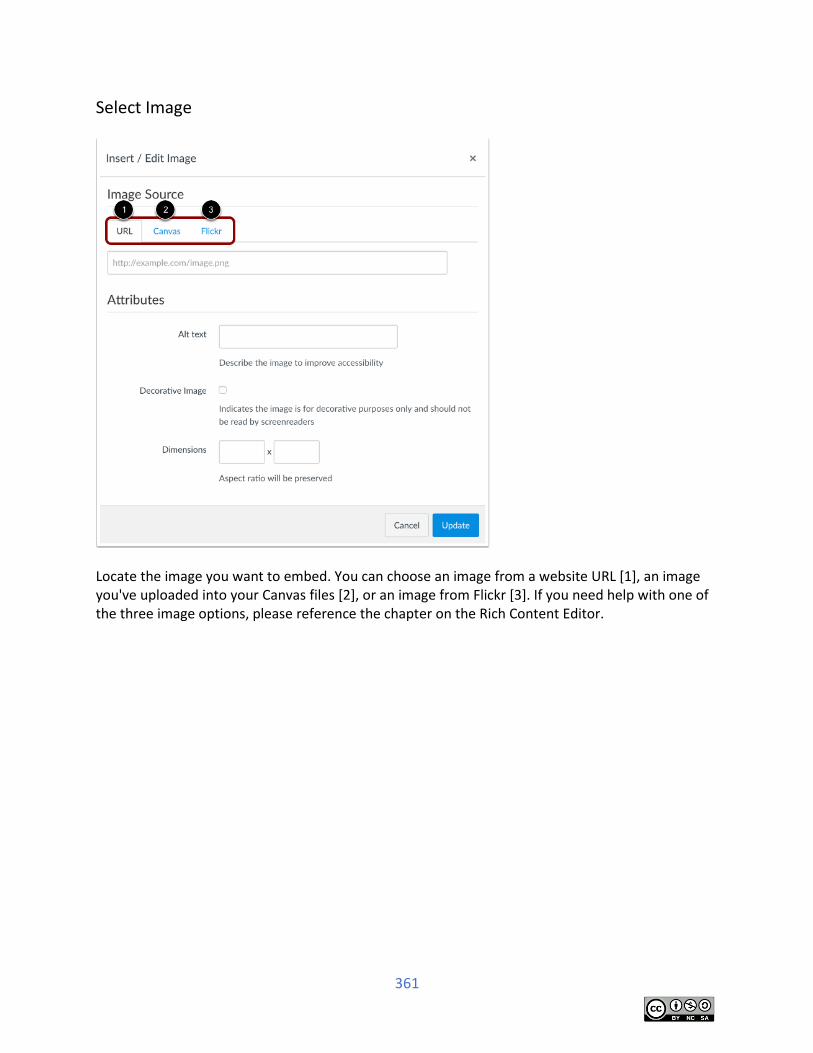
361
Select Image
Locate the image you want to embed. You can choose an image from a website URL [1], an image you've uploaded into your Canvas files [2], or an image from Flickr [3]. If you need help with one of the three image options, please reference the chapter on the Rich Content Editor.
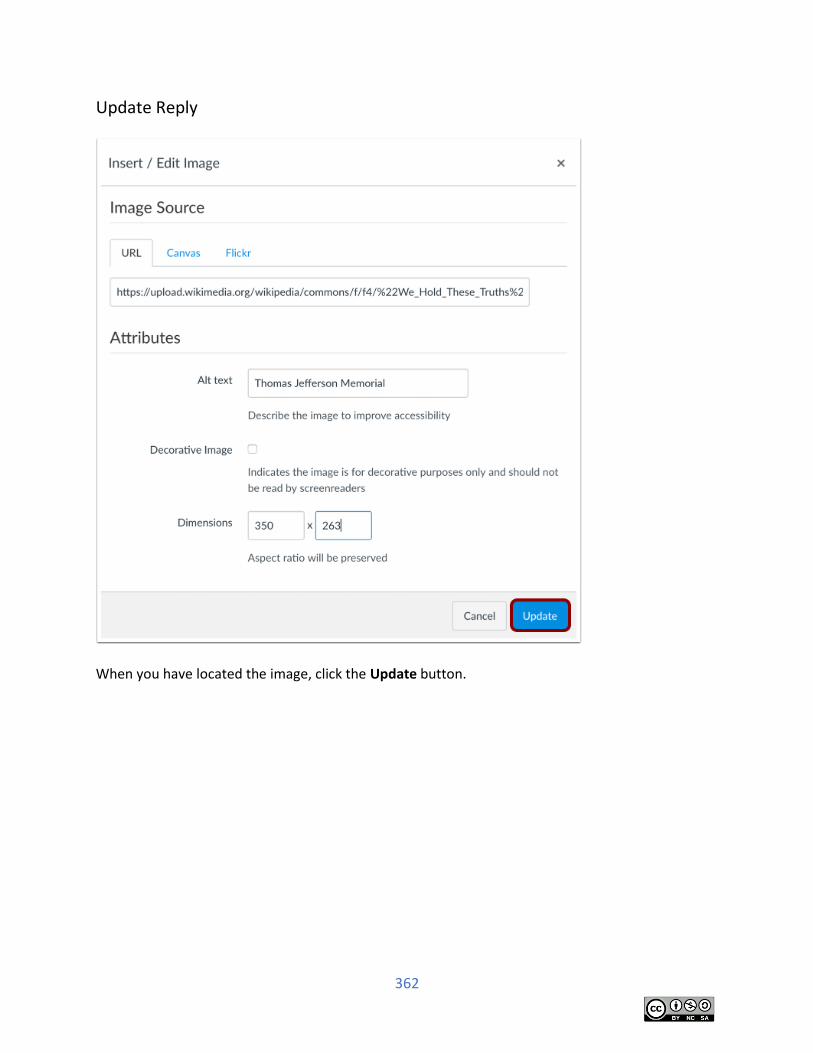
362
Update Reply
When you have located the image, click the Update button.
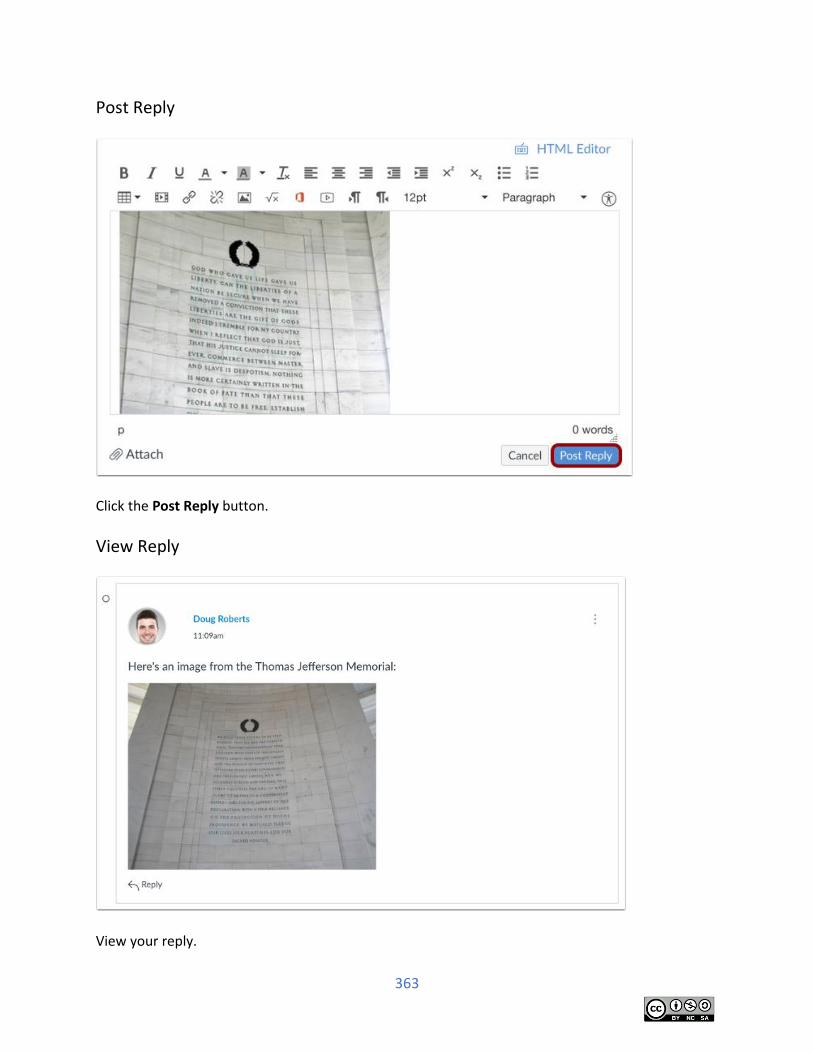
363
Post Reply
Click the Post Reply button.
View Reply
View your reply.
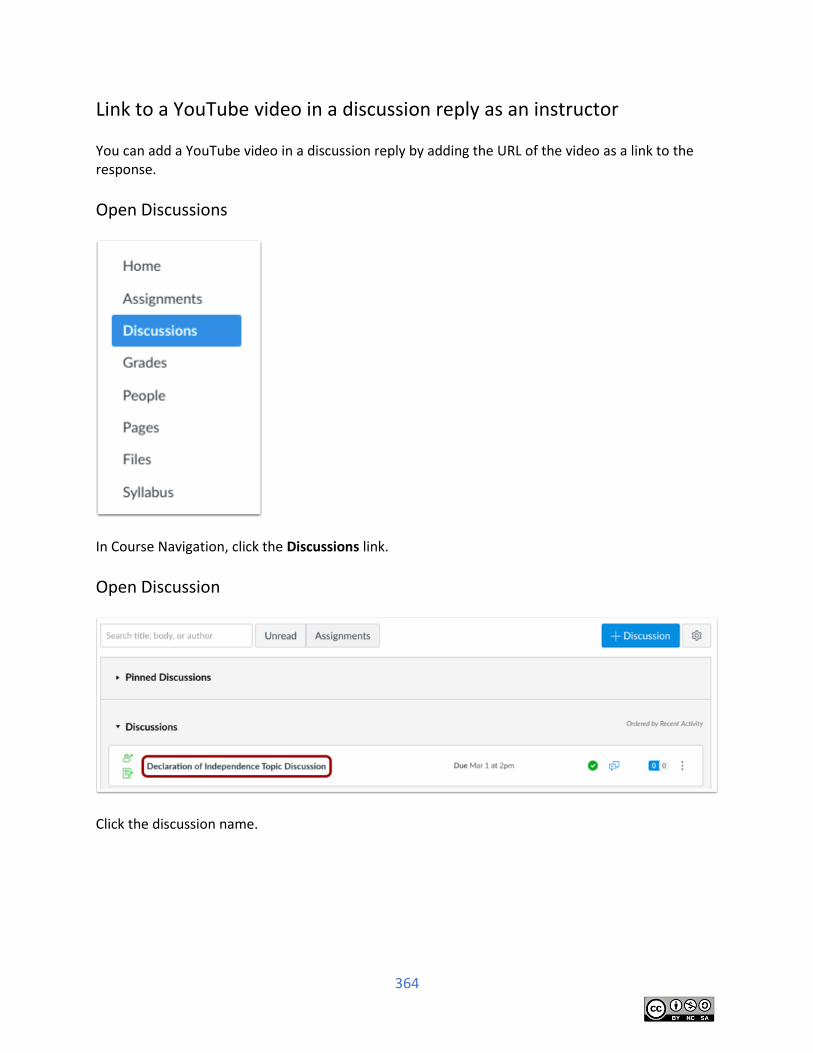
364
Link to a YouTube video in a discussion reply as an instructor You can add a YouTube video in a discussion reply by adding the URL of the video as a link to the response.
Open Discussions
In Course Navigation, click the Discussions link.
Open Discussion
Click the discussion name.
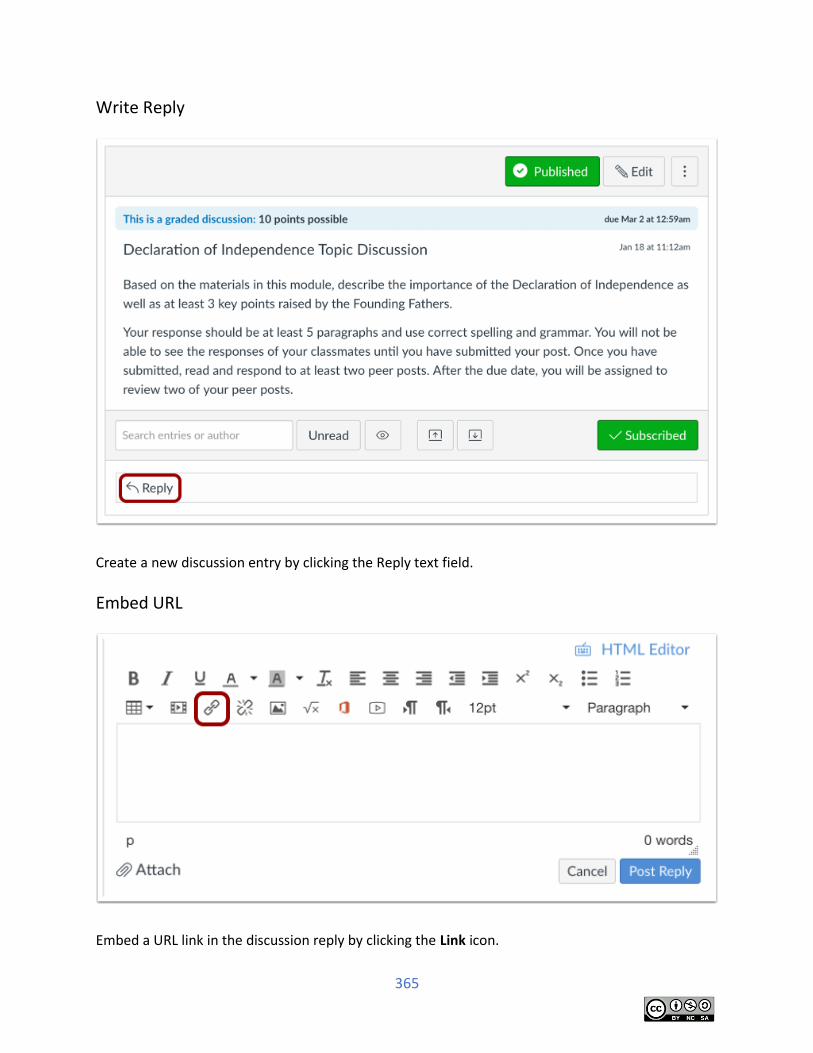
365
Write Reply
Create a new discussion entry by clicking the Reply text field.
Embed URL
Embed a URL link in the discussion reply by clicking the Link icon.
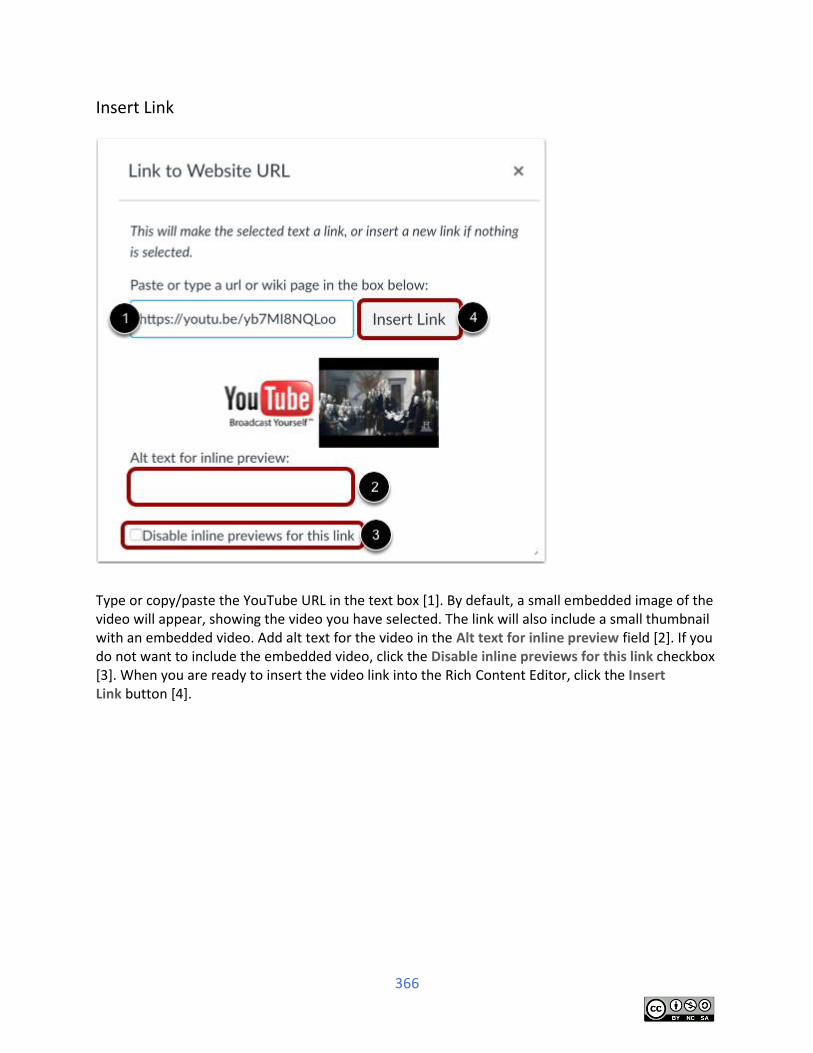
366
Insert Link
Type or copy/paste the YouTube URL in the text box [1]. By default, a small embedded image of the video will appear, showing the video you have selected. The link will also include a small thumbnail with an embedded video. Add alt text for the video in the Alt text for inline preview field [2]. If you do not want to include the embedded video, click the Disable inline previews for this link checkbox [3]. When you are ready to insert the video link into the Rich Content Editor, click the Insert Link button [4].
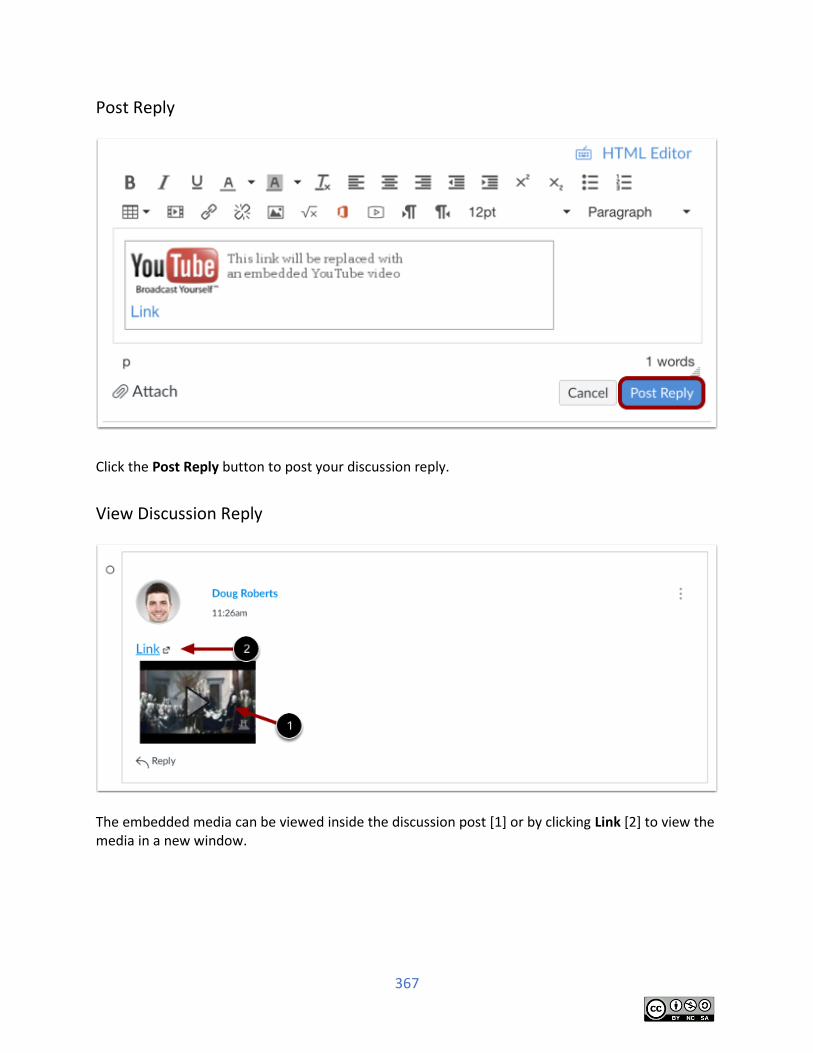
367
Post Reply
Click the Post Reply button to post your discussion reply.
View Discussion Reply
The embedded media can be viewed inside the discussion post [1] or by clicking Link [2] to view the media in a new window.
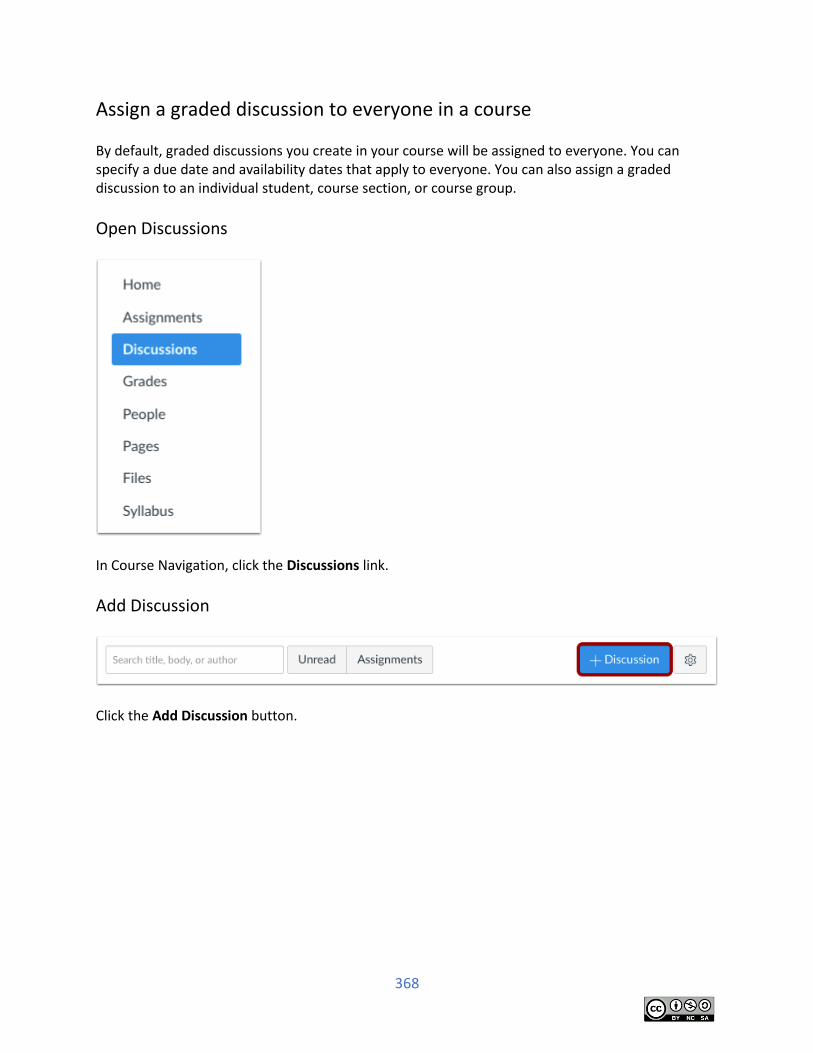
368
Assign a graded discussion to everyone in a course By default, graded discussions you create in your course will be assigned to everyone. You can specify a due date and availability dates that apply to everyone. You can also assign a graded discussion to an individual student, course section, or course group.
Open Discussions
In Course Navigation, click the Discussions link.
Add Discussion
Click the Add Discussion button.
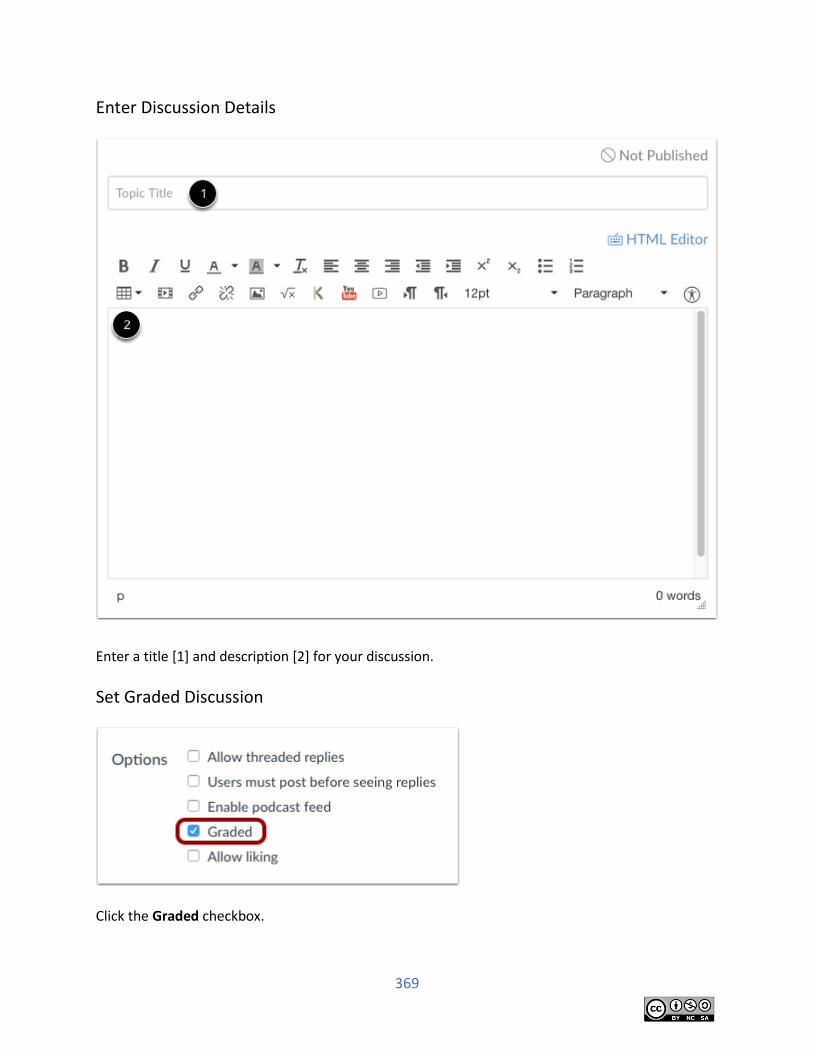
369
Enter Discussion Details
Enter a title [1] and description [2] for your discussion.
Set Graded Discussion
Click the Graded checkbox.
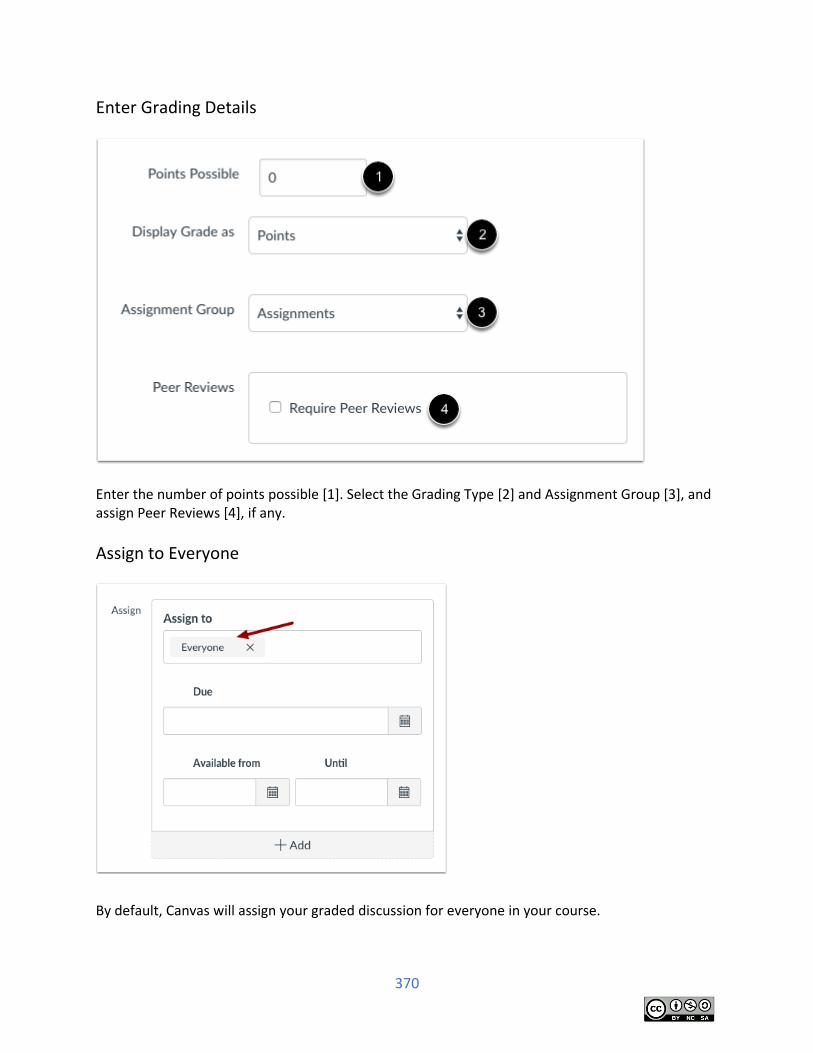
370
Enter Grading Details
Enter the number of points possible [1]. Select the Grading Type [2] and Assignment Group [3], and assign Peer Reviews [4], if any.
Assign to Everyone
By default, Canvas will assign your graded discussion for everyone in your course.
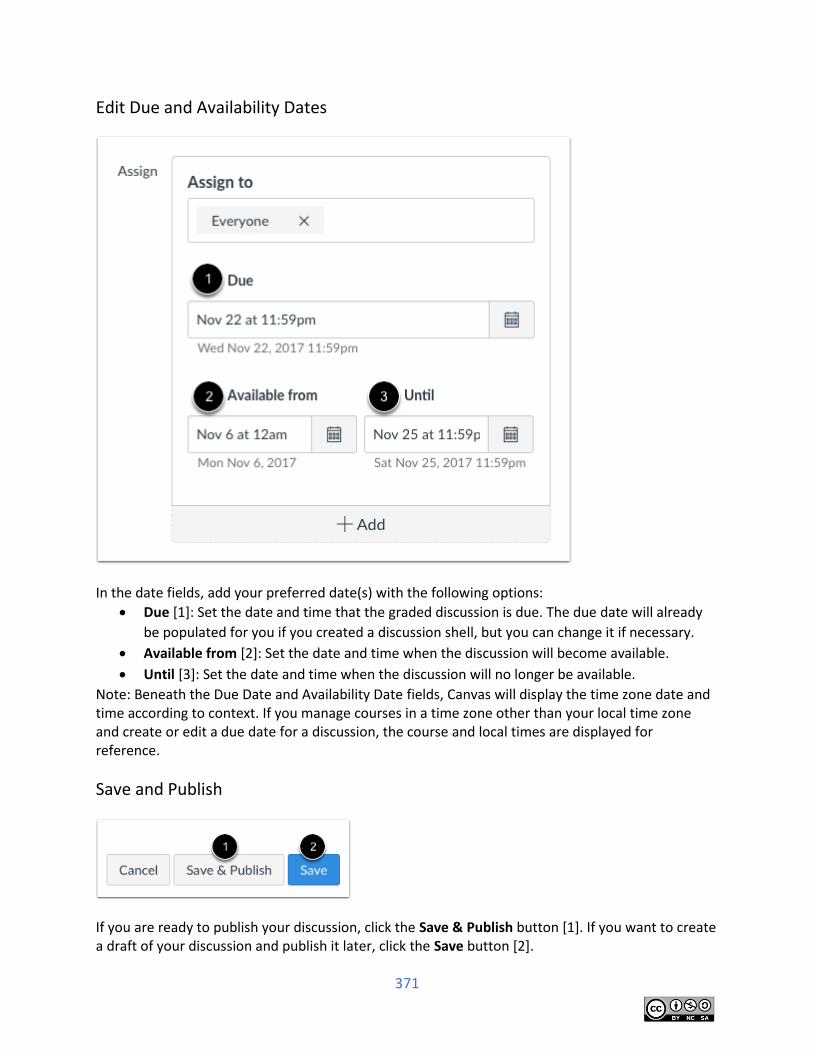
371
Edit Due and Availability Dates
In the date fields, add your preferred date(s) with the following options:
Due [1]: Set the date and time that the graded discussion is due. The due date will already
be populated for you if you created a discussion shell, but you can change it if necessary.
Available from [2]: Set the date and time when the discussion will become available.
Until [3]: Set the date and time when the discussion will no longer be available.
Note: Beneath the Due Date and Availability Date fields, Canvas will display the time zone date and time according to context. If you manage courses in a time zone other than your local time zone and create or edit a due date for a discussion, the course and local times are displayed for reference.
Save and Publish
If you are ready to publish your discussion, click the Save & Publish button [1]. If you want to create a draft of your discussion and publish it later, click the Save button [2].
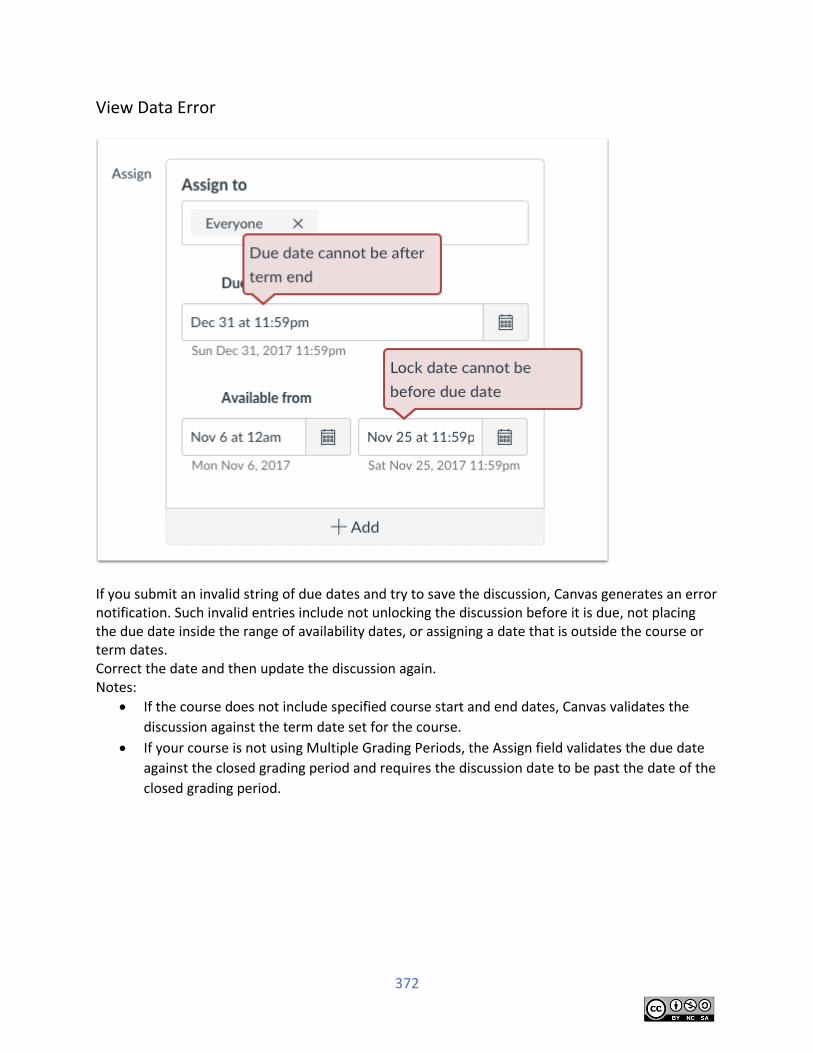
372
View Data Error
If you submit an invalid string of due dates and try to save the discussion, Canvas generates an error notification. Such invalid entries include not unlocking the discussion before it is due, not placing the due date inside the range of availability dates, or assigning a date that is outside the course or term dates. Correct the date and then update the discussion again. Notes:
If the course does not include specified course start and end dates, Canvas validates the
discussion against the term date set for the course.
If your course is not using Multiple Grading Periods, the Assign field validates the due date
against the closed grading period and requires the discussion date to be past the date of the
closed grading period.
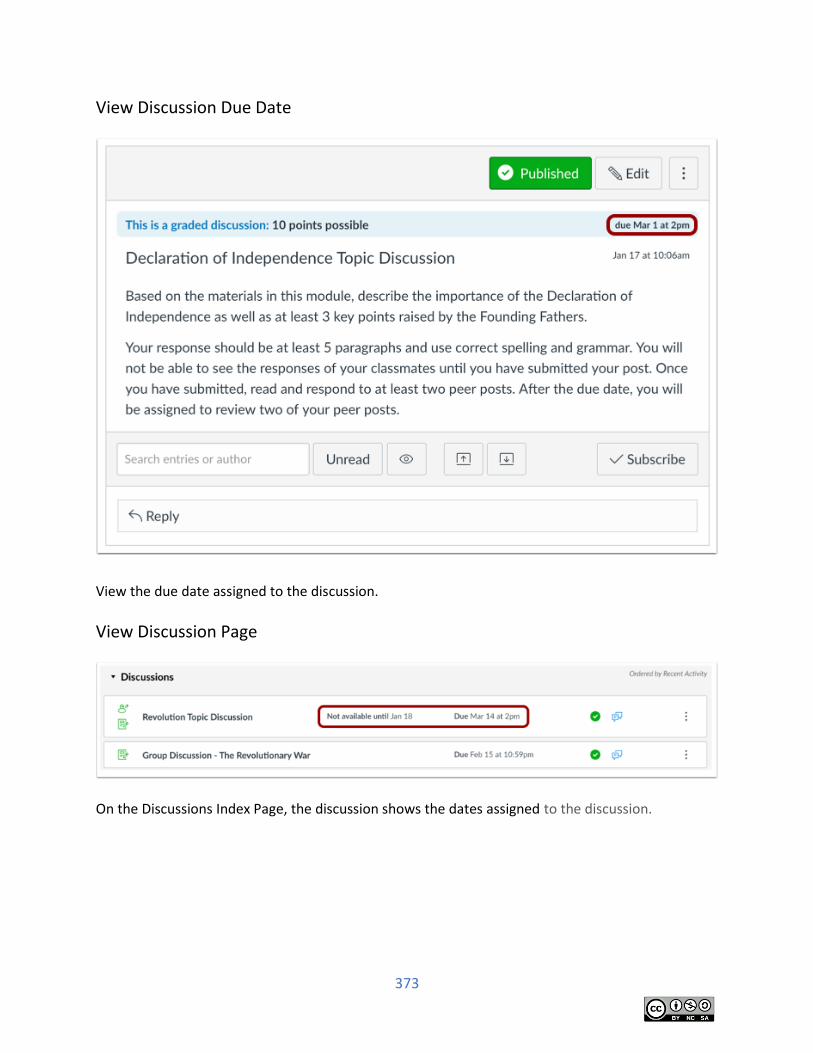
373
View Discussion Due Date
View the due date assigned to the discussion.
View Discussion Page
On the Discussions Index Page, the discussion shows the dates assigned to the discussion.
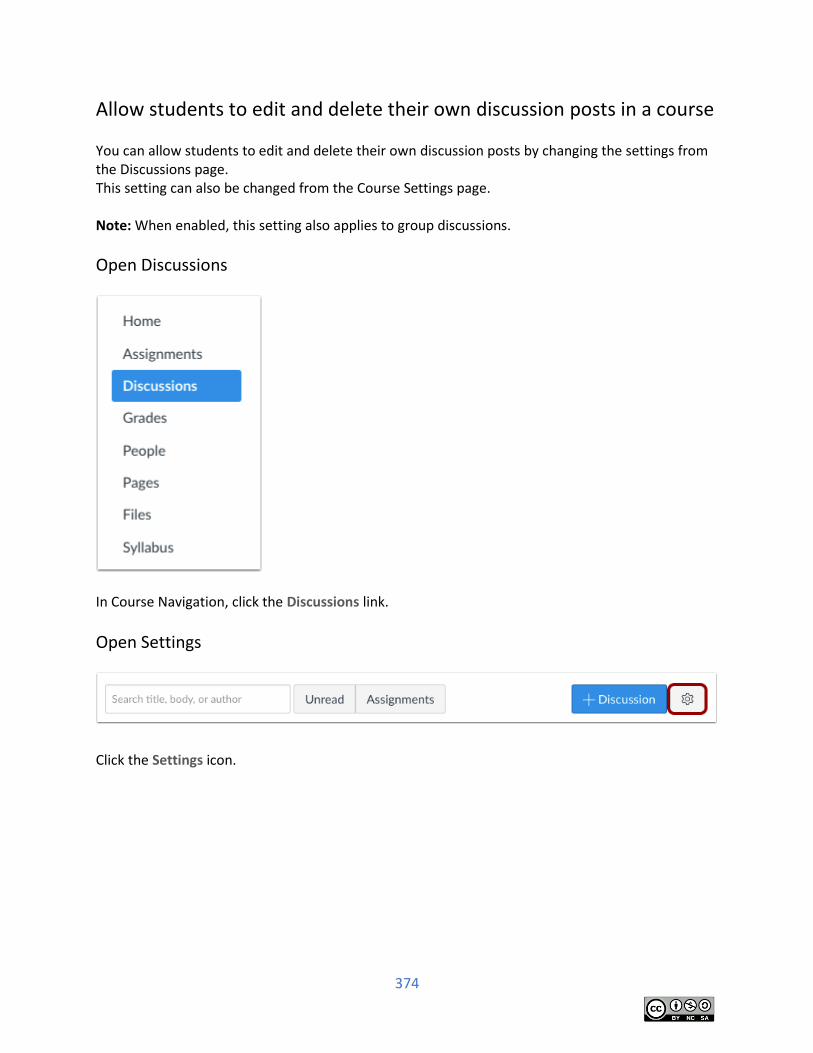
374
Allow students to edit and delete their own discussion posts in a course You can allow students to edit and delete their own discussion posts by changing the settings from the Discussions page. This setting can also be changed from the Course Settings page. Note: When enabled, this setting also applies to group discussions.
Open Discussions
In Course Navigation, click the Discussions link.
Open Settings
Click the Settings icon.
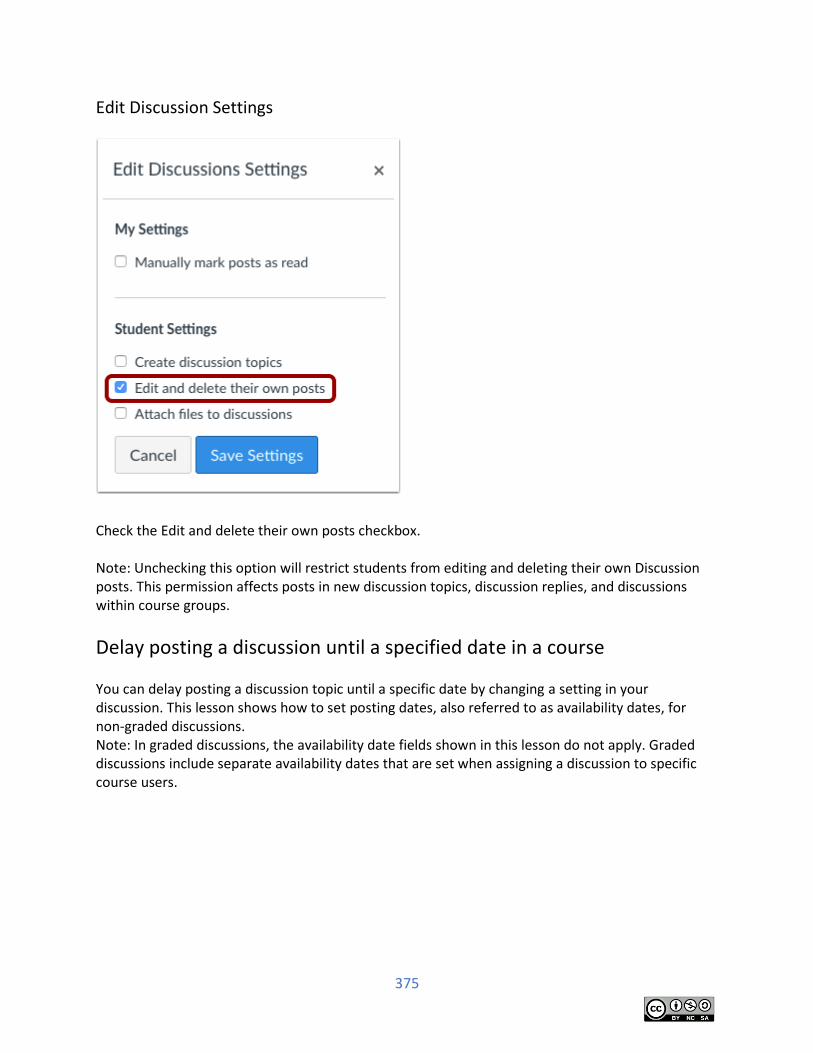
375
Edit Discussion Settings
Check the Edit and delete their own posts checkbox. Note: Unchecking this option will restrict students from editing and deleting their own Discussion posts. This permission affects posts in new discussion topics, discussion replies, and discussions within course groups.
Delay posting a discussion until a specified date in a course You can delay posting a discussion topic until a specific date by changing a setting in your discussion. This lesson shows how to set posting dates, also referred to as availability dates, for non-graded discussions. Note: In graded discussions, the availability date fields shown in this lesson do not apply. Graded discussions include separate availability dates that are set when assigning a discussion to specific course users.
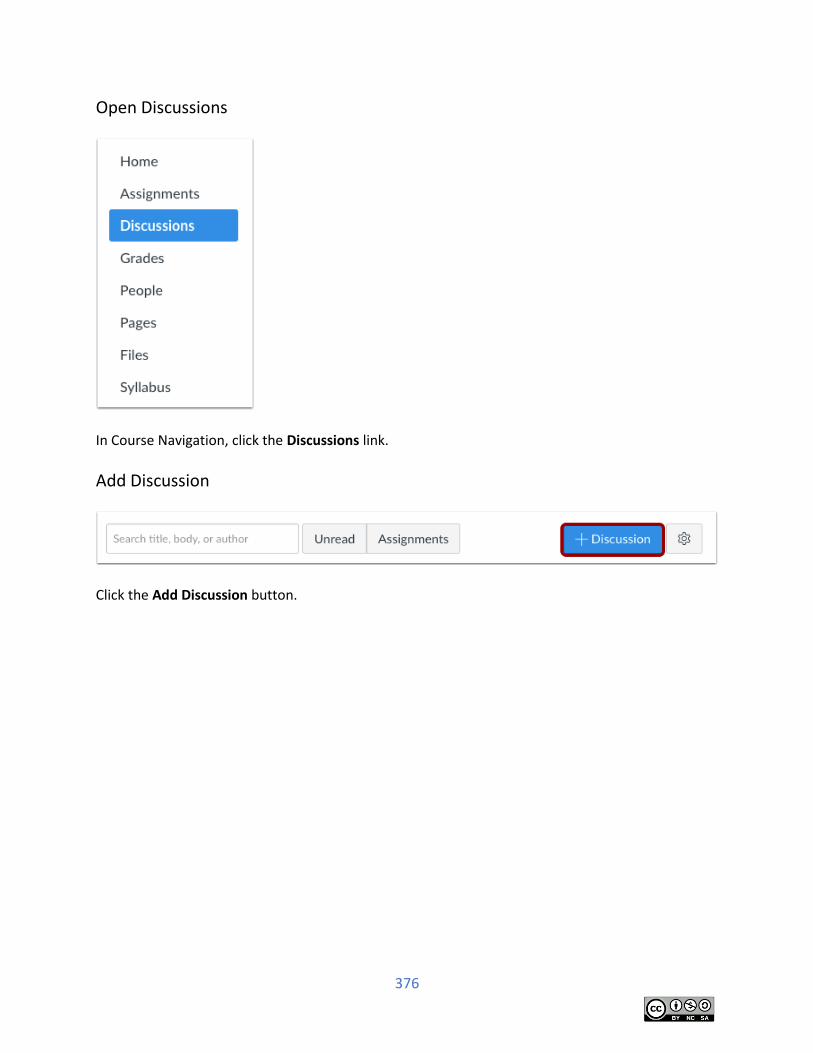
376
Open Discussions
In Course Navigation, click the Discussions link.
Add Discussion
Click the Add Discussion button.
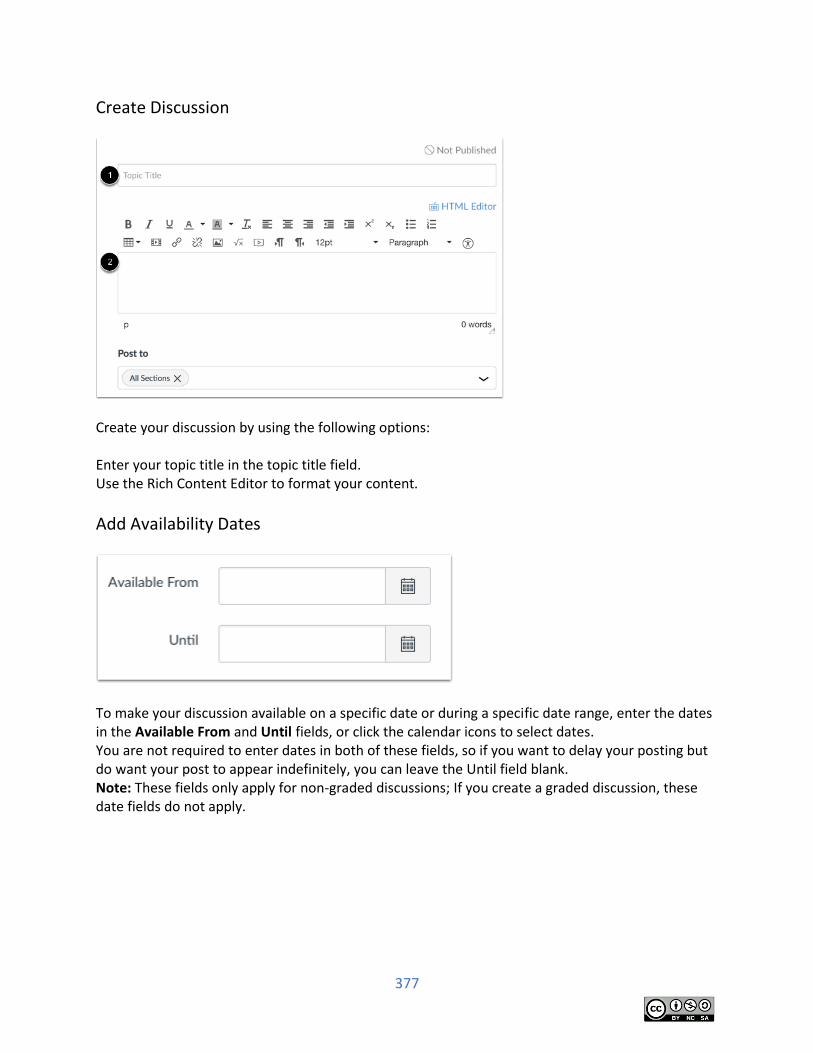
377
Create Discussion
Create your discussion by using the following options:
Enter your topic title in the topic title field. Use the Rich Content Editor to format your content.
Add Availability Dates
To make your discussion available on a specific date or during a specific date range, enter the dates in the Available From and Until fields, or click the calendar icons to select dates. You are not required to enter dates in both of these fields, so if you want to delay your posting but do want your post to appear indefinitely, you can leave the Until field blank. Note: These fields only apply for non-graded discussions; If you create a graded discussion, these date fields do not apply.
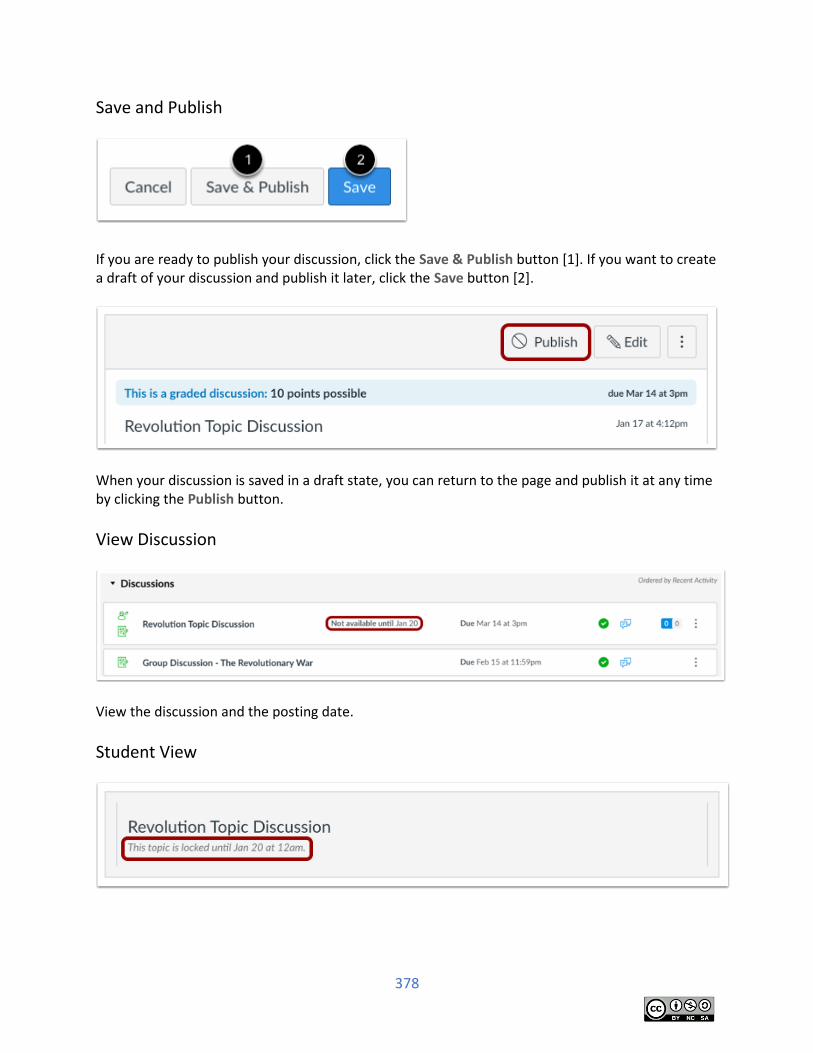
378
Save and Publish
If you are ready to publish your discussion, click the Save & Publish button [1]. If you want to create a draft of your discussion and publish it later, click the Save button [2].
When your discussion is saved in a draft state, you can return to the page and publish it at any time by clicking the Publish button.
View Discussion
View the discussion and the posting date.
Student View
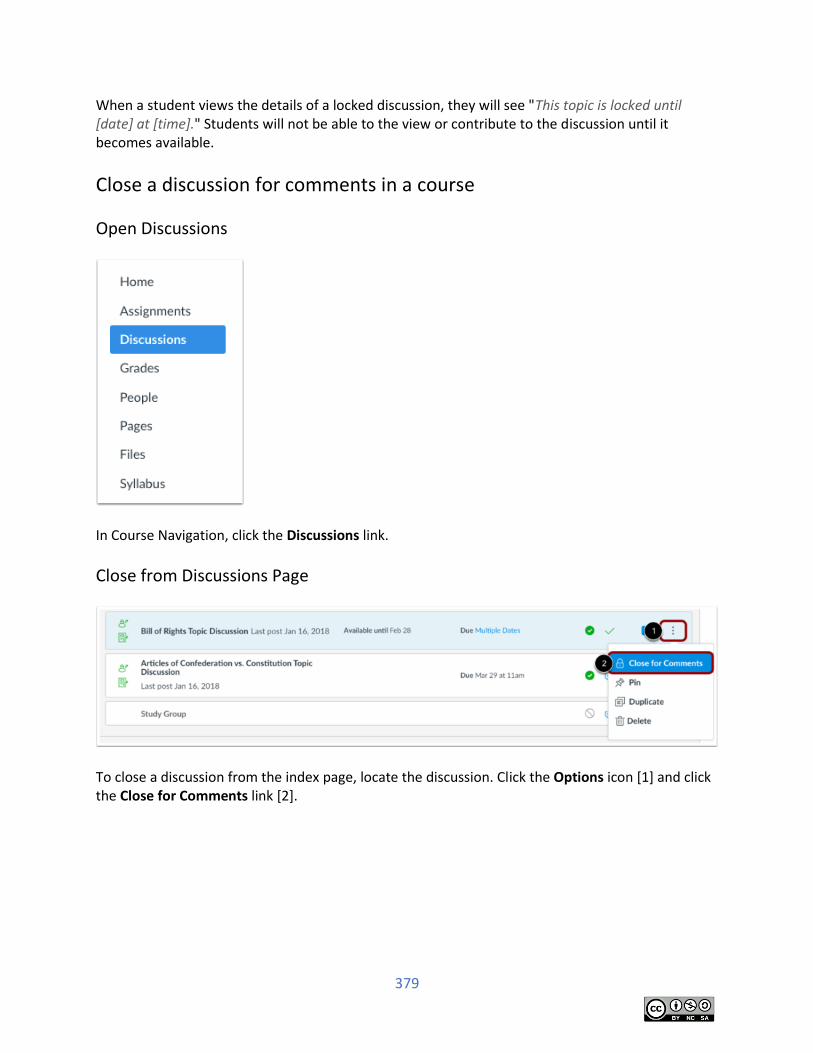
379
When a student views the details of a locked discussion, they will see "This topic is locked until [date] at [time]." Students will not be able to the view or contribute to the discussion until it becomes available.
Close a discussion for comments in a course
Open Discussions
In Course Navigation, click the Discussions link.
Close from Discussions Page
To close a discussion from the index page, locate the discussion. Click the Options icon [1] and click the Close for Comments link [2].
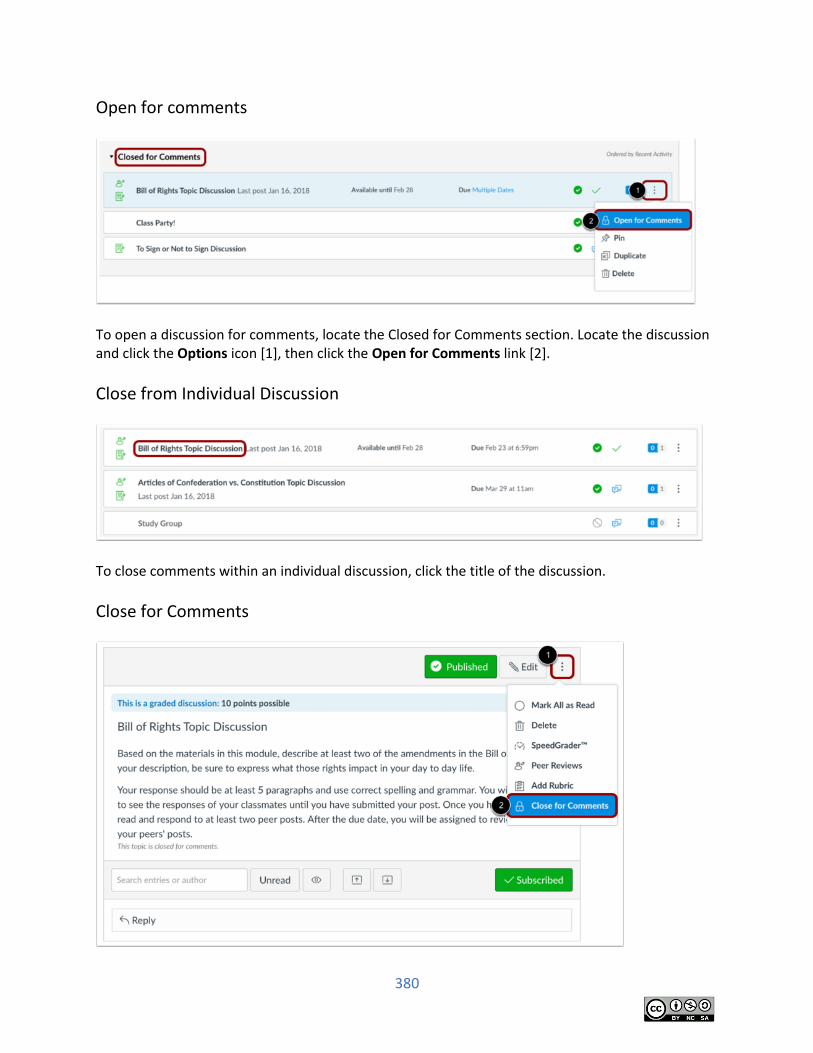
380
Open for comments
To open a discussion for comments, locate the Closed for Comments section. Locate the discussion and click the Options icon [1], then click the Open for Comments link [2].
Close from Individual Discussion
To close comments within an individual discussion, click the title of the discussion.
Close for Comments
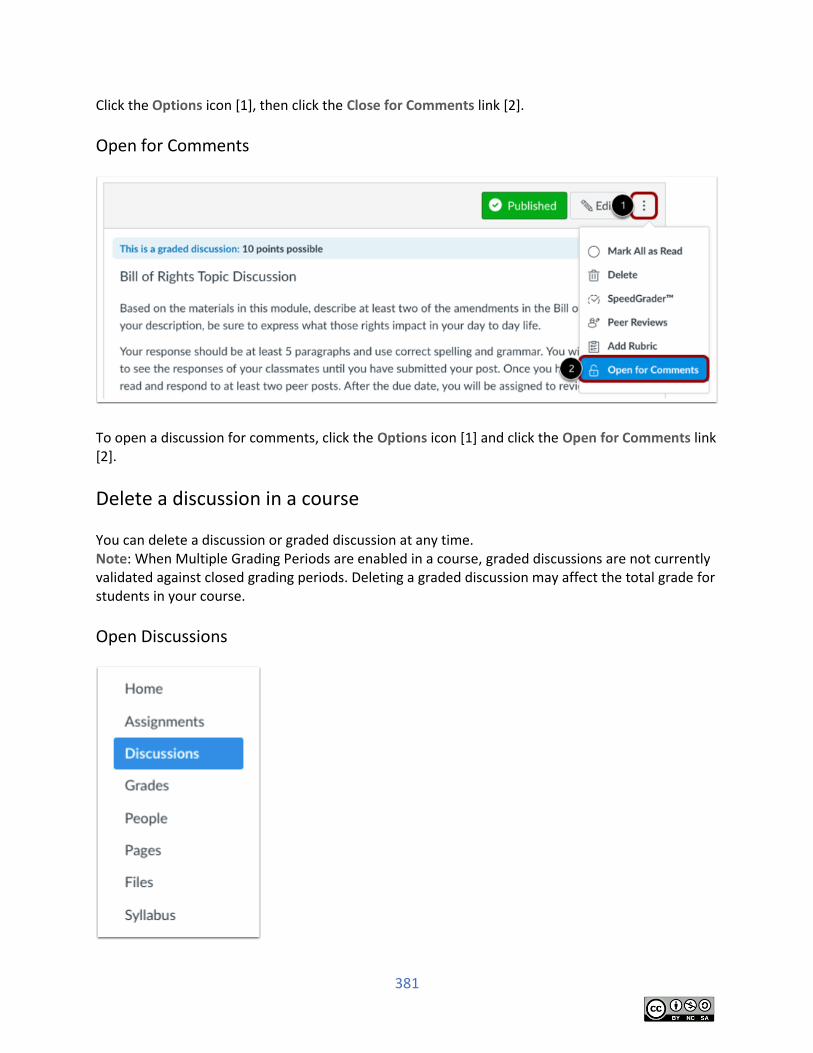
381
Click the Options icon [1], then click the Close for Comments link [2].
Open for Comments
To open a discussion for comments, click the Options icon [1] and click the Open for Comments link [2].
Delete a discussion in a course You can delete a discussion or graded discussion at any time. Note: When Multiple Grading Periods are enabled in a course, graded discussions are not currently validated against closed grading periods. Deleting a graded discussion may affect the total grade for students in your course.
Open Discussions
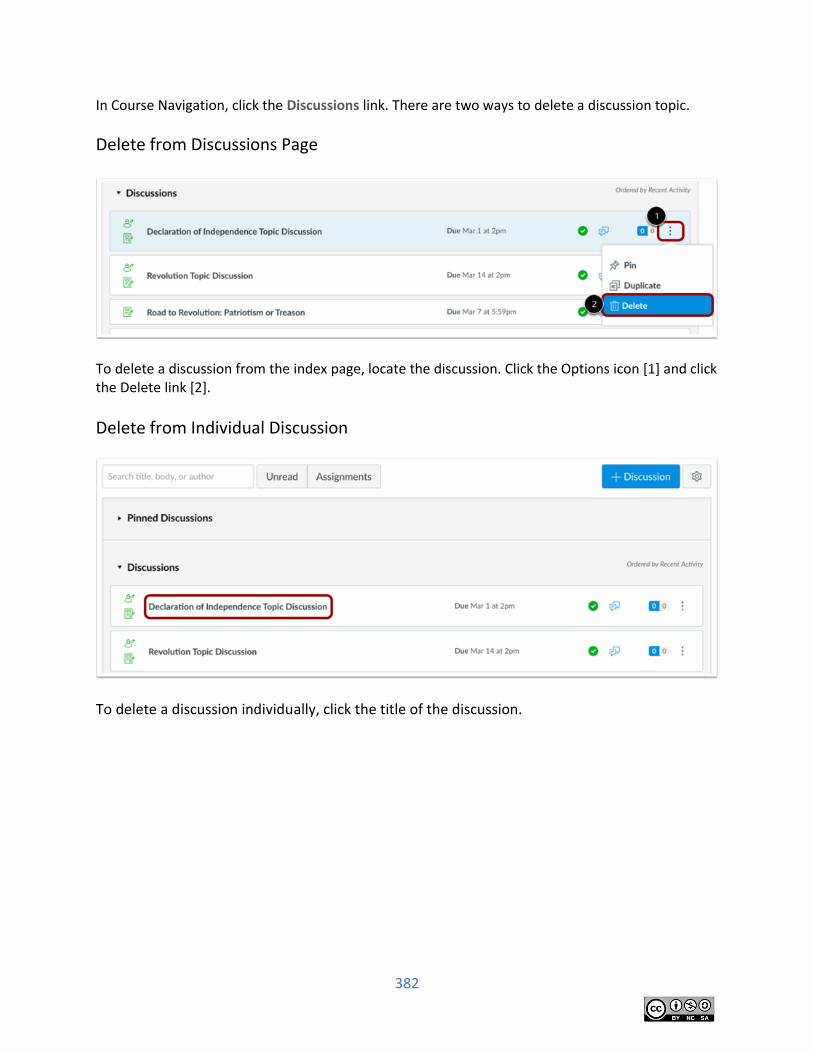
382
In Course Navigation, click the Discussions link. There are two ways to delete a discussion topic.
Delete from Discussions Page
To delete a discussion from the index page, locate the discussion. Click the Options icon [1] and click the Delete link [2].
Delete from Individual Discussion
To delete a discussion individually, click the title of the discussion.
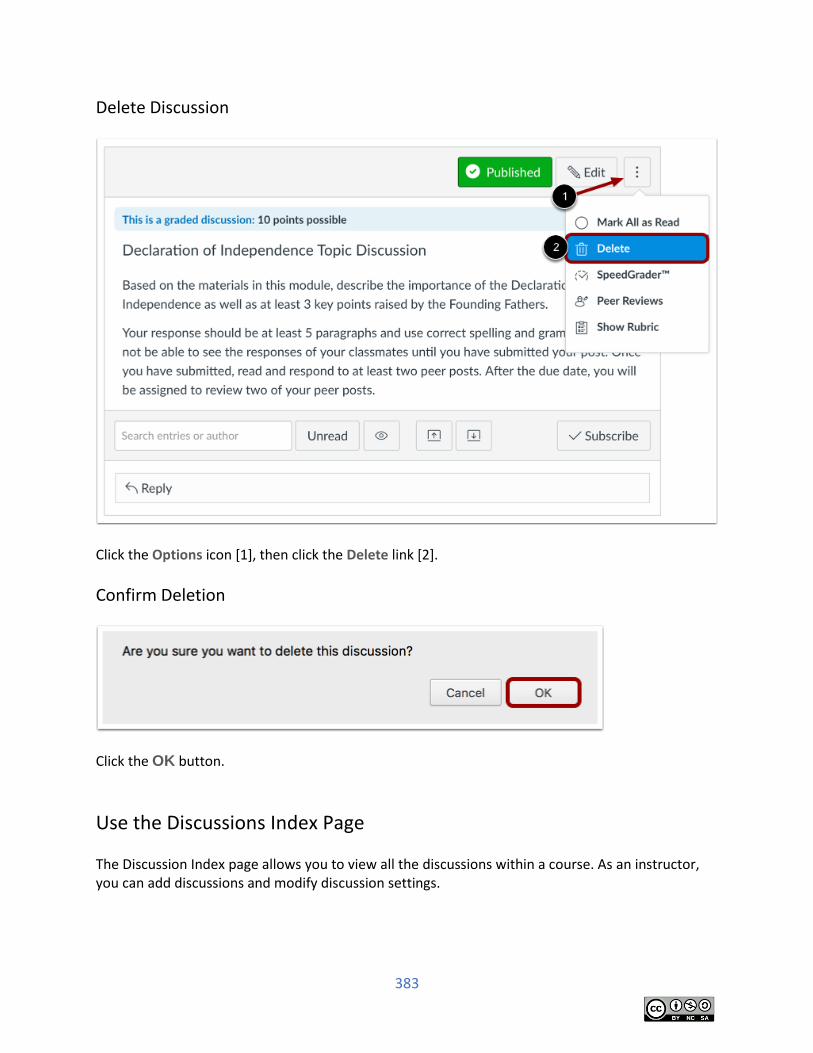
383
Delete Discussion
Click the Options icon [1], then click the Delete link [2].
Confirm Deletion
Click the OK button.
Use the Discussions Index Page The Discussion Index page allows you to view all the discussions within a course. As an instructor, you can add discussions and modify discussion settings.
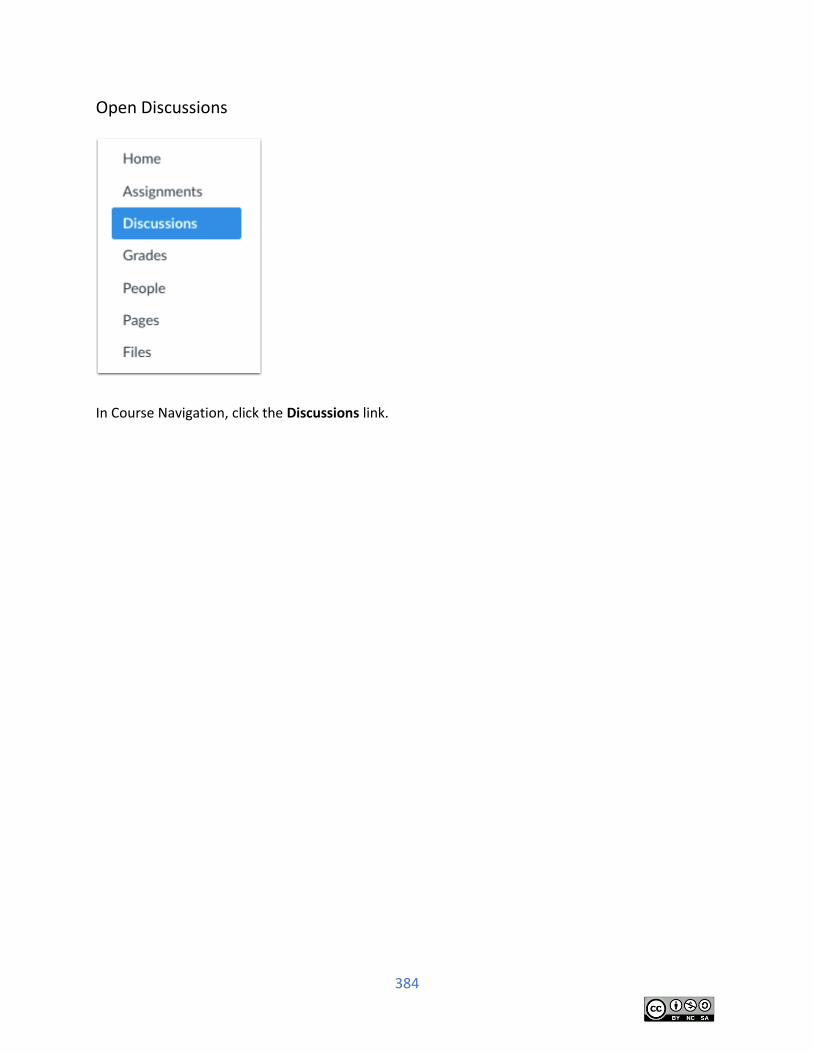
384
Open Discussions
In Course Navigation, click the Discussions link.

385
View Discussions Index Page
The Discussions Index page is designed with global settings at the top of the page [1], followed by the Discussion groups [2]. Individual discussions are nested within each Discussion group [3].
View Discussions Global Settings Global settings include searching for a discussion [1], filtering unread discussions [2], and filtering graded assignments [3]. You can also add a new discussion [4] and edit discussion settings [5].
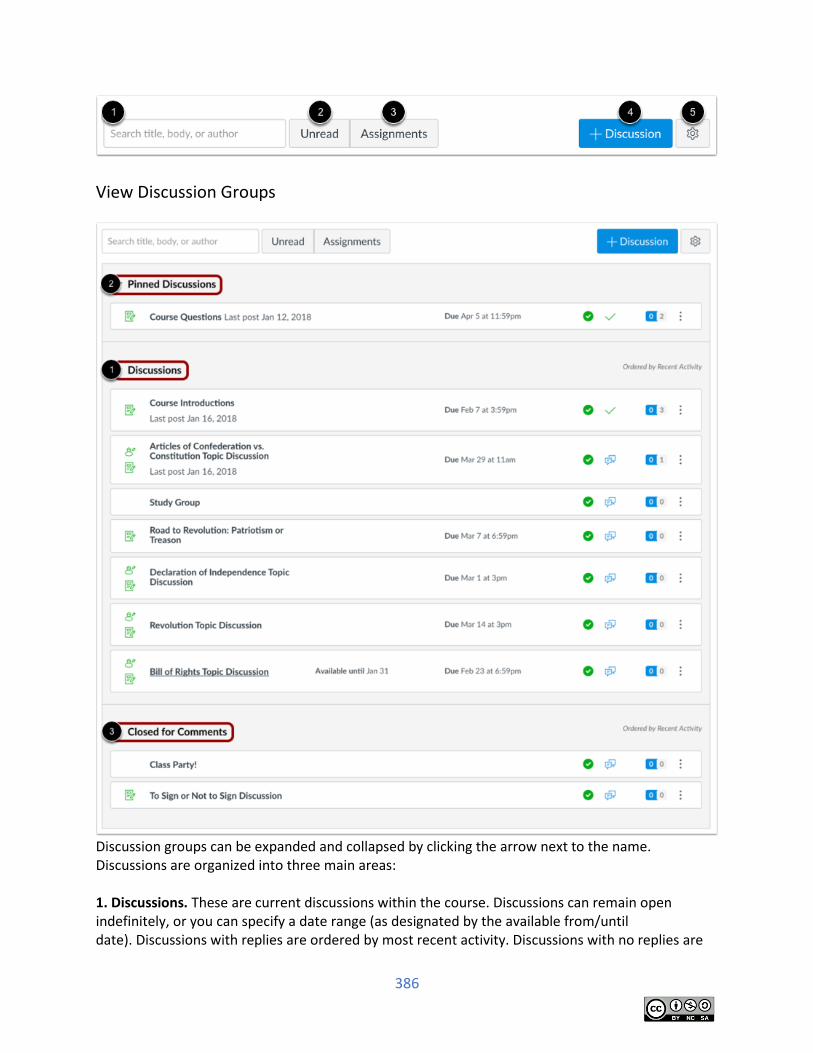
386
View Discussion Groups
Discussion groups can be expanded and collapsed by clicking the arrow next to the name. Discussions are organized into three main areas: 1. Discussions. These are current discussions within the course. Discussions can remain open indefinitely, or you can specify a date range (as designated by the available from/until date). Discussions with replies are ordered by most recent activity. Discussions with no replies are
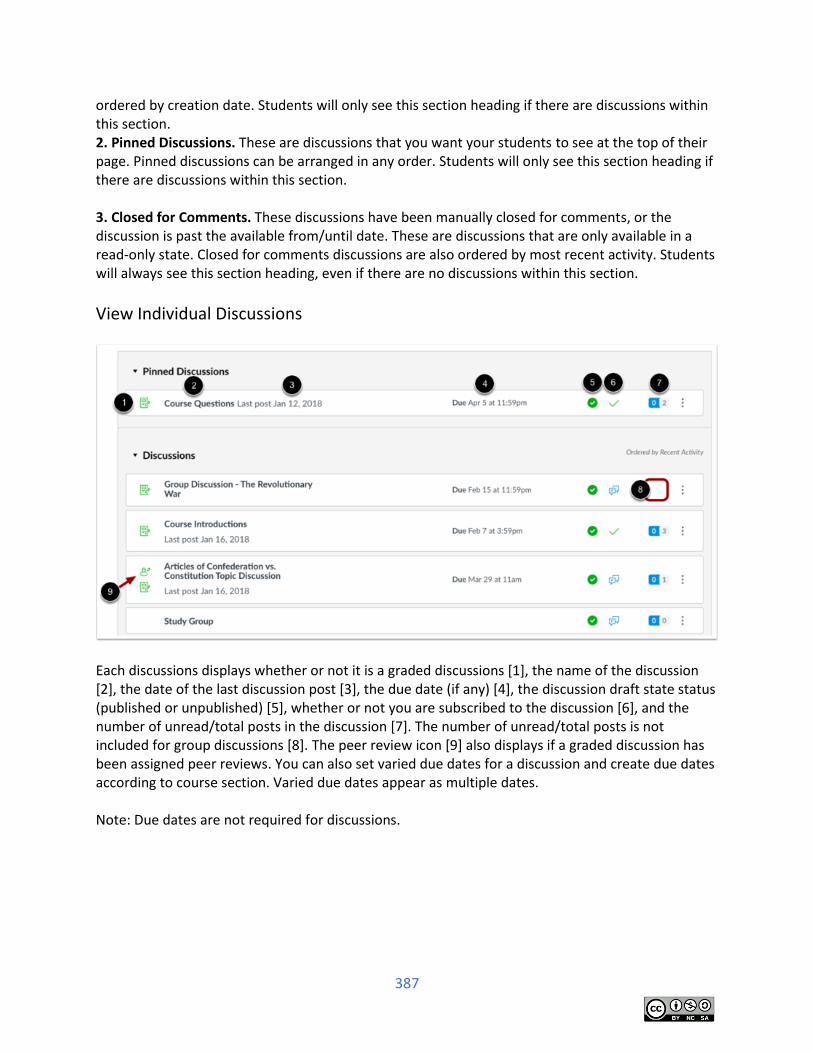
387
ordered by creation date. Students will only see this section heading if there are discussions within this section. 2. Pinned Discussions. These are discussions that you want your students to see at the top of their page. Pinned discussions can be arranged in any order. Students will only see this section heading if there are discussions within this section. 3. Closed for Comments. These discussions have been manually closed for comments, or the discussion is past the available from/until date. These are discussions that are only available in a read-only state. Closed for comments discussions are also ordered by most recent activity. Students will always see this section heading, even if there are no discussions within this section.
View Individual Discussions
Each discussions displays whether or not it is a graded discussions [1], the name of the discussion [2], the date of the last discussion post [3], the due date (if any) [4], the discussion draft state status (published or unpublished) [5], whether or not you are subscribed to the discussion [6], and the number of unread/total posts in the discussion [7]. The number of unread/total posts is not included for group discussions [8]. The peer review icon [9] also displays if a graded discussion has been assigned peer reviews. You can also set varied due dates for a discussion and create due dates according to course section. Varied due dates appear as multiple dates. Note: Due dates are not required for discussions.
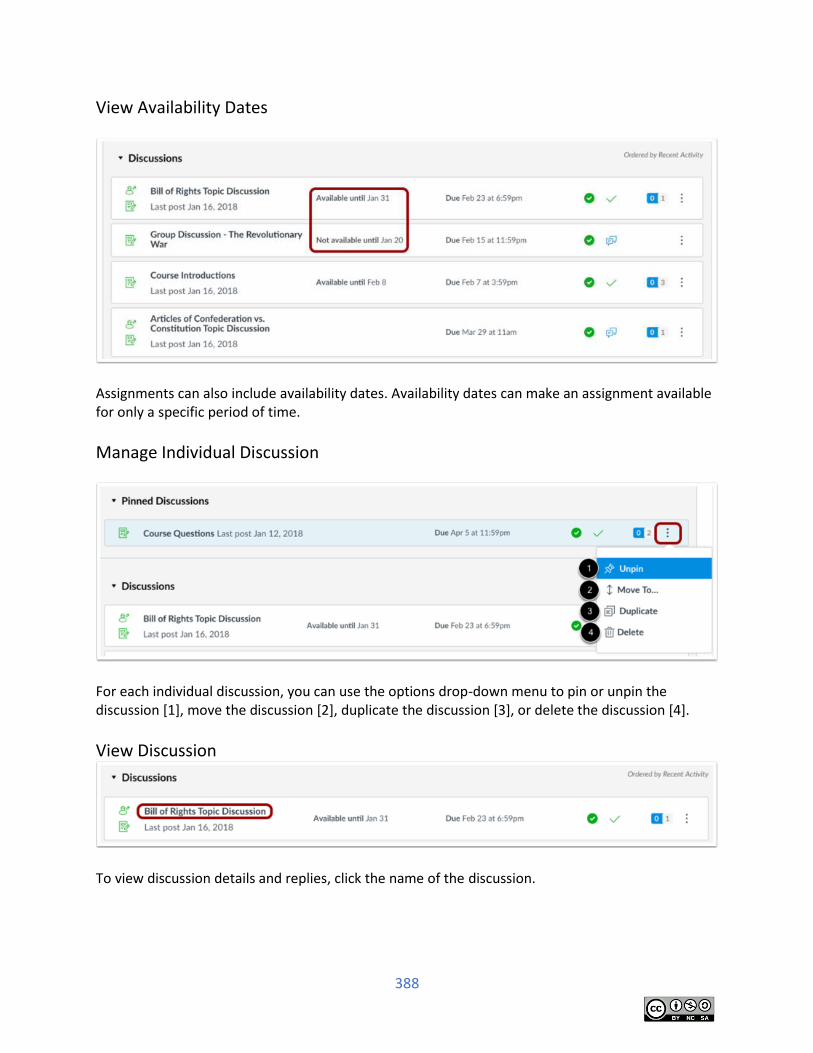
388
View Availability Dates
Assignments can also include availability dates. Availability dates can make an assignment available for only a specific period of time.
Manage Individual Discussion
For each individual discussion, you can use the options drop-down menu to pin or unpin the discussion [1], move the discussion [2], duplicate the discussion [3], or delete the discussion [4].
View Discussion
To view discussion details and replies, click the name of the discussion.

389
Discussion: Try It
Create a Discussion
Create a discussion forum for students to introduce themselves to their classmates. 1. Title your discussion: Student Introductions
2. In the Rich content editor, provide instructions for students. (Use the example
provided in the image below.)
3. From the options menu, allow threaded replies and make the discussion Graded
4. Make the discussion worth 20 possible points
5. Save and Publish your discussion
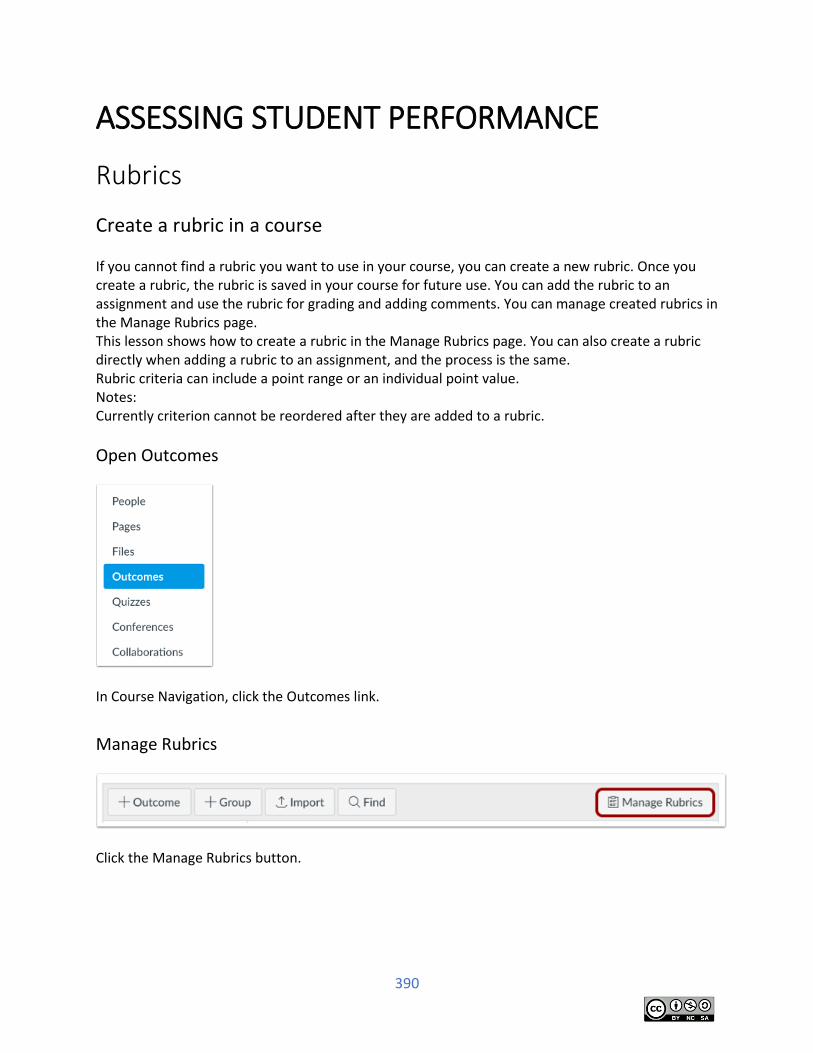
390
ASSESSING STUDENT PERFORMANCE
Rubrics
Create a rubric in a course If you cannot find a rubric you want to use in your course, you can create a new rubric. Once you create a rubric, the rubric is saved in your course for future use. You can add the rubric to an assignment and use the rubric for grading and adding comments. You can manage created rubrics in the Manage Rubrics page. This lesson shows how to create a rubric in the Manage Rubrics page. You can also create a rubric directly when adding a rubric to an assignment, and the process is the same. Rubric criteria can include a point range or an individual point value. Notes: Currently criterion cannot be reordered after they are added to a rubric.
Open Outcomes
In Course Navigation, click the Outcomes link.
Manage Rubrics
Click the Manage Rubrics button.
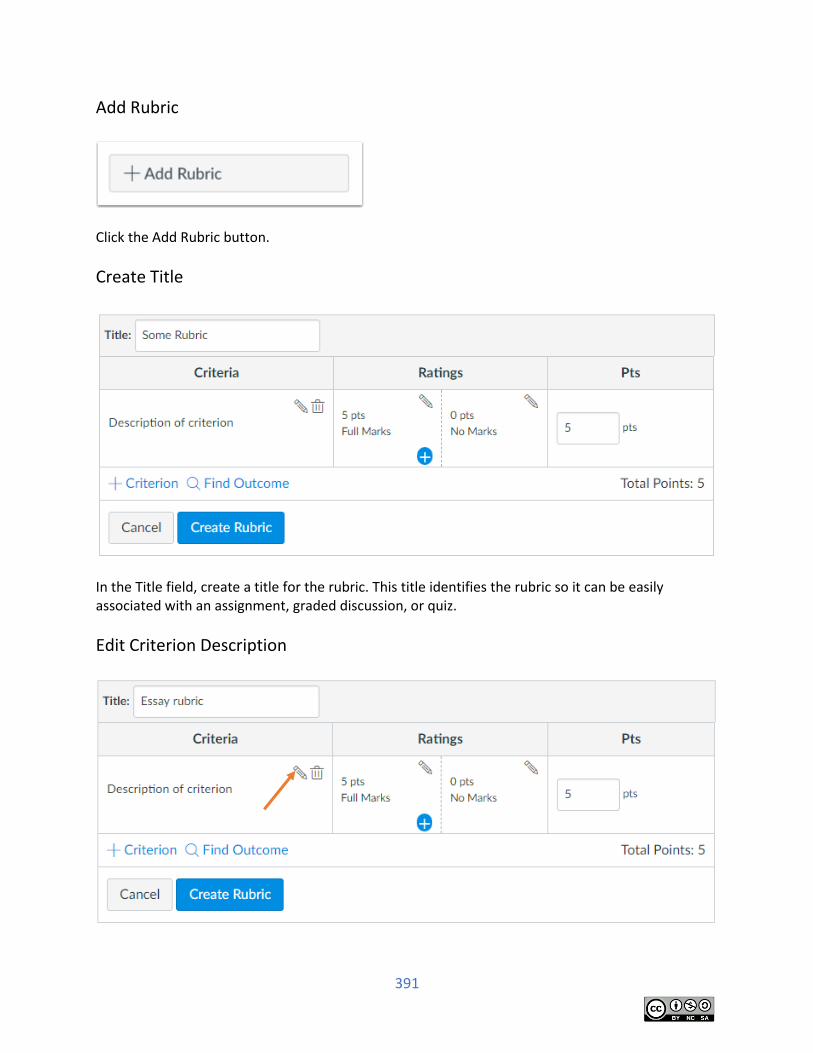
391
Add Rubric
Click the Add Rubric button.
Create Title
In the Title field, create a title for the rubric. This title identifies the rubric so it can be easily associated with an assignment, graded discussion, or quiz.
Edit Criterion Description
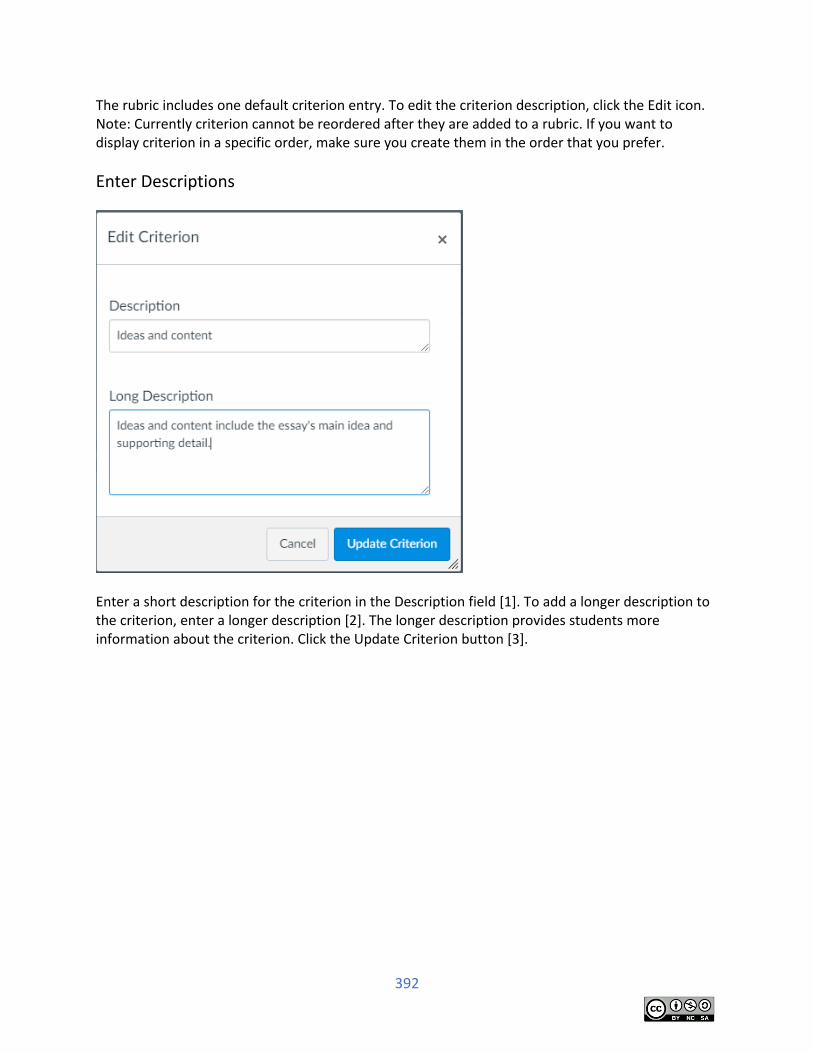
392
The rubric includes one default criterion entry. To edit the criterion description, click the Edit icon. Note: Currently criterion cannot be reordered after they are added to a rubric. If you want to display criterion in a specific order, make sure you create them in the order that you prefer.
Enter Descriptions
Enter a short description for the criterion in the Description field [1]. To add a longer description to the criterion, enter a longer description [2]. The longer description provides students more information about the criterion. Click the Update Criterion button [3].
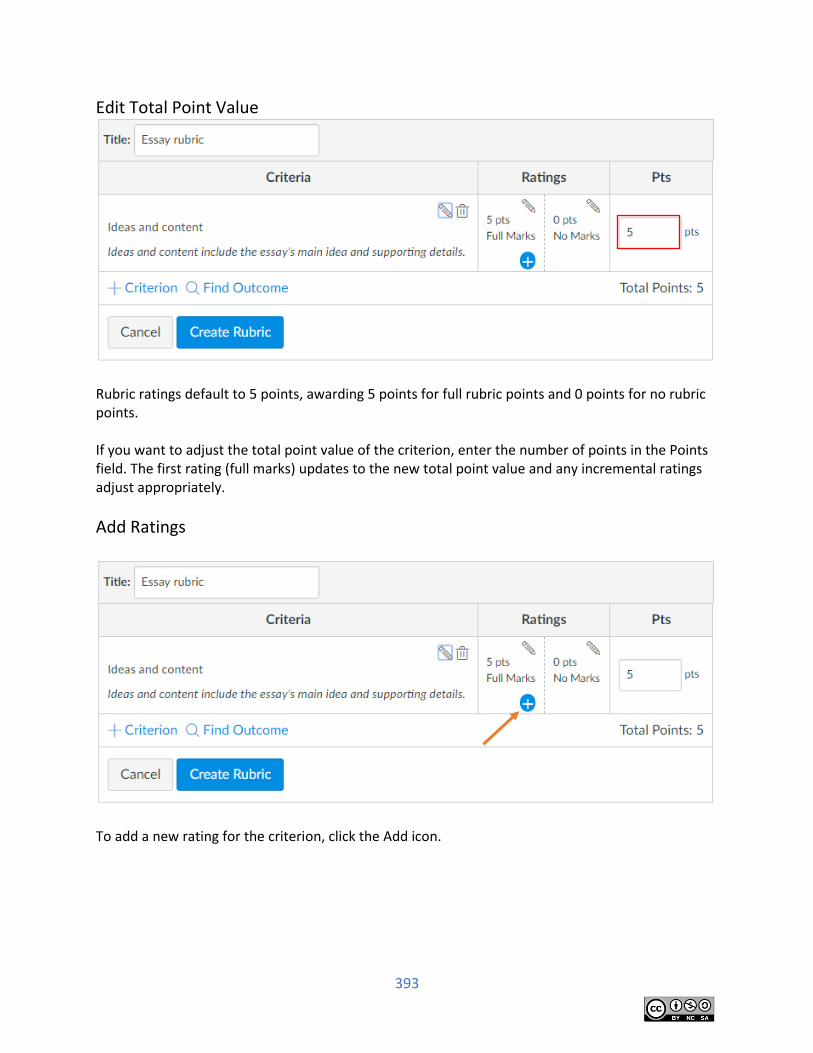
393
Edit Total Point Value
Rubric ratings default to 5 points, awarding 5 points for full rubric points and 0 points for no rubric points. If you want to adjust the total point value of the criterion, enter the number of points in the Points field. The first rating (full marks) updates to the new total point value and any incremental ratings adjust appropriately.
Add Ratings
To add a new rating for the criterion, click the Add icon.
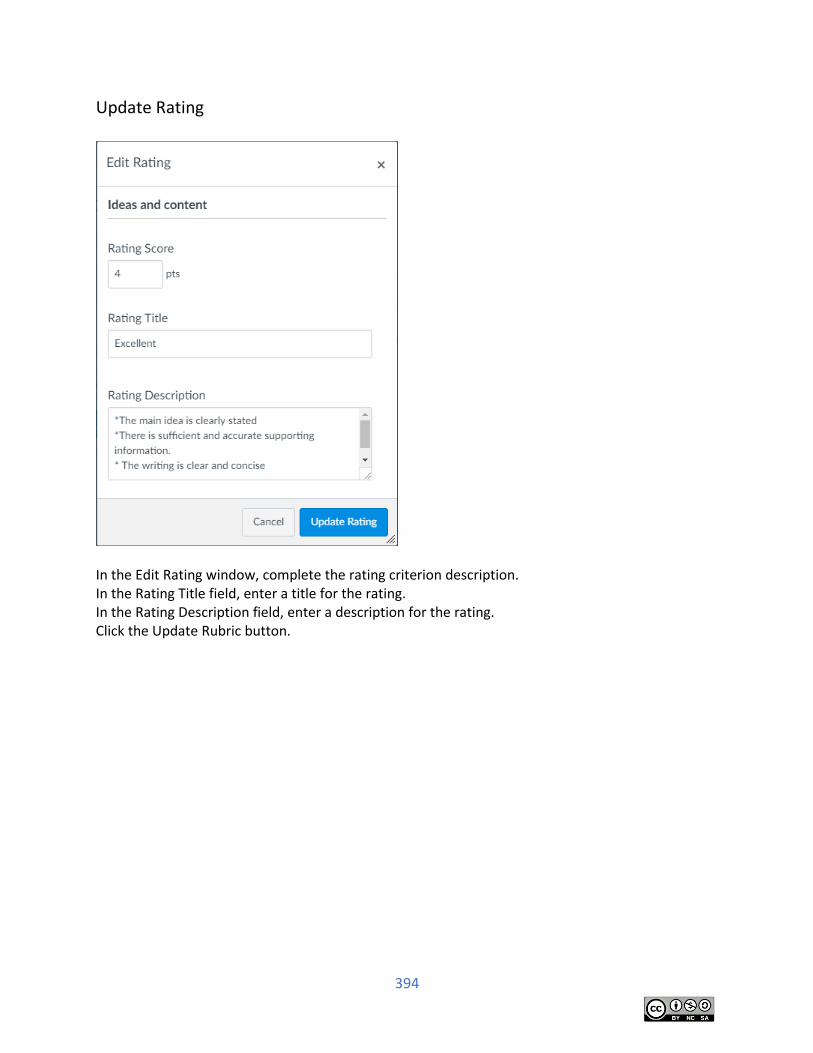
394
Update Rating
In the Edit Rating window, complete the rating criterion description. In the Rating Title field, enter a title for the rating. In the Rating Description field, enter a description for the rating. Click the Update Rubric button.
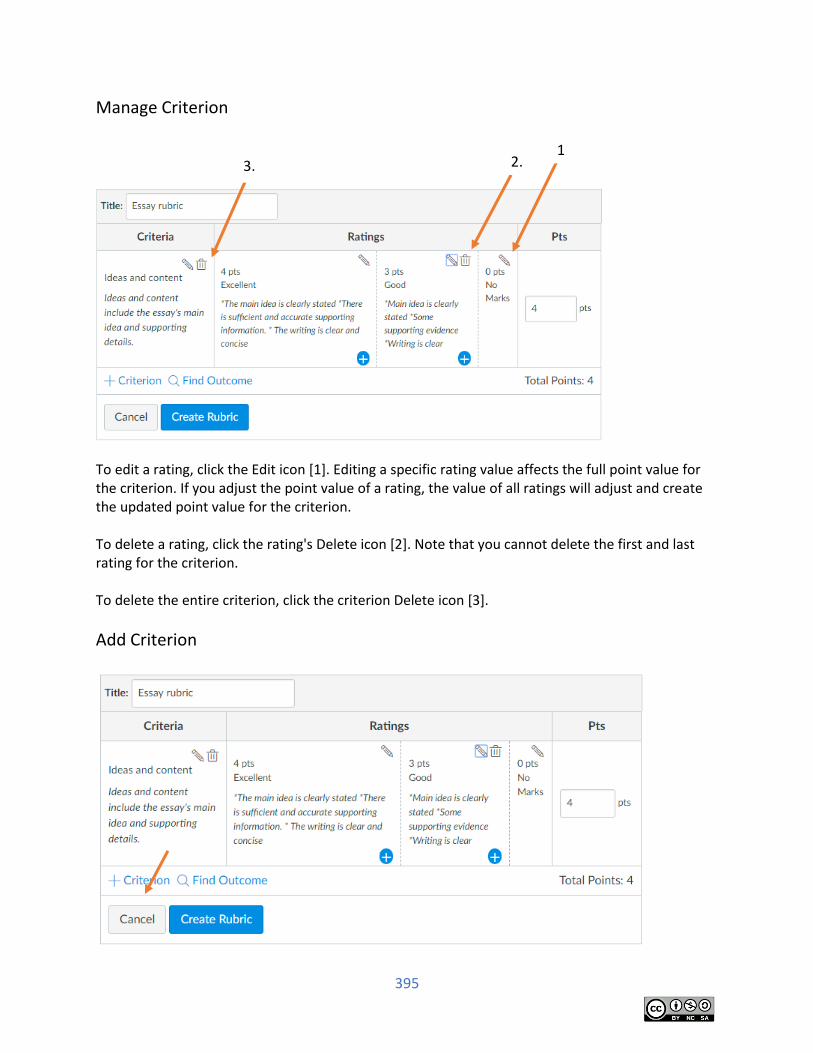
395
Manage Criterion
To edit a rating, click the Edit icon [1]. Editing a specific rating value affects the full point value for the criterion. If you adjust the point value of a rating, the value of all ratings will adjust and create the updated point value for the criterion. To delete a rating, click the rating's Delete icon [2]. Note that you cannot delete the first and last rating for the criterion. To delete the entire criterion, click the criterion Delete icon [3].
Add Criterion
1. 2. 3.
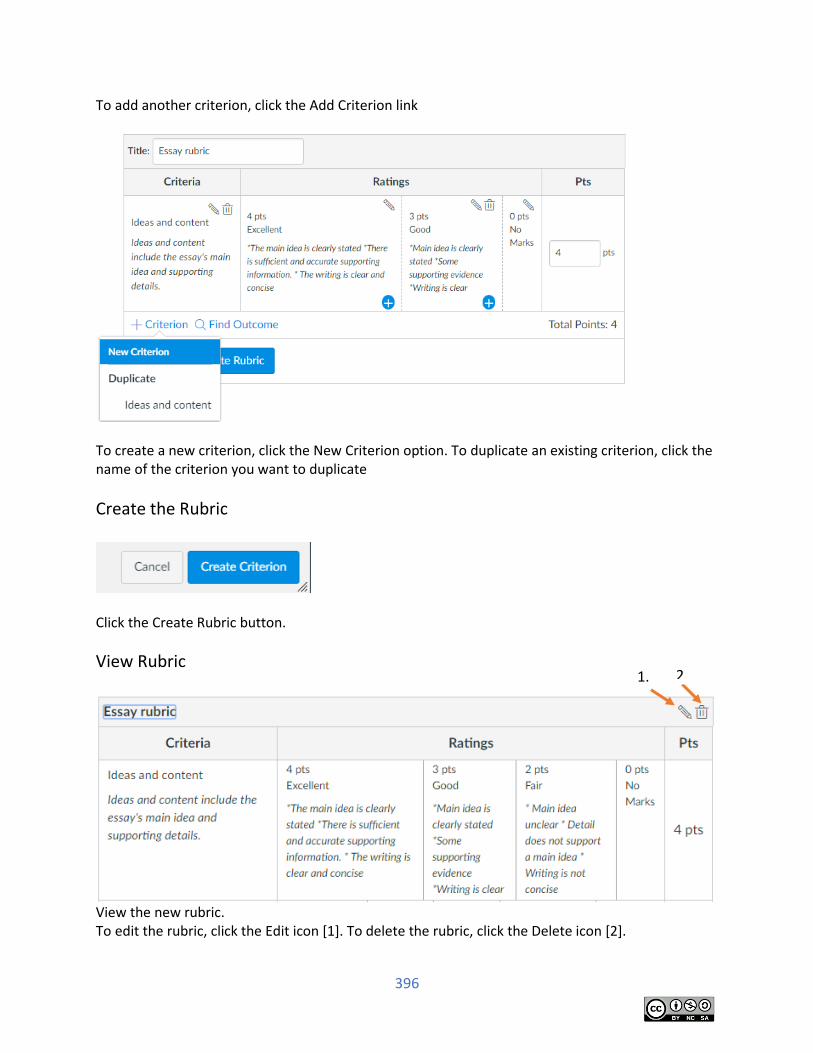
396
To add another criterion, click the Add Criterion link
To create a new criterion, click the New Criterion option. To duplicate an existing criterion, click the name of the criterion you want to duplicate
Create the Rubric
Click the Create Rubric button.
View Rubric
View the new rubric. To edit the rubric, click the Edit icon [1]. To delete the rubric, click the Delete icon [2].
1. 2.
397
Rubric: Try it
Create a rubric for a course
1. Create a rubric for a presentation
2. Title the rubric, “Discussion rubric.”
3. Set up one criterion named “Initial response.” Write a longer description of the
criterion, such as, “The initial response needs to match the prompt, be clear and
concise, and show other evidence of quality writing.”
4. Give the rubric a total point value of 100 points.
5. Add and update rankings so that they read as follows
100 points – Excellent
o In the rating description, add the following, “Response matches the prompt.
Response is concise. Shows evidence of quality writing.”
75 points – Good
o In the rating description, add the following, “Response matches the prompt.
Response is concise. Response is generally well-written.”
50 points – Fair
o In the rating description, add the following, “Response does not match the
prompt. Response is well-written”
25 points – Poor
o In the rating description, add the following, “Response does not match the
prompt. Response is poorly written”
0 points– No credit
o In the rating description, add the following, “Response was not provided or
does not address the initial prompt.”
6. Add a new criterion, called “Mechanics” with the description “Mechanics deals with
issues such as spelling, grammar, and correct citation format.
7. Create the rubric.
8. View the rubric.
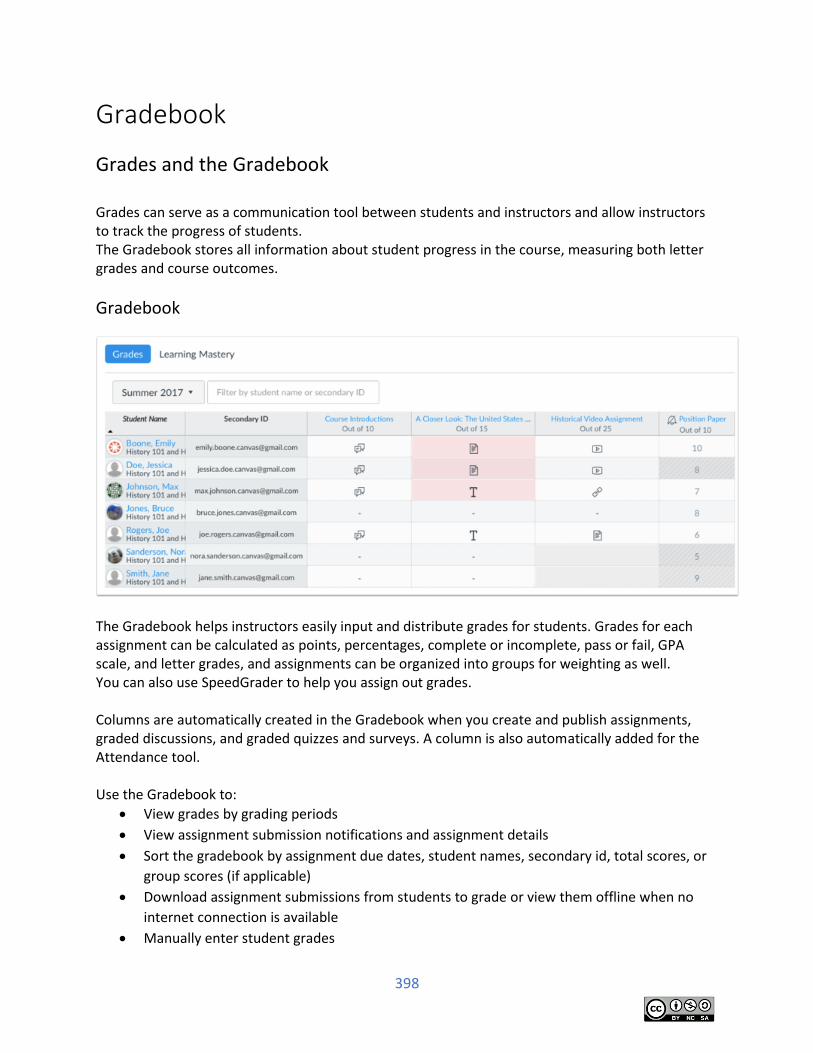
398
Gradebook
Grades and the Gradebook Grades can serve as a communication tool between students and instructors and allow instructors to track the progress of students. The Gradebook stores all information about student progress in the course, measuring both letter grades and course outcomes.
Gradebook
The Gradebook helps instructors easily input and distribute grades for students. Grades for each assignment can be calculated as points, percentages, complete or incomplete, pass or fail, GPA scale, and letter grades, and assignments can be organized into groups for weighting as well. You can also use SpeedGrader to help you assign out grades. Columns are automatically created in the Gradebook when you create and publish assignments, graded discussions, and graded quizzes and surveys. A column is also automatically added for the Attendance tool. Use the Gradebook to:
View grades by grading periods
View assignment submission notifications and assignment details
Sort the gradebook by assignment due dates, student names, secondary id, total scores, or
group scores (if applicable)
Download assignment submissions from students to grade or view them offline when no
internet connection is available
Manually enter student grades
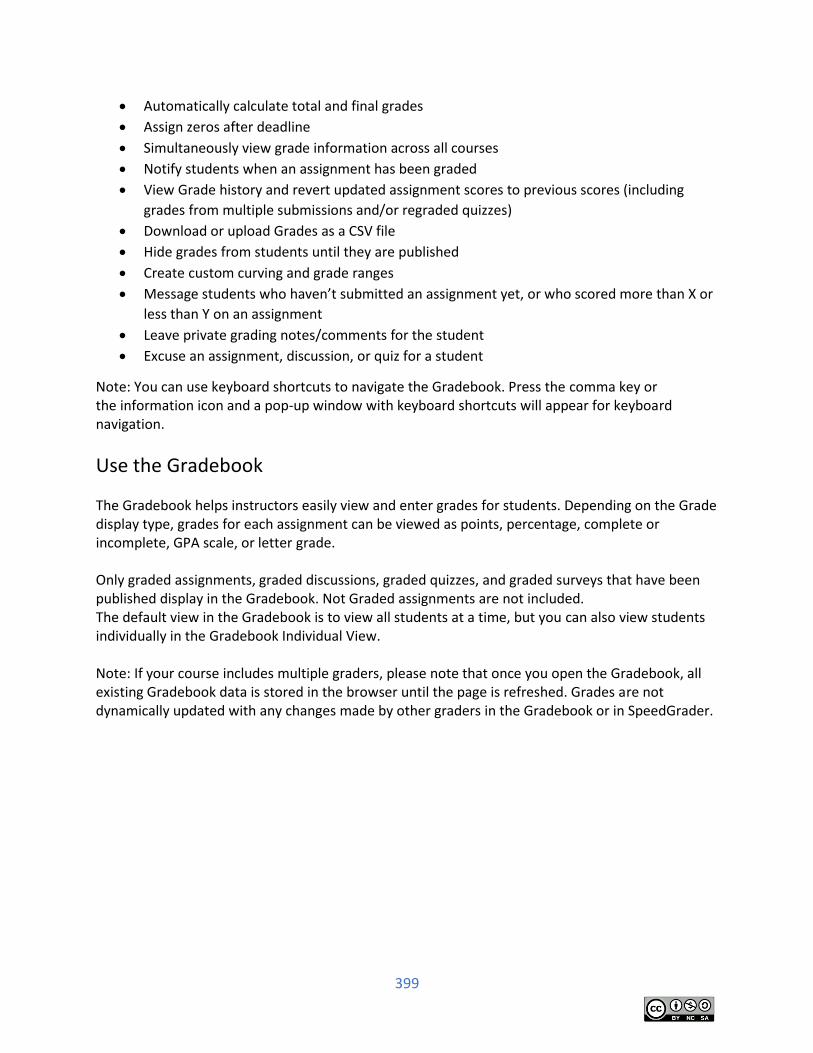
399
Automatically calculate total and final grades
Assign zeros after deadline
Simultaneously view grade information across all courses
Notify students when an assignment has been graded
View Grade history and revert updated assignment scores to previous scores (including
grades from multiple submissions and/or regraded quizzes)
Download or upload Grades as a CSV file
Hide grades from students until they are published
Create custom curving and grade ranges
Message students who haven’t submitted an assignment yet, or who scored more than X or
less than Y on an assignment
Leave private grading notes/comments for the student
Excuse an assignment, discussion, or quiz for a student
Note: You can use keyboard shortcuts to navigate the Gradebook. Press the comma key or the information icon and a pop-up window with keyboard shortcuts will appear for keyboard navigation.
Use the Gradebook
The Gradebook helps instructors easily view and enter grades for students. Depending on the Grade display type, grades for each assignment can be viewed as points, percentage, complete or incomplete, GPA scale, or letter grade. Only graded assignments, graded discussions, graded quizzes, and graded surveys that have been published display in the Gradebook. Not Graded assignments are not included. The default view in the Gradebook is to view all students at a time, but you can also view students individually in the Gradebook Individual View. Note: If your course includes multiple graders, please note that once you open the Gradebook, all existing Gradebook data is stored in the browser until the page is refreshed. Grades are not dynamically updated with any changes made by other graders in the Gradebook or in SpeedGrader.
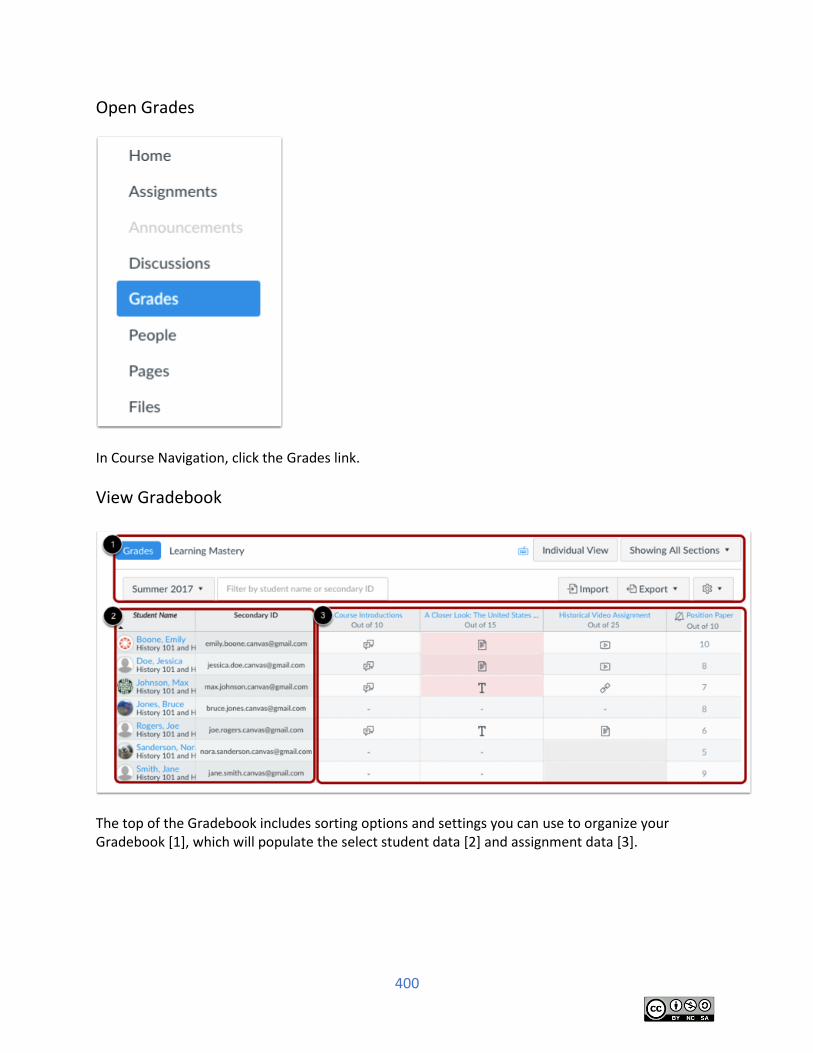
400
Open Grades
In Course Navigation, click the Grades link.
View Gradebook
The top of the Gradebook includes sorting options and settings you can use to organize your Gradebook [1], which will populate the select student data [2] and assignment data [3].

401
Switch to Individual View
The Gradebook has two views. The Default Gradebook allows you to see all students and assignments at the same time. Individual View allows instructors to assess one student and one assignment at a time and is fully accessible for screen readers. Both views retain the same Gradebook settings. You can switch Gradebook views at any time.
Filter Students
By default, your course shows all active students. If your course includes more than one section, you can filter your Gradebook by section [1]. You can also search for a student by name or secondary ID [2].
View Grading Periods
When Multiple Grading Periods are enabled in a course, you can sort the Gradebook by grading period by clicking the Grading Period drop-down menu.
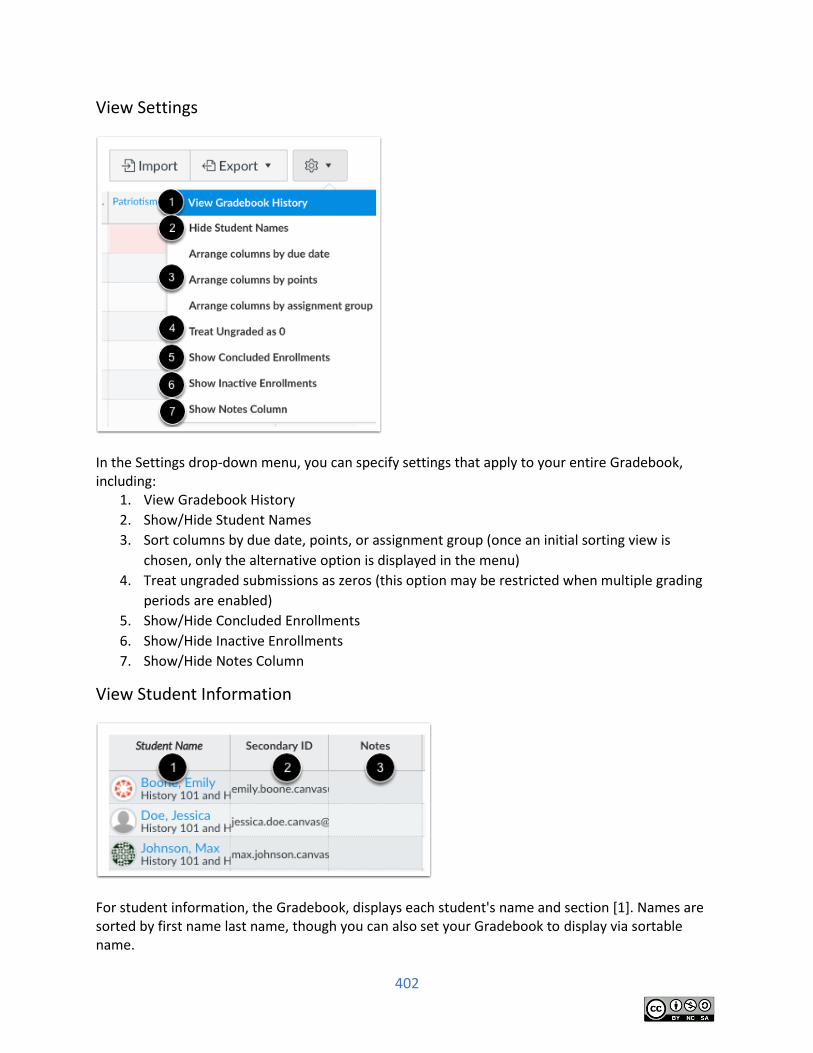
402
View Settings
In the Settings drop-down menu, you can specify settings that apply to your entire Gradebook, including:
1. View Gradebook History
2. Show/Hide Student Names
3. Sort columns by due date, points, or assignment group (once an initial sorting view is
chosen, only the alternative option is displayed in the menu)
4. Treat ungraded submissions as zeros (this option may be restricted when multiple grading
periods are enabled)
5. Show/Hide Concluded Enrollments
6. Show/Hide Inactive Enrollments
7. Show/Hide Notes Column
View Student Information
For student information, the Gradebook, displays each student's name and section [1]. Names are sorted by first name last name, though you can also set your Gradebook to display via sortable name.
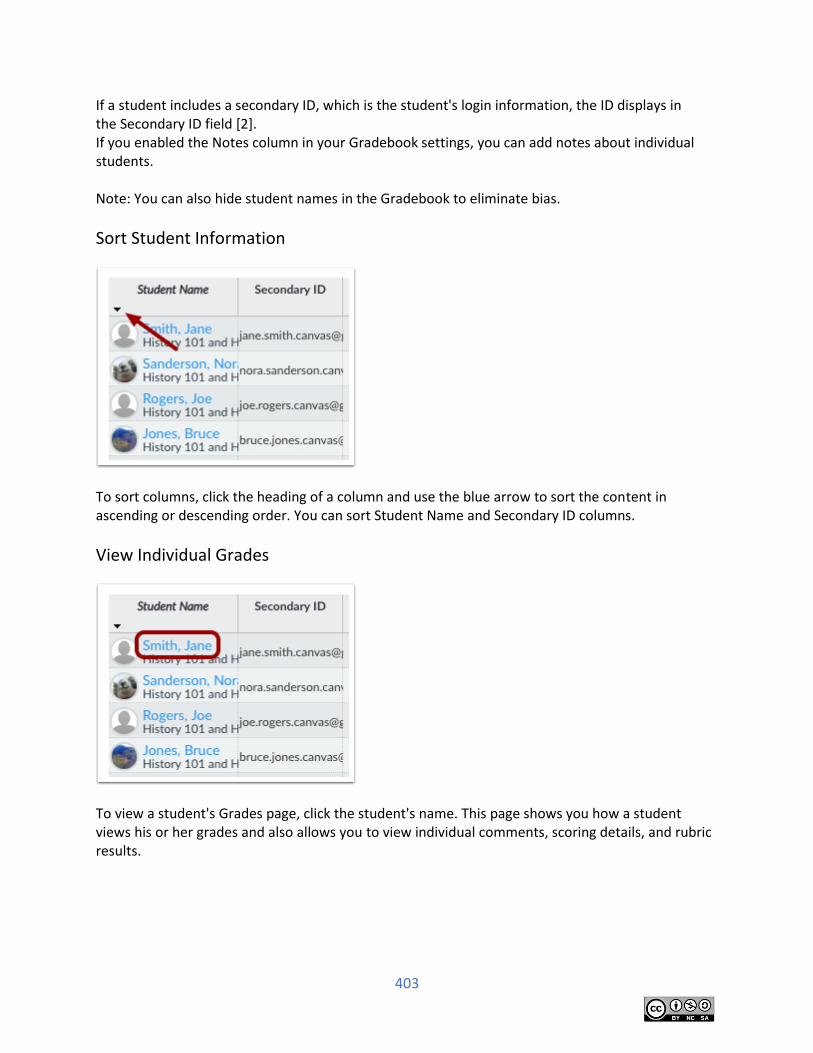
403
If a student includes a secondary ID, which is the student's login information, the ID displays in the Secondary ID field [2]. If you enabled the Notes column in your Gradebook settings, you can add notes about individual students. Note: You can also hide student names in the Gradebook to eliminate bias.
Sort Student Information
To sort columns, click the heading of a column and use the blue arrow to sort the content in ascending or descending order. You can sort Student Name and Secondary ID columns.
View Individual Grades
To view a student's Grades page, click the student's name. This page shows you how a student views his or her grades and also allows you to view individual comments, scoring details, and rubric results.
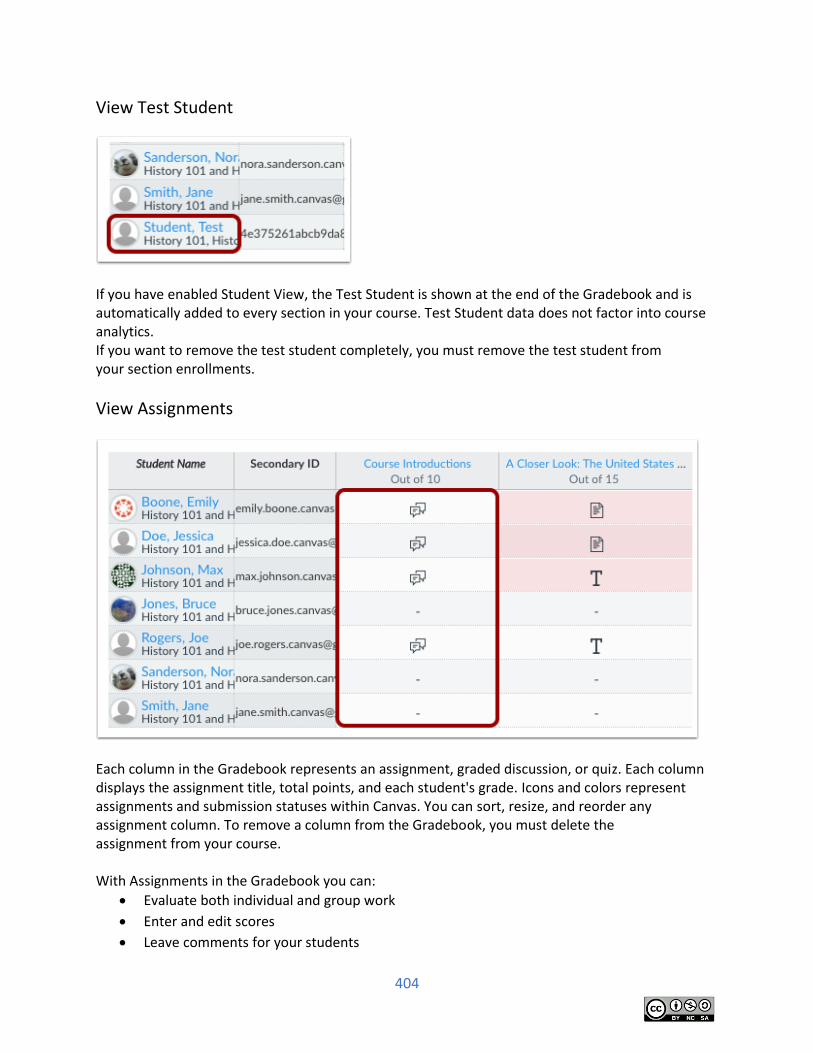
404
View Test Student
If you have enabled Student View, the Test Student is shown at the end of the Gradebook and is automatically added to every section in your course. Test Student data does not factor into course analytics. If you want to remove the test student completely, you must remove the test student from your section enrollments.
View Assignments
Each column in the Gradebook represents an assignment, graded discussion, or quiz. Each column displays the assignment title, total points, and each student's grade. Icons and colors represent assignments and submission statuses within Canvas. You can sort, resize, and reorder any assignment column. To remove a column from the Gradebook, you must delete the assignment from your course. With Assignments in the Gradebook you can:
Evaluate both individual and group work
Enter and edit scores
Leave comments for your students
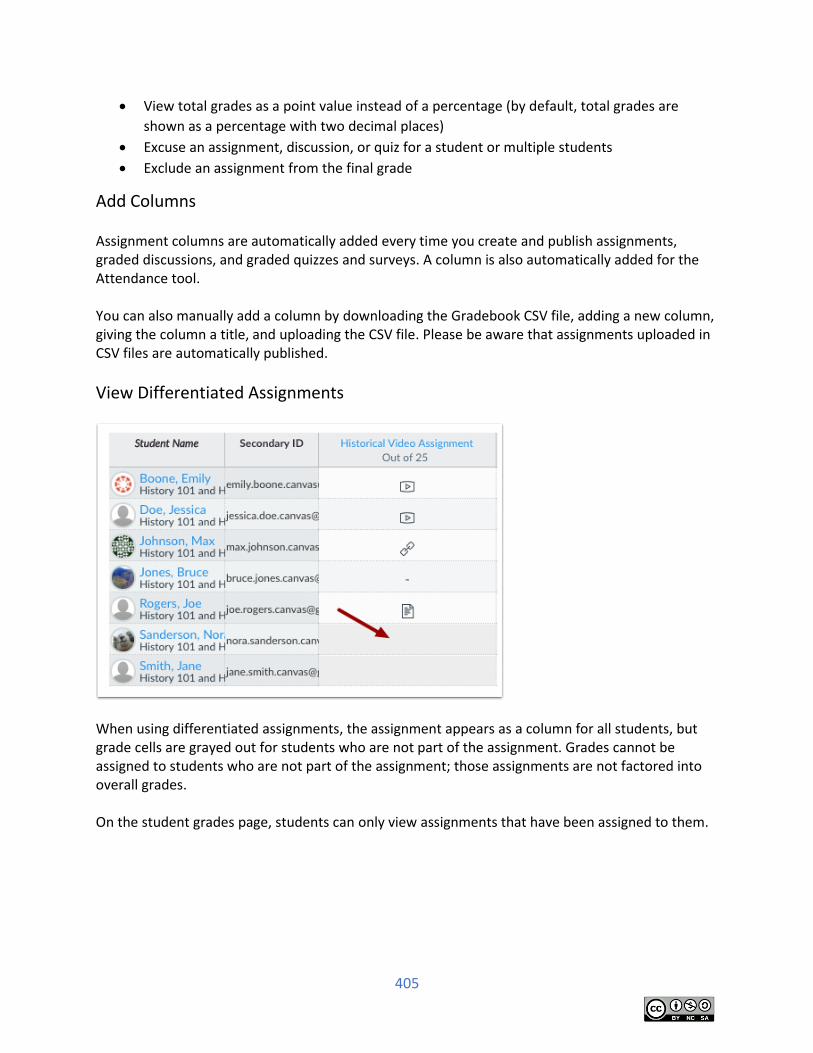
405
View total grades as a point value instead of a percentage (by default, total grades are
shown as a percentage with two decimal places)
Excuse an assignment, discussion, or quiz for a student or multiple students
Exclude an assignment from the final grade
Add Columns Assignment columns are automatically added every time you create and publish assignments, graded discussions, and graded quizzes and surveys. A column is also automatically added for the Attendance tool. You can also manually add a column by downloading the Gradebook CSV file, adding a new column, giving the column a title, and uploading the CSV file. Please be aware that assignments uploaded in CSV files are automatically published.
View Differentiated Assignments
When using differentiated assignments, the assignment appears as a column for all students, but grade cells are grayed out for students who are not part of the assignment. Grades cannot be assigned to students who are not part of the assignment; those assignments are not factored into overall grades. On the student grades page, students can only view assignments that have been assigned to them.
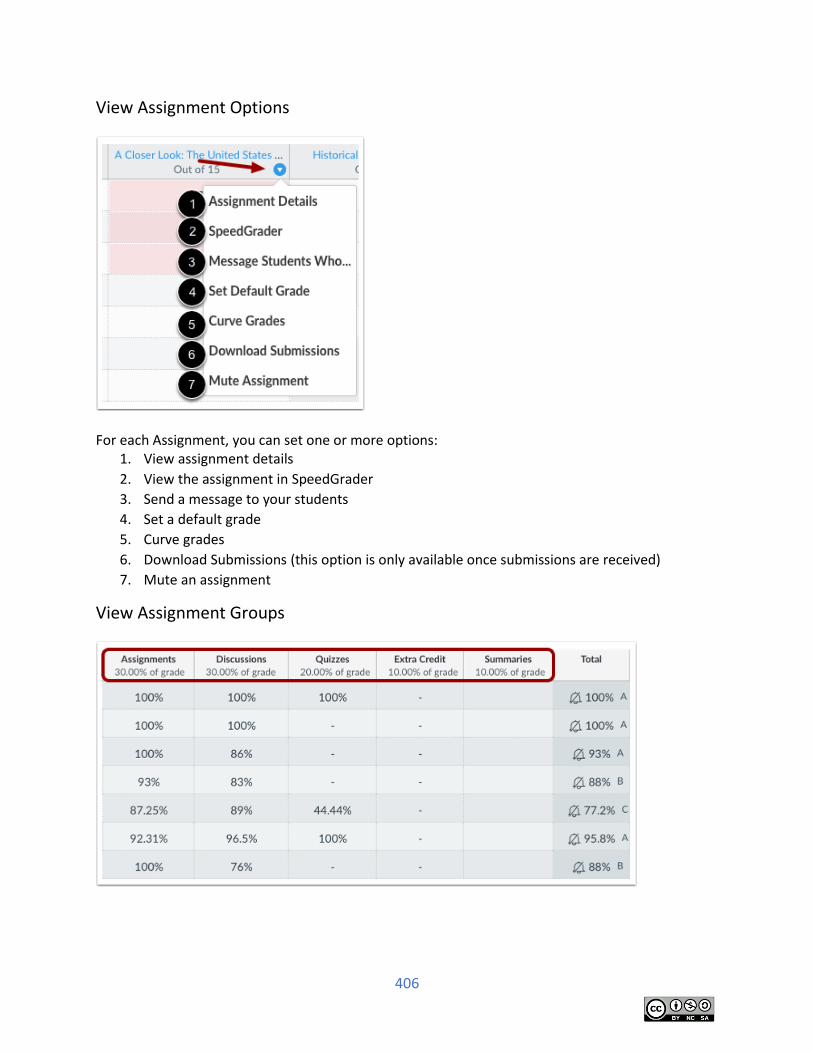
406
View Assignment Options
For each Assignment, you can set one or more options:
1. View assignment details
2. View the assignment in SpeedGrader
3. Send a message to your students
4. Set a default grade
5. Curve grades
6. Download Submissions (this option is only available once submissions are received)
7. Mute an assignment
View Assignment Groups
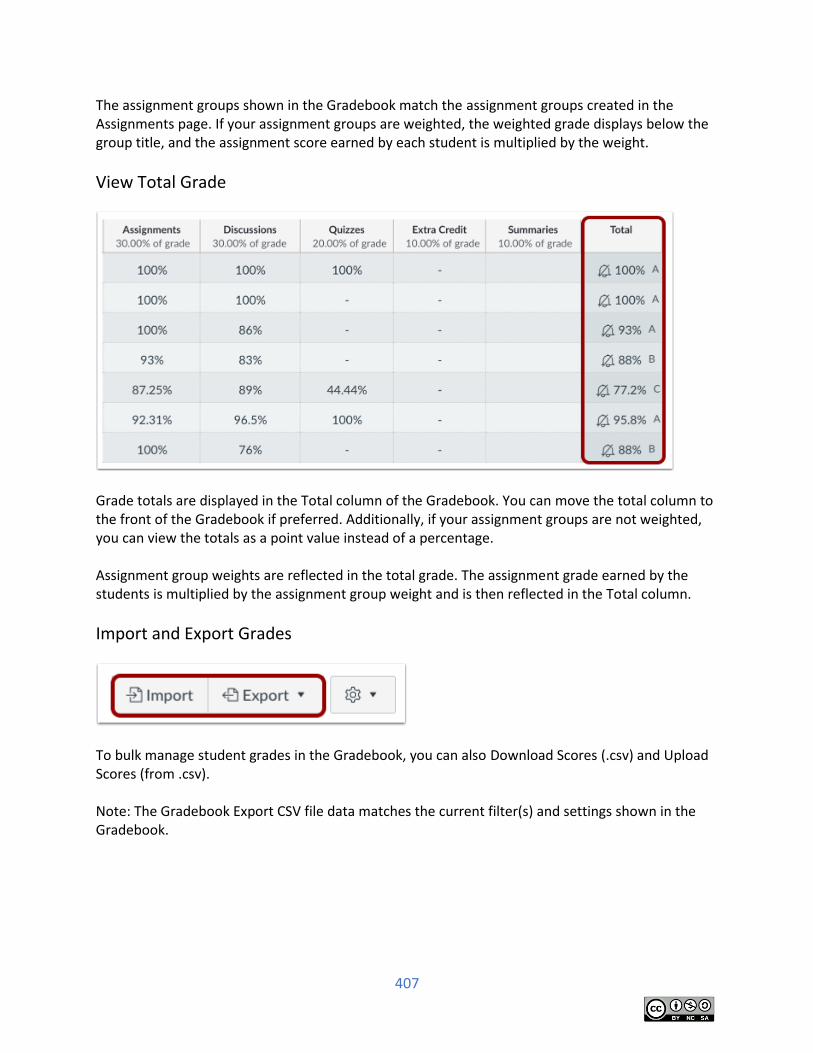
407
The assignment groups shown in the Gradebook match the assignment groups created in the Assignments page. If your assignment groups are weighted, the weighted grade displays below the group title, and the assignment score earned by each student is multiplied by the weight.
View Total Grade
Grade totals are displayed in the Total column of the Gradebook. You can move the total column to the front of the Gradebook if preferred. Additionally, if your assignment groups are not weighted, you can view the totals as a point value instead of a percentage. Assignment group weights are reflected in the total grade. The assignment grade earned by the students is multiplied by the assignment group weight and is then reflected in the Total column.
Import and Export Grades
To bulk manage student grades in the Gradebook, you can also Download Scores (.csv) and Upload Scores (from .csv). Note: The Gradebook Export CSV file data matches the current filter(s) and settings shown in the Gradebook.
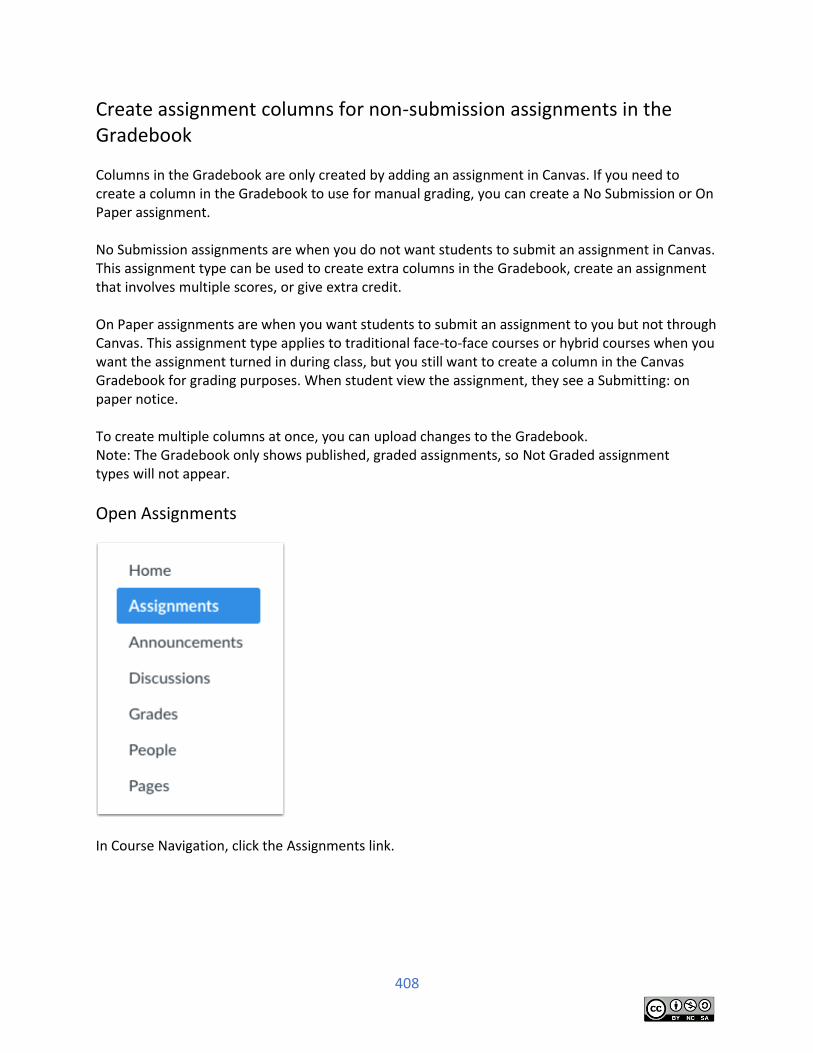
408
Create assignment columns for non-submission assignments in the Gradebook
Columns in the Gradebook are only created by adding an assignment in Canvas. If you need to create a column in the Gradebook to use for manual grading, you can create a No Submission or On Paper assignment. No Submission assignments are when you do not want students to submit an assignment in Canvas. This assignment type can be used to create extra columns in the Gradebook, create an assignment that involves multiple scores, or give extra credit. On Paper assignments are when you want students to submit an assignment to you but not through Canvas. This assignment type applies to traditional face-to-face courses or hybrid courses when you want the assignment turned in during class, but you still want to create a column in the Canvas Gradebook for grading purposes. When student view the assignment, they see a Submitting: on paper notice. To create multiple columns at once, you can upload changes to the Gradebook. Note: The Gradebook only shows published, graded assignments, so Not Graded assignment types will not appear.
Open Assignments
In Course Navigation, click the Assignments link.
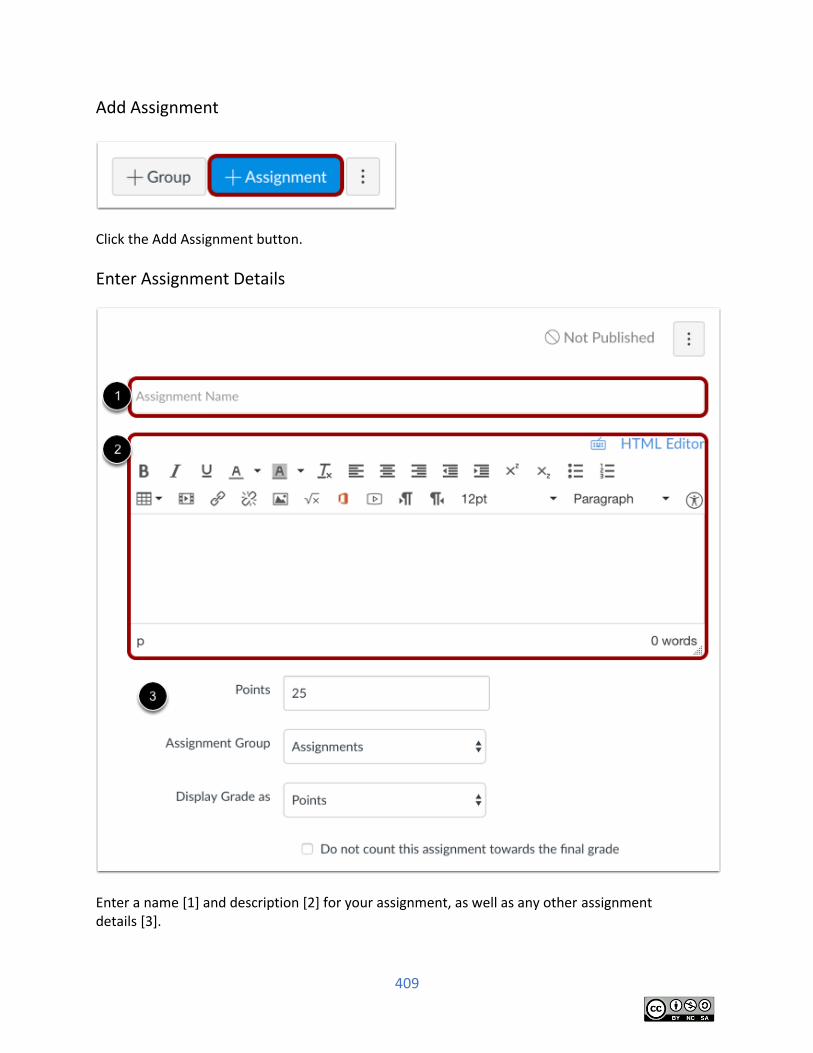
409
Add Assignment
Click the Add Assignment button.
Enter Assignment Details
Enter a name [1] and description [2] for your assignment, as well as any other assignment details [3].
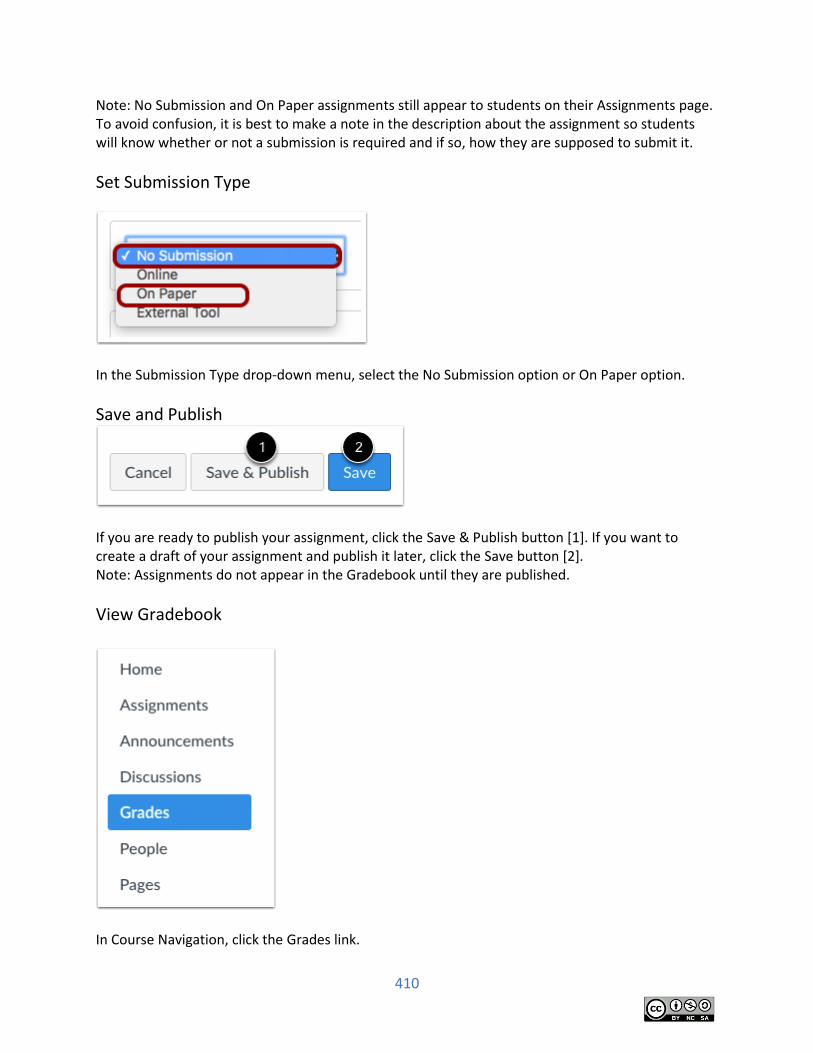
410
Note: No Submission and On Paper assignments still appear to students on their Assignments page. To avoid confusion, it is best to make a note in the description about the assignment so students will know whether or not a submission is required and if so, how they are supposed to submit it.
Set Submission Type
In the Submission Type drop-down menu, select the No Submission option or On Paper option.
Save and Publish
If you are ready to publish your assignment, click the Save & Publish button [1]. If you want to create a draft of your assignment and publish it later, click the Save button [2]. Note: Assignments do not appear in the Gradebook until they are published.
View Gradebook
In Course Navigation, click the Grades link.

411
View Assignment Column
View your assignment in the Gradebook.
Student View
When students view the assignment, they will not see the Submit Assignment button. They can view the details and point value for the assignment.
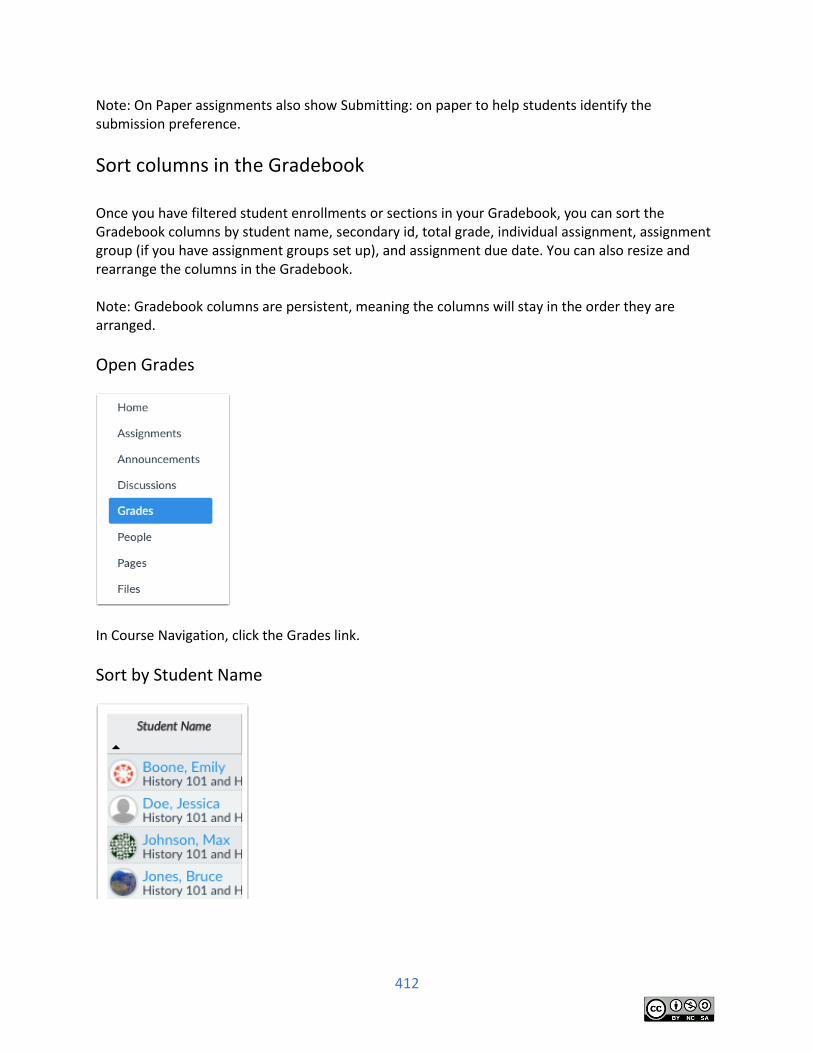
412
Note: On Paper assignments also show Submitting: on paper to help students identify the submission preference.
Sort columns in the Gradebook Once you have filtered student enrollments or sections in your Gradebook, you can sort the Gradebook columns by student name, secondary id, total grade, individual assignment, assignment group (if you have assignment groups set up), and assignment due date. You can also resize and rearrange the columns in the Gradebook. Note: Gradebook columns are persistent, meaning the columns will stay in the order they are arranged.
Open Grades
In Course Navigation, click the Grades link.
Sort by Student Name
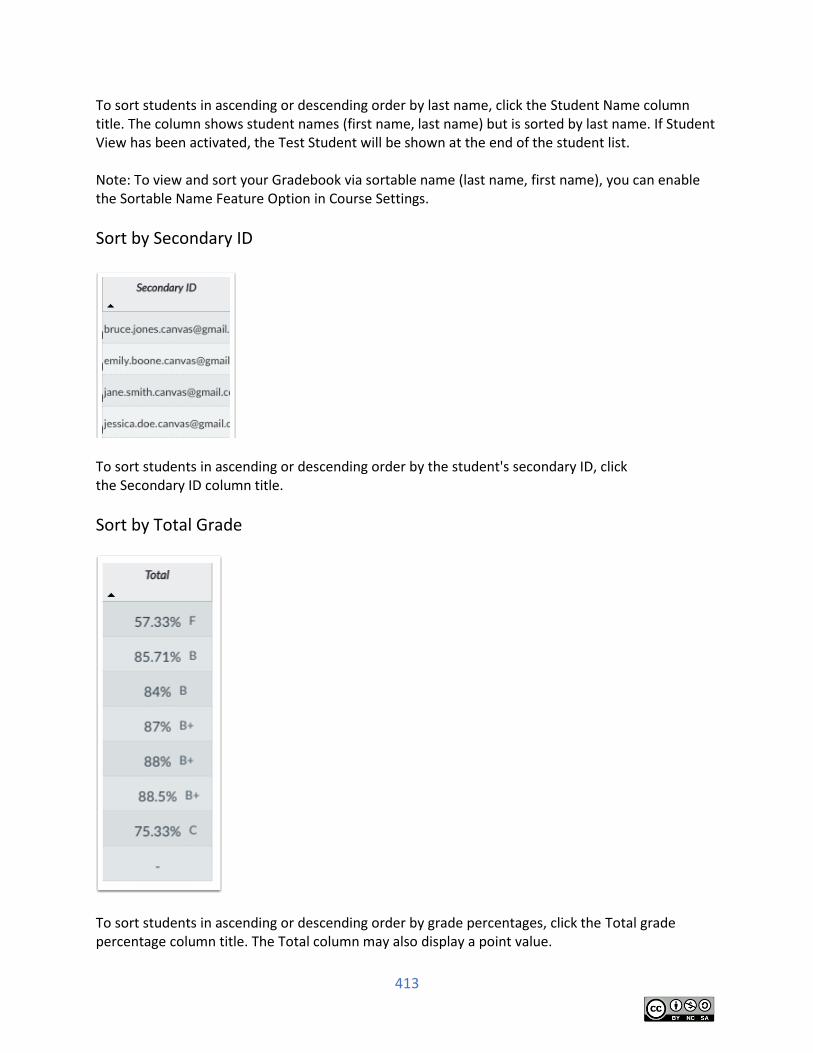
413
To sort students in ascending or descending order by last name, click the Student Name column title. The column shows student names (first name, last name) but is sorted by last name. If Student View has been activated, the Test Student will be shown at the end of the student list. Note: To view and sort your Gradebook via sortable name (last name, first name), you can enable the Sortable Name Feature Option in Course Settings.
Sort by Secondary ID
To sort students in ascending or descending order by the student's secondary ID, click the Secondary ID column title.
Sort by Total Grade
To sort students in ascending or descending order by grade percentages, click the Total grade percentage column title. The Total column may also display a point value.
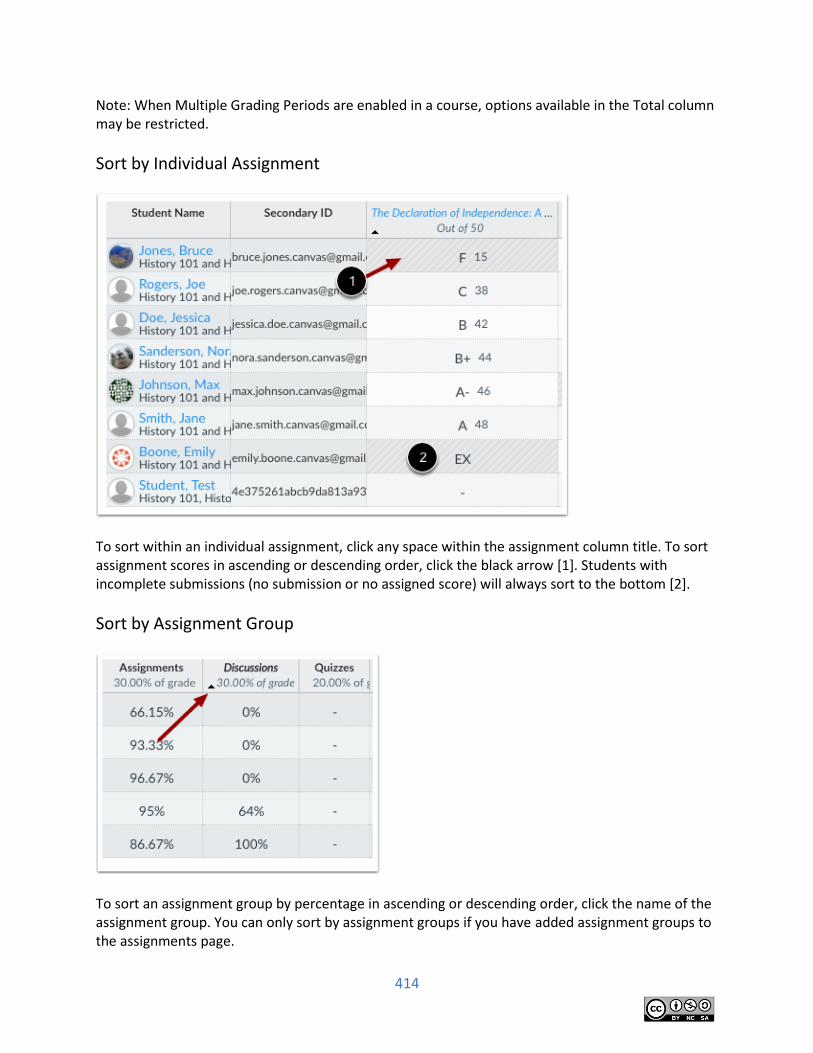
414
Note: When Multiple Grading Periods are enabled in a course, options available in the Total column may be restricted.
Sort by Individual Assignment
To sort within an individual assignment, click any space within the assignment column title. To sort assignment scores in ascending or descending order, click the black arrow [1]. Students with incomplete submissions (no submission or no assigned score) will always sort to the bottom [2].
Sort by Assignment Group
To sort an assignment group by percentage in ascending or descending order, click the name of the assignment group. You can only sort by assignment groups if you have added assignment groups to the assignments page.
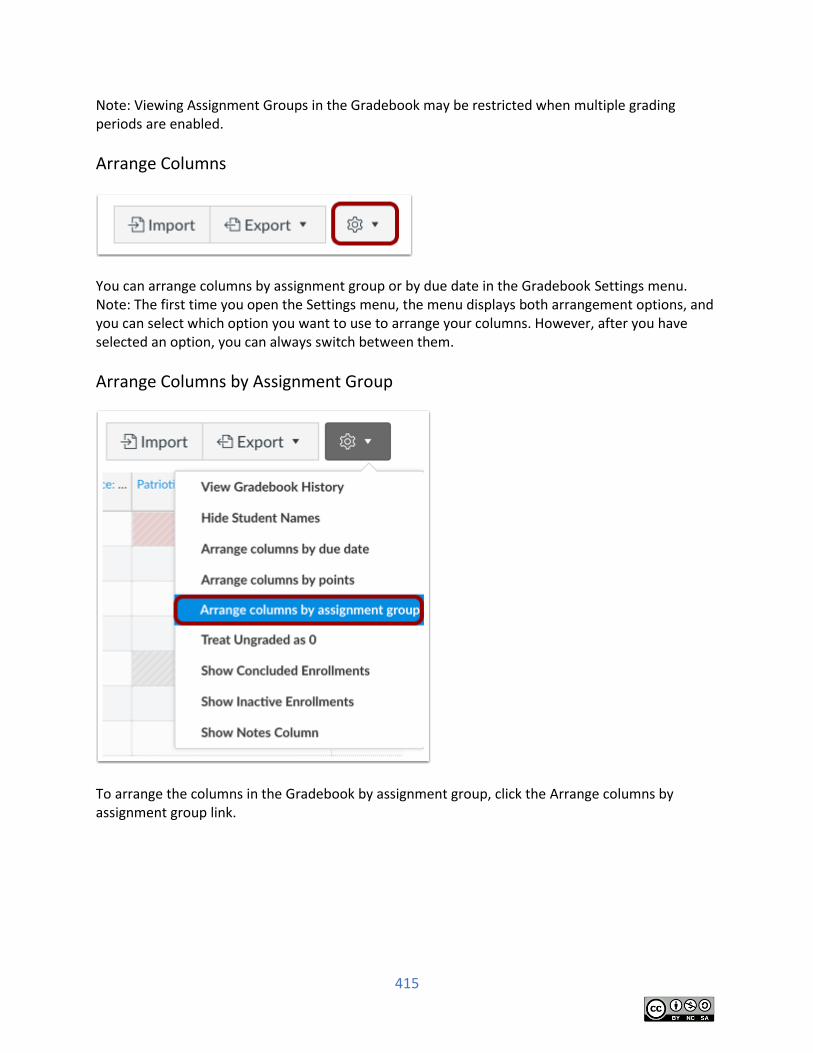
415
Note: Viewing Assignment Groups in the Gradebook may be restricted when multiple grading periods are enabled.
Arrange Columns
You can arrange columns by assignment group or by due date in the Gradebook Settings menu. Note: The first time you open the Settings menu, the menu displays both arrangement options, and you can select which option you want to use to arrange your columns. However, after you have selected an option, you can always switch between them.
Arrange Columns by Assignment Group
To arrange the columns in the Gradebook by assignment group, click the Arrange columns by assignment group link.
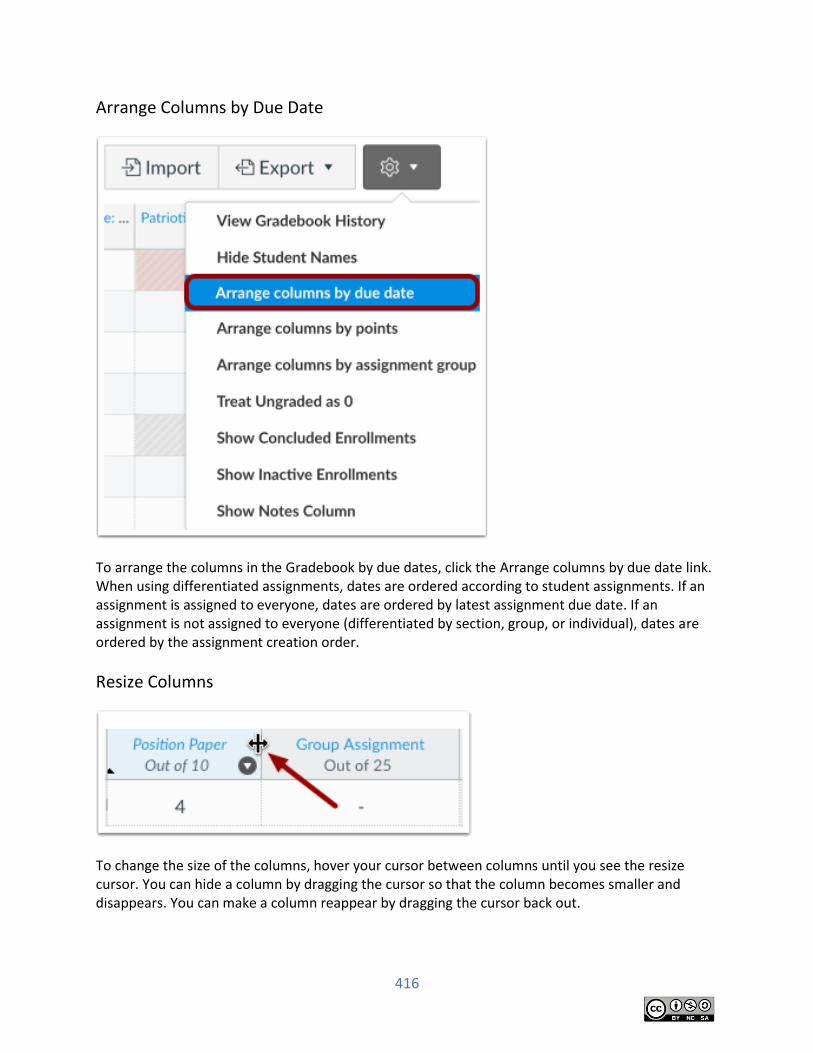
416
Arrange Columns by Due Date
To arrange the columns in the Gradebook by due dates, click the Arrange columns by due date link. When using differentiated assignments, dates are ordered according to student assignments. If an assignment is assigned to everyone, dates are ordered by latest assignment due date. If an assignment is not assigned to everyone (differentiated by section, group, or individual), dates are ordered by the assignment creation order.
Resize Columns
To change the size of the columns, hover your cursor between columns until you see the resize cursor. You can hide a column by dragging the cursor so that the column becomes smaller and disappears. You can make a column reappear by dragging the cursor back out.
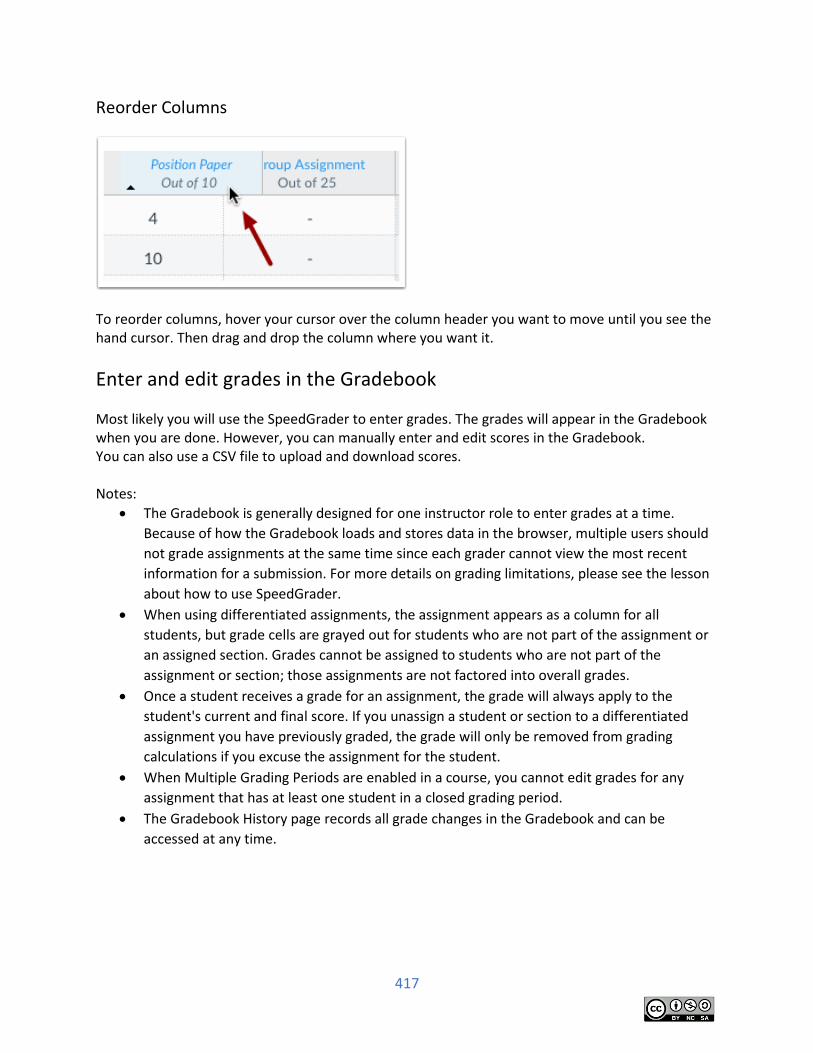
417
Reorder Columns
To reorder columns, hover your cursor over the column header you want to move until you see the hand cursor. Then drag and drop the column where you want it.
Enter and edit grades in the Gradebook
Most likely you will use the SpeedGrader to enter grades. The grades will appear in the Gradebook when you are done. However, you can manually enter and edit scores in the Gradebook. You can also use a CSV file to upload and download scores. Notes:
The Gradebook is generally designed for one instructor role to enter grades at a time.
Because of how the Gradebook loads and stores data in the browser, multiple users should
not grade assignments at the same time since each grader cannot view the most recent
information for a submission. For more details on grading limitations, please see the lesson
about how to use SpeedGrader.
When using differentiated assignments, the assignment appears as a column for all
students, but grade cells are grayed out for students who are not part of the assignment or
an assigned section. Grades cannot be assigned to students who are not part of the
assignment or section; those assignments are not factored into overall grades.
Once a student receives a grade for an assignment, the grade will always apply to the
student's current and final score. If you unassign a student or section to a differentiated
assignment you have previously graded, the grade will only be removed from grading
calculations if you excuse the assignment for the student.
When Multiple Grading Periods are enabled in a course, you cannot edit grades for any
assignment that has at least one student in a closed grading period.
The Gradebook History page records all grade changes in the Gradebook and can be
accessed at any time.
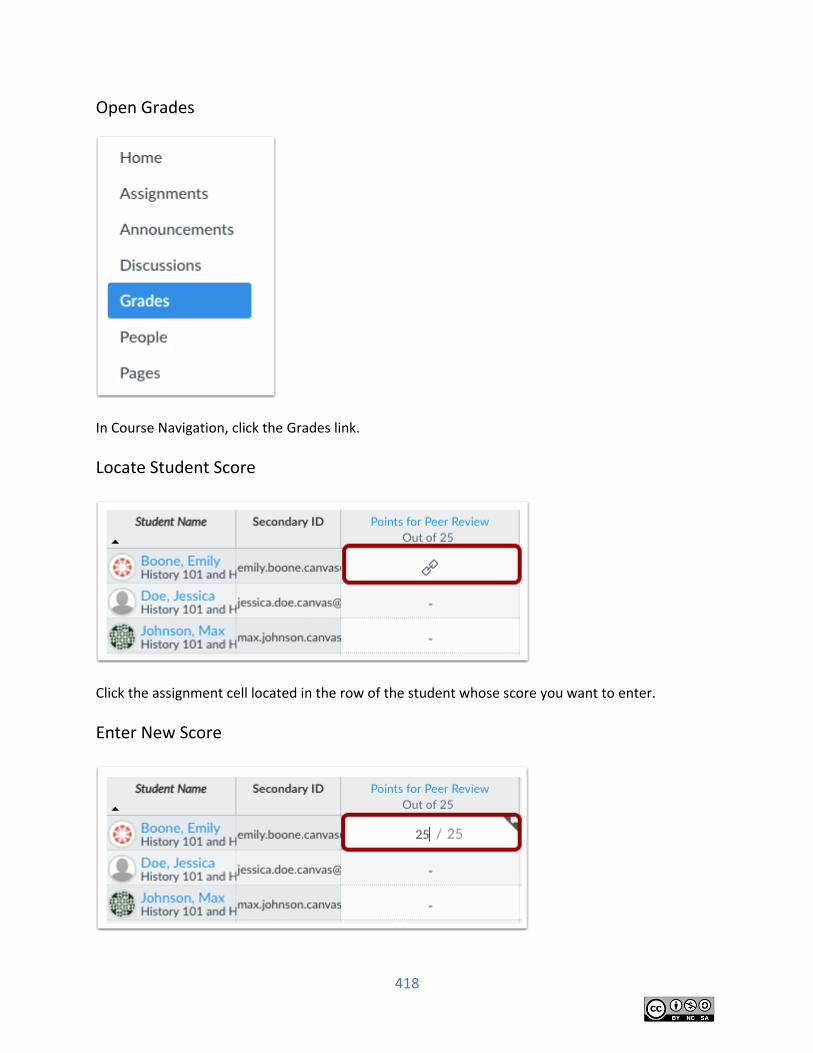
418
Open Grades
In Course Navigation, click the Grades link.
Locate Student Score
Click the assignment cell located in the row of the student whose score you want to enter.
Enter New Score
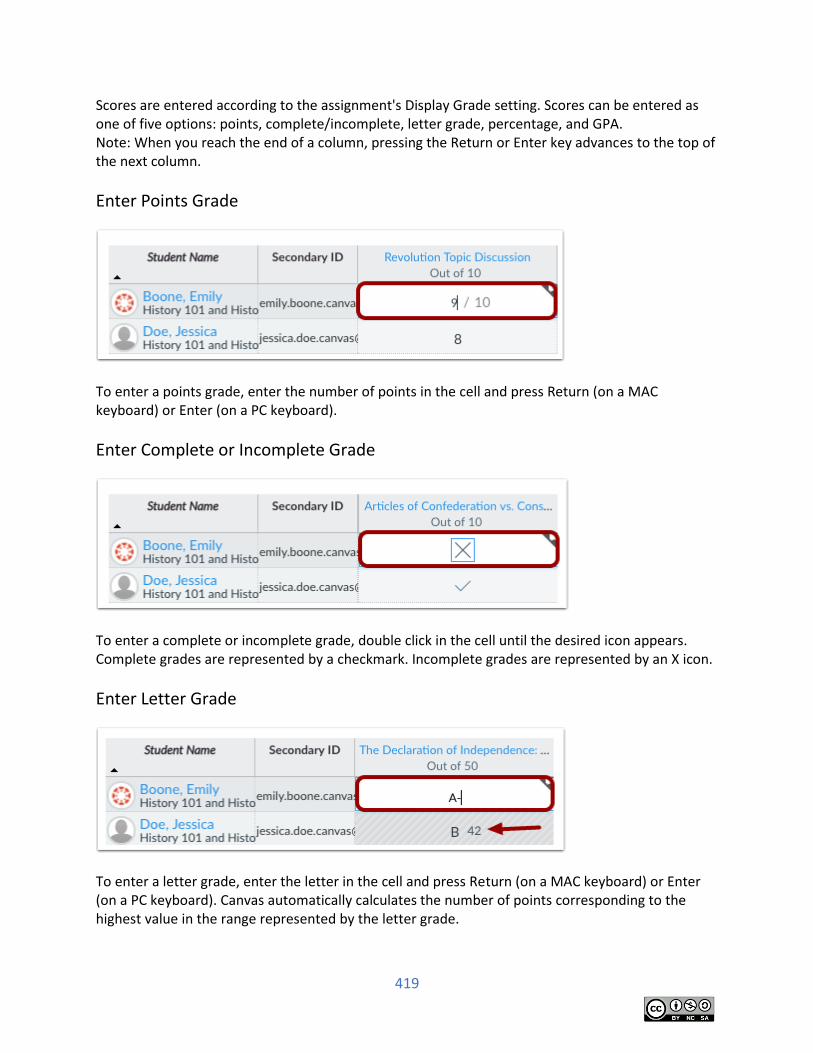
419
Scores are entered according to the assignment's Display Grade setting. Scores can be entered as one of five options: points, complete/incomplete, letter grade, percentage, and GPA. Note: When you reach the end of a column, pressing the Return or Enter key advances to the top of the next column.
Enter Points Grade
To enter a points grade, enter the number of points in the cell and press Return (on a MAC keyboard) or Enter (on a PC keyboard).
Enter Complete or Incomplete Grade
To enter a complete or incomplete grade, double click in the cell until the desired icon appears. Complete grades are represented by a checkmark. Incomplete grades are represented by an X icon.
Enter Letter Grade
To enter a letter grade, enter the letter in the cell and press Return (on a MAC keyboard) or Enter (on a PC keyboard). Canvas automatically calculates the number of points corresponding to the highest value in the range represented by the letter grade.
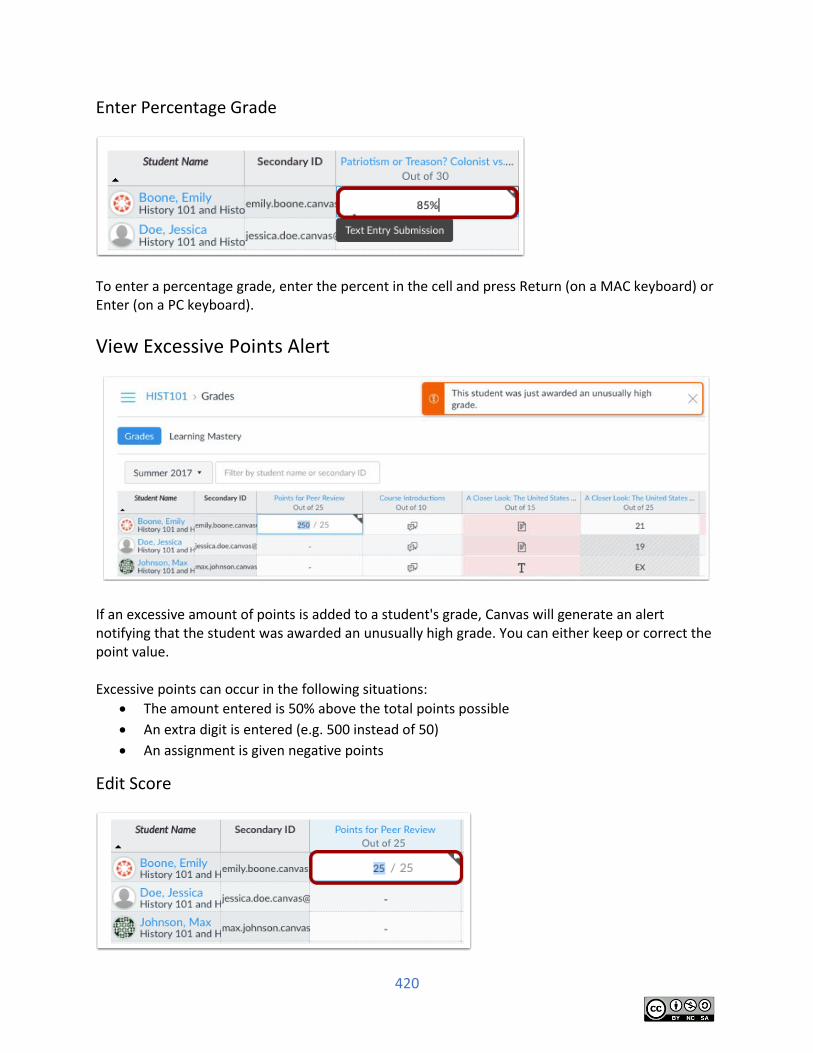
420
Enter Percentage Grade
To enter a percentage grade, enter the percent in the cell and press Return (on a MAC keyboard) or Enter (on a PC keyboard).
View Excessive Points Alert
If an excessive amount of points is added to a student's grade, Canvas will generate an alert notifying that the student was awarded an unusually high grade. You can either keep or correct the point value. Excessive points can occur in the following situations:
The amount entered is 50% above the total points possible
An extra digit is entered (e.g. 500 instead of 50)
An assignment is given negative points
Edit Score
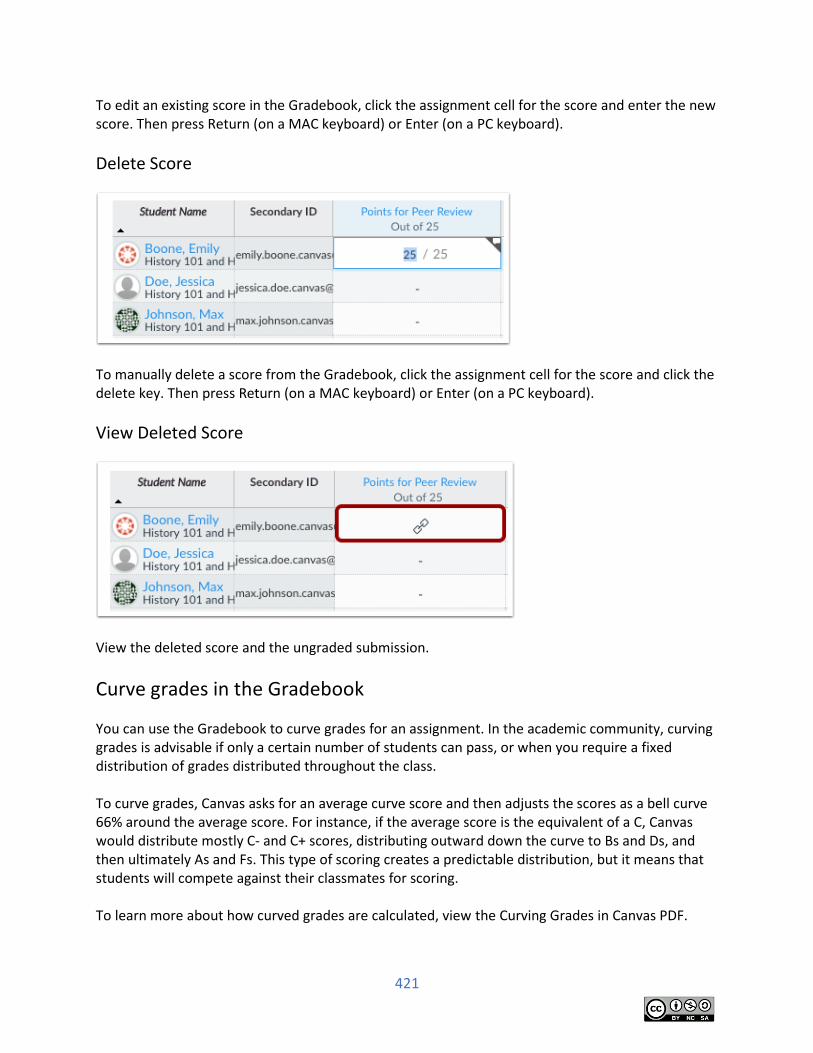
421
To edit an existing score in the Gradebook, click the assignment cell for the score and enter the new score. Then press Return (on a MAC keyboard) or Enter (on a PC keyboard).
Delete Score
To manually delete a score from the Gradebook, click the assignment cell for the score and click the delete key. Then press Return (on a MAC keyboard) or Enter (on a PC keyboard).
View Deleted Score
View the deleted score and the ungraded submission.
Curve grades in the Gradebook
You can use the Gradebook to curve grades for an assignment. In the academic community, curving grades is advisable if only a certain number of students can pass, or when you require a fixed distribution of grades distributed throughout the class. To curve grades, Canvas asks for an average curve score and then adjusts the scores as a bell curve 66% around the average score. For instance, if the average score is the equivalent of a C, Canvas would distribute mostly C- and C+ scores, distributing outward down the curve to Bs and Ds, and then ultimately As and Fs. This type of scoring creates a predictable distribution, but it means that students will compete against their classmates for scoring. To learn more about how curved grades are calculated, view the Curving Grades in Canvas PDF.
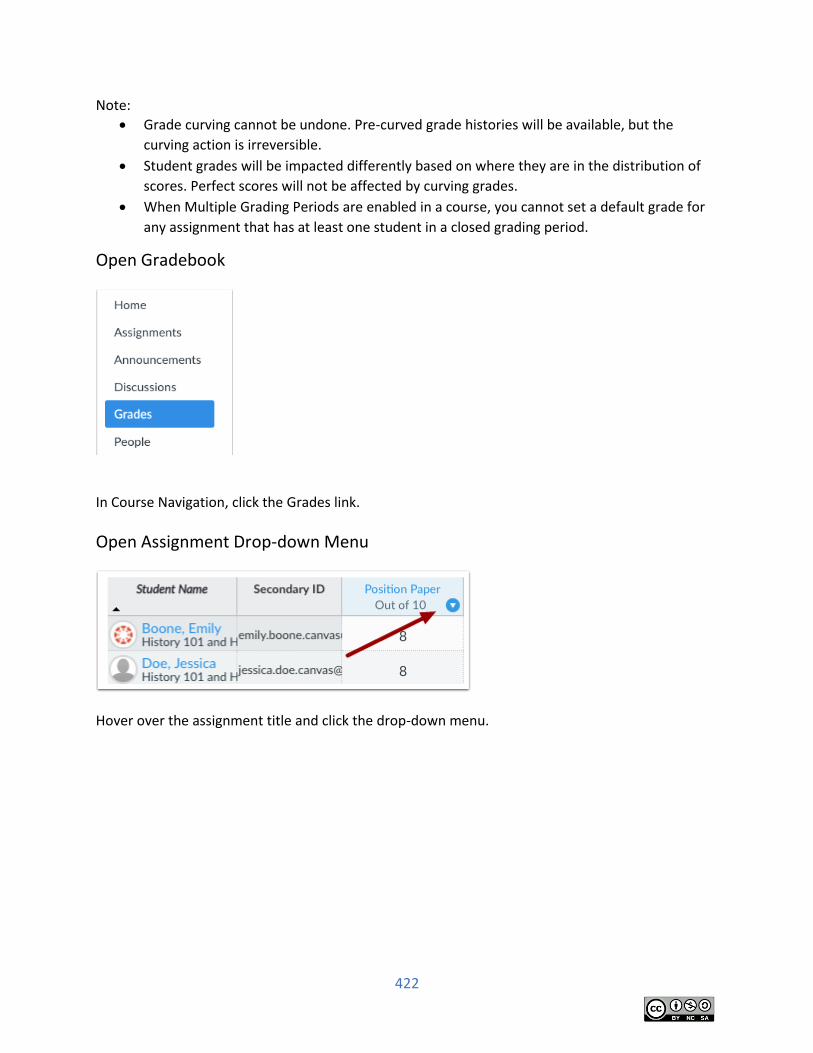
422
Note:
Grade curving cannot be undone. Pre-curved grade histories will be available, but the
curving action is irreversible.
Student grades will be impacted differently based on where they are in the distribution of
scores. Perfect scores will not be affected by curving grades.
When Multiple Grading Periods are enabled in a course, you cannot set a default grade for
any assignment that has at least one student in a closed grading period.
Open Gradebook
In Course Navigation, click the Grades link.
Open Assignment Drop-down Menu
Hover over the assignment title and click the drop-down menu.
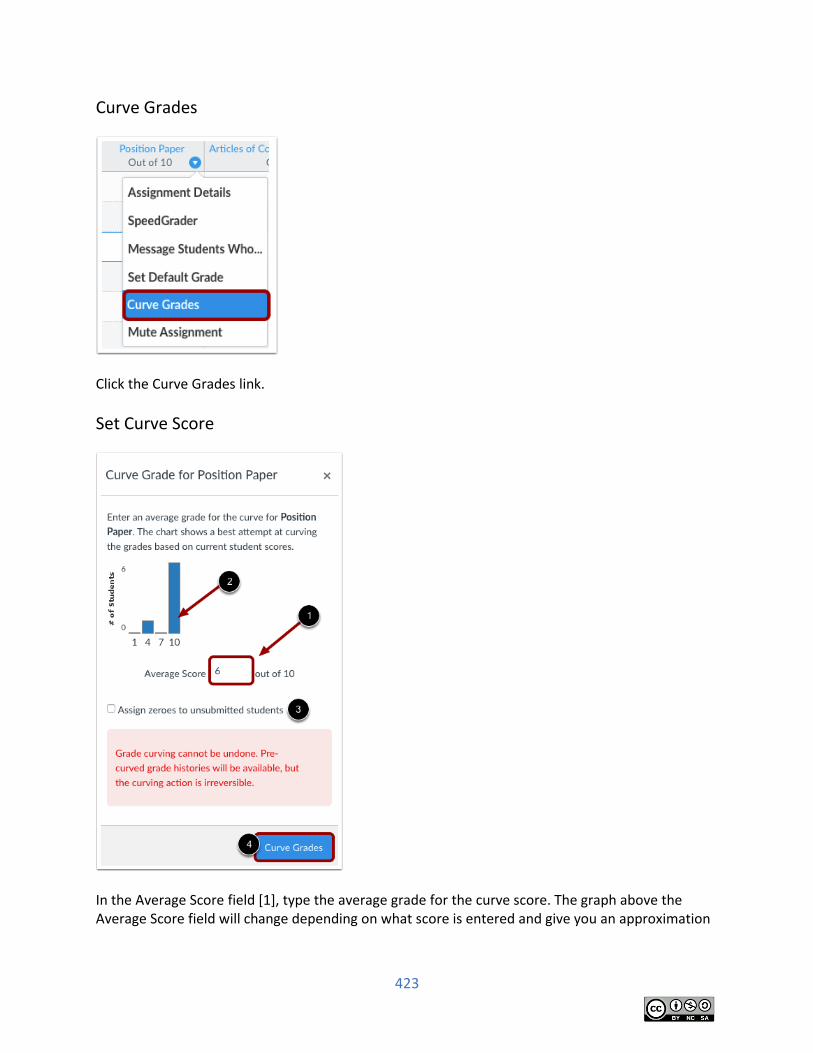
423
Curve Grades
Click the Curve Grades link.
Set Curve Score
In the Average Score field [1], type the average grade for the curve score. The graph above the Average Score field will change depending on what score is entered and give you an approximation
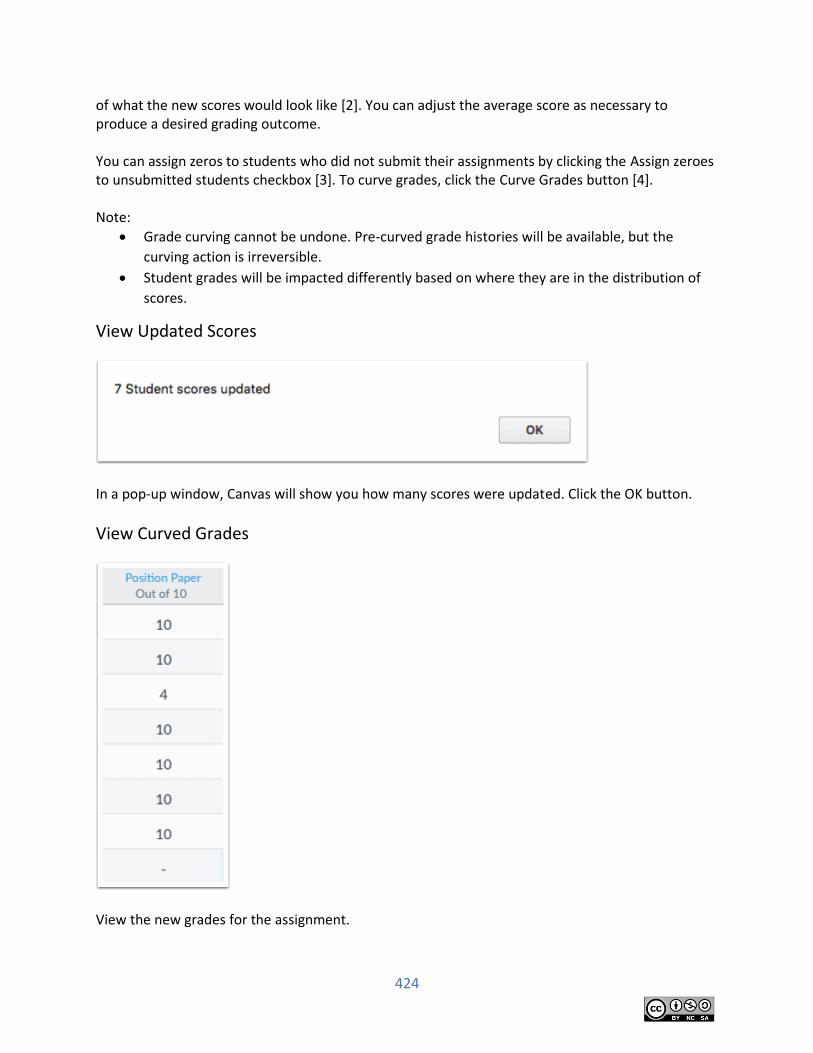
424
of what the new scores would look like [2]. You can adjust the average score as necessary to produce a desired grading outcome. You can assign zeros to students who did not submit their assignments by clicking the Assign zeroes to unsubmitted students checkbox [3]. To curve grades, click the Curve Grades button [4]. Note:
Grade curving cannot be undone. Pre-curved grade histories will be available, but the
curving action is irreversible.
Student grades will be impacted differently based on where they are in the distribution of
scores.
View Updated Scores
In a pop-up window, Canvas will show you how many scores were updated. Click the OK button.
View Curved Grades
View the new grades for the assignment.
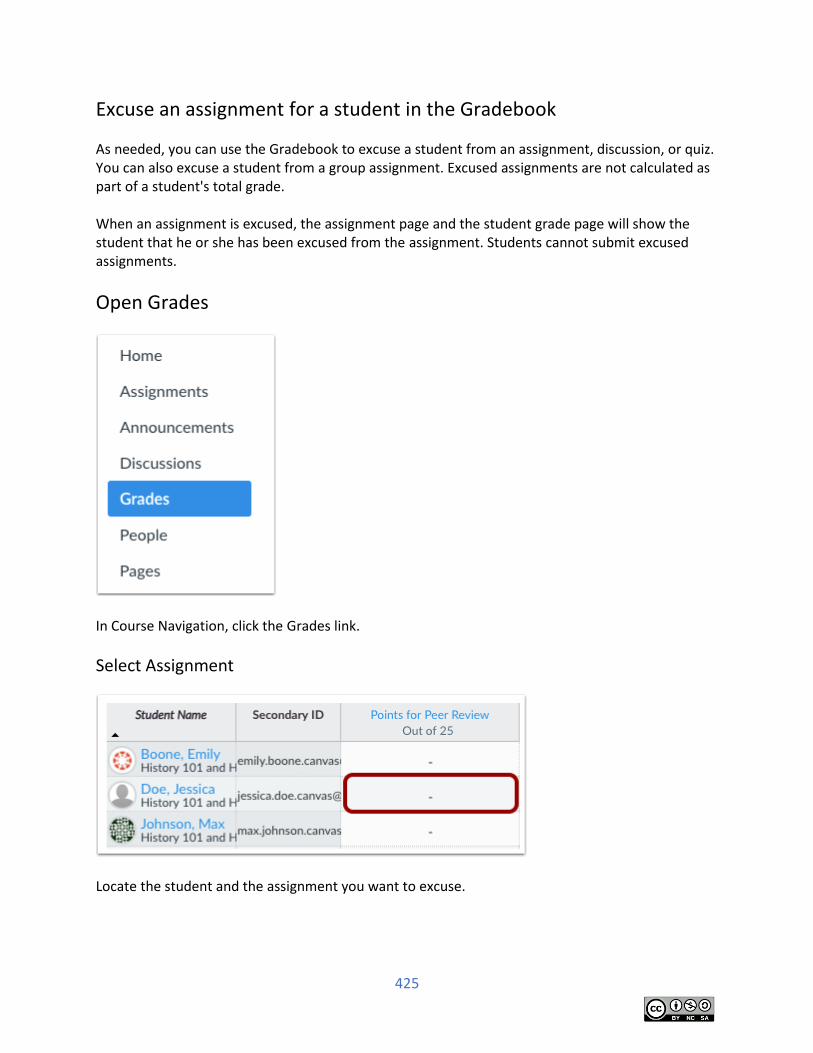
425
Excuse an assignment for a student in the Gradebook
As needed, you can use the Gradebook to excuse a student from an assignment, discussion, or quiz. You can also excuse a student from a group assignment. Excused assignments are not calculated as part of a student's total grade. When an assignment is excused, the assignment page and the student grade page will show the student that he or she has been excused from the assignment. Students cannot submit excused assignments.
Open Grades
In Course Navigation, click the Grades link.
Select Assignment
Locate the student and the assignment you want to excuse.
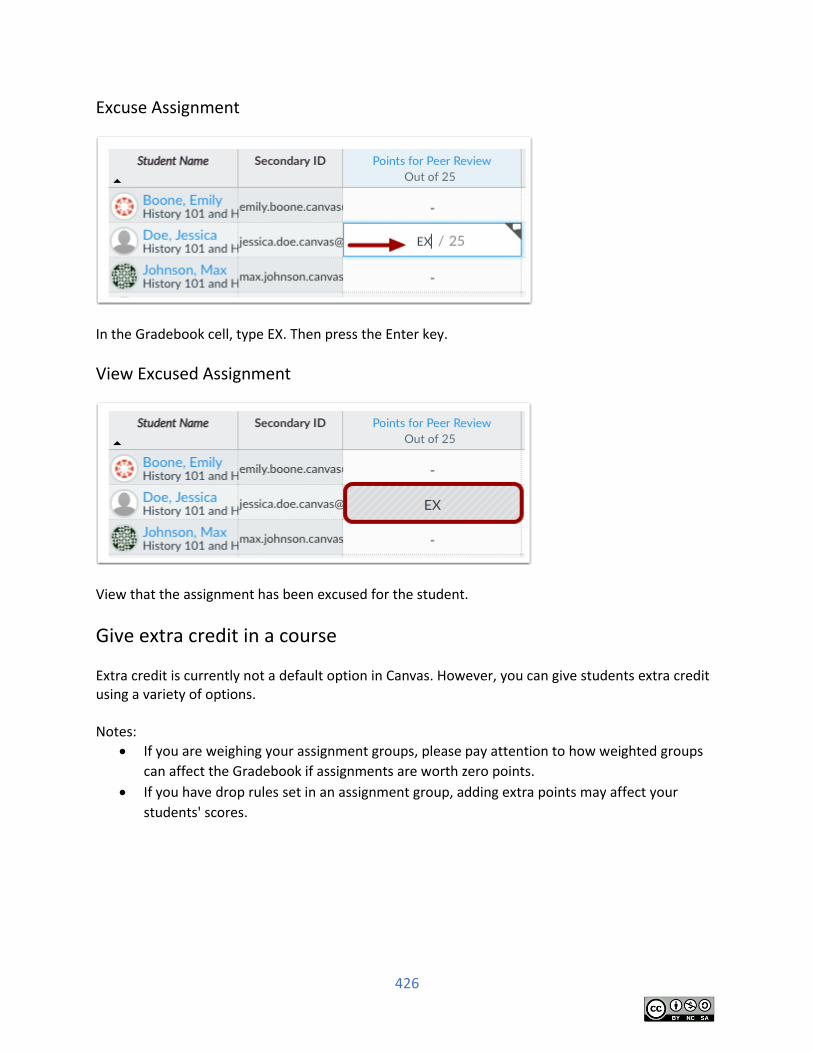
426
Excuse Assignment
In the Gradebook cell, type EX. Then press the Enter key.
View Excused Assignment
View that the assignment has been excused for the student.
Give extra credit in a course
Extra credit is currently not a default option in Canvas. However, you can give students extra credit using a variety of options. Notes:
If you are weighing your assignment groups, please pay attention to how weighted groups
can affect the Gradebook if assignments are worth zero points.
If you have drop rules set in an assignment group, adding extra points may affect your
students' scores.
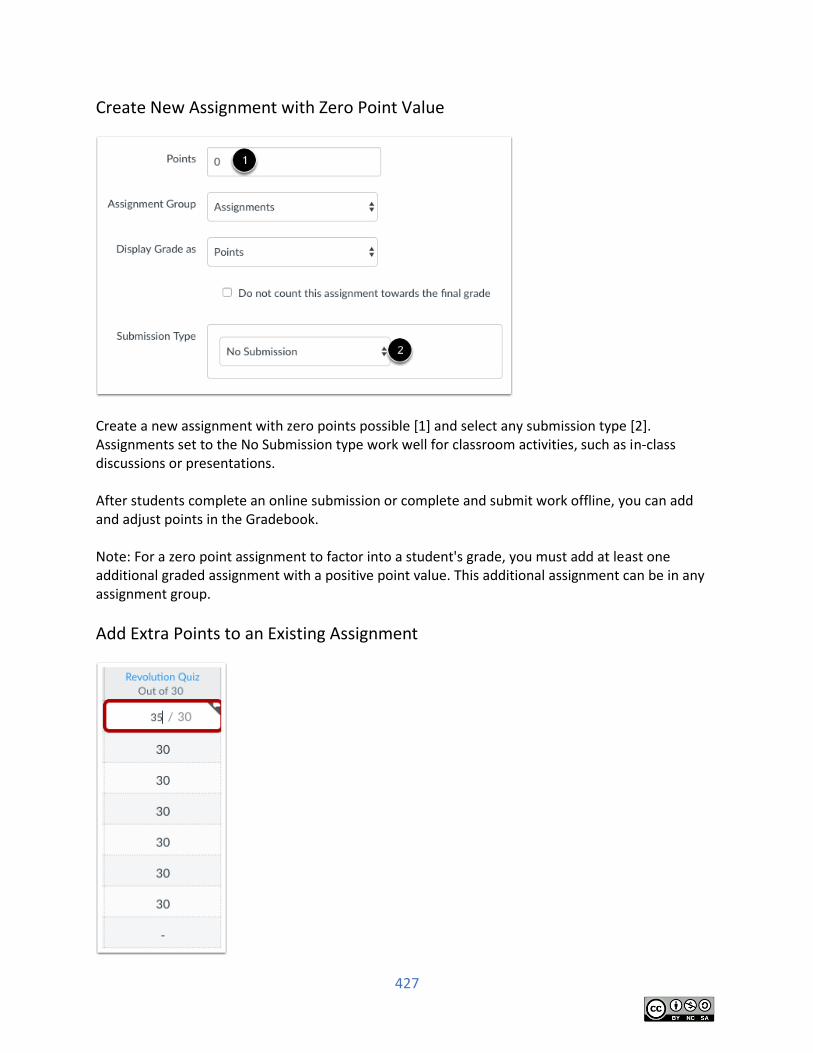
427
Create New Assignment with Zero Point Value
Create a new assignment with zero points possible [1] and select any submission type [2]. Assignments set to the No Submission type work well for classroom activities, such as in-class discussions or presentations. After students complete an online submission or complete and submit work offline, you can add and adjust points in the Gradebook. Note: For a zero point assignment to factor into a student's grade, you must add at least one additional graded assignment with a positive point value. This additional assignment can be in any assignment group.
Add Extra Points to an Existing Assignment
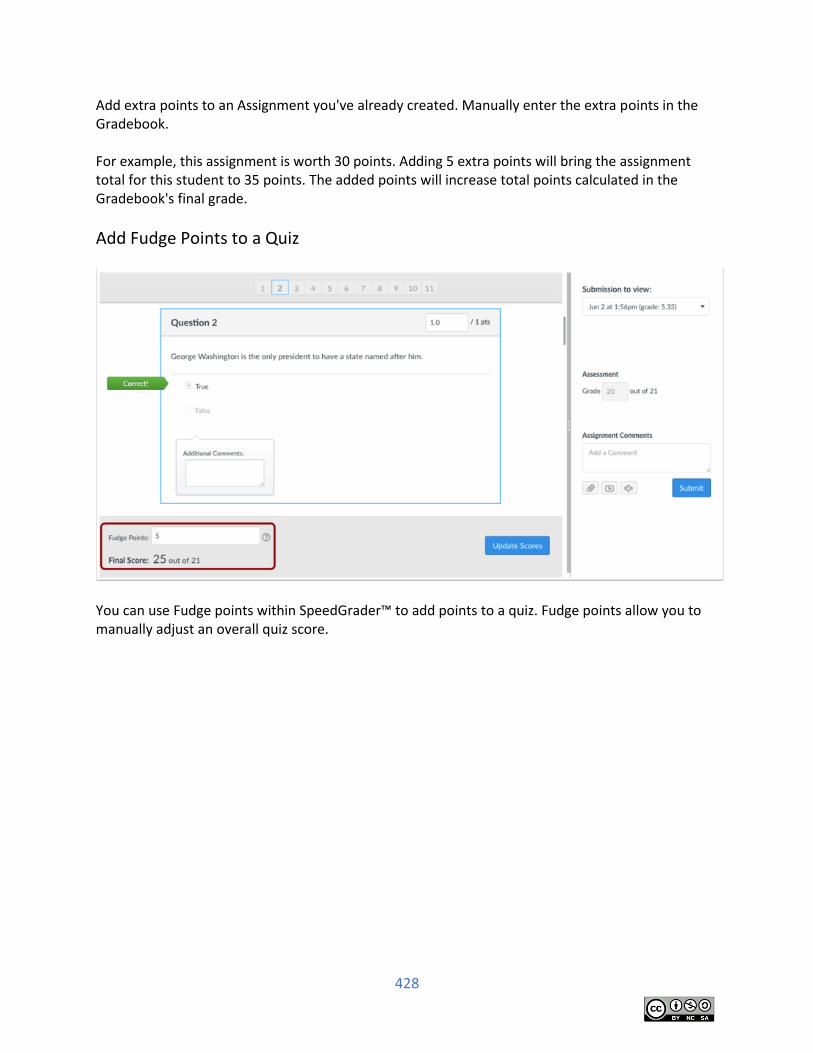
428
Add extra points to an Assignment you've already created. Manually enter the extra points in the Gradebook. For example, this assignment is worth 30 points. Adding 5 extra points will bring the assignment total for this student to 35 points. The added points will increase total points calculated in the Gradebook's final grade.
Add Fudge Points to a Quiz
You can use Fudge points within SpeedGrader™ to add points to a quiz. Fudge points allow you to manually adjust an overall quiz score.
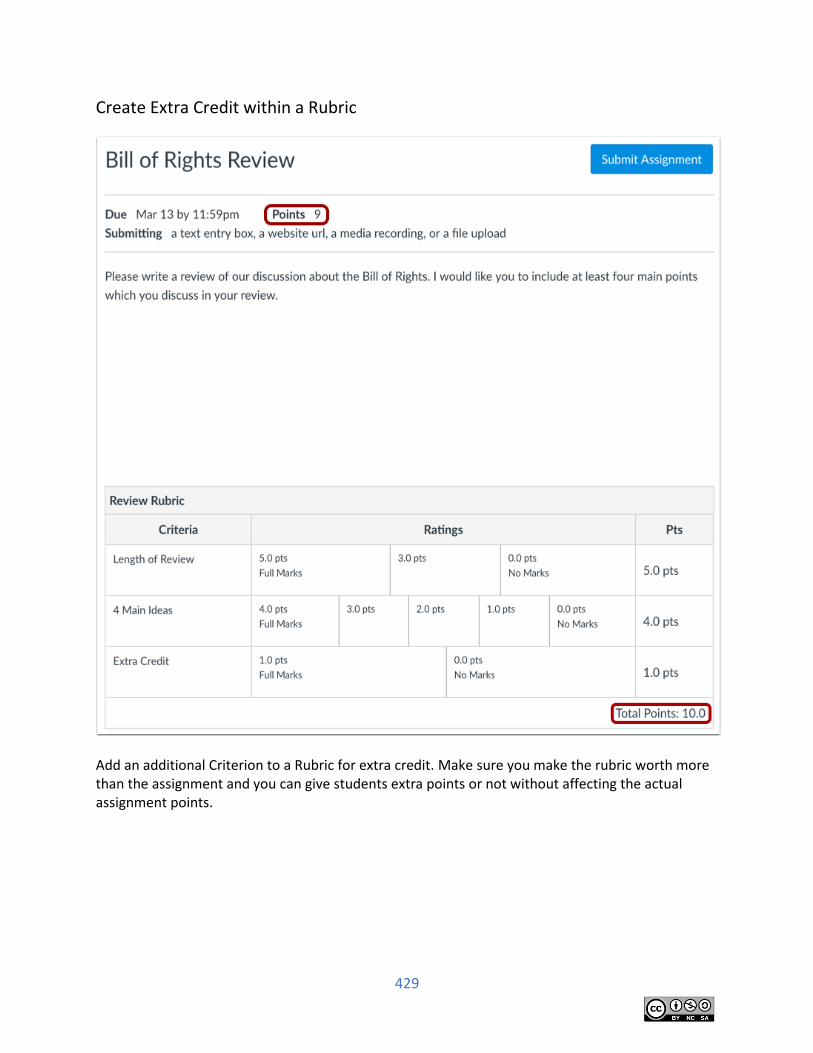
429
Create Extra Credit within a Rubric
Add an additional Criterion to a Rubric for extra credit. Make sure you make the rubric worth more than the assignment and you can give students extra points or not without affecting the actual assignment points.
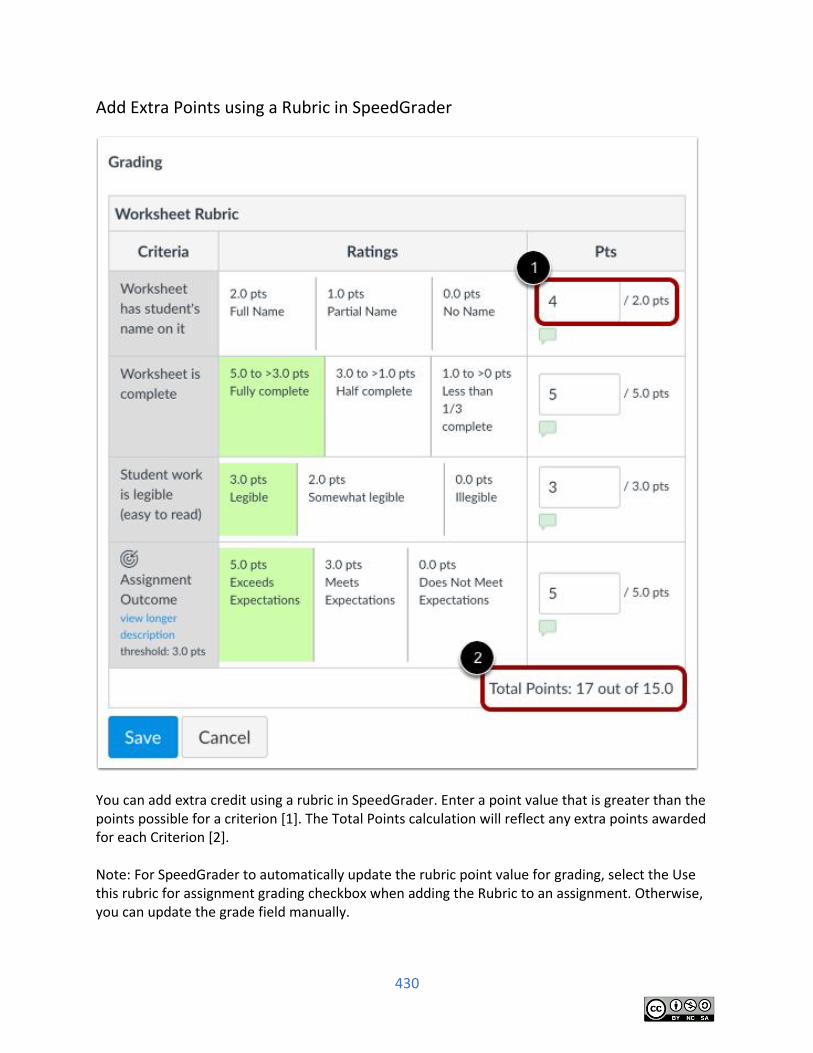
430
Add Extra Points using a Rubric in SpeedGrader
You can add extra credit using a rubric in SpeedGrader. Enter a point value that is greater than the points possible for a criterion [1]. The Total Points calculation will reflect any extra points awarded for each Criterion [2]. Note: For SpeedGrader to automatically update the rubric point value for grading, select the Use this rubric for assignment grading checkbox when adding the Rubric to an assignment. Otherwise, you can update the grade field manually.
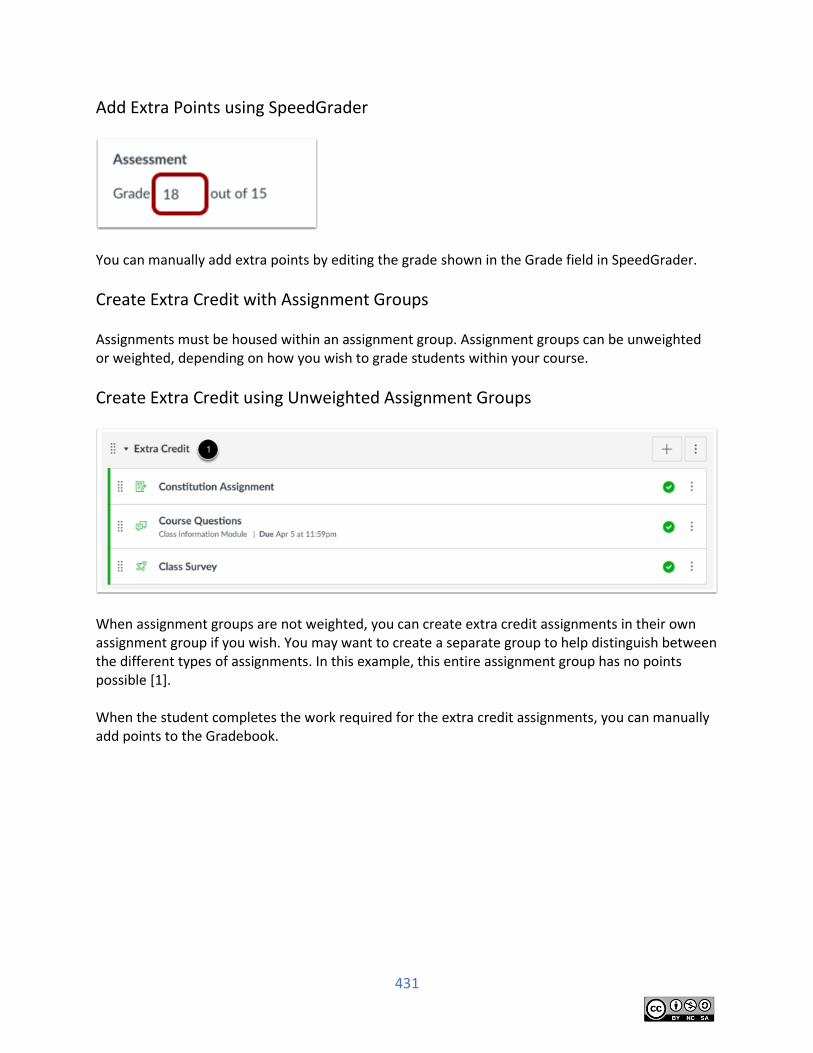
431
Add Extra Points using SpeedGrader
You can manually add extra points by editing the grade shown in the Grade field in SpeedGrader.
Create Extra Credit with Assignment Groups Assignments must be housed within an assignment group. Assignment groups can be unweighted or weighted, depending on how you wish to grade students within your course.
Create Extra Credit using Unweighted Assignment Groups
When assignment groups are not weighted, you can create extra credit assignments in their own assignment group if you wish. You may want to create a separate group to help distinguish between the different types of assignments. In this example, this entire assignment group has no points possible [1]. When the student completes the work required for the extra credit assignments, you can manually add points to the Gradebook.
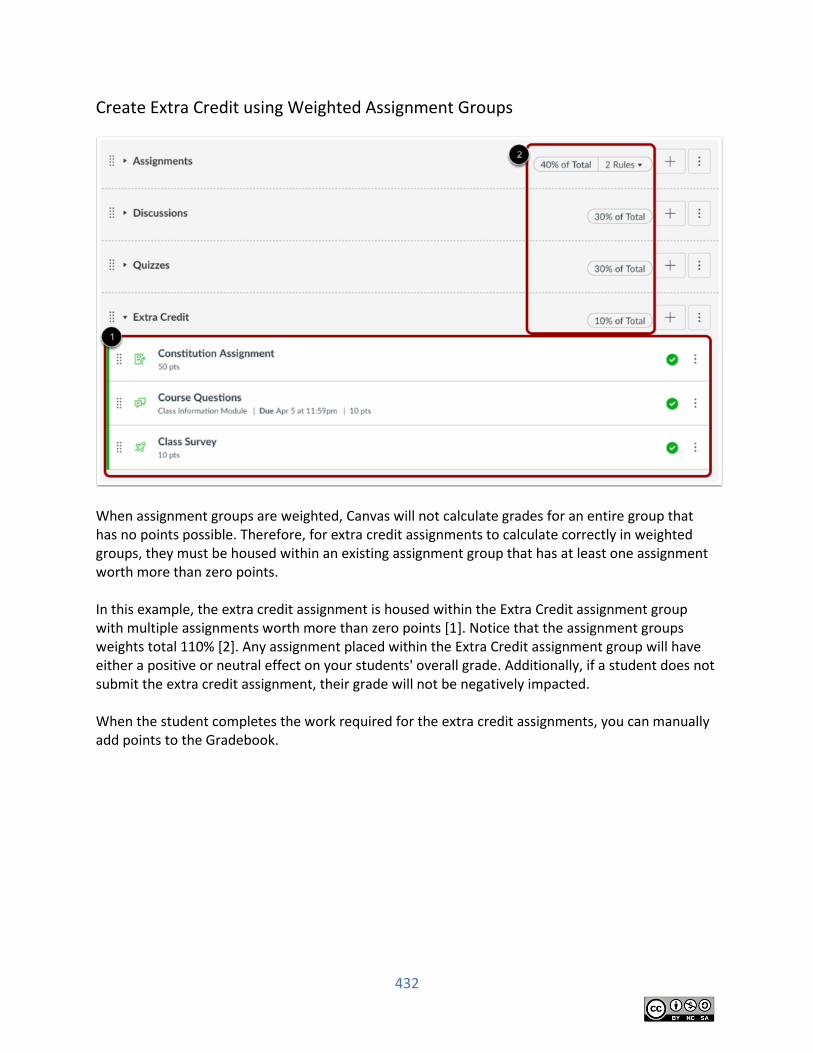
432
Create Extra Credit using Weighted Assignment Groups
When assignment groups are weighted, Canvas will not calculate grades for an entire group that has no points possible. Therefore, for extra credit assignments to calculate correctly in weighted groups, they must be housed within an existing assignment group that has at least one assignment worth more than zero points. In this example, the extra credit assignment is housed within the Extra Credit assignment group with multiple assignments worth more than zero points [1]. Notice that the assignment groups weights total 110% [2]. Any assignment placed within the Extra Credit assignment group will have either a positive or neutral effect on your students' overall grade. Additionally, if a student does not submit the extra credit assignment, their grade will not be negatively impacted. When the student completes the work required for the extra credit assignments, you can manually add points to the Gradebook.
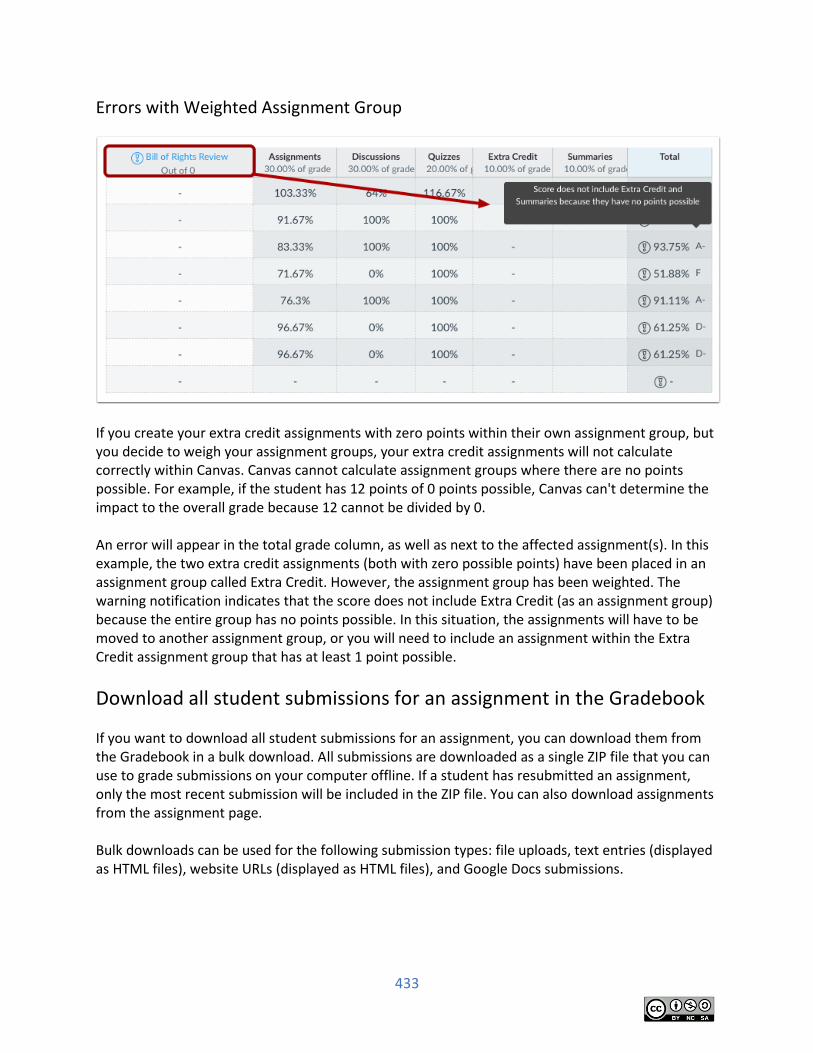
433
Errors with Weighted Assignment Group
If you create your extra credit assignments with zero points within their own assignment group, but you decide to weigh your assignment groups, your extra credit assignments will not calculate correctly within Canvas. Canvas cannot calculate assignment groups where there are no points possible. For example, if the student has 12 points of 0 points possible, Canvas can't determine the impact to the overall grade because 12 cannot be divided by 0. An error will appear in the total grade column, as well as next to the affected assignment(s). In this example, the two extra credit assignments (both with zero possible points) have been placed in an assignment group called Extra Credit. However, the assignment group has been weighted. The warning notification indicates that the score does not include Extra Credit (as an assignment group) because the entire group has no points possible. In this situation, the assignments will have to be moved to another assignment group, or you will need to include an assignment within the Extra Credit assignment group that has at least 1 point possible.
Download all student submissions for an assignment in the Gradebook
If you want to download all student submissions for an assignment, you can download them from the Gradebook in a bulk download. All submissions are downloaded as a single ZIP file that you can use to grade submissions on your computer offline. If a student has resubmitted an assignment, only the most recent submission will be included in the ZIP file. You can also download assignments from the assignment page. Bulk downloads can be used for the following submission types: file uploads, text entries (displayed as HTML files), website URLs (displayed as HTML files), and Google Docs submissions.
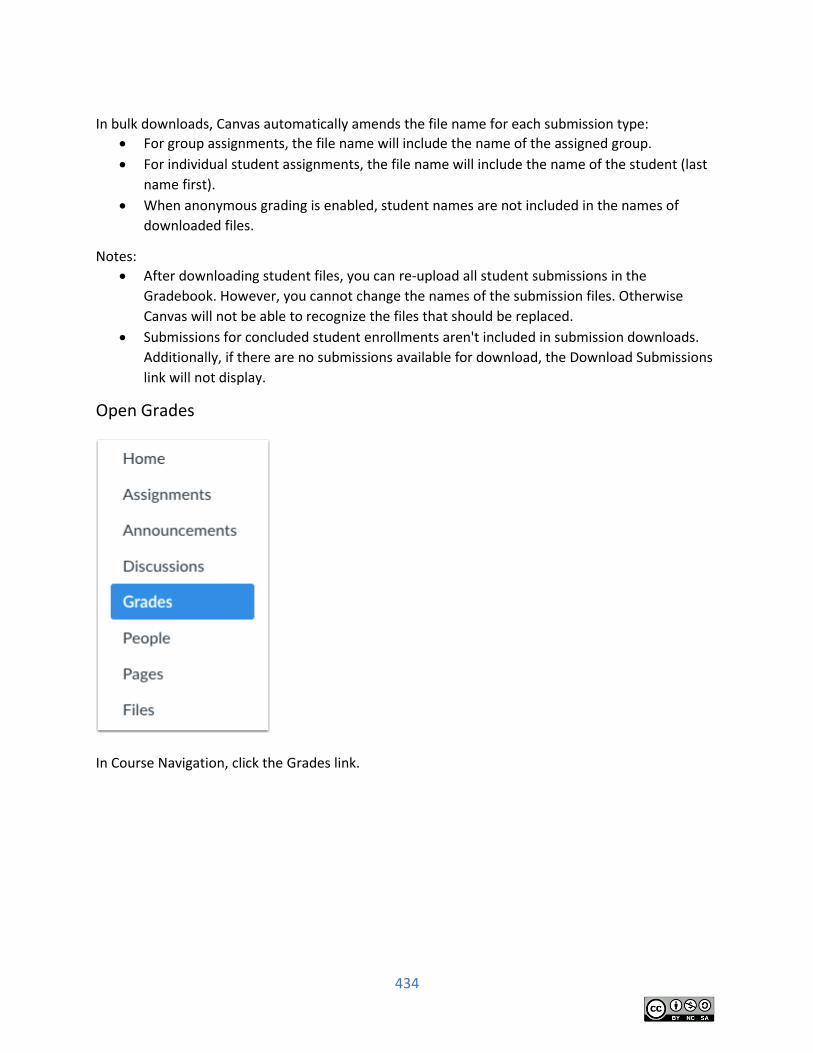
434
In bulk downloads, Canvas automatically amends the file name for each submission type:
For group assignments, the file name will include the name of the assigned group.
For individual student assignments, the file name will include the name of the student (last
name first).
When anonymous grading is enabled, student names are not included in the names of
downloaded files.
Notes:
After downloading student files, you can re-upload all student submissions in the
Gradebook. However, you cannot change the names of the submission files. Otherwise
Canvas will not be able to recognize the files that should be replaced.
Submissions for concluded student enrollments aren't included in submission downloads.
Additionally, if there are no submissions available for download, the Download Submissions
link will not display.
Open Grades
In Course Navigation, click the Grades link.
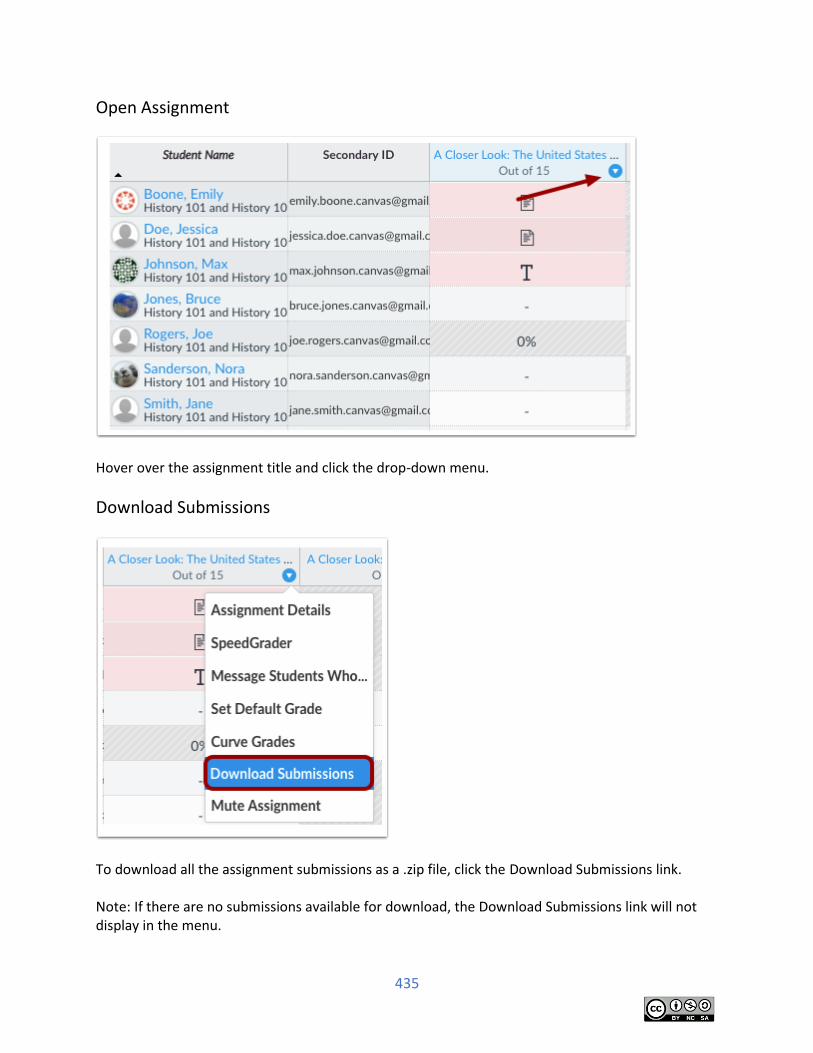
435
Open Assignment
Hover over the assignment title and click the drop-down menu.
Download Submissions
To download all the assignment submissions as a .zip file, click the Download Submissions link. Note: If there are no submissions available for download, the Download Submissions link will not display in the menu.
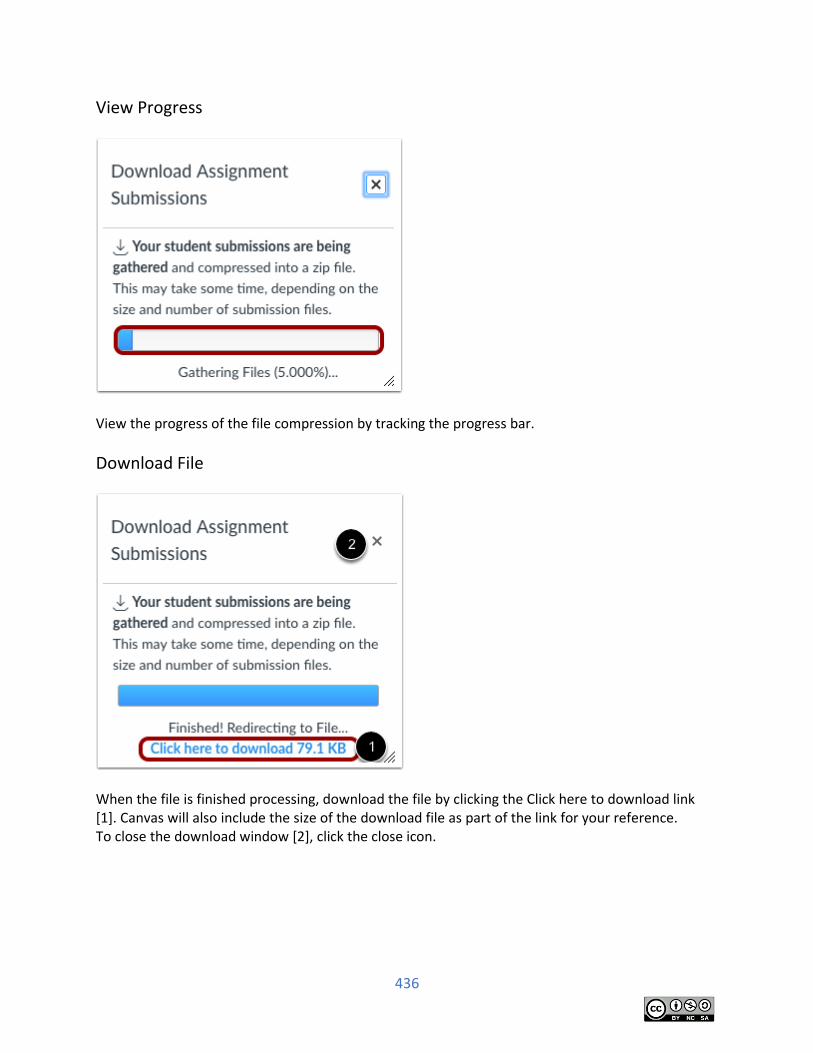
436
View Progress
View the progress of the file compression by tracking the progress bar.
Download File
When the file is finished processing, download the file by clicking the Click here to download link [1]. Canvas will also include the size of the download file as part of the link for your reference. To close the download window [2], click the close icon.
437
Download grades from the Gradebook
You can export scores from the Gradebook and download them to your computer as a CSV file. At the time of export, the CSV file data matches the current filter(s) and settings shown in the Gradebook. Notes about CSV files:
Some columns that appear in the CSV file are read-only columns calculated by rules or
percentages set in Canvas. Any changes made to these columns will be ignored when you
re-upload the file to your course.
For assignment group columns, changes made to assignment scores will automatically be
included in the assignment group calculation in the Gradebook.
CSV downloads honor multiple grading periods. The Gradebook exports the grading period
being viewed in the Gradebook. For All Grading Periods, if the option to view total grades is
not enabled, Total Score columns and assignment group totals are not included in the
download.
The Total Score displayed in the Gradebook reflects each student's score at the time of
viewing, taking into account whether the instructor has muted assignments, assignment due
dates, etc. The CSV download includes read-only columns for current and final scores.
Current score reflects the total while ignoring unsubmitted assignments, and the final score
counts unsubmitted assignments as zero. Muted assignments are unposted grades and
shown in separate columns for unposted current score and unposted final score,
respectively.
If a student has submitted an assignment multiple times, the CSV file only accounts for the
most recent submission.
The notes column is not included in the Gradebook CSV export file.
Concluded and inactive enrollments are not included in the CSV file unless their respective
option, Show Concluded Enrollments or Show Inactive Enrollments, is enabled in the
Gradebook Settings menu.
Complete/incomplete assignments are shown as full or no credit (e.g. for a 10-point
assignment, 10 or 0).
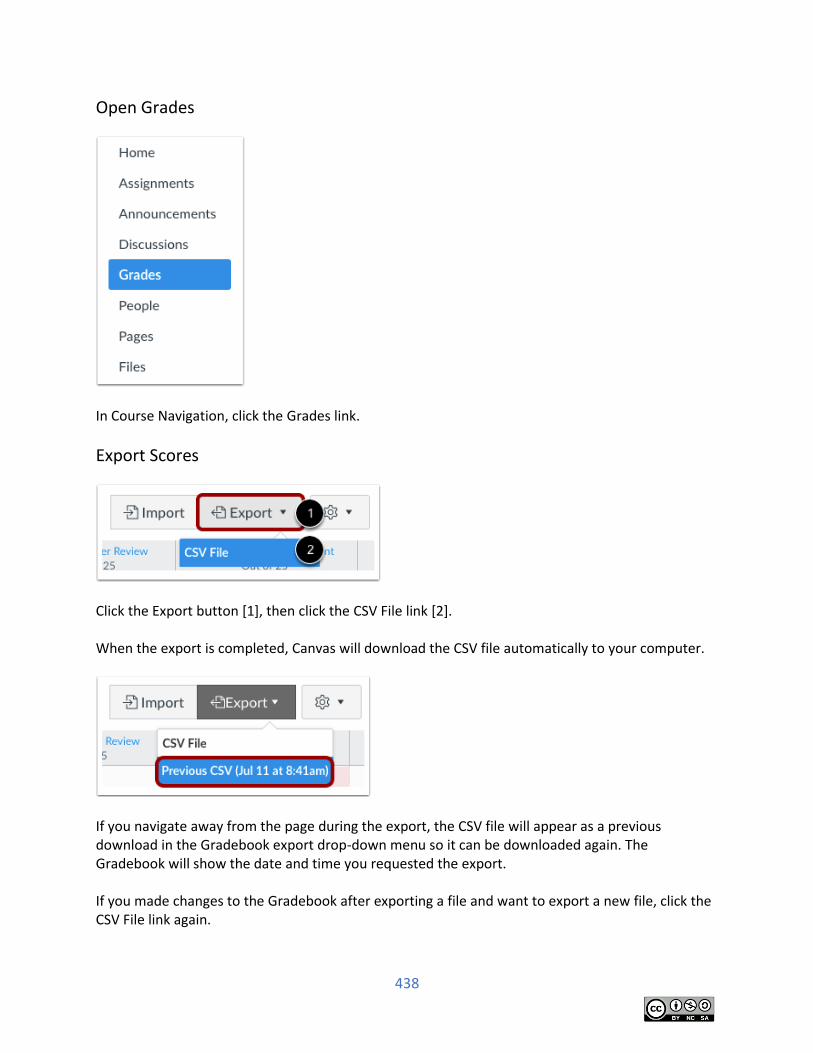
438
Open Grades
In Course Navigation, click the Grades link.
Export Scores
Click the Export button [1], then click the CSV File link [2]. When the export is completed, Canvas will download the CSV file automatically to your computer.
If you navigate away from the page during the export, the CSV file will appear as a previous download in the Gradebook export drop-down menu so it can be downloaded again. The Gradebook will show the date and time you requested the export. If you made changes to the Gradebook after exporting a file and want to export a new file, click the CSV File link again.
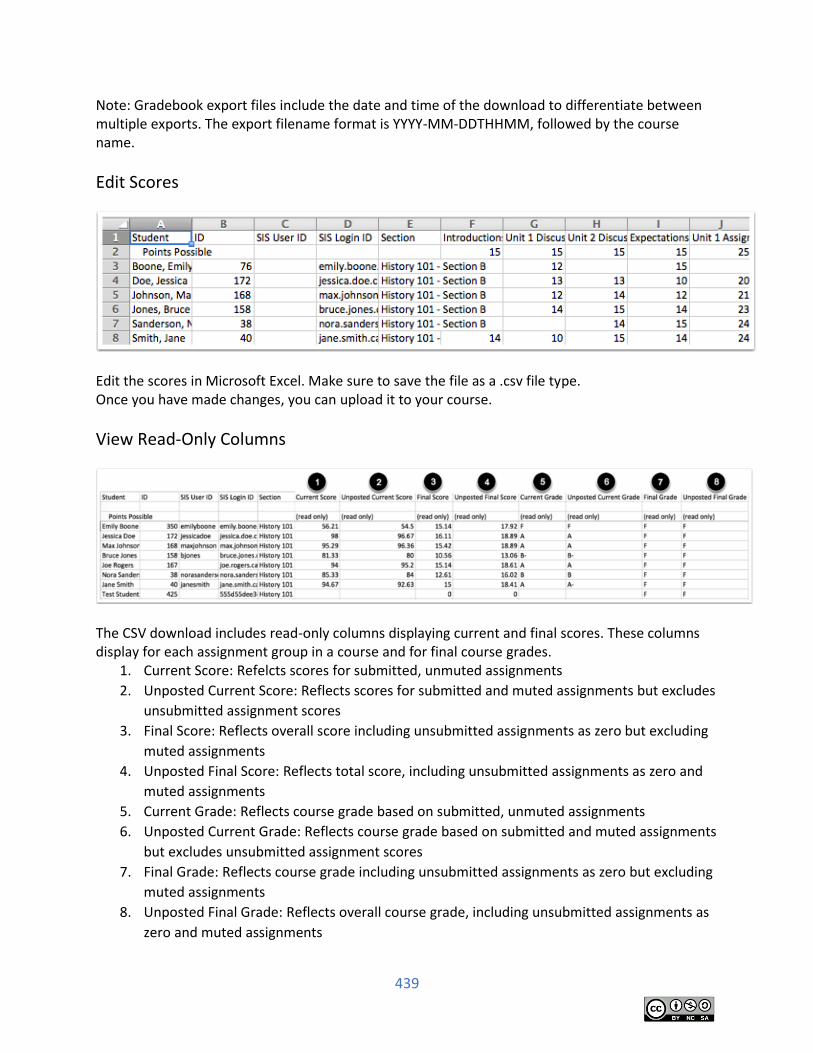
439
Note: Gradebook export files include the date and time of the download to differentiate between multiple exports. The export filename format is YYYY-MM-DDTHHMM, followed by the course name.
Edit Scores
Edit the scores in Microsoft Excel. Make sure to save the file as a .csv file type. Once you have made changes, you can upload it to your course.
View Read-Only Columns
The CSV download includes read-only columns displaying current and final scores. These columns display for each assignment group in a course and for final course grades.
1. Current Score: Refelcts scores for submitted, unmuted assignments
2. Unposted Current Score: Reflects scores for submitted and muted assignments but excludes
unsubmitted assignment scores
3. Final Score: Reflects overall score including unsubmitted assignments as zero but excluding
muted assignments
4. Unposted Final Score: Reflects total score, including unsubmitted assignments as zero and
muted assignments
5. Current Grade: Reflects course grade based on submitted, unmuted assignments
6. Unposted Current Grade: Reflects course grade based on submitted and muted assignments
but excludes unsubmitted assignment scores
7. Final Grade: Reflects course grade including unsubmitted assignments as zero but excluding
muted assignments
8. Unposted Final Grade: Reflects overall course grade, including unsubmitted assignments as
zero and muted assignments
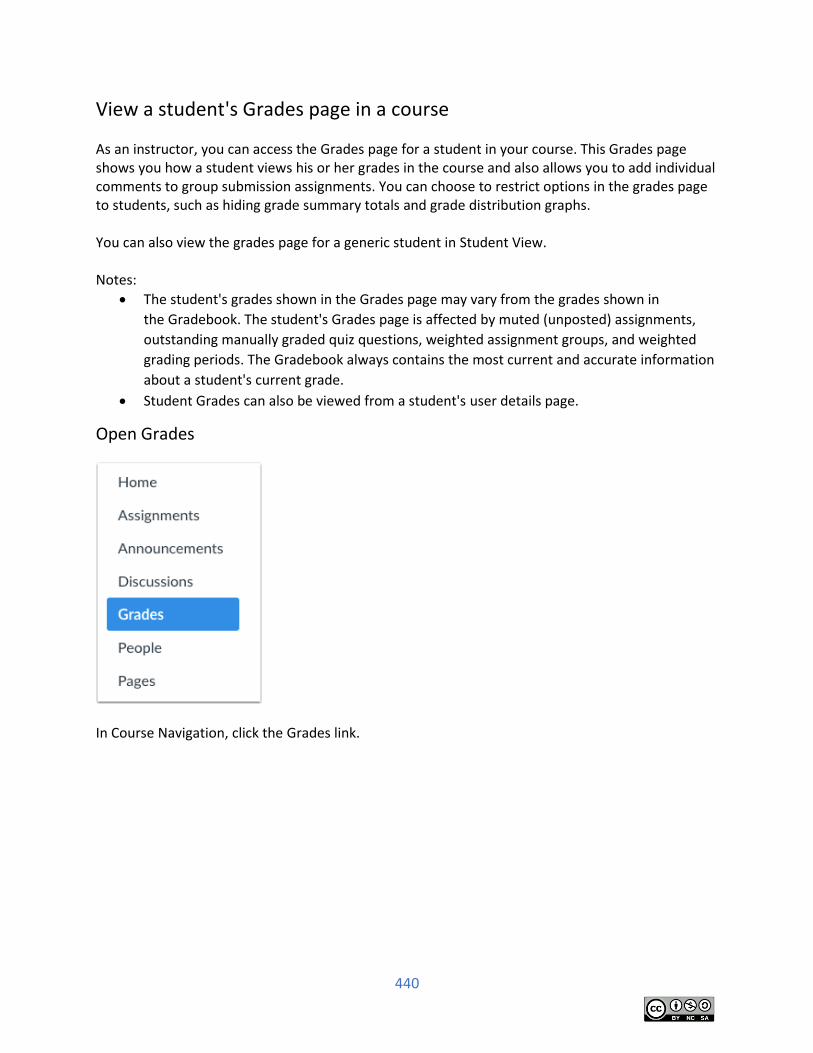
440
View a student's Grades page in a course
As an instructor, you can access the Grades page for a student in your course. This Grades page shows you how a student views his or her grades in the course and also allows you to add individual comments to group submission assignments. You can choose to restrict options in the grades page to students, such as hiding grade summary totals and grade distribution graphs. You can also view the grades page for a generic student in Student View. Notes:
The student's grades shown in the Grades page may vary from the grades shown in
the Gradebook. The student's Grades page is affected by muted (unposted) assignments,
outstanding manually graded quiz questions, weighted assignment groups, and weighted
grading periods. The Gradebook always contains the most current and accurate information
about a student's current grade.
Student Grades can also be viewed from a student's user details page.
Open Grades
In Course Navigation, click the Grades link.

441
Select Student
Click the name of the student.
View Student Context Card
If you have enabled the Student Context Card feature option, click the Grades button.
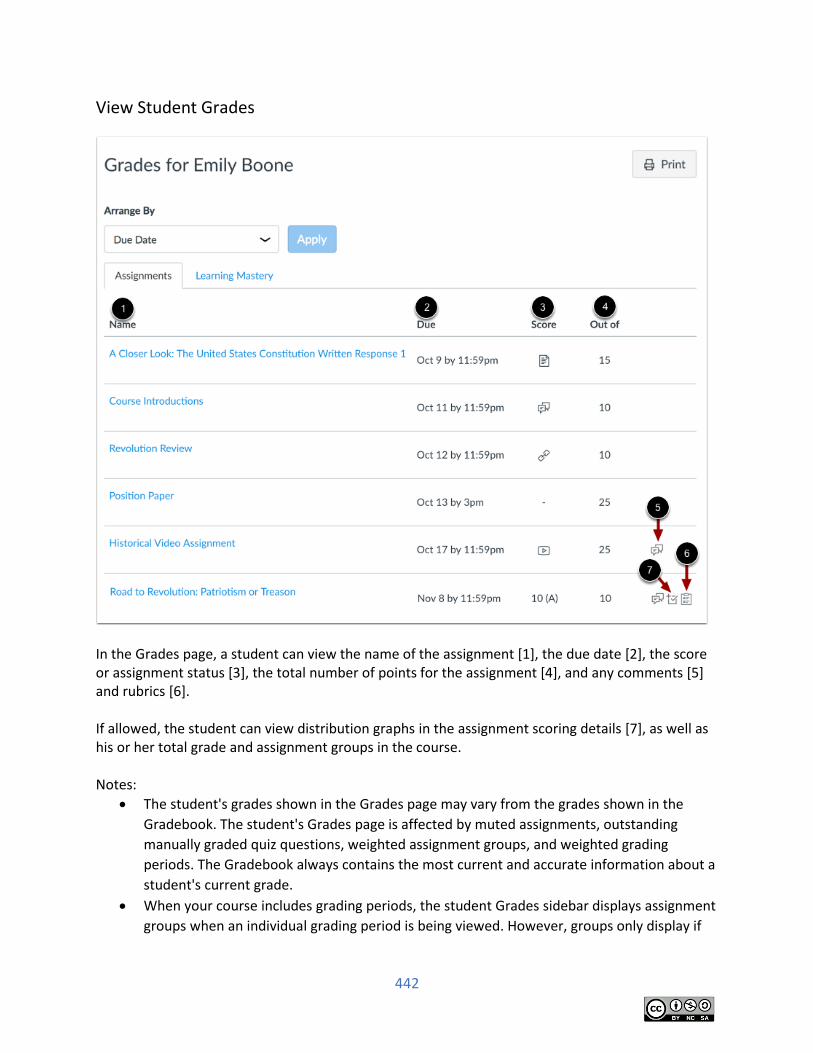
442
View Student Grades
In the Grades page, a student can view the name of the assignment [1], the due date [2], the score or assignment status [3], the total number of points for the assignment [4], and any comments [5] and rubrics [6]. If allowed, the student can view distribution graphs in the assignment scoring details [7], as well as his or her total grade and assignment groups in the course. Notes:
The student's grades shown in the Grades page may vary from the grades shown in the
Gradebook. The student's Grades page is affected by muted assignments, outstanding
manually graded quiz questions, weighted assignment groups, and weighted grading
periods. The Gradebook always contains the most current and accurate information about a
student's current grade.
When your course includes grading periods, the student Grades sidebar displays assignment
groups when an individual grading period is being viewed. However, groups only display if
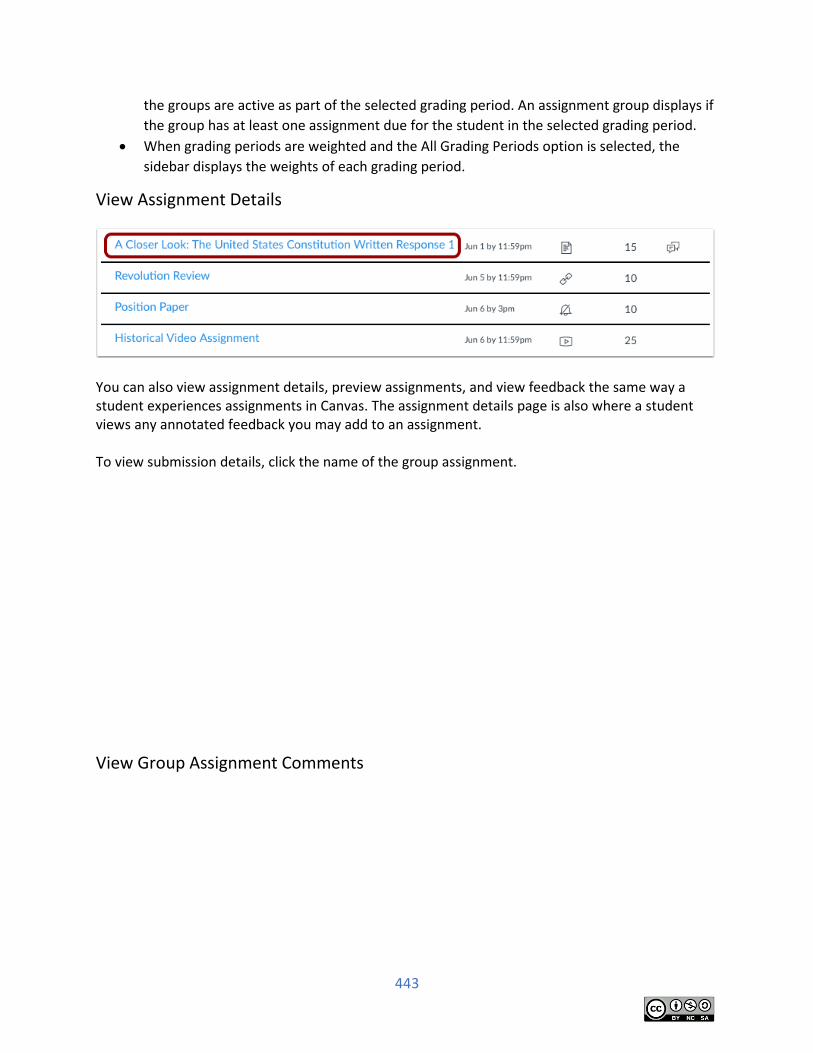
443
the groups are active as part of the selected grading period. An assignment group displays if
the group has at least one assignment due for the student in the selected grading period.
When grading periods are weighted and the All Grading Periods option is selected, the
sidebar displays the weights of each grading period.
View Assignment Details
You can also view assignment details, preview assignments, and view feedback the same way a student experiences assignments in Canvas. The assignment details page is also where a student views any annotated feedback you may add to an assignment. To view submission details, click the name of the group assignment.
View Group Assignment Comments
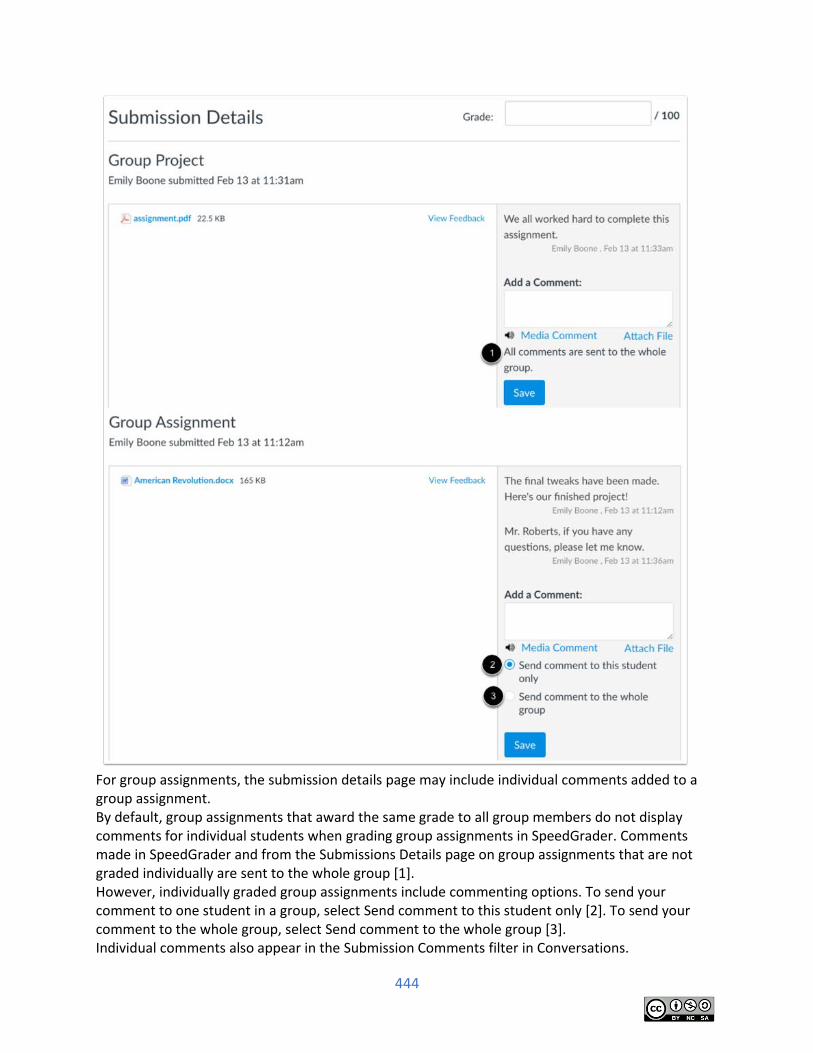
444
For group assignments, the submission details page may include individual comments added to a group assignment. By default, group assignments that award the same grade to all group members do not display comments for individual students when grading group assignments in SpeedGrader. Comments made in SpeedGrader and from the Submissions Details page on group assignments that are not graded individually are sent to the whole group [1]. However, individually graded group assignments include commenting options. To send your comment to one student in a group, select Send comment to this student only [2]. To send your comment to the whole group, select Send comment to the whole group [3]. Individual comments also appear in the Submission Comments filter in Conversations.
445
Gradebook: Try It
Modify Grade in the Gradebook
Modify student's grade in the Gradebook to meet the course requirements.
1. In Course Navigation, click the Grades link.
2. Search for Test Student by typing name in Filter by Student Name or Secondary ID field.
3. Enter 10 points score of the Assignment 1 for Test Student.
4. Delete Test Student's Quiz 1 score from the Gradebook.
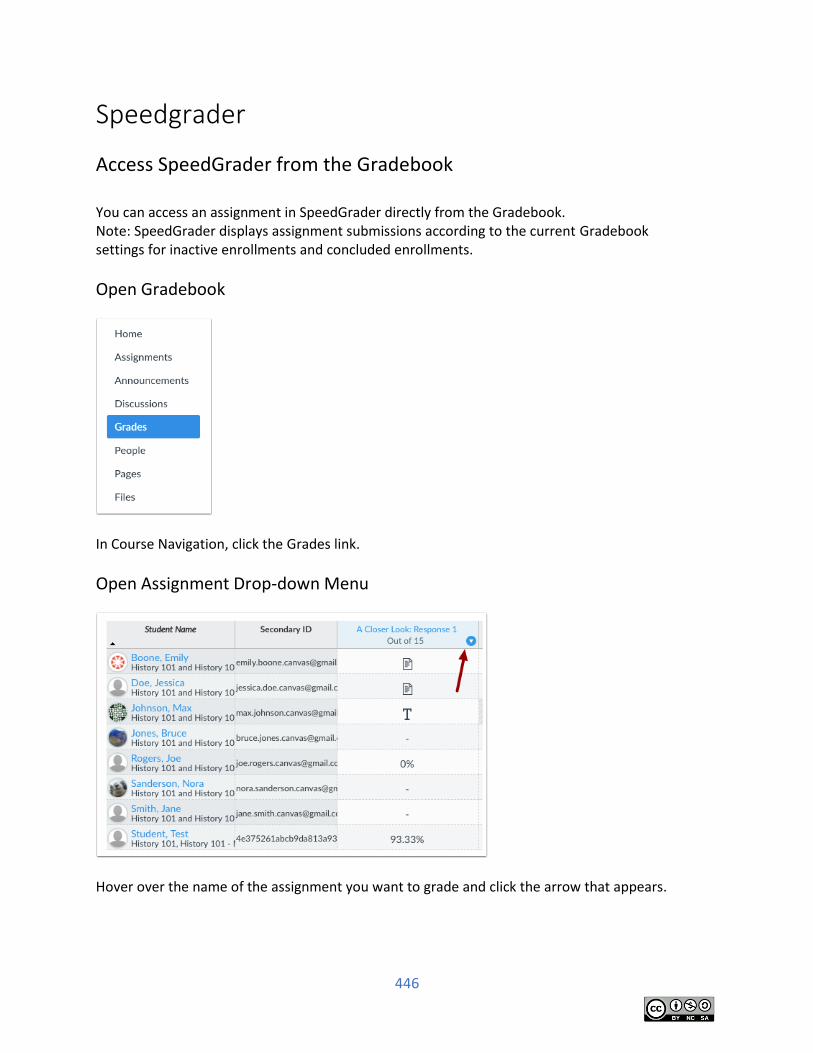
446
Speedgrader
Access SpeedGrader from the Gradebook You can access an assignment in SpeedGrader directly from the Gradebook. Note: SpeedGrader displays assignment submissions according to the current Gradebook settings for inactive enrollments and concluded enrollments.
Open Gradebook
In Course Navigation, click the Grades link.
Open Assignment Drop-down Menu
Hover over the name of the assignment you want to grade and click the arrow that appears.
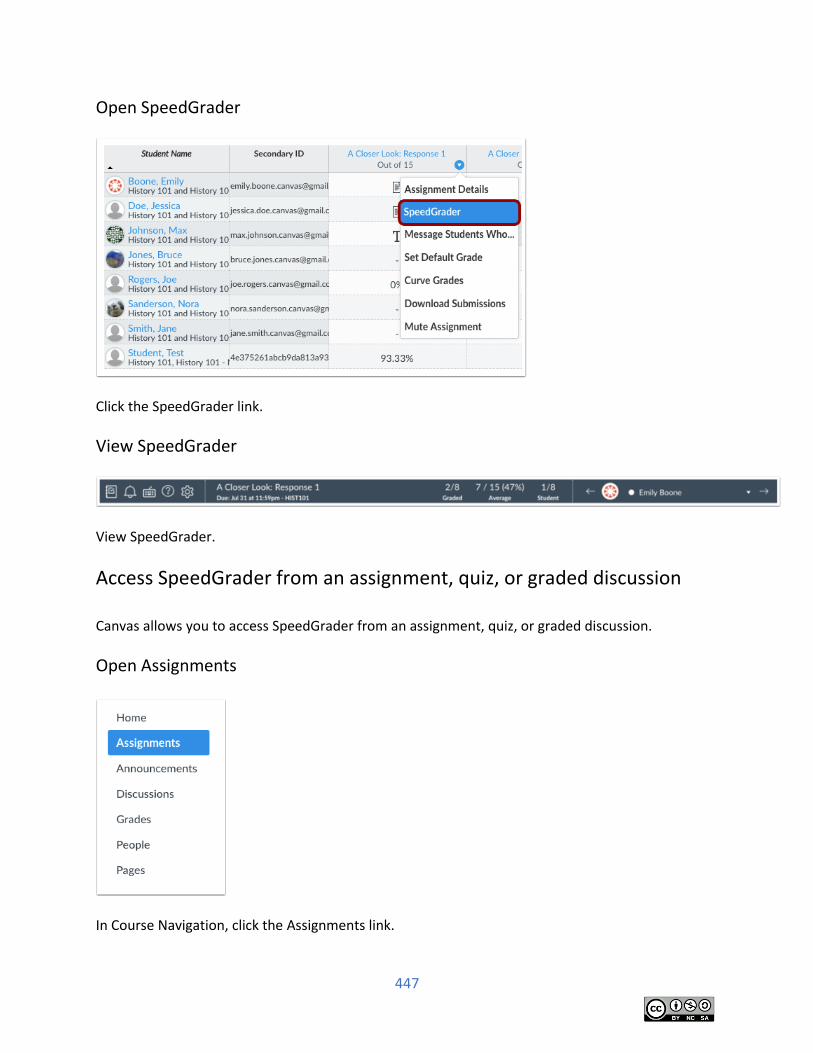
447
Open SpeedGrader
Click the SpeedGrader link.
View SpeedGrader
View SpeedGrader.
Access SpeedGrader from an assignment, quiz, or graded discussion Canvas allows you to access SpeedGrader from an assignment, quiz, or graded discussion.
Open Assignments
In Course Navigation, click the Assignments link.
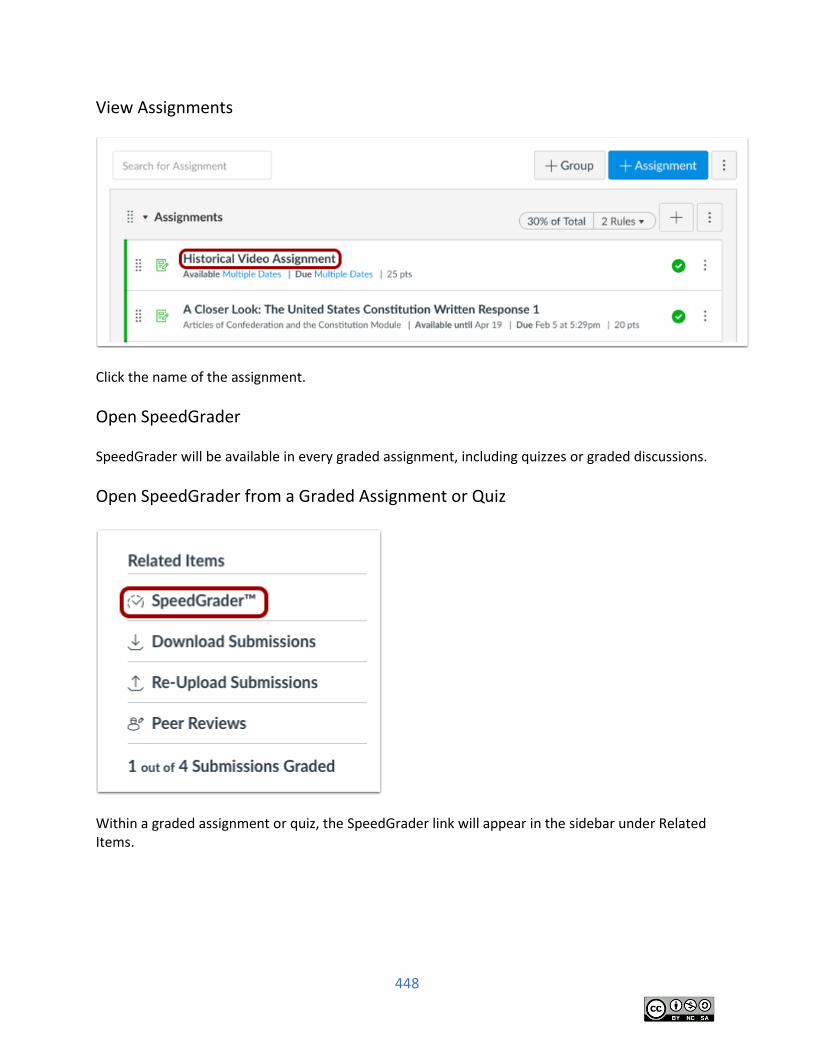
448
View Assignments
Click the name of the assignment.
Open SpeedGrader SpeedGrader will be available in every graded assignment, including quizzes or graded discussions.
Open SpeedGrader from a Graded Assignment or Quiz
Within a graded assignment or quiz, the SpeedGrader link will appear in the sidebar under Related Items.
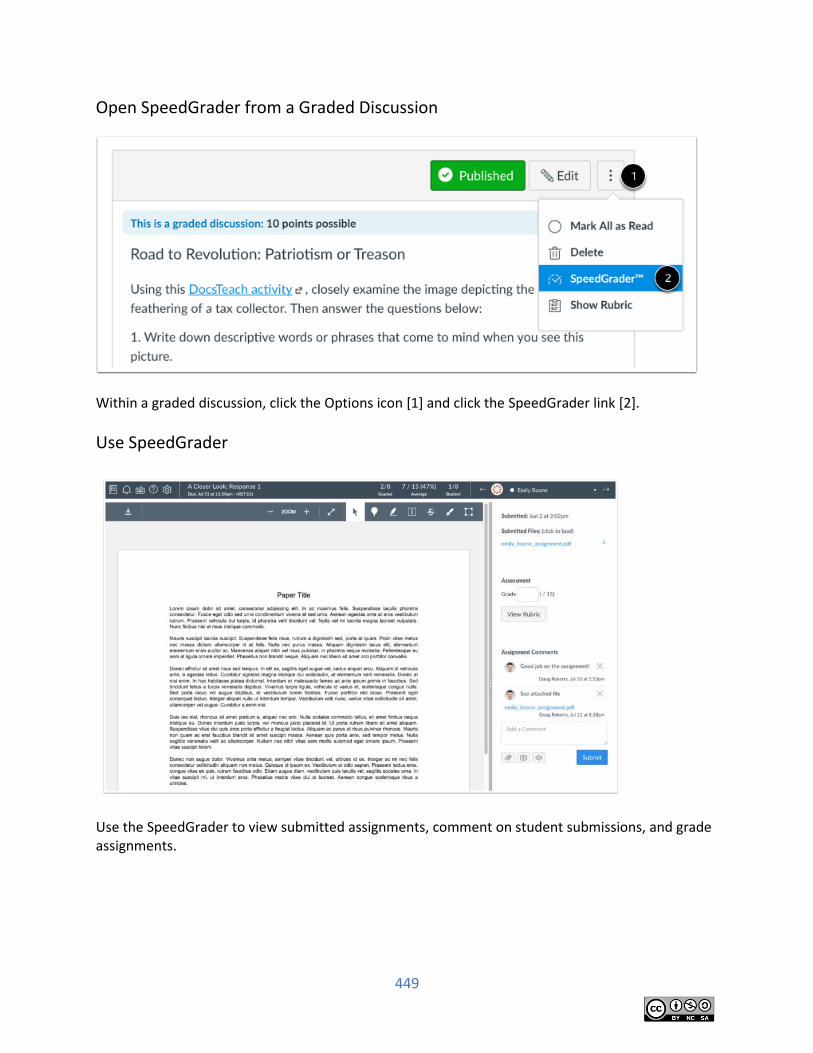
449
Open SpeedGrader from a Graded Discussion
Within a graded discussion, click the Options icon [1] and click the SpeedGrader link [2].
Use SpeedGrader
Use the SpeedGrader to view submitted assignments, comment on student submissions, and grade assignments.
450
Use SpeedGrader SpeedGrader makes it easy to evaluate individual student assignments and group assignments quickly. SpeedGrader displays assignment submissions for active students in your course. However, SpeedGrader displays assignment submissions according to the current Gradebook settings for inactive enrollments and concluded enrollments. For instance, if the Gradebook settings show inactive enrollments, inactive student submissions also appear in SpeedGrader. You can access SpeedGrader through: Assignments, Quizzes, Graded Discussions, and the Gradebook. SpeedGrader Performance In SpeedGrader, all values for an assignment are loaded and saved in the browser, including student submission data, any grades (including original grades for resubmitted assignments), rubrics, and comments. This behavior reduces load time while using SpeedGrader, allowing instructors to grade all submissions quickly without continually refreshing the browser. Advancing from one submission to the next does not dynamically load any updated content. In large courses, SpeedGrader loading times are affected by a threshold of data points that can be loaded within a 60-second window. This threshold is based on a single submission per student. Multiple submissions by the same student increases the submission threshold. Assignments with more than 1500 submissions may result in delayed SpeedGrader loading times, and assignments with more than 2500 submissions may fail to load at all. To improve SpeedGrader performance, large courses should be separated into sections, which allows SpeedGrader to display submissions for a specific section and decrease the overall loading time for an assignment's data. SpeedGrader Users SpeedGrader is generally designed for one instructor role to grade submissions at a time. Because of how SpeedGrader data is loaded and stored in the browser, multiple users should not grade assignments at the same time since each grader cannot view the most recent information for a submission. Updated grades also affect the Gradebook. If your course includes multiple graders, graders added to a course can be limited to only interact with users in a section and only grade submissions in the section where they were enrolled. This enrollment option prevents assignment grading overlap so multiple instructor roles cannot grade the same assignment. An exception to multiple graders is an assignment set up for moderated grading, where an instructor may act as a moderator and allow two additional graders to review a submission independent of each other.
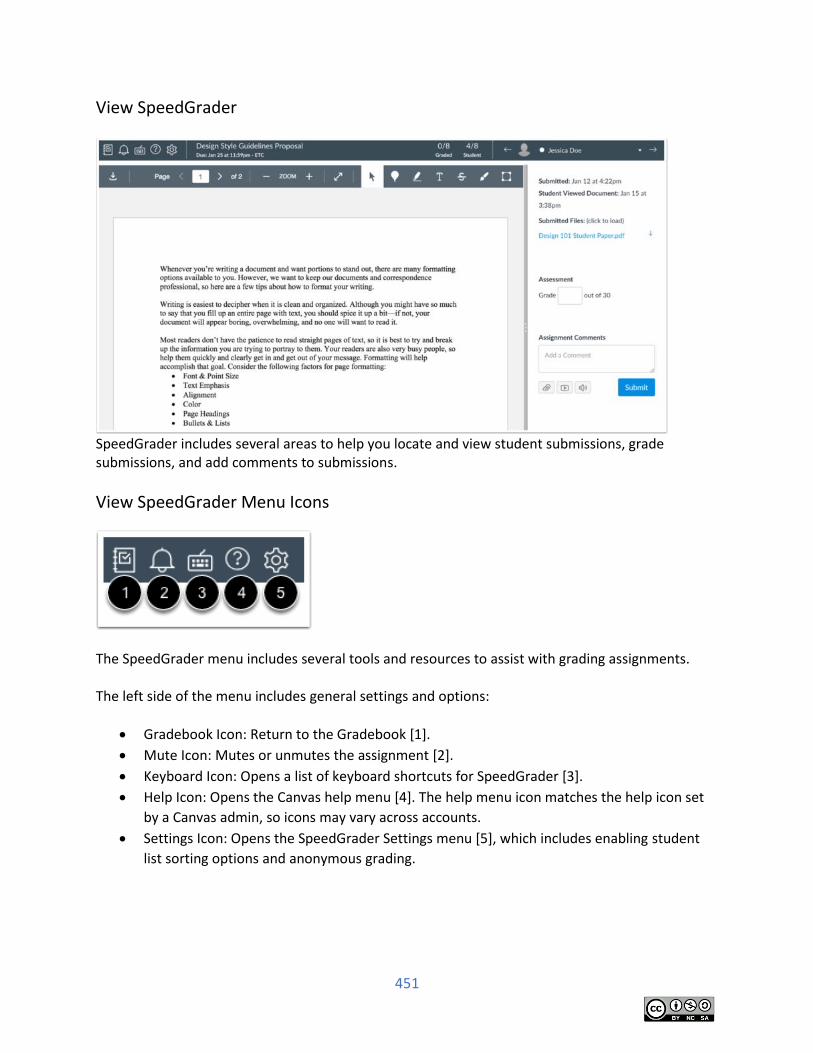
451
View SpeedGrader
SpeedGrader includes several areas to help you locate and view student submissions, grade submissions, and add comments to submissions.
View SpeedGrader Menu Icons
The SpeedGrader menu includes several tools and resources to assist with grading assignments. The left side of the menu includes general settings and options:
Gradebook Icon: Return to the Gradebook [1].
Mute Icon: Mutes or unmutes the assignment [2].
Keyboard Icon: Opens a list of keyboard shortcuts for SpeedGrader [3].
Help Icon: Opens the Canvas help menu [4]. The help menu icon matches the help icon set
by a Canvas admin, so icons may vary across accounts.
Settings Icon: Opens the SpeedGrader Settings menu [5], which includes enabling student
list sorting options and anonymous grading.
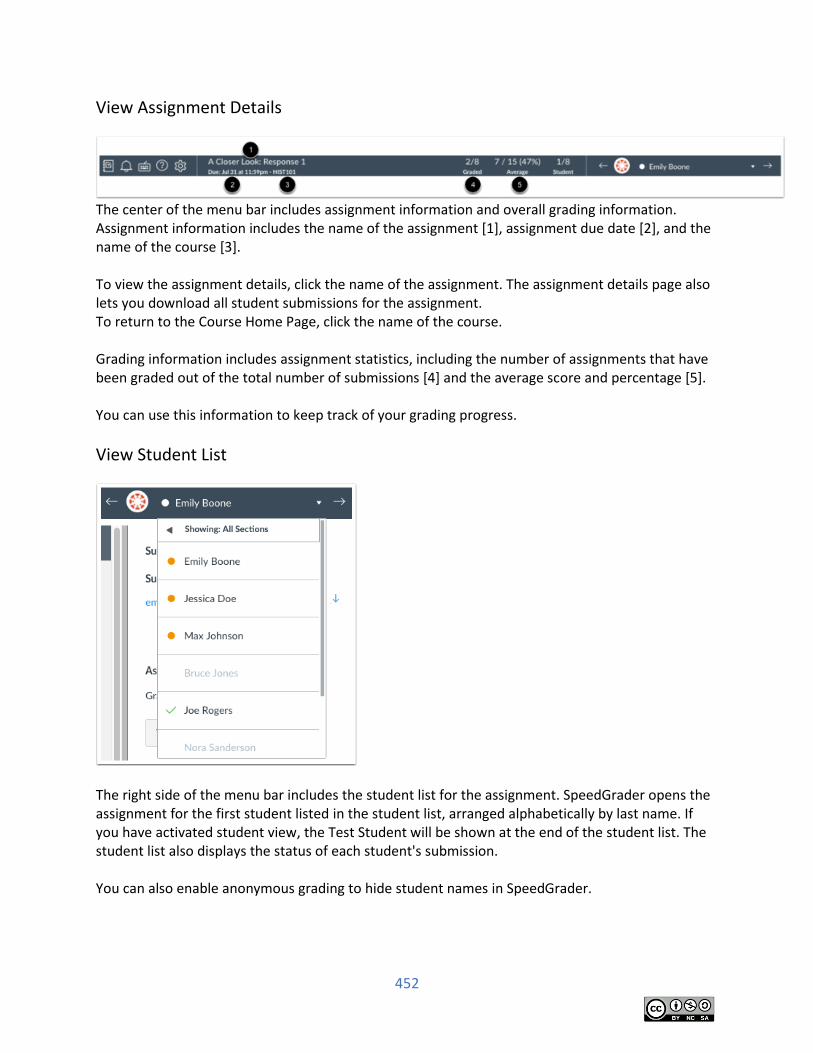
452
View Assignment Details
The center of the menu bar includes assignment information and overall grading information. Assignment information includes the name of the assignment [1], assignment due date [2], and the name of the course [3]. To view the assignment details, click the name of the assignment. The assignment details page also lets you download all student submissions for the assignment. To return to the Course Home Page, click the name of the course. Grading information includes assignment statistics, including the number of assignments that have been graded out of the total number of submissions [4] and the average score and percentage [5]. You can use this information to keep track of your grading progress.
View Student List
The right side of the menu bar includes the student list for the assignment. SpeedGrader opens the assignment for the first student listed in the student list, arranged alphabetically by last name. If you have activated student view, the Test Student will be shown at the end of the student list. The student list also displays the status of each student's submission. You can also enable anonymous grading to hide student names in SpeedGrader.
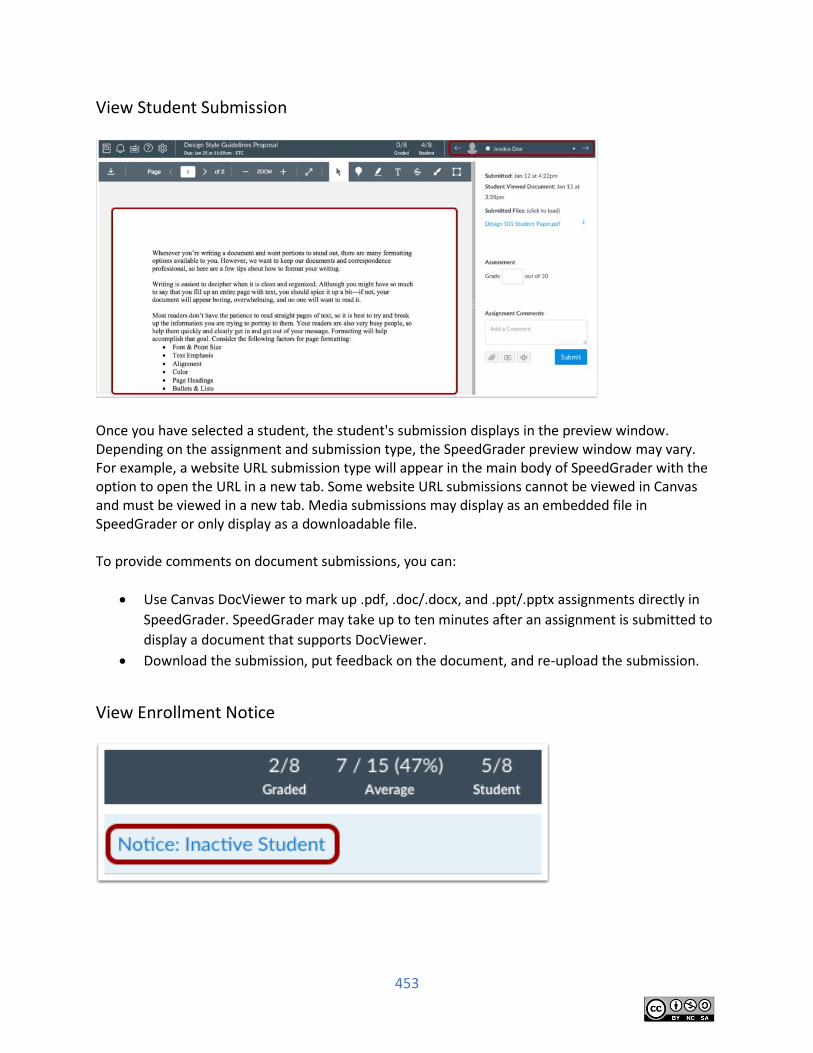
453
View Student Submission
Once you have selected a student, the student's submission displays in the preview window. Depending on the assignment and submission type, the SpeedGrader preview window may vary. For example, a website URL submission type will appear in the main body of SpeedGrader with the option to open the URL in a new tab. Some website URL submissions cannot be viewed in Canvas and must be viewed in a new tab. Media submissions may display as an embedded file in SpeedGrader or only display as a downloadable file. To provide comments on document submissions, you can:
Use Canvas DocViewer to mark up .pdf, .doc/.docx, and .ppt/.pptx assignments directly in
SpeedGrader. SpeedGrader may take up to ten minutes after an assignment is submitted to
display a document that supports DocViewer.
Download the submission, put feedback on the document, and re-upload the submission.
View Enrollment Notice
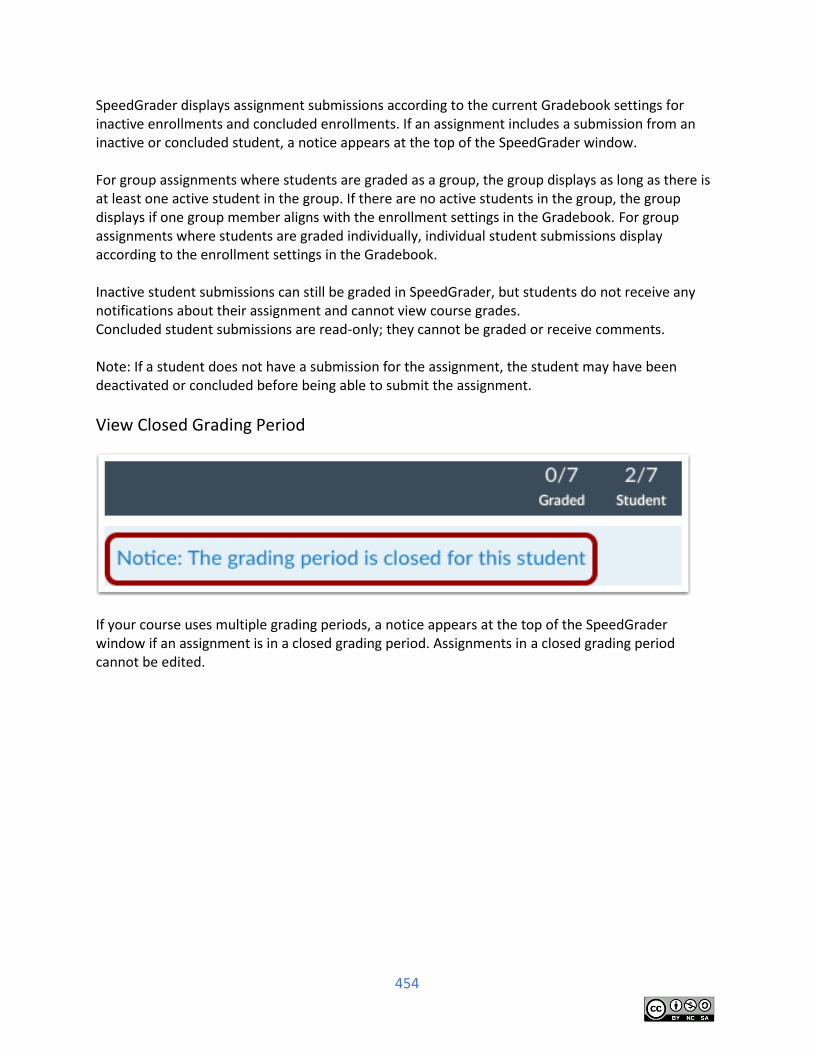
454
SpeedGrader displays assignment submissions according to the current Gradebook settings for inactive enrollments and concluded enrollments. If an assignment includes a submission from an inactive or concluded student, a notice appears at the top of the SpeedGrader window. For group assignments where students are graded as a group, the group displays as long as there is at least one active student in the group. If there are no active students in the group, the group displays if one group member aligns with the enrollment settings in the Gradebook. For group assignments where students are graded individually, individual student submissions display according to the enrollment settings in the Gradebook. Inactive student submissions can still be graded in SpeedGrader, but students do not receive any notifications about their assignment and cannot view course grades. Concluded student submissions are read-only; they cannot be graded or receive comments. Note: If a student does not have a submission for the assignment, the student may have been deactivated or concluded before being able to submit the assignment.
View Closed Grading Period
If your course uses multiple grading periods, a notice appears at the top of the SpeedGrader window if an assignment is in a closed grading period. Assignments in a closed grading period cannot be edited.
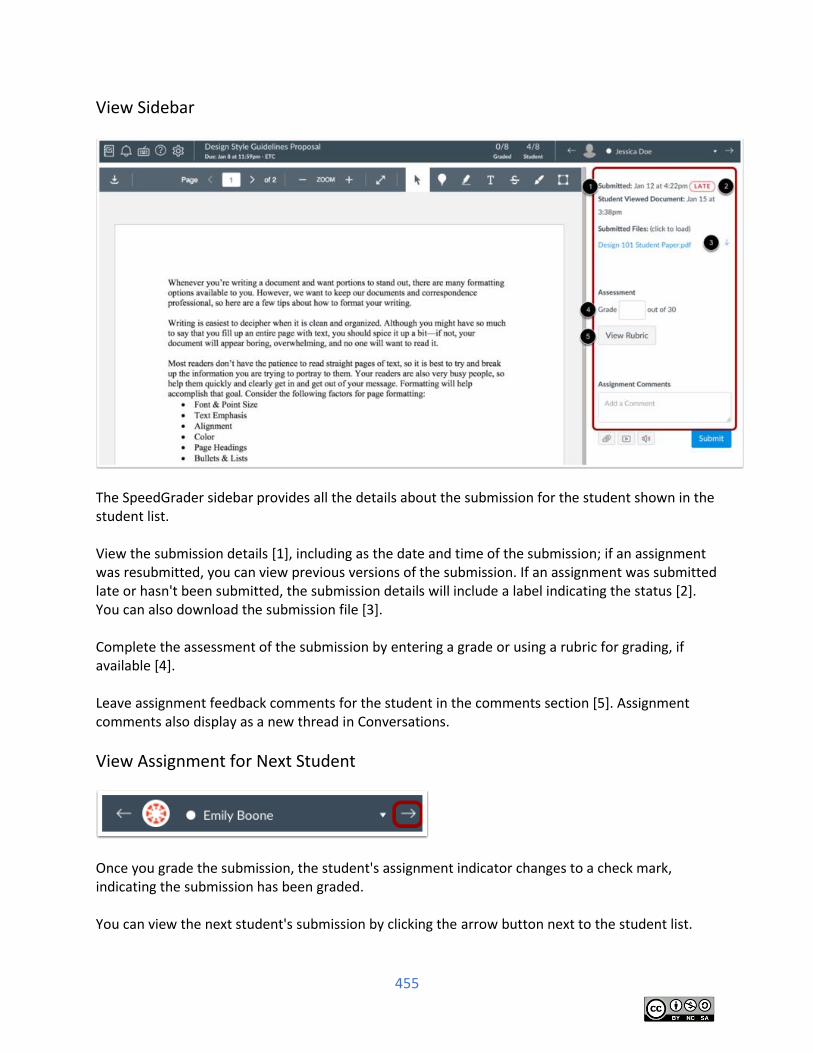
455
View Sidebar
The SpeedGrader sidebar provides all the details about the submission for the student shown in the student list. View the submission details [1], including as the date and time of the submission; if an assignment was resubmitted, you can view previous versions of the submission. If an assignment was submitted late or hasn't been submitted, the submission details will include a label indicating the status [2]. You can also download the submission file [3]. Complete the assessment of the submission by entering a grade or using a rubric for grading, if available [4]. Leave assignment feedback comments for the student in the comments section [5]. Assignment comments also display as a new thread in Conversations.
View Assignment for Next Student
Once you grade the submission, the student's assignment indicator changes to a check mark, indicating the submission has been graded. You can view the next student's submission by clicking the arrow button next to the student list.
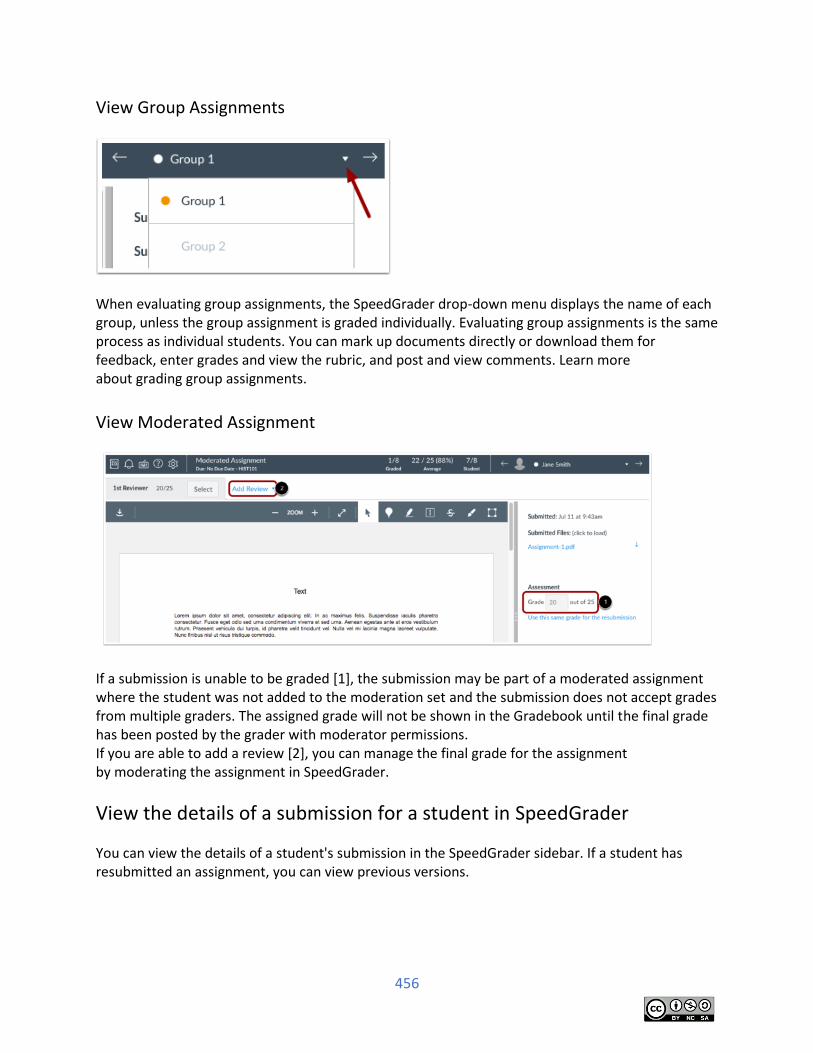
456
View Group Assignments
When evaluating group assignments, the SpeedGrader drop-down menu displays the name of each group, unless the group assignment is graded individually. Evaluating group assignments is the same process as individual students. You can mark up documents directly or download them for feedback, enter grades and view the rubric, and post and view comments. Learn more about grading group assignments.
View Moderated Assignment
If a submission is unable to be graded [1], the submission may be part of a moderated assignment where the student was not added to the moderation set and the submission does not accept grades from multiple graders. The assigned grade will not be shown in the Gradebook until the final grade has been posted by the grader with moderator permissions. If you are able to add a review [2], you can manage the final grade for the assignment by moderating the assignment in SpeedGrader.
View the details of a submission for a student in SpeedGrader
You can view the details of a student's submission in the SpeedGrader sidebar. If a student has resubmitted an assignment, you can view previous versions.
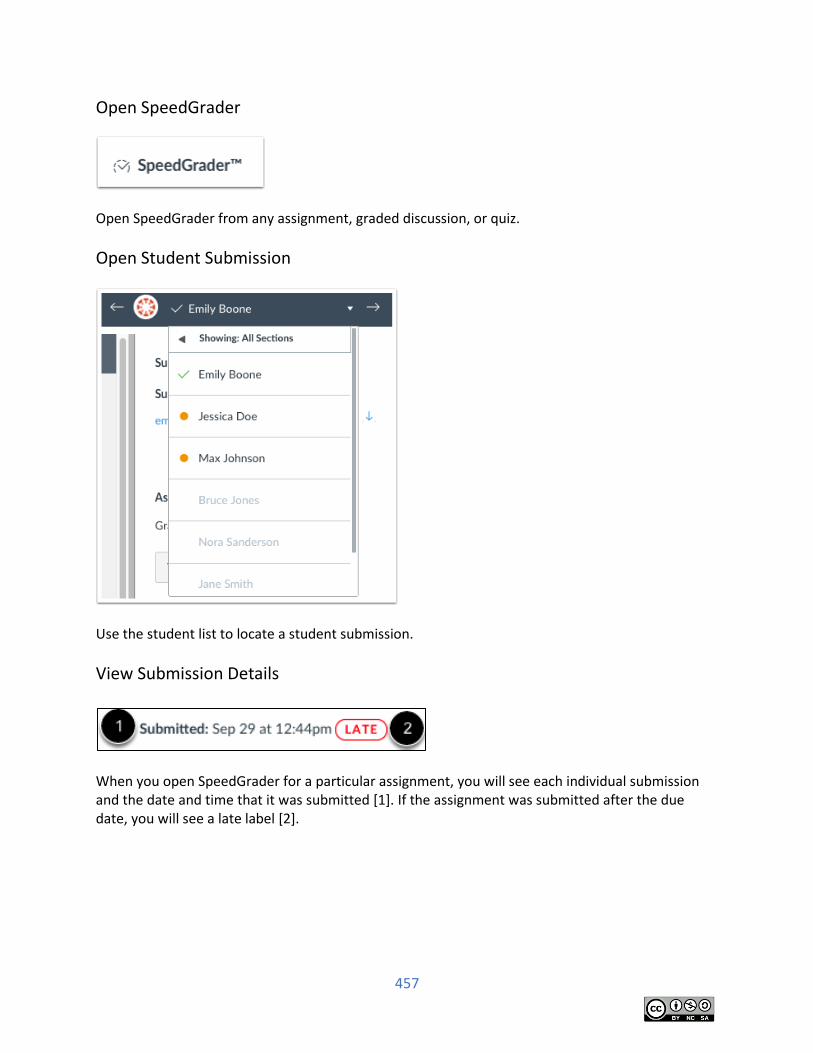
457
Open SpeedGrader
Open SpeedGrader from any assignment, graded discussion, or quiz.
Open Student Submission
Use the student list to locate a student submission.
View Submission Details
When you open SpeedGrader for a particular assignment, you will see each individual submission and the date and time that it was submitted [1]. If the assignment was submitted after the due date, you will see a late label [2].
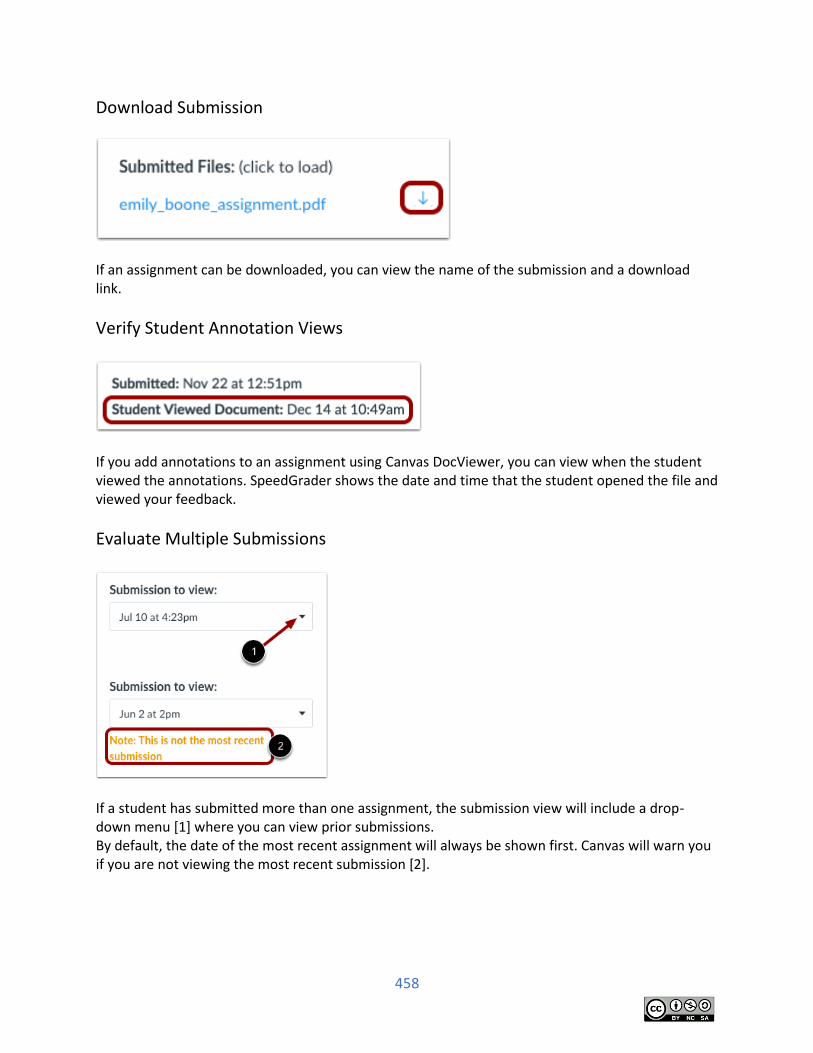
458
Download Submission
If an assignment can be downloaded, you can view the name of the submission and a download link.
Verify Student Annotation Views
If you add annotations to an assignment using Canvas DocViewer, you can view when the student viewed the annotations. SpeedGrader shows the date and time that the student opened the file and viewed your feedback.
Evaluate Multiple Submissions
If a student has submitted more than one assignment, the submission view will include a drop-down menu [1] where you can view prior submissions. By default, the date of the most recent assignment will always be shown first. Canvas will warn you if you are not viewing the most recent submission [2].
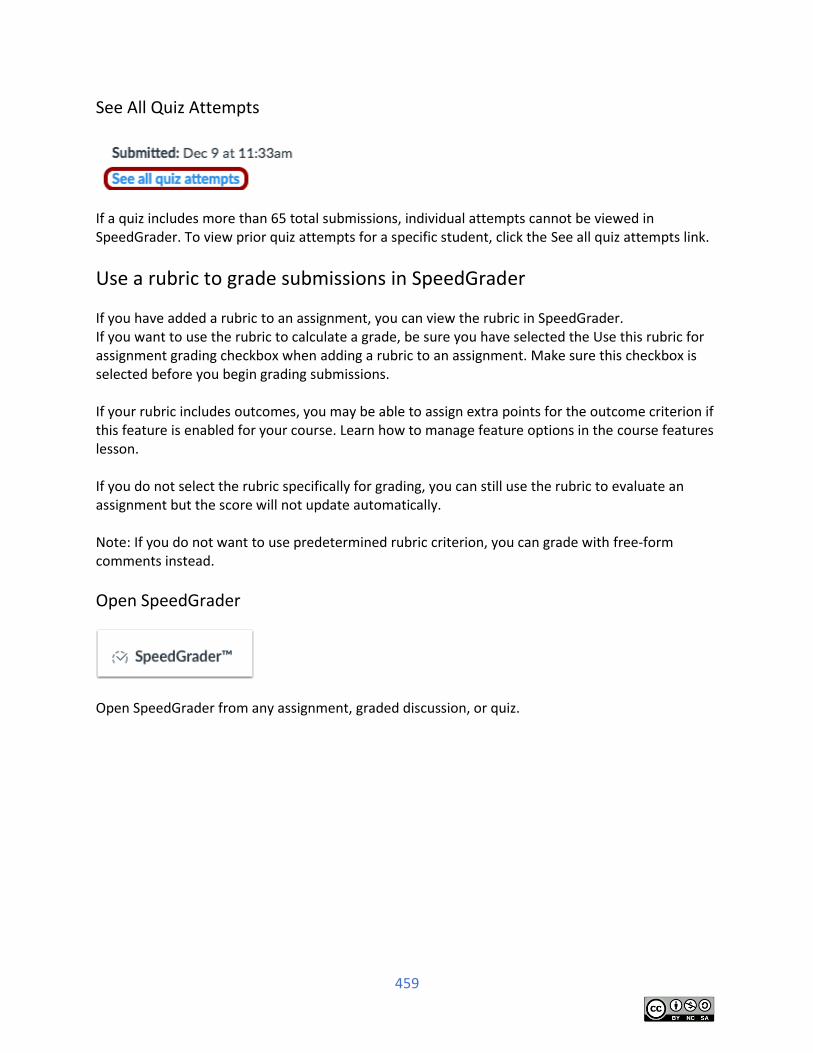
459
See All Quiz Attempts
If a quiz includes more than 65 total submissions, individual attempts cannot be viewed in SpeedGrader. To view prior quiz attempts for a specific student, click the See all quiz attempts link.
Use a rubric to grade submissions in SpeedGrader
If you have added a rubric to an assignment, you can view the rubric in SpeedGrader. If you want to use the rubric to calculate a grade, be sure you have selected the Use this rubric for assignment grading checkbox when adding a rubric to an assignment. Make sure this checkbox is selected before you begin grading submissions. If your rubric includes outcomes, you may be able to assign extra points for the outcome criterion if this feature is enabled for your course. Learn how to manage feature options in the course features lesson. If you do not select the rubric specifically for grading, you can still use the rubric to evaluate an assignment but the score will not update automatically. Note: If you do not want to use predetermined rubric criterion, you can grade with free-form comments instead.
Open SpeedGrader
Open SpeedGrader from any assignment, graded discussion, or quiz.
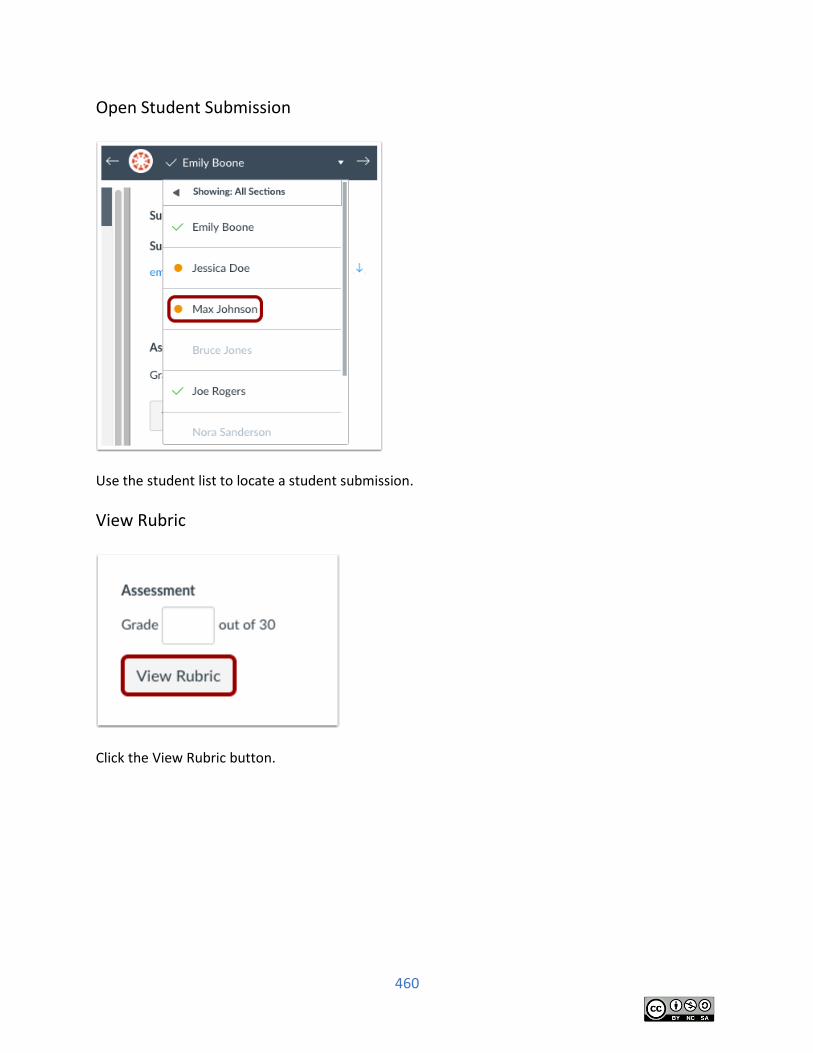
460
Open Student Submission
Use the student list to locate a student submission.
View Rubric
Click the View Rubric button.
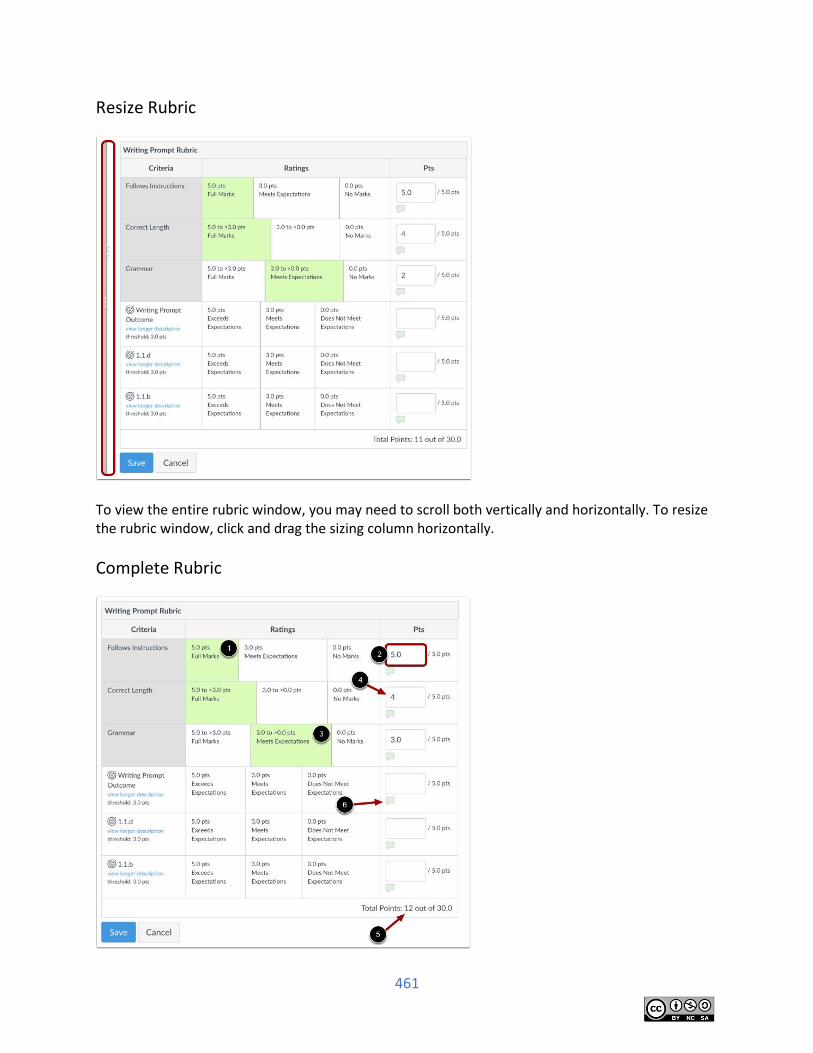
461
Resize Rubric
To view the entire rubric window, you may need to scroll both vertically and horizontally. To resize the rubric window, click and drag the sizing column horizontally.
Complete Rubric
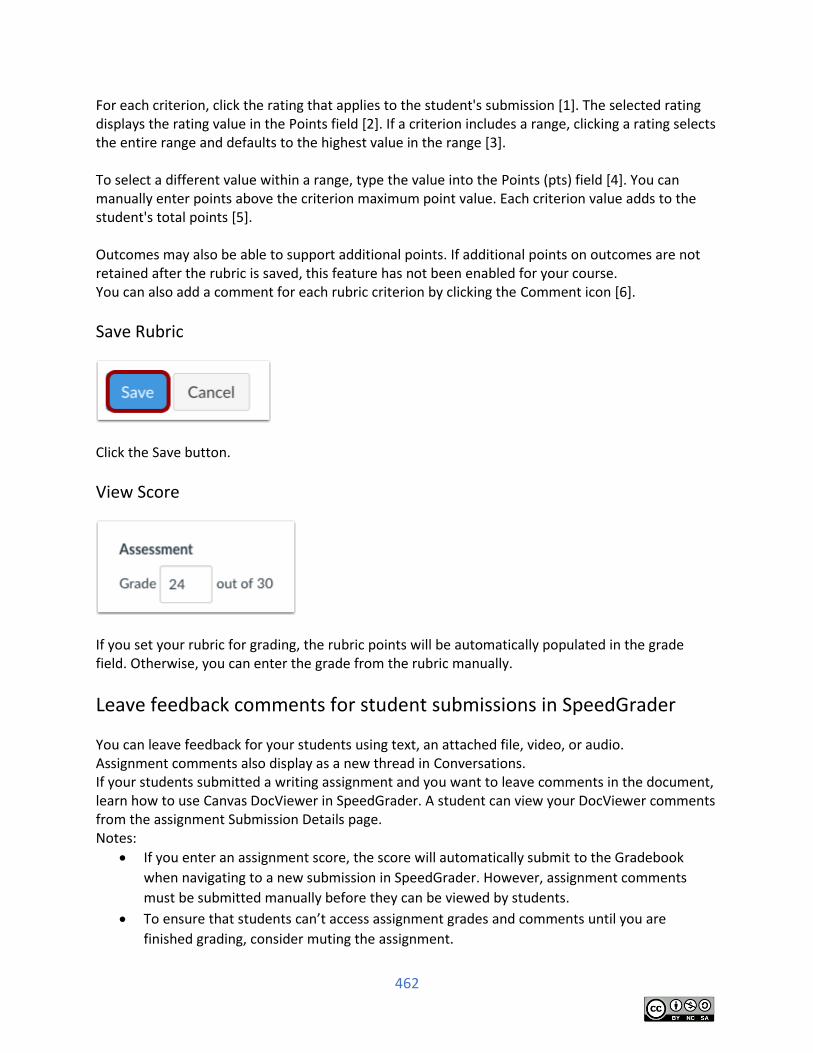
462
For each criterion, click the rating that applies to the student's submission [1]. The selected rating displays the rating value in the Points field [2]. If a criterion includes a range, clicking a rating selects the entire range and defaults to the highest value in the range [3]. To select a different value within a range, type the value into the Points (pts) field [4]. You can manually enter points above the criterion maximum point value. Each criterion value adds to the student's total points [5]. Outcomes may also be able to support additional points. If additional points on outcomes are not retained after the rubric is saved, this feature has not been enabled for your course. You can also add a comment for each rubric criterion by clicking the Comment icon [6].
Save Rubric
Click the Save button.
View Score
If you set your rubric for grading, the rubric points will be automatically populated in the grade field. Otherwise, you can enter the grade from the rubric manually.
Leave feedback comments for student submissions in SpeedGrader
You can leave feedback for your students using text, an attached file, video, or audio. Assignment comments also display as a new thread in Conversations. If your students submitted a writing assignment and you want to leave comments in the document, learn how to use Canvas DocViewer in SpeedGrader. A student can view your DocViewer comments from the assignment Submission Details page. Notes:
If you enter an assignment score, the score will automatically submit to the Gradebook
when navigating to a new submission in SpeedGrader. However, assignment comments
must be submitted manually before they can be viewed by students.
To ensure that students can’t access assignment grades and comments until you are
finished grading, consider muting the assignment.
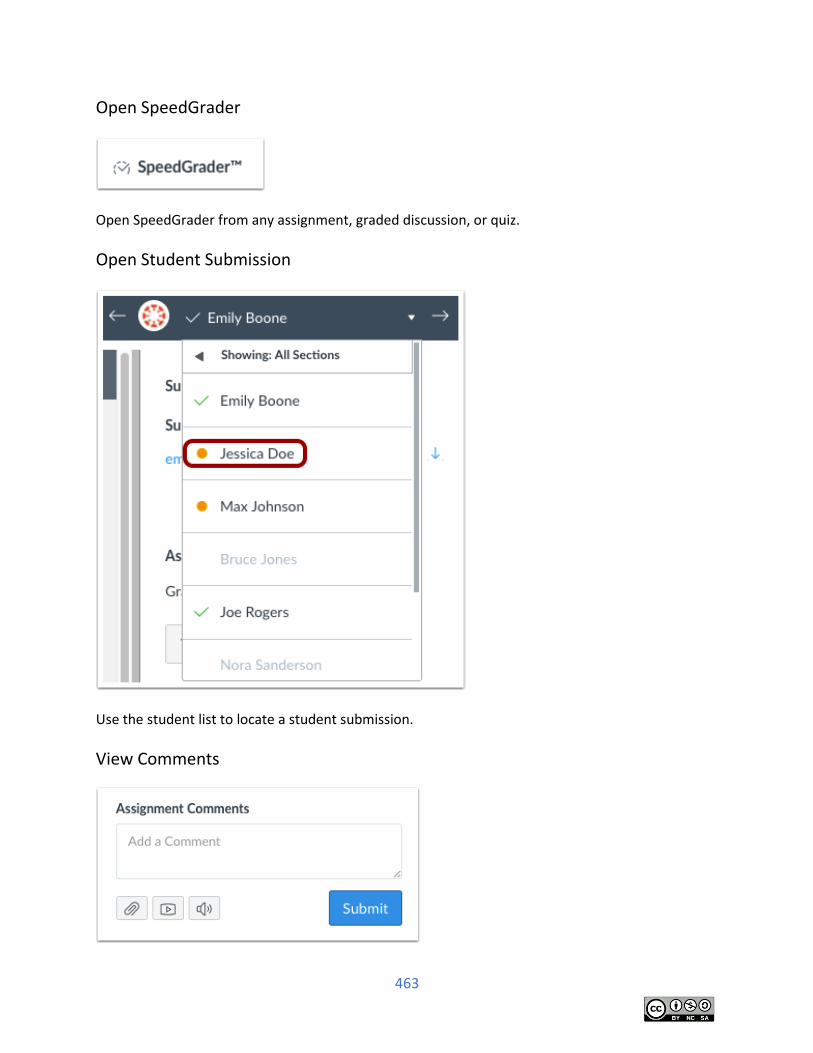
463
Open SpeedGrader
Open SpeedGrader from any assignment, graded discussion, or quiz.
Open Student Submission
Use the student list to locate a student submission.
View Comments
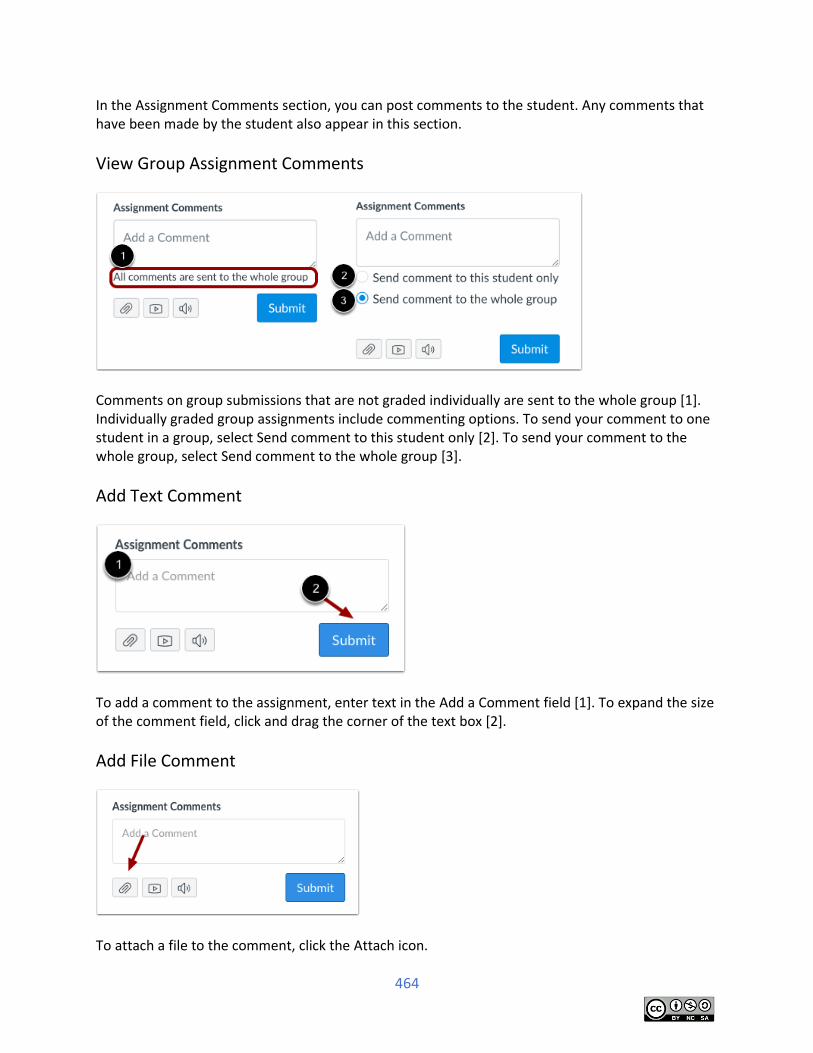
464
In the Assignment Comments section, you can post comments to the student. Any comments that have been made by the student also appear in this section.
View Group Assignment Comments
Comments on group submissions that are not graded individually are sent to the whole group [1]. Individually graded group assignments include commenting options. To send your comment to one student in a group, select Send comment to this student only [2]. To send your comment to the whole group, select Send comment to the whole group [3].
Add Text Comment
To add a comment to the assignment, enter text in the Add a Comment field [1]. To expand the size of the comment field, click and drag the corner of the text box [2].
Add File Comment
To attach a file to the comment, click the Attach icon.
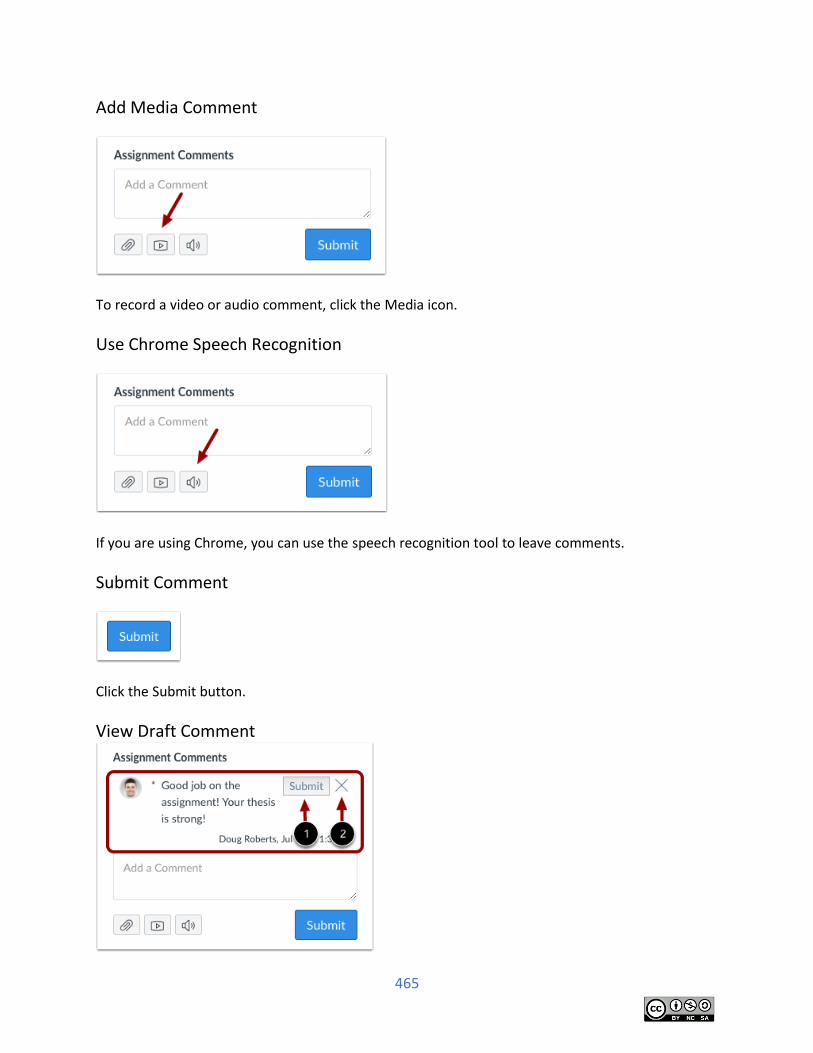
465
Add Media Comment
To record a video or audio comment, click the Media icon.
Use Chrome Speech Recognition
If you are using Chrome, you can use the speech recognition tool to leave comments.
Submit Comment
Click the Submit button.
View Draft Comment
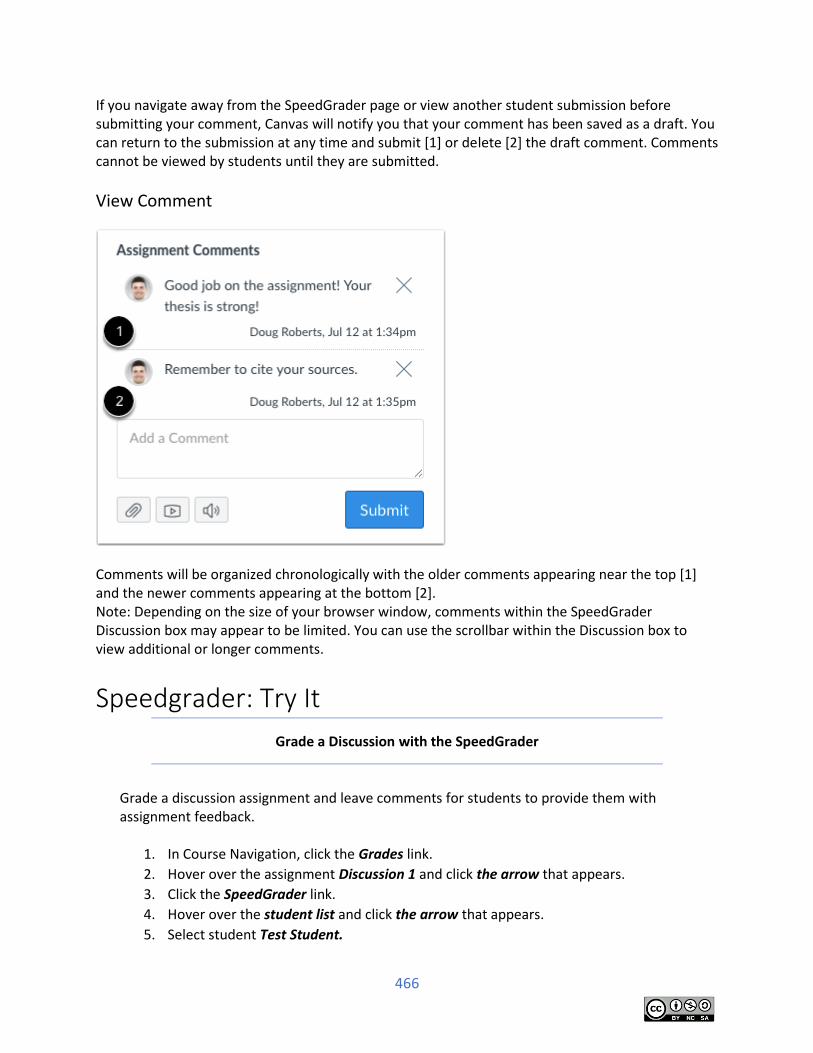
466
If you navigate away from the SpeedGrader page or view another student submission before submitting your comment, Canvas will notify you that your comment has been saved as a draft. You can return to the submission at any time and submit [1] or delete [2] the draft comment. Comments cannot be viewed by students until they are submitted.
View Comment
Comments will be organized chronologically with the older comments appearing near the top [1] and the newer comments appearing at the bottom [2]. Note: Depending on the size of your browser window, comments within the SpeedGrader Discussion box may appear to be limited. You can use the scrollbar within the Discussion box to view additional or longer comments.
Speedgrader: Try It
Grade a Discussion with the SpeedGrader
Grade a discussion assignment and leave comments for students to provide them with assignment feedback.
1. In Course Navigation, click the Grades link.
2. Hover over the assignment Discussion 1 and click the arrow that appears.
3. Click the SpeedGrader link.
4. Hover over the student list and click the arrow that appears.
5. Select student Test Student.

467
6. Enter the grade 5 points manually under Assessment field.
7. Enter text You did a great job! in the Add a Comment field, then click Submit button to
submit your comment.
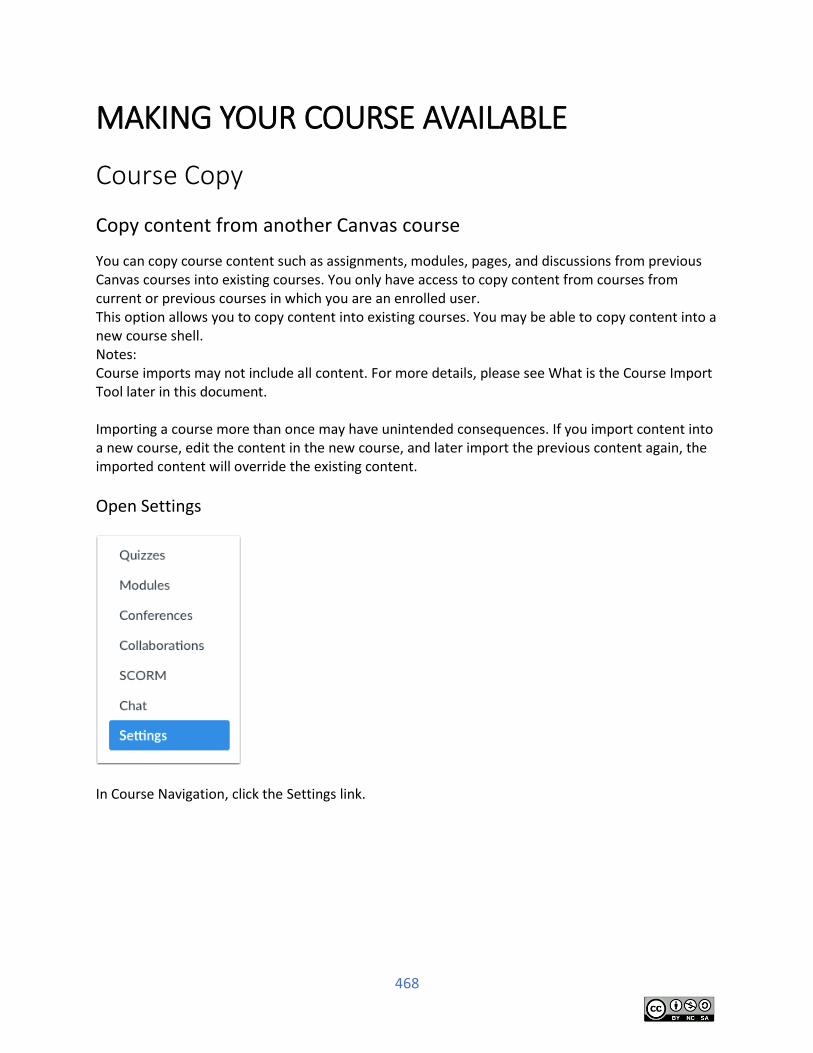
468
MAKING YOUR COURSE AVAILABLE
Course Copy
Copy content from another Canvas course
You can copy course content such as assignments, modules, pages, and discussions from previous Canvas courses into existing courses. You only have access to copy content from courses from current or previous courses in which you are an enrolled user. This option allows you to copy content into existing courses. You may be able to copy content into a new course shell. Notes: Course imports may not include all content. For more details, please see What is the Course Import Tool later in this document. Importing a course more than once may have unintended consequences. If you import content into a new course, edit the content in the new course, and later import the previous content again, the imported content will override the existing content.
Open Settings
In Course Navigation, click the Settings link.
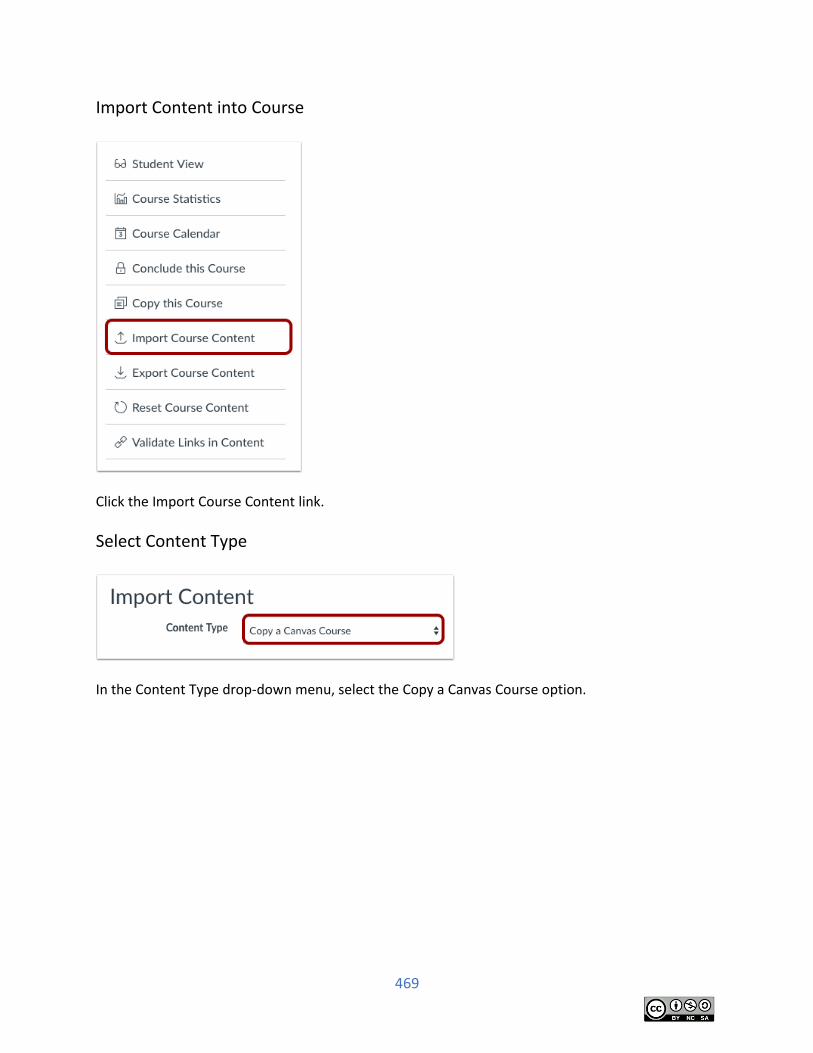
469
Import Content into Course
Click the Import Course Content link.
Select Content Type
In the Content Type drop-down menu, select the Copy a Canvas Course option.
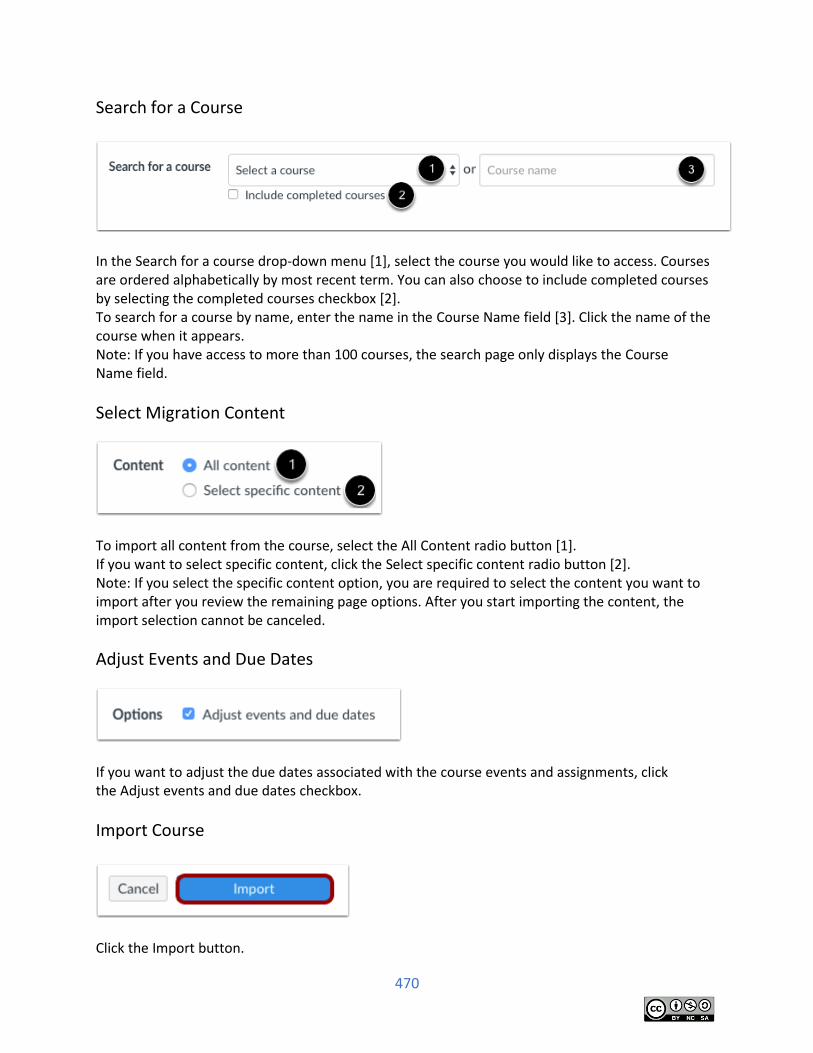
470
Search for a Course
In the Search for a course drop-down menu [1], select the course you would like to access. Courses are ordered alphabetically by most recent term. You can also choose to include completed courses by selecting the completed courses checkbox [2]. To search for a course by name, enter the name in the Course Name field [3]. Click the name of the course when it appears. Note: If you have access to more than 100 courses, the search page only displays the Course Name field.
Select Migration Content
To import all content from the course, select the All Content radio button [1]. If you want to select specific content, click the Select specific content radio button [2]. Note: If you select the specific content option, you are required to select the content you want to import after you review the remaining page options. After you start importing the content, the import selection cannot be canceled.
Adjust Events and Due Dates
If you want to adjust the due dates associated with the course events and assignments, click the Adjust events and due dates checkbox.
Import Course
Click the Import button.
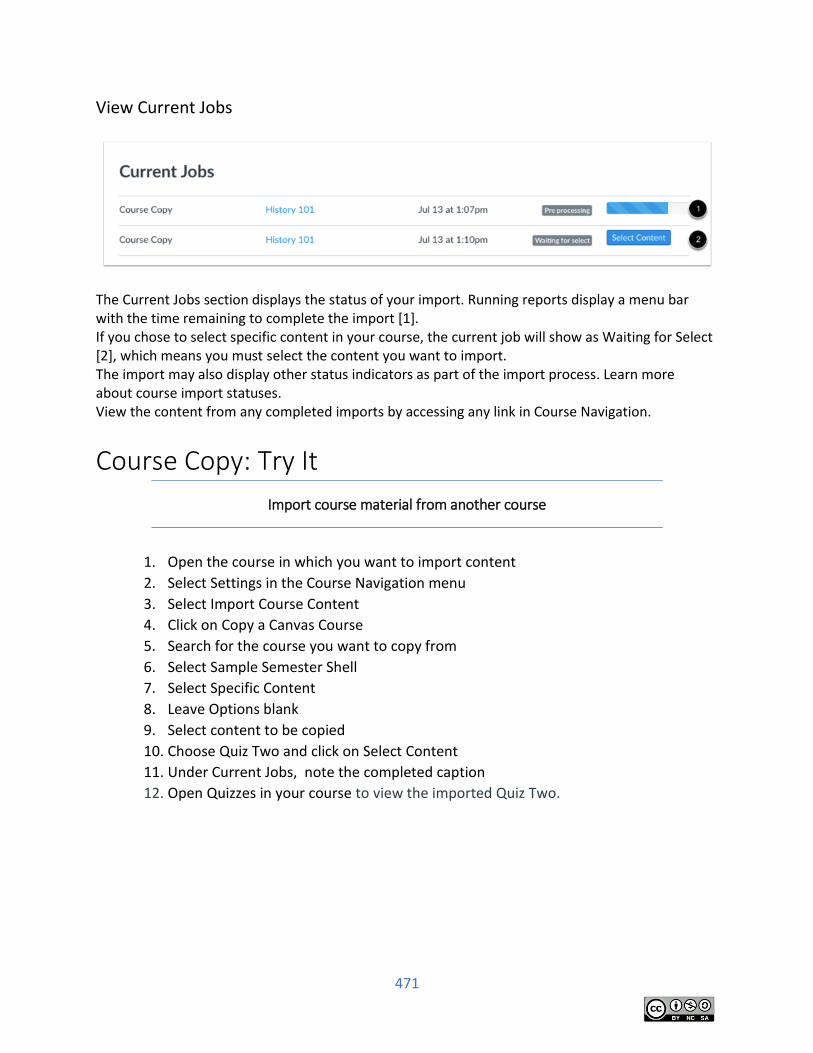
471
View Current Jobs
The Current Jobs section displays the status of your import. Running reports display a menu bar with the time remaining to complete the import [1]. If you chose to select specific content in your course, the current job will show as Waiting for Select [2], which means you must select the content you want to import. The import may also display other status indicators as part of the import process. Learn more about course import statuses. View the content from any completed imports by accessing any link in Course Navigation.
Course Copy: Try It
Import course material from another course
1. Open the course in which you want to import content
2. Select Settings in the Course Navigation menu
3. Select Import Course Content
4. Click on Copy a Canvas Course
5. Search for the course you want to copy from
6. Select Sample Semester Shell
7. Select Specific Content
8. Leave Options blank
9. Select content to be copied
10. Choose Quiz Two and click on Select Content
11. Under Current Jobs, note the completed caption
12. Open Quizzes in your course to view the imported Quiz Two.
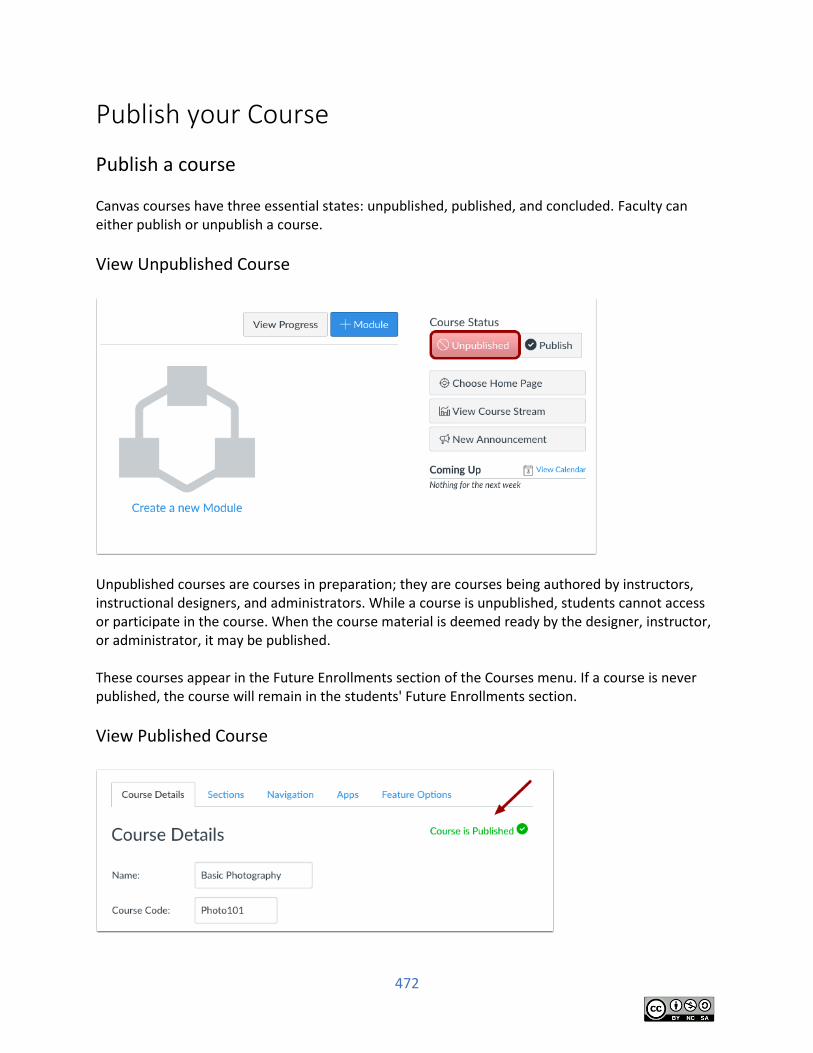
472
Publish your Course
Publish a course Canvas courses have three essential states: unpublished, published, and concluded. Faculty can either publish or unpublish a course.
View Unpublished Course
Unpublished courses are courses in preparation; they are courses being authored by instructors, instructional designers, and administrators. While a course is unpublished, students cannot access or participate in the course. When the course material is deemed ready by the designer, instructor, or administrator, it may be published. These courses appear in the Future Enrollments section of the Courses menu. If a course is never published, the course will remain in the students' Future Enrollments section.
View Published Course
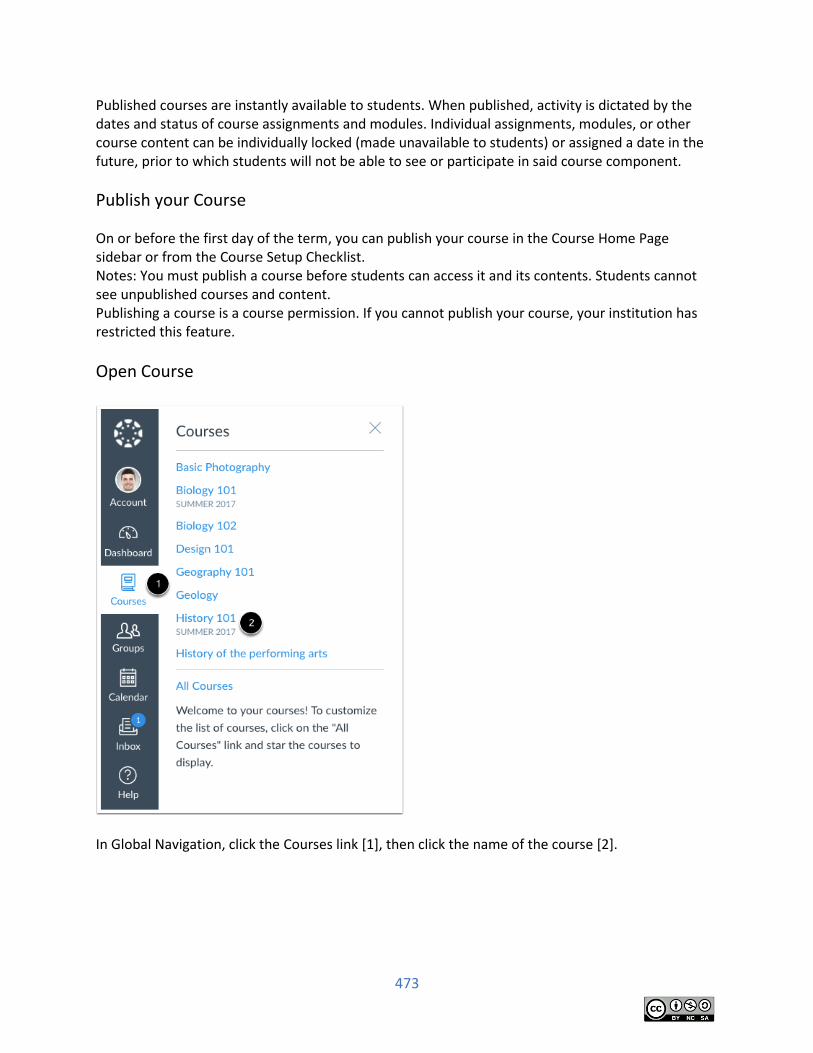
473
Published courses are instantly available to students. When published, activity is dictated by the dates and status of course assignments and modules. Individual assignments, modules, or other course content can be individually locked (made unavailable to students) or assigned a date in the future, prior to which students will not be able to see or participate in said course component.
Publish your Course
On or before the first day of the term, you can publish your course in the Course Home Page sidebar or from the Course Setup Checklist. Notes: You must publish a course before students can access it and its contents. Students cannot see unpublished courses and content. Publishing a course is a course permission. If you cannot publish your course, your institution has restricted this feature.
Open Course
In Global Navigation, click the Courses link [1], then click the name of the course [2].
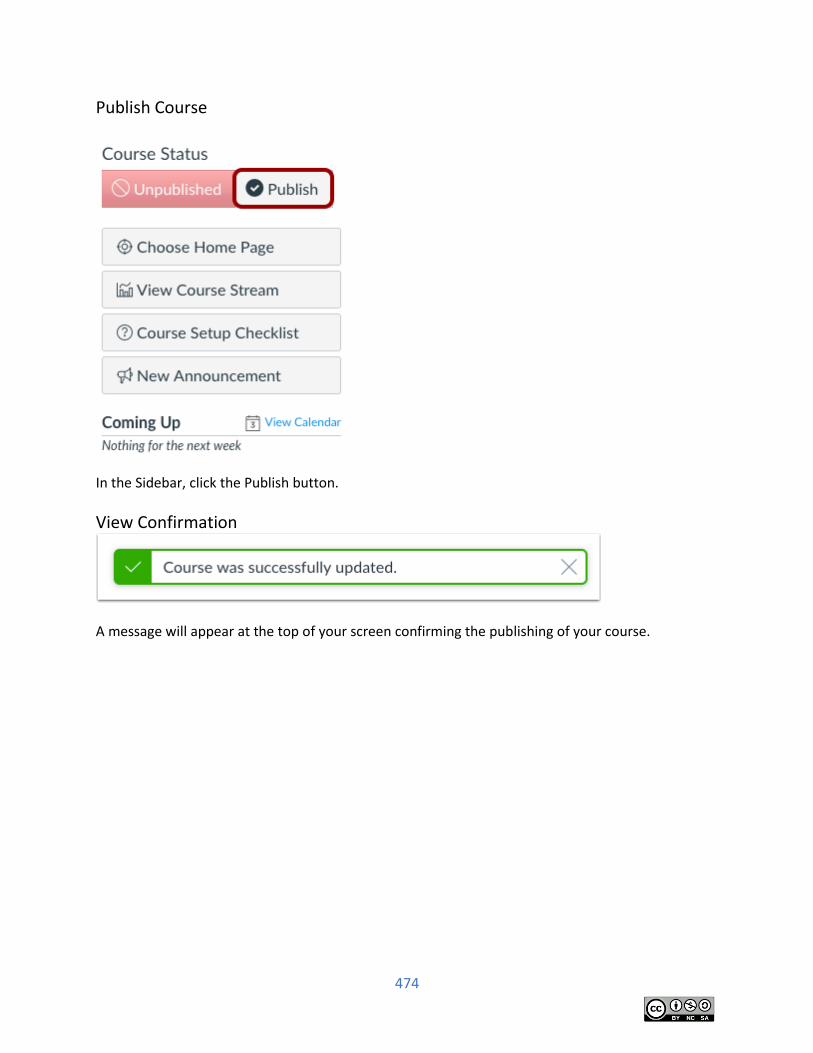
474
Publish Course
In the Sidebar, click the Publish button.
View Confirmation
A message will appear at the top of your screen confirming the publishing of your course.
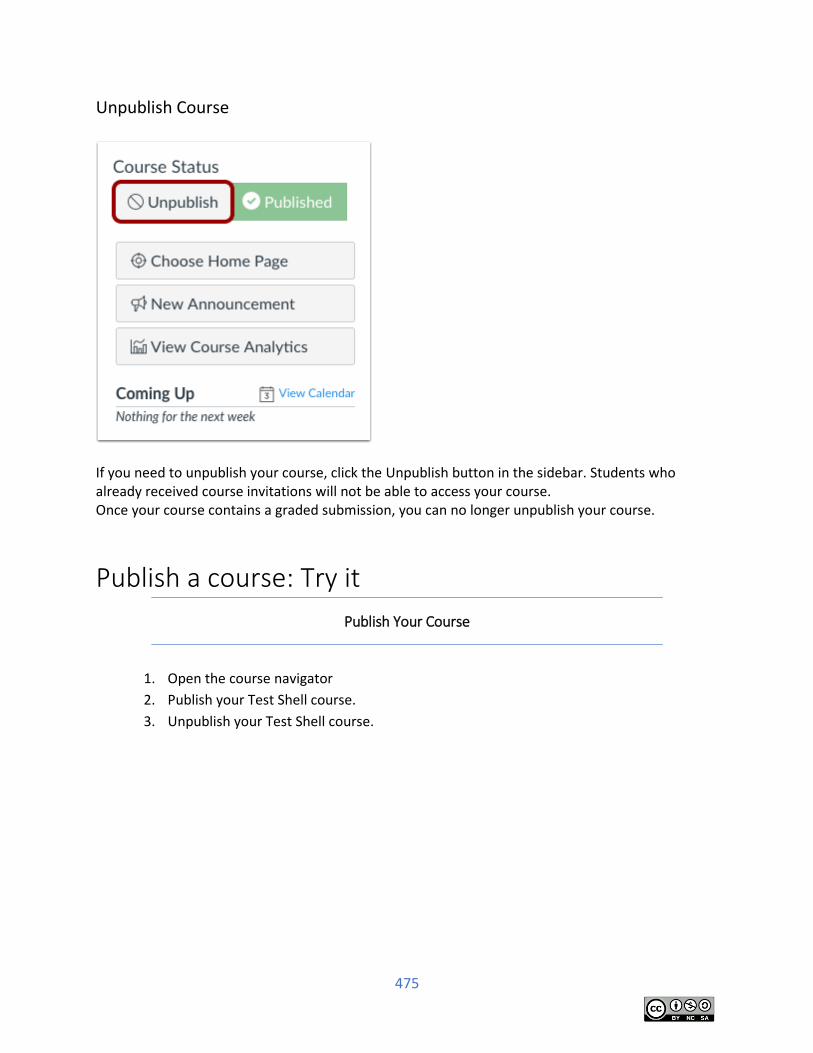
475
Unpublish Course
If you need to unpublish your course, click the Unpublish button in the sidebar. Students who already received course invitations will not be able to access your course. Once your course contains a graded submission, you can no longer unpublish your course.
Publish a course: Try it
Publish Your Course
1. Open the course navigator
2. Publish your Test Shell course.
3. Unpublish your Test Shell course.

476
Related Documents