A BPA Guide to Canopy Piloting A BPA Guide to Canopy Piloting

Welcome message from author
This document is posted to help you gain knowledge. Please leave a comment to let me know what you think about it! Share it to your friends and learn new things together.
Transcript

A BPA Guide toCanopy PilotingA BPA Guide toCanopy Piloting

Canopy Piloting 1
CONTENTS OF MANUAL:
1 Introduction2 What is a high performance landing?3 The swoop explained 4 The corner 5 Methods of turning the canopy front risers, rear risers or toggles6 Altitude drills7 High performance landing8 Learn When To Say No
1

1. INTRODUCTION
This manual contains information that will complement your Canopy Piloting training andprovide the requisite information to complete the British Parachute Association’s writtenexamination for qualification as Grade One in Canopy Piloting (CP1) holder.
High performance landings are inherently dangerous; you must gain instruction and / orcoaching from a properly qualified CP1 Canopy Piloting Coach before attempting any of thetechniques described in this manual. This manual is designed to supplement your CP1coaching; it does not replace proper training and instruction.
The information in this manual is based on the personal opinion of the authors. Whilst allefforts have been made to ensure that it is correct and up to date, it may contain informationthat is incorrect and / or out of date.
The techniques discussed in this manual are dangerous, even if carried out correctly andunder the direct supervision of a CP coach, may still result in serious injury or death.
2. WHAT IS A HIGH PERFORMANCELANDING?
A high performance landing is when the canopy’s air speed is deliberately increased forlanding. This increased speed, when achieved at the correct height above the ground, can beconverted into a high speed “surf” across the ground with the canopy flying level for severalmetres, commonly known as a swoop. There are many ways of achieving this and thismanual will give information on the most commonly used techniques. All methods ofincreasing the canopy speed also include an increase in descent rate. These two factorsmake swooping very dangerous and if attempted at the wrong height or in the wrongconditions can result in serious injury or even death.
3. THE SWOOP EXPLAINED
The aim of swooping is to cover as much ground as possible with the canopy in full flight.To increase the speed of the canopy, the pilot generally initiates a turn using a front riser ortoggle. This turn must be completed at a height that allows the canopy to recover from theturn, ideally without the pilot needing to give any input. The speed generated whilst thecanopy is recovering is then converted into lift, allowing the canopy to maintain flat andlevel flight above the ground. In summary, a smooth turn initiated at the correct altitude willallow the canopy to recover efficiently and create a long and safe swoop.
2

John Leblanc of Performance Designs Inc introduced the concept of the “Corner” to explainthe difference between swoops that are initiated at the correct and incorrect altitudes. Turnsthat are initiated too low are not only very dangerous, but also inefficient and result in amuch shorter swoop.
The diagram shows two swoops, one initiated at the correct altitude and the other at analtitude that is too low to allow the canopy to recover of its own accord.
The black canopy begins its final turn at the correct altitude. The canopy is allowed to flyout of the turn and recover with no input from the pilot. As it does so, it accelerates andreaches a speed that is far in excess of the canopies normal full drive speed. This higherspeed generates more lift from the canopy and allows it to recover from the dive and regainlevel flight. Because no input has been applied by the pilot, the canopy maintains its higherspeed across the ground and creates a swoop that is faster, covers a further distance, and issafer.
3
The Corner
Hook Turn
Safer Approach
Full Glide
Turn Starts too low
Glide flattens withoutany toggle input
Too low - a stabof deep brakes
Diagram kindly supplied by John Leblanc of Performance Designs
4. THE “CORNER”

The red canopy initiates the last turn too low (also see picture below). Because the canopy isstill in a dive, the pilot has to pull down on the brakes sharply to avoid a collision with theground. The toggle input required to save the jumpers life has taken off all the extra speedthat was generated for the swoop. In the end, the length of the swoop is very short,unimpressive and dangerous. This is known as being in the corner. A turn initiated any lowerthan this will no doubt result in serious injury or death.
4
From a photo by Sarah Hall

5. METHODS OF TURNING THE CANOPYUSING FRONT RISERS, REAR RISERS OR
TOGGLES
The canopy can be turned using the steering toggles, risers, or by adjusting the distributionof weight in the harness.
Toggles
From our first jump we are taught to manoeuvre the canopy using the steering toggles. Fornormal flight, the toggles will still be the usual method of control. When carrying out aswoop however, the toggles are not necessarily the most efficient way of steering.
When we pull down on a steering toggle, the tail of the canopy deflects air, slowing it downand creating a turn. For the “swooper,” this has two negative effects:
1 Because the turn is caused by slowing down almost half of the canopy, speed generated for the swoop is reduced.
2 If the turn has been initiated too low, recovery options are reduced to depressing the toggle that is on full flight in an effort to stop the turn and get the canopy back to levelflight. E.g. for a right turn you would have your right hand down and left hand up. Allyou can really do is pull your left hand down to meet the right. This could havedisastrous consequences.
Rear risers
You will have practised using rear riser steering during CH 2. Although an effective methodof steering the canopy, it also slows down the canopy and is therefore not an effective wayof generating speed for landing.
Harness input
By shifting our weight in the harness, we can steer the canopy. The ease of steering isdependant on the wing loading and the type of canopy. The higher the wing loading themore susceptible the canopy will be to steering in this manner. Harness turns produce arelatively slow turn, but do have the advantage of leaving your hands free to operate toggles/ risers.
Front risers
Use of front risers is currently the most common way to speed the canopy up for a highperformance landing. They can be used in a straight line, by pulling both risers downequally or by pulling one down more than the other to create a turn. Be aware, any input of
5

the front risers increases the descent rate and airspeed of the canopy. As the canopy speedsup, pressure inside the cells increases, causing the canopy to want to regain its normal shape.This in turn increases the pressure on the risers as the canopy gains lift. For the “swooper”this is good news as it is this speed and lift that increases horizontal flight. Front riser usefor swooping offers an added advantage over a toggle turn as the canopy can be levelled offrelatively quickly if the manoeuvre needs to be aborted
Exercises designed to help you find which methods work best for you and your canopy willbe explained later in this manual. It should be noted at this stage that not all canopymanufacturers recommend the use of riser input on their equipment as it may be dangerousto do so. Check your manufacturer’s recommendations before attempting to use your frontrisers.
Warning: Just because some methods may allow you to right the canopy quickly, it is not anexcuse to turn low
STAY OUT OF THE CORNER!
6

6. CANOPY DRILLS AT ALTITUDE
The following drills should be carried out at a safe altitude and in a clear sky. It isrecommended that you dedicate some jumps specifically to learning these skills, exitingalone at 5000 to 7000ft. None of the exercises should be carried out until proficient below3000ft.
All jumps should follow the same sequence
• Liaise with DZ control and inform them of your jump• Immediately after opening check the 3 A’s, altitude (have you got enough), airspace
(other canopies) and area (location in relation to the holding area and PLA).• Carry out set exercises above 3000ft• Below 3000ft forget new skills and concentrate on a smooth, safe, accurate
approach and landing
360 degree turns
The aim of these drills is to become more familiar with the canopy. When carrying out anyhigh performance landing it is vital to be highly proficient at handling the canopy. Thismeans knowing exactly how much toggle, riser or harness input to use and the exact effect itwill have on the canopy. We need to be aware of the speed that the canopy will turn for anygiven input, the height lost during that turn, and most importantly, the time and altitudeneeded for the canopy to recover.
Although your first actual high performance landings will be made in a straight line, it ispreferable to start the altitude drills with 360 degree turns, as they will allow you to remainorientated to the landing area and provide enough time in the turn to get a feel for what youare actually trying to achieve.
Swooping takes a long time to learn properly, even those of us with thousands of jumps arestill learning. Take your time carrying out these exercises, don’t try to do too much on anyone jump, but concentrate on each exercise and only move on to the next when both you andyour Canopy Piloting Coach are happy to do so.
Timing the turns
The first thing to get the feel for is how long we take to complete a turn. This is very easyto assess by counting in our head, just as we are taught as students. Pick a definite headingand check the 3A’s before starting a turn.
Begin counting at the same time as starting a smooth turn using a toggle and hold the turnuntil you reacquire your original heading.
7
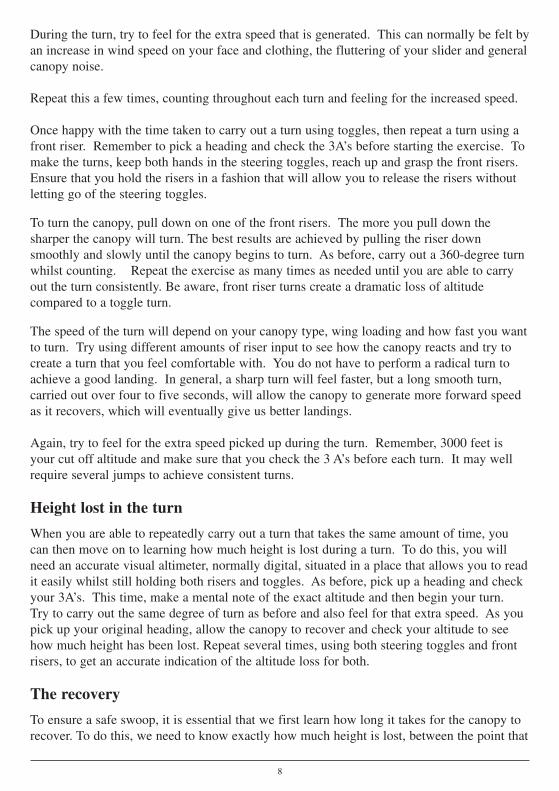
During the turn, try to feel for the extra speed that is generated. This can normally be felt byan increase in wind speed on your face and clothing, the fluttering of your slider and generalcanopy noise.
Repeat this a few times, counting throughout each turn and feeling for the increased speed.
Once happy with the time taken to carry out a turn using toggles, then repeat a turn using afront riser. Remember to pick a heading and check the 3A’s before starting the exercise. Tomake the turns, keep both hands in the steering toggles, reach up and grasp the front risers.Ensure that you hold the risers in a fashion that will allow you to release the risers withoutletting go of the steering toggles.
To turn the canopy, pull down on one of the front risers. The more you pull down thesharper the canopy will turn. The best results are achieved by pulling the riser downsmoothly and slowly until the canopy begins to turn. As before, carry out a 360-degree turnwhilst counting. Repeat the exercise as many times as needed until you are able to carryout the turn consistently. Be aware, front riser turns create a dramatic loss of altitudecompared to a toggle turn.
The speed of the turn will depend on your canopy type, wing loading and how fast you wantto turn. Try using different amounts of riser input to see how the canopy reacts and try tocreate a turn that you feel comfortable with. You do not have to perform a radical turn toachieve a good landing. In general, a sharp turn will feel faster, but a long smooth turn,carried out over four to five seconds, will allow the canopy to generate more forward speedas it recovers, which will eventually give us better landings.
Again, try to feel for the extra speed picked up during the turn. Remember, 3000 feet isyour cut off altitude and make sure that you check the 3 A’s before each turn. It may wellrequire several jumps to achieve consistent turns.
Height lost in the turn
When you are able to repeatedly carry out a turn that takes the same amount of time, youcan then move on to learning how much height is lost during a turn. To do this, you willneed an accurate visual altimeter, normally digital, situated in a place that allows you to readit easily whilst still holding both risers and toggles. As before, pick up a heading and checkyour 3A’s. This time, make a mental note of the exact altitude and then begin your turn.Try to carry out the same degree of turn as before and also feel for that extra speed. As youpick up your original heading, allow the canopy to recover and check your altitude to seehow much height has been lost. Repeat several times, using both steering toggles and frontrisers, to get an accurate indication of the altitude loss for both.
The recovery
To ensure a safe swoop, it is essential that we first learn how long it takes for the canopy torecover. To do this, we need to know exactly how much height is lost, between the point that
8

a turn is completed, to the point where the canopy has naturally (that is without applyingbrakes) slowed down to its normal speed.
IF YOU DO NOT HAVE THIS VITAL PIECE OF INFORMATION, YOU RISKSERIOUS INJURY OR DEATH, EVERY TIME YOU TURN A CANOPY FORLANDING.
To learn the recovery time we will need to repeat the previous exercises. Again, make sureyou start by checking the 3A’s, then pick up a heading, note your altitude and start the turn.This time however, do not begin your count until you are back on your original heading withboth hands all the way up. This is the start of the recovery. Feel for that extra speed dyingoff. Listen to the canopy quieten down and feel the canopy generating lift. Immediately theextra speed is lost, note how long it took and also the altitude lost. Be sure to carry out eachturn consistently, so that you can accurately gauge the time and altitude needed for thecanopy to recover. This will vary greatly depending on the type of canopy and the wingloading, but you should notice that it takes several seconds and possibly hundreds of feet.
Reducing the turn
As stated earlier, our first actual attempts at a swoop landing will be made with a straight-line approach. To prepare for this, we need to repeat the above exercises, but with a lesserdegree of turn. Following the same procedures as before, carry out a series of 180-degreeturns, checking for height lost, time of turn and recovery time. Once you are proficient atmeasuring 180-degree turns, repeat the exercise using 90-degree turns. You will no doubtfind that the effects on height lost etc are less noticeable and therefore harder to measurewith a lesser degree of turn. Sometimes it can be tempting to speed a lesser degree of turnup. Try not to do this. Maintain the same speed of turn as you did throughout the 360-degreeturns, as this will help you to achieve the aim and create much smoother and safer landings.
9
Turn completed
Canopy fully recovers
Recovery

7. HIGH PERFORMANCE LANDINGS
The straight-line approach
Once proficient at turning the canopy through 360, 180 and 90 degrees, it is then time togauge the effect of pulling down on both front risers equally. Just as before, check the 3 A’sand note your altitude before starting the exercise. Pull down both front risers evenly untilyou feel the canopy speed increase, then hold for the same time it took to carry out a 360-turn, then release smoothly and check your altitude. Repeat this until you are consistentwith your riser input, then carry out the exercise again to measure the recovery. Be aware,the canopy will still lose height whilst recovering. You MUST make a note of this heightand time, as this will indicate the height above the ground that you must allow the canopy tobegin its recovery. As a general guideline, you should be allowing approximately tenseconds between the end of your riser input and the start of your flare.
On your first high performance landing, pick a suitable part of the PLA and ensure thefollowing before commencing the approach:
• Check there are no hazards or other people in your chosen landing area. Remember that you may drop short or cover more distance over the ground than anticipated.
• Check the 3A’s. Do not attempt any new manoeuvre if at an inappropriate altitude, in busy airspace or in the wrong area.
Remember all canopies and people below you have priority.
IF IN DOUBT - DON’T!
The plan
As taught in CH1 and CH2, we must always plan our canopy flight before every jump. Thisis even more important whenever we are considering a high performance landing, as wemust ensure that we are at the correct set up point, the correct altitude, facing the correctdirection and that the chosen landing area is clear, before committing to a high performancelanding.
To decide where your set up point for a straight line approach should be, you will need tothink back to the previous straight line front riser altitude drills. You should also consider thefollowing:
How long the approach will take?How much height you expect to lose during the approach?How long it takes for the canopy to recover?How much height will be lost during the recovery phase?With this information, we can plan the correct height to begin the approach and when to
10

release the risers in order to allow enough time for the canopy to recover.Now we have a point at which to start our landing approach, we can plan how to get there,ensuring that our final turn is carried out with enough altitude to allow the canopy to fullyrecover prior to starting the landing approach. Think back to the toggle turns carried outearlier to work this out. It is important that this final turn is correct for two reasons.
1. Safety. You need enough time to ensure that you are at the correct height for the exercise. If you find yourself too low, then abandon the high performance landing.
2. You will find it much easier to pull smoothly down on both toggles if the canopy is at a slower speed. Straight after a turn, riser pressure can be very high, making it almost impossible to pull them down.
Although you may not know exactly where you will touch down, you should have a generalidea. As stated earlier, make sure the whole of your chosen landing area is clear of hazardsand people.
The approach
Once you are in the right place and at the correct altitude, pull down on the front risersevenly, and by the same amount as you did during the exercises carried out earlier. Whilstdoing this, you will need to be constantly aware of your height above the ground. In gaugingwhen to release the risers, try to allow approximately 10 seconds between riser release andthe start of your flare.
11
Final set up
Final turn carriedout early
Overshoots in alldirections
Enough time andaltitude to carry outfinal checks andgrasp risers correctly
Recovery Landing
Area completely clear ofall hazards
Finish Point
Start riserinput here
Releaserisers here
A Flight Plan for aFront Riser Approach(Aerial View)

The recovery
As you reach your planned recovery height, release the risers smoothly and allow the canopyto recover naturally. At this point, your speed across the ground will have increased whichis fine, but you certainly should NOT feel that your descent rate has increased. If you do,then you are TOO LOW and should APPLY BRAKES IMMEDIATELY. As you getcloser to actually landing, the increased speed across the ground becomes more noticeable.
The Landing
Stay relaxed in the harness and concentrate on flying the canopy until the landing iscomplete. There can be a tendency to want to start running as soon as your feet are atground level. Avoid this as you will probably be travelling too fast. Just increase the togglepressure as needed to keep the canopy flying level across the ground. As the canopy slowsit will lose lift and you will need to apply more toggle input to maintain level flight. Thetotal amount and type of toggle input required is dependent upon a number of factors butessentially, if flown correctly, the canopy should continue to provide lift throughout thewhole of the landing phase and will stop creating lift when the weight is taken off theharness by putting your feet firmly on the ground. To this end, continue to fly the canopyuntil it has slowed down enough for you to comfortably walk or run, before attempting totake any weight off the harness.
12
A Straight Line Front Riser Approach
Finalset up
Final Turn
All finalchecks to becarried out
Recovery Landing
Begin riserinput
Release risers
Smooth input required.Must maintain
awareness of altitudeand surroundings.
Be prepared to releaserisers and applybrakes if needed
Canopy should be onfull drive. Use smooth
even toggle input ifrequired
Applybrakes as
required tomaintain level
flight. When atappropriate speed,
take weight off harnessby walking or running

Increasing the degree of turn
Having got to the stage where you are able to repeatedly carry out safe, smooth straight onapproaches using front risers with little or no toggle input to recover the canopy then youcan start to introduce a turn on the approach. This will allow the canopy to pick up morespeed and result in a faster and longer swoop.
45 to 90 degree turns
Thinking back to your earlier altitude drills, you must now plan to set up at the correctaltitude, in the correct place and facing the correct way to enable you to make a 45 to 90degree turn to land.
A practise at altitude of the exact turn that you intend to carry out prior to landing is a goodway to confirm where the set up must be.
As for the straight in approach, ensure that your final turn onto your set up point iscompleted with enough altitude to allow the canopy to fully recover prior to beginning yourfront riser turn.
13
Final set up
Enough time andaltitude to carryout final checksand grasp riserscorrectly
Overshoots in alldirections
Finishriser turnhere
Recovery Landing
Area completely clear ofall hazards
Finish Point
Start riserturn here
90 Degree Turn(Aerial View)

Before beginning your landing it is essential that you check the following:
1 Am I in the correct set up?2 Am I at the correct altitude?4 Is the airspace around me clear?4 Is the airspace below me clear?5 Is the landing area clear?
If the answer to any one of these questions is NO, then you must not attempt a HIGHPERFORMANCE LANDING. Instead you should carry on with a conventional approachand land safely.
Once you have decided that it is safe to carry on, perform a 45 to 90 degree turn exactly aspractised at altitude. As in the straight in approach, IF AT ANY TIME YOU FEEL YOUARE TOO LOW then let go of the risers and APPLY BRAKES IMMEDIATELY.
A correctly executed turn will cause the canopy to pick up much more speed than a straightriser approach. Do not think that because some of the more experienced canopy pilots onyour DZ are carrying out turns in excess of 270 degrees, that a 90 degree turn will notproduce a lot of speed and distance, it will. If carried out correctly a 90 degree turn can bevery effective – if carried out incorrectly it can be disastrous.
The landing should be very similar to your straight on approach, but there are a few pointsthat should be noted.
As mentioned earlier, you may be tempted to take your weight off the harness by runningtoo soon. Don’t – the canopy will be travelling too fast and you probably won’t keep up!Any movement of your body will also affect the weight distribution in the harness, in turnupsetting the canopy and normally resulting in a fall; this isn’t good, especially at highspeed.
The faster the canopy is travelling, the more responsive it will be to any riser, toggle orharness input. The added speed produced during a high performance landing can tempt youinto applying more input than is required. You must therefore be very smooth with anyinput made, all the way through the landing and until you have stopped and the canopy isfully deflated.
The extra speed should result in more distance being covered across the ground. Make sureyou have enough space ahead of you to allow this to happen. COLLIDING WITHHAZARDS OR PEOPLE AT THESE SPEEDS IS NOT AN OPTION. If you are at allworried, then steer away using the flat turn techniques taught and practised in CH 2.Remember, NO SHARP TURNS CLOSE TO THE GROUND.
14

You should practise this type of landing until fully proficient. Before even consideringincreasing the degree of your final turn, you must be able to consistently:
1. Land, having carried out the correct degree of turn with the canopy being allowed to recover with little or no input from the pilot.
2. Control the extra speed with smooth, even toggle input, and take your weight off the harness at the appropriate time
3. Land with a good degree of accuracy, showing the ability to judge where you will reach ground level and where you will stop.
90 to 180 degree turn
When you are ready, your CP coach will clear you to increase your turn up to 180 degrees.This should not be done all in one go but steadily over a number of jumps increasing theturn by no more than 45 degrees at each stage.
In the same way that you prepared for the 90 degree turn, use the altitude drills to work outwhere and at what height to set up for the landing, and carry out practise turns at a safeheight to confirm.
The big difference between 90 and 180 degree turns is not only the extra speed for landing,but also because the turn starts with the target area directly behind you. This requires a highlevel of awareness of your surroundings, in particular, your altitude, position in relation tothe landing area and other canopies.
The extra speed should be easy to deal with as you should not have progressed this farunless completely happy with all stages of your previous landings.
Complete awareness of your surroundings is imperative, as it is this awareness andjudgement that will allow you to be a safe canopy pilot.
The final checks prior to landing may well take longer, so make allowances for this whenplanning your set up. Get to the correct point with plenty of time, so that the canopy canfully recover without you having to make any sharp inputs.
When checking for other jumpers you must check in all directions, especially below andbehind you. This can take some practise and requires a fair bit of movement in the harnessto allow you a full 360-degree field of vision. Don’t leave it until this point to practise this –practise at altitude.
Starting a turn with your back to the target and landing direction can cause an overanxiousness to complete the turn. Remember back to your CH 1 and 2 training on landingdirections. It is possible to land safely in any direction, as long as the canopy is flat andlevel and there are no hazards in the way. The same is true of a high performance landing.However fast it starts, providing you have good control of the toggles, and only take your
15

weight off the harness at the correct canopy speed, landing in any direction can becontrolled. You must however, be aware that the speed across the ground will feel very fastand you will cover a lot of distance.
To give you the option to abort a turn at any time, you should think carefully about yourlanding area. In anticipation of any need to abort your high performance landing, your setup should be over an area that allows overshoots in all directions.
As you carry out your final turn it is important to remember that you must be constantlyaware of your altitude and surroundings. At any time that you have any doubts, release therisers and keep control of the canopy, irrespective of which way you are facing and howhigh you are. Remember – there is only one way to land a canopy
FLAT, LEVEL AND WITHOUT HITTINGANYTHING
16
Enough time and altitude to carry outfinal checks and grasp risers correctly
Overshoots in alldirections
Finish riserturn here
Recovery Landing
Area completely clear ofall hazards
Start riserturn here
Flight Plan for a 180 degree Turn
Final set up
Finish Point
8. LEARN WHEN TO SAY NO
This manual has predominantly lectured on the dynamics and physical aspects of how toexecute a high performance landing. Regardless of whether you are first starting out onyour swooping career or have thousands of high performance landings under your belt, themost important thing to learn is when to say no to a high performance landing.
High performance landings are without doubt impressive if carried out correctly, but pleasedo not allow your ego to overrule common sense. A large majority of injuriesand fatalities have been caused by a canopy pilot taking unnecessary risks in order toimpress or land in a particular place, normally with an audience. Never carry out a highperformance landing if there is traffic that might get in your way, if landing in an unfamiliararea, if the weather conditions are marginal, if you are angry or disappointed with yourperformance in freefall, if you are tired or distracted, or even if something just doesn’t feelright but you can’t identify what it is.
Having a nice soft landing will impress your peers far more than seeing you being driven offin an ambulance, or even worse, a hearse. Learn when to say no and live to swoop anotherday.
17

18

Canopy Piloting 2Introduction
A Canopy Piloting 2 (CP2) qualification is required before being allowed to compete in anyofficial BPA Canopy Piloting Event e.g. A Canopy Piloting Competition be it National,Regional or by any other name that requires a competitor to carry out a high performancelanding. High performance landing is defined in the CP1 manual as: “when the canopy’s airspeed is deliberately increased for landing.”
Experience Criteria
FAI D Certificate (Red), a Grade 1 in Canopy Piloting (CP1), has logged at least 500 highperformance landings in total, including a minimum of 100 high performance landingswithin the previous 12 months.
The above Experience Criteria are a requirement for candidates wishing to apply for a CP2Qualification and / or for CP2 holders who wish to enter any BPA Canopy PilotingCompetition.
Performance Criteria
Safe, high performance runs, over a 185 ft long, 30 ft wide carving course, that consists of10ft vertical markers with a defined entry and exit gate, on at least 3 pre-declaredconsecutive descents.
During the run the candidate must, in a controlled manner, negotiate the course by scoringthe entry gate and then flying to the exit gate without making any physical contact with thesurface or vertical markers that define the course. “Scoring” is defined as some part of thecandidate’s physical body below the tops of the vertical markers that form the entry and exitgates.
Note:Those who are registered as Official Pro Swooping Tour, “Pro” Class competitors aredeemed to have met the above experience and performance criteria providing they havecompleted at least 100 high performance landings within the previous 12 months.
19

Cover photo shows Jay Moledski by Tony Hathaway
Related Documents