1

Welcome message from author
This document is posted to help you gain knowledge. Please leave a comment to let me know what you think about it! Share it to your friends and learn new things together.
Transcript

1

Aperture (AV mode)The aperture on a lens is a small hole that controls the depth of field in a photograph. Depth of field affects focus on close and distant objects, adding blur for shallow depths of field which blurs out the background so that objects in the foreground stand out more. Deep depths of field have both the foreground and background in focus, popular in landscape and architectural shots.
Apertures can be controlled via AV mode on a camera, which is measured in F numbers. The smaller the F numbers means there will be a shallow depth of field, whereas a bigger F number will mean a deeper depth of field.
In the picture above it can be seen that the leftmost picture (F number 1.18) has a very shallow depth of field and that the two middle cupcakes are in focus, while the rest are being blurred in the background. On the other hand, the rightmost picture using F number 10 has all five cupcakes in focus, and little to no blurring in the photo.

Here the milkshake bottle is in full focus whereas the background has become very blurred, making it hard to distinguish details. The focus on the bottle has created a very shallow depth of field. This photo focuses on just the bottle.
This is the middle point where both bottle and background are slightly in focus with a moderate depth of field. There is still some blur and it is hard to see some details in the background. This photo has everything in view.
This photo has the deepest depth of field and as such there is little to no blurring in the background, with both the bottle and surroundings able to be viewed in detail. As the shot has been moved back a little, the background is much more prominent here, to the point where the ‘rule of thirds’ applies (the bottle is in the middle of the thirds)
F3
F7
F14

Shutter Speed (TV mode)Shutter Speed defines the length of time the lens shutter is open, allowing photograph that depict motion to be captured with motion blur – distortion that simulates movement. The speed can be individually controlled, to take less that 1/4000 th of a second, and going all the way up to 3 hour captures for long exposure photography, which can be used to photograph the movement of stars in the night sky.
Above are two examples of long exposure photography. For the prolonged time that the shutter is open and photographing, the camera is able to capture every angle of the lighthouse beacon and the full rotation of the stars.
Above are two examples of short exposure which is able to capture fast and precise movement/moments. The camera is able to snap a picture of the fraction of a second that an object hits the water and splashes.

At 1/125 of a second, the camera cannot capture the precise movement of the spinning fan. Thus, the blades appear completely blurred as they do to the naked eye. The motion blur means that the individual blades of the fan are rotating too fast to be capture precisely by the camera.
At 1/500 of a second, the camera has captured a shot quicker with more of a precise movement, but the fan is still rotating too fast for the exposure time. However, unlike the first image, the individual blades in this photo are visible, showing that there is less motion blur as the exposure time gets closer to the speed of the fan.
At 1/3200 of a second, the fan’s blades can be seen clearly as the exposure time is very close to the actual speed of the fan. However the blades themselves are still blurred but they are much clearer than previous images, with a lot less motion blur because the image was captured quicker.
1/125 Second
1/500 Second
1/3200 Second

ISO settingsThe ISO on a camera is a setting to determine how sensitive it is to light. It is especially useful in dark shooting conditions as a high ISO setting can bring out light, allowing images to come out well lit and in better quality.
Photographers should be warned however that higher ISO settings can increase the amount of noise in a photograph. Noise is random variations of light and brightness caused by a hyper-sensitive sensor and can generally degrade image quality. It is important that ISO and brightness are ‘balanced out’ to achieve the best results.
In the above picture you can see that the leftmost section, with a setting of 100 ISO has a very crisp image and lacks noise. However, on the right hand side, a high ISO of 3200 has generated large amounts of noise which have ruined the image quality and made it appear pockmarked and ugly.

Here a very low setting of ISO was used which results in a much clearer picture. The noise is much less miniscule as the lens is not as sensitive as it would be in higher ISO settings, thus smaller particles of light are not captured.
This image has a mid-range ISO setting and is slightly brighter than the above picture, but it has started to become noisy as the higher sensitivity begins to pick up random particles of light. This is on the threshold of setting balance.
A very high ISO setting was used in this final picture, resulting in a clearer but noisy image. This is evidence that ISO can be used to improve image quality but must be used in moderation in order to preserve image quality as a high ISO setting means that the lens is extremely sensitive to light and can pick up random particles (the noise.).
400 ISO
3200 ISO
6400 ISO
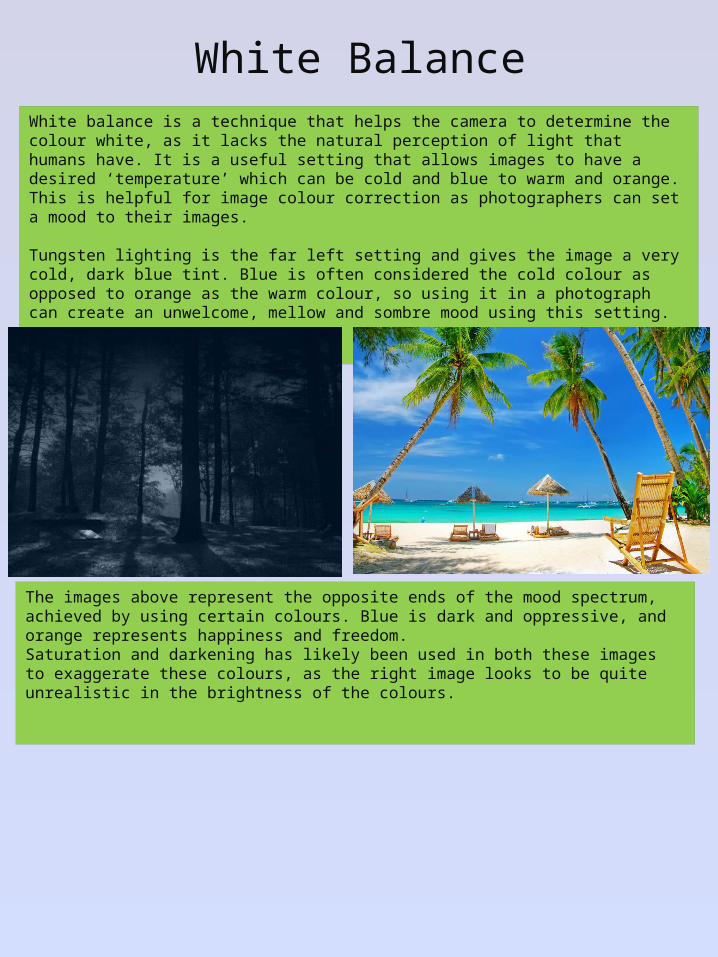
White BalanceWhite balance is a technique that helps the camera to determine the colour white, as it lacks the natural perception of light that humans have. It is a useful setting that allows images to have a desired ‘temperature’ which can be cold and blue to warm and orange. This is helpful for image colour correction as photographers can set a mood to their images.
Tungsten lighting is the far left setting and gives the image a very cold, dark blue tint. Blue is often considered the cold colour as opposed to orange as the warm colour, so using it in a photograph can create an unwelcome, mellow and sombre mood using this setting.
The images above represent the opposite ends of the mood spectrum, achieved by using certain colours. Blue is dark and oppressive, and orange represents happiness and freedom.Saturation and darkening has likely been used in both these images to exaggerate these colours, as the right image looks to be quite unrealistic in the brightness of the colours.

What can be seen from these images is that a lower white balance causes the image to shift to a colder blue temperature, whereas the higher setting brings the colours out more and makes the image appear warmer. The top left image has a dark, unwelcoming tone yet the bottom right image appears bright and welcoming, almost friendly in a way. These images were taken in the same environment at the same time of day so the colour changes are entirely the result of the camera.
All of these photos were taken with the settings 1600 ISO and 1/50 shutter speed.
White Fluorescent light / 1600 ISOTungsten light / 1600 ISO
Daylight / 1600 ISOShady light / 1600 ISO

Original image
Cropped

Levels
Dodging and burning
Colour adjustments
Related Documents