Cambridge Audio A3i Motherboard Replacement Written By: Colby Cambridge Audio A3i Motherboard Replacement © iFixit — CC BY-NC-SA www.iFixit.com Page 1 of 6

Welcome message from author
This document is posted to help you gain knowledge. Please leave a comment to let me know what you think about it! Share it to your friends and learn new things together.
Transcript

Cambridge Audio A3i MotherboardReplacement
Written By: Colby
Cambridge Audio A3i Motherboard Replacement
© iFixit — CC BY-NC-SA www.iFixit.com Page 1 of 6

INTRODUCTION
This guide describes the steps necessary to replace the motherboard of the system. This boardcontains the circuitry for the amplification, power, and output.
TOOLS:Large Needle Nose Pliers (1)
Phillips #2 Screwdriver (1)
Soldering Workstation (1)
Flush Wire Cutters (1)
Cambridge Audio A3i Motherboard Replacement
© iFixit — CC BY-NC-SA www.iFixit.com Page 2 of 6

Step 1 — Case
Remove 2 screws from each side ofthe amplifier.
Step 2
Remove 2 screws on rear of device.Slide top cover up and back frommain case.
Cambridge Audio A3i Motherboard Replacement
© iFixit — CC BY-NC-SA www.iFixit.com Page 3 of 6
Step 3
Remove 3 screws on bottom of case.
Remove 13 screws on rear panel.
Do not move the rear panel too far, as the power cord is still connected.
Step 4
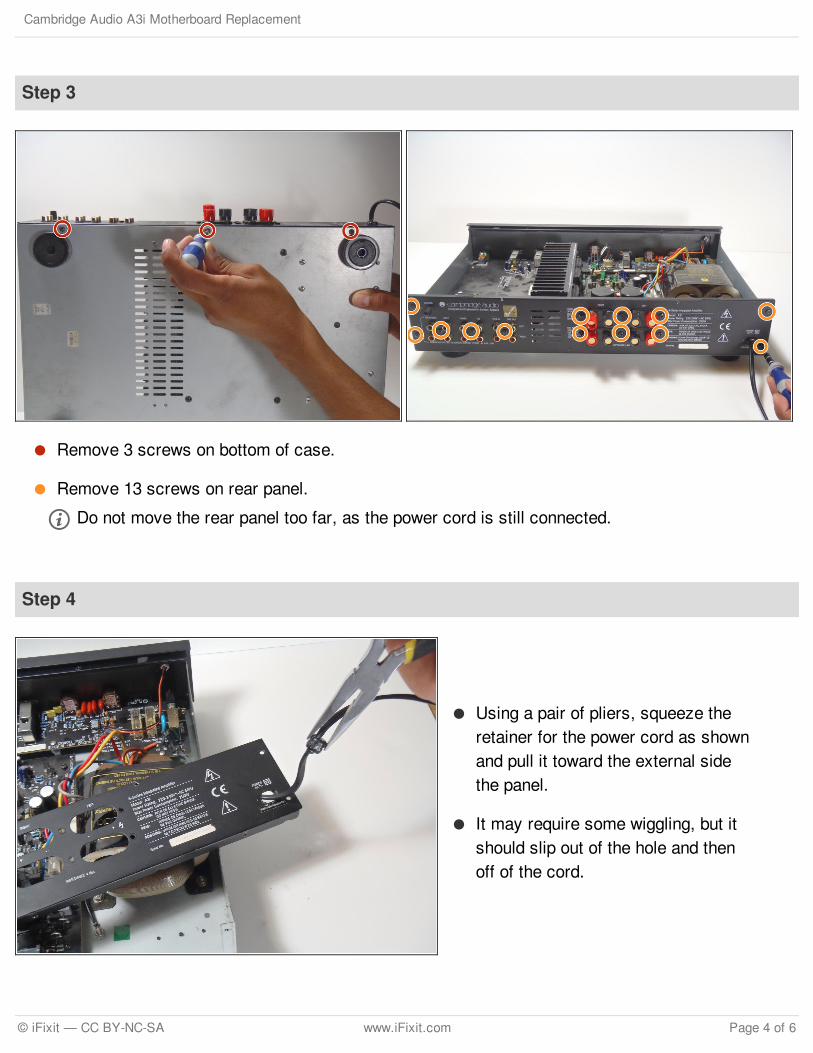
Using a pair of pliers, squeeze theretainer for the power cord as shownand pull it toward the external sidethe panel.
It may require some wiggling, but itshould slip out of the hole and thenoff of the cord.
Cambridge Audio A3i Motherboard Replacement
© iFixit — CC BY-NC-SA www.iFixit.com Page 4 of 6

Step 5 — Motherboard
Remove 2 screws from each side ofthe heatsink. These must beaccessed from directly above thedevice.
Remove the green grounding wirefrom the mounting screw.
Step 6
With the amplifier on it's side,remove the 4 screws that hold themotherboard frame to the main case.
Be sure to hold the motherboard withone hand while removing the mountscrews.
Cambridge Audio A3i Motherboard Replacement
© iFixit — CC BY-NC-SA www.iFixit.com Page 5 of 6

To reassemble your device, follow these instructions in reverse order.
This document was last generated on 2017-07-15 01:34:00 AM.
Step 7
Unscrew ground wire from main case.
De solder 4 wires coming from transformer.
The motherboard can now be lifted from the case. Any part that needs to be removed from it can bede-soldered.
Cambridge Audio A3i Motherboard Replacement
© iFixit — CC BY-NC-SA www.iFixit.com Page 6 of 6
Related Documents