Calypso Construction Features

Welcome message from author
This document is posted to help you gain knowledge. Please leave a comment to let me know what you think about it! Share it to your friends and learn new things together.
Transcript

Calypso Construction Features

2 of 21 Construction Features
Construction Features
The Construction
drop-down menu
contains several
useful construction
features that can be
used to compare two
other features or
perform special
calculations.
Construction features
will show up a teal
blue color in the CAD
window with the
parent features
highlighted in purple.
Also, construction
features will have a
blue box outlining their
symbol in the features
list and will list the
parent features in
parentheses.

3 of 21 Construction Features
A Perpendicular
construction feature
draws a new feature
(typically a line) through
the first selected feature
and perpendicular to the
second selected feature.
As an example, the
screenshots on the right
show a perpendicular
line created through the
center of a front through
bore (Circle 1) and
perpendicular to the top
plane (Plane 2).
Construction Features: Perpendicular

4 of 21 Construction Features
When intersecting a
cylinder or cone with a
plane in order to find
the resulting circle,
you must click the
“Wall” check box. If
Wall is not checked,
your result will be a
point at which the axis
of the cylinder or cone
intersects the plane.
Construction Features: Intersection

Construction Features 5
Construction Features: Symmetry
A Symmetry feature
allows you to draw a
feature symmetric to
two other features. In
this example, a
symmetry plane has
been drawn between
the left and right planes
of the part. This creates
a plane in the exact
middle of the part.

6 of 21 Construction Features
Construction Features: Edge Point
An Edge Point can be
used to determine the
(X,Y,Z) coordinates of
an edge created by two
or three planes. This is
similar to (but less
accurate than) creating
an intersection of two
or three planes.
Feature 1 and Feature
2 must be points taken
on the intersecting
surfaces. If a third
feature is needed, it
may be a point or plane
on the third intersecting
surface.

7 of 21 Construction Features
A Projection is similar
to an Intersection
feature, but enables
circles to be used as
selectable features.
This construction
feature projects
Feature 1 (typically a
circle or other point
feature) onto or up to
Feature 2 (typically a
plane).
As an example, the
screenshot to the right
shows a measured
circle being projected
up to the top plane
surface.
Construction Features: Projection

8 of 21 Construction Features
Construction Features: Tangent (Calypso 4.6)
A Tangent construction
feature is new in the
Calypso 4.6 version.
This allows the user to
draw a 2-D line from a
point tangent to a circle,
or a 2-D line tangent to
two circles.

9 of 21 Construction Features
1 3 2 ALL 4
The Tangent construction menu allows the user to select which
tangent line they wish to output
Construction Features: Tangent (Calypso 4.6)

10 of 21 Construction Features
Construction Features: Min/Max Coordinate
A minimum or maximum
coordinate feature is
used to lock onto the
minimum or maximum
actual data point within
a feature.
An example of when this
would be useful is when
trying to determine the
location of a small step
or edge break in a bore.
A 2-D Line can be
scanned starting just
before and ending just
after the small step or
edge break. As shown in
the screenshot, the
actual data results in a
shape that comes to a
minimum at the location
of the small step or
break.

11 of 21 Construction Features
Construction Features: Min/Max Coordinate
As seen in a
straightness plot of the
2-D line, the lowest
point (marked in the red
circle) is the point that
the Minimum
Coordinate feature will
lock onto. This point
marks the the location
of the small step or
break.
The maximum or
minimum coordinate
feature can then be
used in a characteristic
to find the required
information.

12 of 21 Construction Features
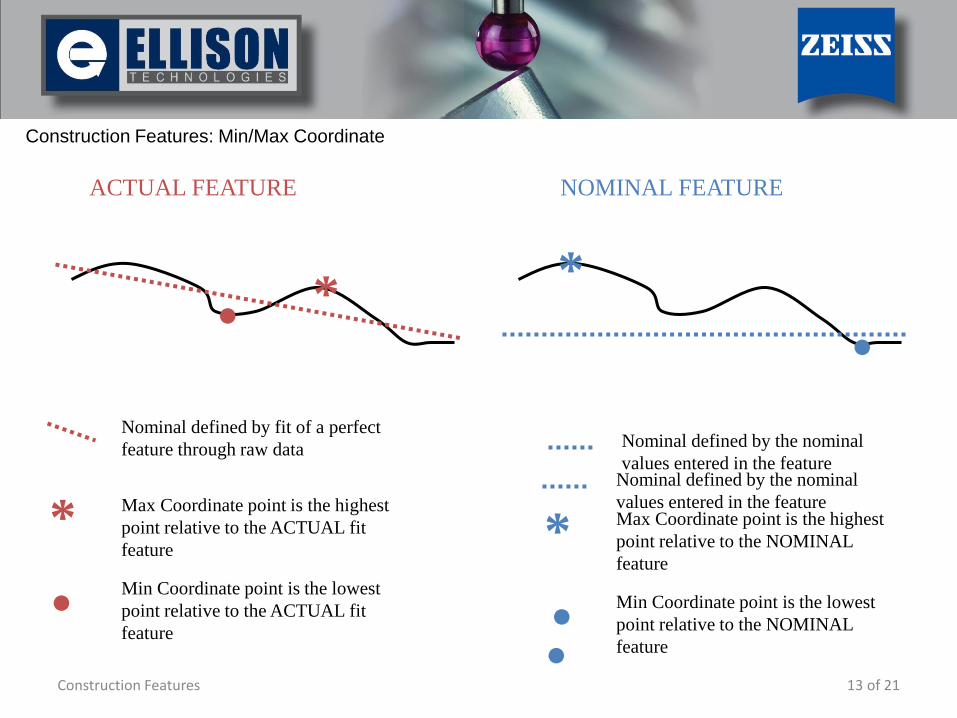
Construction Features: Min/Max Coordinate
Please pay special
attention to the
“REFERENCE” box in
the Min/Max
Coordinate
constructions.
The results will be
different depending
upon the choice you
make.
13 of 21 Construction Features
ACTUAL FEATURE NOMINAL FEATURE
* .
*
.
Construction Features: Min/Max Coordinate
Nominal defined by fit of a perfect
feature through raw data
Max Coordinate point is the highest
point relative to the ACTUAL fit
feature
Min Coordinate point is the lowest
point relative to the ACTUAL fit
feature
*
.
Nominal defined by the nominal
values entered in the feature Max Coordinate point is the highest
point relative to the NOMINAL
feature
Min Coordinate point is the lowest
point relative to the NOMINAL
feature
*
.
.
Nominal defined by the nominal
values entered in the feature

14 of 21 Construction Features
Construction Features: Min/Max/Average Feature
A Minimum, Maximum,
or Average Feature will
allow the user to
determine the feature
with the
min/max/average
selected quality from a
defined list of
measured features.
As an example, it is
necessary to determine
the minimum,
maximum, and average
diameter of the nine
circles in the program
shown here.

15 of 21 Construction Features
Construction Features: Min/Max/Average Feature
After choosing
Diameter from the
extensive list of
available qualities, and
selecting all of the
features using the
“Select Existing
Features” button, the
Maximum Feature will
determine which of the
selected features has
the largest actual
diameter and display
the feature’s name and
information in the
Maximum Feature
window.
The feature will also
highlight in the CAD
window.

16 of 21 Construction Features
Construction Features: Min/Max/Average Feature
Maximum, Minimum,
and Average Features
all look and act the
same with the
exception of the final
result. They are perfect
for sorting through
several similar features
to determine which is
the largest, smallest,
longest, shortest,
highest, lowest, closest,
furthest, and so-fourth.
A list of all possible
qualities to sort with
can be found on the
next slide.

17 of 21 Construction Features
Construction Features: Min/Max/Average Feature
X Value
Y Value
Z Value
Projection Angle One
Projection Angle Two
Angle of Inclination
Angle of Rotation
Diameter
Diameter Two
Radius
Radius Two
Radius Measurement
Length
Width
Cone Angle
Half Cone Angle
Feature Angle
Angle Range
End Angle
Gap
Length of Axis
Polar Position Radius
Polar Position Angle
Polar Position Height
End Point X Value
End Point Y Value
End Point Z Value
End Point Polar Position Angle
End Point Polar Position Height
End Point Polar Position Radius
Focal Point 1 X Value
Focal Point 1 Y Value
Focal Point 1 Z Value
Focal Point 1 Polar Position Angle
Focal Point 1 Polar Position Height
Focal Point 1 Polar Position Radius
Focal Point 2 X Value
Focal Point 2 Y Value
Focal Point 2 Z Value
Focal Point 2 Polar Position Angle
Focal Point 2 Polar Position Height
Focal Point 2 Polar Position Radius
Distance Symmetry
Curve Length
Available feature qualities for Min/Max/Average Features

18 of 21 Construction Features
A Cone Calculation
feature allows us to
perform many
calculations to any
cones that you may
have
We can find a
diameter at a given
length of the cone,
find the length of a
cone at a given
diameter, or simply
select another feature
and find the diameter
of the cone at an
intersect with the
second feature.
Construction Features: Cone Calculation

19 of 21 Construction Features
A Plane with Offset feature
will allow you to choose a
plane within your program,
then create a new plane at
a desired offset distance.
This was useful in helping
us to find the diameter of a
sphere at a given offset
distance from the top
plane.
Construction Features: Plane with Offset

20 of 21 Construction Features
Construction Features: Circle in Contour Best Fit
A Circle in Contour Best
Fit feature will take a
plane profile (curve) of
elliptical or gothic shape
and fit a circle of defined
diameter within the
curve.
Output of this
construction feature
includes X,Y,Z position
of the circle, tangent
points, point at max gap,
and X,Y,Z,R of both
bend circles.

21 of 21 Construction Features
Construction Features: Circle in Contour Best Fit
If you have a large curve
with several possible
locations of a best fit
circle within the contours
of the curve, it will be
necessary to copy-paste
the original curve and
delete data points in
order to evaluate only a
section of the curve.

22 of 21 Construction Features
Construction Features: Circle in Contour Best Fit
When you drop in a
Circle in Contour Best
Fit and choose the curve
feature, Calypso will
prompt for a diameter of
the best fit circle. In the
main window, it is also
possible to set the
minimum contact angle
between contact points.
These settings help the
feature solve for the
desired solution.

23 of 21 Construction Features
Construction Features: Circle in Contour Best Fit
In the results section:
Circle in Contour results
include the center
coordinates of the circle,
the gap between the
circle and curve on the
bisecting line of the
angle between tangent
points, the angle of the
right and left contact
points, and the angle
between contact points.
Tangent Points results
include the coordinate of
the right and left tangent
points.
Point at Max Gap results
include the coordinate of
the point and the gap
distance.
Circle in Contour Tangent Points
Point at Max Gap

24 of 21 Construction Features
Construction Features: Circle in Contour Best Fit
The other two options in
the results section are
right and left bend circle
calculations. This is a
way to determine the
curvature of the feature
curve at the two tangent
points.
This can be found using
either a specified
number of adjacent
points to the tangent
point, or a specified
angle range from the
tangent point.
Related Documents