15.10.2006 WAX-GG in 5 easy steps by Daniel Schweinert e-mail: [email protected] Material: Microscopic Slides – 76 mm x 26 mm x 1 mm (cut to 38 x 26 mm) Hard Paraffin Wax - 95 gramm (Paraffinum durum, Paraffinum solidum) White Bees Wax – 5 gramm (Cera alba) Jar Some clothespins Metal box Tape - 0.05mm thick (Scotch 3M or other tape between 0.05 – 0.10mm) Oven with “circulating air” 1. Turn on your oven and use “circulating air” at 100°C. Fill the jar with 95 gramm of hard paraffin wax and 5 gramm of white bees wax and put it together with the metal box into the oven. Close the oven and let the wax melt. (15-20 minutes)

by Daniel Schweinert - MicroFilmmaker Magazine · by Daniel Schweinert e-mail: [email protected] Material: Microscopic Slides – 76 mm x 26 mm x 1 mm (cut to 38 x 26 mm) Hard Paraffin
Sep 10, 2019
Welcome message from author
This document is posted to help you gain knowledge. Please leave a comment to let me know what you think about it! Share it to your friends and learn new things together.
Transcript

15.10.2006
WAX-GG in 5 easy stepsby Daniel Schweinert
e-mail: [email protected]
Material:
Microscopic Slides – 76 mm x 26 mm x 1 mm (cut to 38 x 26 mm)Hard Paraffin Wax - 95 gramm (Paraffinum durum, Paraffinum solidum)White Bees Wax – 5 gramm (Cera alba)JarSome clothespinsMetal boxTape - 0.05mm thick (Scotch 3M or other tape between 0.05 – 0.10mm)Oven with “circulating air”
1. Turn on your oven and use “circulating air” at 100°C.
Fill the jar with 95 gramm of hard paraffin wax and 5 gramm of white bees wax and put it together with the metal box into the oven. Close the oven and let the wax melt. (15-20 minutes)
15.10.2006
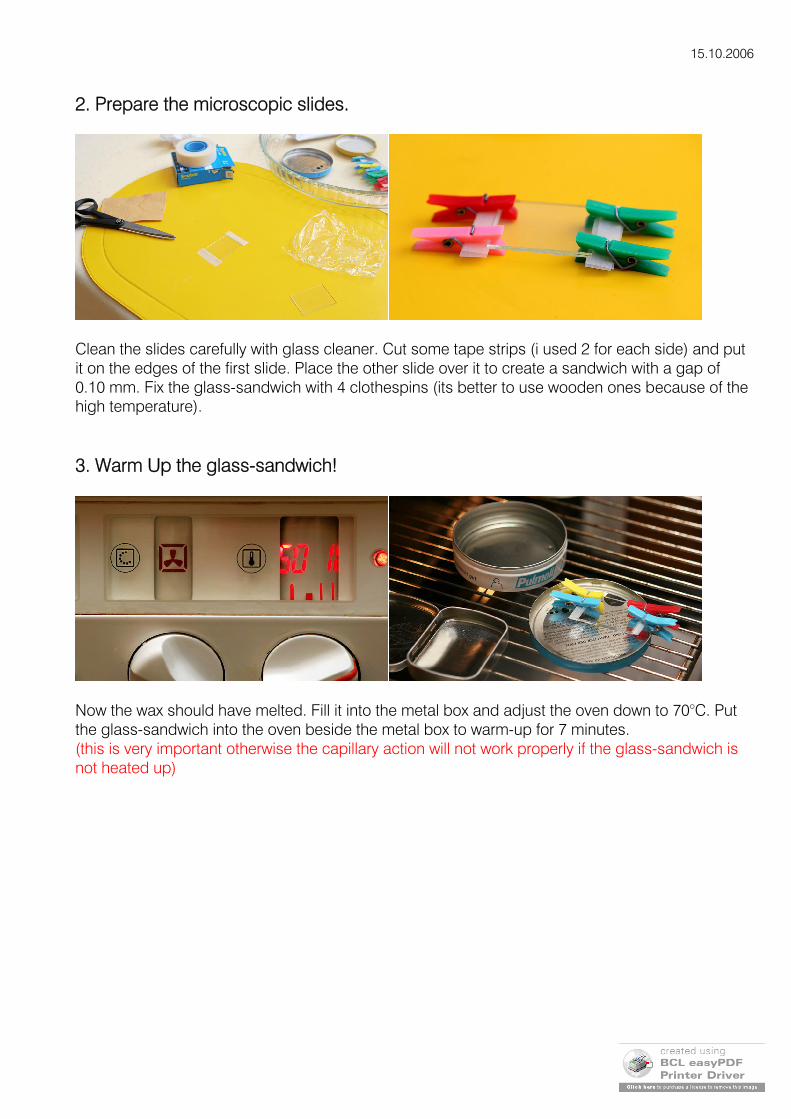
2. Prepare the microscopic slides.
Clean the slides carefully with glass cleaner. Cut some tape strips (i used 2 for each side) and put it on the edges of the first slide. Place the other slide over it to create a sandwich with a gap of 0.10 mm. Fix the glass-sandwich with 4 clothespins (its better to use wooden ones because of the high temperature).
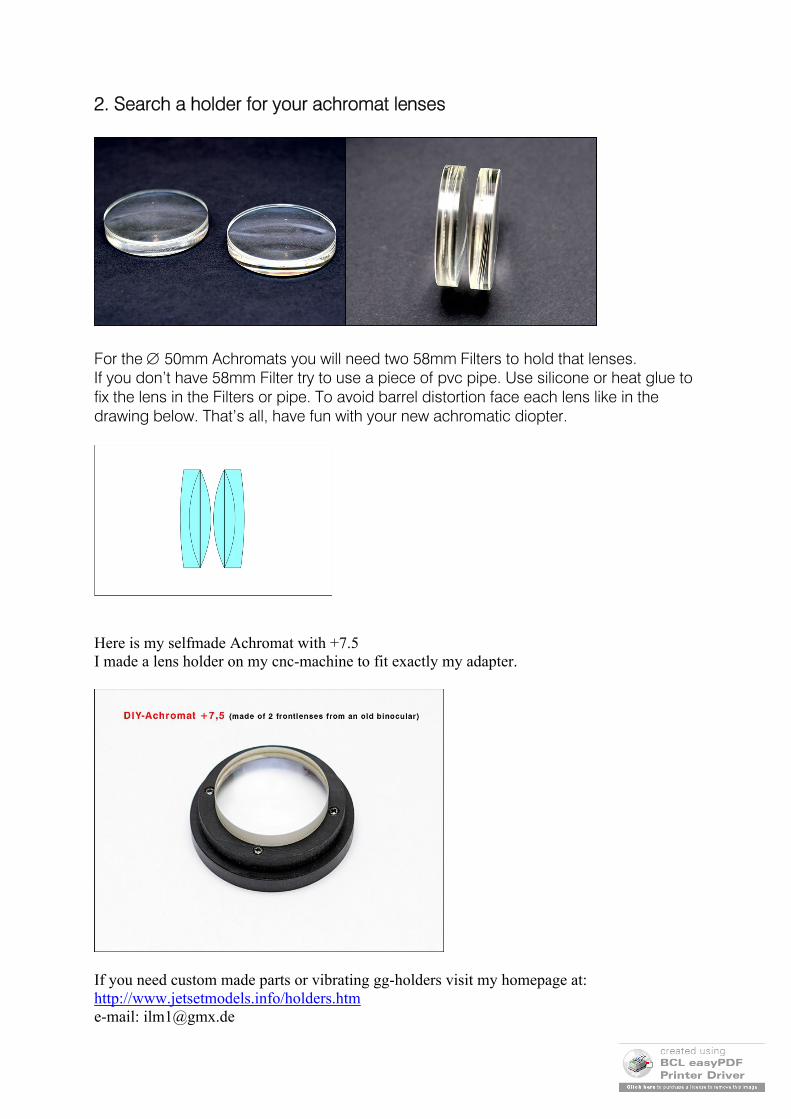
3. Warm Up the glass-sandwich!
Now the wax should have melted. Fill it into the metal box and adjust the oven down to 70°C. Put the glass-sandwich into the oven beside the metal box to warm-up for 7 minutes. (this is very important otherwise the capillary action will not work properly if the glass-sandwich is not heated up)

15.10.2006
4. Touch the wax surface!
Carefully touch the wax surface with the glass-sandwich. Through capillary action the wax is climbing up very fast.
5. Cool down!
Put your wax-gg into the refrigerator (about 30 seconds) or let it cool down slowly (I haven’t seen any differences in the grain between fast cooling in the refrigerator or slowly cooling.)

15.10.2006
Wax-GG made of microscopic slides (38x26x1 mm)
Wax-GG made of acrylic glass
Have fun!
Daniel Schweinerte-mail: [email protected]
If you need custom made parts or vibrating gg-holders visit my homepage at:http://www.jetsetmodels.info/holders.htm

Achromatic-Diopter in 2 easy stepsby Daniel Schweinert
e-mail: [email protected]
Ok, so you need an achromatic diopter for your 35mm DOF adapter. Maybe this tutorial saves you some cash and you can buy a vibrating gg-holder from me ;-)
Dependig on your camcorder lens you will need an achromatic diopter to focus on your 35mm adapters groundglass. I used an old tasco 10x50 binocular with coated frontlenses from ebay for 15,- bucks. For camcorders with small lens (Sony HC1,Panasonic NV-GS400/500…) this binocular with 50mm is ok. If you want to shoot HDV with (Sony FX/Z1, Panasonic HVX200) you will need binoculars with bigger frontlenses 60mm or more to use only the sweetspot of the lens.
Technical data for this 10x50 tasco binocular:Achromatic frontlenses 50mmMagnification 10x (focal length for one achromat is 1 / 0.265m = +3.77 diopters)If you put both frontlenses together you get an very cheap coated achromat with +7.5 diopters for your 35mm adapter. If you need more diopters try binoculars with 7x50. The focal length of the achromats is changing from manufacturer to manufacturer so you have to try.
1. Get yourself a cheap binocular i.e. from ebay
Search for a cheap binocular (I used a tasco 10x50 for my little camcorder) i.e. in ebay.The old binoculars from Zeiss, Tasco… are far better because they have coated lenses that can be unscrewed. The very cheap noname brand binoculars are mostly glued and you will need to saw them off. Open that binocular and take out the frontlenses. Use a screwdriver to open the threads (Be careful not to scratch the lenses).
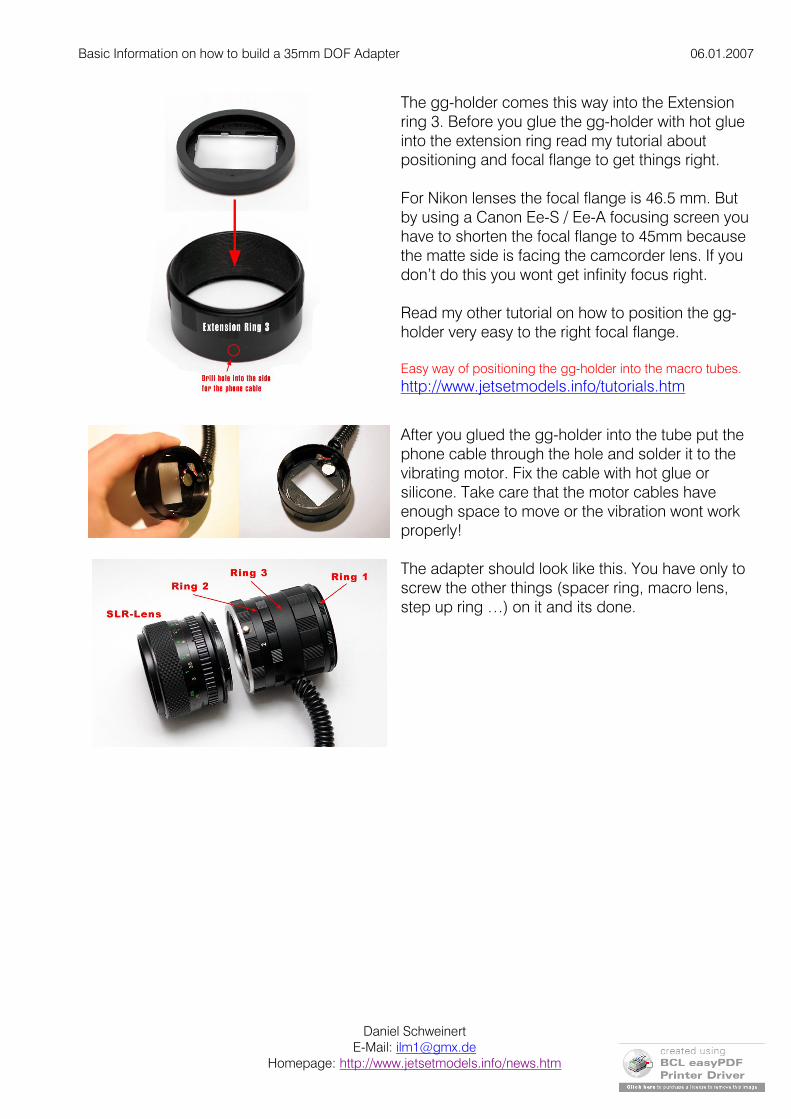
2. Search a holder for your achromat lenses
For the 50mm Achromats you will need two 58mm Filters to hold that lenses.If you don’t have 58mm Filter try to use a piece of pvc pipe. Use silicone or heat glue to fix the lens in the Filters or pipe. To avoid barrel distortion face each lens like in the drawing below. That’s all, have fun with your new achromatic diopter.
Here is my selfmade Achromat with +7.5I made a lens holder on my cnc-machine to fit exactly my adapter.
If you need custom made parts or vibrating gg-holders visit my homepage at:http://www.jetsetmodels.info/holders.htme-mail: [email protected]

Basic Information on how to build a 35mm DOF Adapter 06.01.2007
Daniel SchweinertE-Mail: [email protected]
Homepage: http://www.jetsetmodels.info/news.htm
BASIC Information onhow to build a 35mm DOF Adapter
for Nikon Lenses
by Daniel Schweinerte-mail: [email protected]
(for Canon EOS lenses there is a slight modification)(bigger spacer rings needed with 62mm threads)
(the spacer ring is then glued to one of the extension tube rings)
You will need this parts:
Cheap Nikon extension tubes (with standard 58mm threaded rings)Take care there are 2 different models on the market with two different inner diameters 54mm & 55mm. The one with 55mm inner diameter should have standard 58mm threaded rings.
http://www.enjoyyourcamera.com or search in ebay
Vibrating gg-holder VH-54 or VH-55 depends on used extension tubes. There are different models of the Nikon extension tubes that looks the same but the inner diameters are different.
http://www.jetsetmodels.info/news.htm
Vibrating Disk Motor
http://www.jetsetmodels.info/products.htmhttp://www.hobbyengineering.com/H3425.html
Simple ON / OFF Switch

Basic Information on how to build a 35mm DOF Adapter 06.01.2007
Daniel SchweinertE-Mail: [email protected]
Homepage: http://www.jetsetmodels.info/news.htm
Rheostat or Potentiometer 25 Ohm (3-4 Watt)This is important to control the voltage down to 0.8 – 1.0 Volt of the motor for proper vibration.
1.2 V Ni-MH Battery Mignon AAWith 2700 mAh battery you will get over 30 hours of non stop vibration.
Simple Phone cable for connections
Battery Case for Switch, Rheostat and Battery
Focusing screen (gg = groundglass)You can use the Canon Ee-S or Ee-A that depends on your taste.Look in the forums there are several posts about that screens.Ee-A = The retail version is brighter than the Ee-S.Ee-S = Has finer microlenses and is easier to focus than Ee-A.
You can also use selfmade wax-gg’s with my gg-holders.http://www.jetsetmodels.info/tutorials.htm
Asian Spacer Ring with 58mm threadlength = 1,5” (ca. 38.1mm)
http://www.camerafilters.com or search in ebay
Close Up Lens or Macro Lens +7 or +10 with 58mm threadFor better quality you should consider to buy a good achromatic diopter made of two elements. With cheap close up lenses you will get chromatic aberration and strange effects on the edges. Try also my do it yourself tutorial for achromatic diopters.http://www.jetsetmodels.info/tutorials.htmFor camcorders with small lens diameters < 43mm(Panasonic GS400…) you wont need a close up lens.

Basic Information on how to build a 35mm DOF Adapter 06.01.2007
Daniel SchweinertE-Mail: [email protected]
Homepage: http://www.jetsetmodels.info/news.htm
Step Up Filter Ring(in example for Panasonic GS400 - 43mm to 58mm)depends on your camera filter thread
http://www.camerafilters.com or search in ebay
Circular Polarizing Filter 43mm (not necessary)Buy the cheapest circular polarizing filter that can be rotated.Take out the glass and mount it to your camera. With this filter you can now rotate the whole adapter to position your SLR-Lens showing the focus and aperture numbers upwards.
If you use a circular polarizing filter on your adapter you may consider to use a support rod system. The polarizing filter and your camera lens thread may not be able to hold the whole weight of the adapter + SLR lens and may break appart.
How to make the vibrating part:
Glue the Canon focusing screen with silicone or hot glue into the gg-holder. (Pin is on the left side)
The matte side of the focusing screen should face your camcorder lens and the glossy side the Nikon SLR-Lens! Its enough to put only one drop of hot glue on each corner.The vibrating motor is glued on the back of the gg-holder. The motor has a sticky tape on it that will be enough to hold it in place you wont need any glue.
(Don’t use super glue or the gases will destroy your focusing screen)
Take the longest extension ring (normally its marked with number 3) and drill a hole in its side.
Basic Information on how to build a 35mm DOF Adapter 06.01.2007
Daniel SchweinertE-Mail: [email protected]
Homepage: http://www.jetsetmodels.info/news.htm
The gg-holder comes this way into the Extension ring 3. Before you glue the gg-holder with hot glue into the extension ring read my tutorial about positioning and focal flange to get things right.
For Nikon lenses the focal flange is 46.5 mm. But by using a Canon Ee-S / Ee-A focusing screen you have to shorten the focal flange to 45mm because the matte side is facing the camcorder lens. If you don’t do this you wont get infinity focus right.
Read my other tutorial on how to position the gg-holder very easy to the right focal flange.
Easy way of positioning the gg-holder into the macro tubes.http://www.jetsetmodels.info/tutorials.htm
After you glued the gg-holder into the tube put the phone cable through the hole and solder it to the vibrating motor. Fix the cable with hot glue or silicone. Take care that the motor cables have enough space to move or the vibration wont work properly!
The adapter should look like this. You have only to screw the other things (spacer ring, macro lens, step up ring …) on it and its done.
Basic Information on how to build a 35mm DOF Adapter 06.01.2007
Daniel SchweinertE-Mail: [email protected]
Homepage: http://www.jetsetmodels.info/news.htm
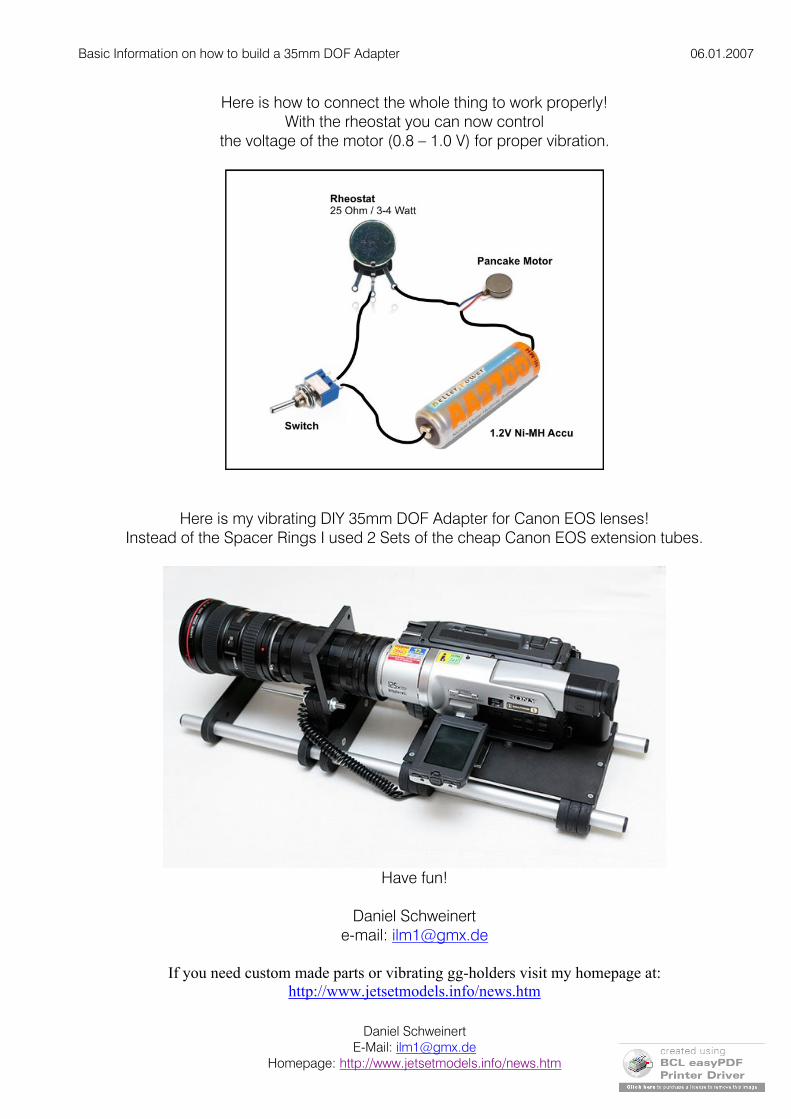
Here is how to connect the whole thing to work properly!With the rheostat you can now control
the voltage of the motor (0.8 – 1.0 V) for proper vibration.
Here is my vibrating DIY 35mm DOF Adapter for Canon EOS lenses!Instead of the Spacer Rings I used 2 Sets of the cheap Canon EOS extension tubes.
Have fun!
Daniel Schweinerte-mail: [email protected]
If you need custom made parts or vibrating gg-holders visit my homepage at:http://www.jetsetmodels.info/news.htm

DS VH-57X Ver. 2.0 with optional interchangeable gg-holder plates
forCanon Ee-S / Ee-A
focusing screenfor
custom made focusing element i.e.wax-gg, acrylic-gg,
light shaping diffusor...
forNikon D (red dot)focusing screen
for Canon EOS extension tubesfocal flange ready!
How to build a compact vibrating 35mm dof adapter with interchangeablegg’s for the Canon HV20.
2007 by Daniel Schweinert - [email protected] - http://www.jetsetmodels.info/news.htm
Tutorial for Canon HV20 with VH-57X(may also work with other cams like Sony HC1...)

1
If you want to make your 35mm dof adapter dust sealed then do it now because later it wont be that easy. Go and buy yourself a 49mm UV-Filter it has to be , dont buy a cheap one or you will get some nasty internal reflections or streaks in your adapter. Put the UV-Filter on a flat surface and gently push on the basering of theVH-57X until the UV-Filter is completely inside the basering of the VH-57X.
multicoated
2
Use some drops of super glue or jb-weld to fix the VH-57X to the bayonetring of the Canon EOS extension tubes. Put the glue around the edge of the basering. Also checkthat the VH-57X is aligned with the bayonet ring. The red dot should point upwards.
2007 by Daniel Schweinert - [email protected] - http://www.jetsetmodels.info/news.htm

3
If you bought the optional Nikon D gg-holder plate then read on. If you have the CanonE e - S o r E e - A g g - h o l d e r p l a t e t h a n g o o n t o t h e n e x t s t e p .Push the Nikon D focusing screen into the gg-holder plate it should stay fixed withoutgluing. If not than use some drops of hot glue to fix the Nikon D screen in place.Fix the the gg-holder plate with the Nikon D screen inside to the VH-57X basic unit.Use the 2 small screws to fix the gg-holder plate. The matte side of the Nikon D should face upwards.
4
Use one drop of hotglue in each corner to fix the Canon Ee-S / Ee-A screen to the gg-holder plate. The small pin should be on the left side! Use the 2 screws to fix the gg-holder plate.Be careful and dont push too hard on the screws or you may break the carbon pins!
(Don’t use superglue the gases will destroy your focusing screen)
2007 by Daniel Schweinert - [email protected] - http://www.jetsetmodels.info/news.htm

5
Take ring nr. 2 and screw it on the bayonet ring like in the pic. Drill a small hole intoring nr. 2 for the cables. You can also drill the hole on the right side where the greenarrow points at. Then you have later more space for soldering the coiled cable.The important part here is to let the cables of the motor long enough to vibrate properly.I bend them to the left and right like in the bottom pic.
6
Because the Canon EOS extension tubes have a non standard threading of 60mm you haveto do a workaround. I found out that a 55mm UV-Filter fits exactly the Canon EOS tubes. Use the JB-Weld glue to fix the 55mm UV-Filter inside ring nr. 1 to get a standard threading of 55mm. (Tip: Put some coins under the UV-Filter to get the right height!) If you dont want to glue I also offer now 55-60mm Step-Up rings. The HV20 Achromat unit (Item: HV20ACHR1) includes already the 55-60mm Step-Up ring.
2007 by Daniel Schweinert - [email protected] - http://www.jetsetmodels.info/news.htm

7
Screw ring nr. 3 over ring nr. 2 and finally screw ring nr. 1 with the 55mm UV-Filter madein step 6. In the end add also a 55mm Circular polarizing filter (without the glass).You need it only for aligning the adapter horizontally to your camcorder.Then put a step-up ring from 43mm - 55mm for the HV20. I also added a small achromatto eliminate the barrel distortion. You can still focus without achromat on the gg but youwill notice a slight barrel distortion in your footage. If you also want that achromat you can get it from www.surplushed.com its the L4673. The appropriate holder with the43-55mm Step-Up ring you can get from me. Check my homepage for the L4673-2 holder.
8
Im not going here into much detail. Solder the coiled cable to the motor and glue it to the ring - to avoid pulling it out. Buy a battery case and solder the other end of the coiledcable to it. Fix the battery case with velcro to the handstrap of the HV20. Inside the battery case you can also implement a switch and my micro-rheostat for adjusting thevibration.
ring 1 with 55mm UV-Filter
ring 3
ring 2 with hole
bayonet ring
2007 by Daniel Schweinert - [email protected] - http://www.jetsetmodels.info/news.htm

9
If you want to use different lenses i.e. Nikon, Contax-Yashica, Pentax, Leica,M42, Olympus, Canon FD... then buy one of these adapter mounts.You can find them very cheap (10-20 USD) in ebay.
I choosed the Canon EOS tubes because they can take many lenses with theseadapter mounts. So you always can change to different lenses without modifyingyour dof adapter.
Nikon to Canon EOSCanon FD to Canon EOSM42 to Canon EOS...
Also for safety reasons I recommend using a telephoto lens holder i.e. Manfrotto 293 or search for cheaper ones. Without a telephoto lens holder your risk to break the 43mm plastic threading of your Canon HV20.
2007 by Daniel Schweinert - [email protected] - http://www.jetsetmodels.info/news.htm
Manfrotto 293 telephotolens holderNikon to Canon EOS
I hope you understand this little tutorial. If something is not clear just ask!If you need parts or custom made things contact me via e-mail I have a little cnc-machine
that can do some pretty nice things :-)
Have funDaniel Schweinerte-mail: [email protected]

PARTS LIST (compact vibrating DOF adapter for Canon HV20 or other small camcorders)
www.jetsetmodels.info/news.htm
ebay local-photo / electronics store
If you want to use different lenses i.e Nikon you’ll need also this:
I recommend also a telephoto lens support:
i.e. Nikon lenses:
(you can obtain from me )1x VH-57X (incl. Motor and Canon Ee-S / Ee-A or Nikon-D gg-holder plate)1x Micro-Rheostat 20 or 50 Ohm (for adjusting the vibration)1x Switch1x L4673-2 achromat holder + 43-55mm Step-Up ring(Get the achromat from www.surplushed.com its the L4673)
(get it from or your )1x Coiled cable1x Battery 1.2V Ni-MH1x Battery holder1x Battery case1x 49mm UV-Filter (multicoated i.e. Hoya, Marumi, B+W...)1x 55mm UV-Filter (the cheapest one take out the glass)1x Canon EOS extension tubes1x Canon Ee-A or Ee-S focusing screen
1x 55mm CPL circular polarizing filter (the cheapest one and take out the glass)
Nikon to EOS mount adapter
Manfrotto 293 or cheaper one
35mm, 50mm, 85mm, 135mm (f1:1.4 or the cheaper ones f1:1.8)Don’t use lenses that are slower (above f1:2.8) or you will get hotspot or vignetting.
01020304
0506070809101112
01
02
03
04
05
06
07
08
09 10
11
12
2007 by Daniel Schweinert - [email protected] - http://www.jetsetmodels.info/news.htm

UPDATE 18.Sept.2007
If you want higher quality and distortion free images and better edge to edge sharpnessthen some little changes are necessary.
1. First you will need 2 extension tubes instead of one.2. Instead of the surplushed achromat, L4673-2 holder, 55mm CPL filter and 43-55mm Step-Up ring you’ll need only the high quality HV20 Zeiss Achromat unit (Item: HV20ACHR1)
See the updated parts list below:
Do you want the highest possible image quality from your dof adapter?
PARTS LIST (high quality vibrating DOF adapter for Canon HV20 or other small camcorders)
www.jetsetmodels.info/news.htm
ebay local-photo / electronics store
(parts you can obtain from me )1x VH-57X (incl. Motor and Canon Ee-S / Ee-A or Nikon-D gg-holder plate)1x MR-50 (Micro-Rheostat 50 Ohm for adjusting the vibration)1x Switch1x HV20ACHR1 (HV20 Zeiss Achromat unit incl. 43-55mm, 55-60mm Step-Up rings, 55mm rotateable ring, no more gluing necessary. Check out my homepage for more infos about the HV20 Zeiss Achromat unit.
(get it from or your )1x Coiled cable1x Battery 1.2V Ni-MH1x Battery holder1x Battery case1x 49mm UV-Filter (multicoated i.e. Hoya, Marumi, B+W...)2x Canon EOS extension tubes1x Canon Ee-A or Ee-S focusing screen
The adapter will be a little longer but you will get the highest possible quality by usingthe HV20 Zeiss Achromat unit and the rings shown below.
2007 by Daniel Schweinert - [email protected] - http://www.jetsetmodels.info/news.htm
Related Documents