INSTRUCTION MANUAL PNF COLORS: RED / BLUE GREEN / YELLOW

Welcome message from author
This document is posted to help you gain knowledge. Please leave a comment to let me know what you think about it! Share it to your friends and learn new things together.
Transcript

INSTRUCTION MANUAL
P N FCOLORS:
RED / BLUE GREEN / YELLOW

Read this instruction manual fully so as to become completely familiar with the features of this product before operating. Failure to operate this product correctly could result in damage to the product, personal property and cause serious injury. This is a sophisticated hobby product and is NOT a toy. It must always be operated with caution, common sense and some basic mechanical ability. This manual provides instructions as the the assembly, safe operation and maintainence of this hobby product. It is highly reccommneded that you follow and read fully the instructions and warnings stated in this manual including safety, assembly, set-up and flying guidelines in order to operate this product correctly and avoid damage or serious injury.
• This is a radio controlled flying model and as such must always be flown with caution and care. This is not a toy.
• This model is designed for intermediate to advanced pilots. • Alway exersie great caution when using the recommended battery to power this product. For full safety notes and operating procedures, please see information provided by your battery
supplier. • Take great care when connecting/disconnecting the battery. See battery supplier for full safty
procedures. • Never power up the model in confined spaces and always keep the props clear of obstructions. • This product is not a toy. Children must be accompanied by an adult at all times if operating this
product. • Only fly this model in an open area away from crowds, people, buildings, tree's, power lines
and obstructions. • Always put safety first when operating this model and consider the warnings stated above. • The supplier/manufacturer accepts no responsibility for damage or injury caused through the
use of the product. Not suitable for children under the age of 14. THIS IS NOT A TOY.
As the user of this product you and you alone are responsible for operating it in a manner that does not endanger yourself and others around you or result in damage to the product or property of others. This product is operated via a radio controlled system that in some cases can be subject to interference from sources outside of your control. Interference may result in a momentary loss of control so it is always recommended that this product be used in a suitably open outdoors space.
1

INTRODUCTION ................................................................................................ 3
SPECIFICATION ................................................................................................ 4
CONTENT .......................................................................................................... 5
ASSEMBLY ........................................................................................................ 6
CONTENTS
SPARE PARTS LISTING ...................................................................................16
TROUBLE SHOOTING ......................................................................................17
CONTACT ......................................................................................................... 17
NOTES ...............................................................................................................18
1. VERTICAL AND HORIZONTAL TAIL SURFACES.............................................................................. 5
2.LANDING GEAR.................................................................................................................................. 5
3. INSTALLATION OF MAIN WING......................................................................................................... 6
4. ELECTRONIC AVIONICS SET UP...................................................................................................... 8
5. CONTROL SET-UP............................................................................................................................. 8
6. CENTRE OF GRAVITY.......................................................................................................................11
7. HINTS.................................................................................................................................................12
8. OPTIONAL SKIS............................................................................................................................... 12
9. MODEL FLYING PRECAUTIONS..................................................................................................... 13
10. PRE-FLIGHT CHECKS................................................................................................................... 14
11. FLYING THE AVIOS BUSHMULE................................................................................................... 14
12. FROM AVIOS TO THE CUSTOMER.............................................................................................. 15
2

Thank you for choosing Avios and for purchasing the Bushmule, the ultimate utilitarian RC model airplane. The Bushmule has been designed as an all-purpose, all terrain Short Take Off & Landing (STOL) machine. Prepare your bush landing strips, snow fields and water runways for this exciting workhorse of the sky.Born from the same stable as the venerable bushmule, The Avios Bushmule is ready to take whatever you can throw at it. Designed to perform many tasks and take everything in its stride. Rough runways, water, snow, dropping cargo and FPV flying the adventure starts today.Powered by two powerful brushless outrunner motors with reversing ESCs combine to create a solid stable platform for all aspects of RC flight.
The Avios team know you will have many happy hours in the air with this reliable yet stubborn steed.Enjoy your Avios Bushmule, Anytime… Anywhere…
SPECIFICATIONS
INTRODUCTION
Wingspan: 1500mm (59”)Length: 1095mm (43.1”)Flying weight: 2250gControls: Minimum 6 channel (Ailerons, Elevator, Throttle, Rudder, Flaps and rear cargo door)ESC: 2 x 30A Aerostar RVS (reversing ESC)Motor: 2 x 35x36mm Aerostar 850kv Brushless Outrunner MotorsLanding gear: Tricycle (Fixed with steerable nose wheel)Props: 3 blade 10 x 8Battery: 2600-4000mah 14.8V 4S lipo (20C min)Radio system: Minimum 5 channel Transmitter and receiver
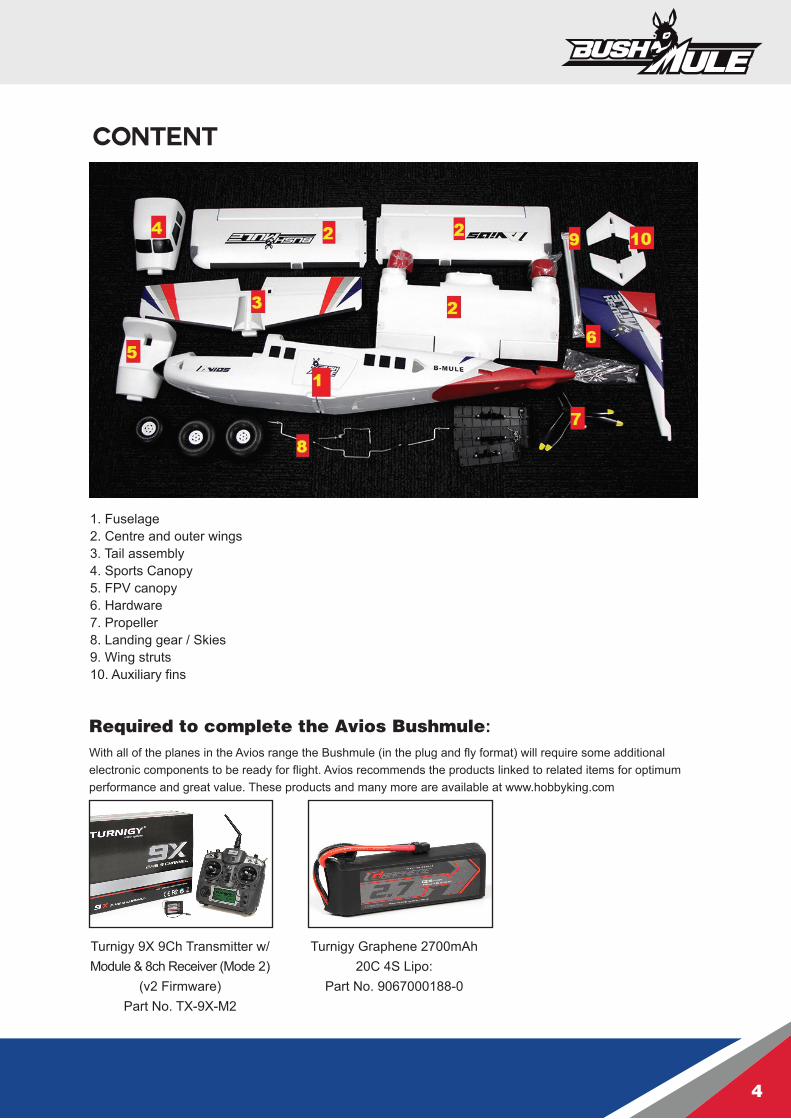
1. Fuselage2. Centre and outer wings3. Tail assembly4. Sports Canopy5. FPV canopy6. Hardware7. Propeller8. Landing gear / Skies9. Wing struts10. Auxiliary fins
Turnigy 9X 9Ch Transmitter w/ Module & 8ch Receiver (Mode 2)
(v2 Firmware)Part No. TX-9X-M2
Turnigy Graphene 2700mAh20C 4S Lipo:
Part No. 9067000188-0
CONTENT
With all of the planes in the Avios range the Bushmule (in the plug and fly format) will require some additional electronic components to be ready for flight. Avios recommends the products linked to related items for optimum performance and great value. These products and many more are available at www.hobbyking.com
Required to complete the Avios Bushmule:
4

1. Vertical and Horizontal Tail Surfaces • Flex all control surfaces (Elevator and rudder) to loosen the hinge joint. • Attach the Horizontal tailplane and then insert the vertical stabilizer with the front first then home the
rear of the vertical stabilizer. Make sure this is a secure firm fit. Use 2 2mm x 45mm self-tapping screws to mount the tail surfaces to the rear of the fuselage.
• The Avios team suggests that you apply either foam safe contact adhesive or a long set time 2-part epoxy on these tail surfaces. If you have no need to remove these parts or if you are going to push the Bushmule to its extreme flight envelope.
• Use a Servo tester to centre your elevator and rudder servos, then adjust the clevises until you have a level and zeroed control service. (Hint-Placing some fuel tube or small zip tie the secure the clevis is always a good for security and peace of mind.)
2. Landing Gear • Insert from landing gear leg in the front mounting bracket. Centre the nose wheel and tighten the
1.5mm grub screw. (Use a thread lock and make sure the grub screw tightens onto the flat part of the shaft)
• Centre the nose wheel steering servo with a servo tester and attach the control rod from the servo arm to the connecting arm of the nose gear shaft.
• Attach the main landing gear, simply insert the pre-bent wire of the landing gear into the slot in the centre of the fuselage. Use the two mounting brackets and the four 2mm x 13mm self-tapping screws to secure the main gear.
ASSEMBLY
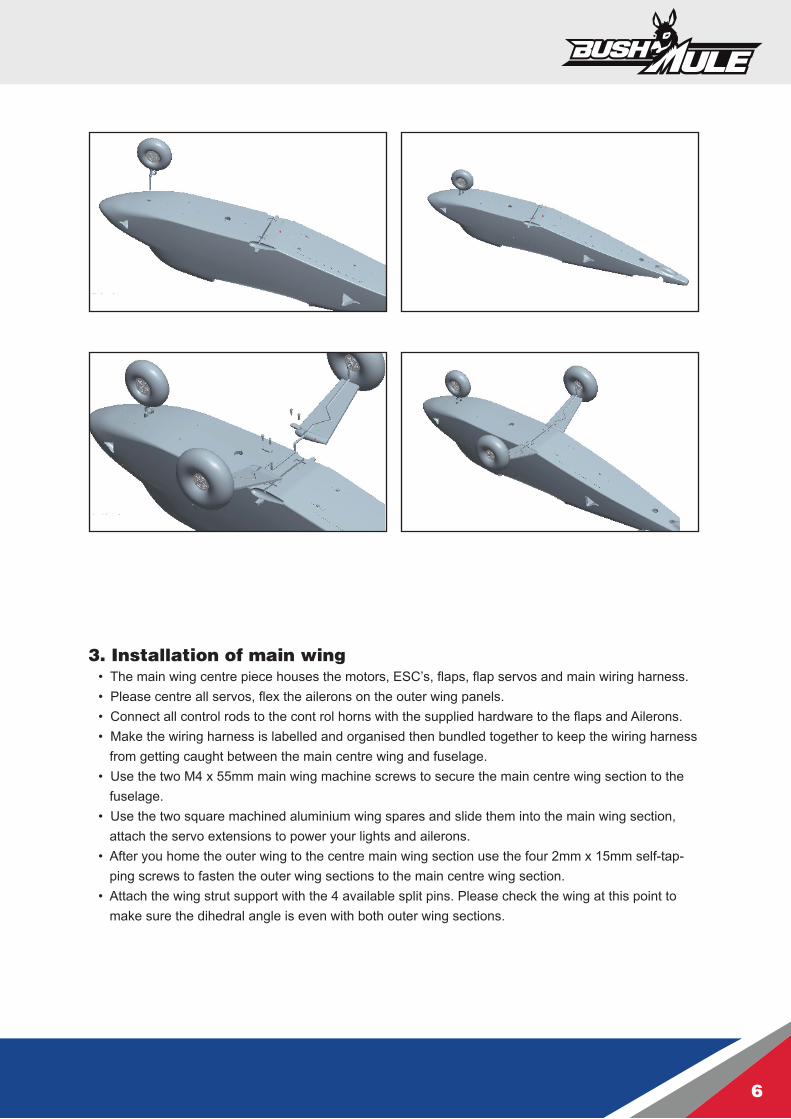
3. Installation of main wing • The main wing centre piece houses the motors, ESC’s, flaps, flap servos and main wiring harness. • Please centre all servos, flex the ailerons on the outer wing panels. • Connect all control rods to the cont rol horns with the supplied hardware to the flaps and Ailerons. • Make the wiring harness is labelled and organised then bundled together to keep the wiring harness
from getting caught between the main centre wing and fuselage. • Use the two M4 x 55mm main wing machine screws to secure the main centre wing section to the
fuselage. • Use the two square machined aluminium wing spares and slide them into the main wing section,
attach the servo extensions to power your lights and ailerons. • After you home the outer wing to the centre main wing section use the four 2mm x 15mm self-tap-
ping screws to fasten the outer wing sections to the main centre wing section. • Attach the wing strut support with the 4 available split pins. Please check the wing at this point to
make sure the dihedral angle is even with both outer wing sections.
6
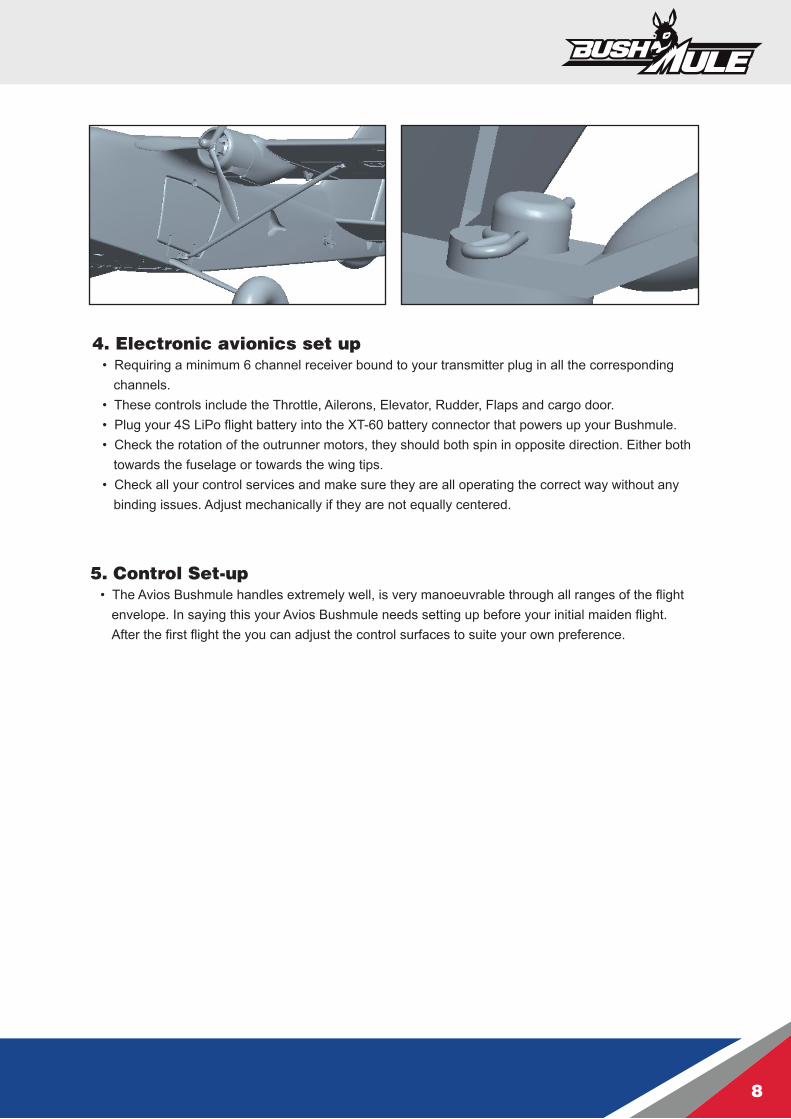
4. Electronic avionics set up • Requiring a minimum 6 channel receiver bound to your transmitter plug in all the corresponding
channels. • These controls include the Throttle, Ailerons, Elevator, Rudder, Flaps and cargo door. • Plug your 4S LiPo flight battery into the XT-60 battery connector that powers up your Bushmule. • Check the rotation of the outrunner motors, they should both spin in opposite direction. Either both
towards the fuselage or towards the wing tips. • Check all your control services and make sure they are all operating the correct way without any
binding issues. Adjust mechanically if they are not equally centered.
5. Control Set-up • The Avios Bushmule handles extremely well, is very manoeuvrable through all ranges of the flight
envelope. In saying this your Avios Bushmule needs setting up before your initial maiden flight. After the first flight the you can adjust the control surfaces to suite your own preference.
8

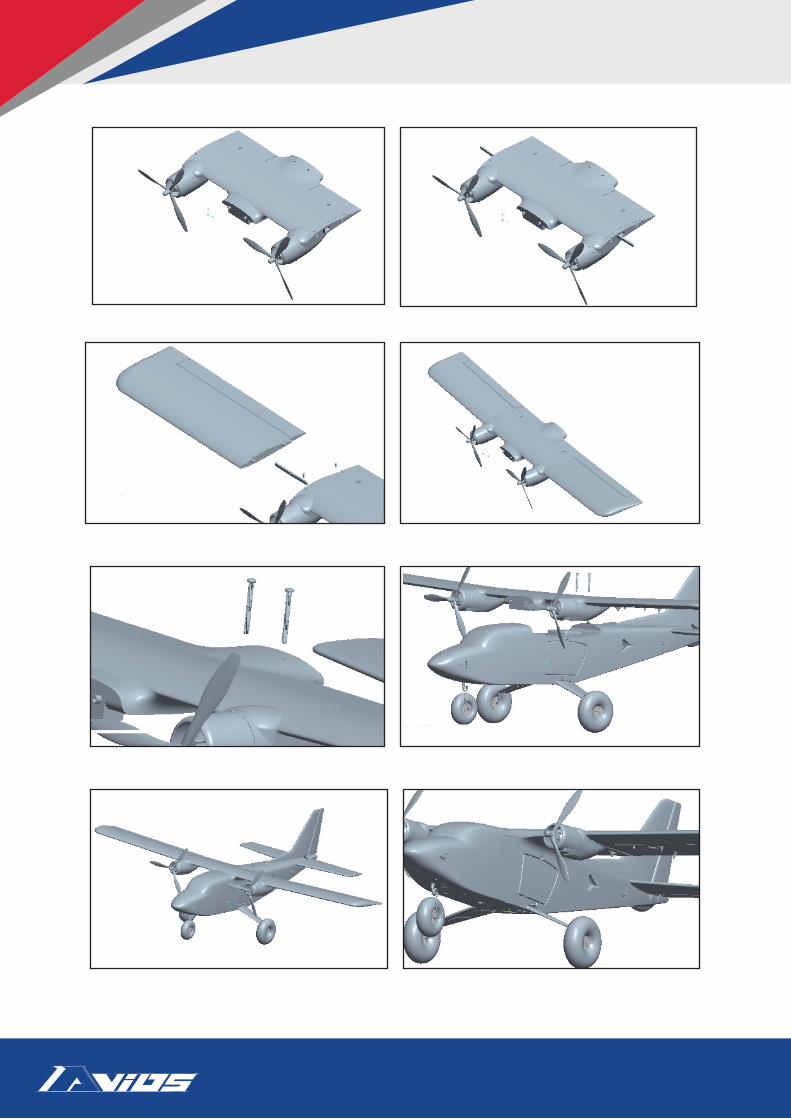
Basic assembly of your Bushmule is complete.Now perform a final check on all screws, bolts and components,
ensuring all are secure and firmly in place.

Roll left
Roll right
Pitch down
Pitch up
Yaw left
Yaw right
Aileron(Roll)
Elevator(Pitch)
Rudder(Yaw)
Control throws:
20 -40 mm
20 -40 mm15-30 mm
15-30 mm
50-60 mm ~RudderElevator
Aileron10 - 15 mm
10 - 15 mm
* Elevator ‘low rates’ 15mm ‘high rates’ 30mm in either direction from neutral. * Aileron ‘low rates’ 20mm ‘high rates’ 40mm in either direction from neutral.* Rudder ‘low rates’ 10mm ‘high rates’ 15mm in either direction from neutral.
ileron Elevator RudderA
10

6. Centre of Gravity
With assembly and set-up now complete, your Avios Bushmule should be ready for flight. However we recommend you read and follow the advice given
in the next stage of this manual before flying your model.
CG 50-60 mm ~ fromleading edge.
The centre of gravity or CoG is the most important measurement for a successful and comfortable flight.
The suggested CoG for the Avios Bushmule is 50-60mm from the leading edge of the wing.With your flight battery installed balance the Bushmule will fly perfectly at the required measurement.
CG Location:
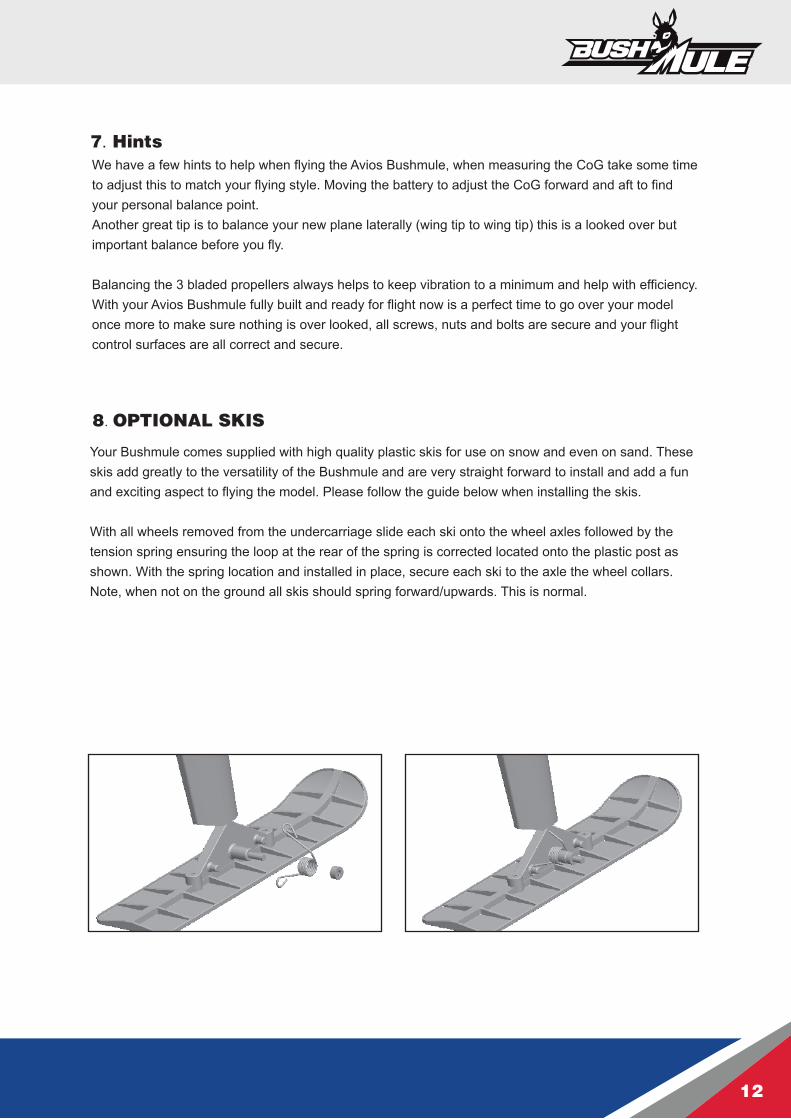
Your Bushmule comes supplied with high quality plastic skis for use on snow and even on sand. These skis add greatly to the versatility of the Bushmule and are very straight forward to install and add a fun and exciting aspect to flying the model. Please follow the guide below when installing the skis.
With all wheels removed from the undercarriage slide each ski onto the wheel axles followed by the tension spring ensuring the loop at the rear of the spring is corrected located onto the plastic post as shown. With the spring location and installed in place, secure each ski to the axle the wheel collars. Note, when not on the ground all skis should spring forward/upwards. This is normal.
We have a few hints to help when flying the Avios Bushmule, when measuring the CoG take some time to adjust this to match your flying style. Moving the battery to adjust the CoG forward and aft to find your personal balance point.Another great tip is to balance your new plane laterally (wing tip to wing tip) this is a looked over but important balance before you fly.
Balancing the 3 bladed propellers always helps to keep vibration to a minimum and help with efficiency.With your Avios Bushmule fully built and ready for flight now is a perfect time to go over your model once more to make sure nothing is over looked, all screws, nuts and bolts are secure and your flight control surfaces are all correct and secure.
7. Hints
8. OPTIONAL SKIS
12

• Select your flight area carefully. Always choose an open space that is unobstructed from trees and buildings and away from crowed areas. Avoid flying in areas with roads, electric/telephone poles/wires and water nearby or within close proximity to full size controlled airspace.
• Do not fly this model in poor weather. High winds, low visibility, inclement weather, rain and storms are to be avoided.
• Never attempt to catch this model whilst in flight. Even a slow-moving model can cause harm to yourself and/others and risks damage to the model.
• This model is recommended for children no younger than 14 years old. All children, no matter what age, should always be supervised by a capable and responsible adult when operating this model.
Always unplug your model battery when not in use. Never leave the battery installed in your model.Please remember to keep clear of the propellers at all times when your flight battery is connected.Before flying, always turn on your transmitter first then plug your flight battery into your model.After flying, always unplug your flight battery first then turn off your radio transmitter.Exercise caution when charging your batteries and follow in full your battery manufacturers safety guideline when doing so.
9. MODEL FLYING PRECAUTIONS

11. FLYING THE BUSHMULE:
• Your Avios Bushmule is one of the most versatile, stable and predictable RC aircraft to fly. A fantas-tic introduction to the world of twin motored RC flying.
• When flying the Bushmule the counter rotating propeller will give the flyer zero or limited torque effect as the motors are spinning in opposite directions.
• The Bushmule has a very wide flight envelope happily flying slow with the large barn door style flaps, the Bushmule is a true STOL (Short Take Off and Landing) workhorse. But, when you put the throttle down the power is perfectly distributed from the 4S flight battery to the twin 30A ESC’s to the powerful and reliable brushless outrunner motors, Spinning two 10 inch propellers the power is converted to a stampeding barnstorming utility thoroughbred. No horsing around the Avios Bushmule is a great flying RC platform.
• Changing the large “Tundra” like wheels to skies or optional floats make this RC aeroplane a special and unique animal.
• With your additional FPV (First Person View) equipment the Bushmule converts easily to a FPV superstar. Pan and tilt cameras, flight camera and VTX’s will easily fit in the well thought out positions and huge fuselage spaces.
10. PRE-FLIGHT CHECKS: • Always perform a range check between your Transmitter (TX) and Receiver (RX). Please follow
your Transmitter manufacturers guidelines for performing this important check. • Check all screw, nuts, bolts, grub screws and mounting points are firmly secured, including control
horns and clevises. • Only fly with fully charged batteries (both flight batteries and transmitter batteries) Failure to do so
could result in loss of control, damage to persons and property. Always check your batteries and have a system that works for you with flat and fully charged batteries.
• With your Bushmule powered up check all your control surfaces are free from damage/obstructions and moving in the correct directions.
• Always inspect the model and propellers for any damage that may have occurred during transit and listen for any unusual sounds from the electronics when powering up your Bushmule. If any doubt do not fly the model.
• With your model held securely and the propellers free from obstructions, increase the throttle to confirm the rotation is in the correct direction.
• If this is the maiden or first flight with your Bushmule double check the CoG is at the correct position. If not adjust the battery position inside the battery area to achieve the required balance point.
• If you are An inexperienced RC flyer then please seek the help and assistance of an experienced RC pilot to help and confirm these final checks and test fly the model for you.
14

• Firstly, thank you for purchasing the Avios Bushmule and welcome to the adventure of all terrain flight. Anytime, Anywhere.
• Whilst not essential to flying, the use of coordinated rudder in flight will add to the general handling through to slow speed manoeuvres, improve your flying skills and let you explore the full potential of this fine model. A mix of 40% aileron-rudder is recommended as a good starting point. From there you can adjust this mix to suite your flying style.
• Although it can be, the Bushmule doesn’t need to be flown at full throttle all the time. Dropping back on the throttle will not only let you enjoy the Bushmule at a more relaxed pace, but will also result in longer flight times, reduce the risk of the motors and ESC’s over heating in hot weather and increase the life of your flight pack.
• Flight packs of 20C discharge rate or above are recommended for use in the Bushmule to ensure optimal performance in flight.
• Keep all leads within the fuselage area as tidy as possible. Tidy wires not only look better but also allow for easier access to all internal components, increase airflow around electronics and reduce the risk of electronic interference.
• Inspect the propellers and mounting nut/bolts frequently, especially if you’ve suffered a hard landing or the prop has been knocked.
• If you intend to use the supplied skis on snow and sand or wish you wish to fit the optional floats and fly off water, it is recommended that you add a coat of clear acrylic varnish to the applied decals. Prolonged exposure to water may cause the decals to lift from the surface and have tired appearance, Let’s face it no one likes a tired looking ass. Please, test your varnish on a scrap piece of EPO first to ensure it does not react badly.
• Our final suggestion is to add a mixture on your Transmitter to enable throttle to be mixed with your rudder inputs. Even though the optional floats have the provision for a water rudder it’s a lot easier to taxi on water, snow or rough fields with this additional mix. Flying the Bushmule with this throttle / rudder mix also opens the Bushmule’s wild side with flat spins and crazy antics. (please check your transmitters owner’s manual for the mixing instructions.)
12. From Avios to the customer
Thank you again for purchasing the Avios Bushmule.We hope you’ll have many happy days of flying in wide open skies
Don't forget, spare parts are available for this model,
please see opposite for details.

SPARE PARTS LISTING (RED / BLUE)�
Canopy Hatch w/Applied Stickers:
Part No. 9310000310-0
Black Foam Nose Cone:Part No.
9310000332-0
Outer Wing Spars:Part No.
9310000313-0
Foam Wheel Set (EPO) w/Plastic Hubs:
Part No.9310000312-0
Wing Strut Set:Part No.
9310000314-0
Wing center section:Part No.
9310000309-0
FPV Canopy Hatch:Part No.
9310000311-0
AeroStar 3536-850KV Brushless Motor w/X
Mount:Part No.
9310000315-0
AeroStar 30A RVS ESC Set (with Reversing):
Part No.9310000316-0
Landing Gear Wire:Part No.
9310000317-0
Control Rods w/Clevises:Part No.
9310000318-0
LED Light Set:Part No.
9310000319-0
Vertical Tail w/Stickers (Red/Blue)Part No.
9310000322-0
Cowls (red) (Pair)Part No.
9310000324-0
Fuselage Set w/Stickers and LEDs (Red/Blue)
Part No. 9310000320-0
Outer Wing Set w/Stickers and LEDs
(Red/Blue):Part No.
9310000321-0
Horizontal Tail w/Stickers and Float Fins
(Red/Blue)Part No.
9310000323-0
Sticker Set (Red/Blue)Part No.
9310000325-0
16

SPARE PARTS LISTING (Yellow / Grey)�
Outer Wing Set w/Stickers and LEDs (Yellow/Grey):
Part No.9310000327-0
Canopy Hatch w/Applied Stickers:
Part No. 9310000310-0
Vertical Tail w/Stickers (Yellow/Grey)
Part No. 9310000328-0
Cowls (Yellow) (Pair):Part No.
9310000330-0
Black Foam Nose Cone:Part No.
9310000332-0
Outer Wing Spars:Part No.
9310000313-0
Foam Wheel Set (EPO) w/Plastic Hubs:
Part No.9310000312-0
Wing Strut Set:Part No.
9310000314-0
Sticker set:Part No.
9310000331-0
Wing center section:Part No.
9310000309-0
FPV Canopy Hatch:Part No.
9310000311-0
AeroStar 3536-850KV Brushless Motor w/X
Mount:Part No.
9310000315-0
Fuselage Set w/Stickers and LEDs (Yellow/Grey):
Part No. 9310000326-0
AeroStar 30A RVS ESC Set (with Reversing):
Part No.9310000316-0
Landing Gear Wire:Part No.
9310000317-0
Control Rods w/Clevises:Part No.
9310000318-0
LED Light Set:Part No.
9310000319-0
Horizontal Tail w/Stickers and Float Fins (Yellow/Grey):
Part No. 9310000329-0

Problem Cause Solution
Motors do not turn
Control surfaces not moving with stick input
Model doesn’t fly straight
1. Control surfaces not centered.2. CoG is not in the correct position.
Model does not climb well
1. The battery is not fully charged.2. Elevator servo is reversed.3. CG too far backwards.
Limited Radio range
1. Transmitter/Receiver batteries are flat.
1. charge/replace batteries.
Model movesbackwards 1. Swap the props around.
1. Charge the batteries.2. Install a full charged battery.3. Check for connection between the ESC and motor.4. Replace motor.5. Consult Radio manual and go through bind procedure again.6. Hold model and move throttle to full postion then back down to idle.
1. Props installed incorrectly
1. The servo lead is connected to \ Rx incorrectly.2. The servo is damaged.
1. Make sure the servo leads are connect properly.
2. Replace servo.
1. Adjust the trims on the transmitter.2. Re-possition lipo as suggested.
1. Charge the battery.2. Change servo direction via Tx.3. Move battery forwards.
TROUBLE SHOOTING�
For more information on this model and the entire range from Avios please visit us at: • hobbyking.com
Or see our Facebook page at: • Facebook.com/hobbyking
And don’t forget you can see the product video for this model and the entire Avios range at: • youtube.com/hobbykinglive
For your next Avios purchase be sure to visit: • hobbyking.com
1. Battery is not fully charged. 2. Transmitter battery low.3. Motors not connected. 4. The motor is damaged. 5. Reciever is not bound to Tx.6. ESC in set-up mode.
CONTACT:
18
MADE IN CHINA
Related Documents


