2CKA001473B7474 │ 13.01.2017 Busch-Welcome ® 83220-SM-xxx Busch-WelcomePanel ®

Welcome message from author
This document is posted to help you gain knowledge. Please leave a comment to let me know what you think about it! Share it to your friends and learn new things together.
Transcript
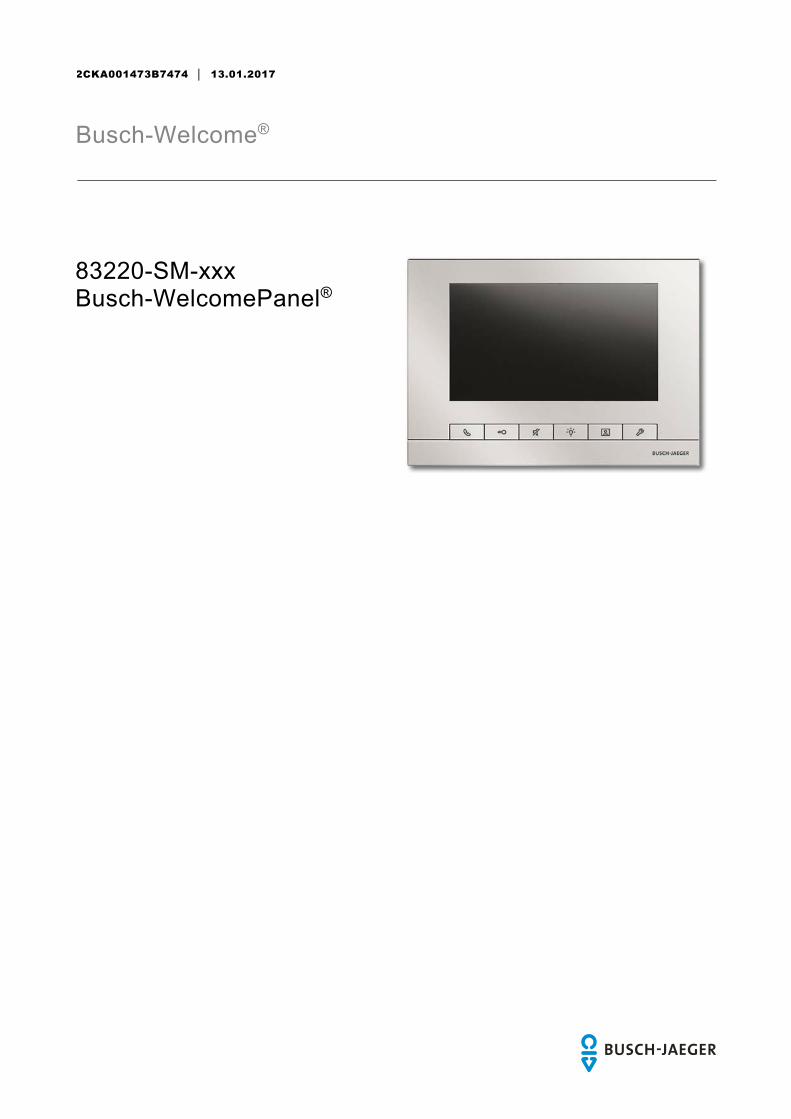
2CKA001473B7474 │ 13.01.2017
Busch-Welcome®
83220-SM-xxx Busch-WelcomePanel®
Busch-Welcome®
| 2CKA001473B7474 — 2 —
1 Safety ....................................................................................................................................................................... 3 2 Intended use ............................................................................................................................................................ 3 3 Environment ............................................................................................................................................................. 3
3.1 Busch-Jaeger devices ............................................................................................................................. 3 4 User Manual............................................................................................................................................................. 3 5 Operation ................................................................................................................................................................. 4
5.1 Standard operation ................................................................................................................................. 4 5.1.1 Control elements ..................................................................................................................................... 4 5.1.2 Welcome screen and status bar .............................................................................................................. 6 5.2 Control actions ........................................................................................................................................ 7 5.2.1 Setting up the voice and video connection .............................................................................................. 7 5.2.2 Opening the door .................................................................................................................................... 8 5.2.3 Muting ..................................................................................................................................................... 9 5.2.4 Switching the light ................................................................................................................................. 10 5.2.5 Camera surveillance ............................................................................................................................. 11 5.2.6 Events and picture memory / history ..................................................................................................... 12 5.2.7 Inserting the SD card ............................................................................................................................ 15 5.2.8 Settings ................................................................................................................................................. 16 5.2.8.1 Overview ............................................................................................................................................... 16 5.2.8.2 Volume .................................................................................................................................................. 18 5.2.8.3 Display .................................................................................................................................................. 19 5.2.8.4 Date / time ............................................................................................................................................. 21 5.2.8.5 Camera list ............................................................................................................................................ 22 5.2.8.6 Language .............................................................................................................................................. 24 5.2.8.7 Door Entry System ................................................................................................................................ 26 5.2.8.8 Firmware update ................................................................................................................................... 27 5.3 Cleaning ................................................................................................................................................ 28 5.4 Adjusting the device .............................................................................................................................. 29 5.4.1 Terminal resistor ................................................................................................................................... 29 5.4.2 Setting the master/slave switch ............................................................................................................. 29
6 Technical data........................................................................................................................................................ 30 7 Mounting / Installation ............................................................................................................................................ 31
7.1 Requirements for the electrician ........................................................................................................... 31 7.2 General installation instructions ............................................................................................................ 31 7.3 Mounting ............................................................................................................................................... 32 7.4 Connection ............................................................................................................................................ 35
8 Addressing ............................................................................................................................................................. 36 8.1 Use of several outdoor stations ............................................................................................................. 36 8.1.1 Uniform assignment of the doorbell push-buttons ................................................................................. 36 8.1.2 Different assignment of the doorbell push-buttons ................................................................................ 37 8.2 Assigning the doorbell push-button of an outdoor station to an apartment ........................................... 38 8.2.1 Factory setting ...................................................................................................................................... 38 8.2.2 Change in the assignment of the doorbell push-buttons ("Offset") ........................................................ 39 8.3 Basic settings ........................................................................................................................................ 40 8.3.1 Defining the standard outdoor station ................................................................................................... 40 8.3.2 Setting the address of the outdoor station ............................................................................................. 40 8.3.3 Setting the address of the indoor station ............................................................................................... 41 8.3.4 Setting of the door opener or light switch .............................................................................................. 42 8.3.5 Setting of the door opener times and light times ................................................................................... 42
Busch-Welcome® Safety
| 2CKA001473B7474 — 3 —
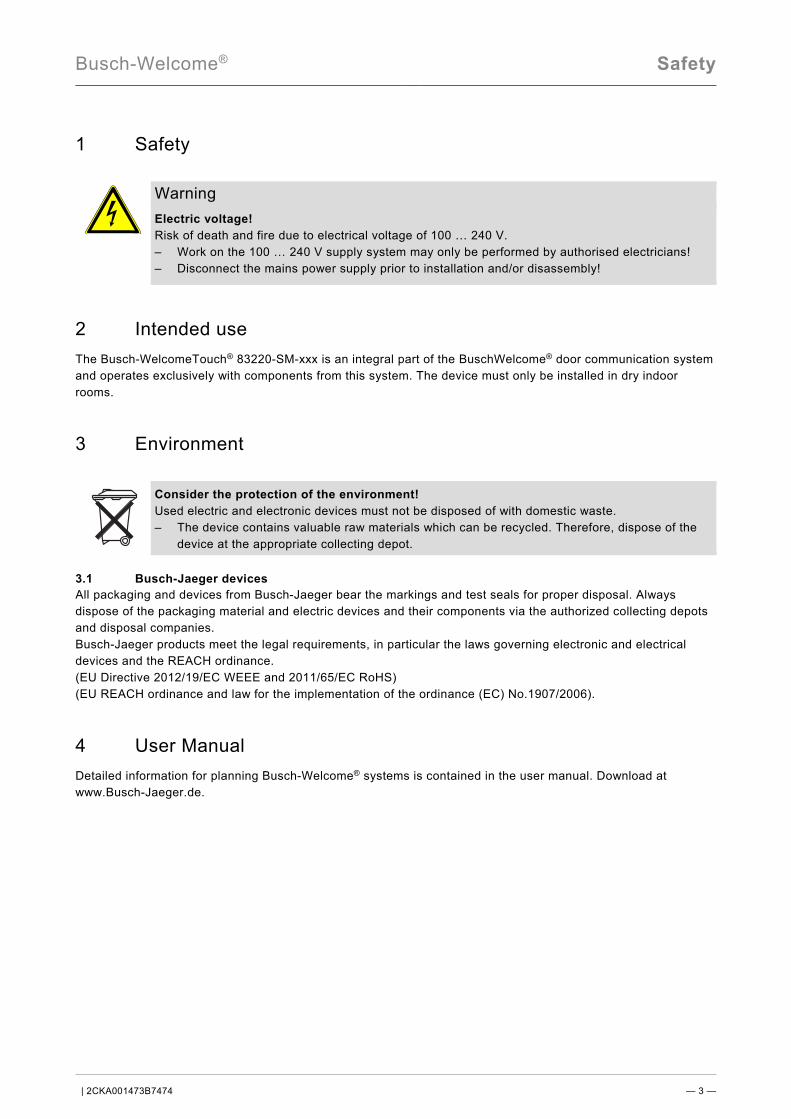
1 Safety
Warning Electric voltage! Risk of death and fire due to electrical voltage of 100 … 240 V. – Work on the 100 … 240 V supply system may only be performed by authorised electricians! – Disconnect the mains power supply prior to installation and/or disassembly!
2 Intended use The Busch-WelcomeTouch® 83220-SM-xxx is an integral part of the BuschWelcome® door communication system and operates exclusively with components from this system. The device must only be installed in dry indoor rooms.
3 Environment
Consider the protection of the environment! Used electric and electronic devices must not be disposed of with domestic waste. – The device contains valuable raw materials which can be recycled. Therefore, dispose of the
device at the appropriate collecting depot. 3.1 Busch-Jaeger devices All packaging and devices from Busch-Jaeger bear the markings and test seals for proper disposal. Always dispose of the packaging material and electric devices and their components via the authorized collecting depots and disposal companies. Busch-Jaeger products meet the legal requirements, in particular the laws governing electronic and electrical devices and the REACH ordinance. (EU Directive 2012/19/EC WEEE and 2011/65/EC RoHS) (EU REACH ordinance and law for the implementation of the ordinance (EC) No.1907/2006).
4 User Manual Detailed information for planning Busch-Welcome® systems is contained in the user manual. Download at www.Busch-Jaeger.de.

Busch-Welcome® Operation
| 2CKA001473B7474 — 4 —
5 Operation 5.1 Standard operation 5.1.1 Control elements
Fig. 1: Overview of control buttons
1 2
6
6-1
6-2
6-3
6-4
6-5
4 5
3-1
3-2
3-3
SD-Card
Mo.31.
6-6
Busch-Welcome® Operation
| 2CKA001473B7474 — 5 —
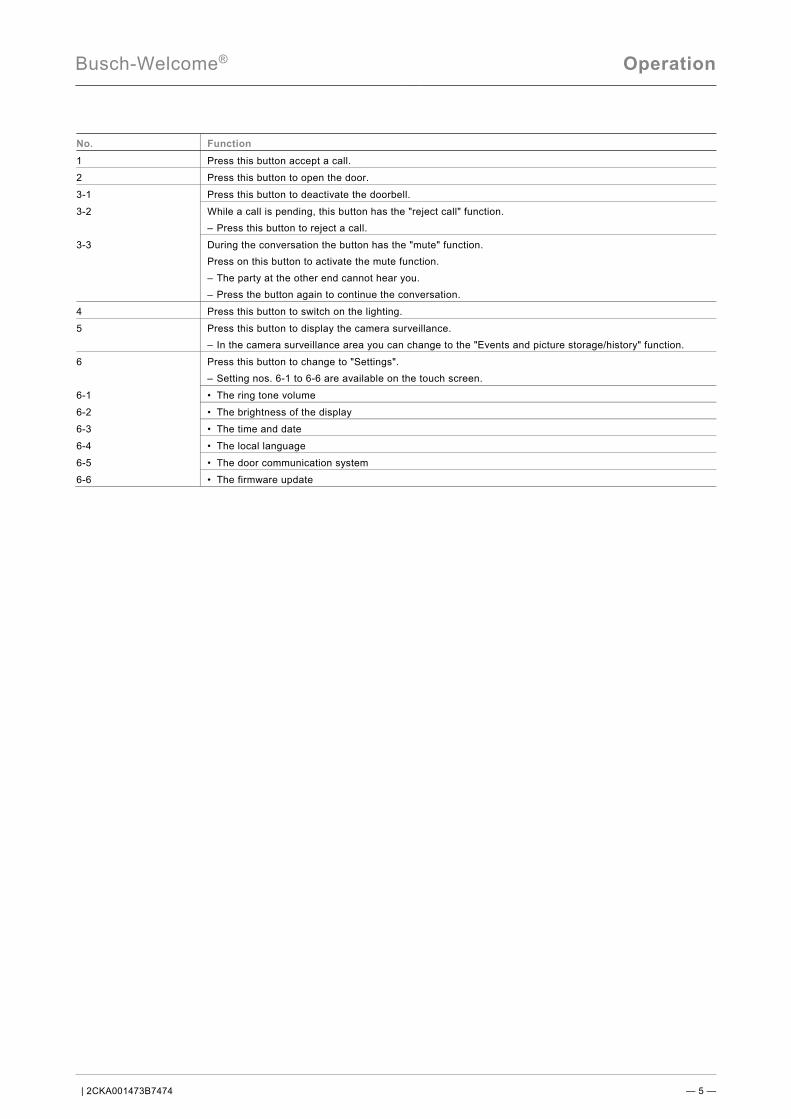
No. Function 1 Press this button accept a call. 2 Press this button to open the door. 3-1 Press this button to deactivate the doorbell. 3-2 While a call is pending, this button has the "reject call" function.
– Press this button to reject a call. 3-3 During the conversation the button has the "mute" function.
Press on this button to activate the mute function. – The party at the other end cannot hear you. – Press the button again to continue the conversation.
4 Press this button to switch on the lighting. 5 Press this button to display the camera surveillance.
– In the camera surveillance area you can change to the "Events and picture storage/history" function. 6 Press this button to change to "Settings".
– Setting nos. 6-1 to 6-6 are available on the touch screen. 6-1 • The ring tone volume 6-2 • The brightness of the display 6-3 • The time and date 6-4 • The local language 6-5 • The door communication system 6-6 • The firmware update
Busch-Welcome® Operation
| 2CKA001473B7474 — 6 —
5.1.2 Welcome screen and status bar
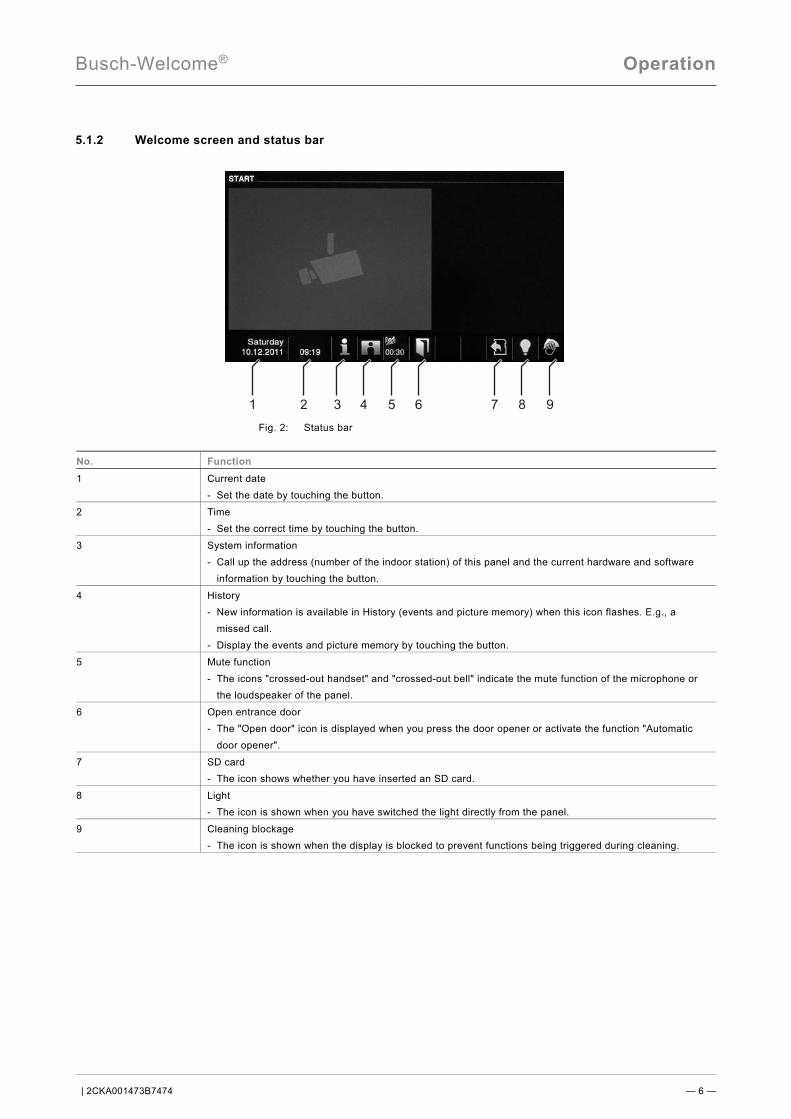
Fig. 2: Status bar No. Function 1 Current date
- Set the date by touching the button. 2 Time
- Set the correct time by touching the button. 3 System information
- Call up the address (number of the indoor station) of this panel and the current hardware and software information by touching the button.
4 History - New information is available in History (events and picture memory) when this icon flashes. E.g., a
missed call. - Display the events and picture memory by touching the button.
5 Mute function - The icons "crossed-out handset" and "crossed-out bell" indicate the mute function of the microphone or
the loudspeaker of the panel. 6 Open entrance door
- The "Open door" icon is displayed when you press the door opener or activate the function "Automatic door opener".
7 SD card - The icon shows whether you have inserted an SD card.
8 Light - The icon is shown when you have switched the light directly from the panel.
9 Cleaning blockage - The icon is shown when the display is blocked to prevent functions being triggered during cleaning.
1 2 3 4 5 6 7 8 9
Busch-Welcome® Operation
| 2CKA001473B7474 — 7 —
5.2 Control actions 5.2.1 Setting up the voice and video connection
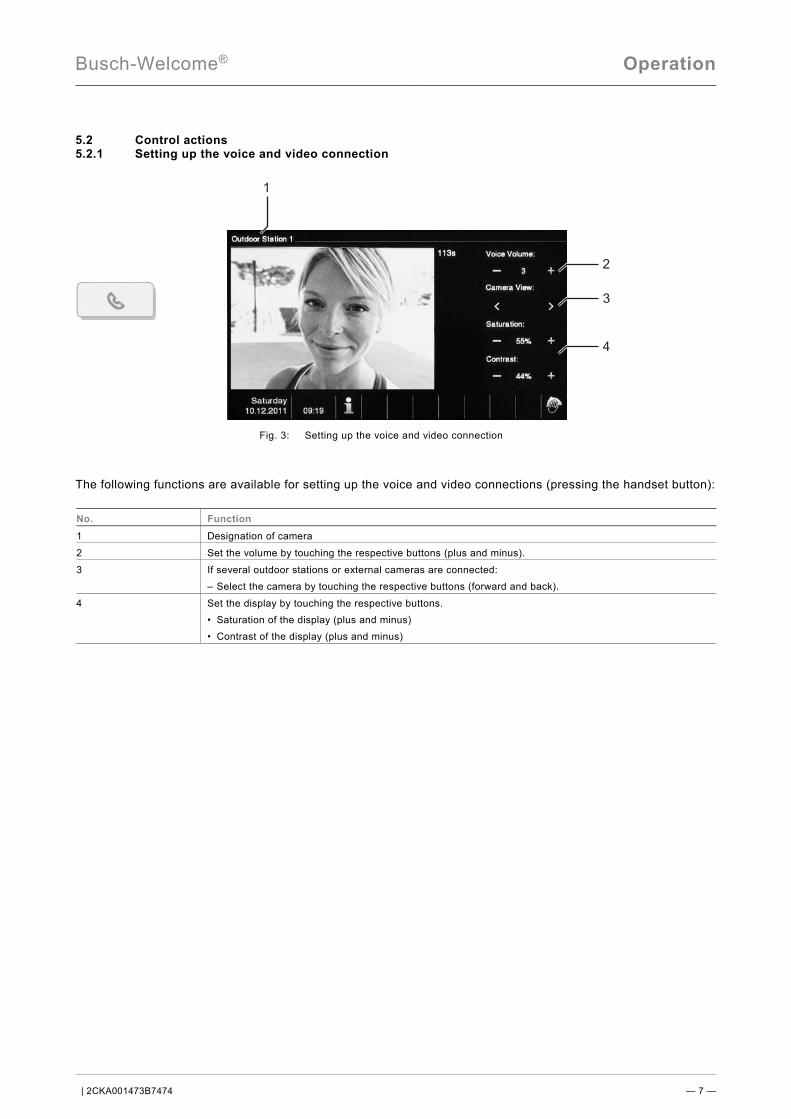
Fig. 3: Setting up the voice and video connection The following functions are available for setting up the voice and video connections (pressing the handset button): No. Function 1 Designation of camera 2 Set the volume by touching the respective buttons (plus and minus). 3 If several outdoor stations or external cameras are connected:
– Select the camera by touching the respective buttons (forward and back). 4 Set the display by touching the respective buttons.
• Saturation of the display (plus and minus) • Contrast of the display (plus and minus)
2
3
1
4
Busch-Welcome® Operation
| 2CKA001473B7474 — 8 —
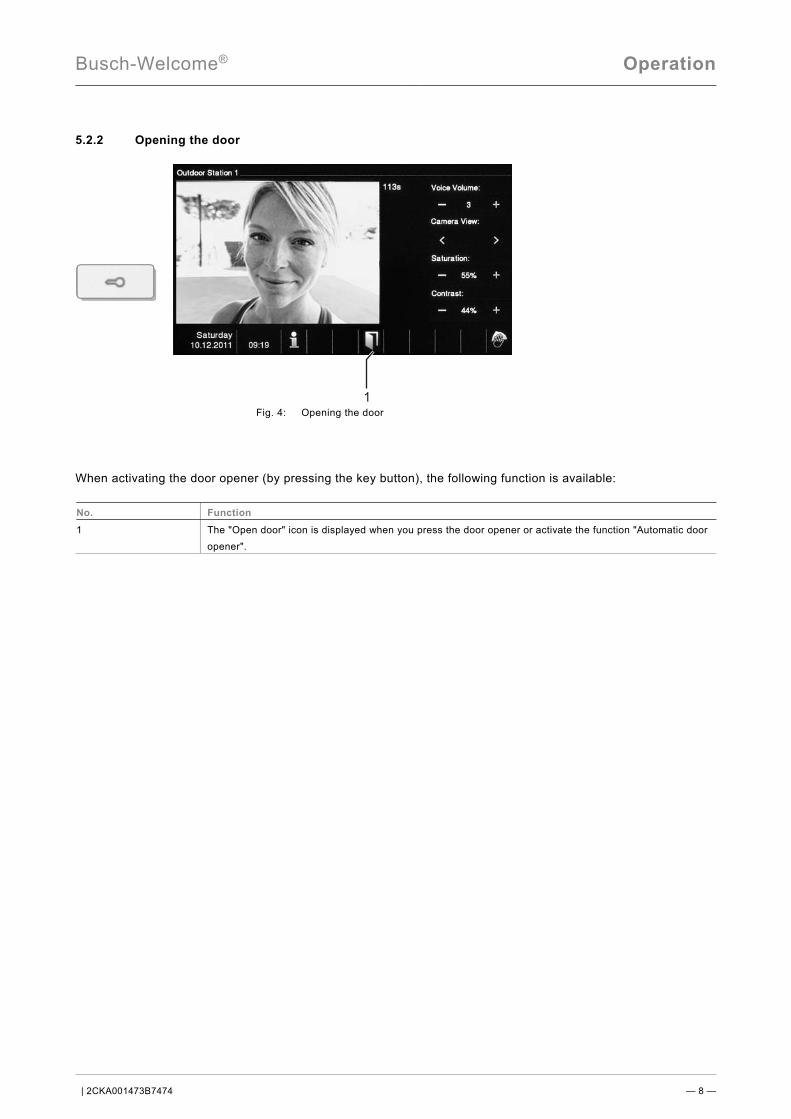
5.2.2 Opening the door
Fig. 4: Opening the door When activating the door opener (by pressing the key button), the following function is available: No. Function 1 The "Open door" icon is displayed when you press the door opener or activate the function "Automatic door
opener".
1
Busch-Welcome® Operation
| 2CKA001473B7474 — 9 —
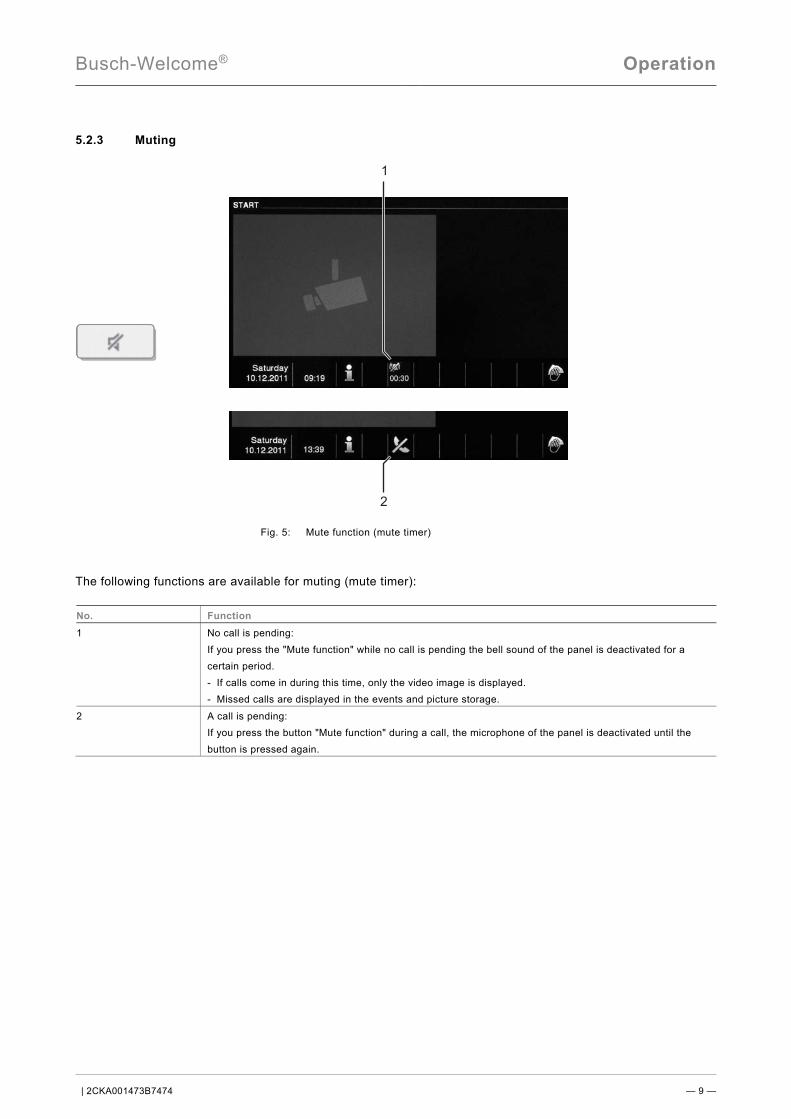
5.2.3 Muting
Fig. 5: Mute function (mute timer) The following functions are available for muting (mute timer): No. Function 1 No call is pending:
If you press the "Mute function" while no call is pending the bell sound of the panel is deactivated for a certain period. - If calls come in during this time, only the video image is displayed. - Missed calls are displayed in the events and picture storage.
2 A call is pending: If you press the button "Mute function" during a call, the microphone of the panel is deactivated until the button is pressed again.
2
1
Busch-Welcome® Operation
| 2CKA001473B7474 — 10 —
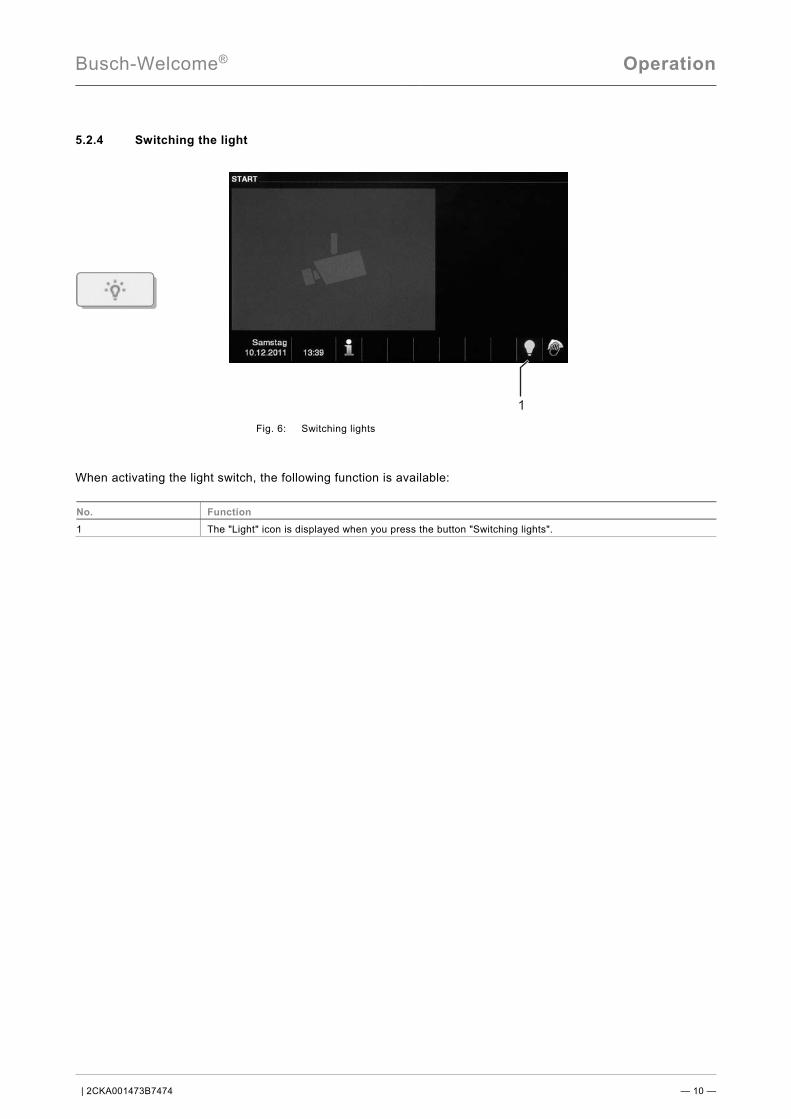
5.2.4 Switching the light
Fig. 6: Switching lights When activating the light switch, the following function is available: No. Function 1 The "Light" icon is displayed when you press the button "Switching lights".
Busch-Welcome® Operation
| 2CKA001473B7474 — 11 —
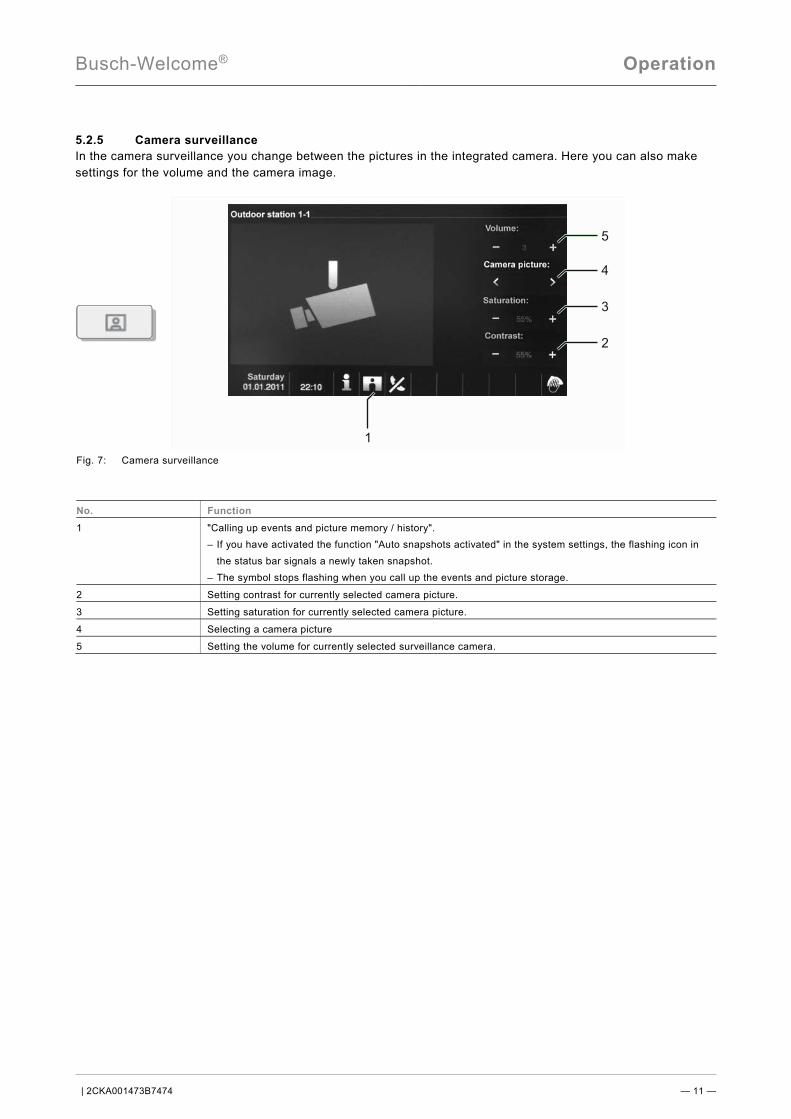
5.2.5 Camera surveillance In the camera surveillance you change between the pictures in the integrated camera. Here you can also make settings for the volume and the camera image.
Fig. 7: Camera surveillance No. Function 1 "Calling up events and picture memory / history".
– If you have activated the function "Auto snapshots activated" in the system settings, the flashing icon in the status bar signals a newly taken snapshot.
– The symbol stops flashing when you call up the events and picture storage.
2 Setting contrast for currently selected camera picture.
3 Setting saturation for currently selected camera picture.
4 Selecting a camera picture
5 Setting the volume for currently selected surveillance camera.
1
2
3
4
5
Busch-Welcome® Operation
| 2CKA001473B7474 — 12 —
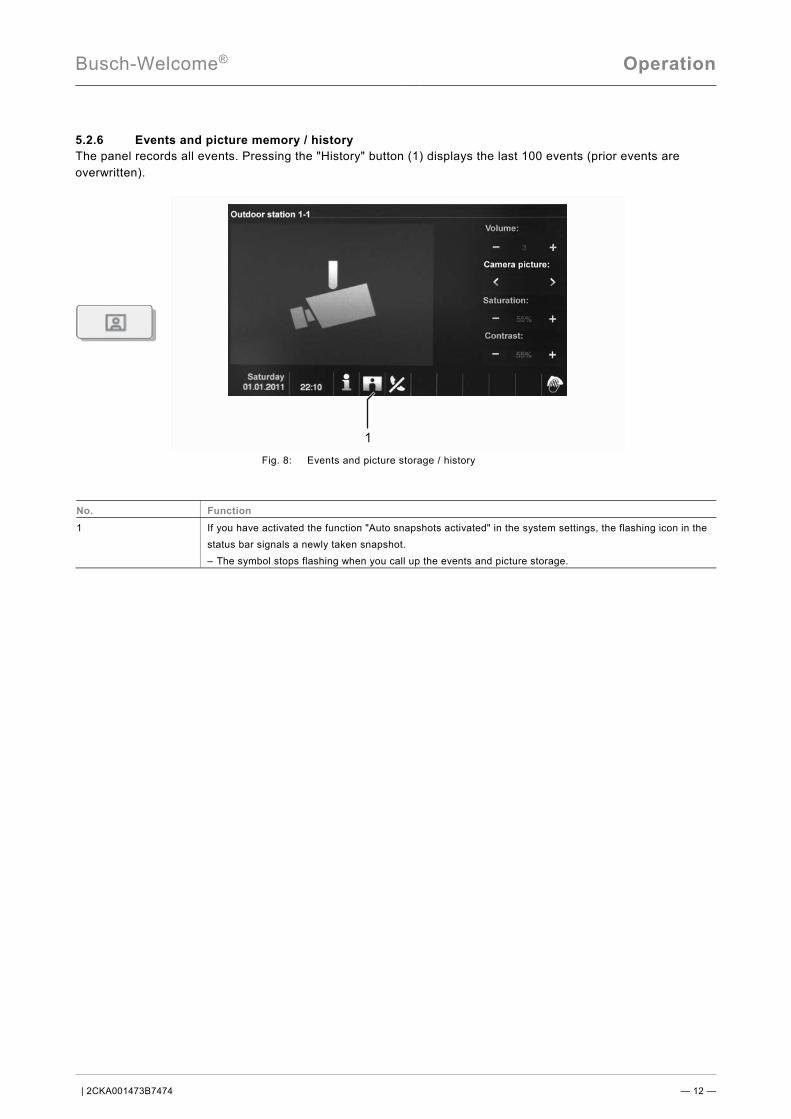
5.2.6 Events and picture memory / history The panel records all events. Pressing the "History" button (1) displays the last 100 events (prior events are overwritten).
Fig. 8: Events and picture storage / history No. Function 1 If you have activated the function "Auto snapshots activated" in the system settings, the flashing icon in the
status bar signals a newly taken snapshot. – The symbol stops flashing when you call up the events and picture storage.
1
Busch-Welcome® Operation
| 2CKA001473B7474 — 13 —
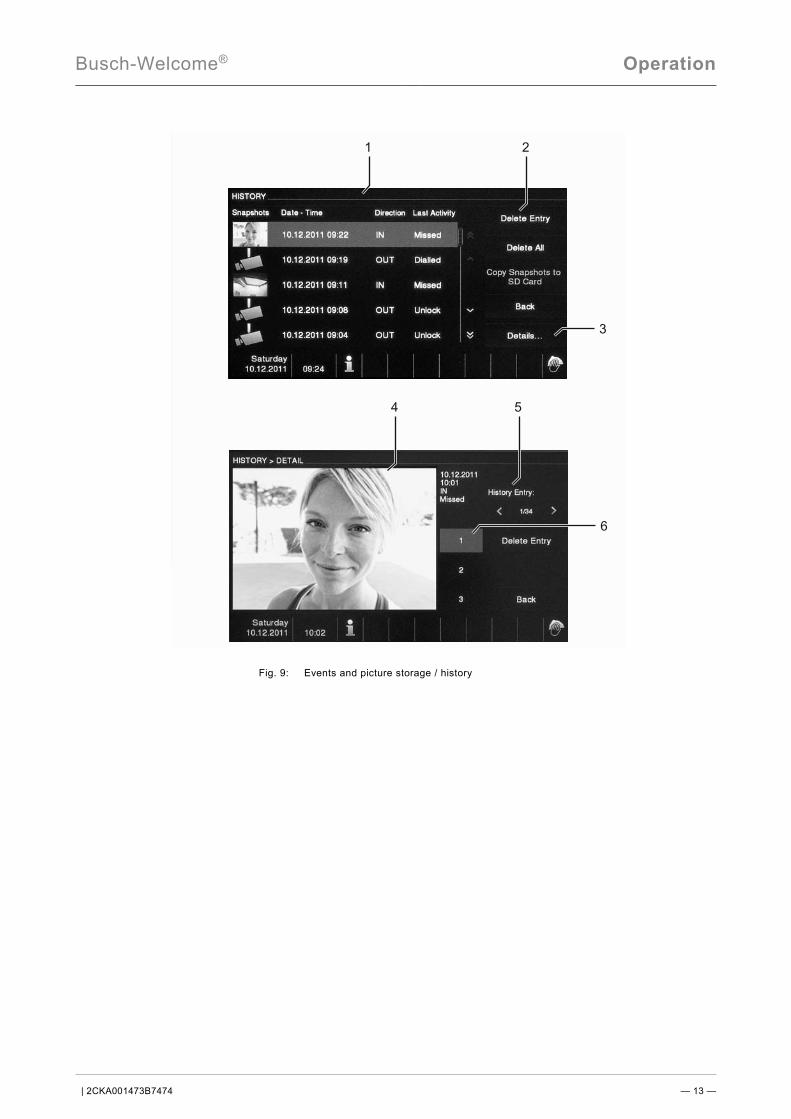
Fig. 9: Events and picture storage / history
1
3
2
6
54
Busch-Welcome® Operation
| 2CKA001473B7474 — 14 —
During a call you can take a snapshot at any time by pressing the "History" button, even when the "Automatic snapshots" function is not active. The following functions are available for the "Events and picture storage /history" function. No. Function 1 If you have activated the system setting "Automatic snapshots", a miniature view is displayed in the events
list when incoming calls are missed. – Date, time and the type of the event are recorded together with the snapshot. – If no automatic snapshots are active, a camera icon is displayed in the miniature view.
2 Individual entries or the entire list can be deleted at any time. – Snapshots which you would like to archive can be copied on an inserted SD card (SD, SDHC).
3 Three pictures are always taken when a visitor rings the bell. This ensures an optimum snapshot. – All recorded pictures are called up via the detail view.
4 Display of the detail view of a record 5 Select the event by tapping the respective buttons (forward and back). 6 Select the single picture by tapping the respective buttons (1 to 3).
Busch-Welcome® Operation
| 2CKA001473B7474 — 15 —
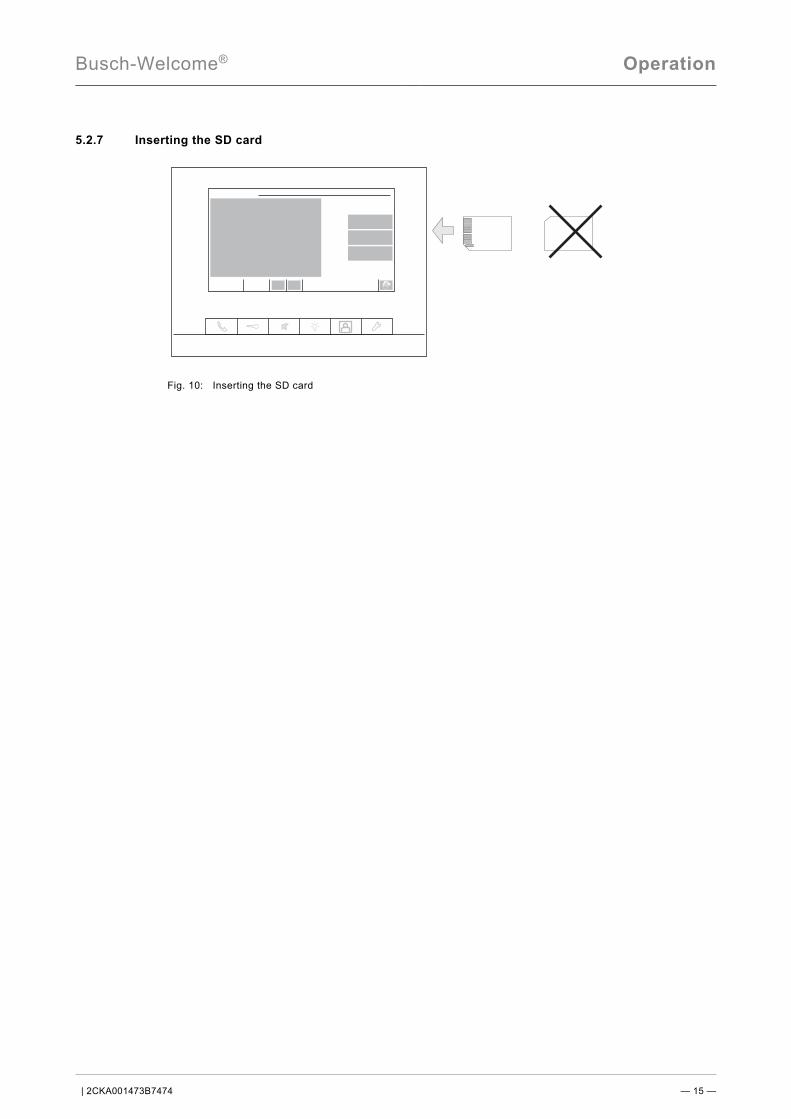
5.2.7 Inserting the SD card
Fig. 10: Inserting the SD card
Busch-Welcome® Operation
| 2CKA001473B7474 — 16 —
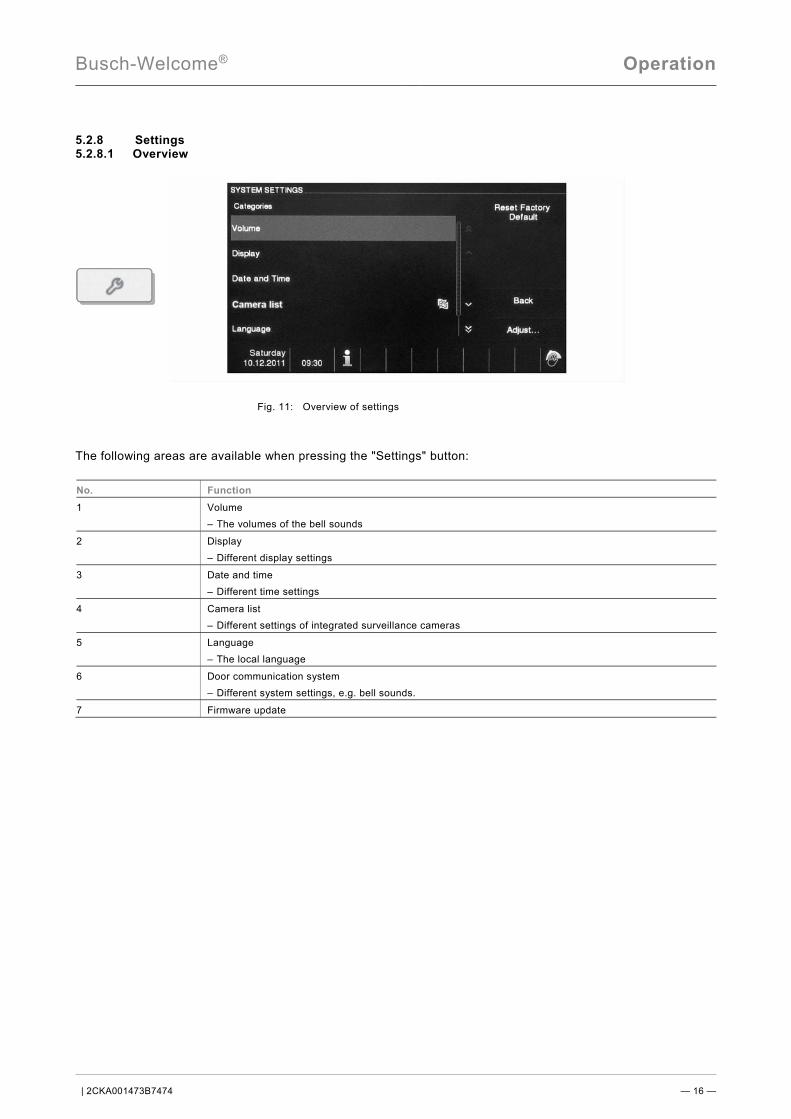
5.2.8 Settings 5.2.8.1 Overview
Fig. 11: Overview of settings The following areas are available when pressing the "Settings" button: No. Function 1 Volume
– The volumes of the bell sounds
2 Display – Different display settings
3 Date and time – Different time settings
4 Camera list – Different settings of integrated surveillance cameras
5 Language – The local language
6 Door communication system – Different system settings, e.g. bell sounds.
7 Firmware update
Busch-Welcome® Operation
| 2CKA001473B7474 — 17 —
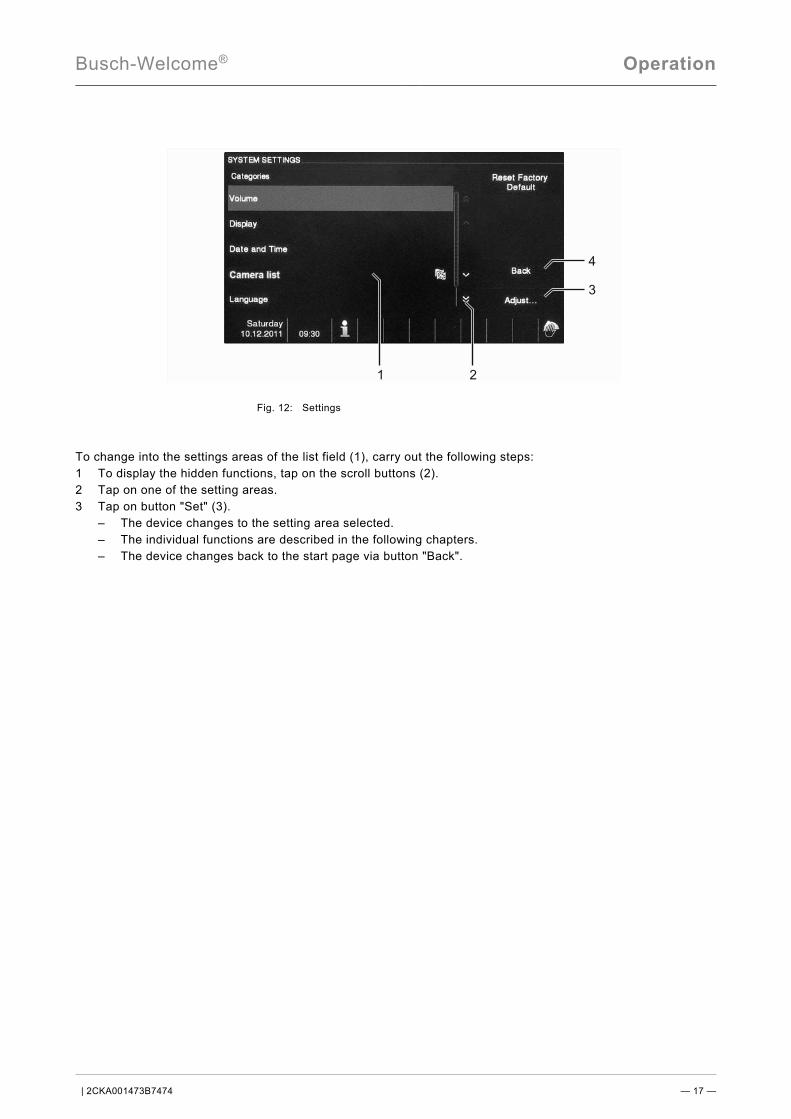
Fig. 12: Settings To change into the settings areas of the list field (1), carry out the following steps: 1 To display the hidden functions, tap on the scroll buttons (2). 2 Tap on one of the setting areas. 3 Tap on button "Set" (3). – The device changes to the setting area selected. – The individual functions are described in the following chapters. – The device changes back to the start page via button "Back".
1 2
4
3
Busch-Welcome® Operation
| 2CKA001473B7474 — 18 —
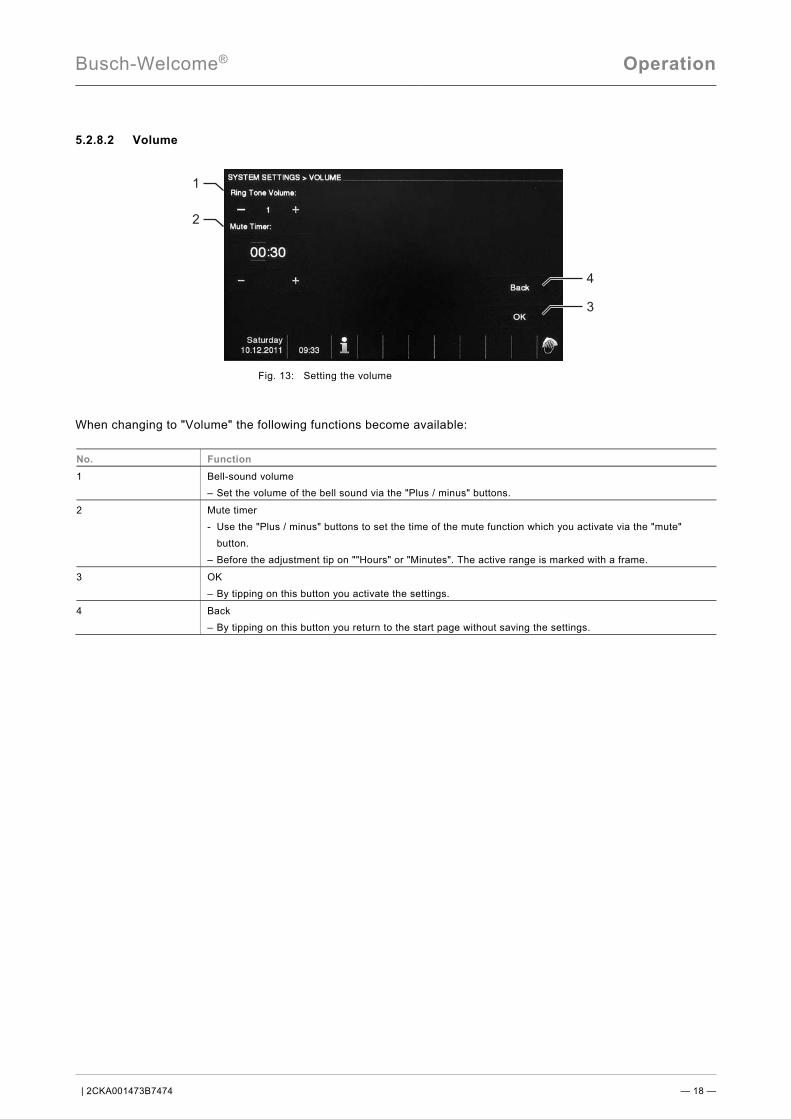
5.2.8.2 Volume
Fig. 13: Setting the volume When changing to "Volume" the following functions become available: No. Function 1 Bell-sound volume
– Set the volume of the bell sound via the "Plus / minus" buttons.
2 Mute timer - Use the "Plus / minus" buttons to set the time of the mute function which you activate via the "mute"
button. – Before the adjustment tip on ""Hours" or "Minutes". The active range is marked with a frame.
3 OK – By tipping on this button you activate the settings.
4 Back – By tipping on this button you return to the start page without saving the settings.
1
2
4
3

Busch-Welcome® Operation
| 2CKA001473B7474 — 19 —
5.2.8.3 Display
Fig. 14: Display settings When changing to "Display", the following functions become available: No. Function 1 Brightness
- Set the brightness of the display via the "Plus / minus" buttons.
2 Screen saver – The display is preset as digital clock – If an SD card with suitable pictures is located in the device, you can select a screen saver via the fold-
down menu. If several pictures are stored on the SD card they are displayed as a slide show. Slide show (electronic picture frame) – Each picture appears for 20 seconds. Picture requirements: – The pictures must be stored on the SD card in directory "DCIM" (Digital Camera Images) on the first
level. – The maximum admissible size of the picture is 2048 x 1960 pixel. – The maximum admissible resolution of a picture is 800 x 480 pixel. – The resolution of the display is 800 x 600. Larger pictures will be reduced to this resolution. – The format supported is "jpg".
3 Touch feedback – By tipping on the checkbox you activate or deactivate the feedback tone which sounds when the display
is touched.
4 The entire screen – Activate or deactivate the full-page mode of the door camera by tipping on the checkbox. The full-page
mode remains active for the period the picture of the visitor is shown after the door bell has been rung.
5 OK – By tipping on this button you activate the settings.
6 Back – By tipping on this button you return to the start page without saving the settings.
7 Calibration – If the buttons and the associated graphics of the display are no longer superimposed, the monitor must
be calibrated. – Tip on the calibration button and then consecutively on the 5 displayed position crosses. Finally confirm
the dialogue box displayed. The display has been calibrated.
1
2 3 4
9 8 7
6
5
Busch-Welcome® Operation
| 2CKA001473B7474 — 20 —
8 Screen saver Off – Select the active period for the screen saver via the fold-down menu until it switches itself off
automatically. – Available are 5 / 15 / 30 minutes. – To protect the display the maximum period for the display is limited to 30 minutes.
9 Screen saver On – Select the start time for the screen saver via the fold-down menu. – Available are 30 / 60 / 120 seconds.
Busch-Welcome® Operation
| 2CKA001473B7474 — 21 —
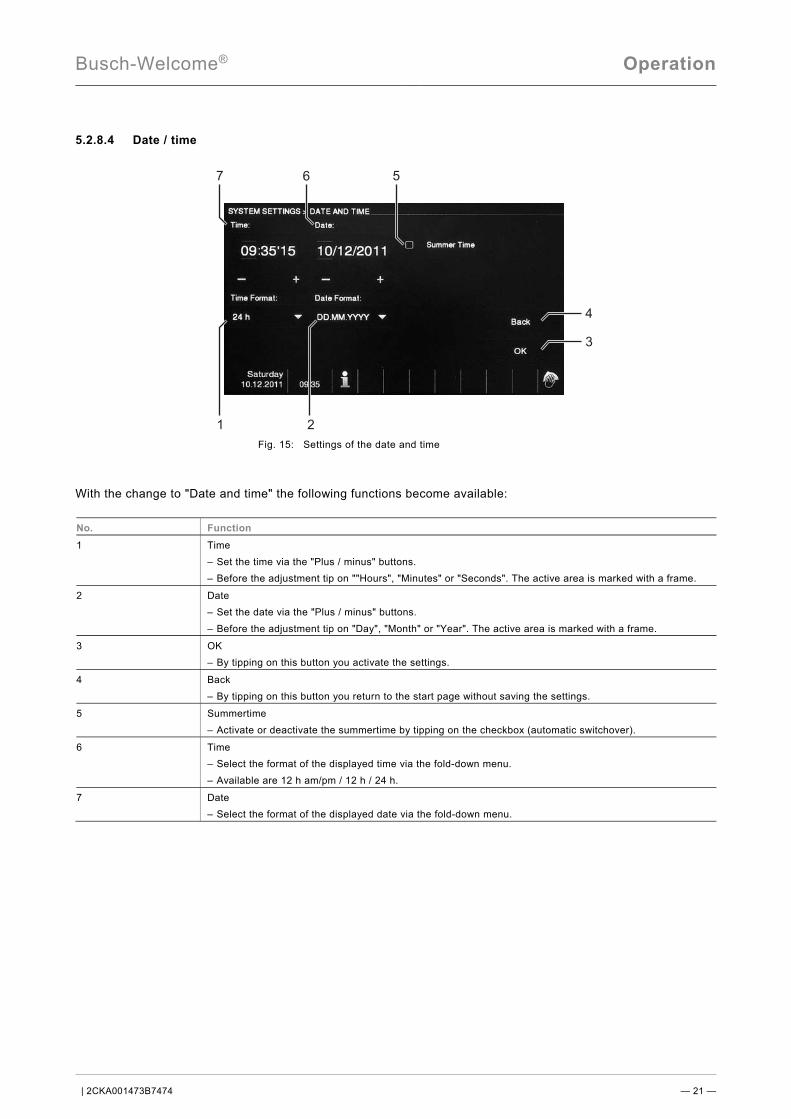
5.2.8.4 Date / time
Fig. 15: Settings of the date and time With the change to "Date and time" the following functions become available: No. Function 1 Time
– Set the time via the "Plus / minus" buttons. – Before the adjustment tip on ""Hours", "Minutes" or "Seconds". The active area is marked with a frame.
2 Date – Set the date via the "Plus / minus" buttons. – Before the adjustment tip on "Day", "Month" or "Year". The active area is marked with a frame.
3 OK – By tipping on this button you activate the settings.
4 Back – By tipping on this button you return to the start page without saving the settings.
5 Summertime – Activate or deactivate the summertime by tipping on the checkbox (automatic switchover).
6 Time – Select the format of the displayed time via the fold-down menu. – Available are 12 h am/pm / 12 h / 24 h.
7 Date – Select the format of the displayed date via the fold-down menu.
7 6 5
1
4
3
2

Busch-Welcome® Operation
| 2CKA001473B7474 — 22 —
5.2.8.5 Camera list
Fig. 16: Camera list Surveillance cameras can be integrated and set in the door communication system. When changing to "System settings Camera list" the following functions become available: No. Function 1 Overview of available cameras
2 Adjust – By tapping on this button you switch to the page for assigning a name to the selected camera.
3 Back – By tapping on this button you return to the start page without saving the settings.
4 Delete – By tapping on this button you delete the camera from the device. It will then be no longer displayed.
However, the camera remains active in the system. – By tapping on the "Update list" button the camera will be displayed again in the list.
5 Floor call camera This function is active only when a camera has been activated via module 3 in the camera interface. – Then this camera acts as internal camera. This, for example, is the camera that has been additionally
installed at the apartment door. This can be switched to when this button is active.
6 Activate camera With this function you select the camera whose image is displayed when surveillance is activated. – By tapping on this button you activate or deactivate this function. – When this function is deactivated, the image of the first camera in the list is always displayed. – When this function is activated, the image of the camera selected in the list is always displayed. By tapping on a camera in the list you activate or deactivate the camera. If several cameras in the list are
activated, the image of the first camera is displayed.
5
7 6
4
3
2
1
Busch-Welcome® Operation
| 2CKA001473B7474 — 23 —
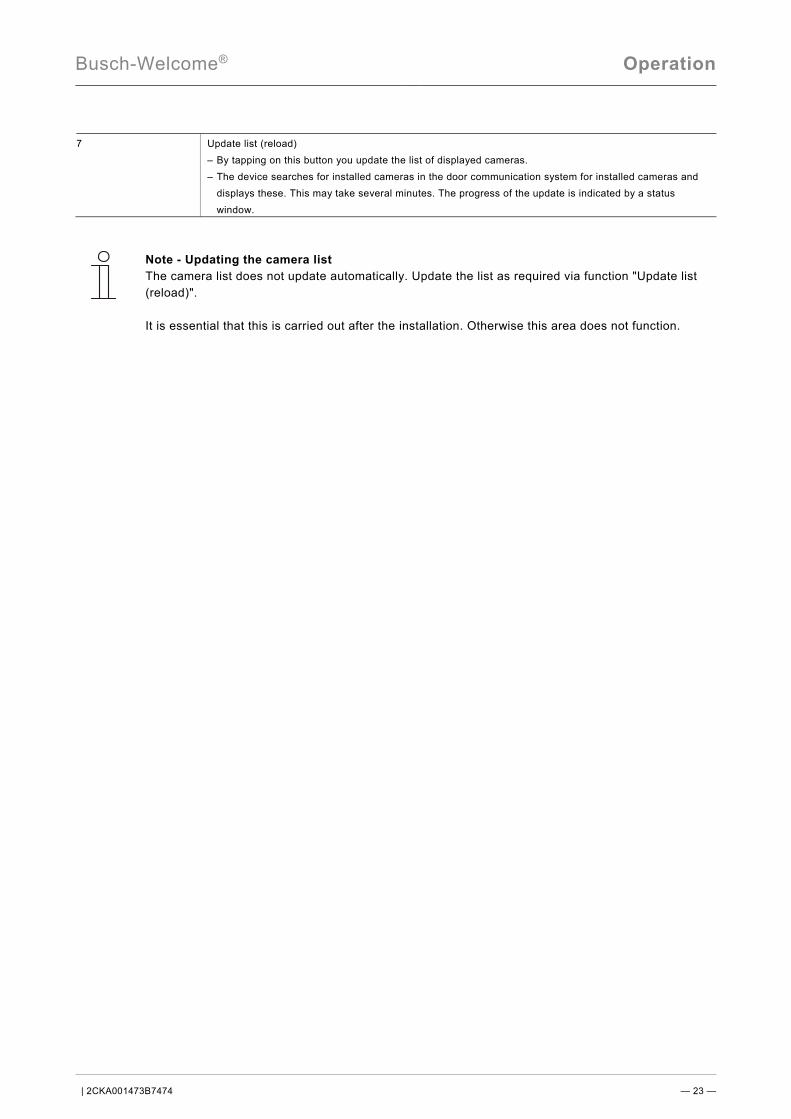
7 Update list (reload) – By tapping on this button you update the list of displayed cameras. – The device searches for installed cameras in the door communication system for installed cameras and
displays these. This may take several minutes. The progress of the update is indicated by a status window.
Note - Updating the camera list The camera list does not update automatically. Update the list as required via function "Update list (reload)". It is essential that this is carried out after the installation. Otherwise this area does not function.
Busch-Welcome® Operation
| 2CKA001473B7474 — 24 —
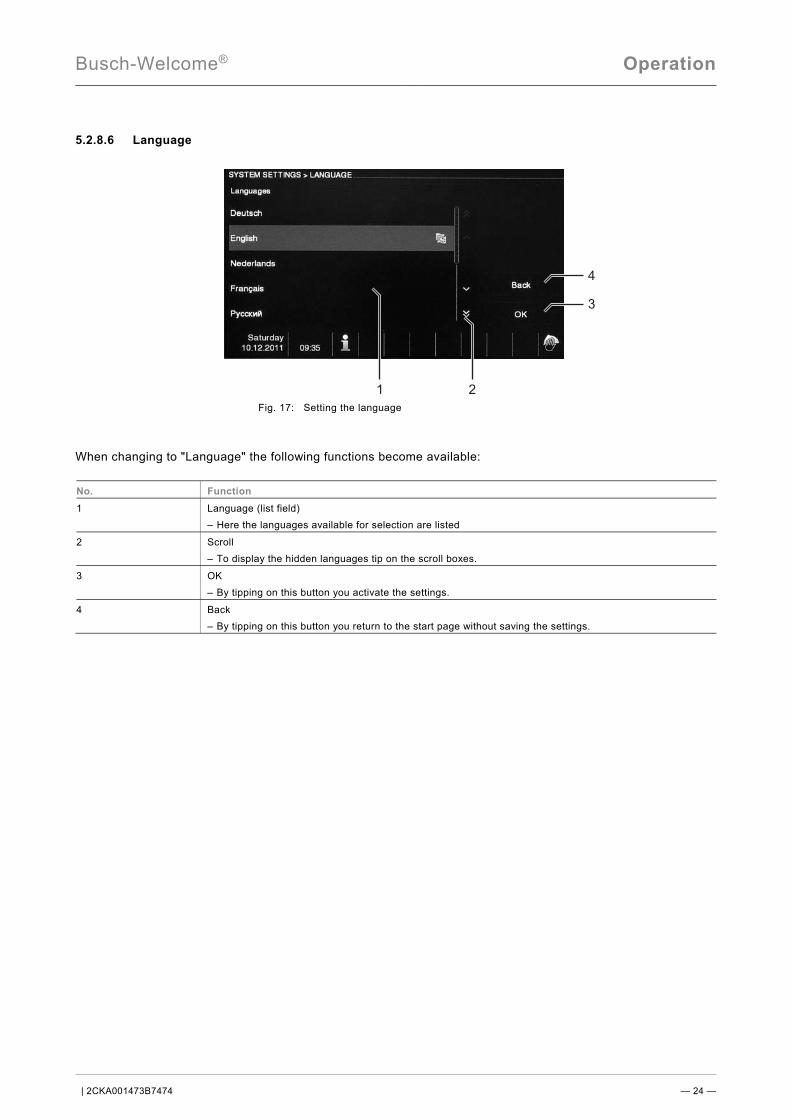
5.2.8.6 Language
Fig. 17: Setting the language When changing to "Language" the following functions become available: No. Function 1 Language (list field)
– Here the languages available for selection are listed
2 Scroll – To display the hidden languages tip on the scroll boxes.
3 OK – By tipping on this button you activate the settings.
4 Back – By tipping on this button you return to the start page without saving the settings.
1 2
4
3
Busch-Welcome® Operation
| 2CKA001473B7474 — 25 —
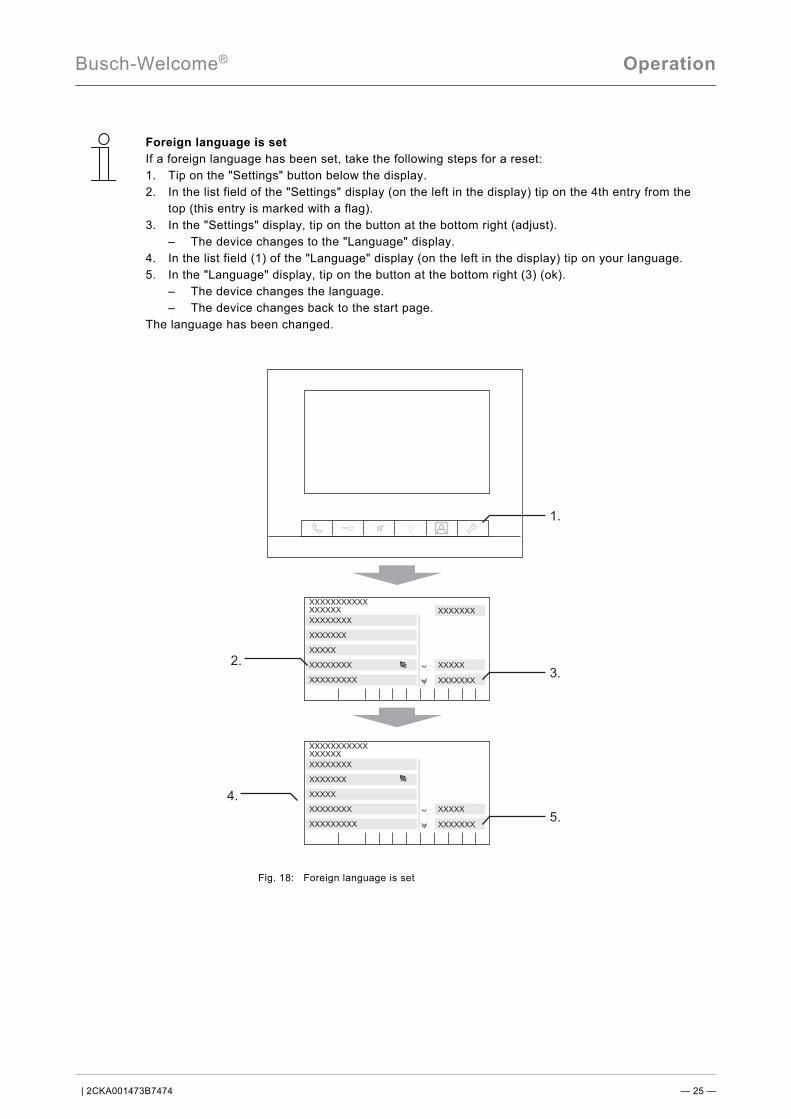
Foreign language is set If a foreign language has been set, take the following steps for a reset: 1. Tip on the "Settings" button below the display. 2. In the list field of the "Settings" display (on the left in the display) tip on the 4th entry from the
top (this entry is marked with a flag). 3. In the "Settings" display, tip on the button at the bottom right (adjust). – The device changes to the "Language" display. 4. In the list field (1) of the "Language" display (on the left in the display) tip on your language. 5. In the "Language" display, tip on the button at the bottom right (3) (ok). – The device changes the language. – The device changes back to the start page. The language has been changed.
Fig. 18: Foreign language is set
Busch-Welcome® Operation
| 2CKA001473B7474 — 26 —
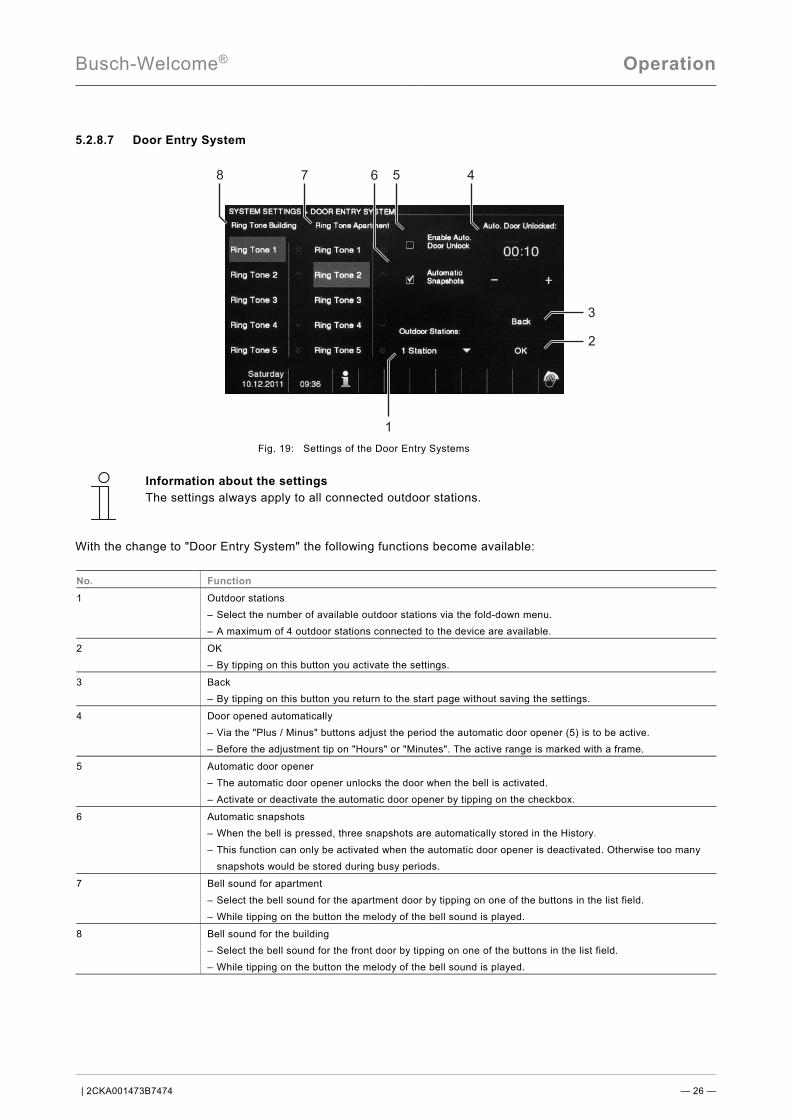
5.2.8.7 Door Entry System
Fig. 19: Settings of the Door Entry Systems
Information about the settings The settings always apply to all connected outdoor stations.
With the change to "Door Entry System" the following functions become available: No. Function 1 Outdoor stations
– Select the number of available outdoor stations via the fold-down menu. – A maximum of 4 outdoor stations connected to the device are available.
2 OK – By tipping on this button you activate the settings.
3 Back – By tipping on this button you return to the start page without saving the settings.
4 Door opened automatically – Via the "Plus / Minus" buttons adjust the period the automatic door opener (5) is to be active. – Before the adjustment tip on "Hours" or "Minutes". The active range is marked with a frame.
5 Automatic door opener – The automatic door opener unlocks the door when the bell is activated. – Activate or deactivate the automatic door opener by tipping on the checkbox.
6 Automatic snapshots – When the bell is pressed, three snapshots are automatically stored in the History. – This function can only be activated when the automatic door opener is deactivated. Otherwise too many
snapshots would be stored during busy periods.
7 Bell sound for apartment – Select the bell sound for the apartment door by tipping on one of the buttons in the list field. – While tipping on the button the melody of the bell sound is played.
8 Bell sound for the building – Select the bell sound for the front door by tipping on one of the buttons in the list field. – While tipping on the button the melody of the bell sound is played.
8 7 5
1
46
3
2
Busch-Welcome® Operation
| 2CKA001473B7474 — 27 —
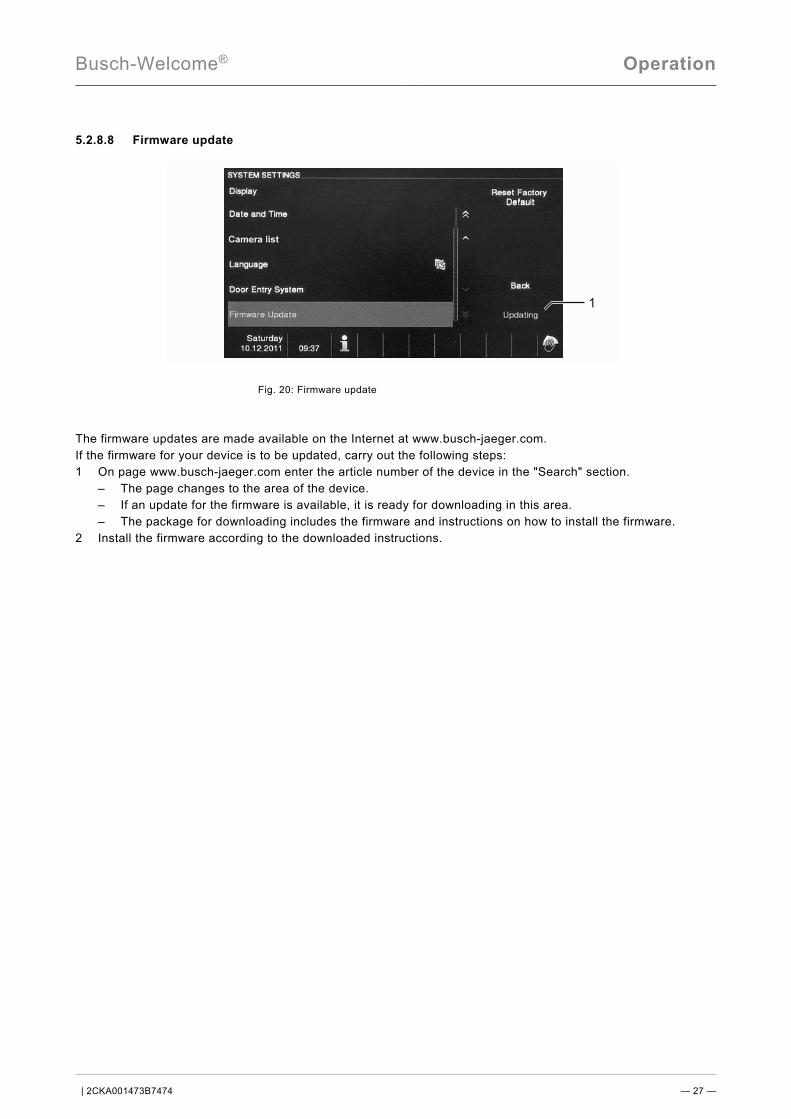
5.2.8.8 Firmware update
Fig. 20: Firmware update The firmware updates are made available on the Internet at www.busch-jaeger.com. If the firmware for your device is to be updated, carry out the following steps: 1 On page www.busch-jaeger.com enter the article number of the device in the "Search" section. – The page changes to the area of the device. – If an update for the firmware is available, it is ready for downloading in this area. – The package for downloading includes the firmware and instructions on how to install the firmware. 2 Install the firmware according to the downloaded instructions.
1
Busch-Welcome® Operation
| 2CKA001473B7474 — 28 —
5.3 Cleaning
Caution Risk of damage to the screen surface. The screen surface can be damaged by hard or sharp objects! Never use such objects for entries on the touch screen monitor. – Use your finger or a plastic stylus. The screen surface can be damaged by cleaning fluids or abrasive agents! – Clean the surfaces using a soft cloth and commercially available glass cleaner. – Never use abrasive cleaning agents.
Busch-Welcome® Operation
| 2CKA001473B7474 — 29 —
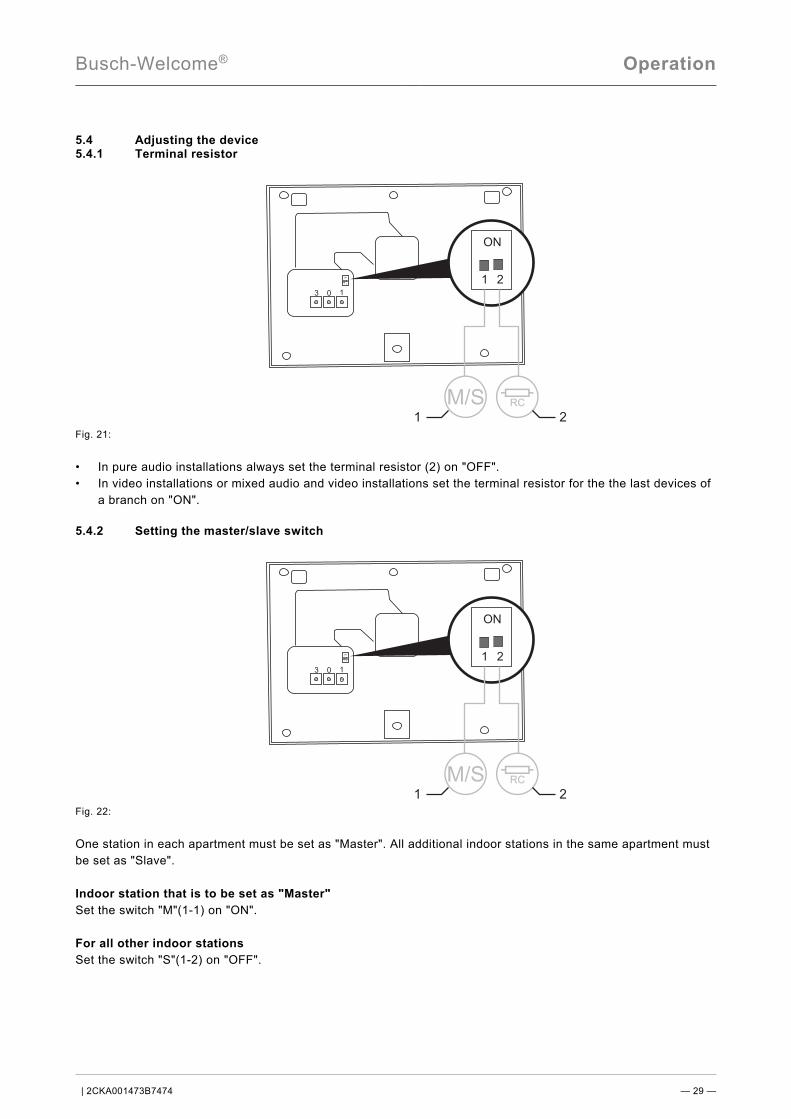
5.4 Adjusting the device 5.4.1 Terminal resistor
Fig. 21: • In pure audio installations always set the terminal resistor (2) on "OFF". • In video installations or mixed audio and video installations set the terminal resistor for the the last devices of
a branch on "ON". 5.4.2 Setting the master/slave switch
Fig. 22: One station in each apartment must be set as "Master". All additional indoor stations in the same apartment must be set as "Slave". Indoor station that is to be set as "Master" Set the switch "M"(1-1) on "ON". For all other indoor stations Set the switch "S"(1-2) on "OFF".
1 2
ON
0 13
1 2
ON
M/S RC
21
1 2
ON
0 13
1 2
ON
M/S RC
21
Busch-Welcome® Technical data
| 2CKA001473B7474 — 30 —
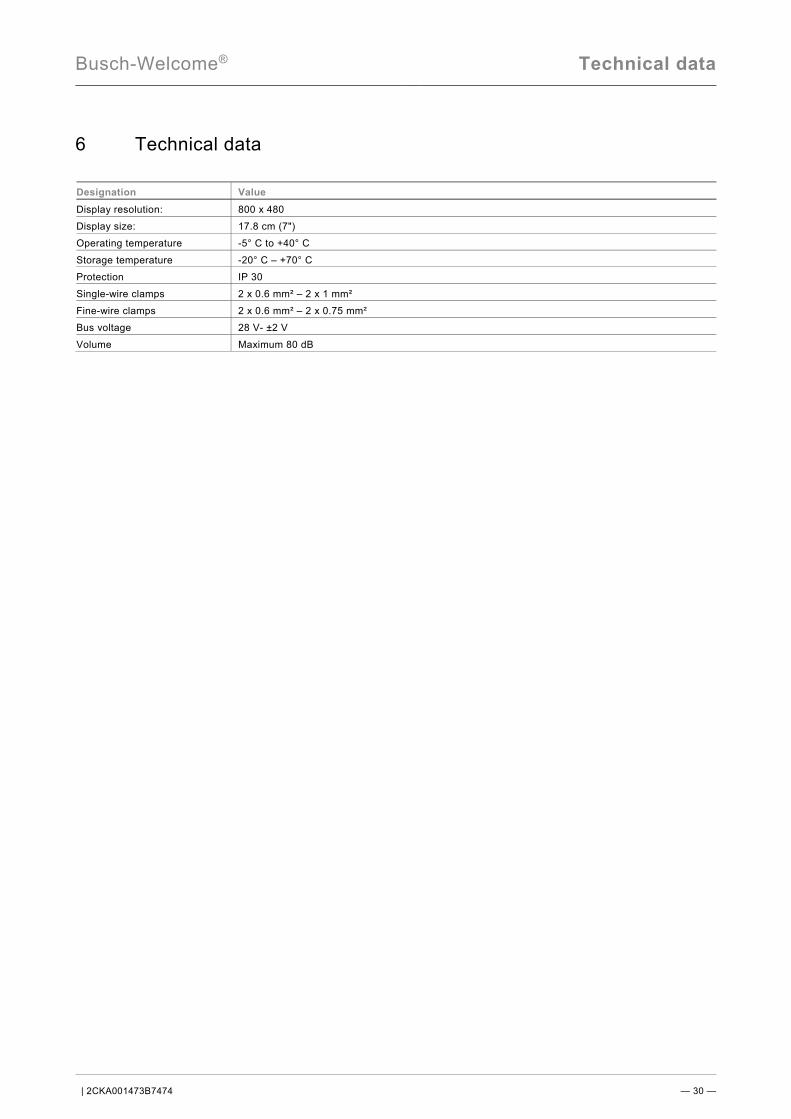
6 Technical data Designation Value Display resolution: 800 x 480 Display size: 17.8 cm (7") Operating temperature -5° C to +40° C Storage temperature -20° C – +70° C Protection IP 30 Single-wire clamps 2 x 0.6 mm² – 2 x 1 mm² Fine-wire clamps 2 x 0.6 mm² – 2 x 0.75 mm² Bus voltage 28 V- ±2 V Volume Maximum 80 dB
Busch-Welcome® Mounting / Installation
| 2CKA001473B7474 — 31 —
7 Mounting / Installation
Warning Electric voltage! Risk of death due to electrical voltage of 100 to 240 V during short-circuit in the low-voltage conduit. – Low-voltage and 100 to 240 V conduits must not be installed together in a flush-mounted box!
7.1 Requirements for the electrician
Warning Electric voltage! Install the device only if you have the necessary electrical engineering knowledge and experience. • Incorrect installation endangers your life and that of the user of the electrical system. • Incorrect installation can cause serious damage to property, e.g. due to fire. The minimum necessary expert knowledge and requirements for the installation are as follows: • Apply the "five safety rules" (DIN VDE 0105, EN 50110): 1. Disconnect from power; 2. Secure against being re-connected; 3. Ensure there is no voltage; 4. Connect to earth and short-circuit; 5. Cover or barricade adjacent live parts. • Use suitable personal protective clothing. • Use only suitable tools and measuring devices. • Check the supply network type (TN system, IT system, TT system) to secure the following
power supply conditions (classic connection to ground, protective earthing, necessary additional measures, etc.).
7.2 General installation instructions • Terminate all branches of the wiring system via a connected bus device (e.g., indoor station, outdoor station,
system device). • Do not install the system controller directly next to the bell transformer and other power supplies (to avoid
interference). • Do not install the lines of the system bus together with 100 to 240 V lines. • Do not use common cables for the connecting wires of the door openers and wires of the system bus. • Avoid bridges between different cable types. • Use only two wires for the system bus in a four-core or multi-core cable. • When looping, never install the incoming and outgoing bus inside the same cable. • Never install the internal and external system bus inside the same cable.
Busch-Welcome® Mounting / Installation
| 2CKA001473B7474 — 32 —
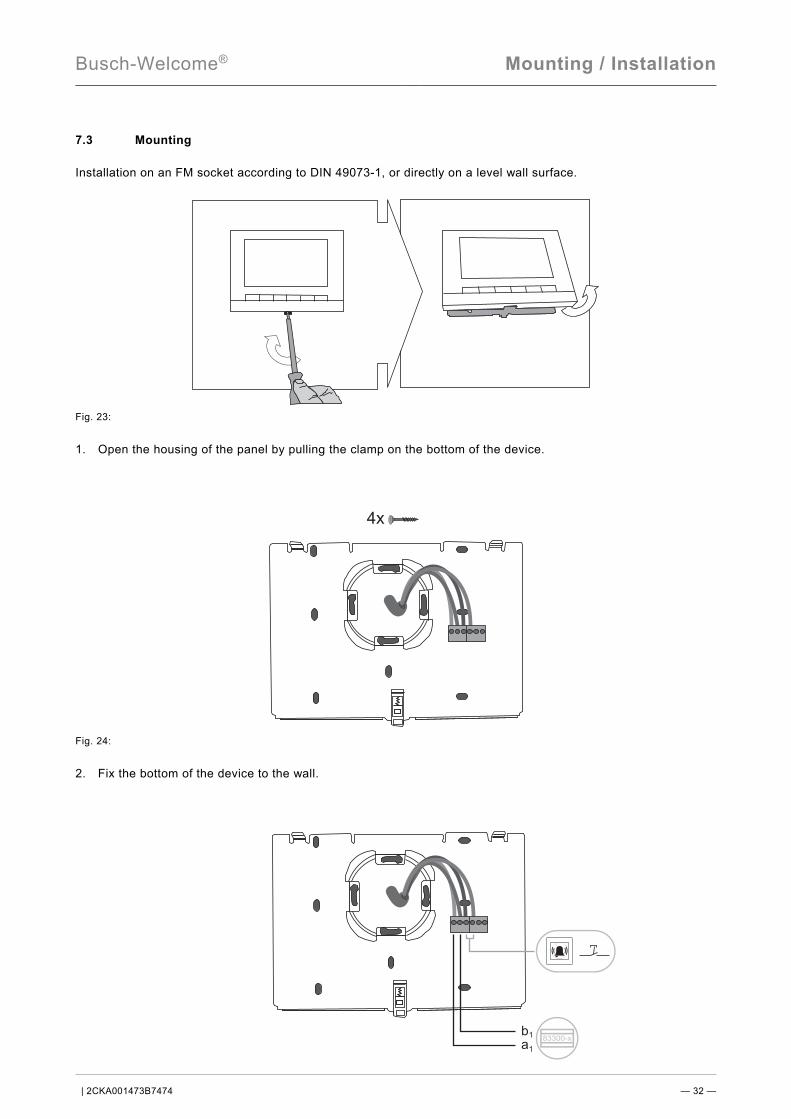
7.3 Mounting Installation on an FM socket according to DIN 49073-1, or directly on a level wall surface.
Fig. 23: 1. Open the housing of the panel by pulling the clamp on the bottom of the device.
Fig. 24: 2. Fix the bottom of the device to the wall.
4x
a
b1
1
83300-x
Busch-Welcome® Mounting / Installation
| 2CKA001473B7474 — 33 —
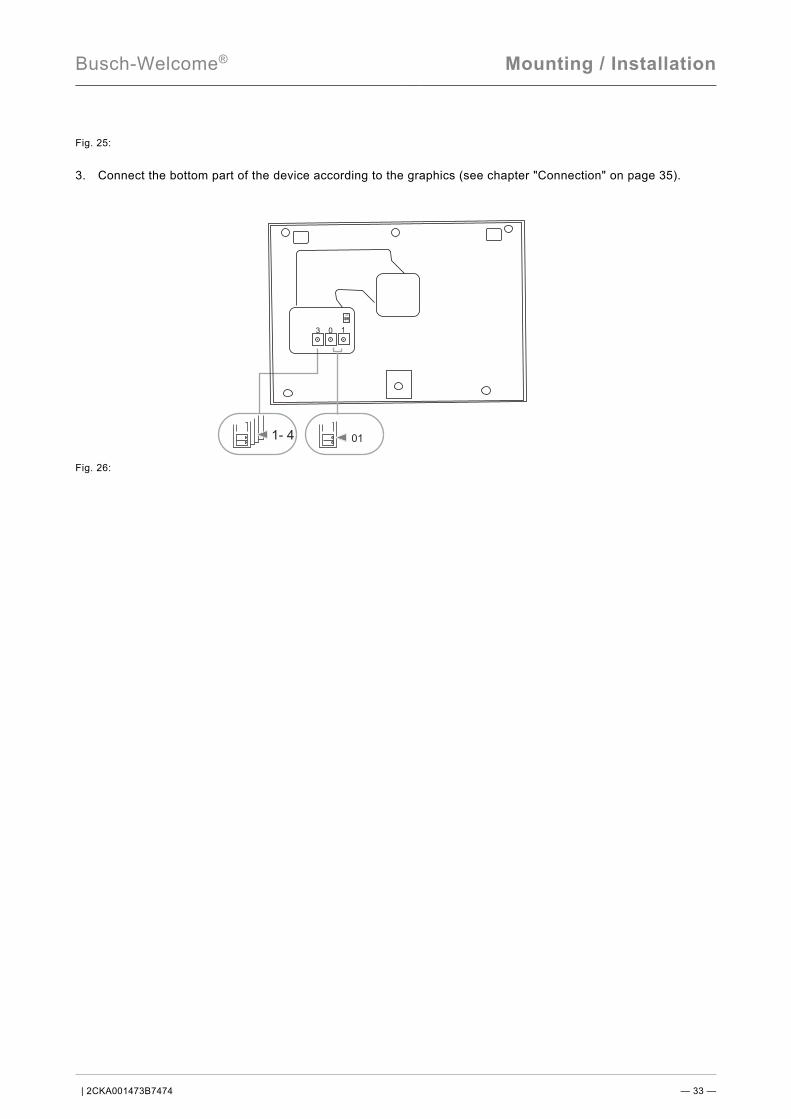
Fig. 25: 3. Connect the bottom part of the device according to the graphics (see chapter "Connection" on page 35).
Fig. 26:
1 2
ON
0 13
01
020101
02
1- 4
Busch-Welcome® Mounting / Installation
| 2CKA001473B7474 — 34 —
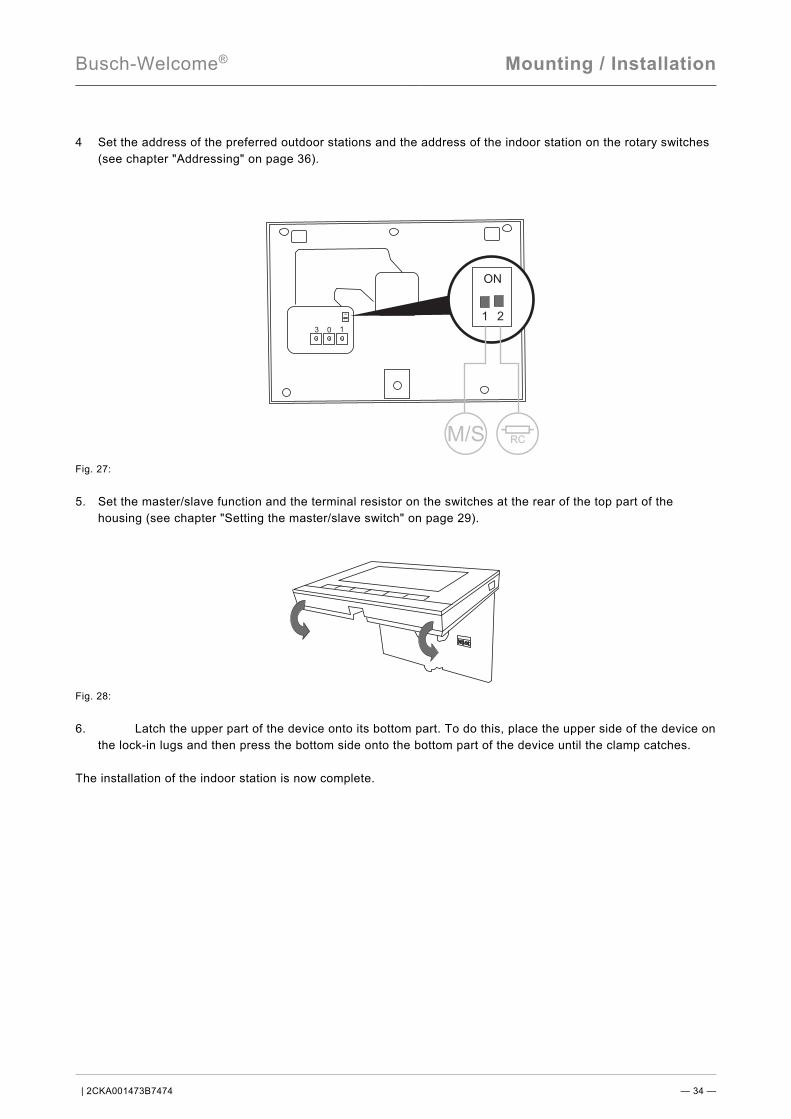
4 Set the address of the preferred outdoor stations and the address of the indoor station on the rotary switches (see chapter "Addressing" on page 36).
Fig. 27: 5. Set the master/slave function and the terminal resistor on the switches at the rear of the top part of the
housing (see chapter "Setting the master/slave switch" on page 29).
Fig. 28: 6. Latch the upper part of the device onto its bottom part. To do this, place the upper side of the device on
the lock-in lugs and then press the bottom side onto the bottom part of the device until the clamp catches. The installation of the indoor station is now complete.
1 2
ON
0 13
1 2
ON
M/S RC
Busch-Welcome® Mounting / Installation
| 2CKA001473B7474 — 35 —
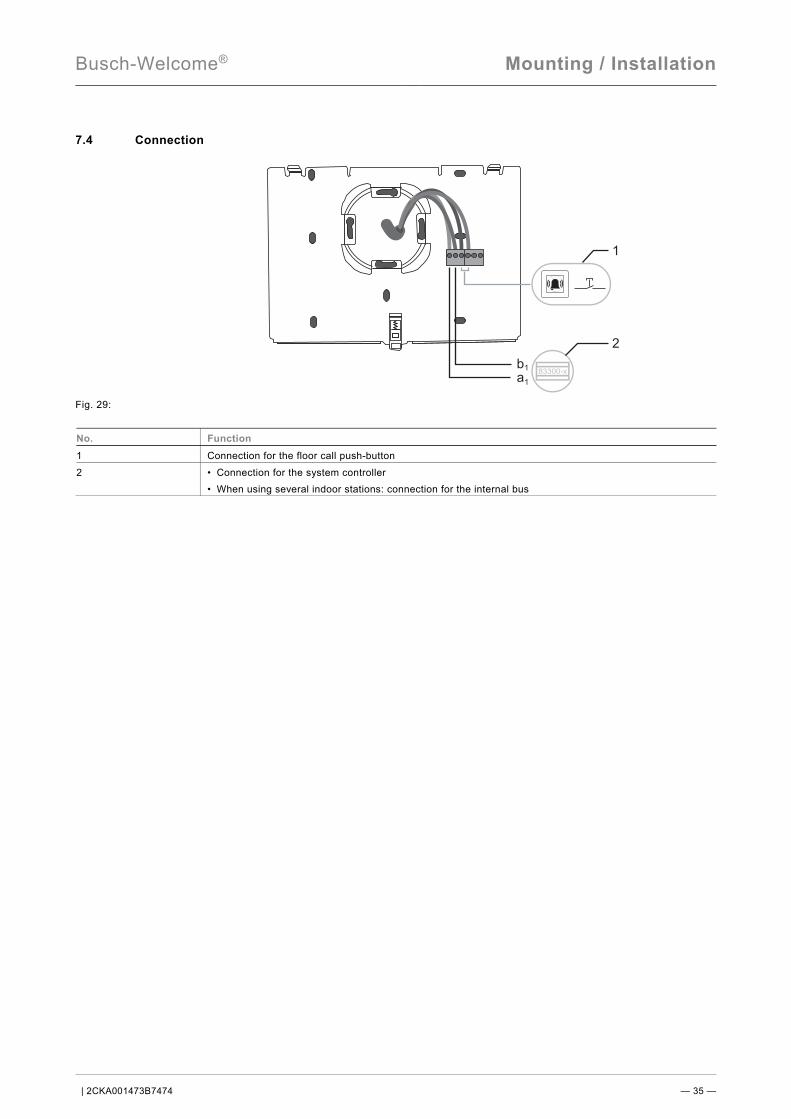
7.4 Connection
Fig. 29: No. Function 1 Connection for the floor call push-button 2 • Connection for the system controller
• When using several indoor stations: connection for the internal bus
a
b1
1
83300-x
1
2

Busch-Welcome® Addressing
| 2CKA001473B7474 — 36 —
8 Addressing Correct addressing of all ABB-Welcome® components is the prerequisite for faultless operation of the entire system. The indoor stations of the apartments can be assigned to the doorbell push-buttons of a door station by setting the address of the device. When the doorbell push-button is pressed the call is received at the fixed address. The option of flexible addressing allows the ABB-Welcome® system to be adapted to the individual requirements of the user. 8.1 Use of several outdoor stations 8.1.1 Uniform assignment of the doorbell push-buttons With several outdoor stations within an ABB-Welcome® system the doorbell push-buttons of each outdoor station are generally assigned uniformly. This means that all apartments can be called from all outdoor stations. This is practical for buildings with several entrances from each of which all apartments are accessible.
Fig. 30: Several outdoor stations with uniform assignment of the doorbell push-buttons No. Designation 1 Main entrance outdoor station
2 Side entrance outdoor station
A
B
C
01
02
03
A
B
C
01
02
03
01
02
03
1 2
Busch-Welcome® Addressing
| 2CKA001473B7474 — 37 —
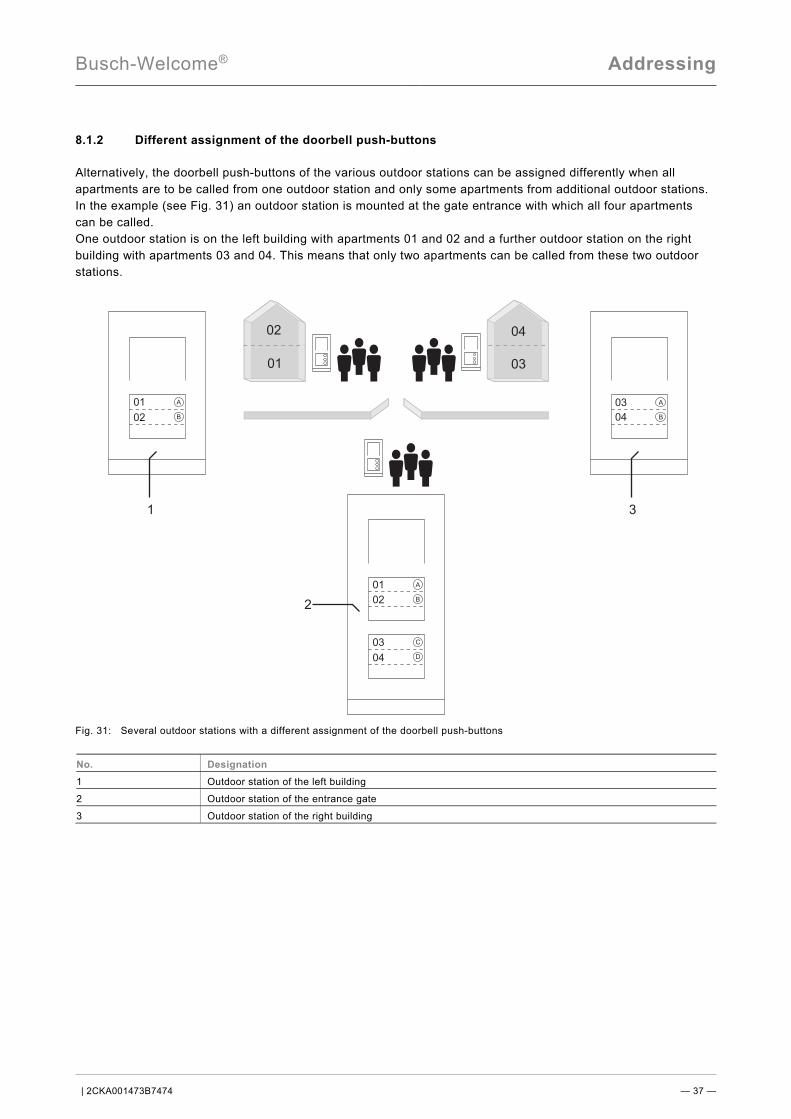
8.1.2 Different assignment of the doorbell push-buttons Alternatively, the doorbell push-buttons of the various outdoor stations can be assigned differently when all apartments are to be called from one outdoor station and only some apartments from additional outdoor stations. In the example (see Fig. 31) an outdoor station is mounted at the gate entrance with which all four apartments can be called. One outdoor station is on the left building with apartments 01 and 02 and a further outdoor station on the right building with apartments 03 and 04. This means that only two apartments can be called from these two outdoor stations.
Fig. 31: Several outdoor stations with a different assignment of the doorbell push-buttons No. Designation 1 Outdoor station of the left building
2 Outdoor station of the entrance gate
3 Outdoor station of the right building
01
02
A
B
01
02
03
04
A
B
C
D
03
04
A
B
01
02
03
04
1
2
3
Busch-Welcome® Addressing
| 2CKA001473B7474 — 38 —
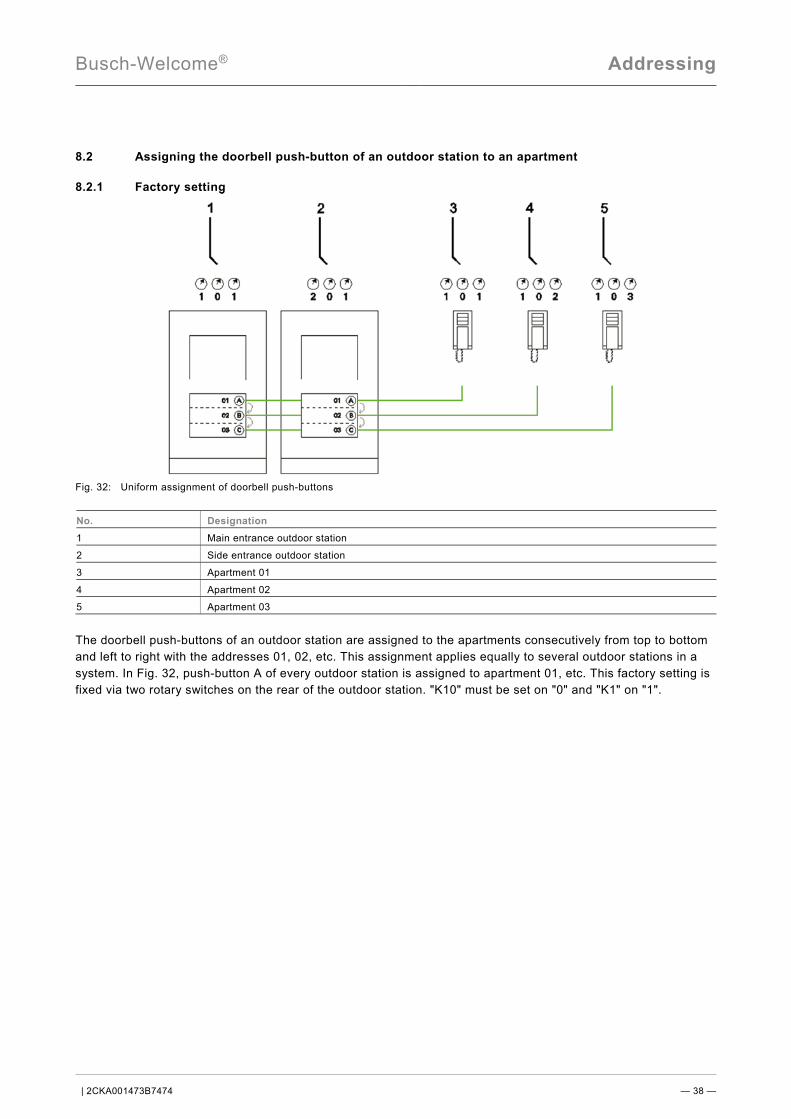
8.2 Assigning the doorbell push-button of an outdoor station to an apartment 8.2.1 Factory setting
Fig. 32: Uniform assignment of doorbell push-buttons No. Designation 1 Main entrance outdoor station
2 Side entrance outdoor station
3 Apartment 01
4 Apartment 02
5 Apartment 03
The doorbell push-buttons of an outdoor station are assigned to the apartments consecutively from top to bottom and left to right with the addresses 01, 02, etc. This assignment applies equally to several outdoor stations in a system. In Fig. 32, push-button A of every outdoor station is assigned to apartment 01, etc. This factory setting is fixed via two rotary switches on the rear of the outdoor station. "K10" must be set on "0" and "K1" on "1".
Busch-Welcome® Addressing
| 2CKA001473B7474 — 39 —
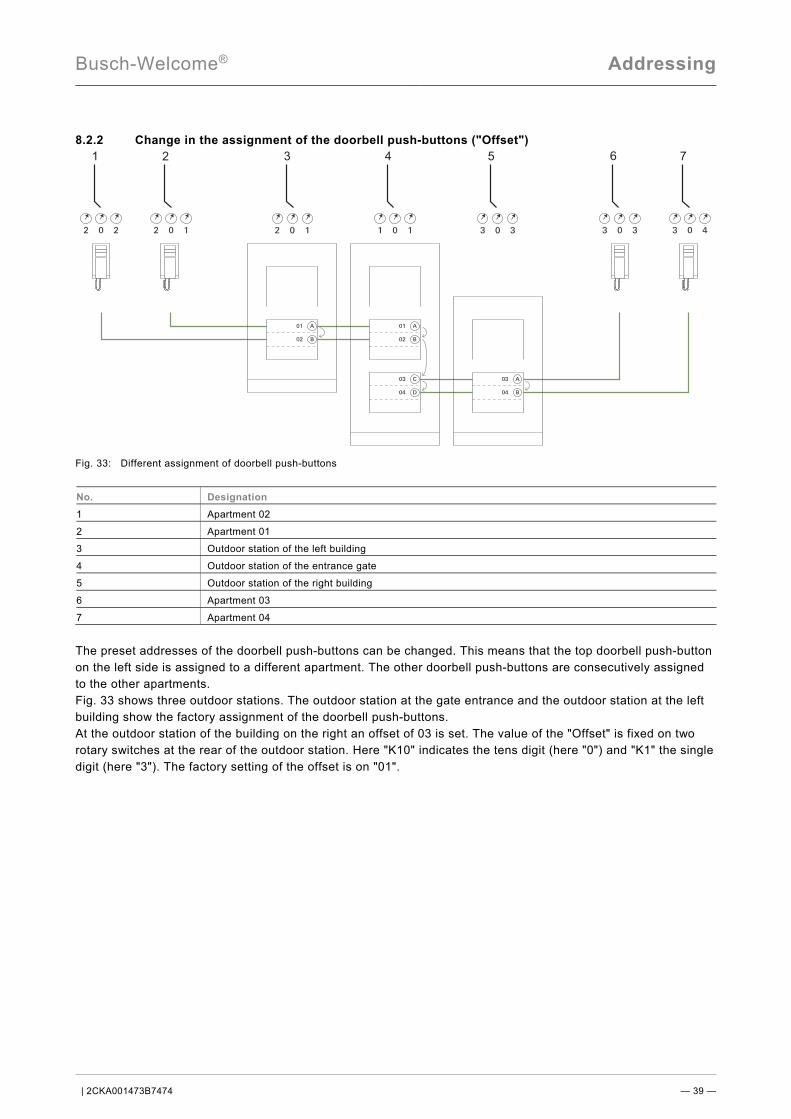
8.2.2 Change in the assignment of the doorbell push-buttons ("Offset")
Fig. 33: Different assignment of doorbell push-buttons No. Designation 1 Apartment 02
2 Apartment 01
3 Outdoor station of the left building
4 Outdoor station of the entrance gate
5 Outdoor station of the right building
6 Apartment 03
7 Apartment 04
The preset addresses of the doorbell push-buttons can be changed. This means that the top doorbell push-button on the left side is assigned to a different apartment. The other doorbell push-buttons are consecutively assigned to the other apartments. Fig. 33 shows three outdoor stations. The outdoor station at the gate entrance and the outdoor station at the left building show the factory assignment of the doorbell push-buttons. At the outdoor station of the building on the right an offset of 03 is set. The value of the "Offset" is fixed on two rotary switches at the rear of the outdoor station. Here "K10" indicates the tens digit (here "0") and "K1" the single digit (here "3"). The factory setting of the offset is on "01".

Busch-Welcome® Addressing
| 2CKA001473B7474 — 40 —
8.3 Basic settings 8.3.1 Defining the standard outdoor station The ABB-Welcome® system guarantees the opening of the door at several outdoor stations at which the visitor has rung the bell. The resident simply presses the button "Open door" at the indoor station. Also the associated light at the entrance can be switched on. Opening and switching in the apartment is also possible without an existing outside call. For several entrances with an outdoor station, one standard outdoor station is defined for opening the door and switching the light. The setting is made at the indoor stations of each apartment. With the ABB-WelcomeTouch® the camera image of an outdoor station can also be activated without having received a call. Here the camera image of the standard outdoor station is displayed. 8.3.2 Setting the address of the outdoor station
Fig. 34: Rotary switch and switch on the outdoor station (example) No. Designation 1 Address of the outdoor station
2 Ten-digit doorbell button
3 Single digit doorbell button
4 Button sounds (ON = active)
The assignment to one of the four inputs of the ABB-Welcome® system is made on the outdoor stations and the associated switch actuators for door and light via the setting of the address. Here the rotary knob (1) "Address of outdoor station" is set on an address between 1 and 4. The rotary switch is located on the rear of the outdoor station and the audio module assembly or on the front of the MDRC switch actuator and the flush-mounted switch actuator. The setting of the rotary switch "K10, K1" (2, 3) determines the start address of the doorbell push-buttons connected to the outdoor station. Setting the button sounds on/off On the outdoor stations the acoustic feedback signal is switched on and off via the "TT" button sounds switch (4) when a doorbell button is pressed. The switch is located on the rear of the outdoor station.
01
23
45 6
78
901
23
45 6
78
901
23
45 6
78
9
K10 K1 TT
ON
1 2 3 4
Busch-Welcome® Addressing
| 2CKA001473B7474 — 41 —
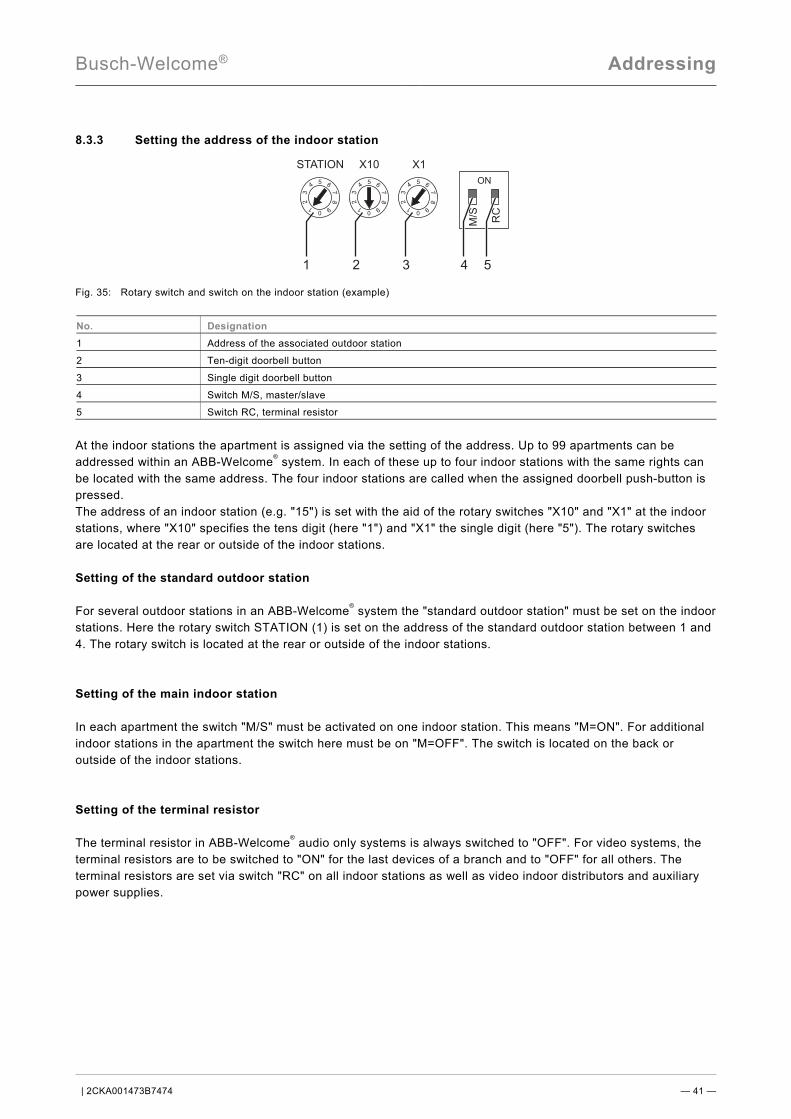
8.3.3 Setting the address of the indoor station
Fig. 35: Rotary switch and switch on the indoor station (example) No. Designation 1 Address of the associated outdoor station
2 Ten-digit doorbell button
3 Single digit doorbell button
4 Switch M/S, master/slave
5 Switch RC, terminal resistor
At the indoor stations the apartment is assigned via the setting of the address. Up to 99 apartments can be addressed within an ABB-Welcome® system. In each of these up to four indoor stations with the same rights can be located with the same address. The four indoor stations are called when the assigned doorbell push-button is pressed. The address of an indoor station (e.g. "15") is set with the aid of the rotary switches "X10" and "X1" at the indoor stations, where "X10" specifies the tens digit (here "1") and "X1" the single digit (here "5"). The rotary switches are located at the rear or outside of the indoor stations. Setting of the standard outdoor station For several outdoor stations in an ABB-Welcome® system the "standard outdoor station" must be set on the indoor stations. Here the rotary switch STATION (1) is set on the address of the standard outdoor station between 1 and 4. The rotary switch is located at the rear or outside of the indoor stations. Setting of the main indoor station In each apartment the switch "M/S" must be activated on one indoor station. This means "M=ON". For additional indoor stations in the apartment the switch here must be on "M=OFF". The switch is located on the back or outside of the indoor stations. Setting of the terminal resistor The terminal resistor in ABB-Welcome® audio only systems is always switched to "OFF". For video systems, the terminal resistors are to be switched to "ON" for the last devices of a branch and to "OFF" for all others. The terminal resistors are set via switch "RC" on all indoor stations as well as video indoor distributors and auxiliary power supplies.
01
23
45 6
78
901
23
45 6
78
901
23
45 6
78
9
X10 X1
1 2 3
STATION
ON
M/S
RC
4 5
Busch-Welcome® Addressing
| 2CKA001473B7474 — 42 —
8.3.4 Setting of the door opener or light switch The setting is only made on the door/light switch actuator. It shows the respective function of the device in the ABB-Welcome® system. The sliding switch on the device is used for setting. 8.3.5 Setting of the door opener times and light times This setting on the system controller and the door/light switch actuator determines the operating period of the door buzzer (from one to ten seconds). The light-on period can be set between one second and five minutes. A separate potentiometer for both is located on the system controller. For the MDRC switch actuator and on the flush-mounted switch actuator the same potentiometer is used for one of the two control values depending on the position of the sliding switch.
Busch-Welcome® Addressing
| 2CKA001473B7474 — 43 —
Project name:
Mounting position for the outdoor station:
Floor 02 01
Busch-Welcome®
2CKA
0014
73B7
474
| 1
3.01
.201
7
A member of the ABB Group Busch-Jaeger Elektro GmbH PO box 58505 Lüdenscheid Freisenbergstraße 2 58513 Lüdenscheid Germany www.BUSCH-JAEGER.de [email protected] Central sales service: Phone: +49 (0) 2351 956-1600 Fax: +49 (0) 2351 956-1700
Notice
We reserve the right to at all times make
technical changes as well as changes to the
contents of this document without prior notice.
The detailed specifications agreed to at the time
of ordering apply to all orders. ABB accepts no
responsibility for possible errors or
incompleteness in this document.
We reserve all rights to this document and the
topics and illustrations contained therein. The
document and its contents, or extracts thereof,
must not be reproduced, transmitted or reused by
third parties without prior written consent by ABB.
Copyright© 2017 Busch-Jaeger Elektro GmbH
All rights reserved
Related Documents