Build your own VoIP System – Part 1: The Basics by Andreas Granig on March 17, 2012 · 5 Comments">5 Comments · in Technical This blog post is the first part of a series of posts, which describe how VoIP works and how the Sipwise sip:provider Platform enables you to start various VoIP business models. Part 1, which is provided in this post, gives you an introduction in how VoIP works. Part 2 shows how you can set up a secure and self-hosted Skype-like VoIP system for free using the sip:provider Platform within 30 minutes. Part 3 is dedicated to the sip:provider Platform acting as an SBC in front of existing VoIP systems. Part 4 describes how you can operate a whole-sale business with the sip:provider Platform. Part 5 shows how to enable Over-The-Top (OTT) services using Apple and Google Push Notification Services. Introduction VoIP Systems are seen as complex communication infrastructures even from a high level perspective, but they‟re not. Well, VoIP is in fact complex in its details, but it has been abstracted by various projects in order to make it really straight-forward to use it, so it‟s easy to start a compelling voice/video communication system or service (which I‟ll name “VoIP system” or “VoIP service” throughout the document) from scratch, but it‟s important to learn a few facts about it in order to choose the right base system for successfully running a VoIP service. The Basics VoIP just means “Voice over IP”, which is a generic term for transporting real-time voice sessions over the Internet. However, it doesn‟t define HOW this is done, and even the term “Voice” is a bit misleading, because with the very same concept, you can transport also Video and Fax over an IP connection. There are a couple of elements involved when you‟re talking about a VoIP system: To sum it up, there are SIP Endpoints, which are the client instances of your customers. These could be software installed on your customer‟s computers (popular software is Jitsi, an open source and cross-

Welcome message from author
This document is posted to help you gain knowledge. Please leave a comment to let me know what you think about it! Share it to your friends and learn new things together.
Transcript
Build your own VoIP System – Part 1: The Basics
by Andreas Granig on March 17, 2012 · 5 Comments">5 Comments · in Technical
This blog post is the first part of a series of posts, which describe how VoIP works and how the Sipwise
sip:provider Platform enables you to start various VoIP business models.
Part 1, which is provided in this post, gives you an introduction in how VoIP works.
Part 2 shows how you can set up a secure and self-hosted Skype-like VoIP system for free using the
sip:provider Platform within 30 minutes.
Part 3 is dedicated to the sip:provider Platform acting as an SBC in front of existing VoIP systems.
Part 4 describes how you can operate a whole-sale business with the sip:provider Platform.
Part 5 shows how to enable Over-The-Top (OTT) services using Apple and Google Push
Notification Services.
Introduction
VoIP Systems are seen as complex communication infrastructures even from a high level perspective, but
they‟re not. Well, VoIP is in fact complex in its details, but it has been abstracted by various projects in
order to make it really straight-forward to use it, so it‟s easy to start a compelling voice/video
communication system or service (which I‟ll name “VoIP system” or “VoIP service” throughout the
document) from scratch, but it‟s important to learn a few facts about it in order to choose the right base
system for successfully running a VoIP service.
The Basics
VoIP just means “Voice over IP”, which is a generic term for transporting real-time voice sessions over the
Internet. However, it doesn‟t define HOW this is done, and even the term “Voice” is a bit misleading,
because with the very same concept, you can transport also Video and Fax over an IP connection.
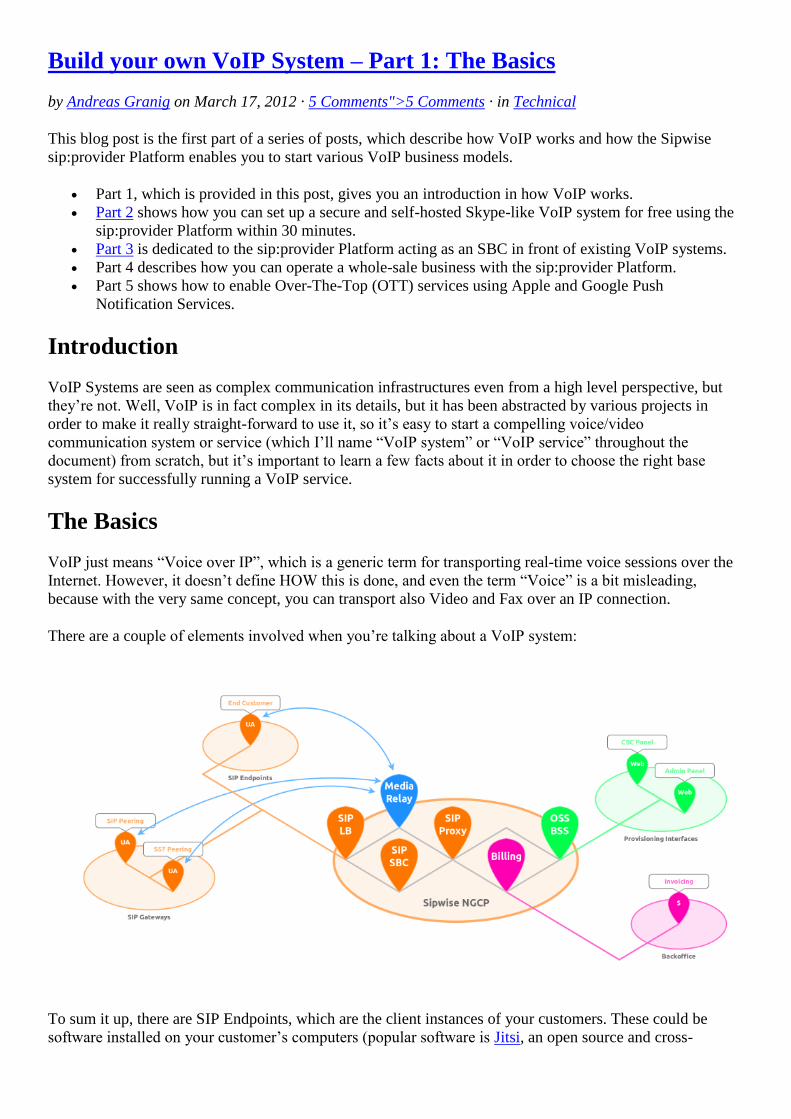
There are a couple of elements involved when you‟re talking about a VoIP system:
To sum it up, there are SIP Endpoints, which are the client instances of your customers. These could be
software installed on your customer‟s computers (popular software is Jitsi, an open source and cross-

platform communications client, or Bria, a commercial multi-platform client for Windows, iOS and
Android). Other possibilities are SIP phones like SNOM phones or Polycom Phones.
Beside the customer facing end points, there are SIP gateways which translate VoIP into traditional fixed-net
and mobile networks. They pretty much act like customer facing clients, but usually are able to handle
multiples of parallel calls. They are usually connected via multiple ISDN E1 or T1 lines, and sometimes an
SS7 control layer is used on top.
How does SIP work?
In order to establish a communication session, you need a signaling protocol, which tells the involved parties
who want to communicate with whom, and which media capabilities might be used (e.g. plain voice,
voice/video, fax etc.). There are several protocols out there, like Skype (a proprietary protocol) and H.323
(more or less obsolete since 2004) and the most important and nowadays most wide-spread one and the one
we‟re concentrating here: SIP, the Session Initiation Protocol.
SIP Registrations
A very important part of VoIP is the registration of customer endpoints. It means if a customer starts its SIP
client, the client tells the SIP server at which IP and port it is reachable in case there‟s a call towards this
customer. The call flow looks like this:
The important part, beside the authentication scenario which is a http digest authentication, is the Contact
header, which indicates at which IP: port the customer is reachable.
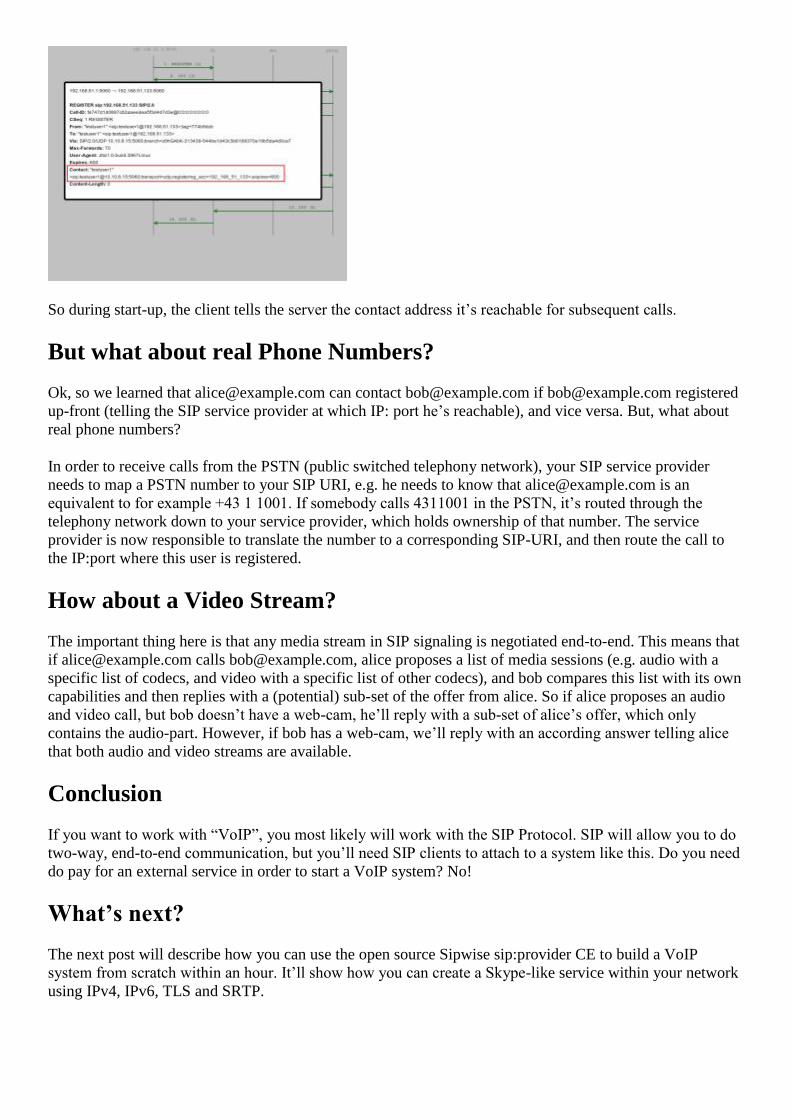
So during start-up, the client tells the server the contact address it‟s reachable for subsequent calls.
But what about real Phone Numbers?
Ok, so we learned that [email protected] can contact [email protected] if [email protected] registered
up-front (telling the SIP service provider at which IP: port he‟s reachable), and vice versa. But, what about
real phone numbers?
In order to receive calls from the PSTN (public switched telephony network), your SIP service provider
needs to map a PSTN number to your SIP URI, e.g. he needs to know that [email protected] is an
equivalent to for example +43 1 1001. If somebody calls 4311001 in the PSTN, it‟s routed through the
telephony network down to your service provider, which holds ownership of that number. The service
provider is now responsible to translate the number to a corresponding SIP-URI, and then route the call to
the IP:port where this user is registered.
How about a Video Stream?
The important thing here is that any media stream in SIP signaling is negotiated end-to-end. This means that
if [email protected] calls [email protected], alice proposes a list of media sessions (e.g. audio with a
specific list of codecs, and video with a specific list of other codecs), and bob compares this list with its own
capabilities and then replies with a (potential) sub-set of the offer from alice. So if alice proposes an audio
and video call, but bob doesn‟t have a web-cam, he‟ll reply with a sub-set of alice‟s offer, which only
contains the audio-part. However, if bob has a web-cam, we‟ll reply with an according answer telling alice
that both audio and video streams are available.
Conclusion
If you want to work with “VoIP”, you most likely will work with the SIP Protocol. SIP will allow you to do
two-way, end-to-end communication, but you‟ll need SIP clients to attach to a system like this. Do you need
do pay for an external service in order to start a VoIP system? No!
What’s next?
The next post will describe how you can use the open source Sipwise sip:provider CE to build a VoIP
system from scratch within an hour. It‟ll show how you can create a Skype-like service within your network
using IPv4, IPv6, TLS and SRTP.
Build your own VoIP System – Part 2: An open Skype Replacement
by Andreas Granig on September 5, 2012 · 7 Comments">7 Comments · in Technical
In Part 1 of our series “Build your own VoIP System” we learned about the very basics of how VoIP and
SIP in particular works.
This is Part 2, describing the process of setting up a Skype-like service using the sip:providerCE
.
In Part 3 you will learn how to protect existing VoIP deployments with the sip:provider acting as a Session
Border Controller (SBC).
Since version 2.6 of our sip:provider platform, we got everything in our hands to build a secure and self-
hosted Skype-like communication service solely based on open source software.
The Goal
In this post, we attempt to build a free, secure, SIP based communication system to provide encrypted voice
and video communication, buddy lists, instant messaging, presence and remote desktop sharing/control on a
self-hosted system.
Once you‟re done with that, adding skype-in/skype-out features to receive and place calls from/to the
traditional telephony/mobile network is fairly easy, but will be covered in a separate post.
The whole process will take around 30 minutes up to an hour for an initial setup, so grab a coffee and clear
your head.
The Ingredients
For our system to work, we need a communication server and a proper client for our end users.
The Server
As a communication server, we will use sip:providerCE
v2.6. The easiest way to get started with it is to
download the VMware or Virtualbox image and fire it up on a suitable machine. If you get more serious,
you want to install the system from scratch on a dedicated server with a public static IP. If you‟re new to
VoIP and SIP, do NOT try to install it on an Amazon EC2 instance, as they‟re using destination NAT, which
is a big pain for SIP and needs some experience with the SPCE to tweak it properly for that scenario.
Note that the SPCE is a 64bit system, so in order to run the VM images, you need to turn on 64bit CPU
virtualization in your BIOS if VMware or Virtualbox warns you about it.
The Client
Like with Skype, your users will need a Client software to leverage the full potential of the server. The good
thing about a SIP based system is that you can hook up pretty much every SIP client (IP phone, ISDN
adapter, Desktop client, Mobile client) to the SPCE. This usually works fine with just voice/video
communication, but with advanced features like presence, diversity leads to interoperability issues, so the
SPCE server is optimized for Jitsi, a Java based multi-platform client providing all the features we require
for this tutorial.
Install the Server
In our setup, we will use Virtualbox to boot the Virtualbox VM image of the SPCE. Follow these steps to
get started:
1. If you don‟t have Virtualbox 4.x installed yet, download it from here and install it, or upgrade your
older version.
2. Download the Virtualbox VM image of the SPCE from here.
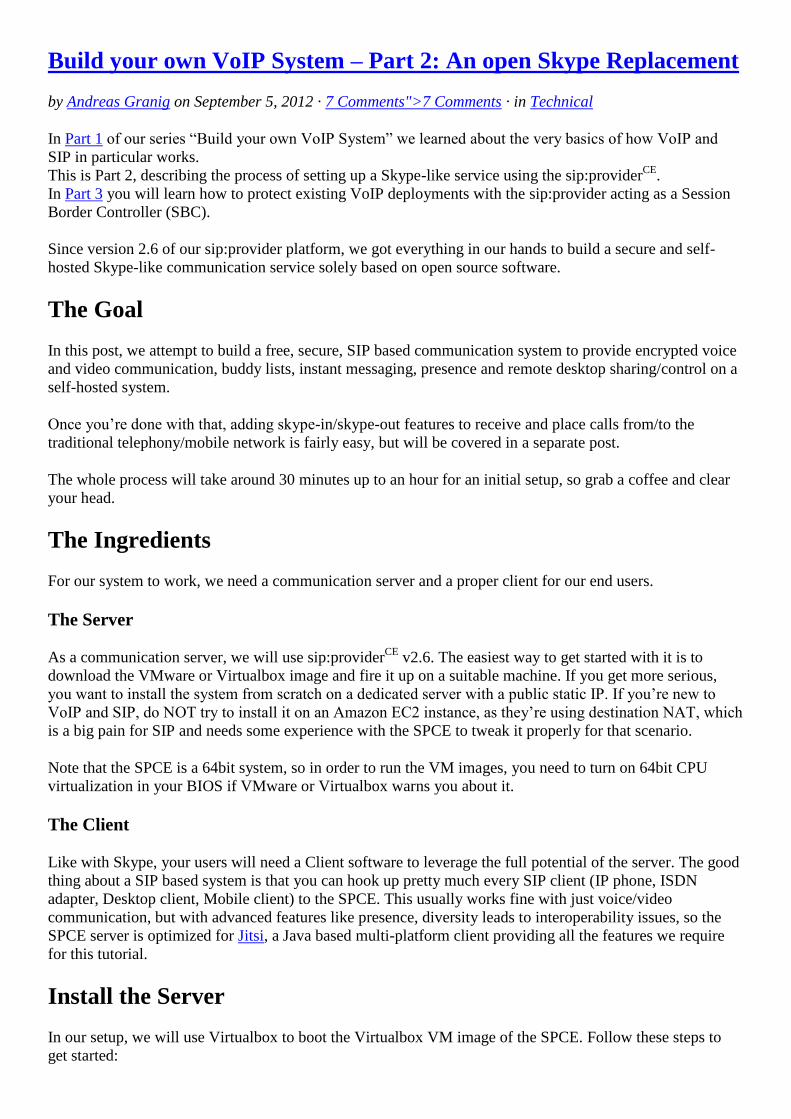
3. Start Virtualbox. On Linux, you can start it like this: $ virtualbox sip_provider_CE_2.6_virtualbox.ova You will be prompted to import the new VM, which will look similar to this:
Once the import is finished, double-check if the network interface is the correct one providing access
to the Internet:
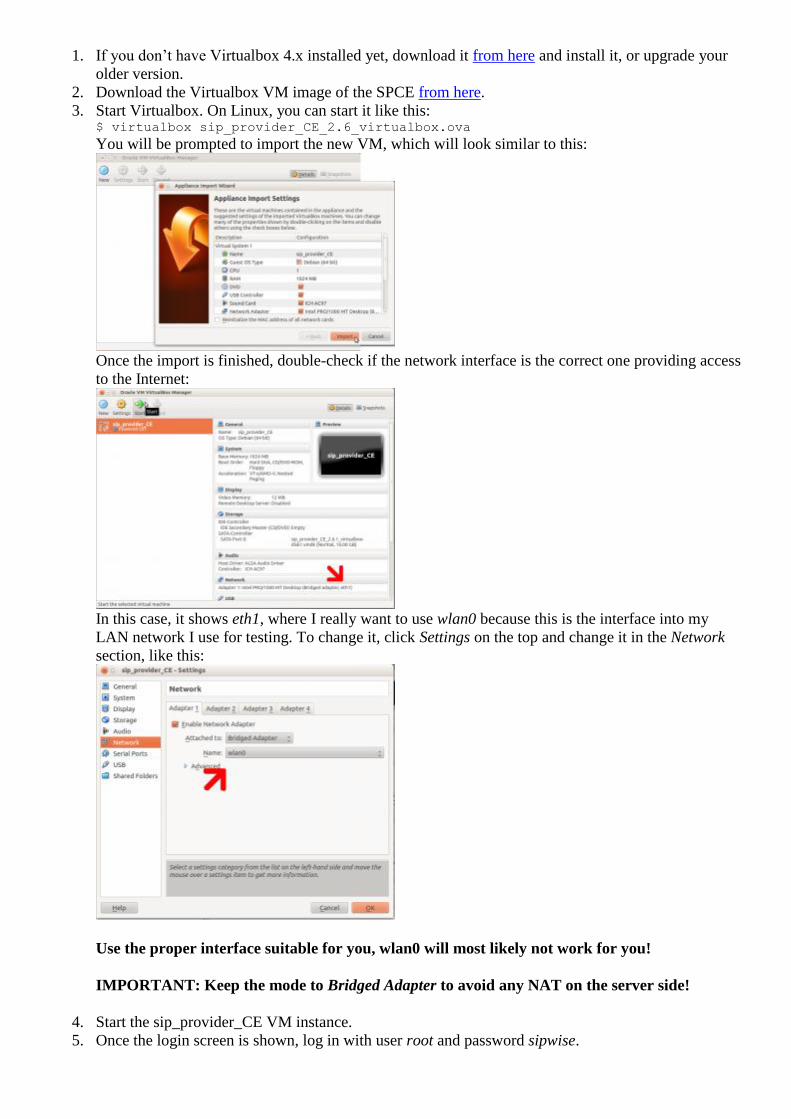
In this case, it shows eth1, where I really want to use wlan0 because this is the interface into my
LAN network I use for testing. To change it, click Settings on the top and change it in the Network
section, like this:
Use the proper interface suitable for you, wlan0 will most likely not work for you!
IMPORTANT: Keep the mode to Bridged Adapter to avoid any NAT on the server side!
4. Start the sip_provider_CE VM instance.
5. Once the login screen is shown, log in with user root and password sipwise.
6. Check your network settings. The VM instance is set to use DHCP by default. If this is fine with you,
execute ifconfig eth0 and remember the IP address of this interface, and continue to the next step.
However if you want to configure a static IP address, you need to edit /etc/network/interfaces, e.g.
like this:
auto lo
iface lo inet loopback
auto eth0
iface eth0 inet static
address 192.168.0.122
netmask 255.255.255.0
gateway 192.168.0.1
dns-nameservers 8.8.8.8 8.8.4.4
Then execute ifdown eth0; ifup eth0 to bring up the interface with the proper configuration. Then edit
/etc/ngcp-config/config.yml, search for eaddress and and change the option to the IP address you
statically set above, like this:
eaddress: 192.168.0.122
7. The last step on the command line is to execute the command ngcpcfg apply to generate the platform
configuration files and reboot the server (only needed for the first time for simplicity reasons to make
sure all services are started correctly).
Configure the Domain and Users
Now that the SPCE system is up and running, point your browser to the Administrative Web Panel located
at HTTPS port 1443 of your IP you configured or got via DHCP above, like this:
https://192.168.0.122:1443
The username is administrator and the password is administrator.
There are a couple of steps to get your first users online:
1. Create a Domain for your users. Your users will have subscribers identified by a so-called SIP URI
like sip:[email protected], and similar to virtual hosts on a web server, you can create as many
domains as you like in order to partition your users. Just make sure that the domain name you define
here is pointing to the IP address of the system. You can also directly use your IP address for testing
purposes, so a user would be [email protected] in my case, and I‟ll use that throughout the rest of
the post.
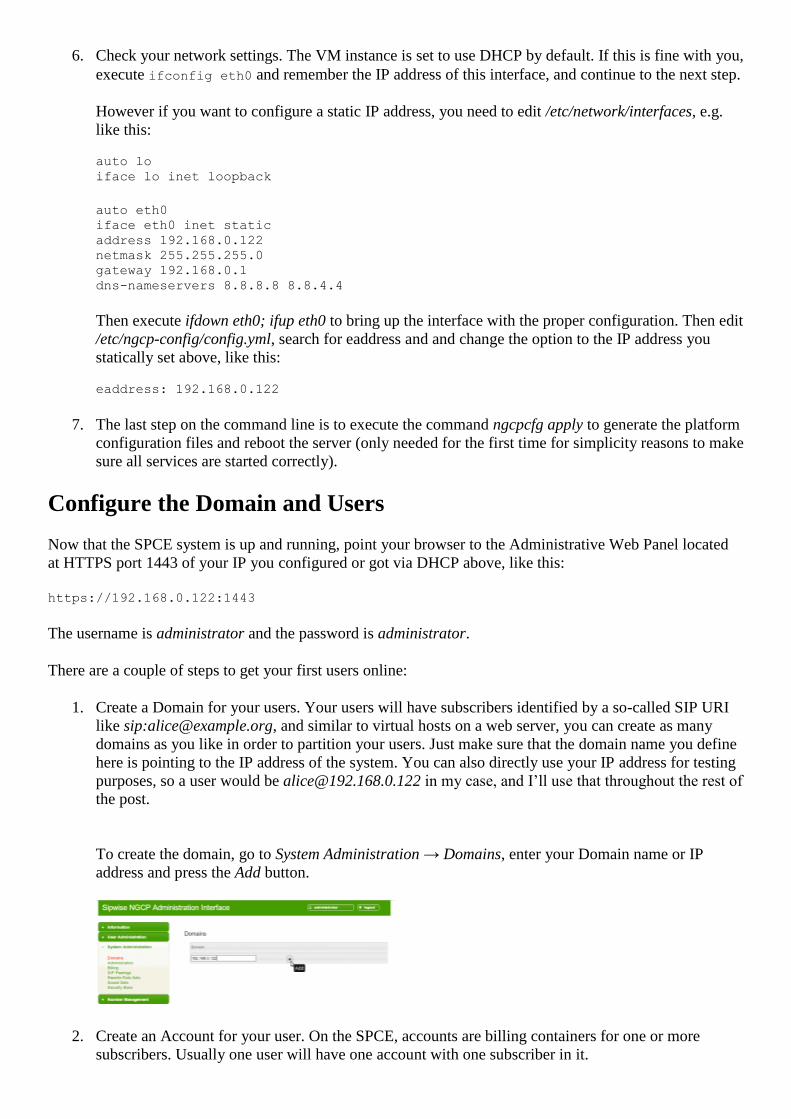
To create the domain, go to System Administration → Domains, enter your Domain name or IP
address and press the Add button.
2. Create an Account for your user. On the SPCE, accounts are billing containers for one or more
subscribers. Usually one user will have one account with one subscriber in it.
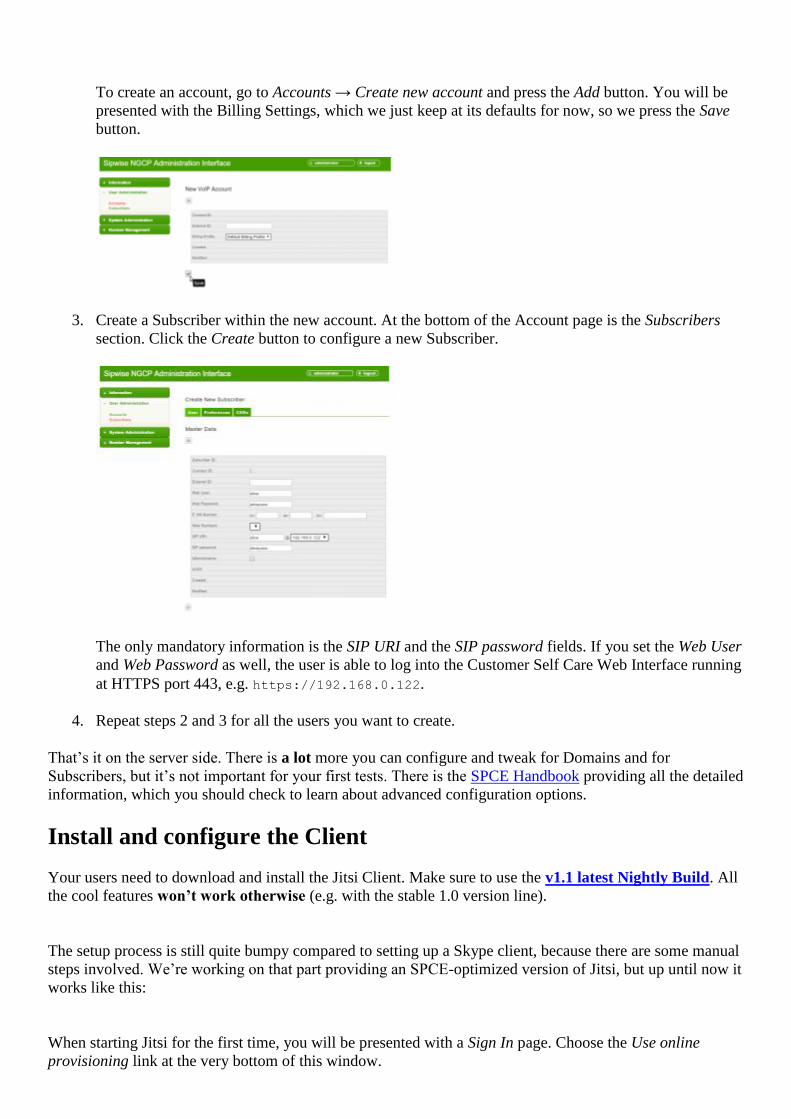
To create an account, go to Accounts → Create new account and press the Add button. You will be
presented with the Billing Settings, which we just keep at its defaults for now, so we press the Save
button.
3. Create a Subscriber within the new account. At the bottom of the Account page is the Subscribers
section. Click the Create button to configure a new Subscriber.
The only mandatory information is the SIP URI and the SIP password fields. If you set the Web User
and Web Password as well, the user is able to log into the Customer Self Care Web Interface running
at HTTPS port 443, e.g. https://192.168.0.122.
4. Repeat steps 2 and 3 for all the users you want to create.
That‟s it on the server side. There is a lot more you can configure and tweak for Domains and for
Subscribers, but it‟s not important for your first tests. There is the SPCE Handbook providing all the detailed
information, which you should check to learn about advanced configuration options.
Install and configure the Client
Your users need to download and install the Jitsi Client. Make sure to use the v1.1 latest Nightly Build. All
the cool features won’t work otherwise (e.g. with the stable 1.0 version line).
The setup process is still quite bumpy compared to setting up a Skype client, because there are some manual
steps involved. We‟re working on that part providing an SPCE-optimized version of Jitsi, but up until now it
works like this:
When starting Jitsi for the first time, you will be presented with a Sign In page. Choose the Use online
provisioning link at the very bottom of this window.

Check the Enable provisioning check box, select Manually specify a provisioning URI and put the following
URL there, with only the IP address part changed to reflect your IP or domain name (make sure to leave
the rest intact exactly as shown here):
https://192.168.0.122/jitsi?user=${username}&pass=${password}&uuid=${uuid}
In case Jitsi was already installed, make sure to click the Forget Password! button as well.
Then exit Jitsi and start it again!
During the next startup, Jitsi will pop up an authentication window asking for your username and password.
Enter your SIP URI and your SIP password here.
.
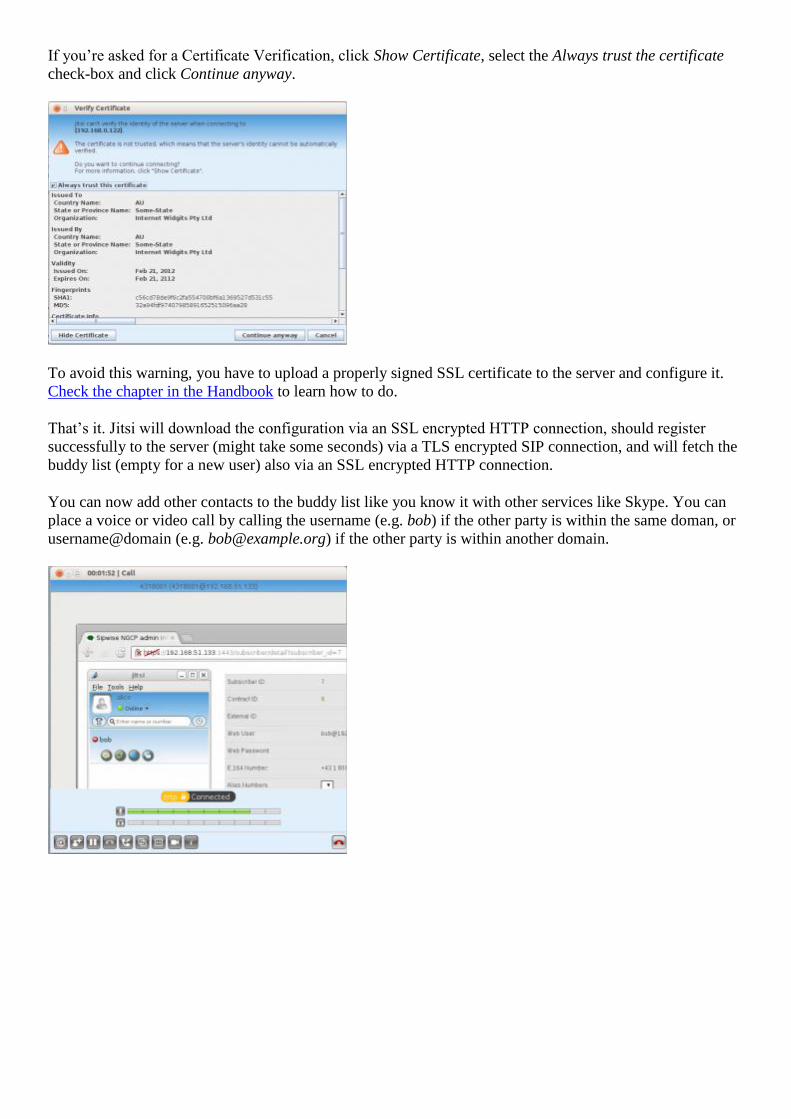
If you‟re asked for a Certificate Verification, click Show Certificate, select the Always trust the certificate
check-box and click Continue anyway.
To avoid this warning, you have to upload a properly signed SSL certificate to the server and configure it.
Check the chapter in the Handbook to learn how to do.
That‟s it. Jitsi will download the configuration via an SSL encrypted HTTP connection, should register
successfully to the server (might take some seconds) via a TLS encrypted SIP connection, and will fetch the
buddy list (empty for a new user) also via an SSL encrypted HTTP connection.
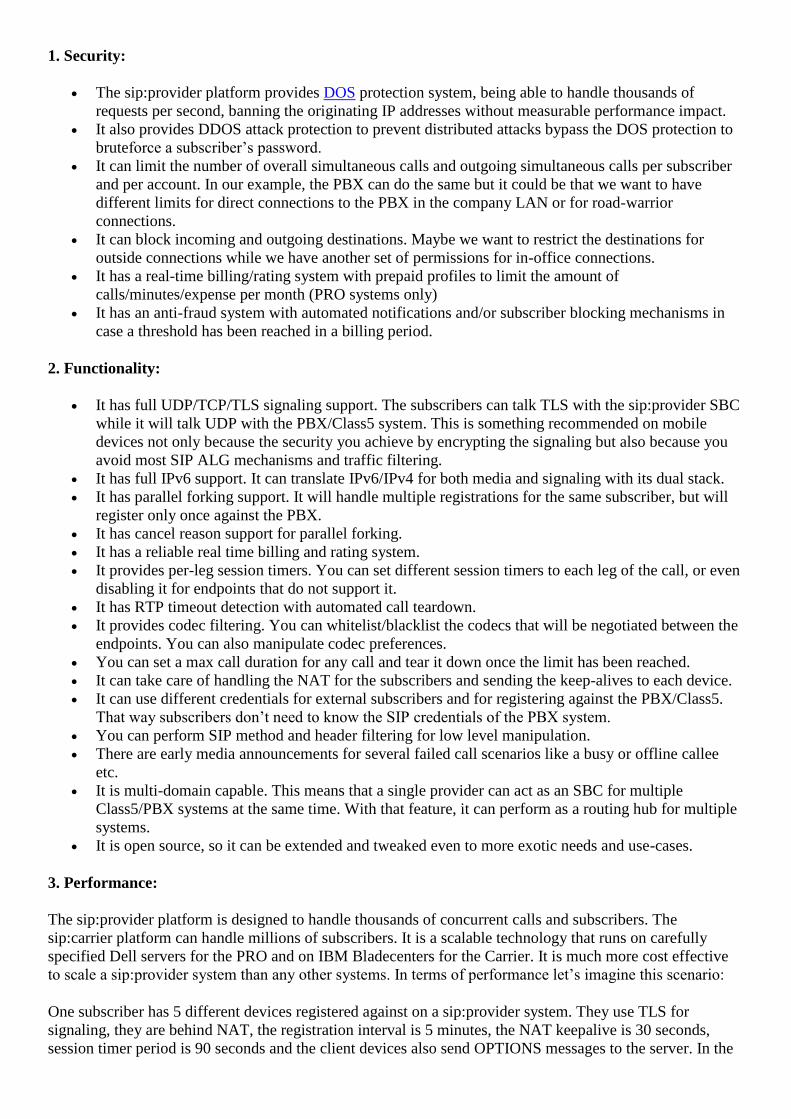
You can now add other contacts to the buddy list like you know it with other services like Skype. You can
place a voice or video call by calling the username (e.g. bob) if the other party is within the same doman, or
username@domain (e.g. [email protected]) if the other party is within another domain.

Next Steps
Please consult the SPCE Handbook to learn how to configure phone numbers for your subscribers, how to
configure subscriber features like call-forwards, call-blockings etc, and how to add SIP Peerings to connect
to the traditional phone network in order to place and receive calls to/from landlines and mobile phones.
Build your own VoIP System – Part 3: the sip:provider as an SBC
by Jon Bonilla on September 5, 2012 · 3 Comments">3 Comments · in Technical
In Part 1 of our series “Build your own VoIP System” we learned about the very basics of how VoIP and
SIP in particular works.
In Part 2 the setup of a Skype-like service was explained.
This is Part 3, where you will learn how to protect existing VoIP deployments with the sip:provider acting as
a Session Border Controller (SBC).
Introduction
Over the last years, we‟ve been developing the NGCP technology to make our products the best Class5
softswitches in the market. 90% of our deployments are Class5 scenarios, where we do green field
deployment or migrations from legacy systems. There are three ways we‟ve deployed the NGCP based
products though:
As Class5 platforms. This is the usual way as we explain in the Handbook.
As SBC systems, to protect and enhance already existing Class5 systems.
As wholesale systems, just sending calls between peers and doing accounting of high traffic.
Benefits
This blog post explains the SBC scenario and its benefits for already existing, in production Class5 or PBX
systems. Before we start the technical part, let‟s imagine a simple scenario: You have a company with
people around the world and your PBX system is exposed to the internet to grant access to your employees
or to let customers call your company via SIP. You now lock down your PBX system and only allow traffic
coming from a Sip:Provider system that will act as SBC in front of your PBX system and will be the only
element exposed to the Internet. Why would you do that? What does the Sip:Provider provide to the PBX
system?
1. Security:
The sip:provider platform provides DOS protection system, being able to handle thousands of
requests per second, banning the originating IP addresses without measurable performance impact.
It also provides DDOS attack protection to prevent distributed attacks bypass the DOS protection to
bruteforce a subscriber‟s password.
It can limit the number of overall simultaneous calls and outgoing simultaneous calls per subscriber
and per account. In our example, the PBX can do the same but it could be that we want to have
different limits for direct connections to the PBX in the company LAN or for road-warrior
connections.
It can block incoming and outgoing destinations. Maybe we want to restrict the destinations for
outside connections while we have another set of permissions for in-office connections.
It has a real-time billing/rating system with prepaid profiles to limit the amount of
calls/minutes/expense per month (PRO systems only)
It has an anti-fraud system with automated notifications and/or subscriber blocking mechanisms in
case a threshold has been reached in a billing period.
2. Functionality:
It has full UDP/TCP/TLS signaling support. The subscribers can talk TLS with the sip:provider SBC
while it will talk UDP with the PBX/Class5 system. This is something recommended on mobile
devices not only because the security you achieve by encrypting the signaling but also because you
avoid most SIP ALG mechanisms and traffic filtering.
It has full IPv6 support. It can translate IPv6/IPv4 for both media and signaling with its dual stack.
It has parallel forking support. It will handle multiple registrations for the same subscriber, but will
register only once against the PBX.
It has cancel reason support for parallel forking.
It has a reliable real time billing and rating system.
It provides per-leg session timers. You can set different session timers to each leg of the call, or even
disabling it for endpoints that do not support it.
It has RTP timeout detection with automated call teardown.
It provides codec filtering. You can whitelist/blacklist the codecs that will be negotiated between the
endpoints. You can also manipulate codec preferences.
You can set a max call duration for any call and tear it down once the limit has been reached.
It can take care of handling the NAT for the subscribers and sending the keep-alives to each device.
It can use different credentials for external subscribers and for registering against the PBX/Class5.
That way subscribers don‟t need to know the SIP credentials of the PBX system.
You can perform SIP method and header filtering for low level manipulation.
There are early media announcements for several failed call scenarios like a busy or offline callee
etc.
It is multi-domain capable. This means that a single provider can act as an SBC for multiple
Class5/PBX systems at the same time. With that feature, it can perform as a routing hub for multiple
systems.
It is open source, so it can be extended and tweaked even to more exotic needs and use-cases.
3. Performance:
The sip:provider platform is designed to handle thousands of concurrent calls and subscribers. The
sip:carrier platform can handle millions of subscribers. It is a scalable technology that runs on carefully
specified Dell servers for the PRO and on IBM Bladecenters for the Carrier. It is much more cost effective
to scale a sip:provider system than any other systems. In terms of performance let‟s imagine this scenario:
One subscriber has 5 different devices registered against on a sip:provider system. They use TLS for
signaling, they are behind NAT, the registration interval is 5 minutes, the NAT keepalive is 30 seconds,
session timer period is 90 seconds and the client devices also send OPTIONS messages to the server. In the
other leg, the sip:provider registers once against the PBX, with a registration expires of 6 hours, no NAT,
using UDP as transport and session timers of 60 minutes. It‟s clear that the traffic and the system load is
lower in the PBX side without having to directly process the subscriber traffic. If you extend this to
hundreds or thousands (or millions!) of subscribers you‟ll see that the existing system can handle more
subscribers with the same hardware and less PBX/Class5 licenses.
Let’s go Technical
This won‟t be a step-by-step tutorial of deploying a sip:providerCE
system (SPCE) as SBC. We offer
deployment and configuration services as well as training and support contracts for this. Let‟s assume that
you have already read the Handbook of the 2.6 system (the stable version at this point). Although it
describes a Class5 scenario deployment, almost everything needed in order to deploy the SBC scenario is
covered there.
The necessary steps are:
1. Read the Handbook. Really, do it.
2. Install the system
3. Set the networking eaddress in config.yml
4. Create a domain (we‟ll use the IP address as domain in this example)
5. Create an account
6. Create a couple of subscribers
7. Create a peering group with the PBX as gateway and an empty (match everything) peering rule for it.
Let‟s use examples:
Please note that for this deployment we won’t touch the already-in-production system configuration.
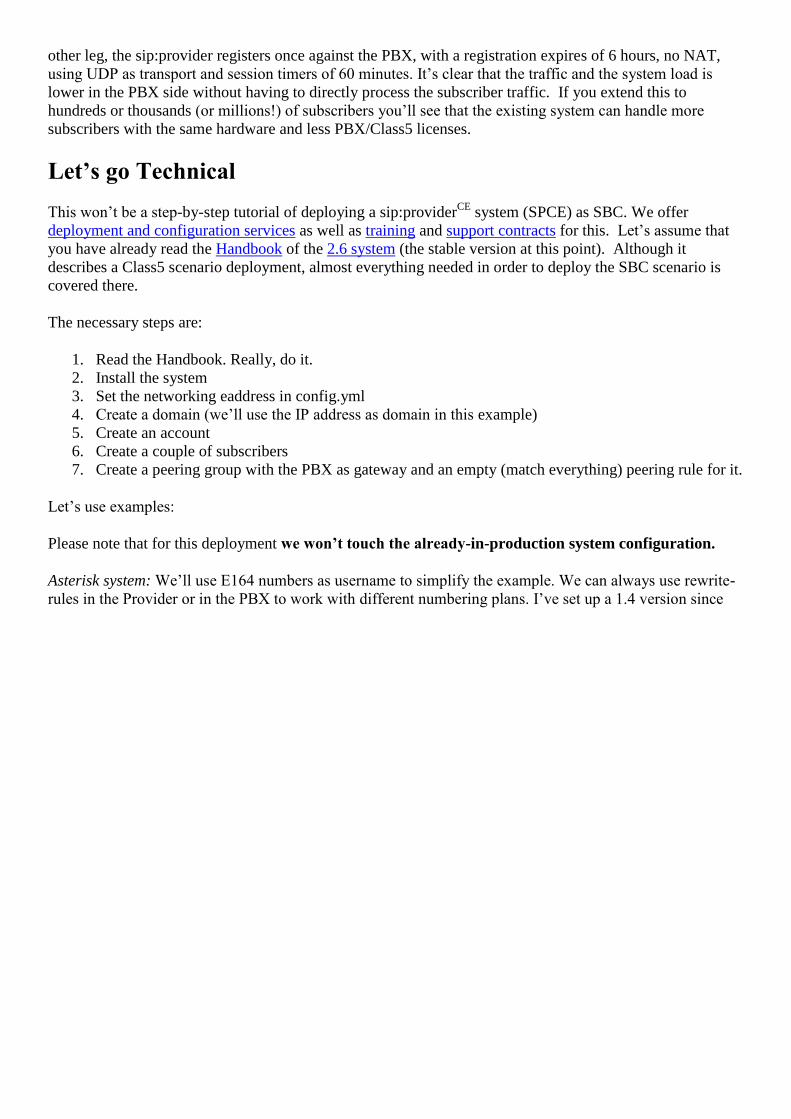
Asterisk system: We‟ll use E164 numbers as username to simplify the example. We can always use rewrite-
rules in the Provider or in the PBX to work with different numbering plans. I‟ve set up a 1.4 version since
it‟s a very common version in production environments. It would work the same way with other versions or
even distributions such as Elastix.
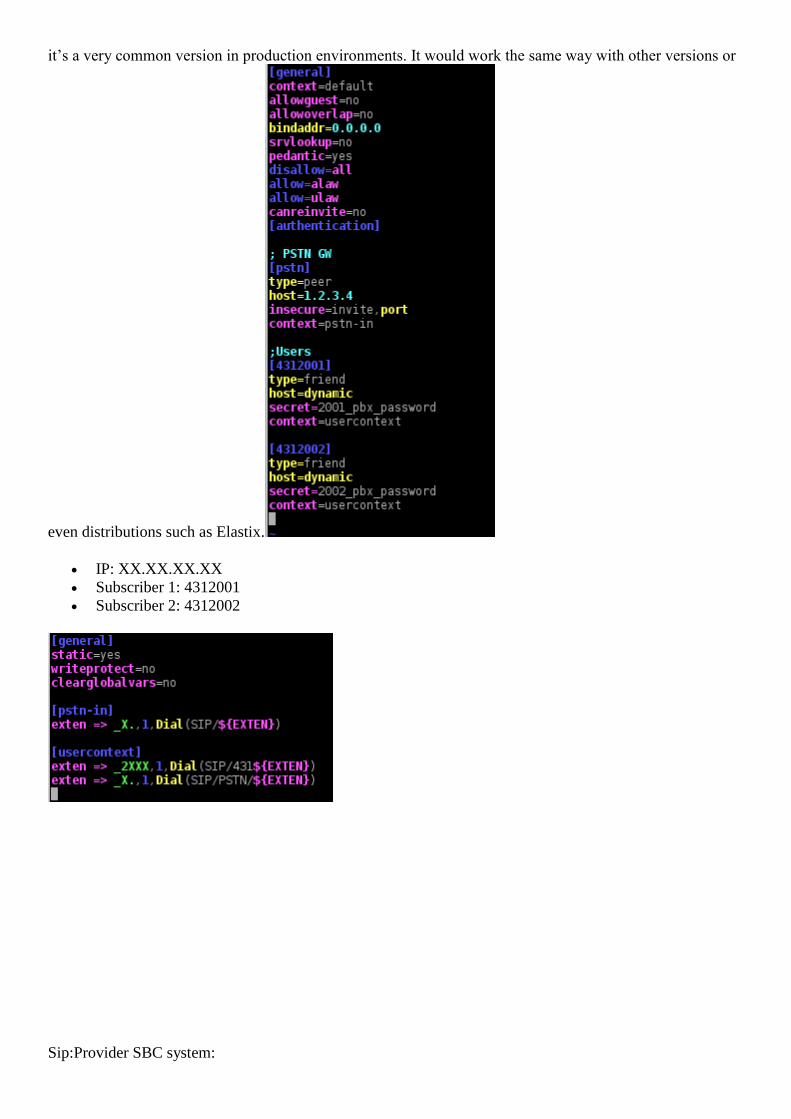
IP: XX.XX.XX.XX
Subscriber 1: 4312001
Subscriber 2: 4312002
Sip:Provider SBC system:
IP: YY.YY:YY.YY
Domain: YY.YY.YY.YY
Subscriber1: Testuser1
Subscriber2: Testuser2
Peer group: Asterisk PBX; Peer gw: XX.XX.XX.XX; Peer rule: Blank
We‟ll make some changes to the low level configuration. We‟ll disable extra services and rating as we are
using the most simple scenario in this example. Other changes like language-, address- and domain-settings
are omitted.
asterisk.voicemail.enable: „no‟
kamailio.proxy.allow_non_numeric_to_pstn: „yes‟
kamailio.proxy.presence.enable: „no‟
networking.eaddress: YY.YY.YY.YY
rateomat.enable: „no‟
sems.conference.enable: „no‟
sems.vsc.enable: „no‟
After modifying the file, apply the changes using the configuration framework: ngcpcfg apply
Now we can deal with the high level configuration settings. As I mentioned before, we‟ll create the
YY.YY.YY.YY domain in the SPCE Admin panel. We‟ll enable some default preferences in this domain
that will be the default for every subscriber. Remember that any domain preference will be overwritten by
the subscriber preference if it is set there as well. For the purpose of this example just one preference is
required: “force_outbound_calls_to_peer“. This setting will force all calls to SPCE subscriber to be routed
to the peer even if the callee is local.
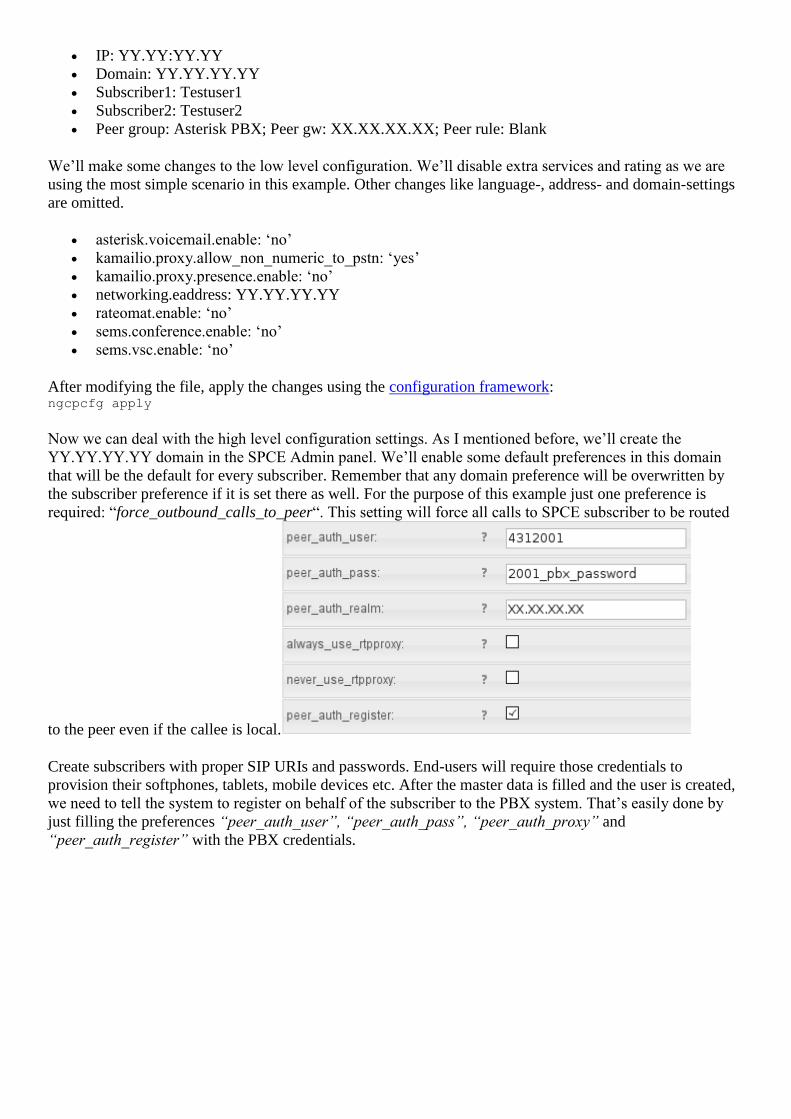
Create subscribers with proper SIP URIs and passwords. End-users will require those credentials to
provision their softphones, tablets, mobile devices etc. After the master data is filled and the user is created,
we need to tell the system to register on behalf of the subscriber to the PBX system. That‟s easily done by
just filling the preferences “peer_auth_user”, “peer_auth_pass”, “peer_auth_proxy” and
“peer_auth_register” with the PBX credentials.

Once the preferences have been saved, the SPCE will automatically send a REGISTER request to the PBX
system:
And that‟s pretty much everything. The PBX will see the subscribers registered exactly as if there was no
SBC in between so no changes need to be made to the configuration. Meanwhile, the SPCE will handle the
attacks, NAT, transport and protocol translation, keepalives etc.
There‟s still some work to do. Enabling REFER to be sent to the PBX (this is disabled by default in the
SPCE) is needed if you put the SPCE in front of a PBX and phones use REFER for call-transfers. It is not
needed in front of Class4 or Class5 switches. To enable that, it requires white-listing the REFER method in
kamailio-proxy and white-listing some headers in the sbc profile.
Questions, Comments and Feedback
If you have any questions regarding the deployment, you can always use our support mailing list or contact
“sales _AT_ sipwise.com” for professional services.
Remember that sip:providerCE
is 100% free. You can install and use it without limitations. So, go and do a
test deployment!
Enjoy!
Discussion
Community
Share
Maurice Madrid • 12 days ago
Excellent! really!! but...where is the other part? hehehe
0
•
Reply
•
Share ›
o
o
o
sipwise Mod Maurice Madrid • 12 days ago
o
o
Part 2 and 3 are linked in the first paragraph. 4 and 5 are not ready yet.
o
o 0
o •
o Reply
o •
o Share ›
Craig • 2 months ago
This is great!!!!!
0
•
Reply
•
Share ›
o
o
o
Craig • 2 months ago
This is great!!!!!
0
•
Reply
•
Share ›
o
o
o
Craig • 2 months ago
This is great!!!!!
0
•
Reply
•
Share ›
o
o
o
als7ly • 4 months ago
hi ,
is this mean that i can develop a desk top software that works and present exactly the features of messengers
like yahoo msn beylexe
0
•
Reply
•
Share ›
o
o
o
Hello • 6 months ago
Thanks a Lot for giving us great prodct
is there anybody one problem can help me to solve.. i cant login the provission
0
•
Reply
•
Share ›
o
o
o
William Ikiabo • 10 months ago
Thanks for this article, I can't wait for the complete series.
Keep on the nice job
0
•
Reply
•
Share ›
o
o
o
William Ikiabo • 10 months ago
Thanks for this article, I can't wait for the complete series.
Keep on the nice job
0
•
Reply
•
Share ›
o
o
o
Ismail • 2 months ago
o
o
Great post, is there a way to make an installation on the ec2 or rackspace cloud?
o
o 0
o •
o Reply
o •
o Share ›
o
sipwise Mod Ismail • 2 months ago
Rackspace should be straight forward, just follow the handbook how to set up a CE on an
ordinary server. Maybe you can even import the vmware image. EC2 is a bit more tricky,
check our mailing list how to use the aaddress setting.
0
•
Reply
•
Share ›
Ismail • 2 months ago
o
o
Great post, is there a way to make an installation on the ec2 or rackspace cloud?
o
o 0
o •
o Reply
o •
o Share ›

Ismail • 2 months ago
o
o
Great post, is there a way to make an installation on the ec2 or rackspace cloud?
o
o 0
o •
o Reply
o •
o Share ›
Jon Bonilla • 2 months ago
o
o
Please, for technical questions, refer to our mailing list.
http://lists.sipwise.com/listi...
o
o 0
o •
o Reply
o •
o Share ›
alex • 2 months ago
o
o
I love the tutorial and was able to set up my server, but I am wondering how i can port forward this
in my router to access this off my LAN. what port does this go through? 1443?
o
o 0
o •
o Reply
o •
o Share ›
alex • 2 months ago
o
o
I love the tutorial and was able to set up my server, but I am wondering how i can port forward this
in my router to access this off my LAN. what port does this go through? 1443?
o
o 0
o •
o Reply
o •
o Share ›
skin whitening product • 4 months ago
o
o
hi!,I love your writing very a lot! share we keep up a correspondence more about your article on
AOL? I require a specialist in this house to solve my problem. Maybe that's you! Having a look
ahead to look you.
o
o 0
o •
o Reply
o •
o Share ›
Mike Telahun • 5 months ago
o
o
I spent a day and a half banging my head against these two issues:
1. When doing the manual provisioning in the jitsi client in the URI field pass=${pass} should read
pass=${password}. Otherwise, when you restart jitsi it will not bring up the username/password
dialog.
2. After I got past the first issue I could make and receive calls fine, but my contacts in the contact-
list were showing as off-line. For some reason jitsi was not passing my sip credentials on to the
presence server. To fix this:
a. Tools -> Options
b. In the Accounts tab select the SIP account it created for you and click the Edit button at the bottom
c. In the Presence tab un-check the "Use SIP Credentials" check box and manually enter your
username and password.
Other than that, Great Work!
o
o 0
o •
o Reply
o •
o Share ›
Mike Telahun • 5 months ago
o
o
I spent a day and a half banging my head against these two issues:
1. When doing the manual provisioning in the jitsi client in the URI field pass=${pass} should read
pass=${password}. Otherwise, when you restart jitsi it will not bring up the username/password
dialog.
2. After I got past the first issue I could make and receive calls fine, but my contacts in the contact-
list were showing as off-line. For some reason jitsi was not passing my sip credentials on to the
presence server. To fix this:
a. Tools -> Options
b. In the Accounts tab select the SIP account it created for you and click the Edit button at the bottom
c. In the Presence tab un-check the "Use SIP Credentials" check box and manually enter your
username and password.
Other than that, Great Work!
Samir Kundu • 14 days ago
o
o
Who do I turn to get help to install and configure , so as
to run VoIP class 5 soft switch?
o
o 0
o •
o Reply
o •
o Share ›
Cal Leeming • 3 months ago
o
o
lol asterisk.
o
o 0
o •
o Reply
o •
o Share ›
Ali Ardestani • 5 months ago
o
o
With this config once the phone on PBX is not answered the SBC keeps retrying and never goes to
voicemail
o
o 0
o •
o Reply
o •
o Share ›
o
Jon Bonilla Ali Ardestani • 4 months ago
You can configure a ringtimeout in your subscriber. For technical questions, please, go to our
mailing list.
0
•
Reply
•
Share ›
Related Documents