Brown Bag Mystery...Use Those Senses! Objectives: 1. Identify their five senses: sight, smell, sound, taste and touch 2. Identify which body part they use for each sense: eyes to see, nose to smell, ears to hear, mouth to taste and hands to touch. 3. Make observations and solve an inquiry using their five senses sight, smell, sound, taste and touch. MCPS Science Standards Met: 1.1; 2.2; 3.5 Season Used: Summer, Fall Time: 40 minutes Grade Level: Kindergarten Materials: ● 6 brown bags ● 6 different fruits and vegetables from the school garden ● Knife and cutting board to cut up fruits and vegetables to sample PreLesson Preparation: ● Put a different fruit or vegetable from the school garden in each brown bag. ACTIVITIES: A) Introduction: Our senses are used to observe, understand and identify the world around us! What are our five main senses? Which body part to we use for each sense? 1. Sight/eyes. 2. Smell/nose. 3. Sound/ears. 4. Taste/mouth. 5. Touch/hands. B) Activity One: Brown Bag Mystery 1. Let’s see if you can get your classmates to guess what’s in these brown bags using your senses as clues! Clues: Each bag contains a different fruit or vegetable found in this garden. Don’t use your sense of sight or taste at this point! You want your classmates to guess what the object is in the bag by describing how it feels and smells. a. Option: as the instructor, give an easy example of how this activity is done by putting your hand in one of the bags and describing the object based on how it feels and smells...Can you guess the fruit or vegetable I’m describing? 2. Ask for a volunteer to put his/her hand in one of the brown bags (without looking in the bag!) and to describe the object...Can your classmates guess the fruit or vegetable 1

Welcome message from author
This document is posted to help you gain knowledge. Please leave a comment to let me know what you think about it! Share it to your friends and learn new things together.
Transcript

Brown Bag Mystery...Use Those Senses! Objectives:
1. Identify their five senses: sight, smell, sound, taste and touch 2. Identify which body part they use for each sense: eyes to see, nose to smell, ears to
hear, mouth to taste and hands to touch. 3. Make observations and solve an inquiry using their five senses sight, smell, sound,
taste and touch. MCPS Science Standards Met: 1.1; 2.2; 3.5 Season Used: Summer, Fall Time: 40 minutes Grade Level: Kindergarten Materials:
6 brown bags 6 different fruits and vegetables from the school garden Knife and cutting board to cut up fruits and vegetables to sample
PreLesson Preparation:
Put a different fruit or vegetable from the school garden in each brown bag. ACTIVITIES: A) Introduction: Our senses are used to observe, understand and identify the world around us! What are our five main senses? Which body part to we use for each sense?
1. Sight/eyes. 2. Smell/nose. 3. Sound/ears. 4. Taste/mouth. 5. Touch/hands.
B) Activity One: Brown Bag Mystery 1. Let’s see if you can get your classmates to guess what’s in these brown bags using your senses as clues! Clues: Each bag contains a different fruit or vegetable found in this garden. Don’t use your sense of sight or taste at this point! You want your classmates to guess what the object is in the bag by describing how it feels and smells.
a. Option: as the instructor, give an easy example of how this activity is done by putting your hand in one of the bags and describing the object based on how it feels and smells...Can you guess the fruit or vegetable I’m describing?
2. Ask for a volunteer to put his/her hand in one of the brown bags (without looking in the bag!) and to describe the object...Can your classmates guess the fruit or vegetable
1

you’re describing? Prompt questions: a. Using your sense of touch, how would you describe the feel of the object? Can you describe the shape? Is it hard or soft? Long or short? Big or little? Smooth or rough? Flat or round? b. Using your sense of smell, can you tell us if the object has a smell? Can you describe the smell? Is the smell sweet? Is the smell familiar?
3. Once the students have guessed the fruit or vegetable, or at least made a couple of guesses, pull it out of the bag. Have the students use their sense of sight to identify the fruit or vegetable. 4. Time to use your sense of taste! Cut up the fruit or vegetable for the students to try. Have them use adjectives to describe what it tastes like...Sweet? Sour? Spicy? Bitter? 5. Ask: Which of our five senses didn’t we use in this activity? Sound.
CONCLUSION:
What are your five senses? Sight, smell, sound, taste and touch. Which body part do you use for each sense? Eyes to see, nose to smell, ears to hear,
mouth to taste and hands to touch. Which fruits and vegetables did we identify and taste in our activity?
2

Garden Magic...Transforming Compost to Soil! Objectives:
1. Learn that compost provides plants with food (a.k.a. nutrients), helping plants to grow. 2. Learn some of the ingredients of a compost. 3. Identify attributes that make worms “living things”. 4. Learn that worms breakdown (a.k.a. “decompose”) compost. 5. Make observations using their sense of touch, smell, sight, and sound; classify identified
objects. MCPS Science Standards Met: 1.1; 3.1; 3.5 Season Used: Spring Time: 40 minutes Grade Level: Kindergarten Materials:
Brown bags, each containing a single compost ingredient: leaves, straw, grass, banana peel, orange peel, coffee grinds
2 large mixing bowls (one is the “compost bowl” in which compost ingredients will be added by the students, the second is the “soil bowl” containing the soil)
Large mixing spoon 1 towel Live or gummy worms White board for writing compost recipe. Compost Recipe: Ingredients: 1 handful dried
leaves, 1 handful straw, 1 pinch grass, 1 banana peel, 1 orange peel, 2 pinches coffee grinds, worms. Directions: Add all dry ingredients to bowl. Stir well. Let sit in a sunny spot for 10 weeks. Spread over garden soil.
PreLesson Preparation:
Write compost recipe on the whiteboard. Put soil in the “soil bowl”. Have the “soil bowl” hidden from the student’s view but within
easy access. During the class activity, you’ll be performing a magic trick (a.k.a. switching out the “compost bowl” for the “soil bowl” while the students have their eyes closed).
Teacher Background: What is compost? Compost is food for plants; when we add it to the soil, plants feed on the nutrients in the compost. These nutrients allow the plants to grow bigger, stronger and healthier. Think of it the same way that the nutrients in the food that we eat help our bodies to grow, repair and maintain itself; compost does the same thing for our plants.
3

Specifically, what is compost made of? Simply put, compost is made up of nonliving, organic matter (such as food scraps, twigs, leaves, grass clippings) that is broken down (a.k.a. decomposed) into smaller bits by living organisms known as “decomposers”. Once the decomposers do their job, the compost will look like very rich, healthy, dark brown soil. ACTIVITIES: A) Introduction: Start by comparing the making of cookies to the making of compost.
1. To cook we combine ingredients to make a recipe. For example, to make chocolate chip cookies we mix ingredients like flour, sugar, eggs, chocolate chips together and then we stick it in the oven to bake. Today, we all get to be cooks but instead of making chocolate chip cookies, we are making food for our plants to eat. 2. Does anyone know what we call food for plants? Compost. This is something we often add to our garden beds before we start planting.
a. Plants are similar to us. They need food to eat just like we need food. They eat some of the same kinds of food as us and some different things. b. Today, we are going to learn what compost is and what it’s made of and how we turn it into soil.
3. Lets begin by putting on our (pretend) aprons and chef hats. B) Activity One: Brown bag activity: guess what’s in the bags.
1. Tell students: each brown bag contains ingredients that we can use to make compost. Read them the “Compost Recipe” so they have an idea of what’s in the bags.
a. Ask for student volunteers to stick their hand in a bag without looking. Describe to the class what it feels like, smells like, and how they’d describe the shape.
1 Once the students guess the ingredient, or after a few guesses, pull it out of bag. Students can use their sense of sight to name the ingredient. 2 Each time an ingredient is pulled out of a bag, have student add it to the empty mixing bowl (this is the “compost bowl”).
b. Have a student mix the ingredients. 1 Who’s ready for a magic trick? We’re going to turn this compost into soil. (If students ask about the worms, say that you want to try this magic trick first without the worms to see what happens and then again with the worms.) 2 Put a towel over the bowl. Have them close their eyes and recite: “One week, two weeks, three weeks, four weeks, five weeks, six weeks, seven weeks, eight weeks, nine weeks, ten weeks. Abracadabra turn this compost into soil!” 3 Have them open their eyes and remove the towel. Show them that nothing has happened to the compost in the “compost bowl”. Oh no, what did we do wrong? Read the recipe ingredients. We forgot the worms! That’s like forgetting the chocolate chips in chocolate chip cookies.
2. Take out some worms. a. Discuss whether worms are living or nonliving. They are living.
1 How do we know they are living? They can breathe. They can grow
4

and change. They need food and water to survive. They can reproduce. b. Add worms to the “compost bowl” and stir.
3. Should we try this magic trick again? a. Put a towel over the bowl. Have them close their eyes. Until this point, the “soil bowl” should be hidden from view; while students have their eyes closed, switch the “compost bowl” for the “soil bowl”. Make sure to hide the “compost bowl” from view. Have them recite: “One week, two weeks, three weeks, four weeks, five weeks, six weeks, seven weeks, eight weeks, nine weeks, ten weeks. Abracadabra turn this compost into soil!” b. Have them open their eyes and remove the towel. c. What did the worms do? They turned the compost into soil!
1 How did the worms do that? They ate the ingredients and pooped out soil. This “poop” we call castings.
4. So, to make compost, we need living organisms, such as worms, to breakdown or eat the nonliving ingredients.
a. This can take months to make. b. Imagine you lived in a house made of food and you had to eat it all. How long do you think it would take you?
5. Now you know the compost recipe. But do WE want to eat the compost? No! With the class, add the “composted” soil to their garden bed or to the spinning composter at the school. We’ll let the plants enjoy the compost.
CONCLUSION:
What is compost? How does it help our plants? What is compost made of? One of the components of compost is worms. Are worms living or nonliving? How do we
know they are living? What do worms do to the compost? Which of our senses did we use today?
CREDIT FOR LESSON ADAPTATION: Parrella, Deborah. "Soil Recipe." Project Seasons: Handson Activities for Discovering the Wonders of the World. Shelburne, VT: Shelburne Farms, 1995. 5960. Print.
5

Plant Detectives Objectives:
1. Use their senses and observation skills to conduct a scientific investigation. 2. Identify the qualities that make plants “living things”. 3. Identify the six main parts of a plant roots, stems, leaves, flowers, fruits and seeds. 4. Learn that plants can vary in color, shape and size, just like people. 5. Learn how to sow seeds and transplant in the garden.
MCPS Science Standards Met: 1.1; 2.2; 3.1 Season Used: Spring Time: 40 minutes Grade Level: Kindergarten Materials:
Magnifying glasses, one for each group A different plant for each group to examine Seeds and transplants Shovels/trowels and watering canisters
PreLesson Preparation:
Have all lesson materials at the ready. ACTIVITIES: A) Introduction: The weather is warming up, which means, we can plant seeds and mature plants in the soil. But first…
1. Tell them: I need your help solving a mystery! We need to figure out what kinds of plants we have amongst us. Let’s put on our (pretend) detective hats.
B) Activity One: Let's revisit our senses! What are our five main senses? Sight, smell, touch, taste, sound. Today, we will be using three of those five senses to examine our plants our sight, touch and smell.
1. Divide students into groups of 34. Give each a magnifying glass and a plant. 2. Have them use the magnifying glasses to look closely at the plant. Pose these questions for them to keep in mind as they do this activity:
a. What describing words would you use to tell others about your plant? b. What does it feel like? Pokey? Soft? Delicate? Hard? Hairy? c. What does it smell like?
3. Circle up again. Tell them to raise a hand if their plant has a quality that I describe, and look around to see if other group’s plants share the same qualities. Questions to ask to hone in their observation skills:
6

a. Does your plant have leaves? b. Does your plant have more than two leaves? Five leaves? Ten leaves? c. Does your plant have round leaves? Oval leaves? Pointy leaves? d. Does your plant have a stem? e. Does your plant have a fuzzy stem? Is it...smooth? Bumpy? Long? Short? f. Does your plant have one or more flowers? g. Does your plant have more than one color? Is it...green? Brown? Yellow? h. ...more questions…
4. Okay Detectives, did anyone notice what sort of qualities all the plants had in common? (Prompt them if need be. Example: Did all the plants have leaves? Stems?...)
a. Conclude that all the plants had roots, stems and leaves. b. Will they all eventually have flowers? Fruits? Seeds? Yes, yes, yes! As they mature, they will eventually develop their flowers, fruits and seeds. c. So, we know all these plants have roots, stems, leaves, flowers, fruits, seeds. d. Do the plant parts song: “Roots, stems, leaves, flowers, fruits and seeds. Fruits and seeds.” (Based off the “Head, shoulder, knees and toes” song.)
5. Now Detectives, what were some differences between the plants we examined? (Prompt them if need be. Example: Did all the plants have fuzzy stems? Were they all the same colors?...)
a. Are all people the same? Look around at your classmates. Are you all the same height? Do you all have the same eye color? Same color hair? b. We notice that plants vary just like people vary. Interesting!
6. What type of fruit or vegetable plant was it that you examined, Detectives? Help them to figure out all the plants by providing them with clues. Example: this plant eventually produces little yellow flowers and fruit that is sometimes red? Tomato plant. 7. Are these plants considered living things? Yes. How do we know? They…
a. Breathe (exchange O2 for CO2) b. Grow and change (turn from a seed into a mature plant) c. Need food and water to survive (roots gather food/water from soil) d. Reproduce (make seeds to make more of themselves)
C) Activity Two: Sow Seeds 1. Have students smooth soil, get rid of big rocks, break up large chunks of soil. 2. Go over depth to plant seeds twice the width of the seed. Plant seeds. 3. What do seeds need to start growing? H2O. Have students water where they planted.
D) Activity Three: Transplant 1. Do a demonstration transplant:
a. First, choose the location in which you want to plant. b. Dig a hole as deep as plant’s soil ball and twice as wide. c. Carefully remove plant from container by squeezing sides of container while upturned in your hand. d. Fill the hole with water. e. Hold plant over hole (stem base plum with top of hole) and fill with soil. f. Pat the soil gently but firmly around the base of the plant’s stem.
7

g. Water the plant. 2. Divide students into groups of 34. Assign roles: digger, waterer, planter.
CONCLUSION: What makes a plant a living thing? What are the six main parts of a plant? Do all plants look alike? What sorts of differences did you observe between plants? Do
all people look the same? What sorts of differences did we notice? How deep do we plant seeds? What are the steps for planting transplants in the garden?
8

Brown Bag Mystery and Sorting...Use Those Senses! Objectives:
1. Identify their five senses: sight, smell, sound, taste and touch. 2. Identify which body part they use for each sense: eyes to see, nose to smell, ears to
hear, mouth to taste and hands to touch. 3. Identify how each sense helps them to observe, understand and identify the world
around them. 4. Make observations and solve an inquiry using their five senses. 5. Sort and classify fruits and vegetables based on color, shape, size, texture and weight.
MCPS Science Standards Met: 1.1; 2.2 Season Used: Summer, Fall Time: 40 minutes Grade Level: 1st Materials:
6 brown bags 6 different fruits and vegetables from the school garden Buckets for sorting fruits and vegetables by particular attributes decided by instructor
(options: sort by color, shape, size, texture, weight…) Knife and cutting board to cut up fruits and vegetables to sample
PreLesson Preparation:
Put a different fruit or vegetable from the school garden in each brown bag. Have buckets, knife and cutting boards at the ready.
ACTIVITIES: A) Introduction: Our senses are used to observe, understand and identify the world around us! What are our five main senses? Which body part to we use for each sense? How does each sense help us?
1. Sight/eyes. Our sense of sight helps us identify and recognize people and objects. 2. Smell/nose. Our sense of smell tells us whether something smells good, bad, sweet, rotten, familiar, new, etc. 3. Sound/ears. Our sense of sound helps us listen and communicate with each other. 4. Taste/mouth. Our sense of taste tells us whether something is tasty, sweet, sour, spicy, salty, bitter, etc. 5. Touch/hands. Our sense of touch helps us identify texture and to feel whether things are soft or hard, smooth or rough, etc.
B) Activity One: Brown Bag Mystery
9

1. Let’s see if you can get your classmates to guess what’s in these brown bags using your senses as clues! Clues: Each bag contains a different fruit or vegetable found in the garden. Don’t use your sense of sight or taste at this point! You want your classmates to guess what the object is in the bag by describing how it feels and smells.
a. Option: as the instructor, give an easy example of how this activity is done by putting your own hand in one of the brown bags and describing the object based on how it feels and smells...Can you guess the fruit or vegetable I’m describing?
2. Ask for a volunteer to put his/her hand in one of the brown bags (without looking in the bag!) and to describe the object...Can your classmates guess the fruit or vegetable you’re describing? Prompt questions:
a. Using your sense of touch, how would you describe the feel of the object? Can you describe the shape? Is it hard or soft? Long or short? Big or little? Smooth or rough? Flat or round? b. Using your sense of smell, can you tell us if the object has a smell? Can you describe the smell? Is the smell sweet? Is the smell familiar?
3. Once the students have guessed the fruit or vegetable, or at least made a couple of guesses, pull it out of the bag. Have the students use their sense of sight to identify the fruit or vegetable. 4. When all the fruits and vegetables in the brown bags have been identified, sort “like” items with “like” items into buckets.
a. Decide on one attribute color, shape, size, texture, weight to have the students sort the fruits and vegetables into. b. Then, have the students sort by a different attribute than the last. For instance: to start, have them sort by color and put “like” colors with “like” colors in the buckets. Next, take all the fruits and vegetables out of the buckets and have them sort “like” shape with “like” shape. c. Ask: what do you notice about the fruits and vegetables when we sort them by a different attribute? They end up in different buckets and associated with different fruits and vegetables depending on the attribute by which they are sorted. Interesting!
5. Time to use your sense of taste! Cut up the fruit or vegetable for the students to try. Have them use adjectives to describe what it tastes like...Sweet? Sour? Spicy? Bitter? 6. Ask: Which of our five senses didn’t we use in these activities? Sound.
CONCLUSION:
What are your five senses? Sight, smell, sound, taste and touch Which body part do you use for each sense? Eyes to see, nose to smell, ears to hear,
mouth to taste and hands to touch. How do your senses help you? They help us observe, understand and identify the world
around us. Which fruits and vegetables did we identify and taste in our activity?
10
Compost Detectives Objectives:
1. Learn that compost provides plants with food (a.k.a. nutrients), helping plants to grow. 2. Sort and classify the ingredients in compost. 3. Identify “living things” in the soil and their basic, survival needs. 4. Learn that some living things are equipped to “decompose” (a.k.a. break down) compost. 5. Make observations using their sense of touch, smell, sight, and sound.
MCPS Science Standards Met: 1.1; 2.2; 3.1 Season Used: Spring Time: 40 minutes Grade Level: 1st Materials:
Containers of compost (one container per group of 3 students, about 8 containers): dried leaves, twigs, straw, pinecone bits, fresh grass, banana peels, orange peels, coffee beans, newspaper, soil
Egg cartons, one for each group Piece of cardboard on which to dump compost mix, one for each group Rakes/shovels/wheelbarrows
PreLesson Preparation:
Fill containers with compost ingredients, one for each group of students. Place work stations around garden beds. Each station needs one container of compost,
one egg carton and one piece of cardboard. Teacher Background: What is compost? Compost is food for plants; when we add it to the soil, plants feed on the nutrients in the compost. These nutrients allow the plants to grow bigger, stronger and healthier. Think of it the same way that the nutrients in the food that we eat help our bodies to grow, repair and maintain itself; compost does the same thing for our plants. Specifically, what is compost made of? Simply put, compost is made up of nonliving, organic matter (such as food scraps, twigs, leaves, grass clippings) that is broken down (a.k.a. decomposed) into smaller bits by living organisms known as “decomposers”. Once the decomposers do their job, the compost will look like very rich, healthy, dark brown soil. ACTIVITIES: A) Introduction: Start by discussing what plants eat. Prompt questions:
11

1. What do plants eat? Food (or nutrients) in the soil. 2. We can add plant food to the soil. What do we call this plant food? Compost. 3. How does compost help plants? It helps them to grow bigger, stronger and healthier.
B) Activity One: We are going to do an activity in which we examine compost. We want to answer these questions: what is compost? What kinds of ingredients go into compost?
1. First, put on your (pretend) detective hats; grab your (pretend) magnifying glasses. 2. Divide students into groups of 3. Assign each group to one workstation that has a container of compost, an egg carton and piece of cardboard.
a. Instruct them to dump the contents of their containers onto cardboard. Tell them to use their keen observation skills to carefully look through the compost and sort “like” items with “like” items into the egg carton
1 What does it mean to “sort like items with like items”? 3. After students have had some time to sort, gather the groups and discuss their finds. Types of questions to ask to hone in their observation skills:
a. What different color items did you find? b. What different shaped items did you find? c. What different size items did you find? d. Did you find items with different textures? Describe. e. Specifically, what items did you find? f. What was the most surprising item(s) you found in your compost?
4. After a few months, compost breaks down and starts to look like soil. Once this happens, we add the compost to the soil in our garden beds. Let’s take a few minutes to once again use our keen observation skills to examine the soil. Have the students dig in the garden bed soil for a few minutes. Discuss as a group what they found.
a. Did any groups find any living things in the soil? If so, what? What living thing do we often find underground? Worms, centipedes, millipedes... b. Even underground, all living things have basic survival needs. What are these needs? Food, water, air, shelter and energy. c. Why is it important to have living things, such as worms, in our soil and compost? What do they do? They eat the organic matter (leaves, grass, straw, food scraps, etc.) and poop it out. We call this poop “castings”. Castings are rich in nutrients that the plants then eat and use as energy to grow.
5. Now that we’ve talked about what compost is and how it’s made, let’s take a look at what fully decomposed compost looks like after it’s been broken down by decomposers. Then, let’s add it to the garden beds!
C) Activity Two: Spread compost on garden beds. 1. Cover rules of using shovels/rakes. 2. Demonstrate how to use shovels/rakes for the purpose of composting. 3. Divide students into two groups. Have half the group shovel/till compost into garden beds, have the other half raking/smoothing the compost into the garden beds.
CONCLUSION:
What kinds of things do we find in compost and in the soil?
12

What does compost do for plants? What are some living things we find in the soil? What do all living things need to survive? What do worms do to compost? What does it mean to sort items?
13

Name That Seed! Objectives:
1. Use their observation skills to conduct a scientific investigation. 2. Identify, sort and classify seeds based on color, shape, size and texture. 3. Learn that seeds can vary in color, shape, size and texture (just like plants and people!). 4. Learn how to sow seeds and transplant in the garden.
MCPS Science Standards Met: 1.1; 2.2 Season Used: Spring Time: 40 minutes Grade Level: 1st Materials:
Bags of seeds jumbled together, one for each group of 34 students (seeds: beans, corn, pumpkin, beets, sunflowers, carrots)
Magnifying glasses, one for each group Clues for each type of seed Seeds and transplants Shovels/trowels and watering canisters
PreLesson Preparation:
Separate seeds into ziplock bags. Write up clues for each type of seed for students to guess.
ACTIVITIES: A) Introduction: With our soil full of compost, we can finally start planting seeds and mature plants. Before we can plant seeds…
1. Tell them: I need your help! My dog Squirt got into some mischief. He thought the seeds were food. He ate through the seed packets and scattered them everywhere! Oh no! Can you help me? Put on your (pretend) detective hats!
B) Activity One: Sort the seeds! 1. Divide students into groups of 34. Give each group a bag of jumbled seeds and magnifying glasses. Seeds in bag: beans, corn, pumpkin, beets, sunflowers, carrots. 2. Provide clues (color, shape, size, texture) for each type of seed and have them locate the seed in their bags. Have them raise their hands when they find the seed and go around and check they have the correct one.
a. Bean seeds are… b. Corn seeds are… c. Pumpkin seeds are…
14

d. Beet seeds are… e. Sunflower seeds are… f. Carrot seeds are…
3. Okay Detectives, let’s think about what we’ve noticed about all these seeds. Prompt them with questions:
a. Do all seeds look alike? Same size? Same shape? Same color? Same texture? Nope! b. Do all plants look alike? Nope! Then, that makes sense that all the seeds didn’t look the same. c. Do all people look the same? Look around at your classmates. Are you all the same height? Do you all have the same eye color? Same color hair? Nope! d. We notice that seeds, plants and people all vary. Interesting!
4. Well, Detectives, thanks for helping me figure out which seeds were which. I’ll be more careful next time to not let Squirt get into my seeds! Hopefully he won’t have plants growing in his tummy now!
C) Activity Two: Sow Seeds 1. Have students smooth soil, get rid of big rocks, break up large chunks of soil. 2. Go over depth to plant seeds twice the width of the seed. Plant seeds. 3. What do seeds need to start growing? H2O. Have students water where they planted.
D) Activity Three: Transplant 1. Do a demonstration transplant:
a. First, choose the location in which you want to plant. b. Dig a hole as deep as plant’s soil ball and twice as wide. c. Carefully remove plant from container by squeezing sides of container while upturned in your hand. d. Fill the hole with water. e. Hold plant over hole (stem base plum with top of hole) and fill with soil. f. Pat the soil gently but firmly around the base of the plant’s stem. g. Water the plant.
2. Divide students into groups of 34. Assign roles: digger, waterer, planter. CONCLUSION:
What did you learn today about seeds? Do all seeds look alike? How did the seeds vary in color, shape, size and texture? Do plants and people vary, the same as seeds? How deep do we plant seeds? What are the steps for planting transplants in the garden?
15

Brown Bag Mystery and Sorting Plant Parts...Use Those Senses! Objectives:
1. Identify their five senses and body part associated with each sense: sight/eyes, sound/ears, smell/nose, taste/mouth and touch/hands.
2. Make observations and solve an inquiry using their five senses. 3. Name the six main plant parts roots, stems, leaves, flowers, fruits and seeds. 4. Compare and contrast fruits and vegetables based on which plant part they are and
what attributes those plant parts share. MCPS Science Standards Met: 2.2; 3.5 Season Used: Summer, Fall Time: 60 minutes Grade Level: 2nd Materials:
6 brown bags 6 different fruits and vegetables from the school garden 6 buckets for sorting fruits and vegetables by plant parts Knife and cutting board to cut up fruits and vegetables to sample
PreLesson Preparation:
Put a different fruit or vegetable from the school garden in each brown bag. Label each bucket with one of the six main plant parts “roots,” “stems,” “leaves,”
“flowers,” “fruits” and “seeds.” Have buckets, knife and cutting board at the ready.
ACTIVITIES: A) Introduction: Let’s talk senses!
1. What are our five main senses and which body part do we use for each sense? Sight/eyes, sound/ears, smell/nose, taste/mouth and touch/hands.
B) Activity One: Brown Bag Mystery 1. Let’s see if you can get your classmates to guess what’s in these bags using your senses as clues! Clues: Each bag contains a different fruit or vegetable found in this garden. Don’t use your sense of sight or taste at this point! You want your classmates to guess what the object in the bag is by describing how it feels and smells. 2. Ask for a volunteer to put his/her hand in one of the brown bags (without looking in the bag!) and to describe the object...Can your classmates guess the fruit or vegetable you’re describing? Prompt questions:
a. Using your sense of touch, how would you describe the feel of the object?
16
Can you describe the shape? Is it hard or soft? Long or short? Big or little? Smooth or rough? Flat or round? b. Using your sense of smell, can you tell us if the object has a smell? Can you describe the smell? Is the smell sweet? Is the smell familiar?
3. Once the students have guessed the fruit or vegetable, or at least made a couple of guesses, pull it out of the bag. Have the students use their sense of sight to identify the fruit or vegetable. 4. When all the fruits and vegetables in the brown bags have been identified, start the next activity by reviewing the six main plant parts roots, stems, leaves, flowers, fruits and seeds.
a. Once the plant parts have been reviewed, have the students sort the fruits and vegetables from the bags into the buckets by plant part. (Examples: a tomato would go into the bucket labeled “fruits,” a carrot would go in the bucket labeled “root,” kale would go into the bucket labeled “leaf,” etc.) b. Use this as an opportunity to talk about “oddball” fruits and vegetables. Who knew that potatoes were actually enlarged stems? Who knew that the onion bulb was actually the leaves? Who knew that broccoli was an immature flower? c. If time allows, ask if they can come up with any other examples of roots, stems, leaves, flowers, fruits or seeds that we eat and could sort into the various buckets. d. Once all the fruits and vegetables have been sorted, talk about the attributes that the fruits and vegetables share within each bucket. (For example: all the roots are hard to the touch.)
5. Time to use your sense of taste! Cut up the fruit or vegetable for the students to try. Have them use adjectives to describe what it tastes like...Sweet? Sour? Spicy? Bitter? 6. Ask: which of our five senses didn’t we use in these activities? Sound.
CONCLUSION:
What are your five main senses and which body part do you use for each sense: Sight/eyes, sound/ears, smell/nose, taste/mouth and touch/hands.
What are the six main plant parts? Roots, stems, leaves, flowers, fruits and seeds. What examples of fruits or vegetables did we come up with for each plant part? What attributes did all the roots share? What about the stems? Leaves? Flowers?
Fruits? Seeds?
17

Weather, Seasons and Food Preservation Objectives:
1. Able to compare and contrast the seasons and identify specific characteristics of each. 2. Identify ways in which we change our behaviors to adapt to different seasons. 3. Learn that most fruits/vegetables in our gardens can’t survive winter due to less
sunshine, cooler temperatures, and freezing ground water. 4. Learn what “preserve” means, why we preserve food, and some methods for preserving:
freeze, dry, can/pickle and store (in cool, dry, dark place). 5. Sort fruits/vegetables into buckets according to best or most common food preservation
method; identify similarities and differences of the produce within and between the buckets.
MCPS Science Standards Met: 2.2; 3.5; 4.4; 4.5 Season Used: Summer, Fall Time: 60 minutes Grade Level: 2nd Materials:
4 buckets A variety of fruits and vegetables to sort into buckets (potato, tomato, cucumber, grapes,
apple, berries, herbs, carrot, beet, kale, bean, pepper, onion, squash) Examples of different food preservation items, examples: tomato sauce, bag of raisins,
jar of pickles, jar of dried herbs PreLesson Preparation:
Label buckets: “freeze,” “can/pickle,” “dry,” “store (in cool, dry, dark place).” Have a variety of fruits and vegetables, as well as food preservation items at the ready.
ACTIVITIES: A) Introduction: Let’s talk weather and seasons! Here are some prompts to get you going:
1. Which season are we in currently? Who can name Montana’s seasons, starting with the season we are in right now? [Fall, winter, spring, summer] 2. What is the weather like today compared to the last few weeks? Spend some time talking about the changes in weather and how the seasons differ in weather. Prompt questions: Is there more sun or less sun in the winter? In which season do we get the most rain? Snow? In which season do the majority of plants start to grow? 3. Ask the students to reflect on how their behavior changes in summer versus winter. Prompt questions: How do you dress differently? How do you eat differently? How do your activities change with the seasons?
18
4. What often happens to water in the winter? It freezes. Can most of the fruits and vegetables that grow in the garden survive the winter if the ground is frozen? No. Why? Their roots can’t access the food and water in the soil if it’s frozen. 5. What does this drop in temperature and change in seasons mean for our fruits and vegetables that we grow in our gardens? We either have to eat them before they die and go bad OR preserve them.
a. What does the word “preserve” mean? It means to save or maintain something in its original state. b. Can you think of some examples of things we might preserve? Brainstorm some examples with the class.
6. What are some ways we might preserve the fruits and vegetables from our gardens? We might freeze them, can/pickle them, dry them, or store them (in a cool, dry, dark place). Let’s explore these methods in more depth by doing an activity…
B) Activity One: Food Preservation Methods Sorting Fruits and Vegetables 1. First off, let’s start with the food preservation method of storing fruits and vegetables in a cool, dry, dark place. We’ll sort some of the fruits and vegetables into the bucket labeled “store (in cool, dry, dark place).”
a. This is the simplest method for preserving fruits/vegetables; as long as they are stored properly (in a cool, dry, dark place), they can last for months! b. Can you think of a place in your home that is cool, dry, and dark where you’d want to store fruits/vegetables? (Basement, garage, food pantry…) c. Some fruits and vegetables cannot be stored nearly as long as others. Those that store well have harder skins, less water, and aren’t squishy. d. Take a look at the fruits/vegetables displayed in front of you on the ground. Which of the fruits/vegetables you see can be stored? Have students put those fruits/vegetables in the “store” bucket. (Examples: potato, carrot, beet, apple, onion, squash) d. All the vegetables in the “store” bucket we call “root vegetables”. What are root vegetables? The part of the plant that we eat that grows underground or right on the surface. They store the best, as long as they are stored properly (in a cool, dry, dark place).
2. The other ways in which we might preserve food are by freezing, canning/pickling or drying them. Here’s how you preserve by those methods:
a. To freeze: we may have to blanch or chop them up, put them in special freezer bags, and stick them in the freezer. b. To can or pickle: we put them in cans or jars, often with other ingredients. Pickling requires adding: vinegar, salt, sugar, and herbs along with the vegetable. c. To dry: we often slice them and let them dry in the sun or in a dehydrator.
3. Into which bucket would YOU sort the rest of the fruits and vegetables? Think of things you have in your cupboards/pantries at home and items you’ve seen on the shelves in the grocery store. Have students sort the produce into the buckets based on which method for preserving they think is best, or most common, for that fruit or vegetable. *Note: fruits/vegetables can fall into more than one category!!
19

Apples: dry; freeze; can as jam; store Basil: dry into herb Beans: freeze; can/pickle Beets: can/pickle; store Carrots: store, freeze; pickle Cucumbers: pickle Dill: dry as herb Grapes: dry into raisins; freeze; can as jam Kale: freeze Kohlrabi: pickle, store Mint: dry as herb Onions: store Peppers: dry Plums: dried into prunes; freeze; can as jam Potatoes: store Raspberries: dry; freeze; can as jam Spinach: freeze Squash: freeze; can into sauce; store Strawberries: dry; freeze; can as jam Tomatoes: dry; freeze; can as pizza sauce or whole/diced tomatoes
4. Let’s use our critical thinking skills and observations to discuss the following questions: Do you notice any similarities between the fruits and vegetables within each bucket? Do you notice differences between the buckets? Discuss these similarities and differences. Discuss why there may be similarities and differences within and between the contents of the buckets.
CONCLUSION:
What are our four seasons? What are some ways in which they differ from each other? What are some examples of ways we change our behaviors according to the season? Why can’t most fruits/vegetables in our gardens survive the winter? What does “preserve” mean? Why do we preserve our food? What are some methods by which we preserve our food? Can you name an example of
a fruit/vegetable we preserve by each method?
20

Space Travelers from Planet Zog! Objectives:
1. Participate in a scientific inquiry to answer the question “what is soil?”. 2. Explore, identify, sort and record the components of soil and compost. 3. Learn that rocks break down and become a major component of soil over time. 4. Identify some of the ingredients that make up compost. 5. Learn that compost is added to soil to help plants grow bigger, stronger and healthier. 6. Learn that soil takes a long time to make through a process called “weatherization”. 7. Learn that decomposers are essential in breaking down compost into soil. 8. Name, identify proper use and use garden tools, such as rakes and shovels.
MCPS Science Standards Met: 1.1; 2.1; 2.2; 2.6; 4.2 Season Used: Spring Time: 60 minutes Grade Level: 2nd Materials:
Need containers filled with compost ingredients (one for each group of 3 students, about 8 containers/class): soil, twigs, straw, pieces of pinecone, dried leaves, grass, pieces of banana peel, pieces of orange peel, coffee beans, lots of small rocks
Egg cartons, one for each group Magnifying glasses, one for each group Clipboard/paper/pencil, one for each group Rakes/shovels/wheelbarrows
PreLesson Preparation:
Fill containers with compost ingredients, one for each group of students. Place work stations around garden beds. Each station needs one egg carton, one
magnifying glass and one clipboard/paper/pencil. ACTIVITIES: A) Introduction: Start by asking students to close their eyes and read in your most alien voice:
Imagine that we are scientists from the planet Zog...We, the people of Zog, are growing tired of raiding other planets for food, and want to find out how to grow our own food. Our astronomers have detected a faraway planet called “Earth” where these strange creatures called “people” live and grow weird things called “fruits” and “vegetables” that come in all different shapes, colors, textures, smells and tastes. Our computers have analyzed the reason for this and it appears to be a combination of sun, water, air and a dark brown substance called “soil”. On Zog we have plenty of sun, water, and air, but no
21

soil. It is difficult for us to believe that all their food comes from this soil substance. Our mission as scientists is to dissect this mystery soil substance in this place called a garden where food is grown, and record every ingredient for our computer. This will allow us to learn how to make soil for our gardens back on planet Zog. Remember: it’s crucial to the success of our mission that every substance found in the garden soil be recorded. Good luck to you. Long Live Planet Zog! [Adapted from “Space Travelers”]
B) Activity One: Dissect soil. Okay fellow scientist aliens, let’s dissect the soil so we may answer the question “what is soil?”. If we can answer this, we will know what kinds of materials we need to bring with us back to planet Zog in order to make soil, and therefore, grow our own fruits and vegetables!
1. Divide students into groups of 3. Assign each group to one work station. a. Tell them to use their super powerful observation skills (and the magnifying glasses) to look through the soil. Record living and nonliving things found. b. Have them sort “like” items they find in the soil into the egg carton and take turns recording their finds on paper (have them write down objects found and tally how many of those objects they find).
1 What does it mean to “sort like items with like items”? 2. After a specified amount of time, have them gather up for a discussion. Types of questions to ask:
a. What did you find in the soil? Have each group name a few items they found. b. What in the soil did you find the most of? Have each group name the object that appeared most in their finds. c. Did you find a lot of rocks? Why is that? Rocks are crushed and become part of the soil. d. What is soil exactly? Soil largely consists of broken down rocks, combined with other nonliving and living matter.
C) Activity Two: Dissect compost. It turns out, scientist aliens, that these beings called “people” add something to their soil that helps their “fruit” and “vegetable” plants to grow bigger, stronger and healthier. We have samples of this stuff they call “compost”. Let’s figure out what it is...
1. Have students regroup. Give each group a container of compost to look through. a. Tell them they need to use their super powerful observation skills again to sort through the compost.
2. After a specified amount of time, have them gather up for a discussion. Prompt questions:
a. What did you find in the compost? Have groups name two different items. b. What needs to happen to the compost before it can be added to the soil? It needs to be broken down or decomposed. c. What does compost look like once it is decomposed? Soil. d. Who or what breaks down compost into soil? Living things called “decomposers”. They eat the compost material and poop it out. This poop is known as “castings”. What are some examples of decomposers? Worms, centipedes, millipedes, bacteria, fungi...
3. Wow! We can grow plants on planet Zog by simply making soil, and then, adding
22

compost and living things? *D) Activity Three: Make soil. Let’s practice making soil for our gardens back on planet Zog!
1. Have the students regroup. Give them a few minutes to try to break down the rocks into as small of pieces as they can by rubbing them together. 2. Have them gather up and discuss results. Prompt questions:
a. Is it easy to make soil? b. Is it easy to grind rocks into soil? No. It takes a lot of time and weathering (a.k.a. breaking down by Earth’s natural forces wind, rain, etc.). In fact, to make one inch of soil takes about 100 years to form by weatherization.
3. Will it be easy to make soil and compost on planet Zog? No. We would need to fill our spaceships with a lot of materials to make soil and compost on planet Zog! Not to mention, we would need a lot of decomposers to break down the soil and compost. Perhaps we should think about settling here on Earth...What do you think?
E) Activity Four: Spread compost on garden beds. 1. Cover rules of using shovels/rakes. 2. Demonstrate how to use shovels/rakes for the purpose of composting. 3. Divide students into two groups. Have half the group shovel/till compost into garden beds, have the other half raking/smoothing the compost into the garden beds.
CONCLUSION: After a long time, what do rocks eventually become? How long can it take for rocks to
break down into one inch of soil? What else composes soil? What sorts of things do we find in compost? Why do we add compost to our soil? What kinds of living things do we often find in soil and compost? What do they do to the
compost? What is the proper use and handling of the garden tools we used to spread compost in
the soil? CREDIT FOR LESSON ADAPTATION: Jaffe, Roberta. "Space Travelers." The Growing Classroom: GardenBased Science. South Burlington, VT: National Gardening Association, 2007. 8182. Print.
23

Exploring Companion Planting Objectives:
1. Identify ways in which plants and animals are similar. 2. Learn that companion plants are plants that help and benefit each other when planted in
close proximity. 3. Learn some ways in which companion plants benefit each other. 4. Use deductive reasoning to match companion plants by their characteristics. 5. Identify visible plant parts of transplants. 6. Learn how to properly sow seeds and transplant in the garden, using garden tools.
MCPS Science Standards Met: 2.6; 3.5 Season Used: Spring Time: 40 minutes Grade Level: 2nd Materials:
Companion plant cards each card should have a picture of the plant, as well as a description of its companion plant
White board and marker Seeds and transplants Shovels/trowels and watering canisters
PreLesson Preparation:
Make companion plant cards. On white board, make two columns of randomly ordered companion matches to be
matched later in the lesson by the students. Teacher Background: What are companion plants? They are plants that, when planted close together, benefit each other in some way. Some examples of how companion plants can benefit each other: One plant may draw an element such as nitrogen out of the air, benefitting its companion plant by helping it to grow. One plant may deter pests by releasing a chemical that would otherwise harm its companion plant. One plant may attract beneficial bugs to the garden that pollinate its companion plant or that eat the pesky bugs. One plant may actually improve the flavor and taste of its companion plant. The companion plants may grow at different speeds, so they take up nutrients from the soil at different times which means they aren’t competing for resources. ACTIVITIES: A) Introduction: Let's delve a little deeper into the plant world.
24

1. Discuss with the class how people differ and how plants differ. Prompt questions: a. Do all people look the same? b. Do all people have the same personalities? What are some different personality types? Quiet, shy, introvert, social, outgoing... c. Do all animals, including people, always get along with each other? d. Do all plants look the same? Does a tomato and carrot plant look the same? e. Do plants have different personalities? Yes. Let’s explore this question more...
2. The same that there is diversity in people’s personalities and with whom they get along, there’s also variation in which plants do and don’t “get along”. Provide examples:
a. Some plants are shy, don’t like crowds, prefer to be alone, while some are more social, like to be part of a community and be around others. b. For example, peas are finicky and a bit stuck up they aren’t fond of onions because they can’t stand onions’ smell. Lettuce, on the other hand, is very friendly and willing to be planted next to any other plant (including smelly onion!).
3. We call people that get along well “companions”. Likewise, we call plants that get along well with others “companion plants”. This not only means they get along well and like being planted close by each other, but they help and benefit each other (they have a give and take relationship). Provide example:
a. Who has heard of “The Three Sisters” companion plants? The Three Sisters are corn, beans and squash. Planted right next to each other, they help each other. For instance, the stalk of the corn provides a trellis for the bean plants to climb; the beans add a nutrient called “Nitrogen” into the soil that helps the corn and squash to grow; the big, prickly leaves of the squash plant shade out weeds and deter predators.
4. Let’s explore other types of companion plants with an activity… B) Activity One: Who’s your companion?
1. Pass out one card to each group of 34 students (making sure there’s an even number of groups and correct matches are distributed). Groups will read their cards. The cards have a picture of the plant, as well as a description of the companion plant. 2. As a class, go around the circle and have each group read their card out loud. Then, as a class, match the companion plants that go together while marking the matches on the whiteboard. Have matches stand together. 3. Once all the companion plants have been united, discuss the different pairings:
a. How do the companion plants benefit each other? Go through some specific examples of companion plants that benefit each other:
1 Tomatoes and basil: Basil is a type of “herb” often added to Italian food. Basil improves the flavor of tomatoes and deters pests, such as mosquitoes and flies, from coming too close and eating the tomatoes. 2 Beets and kohlrabi: Beets grow underground, thus using up nutrients further below the surface. Kohlrabi grows on the surface of the soil, thus using more nutrients on and just below the surface. 3 Carrots and chives: Carrots attract beneficial insects to garden, such as ladybugs and spiders, that eat pests. Chives repel carrot rust flies and
25

improves growth and flavor of carrots. 4 Kale and Onion: Onions deter aphids with their smell. Aphids love to eat kale leaves. 5 Radishes and lettuce: Both grow at about the same speed and mature at about the same time, so neither shades out the other. 6 Zucchini and corn: Zucchini leaves shade out weeds and helps corn retain moisture in its roots. Corn provides zucchini with a stalk to climb up. 7 Cauliflower and mint: Mint deters certain pests with its strong odor and attracts earthworms. 8 Beans and sunflowers: Beans are a nitrogen fixer in the soil. Sunflowers attract beneficial bugs and birds to the garden that will pollinate other plants and eat pesky bugs. 9 Potatoes and marigolds: Marigolds repel pests and deer.
C) Activity Two: Transplant 1. Do a demonstration transplant:
a. First, choose the location in which you want to plant. b. Dig a hole as deep as plant’s soil ball and twice as wide. c. Carefully remove plant from container by squeezing sides of container while upturned in your hand. d. Fill the hole with water. e. Hold plant over hole (stem base plum with top of hole) and fill with soil. f. Pat the soil gently but firmly around the base of the plant’s stem. g. Water the plant.
D) Activity Three: Sow Seeds 1. Have students smooth soil, get rid of big rocks, break up large chunks of soil. 2. Go over depth to plant seeds twice the width of the seed. Plant seeds. 3. What do seeds need to start growing? H2O. Have students water where they planted. 2. Talk about the plant parts of the transplants. Which plant parts have formed? What will form later on as the plant matures? What part of the plant do we eat? 3. Divide students into groups of 34. Assign roles: digger, waterer, planter.
CONCLUSION:
What are some ways in which plants and people are similar? What are “companion plants”? Specifically, what are some ways in which companion plants benefit each other? How deep do we plant seeds? What are the steps for planting transplants in the garden?
REFERENCE FOR COMPANION PLANTING: Israel, Sarah. "An InDepth Companion Planting Guide." Mother Earth News. Ogden Publications, Inc., May 1981. Web. 28 Jan. 2016.
26

Companion Planting Cards
Beet My companion is a funny looking vegetable! It grows on the surface of the soil. It is white or light green with dark green leaves. The part we eat is round will long stems sticking straight up.
Kohlrabi My companion is a round root vegetable. It grows underground. It has long, red stems and green leaves. We eat the root that is usually red or candycane striped.
Kale My companion has a strong smell and spicy taste. It has many layers which are actually the leaves. We eat the circular bulb that can be white, yellow or purple.
Onion My companion grows tall. It has light green stems and dark green leaves. We eat the leaves of my companion. Its leaves can be curly or like dinosaur skin.
27

Carrot My companion looks similar to grass. It has a strong smell, similar to onions. We eat the leaves of my companion. It grows little purple flowers.
Chive My companion is a long root vegetable. It grows underground. It is often orange but can also be purple, red, yellow or white. It has long stems and soft, feathery leaves.
Radish
My companion has leaves that are big and crinkly around the edges. We eat the leaves of my companion. It can often be found in a salad. Its leaves are usually green or red and grows in a head.
Lettuce My companion is a small, round root vegetable. It grows underground. It is red and white. It has green stems and leaves. We eat the root of this plant. It can be spicy!
28
Zucchini
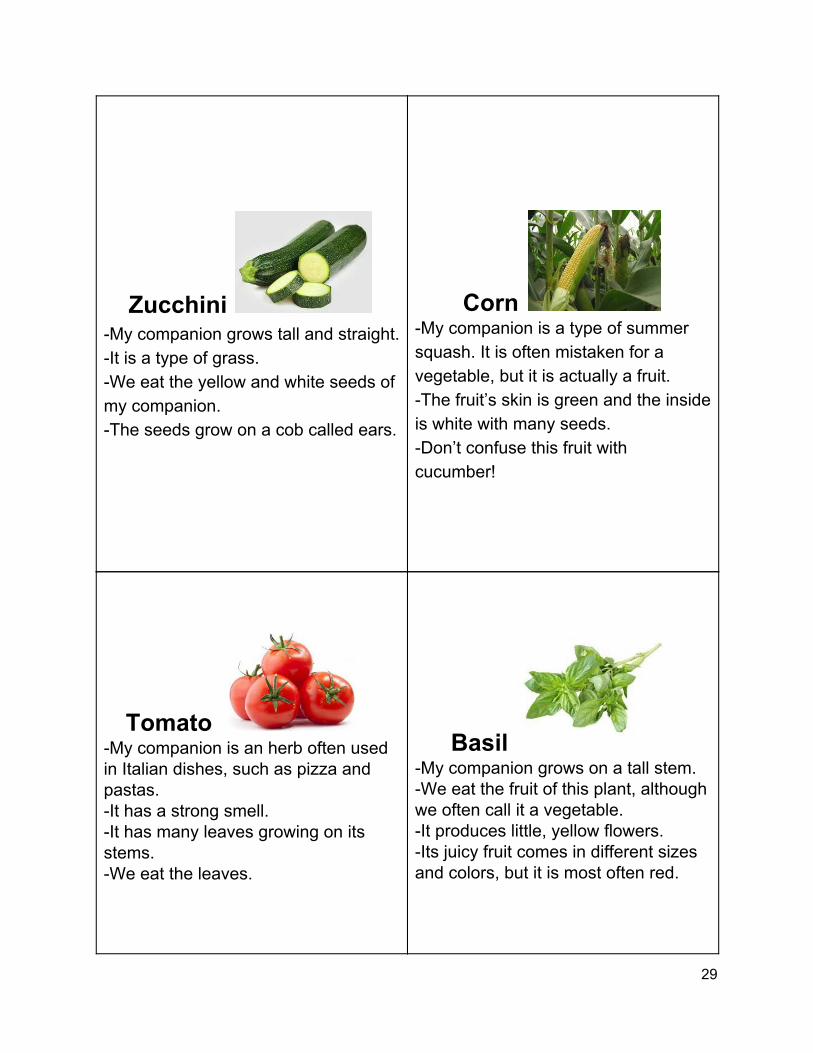
My companion grows tall and straight. It is a type of grass. We eat the yellow and white seeds of my companion. The seeds grow on a cob called ears.
Corn My companion is a type of summer squash. It is often mistaken for a vegetable, but it is actually a fruit. The fruit’s skin is green and the inside is white with many seeds. Don’t confuse this fruit with cucumber!
Tomato My companion is an herb often used in Italian dishes, such as pizza and pastas. It has a strong smell. It has many leaves growing on its stems. We eat the leaves.
Basil My companion grows on a tall stem. We eat the fruit of this plant, although we often call it a vegetable. It produces little, yellow flowers. Its juicy fruit comes in different sizes and colors, but it is most often red.
29

Bean My companion is a type of flower. It can grower taller than a person! It has a yellow petals and black seeds. Its face always follows the sun. Birds and people love to eat the seeds.
Sunflower My companion grows on a climbing vine. A famous fairy tale says the seeds of this plant are magical! Its seeds grow in pods. We eat the green, crunchy pods and seeds.
Potato My companion is a flower. It grows low to the ground. It has a lot of little yellow or orange flower petals and lots of leaves. We can eat this type of flower, but deer don’t like it.
Marigold My companion is usually white and has a mild taste. It can also be gold or red. We eat the part that grows underground. If it turns green it can be poisonous! We eat these baked, mashed, and turned into chips.
30

Cauliflower My companion has lots of stems and little, green leaves. It has a strong smell that makes your breath fresh. It is often used to flavor toothpaste. Its leaves are crinkly and soft.
Mint
My companion is a vegetable and the part we eat looks like a small tree. Although you might not know this, it is a white flower related to broccoli. We often eat it steamed with butter or cheese.
31

32

Weather, Seasons and Food Preservation Objectives:
1. Able to compare and contrast the seasons and identify specific characteristics of each. 2. Identify ways in which we change our behaviors to adapt to different seasons. 3. Recognize that most fruits/vegetables in our gardens can’t survive winter in part because
the plant roots can’t access the ground water and nutrients (food) in the soil when they’re frozen.
4. Learn what “preserve” means, why we preserve food, and some methods for preserving: freeze, dry, can/pickle and store (in cool, dry, dark place).
5. Sort fruits/vegetables into buckets according to best or most common food preservation method; identify similarities and differences of the produce within and between the buckets.
MCPS Science Standards Met: 3.1; 3.5; 4.4; 4.5 Season Used: Summer, Fall Time: 60 minutes Grade Level: 3rd Materials:
4 buckets A variety of fruits and vegetables to sort into buckets (potato, tomato, cucumber, grapes,
apple, berries, herbs, carrot, beet, kale, bean, pepper, onion, squash) Examples of different food preservation items, examples: tomato sauce, bag of raisins,
jar of pickles, jar of dried herbs PreLesson Preparation:
Label buckets: “freeze,” “can/pickle,” “dry,” “store (in cool, dry, dark place).” Have a variety of fruits and vegetables, as well as food preservation items at the ready.
ACTIVITIES: A) Introduction: Let’s talk weather and seasons! Here are some prompts to get you going:
1. Which season are we in currently? Who can name Montana’s seasons, starting with the season we are in right now? [Fall, winter, spring, summer] 2. What is the weather like today compared to the last few weeks? Spend some time talking about the changes in weather and how the seasons differ in weather. Prompt questions: Is there more sun or less sun in the winter? In which season do we get the most rain? Snow? In which season do the majority of plants start to grow? 3. Ask the students to reflect on how their behavior changes in summer versus winter. Prompt questions: How do you dress differently? How do you eat differently? How do
33

your activities change with the seasons? 4. What often happens to water in the winter? It freezes. (At what temperature does water freeze? At and below 32 degrees F.) What does this mean for the fruits and vegetables in our gardens when the water freezes? Let the students throw out ideas. If it hasn’t been said, ask them what it is that the roots of the plant can’t access if water freezes? Their roots can’t access the food and water in the soil if it’s frozen. What happens to the plant then? It dies. 5. What does this drop in temperature and change in seasons mean for our fruits and vegetables that we grow in our gardens? We either have to eat them before they die and go bad OR preserve them.
a. What does the word “preserve” mean? It means to save or maintain something in its original state. b. Can you think of some examples of things we might preserve? Brainstorm some examples with the class.
6. What are some ways we might preserve the fruits and vegetables from our gardens? We might freeze them, can/pickle them, dry them, or store them (in a cool, dry, dark place). Let’s explore these methods in more depth by doing an activity…
B) Activity One: Food Preservation Methods Sorting Fruits and Vegetables 1. First off, let’s start with the food preservation method of storing fruits and vegetables in a cool, dry, dark place. We’ll sort some of the fruits and vegetables into the bucket labeled “store (in cool, dry, dark place).”
a. This is the simplest method for preserving fruits/vegetables; as long as they are stored properly (in a cool, dry, dark place), they can last for months! b. Can you think of a place in your home that is cool, dry, and dark where you’d want to store fruits/vegetables? (Basement, garage, food pantry…) c. Some fruits and vegetables cannot be stored nearly as long as others. Those that store well have harder skins, less water, and aren’t squishy. d. Take a look at the fruits/vegetables displayed in front of you on the ground. Which of the fruits/vegetables you see can be stored? Have students put those fruits/vegetables in the “store” bucket. (Examples: potato, carrot, beet, apple, onion, squash) d. All the vegetables in the “store” bucket we call “root vegetables”. What are root vegetables? The part of the plant that we eat that grows underground or right on the surface. They store the best, as long as they are stored properly (in a cool, dry, dark place).
2. The other ways in which we might preserve food are by freezing, canning/pickling or drying them. Here’s how you preserve by those methods:
a. To freeze: we may have to blanch or chop them up, put them in special freezer bags, and stick them in the freezer. b. To can or pickle: we put them in cans or jars, often with other ingredients. Pickling requires adding: vinegar, salt, sugar, and herbs along with the vegetable. c. To dry: we often slice them and let them dry in the sun or in a dehydrator.
3. Into which bucket would YOU sort the rest of the fruits and vegetables? Think of
34

things you have in your cupboards/pantries at home and items you’ve seen on the shelves in the grocery store. Have students sort the produce into the buckets based on which method for preserving they think is best, or most common, for that fruit or vegetable. *Note: fruits/vegetables can fall into more than one category!!
Apples: dry; freeze; can as jam; store Basil: dry into herb Beans: freeze; can/pickle Beets: can/pickle; store Carrots: store, freeze; pickle Cucumbers: pickle Dill: dry as herb Grapes: dry into raisins; freeze; can as jam Kale: freeze Kohlrabi: pickle, store Mint: dry as herb Onions: store Peppers: dry Plums: dried into prunes; freeze; can as jam Potatoes: store Raspberries: dry; freeze; can as jam Spinach: freeze Squash: freeze; can into sauce; store Strawberries: dry; freeze; can as jam Tomatoes: dry; freeze; can as pizza sauce or whole/diced tomatoes
4. Let’s use our critical thinking skills and observations to discuss the following questions: Do you notice any similarities between the fruits and vegetables within each bucket? Do you notice differences between the buckets? Discuss these similarities and differences. Discuss why there may be similarities and differences within and between the contents of the buckets.
CONCLUSION:
What are our four seasons? What are some ways in which they differ from each other? What are some examples of ways we change our behaviors according to the season? Why can’t most fruits/vegetables in our gardens survive the winter? What happens to the
water in the ground? How does this affect the plant? What does “preserve” mean? Why do we preserve our food? What are some methods by which we preserve our food? Can you name an example of
a fruit/vegetable we preserve by each method?
35
Microorganisms Make Our Compost Objectives:
1. Identify the five basic needs of all living things food, water, air, shelter and energy. 2. Identify where living things, and specifically animals versus plants, obtain energy; how
energy is vital to the survival of living things; ways in which that energy is used. 3. Learn what a “microorganism” is and how they contribute to an important cycle in the
garden called “composting.” 4. Learn all about compost what it is, the process of making it, what you do with it in the
garden and how to make it in a spinning composter. 5. Learn what conditions in the compost need to be present in order for microorganisms to
survive and do their job of “decomposition.” MCPS Science Standards Met: 3.1; 3.2 Season Used: Spring Time: 60 minutes* *Optional: extend the lesson for a period of a couple weeks or months. See “Additional Activity Ideas” at the end of this lesson for ideas. Grade Level: 3rd Materials:
Spinning composter Organic matter (i.e. food scraps, old plant parts) Straw Watering can Trowel
PreLesson Preparation:
Have all the materials at the ready. ACTIVITIES: A) Introduction: Today, we are going to be talking about an extremely small animal that contributes to a very important cycle in the garden.
1. Start with a discussion about the needs of all living things. Here are some prompts: a. All living things need what five things to grow and survive? They need food, water, shelter, air and energy. b. How do living things obtain energy? They get energy from the food they eat. c. Why do living things need energy to survive? Everything living things do takes energy in the form of food in order to grow and survive. d. What are some examples of how we use energy in our lives? (Thinking,
36

running, talking, breathing, eating drinking, sleeping, playing, reading, etc.) e. Specifically, where do animals obtain food? As a class, brainstorm where different animals, including humans, obtain food. Push them to think where their food originates before answers like “grocery store” or “farmer’s market.” (Hunting, fishing, the ground, raising livestock, etc.) Now, compare this to where plants obtain food. Plants obtain food from the soil and from the sun’s light in a process called photosynthesis.
2. We’ve dissected what living things need to grow and survive, as well as the specifics of how and where they obtain energy. Let’s talk about that extremely small animal in the garden that was mentioned earlier.
a. This extremely small animal is called a “microorganism.” What is it? First off, break the word into two “micro” and “organism.” “Micro” is something so small that it can’t be seen with the naked eye; it requires a microscope to see. An “organism” is another word for a living thing. Put the words together and you have an “extremely small living thing.” b. Extra note: just like there are different types of animals we can see with the naked eye dogs, cats, horses, people there are different types of microorganisms fungus, bacterium and virus. c. So, why are we talking about microorganisms? It so happens that microorganisms are part of a very important cycle that takes place in the garden. This process is called “composting.”
3. What is compost? Compost is food for plants; plants get extra nutrients from compost when it’s added to the soil; compost gives plants energy to help them grow bigger, stronger and healthier.
a. How is compost made? How do microorganisms contribute to the making of compost? First, we literally have to collect food scraps (banana peels, egg shells, coffee grinds, etc.) and other organic matter (grass, leaves, etc.) and put it all together we can make piles of compost outdoors, or we can add it to a spinning composter. Then, we let the microorganisms go to work on the compost. The microorganisms eat the contents, and then, poop it out. We call this process “decomposition,” which means that the contents of the compost are “broken down” into smaller pieces. For example, the food scraps and other organic matter added to the compost pile goes from being recognizable, clearly identifiable contents (such as banana peels, egg shells, grass, leaves, etc.) to looking just like soil. It turns dark brown or black and has a very earthy smell.
1 Extra Note: compare this to your own body’s process of passing food through the body...you eat food, your body digests those nutrients it can use for energy, and then, what it can’t use is expelled from the body as a dark brown substance. Poop.
b. Okay...but let’s back up. What type of conditions need to be present in the compost pile (or spinning composter), in order for the microorganisms to not only survive, but to do their job? Same as all living things, they need food, water, air, shelter and energy.
37

B) Activity: Let’s compost! We are going to make sure the microorganisms have all their needs met and make some compost. Have students gather around the spinning composter.
1. To make compost, we need to make sure we are providing the microorganisms with everything they’ll need in order to survive their environment.
a. First, let’s identify their shelter. Give students a chance to come up with ideas and figure out what the microorganism shelter would be in this scenario. Answer: the compost pile or spinning composter. b. Let’s identify their food. We talked about this earlier, what kinds of food do we put in compost for the microorganisms to eat? Answer: food scraps and other organic matter. It’s important to put not only food scraps in the compost, but also other organic matter in the form of dried plant matter, such as dried leaves, dried grass, dead plants, straw, etc. Have students add equal parts straw and food scraps to the composter.
1 Which of the five basic needs of living things will the microorganisms gain once they have food? Energy. How will the microorganisms use this energy in the process of composting? It will allow them to perform the function of eating the compost pile and turning it into a decomposed, soillike substance.
c. Let’s add the microorganisms themselves. Where do you suppose we might find them in the garden? Let the students brainstorm some ideas. Answer: microorganisms can be found in the soil, but of course, because they are “micro,” we can’t actually see them with our naked eyes. Have a student add a trowel full of soil from the garden to the composter. d. Let’s add water. It’s necessary to make sure the compost stays moist. If it’s dry, the microorganisms will dry up and die. Have students add enough water using the watering can to moisten the compost. e. Lastly, we need to make sure the microorganisms have plenty of air to breathe. How do you suppose we can add air into the spinning composter? Let the students brainstorm some ideas. The convenient thing about using a spinning composter is that, as its name suggests, it spins. This makes the ingredients in the composter fluffier by incorporating more air into the pile. Show students this is the case by having them first examine the compost before spinning it have them notice that it’s compact and dense. Have students take turns spinning the composter. Then, have them observe the compost after it’s been spun have them notice how much more voluminous and fluffy it is in comparison.
1 Extra Note: If you had a compost pile instead of a spinning composter, how could you incorporate more air into it? By using a shovel to “turn the pile.”
2. So, with all these steps and basic needs met, the microorganisms should be happy and able to perform their very important job in the garden. 3. Let’s review this whole cycle in the garden to which the microorganisms contribute. They “decompose” (a.k.a. break down) the food scraps and other organic matter that we add to the compost into what looks like soil. Once the compost has been fully
38

decomposed by the microorganisms, we add it to the garden soil. Plants grown in the soil will use the compost as food to help them grow bigger, stronger and healthier. When the plant eventually dies, it can be added to the compost pile (or spinning composter). The process starts all over again!
*Additional Activity Ideas:
1. Have the students draw and label the compost cycle, making sure to add the role that the microorganisms play in the process.
2. Extend this lesson out over the course of a few weeks/months by having the students regularly add food and water, as well as spin the composter. Once the composter is relatively full, have them observe the contents of the compost over a period of time. Have them sketch and journal their observations every few days. Watch as the microorganisms get to work and break down the compost over a period of time! Have them hypothesize how long it will take for all the contents in the compost to break down and become indiscernible. Once the compost has fully decomposed, have students add it to the garden soil.
CONCLUSION:
What are the five basic needs of all living things? From what do living things obtain energy? Specifically, where do animals obtain food
energy versus plants? How is energy vital to the survival of living things? What are some ways in which energy is used?
What is a “microorganism”? To which important cycle in the garden do they contribute and how?
What is compost? How is it made? What do you do with it in the garden? How do you make it in a spinning composter?
What conditions in the compost need to be present in order for microorganisms to survive and do their job of “decomposition”?
39

Rocks to Cheese Riddle Objectives:
1. Use critical thinking skills to solve a scientific inquiry. 2. Learn how the food we eat is reliant upon soil. 3. Learn that soil is made up of rocks and organic matter. 4. Learn that rocks “weather” and eventually turn into sand, silt or clay. 5. Identify/define organic matter. 6. Learn that compost consists of organic matter that is broken down (a.k.a. decomposed)
by living organisms called “decomposers”. 7. Identify needs of all living things, including decomposers. 8. Identify that plants need solar energy to photosynthesize and grow.
MCPS Science Standards Met: 1.1; 3.1; 3.2; 4.1 Season Used: Spring Time: 40 minutes Grade Level: 3rd Materials:
A few big rocks A picture representing “weather” Crushed rocks in a mason jar Brown leaves/twigs/pinecones in a mason jar Soil in a mason jar Green grass in a mason jar A picture of the sun A picture of a cow A milk container A block of cheese (or a picture of cheese) Compost screens to sift through compost in composter Rakes/shovels/wheelbarrows Watering can for composter
PreLesson Preparation:
Lay out all the materials for the riddle where the students will be able to see them. Teacher Background: What is soil? Soil is made up of varying sizes of rock particles (like sand, silt and clay), organic matter, minerals, nutrients, water, air and living organisms that decompose the organic matter. We use soil in our school gardens to grow all the fruits and vegetables that we love to eat! In
40

order to keep our soil healthy and our plants happy, we like to amend the soil with an ingredient called compost. What is compost? Compost is food for plants; when we add it to the soil, plants feed on the nutrients in the compost. These nutrients allow the plants to grow bigger, stronger and healthier. Think of it the same way that the nutrients in the food that we eat help our bodies to grow, repair and maintain itself; compost does the same thing for our plants. Specifically, what is compost made of? Simply put, compost is made up of nonliving, organic matter (such as food scraps, twigs, leaves, grass clippings) that is broken down (a.k.a. decomposed) into smaller bits by living organisms known as “decomposers”. Once the decomposers do their job, the compost will look like very rich, healthy, dark brown soil. ACTIVITIES: A) Introduction: Start with a brainstorming session to get students thinking. Prompt questions:
1. As living things, what do we need in order to survive? Food, water, air, shelter and energy. 2. From where do we get our food? 3. Is it possible to have plants without soil? 4. Is it possible to have food without soil? 5. What does food give us? Energy. 6. Tell them: We couldn’t survive without food and our food (plants) couldn’t survive without soil to help them grow. Let’s keep that in mind as we begin our activity.
B) Activity One: Let’s solve a riddle! What’s a riddle? A puzzling question that one must be creative in solving. Here is the riddle we must solve: How do we turn rocks into cheese?
1. Start by explaining that each of the items laid out is a clue to solving the riddle. These clues must be lined up in order.
a. One at a time, have a student come up and place a clue in the order they think the riddle goes OR let them switch the order of an item.
2. Together work out the order of the items. (The order of items may not follow the exact order below but, students should be able to reason why one item follows another item.)
a. First, rocks. Why? Because this activity is called “Rocks to Cheese”, right? So, we want to start with rocks and end with cheese. Cheese is our goal. b. Second, weather. Why? Rocks weather, breaking them down into smaller and smaller pieces.
1 What do we mean by “weather” in this case? The rocks break down by natural forces, such as wind, water, expansion/contraction with changes in temperature, plant roots force open cracks in rocks.
c. Third, crushed rocks. Why? Weather breaks down big rocks into crushed rocks. Crushed rocks break down into varying sized rock particles, in order from largest to smallest: sand, silt, clay. d. Fourth, brown leaves/twigs/pinecones. Why? The rock particles (sand/clay/silt) mix with the organic matter (brown leaves/twigs/pinecones).
41

1 What’s organic matter? Onceliving plant and animal organisms and their waste products. Examples: brown leaves, twigs, food waste, pinecones, castings, manure. 2 What do we call organic matter that we often spread on our gardens or farms? Compost. Examples: food waste, manure, plant material. 3 There are living organisms in compost that eat the organic matter and break it down, what are they called? Decomposers. Examples: worms, bacteria, fungi, mites, snails, slugs, spiders.
e. Fifth, soil. Why? When decomposers break down the organic matter and the organic matter mixes with the rock particles soil is created. f. Sixth, grass. Why? Once there’s soil, plants (i.e. grass) can begin to grow.
1 What do plants need to grow? Food, water, air, sun and energy. g. Seventh, sun. Why? Grass continues to grow by using energy from the sun.
1 What do we call this process of plants using the sun for food and energy? Photosynthesis.
h. Eighth, cow. Why? With a field of grass growing in our nice, composted soil, the cow has food to eat. i. Ninth, milk container. Why? The happy cows eating the grass in our field produce milk. j. Ninth, block of cheese. Why? The milk can be processed and turned into cheese. We made rocks into cheese! Riddle solved.
3. Recap: Let’s work backwards. Could we have cheese if we didn’t have cows? No. Could we have cows if they didn’t have food like grass? No. Could we have grass without the sun to photosynthesize it? No. Could we have grass without soil? No. Could we have soil without rocks and organic matter? No. Could we have small rocks without the weathering of big rocks? No.
a. What else couldn’t we have if we didn’t have soil? Fruits and vegetables! C) Activity two: Spread compost on garden beds.
1. Cover rules of using shovels/rakes. 2. Demonstrate how to use shovels/rakes for the purpose of composting. 3. Divide students into two groups. Have half the group shovel/till compost into garden beds, have the other half raking/smoothing the compost into the garden beds.
CONCLUSION:
How do we rely on soil? What’s soil made of? What does it mean “to weather”? What are the three types of weathered rocks in order
from largest to smallest? What’s organic matter? What’s compost? How does it decompose? What do all living things, including
decomposers, need to survive? What do plants need to grow? What does the sun give them?
CREDIT FOR LESSON ADAPTATION:
42

Barash, David P., and Megan Camp. "Rocks to Cheese." Project Seasons: Seasonal Teaching Ideas K6. Shelburne, VT: Shelburne Farms, 1986. 68. Print.
43

Create Your Own Seed Dispersal Model
Objectives: 1. Learn why plants have adapted to disperse their seeds. 2. Learn about different ways in which plants disperse their seeds in nature. 3. Follow directions and construct a seed dispersion contraption with materials given to
model a seed dispersion method discussed in the lesson. 4. Communicate and describe the type of seed dispersion contraption they made, why they
decided which materials to use and how it works. 5. Learn how to sow seeds and transplant in the garden.
MCPS Science Standards Met: 1.4; 3.1 Season Used: Spring Time: 60 minutes Grade Level: 3rd Materials:
One bag for each group of 34 students. Bags contain: feathers, balloons, paper clips, toothpicks, rubber bands, tape, cotton, bubble wrap, packing filler, cotton swabs, pipe cleaners
Bottle corks (the “seed”), one for each group White board and marker Seeds and transplants Shovels/trowels and watering canisters
PreLesson Preparation:
Put together the bags with all the necessary materials in each. ACTIVITIES: A) Introduction: Today, we are going to talk all about seeds!
1. First off, why do plants have seeds? To reproduce, grow more of itself. a. Why would plants want to reproduce? To keep their species alive, to survive. b. If plants, like animals, don’t reproduce, what will happen to them? They will go extinct. Which plants or animals can you name that have already gone extinct? Can you name any that are “endangered”?
2. Plants are smart. They have adapted different ways to disperse their seeds. a. Before we continue, lets discuss what “adapted” and “disperse” mean.
1 “Adapt” means to adjust to new conditions. 2 “Disperse” means “to spread”.
3. Can you think of ways in which seeds have adapted to their environment to survive
44

and reproduce? Prompt them to think about different types of seeds they’ve seen and how they are dispersed from the parent plant to the location where they will plant themselves and grow into a new plant. Write some of the common ways seeds are dispersed on the whiteboard:
a. Wind. Certain seeds are carried on the wind. Examples: Often in the summer, we see this seed drifting on a breeze...dandelion seeds. In the fall, we see this seed twirling down through the air...maple tree seeds (a.k.a. helicopter seeds).
1 Characteristics of seeds dispersed by the wind: light weight, have winglike or parachutelike structures.
b. Water. Certain seeds disperse themselves by floating on water. Examples: coconuts and water lilies.
1 Characteristics of seeds dispersed by water: hollow inside like a coconut (air lighter than water = floats), waterresistant.
c. Animal Attachment. This type of seed may stick to the coat of animals. Example: dogs often have these seeds stuck to their fur after a walk in the woods...burrs.
1 Characteristics of seeds that may be dispersed by attaching to animals: hooks.
d. Animal Attractant. Some plants have fruit that attract animals. The animal eats the fruit (and seeds), relocates somewhere else and poops out the seeds (dispersing it to a new location).
1 Characteristics of seeds that are dispersed by attracting animals that will eat them: sweet, colorful.
e. Fire. A great example in MT because of all our wildfires. Fire causes some types of cones from a tree to burst open and disperse their seeds. Example: Lodgepole pine.
1 Characteristics of seeds that are dispersed by fire: Lodgepole pine cones tightly seal in the seeds which will only open when fire or extreme heat melts the resin, releasing the seeds.
4. If you examine any type of seed, you will see features that help them to travel (or disperse themselves) in a certain way. A seed has one purpose, to become a new plant.
B) Activity One: Disperse those seeds! You get to be inventors and design seed dispersion contraption models.
1. Divide students up into groups of 34. 2. Give each group one cork and a bag of supplies. Tell them:
a. Which seed dispersal contraption they are making flying, floating, animal attachment or animal attractor. b. The cork represents the seed. c. Try to use as few materials from the bags as possible keep models simple!!
3. After a certain amount of time, gather students in a circle. Have them explain: a. Which kind of seed contraption model they made. b. Why they chose the materials they used. c. How their model works.
45

*4. Time permitting: have students test their contraptions. C) Activity Two: Sow Seeds
1. Have students smooth soil, get rid of big rocks, break up large chunks of soil. 2. Go over depth to plant seeds twice the width of the seed. Plant seeds. 3. What do seeds need to start growing? H2O. Have students water where they planted.
D) Activity Three: Transplant 1. Do a demonstration transplant:
a. First, choose the location in which you want to plant. b. Dig a hole as deep as plant’s soil ball and twice as wide. c. Carefully remove plant from container by squeezing sides of container while upturned in your hand. d. Fill the hole with water. e. Hold plant over hole (stem base plum with top of hole) and fill with soil. f. Pat the soil gently but firmly around the base of the plant’s stem. g. Water the plant.
2. Divide students into groups of 34. Assign roles: digger, waterer, planter. CONCLUSION:
Why do plants have seeds? Why do plants want to disperse their seeds? What are some different ways seeds have adapted to disperse their seeds? What are some characteristics of seeds dispersed by wind? Water? Attaching to
animals? Attracting animals? Fire? How deep do we plant seeds? What are the steps for planting transplants in the garden?
CREDIT FOR LESSON ADAPTATION: Jaffe, Roberta. "AdaptaSeed." The Growing Classroom: GardenBased Science. South Burlington, VT: National Gardening Association, 2007. 124. Print.
46

Lifecycles in the Garden...Annual, Biennial and Perennial Plants
Objectives: 1. Identify and even observe similarities between different plants in the garden. 2. Identify the six main plant parts and the plant lifecycle as it relates to the plant’s growth,
survival and reproduction. 3. Able to define, differentiate and classify plants in the garden based on whether they’re
“annuals,” “biennials” or “perennials.” MCPS Science Standards Met: 3.1; 3.5 Season Used: Summer, Fall Time: 60 minutes Grade Level: 4th Materials:
A garden with annual, biennial and perennial plants. PreLesson Preparation:
Decide ahead of the lesson which annual, biennial and perennial plants in the garden you want to focus on with your class.
ACTIVITIES: A) Introduction: Let’s get up close and personal with the plants in the garden!
1. Start with a discussion about the similarities between all the plants in the garden. Optional: give students some time to explore the garden to let them generate some thoughts before starting a discussion. Prompt questions:
a. What do all plants have in common? What are the five basic needs of all plants? Food, water, air, shelter and energy. b. Why is it important that all five of these basic plant needs are met? This will help them to grow, survive and reproduce. c. Why does it matter if they reproduce or not? What does “reproduce” mean? It means they will propagate, make more of the same type of plant. This is essential because, without reproduction, the plant would go extinct. d. Think about plant parts as they relate to plant lifecycles. What six main plant parts will they all produce? Roots, stems, leaves, flowers, fruits and seeds.
2. Let’s talk about some differences between plants in the garden. Have students brainstorm some ways in which the plants differ from one another. Prompt questions:
a. Start with differences they can see. What are some of the more obvious, visible differences between the plants you see in the garden? Have students make observations.
47

b. Continue with differences that are biological and not necessarily readily visible. Do all the plants in the garden share the same lifecycle? No. Plants have different lengths of lifecycles, same as different animal species. For instance, how long do dogs typically live? Cats? Horses? People? Plants, too, have different life cycle lengths. Let’s dive deeper into this topic...
B) Activity: Exploring the garden’s plants and their lifecycles. There are names for plants that have different lifecycle lengths: “annual,” “biennial” and “perennial.” We will examine each of these lifecycles in more depth.
1. Let’s begin with annual plants because they are the most common plant type in the garden. In fact, most of the plants we eat from the garden are annuals. Have the class gather around an annual plant in the garden (examples: snap peas, squash/pumpkins, kale, zucchini, cucumber).
a. Time to brainstorm. Start by posing questions to the students and then giving them hints: What is an “annual”? How long does it take for an annual plant to complete its lifecycle? Hint: You’ve probably heard the word “annual” in other contexts…Such as an “annual event”? b. Break it down. “Annual” means that it takes place once a year. Can you provide an example of an annual event at your school? (An annual christmas music program, etc.) For plants, this means that it goes through its entire lifecycle within a year, 365 days, or less.
1 Timeline for an annual plant’s life cycle: The plant starts as a seed. It germinates, producing the stem, cotyledon leaves and roots. Eventually, it produces its flowers. Once the flowers are pollinated, the fruit can grow. Of course, the fruit contains the seeds that are used for reproduction, propagating that plant species. 2 In less than a year an annual plant goes from seed, to producing seeds in a year or less. At the end of this cycle, the plant dies.
a Extra Note: The dead plants can be composted. Eventually, the dead plants will fully decompose and be added to the soil. In the soil, the compost will feed (i.e. provide nutrients to) the next generation of plants. In this way, they contribute to another plant’s lifecycle.
3 Most of the edible plants in the garden are annuals. Can you think of examples of annual plants? Hint: remember, if the plant is an annual it will produce flowers/fruits within one growing season. (Annuals: Snap peas, green beans, pumpkins, kale, zucchini, cucumber...)
2. Let’s continue on and talk about biennial plants in the garden, which are much less common than annuals. Have the class gather around a biennial plant in the garden (examples: carrots, parsley, spinach).
a. Time to brainstorm. Start by posing questions to the students and then giving them hints: What is a “biennial”? How long does it take for a biennial plant to complete its lifecycle? You’ve probably heard the word “biennial” in other contexts...Hint: think of the word “bi” in “biennial.” Lots of you have probably
48

ridden something with “bi” in the word. Bicycle. b. Break it down. “Bi” means “two.” A bicycle has two wheels. For plants, this refers to the number of years it takes for them to go through their full lifecycle.
1 Timeline for a biennial plant’s life cycle: In the first year of growth, the plant produces its roots, stems and leaves. Once winter comes, it goes “dormant.” (“Dormant” is the plant’s version of hibernation.) In the second year of growth, after winter, it quickly regrows a new stem and leaves since it’s already established in the soil. Then, it grows its flowers, fruits and seeds. 2 It takes two years to complete the lifecycle of a biennial. At the end of the second year, the plant dies. 3 Interesting Note: Some of the biennial plants in gardens are grown as if they were annuals. This means that we harvest and eat them in their first year of growth. The reason for this? If we allow them to go dormant through the winter and grow into their second year, they become unpalatable, woody and send all their sugar into the flower(s). 4 Can you come up with some examples of biennial plants in the garden? Hint: think about plants you’ve eaten in the garden that you’ve never seen flower? (Biennials: carrots, spinach and parsley...)
3. Lastly, let’s talk about perennial plants in the garden. Have the class gather around a perennial plant in the garden (examples: strawberries, raspberries, rhubarb, a tree).
a. Time to brainstorm. Start by posing questions to the students and then giving them hints: What is a “perennial” plant? How long does it take a perennial plant to complete its lifecycle? b. Break it down. “Perennial” means that the plant lives for more than two years. Perennial plants can vary a lot by type; some produce new flowers and fruits every year, while some produce flowers and fruits only once.
1 Many perennials don’t reproduce through seeds. Rather, they have an underground root network, in the form of bulbs, tubers or rhizomes. They store all their energy in these root networks over winter, when they go dormant. 2 Interesting Note: Some perennials act like annuals. That is, they go through a lifecycle within a year. The difference is that annuals die after one year while perennials come back year after year. Some garden plants that are perennial, we treat like annuals, depending on the climate of where you live.
a For instance, tomatoes are actually perennials. If they are grown in climates that are warm yearround, the vines don’t die after one year (they aren’t annuals), they keep living year after year as a perennial. However, in a climate like Missoula’s, winter would kill the tomato plant so we treat it as an annual. Every year, we reseed it and transplant it into our gardens.
3 Can you think of some examples of perennials in the garden? Hint:
49

Think of plants in the garden that haven’t been replanted, that regrow year after year? (Strawberries, raspberries, rhubarb, trees…)
CONCLUSION:
What are some similarities, both that can be observed and that are biological, between different plants in the garden?
What are the six main plant parts? What does a plant lifecycle look like? How does it relate to a plant’s growth, survival and
reproduction? What is an “annual” plant? What are some examples of annuals in the garden? What is a “biennial” plant? What are some examples of biennials in the garden? What is a “perennial” plant? What are some examples of perennials in the garden? What are some of the big differentiating features between annuals, biennials and
perennials?
50

Microorganisms Make Our Compost Objectives:
1. Identify the five basic needs of all living things for growth, survival and reproduction food, water, air, shelter and energy.
2. Identify where living things, and specifically animals versus plants, obtain energy; how energy is vital to the survival of living things; ways in which that energy is used.
3. Learn what a “microorganism” is and how they contribute to an important cycle in the garden called “composting.”
4. Learn all about compost what it is, the process of making it, what you do with it in the garden and how to make it in a spinning composter.
5. Learn what conditions in the compost need to be present in order for microorganisms to survive and do their job of “decomposition.”
MCPS Science Standards Met: 3.1; 3.2 Season Used: Spring Time: 60 minutes* *Optional: extend the lesson for a period of a couple weeks or months. See “Additional Activity Ideas” at the end of this lesson for ideas. Grade Level: 4th Materials:
Spinning composter Organic matter (i.e. food scraps, old plant parts) Straw Watering can Trowel
PreLesson Preparation:
Have all the materials at the ready. ACTIVITIES: A) Introduction: Today, we are going to be talking about an extremely small animal that contributes to a very important cycle in the garden.
1. Start with a discussion about the needs of all living things. Here are some prompts: a. All living things need what five things to grow and survive? They need food, water, shelter, air and energy. b. How do living things obtain energy? They get energy from the food they eat. c. Why do living things need energy to survive? Everything living things do takes energy in the form of food in order to grow and survive.
51

d. What are some examples of how we use energy in our lives? (Thinking, running, talking, breathing, eating drinking, sleeping, playing, reading, etc.) e. Specifically, where do animals obtain food? As a class, brainstorm where different animals, including humans, obtain food. Push them to think where their food originates before answers like “grocery store” or “farmer’s market.” (Hunting, fishing, the ground, raising livestock, etc.) Now, compare this to where plants obtain food. Plants obtain food from the soil and from the sun’s light in a process called photosynthesis. f. Why is all of this important? Why is it essential that a living thing’s basic needs are met? It will allow them to grow, survive and, ultimately, reproduce. In essence, reproduction ensures the survival continued propagation of a species. Pose the question: what would happen to a species if they survive and reproduce? They’d go extinct. Can you provide examples of species that have gone extinct? (Dinosaurs, Dodo bird, mammoths, etc.)
2. We’ve dissected what living things need to grow and survive, as well as the specifics of how and where they obtain energy. Let’s talk about that extremely small animal in the garden that was mentioned earlier.
a. This extremely small animal is called a “microorganism.” What is it? First off, break the word into two “micro” and “organism.” “Micro” is something so small that it can’t be seen with the naked eye; it requires a microscope to see. An “organism” is another word for a living thing. Put the words together and you have an “extremely small living thing.” b. Extra Note: Just like there are different types of animals we can see with the naked eye dogs, cats, horses, people there are different types of microorganisms fungus, bacterium and virus. c. So, why are we talking about microorganisms? It so happens that microorganisms are part of a very important cycle that takes place in the garden. This process is called “composting.”
3. What is compost? Compost is food for plants; plants get extra nutrients from compost when it’s added to the soil; compost gives plants energy to help them grow bigger, stronger and healthier.
a. How is compost made? How do microorganisms contribute to the making of compost? First, we literally have to collect food scraps (banana peels, egg shells, coffee grinds, etc.) and other organic matter (grass, leaves, etc.) and put it all together we can make piles of compost outdoors, or we can add it to a spinning composter. Then, we let the microorganisms go to work on the compost. The microorganisms eat the contents, and then, poop it out. We call this process “decomposition,” which means that the contents of the compost are “broken down” into smaller pieces. For example, the food scraps and other organic matter added to the compost pile goes from being recognizable, clearly identifiable contents (such as banana peels, egg shells, grass, leaves, etc.) to looking just like soil. It turns dark brown or black and has a very earthy smell.
1 Extra Note: Compare this to your own body’s process of passing food
52

through the body...you eat food, your body digests those nutrients it can use for energy, and then, what it can’t use is expelled from the body as a dark brown substance. Poop.
b. Okay...but let’s back up. What type of conditions need to be present in the compost pile (or spinning composter), in order for the microorganisms to not only survive, but to do their job? Same as all living things, they need food, water, air, shelter and energy.
B) Activity: Let’s compost! We are going to make sure the microorganisms have all their needs met and make some compost. Have students gather around the spinning composter.
1. To make compost, we need to make sure we are providing the microorganisms with everything they’ll need in order to survive their environment.
a. First, let’s identify their shelter. Give students a chance to come up with ideas and figure out what the microorganism shelter would be in this scenario. Answer: the compost pile or spinning composter. b. Let’s identify their food. We talked about this earlier, what kinds of food do we put in compost for the microorganisms to eat? Answer: food scraps and other organic matter. It’s important to put not only food scraps in the compost, but also other organic matter in the form of dried plant matter, such as dried leaves, dried grass, dead plants, straw, etc. Have students add equal parts straw and food scraps to the composter.
1 Which of the five basic needs of living things will the microorganisms gain once they have food? Energy. How will the microorganisms use this energy in the process of composting? It will allow them to perform the function of eating the compost pile and turning it into a decomposed, soillike substance.
c. Let’s add the microorganisms themselves. Where do you suppose we might find them in the garden? Let the students brainstorm some ideas. Answer: microorganisms can be found in the soil, but of course, because they are “micro,” we can’t actually see them with our naked eyes. Have a student add a trowel full of soil from the garden to the composter. d. Let’s add water. It’s necessary to make sure the compost stays moist. If it’s dry, the microorganisms will dry up and die. Have students add enough water using the watering can to moisten the compost. e. Lastly, we need to make sure the microorganisms have plenty of air to breathe. How do you suppose we can add air into the spinning composter? Let the students brainstorm some ideas. The convenient thing about using a spinning composter is that, as its name suggests, it spins. This makes the ingredients in the composter fluffier by incorporating more air into the pile. Show students this is the case by having them first examine the compost before spinning it have them notice that it’s compact and dense. Have students take turns spinning the composter. Then, have them observe the compost after it’s been spun have them notice how much more voluminous and fluffy it is in comparison.
1 Extra Note: If you had a compost pile instead of a spinning composter,
53

how could you incorporate more air into it? By using a shovel to “turn the pile.”
2. So, with all these steps and basic needs met, the microorganisms should be happy and able to perform their very important job in the garden. 3. Let’s review this whole cycle in the garden to which the microorganisms contribute. They “decompose” (a.k.a. break down) the food scraps and other organic matter that we add to the compost into what looks like soil. Once the compost has been fully decomposed by the microorganisms, we add it to the garden soil. Plants grown in the soil will use the compost as food to help them grow bigger, stronger and healthier. When the plant eventually dies, it can be added to the compost pile (or spinning composter). The process starts all over again!
*Additional Activity Ideas:
1. Have the students draw and label the compost cycle, making sure to add the role that the microorganisms play in the process.
2. Extend this lesson out over the course of a few weeks/months by having the students regularly add food and water, as well as spin the composter. Once the composter is relatively full, have them observe the contents of the compost over a period of time. Have them sketch and journal their observations every few days. Watch as the microorganisms get to work and break down the compost over a period of time! Have them hypothesize how long it will take for all the contents in the compost to break down and become indiscernible. Once the compost has fully decomposed, have students add it to the garden soil.
CONCLUSION:
What are the five basic needs of all living things? Why is it essential that a living thing’s basic needs are met?
From what do living things obtain energy? Specifically, where do animals obtain food energy versus plants? How is energy vital to the survival of living things? What are some ways in which energy is used?
What is a “microorganism”? To which important cycle in the garden do they contribute and how?
What is compost? How is it made? What do you do with it in the garden? How do you make it in a spinning composter?
What conditions in the compost need to be present in order for microorganisms to survive and do their job of “decomposition”?
54

Compost Mapping Objectives:
1. Learn that compost consists of living and nonliving matter. 2. Learn that non living matter can be categorized into carbon matter and nitrogen matter. 3. Classify/identify carbon and nitrogen matter by specific characteristic traits. 4. Learn that decomposers are living organisms that serve a particular function in our
compost: break down (a.k.a. eat) the nonliving matter and turn it into soillike matter. 5. Classify/identify microorganism and macroorganism decomposers. 6. Identify the basic needs of decomposers that will help them to not only survive but, to be
productive and work efficiently. 7. Identify ways people can help decomposers meet their needs in a compost environment.
MCPS Science Standards Met: 3.2; 3.4; 3.5 Season Used: Spring Time: 40 minutes Grade Level: 4th Materials:
A note card for each person in the class representing a different part of the compost: non living carbon materials: Dried Leaves, Straw, Dried Grass, Twigs, Dry Pine
Needles, Wood Chips, Dried Pinecone nonliving nitrogen materials: Manure, Fresh Grass Clippings, Banana Peel, Egg
Shells, Apple Core, Carrot Tops, Cucumber Peelings living decomposers: Worms, Beetles, Spiders, Millipedes, Bacteria, Fungi, Snails,
Slugs, Centipedes Thermometer Watering canister Rope long enough for an entire class to fit inside when laid in a circle Shovel for activity White board and marker Rakes/shovels/wheelbarrows
PreLesson Preparation:
Make notecards: print name, draw picture and laminate. At the top of the white board write “Compost”; along one side of the white board write all
the examples of nonliving carbon matter, non living nitrogen matter and living decomposers listed above under “Materials”.
Have the rope, watering can (filled with water), shovel and thermometer at the ready. Teacher Background:
55

What is soil? Soil is made up of varying sizes of rock particles (like sand, silt and clay), organic matter, minerals, nutrients, water, air and living organisms that decompose the organic matter. We use soil in our school gardens to grow all the fruits and vegetables that we love to eat! In order to keep our soil healthy and our plants happy, we like to amend the soil with an ingredient called compost. What is compost? Compost is food for plants; when we add it to the soil, plants feed on the nutrients in the compost. These nutrients allow the plants to grow bigger, stronger and healthier. Think of it the same way that the nutrients in the food that we eat help our bodies to grow, repair and maintain itself; compost does the same thing for our plants. Specifically, what is compost made of? Simply put, compost is made up of nonliving, organic matter (such as food scraps, twigs, leaves, grass clippings) that is broken down (a.k.a. decomposed) into smaller bits by living organisms known as “decomposers”. Once the decomposers do their job, the compost will look like very rich, healthy, dark brown soil. We’ll come back to the subject of nonliving, organic matter. First, exactly what or who are these decomposers? How does decomposition work? The decomposers are the living things in a compost and include both macroorganisms and microorganisms. They break down the nonliving, organic matter into elements that the plants can use as food. Macroorganisms are large enough to be seen by the naked eye; examples include: worms, beetles, spiders, millipedes, snails and slugs. Microorganisms are so small that you need a microscope in order to see them; examples include: bacteria and fungi. Like all living things, these macroorganisms and microorganisms have certain survival needs. These needs include: food, water, air and shelter. The shelter in this case is the pile of compost. The decomposers get their food from the nonliving, organic matter that we add to the compost. It’s important that the compost stay moist so that the organisms don’t die from dehydration and that the compost be “turned” once in awhile to incorporate in air for the decomposers to breathe. As long as all their needs are met, the decomposers will work fast and efficiently; if their needs aren’t met, they’ll be slow, inefficient and may die. You know decomposition is in progress when the pile heats up from the energy expended by the decomposers. In fact, if you stuck a thermometer in the middle of the compost pile, you may read temperatures as high as 160 degrees F (though a temperature between 110 and 140 degrees F is best). (temperature cited from: http://www.almanac.com/compost) Okay, now back to the subject of nonliving, organic matter in the compost. Let’s break it down further. The nonliving, organic matter can be further classified into two categories: “green matter” and “brown matter”. Green matter has high levels of nitrogen, compared to brown matter which has high levels of carbon. Examples of green matter include: fresh plant matter (green grass, newly fallen leaves), kitchen scraps (fruit/vegetable peelings, fruit cores, vegetable tops, egg shells, coffee grinds) and animal waste (a.k.a. manure). Examples of brown matter include: dried leaves, dried grass, straw, twigs, wood chips, dried pine cones and dried pine needles. In
56

an ideal compost environment, there would be a balance of nitrogenrich and carbonrich matter, and the compost would alternate between layers of green matter and brown matter. How long does compost take to make? That is a relative question. It depends on the climate, and therefore, where you live. In Western Montana, it can take upwards of four weeks for the decomposers to do their job and fully breakdown the compost into its basic elements. ACTIVITIES: A) Introduction: Let’s start with a discussion about compost.
1. Pose these questions to students: a. What is compost? It’s food for plants; it’s recycled food for plants; it provides plants with extra nutrients they can use to grow bigger, stronger and healthier. b. What’s in compost? Food scraps, dried leaves, dried grass, twigs, worms...
2. We can classify things in a compost pile as “living” and “nonliving”. In fact, having both living and nonliving things is essential for a compost pile to decompose. On the white board, make two branches off of the word “Compost” one that says “Nonliving” and one that says “Living.”
a. What does “decompose” mean? To break down into smaller pieces. b. Compost needs to decompose completely before it can be added to the soil in the garden beds. c. What does decomposed compost look like? It looks like soil; it’s dark brown, crumbly organic matter.
3. We can further divide this nonliving component into two categories: carbon matter and nitrogen matter. Compost needs a balance of carbon and nitrogen. In fact, when we add it to our compost, we want to alternate layers of the two. Make two branches off of the word “Nonliving” on the whiteboard one that says “Carbon (brown) Matter” and one that says “Nitrogen (green) Matter”.
a. Dead, dried plant matter is a good source of carbon and tends to be brown in color (hence the alternative name “brown matter”). Fresh, moist plant matter and animal waste are good sources of nitrogen and tend to be green or still have color (hence the alternative name “green matter”). b. Look at the list written to one side of the white board. Help me to determine which of these items are good sources of carbon matter and which are good sources of nitrogen matter. Write items under the appropriate category.
1 Carbon Matter: dried leaves, straw, dried grass, dead branches, twigs, dead pine needles, wood chips, dried pinecone. 2 Nitrogen Matter: manure, green grass, banana peel, egg shells, apple core, carrot tops, cucumber peelings. 3 Any other examples of carbon and nitrogen sources?
4. The living organisms in compost are decomposers. They eat the nonliving matter that is, the carbon and nitrogen matter.
a. What is a decomposer? Eats/consumes dead plants and animals and reduces them to simpler forms of matter.
57

b. Living decomposers can be further broken down into “microorganisms” and “macroorganisms”. Write these on the board branching off of the word “Living.”
1 Macroorganisms can be seen by the naked eye. 2 Microorganisms can only be seen under a microscope.
c. Look at the list written to one side of the white board. Help me to determine which of those items are micro or macro decomposers. Write items under the appropriate category.
1 Macroorganisms: worms, beetles, spiders, millipedes, snails, slugs, centipedes. 2 Microorganisms: bacteria, fungi.
5. What do we know about all living organisms? What do they need to survive? Food, water, air, shelter and energy.
a. If the decomposers in a compost pile have all these key ingredients food, water, air, shelter and energy they are productive and work fast and efficiently. b. Without these ingredients they are slow, lazy and may die. c. So, to have a functioning compost pile, we need to make sure the decomposers have all their needs met.
B) Activity One: Life inside a compost pile. Tell the students they get to experience what life inside a compost pile is like.
1. Pass out compost ingredient cards to all but one student. They will represent what’s on their card. The student without a card is “the gardener”. 2. Tell them that the ingredients can be divided into three categories: non living carbon, nonliving nitrogen, and living decomposers. 3. Have them sort themselves into these three groups. 4. Have each student shout out in turn what he/she “is”. 5. Outline the perimeter of compost with rope and have students stand outside of it. Tell students the circle represents the perimeter of the compost pile. 6. Now, we need to create an environment in which our living, decomposing organisms will want to live, and therefore, will work hard and efficiently. Let’s make sure all their needs are met:
a. Do the decomposers have shelter? Yes. The compost pile (outlined by rope). b. Do the decomposers have food? Not yet. What do we need to add? The nonliving matter carbon and nitrogen.
1 Have the students with carbon and nitrogen cards add their cards one at a time to the center of the circle, alternating carbon and nitrogen.
c. Do the decomposers have water? Not yet. 1 Have “the gardener” student use the watering canister and sprinkle the compost pile with water.
d. How can “the gardener” add more air (or oxygen) to the compost so the decomposer can breathe? Use a shovel and “turn the pile”. This makes the compost light, fluffy and full of air.
1 Have “the gardener” use a shovel and pretend to turn the compost. 2 While “the gardener” does this, have a few of the carbon and nitrogen
58
students spread the carbon and nitrogen cards around the pile to represent “turning the compost”.
e. With food, water, air and shelter needs met, the decomposers should have enough of what? Energy to do their work.
7. Okay, now that we’ve created a good environment for the living decomposers, we can add them into the compost.
a. Have the students with the living decomposer cards scatter their cards throughout the pile. b. Get out the thermometer and pretend to take the temperature. Tell the students the compost is getting hotter...and hotter...and hotter. It’s over 150 degrees F! But now the temperature is starting to drop because the decomposers have eaten up all the carbon and nitrogen matter. Without food, they have less energy. The temperature of the compost is starting to get colder...and colder...and colder. c. How can we heat the pile back up? What do we need to add to the compost to get those decomposers moving again? Add more food, water and air. d. How long does it take to have fully decomposed compost? It can take as little as a month for the living decomposers to break down the nonliving matter in the compost, IF they have all their needs met.
8. Let’s go compost! We are going to look at compost that has been fully decomposed. C) Activity Two: Spread compost on garden beds.
1. Cover rules of using shovels/rakes. 2. Demonstrate how to use shovels/rakes for the purpose of composting. 3. Divide students into two groups. Have half the group shovel/till compost into garden beds, have the other half raking/smoothing the compost into the garden beds.
CONCLUSION:
What are the components of a compost pile? How can we distinguish between carbon matter and nitrogen matter? What are some examples of carbon and nitrogen matter? What do the decomposers do to the compost pile? What do the decomposers need to survive? What are some examples of microorganism and macroorganism decomposers? How can we help decomposers meet their needs in a compost?
CREDIT FOR LESSON ADAPTATION: Parrella, Deborah. "Compost Cake." Project Seasons: Handson Activities for Discovering the Wonders of the World. Shelburne, VT: Shelburne Farms, 1995. 8789. Print.
59

Mapping a Garden Ecosystem Objectives:
1. Define “ecosystem”; identify living and nonliving components of a garden ecosystem. 2. Identify ways in which living and nonliving components of an ecosystem are
interconnected. 3. Learn that removing one element (living or nonliving) in an ecosystem can affect the
whole ecosystem, and even cause it to collapse. 4. Identify ways in which water is essential to a garden ecosystem. 5. Learn how to sow seeds and transplant in the garden.
MCPS Science Standards Met: 3.4 Season Used: Spring Time: 40 minutes Grade Level: 4th Materials:
Huge ball of yarn Whiteboard and marker Seeds and transplants Shovels/trowels and watering canisters
PreLesson Preparation:
Make sure yarn is wound up in a ball. ACTIVITIES: A) Introduction: Last lesson in the garden together, we talked about the components of compost, both living and nonliving. What were some examples of living and nonliving things in compost? Microorganisms, microorganisms, carbon matter and nitrogen matter. We are going to apply that same idea of mapping a compost pile to an entire garden. We are going to talk about the garden as an “ecosystem”. Write the word “ecosystem” on the whiteboard.
1. What is an “ecosystem”? Break up this word into “eco” and “system”. a. “Eco” comes from the word “environment”. (On the whiteboard write: Eco = Environment) Ask students what comes to mind when they think of the word “environment”? (the planet, the earth, trees, plants, animals, forests, rivers, natural world...) b. What is a “system” and what are some examples? (school system, bicycle, car, the respiratory system in our bodies, the food system, cows and grass...) (On the whiteboard write: A system is a collection of parts that interact with one another to function as a whole.)
60

c. Let's combine these definitions. On the whiteboard write: An ecosystem is a system within an environment. What are some ecosystems you’ve heard of before? (rivers, forests, oceans, deserts, and tundra…)
2. Today, we are going to focus on a garden ecosystem. Let's brainstorm parts of the garden ecosystem, both living and nonliving.
a. List student ideas on the whiteboard. Have every student brainstorm at least one element and tell them to remember their idea. Be specific! This list could include: soil, compost, rocks, plants (specific fruits, vegetables, flowers, trees, bushes), insects (bees, ladybugs, centipedes…), decomposers (fungi, bacteria, worms), birds, water, weeds, garden beds, shed, tools, gardener... b. Make sure they bring up living and nonliving things. c. Also, what do our living things in the garden ecosystem need in order to survive? Food, Water, Air, Sun! (These should be added to the list if they weren’t already mentioned by students.) d. Once there is a long list, point out the living items and the nonliving items. How are these connected? As the students to brainstorm how the parts of the garden ecosystem are connected, draw lines between the items to connect them. Try to have at least one good example of interconnectedness. (Add as necessary to the list: people, pollinators, etc.)
B) Activity One: Mapping a garden ecosystem. 1. Okay, let's do an activity in which we see just how interconnected and interdependent are the living and nonliving components of a garden ecosystem.
a. Have the students form a circle. b. Have one student start with the ball of yarn and say their living or nonliving garden item. Make sure water is one of the items of the garden ecosystem. c. The first student then throws the ball of yarn to another student in the circle while still holding onto the string of yarn. The next student should say how their living or nonliving garden component connects to that of the previous student. Continue until all students are holding the yarn and there’s a tangled, interconnected web.
2. The educator will pull on a string in the web and the student(s) that feels the tug raises his/her hand. Do this a few times to demonstrate how they are all interconnected.
a. Talk about how taking away one element of that web affects and changes the whole ecosystem.
1 Give a scenario of water being removed from the garden. The garden has no water. Have the student who represents water, drop the string. 2 Have those students that would be affected if there was no water in the garden to drop their hold on the string. Example) The plants would drop the string, as would other living organisms like the decomposers. They can no longer survive because there’s no water in the garden.
a Why do all living things need water? Think about this: people
61

and plants are largely made up water (the human body is made up of more than 65% water and many of our fruit and vegetable plants are more than 80% water). So, how would a lack of water affect plants? The plants couldn’t photosynthesize, respire or grow. The plants would turn brown, shrivel and die. The same thing happens to people without water, they get dehydrated and shrivel up. b We need water to grow our food. Food, as we know, is another basic need for all living things.
3 Continue until everyone, or most everyone, drops their hold on the yarn. 4 Reinforce that the whole ecosystem is interconnected and removing one element changes the whole system and all its living and nonliving components.
3. We examined one example of a specific type of ecosystem, that being the garden. There are many types of ecosystems, big and small.
C) Activity Two: Sow Seeds 1. Have students smooth soil, get rid of big rocks, break up large chunks of soil. 2. Go over depth to plant seeds twice the width of the seed. Plant seeds. 3. What do seeds need to start growing? H2O. Have students water where they planted.
D) Activity Three: Transplant 1. Do a demonstration transplant:
a. First, choose the location in which you want to plant. b. Dig a hole as deep as plant’s soil ball and twice as wide. c. Carefully remove plant from container by squeezing sides of container while upturned in your hand. d. Fill the hole with water. e. Hold plant over hole (stem base plum with top of hole) and fill with soil. f. Pat the soil gently but firmly around the base of the plant’s stem. g. Water the plant.
2. Divide students into groups of 34. Assign roles: digger, waterer, planter. CONCLUSION:
What is an ecosystem? What are some living and nonliving components of a garden ecosystem? How are the living and nonliving components of a garden ecosystem interconnected? How would removing water from a garden ecosystem affect the rest of the ecosystem? What are ways in which water is essential to a garden ecosystem? How deep do we plant seeds? What are the steps for planting transplants in the garden?
CREDIT FOR LESSON ADAPTATION: Jaffe, Roberta. "You Are What You Eat." The Growing Classroom: GardenBased Science.
62

South Burlington, VT: National Gardening Association, 2007. 220221. Print.
63

Power of Observation...How Native Americans Used Observation to Understand Nature Objectives:
1. Identify and learn ways in which Native Americans used observation to understand nature and processes in nature.
2. Learn about the medicinal benefits of some of Montana’s native plants. 3. Learn how Native Americans adapted their behavior and the foods they ate depending
on the season. 4. Learn about Native American ethics.
MCPS Science Standards Met: 1.6 Season Used: Summer, Fall Time: 60 minutes Grade Level: 5th Materials:
dried, loose chamomile flowers kettle or pot of hot water cups for drinking twine to bundle herbs
PreLesson Preparation:
Boil the hot water. Have other materials at the ready.
ACTIVITIES: A) Introduction: We are going to talk about the power of observation in nature, specifically in regards to how Native Americans used observation to understand nature and its processes.
1. Activity based on observation. Give each student some of the dried chamomile flowers. Don’t tell the students what it is! Using your observation skills, see if you can identify what plant this is.
a. Let the students come up with some guesses. Once they’ve had some chances to guess, give them the answer. Answer: chamomile.
1 Chamomile flowers are often used in evening teas. The reason for this is that the chemical properties in chamomile calm our bodies and minds, putting us in a relaxed state before we go to sleep. It can also soothe our stomachs.
b. Give each students a cup of hot water. Have them add their chamomile flowers to the hot water. Let it sit for a few minutes to steep before drinking. c. Talk about the tools they used in making their observations. What did you use
64
to make your guesses? Your senses. Specifically, your sense of smell and sight. 2. Lecture on the power of observation. Native Americans used their observation skills to better understand nature and natural processes. Over the course of hundreds and thousands of years, the power of their observations helped them to survive and to create a body of knowledge about plants and their uses. We still rely on a lot of this information today for our food and medicine.
a. Native Americans would observe other animals to see what they ate and how it affected them. Through the power of observation, they were able to determine which plants might likewise benefit them and even have medicinal qualities. Native Americans have discovered the medicinal benefits of over 200 plants!!! [1] Here are some examples:
1 Poplar and willow tree bark: It was observed that pregnant moose would eat the inner bark of these trees. So, Native Americans harvested it, steeped it like tea and gave it to their pregnant women. It turns out that it dulled labor pains. Today, the bark is used in aspirin! [2] 2 Yarrow leaves: Used to stop bleeding, fevers, colds and stomach problems. The leaves can also be chewed to reduce toothache. [3] 3 Bee Balm (a.k.a. Wild Bergamot) plant: Native Americans brewed the leaves as tea to help cure colds, stomach aches, excess flatulence and nosebleeds, among other things. [4]
b. Important Note: ALWAYS BE 100 PERCENT POSITIVE YOU HAVE THE CORRECT PLANT WHEN USING IT AS FOOD OR MEDICINE. Some plants have look alikes that are poisonous!!! c. Native Americans had to be observant about the patterns of the seasons and weather. This information would have equipped them with the knowledge of when plants and animals would be available to them. This would be particularly important to know when planning for winter when food was more scarce.
1 Interesting Note from www.lessonsofourland.org: One of Montana’s local tribes, the Kootenais, were practical in naming the months of the year. See if you can guess which season the month falls into by its name: Shooting Month, Bear Month, Melting Snow Month, Cracked Land Month, High Water Month, Ripening of Strawberries Month, Ripening of Serviceberries Month, Fruit Ripening During the Night Month, Ripening of Chokecherries Month, Falling Leaves Month, Deer Calling Month, First Prayers Month. [5] 2 What are ways in which Native Americans prepared their food for the winter? Dried summer fruits, meat, fish and plants; collected nuts.
d. A word about Native American ethics. (What are “ethics”? The behaviors a society, or group of people, consider right or wrong.) What do think were some of the ethics of Native Americans? How do you think they treated the land and nature? Let the students brainstorm some ideas. Possible answers:
1 They respected the land, plants and animals. 2 They used the land sustainably. That is, they didn’t take more than they
65

needed from nature, knowing that if they did, those resources would be depleted and cease to exist in the future. 3 They believed that everything in nature was connected. Examples: All animals breathe the same air, drink the same water and rely on each other to survive. Plants provide animals (including humans) with oxygen and animals provide them with carbon dioxide (which means we have a symbiotic relationship). Soil provides animals with plants to eat, and when plants die, they become part of the soil again.
B) Activity: Let’s bundle herbs for winter! 1. With the weather changing from fall into winter, it’s turning colder. The plants in the garden can’t survive the cold, winter temperatures. Therefore, we should prepare as the Native Americans would have done. We are going to bundle some herbs to dry. 2. Have the students snip the herbs at the base of the stem, closest to the soil. They can use twine to tie them in bundles. Type of herb depends on what is growing in the garden, but here are some good herbs to dry: parsley, basil, thyme, rosemary, sage, mint. These herb bundles could be hung in the classroom to dry!
CONCLUSION:
What are some examples of ways in which Native Americans used observation to understand nature and processes in nature?
What are some examples of medicinal plants? How did Native Americans adapt their behavior and the foods they ate depending on the
season? What does ethics mean? What were some Native American ethics?
REFERENCES: [1] [2] "Traditional Native Healing Plants." Lessons of Our Land. Indian Land Tenure Foundation, n.d. Web. 28 Jan. 2016. [3] "YARROW: Uses, Side Effects, Interactions and Warnings WebMD." WebMD. WebMD, n.d. Web. 28 Jan. 2016. [4] "NPIN: Native Plant Database." Lady Bird Johnson Wildflower Center, The University of Texas at Austin. The Wildflower Center, 28 Aug. 2015. Web. 28 Jan. 2016. [5] "Tribal Calendars." Lessons of Our Land. Indian Land Tenure Foundation, n.d. Web. 28 Jan. 2016. Tribal Calendar Table is an attachment to the article "Tribal Calendars."
66

Is our soil healthy? Soil Testing 101
Objectives: 1. Conduct a scientific investigation; follow directions and properly use the tools given;
interpret the results; communicate the finds to the class. 2. Learn that like humans, plants need vitamins, minerals, and other nutrients to live. 3. Identify where humans get vitamins/minerals versus where plants get them. 4. Identify the three most important plant nutrients: Nitrogen (N), Phosphorus (P),
Potassium (K). 5. Learn that Nitrogen (N) makes leaves green which is crucial for photosynthesis. 6. Learn that Phosphorus (P) promotes seed/fruit development. 7. Learn that Potassium (K) promotes stem strength/helps with disease resistance. 8. Learn that we can amend garden soil with certain ingredients if it’s deficient in NPK.
MCPS Science Standards Met: 1.2; 1.3 Season Used: Spring Time: 40 minutes Grade Level: 5th Materials:
White board and marker 2 NPK (Nitrogen Phosphorous Potassium) soil testing kit for each class (to test NPK in
two different areas of the garden) PLUS a kit to do a demonstration for the class 6 water droppers 2 mason jars Examples of NPK: compost (nitrogen), bone meal (phosphorus), wood ash (potassium) Rakes/shovels/wheelbarrows
PreLesson Preparation:
Prepare the day before class: need two large, glass jars with soil solutions from two different areas of the garden (in the jar put: 5 parts water to 1 part soil). Label jars “Soil Sample One” and “Soil Sample Two” (on each label include information about which garden bed each soil sample was taken and what grew in those beds the previous season). Set jars where they won’t be disturbed (all the soil sediment needs to settle to the bottom of the jar before study can be conducted).
Have classes bring out science journals or paper, clipboards and pencils. At the top of the white board, write “Soil Scientists” and underneath write: N ( ) makes
leaves green/crucial for photosynthesis, P ( ) promotes seeds and fruit development, K ( ) helps promote stem strength/helps disease resistance.
Setup six work stations in the garden (three stations next to each soil sample jar). Each
67

station should have a test kit (for N, P or K), a chemical activator pill (for N, P or K) and one water dropper.
ACTIVITIES: A) Introduction: Let’s start by discussing the similarities between people and plants.
1. Pose these questions to the class: a. How are plants similar to people? They need food, water, air, shelter and energy. b. What is it specifically in food that people and plants need? Vitamins, minerals, and other nutrients. Why? Nutrients in food help people and plants grow, sustain good health, resist diseases, become stronger and generally survive. c. Where do we, humans, get our vitamins and minerals? From the food we eat. When people feel they are not getting enough of a certain mineral or vitamin, they can change their diet or supplement their diet with vitamins or minerals.
1 For example: onions and apples provide us with Vitamin C which helps to fight colds; the Vitamin A in carrots help our eyes and immune systems.
d. Where do plants get their minerals? From the soil. Where do plants get their vitamins? They manufacture their own vitamins! By eating them people get those vitamins and minerals from plants.
2. We can all be soil scientists and find out if our garden soil has enough of the major minerals needed for healthy plant growth.
a. There are about 13 minerals needed by most plants. b. With the soil testing kits, we can test for the three very basic and most important nutrients: Nitrogen, Phosphorous, and Potassium (NPK). Have students record the information on the whiteboard in their science journals.
1 What does the “N” stand for? Nitrogen. It’s what makes a plant green (therefore aiding the process of photosynthesis) and helps it grow. If a plant couldn’t photosynthesize what would happen? It would die because it relies on the sun to convert carbon dioxide and water into sugars. 2 What does the “P” stand for? Phosphorous. It aids in seed/fruit development. Thus providing us with food and more plants. 3 What does the “K” stand for? Potassium. It helps support stem strength and disease resistance. Why are strong stems important? So that the plant doesn’t fall over; if it’s laying in the soil, it has less air circulation and has a greater chance of contracting diseases or getting eaten by bugs/animals.
c. How can this information be helpful to us? Well, if we want particularly big tomatoes, we may want to plant them in an area of the garden with a high Phosphorous content. If an area has a low potassium content, we may consider planting an already disease resistant plant instead of a disease susceptible plant.
B) Explanation/demonstration for testing the soil for NPK: 1. Testing the soil for NPK. Explain there are two beds we are testing for NPK. Name the
68

two beds and what grew in them previously. a. Explain that each group will get a test kit (each group is responsible for a different nutrient either N, P or K), droppers and a chemical activator pill. b. There are two jars of solution each contains soil from a different part of the garden. Don’t disturb the jars of solution because we want the sediment to stay at the bottom of the jar!! c. Show them that the test kits have two chambers a reference chamber and a test chamber. Fill both with solution using the dropper (but don’t fill to the top!). d. In the narrower chamber (i.e. the test chamber) empty the contents of the pill taking care to open the pill over the test chamber and to gently twist the capsule ends apart to open it. e. Put the lid on tight. f. Shake the test kit for 30 seconds. Count out loud with your group. g. Place the test kit on a stable surface and let it sit undisturbed for 510 minutes.
C) Activity One: Your turn to test the soil for NPK! 1. Divide the class into three groups have them count off by 3s. 2. Assign each group the nutrient that they will be testing (N, P or K). 3. Within their group (N, P or K), divide them in half (so now there are six groups total). Each half will test one of the soil solutions from the two different areas of the garden (example: half of the N group will test “Soil Sample One” for nitrogen and the other half of the N group will test “Soil Sample Two” for nitrogen). 4. While waiting 510 minutes for the test kits to show the results, have them circle up for a discussion. Questions to pose to the class:
a. Why do we test different areas of the garden? We want an idea of overall health of the garden. The plant growing in one bed could have taken more nutrients from the soil than the plant growing in the other bed. b. The test kits say “depleted”, “deficient”, “adequate”, “sufficient”, “surplus”. What do these terms mean? Which do we want our tests to show? Adequate or better. c. If our tests show “deficient” or “depleted”, what can we do to our soil? Add amendments such as: compost (N), fishmeal (P), wood ash (K).
5. In their science journals, have the students write their name, date, which bed of soil they tested and whether they tested for N, P or K. 6. Have students return to their test kits and record the results in their science journals. 7. Have the students circle up again. Go over results each group found.
a. Based on the results, how do you think plants will grow in our garden soil? Discuss as a class whether and why plants will grow poorly, okay or well. b. What can we add to the soil to amend it with nitrogen? Phosphorous? Potassium?
8. Tell them to compile their results back in class into a folder labeled “soil testing in garden” this can be used in future years to compare soil quality changes.
D) Activity Two: Spread compost on garden beds. 1. Cover rules of using shovels/rakes. 2. Demonstrate how to use shovels/rakes for the purpose of composting.
69

3. Divide students into two groups. Have half the group shovel/till compost into garden beds, have the other half raking/smoothing the compost into the garden beds.
CONCLUSION:
How are people and plants similar? What, specifically, do people and plants need in food? Where do people get their vitamins/minerals? Where do plants get their
vitamins/minerals? What are the three most important nutrients plants get? What are their abbreviations? How does Nitrogen help plants? How does Phosphorus help plants? How does Potassium help plants? Is it possible to amend our garden soil if it is deficient in NPK? What can we add to
amend the soil? CREDIT FOR LESSON ADAPTATION: Jaffe, Roberta. "Soil Doctors." The Growing Classroom: GardenBased Science. South Burlington, VT: National Gardening Association, 2007. 9697. Print.
70

Seasonality in Missoula, Montana
Objectives: 1. Understand the seasonality of produce in Missoula. 2. Understand where we get produce from in the winter, either imported or preserved. 3. Learn that Missoula’s growing season is 120 days and why this is important knowledge
for growing produce. 4. Learn how to read and interpret a seed packet. 5. Work collaboratively as a group to investigate how to best grow specific produce in
Missoula while effectively interpreting and communicating this data to the class. 6. Learn how to sow seeds and transplant in the garden.
MCPS Science Standards Met: 1.1; 1.3; 3.2 Season Used: Spring Time: 40 minutes Grade Level: 5th Materials:
Seed packets per group of 34 students (need cold weather seeds and warm weather seeds)
Normal size calendar A clipboard, “5th Grade Worksheet”/calendar and pencil for each group of students (see
below for worksheet and calendar) White board and marker Seeds and transplants Shovels/trowels and watering canisters
PreLesson Preparation:
Setup work stations for groups. Stations should include: a clipboard, worksheet, pen and a seed packet.
On seed packets: circle “days to maturity”; on cold weather crop seed packets cross off the higher “days to maturity” value; on warm weather crop seed packets cross off lower “days to maturity” value.
Write on the whiteboard: Average last frost: May 23rd Average first frost: September 20th Number of days in growing season: 120 Days to Maturity: how long it takes, in days, for the the seeds to be fully grown.
ACTIVITIES:
71

A) Introduction: Let’s talk about Missoula’s seasons and growing produce. 1. As a class, discuss these questions:
a. What are some of the first plants to come up in our gardens in the spring? Chives, rhubarb, greens... b. What can we grow in the summer and fall? Everything! The bulk of our produce is ready to be harvested in the summer and fall. c. In Missoula in the winter, the ground is too cold to grow produce. So, how do we eat in the winter if we can’t grow produce outside? We buy imported food from the grocery store OR we can preserve our food.
1 What does “preserve” mean? To keep from decaying. 2 If we want to eat local food in the winter time, what are ways in which we can do that? Store, freeze, dry, can our food. 3 What foods do we get from other places? Tropical fruits. Start to notice where your food is coming from, it often has labels!
2. Talk about length of growing season in Missoula, MT and specific cold weather and warm weather crops. Use calendar to show them a visual.
a. The average date of the last frost in spring is May 23rd. The average date of the first frost in fall is September 20th. How many days total is that? 120 days. That is our window of opportunity to grow things outside without the help of a greenhouse. It is short!
Compare to other locations: Butte, Montana: 74 days Seattle, Washington: 251 days Los Angeles, CA: 365 days
b. Compare cold weather and warm weather crops. 1 Some plants like carrots, beets, greens, and spinach are “cold weather crops” and can handle cold temperatures in the early spring and late fall. Cold weather crops can be sown directly into the soil. 2 Others like tomatoes, peppers, and squash are “warm weather crops”; they like warmer temperatures and grow best in the middle of summer. Warm weather crops we start in a greenhouse to give them extra heat to start growing. After they reach a certain size, we can transplant them outdoors into the garden. This allow us to start harvesting their fruits earlier in the summer.
a What is a greenhouse? What is a greenhouse like inside? Warm, humid, sunny.
B) Activity One: How does that plant grow? Let’s look at various seed packets to determine how they’ll grow in Missoula.
1. Start by introducing the students to the information on a seed packet. The information we are going to focus on today, is the number of days to maturity. This tells us the most about when to plant our crops. The other information on our seed packets helps us to know how to best plant our crops
a. Days to Maturity/Maturity: how long it takes, in days, for the the seeds to be
72
fully grown (or fully mature). b. Planting Depth: how deep, in inches, the seeds should be under the soil. c. Seed Spacing/Thinning: “thinning” means how much space there should be between each plant as it grows. This is important because too little space and the plants will be stunted, too much space means you're not maximizing how much you could grow. d. Spacing Between Rows: how much distance, in inches or feet, there should be between the rows to optimize growth. e. Days to Germination/Germination: how long it takes, in days, for the seeds to sprout and poke through the soil. f. Direct Sow/When to plant outside: the seeds can be sown directly into the soil. This will depend on where you live and the length of the growing season. g. When to start indoors: the seeds need to be planted in a greenhouse first and then transplanted outdoors. This will depend on where you live and the length of the growing season.
2. Divide the students into groups of 34. Give each group a seed packet. (Direct Seed: Carrots, Beets, Greens/Spinach, Radishes, Transplant: Kale, Onion, Tomatoes, Squash) On their worksheets, have them answer these questions:
What is the name of your fruit or vegetable? _______ 1. Is your plant a “cold weather crop” or a “warm weather crop?” 2. Can your seeds be sown directly into the soil? Or will you need to start your seeds inside a greenhouse? 3. How many days does it take for your plant to mature? 4. To be ready to harvest your plants on July 15th, 2015, when would your seeds need to be planted? (Hint: Look at the calendar on the back of this worksheet and count backwards from July 15th)
3. Gather the groups and discuss results each group found. a. How many days does it take for your plants to mature? Which plants take the longest to grow? Which plants are fast to grow? b. Which plants can grow within Missoula’s 120 day growing season? Which cannot? c. Which groups can directly sow their seeds into the soil? Which groups need to start their seeds in the greenhouse?
*4. Optional end discussion: Why would we want to eat locally? Why would we want to preserve our produce for the winter?
a. More sustainable. Your produce has less distance to travel (less carbon from transporting food). b. You know exactly where your food is coming from versus some faraway place where you don’t know the conditions in which it was grown. c. More nutritious, fresher, tastier.
C) Activity Two: Sow Seeds 1. Have students smooth soil, get rid of big rocks, break up large chunks of soil. 2. Go over depth to plant seeds twice the width of the seed. Plant seeds.
73

3. What do seeds need to start growing? H2O. Have students water where they planted. D) Activity Three: Transplant
1. Do a demonstration transplant: a. First, choose the location in which you want to plant. b. Dig a hole as deep as plant’s soil ball and twice as wide. c. Carefully remove plant from container by squeezing sides of container while upturned in your hand. d. Fill the hole with water. e. Hold plant over hole (stem base plum with top of hole) and fill with soil. f. Pat the soil gently but firmly around the base of the plant’s stem. g. Water the plant.
2. Divide students into groups of 34. Assign roles: digger, waterer, planter. CONCLUSION:
How does seasonality affect what we can grow in Missoula? Where do we get our produce in the winter in Missoula? How long is Missoula’s growing season? Why is it important to know the length of a growing season? What kinds of information do we find on a seed packet? How deep do we plant seeds? What are the steps for planting transplants in the garden?
74
5th Grade Worksheet
What is the name of your fruit or vegetable?_______________________________ 1. Is your plant a “cold weather crop” or a “warm weather crop?” 2. Can your seeds be sown directly into the soil? Or will you need to start your seeds inside a greenhouse? 3. How many days does it take for your plant to mature? 4. To be ready to harvest your plants on July 15th, 2015, when would your seeds need to be planted? (Hint: Look at the calendar on the back of this worksheet and count backwards from July 15th)
75

APRIL MAY
1 2 3 4 1 2
5 6 7 8 9 10 11 3 4 5 6 7 8 9
12 13 14 15 16 17 18 10 11 12 13 14 15 16
19 20 21 22 23 24 25 17 18 19 20 21 22 23
26 27 28 29 30 24 25 26 27 28 29 30
31 JUNE JULY
1 2 3 4 5 6 1 2 3 4
7 8 9 10 11 12 13 5 6 7 8 9 10 11
14 15 16 17 18 19 20 12 13 14 15 16 17 18
21 22 23 24 25 26 27 19 20 21 22 23 24 25
28 29 30 26 27 28 29 30 31 AUGUST SEPTEMBER
1 1 2 3 4 5
2 3 4 5 6 7 8 6 7 8 9 10 11 12
9 10 11 12 13 14 15 13 14 15 16 17 18 19
16 17 18 19 20 21 22 20 21 22 23 24 25 26
23 24 25 26 27 28 29 27 28 29 30
30 31
76

5th Grade Worksheet Key 1. Is your plant a “cold weather crop” or a “warm weather crop?” COLD WEATHER CROPS Carrots, Beets, Salad Greens, Spinach, Radishes WARM WEATHER CROPS Kale, Tomatoes, Peppers, Summer Squash, WInter Squash, Onions 2. Can your seeds be sown directly into the soil? Or will you need to start your seeds inside a greenhouse? COLD: Directly sow WARM: Greenhouse 3. How many days does it take for your plant to mature? Carrots: Beets: Salad Greens: Spinach: Radishes: Kale: Tomatoes: Peppers: Summer Squash: Winter Squash: Onions: 4. To be ready to harvest your plants on July 15th, 2015, when would your seeds need to be planted? (Hint: Look at the calendar on the back of this worksheet and count backwards from July 15th) Carrots: Beets: Salad Greens: Spinach: Radishes: Kale: Tomatoes: Peppers: Summer Squash: Winter Squash: Onions:
77
Related Documents


