British Columbia Carpenter Apprenticeship Program Level 3 Line H 7960003574 Build Finished Staircases Competency H-8

Welcome message from author
This document is posted to help you gain knowledge. Please leave a comment to let me know what you think about it! Share it to your friends and learn new things together.
Transcript
British Columbia Carpenter Apprenticeship Program
Level 3 Line H
7960003574
Build Finished StaircasesCompetency H-8

OrderingCrown Publications, Queen’s PrinterPO Box 9452 Stn Prov Govt563 Superior St. 2nd FlrVictoria, B.C. V8W 9V7
Phone: 1 800 663-6105Fax: 250 387-1120Email: [email protected]: www.crownpub.bc.ca
Copyright © 2013 Industry Training AuthorityThis publication may not be reproduced in any form without permission by the Industry Training Authority.Contact Director, Crown Publications, Queen’s Printer at 250 356-6876.

SAFETY ADVISORYPlease note that it is always the responsibility of any person using these materials to inform him/herself about the Occupational Health and Safety Regulation pertaining to his/her work. The references to WorkSafeBC safety regulations contained within these materials do not / may not reflect the most recent Occupational Health and Safety Regulation (the current Standards and Regulation in BC can be obtained on the following website: http://www.worksafebc.com).
BC CARPEnTER APPREnTICESHIP PRogRAM—LEvEL 3 1
CoMPETEnCy H-8 LEARnIng TASk 3
Competency H-8Build Finished Staircases
ContentsObjectives . . . . . . . . . . . . . . . . . . . . . . . . . . . . . . . . . . . . . . . . . . . . . . . . . . . . . . . . . . . . . . . . . . . . . . . . . . . . . . 2
Learning Task 1: Describe Stairs and Balustrades . . . . . . . . . . . . . . . . . . . . . . . . . . . . . . . . . . . . . . . . . . . . . . 3
Self Test 1 . . . . . . . . . . . . . . . . . . . . . . . . . . . . . . . . . . . . . . . . . . . . . . . . . . . . . . . . . . . . . . . . . . . . . . . . . . . . . 17
Learning Task 2: Calculate Stair and Balustrade Dimensions . . . . . . . . . . . . . . . . . . . . . . . . . . . . . . . . . . . . 19
Self Test 2 . . . . . . . . . . . . . . . . . . . . . . . . . . . . . . . . . . . . . . . . . . . . . . . . . . . . . . . . . . . . . . . . . . . . . . . . . . . . . 40
Learning Task 3: Build Stairs and Balustrades . . . . . . . . . . . . . . . . . . . . . . . . . . . . . . . . . . . . . . . . . . . . . . . . 43
Self Test 3 . . . . . . . . . . . . . . . . . . . . . . . . . . . . . . . . . . . . . . . . . . . . . . . . . . . . . . . . . . . . . . . . . . . . . . . . . . . . . 57
Learning Task 4: Calculate Quantities of Materials . . . . . . . . . . . . . . . . . . . . . . . . . . . . . . . . . . . . . . . . . . . . 59
Self Test 4 . . . . . . . . . . . . . . . . . . . . . . . . . . . . . . . . . . . . . . . . . . . . . . . . . . . . . . . . . . . . . . . . . . . . . . . . . . . . . 63

2 BC CARPEnTER APPREnTICESHIP PRogRAM—LEvEL 3
Competency H-8Build Finished Staircases
Entrance stairs are one of the main design features in new homes. These stairs usually include an ornate balustrade and often feature complicated joinery and fine materials. The construction of these stairs takes skill and preparation.
ObjectivesWhen you have completed the Learning Tasks in this Competency, you will be able to:
• identify finishing parts of a staircase
• describe the calculation of measurements for stairs with landings
• describe floor framing techniques for “L” shaped stairs
CompetenciesWritten: “Install finished staircases”
You will be tested on your knowledge of the terminology and techniques used for the construction of finished stairs.
Practical: You will be required to calculate, lay out, cut, and assemble a finished staircase including two flights, a landing, and a balustrade.
You must achieve at least 70% on these Practical Competencies.
BC CARPEnTER APPREnTICESHIP PRogRAM—LEvEL 3 3
CoMPETEnCy H-8 LEARnIng TASk 1
Learning Task 1Describe Stairs and Balustrades
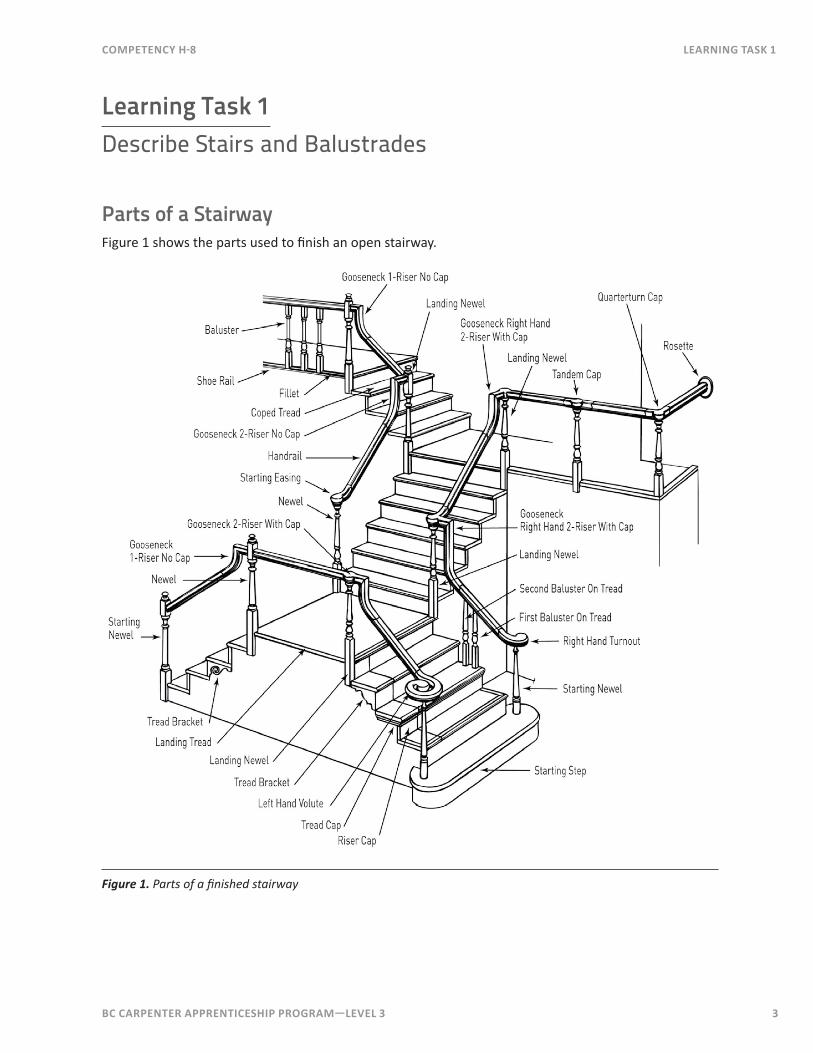
Parts of a StairwayFigure 1 shows the parts used to finish an open stairway.
Figure 1. Parts of a finished stairway
Notes
4 BC CARPEnTER APPREnTICESHIP PRogRAM—LEvEL 3
LEARnIng TASk 1 CoMPETEnCy H-8
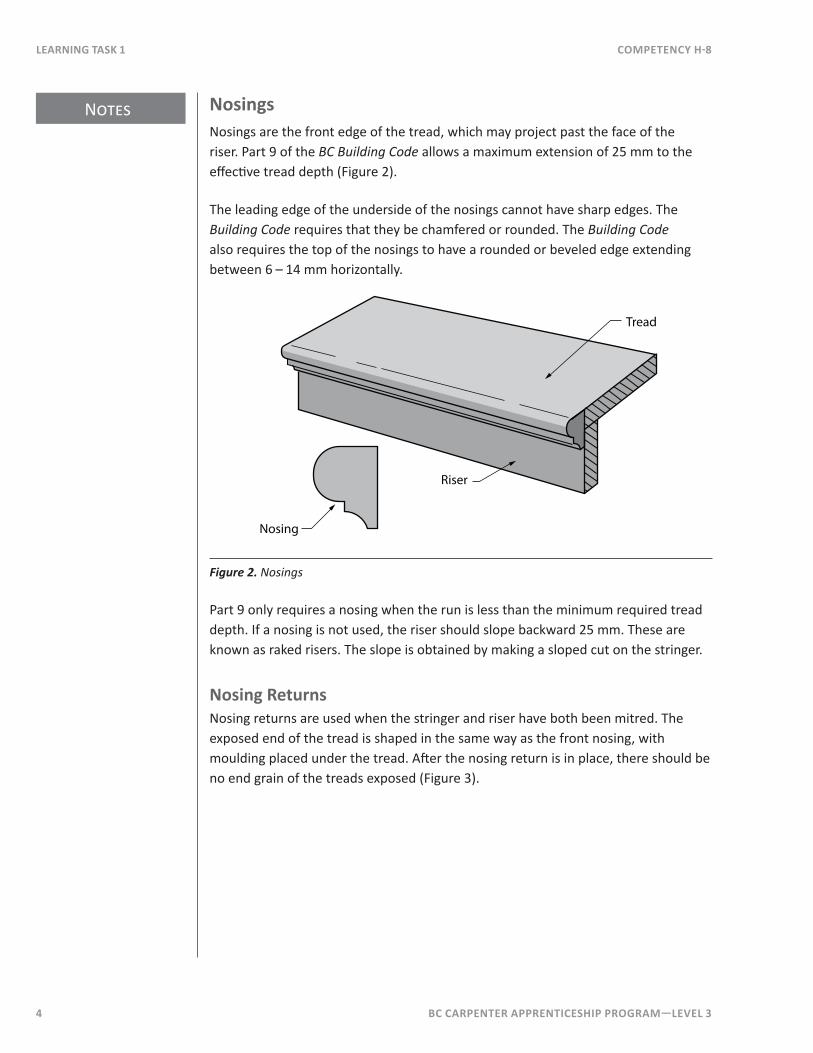
NosingsNosings are the front edge of the tread, which may project past the face of the riser. Part 9 of the BC Building Code allows a maximum extension of 25 mm to the effective tread depth (Figure 2).
The leading edge of the underside of the nosings cannot have sharp edges. The Building Code requires that they be chamfered or rounded. The Building Code also requires the top of the nosings to have a rounded or beveled edge extending between 6 – 14 mm horizontally.
Tread
Nosing
Riser
Figure 2. Nosings
Part 9 only requires a nosing when the run is less than the minimum required tread depth. If a nosing is not used, the riser should slope backward 25 mm. These are known as raked risers. The slope is obtained by making a sloped cut on the stringer.
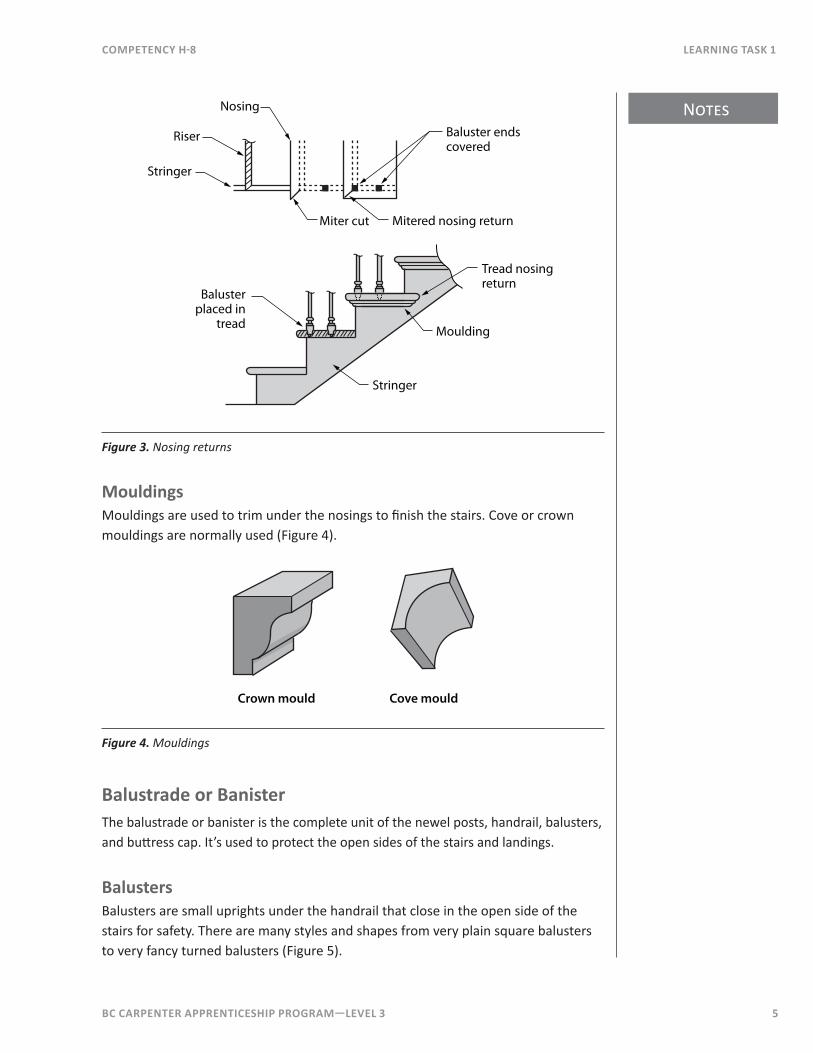
Nosing ReturnsNosing returns are used when the stringer and riser have both been mitred. The exposed end of the tread is shaped in the same way as the front nosing, with moulding placed under the tread. After the nosing return is in place, there should be no end grain of the treads exposed (Figure 3).
BC CARPEnTER APPREnTICESHIP PRogRAM—LEvEL 3 5
Notes
CoMPETEnCy H-8 LEARnIng TASk 1
Nosing
Riser
Stringer
Miter cut
Balusterplaced in
tread
Stringer
Moulding
Tread nosingreturn
Mitered nosing return
Baluster endscovered
Figure 3. Nosing returns
MouldingsMouldings are used to trim under the nosings to finish the stairs. Cove or crown mouldings are normally used (Figure 4).
Crown mould Cove mould
Figure 4. Mouldings
Balustrade or BanisterThe balustrade or banister is the complete unit of the newel posts, handrail, balusters, and buttress cap. It’s used to protect the open sides of the stairs and landings.
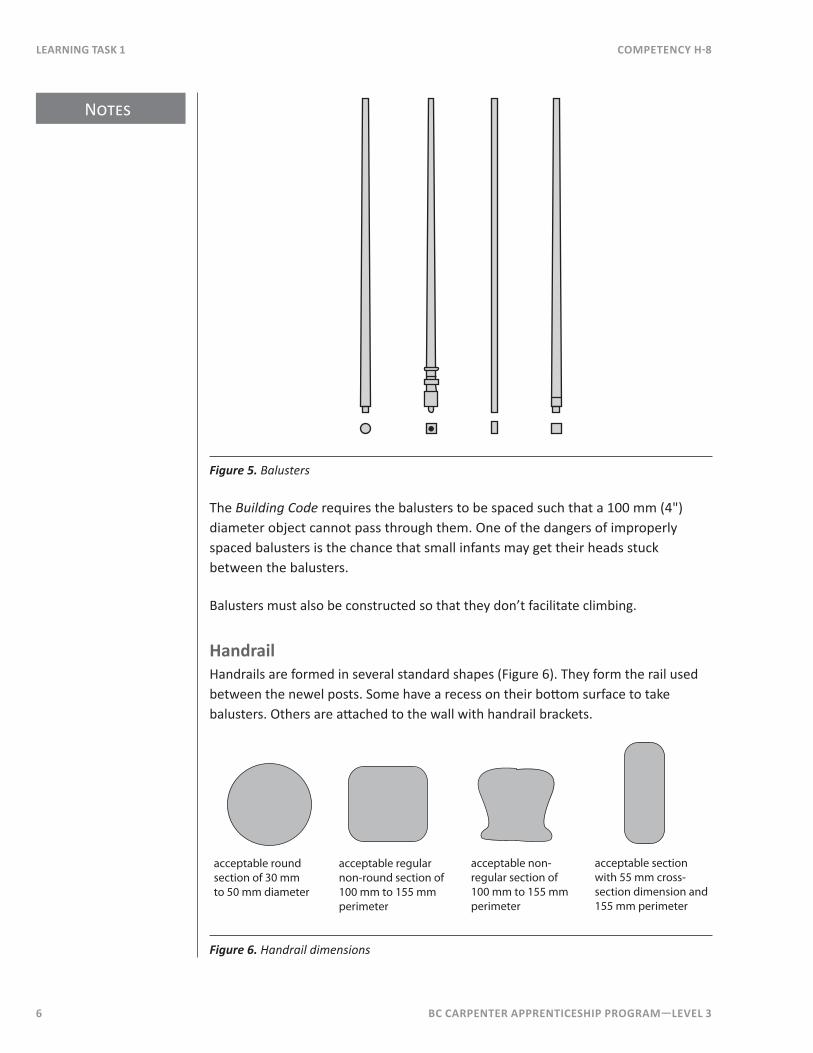
BalustersBalusters are small uprights under the handrail that close in the open side of the stairs for safety. There are many styles and shapes from very plain square balusters to very fancy turned balusters (Figure 5).
Notes
6 BC CARPEnTER APPREnTICESHIP PRogRAM—LEvEL 3
LEARnIng TASk 1 CoMPETEnCy H-8
Figure 5. Balusters
The Building Code requires the balusters to be spaced such that a 100 mm (4") diameter object cannot pass through them. One of the dangers of improperly spaced balusters is the chance that small infants may get their heads stuck between the balusters.
Balusters must also be constructed so that they don’t facilitate climbing.
HandrailHandrails are formed in several standard shapes (Figure 6). They form the rail used between the newel posts. Some have a recess on their bottom surface to take balusters. Others are attached to the wall with handrail brackets.
acceptable round section of 30 mm to 50 mm diameter
acceptable regular non-round section of 100 mm to 155 mm perimeter
acceptable non-regular section of 100 mm to 155 mm perimeter
acceptable section with 55 mm cross-section dimension and 155 mm perimeter
Figure 6. Handrail dimensions

BC CARPEnTER APPREnTICESHIP PRogRAM—LEvEL 3 7
Notes
CoMPETEnCy H-8 LEARnIng TASk 1
Materials used as handrails must be continuously graspable except where interrupted by newels at changes in direction. There must be at least 50 mm (2") clearance between the handrail and wall. A gooseneck can be used as an alternative to the sloping handrail stopping at a newel post. It can also be used for a handrail that runs over the newel post.
BCBC requires minimum stairway widths. This required width is not considered to be reduced as long as the handrails don’t project more than 100 mm (4") into the stairway.
Buttress or String CapsButtress or string caps can be used under the balusters. They’re also known as shoe rails or base rails. They’re shaped to take the end of the baluster and are used in railings at the landings or on top of the stringers (Figure 7).
Figure 7. Buttress or string cap
FiletsFilets are shaped to fit between the balusters under the handrail and on top of the buttress cap as shown in Figure 8.
Filet
Buttress cap(String cap)
Figure 8. Filet placed in a buttress cap
Notes
8 BC CARPEnTER APPREnTICESHIP PRogRAM—LEvEL 3
LEARnIng TASk 1 CoMPETEnCy H-8
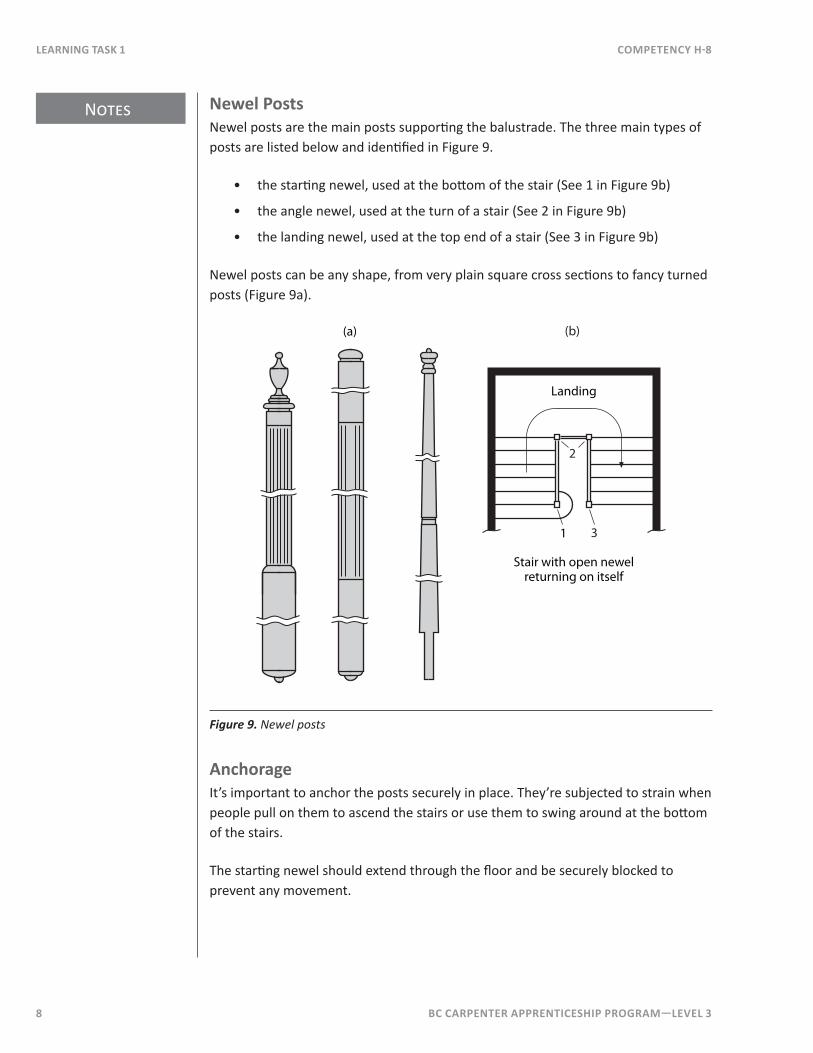
Newel PostsNewel posts are the main posts supporting the balustrade. The three main types of posts are listed below and identified in Figure 9.
• the starting newel, used at the bottom of the stair (See 1 in Figure 9b)
• the angle newel, used at the turn of a stair (See 2 in Figure 9b)
• the landing newel, used at the top end of a stair (See 3 in Figure 9b)
Newel posts can be any shape, from very plain square cross sections to fancy turned posts (Figure 9a).
(a)
Landing
Stair with open newelreturning on itself
1
2
3
(b)
Figure 9. Newel posts
AnchorageIt’s important to anchor the posts securely in place. They’re subjected to strain when people pull on them to ascend the stairs or use them to swing around at the bottom of the stairs.
The starting newel should extend through the floor and be securely blocked to prevent any movement.
BC CARPEnTER APPREnTICESHIP PRogRAM—LEvEL 3 9
Notes
CoMPETEnCy H-8 LEARnIng TASk 1
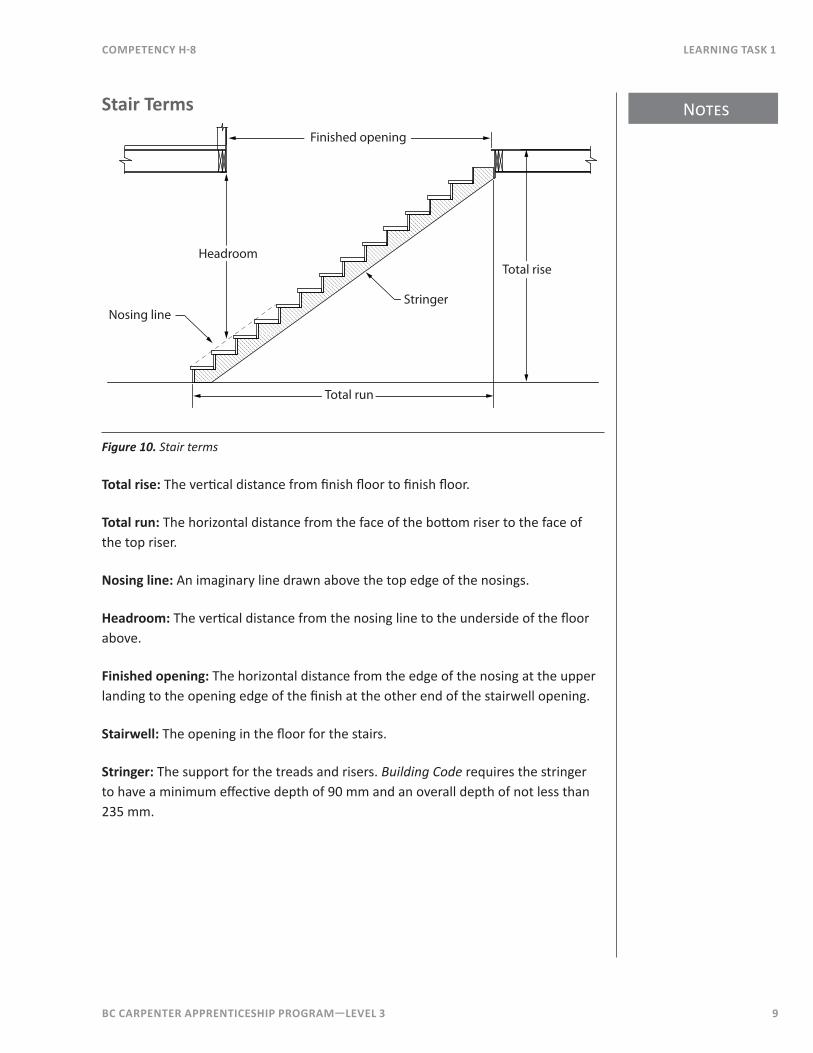
Stair TermsFinished opening
Headroom
Nosing lineStringer
Total run
Total rise
Figure 10. Stair terms
Total rise: The vertical distance from finish floor to finish floor.
Total run: The horizontal distance from the face of the bottom riser to the face of the top riser.
nosing line: An imaginary line drawn above the top edge of the nosings.
Headroom: The vertical distance from the nosing line to the underside of the floor above.
Finished opening: The horizontal distance from the edge of the nosing at the upper landing to the opening edge of the finish at the other end of the stairwell opening.
Stairwell: The opening in the floor for the stairs.
Stringer: The support for the treads and risers. Building Code requires the stringer to have a minimum effective depth of 90 mm and an overall depth of not less than 235 mm.
Notes
10 BC CARPEnTER APPREnTICESHIP PRogRAM—LEvEL 3
LEARnIng TASk 1 CoMPETEnCy H-8
Run
Rise
Riser board
Tread
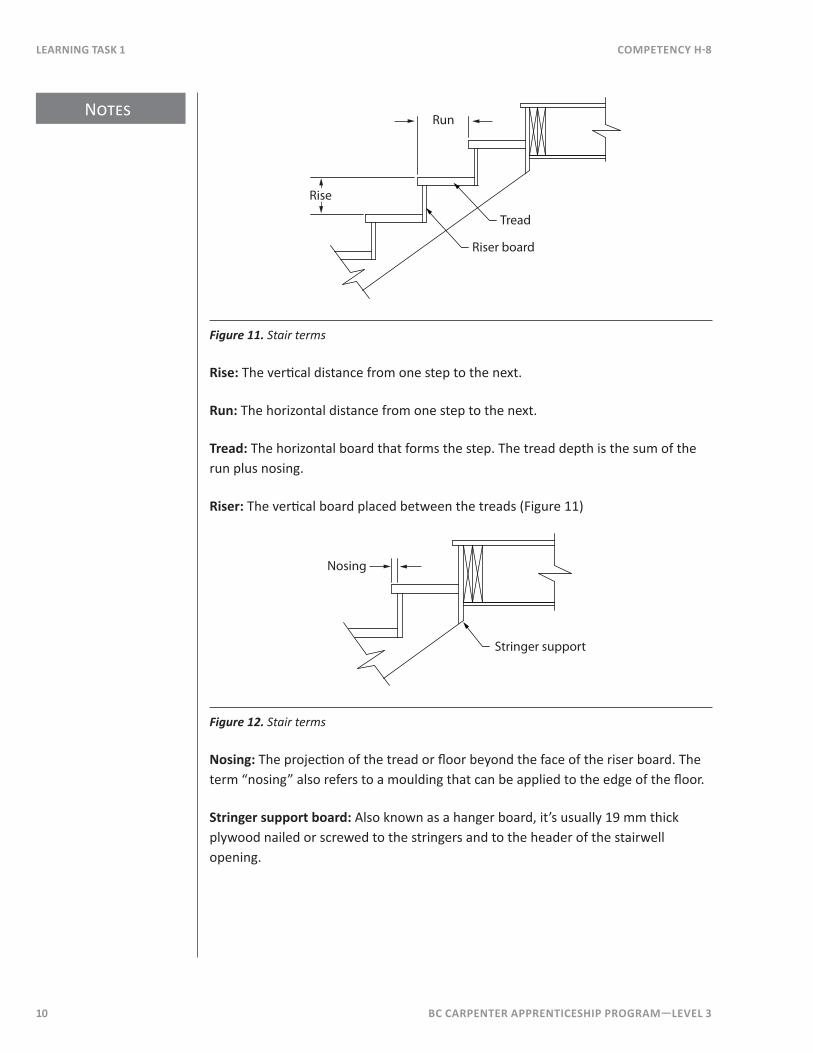
Figure 11. Stair terms
Rise: The vertical distance from one step to the next.
Run: The horizontal distance from one step to the next.
Tread: The horizontal board that forms the step. The tread depth is the sum of the run plus nosing.
Riser: The vertical board placed between the treads (Figure 11)
Nosing
Stringer support
Figure 12. Stair terms
nosing: The projection of the tread or floor beyond the face of the riser board. The term “nosing” also refers to a moulding that can be applied to the edge of the floor.
Stringer support board: Also known as a hanger board, it’s usually 19 mm thick plywood nailed or screwed to the stringers and to the header of the stairwell opening.
BC CARPEnTER APPREnTICESHIP PRogRAM—LEvEL 3 11
Notes
CoMPETEnCy H-8 LEARnIng TASk 1
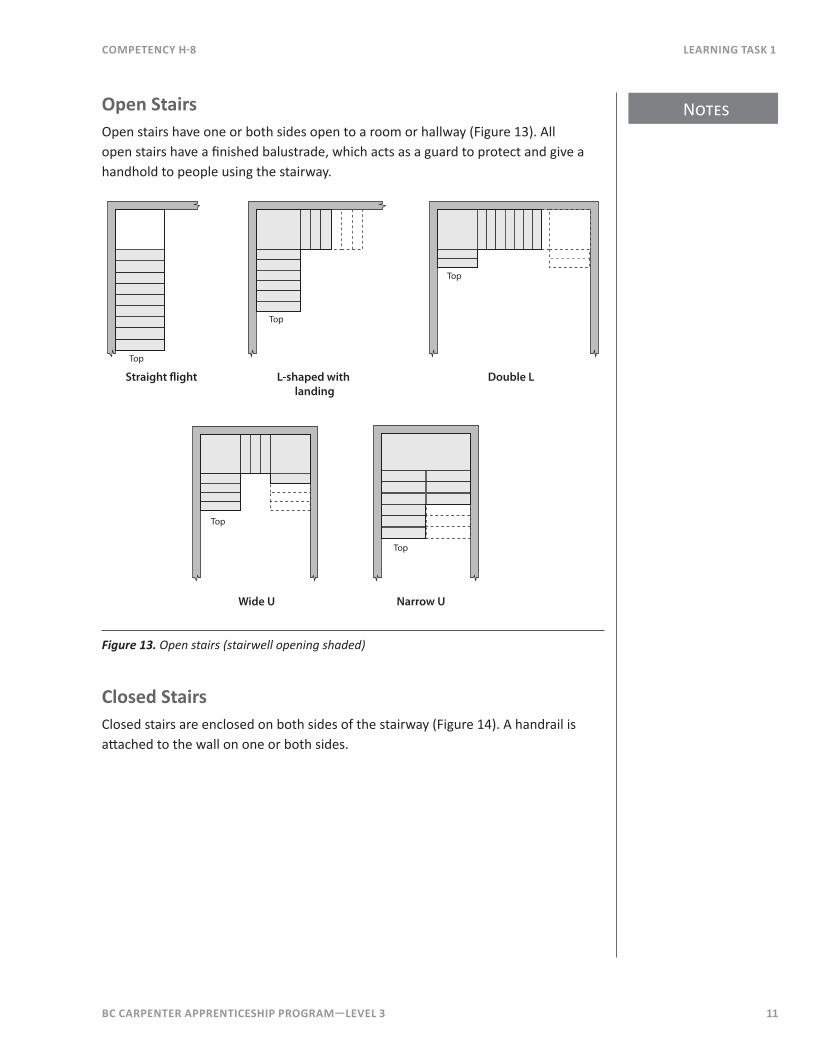
Open StairsOpen stairs have one or both sides open to a room or hallway (Figure 13). All open stairs have a finished balustrade, which acts as a guard to protect and give a handhold to people using the stairway.
Straight �ight L-shaped with landing
Double L
Narrow UWide U
Top
Top
Top
Top
Top
Figure 13. Open stairs (stairwell opening shaded)
Closed StairsClosed stairs are enclosed on both sides of the stairway (Figure 14). A handrail is attached to the wall on one or both sides.
Notes
12 BC CARPEnTER APPREnTICESHIP PRogRAM—LEvEL 3
LEARnIng TASk 1 CoMPETEnCy H-8
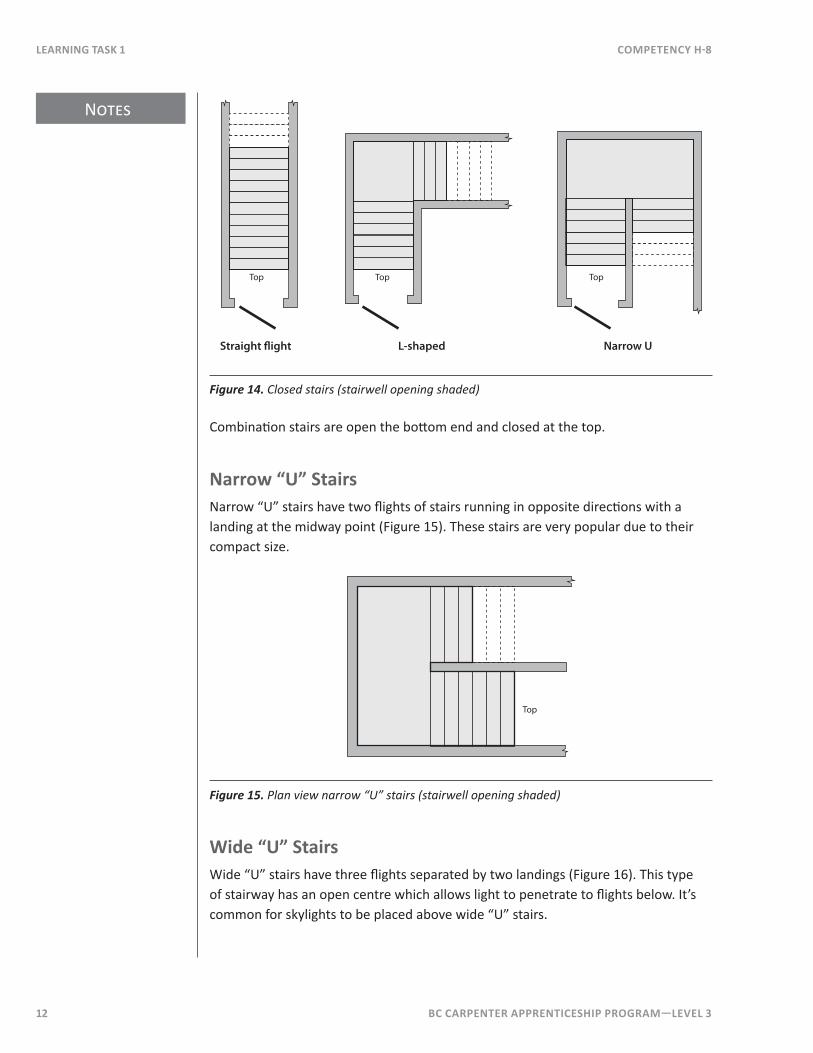
Straight �ight L-shaped Narrow U
Top Top Top
Figure 14. Closed stairs (stairwell opening shaded)
Combination stairs are open the bottom end and closed at the top.
narrow “U” StairsNarrow “U” stairs have two flights of stairs running in opposite directions with a landing at the midway point (Figure 15). These stairs are very popular due to their compact size.
Top
Figure 15. Plan view narrow “U” stairs (stairwell opening shaded)
Wide “U” StairsWide “U” stairs have three flights separated by two landings (Figure 16). This type of stairway has an open centre which allows light to penetrate to flights below. It’s common for skylights to be placed above wide “U” stairs.
BC CARPEnTER APPREnTICESHIP PRogRAM—LEvEL 3 13
Notes
CoMPETEnCy H-8 LEARnIng TASk 1
Top
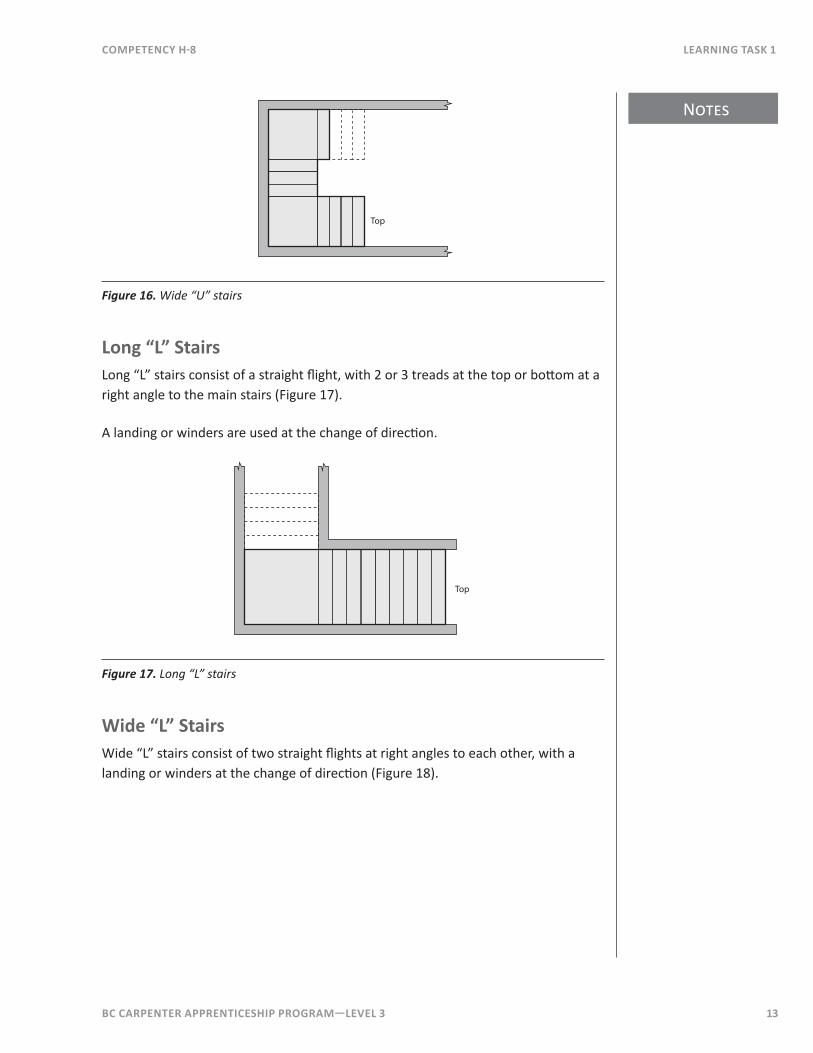
Figure 16. Wide “U” stairs
Long “L” StairsLong “L” stairs consist of a straight flight, with 2 or 3 treads at the top or bottom at a right angle to the main stairs (Figure 17).
A landing or winders are used at the change of direction.
Top
Figure 17. Long “L” stairs
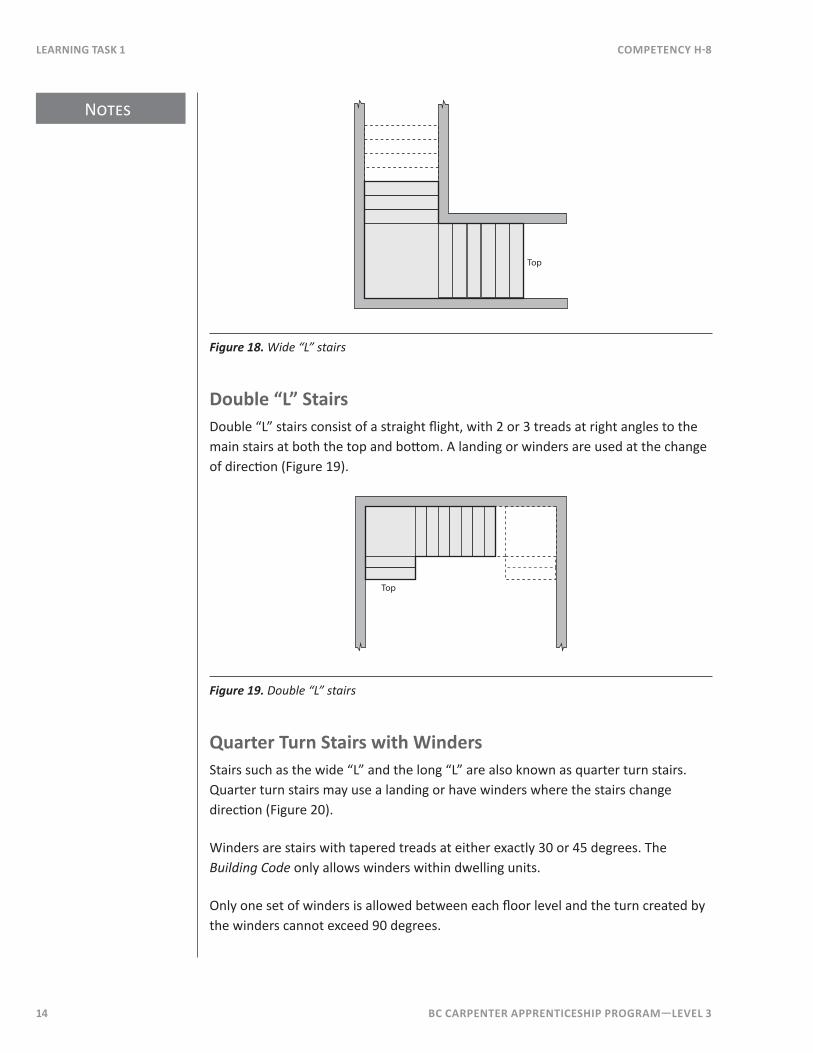
Wide “L” StairsWide “L” stairs consist of two straight flights at right angles to each other, with a landing or winders at the change of direction (Figure 18).
Notes
14 BC CARPEnTER APPREnTICESHIP PRogRAM—LEvEL 3
LEARnIng TASk 1 CoMPETEnCy H-8
Top
Figure 18. Wide “L” stairs
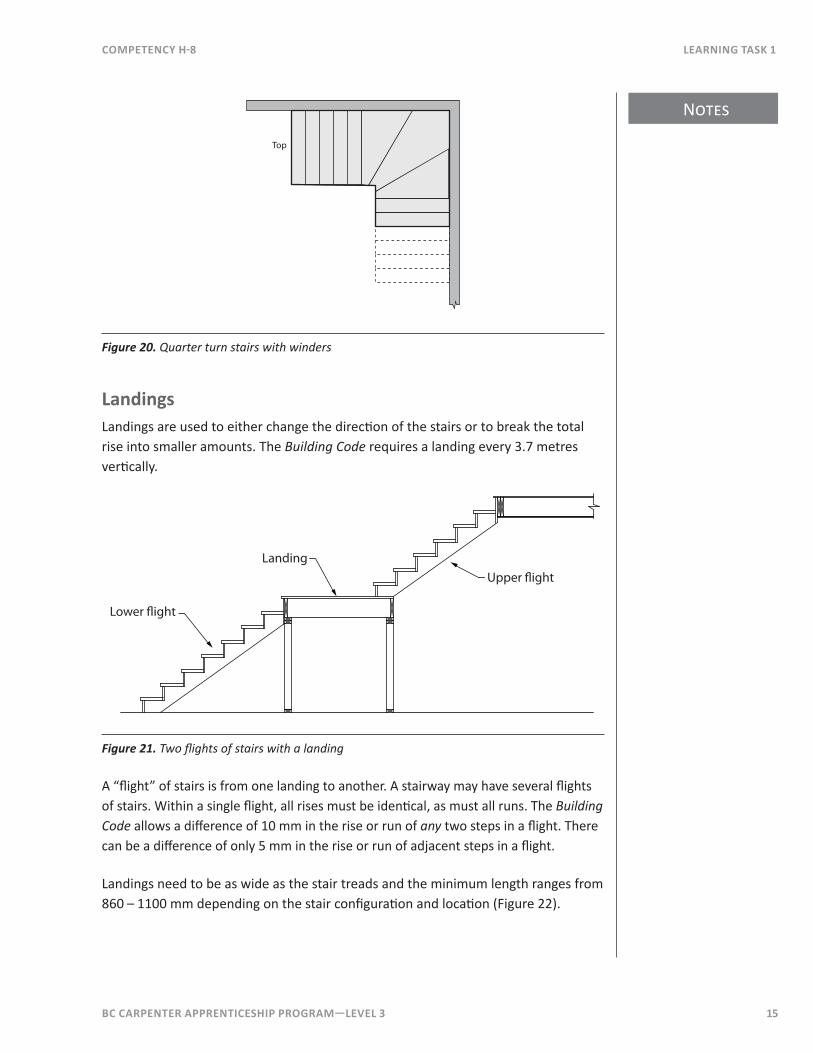
Double “L” StairsDouble “L” stairs consist of a straight flight, with 2 or 3 treads at right angles to the main stairs at both the top and bottom. A landing or winders are used at the change of direction (Figure 19).
Top
Figure 19. Double “L” stairs
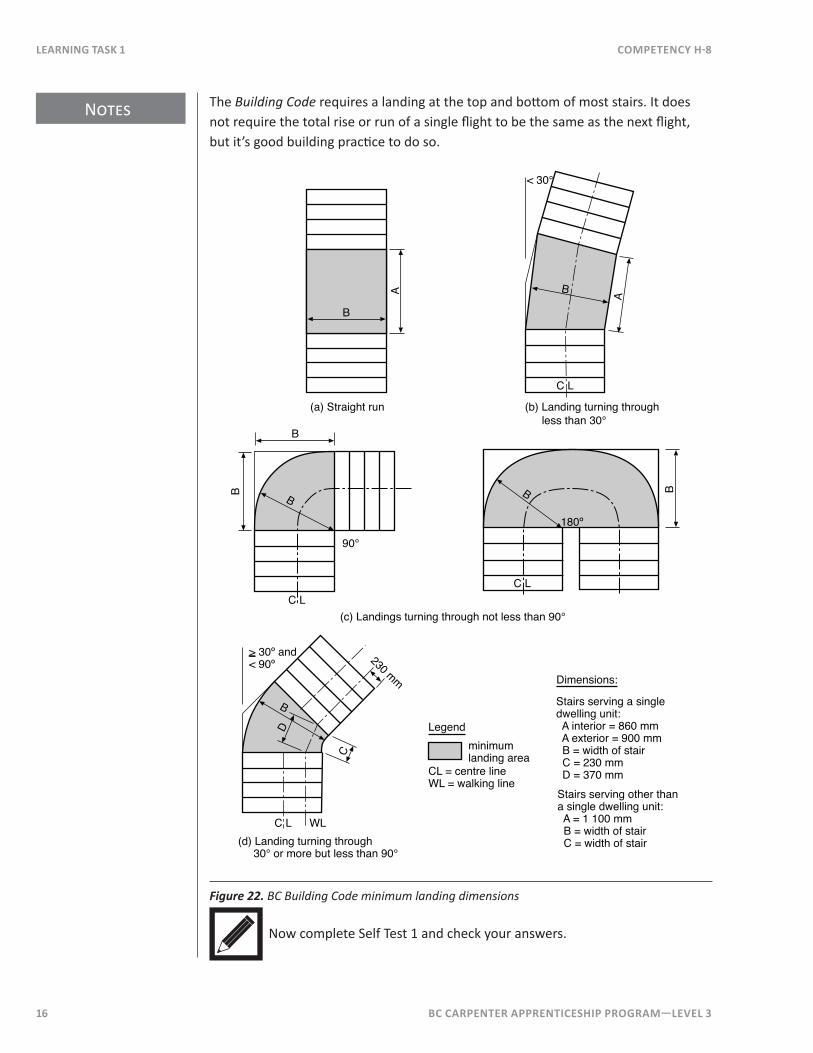
Quarter Turn Stairs with WindersStairs such as the wide “L” and the long “L” are also known as quarter turn stairs. Quarter turn stairs may use a landing or have winders where the stairs change direction (Figure 20).
Winders are stairs with tapered treads at either exactly 30 or 45 degrees. The Building Code only allows winders within dwelling units.
Only one set of winders is allowed between each floor level and the turn created by the winders cannot exceed 90 degrees.
BC CARPEnTER APPREnTICESHIP PRogRAM—LEvEL 3 15
Notes
CoMPETEnCy H-8 LEARnIng TASk 1
Top
Figure 20. Quarter turn stairs with winders
LandingsLandings are used to either change the direction of the stairs or to break the total rise into smaller amounts. The Building Code requires a landing every 3.7 metres vertically.
Lower �ight
LandingUpper �ight
Figure 21. Two flights of stairs with a landing
A “flight” of stairs is from one landing to another. A stairway may have several flights of stairs. Within a single flight, all rises must be identical, as must all runs. The Building Code allows a difference of 10 mm in the rise or run of any two steps in a flight. There can be a difference of only 5 mm in the rise or run of adjacent steps in a flight.
Landings need to be as wide as the stair treads and the minimum length ranges from 860 – 1100 mm depending on the stair configuration and location (Figure 22).
Notes
16 BC CARPEnTER APPREnTICESHIP PRogRAM—LEvEL 3
LEARnIng TASk 1 CoMPETEnCy H-8
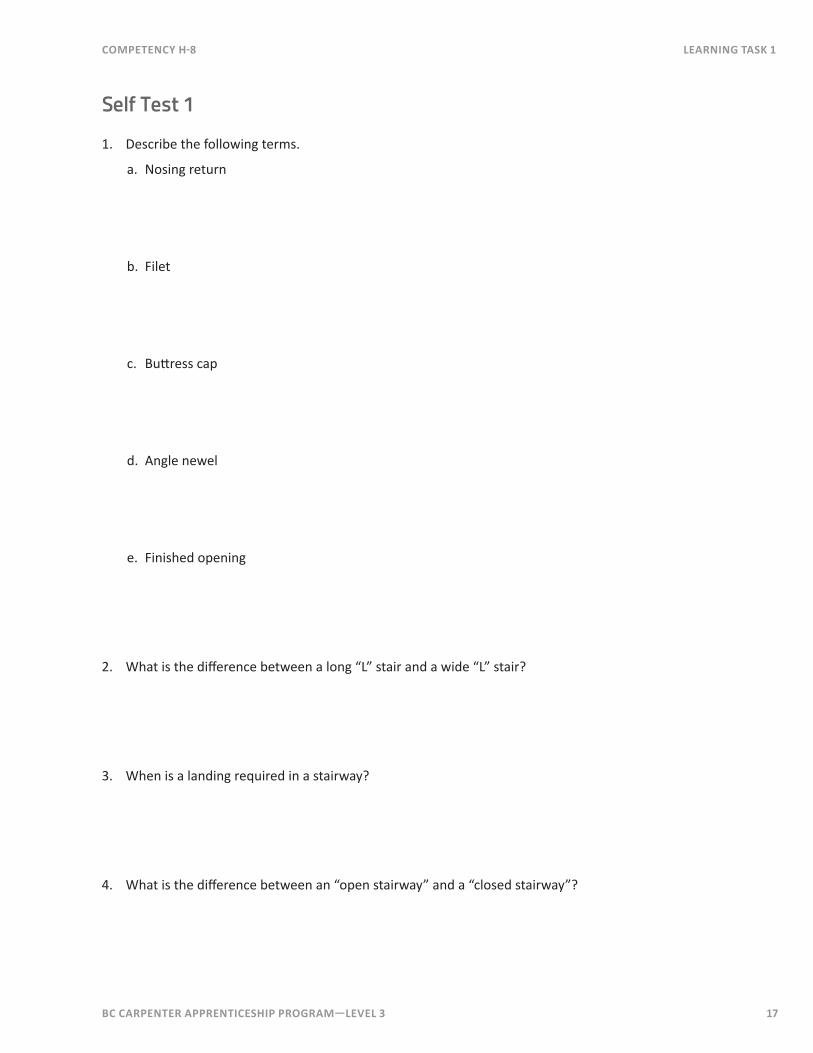
The Building Code requires a landing at the top and bottom of most stairs. It does not require the total rise or run of a single flight to be the same as the next flight, but it’s good building practice to do so.
B
A(a) Straight run
< 30°
B
A
C L
(b) Landing turning through less than 30°
B
C L
B
(c) Landings turning through not less than 90°
> 30º and < 90º
B
D
C
C L WL
230 mm
(d) Landing turning through 30° or more but less than 90°
B
B B
C L
90°
minimumlanding area
Dimensions:
Stairs serving a single dwelling unit: A interior = 860 mm A exterior = 900 mm
B = width of stair C = 230 mm D = 370 mm Stairs serving other than a single dwelling unit:A = 1 100 mm
B = width of stair C = width of stair
CL = centre line WL = walking line
Legend
180º
Figure 22. BC Building Code minimum landing dimensions
Now complete Self Test 1 and check your answers.
BC CARPEnTER APPREnTICESHIP PRogRAM—LEvEL 3 17
CoMPETEnCy H-8 LEARnIng TASk 1
Self Test 1
1. Describe the following terms.
a. Nosing return
b. Filet
c. Buttress cap
d. Angle newel
e. Finished opening
2. What is the difference between a long “L” stair and a wide “L” stair?
3. When is a landing required in a stairway?
4. What is the difference between an “open stairway” and a “closed stairway”?

18 BC CARPEnTER APPREnTICESHIP PRogRAM—LEvEL 3
LEARnIng TASk 1 CoMPETEnCy H-8
5. Using the BC Building Code (Article 9.8.4.6), what is the maximum allowed reduction in tread depth by rounding of the leading edge?
6. What is the minimum landing depth for an L-shaped interior stair serving a dwelling unit?
BC CARPEnTER APPREnTICESHIP PRogRAM—LEvEL 3 19
Notes
CoMPETEnCy H-8 LEARnIng TASk 2
Learning Task 2Calculate Stair and Balustrade Dimensions
Units of MeasurementThe construction industry uses both metric and imperial units of measurement. Stair calculations are easily done in both systems. In this Learning Task, the stair calculations are done using metric measurements only. Imperial dimensions are shown because most residential drawings are drawn in feet and inches. When calculating in metric, all imperial dimensions are first converted to millimetres.
Stair DimensionsSafety of the user is the main concern when designing and building stairs. If the rise is too high and the run too short, the stairs will be steep. Conversely, if the rise is too low and the run too long, the stairs will be very flat. Both situations are dangerous. Improperly designed or built stairs can cause a tripping hazard.
The rise and the run are the primary stair dimensions restricted by the Building Code. There are also Code requirements for tread depth, nosing, stair width, and headroom.
RiseThe maximum rise for private stairs designed using Part 9 of the Building Code is 200 mm and the minimum rise is 125 mm. The most comfortable rise is about 180 mm (7"). Refer to the Building Code for service and public stairs. The maximum rise for stairs designed using Part 3 of the Building Code is 180 mm and the minimum rise is 125 mm. Rounding up the rise during the calculation process can create a back slope.
RunThe maximum run for private stairs is 355 mm and the minimum run is 210 mm. The most comfortable run is about 250 mm (10"). Refer to the Building Code for service and public stairs. The minimum run for stairs designed using Part 3 of the Building Code is 280 mm.
Unit of BridgeThe hypotenuse of the rise and run triangle is referred to as the “unit of bridge”. It’s used to calculate stringer length. It can also be used to layout stringers or check stringer layout for “creep”. Creep is the increase in stringer length caused by inaccurate stepping off. “Stepping off” is the process of marking out rises and runs on a stringer. A dull pencil, for example, can add an extra 1 – 2 mm per step.
Notes
20 BC CARPEnTER APPREnTICESHIP PRogRAM—LEvEL 3
LEARnIng TASk 2 CoMPETEnCy H-8
A stringer of 16 rises could be out by 16 × 2 mm or 32 mm overall, a significant error. This error can be eliminated by checking the bridge units.
Tread DepthThe minimum depth of the tread must be at least 235 mm (9¼") for private stairs. The minimum tread depth is 25 mm deeper than the minimum run of 210 mm. Presumably, this is so that even large feet will fit on the tread when a 25 mm nosing is created.
The maximum depth of tread is the same as the maximum run of 355 mm (14") , so for all runs over 235 mm, no nosing is required. No nosing is allowed at maximum run. Refer to the Building Code for tread and nosing requirements for other stairs.
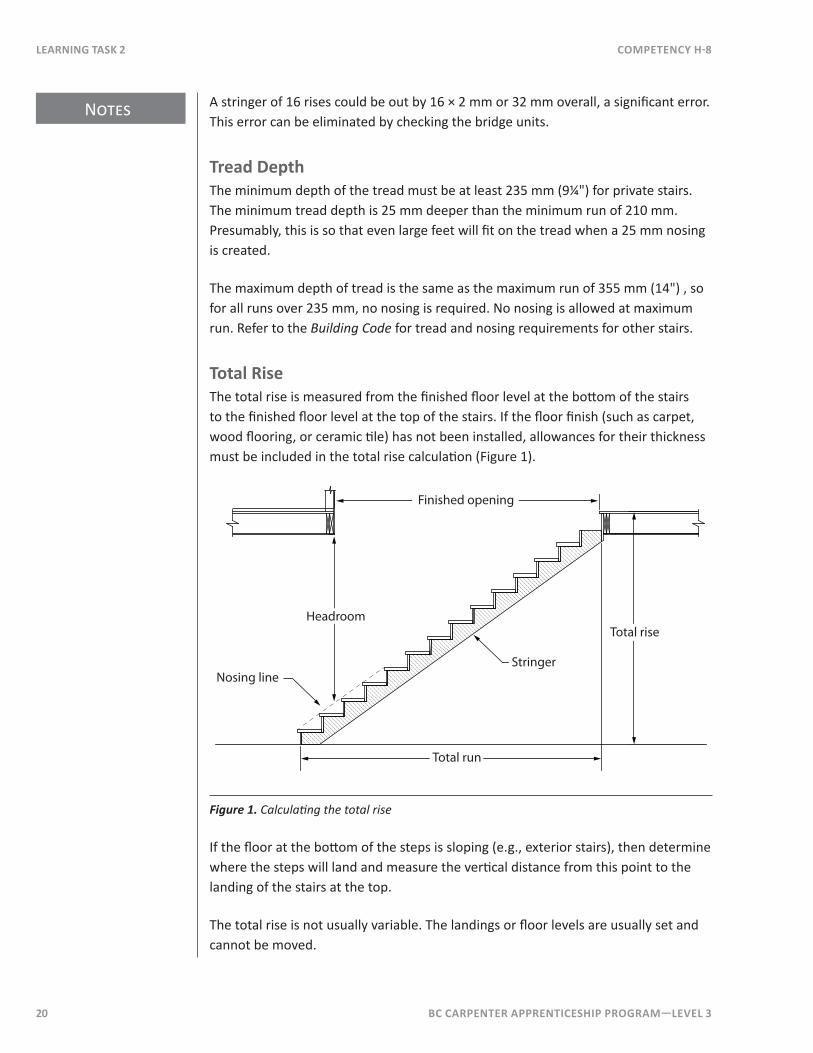
Total RiseThe total rise is measured from the finished floor level at the bottom of the stairs to the finished floor level at the top of the stairs. If the floor finish (such as carpet, wood flooring, or ceramic tile) has not been installed, allowances for their thickness must be included in the total rise calculation (Figure 1).
Finished opening
Headroom
Nosing lineStringer
Total run
Total rise
Figure 1. Calculating the total rise
If the floor at the bottom of the steps is sloping (e.g., exterior stairs), then determine where the steps will land and measure the vertical distance from this point to the landing of the stairs at the top.
The total rise is not usually variable. The landings or floor levels are usually set and cannot be moved.
BC CARPEnTER APPREnTICESHIP PRogRAM—LEvEL 3 21
Notes
CoMPETEnCy H-8 LEARnIng TASk 2
Desired RiseStair dimensions are often omitted in residential construction drawings. The stair calculations are left up to the carpenter. This is because, during construction, the total rise may differ slightly from the dimensions shown on the drawings.
The first step in calculating the stair dimensions is to decide on a “desired rise”. The desired rise must be within the minimum and maximum allowed by the Building Code.
Usually the designer will have allowed only the minimum space for the stairs. This means that the desired rise will be very close to the maximum allowed by the Code since this reduces the number of risers and treads (the fewer treads, the shorter the stair). However, if comfort is the main criteria, rather than space, use 180 mm (7") as the desired rise.
number of RisersTo find the number of risers for the stairway, the total rise is divided by the desired rise (180 mm) to give the number of risers. The result is usually a decimal fraction. It must be rounded off to a whole number because there cannot be a partial step.
The number is rounded mathematically if working to a desired rise chosen for comfort. If the maximum rise was used as the desired rise, the decimal fraction must always be rounded up. Rounding down would produce a rise greater than the maximum allowed by the Code.
Example:
Total rise = 2650 mm
Desired rise = 180 mm
2650 ÷ 180 = 14.72 risers
rounded off = 15 risers
Calculating RiseOnce you’ve calculated the total number of risers, divide the total rise by this number to get the actual rise. The rise is an exact measurement and should only be rounded to the nearest millimetre.
Example:
2650 ÷ 15 = 176.67 mm
rounded off = 177 mm
Notes
22 BC CARPEnTER APPREnTICESHIP PRogRAM—LEvEL 3
LEARnIng TASk 2 CoMPETEnCy H-8
Stair Proportioning FormulasStair proportion rules are used to design stairs that are comfortable to use. Three different rules were developed over 50 years ago but they still apply today. These rules were based on the imperial system of measurement. They are:
• The rise plus the run = 17 – 18" (430 – 460 mm)
• Twice the rise plus the run = 24 – 25" (610 – 635 mm)
• The rise times the run = 72" (45 000 – 48 000 mm)
The first rule is the most common. Note that the most comfortable rise of 7" plus the most comfortable run of 10" meets this rule perfectly.
Note that these values are approximate and that the rules are not requirements of the Building Code.
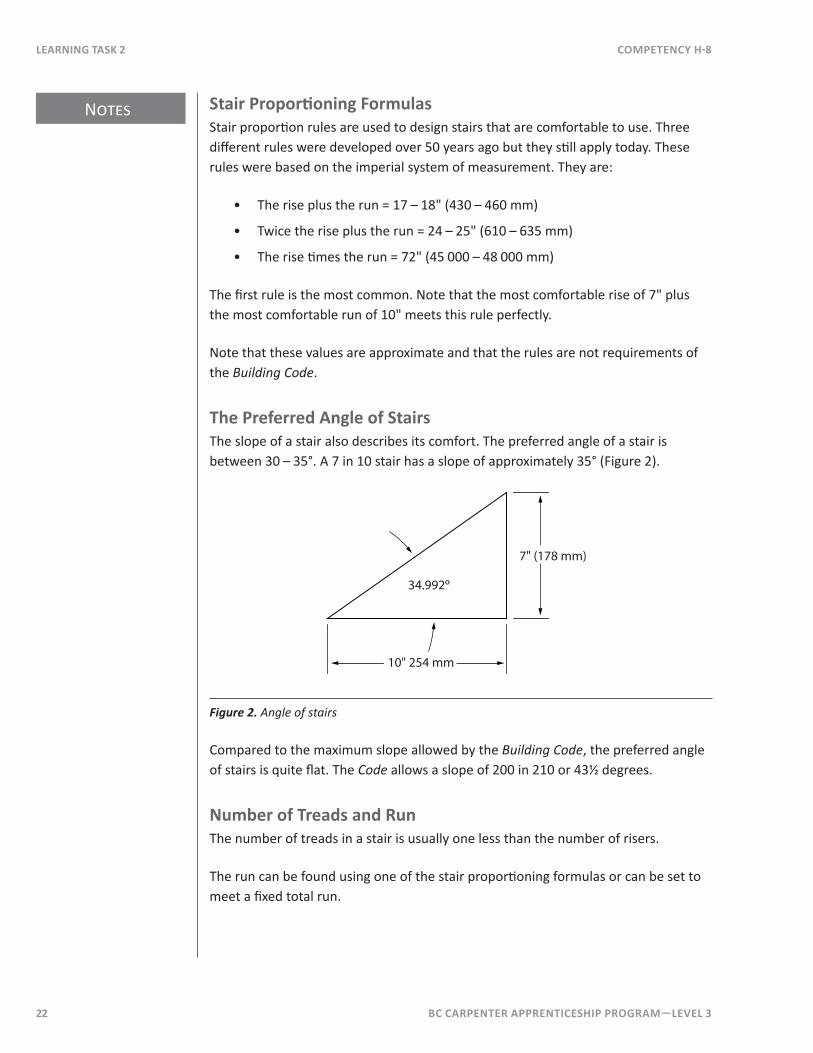
The Preferred Angle of StairsThe slope of a stair also describes its comfort. The preferred angle of a stair is between 30 – 35°. A 7 in 10 stair has a slope of approximately 35° (Figure 2).
34.992º
10" 254 mm
7" (178 mm)
Figure 2. Angle of stairs
Compared to the maximum slope allowed by the Building Code, the preferred angle of stairs is quite flat. The Code allows a slope of 200 in 210 or 43½ degrees.
number of Treads and RunThe number of treads in a stair is usually one less than the number of risers.
The run can be found using one of the stair proportioning formulas or can be set to meet a fixed total run.
BC CARPEnTER APPREnTICESHIP PRogRAM—LEvEL 3 23
Notes
CoMPETEnCy H-8 LEARnIng TASk 2
In residential construction, the total run is usually open and the run is found using one of the proportioning rules.
The first rule, rise plus the run = 17 – 18" (430 – 460 mm), is the simplest and most often used. However, which rule is used, and whether to use the low or high end of the range, is the choice of the carpenter.
Calculating the RunUsing the proportion rules, the run can be calculated.
Example:
Rise plus the run = 450 mm
Number of risers = 15
Number of treads = 14
Rise = 177 mm
450 mm minus 177 = 273 mm
Run = 273 mm
For comparison, the run is found using the other two stair proportioning formulas:
Twice the rise plus the run = 635 mm
Rise = 177 mm
635 mm - (2 × 177 mm) = 281 mm
Run = 281 mm
The rise times run = 48 000 mm
Rise = 177 mm
48 000 ÷ 177 = 271 mm
Run = 271 mm
The resulting run from each of the three calculations meets the Building Code requirements under Part 9 and would produce a comfortable stair. Only the middle rule meets Part 3 requirements.
Stairwell Rough OpeningThe length of the stairwell rough opening must be calculated before framing the opening in the floor. The length of the rough opening is dependent on the headroom required, floor thickness, the rise, and the run.
Notes
24 BC CARPEnTER APPREnTICESHIP PRogRAM—LEvEL 3
LEARnIng TASk 2 CoMPETEnCy H-8
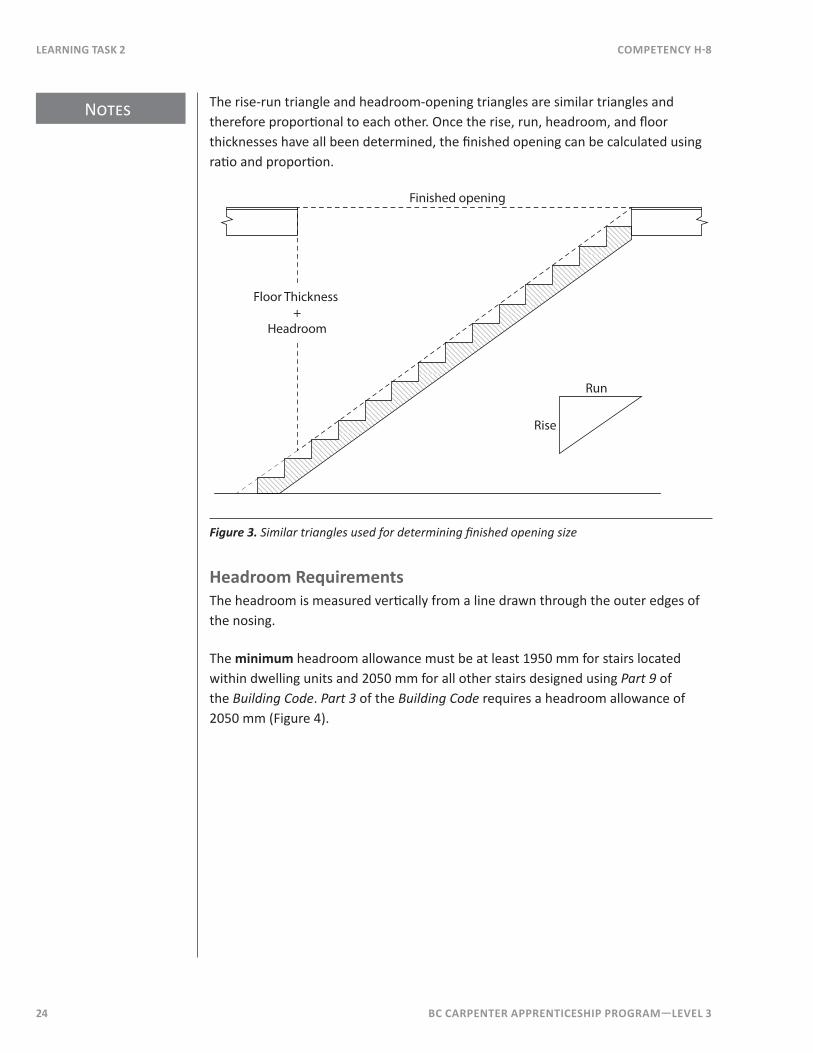
The rise-run triangle and headroom-opening triangles are similar triangles and therefore proportional to each other. Once the rise, run, headroom, and floor thicknesses have all been determined, the finished opening can be calculated using ratio and proportion.
Run
Rise
Finished opening
Floor Thickness +
Headroom
Figure 3. Similar triangles used for determining finished opening size
Headroom RequirementsThe headroom is measured vertically from a line drawn through the outer edges of the nosing.
The minimum headroom allowance must be at least 1950 mm for stairs located within dwelling units and 2050 mm for all other stairs designed using Part 9 of the Building Code. Part 3 of the Building Code requires a headroom allowance of 2050 mm (Figure 4).

BC CARPEnTER APPREnTICESHIP PRogRAM—LEvEL 3 25
Notes
CoMPETEnCy H-8 LEARnIng TASk 2
Parallel lines
A
Figure 4. Headroom requirements
Although 1950 mm and 2050 mm headrooms are permitted for Part 9 buildings, 2100 mm or more should be allowed where possible.
Finished openingThe finished floor opening is the horizontal distance from the edge of the nosing at the landing to the face of the finished wall at the other end of the opening (Figure 1). The rough opening must be greater than the finished opening. An allowance of 75 mm (3") is used to make room for the amount of nosing, the riser thickness, and the finishes.
Rough OpeningTo calculate the length of the rough opening for the stairwell of a straight flight of stairs, the following formula is used:
Rough Opening
UHeadroom Floor
nit run
Unit rise= × + TThickness( )
+ 75 mm
The “floor thickness” is the sum of the ceiling finish, the joist depth, the sub-floor thickness, and the finished floor thickness.
The above formula is based on the two similar triangles:
Unit run
Unit rise
Finished opening
Headroom+floo=
rr thickness( )
Notes
26 BC CARPEnTER APPREnTICESHIP PRogRAM—LEvEL 3
LEARnIng TASk 2 CoMPETEnCy H-8
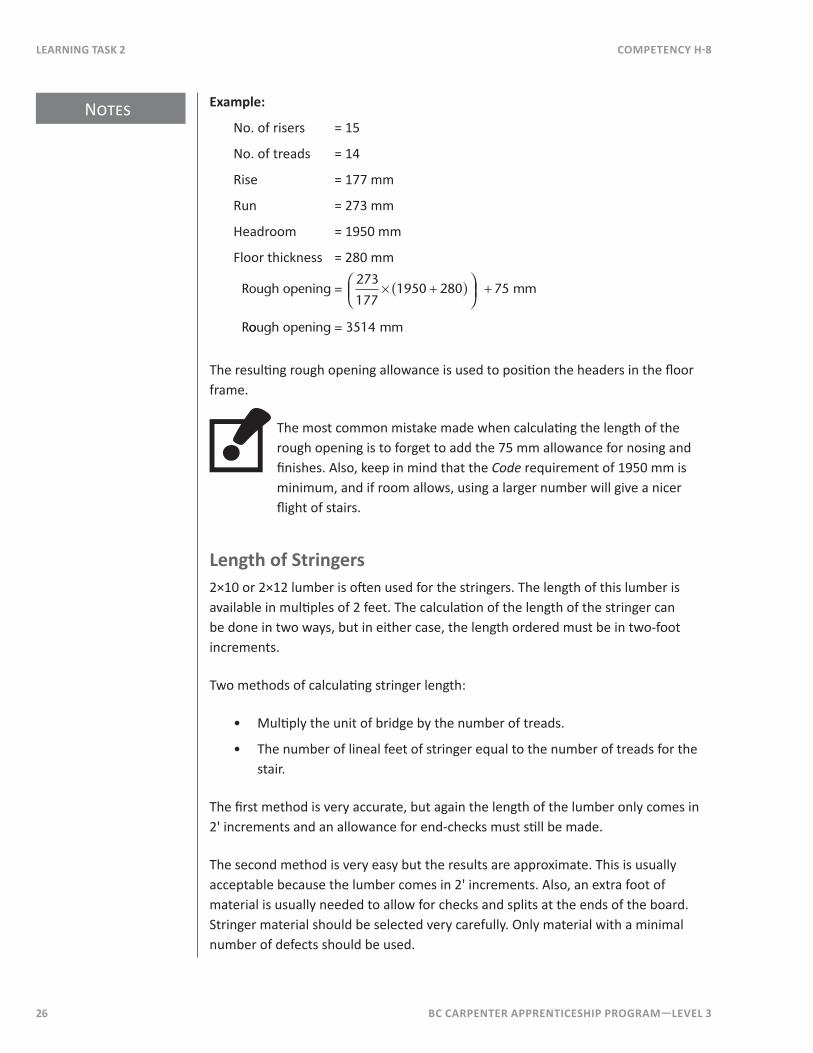
Example:
No. of risers = 15
No. of treads = 14
Rise = 177 mm
Run = 273 mm
Headroom = 1950 mm
Floor thickness = 280 mm
Rough opening = mm
R
273
1771950 280 75× + +( )
oough opening = 3514 mm
The resulting rough opening allowance is used to position the headers in the floor frame.
The most common mistake made when calculating the length of the rough opening is to forget to add the 75 mm allowance for nosing and finishes. Also, keep in mind that the Code requirement of 1950 mm is minimum, and if room allows, using a larger number will give a nicer flight of stairs.
Length of Stringers2×10 or 2×12 lumber is often used for the stringers. The length of this lumber is available in multiples of 2 feet. The calculation of the length of the stringer can be done in two ways, but in either case, the length ordered must be in two-foot increments.
Two methods of calculating stringer length:
• Multiply the unit of bridge by the number of treads.
• The number of lineal feet of stringer equal to the number of treads for the stair.
The first method is very accurate, but again the length of the lumber only comes in 2' increments and an allowance for end-checks must still be made.
The second method is very easy but the results are approximate. This is usually acceptable because the lumber comes in 2' increments. Also, an extra foot of material is usually needed to allow for checks and splits at the ends of the board. Stringer material should be selected very carefully. Only material with a minimal number of defects should be used.

BC CARPEnTER APPREnTICESHIP PRogRAM—LEvEL 3 27
Notes
CoMPETEnCy H-8 LEARnIng TASk 2
Calculating Stringer Lengths Method 1Example:
Rise = 177 mm
Run = 253 mm
Number of treads = 14
Unit of bridge =
=
=
=
177 253
31329 64009
95338
2 2+
+
mm
= mm, to the nearest 10 oth
308 76852
308 8
.
. ff a mm
Unit of bridge multiplied by the number of treads = 308.8 mm × 14
= 4323 mm
Convert 4323 mm to feet by dividing by 304.8 (there are 304.8 mm in a foot). 4323 ÷ 304.8 = 14.18 feet. An extra foot is added for splits, so a 16' board is needed. The length 4323 mm can also be used to check for layout creep as this should be the length from the first run to the last rise.
4323
Figure 5. Checking stringer for creep
Method 2The number of treads is 14 so the length of material needed is 14'. An extra foot is added for splits, so a 16' board is needed. The length of stringer calculated is not as accurate and does not provide a measurement to check for layout creep.
Stairs with LandingsUnless winder treads are used, landings are always included in “L”, narrow “U”, and wide “U” stairs. Landings are also often used with straight flight stairs (Figure 6).
Notes
28 BC CARPEnTER APPREnTICESHIP PRogRAM—LEvEL 3
LEARnIng TASk 2 CoMPETEnCy H-8
Finished opening
1950 mmheadroom Total rise
2650 mm
25 mmtread
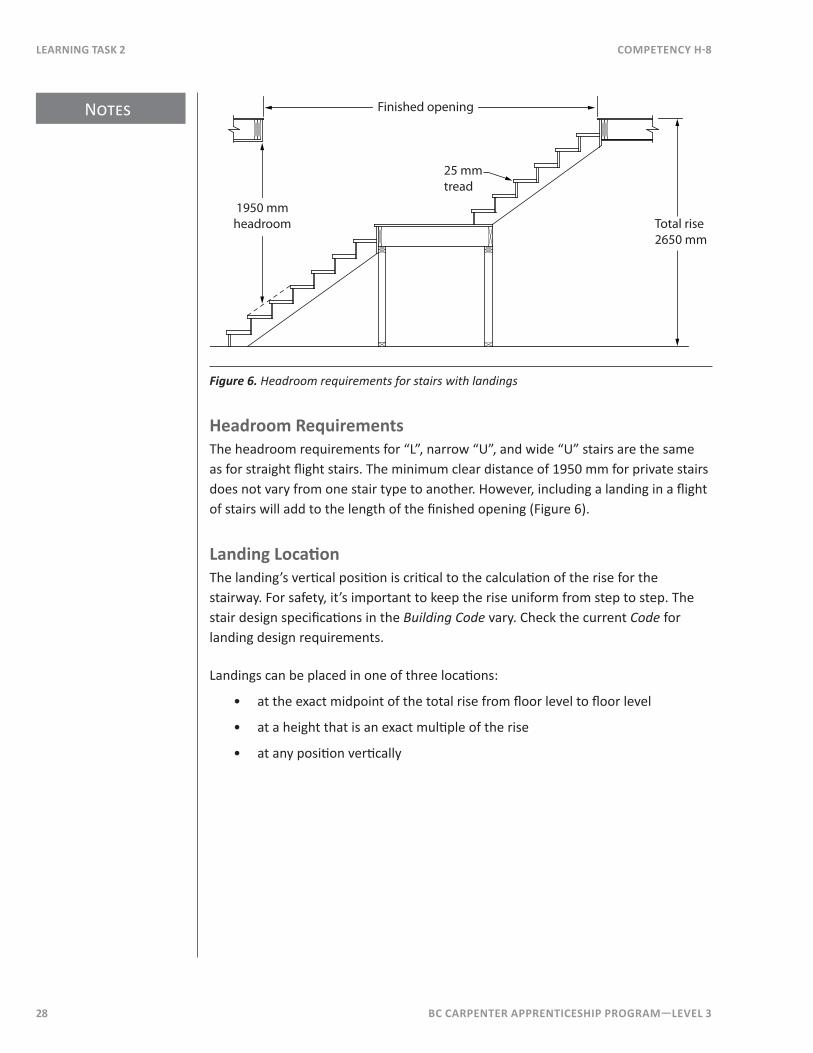
Figure 6. Headroom requirements for stairs with landings
Headroom RequirementsThe headroom requirements for “L”, narrow “U”, and wide “U” stairs are the same as for straight flight stairs. The minimum clear distance of 1950 mm for private stairs does not vary from one stair type to another. However, including a landing in a flight of stairs will add to the length of the finished opening (Figure 6).
Landing LocationThe landing’s vertical position is critical to the calculation of the rise for the stairway. For safety, it’s important to keep the rise uniform from step to step. The stair design specifications in the Building Code vary. Check the current Code for landing design requirements.
Landings can be placed in one of three locations:
• at the exact midpoint of the total rise from floor level to floor level
• at a height that is an exact multiple of the rise
• at any position vertically
BC CARPEnTER APPREnTICESHIP PRogRAM—LEvEL 3 29
Notes
CoMPETEnCy H-8 LEARnIng TASk 2
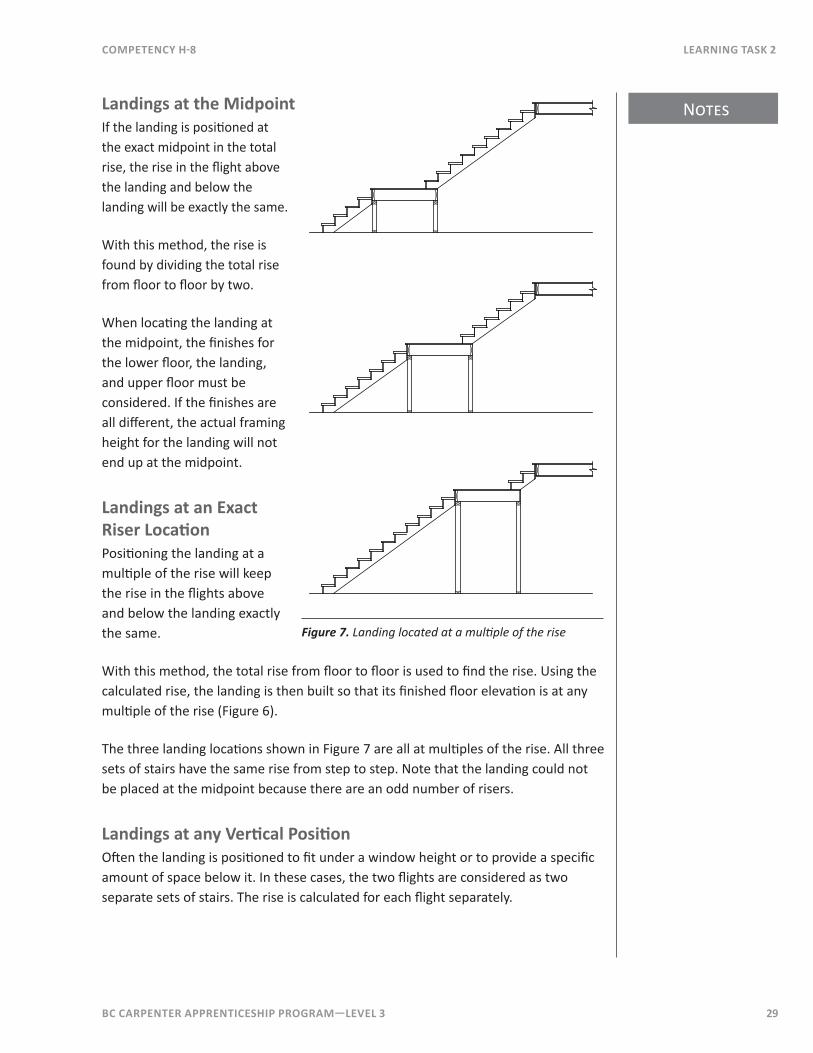
Landings at the MidpointIf the landing is positioned at the exact midpoint in the total rise, the rise in the flight above the landing and below the landing will be exactly the same.
With this method, the rise is found by dividing the total rise from floor to floor by two.
When locating the landing at the midpoint, the finishes for the lower floor, the landing, and upper floor must be considered. If the finishes are all different, the actual framing height for the landing will not end up at the midpoint.
Landings at an Exact Riser LocationPositioning the landing at a multiple of the rise will keep the rise in the flights above and below the landing exactly the same.
With this method, the total rise from floor to floor is used to find the rise. Using the calculated rise, the landing is then built so that its finished floor elevation is at any multiple of the rise (Figure 6).
The three landing locations shown in Figure 7 are all at multiples of the rise. All three sets of stairs have the same rise from step to step. Note that the landing could not be placed at the midpoint because there are an odd number of risers.
Landings at any vertical PositionOften the landing is positioned to fit under a window height or to provide a specific amount of space below it. In these cases, the two flights are considered as two separate sets of stairs. The rise is calculated for each flight separately.
Figure 7. Landing located at a multiple of the rise
Notes
30 BC CARPEnTER APPREnTICESHIP PRogRAM—LEvEL 3
LEARnIng TASk 2 CoMPETEnCy H-8
The difficulty with this landing position is that the rise for the upper flight may end up significantly different from the lower flight.
Try to locate the landing at the midpoint or at a multiple of the rise. Remember to consider the finish floor thicknesses when building the framing for the landing.
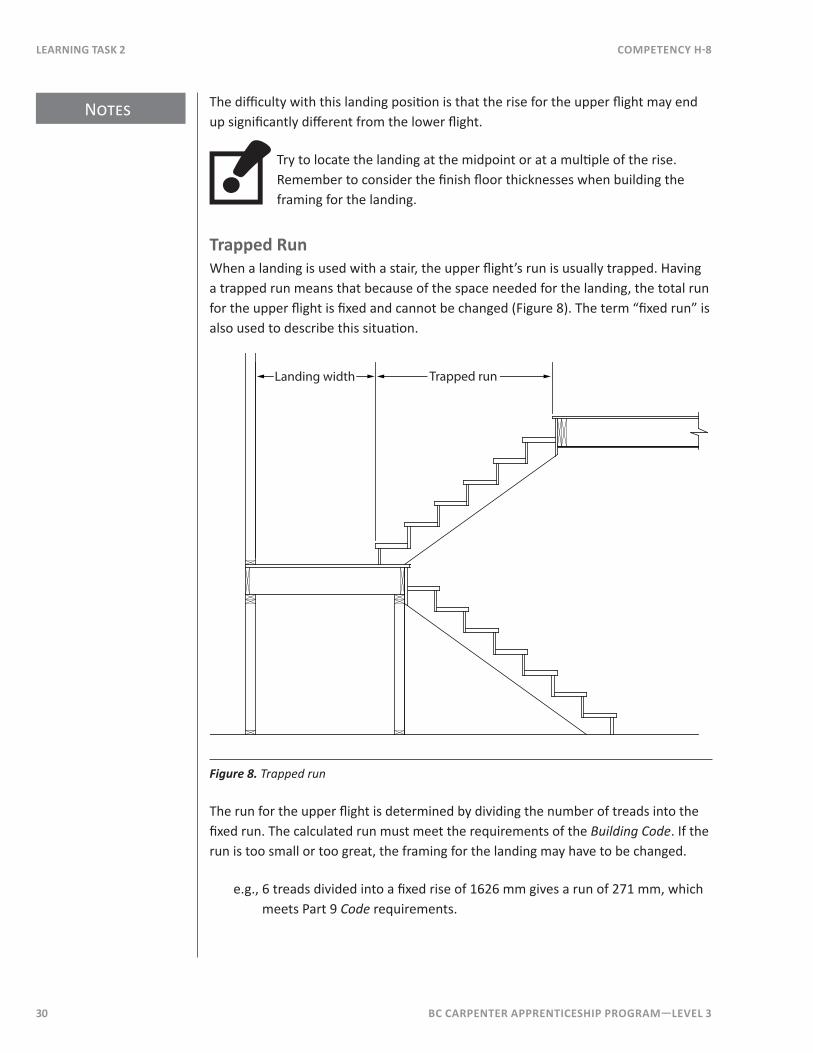
Trapped RunWhen a landing is used with a stair, the upper flight’s run is usually trapped. Having a trapped run means that because of the space needed for the landing, the total run for the upper flight is fixed and cannot be changed (Figure 8). The term “fixed run” is also used to describe this situation.
Landing width Trapped run
Figure 8. Trapped run
The run for the upper flight is determined by dividing the number of treads into the fixed run. The calculated run must meet the requirements of the Building Code. If the run is too small or too great, the framing for the landing may have to be changed.
e.g., 6 treads divided into a fixed rise of 1626 mm gives a run of 271 mm, which meets Part 9 Code requirements.
BC CARPEnTER APPREnTICESHIP PRogRAM—LEvEL 3 31
Notes
CoMPETEnCy H-8 LEARnIng TASk 2
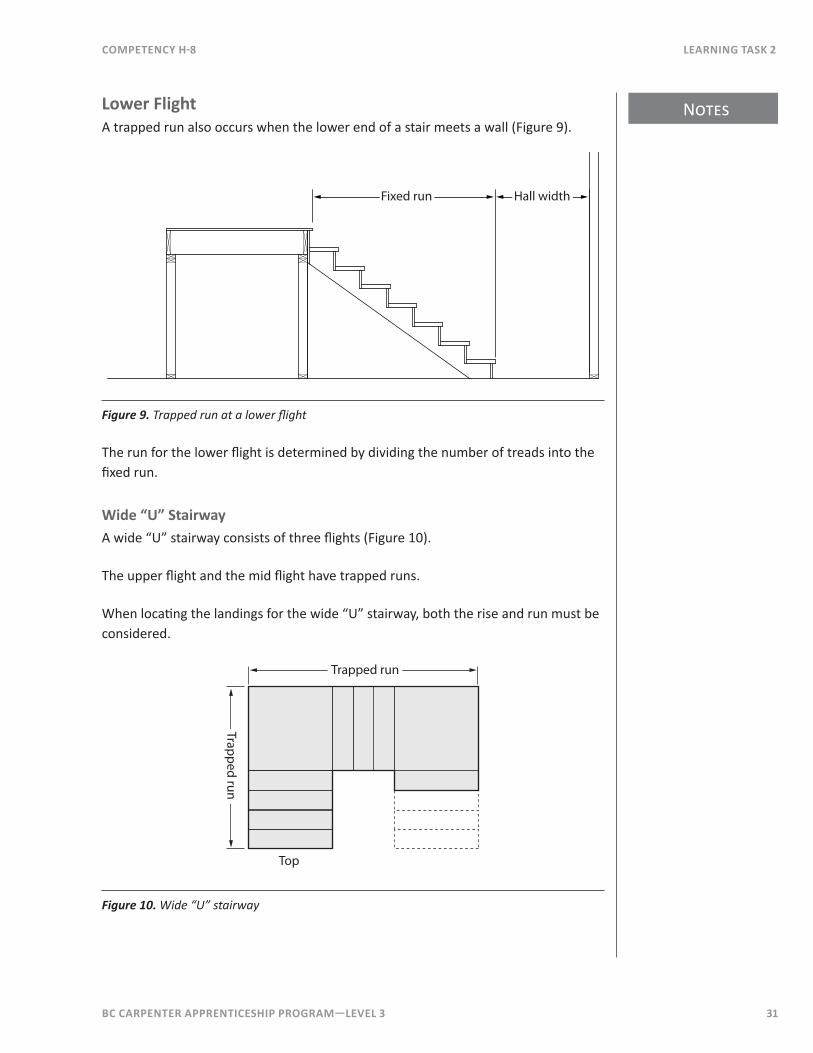
Lower FlightA trapped run also occurs when the lower end of a stair meets a wall (Figure 9).
Fixed run Hall width
Figure 9. Trapped run at a lower flight
The run for the lower flight is determined by dividing the number of treads into the fixed run.
Wide “U” StairwayA wide “U” stairway consists of three flights (Figure 10).
The upper flight and the mid flight have trapped runs.
When locating the landings for the wide “U” stairway, both the rise and run must be considered.
Top
Trapped run
Trapped run
Figure 10. Wide “U” stairway
Notes
32 BC CARPEnTER APPREnTICESHIP PRogRAM—LEvEL 3
LEARnIng TASk 2 CoMPETEnCy H-8
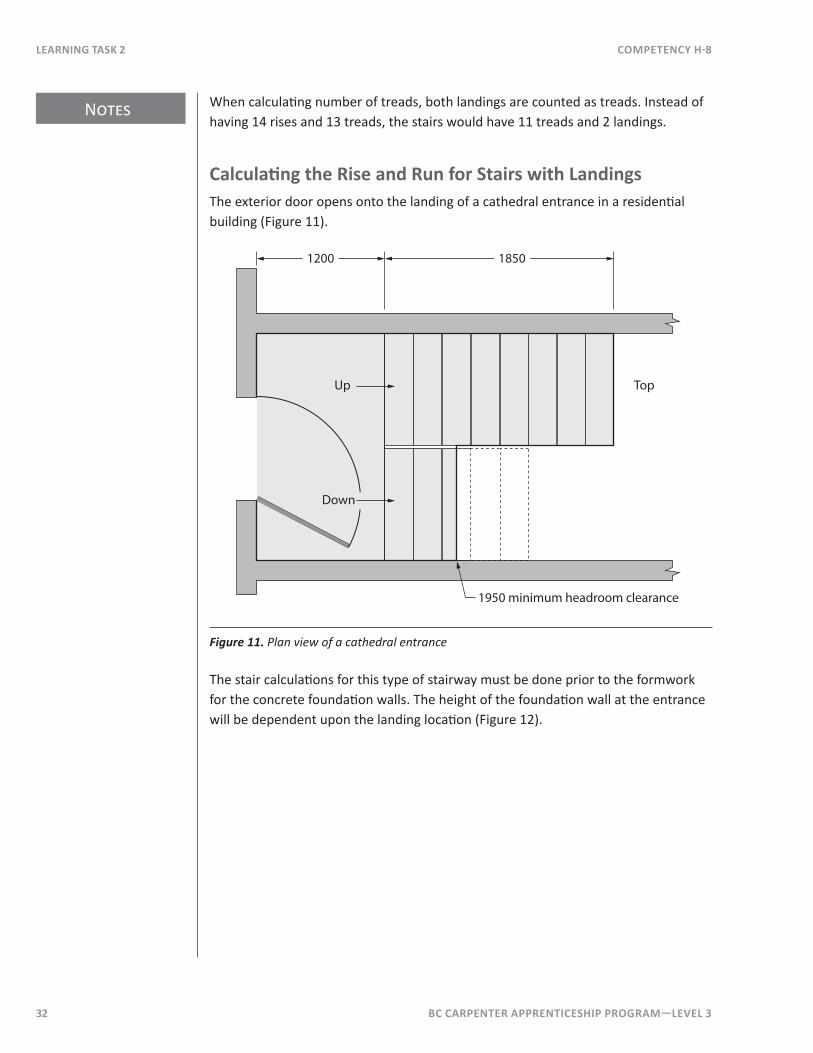
When calculating number of treads, both landings are counted as treads. Instead of having 14 rises and 13 treads, the stairs would have 11 treads and 2 landings.
Calculating the Rise and Run for Stairs with LandingsThe exterior door opens onto the landing of a cathedral entrance in a residential building (Figure 11).
Up Top
Down
18501200
1950 minimum headroom clearance
Figure 11. Plan view of a cathedral entrance
The stair calculations for this type of stairway must be done prior to the formwork for the concrete foundation walls. The height of the foundation wall at the entrance will be dependent upon the landing location (Figure 12).
BC CARPEnTER APPREnTICESHIP PRogRAM—LEvEL 3 33
Notes
CoMPETEnCy H-8 LEARnIng TASk 2
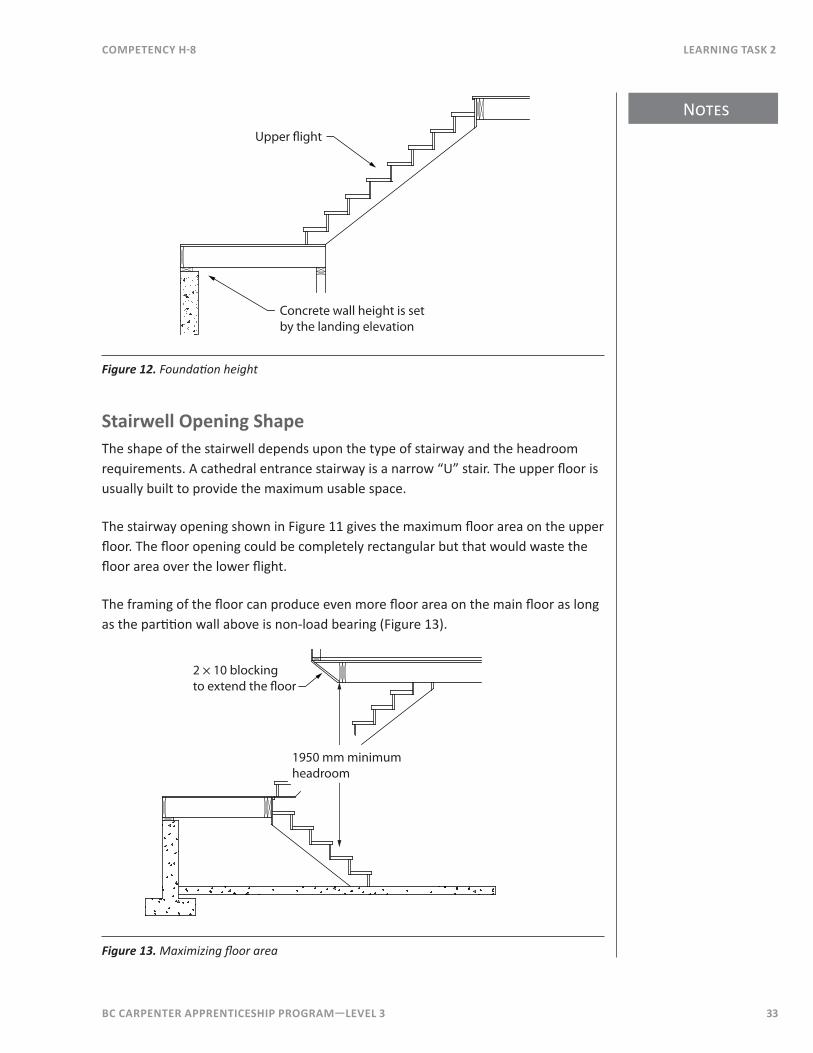
Upper �ight
Concrete wall height is setby the landing elevation
Figure 12. Foundation height
Stairwell Opening ShapeThe shape of the stairwell depends upon the type of stairway and the headroom requirements. A cathedral entrance stairway is a narrow “U” stair. The upper floor is usually built to provide the maximum usable space.
The stairway opening shown in Figure 11 gives the maximum floor area on the upper floor. The floor opening could be completely rectangular but that would waste the floor area over the lower flight.
The framing of the floor can produce even more floor area on the main floor as long as the partition wall above is non-load bearing (Figure 13).
2 × 10 blockingto extend the �oor
1950 mm minimum headroom
Figure 13. Maximizing floor area
Notes
34 BC CARPEnTER APPREnTICESHIP PRogRAM—LEvEL 3
LEARnIng TASk 2 CoMPETEnCy H-8
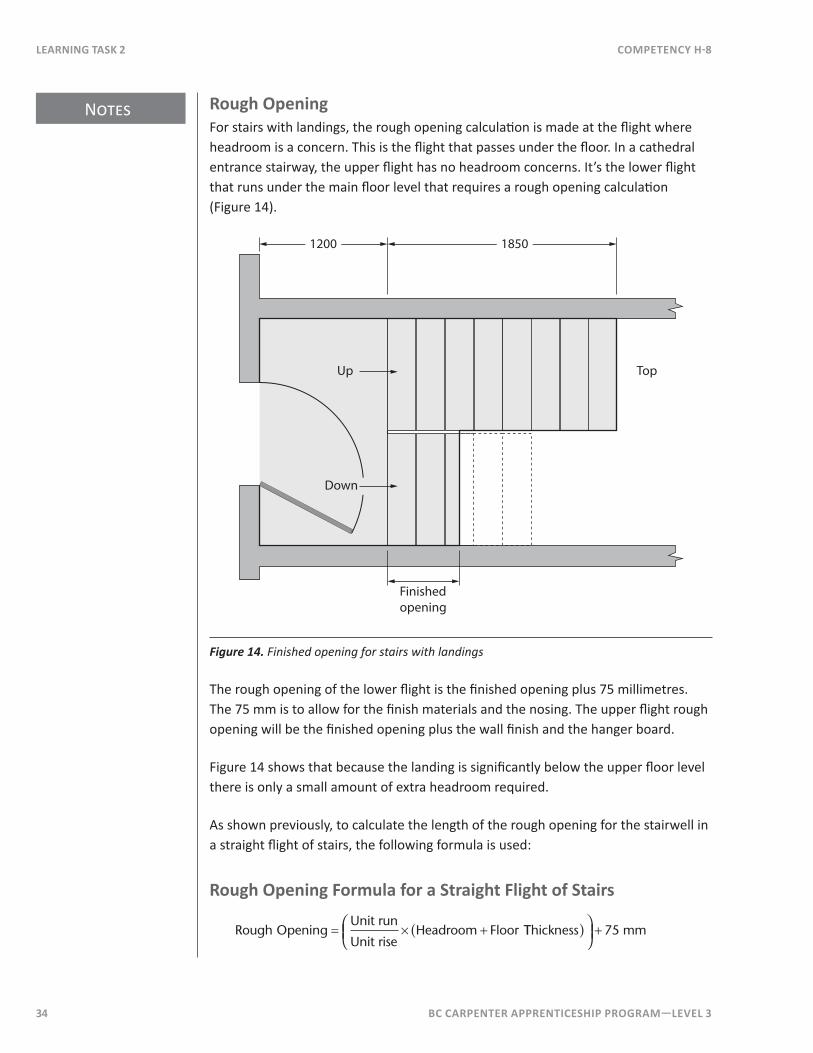
Rough OpeningFor stairs with landings, the rough opening calculation is made at the flight where headroom is a concern. This is the flight that passes under the floor. In a cathedral entrance stairway, the upper flight has no headroom concerns. It’s the lower flight that runs under the main floor level that requires a rough opening calculation (Figure 14).
Up Top
Down
18501200
Finished opening
Figure 14. Finished opening for stairs with landings
The rough opening of the lower flight is the finished opening plus 75 millimetres. The 75 mm is to allow for the finish materials and the nosing. The upper flight rough opening will be the finished opening plus the wall finish and the hanger board.
Figure 14 shows that because the landing is significantly below the upper floor level there is only a small amount of extra headroom required.
As shown previously, to calculate the length of the rough opening for the stairwell in a straight flight of stairs, the following formula is used:
Rough opening Formula for a Straight Flight of Stairs
Rough Opening
UHeadroom Floor
nit run
Unit rise= × + TThickness( )
+ 75 mm
BC CARPEnTER APPREnTICESHIP PRogRAM—LEvEL 3 35
Notes
CoMPETEnCy H-8 LEARnIng TASk 2
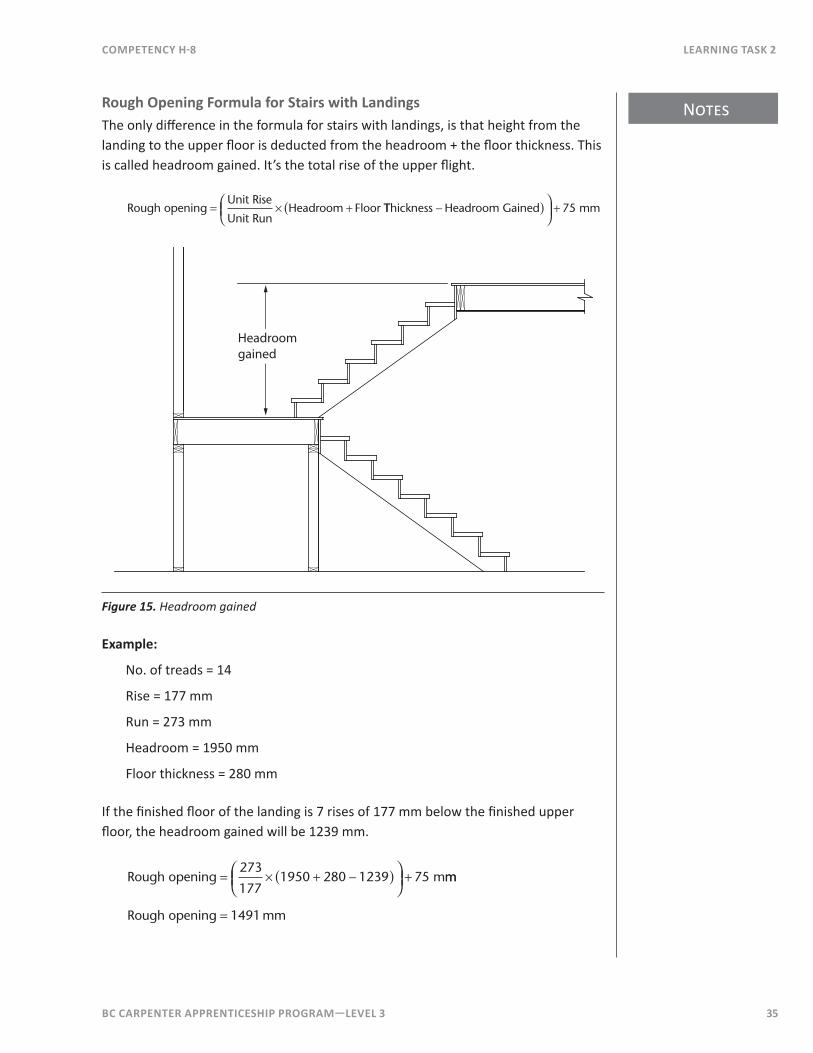
Rough opening Formula for Stairs with LandingsThe only difference in the formula for stairs with landings, is that height from the landing to the upper floor is deducted from the headroom + the floor thickness. This is called headroom gained. It’s the total rise of the upper flight.
Rough opening
Unit Rise
Unit RunFloor= × +Headroom TThickness Headroom Gained− +( )
75 mm
Headroomgained
Figure 15. Headroom gained
Example:
No. of treads = 14
Rise = 177 mm
Run = 273 mm
Headroom = 1950 mm
Floor thickness = 280 mm
If the finished floor of the landing is 7 rises of 177 mm below the finished upper floor, the headroom gained will be 1239 mm.
Rough opening = × + − +( )
273
1771950 280 1239 75 mmm
mmRough opening = 1491
Notes
36 BC CARPEnTER APPREnTICESHIP PRogRAM—LEvEL 3
LEARnIng TASk 2 CoMPETEnCy H-8
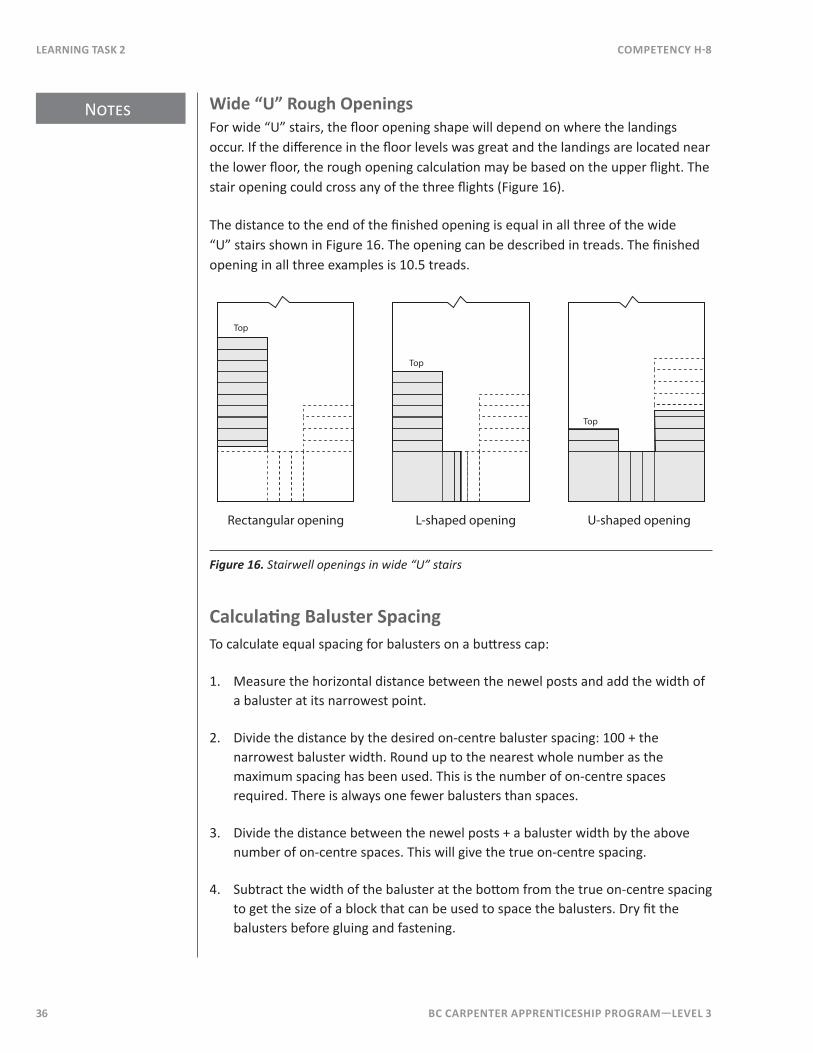
Wide “U” Rough openingsFor wide “U” stairs, the floor opening shape will depend on where the landings occur. If the difference in the floor levels was great and the landings are located near the lower floor, the rough opening calculation may be based on the upper flight. The stair opening could cross any of the three flights (Figure 16).
The distance to the end of the finished opening is equal in all three of the wide “U” stairs shown in Figure 16. The opening can be described in treads. The finished opening in all three examples is 10.5 treads.
Top
Rectangular opening L-shaped opening U-shaped opening
Top
Top
Figure 16. Stairwell openings in wide “U” stairs
Calculating Baluster SpacingTo calculate equal spacing for balusters on a buttress cap:
1. Measure the horizontal distance between the newel posts and add the width of a baluster at its narrowest point.
2. Divide the distance by the desired on-centre baluster spacing: 100 + the narrowest baluster width. Round up to the nearest whole number as the maximum spacing has been used. This is the number of on-centre spaces required. There is always one fewer balusters than spaces.
3. Divide the distance between the newel posts + a baluster width by the above number of on-centre spaces. This will give the true on-centre spacing.
4. Subtract the width of the baluster at the bottom from the true on-centre spacing to get the size of a block that can be used to space the balusters. Dry fit the balusters before gluing and fastening.

BC CARPEnTER APPREnTICESHIP PRogRAM—LEvEL 3 37
Notes
CoMPETEnCy H-8 LEARnIng TASk 2
Example:
25 mm
38 mm
961 mm
Figure 17. Baluster spacing on a buttress cap
1. 961 + 25 = 986 mm (distance between newel posts plus one baluster)
2. 100 + 25 = 125 mm (desired on-centre spacing) 986 ÷ 125 = 7.88 (round up to 8 on-centre spacings) 8 on-centre spacings are created by 7 balusters.
3. 986 ÷ 8 = 123.25 mm (true on-centre spacing)
4. 123.25 – 38 = 85.25 mm (size of the spacer block)
A block 85 mm wide would be cut to use as a spacer. Balusters should be checked for plumb regularly as they are being installed. Over a very long run of balusters, the final 10 or 12 balusters should be checked against the ending newel in case adjustments need to be made to compensate for creep.

Notes
38 BC CARPEnTER APPREnTICESHIP PRogRAM—LEvEL 3
LEARnIng TASk 2 CoMPETEnCy H-8
To calculate the spacing of balusters landing on treads:
1. Subtract the narrowest width of two balusters from the unit run of the stairs.
2. Divide the above answer by two as there will be two spaces. This will be the space between the balusters at their narrowest point. If this number is greater than 100 mm, then repeat the process (starting with step 1) with three balusters and three spacings. (The Building Code requires that the space between balusters can be no more than 100 mm.)
3. To find the size of a spacer block to set the balusters, first subtract the narrowest width from the width at the bottom of the baluster. Then subtract this difference from the spacing between the balusters at the narrowest point. The result will be the length of the spacer block.
Example:
25
38
245
Figure 18. Baluster spacing on treads
1. 245 – (2 × 25) = 195 mm (total space between balusters on each tread)
2. 195 ÷ 2 = 97.5 mm (space between balusters at narrowest point)
3. 38 – 25 = 13 mm (difference between baluster at narrowest point and bottom) 97.5 – 13 = 84.5 mm (size of spacer block at the bottom)

BC CARPEnTER APPREnTICESHIP PRogRAM—LEvEL 3 39
Notes
CoMPETEnCy H-8 LEARnIng TASk 2
Balusters are often lined up with the riser. This creates an even space between the last baluster on a tread and the next riser. Sometimes this position is shifted away from the riser toward the back of the tread to make the space between the first and last baluster and the newel posts work out better. In some cases the spacing of the balusters next to the newel posts may have to be “cheated” or modified. The best position for the starting newel when laying out balusters on the treads is one baluster width from the riser towards the back of the first tread while the landing newel should be aligned with the last riser face. This is usually impossible when dealing with an angle newel, so in this case, some modification of baluster spacing is inevitable.
glueThe use of glue is important to reduce the chance of squeaks in the stairway. Finished stairs are often built with hardwood lumber and veneer plywood. These materials are often stained to a specific colour before finishing. Take extra care when applying glues and adhesives. Do not let the glue contact the exposed finished surfaces of the wood.
ProtectionMany of the parts of a finished stairway must be installed before the interior finishing of the building is completed. Use cardboard and plastic sheeting to cover the exposed surfaces. Do not use plastic sheeting on the treads for safety reasons
Apply stain and the first coat of finish to wood surfaces as soon as possible. This will help to protect the wood should spills or physical damage occur.
SafetyNever leave partially completed stairways unguarded. Loose treads or other stair parts can present a significant slipping and falling hazard. Attach cardboard protection sheets securely to the treads.
Now complete Self Test 2 and check your answers.
40 BC CARPEnTER APPREnTICESHIP PRogRAM—LEvEL 3
LEARnIng TASk 2 CoMPETEnCy H-8
Self Test 2
1. Draw a cross-section of the lower flight of a cathedral entrance. Show the headroom requirement and how the stairwell rough opening is calculated.
2. Draw a plan view of an “L” shaped stairway with the landing set at five risers from the upper floor. Make the stair calculations based on a difference in elevation from finished floor to finished floor of 2950 mm and a desired rise of 180 mm. The rise and the run must be equal for both the upper flight and the lower flight. The run of the upper flight is 1232 mm and the landing is 900 × 900 mm. Allow for a floor thickness of 290 mm and a headroom of 1950 mm.
BC CARPEnTER APPREnTICESHIP PRogRAM—LEvEL 3 41
CoMPETEnCy H-8 LEARnIng TASk 2
Use the dimensions given in Question 2 to answer questions 3 – 7.
3. What is the rise?
4. What is the run in the upper flight?
5. What is the stringer length for the upper flight?
6. What is the stringer length for the lower flight?
7. What is the rough opening for the lower flight? (Not including the landing width.)
8. A flight of stairs has balusters landing on a buttress cap with the following dimensions:
• The distance between the newel posts is 2755 mm.
• The balusters are 22 mm at their narrowest point and 64 mm at the bottom.
Calculate the following:
a. The true on-centre spacing.
b. The number of balusters required.
c. The size of the spacer block to be used at the bottom.
42 BC CARPEnTER APPREnTICESHIP PRogRAM—LEvEL 3
LEARnIng TASk 2 CoMPETEnCy H-8
9. A flight of stairs has the balusters landing on the treads with the following dimensions:
• The run is 265 mm.
• The balusters are 24 mm at their narrowest point and 50 mm at the bottom.
Calculate the following:
a. The number of balusters required on each tread.
b. The space between the balusters at the narrowest point.
c. The size of the spacer block required at the bottom.
BC CARPEnTER APPREnTICESHIP PRogRAM—LEvEL 3 43
Notes
CoMPETEnCy H-8 LEARnIng TASk 3
Learning Task 3Build Stairs and Balustrades
Stairs for many buildings are a major architectural feature. The finish woodwork used to assemble the treads and risers, as well as the balustrade, requires careful planning and execution.
The construction of the finished stairway relies on proper structural framing, especially the stairwell opening and landings. The stairway itself includes two basic steps:
1. construction of the stringers, treads, and risers
2. installation of the balustrade
Framing the Stairwell OpeningThe construction of the stairwell opening begins with the blueprints which should include the dimensions of the stairwell opening. These are often missing or inaccurate, so it’s important to use the calculations covered in Learning Task 2 to determine or confirm the dimensions used for planning the stairwell opening.
Support for the floor joists needs to be carried down to proper bearing. This often requires footings to pick up the point loads created by beams or bearing walls, especially when the floor joists are running perpendicular to the stairs.
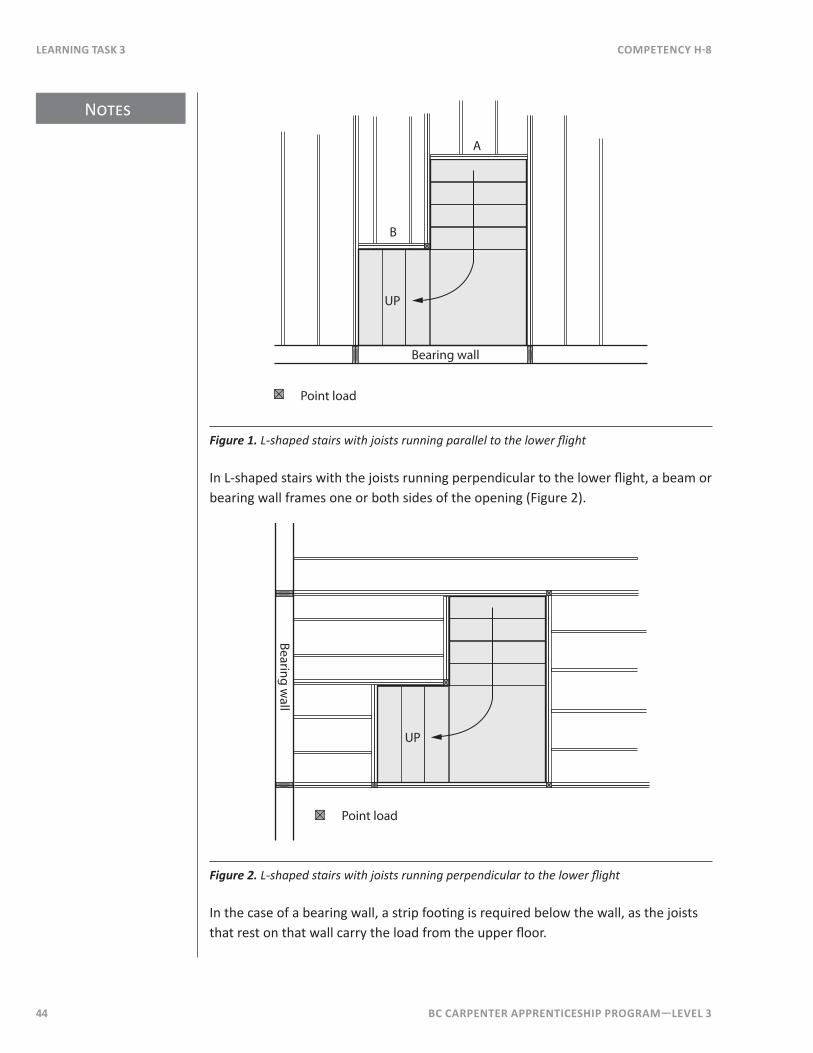
In L-shaped stairs with the joists running parallel to the lower flight, the stairwell opening will be “headered off” with joists hanging off double headers (Figure 1). The support for the inside corner needs to be carried down to bearing. The doubled joists carrying the headers could also be bearing walls, depending on the floor plan of the building.
Notes
44 BC CARPEnTER APPREnTICESHIP PRogRAM—LEvEL 3
LEARnIng TASk 3 CoMPETEnCy H-8
A
B
UP
Bearing wall
Point load
Figure 1. L-shaped stairs with joists running parallel to the lower flight
In L-shaped stairs with the joists running perpendicular to the lower flight, a beam or bearing wall frames one or both sides of the opening (Figure 2).
UP
Bearing wall
Point load
Figure 2. L-shaped stairs with joists running perpendicular to the lower flight
In the case of a bearing wall, a strip footing is required below the wall, as the joists that rest on that wall carry the load from the upper floor.
BC CARPEnTER APPREnTICESHIP PRogRAM—LEvEL 3 45
Notes
CoMPETEnCy H-8 LEARnIng TASk 3
In the case of a beam, the columns supporting the beam at either end require pad footings and blocking in the bottom floor as the joists that rest on or hang from the beam carry the load from the upper floor.
Landing ConstructionThe Building Code is not specific about the construction of stair landings. They’re essentially small floors and therefore should be built to meet the floor framing specifications, complete with point loads or bearing wall loads carried down to the foundation. It’s common for landing joists to be fastened to ledgers that are attached to load bearing walls. As mentioned in the previous Learning Task, the location (height) of the landing is best placed such that both flights of stairs have the same rise and run.
In floor or landing construction, consideration must be given to supporting the stringers where they land at the bottom. Solid blocking or extra joists under the stringers will reduce the possibility of movement due to the dynamic loads on the stairs.
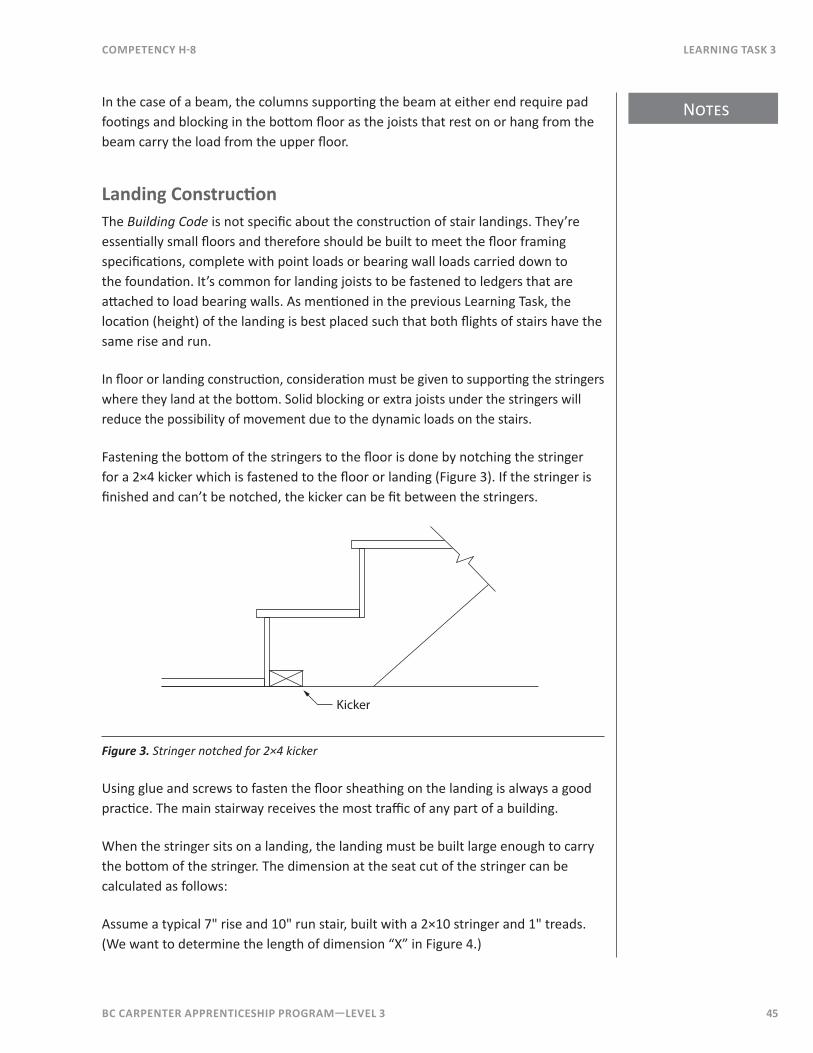
Fastening the bottom of the stringers to the floor is done by notching the stringer for a 2×4 kicker which is fastened to the floor or landing (Figure 3). If the stringer is finished and can’t be notched, the kicker can be fit between the stringers.
Kicker
Figure 3. Stringer notched for 2×4 kicker
Using glue and screws to fasten the floor sheathing on the landing is always a good practice. The main stairway receives the most traffic of any part of a building.
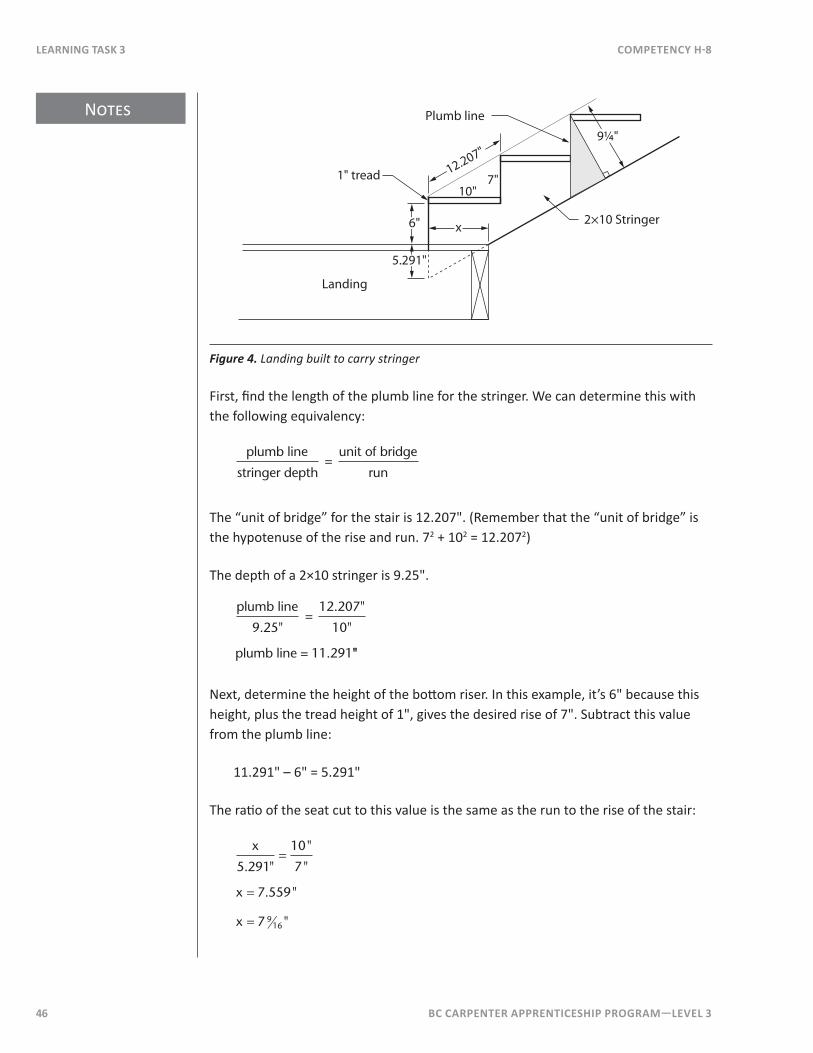
When the stringer sits on a landing, the landing must be built large enough to carry the bottom of the stringer. The dimension at the seat cut of the stringer can be calculated as follows:
Assume a typical 7" rise and 10" run stair, built with a 2×10 stringer and 1" treads. (We want to determine the length of dimension “X” in Figure 4.)
Notes
46 BC CARPEnTER APPREnTICESHIP PRogRAM—LEvEL 3
LEARnIng TASk 3 CoMPETEnCy H-8
x6"
10"7"
5.291"
Plumb line
Landing
2×10 Stringer
12.207"
1" tread
9¼"
Figure 4. Landing built to carry stringer
First, find the length of the plumb line for the stringer. We can determine this with the following equivalency:
plumb line
stringer depth=
unit of bridge
run
The “unit of bridge” for the stair is 12.207". (Remember that the “unit of bridge” is the hypotenuse of the rise and run. 72 + 102 = 12.2072)
The depth of a 2×10 stringer is 9.25".
plumb line
9.25"=
12.207"
10"
plumb line = 11.291""
Next, determine the height of the bottom riser. In this example, it’s 6" because this height, plus the tread height of 1", gives the desired rise of 7". Subtract this value from the plumb line:
11.291" – 6" = 5.291"
The ratio of the seat cut to this value is the same as the run to the rise of the stair:
x
x
x
5 291
10
7
7 559
7 916
. "
"
"
. "
"
=
=
=
BC CARPEnTER APPREnTICESHIP PRogRAM—LEvEL 3 47
Notes
CoMPETEnCy H-8 LEARnIng TASk 3
The landing must be enlarged by 7�⁄��" to carry the stringer.
An alternative to calculating the length of the seat cut of the stringer is to make a full scale layout and take the measurement straight from the drawing.
Attaching the Stringer to the WallWhen building carpeted stairs against a wall before wall board is installed, it’s common to leave �⁄�" between the stringer and the studs (assuming ½" wall board). This is achieved by attaching a strip of �⁄�" plywood to the side of the stringer at the bottom edge. The stringer is then glued and screwed or nailed to the studs. This allows the drywall installers to slip the wall board in between the stringer and the studs and eliminates the need to fit the drywall to the contours of the stairs.
When building stain grade stairs, with treads and risers fitted to the wall, it’s difficult to install the stairs before interior finishes are installed.
In either case, this is a common area for squeaks. The stringers must be solidly fastened to other surfaces.
Finished FloorsIt is extremely important that the thickness of the finish flooring and underlay be determined prior to building the landings and cutting the stringers.
If the finish floor thickness is changed after the stairs are framed, the dimension of the first or last unit of rise will not be the same as the others. This is dangerous. The building inspector may require that the stairs be re-built before issuing an occupancy permit.
Tile floor finishes are popular for entrance ways. They’re typically ceramic tiles, although natural stone, such as slate, is not uncommon. These tiles can vary between ¼" – 1'. The support for floor tile must be very solid. When installing ceramic tile over wood framing, match the thickness of other flooring by adding an additional layer of plywood underlay over the sub-floor. Glue the sub-floor to the joists and the underlay to the sub-floor. Screw the two layers of plywood together with screws spaced at a maximum of 6" o.c. Once again, extra blocking or an extra joist will make a stiffer, more solid floor at the landing or bottom floor.
Carpet and carpet underlay vary in thickness depending on style and quality. In residential construction, these thicknesses can vary from ½ – ¾". In commercial construction, where carpet is glued down to concrete, thickness is typically about ½".

Notes
48 BC CARPEnTER APPREnTICESHIP PRogRAM—LEvEL 3
LEARnIng TASk 3 CoMPETEnCy H-8
Wooden strip floors are common and are typically ¾" thick. There are a large number of prefinished laminated strip floor systems that vary in thickness from �⁄� – ¾". Some float on a foam underlay, others are nailed down in the same manner as traditional finished-in-place strip flooring.
Vinyl composite tile (VC Tile), or sheet linoleum flooring, is common in commercial construction. These products are typically �⁄�" thick.
Stair Construction
StringersAttachment of the stringers at the top of the stairs must be considered before any cutting of the stringer begins because the attachment technique may affect the layout.
For example, the commonly used stringer support board, or “hanger board”, is ¾" plywood to match the risers for the rest of the stairs. The nosing at the top projects over the hanger board the same amount as the rest of the treads project over the risers. Since the thickness of the riser is added to each step, the run on the top tread must be adjusted by subtracting the thickness of the riser from the back of the stringer (Figure 5).
Stringer supportboard
Run
Run – thickness of riser
Figure 5. Subtracting the thickness of the riser from the back of the stringer
BC CARPEnTER APPREnTICESHIP PRogRAM—LEvEL 3 49
Notes
CoMPETEnCy H-8 LEARnIng TASk 3
The position of the top of the stringer relative to the upper floor is important. Often, the finished floor is not yet installed. A simple technique is to hold a tape measure the thickness of the finished floor above the sub floor and measure down one rise plus the tread thickness. Level a line across and set the stringers to the line. The dimension of the hanger board will be this dimension plus the plumb cut at the top of the stringer.
The stringers need to be level from side to side so that the treads are level. Set one stringer in place and level the other to it. Corrections may be required if the bottom floor surface is not level; stringers may need to be shimmed or scribed to match the floor and level to other stringers. It’s important to consider this before cutting the stringers. If the correction is more than �⁄�" or so, you may need to leave material on the bottom of the stringer.
Treads and Riser AssemblyStairs with more than four or five treads are usually too large to build on a bench or floor, so it’s common to install the stringers and build the stairs in place. In most cases, start at the bottom and work towards the top. Install the first riser, then the first tread, second riser, second tread, and so on. There are many methods used to attach treads to the risers. The choice of method depends on the desired strength of the stair, availability of shop equipment, the material being used, and the finish.
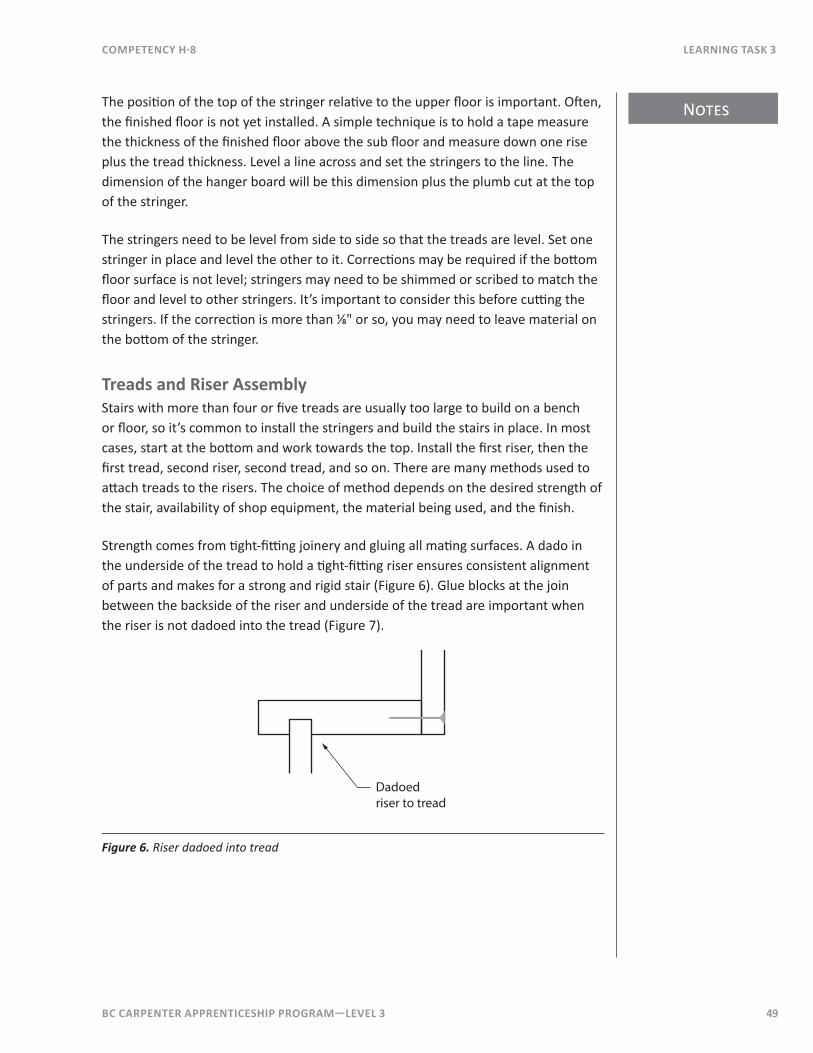
Strength comes from tight-fitting joinery and gluing all mating surfaces. A dado in the underside of the tread to hold a tight-fitting riser ensures consistent alignment of parts and makes for a strong and rigid stair (Figure 6). Glue blocks at the join between the backside of the riser and underside of the tread are important when the riser is not dadoed into the tread (Figure 7).
Dadoed riser to tread
Figure 6. Riser dadoed into tread
Notes
50 BC CARPEnTER APPREnTICESHIP PRogRAM—LEvEL 3
LEARnIng TASk 3 CoMPETEnCy H-8
Glue block
Dadoed treadto riser
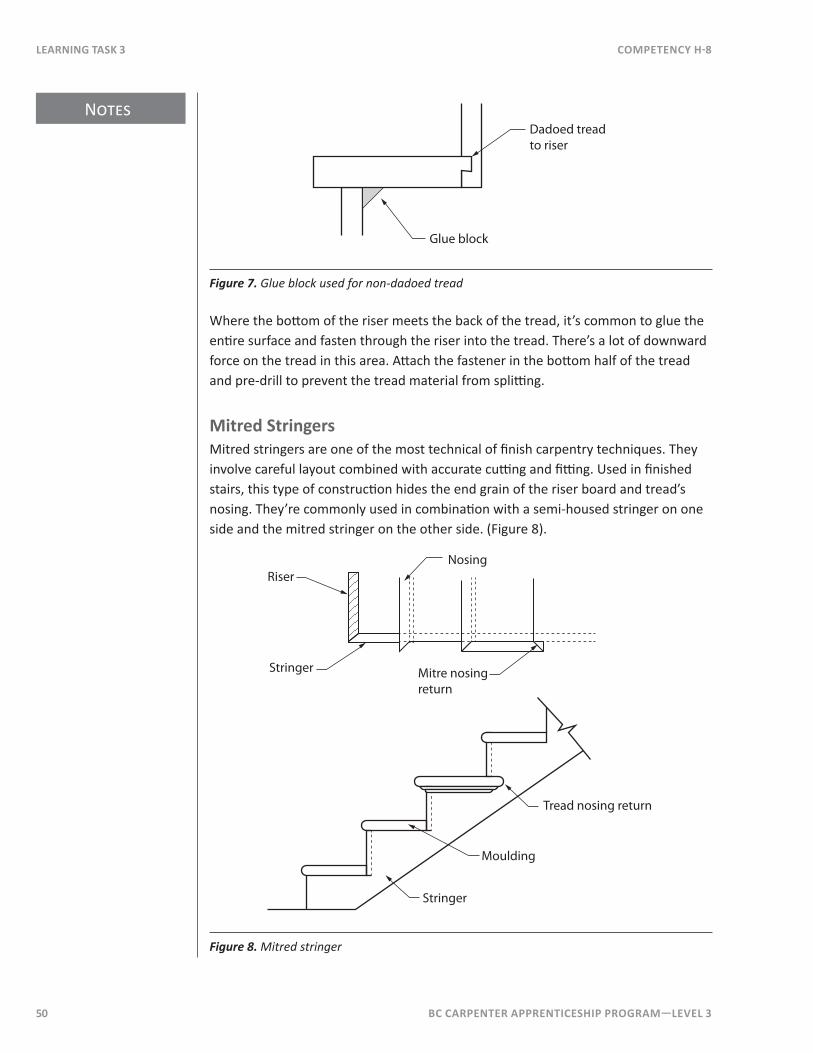
Figure 7. Glue block used for non-dadoed tread
Where the bottom of the riser meets the back of the tread, it’s common to glue the entire surface and fasten through the riser into the tread. There’s a lot of downward force on the tread in this area. Attach the fastener in the bottom half of the tread and pre-drill to prevent the tread material from splitting.
Mitred StringersMitred stringers are one of the most technical of finish carpentry techniques. They involve careful layout combined with accurate cutting and fitting. Used in finished stairs, this type of construction hides the end grain of the riser board and tread’s nosing. They’re commonly used in combination with a semi-housed stringer on one side and the mitred stringer on the other side. (Figure 8).
Stringer
Moulding
Tread nosing return
Riser
Stringer
Nosing
Mitre nosingreturn
Figure 8. Mitred stringer

BC CARPEnTER APPREnTICESHIP PRogRAM—LEvEL 3 51
Notes
CoMPETEnCy H-8 LEARnIng TASk 3
The use of a horizontal storey pole aids in accurate layout. Because there are several pieces that must align accurately (stringers, treads, nosing returns, newels, baluster, handrail), laying this out carefully at the beginning of the process results in accurate assembly and speeds construction.
The layout of newels and balusters must be considered at this time. Careful location of these elements will simplify construction by eliminating complex notching and uneven baluster layout. For example, the newels can be laid out such that the spacing of the balusters on the treads is equal.
The stringer is laid out in the normal way, typically on the finished side of the stringer. The layout lines are the long points of the mitre. A circular saw is set at 45°. The use of a saw guide clamped to the stringer assists in this tricky cut. The cut can only be made up to the tread line and is finished by hand. Use of a compound mitre saw makes a more precise cut.
Another way to lay out the mitred stringer is with the use of a marking jig or “preacher block”: a slotted board the same thickness as the risers. Lay out and cut the plumb cut (scribed to the wall or landing at the top) and bottom cut (level, scribed to the floor) of the mitred stringer. Set the stringer against the notched stringer and with the marking jig tight against the riser, cut transfer the layout to the outside (finished side) of the mitred stringer (Figure 9). Similarly, use the jig to transfer the tread cut to the outside of the stringer.
Hiding or minimizing the use of fasteners is preferred for varnish grade woodwork. The use of masking tape to “clamp” the mitres is common. The use of 23 gauge headless nails or 18 gauge brad nails placed high enough on the riser or low enough to be hidden by the tread can be effective.
Balustrade InstallationBalustrade installation begins with the newels. The newels carry the balustrade and are subject to loads in all directions. 9.8.7.7 of the BC Building Code requires that a balustrade must be able to withstand a load of 0.9 kN (about 200 pounds of force) in any direction. It’s vital that these posts extend into the floor framing and be secured to solid blocking attached to the floor joists.
Notes
52 BC CARPEnTER APPREnTICESHIP PRogRAM—LEvEL 3
LEARnIng TASk 3 CoMPETEnCy H-8
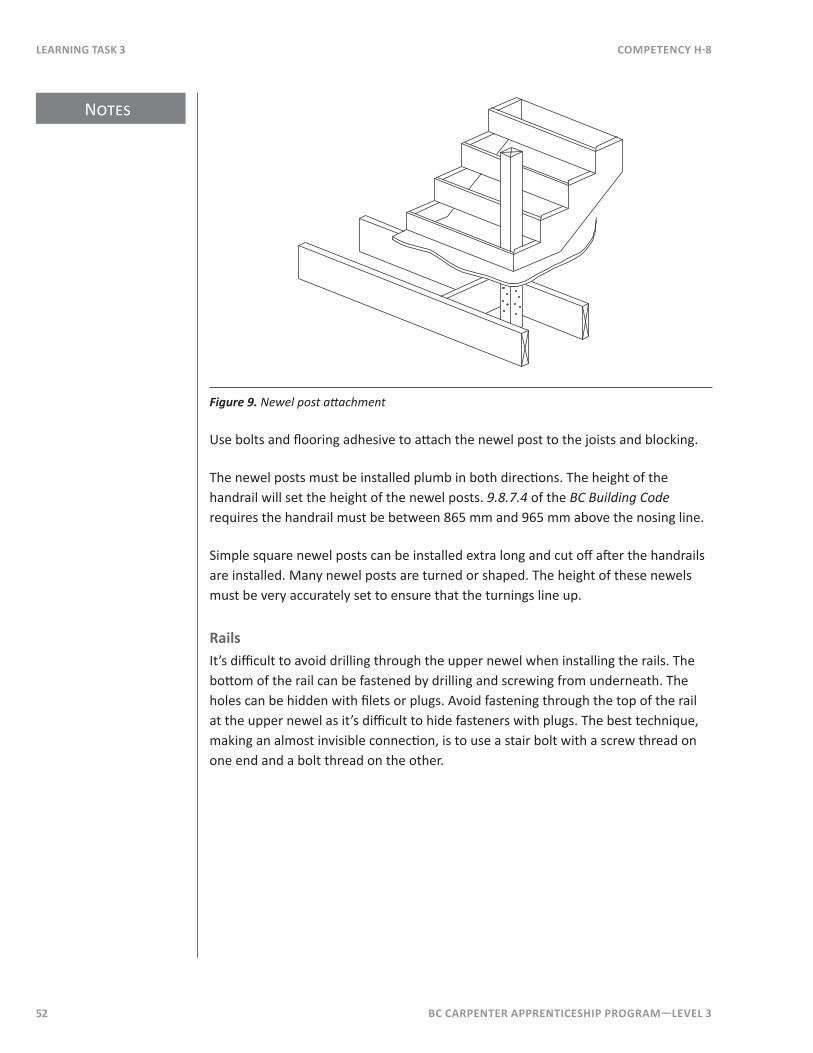
Figure 9. Newel post attachment
Use bolts and flooring adhesive to attach the newel post to the joists and blocking.
The newel posts must be installed plumb in both directions. The height of the handrail will set the height of the newel posts. 9.8.7.4 of the BC Building Code requires the handrail must be between 865 mm and 965 mm above the nosing line.
Simple square newel posts can be installed extra long and cut off after the handrails are installed. Many newel posts are turned or shaped. The height of these newels must be very accurately set to ensure that the turnings line up.
RailsIt’s difficult to avoid drilling through the upper newel when installing the rails. The bottom of the rail can be fastened by drilling and screwing from underneath. The holes can be hidden with filets or plugs. Avoid fastening through the top of the rail at the upper newel as it’s difficult to hide fasteners with plugs. The best technique, making an almost invisible connection, is to use a stair bolt with a screw thread on one end and a bolt thread on the other.

BC CARPEnTER APPREnTICESHIP PRogRAM—LEvEL 3 53
Notes
CoMPETEnCy H-8 LEARnIng TASk 3
Figure 10. Attaching handrail to newel with stair bolt
Another technique is to drill through and use a small lag screw from the back side of the newel. Careful plugging of the hole in a low-visibility area is a third alternative.
The handrail and shoe rail are set parallel to the nosing line. Ensure that the newels are anchored plumb in both directions before proceeding (to prevent them from being pushed or pulled out of plumb). Leave the rail long, make a plumb cut at one end, hold it beside its final position, laying it on top of the nosings and against the bottom newel, and mark it to length.
The rails often have a groove in their surface to accept the square end of the balusters. The space between the balusters is filled with a small moulding called a filet.
If there is no shoe rail or buttress cap, the balusters are fitted into the surface of the wooden tread. This joint is usually a shoulder joint. The shoulder of the joint hides any gap in the fit. If the design allows, the nosing return will cover the joint of the baluster to the tread.
BalustersThe spacing of the balusters is important. The Building Code requires a maximum space of 99 mm between the balusters (this prevents small children from getting their heads stuck in the railing). Since balusters often have complex shapes, it can be difficult to determine the true spacing between them. A practical solution is to make sure that a 100 mm diameter ball does not fit through any portion of the balustrade.

Notes
54 BC CARPEnTER APPREnTICESHIP PRogRAM—LEvEL 3
LEARnIng TASk 3 CoMPETEnCy H-8
The spacing of the balusters ideally should be equal, including the space between the last baluster and the newel post.
The use of filets to space the balusters in dadoed rails is common. Glue and brad nails hidden by the filets are the most common attachment method. When attaching balusters without a dado, the use of screws and plugs to fasten the balusters to the underside to the handrail creates a strong, well-hidden joint. Toe-nailing with brad nails is faster, but much weaker.
There are several ways to fasten balusters to the treads. Baluster fasteners are both accurate and relatively simple to drill and install (Figure 11).
Figure 11. Using baluster fastener to attach balusters
With the handrail installed, each baluster is placed individually starting at the bottom and fastening to the handrail through the long point of the baluster.
Second �let
First �let
First baluster
Figure 12. Nailing a baluster to the handrail
BC CARPEnTER APPREnTICESHIP PRogRAM—LEvEL 3 55
Notes
CoMPETEnCy H-8 LEARnIng TASk 3
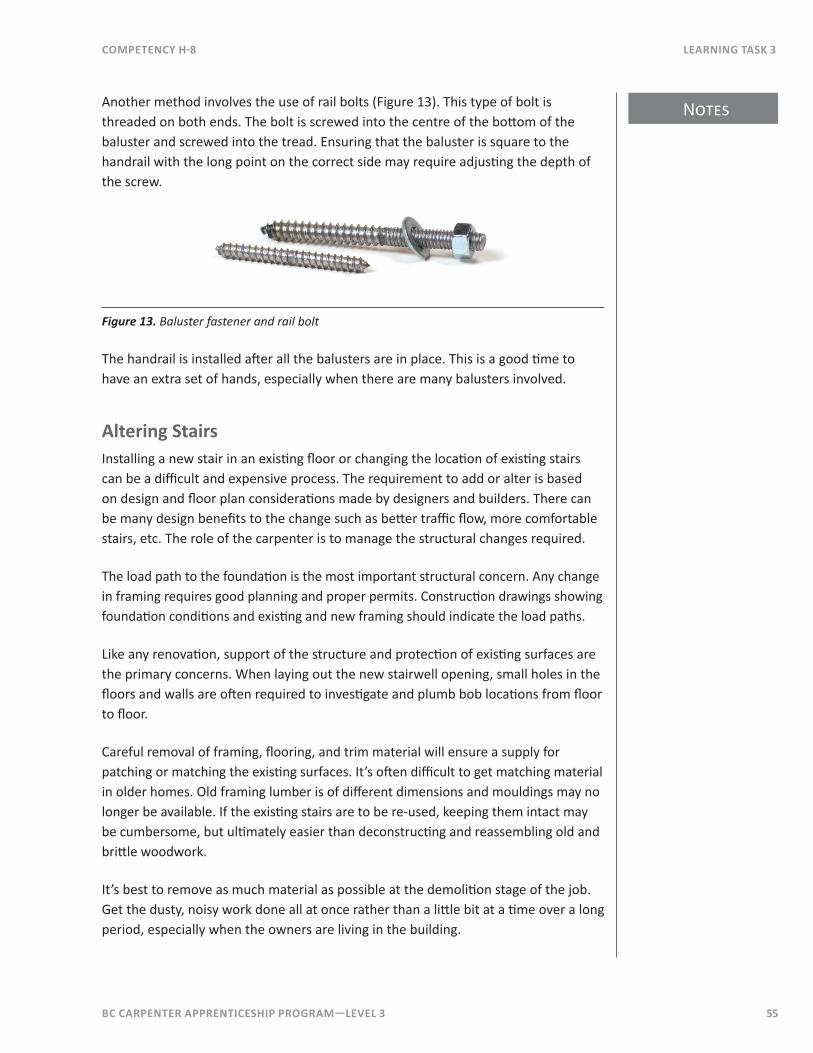
Another method involves the use of rail bolts (Figure 13). This type of bolt is threaded on both ends. The bolt is screwed into the centre of the bottom of the baluster and screwed into the tread. Ensuring that the baluster is square to the handrail with the long point on the correct side may require adjusting the depth of the screw.
Figure 13. Baluster fastener and rail bolt
The handrail is installed after all the balusters are in place. This is a good time to have an extra set of hands, especially when there are many balusters involved.
Altering StairsInstalling a new stair in an existing floor or changing the location of existing stairs can be a difficult and expensive process. The requirement to add or alter is based on design and floor plan considerations made by designers and builders. There can be many design benefits to the change such as better traffic flow, more comfortable stairs, etc. The role of the carpenter is to manage the structural changes required.
The load path to the foundation is the most important structural concern. Any change in framing requires good planning and proper permits. Construction drawings showing foundation conditions and existing and new framing should indicate the load paths.
Like any renovation, support of the structure and protection of existing surfaces are the primary concerns. When laying out the new stairwell opening, small holes in the floors and walls are often required to investigate and plumb bob locations from floor to floor.
Careful removal of framing, flooring, and trim material will ensure a supply for patching or matching the existing surfaces. It’s often difficult to get matching material in older homes. Old framing lumber is of different dimensions and mouldings may no longer be available. If the existing stairs are to be re-used, keeping them intact may be cumbersome, but ultimately easier than deconstructing and reassembling old and brittle woodwork.
It’s best to remove as much material as possible at the demolition stage of the job. Get the dusty, noisy work done all at once rather than a little bit at a time over a long period, especially when the owners are living in the building.
Notes
56 BC CARPEnTER APPREnTICESHIP PRogRAM—LEvEL 3
LEARnIng TASk 3 CoMPETEnCy H-8
Once the demolition is complete, reframing creates a new stairwell opening with new supports. The construction of new staircase itself is much the same as for new stairs.
ProtectionMany of the parts of a finished stairway must be installed before the interior finishing of the building is completed. Use cardboard and plastic sheeting to cover exposed surfaces.
Apply the stain and the first coat of finish to the wood surfaces as soon as possible. This will help protect the wood should spills or physical damage occur.
SafetyNever leave partially completed stairways unguarded. Loose treads or other stair parts can present a significant slipping and falling hazard. Attach cardboard protection sheets securely to the treads.
Now complete Self Test 3 and check your answers.
BC CARPEnTER APPREnTICESHIP PRogRAM—LEvEL 3 57
CoMPETEnCy H-8 LEARnIng TASk 3
Self Test 3
1. What is a common method to attach the stairs at the bottom?
2. Given a flight of stairs with a rise of 7¼", a run of 10", and 1" treads, how much larger must the landing be built to fully support the bottom of a 2×10 stringer?
3. How do you space the stringer off the wall when building carpeted stairs?
4. What ensures good support at the bottom of a stair?
5. Why is it important to know the thickness of the finished floor material?
6. What is a horizontal storey pole?
7. How are balusters attached to stair treads?
8. What is a filet?
9. What is the primary responsibility of the carpenter when altering the stairwell opening?

58 BC CARPEnTER APPREnTICESHIP PRogRAM—LEvEL 3

BC CARPEnTER APPREnTICESHIP PRogRAM—LEvEL 3 59
Notes
CoMPETEnCy H-8 LEARnIng TASk 4
Learning Task 4Calculate Quantities of Materials
A simple listing of parts, dimensions, and quantities is required to estimate and order stair parts.
Calculating quantities depends on well-planned construction details, often requiring a full-scale sketch. For example, do the risers fit into a dado on the underside of the tread? If so, this dimension needs to be added to the width of the riser.
Another consideration is the material being used. For example, carpeted stairs typically use 1" thick, bull-nosed tread material. This comes in 8' lengths and 10 – 12�⁄�" widths and is crosscut and ripped to finished dimensions on site. It’s usually unnecessary to order extra for waste.
If the design requires hardwood lumber to match the floor, specialty finishing stores supply parts to the specifications and will often have systems that include treads, nosings, flooring, and transition strips. One extra tread is sufficient.
Breaking out stair parts from rough lumber requires careful selection of materials and the entire breakout procedure is outlined in Line C modules. This procedure may require 25% waste depending on the quality of material and millwork skill of the carpenter.
The type and finish of stringer will affect the estimate. It’s becoming common to use Laminated Veneer Lumber (LVL) for stringers. They’re stronger, straighter, and more consistent than lumber. However, they are more expensive.
The usual way to estimate stringer length is using the unit of bridge times the number of risers. For example, consider a 7" rise and 10" run stairs with 15 risers. The unit of bridge is 12.207" (72 + 102 = 12.2072). 15 × 12.207" = 183.105" = 15.259'. 16' stringers are required.
Another way to estimate stringer length is to use the hypotenuse of the total rise and total run and round up to the nearest 2-foot increment. There are other things to consider when estimating stairs. Is the stringer a housed stringer? Is the stringer stain grade lumber? Notched on one side and mitred on the other? Is the stringer supported along its length?
Notes
60 BC CARPEnTER APPREnTICESHIP PRogRAM—LEvEL 3
LEARnIng TASk 4 CoMPETEnCy H-8
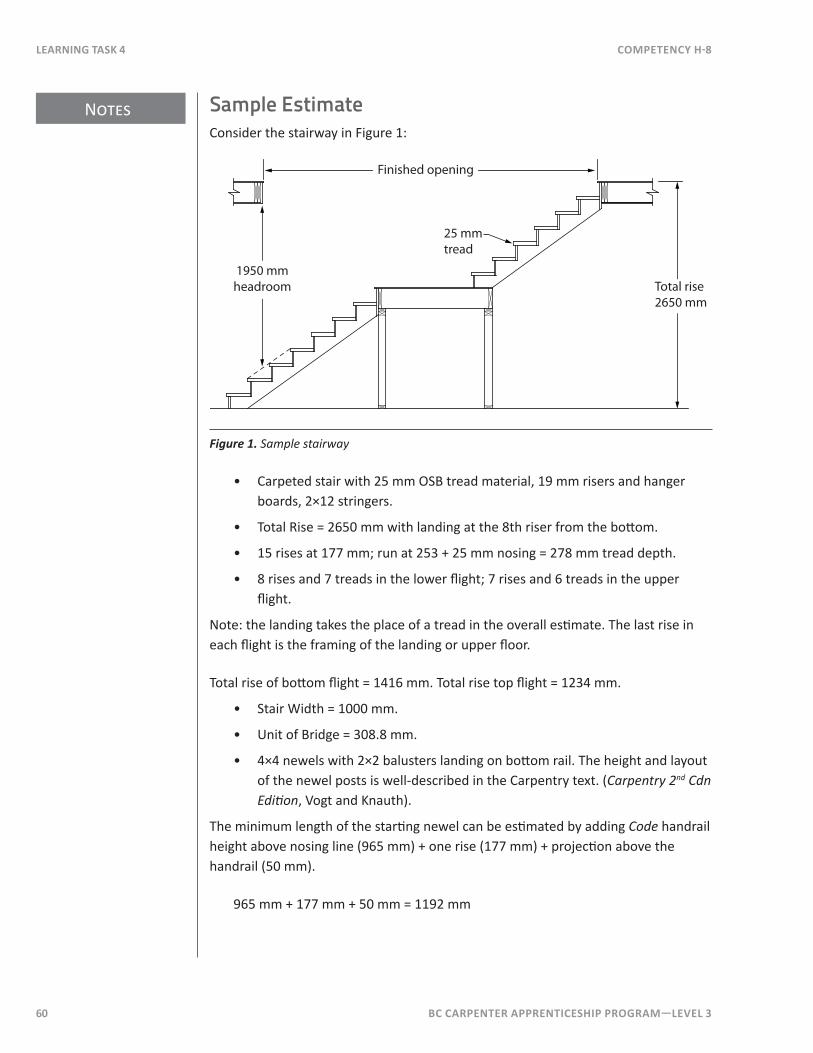
Sample EstimateConsider the stairway in Figure 1:
Finished opening
1950 mmheadroom Total rise
2650 mm
25 mmtread
Figure 1. Sample stairway
• Carpeted stair with 25 mm OSB tread material, 19 mm risers and hanger boards, 2×12 stringers.
• Total Rise = 2650 mm with landing at the 8th riser from the bottom.
• 15 rises at 177 mm; run at 253 + 25 mm nosing = 278 mm tread depth.
• 8 rises and 7 treads in the lower flight; 7 rises and 6 treads in the upper flight.
Note: the landing takes the place of a tread in the overall estimate. The last rise in each flight is the framing of the landing or upper floor.
Total rise of bottom flight = 1416 mm. Total rise top flight = 1234 mm.
• Stair Width = 1000 mm.
• Unit of Bridge = 308.8 mm.
• 4×4 newels with 2×2 balusters landing on bottom rail. The height and layout of the newel posts is well-described in the Carpentry text. (Carpentry 2nd Cdn Edition, Vogt and Knauth).
The minimum length of the starting newel can be estimated by adding Code handrail height above nosing line (965 mm) + one rise (177 mm) + projection above the handrail (50 mm).
965 mm + 177 mm + 50 mm = 1192 mm
BC CARPEnTER APPREnTICESHIP PRogRAM—LEvEL 3 61
CoMPETEnCy H-8 LEARnIng TASk 4
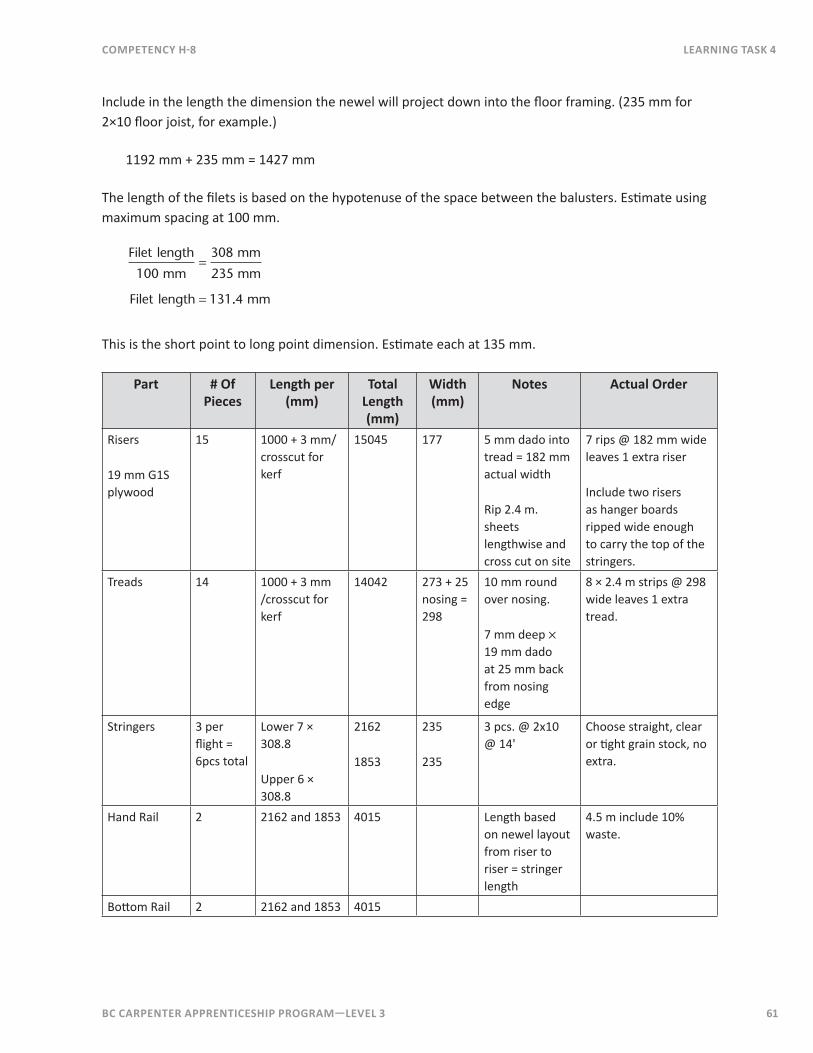
Include in the length the dimension the newel will project down into the floor framing. (235 mm for 2×10 floor joist, for example.)
1192 mm + 235 mm = 1427 mm
The length of the filets is based on the hypotenuse of the space between the balusters. Estimate using maximum spacing at 100 mm.
Filet length
mm
mm
mm
Filet length
100
308
235
131
=
= ..4 mm
This is the short point to long point dimension. Estimate each at 135 mm.
Part # of Pieces
Length per (mm)
Total Length (mm)
Width (mm)
Notes Actual Order
Risers
19 mm G1S plywood
15 1000 + 3 mm/crosscut for kerf
15045 177 5 mm dado into tread = 182 mm actual width
Rip 2.4 m. sheets lengthwise and cross cut on site
7 rips @ 182 mm wide leaves 1 extra riser
Include two risers as hanger boards ripped wide enough to carry the top of the stringers.
Treads 14 1000 + 3 mm /crosscut for kerf
14042 273 + 25 nosing = 298
10 mm round over nosing.
7 mm deep × 19 mm dado at 25 mm back from nosing edge
8 × 2.4 m strips @ 298 wide leaves 1 extra tread.
Stringers 3 per flight = 6pcs total
Lower 7 × 308.8
Upper 6 × 308.8
2162
1853
235
235
3 pcs. @ 2x10 @ 14'
Choose straight, clear or tight grain stock, no extra.
Hand Rail 2 2162 and 1853 4015 Length based on newel layout from riser to riser = stringer length
4.5 m include 10% waste.
Bottom Rail 2 2162 and 1853 4015

62 BC CARPEnTER APPREnTICESHIP PRogRAM—LEvEL 3
LEARnIng TASk 4 CoMPETEnCy H-8
Part # of Pieces
Length per (mm)
Total Length (mm)
Width (mm)
Notes Actual Order
38 × 38 Balusters
28 (includes 1 extra)
900 25.2 m 38 × 38 28 pcs
Baluster spacing based on total run between newels of 14 × 253 = 3542; 3542 + 38 = 3580/138 = 27 pieces + 1 extra @ 900 mm long each.Newels 3 1500 4500 89 × 89 Confirm angle
newel length with layout
Filets 27 × 2 =54
135 7290 Confirm fit to dado
7.5 m
Rail bolts 4 75 mm 8 mm dia.
Bolts, nuts, and washers
Now complete Self Test 4 and check your answers.
BC CARPEnTER APPREnTICESHIP PRogRAM—LEvEL 3 63
CoMPETEnCy H-8 LEARnIng TASk 4
Self Test 4
1. What should you do when unsure of a construction detail while estimating stair parts?
2. List four details to consider when estimating stair parts.

64 BC CARPEnTER APPREnTICESHIP PRogRAM—LEvEL 3
Related Documents