Florian Herzog BPM 7.5 Advanced 32 Bit Installation on AIX - 1 - BPM 7.5 Advanced Process Center Installation Guide Table of Contents: 1 Abstract ..................................................................................................................................... 1 2 Requirements and Sample Environment ................................................................................... 1 3 Step by Step Guide.................................................................................................................... 2 3.1 System Preparation ............................................................................................................ 2 3.2 BPM 7.5 Product Installation ............................................................................................ 2 3.3 Database Creation .............................................................................................................. 3 3.4 Profile Creation.................................................................................................................. 7 3.5 Deployment Environment Configuration .......................................................................... 8 3.6 Loading / Bootstrapping of Process Server Data into Database ...................................... 16 3.7 Starting the Environment ................................................................................................. 16 4 Usage of the Environment....................................................................................................... 16 4.1 Important URLs ............................................................................................................... 16 4.2 BPM 7.5 DNS Alias in local /etc/hosts for Process Designer Usage .............................. 17 5 Next Steps ............................................................................................................................... 17 6 Resources ................................................................................................................................ 17 1 Abstract This document describes the installation process of IBM BPM 7.5 Advanced Process Center 32 Bit on AIX. Key data: Silent installation and ND profile creation as non-root 1 Deployment Manager profile, 1 custom node profile Configuration of Deployment Environment “Remote Messaging” via admin console Creation of databases with Database Design Tool scripts in a DB2 LUW instance 2 Requirements and Sample Environment The following page lists detailed product requirements: http://www-01.ibm.com/support/docview.wss?uid=swg27021019 For this document installation was done on the following sample system: AIX 6.1.4.8 TL04 64 Bit Power 7 LPAR Memory o 8 gb physical, 4 gb pagespace Filesystems on disk o 15 gb for install-target filesystem /usr/websphere/BPM75 1 o 15 gb for DB2 instance /home/bpminst1 1 Italic formatted words denote concrete names used on the sample system; of course these can be adapted to your needs.

Welcome message from author
This document is posted to help you gain knowledge. Please leave a comment to let me know what you think about it! Share it to your friends and learn new things together.
Transcript
Florian Herzog BPM 7.5 Advanced 32 Bit Installation on AIX
- 1 -
BPM 7.5 Advanced Process Center Installation Guide
Table of Contents:
1 Abstract ..................................................................................................................................... 1
2 Requirements and Sample Environment ................................................................................... 1
3 Step by Step Guide .................................................................................................................... 2
3.1 System Preparation ............................................................................................................ 2
3.2 BPM 7.5 Product Installation ............................................................................................ 2
3.3 Database Creation .............................................................................................................. 3
3.4 Profile Creation .................................................................................................................. 7
3.5 Deployment Environment Configuration .......................................................................... 8
3.6 Loading / Bootstrapping of Process Server Data into Database ...................................... 16
3.7 Starting the Environment ................................................................................................. 16
4 Usage of the Environment....................................................................................................... 16
4.1 Important URLs ............................................................................................................... 16
4.2 BPM 7.5 DNS Alias in local /etc/hosts for Process Designer Usage .............................. 17
5 Next Steps ............................................................................................................................... 17
6 Resources ................................................................................................................................ 17
1 Abstract This document describes the installation process of IBM BPM 7.5 Advanced Process Center 32
Bit on AIX.
Key data:
Silent installation and ND profile creation as non-root
1 Deployment Manager profile, 1 custom node profile
Configuration of Deployment Environment “Remote Messaging” via admin console
Creation of databases with Database Design Tool scripts in a DB2 LUW instance
2 Requirements and Sample Environment The following page lists detailed product requirements:
http://www-01.ibm.com/support/docview.wss?uid=swg27021019
For this document installation was done on the following sample system:
AIX 6.1.4.8 TL04 64 Bit Power 7 LPAR
Memory o 8 gb physical, 4 gb pagespace
Filesystems on disk o 15 gb for install-target filesystem
/usr/websphere/BPM751
o 15 gb for DB2 instance
/home/bpminst1
1 Italic formatted words denote concrete names used on the sample system; of course these can be adapted to your
needs.
Florian Herzog BPM 7.5 Advanced 32 Bit Installation on AIX
- 2 -
o 7 gb for installation media
/usr/installmedia/BPM7.5
DB2 9.5 FP 7 root installation (in this sample on the same LPAR but can be remote)
/usr/db2/V9.5
Root access
3 Step by Step Guide The following sections list the steps needed to set up a BPM 7.5 Advanced Process Center.
3.1 System Preparation
As user root do:
Create the 3 needed filesystems (see section 2) and mount them
Create user and group for BPM 7.5 installation, for this sample installation user websph with primary group websphgr
Create user and group for the new DB2 instance owner, for this sample installation user bpminst1 with primary group bpmiadm1
Create user and group for the new DB2 instance fenced user, for this sample installation user bpmfenc1 with primary group bpmfadm1
Change owner and group of filesystems
o chown -R bpminst1:bpmiadm1 /home/bpminst1
o chown -R websph:websphgr /usr/websphere/BPM75
o chown -R websph:websphgr /usr/installmedia/BPM7.5
Modify /etc/security/limits to raise ulimit to 88002
o Add or change “nofiles = 8800“ under default
Modify current ulimit o ulimit -n 8800
Add DNS aliases for the different ND parts and DB2 databases to /etc/hosts (in this case
all pointing to localhost as everything is hosted on one LPAR) in order to stay flexible
o YOUR-LPAR-IP-ADDRESS BPM75DManager01
o YOUR-LPAR-IP-ADDRESS BPM75Node01
o YOUR-LPAR-IP-ADDRESS BPM75CMNDB01
o YOUR-LPAR-IP-ADDRESS BPM75BPEDB01
o YOUR-LPAR-IP-ADDRESS BPM75PDWDB01
o YOUR-LPAR-IP-ADDRESS BPM75BPMDB01
o YOUR-LPAR-IP-ADDRESS BPM75MEDB01
3.2 BPM 7.5 Product Installation
As user websph do:
Download/copy the product files to /usr/installmedia/BPM7.5/ o BPM_Adv_V7.5_AIX_1_of_2.tar.gz (code CI0BBML)
o BPM_Adv_V7.5_AIX_2_of_2.tar.gz (code CI0BCML)
Extract both files to the same directory
2 See
http://publib.boulder.ibm.com/infocenter/dmndhelp/v7r5mx/topic/com.ibm.wbpm.imuc.ebpm.doc/topics/tins_custo
m_full_pcntr.html
Florian Herzog BPM 7.5 Advanced 32 Bit Installation on AIX
- 3 -
o cd /usr/installmedia/BPM7.5/
o gzip -d BPM_Adv_V7.5_AIX_1_of_2.tar.gz
o tar -xf BPM_Adv_V7.5_AIX_1_of_2.tar
o gzip -d BPM_Adv_V7.5_AIX_2_of_2.tar.gz
o tar -xf BPM_Adv_V7.5_AIX_2_of_2.tar
Copy responsefile
o cd /usr/installmedia/BPM7.5/responsefiles/BPM
o cp template_response.xml bpmResponse.xml
Modify response file bpmResponse.xml o Replace „${INSTALL_LOCATION_IM}‟ with Installation Manager install
location „/usr/websphere/BPM75/IM‟
o Replace “${LOCATION_ECLIPSE_CACHE}” with
“/usr/websphere/BPM75/IM/eclipseCache”
o Replace '${INSTALL_LOCATION}' with BPM 7.5 install location
'/usr/websphere/BPM75/Binaries'
o Replace '${FEATURE_LIST}' with
'wps.client.feature,wps.server.feature,wps.samples.feature‟ (all possible features
incl. Samples)
o OPTIONAL:
If installation should be 64 Bit change “<data
key='user.select.64bit.image,com.ibm.websphere.ND.v70' value='false'/>” to true.
Start installation process o /usr/installmedia/BPM7.5/IM/userinstc -acceptLicense input
/usr/installmedia/BPM7.5/responsefiles/BPM/bpmResponse.xml -log
/usr/websphere/BPM75/silent_install.log
3.3 Database Creation
The databases are created with scripts generated by DDT, the Database Design Tool3, before
creating any profiles.
BPM 7.5 Advanced Process Center needs tables for the following components:
3 For additional information about DDT in general see Redbook “WebSphere BPM V7 Production Topologies”
http://www.redbooks.ibm.com/abstracts/sg247854.html, chapter 3.3; it is based on WebSphere Process Server V7
but still useful

Florian Herzog BPM 7.5 Advanced 32 Bit Installation on AIX
- 4 -
Figure 3.1: BPM 7.5 Adv. Components and sample Mapping to DBs
As can be seen in above diagram the 12 components are mapped to 5 databases for this sample
installation, all residing in one DB2 instance.
Hint: For this sample installation the DB2 instance owner user is used for both creating databases
and accessing them later with BPM 7.5 datasources. For some components (e.g. Performance
Data Warehouse) it seems you cannot configure the schema names so the default value (normally
username) is taken when creating them. Mind this or use the same user for both creating and
accessing the databases.
As user websph do:
Create directory to store the database scripts o mkdir -p /usr/websphere/BPM75/scripts/DManager/dbScripts
Change to working directory o cd /usr/websphere/BPM75/scripts/DManager/dbScripts
Create database scripts with interactive shell script DDT
o /usr/websphere/BPM75/Binaries/util/dbUtils/DbDesignGenerator.sh
o Choose 1 for “Create a database design for Standalone profile or Deployment
Environment”
o Choose 1 for “bpm.advanced.nd.topology”
o Configure components from top to bottom (1-12)
DB2 Instance
bpminst1 Common DB
BPC Reporting
(formerly Observer)
Business Space
BPC
SIB Messaging Engine SCA.APP
SIB Messaging Engine SCA.SYS
SIB Messaging Engine BPC
SIB Messaging Engine CEI
SIB Messaging Engine Process Server
SIB Messaging Engine Perf. Datawarehouse
Process Server
Performance Data Warehouse
CMN
DB
BPE
DB
BPM
DB
ME
DB
PDW
DB
Florian Herzog BPM 7.5 Advanced 32 Bit Installation on AIX
- 5 -
The excel sheet coming with this document contains a list of all options for
the components and concrete values used during this sample installation so
that you can e.g. discuss and fill out this with your DB admin
Instead of starting from scratch the file
bpm.advanced.nd.topology.dbDesign coming with this document can be
loaded with DDT (flag “-e”) and adapted to your needs
For options “create tables” or the like, choose false as all databases will be
created with the DDT generated scripts, not during profile/deployment
environment creation
During Process Server DB configuration DDT asks for an administrative
user and password; here the same user was chosen as the one used during
Deployment Manager profile creation (wasadmin)
Fill in all datasource options in DDT so you do not need to provide any
input / connection details later
o Choose 13 to save and exit
Keep default ouput directory
(/usr/websphere/BPM75/scripts/DManager/dbScripts) and filename
(bpm.advanced.nd.topology.dbDesign)
Let DDT create all scripts, keep the default directories
Copy the database design file /usr/websphere/BPM75/scripts/DManager/dbScripts/ bpm.advanced.nd.topology.dbDesign to your local computer, it will be needed later when
configuring the Deployment Environment in the admin console
As user root do:
Create DB2 instance bpminst1 with port 50001
o /usr/db2/V9.5/instance/db2icrt -u bpmfenc1 -p 50001 bpminst1
Copy db scripts to bpminst1 home directory o cp -r /usr/websphere/BPM75/scripts/DManager/dbScripts /home/bpminst1/
o chown -R bpminst1:bpmiadm1 /home/bpminst1/dbScripts
As user bpminst1 do:
Have your friendly, skilled DB admin have a look at the generated scripts for possible optimizations (e.g. remove “MANAGED BY SYSTEM” in favour of automatic storage,
check pagesize values, ...)
Load (= source with “. ”) db2profile
o . /home/bpminst1/sqllib/db2profile
Start the newly created DB2 instance o db2start
Create Common DB o cd /home/bpminst1/dbScripts/DB2-distributed-CommonDB
o ./configCommonDB.sh createDB
o Enter password for bpminst1 if asked for
o Modify transaction log4
db2 connect to CMNDB
4 See
http://publib.boulder.ibm.com/infocenter/dmndhelp/v7r5mx/topic/com.ibm.wbpm.imuc.ebpm.doc/topics/tcfg_db2_b
uffer_pool.html
Florian Herzog BPM 7.5 Advanced 32 Bit Installation on AIX
- 6 -
db2 UPDATE DB CFG FOR CMNDB USING LOGFILSIZ 4096
IMMEDIATE
db2 UPDATE DB CFG FOR CMNDB USING LOGSECOND 64
IMMEDIATE
db2 connect reset
Create BPC Reporting tables in Common DB
o cd /home/bpminst1/dbScripts/DB2-distributed-BPCReporting
o db2 connect to CMNDB
o db2 "CREATE SCHEMA REPORT"
o db2 -tf createTablespace_Observer.sql o db2 -tf createSchema_Observer.sql
o db2 connect reset
Create Business Space tables in Common DB
o cd /home/bpminst1/dbScripts/DB2-distributed-BSpace
o ./configBusinessSpaceDB.sh
o Enter user bpminst1 and password if asked for
Create BPC DB o cd /home/bpminst1/dbScripts/DB2-distributed-BPC
o db2 CREATE DATABASE BPEDB USING CODESET UTF-8 TERRITORY
EN-US PAGESIZE 8 K
o db2 "connect to BPEDB"
o db2 "CREATE SCHEMA BPC"
o db2 -tf createTablespace.sql
o db2 -tf createSchema.sql
o db2 connect reset
o Modify transaction log
db2 connect to BPEDB
db2 UPDATE DB CFG FOR BPEDB USING LOGFILSIZ 4096
IMMEDIATE
db2 UPDATE DB CFG FOR BPEDB USING LOGSECOND 64
IMMEDIATE
db2 connect reset
Create SIB ME DB o cd /home/bpminst1/dbScripts/DB2-distributed-SibME
o db2 "CREATE DATABASE MEDB USING CODESET UTF-8 TERRITORY
EN-US PAGESIZE 8 K"
o db2 connect to MEDB
o db2 -tf BPM_PerformanceDW_ME/DB2-distributed-SibME.sql
o db2 -tf BPM_ProcessServer_ME/DB2-distributed-SibME.sql
o db2 -tf WBI_BPC_ME/DB2-distributed-SibME.sql
o db2 -tf WBI_CEI_ME/DB2-distributed-SibME.sql
o db2 -tf WBI_SCA_APP_ME/DB2-distributed-SibME.sql
o db2 -tf WBI_SCA_SYS_ME/DB2-distributed-SibME.sql
o db2 connect reset
o Modify transaction log
db2 connect to BPEDB
Florian Herzog BPM 7.5 Advanced 32 Bit Installation on AIX
- 7 -
db2 UPDATE DB CFG FOR BPEDB USING LOGFILSIZ 4096
IMMEDIATE
db2 UPDATE DB CFG FOR BPEDB USING LOGSECOND 64
IMMEDIATE
db2 connect reset
Create Performance Data Warehouse DB
o cd /home/bpminst1/dbScripts/DB2-distributed-BPM_PerformanceDW
o db2 -tf createDatabase.sql
o db2 connect to PDWDB
o db2 -tf createTable_PerformanceDW.sql o db2 connect reset
o Hint: No need to modify transaction log, createDatabase.sql already does
Create Process Server DB
o cd /home/bpminst1/dbScripts/DB2-distributed-BPM_ProcessServer
o db2 -tf createDatabase.sql
o db2 connect to BPMDB
o db2 -tf createTable_ProcessServer.sql
o db2 -tdGO -vf createProcedure_ProcessServer.sql
o db2 connect reset
o Hint: No need to modify transaction log, createDatabase.sql already does
Restart DB2 instance to make sure all configuration changes take effect o db2stop
o db2start
3.4 Profile Creation
To set up a Network Deployment topology a Deployment Manager profile as well as a custom
profile are needed.
As user websph do:
Create the Deployment Manager profile o Adapt the following command to your needs, e.g. passwords
5
o /usr/websphere/BPM75/Binaries/bin/manageprofiles.sh -create -templatePath
"/usr/websphere/BPM75/Binaries/profileTemplates/BPM/dmgr.procctr.adv" -
profileName "DManager" -profilePath "/usr/websphere/BPM75/DManager" -
hostName "BPM75DManager01" -nodeName "BPM75DManager01Node01" -
cellName "BPM75DManager01Cell01" -adminUserName "wasadmin" -
adminPassword "####" -bpmdbDesign
"/usr/websphere/BPM75/scripts/DManager/dbScripts/bpm.advanced.nd.topology.
dbDesign" -dbDelayConfig true -configureBPC false -samplesPassword "####" -
personalCertValidityPeriod 6 -signingCertValidityPeriod 15 -startingPort 11100 –
validatePorts
Create the custom profile for a node o /usr/websphere/BPM75/Binaries/bin/manageprofiles.sh -create -templatePath
"/usr/websphere/BPM75/Binaries/profileTemplates/BPM/managed.procctr.adv" -
5 A complete list of options for the manageprofiles command can be found at
http://publib.boulder.ibm.com/infocenter/dmndhelp/v7r5mx/topic/com.ibm.wbpm.ref.doc/topics/rins_manageprofiles
_parms.html
Florian Herzog BPM 7.5 Advanced 32 Bit Installation on AIX
- 8 -
profileName "Node01" -profilePath "/usr/websphere/BPM75/Node01" -hostName
"BPM75Node01" -nodeName "BPM75Node01" -personalCertValidityPeriod 6 -
signingCertValidityPeriod 15 -dbType DB2_UNIVERSAL
Start the Deployment Manager
o Make sure the DB2 instance is up and running
o /usr/websphere/BPM75/DManager/bin/startManager.sh
Federate the node into the cell o /usr/websphere/BPM75/Node01/bin/addNode.sh BPM75DManager01 11103
o If asked for username and password, enter credentials used when creating the
Deployment Manager profile
3.5 Deployment Environment Configuration
For this sample Process Center cell a Deployment Environment according to pattern “Remote
Messaging” is configured. This means there‟s an AppTarget cluster for running processes, CEI
and supporting Web applications and a Messaging Cluster for SIB messaging engines.
Go to admin console (“Integrated Solutions Console”) and login with the primary user
o URL: https://YOUR-LPAR-IP-ADDRESS:11101/admin
Go to Servers Deployment Environments New
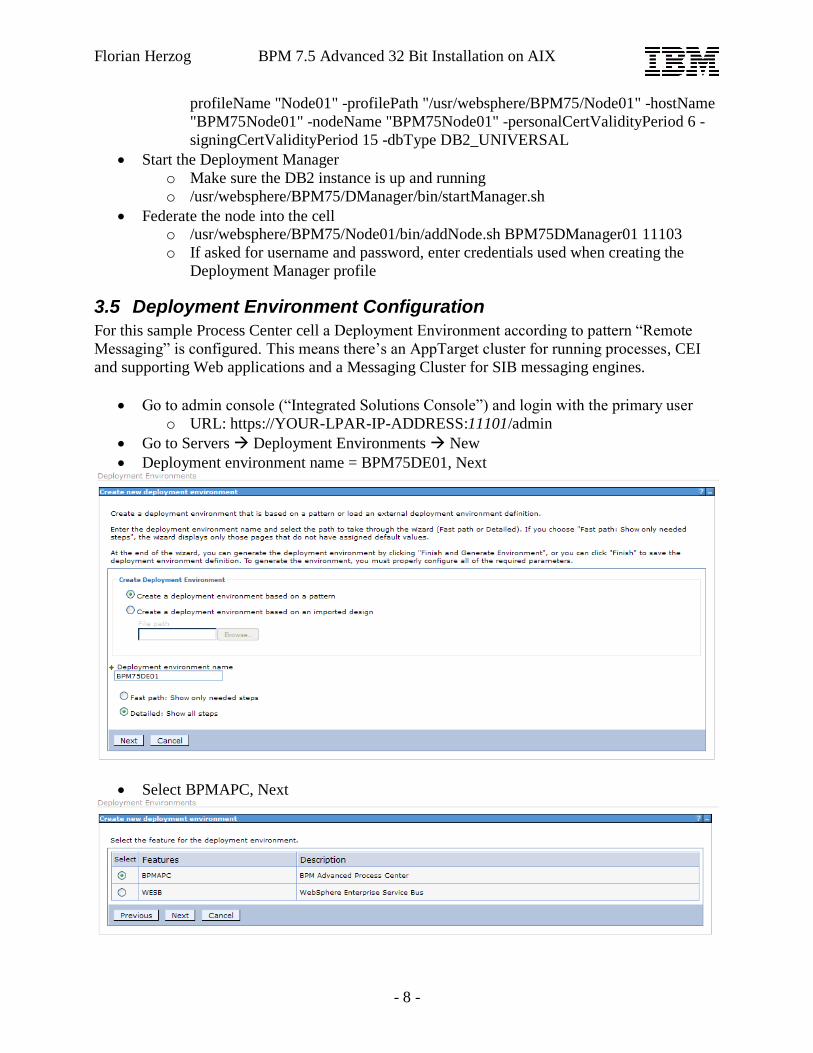
Deployment environment name = BPM75DE01, Next
Select BPMAPC, Next
Florian Herzog BPM 7.5 Advanced 32 Bit Installation on AIX
- 9 -
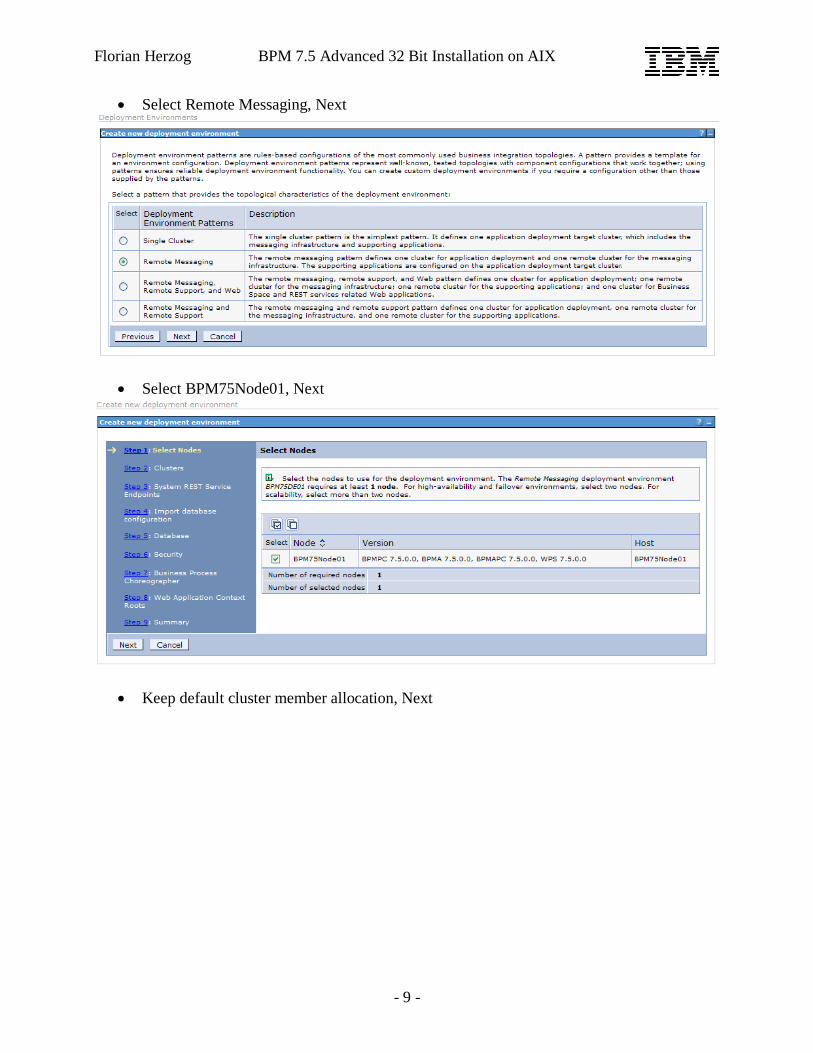
Select Remote Messaging, Next
Select BPM75Node01, Next
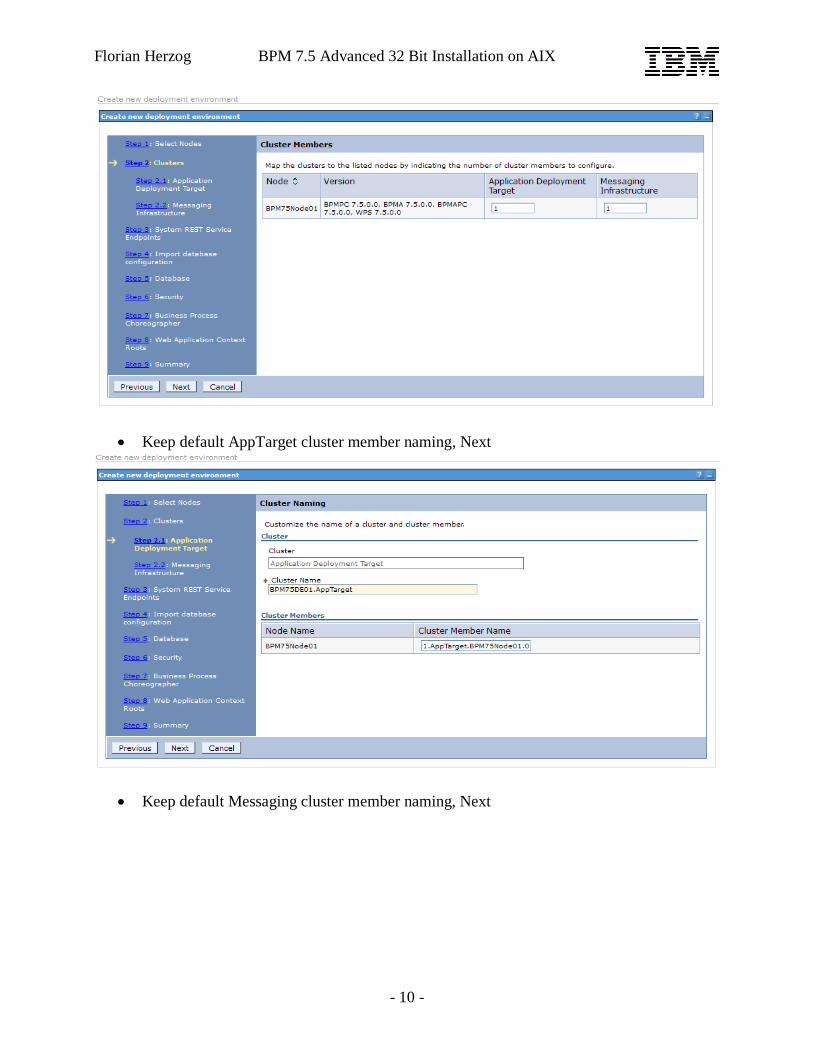
Keep default cluster member allocation, Next
Florian Herzog BPM 7.5 Advanced 32 Bit Installation on AIX
- 10 -
Keep default AppTarget cluster member naming, Next
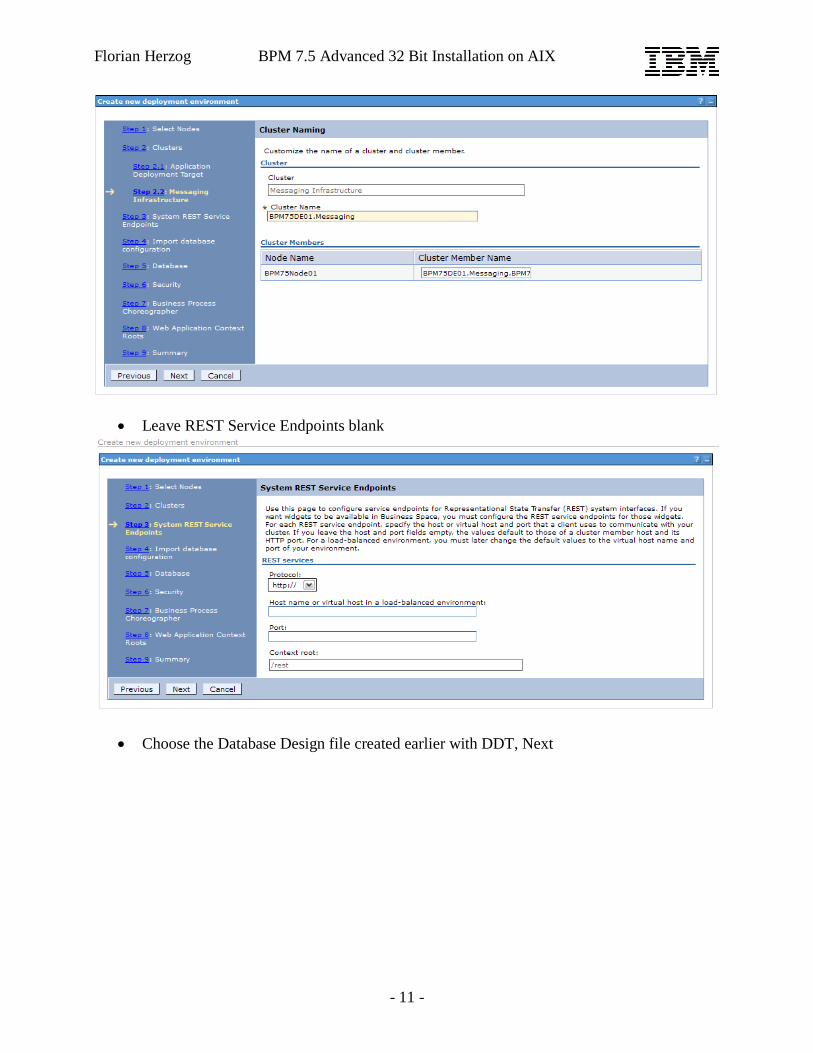
Keep default Messaging cluster member naming, Next
Florian Herzog BPM 7.5 Advanced 32 Bit Installation on AIX
- 11 -
Leave REST Service Endpoints blank
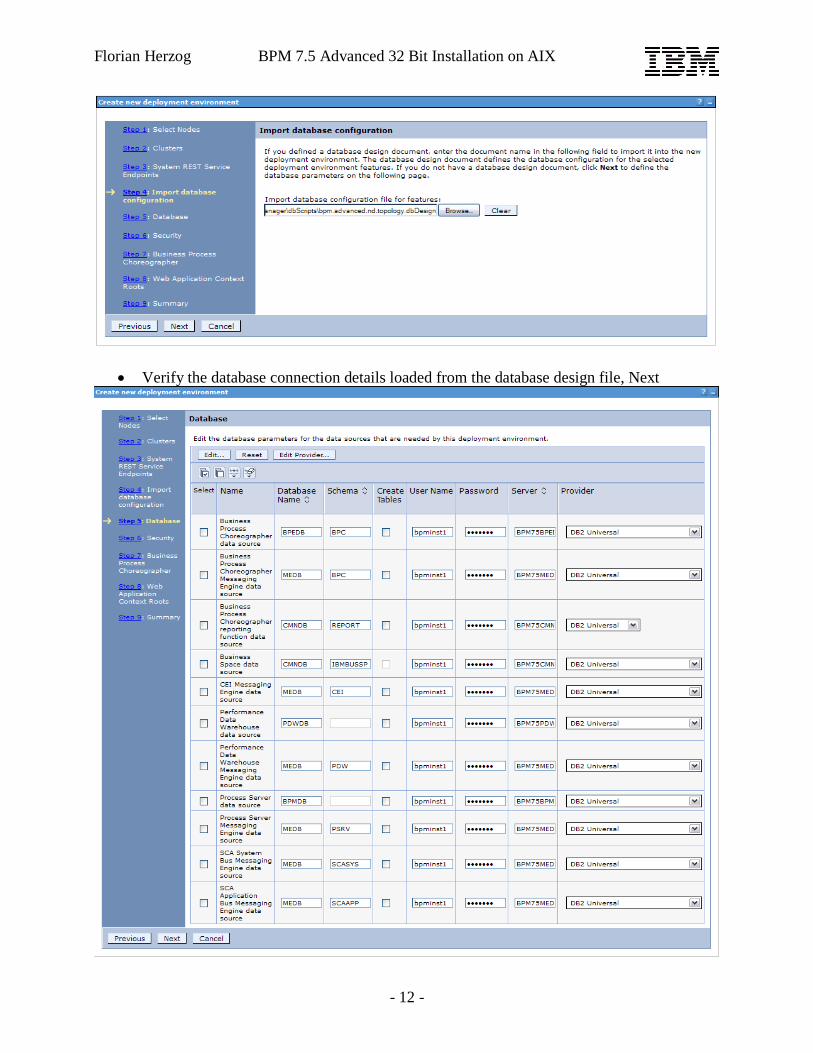
Choose the Database Design file created earlier with DDT, Next
Florian Herzog BPM 7.5 Advanced 32 Bit Installation on AIX
- 12 -
Verify the database connection details loaded from the database design file, Next
Florian Herzog BPM 7.5 Advanced 32 Bit Installation on AIX
- 13 -
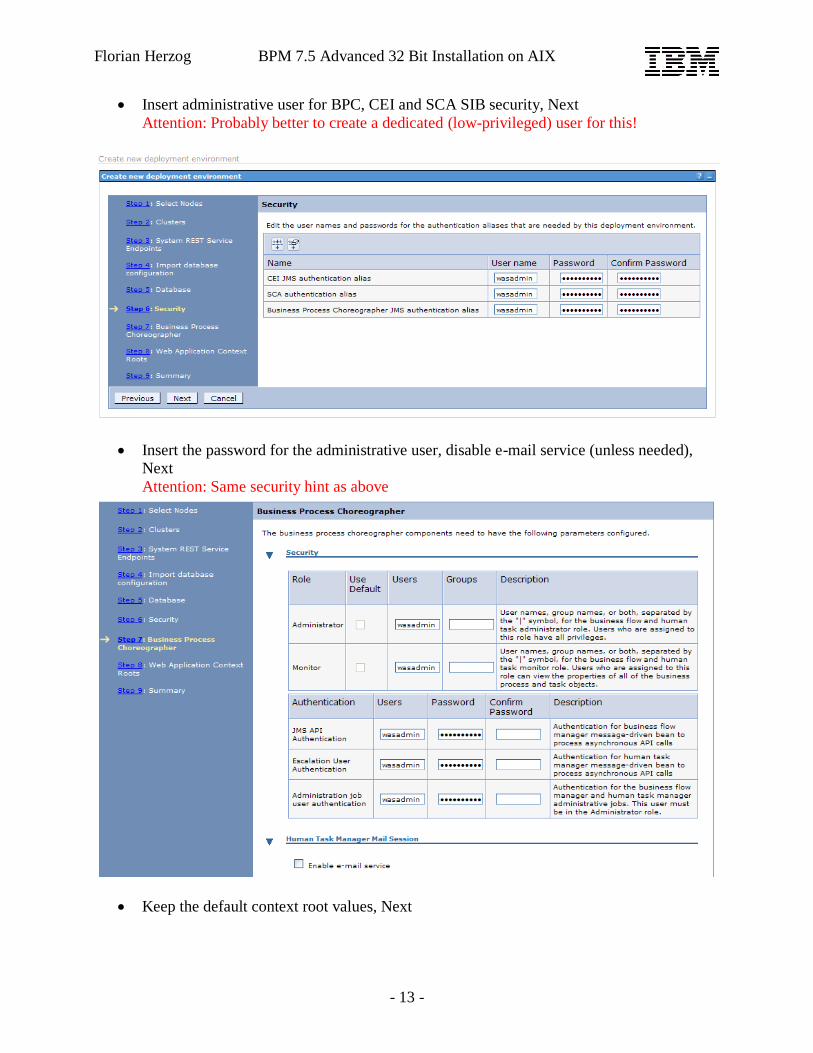
Insert administrative user for BPC, CEI and SCA SIB security, Next
Attention: Probably better to create a dedicated (low-privileged) user for this!
Insert the password for the administrative user, disable e-mail service (unless needed), Next
Attention: Same security hint as above
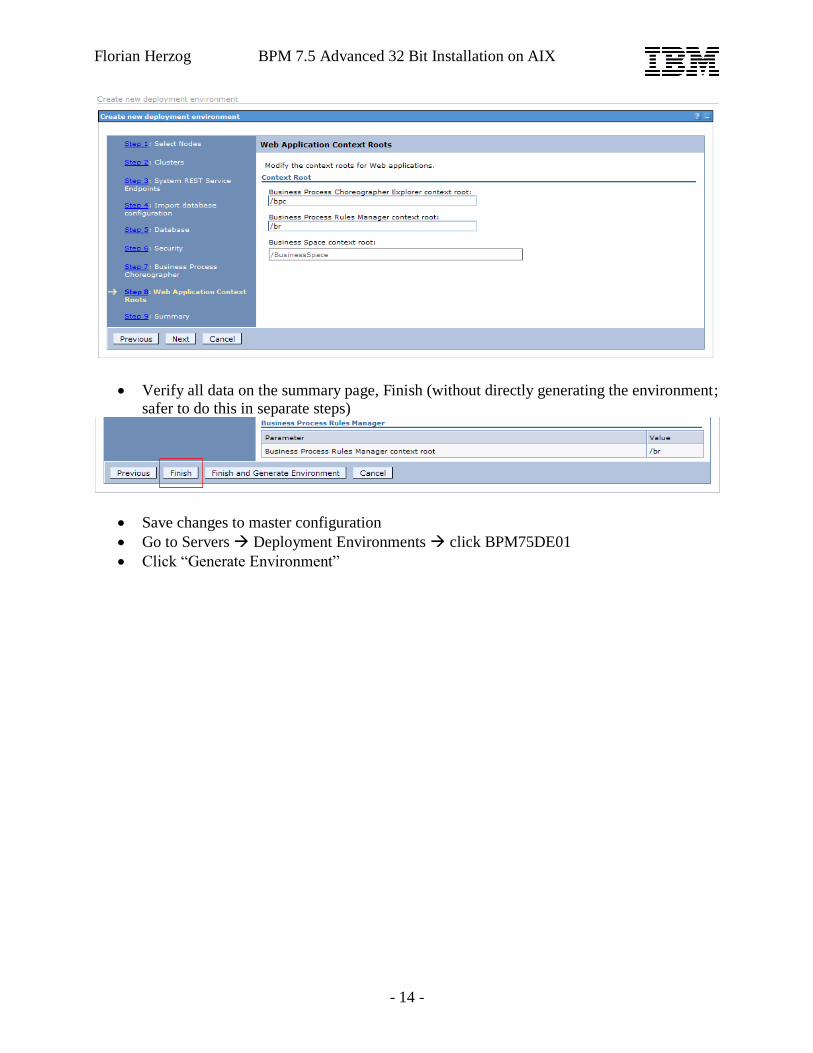
Keep the default context root values, Next
Florian Herzog BPM 7.5 Advanced 32 Bit Installation on AIX
- 14 -
Verify all data on the summary page, Finish (without directly generating the environment; safer to do this in separate steps)
Save changes to master configuration
Go to Servers Deployment Environments click BPM75DE01
Click “Generate Environment”
Florian Herzog BPM 7.5 Advanced 32 Bit Installation on AIX
- 15 -
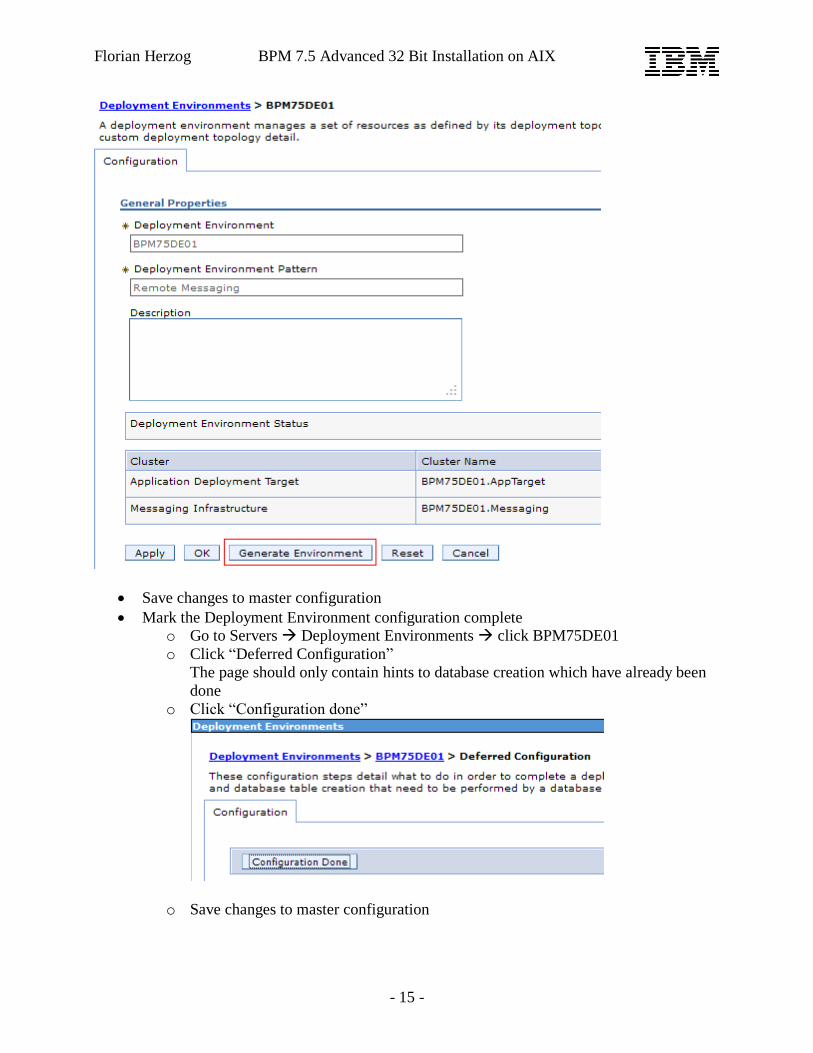
Save changes to master configuration
Mark the Deployment Environment configuration complete o Go to Servers Deployment Environments click BPM75DE01
o Click “Deferred Configuration”
The page should only contain hints to database creation which have already been
done
o Click “Configuration done”
o Save changes to master configuration
Florian Herzog BPM 7.5 Advanced 32 Bit Installation on AIX
- 16 -
3.6 Loading / Bootstrapping of Process Server Data into Database
Before the Process Center can be used some data has to be loaded into the process server
database for the newly created AppTarget6. Failing to do so will e.g. result in Nullpointer
Exceptions in the Process Center Web application.
As user websph do:
Load data for the process center server into the database o /usr/websphere/BPM75/DManager/bin/bootstrapProcessServerData.sh -
profilePath /usr/websphere/BPM75/DManager -dbType DB2_UNIVERSAL -
dbJDBCClasspath /usr/websphere/BPM75/Binaries/jdbcdrivers/DB2 -nodeName
BPM75Node01 -serverName BPM75DE01.AppTarget.BPM75Node01.0
o (if this fails, try to start the Messaging and AppTarget cluster first and then
bootstrap, but make sure to restart the AppTarget cluster afterwards)
3.7 Starting the Environment
All mandatory configurations should be done by now and the Clusters are ready to be started.
In the admin console, go to Servers Clusters WebSphere application server clusters
Select BPM75DE01.Messaging, click “Start”
Wait for cluster start to finish
Select BPM75DE01.AppTarget, click “Start”
Wait for cluster start to finish
4 Usage of the Environment The environment is now ready to be tested.
4.1 Important URLs
The environment‟s most important URLs are7:
WAS Admin Console:
https://YOUR-LPAR-IP-ADDRESS:11101/admin
Process Admin Console8:
http://YOUR-LPAR-IP-ADDRESS: 9082/ProcessAdmin
Process Center: http://YOUR-LPAR-IP-ADDRESS:9082/ProcessCenter
Process Portal:
http:// YOUR-LPAR-IP-ADDRESS:9082/portal
6 See
http://publib.boulder.ibm.com/infocenter/dmndhelp/v7r5mx/index.jsp?topic=/com.ibm.wbpm.imuc.ebpm.doc/topics/
tcnfg_bootstrap.html 7 The ports are specific to this environment so replace them with the proper values (WC_defaulthost port of
AppTarget server) 8 The default BPM 7.5 admin user for the Lombardi portion is “tw_admin” with password “tw_admin”.
Florian Herzog BPM 7.5 Advanced 32 Bit Installation on AIX
- 17 -
Example Usage:
In WAS admin console you can create a new user in the user repository, which you then add to
group tw_authors in Process Admin Console. Then the user downloads the Process Designer IDE
from Process Center, develops some processes and tests them in Process Portal.
Easy as that ;-)
4.2 BPM 7.5 DNS Alias in local /etc/hosts for Process Designer Usage
Attention: The next step has to be performed before starting Process Designer (which can be
downloaded from Process Center). Otherwise connection will fail with a misleading error
message (something like “Wrong username or password”)
When downloading Process Designer from Process Center and installing it, it stores the public
DNS alias of Process Center (the hostname as typed in the URL) in file eclipse.ini. When starting
Process Designer and logging in, at first it connects to this public DNS alias which is good; you
can see the login process in the AppTarget‟s SystemOut.log.
But after login it seems that Process Designer is redirected to the hostname configured when the
custom profile was created (for the sample installation it was “BPM75Node01”). If Process
Designer cannot reach this URL, it fails with above mentioned misleading error message (it really
should be “Host not found”…).
Solution:
Add the Process Center‟s IP address and DNS Alias (“BPM75Node01”) to your local /etc/hosts file (on Windows XP normally C:\WINDOWS\system32\drivers\etc\hosts)
5 Next Steps In addition to this basic setup additional steps should be performed which are not described in
this document, e.g.
Installation of IBM HTTP Servers and mapping of Web applications to them
Installation of fixes
Adding LDAP as user repository to the federated repository / VMM
Change of the built-in users‟ passwords (e.g. for tw_admin)
Change of the business integration users to some low-privileged user (see section 3.5)
Configuration of REST Service URLs (endpoint should point to webserver / loadbalancer)
Installation of a separate Process Server Cell that then is linked to the Process Center
…
6 Resources BPM 7.5 Infocenter
http://publib.boulder.ibm.com/infocenter/dmndhelp/v7r5mx/index.jsp
WebSphere BPM V7 Production Topologies Redbook http://www.redbooks.ibm.com/abstracts/sg247854.html
Fixes for BPM 7.5 http://www-01.ibm.com/support/docview.wss?uid=swg24030032
Related Documents