Document Number: 325925-003 Intel ® Boot Loader Development Kit (Intel ® BLDK) Version 2.0 — UEFI Standard Based Getting Started Guide January 2012

Welcome message from author
This document is posted to help you gain knowledge. Please leave a comment to let me know what you think about it! Share it to your friends and learn new things together.
Transcript

Document Number: 325925-003
Intel® Boot Loader Development Kit (Intel® BLDK)Version 2.0 — UEFI Standard BasedGetting Started Guide
January 2012

Intel® Boot Loader Development KitVersion 2.0 — UEFI Standard Based GSG January 20122 Document Number: 325925-003
INFORMATION IN THIS DOCUMENT IS PROVIDED IN CONNECTION WITH INTEL PRODUCTS. NO LICENSE, EXPRESS OR IMPLIED, BY ESTOPPEL OR OTHERWISE, TO ANY INTELLECTUAL PROPERTY RIGHTS IS GRANTED BY THIS DOCUMENT. EXCEPT AS PROVIDED IN INTEL'S TERMS AND CONDITIONS OF SALE FOR SUCH PRODUCTS, INTEL ASSUMES NO LIABILITY WHATSOEVER AND INTEL DISCLAIMS ANY EXPRESS OR IMPLIED WARRANTY, RELATING TO SALE AND/OR USE OF INTEL PRODUCTS INCLUDING LIABILITY OR WARRANTIES RELATING TO FITNESS FOR A PARTICULAR PURPOSE, MERCHANTABILITY, OR INFRINGEMENT OF ANY PATENT, COPYRIGHT OR OTHER INTELLECTUAL PROPERTY RIGHT.A "Mission Critical Application" is any application in which failure of the Intel Product could result, directly or indirectly, in personal injury or death. SHOULD YOU PURCHASE OR USE INTEL'S PRODUCTS FOR ANY SUCH MISSION CRITICAL APPLICATION, YOU SHALL INDEMNIFY AND HOLD INTEL AND ITS SUBSIDIARIES, SUBCONTRACTORS AND AFFILIATES, AND THE DIRECTORS, OFFICERS, AND EMPLOYEES OF EACH, HARMLESS AGAINST ALL CLAIMS COSTS, DAMAGES, AND EXPENSES AND REASONABLE ATTORNEYS' FEES ARISING OUT OF, DIRECTLY OR INDIRECTLY, ANY CLAIM OF PRODUCT LIABILITY, PERSONAL INJURY, OR DEATH ARISING IN ANY WAY OUT OF SUCH MISSION CRITICAL APPLICATION, WHETHER OR NOT INTEL OR ITS SUBCONTRACTOR WAS NEGLIGENT IN THE DESIGN, MANUFACTURE, OR WARNING OF THE INTEL PRODUCT OR ANY OF ITS PARTS.Intel may make changes to specifications and product descriptions at any time, without notice. Designers must not rely on the absence or characteristics of any features or instructions marked "reserved" or "undefined". Intel reserves these for future definition and shall have no responsibility whatsoever for conflicts or incompatibilities arising from future changes to them. The information here is subject to change without notice. Do not finalize a design with this information.The products described in this document may contain design defects or errors known as errata which may cause the product to deviate from published specifications. Current characterized errata are available on request.Contact your local Intel sales office or your distributor to obtain the latest specifications and before placing your product order.Copies of documents which have an order number and are referenced in this document, or other Intel literature, may be obtained by calling 1-800-548-4725, or go to: http://www.intel.com/design/literature.htm Any software source code reprinted in this document is furnished for informational purposes only and may only be used or copied and no license, express or implied, by estoppel or otherwise, to any of the reprinted source code is granted by this document.Intel processor numbers are not a measure of performance. Processor numbers differentiate features within each processor family, not across different processor families. Go to: http://www.intel.com/products/processor%5Fnumber/Code Names are only for use by Intel to identify products, platforms, programs, services, etc. (“products”) in development by Intel that have not been made commercially available to the public, i.e., announced, launched or shipped. They are never to be used as “commercial” names for products. Also, they are not intended to function as trademarks.BlueMoon, BunnyPeople, Celeron, Celeron Inside, Centrino, Centrino Inside, Cilk, Core Inside, E-GOLD, i960, Intel, the Intel logo, Intel AppUp, Intel Atom, Intel Atom Inside, Intel Core, Intel Inside, Intel Insider, the Intel Inside logo, Intel NetBurst, Intel NetMerge, Intel NetStructure, Intel SingleDriver, Intel SpeedStep, Intel Sponsors of Tomorrow., the Intel Sponsors of Tomorrow. logo, Intel StrataFlash, Intel vPro, Intel XScale, InTru, the InTru logo, the InTru Inside logo, InTru soundmark, Itanium, Itanium Inside, MCS, MMX, Moblin, Pentium, Pentium Inside, Puma, skoool, the skoool logo, SMARTi, Sound Mark, The Creators Project, The Journey Inside, Thunderbolt, Ultrabook, vPro Inside, VTune, Xeon, Xeon Inside, X-GOLD, XMM, X-PMU and XPOSYS are trademarks of Intel Corporation in the U.S. and/or other countries.*Other names and brands may be claimed as the property of others.Copyright © 2012, Intel Corporation. All rights reserved.

Intel® Boot Loader Development KitJanuary 2012 Version 2.0 — UEFI Standard Based GSGDocument Number: 325925-003 3
Contents—Intel® BLDK
Contents
1.0 About this Manual......................................................................................................51.1 Audience............................................................................................................51.2 Related Documents and Tools ...............................................................................51.3 Notational Conventions and Terminology ................................................................7
2.0 Intel® BLDK Distribution ...........................................................................................82.1 Package Naming Convention.................................................................................8
3.0 Installing, Running and Uninstalling the Intel® BLDK Software .................................93.1 Unpacking the Intel® BLDK Software .....................................................................9
3.1.1 Before You Begin......................................................................................93.1.2 Unpacking the Code Base Package............................................................ 10
3.1.2.1 Build Environment Setup on Windows* ........................................ 113.1.2.2 Build Environment Setup on Linux* ............................................. 11
3.2 Unpacking and Installing the Intel® BLDK Development Application ......................... 123.2.1 Unpacking and Installing on Windows*...................................................... 123.2.2 Unpacking and Installing on Linux*........................................................... 12
3.3 Running the Intel® BLDK Development Application ................................................ 123.4 Uninstalling the Intel® BLDK Development Application ........................................... 13
3.4.1 Uninstalling on Windows*........................................................................ 133.4.2 Uninstalling on Linux*............................................................................. 14
4.0 Getting Started with the Intel® BLDK ...................................................................... 154.1 Creating a Firmware Image ................................................................................ 15
4.1.1 Creating a New Project............................................................................ 154.1.2 Configuring the Firmware Image Features ................................................. 174.1.3 Selecting Build Mode............................................................................... 174.1.4 Creating the Final Firmware Image ........................................................... 184.1.5 Updating Firmware ................................................................................. 18
4.1.5.1 Using Hardware SPI Programmer ................................................ 184.1.5.2 Using UEFI Shell Application ....................................................... 19
4.1.6 Enabling Fast Boot.................................................................................. 214.2 Configuring the Intel® BLDK Development Application............................................ 22
4.2.1 Setting Up the Web Browser and General Settings ...................................... 224.2.2 Setting Up the Text Editor ....................................................................... 234.2.3 Adding Your Tools .................................................................................. 244.2.4 Setting Up the Debug Tools ..................................................................... 254.2.5 Setting Up the Update Tools .................................................................... 264.2.6 Setting Up the Build Tools ....................................................................... 27
4.2.6.1 Adding a Debug Build Option ...................................................... 28
Figures1 Intel® BLDK Development Application GUI .................................................................. 132 New Project: Start Configuration ................................................................................ 153 New Project: Create Project....................................................................................... 164 New Project: Processor Properties .............................................................................. 175 Create Final Firmware File ........................................................................................ 186 Mapping the Drives under EFI Shell Environment ......................................................... 207 Enabling Fast Boot ................................................................................................... 218 Application Preferences............................................................................................. 229 Text Editor Preferences............................................................................................. 2310 My Tools ................................................................................................................. 24
Intel® BLDK—Revision History
Intel® Boot Loader Development KitVersion 2.0 — UEFI Standard Based GSG January 20124 Document Number: 325925-003
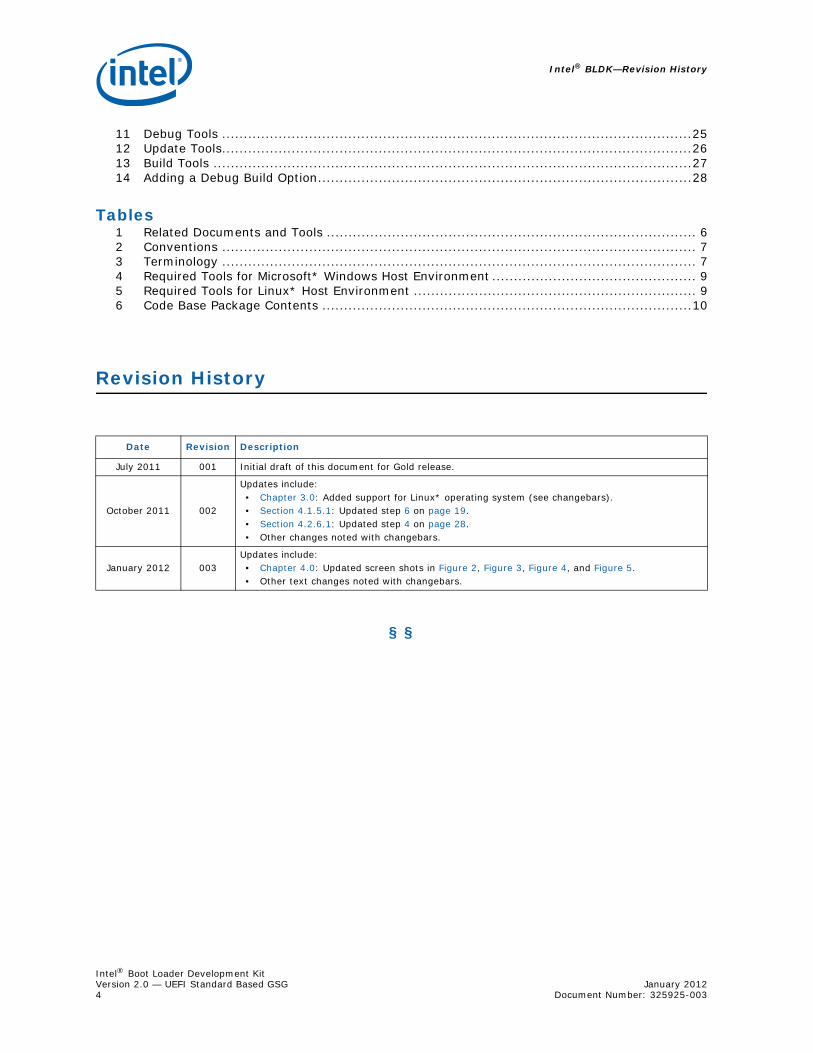
11 Debug Tools ............................................................................................................2512 Update Tools............................................................................................................2613 Build Tools ..............................................................................................................2714 Adding a Debug Build Option......................................................................................28
Tables1 Related Documents and Tools ..................................................................................... 62 Conventions ............................................................................................................. 73 Terminology ............................................................................................................. 74 Required Tools for Microsoft* Windows Host Environment ............................................... 95 Required Tools for Linux* Host Environment ................................................................. 96 Code Base Package Contents .....................................................................................10
Revision History
§ §
Date Revision Description
July 2011 001 Initial draft of this document for Gold release.
October 2011 002
Updates include:• Chapter 3.0: Added support for Linux* operating system (see changebars). • Section 4.1.5.1: Updated step 6 on page 19. • Section 4.2.6.1: Updated step 4 on page 28. • Other changes noted with changebars.
January 2012 003Updates include:• Chapter 4.0: Updated screen shots in Figure 2, Figure 3, Figure 4, and Figure 5.• Other text changes noted with changebars.
Intel® Boot Loader Development KitJanuary 2012 Version 2.0 — UEFI Standard Based GSGDocument Number: 325925-003 5
About this Manual—Intel® BLDK
1.0 About this Manual
The Intel® Boot Loader Development Kit (Intel® BLDK) is a software toolkit that allows creation of customized and optimized initialization firmware solutions for embedded Intel® processor-based platforms. The Intel® BLDK enables rapid development of firmware for fixed-function embedded designs—those requiring basic initialization and functionality rather than the full capabilities delivered with a traditional BIOS.
The foundation of the Intel® BLDK is Intel’s latest implementation of the UEFI Specification Version 2.3, known as the Intel® UEFI Development Kit 2010 (Intel® UDK2010). Consequently, the Intel® BLDK is fully compliant with the latest UEFI standards and compatible for use with the Intel® UEFI Development Kit Debugger Tool and UEFI 2.0 Shell.
Components of the Intel® BLDK toolkit are:• Development application: provides editing capabilities, configuration changes and
build capabilities• Code base: based on the Unified Extensible Firmware Interface (UEFI)• Documentation: Getting Started Guide (this manual) and User Guide
This manual, the Intel® Boot Loader Development Kit Version 2.0 — UEFI Standard Based Getting Started Guide, provides information for installing the development application and the code base onto the host machine. It also provides the general process for building and customizing the code base using the development application. When the build is completed, you will be able to flash the created binary to your target platform.
Note: This manual is not platform-specific but does use the Intel® Atom™ Processor E6xx Series with Intel® Platform Controller Hub EG20T solution as a reference. Also, for convenience the Intel® Atom™ Processor E6xx Series with Intel® Platform Controller Hub EG20T is referred to as Crown Bay in this manual.
1.1 AudienceThis manual is intended for firmware and software engineers who are using the Intel® BLDK to develop embedded devices. The Intel® BLDK solution uses a Host and Target Development Environment. The Host is a development machine that has the Intel® BLDK development application and the build tools. The Target is the platform on which the Intel® BLDK firmware will run, which in turn will launch your operating system.
1.2 Related Documents and ToolsThe documents listed in Table 1 contain additional information useful in designing systems that incorporate the Intel® BLDK. To get copies of these documents, or other Intel literature, call 1-800-548-4725 or visit the Intel web site at http://developer.intel.com.

Intel® BLDK—About this Manual
Intel® Boot Loader Development KitVersion 2.0 — UEFI Standard Based GSG January 20126 Document Number: 325925-003
Table 1. Related Documents and Tools
Title Reference Number / Location
Intel® Boot Loader Development Kit Version 2.0 — UEFI Standard Based User Guide 474049
Minimal Intel® Architecture Boot Loader White Paper http://download.intel.com/design/intarch/papers/323246.pdf
Intel® Embedded Graphics Drivers documentationWebsite contains links to download the latest software and documentation, including Intel® Embedded Graphics Drivers, EFI Video Driver, and Video BIOS User’s Guide
http://www.intel.com/go/iegd
Intel® 64 and IA-32 Architectures Software Developer's Manuals
• Volume 1: Basic Architecture • Volume 2A: Instruction Set Reference, A-M • Volume 2B: Instruction Set Reference, N-Z • Volume 3A: System Programming Guide Part 1 • Volume 3B: System Programming Guide Part 2
http://www.intel.com/products/processor/manuals/index.htm
253665253666253667253668253669
Intel® MultiProcessor Specification 242016
Current hardware documents available at http://developer.intel.com and may be accessed by clicking the associated reference number listed below.
Intel® Atom™ Processor E6xx Series Datasheet 324208
White Paper: The Power Management IC for the Intel® Atom™ Processor E6xx Series and Intel® Platform Controller Hub EG20T 324989
Nettop Platform for 2008 System Design White Paper 319980
ENERGY STAR* Version 5.0 System Implementation 321556
Advanced Configuration and Power Interface (ACPI) Specification, Revision 3.0a
http://www.acpi.info/DOWNLOADS/ACPIspec30a.pdf
ACPI Component Architecture Windows Binary Tools(includes iASL compiler and Windows ACPI tools)
http://www.acpica.org/downloads/binary_tools.php
7-Zip File Archiver http://www.7-zip.org/
Microsoft* Windows Driver Development Kit version 3790.1830 http://download.microsoft.com/download/
9/0/f/90f019ac-8243-48d3-91cf-81fc4093ecfd/1830_usa_ddk.iso
SPI Programming Device, such as DediProg* SF100 or similar
For example: www.siliconbluetech.com/products/
programming_hardware/DediprogSF100.aspx

Intel® Boot Loader Development KitJanuary 2012 Version 2.0 — UEFI Standard Based GSGDocument Number: 325925-003 7
About this Manual—Intel® BLDK
1.3 Notational Conventions and Terminology
Table 2. Conventions
Type Description
Numeric Constants
Represented as follows: • Hexadecimal numbers are represented by a string of hexadecimal digits either
beginning with “0x” or ending with the letter “h.”• Decimal and binary numbers are represented by their customary notation, that
is, 255 is a decimal number and 11111111b is a binary number. Binary numbers are identified by a prefix of “0b” or ending with the letter “b.”
Units of Measure
The following abbreviations are used to represent units of measure• KB - kilobytes (1024 bytes) • MB - megabytes (1048576 bytes) • MHz - megahertz • ms - milliseconds • ns - nanoseconds
Typographic Conventions
The following conventions are used in this manual:• Courier font - code examples and command line entries• Italic text - filenames, API names, and parameters• Bold text - graphical user interface entries and buttons
Table 3. Terminology
Term Description
ACPI Advanced Configuration and Power Interface
ATA Advanced Technology Attachment
BSF Boot Setting File
BSP Board Support Package
CRB Customer Reference Board
DMA Direct Memory Access
EFI Extensible Firmware Interface
FWH Firmware Hub
gdb GNU* Debugger
GUI Graphical User Interface
ICH Input/output Controller Hub
IDE Integrated Development Environment
Intel® BLDK Intel® Boot Loader Development Kit
PCI Peripheral Component Interface
RPM RPM Package Manager
RTOS Real-Time Operating System
SATA Serial Advanced Technology Attachment
UDK Unified Extensible Firmware Interface Development Kit
UEFI Unified Extensible Firmware Interface
WinDDK Windows* Driver Development Kit
Intel® BLDK—Intel® BLDK Distribution
Intel® Boot Loader Development KitVersion 2.0 — UEFI Standard Based GSG January 20128 Document Number: 325925-003
2.0 Intel® BLDK Distribution
2.1 Package Naming ConventionThe package naming scheme uses the following convention:
<CRB>-<EDKII>-<Release>-<a.b.c.d>.<extension>
where:• CRB indicates the supported Customer Reference Board• EDKII indicates the package supports the UEFI standard• Release indicates the type of release (alpha, beta, gold)• a.b.c.d indicates the version details• extension indicates the file type (.exe for the Windows* environment and .tar.gz for
Linux*)
For example, CB-EDKII-Alpha-2.3.6.2.exe means that the package is for a Windows environment, the resulting firmware runs on the Crown Bay (CB) Customer Reference Board (CRB), and it is an alpha release of the Intel® BLDK.
Intel® Boot Loader Development KitJanuary 2012 Version 2.0 — UEFI Standard Based GSGDocument Number: 325925-003 9
Installing, Running and Uninstalling the Intel® BLDK Software—Intel® BLDK
3.0 Installing, Running and Uninstalling the Intel® BLDK Software
Note: The examples in this document are for the Intel® Atom™ Processor E6xx Series with Intel® Platform Controller Hub EG20T, which is referred to as Crown Bay.
3.1 Unpacking the Intel® BLDK Software
3.1.1 Before You Begin
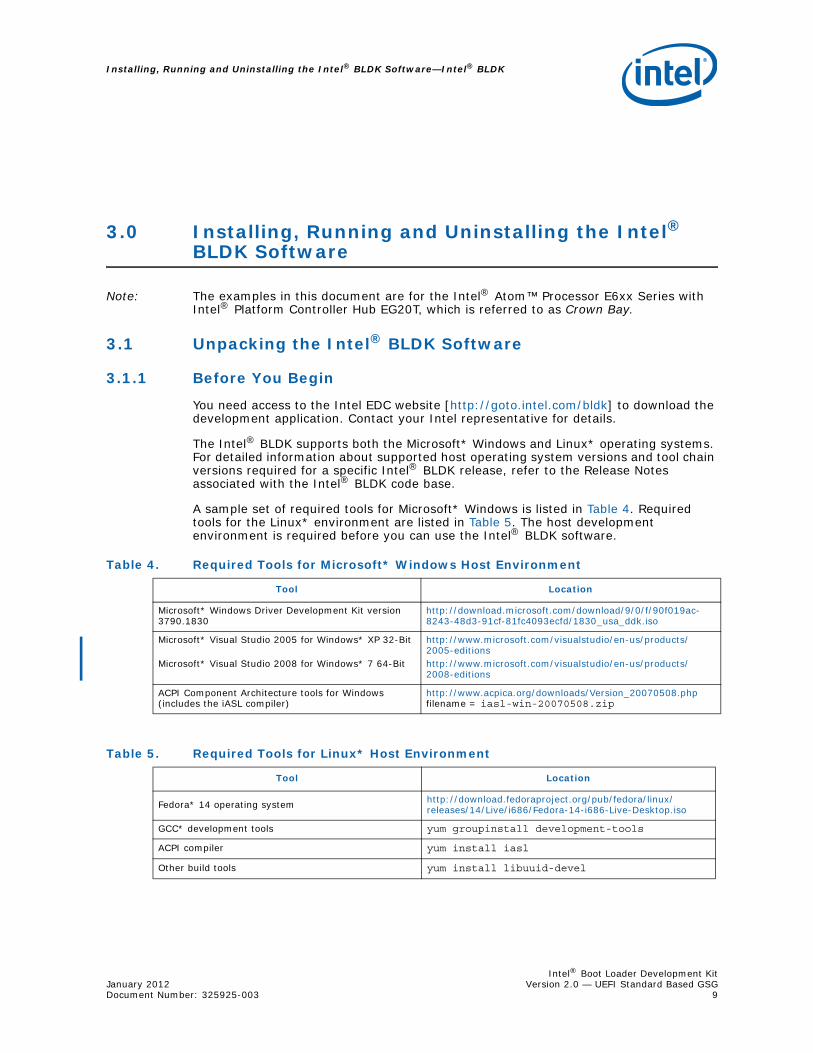
You need access to the Intel EDC website [http://goto.intel.com/bldk] to download the development application. Contact your Intel representative for details.
The Intel® BLDK supports both the Microsoft* Windows and Linux* operating systems. For detailed information about supported host operating system versions and tool chain versions required for a specific Intel® BLDK release, refer to the Release Notes associated with the Intel® BLDK code base.
A sample set of required tools for Microsoft* Windows is listed in Table 4. Required tools for the Linux* environment are listed in Table 5. The host development environment is required before you can use the Intel® BLDK software.
Table 4. Required Tools for Microsoft* Windows Host Environment
Tool Location
Microsoft* Windows Driver Development Kit version 3790.1830
http://download.microsoft.com/download/9/0/f/90f019ac-8243-48d3-91cf-81fc4093ecfd/1830_usa_ddk.iso
Microsoft* Visual Studio 2005 for Windows* XP 32-Bit
Microsoft* Visual Studio 2008 for Windows* 7 64-Bit
http://www.microsoft.com/visualstudio/en-us/products/2005-editionshttp://www.microsoft.com/visualstudio/en-us/products/2008-editions
ACPI Component Architecture tools for Windows (includes the iASL compiler)
http://www.acpica.org/downloads/Version_20070508.php filename = iasl-win-20070508.zip
Table 5. Required Tools for Linux* Host Environment
Tool Location
Fedora* 14 operating system http://download.fedoraproject.org/pub/fedora/linux/releases/14/Live/i686/Fedora-14-i686-Live-Desktop.iso
GCC* development tools yum groupinstall development-tools
ACPI compiler yum install iasl
Other build tools yum install libuuid-devel

Intel® BLDK—Installing, Running and Uninstalling the Intel® BLDK Software
Intel® Boot Loader Development KitVersion 2.0 — UEFI Standard Based GSG January 201210 Document Number: 325925-003
3.1.2 Unpacking the Code Base Package
1. Create a working directory to use for your development. Note: Intel recommends that you place the package at or near the root of your
file system and use a directory name with 8 or fewer alphanumeric characters (no spaces or special characters are allowed), such asC:\bldk (Windows) or /bldk (Linux).
2. Download the code base package from:http://edc.intel.com/Software/Intel-Boot-Loader-Development-Kit/ Select the Download Now tab, select the appropriate code base release for your system, and save it to the working directory.
3. Expand the code base package on your local host machine. a. For a Windows host environment, double-click the file and select Extract. b. For a Linux host environment, open a terminal window and change to the
directory where you saved the archive. Extract the files using the command:tar xzvf CB-EDKII-Gold-2.3.6.7.tar.gz
4. Once you have expanded the code base, the packages listed in Table 6 will be in the directory you specified.
Table 6. Code Base Package Contents (Sheet 1 of 2)
Package / Directory Category Purpose
BaseTools Tools UDK2010 build tools.
Build Output Directory for files generated by the build process.
Build_TC.bat / build_tc.sh Tools Batch or script file used to build the image from the command line.
CrownBayPlatformPkg Platform† Reference implementation for Crown Bay platform. Includes source, binary and build files used to generate the firmware image.
edksetup.bat / edksetup.sh Tools Batch or script file used to configure the build environment.
EdkShellBinPkg UDK2010 UEFI shell binary.
FatBinPkg UDK2010 UEFI driver binary that implements the FAT file system.
IA32FamilyCpuPkg CPU Multiprocessor and SMM initialization drivers.
IntelFrameworkModulePkg UDK2010 Drivers and libraries implementing Intel EFI Framework specification.
IntelFrameworkPkg UDK2010 Header files and libraries conforming to the Intel EFI Framework specification.
MdeModulePkg UDK2010 Modules conforming to UEFI/PI and other industry specifications.
MdePkg UDK2010 Header files and libraries implementing UEFI/PI and other industry specifications.
OldFlashDevicePkg Platform† Libraries supporting various flash devices.
PcAtChipsetPkg UDK2010 Drivers providing support for standard PC-AT devices, such as 8254 and 8259.
SmscLpc47m17xPkg Platform† Driver providing support for SMSC LPC 47M17x device.
SourceLevelDebugPkg UDK2010 Debug agent
TianoModulePkg Generic Drivers implementing Tiano specific services.
† Platform packages vary for different reference implementations. The examples above are for the Intel® Atom™ Processor E6xx Series with Intel® Platform Controller Hub EG20T, referred to as Crown Bay.

Intel® Boot Loader Development KitJanuary 2012 Version 2.0 — UEFI Standard Based GSGDocument Number: 325925-003 11
Installing, Running and Uninstalling the Intel® BLDK Software—Intel® BLDK
3.1.2.1 Build Environment Setup on Windows*
Note: This is a sample tool configuration for the Crown Bay reference implementation. See the release notes included with the reference implementation for any required updates to the tool configuration.
Configure the host machine as follows to set up the build environment used for building the code base. 1. Microsoft* Visual Studio 2005 or 2008 must be installed to your host machine and
can be downloaded from the following: — Microsoft* Visual Studio 2005 for Windows* XP 32-Bit:
http://www.microsoft.com/visualstudio/en-us/products/2005-editions— Microsoft* Visual Studio 2008 for Windows* 7 64-Bit:
http://www.microsoft.com/visualstudio/en-us/products/2008-editions Note: Ensure that the path to Microsoft* Visual Studio is included in the system
environment variable called Path. 2. Microsoft* Windows Driver Development Kit (WinDDK) must also be installed. It
can be downloaded from the Microsoft website:http://download.microsoft.com/download/9/0/f/90f019ac-8243-48d3-91cf-81fc4093ecfd/1830_usa_ddk.iso a. Extract the WinDDK to C:\1830_usa_ddkb. Run C:\1830_usa_ddk\x86\KitSetup.exe c. This installs WinDDK.3790.1830 under C:\WINDDK\3790.1830 d. Verify the correct version of the WinDDK by checking
c:\winddk\3790.1830\bin\bin16\link16.exe for version 5.0.2195.1. 3. Download the ACPI Component Architecture tools (iasl-win-20070508.zip
includes the iASL compiler) for Windows from: http://www.acpica.org/downloads/Version_20070508.php Note: A specific version of the ACPICA tools must be used. For Crown Bay, the
version is v20070508. Refer to the Release Notes for version details. 4. After downloading iASL, you need to extract the zip file into a directory on the host
machine:c:\ASL
3.1.2.2 Build Environment Setup on Linux*
Note: This is a sample tool configuration for the Crown Bay reference implementation. See the release notes included with the reference implementation for any required updates to the tool configuration.
TopcliffPkg Platform† Drivers responsible for initialization of devices on TopCliff IOH.
TunnelCreekPkg Platform† Drivers responsible for initialization of the Intel® Atom™ E6xx Series Processor.
UefiCpuPkg CPU UEFI compatible CPU modules and libraries.
Table 6. Code Base Package Contents (Sheet 2 of 2)
Package / Directory Category Purpose
† Platform packages vary for different reference implementations. The examples above are for the Intel® Atom™ Processor E6xx Series with Intel® Platform Controller Hub EG20T, referred to as Crown Bay.
Intel® BLDK—Installing, Running and Uninstalling the Intel® BLDK Software
Intel® Boot Loader Development KitVersion 2.0 — UEFI Standard Based GSG January 201212 Document Number: 325925-003
Use the following steps to configure your host machine to build the Intel® BLDK using Fedora* 14:1. Install Fedora 14 using the image from:
http://download.fedoraproject.org/pub/fedora/linux/releases/14/Live/i686/Fedora-14-i686-Live-Desktop.iso Note: Later steps require that you have access to the internet, so ensure network
configuration is completed as part of the operating installation process.2. Open a terminal window. 3. Switch to root user using the command:
su root 4. Use yum to install the build tool packages using the following commands:
yum install iasl libuuid-develyum groupinstall development-tools
5. Close the terminal window.
3.2 Unpacking and Installing the Intel® BLDK Development ApplicationDownload the development application for your host environment from:
http://edc.intel.com/Software/Intel-Boot-Loader-Development-Kit/
Select the Download Now tab, select the appropriate release for your system, and save it to a temporary directory.
3.2.1 Unpacking and Installing on Windows*
To complete the installation for the Windows host environment, perform the following: 1. Browse to the temporary directory and extract the zip file contents. 2. Launch the installer, Intel(R)_Boot_Loader_Development_Kit.exe, in the
Windows subdirectory using the default options.
3.2.2 Unpacking and Installing on Linux*
To complete the installation for the Linux host environment, perform the following:1. Open a terminal window and navigate to the temporary directory where you saved
the archive. 2. Extract the installation files using: tar xzvf bldk_tools_2_0_0.tar.gz 3. Switch to root user using: su root 4. Update installation script attributes: chmod u+x install.sh 5. Run the installation script: ./install.sh 6. Close the terminal window.
3.3 Running the Intel® BLDK Development Application When the installation is complete, you can run the development application as follows:
• Windows: click Start > All Programs > Intel Boot Loader Development Kit > Intel Boot Loader Development Kit
• Linux: open a terminal window in Linux and enter /opt/intel/bldk/bin/bldk

Intel® Boot Loader Development KitJanuary 2012 Version 2.0 — UEFI Standard Based GSGDocument Number: 325925-003 13
Installing, Running and Uninstalling the Intel® BLDK Software—Intel® BLDK
The first time you run the development application, you will be asked to accept the software license agreement. After the splash screen loads, the development application GUI appears (Figure 1) and you can perform the tasks outlined in this manual.
3.4 Uninstalling the Intel® BLDK Development ApplicationBefore uninstalling the Intel® BLDK development application, ensure that all running instances of the development application have been stopped. Once the application has been stopped, use the instructions for your host operating systems described below to complete the uninstall.
Note: If the Intel® BLDK development application is running, you will be prompted to end the program before it can be uninstalled.
3.4.1 Uninstalling on Windows*
Use the Windows* Add/Remove Programs mechanism to uninstall the Intel® BLDK development application.
• For Windows* XP, click Start > Control Panel > Add or Remove Programs. Browse to find Intel® Boot Loader Development Kit, click it, then click Remove. Click Yes in the confirmation window.
• For Windows* 7, click Control Panel > Programs and Features. Browse to find Intel® Boot Loader Development Kit, click it, then click Uninstall. Click Yes in the confirmation window.
Figure 1. Intel® BLDK Development Application GUI

Intel® BLDK—Installing, Running and Uninstalling the Intel® BLDK Software
Intel® Boot Loader Development KitVersion 2.0 — UEFI Standard Based GSG January 201214 Document Number: 325925-003
3.4.2 Uninstalling on Linux*
For Linux*, execute the following commands from a terminal window:surpm -e bldk
Intel® Boot Loader Development KitJanuary 2012 Version 2.0 — UEFI Standard Based GSGDocument Number: 325925-003 15
Getting Started with the Intel® BLDK—Intel® BLDK
4.0 Getting Started with the Intel® BLDK
4.1 Creating a Firmware Image This section describes the required steps to create a firmware image. Each new firmware image created using the Intel® BLDK is referred to as a new project.
4.1.1 Creating a New Project
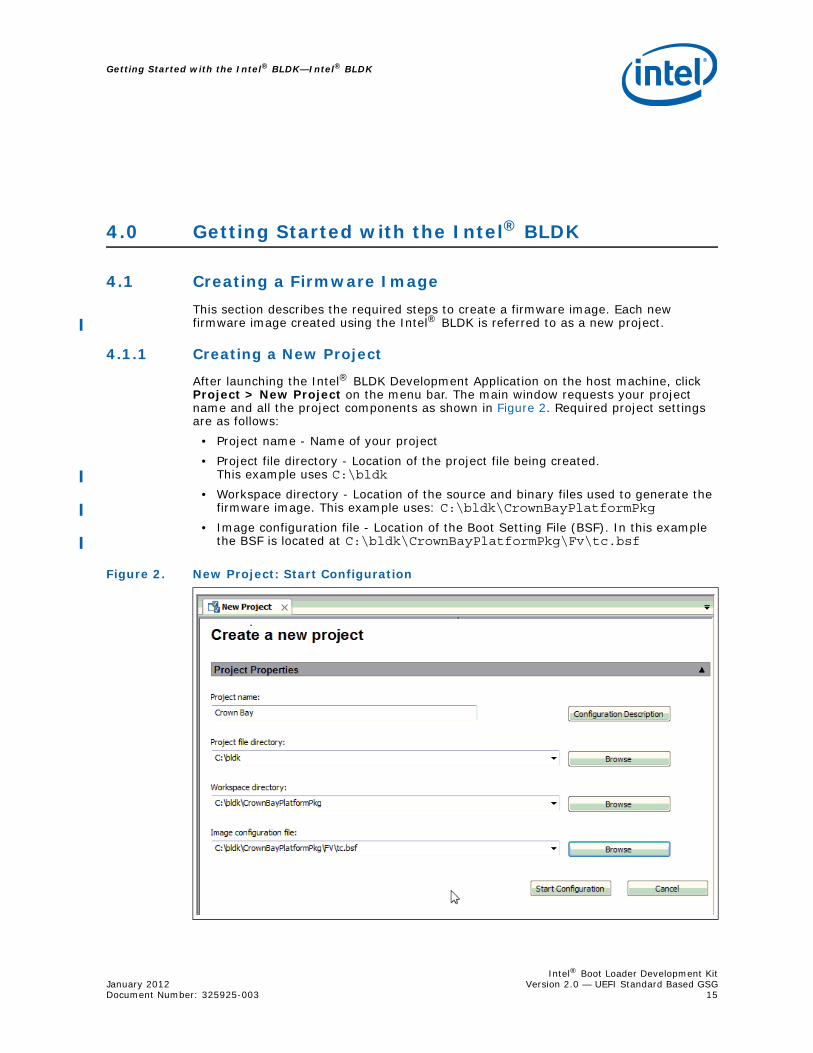
After launching the Intel® BLDK Development Application on the host machine, click Project > New Project on the menu bar. The main window requests your project name and all the project components as shown in Figure 2. Required project settings are as follows:
• Project name - Name of your project• Project file directory - Location of the project file being created.
This example uses C:\bldk • Workspace directory - Location of the source and binary files used to generate the
firmware image. This example uses: C:\bldk\CrownBayPlatformPkg • Image configuration file - Location of the Boot Setting File (BSF). In this example
the BSF is located at C:\bldk\CrownBayPlatformPkg\Fv\tc.bsf
Figure 2. New Project: Start Configuration

Intel® BLDK—Getting Started with the Intel® BLDK
Intel® Boot Loader Development KitVersion 2.0 — UEFI Standard Based GSG January 201216 Document Number: 325925-003
When you have completed entering your parameters, click Start Configuration. Next, the Create a new project screen is displayed, as shown in Figure 3.
To create the project, click the Create Project button. When that completes, the project is created and a list of files will be displayed in the Navigation pane, on the Standard tab. Also, the Processor Properties window will be displayed, as shown in Figure 4.
Note: The Source Debug option shown in Figure 3 is used to determine whether or not the software debug agent will be included in the firmware. This option can only be enabled for Debug mode (see Section 4.1.3). For details on how to use the Software Source Level Debugger, refer to the User Guide.
Figure 3. New Project: Create Project

Intel® Boot Loader Development KitJanuary 2012 Version 2.0 — UEFI Standard Based GSGDocument Number: 325925-003 17
Getting Started with the Intel® BLDK—Intel® BLDK
4.1.2 Configuring the Firmware Image Features
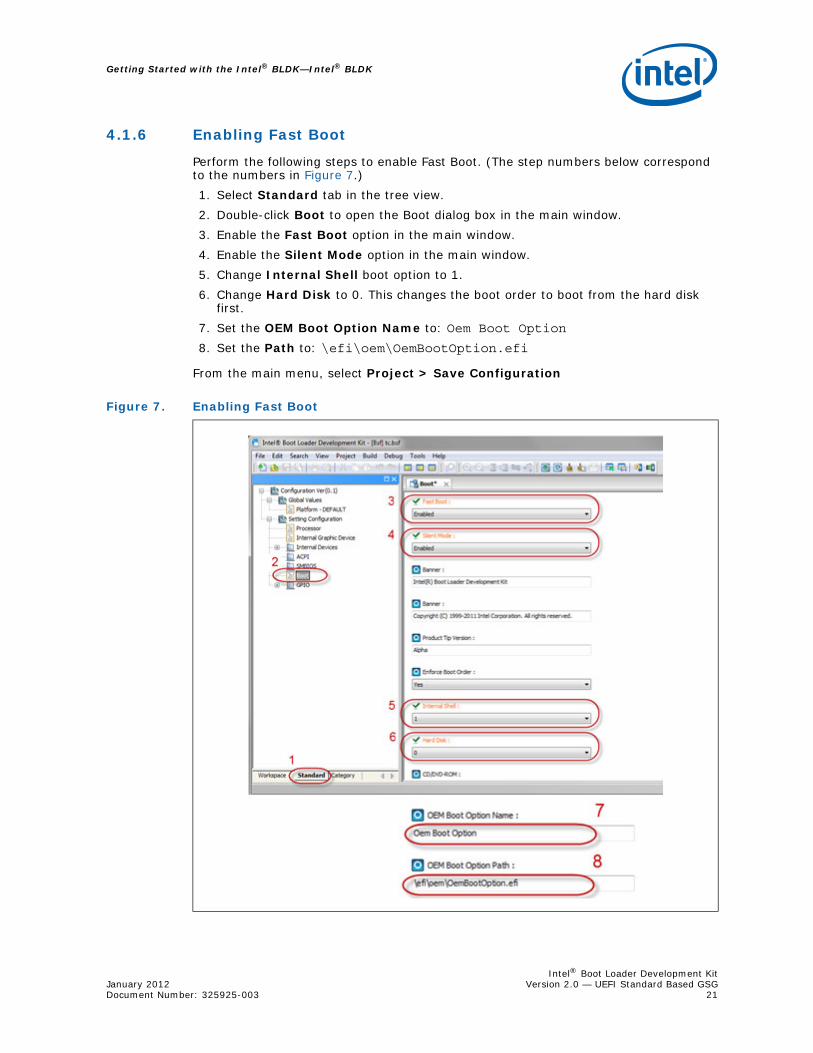
Once you have created the project, you can click on the project components in the Navigation pane and change the parameters that appear in the main window. As an example, in Figure 7 on page 21, a change was made to the Fast Boot parameter by clicking the drop-down button and selecting Disabled.
4.1.3 Selecting Build Mode
After you have created your project, you can select the build mode. Two different build modes are available:
• Release: standard build mode with full compiler optimizations enabled. (Default)• Debug: special debug version of the firmware that enables output of debug
messages via serial cable and also builds symbol information required for source level debugging.
To build the debug version of the firmware, you first need to add a new command to the Build menu as described in Section 4.2.6.1. After the Debug Build command is added, you can use it to create a debug version of the firmware.
Figure 4. New Project: Processor Properties

Intel® BLDK—Getting Started with the Intel® BLDK
Intel® Boot Loader Development KitVersion 2.0 — UEFI Standard Based GSG January 201218 Document Number: 325925-003
4.1.4 Creating the Final Firmware Image
You have two options for creating the final firmware image. If you have made changes to source files or want to build the firmware image from source, select Build > Build from the menu bar to create the image.
The firmware image generated by the Build command (crownbay.fd) will be in the directory C:\bldk\build\CrownBayPlatform\<RELEASE_nnn>\FV, where <RELEASE_nnn> varies depending on the tool chain, the OS, and whether you built a release or debug version. In this example, Visual Studio 2008 was used, so the directory is: C:\bldk\build\CrownBayPlatform\RELEASE_VS2008\FV
Alternatively, you can also create an image based on an existing binary without rebuilding the entire project. To do this, click Build > Create Final Firmware Image. A window will appear asking for your binary file and the firmware file, as shown in Figure 5.
In this example, the binary file is: C:\bldk\build\crownbayplatform\release_vs2008\fv\crownbay.fd Note: The .fd file is the binary file used to burn the final image.
The default firmware file is:C:\bldk\build\crownbayplatform\release_vs2008\fv\crownbay.rom
Note: The .rom file is the final image used to burn the image to a chip.
4.1.5 Updating Firmware
After completing the steps in Section 4.1.4, you will have a firmware image that you can program on your target system. Two methods can be used to program the firmware image in the target; both are described in the following sections.
4.1.5.1 Using Hardware SPI Programmer
To update the target using a hardware SPI programmer, you will need a DediProg* SF100 (or similar device). This may be obtained at: www.siliconbluetech.com/products/programming_hardware/DediprogSF100.aspx
Figure 5. Create Final Firmware File

Intel® Boot Loader Development KitJanuary 2012 Version 2.0 — UEFI Standard Based GSGDocument Number: 325925-003 19
Getting Started with the Intel® BLDK—Intel® BLDK
The steps required to update the firmware with an SPI programmer are as follows:1. Remove power from the target.2. Attach the SPI programmer to the header on the target system. In this example,
the SPI programmer header is J1A2.3. Attach the SPI programmer to the host system via USB.4. Start the SPI programmer software on the host system.5. Select the target flash device, which is 25VF016B in this example. 6. Configure the SPI programmer software such that the firmware image is written to
the top of the flash device. For example, if the firmware image is 1 MB, the starting address to program should be Top of Flash - 1 MB. For a 2 MB firmware image, the starting address should be Top of Flash - 2 MB.
7. Load the firmware image to be programmed. In this example, the image is:C:\bldk\build\CrownBayPlatform\RELEASE_VS2008\FV\crownbay.fd
8. Erase the flash device using the SPI programmer software Erase command.9. Program the image using the SPI programmer software Program command.10. Verify the image using the SPI programmer software Verify command. 11. Remove the SPI programmer.12. Reattach power and boot the system.
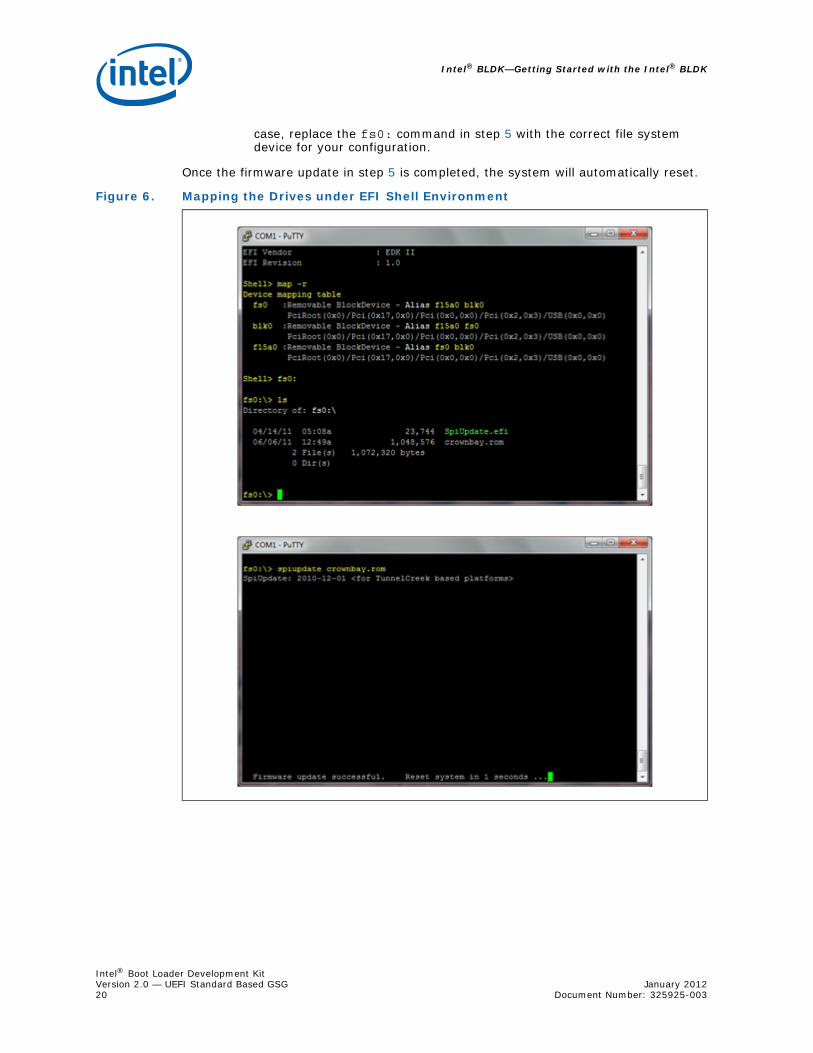
4.1.5.2 Using UEFI Shell Application
Once the Intel® BLDK firmware is successfully programmed on the target, you may use the flash update tool, (spiupdate.efi, which is provided with the Intel® BLDK code base) for subsequent updates of the Intel® BLDK firmware. The spiupdate.efi tool is a UEFI Shell application that runs under the UEFI Shell environment.
This tool is located in the Application folder, under the platform package directory of the Intel® BLDK code base source tree. For Crown Bay, for instance, the tool is located in this folder:
C:\bldk\CrownBayPlatformPkg\Application\
Follow these steps to program an Intel® BLDK firmware image using the spiupdate.efi tool:1. Copy the firmware image to be programmed to the root directory of a USB device
with a formatted FAT partition. In this example, the image is:C:\bldk\build\CrownBayPlatform\RELEASE_VS2008\FV\crownbay.rom
2. Copy the SpiUpdate.efi application to the root directory of the same USB device.
3. Boot the target system to the UEFI shell.4. Insert the USB device with firmware image to be programmed into the USB port on
the target system. 5. At the shell prompt, type the following commands in sequence:
map -rfs0: [Mapped drive for the USB device]SpiUpdate crownbay.rom
Note: The above commands assume that the USB device is the only media attached to the target system. If your system has other media attached (for example, a hard drive), the USB device mapping may change. In this
Intel® BLDK—Getting Started with the Intel® BLDK
Intel® Boot Loader Development KitVersion 2.0 — UEFI Standard Based GSG January 201220 Document Number: 325925-003
case, replace the fs0: command in step 5 with the correct file system device for your configuration.
Once the firmware update in step 5 is completed, the system will automatically reset.
Figure 6. Mapping the Drives under EFI Shell Environment
Intel® Boot Loader Development KitJanuary 2012 Version 2.0 — UEFI Standard Based GSGDocument Number: 325925-003 21
Getting Started with the Intel® BLDK—Intel® BLDK
4.1.6 Enabling Fast Boot
Perform the following steps to enable Fast Boot. (The step numbers below correspond to the numbers in Figure 7.) 1. Select Standard tab in the tree view.2. Double-click Boot to open the Boot dialog box in the main window.3. Enable the Fast Boot option in the main window.4. Enable the Silent Mode option in the main window.5. Change Internal Shell boot option to 1.6. Change Hard Disk to 0. This changes the boot order to boot from the hard disk
first.7. Set the OEM Boot Option Name to: Oem Boot Option 8. Set the Path to: \efi\oem\OemBootOption.efi
From the main menu, select Project > Save Configuration
Figure 7. Enabling Fast Boot
Intel® BLDK—Getting Started with the Intel® BLDK
Intel® Boot Loader Development KitVersion 2.0 — UEFI Standard Based GSG January 201222 Document Number: 325925-003
4.2 Configuring the Intel® BLDK Development Application The development application has the ability to launch several external applications and tools of your choosing, which allows you to use standard and familiar tools for certain processes. The tools and other environment settings can be modified using the Preferences settings found under the File > Preferences menu.
4.2.1 Setting Up the Web Browser and General Settings
The development application can be configured to open the last project and the last edited files on start up. To select this option, click File > Preferences. On the General tab, select the check boxes for the options you wish to turn off, then click Save.
The default web browser can be changed by typing or browsing to the browser application location and then clicking Save.
To restore all options to factory settings, click Restore All Defaults, then click Save.
Note: This option restores defaults for all the preference settings across all the tabs.
Figure 8. Application Preferences

Intel® Boot Loader Development KitJanuary 2012 Version 2.0 — UEFI Standard Based GSGDocument Number: 325925-003 23
Getting Started with the Intel® BLDK—Intel® BLDK
4.2.2 Setting Up the Text Editor
The development application contains a built-in text editor, which is configured by clicking File > Preferences and then the Text Editor tab. Default settings for the built-in text editor are shown in Figure 9. To change the default settings, deselect the check box or button next to the feature you wish to change, and then click Save.
To use your current text editor, select Use external text editor, locate the application using Browse, and then click Save.
Figure 9. Text Editor Preferences

Intel® BLDK—Getting Started with the Intel® BLDK
Intel® Boot Loader Development KitVersion 2.0 — UEFI Standard Based GSG January 201224 Document Number: 325925-003
4.2.3 Adding Your Tools
The development application provides you with the ability to add your own tools to the development environment. To add tools, click File > Preferences and then the My Tools tab.
To add a tool to the list, click New and type the name of the application you want to appear in the Tools menu in the text box. Then type or browse to the file path of the application to select the application. To add commands used with the tool when it is launched, type the command in the Parameters field.
Click Save to save your settings.
Figure 10. My Tools

Intel® Boot Loader Development KitJanuary 2012 Version 2.0 — UEFI Standard Based GSGDocument Number: 325925-003 25
Getting Started with the Intel® BLDK—Intel® BLDK
4.2.4 Setting Up the Debug Tools
The default debug tool for Windows* is WinDbg*. To set up your own debug tools, select File > Preferences and then the Debug Tools tab. Type or browse to the location of your debug application and then click Save.
Figure 11. Debug Tools

Intel® BLDK—Getting Started with the Intel® BLDK
Intel® Boot Loader Development KitVersion 2.0 — UEFI Standard Based GSG January 201226 Document Number: 325925-003
4.2.5 Setting Up the Update Tools
The default terminal emulator for Windows* is HyperTerminal. To change to a different terminal emulator, click File > Preferences and then the Update Tools tab. Type or browse to the location of your terminal emulator and then click Save.
Figure 12. Update Tools

Intel® Boot Loader Development KitJanuary 2012 Version 2.0 — UEFI Standard Based GSGDocument Number: 325925-003 27
Getting Started with the Intel® BLDK—Intel® BLDK
4.2.6 Setting Up the Build Tools
To set up build tools and select commands for the build operation, click File > Preferences, then select the Build Tools tab.
To add a tool to the list, click New and type the name of the tool in the text box. The name you enter will appear in the Build menu. Then type or browse to the application file path to select the application. To enter commands that are passed to the tool when launched, type the command in the Parameters field.
Click Save to save your settings.
Figure 13. Build Tools
Intel® BLDK—Getting Started with the Intel® BLDK
Intel® Boot Loader Development KitVersion 2.0 — UEFI Standard Based GSG January 201228 Document Number: 325925-003
4.2.6.1 Adding a Debug Build Option
To easily build both release and debug versions of the firmware, you can add a debug build command to the Build menu using the steps below:1. Open the Build Tools tab as described in Section 4.2.6.2. Select the New item icon.3. Type Build &Debug in the text box and press Enter.4. Type nmake (Windows*) or make (Linux*) in the Application field.5. Type debugbuild in the Parameters field.6. Click Save.
§ §
Figure 14. Adding a Debug Build Option
Related Documents