Boost Your Chess 3 Mastery By Artur Yusupov Quality Chess www.qualitychess.co.uk

Welcome message from author
This document is posted to help you gain knowledge. Please leave a comment to let me know what you think about it! Share it to your friends and learn new things together.
Transcript
Boost Your Chess 3 Mastery
By
Artur Yusupov
Quality Chess www.qualitychess.co.uk

CONTENTS
Key to symbols used 4 Preface 5 Introduction 6
1 Attacking the king in the centre 82 Realizing an advantage 203 Counterplay 344 Knight endings 445 The English Opening 566 Hanging pawns on c3-d4 707 Counter-attack 828 Rook against pawn 929 The technique of calculating variations 10010 The Reti Opening 11011 The passed pawn in the middlegame 12212 Prophylactic thinking 13413 Bishop against knight 14614 Defence 15815 Candidate moves 17016 Combinational vision 18017 The King’s Indian Defence 19018 Queenside pawn majority 20419 Central pawn majority 21620 Pawn storms 22821 The initiative 24022 The Grünfeld Defence 25423 The elimination method 26624 Knight against bishop 276 Final test 287 Index of composers 297 Index of games 298
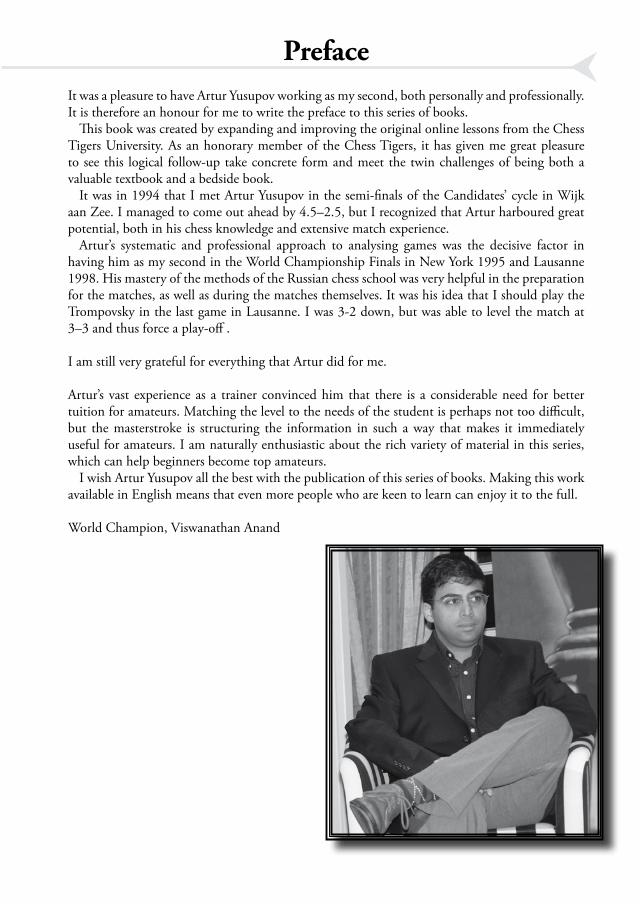
�PrefaceIt was a pleasure to have Artur Yusupov working as my second, both personally and professionally. It is therefore an honour for me to write the preface to this series of books.
This book was created by expanding and improving the original online lessons from the Chess Tigers University. As an honorary member of the Chess Tigers, it has given me great pleasure to see this logical follow-up take concrete form and meet the twin challenges of being both a valuable textbook and a bedside book.
It was in 1994 that I met Artur Yusupov in the semi-finals of the Candidates’ cycle in Wijk aan Zee. I managed to come out ahead by 4.5–2.5, but I recognized that Artur harboured great potential, both in his chess knowledge and extensive match experience.
Artur’s systematic and professional approach to analysing games was the decisive factor in having him as my second in the World Championship Finals in New York 1995 and Lausanne 1998. His mastery of the methods of the Russian chess school was very helpful in the preparation for the matches, as well as during the matches themselves. It was his idea that I should play the Trompovsky in the last game in Lausanne. I was 3-2 down, but was able to level the match at 3–3 and thus force a play-off .
I am still very grateful for everything that Artur did for me.
Artur’s vast experience as a trainer convinced him that there is a considerable need for better tuition for amateurs. Matching the level to the needs of the student is perhaps not too difficult, but the masterstroke is structuring the information in such a way that makes it immediately useful for amateurs. I am naturally enthusiastic about the rich variety of material in this series, which can help beginners become top amateurs.
I wish Artur Yusupov all the best with the publication of this series of books. Making this work available in English means that even more people who are keen to learn can enjoy it to the full.
World Champion, Viswanathan Anand
20 20
Realizing an advantageIn this chapter we shall deal with the most important principles for realizing an advantage. (See also Boost Your Chess 2, Chapter 20.)
The correct psychological attitudeIf we have an advantage, we must raise our level of concentration. If we can solve the next problems to arise, then the game may come to a quick end and we will not have to make any further effort!
Technique
1) Do not allow any counterplayThe most important principle! You can often (but unfortunately not always) control the game when you have a better position and deprive your opponent of his final chances of becoming active. When you have the better position you don’t want to allow him any counterplay.
2) Do not hurryThis principle comes into play when the opponent has no counterplay left. The first thing to do is to improve your position as much as possible (or to make your opponent’s position worse) and only then turn to making active changes in the position.
If your opponent does have some ideas to improve his position, or if by chance you see an opportunity, then you have to hurry!
3) The principle of two weaknessesThis is an important strategic concept. If your opponent has one weakness, then normally he will be able to protect it sufficiently well. But you can break down his defence by provoking a fresh weakness, as far away as possible from the first one. You then attack the two weaknesses turn about and the attacking side’s superior lines of communication will play a decisive role.
4) Capablanca’s principle – the correct exchangesYou should retain only those pieces (or pawns!)
chapter 2Contents
ü The correct psychological attitude
ü Technique� Do not allow any
counterplay� Do not hurry� The principle of two
weaknesses� Making the correct
exchanges
�
21
Realizing an advantage ch
apter 2which you require to win the game! You should
try to swap off any superfluous pieces. A perfectly played positional game is finished off with a won ending.
There is a rule of thumb: the side with the advantage in material strives to exchange pieces, the side which is behind tries to swap off pawns!
The following examples will illustrate these principles of technique.
A.Yusupov – L.ChristiansenLas Palmas 1993
1.d4 d6 2.e4 ¤f6 3.f3 e5 4.dxe5After the exchange of queens White obtains a small,
but safe, advantage. 4...dxe5 5.£xd8† ¢xd8 6.¥c4 ¥e6?!
This exchange damages the pawn structure. 6...¢e8!? would be better, or even 6...¢e7!? preparing ...¥e6 (Rivas).7.¥xe6 fxe6
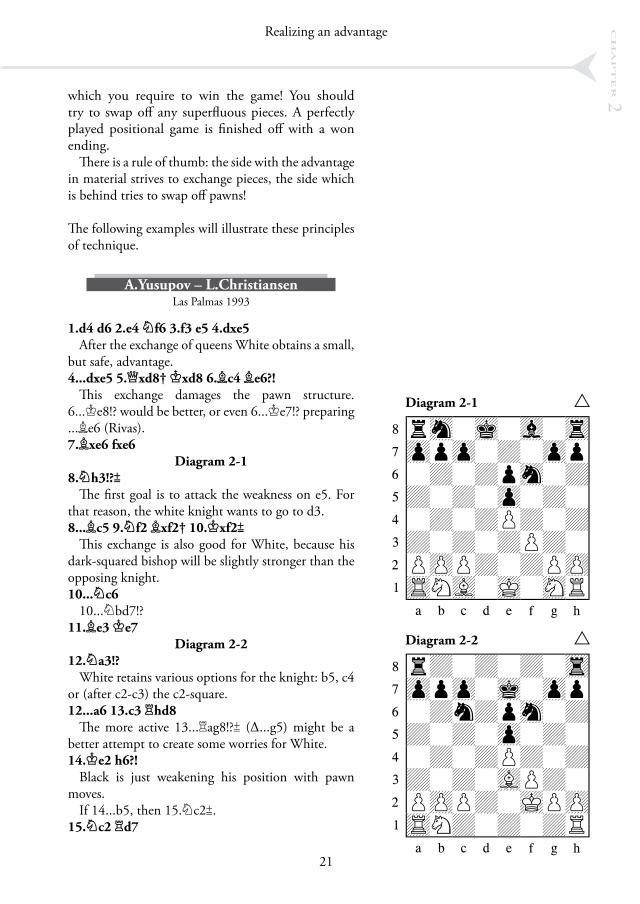
Diagram 2-18.¤h3!?²
The first goal is to attack the weakness on e5. For that reason, the white knight wants to go to d3.8...¥c5 9.¤f2 ¥xf2† 10.¢xf2²
This exchange is also good for White, because his dark-squared bishop will be slightly stronger than the opposing knight. 10...¤c6
10...¤bd7!?11.¥e3 ¢e7
Diagram 2-212.¤a3!?
White retains various options for the knight: b5, c4 or (after c2-c3) the c2-square. 12...a6 13.c3 ¦hd8
The more active 13...¦ag8!?² (…...g5) might be a better attempt to create some worries for White.14.¢e2 h6?!
Black is just weakening his position with pawn moves.
If 14...b5, then 15.¤c2².15.¤c2 ¦d7
Diagram 2-1 r1222222223 ÇtM L V T5 ÆOoO + Oo5 Å + +oM +5 Ä+ + O + 5 Ã + +p+ +5 Â+ + +p+ 5 ÁpPp+ +pP5 ÀRnB K Nr5 7ÈÉÊËÌÍÎÏ9
Diagram 2-2 r1222222223 Çt+ + + T5 ÆOoO L Oo5 Å +m+oM +5 Ä+ + O + 5 Ã + +p+ +5 Â+ + Bp+ 5 ÁpPp+ KpP5 ÀRn+ + +r5 7ÈÉÊËÌÍÎÏ9
�
22
Positional play 1c
hapter 2
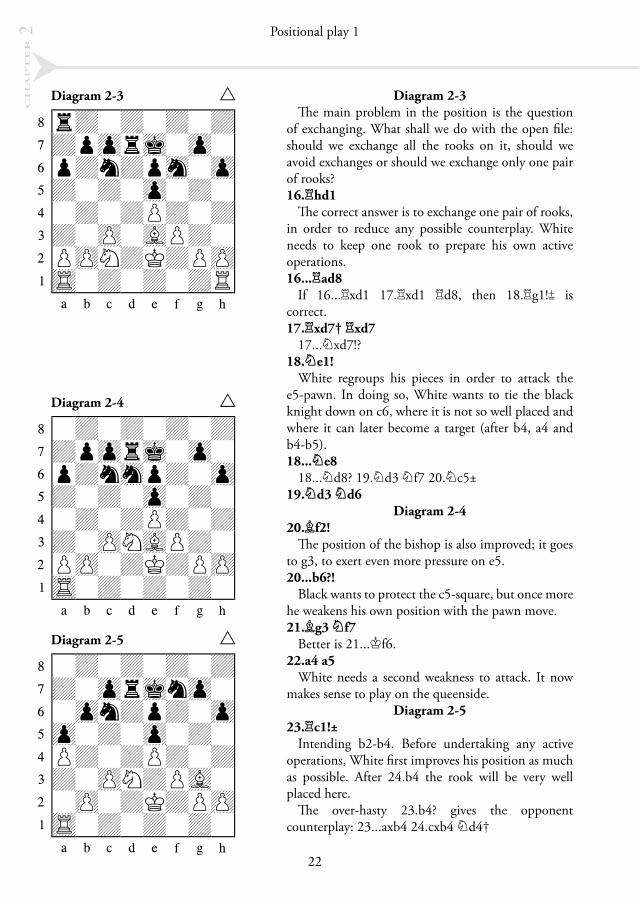
Diagram 2-3The main problem in the position is the question
of exchanging. What shall we do with the open file: should we exchange all the rooks on it, should we avoid exchanges or should we exchange only one pair of rooks? 16.¦hd1
The correct answer is to exchange one pair of rooks, in order to reduce any possible counterplay. White needs to keep one rook to prepare his own active operations. 16...¦ad8
If 16...¦xd1 17.¦xd1 ¦d8, then 18.¦g1!² is correct.17.¦xd7† ¦xd7
17...¤xd7!? 18.¤e1!
White regroups his pieces in order to attack the e5-pawn. In doing so, White wants to tie the black knight down on c6, where it is not so well placed and where it can later become a target (after b4, a4 and b4-b5). 18...¤e8
18...¤d8? 19.¤d3 ¤f7 20.¤c5±19.¤d3 ¤d6
Diagram 2-420.¥f2!
The position of the bishop is also improved; it goes to g3, to exert even more pressure on e5. 20...b6?!
Black wants to protect the c5-square, but once more he weakens his own position with the pawn move. 21.¥g3 ¤f7
Better is 21...¢f6.22.a4 a5
White needs a second weakness to attack. It now makes sense to play on the queenside.
Diagram 2-523.¦c1!±
Intending b2-b4. Before undertaking any active operations, White first improves his position as much as possible. After 24.b4 the rook will be very well placed here.
The over-hasty 23.b4? gives the opponent counterplay: 23...axb4 24.cxb4 ¤d4†
Diagram 2-3 r1222222223 Çt+ + + +5 Æ+oOtL O 5 Åo+m+oM O5 Ä+ + O + 5 Ã + +p+ +5 Â+ P Bp+ 5 ÁpPn+k+pP5 ÀR + + +r5 7ÈÉÊËÌÍÎÏ9
Diagram 2-4 r1222222223 Ç + + + +5 Æ+oOtL O 5 Åo+mMo+ O5 Ä+ + O + 5 Ã + +p+ +5 Â+ PnBp+ 5 ÁpP +k+pP5 ÀR + + + 5 7ÈÉÊËÌÍÎÏ9
Diagram 2-5 r1222222223 Ç + + + +5 Æ+ OtLmO 5 Å Om+o+ O5 ÄO + O + 5 Ãp+ +p+ +5 Â+ Pn+pB 5 Á P +k+pP5 ÀR + + + 5 7ÈÉÊËÌÍÎÏ9
�
23
Realizing an advantage ch
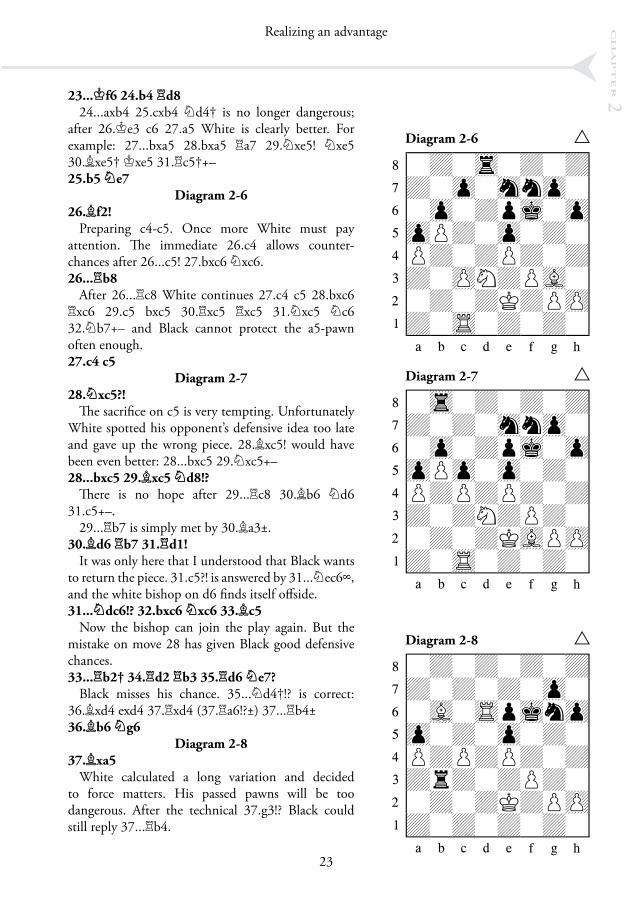
apter 223...¢f6 24.b4 ¦d8
24...axb4 25.cxb4 ¤d4† is no longer dangerous; after 26.¢e3 c6 27.a5 White is clearly better. For example: 27...bxa5 28.bxa5 ¦a7 29.¤xe5! ¤xe5 30.¥xe5† ¢xe5 31.¦c5†+–25.b5 ¤e7
Diagram 2-626.¥f2!
Preparing c4-c5. Once more White must pay attention. The immediate 26.c4 allows counter-chances after 26...c5! 27.bxc6 ¤xc6. 26...¦b8
After 26...¦c8 White continues 27.c4 c5 28.bxc6 ¦xc6 29.c5 bxc5 30.¦xc5 ¦xc5 31.¤xc5 ¤c6 32.¤b7+– and Black cannot protect the a5-pawn often enough.27.c4 c5
Diagram 2-728.¤xc5?!
The sacrifice on c5 is very tempting. Unfortunately White spotted his opponent’s defensive idea too late and gave up the wrong piece. 28.¥xc5! would have been even better: 28...bxc5 29.¤xc5+–28...bxc5 29.¥xc5 ¤d8!?
There is no hope after 29...¦c8 30.¥b6 ¤d6 31.c5+–.
29...¦b7 is simply met by 30.¥a3±.30.¥d6 ¦b7 31.¦d1!
It was only here that I understood that Black wants to return the piece. 31.c5?! is answered by 31...¤ec6÷, and the white bishop on d6 finds itself offside.31...¤dc6!? 32.bxc6 ¤xc6 33.¥c5
Now the bishop can join the play again. But the mistake on move 28 has given Black good defensive chances. 33...¦b2† 34.¦d2 ¦b3 35.¦d6 ¤e7?
Black misses his chance. 35...¤d4†!? is correct: 36.¥xd4 exd4 37.¦xd4 (37.¦a6!?±) 37...¦b4±36.¥b6 ¤g6
Diagram 2-837.¥xa5
White calculated a long variation and decided to force matters. His passed pawns will be too dangerous. After the technical 37.g3!? Black could still reply 37...¦b4.
Diagram 2-6 r1222222223 Ç + T + +5 Æ+ O MmO 5 Å O +oL O5 ÄOp+ O + 5 Ãp+ +p+ +5 Â+ Pn+pB 5 Á + +k+pP5 À+ R + + 5 7ÈÉÊËÌÍÎÏ9
Diagram 2-7 r1222222223 Ç T + + +5 Æ+ + MmO 5 Å O +oL O5 ÄOpO O + 5 Ãp+p+p+ +5 Â+ +n+p+ 5 Á + +kBpP5 À+ R + + 5 7ÈÉÊËÌÍÎÏ9
Diagram 2-8 r1222222223 Ç + + + +5 Æ+ + + O 5 Å B RoLmO5 ÄO + O + 5 Ãp+p+p+ +5 Â+t+ +p+ 5 Á + +k+pP5 À+ + + + 5 7ÈÉÊËÌÍÎÏ9

�
24
Positional play 1c
hapter 2
37...¤f4† 38.¢d2 ¤xg2 39.c5 ¤e3 40.¥d8† ¢f7 41.¦d3!+– ¤c4† 42.¢c2 ¦b8
The point is 42...¦xd3 43.¢xd3 ¤b2† 44.¢c2 ¤xa4 45.¥b6!+– and White forces a won pawn ending.43.c6 ¢e8 44.c7 ¦a8
Diagram 2-945.¦c3
Just before the winning post White begins to lose his concentration. Fortunately he was not punished for it in the game: his opponent’s resistance was already broken.
45.¢c3! would be better: 45...¤b6 46.¢b4+–45...¤b6 46.a5
Nor is this move the best. 46.¦b3! is correct: 46...¤d7 47.a5+–46...¦xa5
Or 46...¤c8 47.¦c5+–.47.c8£
Black resigned, slightly prematurely. After 47...¦a2† I would still have had to find the variation 48.¢b3 ¤xc8 49.¦xc8 ¦xh2 50.¥f6† ¢d7 51.¥xe5+–.
Diagram 2-10
A.Yusupov – J.HallBundesliga 1999
White is better. He controls the a-file and has an advantage in space. Black has the b6-pawn as a weakness, but it is hard to attack and relatively easy to defend. Despite that, it is worth first forcing your opponent onto the defensive and tying down some of his pieces. 46.¤f1!
Planning ¤d2-c4, so as to put further pressure on b6.46...¦e8 47.¤d2 ¤c8 48.¤c4 ¦f8
In order to make progress, White must undertake something on the kingside (the principle of two weaknesses). Since Black has absolutely no counterplay, White manoeuvres for quite a long time, aiming to first bring his pieces to their optimal positions. These waiting tactics are rather unpleasant for his opponent. 49.¥d2 ¦e8 50.¢g3 ¦d8 51.¦a8 ¦b8 52.¦8a4
Diagram 2-9 r1222222223 Çt+ Bl+ +5 Æ+ P + O 5 Å + +o+ O5 Ä+ + O + 5 Ãp+m+p+ +5 Â+ +r+p+ 5 Á +k+ + P5 À+ + + + 5 7ÈÉÊËÌÍÎÏ9
Diagram 2-10 r1222222223 Ç T + + +5 Æ+tL MmO 5 ÅrO O O O5 Ä+pOpO +p5 Ã + +p+p+5 Â+ P BpN 5 Á + + +k+5 ÀR + + + 5 7ÈÉÊËÌÍÎÏ9
�
25
Realizing an advantage ch
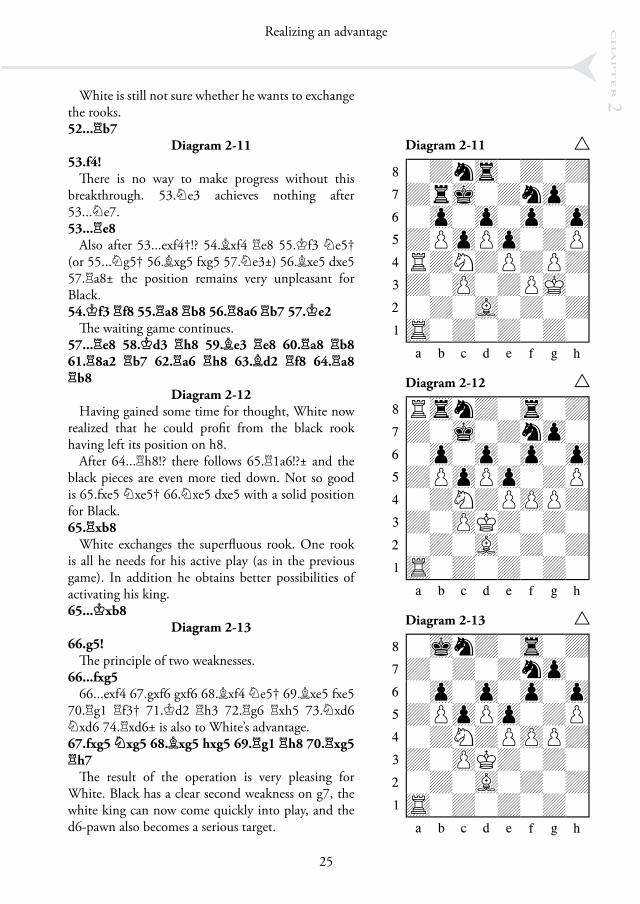
apter 2White is still not sure whether he wants to exchange
the rooks. 52...¦b7
Diagram 2-1153.f4!
There is no way to make progress without this breakthrough. 53.¤e3 achieves nothing after 53...¤e7.53...¦e8
Also after 53...exf4†!? 54.¥xf4 ¦e8 55.¢f3 ¤e5† (or 55...¤g5† 56.¥xg5 fxg5 57.¤e3±) 56.¥xe5 dxe5 57.¦a8± the position remains very unpleasant for Black.54.¢f3 ¦f8 55.¦a8 ¦b8 56.¦8a6 ¦b7 57.¢e2
The waiting game continues. 57...¦e8 58.¢d3 ¦h8 59.¥e3 ¦e8 60.¦a8 ¦b8 61.¦8a2 ¦b7 62.¦a6 ¦h8 63.¥d2 ¦f8 64.¦a8 ¦b8
Diagram 2-12Having gained some time for thought, White now
realized that he could profit from the black rook having left its position on h8.
After 64...¦h8!? there follows 65.¦1a6!?± and the black pieces are even more tied down. Not so good is 65.fxe5 ¤xe5† 66.¤xe5 dxe5 with a solid position for Black.65.¦xb8
White exchanges the superfluous rook. One rook is all he needs for his active play (as in the previous game). In addition he obtains better possibilities of activating his king. 65...¢xb8
Diagram 2-1366.g5!
The principle of two weaknesses. 66...fxg5
66...exf4 67.gxf6 gxf6 68.¥xf4 ¤e5† 69.¥xe5 fxe5 70.¦g1 ¦f3† 71.¢d2 ¦h3 72.¦g6 ¦xh5 73.¤xd6 ¤xd6 74.¦xd6± is also to White’s advantage.67.fxg5 ¤xg5 68.¥xg5 hxg5 69.¦g1 ¦h8 70.¦xg5 ¦h7
The result of the operation is very pleasing for White. Black has a clear second weakness on g7, the white king can now come quickly into play, and the d6-pawn also becomes a serious target.
Diagram 2-11 r1222222223 Ç +mT + +5 Æ+tL +mO 5 Å O O O O5 Ä+pOpO +p5 Ãr+n+p+p+5 Â+ P +pK 5 Á + B + +5 ÀR + + + 5 7ÈÉÊËÌÍÎÏ9
Diagram 2-12 r1222222223 ÇrTm+ T +5 Æ+ L +mO 5 Å O O O O5 Ä+pOpO +p5 Ã +n+pPp+5 Â+ Pk+ + 5 Á + B + +5 ÀR + + + 5 7ÈÉÊËÌÍÎÏ9
Diagram 2-13 r1222222223 Ç Lm+ T +5 Æ+ + +mO 5 Å O O O O5 Ä+pOpO +p5 Ã +n+pPp+5 Â+ Pk+ + 5 Á + B + +5 ÀR + + + 5 7ÈÉÊËÌÍÎÏ9
�
26
Positional play 1c
hapter 2
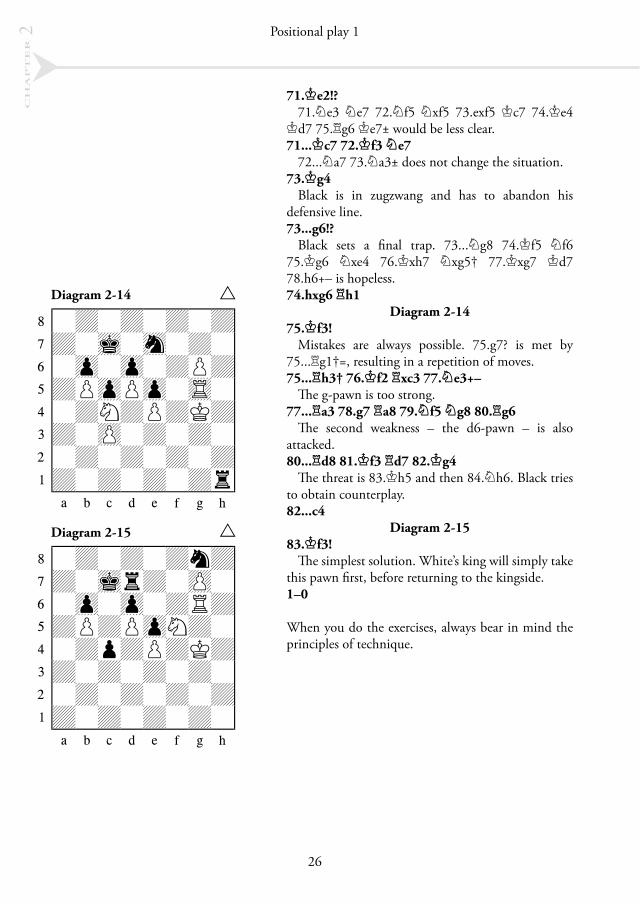
71.¢e2!? 71.¤e3 ¤e7 72.¤f5 ¤xf5 73.exf5 ¢c7 74.¢e4
¢d7 75.¦g6 ¢e7± would be less clear.71...¢c7 72.¢f3 ¤e7
72...¤a7 73.¤a3± does not change the situation.73.¢g4
Black is in zugzwang and has to abandon his defensive line. 73...g6!?
Black sets a final trap. 73...¤g8 74.¢f5 ¤f6 75.¢g6 ¤xe4 76.¢xh7 ¤xg5† 77.¢xg7 ¢d7 78.h6+– is hopeless.74.hxg6 ¦h1
Diagram 2-1475.¢f3!
Mistakes are always possible. 75.g7? is met by 75...¦g1†=, resulting in a repetition of moves.75...¦h3† 76.¢f2 ¦xc3 77.¤e3+–
The g-pawn is too strong. 77...¦a3 78.g7 ¦a8 79.¤f5 ¤g8 80.¦g6
The second weakness – the d6-pawn – is also attacked. 80...¦d8 81.¢f3 ¦d7 82.¢g4
The threat is 83.¢h5 and then 84.¤h6. Black tries to obtain counterplay. 82...c4
Diagram 2-1583.¢f3!
The simplest solution. White’s king will simply take this pawn first, before returning to the kingside.1–0
When you do the exercises, always bear in mind the principles of technique.
Diagram 2-14 r1222222223 Ç + + + +5 Æ+ L M + 5 Å O O +p+5 Ä+pOpO R 5 Ã +n+p+k+5 Â+ P + + 5 Á + + + +5 À+ + + +t5 7ÈÉÊËÌÍÎÏ9
Diagram 2-15 r1222222223 Ç + + +m+5 Æ+ Lt+ P 5 Å O O +r+5 Ä+p+pOn+ 5 Ã +o+p+k+5 Â+ + + + 5 Á + + + +5 À+ + + + 5 7ÈÉÊËÌÍÎÏ9
134 134
Prophylactic thinkingProphylactic thinking is one of the most important themes in the positional game. Chess players often forget that they are not alone at the board, and that they must also take into account their opponent’s plans.
The habit of always asking yourself what your opponent wants to do, of answering the question correctly and taking into account the information you have gained, is prophylactic thinking.
Prophylactic thinking is for me a philosophy of the chess struggle, which embodies due respect to one’s opponent.
Prophylactic thinking often helps not only to find the opponent’s ideas, but also to work out the solution to the position. A move which simultaneously improves our own position and blocks our opponent’s plans is usually the optimal solution.
Prophylactic moves are stronger than purely defensive moves because they improve your own position. Prophylactic moves are also stronger than mere improvements to your own position, because they also hinder your opponent’s game.
There is another important psychological factor in prophylactic thinking which I wish to emphasize: it is extraordinarily difficult to battle against a prophylactic player. Once the plans you have prepared have been thwarted a few times, mistakes often creep in.
Of course we do not always make use of prophylactic thinking. It is when the course of the game is very quiet that prophylactic thinking is most useful. In situations in which we have forcing options, we must first of all calculate variations – we are not interested in our opponent’s intentions if we have a forced mate in three moves!
The following games show how and when we should employ prophylactic thinking.
chapter 12Contents
ü “What does my opponent want to do?”
ü Prophylactic solutionsü When we should employ
prophylaxis
�
135
Prophylactic thinking ch
apter 12A.Yusupov – J.Van der Wiel
Lucerne Olympiad 1982
1.c4 ¤f6 2.¤c3 e6 3.e4 d5 An alternative is 3...c5.
4.e5 ¤e4 4...d4 is the main variation.
5.¤f3 5.¤xe4 dxe4 6.£g4 wins the e4-pawn, but Black
gets control of the d4-square and develops an initiative. White prefers a quieter set-up. 5...¤c6 6.¥e2
After 6.d4!? Black can reply 6...¥b4. 6...¥e7 7.0–0
7.£c2 is met by 7...¤g5!, as in Seirawan – Christiansen, USA Ch, South Bend 1981.7...0–0 8.d4
Now White can occupy the centre. 8...b6 9.¥e3 ¤xc3
Or 9...¥b7 10.cxd5 ¤xc3 (10...exd5 11.¦c1²) 11.bxc3 exd5 12.¥d3².10.bxc3 dxc4
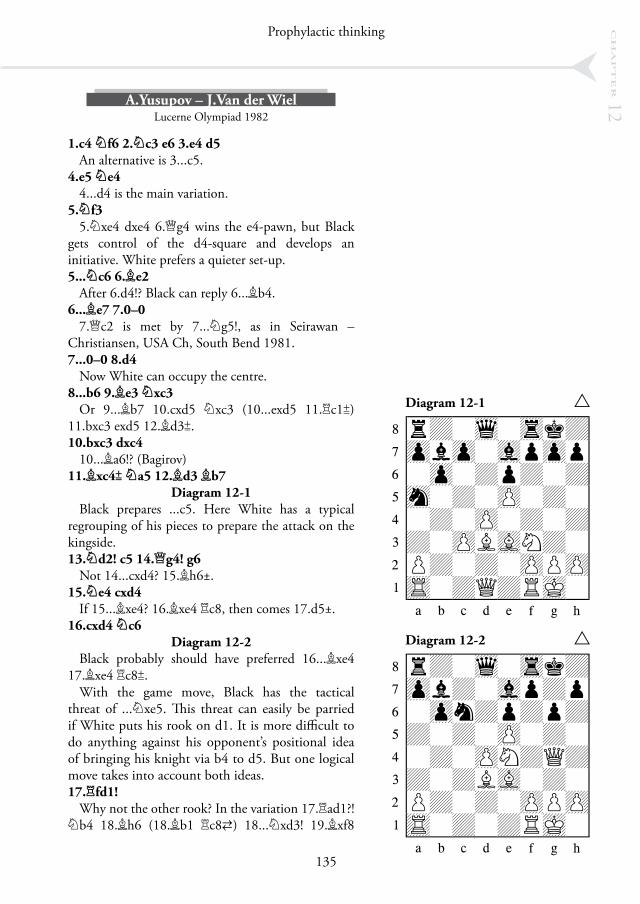
10...¥a6!? (Bagirov)11.¥xc4² ¤a5 12.¥d3 ¥b7
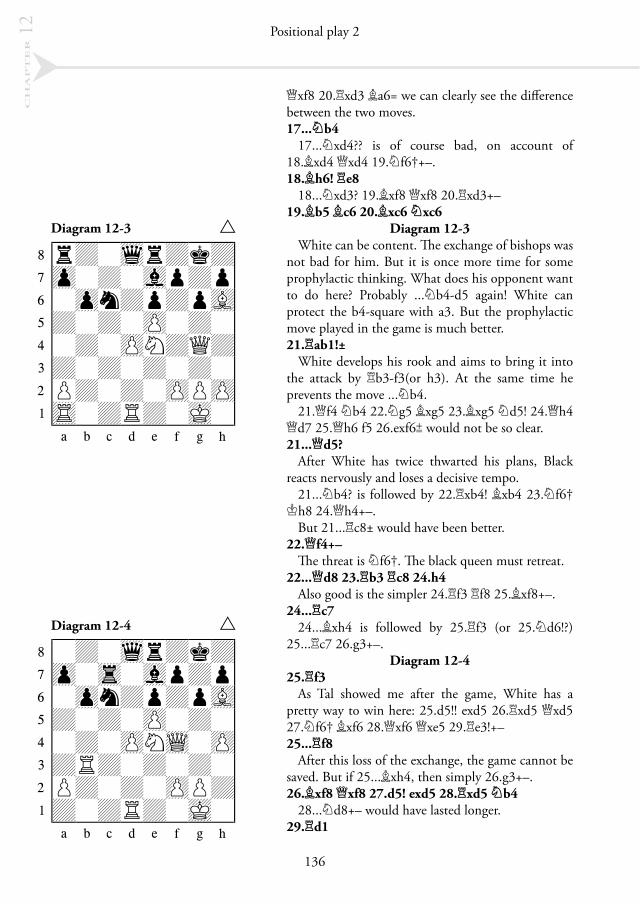
Diagram 12-1Black prepares ...c5. Here White has a typical
regrouping of his pieces to prepare the attack on the kingside.13.¤d2! c5 14.£g4! g6
Not 14...cxd4? 15.¥h6±.15.¤e4 cxd4
If 15...¥xe4? 16.¥xe4 ¦c8, then comes 17.d5±.16.cxd4 ¤c6
Diagram 12-2Black probably should have preferred 16...¥xe4
17.¥xe4 ¦c8².With the game move, Black has the tactical
threat of ...¤xe5. This threat can easily be parried if White puts his rook on d1. It is more difficult to do anything against his opponent’s positional idea of bringing his knight via b4 to d5. But one logical move takes into account both ideas.17.¦fd1!
Why not the other rook? In the variation 17.¦ad1?! ¤b4 18.¥h6 (18.¥b1 ¦c8„) 18...¤xd3! 19.¥xf8
Diagram 12-1 r1222222223 Çt+ W Tl+5 ÆOvO VoOo5 Å O +o+ +5 ÄM + P + 5 Ã + P + +5 Â+ PbBn+ 5 Áp+ + PpP5 ÀR +q+rK 5 7ÈÉÊËÌÍÎÏ9
Diagram 12-2 r1222222223 Çt+ W Tl+5 ÆOv+ Vo+o5 Å Om+o+o+5 Ä+ + P + 5 Ã + Pn+q+5 Â+ +bB + 5 Áp+ + PpP5 ÀR + +rK 5 7ÈÉÊËÌÍÎÏ9
�
136
Positional play 2c
hapter 1
2
£xf8 20.¦xd3 ¥a6= we can clearly see the difference between the two moves. 17...¤b4
17...¤xd4?? is of course bad, on account of 18.¥xd4 £xd4 19.¤f6†+–.18.¥h6! ¦e8
18...¤xd3? 19.¥xf8 £xf8 20.¦xd3+–19.¥b5 ¥c6 20.¥xc6 ¤xc6
Diagram 12-3 White can be content. The exchange of bishops was
not bad for him. But it is once more time for some prophylactic thinking. What does his opponent want to do here? Probably ...¤b4-d5 again! White can protect the b4-square with a3. But the prophylactic move played in the game is much better. 21.¦ab1!±
White develops his rook and aims to bring it into the attack by ¦b3-f3(or h3). At the same time he prevents the move ...¤b4.
21.£f4 ¤b4 22.¤g5 ¥xg5 23.¥xg5 ¤d5! 24.£h4 £d7 25.£h6 f5 26.exf6² would not be so clear.21...£d5?
After White has twice thwarted his plans, Black reacts nervously and loses a decisive tempo.
21...¤b4? is followed by 22.¦xb4! ¥xb4 23.¤f6† ¢h8 24.£h4+–.
But 21...¦c8± would have been better. 22.£f4+–
The threat is ¤f6†. The black queen must retreat.22...£d8 23.¦b3 ¦c8 24.h4
Also good is the simpler 24.¦f3 ¦f8 25.¥xf8+–.24...¦c7
24...¥xh4 is followed by 25.¦f3 (or 25.¤d6!?) 25...¦c7 26.g3+–.
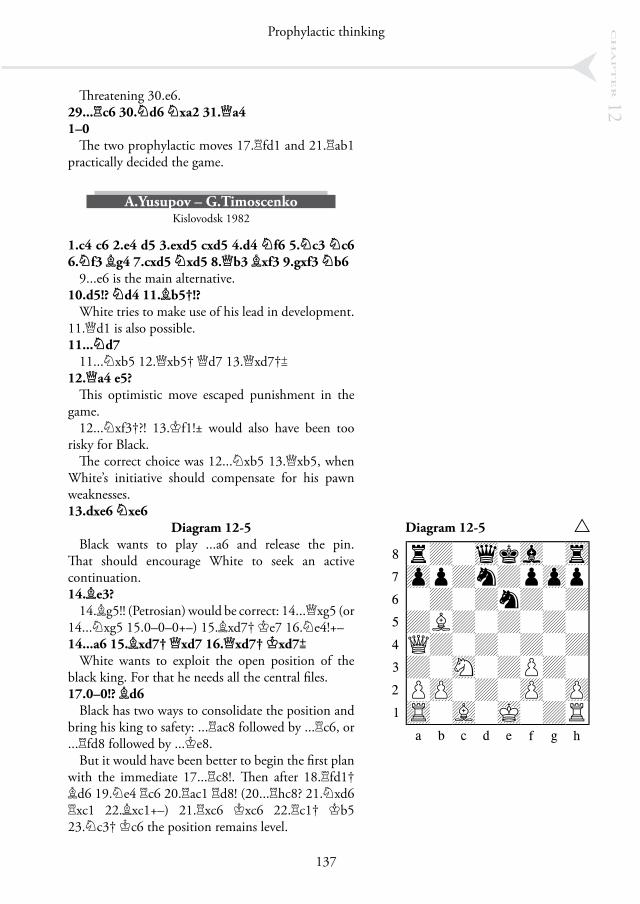
Diagram 12-425.¦f3
As Tal showed me after the game, White has a pretty way to win here: 25.d5!! exd5 26.¦xd5 £xd5 27.¤f6† ¥xf6 28.£xf6 £xe5 29.¦e3!+–25...¦f8
After this loss of the exchange, the game cannot be saved. But if 25...¥xh4, then simply 26.g3+–.26.¥xf8 £xf8 27.d5! exd5 28.¦xd5 ¤b4
28...¤d8+– would have lasted longer.29.¦d1
Diagram 12-3 r1222222223 Çt+ Wt+l+5 ÆO + Vo+o5 Å Om+o+oB5 Ä+ + P + 5 Ã + Pn+q+5 Â+ + + + 5 Áp+ + PpP5 ÀR +r+ K 5 7ÈÉÊËÌÍÎÏ9
Diagram 12-4 r1222222223 Ç + Wt+l+5 ÆO T Vo+o5 Å Om+o+oB5 Ä+ + P + 5 Ã + PnQ P5 Â+r+ + + 5 Áp+ + Pp+5 À+ +r+ K 5 7ÈÉÊËÌÍÎÏ9
�
137
Prophylactic thinking ch
apter 12Threatening 30.e6.
29...¦c6 30.¤d6 ¤xa2 31.£a41–0
The two prophylactic moves 17.¦fd1 and 21.¦ab1 practically decided the game.
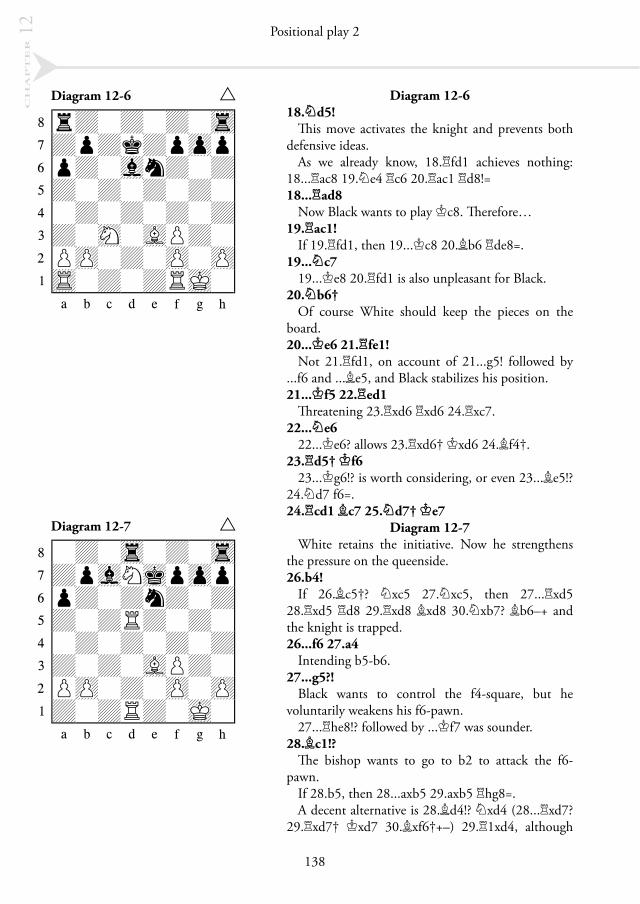
A.Yusupov – G.TimoscenkoKislovodsk 1982
1.c4 c6 2.e4 d5 3.exd5 cxd5 4.d4 ¤f6 5.¤c3 ¤c6 6.¤f3 ¥g4 7.cxd5 ¤xd5 8.£b3 ¥xf3 9.gxf3 ¤b6
9...e6 is the main alternative.10.d5!? ¤d4 11.¥b5†!?
White tries to make use of his lead in development. 11.£d1 is also possible.11...¤d7
11...¤xb5 12.£xb5† £d7 13.£xd7†²12.£a4 e5?
This optimistic move escaped punishment in the game.
12...¤xf3†?! 13.¢f1!± would also have been too risky for Black.
The correct choice was 12...¤xb5 13.£xb5, when White’s initiative should compensate for his pawn weaknesses. 13.dxe6 ¤xe6
Diagram 12-5Black wants to play ...a6 and release the pin.
That should encourage White to seek an active continuation. 14.¥e3?
14.¥g5!! (Petrosian) would be correct: 14...£xg5 (or 14...¤xg5 15.0–0–0+–) 15.¥xd7† ¢e7 16.¤e4!+–14...a6 15.¥xd7† £xd7 16.£xd7† ¢xd7²
White wants to exploit the open position of the black king. For that he needs all the central files. 17.0–0!? ¥d6
Black has two ways to consolidate the position and bring his king to safety: ...¦ac8 followed by ...¦c6, or ...¦fd8 followed by ...¢e8.
But it would have been better to begin the first plan with the immediate 17...¦c8!. Then after 18.¦fd1† ¥d6 19.¤e4 ¦c6 20.¦ac1 ¦d8! (20...¦hc8? 21.¤xd6 ¦xc1 22.¥xc1+–) 21.¦xc6 ¢xc6 22.¦c1† ¢b5 23.¤c3† ¢c6 the position remains level.
Diagram 12-5 r1222222223 Çt+ WlV T5 ÆOo+m+oOo5 Å + +m+ +5 Ä+b+ + + 5 Ãq+ + + +5 Â+ N +p+ 5 ÁpP + P P5 ÀR B K +r5 7ÈÉÊËÌÍÎÏ9
�
138
Positional play 2c
hapter 1
2
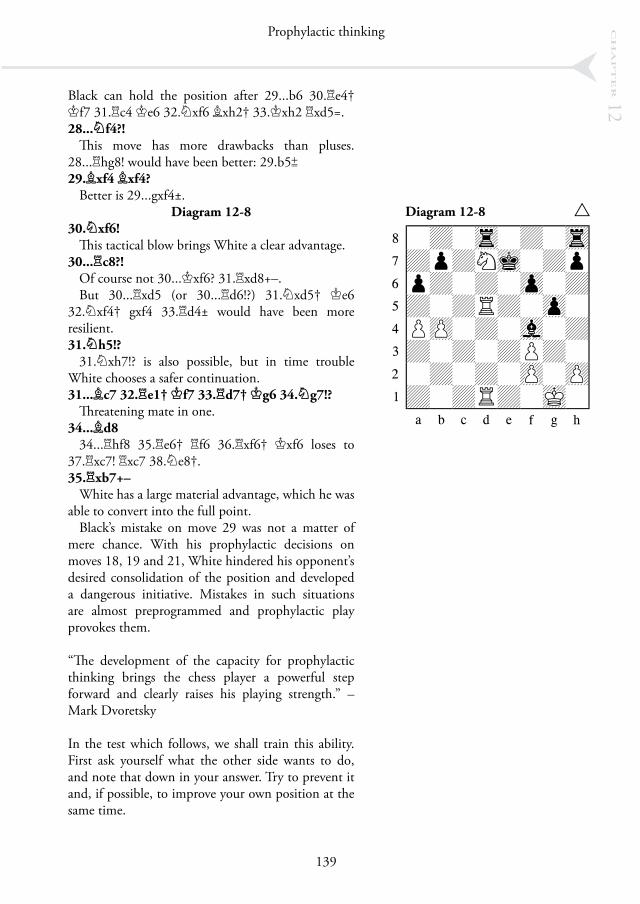
Diagram 12-618.¤d5!
This move activates the knight and prevents both defensive ideas.
As we already know, 18.¦fd1 achieves nothing: 18...¦ac8 19.¤e4 ¦c6 20.¦ac1 ¦d8!=18...¦ad8
Now Black wants to play ¢c8. Therefore…19.¦ac1!
If 19.¦fd1, then 19...¢c8 20.¥b6 ¦de8=.19...¤c7
19...¢e8 20.¦fd1 is also unpleasant for Black.20.¤b6†
Of course White should keep the pieces on the board.20...¢e6 21.¦fe1!
Not 21.¦fd1, on account of 21...g5! followed by ...f6 and ...¥e5, and Black stabilizes his position.21...¢f5 22.¦ed1
Threatening 23.¦xd6 ¦xd6 24.¦xc7.22...¤e6
22...¢e6? allows 23.¦xd6† ¢xd6 24.¥f4†.23.¦d5† ¢f6
23...¢g6!? is worth considering, or even 23...¥e5!? 24.¤d7 f6=.24.¦cd1 ¥c7 25.¤d7† ¢e7
Diagram 12-7White retains the initiative. Now he strengthens
the pressure on the queenside. 26.b4!
If 26.¥c5†? ¤xc5 27.¤xc5, then 27...¦xd5 28.¦xd5 ¦d8 29.¦xd8 ¥xd8 30.¤xb7? ¥b6–+ and the knight is trapped.26...f6 27.a4
Intending b5-b6.27...g5?!
Black wants to control the f4-square, but he voluntarily weakens his f6-pawn.
27...¦he8!? followed by ...¢f7 was sounder.28.¥c1!?
The bishop wants to go to b2 to attack the f6-pawn.
If 28.b5, then 28...axb5 29.axb5 ¦hg8=.A decent alternative is 28.¥d4!? ¤xd4 (28...¦xd7?
29.¦xd7† ¢xd7 30.¥xf6†+–) 29.¦1xd4, although
Diagram 12-6 r1222222223 Çt+ + + T5 Æ+o+l+oOo5 Åo+ Vm+ +5 Ä+ + + + 5 Ã + + + +5 Â+ N Bp+ 5 ÁpP + P P5 ÀR + +rK 5 7ÈÉÊËÌÍÎÏ9
Diagram 12-7 r1222222223 Ç + T + T5 Æ+oVnLoOo5 Åo+ +m+ +5 Ä+ +r+ + 5 Ã + + + +5 Â+ + Bp+ 5 ÁpP + P P5 À+ +r+ K 5 7ÈÉÊËÌÍÎÏ9
�
139
Prophylactic thinking ch
apter 12Black can hold the position after 29...b6 30.¦e4†
¢f7 31.¦c4 ¢e6 32.¤xf6 ¥xh2† 33.¢xh2 ¦xd5=.28...¤f4?!
This move has more drawbacks than pluses. 28...¦hg8! would have been better: 29.b5²29.¥xf4 ¥xf4?
Better is 29...gxf4±.Diagram 12-8
30.¤xf6! This tactical blow brings White a clear advantage.
30...¦c8?! Of course not 30...¢xf6? 31.¦xd8+–.But 30...¦xd5 (or 30...¦d6!?) 31.¤xd5† ¢e6
32.¤xf4† gxf4 33.¦d4± would have been more resilient.31.¤h5!?
31.¤xh7!? is also possible, but in time trouble White chooses a safer continuation. 31...¥c7 32.¦e1† ¢f7 33.¦d7† ¢g6 34.¤g7!?
Threatening mate in one.34...¥d8
34...¦hf8 35.¦e6† ¦f6 36.¦xf6† ¢xf6 loses to 37.¦xc7! ¦xc7 38.¤e8†.35.¦xb7+–
White has a large material advantage, which he was able to convert into the full point.
Black’s mistake on move 29 was not a matter of mere chance. With his prophylactic decisions on moves 18, 19 and 21, White hindered his opponent’s desired consolidation of the position and developed a dangerous initiative. Mistakes in such situations are almost preprogrammed and prophylactic play provokes them.
“The development of the capacity for prophylactic thinking brings the chess player a powerful step forward and clearly raises his playing strength.” – Mark Dvoretsky
In the test which follows, we shall train this ability. First ask yourself what the other side wants to do, and note that down in your answer. Try to prevent it and, if possible, to improve your own position at the same time.
Diagram 12-8 r1222222223 Ç + T + T5 Æ+o+nL +o5 Åo+ + O +5 Ä+ +r+ O 5 ÃpP + V +5 Â+ + +p+ 5 Á + + P P5 À+ +r+ K 5 7ÈÉÊËÌÍÎÏ9
Related Documents