Bonita Bay Bocce Club Website Member Guide Welcome to the Bonita Bay Bocce Club website! As a club member, you can view member-only content, sign up for events, and interact with other members through member directories, and discussion forums. You can also perform self-service functions such as updating your profile, paying invoices, and renewing your membership. In this guide, we'll help you get started, show you how to manage your membership, and introduce you to some of the functionality that appears on the club website. You can also view a mobile-friendly version from your smartphone or tablet by using the Wild Apricot Member app, found in the app store. Member Functions List (click on the topic to be taken directly to the description): • Logging in • Changing Your Password • Updating Your Profile • Changing Your Privacy Settings • Setting Your Email Preferences • Renewing Your Membership • Registering For Events • Paying Once for Multiple Transactions • Viewing Invoices and Making Payments • Using Discussion Forums • Photo Album Pages • Using the Member Directory Logging in You have to log into your member account if you want to access member-only pages on the club site, or if you want to perform self-service functions such as changing your email preferences or paying an invoice. New members are automatically logged in after supplying their email address when they apply for membership or register for an event. If you don't remember the club website address, you can use either of the two previous website addresses, www.bonitabaybocce.com or www.bonitabaybocceclub.com or look for a link in any email that was sent to you by the new system. You will click a Login button that appears in the upper right corner of every page on the website. That will leads to a login dialog box...

Welcome message from author
This document is posted to help you gain knowledge. Please leave a comment to let me know what you think about it! Share it to your friends and learn new things together.
Transcript
Bonita Bay Bocce Club Website Member Guide
Welcome to the Bonita Bay Bocce Club website! As a club member, you can view member-only content,
sign up for events, and interact with other members through member directories, and discussion
forums. You can also perform self-service functions such as updating your profile, paying invoices, and
renewing your membership. In this guide, we'll help you get started, show you how to manage your
membership, and introduce you to some of the functionality that appears on the club website.
You can also view a mobile-friendly version from your smartphone or tablet by using the Wild Apricot
Member app, found in the app store.
Member Functions List (click on the topic to be taken directly to the description):
• Logging in
• Changing Your Password
• Updating Your Profile
• Changing Your Privacy Settings
• Setting Your Email Preferences
• Renewing Your Membership
• Registering For Events
• Paying Once for Multiple Transactions
• Viewing Invoices and Making Payments
• Using Discussion Forums
• Photo Album Pages
• Using the Member Directory
Logging in
You have to log into your member account if you want to access member-only pages on the club site, or
if you want to perform self-service functions such as changing your email preferences or paying an
invoice.
New members are automatically logged in after supplying their email address when they apply for
membership or register for an event.
If you don't remember the club website address, you can use either of the two previous website
addresses, www.bonitabaybocce.com or www.bonitabaybocceclub.com or look for a link in any email
that was sent to you by the new system.
You will click a Login button that appears in the upper right corner of every page on the website. That
will leads to a login dialog box...
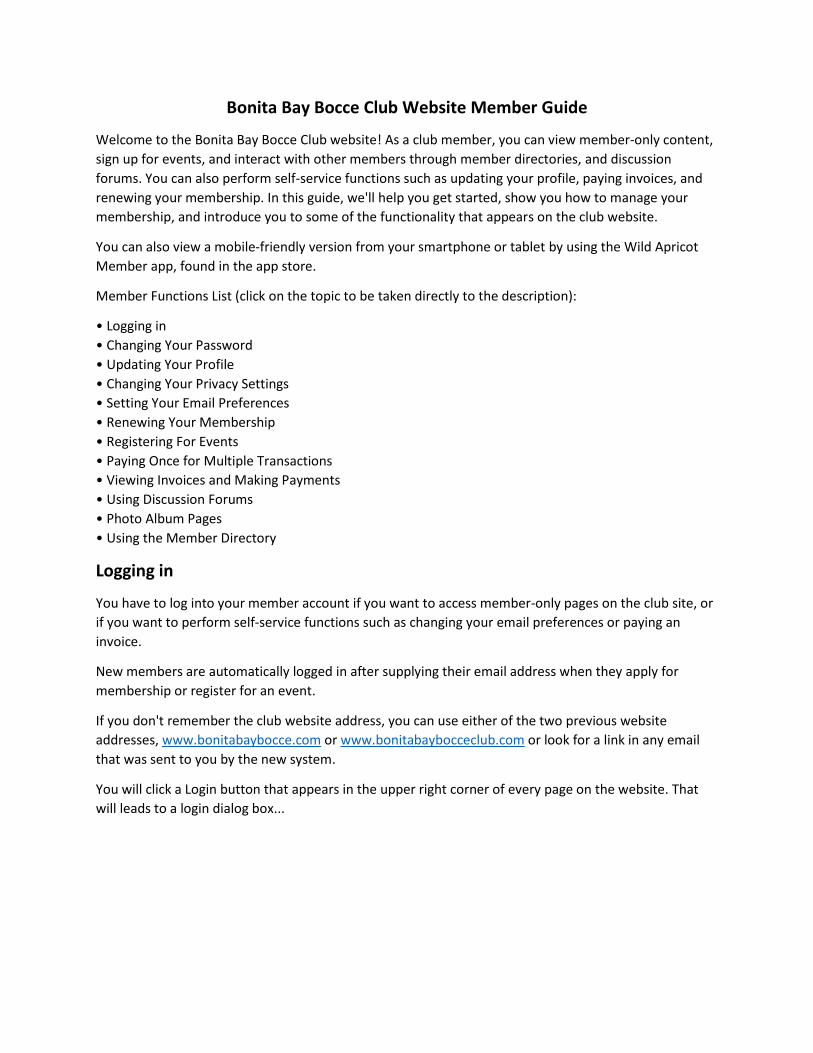
... where you will enter your login information directly into login boxes that appear on the home page.
In the log in fields, you enter your member credentials – your email and password – then click the Login
button. If this is the first time you log in, or you do not remember your password, click the Forgot
password link next to the Login button. On the page that appears, you can enter your email address to
receive a reset password link via email.
When you first log into Wild Apricot, you will be required to accept Wild Apricot's terms of use before
proceeding.
After you log in, a message will appear with links in the bottom right corner if you have unpaid invoices
or incomplete registrations, or are lapsed, overdue, or within a week of your renewal date.
You can click any of these links to resolve the corresponding issue.
Return to List of Member Functions

Changing Your Password
Passwords are automatically generated and emailed to you when join the club as a new member, or
register for an event. Passwords can also be set manually by the club website administrator.
You can change your password by clicking the Change password link that appears below or beside the
link to your profile after you log into the club website.
On the screen that appears, you enter your current password, then the new password, and the new
password again for confirmation.
Password requirements
Minimum of 7 characters
Maximum of 50 characters
Any combination of letters, numbers and characters (except spaces)
Passwords are case sensitive.
Return to List of Member Functions
Updating Your Profile
Information about you is visible to other members, but NOT the general public, on member directories
and forum posts. You update your personal information from your member profile and control what
information is visible to other members.
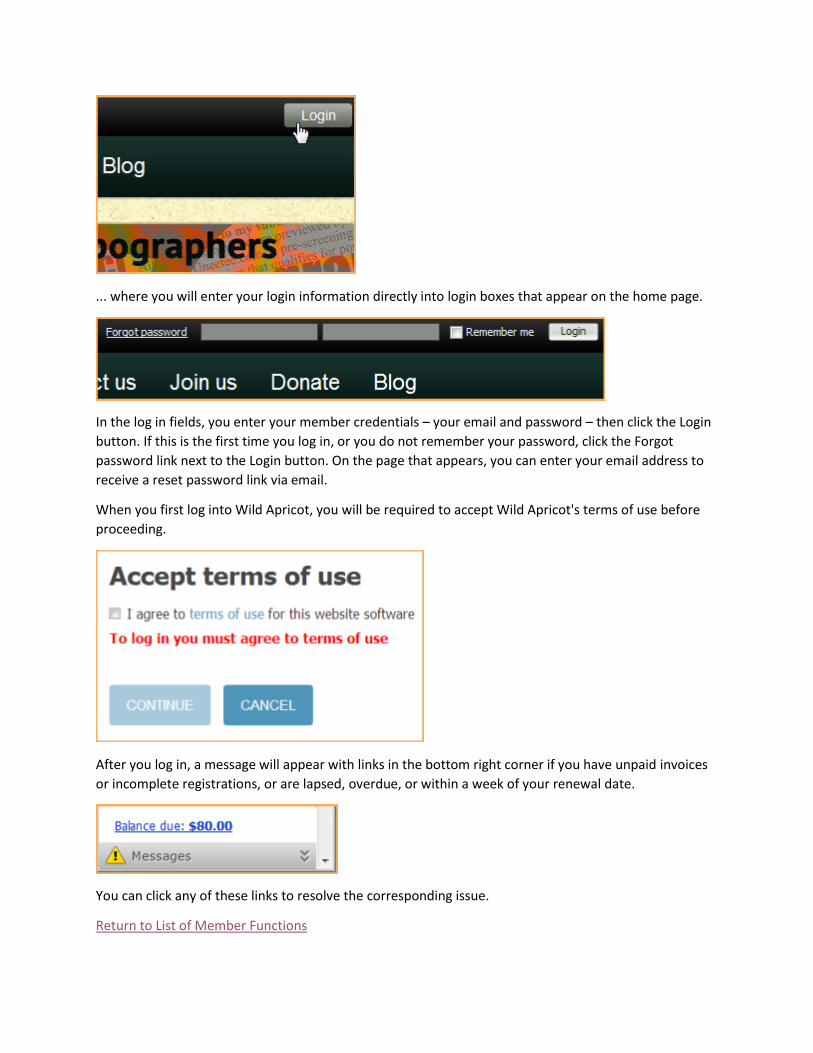
Once you are logged into your Wild Apricot account, a link will appear to your member profile. The link
will appear as your name or as View profile.
From the My profile screen that appears, click the Edit profile button to update your personal
information.
After you've made your changes, click the Save button to save them.
Return to List of Member Functions
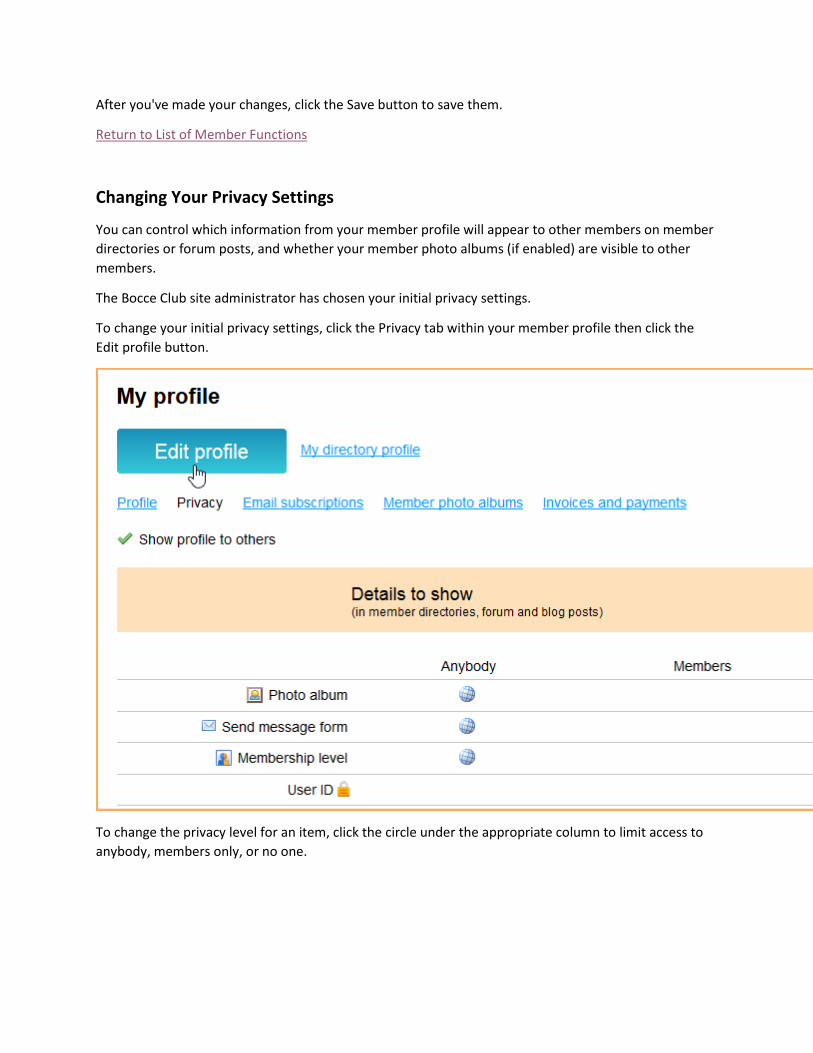
Changing Your Privacy Settings
You can control which information from your member profile will appear to other members on member
directories or forum posts, and whether your member photo albums (if enabled) are visible to other
members.
The Bocce Club site administrator has chosen your initial privacy settings.
To change your initial privacy settings, click the Privacy tab within your member profile then click the
Edit profile button.
To change the privacy level for an item, click the circle under the appropriate column to limit access to
anybody, members only, or no one.
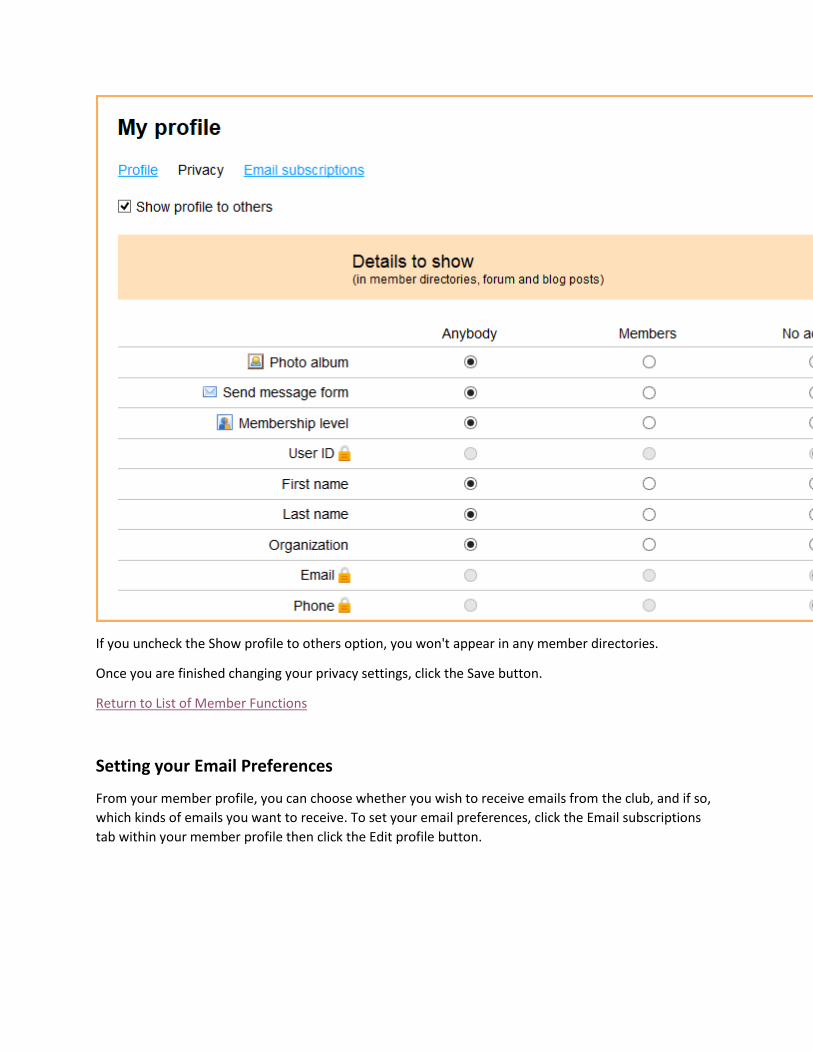
If you uncheck the Show profile to others option, you won't appear in any member directories.
Once you are finished changing your privacy settings, click the Save button.
Return to List of Member Functions
Setting your Email Preferences
From your member profile, you can choose whether you wish to receive emails from the club, and if so,
which kinds of emails you want to receive. To set your email preferences, click the Email subscriptions
tab within your member profile then click the Edit profile button.

You can now indicate whether they consent to receive emails from your organization. If you agree to
receive emails from your organization, you can then choose the type of message you want to receive.
There are three types of emails you can control:
Event notifications – automatic event emails such as event announcements (sent to people not yet
registered) and event reminders (sent to registered attendees only)
Manual email blasts – email blasts sent by site administrators
Forum subscriptions – if you have already subscribed to discussion forum updates
When you first join, you will have event notifications and email blasts turned on. For forum
subscriptions, you can also control how frequently you receive forum update notifications.
After you have made your choices, click Save.
The email settings above do not affect other automatic emails such as membership renewal reminders
and invoices/receipts. Only the club website administrators can disable those emails.
Return to List of Member Functions
Renewing your Membership
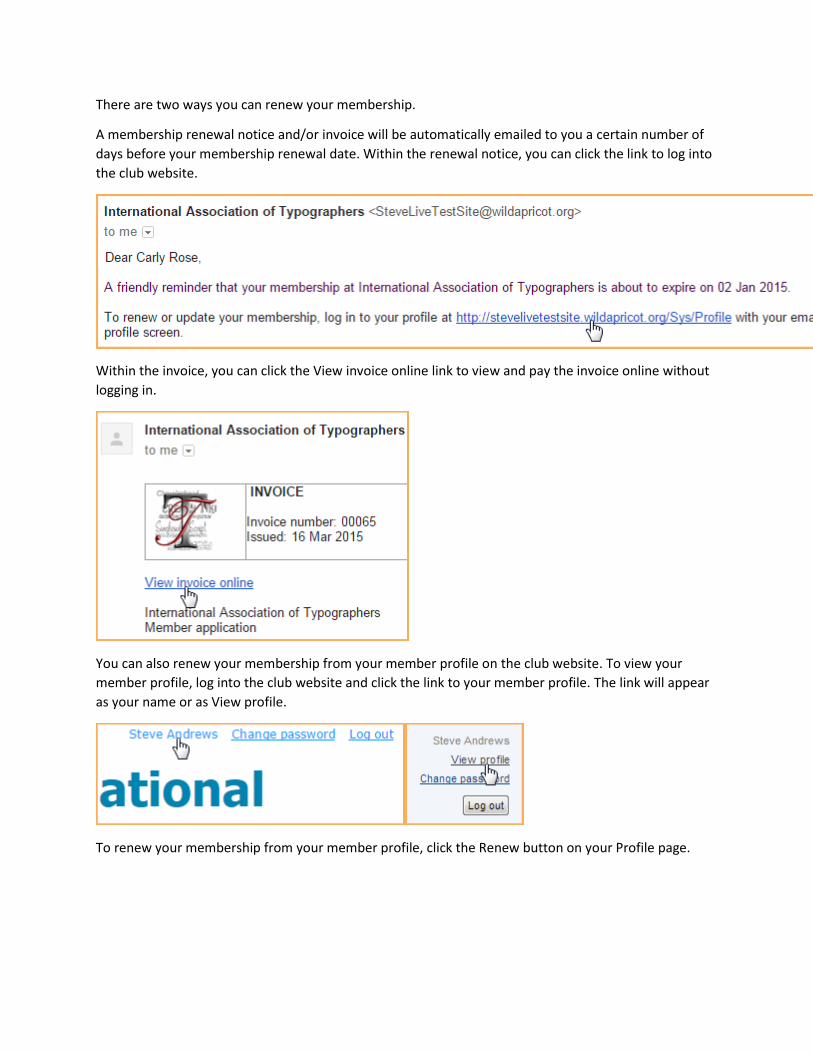
There are two ways you can renew your membership.
A membership renewal notice and/or invoice will be automatically emailed to you a certain number of
days before your membership renewal date. Within the renewal notice, you can click the link to log into
the club website.
Within the invoice, you can click the View invoice online link to view and pay the invoice online without
logging in.
You can also renew your membership from your member profile on the club website. To view your
member profile, log into the club website and click the link to your member profile. The link will appear
as your name or as View profile.
To renew your membership from your member profile, click the Renew button on your Profile page.
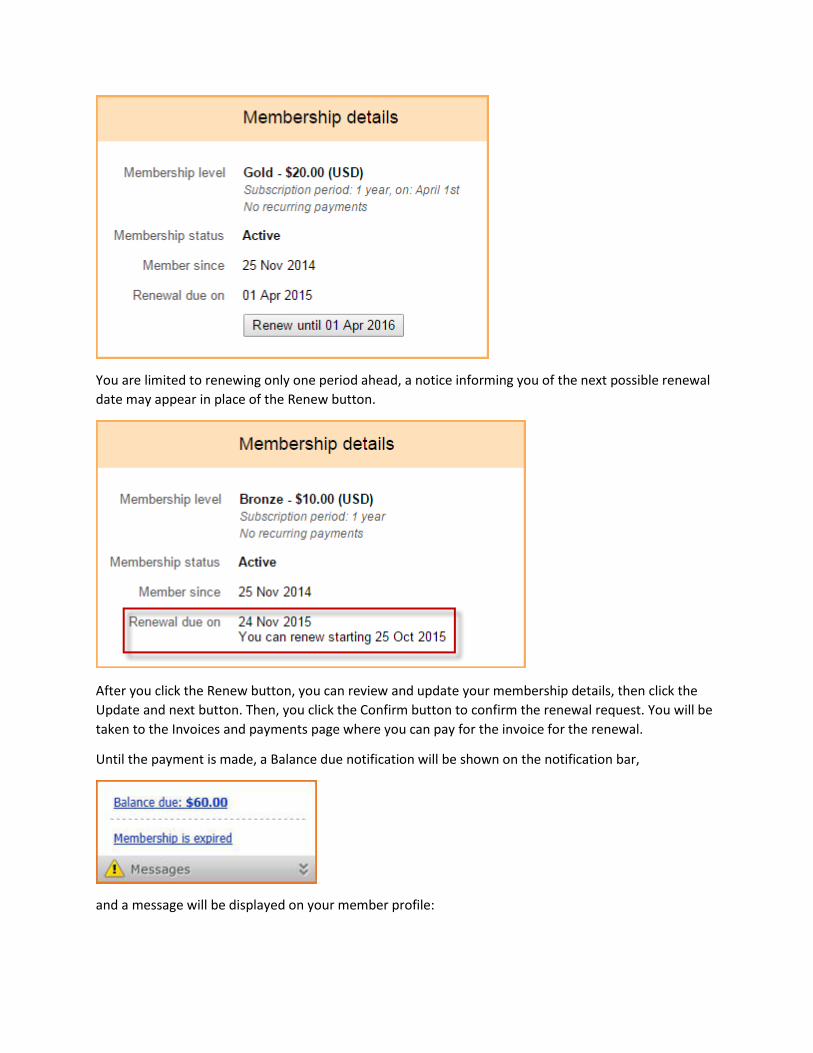
You are limited to renewing only one period ahead, a notice informing you of the next possible renewal
date may appear in place of the Renew button.
After you click the Renew button, you can review and update your membership details, then click the
Update and next button. Then, you click the Confirm button to confirm the renewal request. You will be
taken to the Invoices and payments page where you can pay for the invoice for the renewal.
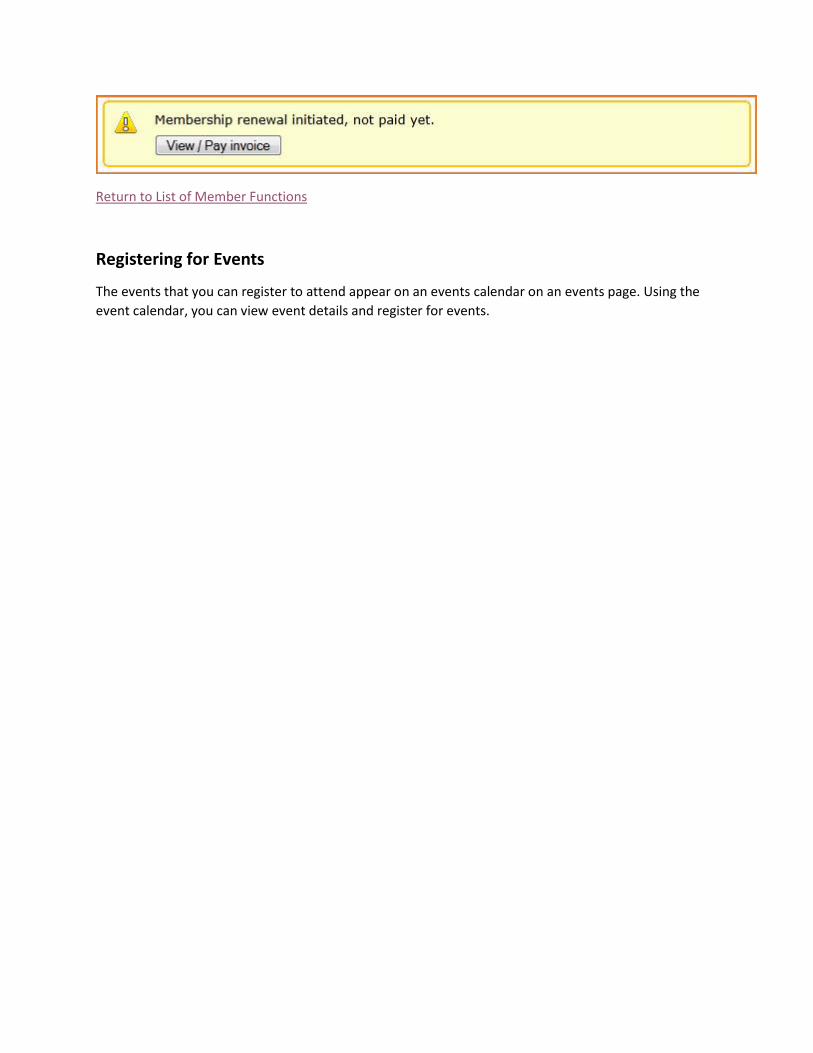
Until the payment is made, a Balance due notification will be shown on the notification bar,
and a message will be displayed on your member profile:
Return to List of Member Functions
Registering for Events
The events that you can register to attend appear on an events calendar on an events page. Using the
event calendar, you can view event details and register for events.
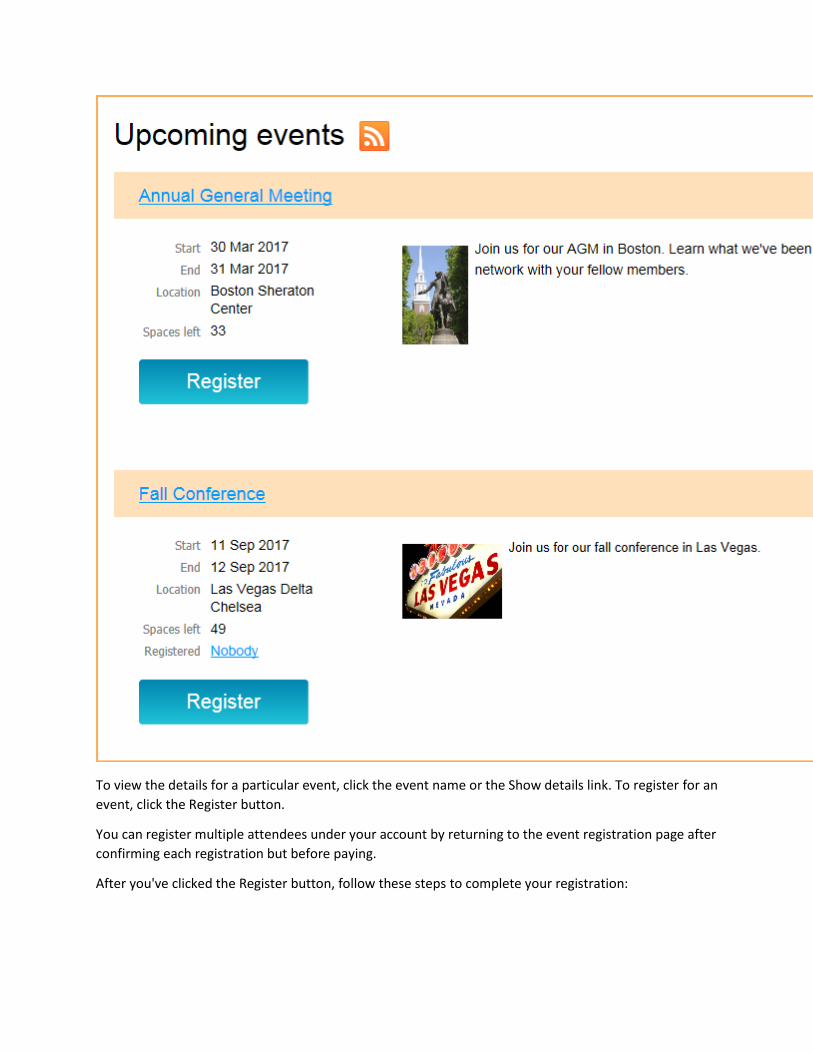
To view the details for a particular event, click the event name or the Show details link. To register for an
event, click the Register button.
You can register multiple attendees under your account by returning to the event registration page after
confirming each registration but before paying.
After you've clicked the Register button, follow these steps to complete your registration:
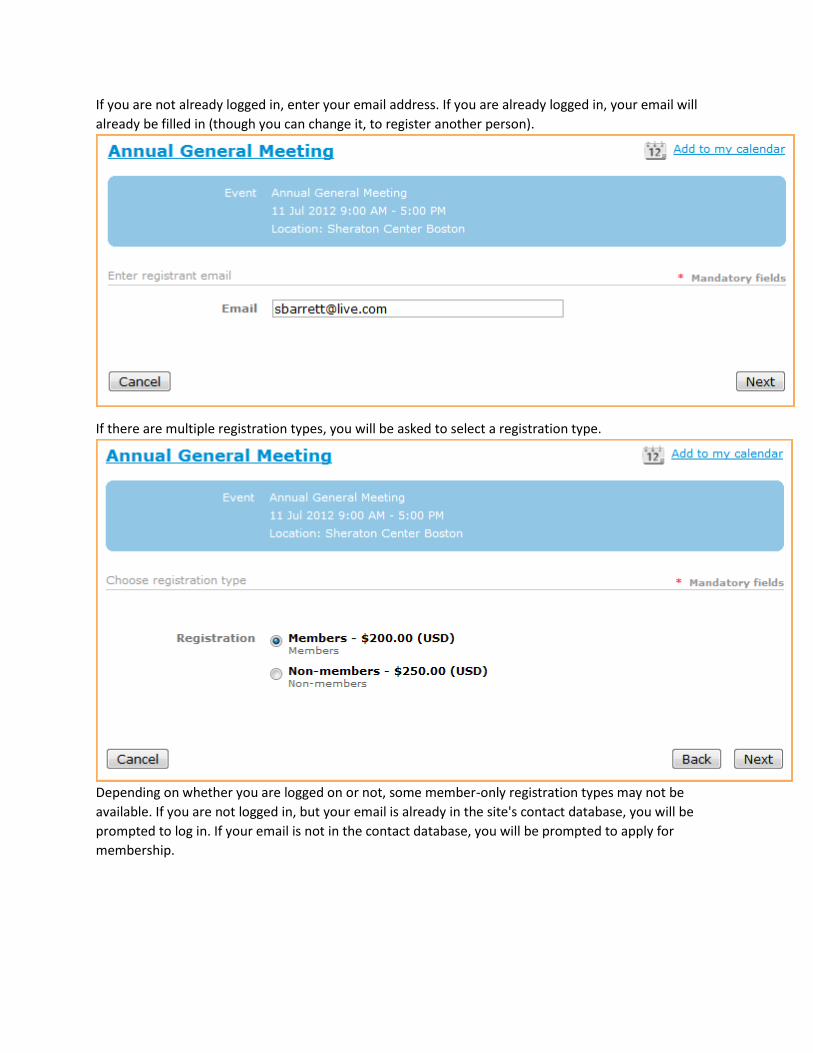
If you are not already logged in, enter your email address. If you are already logged in, your email will
already be filled in (though you can change it, to register another person).
If there are multiple registration types, you will be asked to select a registration type.
Depending on whether you are logged on or not, some member-only registration types may not be
available. If you are not logged in, but your email is already in the site's contact database, you will be
prompted to log in. If your email is not in the contact database, you will be prompted to apply for
membership.
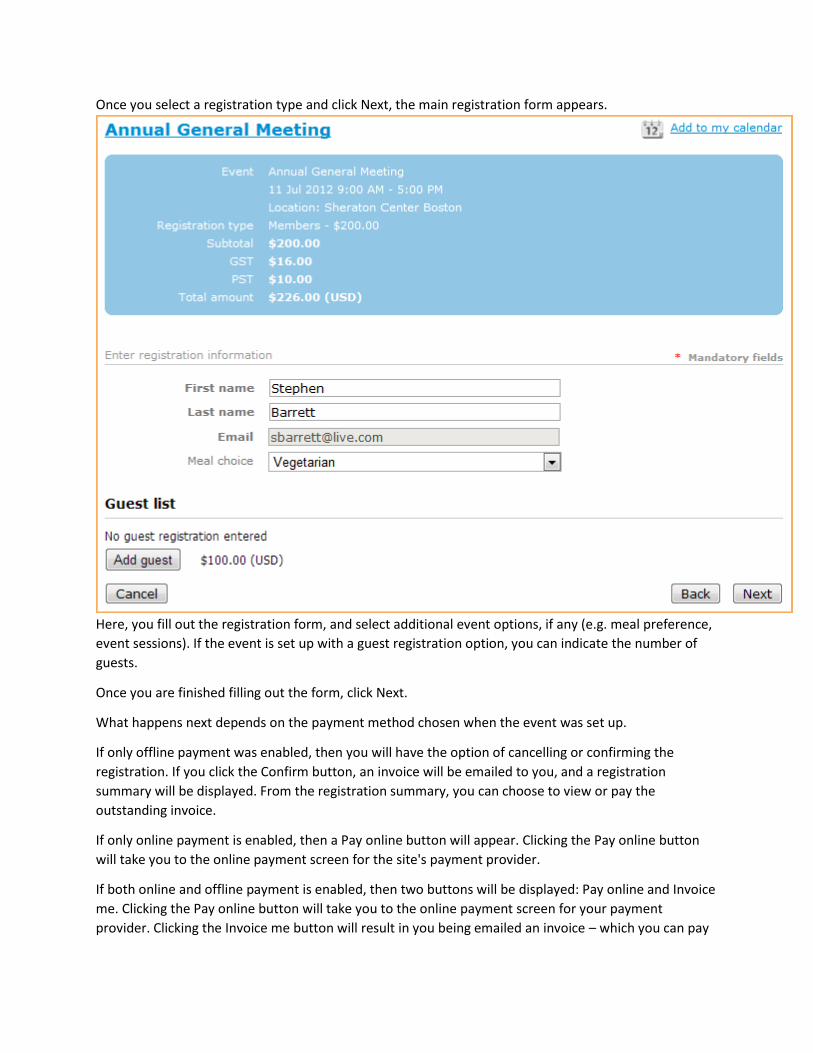
Once you select a registration type and click Next, the main registration form appears.
Here, you fill out the registration form, and select additional event options, if any (e.g. meal preference,
event sessions). If the event is set up with a guest registration option, you can indicate the number of
guests.
Once you are finished filling out the form, click Next.
What happens next depends on the payment method chosen when the event was set up.
If only offline payment was enabled, then you will have the option of cancelling or confirming the
registration. If you click the Confirm button, an invoice will be emailed to you, and a registration
summary will be displayed. From the registration summary, you can choose to view or pay the
outstanding invoice.
If only online payment is enabled, then a Pay online button will appear. Clicking the Pay online button
will take you to the online payment screen for the site's payment provider.
If both online and offline payment is enabled, then two buttons will be displayed: Pay online and Invoice
me. Clicking the Pay online button will take you to the online payment screen for your payment
provider. Clicking the Invoice me button will result in you being emailed an invoice – which you can pay
online or offline – and a registration summary being displayed. From the registration summary, you can
choose to view or pay (online) the outstanding invoice.
Return to List of Member Functions
Paying Once for Multiple Transactions
If you're registering for multiple events, or joining as a member and registering for an event at the same
time, you can make a single payment for the multiple transactions. To avoid paying separately for each
transaction, follow these steps:
For each transaction except the final one, click the Invoice me button rather than the Pay online button.
For the final transaction, click the Pay online button and all your transactions will be combined into a
single payment.
Return to List of Member Functions
Viewing Invoices and Making Payments
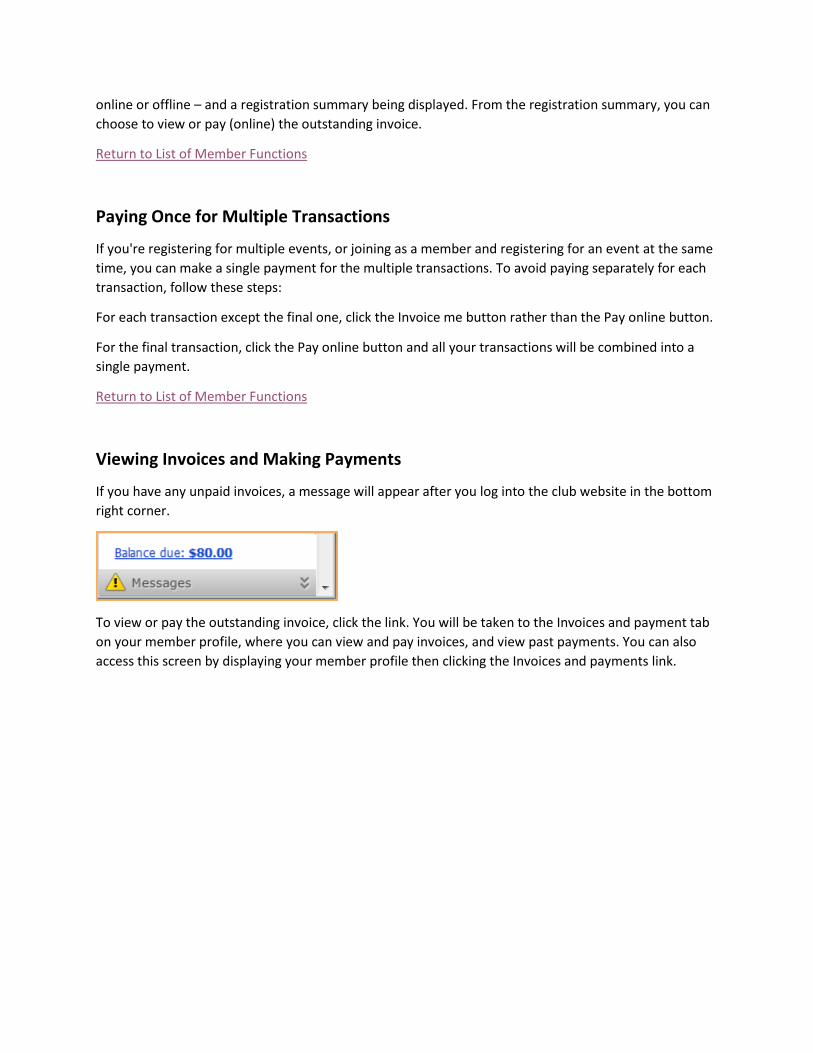
If you have any unpaid invoices, a message will appear after you log into the club website in the bottom
right corner.
To view or pay the outstanding invoice, click the link. You will be taken to the Invoices and payment tab
on your member profile, where you can view and pay invoices, and view past payments. You can also
access this screen by displaying your member profile then clicking the Invoices and payments link.
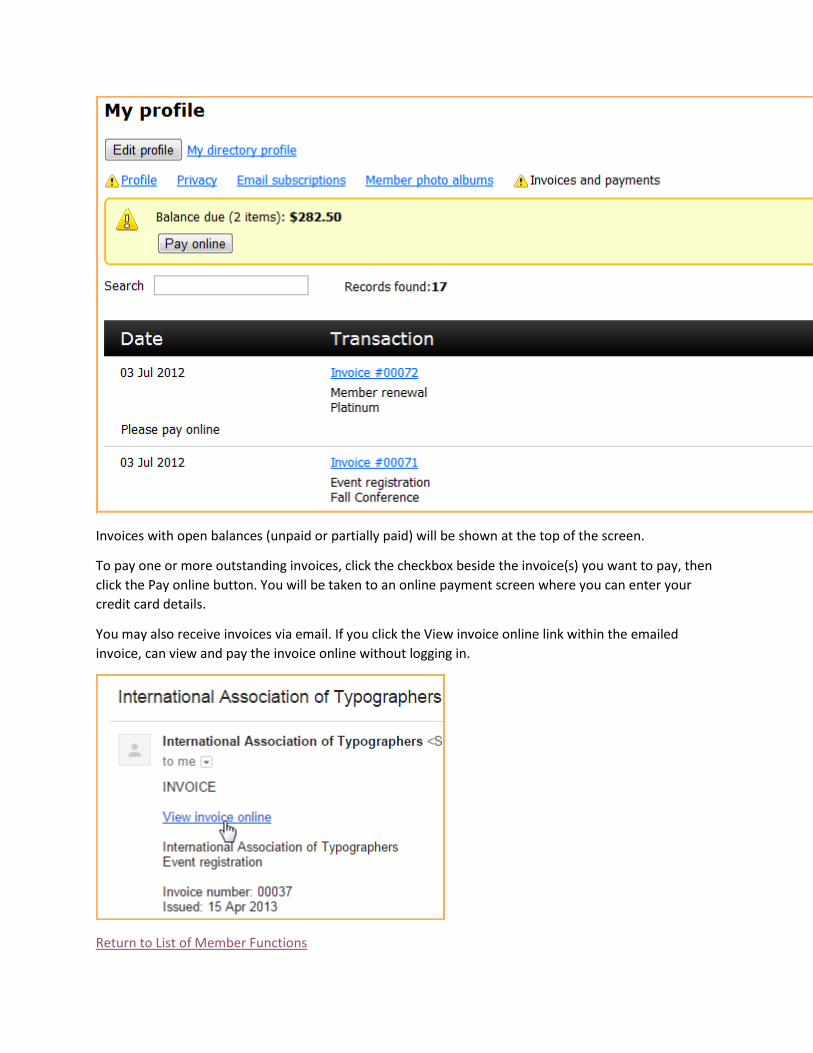
Invoices with open balances (unpaid or partially paid) will be shown at the top of the screen.
To pay one or more outstanding invoices, click the checkbox beside the invoice(s) you want to pay, then
click the Pay online button. You will be taken to an online payment screen where you can enter your
credit card details.
You may also receive invoices via email. If you click the View invoice online link within the emailed
invoice, can view and pay the invoice online without logging in.
Return to List of Member Functions

Using Discussion Forums
Creating a forum topic
If you are authorized to create new forum topic, a Create topic button will appear above and below the
topic list. After clicking this button, you can enter the subject and the body of the new topic. You can use
the options appearing on the content editor toolbar to format the body text, and add links and tables.
Once you are done composing the topic, click Create. The topic will now appear on the main forum
page.
Normally, the topics you post will identify you using your first and last name. If member pictures are
enabled, your picture will be displayed unless the picture field is restricted under your privacy settings. If
you chose to hide your entire profile from others in your privacy settings – or if you are not a member –
the topic will identify you as Anonymous. If you restricted access to both your first name and last name
in your privacy settings, you will be identified as Anonymous member.
Replying and commenting on forum topics
To reply to a topic, display the topic then click the Reply button. After clicking this button, you can enter
the body of your reply. You can use the content editor to format the text and add pictures, document, or
links. Once you are done composing your reply, click Post .
To comment on a particular reply within a topic, click the Quote link above the reply. This will include in
your message the text of the reply that you are commenting on. Once you are done composing your
comment, click Post.
To change the order in which topic replies are displayed, click the Show latest replies link or the Show
oldest replies link. You can set the order differently for different topics, and your choices will be
remembered between visits.
Subscribing to forums
You can subscribe to a forum, or to individual topics within the forum, so that you receive email
notifications of updates. After receiving the notification, you can visit the forum to view the new topics
or replies.
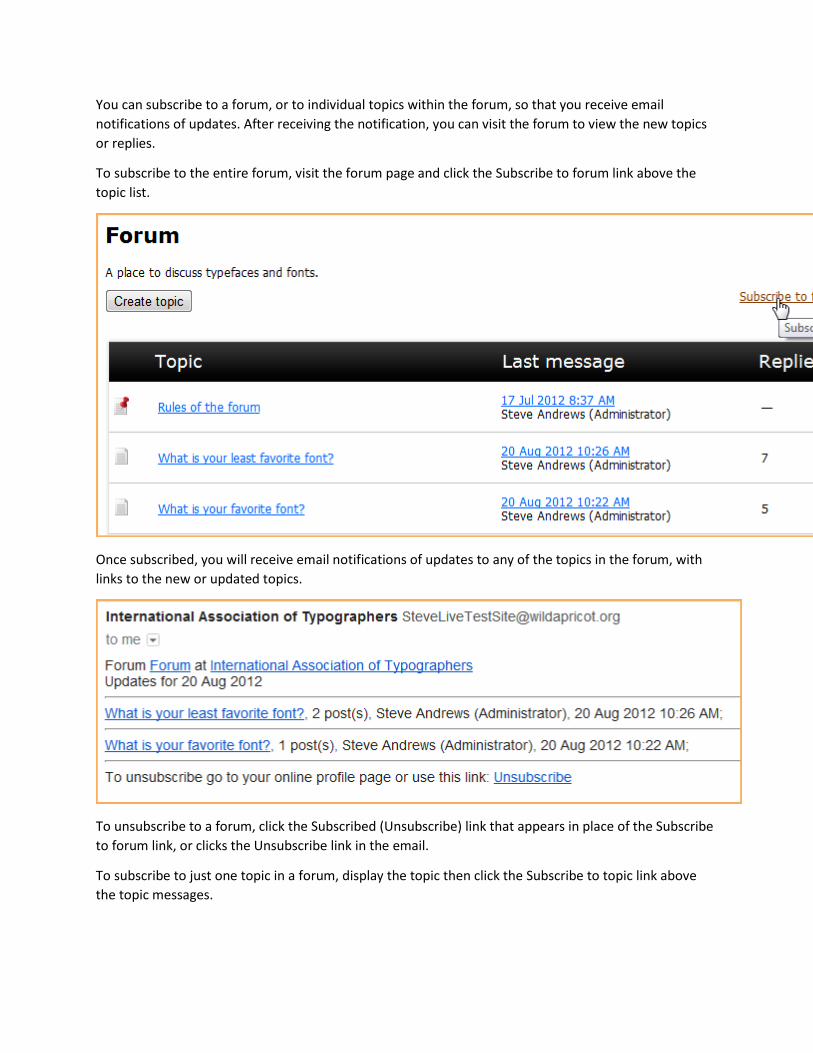
To subscribe to the entire forum, visit the forum page and click the Subscribe to forum link above the
topic list.
Once subscribed, you will receive email notifications of updates to any of the topics in the forum, with
links to the new or updated topics.
To unsubscribe to a forum, click the Subscribed (Unsubscribe) link that appears in place of the Subscribe
to forum link, or clicks the Unsubscribe link in the email.
To subscribe to just one topic in a forum, display the topic then click the Subscribe to topic link above
the topic messages.
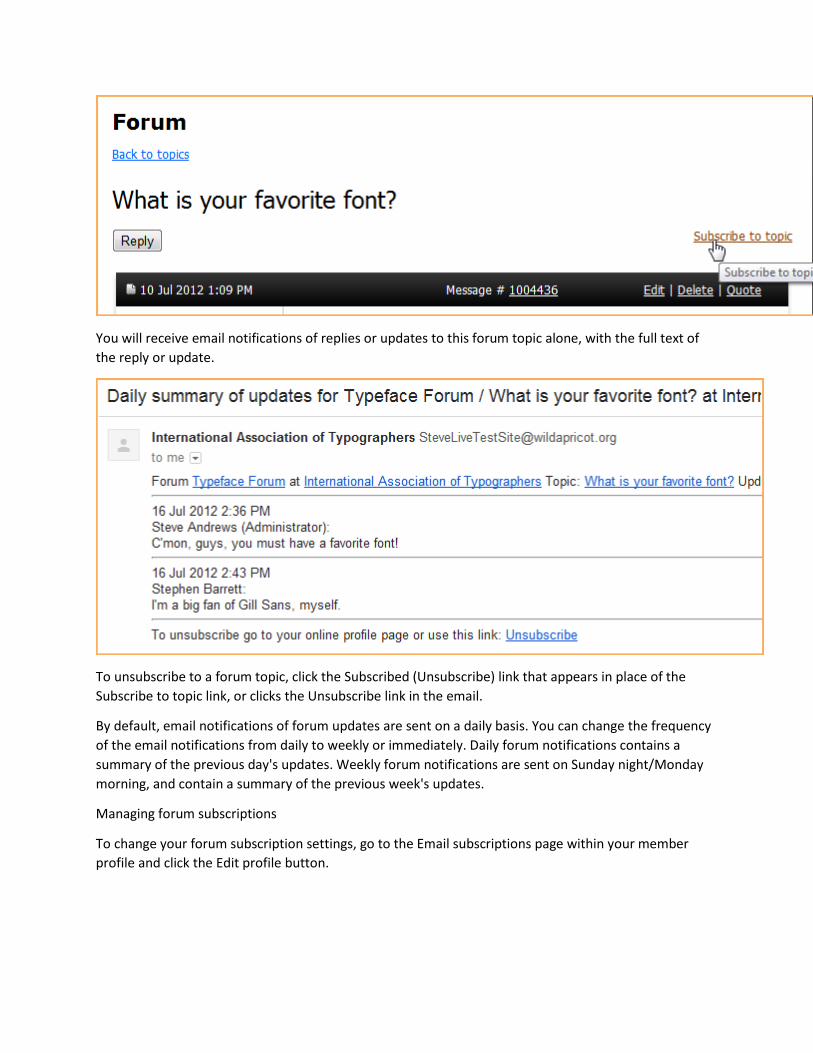
You will receive email notifications of replies or updates to this forum topic alone, with the full text of
the reply or update.
To unsubscribe to a forum topic, click the Subscribed (Unsubscribe) link that appears in place of the
Subscribe to topic link, or clicks the Unsubscribe link in the email.
By default, email notifications of forum updates are sent on a daily basis. You can change the frequency
of the email notifications from daily to weekly or immediately. Daily forum notifications contains a
summary of the previous day's updates. Weekly forum notifications are sent on Sunday night/Monday
morning, and contain a summary of the previous week's updates.
Managing forum subscriptions
To change your forum subscription settings, go to the Email subscriptions page within your member
profile and click the Edit profile button.
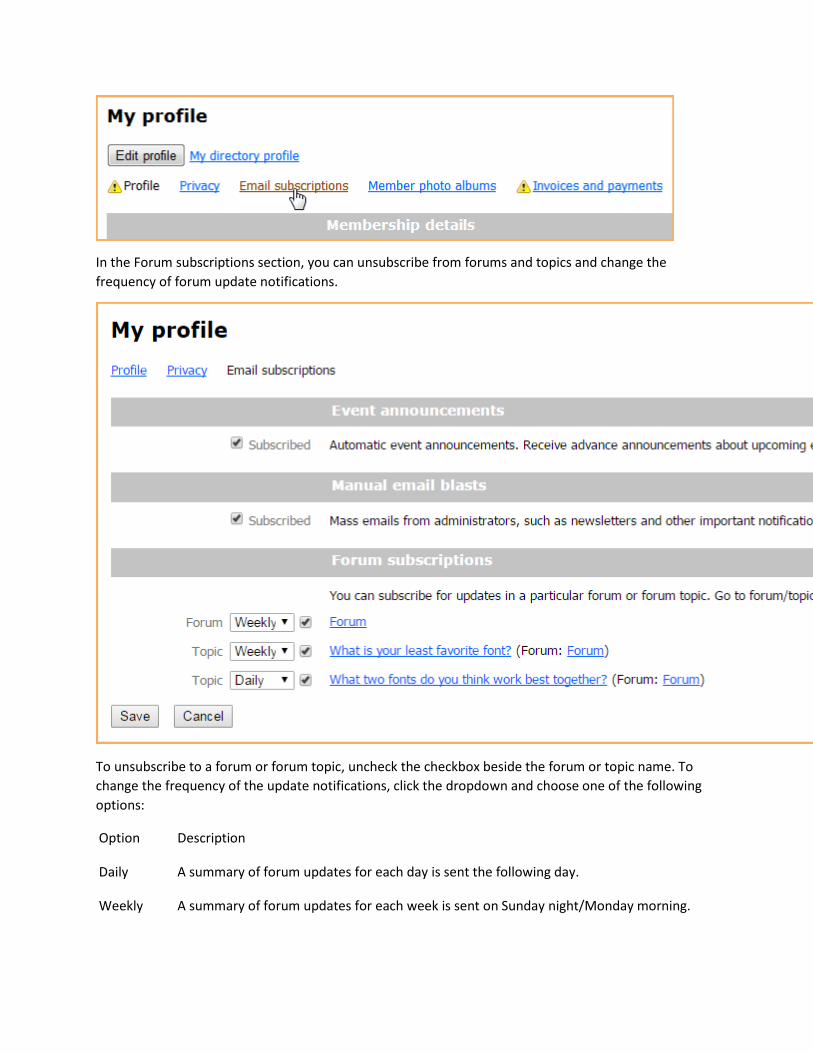
In the Forum subscriptions section, you can unsubscribe from forums and topics and change the
frequency of forum update notifications.
To unsubscribe to a forum or forum topic, uncheck the checkbox beside the forum or topic name. To
change the frequency of the update notifications, click the dropdown and choose one of the following
options:
Option Description
Daily A summary of forum updates for each day is sent the following day.
Weekly A summary of forum updates for each week is sent on Sunday night/Monday morning.
Immediately Notifications are sent immediately after an update is made (though the actual delivery
could be delayed a few minutes or longer depending on the email server load).
Once you are finished making changes, click the Save button.
Return to List of Member Functions
Member Photo Albums
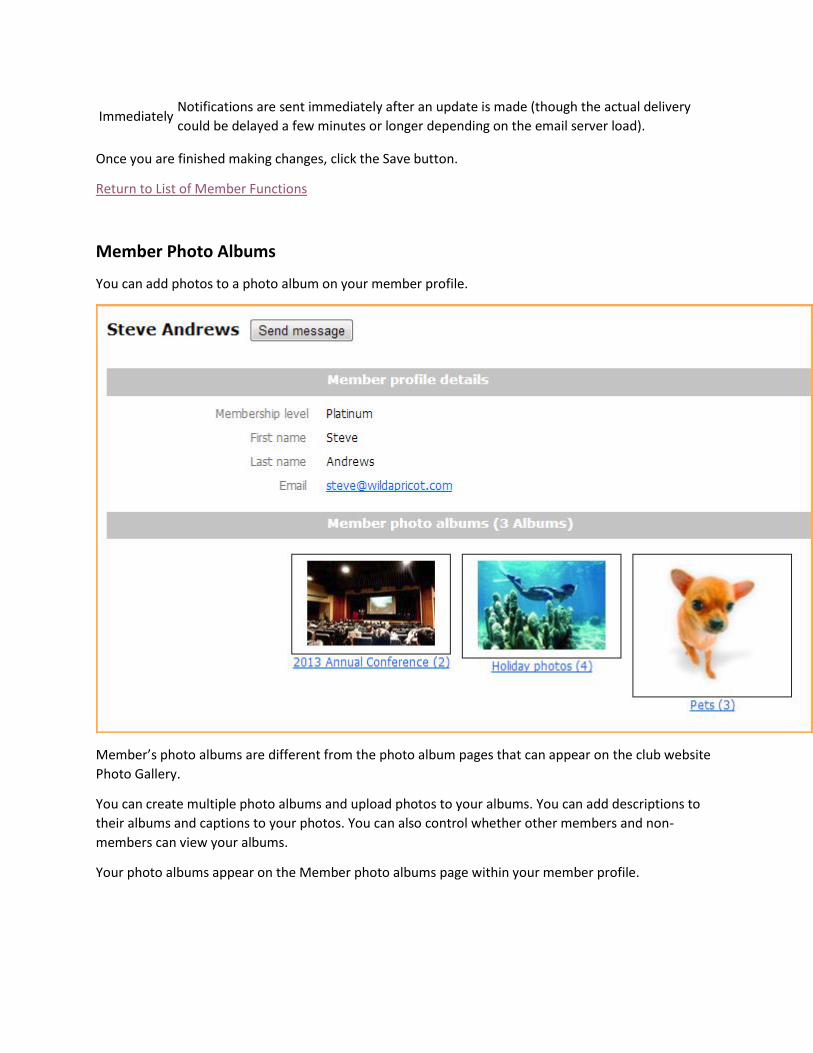
You can add photos to a photo album on your member profile.
Member’s photo albums are different from the photo album pages that can appear on the club website
Photo Gallery.
You can create multiple photo albums and upload photos to your albums. You can add descriptions to
their albums and captions to your photos. You can also control whether other members and non-
members can view your albums.
Your photo albums appear on the Member photo albums page within your member profile.
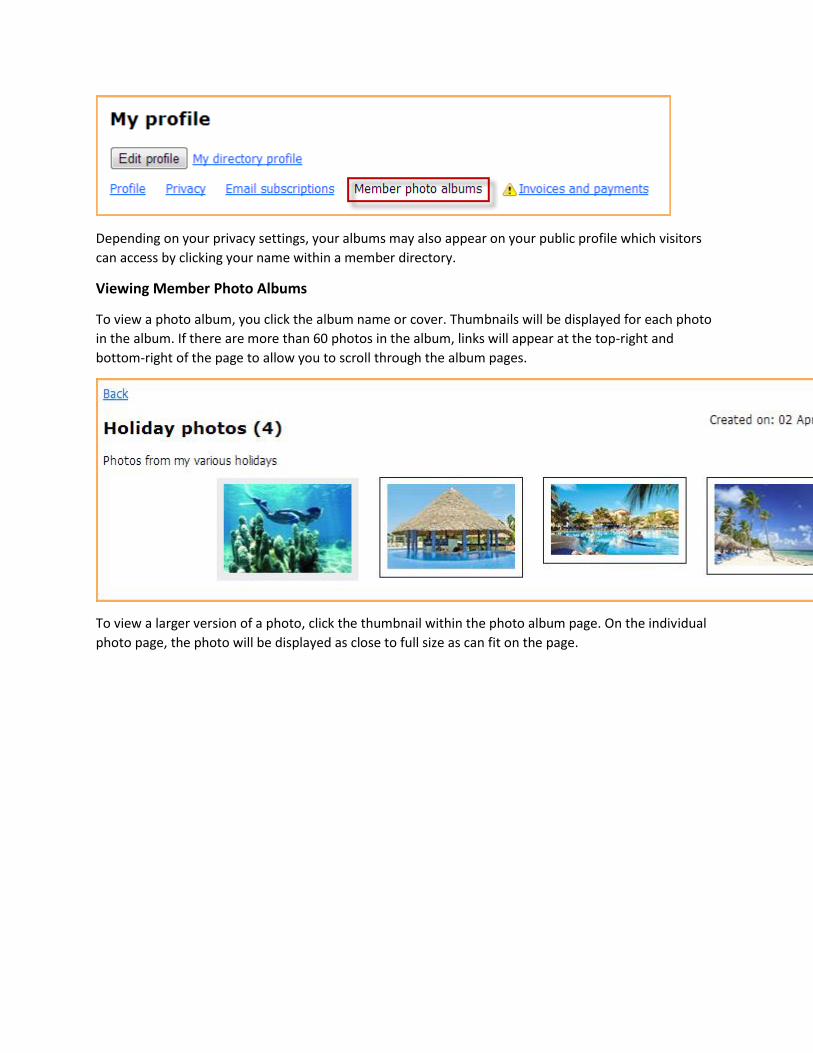
Depending on your privacy settings, your albums may also appear on your public profile which visitors
can access by clicking your name within a member directory.
Viewing Member Photo Albums
To view a photo album, you click the album name or cover. Thumbnails will be displayed for each photo
in the album. If there are more than 60 photos in the album, links will appear at the top-right and
bottom-right of the page to allow you to scroll through the album pages.
To view a larger version of a photo, click the thumbnail within the photo album page. On the individual
photo page, the photo will be displayed as close to full size as can fit on the page.
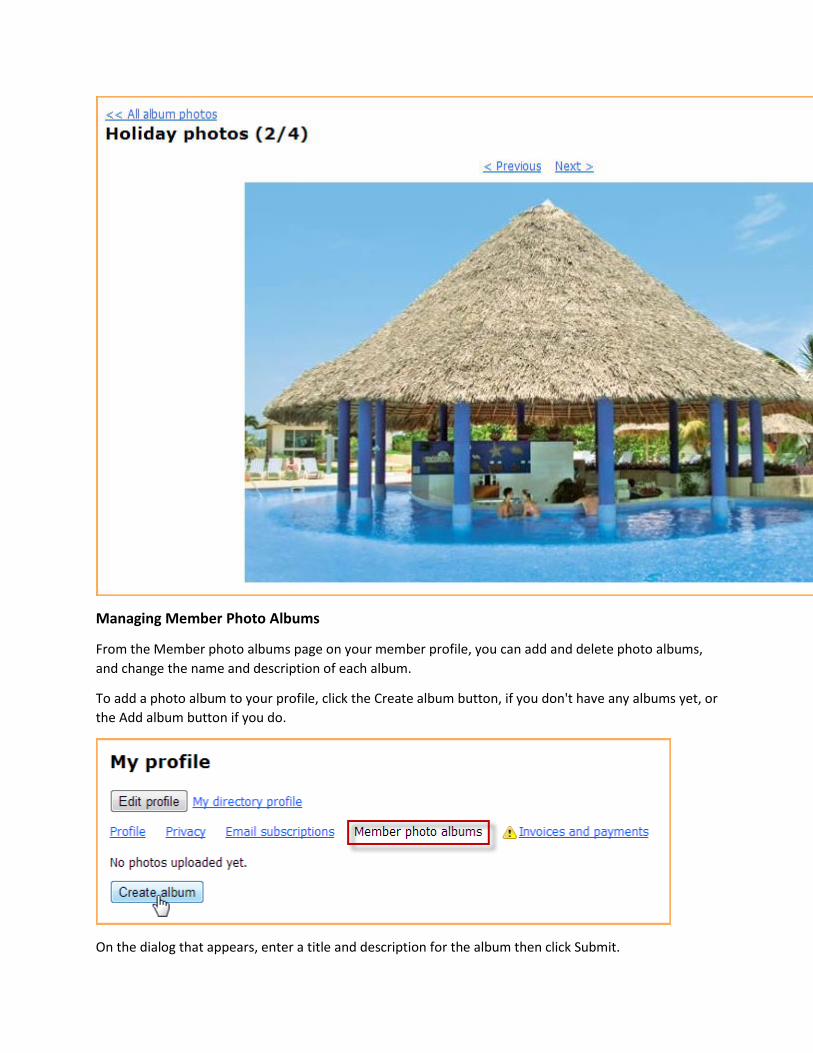
Managing Member Photo Albums
From the Member photo albums page on your member profile, you can add and delete photo albums,
and change the name and description of each album.
To add a photo album to your profile, click the Create album button, if you don't have any albums yet, or
the Add album button if you do.
On the dialog that appears, enter a title and description for the album then click Submit.
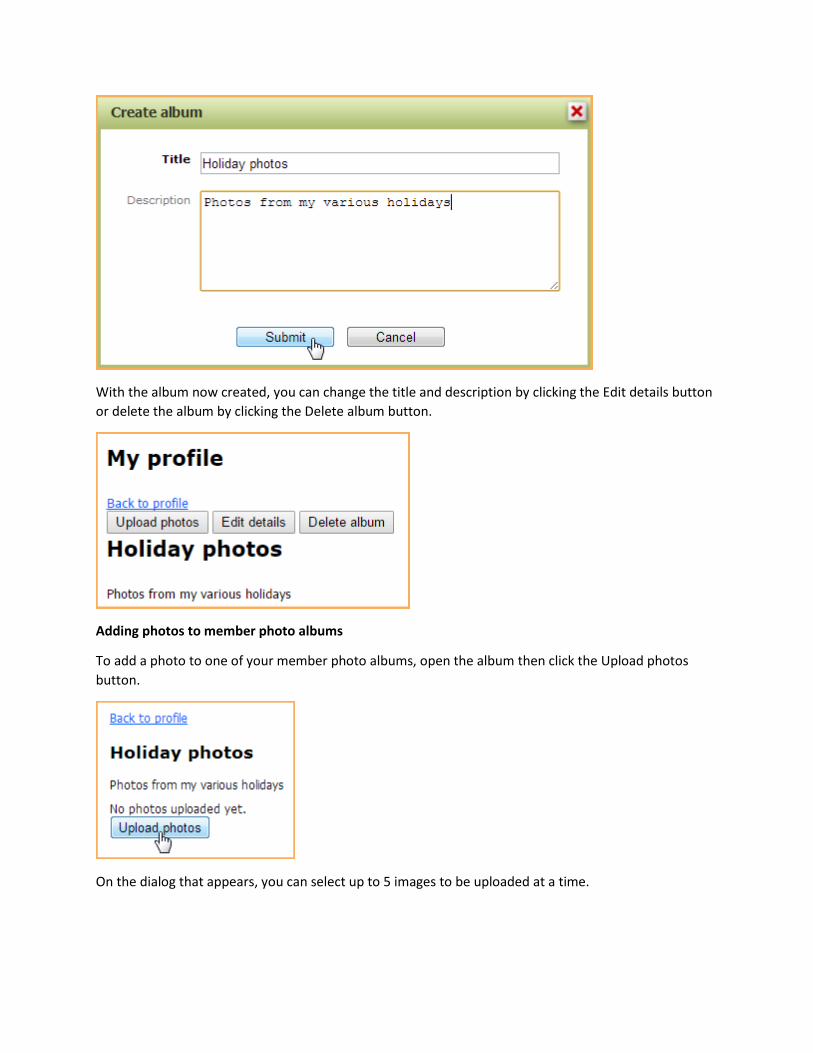
With the album now created, you can change the title and description by clicking the Edit details button
or delete the album by clicking the Delete album button.
Adding photos to member photo albums
To add a photo to one of your member photo albums, open the album then click the Upload photos
button.
On the dialog that appears, you can select up to 5 images to be uploaded at a time.
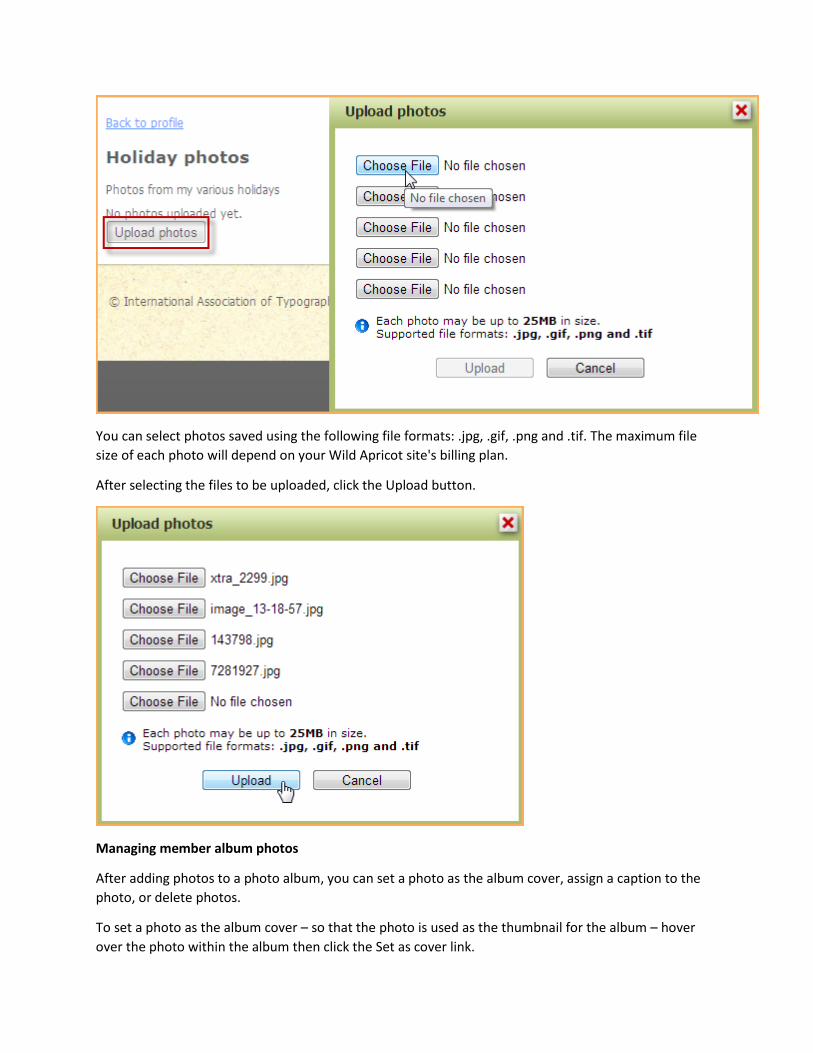
You can select photos saved using the following file formats: .jpg, .gif, .png and .tif. The maximum file
size of each photo will depend on your Wild Apricot site's billing plan.
After selecting the files to be uploaded, click the Upload button.
Managing member album photos
After adding photos to a photo album, you can set a photo as the album cover, assign a caption to the
photo, or delete photos.
To set a photo as the album cover – so that the photo is used as the thumbnail for the album – hover
over the photo within the album then click the Set as cover link.
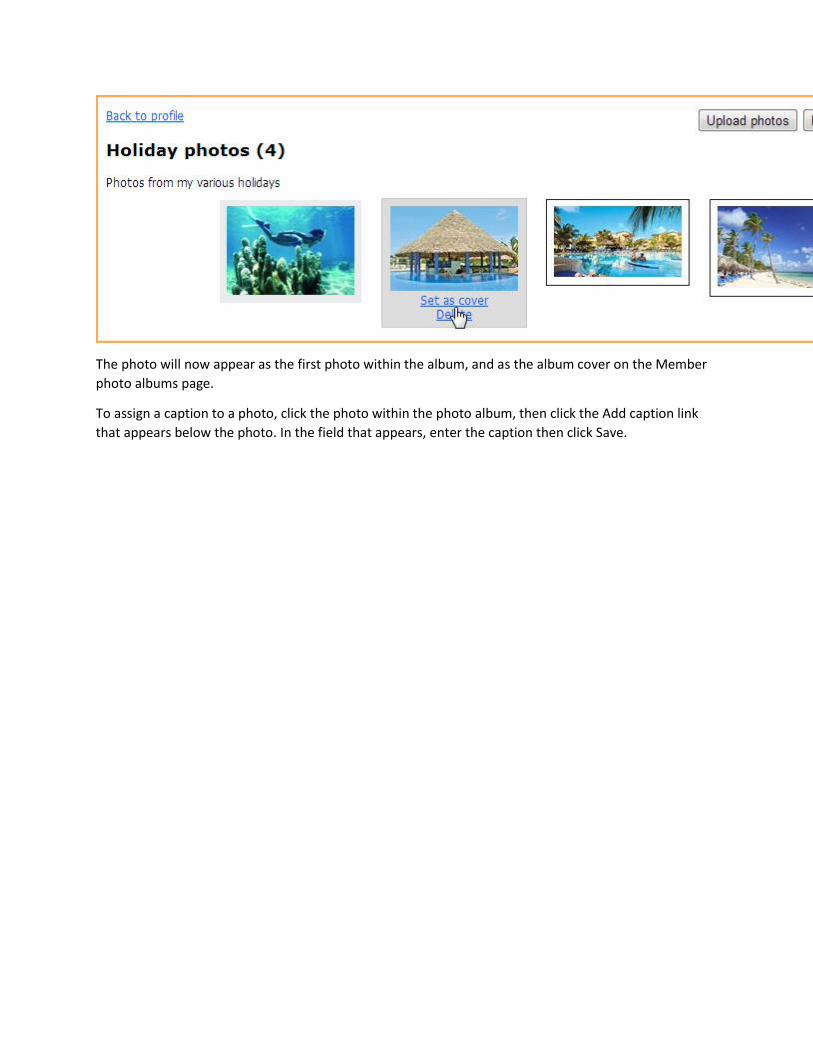
The photo will now appear as the first photo within the album, and as the album cover on the Member
photo albums page.
To assign a caption to a photo, click the photo within the photo album, then click the Add caption link
that appears below the photo. In the field that appears, enter the caption then click Save.

The caption will appear below the photo thumbnail within the album and on the individual photo page.
To a delete a photo, hover over its thumbnail within the photo album page then click the Delete link that
appears.
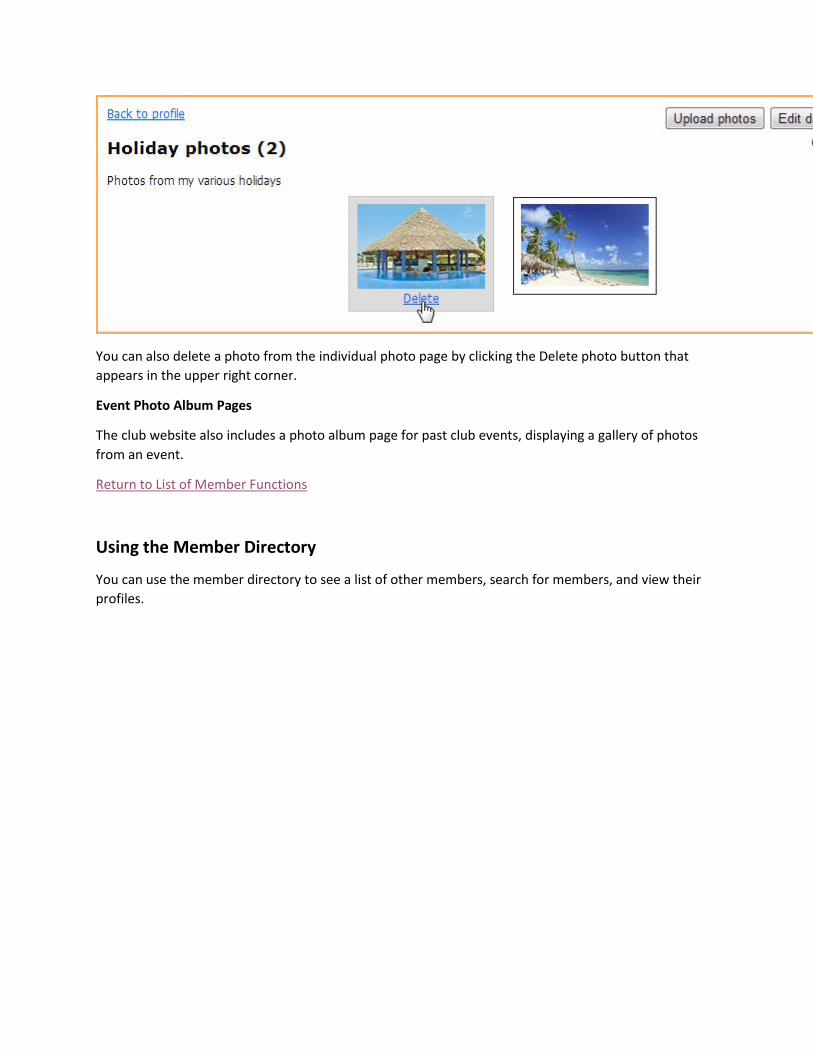
You can also delete a photo from the individual photo page by clicking the Delete photo button that
appears in the upper right corner.
Event Photo Album Pages
The club website also includes a photo album page for past club events, displaying a gallery of photos
from an event.
Return to List of Member Functions
Using the Member Directory
You can use the member directory to see a list of other members, search for members, and view their
profiles.
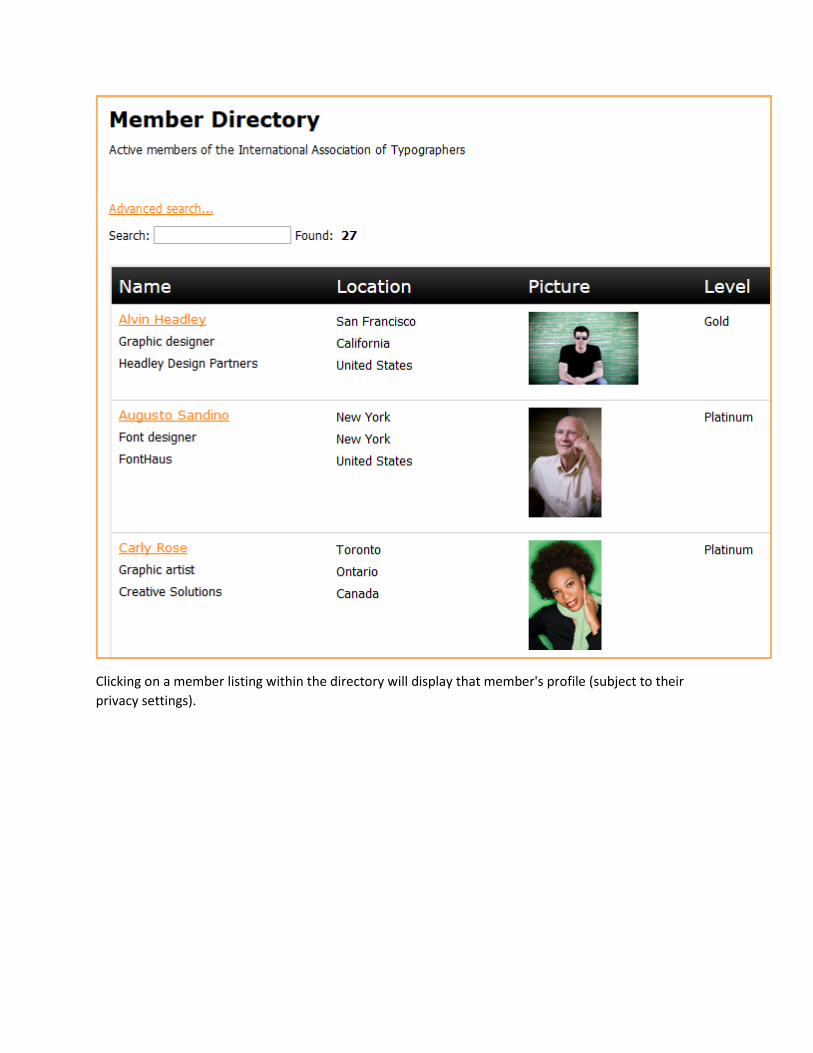
Clicking on a member listing within the directory will display that member's profile (subject to their
privacy settings).
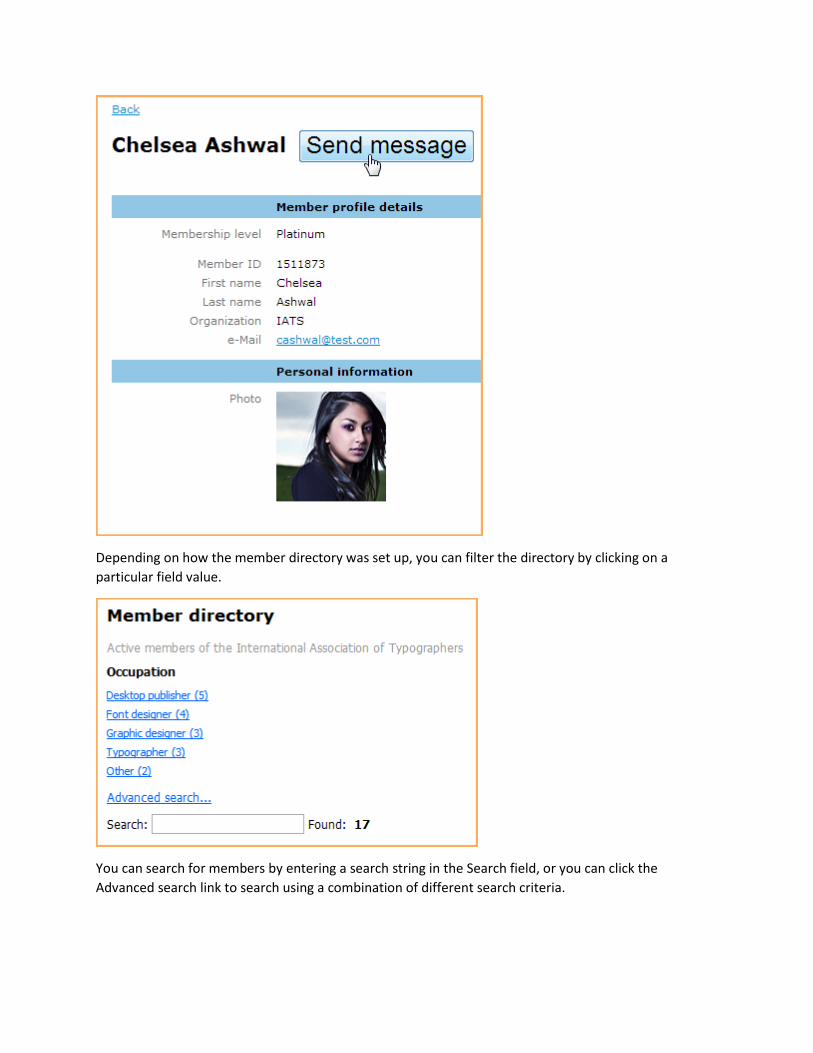
Depending on how the member directory was set up, you can filter the directory by clicking on a
particular field value.
You can search for members by entering a search string in the Search field, or you can click the
Advanced search link to search using a combination of different search criteria.
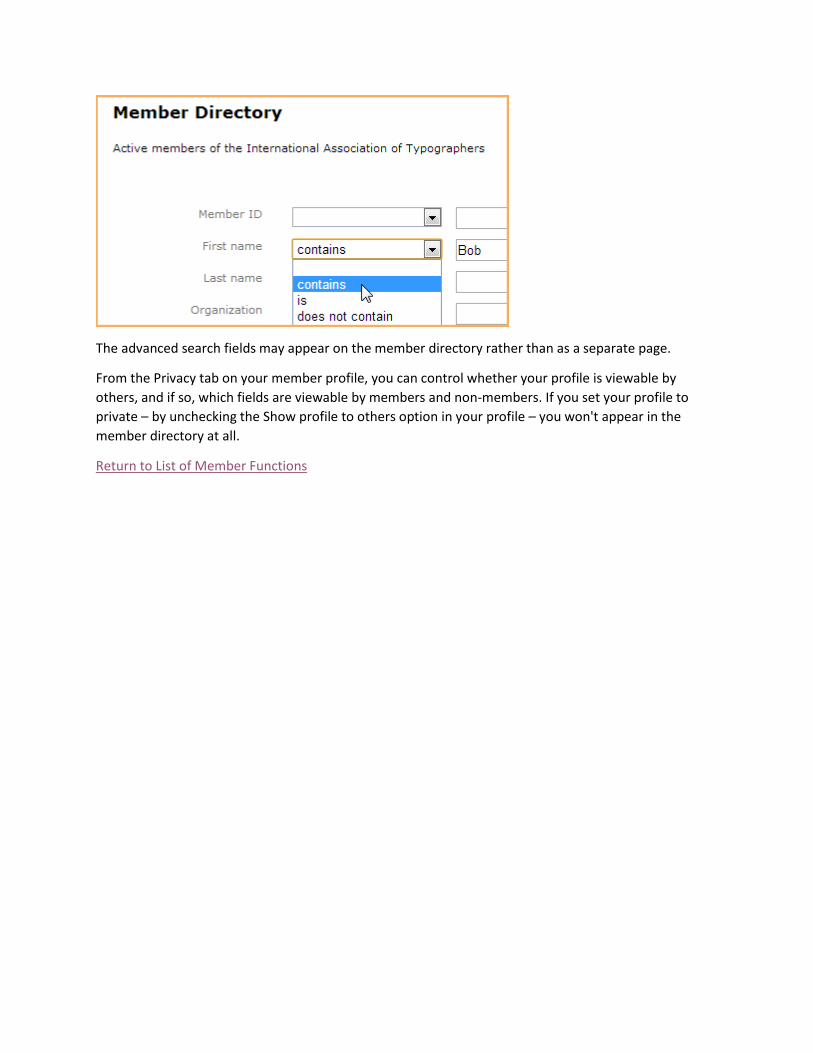
The advanced search fields may appear on the member directory rather than as a separate page.
From the Privacy tab on your member profile, you can control whether your profile is viewable by
others, and if so, which fields are viewable by members and non-members. If you set your profile to
private – by unchecking the Show profile to others option in your profile – you won't appear in the
member directory at all.
Return to List of Member Functions
Related Documents