Part number 550-141-986/1005 • Installation • Startup This manual must only be used by a qualified heating installer/service technician. Before installing, read all instructions, including this manual, the burner manual and any related supplements. Perform steps in the order given. Failure to comply could result in severe personal injury, death or substantial property damage. Oil-Fired Water Boiler • Maintenance • Parts Boiler Manual

Welcome message from author
This document is posted to help you gain knowledge. Please leave a comment to let me know what you think about it! Share it to your friends and learn new things together.
Transcript

Part number 550-141-986/1005
• Installation
• Startup
Thismanualmustonlybeusedbyaqualifiedheatinginstaller/servicetechnician.Beforeinstalling,readallinstructions,includingthismanual,theburnermanualandanyrelatedsupplements.Performstepsintheordergiven.Failuretocomplycouldresultinseverepersonalinjury,deathorsubstantialpropertydamage.
Oil-Fired Water Boiler
• Maintenance
• PartsBoiler Manual

Part number 550-141-986/1005
water boiler — Boiler Manual
�
The waTer boiler – how iT works . . .
1. Weil-McLainlogoplate(standard)orRemoteDisplayModule(optional)TheRemoteDisplayModule(RDM)isusedwhentheoptionalAFM(item�8)isinstalled.Thedisplayshowsboilerandsystemstatusandisusedtoadjustoperatingparameters.
2. ON/OFFswitch
3. ControlPodcoverfastener
4. Pressure/TemperaturegaugeDisplaysboilerwaterpressureandoutletwatertemperature.
5. Jackettoprearpanel
6. ControlPodcoverThe ControlPodcover ishinged toalloweasyaccessto the aquastat, boiler wiring and optionalAdvanced FeaturesModule(AFM).
7. Jacketsidepanelsjacketsidepanelsareinterchangeable.
8. Jacketrearpanel,withinsulation
9. TerminalstripElectricalconnections,bothlineandlowvoltage,connecttotheterminalstrip.
10. Frontsection
11. Intermediatesections
12. Backsection
13. EnviraCOM®wireharnessLowvoltagewireharnessfromL7�48aquastattotheHoneywellburnerprimarycontrol’sEnviraCOM®connector—acommu-nications port designed to optionally allow you to add greatersystem capability at the time of installation. Examples includetestinstrumentsanddial-inaccessand,inthefuture,efficiencyoptimization, zoning, and sequencers. Look for products withtheHoneywellEnviraCOM®nameindicatingproductsthatarecompatiblewithyournewboiler.
14. BurnerwireharnessLinevoltagewiringtoburner,terminatedinaMolexconnectorinthejacketcrosstie(item19).Anadditionalharnessconnectsfromthecrosstieconnectortotheburner.
15. BurnerdoorhingebracketThehingebracketcanbeinstalledoneithersidetoallowforrightorleft-handswing.
16. Swing-awayburnerdoorThe burnerdoorishingedtoprovideeasyaccesstotheboilerheatexchangerforinspectionandcleaning.
17. RotatingobservationportThe observationportisdesignedtopreventsootfromdepositingonthesightglass.Duringnormaloperationthesight
glassislocatedatthe1�:00position.Toviewtheburnerflame,loosenthecentermountingboltandrotatesothesightglassisinthe6:00position.
18. Overfirepressuretapping1/8”npt,withplug.
19. Jacketcrosstie
20. SensorwellsBoileraquastatsensorandP/Tgaugecapillaryandtemperaturesensorareinstalledinthetopoftherearsection.
21. OutlettappingTheboileroutletwatertappingislocatedinthetopoftherearsection.
22. ReturntappingThe boiler return tapping is located in the bottom of the rearsection.
23. Insulationblanket
24. Boilerdrainvalve
25. Flueconnectionboilerscanbechimneyordirectventedfromtherear
flueopening.
26. KnockoutsinjacketrearforelectricalconduitsAll electrical connections enter in conduits connected to theseknockouts.
27. Boilerreliefvalve
28. AFM(AdvancedFeaturesModule)—OptionalThe boilercanbeequippedwiththeAdvancedFeaturesModule(AFM).TheAFMisasystemcontrolthatprovidesboileroutdoorreset,aboilersetpointtemperature,domestichotwaterpumpoperation,andoutdoorresetthroughtheuseofamixingvalveoravariablespeedinjectionpump.Italsocontrolsstagingandrotationoftwoboilers.
When equipped with anAFM, the boiler requires a �0-ampservice.
29. ElectronicAquastatThe boilerisequippedwithaHoneywellL7�48electronicaquastat.TheL7�48sensesboilerwatertemperatureandcallforheatfromthesystemthermostatorAFMtooperatetheburnerandboilercirculator.
30. Burner, with cover
31. Jacketfrontpanel
32. Levelinglegs

Part number 550-141-986/1005 �
water boiler — Boiler Manual
The waTer boiler
Part number 550-141-986/1005
water boiler — Boiler Manual
4
Commonwealth of Massachusetts
WhentheboilerisinstalledwithintheCommon-wealthofMassachusetts:
• Thisproductmustbeinstalledbyalicensedplumber.
• Ifantifreezeisused,areducedpressureback-flowpreventerdeviceshallbeused.
Contents
The waTer boiler — how iT works ......................................2–3Please read before proceeding ...........................................................5Boiler location checklist ......................................................................6Prepare boiler location .........................................................................7Connect breeching .............................................................................11Connect water piping .........................................................................13Connect wiring (Note 1) .........................................................................18Connect oil piping .............................................................................21Startup procedure ..............................................................................22Check-out procedure .........................................................................23Annual service and start-up ..............................................................24Appendix (removing/replacing boiler jacket, replacement parts, dimensions and ratings) ..................................................................... 29Note 1: See burner manual for wiring and additional startup and operating information. Also
see AFM manual if used.
Whencallingorwritingabouttheboil-er—Pleasehavetheboilermodelnumberfromtheboiler rating labeland theCPnumberfromtheboilerjacket.YoumaylisttheCPnumberinthespaceprovidedon the InstallationCertificate foundonpage��.
Consider piping and installation whendeterminingboilerlocation.
Any claims for damage or shortage inshipment must be filed immediatelyagainst the transportation company bytheconsignee.
Thetermsbelowareusedthroughoutthismanualtobringattentiontothepresenceofhazardsofvariousrisklevelsortoimportantinformationconcerningthelifeoftheproduct.
Indicatespresenceofhazardsthatwillcauseseverepersonalinjury,deathorsubstantialpropertydamage.
Indicatespresenceofhazardsthatcancauseseverepersonalinjury,deathorsubstantialpropertydamage.
Indicatespresenceofhazards thatwillorcancauseminorpersonalinjuryorpropertydamage.
Indicatesspecialinstructionsoninstallation,operationormaintenancethatareimportantbutnotrelatedtopersonalinjuryorpropertydamage.

Part number 550-141-986/1005 �
water boiler — Boiler Manual
Please read before proceeding
Read all instructions —• Readallinstructions,includingthismanual,theburner
manualandanyrelatedsupplements.Performstepsintheordergiven.Failuretocomplycouldresultinseverepersonalinjury,deathorsubstantialpropertydamage.
When servicing boiler —• Toavoidelectricshock,disconnectelectricalsupplybefore
performingmaintenance.
• Toavoidsevereburns,allowboilertocoolbeforeperform-ingmaintenance.
Boiler operation —• Donotblockflowofcombustionorventilationair to
burner.
• Shouldoverheatingoccurorfuelsupplyfailtoshutoff,donotturnoffordisconnectelectricalsupplytocirculator.Instead,shutoffthefuelsupplyatalocationexternaltotheappliance.
• Donotusethisboilerifanyparthasbeenunderwater.Electrical and mechanical failures may cause electricshockandfirerisks.Immediatelyinspectchimneyorvent,boiler,burnerandcontrols.Cleantheboilerfluewaysandreplaceallelectricalandmechanicalcontrols;allelectricalwiring;oilburnerandcontrols;insulationandchamberlining.
Boiler firing rate —• Donotreducethefiringrateoftheboiler.Useonlytheoil
nozzlesizespecified.Reducedinputwillcausecondensa-tionintheboilerandventpiping.
Ceramic fiber materials —• Theboilercontainsceramicfibermaterials.Usecare
when handling these materials per instructions onpage��ofthismanual.Failuretocomplycouldresultinseverepersonalinjury.
Boiler water —• Thoroughly flush the system (without boiler con-
nected)toremovesediment.Theboilerheatexchangercanbedamagedbybuild-uporcorrosionduetosedi-ment.
• Do not use petroleum-based cleaning or sealingcompoundsinboilersystem.Gasketsandsealsinthesystemmaybedamaged.Thiscanresultinsubstantialpropertydamage.
• Donotuse“homemadecures”or“boilerpatentmedi-cines.” Serious damage to boiler, personnel and/orpropertymayresult.
• Continual fresh make-up water will reduce boilerlife.Mineralbuildupinboilersectionsreducesheattransfer, overheats the sections, and causes failure.Additionofoxygencarriedinbymake-upwatercancause internal corrosion. Leaks in boiler or pipingmustberepairedatoncetopreventmake-upwater.
• Donotaddcoldwatertohotboiler.Thermalshockcancauseheatexchangertocrack.
Freeze protection fluids —• When using antifreeze — Do not use automotive,
ethylene glycol, undiluted or petroleum-based an-tifreeze. See theWARNING on page �� for moreinformation.
Followtheguidelinesbelowtopreventpossibleseverepersonalinjury,deathorsubstantialpropertydamage.
Followtheguidelinesbelowtopreventseverepersonalinjury,deathorsubstantialpropertydamage.
Fuel• Donotusecrankcasedrainingsoranyoil containing
gasoline.Seeburnermanualforproperfueloil.
• Neverburngarbageorpaperintheboiler.Neverleavecombustiblematerialaroundboiler.
Do not tamper with burner/controls• Always follow specific instructions when starting up
boilerorperformingroutinemaintenanceorservice.
Do not start burner if:• Donotattempttostartburnerwhenexcessoilhasac-
cumulatedincombustionchamber,whenunitisfullofvapor,orwhencombustionchamberisveryhot.
• Donotstartburnerunlessbreechingandburnermount-ingdooraresecuredinplace.

Part number 550-141-986/1005
water boiler — Boiler Manual
6
Boiler location checklist
Before placing the boiler, verify:
❏
United States installations must comply with all applicable U. S. codes:
• Applicable state, local and national codes.• National Electrical Code.• Standard for Controls and Safety Devices for Automatically Fired Boilers, ANSI/
ASME CSD-1, when required.
Canadian installations must comply with all applicable Cana-dian codes:
• Canadian Standards Association CSA B139, Installation Code for Oil-Burning Equip-ment.
• CSA C22.1 Canadian Electrical Code Part One.• Applicable provincial and local codes.
❏ Consider use of space
• The boiler area must be kept free of combustible materials, gasoline and other flam-mable liquids.
• The boiler must be installed so that boiler and system components are protected from dripping or spraying water or rain during operation or service.
❏ Moving boiler to location• See manual pages 38 and 39 for boiler dimensions and weights.• If necessary, the boiler jacket can be removed if desired for handling. See manual
pages 30 and 31 for instructions.
❏ Clearances
• Provide minimum clearances to combustible materials and for servicing boiler.• Ensure that the swing-away burner door can swing open freely. (The hinge can be
mounted on right or left side.)• See manual page 10 for instructions on changing door hinge location.
❏ Flooring and foundation
• Provide level flooring (non-carpeted combustible flooring is acceptable if boiler level-ing legs are installed).
• Provide foundation if necessary.• See manual page 8.
❏ Combustion and ventilation air openings
• Boiler room must provide adequate combustion air and ventilation.• Unless burner uses ducted outside air for combustion, the boiler room must provide
combustion air openings.• See manual page 8.
❏ Venting
Chimney venting:• Ensure the vent pipe can be routed to the chimney, and that the chimney connection
is higher than the boiler flue outlet.• Ensure the vent piping will provide minimum clearances shown on manual pages 7
and 11.• See manual pages 11 and 12 for venting information.
Direct venting:• The Ultra oil boiler can be direct vented, using the Field Controls Direct Vent Kit,
model number FDVS-46, and vent pipe model number FVOP-415. Verify that the vent piping can be installed and routed to the outside wall as specified in the Field Con-trols instruction manual.
• Ensure the vent piping will provide minimum clearances shown on manual page 7.
❏ System water piping• Check location of system water piping connections to be sure boiler can be properly
connected.• See manual pages 13 through 17.
❏ Fuel supply • See manual page 21 for routing of fuel lines.
❏ Electrical power
• The boiler requires 120 vac power and connection to a room thermostat or other device to initiate call for heat.
• If equipped with an AFM, the boiler requires a 20-amp service.• See manual pages 18 through 20.
Failuretokeepboilerareaclearandfreeofcombustiblematerials,gasolineandotherflammableliquidsandvaporscanresultinseverepersonalinjury,deathorsubstantialpropertydamage.
IftheUltraboilerwillreplaceanexistingboiler,checkforandcorrectsystemproblems,suchas:•Systemleakscausingoxygencorrosionorheatexchangercracksfromhardwaterdeposits;•Incorrectly-sizedexpansiontank;•Lackoffreezeprotectioninboilerwatercausingsystemandboilertofreezeandleak.Failuretocorrectsuchconditionscouldresultinfailureofthenewboiler.

Part number 550-141-986/1005 7
water boiler — Boiler Manual
Prepare boiler location
Figure 1 Minimum clearances to combustible surfaces and Provide minimum clearancesFromcombustiblematerials(seeFigure1)1. Hotwaterpipes
• Alldirections—½inch. (notshowninFigure1)
�. Double-wallventpipe• Alldirections—6inches.
�. Single-wallventpipe.• Alldirections—18inches.
4. Boilerjacketsurfaces• TopofControlPodcover—1�inches.• Sidesandback—�inches.
�. Burnercover• Alldirections—�inches.
Combustibleclearancesalwaystakepre-cedenceoverserviceclearances.
Forserviceaccess(seeFigure1)
If you do not provide the minimumservice clearances shown, it might notbepossibletoservicetheboilerwithoutremovingitfromthespace.
1. Recommendedserviceclearances:• Frontofburnercover—�0inches• Jackettop—�4inches• Jacketsidesandback—6inches• Burnerdoorswingclearance—1�inchesminimum
(doormustswingfullyopen)

Part number 550-141-986/1005
water boiler — Boiler Manual
8
Air openings for combustion and ventilation air
Adequatecombustionandventilationairensurespropercombustionandreducesrisk of severe personal injury or deathfrompossiblefluegasleakageandcarbonmonoxideemissions.
Do not install exhaust fan in boilerroom.
Natural infiltrationOlder buildings with single-pane windows, minimalweather-strippingandnovaporbarrieroftenprovideenough natural infiltration and ventilation withoutdedicatedopenings.
Tight constructionNew construction or remodeled buildings are mostoften built tighter.Windows and doors are weather-stripped, vapor barriers are used and openings inwallsarecaulked.Asaresult,suchtightconstructionisunlikelytoallowpropernaturalairinfiltrationandventilation.
Follow code requirementsFollow state, provincial or local codes when sizingadequatecombustionandventilationairopenings.Inabsence of codes, use the following guidelines whenboiler is inaconfinedroom(definedbyNFPA�1aslessthan7�00cubicfeetper1GPHinputofallappli-ancesinarea.Aroom8ft.highx��.�ft.x��.�ft.is7�00cu.ft.).
Provide two permanent openingsProvide two permanent openings — one within 1�inchesofceiling,onewithin1�inchesoffloor.Mini-mumheightorlengthdimensionofeachrectangularopeningshouldbeatleast�inches.
Air from inside the buildingWhen insideair isused—eachopeningmust freelyconnectwithareashavingadequate infiltration fromoutside.Eachopeningshouldbeatleast140sq.in.per1GPHinput(1sq.in.per1000Btuinput)ofallfuel-burningappliancesplus requirements foranyequip-ment thatcanpull air fromroom(includingclothesdryerandfireplace).
Air from outside the buildingWhen outside air is used — connect each openingdirectlyorbyductstotheoutdoorsortocrawlorat-tic space that freelyconnectswithoutdoors.Sizeperbelow:
• Throughoutsidewallorverticalducts—atleast��sq.in.per1GPHinput(1sq.in.per4000Btuinput)ofallfuel-burningappliancesplusrequirementsforanyequipmentthatcanpullairfromroom(includ-ingclothesdryerandfireplace).
• Throughhorizontalducts—atleast70sq.in.per1GPHboilerinput(1sq.in.per�000Btuinput)ofallfuel-burningappliancesplusrequirementsforanyequipmentthatcanpullairfromroom(includingclothesdryerandfireplace).
• Whereductsareused,theyshouldhavesamecross-sectionalareaasfreeareaofopeningstowhichtheyconnect. Compensate for louver, grille or screenblockagewhencalculatingfreeairopenings.Referto theirmanufacturer’s instructions fordetails. Ifunknown,use:—Woodlouvers,whichprovide�0-��%freeair.—Metallouversorgrilles,whichprovide 60-7�%freeair.
Locklouversinopenpositionorinterlockwithequip-menttoproveopenbeforeboileroperation.
Flooring and foundationFlooring1. Installonanylevel,properly-supported,andnon-
carpeted surface.Flooringmaybe combustible ifboilerlevelinglegsareinstalled.
�. Ensuretheflooringiscapableofhandlingtheboilerweight(seepage�9forweightandwatervolume).
ResidentialgarageinstallationsInstallboilersotheburnerisatleast18inchesabovethefloortoavoidcontactwithgasolinefumes.
FoundationProvide a level concrete, masonry or cement blockfoundationiftheflooringcouldbecomefloodedorisnotlevel.SeeTable1forfoundationsizerequired.
Table 1 Boiler foundation size (when req’d)
ModelLength(inches)
Width(inches)
Height, min.(inches)
UO-3 49 23 2
UO-4 53 23 2
UO-5 57 23 2
Prepare boiler location (continued)

Part number 550-141-986/1005 9
water boiler — Boiler Manual
Prepare boiler location (continued)
Place the boiler:Removeoutercrate1. Removeoutercrate,leavingboileronthecratebase.
�. Removethecirculatorandbarometricdampercartonsfromthecratebase.
�. UO-�boilersonly—Removethetwofluebafflesfastenedtothecratebasebehindtheboiler.
4. Removethetwoshippingchannelsbylooseningandremovingthefournuts.Savetheshippingchannelsforlevelingleginstallation.
�. Removethejacketcrosstiefastenedtothecratebase.
Installthelevelinglegsifused(requiredifboilerisplacedoncombustibleflooring)
Thelevelinglegsmustbeinstallediftheboilerisplacedoncombustibleflooring.
Asecondperson,orothermeans,isrequiredtostabilizetheboilerduringlevelingleginstallation.Failuretodosocouldresultinseverepersonalinjuryorpropertydamage.
Wearheavyleatherworkgloveswhenhandlingtheshippingchannelsinthefollowingstepstoavoidpotentialsevereper-sonalinjury.
1. (Figure�a)Useonechannelasalevertoraisethefrontoftheboiler.
�. (Figure�a)Inserttheotherchannelbetweentheboilerlegandcratebase.Placethechanneldirectlyoverthecratebaserunner,asshown.
�. (Figure�b)Liftthechannelundertheboilerlegslightly.
4. (Figure�b)Slidetheotherchannelundertheotherboilerleg.Placethechanneldirectlyoverthecratebaserunner,asshown.
�. (Figure�)Withtheboilerrestingsecurelyonthetwoshippingchan-nels,screwalevelinglegineachboilerleghole.Screwlevelinglegsincompletely.
Toavoidpotentialpersonalinjuryorpropertydamage,DONOTattempttoinsertlevelinglegsunlesstheboilerissecurelyseatedonbothshippingchannels.
6. Reversesteps1through4abovetoremovetheshippingchannels.Leavetheboileronthecratebase.
7. Followsteps1through6onthebacksideoftheboilertoinstalllevelinglegsintherearsectionlegs.
8. Leavetheboileronthecratebase.
Removeboilerfromcratebase
Boilersmaybetopheavy.Usecautionwhenhandlingtoavoidpersonalinjuryorpropertydamage.
1. Attachthecrosstietothejacketsidepanelsusingthetwoscrewslocatedinthebarometricdampercarton.Thenremovetheboilerfromthecratebase.
Donotremovetheboilerfromthecratebasewithoutfirstinstallingthejacketcrosstie.Theboilerwiringharnessesorconnectorscouldbedamaged.
�. Ifnecessary,theboilerjacketcanberemovedforhandling.Seepages�0and�1inthismanualforthejacketremoval/replacementprocedure.
Figure 2a To install leveling legs: Insert first shipping channel under boiler leg.
Figure 3 Inserting levelling legs
Figure 2b To install leveling legs: Insert second shipping channel under

Part number 550-141-986/1005
water boiler — Boiler Manual
10
Perform hydrostatic pressure test:Seepages�and�forboilerfeaturelocations.
1. Installairventinreliefvalvetapping.
�. Plugsupplyandreturntappings.
�. Installtheboilerdrainvalveshippedwithboiler.
4. Fillboiler.
�. Ventallair.
6. Pressuretestboilerat1½timesworkingpressure.
Donotleaveboilerunattended.Coldwaterfillcanexpandanddamagecastiron,resultinginseverepersonalinjury,deathorsubstantialpropertydamage.
7. Checkformaintainedgaugepressureforatleast10minutes.Visuallycheckforleaksifgaugepressuredrops.
8. Drainboiler.Repairleaksiffound.
Do not use petroleum-based sealing compounds to repairleaks. Damage to system components can result, causingpropertydamage.
9. Retestboilerafterrepairingleaks.
10.Removeairventandplugs.Installthereliefvalve(shippedinbarometricdampercarton).
Boiler preparationChangingdoorhingeTheboilerisshippedwiththeburnerdoorhingedontheleftside.Thehingebracketcanberelocatedtotherightsideifdesired.SeeFigure4.
1. Removejacketfrontpanel.
�. Removeandretainburnerdoorscrewsandwashersusedtofastentheburnerdoortothefrontsection(oneoneachsideofdoor).
�. Carefully lift theburnerdoor so thedoorpins liftoutof thehingebracket.
4. Settheburnerdoorasidetemporarily.
Theburnerdoorisheavy.Handlecarefullytoavoidpotentialforpersonalinjury.
Donotdamagetheburnerdoorinsulationwhenhandling.
�. Thehingebrackethaskeyholeslots.Loosenthetwoscrewssecuringthehingebrackettothefrontsection.Removethehingebracket.
6. Loosenthetwoscrewsontheoppositeside.Placethehingebracketonthatsideandtightenthetwoscrewstosecurethebracket.Alsotightenthetwoscrewsontheotherside.
7. Carefullylifttheburnerdoorandpositionsothedoorpinsslideintothehingebracketholes.Thelowerpinislongerthantheupper.Soalignthelowerpin,thentheupper.
8. Replaceburnerdoorscrewsandwashersusedtofastentheburnerdoortothefrontsection(oneoneachsideofdoor).
Fluebaffles—UO-3ONLY–1.0GPHfiringrateONLYOnUO-�boilersfiredat1.0GPHONLY,installthetwoflue bafflessup-pliedwiththeboiler.Seepage��forlocation.
Figure 4 Burner door hinge installation
Prepare boiler location (continued)
DONOTinstallbafflesonUO-�boilersfiredat0.8GPH.Fluegascondensationwillresult,causingcorrosiondamagetoboilerandventsystem.
Combustionchamberfloorblanket—UO-3ONLY–0.8GPHfiringrateONLYOnUO-�boilersfiredat0.8GPHONLY,placethece-ramic fiber floor blanket(suppliedintheUO-�lowfiringratekit)onthefloorofthecombustionchamber.Seepage��forlocation.
Iftheboilerhasfluebafflesinstalled,youmustremovethebafflesbeforechangingtothelowfiringrate.Fluegascondensa-tionwillresult,causingcorrosiondamagetoboilerandventsystem.
Checkchamberandburnerdoor1. Checkforsecureplacementofinsulationonburner
door.
�. UO-�,0.8GPHfiringrateONLY—Checkforsecureplacementofcombustionchamberfloorblanket.
�. Visuallycheckburnermountingdoorandobservationportseals.
Verify gas-tight seal to prevent possibleflue gas leakage and carbon monoxideemissions,whichcanleadtosevereper-sonalinjuryordeath.

Part number 550-141-986/1005 11
water boiler — Boiler Manual
Connect breeching
Direct ventingTheUltraOilboilercanbedirectventedusingtheFieldControlsDirectVentKit,modelnumberFDVS-46,andventpipemodelnumberFVOP-41�.Ventlengthsarelimitedto1�feet.Airintakelengthsarelimitedto��feetofrigid4-inchpipe.Donotuseflexibledryervent.Refertoinstructionsprovidedwiththeventkitforventandairpipinginstallationprocedures.
Chimney ventingGeneralchimneyrequirements:TheUltraOilboilerisdesignedfornaturaldraftfiring.Connectboilertoverticalchimney.
• NFPA�11requireschimneytobelinedbeforecon-nectingtoboiler.
Topreventdowndrafts,extendchimneyatleast�feetabovehighestpointwhereitpassesthroughroofand�feethigherthananyportionofbuildingwithin10feet.Increasechimneycross-sectionalareaandheightatleast4%per1,000feetabovesealevel.
• Minimumclearancesfromventpipetocombustiblematerial:
•Type“L”doublewallvent— 6inches
•Singlewallvent— 18inches
• Minimumchimneysizesshouldbeused.
Oversized chimneys, outside masonrychimneysand/orderatedinputscanresultincondensationinchimney.
Table 2 Chimney venting — vent sizing
Model
Minimum breeching diameter(inches)
Minimum I=B=R chimney size
(inches)
Minimum chimneyheight(feet)
Rect. Round
UO-3 58 x 8
(6¾ x 6¾ liner)
6 15UO-4 6
UO-5 6
Note: boiler flue connection is 6-inch diameter
Install the burner1. Securetheburnerflangetotheburnerdoorusing
thethreeboltsprovided.
�. Checkforsecureplacementofinsulationandsealingropeontheburnerdoor.
Prepare boiler location (continued)
�. Closetheburnerdoorandsecureinplacewiththeburnerdoorscrewsandwashers.
4. Follow the burner manual and boiler manual(pages19to�1)towiretheburnerandconnectfuellines.
• Useventmaterialapprovedbylocalcodesforoil-firedburners.Intheirabsence,referto:• NFPA�1,InstallationofOil-BurningEquipment.• NFPA�11,StandardforChimneys,Fireplaces, VentsandSolidFuelBurningAppliances.• InCanada,refertoCSAB1�9,Installation CodeforOil-BurningEquipment.
Insufficient draft can cause flue gasleakage and carbon monoxide emis-sions,whichwillleadtoseverepersonalinjuryordeath.
Inspectexistingchimneybeforeinstall-ingnewboiler.Failuretodoanyofthefollowingwillresultinseverepersonalinjuryordeath:
• Cleanchimney, includingremovalofblockage.
• Repair or replace damaged pipe orliner.
• Repairmortarandjoints.
Part number 550-141-986/1005
water boiler — Boiler Manual
1�
Connect breeching (continued)
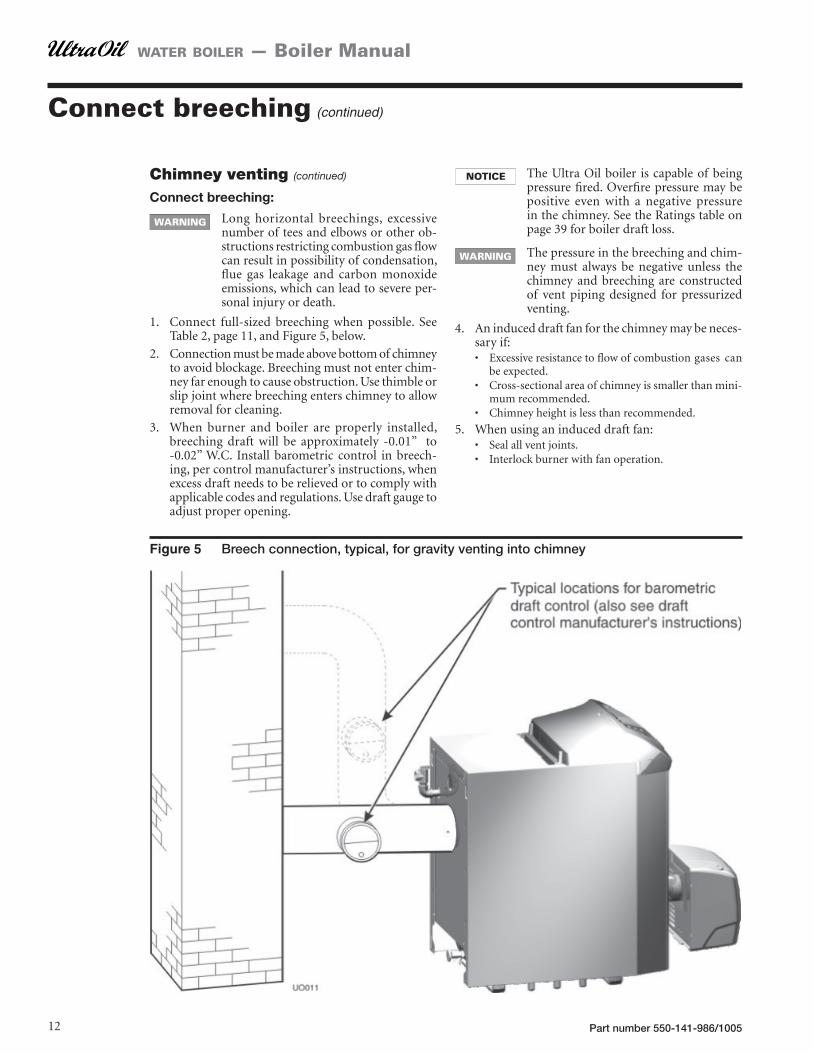
Figure 5 Breech connection, typical, for gravity venting into chimney
Chimney venting (continued)
Connectbreeching:
Long horizontal breechings, excessivenumberofteesandelbowsorotherob-structionsrestrictingcombustiongasflowcanresultinpossibilityofcondensation,flue gas leakage and carbon monoxideemissions,whichcanleadtosevereper-sonalinjuryordeath.
1. Connect full-sized breeching when possible. SeeTable�,page11,andFigure�,below.
�. Connectionmustbemadeabovebottomofchimneytoavoidblockage.Breechingmustnotenterchim-neyfarenoughtocauseobstruction.Usethimbleorslipjointwherebreechingenterschimneytoallowremovalforcleaning.
�. When burner and boiler are properly installed,breeching draft will be approximately -0.01” to-0.0�”W.C. Install barometric control in breech-ing,percontrolmanufacturer’sinstructions,whenexcessdraftneedstoberelievedortocomplywithapplicablecodesandregulations.Usedraftgaugetoadjustproperopening.
TheUltraOilboiler iscapableofbeingpressurefired.Overfirepressuremaybepositive even with a negative pressureinthechimney.SeetheRatingstableonpage�9forboilerdraftloss.
Thepressureinthebreechingandchim-ney must always be negative unless thechimney and breeching are constructedof vent piping designed for pressurizedventing.
4. Aninduceddraftfanforthechimneymaybeneces-saryif:• Excessiveresistancetoflowofcombustiongases can
beexpected.• Cross-sectionalareaofchimneyissmallerthanmini-
mumrecommended.• Chimneyheightislessthanrecommended.
�. Whenusinganinduceddraftfan:• Sealallventjoints.• Interlockburnerwithfanoperation.
Part number 550-141-986/1005 1�
water boiler — Boiler Manual
General piping information:ASMEorCanadianrequirements• IfinstallationistocomplywithASMEorCanadian
requirements,anadditionalhightemperaturelimitisneeded.Installcontrolinsupplypipingbetweenboilerandisolationvalve.Setcontroltoaminimumof�0°Fabovesetpointoftheboileraquastat.Maxi-mumallowablesetpointis��0°F.Wirecontrolasshownonwiringdiagram(page�0).
Lowwatercutoffdevices• Usealowwatercutoffdevicewhen:
• Boilerisinstalledaboveradiationlevel.• Requiredbycertainstateorlocalcodesorinsurance
companies.
• Usealowwatercutoffdesignedforwaterinstalla-tions.
• Probe-typeisrecommended.
• Purchase and install in tee in supply line aboveboiler.Wireperwiringdiagram,page�0.
Backflowprevention• Usebackflowcheckvalve incoldwater supplyas
requiredbylocalcodes.
Install piping:Pipesizing• SeeTable�forpipesizingfornear-boilerpipingand
single-zonepiping.
Near-boilerpiping(with diaphragm expansion tank)• SeeFigure6,page14.
Near-boilerpiping(with closed expansion tank)• SeeFigure7,page14.
Multiple-zonepiping• Seepage1�.
Low-temperaturesystempiping• Seepage16.
Chillersystempiping• Seepage17.
Formultiple-boilerpiping• RefertoWeil-McLain’s“Primary/SecondaryPiping
Guide.”
Reliefvalve• Installreliefvalveverticallyinelbowsupplied.See
Figure6or7forlocation.
• SeeWARNINGatright.
• Alsorefertotagattachedtoreliefvalveformanu-facturer’sinstructions.
Relief valve discharge piping:Toavoidwaterdamageorscaldingduetoreliefvalveoperation:
• Discharge line must be connected toreliefvalveoutletandruntoasafeplaceof disposal. Terminate the dischargeline to eliminate possibility of severeburnsshouldthevalvedischarge.
• Dischargelinemustbeasshortaspos-sibleandbethesamesizeasthevalvedischarge connection throughout itsentirelength.
• Discharge line must pitch downwardfromthevalveand terminateat least6” above the floor drain where anydischargewillbeclearlyvisible.
• The discharge line shall terminateplain, not threaded, with a materialserviceablefortemperaturesof�7�°Forgreater.
• Donotpipethedischargetoanyplacewherefreezingcouldoccur.
• Noshutoffvalveshallbeinstalledbe-tweenthereliefvalveandboiler,orinthedischargeline.Donotplugorplaceanyobstructioninthedischargeline.
• Failuretocomplywiththeaboveguide-linescouldresultinfailureofthereliefvalvetooperate,resultinginpossibil-ityofseverepersonalinjury,deathorsubstantialpropertydamage.
• Test the operation of the valve afterfilling and pressurizing system bylifting the lever. Make sure the valvedischarges freely. If the valve fails tooperatecorrectly,replaceitwithanewreliefvalve.
Connect water piping
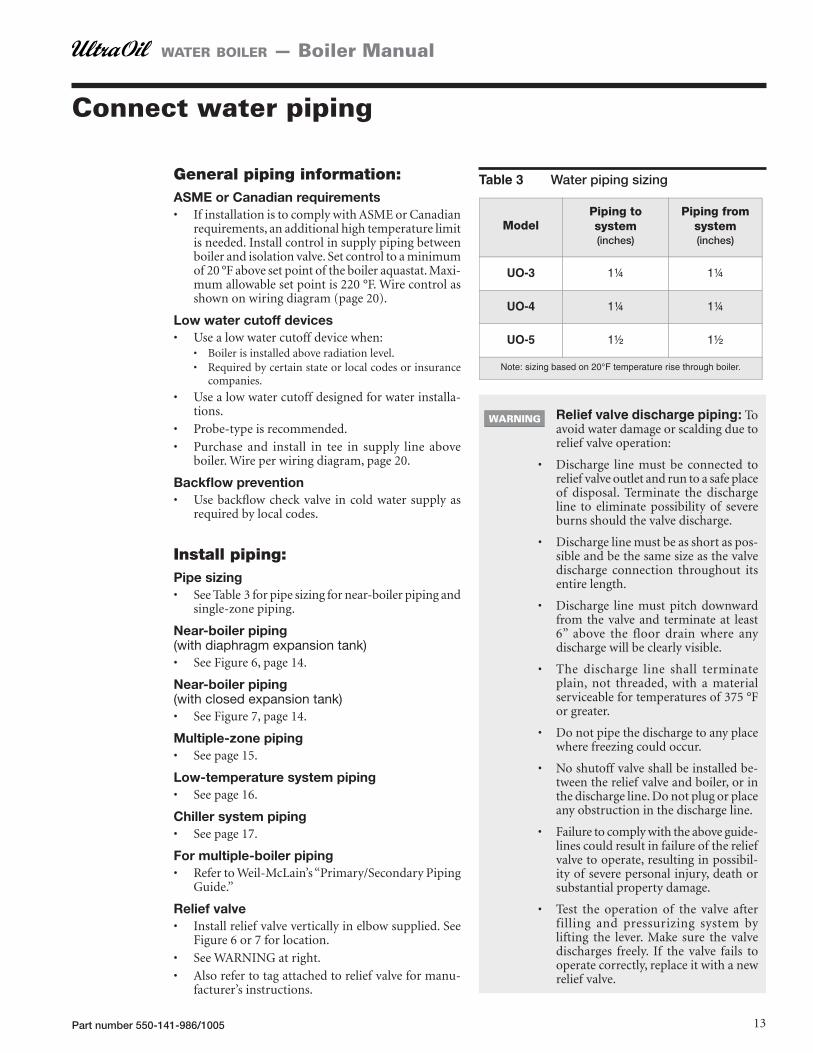
Table 3 Water piping sizing
ModelPiping tosystem(inches)
Piping from system(inches)
UO-3 1¼ 1¼
UO-4 1¼ 1¼
UO-5 1½ 1½
Note: sizing based on 20°F temperature rise through boiler.

Part number 550-141-986/1005
water boiler — Boiler Manual
14
Connect water piping (continued)
DIAPHRAGMexpansiontank(Figure6)• Makesureexpansiontanksizewillhandleboilerand
systemwatervolumeandtemperature.Tankmustbelocatednearboilerbeforeinlettocirculator.Seetankmanufacturer’sinstructionsfordetails.
Undersizedexpansiontankscausesystemwater to be lost from relief valve andmakeup water added through fill valve.Eventualsectionfailurecanresult.
CLOSEDexpansiontank(Figure7)• Ensureexpansiontanksizewillhandleboilerand
systemwatervolumeandtemperature.
Undersizedexpansiontankscausesystemwater to be lost from relief valve andmakeup water added through fill valve.Eventualsectionfailurecanresult.
• Pitchanyhorizontalpipinguptowardstank1inchper�feetofpiping.
Figure 6 Near-boiler piping, with diaphragm expansion tank
Figure 7 Near-boiler piping, with closed expansion tank

Part number 550-141-986/1005 1�
water boiler — Boiler Manual
Connect water piping (continued)
Piping MULTIPLE ZONES — System temperature 140 °F or higher
1. Follow instructions on page 1� and 14 to installpipingnearboiler.
�. Zoningwithcirculators(Figure8)a. Size each circulator to individual circuit require-
ments.b. Removecirculator(whenfurnishedasstandardequip-
ment).c. Installbalancingvalvestoadjustflowtodistributeheat
toallzones.
Figure 8 Multiple zoning with circulators – Figure 9 Multiple zoning with zone valves – Temperatures 140 °F and higher
d. Separaterelayisrequiredforeachcirculator.
�. Zoningwithzonevalves(Figure9)a. Install balancing valves to adjust flow to distribute
heattoallzones.b. Separatetransformerisrequiredtopowerzonevalves.
Referto“Weil-McLainZoneValveWiring Guide”fordetails.
1 Isolation valve
2 Flow control valve
3 Circulator
4 Zone valve
5 Drain valve

Part number 550-141-986/1005
water boiler — Boiler Manual
16
Connect water piping (continued)
Figure 11 Multiple zoning with zone valves – Figure 10 Multiple zoning with circulators –
1. Ifsystemwatertemperaturerequirementsarelessthan 140 °F, such as radiant panels or convertedgravitysystems,usepipingasshowninFigure10or11.
�. Ifsystempipingisplasticwithoutanoxygenbarrier,aheatexchangermustbeused.
�. Follow instructions on page 1� and 14 to installnear-boilerpiping.
4. Zoningwithcirculators(Figure10)a. Size each circulator to individual circuit require-
ments.b. Removecirculator(whenfurnishedasstandardequip-
ment).c. Installbalancingvalvestoadjustflowtodistributeheat
toallzones.d. Separaterelayisrequiredforeachcirculator.
�. Zoningwithzonevalves(Figure11)a. Installbalancingvalvestoadjustflowtodistributeheat
toallzones.b. Separatetransformerisrequiredtopowerzonevalves.
Referto“Weil-McLainZoneValveWiring Guide”fordetails.
6.Tosetthevalves,7aand7b:a. Setthevalveswhilethesystemiscool,settingforthe
coldest expected water temperature (usually 60 °Fsincethesystemwilloftendroptoroomtemperaturebetweencycles).
b. Startwithvalve7afullyclosedand7bfullyopen.c. Graduallyopenvalve7awhileclosing7buntil the
temperatureatgauge8reads1�0°Fwhengauge4areads60°F.
d. Notethatvalve7aregulatestheamountofhotwaterfromtheboilersupply,whichmixeswithreturnwater.Valve7bregulatestheamountofsystemwaterflowingthroughtheboilersecondaryloop.
Piping MULTIPLE ZONES — System temperature below 140 °F
1 Isolation valve2 Flow control valve3 Circulator4 System temperature gauges5 Zone valve
6 Drain valve7 System temperature valves. Adjust valves 8 Blend temperature gauge9 Boiler temperature gauge (not shown)

Part number 550-141-986/1005 17
water boiler — Boiler Manual
Connect water piping (continued)
Piping boiler in refrigeration systems (Figure 12)
• Installboilersothatchilledmediumispipedinparallelwithheatingboiler.Useappropriatevalvestopreventchilledmediumfromenteringboiler.ConsultI=B=RInstallationandPipingGuides.
• Ifboilerisconnectedtoheatingcoilslocatedinairhandlingunitswheretheycanbeexposedtorefrigeratedair,useflowcontrolvalvesorotherautomaticmeanstopreventgravitycirculationduringcoolingcycle.
Figure 12 Piping boiler in a system with chiller

Part number 550-141-986/1005
water boiler — Boiler Manual
18
Connect wiring
General wiring requirements Electric shock hazard.Cancausesevere
personalinjuryordeathifpowersource,includingserviceswitchonboiler,isnotdisconnectedbeforeinstallingorservic-ing.
Installationsmustfollowthesecodes:• UnitedStates:
National Electrical Code,ANSI/NFPA 70, latesteditionandanyadditionalnational,stateorlocalcodes.
• Canada:
CSAC��.1CanadianElectricalCodePart1andanylocalcodes.
Wirerequirements• WiringmustbeN.E.C.Class1.
• If original wire supplied with boiler must be re-placed, type 10� °C wire or equivalent must beused.
• Supplywiring:• Boileronly—14gaugeorheavier.• BoilerwithoptionalAFM—1�gauge.
Electricalrequirements• BoilersnotequippedwithanAFMcanbesupplied
bya1�-ampservice.
• Boilers equippedwithanAFMrequirea�0-ampservice.
Electricalgrounding• Provideelectricalgroundatboilerasrequiredby
codes.
Wiring entrances (see Figure 13)Terminalstripaccess• Remove the tworetainer screws in the jacket top
panel(atrearoftheboiler)andremovethejackettoppanel.
• Release the Control Pod cover by loosening theretainerscrewinthetopcenterofthecover.Swingthecoveropentorevealtheboilerterminalstrip.
• Remove the Control Pod cover to facilitate wirerouting.(Toremove,pushtheControlPodcovertooneside,andgentlyworkthecoverretainerhingeontheothersideoutofthejacketslot.)
Figure 13 Terminal strip access
120-volt wiringConduits• Connecteachconduitsupplyingline-voltagewiring
toorfromtheboilertoaconduitopeningintheupperportionofthejacketrearpanel.
• All field-provided line-voltage wiring must besheathedinflexiblemetalconduit.
Additionallimits• Ifrequiredbystateorlocalcodes,provideadditional
limitsasneeded.
• Whenusingadditionallimits,removethefactory-installedjumperbetweenboilerterminalstripter-minals18and19.
• Connecttheadditionallimitsinseriesandwiretoboilerterminalstripterminals18and19.

Part number 550-141-986/1005 19
water boiler — Boiler Manual
Circulator• Thecirculator is shippedwiththeboiler,butnot
installedorwired.
• Wirethecirculatortotheboilerterminalstripasshownontheboilerwiringdiagram.Providehot,neutral and ground wires, routed in metal con-duit.
Thermostat wiring• Installthermostatoninsidewallawayfrominflu-
ences of drafts, hot or cold water pipes, lightingfixtures,televisions,sunraysorfireplaces.
• Followinstructionswiththermostat.
• Ifthethermostathasaheatanticipator,settheheatanticipator per the limit control manufacturer’srecommendation.
Burner wiring (see Figure 14)• Theburnerharnessesincorporatedisconnectplugs,
providing a convenient way to disconnect wiringwhenburnermountingdoorisopened.
Failuretodisconnecttheburnerwiringhar-nesses before opening the burner door cancausedamage to theburnerandboilerwir-ing.
Optional AFM installation• SeeseparateAFMinstructionswhenused.
When wiring is completed:• Reinstall the Control Pod cover, close cover and
tightentheretainerscrew.
• Replacejackettopandsecurewithscrews.
Figure 14 Burner harness and EnviraCOM®
Connect wiring (continued)

Part number 550-141-986/1005
water boiler — Boiler Manual
�0
Connect wiring (continued)
Figure 15 Boiler and burner wiring, standard equipment Thiswiringdiagramisforstandardboilerequipment.ForwiringwithoptionalAFM,seeAFMinstructions.

Part number 550-141-986/1005 �1
water boiler — Boiler Manual
Connect oil piping
Figure 16 Recommended oil piping connection to burner (follow applicable code requirements and burner manual for component locations)
General oil piping requirements:• Locationandinstallationofoiltanks,oilpipingand
burnersmustfollow:• NFPA�1,StandardfortheInstallationofOil-Burning
Equipment.• In Canada, CSA B1�9, Installation of Oil-Burning
Equipment.• Localcodesandregulations.• Informationprovidedwithburnerandfuelpump.
• Ifanypartoffueloiltankisabovelevelofburner,theuseofananti-siphondeviceishighlyrecommendedtopreventflowofoilincaseofoillinebreak.
• Supportoillinesasrequiredbycodes.
• Maketankconnectionswithswingjointsorcoppertubingtopreventbreaking,incasethetanksettles.
Makeswingjointssotheywilltightenastanksettles.Non-hardening pipe joint compounds should beusedonallthreads.
DonotuseTeflontapeasanoilpipeseal-ant.Itcancausevalvestofail,creatinghaz-ards.Donotusecompressionfittings.
• Undergroundpipemustberuninacasingtopre-ventoilleakingintogroundorunderfloor.Checklocalcodesforinformation.
Oil piping connection at burner:• See Figure 16 for recommended connection at
burner,allowingburnermountingdoor toswingopencompletelyforservicing.

Part number 550-141-986/1005
water boiler — Boiler Manual
��
Startup procedure
Tipsforwatersystems:• Check boiler and system piping for leaks. Continual makeup water
willreduceboilerlife.Mineralscanbuildupinsections,reducingheattransferandcausingcastirontooverheat,resultinginsectionfailure.
FailuretomaintainrecommendedpHandrepairleakscancausesectionironcorrosion,leadingtosectionfailureandleaks.Donotusepetroleum-basedsealingorstop-leakcom-poundsinboilersystems.Damagetosystemcomponentscanresult.
• ForpHconditionsoutside7.0to8.�rangeorunusuallyhardwaterareas(above7grainshardness),consultlocalwatertreatmentcompany.
To place in operation:1. Verifyboilerisfilledwithwater.
�. Openburnermountingdoorandverifyburnerdoorinsulationsectionsareinproperposition.FormodelUO-�,0.8-GPHfiringrate,ensurethechamberfloorinsulationblanketiscorrectlypositioned.
�. Verifyburnermountingdoorisclosedtightly,observationportboltistightandburnerwiringharnessesareconnectedatthejacketcrosstie.
4. Factoryburneradjustmentandsettingsmaynotbesuitableforspecificjobconditions.Alwaysusecombustiontestequipmenttocheckandadjust.a. Followburnermanualforstart-up.
b. Allowboilertoheattodesignconditions.
c. Usingcombustiontestequipment,adjusttheburnerandbarometricdamperforCO
�between11%and1�%,0smoke,andbreechingdraftbetween–0.01
and–0.0�inchesw.c.
�. Toobservetheflame,loosentheobservationportcenterbolt.Rotatetheobservationportsothesightglassisatthe6:00position.Retightenthecenterbolt.Whenfinishedviewing,loosenthecenterbolt.Rotatetheobservationportsotheglassisatthe1�:00position.Thenretightenthebolt.Thiswillpreventsootfromdepositingontheglass.
Makefinalburneradjustmentsusingcombustiontestequip-menttoassureproperoperation.Donotfireboilerwithoutwater.Sectionswilloverheat,damagingboilerandresultinginsubstantialpropertydamage.
6. Ventairfromsystem.Repeatsteps4and�under“Fillthesystem.”Airinsystemcaninterferewithwatercirculationandcauseimproperheatdistribution.
7. Check boiler and system piping for leaks. See“Tips for water sys-tems.”
8. Inspectbreechingandventingforproperoperation.
Follow additional instructions:
ReadandfollowtheBurner Manualandallotherinstruc-tionspackedwiththeboilerorcomponents.
Fill the system:1. Closemanualandautomaticairventsandboiler
draincock.
�. Filltocorrectsystempressure.Correctpressurewillvarywitheachinstallation.Normalcoldwaterfillpressure for residential systems is 1� psig. BoilerwaterpH7.0to8.�isrecommended.
�. Openautomaticairventoneturn.
4. Openothervents.a. Startingonthe lowestfloor,openairventsoneata
timeuntilwatersquirtsout.Closevent.b. Repeatwithremainingvents.
�. Refilltocorrectpressure.
Follow information below to preventsevere personal injury, death or sub-stantialpropertydamage:
• Donotusegasolinecrankcasedrain-ingsoranyoilcontaininggasoline.Seeburnermanualforproperfueloil.
• Donotattempttostartburnerwhenexcessoilhasaccumulated,whenunitis full of vapor or when combustionchamberisveryhot.
• Donotstartburnerunlessbreeching,burnermountingdoorandobservationportaresecuredinplace.
• Never burn garbage or paper in theboiler.
• Never leave combustible materialaroundtheboiler.
When using antifreeze—Donotuseautomotive,ethyleneglycol,undilutedorpetroleum-basedantifreeze.Severepersonal injury, death or substantialpropertydamagecanresult.
• Use antifreeze especially made forhydronicsystems.Inhibitedpropyleneglycolisrecommended.
• �0% solution provides protection toabout-�0°F.Donotexceed�0%mix-ture.
• Local codes may require back-flowpreventer or actual disconnect fromcitywatersupply.
• Determinequantityaccordingtosys-temwatercontent.Boilerwatercontentis listed on page �9 of this manual.Percentofsolutionwillaffectsizingofheatdistributionunits,circulatorandexpansiontank.
• Follow antifreeze manufacturer’s in-structions.

Part number 550-141-986/1005 ��
water boiler — Boiler Manual
Check-out procedure
o 1. Boilerandheatdistributionunitsfilledwithwater?
o �. Automaticairvent,ifused,openedonefullturn?
o �. Airpurgedfromsystem?Pipingcheckedforleaks?
o 4. Airpurgedfromoilpiping?Pipingcheckedforleaks?
o �. Burnerdoorclosed,sealedandboltstight?Observationport bolt tight? Burner harness plugged in and boilerON/OFFswitchon?
Obtaingas-tightseal topreventpossiblefluegasleakageandcarbonmonoxideemissions, leadingtoseverepersonalinjuryordeath.
o 6. Properdraftandburnerflame?Finaladjustmentmadewithcombustiontestequipment?
o 7. Testlimitcontrol:Whileburnerisoperating,adjustlimitcontrol below actual boiler water temperature. Burnershouldgooffwhilecirculatorcontinuestooperate.Raisesetting on limit control above water temperature andburnershouldre-ignite.
o 8. Testadditionalfield-installedcontrols:Ifboilerhasalowwatercutoff,additionalhighlimitorothercontrols,testforoperationasoutlinedbymanufacturer.Burnershould
beoperatingandshouldgooffwhencontrolsaretested.Whencontrolsarerestored,burnershouldre-ignite.
o 9. Limit control set to system temperature requirements(max.��0°F)?
o 10.Formultiplezones,flowadjustedtodistributeheatinallzones?
o 11.Thermostat heat anticipator setting (if available) setproperly?Referto“Thermostatwiring,”page19.
o 1�.Boilercycledwiththermostat?Raisetohighestsettingandverifyboilergoesthroughnormalstart-upcycle.Lowertolowestsettingandverifyboilergoesoff.
o 1�.Observedseveraloperatingcyclesforproperoperation?
o 14.Setroomthermostat(s)todesiredroomtemperature?
o 1�.CompletedInstallation Certificatebelow?
o 16. Reviewed User’s Information Manual with owner ormaintenancepersonand instructedperson tokeep forfuturereference?
o 17.Returnedallinstructionsprovidedwithboilertoitsen-velopeandplacedwithboilerforfuturereference?
Installation Certificate
Boilermodel __________________________Series_________
CPnumber _______________________
Dateinstalled __________________________________________
Nozzlesize,GPH____________Fuelunitpressure,PSIG__________
o Installationinstructionshavebeenfollowed.
o Checkoutsequencehasbeenperformed.
o Aboveinformationiscertifiedtobecorrect.
o Informationreceivedandleftwithowner/maintenanceperson.
Installer ________________________________(company) ________________________________(phone)
________________________________(address)
________________________________(address) _______________________________________
(Installer’ssignature)
Comments:
_______________________________________
_______________________________________
_______________________________________
_______________________________________
_______________________________________
_______________________________________

Part number 550-141-986/1005
water boiler — Boiler Manual
�4
Annual service and start-up
Annual service call check list(follow in the order listed below) D
ate
Dat
e
Dat
e
Dat
e
Dat
e
Dat
e
Dat
e
Dat
e
Dat
e
Dat
e
Comments
1 Check that boiler area is free from combustible materials, gasoline and other flammable vapors and liquids.
2 Check for and remove any obstruction to combustion and ventilation air flow to boiler.
3 Check breeching and chimney or vent for obstructions, damage, etc.Repair or replace as necessary.
4 Clean boiler flueways.See instructions in boiler manual.
5 Perform service on relief valve.See instructions in boiler manual.
6 Check boiler and piping for leaks.Repair if found.
7 Inspect and adjust burner. See burner manual and:• change nozzle.• check ignition electrode settings.• clean blower housing and wheel.• make sure blower wheel turns freely.• oil burner motor if required.• clean air inlet.• clean or change fuel filter and strainer.
8 Make sure boiler is filled with water.
9 Start unit and verify combustion settings with combustion test equipment.
10 Verify operation of all controls on boiler.See boiler manual and burner manual for procedures.
Theboilershouldbeinspectedandstartedannually,atthebeginningoftheheatingseason,onlybyaqualifiedservicetechnician.Inaddition,themaintenanceandcareoftheboilerdesignatedinTable4mustbeperformedtoassuremaximumboilerefficiencyandreliability.Seethefollowingpagesfordetailed instructions. Failure to service and maintain theboilerandsystemcouldresultinequipmentfailure.
Electricalshockhazard—Turnoffpowertotheboilerbeforeanyserviceoperationontheboilerexceptasnotedotherwiseinthisinstructionmanual.Failuretoturnoffelectricalpowercouldresultinelectricalshock,causingseverepersonalinjuryordeath.
Table 4 Annual service and start-up procedure

Part number 550-141-986/1005 ��
water boiler — Boiler Manual
Followtheserviceandmaintenanceproceduresgiventhroughoutthismanualandincomponentliteratureshippedwiththeboiler.Failuretoperformtheserviceandmaintenancecouldresultindamagetotheboilerorsystem.Failuretofollowthedirectionsinthismanualandcomponentlit-eraturecouldresultinseverepersonalinjury,deathorsubstantialpropertydamage.
This product contains fiberglass jacketinsulation and ceramic fiber materials incombustionchamberliningorbasepanelsingasfiredproducts.AirbornefibersfromthesematerialshavebeenlistedbytheStateofCaliforniaasapossiblecauseofcancerthroughinhalation.Thecombustioncham-berliningorbaseinsulationpanelsinthisproduct contain ceramic fiber materials.Ceramicfiberscanbeconvertedtocristo-baliteinveryhightemperatureapplications.TheInternationalAgencyforResearchonCancer (IARC) has concluded,“Crystal-linesilicainhaledintheformofquartzorcristobalite from occupational sources iscarcinogenictohumans(Group1).”:
Suppliersoffiberglasswoolproductsrecom-mend the following precautions be takenwhenhandlingthesematerials:
Precautionarymeasures• Avoid breathing fiberglass dust and contact with
skinoreyes.• UseNIOSHcertifieddustrespirator(N9�). This
typeofrespiratorisbasedontheOSHArequire-mentsforfiberglasswoolatthetimethisdocument
was written. Other types of respirators may beneededdependingonthejobsiteconditions.Cur-rent NIOSH recommendations can be found ontheNIOSHwebsiteathttp://www.cdc.gov/niosh/homepage.html. NIOSH approved respirators,manufacturers,andphonenumbersarealsolistedonthiswebsite.
• Wearlong-sleeved,loosefittingclothing,gloves,andeyeprotection.
• Apply enough water to the combustion chamberliningorbaseinsulationtopreventairbornedust.
• Removecombustionchamberliningorbaseinsula-tionfromtheboilerandplaceitinaplasticbagfordisposal.
• Operationssuchassawing,blowing,tearoutandsprayingmaygenerateairbornefiberconcentrationrequiringadditionalprotection.Bagfordisposal.
• Washpotentiallycontaminatedclothes separatelyfrom other clothing. Rinse clothes washer thor-oughly.
NIOSHstatedFirstAid.• Eye:Irrigateimmediately
• Breathing:Freshair.
Handling ceramic fiber and fiberglass materials
Annual service and start-up (continued)
Address reported problemsInspectanyproblemsreportedbyownerandcorrectbeforeproceeding.
Inspect boiler area1. Verify that boiler area is free of any combustible
materials,gasolineandotherflammablevaporsandliquids.
�. Verifythatairintakeareaisunobstructedandfreeofcorrosivecontaminants.Ifanyofthesearepres-ent in theboiler intakeairvicinity, theymustberemoved.
Inspect boiler interior1. LoosentheControlPodcoverretainingscrewand
openthecover.
�. Inspectcontrolsandwiringtoverifyallareingoodcondition.
�. Checkforanypossibleleaksthatmighthavedrippedwateronthewiringorcontrols.
4. Inspecttheboilerinsulationblanket.
�. Ifinspectionsshowpossibleleaks,findandcorrectthecauseoftheleaks.
Part number 550-141-986/1005
water boiler — Boiler Manual
�6
Check all piping for leaks Eliminateallsystemorboilerleaks.Con-
tinual fresh make-up water will reduceboilerlife.Mineralscanbuildupinsec-tions, reducing heat transfer, overheat-ing heat exchanger, and causing heatexchangerfailure.Leakingwatermayalsocauseseverepropertydamage.
1. Inspectallwaterandoilpipingandverifytobeleakfree.
�. Lookforsignsofleakinglinesandcorrectanyprob-lemsfound.
�. Checkfuellinesandfuelunitasrecommendedinfuelunitandburnermanuals.
Check air openings1. Verify that combustion and ventilation air open-
ingstotheboilerroomand/orbuildingareopenandunobstructed.Checkoperationandwiringofautomaticcombustionairdampers,ifused.
�. Verifythatboilerventdischargeandairintakearecleanandfreeofobstructions.
Flue vent system and air pipingVisually inspect entire flue gas venting system (andairpiping, if installed) forblockage,deteriorationorleakage. Repair any joints that show signs of leakagein accordance with vent manufacturer’s instructions.Whenairisductedtoburner,verifythatairinletpipingisconnectedandproperlysealed.
Failure to inspect for the above condi-tionsandhavethemrepairedcanresultinseverepersonalinjuryordeath.
Check water system1. Verifyallsystemcomponentsarecorrectlyinstalled
andoperational.
�. Checkthecoldfillpressureforthesystem.Verifyitiscorrect(usuallyaround1�psig).
�. Watch the system pressure as the boiler heats up(duringtesting)toensurepressuredoesn’trisetoohigh. Excessive pressure rise indicates expansiontanksizingorperformanceproblem.
4. Inspect automatic air vents and air separators.Removeairventcapsandbrieflypresspushvalvetoflushvent.Replacecaps.Makesureventsdonotleak.Replaceanyleakingvents.
Check expansion tankGeneralguidelinesExpansiontanksprovidespaceforwatertomoveinandoutastheheatingsystemwaterexpandsduetotempera-tureincreaseorcontractsasthewatercools.Tanksmaybeopen,closedordiaphragmorbladdertype.Followguidelinesinthismanualforthebest locationoftheexpansiontank.
Open-type — located above highest radiator orbaseboardunit,usuallyintheatticorcloset.Hasagaugeglassandoverflowpipetoadrain.
Closed-type—weldedgastightandlocatedaboveboiler.Tankispartiallyfilledwithwater,leavinganaircushionforexpansion.• Makesurethistypeoftankisfittedwithatankfitting,
suchastheB>ank-TrolorTacoTaco-Trol.Thisfittingreducesgravitycirculationofair-saturatedtankwaterback to the systemandprevents the air frombubblingupthroughthewaterasitreturnsfromthesystem.
• Donotuseautomaticairventsinsystemswithclosed-typetanks.Theairwillescapefromthesysteminsteadof returning to the tank. Eventually, the tank willwaterlog and no longer control pressurization. Theboilerreliefvalvewillweepfrequently.
Diaphragm or bladder-type—weldedgastightwitharubbermembranetoseparatethetankpres-surizingairand thewater.Maybe locatedatanypointinthesystem,butmostoftenfoundneartheboiler.• Systemswiththistypeofexpansiontankrequireatleast
oneautomaticairvent,preferablylocatedontopofanaireliminator,asshownintheexampleonpage14.
TroubleshootingaweepingreliefvalveIfreliefvalvehastendedtoweepfrequently,theexpan-siontankmaybewaterloggedorundersized.
Closed-type tank — tank is most likely water-logged.Installatankfittingifnotalreadyinstalled.Then check fill level per fitting manufacturer’sinstructions.Iffillleveliscorrect,checktanksizeagainstmanufacturer’s instructions.Replacewithalargertankifnecessary.
Diaphragm or bladder-type—first,checktanksizetobesureitislargeenoughforthesystem.Ifsize is toosmall,addadditional tank(s)asneces-sarytoprovidesufficientexpansion.Iftanksizeislargeenough,removetankfromsystemandcheckchargepressure(usually1�psigforresidentialap-plications).Iftankwon’tholdpressure,membranehasbeendamaged.Replacetank.
Annual service and start-up (continued)

Part number 550-141-986/1005 �7
water boiler — Boiler Manual
Annual service and start-up (continued)
Check boiler relief valve1. Inspect the reliefvalveand lift the lever toverify
flowasinthefollowingwarnings,excerptedfromareliefvalvemanufacturer’swarninglabel.Beforeoperating any relief valve, ensure that it is pipedwithitsdischargeinasafeareatoavoidseverescaldpotential.Readpage1�regardingreliefvalvesbeforeproceedingfurther.
Safetyreliefvalvesshouldbereinspectedat least once every three years,byalicensedplumbingcontractororautho-rized inspection agency, to ensure thatthe product has not been affected bycorrosivewaterconditionsandtoensurethatthevalveanddischargelinehavenotbeen altered or tampered with illegally.Certain naturally occurring conditionsmaycorrodethevalveoritscomponentsover time, rendering the valve inopera-tive. Such conditions are not detectableunlessthevalveanditscomponentsarephysically removed and inspected. Thisinspection must only be conducted bya plumbing contractor or authorizedinspectionagency—notby theowner.Failuretoreinspecttheboilerreliefvalveasdirectedcouldresultinunsafepressurebuildup,whichcanresult insevereper-sonalinjury,deathorsubstantialpropertydamage.
Followinginstallation,thevalvelevermustbeoperatedat least once each yeartoensurethatwaterwaysareclear.Certainnaturallyoccurringmineraldepositsmayadheretothevalve,renderingitinopera-tive.Whenmanuallyoperatingthelever,waterwilldischargeandprecautionsmustbetakentoavoidcontactwithhotwaterandtoavoidwaterdamage.Beforeoper-atinglever,checktoseethatadischargeline is connected to this valve directingtheflowofhotwaterfromthevalvetoaproperplaceofdisposal.Otherwiseseverepersonal injury may result. If no waterflows, valve is inoperative. Shut downboiler until a new relief valve has beeninstalled.
�. Afterfollowingthewarningdirections,ifthereliefvalve weeps or will not seat properly, replace thereliefvalve.Ensurethatthereasonforreliefvalveweepingisthevalveandnotover-pressurizationofthesystemduetoexpansiontankwaterloggingorundersizing.
Check all boiler wiringInspectallboilerwiring,makingsurewiresareingoodconditionandsecurelyattached.
Check control settings1. Checkboilerlimitcontrolsetting,Adjustifneces-
sary.
�. Checksettingsofexternallimitcontrols(ifany)andadjustifnecessary.

Part number 550-141-986/1005
water boiler — Boiler Manual
�8
Clean boiler flueways and check refractory linings
Make sure all electrical connections toboilerareturnedoffandwaituntilboileriswarm,nothot,beforecleaning.Failureto do so will result in severe personalinjury,deathorsubstantialpropertydam-age.
Theboilercontainsfiberglassandceramicfibermaterials.Usecarewhenhandlingthesematerials,perinstructionsonpage��ofthismanual.Failuretocomplycouldresultinseverepersonalinjury.
1. Removejacketfrontpanelandburnercover.
�. Shutoffoilvalves.Arrangedrippansundertheareasofoilpipingthatwillbedisconnected.
�. Disconnecttheoillineattheburner.Providemeanstopreventoilfromdripping.
4. Disconnectburner1�0-voltandEnviraCOM®har-nesses at the jacket crosstie (located beneath theburnerdoor).
Failuretodisconnecttheburnerwiringhar-nesses before opening the burner door cancausedamage to theburnerandboilerwir-ing.
�. Swing theburnerdooropencompletely.SeeFig-ure17.
6. Linethecombustionchamberfloorwithnewspapertocatchanysootthatwillbeloosenedinthecleaningprocess.
7. ModelUO-�,1.0-GPHfiringrateonly—Removethetwofluebaffles.
8. Startingatthetopoftheboiler,useawirefluebrushtothoroughlycleanallfins.
9. Oncethefluewaysarecleaned,carefullyremovethepaperfromthefloorofthecombustionchamber.
10.Verifyburnerdoorsealingropeisintact.
11.Visuallycheckconditionandpositionoftherefrac-tories in the burner mounting door. Replace anypartsasnecessary.
1�.ModelUO-�,1.0-GPHfiringrateonly—Replacethetwofluebaffles.
1�.Close burner mounting door. Insert and tightenburnerdoorboltssecurely.
Maintainagas-tightsealtoavoidpossibleflue gas leakage and carbon monoxideemissions,whichcanleadtosevereper-sonalinjuryordeath.
Figure 17 Access to boiler flueways
Annual service and start-up (continued)
14.Checkthebreechingforsootingandcleanifneces-sary.
1�.Replacethejacketfrontpanelandbreeching.
16.Reconnect the oil line and all electrical connec-tions.
Perform boiler start-up1. Followinstructionsinthismanualandtheburner
manualtostart-upandadjustburnerandboiler.
�. Verifyoperationofallcontrols,includingalllimitdevicesandcombustioncontrols.
Review with ownerReviewtheUser’sInformationManualwiththeownerorboileroperator.
Record the service callRecordtheservicecallontheformonpage�4.

Part number 550-141-986/1005 �9
water boiler — Boiler Manual
Appendix
Removing/replacing boiler jacket .....................................................30
Boiler section assembly parts ...........................................................32
Burner door parts ...............................................................................34
Jacket and control parts ....................................................................36
Dimensions .........................................................................................38
Ratings ................................................................................................39

Part number 550-141-986/1005
water boiler — Boiler Manual
�0
Appendix — Removing/replacing boiler jacket
Removing the boiler jacket Electrical shock hazard — The following
procedureassumestheboilerhasnotbeenwired. If the boiler has been wired, youmustdisconnect allpower to theboiler.Thenlabelallwiresbeforedisconnectingthemattheboilerterminalstrip.
Theboilercontainsfiberglassandceramicfiber materials. Use care when handlingthesematerials,perinstructionsonpage��ofthismanual.Failuretocomplycouldresultinseverepersonalinjury.
1. See Figures18 through�1 for jacket components,hardwareandlocations.
�. Removejacketfrontpanel(Figure18).
�. If the burner has been installed in the burnerdoor:• Removetheburnercover.• Disconnect the two burner wiring harnesses at the
jacketcrosstie(locatedbeneaththeburnerdoor).
Failure todisconnect theburnerwiringhar-nesses before opening the burner door cancause damage to the burner and boiler wir-ing.
• Turnofffuelsupplyvalve(s)anddisconnectfuelline(s)toburner.Placedrippansunderendsoflinestocatchanyoil.
4. Remove the burner door bolts and washers (Fig-ure19).
�. Carefullylifttheburnerdoorsothedoorpinsliftoutofthehingebracket(Figure19).Settheburnerdoorasidetemporarily.
Theburnerdoorisheavy.Handlecarefullytoavoidpotentialforpersonalinjury.
Donotdamagetheburnerdoorinsulationwhenhandling.
6. Loosenthefour#10x�/8”screwssecuringthejackettopandsidepanelstothebackpanel(Figure�0).
7. Removethejackettoppanel.
8. LoosentheControlPodcoverretainerscrewandliftcoverup.
Figure 18 Jacket components and hardware
Figure 19 Jacket components and hardware

Part number 550-141-986/1005 �1
water boiler — Boiler Manual
9. PushtheControlPodcovertooneside,andgentlyworkthecoverretainerhingeontheothersideoutofthejacketslottoremovethecover.
10.RemovethelimittemperaturesensorandP/Tgaugecapillary fromthewells in topof theboilerbacksection.
11.Remove the jacket crosstie by loosening the twoscrewssecuringittothesidepanels(Figure19).Liftthecrosstieupanddisengagethescrewsfromthekeyholes.
1�.Loosenthefour�/8-16x1”jacketfrontscrews.Donotremovethescrews.
1�.Liftthehingebracketandpullouttodisengagethekeyholesfromthescrews.
14.Remove the four #10 x �/8” screws securing theelectricaltraytothejacketsidepanels(Figure�0).Leavetheelectricaltrayinposition.
1�.Removethejacketsidepanelsbypullingbackedgeawayfromthebackoftheboilerandthendisengag-ingthekeyholesfromthejacketfrontscrews.
16.Removetheelectricaltray,keepingthewiringhar-nessesconnectedtothejacketcrosstie.
17.Removetheinsulationblanket.
18.Removethereliefvalveandsupplypipingifalreadyinstalled.
19.Loosen the four �/8–16 x 1” screws securing thejacketbackpaneltotherearsection.Thescrewsarelocatedattherecessedopeningsonthejacketbackpanel(Figure�1).
�0.Liftthejacketbackpanelandpullforwardtodis-engagethekeyholesfromthescrews.
Replacing the jacket1. Toinstallthejacket,reversetheprecedingprocedure.
RoutethepowerandEnviraCOM®cablesasshowninFigure14,page19.
Appendix — Removing/replacing boiler jacket (cont.)
Figure 20 Jacket components and hardware
Figure 21 Jacket components and hardware

Part number 550-141-986/1005
water boiler — Boiler Manual
��
Appendix — Replacement parts (continued)
Boiler section assembly parts
Item Description Part Number
1 Boiler front section 316-900-200
2 Boiler intermediate section 316-900-210
3 Boiler back section 316-900-220
4 Tie rods (4 required) UO-3UO-4UO-5
560-234-468560-234-472560-234-477
5 Nuts (8 required) 561-928-221
6 Washers (4 required) 562-248-668
7 P/T gauge temperature sensor well 592-300-025
8 Limit control sensor well 592-300-006
9 Mounting clip for P/T gauge and limit well 512-400-001
10 P/T gauge pressure sensor check valve 512-400-000
11 Boiler relief valve 511-546-920
12 Flue collar 446-900-000
13 Flue collar gasket 590-318-028
14 Flue collar replacement Kit (flue collar plate, gasket, (4) bolts) 386-902-002
15 Flueway baffles (for UO-3 1.0 gph input only) — (2) required 452-800-455
16 Front/Intermediate section replacement kit (includes seals & rope) 386-902-004
17 Back section replacement kit (includes seals, rope, flue gasket) 386-902-003
18 Leveling legs (4) 386-902-013
19 UO-3 0.80 GPH ONLY combustion chamber floor blanket 591-221-287
20 UO-3 0.80 GPH ONLY low firing rate kit (Not shown)(includes blanket, water glass, nozzle)
386-902-007

Part number 550-141-986/1005 ��
water boiler — Boiler Manual
Appendix — Replacement parts (continued)
Boiler section assembly parts
Part number 550-141-986/1005
water boiler — Boiler Manual
�4
Appendix — Replacement parts (continued)
Burner door parts
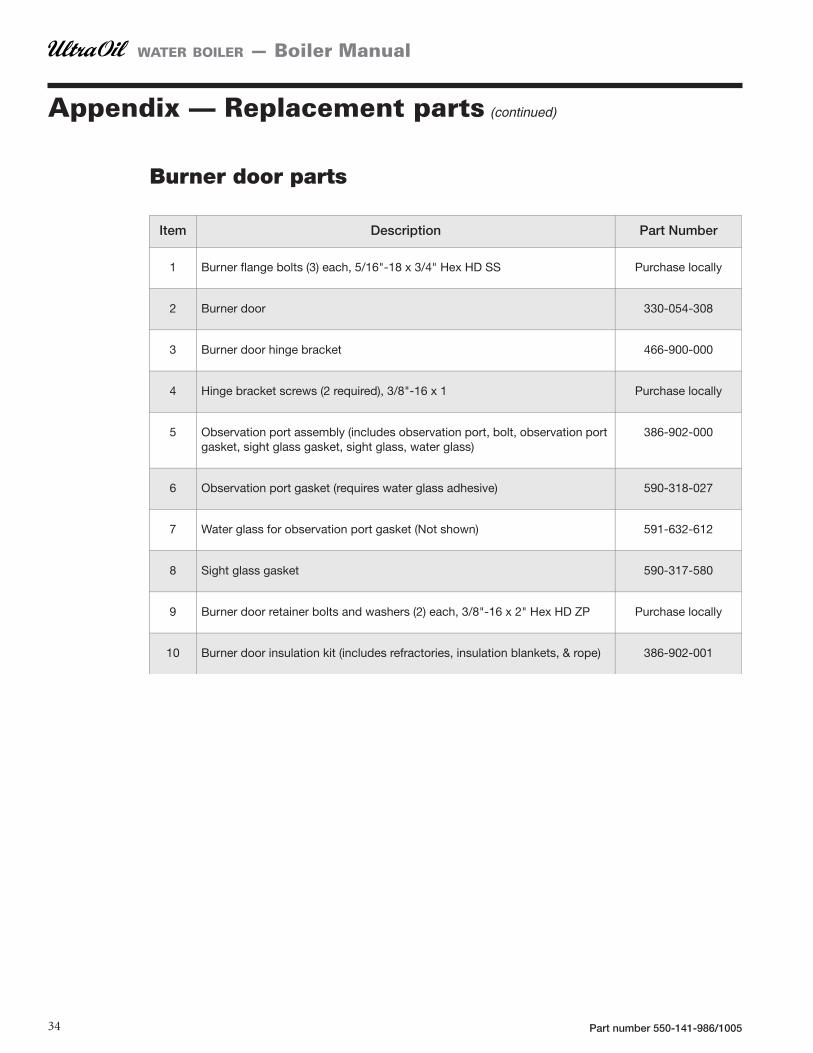
Item Description Part Number
1 Burner flange bolts (3) each, 5/16"-18 x 3/4" Hex HD SS Purchase locally
2 Burner door 330-054-308
3 Burner door hinge bracket 466-900-000
4 Hinge bracket screws (2 required), 3/8"-16 x 1 Purchase locally
5 Observation port assembly (includes observation port, bolt, observation port gasket, sight glass gasket, sight glass, water glass)
386-902-000
6 Observation port gasket (requires water glass adhesive) 590-318-027
7 Water glass for observation port gasket (Not shown) 591-632-612
8 Sight glass gasket 590-317-580
9 Burner door retainer bolts and washers (2) each, 3/8"-16 x 2" Hex HD ZP Purchase locally
10 Burner door insulation kit (includes refractories, insulation blankets, & rope) 386-902-001

Part number 550-141-986/1005 ��
water boiler — Boiler Manual
Appendix — Replacement parts (continued)
Burner door parts

Part number 550-141-986/1005
water boiler — Boiler Manual
�6
Appendix — Replacement parts (continued)
Jacket and control parts
Item Description Part Number
1 Jacket front panel assembly (includes sheet metal, plastic, striker) 386-902-005
2 Jacket front panel plastic 595-000-009
3 Jacket side panel (left and right sides are the same) UO-3UO-4UO-5
426-900-002426-900-003426-900-004
4 Control Pod cover 595-000-011
5 Jacket top panel UO-3UO-4UO-5
426-900-005426-900-006426-900-007
6 Jacket rear panel (if required order insulation below) 426-900-001
7 Jacket rear panel insulation 591-222-181
8 Jacket crosstie 426-900-008
9 Boiler insulation (Not shown) UO-3UO-4UO-5
591-222-178591-222-179591-222-180
10 Control tray assembly (includes tray, limit control, terminal strips, P/T gauge, ON/OFF switch, wiring, labels)
386-902-008
11 Pressure/Temperature gauge 510-218-052
12 ON/OFF switch 511-624-645
13 Weil-McLain logo plate 550-404-306
14 High limit control, Honeywell L7248C-1030 386-902-006
15 Wire harness (Not shown) 386-902-011
16 Barometric draft control (Not shown) 510-512-270
17 Limit control sensor (Not shown) 511-724-291

Part number 550-141-986/1005 �7
water boiler — Boiler Manual
Appendix — Replacement parts (continued)
Jacket and control parts

Part number 550-141-986/1005
water boiler — Boiler Manual
�8
Appendix — Dimensions
1. Boiler circulator is shipped loose. Circulator may bemountedoneitherboilersupplyorreturnpiping.
�. Relief valve is shipped loose, supplied with elbow andnippletoinstallinrearsectiontapping.
Notes

Part number 550-141-986/1005 �9
water boiler — Boiler Manual
Appendix — Ratings
DOE
Notes
(1)BasedonstandardtestproceduresprescribedbytheUnitedStatesDepartmentofEnergyatcombustionconditionof1�.0%CO�and–0.0�”w.c.breechingdraft.
(�)Ratingsshownare forsea levelapplicationsonly.Foraltitudesabove�,000feet,deratetheproductcapacityby4%per1,000feetabovesealevel.
(�)NetI=B=Rratingsarebasedonnetinstalledradia-tionofsufficientquantityfortherequirementsofthebuildingandnothingneedbeaddedfornormalpipingandpick-up.Waterratingsarebasedona
BoilerModel
Number
I=B=RBurner
Capacity
DOEHeatingCapacity
CSAInput
CSAOutput
NetI=B=R
Ratings
BoilerWater
Content
ShippingWeight,Approx.
DOESeasonalEfficiency
FlueConn.Size
DraftLoss
ThroughBoiler
GPH #2 Oil MBH MBH Btuh MBH Gallons Pounds AFUE, % Inches w.c.
Notes: Notes 1, 6 Notes 2, 6 Note 2 Notes 3, 6 Note 4 Note 5
UO-30.8 GPH
0.80 98 112 98 85 15.0 636 86.5 6” 0.000
UO-31.0 GPH
1.00 122 140 122 106 15.0 636 86.5 6” 0.020
UO-4 1.20 146 168 146 127 18.3 737 86.2 6” 0.025
UO-5 1.40 172 196 172 150 21.5 852 86.5 6” 0.040
pipingandpick-upallowanceof1.1�.Anaddi-tionalallowanceshouldbemadeforunusualpip-ingandpick-uploads.ConsultlocalWeil-McLainSalesOffice.
(4)Seepage11forminimumbreechingandchimneysizing.
(�)Boilerdraftlossesarebasedonoperationat11.�%CO
�.Setbreechingdraftat–0.0�inchwatercol-
umn.
(6)MBHreferstothousandsofBtuperhour.

Part number 550-141-986/1005
water boiler — Boiler Manual
40
Related Documents