www.infineon.com Please note that Cypress is an Infineon Technologies Company. The document following this cover page is marked as “Cypress” document as this is the company that originally developed the product. Please note that Infineon will continue to offer the product to new and existing customers as part of the Infineon product portfolio. Continuity of document content The fact that Infineon offers the following product as part of the Infineon product portfolio does not lead to any changes to this document. Future revisions will occur when appropriate, and any changes will be set out on the document history page. Continuity of ordering part numbers Infineon continues to support existing part numbers. Please continue to use the ordering part numbers listed in the datasheet for ordering.

Welcome message from author
This document is posted to help you gain knowledge. Please leave a comment to let me know what you think about it! Share it to your friends and learn new things together.
Transcript

www.infineon.com
Please note that Cypress is an Infineon Technologies Company.The document following this cover page is marked as “Cypress” document as this is the company that originally developed the product. Please note that Infineon will continue to offer the product to new and existing customers as part of the Infineon product portfolio.
Continuity of document contentThe fact that Infineon offers the following product as part of the Infineon product portfolio does not lead to any changes to this document. Future revisions will occur when appropriate, and any changes will be set out on the document history page.
Continuity of ordering part numbersInfineon continues to support existing part numbers. Please continue to use the ordering part numbers listed in the datasheet for ordering.
CE217634 - BLE Continuous Glucose Monitoring Sensor with PSoC 6 MCU with
BLE Connectivity
www.cypress.com Document No. 002-17634 Rev.** 1
Objective
This example project demonstrates the Bluetooth Low Energy (BLE) Continuous Glucose Monitoring Sensor application workflow.
Overview
The application uses the BLE Continuous Glucose Monitoring Profile to report CGM Measurement records to a client by the Continuous Glucose Monitoring Service and to manage the bonding by the Bond Management Service. Also, the application uses the Device Information Service to assert the Device Name and so on.
Requirements
Tool: PSoC Creator™ 4.2
Programming Language: C (Arm® GCC 5.4-2016-q2-update)
Associated Parts: All PSoC® 6 BLE parts
Related Hardware: CY8CKIT-062-BLE PSoC 6 BLE Pioneer Kit
Hardware Setup
This example uses the kit’s default configuration. See the kit guide to ensure the kit is configured correctly.
1. Connect the BLE Pioneer Kit to the computer’s USB port.
2. Connect the BLE Dongle to one of the USB ports on the computer.
LED Behavior
If the VDDD voltage is set to lesser than 2.7 V in the DWR settings System tab, only the red LED is used. The red LED blinks to
indicate that the device is advertising. The red LED is OFF when a device is connected to a peer device. When the device is in Hibernate mode, the red LED stays ON.
LED behavior for VDDD voltage greater than 2.7 V is described in the Operation section.
Software Setup
BLE Host Emulation Tool
This example requires the CySmart application. Download and install either the CySmart Host Emulation Tool PC application or the CySmart app for iOS or Android. You can test the behavior with any of the two options, but the CySmart app is simpler. Scan
one of the following QR codes from your mobile phone to download the CySmart app.
iOS
Android
BLE Continuous Glucose Monitoring Sensor with PSoC 6 MCU with BLE Connectivity
www.cypress.com Document No. 002-17634 Rev.** 2
Terminal Tool
This example uses a terminal window. You must have terminal software, such as Tera Term or PuTTy.
Operation
The project sends the Continuous Glucose Monitoring Service characteristic’s notifications or indications to the Central Client device, which displays the notifications to the user. Also, the device performs Bond Management service operations requested by the client.
The project is intended to work as a pair with any BLE-compatible device (for example, phone, tablet) with the appropriate software (for example, Android, iOS with an installed application that supports Continuous Glucose Monitoring Profile.)
Also, the Continuous Glucose Monitoring Sensor can be used with CySmart app for Windows. You need to match the security settings between the Continuous Glucose Monitor and CySmart Client and pair the devices (bondig) before writing (enabling notifications and so on) to the server’s GATT database. For further instructions on how to use the CySmart application, see the CySmart User Guide.
To connect to the Continuous Glucose Monitoring Sensor device, send a connection request to the device while the device is advertising. The green LED blinks while the device is advertising. The blue LED is turned ON when the device is connected. The red LED is turned ON when the device is disconnected to indicate that no client is connected to the device.
The Continuous Glucose Monitoring Sensor device requires authentication. The IO capability is a keyboard, that is, the device needs to enter the passkey when prompted by the client device through the UART interface (by any software, for example, HyperTerminal). When the client is paired with the Continuous Glucose Monitoring Sensor, enable the CGM Measurement characteristic notification and the Record Access Control Point (RACP) characteristic indication. Then, the RACP characteristic can be written to assert any RACP request (for details, see the Continuous Glucose Monitoring Profile and Service specifications adopted by Bluetooth SIG). When the RACP request is asserted, the client should wait for any CGM Measurement characteristic notifications and the RACP characteristic indication (depending on the asserted request), or write the Abort Operation command into the RACP characteristic. Before writing any CGM Specific Ops Control Point (SOCP) command, the SOCP indication should be enabled. The BLE stack timer is used for time simulations and LED blinking.
Operation Steps
1. Plug the CY8CKIT-062-BLE kit board into your computer’s USB port.
2. Open a terminal window and perform following configuration: Baud rate – 115200, Parity – None, Stop bits – 1, Flow control – XON/XOFF. These settings must match the configuration of the PSoC Creator UART Component in the project.
3. Build the project and program it into the PSoC 6 MCU device. Choose Debug > Program. For more information on device
programming, see PSoC Creator Help. Flash for both CPUs is programmed in a single program operation.
4. Observe the green LED blinking while the device is advertising, and the output in the terminal window.
5. Do the following to test example, using the CySmart Host Emulation Tool application as Continuous Glucose Monitoring Client:
a. Connect the BLE Dongle to your Windows PC. Wait for the driver installation to complete, if necessary.
b. Right-click the BLE Component and select Launch CySmart to launch the CySmart Host Emulation tool. Alternatively, navigate to Start > Programs > Cypress and click CySmart to launch the tool..
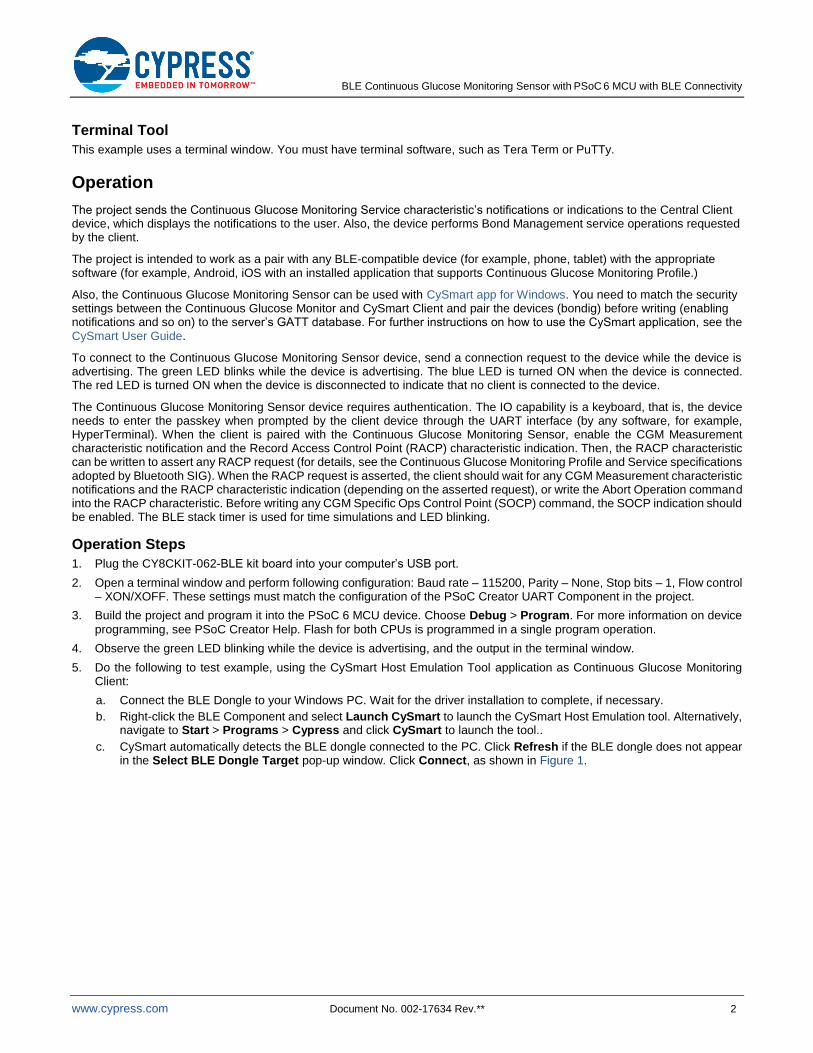
c. CySmart automatically detects the BLE dongle connected to the PC. Click Refresh if the BLE dongle does not appear in the Select BLE Dongle Target pop-up window. Click Connect, as shown in Figure 1.
BLE Continuous Glucose Monitoring Sensor with PSoC 6 MCU with BLE Connectivity
www.cypress.com Document No. 002-17634 Rev.** 3
Figure 1. CySmart BLE Dongle Selection
Note: If the dongle firmware is outdated, you will be alerted with an appropriate message. You must upgrade the firmware
before you can complete this step. Follow the instructions in the window to update the dongle firmware.
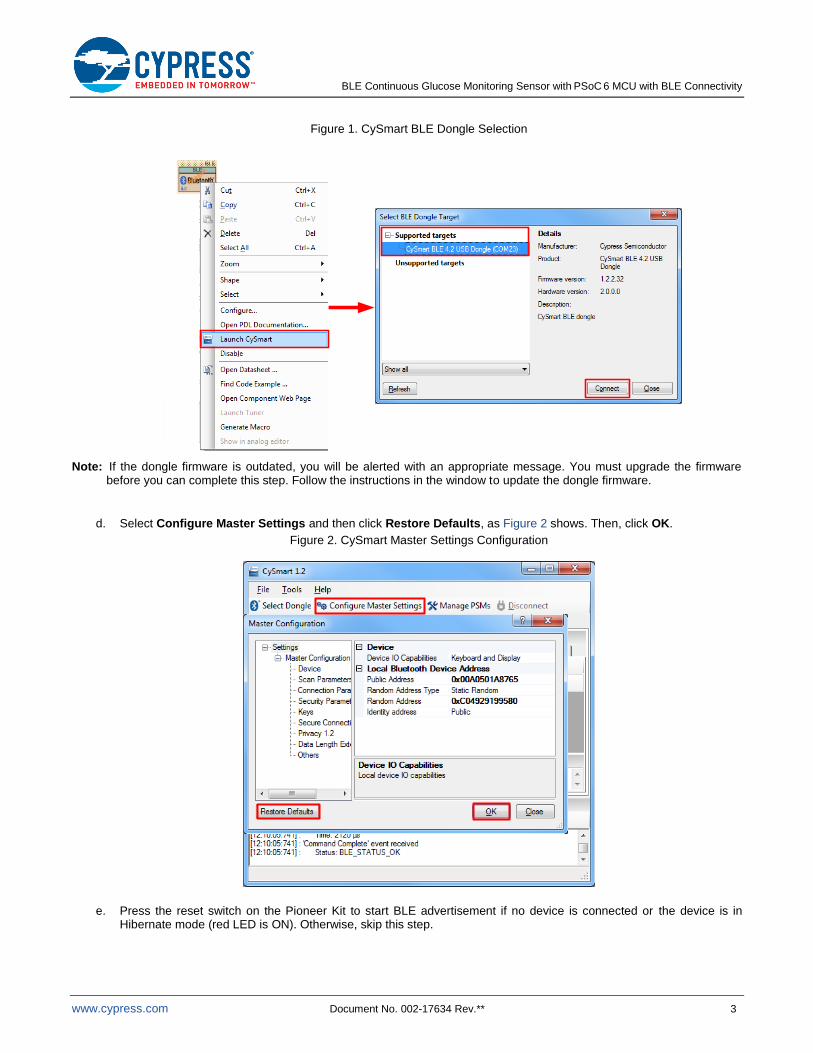
d. Select Configure Master Settings and then click Restore Defaults, as Figure 2 shows. Then, click OK.
Figure 2. CySmart Master Settings Configuration
e. Press the reset switch on the Pioneer Kit to start BLE advertisement if no device is connected or the device is in Hibernate mode (red LED is ON). Otherwise, skip this step.

BLE Continuous Glucose Monitoring Sensor with PSoC 6 MCU with BLE Connectivity
www.cypress.com Document No. 002-17634 Rev.** 4
f. On the CySmart Host Emulation Tool, click Start Scan. Your device name (configured as Glucose Monitor Sensor) should appear in the Discovered devices list, as Figure 3 shows. Select the device and click Connect to establish a BLE connection between the CySmart Host Emulation Tool and your device.
Figure 3. CySmart Device Discovery and Connection
g. Once connected, switch to the Glucose Monitor Sensor device tab and click Discover all Attributes on the CySmart
Host Emulation Tool, as shown in Figure 4.
Figure 4. CySmart Attribute Discovery
h. Click Pair after the discovery is completed, enter a 6-digit passkey through the terminal, click Read All Characteristics, and finally click Enable All Notifications in the CySmart app as shown in Figure 5.
Figure 5. CySmart Pair, Read All Characteristics and Enable All Notification
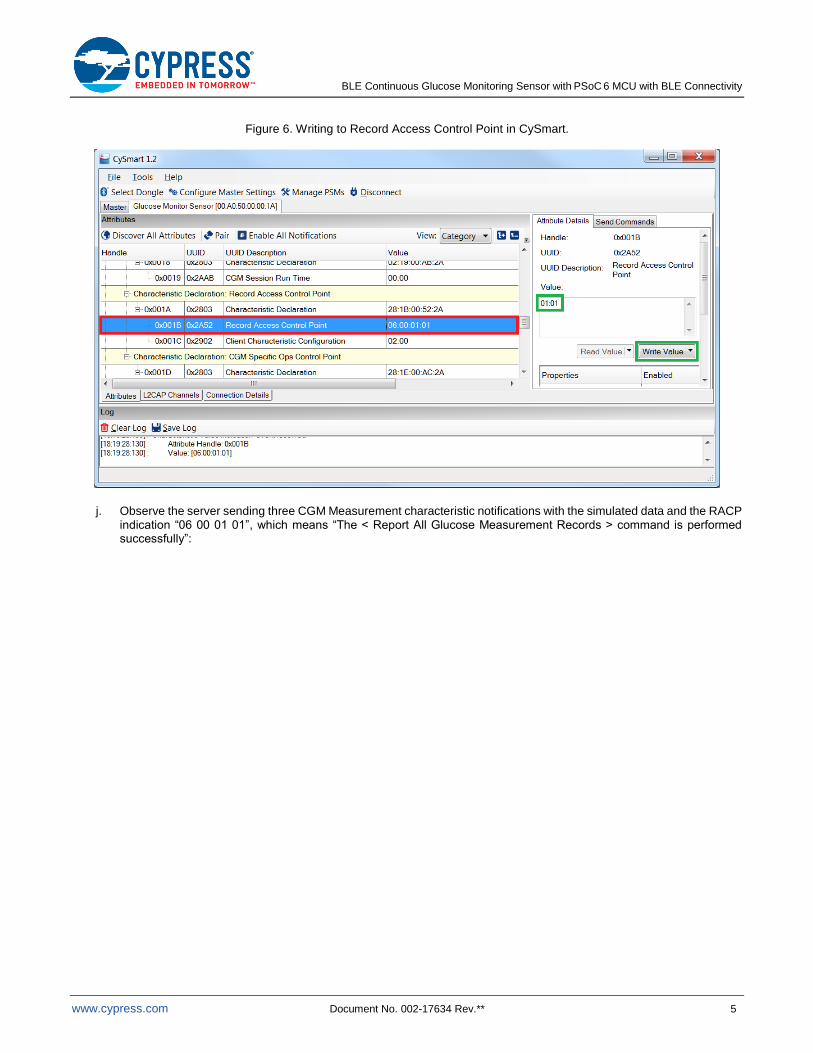
i. Select the Record Access Control Point (RACP) characteristic value and write command 01 01, which means “Report
All Glucose Measurement Records” (for a detailed description of all these commands, see CGMS Specification).
BLE Continuous Glucose Monitoring Sensor with PSoC 6 MCU with BLE Connectivity
www.cypress.com Document No. 002-17634 Rev.** 5
Figure 6. Writing to Record Access Control Point in CySmart.
j. Observe the server sending three CGM Measurement characteristic notifications with the simulated data and the RACP indication “06 00 01 01”, which means “The < Report All Glucose Measurement Records > command is performed successfully”:
BLE Continuous Glucose Monitoring Sensor with PSoC 6 MCU with BLE Connectivity
www.cypress.com Document No. 002-17634 Rev.** 6
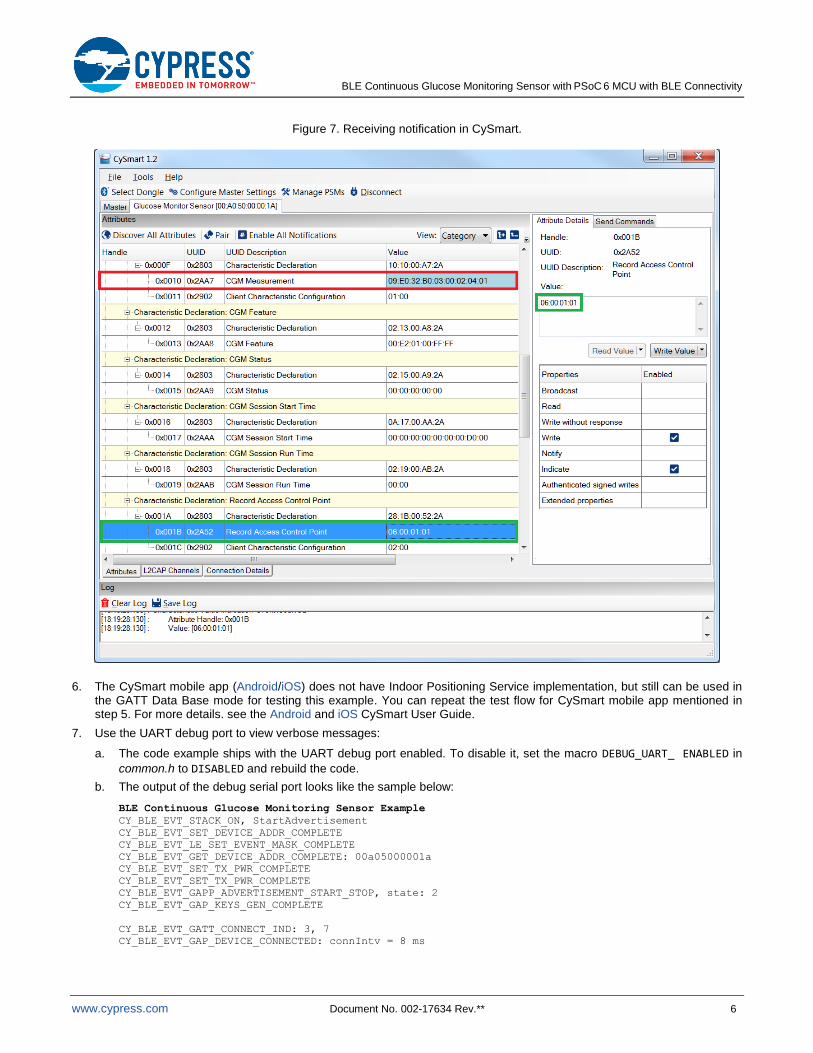
Figure 7. Receiving notification in CySmart.
6. The CySmart mobile app (Android/iOS) does not have Indoor Positioning Service implementation, but still can be used in the GATT Data Base mode for testing this example. You can repeat the test flow for CySmart mobile app mentioned in step 5. For more details. see the Android and iOS CySmart User Guide.
7. Use the UART debug port to view verbose messages:
a. The code example ships with the UART debug port enabled. To disable it, set the macro DEBUG_UART_ ENABLED in
common.h to DISABLED and rebuild the code.
b. The output of the debug serial port looks like the sample below:
BLE Continuous Glucose Monitoring Sensor Example
CY_BLE_EVT_STACK_ON, StartAdvertisement
CY_BLE_EVT_SET_DEVICE_ADDR_COMPLETE
CY_BLE_EVT_LE_SET_EVENT_MASK_COMPLETE
CY_BLE_EVT_GET_DEVICE_ADDR_COMPLETE: 00a05000001a
CY_BLE_EVT_SET_TX_PWR_COMPLETE
CY_BLE_EVT_SET_TX_PWR_COMPLETE
CY_BLE_EVT_GAPP_ADVERTISEMENT_START_STOP, state: 2
CY_BLE_EVT_GAP_KEYS_GEN_COMPLETE
CY_BLE_EVT_GATT_CONNECT_IND: 3, 7
CY_BLE_EVT_GAP_DEVICE_CONNECTED: connIntv = 8 ms
BLE Continuous Glucose Monitoring Sensor with PSoC 6 MCU with BLE Connectivity
www.cypress.com Document No. 002-17634 Rev.** 7
CY_BLE_EVT_GATTS_XCNHG_MTU_REQ
CY_BLE_EVT_GATTS_READ_CHAR_VAL_ACCESS_REQ: handle: 3
CY_BLE_EVT_GAP_AUTH_REQ: bdHandle=7, security=3, bonding=1, ekeySize=10, err=0
CY_BLE_EVT_GAP_SMP_NEGOTIATED_AUTH_INFO: bdHandle=7, security=2, bonding=1, ekeySize=10, err=0
CY_BLE_EVT_GAP_PASSKEY_ENTRY_REQUEST
Enter the passkey displayed on the peer device:
Enter a 6-digit passkey:
157965
CY_BLE_EVT_GAP_ENCRYPT_CHANGE: 0
CY_BLE_EVT_GAP_KEYINFO_EXCHNGE_CMPLT
CY_BLE_EVT_GAP_AUTH_COMPLETE: security:2, bonding:1, ekeySize:10, authErr 0
CY_BLE_EVT_PENDING_FLASH_WRITE
CY_BLE_EVT_GATTS_INDICATION_ENABLED
CY_BLE_EVT_GATTS_READ_CHAR_VAL_ACCESS_REQ: handle: f
RACP Indication is Enabled
CY_BLE_EVT_GATTS_READ_CHAR_VAL_ACCESS_REQ: handle: 21
RACP Indication is Enabled
CY_BLE_EVT_GATTS_READ_CHAR_VAL_ACCESS_REQ: handle: 1e
Glucose Notification is Enabled
CY_BLE_EVT_GATTS_READ_CHAR_VAL_ACCESS_REQ: handle: 13
RACP characteristic is written: 01 01
Opcode: Report stored records
Operator: All records
Cgmt Ntf: 09 e3 32 b0 01 00 02 04 01
Cgmt Ntf: 09 e2 32 b0 02 00 02 04 01
Cgmt Ntf: 09 e0 32 b0 03 00 02 04 01
RACP Ind: 06 00 01 01
RACP Indication is Confirmed
CY_BLE_EVT_GATT_DISCONNECT_IND: 3, 7
CY_BLE_EVT_GAP_DEVICE_DISCONNECTED: bdHandle=7, reason=13, status=0
CY_BLE_EVT_GAPP_ADVERTISEMENT_START_STOP, state: 2
Store bonding data, status: 160012, pending: 2
Store bonding data, status: 0, pending: 0
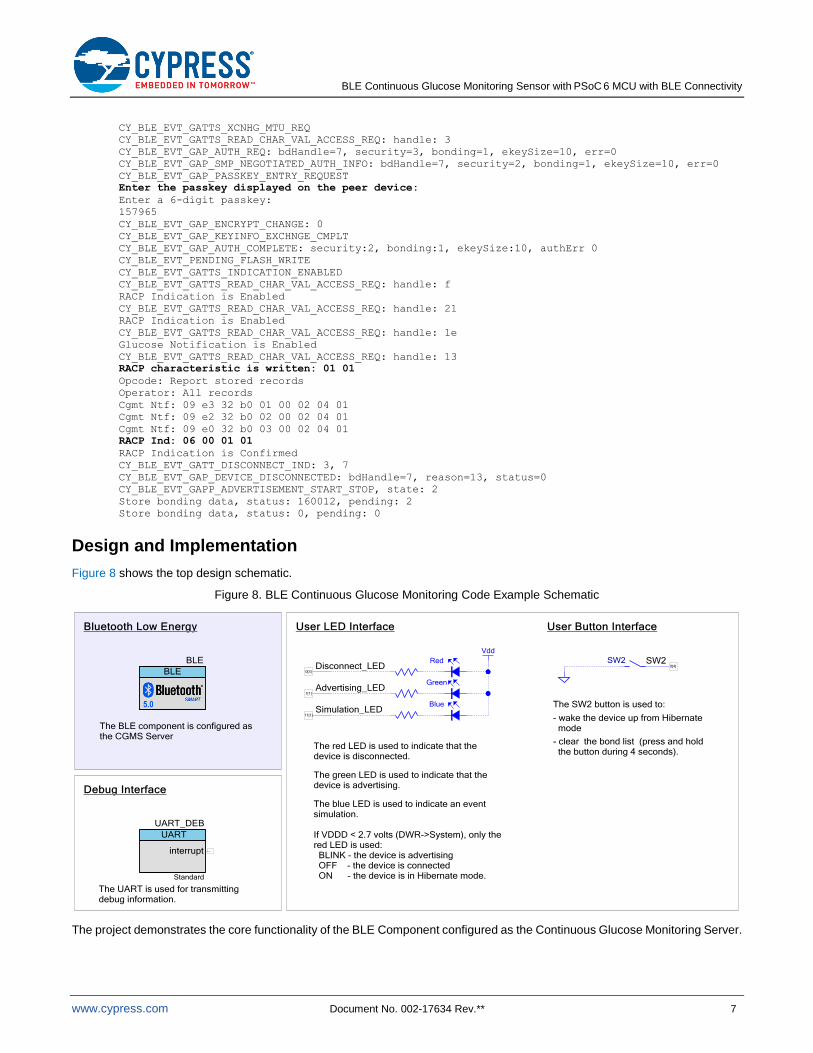
Design and Implementation
Figure 8 shows the top design schematic.
Figure 8. BLE Continuous Glucose Monitoring Code Example Schematic
The project demonstrates the core functionality of the BLE Component configured as the Continuous Glucose Monitoring Server.
BLE Continuous Glucose Monitoring Sensor with PSoC 6 MCU with BLE Connectivity
www.cypress.com Document No. 002-17634 Rev.** 8
After a startup, the device initializes the BLE Component. In this project, three callback functions are required for the BLE operation. The callback function (AppCallBack()) is required to receive generic events from the BLE Stack and service-specific
callbacks CgmsCallBack() and BmsCallBack() are required to receive Continuous Glucose Monitoring and Bond Management
service-specific events accordingly. The CY_BLE_EVT_STACK_ON event indicates successful initialization of the BLE Stack. After
this event is received, the Component starts advertising with the packet structure as configured in the BLE Component customizer. The BLE Component stops advertising when a 180-second advertising period expires.
The Continuous Glucose Monitoring Sensor device can be connected to any BLE-compatible device (4.0 or later), configured as the GAP Central role and GATT Client, which supports the Continuous Glucose Monitoring Profile. Also, the Device Information Service may be optionally used.
While connected to the client and between the connection intervals, the device is put into Sleep mode.
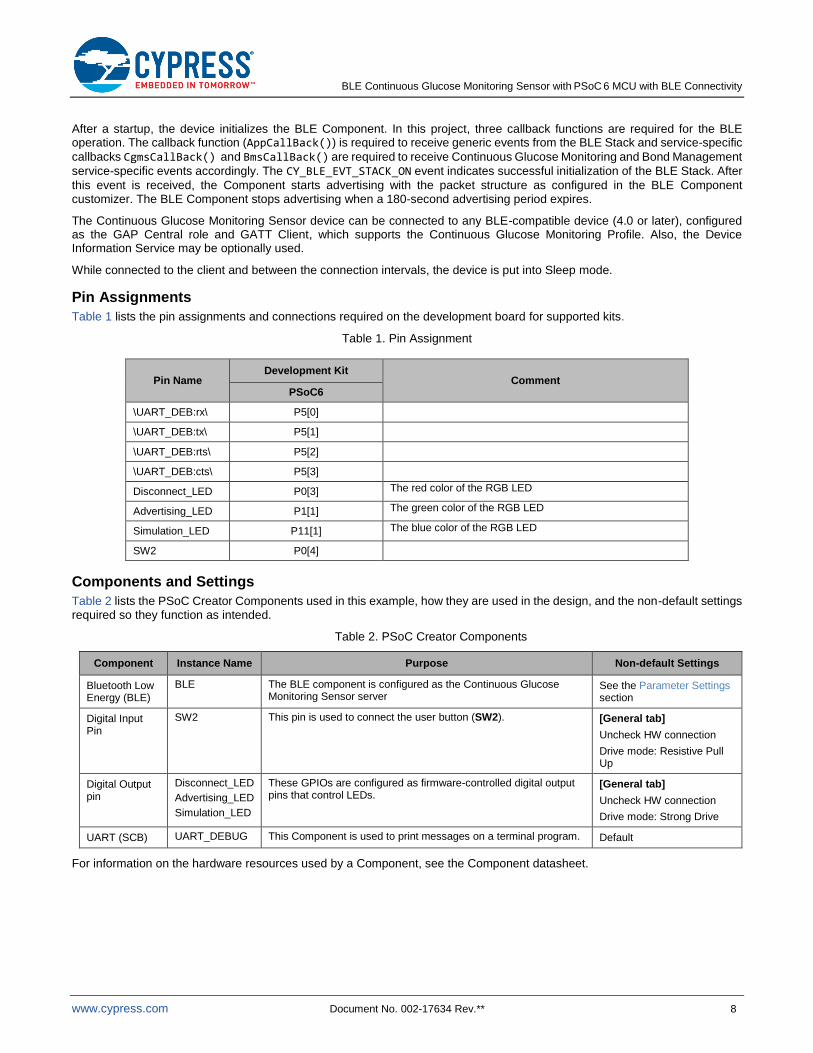
Pin Assignments
Table 1 lists the pin assignments and connections required on the development board for supported kits.
Table 1. Pin Assignment
Pin Name Development Kit
Comment PSoC6
\UART_DEB:rx\ P5[0]
\UART_DEB:tx\ P5[1]
\UART_DEB:rts\ P5[2]
\UART_DEB:cts\ P5[3]
Disconnect_LED P0[3] The red color of the RGB LED
Advertising_LED P1[1] The green color of the RGB LED
Simulation_LED P11[1] The blue color of the RGB LED
SW2 P0[4]
Components and Settings
Table 2 lists the PSoC Creator Components used in this example, how they are used in the design, and the non-default settings required so they function as intended.
Table 2. PSoC Creator Components
Component Instance Name Purpose Non-default Settings
Bluetooth Low Energy (BLE)
BLE The BLE component is configured as the Continuous Glucose Monitoring Sensor server
See the Parameter Settings section
Digital Input Pin
SW2 This pin is used to connect the user button (SW2). [General tab]
Uncheck HW connection
Drive mode: Resistive Pull Up
Digital Output pin
Disconnect_LED
Advertising_LED
Simulation_LED
These GPIOs are configured as firmware-controlled digital output pins that control LEDs.
[General tab]
Uncheck HW connection
Drive mode: Strong Drive
UART (SCB) UART_DEBUG This Component is used to print messages on a terminal program. Default
For information on the hardware resources used by a Component, see the Component datasheet.
BLE Continuous Glucose Monitoring Sensor with PSoC 6 MCU with BLE Connectivity
www.cypress.com Document No. 002-17634 Rev.** 9
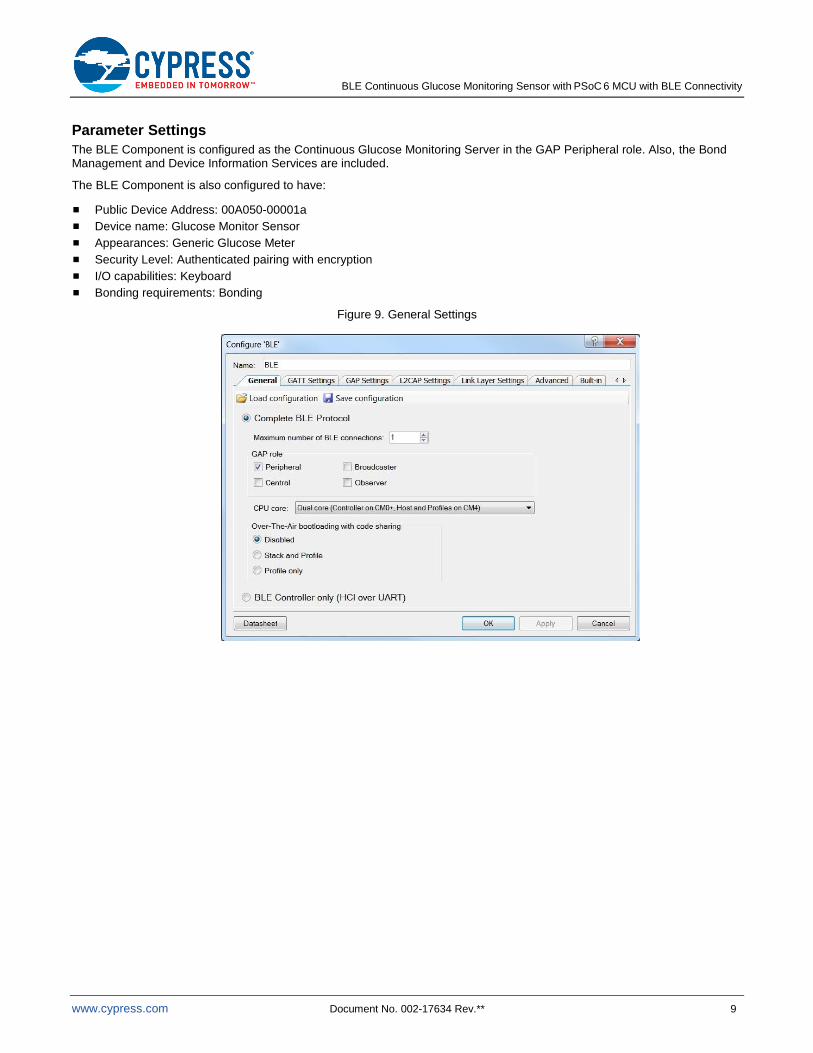
Parameter Settings
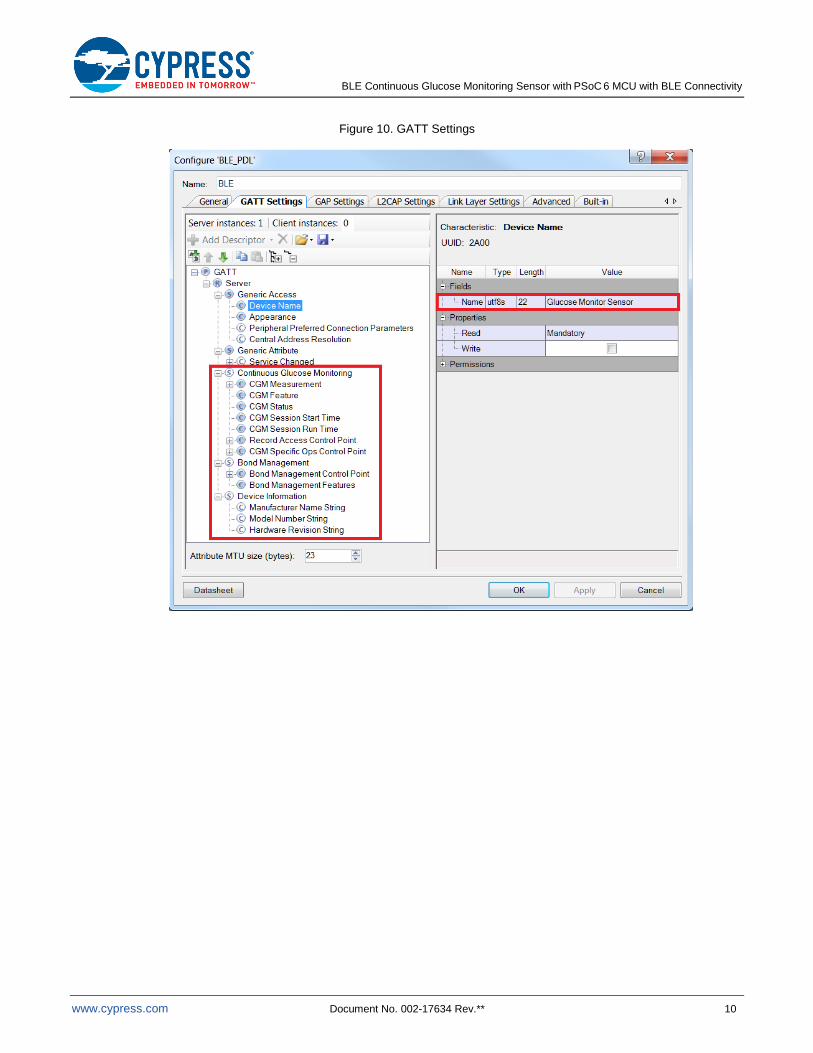
The BLE Component is configured as the Continuous Glucose Monitoring Server in the GAP Peripheral role. Also, the Bond Management and Device Information Services are included.
The BLE Component is also configured to have:
Public Device Address: 00A050-00001a
Device name: Glucose Monitor Sensor
Appearances: Generic Glucose Meter
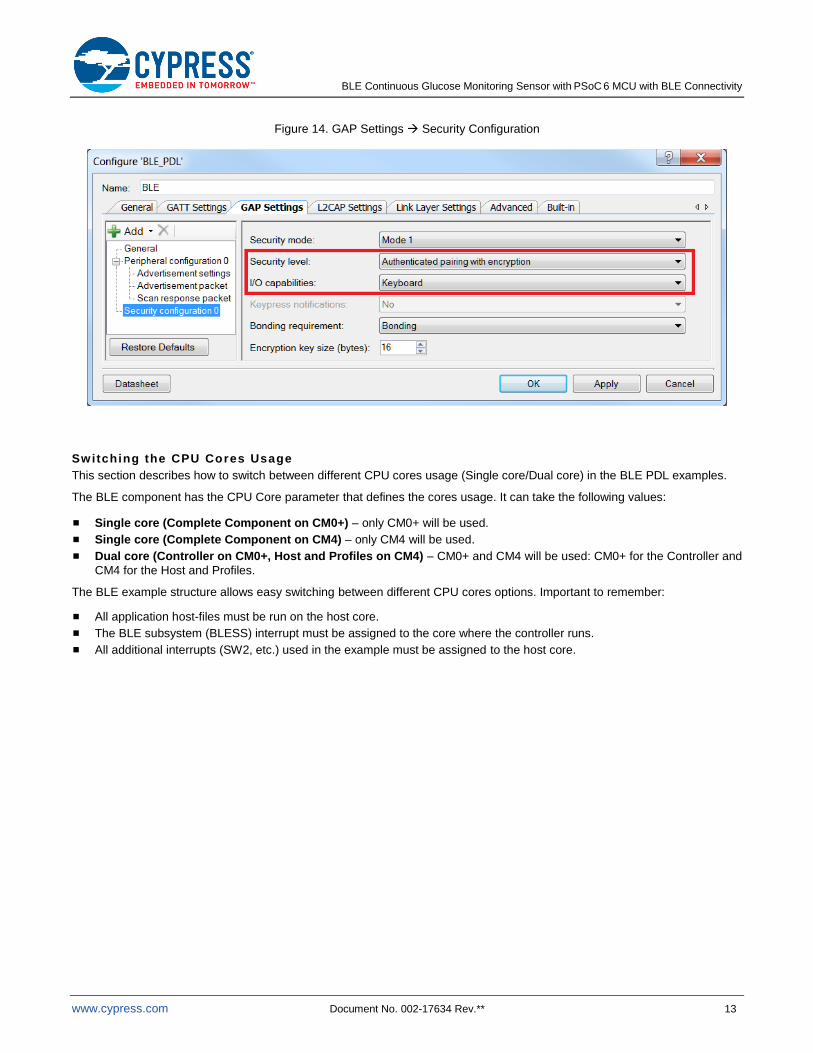
Security Level: Authenticated pairing with encryption
I/O capabilities: Keyboard
Bonding requirements: Bonding
Figure 9. General Settings
BLE Continuous Glucose Monitoring Sensor with PSoC 6 MCU with BLE Connectivity
www.cypress.com Document No. 002-17634 Rev.** 10
Figure 10. GATT Settings
BLE Continuous Glucose Monitoring Sensor with PSoC 6 MCU with BLE Connectivity
www.cypress.com Document No. 002-17634 Rev.** 11
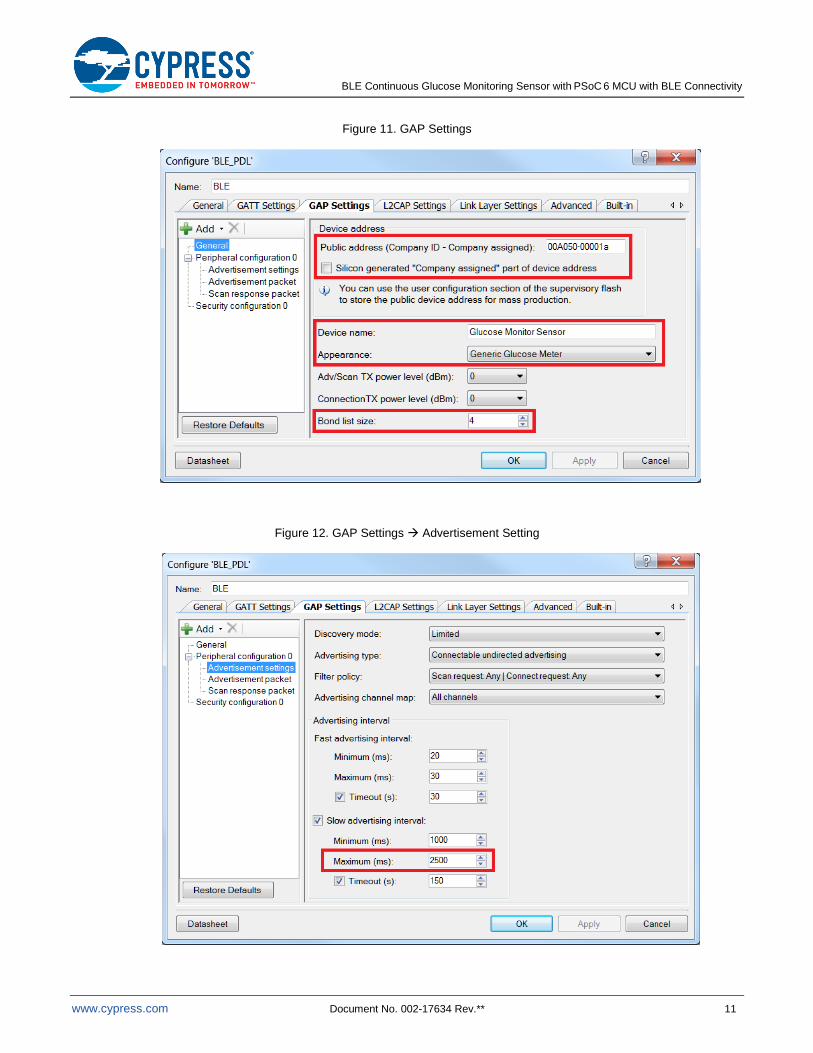
Figure 11. GAP Settings
Figure 12. GAP Settings Advertisement Setting
BLE Continuous Glucose Monitoring Sensor with PSoC 6 MCU with BLE Connectivity
www.cypress.com Document No. 002-17634 Rev.** 12
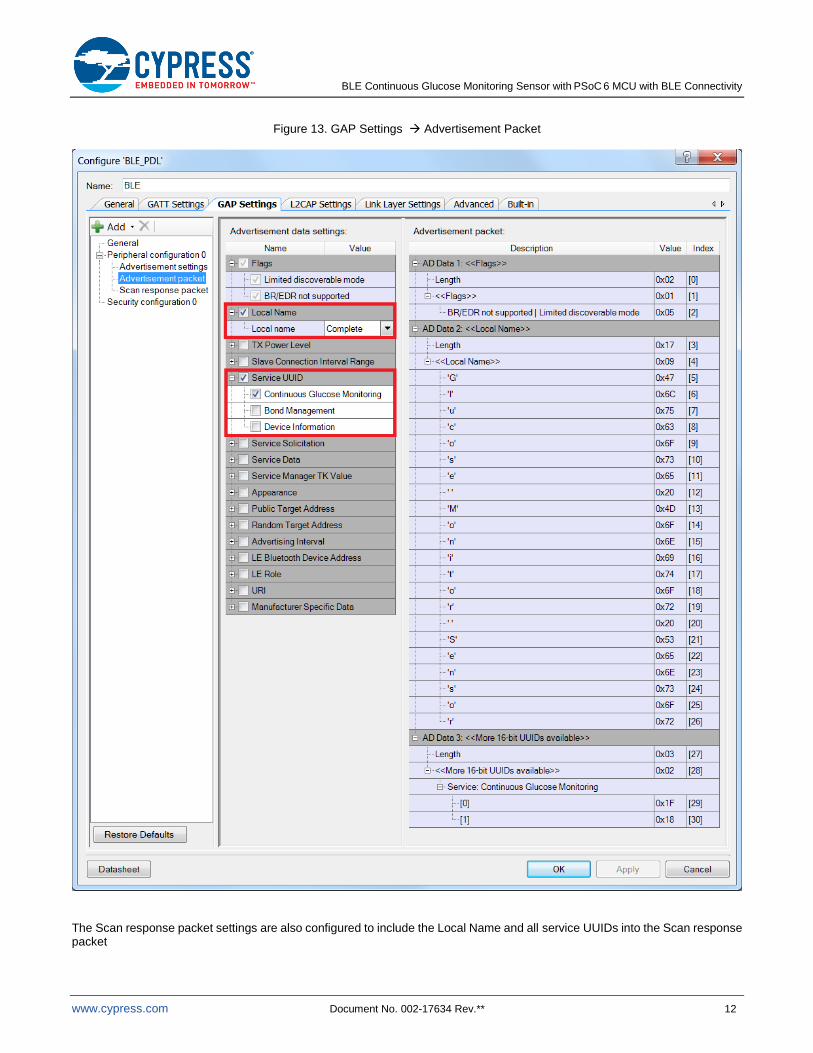
Figure 13. GAP Settings Advertisement Packet
The Scan response packet settings are also configured to include the Local Name and all service UUIDs into the Scan response packet
BLE Continuous Glucose Monitoring Sensor with PSoC 6 MCU with BLE Connectivity
www.cypress.com Document No. 002-17634 Rev.** 13
Figure 14. GAP Settings Security Configuration
Switching the CPU Cores Usage
This section describes how to switch between different CPU cores usage (Single core/Dual core) in the BLE PDL examples.
The BLE component has the CPU Core parameter that defines the cores usage. It can take the following values:
Single core (Complete Component on CM0+) – only CM0+ will be used.
Single core (Complete Component on CM4) – only CM4 will be used.
Dual core (Controller on CM0+, Host and Profiles on CM4) – CM0+ and CM4 will be used: CM0+ for the Controller and
CM4 for the Host and Profiles.
The BLE example structure allows easy switching between different CPU cores options. Important to remember:
All application host-files must be run on the host core.
The BLE subsystem (BLESS) interrupt must be assigned to the core where the controller runs.
All additional interrupts (SW2, etc.) used in the example must be assigned to the host core.
BLE Continuous Glucose Monitoring Sensor with PSoC 6 MCU with BLE Connectivity
www.cypress.com Document No. 002-17634 Rev.** 14
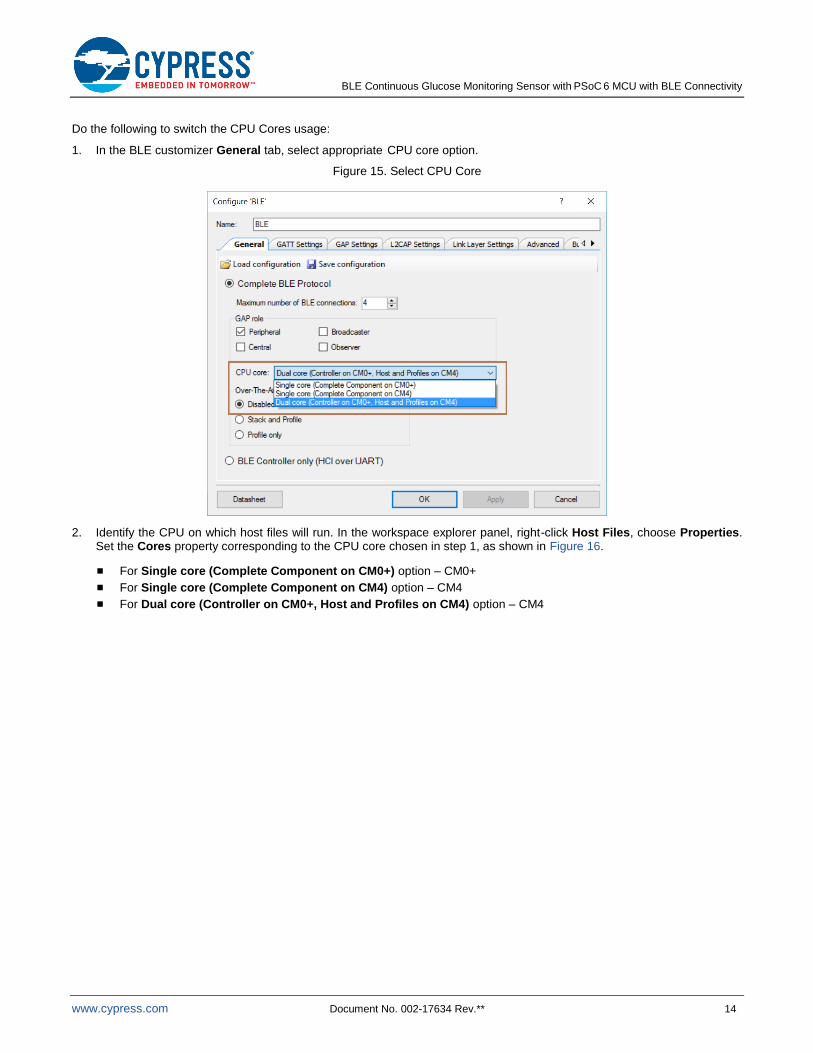
Do the following to switch the CPU Cores usage:
1. In the BLE customizer General tab, select appropriate CPU core option.
Figure 15. Select CPU Core
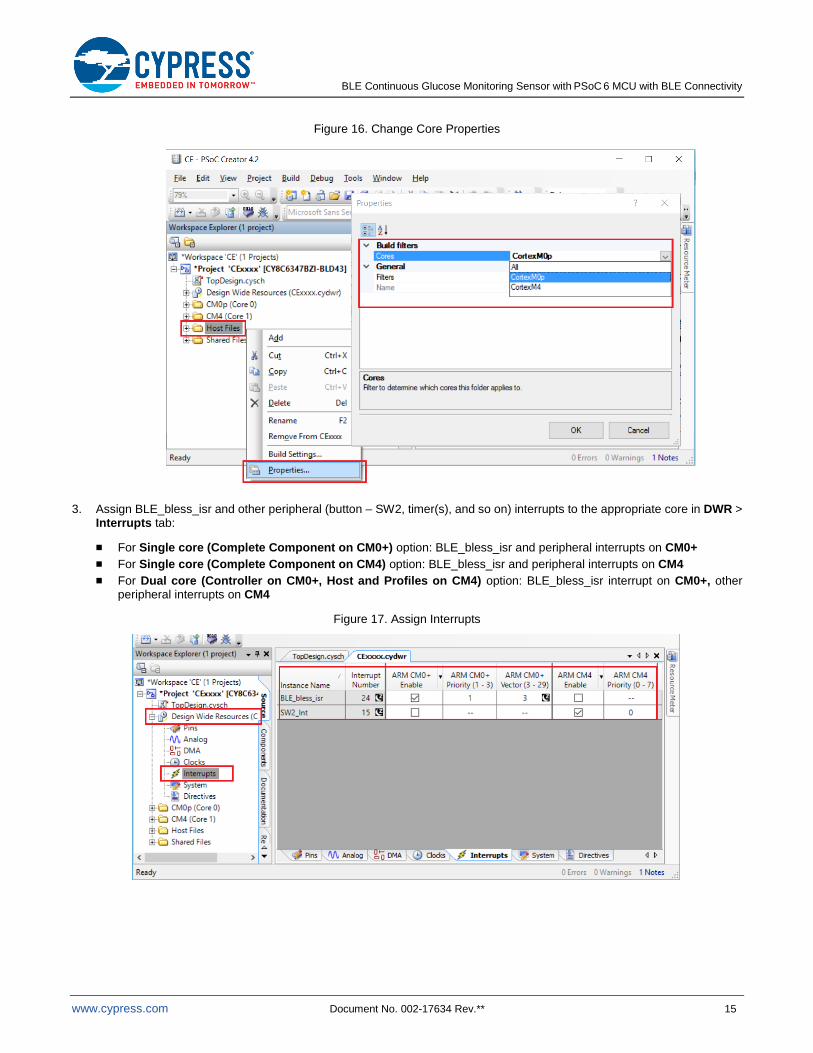
2. Identify the CPU on which host files will run. In the workspace explorer panel, right-click Host Files, choose Properties. Set the Cores property corresponding to the CPU core chosen in step 1, as shown in Figure 16.
For Single core (Complete Component on CM0+) option – CM0+
For Single core (Complete Component on CM4) option – CM4
For Dual core (Controller on CM0+, Host and Profiles on CM4) option – CM4
BLE Continuous Glucose Monitoring Sensor with PSoC 6 MCU with BLE Connectivity
www.cypress.com Document No. 002-17634 Rev.** 15
Figure 16. Change Core Properties
3. Assign BLE_bless_isr and other peripheral (button – SW2, timer(s), and so on) interrupts to the appropriate core in DWR > Interrupts tab:
For Single core (Complete Component on CM0+) option: BLE_bless_isr and peripheral interrupts on CM0+
For Single core (Complete Component on CM4) option: BLE_bless_isr and peripheral interrupts on CM4
For Dual core (Controller on CM0+, Host and Profiles on CM4) option: BLE_bless_isr interrupt on CM0+, other peripheral interrupts on CM4
Figure 17. Assign Interrupts
BLE Continuous Glucose Monitoring Sensor with PSoC 6 MCU with BLE Connectivity
www.cypress.com Document No. 002-17634 Rev.** 16
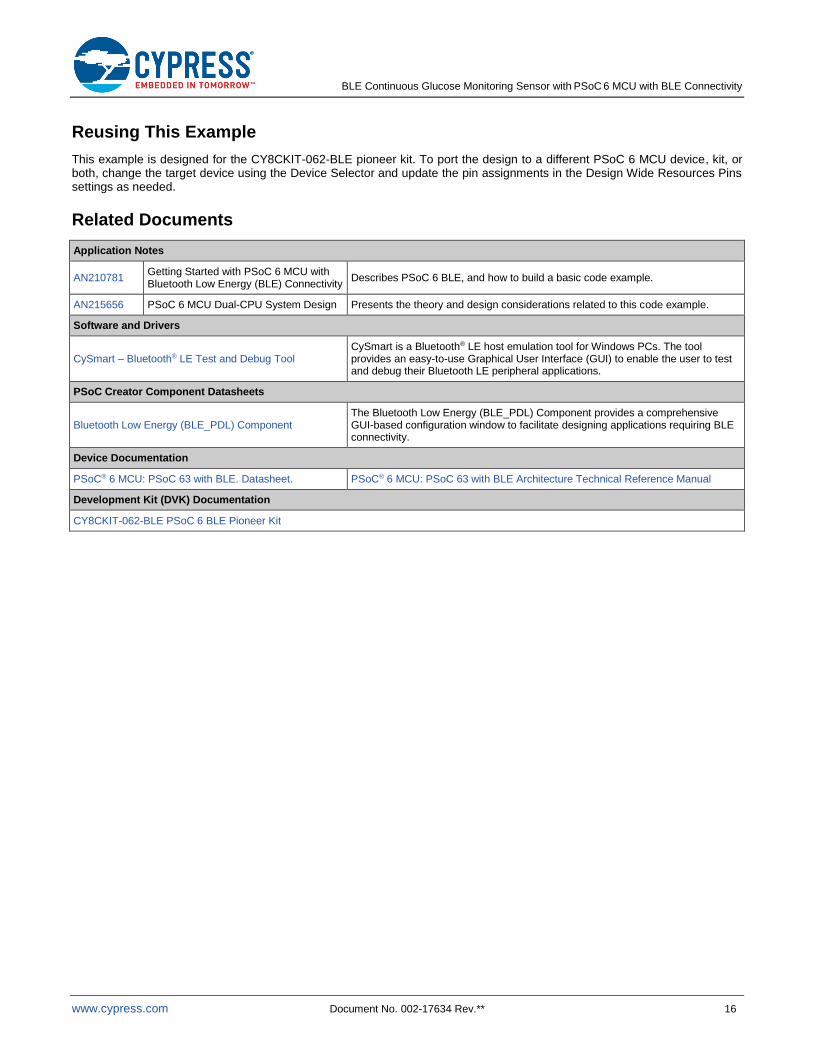
Reusing This Example
This example is designed for the CY8CKIT-062-BLE pioneer kit. To port the design to a different PSoC 6 MCU device, kit, or both, change the target device using the Device Selector and update the pin assignments in the Design Wide Resources Pins settings as needed.
Related Documents
Application Notes
AN210781 Getting Started with PSoC 6 MCU with Bluetooth Low Energy (BLE) Connectivity
Describes PSoC 6 BLE, and how to build a basic code example.
AN215656 PSoC 6 MCU Dual-CPU System Design Presents the theory and design considerations related to this code example.
Software and Drivers
CySmart – Bluetooth® LE Test and Debug Tool CySmart is a Bluetooth® LE host emulation tool for Windows PCs. The tool provides an easy-to-use Graphical User Interface (GUI) to enable the user to test and debug their Bluetooth LE peripheral applications.
PSoC Creator Component Datasheets
Bluetooth Low Energy (BLE_PDL) Component The Bluetooth Low Energy (BLE_PDL) Component provides a comprehensive GUI-based configuration window to facilitate designing applications requiring BLE connectivity.
Device Documentation
PSoC® 6 MCU: PSoC 63 with BLE. Datasheet. PSoC® 6 MCU: PSoC 63 with BLE Architecture Technical Reference Manual
Development Kit (DVK) Documentation
CY8CKIT-062-BLE PSoC 6 BLE Pioneer Kit
BLE Continuous Glucose Monitoring Sensor with PSoC 6 MCU with BLE Connectivity
www.cypress.com Document No. 002-17634 Rev.** 17
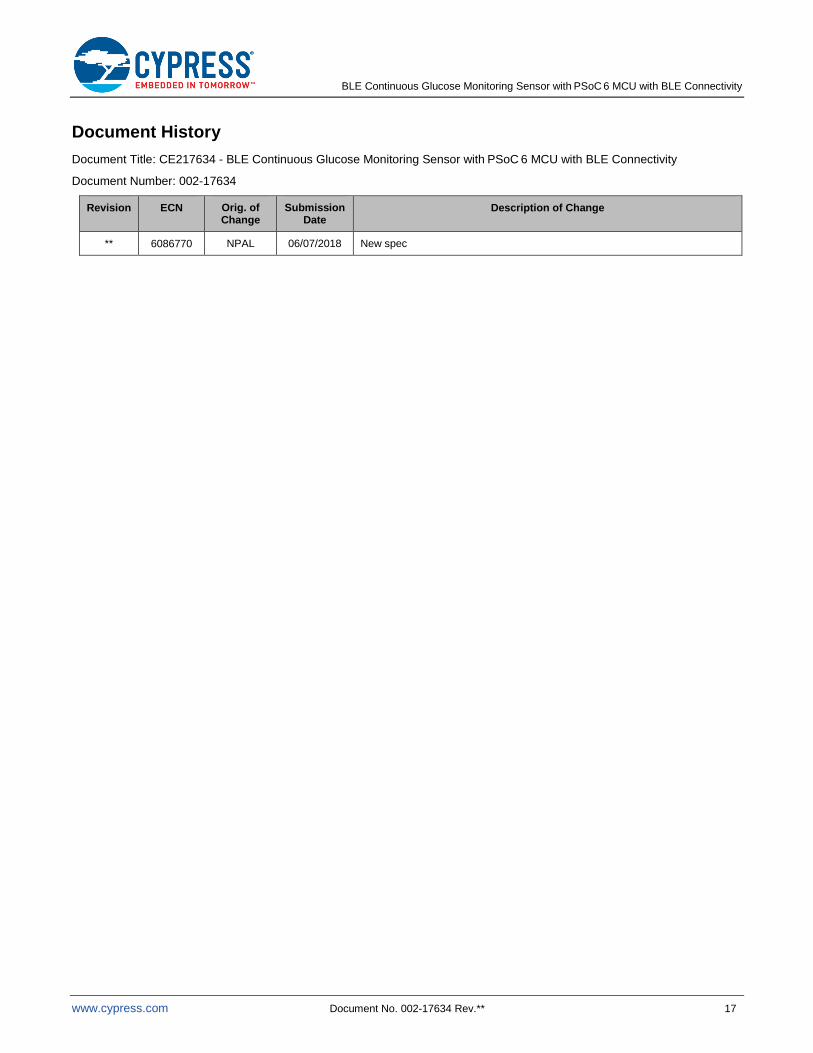
Document History
Document Title: CE217634 - BLE Continuous Glucose Monitoring Sensor with PSoC 6 MCU with BLE Connectivity
Document Number: 002-17634
Revision ECN Orig. of Change
Submission Date
Description of Change
** 6086770 NPAL 06/07/2018 New spec
BLE Continuous Glucose Monitoring Sensor with PSoC 6 MCU with BLE Connectivity
www.cypress.com Document No. 002-17634 Rev.** 18
Worldwide Sales and Design Support
Cypress maintains a worldwide network of offices, solution centers, manufacturer’s representatives, and distributors. To find the office closest to you, visit us at Cypress Locations.
Products
Arm® Cortex® Microcontrollers cypress.com/arm
Automotive cypress.com/automotive
Clocks & Buffers cypress.com/clocks
Interface cypress.com/interface
Internet of Things cypress.com/iot
Memory cypress.com/memory
Microcontrollers cypress.com/mcu
PSoC cypress.com/psoc
Power Management ICs cypress.com/pmic
Touch Sensing cypress.com/touch
USB Controllers cypress.com/usb
Wireless Connectivity cypress.com/wireless
PSoC® Solutions
PSoC 1 | PSoC 3 | PSoC 4 | PSoC 5LP | PSoC 6 MCU
Cypress Developer Community
Community | Projects | Videos | Blogs | Training | Components
Technical Support
cypress.com/support
All other trademarks or registered trademarks referenced herein are the property of their respective owners.
Cypress Semiconductor 198 Champion Court San Jose, CA 95134-1709
© Cypress Semiconductor Corporation, 2018. This document is the property of Cypress Semiconductor Corporation and its subsidiaries, including Spansion LLC (“Cypress”). This document, including any software or firmware included or referenced in this document (“Software”), is owned by Cypress under the intellectual property laws and treaties of the United States and other countries worldwide. Cypress reserves all rights under such laws and treaties and does not, except as specifically stated in this paragraph, grant any license under its patents, copyrights, trademarks, or other intellectual property rights. If the Software is not accompanied by a license agreement and you do not otherwise have a written agreement with Cypress governing the use of the Software, then Cypress hereby grants you a personal, non-exclusive, nontransferable license (without the right to sublicense) (1) under its copyright rights in the Software (a) for Software provided in source code form, to modify and reproduce the Software solely for use with Cypress hardware products, only internally within your organization, and (b) to distribute the Software in binary code form externally to end users (either directly or indirectly through resellers and distributors), solely for use on Cypress hardware product units, and (2) under those claims of Cypress’s patents that are infringed by the Software (as provided by Cypress, unmodified) to make, use, distribute, and import the Software solely for use with Cypress hardware products. Any other use, reproduction, modification, translation, or compilation of the Software is prohibited.
TO THE EXTENT PERMITTED BY APPLICABLE LAW, CYPRESS MAKES NO WARRANTY OF ANY KIND, EXPRESS OR IMPLIED, WITH REGARD TO THIS DOCUMENT OR ANY SOFTWARE OR ACCOMPANYING HARDWARE, INCLUDING, BUT NOT LIMITED TO, THE IMPLIED WARRANTIES OF MERCHANTABILITY AND FITNESS FOR A PARTICULAR PURPOSE. No computing device can be absolutely secure. Therefore, despite security measures implemented in Cypress hardware or software products, Cypress does not assume any liability arising out of any security breach, such as unauthorized access to or use of a Cypress product. In addition, the products described in these materials may contain design defects or errors known as errata which may cause the product to deviate from published specifications. To the extent permitted by applicable law, Cypress reserves the right to make changes to this document without further notice. Cypress does not assume any liability arising out of the application or use of any product or circuit described in this document. Any information provided in this document, including any sample design information or programming code, is provided only for reference purposes. It is the responsibility of the user of this document to properly design, program, and test the functionality and safety of any application made of this information and any resulting product. Cypress products are not designed, intended, or authorized for use as critical components in systems designed or intended for the operation of weapons, weapons systems, nuclear installations, life-support devices or systems, other medical devices or systems (including resuscitation equipment and surgical implants), pollution control or hazardous substances management, or other uses where the failure of the device or system could cause personal injury, death, or property damage (“Unintended Uses”). A critical component is any component of a device or system whose failure to perform can be reasonably expected to cause the failure of the device or system, or to affect its safety or effectiveness. Cypress is not liable, in whole or in part, and you shall and hereby do release Cypress from any claim, damage, or other liability arising from or related to all Unintended Uses of Cypress products. You shall indemnify and hold Cypress harmless from and against all claims, costs, damages, and other liabilities, including claims for personal injury or death, arising from or related to any Unintended Uses of Cypress products.
Cypress, the Cypress logo, Spansion, the Spansion logo, and combinations thereof, WICED, PSoC, CapSense, EZ-USB, F-RAM, and Traveo are trademarks or registered trademarks of Cypress in the United States and other countries. For a more complete list of Cypress trademarks, visit cypress.com. Other names and brands may be claimed as property of their respective owners.
Related Documents


