Updated 1/16/2017 Blackboard Integration Guide for Math & Statistics MyMathLab, MyStatLab Business MyAccountingLab, MyBCommLab, MyBizLab, MyBusinessLawLab, MyEconLab, MyEntrepreneurshipLab, MyFinanceLab, MyManagementLab, MyMarketingLab, MyMISLab, MyOMLab Careers MyAutomotiveLab, MyCarpentryLab, MyCJLab, MyCulinaryLab, MyGraphicsLab, MyHospitalityLab, MyHVACLab, MyServSafeLab, NCCERconnect Health Science & Nursing MyBradyLab, MyHealthProfessionsLab, MyMedicalTerminologyLab, MyNursingLab, The Neighborhood, RealEHRPrep English MyLiteratureLab, MyReadingLab, MySkillsLab MyStudentSuccessLab, MyWritingLab Foundations MyFoundationsLab Teacher Education MyCounselingLab, MyEdLeadershipLab, MyEducationLab

Welcome message from author
This document is posted to help you gain knowledge. Please leave a comment to let me know what you think about it! Share it to your friends and learn new things together.
Transcript

Updated 1/16/2017
Blackboard
Integration Guide
for Math & Statistics MyMathLab, MyStatLab
Business MyAccountingLab, MyBCommLab, MyBizLab,
MyBusinessLawLab, MyEconLab,
MyEntrepreneurshipLab, MyFinanceLab,
MyManagementLab, MyMarketingLab,
MyMISLab, MyOMLab
Careers MyAutomotiveLab, MyCarpentryLab, MyCJLab,
MyCulinaryLab, MyGraphicsLab,
MyHospitalityLab, MyHVACLab,
MyServSafeLab, NCCERconnect
Health Science & Nursing MyBradyLab, MyHealthProfessionsLab,
MyMedicalTerminologyLab, MyNursingLab,
The Neighborhood, RealEHRPrep
English MyLiteratureLab, MyReadingLab, MySkillsLab
MyStudentSuccessLab, MyWritingLab
Foundations MyFoundationsLab
Teacher Education MyCounselingLab, MyEdLeadershipLab,
MyEducationLab

Page 2 Return to the Table of Contents
TABLE OF CONTENTS
Before You Begin .................................................................................................................... 5
Introduction ......................................................................................................................... 5
Getting Started Checklist ................................................................................................... 5
Module 1: Create your Course ............................................................................................... 8
Scenario 1: Do you need to create a Standard Course? .................................................. 8
Create a New MyLab course from the catalog ......................................................................... 9
Copy one of your existing MyLab courses ............................................................................. 15
Copy another instructor’s course ............................................................................................ 21
Scenario 2: Do you need to create a Course Group (Coordinator Course with
Member Courses)? ............................................................................................................. 26
Are you a Coordinator who will customize the Coordinator MyLab course, but then
allow other instructors to copy it, retaining less control over the member courses? This
option is popular with Coordinators who want to set up the structure and content of
the MyLab course, but then want the member section instructors to copy the course,
and own it in their own educator accounts, while still being part of a Course Group. .. 26
Are you a Coordinator who will customize the Coordinator MyLab course and needs
maximum control of the member sections in your own Pearson account? This option is
popular with large programs with many adjuncts, so that the Coordinator can maintain
the most control of the course structure, assignments, and menu items in the MyLab
member courses. Member section instructors will enroll in their MyLab section using
Section Instructor access codes. ............................................................................................. 41
Are you using a Course Group because you’re teaching multiple sections of the same
course yourself, and would like to use a Coordinator Course to manage your own
member sections? ..................................................................................................................... 53
Scenario 3: Do you need to copy a paired Pearson course from a previous term? ... 65
Copy a paired Standard course from a previous term ........................................................ 65
Copy a paired Coordinator course from a previous term ................................................... 67
Module 2: Add Pearson Component & Assignment Links ............................................... 70
Would you like to add MyLab component and assignment links?.............................. 70
Would you like to arrange or remove components? .................................................... 73

Page 3 Return to the Table of Contents
Module 3: Gradebook Set Up and Customization ............................................................. 75
Would you like to Auto Sync your MyLab grades? ........................................................ 75
Prepare Your MyLab for Sync: Select Individual Scores or Overall Score to Sync ........... 75
Sync All Grades .......................................................................................................................... 79
Sync Individual Grades ............................................................................................................. 83
Would you like to manage the auto sync process? ....................................................... 86
Understand Auto Sync timing .................................................................................................. 89
Refresh Pearson grades ........................................................................................................... 89
Fix grade column discrepancies .............................................................................................. 90
View the Grade Synchronization Dashboard ........................................................................ 91
Change grade synchronization settings ................................................................................. 92
Clean up Pearson gradable items ........................................................................................... 94
Turn off auto sync ..................................................................................................................... 95
Would you like to manually transfer grades using Export/Import? ........................... 96
Export Grades ............................................................................................................................ 96
Import Grades into Blackboard ............................................................................................... 99
Would you like to customize the Blackboard Grade Center? .................................... 102
Add Grade Columns ................................................................................................................ 102
Display Grades as Percentages or Points ............................................................................ 103
Change a Column Name ........................................................................................................ 105
Create Categories in Grade Center ....................................................................................... 106
Total Grades by Assignment Type ........................................................................................ 107
Create a Weighted Total Score Column ............................................................................... 111
Module 4: Student & Teaching Assistant Access ............................................................ 115
How students register for their MyLab & Mastering course ..................................... 115

Page 4 Return to the Table of Contents
How Students Change from Temporary to Full MyLab Access .................................. 119
How Teaching Assistants register for their MyLab course ........................................ 125
Module 5: Troubleshooting ............................................................................................... 128
View Common Troubleshooting Issues ............................................................................... 128
Contact 24/7 Pearson Support and Share Diagnostics Information ............................... 128
Delete the Course Association .............................................................................................. 130
Unlink Your Blackboard account from Your Pearson Account ......................................... 133

Page 5 Return to the Table of Contents
Before You Begin
Introduction
Hello and welcome! Did you know Pearson’s MyLab & Mastering online courses are
available for integration with Blackboard Learn? Instructors and students can link their
Blackboard and Pearson accounts to enable single sign-on to MyLab & Mastering from
within their Blackboard courses. Therefore, students can spend more time learning and
less time managing their course access.
If you are looking for guidance in getting started, or seeking information about the
integration and grade sync, you have come to the right place!
Within this guide you will find:
Just-in-time assistance setting up your integration.
Best practices and strategies for effective implementation of the integration.
Support with setting up or modifying the grade sync.
Getting Started Checklist
Before you can integrate your Blackboard course with Pearson MyLab & Mastering, make
sure you note the following:
Please make sure that your school’s Blackboard Administrator has installed the
MyLab & Mastering for Blackboard Learn Building Block.
You will need your username and password for Blackboard. If you do not have
a Blackboard account yet, please speak with your school’s Blackboard
Administrator.
If you are an Educator, Course Coordinator, or Section Instructor who has
previously linked a Blackboard STUDENT account to a Pearson MyLab course,
you will need a NEW Blackboard account, and it must be an INSTRUCTOR
account.

Page 6 Return to the Table of Contents
You will also need a username and password for your Pearson account. If you do
not have a Pearson Account, please speak with your Pearson Sales
Representative.
o Section Instructors whose MyLab courses have been paired for them
through Blackboard will enroll in the MyLab with a Section Instructor
access code and should have a Pearson Section Instructor account or full
Educator account, or will create a Section Instructor account when
enrolling in the course as a Section Instructor.
o Teaching Assistants whose MyLab courses have been paired for them
through Blackboard will enroll in the MyLab with a Student access code
and should have a Pearson student account, or will create a Student
account when enrolling in the course as a TA.
Please check that the MyLab & Mastering materials that you want to link are in
the Pearson catalog. Your Pearson Sales Representative will be able to help you,
if needed.
If you’ve used a Pearson MyLab & Mastering course before, you may remember
that you needed to give students your Course ID to enable them to enroll. When
you integrate with Blackboard, you no longer do this. Students do not need your
Course ID to enroll in your MyLab course when integrated with Blackboard – do
not give it to them. Click here for a student handout on enrolling in your
integrated MyLab course. If a student tries to register through
www.pearsonmylabandmastering.com or their specific product’s website (e.g.
www.mymathlab.com) they will receive an error message that the Course ID they
entered is for a Blackboard-linked course, and they must register through their
local campus version of the Blackboard Learning Management System.

Page 7 Return to the Table of Contents
Still need help? Our Customer Technical Support knowledge base is full of
helpful articles on Blackboard integration. Or Contact Us to call us or start a live
chat, 24 hours a day. There is also a link for commonly asked questions.
Once you have reviewed this list, you are ready to get started!

Page 8 Return to the Table of Contents
Module 1: Create your Course
You have great flexibility when integrating your Blackboard course with a Pearson MyLab &
Mastering course. First, identify the type of course or courses you need:
A Standard Course is the most common and most basic type of course created during
integration. It is a single course for your own use. (Scenario 1)
A Course Group is comprised of a Coordinator Course and Member Courses. There are
different options for setting up coordinator and member sections, depending on who
manages the Blackboard course content, who manages the Pearson MyLab & Mastering
content, how reporting and analysis are handled, and access levels of the Member Course
instructors. (Scenario 2)
Scenario 1: Do you need to create a Standard Course?
If you have chosen to set up a single course for your own use, there are three different
options that you have to set up your Standard Course:
Create a new MyLab course from the catalog
Copy one of your existing MyLab courses
Copy another instructor’s course
Note: You cannot pair your Blackboard course with a Pearson MyLab course you already
have in your Pearson account. However, you can make a COPY of that MyLab course
through Blackboard, so that it contains any customizations you may already have made to
it.

Page 9 Return to the Table of Contents
Create a New MyLab course from the catalog
Video: Instructors: Pair Your Blackboard Course to a Pearson MyLab or
Modified Mastering Course
Log in to your Blackboard Course.
Click Tools in the left-hand navigation bar.
Next, select Pearson’s MyLab & Mastering.
Start in your Blackboard
course
Link your Blackboard
account with your Pearson
account if you haven't
before
Pair your Blackboard course to a course from the Pearson
catalog

Page 10 Return to the Table of Contents
Tip: If you do not see this link, please check with your Blackboard Administrator to make
sure that the Pearson Building Block has been installed.
Now the Pearson’s MyLab & Mastering page will appear. Click Select a MyLab and
Mastering product to use with this course.
If this is your first time integrating a course with Blackboard, you will need to link
your Pearson Account. If you have linked your Blackboard and Pearson
accounts before, skip to step 9.
Read and accept the End User License Agreement and Privacy Policy..

Page 11 Return to the Table of Contents
Now sign in with your Pearson educator account.
Tip: If you cannot remember your Pearson username or password, please use the Forgot
your username or password? link rather than creating a new account. If you don’t have
an instructor account, contact your Pearson sales rep.
Congratulations! – Your Blackboard instructor credentials are now linked with your
Pearson credentials. This is a one-time process; you will not need to sign in to
Pearson MyLab & Mastering again when you access the site through Blackboard, or
if you pair any other Pearson courses through Blackboard. Click Get Started.

Page 12 Return to the Table of Contents
You can create a new MyLab & Mastering course by entering an author’s name, title
of your book, ISBN or a keyword (e.g., Math) in the Search field. Optional: select
your discipline first from the All Disciplines drop-down menu.
Once you have located your book choose Select.
You will now fill in your course information.

Page 13 Return to the Table of Contents
a) Leave the Course Type set to Student Course, if this course will be used for
student enrollment
b) Enter the Course Name.
c) From Allow Copy, check “Instructors can copy this course” if you would like
other instructors to be able to copy your MyLab course.
d) In Course Dates, enter the start and end-date for your course. Students cannot
access the Pearson course until the start date. Student access ends early the
next morning after the course end date. Your access ends one year after that.
e) Select Create Course to create the MyLab course, or Cancel to stop creating
this course, and go back to the course catalog.

Page 14 Return to the Table of Contents
You’re done! Your course is being created and will be ready to go shortly. (Note:
you can disregard the Reference No.; this is for Pearson use.)
Close the tab to return to your Learning Management System.
Note: It takes time for the course to set up. If you try to open the paired MyLab course
before it’s finished processing, you’ll receive a “course1” error message. Once the course is
ready, you will receive an email alerting you that it is now available and ready to for use.
You should receive the email within an hour, but please be aware that it can take up to 3
hours, depending on server traffic. If you do not receive your email within 3 hours, please
check your junk or spam filter as the email might have gotten stuck in the filter. You don’t
have to stay signed into Blackboard during this process.
Your course confirmation email contains a Student Registration Handout.
Distribute this to your students, as it provides the steps to access your MyLab
course.

Page 15 Return to the Table of Contents
Copy one of your existing MyLab courses
Copying one of your existing MyLab courses is extremely useful if you’ve taught with a
Pearson MyLab and Mastering course before, and now find you’re teaching the same
course again but would like to integrate with Blackboard. Copying a course that’s already in
your Pearson account will make an exact copy of that course, but with an empty student
roster. You may need to adjust dates on your assignments, but all of your assignments and
settings will be copied over.
Sometimes there is a misconception that you can pair your Blackboard course with a
MyLab course that you’ve already created. In other words, you’ve set up your course in
your Pearson account and now you want to pair it – this can’t be done. However you CAN
make a copy of this course so that you don’t have to start from scratch.
Video: Instructors: Pair Your Blackboard Course with a COPY of a Pearson
MyLab & Mastering Course
Log in to your Blackboard Course.
Click Tools in the left-hand navigation bar.
Start in your Blackboard
course
Link your Blackboard
account with your Pearson account if you haven't before
Pair your Blackboard course to a copy of a
MyLab course you already have in your
Pearson account

Page 16 Return to the Table of Contents
On the Tools page, click Pearson’s MyLab & Mastering.
Tip: If you do not see this link, please check with your Blackboard Administrator to make
sure that the Pearson Building Block has been installed.
Now the Pearson’s MyLab & Mastering page will appear. Click Select a MyLab and
Mastering product to use with this course.
If this is your first time integrating a course with Blackboard, you will need to link
your Pearson Account. If you have linked your Blackboard and Pearson
accounts before, skip to step 9.
Read and accept the End User License Agreement and Privacy Policy.

Page 17 Return to the Table of Contents
Now sign in with your Pearson educator account.
Tip: If you cannot remember your Pearson username or password, please use the Forgot
your username or password? link rather than creating a new account. If you don’t have
an instructor account, contact your Pearson sales rep.
Congratulations! – Your Blackboard instructor credentials are now linked with your
Pearson credentials. This is a one-time process; you will not need to sign in to
Pearson MyLab & Mastering again when you access the site through Blackboard, or
if you pair any other Pearson courses through Blackboard. Click Get Started.

Page 18 Return to the Table of Contents
Below Copy Existing Course, select See My List.
Note: If you have multiple courses in your Pearson account, be very careful to select
the correct course to copy.
Select the course you wish to copy.
You will now fill in your course information.

Page 19 Return to the Table of Contents
a) Leave the Course Type set to Student Course, if this course will be used for
student enrollment
b) Enter the Course Name.
c) From Allow Copy, check “Instructors can copy this course” if you would like
other instructors to be able to copy your MyLab course.
d) In Course Dates, enter the start and end-date for your course. Students cannot
access the Pearson course until the start date. Student access ends early the
next morning after the course end date. Your access ends one year after that.
e) Select Create Course to create the MyLab course, or Cancel to stop creating
this course, and go back to the course catalog.

Page 20 Return to the Table of Contents
You’re done! Your course is being created and will be ready to go shortly. (Note:
you can disregard the Reference No.; this is for Pearson use.)
Note: It takes time for the course to set up. If you try to open the paired MyLab course
before it’s finished processing, you’ll receive a “course1” error message. Once the course is
ready, you will receive an email alerting you that it is now available and ready to for use.
You should receive the email within an hour, but please be aware that it can take up to 3
hours, depending on server traffic. If you do not receive your email within 3 hours, please
check your junk or spam filter as the email might have gotten stuck in the filter. You don’t
have to stay signed into Blackboard during this process.
Your course confirmation email contains a Student Registration Handout.
Distribute this to your students, as it provides the steps to access your MyLab
course.

Page 21 Return to the Table of Contents
Copy another instructor’s course
Video: Instructors: Pair Your Blackboard Course with a COPY of a Pearson
MyLab & Mastering Course
You can pair your Blackboard course with a copy of another instructor’s course, if that
instructor has made the course available for copy, and has shared the MyLab’s Course ID
with you. This is especially helpful if you are a new instructor, and a colleague has taught
with Pearson MyLab and Mastering before, or if you want to ensure consistency across
sections, and yet have independent courses.
Log in to your Blackboard Course.
Click Tools in the left-hand navigation bar.
On the Tools page, select Pearson’s MyLab & Mastering.
Start in your Blackboard
course
Link your Blackboard
account with your Pearson
account if you haven't
before
Pair your Blackboard course to a copy of a
MyLab course created by
another instructor

Page 22 Return to the Table of Contents
Tip: If you do not see this link, please check with your Blackboard Administrator to make
sure that the Pearson Building Block has been installed.
Now the Pearson’s MyLab & Mastering page will appear. Click Select a MyLab and
Mastering product to use with this course.
If this is your first time integrating a course with Blackboard, you will need to link
your Pearson Account. If you have linked your Blackboard and Pearson
accounts before, skip to step 9.
Read and accept the End User License Agreement and Privacy Policy.

Page 23 Return to the Table of Contents
Now sign in with your Pearson educator account.
Tip: If you cannot remember your Pearson username or password, please use the Forgot
your username or password? link rather than creating a new account. If you don’t have
an instructor account, contact your Pearson sales rep.
Congratulations! – Your Blackboard instructor credentials are now linked with your
Pearson credentials. This is a one-time process; you will not need to sign in to
Pearson MyLab & Mastering again when you access the site through Blackboard, or
if you pair any other Pearson courses through Blackboard. Click Get Started.

Page 24 Return to the Table of Contents
Below Copy Existing Course, enter the Course ID of your colleague’s course.
Note: If you try to copy a colleague’s course and receive a message like the one below, ask
your colleague to sign into www.pearsonmylabandmastering.com, locate the course in the
course list, and select Details on the course tile. He can make sure he is sharing the correct
Course ID, and that Allow Copy is marked Yes. If Allow Copy is marked No, he should select
Edit Course Details to change this setting. Once the setting is saved, you will be able to copy
the course and pair it with your Blackboard course.
Select your colleague’s course.

Page 25 Return to the Table of Contents
Fill in your course information.
a) Leave the Course Type set to Student Course, if this course will be used for
student enrollment
b) Enter the Course Name.
c) From Allow Copy, check “Instructors can copy this course” if you would like
other instructors to be able to copy your MyLab course.
d) In Course Dates, enter the start and end-date for your course. Students cannot
access the Pearson course until the start date. Student access ends early the
next morning after the course end date. Your access ends one year after that.
e) Select Create Course to create the MyLab course, or Cancel to stop creating
this course, and go back to the course catalog.

Page 26 Return to the Table of Contents
You’re done! Your course is being created and will be ready to go shortly. (Note:
you can disregard the Reference No.; this is for Pearson use.)
Note: It takes time for the course to set up. If you try to open the paired MyLab course
before it’s finished processing, you’ll receive a “course1” error message. Once the course is
ready, you will receive an email alerting you that it is now available and ready to for use.
You should receive the email within an hour, but please be aware that it can take up to 3
hours, depending on server traffic. If you do not receive your email within 3 hours, please
check your junk or spam filter as the email might have gotten stuck in the filter. You don’t
have to stay signed into Blackboard during this process.
Your course confirmation email contains a Student Registration Handout.
Distribute this to your students, as it provides the steps to access your MyLab
course.
Scenario 2: Do you need to create a Course Group (Coordinator Course with
Member Courses)?
Does your school offer multiple sections of the same course across the program, that you
are in charge of customizing or managing? Or do you teach multiple sections of the same
course yourself? In both cases, you might be using a Course Group (Coordinator/Member
Courses) to set up or manage these MyLab courses.
You can integrate your Course Group with Blackboard. You have options for how your
Course Group is integrated, depending on how much control you want over the
member courses, and whether you also manage the content of the Blackboard
course.
Are you a Coordinator who will customize the Coordinator MyLab course, but then
allow other instructors to copy it, retaining less control over the member
courses? This option is popular with Coordinators who want to set up the structure
and content of the MyLab course, but then want the member section instructors to

Page 27 Return to the Table of Contents
copy the course, and own it in their own educator accounts, while still being part of a
Course Group.
This Course Group option is generally the easiest to implement as the coordinator. After
setting up your Coordinator course, your member section instructors will pair their
Blackboard member sections with copies of your Coordinator course, thereby joining the
Course Group. You set up the Coordinator course; they pair it with their Blackboard
courses.
As the Coordinator of the course, you will still be able to manage the assignments and
gradebooks of the member sections from your Coordinator course if you wish, but you
generally hand over control of the Blackboard course and the MyLab to your colleagues.
To set up this Course Group option, there are two approaches depending on whether or
not you are in charge of standardizing the Blackboard course shell for your colleagues also
(for example, do you also set up Discussion Boards, add documents, modules, or other
content to the Blackboard course that you want to standardize across your member
sections?). If you only customize the MyLab content, see Option 1. If you also design the
Blackboard course content, skip to Option 2.
Option 1: Are you the Coordinator for the MyLab content only (not Blackboard
content)?
Video: How to Create MyLab Coordinator and Member Courses with
Blackboard
Start in Pearson MyLab &
Mastering
Create and customize a Coordinator
Course, make sure it's
"Available for Copy"
Share your Course ID with the Member
Section Instructors
Member Section
Instructors pair their BB courses with
copies of your Coordinator
course
Member sections are owned by member section
instructors but Coordinators
can access their
Assignment Managers and
Gradebooks through Coord
course.

Page 28 Return to the Table of Contents
As a Coordinator, follow these instructions:
Sign into www.pearsonmylabandmastering.com and create your Coordinator
course (don’t forget you’ll need to change the course’s general settings from
Standard to Coordinator). Make sure that the copy setting is set to “Available for
Copy.”
Ask your Blackboard Administrator to create a Blackboard course for each of your
member section instructors, and enroll him or her as the instructor in the
Blackboard course (if you are teaching any member sections this term, the admin
should make you member sections also).
Provide the Course ID of your Coordinator course to your member section
instructors. Your member section instructors should have Pearson Educator Accounts
set up already.
The instructors of the member sections sign into their Blackboard courses, and pair
the section with a copy of your MyLab Coordinator course.
Note: If you are teaching any member sections, when pairing your Blackboard courses
instead of entering the Course ID, you will select your Coordinator course from See My
List.
Option 1: Each member section instructor will follow these instructions:
As a Member Section Instructor you will:
From Blackboard, select Tools in the left-hand
navigation bar.
On the Tools page, select Pearson’s MyLab &
Mastering.

Page 29 Return to the Table of Contents
Tip: If you do not see this link, please check with your Blackboard Administrator to make
sure that the Pearson Building Block has been installed.
Now the Pearson’s MyLab & Mastering page will appear. Choose Select a MyLab
and Mastering product to use with this course.
If this is your first time integrating a course with Blackboard, you will need to link
your Pearson Account. If you have linked your Blackboard and Pearson
accounts before, skip to step 8.
Read and accept the End User License Agreement and Privacy Policy.

Page 30 Return to the Table of Contents
Now sign in with your Pearson Educator account.
Tip: If you cannot remember your Pearson username or password, please use the Forgot
your username or password? link rather than creating a new account. If you don’t have
an instructor account, contact your Pearson sales rep.
Congratulations! – Your Blackboard instructor credentials are now linked with your
Pearson credentials. This is a one-time process; you will not need to sign in to
Pearson MyLab & Mastering again when you access the site through Blackboard, or
if you pair any other Pearson courses through Blackboard. Click Get Started.

Page 31 Return to the Table of Contents
Below Copy Existing Course, enter the Course ID of your colleague’s course.
Note: If you try to copy a colleague’s course and receive a message like the one below, ask
your colleague to sign into www.pearsonmylabandmastering.com, locate the course in the
course list, and select Details on the course tile. He can make sure he is sharing the correct
Course ID, and that Allow Copy is marked Yes. If Allow Copy is marked No, he should select
Edit Course Details to change this setting. Once the setting is saved, you will be able to copy
the course and pair it with your Blackboard course.
Select your Coordinator’s course.

Page 32 Return to the Table of Contents
Fill in your course information.
a) Leave the Course Type set to Student Course, if this course will be used for
student enrollment
b) Enter the Course Name.
c) From Allow Copy, check “Instructors can copy this course” if you would like
other instructors to be able to copy your MyLab course.
d) In Course Dates, enter the start and end-date for your course. Students cannot
access the Pearson course until the start date. Student access ends early the
next morning after the course end date. Your access ends one year after that.
e) Select Create Course to create the MyLab course, or Cancel to stop creating
this course, and go back to the course catalog.

Page 33 Return to the Table of Contents
You’re done! Your course is being created and will be ready to go shortly. (Note:
you can disregard the Reference No.; this is for Pearson use.)
Note: It takes time for the course to set up. If you try to open the paired MyLab course
before it’s finished processing, you’ll receive a “course1” error message. Once the course is
ready, you will receive an email alerting you that it is now available and ready to for use.
You should receive the email within an hour, but please be aware that it can take up to 3
hours, depending on server traffic. If you do not receive your email within 3 hours, please
check your junk or spam filter as the email might have gotten stuck in the filter. You don’t
have to stay signed into Blackboard during this process.
Your course confirmation email contains a Student Registration Handout.
Distribute this to your students, as it provides the steps to access your MyLab
course.

Page 34 Return to the Table of Contents
Option 2: Are you the Coordinator for the MyLab content and the Blackboard content
also?
As the Coordinator, follow these instructions:
Ask your Blackboard Administrator to create you a Blackboard course shell that
you will use to set up as the template for the member sections. Customize the
Blackboard course with the materials you want the member sections to have. No
students will enroll in this “master” Blackboard course.
Note: Be sure to make all of the desired changes and customizations in the Blackboard
master course before copies of it are made. Once the Blackboard Administrator (or you, if
you have course copy privileges) copies the Blackboard master shell there is no “parent-
child” relationship with the copies. Unlike Pearson MyLab Coordinator courses, any
changes made to the master Blackboard course do not trickle down into the copies
once they’ve been created.
Start in a Blackboard course you will use as a
"master" course
Pair the BB master with MyLab Coord course
Customize the BB course and the MyLab
Coord course
BB Admin creates copies of the BB master
and enrolls member section instructors in
them
Member Section Instructors link their BB accounts and Pearson
Educator Accounts
Member Section Instructors pair their BB courses with copies of
your Coord Course
BB sections have customized BB content AND MyLab is part of
Course Group
Member sections are owned by member
section instructors, but Coord can access their Assignment Managers
and Gradebooks through the Coord
course.

Page 35 Return to the Table of Contents
From the Blackboard master course, select Tools in the navigation menu.
Select Pearson’s MyLab and Mastering.
Click Select a MyLab and Mastering product to use with this course.
If this is your first time integrating a course with Blackboard, you will need to link
your Pearson Account. Once your accounts are linked you can pair this Blackboard
course to a MyLab course.

Page 36 Return to the Table of Contents
a) Pair this master Blackboard course with a new MyLab course from the catalog,
or a copy of a student course you already have in your account. Make sure you
Allow Copy of this course.
Or
b) You can pair the master Blackboard course with a copy of a Coordinator course
you already have in your Pearson account. Select your Coordinator course from
See My List, and change the Course Type from Member Course to Instructor
Course. Make sure you Allow Copy of this course.
Once you’ve created the course paired with the Blackboard master course, change
it to a Coordinator course from the MyLab course settings.
Once the MyLab is promoted to Coordinator course, make your customizations to
the MyLab (make assignments, add due dates, etc).
Now that the Blackboard content and MyLab content are customized, ask your
Blackboard Administrator to create copies of the Blackboard master course for
each of your member section instructors (including you, if you are teaching any
member sections this term), and the member section instructors as the instructor
in the Blackboard course. Your member section instructors should already have
Pearson Educator accounts.
Provide the Course ID of your Coordinator course to your member section
instructors. If they have not integrated Blackboard with a MyLab course before they
will need it when selecting a course to pair.

Page 37 Return to the Table of Contents
Each member section instructor signs into his or her Blackboard course, and pairs
it with a copy of your MyLab Coordinator course, thereby making it part of the
Course Group.
Option 2: Each member section instructor will follow these instructions:
a) Click Tools in the left-hand navigation bar.
b) On the Tools page, click Pearson’s MyLab & Mastering.
c) Now the Pearson’s MyLab & Mastering page will appear. Click Select a MyLab
and Mastering product to use with this course.

Page 38 Return to the Table of Contents
d) If this is your first time integrating a course with Blackboard, you will need to
link your Pearson Account. If you have linked your Blackboard and Pearson
accounts before, skip to step h.
e) Read and accept the End User License Agreement and Privacy Policy.
f) Now sign in with your Pearson educator account.
Page 39 Return to the Table of Contents
Tip: If you cannot remember your Pearson username or password, please use the Forgot
your username or password? link rather than creating a new account. If you don’t have
an instructor account, contact your Pearson sales rep.
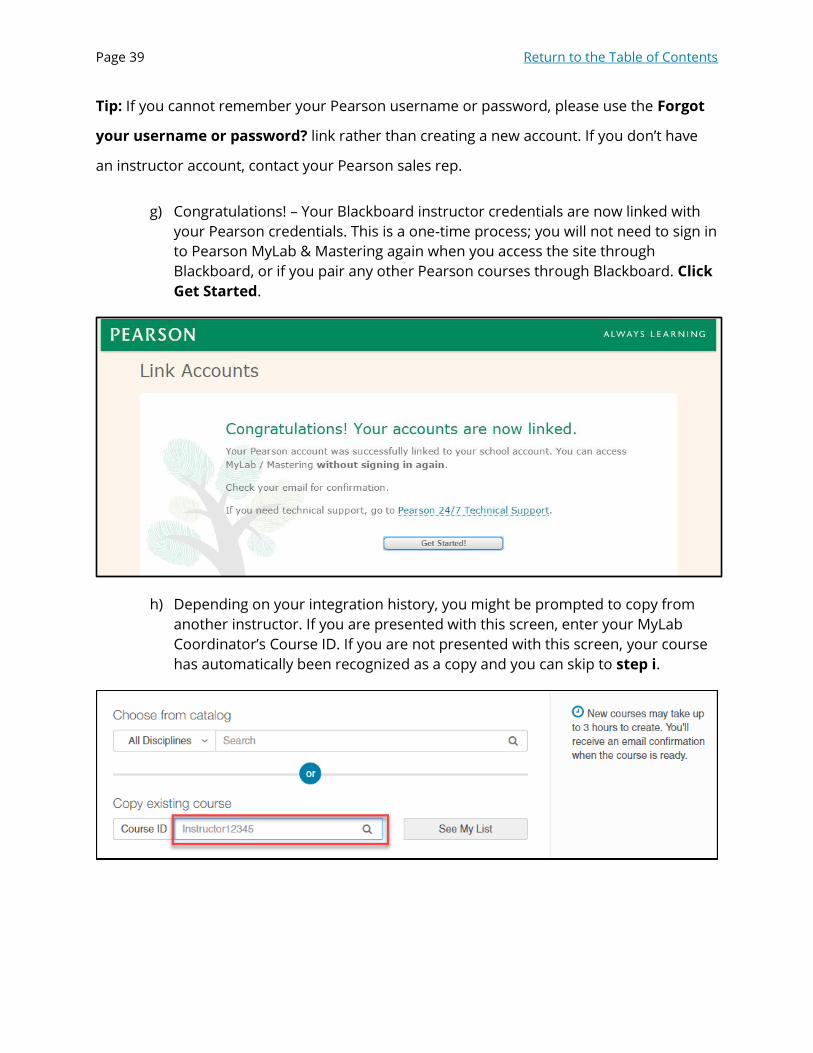
g) Congratulations! – Your Blackboard instructor credentials are now linked with
your Pearson credentials. This is a one-time process; you will not need to sign in
to Pearson MyLab & Mastering again when you access the site through
Blackboard, or if you pair any other Pearson courses through Blackboard. Click
Get Started.
h) Depending on your integration history, you might be prompted to copy from
another instructor. If you are presented with this screen, enter your MyLab
Coordinator’s Course ID. If you are not presented with this screen, your course
has automatically been recognized as a copy and you can skip to step i.

Page 40 Return to the Table of Contents
i) If you’ve integrated before, Blackboard recognizes that this Blackboard course
was copied from a course paired with a Pearson MyLab. Because that MyLab
was a Coordinator course, this copy will be a member course in the Course
Group.
j) You will now fill in your course information. Enter the title (name) of your
course, choose Member Section Course for Student Enrollment as the
course type (this is the setting that will connect your course section to the
course group).
Note: If you allow other instructors to copy this course that you’ve just created, those
courses would be standard courses, and not part of the Course Group; only courses copied
from the Coordinator course are member courses of the Course Group.
k) You’re done! Your course is being created and will be ready to go shortly.
Note: It takes time for the course to set up. If you try to open the paired MyLab course
before it’s finished processing, you’ll receive a “course1” error message. Once the course is
ready, you will receive an email alerting you that it is now available and ready to for use.
You should receive the email within an hour, but please be aware that it can take up to 3
hours, depending on server traffic. If you do not receive your email within 3 hours, please

Page 41 Return to the Table of Contents
check your junk or spam filter as the email might have gotten stuck in the filter. You don’t
have to stay signed into Blackboard during this process.
l) Your course confirmation email contains a Student Registration Handout.
Distribute this to your students, as it provides the steps to access your MyLab
course.
Are you a Coordinator who will customize the Coordinator MyLab course and needs
maximum control of the member sections in your own Pearson account? This
option is popular with large programs with many adjuncts, so that the Coordinator can
maintain the most control of the course structure, assignments, and menu items in the
MyLab member courses. Member section instructors will enroll in their MyLab section
using Section Instructor access codes.
Setting the Course Group up in the following manner requires more work on the part of
you, the Coordinator, because you will pair all of the Blackboard sections with member
sections of the Coordinator course, instead of allowing member section instructors to do
this step. But because you do the pairing, the MyLab member courses will “live” in your
Pearson account, so you, as the Coordinator, have the fullest access and control over these
courses.
To set up this Course Group option, there are two approaches depending on whether or
not you are in charge of standardizing the Blackboard course shell for your colleagues also
(for example, do you also set up Discussion Boards, add documents, modules, or other
content to the Blackboard course that you want to standardize across your member
sections?). If you only customize the MyLab content, see Option 1. If you also design the
Blackboard course content, skip to Option 2.
Option 1: Are you the Coordinator for the MyLab content only (not Blackboard
content)

Page 42 Return to the Table of Contents
Follow these instructions to pair the member sections to your Coordinator course, and
then get your Section Instructors enrolled:
Sign into www.pearsonmylabandmastering.com and create your Coordinator
course (don’t forget you’ll need to change the course’s general settings from
Standard to Coordinator from the Course Settings).
Ask your Blackboard Administrator to create a Blackboard course for each of your
member section instructors (including you, if you are teaching any member
sections this term).
Your Blackboard Administrator should enroll both you and the Member Section
Instructor as instructors in the Blackboard course.
You will sign into each Blackboard member section and pair the section with a copy
of your MyLab coordinator course, by following these instructions:
a) Click Tools in the left-hand navigation bar.
Start in Pearson MyLab and Mastering
Create and customize a Coord Course
Get Section Instructor Access Codes for each Member Section Instructor from
Pearson rep
Blackboard Admin creates Blackboard course for each
Member Section
Blackboard Admin enrolls both you and the Section
Instructor in the Blackboard member course
You pair each Blackboard course with a copy of your
Coord course
Section Instructor signs into Blackboard course, links to Pearson account, enrolls in
the MyLab course with Section Instructor Access
Code
You maintain control of member courses from your Coord course, but SI's can
access their sections as instructors from Blackboard

Page 43 Return to the Table of Contents
b) On the Tools page, click Pearson’s MyLab & Mastering.
Tip: If you do not see this link, please check with your Blackboard Administrator, to make
sure that the Pearson Building Block has been installed.
c) Now the Pearson’s MyLab & Mastering page will appear. Click Select a MyLab
and Mastering product to use with this course.

Page 44 Return to the Table of Contents
d) If this is your first time integrating a course with Blackboard, you will need to
link your Pearson Account. Enter your Pearson username and password,
then you can Get Started.
e) Below Copy Existing Course, select See My List.
f) Choose your Coordinator Course from your list of courses. Click Go.
Note: If you have multiple courses in your Pearson account, be very careful to select the
correct course to copy.
Make sure Course Type is set to Member Section : Use for student enrollment,
and fill in Course Name and Course Dates.

Page 45 Return to the Table of Contents
Select Create Course.
You’re done! Your course is being created and will be ready to go shortly. After the
course has finished processing, you can have your Section Instructors enroll.

Page 46 Return to the Table of Contents
Note: It takes time for the course to set up. If you try to open the paired MyLab course
before it’s finished processing, you’ll receive a “course1” error message. Once the course is
ready, you will receive an email alerting you that it is now available and ready to for use.
You should receive the email within an hour, but please be aware that it can take up to 3
hours, depending on server traffic. If you do not receive your email within 3 hours, please
check your junk or spam filter as the email might have gotten stuck in the filter. You don’t
have to stay signed into Blackboard during this process.
Repeat this process for each member section of the Course Group.
After you’ve paired each member section, your Section Instructors will each need to
sign into their Blackboard sections, and enroll in their MyLab course with section
instructor access codes. You can get section instructor access codes from your
Pearson representative.
Option 1: Your Section Instructor will follow these instructions to
register and enroll in the member sections:
Please click here for a handout of step-by-step instructions.

Page 47 Return to the Table of Contents
Option 2: Are you the Coordinator for the MyLab content and the Blackboard content
also?
Follow these instructions to create a “master” Blackboard course, pair it with the
Coordinator course, pair the member sections to your Coordinator course, and then get
your Section Instructors enrolled:
Ask your Blackboard Administrator to create you a Blackboard course shell that
you will use to set up as the template for the member sections. Customize the
Blackboard course with the materials you want the member sections to have. No
students will enroll in this “master” Blackboard course.
Note: Be sure to make all of the desired changes and customizations in the Blackboard
master course before copies of it are made. Once the Blackboard Administrator (or you, if
you have course copy privileges) copies the Blackboard master shell there is no “parent-
child” relationship with the copies. Unlike Pearson MyLab Coordinator courses, any
Start in a Blackboard course you will use as a "master"
course
Pair the BB master with MyLab Coord course
Customize the BB course and the Mylab Coord
course
Get Section Instructor Access Codes for each
Member Section Instructor from Pearson rep
BB Admin creates copies of the BB master and enrolls
you and the member section instructors in them
You pair each BB course with a copy of your Coord
course
Section Instructor signs into BB course, links to Pearson
account, enrolling in the MyLab course with Section
Instructor Access Code
Member courses live in your Pearson account but
SI's can access as instructors

Page 48 Return to the Table of Contents
changes made to the master Blackboard course do not trickle down into the copies
once they’ve been created.
From the Blackboard master course, select Tools in the navigation menu.
Select Pearson’s MyLab and Mastering.
Click Select a MyLab and Mastering product to use with this course.
Page 49 Return to the Table of Contents
If this is your first time integrating a course with Blackboard, you will need to link
your Pearson Account. Once your accounts are linked you can pair this Blackboard
course to a MyLab course.
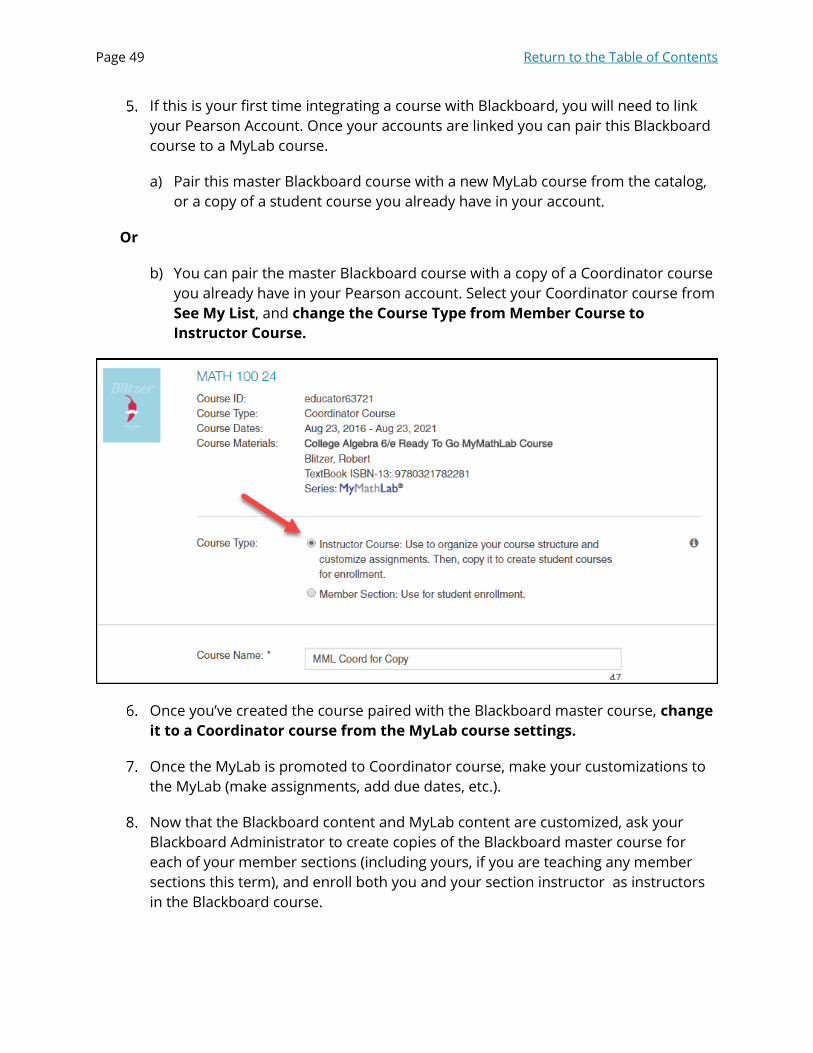
a) Pair this master Blackboard course with a new MyLab course from the catalog,
or a copy of a student course you already have in your account.
Or
b) You can pair the master Blackboard course with a copy of a Coordinator course
you already have in your Pearson account. Select your Coordinator course from
See My List, and change the Course Type from Member Course to
Instructor Course.
Once you’ve created the course paired with the Blackboard master course, change
it to a Coordinator course from the MyLab course settings.
Once the MyLab is promoted to Coordinator course, make your customizations to
the MyLab (make assignments, add due dates, etc.).
Now that the Blackboard content and MyLab content are customized, ask your
Blackboard Administrator to create copies of the Blackboard master course for
each of your member sections (including yours, if you are teaching any member
sections this term), and enroll both you and your section instructor as instructors
in the Blackboard course.

Page 50 Return to the Table of Contents
Now you will need to go into each Blackboard section in your Blackboard account,
and pair the section with a copy of your Pearson MyLab Coordinator course,
making a member section course.
a) Click Tools in the left-hand navigation bar.
b) On the Tools page, click Pearson’s MyLab & Mastering.
c) Now the Pearson’s MyLab & Mastering page will appear. Choose Select a
MyLab and Mastering product to use with this course.

Page 51 Return to the Table of Contents
d) Blackboard recognizes that this Blackboard course was copied from a course
paired with a Pearson MyLab. Because that MyLab was your Coordinator
course, this copy will be a member course in the Course Group. Select Create
Course Copy.
You will now fill in the member section information. Leave the default Course Type -
Member Section: Use for student enrollment. Enter Course Name and Course Dates,
and select Create Course.

Page 52 Return to the Table of Contents
Note: If you allow other instructors to copy this course that you’ve just created, those
courses would be standard courses, and not part of the Course Group; only courses copied
from the Coordinator course are member courses of the Course Group.
e) You’re done! Your course is being created and will be ready to go shortly.
Note: It takes time for the course to set up. If you try to open the paired MyLab course
before it’s finished processing, you’ll receive a “course1” error message. Once the course is
ready, you will receive an email alerting you that it is now available and ready to for use.
You should receive the email within an hour, but please be aware that it can take up to 3
hours, depending on server traffic. If you do not receive your email within 3 hours, please
check your junk or spam filter as the email might have gotten stuck in the filter. You don’t
have to stay signed into Blackboard during this process.
Repeat these steps, pairing each Blackboard member section with your
Coordinator course.
After all Blackboard sections have been paired with the MyLab, your Section
Instructors will need to sign into their Blackboard accounts, and click into the
course in which they will be a Section Instructor. You can get complimentary
Section Instructor access codes from your Pearson representative. If any Section
Instructors teach more than one section of the same course, they will only need to
use one Section Instructor access code.

Page 53 Return to the Table of Contents
Option 2: Your Section Instructor will follow these instructions to
register and enroll in the member sections:
Please click here for a handout of step-by-step instructions.
Are you using a Course Group because you’re teaching multiple sections of the same
course yourself, and would like to use a Coordinator Course to manage your own
member sections?
If you’re teaching multiple sections of the same MyLab course, using an integrated Course
Group is an easy way to manage your sections. To set up this Course Group option, there
are two approaches depending on whether you only care about standardizing the MyLab
course across all of your sections, or if you also want to make customizations to the
Blackboard course shell that you want to have across all of your member sections.
Do you want to standardize the MyLab content across all of your sections?
Follow these instructions to pair your member sections to your Coordinator course:
Sign into www.pearsonmylabandmastering.com and create your Coordinator
course.
Ask your Blackboard Administrator to create a Blackboard course for each of your
member sections, and enroll you as the instructor of each section.
Start in Pearson MyLab &
Mastering
Create your Coord course
BB Admin creates BB courses for
each of your
sections
Sign into each BB
section and pair it with a copy of
your Coord Course
Manage MyLab
sections by signing into
MyLab & Mastering
and entering the Coord
course

Page 54 Return to the Table of Contents
You will sign into each Blackboard member section and pair the section with a copy
of your MyLab coordinator course, by following these instructions:
a) Click Tools in the left-hand navigation bar.
b) On the Tools page, click Pearson’s MyLab & Mastering.
Tip: If you do not see this link, please check with your Blackboard Administrator to make
sure that the Pearson Building Block has been installed.
c) Now the Pearson’s MyLab & Mastering page will appear. Click Select a MyLab
and Mastering product to use with this course.

Page 55 Return to the Table of Contents
d) If this is your first time integrating a course with Blackboard, you will need to
link your Pearson Account in the first section you pair. You’ll only need to do
this once. If you have linked your Blackboard and Pearson accounts before,
skip to step h.
e) Read and accept the End User License Agreement and Privacy Policy.
f) Now sign in with your Pearson educator account.

Page 56 Return to the Table of Contents
Tip: If you cannot remember your Pearson username or password, please use the Forgot
your username or password? link rather than creating a new account. If you don’t have
an instructor account, contact your Pearson sales rep.
g) Congratulations! – Your Blackboard instructor credentials are now linked with
your Pearson credentials. This is a one-time process; you will not need to sign in
to Pearson MyLab & Mastering again when you access the site through
Blackboard, or when you pair any other Pearson courses through Blackboard.
Click Get Started.
h) Below Copy Existing Course, select See My List.
Note: If you have multiple courses in your Pearson account, be very careful to select
the correct course to copy.
i) Choose your Coordinator Course from your list of courses. Click Go.

Page 57 Return to the Table of Contents
Note: If you have multiple courses in your Pearson account, be very careful to select the
correct course to copy.
j) Make sure Course Type is set to Member Section : Use for student
enrollment, and fill in Course Name and Course Dates.
k) Select Create Course.
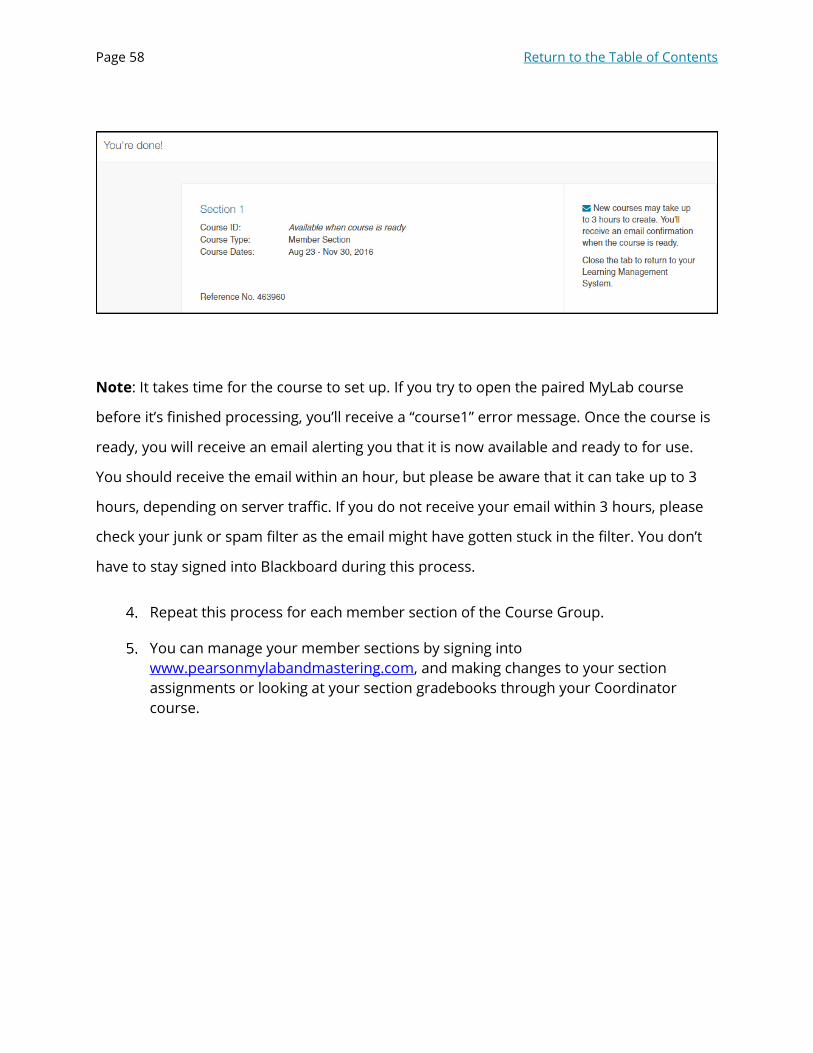
l) You’re done! Your course is being created and will be ready to go shortly. After
the course has finished processing, you can have your Section Instructors
enroll.
Page 58 Return to the Table of Contents
Note: It takes time for the course to set up. If you try to open the paired MyLab course
before it’s finished processing, you’ll receive a “course1” error message. Once the course is
ready, you will receive an email alerting you that it is now available and ready to for use.
You should receive the email within an hour, but please be aware that it can take up to 3
hours, depending on server traffic. If you do not receive your email within 3 hours, please
check your junk or spam filter as the email might have gotten stuck in the filter. You don’t
have to stay signed into Blackboard during this process.
Repeat this process for each member section of the Course Group.
You can manage your member sections by signing into
www.pearsonmylabandmastering.com, and making changes to your section
assignments or looking at your section gradebooks through your Coordinator
course.

Page 59 Return to the Table of Contents
Do you want to standardize both the MyLab content and the Blackboard course
content across all of your sections?
Follow these steps to set up a Blackboard “master” course, pair it with a Coordinator
course, then pair your member sections:
Ask your Blackboard Administrator to create you a Blackboard course shell that
you will use to set up as the template for the member sections. Customize the
Blackboard course with the materials you want the member sections to have. No
students will enroll in this “master” Blackboard course.
Note: Be sure to make all of the desired changes and customizations in the Blackboard
master course before copies of it are made. Once the Blackboard Administrator (or you, if
you have course copy privileges) copies the Blackboard master shell there is no “parent-
child” relationship with the copies. Any changes made to the master Blackboard course do
not trickle down into the copies once they’ve been created.
Start in a Blackboard course you will use as a
"master" course
Pair the BB master with MyLab Coord course
Customize the BB course and the MyLab
Coord course
BB Admin creates copies of the BB master and enrolls you in them
as the instructor
You sign into each BB course and pair it with a
copy of your Coord course
Manage your MyLab member sections
through your Coord course

Page 60 Return to the Table of Contents
From the Blackboard master course, select Tools in the navigation menu.
Select Pearson’s MyLab and Mastering.
Click Select a MyLab and Mastering product to use with this course.
If this is your first time integrating a course with Blackboard, you will need to link
your Pearson Account. Once your accounts are linked you can pair this Blackboard
course to a MyLab course.

Page 61 Return to the Table of Contents
a) Pair this master Blackboard course with a new MyLab course from the catalog,
or a copy of a student course you already have in your account. Make sure you
Allow Copy of this course.
Or
b) You can pair the master Blackboard course with a copy of a Coordinator course
you already have in your Pearson account. Select your Coordinator course from
See My List, and change the Course Type from Member Course to Instructor
Course. Make sure you Allow Copy of this course.
Once you’ve created the course paired with the Blackboard master course, change
it to a Coordinator course from the MyLab course settings.
Once the MyLab is promoted to Coordinator course, make your customizations to
the MyLab (make assignments, add due dates, etc).
Now that the Blackboard content and MyLab content are customized, ask your
Blackboard Administrator to create copies of the Blackboard master course for
each of your member section.
Now you will need to click into each Blackboard section in your Blackboard account
and pair the section with your Coordinator course to make member sections.
a) Click Tools in the left-hand navigation bar.

Page 62 Return to the Table of Contents
b) On the Tools page, click Pearson’s MyLab & Mastering.
c) Now the Pearson’s MyLab & Mastering page will appear. Click Select a MyLab
and Mastering product to use with this course.

Page 63 Return to the Table of Contents
d) Blackboard recognizes that this Blackboard course was copied from a course
paired with a Pearson MyLab. Because that MyLab was your Coordinator
course, this copy will be a member course in the Course Group. Select Create
Course Copy.
You will now fill in the member section information. Leave the default Course Type -
Member Section: Use for student enrollment. Enter Course Name and Course Dates,
and select Create Course.
Note: If you allow other instructors to copy this course that you’ve just created, those
courses would be standard courses, and not part of the Course Group; only courses copied
from the Coordinator course are member courses of the Course Group.
e) You’re done! Your course is being created and will be ready to go shortly.

Page 64 Return to the Table of Contents
Note: It takes time for the course to set up. If you try to open the paired MyLab course
before it’s finished processing, you’ll receive a “course1” error message. Once the course is
ready, you will receive an email alerting you that it is now available and ready to for use.
You should receive the email within an hour, but please be aware that it can take up to 3
hours, depending on server traffic. If you do not receive your email within 3 hours, please
check your junk or spam filter as the email might have gotten stuck in the filter. You don’t
have to stay signed into Blackboard during this process.
Repeat these steps, pairing each Blackboard member section with your
Coordinator course.
You can manage your section assignments or look at your member section
gradebooks by signing into your master Blackboard course and entering your
Coordinator course through it, or by signing into
www.pearsonmylabandmastering.com, and entering your Coordinator course.
Page 65 Return to the Table of Contents
Scenario 3: Do you need to copy a paired Pearson course from a previous
term?
If you previously integrated your MyLab course with Blackboard, and you’re teaching with
the same MyLab and Mastering product again next term, follow these steps for an easy
transition.
Copy a paired Standard course from a previous term
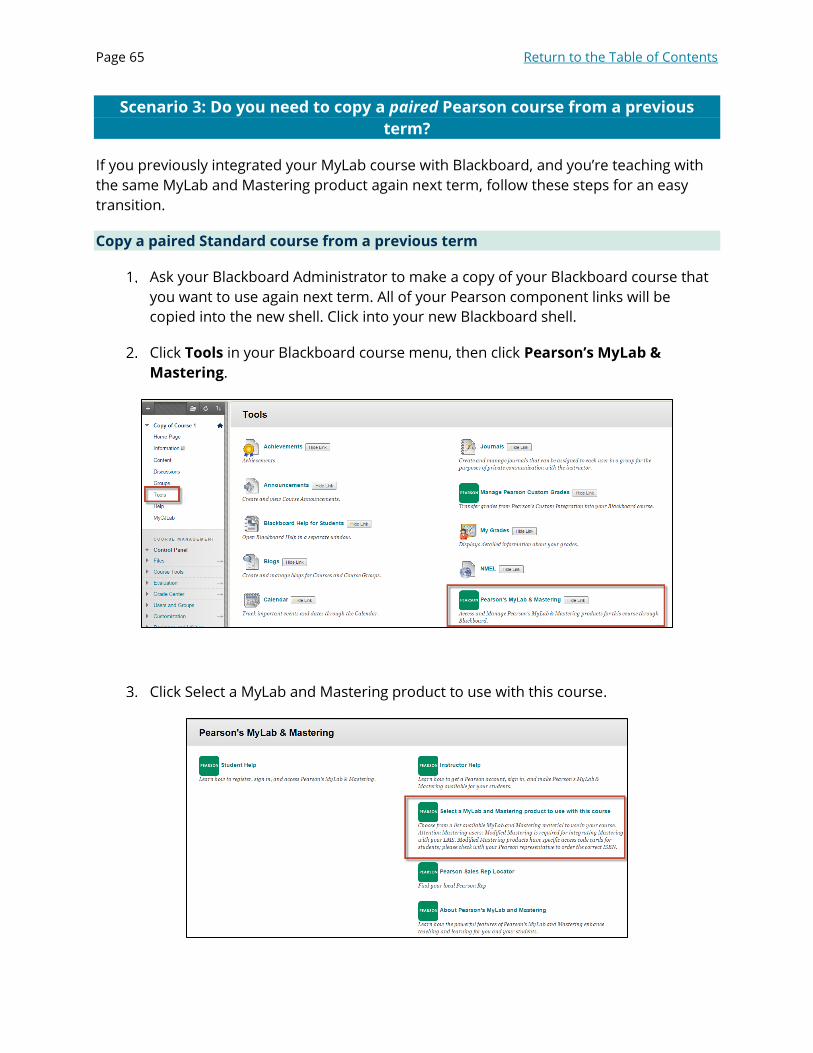
Ask your Blackboard Administrator to make a copy of your Blackboard course that
you want to use again next term. All of your Pearson component links will be
copied into the new shell. Click into your new Blackboard shell.
Click Tools in your Blackboard course menu, then click Pearson’s MyLab &
Mastering.
Click Select a MyLab and Mastering product to use with this course.

Page 66 Return to the Table of Contents
Pearson will recognize that your Blackboard course is a copy of one that was
previously paired to your Pearson product. Select Create Course Copy.
Leave default Course Type: Student Course: Use for student enrollment. Enter
Course Name. Specify if you want to Allow Copy, so that other instructors can copy
this course if provided your Course ID. Enter Course Dates. Select Create Course.
You’re done! Your course is being prepared and will be ready to go shortly.
6. Once you receive the email notification that your Pearson course has been created, the
Pearson links in your Blackboard course will be active once again, and will be paired to the
brand new copy of the same Pearson course that you used last term.

Page 67 Return to the Table of Contents
Copy a paired Coordinator course from a previous term
If you previously linked a Blackboard master course to your Coordinator MyLab course, you
can save time by copying this set-up for next term. Ask your Blackboard Administrator to
make a copy of your Blackboard master course that was paired to your Coordinator course.
All of your Pearson component links will be copied into the new shell. Click into your new
Blackboard master. Like last term, no students will enroll in this course. You will pair this
new master with a copy of your Coordinator course, create an Instructor Course instead of
a Member Course, then change this copy to a Coordinator course.
Select Tools in your Blackboard course menu, then click Pearson’s MyLab &
Mastering.
Choose Select a MyLab and Mastering product to use with this course.

Page 68 Return to the Table of Contents
Pearson will recognize that your Blackboard course is a copy of one that was
previously paired to your Coordinator course. Select Create Course Copy.
Change Course Type to Instructor Course. Enter Course Name.
Note: Make sure to Allow Copy, if member section instructors will be pairing their
Blackboard section to your Coordinator course to create member sections in the
Course Group.
Click Create Course.
You’re done! Your course is being created, and you will receive an email when your
Pearson course has finished processing.

Page 69 Return to the Table of Contents
You must now promote this Instructor course to make this new course a
Coordinator course. Sign into www.pearsonmylabandmastering.com and locate
the new Instructor Course. Inside the course, promote from Standard course to
Coordinator course from the Course Settings.
Make any desired customizations to this new Coordinator course. For example, you
may need to change assignment due dates from what they were last term.
Now you or your Blackboard Administrator will be able to make copies of the Blackboard
master for any member sections that need to be paired with the Coordinator course as
member courses, and be part of this new Course Group.

Page 70 Return to the Table of Contents
Module 2: Add Pearson Component & Assignment Links
After you complete the initial course setup, you can add links to your MyLab & Mastering
course components from within Blackboard Learn. A component is a part of the MyLab
course, for example, the page where students can access the MyLab course home, all of
their homework assignments, the study plan, or results.
You can also add links to individual MyLab assignments.
Adding a Content Area menu item to your Blackboard menu which contains component
links can help your students find your MyLab content more easily, so they do not have to
click Tools, then Pearson’s MyLab & Mastering to get to the MyLab.
Would you like to add MyLab component and assignment links?
Video: Instructors: How To Add Pearson Content to Your Blackboard
Learn Course
Enter your Blackboard course.
Decide where to add links to MyLab components or assignments. You have two
options here.
You can:
Option 1: Add the links to the Content menu item that’s already in your course. Click
Content in the left hand navigation bar. Continue to Step 3.
Option 2: Or you can create your own menu item for these links, and name it something
more specific, like “MyMathLab” or “MyFinanceLab Assignments”. Click “+” at the top of the
left hand navigation bar. Click Content Area.

Page 71 Return to the Table of Contents
Name your Content Area, check the “Available to Users” box, and click Submit.
Now continue to Step 3.
From the preferred Content menu item, now click the Tools tab and click Pearson’s
MyLab & Mastering (Content).
The Add Pearson's MyLab & Mastering Links page displays the MyLab component links
and any MyLab assignments that are set to “Send to Blackboard” in your MyLab &
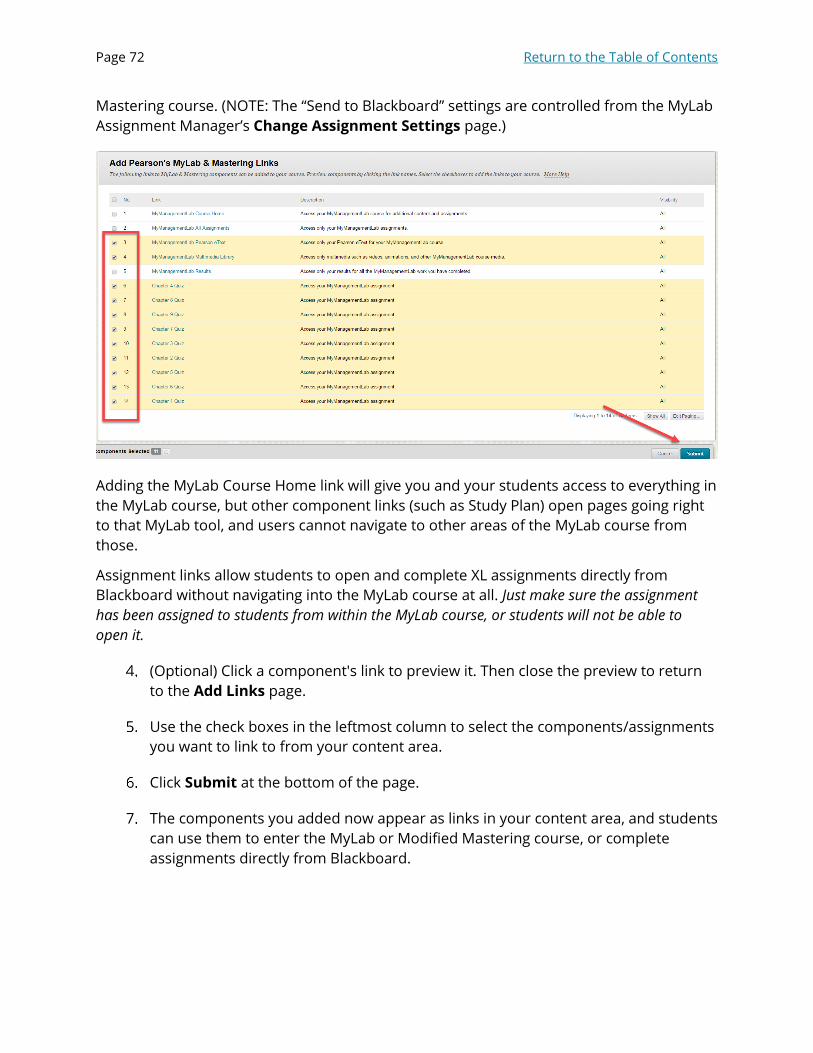
Page 72 Return to the Table of Contents
Mastering course. (NOTE: The “Send to Blackboard” settings are controlled from the MyLab
Assignment Manager’s Change Assignment Settings page.)
Adding the MyLab Course Home link will give you and your students access to everything in
the MyLab course, but other component links (such as Study Plan) open pages going right
to that MyLab tool, and users cannot navigate to other areas of the MyLab course from
those.
Assignment links allow students to open and complete XL assignments directly from
Blackboard without navigating into the MyLab course at all. Just make sure the assignment
has been assigned to students from within the MyLab course, or students will not be able to
open it.
(Optional) Click a component's link to preview it. Then close the preview to return
to the Add Links page.
Use the check boxes in the leftmost column to select the components/assignments
you want to link to from your content area.
Click Submit at the bottom of the page.
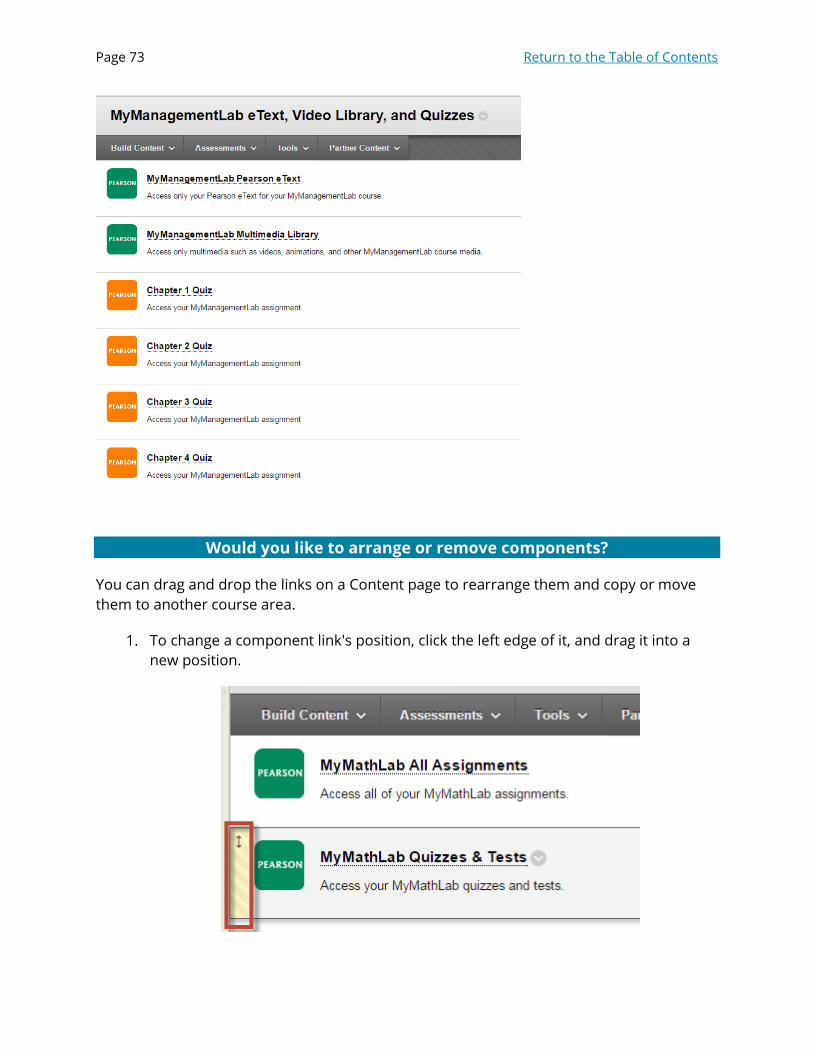
The components you added now appear as links in your content area, and students
can use them to enter the MyLab or Modified Mastering course, or complete
assignments directly from Blackboard.
Page 73 Return to the Table of Contents
Would you like to arrange or remove components?
You can drag and drop the links on a Content page to rearrange them and copy or move
them to another course area.
To change a component link's position, click the left edge of it, and drag it into a
new position.

Page 74 Return to the Table of Contents
To delete a component, point to it, click its drop-down arrow, and select Delete.

Page 75 Return to the Table of Contents
Module 3: Gradebook Set Up and Customization
There are three ways to transfer grades from a MyLab gradebook into the Blackboard Learn Grade Center:
Automatically synchronize grades: This is a one-way process that automatically
brings assignment grades or Overall score from your MyLab course's gradebook
into the Blackboard Grade Center. You can choose to Sync All Grades or Individual
Grades. Auto Sync is the recommended method of getting grades from your
Pearson MyLab & Mastering course into Blackboard.
Manually Transfer Grades using Export/Import: You can export the Pearson
gradebook information to a .csv file and import that file into the Grade Center.
Manually enter grades: You can go into the Grade Center and type student
grades into the appropriate columns.
Tip: You need to choose either auto sync or export/import to avoid duplicate columns in
the Grade Center.
Would you like to Auto Sync your MyLab grades?
Before setting up Auto Sync, there are some things to consider.
Your Blackboard Administrator should have installed the MyLab and Mastering
building block and enabled the auto grade synchronization feature.
The Pearson course linked to the Blackboard course has at least one gradable
activity in the Assignment Manager of the MyLab course.
By default, any assignment in the Assignment Manager will be available to sync. You
can control which items sync from the Change Assignment Settings page of your
MyLab.
You may sync individual assignments by Raw Points or Weighted Points, or choose
to sync only the Overall MyLab score to Blackboard.
If your MyLab course contains several pre-built assignments that you’re not
assigning to students, consider deleting those assignments, to make the number of
assignments in your course more manageable.
Prepare Your MyLab for Sync: Select Individual Scores or Overall Score to Sync
Once you have built the MyLab assignments (or in prebuilt courses, selected the ones you
want to assign), you can set up those assignments, or the overall MyLab score, to sync with
Blackboard.

Page 76 Return to the Table of Contents
Before you Set Up Grade Synchronization in Blackboard, make sure your MyLab
Gradebook is ready to send scores to Blackboard in the manner you prefer.
Note: Any assignment that is in your Assignment Manager (sometimes called
Activities/Assessment Manager) will appear in your MyLab Gradebook. Consider editing the
coverage of the MyLab or deleting assignments if your MyLab course contains many prebuilt
assignments that you are confident you will not assign this term.
Step-by-Step Instructions for Preparing Your MyLab for Grade Sync
Log in to your Blackboard course. On the left hand navigation bar, click Tools.
On the Tools page, click Pearson’s MyLab & Mastering.
Click the link to the MyLab Gradebook.
NOTE: If you don’t have a link to the MyLab Gradebook, click the link to Course
Home, then navigate to this link through your MyLab’s Instructor Tools menu item.

Page 77 Return to the Table of Contents
From the MyLab Gradebook, select Change Weights & Grade Sync Settings.
In the LMS Grade Synchronization Settings, choose how you want to sync grades.
a) By default, syncing your grades will send Raw Points from your MyLab to
Blackboard. For example, if a MyLab homework assignment has 5 questions
worth 1 point apiece, the raw score would be out of 5 points.

Page 78 Return to the Table of Contents
b) Or, you can select to send individual assignment scores by Weighted Points to
Blackboard. From the list of assignments at the bottom of the Change Weights
and Grade Sync Settings page, modify the Assignment Weight point value. For
example, if you prefer to make all homework assignments worth 10 points,
whether they contain 5 questions, or 8 questions, use Assignment Weighting to
make each assignment worth 10 weighted points.
c) Or you can choose only to send the Overall Score to Blackboard. If you select
Overall Score, you can use Category and Assignments Weighting or
Assignment Weighting Only to determine your students Overall score, and
only that one score will sync with Blackboard.
Once you’ve selected how you want MyLab scores to sync, select Save at the
bottom of the Change Weights & Grade Sync Settings page.
If you choose to sync Raw Points or Weighted Points, select the link to Change
Assignment Settings at the top of the page.
Make sure only the assignments you want to Send to Blackboard are checked.
Note: Choose your assignments to send to Blackboard carefully. Once a student has
started working on an assignment, you can’t change this setting,

Page 79 Return to the Table of Contents
Once you have selecting which assignments to Send to Blackboard, select Update
at the bottom of the page.
Note: If you choose to sync your Overall Score from your MyLab, instead of Raw Points or
Weighted Points, none of the individual assignment scores will be available to send to
Blackboard, to prevent them from counting twice.
Close your MyLab browser window once your work has been saved.
Now you can proceed with the Blackboard Grade Sync process either by syncing all
of the assignments you just specified, or individual assignments from these
specified assignments.
Sync All Grades
This option is best when you want to set up Blackboard Grade Center columns for all of the
MyLab grade items set to “Send to Blackboard”, at once. You can also use this option if
you’ve chosen to sync the Overall score from MyLab.
Video: MyLab & Mastering for Blackboard Set Up Grade Sync for all Items

Page 80 Return to the Table of Contents
Step-by-Step
Log into your Blackboard course. On the left hand
navigation bar, click Tools.
On the Tools page, click Pearson’s MyLab &
Mastering.
On the Pearson’s MyLab & Mastering Page, scroll down to Support Tools and click
Manage Pearson MyLab & Mastering Grades.
On the Manage Pearson MyLab & Mastering Grades Screen click Set Up Grade
Synchronization.

Page 81 Return to the Table of Contents
A Set Up Grade Synchronization Wizard will now start. You will be asked to
choose your desired Grade Synchronization Method.
Choosing Auto Sync syncs all MyLab assignments available to sync automatically. This
includes all assignments that are in the Assignment Manager at the time the auto grade
sync is set up. Any assignments created and assigned in the future will automatically be
synced through the auto sync process.
Note: If your Blackboard course is a copy of a previous semester's Blackboard course
where Auto Grade Sync was turned on, you are prompted to clean up the Pearson gradable
items before proceeding. Click the Cleanup button to proceed.
Video: MyLab & Mastering for Blackboard Integration Grade Center Clean Up
Choose to sync “All available MyLab & Mastering assignments”. Click Next. You
will now choose your grade sync settings.

Page 82 Return to the Table of Contents
Include These Items in the Grade Center Calculations: Most users
select Yes for this option. Selecting Yes means you have the option of including
the auto synced grades in Grade Center calculations.
Email notifications: Enter the email addresses of anyone—including yourself—
who should to be notified if auto sync adds a column to the Grade Center.
Category: Select your category.
Once you have made your selections click Submit. You receive a confirmation
message and can see your Grade Synchronization Dashboard.

Page 83 Return to the Table of Contents
Sync Individual Grades
This option is best if you want to choose only certain items to sync, from the list of MyLab
assignments set to “Send to Blackboard”. You can also use this option if you’ve chosen to
sync the Overall score from MyLab.
Video: MyLab & Mastering for Blackboard Set Up Grade Sync for Individual
Items
Step-by-Step
Log into your Blackboard course. On the left hand navigation
bar, click on Tools.
On the Tools page, click on Pearson’s MyLab & Mastering.
On the Pearson’s MyLab & Mastering Page, scroll down to Support Tools and click
on Manage Pearson MyLab & Mastering Grades.

Page 84 Return to the Table of Contents
On the Manage Pearson MyLab & Mastering Grades Screen click Set Up Grade
Synchronization.
On the Set Up Grade Synchronization page, choose Select Individual Pearson
assignments. Then click Next.
Select Add Grade Columns.

Page 85 Return to the Table of Contents
To Select Individual Pearson Assignments, choose the individual assignments
you want to sync from your MyLab course by checking the box to the left of the
assignment name. Then click the Submit button.
On the next page you will choose your Individual Item Grade Sync Settings.
Verify that the list of grade items and Points Possible matches your selections.
Include These Items in the Grade Center Calculations: Most users select Yes
for this option. Selecting Yes means you have the option of including the auto
synced grades in Grade Center calculations.
Category: Choose a category for the item(s)

Page 86 Return to the Table of Contents
Click Submit. These items will now be listed as Blackboard Grade Center columns
and will sync automatically, at a frequency set by your Blackboard Administrator.
Would you like to manage the auto sync process?
Now that you have your auto grade sync set up, here are some helpful tips on managing
your Pearson MyLab & Mastering Grades.
From the Manage Pearson’s MyLab and Mastering Page there are several changes you can
make.
These include:
Learn about auto sync timing
Manually refresh Pearson grades
Fix any grade column discrepancies
Get Diagnostic Data from the grade sync dashboard
Edit auto sync settings
Clean up Pearson Gradable items
Disable auto sync
Follow these steps to get to the Manage Pearson’s MyLab and Mastering Grades page.
You have two options for getting there:
Option 1:
Step 1. In your Blackboard course, click Tools in the left hand navigation bar.
Step 2. On the Tools Page, click Pearson’s MyLab & Mastering.

Page 87 Return to the Table of Contents
Step 3. On the Pearson’s MyLab & Mastering page, scroll down until you get to Support
Tools and click Manage Pearson MyLab & Mastering Grades.
Step 4. You are now on the Manage Pearson’s MyLab & Mastering Grades page.
Option 2:
Step 1. In the left hand navigation bar, scroll down to Grade Center. Click the drop down
arrow next to Grade Center.

Page 88 Return to the Table of Contents
Step 2. Click Full Grade Center.
Step 3. You are now on the Full Grade Center, click Manage to manage Pearson’s MyLab &
Mastering Grades page.

Page 89 Return to the Table of Contents
Understand Auto Sync timing
When you enable auto grade sync, Pearson sends the most recent grades from the
Pearson course's gradebook to the Pearson Grade Repository every 15 minutes.
Blackboard Learn prompts the Pearson Grade Repository to send grades to the Blackboard
Grade Center at a frequency interval set by your Blackboard administrator, typically every
60, 90, 120, or 240 minutes. The repository then sends the grades to the Blackboard Grade
Center.
However, the Blackboard administrator may have left the frequency set at "Never." You can
override the frequency setting, even when it's "Never," by manually refreshing the auto
synced grades.
Refresh Pearson grades
There may be a time where you will need to manually refresh your auto synced Pearson
grades within Blackboard. For example you may need your grades before the scheduled
Blackboard sync.
This list should include all items that you previously synced with your Blackboard Grade
Center plus any assignments that you created in your MyLab or Modified Mastering course
since the last sync took place.
Video: MyLab & Mastering for Blackboard Refresh All Grades

Page 90 Return to the Table of Contents
Video: Refresh Individual Grades for MyLab & Mastering
Step 1. From the Manage Pearson’s MyLab & Mastering Grade page, click Refresh Pearson
Grades.
Step 2. View the items available in the refresh.
Step 3. Click the Submit button.
When the grades are refreshed, Blackboard displays the Pearson's MyLab and Mastering
page with a confirmation message at the top of the page
If there are items listed in the Duplicate Pearson Items in Blackboard course section of this
page, be sure to delete them. Follow the steps in Tip 3 to complete this.
Fix grade column discrepancies
Grade Column Discrepancy occurs when the column is in the Blackboard Grade Center but
is no longer included in the Pearson sync. This could happen because:
• The synchronization settings in your Pearson MyLab & Mastering course no longer
include syncing the item.
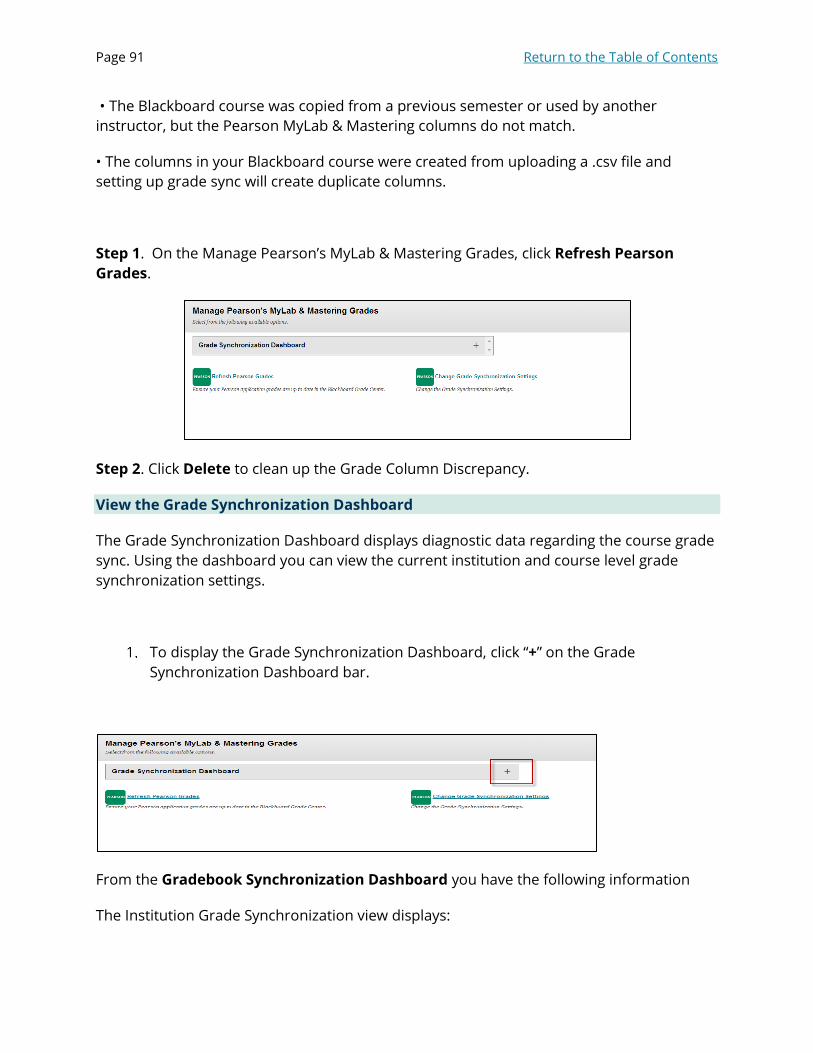
Page 91 Return to the Table of Contents
• The Blackboard course was copied from a previous semester or used by another
instructor, but the Pearson MyLab & Mastering columns do not match.
• The columns in your Blackboard course were created from uploading a .csv file and
setting up grade sync will create duplicate columns.
Step 1. On the Manage Pearson’s MyLab & Mastering Grades, click Refresh Pearson
Grades.
Step 2. Click Delete to clean up the Grade Column Discrepancy.
View the Grade Synchronization Dashboard
The Grade Synchronization Dashboard displays diagnostic data regarding the course grade
sync. Using the dashboard you can view the current institution and course level grade
synchronization settings.
To display the Grade Synchronization Dashboard, click “+” on the Grade
Synchronization Dashboard bar.
From the Gradebook Synchronization Dashboard you have the following information
The Institution Grade Synchronization view displays:

Page 92 Return to the Table of Contents
Institution Grade Update Frequency: The number of minutes between the times
that the Blackboard Learn instance is set to call Pearson for grades.
Grade Updates Status: The status of the grade update process.
Last Institution Grade Check: The day, date, and time of the last time the
Blackboard Learn instance called to Pearson for grades.
Last Institution Grade Update: The day, date, and time of the last time the
Blackboard Learn instance updated grades.
The Course Grade Synchronization view displays:
Grade Synchronization Settings: The current grade sync setting in the individual
course.
Include Grade Columns in Grade Center Calculations: Whether Pearson grades
are being included in the Blackboard Grade Center calculations.
Email Notifications: The email address to which grade sync notifications are being
sent.
Category: The grade sync settings category selection.
Last Course Grade Update: The day, date, and time that the grades for the
individual course were updated.
Change grade synchronization settings
You can make changes to the grade sync settings from the Manage Pearson’s MyLab &
Mastering Grades page.

Page 93 Return to the Table of Contents
On the Manage Pearson’s MyLab & Mastering Grades page, click Change Grade
Synchronization Settings.
The Set Up Grade Synchronization Wizard will open. Make sure that All available
MyLab & Mastering assignments button is checked. Click Next.
The Grade Synchronization Settings Page now appears. Make any desired changes
and click Submit.
Notes:
If you have already synced all items from the MyLab & Mastering course to the
Blackboard Grade Center, these changes will be applied only to

Page 94 Return to the Table of Contents
assignments that are deployed to the Grade Center after you make these changes.
To change category settings for items that are already deployed to the Blackboard Grade Center, make the changes to the individual grade column in
the Blackboard Grade Center.
Clean up Pearson gradable items
Video: MyLab & Mastering for Blackboard Integration Grade Center Clean
Up
Sometimes while setting up auto grade sync or refreshing your grade sync, you
may be prompted to clean up Grade Column Discrepancy.
Grade Column Discrepancy occurs when the column is in the Blackboard Grade Center but
is no longer included in the Pearson sync. This could happen because:
The synchronization settings in your Pearson MyLab & Mastering course no
longer include syncing the item, because items are no longer set to sync, or
because you would now like to sync the Overall MyLab score instead of
individual assignments (or vice versa).
The Blackboard course was copied from a previous semester or used by another
instructor, but the Pearson MyLab & Mastering columns do not match
The columns in your Blackboard course were created from uploading a .csv file
and setting up grade sync will create duplicate columns
The clean-up process removes the old or mismatched items, their associated grade
columns, and any grades associated with the grade columns in Blackboard (grades in the
MyLab are not affected).
On the Manage Pearson’s MyLab & Mastering Grades page, click Set Up Grade
Synchronization in a newly copied course, or Refresh Pearson Grades, if grade
sync has already been set up.
Any items for cleanup will be listed in the Grade Column Discrepancy Cleanup list
at the bottom of the page.
Click Delete for each item.

Page 95 Return to the Table of Contents
A message stating that you have successfully cleaned up the Pearson gradable items is
displayed.
Proceed with setting up auto grade sync if it has not yet been set up.
Turn off auto sync
If you decide to turn off auto sync, here are the steps to do so.
Video: MyLab & Mastering for Blackboard Turn Off Grade Sync
On the Manage Pearson’s MyLab & Mastering Grades page, click Change Grade
Synchronization Settings.
From the list of options choose Turn off grade sync. Then click Next.

Page 96 Return to the Table of Contents
Note: When auto grade sync is disabled, Blackboard no longer updates the Grade Center
with grades from the Pearson Grade Repository. All grades and columns in the Grade
Center remain intact when you turn off auto sync.
Would you like to manually transfer grades using Export/Import?
If you choose not to Auto Sync your grades, you can transfer your MyLab grades by
exporting them via a .csv file from the MyLab, then importing them into Blackboard. To
avoid duplicate grade columns in your Blackboard Grade Center, you should choose either
to Auto Sync or use Export/Import, but a best practice is to avoid using both.
Export Grades
The following steps lead you through the process to export grades from Pearson’s MyLab &
Mastering and then importing them into Blackboard.
First you need to export the grades from your Pearson’s MyLab & Mastering Course.
Log into Blackboard. On the left hand navigation bar click Tools.
On the Tools page, click Pearson’s MyLab and Mastering.

Page 97 Return to the Table of Contents
On the Pearson’s MyLab & Mastering page, click the Gradebook (or, if you do not
have a link directly to the Gradebook in your Blackboard course, click the link to the
Course Home then go to Gradebook once inside your MyLab course).
Click the Export Data button and choose Advanced Export.

Page 98 Return to the Table of Contents
On the Advanced Export screen, title your export in Export Name. For Export
Type choose Student Assignment Results. Choose Blackboard-
MyLab/Mastering Format in the Spreadsheet Layout field.
Once the screen updates, you will now choose the settings for the grades you want
to download. Here is where you will choose the Specific Assignments to export.
Click Choose to do so. Once you have chosen your assignments click Submit
Request.
Wait for the email informing you that your exported report is ready. Go back to the
MyLab Gradebook, and click the Export Data button. Select Retrieve Advanced
Exports.

Page 99 Return to the Table of Contents
Keep the .csv extension if you rename the file.
Import Grades into Blackboard
Log into Blackboard. On the left hand navigation bar click Tools.
On the Tools page, Click Pearson’s MyLab and Mastering.

Page 100 Return to the Table of Contents
On the Pearson’s MyLab & Mastering page, scroll down until you get to Support
Tools and click Manage Pearson MyLab & Mastering Grades.
On the Manage Pearson’s MyLab & Mastering Grades page, click Set Up Grade
Synchronization.

Page 101 Return to the Table of Contents
Note: If you had set up Auto Sync, but now wish to use Export/Import, you will see Change
Grade Synchronization Settings.
On the Set Up Grade Synchronization page, choose the option to Upload grades
via .CSV file. Click Next.
On the Upload Pearson’s MyLab & Mastering Grades, Browse My Computer for
the .csv file that you saved when you exported the grades. Click Submit.
Under Select Columns, select the assignments that you want to import into the
Blackboard Learn Grade Center. (Remove the check mark from any assignments
you do not want to import.) Click Submit.
If you previously uploaded grades for an assignment, the new grades are automatically
uploaded to the same assignment/column. If the upload includes a new assignment (one
not previously uploaded), the Grade Center creates a new column for it.
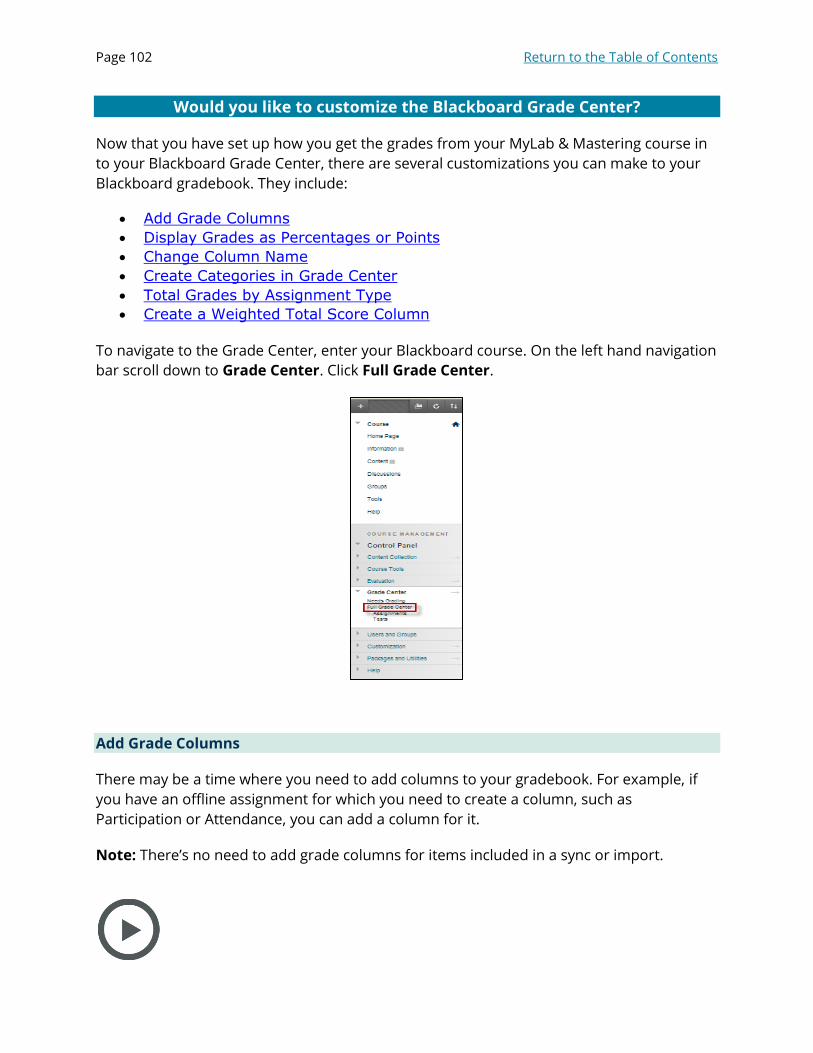
Page 102 Return to the Table of Contents
Would you like to customize the Blackboard Grade Center?
Now that you have set up how you get the grades from your MyLab & Mastering course in
to your Blackboard Grade Center, there are several customizations you can make to your
Blackboard gradebook. They include:
Add Grade Columns
Display Grades as Percentages or Points
Change Column Name
Create Categories in Grade Center
Total Grades by Assignment Type
Create a Weighted Total Score Column
To navigate to the Grade Center, enter your Blackboard course. On the left hand navigation
bar scroll down to Grade Center. Click Full Grade Center.
Add Grade Columns
There may be a time where you need to add columns to your gradebook. For example, if
you have an offline assignment for which you need to create a column, such as
Participation or Attendance, you can add a column for it.
Note: There’s no need to add grade columns for items included in a sync or import.

Page 103 Return to the Table of Contents
Video: MyLab & Mastering for Blackboard Integration Add Grade Columns
Go to the Full Grade Center, click on Create Column.
The Create Grade Column Wizard will appear. Fill out the Column Information,
Dates, and Options. Click Submit to create the column.
Display Grades as Percentages or Points
When individual grades are synced from your MyLab & Mastering Course to your
Blackboard course they are in points. The following steps will show you how to change the
points into percentages.
Go to the Full Grade Center.

Page 104 Return to the Table of Contents
Locate the column you want to change from points to percentages and click the
drop down arrow in the column header. Choose Edit Column Information.
The Edit Column Wizard will appear. Under Primary Display change the drop
down box to Percentage.

Page 105 Return to the Table of Contents
Click Submit to update the changes.
Change a Column Name
After you import grades into the Grade Center, you can change the column names as
needed. The procedure below describes renaming a column by changing the Grade Center
Name field. When you rename this field and later re-upload that column's grades, the sync
process will upload the grades into the renamed column.
Go to the Full Grade Center.
Locate the column you want to change the name and click the drop down arrow in
the column header. Choose Edit Column Information.

Page 106 Return to the Table of Contents
The Edit Column Wizard will appear. Under Column Information change the name
of your course in the Course Name field.
Click Submit to save your changes.
Create Categories in Grade Center
In the Blackboard Grade Center, you can use categories to organize and perform
calculations on Grade Center data. For example, assume you want to create a weighted grade column for quiz, exercise, and test scores. You would first create three categories (quiz, exercise, and test), and then associate each grade type with
its category. All quiz grade columns would be associated with the quiz category, exercise columns with the exercise category, and so on.
The Grade Center has several pre-defined categories that you can use, such as
Homework, Assignments, Blog, and Journal, in addition you can create your own categories.
Go to the Full Grade Center.
Click the drop down arrow next to Manage and choose Categories.

Page 107 Return to the Table of Contents
Click Create Category.
The Create Category Wizard will appear. Enter the Name of the new category and
click Submit.
Total Grades by Assignment Type
You can create a calculated column that displays summary scores for your students in the Blackboard Learn Grade Center. For example, if a course has ten
assignments, each assignment has its own grade column. You can create an

Page 108 Return to the Table of Contents
Assignment Total column that totals each student’s assignment grades, and displays that total in a single column.
When you set up the column, you specify the grade columns and/or categories that
you want totaled. You also have the option of dropping high or low grades or using only high or low scores for the calculation.
Important: Before performing this procedure, you must first sync the relevant MyLab & Mastering grades into the Grade Center.
Go to the Full Grade Center.
Click on Create Calculated Column on the action bar and click Total Column.
The Create Total Column Wizard will appear. Enter the Column Name. Choose
the primary display (optional).
Under Select Columns, select Selected Columns and Categories. A panel displays
all the Grade Center columns and categories for the course. You can select
columns and/or categories to include in the Total Column.

Page 109 Return to the Table of Contents
Select a column and/or category to include in the total and click the right-pointing
arrow on the Selected Columns panel.
Click a category in the panel on the right to select the options you want, as
described below. (If you selected only columns, continue with the next step.)
Drop Grades OR Use Only: You can choose to drop a student's lowest or highest grades from the total or to use only a student's lowest or highest grades.
To drop grades, enter the number of highest or lowest grades to drop.
To total only low or high grades, enter the number of grades to use. For example,
to total only the highest five grades, you would enter 5 in the Highest Value to Calculate text box.

Page 110 Return to the Table of Contents
Note: If you enter a number that exceeds the number of grades available for a column or
category, it will not be calculated. For example, if you want to drop the two lowest quiz
grades, the quiz grades cannot be calculated until there are at least three quiz grades.
(Optional) Click a column or category's remove icon to delete it from the
Selected Columns panel.
Click Submit at the bottom of the Create Total Column page.
You are returned to the Grade Center and the message at the top of the page tells you whether the column was successfully created. The column also calculates and displays the students' Total grades.

Page 111 Return to the Table of Contents
Create a Weighted Total Score Column
You can create a column in the Blackboard Grade Center that calculates a weighted grade. For example, a student's final grade might be calculated with homework grades worth 20%, quizzes worth 20%, and exams worth 60%.
When specifying which grades you want included in the calculation, you can choose either columns or categories.
Note: Before performing this procedure, you must first sync the relevant MyLab &
Mastering grades into the Grade Center.
Go to the Full Grade Center.
Click on the Weighted Total column's header and click Edit Column Information.
The Edit Weight Column page is displayed. Choose the title in Column Name field.
Select Percentage (Optional) from the Primary Display drop-down to display the
weighted grade as a percentage.

Page 112 Return to the Table of Contents
Under Select Columns, select the columns and/or categories you want to include
in the weighting.
Click the column or category name in the Columns to Select or Categories to
Select list.
Click the Selected Column panel's right-pointing arrow to include the selected
column or category.

Page 113 Return to the Table of Contents
Enter each column or category's percentage weight in its % text box.
For a category, select the options you want, as described below. (If you selected
only columns, continue with the next step.)
Drop Grades OR Use Only: You can choose to drop a student's lowest or highest grades
from the calculation or to use only a student's lowest or highest grades.
To drop grades, enter the number of highest or lowest grades to drop.
To calculate only low or high grades, enter the number of grades to use. For example, to
use only the highest five grades, you would enter 5 in the Highest Value to
Calculate text box.

Page 114 Return to the Table of Contents
Note: If you enter a number that exceeds the number of grades available for a column or
category, it will not be calculated. For example, if you want to drop the two lowest quiz
grades, the quiz grades cannot be calculated until there are at least three quiz grades.
Click Submit at the bottom of the page.

Page 115 Return to the Table of Contents
Module 4: Student & Teaching Assistant Access
Now that you have set up your course, you are ready for students and teaching assistants
to enroll. Your students and teaching assistants will also link their Blackboard and Pearson
accounts, or create a Pearson student account during registration and enrollment.
How students register for their MyLab & Mastering course
These are the basic steps your students take to link their accounts and register for the
MyLab course.
Step-by-Step Instructions:
Students will log in to their Blackboard account.
Click Tools in the left navigation.
Click Pearson's MyLab & Mastering on the Tools page.

Page 116 Return to the Table of Contents
On the Pearson MyLab & Mastering page, click any MyLab & Mastering content link.
The first time students access their MyLab course through Blackboard, they are
prompted to agree to our Privacy Policy.

Page 117 Return to the Table of Contents
On the next screen, students will be asked to either sign in with a Pearson student
account, or create a new Pearson student account.
Note: If any students have used a Pearson product in the past but can’t remember their
username or password, they should use the Forgot your username or password tool
before they create a new account. Creating multiple Pearson accounts can result in future
account access issues.
After signing in or creating a new student account, the student payment options
appear.
Students can choose to:
1) Purchase access with a credit card 2) Redeem a MyLab or Modified Mastering access code that they already
purchased
3) Request temporary access so they can pay later

Page 118 Return to the Table of Contents
After this one-time process, students click a link in the Blackboard course to launch their
MyLab course materials. After linking their accounts, students are never prompted to
sign in to MyLab & Mastering again from within Blackboard.
Click HERE to access PPTs, handouts, and videos to assist with the first day of class.

Page 119 Return to the Table of Contents
Important!
Students do not need a MyLab Course ID during registration. If they are asked for one,
they are not registering correctly. Make sure they first log in to Blackboard and then access
the Pearson course, as described in the following procedure.
Do not hide the Tools command from students. It gives them access to all Pearson
student support tools including Help and Diagnostics.
If you plan to sync grades from the MyLab gradebook into the Blackboard Grade
Center, make sure that all students complete the registration process that links their
Blackboard and Pearson accounts.
How Students Change from Temporary to Full MyLab Access
There are three methods students can use to change their temporary to full access. Please
select the appropriate situation below to see the steps students will follow to gain full
access: (Sharable link for students found HERE)
Your Access Has Not Yet Expired - Click the Link in the Pearson Email
Your Access Has Not Yet Expired - Go into Your Course and to the Courses
Section of Your MyLab
Your Access Has Expired - Go into Your Course and Click the Link to Your
MyLab
Your Access Has Not Yet Expired - Click the Link in the Pearson Email

Page 120 Return to the Table of Contents
Before your access expires, click on the link in the email you received confirming
your temporary access.
Sign in with your Pearson account.

Page 121 Return to the Table of Contents
You can now purchase permanent access to your MyLab.
Your Access Has Not Yet Expired - Go into Your Course and to the Courses Section of
Your MyLab
Before your access expires, enter your Blackboard course.
Click on MyLab & Mastering Tool.

Page 122 Return to the Table of Contents
Click on a link to open the MyLab.
Select My Courses from the main menu in your course.

Page 123 Return to the Table of Contents
Select Upgrade access in the temporary access alert message for the course.
Purchase permanent access to your MyLab course.

Page 124 Return to the Table of Contents
Your Access Has Expired - Go into Your Course and Click the Link to Your MyLab
Go into your Blackboard course then click to go your MyLab.
Sign in with your Pearson account.

Page 125 Return to the Table of Contents
Select an option for payment.
How Teaching Assistants register for their MyLab course
If you have a teaching assistant helping you teach your integrated MyLab course he or she
will enroll as a student in the course, and then you will promote their access to Teaching
Assistant through the MyLab course roster.
Your TA will need these three things:
A Blackboard account
The Blackboard course already paired with your Pearson MyLab course
A complimentary Pearson student access code from you that you obtain from your
Pearson representative.
Click here for step-by-step instructions you can provide your TA when you give out the
student access code required to register.
Once the TA has registered and enrolled in the MyLab course through Blackboard, you will
need to promote to Teaching Assistant privileges through the MyLab roster:
Step-by-Step Instructions
From your Blackboard section’s homepage click Tools.
Click the link to Pearson’s MyLab & Mastering.

Page 126 Return to the Table of Contents
Click the Course Home link from your list of MyLab links.
In your MyLab course, navigate to the Instructor Tools, and click Roster/Course
Details. Next to the Teaching Assistant’s name, click Student in the Role column

Page 127 Return to the Table of Contents
In the new window change the
Student’s role to Teaching Assistant,
then click “x” to close the window.
Click Save to save the student’s new role as TA.
Your TA will now have whatever MyLab privileges you set through the MyLab
course. To set privileges, go to Gradebook from Instructor Tools. Select Manage
Instructor Access from More Gradebook Tools.
Use the drop-down list of privilege
options to determine the level of access
your TA will have in your MyLab course.

Page 128 Return to the Table of Contents
Module 5: Troubleshooting
This Troubleshooting module was developed by consulting with the Pearson Support team
and identifying frequently asked questions.
View Common Troubleshooting Issues
See MyLab & Mastering Help for Blackboard for a list of common issues and advice on
troubleshooting them.
Contact 24/7 Pearson Support and Share Diagnostics Information
If you need assistance with linking or working in a Pearson MyLab course and cannot find
the information you need in the Help, contact Pearson Support by phone or chat, 24/7.
Please disable pop-ups in your browser to Chat with a Pearson Support agent.
In order to assist, Pearson Support may ask you or your students to provide information
from the Pearson Diagnostics page. The Diagnostics page provides information about
your Blackboard and Pearson accounts.

Page 129 Return to the Table of Contents
To display and export the Diagnostics page:
Enter the Blackboard course.
Click Tools in the left navigation. (In order for students to access their own
Diagnostics pages, they must be able to access the Tools link from their course.
Enable it if it is not already available.)
Click Pearson's MyLab and Mastering on the Tools page.
Scroll to the bottom of the page and click Diagnostics.
The Pearson's MyLab / Mastering Diagnostics page is displayed.
(Optional) To check your Blackboard Learn Version and Service Pack (SP), scroll
down to Integration and Server Information.
The Building Block Version displays the Blackboard Learn release and SP numbers
after the forward slash.
The version is the digit, decimal point, and digits immediately following the slash
and before the second decimal point. The number following the second decimal
point is the SP number. For example, 9.1.12 is version 9.1 and SP 12.
(Optional) Click Export File at the top of the Diagnostics page to export the
information to a .txt file.
Pearson Support may ask you to attach this export file to an email or live chat
session.
If you are working with Pearson Support on behalf of a student, you can view and export
STUDENT diagnostic information also.

Page 130 Return to the Table of Contents
To display and export a student’s Diagnostics page:
Enter the Blackboard course.
Click Tools in the left navigation.
Click Pearson's MyLab and Mastering on the Tools page.
Click Roster Information.
Select the Options arrow next to the student’s Username, and choose View
Diagnostics.
The student’s Diagnostics page is displayed and can be exported, and emailed to
Pearson Support or attached to a Live Chat.
Delete the Course Association
You may decide to delete the pairing between a Blackboard and MyLab course. Typically,
this occurs when students have access codes for one course, but you paired a different
course. For example, the students might have access codes for a fifth edition textbook, but
the pairing is to a course using the fourth edition text. You might also need to delete the
pairing if you accidentally created or copied the wrong MyLab or Modified Mastering
course. Note: you cannot delete the course association of a paired Coordinator course if it
already has member sections tied to it.
When you delete the pairing:
The MyLab or Modified Mastering course is permanently deleted. Any
customizations you made to the course are lost.

Page 131 Return to the Table of Contents
The MyLab or Modified Mastering course's paired components are removed
from the Pearson Tools page. However, you must remove any links that you
added to the course content.
If any students are enrolled in the paired MyLab or Modified Mastering course,
when you unpair the course all their work and grades in that course are lost.
When you pair the Blackboard course with a different MyLab or Modified
Mastering course, the grade items from the original course remain but are not
updated in future syncs. These grade items are included in the list of items to
sync, which may result in duplicate items.
After you unpair the courses, you can pair the Blackboard course to another MyLab course.
Your students must enter the Blackboard course, click the MyLab & Mastering course link,
and enroll in the new MyLab or Modified Mastering course.
If you pair the same MyLab or Modified Mastering course materials, students who
already redeemed their access codes or paid with a credit card automatically gain
access, although they may be asked to sign in first. Students must use the same
Pearson username and password that they used to sign in to the first course.
If you pair a different MyLab or Modified Mastering course materials, the enrollment
process prompts students for additional payment. To ensure that they don't have to
pay for the re-enrollment, contact your Pearson sales representative and request
replacement access codes that match the course materials for these students.
Step-by-Step
Export any grade items that you need from the original MyLab or Modified
Mastering course you are unpairing from the Blackboard course.
Note: These grades cannot be imported into your new MyLab or Modified
Mastering course. Instead, you must manually change the grades in the new course.
If applicable, advise students that you are unpairing the MyLab or Modified
Mastering course.
Enter the Blackboard course.
Click Tools in the left navigation bar.
Click Pearson's MyLab and Mastering on the Tools page.
Scroll to the bottom of the Pearson's MyLab and Mastering page, and
click Diagnostics.

Page 132 Return to the Table of Contents
On the Diagnostics page, scroll to the bottom of the Diagnostics page, and
select Click here to delete your MyLab & Mastering course association.
A warning message appears with details on unpairing the courses.
Enter Delete in the confirmation box.
Click Submit.
A message appears indicating that the course association was successfully deleted.
If you are unpairing courses because you selected the wrong product, you must also
remove the component links from the content areas. For example, if you pair a MyMathLab
course instead of a MyStatLab course, after you unpair the courses, you must remove the
component links.
See the Blackboard Help for information on removing the MyLab & Mastering links from
the Blackboard content and, if applicable, removing grades. If you were auto syncing
grades from the deleted MyLab course, you also need to turn off auto sync and delete the

Page 133 Return to the Table of Contents
grade repository links in the Default Destination Folder. (If you don't remember the
location of this folder, check the auto sync settings.)
If there are duplicate columns in the Blackboard Grade Center, wait until grade validation
runs and then manually refresh and delete the duplicate grades.
To create another link to the same product using the same or different MyLab or Modified
Mastering course materials, follow the procedures in initial course setup.
Unlink Your Blackboard account from Your Pearson Account
Unlinking your accounts requires contacting Pearson Support, so should be done only
when absolutely necessary.
Notes on Unlinking Accounts:
You will no longer be able to access your MyLab courses from Blackboard
ALL of your linked MyLab courses are impacted. You'll be prompted to link
accounts from each course.
If your students unlink accounts, grades will no longer sync.
If your students unlink accounts, it impacts all of their courses. So if students
are enrolled in other instructors’ linked courses, their grades won't sync for the
other courses either.
Related Documents


