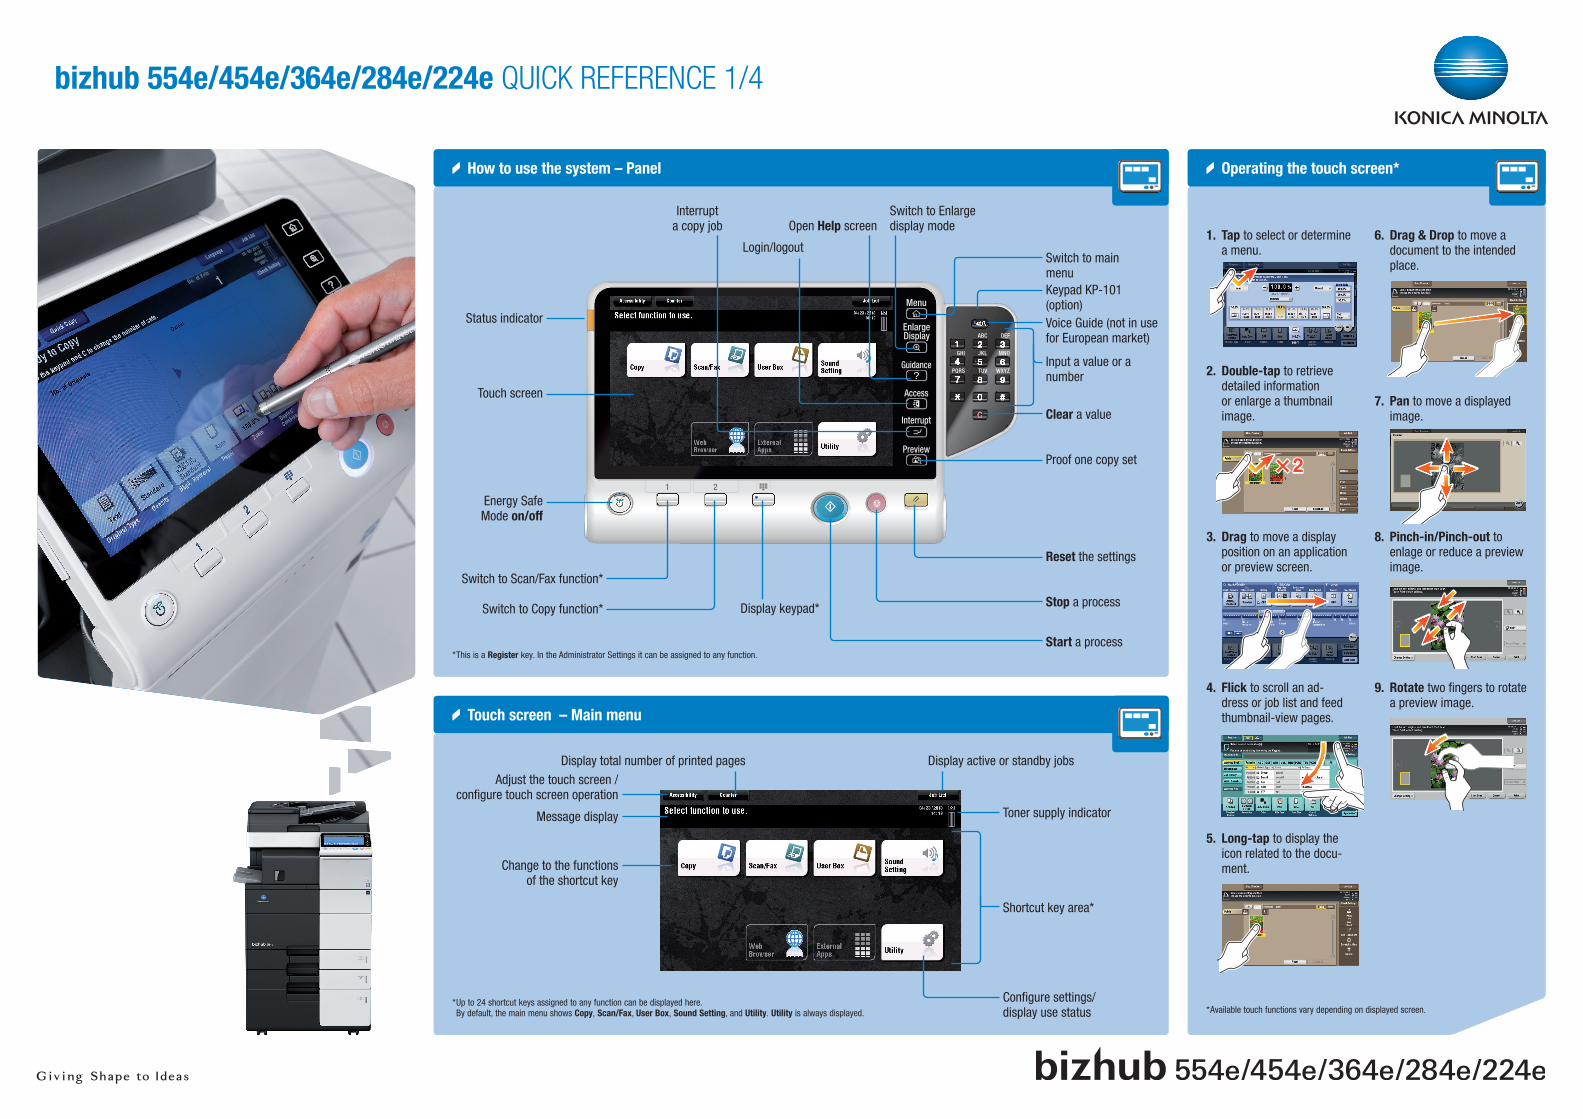
bizhub 554e/454e/364e/284e/224e QUICK REFERENCE 1/4 How to use the system – Panel Operating the touch screen* Touch screen – Main menu 1. Tap to select or determine a menu. 2. Double-tap to retrieve detailed information or enlarge a thumbnail image. 3. Drag to move a display position on an application or preview screen. 4. Flick to scroll an ad- dress or job list and feed thumbnail-view pages. 5. Long-tap to display the icon related to the docu- ment. 6. Drag & Drop to move a document to the intended place. 7. Pan to move a displayed image. 8. Pinch-in/Pinch-out to enlage or reduce a preview image. 9. Rotate two fingers to rotate a preview image. Open Help screen Login/logout Touch screen Reset the settings Interrupt a copy job Energy Safe Mode on/off Clear a value Switch to Enlarge display mode Status indicator Switch to main menu Input a value or a number Shortcut key area* Configure settings/ display use status Switch to Scan/Fax function* Stop a process Start a process Voice Guide (not in use for European market) Switch to Copy function* Display keypad* Proof one copy set * This is a Register key. In the Administrator Settings it can be assigned to any function. Message display Adjust the touch screen / configure touch screen operation Change to the functions of the shortcut key Toner supply indicator Display active or standby jobs Display total number of printed pages * Up to 24 shortcut keys assigned to any function can be displayed here. By default, the main menu shows Copy, Scan/Fax, User Box, Sound Setting, and Utility. Utility is always displayed. Keypad KP-101 (option) * Available touch functions vary depending on displayed screen.

Welcome message from author
This document is posted to help you gain knowledge. Please leave a comment to let me know what you think about it! Share it to your friends and learn new things together.
Transcript
bizhub 554e/454e/364e/284e/224e QUICK REFERENCE 1/4
How to use the system – Panel Operating the touch screen*
Touch screen – Main menu
1. Tap to select or determine a menu.
2. Double-tap to retrieve detailed information or enlarge a thumbnail image.
3. Drag to move a display position on an application or preview screen.
4. Flick to scroll an ad-dress or job list and feed thumbnail-view pages.
5. Long-tap to display the icon related to the docu-ment.
6. Drag & Drop to move a document to the intended place.
7. Pan to move a displayed image.
8. Pinch-in/Pinch-out to enlage or reduce a preview image.
9. Rotate two fingers to rotate a preview image.
Open Help screen
Login/logout
Touch screen
Reset the settings
Interrupt a copy job
Energy Safe Mode on/off
Clear a value
Switch to Enlargedisplay mode
Status indicator
Switch to main menu
Input a value or a number
Shortcut key area*
Configure settings/display use status
Switch to Scan/Fax function*
Stop a process
Start a process
Voice Guide (not in use for European market)
Switch to Copy function* Display keypad*
Proof one copy set
* This is a Register key. In the Administrator Settings it can be assigned to any function.
Message display
Adjust the touch screen / configure touch screen operation
Change to the functions of the shortcut key
Toner supply indicator
Display active or standby jobsDisplay total number of printed pages
* Up to 24 shortcut keys assigned to any function can be displayed here. By default, the main menu shows Copy, Scan/Fax, User Box, Sound Setting, and Utility. Utility is always displayed.
Keypad KP-101 (option)
* Available touch functions vary depending on displayed screen.

bizhub 554e/454e/364e/284e/224e QUICK REFERENCE 2/4
Copy operations – Basic copy screen
Duplex/Combine
Zoom
Check copy settings
Check Finishing settings
Register a copy program
Input/output image (only visible when originals are placed
on platen glass or document feeder)
Number of copy sets
Display job list
Display Quick Copy screen
Specify additional copy settingsSpecify the type of the original
Create a bookletSelect paper size and type of the original/change size and type of the paper loaded
in paper trays
Specify a zoom ratioSpecify Duplex/Combine settings
Specify Finishing settings
*Available functions depend on system configuration.
Two times 7 copy func-tions can be set for each function bar*
Adjust the copy density
Change zoom manually
User defined zoom (values can be changed)
Preset zoom values
Automatically reduce/enlarge original size to paper size
Different values for X and Y (distortion)
Change user defined zoom values
Copy the entire original including its edges by slightly
reducing the original size
1. Position the original(s).2. Tap Zoom in the copy screen.3. Make the desired settings.4. Tap OK.5. Press the Start key.
Select 1-sided or 2-sided copying
Specify binding positions for the original and the copies
Copy 2 - 8 document pages onto one page
Select orientation of the original loaded into ADF or placed on the original glass
1. Position the original(s).2. Tap Duplex/Combine in the copy
screen.3. Make the desired settings.4. Tap OK.5. Press the Start key.
1. Position the original(s).
2. Tap Copy in the main menu.
3. Tap the input area to display the keypad.
4. Type in the number of copies.
5. Press the Start key.
Basic copy functions – Make a copy
1. Tap the numerals or the input area on the screen to display the keypad.
2. If necessary, touch the upper side of the keypad and drag it to another display position.
Operation of keypad*
*If the system is equipped with the optional hardware keypad KP-101, it can be used instead.

bizhub 554e/454e/364e/284e/224e QUICK REFERENCE 3/4
1. Position the original(s).2. Plug the USB memory device into the USB port*.
3. Tap Save a document to External Memory.
4. Make the desired setting(s).5. Press the Start key.
* Do not insert the USB memory device into the USB port close to the rear panel of this machine.
Scan operations – Scan/Fax screen*
Search for a destination
Sending data to multiple destinations
Scan to e-mail (Direct input) Scan to USB memory – (Direct input)
Check scan settings
Select type of destination
Display job list
Specify additional scan/fax settings
Select the size of the original
Specify simplex or duplex Change the file name of the scanned original/email subject and sender
Specify the file type used to save the scanned data
Select a destination from the address book
Select a color mode for scanning
Specify the scan resolution
Enter a destination manually
Display job history
Search for a destination
Register a destination
View destinations as keys or sortable list
Register a scan/fax program Number of sets
1. Tap Scan/Fax in the main menu. The destinations categorized into Favorite are displayed.
2. Tap Addr. Search > Search.3. Tap Name Search or Address search.4. Enter the search text and tap Search.5. Select the destination from the search result.6. Press the Start key.
1. Position the original(s).2. Tap Scan/Fax in the main menu.
The destinations categorized into Favorites are displayed.3. Tap Add. Type.4. Select the desired type of destination.5. Specify two or more destinations.6. Press the Start key.
1. Position the original(s).2. Tap Scan/Fax in the main menu.3. Tap Direct Input.
4. Tap E-mail.5. Enter the destination address.
6. Tap OK.7. Press the Start key.
Select how to fold or bind paper
Select the binding position and original loading direction.
Specify Group/Sort settings
Select 2-hole or 4-hole punching
Select corner or two point stapling
1. Position the original(s).2. Tap Finishing in the copy screen.3. Make the desired setting(s)*.4. Tap OK.5. Press the Start key.
Finishing
*Available functions depend on system configuration.
*Available functions depend on system configuration.

bizhub 554e/454e/364e/284e/224e QUICK REFERENCE 4/4
1
1 1
Box operations – User Box screen
Create a user box Fax operations (only with fax option) – Send a fax Save file in a public user box
Create a user box
Check scan settings
Search for a user box
Save file in a user box
Registered user boxes Display job list
Display public user boxes (documents can be stored
here by all users)
Display Group user boxes (only users belonging to the same group
can store and use documents)*
*Only available if user authentication is enabled. Not displayed when an unauthorized user has logged in.
Display Personal user boxes (Only accessible by a personal user
logged in to the system)*
Display System boxes (used by the system to temporarily store files)
1. Tap Utility in the main menu.2. Tap One-Touch/User Box Regis-
tration.3. Tap Create User Box.4. Tap Public/Personal User Box.5. Tap New.6. Enter the registration information
and tap OK.
1. Position the original(s).2. Tap User Box in the main menu.3. Tap Public.4. Select the desired user box and
tap Save.5. Set the file save options and scan
settings if necessary.6. Press the Start key.
The file is saved.
1. Position the original(s).
2. Tap Scan/FAX in the main menu.
3. Press the keypad button.
4. Type in the fax number.
5. Press the Start key.
Register a destination
1. Tap Scan/Fax in the main menu.2. Tap Address Reg.3. Tap Input new Address.4. Select the type of destination you
want to register.5. Enter the destination information
and tap Register.
Related Documents