Administrator’s Guide Plain-paper digital Fax/Copier/Printer/Scanner

Welcome message from author
This document is posted to help you gain knowledge. Please leave a comment to let me know what you think about it! Share it to your friends and learn new things together.
Transcript
Administrator’s Guide
Plain-paper digital Fax/Copier/Printer/Scanner
1
2
3
4
5
6
Chapter 1 Using common functions
Chapter 2 Management
Chapter 3 Maintenance
Chapter 4 Troubleshooting
Chapter 5 Specifications
Chapter 6 Trademarks and copyrights
ii Contents
ContentsHow to read this manual .............................................................................................v
Symbols ....................................................................................................................... vKey descriptions ......................................................................................................... vScreens ........................................................................................................................ vAbout the operating instructions .............................................................................vi
Cautions for using the machine .............................................................................. viiInstallation location .................................................................................................viiTransporting the machine ......................................................................................viiiHandling of consumables .......................................................................................... ixDaily maintenance ..................................................................................................... xVentilation .................................................................................................................. xENERGY STAR® .......................................................................................................xiExport controls ..........................................................................................................xi
Chapter 1 Using common functionsEntering characters ...................................................................................................1-2
Overview of the character entry screen .................................................................1-2Entering characters ................................................................................................1-2Editing characters ...................................................................................................1-5
Checking the machine information .......................................................................1-6Registering various functions .................................................................................1-7
List of registration ..................................................................................................1-8Using My Jobs ...........................................................................................................1-10
Registering / Editing My Jobs ..............................................................................1-10Deleting My Jobs ...................................................................................................1-13Printing My Jobs list .............................................................................................1-14Executing My Jobs ................................................................................................1-14
Changing the soft keys ............................................................................................1-15Editing the My MFP shortcuts ..............................................................................1-17
Editing from the settings screen ..........................................................................1-18Paper settings ............................................................................................................1-19
List of paper settings ............................................................................................1-20Specifying default settings .....................................................................................1-21
List of default settings ..........................................................................................1-22Setting smart energy save ....................................................................................1-25
Printing lists ..............................................................................................................1-27List of lists .............................................................................................................1-28
Using personal settings ...........................................................................................1-29Specifying personal settings .................................................................................1-29Using personal settings ........................................................................................1-31
Logging in / Logging out .........................................................................................1-32Logging in ..............................................................................................................1-32Logging out ............................................................................................................1-33
1
Contents iii
Chapter 2 ManagementMachine management settings................................................................................2-2
List of machine management settings ...................................................................2-3Setting security codes ...............................................................................................2-5
Setting the administrator password ......................................................................2-5Setting the protect passcode ...................................................................................2-7
Function protect settings .........................................................................................2-9Setting function protection ...................................................................................2-10Using function protection .....................................................................................2-11
Setting mode protection .........................................................................................2-13Managing user access ..............................................................................................2-14
Printing the user access management list ...........................................................2-14Resetting the counter ............................................................................................2-15
Specifying the network settings ...........................................................................2-16Network settings ...................................................................................................2-16List of network settings ........................................................................................2-17TCP/IP settings .....................................................................................................2-19Registering LDAP Servers ....................................................................................2-22Specifying the archive settings .............................................................................2-27Setting user authentication ..................................................................................2-31Setting an e-mail gateway ....................................................................................2-32
Mirroring the machine settings ............................................................................2-34Importing / Exporting using USB memory device ..............................................2-34
Setting the automatic logout time ........................................................................2-39
Chapter 3 MaintenanceReplacing consumables.............................................................................................3-2
Replacing the toner cartridge .................................................................................3-2Replacing the drum cartridge .................................................................................3-3
Replacing the stamp ..................................................................................................3-4Cleaning ........................................................................................................................3-6
Cleaning the outside of the machine ......................................................................3-6Cleaning the touch panel ........................................................................................3-7Cleaning the scanning area ....................................................................................3-8Cleaning the recording area .................................................................................3-11Cleaning the charging needle ...............................................................................3-12
iv Contents
Chapter 4 TroubleshootingError messages............................................................................................................4-2
Error messages displayed on the screen ................................................................4-2Troubleshooting ..........................................................................................................4-4
Cannot connect to the network ...............................................................................4-4Image quality problems ..........................................................................................4-5
When a power failure occurs ...................................................................................4-7Main unit operation ................................................................................................4-7
Chapter 5 SpecificationsSpecifications ..............................................................................................................5-2
General ....................................................................................................................5-2Acceptable paper .....................................................................................................5-9Acceptable documents ...........................................................................................5-11Options ...................................................................................................................5-13External dimensions .............................................................................................5-13
Chapter 6 Trademarks and copyrightsTrademarks and copyrights .....................................................................................6-2
Trademarks .............................................................................................................6-2Open source software licence statement ................................................................6-3

1
How to read this manual v
How to read this manual
SymbolsIn this manual, the following symbols are used with the items where important operational and safety information must be observed.
Symbol Meaning
Describes warnings to protect yourself and others from serious or potentially fatal injury if you handle the machine incorrectly. For safe operation, please follow instructions carefully.
Notes a caution to protect yourself and others from personal injury or damage to properties if you handle the machine incorrectly. For safe operation, please follow instructions carefully.
IMPORTANTDescribes important conditions or restrictions you should carefully observe to avoid problems caused by incorrect operations.
NOTE Describes reference information and additional notes for operation.
Key descriptionsIn this manual, the operating keys are described as follows:
< > : Keys on the control panel For example, the start key <Start>[ ] : Buttons on the display and computer For example, the “Setting” button [Setting]
ScreensThis manual uses the screens of the bizhub 28e standard model, unless otherwise stated. The screens you see may differ, depending on the options installed.
vi How to read this manual
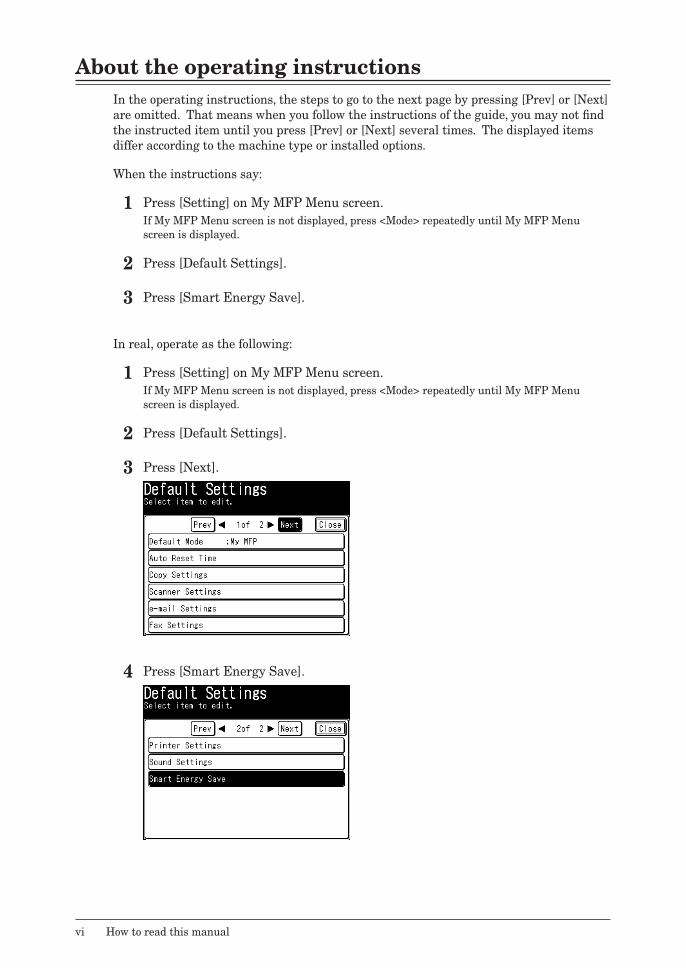
About the operating instructionsIn the operating instructions, the steps to go to the next page by pressing [Prev] or [Next] are omitted. That means when you follow the instructions of the guide, you may not find the instructed item until you press [Prev] or [Next] several times. The displayed items differ according to the machine type or installed options.
When the instructions say:
1 Press [Setting] on My MFP Menu screen.If My MFP Menu screen is not displayed, press <Mode> repeatedly until My MFP Menu screen is displayed.
2 Press [Default Settings].
3 Press [Smart Energy Save].
In real, operate as the following:
1 Press [Setting] on My MFP Menu screen.If My MFP Menu screen is not displayed, press <Mode> repeatedly until My MFP Menu screen is displayed.
2 Press [Default Settings].
3 Press [Next].
4 Press [Smart Energy Save].
1
Cautions for using the machine vii
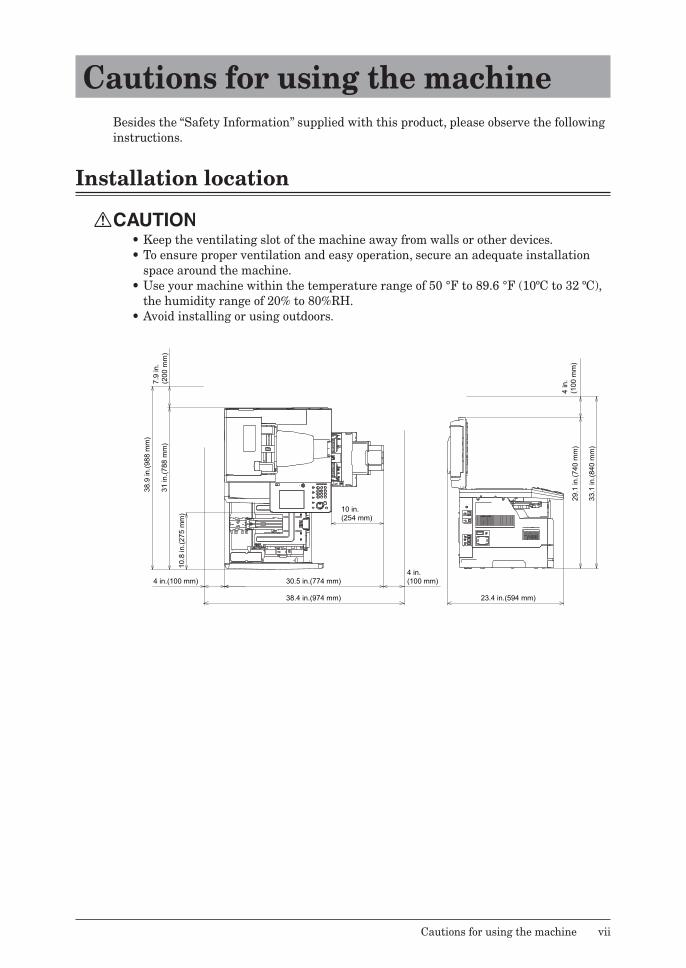
Cautions for using the machineBesides the “Safety Information” supplied with this product, please observe the following instructions.
Installation location
•Keep the ventilating slot of the machine away from walls or other devices.•To ensure proper ventilation and easy operation, secure an adequate installation
space around the machine.•Use your machine within the temperature range of 50 °F to 89.6 °F (10ºC to 32 ºC),
the humidity range of 20% to 80%RH.•Avoid installing or using outdoors.
10.8
in.(2
75 m
m)
31 in
.(788
mm
)
38.9
in.(9
88 m
m)
7.9
in.
(200
mm
)
29.1
in.(7
40 m
m)
33.1
in.(8
40 m
m)
10 in.(254 mm)
4 in.(100 mm)4 in.(100 mm) 30.5 in.(774 mm)
38.4 in.(974 mm) 23.4 in.(594 mm)
4 in
.(1
00 m
m)
viii Cautions for using the machine
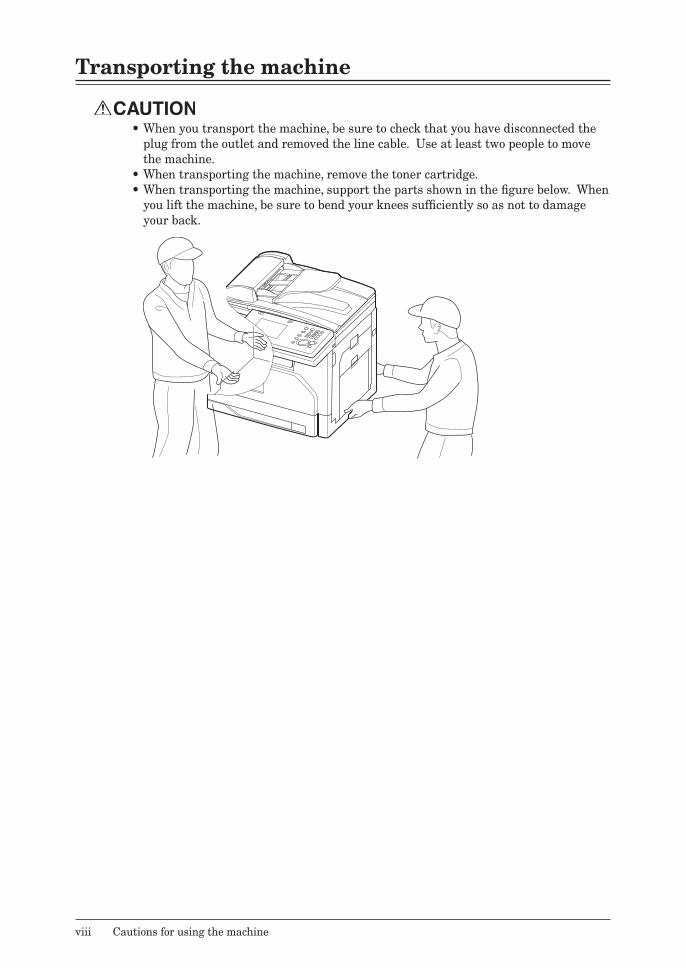
Transporting the machine
•When you transport the machine, be sure to check that you have disconnected the plug from the outlet and removed the line cable. Use at least two people to move the machine.
•When transporting the machine, remove the toner cartridge.•When transporting the machine, support the parts shown in the figure below. When
you lift the machine, be sure to bend your knees sufficiently so as not to damage your back.
1
Cautions for using the machine ix
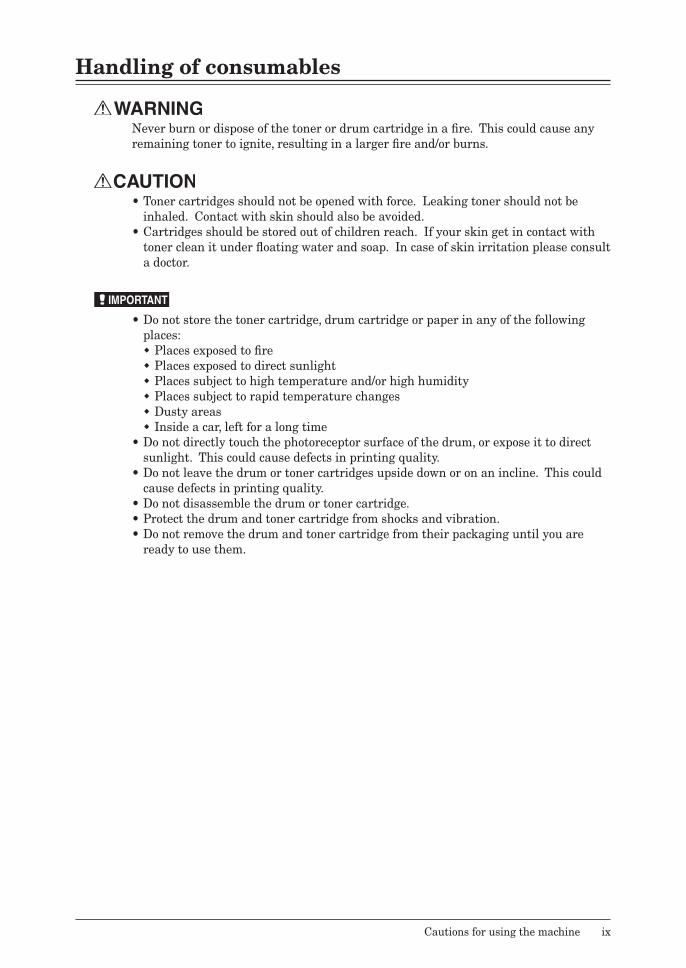
Handling of consumables
Never burn or dispose of the toner or drum cartridge in a fire. This could cause any remaining toner to ignite, resulting in a larger fire and/or burns.
•Toner cartridges should not be opened with force. Leaking toner should not be inhaled. Contact with skin should also be avoided.
•Cartridges should be stored out of children reach. If your skin get in contact with toner clean it under floating water and soap. In case of skin irritation please consult a doctor.
IMPORTANT
•Do not store the toner cartridge, drum cartridge or paper in any of the following places:
� Places exposed to fire � Places exposed to direct sunlight � Places subject to high temperature and/or high humidity � Places subject to rapid temperature changes � Dusty areas � Inside a car, left for a long time
•Do not directly touch the photoreceptor surface of the drum, or expose it to direct sunlight. This could cause defects in printing quality.
•Do not leave the drum or toner cartridges upside down or on an incline. This could cause defects in printing quality.
•Do not disassemble the drum or toner cartridge.•Protect the drum and toner cartridge from shocks and vibration.•Do not remove the drum and toner cartridge from their packaging until you are
ready to use them.
x Cautions for using the machine
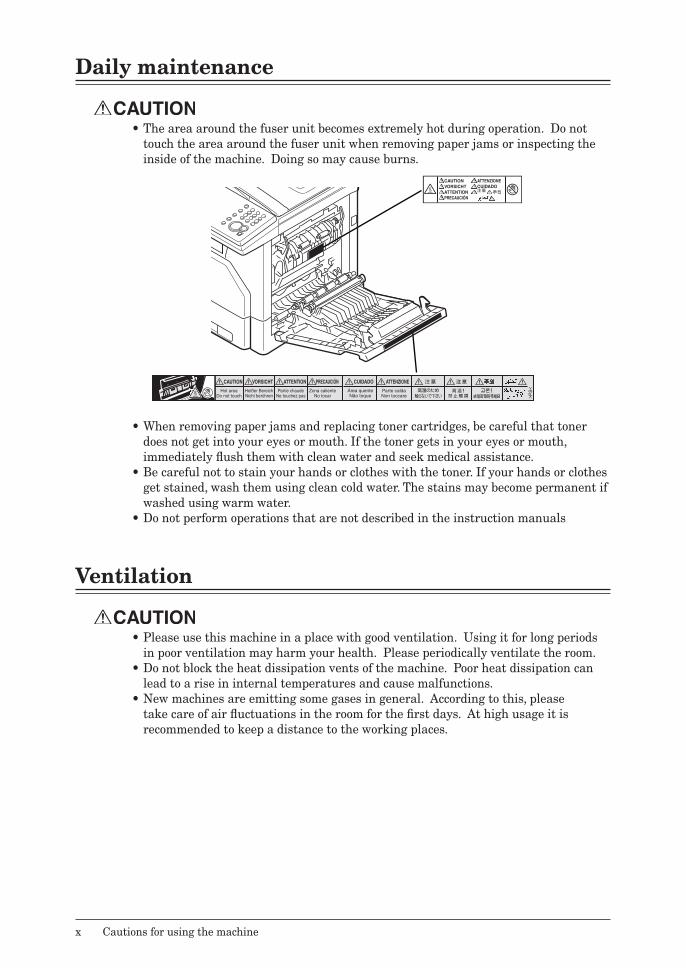
Daily maintenance
•The area around the fuser unit becomes extremely hot during operation. Do not touch the area around the fuser unit when removing paper jams or inspecting the inside of the machine. Doing so may cause burns.
•When removing paper jams and replacing toner cartridges, be careful that toner does not get into your eyes or mouth. If the toner gets in your eyes or mouth, immediately flush them with clean water and seek medical assistance.
•Be careful not to stain your hands or clothes with the toner. If your hands or clothes get stained, wash them using clean cold water. The stains may become permanent if washed using warm water.
•Do not perform operations that are not described in the instruction manuals
Ventilation
•Please use this machine in a place with good ventilation. Using it for long periods in poor ventilation may harm your health. Please periodically ventilate the room.
•Do not block the heat dissipation vents of the machine. Poor heat dissipation can lead to a rise in internal temperatures and cause malfunctions.
•New machines are emitting some gases in general. According to this, please take care of air fluctuations in the room for the first days. At high usage it is recommended to keep a distance to the working places.
1
Cautions for using the machine xi
ENERGY STAR®
As an ENERGY STAR® partner, Konica Minolta has determined that this product meets the ENERGY STAR® guidelines for energy efficiency.
Export controlsThis product includes the item, technology or software subject to the United States and Japan export control laws, and may be subject to export regulations in other countries. Please comply with such export control laws and regulations.

xii Cautions for using the machine
This page intentionally left blank.
Chapter 1Using common functions
Entering characters ...................................................................................................1-2Overview of the character entry screen .................................................................1-2Entering characters ................................................................................................1-2Editing characters ...................................................................................................1-5
Checking the machine information .......................................................................1-6Registering various functions .................................................................................1-7
List of registration ..................................................................................................1-8Using My Jobs ...........................................................................................................1-10
Registering / Editing My Jobs ..............................................................................1-10Deleting My Jobs ...................................................................................................1-13Printing My Jobs list .............................................................................................1-14Executing My Jobs ................................................................................................1-14
Changing the soft keys ............................................................................................1-15Editing the My MFP shortcuts ..............................................................................1-17
Editing from the settings screen ..........................................................................1-18Paper settings ............................................................................................................1-19
List of paper settings ............................................................................................1-20Specifying default settings .....................................................................................1-21
List of default settings ..........................................................................................1-22Setting smart energy save ....................................................................................1-25
Printing lists ..............................................................................................................1-27List of lists .............................................................................................................1-28
Using personal settings ...........................................................................................1-29Specifying personal settings .................................................................................1-29Using personal settings ........................................................................................1-31
Logging in / Logging out .........................................................................................1-32Logging in ..............................................................................................................1-32Logging out ............................................................................................................1-33
1-2 Entering characters
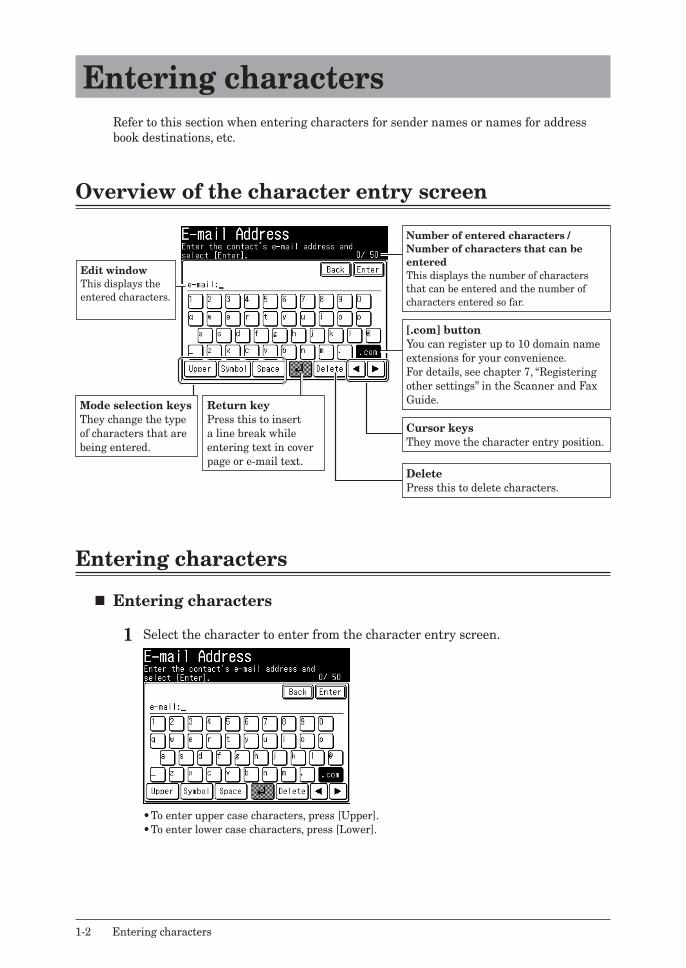
Entering charactersRefer to this section when entering characters for sender names or names for address book destinations, etc.
Overview of the character entry screen
Entering characters
� Entering characters
1 Select the character to enter from the character entry screen.
•To enter upper case characters, press [Upper].•To enter lower case characters, press [Lower].
Number of entered characters / Number of characters that can be enteredThis displays the number of characters that can be entered and the number of characters entered so far.
[.com] buttonYou can register up to 10 domain name extensions for your convenience.For details, see chapter 7, “Registering other settings” in the Scanner and Fax Guide.
DeletePress this to delete characters.
Cursor keysThey move the character entry position.
Return keyPress this to insert a line break while entering text in cover page or e-mail text.
Mode selection keysThey change the type of characters that are being entered.
Edit windowThis displays the entered characters.

1
Usi
ng
co
mm
on
fu
nct
ion
s
Entering characters 1-3
� Entering numbersNumbers can be entered using the numeric keys or from the character entry screen.
� Entering symbols / special characters
1 Press [Symbol].
2 Select the symbol, and press [Enter].You can enter “@”, “ ”, and “.” from the character entry screen.
� Entering spacesPress [Space] while entering characters.
� Entering “.com”You can press the [.com] button when entering e-mail addresses, etc. to easily enter domain names. You can also register the parts other than the domain name in advance to easily enter frequently used strings.
NOTE
For details on registering domain names, refer to Chapter 7, “Registering Other Settings” in the Scanner and Fax Guide.
1 Enter the e-mail address.
2 Press [.com].
1-4 Entering characters
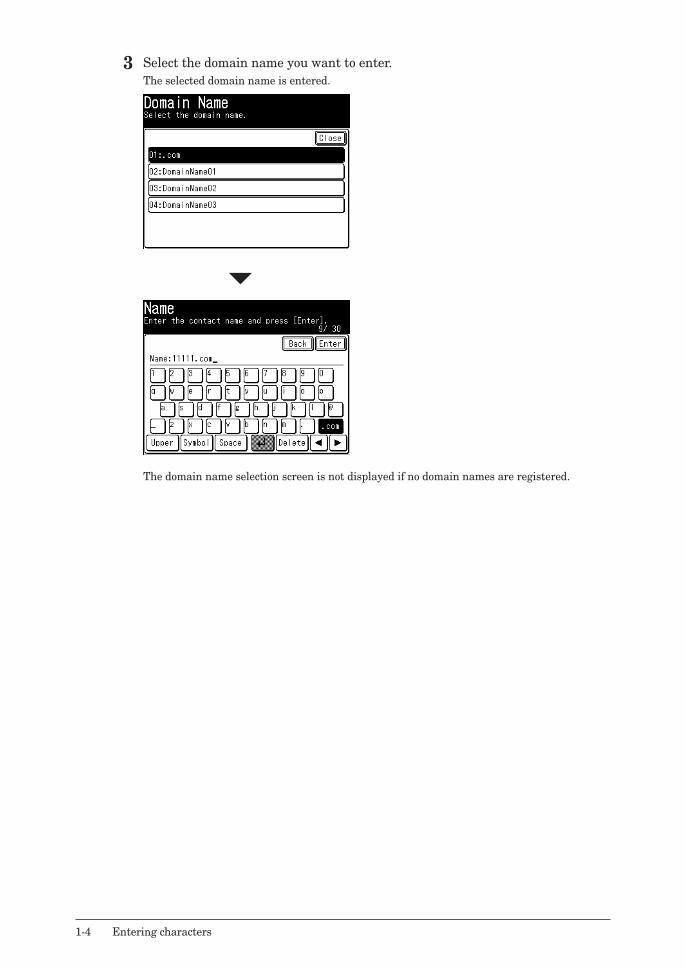
3 Select the domain name you want to enter.The selected domain name is entered.
The domain name selection screen is not displayed if no domain names are registered.
1
Usi
ng
co
mm
on
fu
nct
ion
s
Entering characters 1-5
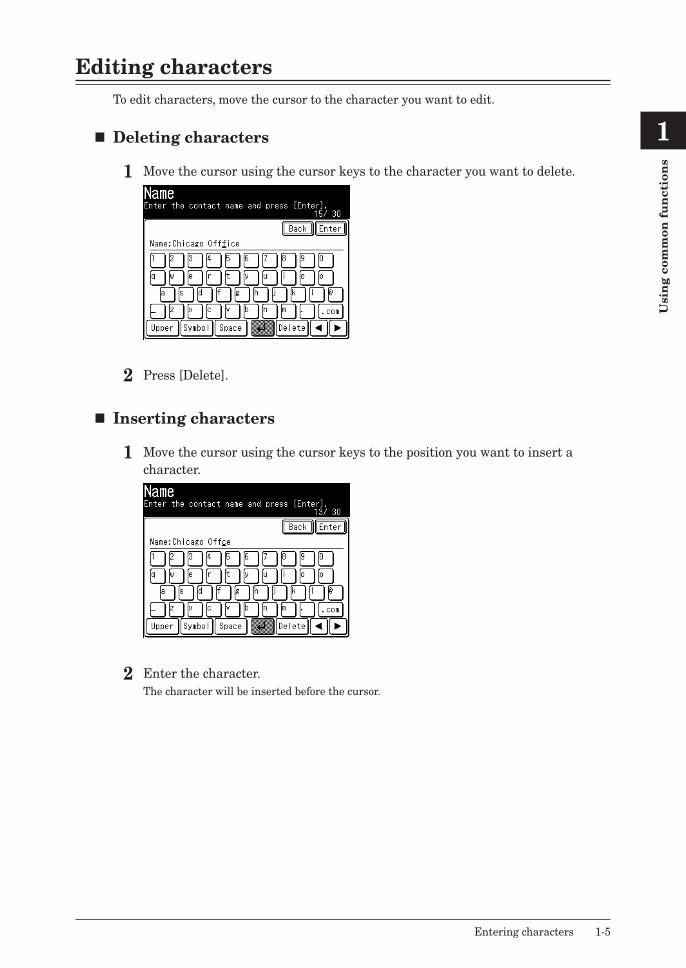
Editing charactersTo edit characters, move the cursor to the character you want to edit.
� Deleting characters
1 Move the cursor using the cursor keys to the character you want to delete.
2 Press [Delete].
� Inserting characters
1 Move the cursor using the cursor keys to the position you want to insert a character.
2 Enter the character.The character will be inserted before the cursor.
1-6 Checking the machine information
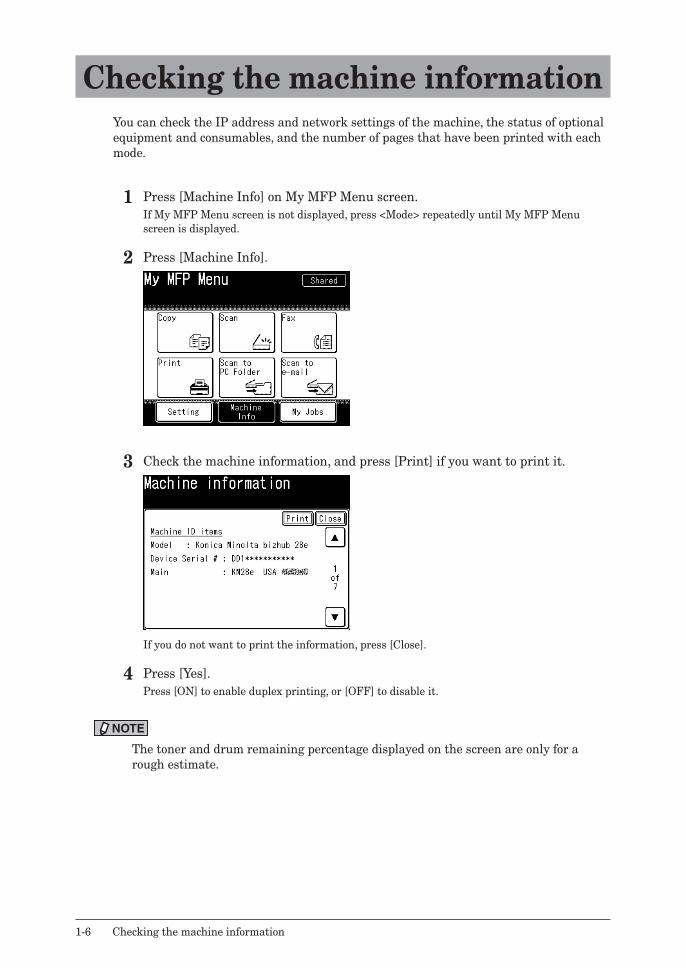
Checking the machine informationYou can check the IP address and network settings of the machine, the status of optional equipment and consumables, and the number of pages that have been printed with each mode.
1 Press [Machine Info] on My MFP Menu screen.If My MFP Menu screen is not displayed, press <Mode> repeatedly until My MFP Menu screen is displayed.
2 Press [Machine Info].
3 Check the machine information, and press [Print] if you want to print it.
If you do not want to print the information, press [Close].
4 Press [Yes].Press [ON] to enable duplex printing, or [OFF] to disable it.
NOTE
The toner and drum remaining percentage displayed on the screen are only for a rough estimate.
1
Usi
ng
co
mm
on
fu
nct
ion
s
Registering various functions 1-7
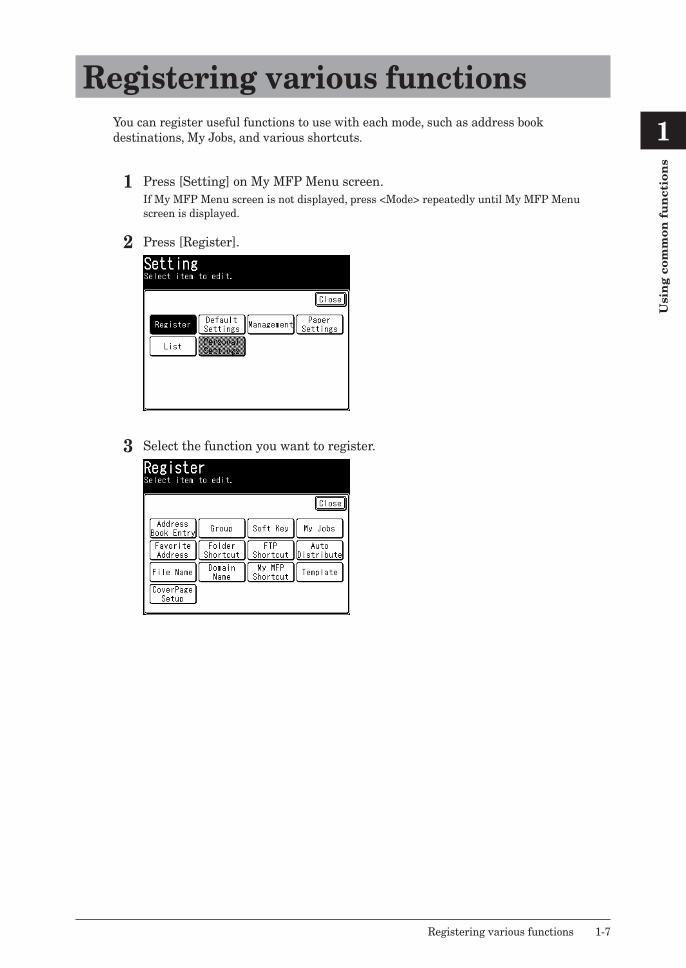
Registering various functionsYou can register useful functions to use with each mode, such as address book destinations, My Jobs, and various shortcuts.
1 Press [Setting] on My MFP Menu screen.If My MFP Menu screen is not displayed, press <Mode> repeatedly until My MFP Menu screen is displayed.
2 Press [Register].
3 Select the function you want to register.
1-8 Registering various functions
List of registration
Function Description Settings Reference page
Address Book Entry
You can register, edit, and delete address book destinations.
Chapter 7, “Registering destinations” in the Scanner and Fax Guide.
Group You can register, edit, and delete groups.
Soft Key You can set frequently used functions as soft keys.
•CopyFunctionsDoc.Type, Contrast, DuplexCopy, Doc.Size, Card Copy
•ScannerFunctionsDoc.Type, Contrast, Resolution, File Name, Color
•FaxFunctionsResolution, Contrast, Redial, Monitor, Broadcast
1-15
My Jobs You can register, edit, and delete My Jobs, or print a list of My Jobs.
1-10
Favorite Address
You can register, edit, and delete destinations to display in the “Faves” tab on the scan ready screen.
Chapter 7, “Registering destinations” in the Scanner and Fax Guide.
Folder Shortcut
You can register, edit, and delete shortcuts to shared folder paths.
FTP Shortcut
You can register, edit, and delete shortcuts to FTP servers.
Auto Distribute
You can register conditions to determine whether to distribute a received fax. You can also edit, delete, and print a list of the conditions.
•SettingOFFON
•NameNot registered
•DestinationNot registered
•PriorityLowMiddleHigh
•ConditionsMatching MethodEqualInitialFinalAny
Chapter 4, “Useful reception function” in the Scanner and Fax Guide.

1
Usi
ng
co
mm
on
fu
nct
ion
s
Registering various functions 1-9
Function Description Settings Reference page
Auto Distribute
•ScheduleWeekdayMon, Tue, Wed, Thu, Fri, Sat, Sun
Start Time12:00 am to 11:59 pm: 12:00 am
End Time12:00 am to 11:59 pm: 11:59 pm
•AutoPrintOFFON
Chapter 4, “Useful reception function” in the Scanner and Fax Guide.
File Name You can register the file name for the scanned image data in advance.
Chapter 7, “Registering Other Settings” in the Scanner and Fax Guide.
Domain Name
You can register the domain names to display on the character entry screen.
My MFP Shortcut
You can change the My MFP shortcut keys.
CopyScanFaxPrintScan to PC FolderScan to e-mail
1-17
Template You can register a subject and mail text for internet faxes and Scan to E-Mail in advance.
Chapter 7, “Registering Other Settings” in the Scanner and Fax Guide.
CoverPage Setup
You can register cover page message. Chapter 4, “Cover page” in “Transmission related settings” in the Scanner and Fax Guide.
NOTE
Underlined values are the default settings specified at the time of shipment.
1-10 Using My Jobs
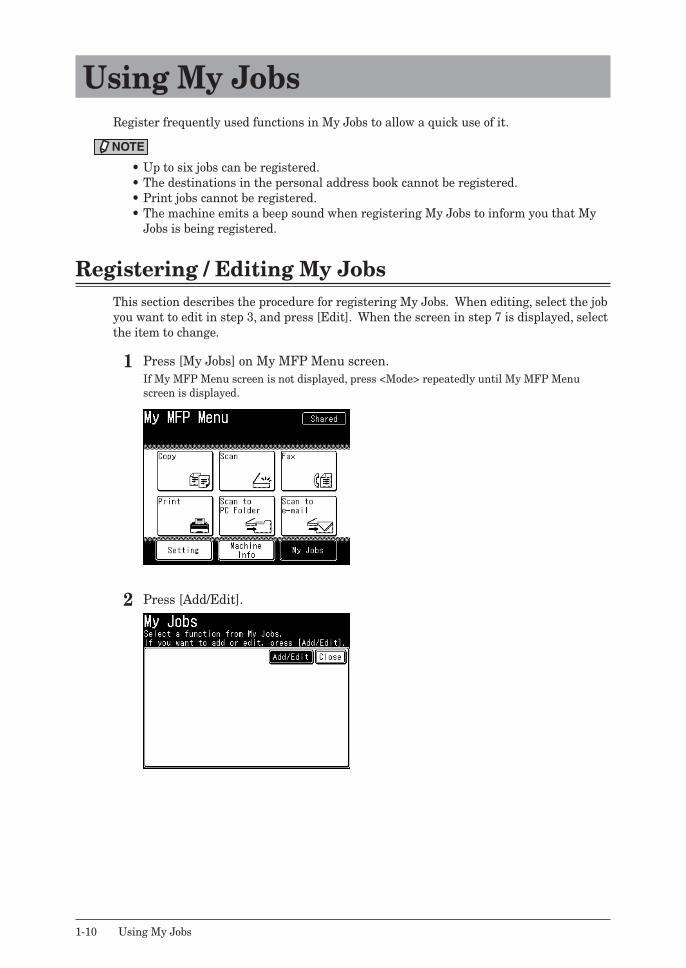
Using My JobsRegister frequently used functions in My Jobs to allow a quick use of it.
NOTE
•Up to six jobs can be registered.•The destinations in the personal address book cannot be registered.•Print jobs cannot be registered.•The machine emits a beep sound when registering My Jobs to inform you that My
Jobs is being registered.
Registering / Editing My JobsThis section describes the procedure for registering My Jobs. When editing, select the job you want to edit in step 3, and press [Edit]. When the screen in step 7 is displayed, select the item to change.
1 Press [My Jobs] on My MFP Menu screen.If My MFP Menu screen is not displayed, press <Mode> repeatedly until My MFP Menu screen is displayed.
2 Press [Add/Edit].
1
Usi
ng
co
mm
on
fu
nct
ion
s
Using My Jobs 1-11
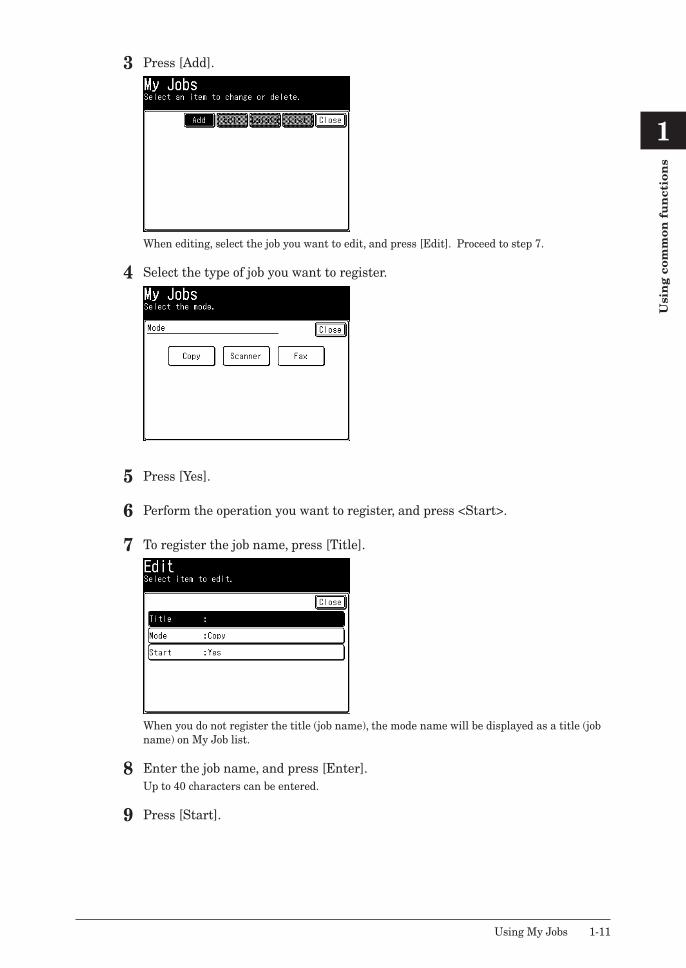
3 Press [Add].
When editing, select the job you want to edit, and press [Edit]. Proceed to step 7.
4 Select the type of job you want to register.
5 Press [Yes].
6 Perform the operation you want to register, and press <Start>.
7 To register the job name, press [Title].
When you do not register the title (job name), the mode name will be displayed as a title (job name) on My Job list.
8 Enter the job name, and press [Enter].Up to 40 characters can be entered.
9 Press [Start].
1-12 Using My Jobs
10 Select [Yes] to include the start key operation in the job or [No] not to include the start key operation, and press [Enter].No: The registered job will displayed when you execute the job. You can confirm the
functions and then press <Start>.Yes: The registered job will be done when you execute the job.
11 Press [Close].
NOTE
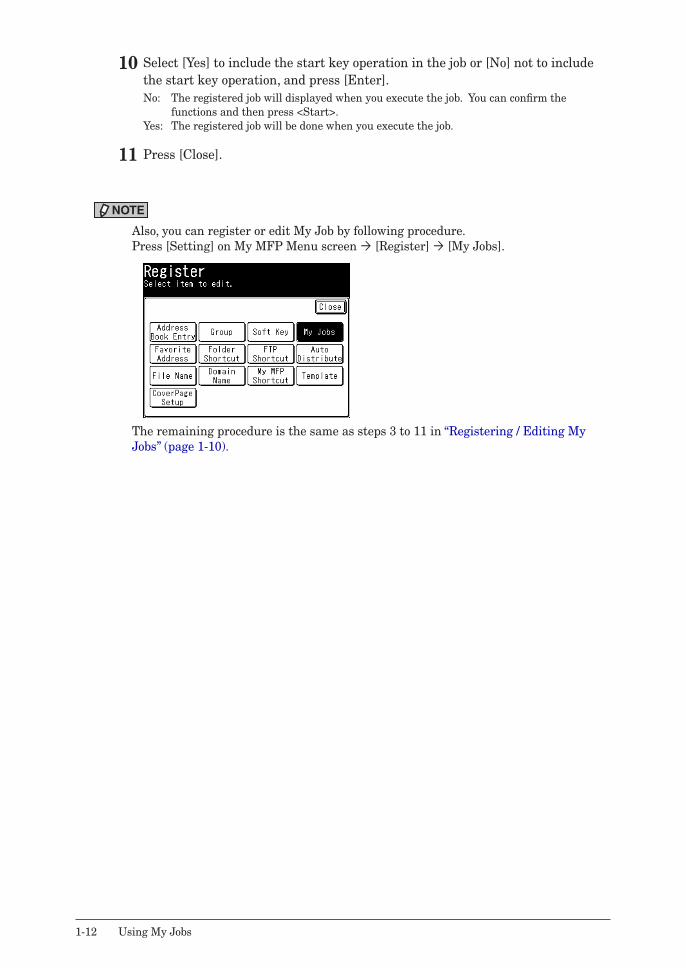
Also, you can register or edit My Job by following procedure.Press [Setting] on My MFP Menu screen [Register] [My Jobs].
The remaining procedure is the same as steps 3 to 11 in “Registering / Editing My Jobs” (page 1-10).
1
Usi
ng
co
mm
on
fu
nct
ion
s
Using My Jobs 1-13
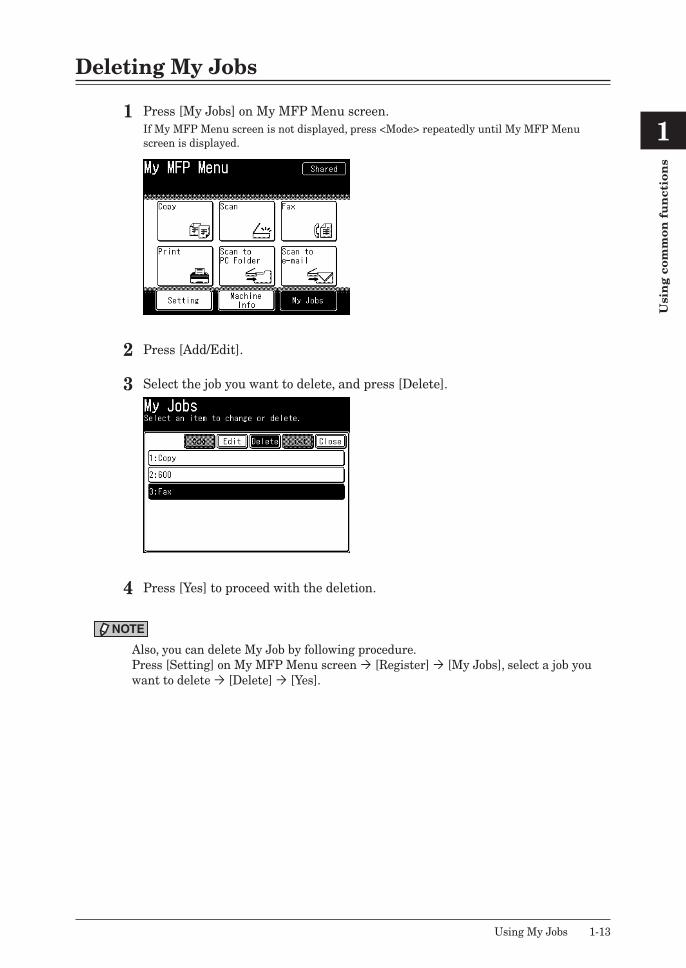
Deleting My Jobs
1 Press [My Jobs] on My MFP Menu screen.If My MFP Menu screen is not displayed, press <Mode> repeatedly until My MFP Menu screen is displayed.
2 Press [Add/Edit].
3 Select the job you want to delete, and press [Delete].
4 Press [Yes] to proceed with the deletion.
NOTE
Also, you can delete My Job by following procedure.Press [Setting] on My MFP Menu screen [Register] [My Jobs], select a job you want to delete [Delete] [Yes].
1-14 Using My Jobs
Printing My Jobs list
1 Press [My Jobs] on My MFP Menu screen.If My MFP Menu screen is not displayed, press <Mode> repeatedly until My MFP Menu screen is displayed.
2 Press [Add/Edit].
3 Press [List].
4 Press [Yes].Press [ON] to enable duplex printing, or [OFF] to disable it.
NOTE
Also, you can print My Job list by following procedure.Press [Setting] on My MFP Menu screen [List] [My Jobs List] [Yes].
Executing My Jobs
1 Press [My Jobs] on My MFP Menu screen.If My MFP Menu screen is not displayed, press <Mode> repeatedly until My MFP Menu screen is displayed.
2 Press the job you want to execute.
NOTE
If the registered function is protected, a message indicating so is displayed when My Jobs is executed. For details, see “Setting mode protection” (page 2-13).
1
Usi
ng
co
mm
on
fu
nct
ion
s
Changing the soft keys 1-15
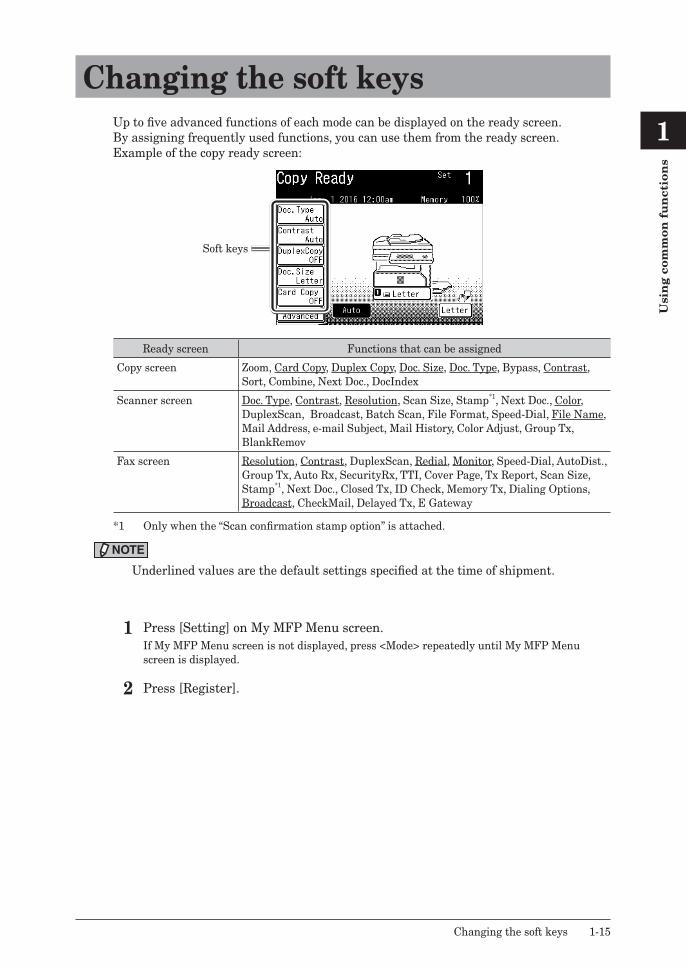
Changing the soft keysUp to five advanced functions of each mode can be displayed on the ready screen.By assigning frequently used functions, you can use them from the ready screen.Example of the copy ready screen:
Soft keys
Ready screen Functions that can be assigned
Copy screen Zoom, Card Copy, Duplex Copy, Doc. Size, Doc. Type, Bypass, Contrast, Sort, Combine, Next Doc., DocIndex
Scanner screen Doc. Type, Contrast, Resolution, Scan Size, Stamp*1, Next Doc., Color, DuplexScan, Broadcast, Batch Scan, File Format, Speed-Dial, File Name, Mail Address, e-mail Subject, Mail History, Color Adjust, Group Tx, BlankRemov
Fax screen Resolution, Contrast, DuplexScan, Redial, Monitor, Speed-Dial, AutoDist., Group Tx, Auto Rx, SecurityRx, TTI, Cover Page, Tx Report, Scan Size, Stamp*1, Next Doc., Closed Tx, ID Check, Memory Tx, Dialing Options, Broadcast, CheckMail, Delayed Tx, E Gateway
*1 Only when the “Scan confirmation stamp option” is attached.
NOTE
Underlined values are the default settings specified at the time of shipment.
1 Press [Setting] on My MFP Menu screen.If My MFP Menu screen is not displayed, press <Mode> repeatedly until My MFP Menu screen is displayed.
2 Press [Register].
1-16 Changing the soft keys
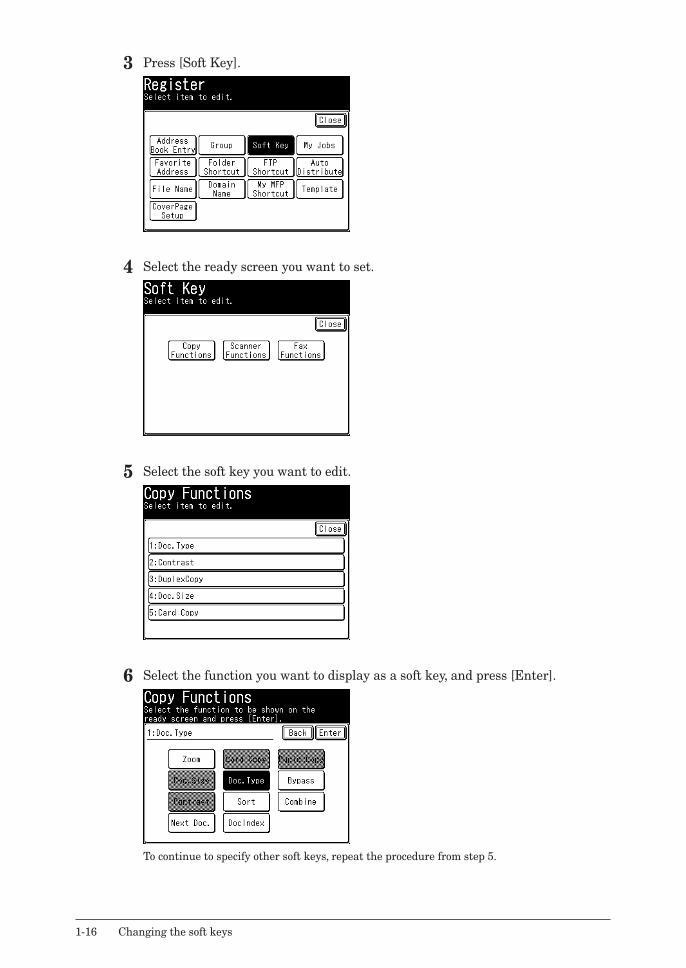
3 Press [Soft Key].
4 Select the ready screen you want to set.
5 Select the soft key you want to edit.
6 Select the function you want to display as a soft key, and press [Enter].
To continue to specify other soft keys, repeat the procedure from step 5.
1
Usi
ng
co
mm
on
fu
nct
ion
s
Editing the My MFP shortcuts 1-17
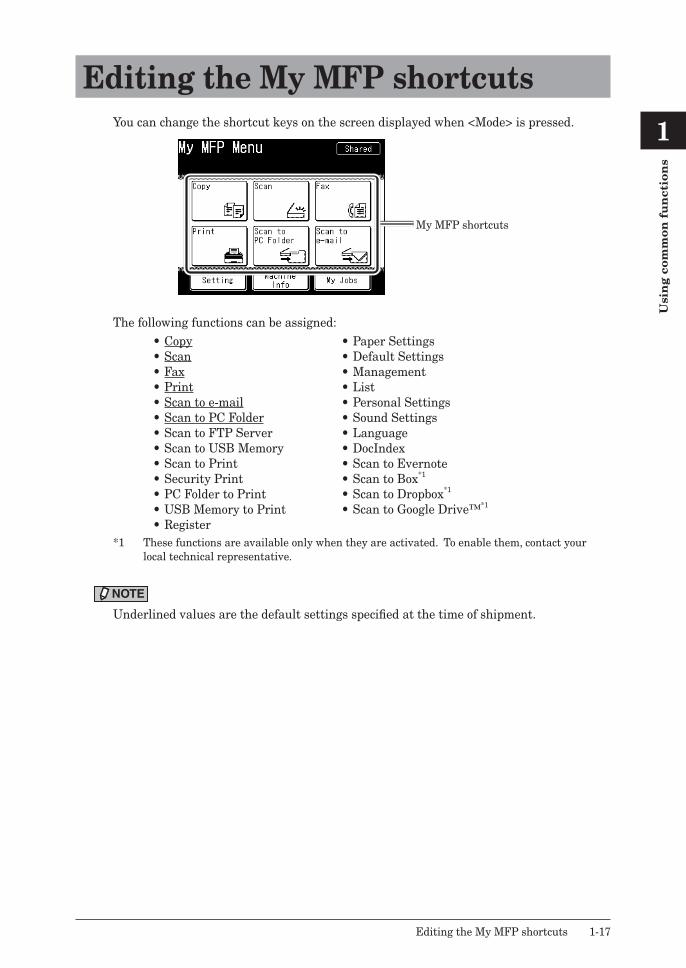
Editing the My MFP shortcutsYou can change the shortcut keys on the screen displayed when <Mode> is pressed.
My MFP shortcuts
The following functions can be assigned:•Copy•Scan•Fax•Print•Scan to e-mail•Scan to PC Folder•Scan to FTP Server•Scan to USB Memory•Scan to Print•Security Print•PC Folder to Print•USB Memory to Print•Register
•Paper Settings•Default Settings•Management•List•Personal Settings•Sound Settings•Language•DocIndex•Scan to Evernote•Scan to Box*1
•Scan to Dropbox*1
•Scan to Google Drive™*1
*1 These functions are available only when they are activated. To enable them, contact your local technical representative.
NOTE
Underlined values are the default settings specified at the time of shipment.
1-18 Editing the My MFP shortcuts
Editing from the settings screen
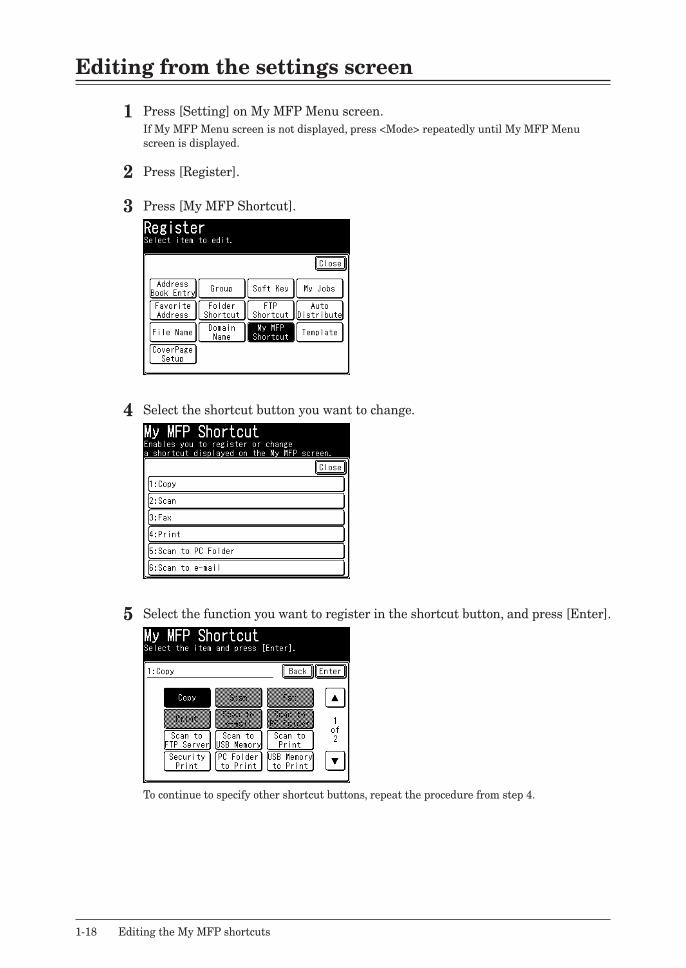
1 Press [Setting] on My MFP Menu screen.If My MFP Menu screen is not displayed, press <Mode> repeatedly until My MFP Menu screen is displayed.
2 Press [Register].
3 Press [My MFP Shortcut].
4 Select the shortcut button you want to change.
5 Select the function you want to register in the shortcut button, and press [Enter].
To continue to specify other shortcut buttons, repeat the procedure from step 4.
1
Usi
ng
co
mm
on
fu
nct
ion
s
Paper settings 1-19
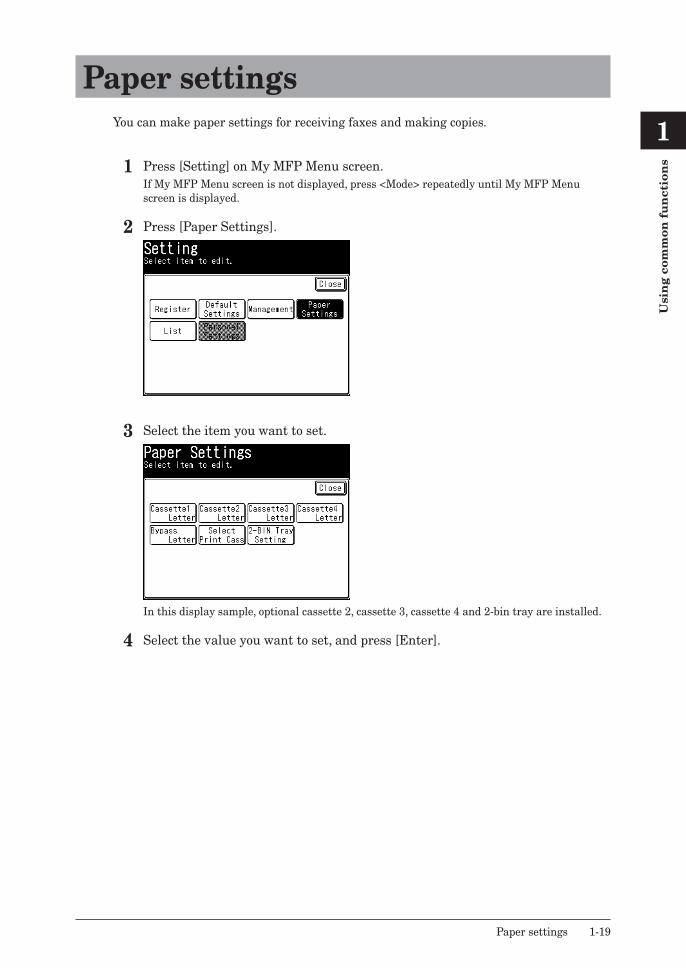
Paper settingsYou can make paper settings for receiving faxes and making copies.
1 Press [Setting] on My MFP Menu screen.If My MFP Menu screen is not displayed, press <Mode> repeatedly until My MFP Menu screen is displayed.
2 Press [Paper Settings].
3 Select the item you want to set.
In this display sample, optional cassette 2, cassette 3, cassette 4 and 2-bin tray are installed.
4 Select the value you want to set, and press [Enter].
1-20 Paper settings
List of paper settings
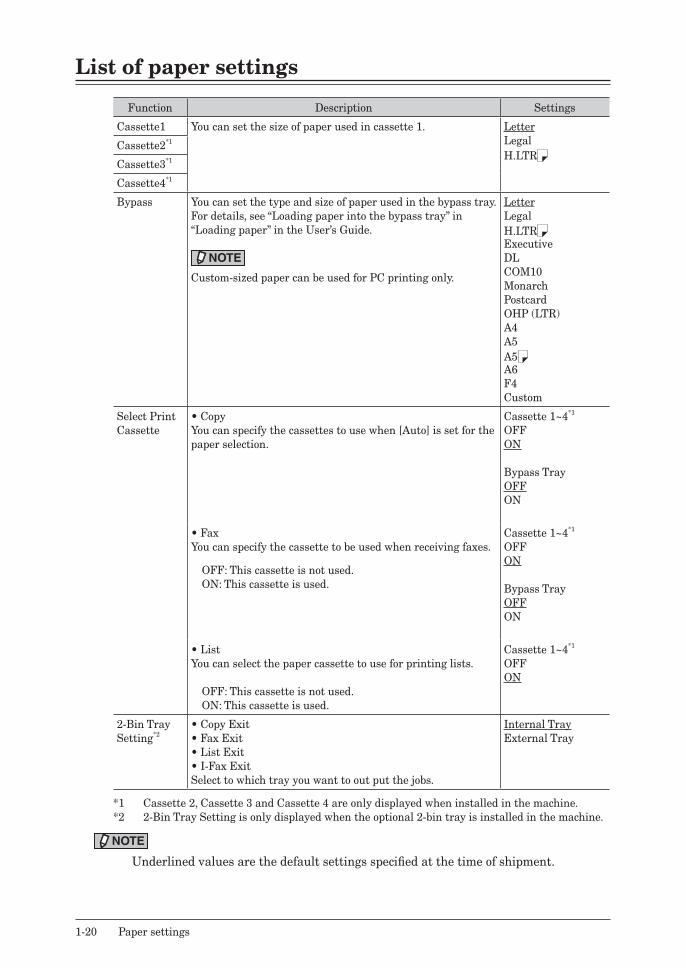
Function Description Settings
Cassette1 You can set the size of paper used in cassette 1. LetterLegalH.LTR
Cassette2*1
Cassette3*1
Cassette4*1
Bypass You can set the type and size of paper used in the bypass tray.For details, see “Loading paper into the bypass tray” in “Loading paper” in the User’s Guide.
NOTE
Custom-sized paper can be used for PC printing only.
LetterLegalH.LTRExecutiveDLCOM10MonarchPostcardOHP (LTR)A4A5A5A6F4Custom
Select Print Cassette
•CopyYou can specify the cassettes to use when [Auto] is set for the paper selection.
Cassette 1~4*1
OFFON
Bypass TrayOFFON
•FaxYou can specify the cassette to be used when receiving faxes.
OFF: This cassette is not used. ON: This cassette is used.
Cassette 1~4*1
OFFON
Bypass TrayOFFON
•ListYou can select the paper cassette to use for printing lists.
OFF: This cassette is not used. ON: This cassette is used.
Cassette 1~4*1
OFFON
2-Bin Tray Setting*2
•CopyExit•FaxExit•ListExit•I-FaxExitSelect to which tray you want to out put the jobs.
Internal TrayExternal Tray
*1 Cassette 2, Cassette 3 and Cassette 4 are only displayed when installed in the machine.*2 2-Bin Tray Setting is only displayed when the optional 2-bin tray is installed in the machine.
NOTE
Underlined values are the default settings specified at the time of shipment.
1
Usi
ng
co
mm
on
fu
nct
ion
s
Specifying default settings 1-21
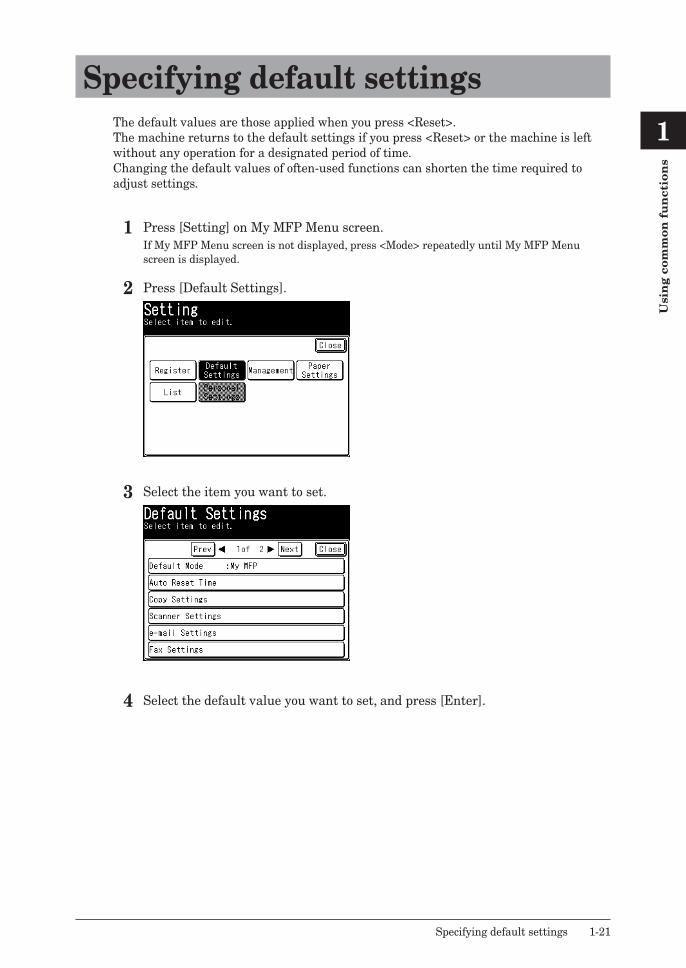
Specifying default settingsThe default values are those applied when you press <Reset>.The machine returns to the default settings if you press <Reset> or the machine is left without any operation for a designated period of time.Changing the default values of often-used functions can shorten the time required to adjust settings.
1 Press [Setting] on My MFP Menu screen.If My MFP Menu screen is not displayed, press <Mode> repeatedly until My MFP Menu screen is displayed.
2 Press [Default Settings].
3 Select the item you want to set.
4 Select the default value you want to set, and press [Enter].
1-22 Specifying default settings
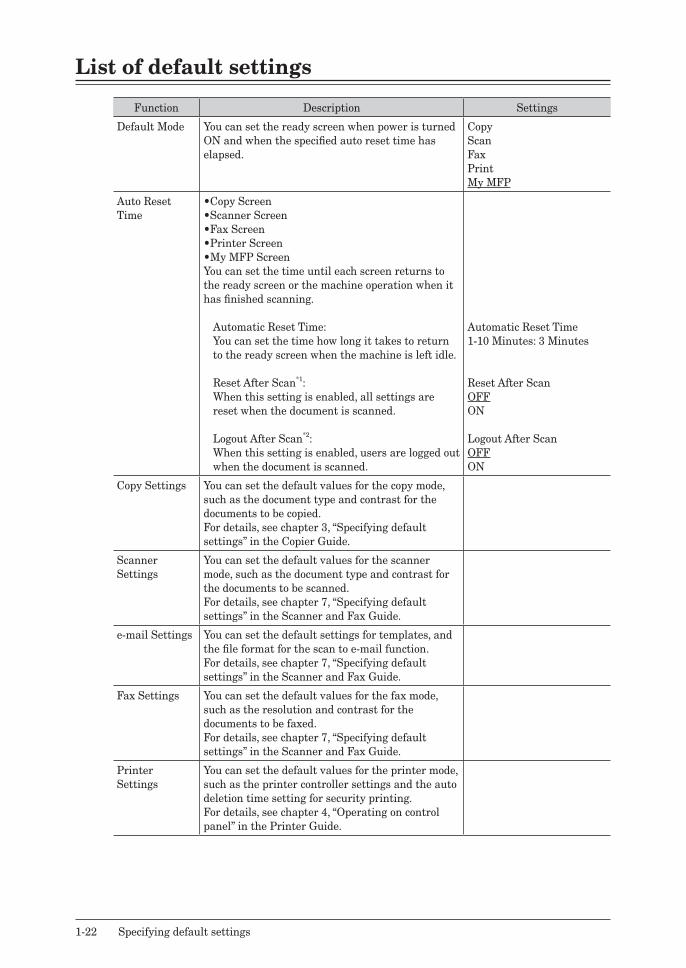
List of default settings
Function Description Settings
Default Mode You can set the ready screen when power is turned ON and when the specified auto reset time has elapsed.
CopyScanFaxPrintMy MFP
Auto Reset Time
•CopyScreen•ScannerScreen•FaxScreen•PrinterScreen•MyMFPScreenYou can set the time until each screen returns to the ready screen or the machine operation when it has finished scanning.
Automatic Reset Time: You can set the time how long it takes to return
to the ready screen when the machine is left idle.
Reset After Scan*1: When this setting is enabled, all settings are
reset when the document is scanned.
Logout After Scan*2: When this setting is enabled, users are logged out
when the document is scanned.
Automatic Reset Time1-10 Minutes: 3 Minutes
Reset After ScanOFFON
Logout After ScanOFFON
Copy Settings You can set the default values for the copy mode, such as the document type and contrast for the documents to be copied.For details, see chapter 3, “Specifying default settings” in the Copier Guide.
Scanner Settings
You can set the default values for the scanner mode, such as the document type and contrast for the documents to be scanned.For details, see chapter 7, “Specifying default settings” in the Scanner and Fax Guide.
e-mail Settings You can set the default settings for templates, and the file format for the scan to e-mail function.For details, see chapter 7, “Specifying default settings” in the Scanner and Fax Guide.
Fax Settings You can set the default values for the fax mode, such as the resolution and contrast for the documents to be faxed.For details, see chapter 7, “Specifying default settings” in the Scanner and Fax Guide.
Printer Settings
You can set the default values for the printer mode, such as the printer controller settings and the auto deletion time setting for security printing.For details, see chapter 4, “Operating on control panel” in the Printer Guide.
1
Usi
ng
co
mm
on
fu
nct
ion
s
Specifying default settings 1-23
Function Description Settings
Sound Settings You can set the various sound settings.
•VolumeYou can adjust the volume of the confirmation tone, completion tone, alarm, and beep.
•ConfirmationToneYou can change the tone that is heard when pressing the buttons.
•CompletionToneThe machine informs you that a job is completed with a beep.To set the tone individually, press [Custom], and specify the settings individually. •CopyComplete •TransmissionComplete •ReceptionComplete •RxPrintComplete •PCPrintingComplete •ListPrintComplete •GlassScanComplete
Level 1-7: 4
OFFLowMidHigh
OFFType 1Type 2Type 3
•AlarmYou can set the machine to inform you of errors such as when paper has jammed.To set the sound individually, press [Custom], and specify the settings individually. •Paperjam •Outofpaper •Tonerreplacement •PCprinterror •FaxCommunicationerror •Faxcancelinformation •MemoryOverflow •CoverOpen •Documentjam •Drumcartridgereplacement •Checkouterror •FaxReceptionPrintWarning
•BeepYou can set the ringer for fax reception.
OFFON
OFFON

1-24 Specifying default settings
Function Description Settings
Smart Energy Save
For details, see “Setting smart energy save” (page 1-25).
•EnergySaveMode01-240 Minutes: 01 Minute
•EnergySavePeriodStart TimeOFFON
Reset TimeOFFON
WeekdayMon, Tue, Wed, Thu, Fri, Sat, Sun
*1 Except for the Fax screen, Printer screen and My MFP screen.*2 Except for the Printer screen and My MFP screen.
NOTE
Underlined values are the default settings specified at the time of shipment.
1
Usi
ng
co
mm
on
fu
nct
ion
s
Specifying default settings 1-25
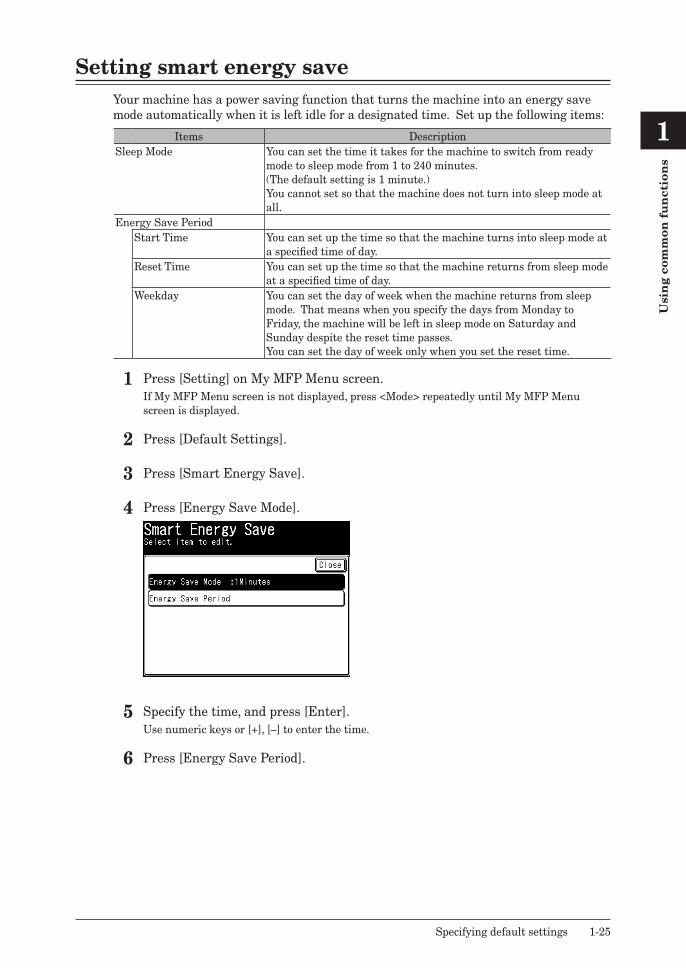
Setting smart energy saveYour machine has a power saving function that turns the machine into an energy save mode automatically when it is left idle for a designated time. Set up the following items:
Items DescriptionSleep Mode You can set the time it takes for the machine to switch from ready
mode to sleep mode from 1 to 240 minutes.(The default setting is 1 minute.)You cannot set so that the machine does not turn into sleep mode at all.
Energy Save PeriodStart Time You can set up the time so that the machine turns into sleep mode at
a specified time of day.Reset Time You can set up the time so that the machine returns from sleep mode
at a specified time of day.Weekday You can set the day of week when the machine returns from sleep
mode. That means when you specify the days from Monday to Friday, the machine will be left in sleep mode on Saturday and Sunday despite the reset time passes.You can set the day of week only when you set the reset time.
1 Press [Setting] on My MFP Menu screen.If My MFP Menu screen is not displayed, press <Mode> repeatedly until My MFP Menu screen is displayed.
2 Press [Default Settings].
3 Press [Smart Energy Save].
4 Press [Energy Save Mode].
5 Specify the time, and press [Enter].Use numeric keys or [+], [–] to enter the time.
6 Press [Energy Save Period].
1-26 Specifying default settings
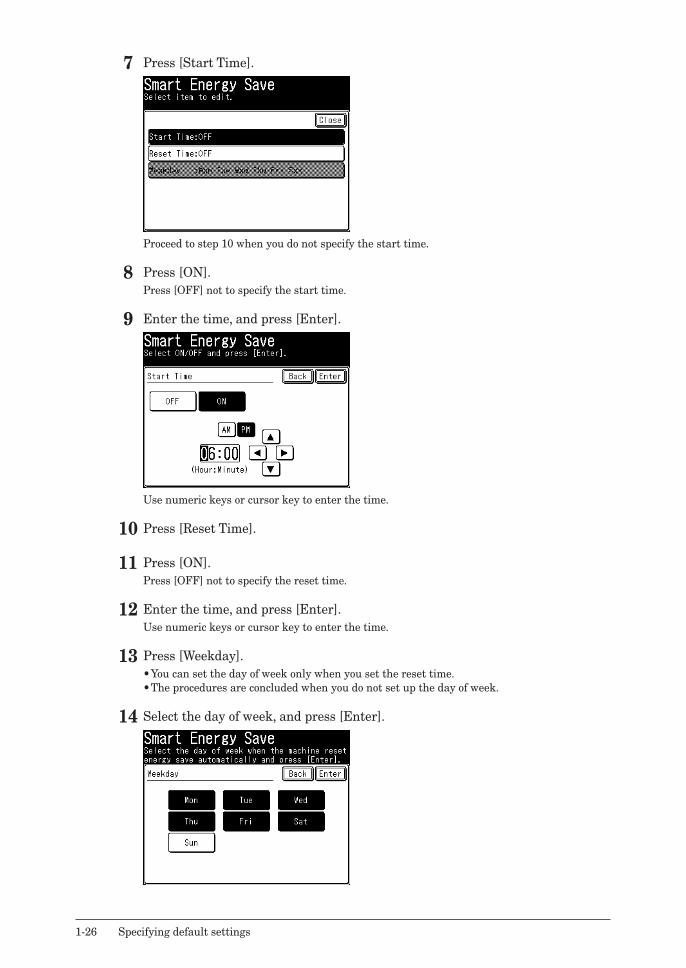
7 Press [Start Time].
Proceed to step 10 when you do not specify the start time.
8 Press [ON].Press [OFF] not to specify the start time.
9 Enter the time, and press [Enter].
Use numeric keys or cursor key to enter the time.
10 Press [Reset Time].
11 Press [ON].Press [OFF] not to specify the reset time.
12 Enter the time, and press [Enter].Use numeric keys or cursor key to enter the time.
13 Press [Weekday].•You can set the day of week only when you set the reset time.•The procedures are concluded when you do not set up the day of week.
14 Select the day of week, and press [Enter].
1
Usi
ng
co
mm
on
fu
nct
ion
s
Printing lists 1-27
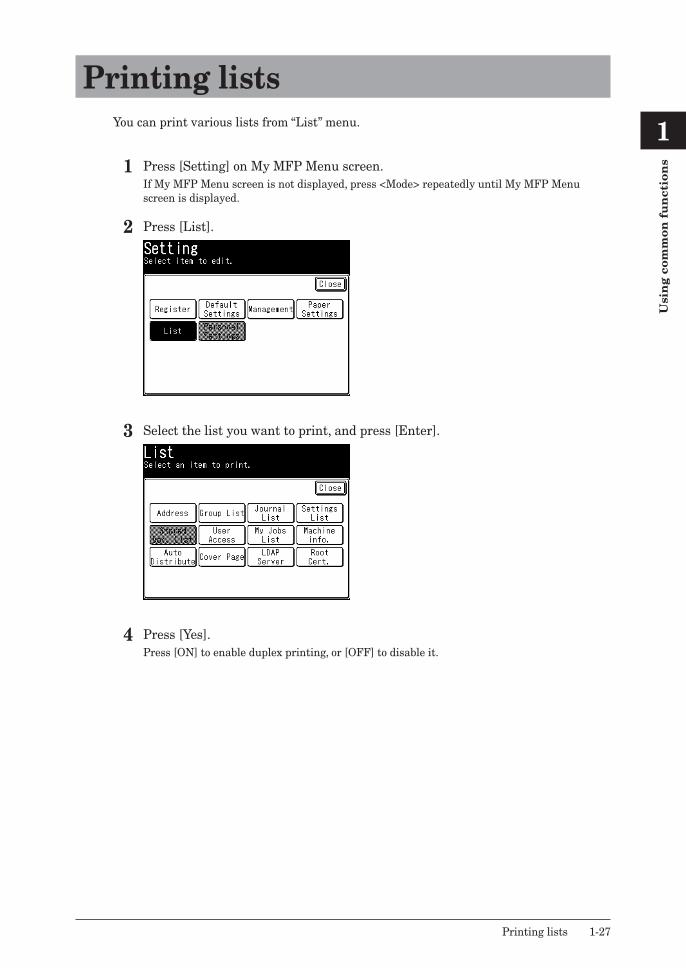
Printing listsYou can print various lists from “List” menu.
1 Press [Setting] on My MFP Menu screen.If My MFP Menu screen is not displayed, press <Mode> repeatedly until My MFP Menu screen is displayed.
2 Press [List].
3 Select the list you want to print, and press [Enter].
4 Press [Yes].Press [ON] to enable duplex printing, or [OFF] to disable it.
1-28 Printing lists
List of lists
List name Content printed Reference page
Address Book List Prints a list of the destinations registered in the address book. The list can be printed in order of the numbers or in alphabetical order.
Chapter 7, “Registering destinations” in the Scanner and Fax Guide.
Group List Prints a list of the destinations registered in the address book as groups. The list can be printed in order of the numbers or in alphabetical order.
Journal List Prints a list of the communication results. Chapter 6, “Printing journals” in the Scanner and Fax Guide.
Settings List Prints a list of default settings, management settings, and paper settings, etc.
—
Stored Doc. List Prints a list of the stored documents, such as the reserved documents.
—
User Access Management
Prints a list of the total number of pages used for each mode and total communication time.
—
My Jobs List Prints a list of the registered My Jobs. 1-14
Machine information Prints the IP address and network settings of the machine, the status of optional equipment and consumables, and the number of pages that have been printed with each mode.
1-6
Auto Distribute Prints a list of the distributing conditions set. Chapter 4, “Useful reception function” in the Scanner and Fax Guide.
Cover Page Prints a sample cover page. Chapter 4, “Cover page” in “Transmission related settings” in the Scanner and Fax Guide.
LDAP Server Prints a list of the registered LDAP servers. 2-26
Root Certificate List You can print the fingerprints for the root certificates of private certificate authorities.
—
1
Usi
ng
co
mm
on
fu
nct
ion
s
Using personal settings 1-29
Using personal settingsIn the personal settings, you can customize the various settings for each user.Personal settings are displayed when a user login is performed. For details, see “Logging in / Logging out” (page 1-32).
Specifying personal settings
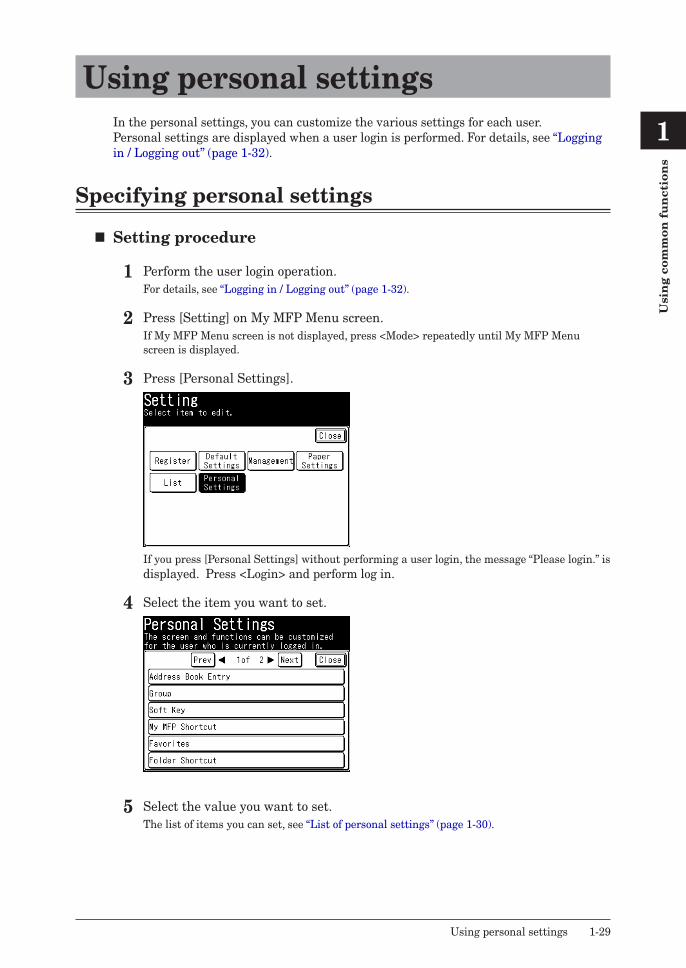
� Setting procedure
1 Perform the user login operation.For details, see “Logging in / Logging out” (page 1-32).
2 Press [Setting] on My MFP Menu screen.If My MFP Menu screen is not displayed, press <Mode> repeatedly until My MFP Menu screen is displayed.
3 Press [Personal Settings].
If you press [Personal Settings] without performing a user login, the message “Please login.” is displayed. Press <Login> and perform log in.
4 Select the item you want to set.
5 Select the value you want to set.The list of items you can set, see “List of personal settings” (page 1-30).
1-30 Using personal settings
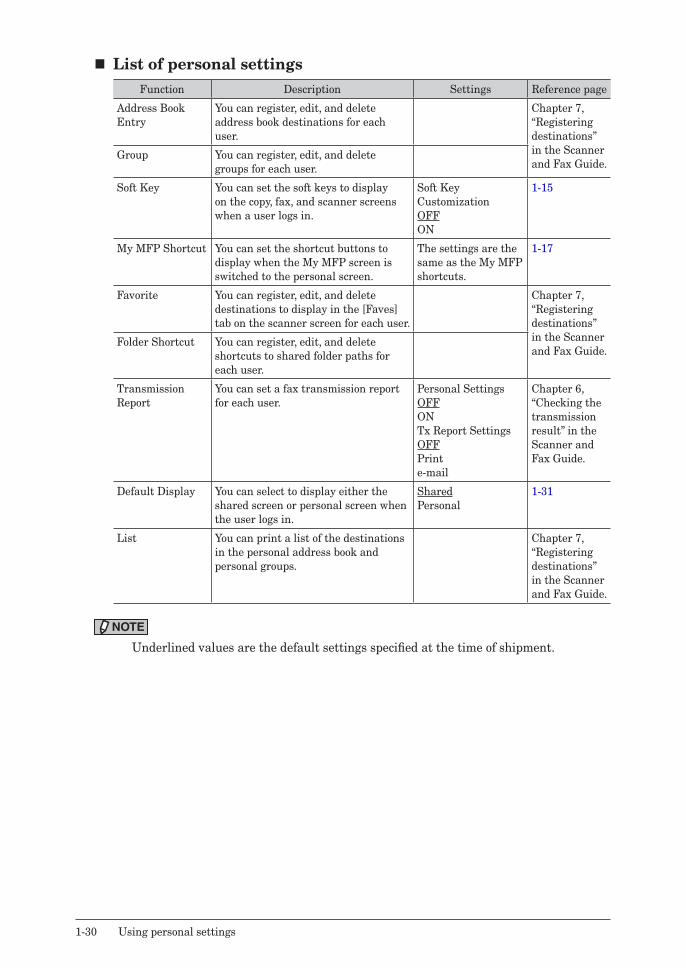
� List of personal settingsFunction Description Settings Reference page
Address Book Entry
You can register, edit, and delete address book destinations for each user.
Chapter 7, “Registering destinations” in the Scanner and Fax Guide.
Group You can register, edit, and delete groups for each user.
Soft Key You can set the soft keys to display on the copy, fax, and scanner screens when a user logs in.
Soft Key CustomizationOFFON
1-15
My MFP Shortcut You can set the shortcut buttons to display when the My MFP screen is switched to the personal screen.
The settings are the same as the My MFP shortcuts.
1-17
Favorite You can register, edit, and delete destinations to display in the [Faves] tab on the scanner screen for each user.
Chapter 7, “Registering destinations” in the Scanner and Fax Guide.
Folder Shortcut You can register, edit, and delete shortcuts to shared folder paths for each user.
Transmission Report
You can set a fax transmission report for each user.
Personal SettingsOFFONTx Report SettingsOFFPrinte-mail
Chapter 6, “Checking the transmission result” in the Scanner and Fax Guide.
Default Display You can select to display either the shared screen or personal screen when the user logs in.
SharedPersonal
1-31
List You can print a list of the destinations in the personal address book and personal groups.
Chapter 7, “Registering destinations” in the Scanner and Fax Guide.
NOTE
Underlined values are the default settings specified at the time of shipment.
1
Usi
ng
co
mm
on
fu
nct
ion
s
Using personal settings 1-31
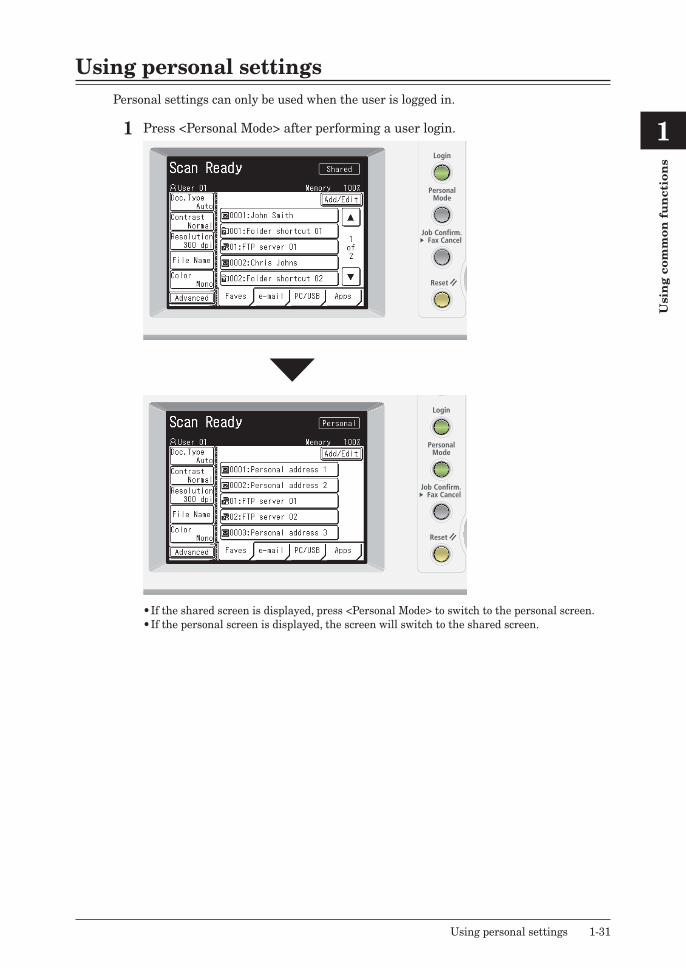
Using personal settingsPersonal settings can only be used when the user is logged in.
1 Press <Personal Mode> after performing a user login.
•If the shared screen is displayed, press <Personal Mode> to switch to the personal screen.•If the personal screen is displayed, the screen will switch to the shared screen.
1-32 Logging in / Logging out
Logging in / Logging outTo use the machine with receiving user authentication, log in to the machine. If you log in, you can use the following functions.
•Personal settings•Security print•User access management•Journal report (with the user name printing in the sender field)•Personal address book
NOTE
•For details on setting user authentication, see “Setting user authentication” (page 2-31).•When the “Guest account setting” is effective at machine policy setting on Message
Board, press <Reset> to use the machine as a guest.
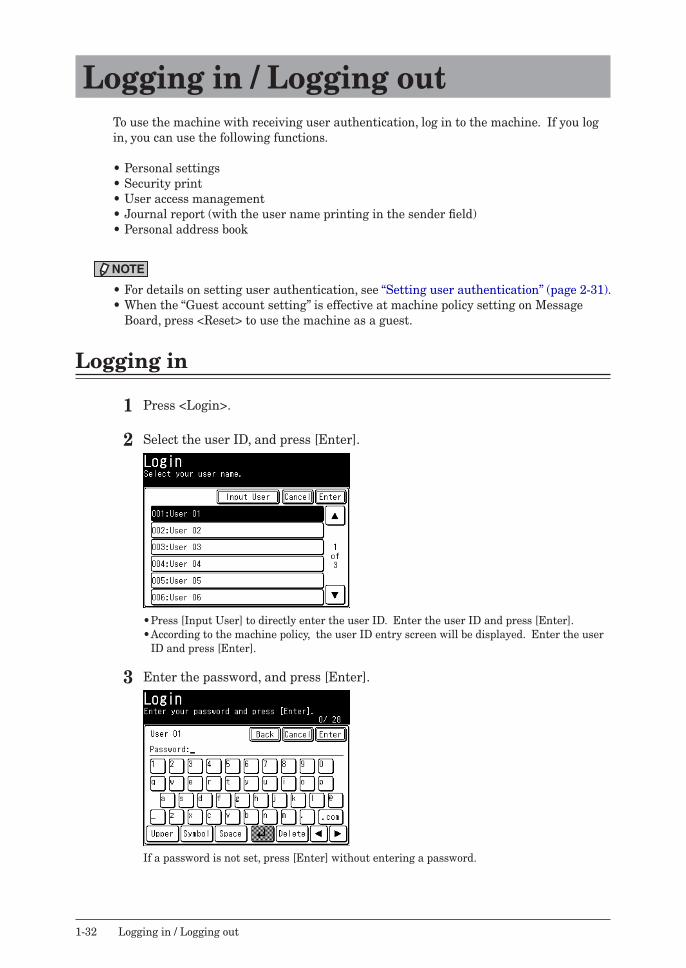
Logging in
1 Press <Login>.
2 Select the user ID, and press [Enter].
•Press [Input User] to directly enter the user ID. Enter the user ID and press [Enter].•According to the machine policy, the user ID entry screen will be displayed. Enter the user
ID and press [Enter].
3 Enter the password, and press [Enter].
If a password is not set, press [Enter] without entering a password.
1
Usi
ng
co
mm
on
fu
nct
ion
s
Logging in / Logging out 1-33
NOTE
For details on the machine policy settings, see chapter 4, “Setting the machine policy” in “Setting security” in the Message Board Guide.
Logging outThere are two methods to log out; manual and automatic. Here the procedure to log out manually is described.
NOTE
•For details on how to set automatic logout time, see “Setting the automatic logout time” (page 2-39).
•For details on how to set logout when scanning is finished, see “Auto Reset Time” in “List of default settings” (page 1-22).
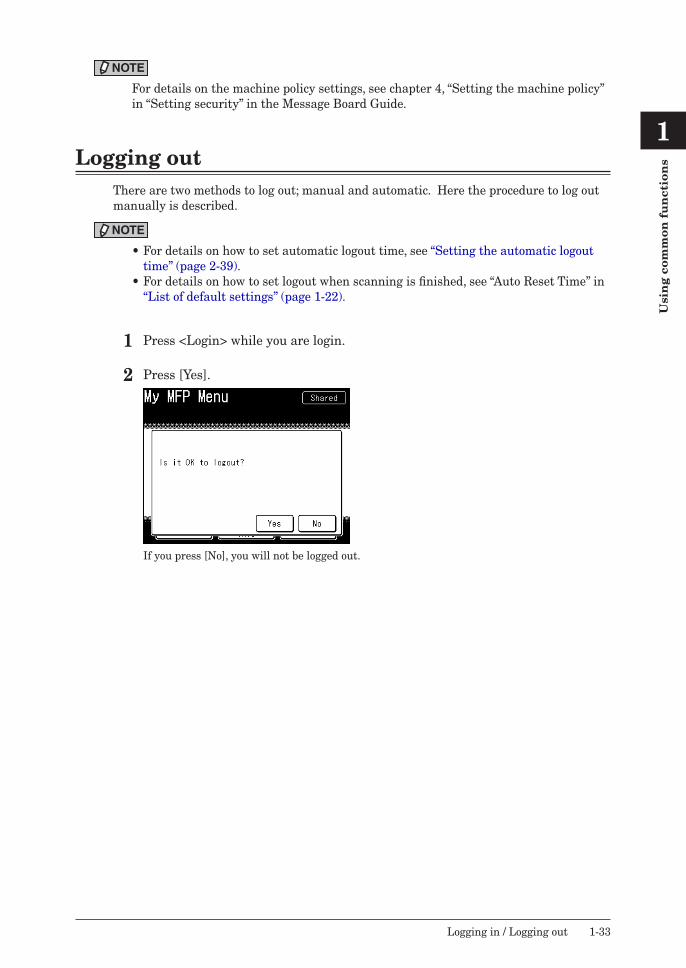
1 Press <Login> while you are login.
2 Press [Yes].
If you press [No], you will not be logged out.

1-34 Logging in / Logging out
This page intentionally left blank.
Chapter 2Management
Machine management settings................................................................................2-2List of machine management settings ...................................................................2-3
Setting security codes ...............................................................................................2-5Setting the administrator password ......................................................................2-5Setting the protect passcode ...................................................................................2-7
Function protect settings .........................................................................................2-9Setting function protection ...................................................................................2-10Using function protection .....................................................................................2-11
Setting mode protection .........................................................................................2-13Managing user access ..............................................................................................2-14
Printing the user access management list ...........................................................2-14Resetting the counter ............................................................................................2-15
Specifying the network settings ...........................................................................2-16Network settings ...................................................................................................2-16List of network settings ........................................................................................2-17TCP/IP settings .....................................................................................................2-19Registering LDAP Servers ....................................................................................2-22Specifying the archive settings .............................................................................2-27Setting user authentication ..................................................................................2-31Setting an e-mail gateway ....................................................................................2-32
Mirroring the machine settings ............................................................................2-34Importing / Exporting using USB memory device ..............................................2-34
Setting the automatic logout time ........................................................................2-39
2-2 Machine management settings
Machine management settingsYou can specify the important settings related to the machine, such as the user install mode and security communication settings, and network settings, etc.If you set an administrator password, a screen for entering the administrator password is displayed whenever you press [Management], which enables you to prevent users other than the administrator from changing the settings. Once you enter the administrator password, you can set the setting continuously in “Management”.
1 Press [Setting] on My MFP Menu screen.If My MFP Menu screen is not displayed, press <Mode> repeatedly until My MFP Menu screen is displayed.
2 Press [Management].
3 If an administrator password is set, enter the password and press [Enter].If an administrator password is not set, proceed to step 4.
4 Select the function you want to set.
1
2
Ma
na
gem
ent
Machine management settings 2-3
List of machine management settings
Function Description Settings Reference page
Security Communication
You can specify the various security communication settings, such as closed transmission, ID check, destination confirmation, and security reception settings.
•Closed Transmission OFFON
•Closed Reception OFFON
•Passcode0000 to 9999: (not registered)
•ID Check Tx OFFON
•Confirm DestinationOFFONBroadcast Only
•Confirm Speed-Dial OFFON
•Confirm Numeric keysOFFON
•Broadcast TxOFFON
•Secure ReceptionOFFON (current time)
Chapter 4, “Security fax functions” in the Scanner and Fax Guide.
Function Protect Setting
You can manage the various settings using an administrator password and protect passcode.
ProhibitedProtect ONProtect OFF
2-9
Mode Protect Setting
You can set the machine to prohibit the copy, scan, fax, or print modes from being used.
OFFON
2-13
User Access Management
You can reset the counter. 2-15
Network Settings
You can set the network settings for using the machine on a network.
2-16
User Install You can specify the settings required for using the machine.
Chapter 7, “Initial setup (User Install)” in the Scanner and Fax Guide.
Mirroring You can copy the settings information to another machine between same model.
2-34
2-4 Machine management settings
Function Description Settings Reference page
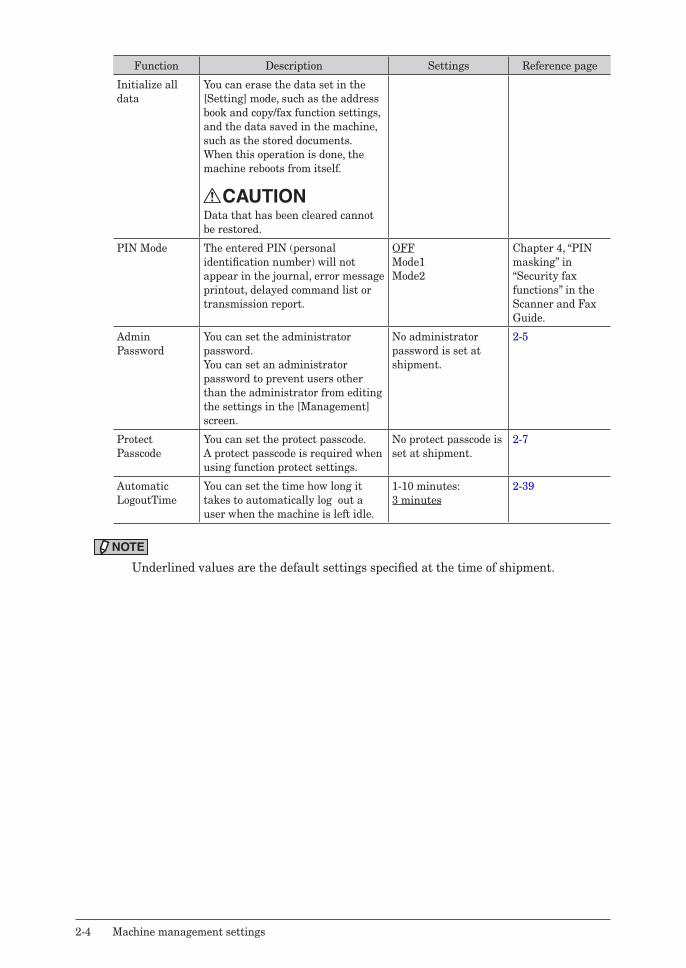
Initialize all data
You can erase the data set in the [Setting] mode, such as the address book and copy/fax function settings, and the data saved in the machine, such as the stored documents. When this operation is done, the machine reboots from itself.
Data that has been cleared cannot be restored.
PIN Mode The entered PIN (personal identification number) will not appear in the journal, error message printout, delayed command list or transmission report.
OFFMode1Mode2
Chapter 4, “PIN masking” in “Security fax functions” in the Scanner and Fax Guide.
Admin Password
You can set the administrator password.You can set an administrator password to prevent users other than the administrator from editing the settings in the [Management] screen.
No administrator password is set at shipment.
2-5
Protect Passcode
You can set the protect passcode.A protect passcode is required when using function protect settings.
No protect passcode is set at shipment.
2-7
Automatic LogoutTime
You can set the time how long it takes to automatically log out a user when the machine is left idle.
1-10 minutes:3 minutes
2-39
NOTE
Underlined values are the default settings specified at the time of shipment.
1
2
Ma
na
gem
ent
Setting security codes 2-5
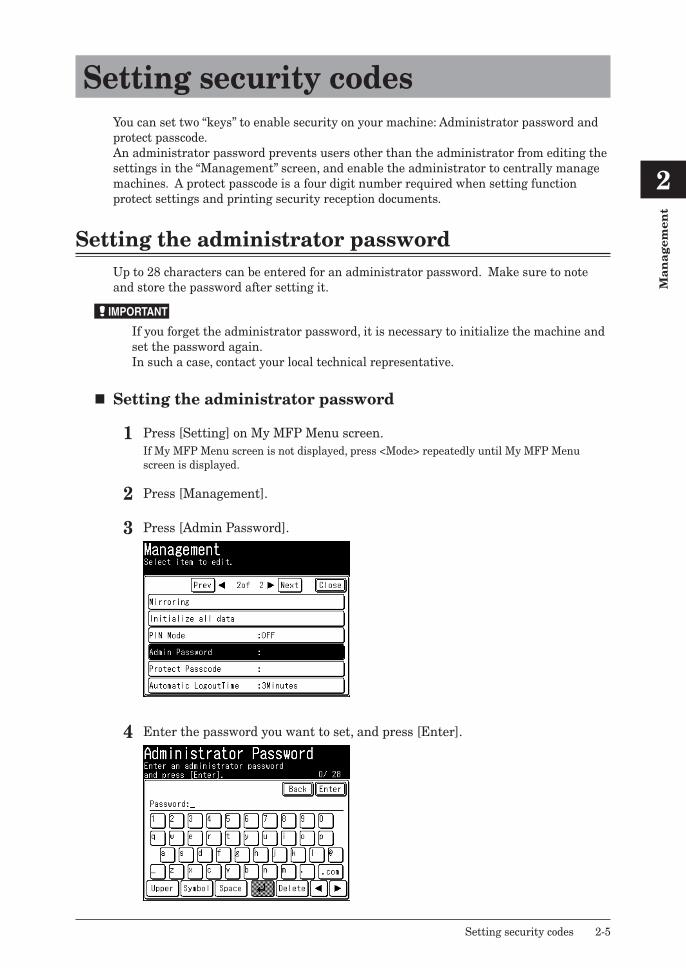
Setting security codesYou can set two “keys” to enable security on your machine: Administrator password and protect passcode.An administrator password prevents users other than the administrator from editing the settings in the “Management” screen, and enable the administrator to centrally manage machines. A protect passcode is a four digit number required when setting function protect settings and printing security reception documents.
Setting the administrator passwordUp to 28 characters can be entered for an administrator password. Make sure to note and store the password after setting it.
IMPORTANT
If you forget the administrator password, it is necessary to initialize the machine and set the password again.In such a case, contact your local technical representative.
� Setting the administrator password
1 Press [Setting] on My MFP Menu screen.If My MFP Menu screen is not displayed, press <Mode> repeatedly until My MFP Menu screen is displayed.
2 Press [Management].
3 Press [Admin Password].
4 Enter the password you want to set, and press [Enter].
2-6 Setting security codes
5 Enter the password again, and press [Enter].
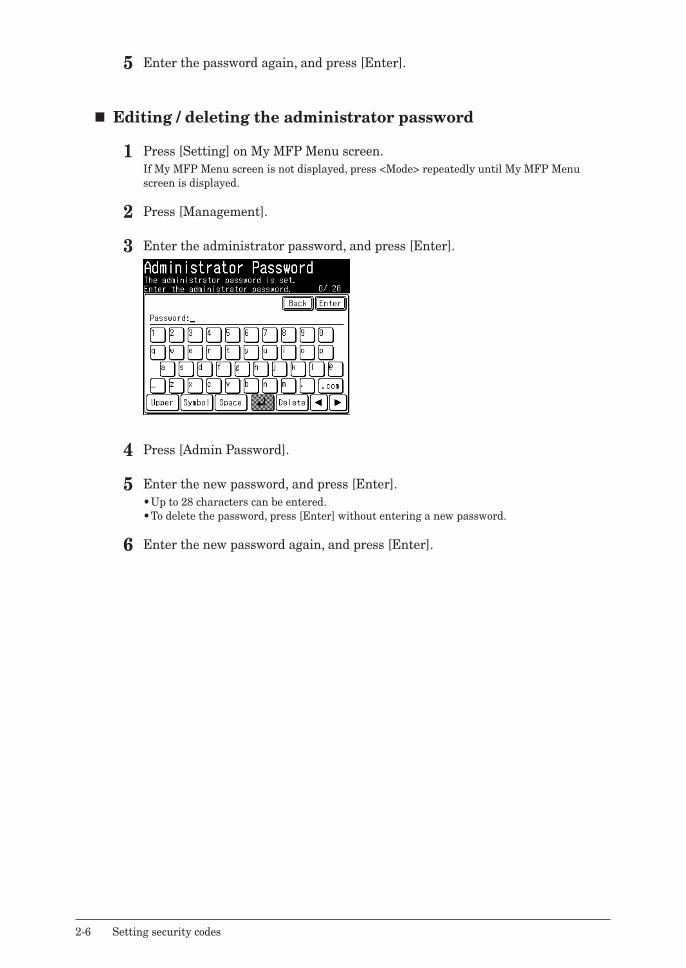
� Editing / deleting the administrator password
1 Press [Setting] on My MFP Menu screen.If My MFP Menu screen is not displayed, press <Mode> repeatedly until My MFP Menu screen is displayed.
2 Press [Management].
3 Enter the administrator password, and press [Enter].
4 Press [Admin Password].
5 Enter the new password, and press [Enter].• Up to 28 characters can be entered.• To delete the password, press [Enter] without entering a new password.
6 Enter the new password again, and press [Enter].

1
2
Ma
na
gem
ent
Setting security codes 2-7
Setting the protect passcodeYou can set a four digit number of your choice for the protect passcode. Make sure to note and store the number after setting it.
� Setting the protect passcode
1 Press [Setting] on My MFP Menu screen.If My MFP Menu screen is not displayed, press <Mode> repeatedly until My MFP Menu screen is displayed.
2 Press [Management].
3 If an administrator password is set, enter the password and press [Enter].If an administrator password is not set, proceed to step 4.
4 Press [Protect Passcode].
5 Enter the protect passcode using the numeric keys, and press [Enter].
Enter a four digit number.
2-8 Setting security codes
� Editing / deleting the protect passcode
1 Press [Setting] on My MFP Menu screen.If My MFP Menu screen is not displayed, press <Mode> repeatedly until My MFP Menu screen is displayed.
2 Press [Management].
3 If an administrator password is set, enter the password and press [Enter].If an administrator password is not set, proceed to step 4.
4 Press [Protect Passcode].
5 Enter the current protect passcode using the numeric keys, and press [Enter].
6 Enter the new passcode using the numeric keys, and press [Enter].To delete the protect passcode, enter “0000” using the numeric keys, and press [Enter].
1
2
Ma
na
gem
ent
Function protect settings 2-9
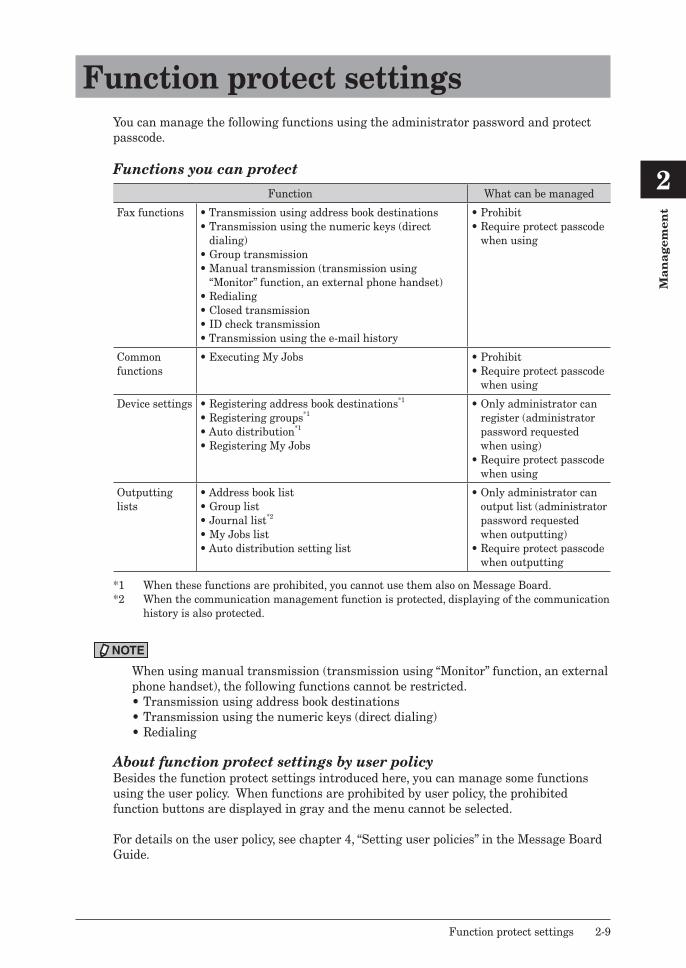
Function protect settingsYou can manage the following functions using the administrator password and protect passcode.
Functions you can protect
Function What can be managed
Fax functions • Transmission using address book destinations• Transmission using the numeric keys (direct
dialing)• Group transmission• Manual transmission (transmission using
“Monitor” function, an external phone handset)• Redialing• Closed transmission• ID check transmission• Transmission using the e-mail history
• Prohibit• Require protect passcode
when using
Common functions
• Executing My Jobs • Prohibit• Require protect passcode
when using
Device settings • Registering address book destinations*1
• Registering groups*1
• Auto distribution*1
• Registering My Jobs
• Only administrator can register (administrator password requested when using)
• Require protect passcode when using
Outputting lists
• Address book list• Group list• Journal list*2
• My Jobs list• Auto distribution setting list
• Only administrator can output list (administrator password requested when outputting)
• Require protect passcode when outputting
*1 When these functions are prohibited, you cannot use them also on Message Board.*2 When the communication management function is protected, displaying of the communication
history is also protected.
NOTE
When using manual transmission (transmission using “Monitor” function, an external phone handset), the following functions cannot be restricted.• Transmission using address book destinations• Transmission using the numeric keys (direct dialing)• Redialing
About function protect settings by user policyBesides the function protect settings introduced here, you can manage some functions using the user policy. When functions are prohibited by user policy, the prohibited function buttons are displayed in gray and the menu cannot be selected.
For details on the user policy, see chapter 4, “Setting user policies” in the Message Board Guide.
2-10 Function protect settings
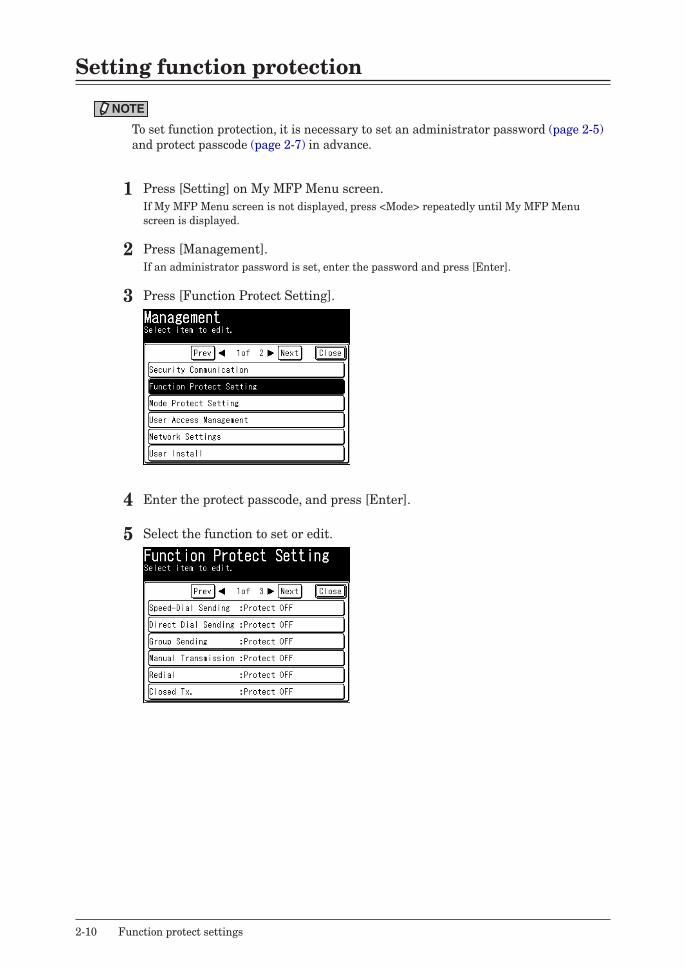
Setting function protection
NOTE
To set function protection, it is necessary to set an administrator password (page 2-5) and protect passcode (page 2-7) in advance.
1 Press [Setting] on My MFP Menu screen.If My MFP Menu screen is not displayed, press <Mode> repeatedly until My MFP Menu screen is displayed.
2 Press [Management].If an administrator password is set, enter the password and press [Enter].
3 Press [Function Protect Setting].
4 Enter the protect passcode, and press [Enter].
5 Select the function to set or edit.
1
2
Ma
na
gem
ent
Function protect settings 2-11
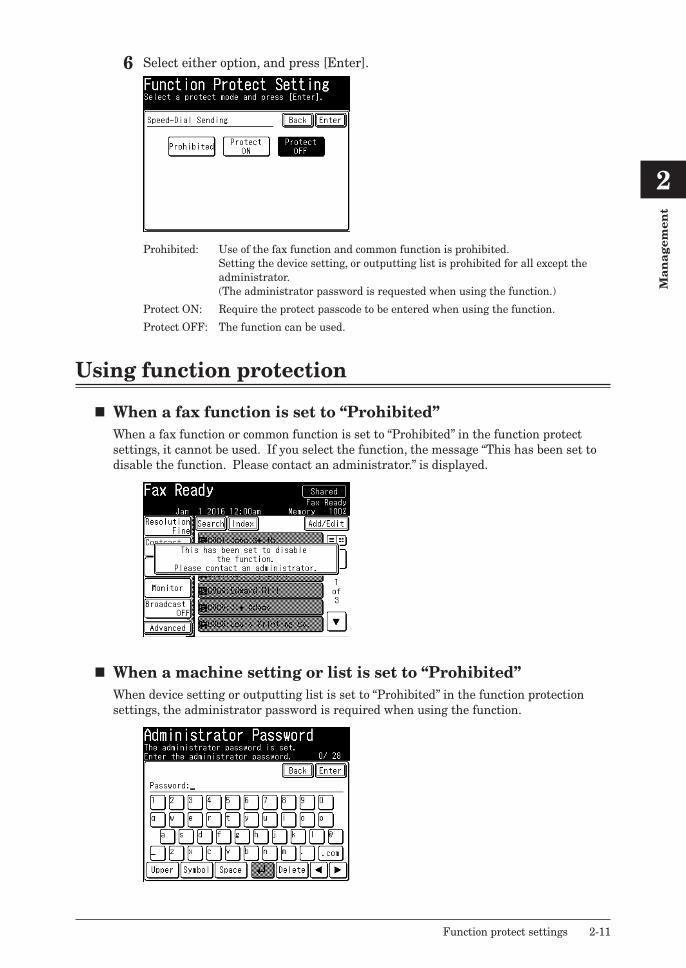
6 Select either option, and press [Enter].
Prohibited:
Protect ON:
Protect OFF:
Use of the fax function and common function is prohibited.Setting the device setting, or outputting list is prohibited for all except the administrator.(The administrator password is requested when using the function.)
Require the protect passcode to be entered when using the function.
The function can be used.
Using function protection
� When a fax function is set to “Prohibited”When a fax function or common function is set to “Prohibited” in the function protect settings, it cannot be used. If you select the function, the message “This has been set to disable the function. Please contact an administrator.” is displayed.
� When a machine setting or list is set to “Prohibited”When device setting or outputting list is set to “Prohibited” in the function protection settings, the administrator password is required when using the function.
2-12 Function protect settings
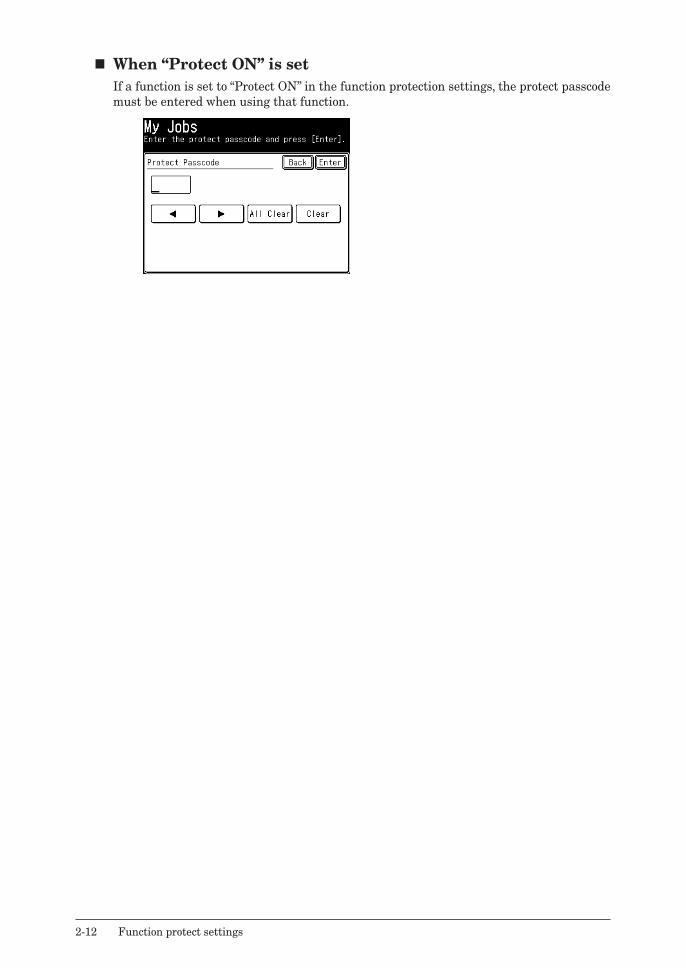
� When “Protect ON” is setIf a function is set to “Protect ON” in the function protection settings, the protect passcode must be entered when using that function.
1
2
Ma
na
gem
ent
Setting mode protection 2-13
Setting mode protectionYou can protect copy, scanner, fax, or printer modes from being used.For example, if you enable copy mode protection, the machine will not switch to the copy screen.
1 Press [Setting] on My MFP Menu screen.If My MFP Menu screen is not displayed, press <Mode> repeatedly until My MFP Menu screen is displayed.
2 Press [Management].If an administrator password is set, enter the password and press [Enter].
3 Press [Mode Protect Setting].
4 Select the function to set, and press [Enter].
5 Select [ON], and press [Enter].Select [OFF] to deselect this function.
2-14 Managing user access
Managing user accessIf you use this function, you can check the total number of pages used for the fax, copy, scan, and print modes and the total communication time for all user.
Printing the user access management listThe following information is included on the user access management list.• The total communication time for all users• The total number of pages of faxing, copying, scanning and printing for all users
NOTE
• A maximum of 999,999 pages and a maximum time of 999:59:59 (999 hours, 59 minutes, 59 seconds) can be counted.
• For details on resetting the counters, see “Resetting the counter” (page 2-15).• If you want to print the device usage status for a specific user only, print the list
from Message Board. For details, see chapter 4, “User access management” in the Message Board Guide.
1 Press [Setting] on My MFP Menu screen.If My MFP Menu screen is not displayed, press <Mode> repeatedly until My MFP Menu screen is displayed.
2 Press [List].
3 Press [User Access].
4 Press [Yes].Press [ON] to enable duplex printing, or [OFF] to disable it.
1
2
Ma
na
gem
ent
Managing user access 2-15
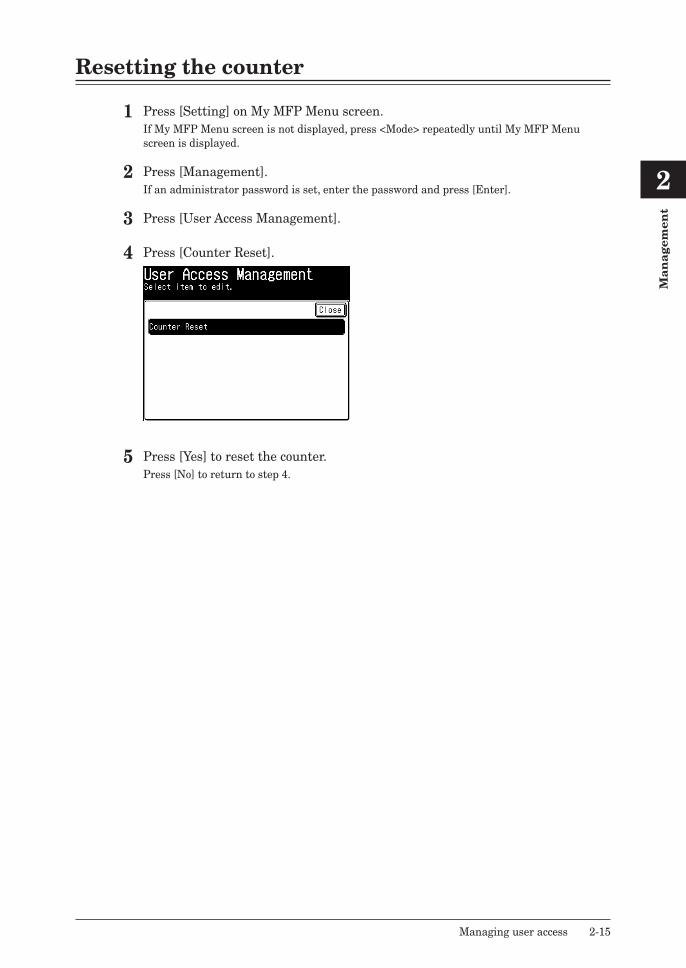
Resetting the counter
1 Press [Setting] on My MFP Menu screen.If My MFP Menu screen is not displayed, press <Mode> repeatedly until My MFP Menu screen is displayed.
2 Press [Management].If an administrator password is set, enter the password and press [Enter].
3 Press [User Access Management].
4 Press [Counter Reset].
5 Press [Yes] to reset the counter.Press [No] to return to step 4.
2-16 Specifying the network settings
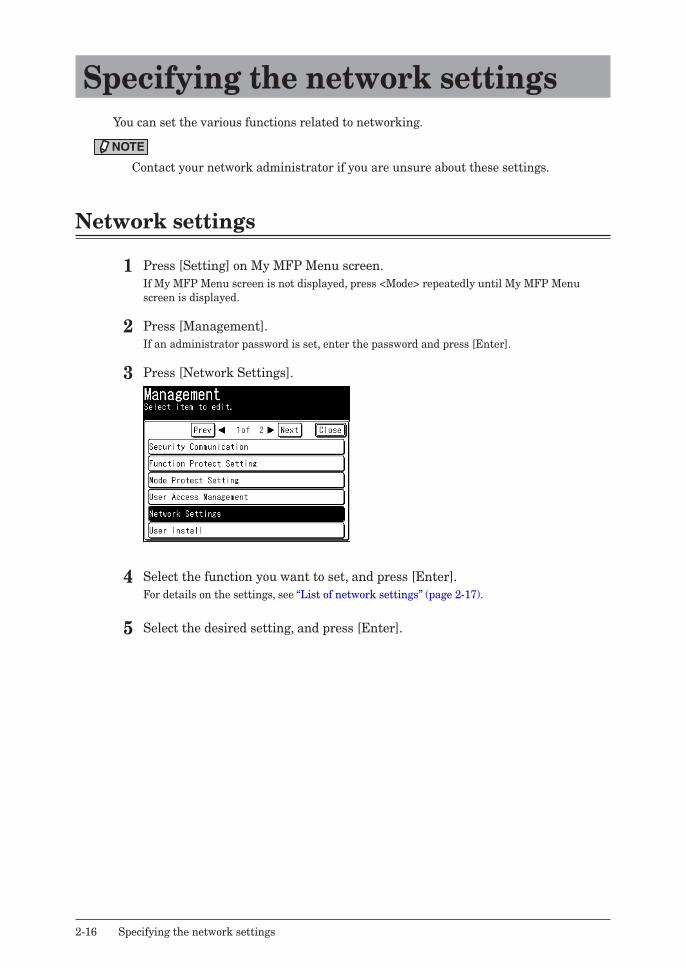
Specifying the network settingsYou can set the various functions related to networking.
NOTE
Contact your network administrator if you are unsure about these settings.
Network settings
1 Press [Setting] on My MFP Menu screen.If My MFP Menu screen is not displayed, press <Mode> repeatedly until My MFP Menu screen is displayed.
2 Press [Management].If an administrator password is set, enter the password and press [Enter].
3 Press [Network Settings].
4 Select the function you want to set, and press [Enter].For details on the settings, see “List of network settings” (page 2-17).
5 Select the desired setting, and press [Enter].
1
2
Ma
na
gem
ent
Specifying the network settings 2-17
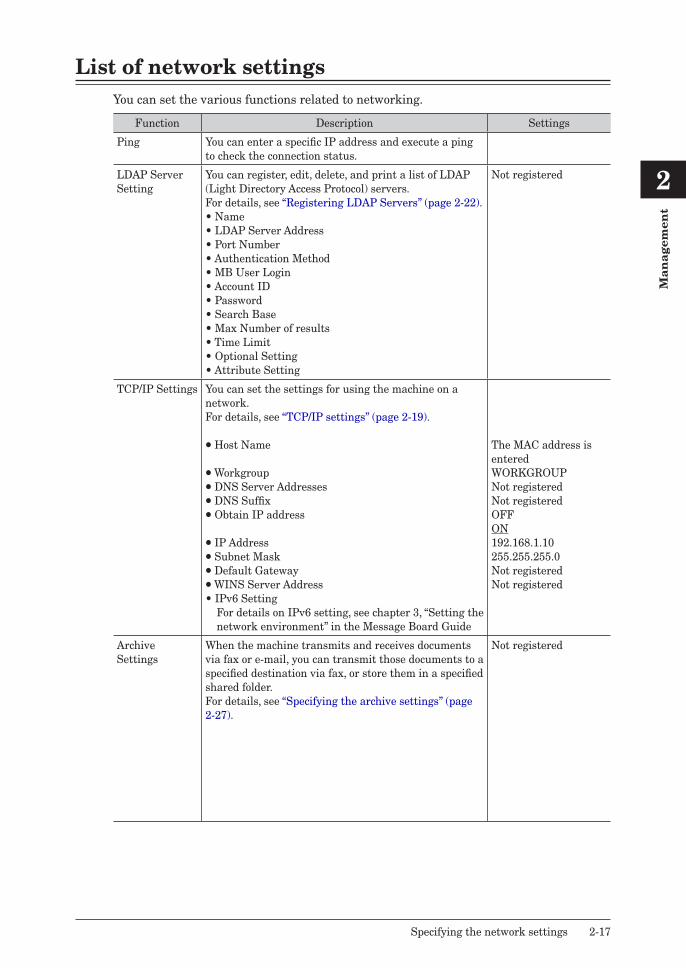
List of network settingsYou can set the various functions related to networking.
Function Description Settings
Ping You can enter a specific IP address and execute a ping to check the connection status.
LDAP Server Setting
You can register, edit, delete, and print a list of LDAP (Light Directory Access Protocol) servers.For details, see “Registering LDAP Servers” (page 2-22).• Name• LDAP Server Address• Port Number• Authentication Method• MB User Login• Account ID• Password• Search Base• Max Number of results• Time Limit• Optional Setting• Attribute Setting
Not registered
TCP/IP Settings You can set the settings for using the machine on a network.For details, see “TCP/IP settings” (page 2-19).
Host Name
Workgroup DNS Server Addresses DNS Suffix Obtain IP address
IP Address Subnet Mask Default Gateway WINS Server Address• IPv6 Setting
For details on IPv6 setting, see chapter 3, “Setting the network environment” in the Message Board Guide
The MAC address is enteredWORKGROUPNot registeredNot registeredOFFON192.168.1.10255.255.255.0Not registeredNot registered
ArchiveSettings
When the machine transmits and receives documents via fax or e-mail, you can transmit those documents to a specified destination via fax, or store them in a specified shared folder.For details, see “Specifying the archive settings” (page 2-27).
Not registered
2-18 Specifying the network settings
Function Description Settings
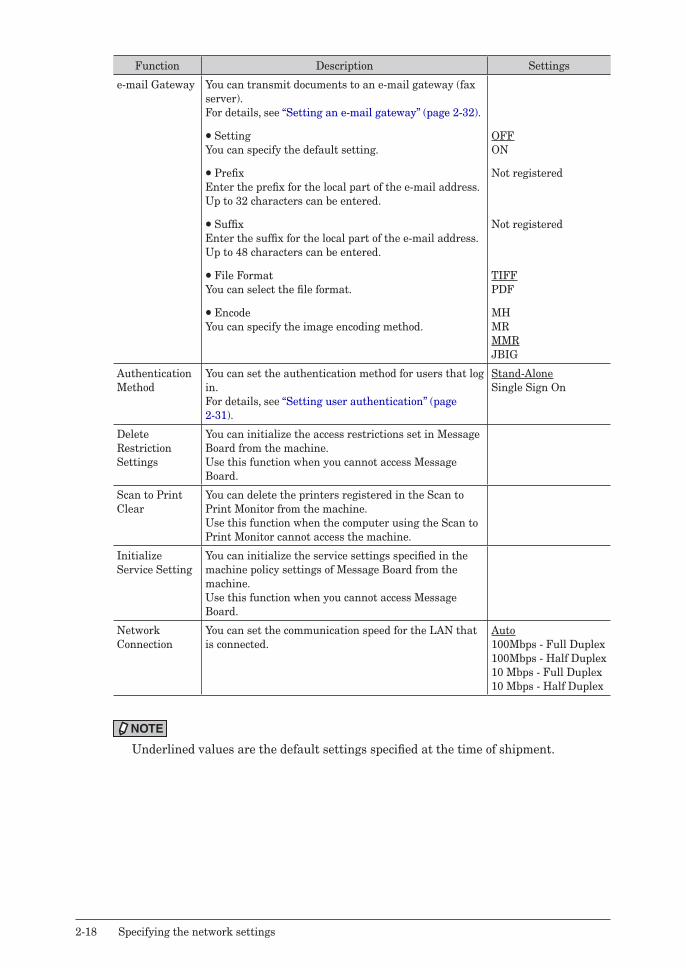
e-mail Gateway You can transmit documents to an e-mail gateway (fax server).For details, see “Setting an e-mail gateway” (page 2-32).
SettingYou can specify the default setting.
PrefixEnter the prefix for the local part of the e-mail address.Up to 32 characters can be entered.
SuffixEnter the suffix for the local part of the e-mail address.Up to 48 characters can be entered.
File FormatYou can select the file format.
EncodeYou can specify the image encoding method.
OFFON
Not registered
Not registered
TIFFPDF
MHMRMMRJBIG
Authentication Method
You can set the authentication method for users that log in.For details, see “Setting user authentication” (page 2-31).
Stand-AloneSingle Sign On
Delete Restriction Settings
You can initialize the access restrictions set in Message Board from the machine.Use this function when you cannot access Message Board.
Scan to Print Clear
You can delete the printers registered in the Scan to Print Monitor from the machine.Use this function when the computer using the Scan to Print Monitor cannot access the machine.
Initialize Service Setting
You can initialize the service settings specified in the machine policy settings of Message Board from the machine.Use this function when you cannot access Message Board.
Network Connection
You can set the communication speed for the LAN that is connected.
Auto100Mbps - Full Duplex100Mbps - Half Duplex10 Mbps - Full Duplex10 Mbps - Half Duplex
NOTE
Underlined values are the default settings specified at the time of shipment.
1
2
Ma
na
gem
ent
Specifying the network settings 2-19
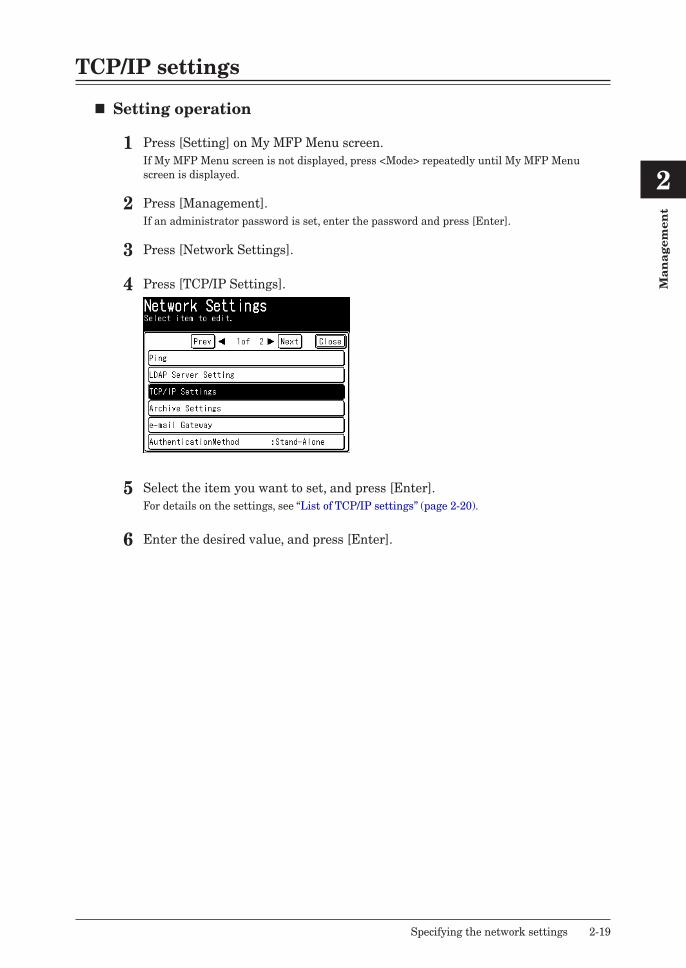
TCP/IP settings
� Setting operation
1 Press [Setting] on My MFP Menu screen.If My MFP Menu screen is not displayed, press <Mode> repeatedly until My MFP Menu screen is displayed.
2 Press [Management].If an administrator password is set, enter the password and press [Enter].
3 Press [Network Settings].
4 Press [TCP/IP Settings].
5 Select the item you want to set, and press [Enter].For details on the settings, see “List of TCP/IP settings” (page 2-20).
6 Enter the desired value, and press [Enter].
2-20 Specifying the network settings
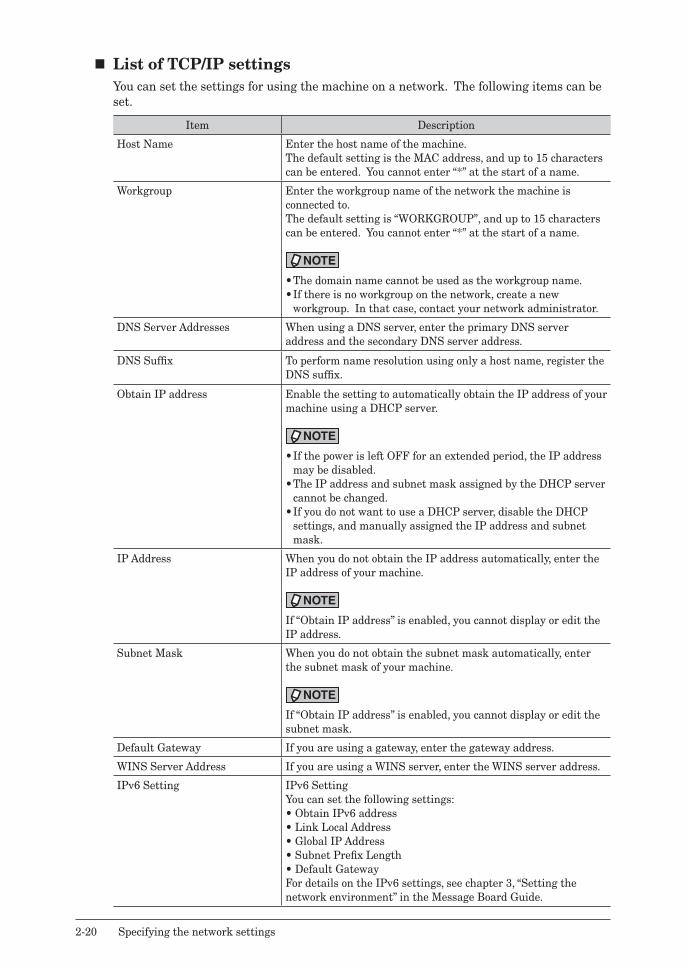
� List of TCP/IP settingsYou can set the settings for using the machine on a network. The following items can be set.
Item Description
Host Name Enter the host name of the machine.The default setting is the MAC address, and up to 15 characters can be entered. You cannot enter “*” at the start of a name.
Workgroup Enter the workgroup name of the network the machine is connected to.The default setting is “WORKGROUP”, and up to 15 characters can be entered. You cannot enter “*” at the start of a name.
NOTE
• The domain name cannot be used as the workgroup name.• If there is no workgroup on the network, create a new
workgroup. In that case, contact your network administrator.
DNS Server Addresses When using a DNS server, enter the primary DNS server address and the secondary DNS server address.
DNS Suffix To perform name resolution using only a host name, register the DNS suffix.
Obtain IP address Enable the setting to automatically obtain the IP address of your machine using a DHCP server.
NOTE
• If the power is left OFF for an extended period, the IP address may be disabled.
• The IP address and subnet mask assigned by the DHCP server cannot be changed.
• If you do not want to use a DHCP server, disable the DHCP settings, and manually assigned the IP address and subnet mask.
IP Address When you do not obtain the IP address automatically, enter the IP address of your machine.
NOTE
If “Obtain IP address” is enabled, you cannot display or edit the IP address.
Subnet Mask When you do not obtain the subnet mask automatically, enter the subnet mask of your machine.
NOTE
If “Obtain IP address” is enabled, you cannot display or edit the subnet mask.
Default Gateway If you are using a gateway, enter the gateway address.
WINS Server Address If you are using a WINS server, enter the WINS server address.
IPv6 Setting IPv6 SettingYou can set the following settings:• Obtain IPv6 address• Link Local Address• Global IP Address• Subnet Prefix Length• Default GatewayFor details on the IPv6 settings, see chapter 3, “Setting the network environment” in the Message Board Guide.
1
2
Ma
na
gem
ent
Specifying the network settings 2-21
NOTE
Make sure to obtain permission from the network administrator when you change the IP address. Improperly changing the IP address may cause the network to stop functioning normally.
2-22 Specifying the network settings
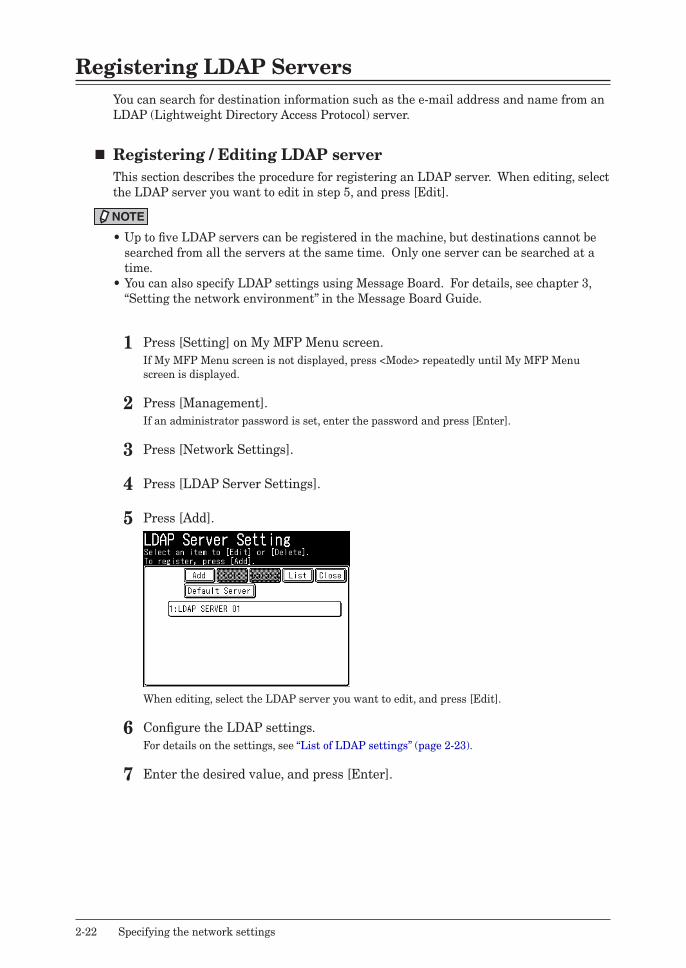
Registering LDAP ServersYou can search for destination information such as the e-mail address and name from an LDAP (Lightweight Directory Access Protocol) server.
� Registering / Editing LDAP serverThis section describes the procedure for registering an LDAP server. When editing, select the LDAP server you want to edit in step 5, and press [Edit].
NOTE
• Up to five LDAP servers can be registered in the machine, but destinations cannot be searched from all the servers at the same time. Only one server can be searched at a time.
• You can also specify LDAP settings using Message Board. For details, see chapter 3, “Setting the network environment” in the Message Board Guide.
1 Press [Setting] on My MFP Menu screen.If My MFP Menu screen is not displayed, press <Mode> repeatedly until My MFP Menu screen is displayed.
2 Press [Management].If an administrator password is set, enter the password and press [Enter].
3 Press [Network Settings].
4 Press [LDAP Server Settings].
5 Press [Add].
When editing, select the LDAP server you want to edit, and press [Edit].
6 Configure the LDAP settings.For details on the settings, see “List of LDAP settings” (page 2-23).
7 Enter the desired value, and press [Enter].
1
2
Ma
na
gem
ent
Specifying the network settings 2-23
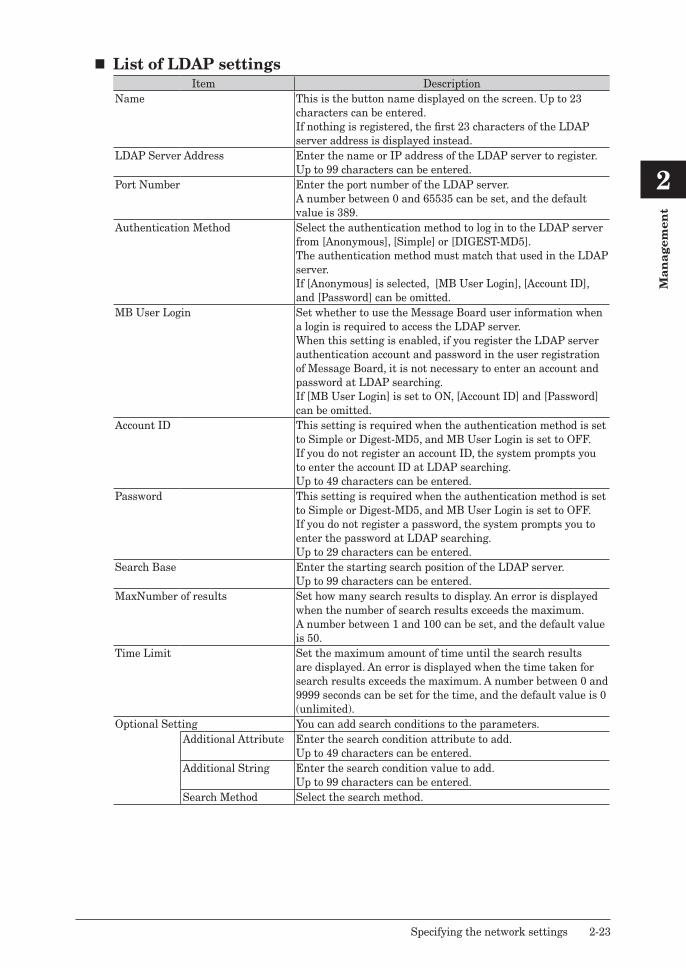
� List of LDAP settingsItem Description
Name This is the button name displayed on the screen. Up to 23 characters can be entered.If nothing is registered, the first 23 characters of the LDAP server address is displayed instead.
LDAP Server Address Enter the name or IP address of the LDAP server to register. Up to 99 characters can be entered.
Port Number Enter the port number of the LDAP server.A number between 0 and 65535 can be set, and the default value is 389.
Authentication Method Select the authentication method to log in to the LDAP server from [Anonymous], [Simple] or [DIGEST-MD5].The authentication method must match that used in the LDAP server.If [Anonymous] is selected, [MB User Login], [Account ID], and [Password] can be omitted.
MB User Login Set whether to use the Message Board user information when a login is required to access the LDAP server.When this setting is enabled, if you register the LDAP server authentication account and password in the user registration of Message Board, it is not necessary to enter an account and password at LDAP searching.If [MB User Login] is set to ON, [Account ID] and [Password] can be omitted.
Account ID This setting is required when the authentication method is set to Simple or Digest-MD5, and MB User Login is set to OFF.If you do not register an account ID, the system prompts you to enter the account ID at LDAP searching.Up to 49 characters can be entered.
Password This setting is required when the authentication method is set to Simple or Digest-MD5, and MB User Login is set to OFF.If you do not register a password, the system prompts you to enter the password at LDAP searching.Up to 29 characters can be entered.
Search Base Enter the starting search position of the LDAP server. Up to 99 characters can be entered.
MaxNumber of results Set how many search results to display. An error is displayed when the number of search results exceeds the maximum. A number between 1 and 100 can be set, and the default value is 50.
Time Limit Set the maximum amount of time until the search results are displayed. An error is displayed when the time taken for search results exceeds the maximum. A number between 0 and 9999 seconds can be set for the time, and the default value is 0 (unlimited).
Optional Setting You can add search conditions to the parameters.Additional Attribute Enter the search condition attribute to add.
Up to 49 characters can be entered.Additional String Enter the search condition value to add.
Up to 99 characters can be entered.Search Method Select the search method.
2-24 Specifying the network settings
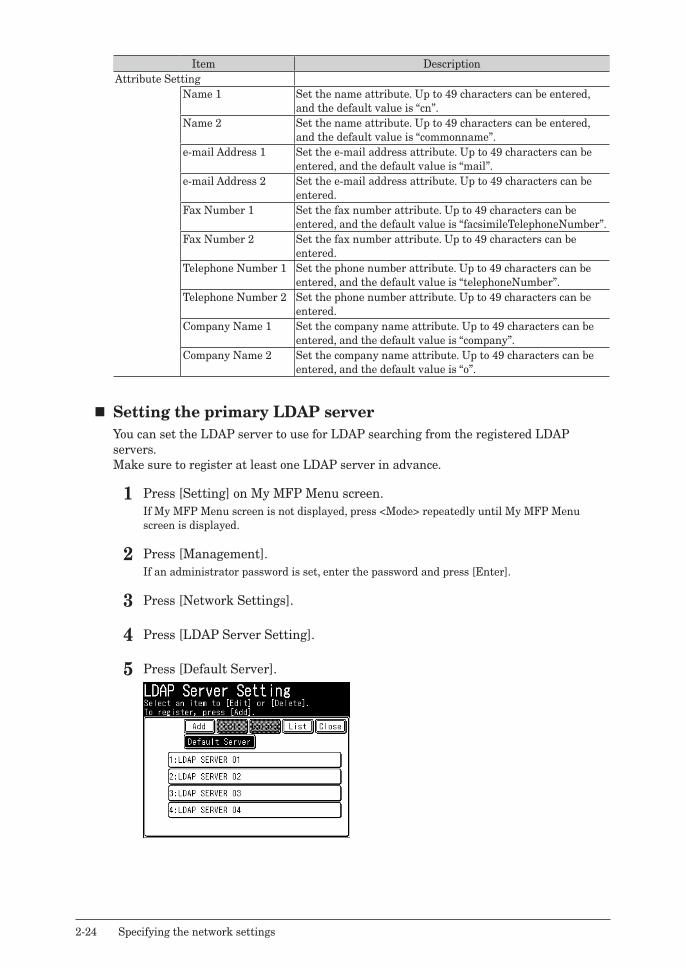
Item DescriptionAttribute Setting
Name 1 Set the name attribute. Up to 49 characters can be entered, and the default value is “cn”.
Name 2 Set the name attribute. Up to 49 characters can be entered, and the default value is “commonname”.
e-mail Address 1 Set the e-mail address attribute. Up to 49 characters can be entered, and the default value is “mail”.
e-mail Address 2 Set the e-mail address attribute. Up to 49 characters can be entered.
Fax Number 1 Set the fax number attribute. Up to 49 characters can be entered, and the default value is “facsimileTelephoneNumber”.
Fax Number 2 Set the fax number attribute. Up to 49 characters can be entered.
Telephone Number 1 Set the phone number attribute. Up to 49 characters can be entered, and the default value is “telephoneNumber”.
Telephone Number 2 Set the phone number attribute. Up to 49 characters can be entered.
Company Name 1 Set the company name attribute. Up to 49 characters can be entered, and the default value is “company”.
Company Name 2 Set the company name attribute. Up to 49 characters can be entered, and the default value is “o”.
� Setting the primary LDAP serverYou can set the LDAP server to use for LDAP searching from the registered LDAP servers.Make sure to register at least one LDAP server in advance.
1 Press [Setting] on My MFP Menu screen.If My MFP Menu screen is not displayed, press <Mode> repeatedly until My MFP Menu screen is displayed.
2 Press [Management].If an administrator password is set, enter the password and press [Enter].
3 Press [Network Settings].
4 Press [LDAP Server Setting].
5 Press [Default Server].
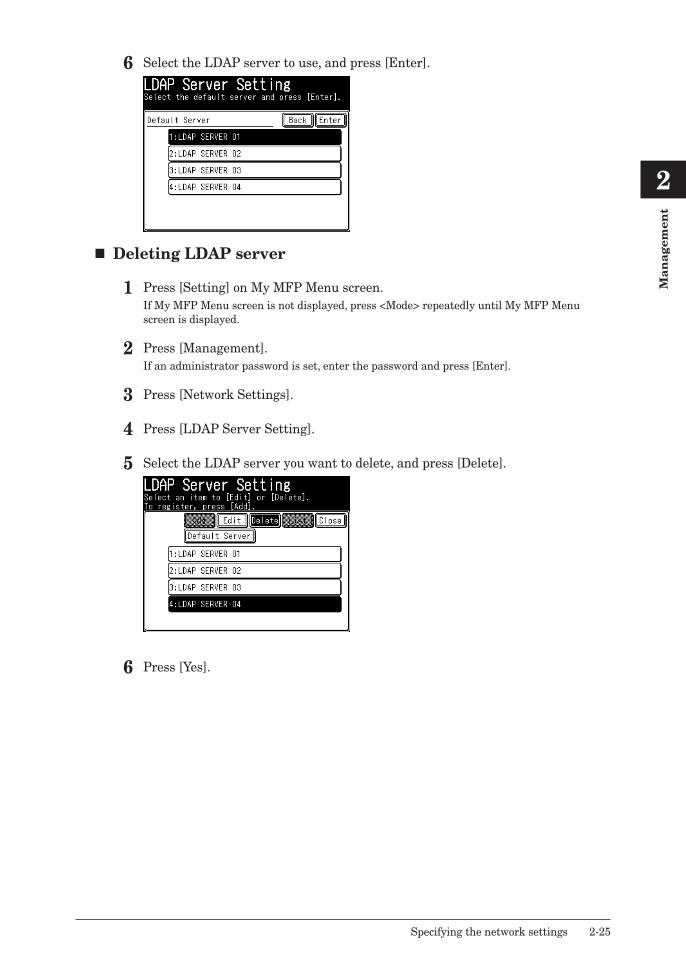
1
2
Ma
na
gem
ent
Specifying the network settings 2-25
6 Select the LDAP server to use, and press [Enter].
� Deleting LDAP server
1 Press [Setting] on My MFP Menu screen.If My MFP Menu screen is not displayed, press <Mode> repeatedly until My MFP Menu screen is displayed.
2 Press [Management].If an administrator password is set, enter the password and press [Enter].
3 Press [Network Settings].
4 Press [LDAP Server Setting].
5 Select the LDAP server you want to delete, and press [Delete].
6 Press [Yes].
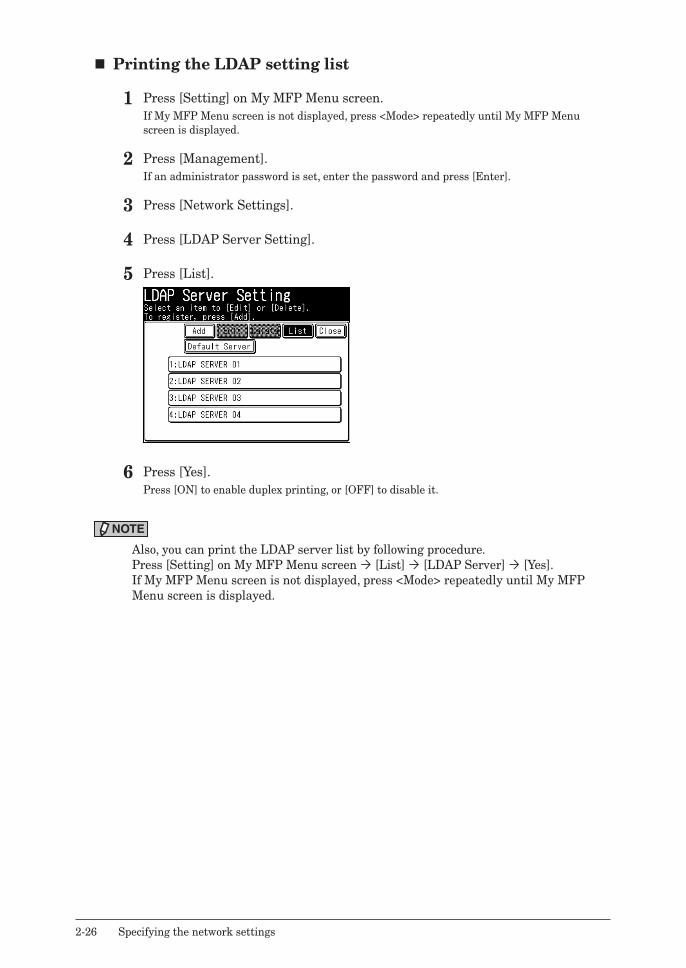
2-26 Specifying the network settings
� Printing the LDAP setting list
1 Press [Setting] on My MFP Menu screen.If My MFP Menu screen is not displayed, press <Mode> repeatedly until My MFP Menu screen is displayed.
2 Press [Management].If an administrator password is set, enter the password and press [Enter].
3 Press [Network Settings].
4 Press [LDAP Server Setting].
5 Press [List].
6 Press [Yes].Press [ON] to enable duplex printing, or [OFF] to disable it.
NOTE
Also, you can print the LDAP server list by following procedure.Press [Setting] on My MFP Menu screen [List] [LDAP Server] [Yes].If My MFP Menu screen is not displayed, press <Mode> repeatedly until My MFP Menu screen is displayed.
1
2
Ma
na
gem
ent
Specifying the network settings 2-27
Specifying the archive settingsWhen the machine transmits or receives documents, you can transmit those documents to a specified destination via fax, e-mail, or store them in a specified shared folder. This is called “archiving”. You can set a single archive destination for each type of communication.
� Archivable communication type• Transmitted faxes• Transmitted e-mails• Received faxes• Received e-mails
� Location to store (choose one)• Fax destination• E-mail destination• Shared folder
NOTE
• Transmitted e-mails cannot be archived to a fax destination.• The specified archiving is only performed when the transmission/reception
is completed successfully. The specified archiving is not performed when the transmission/reception results in an error.
• When the archive settings are enabled, real time transmission and manual transmission (transmission using the [Monitor] function, or external phone handset) cannot be used.
• A check message is printed if the archiving fails. This does not mean that transmission/reception failed for the fax or e-mail sending.
• You can also specify archive settings using Message Board. For details, see chapter 3, “Specifying the archive settings” in the Message Board Guide.
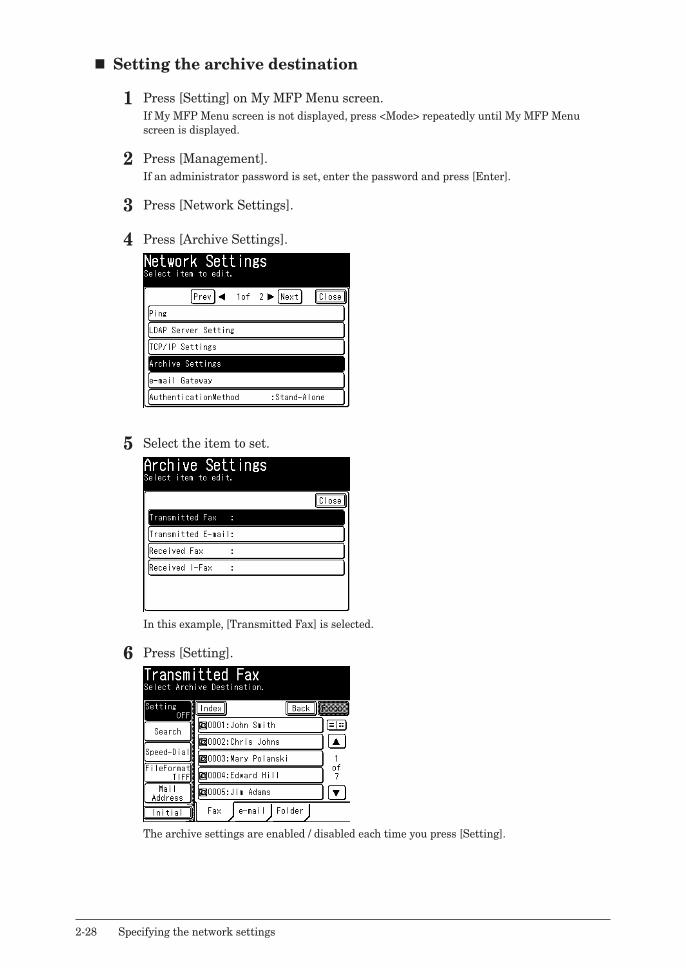
2-28 Specifying the network settings
� Setting the archive destination
1 Press [Setting] on My MFP Menu screen.If My MFP Menu screen is not displayed, press <Mode> repeatedly until My MFP Menu screen is displayed.
2 Press [Management].If an administrator password is set, enter the password and press [Enter].
3 Press [Network Settings].
4 Press [Archive Settings].
5 Select the item to set.
In this example, [Transmitted Fax] is selected.
6 Press [Setting].
The archive settings are enabled / disabled each time you press [Setting].
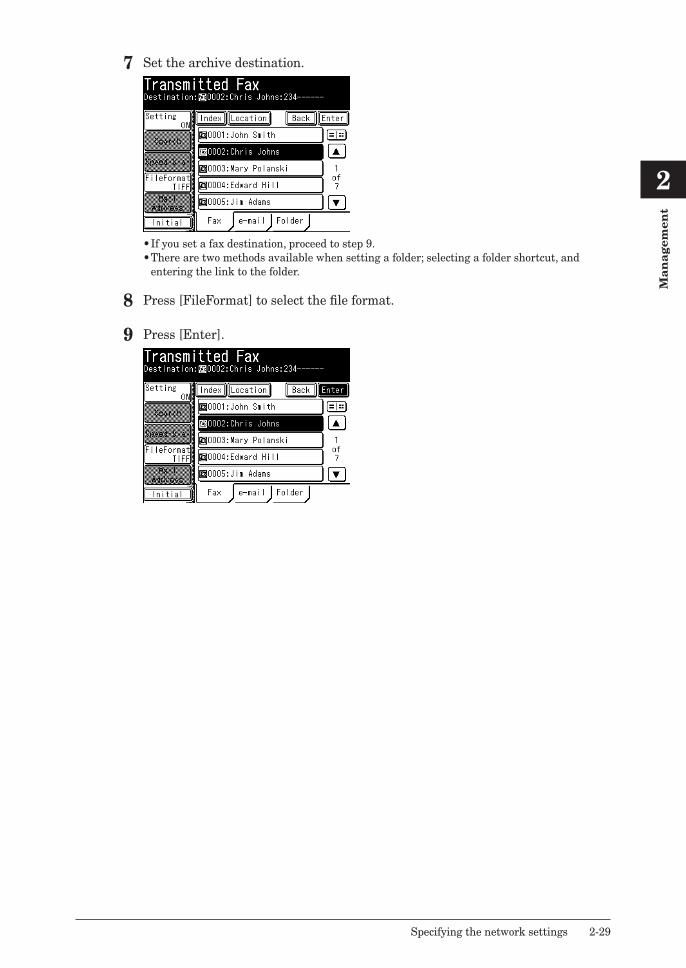
1
2
Ma
na
gem
ent
Specifying the network settings 2-29
7 Set the archive destination.
• If you set a fax destination, proceed to step 9.• There are two methods available when setting a folder; selecting a folder shortcut, and
entering the link to the folder.
8 Press [FileFormat] to select the file format.
9 Press [Enter].
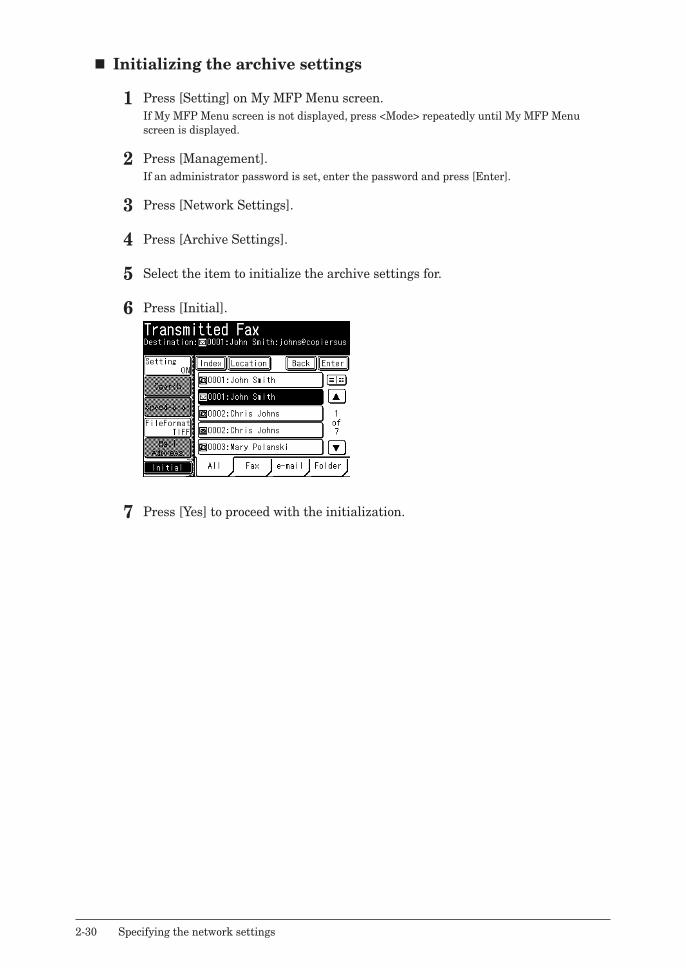
2-30 Specifying the network settings
� Initializing the archive settings
1 Press [Setting] on My MFP Menu screen.If My MFP Menu screen is not displayed, press <Mode> repeatedly until My MFP Menu screen is displayed.
2 Press [Management].If an administrator password is set, enter the password and press [Enter].
3 Press [Network Settings].
4 Press [Archive Settings].
5 Select the item to initialize the archive settings for.
6 Press [Initial].
7 Press [Yes] to proceed with the initialization.
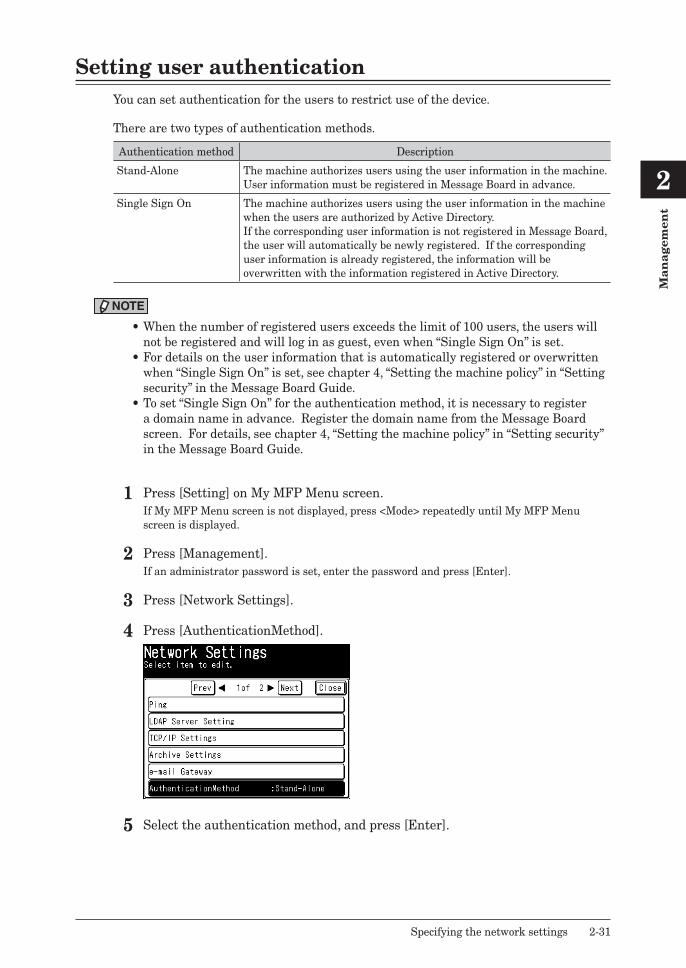
1
2
Ma
na
gem
ent
Specifying the network settings 2-31
Setting user authenticationYou can set authentication for the users to restrict use of the device.
There are two types of authentication methods.
Authentication method Description
Stand-Alone The machine authorizes users using the user information in the machine.User information must be registered in Message Board in advance.
Single Sign On The machine authorizes users using the user information in the machine when the users are authorized by Active Directory.If the corresponding user information is not registered in Message Board, the user will automatically be newly registered. If the corresponding user information is already registered, the information will be overwritten with the information registered in Active Directory.
NOTE
• When the number of registered users exceeds the limit of 100 users, the users will not be registered and will log in as guest, even when “Single Sign On” is set.
• For details on the user information that is automatically registered or overwritten when “Single Sign On” is set, see chapter 4, “Setting the machine policy” in “Setting security” in the Message Board Guide.
• To set “Single Sign On” for the authentication method, it is necessary to register a domain name in advance. Register the domain name from the Message Board screen. For details, see chapter 4, “Setting the machine policy” in “Setting security” in the Message Board Guide.
1 Press [Setting] on My MFP Menu screen.If My MFP Menu screen is not displayed, press <Mode> repeatedly until My MFP Menu screen is displayed.
2 Press [Management].If an administrator password is set, enter the password and press [Enter].
3 Press [Network Settings].
4 Press [AuthenticationMethod].
5 Select the authentication method, and press [Enter].

2-32 Specifying the network settings
Setting an e-mail gatewayThe e-mail gateway function enables you to send a fax to a fax server so that the server sends the data through public line to the destinations. Consult the instruction manual of your fax server how to use the function.
NOTE
For details on transmitting faxes using the e-mail gateway function, see chapter 4, “Transmission related settings” in the Scanner and Fax Guide.
1 Press [Setting] on My MFP Menu screen.If My MFP Menu screen is not displayed, press <Mode> repeatedly until My MFP Menu screen is displayed.
2 Press [Management].If an administrator password is set, enter the password and press [Enter].
3 Press [Network Settings].
4 Press [e-mail Gateway].
5 Press [Setting].
6 Select [ON], and press [Enter].Select [OFF] to deselect this function.
7 Press [Prefix].
8 Enter the prefix to add before the fax number using the numeric keys, and press [Enter].
9 Press [Suffix].
10 Enter the suffix to add to the end of the fax number using the numeric keys, and press [Enter].
11 Press [File Format].
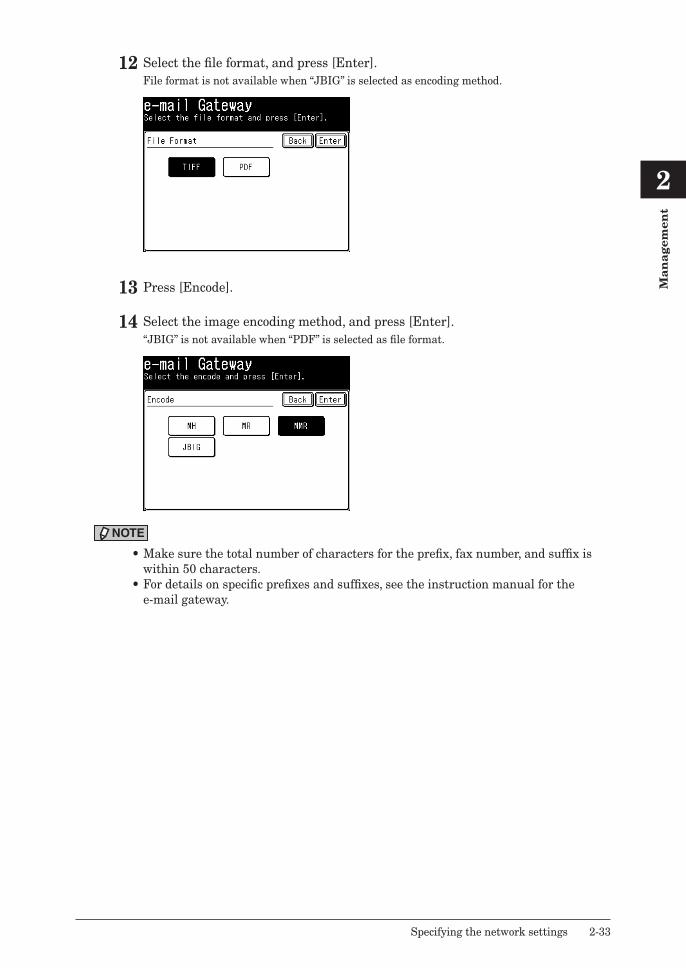
1
2
Ma
na
gem
ent
Specifying the network settings 2-33
12 Select the file format, and press [Enter].File format is not available when “JBIG” is selected as encoding method.
13 Press [Encode].
14 Select the image encoding method, and press [Enter].“JBIG” is not available when “PDF” is selected as file format.
NOTE
• Make sure the total number of characters for the prefix, fax number, and suffix is within 50 characters.
• For details on specific prefixes and suffixes, see the instruction manual for the e-mail gateway.
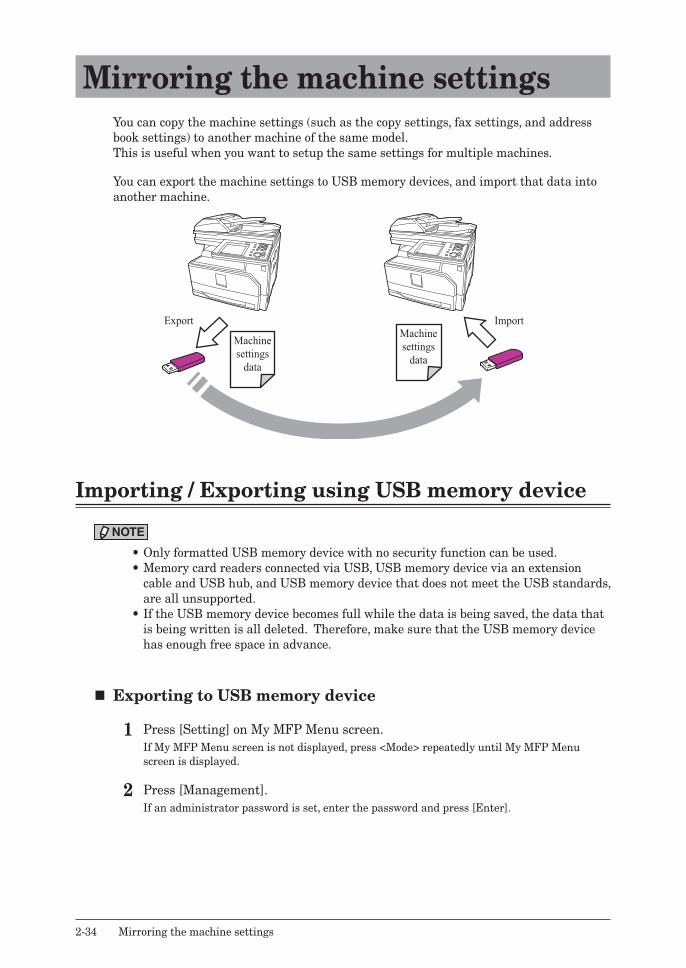
2-34 Mirroring the machine settings
Mirroring the machine settingsYou can copy the machine settings (such as the copy settings, fax settings, and address book settings) to another machine of the same model.This is useful when you want to setup the same settings for multiple machines.
You can export the machine settings to USB memory devices, and import that data into another machine.
Export Import
Machinesettingsdata
Machinesettingsdata
Importing / Exporting using USB memory device
NOTE
• Only formatted USB memory device with no security function can be used.• Memory card readers connected via USB, USB memory device via an extension
cable and USB hub, and USB memory device that does not meet the USB standards, are all unsupported.
• If the USB memory device becomes full while the data is being saved, the data that is being written is all deleted. Therefore, make sure that the USB memory device has enough free space in advance.
� Exporting to USB memory device
1 Press [Setting] on My MFP Menu screen.If My MFP Menu screen is not displayed, press <Mode> repeatedly until My MFP Menu screen is displayed.
2 Press [Management].If an administrator password is set, enter the password and press [Enter].
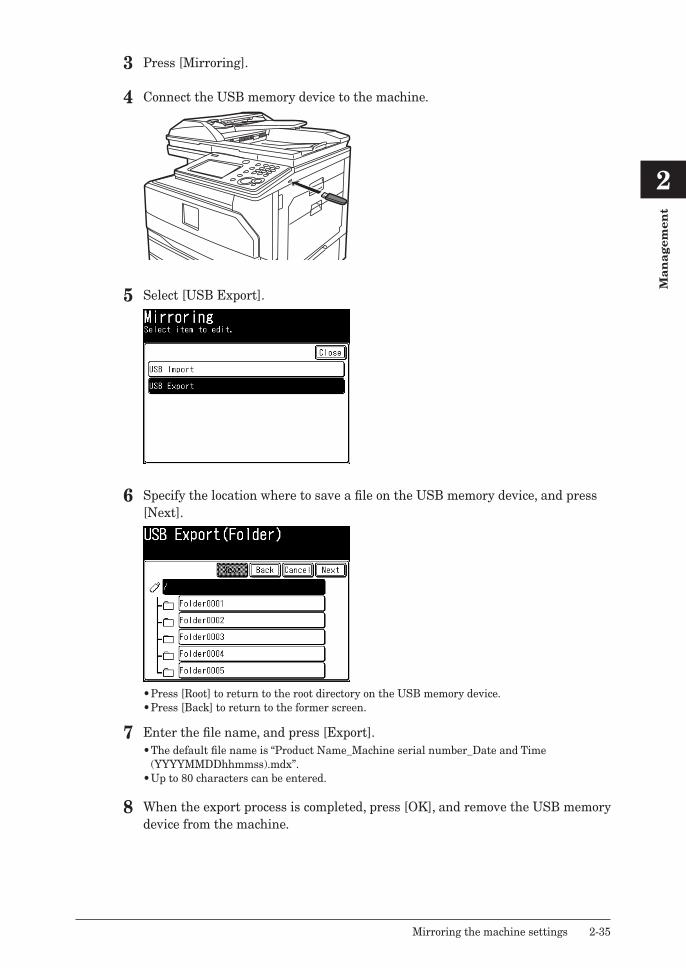
1
2
Ma
na
gem
ent
Mirroring the machine settings 2-35
3 Press [Mirroring].
4 Connect the USB memory device to the machine.
5 Select [USB Export].
6 Specify the location where to save a file on the USB memory device, and press [Next].
• Press [Root] to return to the root directory on the USB memory device.• Press [Back] to return to the former screen.
7 Enter the file name, and press [Export].• The default file name is “Product Name_Machine serial number_Date and Time
(YYYYMMDDhhmmss).mdx”.• Up to 80 characters can be entered.
8 When the export process is completed, press [OK], and remove the USB memory device from the machine.
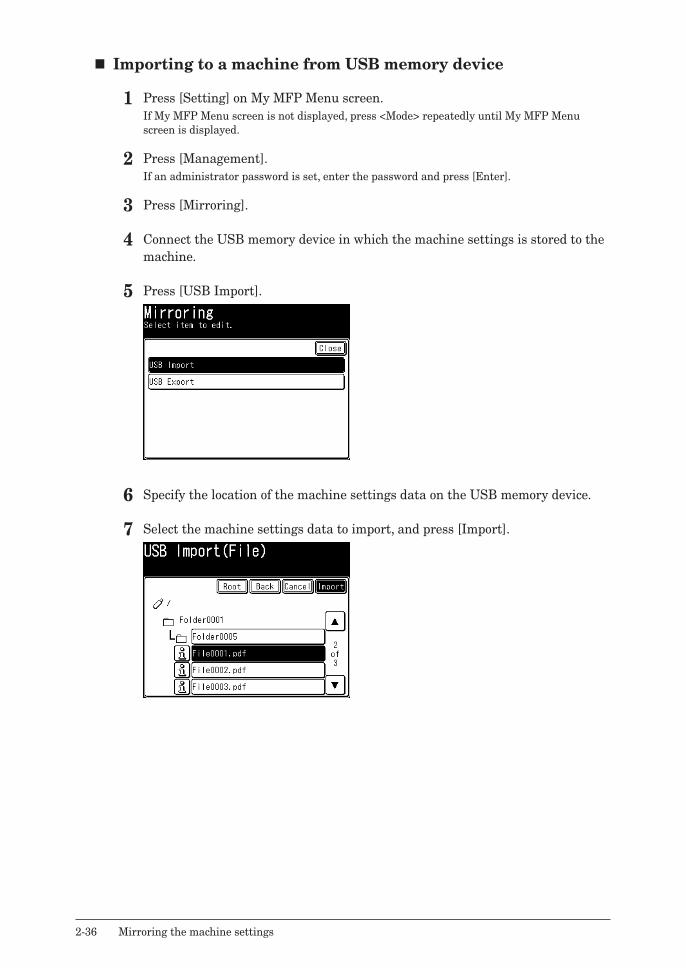
2-36 Mirroring the machine settings
� Importing to a machine from USB memory device
1 Press [Setting] on My MFP Menu screen.If My MFP Menu screen is not displayed, press <Mode> repeatedly until My MFP Menu screen is displayed.
2 Press [Management].If an administrator password is set, enter the password and press [Enter].
3 Press [Mirroring].
4 Connect the USB memory device in which the machine settings is stored to the machine.
5 Press [USB Import].
6 Specify the location of the machine settings data on the USB memory device.
7 Select the machine settings data to import, and press [Import].
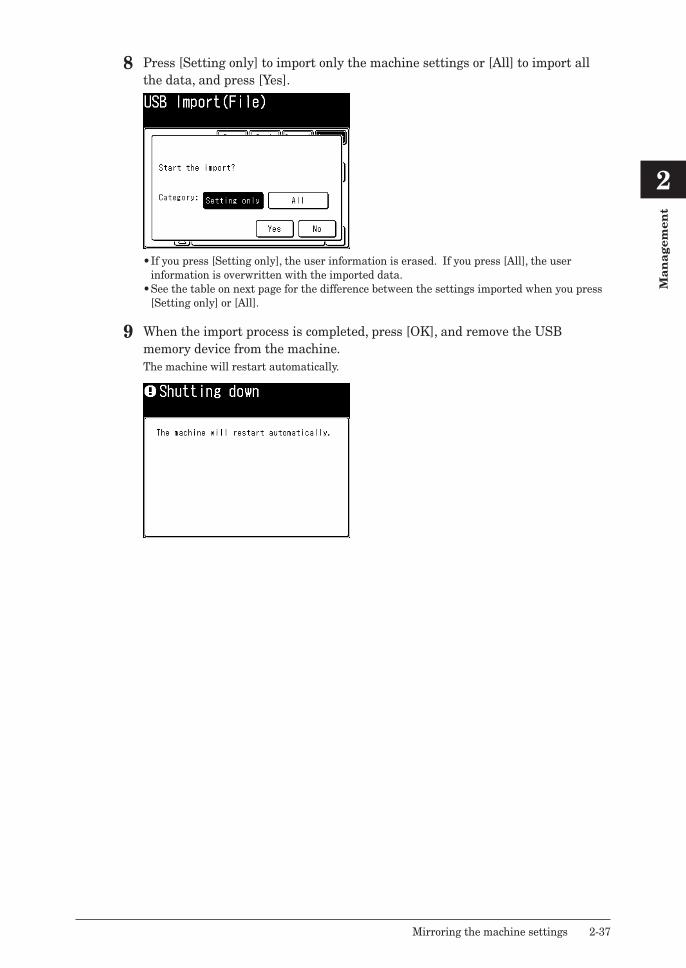
1
2
Ma
na
gem
ent
Mirroring the machine settings 2-37
8 Press [Setting only] to import only the machine settings or [All] to import all the data, and press [Yes].
• If you press [Setting only], the user information is erased. If you press [All], the user information is overwritten with the imported data.
• See the table on next page for the difference between the settings imported when you press [Setting only] or [All].
9 When the import process is completed, press [OK], and remove the USB memory device from the machine.The machine will restart automatically.
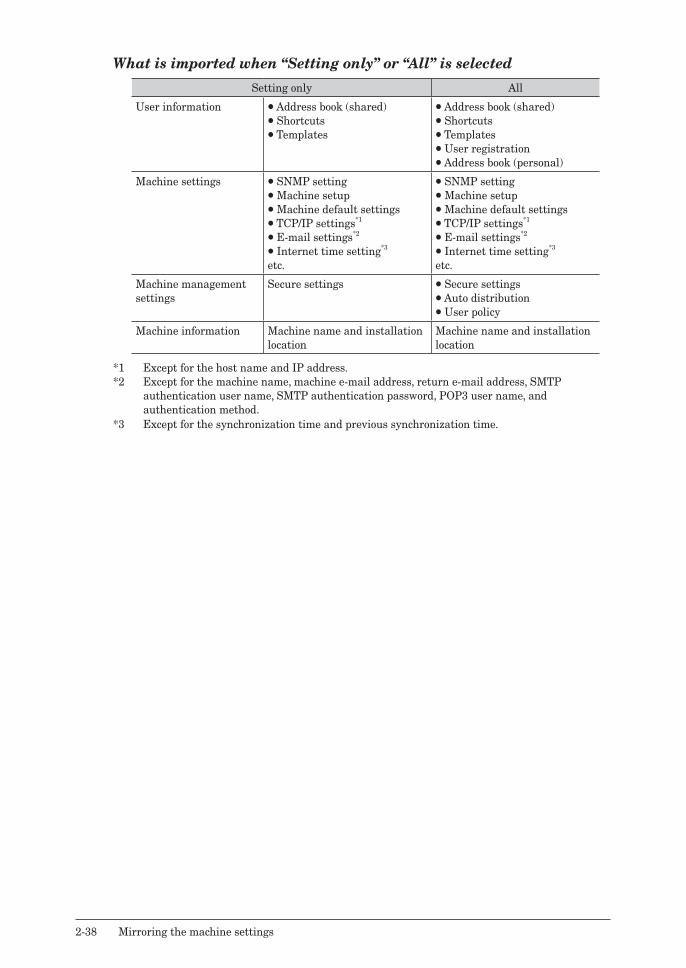
2-38 Mirroring the machine settings
What is imported when “Setting only” or “All” is selected
Setting only All
User information Address book (shared) Shortcuts Templates
Address book (shared) Shortcuts Templates User registration Address book (personal)
Machine settings SNMP setting Machine setup Machine default settings TCP/IP settings*1
E-mail settings*2
Internet time setting*3
etc.
SNMP setting Machine setup Machine default settings TCP/IP settings*1
E-mail settings*2
Internet time setting*3
etc.
Machine management settings
Secure settings Secure settings Auto distribution User policy
Machine information Machine name and installation location
Machine name and installation location
*1 Except for the host name and IP address.*2 Except for the machine name, machine e-mail address, return e-mail address, SMTP
authentication user name, SMTP authentication password, POP3 user name, and authentication method.
*3 Except for the synchronization time and previous synchronization time.
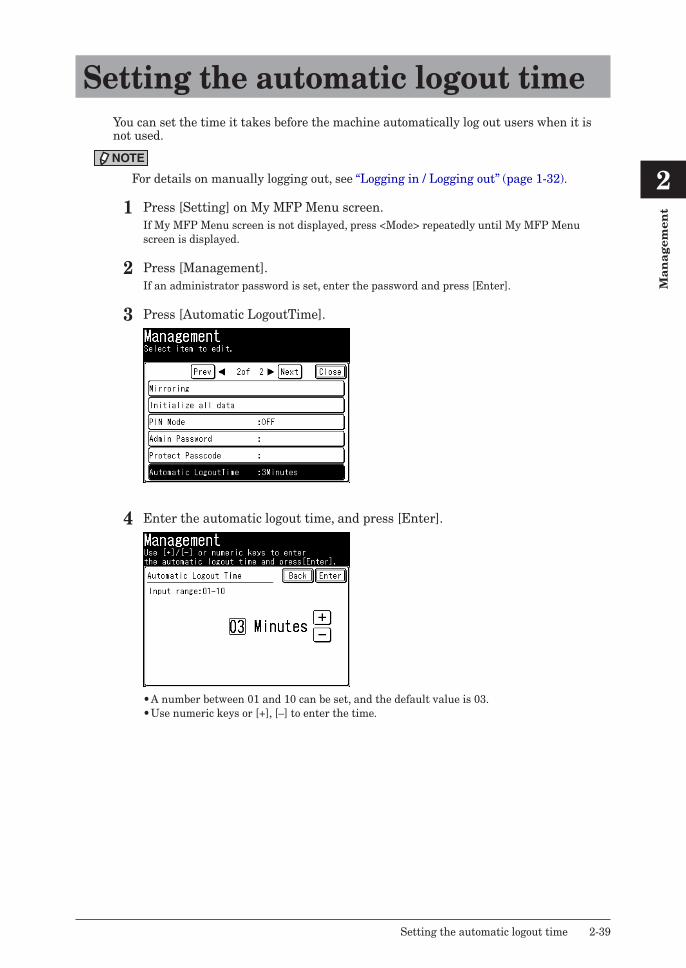
1
2
Ma
na
gem
ent
Setting the automatic logout time 2-39
Setting the automatic logout timeYou can set the time it takes before the machine automatically log out users when it is not used.
NOTE
For details on manually logging out, see “Logging in / Logging out” (page 1-32).
1 Press [Setting] on My MFP Menu screen.If My MFP Menu screen is not displayed, press <Mode> repeatedly until My MFP Menu screen is displayed.
2 Press [Management].If an administrator password is set, enter the password and press [Enter].
3 Press [Automatic LogoutTime].
4 Enter the automatic logout time, and press [Enter].
• A number between 01 and 10 can be set, and the default value is 03.• Use numeric keys or [+], [–] to enter the time.

2-40 Setting the automatic logout time
This page intentionally left blank.
Chapter 3Maintenance
Replacing consumables.............................................................................................3-2Replacing the toner cartridge .................................................................................3-2Replacing the drum cartridge .................................................................................3-3
Replacing the stamp ..................................................................................................3-4Cleaning ........................................................................................................................3-6
Cleaning the outside of the machine ......................................................................3-6Cleaning the touch panel ........................................................................................3-7Cleaning the scanning area ....................................................................................3-8Cleaning the recording area .................................................................................3-11Cleaning the charging needle ...............................................................................3-12
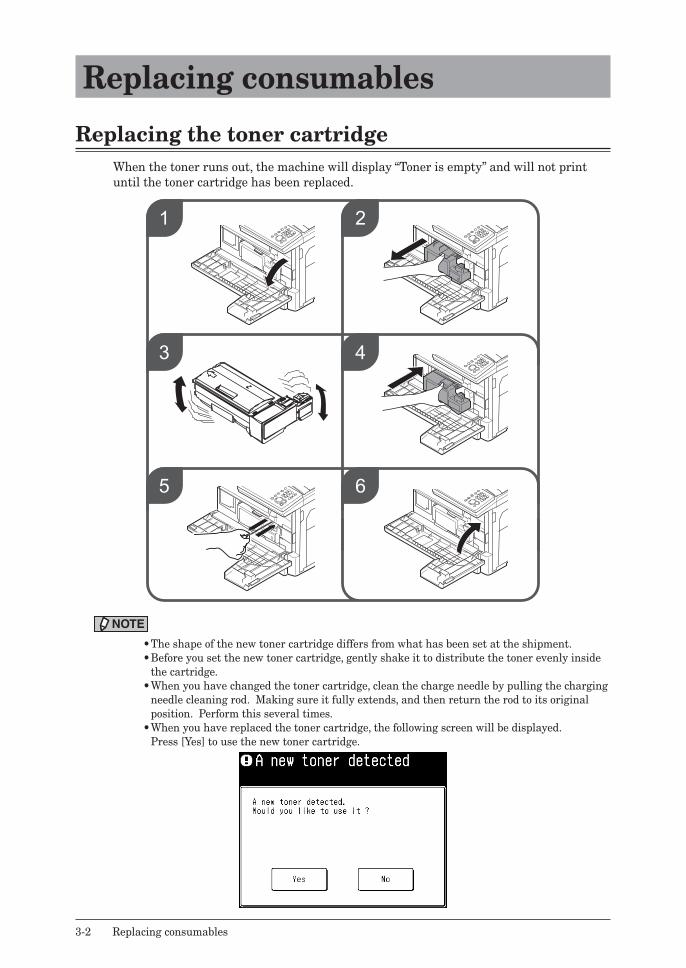
3-2 Replacing consumables
Replacing consumables
Replacing the toner cartridgeWhen the toner runs out, the machine will display “Toner is empty” and will not print until the toner cartridge has been replaced.
1
3
2
4
5 6
NOTE
•The shape of the new toner cartridge differs from what has been set at the shipment.•Before you set the new toner cartridge, gently shake it to distribute the toner evenly inside
the cartridge.•When you have changed the toner cartridge, clean the charge needle by pulling the charging
needle cleaning rod. Making sure it fully extends, and then return the rod to its original position. Perform this several times.
•When you have replaced the toner cartridge, the following screen will be displayed. Press [Yes] to use the new toner cartridge.
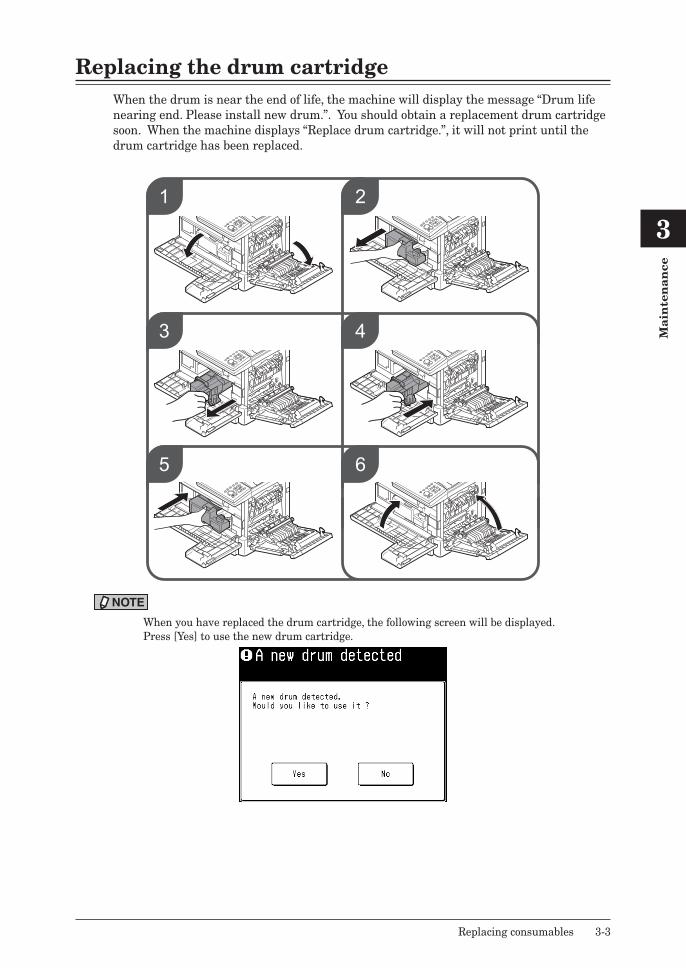
1
2
3
Ma
inte
na
nce
Replacing consumables 3-3
Replacing the drum cartridgeWhen the drum is near the end of life, the machine will display the message “Drum life nearing end. Please install new drum.”. You should obtain a replacement drum cartridge soon. When the machine displays “Replace drum cartridge.”, it will not print until the drum cartridge has been replaced.
1
3
2
4
5 6
NOTE
When you have replaced the drum cartridge, the following screen will be displayed. Press [Yes] to use the new drum cartridge.
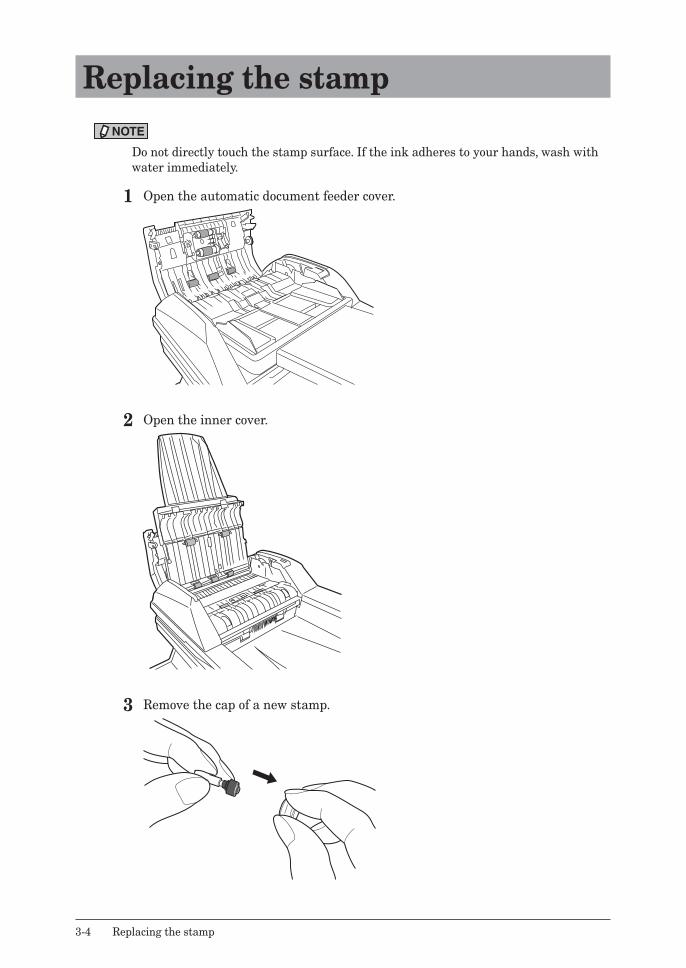
3-4 Replacing the stamp
Replacing the stampNOTE
Do not directly touch the stamp surface. If the ink adheres to your hands, wash with water immediately.
1 Open the automatic document feeder cover.
2 Open the inner cover.
3 Remove the cap of a new stamp.
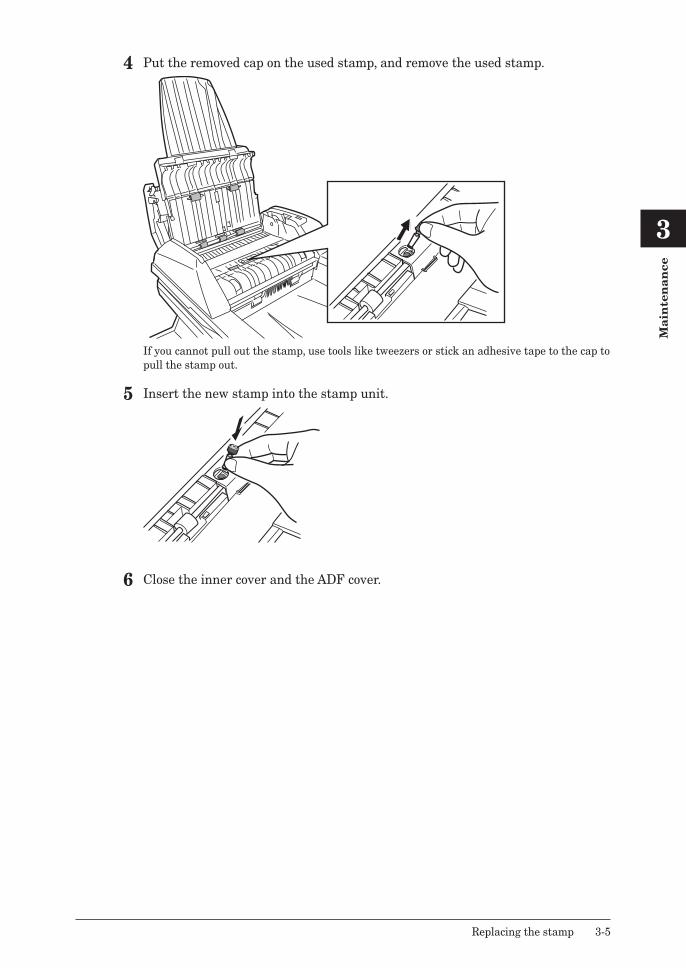
1
2
3
Ma
inte
na
nce
Replacing the stamp 3-5
4 Put the removed cap on the used stamp, and remove the used stamp.
If you cannot pull out the stamp, use tools like tweezers or stick an adhesive tape to the cap to pull the stamp out.
5 Insert the new stamp into the stamp unit.
6 Close the inner cover and the ADF cover.
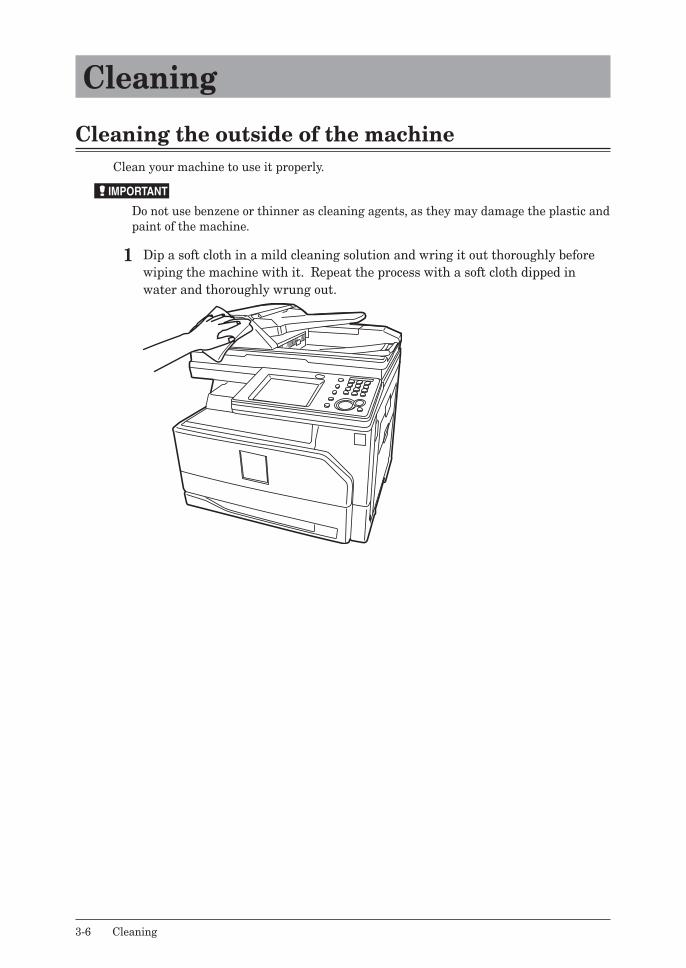
3-6 Cleaning
Cleaning
Cleaning the outside of the machineClean your machine to use it properly.
IMPORTANT
Do not use benzene or thinner as cleaning agents, as they may damage the plastic and paint of the machine.
1 Dip a soft cloth in a mild cleaning solution and wring it out thoroughly before wiping the machine with it. Repeat the process with a soft cloth dipped in water and thoroughly wrung out.
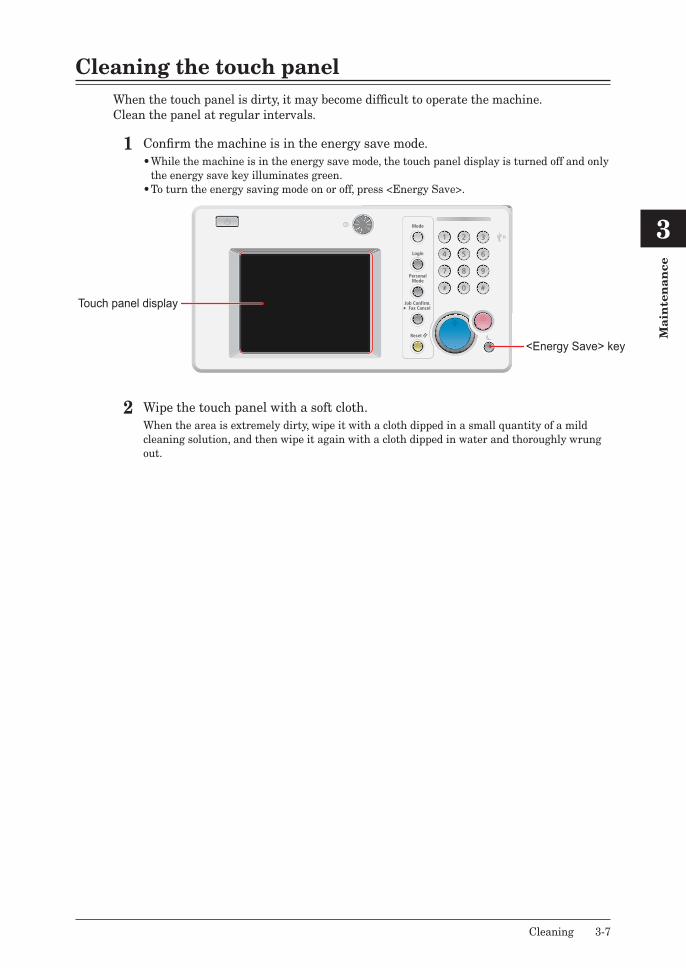
1
2
3
Ma
inte
na
nce
Cleaning 3-7
Cleaning the touch panelWhen the touch panel is dirty, it may become difficult to operate the machine. Clean the panel at regular intervals.
1 Confirm the machine is in the energy save mode.•While the machine is in the energy save mode, the touch panel display is turned off and only
the energy save key illuminates green.•To turn the energy saving mode on or off, press <Energy Save>.
2 Wipe the touch panel with a soft cloth.When the area is extremely dirty, wipe it with a cloth dipped in a small quantity of a mild cleaning solution, and then wipe it again with a cloth dipped in water and thoroughly wrung out.
Touch panel display
<Energy Save> key
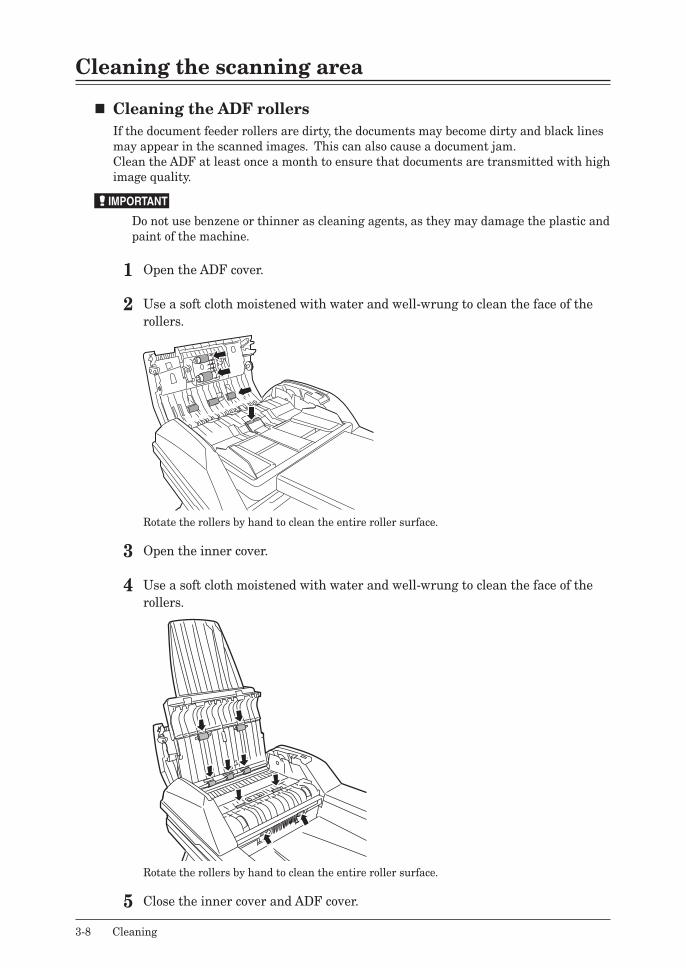
3-8 Cleaning
Cleaning the scanning area
� Cleaning the ADF rollersIf the document feeder rollers are dirty, the documents may become dirty and black lines may appear in the scanned images. This can also cause a document jam.Clean the ADF at least once a month to ensure that documents are transmitted with high image quality.
IMPORTANT
Do not use benzene or thinner as cleaning agents, as they may damage the plastic and paint of the machine.
1 Open the ADF cover.
2 Use a soft cloth moistened with water and well-wrung to clean the face of the rollers.
Rotate the rollers by hand to clean the entire roller surface.
3 Open the inner cover.
4 Use a soft cloth moistened with water and well-wrung to clean the face of the rollers.
Rotate the rollers by hand to clean the entire roller surface.
5 Close the inner cover and ADF cover.
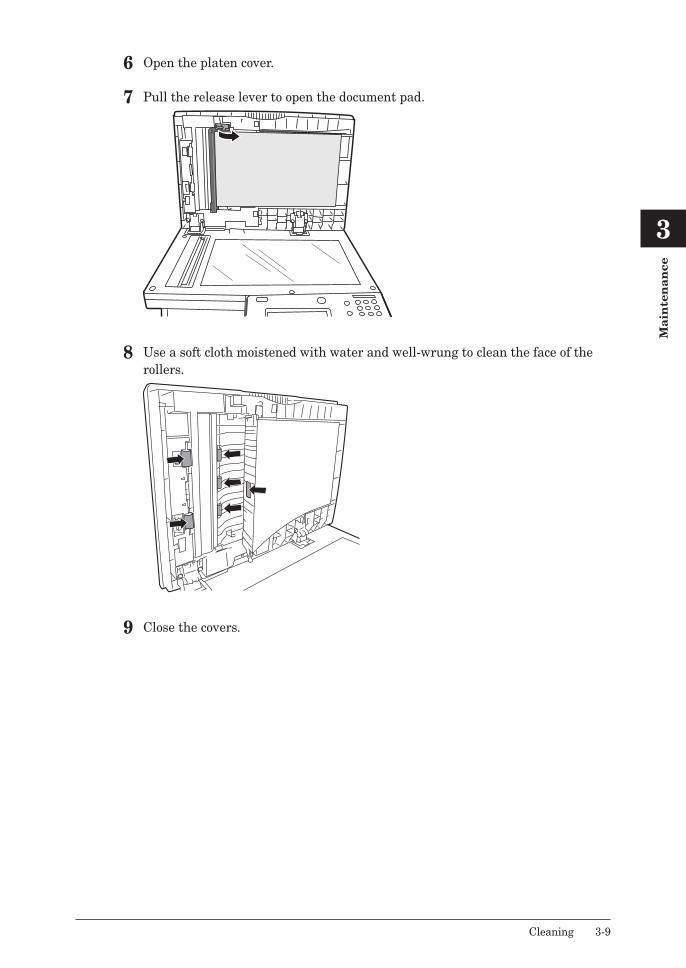
1
2
3
Ma
inte
na
nce
Cleaning 3-9
6 Open the platen cover.
7 Pull the release lever to open the document pad.
8 Use a soft cloth moistened with water and well-wrung to clean the face of the rollers.
9 Close the covers.

3-10 Cleaning
� Cleaning the scanning areaA dirty ADF document pad will cause black lines or other unwanted markings in scanned images. To maintain high picture quality, clean the ADF document pad and document pad at least once a month.
1 Open the platen cover.
2 Wipe the document pad, ADF document pad, document glass, and ADF glass with a soft cloth moistened with water and well-wrung. Then, wipe with a clean dry cloth.
3 Then wipe it with a clean, soft, dry, lint-free cloth until it is clean and dry.
ADF glass
Document glass
ADF document pad
Document pad
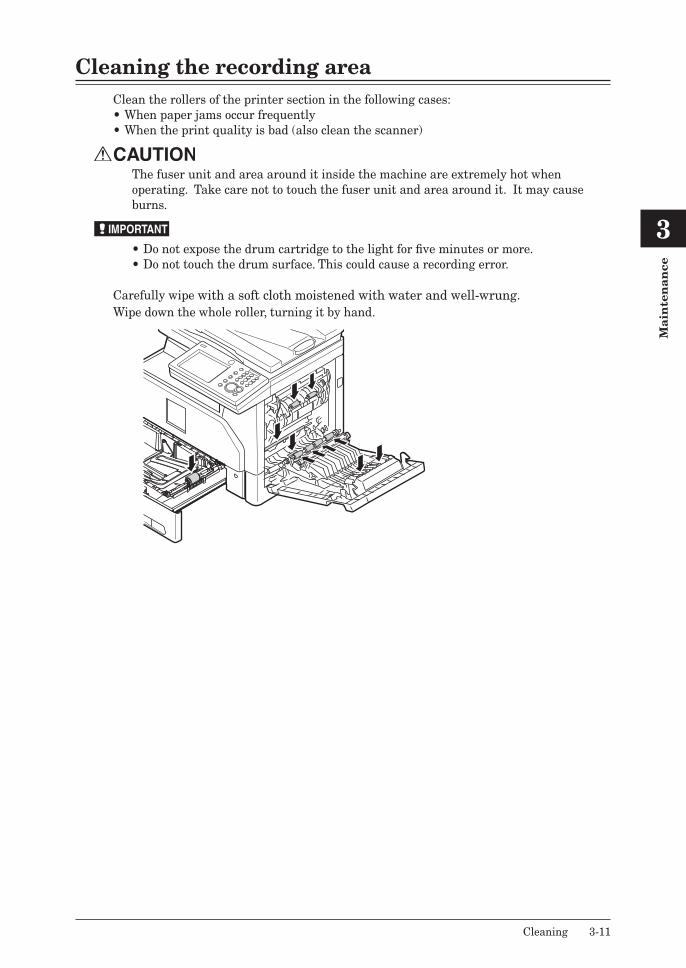
1
2
3
Ma
inte
na
nce
Cleaning 3-11
Cleaning the recording areaClean the rollers of the printer section in the following cases:•When paper jams occur frequently•When the print quality is bad (also clean the scanner)
The fuser unit and area around it inside the machine are extremely hot when operating. Take care not to touch the fuser unit and area around it. It may cause burns.
IMPORTANT
•Do not expose the drum cartridge to the light for five minutes or more.•Do not touch the drum surface. This could cause a recording error.
Carefully wipe with a soft cloth moistened with water and well-wrung.Wipe down the whole roller, turning it by hand.
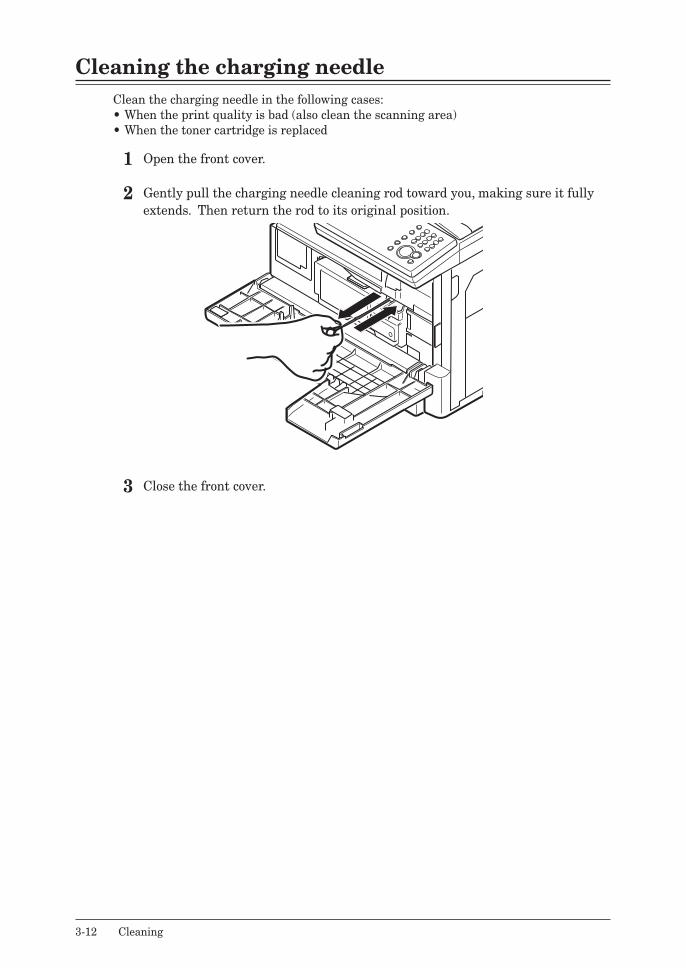
3-12 Cleaning
Cleaning the charging needleClean the charging needle in the following cases:•When the print quality is bad (also clean the scanning area)•When the toner cartridge is replaced
1 Open the front cover.
2 Gently pull the charging needle cleaning rod toward you, making sure it fully extends. Then return the rod to its original position.
3 Close the front cover.
Chapter 4Troubleshooting
Error messages............................................................................................................4-2Error messages displayed on the screen ................................................................4-2
Troubleshooting ..........................................................................................................4-4Cannot connect to the network ...............................................................................4-4Image quality problems ..........................................................................................4-5
When a power failure occurs ...................................................................................4-7Main unit operation ................................................................................................4-7
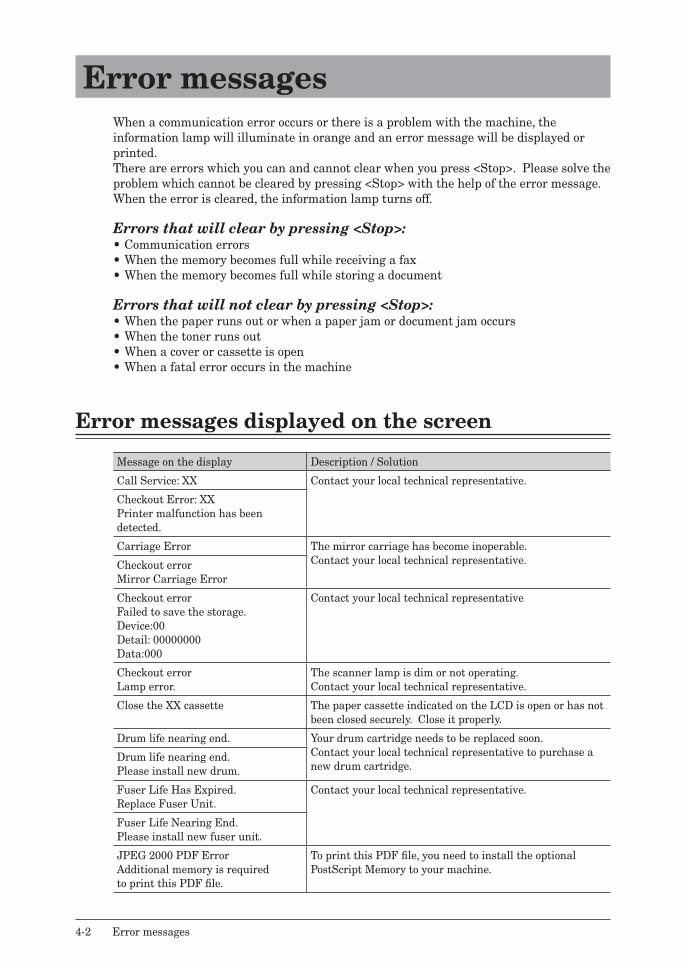
4-2 Error messages
Error messagesWhen a communication error occurs or there is a problem with the machine, the information lamp will illuminate in orange and an error message will be displayed or printed.There are errors which you can and cannot clear when you press <Stop>. Please solve the problem which cannot be cleared by pressing <Stop> with the help of the error message. When the error is cleared, the information lamp turns off.
Errors that will clear by pressing <Stop>:•Communication errors•When the memory becomes full while receiving a fax•When the memory becomes full while storing a document
Errors that will not clear by pressing <Stop>:•When the paper runs out or when a paper jam or document jam occurs•When the toner runs out•When a cover or cassette is open•When a fatal error occurs in the machine
Error messages displayed on the screen
Message on the display Description / Solution
Call Service: XX Contact your local technical representative.
Checkout Error: XXPrinter malfunction has been detected.
Carriage Error The mirror carriage has become inoperable.Contact your local technical representative.Checkout error
Mirror Carriage Error
Checkout errorFailed to save the storage.Device:00Detail: 00000000Data:000
Contact your local technical representative
Checkout errorLamp error.
The scanner lamp is dim or not operating.Contact your local technical representative.
Close the XX cassette The paper cassette indicated on the LCD is open or has not been closed securely. Close it properly.
Drum life nearing end. Your drum cartridge needs to be replaced soon.Contact your local technical representative to purchase a new drum cartridge.
Drum life nearing end.Please install new drum.
Fuser Life Has Expired.Replace Fuser Unit.
Contact your local technical representative.
Fuser Life Nearing End.Please install new fuser unit.
JPEG 2000 PDF ErrorAdditional memory is requiredto print this PDF file.
To print this PDF file, you need to install the optional PostScript Memory to your machine.
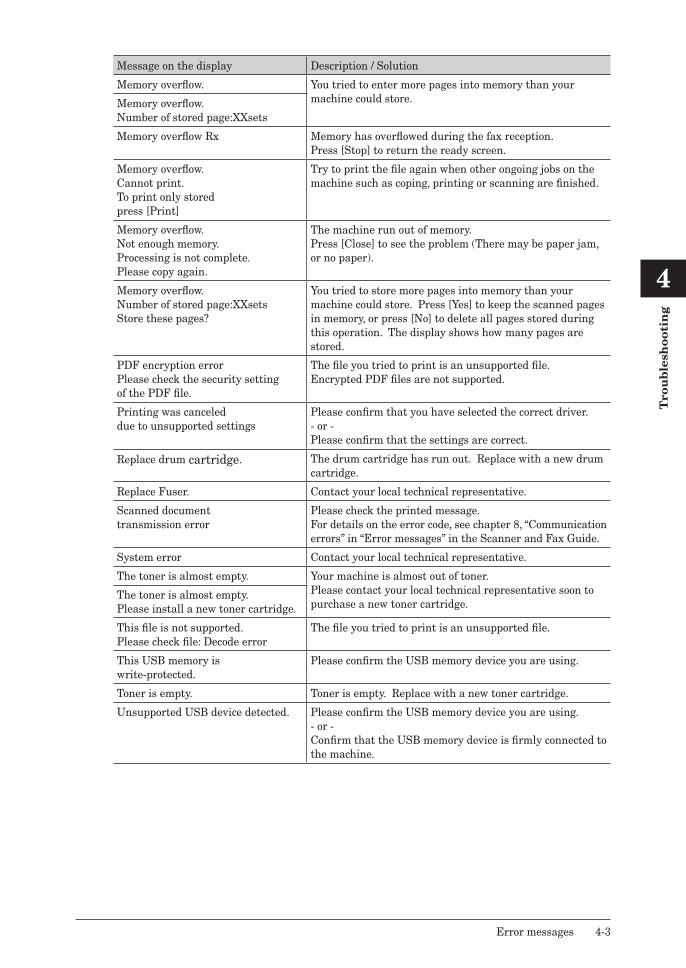
1
2
3
4
Tro
ub
lesh
oo
tin
g
Error messages 4-3
Message on the display Description / Solution
Memory overflow. You tried to enter more pages into memory than your machine could store.Memory overflow.
Number of stored page:XXsets
Memory overflow Rx Memory has overflowed during the fax reception.Press [Stop] to return the ready screen.
Memory overflow.Cannot print.To print only storedpress [Print]
Try to print the file again when other ongoing jobs on the machine such as coping, printing or scanning are finished.
Memory overflow.Not enough memory.Processing is not complete.Please copy again.
The machine run out of memory.Press [Close] to see the problem (There may be paper jam, or no paper).
Memory overflow.Number of stored page:XXsetsStore these pages?
You tried to store more pages into memory than your machine could store. Press [Yes] to keep the scanned pages in memory, or press [No] to delete all pages stored during this operation. The display shows how many pages are stored.
PDF encryption errorPlease check the security settingof the PDF file.
The file you tried to print is an unsupported file.Encrypted PDF files are not supported.
Printing was canceleddue to unsupported settings
Please confirm that you have selected the correct driver.- or -Please confirm that the settings are correct.
Replace drum cartridge. The drum cartridge has run out. Replace with a new drum cartridge.
Replace Fuser. Contact your local technical representative.
Scanned documenttransmission error
Please check the printed message.For details on the error code, see chapter 8, “Communication errors” in “Error messages” in the Scanner and Fax Guide.
System error Contact your local technical representative.
The toner is almost empty. Your machine is almost out of toner.Please contact your local technical representative soon to purchase a new toner cartridge.
The toner is almost empty.Please install a new toner cartridge.
This file is not supported.Please check file: Decode error
The file you tried to print is an unsupported file.
This USB memory is write-protected.
Please confirm the USB memory device you are using.
Toner is empty. Toner is empty. Replace with a new toner cartridge.
Unsupported USB device detected. Please confirm the USB memory device you are using.- or -Confirm that the USB memory device is firmly connected to the machine.
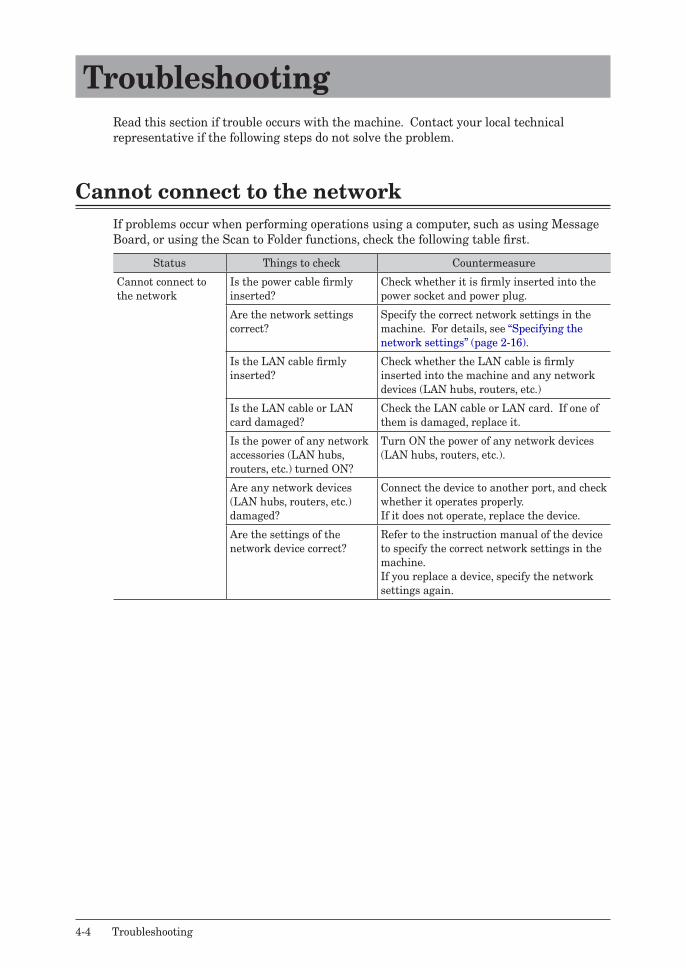
4-4 Troubleshooting
TroubleshootingRead this section if trouble occurs with the machine. Contact your local technical representative if the following steps do not solve the problem.
Cannot connect to the networkIf problems occur when performing operations using a computer, such as using Message Board, or using the Scan to Folder functions, check the following table first.
Status Things to check Countermeasure
Cannot connect to the network
Is the power cable firmly inserted?
Check whether it is firmly inserted into the power socket and power plug.
Are the network settings correct?
Specify the correct network settings in the machine. For details, see “Specifying the network settings” (page 2-16).
Is the LAN cable firmly inserted?
Check whether the LAN cable is firmly inserted into the machine and any network devices (LAN hubs, routers, etc.)
Is the LAN cable or LAN card damaged?
Check the LAN cable or LAN card. If one of them is damaged, replace it.
Is the power of any network accessories (LAN hubs, routers, etc.) turned ON?
Turn ON the power of any network devices (LAN hubs, routers, etc.).
Are any network devices (LAN hubs, routers, etc.) damaged?
Connect the device to another port, and check whether it operates properly.If it does not operate, replace the device.
Are the settings of the network device correct?
Refer to the instruction manual of the device to specify the correct network settings in the machine.If you replace a device, specify the network settings again.
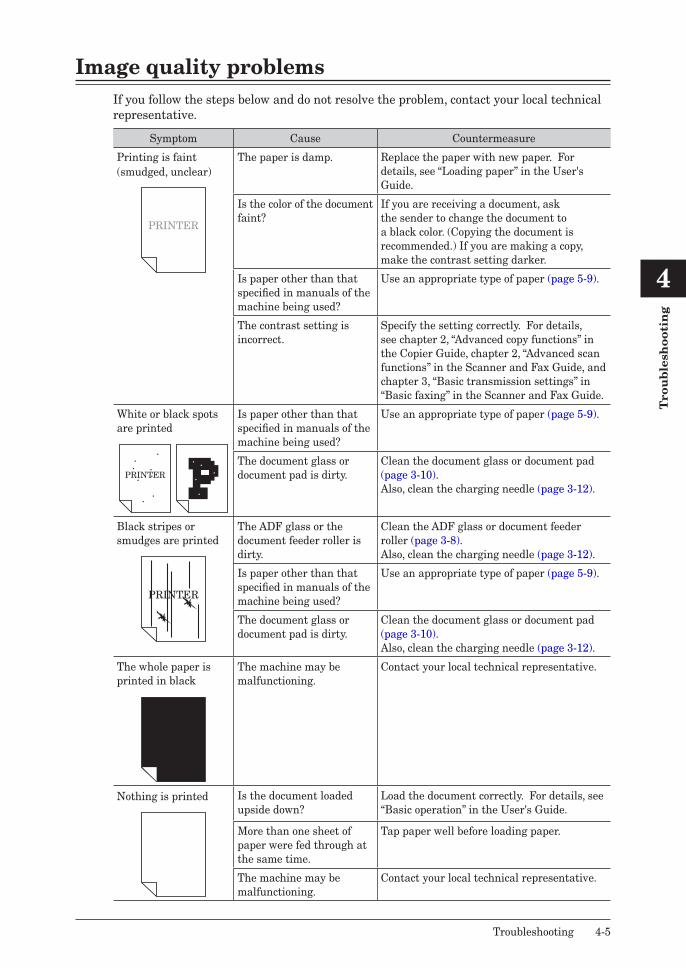
1
2
3
4
Tro
ub
lesh
oo
tin
g
Troubleshooting 4-5
Image quality problemsIf you follow the steps below and do not resolve the problem, contact your local technical representative.
Symptom Cause Countermeasure
Printing is faint(smudged, unclear)
The paper is damp. Replace the paper with new paper. For details, see “Loading paper” in the User's Guide.
Is the color of the document faint?
If you are receiving a document, ask the sender to change the document to a black color. (Copying the document is recommended.) If you are making a copy, make the contrast setting darker.
Is paper other than that specified in manuals of the machine being used?
Use an appropriate type of paper (page 5-9).
The contrast setting is incorrect.
Specify the setting correctly. For details, see chapter 2, “Advanced copy functions” in the Copier Guide, chapter 2, “Advanced scan functions” in the Scanner and Fax Guide, and chapter 3, “Basic transmission settings” in “Basic faxing” in the Scanner and Fax Guide.
White or black spots are printed
PRINTER
Is paper other than that specified in manuals of the machine being used?
Use an appropriate type of paper (page 5-9).
The document glass or document pad is dirty.
Clean the document glass or document pad (page 3-10).Also, clean the charging needle (page 3-12).
Black stripes or smudges are printed
PRINTER
The ADF glass or the document feeder roller is dirty.
Clean the ADF glass or document feeder roller (page 3-8).Also, clean the charging needle (page 3-12).
Is paper other than that specified in manuals of the machine being used?
Use an appropriate type of paper (page 5-9).
The document glass or document pad is dirty.
Clean the document glass or document pad (page 3-10).Also, clean the charging needle (page 3-12).
The whole paper is printed in black
The machine may be malfunctioning.
Contact your local technical representative.
Nothing is printed Is the document loaded upside down?
Load the document correctly. For details, see “Basic operation” in the User's Guide.
More than one sheet of paper were fed through at the same time.
Tap paper well before loading paper.
The machine may be malfunctioning.
Contact your local technical representative.
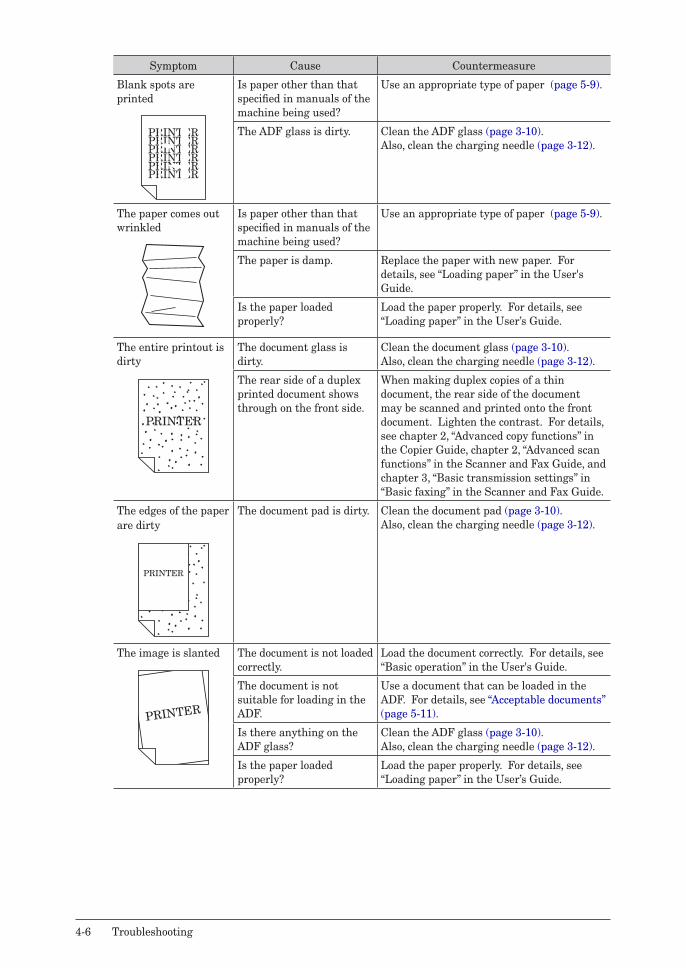
4-6 Troubleshooting
Symptom Cause Countermeasure
Blank spots are printed
PRINTER PRINTER
PRINTER
PRINTER PRINTER
PRINTER
Is paper other than that specified in manuals of the machine being used?
Use an appropriate type of paper (page 5-9).
The ADF glass is dirty. Clean the ADF glass (page 3-10).Also, clean the charging needle (page 3-12).
The paper comes out wrinkled
Is paper other than that specified in manuals of the machine being used?
Use an appropriate type of paper (page 5-9).
The paper is damp. Replace the paper with new paper. For details, see “Loading paper” in the User's Guide.
Is the paper loaded properly?
Load the paper properly. For details, see “Loading paper” in the User’s Guide.
The entire printout is dirty
PRINTER
The document glass is dirty.
Clean the document glass (page 3-10).Also, clean the charging needle (page 3-12).
The rear side of a duplex printed document shows through on the front side.
When making duplex copies of a thin document, the rear side of the document may be scanned and printed onto the front document. Lighten the contrast. For details, see chapter 2, “Advanced copy functions” in the Copier Guide, chapter 2, “Advanced scan functions” in the Scanner and Fax Guide, and chapter 3, “Basic transmission settings” in “Basic faxing” in the Scanner and Fax Guide.
The edges of the paper are dirty
PRINTER
The document pad is dirty. Clean the document pad (page 3-10).Also, clean the charging needle (page 3-12).
The image is slanted
PRINTER
The document is not loaded correctly.
Load the document correctly. For details, see “Basic operation” in the User's Guide.
The document is not suitable for loading in the ADF.
Use a document that can be loaded in the ADF. For details, see “Acceptable documents” (page 5-11).
Is there anything on the ADF glass?
Clean the ADF glass (page 3-10).Also, clean the charging needle (page 3-12).
Is the paper loaded properly?
Load the paper properly. For details, see “Loading paper” in the User’s Guide.
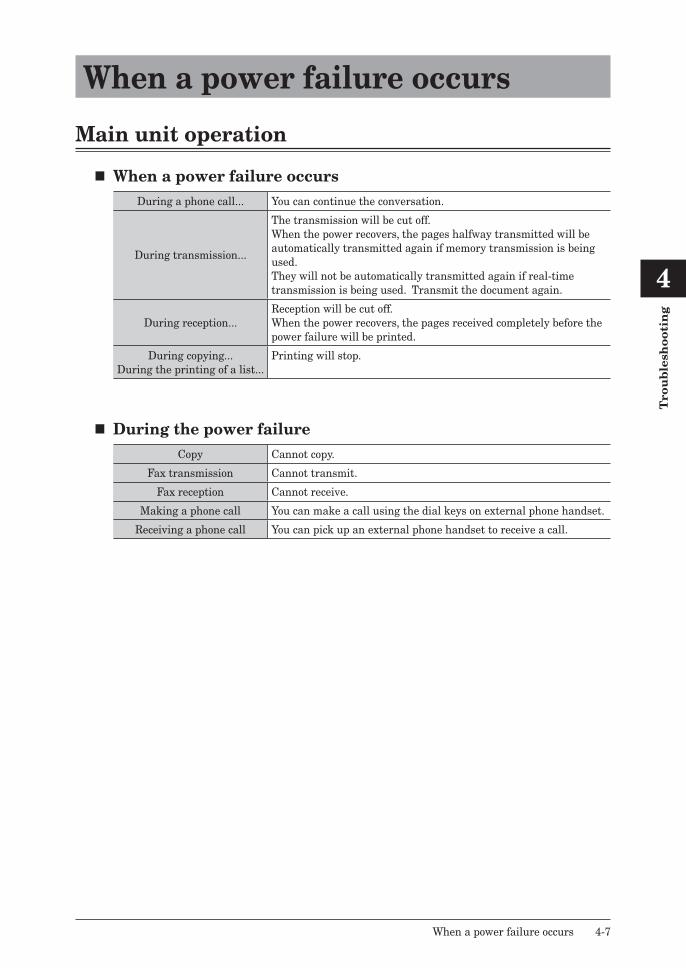
1
2
3
4
Tro
ub
lesh
oo
tin
g
When a power failure occurs 4-7
When a power failure occurs
Main unit operation
� When a power failure occursDuring a phone call... You can continue the conversation.
During transmission...
The transmission will be cut off.When the power recovers, the pages halfway transmitted will be automatically transmitted again if memory transmission is being used.They will not be automatically transmitted again if real-time transmission is being used. Transmit the document again.
During reception...Reception will be cut off.When the power recovers, the pages received completely before the power failure will be printed.
During copying...During the printing of a list...
Printing will stop.
� During the power failureCopy Cannot copy.
Fax transmission Cannot transmit.
Fax reception Cannot receive.
Making a phone call You can make a call using the dial keys on external phone handset.
Receiving a phone call You can pick up an external phone handset to receive a call.

4-8 When a power failure occurs
This page intentionally left blank.
Chapter 5Specifications
Specifications ..............................................................................................................5-2General ....................................................................................................................5-2Acceptable paper .....................................................................................................5-9Acceptable documents ...........................................................................................5-11Options ...................................................................................................................5-13External dimensions .............................................................................................5-13
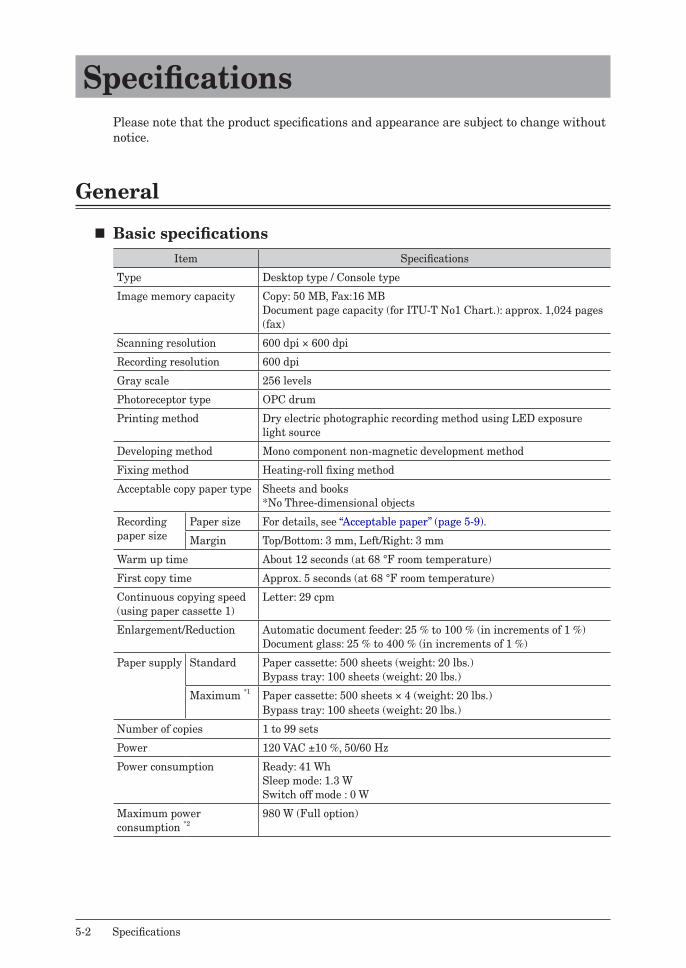
5-2 Specifications
SpecificationsPlease note that the product specifications and appearance are subject to change without notice.
General
� Basic specificationsItem Specifications
Type Desktop type / Console type
Image memory capacity Copy: 50 MB, Fax:16 MBDocument page capacity (for ITU-T No1 Chart.): approx. 1,024 pages (fax)
Scanning resolution 600 dpi × 600 dpi
Recording resolution 600 dpi
Gray scale 256 levels
Photoreceptor type OPC drum
Printing method Dry electric photographic recording method using LED exposure light source
Developing method Mono component non-magnetic development method
Fixing method Heating-roll fixing method
Acceptable copy paper type Sheets and books*No Three-dimensional objects
Recording paper size
Paper size For details, see “Acceptable paper” (page 5-9).
Margin Top/Bottom: 3 mm, Left/Right: 3 mm
Warm up time About 12 seconds (at 68 °F room temperature)
First copy time Approx. 5 seconds (at 68 °F room temperature)
Continuous copying speed(using paper cassette 1)
Letter: 29 cpm
Enlargement/Reduction Automatic document feeder: 25 % to 100 % (in increments of 1 %)Document glass: 25 % to 400 % (in increments of 1 %)
Paper supply Standard Paper cassette: 500 sheets (weight: 20 lbs.)Bypass tray: 100 sheets (weight: 20 lbs.)
Maximum *1 Paper cassette: 500 sheets × 4 (weight: 20 lbs.)Bypass tray: 100 sheets (weight: 20 lbs.)
Number of copies 1 to 99 sets
Power 120 VAC ±10 %, 50/60 Hz
Power consumption Ready: 41 WhSleep mode: 1.3 WSwitch off mode : 0 W
Maximum power consumption *2
980 W (Full option)
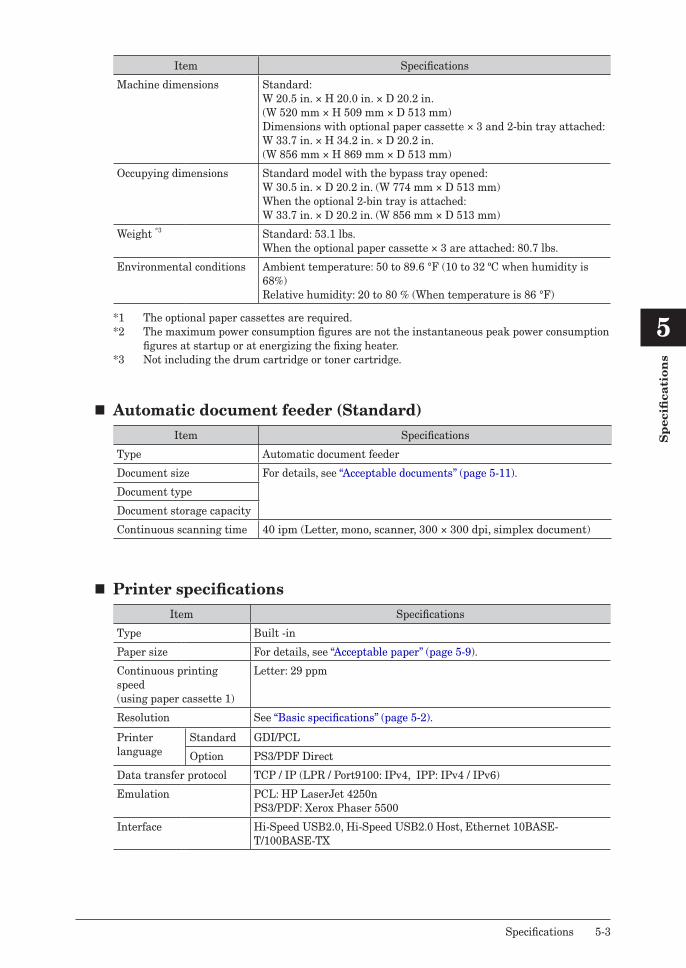
1
2
3
4
5
Sp
ecifi
cati
on
s
Specifications 5-3
Item Specifications
Machine dimensions Standard: W 20.5 in. × H 20.0 in. × D 20.2 in.(W 520 mm × H 509 mm × D 513 mm)Dimensions with optional paper cassette × 3 and 2-bin tray attached: W 33.7 in. × H 34.2 in. × D 20.2 in.(W 856 mm × H 869 mm × D 513 mm)
Occupying dimensions Standard model with the bypass tray opened: W 30.5 in. × D 20.2 in. (W 774 mm × D 513 mm)When the optional 2-bin tray is attached: W 33.7 in. × D 20.2 in. (W 856 mm × D 513 mm)
Weight *3 Standard: 53.1 lbs.When the optional paper cassette × 3 are attached: 80.7 lbs.
Environmental conditions Ambient temperature: 50 to 89.6 °F (10 to 32 ºC when humidity is 68%)Relative humidity: 20 to 80 % (When temperature is 86 °F)
*1 The optional paper cassettes are required.*2 The maximum power consumption figures are not the instantaneous peak power consumption
figures at startup or at energizing the fixing heater.*3 Not including the drum cartridge or toner cartridge.
� Automatic document feeder (Standard)Item Specifications
Type Automatic document feeder
Document size For details, see “Acceptable documents” (page 5-11).
Document type
Document storage capacity
Continuous scanning time 40 ipm (Letter, mono, scanner, 300 × 300 dpi, simplex document)
� Printer specificationsItem Specifications
Type Built -in
Paper size For details, see “Acceptable paper” (page 5-9).
Continuous printing speed(using paper cassette 1)
Letter: 29 ppm
Resolution See “Basic specifications” (page 5-2).
Printer language
Standard GDI/PCL
Option PS3/PDF Direct
Data transfer protocol TCP / IP (LPR / Port9100: IPv4, IPP: IPv4 / IPv6)
Emulation PCL: HP LaserJet 4250nPS3/PDF: Xerox Phaser 5500
Interface Hi-Speed USB2.0, Hi-Speed USB2.0 Host, Ethernet 10BASE-T/100BASE-TX
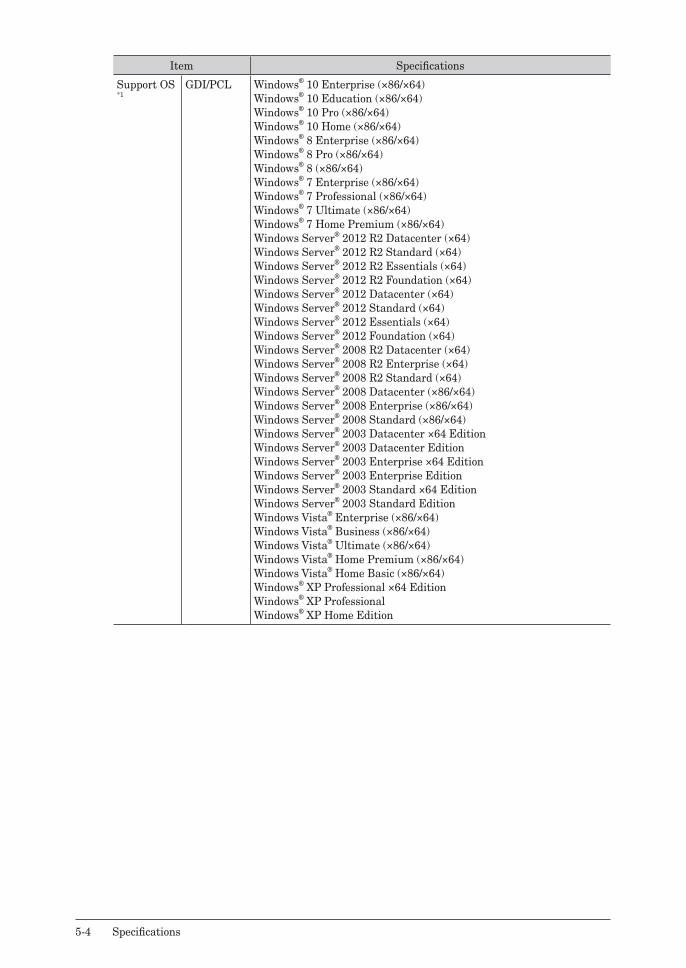
5-4 Specifications
Item Specifications
Support OS *1
GDI/PCL Windows® 10 Enterprise (×86/×64)Windows® 10 Education (×86/×64)Windows® 10 Pro (×86/×64)Windows® 10 Home (×86/×64)Windows® 8 Enterprise (×86/×64)Windows® 8 Pro (×86/×64)Windows® 8 (×86/×64)Windows® 7 Enterprise (×86/×64)Windows® 7 Professional (×86/×64)Windows® 7 Ultimate (×86/×64)Windows® 7 Home Premium (×86/×64)Windows Server® 2012 R2 Datacenter (×64)Windows Server® 2012 R2 Standard (×64)Windows Server® 2012 R2 Essentials (×64)Windows Server® 2012 R2 Foundation (×64)Windows Server® 2012 Datacenter (×64)Windows Server® 2012 Standard (×64)Windows Server® 2012 Essentials (×64)Windows Server® 2012 Foundation (×64)Windows Server® 2008 R2 Datacenter (×64)Windows Server® 2008 R2 Enterprise (×64)Windows Server® 2008 R2 Standard (×64)Windows Server® 2008 Datacenter (×86/×64)Windows Server® 2008 Enterprise (×86/×64)Windows Server® 2008 Standard (×86/×64)Windows Server® 2003 Datacenter ×64 EditionWindows Server® 2003 Datacenter EditionWindows Server® 2003 Enterprise ×64 EditionWindows Server® 2003 Enterprise EditionWindows Server® 2003 Standard ×64 EditionWindows Server® 2003 Standard EditionWindows Vista® Enterprise (×86/×64)Windows Vista® Business (×86/×64)Windows Vista® Ultimate (×86/×64)Windows Vista® Home Premium (×86/×64)Windows Vista® Home Basic (×86/×64)Windows® XP Professional ×64 EditionWindows® XP ProfessionalWindows® XP Home Edition
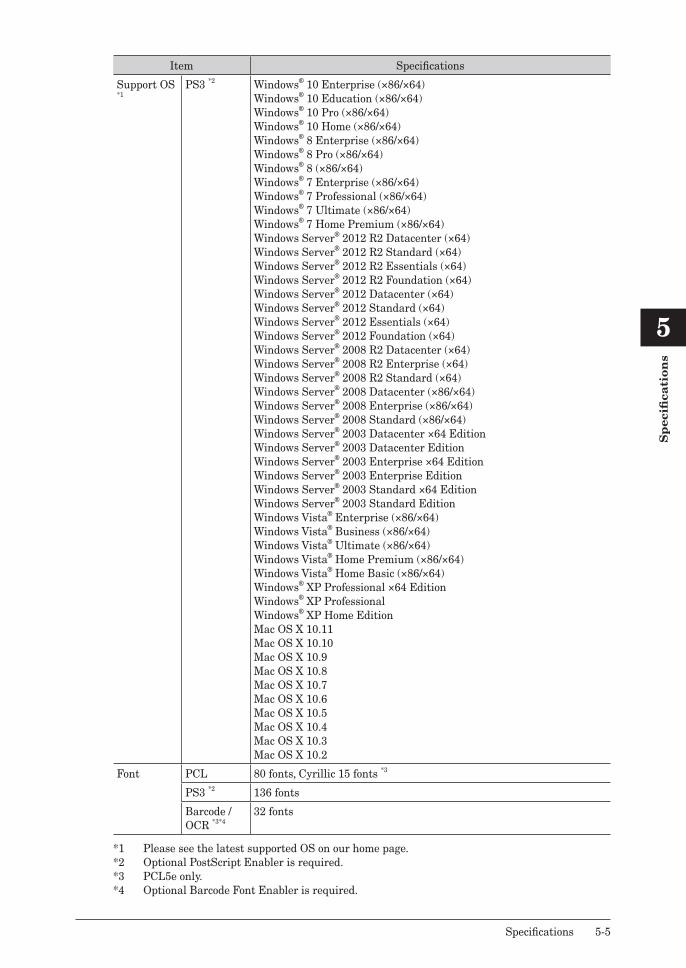
1
2
3
4
5
Sp
ecifi
cati
on
s
Specifications 5-5
Item Specifications
Support OS *1
PS3 *2 Windows® 10 Enterprise (×86/×64)Windows® 10 Education (×86/×64)Windows® 10 Pro (×86/×64)Windows® 10 Home (×86/×64)Windows® 8 Enterprise (×86/×64)Windows® 8 Pro (×86/×64)Windows® 8 (×86/×64)Windows® 7 Enterprise (×86/×64)Windows® 7 Professional (×86/×64)Windows® 7 Ultimate (×86/×64)Windows® 7 Home Premium (×86/×64)Windows Server® 2012 R2 Datacenter (×64)Windows Server® 2012 R2 Standard (×64)Windows Server® 2012 R2 Essentials (×64)Windows Server® 2012 R2 Foundation (×64)Windows Server® 2012 Datacenter (×64)Windows Server® 2012 Standard (×64)Windows Server® 2012 Essentials (×64)Windows Server® 2012 Foundation (×64)Windows Server® 2008 R2 Datacenter (×64)Windows Server® 2008 R2 Enterprise (×64)Windows Server® 2008 R2 Standard (×64)Windows Server® 2008 Datacenter (×86/×64)Windows Server® 2008 Enterprise (×86/×64)Windows Server® 2008 Standard (×86/×64)Windows Server® 2003 Datacenter ×64 EditionWindows Server® 2003 Datacenter EditionWindows Server® 2003 Enterprise ×64 EditionWindows Server® 2003 Enterprise EditionWindows Server® 2003 Standard ×64 EditionWindows Server® 2003 Standard EditionWindows Vista® Enterprise (×86/×64)Windows Vista® Business (×86/×64)Windows Vista® Ultimate (×86/×64)Windows Vista® Home Premium (×86/×64)Windows Vista® Home Basic (×86/×64)Windows® XP Professional ×64 EditionWindows® XP ProfessionalWindows® XP Home EditionMac OS X 10.11Mac OS X 10.10Mac OS X 10.9Mac OS X 10.8Mac OS X 10.7Mac OS X 10.6Mac OS X 10.5Mac OS X 10.4Mac OS X 10.3Mac OS X 10.2
Font PCL 80 fonts, Cyrillic 15 fonts *3
PS3 *2 136 fonts
Barcode / OCR *3*4
32 fonts
*1 Please see the latest supported OS on our home page.*2 Optional PostScript Enabler is required.*3 PCL5e only.*4 Optional Barcode Font Enabler is required.
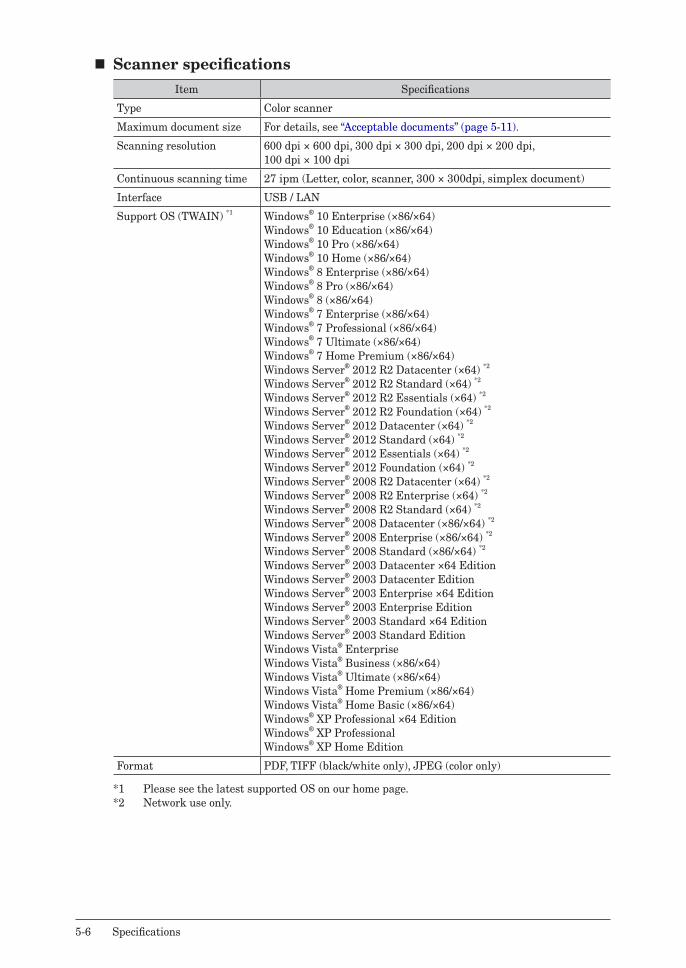
5-6 Specifications
� Scanner specificationsItem Specifications
Type Color scanner
Maximum document size For details, see “Acceptable documents” (page 5-11).
Scanning resolution 600 dpi × 600 dpi, 300 dpi × 300 dpi, 200 dpi × 200 dpi,100 dpi × 100 dpi
Continuous scanning time 27 ipm (Letter, color, scanner, 300 × 300dpi, simplex document)
Interface USB / LAN
Support OS (TWAIN) *1 Windows® 10 Enterprise (×86/×64)Windows® 10 Education (×86/×64)Windows® 10 Pro (×86/×64)Windows® 10 Home (×86/×64)Windows® 8 Enterprise (×86/×64) Windows® 8 Pro (×86/×64) Windows® 8 (×86/×64) Windows® 7 Enterprise (×86/×64)Windows® 7 Professional (×86/×64)Windows® 7 Ultimate (×86/×64)Windows® 7 Home Premium (×86/×64)Windows Server® 2012 R2 Datacenter (×64) *2
Windows Server® 2012 R2 Standard (×64) *2
Windows Server® 2012 R2 Essentials (×64) *2
Windows Server® 2012 R2 Foundation (×64) *2
Windows Server® 2012 Datacenter (×64) *2
Windows Server® 2012 Standard (×64) *2
Windows Server® 2012 Essentials (×64) *2
Windows Server® 2012 Foundation (×64) *2
Windows Server® 2008 R2 Datacenter (×64) *2
Windows Server® 2008 R2 Enterprise (×64) *2
Windows Server® 2008 R2 Standard (×64) *2
Windows Server® 2008 Datacenter (×86/×64) *2
Windows Server® 2008 Enterprise (×86/×64) *2
Windows Server® 2008 Standard (×86/×64) *2
Windows Server® 2003 Datacenter ×64 EditionWindows Server® 2003 Datacenter EditionWindows Server® 2003 Enterprise ×64 EditionWindows Server® 2003 Enterprise EditionWindows Server® 2003 Standard ×64 EditionWindows Server® 2003 Standard EditionWindows Vista® EnterpriseWindows Vista® Business (×86/×64)Windows Vista® Ultimate (×86/×64)Windows Vista® Home Premium (×86/×64)Windows Vista® Home Basic (×86/×64)Windows® XP Professional ×64 EditionWindows® XP ProfessionalWindows® XP Home Edition
Format PDF, TIFF (black/white only), JPEG (color only)
*1 Please see the latest supported OS on our home page.*2 Network use only.
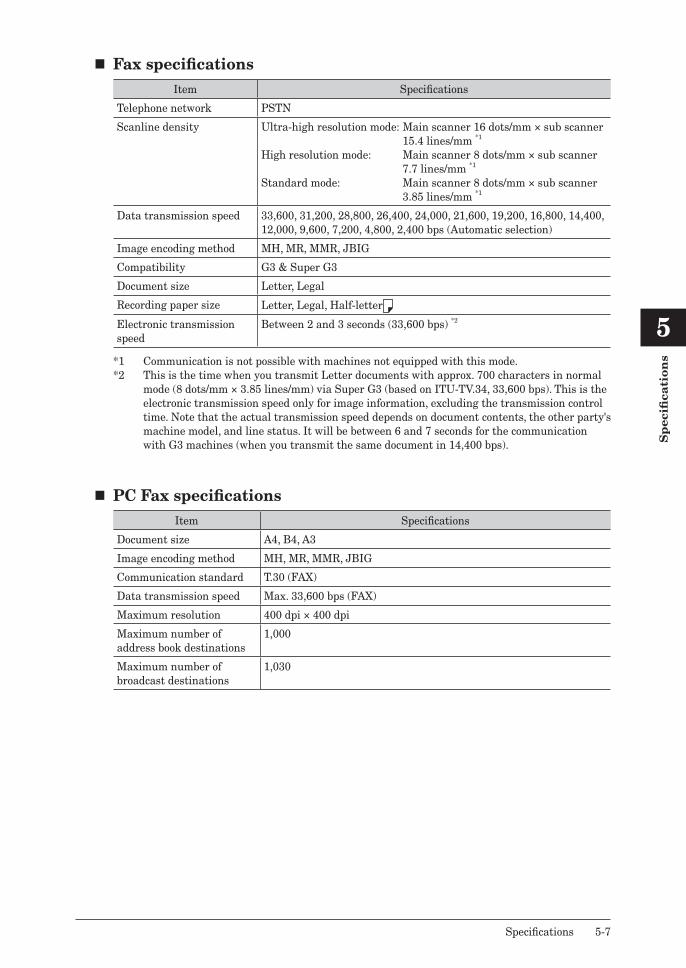
1
2
3
4
5
Sp
ecifi
cati
on
s
Specifications 5-7
� Fax specificationsItem Specifications
Telephone network PSTN
Scanline density Ultra-high resolution mode: Main scanner 16 dots/mm × sub scanner 15.4 lines/mm *1
High resolution mode: Main scanner 8 dots/mm × sub scanner 7.7 lines/mm *1
Standard mode: Main scanner 8 dots/mm × sub scanner 3.85 lines/mm *1
Data transmission speed 33,600, 31,200, 28,800, 26,400, 24,000, 21,600, 19,200, 16,800, 14,400, 12,000, 9,600, 7,200, 4,800, 2,400 bps (Automatic selection)
Image encoding method MH, MR, MMR, JBIG
Compatibility G3 & Super G3
Document size Letter, Legal
Recording paper size Letter, Legal, Half-letter
Electronic transmission speed
Between 2 and 3 seconds (33,600 bps) *2
*1 Communication is not possible with machines not equipped with this mode.*2 This is the time when you transmit Letter documents with approx. 700 characters in normal
mode (8 dots/mm × 3.85 lines/mm) via Super G3 (based on ITU-TV.34, 33,600 bps). This is the electronic transmission speed only for image information, excluding the transmission control time. Note that the actual transmission speed depends on document contents, the other party's machine model, and line status. It will be between 6 and 7 seconds for the communication with G3 machines (when you transmit the same document in 14,400 bps).
� PC Fax specificationsItem Specifications
Document size A4, B4, A3
Image encoding method MH, MR, MMR, JBIG
Communication standard T.30 (FAX)
Data transmission speed Max. 33,600 bps (FAX)
Maximum resolution 400 dpi × 400 dpi
Maximum number of address book destinations
1,000
Maximum number of broadcast destinations
1,030
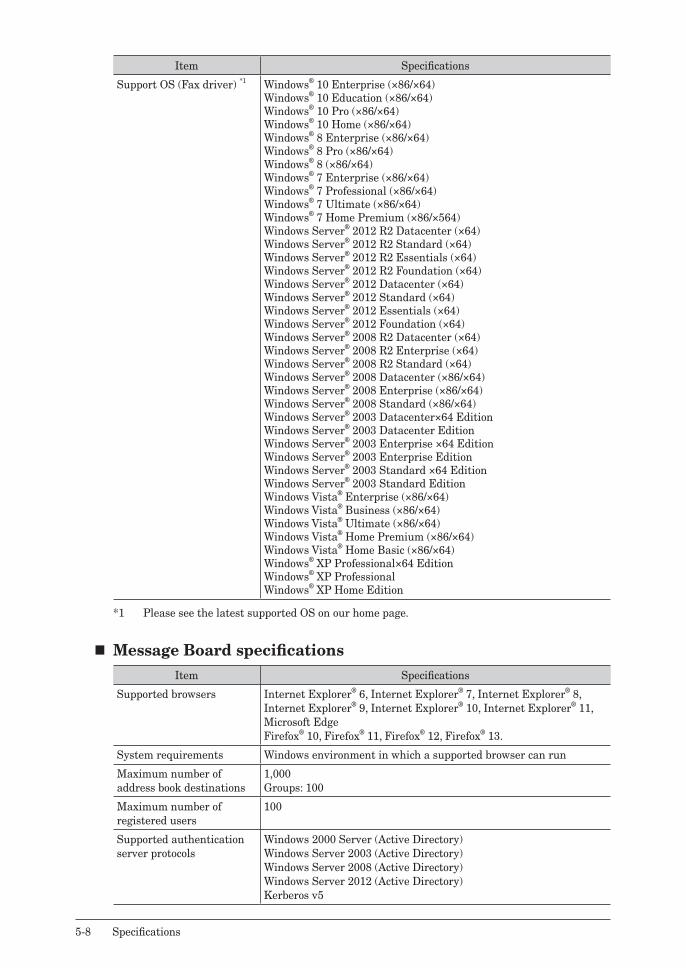
5-8 Specifications
Item Specifications
Support OS (Fax driver) *1 Windows® 10 Enterprise (×86/×64)Windows® 10 Education (×86/×64)Windows® 10 Pro (×86/×64)Windows® 10 Home (×86/×64)Windows® 8 Enterprise (×86/×64) Windows® 8 Pro (×86/×64) Windows® 8 (×86/×64) Windows® 7 Enterprise (×86/×64)Windows® 7 Professional (×86/×64)Windows® 7 Ultimate (×86/×64)Windows® 7 Home Premium (×86/×564)Windows Server® 2012 R2 Datacenter (×64)Windows Server® 2012 R2 Standard (×64)Windows Server® 2012 R2 Essentials (×64)Windows Server® 2012 R2 Foundation (×64)Windows Server® 2012 Datacenter (×64)Windows Server® 2012 Standard (×64)Windows Server® 2012 Essentials (×64)Windows Server® 2012 Foundation (×64)Windows Server® 2008 R2 Datacenter (×64)Windows Server® 2008 R2 Enterprise (×64)Windows Server® 2008 R2 Standard (×64)Windows Server® 2008 Datacenter (×86/×64)Windows Server® 2008 Enterprise (×86/×64)Windows Server® 2008 Standard (×86/×64)Windows Server® 2003 Datacenter×64 EditionWindows Server® 2003 Datacenter EditionWindows Server® 2003 Enterprise ×64 EditionWindows Server® 2003 Enterprise EditionWindows Server® 2003 Standard ×64 EditionWindows Server® 2003 Standard EditionWindows Vista® Enterprise (×86/×64)Windows Vista® Business (×86/×64)Windows Vista® Ultimate (×86/×64)Windows Vista® Home Premium (×86/×64)Windows Vista® Home Basic (×86/×64)Windows® XP Professional×64 EditionWindows® XP ProfessionalWindows® XP Home Edition
*1 Please see the latest supported OS on our home page.
� Message Board specificationsItem Specifications
Supported browsers Internet Explorer® 6, Internet Explorer® 7, Internet Explorer® 8, Internet Explorer® 9, Internet Explorer® 10, Internet Explorer® 11, Microsoft EdgeFirefox® 10, Firefox® 11, Firefox® 12, Firefox® 13.
System requirements Windows environment in which a supported browser can run
Maximum number of address book destinations
1,000Groups: 100
Maximum number of registered users
100
Supported authentication server protocols
Windows 2000 Server (Active Directory)Windows Server 2003 (Active Directory)Windows Server 2008 (Active Directory)Windows Server 2012 (Active Directory)Kerberos v5
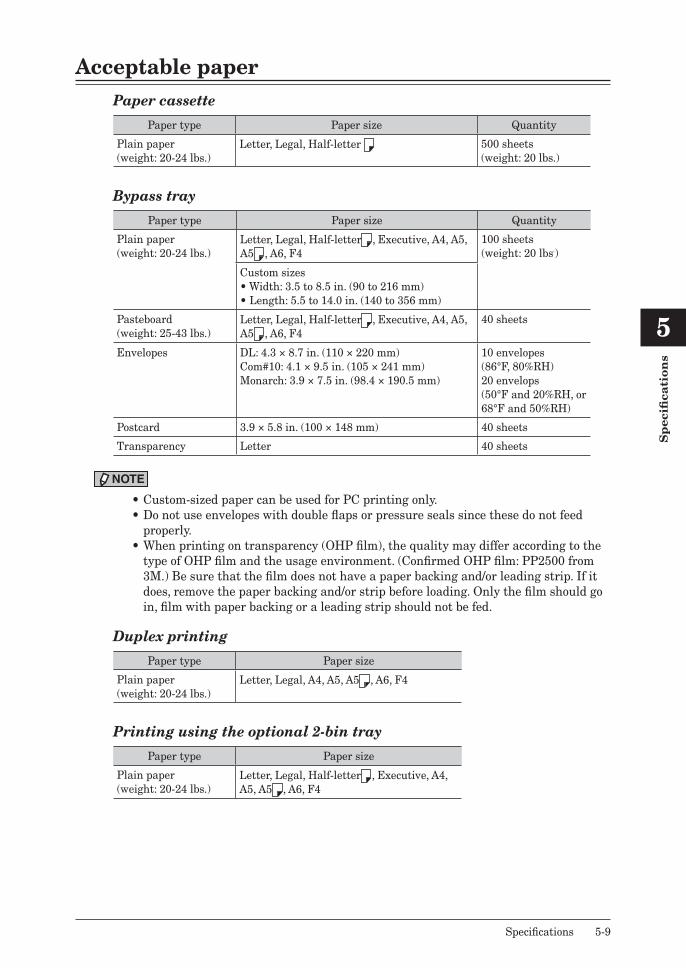
1
2
3
4
5
Sp
ecifi
cati
on
s
Specifications 5-9
Acceptable paperPaper cassette
Paper type Paper size Quantity
Plain paper(weight: 20-24 lbs.)
Letter, Legal, Half-letter 500 sheets(weight: 20 lbs.)
Bypass tray
Paper type Paper size Quantity
Plain paper(weight: 20-24 lbs.)
Letter, Legal, Half-letter , Executive, A4, A5, A5 , A6, F4
100 sheets(weight: 20 lbs.)
Custom sizes• Width: 3.5 to 8.5 in. (90 to 216 mm)• Length: 5.5 to 14.0 in. (140 to 356 mm)
Pasteboard(weight: 25-43 lbs.)
Letter, Legal, Half-letter , Executive, A4, A5, A5 , A6, F4
40 sheets
Envelopes DL: 4.3 × 8.7 in. (110 × 220 mm)Com#10: 4.1 × 9.5 in. (105 × 241 mm)Monarch: 3.9 × 7.5 in. (98.4 × 190.5 mm)
10 envelopes(86°F, 80%RH)20 envelops(50°F and 20%RH, or 68°F and 50%RH)
Postcard 3.9 × 5.8 in. (100 × 148 mm) 40 sheets
Transparency Letter 40 sheets
NOTE
• Custom-sized paper can be used for PC printing only.• Do not use envelopes with double flaps or pressure seals since these do not feed
properly.• When printing on transparency (OHP film), the quality may differ according to the
type of OHP film and the usage environment. (Confirmed OHP film: PP2500 from 3M.) Be sure that the film does not have a paper backing and/or leading strip. If it does, remove the paper backing and/or strip before loading. Only the film should go in, film with paper backing or a leading strip should not be fed.
Duplex printing
Paper type Paper size
Plain paper(weight: 20-24 lbs.)
Letter, Legal, A4, A5, A5 , A6, F4
Printing using the optional 2-bin tray
Paper type Paper size
Plain paper(weight: 20-24 lbs.)
Letter, Legal, Half-letter , Executive, A4, A5, A5 , A6, F4
5-10 Specifications
� Items to avoidTo prevent jams and damage to your machine, do not use the following:• Creased paper• Wrinkled paper• Folded paper• Curled paper• Torn paper• Carbon paper• Moist paper• Paper previously printed on by a printer• Paper with holes• Envelopes with pressure seals• Extremely shiny or highly textured paper• Paper which has been printed on using a thermal transfer printer • Back side of printed paper
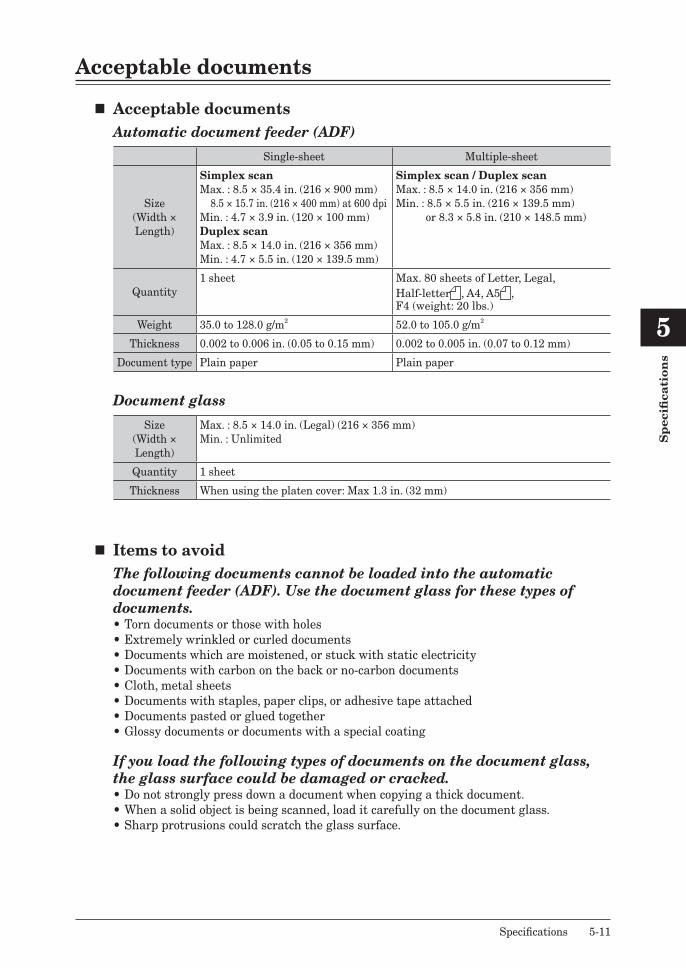
1
2
3
4
5
Sp
ecifi
cati
on
s
Specifications 5-11
Acceptable documents
� Acceptable documentsAutomatic document feeder (ADF)
Single-sheet Multiple-sheet
Size(Width × Length)
Simplex scanMax. : 8.5 × 35.4 in. (216 × 900 mm) 8.5 × 15.7 in. (216 × 400 mm) at 600 dpiMin. : 4.7 × 3.9 in. (120 × 100 mm)Duplex scanMax. : 8.5 × 14.0 in. (216 × 356 mm)Min. : 4.7 × 5.5 in. (120 × 139.5 mm)
Simplex scan / Duplex scanMax. : 8.5 × 14.0 in. (216 × 356 mm)Min. : 8.5 × 5.5 in. (216 × 139.5 mm) or 8.3 × 5.8 in. (210 × 148.5 mm)
Quantity1 sheet Max. 80 sheets of Letter, Legal,
Half-letter , A4, A5 , F4 (weight: 20 lbs.)
Weight 35.0 to 128.0 g/m2 52.0 to 105.0 g/m2
Thickness 0.002 to 0.006 in. (0.05 to 0.15 mm) 0.002 to 0.005 in. (0.07 to 0.12 mm)
Document type Plain paper Plain paper
Document glass
Size(Width × Length)
Max. : 8.5 × 14.0 in. (Legal) (216 × 356 mm)Min. : Unlimited
Quantity 1 sheet
Thickness When using the platen cover: Max 1.3 in. (32 mm)
� Items to avoidThe following documents cannot be loaded into the automatic document feeder (ADF). Use the document glass for these types of documents.• Torn documents or those with holes• Extremely wrinkled or curled documents• Documents which are moistened, or stuck with static electricity• Documents with carbon on the back or no-carbon documents• Cloth, metal sheets• Documents with staples, paper clips, or adhesive tape attached• Documents pasted or glued together• Glossy documents or documents with a special coating
If you load the following types of documents on the document glass, the glass surface could be damaged or cracked.• Do not strongly press down a document when copying a thick document.• When a solid object is being scanned, load it carefully on the document glass.• Sharp protrusions could scratch the glass surface.
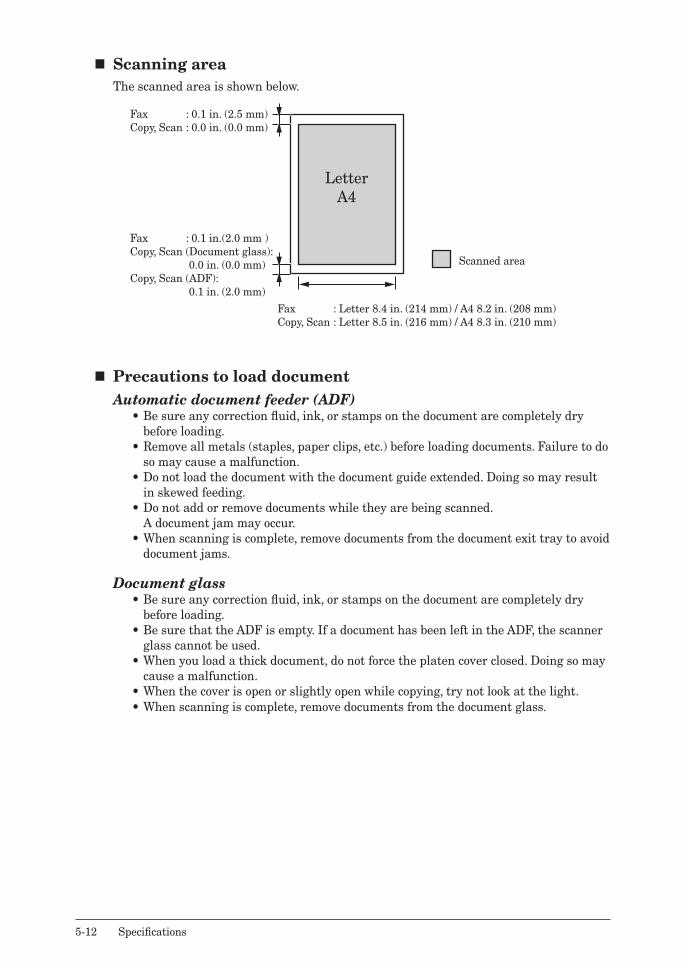
5-12 Specifications
� Scanning areaThe scanned area is shown below.
LetterA4
Fax : Letter 8.4 in. (214 mm) / A4 8.2 in. (208 mm)Copy, Scan : Letter 8.5 in. (216 mm) / A4 8.3 in. (210 mm)
Fax : 0.1 in.(2.0 mm )Copy, Scan (Document glass): 0.0 in. (0.0 mm)Copy, Scan (ADF): 0.1 in. (2.0 mm)
Fax : 0.1 in. (2.5 mm)Copy, Scan : 0.0 in. (0.0 mm)
Scanned area
� Precautions to load documentAutomatic document feeder (ADF)
• Be sure any correction fluid, ink, or stamps on the document are completely dry before loading.
• Remove all metals (staples, paper clips, etc.) before loading documents. Failure to do so may cause a malfunction.
• Do not load the document with the document guide extended. Doing so may result in skewed feeding.
• Do not add or remove documents while they are being scanned. A document jam may occur.
• When scanning is complete, remove documents from the document exit tray to avoid document jams.
Document glass• Be sure any correction fluid, ink, or stamps on the document are completely dry
before loading.• Be sure that the ADF is empty. If a document has been left in the ADF, the scanner
glass cannot be used.• When you load a thick document, do not force the platen cover closed. Doing so may
cause a malfunction.• When the cover is open or slightly open while copying, try not look at the light.• When scanning is complete, remove documents from the document glass.
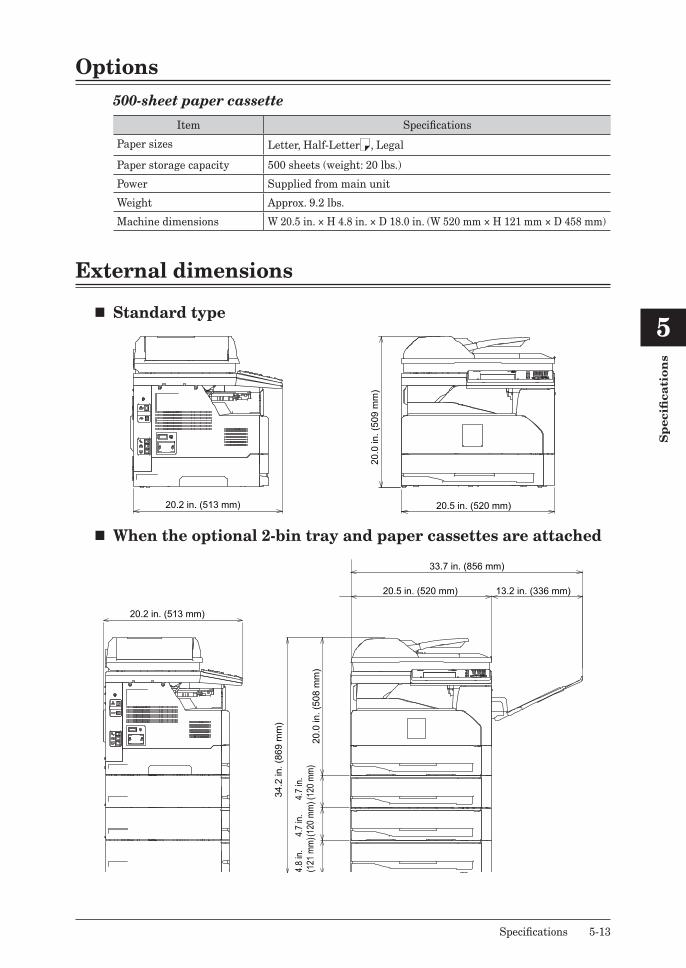
1
2
3
4
5
Sp
ecifi
cati
on
s
Specifications 5-13
Options500-sheet paper cassette
Item Specifications
Paper sizes Letter, Half-Letter , Legal
Paper storage capacity 500 sheets (weight: 20 lbs.)
Power Supplied from main unit
Weight Approx. 9.2 lbs.
Machine dimensions W 20.5 in. × H 4.8 in. × D 18.0 in. (W 520 mm × H 121 mm × D 458 mm)
External dimensions
� Standard type
20.0
in. (
509
mm
)
20.5 in. (520 mm)20.2 in. (513 mm)
� When the optional 2-bin tray and paper cassettes are attached
13.2 in. (336 mm)
33.7 in. (856 mm)
34.2
in. (
869
mm
)
20.5 in. (520 mm)
20.0
in. (
508
mm
)
4.7
in.(1
20 m
m)
4.8
in.(1
21 m
m)
4.7
in.(1
20 m
m)
20.2 in. (513 mm)

5-14 Specifications
This page intentionally left blank.

Chapter 6Trademarks and copyrights
Trademarks and copyrights .....................................................................................6-2Trademarks .............................................................................................................6-2Open source software licence statement ................................................................6-3
6-2 Trademarks and copyrights
Trademarks and copyrights
Trademarks• KONICA MINOLTA and the KONICA MINOLTA logo are trademarks or registered
trademarks of KONICA MINOLTA HOLDINGS, INC.• bizhub and PageScope are trademarks or registered trademarks of Konica Minolta, Inc.• Microsoft®, the Windows logo, Windows®, Windows Server®, Windows Vista®, Internet
Explorer® are registered trademarks of the Microsoft Corporation in the United Statesand/or other countries.Microsoft product screen shot(s) reprinted with permission from Microsoft Corporation.
• RSA® and BSAFE® are registered trademarks of RSA Security Inc.• This product includes RSA BSAFE® Cryptographic software from RSA Security Inc.•
� Monotype is a trademark of Monotype Imaging, Inc. registered in the UnitedStates Patent and Trademark Office and may be registered in certain jurisdictions.The Monotype Imaging logo is a trademark of Monotype Imaging, Inc. and may beregistered in certain jurisdictions.
� UFST is a trademark of Monotype Imaging, Inc. and may be registered in certainjurisdictions.
• Mozilla® and Firefox® are registered trademarks of Mozilla Foundation.• Apple, Mac and Mac OS are registered trademarks of Apple Inc.• Adobe®, Acrobat®, Acrobat Reader® and Adobe Acrobat Reader® are registered
trademarks of Adobe Systems Incorporated.• PCL is a registered trademark of the Hewlett Packard Company.• Ethernet is a registered trademark of Xerox Corporation.• Dropbox is registered trademark of Dropbox Inc.• Google Drive is a trademark of Google Inc. Use of this trademark is subject to Google
Permissions.• All other company names and product names referenced are trademarks or registered
trademarks of their respective companies.
1
2
3
4
5
6
Tra
dem
ark
s a
nd
co
py
rig
hts
Trademarks and copyrights 6-3
Open source software licence statement
� BSD licenseCopyright © 1995 - 2001 Kungliga Tekniska Högskolan(Royal Institute of Technology, Stockholm, Sweden).All rights reserved.
Redistribution and use in source and binary forms, with or without modification, are permitted provided that the following conditions are met:1. Redistributions of source code must retain the above copyright notice, this list of
conditions and the following disclaimer.2. Redistributions in binary form must reproduce the above copyright notice, this list of
conditions and the following disclaimer in the documentation and/or other materials provided with the distribution.
3. Neither the name of the Institute nor the names of its contributors may be used to endorse or promote products derived from this software without specific prior written permission.
THIS SOFTWARE IS PROVIDED BY THE INSTITUTE AND CONTRIBUTORS “AS IS” AND ANY EXPRESS OR IMPLIED WARRANTIES, INCLUDING, BUT NOT LIMITED TO, THE IMPLIED WARRANTIES OF MERCHANTABILITY AND FITNESS FOR A PARTICULAR PURPOSE ARE DISCLAIMED. IN NO EVENT SHALL THE INSTITUTE OR CONTRIBUTORS BE LIABLE FOR ANY DIRECT, INDIRECT, INCIDENTAL, SPECIAL, EXEMPLARY, OR CONSEQUENTIAL DAMAGES (INCLUDING, BUT NOT LIMITED TO, PROCUREMENT OF SUBSTITUTE GOODS OR SERVICES; LOSS OF USE, DATA, OR PROFITS; OR BUSINESS INTERRUPTION)HOWEVER CAUSED AND ON ANY THEORY OF LIABILITY, WHETHER IN CONTRACT, STRICT LIABILITY, OR TORT (INCLUDING NEGLIGENCE OR OTHERWISE) ARISING IN ANY WAY OUT OF THE USE OF THIS SOFTWARE, EVEN IF ADVISED OF THE POSSIBILITY OF SUCH DAMAGE.
� The zlib/libpng licenseTinyXML is released under the zlib license:This software is provided ‘as-is’, without any express or implied warranty. In no event will the authors be held liable for any damages arising from the use of this software.Permission is granted to anyone to use this software for any purpose, including commercial applications, and to alter it and redistribute it freely, subject to the following restrictions:1. The origin of this software must not be misrepresented; you must not claim that you
wrote the original software. If you use this software in a product, an acknowledgment in the product documentation would be appreciated but is not required.
2. Altered source versions must be plainly marked as such, and must not be misrepresented as being the original software.
3. This notice may not be removed or altered from any source distribution.
Copyright © 1995-1998 Jean-loup Gailly and Mark AdlerThis software is provided ‘as-is’, without any express or implied warranty. In no event will the authors be held liable for any damages arising from the use of this software.Permission is granted to anyone to use this software for any purpose, including commercial applications, and to alter it and redistribute it freely, subject to the following restrictions:1. The origin of this software must not be misrepresented; you must not claim that you
6-4 Trademarks and copyrights
wrote the original software. If you use this software in a product, an acknowledgment in the product documentation would be appreciated but is not required.
2. Altered source versions must be plainly marked as such, and must not be misrepresented as being the original software.
3. This notice may not be removed or altered from any source distribution. Jean-loup Gailly Mark [email protected] [email protected]
� Boost software licenseBoost Software License - Version 1.0 - August 17th, 2003
Permission is hereby granted, free of charge, to any person or organization obtaining a copy of the software and accompanying documentation covered by this license (the “Software”) to use, reproduce, display, distribute, execute, and transmit the Software, and to prepare derivative works of the Software, and to permit third-parties to whom the Software is furnished to do so, all subject to the following:
The copyright notices in the Software and this entire statement, including the above license grant, this restriction and the following disclaimer, must be included in all copies of the Software, in whole or in part, and all derivative works of the Software, unless such copies or derivative works are solely in the form of machine-executable object codegenerated by a source language processor.
THE SOFTWARE IS PROVIDED “AS IS”, WITHOUT WARRANTY OF ANY KIND, EXPRESS OR IMPLIED, INCLUDING BUT NOT LIMITED TO THE WARRANTIES OF MERCHANTABILITY, FITNESS FOR A PARTICULAR PURPOSE, TITLE AND NONINFRINGEMENT. IN NO EVENT SHALL THE COPYRIGHT HOLDERS OR ANYONE DISTRIBUTING THE SOFTWARE BE LIABLE FOR ANY DAMAGES OR OTHER LIABILITY, WHETHER IN CONTRACT, TORT OR OTHERWISE, ARISING FROM, OUT OF OR IN CONNECTION WITH THE SOFTWARE OR THE USE OR OTHER DEALINGS IN THE SOFTWARE.
� The independent JPEG group’s JPEG softwareThis software is based in part on the work of the Independent JPEG Group.
� SSLeay LicenseCopyright © 1995-1997 Eric Young ([email protected])All rights reserved.
This package is an SSL implementation written by Eric Young ([email protected]).The implementation was written so as to conform with Netscapes SSL.
This library is free for commercial and non-commercial use as long as the following conditions are aheared to. The following conditions apply to all code found in this distribution, be it the RC4, RSA, lhash, DES, etc., code; not just the SSL code. The SSL documentation included with this distribution is covered by the same copyright terms except that the holder is Tim Hudson ([email protected]).
Copyright remains Eric Young’s, and as such any Copyright notices in the code are not to be removed.If this package is used in a product, Eric Young should be given attribution as the author
1
2
3
4
5
6
Tra
dem
ark
s a
nd
co
py
rig
hts
Trademarks and copyrights 6-5
of the parts of the library used.This can be in the form of a textual message at program startup or in documentation (online or textual) provided with the package.
Redistribution and use in source and binary forms, with or without modification, are permitted provided that the following conditions are met:1. Redistributions of source code must retain the copyright notice, this list of conditions
and the following disclaimer.2. Redistributions in binary form must reproduce the above copyright notice, this list of
conditions and the following disclaimer in the documentation and/or other materials provided with the distribution.
3. All advertising materials mentioning features or use of this software must display the following acknowledgement:
“This product includes cryptographic software written by Eric Young ([email protected])”
The word ‘cryptographic’ can be left out if the rouines from the library being used are not cryptographic related :-).
4. If you include any Windows specific code (or a derivative thereof) from the apps directory (application code) you must include an acknowledgement:
“This product includes software written by Tim Hudson ([email protected])”
THIS SOFTWARE IS PROVIDED BY ERIC YOUNG “AS IS” AND ANY EXPRESS OR IMPLIED WARRANTIES, INCLUDING, BUT NOT LIMITED TO, THE IMPLIED WARRANTIES OF MERCHANTABILITY AND FITNESS FOR A PARTICULAR PURPOSE ARE DISCLAIMED. IN NO EVENT SHALL THE AUTHOR OR CONTRIBUTORS BE LIABLE FOR ANY DIRECT, INDIRECT, INCIDENTAL, SPECIAL, EXEMPLARY, OR CONSEQUENTIAL DAMAGES (INCLUDING, BUT NOT LIMITED TO, PROCUREMENT OF SUBSTITUTE GOODS OR SERVICES; LOSS OF USE, DATA, OR PROFITS; OR BUSINESS INTERRUPTION)HOWEVER CAUSED AND ON ANY THEORY OF LIABILITY, WHETHER IN CONTRACT, STRICT LIABILITY, OR TORT (INCLUDING NEGLIGENCE OR OTHERWISE) ARISING IN ANY WAY OUT OF THE USE OF THIS SOFTWARE, EVEN IF ADVISED OF THE POSSIBILITY OF SUCH DAMAGE.
The licence and distribution terms for any publically available version or derivative of this code cannot be changed. i.e. this code cannot simply be copied and put under another distribution licence[including the GNU Public Licence.]

6-6 Trademarks and copyrights
This page intentionally left blank.

© 2016 KONICA MINOLTA BUSINESS SOLUTIONS U.S.A., INC.
Related Documents