Biosafety Practices This resource developed by LabCentral for the Pagliuca Harvard Life Lab Revision 2, Effective Mar 17,2017

Welcome message from author
This document is posted to help you gain knowledge. Please leave a comment to let me know what you think about it! Share it to your friends and learn new things together.
Transcript

Biosafety Practices
This resource developed by LabCentral for the Pagliuca Harvard Life Lab
Revision 2, Effective Mar 17,2017

Page 2 of 20
Table of Contents 1.0 PURPOSE ...................................................................................................................3
2.0 SCOPE ........................................................................................................................3
3.0 BIOSAFETY PROCEDURES & PRACTICES .......................................................................3
3.1 Biosafety Level 1 .................................................................................................................. 3
3.2 Biosafety Level 2 .................................................................................................................. 4
3.3 Standard Microbiological Practices ..................................................................................... 5
3.4 Personal Protection ............................................................................................................. 6
3.5 Sharps .................................................................................................................................. 7
3.6 Insect/Rodent Control ......................................................................................................... 8
4.0 EQUIPMENT PROCEDURES .........................................................................................8
4.1 Biosafety Cabinets ............................................................................................................... 8
4.2 Aspiration........................................................................................................................... 11
4.3 Centrifugation .................................................................................................................... 12
4.4 Growth Chambers and Shakers ......................................................................................... 13
4.5 Blenders, Vortex Mixers, and Pipettes .............................................................................. 13
5.0 STERILIZATION AND DISINFECTION ........................................................................... 13
5.1 Sterilization ........................................................................................................................ 13
5.2 Disinfection ........................................................................................................................ 15
5.3 Disinfectants for Work Surfaces and Reusable Items ....................................................... 16
6.0 WASTE MANAGEMENT ............................................................................................ 17
6.1 Liquid Biological Waste ...................................................................................................... 17
6.2 Solid Biological Waste (Non-Sharps) ................................................................................. 18
7.0 SPILL RESPONSE ....................................................................................................... 18
7.1 Spill Supplies ...................................................................................................................... 18
7.2 Exposure response............................................................................................................. 18
7.3 Biohazard Spill Responses ................................................................................................. 19
8.0 REFERENCES ............................................................................................................ 20
9.0 REVISION HISTORY ................................................................................................... 20
Page 3 of 20
1.0 PURPOSE
The Pagliuca Harvard Life Lab is committed to creating and maintaining a safe and healthy environment
for all who work in the facility. This Biosafety Practices document is an extension to the Biological Safety
Manual and Exposure Control Plan. It outlines the best practices for handling Biosafety Level 1 and
Biosafety Level 2 materials at the Life Lab. This guide is intended for use as a supplement to the NIH
Guidelines for Research Involving rDNA Molecules and the CDC/NIH Biosafety in Microbiological and
Biomedical Laboratories (BMBL). These resources should be referred to should any questions or
clarifications be required for applicability to the work being conducted.
2.0 SCOPE
All employees and members of the Life Lab who are working with or among biological materials are
expected to follow the procedures outlined in this guide. The Life Lab encourages all members to report
unsafe processes or conditions and provide recommendations to improve safety in the work environment.
The Life Lab may establish additional practices to assist researchers and employees in the safe conduct of
their work.
3.0 BIOSAFETY PROCEDURES & PRACTICES
Good microbiological practices are important not only for safe handling of biological materials but also
for ensuring good experimental results. This section outlines laboratory practices to be used for Biosafety
Level One (BL1) and Biosafety Level Two (BL2) laboratories.
The objective of physical containment is to confine organisms that are known to cause health or physical
hazards, and to reduce the potential for exposure to the laboratory worker, to persons outside the
laboratory, and to the environment. Physical containment is achieved through the use of laboratory
practices, containment equipment, and special laboratory design. The primary means of physical
containment is provided by the use of specific equipment and adherence to laboratory practices. Special
laboratory design provides a secondary means of protection against the accidental release of organisms
outside the laboratory or to the environment.
3.1 Biosafety Level 1
Laboratories that are designated as BL1 are suitable for work involving well-characterized agents not
known to cause disease in healthy adult humans, and of minimal potential hazard to laboratory personnel
and the environment. At the Life Lab, the BL1 laboratory is not necessarily separated from the general

Page 4 of 20
traffic patterns. Work is generally conducted on open bench tops using standard microbiological practices.
Special containment equipment or facility design is not required nor generally used. Laboratory personnel
have specific training on the procedures conducted in the laboratory and are supervised by a scientist
with general training in microbiology or a related science.
Laboratory facilities for BL1 must include the following features:
• A sign posted on the laboratory door including “BL1” and the universal biohazard symbol (Figure 1)
• The door to the lab must stay closed with limited access
• A sink for hand washing
• The laboratory is designed so that it can be easily cleaned; spaces between benches, cabinets,
and equipment are accessible for cleaning
• Bench tops are impervious to water and resistant to acids, alkalis, organic solvents, and moderate
heat
• All surfaces must be non-porous, free of cracks, and decontaminated whenever a spill occurs
• Laboratory furniture is sturdy
Examples of BL1 materials include: Escherichia coli (K12), aspergillus Niger, bacillus subtilis, and
clostridium sporogenes.
3.2 Biosafety Level 2
BL2 laboratories are suitable for work involving agents of moderate potential hazards to personnel and
the environment. Labs that are designated as BL2 differ from BL1 labs in the following ways:
• Laboratory personnel have specific training in handling pathogenic agents and are directed by
competent scientists
• Access to the laboratory is limited when work is being conducted
• Extreme precautions are taken with contaminated sharp items
• Certain procedures in which infectious aerosols or splashes may be created are conducted in
biological safety cabinets or other physical containment equipment
BL2 laboratory facilities have the same features as BL1 labs, in addition to the following:
• A sign is posted on the laboratory door including “BL2”, the universal biohazard symbol, “LIMITED
ACCESS” and emergency contact information.
• Doors to the lab must be kept closed and access is restricted
Figure 1: Universal Biohazard Symbol
Page 5 of 20
• A method for decontamination of infectious or regulated laboratory wastes is available (i.e.
autoclave, chemical disinfection, incinerator, or other approved decontamination system)
• An eyewash facility is readily available
Examples of BL2 materials include: Escherichia coli (enteropathogenic, enterotoxigenic, enteroinvasive,
and strains bearing K1 antigen, including O157:H7), pseudomonas aeruginosa, staphylococcus aureus,
streptococcus pyogenes, streptococcus pneumoniae, klebsiella pneumoniae, cells and cell lines of any
origin unless certified or tested to be free of adventitious agents and approved by COMS to be handled at
a lower containment level, and animal derived products such as fetal bovine serum and bovine serum
albumin.
3.2.1 BL2 Enhanced Practices
Although not formally recognized in the BMBL, BL2 enhanced designation is used at the Life Lab when
work with biological materials is conducted in a BL2 laboratory with certain biosafety practices and
procedures that are typically found at Biosafety Level 3. BL2 enhanced practices are recommended based
on project-specific risk assessments.
Examples of materials that warrant utilization of BL2 enhanced practices include: lentivirus, and certain
viral vectors that express oncogenes, genes that silence a tumor suppressor gene, or genes of unknown
function, drug-resistant bacteria, high concentration (>106 plaque forming units/milliliter) BL2 viruses, and
large volumes (>10 liters) of BL2 agents.
3.3 Standard Microbiological Practices
The following standard microbiological practices shall be practiced in both BL1 and BL2 laboratories:
• Personnel must wash their hands after they handle viable materials, after removing gloves, and
before leaving the laboratory. Sinks are available in the laboratory for this purpose.
• Eating, drinking, smoking, handling contact lenses, and applying cosmetics is not permitted in the
laboratory. Food is stored outside the work area in cabinets or refrigerators designated and used
for this purpose only.
• Mechanical pipetting devices are used because mouth pipetting is prohibited.
• All procedures are performed carefully to minimize the creation of splashes or aerosols.
• Work surfaces and equipment are decontaminated on a regular basis with an appropriate
disinfectant and after any spill of viable material.
• Avoid contaminating your mouth, eyes, and nose with biological materials.

Page 6 of 20
• Wounds/dermatitis should be protected with a bandage and personal protective equipment such
as a lab coat and gloves.
• Substitute plastic for glass whenever possible.
• BL1 materials are placed in a closed primary container for storage and transport through corridors
and when possible during handling and processing. Examples of primary containers include
capped tubes and bottles and stoppered flasks.
The following containment procedures are required in BL2 laboratories (and recommended for BL1 labs):
• Work in a biosafety cabinet as much as possible.
• Keep vessels closed as much as possible.
• Use face shields, goggles, or a surgical mask as deemed necessary by a risk assessment or COMS
stipulation.
• Use techniques to minimize the creation of aerosols and splashes, including wrapping tube caps
with gauze before opening and using filtered tips for pipetting.
• BL2 materials are placed in a closed primary container which is placed within a closed secondary
container to prevent leakage during storage and transport through corridors and when possible
during handling and processing. Examples of secondary containers include biosafety cabinets,
centrifuge safety cups, plastic containers with lids, or sealable plastic bags.
3.4 Personal Protection
Personal protection starts with the street clothes worn by the researcher when arriving at the facility to
perform work. Street clothes must include shoes that cover the entire foot. Long pants or other garment
that provides protection to the entire leg is highly recommended. The following are personal protective
equipment (PPE) guidelines for all Life Lab laboratories:
PPE BL1 BL2 BL2 enhanced
Lab coat Required Required Disposable lab coat over
regular lab coat recommended
Disposable gloves Required Required Double gloves required
Safety glasses Required Required Required
Disposable sleeves Not required Not required Required over lab coat sleeves

Page 7 of 20
PPE BL1 BL2 BL2 enhanced
Surgical mask Not required Not required unless
deemed necessary by
risk assessment
Recommended
Figure 2 PPE Guidelines
• Disposable lab coats and gloves must not be removed from BL2 labs. Lab coats may be placed in
the hamper for laundering.
• Door handles may not be touched with gloved hands regardless of biosafety level classification.
• It is recommended that scientists wear gloves when using computers located inside of the lab.
• Gloves should be changed frequently and disposable gloves must not be reused.
• All lab PPE must be removed and hands washed prior to entering a non-lab area. Bringing lab PPE
into non-lab areas is prohibited.
3.5 Sharps
Sharps are any of the following: needles, scalpels, razors, glass Pasteur pipettes, serological and aspirating
pipettes, slides, cover slips, syringes, broken glassware, or anything that can easily puncture or scrape the
skin. When working with hazardous materials (e.g. BL2, acutely hazardous chemicals), the use of sharps
is restricted unless there is no alternative.
Sharps use guidelines:
• Always minimize the use of needles and other sharps. When sharps must be used, employ
engineering and work practice controls to reduce the risk of sharps-related injuries.
• Plastic labware should be substituted for glassware whenever possible.
• Do not handle broken glassware directly, use a brush and dustpan, tongs, or forceps.
• Handle one sharp object at a time and dispose or store it immediately after use.
• Needles must not be bent, sheared, broken, recapped, removed from disposable syringes, or
manipulated by hand before disposal.
• When following BL2 enhanced practices:

Page 8 of 20
o Dispose of contaminated sharps in a cardboard pipette keeper
(Figure 3) inside of the biosafety cabinet before disposing the
container into the biohazardous waste container.
o Develop and implement a standard operation procedure for
the safe handling of sharps.
Sharps disposal:
• Rigid, puncture resistant sharps containers with lids are provided by
the contracted waste hauler for the disposal of biohazardous sharps.
These sharps containers are labeled with the universal biohazard
symbol and are typically made of red plastic (Figure 4).
• Place the sharps waste container close to the work area.
• Sharps containers must be closed after each work period.
• Do not fill sharps containers more than ¾ full or allow items to
overflow. Do not force sharps into a full container as this action often results in puncture injuries.
Full sharps containers will be collected and replaced by the biohazards waste hauler.
• Do not discard non-sharp items such as paper towels in sharps containers.
• Non-disposable sharps must be stored and transported in a puncture resistant container. If
necessary, decontaminate non-disposable sharps preferably by autoclaving to minimize user
handling.
• Dispose of broken clean glassware in designated cardboard boxes located in the open lab. Dispose
of contaminated broken glassware in a biohazardous sharps container or chemical waste
container depending on the contaminant.
• Plastic pipette tips may be disposed in biohazard sharps bins or in biohazard boxes.
3.6 Insect/Rodent Control
A monthly insect and rodent control program is in place and coordinated by Harvard Facilities.
4.0 EQUIPMENT PROCEDURES
4.1 Biosafety Cabinets
Biosafety cabinets (BSCs) are primary containment devices that are designed to provide protection for the
worker and the environment, as well as provide a work environment free of contaminants. The
Figure 4 Sharps biohazard waste containers
Figure 3 Pipette keeper

Page 9 of 20
effectiveness of the biosafety cabinet is directly dependent on the manner in which users perform their
work.
The effectiveness of the cabinet is a function of three separate directional airflows:
• Inward from the room through the front grill
• Downward through a high efficiency particulate air (HEPA) filter onto the work surface
• Out of the cabinet through the HEPA filter
General comments on the use of BSCs:
• Do not store anything on top of the cabinet because it will negatively impact the airflow.
• Hazardous chemicals are not to be used in BSCs as they recirculate air into the room without
proper filtration.
• BSCs should be labeled with the universal biohazard symbol and biosafety level as appropriate.
• BSCs are tested and certified on a semi-annual basis by an external service provider.
• Regularly scheduled chemical surface decontamination is performed by the Life Lab team.
Additional decontamination and maintenance will be performed as needed.
• Users will be notified of any issues with BSCs and the equipment will be taken out of operation if
necessary.
• If a BSC is moved within the laboratory it needs to be tested and recertified. If a BSC is to be
moved out of the laboratory it must be fumigated before relocation.
• If the BSC alarm goes off for something other than the sash being opened, cap all open tubes, turn
off the blower, close the sash, evacuate the lab, then put a “Do Not Enter” sign on the door.
Contact someone on the Life Lab team for assistance.
• Ultra violet (UV) lamps are not recommended as a means of decontaminating the BSC work space
for the following reasons:
o The Life Lab does not test for UV lamp effectiveness
o UV light may disinfect surfaces but particles are not wiped away
o UV light degrades plastics over time leading to off-gassing and shedding
o Chemical disinfection and proper BSC use should remove the need to use the UV light
UV lamps are not installed in the BSCs provided by the Life Lab. It is recommended that the blower
remains on during normal working hours and the cabinet is properly wiped down with 70%
ethanol prior to and after work has been completed in the BSCs.

Page 10 of 20
Prior to working in the BSC follow these procedures to ensure proper effectiveness:
• While using the BSC wear appropriate PPE; at a minimum, gloves, a buttoned lab coat, and safety
glasses. If following BL2 enhanced practices, wear disposable arm sleeves or a disposable lab coat
over your regular lab coat and use two layers of gloves.
• Open the sash to the indicated working height then turn on the blower for a least 5- 10 minutes
before using the BSC to purge the environment.
• Turn on the fluorescent light to indicate that the BSC is in use.
• Check the LCD display or the magnehelic gauge for the BSC status.
o If the unit has an LCD, it will display “OK” when the motor is operating properly and the
sash is not open too far. If the LCD display indicates an alert or error, do not use the BSC
and contact the Facility Biosafety Officer.
o If the unit has a magnehelic gauge, it should read ± 0.02 units from the posted certified
value to ensure proper operation. If the gauge displays a value outside of the specified
range, do not use the BSC and contact the Facility Biosafety Officer.
• Check the aspiration flasks, take action as needed (described in Section 4.2).
• Spray gloves and sleeves with 70% ethanol solution before entering the BSC. Wipe the work
surface, interior walls, and window with 70% ethanol solution, or alternate non-corrosive
disinfectant that is effective against the agents in use. Consult the Life Lab team for assistance in
selecting a disinfectant.
• Wipe any items entering the BSC with 70% ethanol solution, or alternate non-corrosive
disinfectant. If using BL2 enhanced practices, bring secondary containers (such as a Pipette
Keeper for serological pipettes or sealable bag for pipette tips) into the BSC to safely contain waste
materials.
• Do not disrupt the airflow by placing materials over the grates; separate items that are clean and
dirty to minimize cross contamination.
• Delay manipulation of materials for approximately 1 minute after placing hands/arms inside of
the BSC and minimize the frequency of moving into and out of the BSC. Work at a controlled pace
to minimize the airflow disruption that occurs with rapid movements.
After using the BSC follow these procedures to ensure readiness for the next user:
• If the aspiration line was used, aspirate water until the aspiration tubing is clear.

Page 11 of 20
• Decontaminate then remove all equipment and waste from the BSC so that it is empty for the
next user. Ensure that pipette tips are discarded in biohazard bins and serological pipettes are
discarded in sharps containers. If using BL2 enhanced practices, ensure waste is in a secondary
container (such as a Pipette Keeper or sealed bag) which is sprayed with disinfectant before
removal from the BSC and subsequently discarded in a biohazard bin or sharps container.
• Refill serological and aspirating pipettes in the magnetic holder for the next user.
• Recharge the serological pipette aid.
• Check aspiration flasks and take action as needed (described in Section 4.2).
• Wipe the work surface, interior walls, and window with 70% ethanol solution provided by the Life
Lab, or alternate disinfectant that is effective against the biological materials used.
• Leave the blower on and the sash up at the certified working height. Turn off the fluorescent light
to indicate that the biosafety cabinet is available for the next user. (Keeping the blower active
throughout the day ensures proper airflow, minimizes the risk of contamination, and prevents the
need to equilibrate the blower before each use.)
• The last user of the day should turn off the blower, turn off the working light, and close the sash.
Turbulence in a biosafety cabinet may cause aerosols to cross-contaminate open vessels and/or escape
the hood. Turbulence should be minimized by taking the following items into account:
• Do not block airflow grills
• Minimize the rapid movement of arms into/out of the BSC
• People should move in a slow, controlled manner behind those working in the BSC
• BSCs should not be installed under ventilation systems due to downward drafts
• BSCs should not be installed next to doors due to cross drafts caused by door opening and closing
4.2 Aspiration
Certain procedures require the aspiration of liquid from one container to another. The Life Lab has a
plumbed vacuum system that may be used to facilitate aspiration.
The proper set-up for an aspiration process is illustrated below in Figure 5.

Page 12 of 20
During aspiration, the vacuum line must be
protected by an inline hydrophobic filter or
vacuguard to reduce the risk of contaminating the
vacuum system. If the aspiration set-up is not at eye
level, there must be two flasks connected in series,
one for collection and one for overflow. If the flasks
are stored on the floor place them in a secondary
container to protect them against breakage.
The aspiration flask(s) should contain a
premeasured amount of disinfectant and be labeled
with the universal biohazard symbol and contents.
People who use the shared BSCs must inform the
Life Lab team if their aspiration waste is incompatible with sodium hypochlorite bleach solution, or if
the aspiration waste must be disposed of as a chemical waste. If the waste is compatible with sodium
hypochlorite bleach and may be disposed of down the lab sink, the following procedure may be followed.
• Fill the collection flask with sodium hypochlorite bleach on a daily basis. The volume of bleach
should be 10% of the total flask working volume.
• If the set-up includes an overflow flask, fill it with sodium hypochlorite bleach weekly, or when
overflow is identified. The volume of bleach should be 10% of the total flask working volume.
• On a daily basis, when the collection flask is full, or if overflow is identified, add sodium
hypochlorite bleach to the flask(s) at a concentration of 10% volume bleach/volume solution.
Allow the bleach to react for 20 minutes then dispose of the decontaminated solution down the
lab sink with copious amounts of water.
• Refill the empty flask(s) with bleach as specified in the first two steps.
4.3 Centrifugation
Centrifugation of materials shall be done in screw cap or pressure seal tubes and bottles. These should
be inverted carefully after filling to check the seal. If there has been any possibility of leakage during
centrifugation, the inner walls of the centrifuge chamber and the rotor must be decontaminated
immediately with an appropriate disinfectant. Always check the centrifuge cavity, rotor bores, buckets,
and adapters before and after use for spills. Immediately conduct decontaminations with an appropriate
A: Aspiration flask B: Overflow flask C: HEPA filter D: Vacuum valve
Figure 5 Aspiration set-up

Page 13 of 20
disinfectant if a spill is identified. If using a corrosive disinfectant, follow with a water then 70% ethanol
wipe down.
When centrifuging BL2 materials, sealed rotors and centrifuge safety cups must be used to contain
aerosols. After a centrifugation program completes, wait at least two minutes before retrieving samples
to minimize the release of aerosols. When utilizing BL2 enhanced practices, load and unload all samples
into the sealed rotor or centrifuge safety cups inside of the BSC. Wipe the outside of the centrifuge rotor
or safety cups with an effective disinfectant when moving them into and out of the biosafety cabinet. If
using a corrosive disinfectant, follow with a water then 70% ethanol wipe down.
4.4 Growth Chambers and Shakers
All culture vessels and shakers must be kept closed. Plastic flasks and bottles should be used instead of
glass whenever possible to avoid breakage. Cotton plugged flasks are not considered open vessels as long
as the plugs fit tightly, with no tendency to pop out. Always wipe down the outside of tissue culture flasks
with 70% ethanol or appropriate disinfectant before they enter and after they exit the incubator.
Decontaminate any spills identified inside of an incubator immediately. If an incidental spill is identified
in a shaker, stop the shaking, wait for 30 minutes to allow aerosols to be cleared by the HVAC system,
then clean up the spill. Please refer to the Emergency Action and Contingency Plan for the definition of
incidental vs emergency spill.
4.5 Blenders, Vortex Mixers, and Pipettes
Blending, vortex mixing, and pipetting processes are proven to generate aerosols and therefore certain
measures must be taken to contain them in order to minimize exposure. These mixing processes should
be conducted in a BSC when handling BL2 materials and using BL2 enhanced practices. All equipment
should be wiped with 70% ethanol solution before being brought into a BSC and wiped with an effective
disinfectant after removal from the BSC. Safety blenders, which have been designed to contain aerosols,
are available for purchase and should be used whenever possible.
5.0 STERILIZATION AND DISINFECTION
Laboratories are subject to contamination by infectious and non-infectious biological materials. Frequent
decontamination is necessary to provide a work area that is suitable for good microbiological practices
and to render contaminated materials safe for handling.
5.1 Sterilization

Page 14 of 20
Sterilization is the complete removal of all living microorganisms and viruses. In laboratories, it is often
accomplished by using steam or gas. Sterilization equipment includes steam autoclaves and ethylene
oxide chambers. Sterilization is used to process clean, pre-wrapped items in which the steam or gas can
penetrate to reach all areas within the packaging. Sterilization is also used for liquids, like culture media,
to ensure biological experiments are free of contaminants. The use of sterile equipment, media, and
techniques prevents unwanted microorganisms from contaminating cultures.
A steam autoclave may be used to sterilize different materials at high temperature and pressure for
various cycle durations. For example, the cycle time for dry goods sterilization will be shorter than for a
liquid with a high protein load. As protein load increases, so does the cycle time for sterilization. A steam
autoclave is available for use at the Life Lab.
Steam Sterilizer/Autoclave Practices
• Regular inspection and maintenance is performed to ensure the autoclave is operating properly.
• Discontinue use immediately and inform the Life Lab team if the autoclave is not working properly
or if an alarm sounds.
• Do not touch any of the internal elements of the autoclave due to the risk of severe burns. Wear
appropriate PPE including a lab coat, safety glasses, closed-toe shoes, and heat resistant gloves.
• Do not stack or store combustible materials next to the autoclave.
• After restarting the autoclave, allow it to warm-up for at least 30 minutes before starting a
sterilization program; it takes roughly 30 minutes to build steam in the generator.
• Check the inside of the autoclave before use to ensure that it is empty.
• Contain items and liquid bottles in autoclave-rated trays; do not use a plastic tray if it is warped
or cracked.
• Ensure seals on containers are vented/loosened so vapor expansion during the heating process
does not cause the container to explode.
• Do not overfill containers; leave the top third empty as expansion space.
• When running a liquid sterilization program, use the slow exhaust function to prevent liquid from
boiling over.
• Allow materials inside the autoclave to cool for at least 10 minutes with the door open before
unloading. Removing the contents too soon may cause heat stress and fracturing of containers,
especially glass bottles.
• Allow bubbling liquids to sit inside the autoclave until they have cooled and are no longer bubbling.

Page 15 of 20
• Tie autoclave bags loosely to allow steam to penetrate the load.
• Use heat sensitive sterilization indicator tape for each load to indicate that the load has
undergone an effective sterilization program; do not use lead-based indicator tape.
• Prohibited items
o Combustibles flammables, volatiles, corrosive substances, and oxidizers may not be
autoclaved
o Never autoclave sealed containers
o Do not autoclave polyethylene plastics (example low and high density polyethylene- LDPE
and HDPE)
o Do not allow materials to touch the interior surfaces of the autoclave; load tray(s) onto
the shelf or rack
• Autoclave-safe items
Most vendors will indicate if their materials may be autoclaved
o Glass: use only borosilicate glass such as Pyrex or Kimex brand
o Plastic: polypropylene bags, pans, and trays are recommended; be aware that melting
depends on autoclave settings, density of the material, and type of plastic
o Metals: remove any plastics, liners, or other items that may melt or combust
o Paper, latex, or vinyl: these items will generally melt or combust inside of an autoclave;
however, these items may be autoclaved if placed inside of an autoclavable biohazard
bag on a liquid setting
NOTE: Liquid or solid biological waste may NOT be inactivated by autoclaving at the Life Lab. Highly
infectious substances must be double-bagged prior to disposal in the biohazard waste stream. However,
while it is not used for routine bio waste treatment, the autoclave is still available for emergency
inactivation of biological materials (i.e. in the case of a cleanup of a large spill of pathogenic materials
where materials are too large to fit into the normal biohazard waste stream). If the autoclave must be
used for emergency inactivation of biological materials, the sterilized material should still be handled and
packaged appropriately and sent through the biohazard waste stream because the autoclave at the Life
Lab is not validated and calibrated to meet MA state regulations to ensure complete inactivation of the
pathogenic materials.
5.2 Disinfection
Page 16 of 20
Disinfection is the process of eliminating nearly all pathogenic microorganisms but not necessarily all
microbial forms on inanimate objects. Usually disinfection is performed with a chemical agent, but heat
may also be a suitable treatment for liquid materials.
There are many types of chemical disinfectants used in laboratories:
• Chlorine based compounds, such as sodium hypochlorite solution (bleach)
• Alcohols, typically ethanol or isopropanol
• Iodophors, such as iodine
• Quaternary ammonium compounds
There is no universal disinfectant for all microbial agents. Some disinfectants are useful against many
different types of microbes, others are used for very specific situations and agents.
It is important to take into account the hazards and environmental impact associated with chemical
disinfectants when choosing between different formulas and creating a disinfection procedure. It is
important to always use a disinfectant that is compatible with the waste stream and contacted materials.
Contact time and concentration plays a role in the effectiveness of a disinfectant used in a process. A risk
assessment should be performed to determine which disinfectant is effective against the agent(s) in
question.
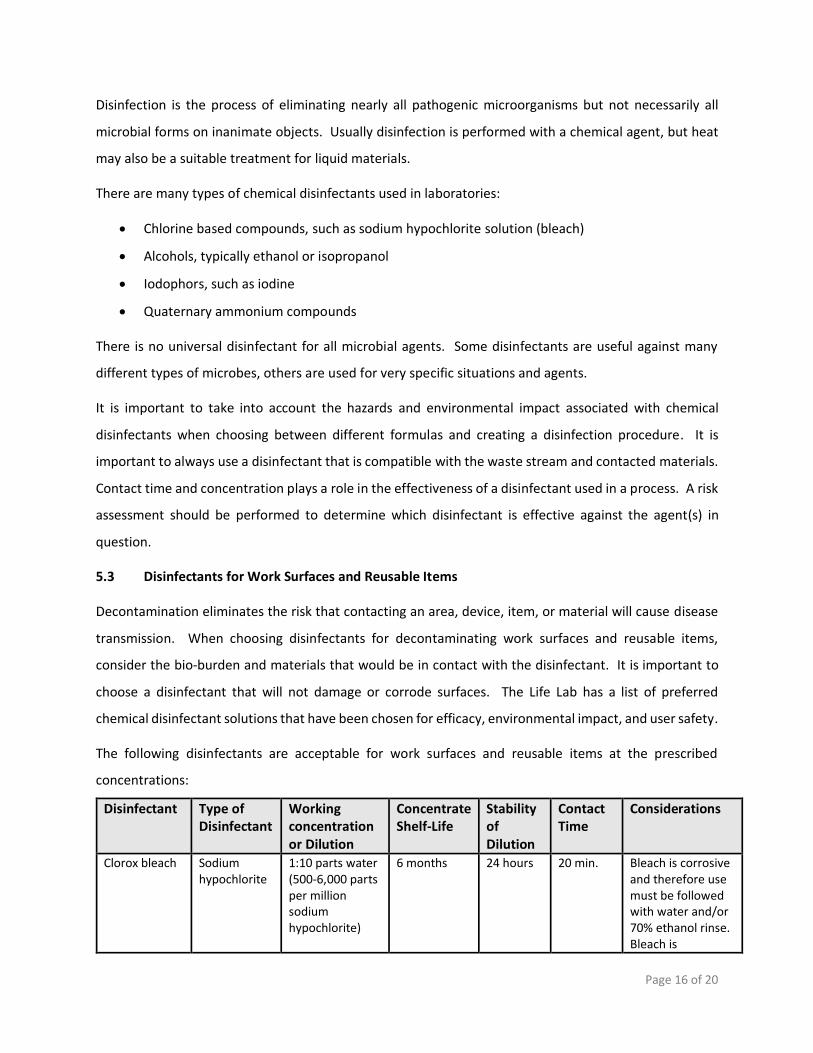
5.3 Disinfectants for Work Surfaces and Reusable Items
Decontamination eliminates the risk that contacting an area, device, item, or material will cause disease
transmission. When choosing disinfectants for decontaminating work surfaces and reusable items,
consider the bio-burden and materials that would be in contact with the disinfectant. It is important to
choose a disinfectant that will not damage or corrode surfaces. The Life Lab has a list of preferred
chemical disinfectant solutions that have been chosen for efficacy, environmental impact, and user safety.
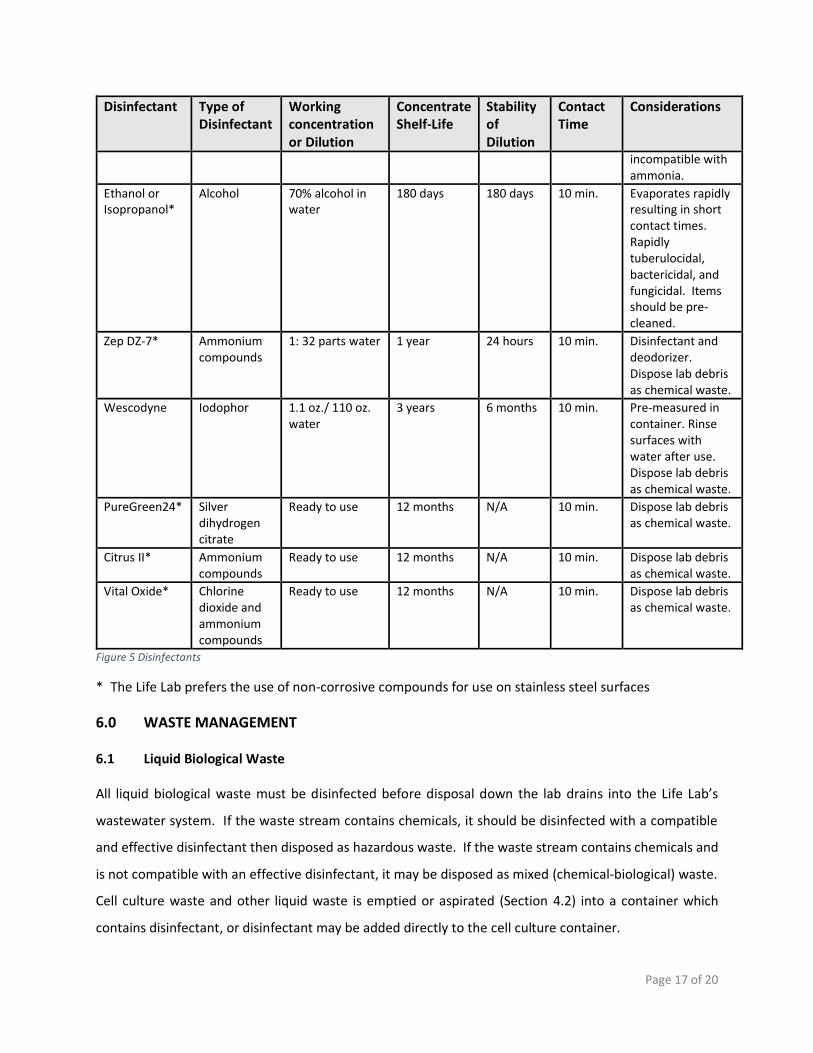
The following disinfectants are acceptable for work surfaces and reusable items at the prescribed
concentrations:
Disinfectant Type of Disinfectant
Working concentration or Dilution
Concentrate Shelf-Life
Stability of Dilution
Contact Time
Considerations
Clorox bleach Sodium hypochlorite
1:10 parts water (500-6,000 parts per million sodium hypochlorite)
6 months 24 hours 20 min. Bleach is corrosive and therefore use must be followed with water and/or 70% ethanol rinse. Bleach is
Page 17 of 20
Disinfectant Type of Disinfectant
Working concentration or Dilution
Concentrate Shelf-Life
Stability of Dilution
Contact Time
Considerations
incompatible with ammonia.
Ethanol or Isopropanol*
Alcohol 70% alcohol in water
180 days 180 days 10 min. Evaporates rapidly resulting in short contact times. Rapidly tuberulocidal, bactericidal, and fungicidal. Items should be pre-cleaned.
Zep DZ-7* Ammonium compounds
1: 32 parts water 1 year 24 hours 10 min. Disinfectant and deodorizer. Dispose lab debris as chemical waste.
Wescodyne Iodophor 1.1 oz./ 110 oz. water
3 years 6 months 10 min. Pre-measured in container. Rinse surfaces with water after use. Dispose lab debris as chemical waste.
PureGreen24* Silver dihydrogen citrate
Ready to use 12 months N/A 10 min. Dispose lab debris as chemical waste.
Citrus II* Ammonium compounds
Ready to use 12 months N/A 10 min. Dispose lab debris as chemical waste.
Vital Oxide* Chlorine dioxide and ammonium compounds
Ready to use 12 months N/A 10 min. Dispose lab debris as chemical waste.
Figure 5 Disinfectants
* The Life Lab prefers the use of non-corrosive compounds for use on stainless steel surfaces
6.0 WASTE MANAGEMENT
6.1 Liquid Biological Waste
All liquid biological waste must be disinfected before disposal down the lab drains into the Life Lab’s
wastewater system. If the waste stream contains chemicals, it should be disinfected with a compatible
and effective disinfectant then disposed as hazardous waste. If the waste stream contains chemicals and
is not compatible with an effective disinfectant, it may be disposed as mixed (chemical-biological) waste.
Cell culture waste and other liquid waste is emptied or aspirated (Section 4.2) into a container which
contains disinfectant, or disinfectant may be added directly to the cell culture container.

Page 18 of 20
The following disinfectants are approved for liquid waste decontamination at the prescribed
concentrations:
• Sodium hypochlorite bleach solution should be diluted to a final concentration of 10% in liquid
waste. Bleach is recommended for decontaminating human source materials. If the protein load
in the liquid waste is high, dilute the bleach to a 20% final concentration in liquid waste. Allow a
contact time of at least 20 minutes when using bleach.
• Wescodyne diluted to the working concentration (175 parts per million iodine) is acceptable for
decontaminating tissue culture media and other cell culture solutions. Allow a contact time of at
least 20 minutes when using Wescodyne.
6.2 Solid Biological Waste (Non-Sharps)
All non-sharps consumables which have been in direct contact with
biological materials should be placed in a designated biohazardous
waste box. The biohazardous waste box consists of a cardboard box
labeled with the universal biohazard symbol, a liner consisting of two
red plastic biohazard bags, and a lid (Figure 6). When the biohazard box
is ¾ full or has reached 55 pounds, it must be sealed and moved to the
biological waste storage area within the Life Lab’s facility. The
biological waste is then removed from the facility by a licensed
biological waste hauler to be treated offsite. Biological waste boxes will
not be removed from the facility if they are leaking or not properly sealed.
7.0 SPILL RESPONSE
7.1 Spill Supplies
Spill supplies available in the Life Lab laboratories include: gloves, absorbent pads, absorbent socks, and
disposal bags. Additionally, disinfectant and paper towels are located throughout the labs for use in the
case of a biological spill. Any spill cleanup MUST be followed by a thorough disinfection of all exposed
surfaces.
7.2 Exposure response
Promptly seek medical attention in the case of any exposure. Seek professional counseling regarding the
risk of infection. In case of any of the following exposures with biological materials, follow the listed
decontamination procedures before seeking medical treatment and reporting the incident.
Figure 6 Biohazard box

Page 19 of 20
Exposure Decontamination Method
Eye splash Hold eye(s) open while using eyewash station for 15 min. If one eye is
exposed, take care to not contaminate the other eye.
Mucous membrane Wash well with water.
Exposed skin or
needlestick
Wash with antimicrobial or nonabrasive soap using a sink or safety
shower.
Clothing Remove clothing then wash exposed skin for a minimum of 15 min.
7.3 Biohazard Spill Responses
The venture principal scientist, the facility BSO, and the Emergency Coordinator must be notified
immediately when there is a spill of more than 1 liter of BL1 or BL2 materials. Follow the guidelines below
when a spill of biohazardous materials has occurred. Consult the Life Lab Emergency Action and
Contingency Plan for additional information.
Type of spill Response
Surface spill inside biosafety cabinet Scientist may conduct clean-up and surface
decontamination
Spill leaking through the grate of the biosafety
cabinet
Life Lab team will decontaminate and deconstruct the
biosafety cabinet according to SOP
Incidental spill outside of biosafety cabinet
(spilled material is not toxic, non-pathogenic,
and the spill volume is less than 1L)
Place paper towels soaked in disinfectant over the spill,
allow it to sit for 20 minutes then clean up the spill,
disposing of all materials in the appropriate biohazard
bin.
Major spill outside of biosafety cabinet (spilled
material is acutely toxic, pathogenic, and/or
the spill volume is greater than 1L)
Evacuate the area, post a “DO NOT ENTER” sign, then
notify the Life Lab Emergency Coordinator for the next
steps.

Page 20 of 20
8.0 REFERENCES
Biosafety in Microbiological and Biomedical Laboratories, 5th Edition
WHO Laboratory Biosafety Manual, 3rd Edition
NIH Guidelines for Research Involving Recombinant or Synthetic Nucleic Acid Molecules (NIH Guidelines)
American Biological Safety Association (ABSA) Risk Group Database
A Practical Guide to Implementing A BSL-2+ Biosafety Program in Laboratories
9.0 REVISION HISTORY
Change Reason Effective Date
New document Companion document to the Biological Safety Manual and Exposure Control Plan
Dec 29, 2016
• Minor text edits throughout the document
• Section 3.4, Personal Protection: added text on clothing requirements/recommendations for lab work
• Section 4.1, Biosafety Cabinets: added text on operational status
• Section 5.1, Sterilization: added text regarding usage of the autoclave for emergency inactivation of materials
• Section 6.1, Liquid Biological Waste: deleted text about not using Wescodyne with human source materials
• For more clarification in the text
• Havard requirements
• Updated for newer models of equipment
• For clarification on use of the autoclave in emergency situations
• Could not find data to support this statement
Mar 17, 2017
Related Documents