Stk. 18040081 - Ref. Acerola - Take away VDSL2 - 06/2011 Installation guide

Welcome message from author
This document is posted to help you gain knowledge. Please leave a comment to let me know what you think about it! Share it to your friends and learn new things together.
Transcript
Stk. 18040081 - Ref. Acerola - Take away VDSL2 - 06/2011
Installation guide
32
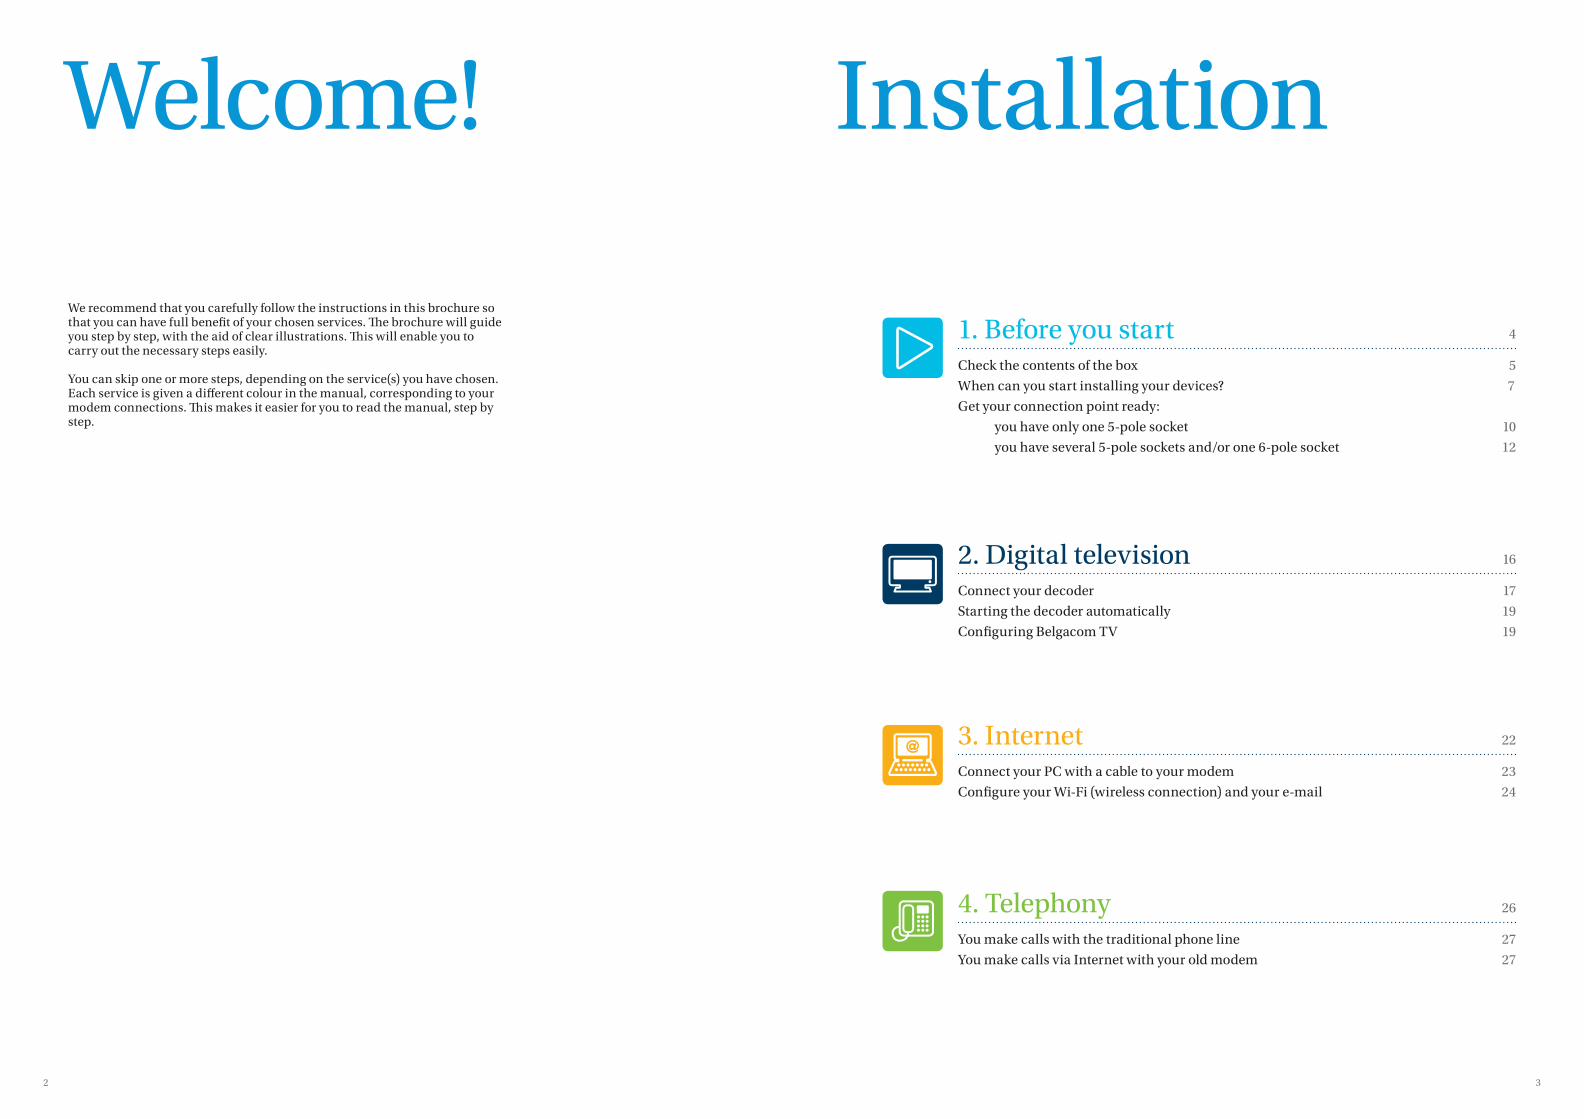
Welcome!
We recommend that you carefully follow the instructions in this brochure so that you can have full benefi t of your chosen services. Th e brochure will guide you step by step, with the aid of clear illustrations. Th is will enable you to carry out the necessary steps easily.
You can skip one or more steps, depending on the service(s) you have chosen. Each service is given a diff erent colour in the manual, corresponding to your modem connections. Th is makes it easier for you to read the manual, step by step.
Installation
1. Before you start 4
Check the contents of the box 5
When can you start installing your devices? 7
Get your connection point ready:
you have only one 5-pole socket 10
you have several 5-pole sockets and/or one 6-pole socket 12
2. Digital television 16
Connect your decoder 17
Starting the decoder automatically 19
Confi guring Belgacom TV 19
3. Internet 22
Connect your PC with a cable to your modem 23
Confi gure your Wi-Fi (wireless connection) and your e-mail 24
4. Telephony 26
You make calls with the traditional phone line 27
You make calls via Internet with your old modem 27

54
1. Before you start Top layer
VDSL2 junction box Adapter VDSL2 splitterClamps for fi xing in
built-in box
Can't fi nd all the components below in the box, or do you need extra materials (cables, etc.)? If so, go to a Belgacom point of sale.
Check the contents of the box
Modem power supply cable An envelope containing:• this installation guide• the list of channels• the Belgacom TV manual• the brochure 'Need help?'
Bottom layer
decoderRemote control Decoder power supply cable
Side layer
VDSL2 cable VDSL2 cable HDMI cableEthernet cable Ethernet cableEthernet cable
b-box 2 modem
To connect the modem to the decoder (diff erent lengths available, depending on your installation).
To connect the modem to the VDSL2 splitter (diff erent lengths available, depending on your installation).
To connect the decoder to your TV (HD or not HD).
To connect the modem to your PC.
or
SCART cable
It is possible that the model of the devices diff ers from the model in the illustration.
76
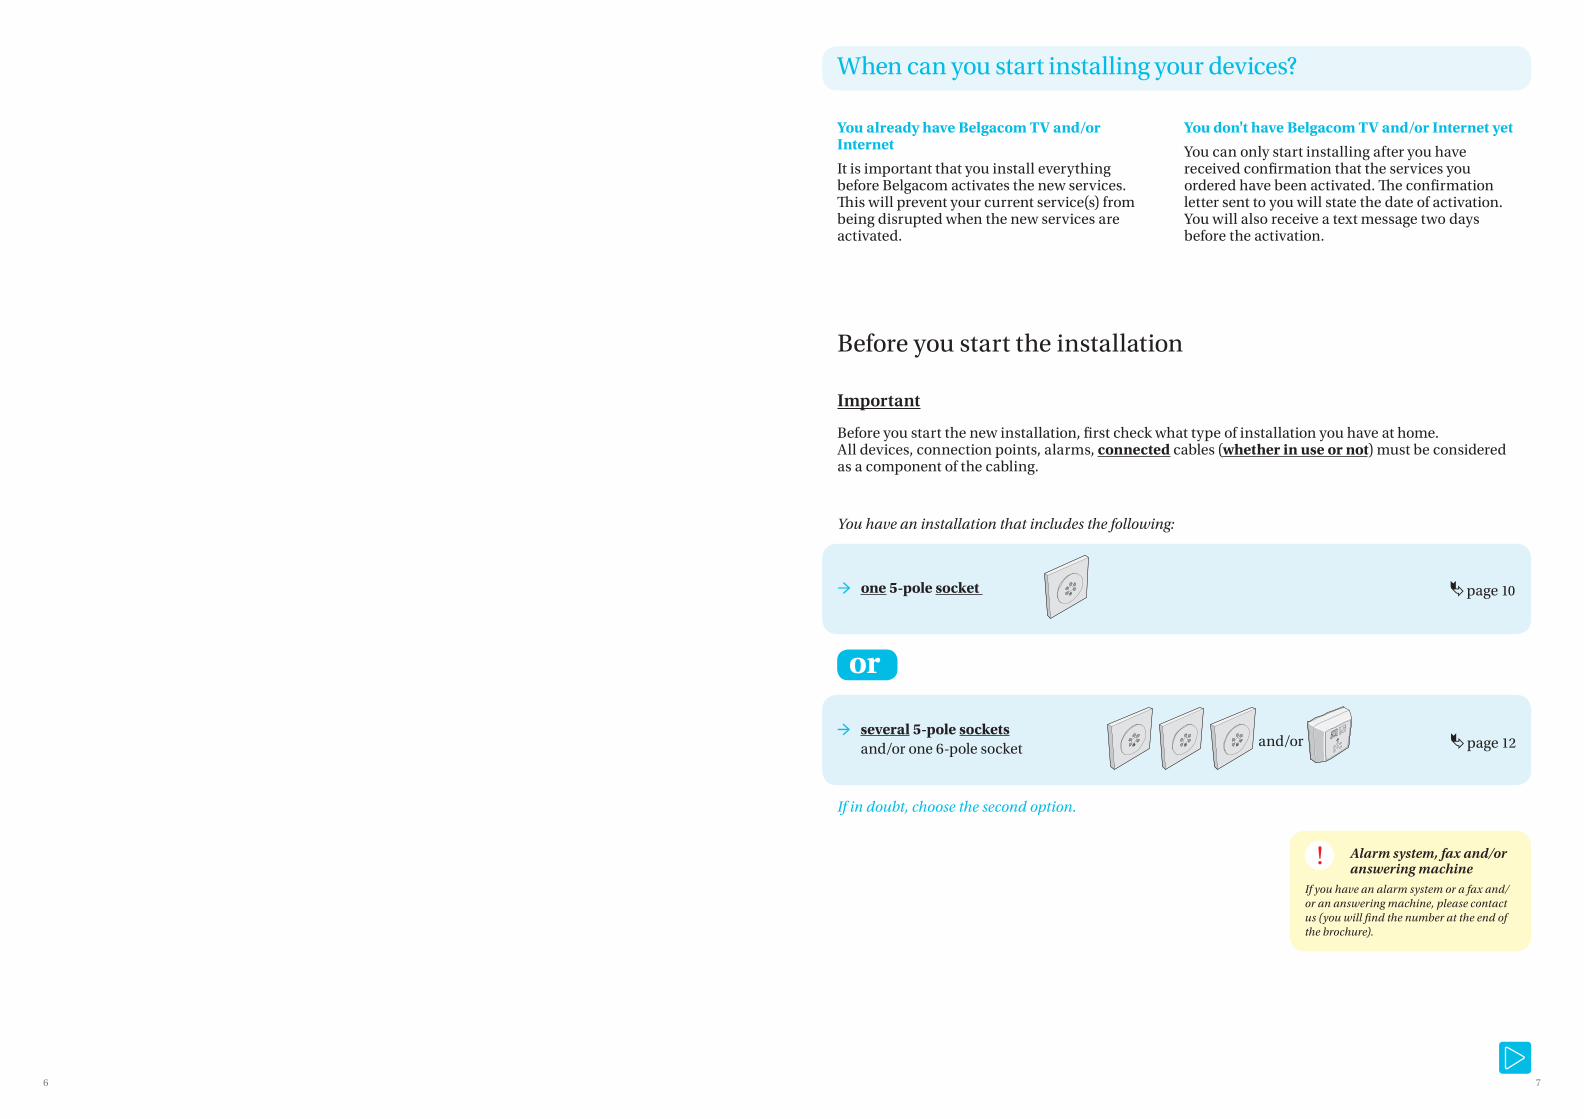
If in doubt, choose the second option.
When can you start installing your devices?
Important
Before you start the new installation, fi rst check what type of installation you have at home.All devices, connection points, alarms, connected cables (whether in use or not) must be considered as a component of the cabling.
Before you start the installation
You have an installation that includes the following:
Alarm system, fax and/or answering machine
If you have an alarm system or a fax and/or an answering machine, please contact us (you will fi nd the number at the end of the brochure).
You already have Belgacom TV and/or Internet
It is important that you install everything before Belgacom activates the new services. Th is will prevent your current service(s) from being disrupted when the new services are activated.
You don't have Belgacom TV and/or Internet yet
You can only start installing after you have received confi rmation that the services you ordered have been activated. Th e confi rmation letter sent to you will state the date of activation. You will also receive a text message two days before the activation.
→ several 5-pole sockets and/or one 6-pole socket and/or
→ one 5-pole socket page 10
page 12
or
98
SIGNAL HD RECORD
MENU
SMART CARDOKHD
Belgacom network
Telephone Telephone
Telephone
Telephone
Belgacom network
Belgacom network
Telephone
→ If you have several 5-pole sockets and/or one 6-pole socket page 12
The modem will be installed in another roomthan the connection point
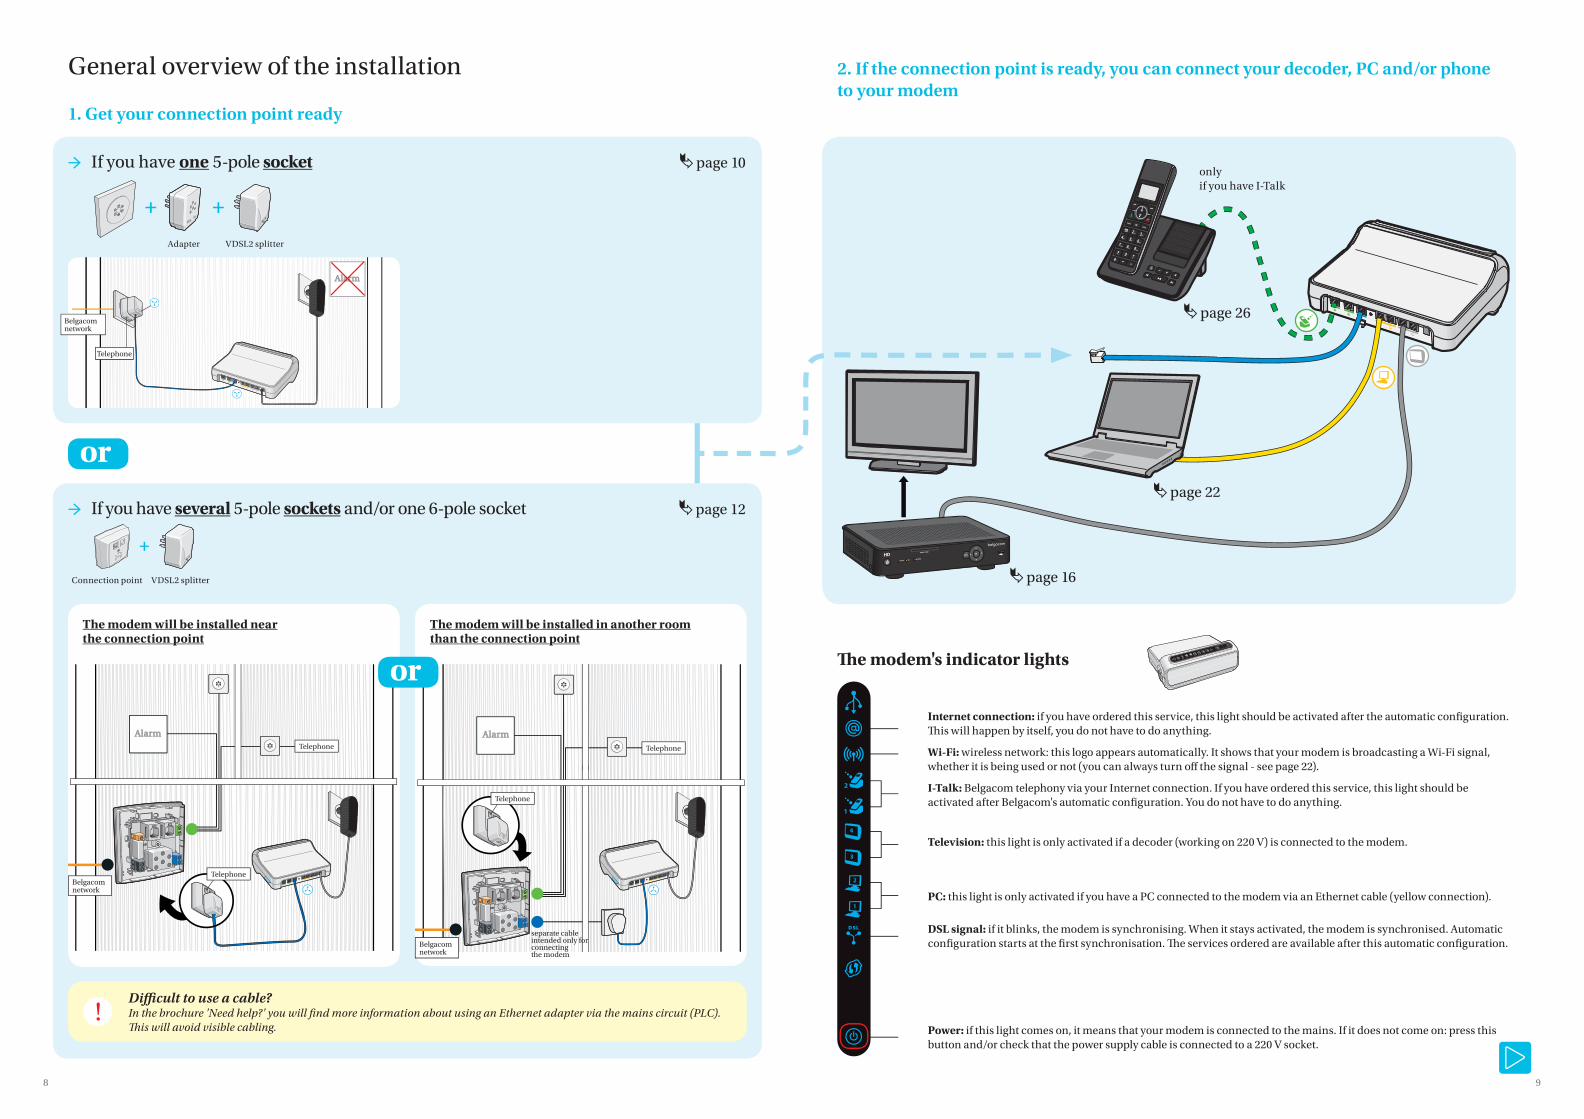
2. If the connection point is ready, you can connect your decoder, PC and/or phone to your modem
General overview of the installation
1. Get your connection point ready
→ If you have one 5-pole socket page 10
The modem will be installed nearthe connection point
Th e modem's indicator lights
or
page 16
page 22
page 26
onlyif you have I-Talk
Adapter VDSL2 splitter
separate cable intended only for connecting the modem
Internet connection: if you have ordered this service, this light should be activated after the automatic confi guration. Th is will happen by itself, you do not have to do anything.
Wi-Fi: wireless network: this logo appears automatically. It shows that your modem is broadcasting a Wi-Fi signal, whether it is being used or not (you can always turn off the signal - see page 22).
I-Talk: Belgacom telephony via your Internet connection. If you have ordered this service, this light should be activated after Belgacom's automatic confi guration. You do not have to do anything.
Television: this light is only activated if a decoder (working on 220 V) is connected to the modem.
PC: this light is only activated if you have a PC connected to the modem via an Ethernet cable (yellow connection).
DSL signal: if it blinks, the modem is synchronising. When it stays activated, the modem is synchronised. Automatic confi guration starts at the fi rst synchronisation. Th e services ordered are available after this automatic confi guration.
Power: if this light comes on, it means that your modem is connected to the mains. If it does not come on: press this button and/or check that the power supply cable is connected to a 220 V socket.
VDSL2 splitterConnection point
or
Diffi cult to use a cable? In the brochure 'Need help?' you will fi nd more information about using an Ethernet adapter via the mains circuit (PLC). Th is will avoid visible cabling.

1110
1 Unplug all devices or existing splitters and fi rst place the adapter, followed by the VDSL2 splitter.
2 If you have a traditional phone line, plug the phone wire into one of the two 'TEL' sockets on the adapter.
You have only one 5-pole socket
of the following type:
If you have a traditional phone line, check whether the switches at the back of the VDSL2 splitter are in the upper position.
Th e switches on the VDSL2 splitter
Check the cables.
Nothing lit up?
1. Is this your fi rst connectionwith Belgacom TV and/or Internet?It is normal for this light to continueblinking. You will have to wait for the day of activation.
2. Is this not your fi rst connectionwith Belgacom TV and/or Internet?Check whether the VDSL2 cable is properly connected.
Th e light continues to blink.
3 Connect your modem to the splitter.
VDSL2 cable
5 Th e light comes on.If not, press this button.
4 Connect the modem to the mains: insert the modem plug into a socket.
Confi guring the modem
Th e initiation and confi guration of the modem are entirely automatic and can take up to 30 minutes.As soon as the lights for your services are activated, you can go on to install the equipment for the services ordered and the connected devices.
Various indicator lights come on, depending on the services you have ordered.
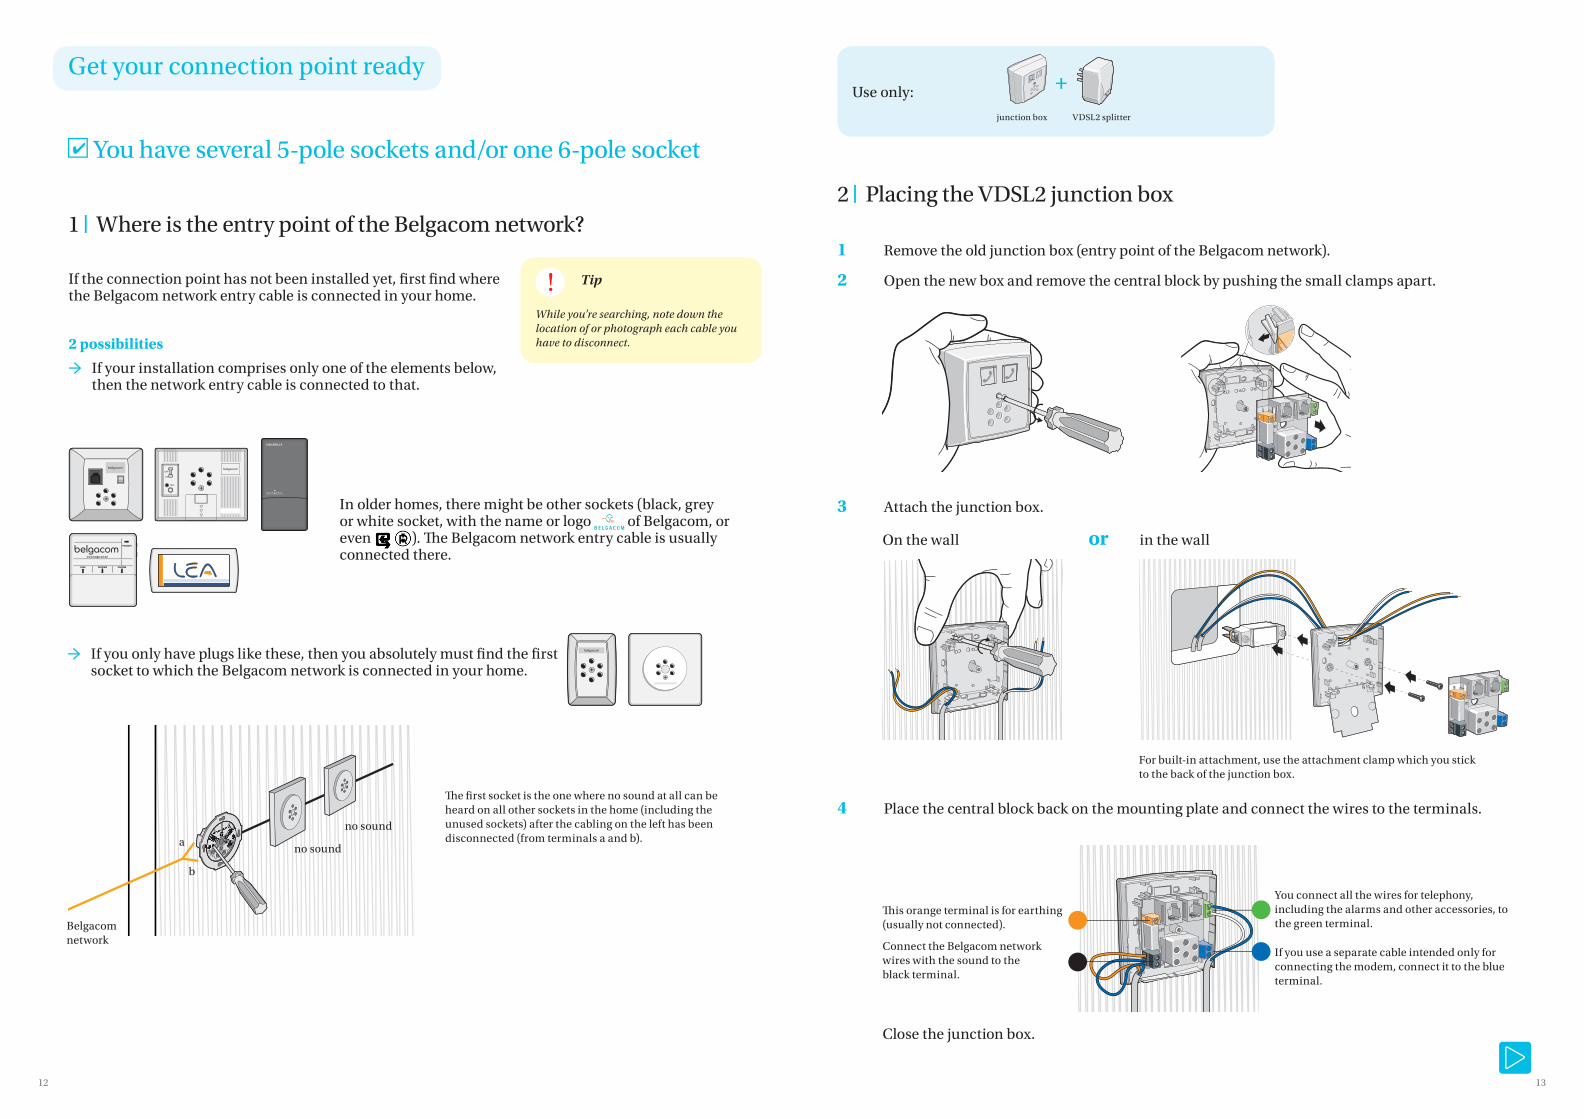
Get your connection point ready
OFF
ON
TEST
If you are a Belgacom TV subscriber, you can go on to the next stepConnect your decoder page 17
If you are only an Internet subscriber page 22
Do not disconnect the power supply and VDSL2 cable from the modem.
Important
A junction box is possible, but no other connection is permitted.
adapter VDSL2 splitter
Use only:
1312
OFF
ON
TEST
1000 ADSL LP
Th e fi rst socket is the one where no sound at all can be heard on all other sockets in the home (including the unused sockets) after the cabling on the left has been disconnected (from terminals a and b).
If the connection point has not been installed yet, fi rst fi nd where the Belgacom network entry cable is connected in your home.
2 possibilities
→ If your installation comprises only one of the elements below, then the network entry cable is connected to that.
→ If you only have plugs like these, then you absolutely must fi nd the fi rst socket to which the Belgacom network is connected in your home.
In older homes, there might be other sockets (black, grey or white socket, with the name or logo of Belgacom, or even ). Th e Belgacom network entry cable is usually connected there.
no sound
no sound
b
a
Belgacom network
While you're searching, note down the location of or photograph each cable you have to disconnect.
Tip
2 ❘ Placing the VDSL2 junction box
2 Open the new box and remove the central block by pushing the small clamps apart.
1 Remove the old junction box (entry point of the Belgacom network).
3 Attach the junction box.
On the wall or in the wall
For built-in attachment, use the attachment clamp which you stick to the back of the junction box.
Close the junction box.
You have several 5-pole sockets and/or one 6-pole socket
1 ❘ Where is the entry point of the Belgacom network?
4 Place the central block back on the mounting plate and connect the wires to the terminals.
You connect all the wires for telephony, including the alarms and other accessories, to the green terminal.
If you use a separate cable intended only for connecting the modem, connect it to the blue terminal.
Th is orange terminal is for earthing (usually not connected).
Connect the Belgacom network wires with the sound to the black terminal.
junction box VDSL2 splitter
Use only:
Get your connection point ready
1514
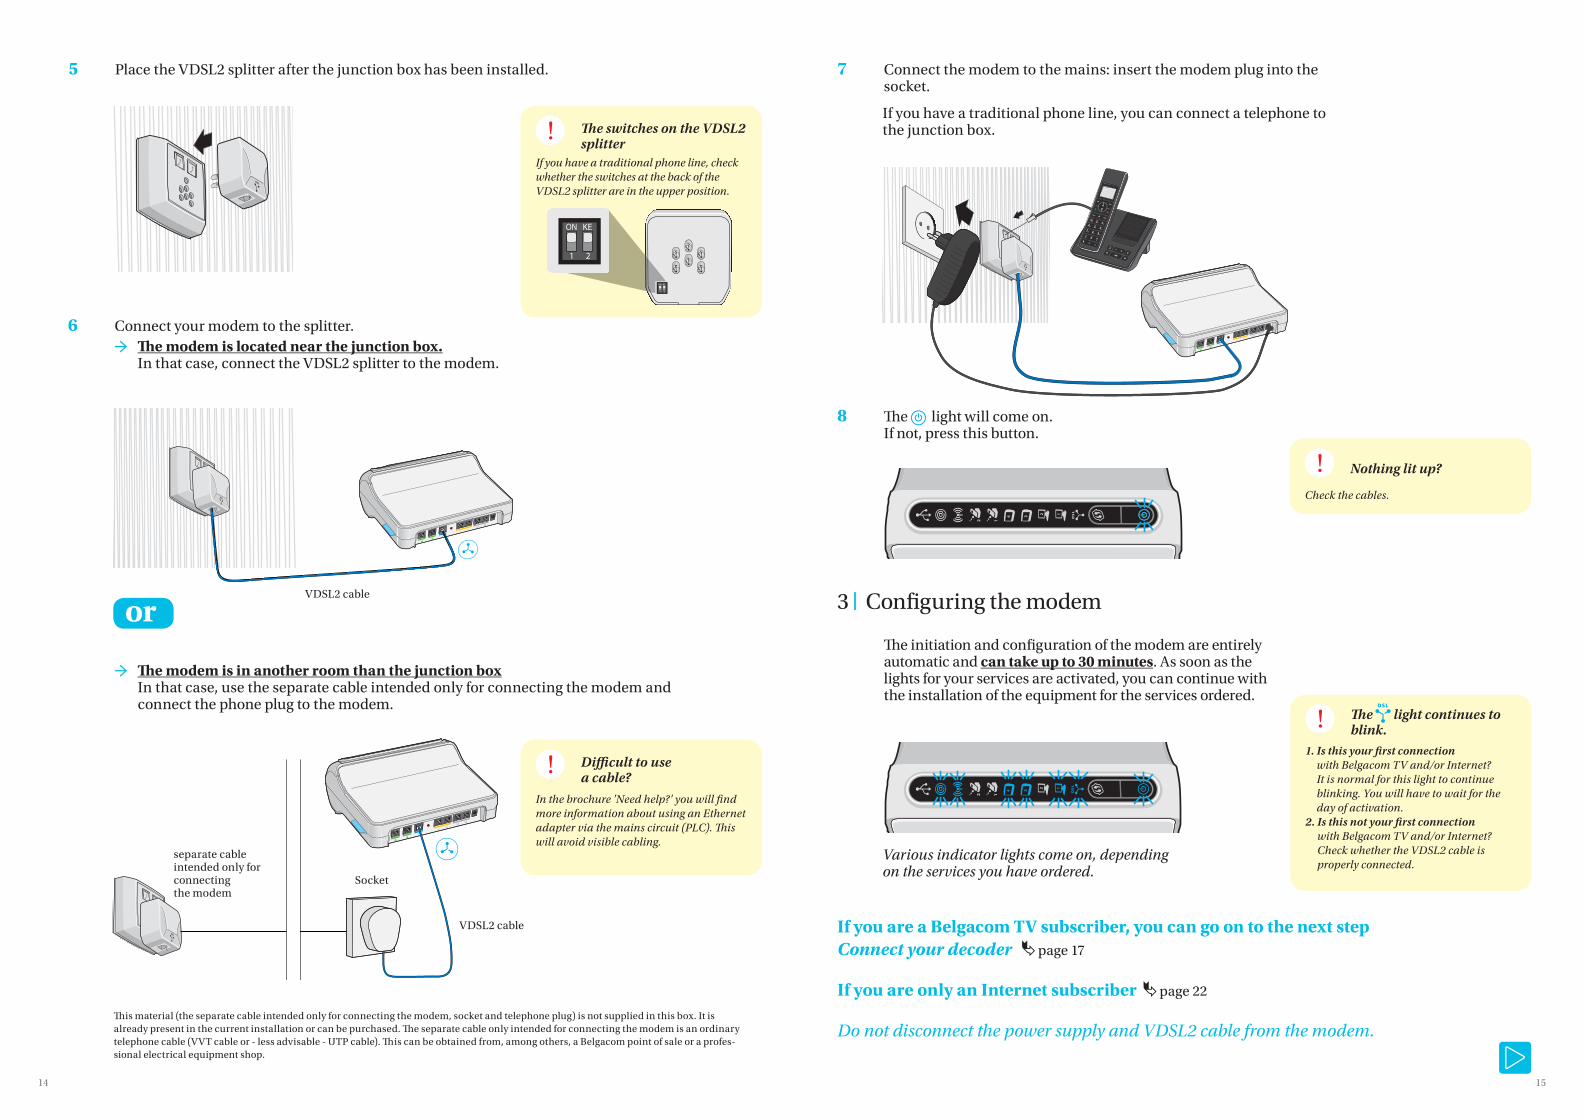
5 Place the VDSL2 splitter after the junction box has been installed.
8 Th e light will come on.If not, press this button.
3 ❘ Confi guring the modem
Th e initiation and confi guration of the modem are entirely automatic and can take up to 30 minutes. As soon as the lights for your services are activated, you can continue with the installation of the equipment for the services ordered.
7 Connect the modem to the mains: insert the modem plug into the socket.
If you have a traditional phone line, check whether the switches at the back of the VDSL2 splitter are in the upper position.
Th e switches on the VDSL2 splitter
In the brochure 'Need help?' you will fi nd more information about using an Ethernet adapter via the mains circuit (PLC). Th is will avoid visible cabling.
Diffi cult to use a cable?
Check the cables.
Nothing lit up?
Various indicator lights come on, depending on the services you have ordered.
If you are a Belgacom TV subscriber, you can go on to the next stepConnect your decoder page 17
If you are only an Internet subscriber page 22
Do not disconnect the power supply and VDSL2 cable from the modem.
If you have a traditional phone line, you can connect a telephone to the junction box.
1. Is this your fi rst connectionwith Belgacom TV and/or Internet?It is normal for this light to continueblinking. You will have to wait for the day of activation.
2. Is this not your fi rst connectionwith Belgacom TV and/or Internet?Check whether the VDSL2 cable is properly connected.
Th e light continues to blink.
or
6 Connect your modem to the splitter. → Th e modem is located near the junction box.
In that case, connect the VDSL2 splitter to the modem.
VDSL2 cable
Th is material (the separate cable intended only for connecting the modem, socket and telephone plug) is not supplied in this box. It is already present in the current installation or can be purchased. Th e separate cable only intended for connecting the modem is an ordinary telephone cable (VVT cable or - less advisable - UTP cable). Th is can be obtained from, among others, a Belgacom point of sale or a profes-sional electrical equipment shop.
→ Th e modem is in another room than the junction boxIn that case, use the separate cable intended only for connecting the modem and connect the phone plug to the modem.
VDSL2 cable
Socket
separate cable intended only for connecting the modem
1716
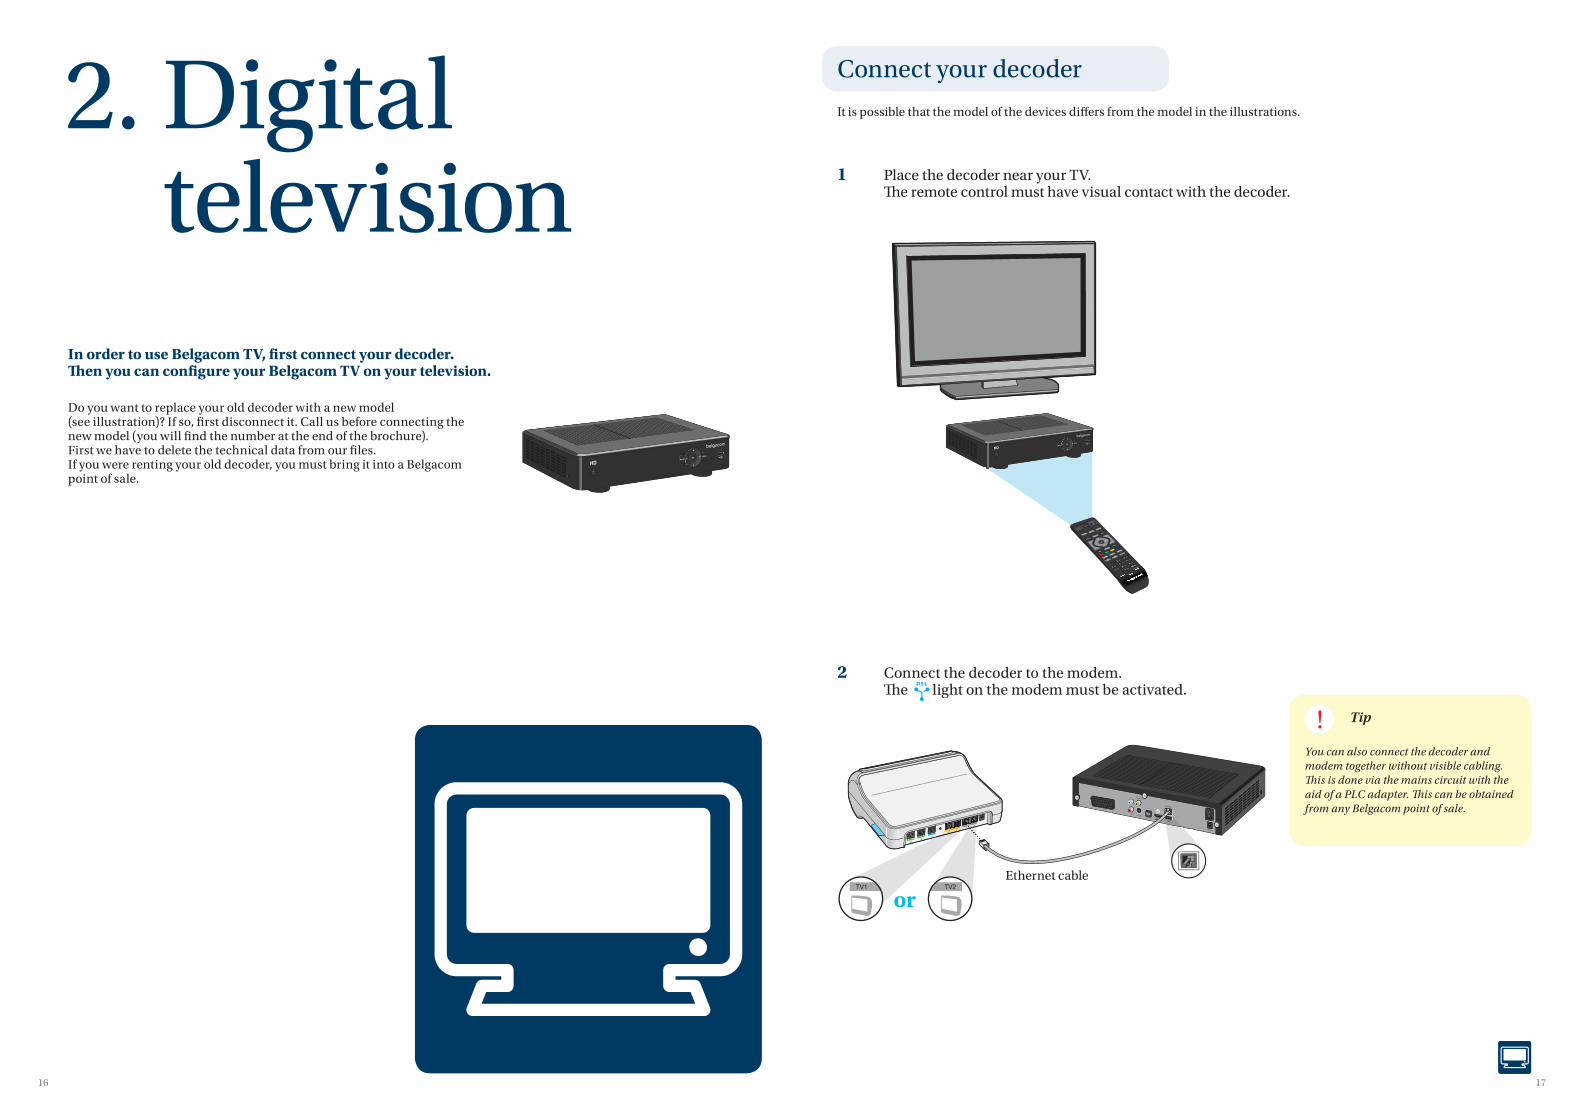
Ethernet cable
or
You can also connect the decoder and modem together without visible cabling. Th is is done via the mains circuit with the aid of a PLC adapter. Th is can be obtained from any Belgacom point of sale.
Tip
2. Digital television
In order to use Belgacom TV, fi rst connect your decoder.Th en you can confi gure your Belgacom TV on your television.
Do you want to replace your old decoder with a new model (see illustration)? If so, fi rst disconnect it. Call us before connecting the new model (you will fi nd the number at the end of the brochure). First we have to delete the technical data from our fi les. If you were renting your old decoder, you must bring it into a Belgacom point of sale.
1 Place the decoder near your TV.Th e remote control must have visual contact with the decoder.
It is possible that the model of the devices diff ers from the model in the illustrations.
2 Connect the decoder to the modem.Th e light on the modem must be activated.
Connect your decoder
1918
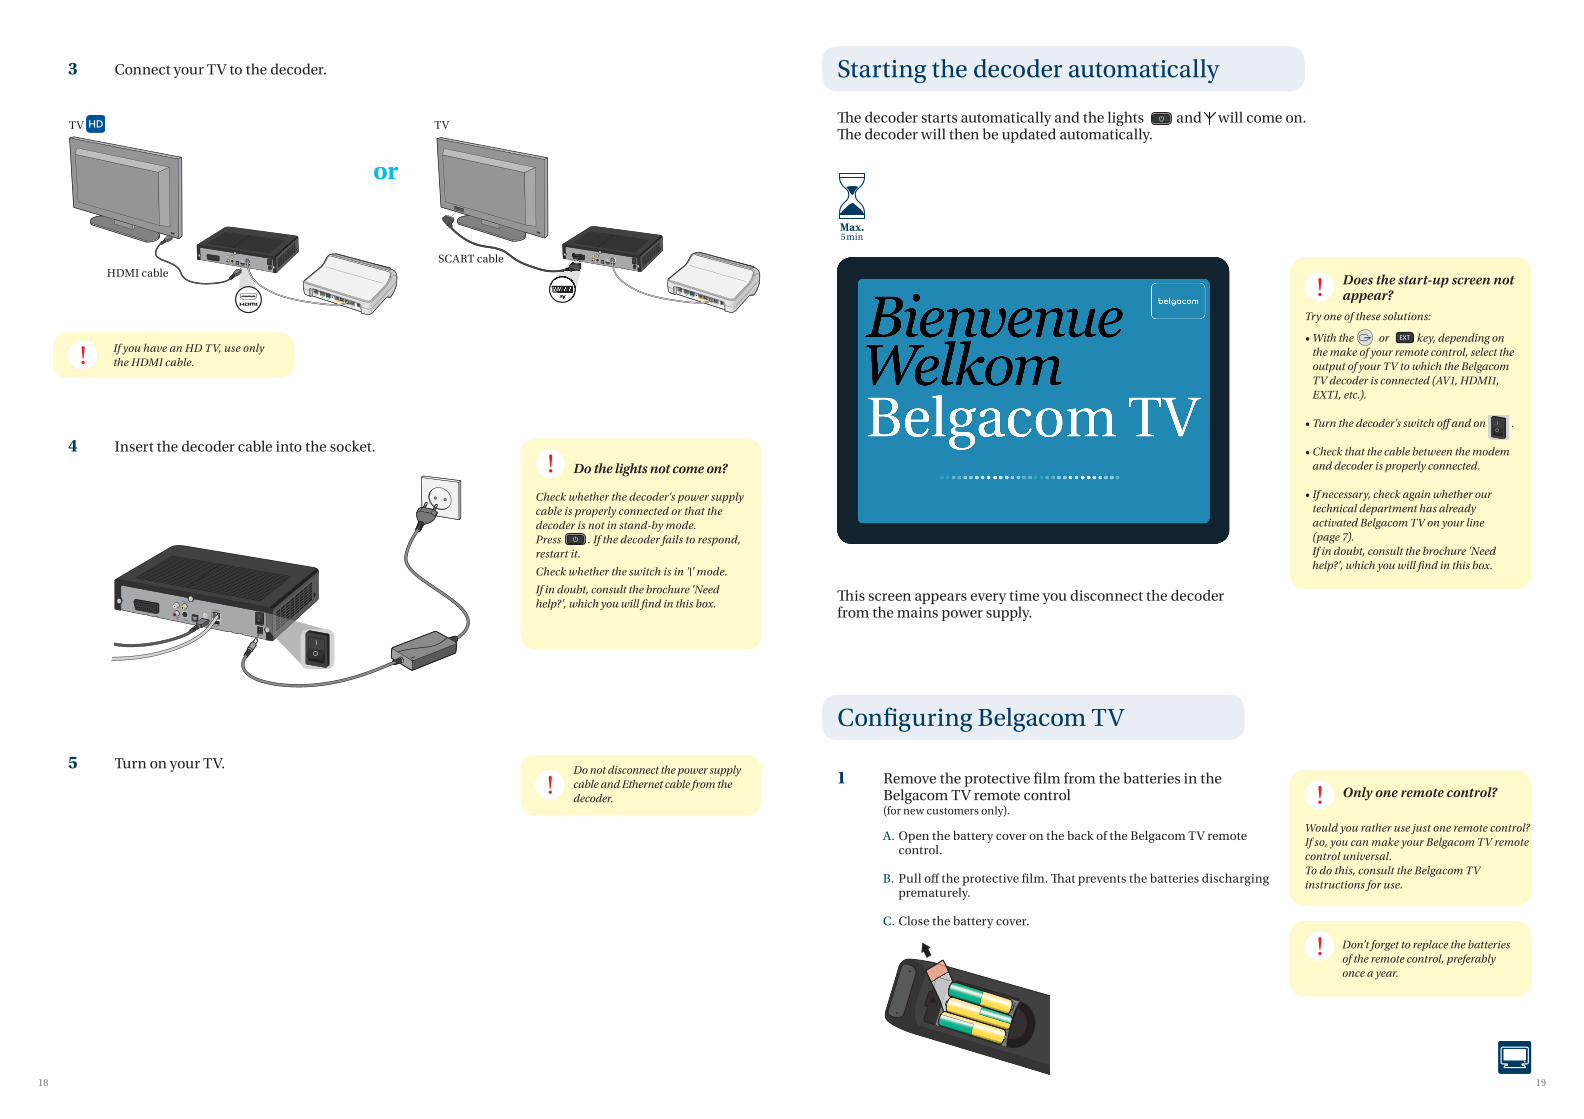
1 Remove the protective fi lm from the batteries in the Belgacom TV remote control(for new customers only).
A. Open the battery cover on the back of the Belgacom TV remote control.
B. Pull off the protective fi lm. Th at prevents the batteries discharging prematurely.
C. Close the battery cover.
Confi guring Belgacom TV
Only one remote control?
Would you rather use just one remote control? If so, you can make your Belgacom TV remote control universal. To do this, consult the Belgacom TV instructions for use.
Don't forget to replace the batteries of the remote control, preferably once a year.
If you have an HD TV, use only the HDMI cable.
Th e decoder starts automatically and the lights and will come on.Th e decoder will then be updated automatically.
Starting the decoder automatically
Does the start-up screen not appear?
Try one of these solutions:
• With the or key, depending on the make of your remote control, select the output of your TV to which the Belgacom TV decoder is connected (AV1, HDMI1, EXT1, etc.).
• Turn the decoder's switch off and on
.
• Check that the cable between the modem and decoder is properly connected.
• If necessary, check again whether our technical department has already activated Belgacom TV on your line (page 7). If in doubt, consult the brochure 'Need help?', which you will fi nd in this box.
Do not disconnect the power supply cable and Ethernet cable from the decoder.
4 Insert the decoder cable into the socket.
5 Turn on your TV.
Do the lights not come on?
Check whether the decoder's power supply cable is properly connected or that the decoder is not in stand-by mode. Press . If the decoder fails to respond, restart it.
Check whether the switch is in '|' mode.
If in doubt, consult the brochure 'Need help?', which you will fi nd in this box.
Th is screen appears every time you disconnect the decoder from the mains power supply.
Max.5 min
3 Connect your TV to the decoder.
HDMI cableSCART cable
or
TV TV

2120
Does your remote not respond?
Press the key until the
light comes on,
if you have this model of
remote control.
2 Enter your details on the confi guration screen using the Belgacom TV remote control.
A. Preferred language
Belgacom TV has now been confi gured!
If you also have Internet, you can now go on with the next step.Connect your PC with a cable to your modem
Tip
Would you also like to install a DVD player, VHS recorder, a game console, an extra TV?Consult the brochure 'Need help?', which you will fi nd in this box.
Restarting the decoder after completing the installation
Once the decoder has restarted, you can view the channels after about 3 minutes.
About 6 minutes later, you can navi-gate around the menus.
3 min
6 min
3 Using the buttons on the remote control, go to 'Activate the service' and confi rm with the button.
Max.10 min
B. Select the name of your decoder.
Th e PIN code
You can change the PIN code. See the Belgacom TV instructions for use.
You can also use the PIN code for renting TV programmes, fi lms, etc. later.
C. Line number: your phone number or reference number mentioned in the letter confi rming the activation of Belgacom TV.
Pin code (by default this is 1234 unless you have already changed it). Did you enter the wrong number?Use the buttons to navigate and enter the right number.
Consult the Belgacom TV instructions for use for information about using Belgacom TV.Press the button to access the Belgacom TV demo fi lms.
Tip
2322
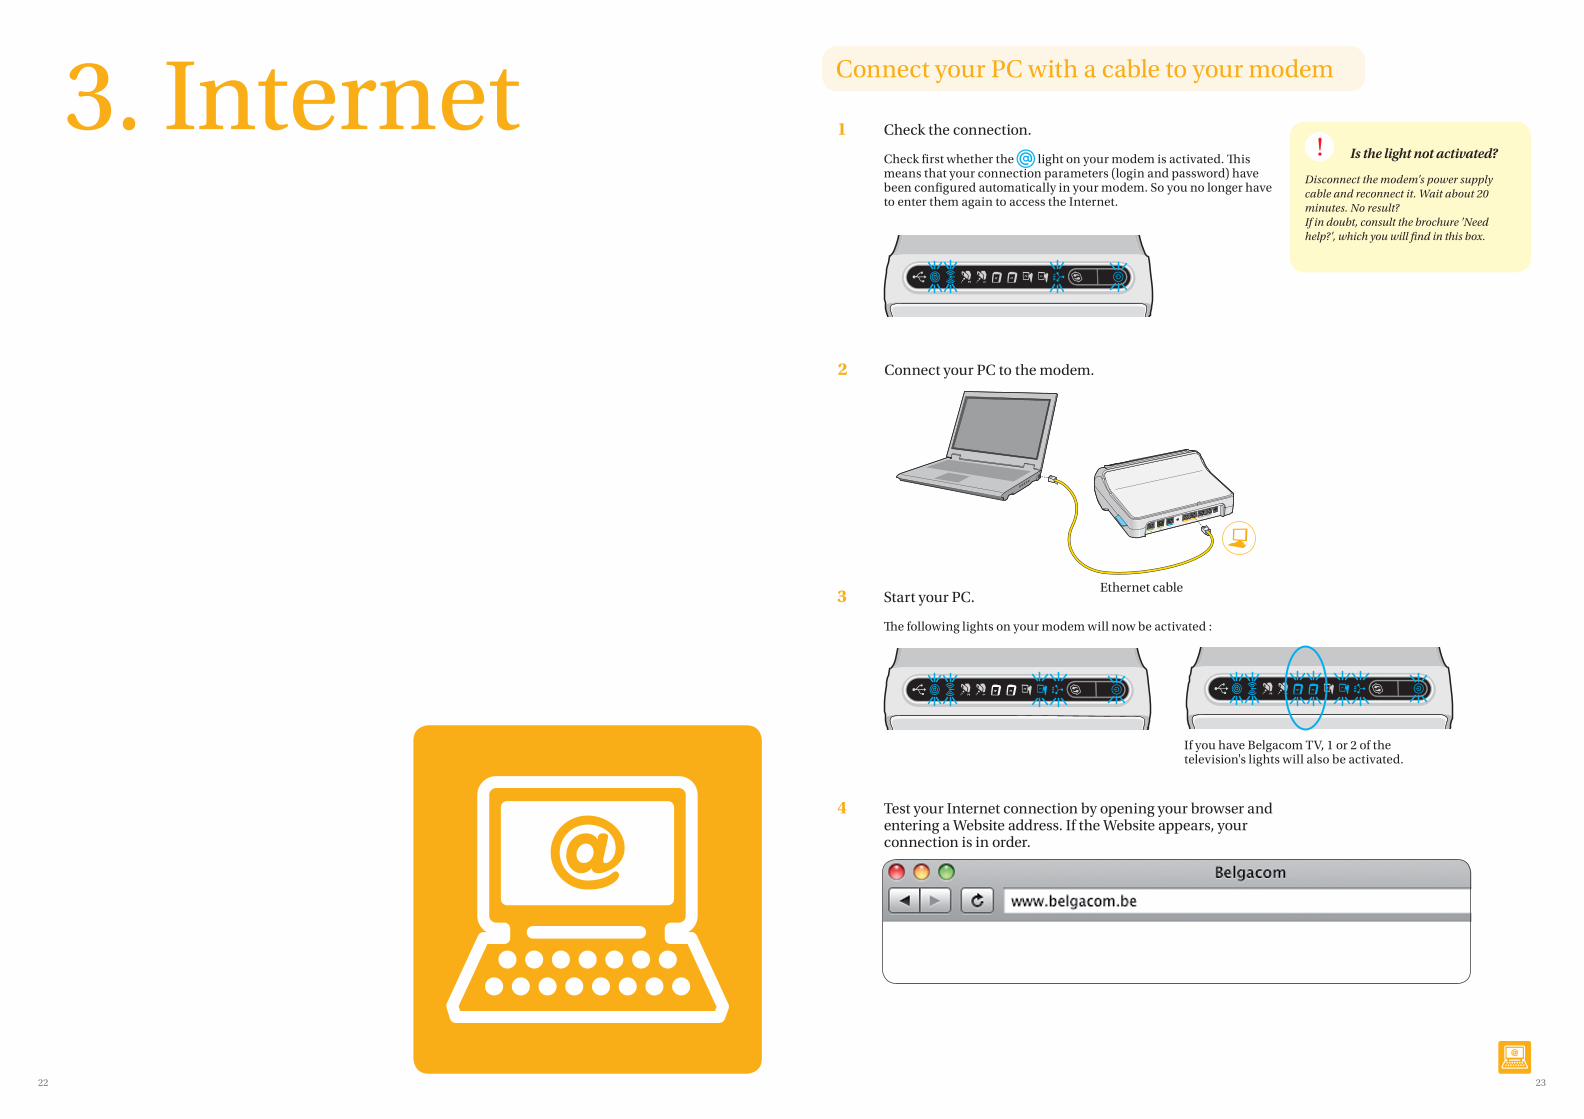
3. Internet Connect your PC with a cable to your modem
1 Check the connection.
Check fi rst whether the light on your modem is activated. Th is means that your connection parameters (login and password) have been confi gured automatically in your modem. So you no longer have to enter them again to access the Internet.
Is the light not activated?
Disconnect the modem's power supply cable and reconnect it. Wait about 20 minutes. No result? If in doubt, consult the brochure 'Need help?', which you will fi nd in this box.
2 Connect your PC to the modem.
3 Start your PC.
Th e following lights on your modem will now be activated :
4 Test your Internet connection by opening your browser and entering a Website address. If the Website appears, your connection is in order.
If you have Belgacom TV, 1 or 2 of the television's lights will also be activated.
Ethernet cable
2524
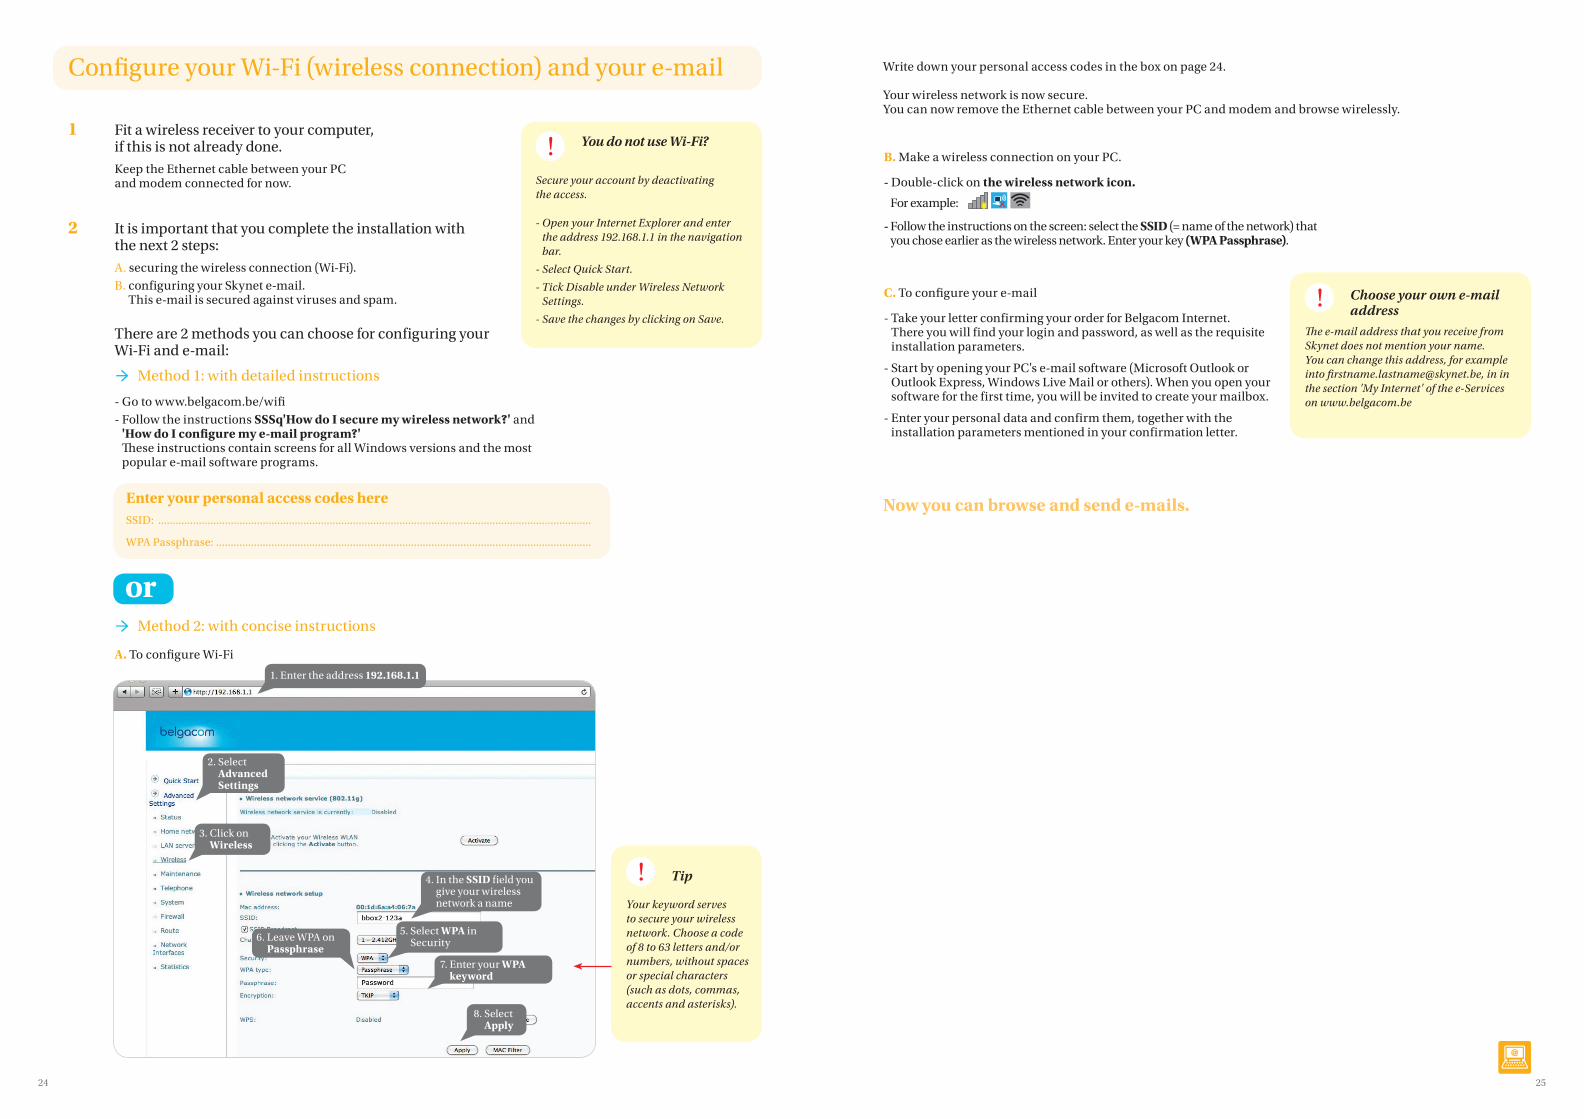
You do not use Wi-Fi?
Secure your account by deactivating the access.
- Open your Internet Explorer and enter the address 192.168.1.1 in the navigation bar.
- Select Quick Start.
- Tick Disable under Wireless Network Settings.
- Save the changes by clicking on Save.
1 Fit a wireless receiver to your computer, if this is not already done.
Keep the Ethernet cable between your PC and modem connected for now.
2 It is important that you complete the installation with the next 2 steps:
A. securing the wireless connection (Wi-Fi). B. configuring your Skynet e-mail.
This e-mail is secured against viruses and spam.
There are 2 methods you can choose for configuring your Wi-Fi and e-mail:
→ Method 1: with detailed instructions
- Go to www.belgacom.be/wifi - Follow the instructions SSSq'How do I secure my wireless network?' and
'How do I confi gure my e-mail program?'Th ese instructions contain screens for all Windows versions and the most popular e-mail software programs.
→ Method 2: with concise instructions
A. To confi gure Wi-Fi
Confi gure your Wi-Fi (wireless connection) and your e-mail
C. To confi gure your e-mail
- Take your letter confirming your order for Belgacom Internet. There you will find your login and password, as well as the requisite installation parameters.
- Start by opening your PC's e-mail software (Microsoft Outlook or Outlook Express, Windows Live Mail or others). When you open your software for the first time, you will be invited to create your mailbox.
- Enter your personal data and confirm them, together with the installation parameters mentioned in your confirmation letter.
Now you can browse and send e-mails.
B. Make a wireless connection on your PC.
- Double-click on the wireless network icon.
For example:
- Follow the instructions on the screen: select the SSID (= name of the network) that you chose earlier as the wireless network. Enter your key (WPA Passphrase).
Enter your personal access codes hereSSID: .....................................................................................................................................................
WPA Passphrase: .................................................................................................................................
Tip
Your keyword serves to secure your wireless network. Choose a code of 8 to 63 letters and/or numbers, without spaces or special characters (such as dots, commas, accents and asterisks).
2. Select Advanced Settings
5. Select WPA in Security
4. In the SSID field you give your wireless network a name
8. Select Apply
7. Enter your WPA keyword
3. Click on Wireless
6. Leave WPA on Passphrase
1. Enter the address 192.168.1.1
Write down your personal access codes in the box on page 24.
Your wireless network is now secure.You can now remove the Ethernet cable between your PC and modem and browse wirelessly.
Choose your own e-mail address
Th e e-mail address that you receive from Skynet does not mention your name. You can change this address, for example into fi [email protected], in in the section 'My Internet' of the e-Services on www.belgacom.be
or
2726
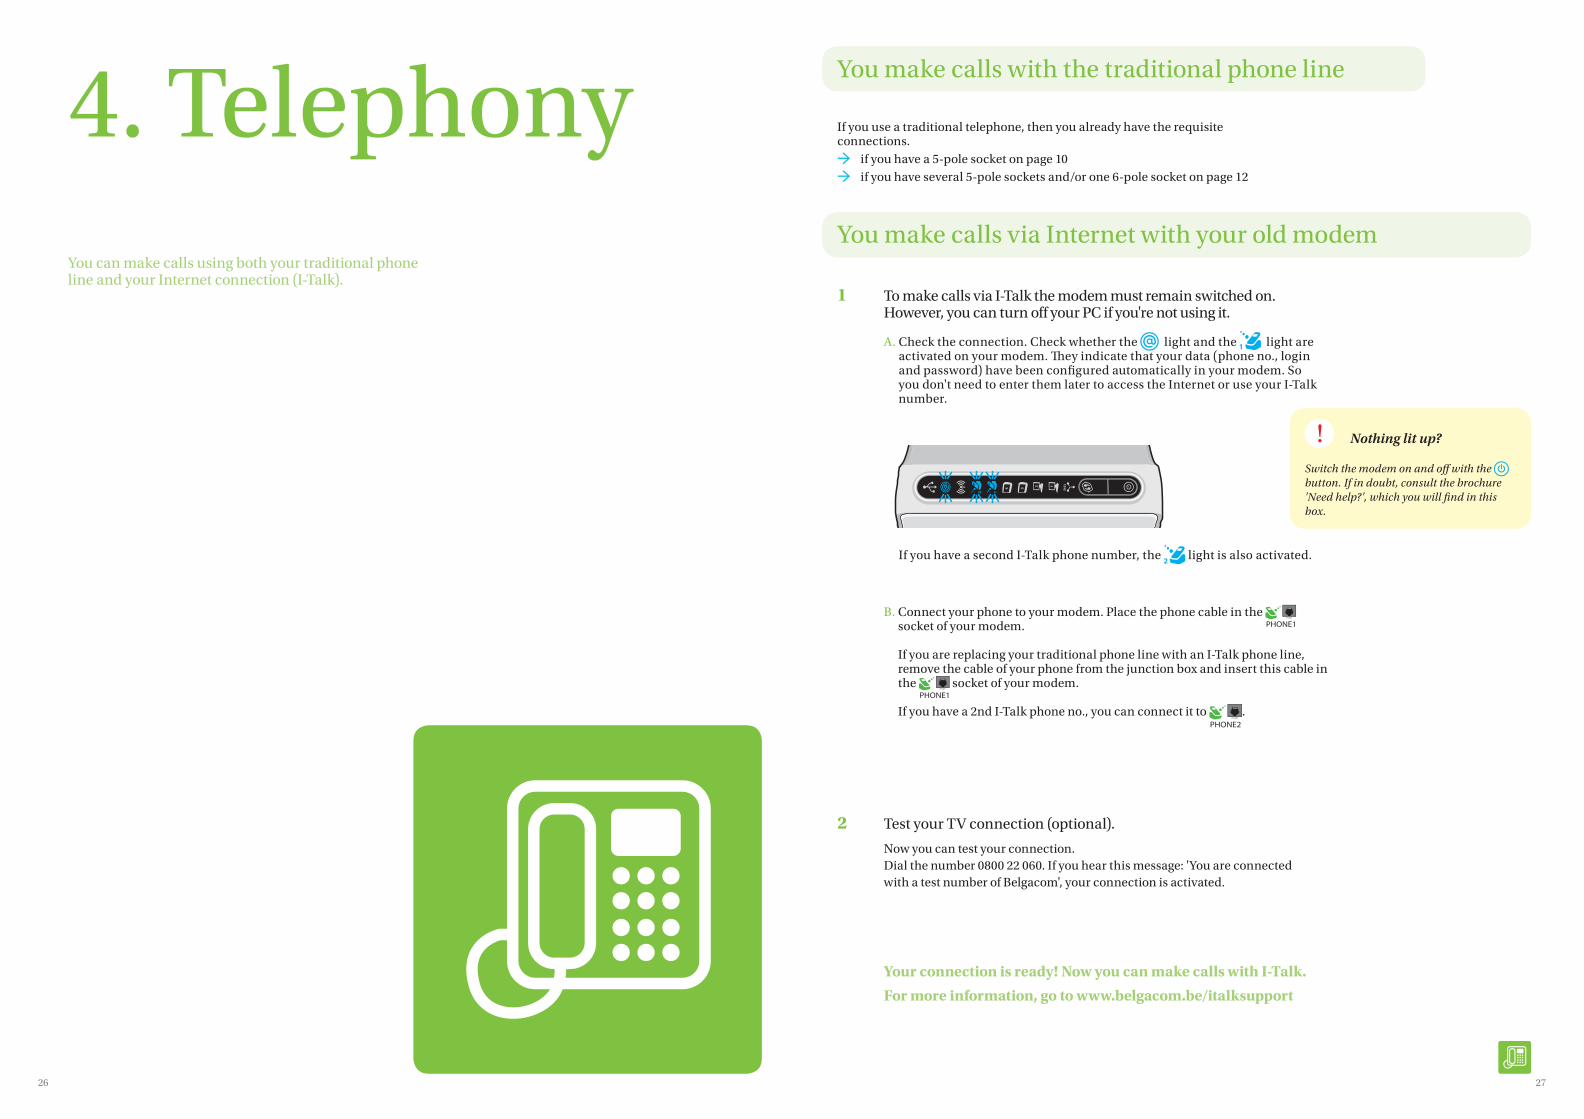
You make calls via Internet with your old modem
Nothing lit up?
Switch the modem on and off with the button. If in doubt, consult the brochure 'Need help?', which you will fi nd in this box.
1 To make calls via I-Talk the modem must remain switched on. However, you can turn off your PC if you're not using it.
A. Check the connection. Check whether the light and the light are activated on your modem. Th ey indicate that your data (phone no., login and password) have been confi gured automatically in your modem. So you don't need to enter them later to access the Internet or use your I-Talk number.
If you have a second I-Talk phone number, the light is also activated.
B. Connect your phone to your modem. Place the phone cable in the socket of your modem.
If you are replacing your traditional phone line with an I-Talk phone line, remove the cable of your phone from the junction box and insert this cable in the socket of your modem.
If you have a 2nd I-Talk phone no., you can connect it to .
2 Test your TV connection (optional).
Now you can test your connection.Dial the number 0800 22 060. If you hear this message: 'You are connected with a test number of Belgacom', your connection is activated.
Your connection is ready! Now you can make calls with I-Talk.
For more information, go to www.belgacom.be/italksupport
You make calls with the traditional phone line
If you use a traditional telephone, then you already have the requisite connections.
→ if you have a 5-pole socket on page 10 → if you have several 5-pole sockets and/or one 6-pole socket on page 12
4. TelephonyYou can make calls using both your traditional phone line and your Internet connection (I-Talk).
Check one last time whether you have completed all the steps in this installation guide.
If you need help, you can contact our technical department 7 days per week free of charge from 08:00 to 22:00 on 0800 55 700. If necessary, a technician can visit you to assist you.
Th e best thing is to call us with your mobile from the place where the problem arises, so that we can solve it together.We can then immediately test your fi xed line and you won't need to call again.
Keep your last invoice to hand, so that you have your number(s) (in the column 'abonnementen'). New customers will fi nd this infor-mation in the confi rmation letter.
Responsible Editor: Kris Vervaet, Belgacom Limited company under Public Law, Koning Albert II-laan 27, B-1030 Brussels - BE 0202.239.951. - 20004
Related Documents