BFTA Technical Skills Manual © The BFTA & NSRA 2013 (Version 1.01) 1 BRITISH FIELD TARGET ASSOCIATION Produced in conjunction with: The National Smallbore Rifle Association TECHNICAL SKILLS MANUAL

Welcome message from author
This document is posted to help you gain knowledge. Please leave a comment to let me know what you think about it! Share it to your friends and learn new things together.
Transcript

BFTA Technical Skills Manual
© The BFTA & NSRA 2013 (Version 1.01) 1
BRITISH FIELD TARGET ASSOCIATION
Produced in conjunction with: The National Smallbore Rifle Association
TECHNICAL SKILLS
MANUAL

BFTA Technical Skills Manual
© The BFTA & NSRA 2013 (Version 1.01) 2
Contents
The History of Field Target - page 3 The Law - page 4 Safety - page 5
Breathing - page 7 Trigger Control - page 8 Follow Through - page 12
Freestyle Position - page 13 Kneeling Position - page 17 Standing Position - page 21
Range finding - page 24 Wind - page 30
BFTA Technical Skills Manual
© The BFTA & NSRA 2013 (Version 1.01) 3
The History of Field Target Airgun Field Target shooting began in 1981 as an alternative to hunting. Targets were metal silhouettes of quarry species, such as pigeon, squirrel, rat, etc. A circular sticker was placed over the 'hit' area and a point was awarded if the sticker was hit. Because of the inconvenience of having to change the sticker for each shooter, a mechanical target was devised with a circular hole to signify the target area; this would fall flat when hit, and could be reset from the firing line. The target area was 50mm diameter and the maximum distance on a typical 20 shot course was 40-45 yards. The type of gun used was spring powered and generally break barrel, in .22 calibre. The main reason for this was that the break barrel was the most popular type of gun on the market (with the exception of perhaps the BSA AirSporter) and at the time .22 calibre was the most accurate for outdoor shooting due to the types of pellet that were available; domed pellets such as Eley Wasp were favoured as they performed well in windy conditions. The only accurate .177 pellets available were flat heads that were designed for indoor shooting, because of their shape and light weight it proved difficult to achieve consistent results in outdoor conditions. A few multi-pump pneumatics such as the Sharp Innova were also used, but were not popular due to the effort required in charging the gun. Range finding was done by eye, and individuals became expert at accurately judging target distance. Telescopic sights were used but the highest magnification was typically 9x. It was not unusual in the early days of the sport to have unlimited re-entry's for the main shoot, which meant that an individual could learn the targets distance and windage from previous attempts and therefore improve his/her score. In 1984, the British Field Target Council was formed with the aim of promoting the sport of Field Target, and formalising basic rules of safety and conduct. Field Target Today Today's target still retains the silhouette shape, while the 'hit' zone has a maximum diameter of 45mm. A normal competition course consists of 40 targets set out at random ranges of between 7 metres and 50 metres. One shot per target is allowed, with one point being awarded if the target is successfully knocked over. Only one entry is allowed on the main course. Running alongside of this competition you will find various side events, such as; long range, vermin shoot with reduced hit zones, speed shoots and pistol shoots. All side shoots allow re-entry. The skill in this type of shooting is in accurately judging the range of each target, and making allowances for wind and weather conditions, which can change the path of the comparatively slow and lightweight air rifle pellet. Field target is a safe, exacting and challenging outdoor sport, which can be enjoyed by all the family. It is a target sport and does not involve the shooting of any live animals or birds. As a shooting sport, Airgun Field Target shooting is the quietest and the fastest growing - having been successfully exported to Europe and the United States of America. It is a year round sport, with clubs joining together to run winter and summer league competitions. Many open events are run all over Britain, at weekends. Shooters are normally graded at these events and therefore compete with others of similar ability, irrespective of age or sex. It is a great family sport and there is often good-natured rivalry between clubs - in the best sporting traditions.

BFTA Technical Skills Manual
© The BFTA & NSRA 2013 (Version 1.01) 4
THE LAW
It is most important that you are fully acquainted with the law in relation to the possession and ownership of air rifles, ammunition and their use with specific consideration as to the age of any participants (e.g. children and young persons). The BFTA is not qualified to offer legal advice. The Law should be determined in your own country and even by region. Bear this in mind when attending International Competitions. For the United Kingdom we refer you to the BASC site http://www.basc.org.uk/en/shooting/airgunning/air-rifles.cfm A handy reference PDF is available here http://www.basc.org.uk/en/utilities/document-summary.cfm/docid/038BE62F-14D4-41FA-BEE9D95E3AFF5511 These links may change so visit www.basc.org.uk and search for “air gun”

BFTA Technical Skills Manual
© The BFTA & NSRA 2013 (Version 1.01) 5
Safety Safety with any type of firearm is everyone’s responsibility. Shooting is one of the safest of all sports. The reason for this is that there are safety rules that MUST be observed at all times. The two most fundamental of these are:
Never point a gun at anyone
Always treat a gun as if it were loaded The majority of the other rules arise from the application of these two rules in different circumstances. Handling guns
• When you get out your gun check it is unloaded and that it is not cocked • Show that the gun is unloaded before handing it to another person • When you put your gun away check it is unloaded and that it is not cocked. Never put a
gun away that is loaded • When you are given a gun first check that it is unloaded and that it is not cocked. If you
don’t know how to, ask the owner • Never pick up a gun without the permission of the owner
Remember it is better to check your gun is unloaded 100 times too often than
once not enough.
Operating the gun • Keep the gun pointing downrange when in use • Load the gun pointing downrange • If you are using break barrel rifles or underlevers where the breach could snap shut on
you fingers, keep hold of the barrel/cocking lever when inserting the pellet Moving around with guns
• Never move between lanes with a loaded gun • When moving between lanes open the breach and remove any magazine from the rifle • When carrying a gun it must not be cocked, the breach must be open, the magazine
removed and the gun carried vertically • Keep your gun in a case when it is not in use
Range commands
• If you hear a single note on a whistle or the command STOP, stop immediately • Always obey instructions from the range officials immediately • Never go forward of the firing line without permission of the range official
General
• Don’t rely on safety catches to keep you or your companions safe • Don’t attract people’s attention when they are shooting as it may cause them to turn
around • Observe all the usual safety rules when dry firing
BFTA Technical Skills Manual
© The BFTA & NSRA 2013 (Version 1.01) 6
Safety with Compressed Air Many modern air rifles use compressed air as a power source. It provides for convenient an effortless shooting but we must never underestimate the amount of energy that is stored up inside a cylinder. A compressed air cylinder is a potential bomb if handled incorrectly.
• Store bottles away from sources of heat • Avoid dropping bottles and hard knocks to the cylinder or decanting set • Do not use any bottle or fittings that appear to be damaged • Always check the charge pressure of unknown bottles • Make sure your bottle is in test • When tightening bottle fittings use a minimum of pressure, hand tight is generally enough • When using buddy bottles or other removable cylinders never stand in front of the bottle
as it is charged • Always keep control of buddy bottles and hoses when charging • Avoid looking directly at gauges as you fill cylinders • Always charge your gun slowly, don’t put full pressure onto the gun • Avoid contact between skin and high pressure air • Avoid getting oils and greases in the high pressure air system
Safety with CO2 Cartridges CO2 Cartridges provide a convenient power source for modern rifles and pistols. However they require special care in operation in addition to the normal safety rules.
• In the club room • Do not load magazines • Do not install CO2 capsules
• On the firing point
• When installing CO2 capsule the gun must point downrange • When installing magazines the gun must point downrange • When exhausting spent CO2 capsule the gun must point downrange • Take care when handling exhausted CO2 capsules as they become very cold.
• Before leaving the firing point:
• Remove the magazine and make sure it is empty • Remove the CO2 cartridge • Put the gun in its case
BFTA Technical Skills Manual
© The BFTA & NSRA 2013 (Version 1.01) 7
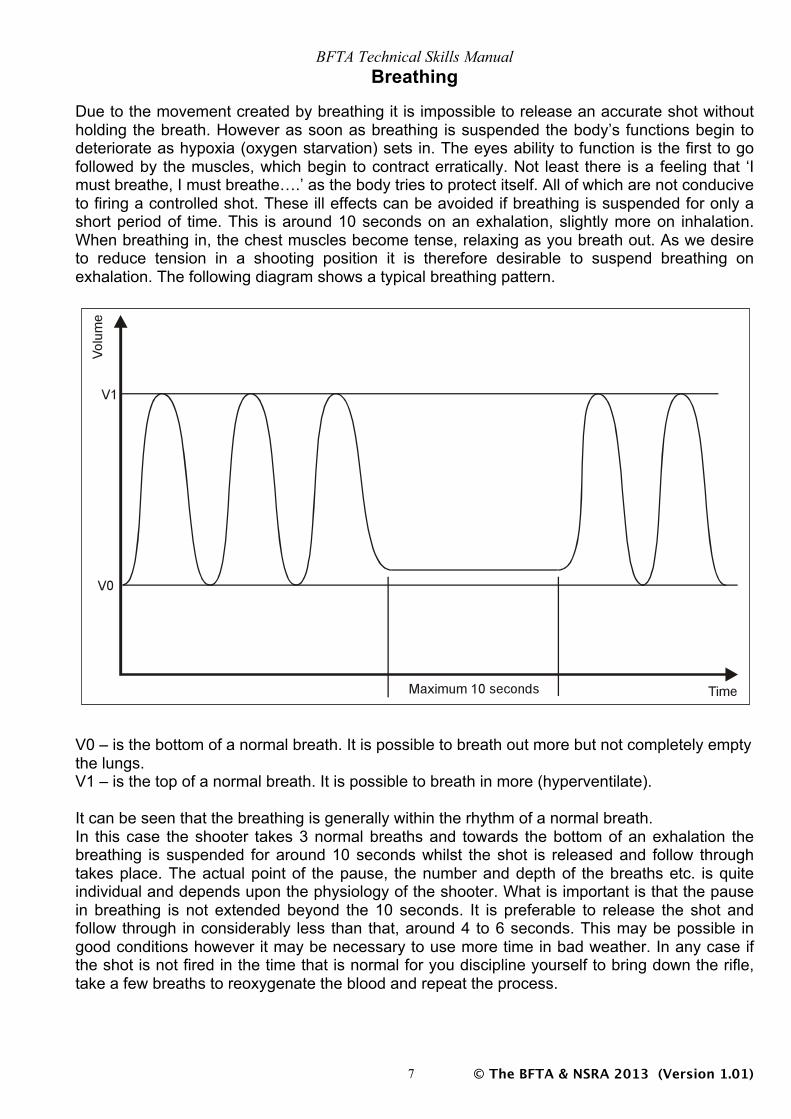
Breathing Due to the movement created by breathing it is impossible to release an accurate shot without holding the breath. However as soon as breathing is suspended the body’s functions begin to deteriorate as hypoxia (oxygen starvation) sets in. The eyes ability to function is the first to go followed by the muscles, which begin to contract erratically. Not least there is a feeling that ‘I must breathe, I must breathe….’ as the body tries to protect itself. All of which are not conducive to firing a controlled shot. These ill effects can be avoided if breathing is suspended for only a short period of time. This is around 10 seconds on an exhalation, slightly more on inhalation. When breathing in, the chest muscles become tense, relaxing as you breath out. As we desire to reduce tension in a shooting position it is therefore desirable to suspend breathing on exhalation. The following diagram shows a typical breathing pattern.
V0 – is the bottom of a normal breath. It is possible to breath out more but not completely empty the lungs. V1 – is the top of a normal breath. It is possible to breath in more (hyperventilate). It can be seen that the breathing is generally within the rhythm of a normal breath. In this case the shooter takes 3 normal breaths and towards the bottom of an exhalation the breathing is suspended for around 10 seconds whilst the shot is released and follow through takes place. The actual point of the pause, the number and depth of the breaths etc. is quite individual and depends upon the physiology of the shooter. What is important is that the pause in breathing is not extended beyond the 10 seconds. It is preferable to release the shot and follow through in considerably less than that, around 4 to 6 seconds. This may be possible in good conditions however it may be necessary to use more time in bad weather. In any case if the shot is not fired in the time that is normal for you discipline yourself to bring down the rifle, take a few breaths to reoxygenate the blood and repeat the process.

BFTA Technical Skills Manual
© The BFTA & NSRA 2013 (Version 1.01) 8
Trigger Control
Whatever type of trigger or method of control, the desired outcome is the same, to release the trigger without moving the gun from the point of aim. Any triggering method that brings about this outcome consistently is acceptable. General Requirements All triggers need to be:
• Consistent - if the release point and pressure of the trigger is not the same for each shot good control and release is impossible.
• Reliable - not only to ensure good performance but also from the safety perspective. • Smooth in operation. • Can be operated with reasonably light pressures.
It is also desirable if they are:
• Adjustable for weight. • Adjustable for position of the blade. • Easy to adjust.
Types of trigger Although there are 4 main types of trigger, only 2 have found general acceptance in field target shooting. These are the single and two stage trigger systems. Single Stage - This type, sometimes called a direct trigger, has no free movement prior to release. This means that the sear engagement has to be quite shallow if the trigger is to have acceptably low creep. This in turn means that the triggers of this type have been set at higher weight levels than the two-stage variety. Two Stage - This type has a degree of movement before a further resistance is felt. Further movement beyond this point will release the mechanism. The two-stage trigger has deep sear engagement, which is taken away as the first stage is taken up. Due to this these triggers should be safer from accidental discharge. However the majority of two stage triggers are in fact single stage with the free movement built into the trigger blade. Trigger weight It could be assumed that, considering the desired outcome of releasing the trigger without moving the gun, as light a trigger as possible would be an advantage since this introduces less force into the system. However this is not always the case. An overriding factor is the shooters ability to feel the point of release and control minutely the point at which the gun fires – not only in training but also in the heat of competition. For this reason the triggers on field target rifles are rarely set on the minimum setting. A weight of around 120 grams is light enough to give minimal disturbance but adequate feel. Experimentation will find the ideal weight for an individual shooter. The less expensive rifles may have non-adjustable triggers. These tend to be set at rather high weights and can only be altered by a gunsmith.
BFTA Technical Skills Manual
© The BFTA & NSRA 2013 (Version 1.01) 9
Grip and Trigger Operation
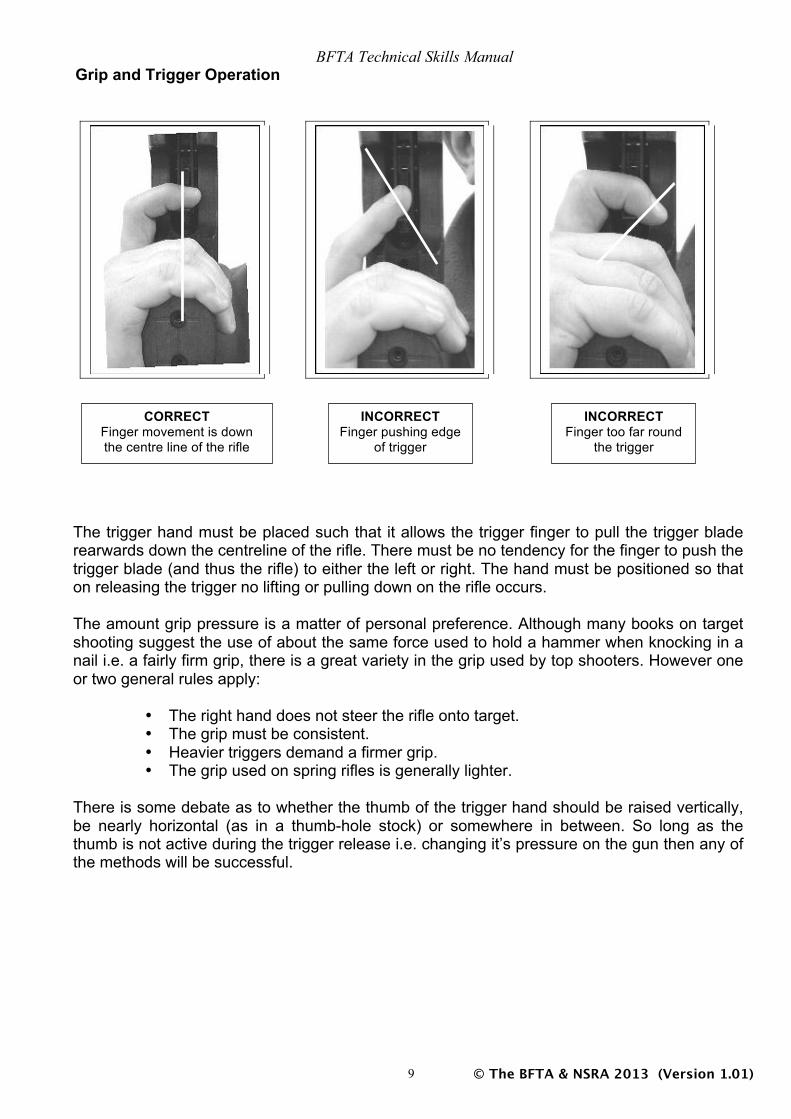
CORRECT Finger movement is down the centre line of the rifle
INCORRECT Finger pushing edge
of trigger
INCORRECT Finger too far round
the trigger
The trigger hand must be placed such that it allows the trigger finger to pull the trigger blade rearwards down the centreline of the rifle. There must be no tendency for the finger to push the trigger blade (and thus the rifle) to either the left or right. The hand must be positioned so that on releasing the trigger no lifting or pulling down on the rifle occurs. The amount grip pressure is a matter of personal preference. Although many books on target shooting suggest the use of about the same force used to hold a hammer when knocking in a nail i.e. a fairly firm grip, there is a great variety in the grip used by top shooters. However one or two general rules apply:
• The right hand does not steer the rifle onto target. • The grip must be consistent. • Heavier triggers demand a firmer grip. • The grip used on spring rifles is generally lighter.
There is some debate as to whether the thumb of the trigger hand should be raised vertically, be nearly horizontal (as in a thumb-hole stock) or somewhere in between. So long as the thumb is not active during the trigger release i.e. changing it’s pressure on the gun then any of the methods will be successful.
BFTA Technical Skills Manual
© The BFTA & NSRA 2013 (Version 1.01) 10
Methods of Operation
There have been many ways of describing the means of smoothly increasing the pressure on the trigger until the gun fires. The classic ‘squeeze the trigger’ is perhaps the least accurate. This gives the impression that the pressure is increased over the whole hand squeezing the grip and trigger as a consequence. Nothing could be further from the truth. In correct trigger release the only thing that moves is the trigger finger, the aim remains stable and the gun fires without any extra movement being transmitted to it. However there are several methods employed to bring about this action. All of the methods have been used by elite shooters at some time. The graphs below illustrate several methods but in reality shooters may develop a release that uses a combination of two or more methods. There are several mistakes that most often occur in trigger release:
• Snatching the trigger – that is a very rapid build up of pressure, made even worse if the finger takes a ‘run at it’ i.e. approaches the trigger blade at speed.
• Pulling through the first stage quickly and hitting the second stage pressure and continuing through.
• Taking up the first stage then releasing the pressure a little before snatching at the second stage.
All of the above will transmit large movements to the gun as it fires.
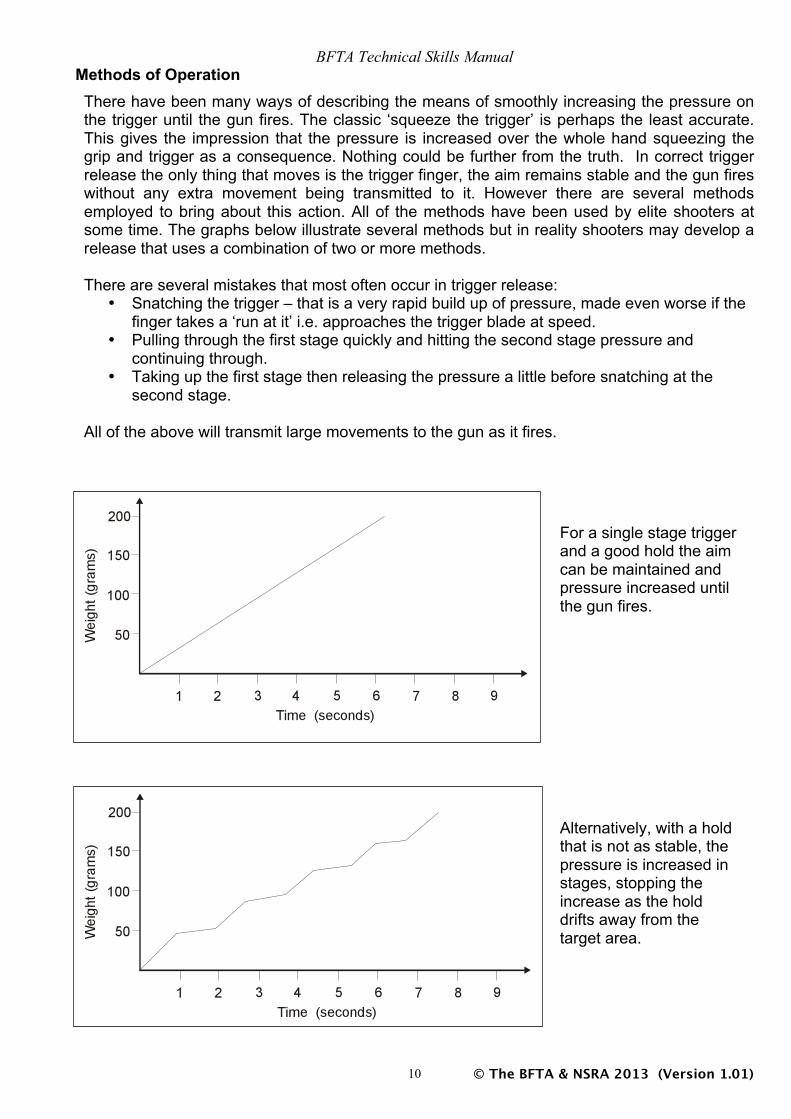
For a single stage trigger and a good hold the aim can be maintained and pressure increased until the gun fires.
Alternatively, with a hold that is not as stable, the pressure is increased in stages, stopping the increase as the hold drifts away from the target area.
BFTA Technical Skills Manual
© The BFTA & NSRA 2013 (Version 1.01) 11
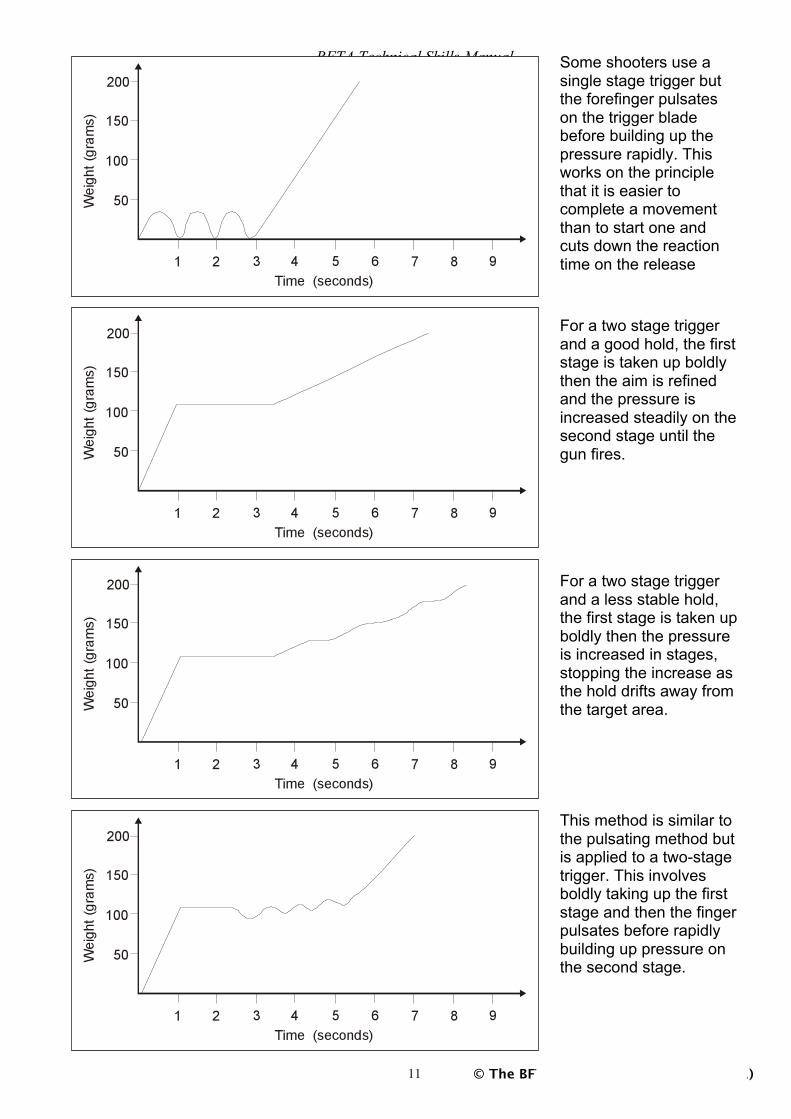
Some shooters use a single stage trigger but the forefinger pulsates on the trigger blade before building up the pressure rapidly. This works on the principle that it is easier to complete a movement than to start one and cuts down the reaction time on the release
For a two stage trigger and a good hold, the first stage is taken up boldly then the aim is refined and the pressure is increased steadily on the second stage until the gun fires.
For a two stage trigger and a less stable hold, the first stage is taken up boldly then the pressure is increased in stages, stopping the increase as the hold drifts away from the target area.
This method is similar to the pulsating method but is applied to a two-stage trigger. This involves boldly taking up the first stage and then the finger pulsates before rapidly building up pressure on the second stage.
BFTA Technical Skills Manual
© The BFTA & NSRA 2013 (Version 1.01) 12
Follow Through The aiming and firing process does not end when the trigger is released. The process of maintaining the aim during and beyond the release of the shot is called follow through. Follow through is of vital importance, particularly in air rifle shooting, because the action of the air rifle is quite slow. It takes time for the shot to develop after the trigger is released. In a pre-charged rifle the trigger releases the hammer, which moves forward to open the valve, air is released which accelerates the pellet up the barrel before it finally leaves the muzzle and only then is it free of the influence of the shooter. During this period if the aim is disturbed a poor shot will result. There are several physiological reasons to follow through. When you see the correct sight picture, you release the trigger but the finger doesn’t move instantly. A delay of some 0.3 seconds, which is equivalent to you reaction time, occurs before your finger moves. Through this period the aim must be maintained. Also, the gun is held in position by some muscular effort that must remain the same until the shot has left the rifle. Without follow through there is the chance that the muscles holding the gun might relax a fraction of a second early, before the pellet has left the muzzle, moving the gun and resulting in a poor shot. Good follow through can be obtained by maintaining the aim of the rifle for about 1 second after trigger release. This is more than enough time to allow the shot to leave the rifle. Some shooters use longer periods of time up to about 3 seconds. It looks good but in reality is a waste of energy. The other component of follow through is psychological. It is insufficient to physically maintain the rifle in position whilst the shot is fired. Concentration on the execution of the shot must also continue if the full benefits are to be gained. Continuing the attention on the movement of the muzzle during the release valuable information is obtained on the quality of the shot. This is referred to as ‘calling the shot’ and gives feed back on technique to be used for subsequent shots. It is very useful when deciding when to make sight corrections as these can be based on information from shots that you called as being technically good.

BFTA Technical Skills Manual
© The BFTA & NSRA 2013 (Version 1.01) 13
Free Style The majority of targets on the Field Target course can be taken freestyle, which as the name suggests, is any position off the competitors choosing. Whilst there are people who have gained some success from other positions the most prominent position for the freestyle section is the sitting position. This position started life in the early eighties and is an amalgam of other previous sitting positions used in other disciplines tailored to the special requirements of the air rifle. The advantages of this position are its stability, ease of use, relative comfort and sufficient ground clearance.
Shoulders in same plane
as pelvis
Head upright and tilted slightly
forward
Weight of rifle taken by knee using minimum
muscular effort
Majority of weight supported by
shooting cushion Feet flat to the
floor
The position is constructed as follows. The majority of the weight is taken by the shooting cushion which is a strong waterproof bag part filled with a supportive material (such as polystyrene balls) to a maximum height of 4 inches. The knees are drawn up towards the chest and the rifle supported over the left knee in some way, in the case of the picture by the left elbow. Better stability is achieved if the feet are in full contact with the floor but they must do so naturally and not be forced downward. Adjusting the height of the cushion may facilitate this. The right hand takes up the grip but does not steer the rifle and the right knee supports the right elbow. The left hand may rest on the right forearm or wherever is convenient so that muscular tension is minimised. The back is allowed to form a natural arch so that tension in the postural muscles is minimised. It must be noted that the various lengths of an individuals limbs and body will have a great effect on the outward appearance of the position, as they are all interrelated. In all cases the shoulders must be maintained in the same plane as the pelvis when looking from above. If this is not achieved side-to-side movement will result. To facilitate this it is best to use this as the starting point when constructing the position from the outset to ensure a good foundation for development.

BFTA Technical Skills Manual
© The BFTA & NSRA 2013 (Version 1.01) 14
Variations As the sitting position has developed 2 distinct variations have emerged. Both positions have been used by elite shooters to equal effect and indeed some have changed between the two.
Variation 1
In this variation the body leans further forward and the weight of the body and gun is spread between the buttocks and the feet. The buttocks take about 60% of the weight whilst the feet have 20% each. The centre of gravity of the whole position is further forward with some bodyweight transmitted to the feet via the knees. The torso, shoulders and arms should be as relaxed as possible in order not to transmit unnecessary force to the rifle.
60% of weight on buttocks
BFTA Technical Skills Manual
© The BFTA & NSRA 2013 (Version 1.01) 15
Variation 2
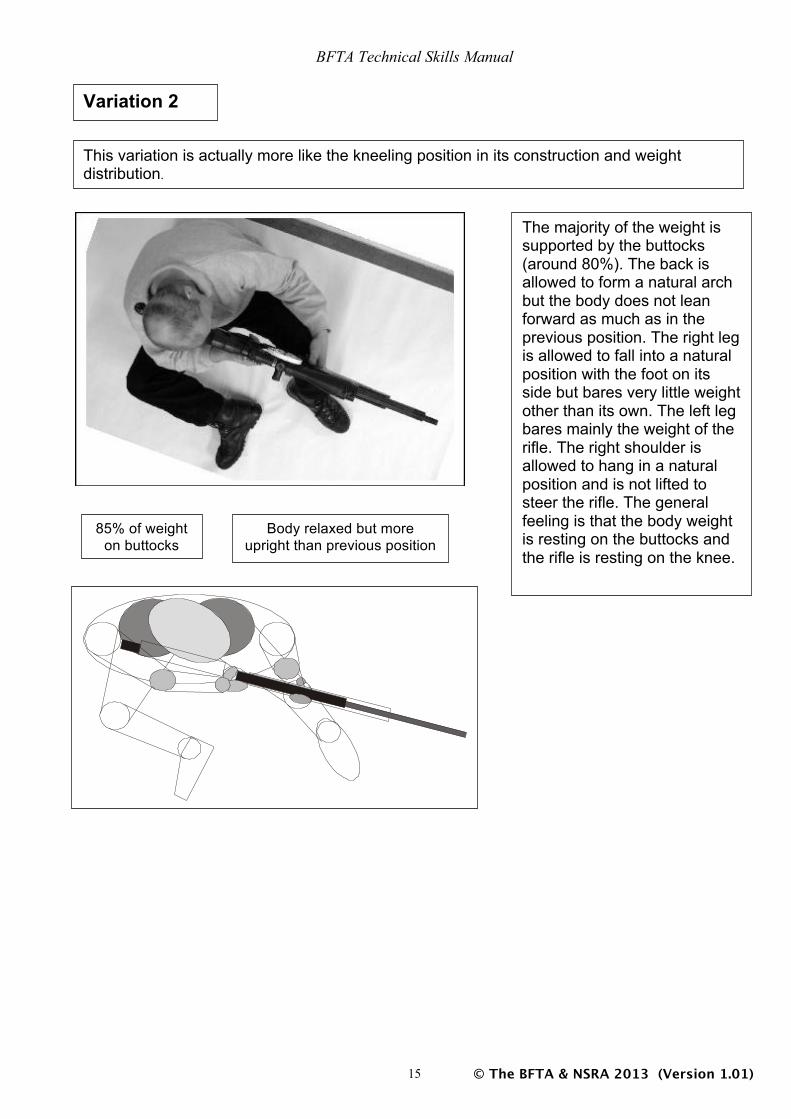
This variation is actually more like the kneeling position in its construction and weight distribution.
The majority of the weight is supported by the buttocks (around 80%). The back is allowed to form a natural arch but the body does not lean forward as much as in the previous position. The right leg is allowed to fall into a natural position with the foot on its side but bares very little weight other than its own. The left leg bares mainly the weight of the rifle. The right shoulder is allowed to hang in a natural position and is not lifted to steer the rifle. The general feeling is that the body weight is resting on the buttocks and the rifle is resting on the knee.
85% of weight on buttocks
Body relaxed but more upright than previous position

BFTA Technical Skills Manual
© The BFTA & NSRA 2013 (Version 1.01) 16
Supporting the Rifle There are several ways to support the front of the rifle in the sitting position:
Over arm – In this position the rifle is resting on the elbow joint area, which is in turn resting on the knee. This position gives good height to the rifle (useful if a slim stocked sporting rifle is being used) and there is little tendency to steer the rifle using muscular effort.
Resting on the knee – In this position the weight of the rifle is supported directly by the knee. The left hand serves only to provide improved location. This is a very stable position as it eliminates a joint (and the possibility of misalignment) but there is a risk of steering the rifle with the hand in the inexperienced. Also if a spring gun is being used vertical variation can be caused due to the relatively hard support surface of the knee. Another variation uses the shooting glove between the knee and the rifle. This gives more height to the rifle and slightly less reaction from the spring gun. In all other aspects it is the same as the standard position.
Resting on the hand – In this position the weight of the rifle is supported on the knee by the hand. The left hand provides improved height and location. There is an increased risk of steering the rifle with the hand in the inexperienced. This position gives more height to the rifle and slightly less reaction from the spring gun.
BFTA Technical Skills Manual
© The BFTA & NSRA 2013 (Version 1.01) 17
Kneeling Position On a Field Target course there are likely to be several compulsory kneeling shots. These often cause problems for shooters who regard the kneeling position as relatively unstable in comparison to their usual sitting position. In fact a properly constructed kneeling position is almost as stable as sitting (or indeed prone). The ISSF shooting disciplines involve shooting in the kneeling position and whilst the Field Target style may have grown from this it differs in many ways.
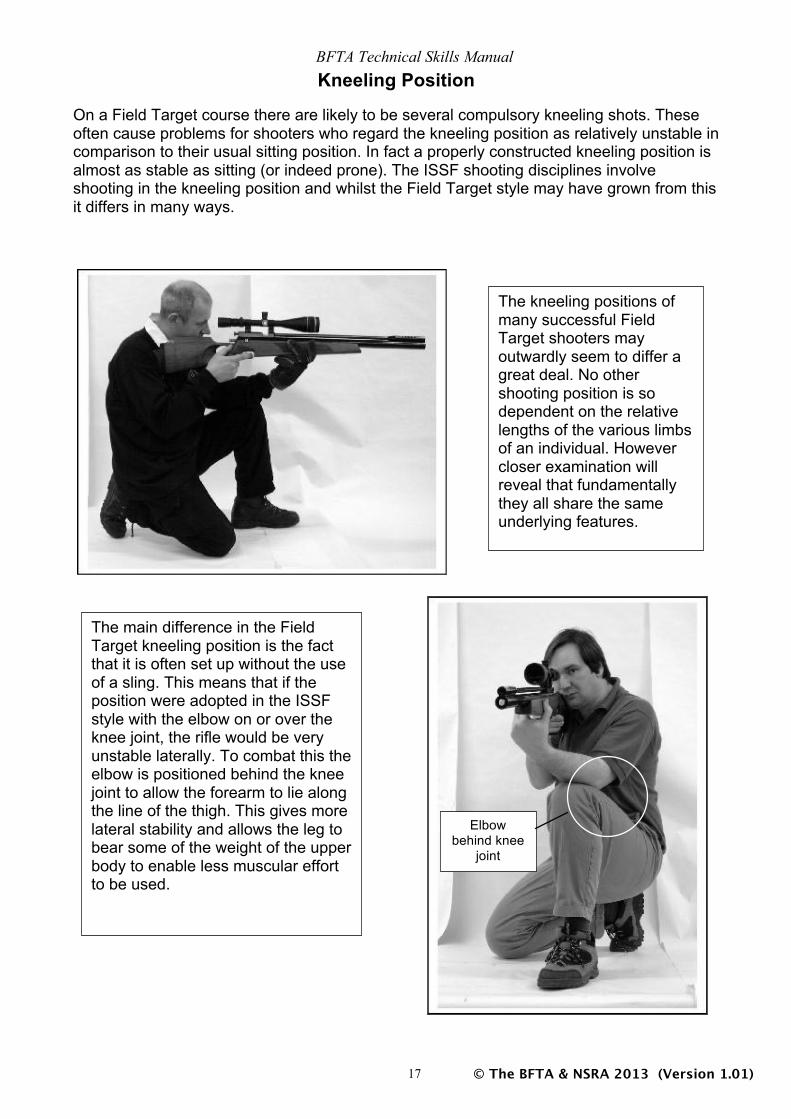
The kneeling positions of many successful Field Target shooters may outwardly seem to differ a great deal. No other shooting position is so dependent on the relative lengths of the various limbs of an individual. However closer examination will reveal that fundamentally they all share the same underlying features.
The main difference in the Field Target kneeling position is the fact that it is often set up without the use of a sling. This means that if the position were adopted in the ISSF style with the elbow on or over the knee joint, the rifle would be very unstable laterally. To combat this the elbow is positioned behind the knee joint to allow the forearm to lie along the line of the thigh. This gives more lateral stability and allows the leg to bear some of the weight of the upper body to enable less muscular effort to be used.
Elbow behind knee
joint
BFTA Technical Skills Manual
© The BFTA & NSRA 2013 (Version 1.01) 18
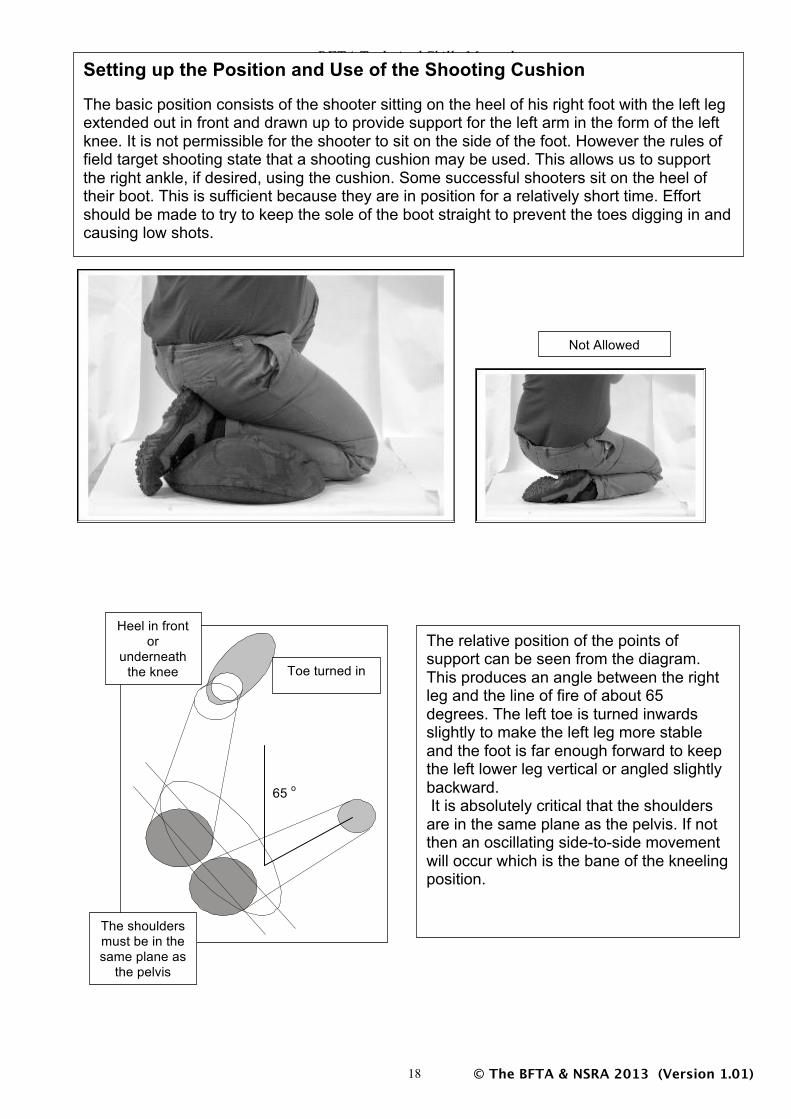
Setting up the Position and Use of the Shooting Cushion The basic position consists of the shooter sitting on the heel of his right foot with the left leg extended out in front and drawn up to provide support for the left arm in the form of the left knee. It is not permissible for the shooter to sit on the side of the foot. However the rules of field target shooting state that a shooting cushion may be used. This allows us to support the right ankle, if desired, using the cushion. Some successful shooters sit on the heel of their boot. This is sufficient because they are in position for a relatively short time. Effort should be made to try to keep the sole of the boot straight to prevent the toes digging in and causing low shots.
Not Allowed
65 o
Heel in front or
underneath the knee Toe turned in
The shoulders must be in the same plane as
the pelvis
The relative position of the points of support can be seen from the diagram. This produces an angle between the right leg and the line of fire of about 65 degrees. The left toe is turned inwards slightly to make the left leg more stable and the foot is far enough forward to keep the left lower leg vertical or angled slightly backward. It is absolutely critical that the shoulders are in the same plane as the pelvis. If not then an oscillating side-to-side movement will occur which is the bane of the kneeling position.
BFTA Technical Skills Manual
© The BFTA & NSRA 2013 (Version 1.01) 19
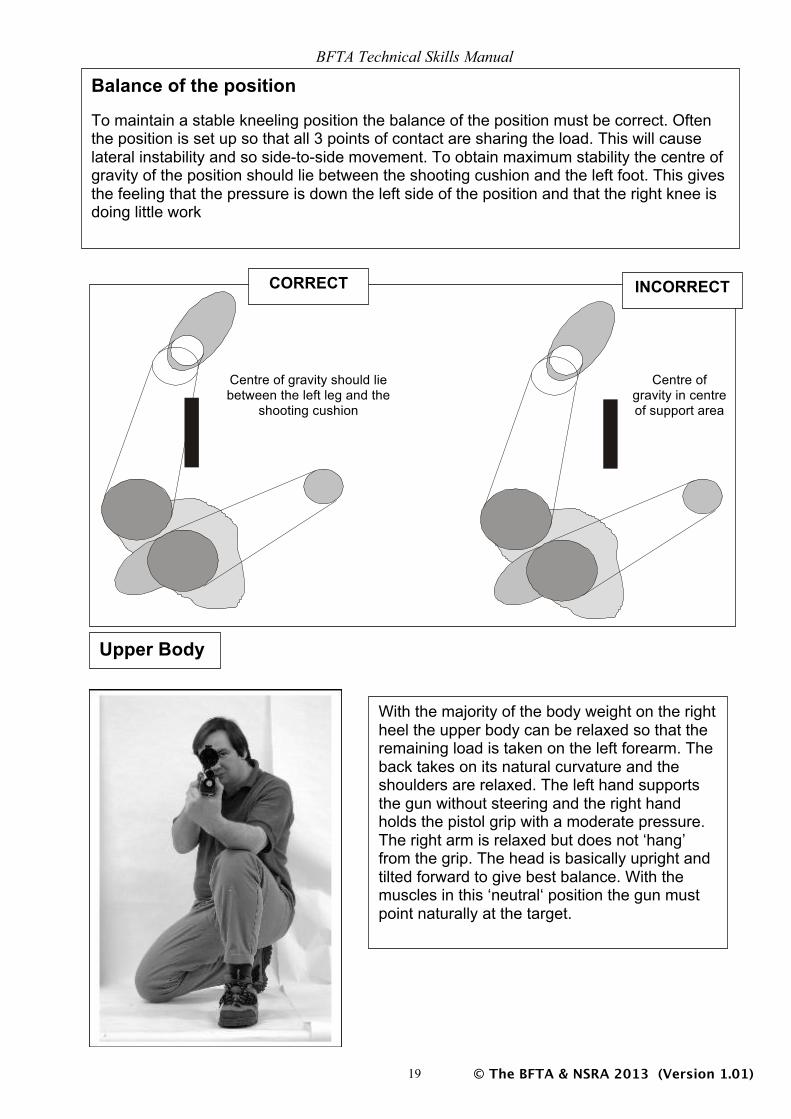
Balance of the position To maintain a stable kneeling position the balance of the position must be correct. Often the position is set up so that all 3 points of contact are sharing the load. This will cause lateral instability and so side-to-side movement. To obtain maximum stability the centre of gravity of the position should lie between the shooting cushion and the left foot. This gives the feeling that the pressure is down the left side of the position and that the right knee is doing little work
Centre of gravity should lie between the left leg and the
shooting cushion
Centre of gravity in centre of support area
CORRECT INCORRECT
Upper Body
With the majority of the body weight on the right heel the upper body can be relaxed so that the remaining load is taken on the left forearm. The back takes on its natural curvature and the shoulders are relaxed. The left hand supports the gun without steering and the right hand holds the pistol grip with a moderate pressure. The right arm is relaxed but does not ‘hang’ from the grip. The head is basically upright and tilted forward to give best balance. With the muscles in this ‘neutral‘ position the gun must point naturally at the target.
BFTA Technical Skills Manual
© The BFTA & NSRA 2013 (Version 1.01) 20
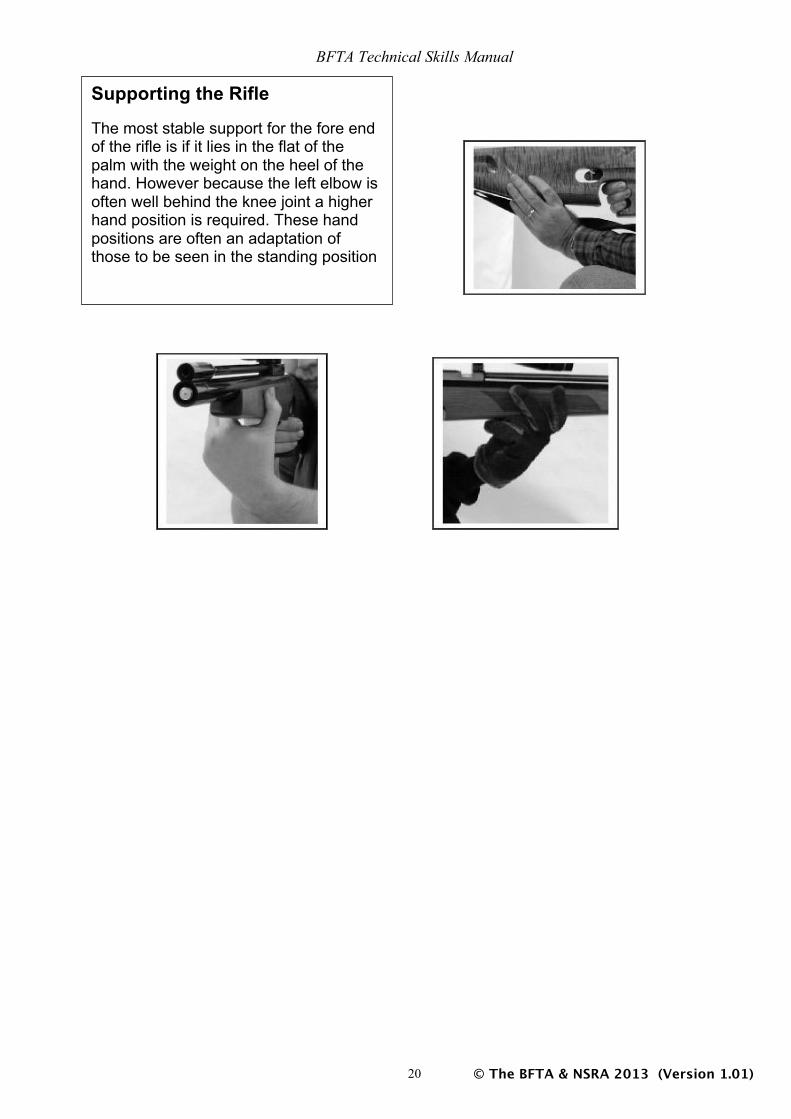
Supporting the Rifle The most stable support for the fore end of the rifle is if it lies in the flat of the palm with the weight on the heel of the hand. However because the left elbow is often well behind the knee joint a higher hand position is required. These hand positions are often an adaptation of those to be seen in the standing position
BFTA Technical Skills Manual
© The BFTA & NSRA 2013 (Version 1.01) 21
Standing Position
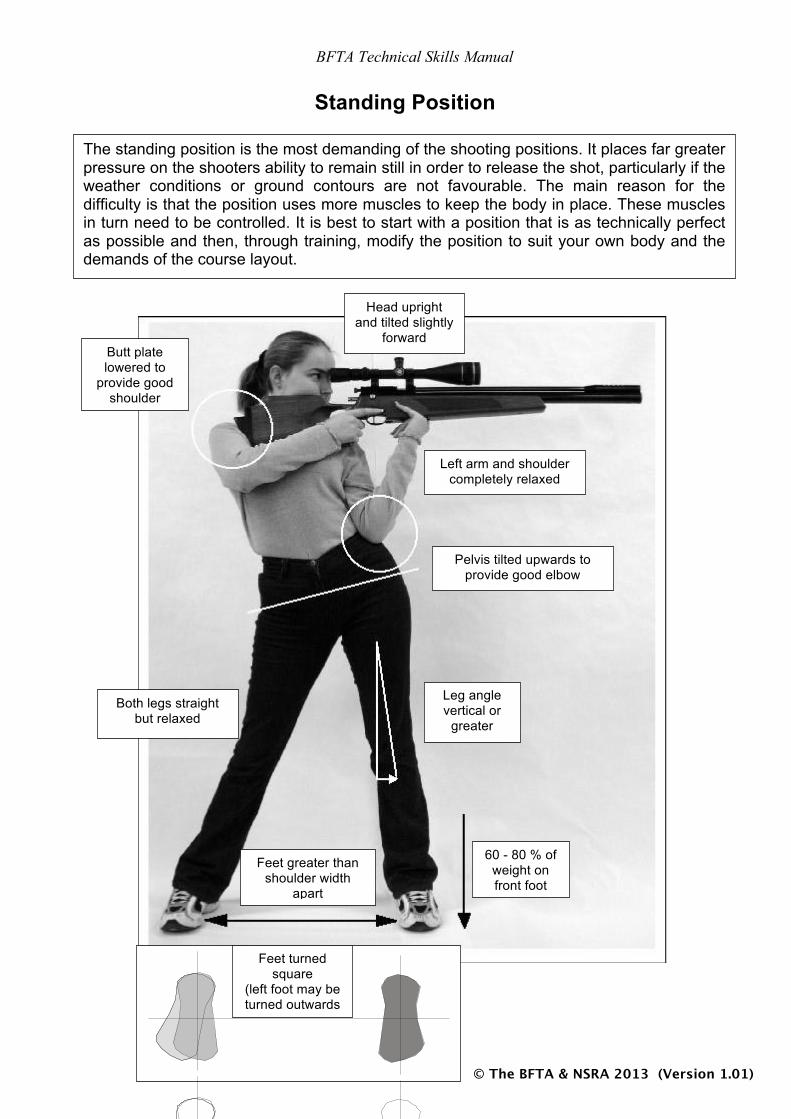
The standing position is the most demanding of the shooting positions. It places far greater pressure on the shooters ability to remain still in order to release the shot, particularly if the weather conditions or ground contours are not favourable. The main reason for the difficulty is that the position uses more muscles to keep the body in place. These muscles in turn need to be controlled. It is best to start with a position that is as technically perfect as possible and then, through training, modify the position to suit your own body and the demands of the course layout.
Head upright and tilted slightly
forward Butt plate
lowered to provide good
shoulder contact
Left arm and shoulder completely relaxed
Pelvis tilted upwards to provide good elbow
contact
Both legs straight but relaxed
Leg angle vertical or
greater
Feet greater than shoulder width
apart
60 - 80 % of weight on front foot
Feet turned square
(left foot may be turned outwards
slightly
BFTA Technical Skills Manual
© The BFTA & NSRA 2013 (Version 1.01) 22
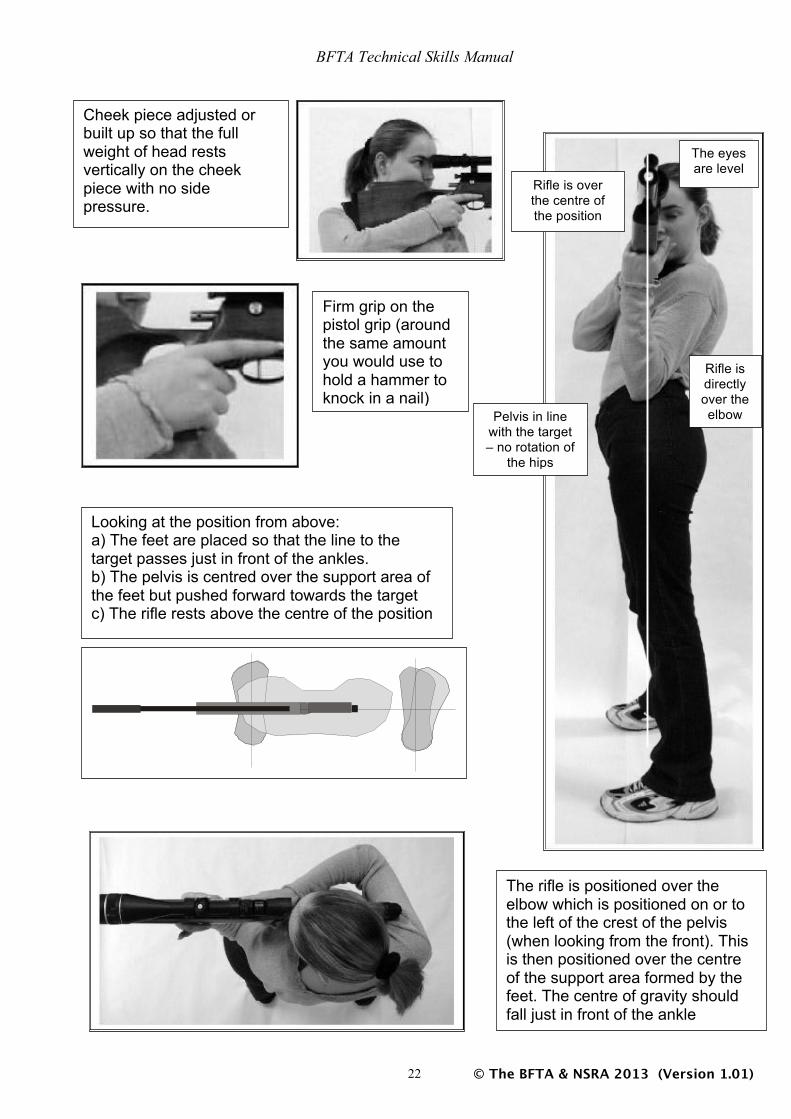
Cheek piece adjusted or built up so that the full weight of head rests vertically on the cheek piece with no side pressure.
Firm grip on the pistol grip (around the same amount you would use to hold a hammer to knock in a nail)
The eyes are level
Rifle is over the centre of the position
Rifle is directly over the elbow Pelvis in line
with the target – no rotation of
the hips
Looking at the position from above: a) The feet are placed so that the line to the target passes just in front of the ankles. b) The pelvis is centred over the support area of the feet but pushed forward towards the target c) The rifle rests above the centre of the position
The rifle is positioned over the elbow which is positioned on or to the left of the crest of the pelvis (when looking from the front). This is then positioned over the centre of the support area formed by the feet. The centre of gravity should fall just in front of the ankle
BFTA Technical Skills Manual
© The BFTA & NSRA 2013 (Version 1.01) 23
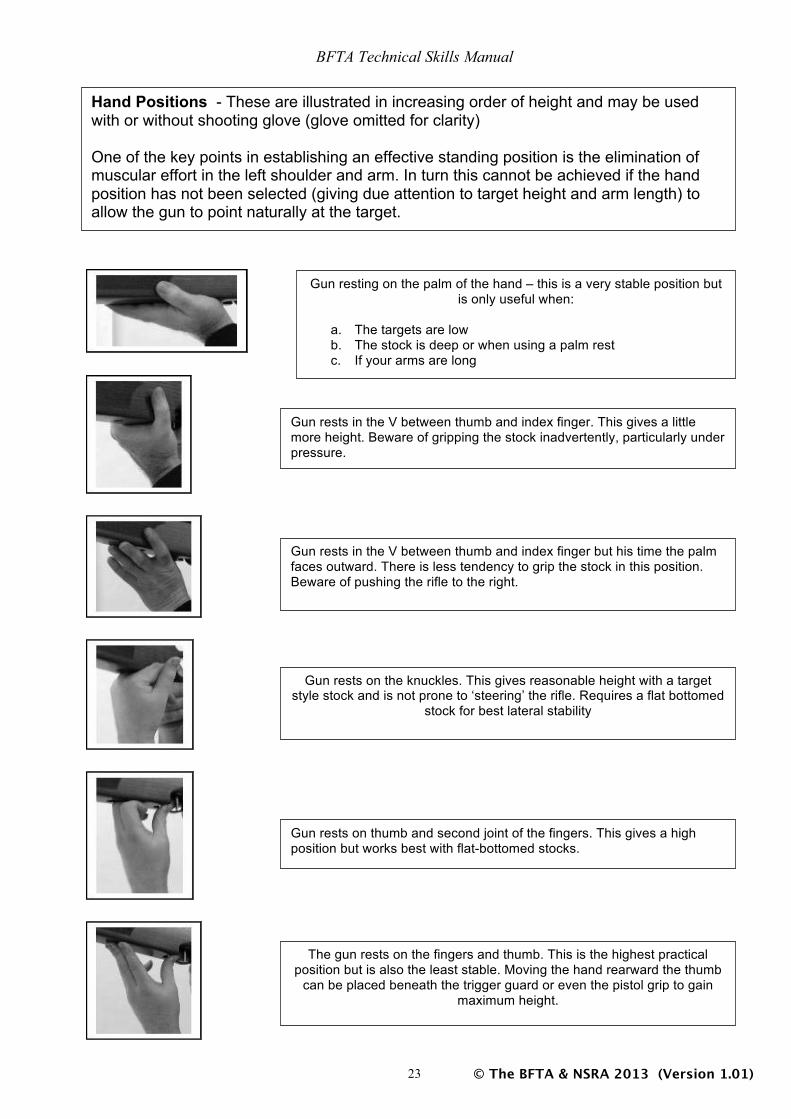
Hand Positions - These are illustrated in increasing order of height and may be used with or without shooting glove (glove omitted for clarity) One of the key points in establishing an effective standing position is the elimination of muscular effort in the left shoulder and arm. In turn this cannot be achieved if the hand position has not been selected (giving due attention to target height and arm length) to allow the gun to point naturally at the target.
Gun resting on the palm of the hand – this is a very stable position but is only useful when:
a. The targets are low b. The stock is deep or when using a palm rest c. If your arms are long
Gun rests in the V between thumb and index finger. This gives a little more height. Beware of gripping the stock inadvertently, particularly under pressure.
Gun rests in the V between thumb and index finger but his time the palm faces outward. There is less tendency to grip the stock in this position. Beware of pushing the rifle to the right.
Gun rests on the knuckles. This gives reasonable height with a target style stock and is not prone to ‘steering’ the rifle. Requires a flat bottomed
stock for best lateral stability
Gun rests on thumb and second joint of the fingers. This gives a high position but works best with flat-bottomed stocks.
The gun rests on the fingers and thumb. This is the highest practical position but is also the least stable. Moving the hand rearward the thumb
can be placed beneath the trigger guard or even the pistol grip to gain maximum height.

BFTA Technical Skills Manual
© The BFTA & NSRA 2013 (Version 1.01) 24
Range Finding
Unfortunately when a pellet is fired from an air rifle it doesn’t travel in a straight line. As with all projectiles they are affected by gravity and begin to fall as soon as they leave the muzzle of the gun. This combined with the forward motion describes an arc through as the pellet travels towards the target.
This means that in order to hit the target at all the barrel must be elevated in relation to the sight line as in the diagram. For a given elevation (sight setting) the pellet will then travel up towards the sight line and cross over it, rising above and finally falling back to, the sight line. This means that a rifle can only be zeroed in for 2 distances at one time, so for targets at various distances you have the choice of either:
• Aim in a different place, allowing for the drop of the pellet, or • Change the setting of the sights
BFTA Technical Skills Manual
© The BFTA & NSRA 2013 (Version 1.01) 25
The two methods are referred to as Holdover and Dialling. Holdover This method involves practicing at known distances and finding how much to hold over or under the target. The amount of holdover can be judged as a distance in relation to the target (say half or quarter diameter of the kill area), as distances (half inch etc.) or by using different parts of the reticule. Some shooters have taken this a stage further and have extra lines or dots built into the reticule that corresponds to different distances. This gives a more repeatable method of holdover.
Dialling This method involves practicing at known distances and finding how much to move the sights for different distances. Although this method can be used with any scope it really requires a scope with larger, graduated adjustment knobs known as target turrets. Shooters can either:
• Use the graduations on the turret (which tend to be in minutes of angle) taking note of the setting for each distance
• Count the number of clicks between each distance (probably least useful) or • Change the markings on the turret to the distances required
Advantages
• Can be used with any scope • Fast to use
Disadvantages
• Not as accurate as dialling • Multi dot reticules can be confusing
Advantages
• Accurate • Repeatable
Disadvantages
• Needs a more expensive scope • Turret wear cannot be ruled out
BFTA Technical Skills Manual
© The BFTA & NSRA 2013 (Version 1.01) 26
Methods of Range Finding
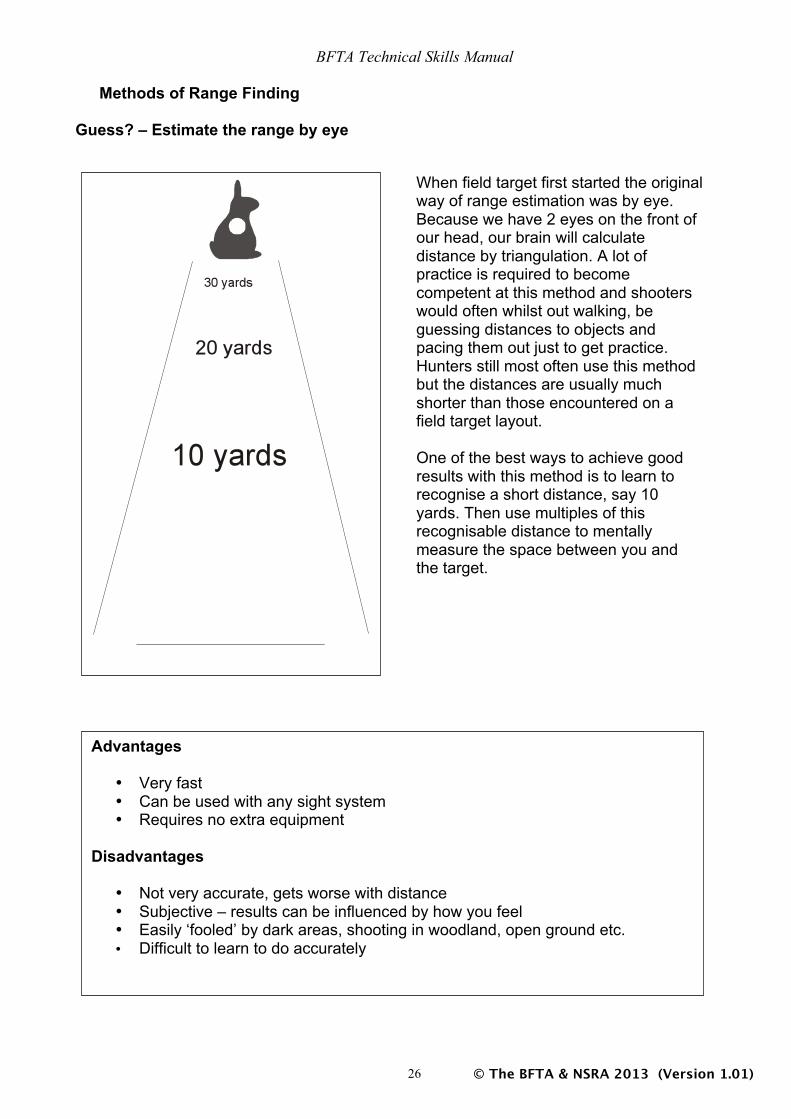
Guess? – Estimate the range by eye
When field target first started the original way of range estimation was by eye. Because we have 2 eyes on the front of our head, our brain will calculate distance by triangulation. A lot of practice is required to become competent at this method and shooters would often whilst out walking, be guessing distances to objects and pacing them out just to get practice. Hunters still most often use this method but the distances are usually much shorter than those encountered on a field target layout. One of the best ways to achieve good results with this method is to learn to recognise a short distance, say 10 yards. Then use multiples of this recognisable distance to mentally measure the space between you and the target.
Advantages
• Very fast • Can be used with any sight system • Requires no extra equipment
Disadvantages
• Not very accurate, gets worse with distance • Subjective – results can be influenced by how you feel • Easily ‘fooled’ by dark areas, shooting in woodland, open ground etc. • Difficult to learn to do accurately
BFTA Technical Skills Manual
© The BFTA & NSRA 2013 (Version 1.01) 27
Parrallaxing
Parallax adjustments on telescopic sights are described in the section on equipment. These are most often found in the form of an adjustable objective lens or side wheel marked out with graduations for distance. This was originally designed to remove errors due to the reticule moving in relation to the image in the scope, the idea being to set the distance on the scale prior to the shot. However in field target the parallax adjustment can be used in the reverse manner. Due to the relatively short distances involved the image (or the reticule) in the scope will look out of focus if the parallax is incorrectly adjusted. This means the shooter looks through the scope and moves the parallax ring around until both image and reticule look to be in focus at the same time. The range can then be read from the parallax ring. Most shooters do not rely on the graduations marked on the scope at the factory. These are rarely accurate enough for field target shooting and there is to greater spacing between graduations. Masking tape is placed over these and targets are viewed at known distances and the parallax adjustments made. The ranges can then be marked on the tape for use when viewing targets at unknown distances. Parallax is less easy to judge at longer distances. Getting the parallax correct at 25 yards is much easier than at say 50 yards. Also the drop of the pellet at these longer ranges is far more marked. This means that the range is more difficult to find at the distances at which it makes most difference. However field target shooters have noticed that the higher the magnification of the scope, the more critical the parallax becomes i.e. the less are that can be judged to be in focus at one time. This has given rise to scope magnification becoming greater and greater in an effort to give more accurate range estimation especially at longer ranges. Magnifications of 50x and 60x are not uncommon on the field target circuit – these magnifications are rarely used for taking the shot as the movement of the gun is more apparent but are used to find the range and make the necessary compensation prior to aiming.
Advantages
• Accurate • Not as subjective as other methods • Works well in a variety of conditions
Disadvantages
• Requires a high magnification scope with good optical quality. These are generally expensive
• Slower to use
BFTA Technical Skills Manual
© The BFTA & NSRA 2013 (Version 1.01) 28
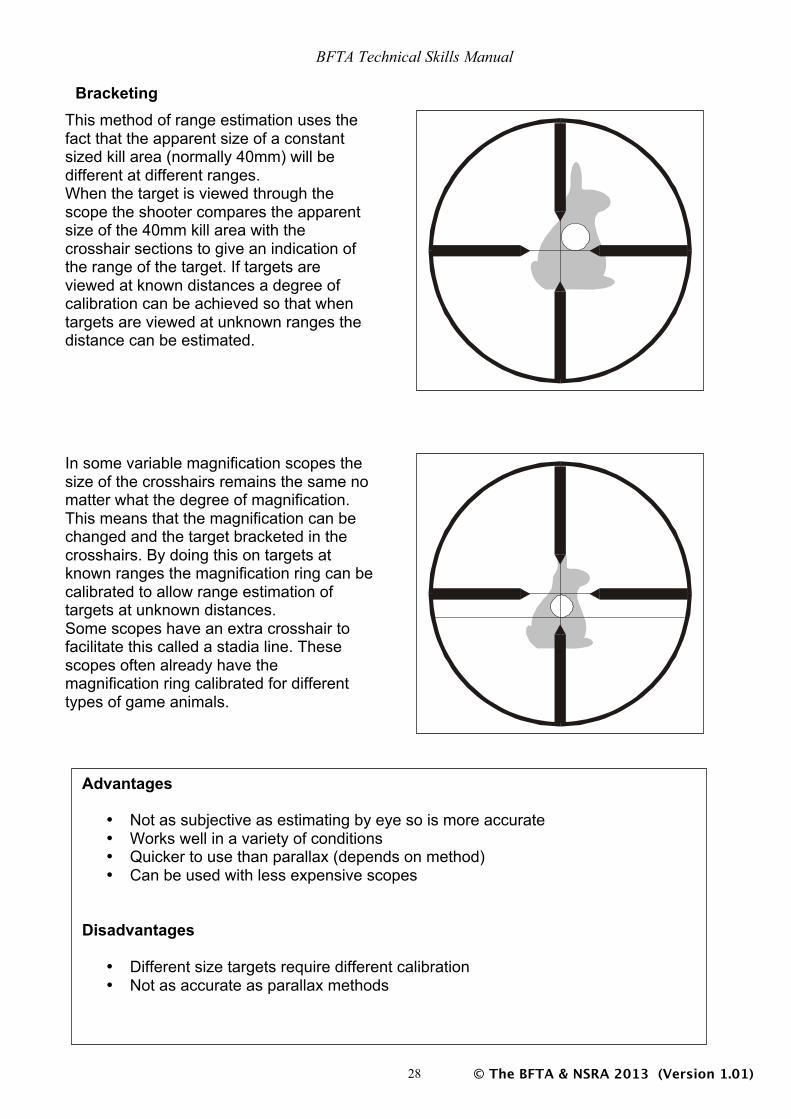
Bracketing
This method of range estimation uses the fact that the apparent size of a constant sized kill area (normally 40mm) will be different at different ranges. When the target is viewed through the scope the shooter compares the apparent size of the 40mm kill area with the crosshair sections to give an indication of the range of the target. If targets are viewed at known distances a degree of calibration can be achieved so that when targets are viewed at unknown ranges the distance can be estimated.
In some variable magnification scopes the size of the crosshairs remains the same no matter what the degree of magnification. This means that the magnification can be changed and the target bracketed in the crosshairs. By doing this on targets at known ranges the magnification ring can be calibrated to allow range estimation of targets at unknown distances. Some scopes have an extra crosshair to facilitate this called a stadia line. These scopes often already have the magnification ring calibrated for different types of game animals.
Advantages • Not as subjective as estimating by eye so is more accurate • Works well in a variety of conditions • Quicker to use than parallax (depends on method) • Can be used with less expensive scopes
Disadvantages
• Different size targets require different calibration • Not as accurate as parallax methods
BFTA Technical Skills Manual
© The BFTA & NSRA 2013 (Version 1.01) 29
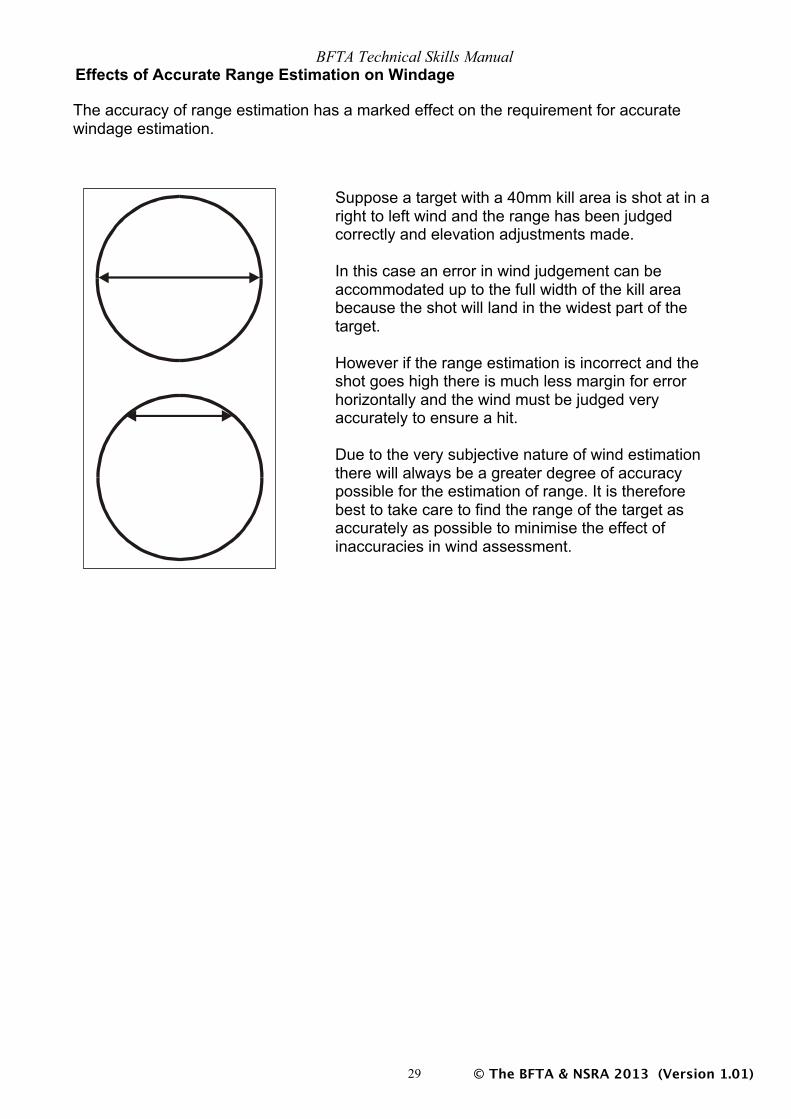
Effects of Accurate Range Estimation on Windage
The accuracy of range estimation has a marked effect on the requirement for accurate windage estimation.
Suppose a target with a 40mm kill area is shot at in a right to left wind and the range has been judged correctly and elevation adjustments made. In this case an error in wind judgement can be accommodated up to the full width of the kill area because the shot will land in the widest part of the target. However if the range estimation is incorrect and the shot goes high there is much less margin for error horizontally and the wind must be judged very accurately to ensure a hit. Due to the very subjective nature of wind estimation there will always be a greater degree of accuracy possible for the estimation of range. It is therefore best to take care to find the range of the target as accurately as possible to minimise the effect of inaccuracies in wind assessment.
BFTA Technical Skills Manual
© The BFTA & NSRA 2013 (Version 1.01) 30 30
Wind As all field target shooting is done outdoors the effect of the wind is an ever-present factor. Due to the light weight and relatively low velocity of air gun pellets even the lightest wind will push them of line. This means that the field target shooter must be constantly aware of what the wind is up to and have the ability deal with the variety of circumstances that it can generate. Wind Indicators Unlike other shooting disciplines there are no wind flags set out on the field target layout. This means that the field target shooter must use natural indicators to give an idea if what is happening. Although the list of these is seemingly endless and varies from shoot to shoot a number are often met on field target courses: Dust Smoke Grass Leaves and Branches Rain Also: Feel of the wind on the skin or clothing Sound of the wind Many shooters also use a ‘windicator’ i.e. a piece of light thread or wool attached to the end of the gun. This is easily seen whilst on aim and is consistent whatever course you are shooting on. Use of Wind Indicators All of the above indicators have one thing in common. They are historical i.e. when you see the effect on the indicator that wind condition as already past that point. This means that when reading conditions an upwind indicator is always preferable. Windicators fastened to the gun have the problem that they are behind the muzzle and historical. However they are consistent (unless wet) and are less subjective than the feel of the wind on the body. If the weather is warm or cold the perception of wind strength is different and so effects should be sorted out on the practice range prior to the start if possible. Often the practice range is not set out in the same direction as the main course, so the new direction must be worked out for each target. The only real time wind indicator is mirage. This is found in open areas on hot days when the ground is heated up and the hot air rises giving a boiling effect. It is an excellent wind indicator because it reacts quickly to changes. Its disadvantages are it is not often seen in woodland and broken ground and it disappears in winds above 20mph. It also causes the apparent position of the target to rise leading to low shots for the unwary. However, on open fields sometimes it may be the only indicator you have downrange. It is best viewed through a telescope.
BFTA Technical Skills Manual
© The BFTA & NSRA 2013 (Version 1.01) 31 31
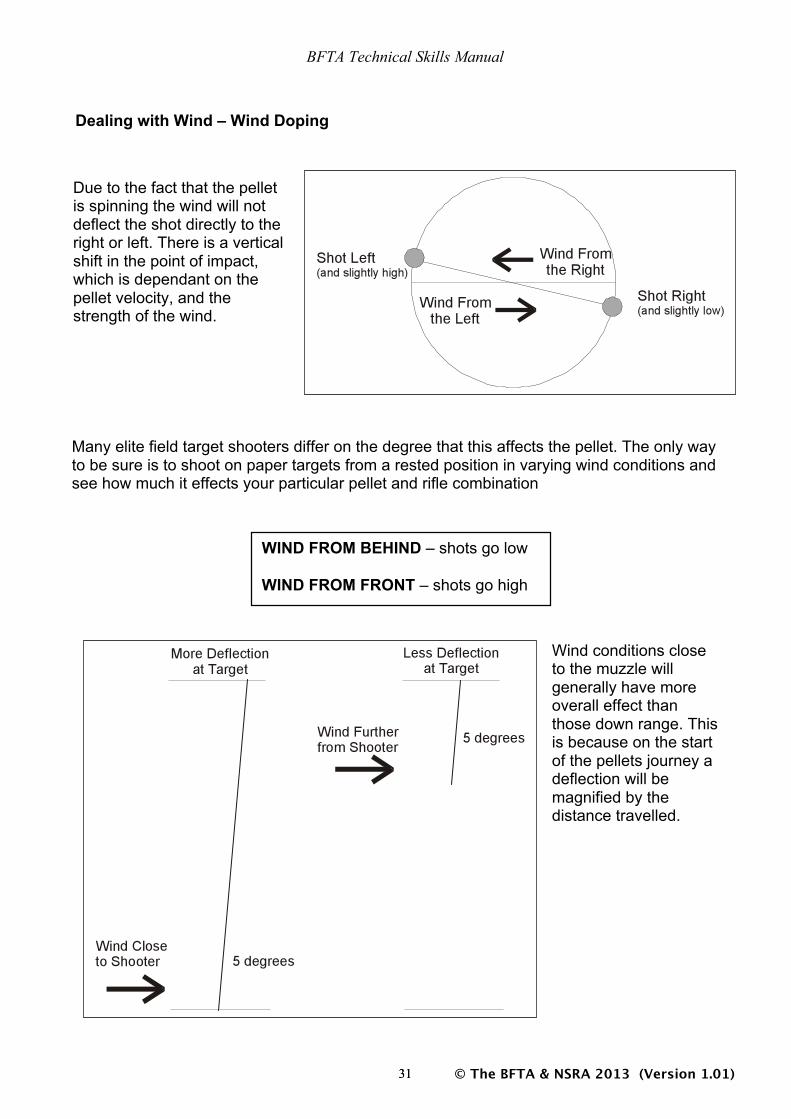
Dealing with Wind – Wind Doping
Due to the fact that the pellet is spinning the wind will not deflect the shot directly to the right or left. There is a vertical shift in the point of impact, which is dependant on the pellet velocity, and the strength of the wind.
Many elite field target shooters differ on the degree that this affects the pellet. The only way to be sure is to shoot on paper targets from a rested position in varying wind conditions and see how much it effects your particular pellet and rifle combination
WIND FROM BEHIND – shots go low WIND FROM FRONT – shots go high
Wind conditions close to the muzzle will generally have more overall effect than those down range. This is because on the start of the pellets journey a deflection will be magnified by the distance travelled.

BFTA Technical Skills Manual
© The BFTA & NSRA 2013 (Version 1.01) 32 32
Learning to Shoot in the Wind
Shooting in the wind is always more art than science. This is because of the vast range of factors that influence the pellet once it leaves the barrel combined with the very subjective means that we use to work out what is happening. There is no substitute for experience when it comes to dealing with wind and the best way to gain that experience is by shooting in windy conditions on paper targets at the various distances between 7 and 55 yards. Obviously the greater the distance the greater the effect of the wind on the pellet, so many shooters concentrate their efforts on the longer targets. However do not neglect the closer ones entirely particularly as they sometimes appear with reduced kill areas. Stage 1 Shoot on targets at known distances and deliberately fire when the wind is strongest and weakest to find the lateral spread caused by that condition at that range. Stage 2 Still on paper targets shoot this time to try to get your shots centrally on the target i.e. make allowances in your aiming for the conditions Stage 3 Now try the skill on Field Targets. And relate your “aiming off” to the size of the kill area. Aiming off in the wind is made much easier if the reticule of the scope is graduated with dots or lines. A standard duplex reticule has several points that can be used to give a measure of how much you are aiming off to the side. However scopes are now available with multiple dots and lines that give far more points of reference. Indeed custom made reticules have been developed that have dots that correspond to the width of the kill zone at a specific distance to further standardise the aiming off procedure. All of these reticules can be useful on the day but are only as good as your ability to judge what the wind is doing and apply it to your particular rifle and pellet combination. Dialling for Wind Many smallbore and the majority of fullbore shooters judge the wind then alter the scope settings to compensate for the conditions. Whilst this works well on a smallbore or fullbore range it is not recommended for field target shooting. The variety of height, distance, angle and orientation of the layout mean that scope changes would result in confusion and resulting errors in adjustment. Also in Field Target telescope sights are almost exclusively used. This allows aiming off to be done with much greater precision than with the open sights used in other disciplines.
BFTA Technical Skills Manual
© The BFTA & NSRA 2013 (Version 1.01) 33 33
Version history Version 1.00 [June 2013] the Original (2007) document has been simply updated with a copyright and version footer Version 1.01 {21st June 2013] In response to advice regarding the section “The Law” the old text has been replaced with links to information on BASC.
Related Documents