BeyondInsight and Password Safe Third-Party Integration Guide 6.10 ©2003-2020 BeyondTrust Corporation. All Rights Reserved. Other trademarks identified on this page are owned by their respective owners. BeyondTrust is not a chartered bank or trust company, or depository institution. It is not authorized to accept deposits or trust accounts and is not licensed or regulated by any state or federal banking authority. TC:5/5/2020

Welcome message from author
This document is posted to help you gain knowledge. Please leave a comment to let me know what you think about it! Share it to your friends and learn new things together.
Transcript

BeyondInsight and Password SafeThird-Party Integration Guide 6.10
©2003-2020 BeyondTrust Corporation. All Rights Reserved. Other trademarks identified on this page are owned by their respective owners. BeyondTrust is not a chartered bank or trust company, or depositoryinstitution. It is not authorized to accept deposits or trust accounts and is not licensed or regulated by any state or federal banking authority.
TC:5/5/2020
Table of Contents
BeyondInsight and Password Safe Third-Party Integration Guide 4
Configure Exabeam® Event Forwarding 5
Configure FireEye® TAP Cloud Collector™ 6
Configure HP ArcSight™ Event Forwarding 7
Configure IBM® QRadar® Connector 8
Configure Kenna™ API Connector 9
Configure Local Event Log Forwarding 10
Configure LogRhythm® Syslog Connector 11
Configure McAfee® DXL Event Forwarding 12
Installation and Configuration Overview 12
Install the McAfee Agent 12
Deploy the DXL Client to the BeyondInsight Instance 12
Configure the BeyondInsight Event Topics 13
Verify the McAfee Agent and DXL Client Connectivity 14
Run the BeyondInsight DXL Broker Service Installer 14
Create the BeyondInsight DXL Event Forwarder Connector 14
Test the DXL Connection with BeyondInsight 15
Troubleshoot Issues with McAfee DXL Connector 15
Configure McAfee® ESM Syslog Connector 17
Configure NetIQ® Sentinel™ Event Forwarding 18
Configure Palo Alto Networks Connector 19
Configure SailPoint Integration 20
Create the SailPoint Integration Connector 20
Create a SailPoint User Group (for v1 - Role Import) 21
Provision Users to BeyondInsight Local Groups (for v2 - Entitlement Provisioning) 21
View Permissions in IdentityIQ 21
Configure SCIM Connector 23
SailPoint IdentityIQ Integration 23
Enable the SCIM Connector 24
Configure SNMP Trap and Syslog Event Forwarding 26
Enable SNMP Event Forwarding 26
SALES: www.beyondtrust.com/contact SUPPORT: www.beyondtrust.com/support DOCUMENTATION: www.beyondtrust.com/docs 2©2003-2020 BeyondTrust Corporation. All Rights Reserved. Other trademarks identified on this page are owned by their respective owners. BeyondTrust is not a chartered bank or trust company, or depositoryinstitution. It is not authorized to accept deposits or trust accounts and is not licensed or regulated by any state or federal banking authority.
TC: 5/5/2020
BEYONDINSIGHT AND PASSWORD SAFE
THIRD-PARTY INTEGRATION GUIDE 6.10
This page needed for table ofcontents. Do not delete.
Enable Syslog Event Forwarding 26
Configure STIX™/TAXII™ Connector 28
Configure Splunk® HTTP Event Collector 29
Configure the Splunk® HTTP EC Connector 29
View Events in Splunk 29
Configure Third Party Credential Provider 31
Configure Universal Event Forwarder 33
SALES: www.beyondtrust.com/contact SUPPORT: www.beyondtrust.com/support DOCUMENTATION: www.beyondtrust.com/docs 3©2003-2020 BeyondTrust Corporation. All Rights Reserved. Other trademarks identified on this page are owned by their respective owners. BeyondTrust is not a chartered bank or trust company, or depositoryinstitution. It is not authorized to accept deposits or trust accounts and is not licensed or regulated by any state or federal banking authority.
TC: 5/5/2020
BEYONDINSIGHT AND PASSWORD SAFE
THIRD-PARTY INTEGRATION GUIDE 6.10
This page needed for table ofcontents. Do not delete.
BeyondInsight and Password Safe Third-Party IntegrationGuideThe BeyondInsight management console enables teams to centrally manage organization-wide IT security and compliance initiativesfrom a single, web-based console. It provides discovery, prioritization, and remediation of security risks by delivering what matters themost – context.
This document details the complementary technologies that BeyondInsight offers to an existing infrastructure. It highlights a criticalstep in the process for user and asset security events to be escalated into any third-party solution.
SALES: www.beyondtrust.com/contact SUPPORT: www.beyondtrust.com/support DOCUMENTATION: www.beyondtrust.com/docs 4©2003-2020 BeyondTrust Corporation. All Rights Reserved. Other trademarks identified on this page are owned by their respective owners. BeyondTrust is not a chartered bank or trust company, or depositoryinstitution. It is not authorized to accept deposits or trust accounts and is not licensed or regulated by any state or federal banking authority.
TC: 5/5/2020
BEYONDINSIGHT AND PASSWORD SAFE
THIRD-PARTY INTEGRATION GUIDE 6.10
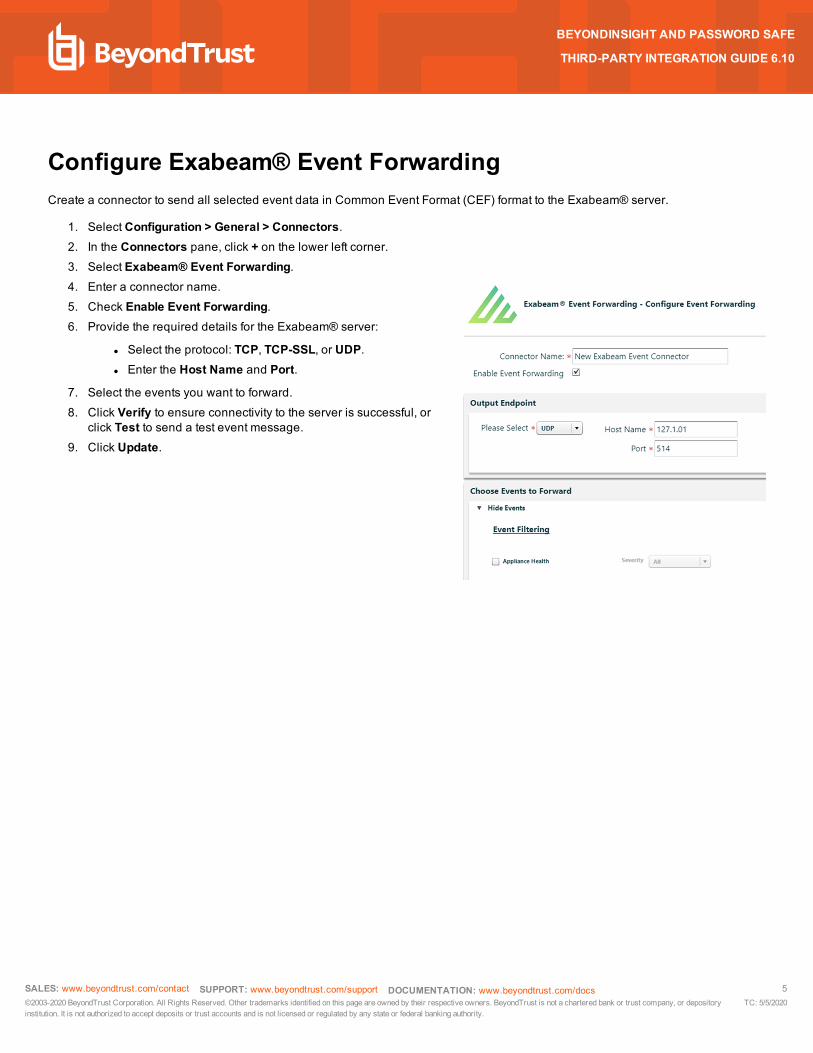
Configure Exabeam® Event ForwardingCreate a connector to send all selected event data in Common Event Format (CEF) format to the Exabeam® server.
1. Select Configuration > General > Connectors.2. In the Connectors pane, click + on the lower left corner.3. Select Exabeam® Event Forwarding.4. Enter a connector name.5. Check Enable Event Forwarding.6. Provide the required details for the Exabeam® server:
l Select the protocol: TCP, TCP-SSL, or UDP.l Enter the Host Name and Port.
7. Select the events you want to forward.8. Click Verify to ensure connectivity to the server is successful, or
click Test to send a test event message.9. Click Update.
SALES: www.beyondtrust.com/contact SUPPORT: www.beyondtrust.com/support DOCUMENTATION: www.beyondtrust.com/docs 5©2003-2020 BeyondTrust Corporation. All Rights Reserved. Other trademarks identified on this page are owned by their respective owners. BeyondTrust is not a chartered bank or trust company, or depositoryinstitution. It is not authorized to accept deposits or trust accounts and is not licensed or regulated by any state or federal banking authority.
TC: 5/5/2020
BEYONDINSIGHT AND PASSWORD SAFE
THIRD-PARTY INTEGRATION GUIDE 6.10
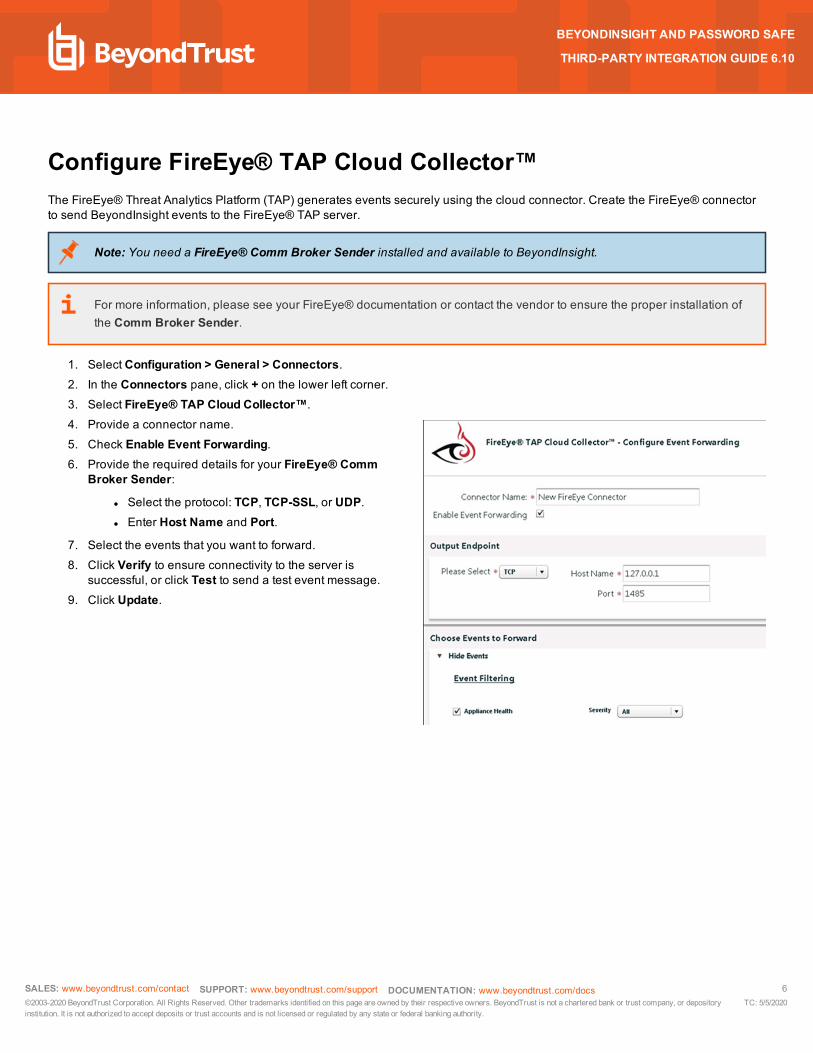
Configure FireEye® TAP Cloud Collector™The FireEye® Threat Analytics Platform (TAP) generates events securely using the cloud connector. Create the FireEye® connectorto send BeyondInsight events to the FireEye® TAP server.
Note: You need a FireEye® Comm Broker Sender installed and available to BeyondInsight.
For more information, please see your FireEye® documentation or contact the vendor to ensure the proper installation ofthe Comm Broker Sender.
1. Select Configuration > General > Connectors.2. In the Connectors pane, click + on the lower left corner.3. Select FireEye® TAP Cloud Collector™.4. Provide a connector name.5. Check Enable Event Forwarding.6. Provide the required details for your FireEye® Comm
Broker Sender:
l Select the protocol: TCP, TCP-SSL, or UDP.l Enter Host Name and Port.
7. Select the events that you want to forward.8. Click Verify to ensure connectivity to the server is
successful, or click Test to send a test event message.9. Click Update.
SALES: www.beyondtrust.com/contact SUPPORT: www.beyondtrust.com/support DOCUMENTATION: www.beyondtrust.com/docs 6©2003-2020 BeyondTrust Corporation. All Rights Reserved. Other trademarks identified on this page are owned by their respective owners. BeyondTrust is not a chartered bank or trust company, or depositoryinstitution. It is not authorized to accept deposits or trust accounts and is not licensed or regulated by any state or federal banking authority.
TC: 5/5/2020
BEYONDINSIGHT AND PASSWORD SAFE
THIRD-PARTY INTEGRATION GUIDE 6.10
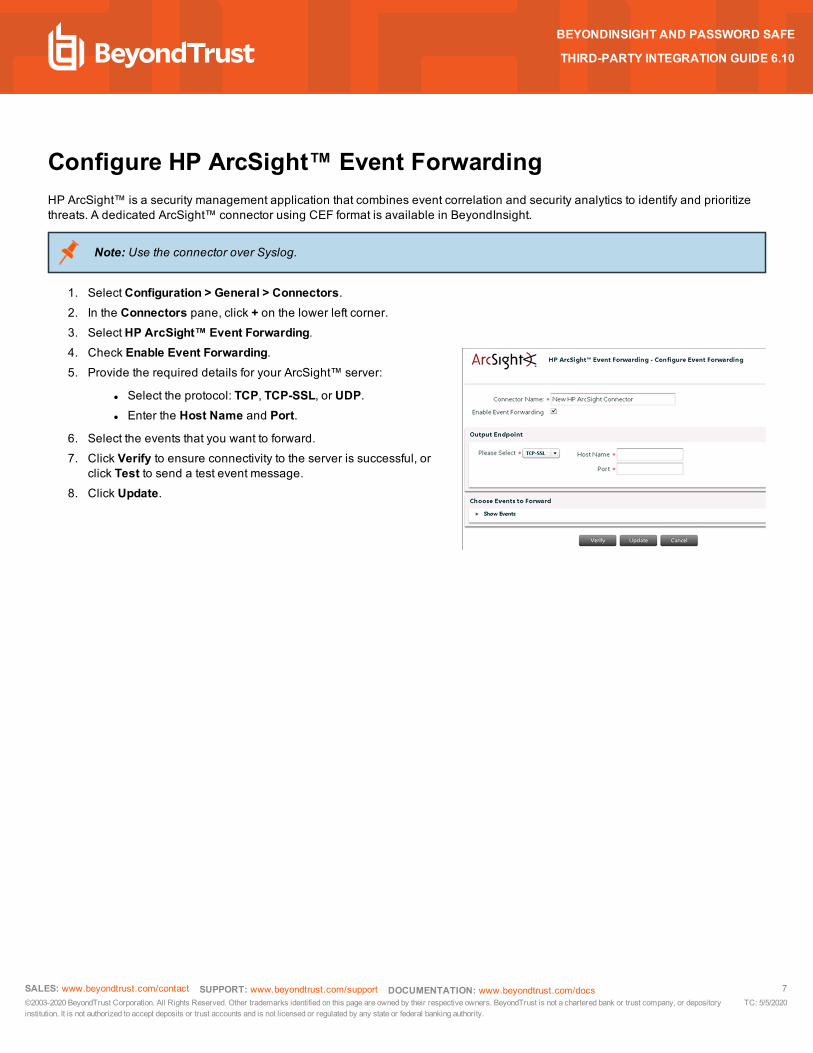
Configure HP ArcSight™ Event ForwardingHP ArcSight™ is a security management application that combines event correlation and security analytics to identify and prioritizethreats. A dedicated ArcSight™ connector using CEF format is available in BeyondInsight.
Note: Use the connector over Syslog.
1. Select Configuration > General > Connectors.2. In the Connectors pane, click + on the lower left corner.3. Select HP ArcSight™ Event Forwarding.4. Check Enable Event Forwarding.5. Provide the required details for your ArcSight™ server:
l Select the protocol: TCP, TCP-SSL, or UDP.l Enter the Host Name and Port.
6. Select the events that you want to forward.7. Click Verify to ensure connectivity to the server is successful, or
click Test to send a test event message.8. Click Update.
SALES: www.beyondtrust.com/contact SUPPORT: www.beyondtrust.com/support DOCUMENTATION: www.beyondtrust.com/docs 7©2003-2020 BeyondTrust Corporation. All Rights Reserved. Other trademarks identified on this page are owned by their respective owners. BeyondTrust is not a chartered bank or trust company, or depositoryinstitution. It is not authorized to accept deposits or trust accounts and is not licensed or regulated by any state or federal banking authority.
TC: 5/5/2020
BEYONDINSIGHT AND PASSWORD SAFE
THIRD-PARTY INTEGRATION GUIDE 6.10
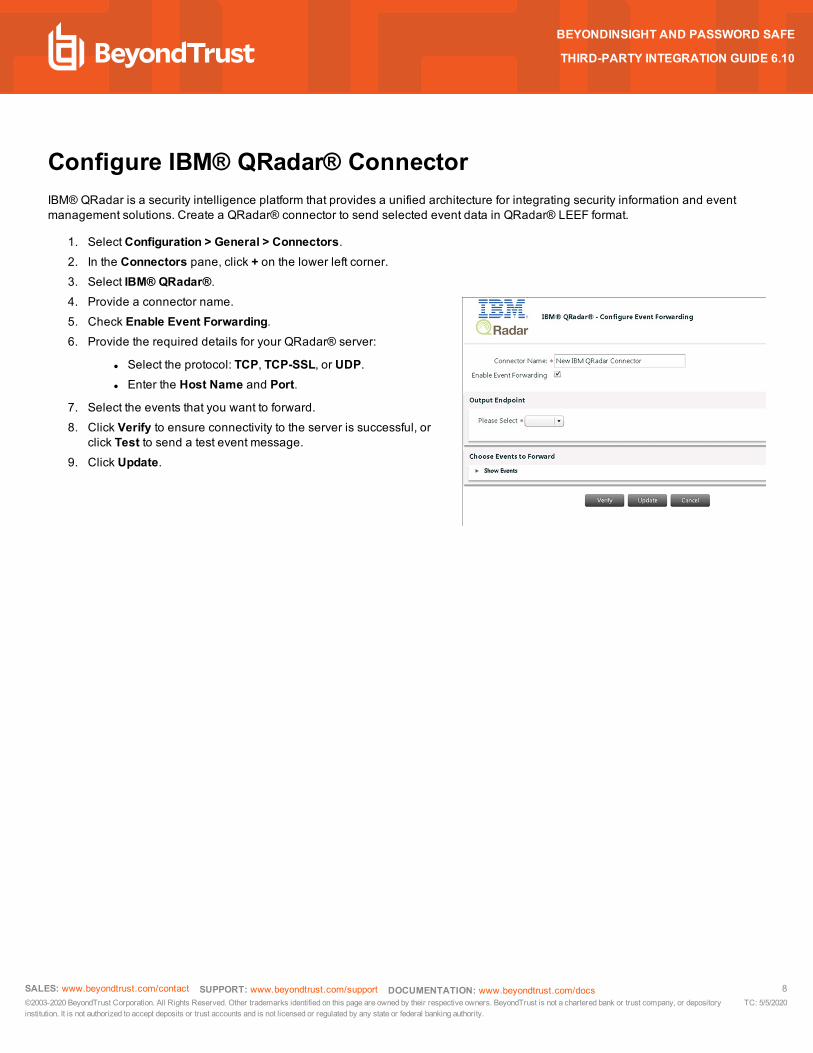
Configure IBM® QRadar® ConnectorIBM® QRadar is a security intelligence platform that provides a unified architecture for integrating security information and eventmanagement solutions. Create a QRadar® connector to send selected event data in QRadar® LEEF format.
1. Select Configuration > General > Connectors.2. In the Connectors pane, click + on the lower left corner.3. Select IBM® QRadar®.4. Provide a connector name.5. Check Enable Event Forwarding.6. Provide the required details for your QRadar® server:
l Select the protocol: TCP, TCP-SSL, or UDP.l Enter the Host Name and Port.
7. Select the events that you want to forward.8. Click Verify to ensure connectivity to the server is successful, or
click Test to send a test event message.9. Click Update.
SALES: www.beyondtrust.com/contact SUPPORT: www.beyondtrust.com/support DOCUMENTATION: www.beyondtrust.com/docs 8©2003-2020 BeyondTrust Corporation. All Rights Reserved. Other trademarks identified on this page are owned by their respective owners. BeyondTrust is not a chartered bank or trust company, or depositoryinstitution. It is not authorized to accept deposits or trust accounts and is not licensed or regulated by any state or federal banking authority.
TC: 5/5/2020
BEYONDINSIGHT AND PASSWORD SAFE
THIRD-PARTY INTEGRATION GUIDE 6.10
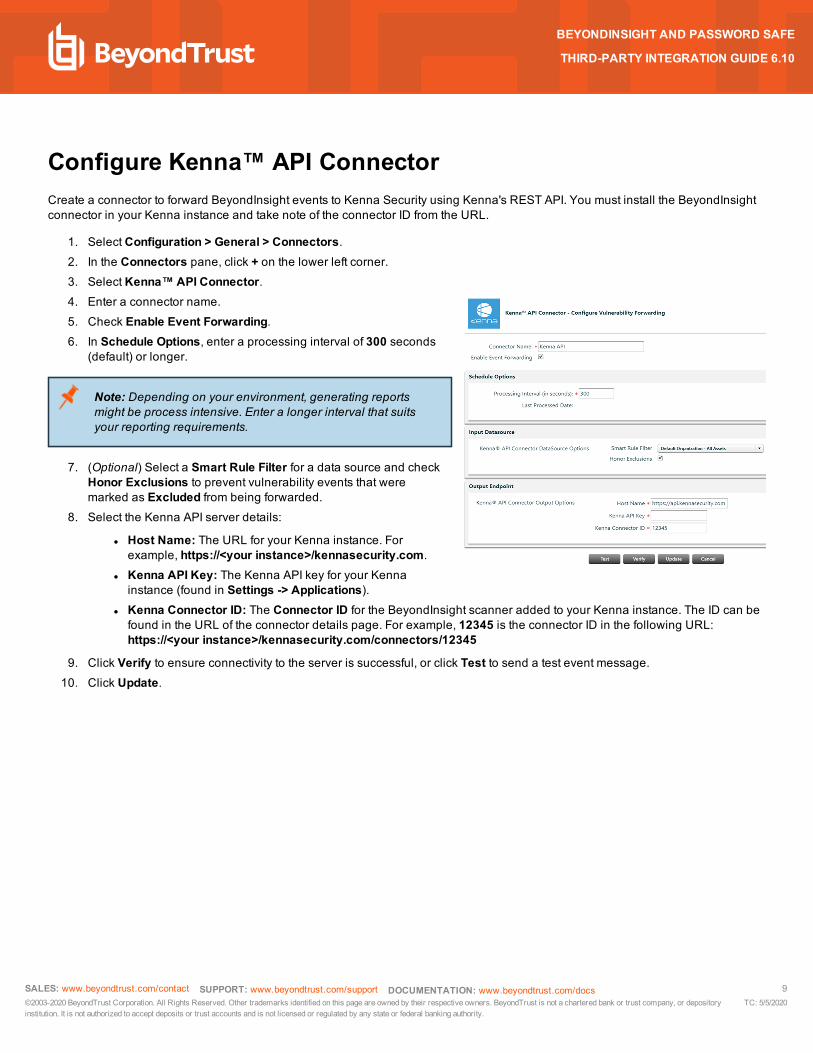
Configure Kenna™ API ConnectorCreate a connector to forward BeyondInsight events to Kenna Security using Kenna's REST API. You must install the BeyondInsightconnector in your Kenna instance and take note of the connector ID from the URL.
1. Select Configuration > General > Connectors.2. In the Connectors pane, click + on the lower left corner.3. Select Kenna™ API Connector.4. Enter a connector name.5. Check Enable Event Forwarding.6. In Schedule Options, enter a processing interval of 300 seconds
(default) or longer.
Note: Depending on your environment, generating reportsmight be process intensive. Enter a longer interval that suitsyour reporting requirements.
7. (Optional) Select a Smart Rule Filter for a data source and checkHonor Exclusions to prevent vulnerability events that weremarked as Excluded from being forwarded.
8. Select the Kenna API server details:
l Host Name: The URL for your Kenna instance. Forexample, https://<your instance>/kennasecurity.com.
l Kenna API Key: The Kenna API key for your Kennainstance (found in Settings -> Applications).
l Kenna Connector ID: The Connector ID for the BeyondInsight scanner added to your Kenna instance. The ID can befound in the URL of the connector details page. For example, 12345 is the connector ID in the following URL:https://<your instance>/kennasecurity.com/connectors/12345
9. Click Verify to ensure connectivity to the server is successful, or click Test to send a test event message.10. Click Update.
SALES: www.beyondtrust.com/contact SUPPORT: www.beyondtrust.com/support DOCUMENTATION: www.beyondtrust.com/docs 9©2003-2020 BeyondTrust Corporation. All Rights Reserved. Other trademarks identified on this page are owned by their respective owners. BeyondTrust is not a chartered bank or trust company, or depositoryinstitution. It is not authorized to accept deposits or trust accounts and is not licensed or regulated by any state or federal banking authority.
TC: 5/5/2020
BEYONDINSIGHT AND PASSWORD SAFE
THIRD-PARTY INTEGRATION GUIDE 6.10
Configure Local Event Log ForwardingBeyondInsight can duplicate stored events within theWindows Application Log. This setting is available in the console on theConnectors page. It allows BeyondTrust Network Security Scanner events with user defined filters to be duplicated in the log so thata log monitoring or scraper tool can perform monitoring for critical events.
1. Select Configuration > General > Connectors.2. In the Connectors pane, click + on the lower left corner.3. Select Local Event Log.4. Check Enable Event Forwarding.5. Set desired Event Filtering options.6. Click Update.
SALES: www.beyondtrust.com/contact SUPPORT: www.beyondtrust.com/support DOCUMENTATION: www.beyondtrust.com/docs 10©2003-2020 BeyondTrust Corporation. All Rights Reserved. Other trademarks identified on this page are owned by their respective owners. BeyondTrust is not a chartered bank or trust company, or depositoryinstitution. It is not authorized to accept deposits or trust accounts and is not licensed or regulated by any state or federal banking authority.
TC: 5/5/2020
BEYONDINSIGHT AND PASSWORD SAFE
THIRD-PARTY INTEGRATION GUIDE 6.10
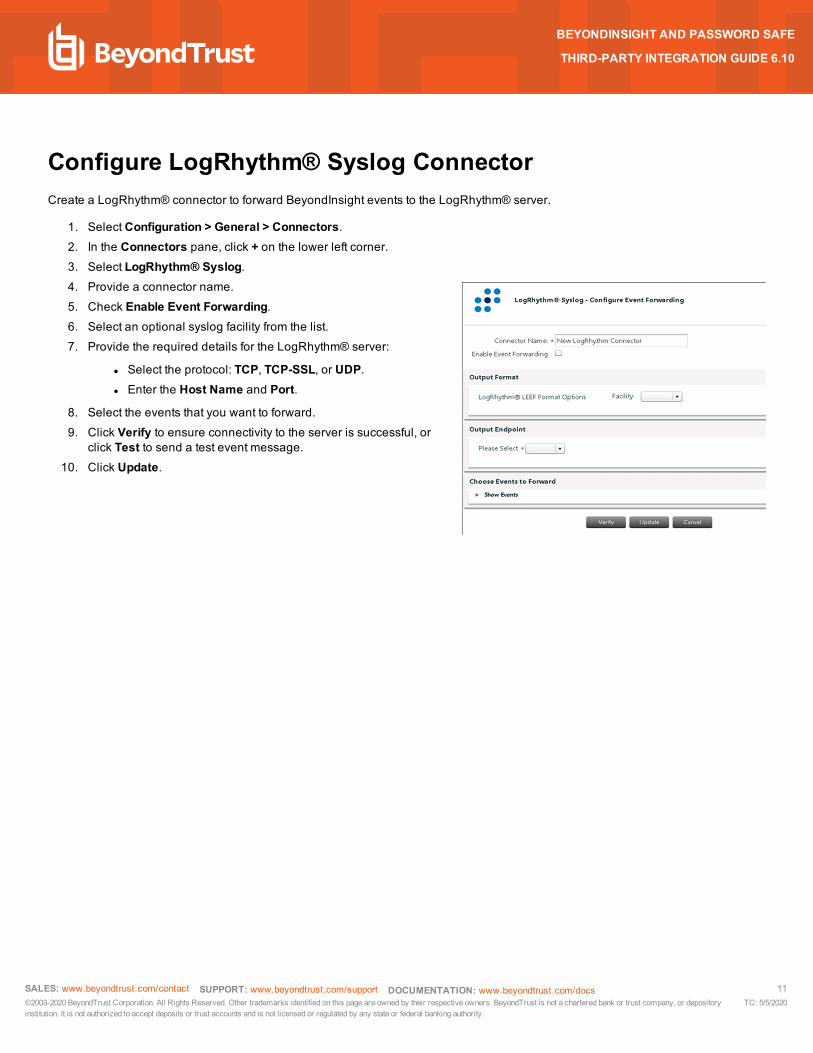
Configure LogRhythm® Syslog ConnectorCreate a LogRhythm® connector to forward BeyondInsight events to the LogRhythm® server.
1. Select Configuration > General > Connectors.2. In the Connectors pane, click + on the lower left corner.3. Select LogRhythm® Syslog.4. Provide a connector name.5. Check Enable Event Forwarding.6. Select an optional syslog facility from the list.7. Provide the required details for the LogRhythm® server:
l Select the protocol: TCP, TCP-SSL, or UDP.l Enter the Host Name and Port.
8. Select the events that you want to forward.9. Click Verify to ensure connectivity to the server is successful, or
click Test to send a test event message.10. Click Update.
SALES: www.beyondtrust.com/contact SUPPORT: www.beyondtrust.com/support DOCUMENTATION: www.beyondtrust.com/docs 11©2003-2020 BeyondTrust Corporation. All Rights Reserved. Other trademarks identified on this page are owned by their respective owners. BeyondTrust is not a chartered bank or trust company, or depositoryinstitution. It is not authorized to accept deposits or trust accounts and is not licensed or regulated by any state or federal banking authority.
TC: 5/5/2020
BEYONDINSIGHT AND PASSWORD SAFE
THIRD-PARTY INTEGRATION GUIDE 6.10
Configure McAfee® DXL Event ForwardingThe communication between the BeyondInsight and the McAfee Data Exchange Layer (DXL) is managed by the BeyondTrust DXLBroker Service. This service is installed as an additional component to the main BeyondInsight installation and facilitates thebrokering of events from BeyondInsight to the DXL fabric. Along with this service, the BeyondInsight instance must have a McAfeeAgent and DXL Client installed to communicate with your McAfee DXL Broker instance. Within your McAfee ePO instance, you willneed to ensure that the McAfee Agent and DXL Client installed on the BeyondInsight instance are configured for propercommunication between BeyondInsight and ePO via the DXL fabric.
Installation and Configuration Overview
1. Install the McAfee Agent 5.5. on the BeyondInsight instance.2. On the McAfee ePO instance:
l Deploy the DXL Client to the BeyondInsight instance.l Configure the BeyondInsight event topics.
3. On the BeyondInsight instance:
l Verify the McAfee Agent and DXL Client connectivity.l Install the BeyondInsight DXL Broker service.l Configure a McAfee Event Forwarder connector within the BeyondInsight management console.l Verify the installation and configuration.
Install the McAfee AgentOn the BeyondInsight instance, follow the steps below to install the McAfee Agent.
Note: If you cannot push the McAfee Agent from the ePO admin console due to firewall or other restrictions, you can installthe agent manually by copying the installer to the BeyondInsight instance and then manually running the installer.
1. Locate and run the McAfee Agent installer on the BeyondInsight instance. You must use the installer specific to your McAfeeePO instance. For example, it may be located at:C:\Program Files (x86)\McAfee\ePolicy Orchestrator\DB\Software\Current\EPOAGENT3000\Install\0409\FramePkg.exe
2. Copy the FramePkg.exe file to the BeyondInsight instance and run the installer.3. Verify the installation by looking at the system tray for the McAfee icon.
Deploy the DXL Client to the BeyondInsight Instance
1. On the McAfee ePO instance, deploy the a DXL Client to the BeyondInsight instance using a Client Task from within the ePOadministration console.
2. Create a DXL Client Task.3. SelectMenu > Client Task Catalog.4. Under McAfee Agent > Product Deployment, click New Task and then select the following:
l Task Name: Deploy DXL Clientl Target Platforms: Check Windows
SALES: www.beyondtrust.com/contact SUPPORT: www.beyondtrust.com/support DOCUMENTATION: www.beyondtrust.com/docs 12©2003-2020 BeyondTrust Corporation. All Rights Reserved. Other trademarks identified on this page are owned by their respective owners. BeyondTrust is not a chartered bank or trust company, or depositoryinstitution. It is not authorized to accept deposits or trust accounts and is not licensed or regulated by any state or federal banking authority.
TC: 5/5/2020
BEYONDINSIGHT AND PASSWORD SAFE
THIRD-PARTY INTEGRATION GUIDE 6.10

l Products and components: Data Exchange Layer Client 4.0+, action=Install, ...
5. Click Save.6. Deploy the DXL Client to the BeyondInsight instance.7. SelectMenu > Systems > Locate.8. Find the BeyondInsight instance to view the server's detail page.9. From the Actions list, select Agent > Run Client Task Now.10. Locate the Deploy DXL Client task created above.11. SelectMcAfee Agent > Product Deployment > Deploy DXL Client.12. Click Run Task Now.
Configure the BeyondInsight Event TopicsOn the McAfee ePO instance, create topic subscriptions for the BeyondInsight categories you wish to receive.
Open the ePO administration console, and then navigate to the SIA DXL Task and to the BeyondInsight topics of interest:
Appliance Health /beyondtrust/event/beyondinsight/genapphlth
Clarity /beyondtrust/event/beyondinsight/clarity_mlwr
File Integrity Monitoring /beyondtrust/event/beyondinsight/fim
EPP - Attack /beyondtrust/event/beyondinsight/attack
EPP - Malware /beyondtrust/event/beyondinsight/malware
EPP - Attack /beyondtrust/event/beyondinsight/attack
EPP - Vulnerabilities /beyondtrust/event/beyondinsight/epp_vulnerability
EPP - Windows Events /beyondtrust/event/beyondinsight/epp_wef
PBMac /beyondtrust/event/beyondinsight/pbmac
PBPS /beyondtrust/event/beyondinsight/pbps
PBW - Events /beyondtrust/event/beyondinsight/pbw
PBW - Vulnerabilities /beyondtrust/event/beyondinsight/pbw_vulnerability
Retina /beyondtrust/event/beyondinsight/retina
Uncategorized Events /beyondtrust/event/beyondinsight/uncategorized
Test Events /beyondtrust/event/beyondinsight/test
SALES: www.beyondtrust.com/contact SUPPORT: www.beyondtrust.com/support DOCUMENTATION: www.beyondtrust.com/docs 13©2003-2020 BeyondTrust Corporation. All Rights Reserved. Other trademarks identified on this page are owned by their respective owners. BeyondTrust is not a chartered bank or trust company, or depositoryinstitution. It is not authorized to accept deposits or trust accounts and is not licensed or regulated by any state or federal banking authority.
TC: 5/5/2020
BEYONDINSIGHT AND PASSWORD SAFE
THIRD-PARTY INTEGRATION GUIDE 6.10

Verify the McAfee Agent and DXL Client ConnectivityAfter the MacAfee Agent and DXL Clients are successfully installed,verify the connectivity on the BeyondInsight server by opening thesystem tray McAfee icon About section. It should list the McAfee Agentrunning and connected and the DXL Client running and connected.
Note: The DXL Client may not be in a connected state untilBeyondInsight DXL Broker service is installed and running.
Run the BeyondInsight DXL Broker Service Installer
1. Run the BeyondInsightDXLMessageBroker.msi installer from an elevated command prompt and go through the installationsteps. Admin privileges are required to enable the MSMQWindows feature.
2. An MSMQWindows feature will be enabled with a default DXL events (outbound) queue. This can be managed in thefollowing location: Computer > Manage > Services and Applications > Message Queue.
Note: By default this queue is not accessible by the admin. In order to manage this queue, refer to the steps below.
3. The installer deploys the BeyondInsight DXL Broker service, along with the service configuration, logs, and utilities to thefollowing location: C:\Program Files\BeyondInsight\DXL Broker Service.
4. To view and manage the private queues, an admin user may need to do the following:
a. Take ownership of the queue through Properties > Security > Advanced button > Owner.b. Change the owner to an admin user.c. Add the admin user to Users and Groups for the queue and assign full control access.d. The McAfee system tray will indicate that the DXL Client is connected.
Create the BeyondInsight DXL Event Forwarder Connector
1. Select Configuration > General > Connectors.2. In the Connectors pane, click + on the lower left corner.
SALES: www.beyondtrust.com/contact SUPPORT: www.beyondtrust.com/support DOCUMENTATION: www.beyondtrust.com/docs 14©2003-2020 BeyondTrust Corporation. All Rights Reserved. Other trademarks identified on this page are owned by their respective owners. BeyondTrust is not a chartered bank or trust company, or depositoryinstitution. It is not authorized to accept deposits or trust accounts and is not licensed or regulated by any state or federal banking authority.
TC: 5/5/2020
BEYONDINSIGHT AND PASSWORD SAFE
THIRD-PARTY INTEGRATION GUIDE 6.10
3. SelectMcAfee DXL Event Forwarder.4. Enter a name for the connector.5. Check Enable Event Forwarding.6. Select your desired event types to forward and then click Update.
Test the DXL Connection with BeyondInsightTo verify the connector configured above, you can send a simple test message from the Event Forwarder configuration page. Beforeproceeding, ensure that you have subscribed to the corresponding Test topic within ePO.
For more information, please see "Configure the BeyondInsight Event Topics" on page 13.
1. Select Configuration > General > Connectors.2. Select the connector you configured above and then click Test.3. Within ePO, verify that the Test topic has received the test event message.
Troubleshoot Issues with McAfee DXL Connector
The McAfee Agent or DXL Client Not Showing as Connected
After installing the McAfee Agent and DXL Client, a machine reboot may be required to register the new software.
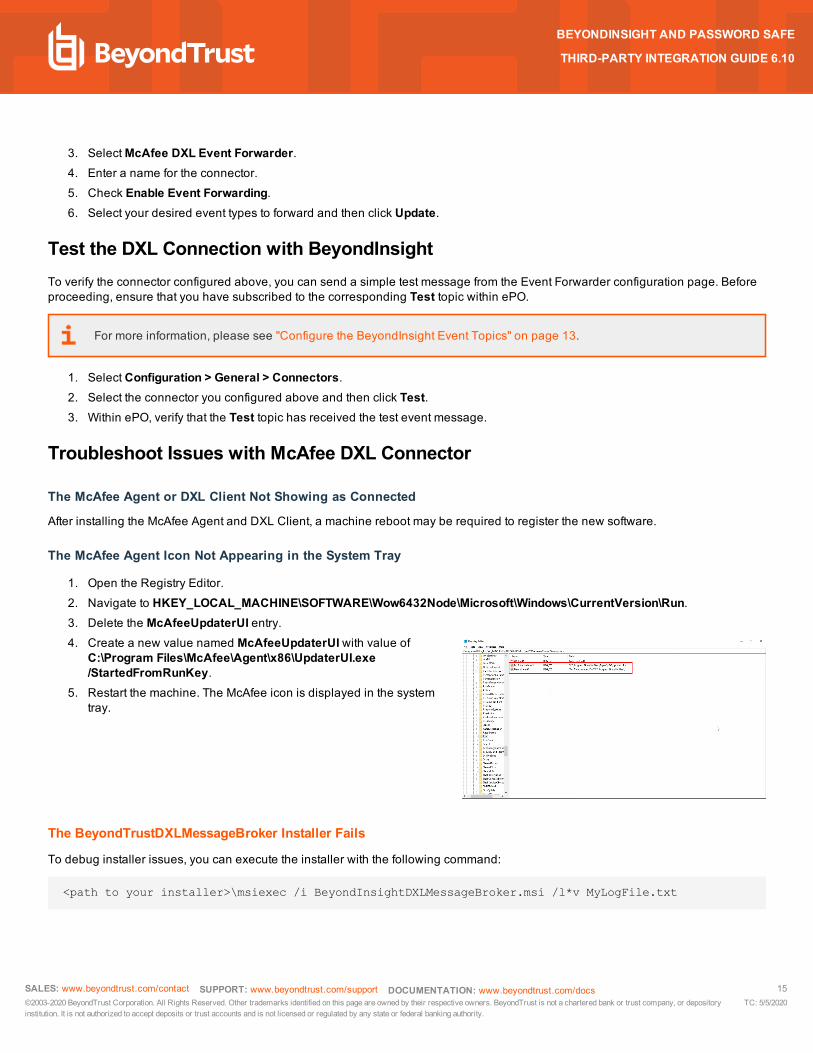
The McAfee Agent Icon Not Appearing in the System Tray
1. Open the Registry Editor.2. Navigate to HKEY_LOCAL_MACHINE\SOFTWARE\Wow6432Node\Microsoft\Windows\CurrentVersion\Run.3. Delete the McAfeeUpdaterUI entry.4. Create a new value named McAfeeUpdaterUI with value of
C:\Program Files\McAfee\Agent\x86\UpdaterUI.exe/StartedFromRunKey.
5. Restart the machine. The McAfee icon is displayed in the systemtray.
The BeyondTrustDXLMessageBroker Installer Fails
To debug installer issues, you can execute the installer with the following command:
<path to your installer>\msiexec /i BeyondInsightDXLMessageBroker.msi /l*v MyLogFile.txt
SALES: www.beyondtrust.com/contact SUPPORT: www.beyondtrust.com/support DOCUMENTATION: www.beyondtrust.com/docs 15©2003-2020 BeyondTrust Corporation. All Rights Reserved. Other trademarks identified on this page are owned by their respective owners. BeyondTrust is not a chartered bank or trust company, or depositoryinstitution. It is not authorized to accept deposits or trust accounts and is not licensed or regulated by any state or federal banking authority.
TC: 5/5/2020
BEYONDINSIGHT AND PASSWORD SAFE
THIRD-PARTY INTEGRATION GUIDE 6.10
A 1603 Error Code often indicates that the installer is not being executed with sufficient privileges to enable the MSMQWindowsfeature.
The BeyondTrust DXL Message Broker Service Cannot be Restarted or Removed
If necessary, to forcibly remove a stuck service (and subsequently re-install the service), use the following command:
sc delete BeyondInsightDXLMessageBroker
Location of Log Files
l BeyondInsight Message Broker logs are located here by default:
C:\Program Files\BeyondTrust\DXL Message Broker\Logs
l McAfee Agent and DXL Client logs are located here by default:
C:\ProgramData\McAfee\Agent\logs
C:\ProgramData\McAfee\Data_Exchange_Layer
SALES: www.beyondtrust.com/contact SUPPORT: www.beyondtrust.com/support DOCUMENTATION: www.beyondtrust.com/docs 16©2003-2020 BeyondTrust Corporation. All Rights Reserved. Other trademarks identified on this page are owned by their respective owners. BeyondTrust is not a chartered bank or trust company, or depositoryinstitution. It is not authorized to accept deposits or trust accounts and is not licensed or regulated by any state or federal banking authority.
TC: 5/5/2020
BEYONDINSIGHT AND PASSWORD SAFE
THIRD-PARTY INTEGRATION GUIDE 6.10
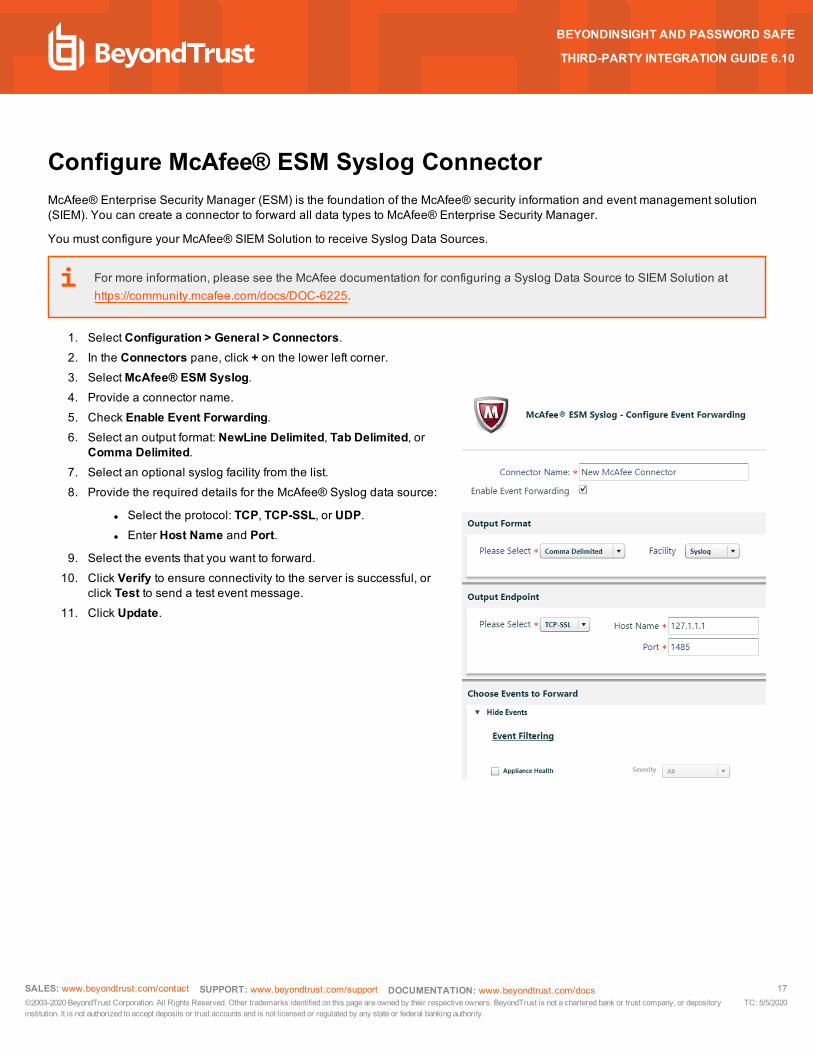
Configure McAfee® ESM Syslog ConnectorMcAfee® Enterprise Security Manager (ESM) is the foundation of the McAfee® security information and event management solution(SIEM). You can create a connector to forward all data types to McAfee® Enterprise Security Manager.
You must configure your McAfee® SIEM Solution to receive Syslog Data Sources.
For more information, please see the McAfee documentation for configuring a Syslog Data Source to SIEM Solution athttps://community.mcafee.com/docs/DOC-6225.
1. Select Configuration > General > Connectors.2. In the Connectors pane, click + on the lower left corner.3. SelectMcAfee® ESM Syslog.4. Provide a connector name.5. Check Enable Event Forwarding.6. Select an output format: NewLine Delimited, Tab Delimited, or
Comma Delimited.7. Select an optional syslog facility from the list.8. Provide the required details for the McAfee® Syslog data source:
l Select the protocol: TCP, TCP-SSL, or UDP.l Enter Host Name and Port.
9. Select the events that you want to forward.10. Click Verify to ensure connectivity to the server is successful, or
click Test to send a test event message.11. Click Update.
SALES: www.beyondtrust.com/contact SUPPORT: www.beyondtrust.com/support DOCUMENTATION: www.beyondtrust.com/docs 17©2003-2020 BeyondTrust Corporation. All Rights Reserved. Other trademarks identified on this page are owned by their respective owners. BeyondTrust is not a chartered bank or trust company, or depositoryinstitution. It is not authorized to accept deposits or trust accounts and is not licensed or regulated by any state or federal banking authority.
TC: 5/5/2020
BEYONDINSIGHT AND PASSWORD SAFE
THIRD-PARTY INTEGRATION GUIDE 6.10
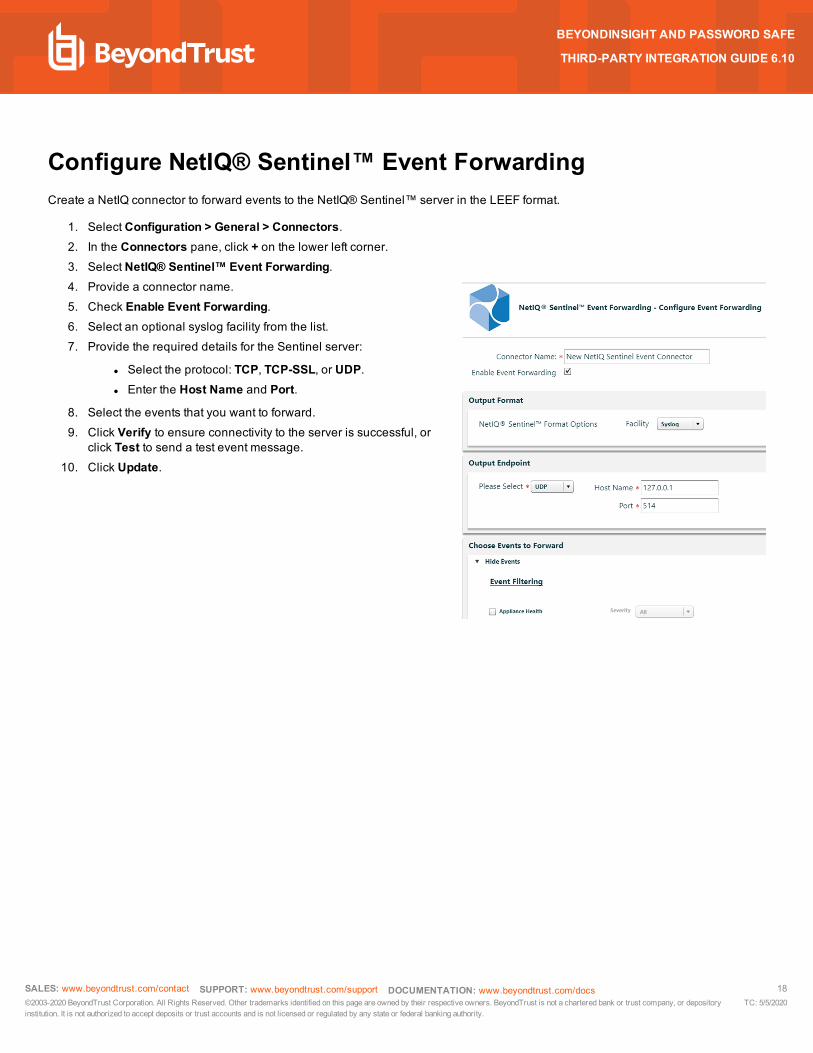
Configure NetIQ® Sentinel™ Event ForwardingCreate a NetIQ connector to forward events to the NetIQ® Sentinel™ server in the LEEF format.
1. Select Configuration > General > Connectors.2. In the Connectors pane, click + on the lower left corner.3. Select NetIQ® Sentinel™ Event Forwarding.4. Provide a connector name.5. Check Enable Event Forwarding.6. Select an optional syslog facility from the list.7. Provide the required details for the Sentinel server:
l Select the protocol: TCP, TCP-SSL, or UDP.l Enter the Host Name and Port.
8. Select the events that you want to forward.9. Click Verify to ensure connectivity to the server is successful, or
click Test to send a test event message.10. Click Update.
SALES: www.beyondtrust.com/contact SUPPORT: www.beyondtrust.com/support DOCUMENTATION: www.beyondtrust.com/docs 18©2003-2020 BeyondTrust Corporation. All Rights Reserved. Other trademarks identified on this page are owned by their respective owners. BeyondTrust is not a chartered bank or trust company, or depositoryinstitution. It is not authorized to accept deposits or trust accounts and is not licensed or regulated by any state or federal banking authority.
TC: 5/5/2020
BEYONDINSIGHT AND PASSWORD SAFE
THIRD-PARTY INTEGRATION GUIDE 6.10

Configure Palo Alto Networks ConnectorBefore you create the Palo Alto connector, create an address group that includes the IP addresses.
1. Select Configuration > General > Connectors.2. In the Connectors pane, click + on the lower left corner.3. Select Palo Alto Networks Connector.4. Provide a connector name and description.5. Enter the URI address for the Palo Alto service, including the
credential to access the site. Click Test Connection to ensure theBeyondInsight server can reach the Palo Alto server.
6. By default, a Palo Alto Networks Workgroup is selected. Theworkgroup will be created when the connector is created.
7. Select the address group that you created from the list.8. Check Active to turn on synchronization.9. Select scheduling settings for when the synchronization runs.10. Check Run Immediate to start the synchronization immediately
after clicking Update.11. Click Update. The first synchronization can take time. The first run
includes importing the vulnerability definitions.
SALES: www.beyondtrust.com/contact SUPPORT: www.beyondtrust.com/support DOCUMENTATION: www.beyondtrust.com/docs 19©2003-2020 BeyondTrust Corporation. All Rights Reserved. Other trademarks identified on this page are owned by their respective owners. BeyondTrust is not a chartered bank or trust company, or depositoryinstitution. It is not authorized to accept deposits or trust accounts and is not licensed or regulated by any state or federal banking authority.
TC: 5/5/2020
BEYONDINSIGHT AND PASSWORD SAFE
THIRD-PARTY INTEGRATION GUIDE 6.10

Configure SailPoint IntegrationIdentityIQ is an identity and access management solution from SailPoint. BeyondInsight offers two ways of integrating with IdentityIQvia IdentityIQ's Simple Table Integration, referred to as v1 (Role Import) and v2 (Entitlement Provisioning). V2 (EntitlementProvisioning) is the recommended method for integration.
V1 Role Import
User accounts and roles created in IdentityIQ can be imported and managed in BeyondInsight.
V2 Entitlement Provisioning
BeyondInsight accounts and groups can be imported into IdentityIQ. New or existing Active Directory users can then be provisionedto BeyondInsight local groups. Although the role import method can also be used with entitlement provisioning, it's not recommended.
For both versions, permissions defined in BeyondInsight and Password Safe will be synchronized with IdentityIQ.
Create the SailPoint Integration Connector
1. Select Configuration > General > Connectors.2. In the Connectors pane, click + on the lower left corner.3. Select SailPoint Integration.4. Check Enable SailPoint Integration, and then provide the
following information:
l Integration Version: Select the type of integration you areconfiguring: v1 (Role import) or v2 (Entitlementprovisioning).
l Database: Select a database type from the list:MySQL,Oracle, DB2, or Microsoft SQL Server.
l If your database is DB2, set the Path to DB2 DLL, whichis DB2's ADO.net library.
l Host: Enter the IP address or host name of the SailPointinstance.
l Port: Enter the port to use to connect to the SailPointMySQL instance.
l Username: Enter the username that has read and writeaccess to the STI database and read access to theIdentityIQ database.
l Password: The password for the username enteredabove.
l IdentityIQ Database Name: Enter the name of theIdentityIQ database.
l IdentityIQ Schema Name: Enter the name of theIdentityIQ schema. For MySQL, the schema name is thesame as the database name.
l STI Database Name: Enter the name of the STI database.l STI Schema Name: Enter the name of the STI schema.
SALES: www.beyondtrust.com/contact SUPPORT: www.beyondtrust.com/support DOCUMENTATION: www.beyondtrust.com/docs 20©2003-2020 BeyondTrust Corporation. All Rights Reserved. Other trademarks identified on this page are owned by their respective owners. BeyondTrust is not a chartered bank or trust company, or depositoryinstitution. It is not authorized to accept deposits or trust accounts and is not licensed or regulated by any state or federal banking authority.
TC: 5/5/2020
BEYONDINSIGHT AND PASSWORD SAFE
THIRD-PARTY INTEGRATION GUIDE 6.10

Note: If you use DB2, you must install a driver package on the BeyondInsight server. The name of the package is ibm_data_server_driver_package_win64_v11.1 and it can be downloaded at:https://www.ibm.com/support/pages/node/387577
5. Click Update.
Create a SailPoint User Group (for v1 - Role Import)
1. Select Configuration > Role Based Access > Users & Groups.2. In the User Groups pane, click +.3. Select SailPoint Group.
4. Select a SailPoint role from the list that you want to import.
5. Assign permissions for this group.6. Click Create.
The user accounts will be imported from SailPoint. You can then log into BeyondInsight and Password Safe with these user accounts,using their Active Directory credentials.
Provision Users to BeyondInsight Local Groups (for v2 - Entitlement Provisioning)Provision operations are performed in IdentityIQ. Once BeyondInsight has synchronized its users and groups with IdentityIQ, and theSTI BeyondInsight account and group aggregation tasks in IdentityIQ have run, you can provision new or existing users toBeyondInsight local groups.
Only BeyondInsight local groups can be provisioned in IdentityIQ. BeyondInsight active directory groups and role-based groups thatwere imported from IdentityIQ cannot be provisioned because they are based on an external data source and can't be modified.
In order for an identity to be provisioned, the identity must have an active directory account. If an identity has multiple active directoryaccounts, you must complete a provisioning form to select which active directory account is intended to be provisioned.
View Permissions in IdentityIQPeriodically, permissions and users will be synchronized with SailPoint. You can view BeyondInsight and Password Safepermissions in SailPoint by logging in to IdentityIQ and performing one of the following series of steps:
SALES: www.beyondtrust.com/contact SUPPORT: www.beyondtrust.com/support DOCUMENTATION: www.beyondtrust.com/docs 21©2003-2020 BeyondTrust Corporation. All Rights Reserved. Other trademarks identified on this page are owned by their respective owners. BeyondTrust is not a chartered bank or trust company, or depositoryinstitution. It is not authorized to accept deposits or trust accounts and is not licensed or regulated by any state or federal banking authority.
TC: 5/5/2020
BEYONDINSIGHT AND PASSWORD SAFE
THIRD-PARTY INTEGRATION GUIDE 6.10
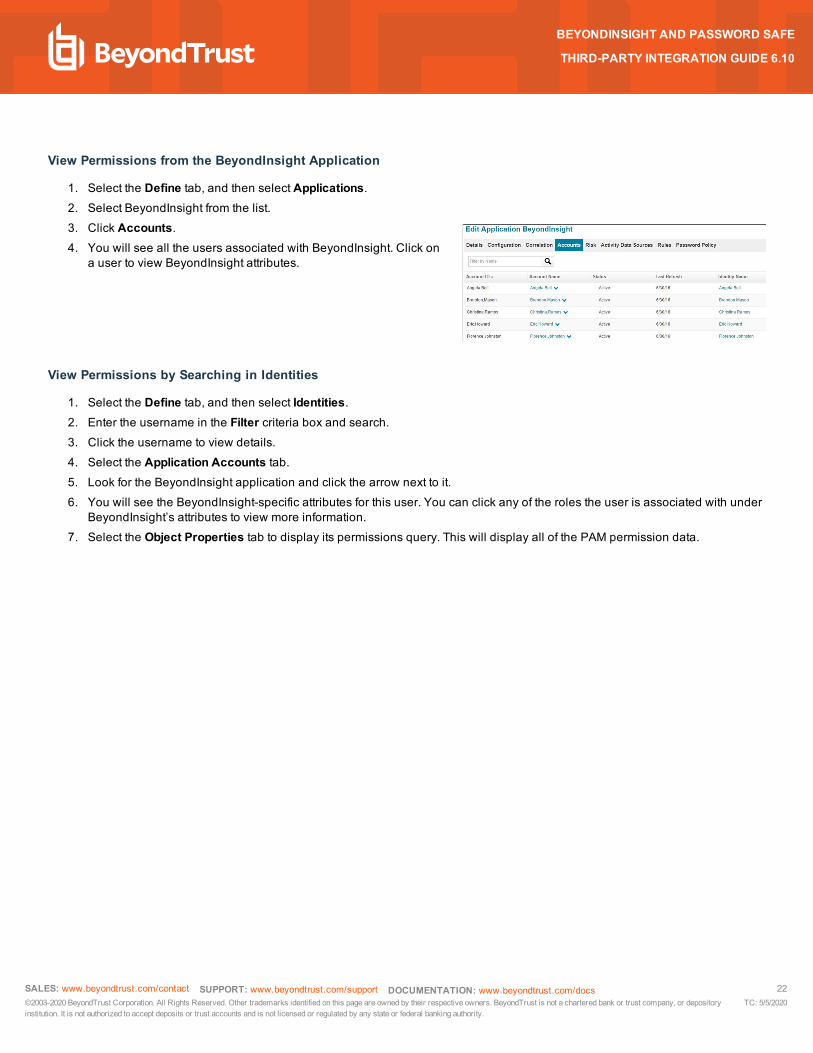
View Permissions from the BeyondInsight Application
1. Select the Define tab, and then select Applications.2. Select BeyondInsight from the list.3. Click Accounts.4. You will see all the users associated with BeyondInsight. Click on
a user to view BeyondInsight attributes.
View Permissions by Searching in Identities
1. Select the Define tab, and then select Identities.2. Enter the username in the Filter criteria box and search.3. Click the username to view details.4. Select the Application Accounts tab.5. Look for the BeyondInsight application and click the arrow next to it.6. You will see the BeyondInsight-specific attributes for this user. You can click any of the roles the user is associated with under
BeyondInsight’s attributes to view more information.7. Select the Object Properties tab to display its permissions query. This will display all of the PAM permission data.
SALES: www.beyondtrust.com/contact SUPPORT: www.beyondtrust.com/support DOCUMENTATION: www.beyondtrust.com/docs 22©2003-2020 BeyondTrust Corporation. All Rights Reserved. Other trademarks identified on this page are owned by their respective owners. BeyondTrust is not a chartered bank or trust company, or depositoryinstitution. It is not authorized to accept deposits or trust accounts and is not licensed or regulated by any state or federal banking authority.
TC: 5/5/2020
BEYONDINSIGHT AND PASSWORD SAFE
THIRD-PARTY INTEGRATION GUIDE 6.10

Configure SCIM ConnectorThe SCIM connector adds a SCIM API to Password Safe to allow third-party applications to view and modify users, groups, and smartrule permissions.
For more information, please see the following:
SCIM implementations at http://www.simplecloud.info/
The PAM extension, viewable at https://tools.ietf.org/html/draft-grizzle-scim-pam-ext-00
SailPoint IdentityIQ IntegrationIdentityIQ currently supports:
l Reading users, groups, smart rules, and smart rule permissions into their systeml Creating users, and adding and removing users to and from groups
Although this is what the IdentityIQ supports, the SCIM connector follows the SCIM and PAM extension standard, so it is possible toassign permissions to groups. IdentityIQ supports assigning permissions to users only, which isn't compatible with Password Safe.
Configure SailPoint IdentityIQ
To help configure the SCIM API in IndentityIQ, an application XML pre-built with local and AD user provisioning is available on theBeyondTrust customer portal.
To configure the IdentityIQ SCIM application manually to be compatible with Password Safe, there are some default schema settingsyou need to modify, as follows:
Account Schema
l Under name, remove middleName, honorificPrefix, and honorificSuffix.l Remove nickName, profileUrl, title, userType, preferredLanguage, locale, and timezone.l Remove all email fields and replace with a single email field.
For the provisioning form, if you intend to create Active Directory users only, the native identifier must be populated with thedistinguished name. All other fields will be populated with what is in Active Directory. The following script will populate IdentityIQfields with allowed values for distinguished name:
import java.util.*;import sailpoint.object.*;import sailpoint.api.*;
List adLinks = new ArrayList();if (identity != null) {Application targetApplication = context.getObjectByName(Application.class, "Active Directory");// "Active Directory" here is the name of the AD application you want to useIdentityService identityService = new IdentityService(context);List links = identityService.getLinks(identity, targetApplication);if (links != null) {
SALES: www.beyondtrust.com/contact SUPPORT: www.beyondtrust.com/support DOCUMENTATION: www.beyondtrust.com/docs 23©2003-2020 BeyondTrust Corporation. All Rights Reserved. Other trademarks identified on this page are owned by their respective owners. BeyondTrust is not a chartered bank or trust company, or depositoryinstitution. It is not authorized to accept deposits or trust accounts and is not licensed or regulated by any state or federal banking authority.
TC: 5/5/2020
BEYONDINSIGHT AND PASSWORD SAFE
THIRD-PARTY INTEGRATION GUIDE 6.10
for (Link link : links) {adLinks.add((String)link.getAttribute("distinguishedName"));
}}
}return adLinks;
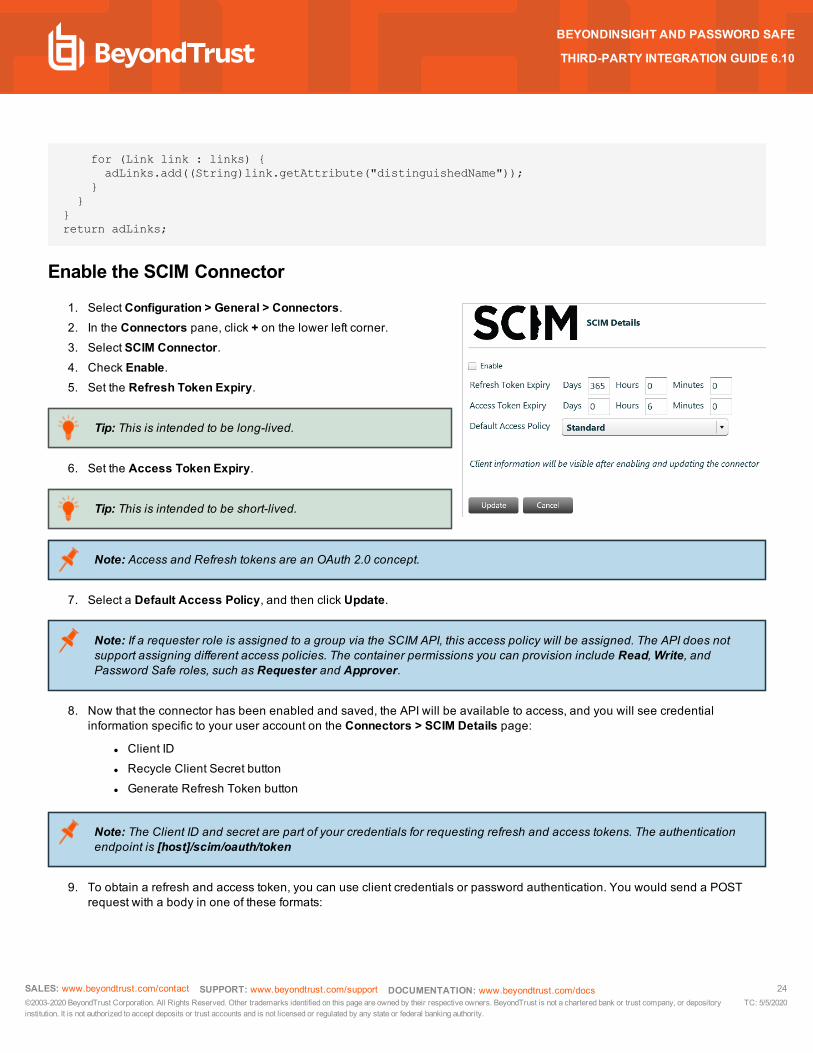
Enable the SCIM Connector
1. Select Configuration > General > Connectors.2. In the Connectors pane, click + on the lower left corner.3. Select SCIM Connector.4. Check Enable.5. Set the Refresh Token Expiry.
Tip: This is intended to be long-lived.
6. Set the Access Token Expiry.
Tip: This is intended to be short-lived.
Note: Access and Refresh tokens are an OAuth 2.0 concept.
7. Select a Default Access Policy, and then click Update.
Note: If a requester role is assigned to a group via the SCIM API, this access policy will be assigned. The API does notsupport assigning different access policies. The container permissions you can provision include Read,Write, andPassword Safe roles, such as Requester and Approver.
8. Now that the connector has been enabled and saved, the API will be available to access, and you will see credentialinformation specific to your user account on the Connectors > SCIM Details page:
l Client IDl Recycle Client Secret buttonl Generate Refresh Token button
Note: The Client ID and secret are part of your credentials for requesting refresh and access tokens. The authenticationendpoint is [host]/scim/oauth/token
9. To obtain a refresh and access token, you can use client credentials or password authentication. You would send a POSTrequest with a body in one of these formats:
SALES: www.beyondtrust.com/contact SUPPORT: www.beyondtrust.com/support DOCUMENTATION: www.beyondtrust.com/docs 24©2003-2020 BeyondTrust Corporation. All Rights Reserved. Other trademarks identified on this page are owned by their respective owners. BeyondTrust is not a chartered bank or trust company, or depositoryinstitution. It is not authorized to accept deposits or trust accounts and is not licensed or regulated by any state or federal banking authority.
TC: 5/5/2020
BEYONDINSIGHT AND PASSWORD SAFE
THIRD-PARTY INTEGRATION GUIDE 6.10
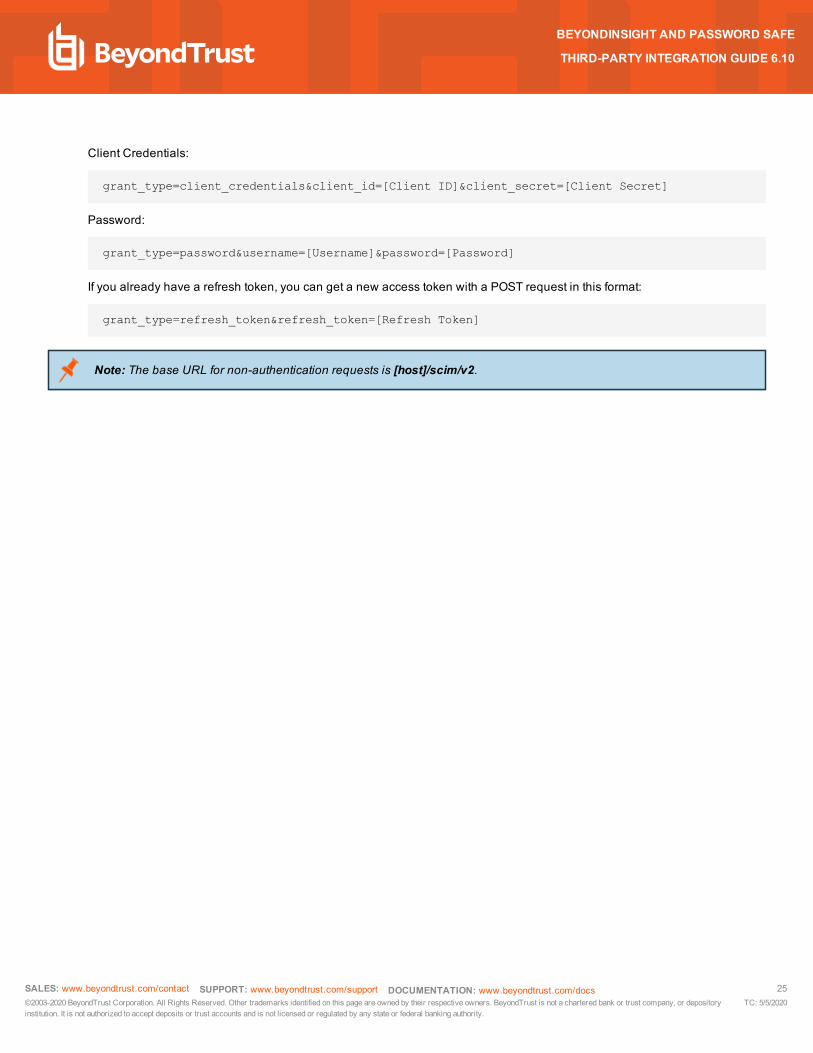
Client Credentials:
grant_type=client_credentials&client_id=[Client ID]&client_secret=[Client Secret]
Password:
grant_type=password&username=[Username]&password=[Password]
If you already have a refresh token, you can get a new access token with a POST request in this format:
grant_type=refresh_token&refresh_token=[Refresh Token]
Note: The base URL for non-authentication requests is [host]/scim/v2.
SALES: www.beyondtrust.com/contact SUPPORT: www.beyondtrust.com/support DOCUMENTATION: www.beyondtrust.com/docs 25©2003-2020 BeyondTrust Corporation. All Rights Reserved. Other trademarks identified on this page are owned by their respective owners. BeyondTrust is not a chartered bank or trust company, or depositoryinstitution. It is not authorized to accept deposits or trust accounts and is not licensed or regulated by any state or federal banking authority.
TC: 5/5/2020
BEYONDINSIGHT AND PASSWORD SAFE
THIRD-PARTY INTEGRATION GUIDE 6.10

Configure SNMP Trap and Syslog Event ForwardingBeyondInsight, Network Security Scanner, Password Safe, and Endpoint Privilege Management products can forward the following:
l SNMP traps using versions 1, 2, or 3l Events through a Syslog Daemeon
With this forwarding function, it is feasible to integrate critical event information directly into a NMS, SIM, NAC, or other logconsolidation, or event management systems.
A standard SNMP MIB, EEYE-RETINA_ EVENT-MIB, is available for decoding traps at the destination and is located at C:\ProgramFiles\BeyondTrust\Retina 5\Help\Snmp Directory.
Note: This MIB is valid for BeyondInsight and Network Security Scanner.
You can configure SNMP and Syslog event forwarding settings from the Connectors page. Both protocols work for all dataaggregated by BeyondInsight and Network Security Scanner.
Enable SNMP Event Forwarding
1. Select Configuration > General > Connectors.2. In the Connectors pane, click + on the lower left corner.3. Select SNMP Event Forwarding.4. Enter a connector name.5. Check Enable Event Forwarding.6. Select an Output Format and provide the name of the SNMP
Community.7. Provide the IP address and port for the SNMP Trap receiver.8. Select the events that you want to forward.9. Click Verify to ensure connectivity to the server is successful, or
click Test to send a test event message.10. Click Update.
Enable Syslog Event Forwarding
1. Select Configuration > General > Connectors.2. In the Connectors pane, click + on the lower left corner.
SALES: www.beyondtrust.com/contact SUPPORT: www.beyondtrust.com/support DOCUMENTATION: www.beyondtrust.com/docs 26©2003-2020 BeyondTrust Corporation. All Rights Reserved. Other trademarks identified on this page are owned by their respective owners. BeyondTrust is not a chartered bank or trust company, or depositoryinstitution. It is not authorized to accept deposits or trust accounts and is not licensed or regulated by any state or federal banking authority.
TC: 5/5/2020
BEYONDINSIGHT AND PASSWORD SAFE
THIRD-PARTY INTEGRATION GUIDE 6.10
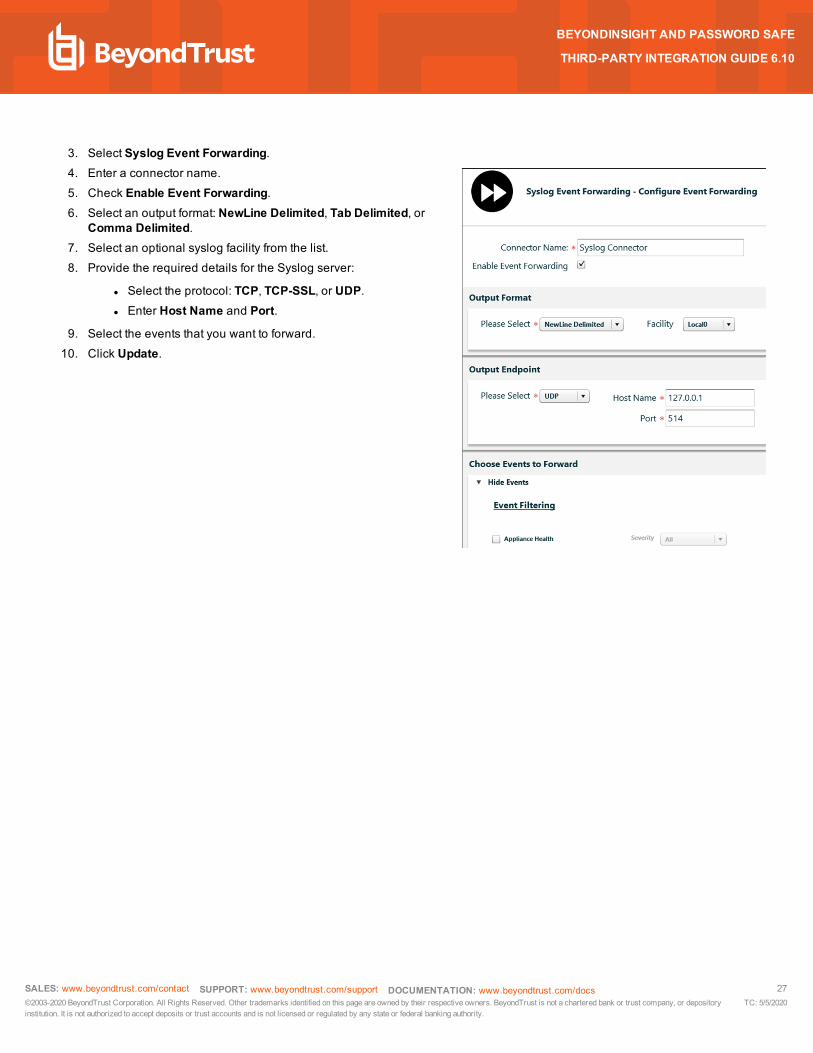
3. Select Syslog Event Forwarding.4. Enter a connector name.5. Check Enable Event Forwarding.6. Select an output format: NewLine Delimited, Tab Delimited, or
Comma Delimited.7. Select an optional syslog facility from the list.8. Provide the required details for the Syslog server:
l Select the protocol: TCP, TCP-SSL, or UDP.l Enter Host Name and Port.
9. Select the events that you want to forward.10. Click Update.
SALES: www.beyondtrust.com/contact SUPPORT: www.beyondtrust.com/support DOCUMENTATION: www.beyondtrust.com/docs 27©2003-2020 BeyondTrust Corporation. All Rights Reserved. Other trademarks identified on this page are owned by their respective owners. BeyondTrust is not a chartered bank or trust company, or depositoryinstitution. It is not authorized to accept deposits or trust accounts and is not licensed or regulated by any state or federal banking authority.
TC: 5/5/2020
BEYONDINSIGHT AND PASSWORD SAFE
THIRD-PARTY INTEGRATION GUIDE 6.10

Configure STIX™/TAXII™ ConnectorYou can create a connector in BeyondInsight to forward and receive privilege and vulnerability events that adhere to the STIX™ andTAXII™ industry standard specifications.
The BeyondInsight STIX™/TAXII™ Connector submits a STIX™ Incident Report to a TAXII Inbox Service. You must have anappropriate Inbox service configured on your TAXII™ services.
1. Select Configuration > General > Connectors.2. In the Connectors pane, click + on the lower left corner.3. Select STIX™/TAXII™ Connector.4. Enter a connector name.5. Check Enable Event Forwarding.6. Set the processing interval. The default is 300 seconds (5
minutes).7. Set the following TAXII™ Client Output Options for the TAXII™
server:
l TAXII Version: Select the version of TAXII on your server.l Host Name: Enter the URL to your TAXII Inbox service, forexample:https://taxii.mitre.org/services/inbox/default/
l Authentication: Select an authentication type: Basic orNone.
l Username: If you select Basic authentication, enter theusername for the TAXII Inbox Service.
l Password: If you select Basic authentication, enter theusername for the TAXII Inbox Service.
8. Click Verify to ensure connectivity to the server is successful, orclick Test to send a test event message.
9. Click Update.
SALES: www.beyondtrust.com/contact SUPPORT: www.beyondtrust.com/support DOCUMENTATION: www.beyondtrust.com/docs 28©2003-2020 BeyondTrust Corporation. All Rights Reserved. Other trademarks identified on this page are owned by their respective owners. BeyondTrust is not a chartered bank or trust company, or depositoryinstitution. It is not authorized to accept deposits or trust accounts and is not licensed or regulated by any state or federal banking authority.
TC: 5/5/2020
BEYONDINSIGHT AND PASSWORD SAFE
THIRD-PARTY INTEGRATION GUIDE 6.10
Configure Splunk® HTTP Event CollectorSIEM products, like Splunk HTTP Event Collector (EC), correlate information from an extensive list of security and operationalsolutions to gain visibility and context within an IT environment. This procedure documents how to integrate BeyondInsight andSplunk to help improve visibility and the decision-making processes with vulnerability data.
Events from BeyondTrust's endpoint privilege management and vulnerability management products can be forwarded to Splunk.
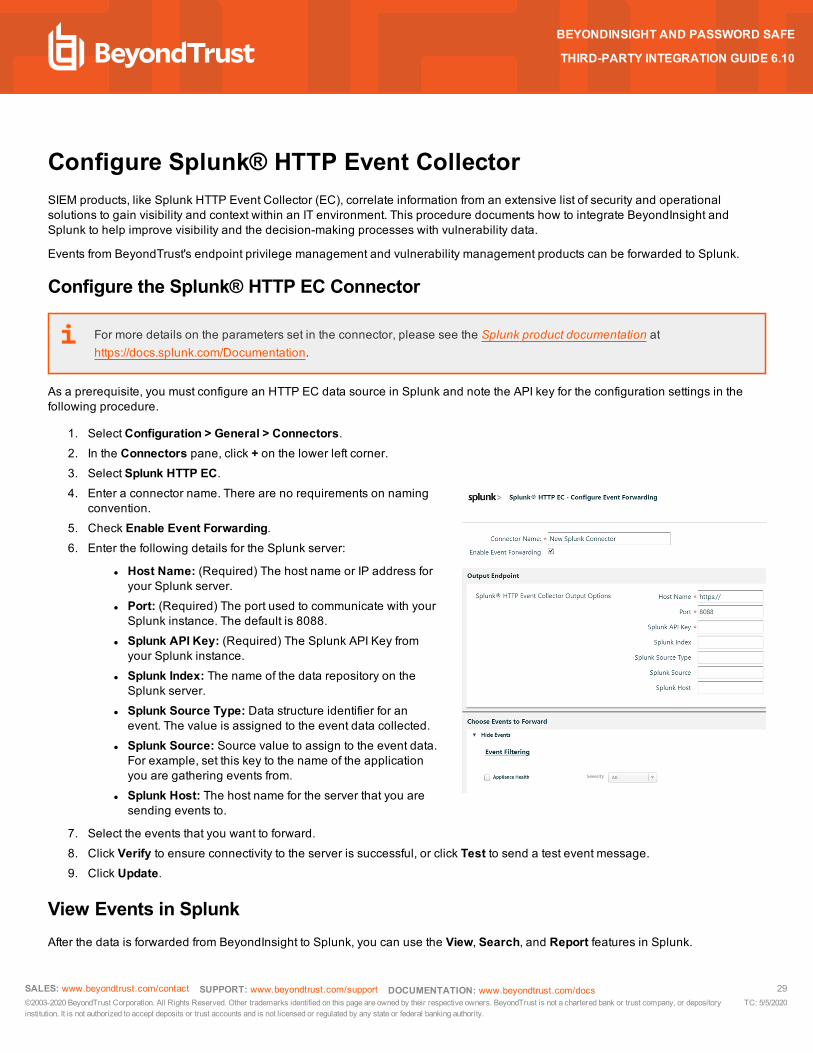
Configure the Splunk® HTTP EC Connector
For more details on the parameters set in the connector, please see the Splunk product documentation athttps://docs.splunk.com/Documentation.
As a prerequisite, you must configure an HTTP EC data source in Splunk and note the API key for the configuration settings in thefollowing procedure.
1. Select Configuration > General > Connectors.2. In the Connectors pane, click + on the lower left corner.3. Select Splunk HTTP EC.4. Enter a connector name. There are no requirements on naming
convention.5. Check Enable Event Forwarding.6. Enter the following details for the Splunk server:
l Host Name: (Required) The host name or IP address foryour Splunk server.
l Port: (Required) The port used to communicate with yourSplunk instance. The default is 8088.
l Splunk API Key: (Required) The Splunk API Key fromyour Splunk instance.
l Splunk Index: The name of the data repository on theSplunk server.
l Splunk Source Type: Data structure identifier for anevent. The value is assigned to the event data collected.
l Splunk Source: Source value to assign to the event data.For example, set this key to the name of the applicationyou are gathering events from.
l Splunk Host: The host name for the server that you aresending events to.
7. Select the events that you want to forward.8. Click Verify to ensure connectivity to the server is successful, or click Test to send a test event message.9. Click Update.
View Events in SplunkAfter the data is forwarded from BeyondInsight to Splunk, you can use the View, Search, and Report features in Splunk.
SALES: www.beyondtrust.com/contact SUPPORT: www.beyondtrust.com/support DOCUMENTATION: www.beyondtrust.com/docs 29©2003-2020 BeyondTrust Corporation. All Rights Reserved. Other trademarks identified on this page are owned by their respective owners. BeyondTrust is not a chartered bank or trust company, or depositoryinstitution. It is not authorized to accept deposits or trust accounts and is not licensed or regulated by any state or federal banking authority.
TC: 5/5/2020
BEYONDINSIGHT AND PASSWORD SAFE
THIRD-PARTY INTEGRATION GUIDE 6.10
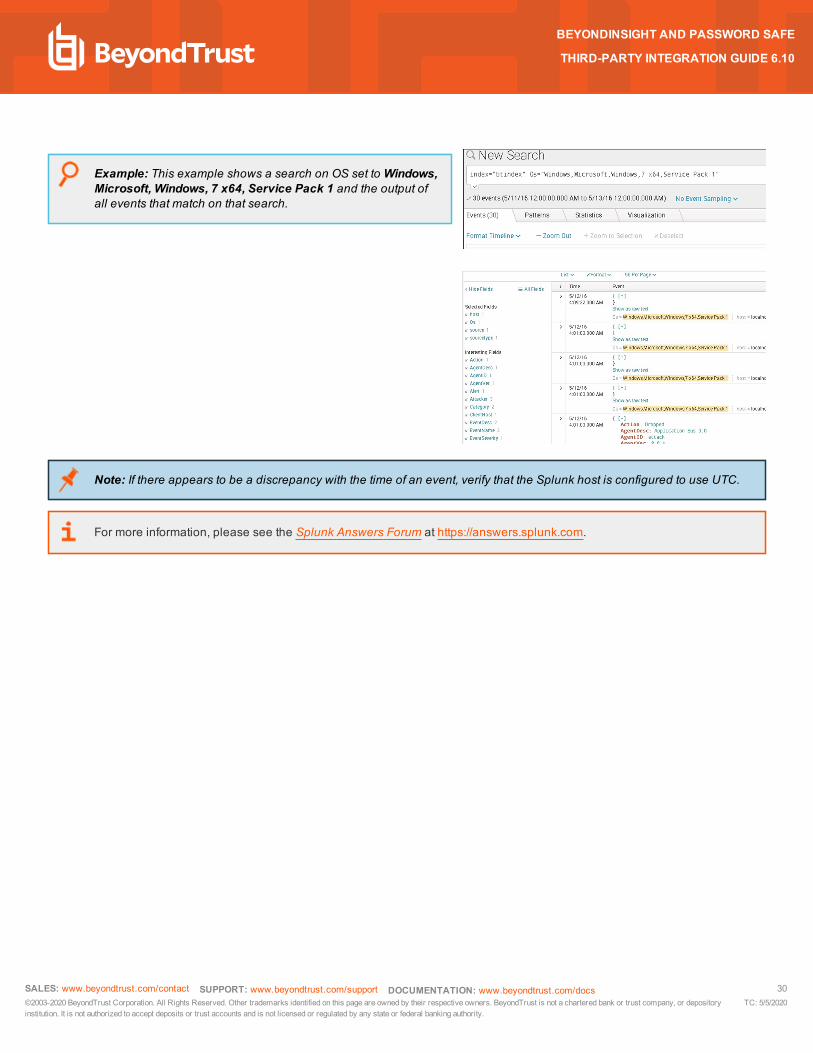
Example: This example shows a search on OS set toWindows,Microsoft, Windows, 7 x64, Service Pack 1 and the output ofall events that match on that search.
Note: If there appears to be a discrepancy with the time of an event, verify that the Splunk host is configured to use UTC.
For more information, please see the Splunk Answers Forum at https://answers.splunk.com.
SALES: www.beyondtrust.com/contact SUPPORT: www.beyondtrust.com/support DOCUMENTATION: www.beyondtrust.com/docs 30©2003-2020 BeyondTrust Corporation. All Rights Reserved. Other trademarks identified on this page are owned by their respective owners. BeyondTrust is not a chartered bank or trust company, or depositoryinstitution. It is not authorized to accept deposits or trust accounts and is not licensed or regulated by any state or federal banking authority.
TC: 5/5/2020
BEYONDINSIGHT AND PASSWORD SAFE
THIRD-PARTY INTEGRATION GUIDE 6.10
Configure Third Party Credential ProviderYou can create a connector and configure it to support credential providers that accept SOAP requests to a web service. You canthen use this credential to run a scan in BeyondInsight. You must be logged into BeyondInsight with an administrator account toconfigure a third party credential provider.
The below procedure uses CyberArk® Central Credential Provider (CCP), which is a SOAP API , as an example of how to create aconnector to third party credential provider in BeyondInsight. The following prerequisites are necessary to create a CCP connector:
l A CCP installation, including the Application Credential Provider (ACP) .l The ACP must be configured in CyberArk's Password Vault web interface (PVWA).l The application and the credential provider user need access to the account used for scanning with BeyondInsight.
For more information on CyberArk® Central Credential Provider, please see the CyberArk® product documentation.
Note: By default, the ACP is set to cache passwords for 3 minutes. This might cause the scan account’s password to notbe up to date when requested from BeyondInsight. The CacheLevel parameter can either be configured during ACPsetup , or in the AppProvider configuration found in the CyberArk ApplicationPasswordProvider\Env directory.
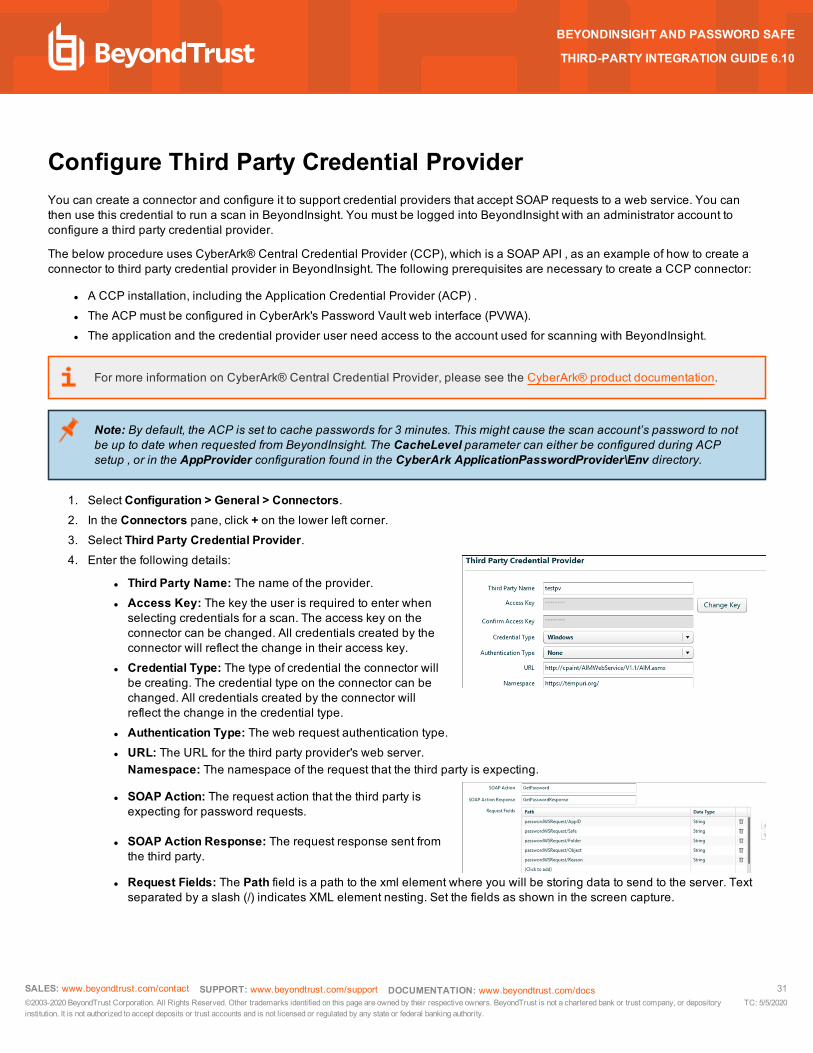
1. Select Configuration > General > Connectors.2. In the Connectors pane, click + on the lower left corner.3. Select Third Party Credential Provider.4. Enter the following details:
l Third Party Name: The name of the provider.l Access Key: The key the user is required to enter whenselecting credentials for a scan. The access key on theconnector can be changed. All credentials created by theconnector will reflect the change in their access key.
l Credential Type: The type of credential the connector willbe creating. The credential type on the connector can bechanged. All credentials created by the connector willreflect the change in the credential type.
l Authentication Type: The web request authentication type.l URL: The URL for the third party provider's web server.Namespace: The namespace of the request that the third party is expecting.
l SOAP Action: The request action that the third party isexpecting for password requests.
l SOAP Action Response: The request response sent fromthe third party.
l Request Fields: The Path field is a path to the xml element where you will be storing data to send to the server. Textseparated by a slash (/) indicates XML element nesting. Set the fields as shown in the screen capture.
SALES: www.beyondtrust.com/contact SUPPORT: www.beyondtrust.com/support DOCUMENTATION: www.beyondtrust.com/docs 31©2003-2020 BeyondTrust Corporation. All Rights Reserved. Other trademarks identified on this page are owned by their respective owners. BeyondTrust is not a chartered bank or trust company, or depositoryinstitution. It is not authorized to accept deposits or trust accounts and is not licensed or regulated by any state or federal banking authority.
TC: 5/5/2020
BEYONDINSIGHT AND PASSWORD SAFE
THIRD-PARTY INTEGRATION GUIDE 6.10
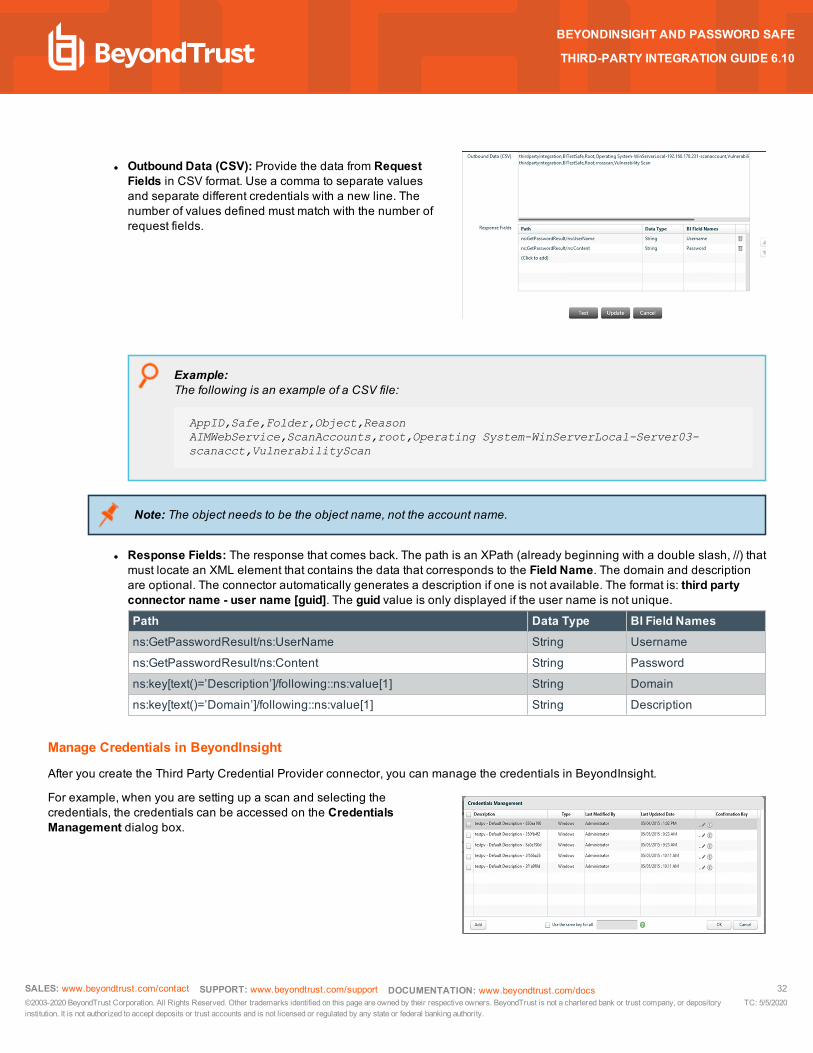
l Outbound Data (CSV): Provide the data from RequestFields in CSV format. Use a comma to separate valuesand separate different credentials with a new line. Thenumber of values defined must match with the number ofrequest fields.
Example:The following is an example of a CSV file:
AppID,Safe,Folder,Object,ReasonAIMWebService,ScanAccounts,root,Operating System-WinServerLocal-Server03-scanacct,VulnerabilityScan
Note: The object needs to be the object name, not the account name.
l Response Fields: The response that comes back. The path is an XPath (already beginning with a double slash, //) thatmust locate an XML element that contains the data that corresponds to the Field Name. The domain and descriptionare optional. The connector automatically generates a description if one is not available. The format is: third partyconnector name - user name [guid]. The guid value is only displayed if the user name is not unique.Path Data Type BI Field Namesns:GetPasswordResult/ns:UserName String Username
ns:GetPasswordResult/ns:Content String Password
ns:key[text()=’Description’]/following::ns:value[1] String Domain
ns:key[text()=’Domain’]/following::ns:value[1] String Description
Manage Credentials in BeyondInsight
After you create the Third Party Credential Provider connector, you can manage the credentials in BeyondInsight.
For example, when you are setting up a scan and selecting thecredentials, the credentials can be accessed on the CredentialsManagement dialog box.
SALES: www.beyondtrust.com/contact SUPPORT: www.beyondtrust.com/support DOCUMENTATION: www.beyondtrust.com/docs 32©2003-2020 BeyondTrust Corporation. All Rights Reserved. Other trademarks identified on this page are owned by their respective owners. BeyondTrust is not a chartered bank or trust company, or depositoryinstitution. It is not authorized to accept deposits or trust accounts and is not licensed or regulated by any state or federal banking authority.
TC: 5/5/2020
BEYONDINSIGHT AND PASSWORD SAFE
THIRD-PARTY INTEGRATION GUIDE 6.10
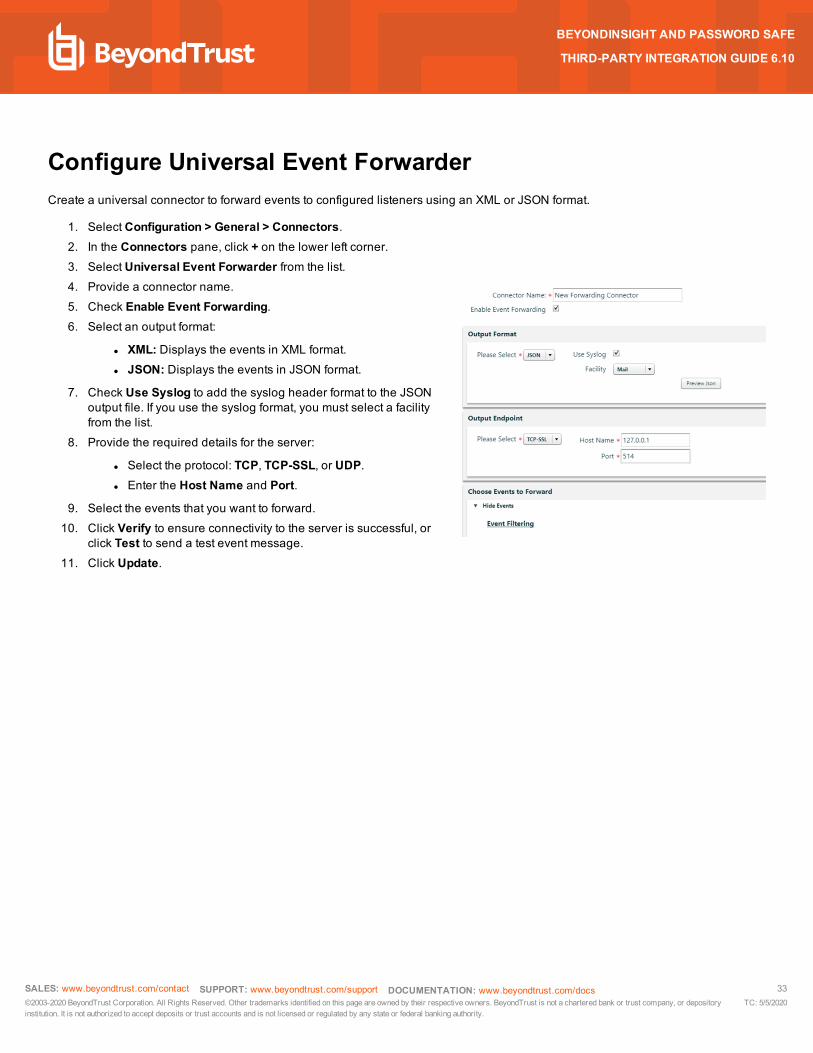
Configure Universal Event ForwarderCreate a universal connector to forward events to configured listeners using an XML or JSON format.
1. Select Configuration > General > Connectors.2. In the Connectors pane, click + on the lower left corner.3. Select Universal Event Forwarder from the list.4. Provide a connector name.5. Check Enable Event Forwarding.6. Select an output format:
l XML: Displays the events in XML format.l JSON: Displays the events in JSON format.
7. Check Use Syslog to add the syslog header format to the JSONoutput file. If you use the syslog format, you must select a facilityfrom the list.
8. Provide the required details for the server:
l Select the protocol: TCP, TCP-SSL, or UDP.l Enter the Host Name and Port.
9. Select the events that you want to forward.10. Click Verify to ensure connectivity to the server is successful, or
click Test to send a test event message.11. Click Update.
SALES: www.beyondtrust.com/contact SUPPORT: www.beyondtrust.com/support DOCUMENTATION: www.beyondtrust.com/docs 33©2003-2020 BeyondTrust Corporation. All Rights Reserved. Other trademarks identified on this page are owned by their respective owners. BeyondTrust is not a chartered bank or trust company, or depositoryinstitution. It is not authorized to accept deposits or trust accounts and is not licensed or regulated by any state or federal banking authority.
TC: 5/5/2020
BEYONDINSIGHT AND PASSWORD SAFE
THIRD-PARTY INTEGRATION GUIDE 6.10
Related Documents