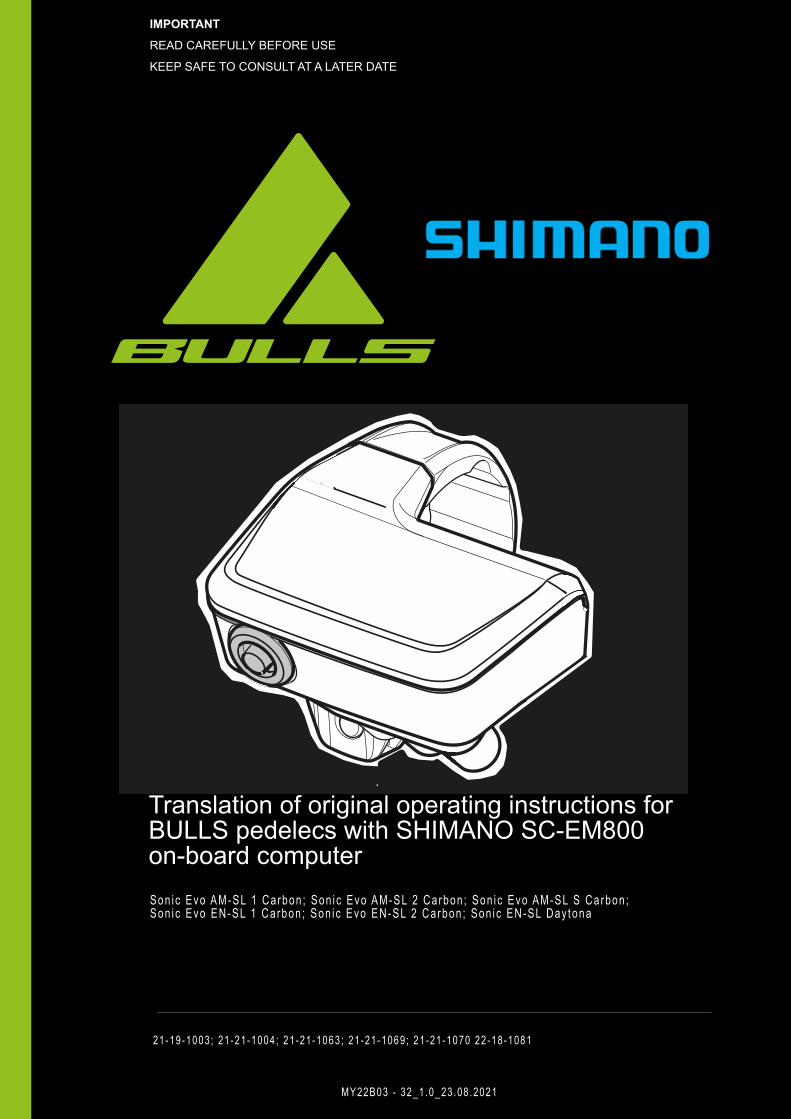
MY22B03 - 32_1.0_23.08.2021 Translation of original operating instructions for BULLS pedelecs with SHIMANO SC-EM800 on-board computer Sonic Evo AM-SL 1 Carbon; Sonic Evo AM-SL 2 Carbon; Sonic Evo AM-SL S Carbon; Sonic Evo EN-SL 1 Carbon; Sonic Evo EN-SL 2 Carbon; Sonic EN-SL Daytona 21-19-1003; 21-21-1004; 21-21-1063; 21-21-1069; 21-21-1070 22-18-1081 IMPORTANT READ CAREFULLY BEFORE USE KEEP SAFE TO CONSULT AT A LATER DATE

Welcome message from author
This document is posted to help you gain knowledge. Please leave a comment to let me know what you think about it! Share it to your friends and learn new things together.
Transcript
MY22B03 - 32_1 .0_23 .08 .2021
Translation of original operating instructions for BULLS pedelecs with SHIMANO SC-EM800 on-board computerSon ic Evo AM- SL 1 Ca rbon ; Son i c Evo AM- S L 2 Ca rbon ; Son i c Evo AM-SL S Ca rbon ; Son i c Evo EN- SL 1 Ca rbon ; Son i c Evo EN-SL 2 Ca rbon ; Son i c EN-SL Day t ona
21-19-1003 ; 21-21-1004 ; 21-21-1063 ; 21-21-1069 ; 21-21-1070 22 -18-1081
IMPORTANTREAD CAREFULLY BEFORE USE
KEEP SAFE TO CONSULT AT A LATER DATE

Contents
Contents1 About these operating instructions
1.1 Manufacturer 101.2 Laws, standards and directives 101.3 Language 101.4 For your information 101.4.1 Warnings 101.4.2 Markups 101.5 Type number and model 111.6 Frame number 111.7 Identifying the operating instructions 111.8 Aim of the operating instructions 12
2 Safety2.1 Residual risks 132.1.1 Risk of fire and explosion 132.1.1.1 Rechargeable battery 132.1.1.2 Overheated charger 132.1.1.3 Hot components 132.1.2 Electric shock 142.1.2.1 Damage 142.1.2.2 Water penetration 142.1.2.3 Condensation 142.1.3 Risk of a crash 142.1.3.1 Incorrect quick release setting 142.1.3.2 Incorrect tightening torque 142.1.3.3 Incorrect component 142.1.4 Risk of amputation 142.1.5 Key breaking off 142.1.6 Malfunctions due to Bluetooth® 152.2 Toxic substances 162.2.1 Brake fluid 162.2.2 Suspension oil 162.2.3 Lubrication oil 162.2.4 Defective battery 162.3 Requirements for riders 162.4 Vulnerable groups 162.5 Personal protective equipment 162.6 Safety guards 162.7 Safety markings and safety instructions 172.8 What to do in an emergency 172.8.1 Dangerous situation in road traffic 172.8.2 Leaked brake fluid 172.8.3 Battery vapours emitted 182.8.4 Battery fire 182.8.5 Oil and lubricant leaks from the rear frame damper 182.8.6 Oil and lubricant leaks from the fork 182.8.7 Lubricant leaking from the eightpins suspension seat post 19
3 Description3.1 Proper use 203.1.1 Improper use 213.1.2 Permitted total weight (PTW) 223.1.3 Environmental requirements 233.2 Nameplate 253.3 Components 26
MY22B03 - 32_1.0_23.08.2021 1
Contents
3.3.1 Overview 263.3.2 Chassis 273.3.2.1 Frame 273.3.2.2 Steering system 273.3.2.3 Steering headset 273.3.2.4 Stem 273.3.2.5 Handlebars 283.3.2.6 Fork 283.3.3 Suspension 293.3.3.1 Suspension fork 293.3.3.2 Rear frame damper 333.3.3.3 Suntour rear frame damper 363.3.3.4 RockShox rear frame damper 373.3.4 Wheel 383.3.4.1 Tyres 383.3.4.2 Rim 383.3.4.3 Valve 383.3.4.4 Spoke 393.3.4.5 Spoke nipples 393.3.4.6 Hub 393.3.5 Braking system 403.3.5.1 Mechanical brake 403.3.5.2 Hydraulic brake 403.3.5.3 Disc brake 413.3.6 Seat post 423.3.6.1 Patent seat post 423.3.6.2 Suspension seat post 423.3.6.3 ROCKSHOX Reverb AXS dropper post 433.3.7 Mechanical drive system 443.3.7.1 Chain drive layout 443.3.7.2 Belt drive layout 443.3.8 Electric drive system 453.3.8.1 Motor 453.3.8.2 Battery 453.3.8.3 Rechargeable battery 463.3.9 Riding light 463.3.10 Charger 463.3.10.1 On-board computer 473.3.10.2 Control panel 473.4 Description of controls and screens 483.4.1 Handlebars 483.4.2 On-board computer 493.4.2.1 Main screen 493.4.3 Warnings and errors 513.4.3.1 Warnings 513.4.3.2 Error messages 513.4.4 Gear shift 523.4.4.1 Control panel functions on right 523.4.5 Hand brake 543.4.6 Battery level indicator (battery) 553.5 Technical data 563.5.1 Pedelec 563.5.2 SHIMANO EP8 DU-EP800 motor 563.5.3 Rechargeable battery 563.5.3.1 BMZ, V10 563.5.4 Charger 563.5.4.1 SHIMANO, EC-E6002 563.5.5 SHIMANO SC-EM800 on-board computer 563.5.5.1 Specifications for wireless systems 56
MY22B03 - 32_1.0_23.08.2021 2
Contents
3.5.6 Emissions 573.5.7 Tightening torques 58
4 Transporting and storing4.1 Weight and dimensions for transportation 604.2 Designated handles, lifting points 604.3 Transportation 614.3.1 Using the brake transport securing system 614.3.2 Transporting the pedelec 614.3.3 Shipping a pedelec 614.3.4 Transporting the battery 614.3.5 Shipping the battery 614.4 Storing 624.4.1 Break in operation 624.4.1.1 Preparing a break in operation 624.4.1.2 Carrying out a break in operation 62
5 Assembly5.1 Unpacking 635.2 Required tools 635.3 Commissioning 645.3.1 Checking the battery 645.3.2 Preparing the wheel 655.3.3 Preparing the LIMOTEC seat post 665.3.4 Preparing the RockShox Reverb AXS seat post 675.3.4.1 Recharging the SRAM battery 675.3.4.2 Inserting the SRAM battery 675.3.4.3 Pairing the system 675.3.4.4 Ending pairing 675.3.5 Fitting the pedals 685.3.6 Checking the stem and handlebars 695.3.6.1 Checking the connections 695.3.6.2 Checking stem is firmly in position 695.3.6.3 Checking the headset backlash 695.4 Pedelec sale 69
6 Operation6.1 Risks and hazards 706.2 Tips for a greater range 726.3 Error messages 736.3.1 Battery error message 736.3.2 On-board computer warnings 746.4 Error message screen 756.5 Instruction and customer service 766.6 Adjusting the pedelec 766.6.1 Preparing 766.6.2 Pedelec adjustment procedure 776.6.3 Determining the sitting position 786.6.4 Adjusting the saddle 796.6.4.1 Straightening the saddle 796.6.4.2 Adjusting the saddle height 796.6.4.3 Setting the saddle height with the remote control 806.6.4.4 Adjusting the saddle position 816.6.4.5 Adjusting the saddle tilt 816.6.4.6 Checking saddle stability 816.6.5 Handlebars 826.6.5.1 Handlebar width 826.6.5.2 Hand position 82
MY22B03 - 32_1.0_23.08.2021 3
Contents
6.6.5.3 Adjusting the handlebars 826.6.6 Stem 836.6.6.1 Adjusting the handlebar height with quick release 836.6.6.2 Setting the quill stem 846.6.6.3 Adjusting the Ahead stem 846.6.6.4 Adjusting the angle-adjustable stem 856.6.7 Ergonomic handles 866.6.7.1 Checking handlebar stability 866.6.8 Tyres 876.6.9 Brake 886.6.9.1 Brake handle position 886.6.9.2 Brake handle tilt angle 886.6.9.3 Determining the grip distance 896.6.9.4 Grip distance on a SHIMANO ST-EF41 brake lever 906.6.9.5 Retracting the brake linings 916.6.10 Gear shift 926.6.10.1 SHIMANO shifter 926.6.11 Suspension 936.6.12 Fork sag 936.6.12.1 Adjusting the ROCKSHOX fork coil spring with spacer for pre-tensioning 946.6.12.2 Adjusting the RockShox coil spring with an external preload adjuster 966.6.12.3 ROCKSHOX Paragon Silver coil spring 976.6.12.4 Adjusting the RockShox fork air suspension 996.6.13 Adjust the rear frame damper sag 1016.6.13.1 Adjusting the RockShox rear frame damper 1026.6.14 Fork rebound damping 1046.6.14.1 Adjusting the RockShox suspension fork 1056.6.15 Adjusting the rear frame damper rebound damper 1066.6.15.1 Adjusting the RockShox rear frame damper 1076.6.16 Compression adjuster on rear frame damper 1086.6.16.1 Adjusting the RockShox compression adjuster 1096.6.17 Lighting 1106.6.17.1 Adjusting the lights 1106.6.18 Adjust on-board computer 1126.6.19 Opening the settings menu 1136.6.20 Closing the settings menu 1146.6.20.1 Sets the language 1146.6.20.2 Setting units 1146.6.20.3 Changing the displayed speed 1146.6.20.4 Adjusting the clock 1156.6.20.5 Changing the brightness 1156.6.20.6 Changing the beep sound 1156.6.20.7 Automatic light setting 1166.6.20.8 Adjusting the start gear 1166.6.20.9 Changing level of assistance 1166.6.20.10 Adjusts the gear shift 1176.6.20.11 RD protection reset 1176.6.20.12 Deleting all saved values 1186.6.21 Connecting an external device 1186.6.21.1 Connecting device via the ANT 1186.6.21.2 Connecting the device via Bluetooth® LE 1186.7 Connect external devices 1196.7.1 Connect via Bluetooth® LE 1196.7.2 Connect via ANT 1196.8 Using E-TUBE PROJECT 1196.9 Accessories 1206.9.1 Child seat 1206.9.2 Trailer 1216.9.2.1 Approval for trailer with Enviolo hub 121
MY22B03 - 32_1.0_23.08.2021 4
Contents
6.9.2.2 Approval for trailer with ROHLOFF hub 1226.9.3 Mobile holder 1226.9.4 Tubeless and airless tyres 1226.9.5 Suspension fork coil spring 1226.9.6 Pannier rack 1226.9.7 Panniers and cargo boxes 1226.10 Personal protective equipment and accessories for road safety 1236.11 Before each ride 1236.12 Straightening the quickly adjustable stem 1246.13 Using the pannier rack 1246.14 Raising the kickstand 1256.15 Using the saddle 1256.15.1 Using the leather saddle 1256.16 Using the pedals 1256.17 Using the multifunctional handlebars or bar ends 1256.17.1 Using leather handles 1256.18 Using the bell 1256.19 Rechargeable battery 1266.19.1 Removing the BT-E8036 battery 1266.19.2 Inserting the BT-E8036 battery 1276.19.3 Charging the battery 1276.20 Using pedelec with the electric drive system 1286.20.1 Switching on the electric drive system 1286.20.2 Switching off the electric drive system 1286.21 Using the on-board computer 1296.21.1 Using the riding light 1306.21.2 Selecting the level of assistance 1306.21.3 Using the push assist system 1316.21.3.1 Select WALK level of assistance 1316.21.3.2 Switching on the push assist 1316.21.3.3 Switching off the push assist 1316.21.3.4 Exit WALK level of assistance 1316.21.4 Switching the journey information 1316.22 Brake 1326.22.1 Using the brake lever 1326.23 Suspension and damping 1336.23.0.1 Adjusting the RockShox compression adjuster 1346.24 Gear shift 1356.24.1 Using the derailleur gears 1356.25 Parking 1366.25.1 Screwing in the All Up handlebars 136
7 Cleaning, servicing and maintenance7.1 Before each ride 1427.1.1 Checking the guards 1427.1.2 Checking the frame 1427.1.3 Checking the fork 1427.1.4 Checking the rear frame damper 1427.1.5 Checking the pannier rack 1427.1.6 Checking the guards 1427.1.7 Checking wheel concentricity 1427.1.8 Checking the quick releases 1427.1.9 Checking the suspension seat post 1427.1.10 Checking the bell 1437.1.11 Checking the handles 1437.1.12 Checking the USB cover 1437.1.13 Checking the lighting 1437.1.14 Checking the brake 143
MY22B03 - 32_1.0_23.08.2021 5

Contents
7.2 After each ride 1447.2.1 Cleaning the lights and reflectors 1447.2.2 Cleaning the suspension fork 1447.2.3 Caring for the suspension fork 1447.2.4 Cleaning the pedals 1447.2.5 Cleaning the brake 1447.2.6 Cleaning the suspension seat post 1447.2.7 Cleaning the rear frame damper 1447.3 Basic cleaning 1457.3.1 On-board computer and control panel 1457.3.2 Rechargeable battery 1457.3.3 Motor 1457.3.4 Frame, fork, pannier rack, guards and kickstand 1467.3.5 Stem 1467.3.6 Handlebars 1467.3.7 Handles 1467.3.7.1 Leather handles 1467.3.8 Seat post 1467.3.9 Saddle 1467.3.9.1 Leather saddle 1477.3.10 Tyres 1477.3.11 Spokes and spoke nipples 1477.3.12 Hub 1477.3.13 Switching elements 1477.3.13.1 Shifter 1477.3.14 Cassette, chain wheels and front derailleur 1477.3.15 Brake 1487.3.15.1 Brake lever 1487.3.16 Brake disc 1487.3.17 Belt 1487.3.18 Chain 1487.3.18.1 Chain with all-round chain guard 1487.4 Servicing 1497.4.1 Frame 1497.4.2 Fork 1497.4.3 Pannier rack 1507.4.4 Mudguard 1507.4.5 Servicing the kickstand 1507.4.6 Stem 1507.4.7 Handlebars 1507.4.8 Handle 1507.4.8.1 Rubber handles 1507.4.8.2 Leather handle 1517.4.9 Seat post 1517.4.9.1 Suspension seat post 1517.4.9.2 Carbon seat post 1517.4.10 Leather saddle 1517.4.11 Hub 1517.4.12 Spoke nipples 1517.4.13 Rim 1517.4.14 Gear shift 1527.4.14.1 Rear derailleur articulated shafts and jockey wheels 1527.4.14.2 Shifter 1527.4.15 Pedal 1527.4.16 Caring for the chain 1527.4.16.1 Caring for the chain and all-round chain guard 1527.4.17 Caring for the brake 1537.4.17.1 Caring for the brake 1537.4.18 Lubricating the eightpins seat post tube 153
MY22B03 - 32_1.0_23.08.2021 6
Contents
7.5 Maintenance 1547.5.1 Wheel 1547.5.1.1 Checking the tyre pressure 1547.5.1.2 Checking the tyres 1567.5.1.3 Checking the rims 1577.5.1.4 Checking the nipple holes 1577.5.1.5 Checking the nipple well 1577.5.1.6 Checking the rim hooks 1577.5.1.7 Checking the spokes 1577.5.2 Checking the brake system 1587.5.2.1 Checking the hand brake 1587.5.2.2 Checking the hydraulic system 1587.5.2.3 Checking the Bowden cables 1587.5.2.4 Checking the disc brake 1597.5.2.5 Checking the back-pedal brake 1607.5.2.6 Checking the rim brake 1617.5.3 Checking the lighting 1627.5.4 Checking the stem 1637.5.5 Check the handlebars 1637.5.6 Checking the saddle 1637.5.7 Checking the seat post 1637.5.8 Checking the chain 1637.5.9 Checking the chain and belt tension 1637.5.9.1 Checking the derailleur gears 1647.5.9.2 Checking the hub gear 1647.5.10 Checking the gear shift 1647.5.10.1 Electric gear shift 1647.5.10.2 Mechanical gear shift 1647.5.10.3 Checking the derailleur gears 1647.5.11 Adjusting gear shift 1657.5.11.1 ROHLOFF hub 1657.5.12 Bowden-cable-operated gear shift, single-cable 1657.5.13 Bowden-cable-operated gear shift, dual-cable 1657.5.14 Bowden-cable-operated twist grip, dual-cable 1667.5.15 Checking kickstand stability 166
8 Maintenance8.1 Initial inspection 1678.2 Maintenance 1678.3 Component-specific maintenance tasks 1678.4 Carry out initial inspection 1708.5 Maintenance instructions 1718.5.1 Servicing the frame 1788.5.1.1 Servicing the carbon frame 1788.5.2 Checking the pannier rack 1788.5.3 Servicing axle with quick release 1788.5.4 Maintaining the stem 1798.5.5 Servicing the gear hub 1798.5.5.1 Adjusting the hub with cone bearing 1798.5.6 Servicing the steering headset 1808.5.7 Servicing the fork 1808.5.7.1 Servicing the carbon suspension fork 1818.5.7.2 Servicing the suspension fork 1818.5.8 Servicing seat post 1828.5.8.1 Servicing the carbon seat post 1828.5.8.2 by.schulz suspension seat post 1838.5.8.3 Suntour suspension seat post 1838.5.8.4 Eightpins NGS2 seat post 1848.5.8.5 Eightpins H01 seat post 190
MY22B03 - 32_1.0_23.08.2021 7
Contents
8.5.9 Rear frame damper 1948.5.9.1 FOX component-specific maintenance 195
9 Troubleshooting, fault clearance and repair9.1 Troubleshooting and fault clearance 1969.1.1 The drive system or display do not start up 1969.1.2 RD protection reset 1969.1.3 Warning messages and LEDs 1969.2 Assistance function 1979.3 Rechargeable battery 1989.4 Lighting 1999.4.1 On-board computer error 1999.5 Miscellaneous 2009.5.1 RockShox suspension fork 2019.5.1.1 Rebound too fast 2019.5.1.2 Rebounding too slowly 2029.5.1.3 Suspension too soft on inclines 2039.5.1.4 Excessively hard damping on bumps 2049.5.2 RockShox rear frame damper 2059.5.2.1 Rebound too fast 2059.5.2.2 Rebounding too slowly 2069.5.2.3 Suspension too soft on inclines 2079.5.2.4 Excessively hard damping on bumps 2089.6 Repair 2099.6.1 Original parts and lubricants 2099.6.2 Replacing the lighting 2099.6.3 Setting the front light 2099.6.4 Checking tyre clearance 209
10 Recycling and disposal10.1 Removal of waste guidelines 210
11 Documents11.1 Assembly report 21211.2 Maintenance log 21411.2.1 Sonic AM-SL 1 Carbon 21811.2.2 Sonic AM-SL 1 Carbon 22011.2.3 Sonic AM-SL 2 Carbon 22211.2.4 Sonic EN-SL 1 Carbon 22411.2.5 Sonic EN-SL 2 Carbon 22611.2.6 Sonic EN-SL Daytona 228
12 Glossary12.1 Abbreviations 23312.2 Simplified terms 233
13 AppendixI. Translation of the original EC/EU Declaration of Conformity 2341.1 Declaration of Conformity for incomplete machine 2351.2 RED Declaration of Conformity 237
14 Keyword index
MY22B03 - 32_1.0_23.08.2021 8
About these operating instructions
Thank you for your trust!
BULLS pedelecs are premium quality vehicles. You have made an excellent choice. Your specialist dealer will provide you with guidance and instruction and assemble your product. Your specialist dealer will also be happy to assist you in the future, whether you require maintenance, conversion or repair.
You are receiving these operating instructions with your new pedelec. Please take time to become familiar with your new pedelec. Use the tips and suggestions in the operating instructions. They will help you to enjoy your pedelec for a long time to come. We hope you have fun and wish you well on all of your rides!
Download the operating instructions onto your phone at the following link, so that you can use them when you are out riding:
www.bulls.de/service/downloads.
Copyright
© ZEG Zweirad-Einkaufs-Genossenschaft eG
Distribution or reproduction of these operating instructions and utilisation or communication of their content is prohibited unless expressly approved. Any infringement will render the offender liable for compensation. All rights reserved in the event that a patent, utility model or industrial design is registered.
Subject to internal changes
The information contained in these operating instructions are the approved technical specifications at the time of printing. In addition to the functions described here, software changes may be introduced to rectify errors and extend functions at any time.
Any significant changes are included in a new published version of the operating instructions. All changes to the operating instructions are published on the following website:
www.bulls.de/service/downloads.
Editing
Text and images:ZEG Zweirad-Einkaufs-Genossenschaft eGLongericher Strasse 250739 Köln, Germany
Translation
RKT Übersetzungs- und Dokumentations-GmbHBahnhofstrasse 2778713 Schramberg, Germany
In case of any questions or problems regarding these operating instructions, please contact:
MY22B03 - 32_1.0_23.08.2021 9
About these operating instructions
1 About these operating instructions
1.1 Manufacturer
ZEG Zweirad-Einkaufs-Genossenschaft eGLongericher Strasse 250739 Köln, Germany
Tel.: +49 221 17959 0 Fax: +49 221 1795931E-mail: [email protected]
1.2 Laws, standards and directives
The operating instructions comply with the essential requirements specified in:
• Machinery Directive 2006/42/EC • Electromagnetic Compatibility Directive 2014/30/
EU • ISO 20607:2018 Safety of machinery –
Instruction handbook – General drafting principles
• EN 15194:2018 Cycles – Electrically power assisted cycles – pedelec bicycles
• EN 11243:2016, Cycles – Pannier racks for bicycles – Requirements and test methods
• ISO 17100:2016-05 Translation Services – Requirements for translation services.
1.3 Language
The original operating instructions are written in German. A translation is invalid without the original operating instructions.
1.4 For your information
Different markings are used in the operating instructions to make them easier to read.
1.4.1 Warnings Warnings indicate hazardous situations and actions. You will find three warnings in the operating instructions:
1.4.2 Markups
You will find ten text markups in the operating instructions:
May lead to serious or even fatal injuries if ignored. Medium-risk hazard.
May lead to minor or moderate injuries if ignored. Low-risk hazard.
Notice
May lead to material damage if ignored.
Stylised form Use
Italics Glossary term, first mention in section
Underlined in blue Link
Underlined in grey Cross references
Requirements
Instructions for actions without specific order
1 Instructions for actions in specified order
Result of the action
SPACED Indicators on the display screen
• Bulleted lists
Only applies to pedelecs with this equipment
A note beneath the heading indicates components which can be used as an option.
Table 1: Markups
WARNING!
CAUTION!
MY22B03 - 32_1.0_23.08.2021 10
MY22B03 - 32_1.0_23.08.2021 11
About these operating instructions
1.5 Type number and model
These operating instructions are an integral part of pedelecs with the type numbers:
1.6 Frame number
Each frame has an individual frame number stamped on it (see Figure 2). The frame number can be used to associate the pedelec with the owner. The frame number is the most important identifier for verifying ownership.
1.7 Identifying the operating instructions
The operating instructions identification number is located in bottom left-hand corner of each page.
The identification number is composed of the document number, the version number and the release date.
Type no. Model Pedelec type
21-21-1070 Sonic AM-SL 1 Carbon Mountain bike
21-21-1069 Sonic AM-SL 2 Carbon Mountain bike
21-21-1063 Sonic AM-SL S Carbon Mountain bike
21-21-1004 Sonic EN-SL 1 Carbon Mountain bike
21-19-1003 Sonic EN-SL 2 Carbon Mountain bike
22-18-1081 Sonic EN-SL Daytona City and trekking bicycle
Table 2: Type number, model and pedelec type

MY22B03 - 32_1.0_23.08.2021 12
About these operating instructions
1.8 Aim of the operating instructionsThese operating instructions are not a substitute for personal instruction by the specialist dealer supplying the bike. These operating instructions are an integral part of the pedelec. Therefore, if it is re-sold at a later time, they must be handed over to the subsequent owner.
These operating instructions are mainly designed for riders and operators of the pedelec.
Paragraphs with a white background are intended to enable non-professionals to make safe settings on the pedelec, use it, clean it and identify and eliminate any faults.
Sections intended for technical staff are highlighted in blue and marked with a spanner symbol.
These paragraphs aim to allow trained technical staff (bicycle mechatronics engineers, bicycle mechanics or similar) to carry out initial assembly, adjustment, maintenance and repair safely.
Technical staff also need to read all sections for riders and operators to ensure they can provide a better customer service.
All documents in Section 11 need to be filled out whenever any work is performed on the vehicle (assembly report, maintenance report).
Section
Rid
er
Spec
ialis
t dea
ler
1 About these instructions
2 Safety
3 Description
4 Transportation and storage
5 Assembly and installation
6 Operation
7 Cleaning and servicing
8 Maintenance
9.1 Troubleshooting and fault clearance
9.2 Repair
10 Disassembly and disposal
11 Documents
12 Glossary
13 Appendix
14 Keyword index
Table 3: Target groups-section matrix
MY22B03 - 32_1.0_23.08.2021 13
Safety
2 Safety
2.1 Residual risks2.1.1 Risk of fire and explosion 2.1.1.1 Rechargeable battery
The safety electronics may fail if the batteries are damaged or faulty. The residual voltage can cause a short circuit. The battery may self-ignite and explode.
Only use and charge the battery and accessories if they are in perfect condition.
Never open or repair the battery.
Batteries with external damage must be removed from service immediately.
If a battery is dropped or struck, remove it from service and keep it under observation for at least 24 hours.
Faulty batteries are hazardous goods.
Dispose of faulty batteries in the correct manner.
Store battery in a dry place until disposal.
Never store near flammable substances.
The battery is only protected from spray water. Penetration by water can cause a short circuit. The battery may self-ignite and explode.
Never immerse battery in water.
Put battery out of service if you suspect water has penetrated it.
Temperatures over 60 °C can also cause liquid to leak from the battery and the battery will become damaged. The battery may self-ignite and explode.
Protect the battery against heat.
Never store next to hot objects.
Never expose battery to continuous direct sunlight.
Avoid wide temperature fluctuations.
Chargers with excessive voltage damage batteries. This may cause a fire or an explosion.
Only use approved batteries to charge.
Metal objects may interconnect the battery's electrical terminals. The battery may self-ignite and explode.
Never insert paper clips, screws, coins, keys and other small parts into the battery.
2.1.1.2 Overheated charger
The charger heats up when charging the battery. If it is not allowed to cool down sufficiently, it can cause a fire or burns to the hands.
Never use charger on a highly flammable surface.
Never cover the charger during charging.
Never leave battery unattended during charging.
2.1.1.3 Hot components
The brakes and the motor may become very hot during operation. There is a risk of burns or fire in case of contact.
Never touch the brakes or the motor immediately after a ride.
Never place the pedelec on a flammable surface, such as grass or wood, directly after use.
Safety
2.1.2 Electric shock
2.1.2.1 Damage
Damaged chargers, cables and plug connectors increase the risk of electric shock.
Check the charger, cable and plug connector before each use. Never use a damaged charger.
2.1.2.2 Water penetration
If water penetrates into the charger, there is a risk of electric shock.
Never charge the battery outdoors.
2.1.2.3 Condensation
Condensation may form in the charger and battery when the temperature changes from cold to hot, causing a short circuit.
Wait until both charger and battery are at room temperature before connecting them.
2.1.3 Risk of a crash
2.1.3.1 Incorrect quick release setting
Excessively high clamping force will damage the quick release and cause it to lose its function. Insufficient clamping force will result in unfavourable transmission of force. This can cause components to break. This will cause a crash with injuries.
Never fasten a quick release using a tool (e.g. hammer or pliers).
Only use the clamping lever with the specified set clamping force.
2.1.3.2 Incorrect tightening torque
If a screw is fastened too tightly, it may break. If a screw is not fastened enough, it may loosen. This will cause a crash with injuries.
Always observe the indicated tightening torque on the screw or in the operating instructions.
2.1.3.3 Incorrect component
The wheels are designed exclusively for use with rim brakes or disc brakes. The wheel may break if an incorrect brake is used. This will cause a crash with injuries.
Never use the wheel with a different brake.
2.1.4 Risk of amputation
The brake disc in disc brakes is so sharp that it can cause serious injuries to fingers if they are inserted into the brake disc openings.
Always keep fingers well away from the rotating brake discs.
2.1.5 Key breaking off
If you leave a key inserted when riding or transporting the pedelec, it may break off or the locking system may open accidentally.
Remove the key to the battery lock.
MY22B03 - 32_1.0_23.08.2021 14
Safety
2.1.6 Malfunctions due to Bluetooth®If you use the on-board computer with Bluetooth® and/or Wi-Fi®, it may cause interference with other devices, other equipment, aircraft and medical devices, such as pacemakers and hearing aids.
Likewise, harm to people and animals in the immediate vicinity cannot be completely excluded.
Never use the pedelec with Bluetooth® when in close proximity to medical devices, filling stations, chemical plants, areas at risk of explosion and in blasting zones.
Never use pedelec with Bluetooth® in aircraft.
Avoid operating for longer periods in close proximity to the body.
MY22B03 - 32_1.0_23.08.2021 15

Safety
2.2 Toxic substances2.2.1 Brake fluidBrake fluid may leak out after an accident or due to material fatigue. Brake fluid can be fatal if swallowed or inhaled.
Never dismantle the brake system.
Avoid contact with skin.
Do not inhale vapours.
2.2.2 Suspension oilSuspension oil in the fork and the rear frame damper is toxic to the touch, irritates respiratory tracts and can cause cancer, sterility and changes to the genetic make-up of germ cells.
Never dismantle the rear frame damper or the suspension fork.
Avoid skin coming into contact with suspension oil.
2.2.3 Lubrication oilEightpins seat post lubrication oil is toxic if inhaled and can be fatal if swallowed.
Never remove the Eightpins seat post from the frame.
Lubricate seat post in the open air or in a well-ventilated room only.
Avoid skin coming into contact with lubrication oil. Wear nitrile gloves when lubricating, cleaning and servicing the vehicle.
2.2.4 Defective batteryLiquids and vapours may leak from damaged or faulty batteries. Excessively high temperatures may also cause liquids and vapours to leak from the battery. Such liquids and vapours can irritate the airways and cause burns.
Never dismantle the battery.
Avoid contact with skin.
Do not inhale vapours.
2.3 Requirements for ridersThe rider must have the required mental capacity and physical and motor skills to ride on public roads. A minimum age of 14 years is recommended.
2.4 Vulnerable groups Keep batteries and the charger away from children and people with reduced physical, sensory or mental capacities or lacking in experience and knowledge.
If minors use the pedelec, a legal guardian must should provide them with comprehensive instructions.
2.5 Personal protective equipment Wear a suitable helmet for your protection. The helmet must have a reflective strip or a light in a clearly visible colour.
Wear sturdy shoes.
Clothing should be retroreflective or as light as possible. Fluorescent materials are also suitable. High-visibility jackets and straps on your upper body ensure even greater safety. Never wear a skirt. Always wear trousers which reach down to your ankles instead.
2.6 Safety guardsThree safety guards protect riders against heat or moving parts:
• Chain or belt guards prevent clothing from being pulled into the drive train
• Mudguards protect against dirt and water splashing up from the road.
• Motor covers on the motor casing protect against heat.
Never remove the guards.
Check the guards on a regular basis.
Take pedelec out of service if a guard is damaged or missing. Contact specialist dealer.
MY22B03 - 32_1.0_23.08.2021 16

Safety
2.7 Safety markings and safety instructions
The pedelec and battery nameplates contain these safety markings and safety instructions:
2.8 What to do in an emergency2.8.1 Dangerous situation in road traffic In the event of any hazards or dangers in road
traffic, apply the brakes on the pedelec until it comes to a halt. The brake acts as an emergency stop system in such cases.
2.8.2 Leaked brake fluid Remove those affected from the danger area to
fresh air.
Never leave those affected unattended.
Remove any clothing contaminated with brake fluid immediately.
Never inhale vapours. Ensure sufficient ventilation.
Wear gloves and safety gloves as protective equipment.
Keep unprotected persons away.
Take care with leaked brake fluid as it poses a slip hazard.
Keep leaking brake fluid away from naked flames, hot surfaces and sources of ignition.
Avoid contact with skin and eyes.
After inhalation
Take in fresh air. Immediately consult a doctor in case of any discomfort.
After skin contact
Wash affected skin with soap and water and rinse well. Remove contaminated clothing. Consult doctor in the event of pain or discomfort.
After contact with eyes
Rinse eyes under flowing water for at least ten minutes with the lids open; also rinse under lids. Immediately consult a doctor in case of any pain or discomfort.
Symbol Explanation
General warning
Adhere to the instructions for use
Table 4: Meaning of safety markings
Symbol Explanation
Read the instructions
Separate collection of electrical and electronic devices
Separate collection of ordinary and rechargeable batteries
Must not be thrown into fire (burning prohibited)
It is forbidden to open any batteries
Device of protection class II
Only suitable for use indoors
Fuse (device fuse)
EU conformity
Recyclable material
Protect from temperatures above 50 °C and direct sunlight
Table 5: Safety instructions
max. 50°C
MY22B03 - 32_1.0_23.08.2021 17
Safety
After swallowing
Rinse out mouth with water. Never induce vomiting. Risk of aspiration.
If a person is lying on their back and vomiting, place them in the recovery position. Seek medical advice immediately.
Environmental protection measures
Never allow brake fluid to flow into the sewage system, water courses or groundwater.
Notify the relevant authorities if fluid penetrates the ground, water courses or the sewage system.
Dispose of leaked brake fluid in an environmentally responsible way in accordance with statutory regulations (see Section 10.1).
The brake system must be repaired immediately if brake fluid leaks out. Contact specialist dealer.
2.8.3 Battery vapours emittedVapours may be emitted if the battery is damaged or used improperly. The vapours may cause respiratory tract irritation.
Get into fresh air.
Consult doctor in the event of pain or discomfort.
After contact with eyes
Carefully rinse eyes with plenty of water for at least 15 minutes. Protect unaffected eye. Seek medical advice immediately.
After skin contact
Remove any solid particles immediately.
Rinse the affected area with plenty of water for at least 15 minutes. Then dab the affected skin gently. Do not rub dry.
Remove contaminated clothing immediately.
Immediately consult a doctor if there is any redness, pain or discomfort.
2.8.4 Battery fireThe safety electronics may fail if the battery is damaged or faulty. The residual voltage can cause a short circuit. The battery may self-ignite and explode.
1 Keep your distance if the battery becomes deformed or starts to emit smoke.
2 If charging, remove the plug connector from the socket.
3 Contact the fire service immediately.
Use Class fire extinguishers to put out the fire.
Never extinguish damaged batteries with water or allow them to come into contact with water.
Inhaling vapours can cause intoxication.
Stand on the side of the fire where the wind is blowing from.
Use breathing apparatus if possible.
2.8.5 Oil and lubricant leaks from the rear frame damper
Dispose of leaked oils and lubricants in an environmentally responsible way in accordance with statutory regulations (see Section 10.1).
Contact specialist dealer.
2.8.6 Oil and lubricant leaks from the fork Dispose of leaked oils and lubricants in an
environmentally responsible way in accordance with statutory regulations (see Section 10.1).
MY22B03 - 32_1.0_23.08.2021 18
MY22B03 - 32_1.0_23.08.2021 19
Safety
2.8.7 Lubricant leaking from the eightpins suspension seat post
Avoid contact with skin and eyes. Wear nitrile gloves to protect yourself.
Never inhale vapours. Ensure sufficient ventilation.
Immediately remove any clothing items contaminated with lubricants.
If swallowed
Phone doctor or poison information centre immediately.
Never induce vomiting.
If inhaled
Take in fresh air. Phone doctor or poison information centre immediately if there is any discomfort.
After skin contact
Wash affected skin with soap and water and rinse well. Remove contaminated clothing. Consult doctor in the event of pain or discomfort.
Environmental protection measures
Never allow lubricant to flow into the sewage system, water courses or groundwater.
Notify the relevant authorities if fluid penetrates the ground, water courses or the sewage system.
Dispose of leaked lubricants in an environmentally responsible way in accordance with statutory regulations (see Section 10.1).
MY22B03 - 32_1.0_23.08.2021 20
Description
3 Description
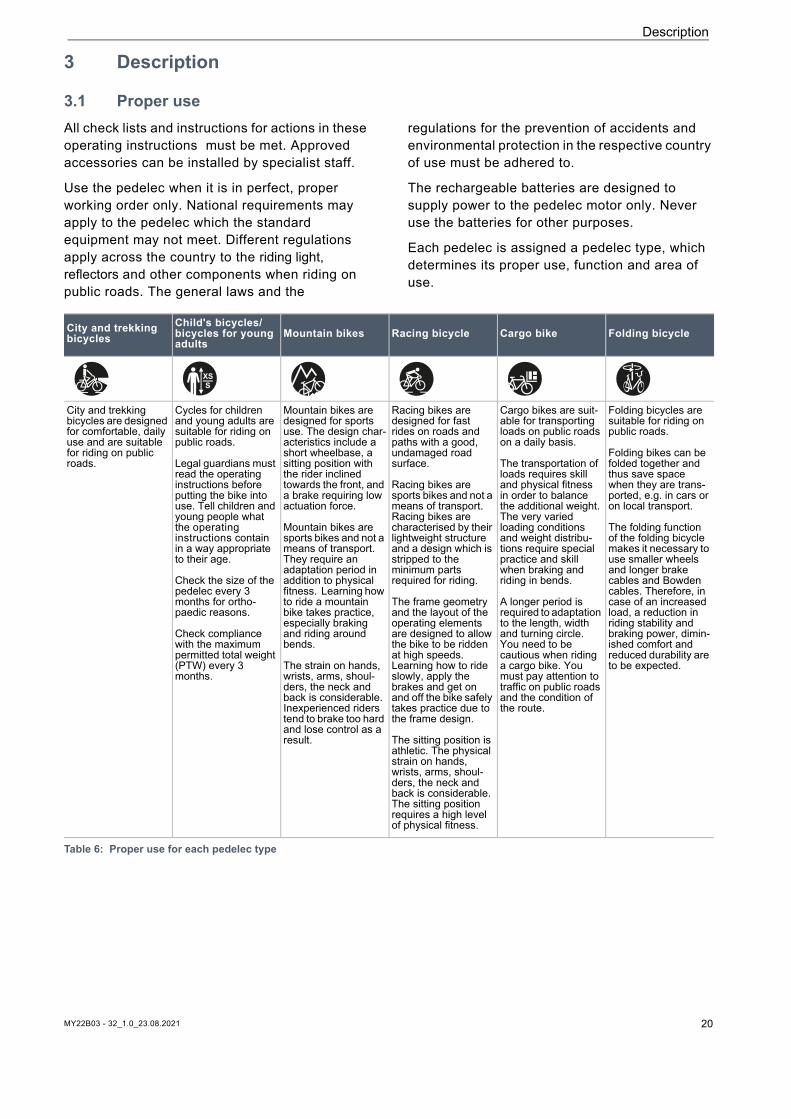
3.1 Proper use All check lists and instructions for actions in these operating instructions must be met. Approved accessories can be installed by specialist staff.
Use the pedelec when it is in perfect, proper working order only. National requirements may apply to the pedelec which the standard equipment may not meet. Different regulations apply across the country to the riding light, reflectors and other components when riding on public roads. The general laws and the
regulations for the prevention of accidents and environmental protection in the respective country of use must be adhered to.
The rechargeable batteries are designed to supply power to the pedelec motor only. Never use the batteries for other purposes.
Each pedelec is assigned a pedelec type, which determines its proper use, function and area of use.
City and trekking bicycles
Child's bicycles/bicycles for young adults
Mountain bikes Racing bicycle Cargo bike Folding bicycle
City and trekking bicycles are designed for comfortable, daily use and are suitable for riding on public roads.
Cycles for children and young adults are suitable for riding on public roads.
Legal guardians must read the operating instructions before putting the bike into use. Tell children and young people what the operating instructions contain in a way appropriate to their age.
Check the size of the pedelec every 3 months for ortho-paedic reasons.
Check compliance with the maximum permitted total weight (PTW) every 3 months.
Mountain bikes are designed for sports use. The design char-acteristics include a short wheelbase, a sitting position with the rider inclined towards the front, and a brake requiring low actuation force.
Mountain bikes are sports bikes and not a means of transport. They require an adaptation period in addition to physical fitness. Learning how to ride a mountain bike takes practice, especially braking and riding around bends.
The strain on hands, wrists, arms, shoul-ders, the neck and back is considerable. Inexperienced riders tend to brake too hard and lose control as a result.
Racing bikes are designed for fast rides on roads and paths with a good, undamaged road surface.
Racing bikes are sports bikes and not a means of transport. Racing bikes are characterised by their lightweight structure and a design which is stripped to the minimum parts required for riding.
The frame geometry and the layout of the operating elements are designed to allow the bike to be ridden at high speeds. Learning how to ride slowly, apply the brakes and get on and off the bike safely takes practice due to the frame design.
The sitting position is athletic. The physical strain on hands, wrists, arms, shoul-ders, the neck and back is considerable. The sitting position requires a high level of physical fitness.
Cargo bikes are suit-able for transporting loads on public roads on a daily basis.
The transportation of loads requires skill and physical fitness in order to balance the additional weight. The very varied loading conditions and weight distribu-tions require special practice and skill when braking and riding in bends.
A longer period is required to adaptation to the length, width and turning circle. You need to be cautious when riding a cargo bike. You must pay attention to traffic on public roads and the condition of the route.
Folding bicycles are suitable for riding on public roads.
Folding bikes can be folded together and thus save space when they are trans-ported, e.g. in cars or on local transport.
The folding function of the folding bicycle makes it necessary to use smaller wheels and longer brake cables and Bowden cables. Therefore, in case of an increased load, a reduction in riding stability and braking power, dimin-ished comfort and reduced durability are to be expected.
Table 6: Proper use for each pedelec type
MY22B03 - 32_1.0_23.08.2021 21
Description
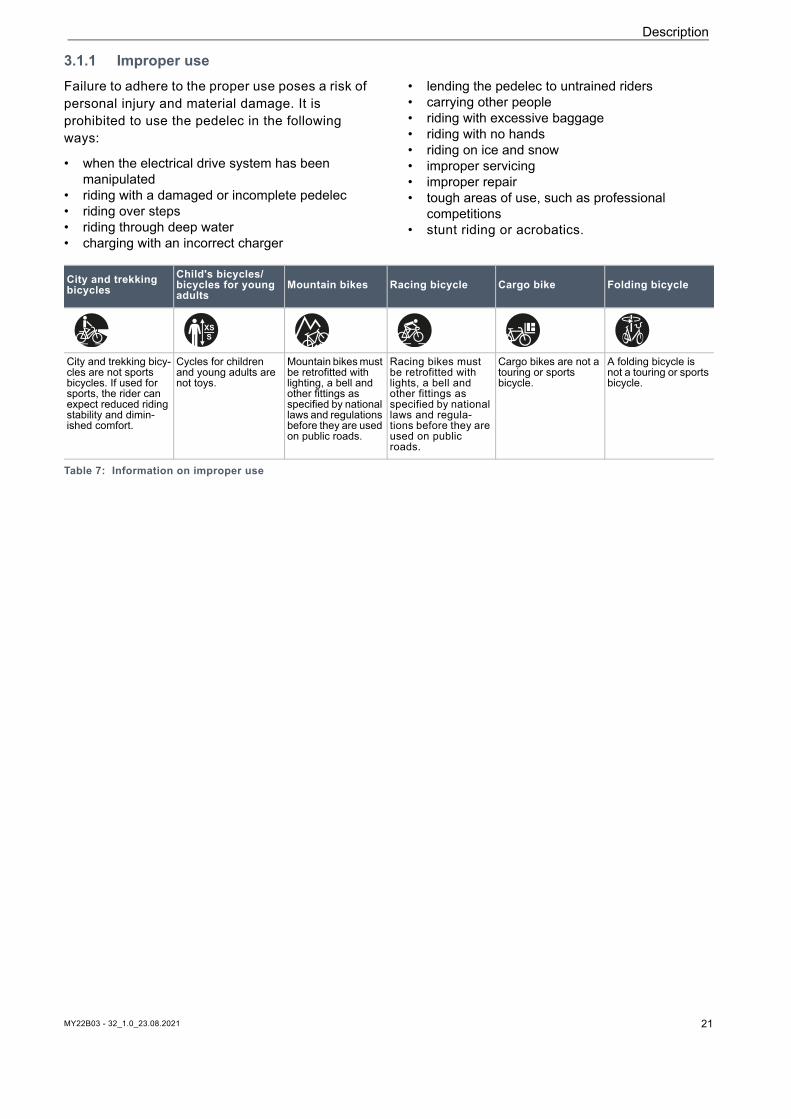
3.1.1 Improper use Failure to adhere to the proper use poses a risk of personal injury and material damage. It is prohibited to use the pedelec in the following ways:
• when the electrical drive system has been manipulated
• riding with a damaged or incomplete pedelec • riding over steps • riding through deep water • charging with an incorrect charger
• lending the pedelec to untrained riders• carrying other people • riding with excessive baggage • riding with no hands • riding on ice and snow • improper servicing • improper repair • tough areas of use, such as professional
competitions • stunt riding or acrobatics.
City and trekking bicycles
Child's bicycles/bicycles for young adults
Mountain bikes Racing bicycle Cargo bike Folding bicycle
City and trekking bicy-cles are not sports bicycles. If used for sports, the rider can expect reduced riding stability and dimin-ished comfort.
Cycles for children and young adults are not toys.
Mountain bikes must be retrofitted with lighting, a bell and other fittings as specified by national laws and regulations before they are used on public roads.
Racing bikes must be retrofitted with lights, a bell and other fittings as specified by national laws and regula-tions before they are used on public roads.
Cargo bikes are not a touring or sports bicycle.
A folding bicycle is not a touring or sports bicycle.
Table 7: Information on improper use
MY22B03 - 32_1.0_23.08.2021 22
About these operating instructions
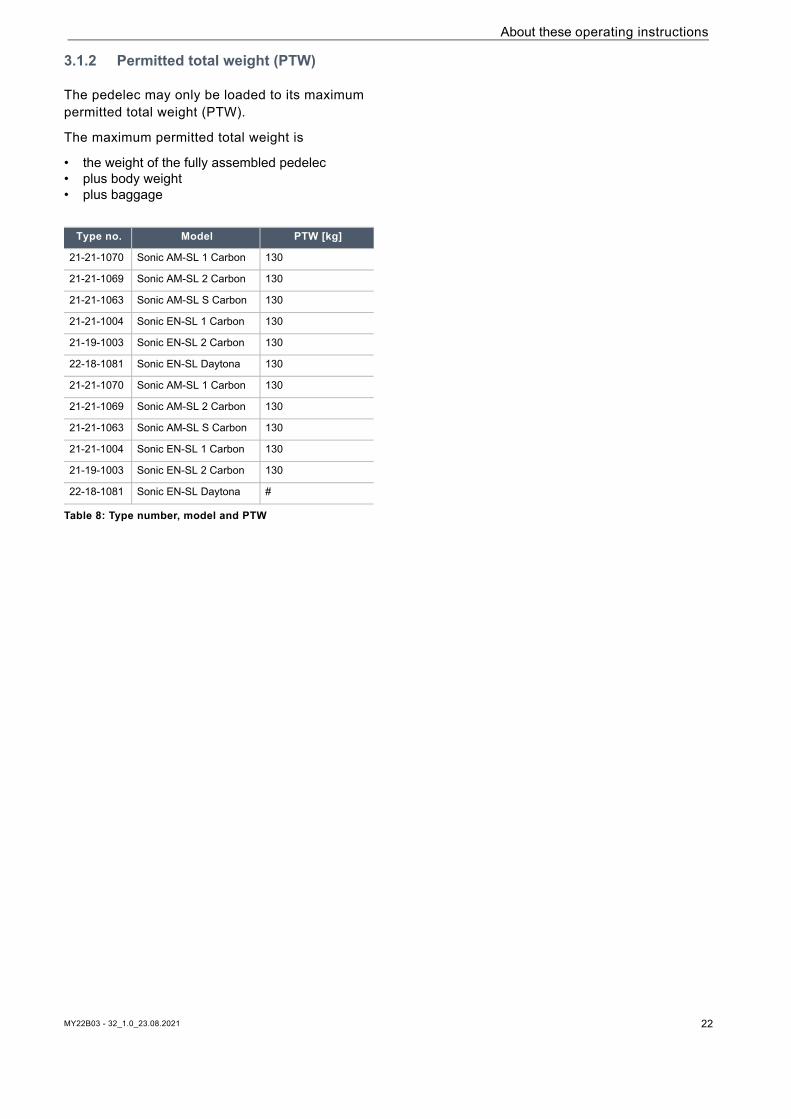
3.1.2 Permitted total weight (PTW)
The pedelec may only be loaded to its maximum permitted total weight (PTW).
The maximum permitted total weight is
• the weight of the fully assembled pedelec • plus body weight• plus baggage
Type no. Model PTW [kg]
21-21-1070 Sonic AM-SL 1 Carbon 130
21-21-1069 Sonic AM-SL 2 Carbon 130
21-21-1063 Sonic AM-SL S Carbon 130
21-21-1004 Sonic EN-SL 1 Carbon 130
21-19-1003 Sonic EN-SL 2 Carbon 130
22-18-1081 Sonic EN-SL Daytona 130
21-21-1070 Sonic AM-SL 1 Carbon 130
21-21-1069 Sonic AM-SL 2 Carbon 130
21-21-1063 Sonic AM-SL S Carbon 130
21-21-1004 Sonic EN-SL 1 Carbon 130
21-19-1003 Sonic EN-SL 2 Carbon 130
22-18-1081 Sonic EN-SL Daytona #
Table 8: Type number, model and PTW
Overview
3.1.3 Environmental requirementsYou can be ride the pedelec within a temperature range between -10 °C and +50 °C. The electric drive system is limited in its performance outside this temperature range.
During winter use, especially at temperatures below 0 °C, we recommend that you don't insert a battery charged and stored at room temperature into the pedelec until just before setting off. We recommend using thermal protection sleeves when riding longer distances in the cold.
Temperatures under -10 °C and over +60 °C must be avoided.
You must also keep within the following temperature ranges:
The nameplate contains symbols for the pedelec's area of use.
Check what tracks and roads you may ride on before setting off for the first time.
Operating temperature -10…+50 °CTransportation temperature -20…+60 °C
Storage temperature -20…+60 °C
Work environment temperature +15…+25 °C
Charging temperature 0…+40 °C
Area of useCity and trekking bicycles
Child's bicycles/bicycles for young adults
Mountain bikes Racing bicycle Cargo bike Folding bicycle
Suitable for tarmacked and paved roads.
Suitable for tarmacked and paved roads.
Suitable for tarmacked and paved roads.
Suitable for tarmacked and paved roads.
Suitable for tarmacked and paved roads.
Suitable for tarmacked roads, cycle paths and firm gravel paths and roads, and longer sections with moderate slopes and jumps up to 15 cm.
Suitable for tarmacked roads, cycle paths and firm gravel paths and roads, and longer sections with moderate slopes and jumps up to 15 cm.
Suitable for tarmacked roads, cycle paths and firm gravel paths and roads, and longer sections with moderate slopes and jumps up to 15 cm.
Suitable for tarmacked roads, cycle paths and firm gravel paths and roads, and longer sections with moderate slopes and jumps up to 15 cm.
Suitable for tarmacked roads, cycle paths and easy to demanding off-road riding, sections with moderate slopes and jumps up to 61 cm.
Suitable for tarmacked roads, cycle paths and easy to demanding off-road riding, sections with moderate slopes and jumps up to 61 cm.
Suitable for tarmacked roads, cycle paths and easy to demanding off-road riding, limited downhill use and jumps up to 122 cm.
Table 9: Area of use
MY22B03 - 32_1.0_23.08.2021 23

Overview
The pedelec is unsuitable for the following areas of use:
Area of useCity and trekking bicycles
Child's bicycles/bicycles for young adults
Mountain bikes Racing bicycle Cargo bike Folding bicycle
Never drive off-road or perform jumps.
Never drive off-road or perform jumps.
Never drive off-road or perform jumps.
Never drive off-road or perform jumps.
Never drive off-road or perform jumps.
Never drive off-road or perform jumps over 15 cm.
Never drive off-road or perform jumps over 15 cm.
Never drive off-road or perform jumps over 15 cm.
Never drive off-road or perform jumps over 15 cm.
Never ride downhill or perform jumps over 61 cm.
Never ride downhill or perform jumps over 61 cm.
Never traverse extremely difficult off-road terrain or perform jumps over 122 cm.
Table 10: Unsuitable terrain
MY22B03 - 32_1.0_23.08.2021 24
MY22B03 - 32_1.0_23.08.2021 25
Overview
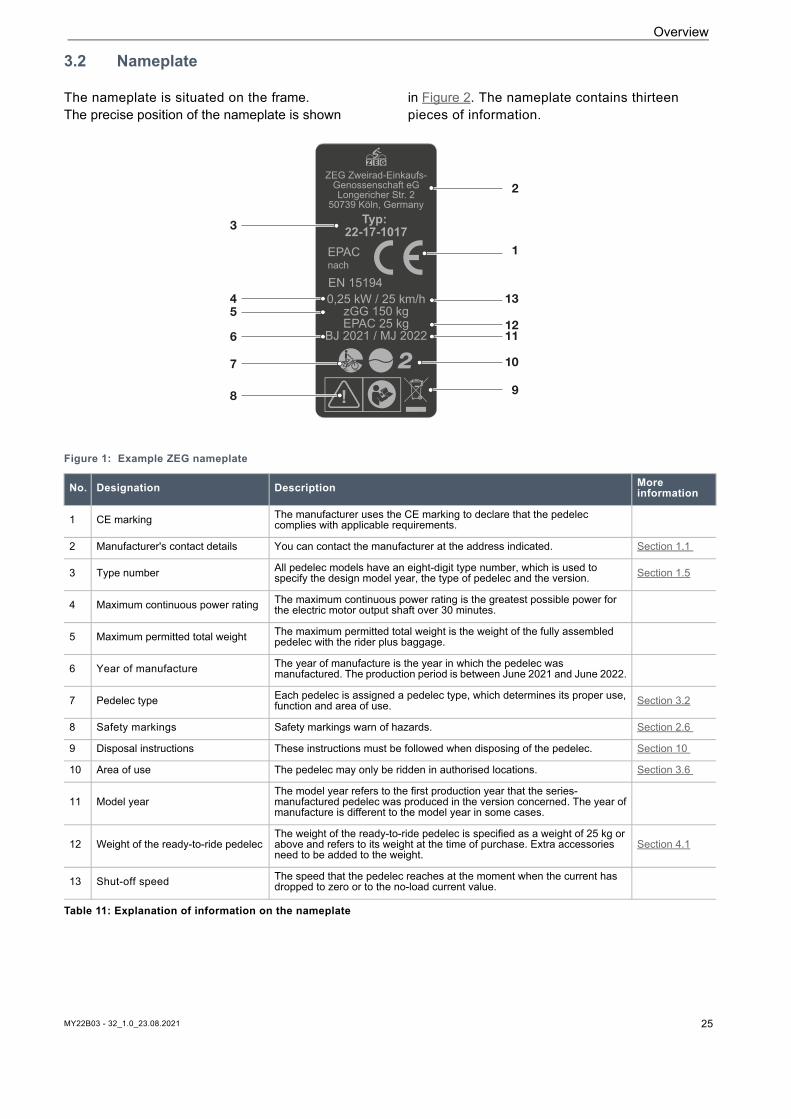
3.2 Nameplate
The nameplate is situated on the frame. The precise position of the nameplate is shown
in Figure 2. The nameplate contains thirteen pieces of information.
Figure 1: Example ZEG nameplate
ZEG Zweirad-Einkaufs-Genossenschaft eGLongericher Str. 2
50739 Köln, GermanyTyp:
22-17-1017
0,25 kW / 25 km/hzGG 150 kgEPAC 25 kg
BJ 2021 / MJ 2022
EN 15194nachEPAC
2
1
9
12
13
10
11
45
6
7
8
3
No. Designation Description More information
1 CE marking The manufacturer uses the CE marking to declare that the pedelec complies with applicable requirements.
2 Manufacturer's contact details You can contact the manufacturer at the address indicated. Section 1.1
3 Type number All pedelec models have an eight-digit type number, which is used to specify the design model year, the type of pedelec and the version. Section 1.5
4 Maximum continuous power rating The maximum continuous power rating is the greatest possible power for the electric motor output shaft over 30 minutes.
5 Maximum permitted total weight The maximum permitted total weight is the weight of the fully assembled pedelec with the rider plus baggage.
6 Year of manufacture The year of manufacture is the year in which the pedelec was manufactured. The production period is between June 2021 and June 2022.
7 Pedelec type Each pedelec is assigned a pedelec type, which determines its proper use, function and area of use. Section 3.2
8 Safety markings Safety markings warn of hazards. Section 2.6
9 Disposal instructions These instructions must be followed when disposing of the pedelec. Section 10
10 Area of use The pedelec may only be ridden in authorised locations. Section 3.6
11 Model year The model year refers to the first production year that the series-manufactured pedelec was produced in the version concerned. The year of manufacture is different to the model year in some cases.
12 Weight of the ready-to-ride pedelecThe weight of the ready-to-ride pedelec is specified as a weight of 25 kg or above and refers to its weight at the time of purchase. Extra accessories need to be added to the weight.
Section 4.1
13 Shut-off speed The speed that the pedelec reaches at the moment when the current has dropped to zero or to the no-load current value.
Table 11: Explanation of information on the nameplate
MY22B03 - 32_1.0_23.08.2021 26
Description
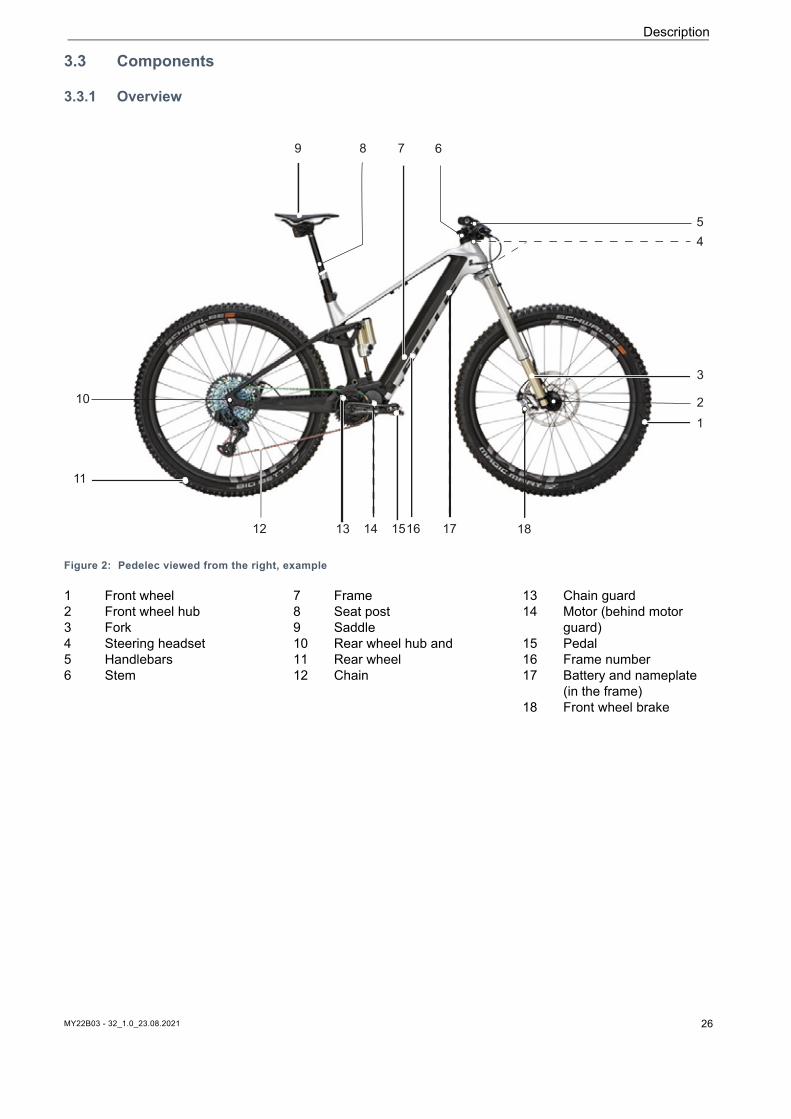
3.3 Components
3.3.1 Overview
Figure 2: Pedelec viewed from the right, example
1 Front wheel2 Front wheel hub3 Fork4 Steering headset5 Handlebars6 Stem
7 Frame8 Seat post 9 Saddle10 Rear wheel hub and 11 Rear wheel12 Chain
13 Chain guard14 Motor (behind motor
guard)15 Pedal16 Frame number17 Battery and nameplate
(in the frame)18 Front wheel brake
12
5
6789
11
12 13 14 1516 17
4
18
3
10
Description
3.3.2 Chassis
The chassis comprises two components:
• Frame and• steering system.
3.3.2.1 Frame
The frame absorbs all forces which act on the pedelec from body weight, pedalling and the ground. The frame also acts as a carrier for most components.
The frame geometry determines the pedelec’s ride performance.
3.3.2.2 Steering system
The steering system components are:
• Steering headset • Stem• Handlebars • Fork.
3.3.2.3 Steering headset
The steering headset (also known as a bike headset or simply a headset) is the fork bearing system in the frame. A distinction is made between two different types:
• Conventional steering headsets for fork steerers with thread and
• Steering headsets for threadless fork steerers, what are known as headsets.
3.3.2.4 Stem
The stem is the connecting component between the handlebars and the fork steerer tube. The stem is used to adjust the handlebars to the rider. The stem is used to adjust the handlebar height and the gap between the handlebars and saddle (see Section 6.5.6).
Quickly adjustable stems
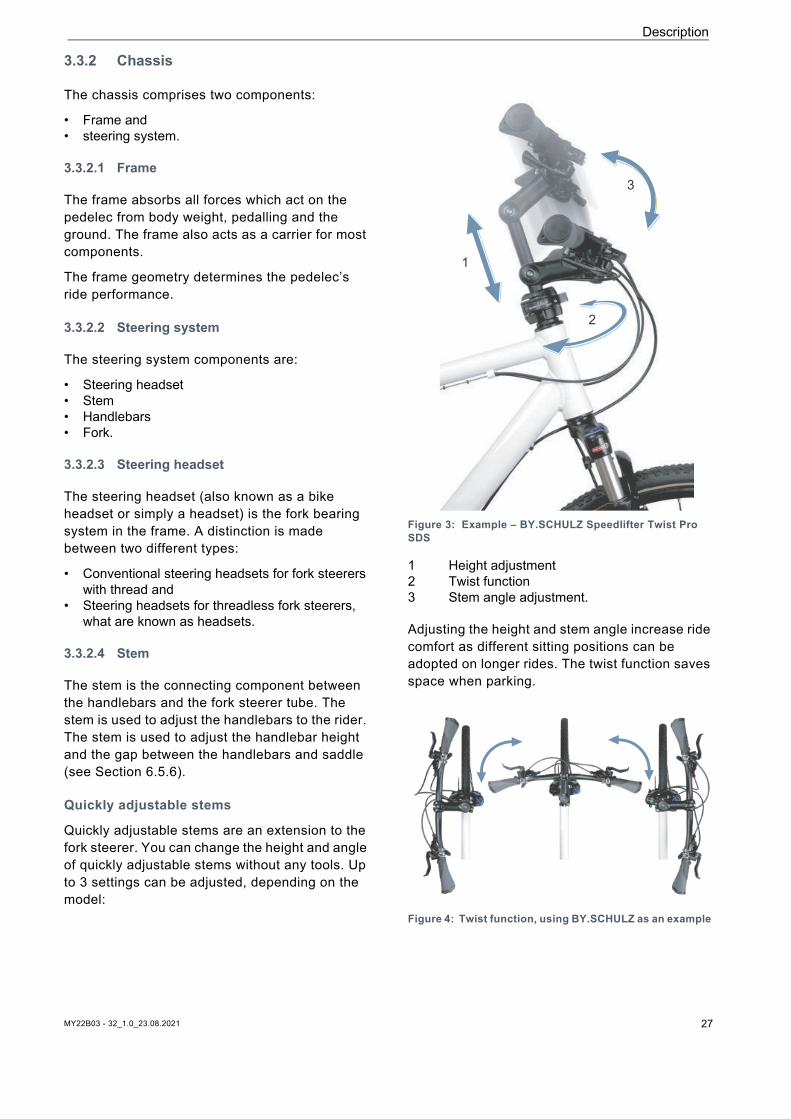
Quickly adjustable stems are an extension to the fork steerer. You can change the height and angle of quickly adjustable stems without any tools. Up to 3 settings can be adjusted, depending on the model:
Figure 3: Example – BY.SCHULZ Speedlifter Twist Pro SDS
1 Height adjustment2 Twist function3 Stem angle adjustment.
Adjusting the height and stem angle increase ride comfort as different sitting positions can be adopted on longer rides. The twist function saves space when parking.
Figure 4: Twist function, using BY.SCHULZ as an example
2
1
3
MY22B03 - 32_1.0_23.08.2021 27
Description
3.3.2.5 Handlebars
The pedelec is steered using the handlebars. The handlebars are used to support the upper body and is the mount for most controls and displays (see Section 3.4.1).
Figure 5: Handlebar dimensions
The main structural dimensions of handlebars are:
1 Rise (height)2 Width3 Backsweep
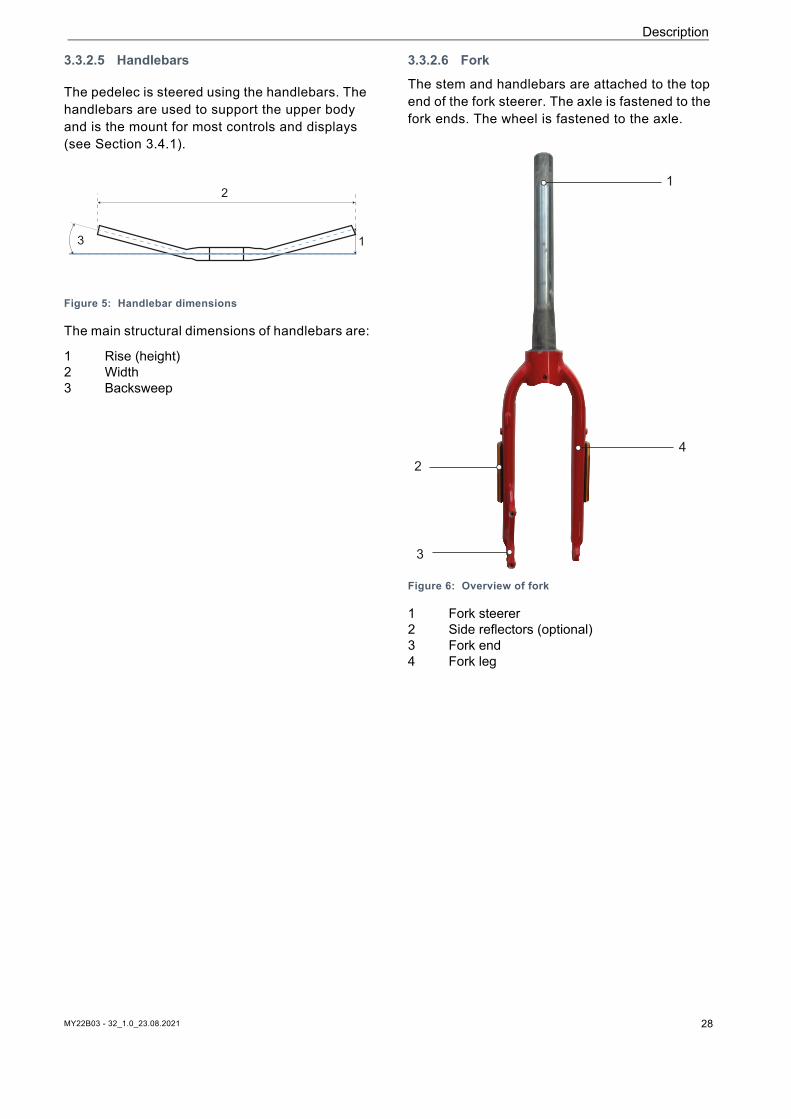
3.3.2.6 Fork
The stem and handlebars are attached to the top end of the fork steerer. The axle is fastened to the fork ends. The wheel is fastened to the axle.
Figure 6: Overview of fork
1 Fork steerer 2 Side reflectors (optional)3 Fork end4 Fork leg
1
2
3
1
2
3
4
MY22B03 - 32_1.0_23.08.2021 28
Overview
3.3.3 Suspension
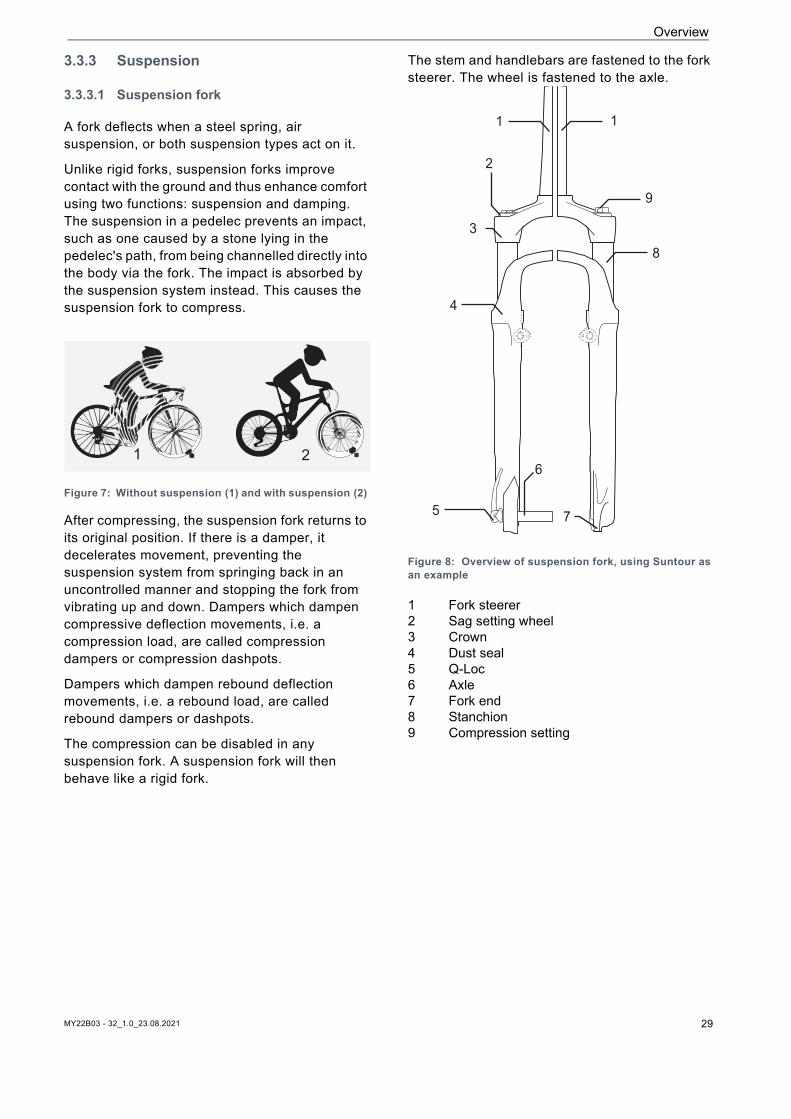
3.3.3.1 Suspension fork
A fork deflects when a steel spring, air suspension, or both suspension types act on it.
Unlike rigid forks, suspension forks improve contact with the ground and thus enhance comfort using two functions: suspension and damping. The suspension in a pedelec prevents an impact, such as one caused by a stone lying in the pedelec's path, from being channelled directly into the body via the fork. The impact is absorbed by the suspension system instead. This causes the suspension fork to compress.
Figure 7: Without suspension (1) and with suspension (2)
After compressing, the suspension fork returns to its original position. If there is a damper, it decelerates movement, preventing the suspension system from springing back in an uncontrolled manner and stopping the fork from vibrating up and down. Dampers which dampen compressive deflection movements, i.e. a compression load, are called compression dampers or compression dashpots.
Dampers which dampen rebound deflection movements, i.e. a rebound load, are called rebound dampers or dashpots.
The compression can be disabled in any suspension fork. A suspension fork will then behave like a rigid fork.
The stem and handlebars are fastened to the fork steerer. The wheel is fastened to the axle.
Figure 8: Overview of suspension fork, using Suntour as an example
1 Fork steerer2 Sag setting wheel3 Crown4 Dust seal5 Q-Loc6 Axle7 Fork end8 Stanchion9 Compression setting
1 2
11
2
3
4
5
6
8
9
7
MY22B03 - 32_1.0_23.08.2021 29

Overview
Negative deflection (sag)
The sag is the percentage of total spring deflection that is compressed by the rider’s body weight, including equipment (such as a backpack), their seating position and frame geometry. Sag is not caused by riding.
The pedelec rebounds at a controlled speed if it is optimally adjusted. The wheel stays in contact with the ground when passing over bumps (blue line). The fork head, handlebars and body roughly follow the terrain (green line) when riding over bumps. The suspension motion is predictable and controlled.
Figure 9: Optimum fork ride performance
When optimally adjusted, the fork counteracts deflection, stays higher in its deflection range and
helps the rider to maintain speed while riding on hilly parts of terrain.
Figure 10: Optimum fork ride performance on hilly terrain
When optimally adjusted, the fork deflects quickly and unhindered when the bike hits bumps and absorbs a bump. Traction is retained (blue line).
The fork responds quickly to the bump. The headset and handlebars rise slightly when absorbing a bump (green line).
Figure 11: Optimum fork ride performance over bumps
MY22B03 - 32_1.0_23.08.2021 30
MY22B03 - 32_1.0_23.08.2021 31
Description
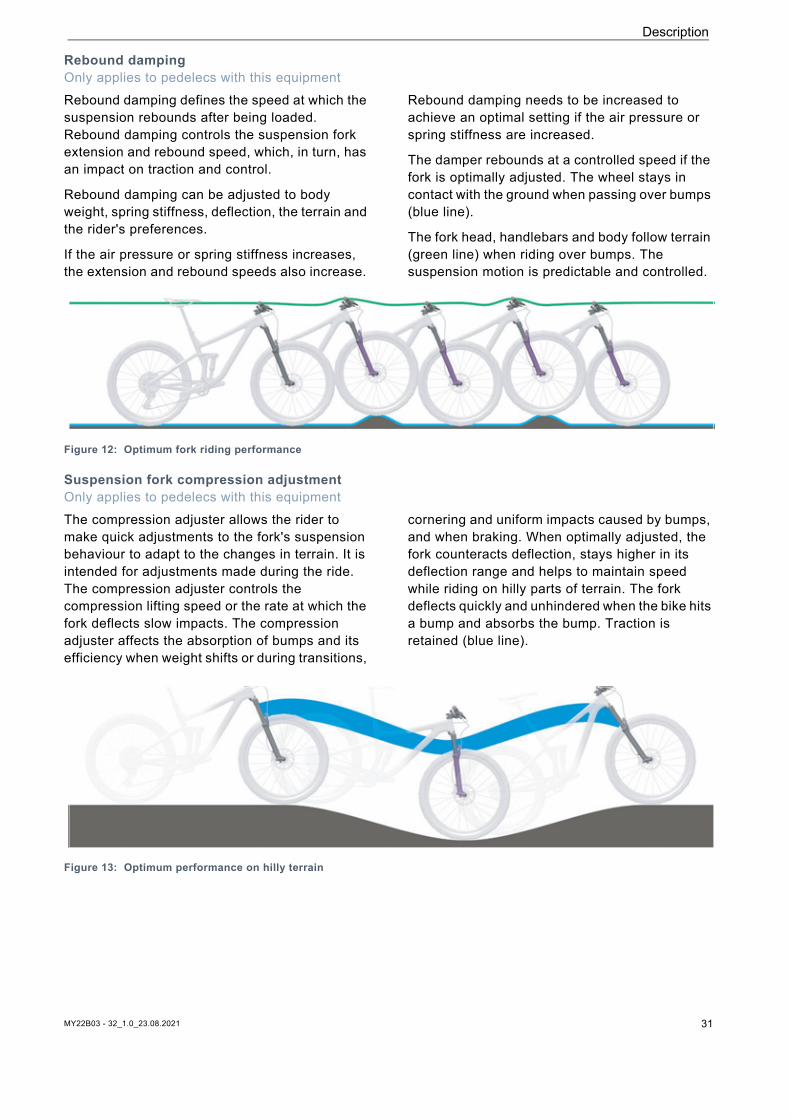
Rebound dampingOnly applies to pedelecs with this equipment Rebound damping defines the speed at which the suspension rebounds after being loaded. Rebound damping controls the suspension fork extension and rebound speed, which, in turn, has an impact on traction and control.
Rebound damping can be adjusted to body weight, spring stiffness, deflection, the terrain and the rider's preferences.
If the air pressure or spring stiffness increases, the extension and rebound speeds also increase.
Rebound damping needs to be increased to achieve an optimal setting if the air pressure or spring stiffness are increased.
The damper rebounds at a controlled speed if the fork is optimally adjusted. The wheel stays in contact with the ground when passing over bumps (blue line).
The fork head, handlebars and body follow terrain (green line) when riding over bumps. The suspension motion is predictable and controlled.
Figure 12: Optimum fork riding performance
Suspension fork compression adjustmentOnly applies to pedelecs with this equipmentThe compression adjuster allows the rider to make quick adjustments to the fork's suspension behaviour to adapt to the changes in terrain. It is intended for adjustments made during the ride. The compression adjuster controls the compression lifting speed or the rate at which the fork deflects slow impacts. The compression adjuster affects the absorption of bumps and its efficiency when weight shifts or during transitions,
cornering and uniform impacts caused by bumps, and when braking. When optimally adjusted, the fork counteracts deflection, stays higher in its deflection range and helps to maintain speed while riding on hilly parts of terrain. The fork deflects quickly and unhindered when the bike hits a bump and absorbs the bump. Traction is retained (blue line).
Figure 13: Optimum performance on hilly terrain
MY22B03 - 32_1.0_23.08.2021 32
Description
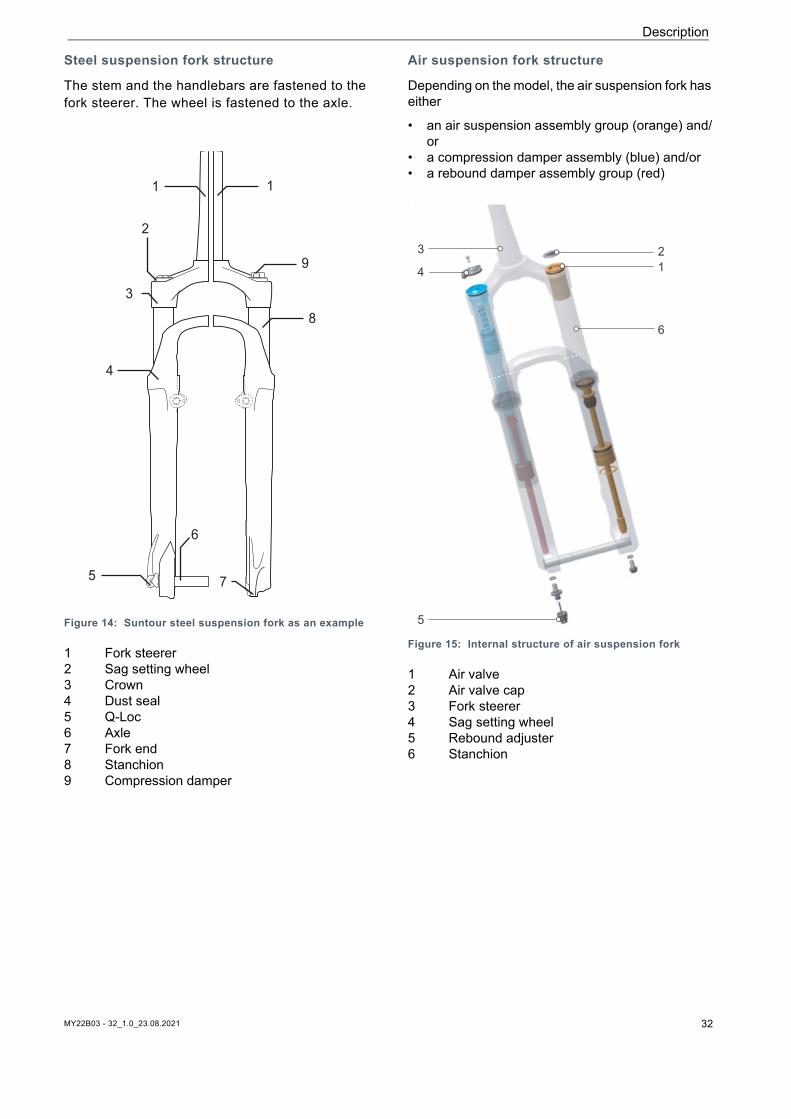
Steel suspension fork structure
The stem and the handlebars are fastened to the fork steerer. The wheel is fastened to the axle.
Figure 14: Suntour steel suspension fork as an example
1 Fork steerer2 Sag setting wheel3 Crown4 Dust seal5 Q-Loc6 Axle7 Fork end8 Stanchion9 Compression damper
Air suspension fork structure
Depending on the model, the air suspension fork has either
• an air suspension assembly group (orange) and/or
• a compression damper assembly (blue) and/or• a rebound damper assembly group (red)
.
Figure 15: Internal structure of air suspension fork
1 Air valve2 Air valve cap3 Fork steerer4 Sag setting wheel5 Rebound adjuster6 Stanchion
11
2
3
4
5
6
8
9
7
123
4
5
6
Overview
3.3.3.2 Rear frame damper
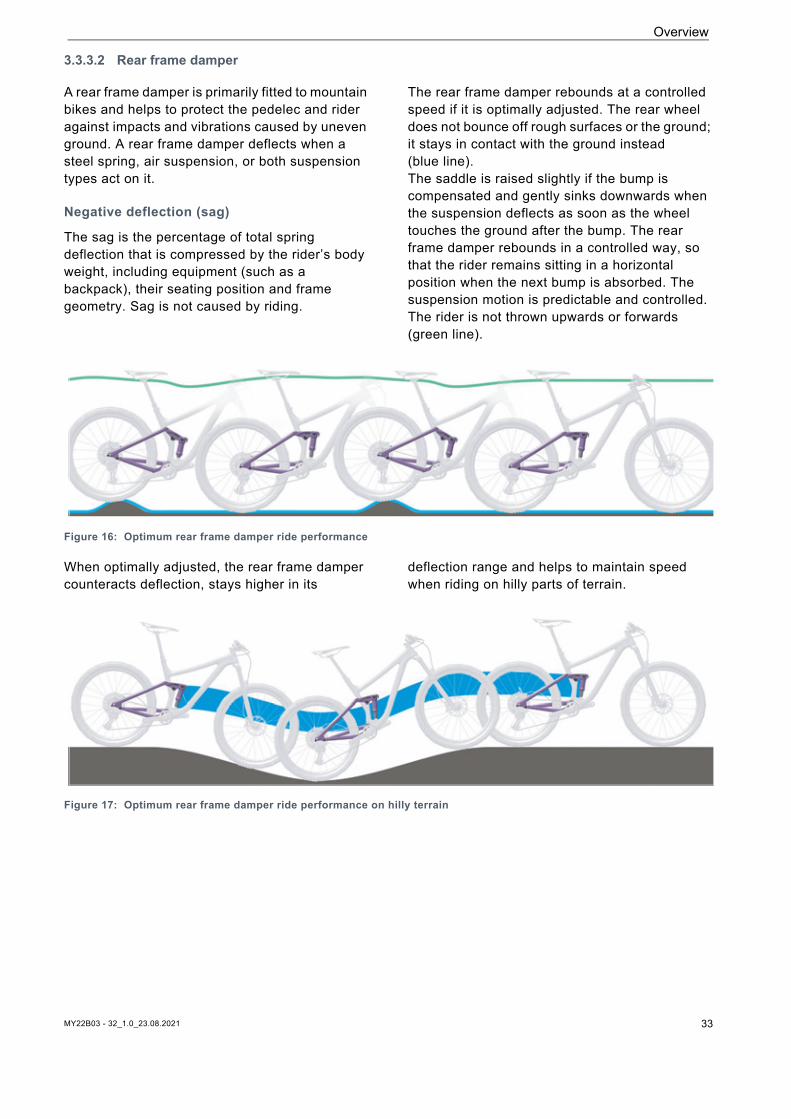
A rear frame damper is primarily fitted to mountain bikes and helps to protect the pedelec and rider against impacts and vibrations caused by uneven ground. A rear frame damper deflects when a steel spring, air suspension, or both suspension types act on it.
Negative deflection (sag)
The sag is the percentage of total spring deflection that is compressed by the rider’s body weight, including equipment (such as a backpack), their seating position and frame geometry. Sag is not caused by riding.
The rear frame damper rebounds at a controlled speed if it is optimally adjusted. The rear wheel does not bounce off rough surfaces or the ground; it stays in contact with the ground instead (blue line). The saddle is raised slightly if the bump is compensated and gently sinks downwards when the suspension deflects as soon as the wheel touches the ground after the bump. The rear frame damper rebounds in a controlled way, so that the rider remains sitting in a horizontal position when the next bump is absorbed. The suspension motion is predictable and controlled. The rider is not thrown upwards or forwards (green line).
Figure 16: Optimum rear frame damper ride performance
When optimally adjusted, the rear frame damper counteracts deflection, stays higher in its
deflection range and helps to maintain speed when riding on hilly parts of terrain.
Figure 17: Optimum rear frame damper ride performance on hilly terrain
MY22B03 - 32_1.0_23.08.2021 33
Overview
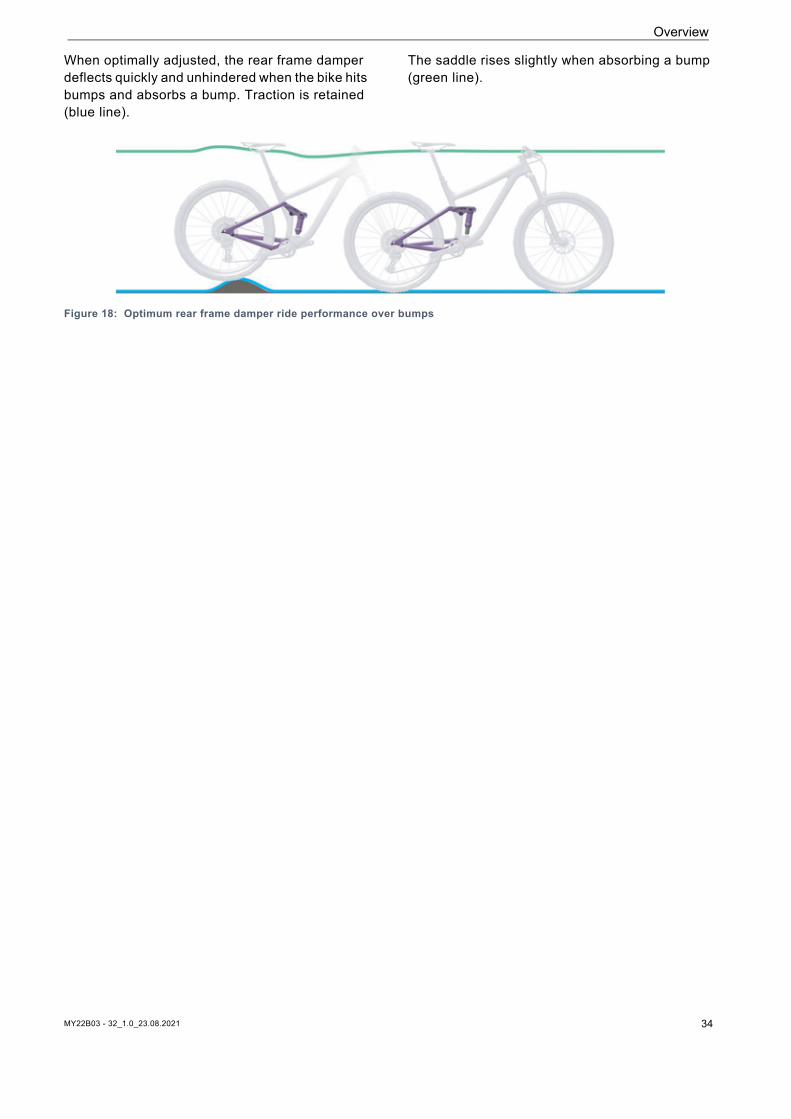
When optimally adjusted, the rear frame damper deflects quickly and unhindered when the bike hits bumps and absorbs a bump. Traction is retained (blue line).
The saddle rises slightly when absorbing a bump (green line).
Figure 18: Optimum rear frame damper ride performance over bumps
MY22B03 - 32_1.0_23.08.2021 34
MY22B03 - 32_1.0_23.08.2021 35
Overview
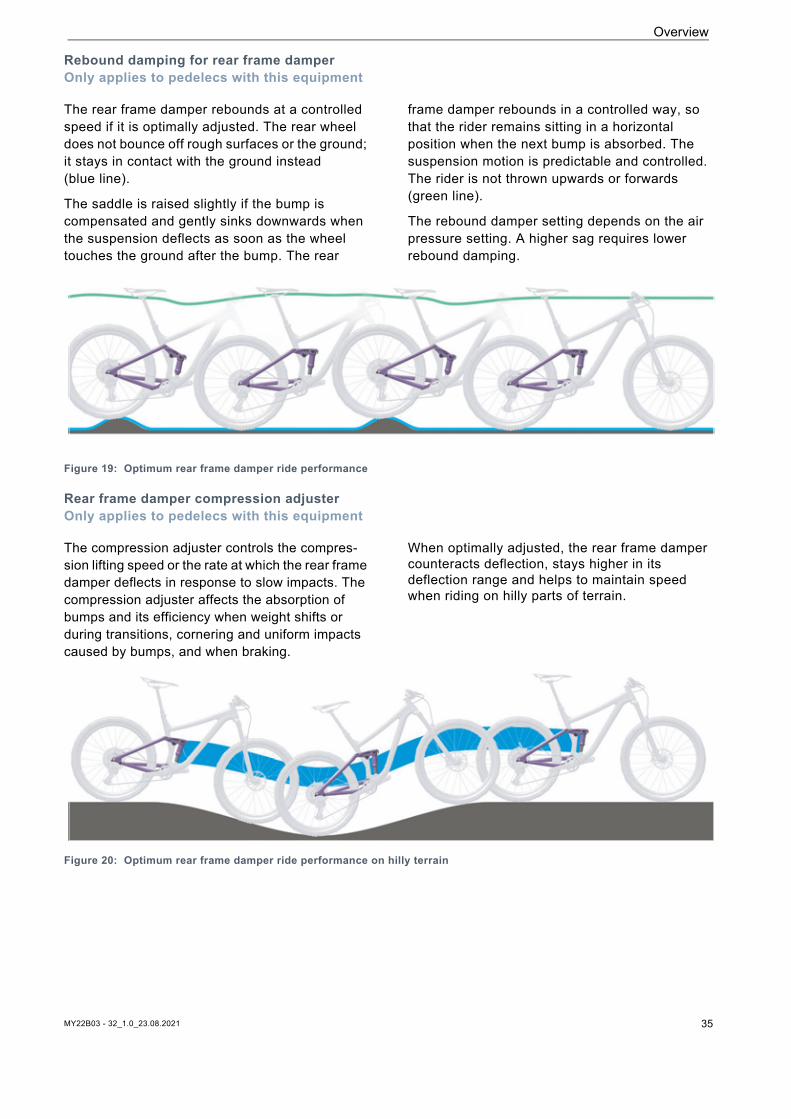
Rebound damping for rear frame damperOnly applies to pedelecs with this equipment
The rear frame damper rebounds at a controlled speed if it is optimally adjusted. The rear wheel does not bounce off rough surfaces or the ground; it stays in contact with the ground instead (blue line).
The saddle is raised slightly if the bump is compensated and gently sinks downwards when the suspension deflects as soon as the wheel touches the ground after the bump. The rear
frame damper rebounds in a controlled way, so that the rider remains sitting in a horizontal position when the next bump is absorbed. The suspension motion is predictable and controlled. The rider is not thrown upwards or forwards (green line).
The rebound damper setting depends on the air pressure setting. A higher sag requires lower rebound damping.
Figure 19: Optimum rear frame damper ride performance
Rear frame damper compression adjusterOnly applies to pedelecs with this equipment
The compression adjuster controls the compres-sion lifting speed or the rate at which the rear frame damper deflects in response to slow impacts. The compression adjuster affects the absorption of bumps and its efficiency when weight shifts or during transitions, cornering and uniform impacts caused by bumps, and when braking.
When optimally adjusted, the rear frame damper counteracts deflection, stays higher in its deflection range and helps to maintain speed when riding on hilly parts of terrain.
Figure 20: Optimum rear frame damper ride performance on hilly terrain
MY22B03 - 32_1.0_23.08.2021 36
Overview
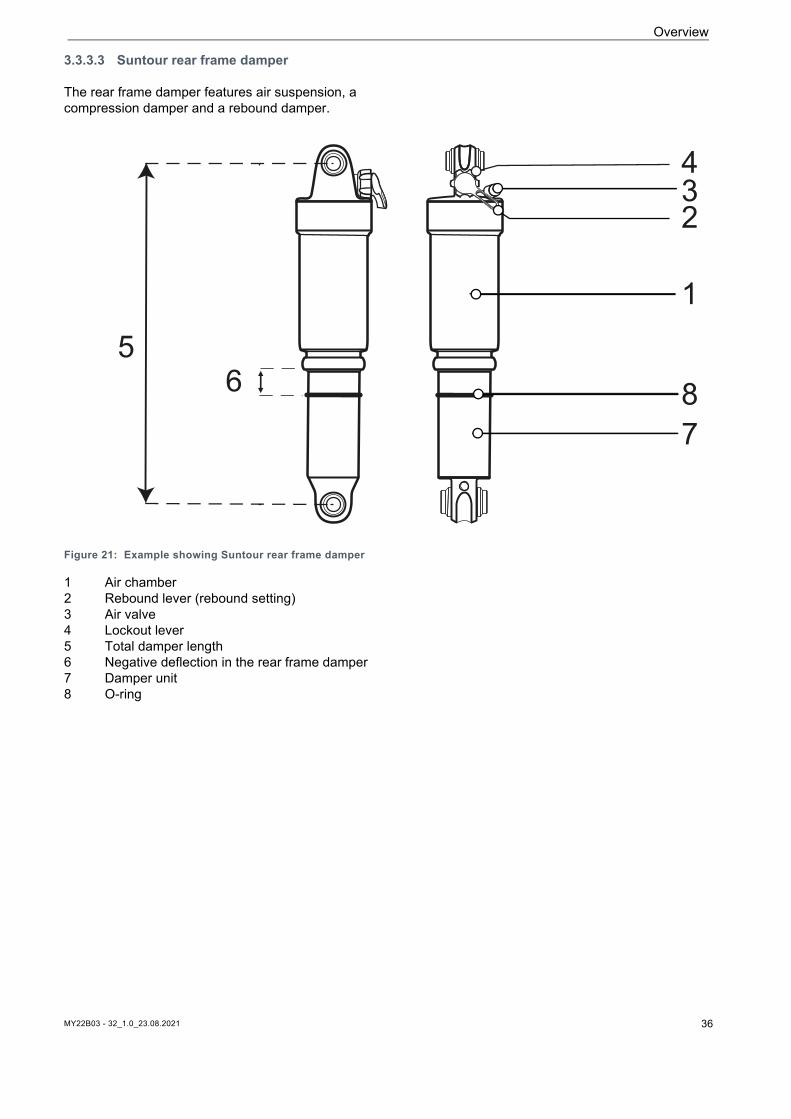
3.3.3.3 Suntour rear frame damper
The rear frame damper features air suspension, a compression damper and a rebound damper.
Figure 21: Example showing Suntour rear frame damper
1 Air chamber2 Rebound lever (rebound setting)3 Air valve 4 Lockout lever5 Total damper length6 Negative deflection in the rear frame damper7 Damper unit8 O-ring
3
1
7
2
4
85
6
MY22B03 - 32_1.0_23.08.2021 37
Overview
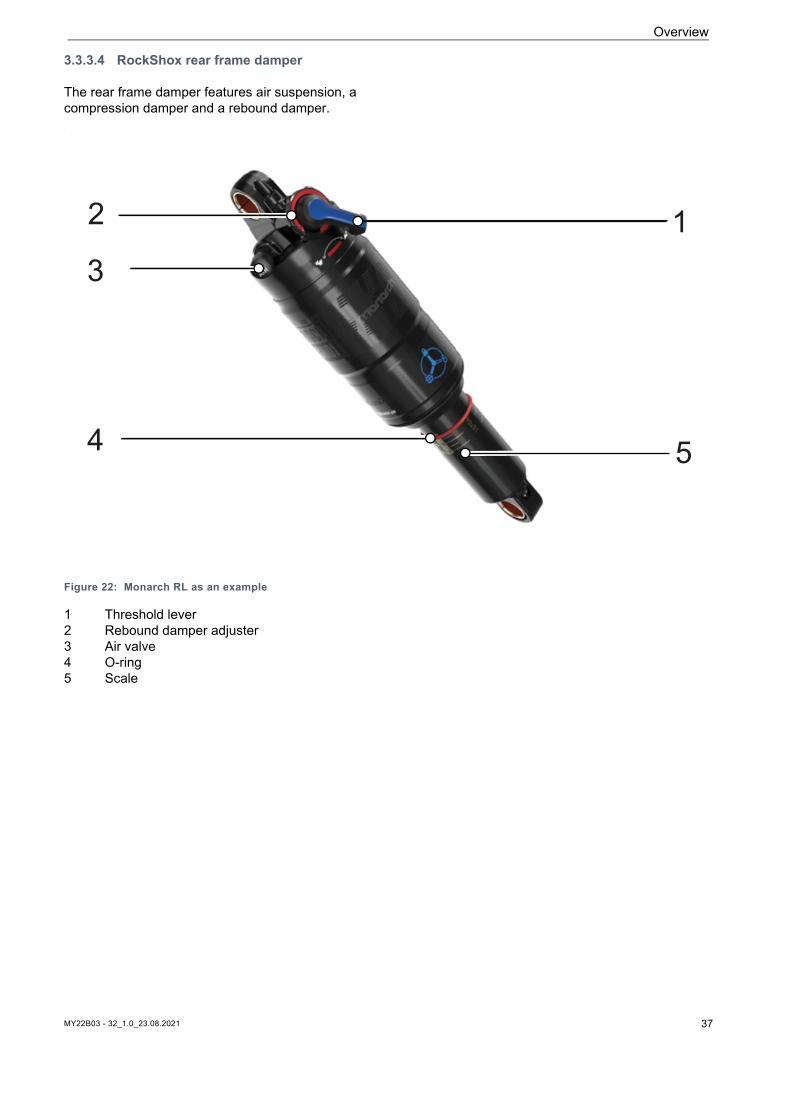
3.3.3.4 RockShox rear frame damper
The rear frame damper features air suspension, a compression damper and a rebound damper. .
Figure 22: Monarch RL as an example
1 Threshold lever 2 Rebound damper adjuster3 Air valve4 O-ring5 Scale
12
3
4 5
Description
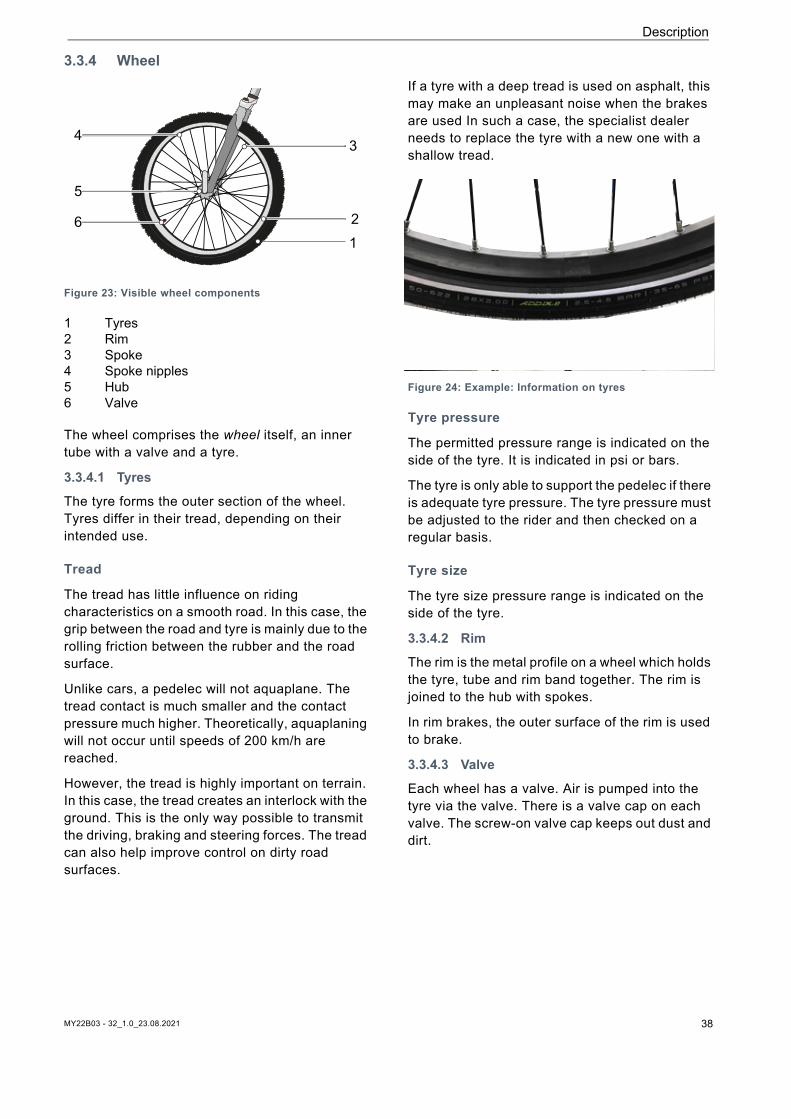
3.3.4 Wheel
Figure 23: Visible wheel components
1 Tyres2 Rim3 Spoke4 Spoke nipples5 Hub6 Valve
The wheel comprises the wheel itself, an inner tube with a valve and a tyre.
3.3.4.1 Tyres
The tyre forms the outer section of the wheel. Tyres differ in their tread, depending on their intended use.
Tread
The tread has little influence on riding characteristics on a smooth road. In this case, the grip between the road and tyre is mainly due to the rolling friction between the rubber and the road surface.
Unlike cars, a pedelec will not aquaplane. The tread contact is much smaller and the contact pressure much higher. Theoretically, aquaplaning will not occur until speeds of 200 km/h are reached.
However, the tread is highly important on terrain. In this case, the tread creates an interlock with the ground. This is the only way possible to transmit the driving, braking and steering forces. The tread can also help improve control on dirty road surfaces.
If a tyre with a deep tread is used on asphalt, this may make an unpleasant noise when the brakes are used In such a case, the specialist dealer needs to replace the tyre with a new one with a shallow tread.
Figure 24: Example: Information on tyres
Tyre pressure
The permitted pressure range is indicated on the side of the tyre. It is indicated in psi or bars.
The tyre is only able to support the pedelec if there is adequate tyre pressure. The tyre pressure must be adjusted to the rider and then checked on a regular basis.
Tyre size
The tyre size pressure range is indicated on the side of the tyre.
3.3.4.2 Rim
The rim is the metal profile on a wheel which holds the tyre, tube and rim band together. The rim is joined to the hub with spokes.
In rim brakes, the outer surface of the rim is used to brake.
3.3.4.3 Valve
Each wheel has a valve. Air is pumped into the tyre via the valve. There is a valve cap on each valve. The screw-on valve cap keeps out dust and dirt.
12
3
6
5
4
MY22B03 - 32_1.0_23.08.2021 38
Description
The pedelec has either:
• a conventional valve • a Presta valve or • a Schrader valve.
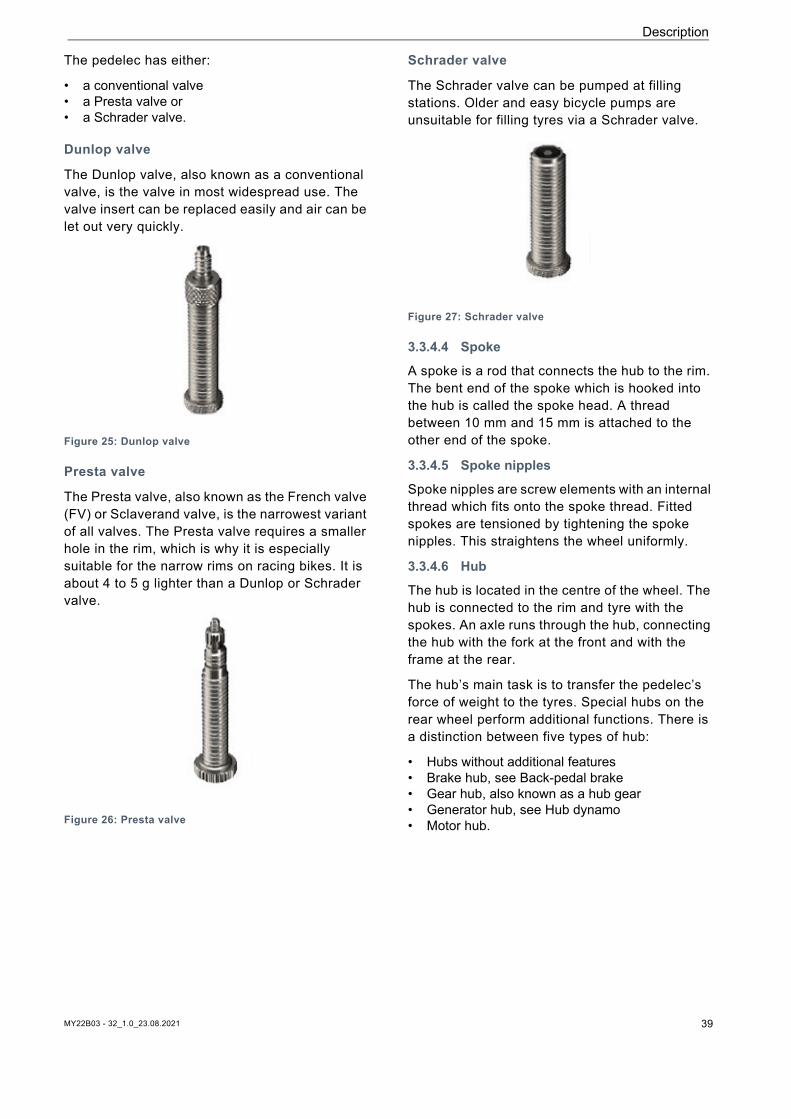
Dunlop valve
The Dunlop valve, also known as a conventional valve, is the valve in most widespread use. The valve insert can be replaced easily and air can be let out very quickly.
Figure 25: Dunlop valve
Presta valve
The Presta valve, also known as the French valve (FV) or Sclaverand valve, is the narrowest variant of all valves. The Presta valve requires a smaller hole in the rim, which is why it is especially suitable for the narrow rims on racing bikes. It is about 4 to 5 g lighter than a Dunlop or Schrader valve.
Figure 26: Presta valve
Schrader valve
The Schrader valve can be pumped at filling stations. Older and easy bicycle pumps are unsuitable for filling tyres via a Schrader valve.
Figure 27: Schrader valve
3.3.4.4 Spoke
A spoke is a rod that connects the hub to the rim. The bent end of the spoke which is hooked into the hub is called the spoke head. A thread between 10 mm and 15 mm is attached to the other end of the spoke.
3.3.4.5 Spoke nipples
Spoke nipples are screw elements with an internal thread which fits onto the spoke thread. Fitted spokes are tensioned by tightening the spoke nipples. This straightens the wheel uniformly.
3.3.4.6 Hub
The hub is located in the centre of the wheel. The hub is connected to the rim and tyre with the spokes. An axle runs through the hub, connecting the hub with the fork at the front and with the frame at the rear.
The hub’s main task is to transfer the pedelec’s force of weight to the tyres. Special hubs on the rear wheel perform additional functions. There is a distinction between five types of hub:
• Hubs without additional features• Brake hub, see Back-pedal brake • Gear hub, also known as a hub gear • Generator hub, see Hub dynamo• Motor hub.
MY22B03 - 32_1.0_23.08.2021 39

MY22B03 - 32_1.0_23.08.2021 40
Description
3.3.5 Braking system A pedelec's brake system is primarily operated using the brake lever on the handlebars.
• If the left brake handle is pulled, the brake on the front wheel is applied.
• If the right brake handle is pulled, the brake on the rear wheel is applied.
The brakes are used as an emergency stop system and bring the bicycle to a halt quickly and safely in the event of an emergency.
The brake is applied using the brake lever either
• with the brake lever and shift cable (mechanical brake) or
• with the brake lever and hydraulic brake cable (hydraulic brake).
3.3.5.1 Mechanical brake
The brake lever is connected with the brake via a wire inside the shift cable (also known as a Bowden cable).
Figure 28: Bowden cable structure
3.3.5.2 Hydraulic brake
The brake fluid is in a closed hose system. If the brake lever is pulled, the brake fluid transfers pressure to the brake on the wheel.
Figure 29: Components in a brake cable
1 Brake cable2 Cable clip 3 Union nut4 Cover cap5 Knob 6 Insert pin
2
12
3
456

MY22B03 - 32_1.0_23.08.2021 41
Description
3.3.5.3 Disc brake
Figure 30: Brake system with disc brake – example
1 Brake disc2 Brake calliper with brake linings3 Handlebars with brake lever 4 Front wheel brake disc5 Rear wheel brake disc
On a pedelec with a disc brake, the brake disc is screwed permanently to the wheel hub.
You increase brake pressure by pulling the brake lever. The brake fluid is used to transfer pressure through the brake cables to the cylinders in the brake calliper. The braking force is boosted by a speed reduction and applied to the brake linings. These apply the brake disc mechanically. If the brake lever is pushed, the brake linings are pressed against the brake disc and the wheel movement is decelerated until it comes to a stop.
1
3
4
5
2

MY22B03 - 32_1.0_23.08.2021 42
Description
3.3.6 Seat postSeat posts are not designed to fasten the saddle but also to adjust exactly to the optimum sitting position. The seat post can:
• adjust the seat height in the seat tube • adjust the saddle horizontally with a clamping
mechanism and• adjust the saddle angle by swivelling the entire
saddle clamping mechanism.
Retractable seat posts feature a remote control on the handlebars, which can be used to lower the seat post – at a traffic light, for example – and raise it again.
3.3.6.1 Patent seat post
Figure 31: Example of ergotec patent seat post with either one or two seat clamping screws
Patent seat posts have a rigid link between the saddle and the post. Patent seat posts which are angled more markedly towards the rear are called offset seat posts. Offset seat posts provide a greater distance between the saddle and the handlebars.
In patent saddle posts, the saddle is attached to the head with one or two saddle clamping screws. It is recommended to lubricate the thread in these screws to ensure sufficient tension when tightening the screw.
Patent saddle posts are fastened into the seat tube with either a quick release or a screwable clamp.
Figure 32: Example of a quick release
3.3.6.2 Suspension seat post
Spring-loaded seat posts can reduce shock after one-time hard impacts, thus improving ride comfort significantly. However, suspension seat posts are not able to compensate for bumps in the road.
If the seat post is the only suspension element, the entire vehicle is a non-suspended mass. This has an unfavourable effect on loaded touring bikes or pedelecs with child trailers.
Suspension seat posts feature small, heavy-duty slide bearings, guides and articulated joints. If they are not lubricated on a regular basis, the sensitive response behaviour diminishes considerably, causing excessive wear.
The pre-tensioning in non-damped suspension seat posts must be adjusted in such a way that the suspension seat post does not deflect with just body weight. This prevents the suspension seat post from deflecting and bobbing intermittently at higher pedalling frequencies or if the rider pedals irregularly.
The spring stiffness can be set lower with damped suspension seat posts, thus making use of the negative deflection.
3
MY22B03 - 32_1.0_23.08.2021 43
About these operating instructions
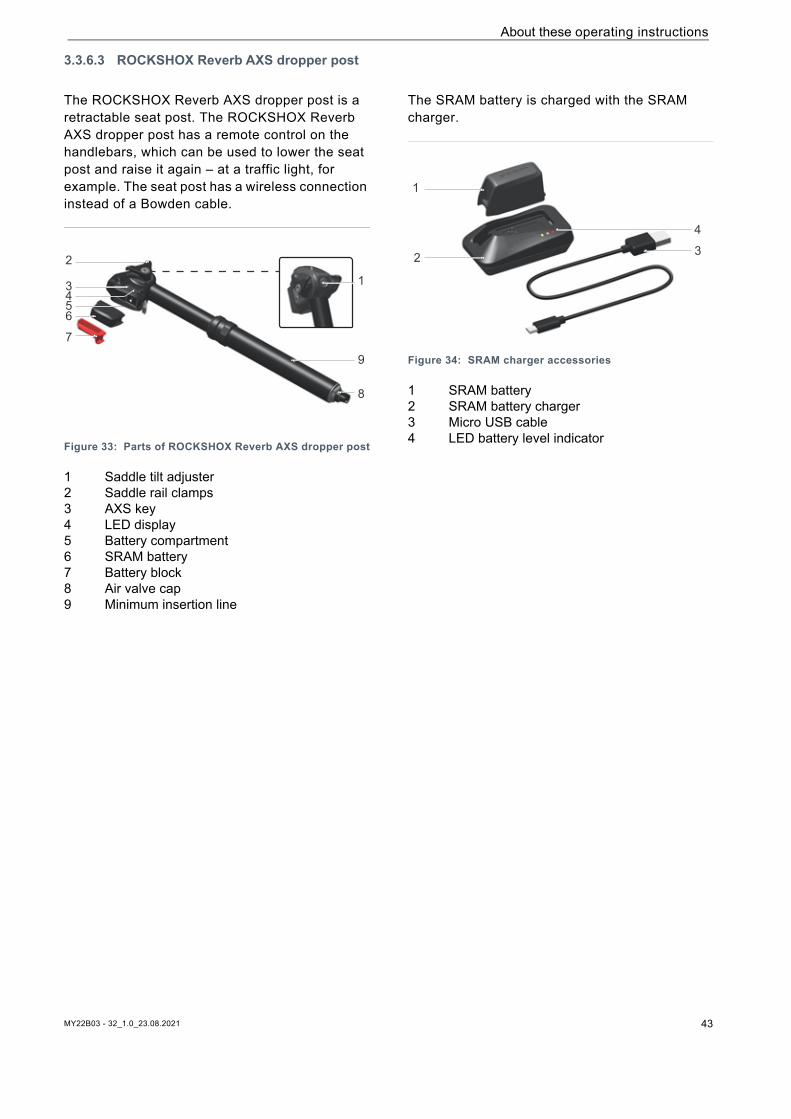
3.3.6.3 ROCKSHOX Reverb AXS dropper post
The ROCKSHOX Reverb AXS dropper post is a retractable seat post. The ROCKSHOX Reverb AXS dropper post has a remote control on the handlebars, which can be used to lower the seat post and raise it again – at a traffic light, for example. The seat post has a wireless connection instead of a Bowden cable.
Figure 33: Parts of ROCKSHOX Reverb AXS dropper post
1 Saddle tilt adjuster2 Saddle rail clamps3 AXS key4 LED display5 Battery compartment6 SRAM battery7 Battery block8 Air valve cap9 Minimum insertion line
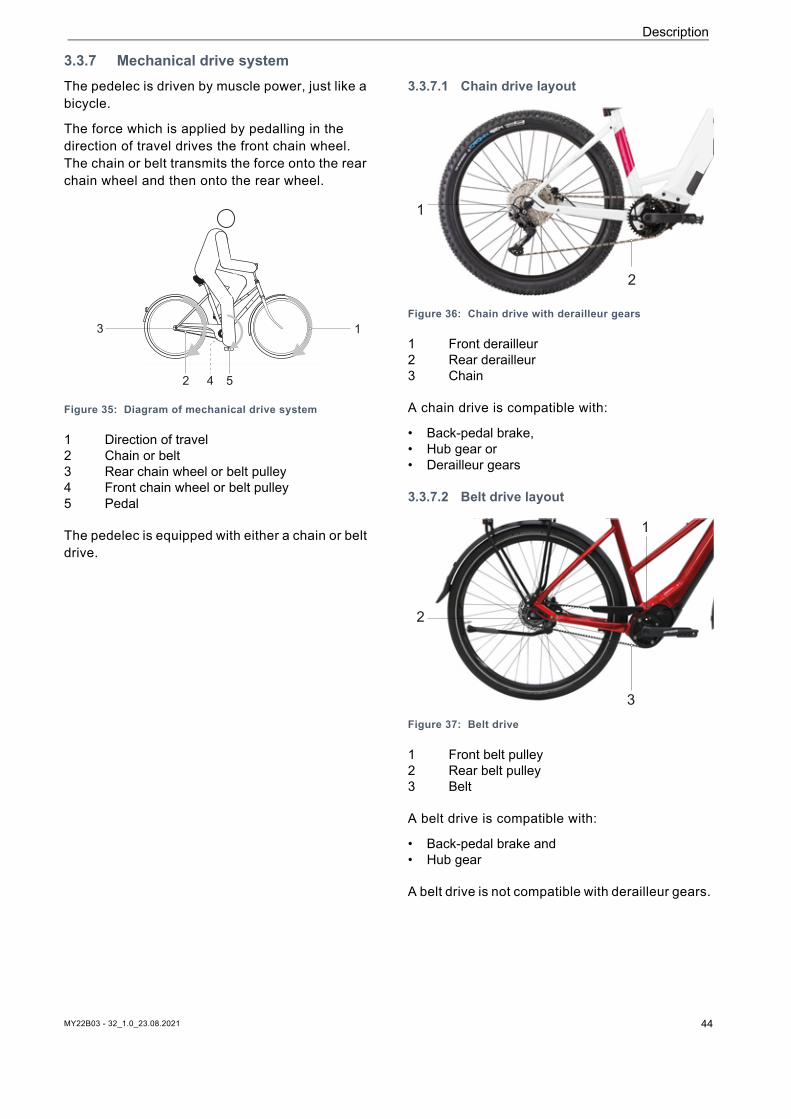
The SRAM battery is charged with the SRAM charger.
Figure 34: SRAM charger accessories
1 SRAM battery2 SRAM battery charger3 Micro USB cable4 LED battery level indicator
1
2
3456
7
8
9
1
2
4
3
MY22B03 - 32_1.0_23.08.2021 44
Description
3.3.7 Mechanical drive systemThe pedelec is driven by muscle power, just like a bicycle.
The force which is applied by pedalling in the direction of travel drives the front chain wheel. The chain or belt transmits the force onto the rear chain wheel and then onto the rear wheel.
Figure 35: Diagram of mechanical drive system
1 Direction of travel2 Chain or belt3 Rear chain wheel or belt pulley4 Front chain wheel or belt pulley5 Pedal
The pedelec is equipped with either a chain or belt drive.
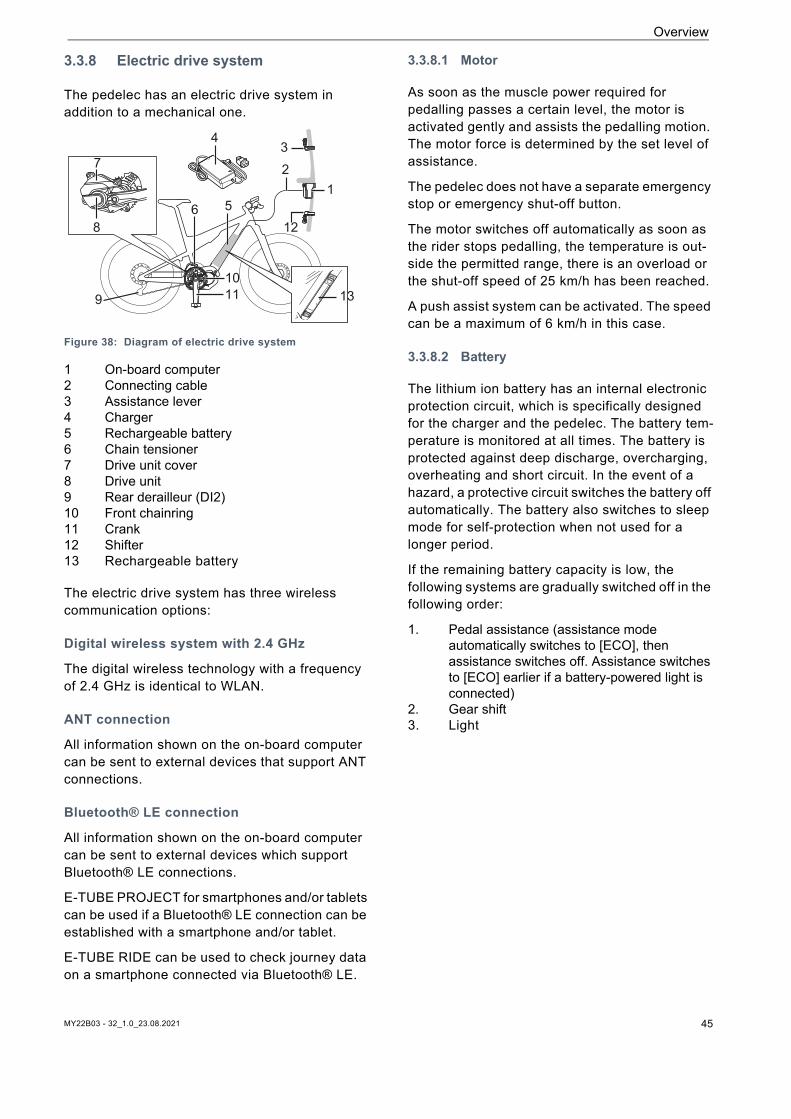
3.3.7.1 Chain drive layout
Figure 36: Chain drive with derailleur gears
1 Front derailleur2 Rear derailleur 3 Chain
A chain drive is compatible with:
• Back-pedal brake,• Hub gear or• Derailleur gears
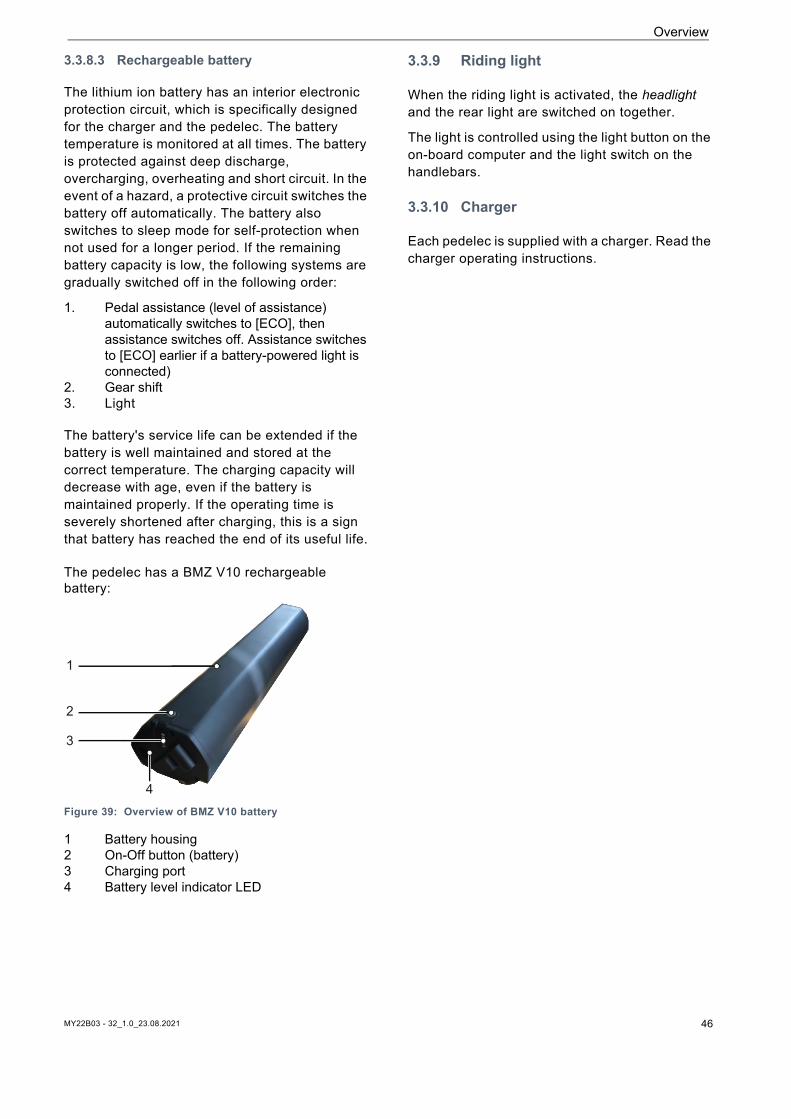
3.3.7.2 Belt drive layout
Figure 37: Belt drive
1 Front belt pulley2 Rear belt pulley3 Belt
A belt drive is compatible with:
• Back-pedal brake and • Hub gear
A belt drive is not compatible with derailleur gears.
13
2 4 5
1
2
1
2
3
Overview
3.3.8 Electric drive system
The pedelec has an electric drive system in addition to a mechanical one.
Figure 38: Diagram of electric drive system
1 On-board computer2 Connecting cable3 Assistance lever4 Charger 5 Rechargeable battery 6 Chain tensioner 7 Drive unit cover8 Drive unit 9 Rear derailleur (DI2) 10 Front chainring 11 Crank 12 Shifter13 Rechargeable battery
The electric drive system has three wireless communication options:
Digital wireless system with 2.4 GHz
The digital wireless technology with a frequency of 2.4 GHz is identical to WLAN.
ANT connection
All information shown on the on-board computer can be sent to external devices that support ANT connections.
Bluetooth® LE connection
All information shown on the on-board computer can be sent to external devices which support Bluetooth® LE connections.
E-TUBE PROJECT for smartphones and/or tablets can be used if a Bluetooth® LE connection can be established with a smartphone and/or tablet.
E-TUBE RIDE can be used to check journey data on a smartphone connected via Bluetooth® LE.
3.3.8.1 Motor
As soon as the muscle power required for pedalling passes a certain level, the motor is activated gently and assists the pedalling motion. The motor force is determined by the set level of assistance.
The pedelec does not have a separate emergency stop or emergency shut-off button.
The motor switches off automatically as soon as the rider stops pedalling, the temperature is out-side the permitted range, there is an overload or the shut-off speed of 25 km/h has been reached.
A push assist system can be activated. The speed can be a maximum of 6 km/h in this case.
3.3.8.2 Battery
The lithium ion battery has an internal electronic protection circuit, which is specifically designed for the charger and the pedelec. The battery tem-perature is monitored at all times. The battery is protected against deep discharge, overcharging, overheating and short circuit. In the event of a hazard, a protective circuit switches the battery off automatically. The battery also switches to sleep mode for self-protection when not used for a longer period.
If the remaining battery capacity is low, the following systems are gradually switched off in the following order:
1. Pedal assistance (assistance mode automatically switches to [ECO], then assistance switches off. Assistance switches to [ECO] earlier if a battery-powered light is connected)
2. Gear shift3. Light
6 5
4
12
1
3
2
910
7
8
11 13
MY22B03 - 32_1.0_23.08.2021 45
Overview
3.3.8.3 Rechargeable battery
The lithium ion battery has an interior electronic protection circuit, which is specifically designed for the charger and the pedelec. The battery temperature is monitored at all times. The battery is protected against deep discharge, overcharging, overheating and short circuit. In the event of a hazard, a protective circuit switches the battery off automatically. The battery also switches to sleep mode for self-protection when not used for a longer period. If the remaining battery capacity is low, the following systems are gradually switched off in the following order:
1. Pedal assistance (level of assistance) automatically switches to [ECO], then assistance switches off. Assistance switches to [ECO] earlier if a battery-powered light is connected)
2. Gear shift3. Light
The battery's service life can be extended if the battery is well maintained and stored at the correct temperature. The charging capacity will decrease with age, even if the battery is maintained properly. If the operating time is severely shortened after charging, this is a sign that battery has reached the end of its useful life.
The pedelec has a BMZ V10 rechargeable battery:
Figure 39: Overview of BMZ V10 battery
1 Battery housing2 On-Off button (battery)3 Charging port4 Battery level indicator LED
3.3.9 Riding light
When the riding light is activated, the headlight and the rear light are switched on together.
The light is controlled using the light button on the on-board computer and the light switch on the handlebars.
3.3.10 Charger
Each pedelec is supplied with a charger. Read the charger operating instructions.
4
3
2
1
MY22B03 - 32_1.0_23.08.2021 46
Overview
3.3.10.1 On-board computer
The SC-EM800 on-board computer controls the drive system with two operating elements, and displays the journey data.
Figure 40: Overview of SC-EM800 on-board computer
3.3.10.2 Control panel
The electric drive system is operated using the on-board computer (II) and the left-hand control panel (I). The right-hand control panel (III) switches the gears.
Figure 41: Overview of control panel position
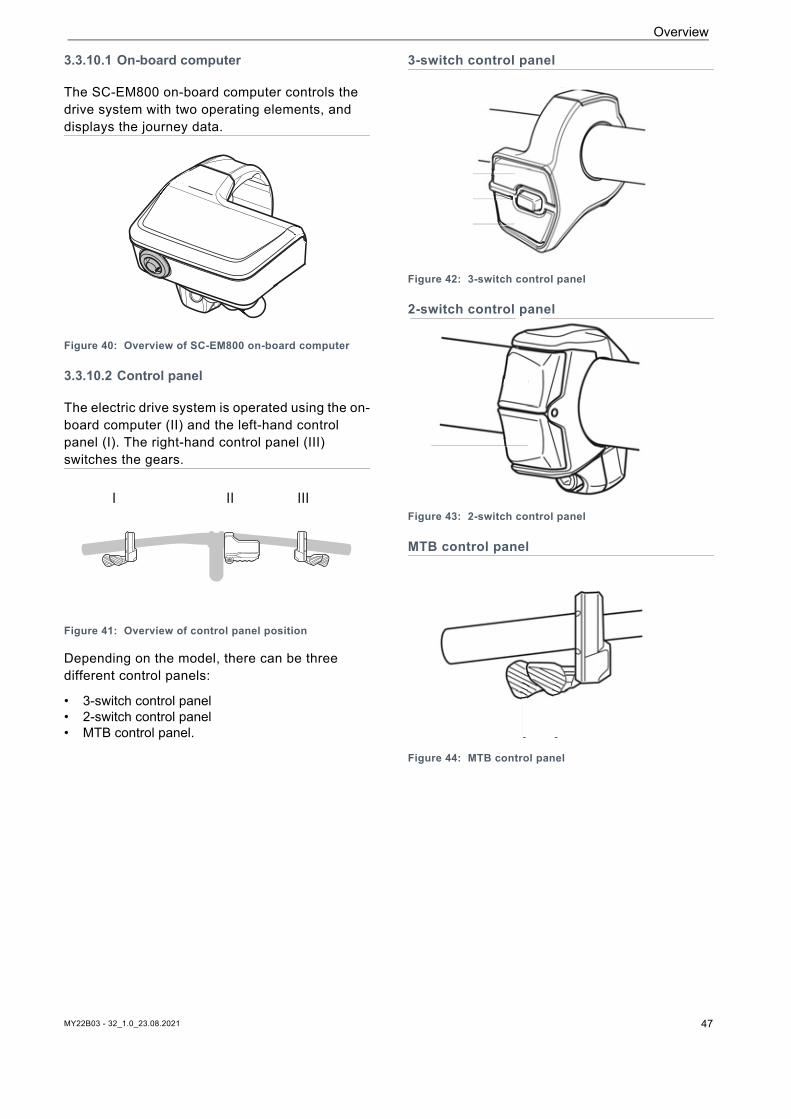
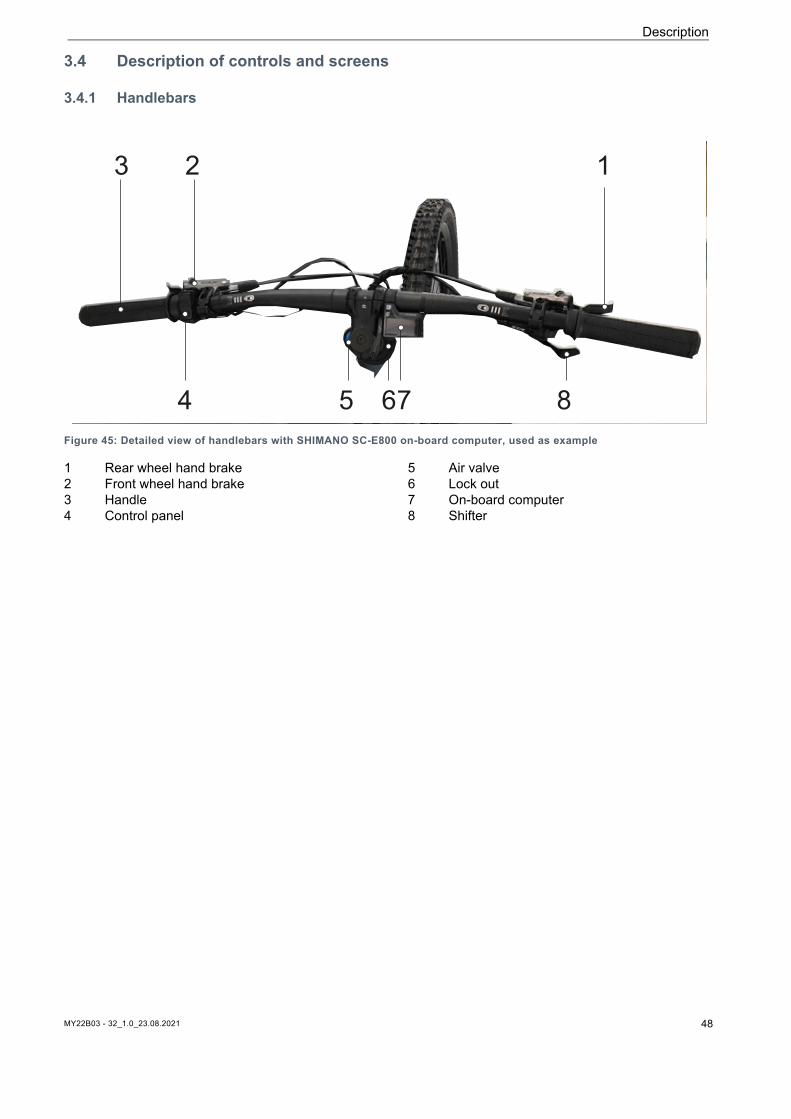
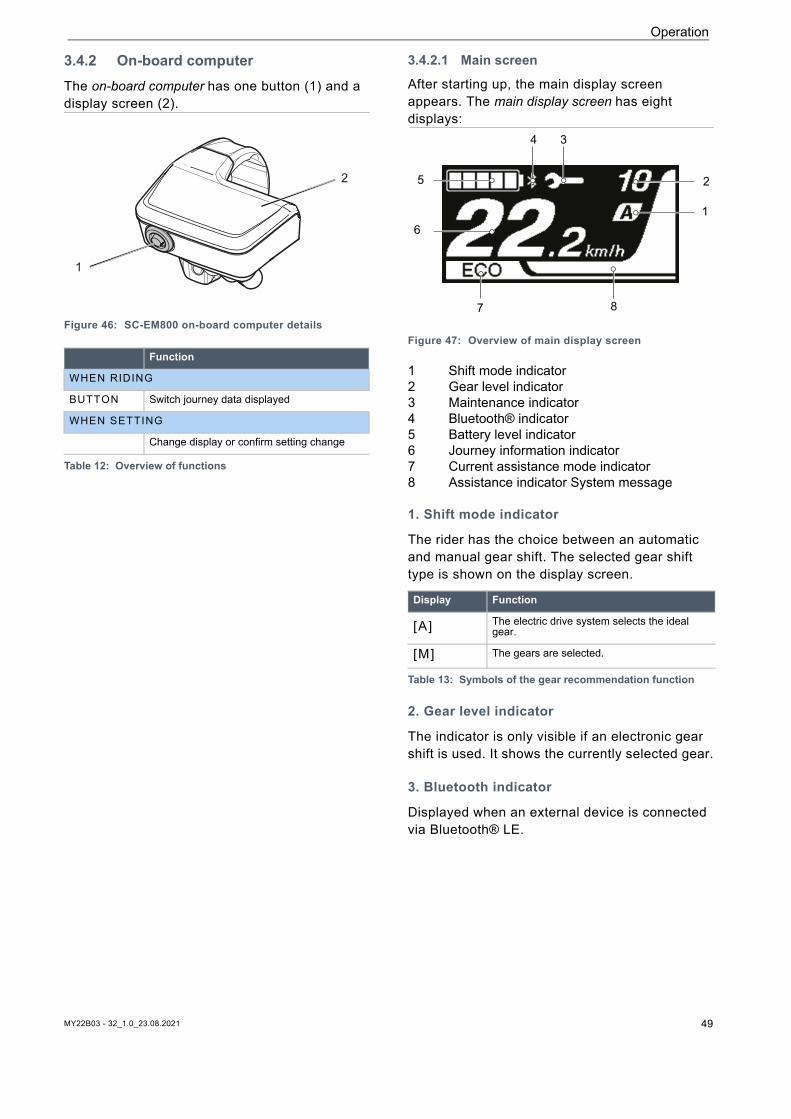
Depending on the model, there can be three different control panels:
• 3-switch control panel• 2-switch control panel• MTB control panel.
3-switch control panel
Figure 42: 3-switch control panel
2-switch control panel
Figure 43: 2-switch control panel
MTB control panel
Figure 44: MTB control panel
I II III
MY22B03 - 32_1.0_23.08.2021 47
MY22B03 - 32_1.0_23.08.2021 48
Description
3.4 Description of controls and screens
3.4.1 Handlebars
Figure 45: Detailed view of handlebars with SHIMANO SC-E800 on-board computer, used as example
1 Rear wheel hand brake2 Front wheel hand brake3 Handle4 Control panel
5 Air valve6 Lock out7 On-board computer8 Shifter
123
4 5 67 8
Operation
3.4.2 On-board computer The on-board computer has one button (1) and a display screen (2).
Figure 46: SC-EM800 on-board computer details
3.4.2.1 Main screen
After starting up, the main display screen appears. The main display screen has eight displays:
Figure 47: Overview of main display screen
1 Shift mode indicator 2 Gear level indicator 3 Maintenance indicator 4 Bluetooth® indicator 5 Battery level indicator6 Journey information indicator7 Current assistance mode indicator 8 Assistance indicator System message
1. Shift mode indicator
The rider has the choice between an automatic and manual gear shift. The selected gear shift type is shown on the display screen.
2. Gear level indicator
The indicator is only visible if an electronic gear shift is used. It shows the currently selected gear.
3. Bluetooth indicator
Displayed when an external device is connected via Bluetooth® LE.
Function
WHEN RIDING
BUTTON Switch journey data displayed
WHEN SETTING
Change display or confirm setting change
Table 12: Overview of functions
1
2
Display Function
[A] The electric drive system selects the ideal gear.
[M] The gears are selected.
Table 13: Symbols of the gear recommendation function
1
2
34
5
6
7 8
MY22B03 - 32_1.0_23.08.2021 49
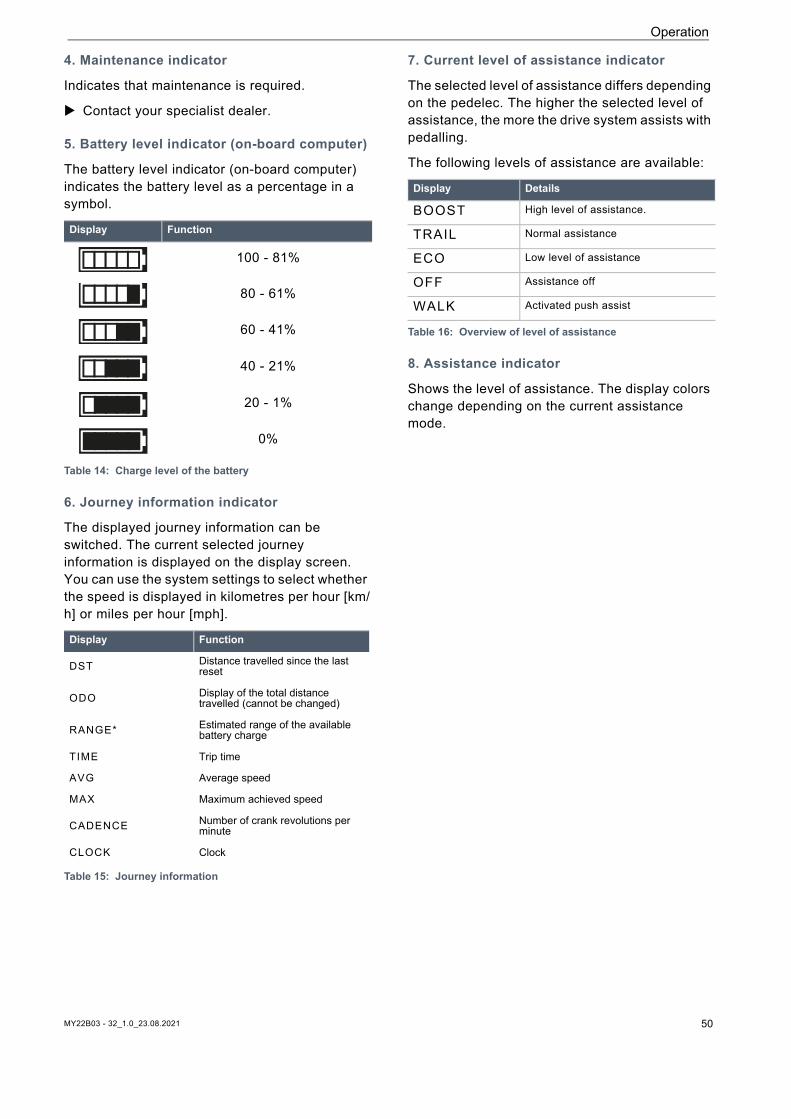
Operation
4. Maintenance indicator
Indicates that maintenance is required.
Contact your specialist dealer.
5. Battery level indicator (on-board computer)
The battery level indicator (on-board computer) indicates the battery level as a percentage in a symbol.
6. Journey information indicator
The displayed journey information can be switched. The current selected journey information is displayed on the display screen. You can use the system settings to select whether the speed is displayed in kilometres per hour [km/h] or miles per hour [mph].
7. Current level of assistance indicator
The selected level of assistance differs depending on the pedelec. The higher the selected level of assistance, the more the drive system assists with pedalling.
The following levels of assistance are available:
8. Assistance indicator
Shows the level of assistance. The display colors change depending on the current assistance mode.
Display Function
100 - 81%
80 - 61%
60 - 41%
40 - 21%
20 - 1%
0%
Table 14: Charge level of the battery
Display Function
DST Distance travelled since the last reset
ODO Display of the total distance travelled (cannot be changed)
RANGE* Estimated range of the available battery charge
TIME Trip time
AVG Average speed
MAX Maximum achieved speed
CADENCE Number of crank revolutions per minute
CLOCK Clock
Table 15: Journey information
Display Details
BOOST High level of assistance.
TRAIL Normal assistance
ECO Low level of assistance
OFF Assistance off
WALK Activated push assist
Table 16: Overview of level of assistance
MY22B03 - 32_1.0_23.08.2021 50
Operation
3.4.3 Warnings and errorsThe drive system monitors itself continuously and if an error is detected, it is indicated by a system message. The system may switch off automatically depending on the type of error. You will find more information and a table containing all system messages in Section 6.3.
The drive system distinguishes between two system messages: warnings and error messages.
3.4.3.1 Warnings
Warnings are displayed between the selected gear and the current speed on the system message screen. There are limitations to the system's operation, depending on the error type. There is a table of system messages and remedial measures in Section 6.3.1.
3.4.3.2 Error messages
Error messages are shown on the entire display. There are limitations to the drive systems system's operation, depending on the error type. There is a table of error messages and remedial measures in Section 6.3.2.
MY22B03 - 32_1.0_23.08.2021 51

Operation
3.4.4 Gear shift
There is either a switch control panel or a shifter on the right side of the handlebars. There can be three different switches, depending on the model:
• 3-switch control panel• 2-switch control panel or• MTB control panel.
3-switch control panel
Figure 48: 3-switch control panel
1 Switch X 2 Switch A 3 Switch Y
2-switch control panel
Figure 49: 2-switch control panel
1 Switch X 2 Switch Y
MTB control panel
Figure 50: MTB control panel
1 Switch Y2 Switch X
3.4.4.1 Control panel functions on right
If there is no switch A on the switch control panel, the button on the on-board computer will control these functions.
SHIMANO shifter SL-M5100
Figure 51: Shifter SL-M5100
1 Shifter A2 Shifter B
1
2
3
1
2
Switch Function
X Change up
Y Change down
ASwitch betweenautomatic and manualGear shift
1 2
1
2
MY22B03 - 32_1.0_23.08.2021 52
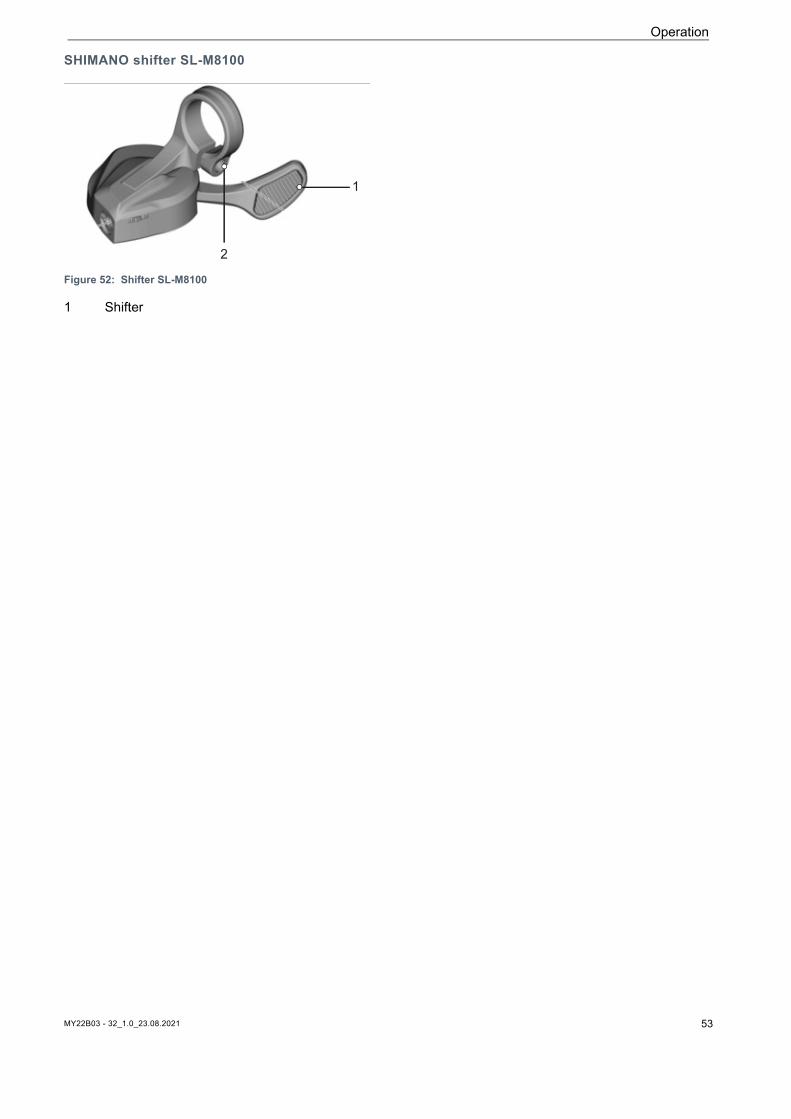
Operation
SHIMANO shifter SL-M8100
Figure 52: Shifter SL-M8100
1 Shifter
1
2
MY22B03 - 32_1.0_23.08.2021 53
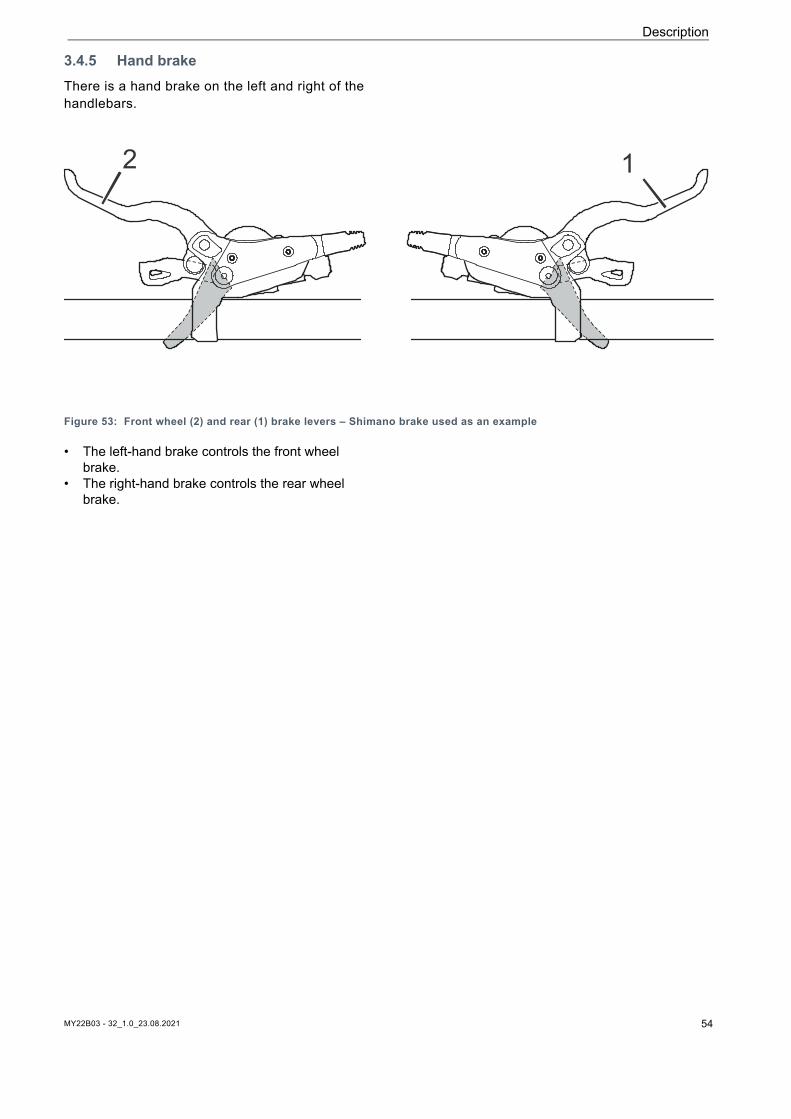
MY22B03 - 32_1.0_23.08.2021 54
Description
3.4.5 Hand brakeThere is a hand brake on the left and right of the handlebars.
Figure 53: Front wheel (2) and rear (1) brake levers – Shimano brake used as an example
• The left-hand brake controls the front wheel brake.
• The right-hand brake controls the rear wheel brake.
12
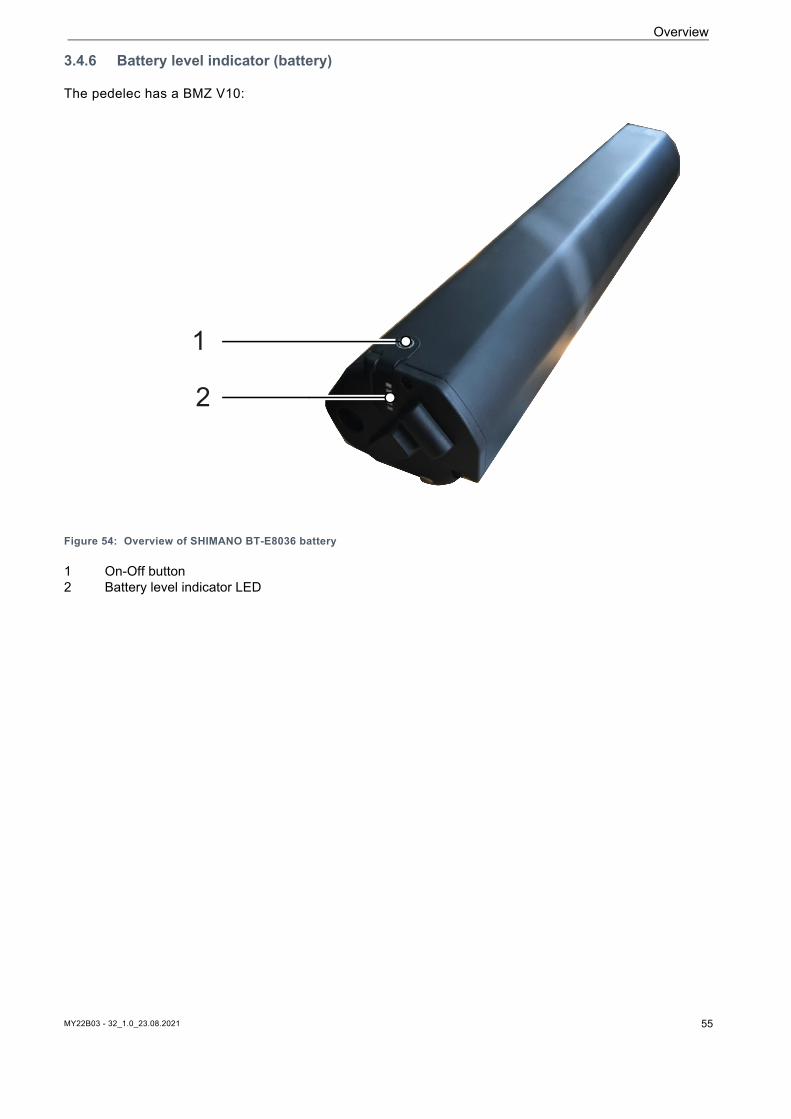
MY22B03 - 32_1.0_23.08.2021 55
Overview
3.4.6 Battery level indicator (battery)
The pedelec has a BMZ V10:
Figure 54: Overview of SHIMANO BT-E8036 battery
1 On-Off button2 Battery level indicator LED
2
1
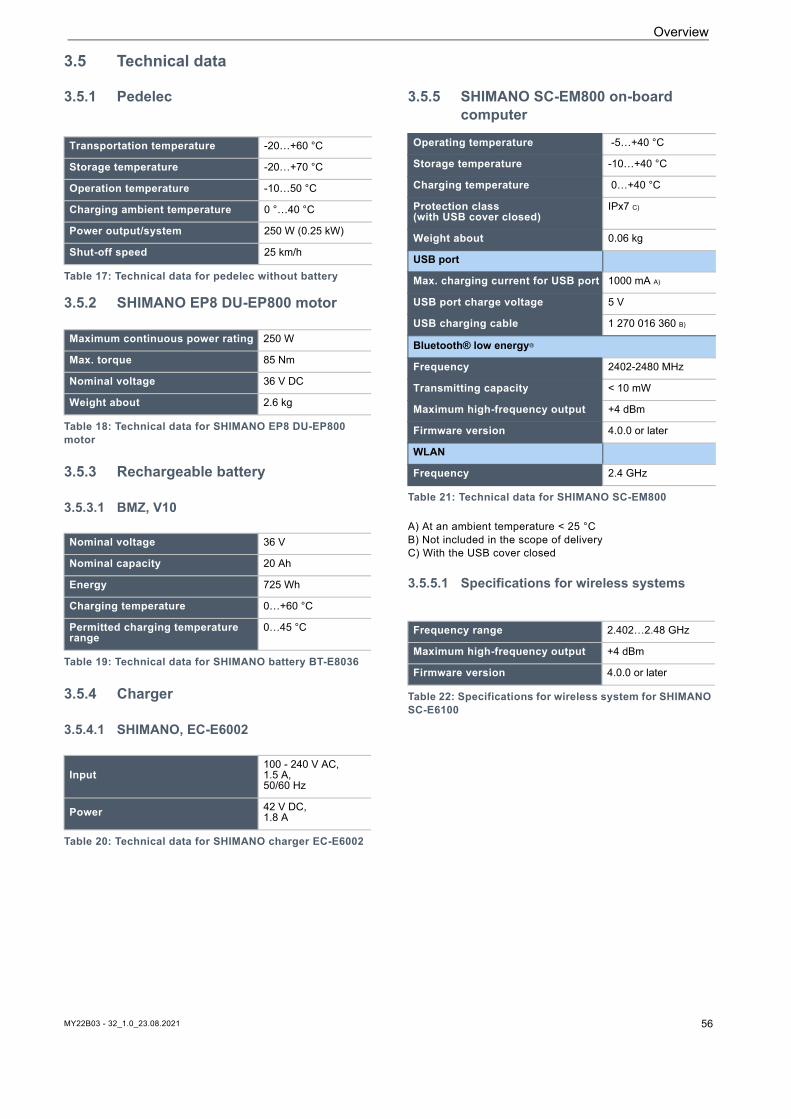
Overview
3.5 Technical data
3.5.1 Pedelec
3.5.2 SHIMANO EP8 DU-EP800 motor
3.5.3 Rechargeable battery
3.5.3.1 BMZ, V10
3.5.4 Charger
3.5.4.1 SHIMANO, EC-E6002
3.5.5 SHIMANO SC-EM800 on-board computer
A) At an ambient temperature < 25 °CB) Not included in the scope of deliveryC) With the USB cover closed
3.5.5.1 Specifications for wireless systems
Transportation temperature -20…+60 °C
Storage temperature -20…+70 °C
Operation temperature -10…50 °C
Charging ambient temperature 0 °…40 °C
Power output/system 250 W (0.25 kW)
Shut-off speed 25 km/h
Table 17: Technical data for pedelec without battery
Maximum continuous power rating 250 W
Max. torque 85 Nm
Nominal voltage 36 V DC
Weight about 2.6 kg
Table 18: Technical data for SHIMANO EP8 DU-EP800 motor
Nominal voltage 36 V
Nominal capacity 20 Ah
Energy 725 Wh
Charging temperature 0…+60 °C
Permitted charging temperature range
0…45 °C
Table 19: Technical data for SHIMANO battery BT-E8036
Input100 - 240 V AC, 1.5 A, 50/60 Hz
Power 42 V DC, 1.8 A
Table 20: Technical data for SHIMANO charger EC-E6002
Operating temperature -5…+40 °C
Storage temperature -10…+40 °C
Charging temperature 0…+40 °C
Protection class(with USB cover closed)
IPx7 C)
Weight about 0.06 kg
USB port
Max. charging current for USB port 1000 mA A)
USB port charge voltage 5 V
USB charging cable 1 270 016 360 B)
Bluetooth® low energy®
Frequency 2402-2480 MHz
Transmitting capacity < 10 mW
Maximum high-frequency output +4 dBm
Firmware version 4.0.0 or later
WLAN
Frequency 2.4 GHz
Table 21: Technical data for SHIMANO SC-EM800
Frequency range 2.402…2.48 GHz
Maximum high-frequency output +4 dBm
Firmware version 4.0.0 or later
Table 22: Specifications for wireless system for SHIMANO SC-E6100
MY22B03 - 32_1.0_23.08.2021 56
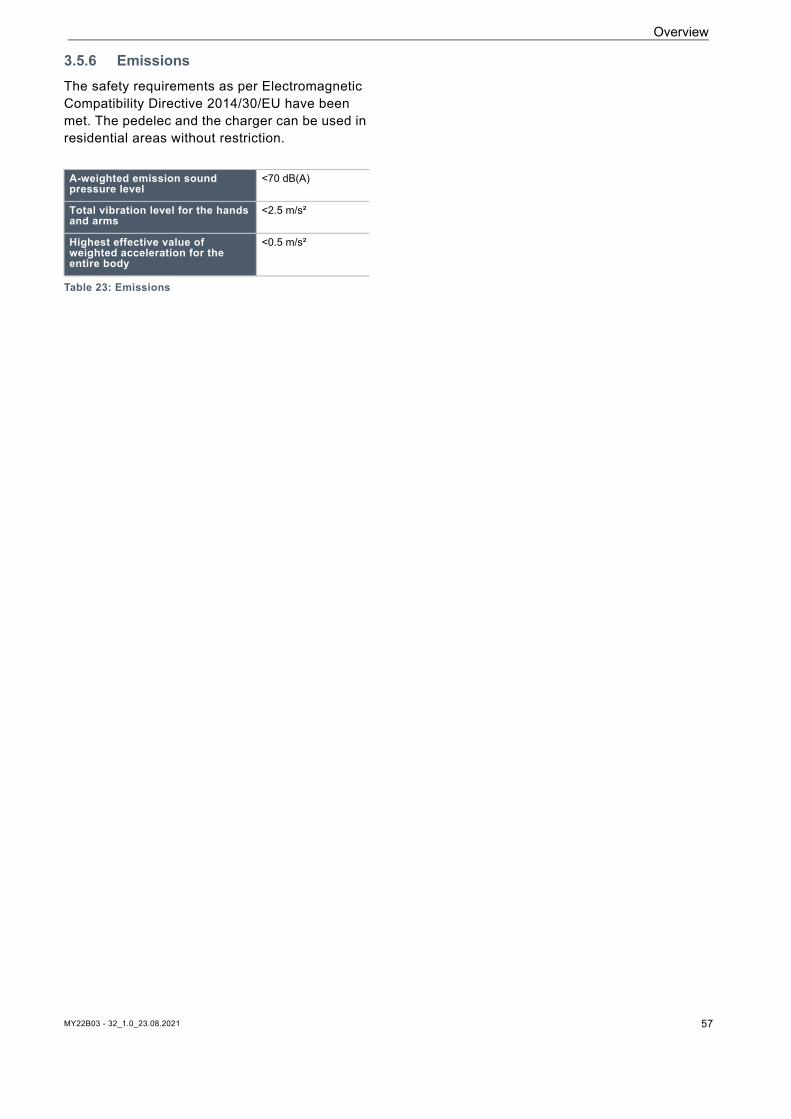
Overview
3.5.6 EmissionsThe safety requirements as per Electromagnetic Compatibility Directive 2014/30/EU have been met. The pedelec and the charger can be used in residential areas without restriction.
A-weighted emission sound pressure level
<70 dB(A)
Total vibration level for the hands and arms
<2.5 m/s²
Highest effective value of weighted acceleration for the entire body
<0.5 m/s²
Table 23: Emissions
MY22B03 - 32_1.0_23.08.2021 57
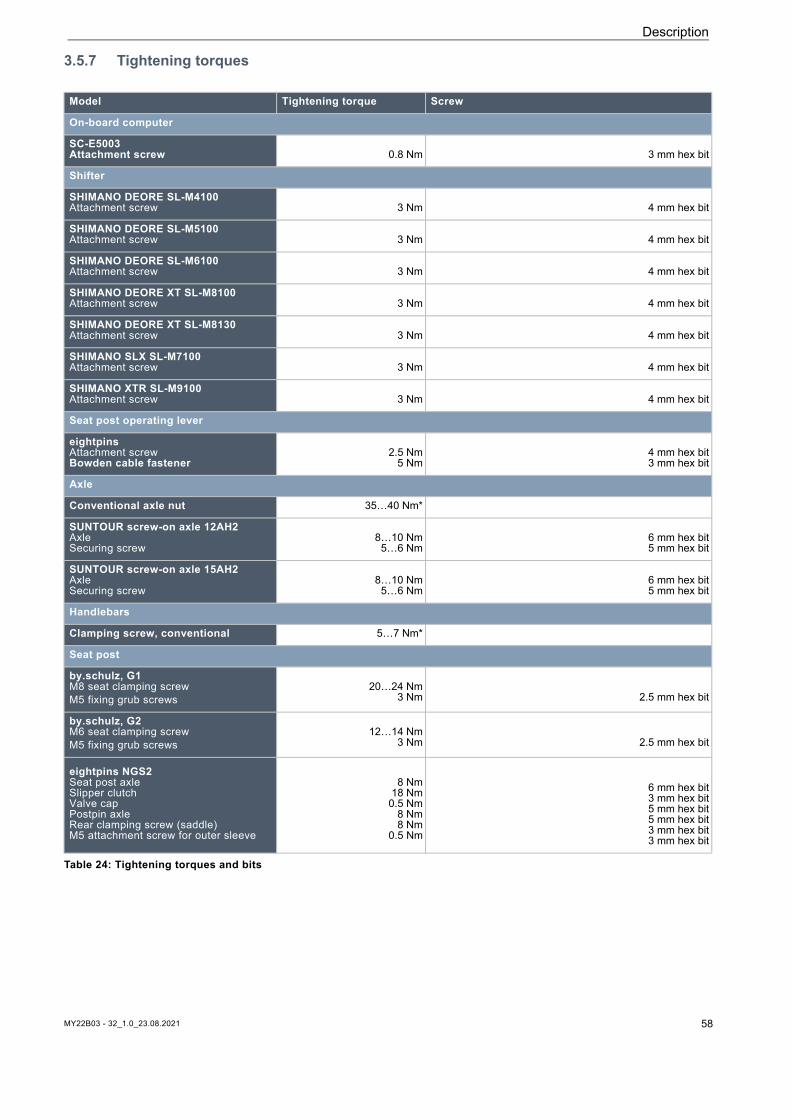
Description
3.5.7 Tightening torques
Model Tightening torque Screw
On-board computer
SC-E5003Attachment screw 0.8 Nm 3 mm hex bit
Shifter
SHIMANO DEORE SL-M4100Attachment screw 3 Nm 4 mm hex bit
SHIMANO DEORE SL-M5100Attachment screw 3 Nm 4 mm hex bit
SHIMANO DEORE SL-M6100Attachment screw 3 Nm 4 mm hex bit
SHIMANO DEORE XT SL-M8100Attachment screw 3 Nm 4 mm hex bit
SHIMANO DEORE XT SL-M8130Attachment screw 3 Nm 4 mm hex bit
SHIMANO SLX SL-M7100Attachment screw 3 Nm 4 mm hex bit
SHIMANO XTR SL-M9100Attachment screw 3 Nm 4 mm hex bit
Seat post operating lever
eightpinsAttachment screw Bowden cable fastener
2.5 Nm5 Nm
4 mm hex bit3 mm hex bit
Axle
Conventional axle nut 35…40 Nm*
SUNTOUR screw-on axle 12AH2 AxleSecuring screw
8…10 Nm5…6 Nm
6 mm hex bit5 mm hex bit
SUNTOUR screw-on axle 15AH2AxleSecuring screw
8…10 Nm5…6 Nm
6 mm hex bit5 mm hex bit
Handlebars
Clamping screw, conventional 5…7 Nm*
Seat post
by.schulz, G1M8 seat clamping screw M5 fixing grub screws
20…24 Nm3 Nm 2.5 mm hex bit
by.schulz, G2M6 seat clamping screw M5 fixing grub screws
12…14 Nm3 Nm 2.5 mm hex bit
eightpins NGS2Seat post axleSlipper clutchValve capPostpin axleRear clamping screw (saddle)M5 attachment screw for outer sleeve
8 Nm18 Nm
0.5 Nm8 Nm8 Nm
0.5 Nm
6 mm hex bit3 mm hex bit5 mm hex bit5 mm hex bit3 mm hex bit3 mm hex bit
Table 24: Tightening torques and bits
MY22B03 - 32_1.0_23.08.2021 58
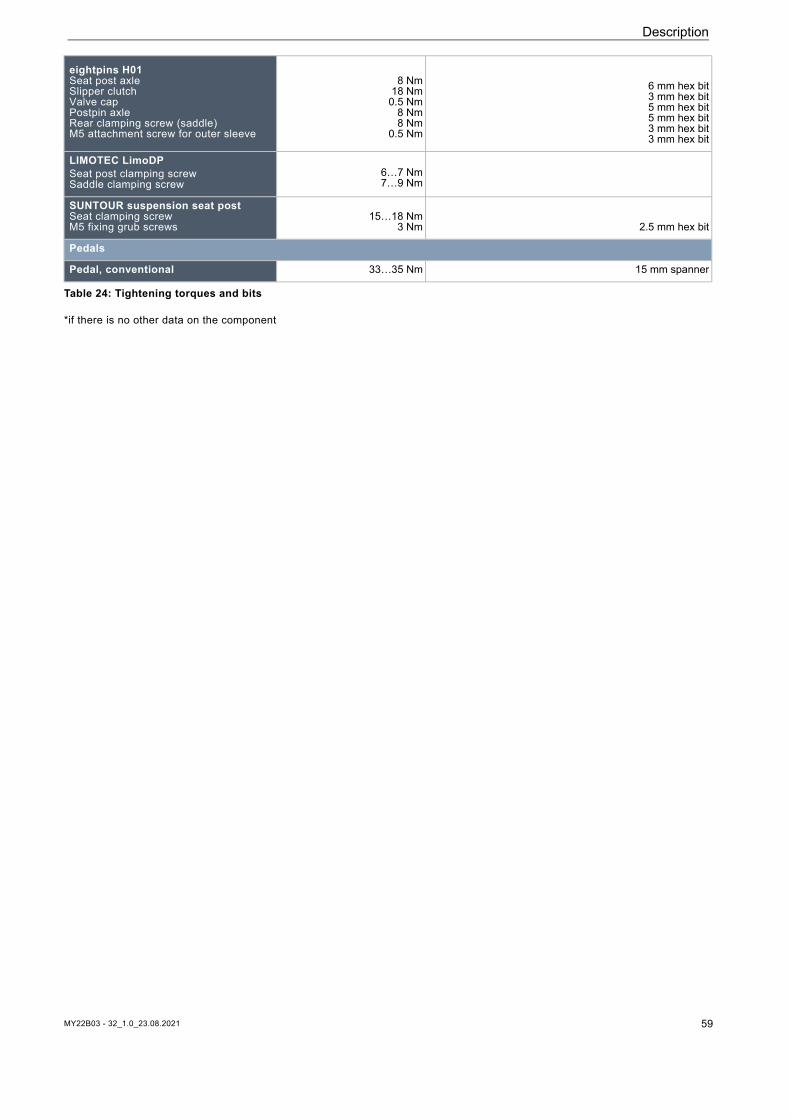
Description
*if there is no other data on the component
eightpins H01Seat post axleSlipper clutchValve capPostpin axleRear clamping screw (saddle)M5 attachment screw for outer sleeve
8 Nm18 Nm
0.5 Nm8 Nm8 Nm
0.5 Nm
6 mm hex bit3 mm hex bit5 mm hex bit5 mm hex bit3 mm hex bit3 mm hex bit
LIMOTEC LimoDPSeat post clamping screwSaddle clamping screw
6…7 Nm7…9 Nm
SUNTOUR suspension seat post Seat clamping screw M5 fixing grub screws
15…18 Nm3 Nm 2.5 mm hex bit
Pedals
Pedal, conventional 33…35 Nm 15 mm spanner
Table 24: Tightening torques and bits
MY22B03 - 32_1.0_23.08.2021 59
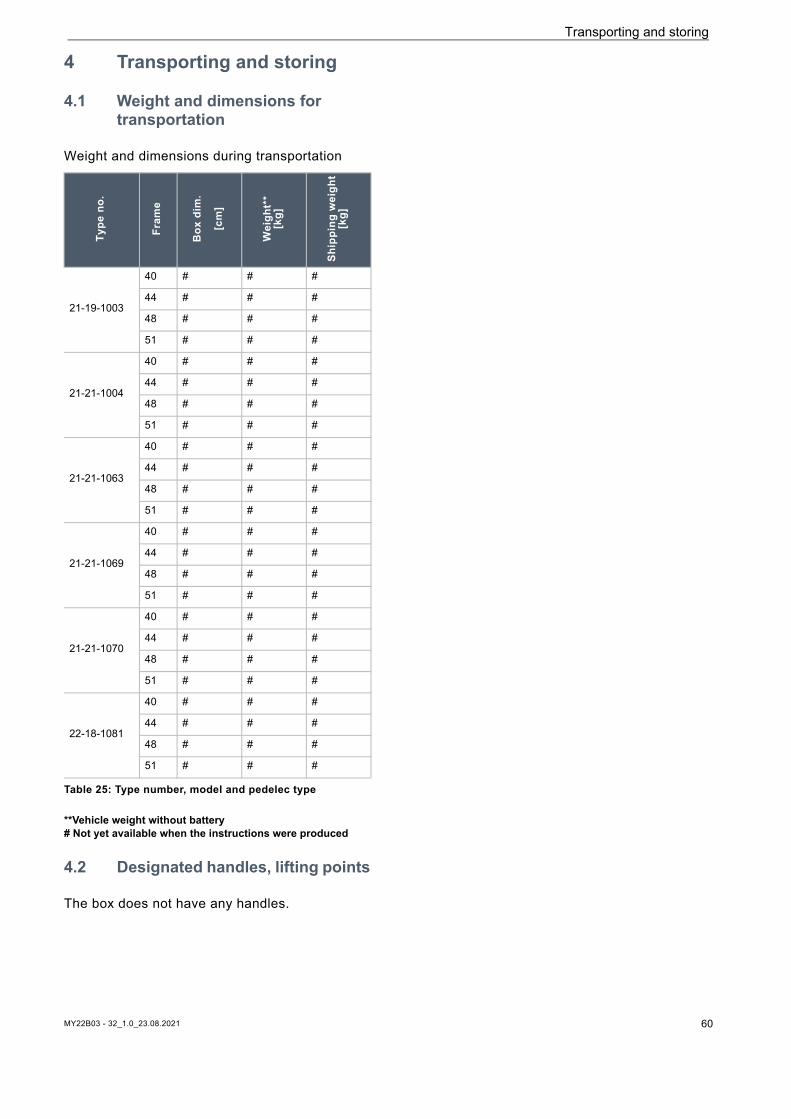
MY22B03 - 32_1.0_23.08.2021 60
Transporting and storing
4 Transporting and storing
4.1 Weight and dimensions for transportation
Weight and dimensions during transportation
**Vehicle weight without battery# Not yet available when the instructions were produced
4.2 Designated handles, lifting points
The box does not have any handles.
Type
no.
Fram
e
Box
dim
.
[cm
]
Wei
ght*
*[k
g]
Ship
ping
wei
ght
[kg]
21-19-1003
40 # # #
44 # # #
48 # # #
51 # # #
21-21-1004
40 # # #
44 # # #
48 # # #
51 # # #
21-21-1063
40 # # #
44 # # #
48 # # #
51 # # #
21-21-1069
40 # # #
44 # # #
48 # # #
51 # # #
21-21-1070
40 # # #
44 # # #
48 # # #
51 # # #
22-18-1081
40 # # #
44 # # #
48 # # #
51 # # #
Table 25: Type number, model and pedelec type
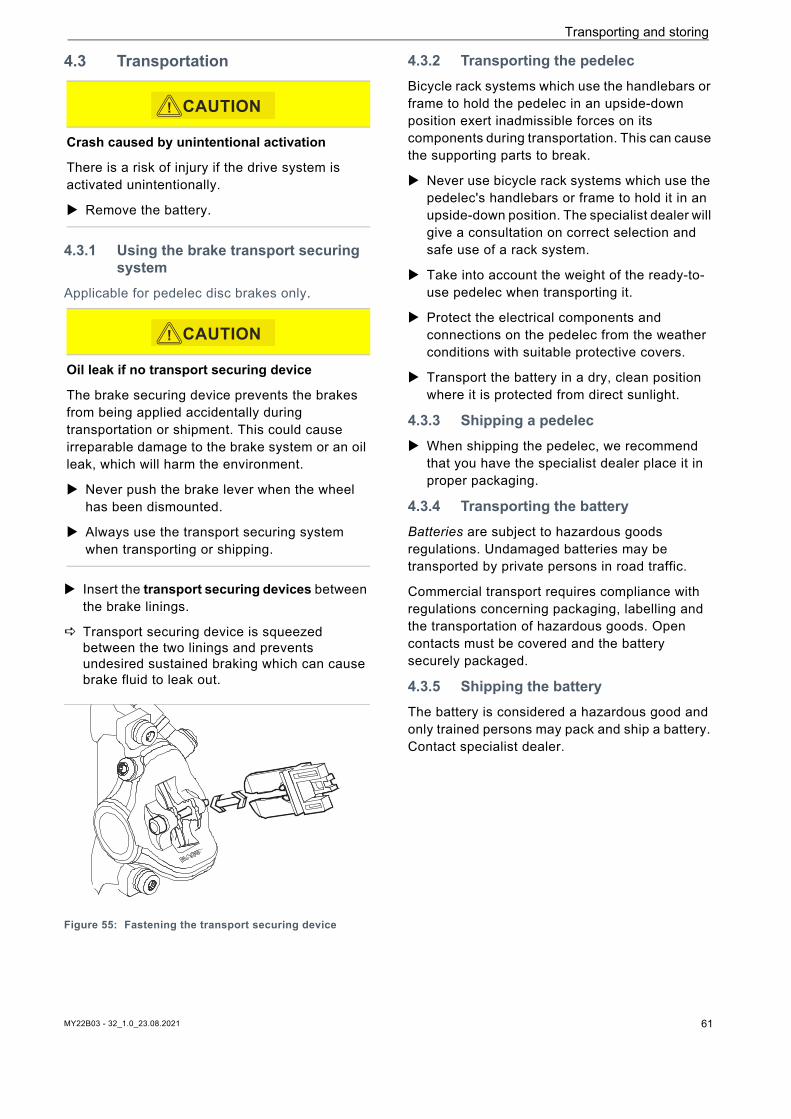
Transporting and storing
4.3 Transportation
4.3.1 Using the brake transport securing system
Applicable for pedelec disc brakes only.
Insert the transport securing devices between the brake linings.
Transport securing device is squeezed between the two linings and prevents undesired sustained braking which can cause brake fluid to leak out.
Figure 55: Fastening the transport securing device
4.3.2 Transporting the pedelecBicycle rack systems which use the handlebars or frame to hold the pedelec in an upside-down position exert inadmissible forces on its components during transportation. This can cause the supporting parts to break.
Never use bicycle rack systems which use the pedelec's handlebars or frame to hold it in an upside-down position. The specialist dealer will give a consultation on correct selection and safe use of a rack system.
Take into account the weight of the ready-to-use pedelec when transporting it.
Protect the electrical components and connections on the pedelec from the weather conditions with suitable protective covers.
Transport the battery in a dry, clean position where it is protected from direct sunlight.
4.3.3 Shipping a pedelec When shipping the pedelec, we recommend
that you have the specialist dealer place it in proper packaging.
4.3.4 Transporting the batteryBatteries are subject to hazardous goods regulations. Undamaged batteries may be transported by private persons in road traffic.
Commercial transport requires compliance with regulations concerning packaging, labelling and the transportation of hazardous goods. Open contacts must be covered and the battery securely packaged.
4.3.5 Shipping the batteryThe battery is considered a hazardous good and only trained persons may pack and ship a battery. Contact specialist dealer.
Crash caused by unintentional activation
There is a risk of injury if the drive system is activated unintentionally.
Remove the battery.
Oil leak if no transport securing device
The brake securing device prevents the brakes from being applied accidentally during transportation or shipment. This could cause irreparable damage to the brake system or an oil leak, which will harm the environment.
Never push the brake lever when the wheel has been dismounted.
Always use the transport securing system when transporting or shipping.
CAUTION!
CAUTION!
MY22B03 - 32_1.0_23.08.2021 61
Transporting and storing
4.4 Storing Store pedelec, on-board computer, battery and
charger in a clean, dry place where they are protected from sunlight. Do not store outdoors to ensure a long service life.
Temperatures under -10 °C or over +40 °C must generally be avoided.
Storage at about 10 °C to 20 °C is beneficial to a long battery life.
Store pedelec, on-board computer, battery and charger separately.
4.4.1 Break in operation
Remove the on-board computer from its mount if the pedelec is not going to be used for up to four weeks. Store the on-board computer away safely in a dry environment at room temperature.
If the pedelec is removed from service for longer than four weeks, you need to prepare it for a break in operation.
4.4.1.1 Preparing a break in operation
Remove the rechargeable battery from the pedelec.
Charge battery to 30%–60%. The pedelec needs to be cleaned with a damp
cloth and preserved with wax spray. Never wax the friction surfaces of the brake.
Before longer periods without use, it is recommended to have the specialist dealer carry out an inspection and basic cleaning and apply preservative agent.
4.4.1.2 Carrying out a break in operation
1 Store the pedelec, battery and charger in a dry, clean environment. We recommend storing them in uninhabited rooms with smoke alarms. Dry locations with an ambient temperature between 10 °C and 20 °C are ideal.
2 Recharge the on-board computer battery for at least 1 hour every 3 months.
3 Check the battery level after 6 months. If only one LED on the battery level indicator lights up, recharge the battery to between 30% and 60%.
Optimum pedelec storage temperature +10… +20 °C
Table 26: Storage temperature for batteries and the pedelec
Notice
The battery discharges when not in use. This can cause irreparable damage to the battery.
The battery must be recharged every 6 months.
The battery may become damaged if it is connected permanently to the charger.
Never connect the battery to the charger permanently.
The on-board computer battery discharges when it is not in use. This can cause irreparable damage to it.
Recharge the on-board computer battery for at least 1 hour every 3 months.
MY22B03 - 32_1.0_23.08.2021 62
Assembly
5 Assembly
Assemble the pedelec in a clean, dry environment.
The work environment temperature should be between 15 °C and 25 °C.
The fitting stand used must be approved for a maximum weight of least 30 kg.
5.1 Unpacking The packaging material consists mainly of cardboard and plastic film.
Dispose of the packaging in accordance with the regulatory requirements (see Section 10).
Pedelecs are fully assembled in the factory for test purposes and then dismantled for transportation. The pedelec is 95% to 98% pre-assembled.
Scope of delivery
5.2 Required tools The following tools are required to assemble the pedelec:
Risk of eye injury
Problems may arise if components are set incorrectly. They may cause serious injuries to the face.
Always wear safety glasses to protect eyes when assembling pedelecs.
Crash and crushing hazard caused by unintentional activation
There is a risk of injury if the drive system is activated unintentionally.
Remove the battery.
WARNING!
CAUTION!
1 pre-assembled pedelec
1 front wheel
2 pedals
2 quick releases (optional)
1 charger
1 set of operating instructions on CD.
1 battery (supplied separately from the pedelec)
Knife
Ring spanners 8 mm, 9 mm, 10 mm, 13 mm, 14 mm and 15 mm
Torque wrench Working range 5–40 Nm
by.Schulz handlebars:TORX® bits: 4 mm, 5 mm and 6 mmIf not:Hexagon bits: 4 mm, 5 mm and 6 mm
Hexagon socket spanner 2 mm, 2.5 mm, 3 mm, 4 mm, 5 mm, 6 mm and 8 mm
Spline nut socket T25
Cross-recess screwdriver
Slotted-head screwdriver
Table 27: Tools required for assembly
MY22B03 - 32_1.0_23.08.2021 63
Assembly
5.3 Commissioning Only trained specialist staff may perform initial commissioning since initial commissioning of the pedelec requires special tools and specialist knowledge.
Experience has shown that a pedelec which has not yet been sold is automatically handed to customers as soon as it appears ready to ride.
It makes sense to prepare each pedelec so that it is fully ready for use immediately after being assembled.
The assembly report (see Section 11.2) describes all safety-relevant inspections, tests and maintenance tasks.
All assembly work must be completed to ensure the pedelec is ready to ride.
Complete an assembly report to document quality assurance (see Section 11.1).
5.3.1 Checking the batteryThe battery must be checked before it is charged for the first time.
Press the On-Off button (battery).
If none of the LEDs on the battery level indicator light up, the battery may be damaged.
The battery may be fully charged if at least one, but not all, of the LEDs on the battery level indicator is lit up.
MY22B03 - 32_1.0_23.08.2021 64

MY22B03 - 32_1.0_23.08.2021 65
Assembly
5.3.2 Preparing the wheelThere is an arrow on the sides of the tyres with the inscription ROTATION to show the direction of rotation. The inscription says DRIVE on older tyres. The rotation direction arrow indicates the recommended direction of rotation. On road tyres, the direction of rotation is mainly for optical reasons.
Figure 56: Rotation direction arrow
The direction of rotation is much more important on off-road terrain because the tread creates an interlock with the ground. While the rear wheel needs to transmit the drive forces, the front wheel is responsible for transmitting braking and steering forces. Drive and braking forces have different directions of action. This is why some tyres are mounted on the front and rear wheels in opposite directions. On these tyres, there are two rotation direction arrows:
• The FRONT rotation direction arrow indicates the recommended direction of rotation for the front wheel.
• The REAR rotation direction arrow indicates the recommended direction of rotation for the rear wheel.
Figure 57: Rotation direction arrow on MTB tyres
The rotation direction arrow must point in the direction of travel when the wheel is placed in the fork.
There are also non-directional tyre profiles with no rotation direction arrow.

MY22B03 - 32_1.0_23.08.2021 66
Assembly
5.3.3 Preparing the LIMOTEC seat postOnly applies to pedelecs with this equipment
1 Use the seat height formula to calculate the optimum seat post height for the length of rider's leg:Seat height (SH) = inner leg length (I) × 0.9
2 Lower the seat post further into the seat tube
3 The seat post Bowden cable must be tightened in the frame up to the remote control to the same length as the seat post was lowered.
4 Trim the seat post Bowden cable on the handlebars if necessary.

MY22B03 - 32_1.0_23.08.2021 67
Assembly
5.3.4 Preparing the RockShox Reverb AXS seat postOnly applies to pedelecs with this equipment
5.3.4.1 Recharging the SRAM battery
1 Remove battery cover from battery.
2 Do not dispose of battery cover. When the battery is not in the charger or in the seat post, attach the battery cover to the SRAM battery to protect the battery contacts.
3 You will find instructions on charging, maintaining and transporting in the SRAM operating instructions for the battery and charger at
www.sram.com/service.
5.3.4.2 Inserting the SRAM battery
1 Insert fully charged battery into the seat post.
If the battery is properly inserted, the locking mechanism will engage.
2 Close battery compartment.
5.3.4.3 Pairing the system
All AXS systems have a master component which is used to start and end the pairing session. The RockShox AXS controller must be paired with the seat post master component before use. Pairing allows the RockShox AXS controller to transmit actuation commands to the seat post.
Additional AXS systems can be combined to create one AXS system. To combine AXS systems, begin pairing with any one of the master components.
The pairing process does not need to be repeated when either battery is removed and/or replaced.
The pairing process must be repeated if any components are replaced, added, or removed.
1 Keep AXS button on the seat post held down.
The green LED will flash slowly.
2 Release button. The pairing session is ended automatically after 30 seconds of inactivity.
3 Keep AXS button on the remote control held down.
The green LED will flash quickly.
4 Release button.
5 Press rocker switch on the controls.
Pairing is confirmed. The green LED on the seat post will light up
continuously. You will hear the motor.
6 If the seat post does not respond, repeat pairing process.
5.3.4.4 Ending pairing
1 Keep AXS button on the seat post held down.
2 Release to end pairing.
The green LED will stop flashing.

MY22B03 - 32_1.0_23.08.2021 68
Assembly
5.3.5 Fitting the pedalsThe pedals have two different threads to ensure they don’t come loose while the rider is pedalling.
• The pedal on the left facing the direction of travel has a left-hand thread and is marked L.
• The pedal on the right facing the direction of travel has a right-hand thread and is marked R.
The mark is either on the top end, the axle or the pedal body.
Figure 58: Example of markings on pedals
1 Coat threads in both pedals with waterproof grease.
2 Turn the pedal marked L anti-clockwise by hand into the crank arm on the left as seen when facing the direction of travel.
Figure 59: L-pedal in the left-hand crank arm
3 Turn the pedal marked R anti-clockwise by hand into the crank arm on the right as seen when facing the direction of travel.
Figure 60: R-pedal in the right-hand crank arm
4 Use a 15 mm spanner to fasten the left-hand pedal thread in an anti-clockwise direction and the right-hand pedal in a clockwise direction with a torque between 33 Nm and 35 Nm.
L R
L
L
R
MY22B03 - 32_1.0_23.08.2021 69
Assembly
5.3.6 Checking the stem and handlebars5.3.6.1 Checking the connections
1 Stand in front of the pedelec. Clamp the front wheel between your legs. Grasp the handlebar grips.
2 Try to twist the handlebars against the direction of the front wheel.
The stem must not move or twist.
3 If the stem can be twisted, check fastening.
If the stem cannot be fastened, contact your specialist dealer.
5.3.6.2 Checking stem is firmly in position
1 Press full body weight on the handlebars.
The handlebars must not move downwards in the fork.
Stem with clamping lever version I
2 If the handlebars should move, increase the lever tension in the clamping lever.
3 Turn knurled nut in a clockwise direction with the clamping lever open.
4 Close clamping lever and check stem is firmly in position again.
5 If the handlebars cannot be fastened, contact your specialist dealer.
Stem with clamping lever version II and stem with screw
If the handlebars cannot be fastened, contact your specialist dealer.
5.3.6.3 Checking the headset backlash
1 Place the fingers of one hand on the upper headset cup. Pull the front wheel brake with the other hand and try to push the pedelec backwards and forwards. Keep in mind that there may be noticeable backlash due to worn-out bearing bushes or brake lining backlash in suspension forks and disc brakes.
The headset cup halves must not move towards one another.
2 Set bearing clearance as per the stem repair manual as quickly as possible as otherwise the bearing will become damaged. Contact specialist dealer.
5.4 Pedelec sale Complete Pedelec pass on the operating
instructions envelope.
Note down the manufacturer and the number of the battery key.
Adjust the pedelec to the rider; see Section 6.5.
Adjust the stand and shifter.
Brief operator or rider on all the pedelec’s functions (see Section 6.3).
Operation
6 Operation
6.1 Risks and hazards
Injuries and fatalities caused by blind spots
Other road users, trucks, cars and pedestrians often underestimate the speed of pedelecs. Likewise, other road users frequently do not see pedelecs. This may cause a crash with serious injuries or even death. Wear a helmet. The helmet must have a
reflective strip or a light in a clearly visible colour.
Clothing should be retroreflective or as light as possible. Fluorescent materials are also suitable. High-visibility jackets and straps on your upper body ensure even greater safety.
Always take a defensive approach to riding.
Avoid the blind spots of vehicles turning off the road. Reduce speed as a precaution when other road users turn right.
Injuries and death caused by riding incorrectly
A pedelec is not a bicycle. Incorrect riding and underestimated speeds soon result in hazardous situations. This can cause an accident with serious or fatal injuries. Slowly get used to road traffic and speed
before riding at speeds over 12 km/h, especially if you have not ridden a bike for some time. Increase the levels of assistance gradually.
Practice braking hard on a regular basis.
Take and complete a riding safety course.
WARNING!
Injuries and death caused by distraction
A lack of concentration while riding increases the risk of an accident. This may cause a crash with serious injuries.
Never allow yourself to be distracted by the on-board computer or your mobile phone.
Stop the pedelec if you want to make inputs on the on-board computer other than change the level of assistance. Only enter data when stationary.
Crash caused by loose clothing
Shoe laces, scarves and other loose items may become entangled in the spokes on the wheels and on the chain drive. This may cause a crash with injuries.
Wear sturdy footwear and close-fitting clothing.
Crash caused by difficult-to-spot damage
If the pedelec topples over or you have a fall or an accident, there may be difficult-to-spot damage to components such as the brake system, quick releases or frame. This may cause a crash with injuries.
Take pedelec out of service. Contact specialist dealer.
WARNING!
CAUTION!
MY22B03 - 32_1.0_23.08.2021 70
Operation
Crash caused by material fatigue
Intensive use can cause material fatigue. A component may suddenly fail in case of material fatigue. This may cause a crash with injuries.
Remove the pedelec from service immediately if there are any signs of material fatigue. Have your specialist dealer inspect the component.
Arrange the mandatory maintenance appointments with your specialist dealer on a regular basis. During maintenance, the specialist dealer will inspect the pedelec for any signs of material fatigue on the frame, fork, suspension element mountings (if there are any) and components made of composite materials.
Carbon becomes brittle when exposed to heat radiation such as heating. This can cause the carbon part to break and result in a crash with injuries.
Never expose carbon parts on the pedelec to strong sources of heat.
Crash caused by poor road conditions
Loose objects, such as branches and twigs, may become caught in the wheels and cause a crash with injuries.
Be aware of the road conditions.
Ride slowly and brake in good time.
The tyres may slip on wet roads. In wet conditions you must also expect a longer braking distance. The braking sensation differs from the usual sensation. This can cause loss of control or a crash, which may result in injuries.
Ride slowly and brake in good time when it is raining.
CAUTION!
Crash caused by soiling
Heavy soiling can impair pedelec functions, such as braking. This may cause a crash with injuries.
Remove coarse soiling before riding.
Notice
Heat or direct sunlight can cause the tyre pressure to increase above the permitted maximum pressure. This can destroy the tyres.
Never park the pedelec in the sun.
On hot days, regularly check the tyre pressure and adjust it as necessary.
When riding downhill, high speeds may be reached. The pedelec is only designed to exceed a speed of 25 km/h for short intervals. The tyres in particular can fail if exposed to a continuous load.
Use the brakes to decelerate the pedelec if you reach speeds greater than 25 km/h.
Moisture penetrating at low temperatures may impair individual functions due to the open structural design.
Always keep the pedelec dry and free from frost.
If the pedelec is used at temperatures below 3 °C, the specialist dealer must perform an inspection beforehand and prepared it for winter use.
Off-road riding subjects the joints in the arms to severe strain. Take a break from riding every 30 to 90 minutes, depending on the road surface and your physical fitness.
CAUTION!
MY22B03 - 32_1.0_23.08.2021 71

Operation
6.2 Tips for a greater rangeThe pedelec's range depends on many influencing factors. A single battery charge may only last fewer than 20 kilometres but much more than 100 is also possible. There are a few tips which will generally help you maximize range.
Suspension elements
Only open suspension fork and damper when necessary on terrain or gravel paths. Block suspension fork and damper on tarmacked roads or on hills.
Mileage
The more own physical effort the rider makes, the greater the attainable range is.
Shift down 1 to 2 gears to increase the induced power and pedalling frequency.
Pedalling frequency
Ride using pedalling frequencies of over 50 revolutions per minute. This optimises the electric drive's efficiency.
Avoid pedalling very slowly.
Weight
Minimise the total weight of pedelec and baggage.
Stopping and starting
Ride long distances at a constant speed.
Avoid stopping and starting frequently.
Level of assistance
The higher the selected levels of assistance are, the shorter the range is.
Gear shift
Use a low gear and a low level of assistance on hills and when setting off.
Switch up a gear depending on the speed and terrain.
50-80 crank rotations are optimal. Avoid high stress loads on the crank during a
gear change.
Switch gear back in good time, e.g. before inclines.
Tyres
Always select the right tyres for the surface type. As a general rule, narrower treads move along more easily than heavier ones. Long studs and large grooves usually have an unfavourable effect on energy consumption.
When riding on asphalt, it is important to always use the maximum permitted tyre pressure.
When riding off-road on gravel tracks or soft woodland or meadow soils, it is important to remember the lower the tyre pressure is, the greater the rolling resistance is and thus the greater electric drive system energy consumption is.
Rechargeable battery
Electrical resistance increases as the temperature drops. Battery performance is reduced. As a result, you should expect the range to be shorter than normal in winter.
Use a thermal protection sleeve on the battery in winter.
The range also depends on the battery’s age, charge level and state of repair.
Maintain the battery and replace older batteries where necessary.
MY22B03 - 32_1.0_23.08.2021 72
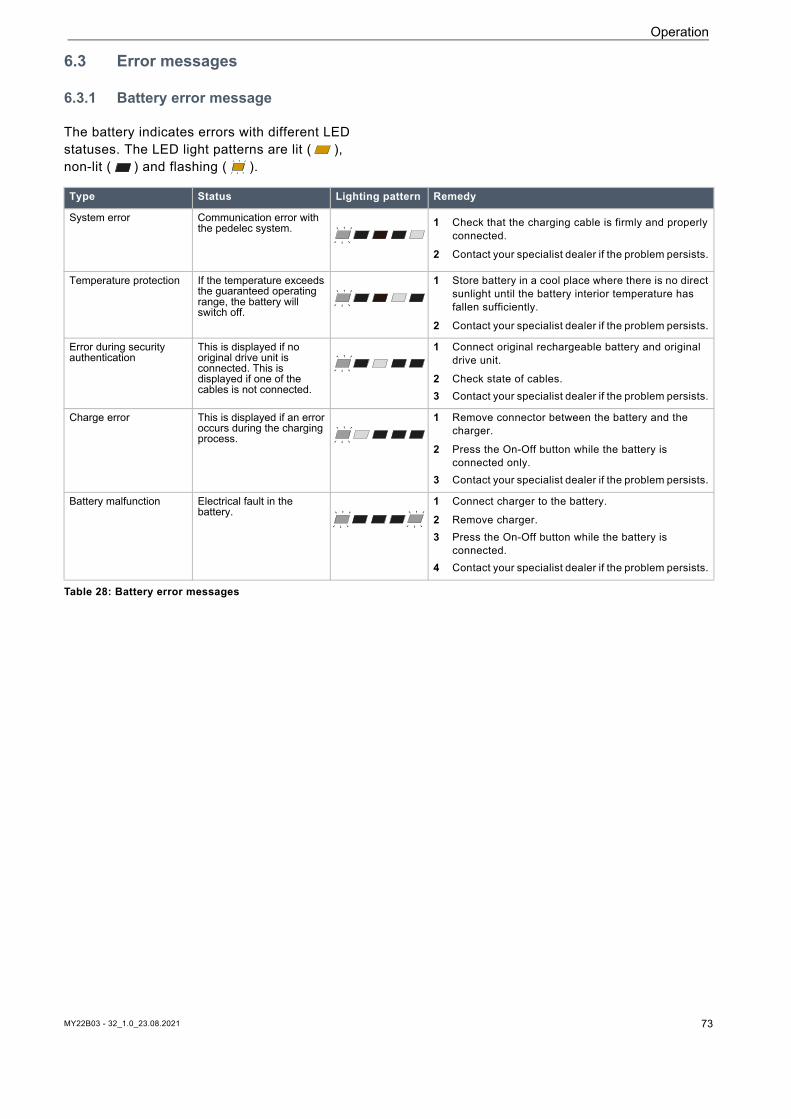
Operation
6.3 Error messages
6.3.1 Battery error message
The battery indicates errors with different LED statuses. The LED light patterns are lit ( ), non-lit ( ) and flashing ( ).
Type Status Lighting pattern Remedy
System error Communication error with the pedelec system. 1 Check that the charging cable is firmly and properly
connected.
2 Contact your specialist dealer if the problem persists.
Temperature protection If the temperature exceeds the guaranteed operating range, the battery will switch off.
1 Store battery in a cool place where there is no direct sunlight until the battery interior temperature has fallen sufficiently.
2 Contact your specialist dealer if the problem persists.
Error during security authentication
This is displayed if no original drive unit is connected. This is displayed if one of the cables is not connected.
1 Connect original rechargeable battery and original drive unit.
2 Check state of cables.3 Contact your specialist dealer if the problem persists.
Charge error This is displayed if an error occurs during the charging process.
1 Remove connector between the battery and the charger.
2 Press the On-Off button while the battery is connected only.
3 Contact your specialist dealer if the problem persists.
Battery malfunction Electrical fault in the battery.
1 Connect charger to the battery.
2 Remove charger.3 Press the On-Off button while the battery is
connected.4 Contact your specialist dealer if the problem persists.
Table 28: Battery error messages
MY22B03 - 32_1.0_23.08.2021 73

Operation
6.3.2 On-board computer warnings
Figure 61: Example: Warning W000
Code Cause Limitation Remedy
W101(W011)
No vehicle speed signal was detected by the speed sensor.
The maximum speed at which assistance is provided is lower than normal.
Contact your specialist dealer.
W103(W013)
Normal sensor initialisation could not be completed.
The drive will be lower than normal.
1 Turn the cranks backwards two or three times.
2 If the problem persists, contact your specialist dealer.
W104 The power was switched off because a power loss was detected in the system.
No assistance provided when cycling.
Contact your specialist dealer.
W105 Unexpected power cut-out detected.
The motor assistance functions are not restricted during display.
1 Re-start the system.
2 If the problem persists, contact your specialist dealer.
W200 (W020)
The power was switched off because the temperature exceeded the guaranteed operating range.
System functions do not start. 1 If the battery overheats, store in a cool place where there is no direct sunlight until the battery interior temperature has fallen sufficiently.
2 If the battery has been exposed to excessive cooling, store in a warm room. Monitor and wait until the battery temperature has risen sufficiently.
W302 (W032)
The fitted gear shift is different to the one configured in the system.
No shifting is possible. Contact your specialist dealer.
Table 29: List of warnings
MY22B03 - 32_1.0_23.08.2021 74
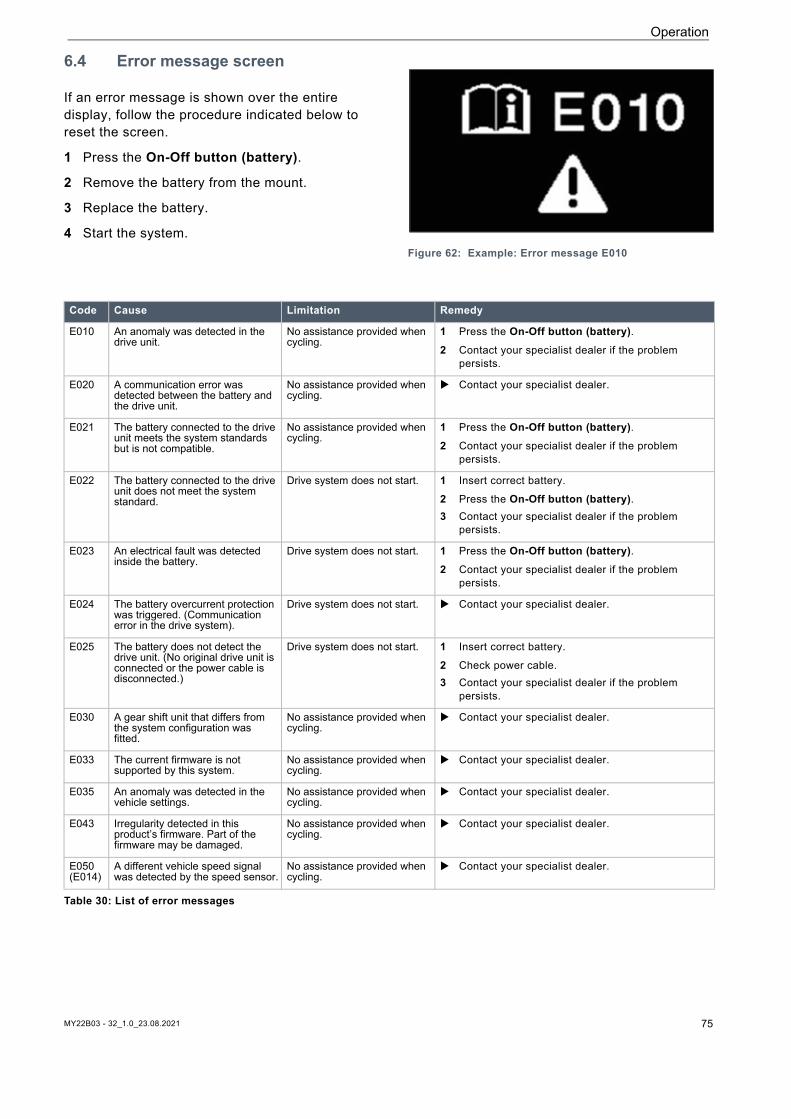
Operation
6.4 Error message screen
If an error message is shown over the entire display, follow the procedure indicated below to reset the screen.
1 Press the On-Off button (battery).
2 Remove the battery from the mount.
3 Replace the battery.
4 Start the system.Figure 62: Example: Error message E010
Code Cause Limitation Remedy
E010 An anomaly was detected in the drive unit.
No assistance provided when cycling.
1 Press the On-Off button (battery).2 Contact your specialist dealer if the problem
persists.
E020 A communication error was detected between the battery and the drive unit.
No assistance provided when cycling.
Contact your specialist dealer.
E021 The battery connected to the drive unit meets the system standards but is not compatible.
No assistance provided when cycling.
1 Press the On-Off button (battery).2 Contact your specialist dealer if the problem
persists.
E022 The battery connected to the drive unit does not meet the system standard.
Drive system does not start. 1 Insert correct battery.
2 Press the On-Off button (battery).3 Contact your specialist dealer if the problem
persists.
E023 An electrical fault was detected inside the battery.
Drive system does not start. 1 Press the On-Off button (battery).2 Contact your specialist dealer if the problem
persists.
E024 The battery overcurrent protection was triggered. (Communication error in the drive system).
Drive system does not start. Contact your specialist dealer.
E025 The battery does not detect the drive unit. (No original drive unit is connected or the power cable is disconnected.)
Drive system does not start. 1 Insert correct battery.
2 Check power cable.3 Contact your specialist dealer if the problem
persists.
E030 A gear shift unit that differs from the system configuration was fitted.
No assistance provided when cycling.
Contact your specialist dealer.
E033 The current firmware is not supported by this system.
No assistance provided when cycling.
Contact your specialist dealer.
E035 An anomaly was detected in the vehicle settings.
No assistance provided when cycling.
Contact your specialist dealer.
E043 Irregularity detected in this product’s firmware. Part of the firmware may be damaged.
No assistance provided when cycling.
Contact your specialist dealer.
E050 (E014)
A different vehicle speed signal was detected by the speed sensor.
No assistance provided when cycling.
Contact your specialist dealer.
Table 30: List of error messages
MY22B03 - 32_1.0_23.08.2021 75
MY22B03 - 32_1.0_23.08.2021 76
Operation
6.5 Instruction and customer serviceThe supplying specialist dealer will provide customer service. Contact details can be found on the pedelec pass for these operating instructions. The specialist dealer will explain all the pedelec functions to the new owner in person, this being when the specialist dealer hands over the pedelec at the latest. These operating instructions are provided with every pedelec, so that the rider can consult them at a later stage.
The supplying specialist dealer will also perform all maintenance, modifications and repairs in the future.
6.6 Adjusting the pedelec
Only a correctly adjusted pedelec will guarantee the desired ride comfort and health-promoting activity.
All settings must be re-configured if the body weight or maximum baggage weight changes.
6.6.1 PreparingThe following tools are required to adjust the pedelec:
Crash caused by incorrectly adjusted torques
If a screw is fastened too tightly, it may break. If a screw is not fastened enough, it may loosen. This will cause a crash with injuries.
Always observe the indicated torques on the screw and in the operating instructions.
CAUTION!
Tape measure
Scales
Spirit level
Ring spanners 8 mm, 9 mm, 10 mm, 13 mm, 14 mm and 15 mm
Torque wrench Working range 5–40 Nm
Hex key 2 mm, 2.5 mm, 3 mm, 4 mm, 5 mm, 6 mm and 8 mm
Cross-recess screwdriver
Slotted-head screwdriver
Table 31: Tools required for assembly
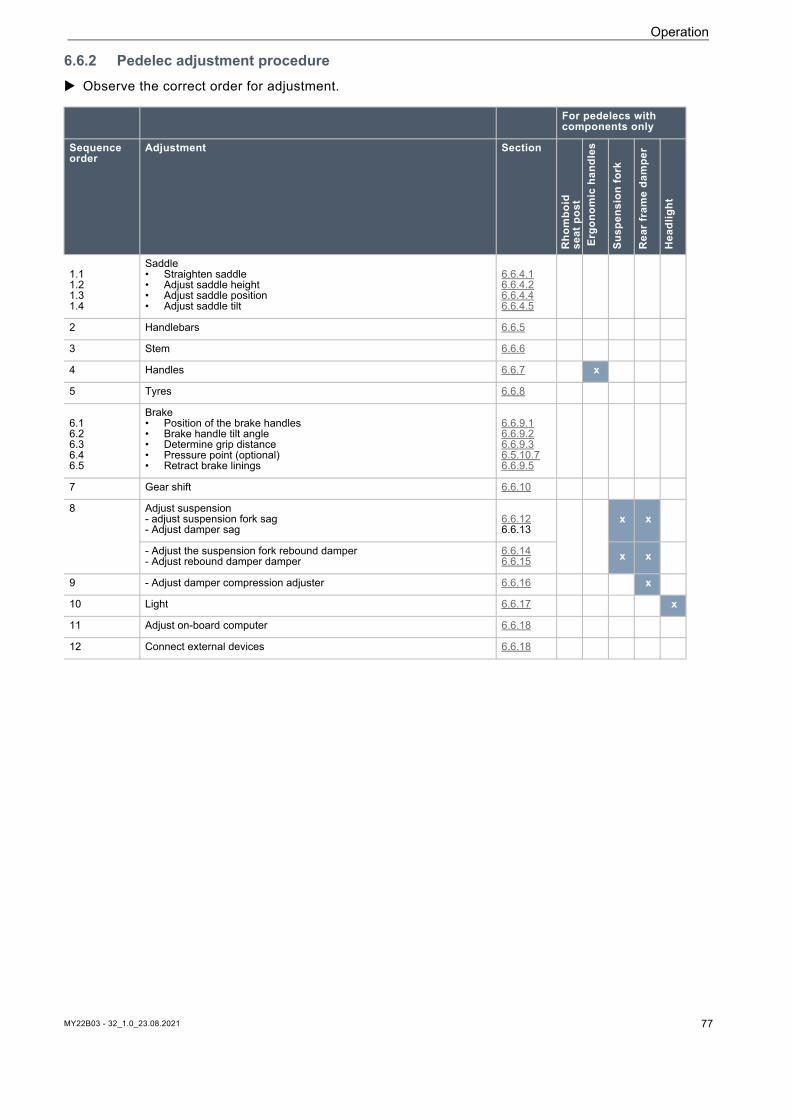
MY22B03 - 32_1.0_23.08.2021 77
Operation
6.6.2 Pedelec adjustment procedure Observe the correct order for adjustment.
For pedelecs with components only
Sequence order
Adjustment Section
Rho
mbo
id
seat
pos
t E
rgon
omic
han
dles
Susp
ensi
on fo
rk
Rea
r fr
ame
dam
per
Hea
dlig
ht
1.11.21.31.4
Saddle • Straighten saddle• Adjust saddle height• Adjust saddle position• Adjust saddle tilt
6.6.4.16.6.4.26.6.4.46.6.4.5
2 Handlebars 6.6.5
3 Stem 6.6.6
4 Handles 6.6.7 x
5 Tyres 6.6.8
6.16.26.36.46.5
Brake• Position of the brake handles • Brake handle tilt angle • Determine grip distance• Pressure point (optional)• Retract brake linings
6.6.9.16.6.9.26.6.9.36.5.10.76.6.9.5
7 Gear shift 6.6.10
8 Adjust suspension- adjust suspension fork sag- Adjust damper sag
6.6.126.6.13
x x
- Adjust the suspension fork rebound damper- Adjust rebound damper damper
6.6.146.6.15 x x
9 - Adjust damper compression adjuster 6.6.16 x
10 Light 6.6.17 x
11 Adjust on-board computer 6.6.18
12 Connect external devices 6.6.18
MY22B03 - 32_1.0_23.08.2021 78
Operation
6.6.3 Determining the sitting positionThe starting point for a comfortable posture is the correct position of the pelvis. If the pelvis is in the wrong position, it can cause different types of pain, e.g. in the shoulder or back.
Figure 63: The pelvis is in the right position (green) or incorrect position (red)
The pelvis is in the right position if the spine forms an S-shape and a natural, easy arch.
The pelvis is positioned incorrectly if it tilts slightly backwards. As a result, the spine becomes curved and can no longer deflect to an optimal extent.
A suitable sitting position must be selected beforehand depending on the pedelec type, physical fitness and desired trip distance or speed.
It is especially advisable to check and optimise the sitting position once more before longer rides.
Position on trekking bike Position on sports bike
Angle of upper body(black dashed line)
Considerably inclined upper body, back at an angle of 30°–60°.Greater distance between handlebars and saddle.
Sharply inclined upper body, back at an angle of 15°–30°.Saddle higher than the handlebars.
Angle between upper arm & upper body (red line)
An angle of 90° is optimum.The muscular support required in the arms, back and shoulder girdle is reduced at 90°.
Above 90°Shoulders, arms and hands need to provide a great deal of support, the supporting muscles in the back are heavily strained and the load on the bearing surface shifts to the front.
Saddle-handlebar height difference [cm](blue and green line)
5…0Handlebars and saddle are almost at the same height.
<0The saddle is positioned far higher than the handlebars.
Benefits
Shoulders, neck and hands provide more of the support effort, thus promoting a dynamic, agile riding style. Impact is reduced on the back, spine and buttocks, which is particularly important on longer rides. The whole body can apply force to the pedals effectively.
Optimum power transmis-sion.Aerodynamic: low air resist-ance.
Disadvantages
There is greater strain on the hands, neck and shoulders. The muscular system needs to be trained for this higher strain, i.e. riders should practise.
Requires highly trained muscles in back, legs, shoul-ders, abdomen!Comfortable position only for people who are fit.
Fitness level and use
Medium to high fitness level, riding long distances.
Speed-oriented, sports cycling.
Table 32: Overview of sitting positions
Operation
6.6.4 Adjusting the saddle
6.6.4.1 Straightening the saddle
Position saddle in direction of travel. In doing so, align the tip of the saddle with the top tube.
Figure 64: Positioning the saddle in direction of travel
Positioning the saddle with eightpins suspension seat post
Only applies to pedelecs with this equipment
1 Position saddle in direction of travel. In doing so, align the tip of the saddle with the top tube.
2 Use a torque wrench to tighten the seat post axle with 8 Nm.
Figure 65: Tightening the seat post axle
6.6.4.2 Adjusting the saddle height
To adjust the saddle height safely, either: • Push the pedelec near to a wall so that the rider
can lean on the wall to support themselves or • Ask another person to hold the pedelec.
1 Use the seat height formula to roughly set the saddle height:Seat height (SH) = inner leg length (I) × 0.9
2 Climb onto the bicycle.
3 Place your heel on the pedal and extend your leg, so that the pedal is at the lowest crank rotation point. Your knee should now be fully extended.
Figure 66: Heel method
4 Take a test ride.
Riders should sit straight on the saddle at an optimal saddle height.
• If the pelvis moves to the left and right as you pedal, the saddle is too high.
• If your knees are painful after a few kilometres, the saddle is too low.
Position the seat post according to needs if necessary. Adjust the seat height with the quick release.
MY22B03 - 32_1.0_23.08.2021 79
Operation
5 Open the quick release on the seat post to change the seat height (1). To do so, push the clamping lever away from the seat post (3).
Figure 67: Opening the seat post quick release
6 Set the seat post to the required height.
Figure 68: Detailed view of the seat post – examples of the minimum insertion depth marking
7 To close it, push the seat post clamping lever as far as it will go into the seat post (2).
8 Check the clamping force of the quick releases.
6.6.4.3 Setting the saddle height with the remote control
Use the seat height formula to set the saddle height:Seat height (SH) = inner leg length (I) × 0.9
Lowering the saddle
1 Sit on the saddle.
2 Press the remote control operating lever.
The seat post will lower.
3 Release the remote control operating lever when you have reached the desired height.
Figure 69: Remote control operating lever (1)
Raising the saddle
1 Remove any pressure from the saddle.
2 Press the remote control operating lever.
The seat post will rise.
3 Release the remote control operating lever when you have reached the desired height.
Crash caused by an excessively high seat post setting
A seat post which is set too high will cause the seat post or the frame to break. This will cause a crash with injuries.
Do not pull the seat post out of the frame beyond the minimum insertion depth marking.
3
45
1
2
3
CAUTION!
3
4
2
1
Notice
If you are unable to achieve the required saddle height, the seat post must be lowered further into the seat tube. The seat post Bowden cable must be tightened in the frame up to the remote control to the same length as the seat post was lowered. If this is not possible, contact your specialist dealer.
1
MY22B03 - 32_1.0_23.08.2021 80
MY22B03 - 32_1.0_23.08.2021 81
Operation
6.6.4.4 Adjusting the saddle position
The saddle can be shifted on the saddle frame. The right horizontal position ensures an optimal leverage position for legs. This prevents knee pain and painful incorrect pelvis positions. If you have displaced the saddle more than 10 mm, you need to adjust the saddle height again since both settings affect one another.
The saddle setting must only be made when the bicycle is stationary.
To set the saddle position, either:
• Push the pedelec near to a wall so that the rider can lean on the wall to support themselves or
• Ask another person to hold the pedelec. Move the saddle within its permitted
displacement range only (marked on the saddle stay).
1 Climb onto the pedelec.
2 Place the pedals into the vertical position with your feet.
Riders are adopting the optimal saddle position if the perpendicular line from the kneecap runs through the pedal axle.
If the perpendicular line crosses behind the pedal, bring the saddle further forward.
If the perpendicular line crosses in front of the pedal, bring the saddle further back.
Figure 70: Knee cap perpendicular line
3 Unfasten and adjust the designated screw connections, and clamp them with the maximum tightening torque for the saddle clamping screws.
6.6.4.5 Adjusting the saddle tilt
The saddle tilt must be adjusted to the seat height, the saddle and handlebar position, and the saddle shape to ensure an optimum fit. The seating position can be optimised in this way if needed.
The saddle placed in a horizontal position prevents the rider from slipping backwards or forwards. This avoids seat problems. In any other position, the tip of the saddle may press uncomfortably into the crotch area. It is also recommended that the centre of the saddle is exactly straight. This ensures that the rider is seated with their sit bones on the wide rear part of the saddle.
1 Adjust the saddle tilt to horizontal.
2 Position saddle middle so that it is completely straight.
Figure 71: Horizontal saddle tilt with 0° tilt in the centre of the saddle
Riders sit comfortably on the saddle and do not slip backwards or forwards.
3 If the rider tends to slip forwards or sit on the narrow part of the saddle, adjust the seat position (see Section 6.6.2.3) or tilt the saddle very slightly backwards.
6.6.4.6 Checking saddle stability
Check saddle stability after adjusting it; see Section 7.5.6.
90°
0°

MY22B03 - 32_1.0_23.08.2021 82
Operation
6.6.5 Handlebars Check handlebar width and hand position.
Choose different handlebars if necessary. Contact specialist dealer.
6.6.5.1 Handlebar width
The handlebar width should be as wide as the rider's shoulders as a minimum. This is measured from mid-point to mid-point on the hand contact surfaces.
Figure 72: Determining the optimal handlebar width
The wider the handlebars are, the more control they provide, although wide handlebars require greater supporting force. Wider handlebars are particularly useful to ensure a safer ride for loaded touring bikes.
6.6.5.2 Hand position
The hand is an optimal position on the handlebars when the forearm and hand are in a straight line, i.e. the wrist is not bent. In this way, the nerves are not pinched and do not cause pain.
Figure 73: Distribution of nerves with curved and straight handlebars
The narrower the shoulders are, the greater the bend of the handlebars should be (maximum 28°).
Straight handlebars are advisable for sports bikes (e.g. MTB). They support direct steering behaviour, but lead to peaks in pressure and greater muscular strain on the arm and shoulder muscles.
6.6.5.3 Adjusting the handlebars
The handlebars and their position determine the posture that the rider adopts on the pedelec.
1 After selecting the seating position (see Section 6.6.2.1), determine the angle of the upper body and of the upper arm.
2 Pre-tension the back muscles when adjusting the handlebars. The only way to stabilise the spine and protect it from excessive strain is with the back and abdominal muscles pre-tensioned. Passive muscles are not able to perform this important task.
3 Set the required handlebar position by adjusting the stem height and angle (see Section 6.6.6).
4 After adjusting the handlebars, check the saddle height and seat position again. The position of the pelvis on the saddle may have changed when the handlebars were adjusted. This can have considerable impact on the position of the hip joint due to the pelvis tilting and may change the usable leg length on the saddle support by up to 3 cm.
5 Correct the saddle height and sitting posture if necessary.
28°
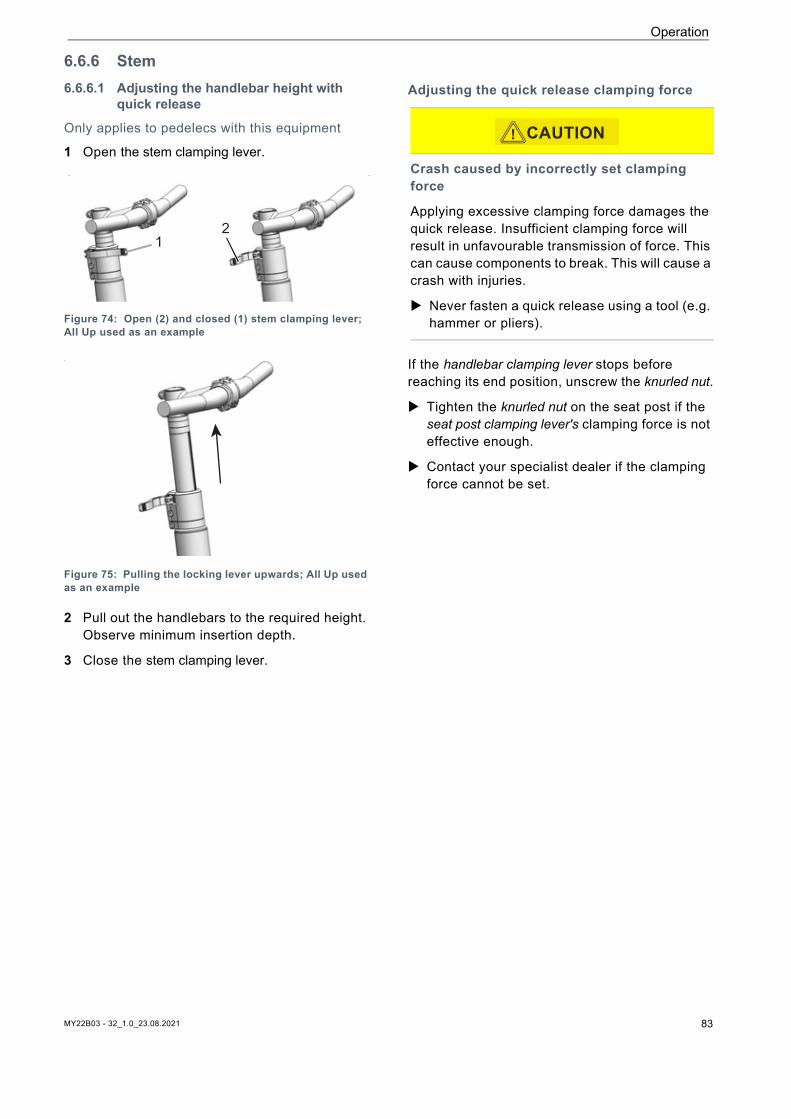
Operation
6.6.6 Stem 6.6.6.1 Adjusting the handlebar height with
quick release
Only applies to pedelecs with this equipment
1 Open the stem clamping lever.
Figure 74: Open (2) and closed (1) stem clamping lever; All Up used as an example
Figure 75: Pulling the locking lever upwards; All Up used as an example
2 Pull out the handlebars to the required height. Observe minimum insertion depth.
3 Close the stem clamping lever.
Adjusting the quick release clamping force
If the handlebar clamping lever stops before reaching its end position, unscrew the knurled nut.
Tighten the knurled nut on the seat post if the seat post clamping lever's clamping force is not effective enough.
Contact your specialist dealer if the clamping force cannot be set.
12
Crash caused by incorrectly set clamping force
Applying excessive clamping force damages the quick release. Insufficient clamping force will result in unfavourable transmission of force. This can cause components to break. This will cause a crash with injuries.
Never fasten a quick release using a tool (e.g. hammer or pliers).
CAUTION!
MY22B03 - 32_1.0_23.08.2021 83

Operation
6.6.6.2 Setting the quill stem
Only applies to pedelecs with this equipment
In the case of a quill stem, the stem and fork steerer form a permanently interconnected component, which is clamped in the fork steerer. The stem and shaft must be replaced together.
Figure 76: Adjusting the quill stem height
1 Undo screw.
2 Pull quill stem out.
3 Tighten screw.
6.6.6.3 Adjusting the Ahead stem
Only applies to pedelecs with this equipment
In the case of an Ahead stem, the stem is placed directly on the fork steerer, which protrudes over the frame.
Figure 77: Raising the Ahead stem by fitting spacer rings
The handlebar height is adjusted once during production using spacer rings. The part of the fork steerer protruding is then cut off. The handlebar stem can then no longer be raised.
MY22B03 - 32_1.0_23.08.2021 84
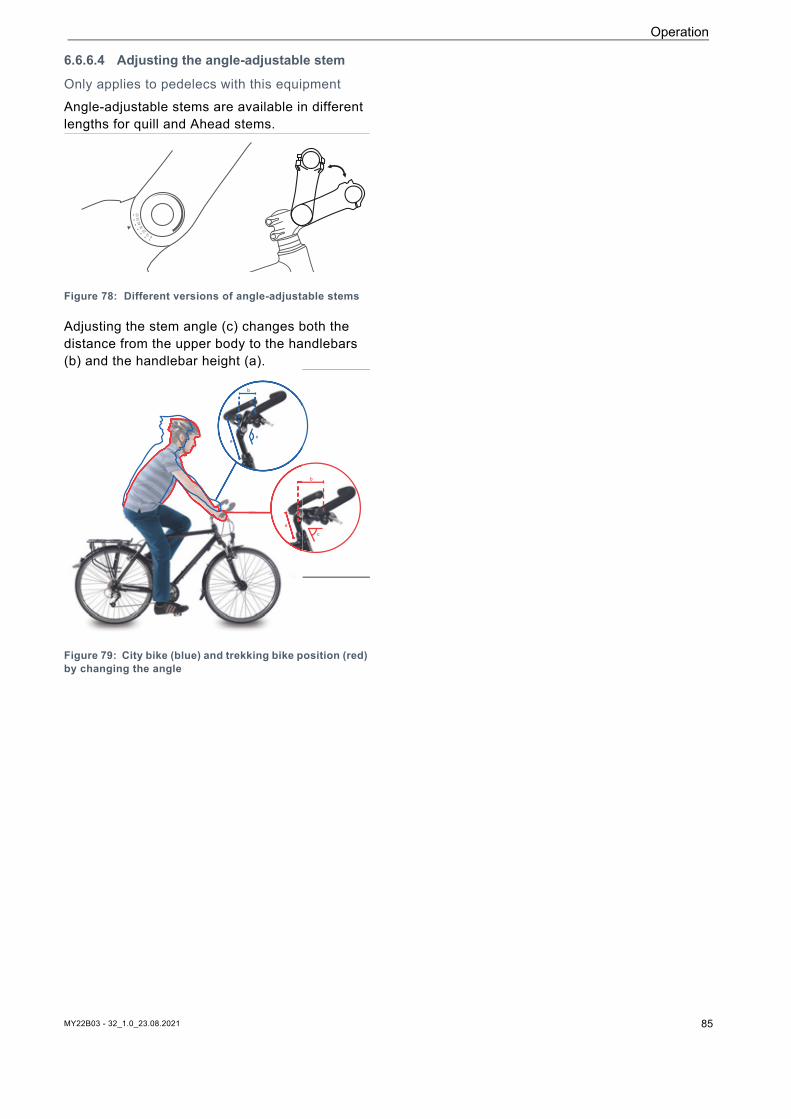
Operation
6.6.6.4 Adjusting the angle-adjustable stem
Only applies to pedelecs with this equipment
Angle-adjustable stems are available in different lengths for quill and Ahead stems.
Figure 78: Different versions of angle-adjustable stems
Adjusting the stem angle (c) changes both the distance from the upper body to the handlebars (b) and the handlebar height (a).
Figure 79: City bike (blue) and trekking bike position (red) by changing the angle
a
a
b
b
c
c
MY22B03 - 32_1.0_23.08.2021 85
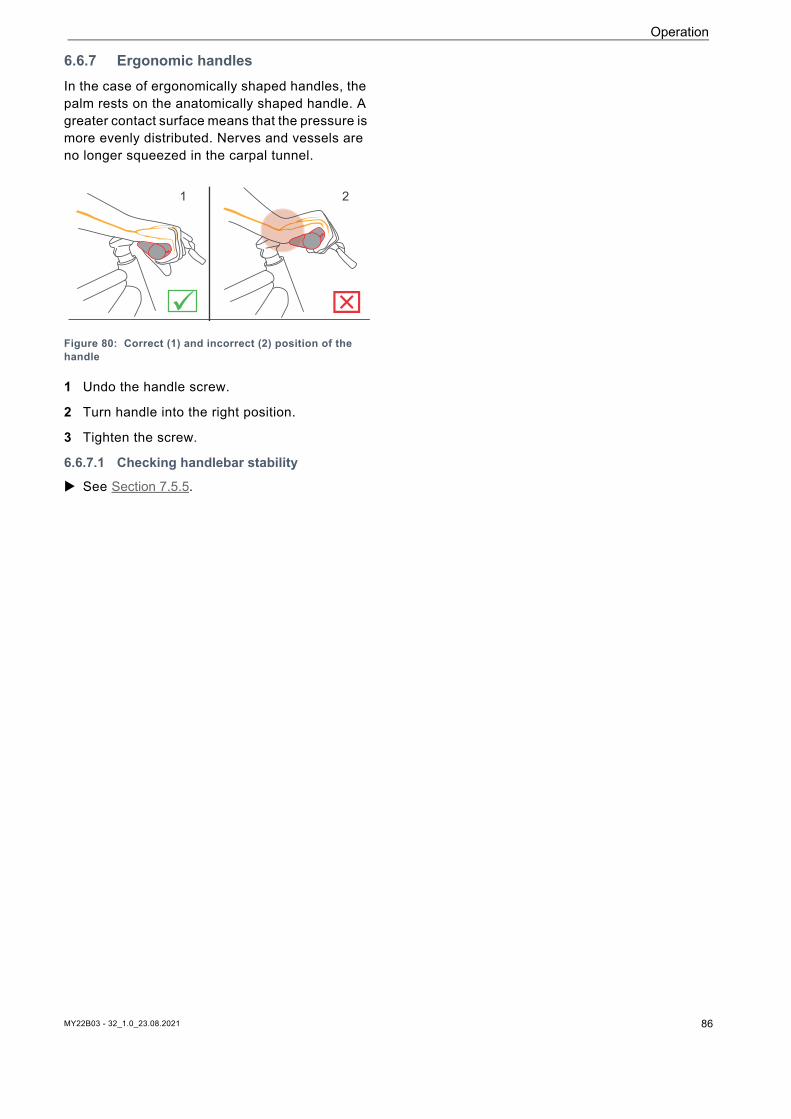
MY22B03 - 32_1.0_23.08.2021 86
Operation
6.6.7 Ergonomic handles In the case of ergonomically shaped handles, the palm rests on the anatomically shaped handle. A greater contact surface means that the pressure is more evenly distributed. Nerves and vessels are no longer squeezed in the carpal tunnel.
Figure 80: Correct (1) and incorrect (2) position of the handle
1 Undo the handle screw.
2 Turn handle into the right position.
3 Tighten the screw.
6.6.7.1 Checking handlebar stability
See Section 7.5.5.
1 2
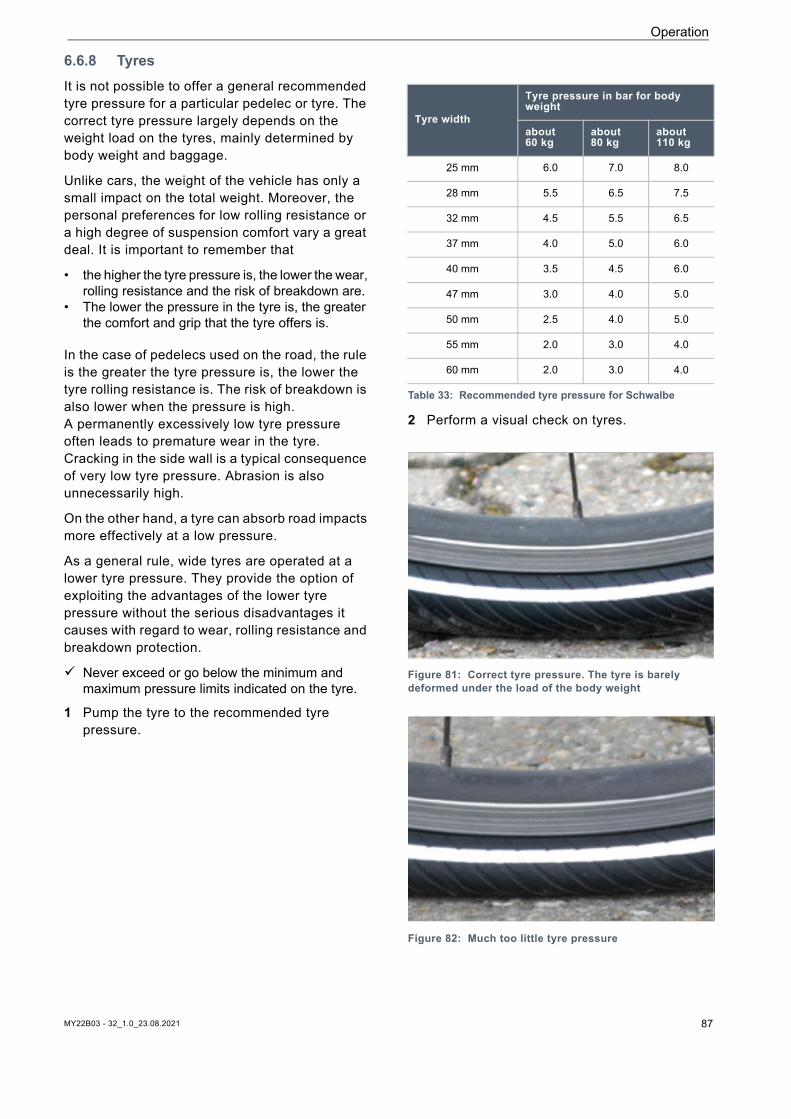
MY22B03 - 32_1.0_23.08.2021 87
Operation
6.6.8 Tyres It is not possible to offer a general recommended tyre pressure for a particular pedelec or tyre. The correct tyre pressure largely depends on the weight load on the tyres, mainly determined by body weight and baggage.
Unlike cars, the weight of the vehicle has only a small impact on the total weight. Moreover, the personal preferences for low rolling resistance or a high degree of suspension comfort vary a great deal. It is important to remember that
• the higher the tyre pressure is, the lower the wear, rolling resistance and the risk of breakdown are.
• The lower the pressure in the tyre is, the greater the comfort and grip that the tyre offers is.
In the case of pedelecs used on the road, the rule is the greater the tyre pressure is, the lower the tyre rolling resistance is. The risk of breakdown is also lower when the pressure is high. A permanently excessively low tyre pressure often leads to premature wear in the tyre. Cracking in the side wall is a typical consequence of very low tyre pressure. Abrasion is also unnecessarily high.
On the other hand, a tyre can absorb road impacts more effectively at a low pressure.
As a general rule, wide tyres are operated at a lower tyre pressure. They provide the option of exploiting the advantages of the lower tyre pressure without the serious disadvantages it causes with regard to wear, rolling resistance and breakdown protection.
Never exceed or go below the minimum and maximum pressure limits indicated on the tyre.
1 Pump the tyre to the recommended tyre pressure.
2 Perform a visual check on tyres.
Figure 81: Correct tyre pressure. The tyre is barely deformed under the load of the body weight
Figure 82: Much too little tyre pressure
Tyre width
Tyre pressure in bar for body weight
about 60 kg
about 80 kg
about 110 kg
25 mm 6.0 7.0 8.0
28 mm 5.5 6.5 7.5
32 mm 4.5 5.5 6.5
37 mm 4.0 5.0 6.0
40 mm 3.5 4.5 6.0
47 mm 3.0 4.0 5.0
50 mm 2.5 4.0 5.0
55 mm 2.0 3.0 4.0
60 mm 2.0 3.0 4.0
Table 33: Recommended tyre pressure for Schwalbe
Operation
6.6.9 Brake The brake lever grip distance can be adjusted to ensure that it can be reached more easily. The pressure point can also be adjusted to the rider's preferences.
6.6.9.1 Brake handle position
Having the brake handle in the correct position prevents the rider from stretching their wrist too far. Moreover, the brake can also be operated without any discomfort and without changing the handle position or releasing the handle.
Apply the brake lever with the third finger phalanx to brake gently in bursts.
The setting for the middle finger is used for riders who brake with their middle finger or with two fingers.
1 Position your hand on the handle in such a way that the outer heel of the hand is flush with the end of the handlebar.
2 Extend the index finger (about 15°).
Figure 83: Brake handle position
3 Push brake lever outwards until the third finger phalanx sits in the brake lever recessed grip.
6.6.9.2 Brake handle tilt angle
The nerves that pass through the carpal tunnel are connected to the thumb and the index and middle fingers. An excessively steep or excessively flat brake angle will cause the wrist to bend, thus narrowing the carpal tunnel. This can cause numbness and tingling in the thumb and index and middle fingers.
1 Calculate the difference between the height of the handlebars and the saddle height to determine the saddle-handlebar height difference.
Figure 84: Example of 4 different handlebar heights (A, B, C and D) and the saddle height (E)
Adjust the angle of the brake levers so that they form a natural extension of the forearm.
15°
Calculation Saddle-handlebar height difference [mm]
A – E >10
B – E 0…10
C – E 0 …-10
D – E <-10
Table 34: Examples of saddle-handlebar height difference
AB
CD
E
MY22B03 - 32_1.0_23.08.2021 88
Operation
2 Set the brake lever angle as indicated in the table.
Figure 85: Brake angle
6.6.9.3 Determining the grip distance
1 Measure hand size using the grip distance gauge.
2 Adjust the grip distance at the pressure point based on the hand size.
Figure 86: Brake lever position
Saddle-handlebar height difference (mm) Brake angle
>10 20°…25°
0…10 25°…30°
0…-10 30°…35°
< -10 35°…45°
Hand size Grip distance (cm)
S 2
M 3
L 4
20 – 25° > 10 cm
25 – 30° 0 – 10 cm
30 – 35° 0 – 10 cm
35 – 45° > 10 cm
E
32
1
MY22B03 - 32_1.0_23.08.2021 89
MY22B03 - 32_1.0_23.08.2021 90
Operation
6.6.9.4 Grip distance on a SHIMANO ST-EF41 brake lever Only applies to pedelecs with brakes:BL-M4100BL-M7100BL-M8100BL-MT200BL-MT201BL-MT400BL-MT401BL-MT402BL-T6000GRX ST-RX600M7100M8100RS785
The brake lever position can be adjusted to the rider's requirements. Contact your specialist dealer.
MY22B03 - 32_1.0_23.08.2021 91
Operation
6.6.9.5 Retracting the brake linings
Disc brakes require wearing-in time. The braking force increases over time. The braking force is increased during break-in time. This is also the case when the brake pads or brake discs are replaced.
1 Accelerate pedelec to 25 km/h.
2 Brake pedelec until it comes to a halt.
3 Repeat process 30 to 50 times.
The disc brake is retracted and provides optimal braking power.
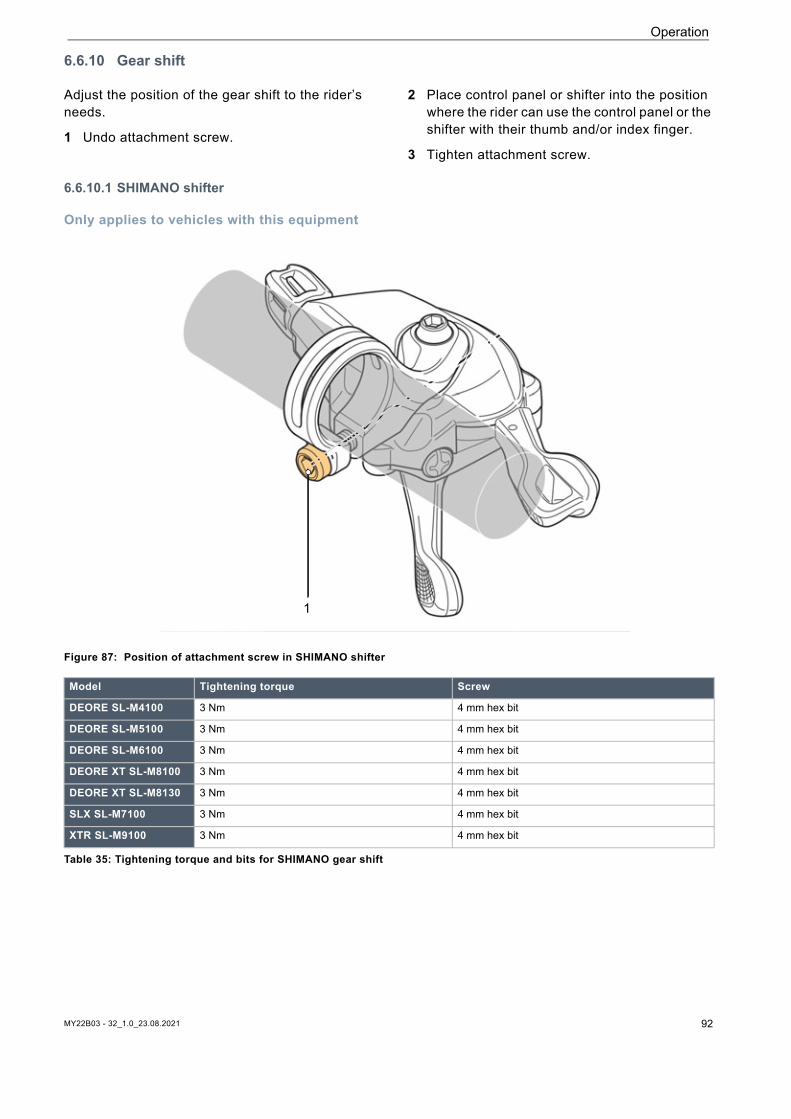
MY22B03 - 32_1.0_23.08.2021 92
Operation
6.6.10 Gear shift
Adjust the position of the gear shift to the rider’s needs.
1 Undo attachment screw.
2 Place control panel or shifter into the position where the rider can use the control panel or the shifter with their thumb and/or index finger.
3 Tighten attachment screw.
6.6.10.1 SHIMANO shifter
Only applies to vehicles with this equipment
Figure 87: Position of attachment screw in SHIMANO shifter
1
Model Tightening torque Screw
DEORE SL-M4100 3 Nm 4 mm hex bit
DEORE SL-M5100 3 Nm 4 mm hex bit
DEORE SL-M6100 3 Nm 4 mm hex bit
DEORE XT SL-M8100 3 Nm 4 mm hex bit
DEORE XT SL-M8130 3 Nm 4 mm hex bit
SLX SL-M7100 3 Nm 4 mm hex bit
XTR SL-M9100 3 Nm 4 mm hex bit
Table 35: Tightening torque and bits for SHIMANO gear shift
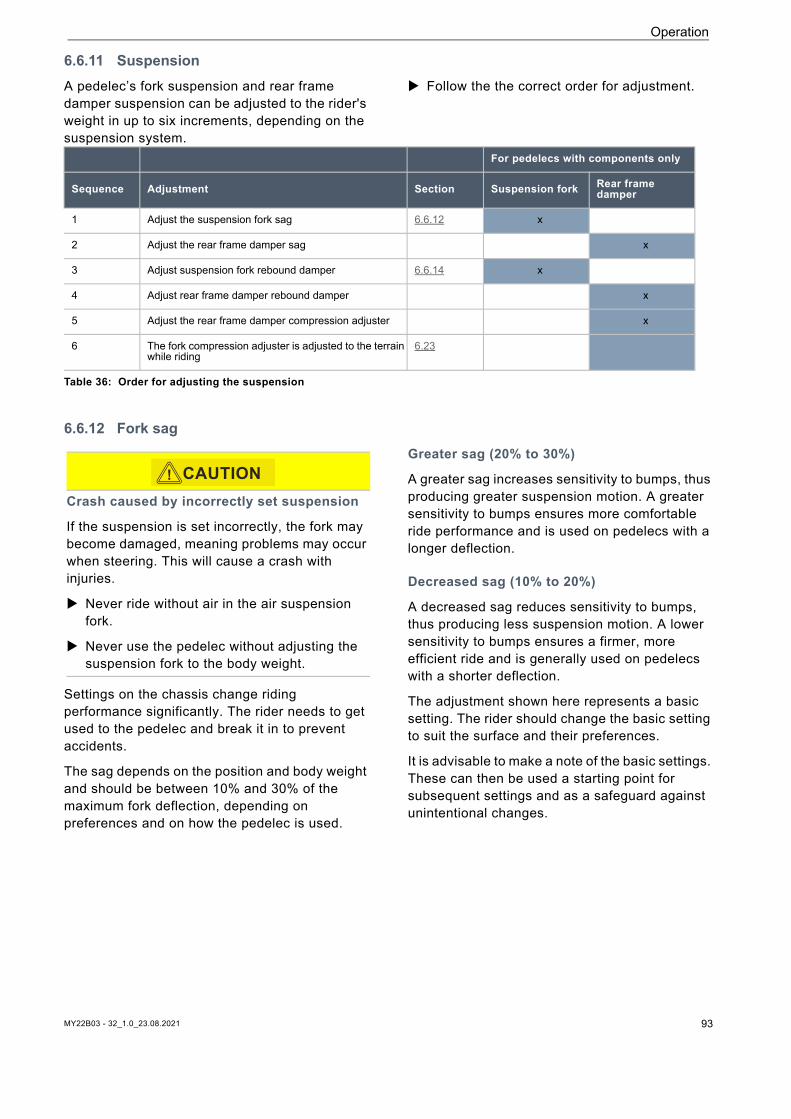
MY22B03 - 32_1.0_23.08.2021 93
Operation
6.6.11 Suspension A pedelec’s fork suspension and rear frame damper suspension can be adjusted to the rider's weight in up to six increments, depending on the suspension system.
Follow the the correct order for adjustment.
6.6.12 Fork sag
Settings on the chassis change riding performance significantly. The rider needs to get used to the pedelec and break it in to prevent accidents.
The sag depends on the position and body weight and should be between 10% and 30% of the maximum fork deflection, depending on preferences and on how the pedelec is used.
Greater sag (20% to 30%)
A greater sag increases sensitivity to bumps, thus producing greater suspension motion. A greater sensitivity to bumps ensures more comfortable ride performance and is used on pedelecs with a longer deflection.
Decreased sag (10% to 20%)
A decreased sag reduces sensitivity to bumps, thus producing less suspension motion. A lower sensitivity to bumps ensures a firmer, more efficient ride and is generally used on pedelecs with a shorter deflection.
The adjustment shown here represents a basic setting. The rider should change the basic setting to suit the surface and their preferences.
It is advisable to make a note of the basic settings. These can then be used a starting point for subsequent settings and as a safeguard against unintentional changes.
For pedelecs with components only
Sequence Adjustment Section Suspension fork Rear frame damper
1 Adjust the suspension fork sag 6.6.12 x
2 Adjust the rear frame damper sag x
3 Adjust suspension fork rebound damper 6.6.14 x
4 Adjust rear frame damper rebound damper x
5 Adjust the rear frame damper compression adjuster x
6 The fork compression adjuster is adjusted to the terrain while riding
6.23
Table 36: Order for adjusting the suspension
Crash caused by incorrectly set suspension
If the suspension is set incorrectly, the fork may become damaged, meaning problems may occur when steering. This will cause a crash with injuries.
Never ride without air in the air suspension fork.
Never use the pedelec without adjusting the suspension fork to the body weight.
CAUTION!
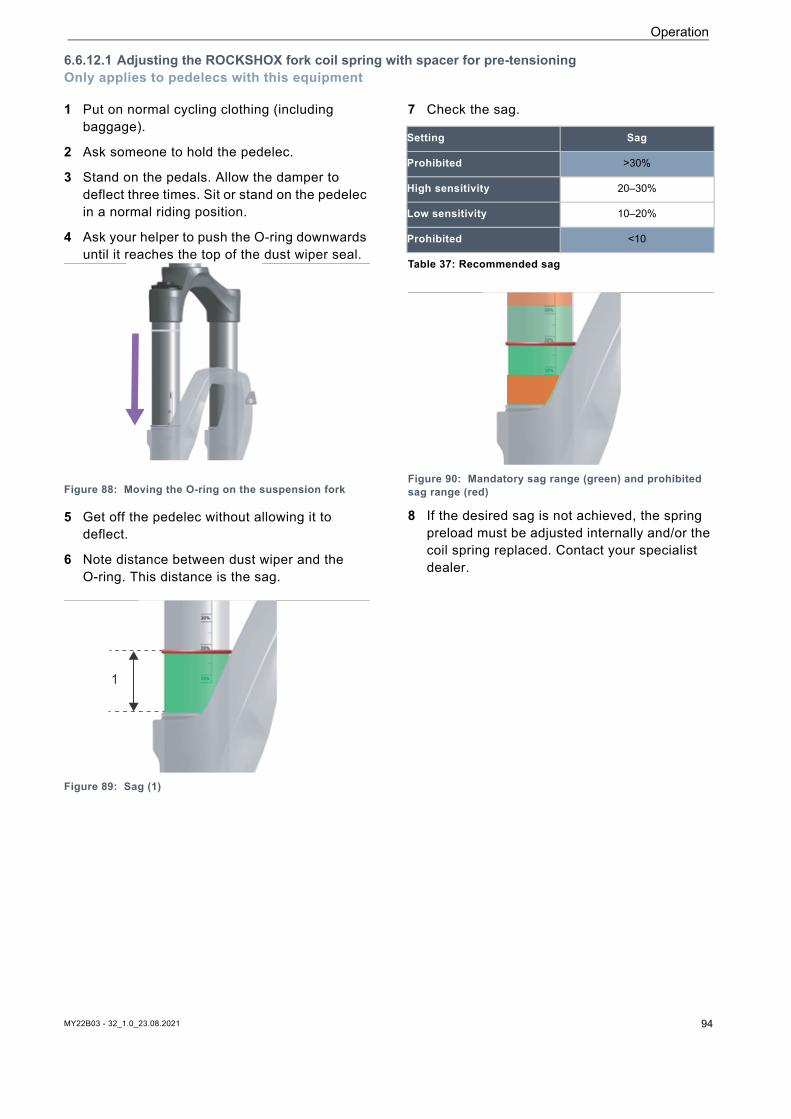
Operation
6.6.12.1 Adjusting the ROCKSHOX fork coil spring with spacer for pre-tensioningOnly applies to pedelecs with this equipment
1 Put on normal cycling clothing (including baggage).
2 Ask someone to hold the pedelec.
3 Stand on the pedals. Allow the damper to deflect three times. Sit or stand on the pedelec in a normal riding position.
4 Ask your helper to push the O-ring downwards until it reaches the top of the dust wiper seal.
Figure 88: Moving the O-ring on the suspension fork
5 Get off the pedelec without allowing it to deflect.
6 Note distance between dust wiper and the O-ring. This distance is the sag.
Figure 89: Sag (1)
7 Check the sag.
8 If the desired sag is not achieved, the spring preload must be adjusted internally and/or the coil spring replaced. Contact your specialist dealer.
1
Setting Sag
Prohibited >30%
High sensitivity 20–30%
Low sensitivity 10–20%
Prohibited <10
Table 37: Recommended sag
Figure 90: Mandatory sag range (green) and prohibited sag range (red)
MY22B03 - 32_1.0_23.08.2021 94
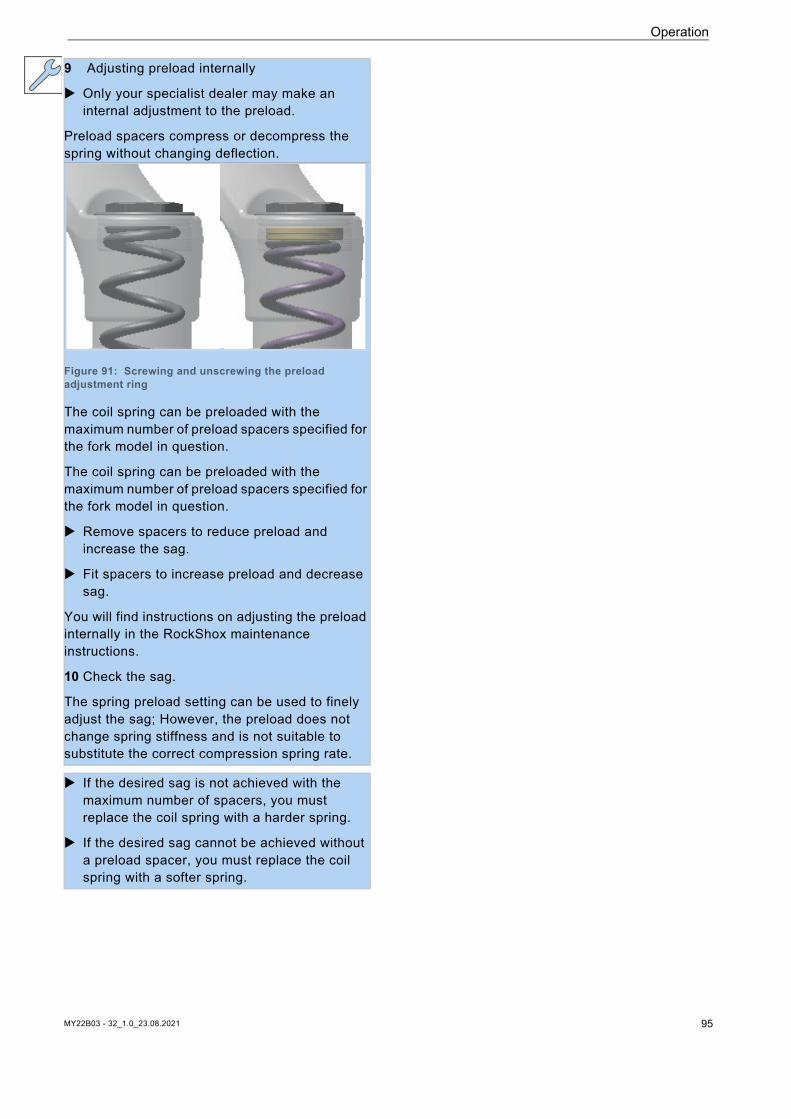
Operation
9 Adjusting preload internally
Only your specialist dealer may make an internal adjustment to the preload.
Preload spacers compress or decompress the spring without changing deflection.
Figure 91: Screwing and unscrewing the preload adjustment ring
The coil spring can be preloaded with the maximum number of preload spacers specified for the fork model in question.
The coil spring can be preloaded with the maximum number of preload spacers specified for the fork model in question.
Remove spacers to reduce preload and increase the sag.
Fit spacers to increase preload and decrease sag.
You will find instructions on adjusting the preload internally in the RockShox maintenance instructions.
10 Check the sag.
The spring preload setting can be used to finely adjust the sag; However, the preload does not change spring stiffness and is not suitable to substitute the correct compression spring rate.
If the desired sag is not achieved with the maximum number of spacers, you must replace the coil spring with a harder spring.
If the desired sag cannot be achieved without a preload spacer, you must replace the coil spring with a softer spring.
MY22B03 - 32_1.0_23.08.2021 95
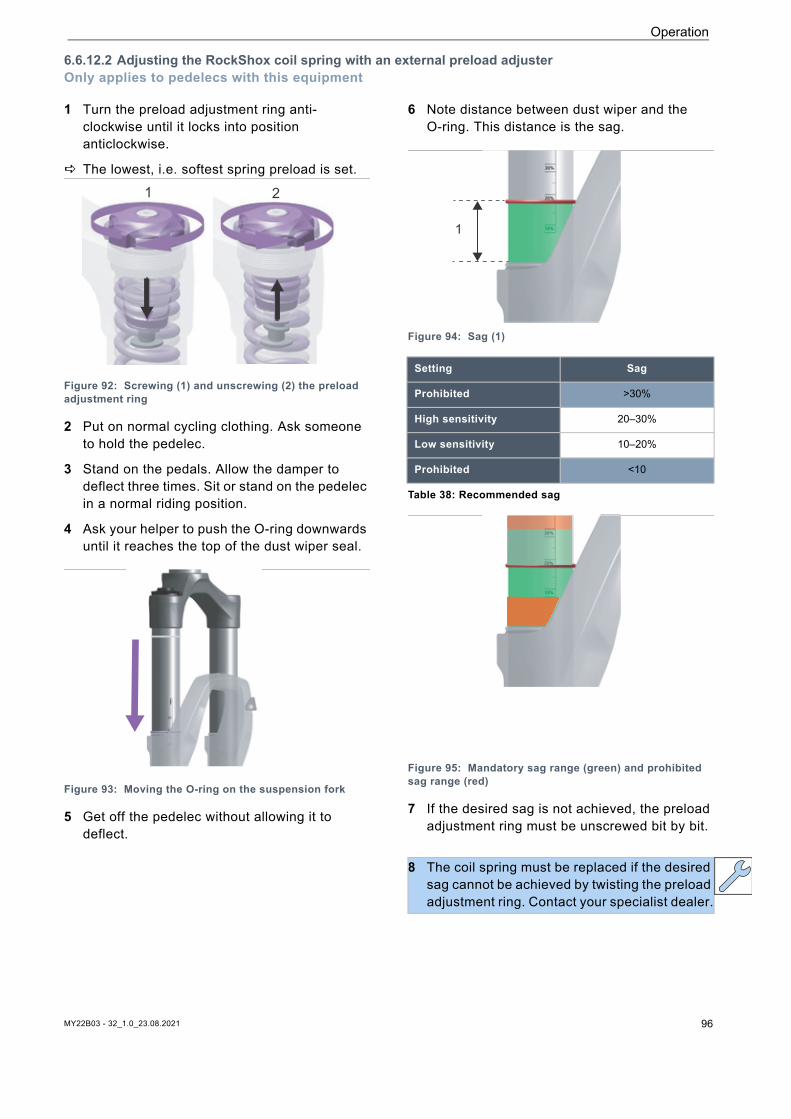
MY22B03 - 32_1.0_23.08.2021 96
Operation
6.6.12.2 Adjusting the RockShox coil spring with an external preload adjusterOnly applies to pedelecs with this equipment
1 Turn the preload adjustment ring anti-clockwise until it locks into position anticlockwise.
The lowest, i.e. softest spring preload is set.
Figure 92: Screwing (1) and unscrewing (2) the preload adjustment ring
2 Put on normal cycling clothing. Ask someone to hold the pedelec.
3 Stand on the pedals. Allow the damper to deflect three times. Sit or stand on the pedelec in a normal riding position.
4 Ask your helper to push the O-ring downwards until it reaches the top of the dust wiper seal.
Figure 93: Moving the O-ring on the suspension fork
5 Get off the pedelec without allowing it to deflect.
6 Note distance between dust wiper and the O-ring. This distance is the sag.
Figure 94: Sag (1)
7 If the desired sag is not achieved, the preload adjustment ring must be unscrewed bit by bit.
1 2
Setting Sag
Prohibited >30%
High sensitivity 20–30%
Low sensitivity 10–20%
Prohibited <10
Table 38: Recommended sag
Figure 95: Mandatory sag range (green) and prohibited sag range (red)
8 The coil spring must be replaced if the desired sag cannot be achieved by twisting the preload adjustment ring. Contact your specialist dealer.
1
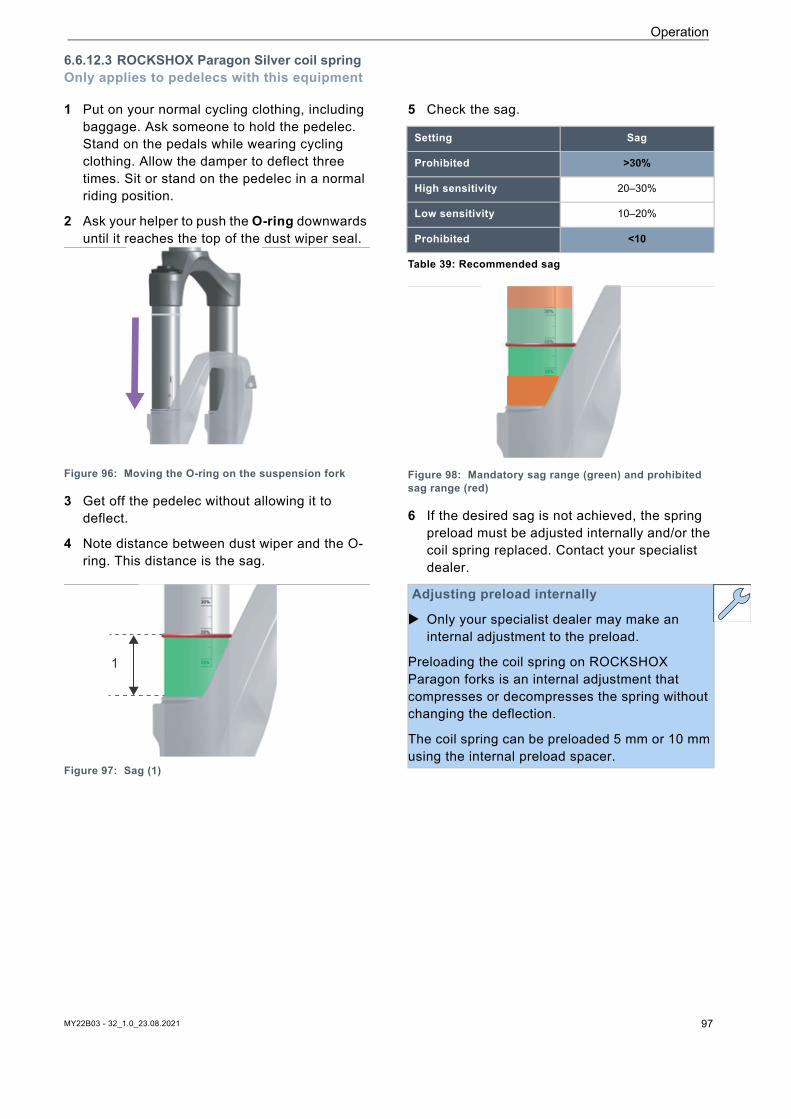
Operation
6.6.12.3 ROCKSHOX Paragon Silver coil springOnly applies to pedelecs with this equipment
1 Put on your normal cycling clothing, including baggage. Ask someone to hold the pedelec. Stand on the pedals while wearing cycling clothing. Allow the damper to deflect three times. Sit or stand on the pedelec in a normal riding position.
2 Ask your helper to push the O-ring downwards until it reaches the top of the dust wiper seal.
Figure 96: Moving the O-ring on the suspension fork
3 Get off the pedelec without allowing it to deflect.
4 Note distance between dust wiper and the O-ring. This distance is the sag.
Figure 97: Sag (1)
5 Check the sag.
Figure 98: Mandatory sag range (green) and prohibited sag range (red)
6 If the desired sag is not achieved, the spring preload must be adjusted internally and/or the coil spring replaced. Contact your specialist dealer.
1
Setting Sag
Prohibited >30%
High sensitivity 20–30%
Low sensitivity 10–20%
Prohibited <10
Table 39: Recommended sag
Adjusting preload internally
Only your specialist dealer may make an internal adjustment to the preload.
Preloading the coil spring on ROCKSHOX Paragon forks is an internal adjustment that compresses or decompresses the spring without changing the deflection.
The coil spring can be preloaded 5 mm or 10 mm using the internal preload spacer.
MY22B03 - 32_1.0_23.08.2021 97
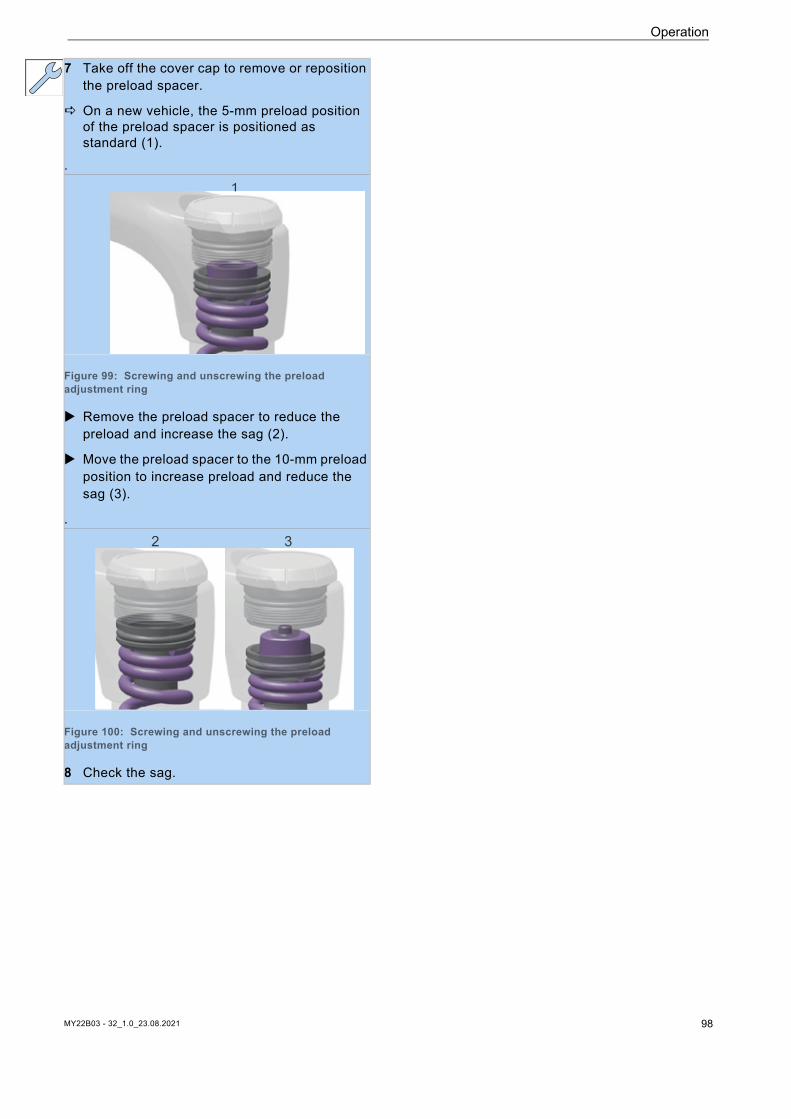
Operation
7 Take off the cover cap to remove or reposition the preload spacer.
On a new vehicle, the 5-mm preload position of the preload spacer is positioned as standard (1).
.
Figure 99: Screwing and unscrewing the preload adjustment ring
Remove the preload spacer to reduce the preload and increase the sag (2).
Move the preload spacer to the 10-mm preload position to increase preload and reduce the sag (3).
.
Figure 100: Screwing and unscrewing the preload adjustment ring
8 Check the sag.
1
2 3
MY22B03 - 32_1.0_23.08.2021 98

Operation
6.6.12.4 Adjusting the RockShox fork air suspensionOnly applies to pedelecs with this equipment The pressure should be measured at an ambient
temperature of 21 °C to 24 °C.
1 Place all dampers in the open position before adjusting the sag.
Turn the adjuster anti-clockwise until it will go no further.
Figure 101: Opening the rebound damper (1) and compression adjuster (2 and 3)
If the pedelec has a handlebar remote control, position the compression dashpot in the open position.
2 The air valve is located under a cover on the head of the shock absorber. Unscrew the air valve cap in an anti-clockwise direction.
Figure 102: Removing the cover (1) from the air valve (2)
3 Place a high-pressure pump on the valve.
4 Pump the suspension fork to the required pressure. Observe the levels in the air pressure table.
5 The recommendations for air pressure in the front wheel suspension are also indicated on the rear of the fork and can be found at https://trailhead.rockshox.com/en.
6 Remove the high-pressure pump.
7 Put on normal cycling clothing (including baggage).
8 Ask someone to hold the pedelec. Stand on the pedals. Allow the damper to deflect three times. Sit or stand on the pedelec in a normal riding position.
9 Ask your helper to push the O-ring downwards until it reaches the top of the dust wiper seal.
Figure 103: Moving the O-ring on the suspension fork
1 2 3
1
2
Body weight ROCKSHOX LYRIK SELECT
kg psi bar
<55 <55 <3.8
55 - 63 55–65 3.8–4.5
63 - 72 65–75 4.5–5.2
72 - 81 75–85 5.2–5.9
81 - 90 85–95 5.9–6.6
90 - 99 95–105 6.6–6.8
>99 105+ 6.8+
Max. pressure 163 11.2
Table 40: Filling pressure table for RockShox LYRIK SELECT air fork
MY22B03 - 32_1.0_23.08.2021 99
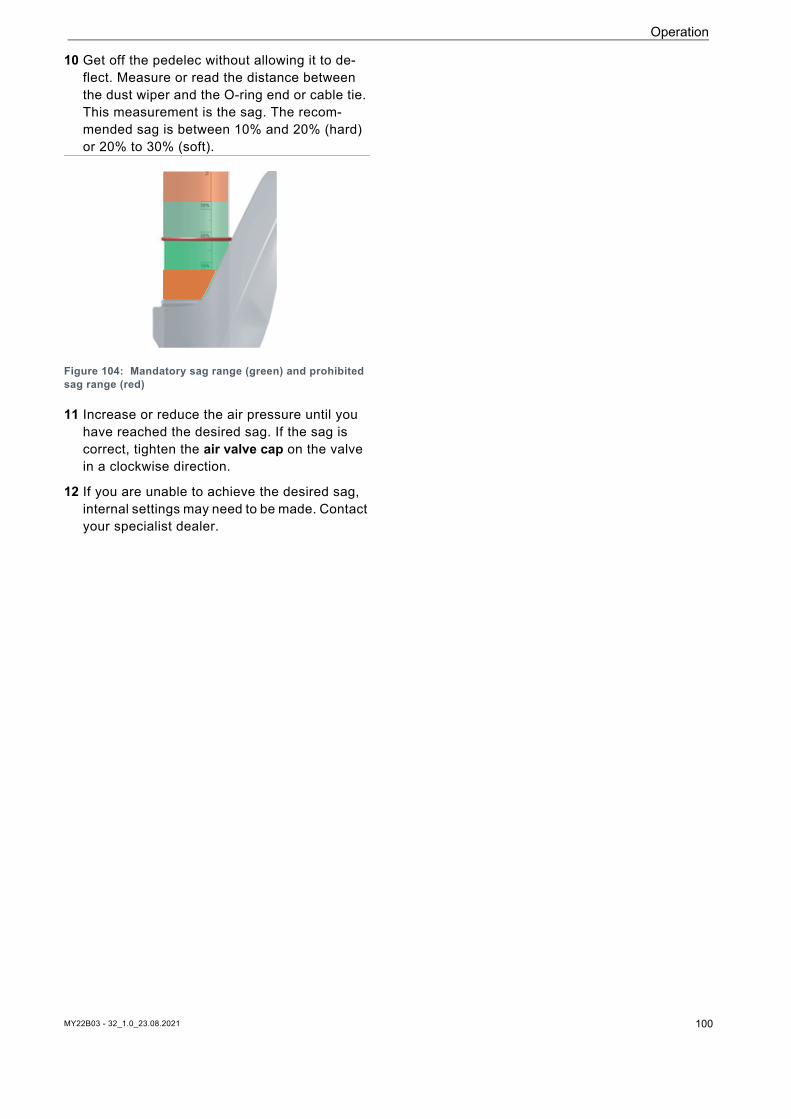
Operation
10 Get off the pedelec without allowing it to de-flect. Measure or read the distance between the dust wiper and the O-ring end or cable tie. This measurement is the sag. The recom-mended sag is between 10% and 20% (hard) or 20% to 30% (soft).
Figure 104: Mandatory sag range (green) and prohibited sag range (red)
11 Increase or reduce the air pressure until you have reached the desired sag. If the sag is correct, tighten the air valve cap on the valve in a clockwise direction.
12 If you are unable to achieve the desired sag, internal settings may need to be made. Contact your specialist dealer.
MY22B03 - 32_1.0_23.08.2021 100
MY22B03 - 32_1.0_23.08.2021 101
Operation
6.6.13 Adjust the rear frame damper sag Settings on the chassis change ride performance significantly. The rider needs to get used to the pedelec and break it in to prevent accidents.
Greater sag (20%–30%)
A greater sag increases sensitivity to bumps, thus producing greater suspension motion. A greater sensitivity to bumps ensures more comfortable ride performance and is used on pedelecs with a longer deflection.
Decreased sag (10%– 20%)
A decreased sag reduces sensitivity to bumps, thus producing less suspension motion. A lower sensitivity to bumps ensures a firmer, more efficient ride performance and is generally used on pedelecs with a shorter deflection.
The adjustment shown here represents a basic setting. The rider should change the basic setting to suit the surface and their preferences.
It is advisable to make a note of the basic settings. These can then be used a starting point for subsequent optimised settings and as a safeguard against unintentional changes.
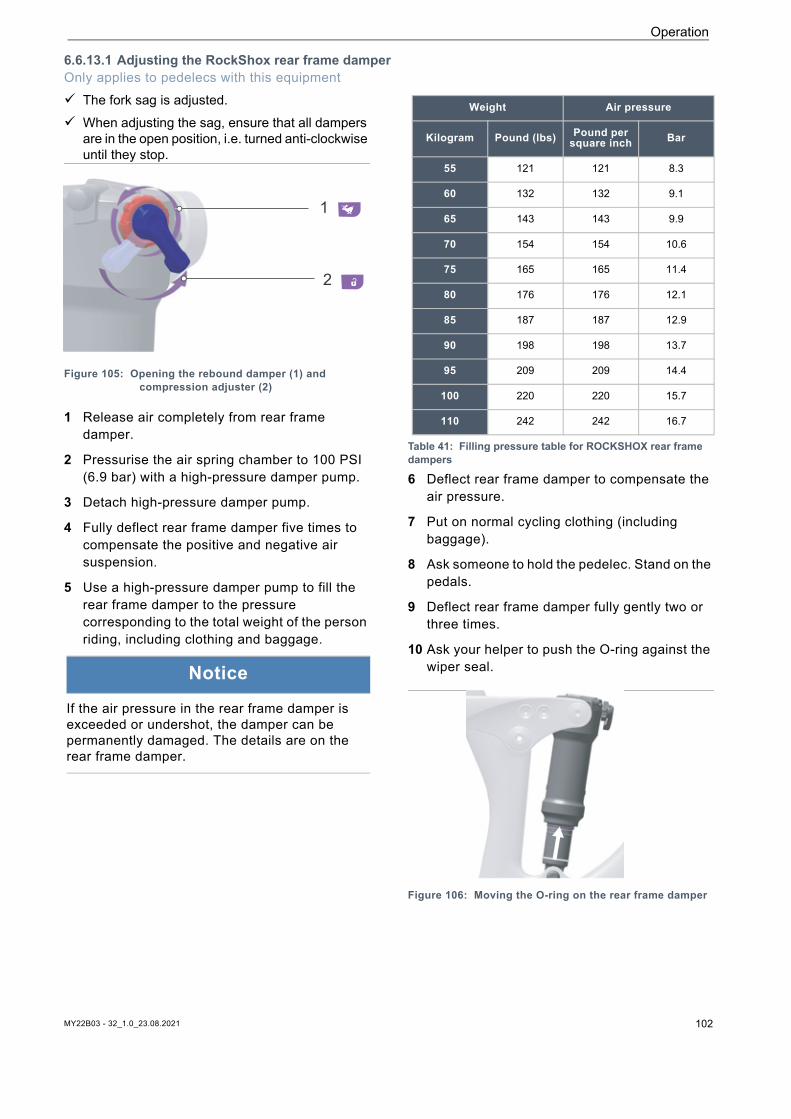
Operation
6.6.13.1 Adjusting the RockShox rear frame damperOnly applies to pedelecs with this equipment The fork sag is adjusted.
When adjusting the sag, ensure that all dampers are in the open position, i.e. turned anti-clockwise until they stop.
Figure 105: Opening the rebound damper (1) and compression adjuster (2)
1 Release air completely from rear frame damper.
2 Pressurise the air spring chamber to 100 PSI (6.9 bar) with a high-pressure damper pump.
3 Detach high-pressure damper pump.
4 Fully deflect rear frame damper five times to compensate the positive and negative air suspension.
5 Use a high-pressure damper pump to fill the rear frame damper to the pressure corresponding to the total weight of the person riding, including clothing and baggage.
6 Deflect rear frame damper to compensate the air pressure.
7 Put on normal cycling clothing (including baggage).
8 Ask someone to hold the pedelec. Stand on the pedals.
9 Deflect rear frame damper fully gently two or three times.
10 Ask your helper to push the O-ring against the wiper seal.
Figure 106: Moving the O-ring on the rear frame damper
Notice
If the air pressure in the rear frame damper is exceeded or undershot, the damper can be permanently damaged. The details are on the rear frame damper.
1
2
Weight Air pressure
Kilogram Pound (lbs) Pound per square inch Bar
55 121 121 8.3
60 132 132 9.1
65 143 143 9.9
70 154 154 10.6
75 165 165 11.4
80 176 176 12.1
85 187 187 12.9
90 198 198 13.7
95 209 209 14.4
100 220 220 15.7
110 242 242 16.7
Table 41: Filling pressure table for ROCKSHOX rear frame dampers
MY22B03 - 32_1.0_23.08.2021 102
Operation
11 Read the sag value on the scale. The optimum sag percentage is 25%. The sag level may be adjusted by ± 5%, depending on the rider's preferences (20% to 30%).
12 The air pressure must be adjusted if the sag level is not reached.
• Increase the air pressure to reduce the sag.• Decrease the air pressure to increase the sag.
MY22B03 - 32_1.0_23.08.2021 103
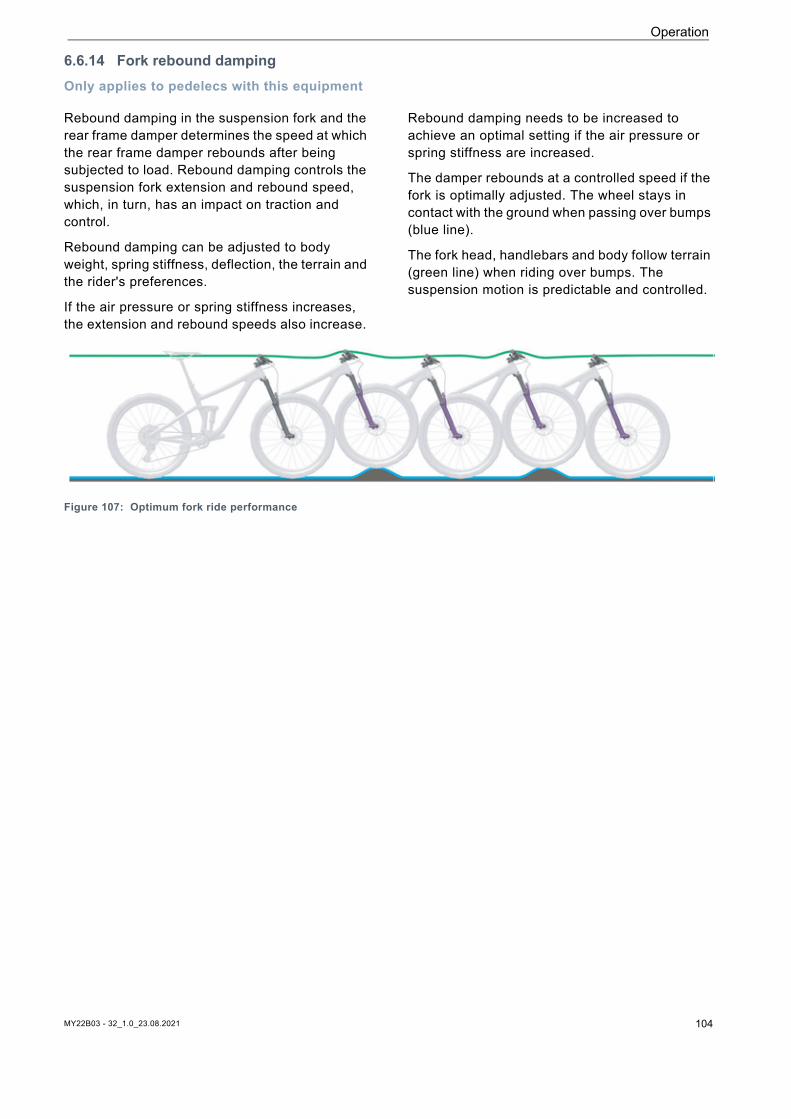
MY22B03 - 32_1.0_23.08.2021 104
Operation
6.6.14 Fork rebound damping Only applies to pedelecs with this equipment
Rebound damping in the suspension fork and the rear frame damper determines the speed at which the rear frame damper rebounds after being subjected to load. Rebound damping controls the suspension fork extension and rebound speed, which, in turn, has an impact on traction and control.
Rebound damping can be adjusted to body weight, spring stiffness, deflection, the terrain and the rider's preferences.
If the air pressure or spring stiffness increases, the extension and rebound speeds also increase.
Rebound damping needs to be increased to achieve an optimal setting if the air pressure or spring stiffness are increased.
The damper rebounds at a controlled speed if the fork is optimally adjusted. The wheel stays in contact with the ground when passing over bumps (blue line).
The fork head, handlebars and body follow terrain (green line) when riding over bumps. The suspension motion is predictable and controlled.
Figure 107: Optimum fork ride performance
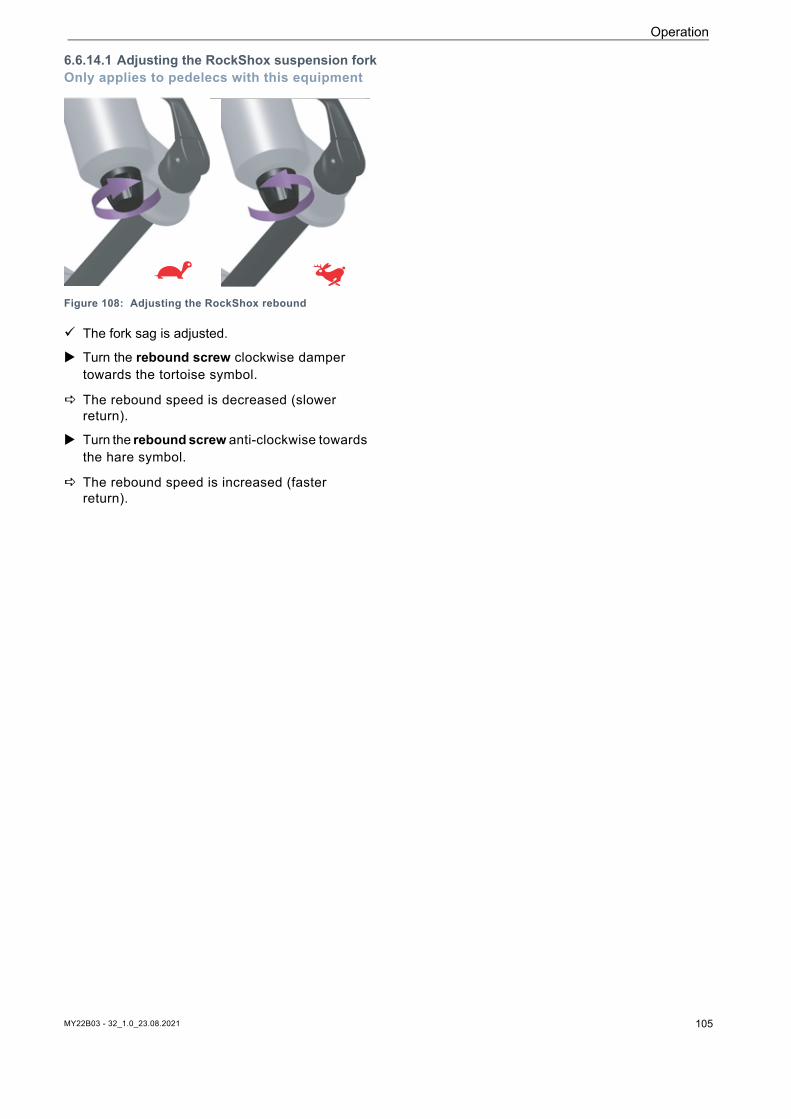
MY22B03 - 32_1.0_23.08.2021 105
Operation
6.6.14.1 Adjusting the RockShox suspension forkOnly applies to pedelecs with this equipment
Figure 108: Adjusting the RockShox rebound
The fork sag is adjusted.
Turn the rebound screw clockwise damper towards the tortoise symbol.
The rebound speed is decreased (slower return).
Turn the rebound screw anti-clockwise towards the hare symbol.
The rebound speed is increased (faster return).
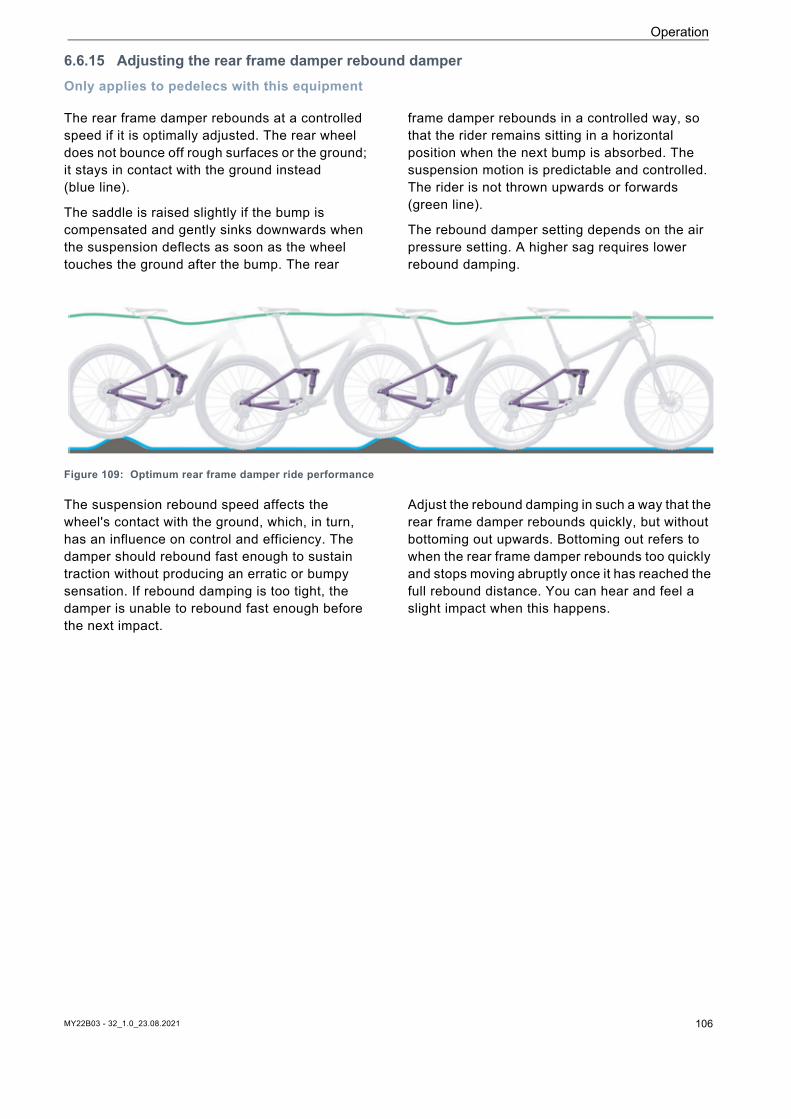
MY22B03 - 32_1.0_23.08.2021 106
Operation
6.6.15 Adjusting the rear frame damper rebound damperOnly applies to pedelecs with this equipment
The rear frame damper rebounds at a controlled speed if it is optimally adjusted. The rear wheel does not bounce off rough surfaces or the ground; it stays in contact with the ground instead (blue line).
The saddle is raised slightly if the bump is compensated and gently sinks downwards when the suspension deflects as soon as the wheel touches the ground after the bump. The rear
frame damper rebounds in a controlled way, so that the rider remains sitting in a horizontal position when the next bump is absorbed. The suspension motion is predictable and controlled. The rider is not thrown upwards or forwards (green line).
The rebound damper setting depends on the air pressure setting. A higher sag requires lower rebound damping.
Figure 109: Optimum rear frame damper ride performance
The suspension rebound speed affects the wheel's contact with the ground, which, in turn, has an influence on control and efficiency. The damper should rebound fast enough to sustain traction without producing an erratic or bumpy sensation. If rebound damping is too tight, the damper is unable to rebound fast enough before the next impact.
Adjust the rebound damping in such a way that the rear frame damper rebounds quickly, but without bottoming out upwards. Bottoming out refers to when the rear frame damper rebounds too quickly and stops moving abruptly once it has reached the full rebound distance. You can hear and feel a slight impact when this happens.
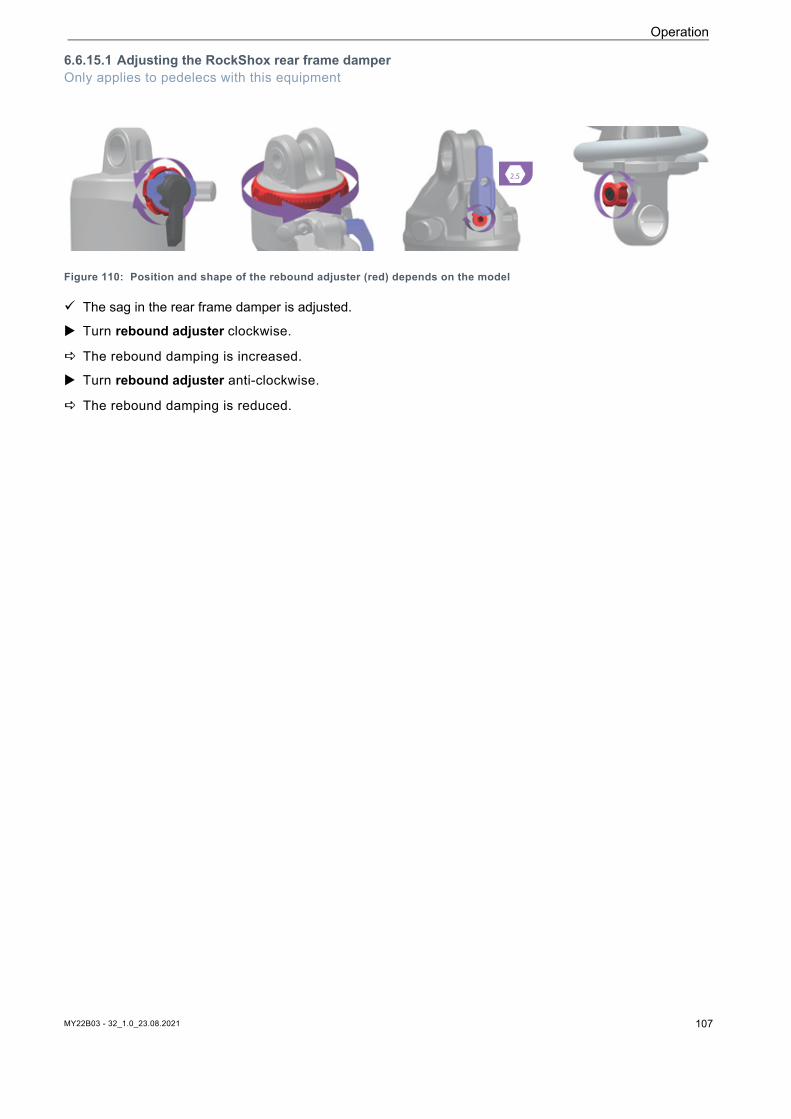
MY22B03 - 32_1.0_23.08.2021 107
Operation
6.6.15.1 Adjusting the RockShox rear frame damperOnly applies to pedelecs with this equipment
Figure 110: Position and shape of the rebound adjuster (red) depends on the model
The sag in the rear frame damper is adjusted.
Turn rebound adjuster clockwise.
The rebound damping is increased.
Turn rebound adjuster anti-clockwise.
The rebound damping is reduced.
2.5
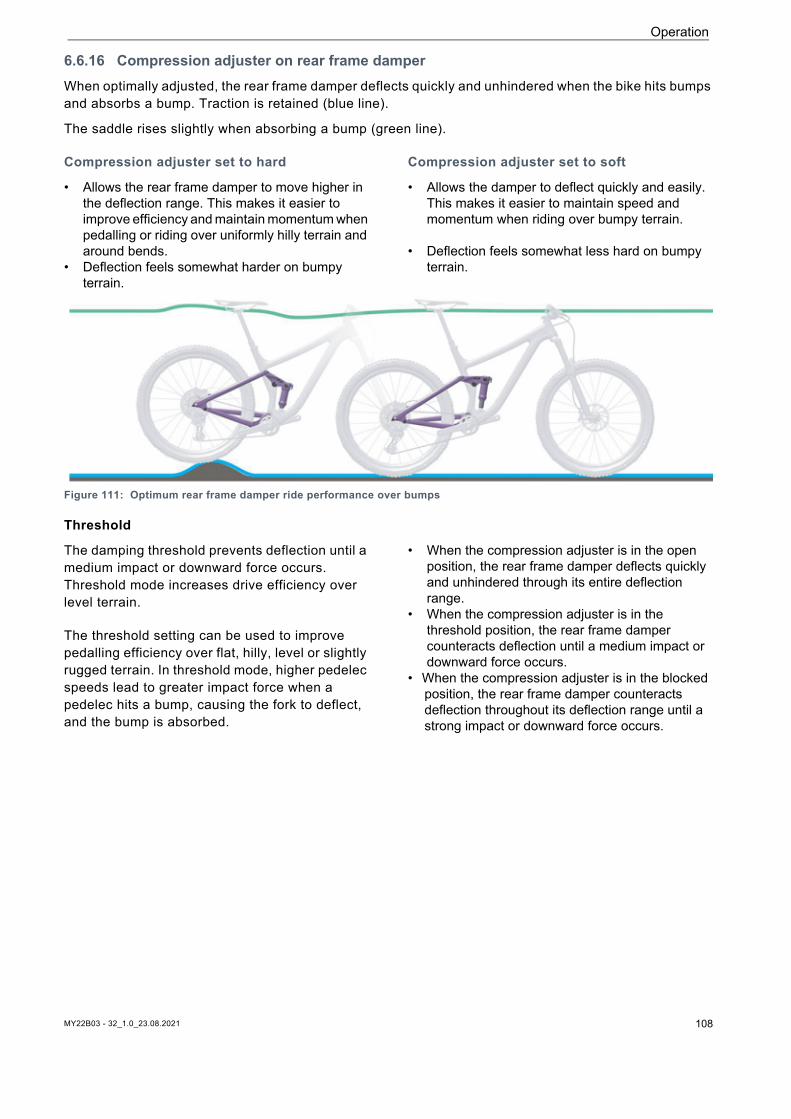
MY22B03 - 32_1.0_23.08.2021 108
Operation
6.6.16 Compression adjuster on rear frame damper When optimally adjusted, the rear frame damper deflects quickly and unhindered when the bike hits bumps and absorbs a bump. Traction is retained (blue line).
The saddle rises slightly when absorbing a bump (green line).
Compression adjuster set to hard
• Allows the rear frame damper to move higher in the deflection range. This makes it easier to improve efficiency and maintain momentum when pedalling or riding over uniformly hilly terrain and around bends.
• Deflection feels somewhat harder on bumpy terrain.
Compression adjuster set to soft
• Allows the damper to deflect quickly and easily. This makes it easier to maintain speed and momentum when riding over bumpy terrain.
• Deflection feels somewhat less hard on bumpy terrain.
Figure 111: Optimum rear frame damper ride performance over bumps
Threshold
The damping threshold prevents deflection until a medium impact or downward force occurs. Threshold mode increases drive efficiency over level terrain.
The threshold setting can be used to improve pedalling efficiency over flat, hilly, level or slightly rugged terrain. In threshold mode, higher pedelec speeds lead to greater impact force when a pedelec hits a bump, causing the fork to deflect, and the bump is absorbed.
• When the compression adjuster is in the open position, the rear frame damper deflects quickly and unhindered through its entire deflection range.
• When the compression adjuster is in the threshold position, the rear frame damper counteracts deflection until a medium impact or downward force occurs.
• When the compression adjuster is in the blocked position, the rear frame damper counteracts deflection throughout its deflection range until a strong impact or downward force occurs.
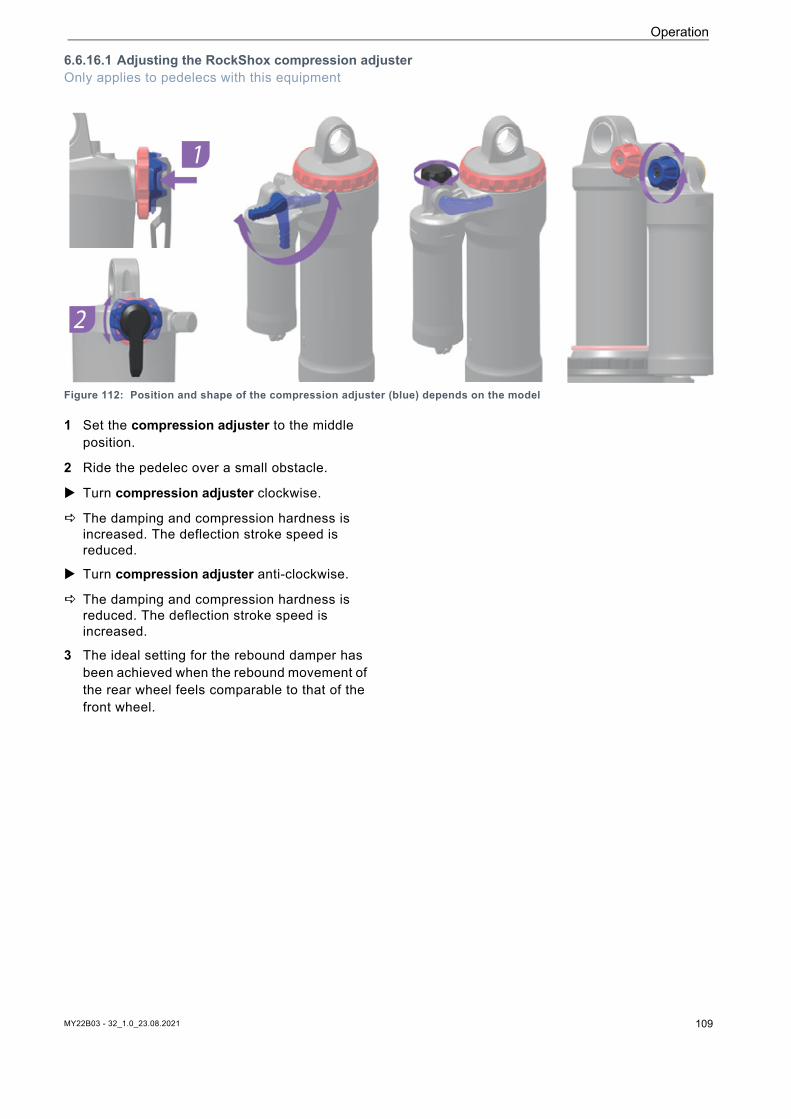
MY22B03 - 32_1.0_23.08.2021 109
Operation
6.6.16.1 Adjusting the RockShox compression adjusterOnly applies to pedelecs with this equipment
Figure 112: Position and shape of the compression adjuster (blue) depends on the model
1 Set the compression adjuster to the middle position.
2 Ride the pedelec over a small obstacle.
Turn compression adjuster clockwise.
The damping and compression hardness is increased. The deflection stroke speed is reduced.
Turn compression adjuster anti-clockwise.
The damping and compression hardness is reduced. The deflection stroke speed is increased.
3 The ideal setting for the rebound damper has been achieved when the rebound movement of the rear wheel feels comparable to that of the front wheel.
1
2
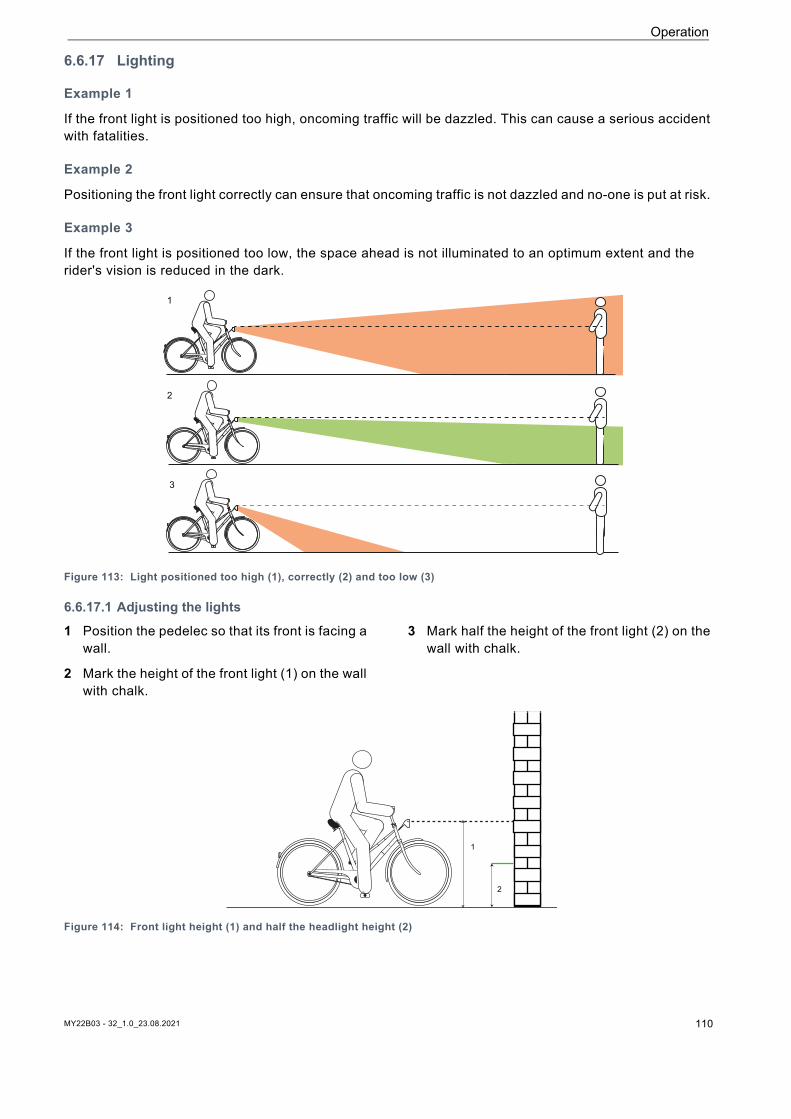
Operation
6.6.17 Lighting
Example 1
If the front light is positioned too high, oncoming traffic will be dazzled. This can cause a serious accident with fatalities.
Example 2
Positioning the front light correctly can ensure that oncoming traffic is not dazzled and no-one is put at risk.
Example 3
If the front light is positioned too low, the space ahead is not illuminated to an optimum extent and the rider's vision is reduced in the dark.
Figure 113: Light positioned too high (1), correctly (2) and too low (3)
6.6.17.1 Adjusting the lights
1 Position the pedelec so that its front is facing a wall.
2 Mark the height of the front light (1) on the wall with chalk.
3 Mark half the height of the front light (2) on the wall with chalk.
Figure 114: Front light height (1) and half the headlight height (2)
1
2
3
1
2
MY22B03 - 32_1.0_23.08.2021 110
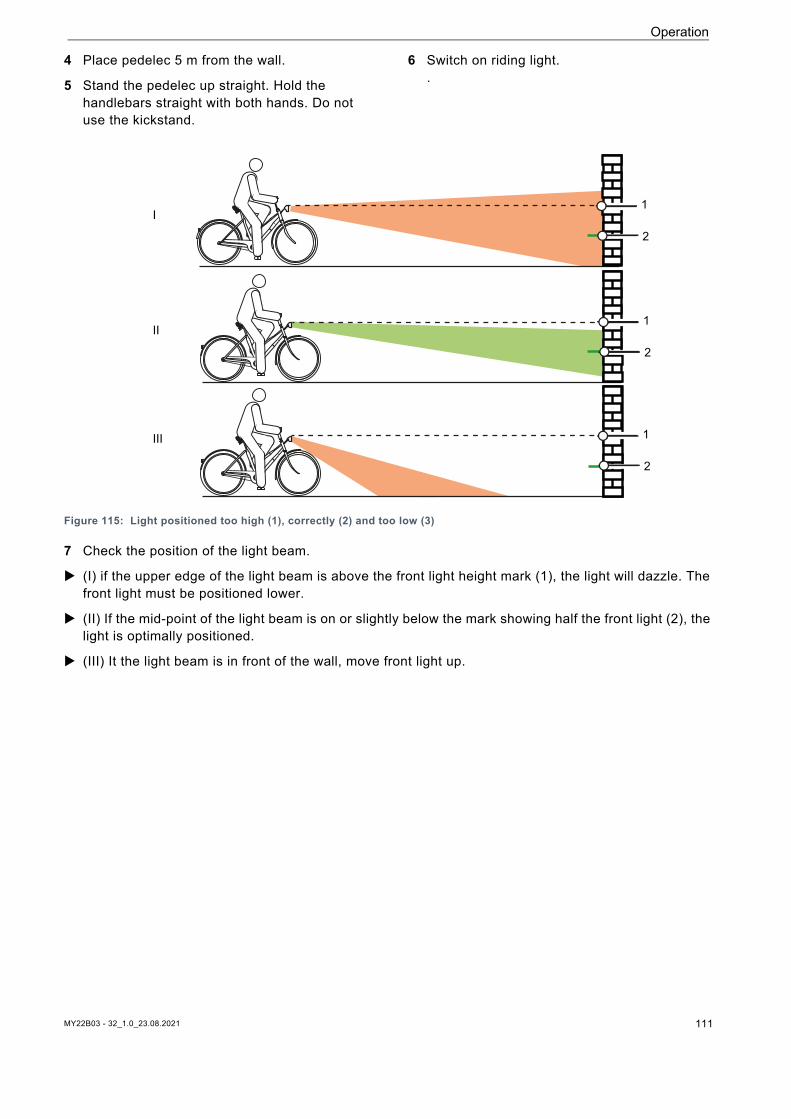
Operation
4 Place pedelec 5 m from the wall.
5 Stand the pedelec up straight. Hold the handlebars straight with both hands. Do not use the kickstand.
6 Switch on riding light..
Figure 115: Light positioned too high (1), correctly (2) and too low (3)
7 Check the position of the light beam.
(I) if the upper edge of the light beam is above the front light height mark (1), the light will dazzle. The front light must be positioned lower.
(II) If the mid-point of the light beam is on or slightly below the mark showing half the front light (2), the light is optimally positioned.
(III) It the light beam is in front of the wall, move front light up.
I
II
III
1
2
1
2
1
2
MY22B03 - 32_1.0_23.08.2021 111
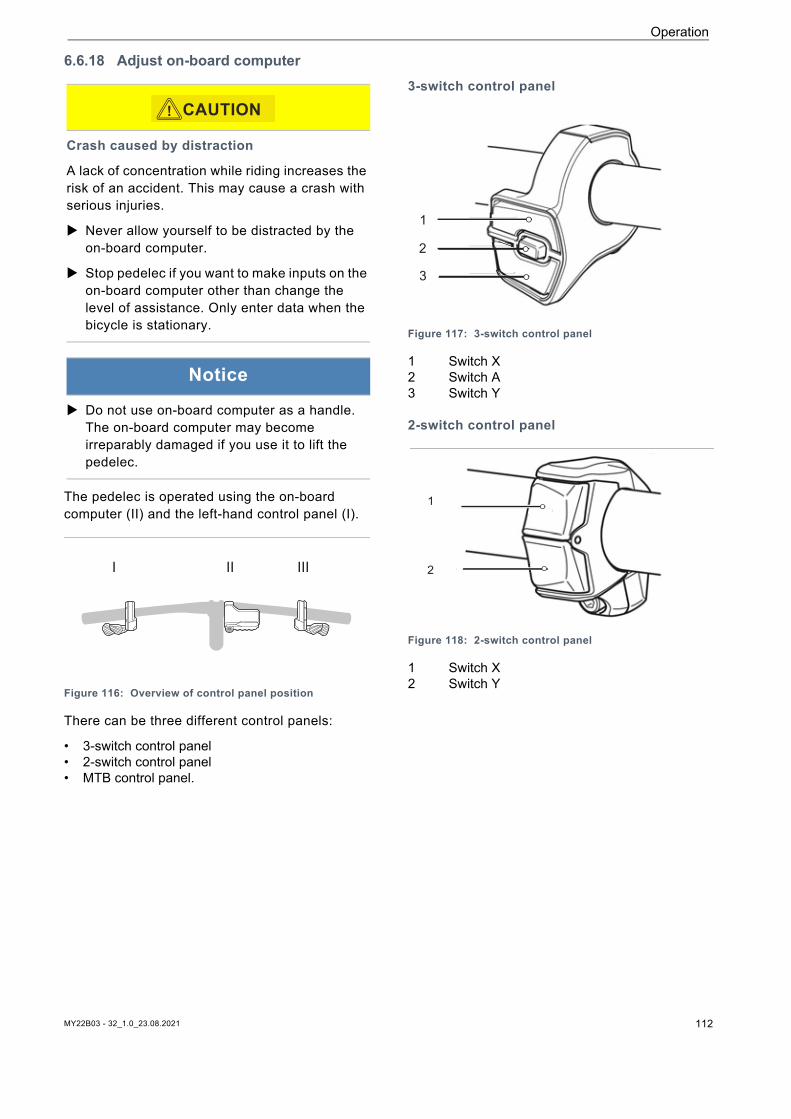
Operation
6.6.18 Adjust on-board computer
The pedelec is operated using the on-board computer (II) and the left-hand control panel (I).
Figure 116: Overview of control panel position
There can be three different control panels:
• 3-switch control panel• 2-switch control panel• MTB control panel.
3-switch control panel
Figure 117: 3-switch control panel 1 Switch X 2 Switch A 3 Switch Y
2-switch control panel
Figure 118: 2-switch control panel
1 Switch X 2 Switch Y
Crash caused by distraction
A lack of concentration while riding increases the risk of an accident. This may cause a crash with serious injuries.
Never allow yourself to be distracted by the on-board computer.
Stop pedelec if you want to make inputs on the on-board computer other than change the level of assistance. Only enter data when the bicycle is stationary.
Notice
Do not use on-board computer as a handle. The on-board computer may become irreparably damaged if you use it to lift the pedelec.
CAUTION!
I II III
1
2
3
1
2
MY22B03 - 32_1.0_23.08.2021 112
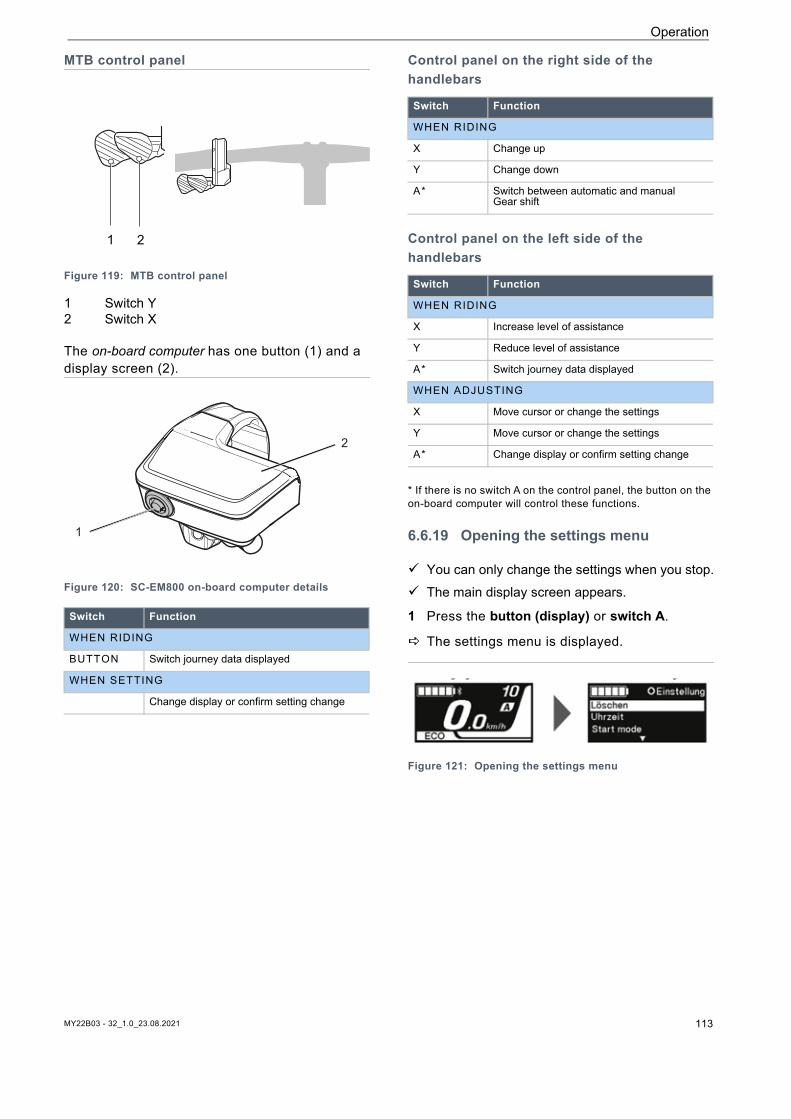
Operation
MTB control panel
Figure 119: MTB control panel 1 Switch Y2 Switch X
The on-board computer has one button (1) and a display screen (2).
Figure 120: SC-EM800 on-board computer details
Control panel on the right side of the handlebars
Control panel on the left side of the handlebars
* If there is no switch A on the control panel, the button on the on-board computer will control these functions.
6.6.19 Opening the settings menu
You can only change the settings when you stop. The main display screen appears.
1 Press the button (display) or switch A.
The settings menu is displayed.
Figure 121: Opening the settings menu
Switch Function
WHEN RIDING
BUTTON Switch journey data displayed
WHEN SETTING
Change display or confirm setting change
1 2
1
2
Switch Function
WHEN RIDING
X Change up
Y Change down
A* Switch between automatic and manualGear shift
Switch Function
WHEN RIDING
X Increase level of assistance
Y Reduce level of assistance
A* Switch journey data displayed
WHEN ADJUSTING
X Move cursor or change the settings
Y Move cursor or change the settings
A* Change display or confirm setting change
MY22B03 - 32_1.0_23.08.2021 113
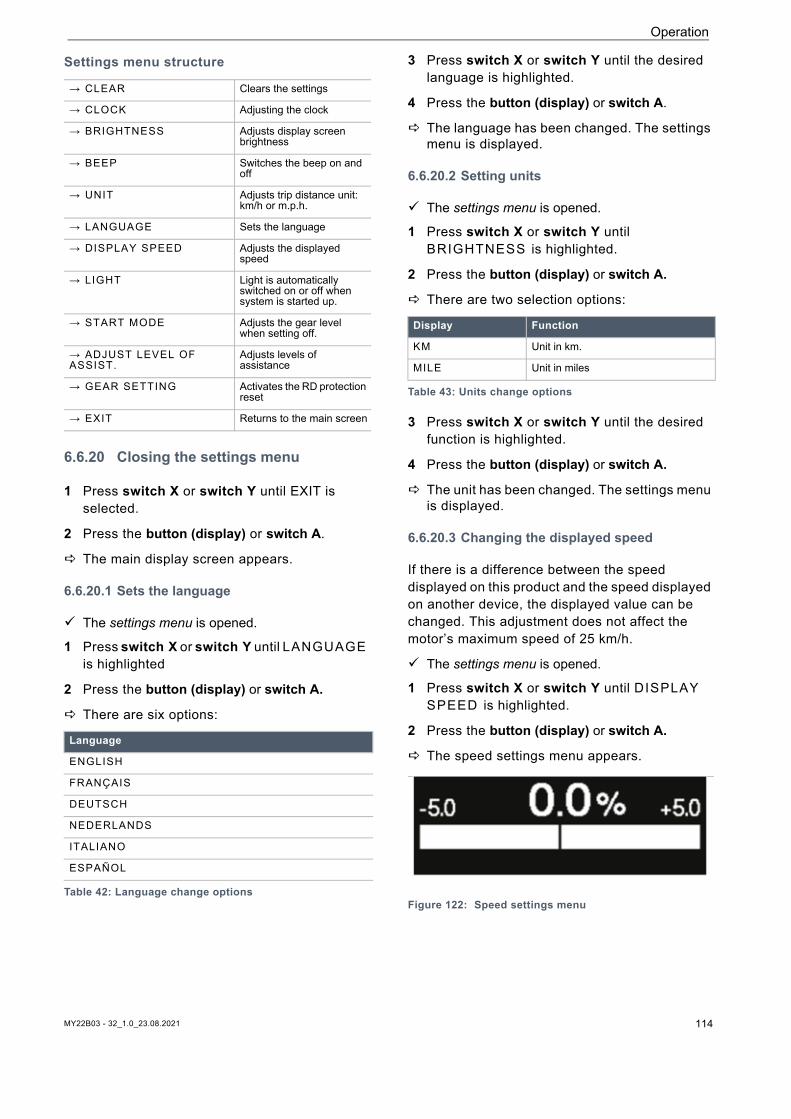
Operation
Settings menu structure
6.6.20 Closing the settings menu
1 Press switch X or switch Y until EXIT is selected.
2 Press the button (display) or switch A.
The main display screen appears.
6.6.20.1 Sets the language
The settings menu is opened.
1 Press switch X or switch Y until LANGUAGE is highlighted
2 Press the button (display) or switch A.
There are six options:
3 Press switch X or switch Y until the desired language is highlighted.
4 Press the button (display) or switch A.
The language has been changed. The settings menu is displayed.
6.6.20.2 Setting units
The settings menu is opened.
1 Press switch X or switch Y until BRIGHTNESS is highlighted.
2 Press the button (display) or switch A.
There are two selection options:
3 Press switch X or switch Y until the desired function is highlighted.
4 Press the button (display) or switch A.
The unit has been changed. The settings menu is displayed.
6.6.20.3 Changing the displayed speed
If there is a difference between the speed displayed on this product and the speed displayed on another device, the displayed value can be changed. This adjustment does not affect the motor’s maximum speed of 25 km/h.
The settings menu is opened.
1 Press switch X or switch Y until DISPLAY SPEED is highlighted.
2 Press the button (display) or switch A.
The speed settings menu appears.
Figure 122: Speed settings menu
→ CLEAR Clears the settings
→ CLOCK Adjusting the clock
→ BRIGHTNESS Adjusts display screen brightness
→ BEEP Switches the beep on and off
→ UNIT Adjusts trip distance unit: km/h or m.p.h.
→ LANGUAGE Sets the language
→ DISPLAY SPEED Adjusts the displayed speed
→ LIGHT Light is automatically switched on or off when system is started up.
→ START MODE Adjusts the gear level when setting off.
→ ADJUST LEVEL OF ASSIST.
Adjusts levels of assistance
→ GEAR SETTING Activates the RD protection reset
→ EXIT Returns to the main screen
Language
ENGLISH
FRANÇAIS
DEUTSCH
NEDERLANDS
ITALIANO
ESPAÑOL
Table 42: Language change options
Display Function
KM Unit in km.
MILE Unit in miles
Table 43: Units change options
MY22B03 - 32_1.0_23.08.2021 114
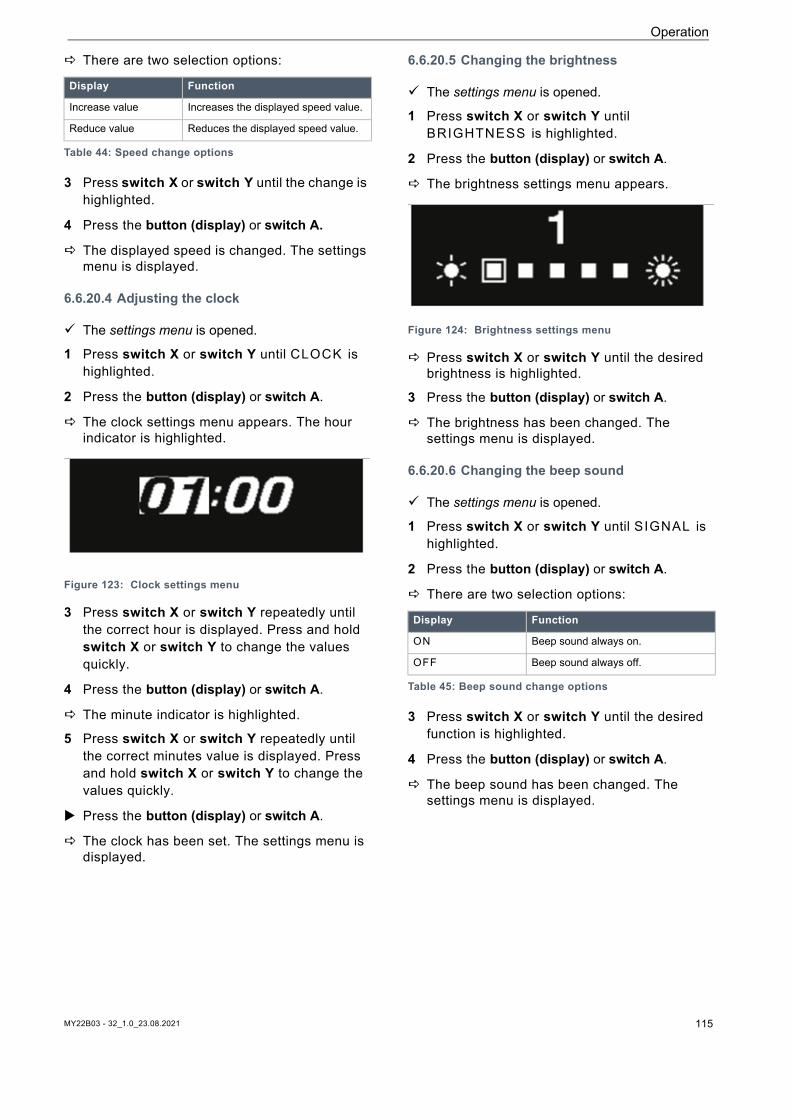
Operation
There are two selection options:
3 Press switch X or switch Y until the change is highlighted.
4 Press the button (display) or switch A.
The displayed speed is changed. The settings menu is displayed.
6.6.20.4 Adjusting the clock
The settings menu is opened.
1 Press switch X or switch Y until CLOCK is highlighted.
2 Press the button (display) or switch A.
The clock settings menu appears. The hour indicator is highlighted.
Figure 123: Clock settings menu
3 Press switch X or switch Y repeatedly until the correct hour is displayed. Press and hold switch X or switch Y to change the values quickly.
4 Press the button (display) or switch A.
The minute indicator is highlighted.
5 Press switch X or switch Y repeatedly until the correct minutes value is displayed. Press and hold switch X or switch Y to change the values quickly.
Press the button (display) or switch A.
The clock has been set. The settings menu is displayed.
6.6.20.5 Changing the brightness
The settings menu is opened.
1 Press switch X or switch Y until BRIGHTNESS is highlighted.
2 Press the button (display) or switch A.
The brightness settings menu appears.
Figure 124: Brightness settings menu
Press switch X or switch Y until the desired brightness is highlighted.
3 Press the button (display) or switch A.
The brightness has been changed. The settings menu is displayed.
6.6.20.6 Changing the beep sound
The settings menu is opened.
1 Press switch X or switch Y until SIGNAL is highlighted.
2 Press the button (display) or switch A.
There are two selection options:
3 Press switch X or switch Y until the desired function is highlighted.
4 Press the button (display) or switch A.
The beep sound has been changed. The settings menu is displayed.
Display Function
Increase value Increases the displayed speed value.
Reduce value Reduces the displayed speed value.
Table 44: Speed change options
Display Function
ON Beep sound always on.
OFF Beep sound always off.
Table 45: Beep sound change options
MY22B03 - 32_1.0_23.08.2021 115
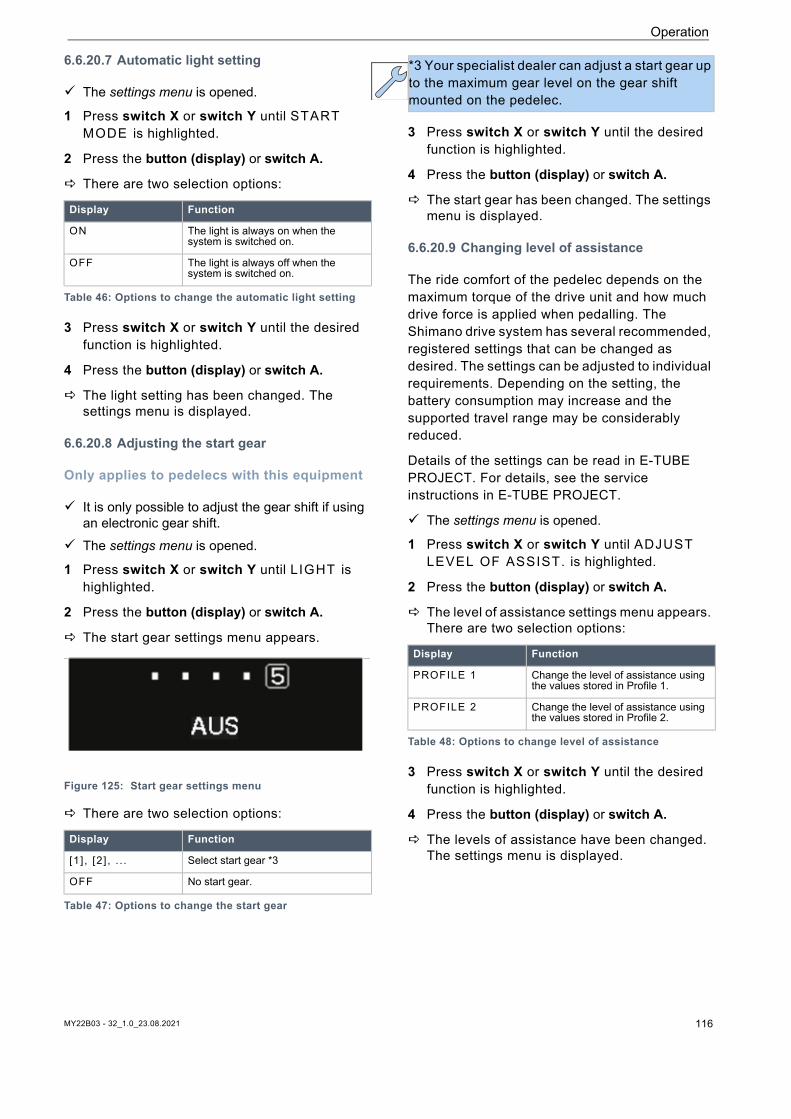
Operation
6.6.20.7 Automatic light setting
The settings menu is opened.
1 Press switch X or switch Y until START MODE is highlighted.
2 Press the button (display) or switch A.
There are two selection options:
3 Press switch X or switch Y until the desired function is highlighted.
4 Press the button (display) or switch A.
The light setting has been changed. The settings menu is displayed.
6.6.20.8 Adjusting the start gear
Only applies to pedelecs with this equipment
It is only possible to adjust the gear shift if using an electronic gear shift.
The settings menu is opened.
1 Press switch X or switch Y until LIGHT is highlighted.
2 Press the button (display) or switch A.
The start gear settings menu appears.
Figure 125: Start gear settings menu
There are two selection options:
3 Press switch X or switch Y until the desired function is highlighted.
4 Press the button (display) or switch A.
The start gear has been changed. The settings menu is displayed.
6.6.20.9 Changing level of assistance
The ride comfort of the pedelec depends on the maximum torque of the drive unit and how much drive force is applied when pedalling. The Shimano drive system has several recommended, registered settings that can be changed as desired. The settings can be adjusted to individual requirements. Depending on the setting, the battery consumption may increase and the supported travel range may be considerably reduced.
Details of the settings can be read in E-TUBE PROJECT. For details, see the service instructions in E-TUBE PROJECT.
The settings menu is opened.
1 Press switch X or switch Y until ADJUST LEVEL OF ASSIST. is highlighted.
2 Press the button (display) or switch A.
The level of assistance settings menu appears. There are two selection options:
3 Press switch X or switch Y until the desired function is highlighted.
4 Press the button (display) or switch A.
The levels of assistance have been changed. The settings menu is displayed.
Display Function
ON The light is always on when the system is switched on.
OFF The light is always off when the system is switched on.
Table 46: Options to change the automatic light setting
Display Function
[1] , [2] , . . . Select start gear *3
OFF No start gear.
Table 47: Options to change the start gear
*3 Your specialist dealer can adjust a start gear up to the maximum gear level on the gear shift mounted on the pedelec.
Display Function
PROFILE 1 Change the level of assistance using the values stored in Profile 1.
PROFILE 2 Change the level of assistance using the values stored in Profile 2.
Table 48: Options to change level of assistance
MY22B03 - 32_1.0_23.08.2021 116
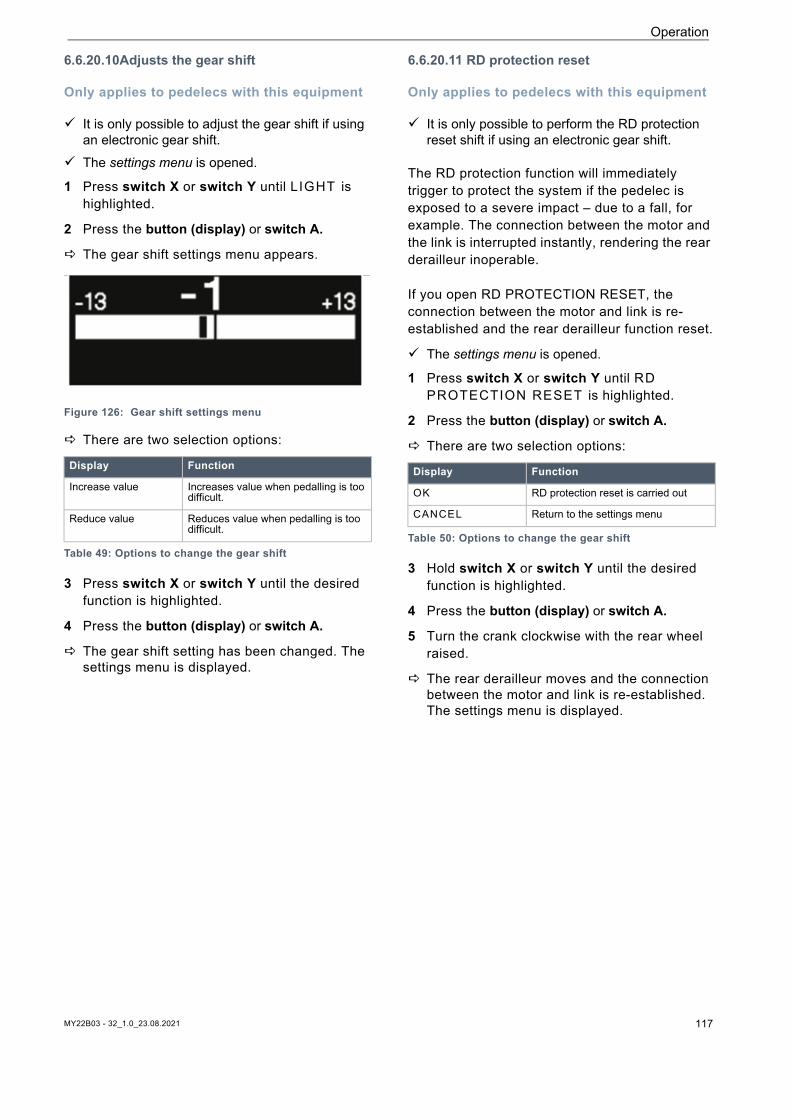
Operation
6.6.20.10Adjusts the gear shift
Only applies to pedelecs with this equipment
It is only possible to adjust the gear shift if using an electronic gear shift.
The settings menu is opened.
1 Press switch X or switch Y until LIGHT is highlighted.
2 Press the button (display) or switch A.
The gear shift settings menu appears.
Figure 126: Gear shift settings menu There are two selection options:
3 Press switch X or switch Y until the desired function is highlighted.
4 Press the button (display) or switch A.
The gear shift setting has been changed. The settings menu is displayed.
6.6.20.11 RD protection reset
Only applies to pedelecs with this equipment
It is only possible to perform the RD protection reset shift if using an electronic gear shift.
The RD protection function will immediately trigger to protect the system if the pedelec is exposed to a severe impact – due to a fall, for example. The connection between the motor and the link is interrupted instantly, rendering the rear derailleur inoperable.
If you open RD PROTECTION RESET, the connection between the motor and link is re-established and the rear derailleur function reset.
The settings menu is opened.
1 Press switch X or switch Y until RD PROTECTION RESET is highlighted.
2 Press the button (display) or switch A.
There are two selection options:
3 Hold switch X or switch Y until the desired function is highlighted.
4 Press the button (display) or switch A.
5 Turn the crank clockwise with the rear wheel raised.
The rear derailleur moves and the connection between the motor and link is re-established. The settings menu is displayed.
Display Function
Increase value Increases value when pedalling is too difficult.
Reduce value Reduces value when pedalling is too difficult.
Table 49: Options to change the gear shift
Display Function
OK RD protection reset is carried out
CANCEL Return to the settings menu
Table 50: Options to change the gear shift
MY22B03 - 32_1.0_23.08.2021 117
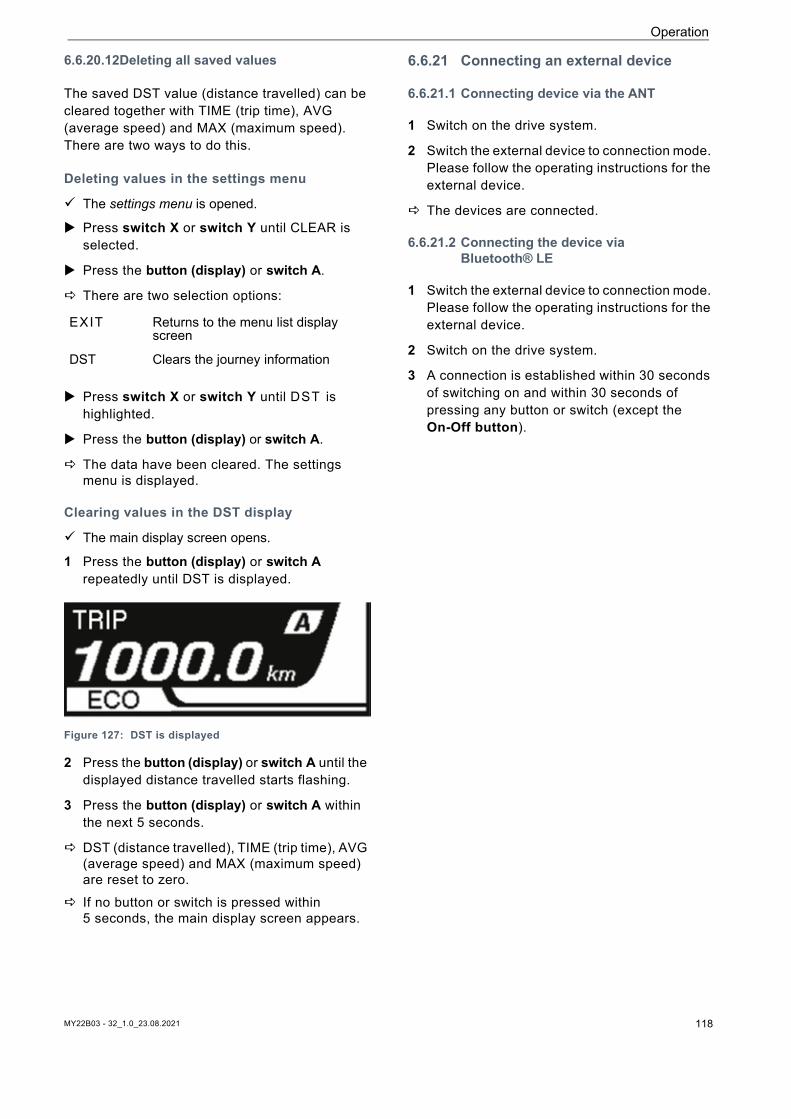
Operation
6.6.20.12Deleting all saved values
The saved DST value (distance travelled) can be cleared together with TIME (trip time), AVG (average speed) and MAX (maximum speed). There are two ways to do this.
Deleting values in the settings menu
The settings menu is opened.
Press switch X or switch Y until CLEAR is selected.
Press the button (display) or switch A.
There are two selection options:
Press switch X or switch Y until DST is highlighted.
Press the button (display) or switch A.
The data have been cleared. The settings menu is displayed.
Clearing values in the DST display
The main display screen opens.
1 Press the button (display) or switch A repeatedly until DST is displayed.
Figure 127: DST is displayed
2 Press the button (display) or switch A until the displayed distance travelled starts flashing.
3 Press the button (display) or switch A within the next 5 seconds.
DST (distance travelled), TIME (trip time), AVG (average speed) and MAX (maximum speed) are reset to zero.
If no button or switch is pressed within 5 seconds, the main display screen appears.
6.6.21 Connecting an external device
6.6.21.1 Connecting device via the ANT
1 Switch on the drive system.
2 Switch the external device to connection mode. Please follow the operating instructions for the external device.
The devices are connected.
6.6.21.2 Connecting the device via Bluetooth® LE
1 Switch the external device to connection mode. Please follow the operating instructions for the external device.
2 Switch on the drive system.
3 A connection is established within 30 seconds of switching on and within 30 seconds of pressing any button or switch (except the On-Off button).
EXIT Returns to the menu list display screen
DST Clears the journey information
MY22B03 - 32_1.0_23.08.2021 118
MY22B03 - 32_1.0_23.08.2021 119
Operation
6.7 Connect external devices
6.7.1 Connect via Bluetooth® LE
The external device supports Bluetooth® LE connections.
1 Switch the external device to connection mode. Follow the operating instructions for the external device when doing so.
Drive system will start within 30 seconds of the external device being placed in pairing mode, or
Press any button within 30 seconds of the external device being placed in pairing mode.
2 Establish connection
The connection is established.
6.7.2 Connect via ANT
The external device supports ANT connections.
1 Switch the external device to connection mode. Follow the operating instructions for the external device when doing so.
2 Switch on the drive system.
3 Establish connection.
The connection is established.
6.8 Using E-TUBE PROJECT
E-TUBE PROJECT is required to change drive system settings and update firmware.
The functions that can be configured differ depending on the pedelec. You will find details in the E-TUBE PROJECT operating instructions.
• Functions allocated to each operating switch can be changed.
• The pedelec's settings can also be configured using E-TUBE PROJECT.
• Settings for ride comfort can be saved and registered in E-TUBE PROJECT; see “Dynamic change to ride characteristics [Sup. adjust.]” in the E-TUBE PROJECT operating instructions.
You will find information on installing E-TUBE PROJECT on the support website.
Download E-TUBE PROJECT onto the connected external device from the SHIMANO support website:https://e-tubeproject.shimano.com.
Notice
Do not establish connection to external devices if the battery is charging.
Operation
6.9 Accessories
We recommend a parking stand into which either the front wheel or rear wheel can be inserted securely for pedelecs which do not have a kickstand. The following accessories are recommended:
6.9.1 Child seat
The specialist dealer will advise you on choosing a suitable child seat system for the child and the pedelec.
The specialist dealer must install the child seat the first time to ensure that it is safely fitted.
When installing a child seat, the specialist dealer makes sure that the seat and the fastening mechanism for the seat are suitable for the pedelec and that all components are installed and firmly fastened. They will also ensure that shift cables, brake cables, hydraulic lines and electrical cables are adjusted as necessary, the rider has optimum freedom of movement and the pedelec’s maximum permitted total weight is complied with.
The specialist dealer will provide instruction on how to handle the pedelec and the child seat.
Description Article number
Protective cover for electrical components 080-41000 ff
Panniers,system component* 080-40946
Rear wheel basket,system component* 051-20603
Bicycle box,system component* 080-40947
Parking stand universal stand XX-TWO14B
Table 51: Accessories
Crash caused by incorrect child seat
The pannier rack and down tube are unsuitable for mounting child seats and may break. Such an incorrect position may cause a crash with serious injuries for the rider or child.
Never attach a child seat to the saddle, handlebars or down tube.
Crash caused by improper handling
When using child seats, the pedelec's handling characteristics and stability change considerably. This can cause a loss of control, a crash and injuries.
You should practice how to use the child seat safely before using the pedelec in public spaces.
WARNING!
CAUTION!
Risk of crushing due to exposed springs
The child may crush his/her fingers on exposed springs or open mechanical parts of the saddle or the seat post.
Never install saddles with exposed springs if a child seat is being used.
Never install seat posts with suspension with open mechanical parts or exposed springs if a child seat is being used.
Notice
Observe the legal regulations on the use of child seats.
Observe the operating and safety instructions for the child seat system.
Never exceed the maximum permitted total weight.
CAUTION!
MY22B03 - 32_1.0_23.08.2021 120
Operation
6.9.2 Trailer
A pedelec which is approved for towing a trailer will bear an appropriate adhesive label. You may only use trailers with a tongue load and weight which do not exceed the permitted values.
Figure 128: Trailer sign The specialist dealer will advise on choosing a suitable trailer system for the pedelec. The specialist dealer must install the trailer the first time to ensure that it is fitted safely.
6.9.2.1 Approval for trailer with Enviolo hub
Only applies to pedelecs with this equipment
Only compatible bicycle trailers are approved for ENVIOLO hub gears.
KETTLER
KETTLER QUADRIGA child trailer.
BURLY
CROOZER
THULE
Crash caused by brake failure
The braking distance may be longer if the trailer is carrying excessive load. The long braking distance can cause a crash or an accident and injuries.
Never exceed the specified trailer load.
Notice
The operating and safety instructions for the trailer system must be observed.
The statutory regulations on the use of bicycle trailers must be observed.
Only use type-approved coupling systems.
CAUTION!
Trailer Adapter
Minnow Bee
Item no. 960038
Honey Bee
Encore
solo
Cub
D’Lite
Normad
Flatbed
Tail Wagon
Trailer Adapter
Croozer KidItem no. 122003516, XL: +10 mm Item no. 122003716Item no. 12200715Croozer axle nut adapter with Thule coupling
Croozer Kid Plus
Croozer Cargo
Croozer Dog
Trailer Adapter
Thule Chariot Lite
Item no. 20100798
Thule Chariot Cab
Thule Chariot Cross
Thule Chariot Sport
Thule Coaster XT
MY22B03 - 32_1.0_23.08.2021 121
Operation
6.9.2.2 Approval for trailer with ROHLOFF hub
Only applies to pedelecs with this equipment
ROHLOFF Speedhub 500/14
As a basic rule, it is permitted to use a trailer in combination with the ROHLOFF SPEEDHUB 500/14.
There must be no component contact with the cover of the ROHLOFF E-14 gear shift unit caused by pressure or tension at any time during assembly or when riding with the trailer under any circumstances.
Collision causing possible damage to the ROHLOFF E-14 gear shift unit can be avoided with suitable washers or special axle adapters (spacers or polygon) from the coupling manufacturer concerned.
Speedhub with A-12
6.9.3 Mobile holderOnly applies to pedelecs with this equipment
A holder for SP Connect mobile case is fitted to the stem.
Observe the operating instructions for the mobile and the SP Connect mobile case.
Use on tarmacked roads only. Protect mobile from theft.
To attach: insert the SP Connect mobile case in the holder and turn 90° to the right.
To release: turn the SP Connect mobile case 90° to the left and remove.
6.9.4 Tubeless and airless tyres
Bicycle riding without tubes reduces the risk of tyre punctures or even avoids them completely.
The specialist dealer will advise on choosing a suitable tyre system for the pedelec.
A specialist dealer must carry out conversion to tubeless or airless tyres for safety reasons.
6.9.5 Suspension fork coil spring
If the desired suspension fork sag cannot be achieved after adjustment, the coil spring assembly must be replaced with a softer or harder spring.
Fit a softer coil spring assembly group to increase the sag.
Fit a harder coil spring assembly group to decrease the sag.
6.9.6 Pannier rack
The specialist dealer will advise on choosing a suitable pannier rack.
The specialist dealer must install the pannier rack the first time to ensure that it is safely fitted.
When installing a pannier rack, the specialist dealer makes sure that the fastening mechanism is suitable for the pedelec and that all components are installed and firmly fastened. They will also ensure that shift cables, brake cables, hydraulic lines and electrical cables are adjusted as necessary, the rider has optimum freedom of movement and the pedelec's maximum permitted total weight is not exceeded.
The specialist dealer will provide instruction on how to handle the pedelec and the pannier rack.
6.9.7 Panniers and cargo boxes
Use a paint protection film when attaching panniers. This will reduce abrasion on paint and wear on components.
Risk of an accident
The A-12 attachment screw has a very low screw-in depth. The screw or the thread in the axle plate can be damaged or ripped out if a trailer hitch is fitted directly onto the axle or the A-12 attachment screw. This may cause an accident with injuries.
Never fit a trailer hitch directly on the axle and the A-12 attachment screw to a ROHLOFF Speedhub with an A-12 axle system in a 12 mm quick release axle frame.
CAUTION!
MY22B03 - 32_1.0_23.08.2021 122
MY22B03 - 32_1.0_23.08.2021 123
Operation
6.10 Personal protective equipment and accessories for road safety
Seeing and being seen is crucial in road traffic. The following requirements must be met for riding a road-safe vehicle on public roads.
Figure 129: Road safety
1 The helmet must have a reflective strip or a light in a clearly visible colour.
2 Cycle clothing is essential at all times of year. Clothing should be retroreflective or as light as possible. Fluorescent materials are also suitable. High-visibility jackets and straps on your upper body ensure even greater safety. Never wear a skirt. Always wear trousers which reach down to your ankles instead.
3 The large red reflector with a “Z” registration mark and the red rear light must be clean. The rear light is attached high enough so that cars can see it (minimum height 25 cm). The rear light must work.
4 The two reflectors on the two non-slip pedals must be clean.
5 The yellow spoke reflectors on both wheels or the white, fluorescent surface on both wheels must be clean.
6 The white front light must work and must be positioned so that it does not dazzle other road users. If the white reflector is not integrated into the front light, it must be clean at all times.
7 The two separate brakes on the pedelec must work at all times.
8 The clear sounding bell must be fitted and must work.
6.11 Before each ride
Check pedelec before each ride; see section 7.1.
Be alert to any unusual noises, vibrations or odours while riding. Be alert to any unusual operating sensations when braking, pedalling or steering. This indicates material fatigue.
Take pedelec out of service if there are any deviations from the “Before each ride” check list or any unusual behaviour. Contact your specialist dealer.
1
2
76
3
4 5
8Check list before each ride
Check everything is sufficiently clean. See section 7.2
Check guards. See section 7.1.1
Check battery to ensure it is firmly in place. See section 6.7.3
Check lights. See section 7.1.13
Check brake. See section 7.1.14
Check suspension seat post. See section 7.1.9
Check pannier rack. See section 7.1.5
Check bell. See section 7.1.10
Check handles. See section 7.1.11
Check rear frame damper. See section 7.1.4
Check frame. See section 7.1.2
Check wheel concentricity. See section 7.1.7
Check quick releases. See section 7.1.8
Check mudguards. See section 7.1.6
Check USB cover. See section 7.1.12
Operation
6.12 Straightening the quickly adjustable stem
Only applies to pedelecs with this equipment
1 Open stem clamping lever.
Figure 130: Example of All Up with open stem clamping lever
2 Pull handlebars into the highest possible position.
Figure 131: Example of All Up pulled into highest possible position
3 Turn handlebars 90° anti-clockwise so that they are straight.
Figure 132: Example of All Up in straight position
4 Place handlebars at required height
5 Close stem clamping lever.
6.13 Using the pannier rack
Distribute the baggage as evenly as possible between the left- and right-hand side.
We recommend the use of panniers and baggage baskets.
Crash caused by loaded pannier rack
The pedelec is handled differently with a loaded pannier rack, in particular when the rider needs to steer and brake. This can lead to a loss of control. This may cause a crash with injuries.
You should practice how to use a loaded pannier rack safely before using the pedelec in public spaces.
Crushing the fingers in the spring flap
The spring flap on the pannier rack operates with a high clamping force. There is a risk of crushing the fingers.
Never allow the spring flap to snap shut in an uncontrolled manner.
Be careful where you position your fingers when closing the spring flap.
Crash caused by unsecured baggage
Loose or unsecured objects on the pannier rack, e.g. belts, may become caught in the rear wheel. This may cause a crash with injuries.Objects which are fastened to the pannier rack may cover the reflectors and the riding light. Other users may not see the pedelec on public roads as a result. This may cause a crash with injuries.
Secure any objects which are attached to the pannier rack sufficiently.
Objects fastened to the pannier rack must never cover the reflectors, the front lamp or the rear light.
CAUTION!
MY22B03 - 32_1.0_23.08.2021 124
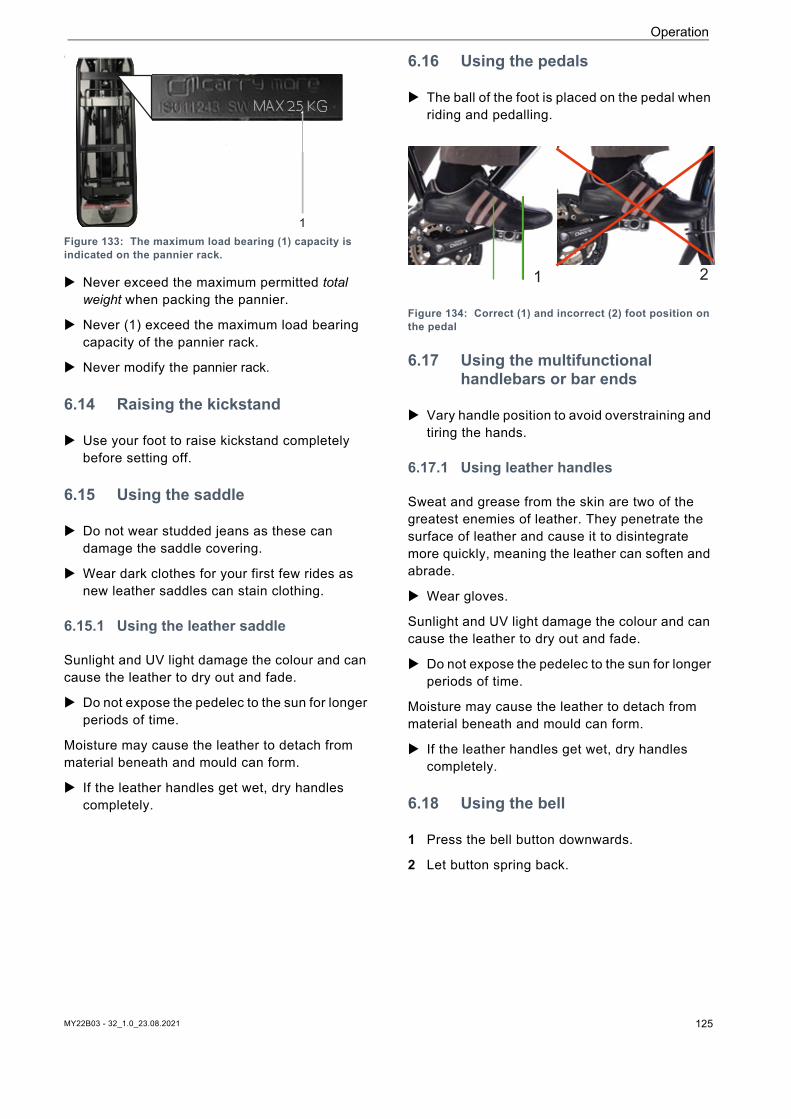
Operation
l.Figure 133: The maximum load bearing (1) capacity is indicated on the pannier rack.
Never exceed the maximum permitted total weight when packing the pannier.
Never (1) exceed the maximum load bearing capacity of the pannier rack.
Never modify the pannier rack.
6.14 Raising the kickstand
Use your foot to raise kickstand completely before setting off.
6.15 Using the saddle
Do not wear studded jeans as these can damage the saddle covering.
Wear dark clothes for your first few rides as new leather saddles can stain clothing.
6.15.1 Using the leather saddle
Sunlight and UV light damage the colour and can cause the leather to dry out and fade.
Do not expose the pedelec to the sun for longer periods of time.
Moisture may cause the leather to detach from material beneath and mould can form.
If the leather handles get wet, dry handles completely.
6.16 Using the pedals
The ball of the foot is placed on the pedal when riding and pedalling.
Figure 134: Correct (1) and incorrect (2) foot position on the pedal
6.17 Using the multifunctional handlebars or bar ends
Vary handle position to avoid overstraining and tiring the hands.
6.17.1 Using leather handles
Sweat and grease from the skin are two of the greatest enemies of leather. They penetrate the surface of leather and cause it to disintegrate more quickly, meaning the leather can soften and abrade.
Wear gloves.
Sunlight and UV light damage the colour and can cause the leather to dry out and fade.
Do not expose the pedelec to the sun for longer periods of time.
Moisture may cause the leather to detach from material beneath and mould can form.
If the leather handles get wet, dry handles completely.
6.18 Using the bell
1 Press the bell button downwards.
2 Let button spring back.
1
1
21
MY22B03 - 32_1.0_23.08.2021 125
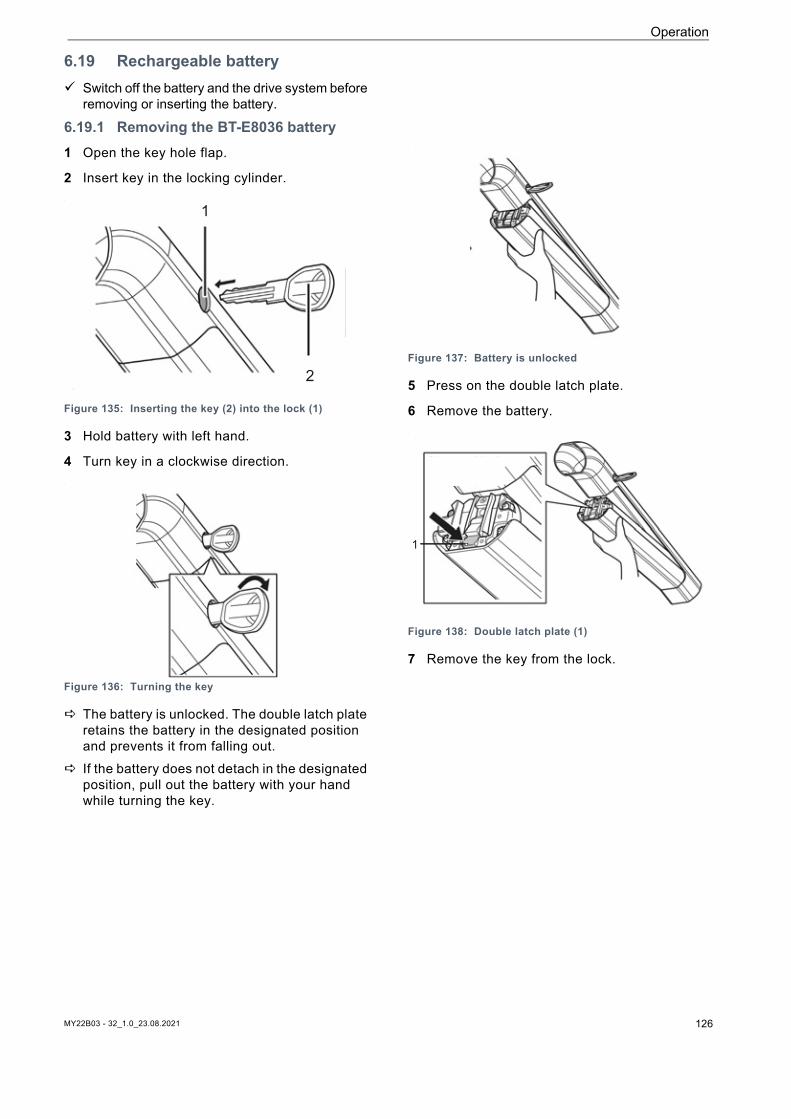
Operation
6.19 Rechargeable battery Switch off the battery and the drive system before
removing or inserting the battery.
6.19.1 Removing the BT-E8036 battery 1 Open the key hole flap.
2 Insert key in the locking cylinder..
Figure 135: Inserting the key (2) into the lock (1)
3 Hold battery with left hand.
4 Turn key in a clockwise direction..
Figure 136: Turning the key
The battery is unlocked. The double latch plate retains the battery in the designated position and prevents it from falling out.
If the battery does not detach in the designated position, pull out the battery with your hand while turning the key.
.
Figure 137: Battery is unlocked
5 Press on the double latch plate.
6 Remove the battery. .
Figure 138: Double latch plate (1)
7 Remove the key from the lock.
2
1
1
MY22B03 - 32_1.0_23.08.2021 126
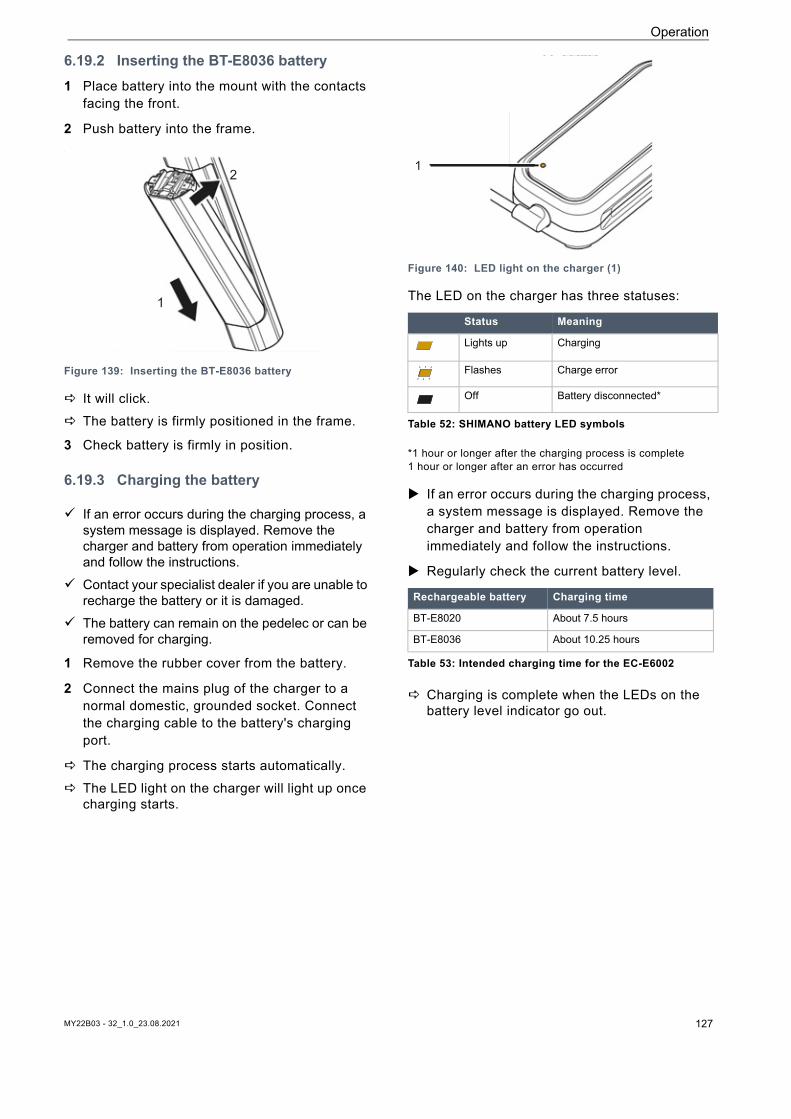
Operation
6.19.2 Inserting the BT-E8036 battery 1 Place battery into the mount with the contacts
facing the front.
2 Push battery into the frame..
Figure 139: Inserting the BT-E8036 battery
It will click. The battery is firmly positioned in the frame.
3 Check battery is firmly in position.
6.19.3 Charging the battery
If an error occurs during the charging process, a system message is displayed. Remove the charger and battery from operation immediately and follow the instructions.
Contact your specialist dealer if you are unable to recharge the battery or it is damaged.
The battery can remain on the pedelec or can be removed for charging.
1 Remove the rubber cover from the battery.
2 Connect the mains plug of the charger to a normal domestic, grounded socket. Connect the charging cable to the battery's charging port.
The charging process starts automatically. The LED light on the charger will light up once
charging starts.
Figure 140: LED light on the charger (1)
The LED on the charger has three statuses:
*1 hour or longer after the charging process is complete1 hour or longer after an error has occurred
If an error occurs during the charging process, a system message is displayed. Remove the charger and battery from operation immediately and follow the instructions.
Regularly check the current battery level.
Charging is complete when the LEDs on the battery level indicator go out.
1
2
Status Meaning
Lights up Charging
Flashes Charge error
Off Battery disconnected*
Table 52: SHIMANO battery LED symbols
Rechargeable battery Charging time
BT-E8020 About 7.5 hours
BT-E8036 About 10.25 hours
Table 53: Intended charging time for the EC-E6002
1
MY22B03 - 32_1.0_23.08.2021 127
MY22B03 - 32_1.0_23.08.2021 128
Operation
6.20 Using pedelec with the electric drive system
6.20.1 Switching on the electric drive system
A sufficiently charged battery has been inserted into the pedelec.
Never place your feet on the pedals when switching on. If the pedals are moved when switching on, a system error is caused.
The battery is firmly in place. The key has been removed.
The system cannot be switched on while charging.
Press On-Off button (battery).
The LED light will light up and indicate the remaining battery capacity.
If the drive system is switched on, the drive is activated as soon as the pedals are moved with sufficient force.
6.20.2 Switching off the electric drive system
The system switches off automatically ten minutes after the last command.
The drive system can also be switched off on the battery.
Press On-Off button (battery) for 6 seconds.
Crash caused by lack of readiness for braking
When it is switched on, the drive system can be activated by the application of force on the pedals. There is a risk of a crash if the drive is activated unintentionally and the brake is not reached.
Never start the electric drive system, or switch it off immediately, if the brake cannot be reached safely and reliably.
CAUTION!
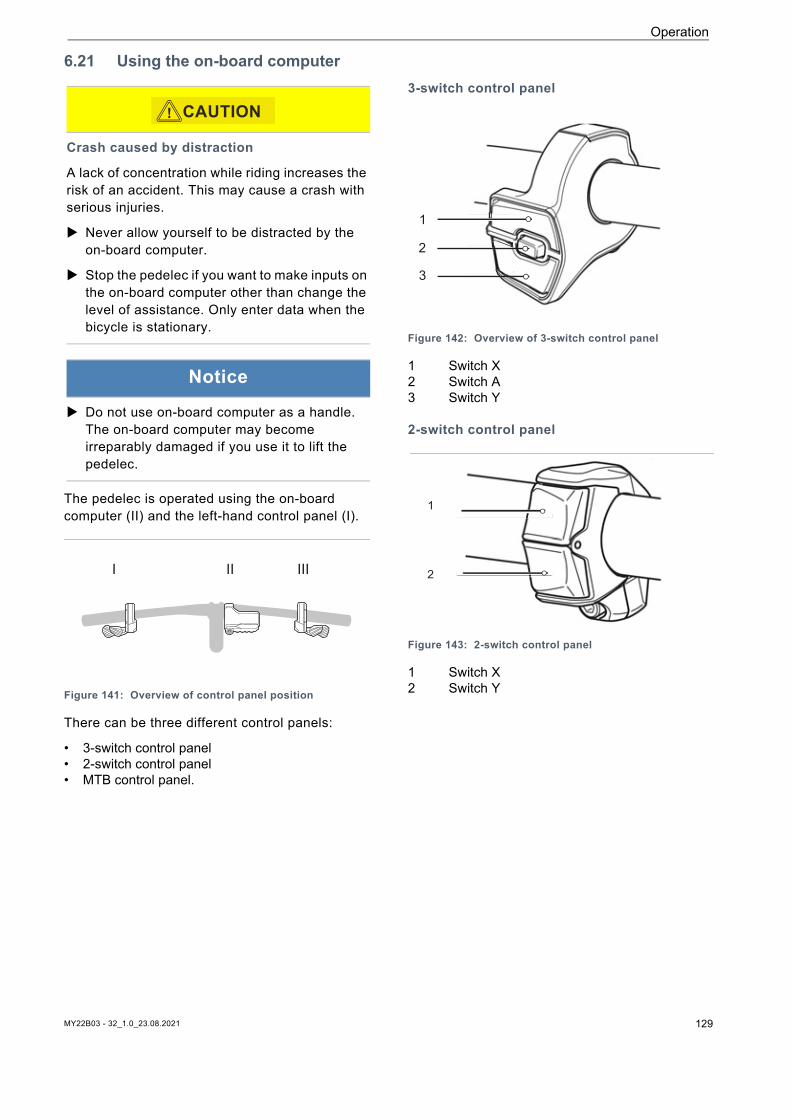
Operation
6.21 Using the on-board computer
The pedelec is operated using the on-board computer (II) and the left-hand control panel (I).
Figure 141: Overview of control panel position
There can be three different control panels:
• 3-switch control panel• 2-switch control panel• MTB control panel.
3-switch control panel
Figure 142: Overview of 3-switch control panel 1 Switch X 2 Switch A 3 Switch Y
2-switch control panel
Figure 143: 2-switch control panel
1 Switch X 2 Switch Y
Crash caused by distraction
A lack of concentration while riding increases the risk of an accident. This may cause a crash with serious injuries.
Never allow yourself to be distracted by the on-board computer.
Stop the pedelec if you want to make inputs on the on-board computer other than change the level of assistance. Only enter data when the bicycle is stationary.
Notice
Do not use on-board computer as a handle. The on-board computer may become irreparably damaged if you use it to lift the pedelec.
CAUTION!
I II III
1
2
3
1
2
MY22B03 - 32_1.0_23.08.2021 129
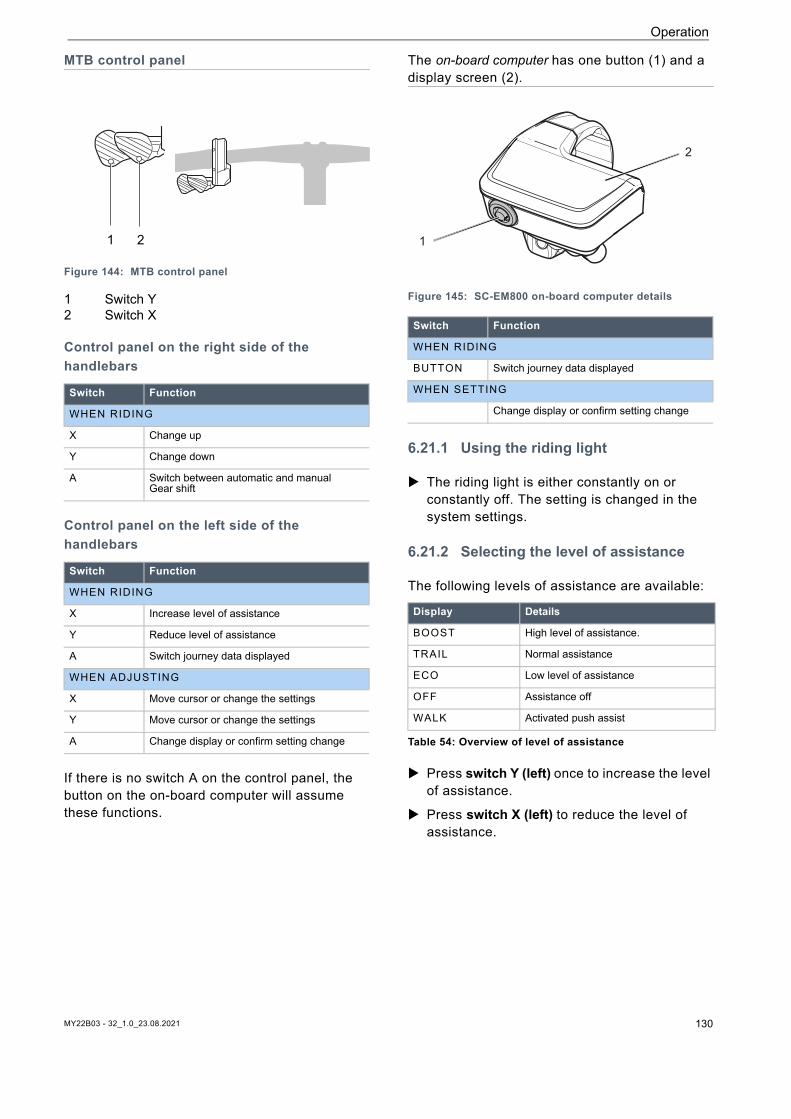
Operation
MTB control panel
Figure 144: MTB control panel 1 Switch Y2 Switch X
Control panel on the right side of the handlebars
Control panel on the left side of the handlebars
If there is no switch A on the control panel, the button on the on-board computer will assume these functions.
The on-board computer has one button (1) and a display screen (2).
Figure 145: SC-EM800 on-board computer details
6.21.1 Using the riding light
The riding light is either constantly on or constantly off. The setting is changed in the system settings.
6.21.2 Selecting the level of assistance
The following levels of assistance are available:
Press switch Y (left) once to increase the level of assistance.
Press switch X (left) to reduce the level of assistance.
Switch Function
WHEN RIDING
X Change up
Y Change down
A Switch between automatic and manualGear shift
Switch Function
WHEN RIDING
X Increase level of assistance
Y Reduce level of assistance
A Switch journey data displayed
WHEN ADJUSTING
X Move cursor or change the settings
Y Move cursor or change the settings
A Change display or confirm setting change
1 2
Switch Function
WHEN RIDING
BUTTON Switch journey data displayed
WHEN SETTING
Change display or confirm setting change
Display Details
BOOST High level of assistance.
TRAIL Normal assistance
ECO Low level of assistance
OFF Assistance off
WALK Activated push assist
Table 54: Overview of level of assistance
1
2
MY22B03 - 32_1.0_23.08.2021 130
Operation
6.21.3 Using the push assist system
The push assist helps move the pedelec. The speed can be a maximum of 6 km/h in this case. The tractive power of the push assist and its speed can be influenced by the selection of gear. We recommend using first gear for cycling uphill to protect the drive.
6.21.3.1 Select WALK level of assistance
Press and hold switch Y (left).
The level of assistance WALK is displayed.
If a warning is sounded during switchover, it is impossible to switch to the WALK level of assistance. This may be due to the current speed not being 0 km/h, pressure being applied to the pedals or similar.
Release switch Y (left).
6.21.3.2 Switching on the push assist
Press switch Y (left) to switch on push assist.
6.21.3.3 Switching off the push assist
Release switch Y (left) to switch off push assist.
6.21.3.4 Exit WALK level of assistance
Push switch X (left) to change from the WALK level of assistance to the level of assistance last used. If switch Y (left) is not pushed for longer than one minute, the level of assistance is reset to the level of assistance used previously.
6.21.4 Switching the journey information
The displayed journey information can be switched.
Figure 146: Changing from main display screen to DST display, example
Press the button (display) or switch A until the required journey information is displayed. The sequence is as follows:
*1 The range should be used for guidance purposes only. The value is not displayed in assistance mode [OFF].
*2 The display of values is managed in the E-Tube project.
Injury caused by pedals
The pedals turn when using the push assist due to the system design.
You must steer the pedelec securely with both hands when using push assist.
Allow for enough freedom of movement for the pedals.
CAUTION!
Display Function
– The current speed is displayed on the main display screen
DST Distance travelled since the last reset
ODO Display of the total distance travelled (cannot be changed)
RANGE Estimated range of the available battery charge *1
TIME Trip time *2
AVG Average speed *2
MAX Maximum achieved speed *2
CADENCE Number of crank revolutions per minute *2
CLOCK Current time *2
Table 55: Journey information
MY22B03 - 32_1.0_23.08.2021 131

MY22B03 - 32_1.0_23.08.2021 132
Operation
6.22 Brake
The motor drive force is shut off during the ride as soon as the rider is no longer pedalling. The drive system does not switch off when braking.
In order to achieve optimum braking results, do not pedal while braking.
6.22.1 Using the brake lever
Figure 147: Brake lever, rear (1) and front (2), SHIMANO brake used as an example
Push the left-hand brake lever to apply the front wheel brake.
Push the right-hand brake lever to apply the rear wheel brake.
Turn the setting wheel in an anti-clockwise direction to increase the rebound speed.
Turn the setting wheel in a clockwise direction to decrease the rebound speed.
Crash caused by brake failure
Oil or lubricant on the brake disc in a disc brake or on the rim of a rim brake can cause the brake to fail completely. This may cause a crash with serious injuries.
Never allow oil or lubricant to come into contact with the brake disc or brake linings or on the rim of a rim brake.
If the brake linings have come into contact with oil or lubricant, contact specialist dealer to have the components cleaned or replaced.
If the brakes are applied continuously for a long time (e.g. while riding downhill for a long time), the fluid in the brake system may heat up. This may create a vapour bubble. This will cause air bubbles or water contained in the brake system to expand. This may suddenly make the lever travel wider. This may cause a crash with serious injuries.
Release the brake regularly when riding downhill for a longer period of time.
WARNING!12
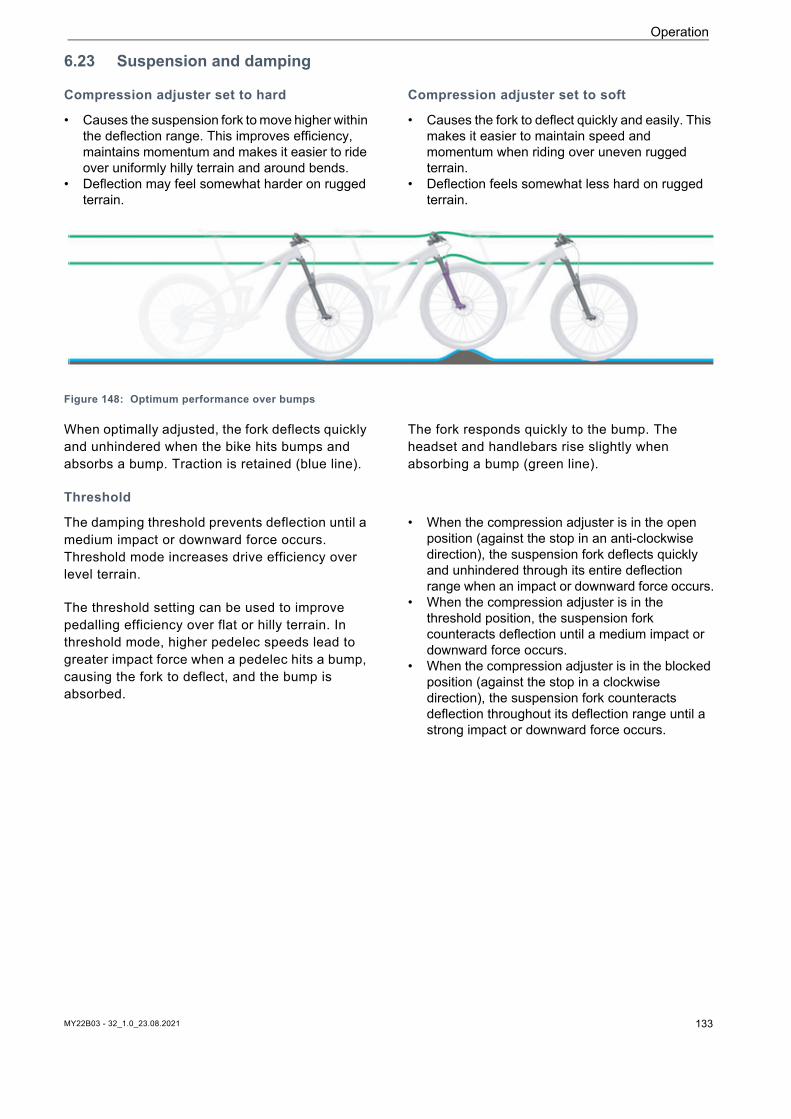
MY22B03 - 32_1.0_23.08.2021 133
Operation
6.23 Suspension and damping
Compression adjuster set to hard
• Causes the suspension fork to move higher within the deflection range. This improves efficiency, maintains momentum and makes it easier to ride over uniformly hilly terrain and around bends.
• Deflection may feel somewhat harder on rugged terrain.
Compression adjuster set to soft
• Causes the fork to deflect quickly and easily. This makes it easier to maintain speed and momentum when riding over uneven rugged terrain.
• Deflection feels somewhat less hard on rugged terrain.
Figure 148: Optimum performance over bumps
When optimally adjusted, the fork deflects quickly and unhindered when the bike hits bumps and absorbs a bump. Traction is retained (blue line).
The fork responds quickly to the bump. The headset and handlebars rise slightly when absorbing a bump (green line).
Threshold
The damping threshold prevents deflection until a medium impact or downward force occurs. Threshold mode increases drive efficiency over level terrain.
The threshold setting can be used to improve pedalling efficiency over flat or hilly terrain. In threshold mode, higher pedelec speeds lead to greater impact force when a pedelec hits a bump, causing the fork to deflect, and the bump is absorbed.
• When the compression adjuster is in the open position (against the stop in an anti-clockwise direction), the suspension fork deflects quickly and unhindered through its entire deflection range when an impact or downward force occurs.
• When the compression adjuster is in the threshold position, the suspension fork counteracts deflection until a medium impact or downward force occurs.
• When the compression adjuster is in the blocked position (against the stop in a clockwise direction), the suspension fork counteracts deflection throughout its deflection range until a strong impact or downward force occurs.
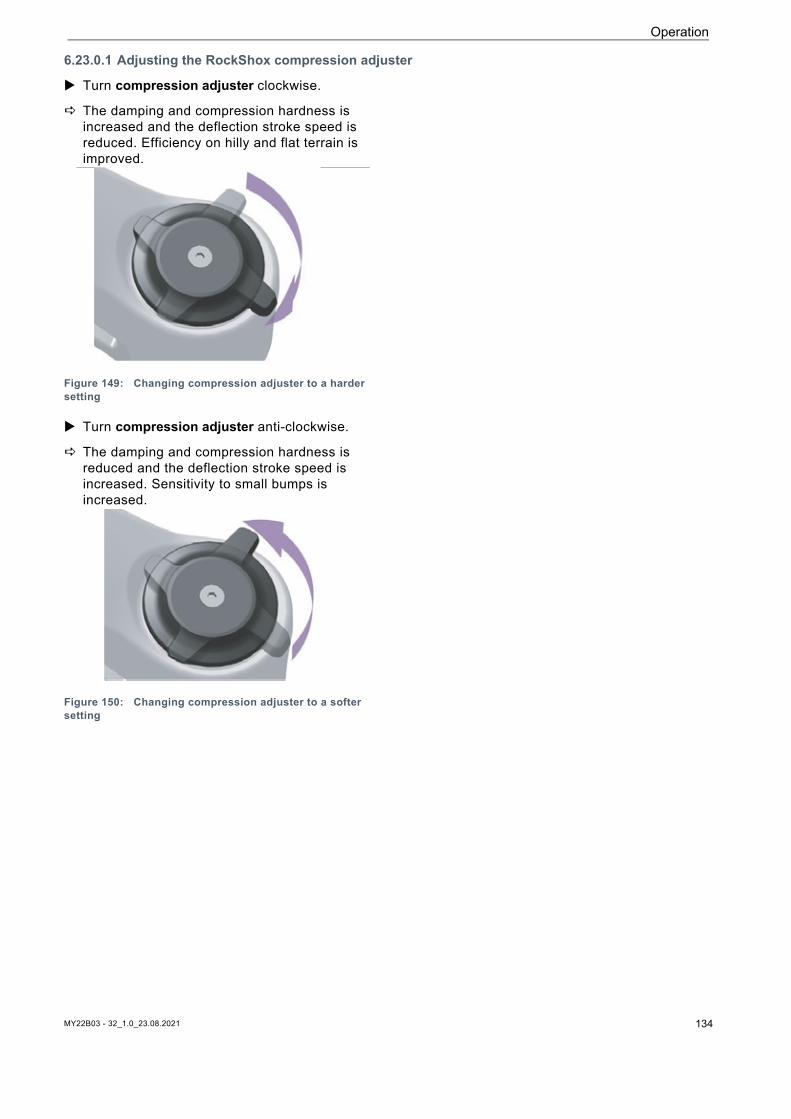
MY22B03 - 32_1.0_23.08.2021 134
Operation
6.23.0.1 Adjusting the RockShox compression adjuster
Turn compression adjuster clockwise.
The damping and compression hardness is increased and the deflection stroke speed is reduced. Efficiency on hilly and flat terrain is improved.
Figure 149: Changing compression adjuster to a harder setting
Turn compression adjuster anti-clockwise.
The damping and compression hardness is reduced and the deflection stroke speed is increased. Sensitivity to small bumps is increased.
Figure 150: Changing compression adjuster to a softer setting
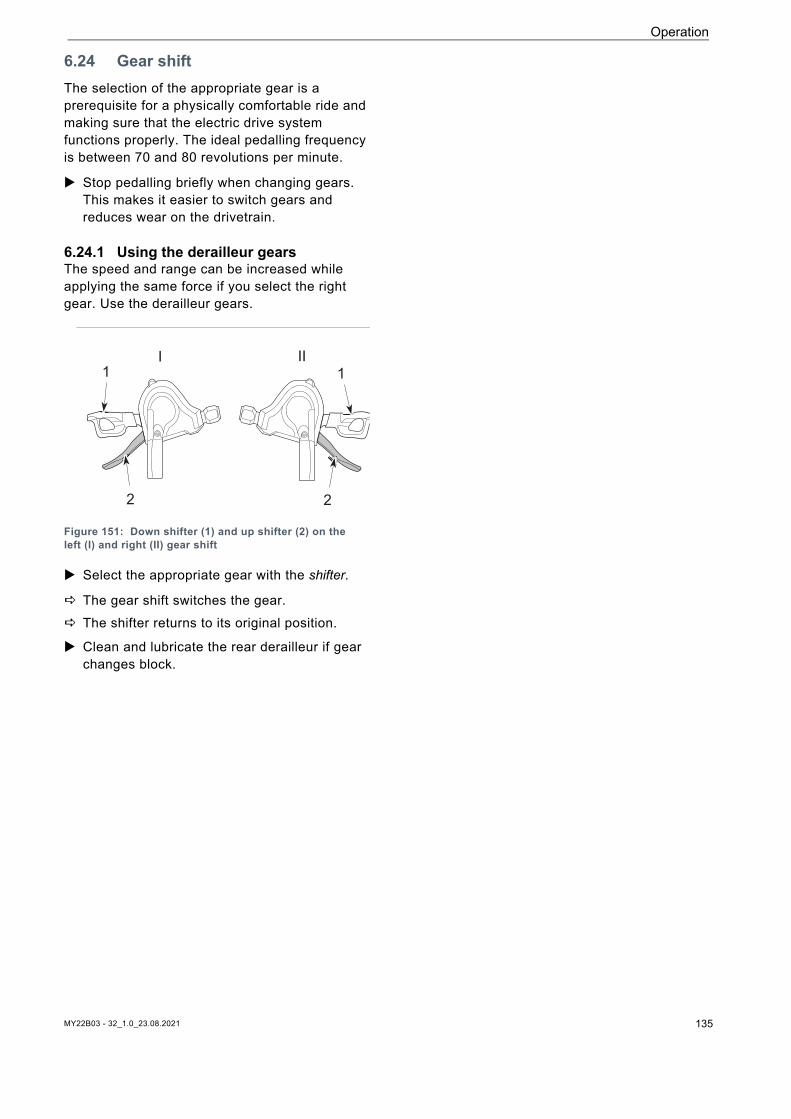
MY22B03 - 32_1.0_23.08.2021 135
Operation
6.24 Gear shiftThe selection of the appropriate gear is a prerequisite for a physically comfortable ride and making sure that the electric drive system functions properly. The ideal pedalling frequency is between 70 and 80 revolutions per minute.
Stop pedalling briefly when changing gears. This makes it easier to switch gears and reduces wear on the drivetrain.
6.24.1 Using the derailleur gearsThe speed and range can be increased while applying the same force if you select the right gear. Use the derailleur gears.
Figure 151: Down shifter (1) and up shifter (2) on the left (I) and right (II) gear shift
Select the appropriate gear with the shifter.
The gear shift switches the gear. The shifter returns to its original position.
Clean and lubricate the rear derailleur if gear changes block.
I II1
2 2
1
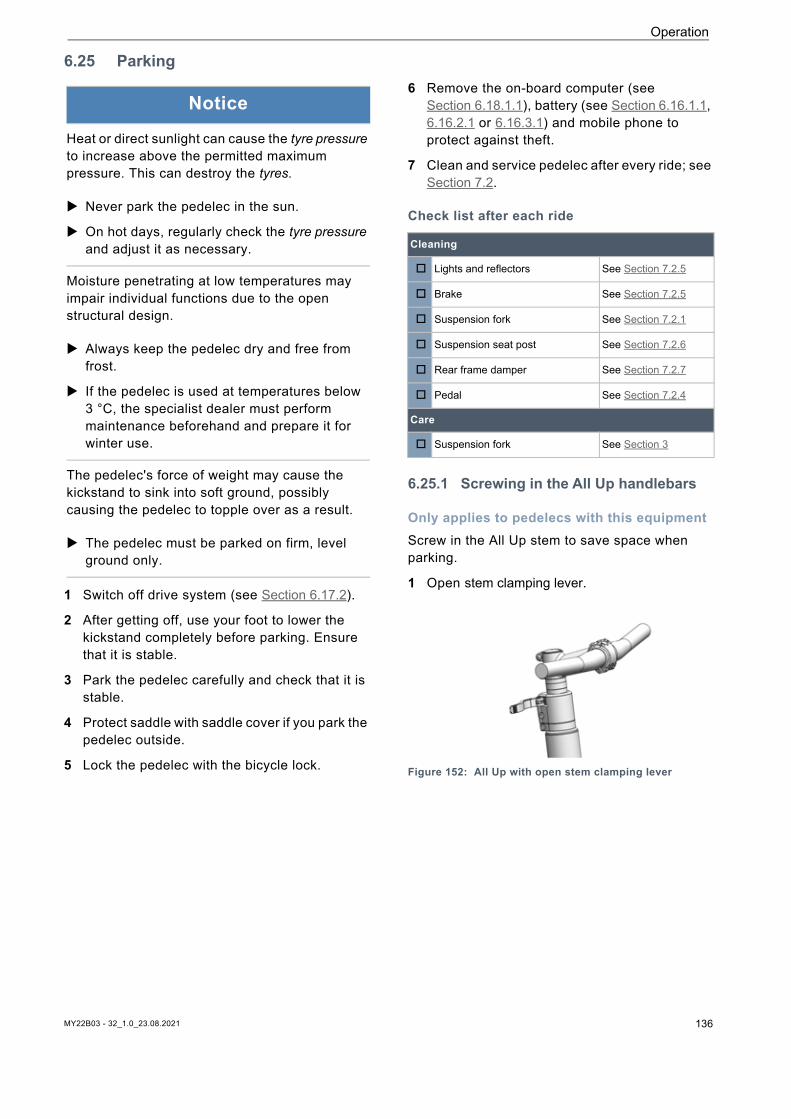
Operation
6.25 Parking
1 Switch off drive system (see Section 6.17.2).
2 After getting off, use your foot to lower the kickstand completely before parking. Ensure that it is stable.
3 Park the pedelec carefully and check that it is stable.
4 Protect saddle with saddle cover if you park the pedelec outside.
5 Lock the pedelec with the bicycle lock.
6 Remove the on-board computer (see Section 6.18.1.1), battery (see Section 6.16.1.1, 6.16.2.1 or 6.16.3.1) and mobile phone to protect against theft.
7 Clean and service pedelec after every ride; see Section 7.2.
Check list after each ride
6.25.1 Screwing in the All Up handlebars
Only applies to pedelecs with this equipmentScrew in the All Up stem to save space when parking.
1 Open stem clamping lever.
Figure 152: All Up with open stem clamping lever
Notice
Heat or direct sunlight can cause the tyre pressure to increase above the permitted maximum pressure. This can destroy the tyres.
Never park the pedelec in the sun.
On hot days, regularly check the tyre pressure and adjust it as necessary.
Moisture penetrating at low temperatures may impair individual functions due to the open structural design.
Always keep the pedelec dry and free from frost.
If the pedelec is used at temperatures below 3 °C, the specialist dealer must perform maintenance beforehand and prepare it for winter use.
The pedelec's force of weight may cause the kickstand to sink into soft ground, possibly causing the pedelec to topple over as a result.
The pedelec must be parked on firm, level ground only.
Cleaning
Lights and reflectors See Section 7.2.5
Brake See Section 7.2.5
Suspension fork See Section 7.2.1
Suspension seat post See Section 7.2.6
Rear frame damper See Section 7.2.7
Pedal See Section 7.2.4
Care
Suspension fork See Section 3
MY22B03 - 32_1.0_23.08.2021 136
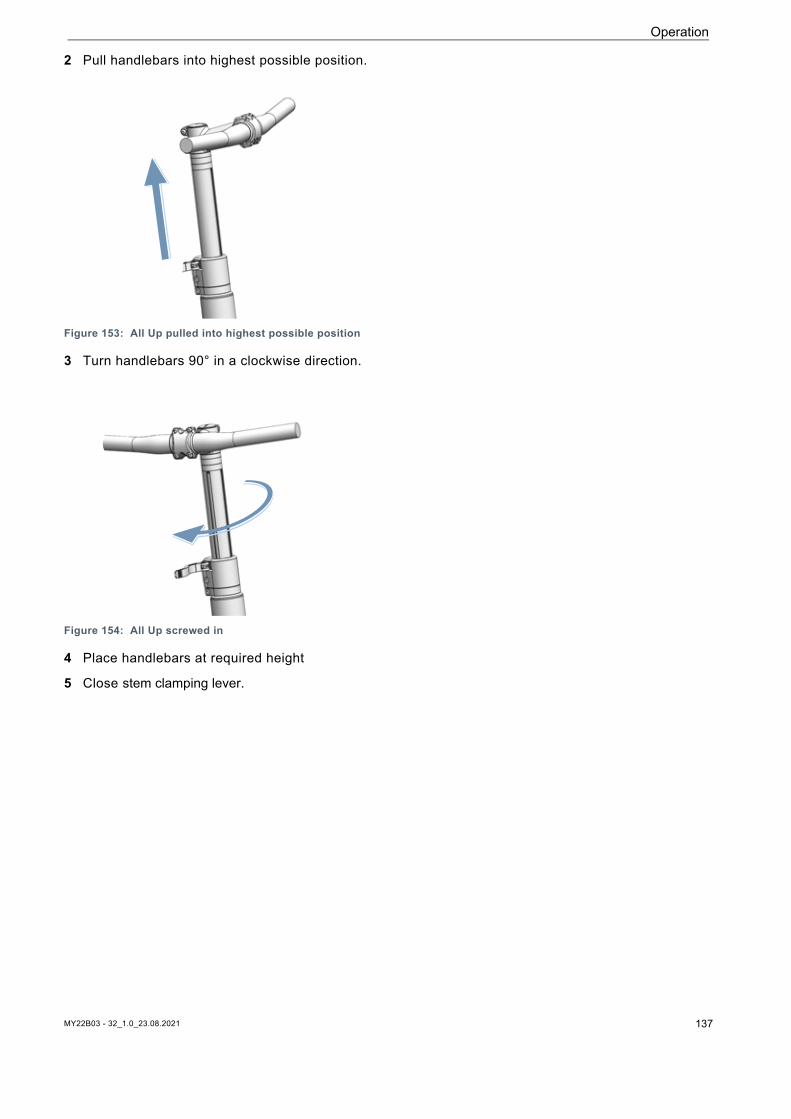
Operation
2 Pull handlebars into highest possible position.
Figure 153: All Up pulled into highest possible position
3 Turn handlebars 90° in a clockwise direction.
Figure 154: All Up screwed in
4 Place handlebars at required height
5 Close stem clamping lever.
MY22B03 - 32_1.0_23.08.2021 137
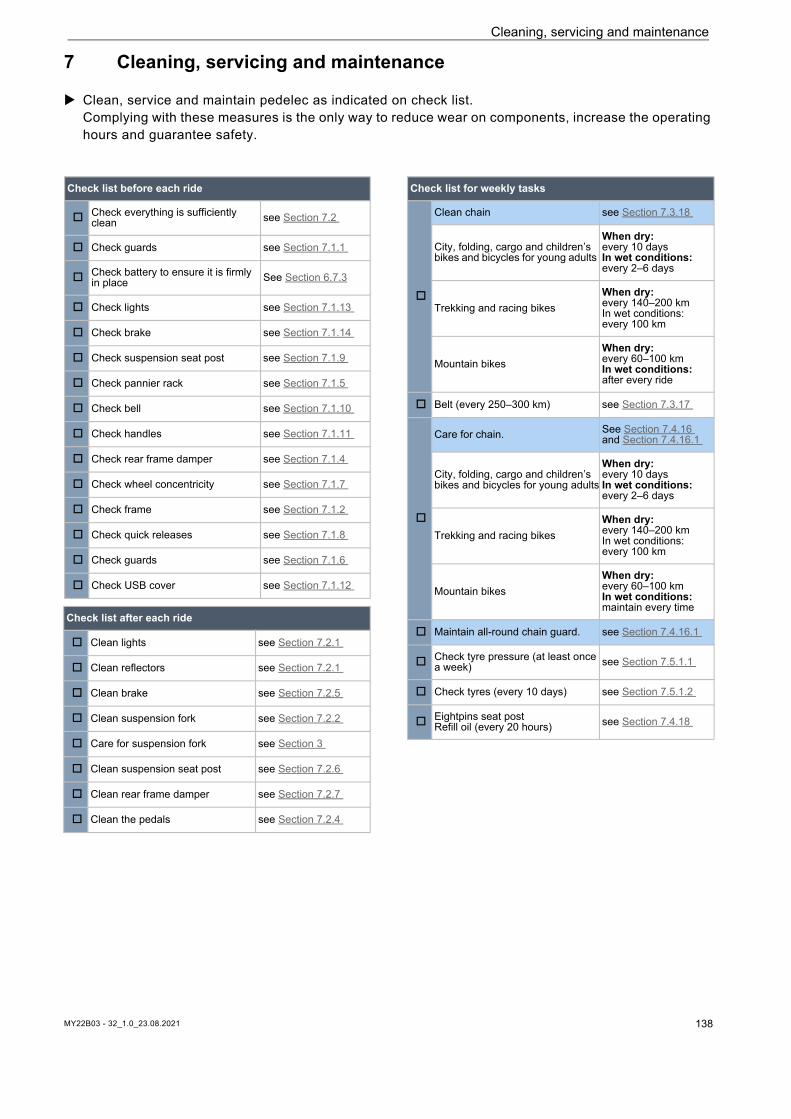
Cleaning, servicing and maintenance
7 Cleaning, servicing and maintenance
Clean, service and maintain pedelec as indicated on check list. Complying with these measures is the only way to reduce wear on components, increase the operating hours and guarantee safety.
Check list before each ride
Check everything is sufficiently clean see Section 7.2
Check guards see Section 7.1.1
Check battery to ensure it is firmly in place See Section 6.7.3
Check lights see Section 7.1.13
Check brake see Section 7.1.14
Check suspension seat post see Section 7.1.9
Check pannier rack see Section 7.1.5
Check bell see Section 7.1.10
Check handles see Section 7.1.11
Check rear frame damper see Section 7.1.4
Check wheel concentricity see Section 7.1.7
Check frame see Section 7.1.2
Check quick releases see Section 7.1.8
Check guards see Section 7.1.6
Check USB cover see Section 7.1.12
Check list after each ride
Clean lights see Section 7.2.1
Clean reflectors see Section 7.2.1
Clean brake see Section 7.2.5
Clean suspension fork see Section 7.2.2
Care for suspension fork see Section 3
Clean suspension seat post see Section 7.2.6
Clean rear frame damper see Section 7.2.7
Clean the pedals see Section 7.2.4
Check list for weekly tasks
Clean chain see Section 7.3.18
City, folding, cargo and children’s bikes and bicycles for young adults
When dry: every 10 daysIn wet conditions: every 2–6 days
Trekking and racing bikesWhen dry: every 140–200 kmIn wet conditions: every 100 km
Mountain bikesWhen dry: every 60–100 kmIn wet conditions:after every ride
Belt (every 250–300 km) see Section 7.3.17
Care for chain. See Section 7.4.16 and Section 7.4.16.1
City, folding, cargo and children’s bikes and bicycles for young adults
When dry: every 10 daysIn wet conditions: every 2–6 days
Trekking and racing bikesWhen dry: every 140–200 kmIn wet conditions: every 100 km
Mountain bikesWhen dry: every 60–100 kmIn wet conditions: maintain every time
Maintain all-round chain guard. see Section 7.4.16.1
Check tyre pressure (at least once a week) see Section 7.5.1.1
Check tyres (every 10 days) see Section 7.5.1.2
Eightpins seat post Refill oil (every 20 hours) see Section 7.4.18
MY22B03 - 32_1.0_23.08.2021 138
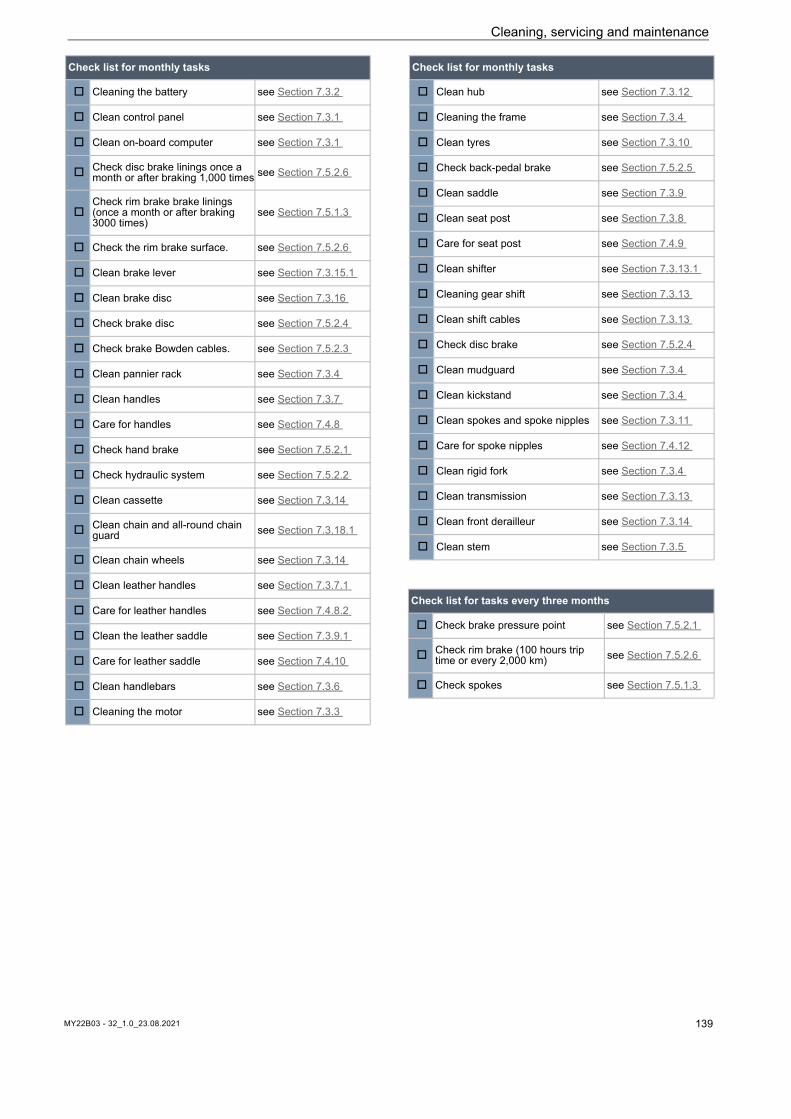
Cleaning, servicing and maintenance
Check list for monthly tasks
Cleaning the battery see Section 7.3.2
Clean control panel see Section 7.3.1
Clean on-board computer see Section 7.3.1
Check disc brake linings once a month or after braking 1,000 times see Section 7.5.2.6
Check rim brake brake linings (once a month or after braking 3000 times)
see Section 7.5.1.3
Check the rim brake surface. see Section 7.5.2.6
Clean brake lever see Section 7.3.15.1
Clean brake disc see Section 7.3.16
Check brake disc see Section 7.5.2.4
Check brake Bowden cables. see Section 7.5.2.3
Clean pannier rack see Section 7.3.4
Clean handles see Section 7.3.7
Care for handles see Section 7.4.8
Check hand brake see Section 7.5.2.1
Check hydraulic system see Section 7.5.2.2
Clean cassette see Section 7.3.14
Clean chain and all-round chain guard see Section 7.3.18.1
Clean chain wheels see Section 7.3.14
Clean leather handles see Section 7.3.7.1
Care for leather handles see Section 7.4.8.2
Clean the leather saddle see Section 7.3.9.1
Care for leather saddle see Section 7.4.10
Clean handlebars see Section 7.3.6
Cleaning the motor see Section 7.3.3
Clean hub see Section 7.3.12
Cleaning the frame see Section 7.3.4
Clean tyres see Section 7.3.10
Check back-pedal brake see Section 7.5.2.5
Clean saddle see Section 7.3.9
Clean seat post see Section 7.3.8
Care for seat post see Section 7.4.9
Clean shifter see Section 7.3.13.1
Cleaning gear shift see Section 7.3.13
Clean shift cables see Section 7.3.13
Check disc brake see Section 7.5.2.4
Clean mudguard see Section 7.3.4
Clean kickstand see Section 7.3.4
Clean spokes and spoke nipples see Section 7.3.11
Care for spoke nipples see Section 7.4.12
Clean rigid fork see Section 7.3.4
Clean transmission see Section 7.3.13
Clean front derailleur see Section 7.3.14
Clean stem see Section 7.3.5
Check list for tasks every three months
Check brake pressure point see Section 7.5.2.1
Check rim brake (100 hours trip time or every 2,000 km) see Section 7.5.2.6
Check spokes see Section 7.5.1.3
Check list for monthly tasks
MY22B03 - 32_1.0_23.08.2021 139
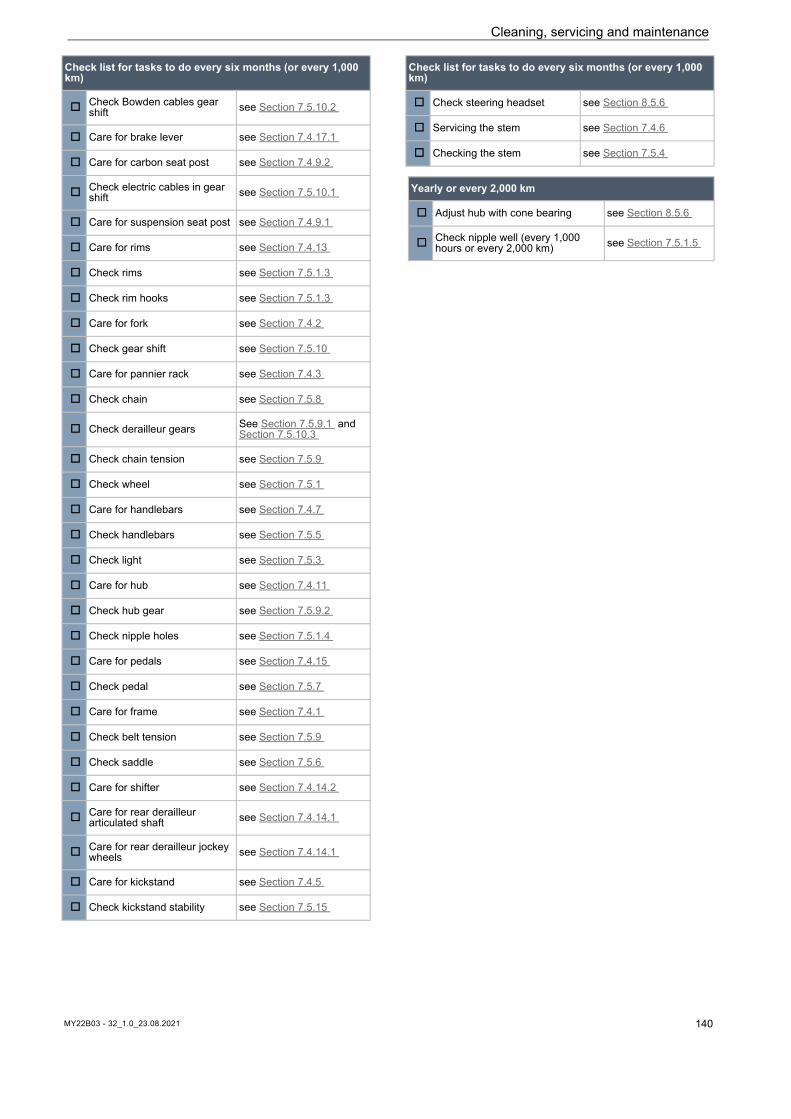
Cleaning, servicing and maintenance
Check list for tasks to do every six months (or every 1,000 km)
Check Bowden cables gear shift see Section 7.5.10.2
Care for brake lever see Section 7.4.17.1
Care for carbon seat post see Section 7.4.9.2
Check electric cables in gear shift see Section 7.5.10.1
Care for suspension seat post see Section 7.4.9.1
Care for rims see Section 7.4.13
Check rims see Section 7.5.1.3
Check rim hooks see Section 7.5.1.3
Care for fork see Section 7.4.2
Check gear shift see Section 7.5.10
Care for pannier rack see Section 7.4.3
Check chain see Section 7.5.8
Check derailleur gears See Section 7.5.9.1 and Section 7.5.10.3
Check chain tension see Section 7.5.9
Check wheel see Section 7.5.1
Care for handlebars see Section 7.4.7
Check handlebars see Section 7.5.5
Check light see Section 7.5.3
Care for hub see Section 7.4.11
Check hub gear see Section 7.5.9.2
Check nipple holes see Section 7.5.1.4
Care for pedals see Section 7.4.15
Check pedal see Section 7.5.7
Care for frame see Section 7.4.1
Check belt tension see Section 7.5.9
Check saddle see Section 7.5.6
Care for shifter see Section 7.4.14.2
Care for rear derailleur articulated shaft see Section 7.4.14.1
Care for rear derailleur jockey wheels see Section 7.4.14.1
Care for kickstand see Section 7.4.5
Check kickstand stability see Section 7.5.15
Check steering headset see Section 8.5.6
Servicing the stem see Section 7.4.6
Checking the stem see Section 7.5.4
Yearly or every 2,000 km
Adjust hub with cone bearing see Section 8.5.6
Check nipple well (every 1,000 hours or every 2,000 km) see Section 7.5.1.5
Check list for tasks to do every six months (or every 1,000 km)
MY22B03 - 32_1.0_23.08.2021 140
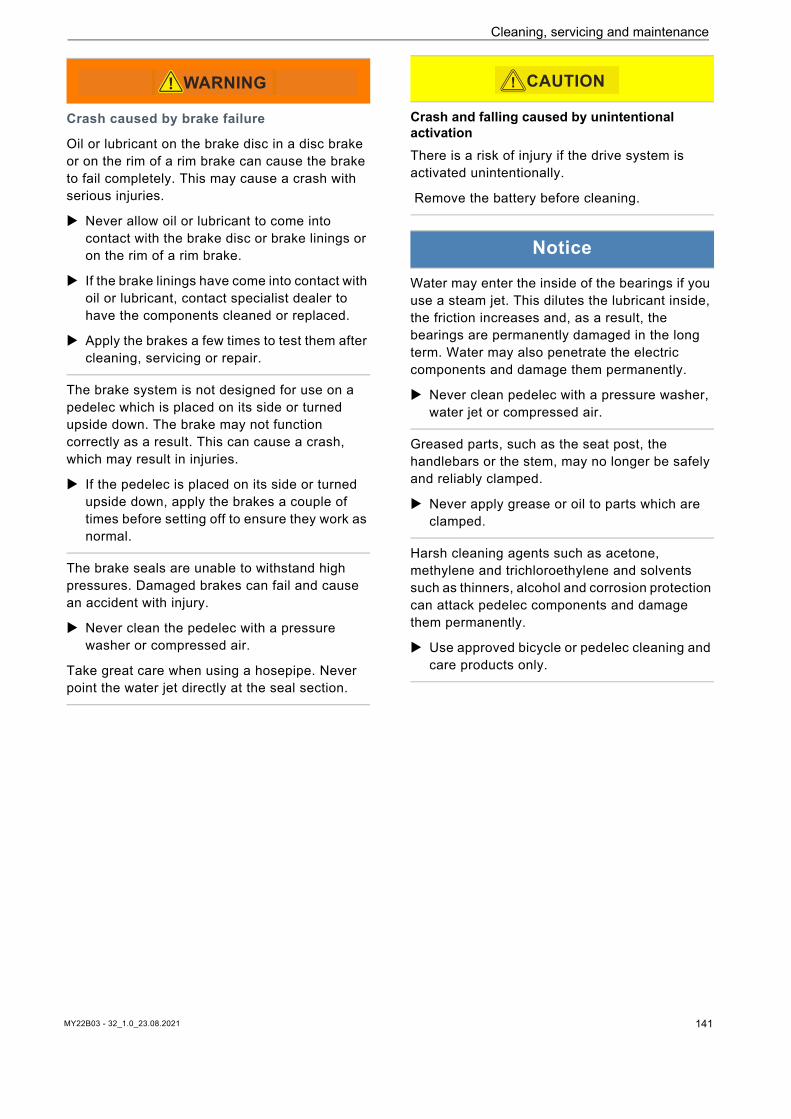
Cleaning, servicing and maintenance
Crash caused by brake failure
Oil or lubricant on the brake disc in a disc brake or on the rim of a rim brake can cause the brake to fail completely. This may cause a crash with serious injuries.
Never allow oil or lubricant to come into contact with the brake disc or brake linings or on the rim of a rim brake.
If the brake linings have come into contact with oil or lubricant, contact specialist dealer to have the components cleaned or replaced.
Apply the brakes a few times to test them after cleaning, servicing or repair.
The brake system is not designed for use on a pedelec which is placed on its side or turned upside down. The brake may not function correctly as a result. This can cause a crash, which may result in injuries.
If the pedelec is placed on its side or turned upside down, apply the brakes a couple of times before setting off to ensure they work as normal.
The brake seals are unable to withstand high pressures. Damaged brakes can fail and cause an accident with injury.
Never clean the pedelec with a pressure washer or compressed air.
Take great care when using a hosepipe. Never point the water jet directly at the seal section.
WARNING!
Crash and falling caused by unintentional activationThere is a risk of injury if the drive system is activated unintentionally.
Remove the battery before cleaning.
Notice
Water may enter the inside of the bearings if you use a steam jet. This dilutes the lubricant inside, the friction increases and, as a result, the bearings are permanently damaged in the long term. Water may also penetrate the electric components and damage them permanently.
Never clean pedelec with a pressure washer, water jet or compressed air.
Greased parts, such as the seat post, the handlebars or the stem, may no longer be safely and reliably clamped.
Never apply grease or oil to parts which are clamped.
Harsh cleaning agents such as acetone, methylene and trichloroethylene and solvents such as thinners, alcohol and corrosion protection can attack pedelec components and damage them permanently.
Use approved bicycle or pedelec cleaning and care products only.
CAUTION!
MY22B03 - 32_1.0_23.08.2021 141
Cleaning and servicing
7.1 Before each rideComplying with these cleaning instructions is the only way to reduce wear on components, increase the operating hours and guarantee safety.
7.1.1 Checking the guardsThe chain or belt guards, mudguards or the motor cover can break off and go missing when the pedelec is transported or parked outside.
Check that all guards are in place.
7.1.2 Checking the frame Check frame for cracks, warping and damage
to the paintwork.
If there are any cracks, warping or damage to the paintwork, remove the pedelec from service. Contact specialist dealer.
7.1.3 Checking the fork Check fork for cracks, warping, tarnished
components, leaked oil and damage to the paintwork. Also look at hidden parts on the underside.
If there are any cracks, warping, tarnished components, leaked oil or damage to the paintwork, remove the pedelec from service. Contact specialist dealer.
7.1.4 Checking the rear frame damper Check rear frame damper for cracks, warping,
tarnished components, leaked oil and damage to the paintwork. Also look at hidden parts on the underside.
If there are any cracks, warping, tarnished components, leaked oil or damage to the paintwork, remove the pedelec from service. Contact specialist dealer.
7.1.5 Checking the pannier rack1 Hold onto pedelec by its frame. Hold onto
pannier rack with the other hand.
2 Move the pannier rack backwards and forwards to check that all screw connections are firmly in place.
Tighten loose screws. Attach loose baskets permanently with a
basket bracket or cable ties.
7.1.6 Checking the guards1 Hold onto pedelec by its frame. Hold onto
mudguard rack with the other hand.
2 Move the mudguard backwards and forwards to check that all screw connections are firmly in place.
Tighten loose screws.
7.1.7 Checking wheel concentricity Lift the front and rear wheels one after the
other. and spin each wheel when lifted.
If the wheel is loose or is crooked when it turns, take pedelec out of service. Contact specialist dealer.
7.1.8 Checking the quick releases Check quick releases to ensure that all quick
releases are firmly in their fully closed end position.
If a quick release is not firmly in its closed end position, open quick release and place in its end position.
If the quick release cannot be firmly placed in its end position, take pedelec out of service. Contact specialist dealer.
7.1.9 Checking the suspension seat post Deflect and let the suspension seat post
rebound.
If you hear unusual noises when the suspension seat post deflects and rebounds, or it yields without any resistance, take pedelec out of service. Contact specialist dealer.
MY22B03 - 32_1.0_23.08.2021 142
Cleaning and servicing
7.1.10 Checking the bell1 Press the bell button downwards.
2 Let button spring back.
If you do not hear a clear, distinct ring of the bell, replace bell. Contact specialist dealer.
7.1.11 Checking the handles Check the handles are firmly in place.
Screw loose handles firmly into place.
7.1.12 Checking the USB cover If featured, check the position of the cover on
the USB port on a regular basis and adjust if necessary.
7.1.13 Checking the lighting1 Switch light on.
2 Check that the front and rear lights come on.
If the front and rear lights do not come on, take pedelec out of service. Contact specialist dealer.
7.1.14 Checking the brake1 Pull both brake levers when stationary.
2 Push the pedals.
If no resistance is generated in the usual brake lever position, take pedelec out of service. Contact specialist dealer.
If the brake is losing fluid, take pedelec out of service. Contact specialist dealer.
MY22B03 - 32_1.0_23.08.2021 143
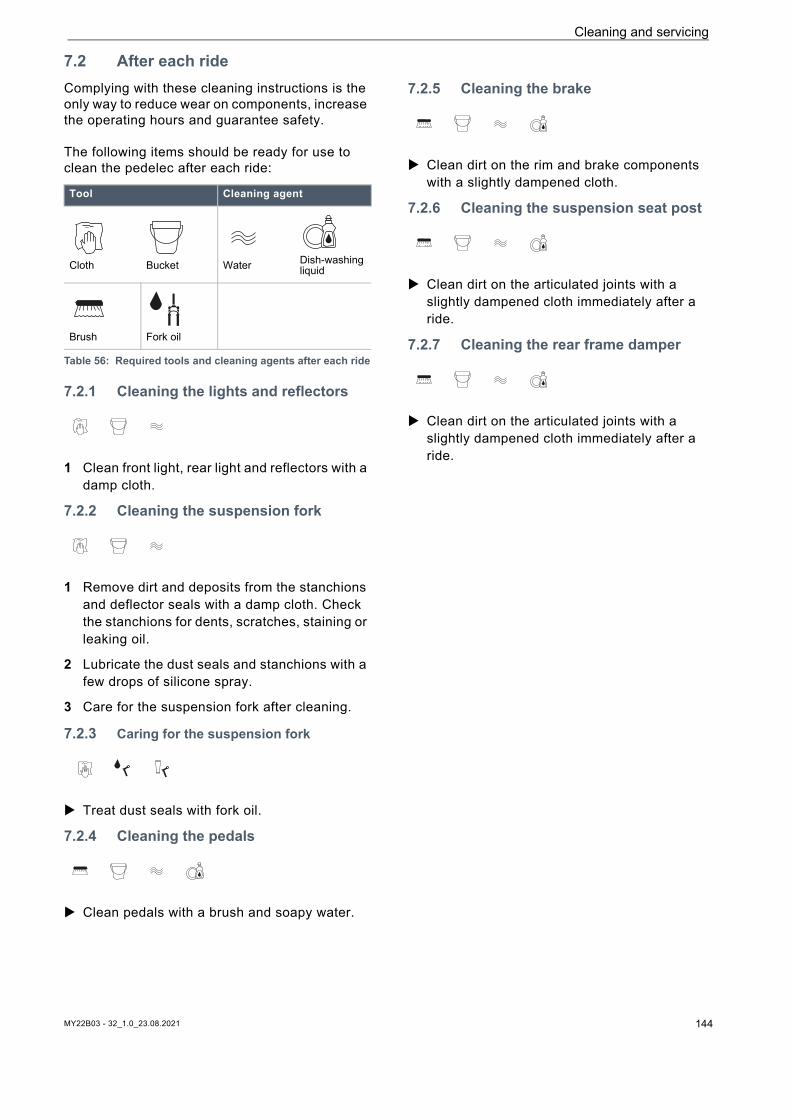
MY22B03 - 32_1.0_23.08.2021 144
Cleaning and servicing
7.2 After each rideComplying with these cleaning instructions is the only way to reduce wear on components, increase the operating hours and guarantee safety.
The following items should be ready for use to clean the pedelec after each ride:
7.2.1 Cleaning the lights and reflectors
1 Clean front light, rear light and reflectors with a damp cloth.
7.2.2 Cleaning the suspension fork
1 Remove dirt and deposits from the stanchions and deflector seals with a damp cloth. Check the stanchions for dents, scratches, staining or leaking oil.
2 Lubricate the dust seals and stanchions with a few drops of silicone spray.
3 Care for the suspension fork after cleaning.
7.2.3 Caring for the suspension fork
Treat dust seals with fork oil.
7.2.4 Cleaning the pedals
Clean pedals with a brush and soapy water.
7.2.5 Cleaning the brake
Clean dirt on the rim and brake components with a slightly dampened cloth.
7.2.6 Cleaning the suspension seat post
Clean dirt on the articulated joints with a slightly dampened cloth immediately after a ride.
7.2.7 Cleaning the rear frame damper
Clean dirt on the articulated joints with a slightly dampened cloth immediately after a ride.
Tool Cleaning agent
Cloth Bucket Water Dish-washing liquid
Brush Fork oil
Table 56: Required tools and cleaning agents after each ride
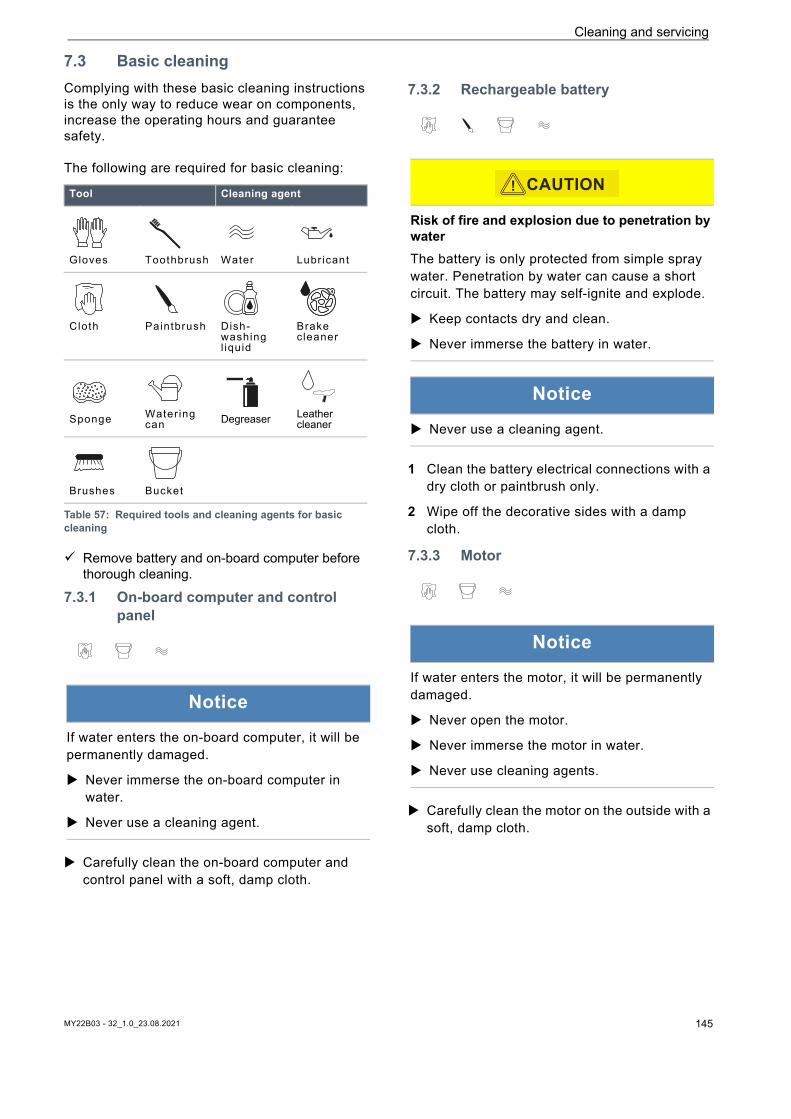
Cleaning and servicing
7.3 Basic cleaningComplying with these basic cleaning instructions is the only way to reduce wear on components, increase the operating hours and guarantee safety.
The following are required for basic cleaning:
Remove battery and on-board computer before thorough cleaning.
7.3.1 On-board computer and control panel
Carefully clean the on-board computer and control panel with a soft, damp cloth.
7.3.2 Rechargeable battery
1 Clean the battery electrical connections with a dry cloth or paintbrush only.
2 Wipe off the decorative sides with a damp cloth.
7.3.3 Motor
Carefully clean the motor on the outside with a soft, damp cloth.
Tool Cleaning agent
Gloves Toothbrush Water Lubr icant
Cloth Paintbrush Dish-washing l iquid
Brake cleaner
Sponge Water ing can Degreaser Leather
cleaner
Brushes Bucket
Table 57: Required tools and cleaning agents for basic cleaning
Notice
If water enters the on-board computer, it will be permanently damaged.
Never immerse the on-board computer in water.
Never use a cleaning agent.
Risk of fire and explosion due to penetration by waterThe battery is only protected from simple spray water. Penetration by water can cause a short circuit. The battery may self-ignite and explode.
Keep contacts dry and clean.
Never immerse the battery in water.
Notice
Never use a cleaning agent.
Notice
If water enters the motor, it will be permanently damaged.
Never open the motor.
Never immerse the motor in water.
Never use cleaning agents.
CAUTION!
MY22B03 - 32_1.0_23.08.2021 145
Cleaning and servicing
7.3.4 Frame, fork, pannier rack, guards and kickstand
1 Soak the components with dish-washing detergent if the dirt is thick and ingrained.
2 After leaving it to soak for a short time, remove the dirt and mud with a sponge, brush and toothbrushes.
3 Rinse off the components with water from a watering can.
4 Wipe away oil stains with a degreaser.
7.3.5 Stem
1 Clean stem with a cloth and soapy water.
2 Rinse off component with water from a watering can.
7.3.6 Handlebars
1 Clean handlebars, including handles and all gears or twist grips, with a cloth and soapy water.
2 Rinse off component with water from a watering can.
7.3.7 Handles
1 Clean handles with sponge, water and soapy water.
2 Rinse off component with water from a watering can.
3 Care for rubber handles after cleaning (see Section 7.4.8).
7.3.7.1 Leather handles
Leather is a natural product and has similar properties to human skin. Regular cleaning and care help to prevent leather dehydrating, fading or becoming brittle or stained.
1 Remove dirt with a soft, damp cloth.
2 Remove stubborn stains with a leather cleaner.
3 Care for leather handles after cleaning (see Section 7.4.8.2).
7.3.8 Seat post
1 Clean seat post with a cloth and soapy water.
2 Rinse off component with water from a watering can.
3 Wipe away any grease or assembly paste residue with a cloth and degreaser.
7.3.9 Saddle
1 Clean the saddle with lukewarm water and a cloth dampened with soapy water.
2 Rinse off component with water from a watering can.
MY22B03 - 32_1.0_23.08.2021 146
Cleaning and servicing
7.3.9.1 Leather saddle
Leather is a natural product and has similar properties to human skin. Regular cleaning and care help to prevent leather dehydrating, fading or becoming brittle or stained.
1 Remove dirt with a soft, damp cloth.
2 Remove stubborn stains with a leather cleaner.
3 Care for leather saddle after cleaning (see Section 7.4.10).
7.3.10 Tyres
1 Clean tyres with a sponge, a brush and soap cleaner.
2 Rinse off component with water from a watering can.
3 Remove any embedded chips and small stones.
7.3.11 Spokes and spoke nipples 1 Clean spokes from the inside to the outside
with a sponge, brush and soapy water.
2 Clean rim with a sponge.
3 Rinse off component with water from a watering can.
4 Care for spoke nipples after cleaning (see Section 7.4.12).
7.3.12 Hub
1 Put on protective gloves.
2 Remove dirt from hub with a sponge and soapy water.
3 Rinse off component with water from a watering can.
4 Wipe off oily dirt with a degreaser and a cloth.
7.3.13 Switching elements
1 Clean gear shift, shift cables and transmission with water, a brush and dish-washing detergent.
2 Rinse off component with water from a watering can.
7.3.13.1 Shifter
Carefully clean shifter with a damp, soft cloth.
7.3.14 Cassette, chain wheels and front derailleur
1 Put on protective gloves.
2 Spray the cassette, the chain wheels and the front derailleur with a degreasing agent.
3 Clean coarse dirt with a brush after soaking for a short time.
4 Wash down all parts with dish-washing detergent and a toothbrush.
5 Rinse off component with water from a watering can.
MY22B03 - 32_1.0_23.08.2021 147
Cleaning and servicing
7.3.15 Brake
7.3.15.1 Brake lever
Carefully clean the brake levers with a damp, soft cloth.
7.3.16 Brake disc
1 Put on protective gloves.
2 Spray brake disc with brake disc cleaning spray.
3 Wipe with a cloth.
7.3.17 Belt
1 Dampen a cloth with soapy water. Place the cloth on the belt.
2 Hold and apply slight pressure while slowly turning the rear wheel, so the belt passes through the cloth.
7.3.18 Chain
Place newspaper or paper towels underneath to collect dirt.
1 Slightly dampen a brush with dish-washing liquid. Brush both sides of the chain.
2 Dampen a cloth with soapy water. Place the cloth on the chain.
3 Hold and apply slight pressure while slowly turning the rear wheel, so the chain passes through the cloth.
4 Wipe off oily, dirty chains thoroughly with a cloth and degreaser.
5 Care for chain after cleaning (see Section 7.4.16).
7.3.18.1 Chain with all-round chain guard
Clean water hole on the chain guard lower surface.
Care for chain after cleaning (see Section 7.4.16.1).
Notice
Protect brake disc against lubricants and grease from hands.
Notice
Never use aggressive (acid-based) cleaners, rust removers or degreasers when cleaning the belt.
Notice
Never use aggressive (acid-based) cleaners, rust removers or degreasers when cleaning the chain.
Never use gun oil or rust remover spray.
Never use chain cleaning devices or chain cleaning baths.
Have chain with all-round guard cleaned and cared for during maintenance.
Notice
The chain guard must be removed before cleaning. Contact specialist dealer.
MY22B03 - 32_1.0_23.08.2021 148
Cleaning and servicing
7.4 ServicingComplying with these servicing instructions is the only way to reduce wear on components, increase the operating hours and guarantee safety.
Figure 155: Diagram showing wear, operating hours (x) vs. material erosion (y)
The service life (3) of an optimally serviced drive chain (1) is almost three times as long with lubrication (A) compared to a drive chain (2) lubricated on an irregular basis.
These tools and cleaning agents are required for servicing:
7.4.1 Frame
1 Dry frame with a cloth.
2 Spray frame with spray wax and leave to dry.
3 Wipe away any wax residue with a cloth.
7.4.2 Fork
1 Dry frame with a cloth.
2 Spray care oil on frame and leave to dry.
3 Wipe away any wax residue with a cloth.
Tool Cleaning agent
Cloth Toothbrush Frame wax spray
Silicone or Teflon oil
Acid-free lubricating grease
Fork oil
Teflon spray Spray oil
Chain oil Leather care product
Table 58: Required tools and cleaning agents for servicing
2
y
x
1
3
AA
A Notice
Hard wax polish and protection wax are particularly resistant on gloss paintwork. These car accessory retail products are unsuitable for matt paint finishes.
Try wax spray out on a small spot before application.
Notice
Hard wax polish and protection wax are particularly resistant on gloss paintwork. These car accessory retail products are unsuitable for matt paint finishes.
Try wax spray out on a small spot before application.
MY22B03 - 32_1.0_23.08.2021 149
Cleaning and servicing
7.4.3 Pannier rack
1 Dry pannier rack with a cloth.
2 Spray pannier rack with spray wax and leave to dry.
3 Wipe pannier rack with a cloth.
4 Protect chafing points on panniers with adhesive film. Replace worn adhesive film.
5 Care for coil springs with silicone spray or wax spray from time to time.
7.4.4 Mudguard
Depending on the mudguard material’s requirements, apply hard wax polish, metal polish or plastic care product as per the product instructions.
7.4.5 Servicing the kickstand
1 Dry kickstand with a cloth.
2 Spray kickstand rack with spray wax and leave to dry.
3 Wipe down kickstand with a cloth.
4 Lubricate the kickstand joints with spray oil.
7.4.6 Stem
1 Spray painted and polished metal surfaces with wax spray and leave to dry.
2 Wipe away any wax residue with a cloth.
3 Apply silicone or Teflon oil to the stem shaft tube and the quick release lever pivot point with a cloth.
4 If you have a Speedlifter Twist, also apply oil to the unlocking bolt using the groove in the Speedlifter body.
5 Apply a little acid-free lubricant grease between the stem quick release lever and the sliding piece to reduce the quick release lever operating force.
6 If you have a stem with a cone clamp, apply a new protective layer of assembly paste onto the stem and fork steerer contact point once a year.
7.4.7 Handlebars
1 Spray painted and polished metal surfaces with wax spray and leave to dry.
2 Wipe away any wax residue with a cloth.
7.4.8 Handle 7.4.8.1 Rubber handles
1 Apply talcum powder to sticky rubber handles.
Notice
Never apply talcum powder to leather or foam handles.
MY22B03 - 32_1.0_23.08.2021 150

Cleaning and servicing
7.4.8.2 Leather handle
Standard leather care products keep leather smooth and resistant, brighten its appearance and improve or replace stain protection.
1 Try leather care product out on a less visible spot before use.
2 Care for leather handles with a leather care product.
7.4.9 Seat post 1 Carefully preserve screw connections with wax
spray. In doing so, ensure that no wax is applied to the metal contact surfaces.
2 Replace the assembly paste protective layer on the metal contact surfaces on the seat post and seat tube every year.
7.4.9.1 Suspension seat post
1 Lubricate articulated joints with spray oil.
2 Deflect and let the suspension seat post rebound five times. Remove any surplus lubricant with a clean cloth.
7.4.9.2 Carbon seat post
1 Take out the carbon seat post.
2 Remove old assembly paste with a cloth.
3 Apply new assembly paste with a cloth.
4 Re-insert the carbon seat post.
7.4.10 Leather saddle
Standard leather care products keep leather smooth and resistant, brighten its appearance and improve or replace stain protection.
1 Try leather care product out on a less visible spot before use.
2 Care for leather saddle from below with a leather care product. Only care for the top of leather saddles with a leather care product if they are badly worn and dried-out.
3 Avoid wearing light-coloured trousers after care due to staining.
7.4.11 Hub
1 Apply wax spray especially around the spoke holes. In doing so, ensure that no wax is applied to brake parts.
2 Treat rubber seals with a cloth with one or two drops of silicone spray. Never use oil if you have disc brakes.
7.4.12 Spoke nipples
1 Apply wax spray onto the spoke nipples from the rim side.
2 Treat heavily corroded spoke nipples with a drop of penetrating of special care oil.
7.4.13 Rim
Care for chrome rims, stainless steel rims and polished aluminium with chrome or metal polish. Never care for the brake surface with polish.
Notice
If carbon seat posts are used in an aluminium frame without protective assembly paste, rain and puddle water can cause contact corrosion. It may then take a great deal of force to remove the seat post. The carbon seat post may break as a result.
MY22B03 - 32_1.0_23.08.2021 151
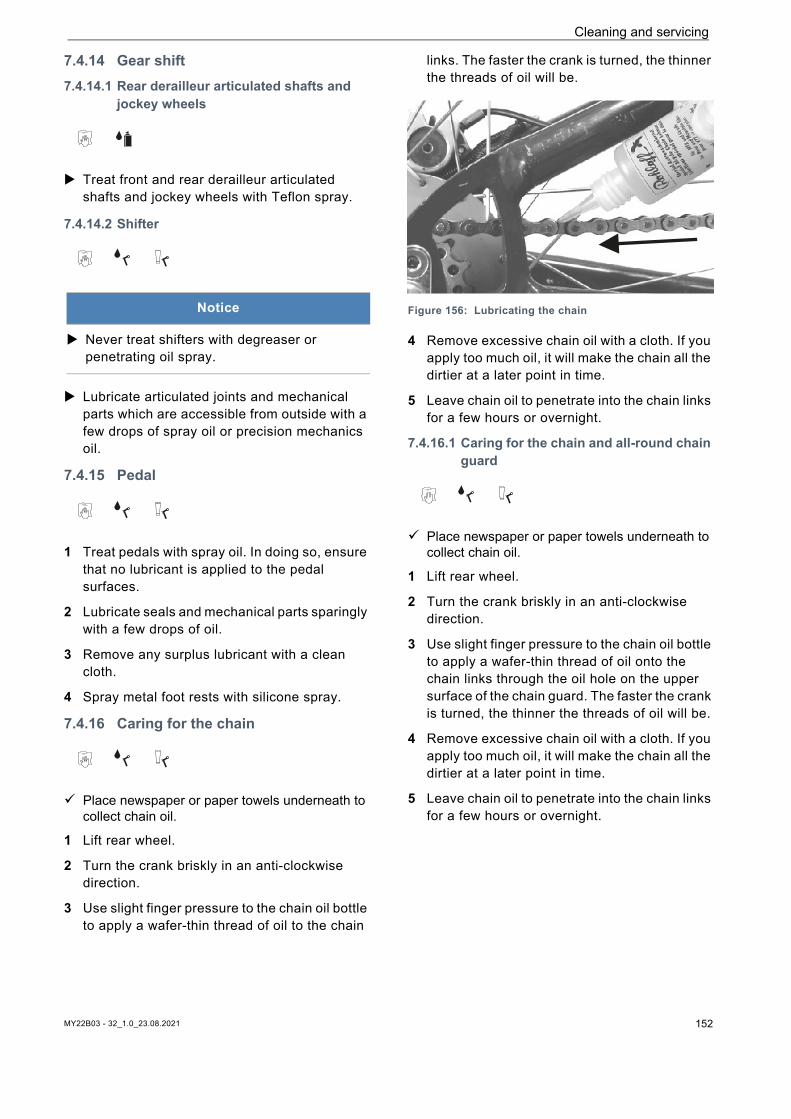
Cleaning and servicing
7.4.14 Gear shift 7.4.14.1 Rear derailleur articulated shafts and
jockey wheels
Treat front and rear derailleur articulated shafts and jockey wheels with Teflon spray.
7.4.14.2 Shifter
Lubricate articulated joints and mechanical parts which are accessible from outside with a few drops of spray oil or precision mechanics oil.
7.4.15 Pedal
1 Treat pedals with spray oil. In doing so, ensure that no lubricant is applied to the pedal surfaces.
2 Lubricate seals and mechanical parts sparingly with a few drops of oil.
3 Remove any surplus lubricant with a clean cloth.
4 Spray metal foot rests with silicone spray.
7.4.16 Caring for the chain
Place newspaper or paper towels underneath to collect chain oil.
1 Lift rear wheel.
2 Turn the crank briskly in an anti-clockwise direction.
3 Use slight finger pressure to the chain oil bottle to apply a wafer-thin thread of oil to the chain
links. The faster the crank is turned, the thinner the threads of oil will be.
Figure 156: Lubricating the chain
4 Remove excessive chain oil with a cloth. If you apply too much oil, it will make the chain all the dirtier at a later point in time.
5 Leave chain oil to penetrate into the chain links for a few hours or overnight.
7.4.16.1 Caring for the chain and all-round chain guard
Place newspaper or paper towels underneath to collect chain oil.
1 Lift rear wheel.
2 Turn the crank briskly in an anti-clockwise direction.
3 Use slight finger pressure to the chain oil bottle to apply a wafer-thin thread of oil onto the chain links through the oil hole on the upper surface of the chain guard. The faster the crank is turned, the thinner the threads of oil will be.
4 Remove excessive chain oil with a cloth. If you apply too much oil, it will make the chain all the dirtier at a later point in time.
5 Leave chain oil to penetrate into the chain links for a few hours or overnight.
Notice
Never treat shifters with degreaser or penetrating oil spray.
MY22B03 - 32_1.0_23.08.2021 152
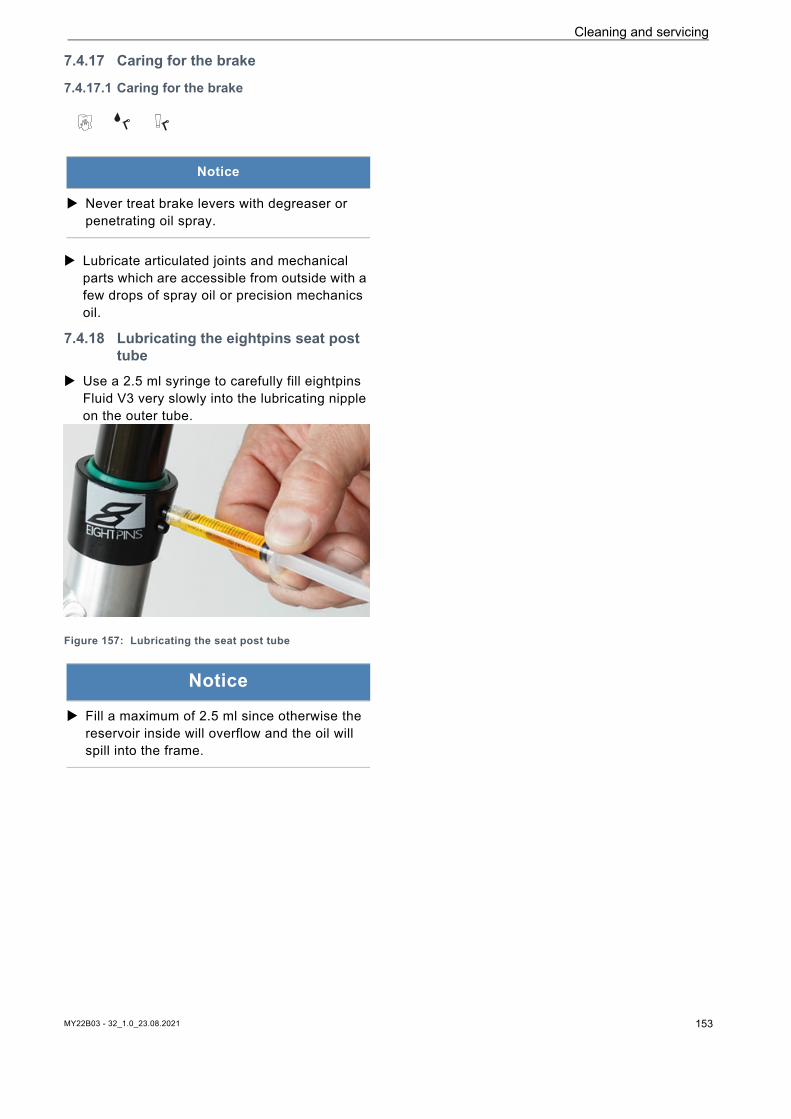
Cleaning and servicing
7.4.17 Caring for the brake
7.4.17.1 Caring for the brake
Lubricate articulated joints and mechanical parts which are accessible from outside with a few drops of spray oil or precision mechanics oil.
7.4.18 Lubricating the eightpins seat post tube
Use a 2.5 ml syringe to carefully fill eightpins Fluid V3 very slowly into the lubricating nipple on the outer tube.
Figure 157: Lubricating the seat post tube
Notice
Never treat brake levers with degreaser or penetrating oil spray.
Notice
Fill a maximum of 2.5 ml since otherwise the reservoir inside will overflow and the oil will spill into the frame.
MY22B03 - 32_1.0_23.08.2021 153
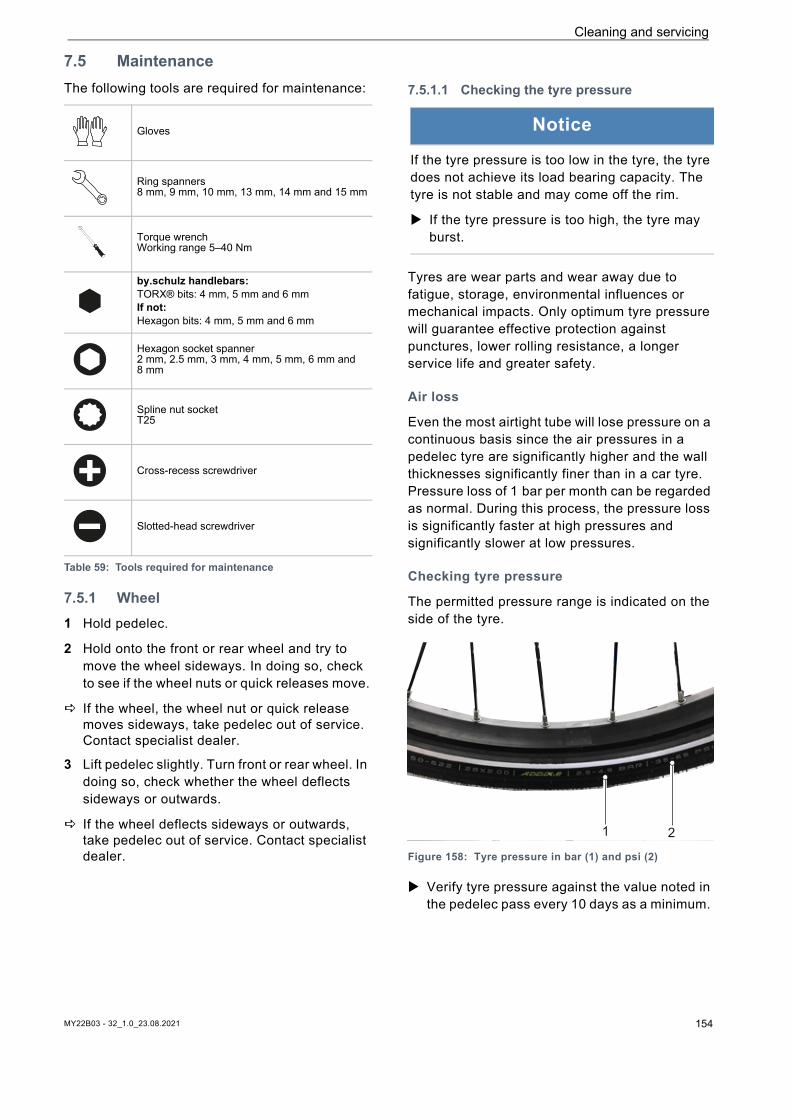
Cleaning and servicing
7.5 Maintenance The following tools are required for maintenance:
7.5.1 Wheel 1 Hold pedelec.
2 Hold onto the front or rear wheel and try to move the wheel sideways. In doing so, check to see if the wheel nuts or quick releases move.
If the wheel, the wheel nut or quick release moves sideways, take pedelec out of service. Contact specialist dealer.
3 Lift pedelec slightly. Turn front or rear wheel. In doing so, check whether the wheel deflects sideways or outwards.
If the wheel deflects sideways or outwards, take pedelec out of service. Contact specialist dealer.
7.5.1.1 Checking the tyre pressure
Tyres are wear parts and wear away due to fatigue, storage, environmental influences or mechanical impacts. Only optimum tyre pressure will guarantee effective protection against punctures, lower rolling resistance, a longer service life and greater safety.
Air loss
Even the most airtight tube will lose pressure on a continuous basis since the air pressures in a pedelec tyre are significantly higher and the wall thicknesses significantly finer than in a car tyre. Pressure loss of 1 bar per month can be regarded as normal. During this process, the pressure loss is significantly faster at high pressures and significantly slower at low pressures.
Checking tyre pressure
The permitted pressure range is indicated on the side of the tyre.
Figure 158: Tyre pressure in bar (1) and psi (2)
Verify tyre pressure against the value noted in the pedelec pass every 10 days as a minimum.
Gloves
Ring spanners 8 mm, 9 mm, 10 mm, 13 mm, 14 mm and 15 mm
Torque wrench Working range 5–40 Nm
by.schulz handlebars:TORX® bits: 4 mm, 5 mm and 6 mmIf not:Hexagon bits: 4 mm, 5 mm and 6 mm
Hexagon socket spanner 2 mm, 2.5 mm, 3 mm, 4 mm, 5 mm, 6 mm and 8 mm
Spline nut socket T25
Cross-recess screwdriver
Slotted-head screwdriver
Table 59: Tools required for maintenance
Notice
If the tyre pressure is too low in the tyre, the tyre does not achieve its load bearing capacity. The tyre is not stable and may come off the rim.
If the tyre pressure is too high, the tyre may burst.
21
MY22B03 - 32_1.0_23.08.2021 154

Cleaning and servicing
Dunlop valve
Only applies to pedelecs with this equipmentThe tyre pressure cannot be measured on the simple Dunlop valve. The tyre pressure is therefore measured in the filling hose when pumping slowly with the bicycle pump.
It is recommendable to use a bicycle pump with a pressure gauge.
1 Unscrew and remove the valve cap.
2 Undo the rim nuts.
3 Connect the bicycle pump.
4 Pump up the tyre slowly and pay attention to the tyre pressure in the process.
5 Correct the tyre pressure to meet the specified value in the Pedelec pass.
6 If the tyre pressure is too high, unfasten the union nut, let air out and re-tighten the union nut.
7 Remove the bicycle pump.
8 Screw the valve cap tight.
9 Screw the rim nut gently against the rim with the tips of your fingers.
Correct tyre pressure if necessary (see Section 6.6.8).
Schrader valve
Only applies to pedelecs with this equipment
It is recommended to use the air pump at a filling station. Older and easy bicycle pumps are unsuitable for filling tyres via a Schrader valve.
1 Unscrew and remove the valve cap.
1 Undo the rim nuts.
2 Attach the bicycle pump.
3 Pump up the tyre slowly and pay attention to the tyre pressure in the process.
The tyre pressure has been adjusted as per the specifications.
4 Remove the bicycle pump.
5 Screw the valve cap tight.
6 Screw the rim nut gently against the rim with the tips of your fingers.
Correct tyre pressure if necessary (see Section 6.6.8).
Presta valve
Only applies to pedelecs with this equipment
It is recommendable to use a bicycle pump with a pressure gauge. The operating instructions for the bicycle pump must be adhered to.
1 Unscrew and remove the valve cap.
2 Open the knurled nut around four turns.
3 Carefully apply the bicycle pump so that the valve insert is not bent.
4 Pump up the tyre slowly and pay attention to the tyre pressure in the process.
5 Correct the tyre pressure as per the specifications on the tyre.
6 Remove the bicycle pump.
7 Tighten the knurled nut with your fingers.
8 Screw the valve cap tight.
9 Screw the knurled nut gently against the rim with the tips of your fingers.
Correct tyre pressure if necessary (see Section 6.6.8).
MY22B03 - 32_1.0_23.08.2021 155
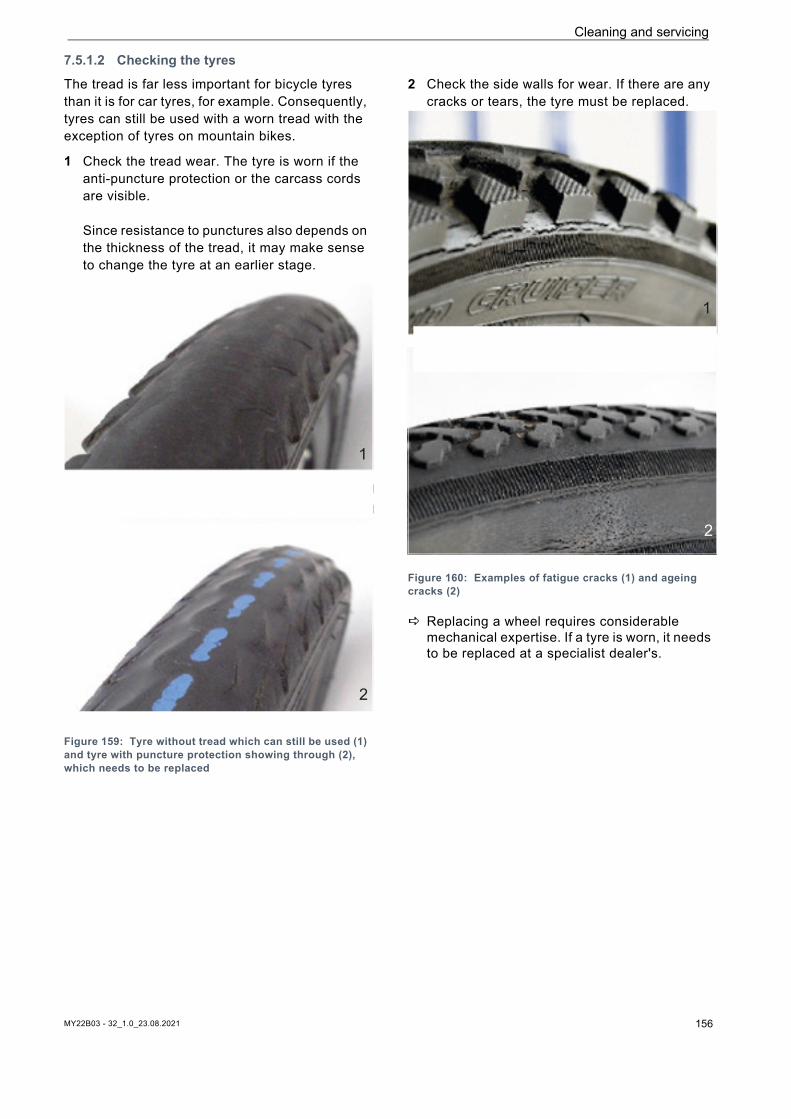
Cleaning and servicing
7.5.1.2 Checking the tyres
The tread is far less important for bicycle tyres than it is for car tyres, for example. Consequently, tyres can still be used with a worn tread with the exception of tyres on mountain bikes.
1 Check the tread wear. The tyre is worn if the anti-puncture protection or the carcass cords are visible.
Since resistance to punctures also depends on the thickness of the tread, it may make sense to change the tyre at an earlier stage.
Figure 159: Tyre without tread which can still be used (1) and tyre with puncture protection showing through (2), which needs to be replaced
2 Check the side walls for wear. If there are any cracks or tears, the tyre must be replaced.
Figure 160: Examples of fatigue cracks (1) and ageing cracks (2)
Replacing a wheel requires considerable mechanical expertise. If a tyre is worn, it needs to be replaced at a specialist dealer's.
1
2
1
2
MY22B03 - 32_1.0_23.08.2021 156
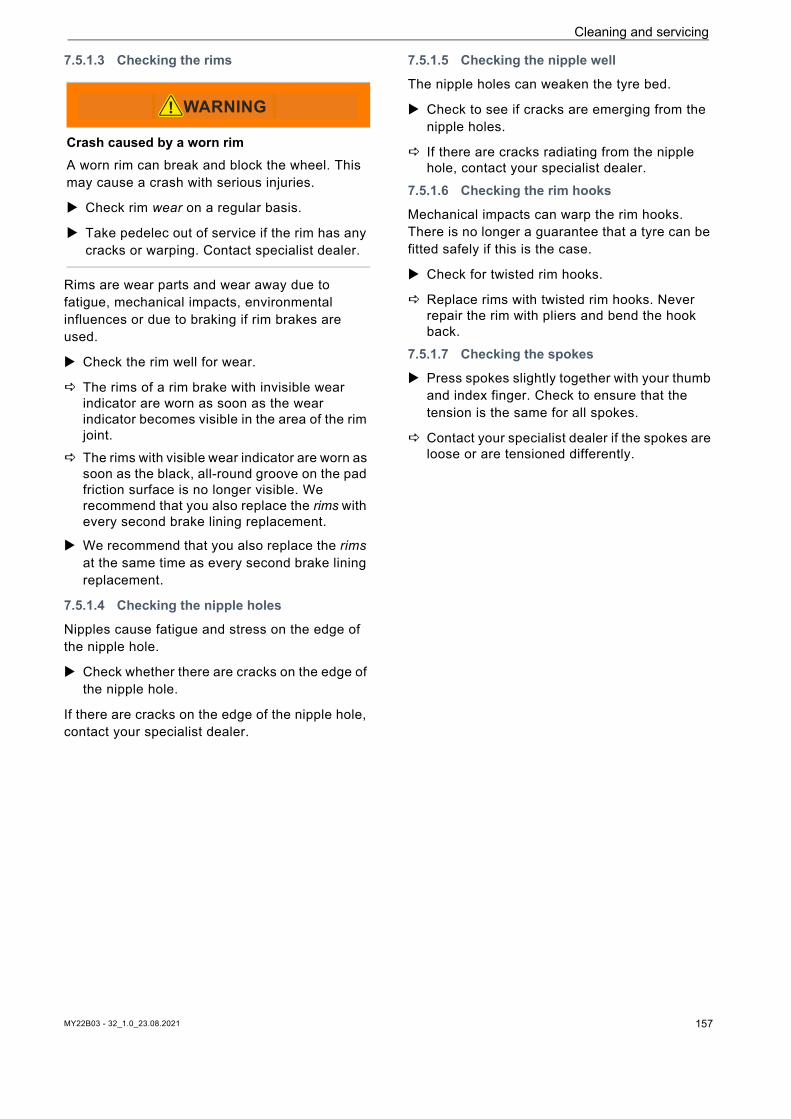
Cleaning and servicing
7.5.1.3 Checking the rims
Rims are wear parts and wear away due to fatigue, mechanical impacts, environmental influences or due to braking if rim brakes are used.
Check the rim well for wear.
The rims of a rim brake with invisible wear indicator are worn as soon as the wear indicator becomes visible in the area of the rim joint.
The rims with visible wear indicator are worn as soon as the black, all-round groove on the pad friction surface is no longer visible. We recommend that you also replace the rims with every second brake lining replacement.
We recommend that you also replace the rims at the same time as every second brake lining replacement.
7.5.1.4 Checking the nipple holes
Nipples cause fatigue and stress on the edge of the nipple hole.
Check whether there are cracks on the edge of the nipple hole.
If there are cracks on the edge of the nipple hole, contact your specialist dealer.
7.5.1.5 Checking the nipple well
The nipple holes can weaken the tyre bed.
Check to see if cracks are emerging from the nipple holes.
If there are cracks radiating from the nipple hole, contact your specialist dealer.
7.5.1.6 Checking the rim hooks
Mechanical impacts can warp the rim hooks. There is no longer a guarantee that a tyre can be fitted safely if this is the case.
Check for twisted rim hooks.
Replace rims with twisted rim hooks. Never repair the rim with pliers and bend the hook back.
7.5.1.7 Checking the spokes
Press spokes slightly together with your thumb and index finger. Check to ensure that the tension is the same for all spokes.
Contact your specialist dealer if the spokes are loose or are tensioned differently.
Crash caused by a worn rimA worn rim can break and block the wheel. This may cause a crash with serious injuries.
Check rim wear on a regular basis.
Take pedelec out of service if the rim has any cracks or warping. Contact specialist dealer.
WARNING!
MY22B03 - 32_1.0_23.08.2021 157
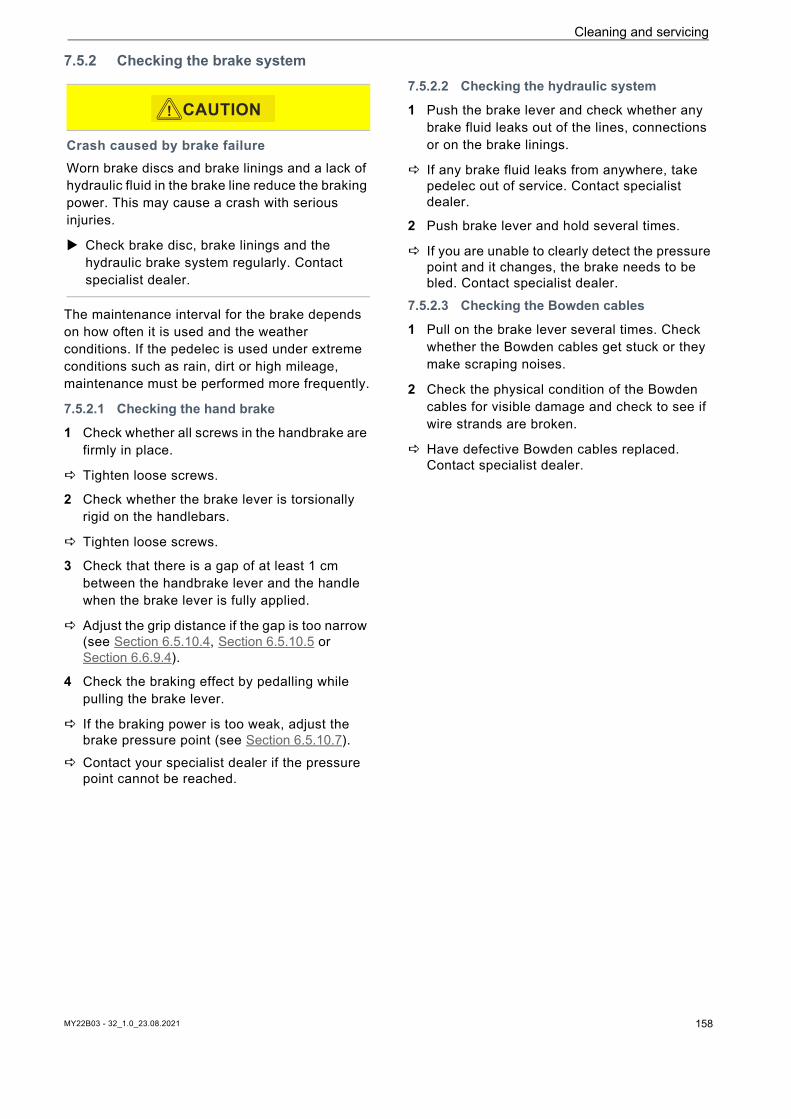
MY22B03 - 32_1.0_23.08.2021 158
Cleaning and servicing
7.5.2 Checking the brake system
The maintenance interval for the brake depends on how often it is used and the weather conditions. If the pedelec is used under extreme conditions such as rain, dirt or high mileage, maintenance must be performed more frequently.
7.5.2.1 Checking the hand brake
1 Check whether all screws in the handbrake are firmly in place.
Tighten loose screws.
2 Check whether the brake lever is torsionally rigid on the handlebars.
Tighten loose screws.
3 Check that there is a gap of at least 1 cm between the handbrake lever and the handle when the brake lever is fully applied.
Adjust the grip distance if the gap is too narrow (see Section 6.5.10.4, Section 6.5.10.5 or Section 6.6.9.4).
4 Check the braking effect by pedalling while pulling the brake lever.
If the braking power is too weak, adjust the brake pressure point (see Section 6.5.10.7).
Contact your specialist dealer if the pressure point cannot be reached.
7.5.2.2 Checking the hydraulic system
1 Push the brake lever and check whether any brake fluid leaks out of the lines, connections or on the brake linings.
If any brake fluid leaks from anywhere, take pedelec out of service. Contact specialist dealer.
2 Push brake lever and hold several times.
If you are unable to clearly detect the pressure point and it changes, the brake needs to be bled. Contact specialist dealer.
7.5.2.3 Checking the Bowden cables
1 Pull on the brake lever several times. Check whether the Bowden cables get stuck or they make scraping noises.
2 Check the physical condition of the Bowden cables for visible damage and check to see if wire strands are broken.
Have defective Bowden cables replaced. Contact specialist dealer.
Crash caused by brake failureWorn brake discs and brake linings and a lack of hydraulic fluid in the brake line reduce the braking power. This may cause a crash with serious injuries.
Check brake disc, brake linings and the hydraulic brake system regularly. Contact specialist dealer.
CAUTION!
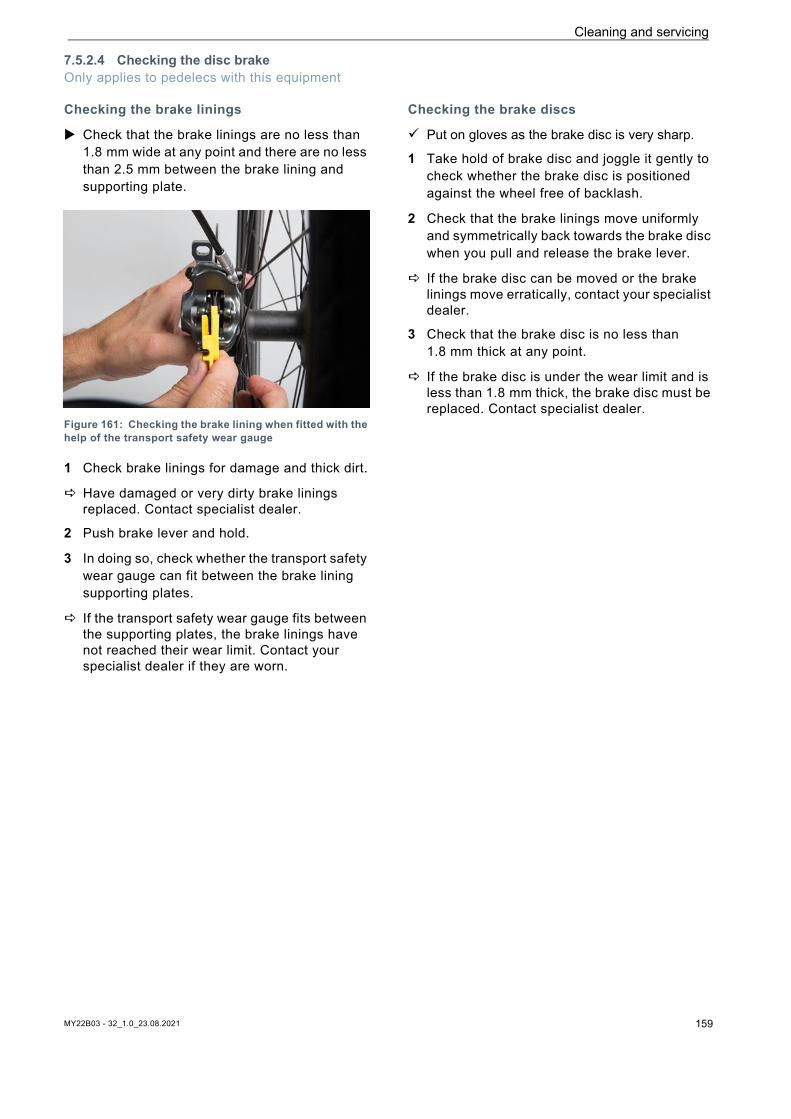
MY22B03 - 32_1.0_23.08.2021 159
Cleaning and servicing
7.5.2.4 Checking the disc brakeOnly applies to pedelecs with this equipment
Checking the brake linings
Check that the brake linings are no less than 1.8 mm wide at any point and there are no less than 2.5 mm between the brake lining and supporting plate.
Figure 161: Checking the brake lining when fitted with the help of the transport safety wear gauge
1 Check brake linings for damage and thick dirt.
Have damaged or very dirty brake linings replaced. Contact specialist dealer.
2 Push brake lever and hold.
3 In doing so, check whether the transport safety wear gauge can fit between the brake lining supporting plates.
If the transport safety wear gauge fits between the supporting plates, the brake linings have not reached their wear limit. Contact your specialist dealer if they are worn.
Checking the brake discs
Put on gloves as the brake disc is very sharp.
1 Take hold of brake disc and joggle it gently to check whether the brake disc is positioned against the wheel free of backlash.
2 Check that the brake linings move uniformly and symmetrically back towards the brake disc when you pull and release the brake lever.
If the brake disc can be moved or the brake linings move erratically, contact your specialist dealer.
3 Check that the brake disc is no less than 1.8 mm thick at any point.
If the brake disc is under the wear limit and is less than 1.8 mm thick, the brake disc must be replaced. Contact specialist dealer.
MY22B03 - 32_1.0_23.08.2021 160
Cleaning and servicing
7.5.2.5 Checking the back-pedal brakeOnly applies to pedelecs with this equipment There are sharp corners and edges on the back-
pedal brake. Wear gloves.
1 Hold and check counter support to ensure it is firmly attached to rear frame down tube.
Tighten screw into the counter support if it is loose.
2 Carry out brake test. Listen for noises while doing so.
If braking with the backpedal makes noises, contact specialist dealer.
MY22B03 - 32_1.0_23.08.2021 161
Cleaning and servicing
7.5.2.6 Checking the rim brakeOnly applies to pedelecs with this equipment
Checking the brake linings
We recommend that you also replace the rims at the same time as every second brake lining replacement.
1 Check whether the brake linings are worn evenly on both sides of the rim.
2 Check whether the brake linings are worn to one side.
If the brake linings are worn unevenly or worn to one side, contact your specialist dealer.
3 Check whether the brake lining wear limit has been reached.
If the brake linings have reached their wear limit, they need to be changed. Contact specialist dealer.
4 Check whether the brake linings can be twisted.
If the brake linings twist, the brake lining bracket is defective and must be replaced. Contact specialist dealer.
5 Check that the brake linings move uniformly and symmetrically towards the rim when you pull and release the brake lever.
If the brake linings move unevenly, contact your specialist dealer.
Checking the rim braking surface for wear
The side wall is more prone to wear in rim brakes. The wear depends on the stress loads during rides. Dirt between the brake lining and rim and strong braking forces can have an impact on the service life.
The rim must be replaced if the wall is less than 0.9 mm thick. If deep grooves are visible, rim hooks will warp towards the outside or the braking power will change, contact your specialist dealer as soon as possible.
Replacing a rim requires considerable mechanical expertise. Only a specialist dealer should carry out this task.
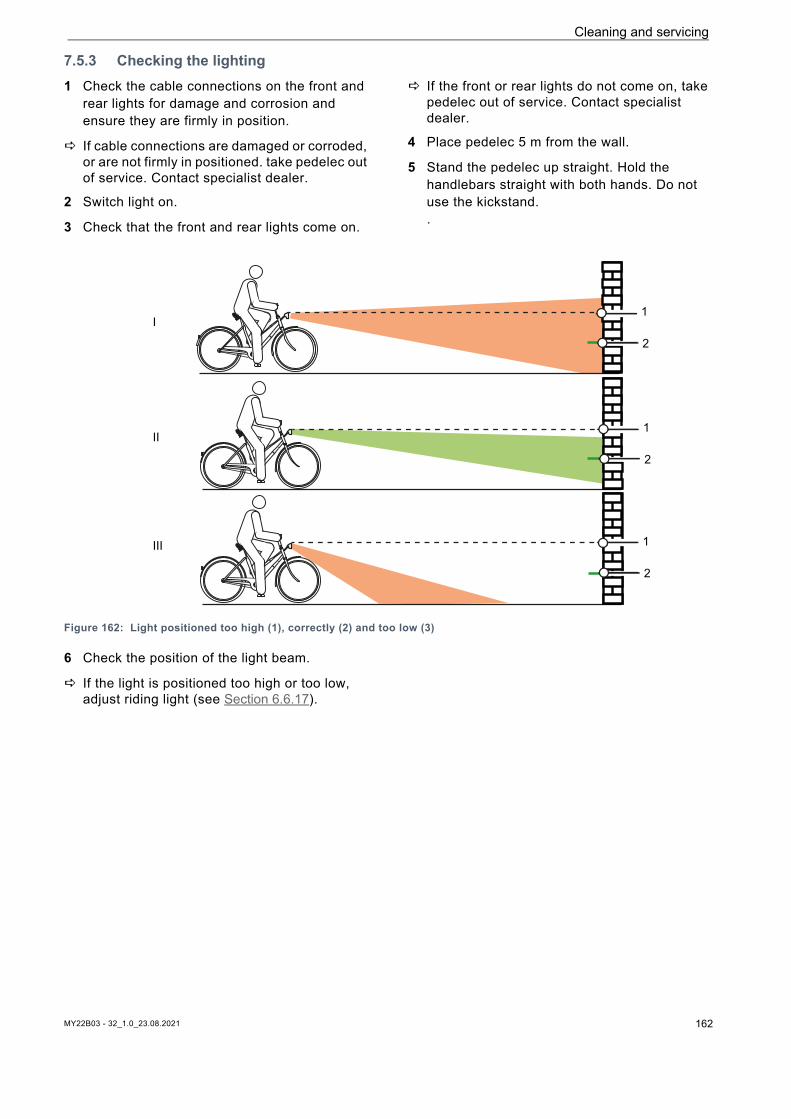
MY22B03 - 32_1.0_23.08.2021 162
Cleaning and servicing
7.5.3 Checking the lighting1 Check the cable connections on the front and
rear lights for damage and corrosion and ensure they are firmly in position.
If cable connections are damaged or corroded, or are not firmly in positioned. take pedelec out of service. Contact specialist dealer.
2 Switch light on.
3 Check that the front and rear lights come on.
If the front or rear lights do not come on, take pedelec out of service. Contact specialist dealer.
4 Place pedelec 5 m from the wall.
5 Stand the pedelec up straight. Hold the handlebars straight with both hands. Do not use the kickstand..
Figure 162: Light positioned too high (1), correctly (2) and too low (3)
6 Check the position of the light beam.
If the light is positioned too high or too low, adjust riding light (see Section 6.6.17).
I
II
III
1
2
1
2
1
2
Cleaning and servicing
7.5.4 Checking the stem The stem and quick release system must be
inspected at regular intervals. The specialist dealer should adjust them if they require adjustment.
If the hexagon socket head screw is also loosened, the headset backlash also needs to be adjusted. Medium-strength thread locker, such as Loctite blue, then needs to be applied to the loosened screws and the screws tightened as per specifications.
Check metal contact surfaces on cone, stem clamping screw and fork steerer for corrosion.
Take pedelec out of service if there is any wear or signs of corrosion. Contact specialist dealer.
7.5.5 Check the handlebars 1 Take hold of handlebars with both hands on the
handles.
2 Move handlebars up and down and press to tilt.
If the handlebars move, contact specialist dealer.
3 Place front wheel in position where it can't move sideways (e.g. in a bike stand).
4 Hold handlebars firmly with both hands.
5 Check if the handlebars are able to twist against the front wheel.
If the handlebars can move, contact your specialist dealer.
7.5.6 Checking the saddle1 Hold saddle firmly.
2 Check whether the saddle twists, tilts or can be pushed in one direction or other.
If the saddle twists, tilts or can be pushed in one direction or other, adjust the saddle (see Section xxx).
Contact your specialist dealer if the saddle cannot be fixed into position.
7.5.7 Checking the seat post1 Take seat post out of the frame.
2 Check seat post for cracks and corrosion.
3 Reinsert seat post.
4 Check pedal.
5 Hold pedal and try to move it sideways toward the inside or outside. In doing so, observe whether the crank arm or bearing move sideways.
If the pedal, crank arm or crank bearing moves sideways, fasten screw on the pedal crank rear.
6 Hold pedal and try to move it upwards and downwards vertically. In doing so, observe whether the pedal, crank arm or crank bearing moves vertically.
If the pedal, crank arm or crank bearing moves vertically, fasten screw.
7.5.8 Checking the chain Check chain for rust or warping.
Replace a rusted chain since it will not be able to withstand the tensile loads from the drive. Contact your specialist retailer.
7.5.9 Checking the chain and belt tension
7 If a hub gear is fitted, the rear wheel must be pushed backwards and forwards to tighten the chain. Contact specialist dealer.
Notice
Excessive chain tension increases wear. If the chain tension is too low, there is a risk that the chain will slip off the chain wheels.
Check the chain tension once a month.
MY22B03 - 32_1.0_23.08.2021 163
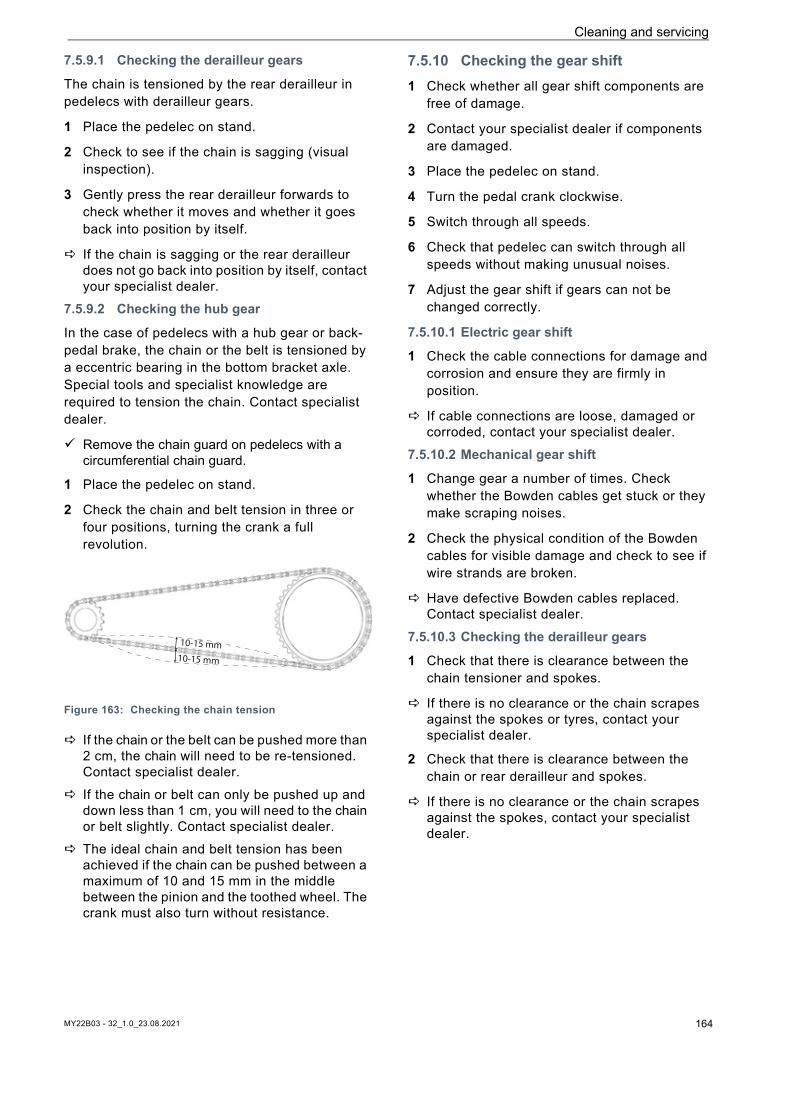
Cleaning and servicing
7.5.9.1 Checking the derailleur gears
The chain is tensioned by the rear derailleur in pedelecs with derailleur gears.
1 Place the pedelec on stand.
2 Check to see if the chain is sagging (visual inspection).
3 Gently press the rear derailleur forwards to check whether it moves and whether it goes back into position by itself.
If the chain is sagging or the rear derailleur does not go back into position by itself, contact your specialist dealer.
7.5.9.2 Checking the hub gear
In the case of pedelecs with a hub gear or back-pedal brake, the chain or the belt is tensioned by a eccentric bearing in the bottom bracket axle. Special tools and specialist knowledge are required to tension the chain. Contact specialist dealer.
Remove the chain guard on pedelecs with a circumferential chain guard.
1 Place the pedelec on stand.
2 Check the chain and belt tension in three or four positions, turning the crank a full revolution.
Figure 163: Checking the chain tension
If the chain or the belt can be pushed more than 2 cm, the chain will need to be re-tensioned. Contact specialist dealer.
If the chain or belt can only be pushed up and down less than 1 cm, you will need to the chain or belt slightly. Contact specialist dealer.
The ideal chain and belt tension has been achieved if the chain can be pushed between a maximum of 10 and 15 mm in the middle between the pinion and the toothed wheel. The crank must also turn without resistance.
7.5.10 Checking the gear shift1 Check whether all gear shift components are
free of damage.
2 Contact your specialist dealer if components are damaged.
3 Place the pedelec on stand.
4 Turn the pedal crank clockwise.
5 Switch through all speeds.
6 Check that pedelec can switch through all speeds without making unusual noises.
7 Adjust the gear shift if gears can not be changed correctly.
7.5.10.1 Electric gear shift
1 Check the cable connections for damage and corrosion and ensure they are firmly in position.
If cable connections are loose, damaged or corroded, contact your specialist dealer.
7.5.10.2 Mechanical gear shift
1 Change gear a number of times. Check whether the Bowden cables get stuck or they make scraping noises.
2 Check the physical condition of the Bowden cables for visible damage and check to see if wire strands are broken.
Have defective Bowden cables replaced. Contact specialist dealer.
7.5.10.3 Checking the derailleur gears
1 Check that there is clearance between the chain tensioner and spokes.
If there is no clearance or the chain scrapes against the spokes or tyres, contact your specialist dealer.
2 Check that there is clearance between the chain or rear derailleur and spokes.
If there is no clearance or the chain scrapes against the spokes, contact your specialist dealer.
10-15 mm10-15 mm
MY22B03 - 32_1.0_23.08.2021 164
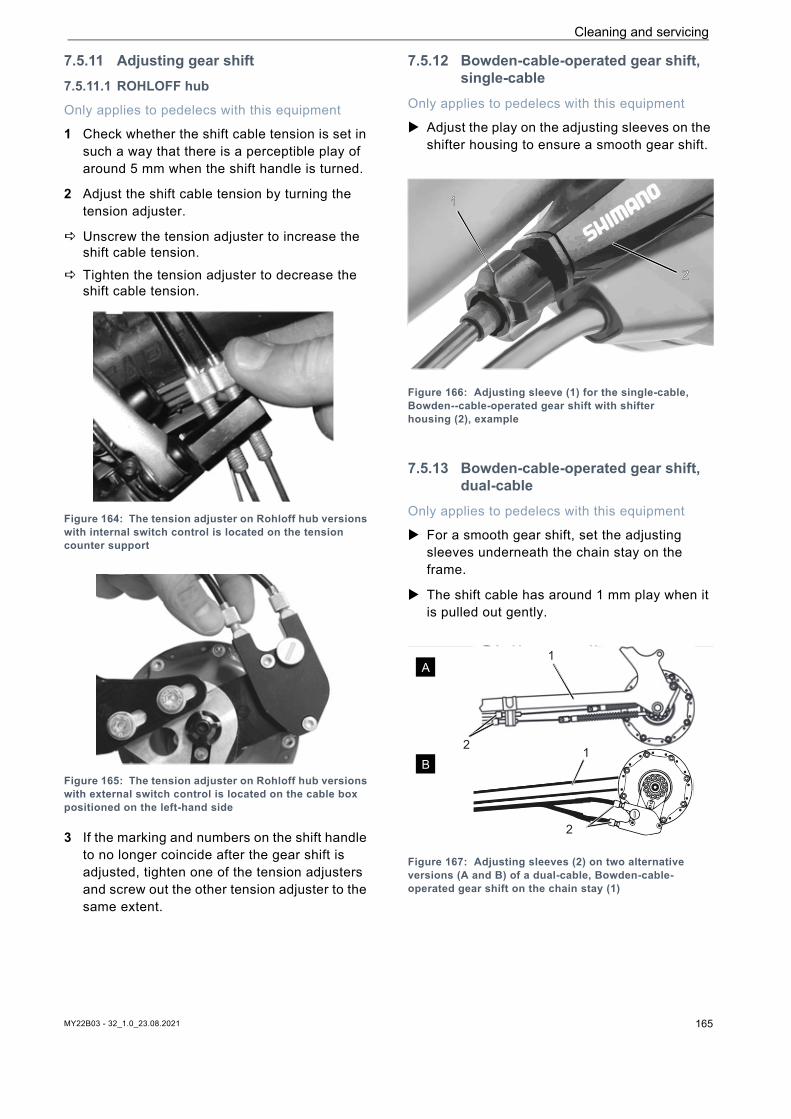
Cleaning and servicing
7.5.11 Adjusting gear shift7.5.11.1 ROHLOFF hub
Only applies to pedelecs with this equipment
1 Check whether the shift cable tension is set in such a way that there is a perceptible play of around 5 mm when the shift handle is turned.
2 Adjust the shift cable tension by turning the tension adjuster.
Unscrew the tension adjuster to increase the shift cable tension.
Tighten the tension adjuster to decrease the shift cable tension.
Figure 164: The tension adjuster on Rohloff hub versions with internal switch control is located on the tension counter support
Figure 165: The tension adjuster on Rohloff hub versions with external switch control is located on the cable box positioned on the left-hand side
3 If the marking and numbers on the shift handle to no longer coincide after the gear shift is adjusted, tighten one of the tension adjusters and screw out the other tension adjuster to the same extent.
7.5.12 Bowden-cable-operated gear shift, single-cable
Only applies to pedelecs with this equipment
Adjust the play on the adjusting sleeves on the shifter housing to ensure a smooth gear shift.
Figure 166: Adjusting sleeve (1) for the single-cable, Bowden--cable-operated gear shift with shifter housing (2), example
7.5.13 Bowden-cable-operated gear shift, dual-cable
Only applies to pedelecs with this equipment
For a smooth gear shift, set the adjusting sleeves underneath the chain stay on the frame.
The shift cable has around 1 mm play when it is pulled out gently.
Figure 167: Adjusting sleeves (2) on two alternative versions (A and B) of a dual-cable, Bowden-cable-operated gear shift on the chain stay (1)
2
1
1A
B
1
2
2
1
MY22B03 - 32_1.0_23.08.2021 165
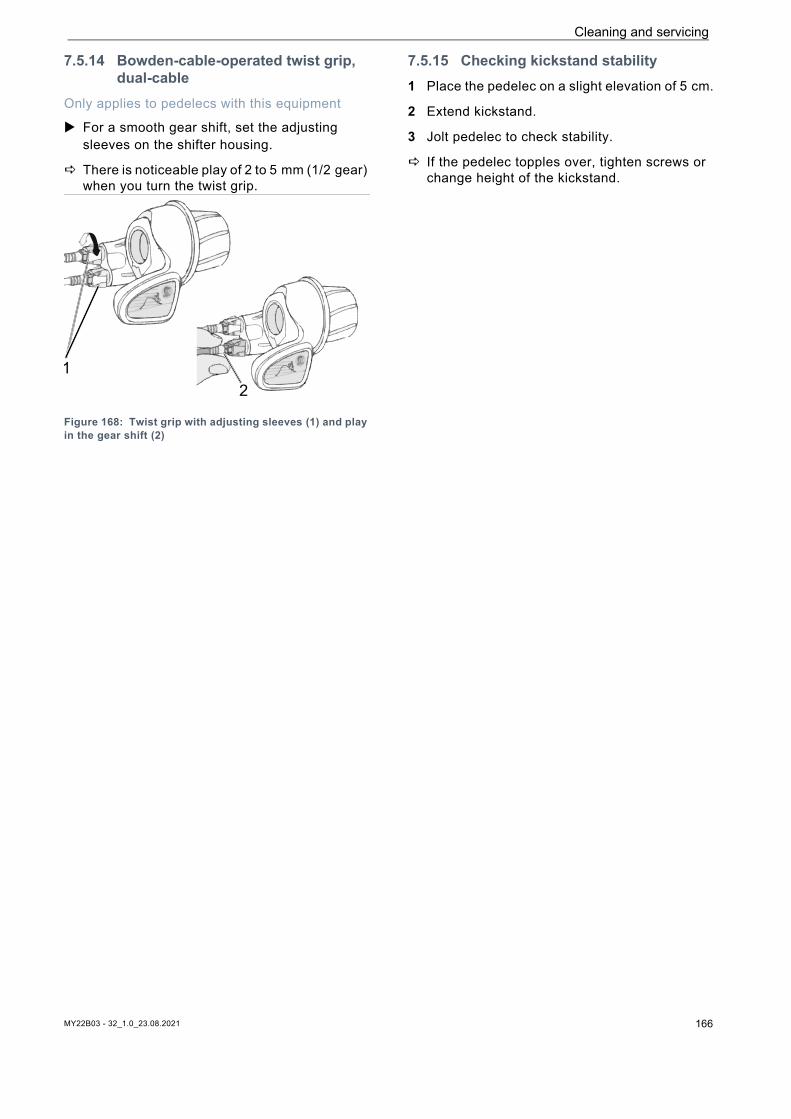
Cleaning and servicing
7.5.14 Bowden-cable-operated twist grip, dual-cable
Only applies to pedelecs with this equipment
For a smooth gear shift, set the adjusting sleeves on the shifter housing.
There is noticeable play of 2 to 5 mm (1/2 gear) when you turn the twist grip.
Figure 168: Twist grip with adjusting sleeves (1) and play in the gear shift (2)
7.5.15 Checking kickstand stability1 Place the pedelec on a slight elevation of 5 cm.
2 Extend kickstand.
3 Jolt pedelec to check stability.
If the pedelec topples over, tighten screws or change height of the kickstand.
12
MY22B03 - 32_1.0_23.08.2021 166
Maintenance
8 Maintenance
8.1 Initial inspection
Vibrations produced while riding can cause screws and springs that were tightened during manufacture of the pedelec to settle or come loose.
Arrange an appointment for the initial inspection directly when purchasing the pedelec.
Have the initial inspection entered and stamped in the maintenance book.
8.2 Maintenance
You must have your specialist dealer perform maintenance every six months as a minimum. This is the only way to ensure that the pedelec remains safe and fully functional.
Maintenance tasks require technical expertise, special tools and special lubricants. The pedelec may become damaged if the stipulated maintenance intervals and procedures are not carried out. This is why only specialist dealers may carry out maintenance.
Contact your specialist dealer and arrange an appointment.
Enter and stamp maintenance tasks in the maintenance book.
8.3 Component-specific maintenance tasks
High-quality components require extra maintenance. Maintenance tasks require technical expertise, special tools and special lubricants. The pedelec may become damaged if the stipulated maintenance intervals and procedures are not carried out. This is why only specialist dealers may carry out maintenance.
Correct maintenance on the fork not only guarantees a long service life, but also ensures optimal performance.
Each maintenance interval shows the maximum cycling hours for the required type of maintenance that the component manufacturer recommends.
Optimise performance with shorter maintenance intervals, depending on use, terrain and environmental conditions.
After 200 km or 4 weeks after purchase
Carrying out the initial inspection, see Section 8.4.
every six months
Perform maintenance.
Enter any components with extra maintenance requirements with their corresponding maintenance intervals into the maintenance book when the pedelec is purchased.
Inform the buyer of the additional maintenance schedule.
Enter and stamp maintenance tasks in the maintenance book.
MY22B03 - 32_1.0_23.08.2021 167
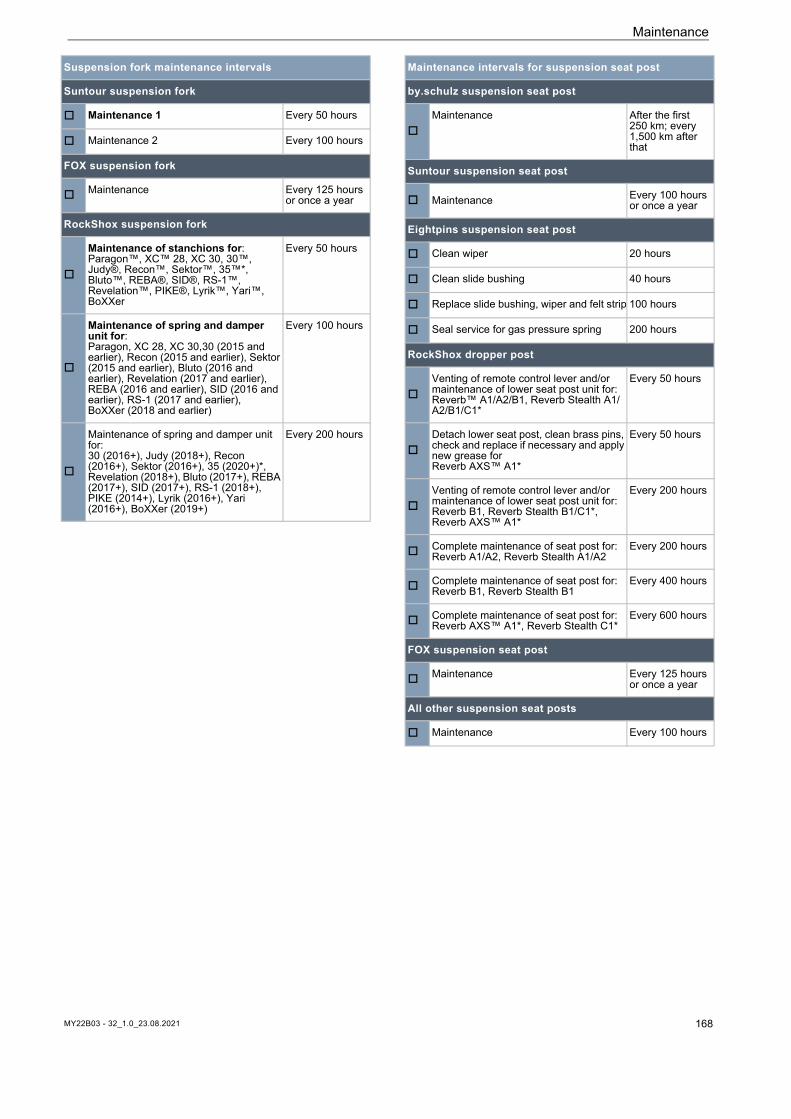
Maintenance
Suspension fork maintenance intervals
Suntour suspension fork
Maintenance 1 Every 50 hours
Maintenance 2 Every 100 hours
FOX suspension fork
Maintenance Every 125 hours or once a year
RockShox suspension fork
Maintenance of stanchions for:Paragon™, XC™ 28, XC 30, 30™, Judy®, Recon™, Sektor™, 35™*, Bluto™, REBA®, SID®, RS-1™, Revelation™, PIKE®, Lyrik™, Yari™, BoXXer
Every 50 hours
Maintenance of spring and damper unit for:Paragon, XC 28, XC 30,30 (2015 and earlier), Recon (2015 and earlier), Sektor (2015 and earlier), Bluto (2016 and earlier), Revelation (2017 and earlier), REBA (2016 and earlier), SID (2016 and earlier), RS-1 (2017 and earlier), BoXXer (2018 and earlier)
Every 100 hours
Maintenance of spring and damper unit for:30 (2016+), Judy (2018+), Recon (2016+), Sektor (2016+), 35 (2020+)*, Revelation (2018+), Bluto (2017+), REBA (2017+), SID (2017+), RS-1 (2018+), PIKE (2014+), Lyrik (2016+), Yari (2016+), BoXXer (2019+)
Every 200 hours
Maintenance intervals for suspension seat post
by.schulz suspension seat post
Maintenance After the first
250 km; every 1,500 km after that
Suntour suspension seat post
Maintenance Every 100 hours or once a year
Eightpins suspension seat post
Clean wiper 20 hours
Clean slide bushing 40 hours
Replace slide bushing, wiper and felt strip 100 hours
Seal service for gas pressure spring 200 hours
RockShox dropper post
Venting of remote control lever and/or maintenance of lower seat post unit for:Reverb™ A1/A2/B1, Reverb Stealth A1/A2/B1/C1*
Every 50 hours
Detach lower seat post, clean brass pins, check and replace if necessary and apply new grease for Reverb AXS™ A1*
Every 50 hours
Venting of remote control lever and/or maintenance of lower seat post unit for:Reverb B1, Reverb Stealth B1/C1*, Reverb AXS™ A1*
Every 200 hours
Complete maintenance of seat post for:Reverb A1/A2, Reverb Stealth A1/A2
Every 200 hours
Complete maintenance of seat post for:Reverb B1, Reverb Stealth B1
Every 400 hours
Complete maintenance of seat post for:Reverb AXS™ A1*, Reverb Stealth C1*
Every 600 hours
FOX suspension seat post
Maintenance Every 125 hours or once a year
All other suspension seat posts
Maintenance Every 100 hours
MY22B03 - 32_1.0_23.08.2021 168
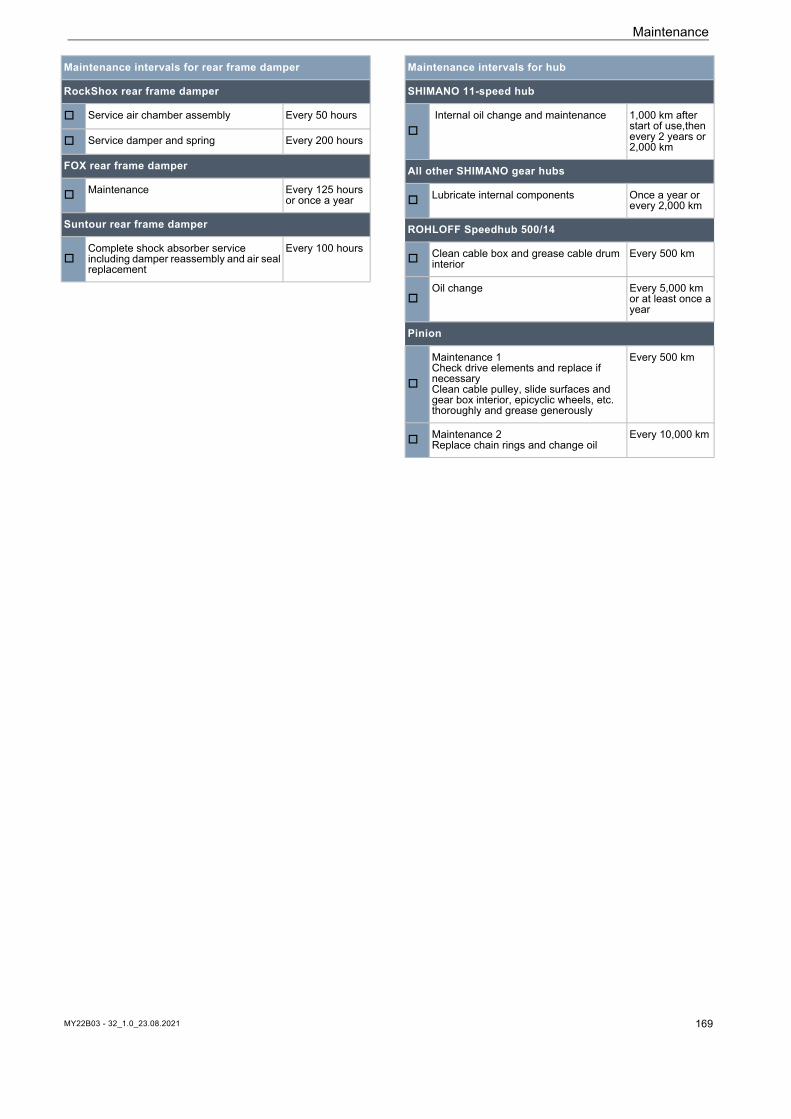
Maintenance
Maintenance intervals for rear frame damper
RockShox rear frame damper
Service air chamber assembly Every 50 hours
Service damper and spring Every 200 hours
FOX rear frame damper
Maintenance Every 125 hours or once a year
Suntour rear frame damper
Complete shock absorber service including damper reassembly and air seal replacement
Every 100 hours
Maintenance intervals for hub
SHIMANO 11-speed hub
Internal oil change and maintenance 1,000 km after
start of use,then every 2 years or 2,000 km
All other SHIMANO gear hubs
Lubricate internal components Once a year or every 2,000 km
ROHLOFF Speedhub 500/14
Clean cable box and grease cable drum interior
Every 500 km
Oil change Every 5,000 km
or at least once a year
Pinion
Maintenance 1Check drive elements and replace if necessaryClean cable pulley, slide surfaces and gear box interior, epicyclic wheels, etc. thoroughly and grease generously
Every 500 km
Maintenance 2Replace chain rings and change oil
Every 10,000 km
MY22B03 - 32_1.0_23.08.2021 169
Maintenance
8.4 Carry out initial inspection
Vibration produced while riding can cause screws and springs that were tightened during manufacture of the pedelec to settle or come loose.
Check quick release system is fixed in position.
Check all tightening torques of screws and screw connections.
Incorrectly fastened screws may come loose due to impact. The stem may no longer be firmly fixed in its position as a result. This will cause a crash with injuries.
Check the handlebars and the stem quick release system are firmly in position after the first two hours of riding.
Injury due to damaged brakes
Special tools and specialist knowledge are required to repair the brakes. Incorrect or unauthorised assembly can damage the brakes. This may lead to an accident with serious injuries.
Only specialist dealers may carry out repairs on brakes.
Only carry out work or changes, such as dismantling, sanding or painting, which are permitted and described in the brake operating instructions.
Injury to the eyes
Problems may arise if the settings are not made properly and you may sustain serious injuries as a result.
Always wear safety glasses during maintenance work.
Crash and falling caused by unintentional activationThere is a risk of injury if the drive system is activated unintentionally.
Remove the battery before maintenance.
Crash caused by material fatigueIf the service life of a component has expired, the component may suddenly fail. This may cause a crash with injuries.
Have the specialist dealer carry out basic cleaning of the pedelec every six months, preferably at the same time as the required servicing work.
WARNING!
CAUTION!
Hazard for the environment due to toxic substances
The brake system contains toxic and environmentally harmful oils and lubricants. Such fluids will contaminate if they enter the sewers or groundwater.
Dispose of lubricants and oils left over after repairs in an environmentally responsible way in accordance with statutory regulations.
Notice
The motor is maintenance-free and only qualified specialist personnel may open it.
Never open the motor.
CAUTION!
MY22B03 - 32_1.0_23.08.2021 170
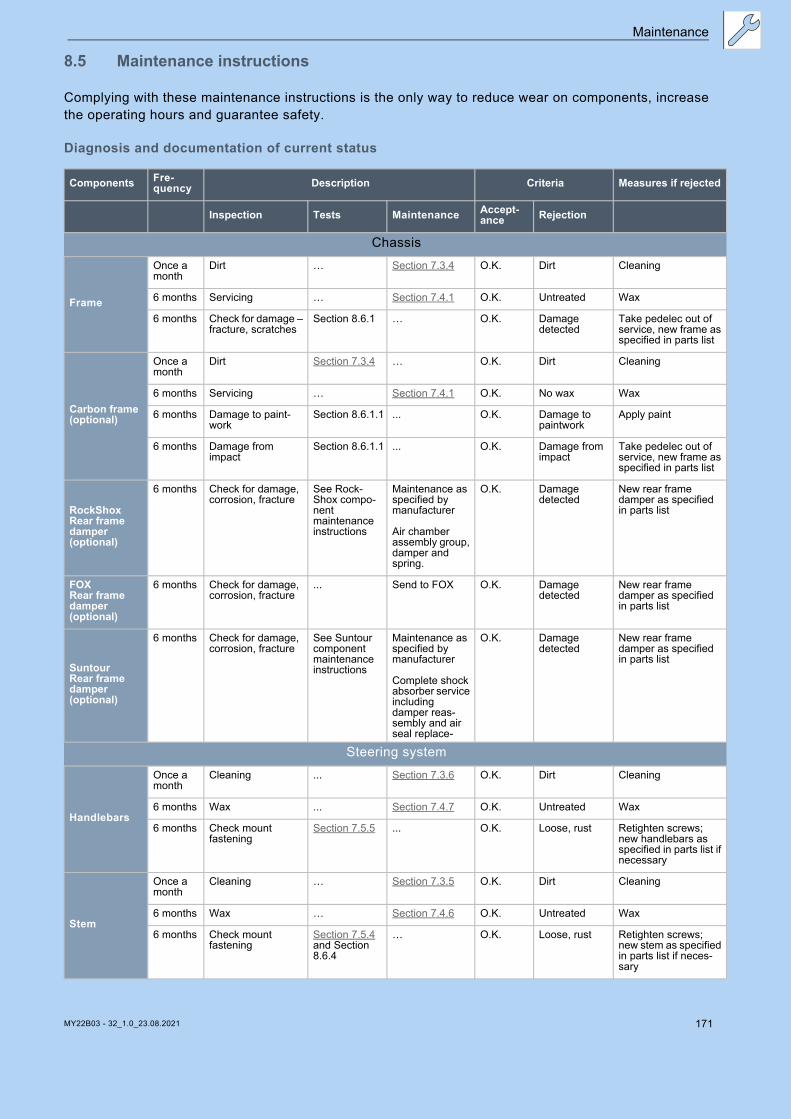
Maintenance
8.5 Maintenance instructions
Complying with these maintenance instructions is the only way to reduce wear on components, increase the operating hours and guarantee safety.
Diagnosis and documentation of current status
Components Fre-quency Description Criteria Measures if rejected
Inspection Tests Maintenance Accept-ance Rejection
Chassis
Frame
Once a month
Dirt … Section 7.3.4 O.K. Dirt Cleaning
6 months Servicing … Section 7.4.1 O.K. Untreated Wax
6 months Check for damage – fracture, scratches
Section 8.6.1 … O.K. Damage detected
Take pedelec out of service, new frame as specified in parts list
Carbon frame(optional)
Once a month
Dirt Section 7.3.4 … O.K. Dirt Cleaning
6 months Servicing … Section 7.4.1 O.K. No wax Wax
6 months Damage to paint-work
Section 8.6.1.1 ... O.K. Damage to paintwork
Apply paint
6 months Damage from impact
Section 8.6.1.1 ... O.K. Damage from impact
Take pedelec out of service, new frame as specified in parts list
RockShox Rear frame damper (optional)
6 months Check for damage, corrosion, fracture
See Rock-Shox compo-nent maintenance instructions
Maintenance as specified by manufacturer
Air chamber assembly group, damper and spring.
O.K. Damage detected
New rear frame damper as specified in parts list
FOXRear frame damper (optional)
6 months Check for damage, corrosion, fracture
... Send to FOX O.K. Damage detected
New rear frame damper as specified in parts list
SuntourRear frame damper (optional)
6 months Check for damage, corrosion, fracture
See Suntour component maintenance instructions
Maintenance as specified by manufacturer
Complete shock absorber service including damper reas-sembly and air seal replace-
O.K. Damage detected
New rear frame damper as specified in parts list
Steering system
Handlebars
Once a month
Cleaning ... Section 7.3.6 O.K. Dirt Cleaning
6 months Wax ... Section 7.4.7 O.K. Untreated Wax
6 months Check mount fastening
Section 7.5.5 ... O.K. Loose, rust Retighten screws; new handlebars as specified in parts list if necessary
Stem
Once a month
Cleaning … Section 7.3.5 O.K. Dirt Cleaning
6 months Wax … Section 7.4.6 O.K. Untreated Wax
6 months Check mount fastening
Section 7.5.4 and Section 8.6.4
… O.K. Loose, rust Retighten screws; new stem as specified in parts list if neces-sary
MY22B03 - 32_1.0_23.08.2021 171
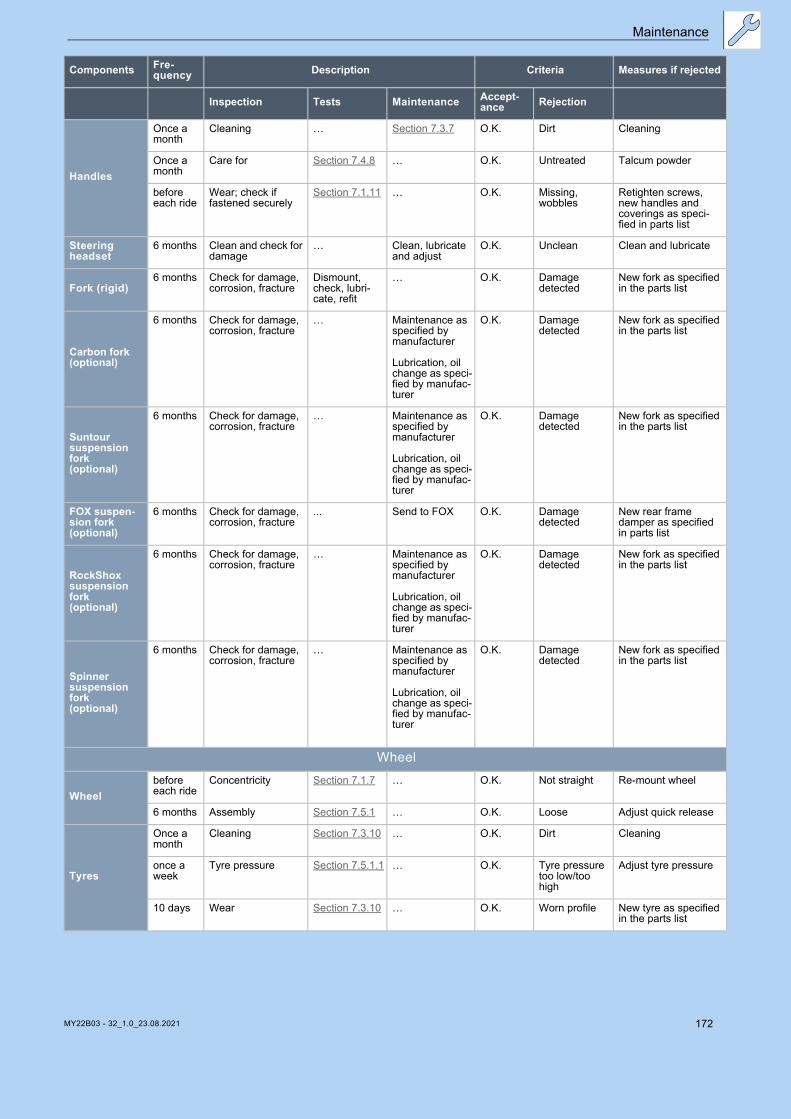
Maintenance
Inspection Tests Maintenance Accept-ance Rejection
Handles
Once a month
Cleaning … Section 7.3.7 O.K. Dirt Cleaning
Once a month
Care for Section 7.4.8 … O.K. Untreated Talcum powder
before each ride
Wear; check if fastened securely
Section 7.1.11 … O.K. Missing, wobbles
Retighten screws, new handles and coverings as speci-fied in parts list
Steering headset
6 months Clean and check for damage
… Clean, lubricate and adjust
O.K. Unclean Clean and lubricate
Fork (rigid)6 months Check for damage,
corrosion, fractureDismount, check, lubri-cate, refit
… O.K. Damage detected
New fork as specified in the parts list
Carbon fork (optional)
6 months Check for damage, corrosion, fracture
… Maintenance as specified by manufacturer
Lubrication, oil change as speci-fied by manufac-turer
O.K. Damage detected
New fork as specified in the parts list
Suntour suspension fork(optional)
6 months Check for damage, corrosion, fracture
… Maintenance as specified by manufacturer
Lubrication, oil change as speci-fied by manufac-turer
O.K. Damage detected
New fork as specified in the parts list
FOX suspen-sion fork(optional)
6 months Check for damage, corrosion, fracture
... Send to FOX O.K. Damage detected
New rear frame damper as specified in parts list
RockShox suspension fork(optional)
6 months Check for damage, corrosion, fracture
… Maintenance as specified by manufacturer
Lubrication, oil change as speci-fied by manufac-turer
O.K. Damage detected
New fork as specified in the parts list
Spinner suspension fork(optional)
6 months Check for damage, corrosion, fracture
… Maintenance as specified by manufacturer
Lubrication, oil change as speci-fied by manufac-turer
O.K. Damage detected
New fork as specified in the parts list
Wheel
Wheelbefore each ride
Concentricity Section 7.1.7 … O.K. Not straight Re-mount wheel
6 months Assembly Section 7.5.1 … O.K. Loose Adjust quick release
Tyres
Once a month
Cleaning Section 7.3.10 … O.K. Dirt Cleaning
once a week
Tyre pressure Section 7.5.1.1 … O.K. Tyre pressure too low/too high
Adjust tyre pressure
10 days Wear Section 7.3.10 … O.K. Worn profile New tyre as specified in the parts list
Components Fre-quency Description Criteria Measures if rejected
MY22B03 - 32_1.0_23.08.2021 172
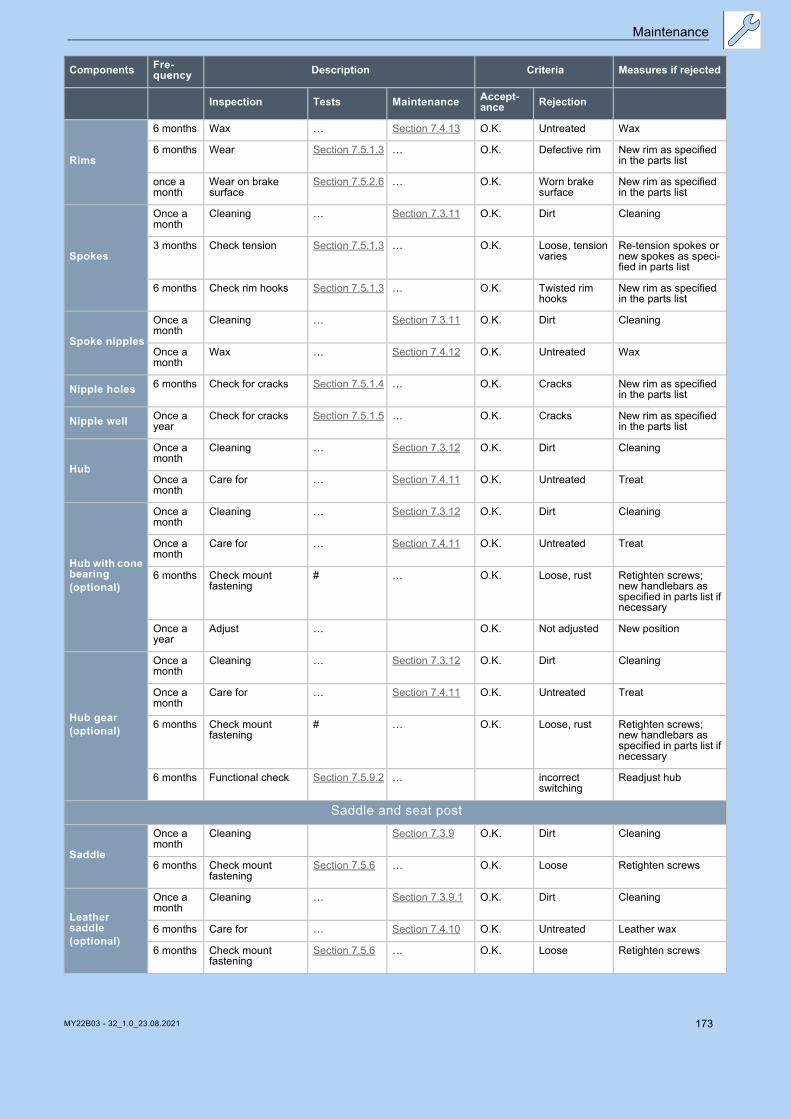
Maintenance
Inspection Tests Maintenance Accept-ance Rejection
Rims
6 months Wax … Section 7.4.13 O.K. Untreated Wax
6 months Wear Section 7.5.1.3 … O.K. Defective rim New rim as specified in the parts list
once a month
Wear on brake surface
Section 7.5.2.6 … O.K. Worn brake surface
New rim as specified in the parts list
Spokes
Once a month
Cleaning … Section 7.3.11 O.K. Dirt Cleaning
3 months Check tension Section 7.5.1.3 … O.K. Loose, tension varies
Re-tension spokes or new spokes as speci-fied in parts list
6 months Check rim hooks Section 7.5.1.3 … O.K. Twisted rim hooks
New rim as specified in the parts list
Spoke nipples
Once a month
Cleaning … Section 7.3.11 O.K. Dirt Cleaning
Once a month
Wax … Section 7.4.12 O.K. Untreated Wax
Nipple holes 6 months Check for cracks Section 7.5.1.4 … O.K. Cracks New rim as specified in the parts list
Nipple well Once a year
Check for cracks Section 7.5.1.5 … O.K. Cracks New rim as specified in the parts list
Hub
Once a month
Cleaning … Section 7.3.12 O.K. Dirt Cleaning
Once a month
Care for … Section 7.4.11 O.K. Untreated Treat
Hub with cone bearing(optional)
Once a month
Cleaning … Section 7.3.12 O.K. Dirt Cleaning
Once a month
Care for … Section 7.4.11 O.K. Untreated Treat
6 months Check mount fastening
# … O.K. Loose, rust Retighten screws; new handlebars as specified in parts list if necessary
Once a year
Adjust … O.K. Not adjusted New position
Hub gear(optional)
Once a month
Cleaning … Section 7.3.12 O.K. Dirt Cleaning
Once a month
Care for … Section 7.4.11 O.K. Untreated Treat
6 months Check mount fastening
# … O.K. Loose, rust Retighten screws; new handlebars as specified in parts list if necessary
6 months Functional check Section 7.5.9.2 … incorrect switching
Readjust hub
Saddle and seat post
Saddle
Once a month
Cleaning Section 7.3.9 O.K. Dirt Cleaning
6 months Check mount fastening
Section 7.5.6 … O.K. Loose Retighten screws
Leather saddle(optional)
Once a month
Cleaning … Section 7.3.9.1 O.K. Dirt Cleaning
6 months Care for … Section 7.4.10 O.K. Untreated Leather wax
6 months Check mount fastening
Section 7.5.6 … O.K. Loose Retighten screws
Components Fre-quency Description Criteria Measures if rejected
MY22B03 - 32_1.0_23.08.2021 173
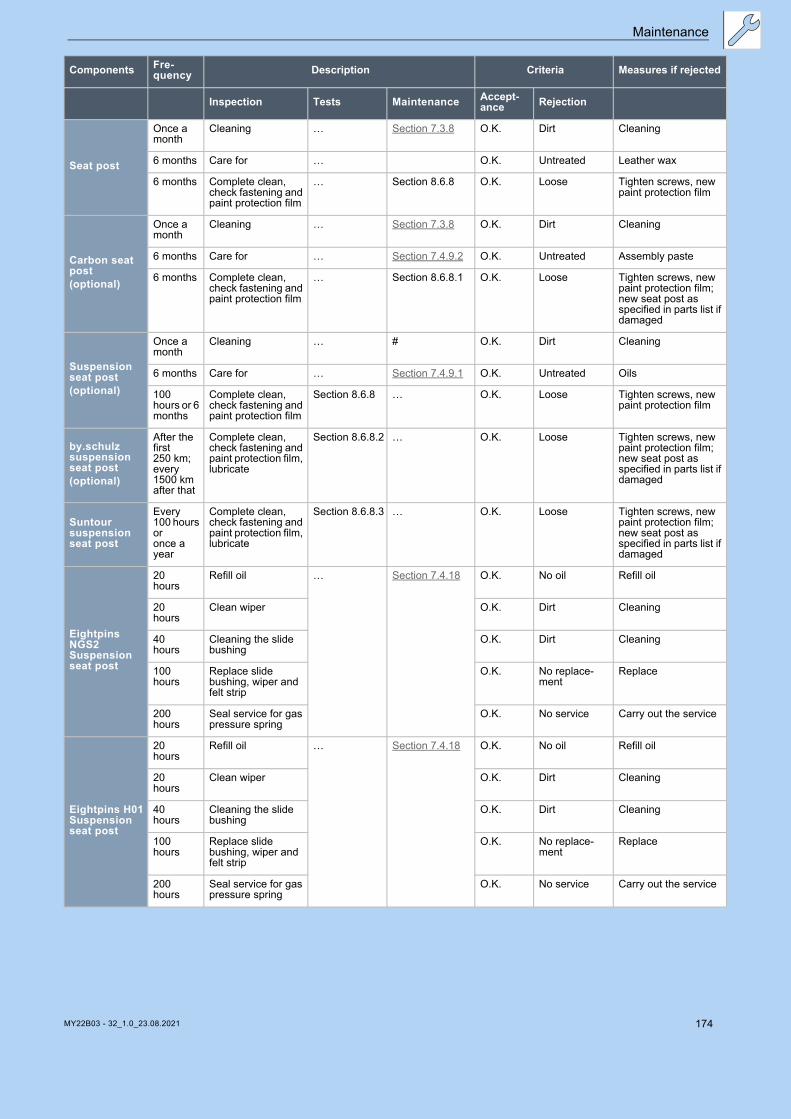
Maintenance
Inspection Tests Maintenance Accept-ance Rejection
Seat post
Once a month
Cleaning … Section 7.3.8 O.K. Dirt Cleaning
6 months Care for … O.K. Untreated Leather wax
6 months Complete clean, check fastening and paint protection film
… Section 8.6.8 O.K. Loose Tighten screws, new paint protection film
Carbon seat post(optional)
Once a month
Cleaning … Section 7.3.8 O.K. Dirt Cleaning
6 months Care for … Section 7.4.9.2 O.K. Untreated Assembly paste
6 months Complete clean, check fastening and paint protection film
… Section 8.6.8.1 O.K. Loose Tighten screws, new paint protection film; new seat post as specified in parts list if damaged
Suspension seat post(optional)
Once a month
Cleaning … # O.K. Dirt Cleaning
6 months Care for … Section 7.4.9.1 O.K. Untreated Oils
100 hours or 6 months
Complete clean, check fastening and paint protection film
Section 8.6.8 … O.K. Loose Tighten screws, new paint protection film
by.schulz suspension seat post(optional)
After the first 250 km; every 1500 km after that
Complete clean, check fastening and paint protection film, lubricate
Section 8.6.8.2 … O.K. Loose Tighten screws, new paint protection film; new seat post as specified in parts list if damaged
Suntour suspension seat post
Every 100 hours or once a year
Complete clean, check fastening and paint protection film, lubricate
Section 8.6.8.3 … O.K. Loose Tighten screws, new paint protection film; new seat post as specified in parts list if damaged
Eightpins NGS2Suspension seat post
20 hours
Refill oil … Section 7.4.18 O.K. No oil Refill oil
20 hours
Clean wiper O.K. Dirt Cleaning
40 hours
Cleaning the slide bushing
O.K. Dirt Cleaning
100 hours
Replace slide bushing, wiper and felt strip
O.K. No replace-ment
Replace
200 hours
Seal service for gas pressure spring
O.K. No service Carry out the service
Eightpins H01Suspension seat post
20 hours
Refill oil … Section 7.4.18 O.K. No oil Refill oil
20 hours
Clean wiper O.K. Dirt Cleaning
40 hours
Cleaning the slide bushing
O.K. Dirt Cleaning
100 hours
Replace slide bushing, wiper and felt strip
O.K. No replace-ment
Replace
200 hours
Seal service for gas pressure spring
O.K. No service Carry out the service
Components Fre-quency Description Criteria Measures if rejected
MY22B03 - 32_1.0_23.08.2021 174

Maintenance
Inspection Tests Maintenance Accept-ance Rejection
RockShox suspension seat post
50 hours
Venting … See manufac-turer
O.K.
50 hours
Cleaning … See manufac-turer
O.K.
200 hours
Venting … See manufac-turer
O.K.
200 hours
Complete mainte-nance
… See manufac-turer
O.K.
400 hours
Complete mainte-nance
… See manufac-turer
O.K.
600 hours
Complete mainte-nance
… See manufac-turer
O.K.
FOX suspen-sion seat post
Every 125 hours or once a year
Complete mainte-nance
See manufac-turer
At the manufac-turer FOX
... ...
Safety guardsBelt or chain guards
6 months Attachment Check mount fastening
… O.K. Loose Retighten screws
Guard 6 months Attachment Check mount fastening
… O.K. Loose Retighten screws
Motor cover 6 months Attachment Check mount fastening
… O.K. Loose Retighten screws
Brake system
Brake lever 6 months Attachment Check mount fastening
… O.K. Loose Retighten screws
Brake fluid6 months Check fluid level Depending on
time of year… O.K. Too little Top up brake fluid;
take Pedelec out of service if damaged; new brake hoses
Brake linings 6 months Brake linings, brake discs and rims
Check for damage
… O.K. Damage detected
New brake linings, brake discs and rims
Back-pedal brake braking armature
6 months Attachment Check mount fastening
… O.K. Loose Retighten screws
Brake system 6 months Attachment Check mount fastening
… O.K. Loose Retighten screws
Lighting system
Light cabling 6 months Connections, correct wiring
Check … O.K. Cable defec-tive, no light
New cabling
Rear light6 months Side light Functional
check… O.K. No constant
lightNew rear light as specified in parts list; replace if necessary
Front light6 months Side light, daytime
riding lightFunctional check
… O.K. No constant light
New front light as specified in parts list; replace if necessary
Reflectors6 months All complete, state,
fasteningCheck … O.K. Damaged or
not all complete
New reflectors
Components Fre-quency Description Criteria Measures if rejected
MY22B03 - 32_1.0_23.08.2021 175
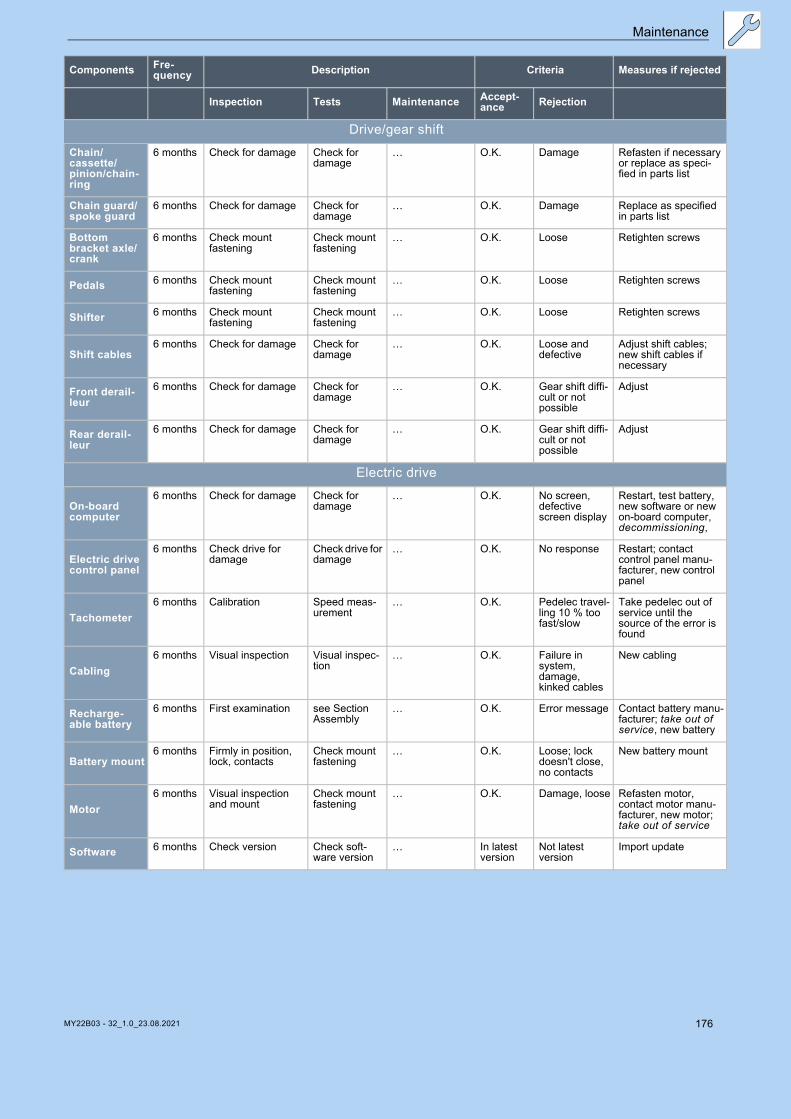
Maintenance
Inspection Tests Maintenance Accept-ance Rejection
Drive/gear shiftChain/cassette/pinion/chain-ring
6 months Check for damage Check for damage
… O.K. Damage Refasten if necessary or replace as speci-fied in parts list
Chain guard/spoke guard
6 months Check for damage Check for damage
… O.K. Damage Replace as specified in parts list
Bottom bracket axle/crank
6 months Check mount fastening
Check mount fastening
… O.K. Loose Retighten screws
Pedals 6 months Check mount fastening
Check mount fastening
… O.K. Loose Retighten screws
Shifter 6 months Check mount fastening
Check mount fastening
… O.K. Loose Retighten screws
Shift cables6 months Check for damage Check for
damage… O.K. Loose and
defectiveAdjust shift cables; new shift cables if necessary
Front derail-leur
6 months Check for damage Check for damage
… O.K. Gear shift diffi-cult or not possible
Adjust
Rear derail-leur
6 months Check for damage Check for damage
… O.K. Gear shift diffi-cult or not possible
Adjust
Electric drive
On-board computer
6 months Check for damage Check for damage
… O.K. No screen, defective screen display
Restart, test battery, new software or new on-board computer, decommissioning,
Electric drive control panel
6 months Check drive for damage
Check drive for damage
… O.K. No response Restart; contact control panel manu-facturer, new control panel
Tachometer6 months Calibration Speed meas-
urement… O.K. Pedelec travel-
ling 10 % too fast/slow
Take pedelec out of service until the source of the error is found
Cabling6 months Visual inspection Visual inspec-
tion… O.K. Failure in
system, damage, kinked cables
New cabling
Recharge-able battery
6 months First examination see Section Assembly
… O.K. Error message Contact battery manu-facturer; take out of service, new battery
Battery mount6 months Firmly in position,
lock, contactsCheck mount fastening
… O.K. Loose; lock doesn't close, no contacts
New battery mount
Motor6 months Visual inspection
and mountCheck mount fastening
… O.K. Damage, loose Refasten motor, contact motor manu-facturer, new motor; take out of service
Software 6 months Check version Check soft-ware version
… In latest version
Not latest version
Import update
Components Fre-quency Description Criteria Measures if rejected
MY22B03 - 32_1.0_23.08.2021 176

Maintenance
Technical inspection, checking safety, test ride
Inspection Tests Maintenance Accept-ance Rejection
Miscellaneous
Pannier rack
before each ride
Stability Section 7.1.5 … O.K. Loose Firm
Once a month
Dirt … Section 7.3.4 O.K. Dirt Cleaning
6 months Servicing … Section 7.4.3 O.K. Untreated Wax
6 months Check fastening and paint protection film
Section 8.5.2 … O.K. Loose Tighten screws, new paint protection film
Kickstand
Once a month
Dirt … Section 7.3.4 O.K. Dirt Cleaning
6 months Servicing … Section 7.4.5 O.K. Untreated Wax
6 months Attachment Section 7.5.15 … O.K. Loose Retighten screws
6 months Stability Section 7.5.15 … O.K. Tips over Change kickstand height
Bellbefore each ride
Sound Functional check Section 7.1.10
… O.K. No ring, too quiet, missing
New bell as specified in the parts list
Attachments(optional)
6 months Attachment Check mount fastening
… O.K. Loose Retighten screws
Components Fre-quency Description Criteria Measures if rejected
Components Description Criteria Measures if rejected
Assembly/inspection Tests Acceptance Rejection
Brake system 6 months Functional check O.K. No full braking; braking distance too long
Locate defective part in brake system and correct
Gear shift under operating load
6 months Functional check O.K. Problems when shifting gear
Readjust gear shift
Suspension components (fork, shock absorber, seat post)
6 months Functional check O.K. Suspension too deep or no longer exists
Locate defective component and correct
Electric drive6 months Functional check O.K. Loose connection,
problems when riding, accelerate
Locate defective part in electric drive and correct
Lighting system 6 months Functional check O.K. No continuous light, not bright enough
Locate defective part in lighting system and correct
Test ride 6 months Functional check No strange noises
Strange noises Locate source of noise and correct
MY22B03 - 32_1.0_23.08.2021 177
Maintenance
8.5.1 Servicing the frame 1 Check frame for cracks, warping and damage
to the paintwork.
If there are any cracks, warping or damage to the paintwork, remove the pedelec from service. New frame as specified in the parts list.
8.5.1.1 Servicing the carbon frame
You need to distinguish between scratches on the paintwork and impacts if the carbon frame paintwork is damaged.
Ask customer what caused the damage.
Examine damage with a magnifying glass to see if fibres are permanently damaged.
Damage to paintwork
1 Gently sand paintwork damage with 600-grit sandpaper.
2 Smooth edges.
3 Apply one or two coats of repair paint.
Damage from impact
There may be damage to the laminate beneath the paintwork in the case of impact damage. The frame may break even under light stress.
1 Take pedelec out of service.
2 Send frame to a fibre composite repair company or purchase new frame as specified in the parts list.
8.5.2 Checking the pannier rackScratches, cracks and breaks may appear on the pannier rack caused by the panniers and cargo boxes.
1 Examine pannier rack for scratches, cracks and breaks.
Replace damaged pannier racks.
If the paint protection film is missing or has worn away, affix a new paint protection film.
8.5.3 Servicing axle with quick release
1 Undo quick release.
2 Fasten quick release.
3 Check the position and clamping force of the quick release lever.
Crash caused by unfastened quick releaseA faulty or incorrectly installed quick release may become caught in the brake disc and block the wheel. This will cause a crash.
Install the front wheel quick release lever on the opposite side to the brake disc.
Crash caused by faulty or incorrectly installed quick release
The brake disc becomes very hot during operation. Parts of the quick release may become damaged as a result. The quick release comes loose. This will cause a crash with injuries.
The front wheel quick release lever and the brake disc must be situated on opposite sides.
Crash caused by incorrectly set clamping force
Excessively high clamping force will damage the quick release and cause it to lose its function.
Insufficient clamping force will cause a detrimental transmission of force. The suspension fork or the frame may break. This will cause a crash with serious injuries.
Never fasten a quick release using a tool (e.g. hammer or pliers).
Only use the clamping lever with the specified set clamping force.
CAUTION!
MY22B03 - 32_1.0_23.08.2021 178
Maintenance
The quick release lever is flush with the lower housing.
You should be able to see slight impression on the palm of your hand when you close the quick release lever.
Figure 169: Adjusting the quick release clamping force
4 Use a 4 mm hexagon socket spanner to adjust the clamping lever clamping force if required.
5 Check the quick release lever position and clamping force again.
Figure 170: Adjusting the quick release clamping force
8.5.4 Maintaining the stemIncorrectly fastened screws may come loose due to impact. The stem may no longer be firmly fixed in its position as a result. This will cause a crash with injuries.
Check the handlebars and the stem’s quick release are firmly in position.
8.5.5 Servicing the gear hub8.5.5.1 Adjusting the hub with cone bearing
In the case of hubs with a cone bearing, the bearing shell fixed in the hub cone body rotates with its larger ball bearing surfaces around the inner bearing cone resting against the fork end. The outer bearing shell rotating around the stationary bearing cone is subject to considerably more evenly distributed loads thanks to its larger ball running surface.
1 Attach a small, red colour marking on the lock nut.
2 Turn the wheel axle 40° to 90° every 1,000 to 2,000 km.
The bearing cone is subject to evenly distributed loads.
MY22B03 - 32_1.0_23.08.2021 179
Maintenance
8.5.6 Servicing the steering headset1 Remove fork.
2 Clean steering headset. If it is very dirty, flush the bearing with cleaning agents such as WD-40 or Karamba.
3 Check steering headset for damage.
If the steering headset is damaged, replace steering headset as specified in the parts list.
4 Grease steering headset and bearing seat with highly viscous, water-repellent grease (e.g. Dura Ace special grease by SHIMANO).
5 Re-fit fork with steering headset as per fork instructions.
8.5.7 Servicing the forkOnly applies to pedelecs with this equipment
1 Remove fork.
2 Check fork for cracks, warping and damage to the paintwork.
If there are any cracks, warping or damage to the paintwork, remove the pedelec from service. New fork as specified in the parts list.
3 Clean inside and exterior.
4 Grease fork.
5 Install fork.
Injury due to explosionThe air chamber is pressurised. If the air system in a faulty suspension fork is maintained, it can explode and cause serious injury.
Wear safety goggles, protective gloves and safety clothing when assembling or carrying out maintenance on the bicycle.
Release the air for the air chambers. Detach all air insert fitments.
Never service or dismantle a suspension fork if it has not completely rebounded.
Hazard for the environment due to toxic substances
The suspension fork contains toxic and environmentally harmful oils and lubricants. Such fluids will contaminate if they enter the sewers or groundwater.
Dispose of lubricants and oils left over after repairs in an environmentally responsible way in accordance with statutory regulations.
WARNING!
CAUTION!
MY22B03 - 32_1.0_23.08.2021 180
Maintenance
8.5.7.1 Servicing the carbon suspension fork
1 Remove fork.
2 Check fork for cracks, warping and damage to the paintwork.
3 You need to distinguish between scratches on the paintwork and impacts if the carbon suspension fork paintwork is damaged.
Ask customer what caused the damage.
Examine damage with a magnifying glass to see if fibres are permanently damaged.
Damage to paintwork
1 Gently sand paintwork damage with 600-grit sandpaper.
2 Smooth edges.
3 Apply one or two coats of repair paint.
Damage from impact
There may be damage to the laminate beneath the paintwork in the case of impact damage. The fork may break even under light stress.
Take pedelec out of service. New fork as specified in the parts list.
The fork must be free from any defects.
4 Clean inside and exterior.
5 Grease fork.
6 Install fork.
8.5.7.2 Servicing the suspension fork
1 Remove fork.
2 Check fork for cracks, warping and damage to the paintwork.
If there are any cracks, warping or damage to the paintwork, remove the pedelec from service. New fork as specified in the parts list.
3 Dismantle suspension fork.
4 Lubricate dust seals and slide bushings.
5 Check torques.
6 Clean inside and exterior.
7 Grease fork.
8 Install fork.
9 Adjust suspension fork (see Section 6.3.14).
MY22B03 - 32_1.0_23.08.2021 181
Maintenance
8.5.8 Servicing seat post
1 Remove seat post from the frame.
2 Clean seat post on the inside and outside.
3 Examine seat post rack for scratches, cracks and breaks.
Replaced damaged seat post as specified in the parts list.
If the paint protection film is missing or has worn away, affix a new paint protection film.
4 Fit seat post as per height specifications in the pedelec pass.
8.5.8.1 Servicing the carbon seat post
Only applies to pedelecs with this equipment
You need to distinguish between scratches on the paintwork and impacts if the carbon seat post paintwork is damaged.
Ask customer what caused the damage.
Examine damage with a magnifying glass to see if fibres are permanently damaged.
Damage to paintwork
1 Gently sand paintwork damage with 600-grit sandpaper.
2 Smooth edges.
3 Apply one or two coats of repair paint.
Damage from impact
There may be damage to the laminate beneath the paintwork in the case of impact damage. The carbon seat post may break even under light stress.
1 Take pedelec out of service.
2 New carbon seat post as specified in the parts list.
Intoxication from lubrication oilThe lubrication oil for Eightpins seat posts is toxic if touched or inhaled.
Always wear safety goggles and nitrile gloves when working with lubrication oil.
Lubricate seat post in the open air or in a well-ventilated room only.
Avoid skin coming into contact with lubrication oil. Wear nitrile gloves when lubricating, cleaning and servicing the vehicle.
Use an oil catchment tray under the section where the seat post is serviced.
WARNING!
MY22B03 - 32_1.0_23.08.2021 182
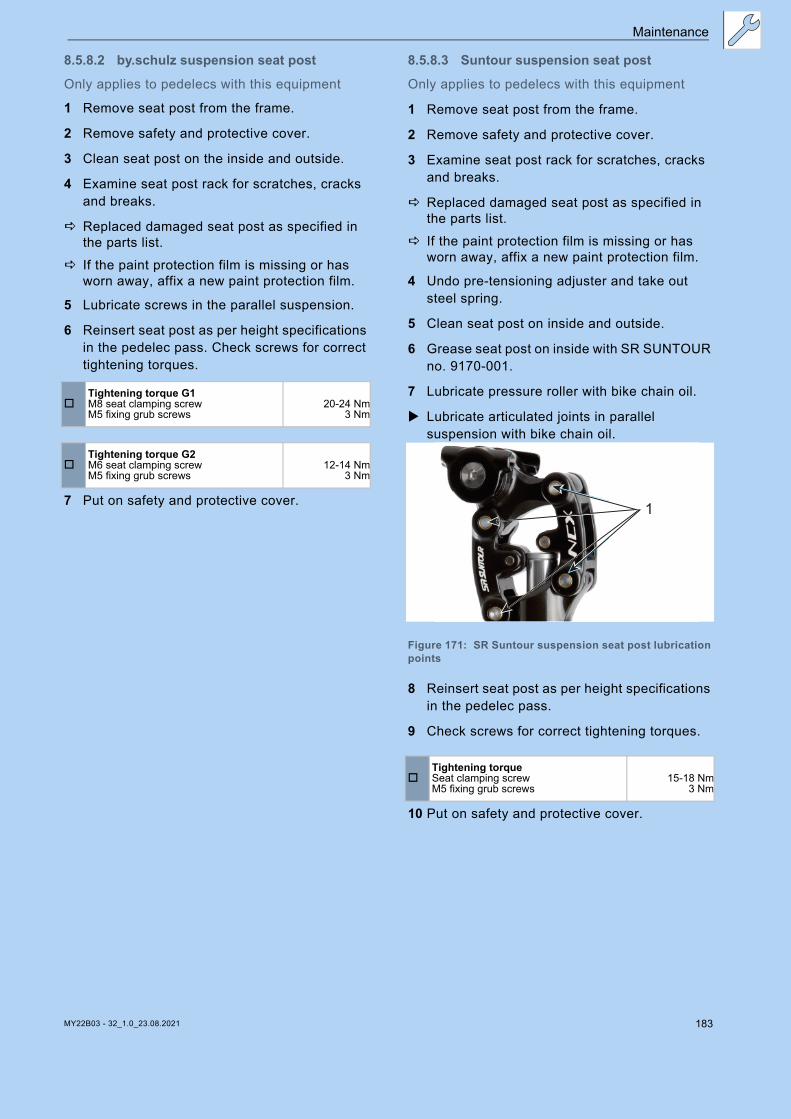
Maintenance
8.5.8.2 by.schulz suspension seat post
Only applies to pedelecs with this equipment
1 Remove seat post from the frame.
2 Remove safety and protective cover.
3 Clean seat post on the inside and outside.
4 Examine seat post rack for scratches, cracks and breaks.
Replaced damaged seat post as specified in the parts list.
If the paint protection film is missing or has worn away, affix a new paint protection film.
5 Lubricate screws in the parallel suspension.
6 Reinsert seat post as per height specifications in the pedelec pass. Check screws for correct tightening torques.
7 Put on safety and protective cover.
8.5.8.3 Suntour suspension seat post
Only applies to pedelecs with this equipment
1 Remove seat post from the frame.
2 Remove safety and protective cover.
3 Examine seat post rack for scratches, cracks and breaks.
Replaced damaged seat post as specified in the parts list.
If the paint protection film is missing or has worn away, affix a new paint protection film.
4 Undo pre-tensioning adjuster and take out steel spring.
5 Clean seat post on inside and outside.
6 Grease seat post on inside with SR SUNTOUR no. 9170-001.
7 Lubricate pressure roller with bike chain oil.
Lubricate articulated joints in parallel suspension with bike chain oil.
Figure 171: SR Suntour suspension seat post lubrication points
8 Reinsert seat post as per height specifications in the pedelec pass.
9 Check screws for correct tightening torques.
10 Put on safety and protective cover.
Tightening torque G1M8 seat clamping screw M5 fixing grub screws
20-24 Nm3 Nm
Tightening torque G2M6 seat clamping screw M5 fixing grub screws
12-14 Nm3 Nm
Tightening torque Seat clamping screw M5 fixing grub screws
15-18 Nm3 Nm
1
MY22B03 - 32_1.0_23.08.2021 183
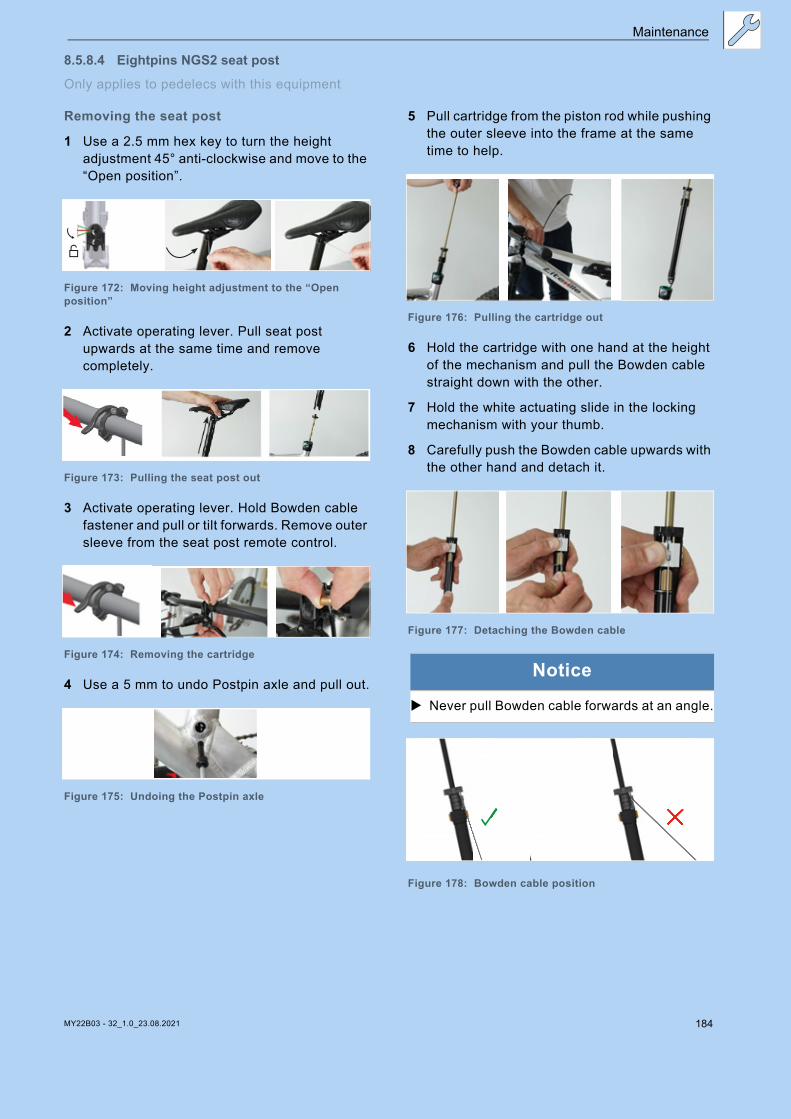
Maintenance
8.5.8.4 Eightpins NGS2 seat post
Only applies to pedelecs with this equipment
Removing the seat post
1 Use a 2.5 mm hex key to turn the height adjustment 45° anti-clockwise and move to the “Open position”.
Figure 172: Moving height adjustment to the “Open position”
2 Activate operating lever. Pull seat post upwards at the same time and remove completely.
Figure 173: Pulling the seat post out
3 Activate operating lever. Hold Bowden cable fastener and pull or tilt forwards. Remove outer sleeve from the seat post remote control.
Figure 174: Removing the cartridge
4 Use a 5 mm to undo Postpin axle and pull out.
Figure 175: Undoing the Postpin axle
5 Pull cartridge from the piston rod while pushing the outer sleeve into the frame at the same time to help.
Figure 176: Pulling the cartridge out
6 Hold the cartridge with one hand at the height of the mechanism and pull the Bowden cable straight down with the other.
7 Hold the white actuating slide in the locking mechanism with your thumb.
8 Carefully push the Bowden cable upwards with the other hand and detach it.
Figure 177: Detaching the Bowden cable
Figure 178: Bowden cable position
Notice
Never pull Bowden cable forwards at an angle.
MY22B03 - 32_1.0_23.08.2021 184
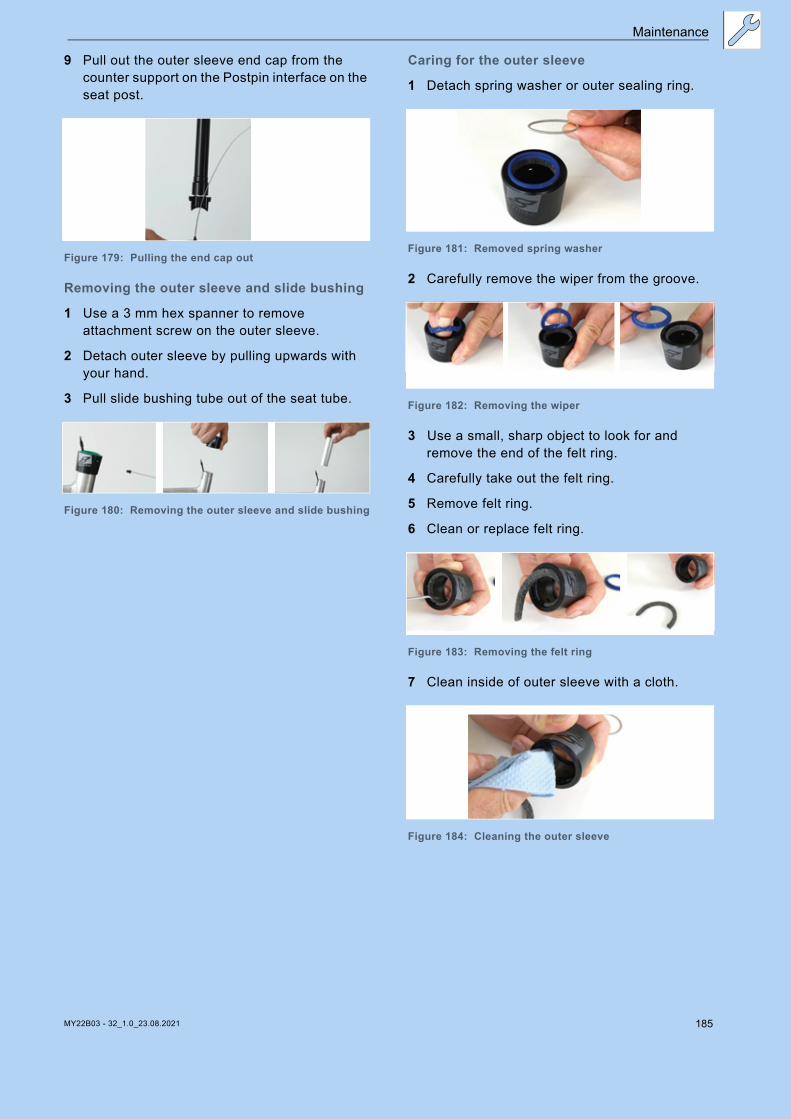
Maintenance
9 Pull out the outer sleeve end cap from the counter support on the Postpin interface on the seat post.
Figure 179: Pulling the end cap out
Removing the outer sleeve and slide bushing
1 Use a 3 mm hex spanner to remove attachment screw on the outer sleeve.
2 Detach outer sleeve by pulling upwards with your hand.
3 Pull slide bushing tube out of the seat tube.
Figure 180: Removing the outer sleeve and slide bushing
Caring for the outer sleeve
1 Detach spring washer or outer sealing ring.
Figure 181: Removed spring washer
2 Carefully remove the wiper from the groove.
Figure 182: Removing the wiper
3 Use a small, sharp object to look for and remove the end of the felt ring.
4 Carefully take out the felt ring.
5 Remove felt ring.
6 Clean or replace felt ring.
Figure 183: Removing the felt ring
7 Clean inside of outer sleeve with a cloth.
Figure 184: Cleaning the outer sleeve
MY22B03 - 32_1.0_23.08.2021 185
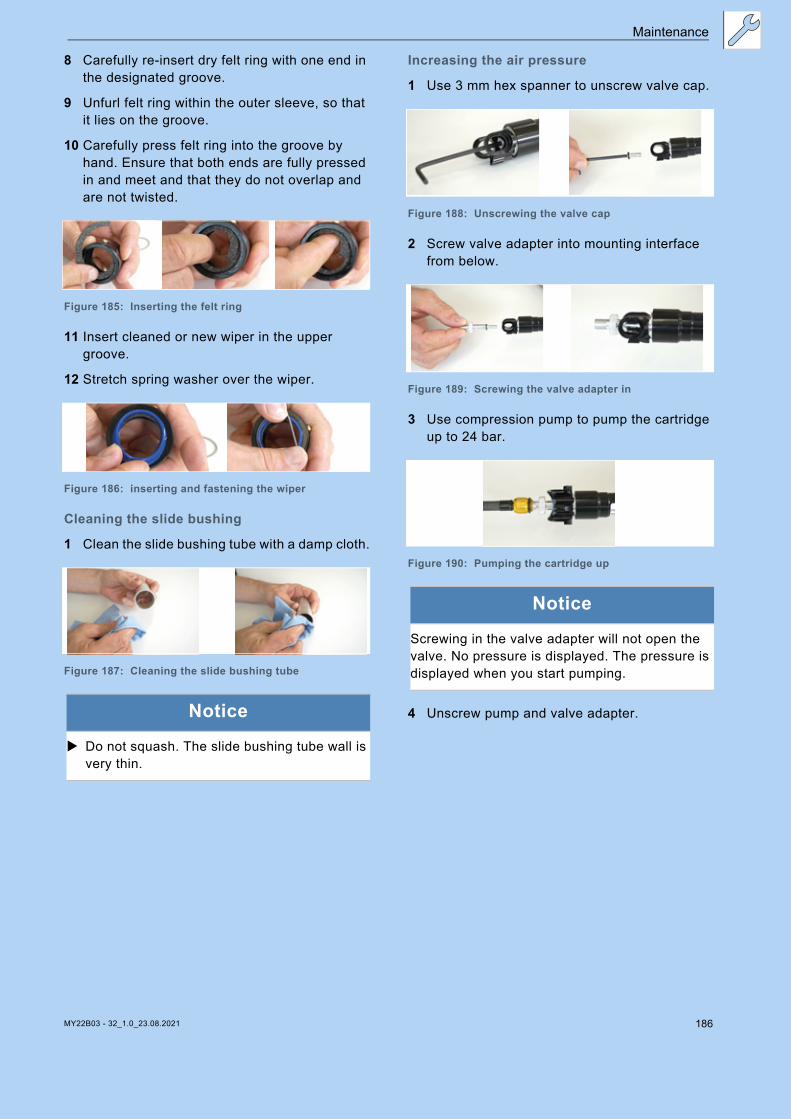
Maintenance
8 Carefully re-insert dry felt ring with one end in the designated groove.
9 Unfurl felt ring within the outer sleeve, so that it lies on the groove.
10 Carefully press felt ring into the groove by hand. Ensure that both ends are fully pressed in and meet and that they do not overlap and are not twisted.
Figure 185: Inserting the felt ring
11 Insert cleaned or new wiper in the upper groove.
12 Stretch spring washer over the wiper.
Figure 186: inserting and fastening the wiper
Cleaning the slide bushing
1 Clean the slide bushing tube with a damp cloth.
Figure 187: Cleaning the slide bushing tube
Increasing the air pressure
1 Use 3 mm hex spanner to unscrew valve cap.
Figure 188: Unscrewing the valve cap
2 Screw valve adapter into mounting interface from below.
Figure 189: Screwing the valve adapter in
3 Use compression pump to pump the cartridge up to 24 bar.
Figure 190: Pumping the cartridge up
4 Unscrew pump and valve adapter.Notice
Do not squash. The slide bushing tube wall is very thin.
Notice
Screwing in the valve adapter will not open the valve. No pressure is displayed. The pressure is displayed when you start pumping.
MY22B03 - 32_1.0_23.08.2021 186
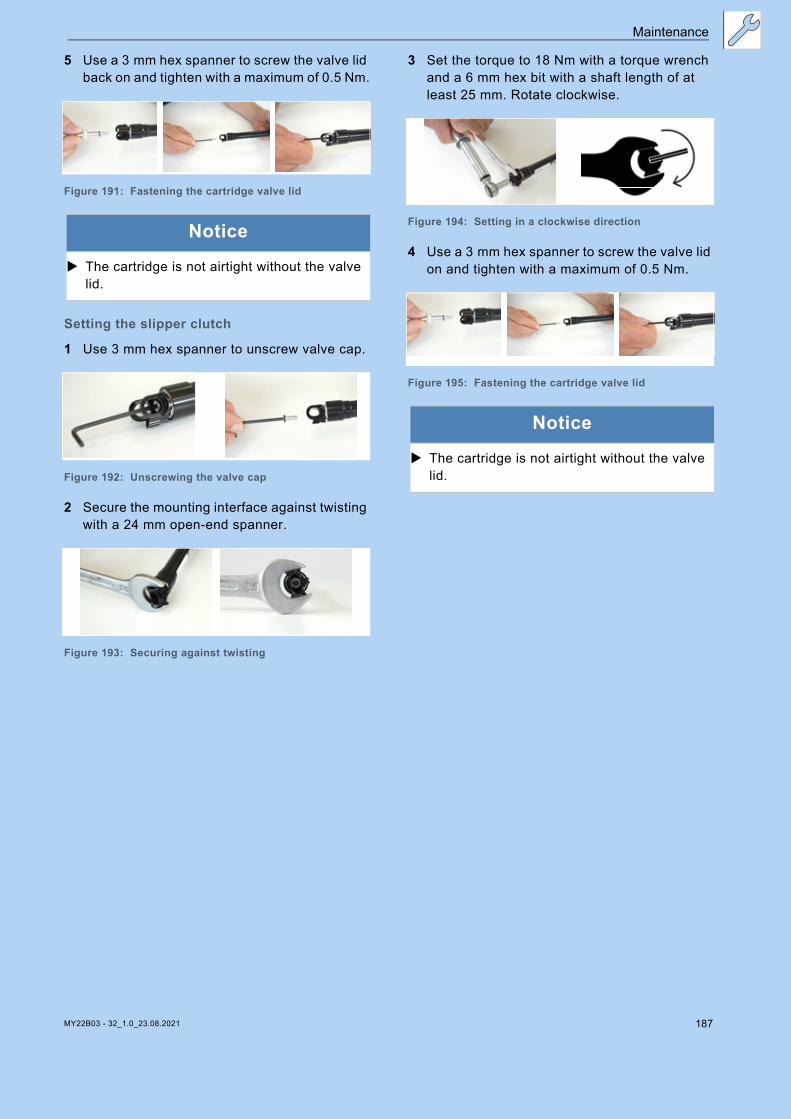
Maintenance
5 Use a 3 mm hex spanner to screw the valve lid back on and tighten with a maximum of 0.5 Nm.
Figure 191: Fastening the cartridge valve lid
Setting the slipper clutch
1 Use 3 mm hex spanner to unscrew valve cap.
Figure 192: Unscrewing the valve cap
2 Secure the mounting interface against twisting with a 24 mm open-end spanner.
Figure 193: Securing against twisting
3 Set the torque to 18 Nm with a torque wrench and a 6 mm hex bit with a shaft length of at least 25 mm. Rotate clockwise.
.
Figure 194: Setting in a clockwise direction
4 Use a 3 mm hex spanner to screw the valve lid on and tighten with a maximum of 0.5 Nm.
Figure 195: Fastening the cartridge valve lid
Notice
The cartridge is not airtight without the valve lid.
Notice
The cartridge is not airtight without the valve lid.
MY22B03 - 32_1.0_23.08.2021 187
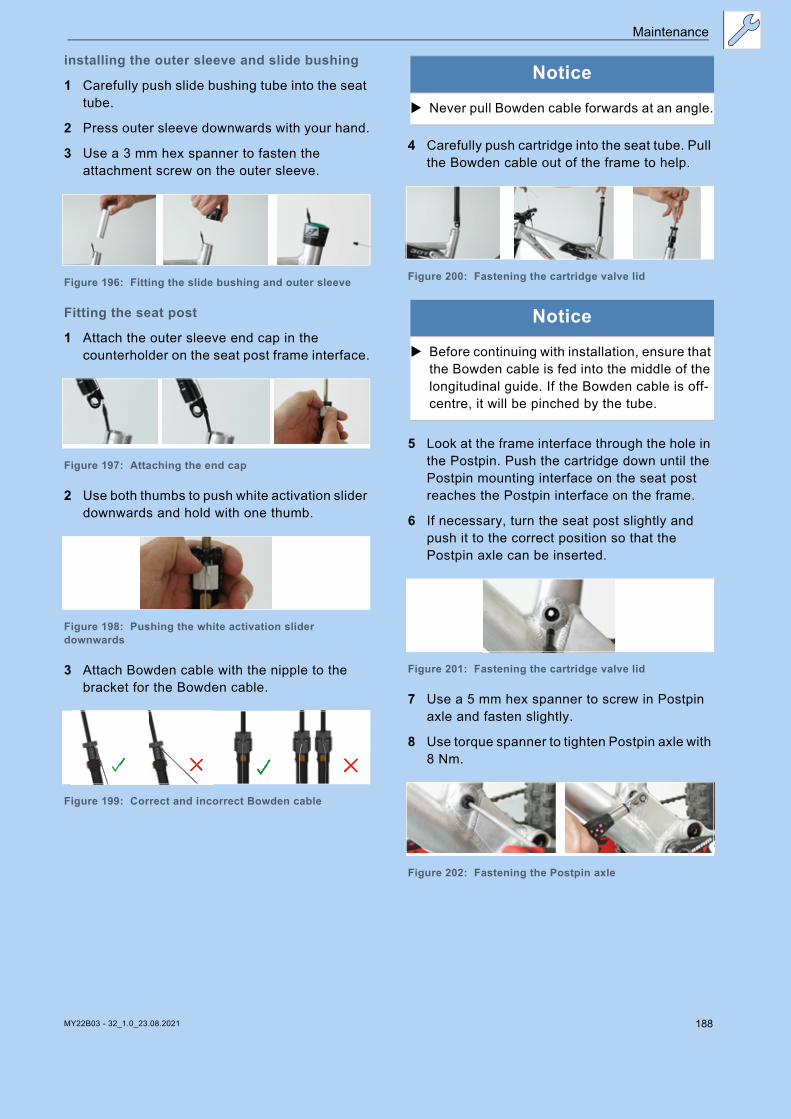
Maintenance
installing the outer sleeve and slide bushing
1 Carefully push slide bushing tube into the seat tube.
2 Press outer sleeve downwards with your hand.
3 Use a 3 mm hex spanner to fasten the attachment screw on the outer sleeve.
Figure 196: Fitting the slide bushing and outer sleeve
Fitting the seat post
1 Attach the outer sleeve end cap in the counterholder on the seat post frame interface.
Figure 197: Attaching the end cap
2 Use both thumbs to push white activation slider downwards and hold with one thumb.
Figure 198: Pushing the white activation slider downwards
3 Attach Bowden cable with the nipple to the bracket for the Bowden cable.
Figure 199: Correct and incorrect Bowden cable
4 Carefully push cartridge into the seat tube. Pull the Bowden cable out of the frame to help.
Figure 200: Fastening the cartridge valve lid
5 Look at the frame interface through the hole in the Postpin. Push the cartridge down until the Postpin mounting interface on the seat post reaches the Postpin interface on the frame.
6 If necessary, turn the seat post slightly and push it to the correct position so that the Postpin axle can be inserted.
Figure 201: Fastening the cartridge valve lid
7 Use a 5 mm hex spanner to screw in Postpin axle and fasten slightly.
8 Use torque spanner to tighten Postpin axle with 8 Nm.
Figure 202: Fastening the Postpin axle
Notice
Never pull Bowden cable forwards at an angle.
Notice
Before continuing with installation, ensure that the Bowden cable is fed into the middle of the longitudinal guide. If the Bowden cable is off-centre, it will be pinched by the tube.
MY22B03 - 32_1.0_23.08.2021 188
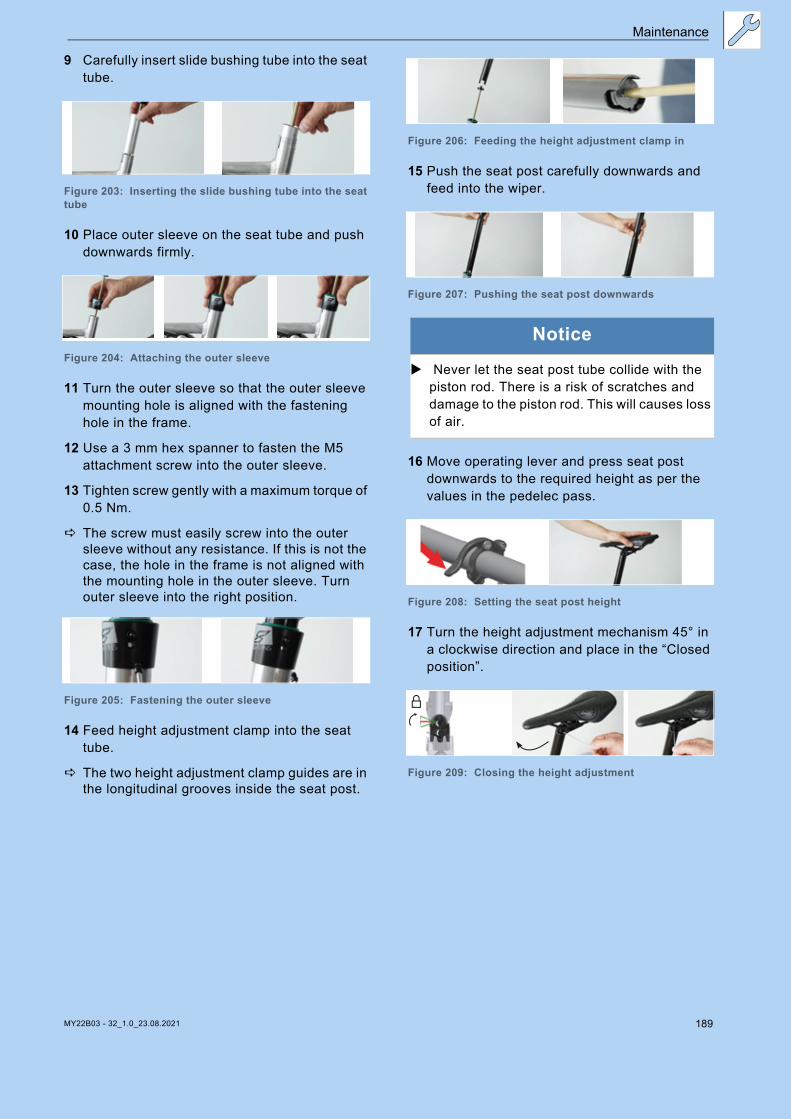
Maintenance
9 Carefully insert slide bushing tube into the seat tube.
Figure 203: Inserting the slide bushing tube into the seat tube
10 Place outer sleeve on the seat tube and push downwards firmly.
Figure 204: Attaching the outer sleeve
11 Turn the outer sleeve so that the outer sleeve mounting hole is aligned with the fastening hole in the frame.
12 Use a 3 mm hex spanner to fasten the M5 attachment screw into the outer sleeve.
13 Tighten screw gently with a maximum torque of 0.5 Nm.
The screw must easily screw into the outer sleeve without any resistance. If this is not the case, the hole in the frame is not aligned with the mounting hole in the outer sleeve. Turn outer sleeve into the right position.
Figure 205: Fastening the outer sleeve
14 Feed height adjustment clamp into the seat tube.
The two height adjustment clamp guides are in the longitudinal grooves inside the seat post.
Figure 206: Feeding the height adjustment clamp in
15 Push the seat post carefully downwards and feed into the wiper.
Figure 207: Pushing the seat post downwards
16 Move operating lever and press seat post downwards to the required height as per the values in the pedelec pass.
Figure 208: Setting the seat post height
17 Turn the height adjustment mechanism 45° in a clockwise direction and place in the “Closed position”.
Figure 209: Closing the height adjustment
Notice
Never let the seat post tube collide with the piston rod. There is a risk of scratches and damage to the piston rod. This will causes loss of air.
MY22B03 - 32_1.0_23.08.2021 189
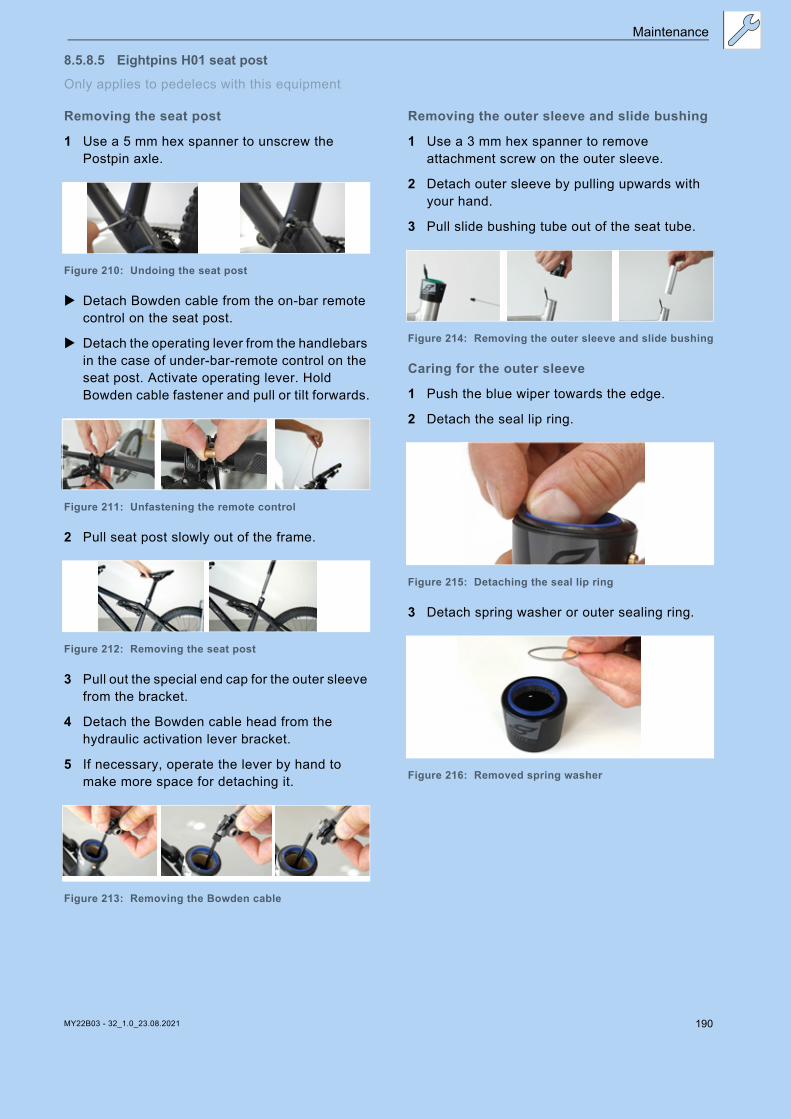
Maintenance
8.5.8.5 Eightpins H01 seat post
Only applies to pedelecs with this equipment
Removing the seat post
1 Use a 5 mm hex spanner to unscrew the Postpin axle.
Figure 210: Undoing the seat post
Detach Bowden cable from the on-bar remote control on the seat post.
Detach the operating lever from the handlebars in the case of under-bar-remote control on the seat post. Activate operating lever. Hold Bowden cable fastener and pull or tilt forwards.
.
Figure 211: Unfastening the remote control
2 Pull seat post slowly out of the frame.
Figure 212: Removing the seat post
3 Pull out the special end cap for the outer sleeve from the bracket.
4 Detach the Bowden cable head from the hydraulic activation lever bracket.
5 If necessary, operate the lever by hand to make more space for detaching it.
Figure 213: Removing the Bowden cable
Removing the outer sleeve and slide bushing
1 Use a 3 mm hex spanner to remove attachment screw on the outer sleeve.
2 Detach outer sleeve by pulling upwards with your hand.
3 Pull slide bushing tube out of the seat tube.
Figure 214: Removing the outer sleeve and slide bushing
Caring for the outer sleeve
1 Push the blue wiper towards the edge.
2 Detach the seal lip ring.
Figure 215: Detaching the seal lip ring
3 Detach spring washer or outer sealing ring.
Figure 216: Removed spring washer
MY22B03 - 32_1.0_23.08.2021 190

Maintenance
4 Carefully remove the wiper from the groove.
Figure 217: Removing the wiper
5 Use a small, sharp object to look for and remove the end of the felt ring.
6 Carefully take out the felt ring.
7 Remove felt ring.
8 Clean or replace felt ring.
Figure 218: Removing the felt ring
9 Clean inside of outer sleeve with a cloth.
Figure 219: Cleaning the outer sleeve
10 Carefully re-insert dry felt ring with one end in the designated groove.
11 Unfurl felt ring within the outer sleeve, so that it lies on the groove.
12 Carefully press felt ring into the groove by hand. Ensure that both ends are fully pressed in and meet and that they do not overlap and are not twisted.
Figure 220: Inserting the felt ring
13 Insert cleaned or new wiper in the upper groove.
14 Stretch spring washer over the wiper.
Figure 221: inserting and fastening the wiper
MY22B03 - 32_1.0_23.08.2021 191
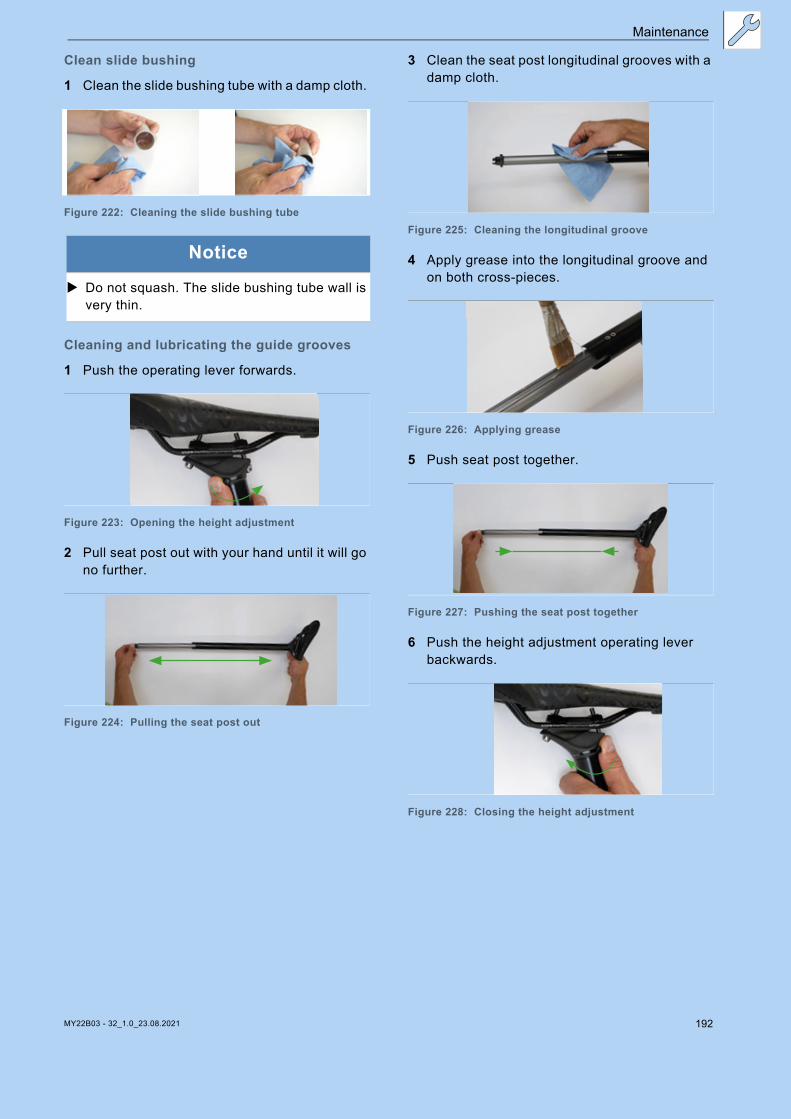
Maintenance
Clean slide bushing
1 Clean the slide bushing tube with a damp cloth.
Figure 222: Cleaning the slide bushing tube
Cleaning and lubricating the guide grooves
1 Push the operating lever forwards.
Figure 223: Opening the height adjustment
2 Pull seat post out with your hand until it will go no further.
Figure 224: Pulling the seat post out
3 Clean the seat post longitudinal grooves with a damp cloth.
Figure 225: Cleaning the longitudinal groove
4 Apply grease into the longitudinal groove and on both cross-pieces.
Figure 226: Applying grease
5 Push seat post together.
Figure 227: Pushing the seat post together
6 Push the height adjustment operating lever backwards.
Figure 228: Closing the height adjustment
Notice
Do not squash. The slide bushing tube wall is very thin.
MY22B03 - 32_1.0_23.08.2021 192
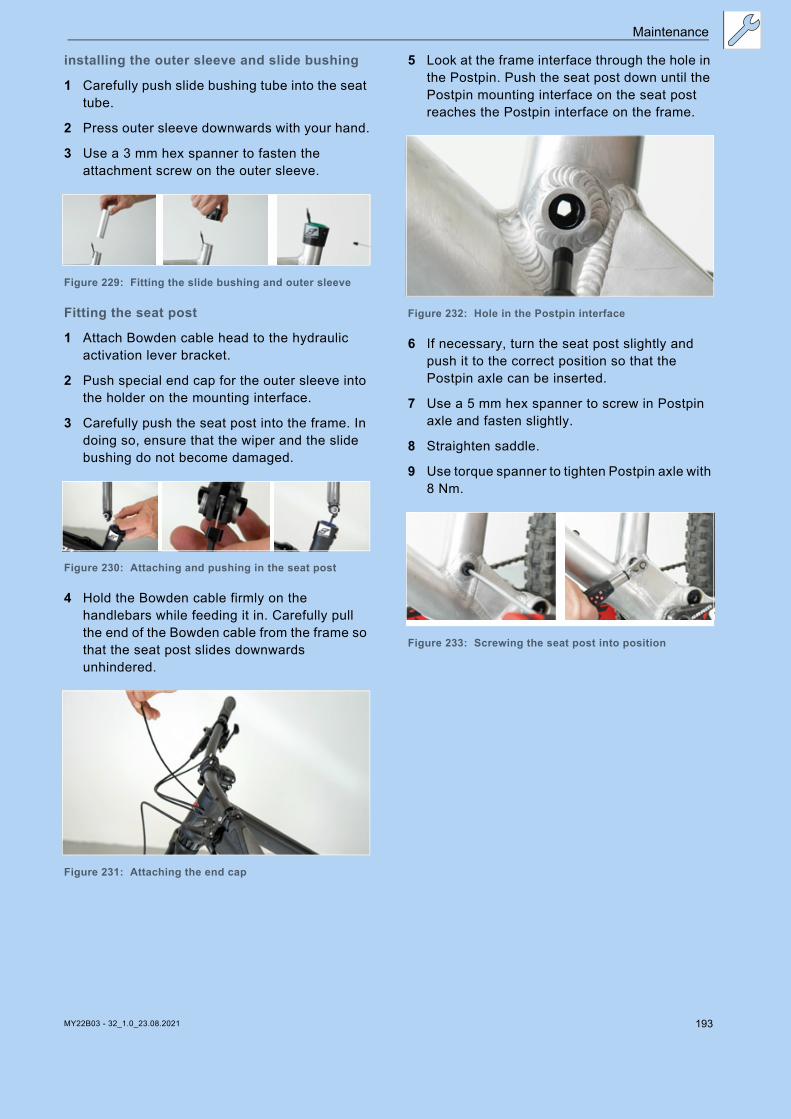
Maintenance
installing the outer sleeve and slide bushing
1 Carefully push slide bushing tube into the seat tube.
2 Press outer sleeve downwards with your hand.
3 Use a 3 mm hex spanner to fasten the attachment screw on the outer sleeve.
Figure 229: Fitting the slide bushing and outer sleeve
Fitting the seat post
1 Attach Bowden cable head to the hydraulic activation lever bracket.
2 Push special end cap for the outer sleeve into the holder on the mounting interface.
3 Carefully push the seat post into the frame. In doing so, ensure that the wiper and the slide bushing do not become damaged.
Figure 230: Attaching and pushing in the seat post
4 Hold the Bowden cable firmly on the handlebars while feeding it in. Carefully pull the end of the Bowden cable from the frame so that the seat post slides downwards unhindered.
Figure 231: Attaching the end cap
5 Look at the frame interface through the hole in the Postpin. Push the seat post down until the Postpin mounting interface on the seat post reaches the Postpin interface on the frame.
Figure 232: Hole in the Postpin interface
6 If necessary, turn the seat post slightly and push it to the correct position so that the Postpin axle can be inserted.
7 Use a 5 mm hex spanner to screw in Postpin axle and fasten slightly.
8 Straighten saddle.
9 Use torque spanner to tighten Postpin axle with 8 Nm.
Figure 233: Screwing the seat post into position
MY22B03 - 32_1.0_23.08.2021 193
Maintenance
8.5.9 Rear frame damperOnly applies to pedelecs with this equipment
1 Dismantle the rear frame damper.
2 Clean and inspect its interior and exterior.
3 Recondition air springs.
4 Replace airtight seals on air springs.
5 Change oil.
6 Replace dust wipers.
Injury due to explosionThe air chamber is pressurised. If the air system is serviced in a rear frame damper, it can explode and cause serious injury.
Wear safety goggles, protective gloves and safety clothing when assembling or carrying out maintenance on the bicycle.
Release the air for the air chambers. Detach all air insert fitments.
Never service or dismantle a rear frame damper if it has not completely rebounded.
Intoxication from suspension oilSuspension oil is poisonous to the touch, irritates respiratory tracts and causes cancer, sterility and mutation in germ cells.
Always wear safety goggles and nitrile gloves when carrying suspension oil.
Never perform maintenance when you are pregnant.
Use an oil catchment tray under the section where the rear frame damper is being serviced.
Intoxication from lubrication oilThe lubrication oil for Eightpins seat posts is toxic if touched or inhaled.
Always wear safety goggles and nitrile gloves when working with lubrication oil.
Lubricate seat post in the open air or in a well-ventilated room only.
Avoid skin coming into contact with lubrication oil. Wear nitrile gloves when lubricating, cleaning and servicing the vehicle.
Use an oil catchment tray under the section where the seat post is serviced.
WARNING!
Hazard for the environment due to toxic substances
The rear frame damper contains toxic and environmentally harmful oils and lubricants. Such fluids will contaminate if they enter the sewers or groundwater.
Dispose of lubricants and oils left over after repairs in an environmentally responsible way in accordance with statutory regulations.
CAUTION!
MY22B03 - 32_1.0_23.08.2021 194

Maintenance
8.5.9.1 FOX component-specific maintenance
FOX Service must perform maintenance on suspension forks, rear frame dampers and suspension seat posts.
Maintenance includes a complete inspection of interiors/exteriors.
All dampers are reconditioned.
The airtight seals are replaced in air suspension forks.
The air spring is reconditioned.
The oil is changed.
The dust wipers are replaced.
More information at: www.foxracingshox.de/service
MY22B03 - 32_1.0_23.08.2021 195
Troubleshooting, fault clearance and repair
9 Troubleshooting, fault clearance and repair
9.1 Troubleshooting and fault clearance
The components of the drive system are checked constantly and automatically. If an error is detected, an error message appears on the display. The drive may be shut off automatically, depending on the type of error.
9.1.1 The drive system or display do not start up
If the display and/or the drive system do not start up, proceed as follows:
1 Check whether the battery is switched on. If not, start the battery.
Contact your specialist dealer if the Battery Level indicator LEDs do not light up.
2 If the LEDs on the Battery Level indicator light up, but the drive system does not start, remove the battery.
3 Insert the battery.
4 Start the drive system.
5 If the drive system does not start up, remove the battery.
6 Clean all the contacts with a soft cloth.
7 Insert the battery.
8 Start the drive system.
9 If the drive system does not start up, remove the battery.
10 Charge battery fully.
11 Insert the battery.
12 Start the drive system.
13 If the drive system won’t start, press the On-Off button (battery) for at least 8 seconds.
14 If the drive system won’t start after about 6 seconds, press the On-Off button (battery) for at least 2 seconds.
15 If the drive system still won’t start, contact your specialist dealer.
9.1.2 RD protection reset
The rear derailleur protection function will immediately trigger to protect the system if the pedelec is exposed to a strong impact – due to a fall, for example. The connection between the motor and the link is interrupted instantly, rendering the rear derailleur inoperable.
If you open RD PROTECTION RESET, the connection between the motor and link is re-established and the rear derailleur function reset.
The settings menu is opened.
Press the button (display) or switch A (left) repeatedly until RD PROTECTION RESET is displayed.
Press the button (display) or switch A (left).
There are two selection options:
Push switch Y (left) or switch X (left) briefly until the required function is highlighted.
Press the button (display) or switch A (left).
The display screen switches back to the start screen.
Turn crank.
The connection between the motor and the link is restored.
9.1.3 Warning messages and LEDs
All warning messages and the meaning of the different LEDs are explained in Section 6.2.
Display Function
OK Rear derailleur reset isin progress
CANCEL Back to the main menu
Table 60:Rear derailleur reset change options
MY22B03 - 32_1.0_23.08.2021 196
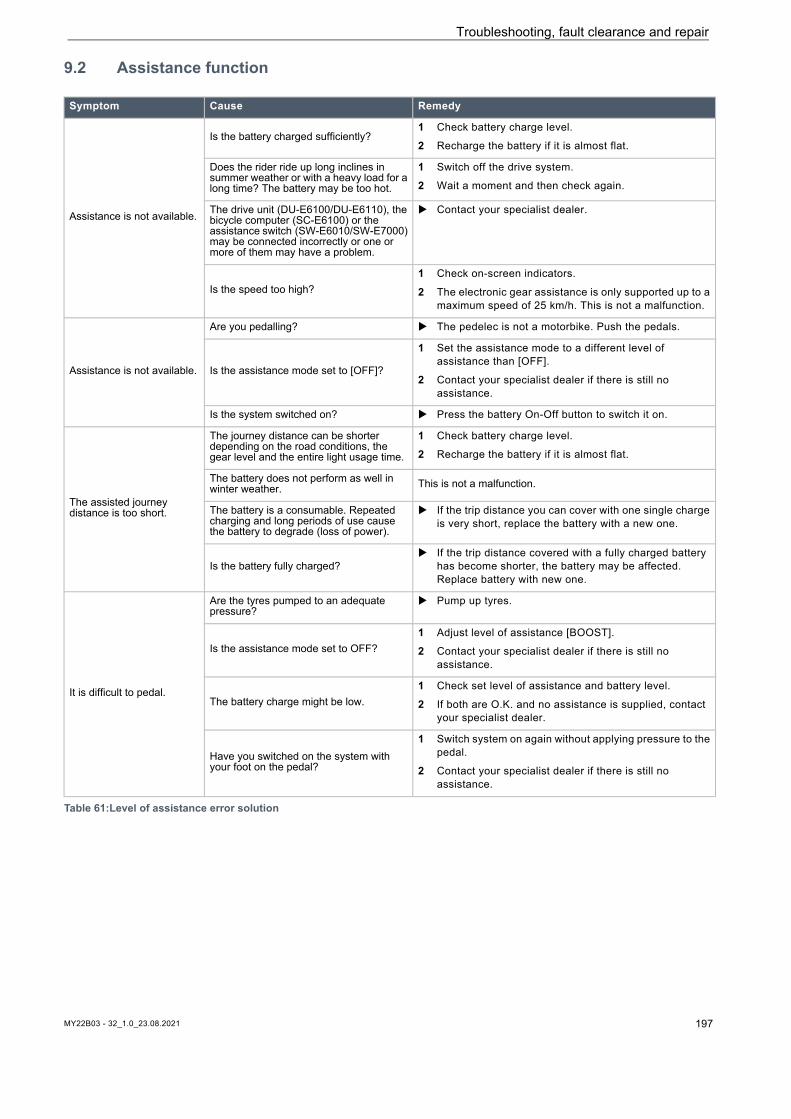
Troubleshooting, fault clearance and repair
9.2 Assistance function
Symptom Cause Remedy
Assistance is not available.
Is the battery charged sufficiently?1 Check battery charge level.
2 Recharge the battery if it is almost flat.
Does the rider ride up long inclines in summer weather or with a heavy load for a long time? The battery may be too hot.
1 Switch off the drive system.
2 Wait a moment and then check again.
The drive unit (DU-E6100/DU-E6110), the bicycle computer (SC-E6100) or the assistance switch (SW-E6010/SW-E7000) may be connected incorrectly or one or more of them may have a problem.
Contact your specialist dealer.
Is the speed too high?1 Check on-screen indicators.
2 The electronic gear assistance is only supported up to a maximum speed of 25 km/h. This is not a malfunction.
Assistance is not available.
Are you pedalling? The pedelec is not a motorbike. Push the pedals.
Is the assistance mode set to [OFF]?
1 Set the assistance mode to a different level of assistance than [OFF].
2 Contact your specialist dealer if there is still no assistance.
Is the system switched on? Press the battery On-Off button to switch it on.
The assisted journey distance is too short.
The journey distance can be shorter depending on the road conditions, the gear level and the entire light usage time.
1 Check battery charge level.
2 Recharge the battery if it is almost flat.
The battery does not perform as well in winter weather. This is not a malfunction.
The battery is a consumable. Repeated charging and long periods of use cause the battery to degrade (loss of power).
If the trip distance you can cover with one single charge is very short, replace the battery with a new one.
Is the battery fully charged? If the trip distance covered with a fully charged battery
has become shorter, the battery may be affected. Replace battery with new one.
It is difficult to pedal.
Are the tyres pumped to an adequate pressure?
Pump up tyres.
Is the assistance mode set to OFF?1 Adjust level of assistance [BOOST].
2 Contact your specialist dealer if there is still no assistance.
The battery charge might be low.1 Check set level of assistance and battery level.
2 If both are O.K. and no assistance is supplied, contact your specialist dealer.
Have you switched on the system with your foot on the pedal?
1 Switch system on again without applying pressure to the pedal.
2 Contact your specialist dealer if there is still no assistance.
Table 61:Level of assistance error solution
MY22B03 - 32_1.0_23.08.2021 197
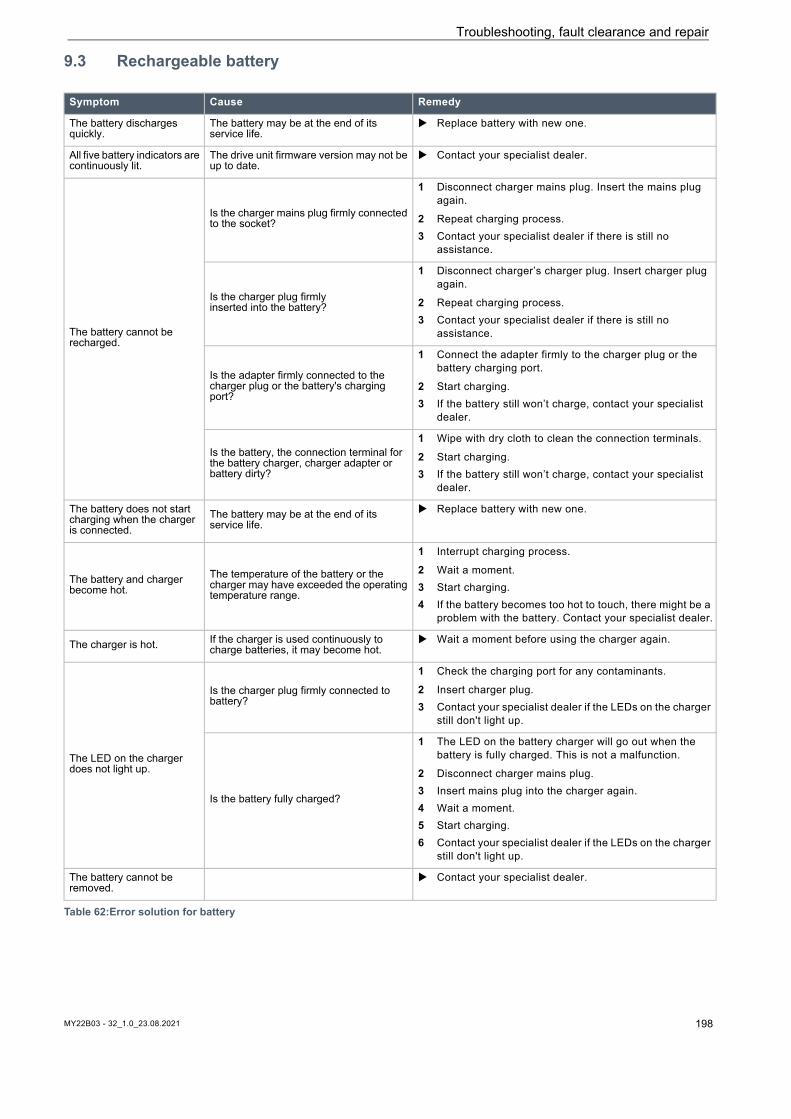
Troubleshooting, fault clearance and repair
9.3 Rechargeable battery
Symptom Cause Remedy
The battery discharges quickly.
The battery may be at the end of its service life.
Replace battery with new one.
All five battery indicators are continuously lit.
The drive unit firmware version may not be up to date.
Contact your specialist dealer.
The battery cannot be recharged.
Is the charger mains plug firmly connected to the socket?
1 Disconnect charger mains plug. Insert the mains plug again.
2 Repeat charging process.3 Contact your specialist dealer if there is still no
assistance.
Is the charger plug firmlyinserted into the battery?
1 Disconnect charger’s charger plug. Insert charger plug again.
2 Repeat charging process.3 Contact your specialist dealer if there is still no
assistance.
Is the adapter firmly connected to the charger plug or the battery's charging port?
1 Connect the adapter firmly to the charger plug or the battery charging port.
2 Start charging.3 If the battery still won’t charge, contact your specialist
dealer.
Is the battery, the connection terminal for the battery charger, charger adapter or battery dirty?
1 Wipe with dry cloth to clean the connection terminals.
2 Start charging.3 If the battery still won’t charge, contact your specialist
dealer.
The battery does not start charging when the charger is connected.
The battery may be at the end of its service life.
Replace battery with new one.
The battery and charger become hot.
The temperature of the battery or the charger may have exceeded the operating temperature range.
1 Interrupt charging process.
2 Wait a moment. 3 Start charging.4 If the battery becomes too hot to touch, there might be a
problem with the battery. Contact your specialist dealer.
The charger is hot. If the charger is used continuously to charge batteries, it may become hot.
Wait a moment before using the charger again.
The LED on the charger does not light up.
Is the charger plug firmly connected to battery?
1 Check the charging port for any contaminants.
2 Insert charger plug. 3 Contact your specialist dealer if the LEDs on the charger
still don't light up.
Is the battery fully charged?
1 The LED on the battery charger will go out when the battery is fully charged. This is not a malfunction.
2 Disconnect charger mains plug.3 Insert mains plug into the charger again.4 Wait a moment. 5 Start charging.6 Contact your specialist dealer if the LEDs on the charger
still don't light up.
The battery cannot be removed.
Contact your specialist dealer.
Table 62:Error solution for battery
MY22B03 - 32_1.0_23.08.2021 198
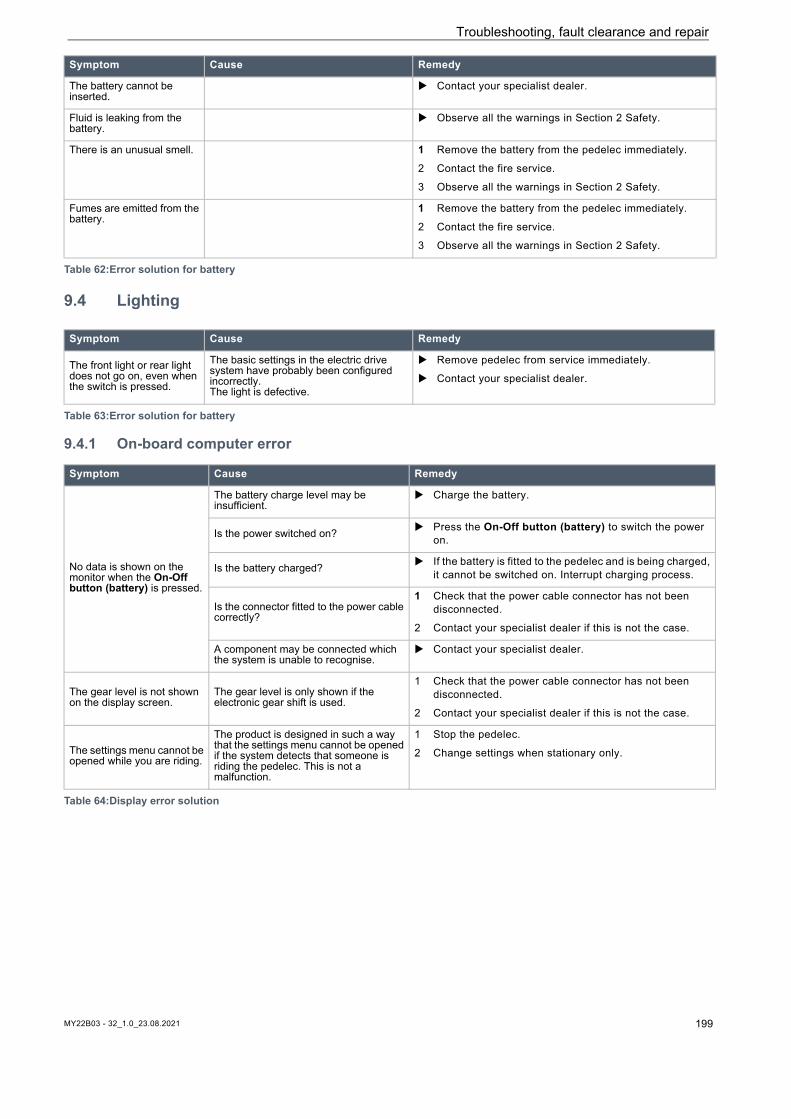
Troubleshooting, fault clearance and repair
9.4 Lighting
9.4.1 On-board computer error
The battery cannot be inserted.
Contact your specialist dealer.
Fluid is leaking from the battery.
Observe all the warnings in Section 2 Safety.
There is an unusual smell. 1 Remove the battery from the pedelec immediately.
2 Contact the fire service.
3 Observe all the warnings in Section 2 Safety.
Fumes are emitted from the battery.
1 Remove the battery from the pedelec immediately.
2 Contact the fire service.
3 Observe all the warnings in Section 2 Safety.
Symptom Cause Remedy
The front light or rear light does not go on, even when the switch is pressed.
The basic settings in the electric drive system have probably been configured incorrectly.The light is defective.
Remove pedelec from service immediately.
Contact your specialist dealer.
Table 63:Error solution for battery
Symptom Cause Remedy
Table 62:Error solution for battery
Symptom Cause Remedy
No data is shown on the monitor when the On-Off button (battery) is pressed.
The battery charge level may be insufficient.
Charge the battery.
Is the power switched on? Press the On-Off button (battery) to switch the power on.
Is the battery charged? If the battery is fitted to the pedelec and is being charged, it cannot be switched on. Interrupt charging process.
Is the connector fitted to the power cable correctly?
1 Check that the power cable connector has not been disconnected.
2 Contact your specialist dealer if this is not the case.
A component may be connected which the system is unable to recognise.
Contact your specialist dealer.
The gear level is not shown on the display screen.
The gear level is only shown if the electronic gear shift is used.
1 Check that the power cable connector has not been disconnected.
2 Contact your specialist dealer if this is not the case.
The settings menu cannot be opened while you are riding.
The product is designed in such a way that the settings menu cannot be opened if the system detects that someone is riding the pedelec. This is not a malfunction.
1 Stop the pedelec.
2 Change settings when stationary only.
Table 64:Display error solution
MY22B03 - 32_1.0_23.08.2021 199
Troubleshooting, fault clearance and repair
9.5 Miscellaneous
Symptom Cause Remedy
Two beeps will sound if a switch is pressed but the switch cannot be operated.
Pressed switch mode has been deactivated. This is not a malfunction.
Three beeps are sounded. A fault or warning has occurred. This occurs when a warning or an error is shown on the
display screen. Follow the instructions for the code in Section 6.2 System Messages.
In the case of an electronic gear shift, pedal assistance becomes weaker when the gear is changed.
This is because the computer sets the pedal assistance to the optimum level. This is not a malfunction.
A noise can be heard after switching.
Contact your specialist dealer.
It is normal to hear a noise coming from the rear wheel when cycling as normal.
The gear shift setting may not have been made properly.
Contact your specialist dealer.
When the bicycle stops, gear transmission will not switch to the position pre-configured in the functional feature.
You may have applied too much pressure on the pedals.
It is easier to change gears if you press onto the pedals gently.
Table 65:Error solution for battery
MY22B03 - 32_1.0_23.08.2021 200
Troubleshooting, fault clearance and repair
9.5.1 RockShox suspension fork
9.5.1.1 Rebound too fast
The suspension fork rebounds too quickly, producing a "pogo stick" effect, where the wheel lifts from the ground in an uncontrolled way. This impairs traction and control (blue line).
Fork head and handlebars are deflected upwards if the wheel bounces back from the ground. Body weight may be thrown up and backwards in an uncontrolled way (green line).
Figure 234: Suspension fork rebounding too quickly
Solution
Figure 235: Turning the rebound screw damper towards tortoise symbol
Turn the rebound screw clockwise damper towards the tortoise symbol.
The rebound speed is decreased (slower return).
MY22B03 - 32_1.0_23.08.2021 201

Troubleshooting, fault clearance and repair
9.5.1.2 Rebounding too slowly
The fork does not rebound quickly enough after absorbing a bump. The fork also remains deflected over subsequent bumps, which reduces deflection and increases the hardness of impacts. Available deflection, traction and control decrease (blue line).
The fork remains in a deflected state, causing the headset and handlebars to move to a lower position. Body weight is shifted forward after impact (green line).
Figure 236: Suspension fork rebounding too slowly
Solution
Figure 237: Turning the rebound screw damper towards hare symbol
Turn the rebound screw anti-clockwise towards the hare symbol.
The rebound speed is increased (faster return).
MY22B03 - 32_1.0_23.08.2021 202
Troubleshooting, fault clearance and repair
9.5.1.3 Suspension too soft on inclines
The fork deflects at a low point in the terrain. The deflection is quickly used up, the rider's weight
shifts forward and the pedelec loses some momentum.
Figure 238: Excessively soft suspension in the suspension fork on hilly terrain
Solution
Figure 239: Changing compression adjuster to a harder setting
Turn compression adjuster clockwise.
The damping and compression hardness is increased and the deflection stroke speed is reduced. Efficiency on hilly and flat terrain is improved.
MY22B03 - 32_1.0_23.08.2021 203
Troubleshooting, fault clearance and repair
9.5.1.4 Excessively hard damping on bumps
When the bike hits a bump, the fork deflects too slowly and the wheel lifts up from the bump. Traction decreases when the wheel no longer touches the ground.
The headset and handlebars are deflected upwards significantly, which can impair control.
Figure 240: Excessively hard damping in the suspension fork on bumps
Solution
Figure 241: Changing compression adjuster to a softer setting
Turn compression adjuster anti-clockwise.
The damping and compression hardness is reduced and the deflection stroke speed is increased. Sensitivity to small bumps is increased.
MY22B03 - 32_1.0_23.08.2021 204

Troubleshooting, fault clearance and repair
9.5.2 RockShox rear frame damper
9.5.2.1 Rebound too fast
The rear frame damper rebounds too quickly, producing a “pogo stick” effect or causing the bike to bounce after the wheel hits a bump and lands on the ground again. This impairs traction and control due to the uncontrolled speed at which the damper rebounds after deflecting (blue line).
Saddle and handlebars are deflected upwards when the wheel bounces back from the ground. The rider's body weight may be shifted upwards and forwards if the damper fully rebounds too quickly (green line).
Figure 242: Rear frame damper rebounding too quickly
Solution
Figure 243: Position and shape of the rebound adjuster (red) depends on the model
Turn rebound adjuster clockwise.
The rebound damping is increased. The rebound speed is reduced and traction and control is increased.
2.5
MY22B03 - 32_1.0_23.08.2021 205
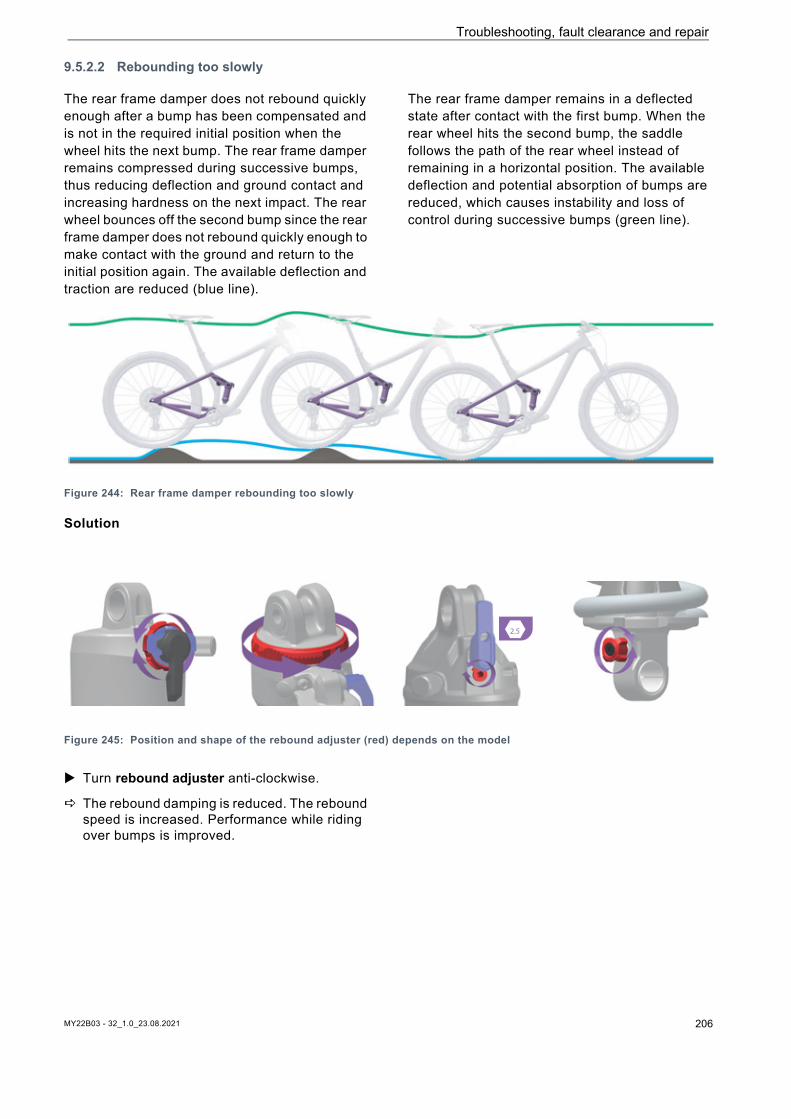
Troubleshooting, fault clearance and repair
9.5.2.2 Rebounding too slowly
The rear frame damper does not rebound quickly enough after a bump has been compensated and is not in the required initial position when the wheel hits the next bump. The rear frame damper remains compressed during successive bumps, thus reducing deflection and ground contact and increasing hardness on the next impact. The rear wheel bounces off the second bump since the rear frame damper does not rebound quickly enough to make contact with the ground and return to the initial position again. The available deflection and traction are reduced (blue line).
The rear frame damper remains in a deflected state after contact with the first bump. When the rear wheel hits the second bump, the saddle follows the path of the rear wheel instead of remaining in a horizontal position. The available deflection and potential absorption of bumps are reduced, which causes instability and loss of control during successive bumps (green line).
Figure 244: Rear frame damper rebounding too slowly
Solution
Figure 245: Position and shape of the rebound adjuster (red) depends on the model
Turn rebound adjuster anti-clockwise.
The rebound damping is reduced. The rebound speed is increased. Performance while riding over bumps is improved.
2.5
MY22B03 - 32_1.0_23.08.2021 206
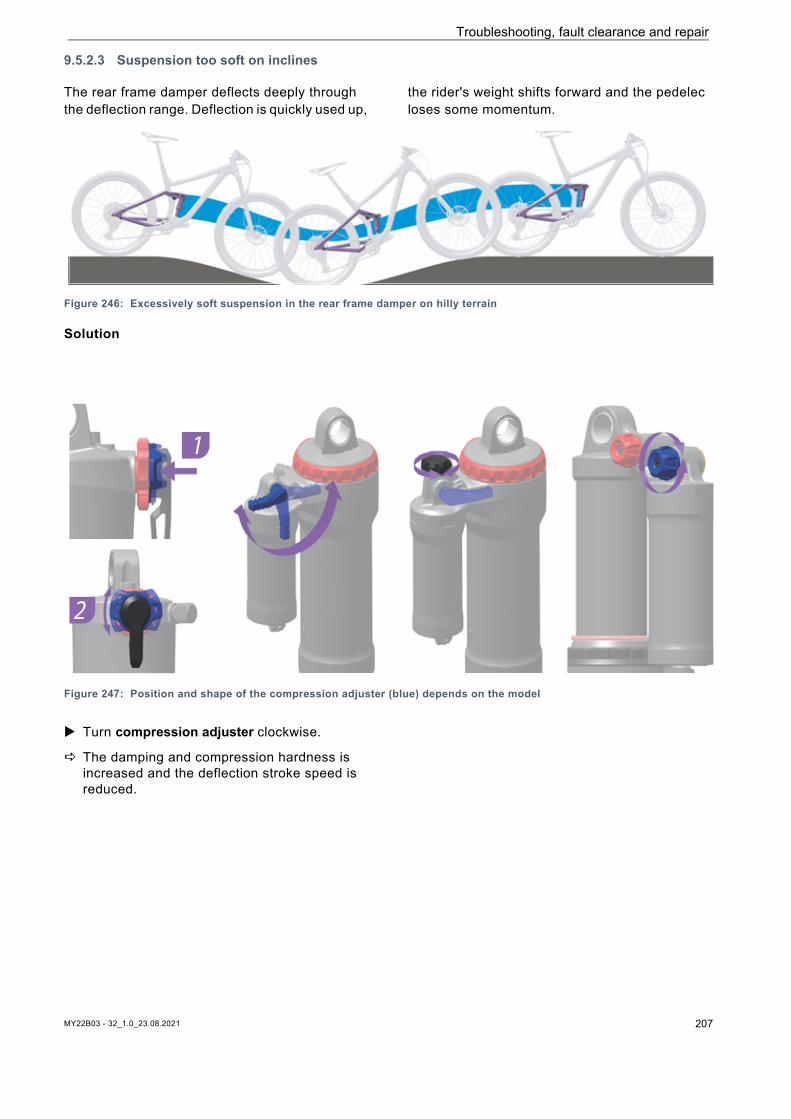
Troubleshooting, fault clearance and repair
9.5.2.3 Suspension too soft on inclines
The rear frame damper deflects deeply through the deflection range. Deflection is quickly used up,
the rider's weight shifts forward and the pedelec loses some momentum.
Figure 246: Excessively soft suspension in the rear frame damper on hilly terrain
Solution
Figure 247: Position and shape of the compression adjuster (blue) depends on the model
Turn compression adjuster clockwise.
The damping and compression hardness is increased and the deflection stroke speed is reduced.
1
2
MY22B03 - 32_1.0_23.08.2021 207
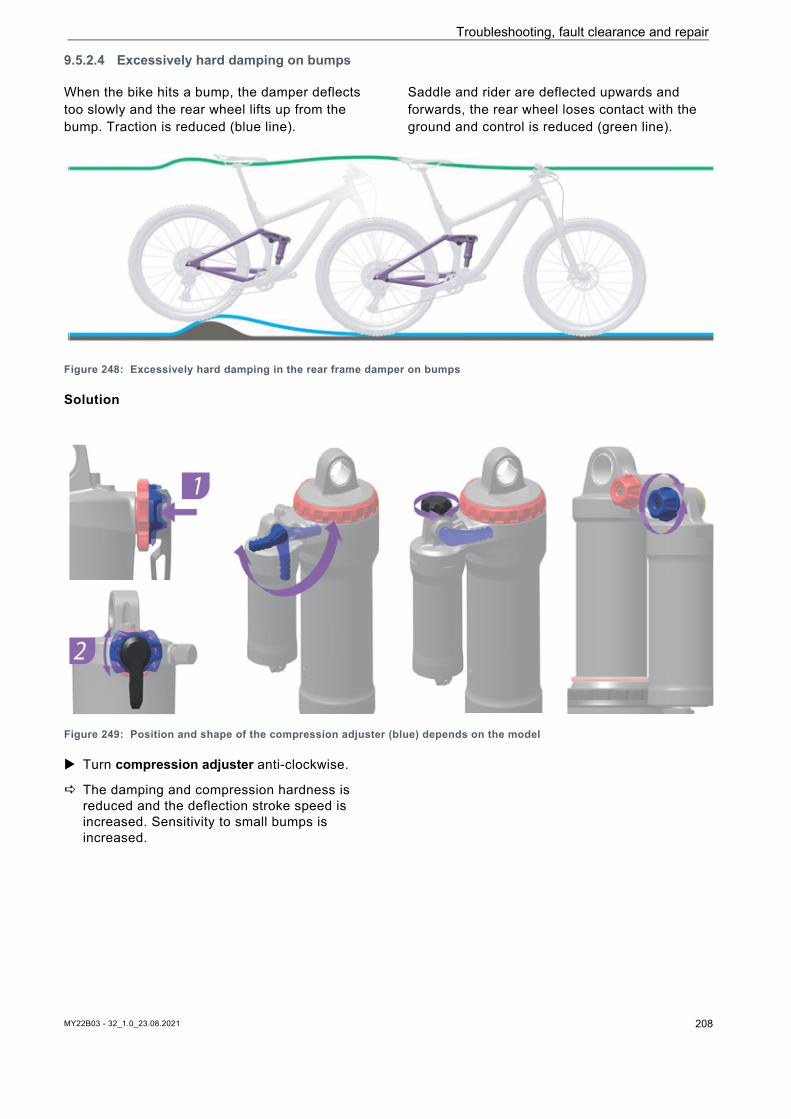
Troubleshooting, fault clearance and repair
9.5.2.4 Excessively hard damping on bumps
When the bike hits a bump, the damper deflects too slowly and the rear wheel lifts up from the bump. Traction is reduced (blue line).
Saddle and rider are deflected upwards and forwards, the rear wheel loses contact with the ground and control is reduced (green line).
Figure 248: Excessively hard damping in the rear frame damper on bumps
Solution
Figure 249: Position and shape of the compression adjuster (blue) depends on the model
Turn compression adjuster anti-clockwise.
The damping and compression hardness is reduced and the deflection stroke speed is increased. Sensitivity to small bumps is increased.
1
2
MY22B03 - 32_1.0_23.08.2021 208

MY22B03 - 32_1.0_23.08.2021 209
Troubleshooting, fault clearance and repair
9.6 RepairSpecial expertise and tools are required for many repairs. For this reason, repairs may only be carried out at a specialist dealer. These include:
• Replacing tyres and rims• Replacing rims, brake linings and brake discs• Replacing and tensioning the chain.
9.6.1 Original parts and lubricants The individual pedelec parts have been carefully selected and matched to one other.
Only original parts and lubricants must be used for maintenance and repair.
The constantly updated accessory approval and parts lists are in Section 11, Documents and Drawings.
Follow the operating instructions for the new components.
9.6.2 Replacing the lighting Only use components of the respective power
class for replacement.
9.6.3 Setting the front light The front light must be set so that its light beam
shines on the road 10 m in front of the pedelec.
9.6.4 Checking tyre clearanceThe tyre needs to be checked each time a suspension fork tyre is changed to another size.
1 Release pressure from the fork.
2 Press fork together fully.
3 Measure the gap between the top of the tyre and the crown's lower surface. The gap must not be less than 10 mm. If the tyre is too large, the tyre will touch the crown's lower surface if the fork is fully pressed together.
4 Release pressure on fork and pump it up again if it is an air suspension fork.
5 Take into account the fact that the gap will be smaller if there is a guard. Check again to ensure that there is sufficient clearance for the tyre.
Recycling and disposal
10 Recycling and disposal
This device is marked according to the European Directive 2012/19/EU on waste electrical and electronic equipment – WEEE and the European Directive 2006/66/EC on accumulators. The directive provides the framework for
the return and recycling of used devices across the EU. Consumers are legally required to return all used batteries of any type. It is forbidden to dispose of batteries in domestic waste.The battery manufacturer is legally obliged to take back used and old batteries free of charge according to Section 9 German Batteries Act. The pedelec frame, battery, motor, on-board computer and charger are recyclable materials. You must dispose of and recycle them separately from the domestic waste in compliance with applicable statutory regulations. Separate collection and
recycling saves reserves of raw materials and ensures that all the regulations for protection of health and the environment are adhered to when recycling the product and/or the battery.
Never dismantle the pedelec, battery or charger for disposal.
The pedelec, on-board computer, the unopened and undamaged battery and the charger can be returned to any specialist dealer free of charge. Further disposal options may be available, depending on the region.
Store the individual parts of the decommissioned pedelec in a dry place, free from frost, where they are protected from direct sunlight.
10.1 Removal of waste guidelines
Waste type Disposal
Non-hazardous waste
Recycling
Waste paper, cardboard Return paper collection bin, paper container, undamaged transport packaging to suppliers
Scrap metal and aluminium Take to municipal collection points or have collected by waste disposal companies
Tyres, tubes Tyre manufacturers’ collection points, collection forms and fax templates available from tyre manufacturersOtherwise, residual waste bin (grey bin)
Fibre composite components (e.g. carbon, GRP) Large carbon components such as defective frames and carbon rims can be sent to special collection points for recycling; see www.cfk-recycling.de/index.php?id=57
Dual system sales packaging made of plastic, metal and composite material, lightweight packaging
Collection by waste disposal firm where applicable; return transport packaging to suppliersPlastic waste bin (yellow bin)
CDs, DVDs Take to municipal collection points since they are made of high-grade plastic and are easy to recycleOtherwise, residual waste bin (grey bin)
Dispose of
Residual waste Residual waste bin (grey bin)
Biodegradable lubricantsBiodegradable oilsBiodegradable cleaning cloths daubed in oil
Residual waste bin (grey bin)
Filament lamps, halogen lamps Residual waste bin (grey bin)
Table 66: Removal of waste guidelines
MY22B03 - 32_1.0_23.08.2021 210
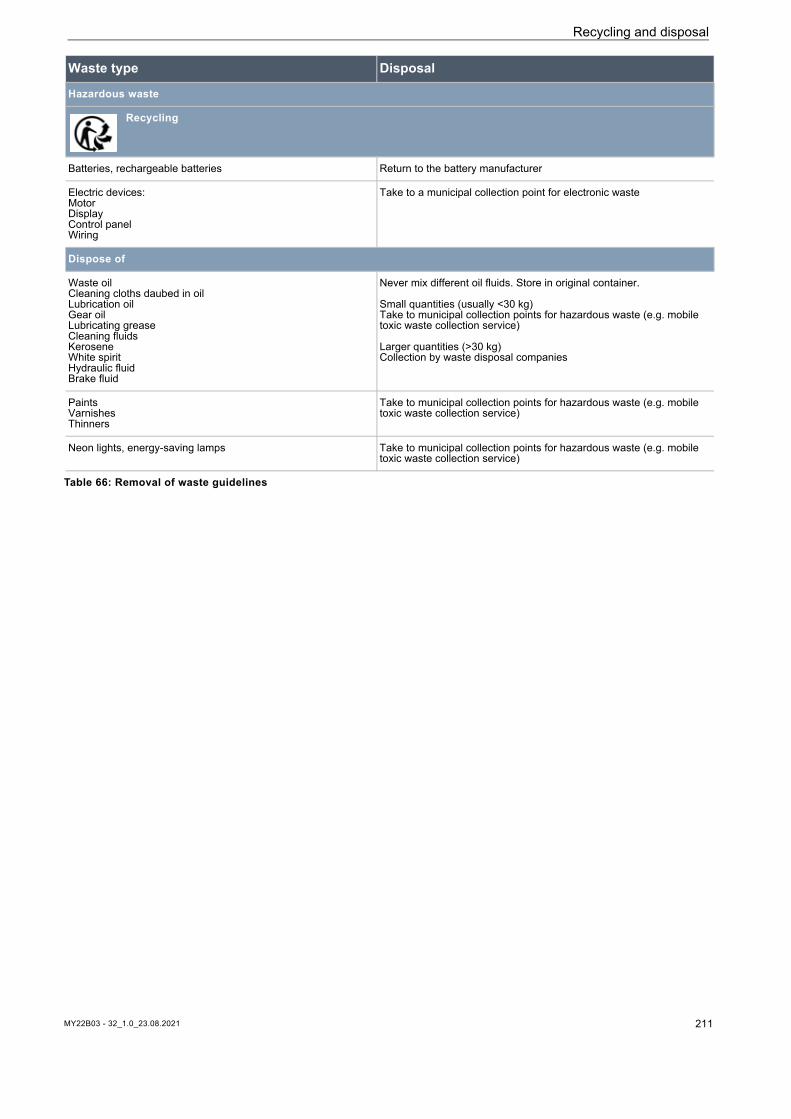
Recycling and disposal
Hazardous waste
Recycling
Batteries, rechargeable batteries Return to the battery manufacturer
Electric devices:MotorDisplayControl panelWiring
Take to a municipal collection point for electronic waste
Dispose of
Waste oilCleaning cloths daubed in oilLubrication oilGear oilLubricating greaseCleaning fluidsKeroseneWhite spiritHydraulic fluidBrake fluid
Never mix different oil fluids. Store in original container.
Small quantities (usually <30 kg)Take to municipal collection points for hazardous waste (e.g. mobile toxic waste collection service)
Larger quantities (>30 kg)Collection by waste disposal companies
PaintsVarnishesThinners
Take to municipal collection points for hazardous waste (e.g. mobile toxic waste collection service)
Neon lights, energy-saving lamps Take to municipal collection points for hazardous waste (e.g. mobile toxic waste collection service)
Waste type Disposal
Table 66: Removal of waste guidelines
MY22B03 - 32_1.0_23.08.2021 211
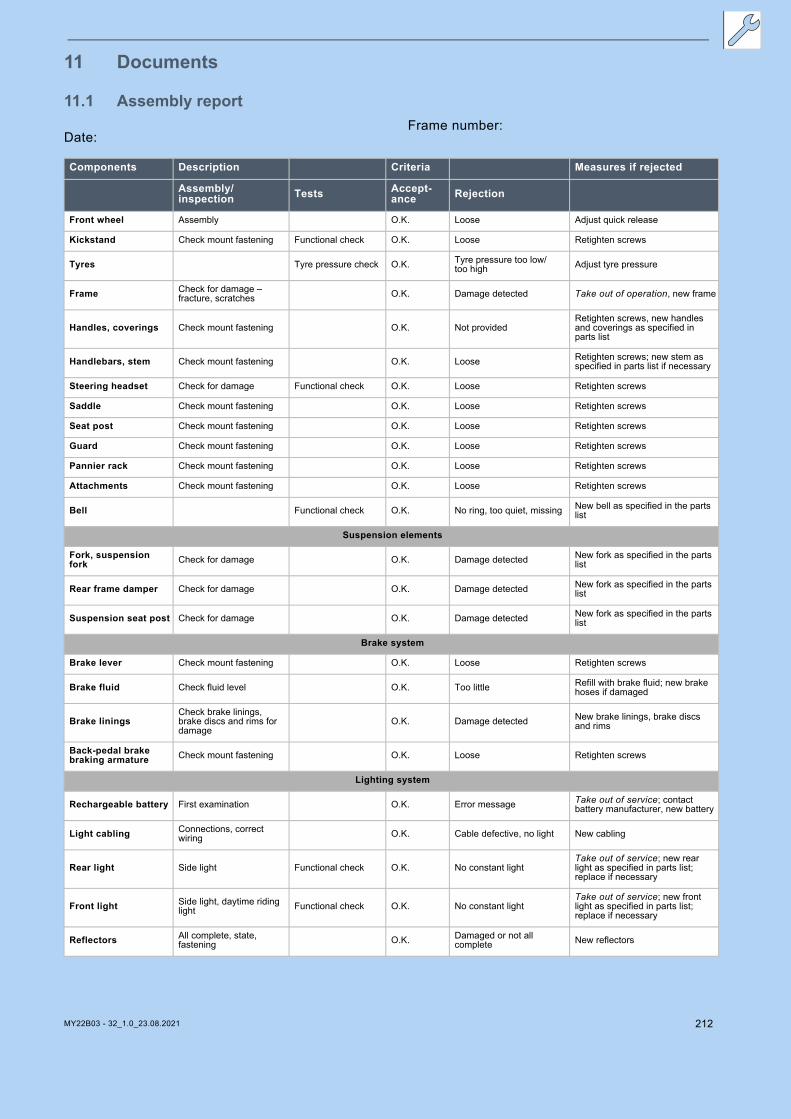
11 Documents
11.1 Assembly report
Date:Frame number:
Components Description Criteria Measures if rejected
Assembly/inspection Tests Accept-
ance Rejection
Front wheel Assembly O.K. Loose Adjust quick release
Kickstand Check mount fastening Functional check O.K. Loose Retighten screws
Tyres Tyre pressure check O.K. Tyre pressure too low/too high Adjust tyre pressure
Frame Check for damage – fracture, scratches O.K. Damage detected Take out of operation, new frame
Handles, coverings Check mount fastening O.K. Not providedRetighten screws, new handles and coverings as specified in parts list
Handlebars, stem Check mount fastening O.K. Loose Retighten screws; new stem as specified in parts list if necessary
Steering headset Check for damage Functional check O.K. Loose Retighten screws
Saddle Check mount fastening O.K. Loose Retighten screws
Seat post Check mount fastening O.K. Loose Retighten screws
Guard Check mount fastening O.K. Loose Retighten screws
Pannier rack Check mount fastening O.K. Loose Retighten screws
Attachments Check mount fastening O.K. Loose Retighten screws
Bell Functional check O.K. No ring, too quiet, missing New bell as specified in the parts list
Suspension elements
Fork, suspension fork Check for damage O.K. Damage detected New fork as specified in the parts
list
Rear frame damper Check for damage O.K. Damage detected New fork as specified in the parts list
Suspension seat post Check for damage O.K. Damage detected New fork as specified in the parts list
Brake system
Brake lever Check mount fastening O.K. Loose Retighten screws
Brake fluid Check fluid level O.K. Too little Refill with brake fluid; new brake hoses if damaged
Brake liningsCheck brake linings, brake discs and rims for damage
O.K. Damage detected New brake linings, brake discs and rims
Back-pedal brake braking armature Check mount fastening O.K. Loose Retighten screws
Lighting system
Rechargeable battery First examination O.K. Error message Take out of service; contact battery manufacturer, new battery
Light cabling Connections, correct wiring O.K. Cable defective, no light New cabling
Rear light Side light Functional check O.K. No constant lightTake out of service; new rear light as specified in parts list; replace if necessary
Front light Side light, daytime riding light Functional check O.K. No constant light
Take out of service; new front light as specified in parts list; replace if necessary
Reflectors All complete, state, fastening O.K. Damaged or not all
complete New reflectors
MY22B03 - 32_1.0_23.08.2021 212
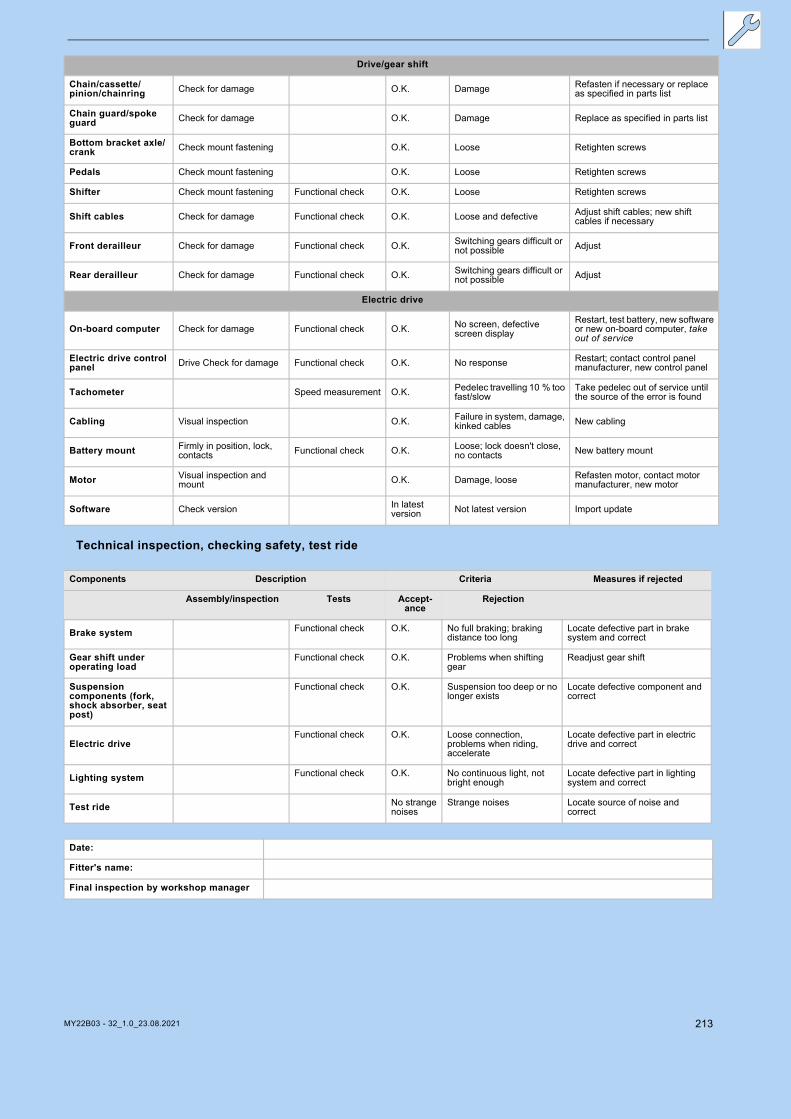
Technical inspection, checking safety, test ride
Drive/gear shift
Chain/cassette/pinion/chainring Check for damage O.K. Damage Refasten if necessary or replace
as specified in parts list
Chain guard/spoke guard Check for damage O.K. Damage Replace as specified in parts list
Bottom bracket axle/crank Check mount fastening O.K. Loose Retighten screws
Pedals Check mount fastening O.K. Loose Retighten screws
Shifter Check mount fastening Functional check O.K. Loose Retighten screws
Shift cables Check for damage Functional check O.K. Loose and defective Adjust shift cables; new shift cables if necessary
Front derailleur Check for damage Functional check O.K. Switching gears difficult or not possible Adjust
Rear derailleur Check for damage Functional check O.K. Switching gears difficult or not possible Adjust
Electric drive
On-board computer Check for damage Functional check O.K. No screen, defective screen display
Restart, test battery, new software or new on-board computer, take out of service
Electric drive control panel Drive Check for damage Functional check O.K. No response Restart; contact control panel
manufacturer, new control panel
Tachometer Speed measurement O.K. Pedelec travelling 10 % too fast/slow
Take pedelec out of service until the source of the error is found
Cabling Visual inspection O.K. Failure in system, damage, kinked cables New cabling
Battery mount Firmly in position, lock, contacts Functional check O.K. Loose; lock doesn't close,
no contacts New battery mount
Motor Visual inspection and mount O.K. Damage, loose Refasten motor, contact motor
manufacturer, new motor
Software Check version In latest version Not latest version Import update
Components Description Criteria Measures if rejected
Assembly/inspection Tests Accept-ance
Rejection
Brake system Functional check O.K. No full braking; braking distance too long
Locate defective part in brake system and correct
Gear shift under operating load
Functional check O.K. Problems when shifting gear
Readjust gear shift
Suspension components (fork, shock absorber, seat post)
Functional check O.K. Suspension too deep or no longer exists
Locate defective component and correct
Electric driveFunctional check O.K. Loose connection,
problems when riding, accelerate
Locate defective part in electric drive and correct
Lighting system Functional check O.K. No continuous light, not bright enough
Locate defective part in lighting system and correct
Test ride No strange noises
Strange noises Locate source of noise and correct
Date:
Fitter's name:
Final inspection by workshop manager
MY22B03 - 32_1.0_23.08.2021 213
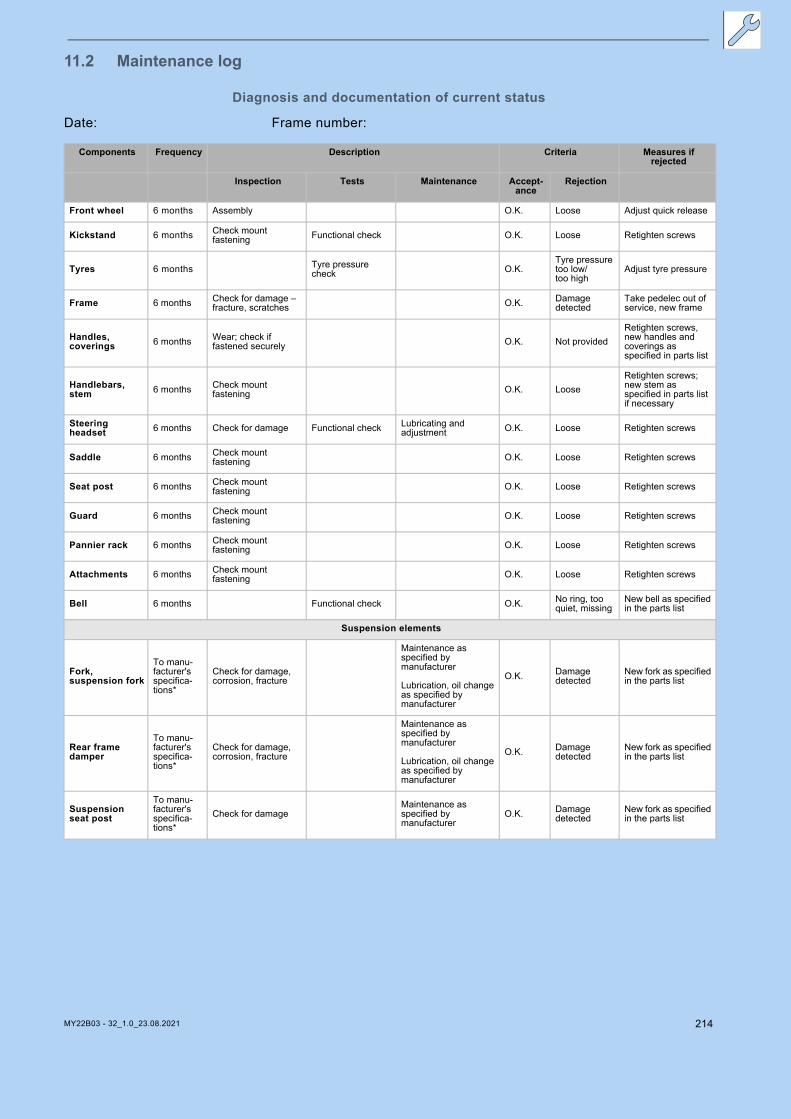
11.2 Maintenance log
Diagnosis and documentation of current status
Date: Frame number:
Components Frequency Description Criteria Measures if rejected
Inspection Tests Maintenance Accept-ance
Rejection
Front wheel 6 months Assembly O.K. Loose Adjust quick release
Kickstand 6 months Check mount fastening Functional check O.K. Loose Retighten screws
Tyres 6 months Tyre pressure check O.K.
Tyre pressure too low/too high
Adjust tyre pressure
Frame 6 months Check for damage – fracture, scratches O.K. Damage
detectedTake pedelec out of service, new frame
Handles, coverings 6 months Wear; check if
fastened securely O.K. Not providedRetighten screws, new handles and coverings as specified in parts list
Handlebars, stem 6 months Check mount
fastening O.K. LooseRetighten screws; new stem as specified in parts list if necessary
Steering headset 6 months Check for damage Functional check Lubricating and
adjustment O.K. Loose Retighten screws
Saddle 6 months Check mount fastening O.K. Loose Retighten screws
Seat post 6 months Check mount fastening O.K. Loose Retighten screws
Guard 6 months Check mount fastening O.K. Loose Retighten screws
Pannier rack 6 months Check mount fastening O.K. Loose Retighten screws
Attachments 6 months Check mount fastening O.K. Loose Retighten screws
Bell 6 months Functional check O.K. No ring, too quiet, missing
New bell as specified in the parts list
Suspension elements
Fork, suspension fork
To manu-facturer's specifica-tions*
Check for damage, corrosion, fracture
Maintenance as specified by manufacturer
Lubrication, oil change as specified by manufacturer
O.K. Damage detected
New fork as specified in the parts list
Rear frame damper
To manu-facturer's specifica-tions*
Check for damage, corrosion, fracture
Maintenance as specified by manufacturer
Lubrication, oil change as specified by manufacturer
O.K. Damage detected
New fork as specified in the parts list
Suspension seat post
To manu-facturer's specifica-tions*
Check for damageMaintenance as specified by manufacturer
O.K. Damage detected
New fork as specified in the parts list
MY22B03 - 32_1.0_23.08.2021 214
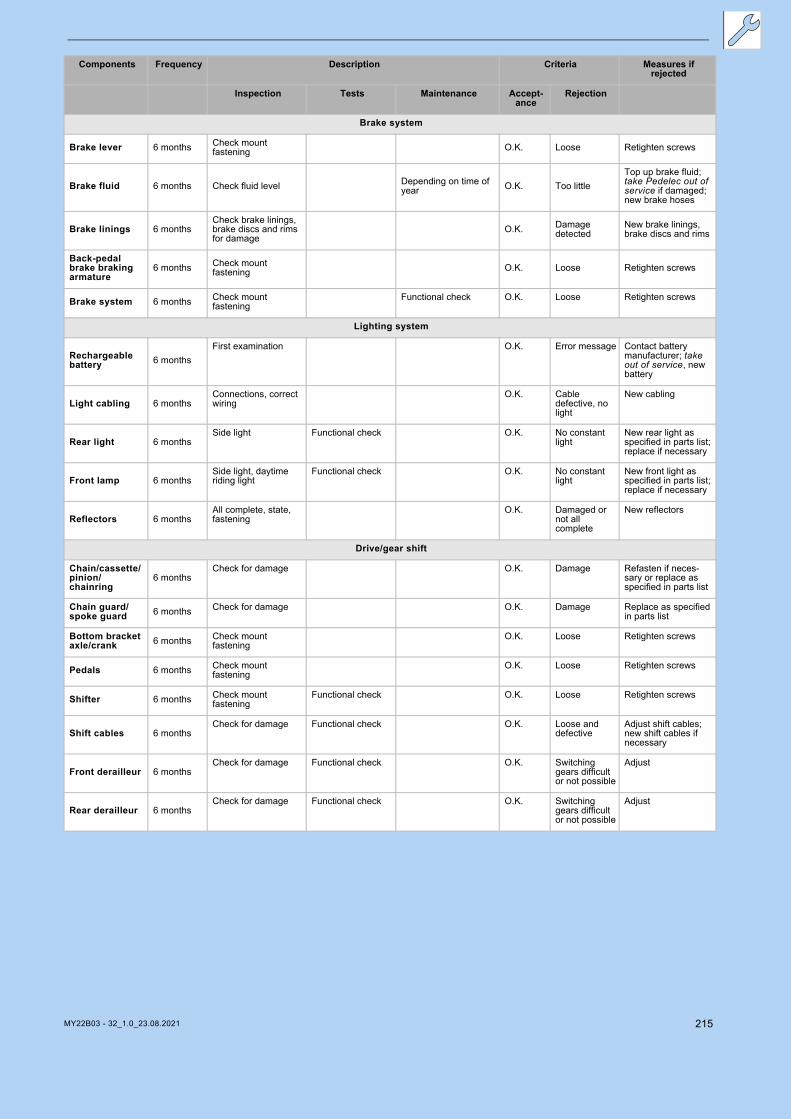
Inspection Tests Maintenance Accept-ance
Rejection
Brake system
Brake lever 6 months Check mount fastening O.K. Loose Retighten screws
Brake fluid 6 months Check fluid level Depending on time of year O.K. Too little
Top up brake fluid; take Pedelec out of service if damaged; new brake hoses
Brake linings 6 monthsCheck brake linings, brake discs and rims for damage
O.K. Damage detected
New brake linings, brake discs and rims
Back-pedal brake braking armature
6 months Check mount fastening O.K. Loose Retighten screws
Brake system 6 months Check mount fastening
Functional check O.K. Loose Retighten screws
Lighting system
Rechargeable battery 6 months
First examination O.K. Error message Contact battery manufacturer; take out of service, new battery
Light cabling 6 monthsConnections, correct wiring
O.K. Cable defective, no light
New cabling
Rear light 6 monthsSide light Functional check O.K. No constant
lightNew rear light as specified in parts list; replace if necessary
Front lamp 6 monthsSide light, daytime riding light
Functional check O.K. No constant light
New front light as specified in parts list; replace if necessary
Reflectors 6 monthsAll complete, state, fastening
O.K. Damaged or not all complete
New reflectors
Drive/gear shift
Chain/cassette/pinion/chainring
6 monthsCheck for damage O.K. Damage Refasten if neces-
sary or replace as specified in parts list
Chain guard/spoke guard 6 months Check for damage O.K. Damage Replace as specified
in parts list
Bottom bracket axle/crank 6 months Check mount
fasteningO.K. Loose Retighten screws
Pedals 6 months Check mount fastening
O.K. Loose Retighten screws
Shifter 6 months Check mount fastening
Functional check O.K. Loose Retighten screws
Shift cables 6 monthsCheck for damage Functional check O.K. Loose and
defectiveAdjust shift cables; new shift cables if necessary
Front derailleur 6 monthsCheck for damage Functional check O.K. Switching
gears difficult or not possible
Adjust
Rear derailleur 6 monthsCheck for damage Functional check O.K. Switching
gears difficult or not possible
Adjust
Components Frequency Description Criteria Measures if rejected
MY22B03 - 32_1.0_23.08.2021 215
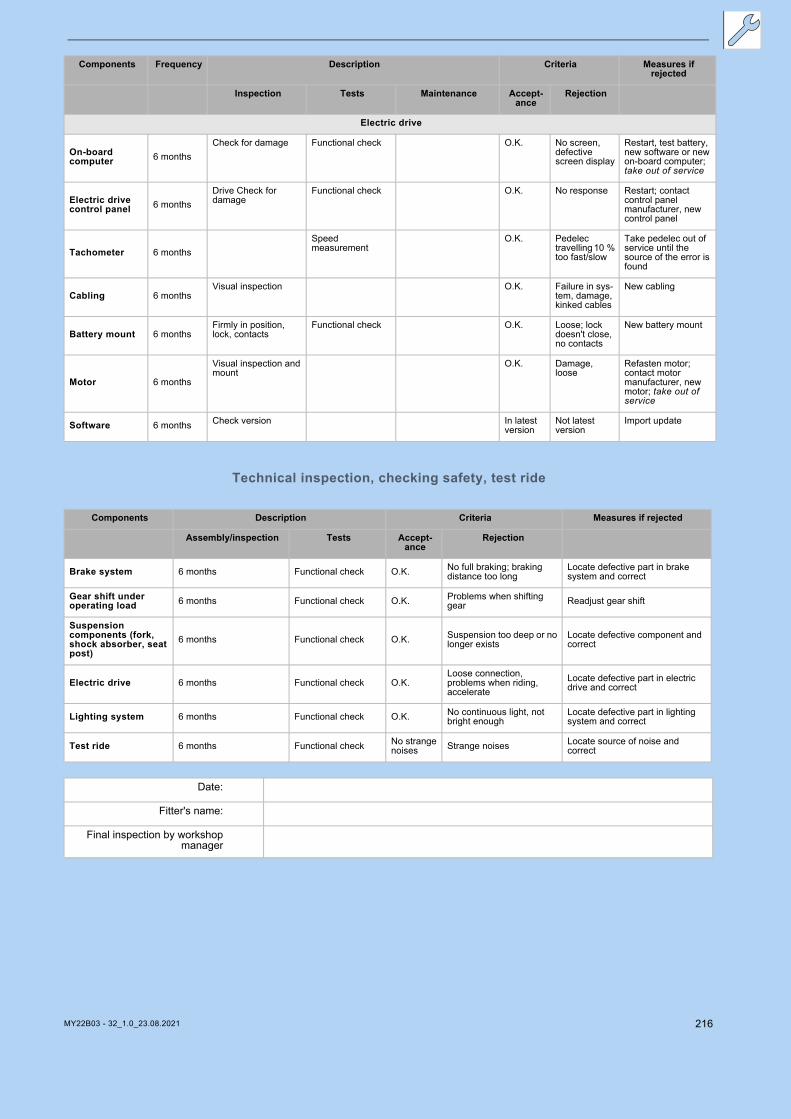
Technical inspection, checking safety, test ride
Inspection Tests Maintenance Accept-ance
Rejection
Electric drive
On-board computer 6 months
Check for damage Functional check O.K. No screen, defective screen display
Restart, test battery, new software or new on-board computer; take out of service
Electric drive control panel 6 months
Drive Check for damage
Functional check O.K. No response Restart; contact control panel manufacturer, new control panel
Tachometer 6 monthsSpeed measurement
O.K. Pedelec travelling 10 % too fast/slow
Take pedelec out of service until the source of the error is found
Cabling 6 monthsVisual inspection O.K. Failure in sys-
tem, damage, kinked cables
New cabling
Battery mount 6 monthsFirmly in position, lock, contacts
Functional check O.K. Loose; lock doesn't close, no contacts
New battery mount
Motor 6 months
Visual inspection and mount
O.K. Damage, loose
Refasten motor; contact motor manufacturer, new motor; take out of service
Software 6 months Check version In latest version
Not latest version
Import update
Components Frequency Description Criteria Measures if rejected
Components Description Criteria Measures if rejected
Assembly/inspection Tests Accept-ance
Rejection
Brake system 6 months Functional check O.K. No full braking; braking distance too long
Locate defective part in brake system and correct
Gear shift under operating load 6 months Functional check O.K. Problems when shifting
gear Readjust gear shift
Suspension components (fork, shock absorber, seat post)
6 months Functional check O.K. Suspension too deep or no longer exists
Locate defective component and correct
Electric drive 6 months Functional check O.K.Loose connection, problems when riding, accelerate
Locate defective part in electric drive and correct
Lighting system 6 months Functional check O.K. No continuous light, not bright enough
Locate defective part in lighting system and correct
Test ride 6 months Functional check No strange noises Strange noises Locate source of noise and
correct
Date:
Fitter's name:
Final inspection by workshopmanager
MY22B03 - 32_1.0_23.08.2021 216

Notes
MY22B03 - 32_1.0_23.08.2021 217
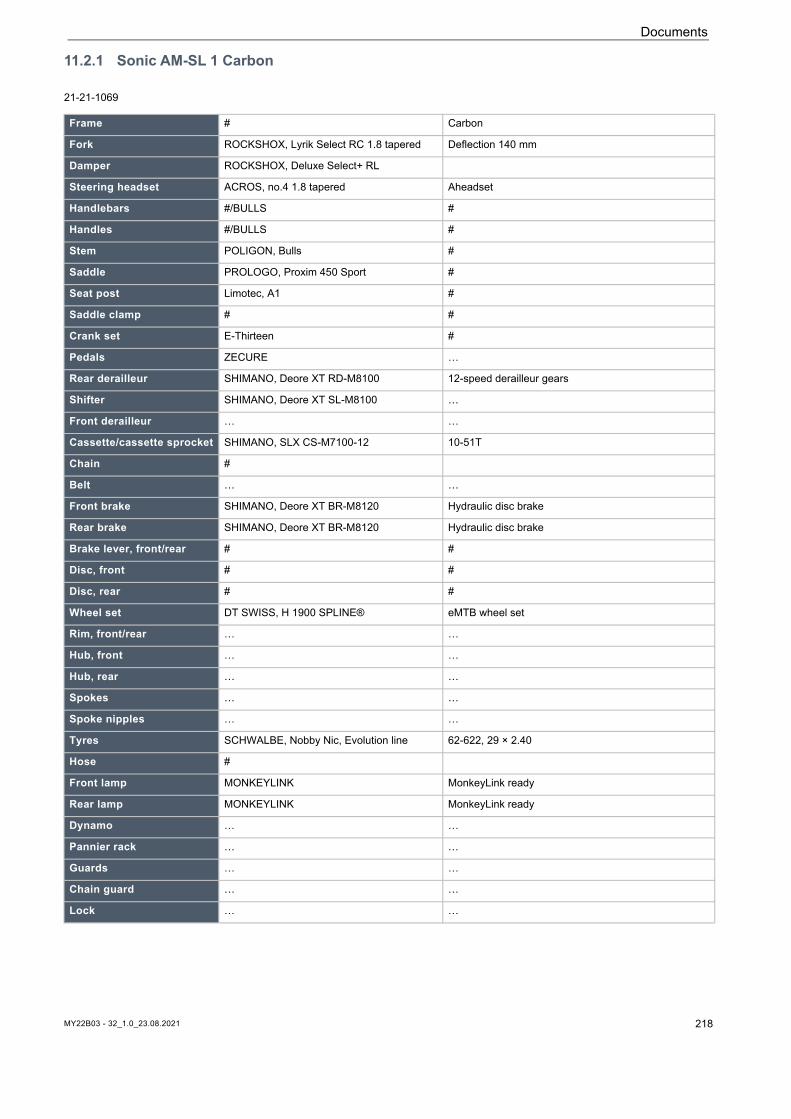
Documents
11.2.1 Sonic AM-SL 1 Carbon
21-21-1069 Frame # Carbon
Fork ROCKSHOX, Lyrik Select RC 1.8 tapered Deflection 140 mm
Damper ROCKSHOX, Deluxe Select+ RL
Steering headset ACROS, no.4 1.8 tapered Aheadset
Handlebars #/BULLS #
Handles #/BULLS #
Stem POLIGON, Bulls #
Saddle PROLOGO, Proxim 450 Sport #
Seat post Limotec, A1 #
Saddle clamp # #
Crank set E-Thirteen #
Pedals ZECURE …
Rear derailleur SHIMANO, Deore XT RD-M8100 12-speed derailleur gears
Shifter SHIMANO, Deore XT SL-M8100 …
Front derailleur … …
Cassette/cassette sprocket SHIMANO, SLX CS-M7100-12 10-51T
Chain #
Belt … …
Front brake SHIMANO, Deore XT BR-M8120 Hydraulic disc brake
Rear brake SHIMANO, Deore XT BR-M8120 Hydraulic disc brake
Brake lever, front/rear # #
Disc, front # #
Disc, rear # #
Wheel set DT SWISS, H 1900 SPLINE® eMTB wheel set
Rim, front/rear … …
Hub, front … …
Hub, rear … …
Spokes … …
Spoke nipples … …
Tyres SCHWALBE, Nobby Nic, Evolution line 62-622, 29 × 2.40
Hose #
Front lamp MONKEYLINK MonkeyLink ready
Rear lamp MONKEYLINK MonkeyLink ready
Dynamo … …
Pannier rack … …
Guards … …
Chain guard … …
Lock … …
MY22B03 - 32_1.0_23.08.2021 218

Documents
...not available
# Not yet available when the instructions were produced
Stand/stand mount … …
Motor SHIMANO, EP8 85 Nm
Rechargeable battery BMZ, V10 725 Wh
On-board computer SHIMANO, Steps SC-EM800 …
Charger SHIMANO 4.5 A
MY22B03 - 32_1.0_23.08.2021 219

Documents
11.2.2 Sonic AM-SL 1 Carbon
21-21-1070 Frame Carbon
Fork ROCKSHOX, 35 Gold 1.8 tapered Deflection 140 mm
Damper ROCKSHOX, Deluxe Select+ RL 140 mm
Steering headset ACROS, no.4 1.8 tapered Aheadset
Handlebars #/BULLS #
Handles #/BULLS #
Stem Bulls S140 #
Saddle PROLOGO, Proxim 450 Sport #
Seat post Limotec, A1L #
Saddle clamp # #
Crank set E-Thirteen #
Pedals ZECURE, VPE-527
Rear derailleur SHIMANO, Deore XT RD-M8100 12-speed derailleur gears
Shifter SHIMANO, Deore XT SL-M6100
Front derailleur …
Cassette/cassette sprocket SHIMANO, Deore CS-M6100 -12 10-51T
Chain #
Belt …
Front brake SHIMANO, Deore BR-M6120 Hydraulic disc brake
Rear brake SHIMANO, Deore BR-M6120 Hydraulic disc brake
Brake lever, front/rear
Disc, front 203 mm
Disc, rear 180 mm
Wheel set SHIMANO
Rim, front/rear … …
Hub, front … …
Hub, rear … …
Spokes … …
Spoke nipples … …
Tyres SCHWALBE, Nobby Nic Performance 62-622, 29 × 2.40
Hose #
Front lamp #
Rear lamp #
Dynamo … …
Pannier rack … …
Guards … …
Chain guard … …
Lock … …
MY22B03 - 32_1.0_23.08.2021 220

Documents
...not available
# Not yet available when the instructions were produced
Stand/stand mount … …
Motor SHIMANO, EP8 85 Nm
Rechargeable battery BMZ, V10 725 Wh
On-board computer SHIMANO, Steps SC-EM800 …
Charger SHIMANO 4.5 A
MY22B03 - 32_1.0_23.08.2021 221
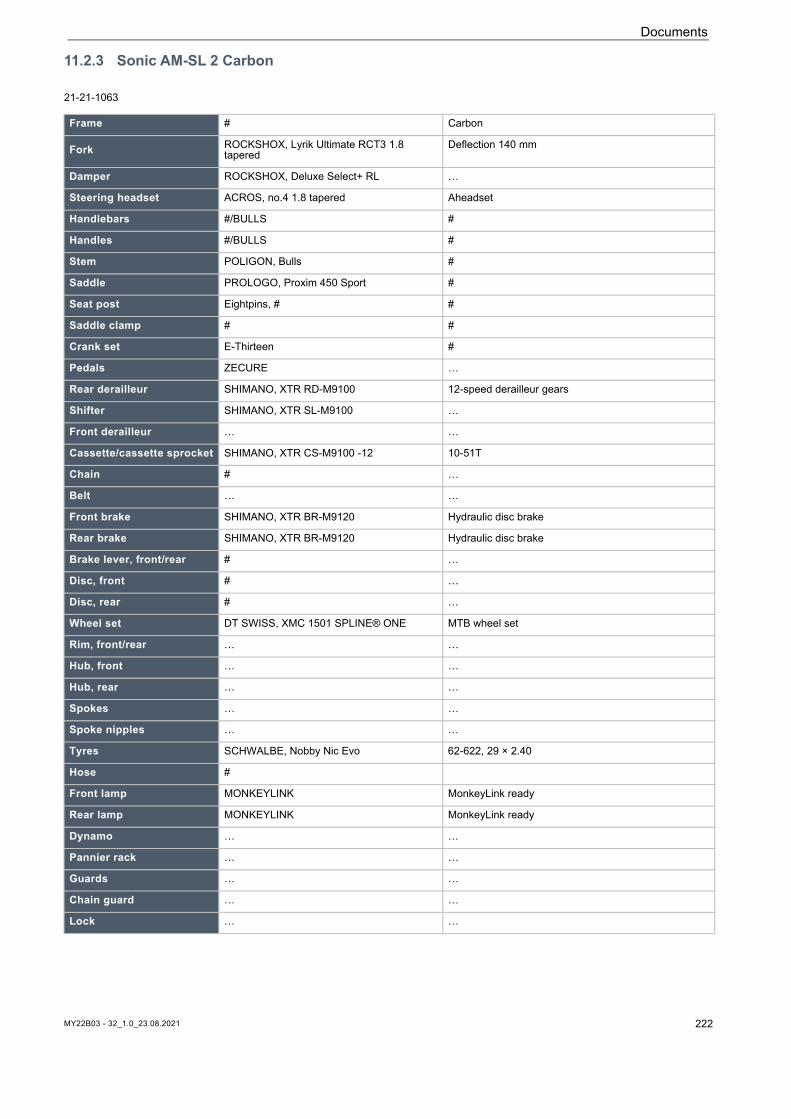
Documents
11.2.3 Sonic AM-SL 2 Carbon
21-21-1063 Frame # Carbon
Fork ROCKSHOX, Lyrik Ultimate RCT3 1.8 tapered
Deflection 140 mm
Damper ROCKSHOX, Deluxe Select+ RL …
Steering headset ACROS, no.4 1.8 tapered Aheadset
Handlebars #/BULLS #
Handles #/BULLS #
Stem POLIGON, Bulls #
Saddle PROLOGO, Proxim 450 Sport #
Seat post Eightpins, # #
Saddle clamp # #
Crank set E-Thirteen #
Pedals ZECURE …
Rear derailleur SHIMANO, XTR RD-M9100 12-speed derailleur gears
Shifter SHIMANO, XTR SL-M9100 …
Front derailleur … …
Cassette/cassette sprocket SHIMANO, XTR CS-M9100 -12 10-51T
Chain # …
Belt … …
Front brake SHIMANO, XTR BR-M9120 Hydraulic disc brake
Rear brake SHIMANO, XTR BR-M9120 Hydraulic disc brake
Brake lever, front/rear # …
Disc, front # …
Disc, rear # …
Wheel set DT SWISS, XMC 1501 SPLINE® ONE MTB wheel set
Rim, front/rear … …
Hub, front … …
Hub, rear … …
Spokes … …
Spoke nipples … …
Tyres SCHWALBE, Nobby Nic Evo 62-622, 29 × 2.40
Hose #
Front lamp MONKEYLINK MonkeyLink ready
Rear lamp MONKEYLINK MonkeyLink ready
Dynamo … …
Pannier rack … …
Guards … …
Chain guard … …
Lock … …
MY22B03 - 32_1.0_23.08.2021 222
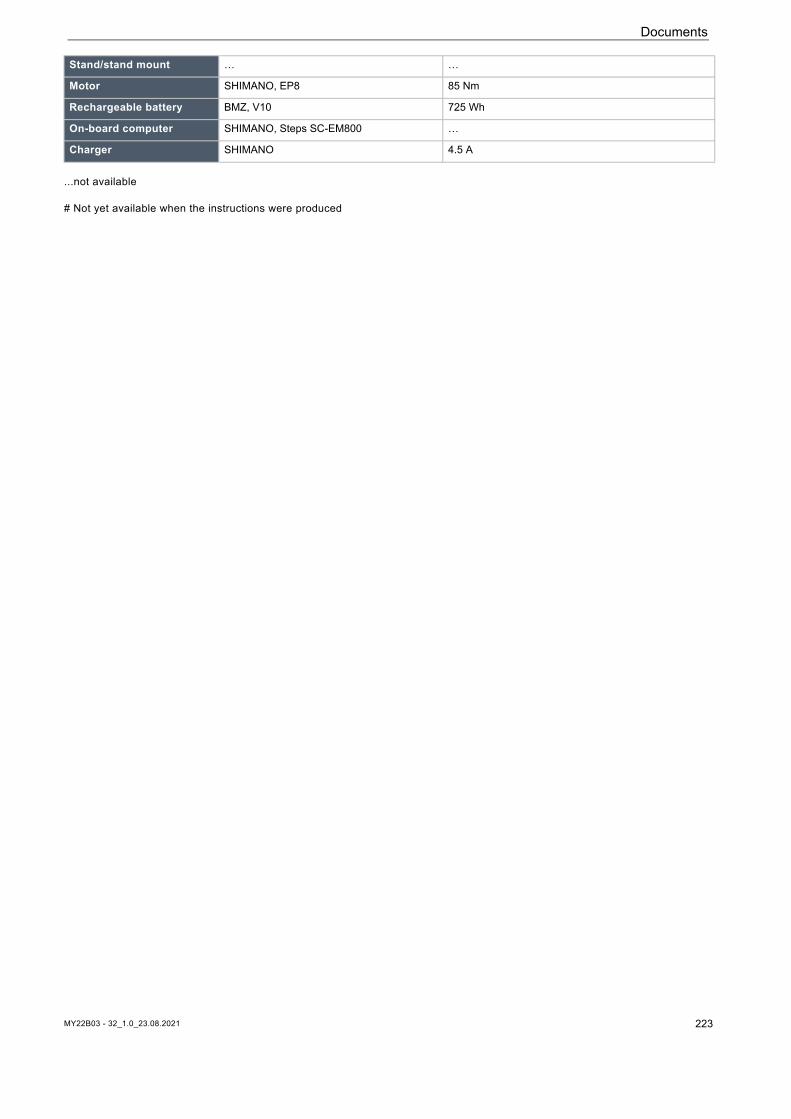
Documents
...not available
# Not yet available when the instructions were produced
Stand/stand mount … …
Motor SHIMANO, EP8 85 Nm
Rechargeable battery BMZ, V10 725 Wh
On-board computer SHIMANO, Steps SC-EM800 …
Charger SHIMANO 4.5 A
MY22B03 - 32_1.0_23.08.2021 223

Documents
11.2.4 Sonic EN-SL 1 Carbon
21-21-1004 Frame # Carbon
Fork ROCKSHOX, Lyrik Select RC 1.8 tapered Deflection 160 mm
Damper ROCKSHOX, Super Deluxe Select+ RL
Steering headset ACROS, no.4 1.8 tapered Aheadset
Handlebars #/BULLS #
Handles #/BULLS #
Stem POLIGON, Bulls #
Saddle PROLOGO, Proxim 450 Sport #
Seat post LIMOTEC, A1L #
Saddle clamp # #
Crank set E-Thirteen #
Pedals ZECURE
Rear derailleur SHIMANO, Deore XT RD-M8100 12-speed derailleur gears
Shifter SHIMANO, Deore XT SL-M6100
Front derailleur …
Cassette/cassette sprocket SHIMANO, Deore CS-M6100 -12 10-51T
Chain #
Belt …
Front brake SHIMANO, Deore BR-M6120 Hydraulic disc brake
Rear brake SHIMANO, Deore BR-M6120 Hydraulic disc brake
Brake lever, front/rear #
Disc, front # #
Disc, rear # #
Wheel set # #
Rim, front/rear … …
Hub, front … …
Hub, rear … …
Spokes … …
Spoke nipples … …
Tyres SCHWALBE, Magic Mary/Big Betty 62-622, 29 × 2.40
Hose #
Front lamp MONKEYLINK MonkeyLink ready
Rear lamp MONKEYLINK MonkeyLink ready
Dynamo … …
Pannier rack … …
Guards … …
Chain guard … …
Lock … …
MY22B03 - 32_1.0_23.08.2021 224

Documents
...not available
# Not yet available when the instructions were produced
Stand/stand mount … …
Motor SHIMANO, EP8 85 Nm
Rechargeable battery BMZ, V10 725 Wh
On-board computer SHIMANO, Steps SC-EM800 …
Charger SHIMANO 4.5 A
MY22B03 - 32_1.0_23.08.2021 225
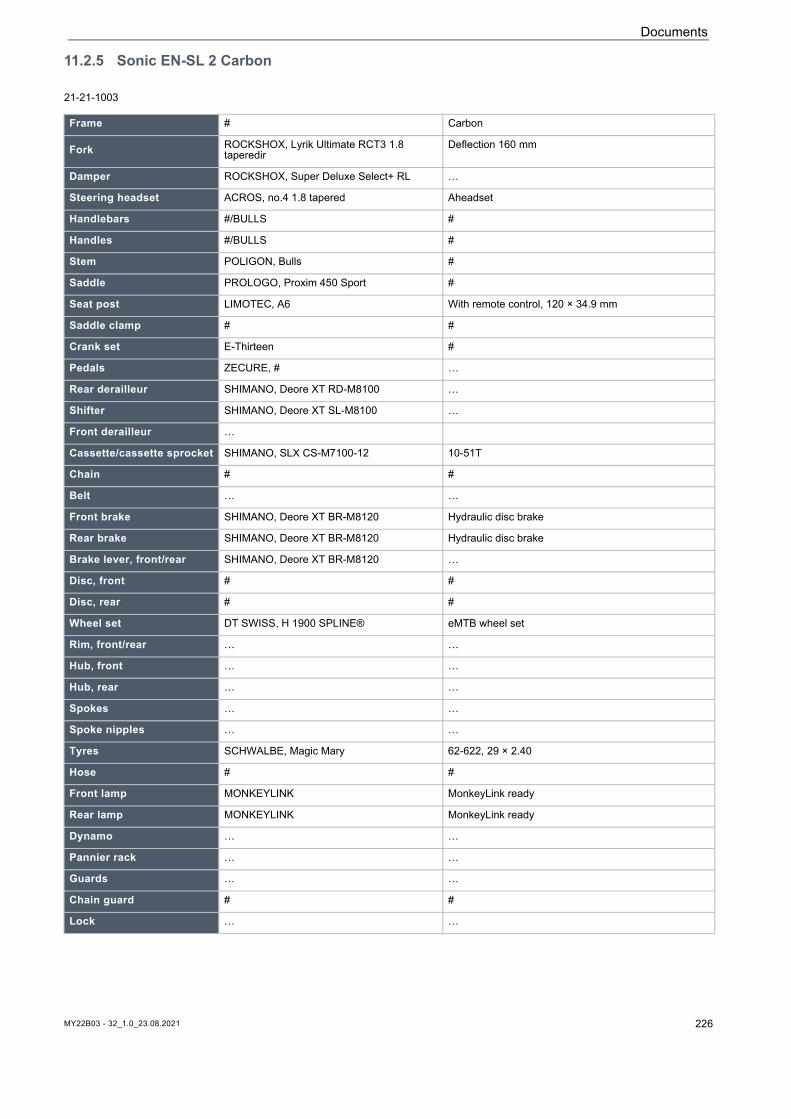
Documents
11.2.5 Sonic EN-SL 2 Carbon
21-21-1003 Frame # Carbon
Fork ROCKSHOX, Lyrik Ultimate RCT3 1.8 taperedir
Deflection 160 mm
Damper ROCKSHOX, Super Deluxe Select+ RL …
Steering headset ACROS, no.4 1.8 tapered Aheadset
Handlebars #/BULLS #
Handles #/BULLS #
Stem POLIGON, Bulls #
Saddle PROLOGO, Proxim 450 Sport #
Seat post LIMOTEC, A6 With remote control, 120 × 34.9 mm
Saddle clamp # #
Crank set E-Thirteen #
Pedals ZECURE, # …
Rear derailleur SHIMANO, Deore XT RD-M8100 …
Shifter SHIMANO, Deore XT SL-M8100 …
Front derailleur …
Cassette/cassette sprocket SHIMANO, SLX CS-M7100-12 10-51T
Chain # #
Belt … …
Front brake SHIMANO, Deore XT BR-M8120 Hydraulic disc brake
Rear brake SHIMANO, Deore XT BR-M8120 Hydraulic disc brake
Brake lever, front/rear SHIMANO, Deore XT BR-M8120 …
Disc, front # #
Disc, rear # #
Wheel set DT SWISS, H 1900 SPLINE® eMTB wheel set
Rim, front/rear … …
Hub, front … …
Hub, rear … …
Spokes … …
Spoke nipples … …
Tyres SCHWALBE, Magic Mary 62-622, 29 × 2.40
Hose # #
Front lamp MONKEYLINK MonkeyLink ready
Rear lamp MONKEYLINK MonkeyLink ready
Dynamo … …
Pannier rack … …
Guards … …
Chain guard # #
Lock … …
MY22B03 - 32_1.0_23.08.2021 226

Documents
...not available
# Not yet available when the instructions were produced
Stand/stand mount … …
Motor SHIMANO Steps DU-EP800A 85 Nm
Rechargeable battery BMZ, V10 725 Wh
On-board computer SHIMANO, Steps SC-EM800 …
Charger SHIMANO 4.5 A
MY22B03 - 32_1.0_23.08.2021 227

Documents
11.2.6 Sonic EN-SL Daytona
22-18-1081 Frame # Carbon
Fork INTEND, Blackline Edge Deflection 160 mm
Damper INTEND, Hover Gamechanger 150 mm
Steering headset # #
Handlebars BULLS Carbon Carbon
Handles # #
Stem BULLS Carbon Carbon
Saddle PROLOGO, Proxim Carbon Rail #
Seat post ROCKSHOX, Reverb AXS
Saddle clamp # #
Crank set E-Thirteen Carbon
Pedals ZECURE, VPE-527
Rear derailleur SRAM, XX AXS 12-speed derailleur gears
Shifter #
Front derailleur …
Cassette/cassette sprocket SRAM, XX 10-52T
Chain #
Belt …
Front brake TRICK STUFF, Direttissima Hydraulic disc brake
Rear brake TRICK STUFF, Direttissima Hydraulic disc brake
Brake lever, front/rear
Disc, front # 224 mm /203 mm
Disc, rear # 224 mm /203 mm
Wheel set DT SWISS, HXC 1200 SPLINE® eMTB wheel set
Rim, front/rear … …
Hub, front … …
Hub, rear … …
Spokes … …
Spoke nipples SCHWALBE, Magic Mary/Big Betty 62-622, 29 × 2.40
Tyres #
Tube #
Front lamp #
Rear lamp … …
Dynamo … …
Pannier rack … …
Guards … …
Chain guard … …
Lock … …
MY22B03 - 32_1.0_23.08.2021 228

Documents
...not available
# Not yet available when the instructions were produced
Stand/stand mount … …
Motor SHIMANO, EP8 85 Nm
Rechargeable battery BMZ, V10 725 Wh
On-board computer SHIMANO, Steps SC-EM800 …
Charger SHIMANO 4.5 A
MY22B03 - 32_1.0_23.08.2021 229
Glossary
12 Glossary
Bicycle for young adults
Source: ISO 4210-2: pedelec designed for use on public roads by a young adult whose weight is less than 40 kg, with maximum saddle height of 635 mm or more and less than 750 mm (see ISO 4210).
Brake lever
Source: EN 15194:2017: lever used to apply the brake.
Braking distance
Source: EN 15194:2017: distance travelled by a pedelec between the commencement of braking and the point at which the pedelec comes to rest.
Cargo bike
Source: DIN 79010: pedelec mainly designed to carry goods.
CE marking
Source: Directive on Machinery: the manufacturer uses the CE marking to declare that the pedelec complies with the applicable requirements.
City and trekking bicycles
Source: EN-ISO 4210 - 2: pedelec designed for use on public roads primarily for means of trans-portation or leisure.
Consumables
Source: EN 82079-1: any part or material that is needed to continue using or maintain the product.
Continuous power rating
Source: ISO 15194:2017, output power specified by the manufacturer at which the motor reaches its thermal equilibrium under the specified ambi-ent conditions.
Decommissioning
Source: DIN 31051: intentional, unlimited inter-ruption in an object's functional capability.
Disc brake
Source: EN 15194:2017: brake in which brake pads are used to grip the lateral faces of a thin disc attached to or incorporated into the wheel hub.
Drive belt
Source: EN 15194:2017: seamless ring belt which is used as a means of transmitting drive force.
Electrical control system
Source: EN 15194:2017: electronic and/or electri-cal component or an assembly of components provided for installation into a vehicle, together with all electrical connections and associated wir-ing for the motor electrical power assistance.
Electrically power assisted pedelec, pedelec
Source: EN 15194:2017: electrically power assist-ed cycle pedelec EPAC bicycles, equipped with pedals and an auxiliary electric motor, which can-not be propelled exclusively by means of the aux-iliary electric motor, except in start-up assistance mode.
Emergency stop
Source: ISO 13850:2015, function or signal, de-signed: — to avert arising or reduce existing haz-ards to persons, damage to machinery or to work in progress; – to be initiated by a single human ac-tion.
Fault
Source: EN 13306:2018-02, 6.1: state of an item (4.2.1) characterized by inability to perform a re-quired function (4.5.1), excluding the inability dur-ing preventive maintenance or other planned ac-tions, or due to lack of external resources.
Folding bicycle
Source: ISO 4210-2: pedelec designed to fold into a compact form, making it easy to transport and store.
MY22B03 - 32_1.0_23.08.2021 230
Glossary
Fork steerer
Source: EN 15194:2017: part of a fork that rotates around the steering axis of a pedelec frame head tube. It is normally connected to the fork crown or directly to the fork legs, and is normally the point of connection between the fork and the handlebar stem.
Fracture
Source: EN 15194:2017: unintentional separation into two or more parts.
Maintenance
Source: DIN 31051: maintenance is generally per-formed at regular intervals and often carried out by trained technical staff. This ensures a maxi-mum service life and low wear and tear for the maintained items. Proper maintenance is often also a pre-requisite for providing a warranty.
Manufacturer
Source: Directive 2006/42/EC on Machin-ery,17.05.2006 Any natural or legal person who designs and/or manufactures machinery or partly completed machinery covered by this Directive and is responsible for the conformity of the ma-chinery or the partly completed machinery with this Directive with a view to its being placed on the market, under his own name or trademark or for his own use.
Maximum continuous power rating
Source: ZEG: the maximum continuous power rat-ing is the maximum power for the electric motor output shaft during 30 minutes.
Maximum permitted total weight
Source: EN 15194:2017: weight of the fully as-sembled pedelec plus the rider and baggage, as specified by the manufacturer.
Maximum saddle height
Source: EN 15194:2017: vertical distance from the ground to the point where the top of the seat surface is intersected by the seat-post axis, meas-ured with the saddle in a horizontal position and with the seat-post set to the minimum insertion-depth mark.
Maximum tyre pressure
Source: EN 15194:2017: maximum tyre pressure recommended by the tyre or rim manufacturer for a safe and efficient performance. If the rim and tyre both indicate a maximum tyre pressure, the maximum inflation pressure is the lower of the two pressures indicated.
Minimum insertion depth
Source: EN 15194:2017: mark indicating the min-imum insertion depth of handlebar stem into fork steerer (fork stem) or seat post into frame.
Model year
Source: ZEG: the model year refers to the first production year that the series-manufactured pedelec was manufactured in the version in ques-tion and is not always identical with the year of manufacture. The year of manufacture may be be-fore the model year in some cases. If no technical modifications are introduced to the series, produc-tion may continue of pedelecs from a previous model year.
Mountain bike
Source: ISO 4210 - 2: pedelec designed for use off-road on rough terrain, on public roads, and on public pathways, equipped with a suitably strengthened frame and other components, and, typically, with wide-section tyres with coarse tread patterns and a wide range of transmission gears.
Negative deflection
Negative deflection or sag is fork compression caused by body weight and gear (e.g. a backpack), their sitting position and the frame geometry.
Off-road rough terrain
Source: EN 15194:2017: rough gravel tracks, for-est trails and other generally off-road tracks where tree roots and rocks are likely to be encountered.
Operating instructions
Source: ISO/DIS 20607:2018: part of the user in-formation that machine manufacturers provide to machine operators; it contains guidance, instruc-tions and tips related to the use of the machine in all its life cycle phases.
MY22B03 - 32_1.0_23.08.2021 231
Glossary
Placing on the market
Source: Directive 2006/42/EC on Machinery, 17.05.2006, Making available for the first time in the Community machinery or partly completed machinery with a view to distribution or use, whether for reward or free of charge.
Pressure point
Source: ZEG: the pressure point on a brake is the point on the brake lever where the brake disc and brake pads respond and the braking process is in-itiated.
Quick-release device, quick release
Source: EN 15194:2017: lever actuated mecha-nism that connects, retains or secures a wheel or any other component.
Racing bicycle
Source: ISO 4210-2: pedelec designed for ama-teur rides at high speed and for use on public roads having a control and steering assembly with multiple grip positions to provide an aerodynamic posture Bicycle multi-speed transmission system and a tyre width not greater than 28 mm with the fully assembled bicycle having a maximum mass of 12 kg.
Rebound
The rebound defines the speed at which the fork rebounds after being loaded.
Rechargeable battery, battery
Source: DIN 40729:1985-05: a rechargeable bat-tery is an energy storage device that can store supplied electrical energy as chemical energy (charging) and release it as electrical energy when required (discharging).
Seat post
Source: EN 15194:2017: component that clamps the saddle (with a bolt or assembly) and connects it to the frame.
Serial number
Source – ZEG: each pedelec has an eight-digit type number which is used to specify the design model year, the type and the version.
Shut-off speed
Source: EN 15194:2017: speed reached, by the pedelec, at the moment the current has dropped to zero or to the no load current value.
Slippage
Source: DIN 75204-1:1992-05: the difference in relation to vehicle speed between the vehicle speed and the speed of its wheels at their circum-ference.
Spare part
Source: EN 13306:2018-02, 3.5: item intended to replace a corresponding item in order to retain or maintain the original required function of the item.
Suspension fork
Source: EN 15194:2017: front wheel fork incorpo-rating controlled, axial flexibility to reduce the transmission of road-shocks to the rider.
Suspension frame
Source: EN 15194:2017: frame incorporating con-trolled, vertical flexibility to reduce the transmis-sion of road-shocks to the rider.
Total deflection
Source: Benny Wilbers, Werner Koch: Neue Fahr-werkstechnik im Detail (New chassis technology in detail): The distance that the wheel travels be-tween an unloaded and a loaded position is called total deflection. When at rest, the vehicle's mass is applied to the springs and reduces the total de-flection by the negative deflection to the positive deflection.
Wear
Source: DIN 31051: reduction in useful life (4.3.4), caused by chemical and/or physical processes.
Weight of ready-to-ride pedelec
Source: ZEG: the indicated weight for a ready-to-ride pedelec refers to the weight of a pedelec at the time of sale. The weight of each additional ac-cessory must be added to this weight
MY22B03 - 32_1.0_23.08.2021 232
Glossary
Wheel
Source: ISO 4210 - 2: unit or combination of hub, rim and spokes or disc, but excluding tyre assem-bly.
Work environment
Source: ISO 9000:2015: set of conditions under which work is performed.
Year of manufacture
Source: ZEG: the year of manufacture is the year in which the pedelec was manufactured. The pro-duction period is always from May to July the fol-lowing year.
12.1 Abbreviations
ABS = anti-blocking system
ECP = electronic cell protection
12.2 Simplified terms
The following terms are used for better legibility: Term Meaning
Operating instruc-tions
Original operating instruc-tions
Damper Rear frame damper
Specialist dealer Bicycle specialist dealer
Motor Drive motor, sub-system
Belt drive Toothed belt drive
Table 67: Simplified terms
MY22B03 - 32_1.0_23.08.2021 233

MY22B03 - 32_1.0_23.08.2021 234
Appendix
13 Appendix
I. Translation of the original EC/EU Declaration of Conformity
The machine, pedelec types:
21-21-1070 Sonic AM-SL 1 Carbon Mountain bike21-21-1069 Sonic AM-SL 2 Carbon Mountain bike21-21-1063 Sonic AM-SL S Carbon Mountain bike21-21-1004 Sonic EN-SL 1 Carbon Mountain bike21-19-1003 Sonic EN-SL 2 Carbon Mountain bike22-18-1081 Sonic EN-SL Daytona Mountain bike
Year of manufacture 2021 and year of manufacture 2022, complies with the following applicable EU provisions:• Machinery Directive 2006/42/EC • RoHS Directive 2011/65/EU• Electromagnetic Compatibility Directive 2014/30/EU.
The safety objectives in the Low Voltage Directive 2014/35/EU have been met in compliance with Appendix I, No. 1.5.1 of the Machinery Directive 2006/42/EC.
The following harmonised standards have been applied:• ISO 20607:2018 Safety machinery – Instruction handbook – General drafting principles• EN 15194:2017, Cycles – Electrically power assisted cycles – EPAC Bicycles
The following other technical standards have been applied:• EN 11243:2016: Cycles – Pannier racks for bicycles – Requirements and test methods
Cologne, 19/04/2021…………………………………………………………………………………………………………………Egbert Hageböck, Managing Director, ZEG Zweirad-Einkaufs-Genossenschaft eG
* Community member who is authorised to compile the technical documentation
Manufacturer
ZEG Zweirad-Einkaufs-Genossenschaft eGLongericher Strasse 250739 Köln, Germany
Authorised representative for documentation*
Janine Ottoc/o ZEG Zweirad-Einkaufs-Genossenschaft eGLongericher Strasse 250739 Köln, Germany
Appendix
1.1 Declaration of Conformity for incomplete machine
2006/42/EC DECLARATION OF INCORPORATION OF PARTLY COMPLETED MACHINERY (Original)
SHIMANO INC. 1. Business name and full address of the manufacturer and, where appropriate, his authorized representative; SHIMANO INC. 3-77 Oimatsu-cho, Sakai-ku, Sakai City, Osaka, Japan 2. Name and address of the person authorized to compile the technical file, who must be established in the Community; Shimano Europe BV High Tech Campus 92, 5656 AG Eindhoven, the Netherlands Senior Manager, Mr. Frank Peiffer 3. Description and identification of the partly completed machinery, including generic denomination, function, model, type, serial number and commercial name; Electric Power Assisted Cycle components SHIMANO STEPS EP800 series
SC-E5003, SC-E7000, SC-EM800, SW-E6010-L, SW-E7000-L, SW-EM800-L, SW-E7000-R, SW-E6010-R SW-M8050-R, RD-M8050-GS, RD-M8100-SGS, RD-M9100-SGS, RD-M8120-SGS, RD-M9100-GS DU-EP800, DC-EP800-A, DC-EP800-B, DC-EP800-G, RT-EM810, RT-EM910, RT-EM300, RT-EM600 SM-CN910-12, FC-EM600, FC-M8150, FC-EM900, SM-CRE80-B, SM-CRE80, SM-CRE70, SM-CRE70-B SM-CRE70-12, SM-CRE80-12-B,SM-CRE80-12-SB, SM-CRE61, SM-CDE80, CD-EM800, MU-UR500 BM-E8016, BM-E8020, BM-E8030-A, BM-E8030-B, BM-E8031-A, BM-E8031-B, BT-E8016, BT-E8010 BT-E8014, BT-E8020, BT-E8036, BT-E8035, BT-E8035-L, EW-SW300, EW-SW100, EW-CP100 EC-E6000, EC-E6002, EC-E8004, SM-BCC1, EW-SD300, EW-SD50, EW-AD305, EW-JC302, EW-JC304
4. We, Shimano Inc. hereby declare that the following partly completed machinery EP800 fulfills all of the relevant requirements of EC Machinery Directive 2006/42/EC. List of the applied and observed requirements of the Machinery Directive 2006/42/EC, Appendix I, that the partly completed machinery fulfills: 1.1.1, 1.1.2, 1.1.3, 1.1.5, 1.2.1, 1.2.2, 1.2.3, 1.2.4, 1.2.4.1, 1.2.4.2, 1.2.5, 1.2.6, 1.3.1, 1.3.2, 1.3.3, 1.3.4, 1.3.5, 1.3.6, 1.3.7, 1.4.1, 1.4.2, 1.4.2.1, 1.5.1, 1.5.2, 1.5.3, 1.5.4, 1.5.5, 1.5.6, 1.5.7, 1.5.8 1.5.9, 1.5.10, 1.5.11, 1.5.13, 1.6.1, 1.6.2, 1.6.3, 1.7, 1.7.1, 1.7.4, 1.7.4.1, 1.7.4.2, 1.7.4.3 Applicable harmonized standards: EN 15194:2017 Cycles - Electrically power assisted cycles - EPAC Bicycles EN 62133:2017 (for battery required by EN 15194:2017) EN 60335-2-29:2004+A2:2010 (for battery charger required by EN 15194:2017)
MY22B03 - 32_1.0_23.08.2021 235
Appendix
MY22B03 - 32_1.0_23.08.2021 236
Appendix
1.2 RED Declaration of Conformity
MODEL: SC-EM800 RI-7H90D-000
Regional regulatory information
Europe
Česky [Czech] Tímto SHIMANO INC. prohlašuje, že typ rádiového zařízení SC-EM800 je v souladu se směrnicí 2014/53/EU.
Úplné znění EU prohlášení o shodě je k dispozici na této internetové adrese: http://si.shimano.com
Dansk [Danish] Hermed erklærer SHIMANO INC., at radioudstyrstypen SC-EM800 er i overensstemmelse med direktiv 2014/53/EU.
EU-overensstemmelseserklæringens fulde tekst kan findes på følgende internetadresse: http://si.shimano.com
Deutsch [German] Hiermit erklärt SHIMANO INC., dass der Funkanlagentyp SC-EM800 der Richtlinie 2014/53/EU entspricht.
Der vollständige Text der EU-Konformitätserklärung ist unter der folgenden Internetadresse verfügbar: http://si.shimano.com
Eesti [Estonian] Käesolevaga deklareerib SHIMANO INC., et käesolev raadioseadme tüüp SC-EM800 vastab direktiivi 2014/53/EL nõuetele.
ELi vastavusdeklaratsiooni täielik tekst on kättesaadav järgmisel internetiaadressil: http://si.shimano.com
English Hereby, SHIMANO INC. declares that the radio equipment type SC-EM800 is in compliance with Directive 2014/53/EU.
The full text of the EU declaration of conformity is available at the following internet address: http://si.shimano.com
Español [Spanish] Por la presente, SHIMANO INC. declara que el tipo de equipo radioeléctrico SC-EM800 es conforme con la Directiva 2014/53/UE.
El texto completo de la declaración UE de conformidad está disponible en la dirección Internet siguiente: http://si.shimano.com
Français [French] Le soussigné, SHIMANO INC., déclare que l'équipement radioélectrique du type SC-EM800 est conforme à la directive 2014/53/UE.
Le texte complet de la déclaration UE de conformité est disponible à l'adresse internet suivante: http://si.shimano.com
Hrvatski [Croatian] SHIMANO INC. ovime izjavljuje da je radijska oprema tipa SC-EM800 u skladu s Direktivom 2014/53/EU.
Cjeloviti tekst EU izjave o sukladnosti dostupan je na sljedećoj internetskoj adresi: http://si.shimano.com
Italiano [Italian] Il fabbricante, SHIMANO INC., dichiara che il tipo di apparecchiatura radio SC-EM800 è conforme alla direttiva 2014/53/UE.
Il testo completo della dichiarazione di conformità UE è disponibile al seguente indirizzo Internet: http://si.shimano.com
Latviski [Latvian] Ar šo SHIMANO INC. deklarē, ka radioiekārta SC-EM800 atbilst Direktīvai 2014/53/ES.
Pilns ES atbilstības deklarācijas teksts ir pieejams šādā interneta vietnē: http://si.shimano.com
Lietuvių [Lithuanian] Aš, SHIMANO INC., patvirtinu, kad radijo įrenginių tipas SC-EM800 atitinka Direktyvą 2014/53/ES.
Visas ES atitikties deklaracijos tekstas prieinamas šiuo interneto adresu: http://si.shimano.com
Nederlands [Dutch] Hierbij verklaar ik, SHIMANO INC., dat het type radioapparatuur SC-EM800 conform is met Richtlijn 2014/53/EU.
De volledige tekst van de EU-conformiteitsverklaring kan worden geraadpleegd op het volgende internetadres: http://si.shimano.com
Magyar [Hungarian] SHIMANO INC. igazolja, hogy a SC-EM800 típusú rádióberendezés megfelel a 2014/53/EU irányelvnek.
Az EU-megfelelőségi nyilatkozat teljes szövege elérhető a következő internetes címen: http://si.shimano.com
Polski [Polish] SHIMANO INC. niniejszym oświadcza, że typ urządzenia radiowego SC-EM800 jest zgodny z dyrektywą 2014/53/UE.
Pełny tekst deklaracji zgodności UE jest dostępny pod następującym adresem internetowym: http://si.shimano.com
Português [Portuguese] O(a) abaixo assinado(a) SHIMANO INC. declara que o presente tipo de equipamento de rádio SC-EM800 está em conformidade com a Diretiva 2014/53/UE.
O texto integral da declaração de conformidade está disponível no seguinte endereço de Internet: http://si.shimano.com
Român [Romanian] Prin prezenta, SHIMANO INC. declară că tipul de echipamente radio SC-EM800 este în conformitate cu Directiva 2014/53/UE.
Textul integral al declarației UE de conformitate este disponibil la următoarea adresă internet: http://si.shimano.com
Slovensko [Slovenian] SHIMANO INC. potrjuje, da je tip radijske opreme SC-EM800 skladen z Direktivo 2014/53/EU.
Celotno besedilo izjave EU o skladnosti je na voljo na naslednjem spletnem naslovu: http://si.shimano.com
Slovensky [Slovak] SHIMANO INC. týmto vyhlasuje, že rádiové zariadenie typu SC-EM800 je v súlade so smernicou 2014/53/EÚ.
Úplné EÚ vyhlásenie o zhode je k dispozícii na tejto internetovej adrese: http://si.shimano.com
Suomi [Finnish] SHIMANO INC. vakuuttaa, että radiolaitetyyppi SC-EM800 on direktiivin 2014/53/EU mukainen.
EU-vaatimustenmukaisuusvakuutuksen täysimittainen teksti on saatavilla seuraavassa internetosoitteessa: http://si.shimano.com
Svenska [Swedish] Härmed försäkrar SHIMANO INC. att denna typ av radioutrustning SC-EM800 överensstämmer med direktiv 2014/53/EU.
Den fullständiga texten till EU-försäkran om överensstämmelse finns på följande webbadress: http://si.shimano.com
Türkçe [Turkish] İşburada, SHIMANO INC. SC-EM800 tipi telsiz ekipmanının 2014/53/EU sayılı direktif ile uyumlu olduğunu beyan eder.
AB uyumluluk beyanının tam metnini internet sitemizden bulabilirsiniz: http://si.shimano.com
Norsk [Norwegian] Herved erklærer SHIMANO INC. at radioutstyret av typen SC-EM800 er i samsvar med EU-direktiv 2014/53/EU.
Den fullstendige teksten til EU-konformitetserklæringen er tilgjengelig på følgende internettadresse: http://si.shimano.com
USAThis device complies with part 15 of the FCC Rules. Operation is subject to the following two conditions: (1) This device may not cause harmful interference, and (2) this device must accept any interference received, including interference that may cause undesired operation.
CAUTION
• Changes or modifications not expressly approved by the party responsible for compliance could void the user's authority to operate the equipment. • To maintain compliance with FCC's RF exposure guidelines, use only the supplied antenna. Unauthorized antenna, modification, or attachments could damage the transmitter and may violate FCC regulations. This equipment complies with FCC RF radiation exposure limits set forth for an uncontrolled environment.
NOTE: This equipment has been tested and found to comply with the limits for a Class B digital device, pursuant to part 15 of the FCC Rules. These limits are designed to provide reasonable protection against harmful interference in a residential installation. This equipment generates, uses and can radiate radio frequency energy and, if not installed and used in accordance with the instructions, may cause harmful interference to radio communications. However, there is no guarantee that interference will not occur in a particular installation. If this equipment does cause harmful interference to radio or television reception, which can be determined by turning the equipment off and on, the user is encouraged to try to correct the interference by one or more of the following measures:
- Reorient or relocate the receiving antenna. - Increase the separation between the equipment and receiver. - Connect the equipment into an outlet on a circuit different from that to which the receiver is connected. - Consult the dealer or an experienced radio/ TV technician for help.
MY22B03 - 32_1.0_23.08.2021 237
Appendix
CanadaThis device complies with Industry Canada license-exempt RSS standards. Operation is subject to the following two conditions:1. this device may not cause interference, and2. this device must accept any interference, including interference that may cause
undesired operation of the device.
Le présent appareil est conforme aux CNR d'Industrie Canada applicables aux appareils radio exempts de licence. L'exploitation est autorisée aux deux conditions suivantes:1. l'appareil ne doit pas produire de brouillage, et2. l'utilisateur de l'appareil doit accepter tout brouillage radioélectrique subi, même
si le brouillage est susceptible d'en compromettre le fonctionnement.
Japan
本製品には、電波法に基づく小電力データ通信システムの無線局として、工事設計認証を受けた無線設備を内蔵しています。SWAN-2: 『001-A06159』
Singapore
Complies withIMDA Standards
DA105949
Brazil
00243-16-04304
Fabricado no JapãoEste produto contém a placa SWAN-2 código de homologação: 00243-16-04304.Este produto está homologado pela ANATEL, de acordo com os procedimentos regulamentados pela Resolução 242/2000, e atende aos requisitos técnicos aplicados.Para maiores informações, consulte o site da ANATEL:http://www.anatel.gov.brEste equipamento opera em caráter secundário, isto é, não tem direito a proteção contra interferência prejudicial, mesmo de estações do mesmo tipo, e não pode causar interferência a sistemas operando em caráter primário.
Israel
KoreaMSIP-CRM-WY7-SWAN-2R-R-WY7-3A
Thailand
Taiwan
MY22B03 - 32_1.0_23.08.2021 238
Keyword index
14 Keyword index
AAir valve, 32Articulated shaft,
- caring for 152Axle, 32BBasic cleaning 145Battery, 46
- checking, 64- cleaning, 145- disposing of, 210- shipping 61- transporting, 61
Belt guard 16Belt pulley, 44Belt tension,
- check 163Belt, 44
- cleaning, 148Bike headset, see steeringheadsetBowden cable 40Brake cable, 40Brake calliper, 41Brake disc, 41
- checking 159- cleaning, 148
Brake lever- cleaning, 148
Brake lever,– caring for, 153
Brake lining, 41Brake, 40
- checking brake cables 162- checking the brake disc
159– checking the pressure
point 158- cleaning, 144- securing during transport
61Cable clip, 40Cover cap, 40hydraulic 40Insert pin, 40Knob, 40mechanical 40Union nut 40
Break in operation, 62- carrying out, 62- preparing, 62
CCarbon seat post
– caring for, 151Cassette,
- cleaning, 147Chain guard 16
- cleaning, 148Chain tension,
- checking 163Chain wheel, 44Chain wheels,
- cleaning, 147Chain, 44
– caring for, 152- cleaning, 148- maintaining, 155, 164
Charger,- disposing of, 210
Chassis, 27Child seat, 120Compression adjustment, 31Compression damper, 32Control panel,
- cleaning, 145Crown, 32DDimensions, 60Direction of travel, 44Disc brake, 41Display, 47
- charging the battery, 112,119, 129
Drive system, 44- switching off, 128- switching on, 128mechanical 44
Dust seal, 32EElectrical cable,
- checking 162Emergency stop system 17FFork end, 28, 32Fork leg 28Fork steerer, 28, 32Fork, 28
– caring for, 149- cleaning, 146– servicing, 144- SR Suntour structure, 32
Frame, 26, 27– caring for, 149
- cleaning, 146– servicing, 144
Front derailleur, 44- cleaning, 147
Front wheel brake, 41- braking, 132
Front wheel, see WheelGGear recommendation, 49Gear shift,
- switching, 135, 136HHandle,
– caring for, 150Handlebars, 26, 28
– caring for, 150- cleaning, 146
Handles,- cleaning, 146
Headset, see steering headsetHub, 38
– caring for, 151- cleaning, 147
IInitial commissioning, 64JJockey wheel,
- caring for 152Journey information,
- switching, 50, 131Max. speed, 50, 114, 131
KKickstand,
– caring for, 150- cleaning, 146
LLeather handle,
– caring for, 151Leather handles,
- cleaning, 146Leather saddle,
– caring for, 151- cleaning, 147
Level of assistance, 50, 130- selecting, 130ECO, 50, 130SPORT, 50, 130TOUR, 50, 130TURBO, 50, 130
MMinimum insertion depth mar-king, 80
MY22B03 - 32_1.0_23.08.2021 239
Keyword index
Motor cover 16Motor,
- cleaning, 145Mudguard 16
– caring for, 150- cleaning, 146
OOn-board computer,
- cleaning, 145On-screen indicator, 49, 121Operating status indicator, 55PPannier rack, 26
– caring for, 150- changing, 125- cleaning, 146- using, 124
Patent seat post, 42Pedal, 44
– caring for, 152- cleaning, 144
Pedelec,- shipping 61- transporting, 61
Push assist,- using, 131
QQ-Loc, 32RRear derailleur, 44
– caring for, 152Rear frame damper,
structure, 33, 35, 37, 106Rear wheel brake, 41Rebound adjuster, 32Rebound damping 31Riding light, 46Rim brake locking lever 40Rim, 38
– caring for, 151SSaddle, 26, 125
- changing the saddle tilt, 79- changing the seat length,
81- cleaning, 146- determining the saddle
height, 79, 81- using, 125
Sag,Setting wheel, 32
Seat post, 26, 42– caring for, 151- cleaning, 146
Shifter,– caring for, 152- cleaning, 147
Spoke nipples, 39– caring for, 151
Spoke, 38Stanchion, 32Steering headset 27Steering system, 27Stem, 27
– caring for, 150- checking 163- cleaning, 146
Suspension fork,- cleaning, 144– servicing, 144
Suspension seat post, 42– caring for, 151- cleaning, 144
Switching elements,- cleaning, 147
System message, 51TTrailer, 121Transporting, 60Transporting, see Transportati-onTyre pressure, 38Tyre size, 38Tyres, 38
- checking 156- cleaning, 147- converting 122Airless 122Tubeless 122
VValve, 38
Dunlop valve, 39Presta valve, 39Schrader valve, 39
WWeight,
– Shipping weight, 60– Weight, 60
Wheel, 38Winter break, see Break in ope-ration
MY22B03 - 32_1.0_23.08.2021 240
Related Documents