2 IN 2 CHAIN MAILLE AND BEAD BRACELET The 2 in 2 Chain Maille and Bead Bracelet is a simple project that's perfect for beginners as it is the basis for many more advanced weaves. These very detailed instructions will quickly guide you into the world of chain maille. 2 in 2 Chain Maille and Bead Bracelet This image courtesy of Making-Beaded-Jewelry.com Project Type: Make a Project Bead Type: Crystal Time to complete: In an evening Bead Technique Used: Chainmail/Wirework Bead Project Type: Bracelet Difficulty Level: Beginner The instructions for this bead chain maille bracelet were graciously written by Wanda Epps . Jewelry Making Supplies: sixty four 18 gauge 6mm OD (outside diameter) 3.5mm ID (inside diameter) unsoldered jump rings four 2 1/4 inch (5.7 cm) lengths of 20 gauge round wire four 8mm cosmojet Swarovski® crystals one toggle clasp Jewelry Making Tools: wire cutters

Bead Making Project
Nov 29, 2015
Bead Making Project
Welcome message from author
This document is posted to help you gain knowledge. Please leave a comment to let me know what you think about it! Share it to your friends and learn new things together.
Transcript
2 IN 2 CHAIN MAILLE AND BEAD BRACELET
The 2 in 2 Chain Maille and Bead Bracelet is a simple project that's perfect for beginners as it is
the basis for many more advanced weaves. These very detailed instructions will quickly guide
you into the world of chain maille.
2 in 2 Chain Maille and Bead Bracelet
This image courtesy of Making-Beaded-Jewelry.com
Project Type: Make a Project
Bead Type: Crystal
Time to complete: In an evening
Bead Technique Used: Chainmail/Wirework
Bead Project Type: Bracelet
Difficulty Level: Beginner
The instructions for this bead chain maille bracelet were graciously written by Wanda Epps.
Jewelry Making Supplies:
sixty four 18 gauge 6mm OD (outside diameter) 3.5mm ID (inside diameter) unsoldered
jump rings
four 2 1/4 inch (5.7 cm) lengths of 20 gauge round wire
four 8mm cosmojet Swarovski® crystals
one toggle clasp
Jewelry Making Tools:
wire cutters
round nose pliers
chain nose pliers, two pair
Instructions:
1. Make a double wire loop bead unit: Using the wire cutters, cut four 2 1/4 inch (5.7 cm)
lengths of 20gauge round wire.
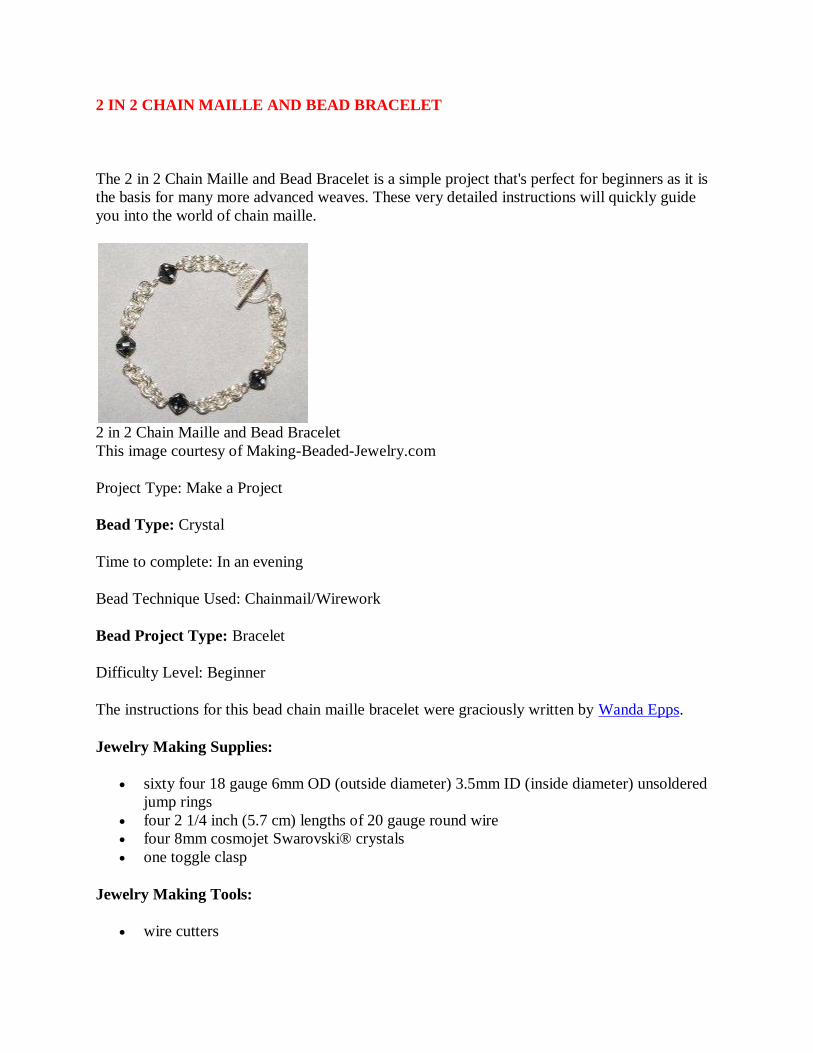
2. Grasp one end of one wire between the jaws of your round nose pliers, about half way up
the pliers' jaws.
3. Rotate the pliers forward, creating a wire loop.
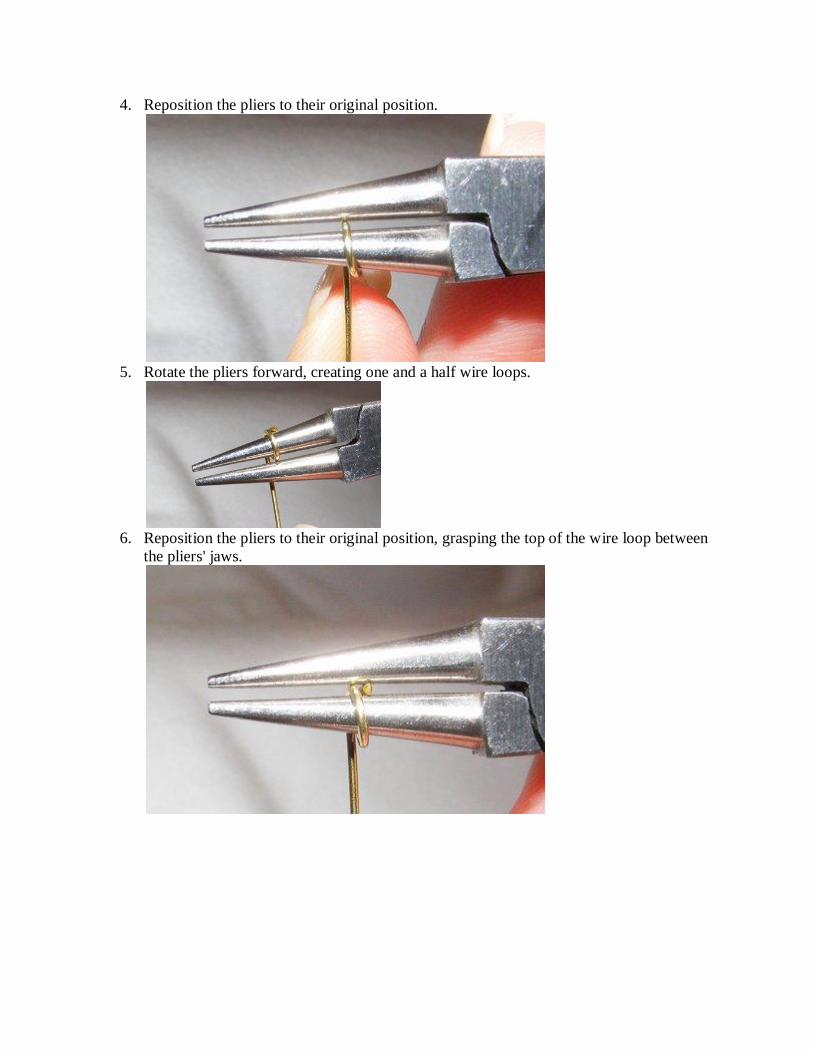
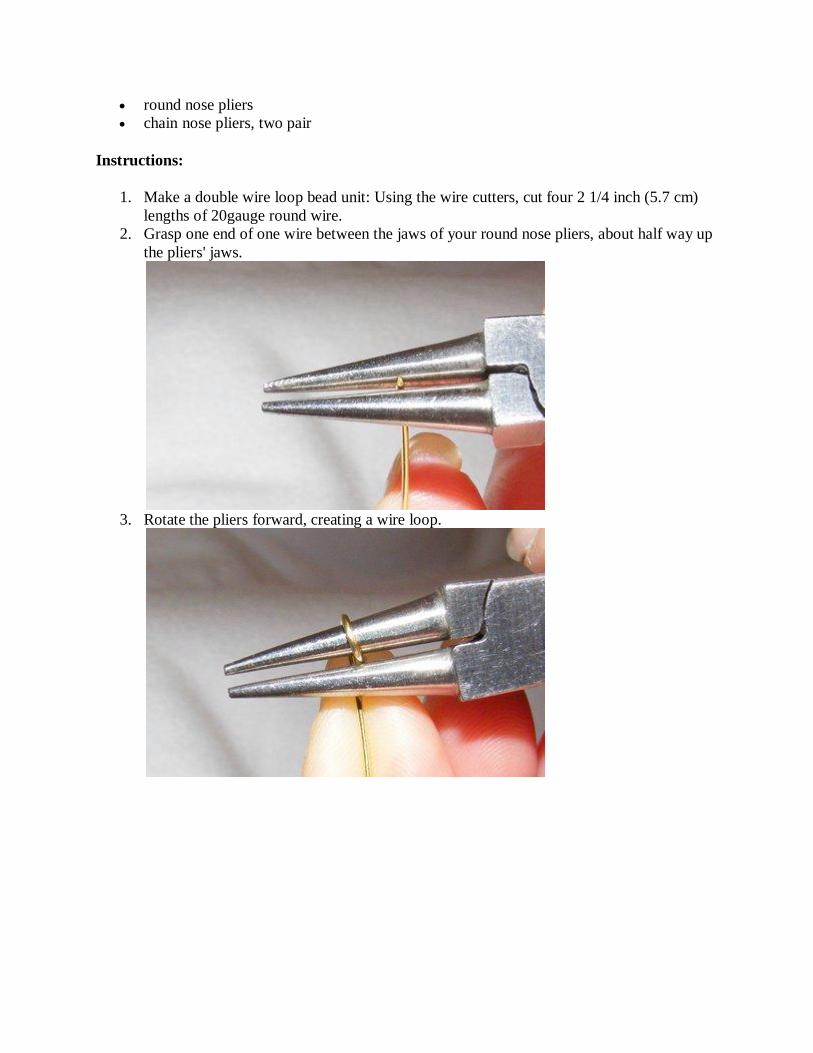
4. Reposition the pliers to their original position.
5. Rotate the pliers forward, creating one and a half wire loops.
6. Reposition the pliers to their original position, grasping the top of the wire loop between
the pliers' jaws.
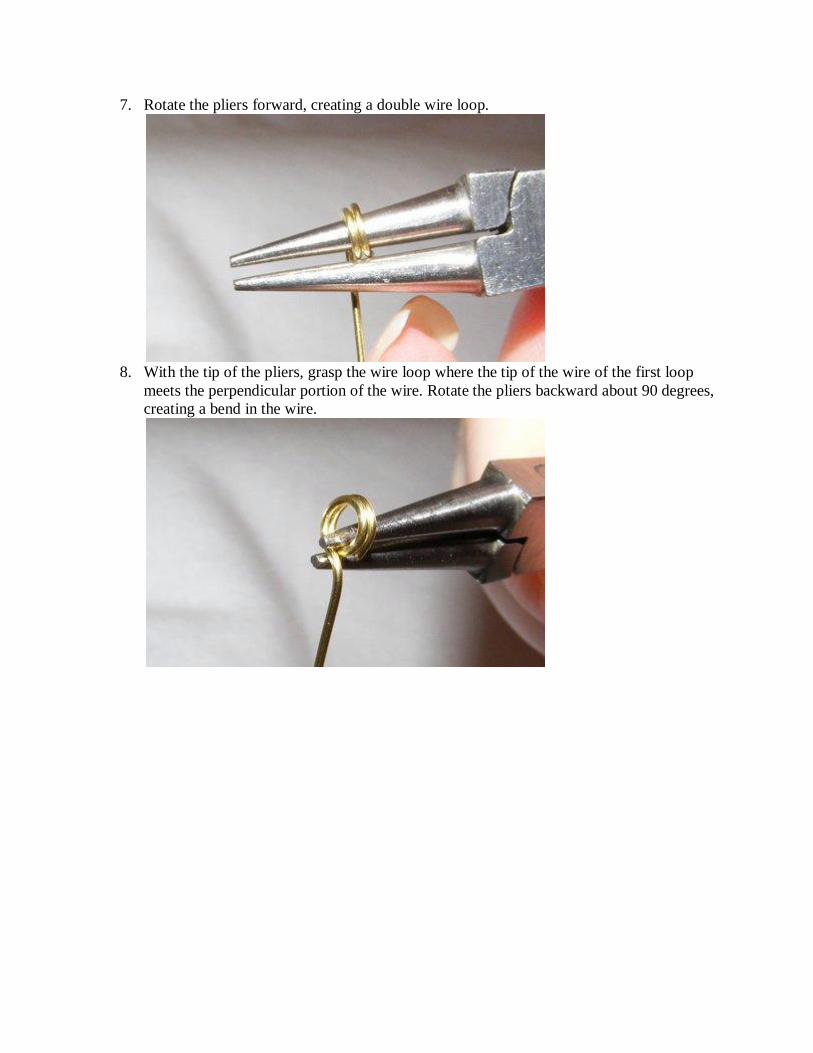
7. Rotate the pliers forward, creating a double wire loop.
8. With the tip of the pliers, grasp the wire loop where the tip of the wire of the first loop
meets the perpendicular portion of the wire. Rotate the pliers backward about 90 degrees,
creating a bend in the wire.
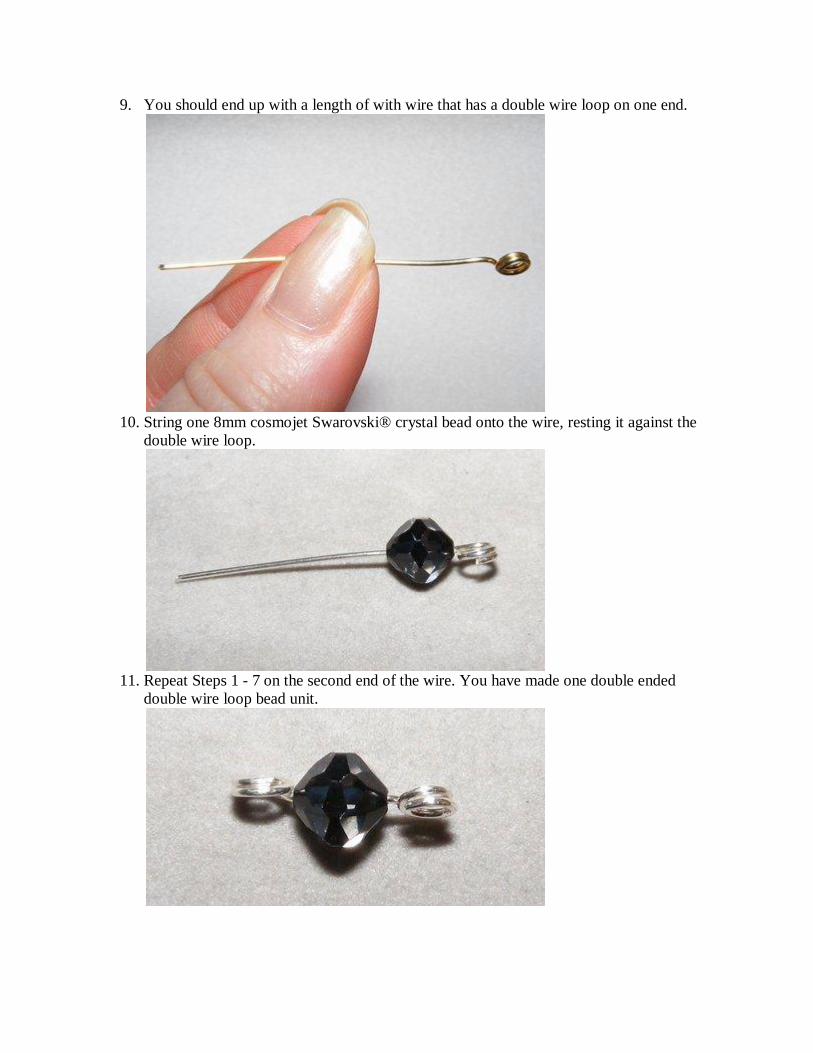
9. You should end up with a length of with wire that has a double wire loop on one end.
10. String one 8mm cosmojet Swarovski® crystal bead onto the wire, resting it against the
double wire loop.
11. Repeat Steps 1 - 7 on the second end of the wire. You have made one double ended
double wire loop bead unit.

12. Repeat Steps 1 - 10 to make three more double ended double wire loop bead units for a
total of four.
If you've finished part 1, get started on finishing your bracelet. In this part you'll learn the
real basics of chain maille and make a bracelet that will leave your friends' jaws on the
ground when you tell them you made it yourself.
2 in 2 Chain Maille and Bead Bracelet
This image courtesy of Making-Beaded-Jewelry.com
Project Type: Make a Project
Bead Type: Crystal
Time to complete: In an evening
Bead Technique Used: Chainmail/Wirework
Bead Project Type: Bracelet
Difficulty Level: Beginner
The instructions for this bead chain maille bracelet were graciously written by Wanda Epps.
Jewelry Making Supplies:
sixty four 18 gauge 6mm OD (outside diameter) 3.5mm ID (inside diameter) unsoldered
jump rings
four 2 1/4 inch (5.7 cm) lengths of 20 gauge round wire
four 8mm cosmojet Swarovski® crystals
one toggle clasp
Jewelry Making Tools:
wire cutters
round nose pliers
chain nose pliers, two pair
Instructions:
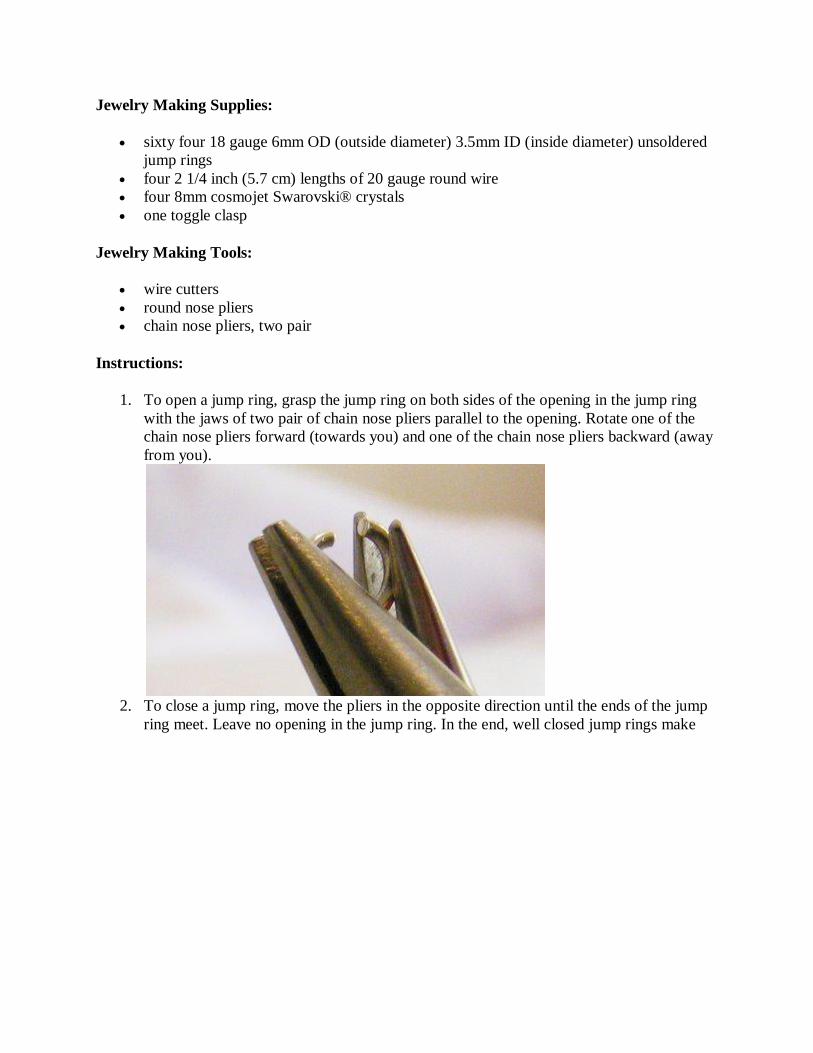
1. To open a jump ring, grasp the jump ring on both sides of the opening in the jump ring
with the jaws of two pair of chain nose pliers parallel to the opening. Rotate one of the
chain nose pliers forward (towards you) and one of the chain nose pliers backward (away
from you).
2. To close a jump ring, move the pliers in the opposite direction until the ends of the jump
ring meet. Leave no opening in the jump ring. In the end, well closed jump rings make

neater and better looking finished jewelry.
3. Lie two closed jump rings atop one another onto your work surface. Open one jump ring.
4. Using the chain nose pliers (or your fingers), slide the two closed jump rings onto the
open jump ring. Close the open jump ring.
5. Open one jump ring. Using the chain nose pliers (or your fingers), slide the two
originally closed jump rings onto the open jump ring.Close the open jump ring. You now
have two pair of interconnected jump rings, hence the name 2-in-2 chain weave.
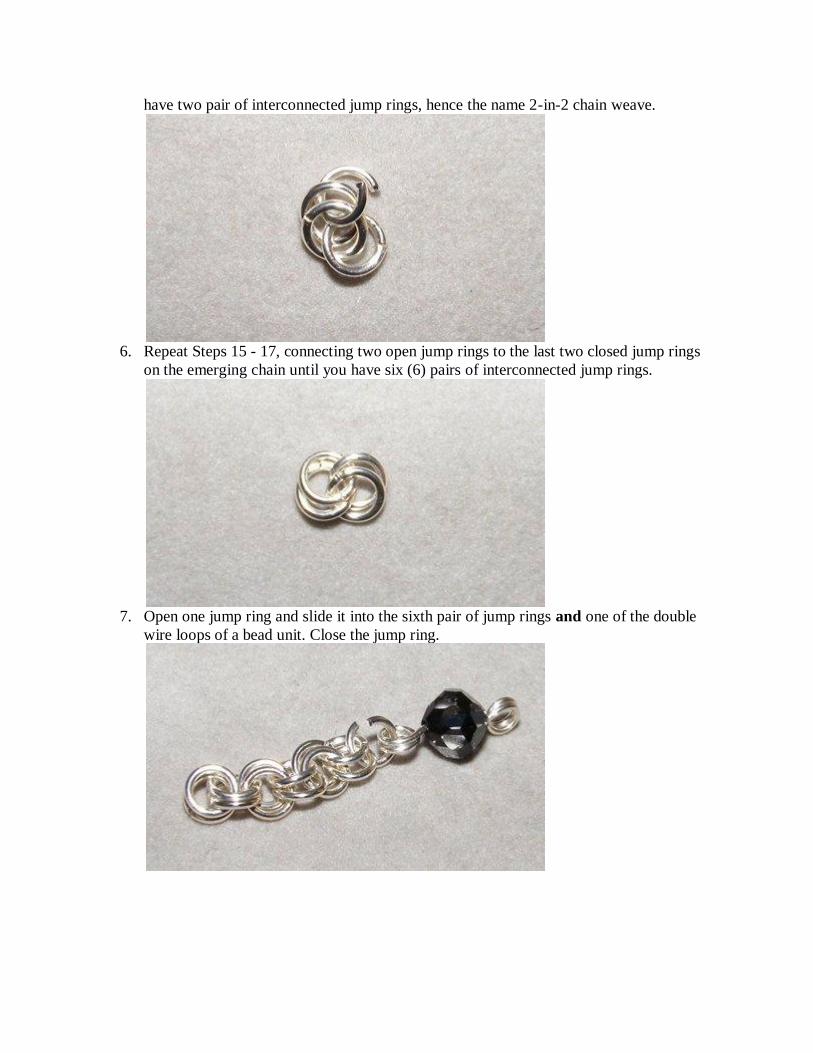
6. Repeat Steps 15 - 17, connecting two open jump rings to the last two closed jump rings
on the emerging chain until you have six (6) pairs of interconnected jump rings.
7. Open one jump ring and slide it into the sixth pair of jump rings and one of the double
wire loops of a bead unit. Close the jump ring.
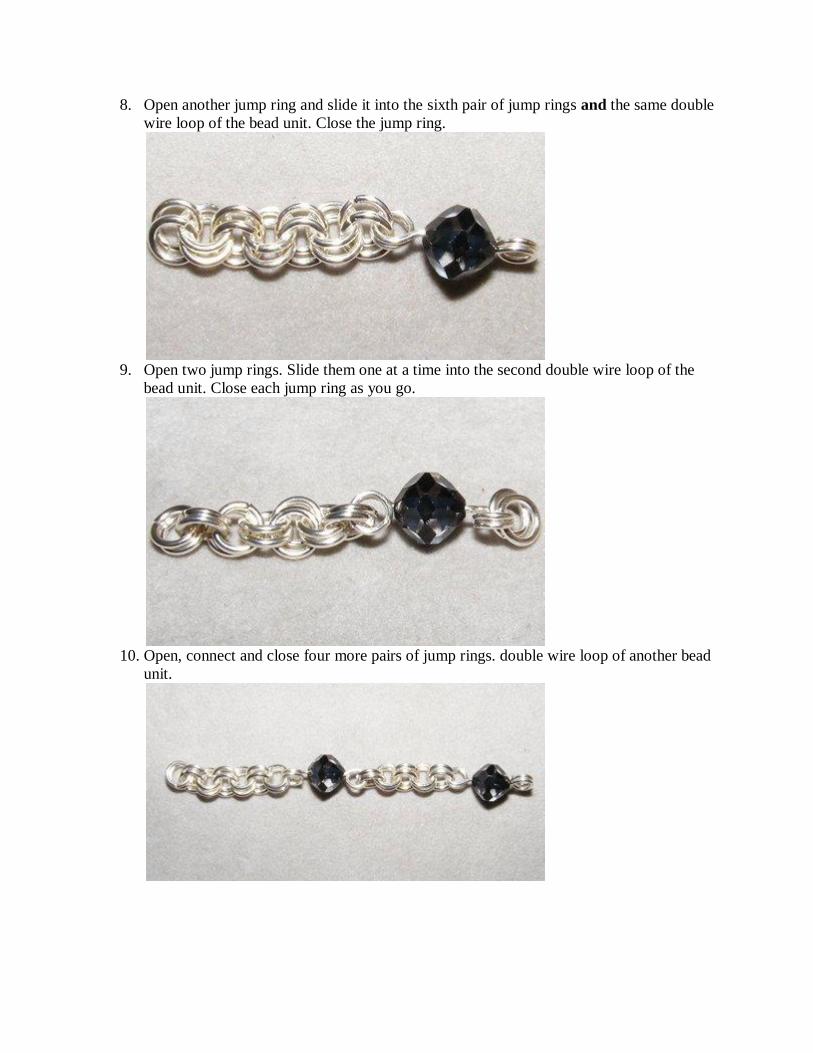
8. Open another jump ring and slide it into the sixth pair of jump rings and the same double
wire loop of the bead unit. Close the jump ring.
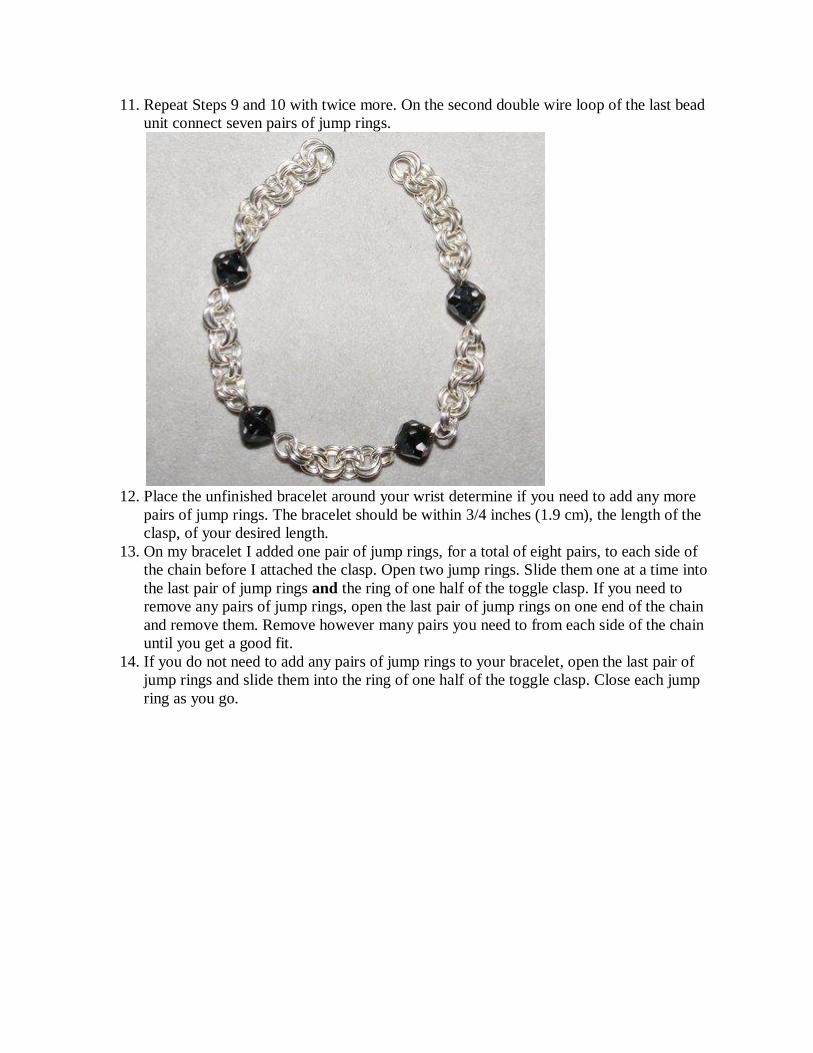
9. Open two jump rings. Slide them one at a time into the second double wire loop of the
bead unit. Close each jump ring as you go.
10. Open, connect and close four more pairs of jump rings. double wire loop of another bead
unit.
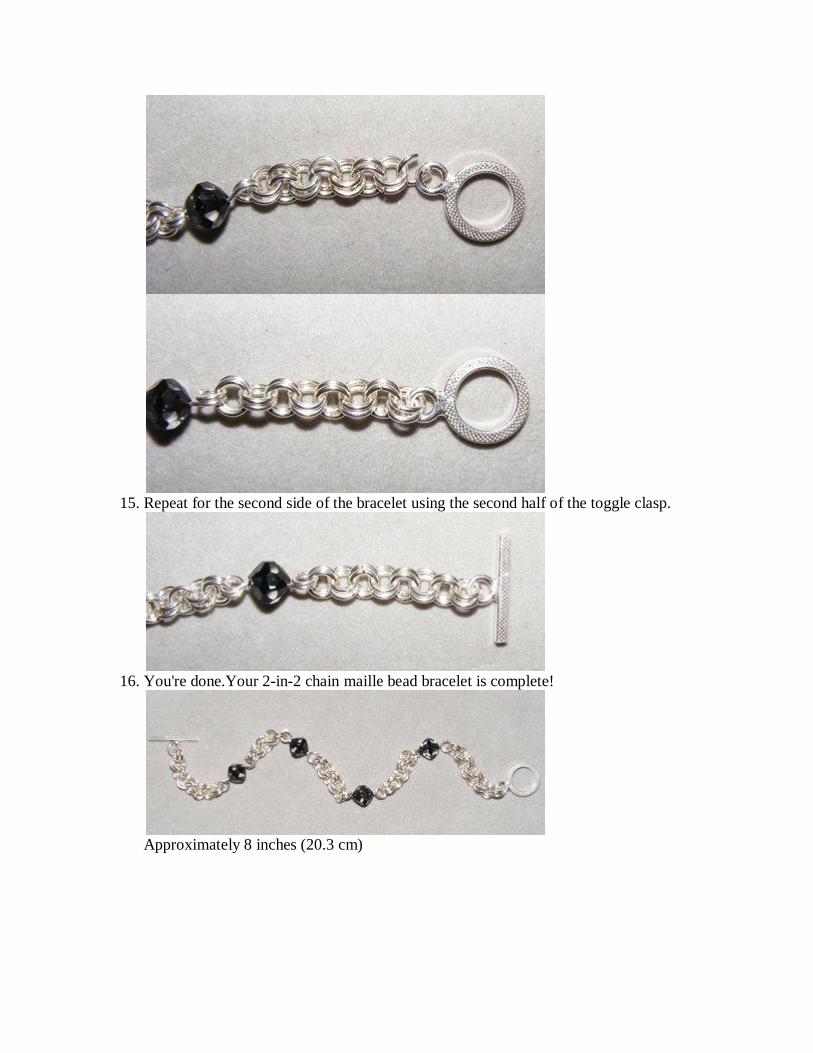
11. Repeat Steps 9 and 10 with twice more. On the second double wire loop of the last bead
unit connect seven pairs of jump rings.
12. Place the unfinished bracelet around your wrist determine if you need to add any more
pairs of jump rings. The bracelet should be within 3/4 inches (1.9 cm), the length of the
clasp, of your desired length.
13. On my bracelet I added one pair of jump rings, for a total of eight pairs, to each side of
the chain before I attached the clasp. Open two jump rings. Slide them one at a time into
the last pair of jump rings and the ring of one half of the toggle clasp. If you need to
remove any pairs of jump rings, open the last pair of jump rings on one end of the chain
and remove them. Remove however many pairs you need to from each side of the chain
until you get a good fit.
14. If you do not need to add any pairs of jump rings to your bracelet, open the last pair of
jump rings and slide them into the ring of one half of the toggle clasp. Close each jump
ring as you go.
15. Repeat for the second side of the bracelet using the second half of the toggle clasp.
16. You're done.Your 2-in-2 chain maille bead bracelet is complete!
Approximately 8 inches (20.3 cm)
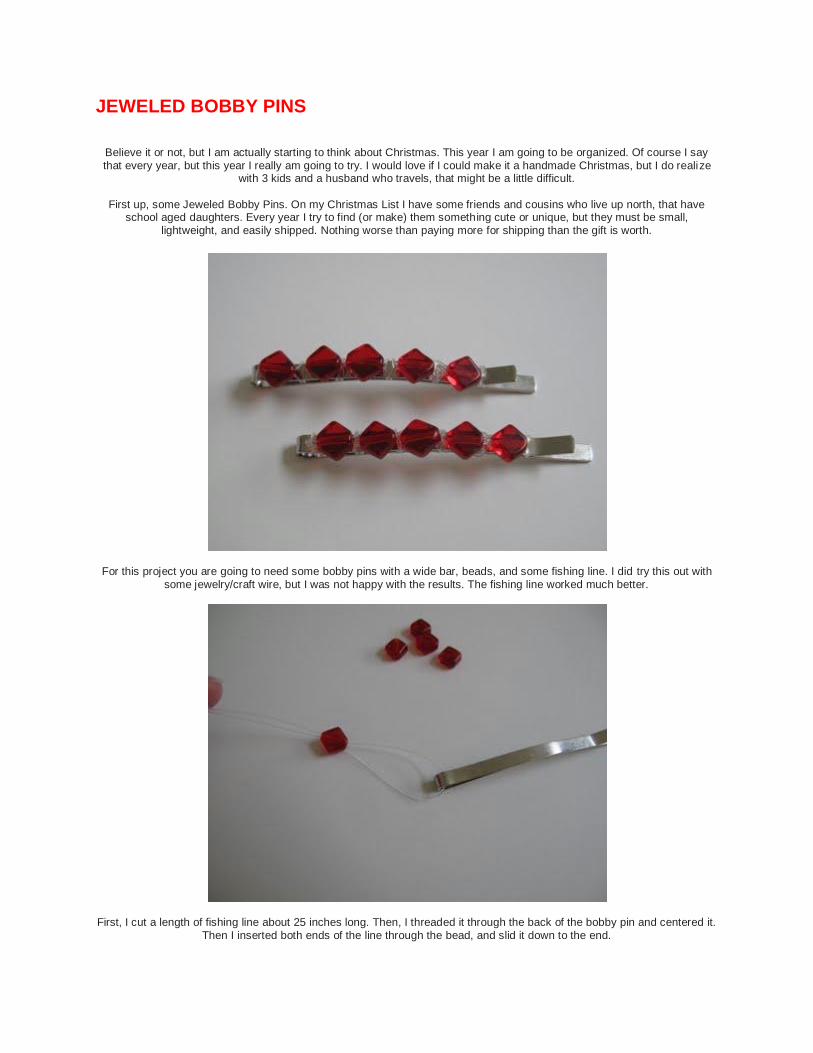
JEWELED BOBBY PINS
Believe it or not, but I am actually starting to think about Christmas. This year I am going to be organized. Of course I say
that every year, but this year I really am going to try. I would love if I could make it a handmade Christmas, but I do realize with 3 kids and a husband who travels, that might be a little difficult.
First up, some Jeweled Bobby Pins. On my Christmas List I have some friends and cousins who live up north, that have
school aged daughters. Every year I try to find (or make) them something cute or unique, but they must be small, lightweight, and easily shipped. Nothing worse than paying more for shipping than the gift is worth.
For this project you are going to need some bobby pins with a wide bar, beads, and some fishing line. I did try this out with some jewelry/craft wire, but I was not happy with the results. The fishing line worked much better.
First, I cut a length of fishing line about 25 inches long. Then, I threaded it through the back of the bobby pin and centered it. Then I inserted both ends of the line through the bead, and slid it down to the end.
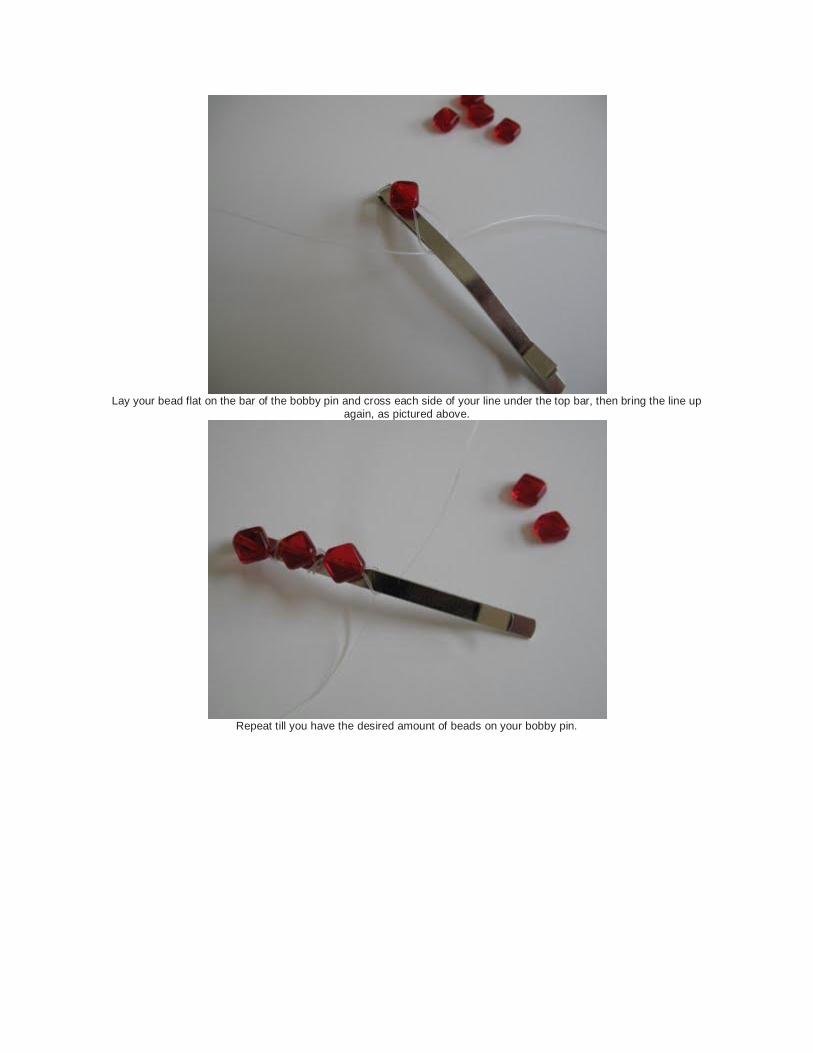
Lay your bead flat on the bar of the bobby pin and cross each side of your line under the top bar, then bring the line up
again, as pictured above.
Repeat till you have the desired amount of beads on your bobby pin.
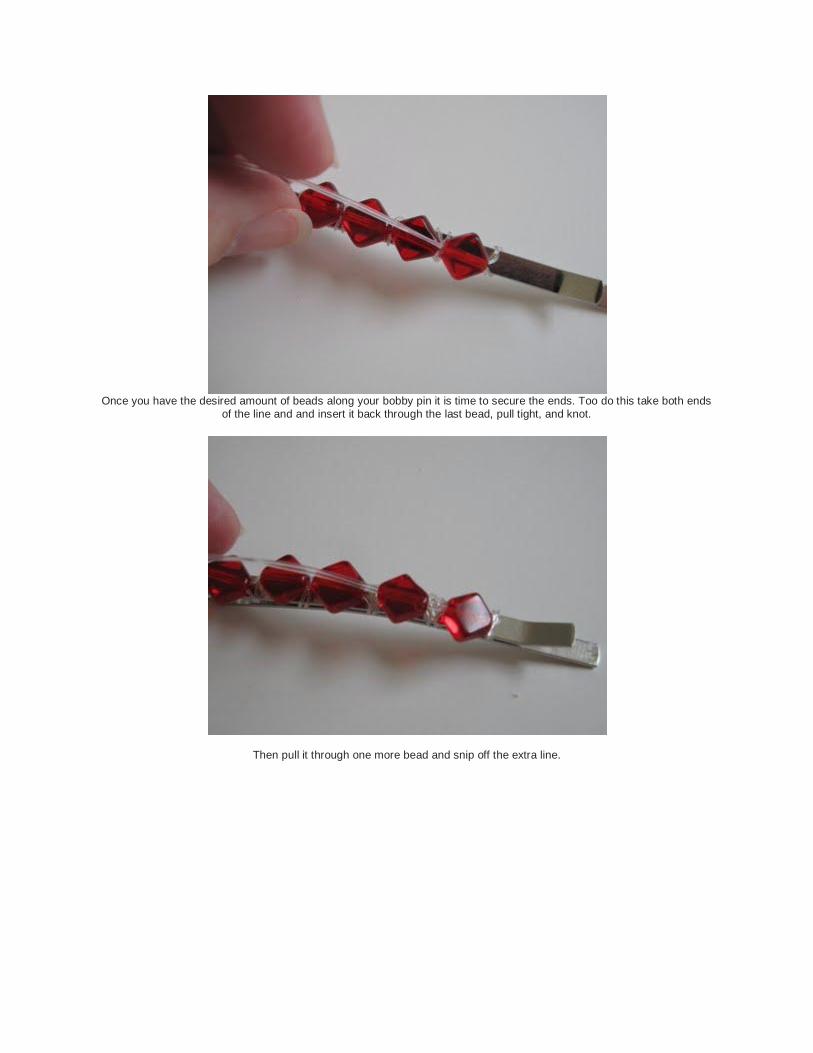
Once you have the desired amount of beads along your bobby pin it is time to secure the ends. Too do this take both ends
of the line and and insert it back through the last bead, pull tight, and knot.
Then pull it through one more bead and snip off the extra line.
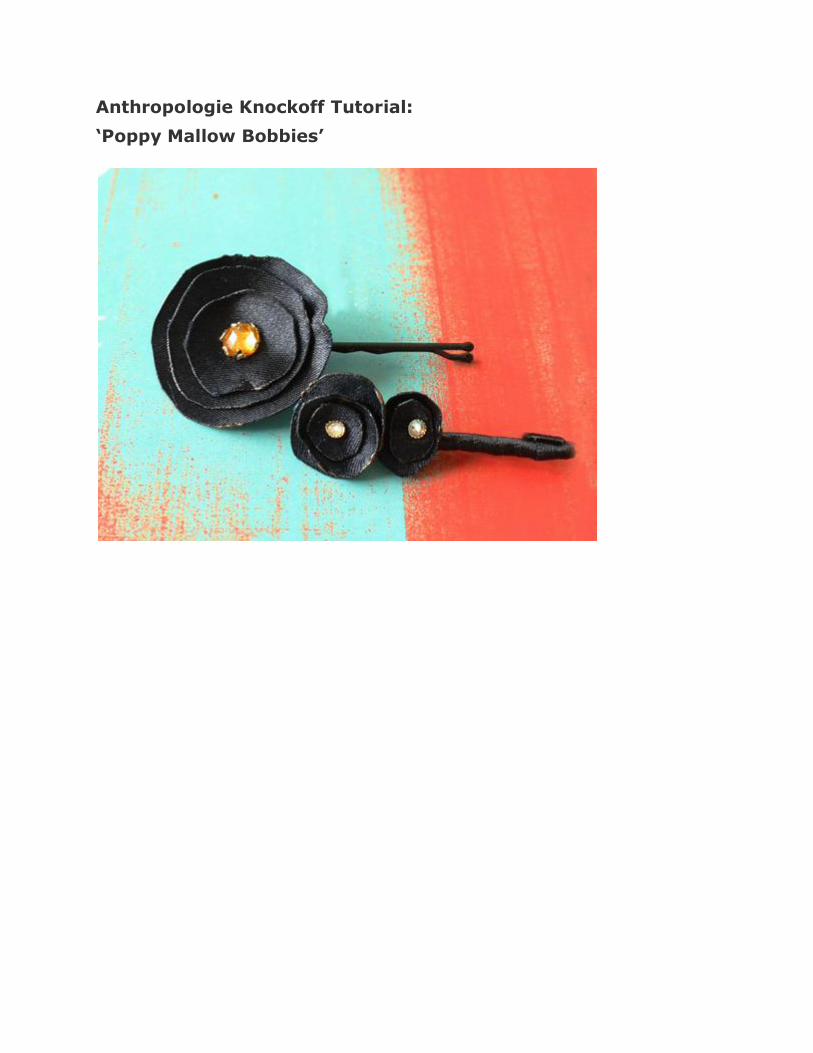
Anthropologie Knockoff Tutorial:
‘Poppy Mallow Bobbies’
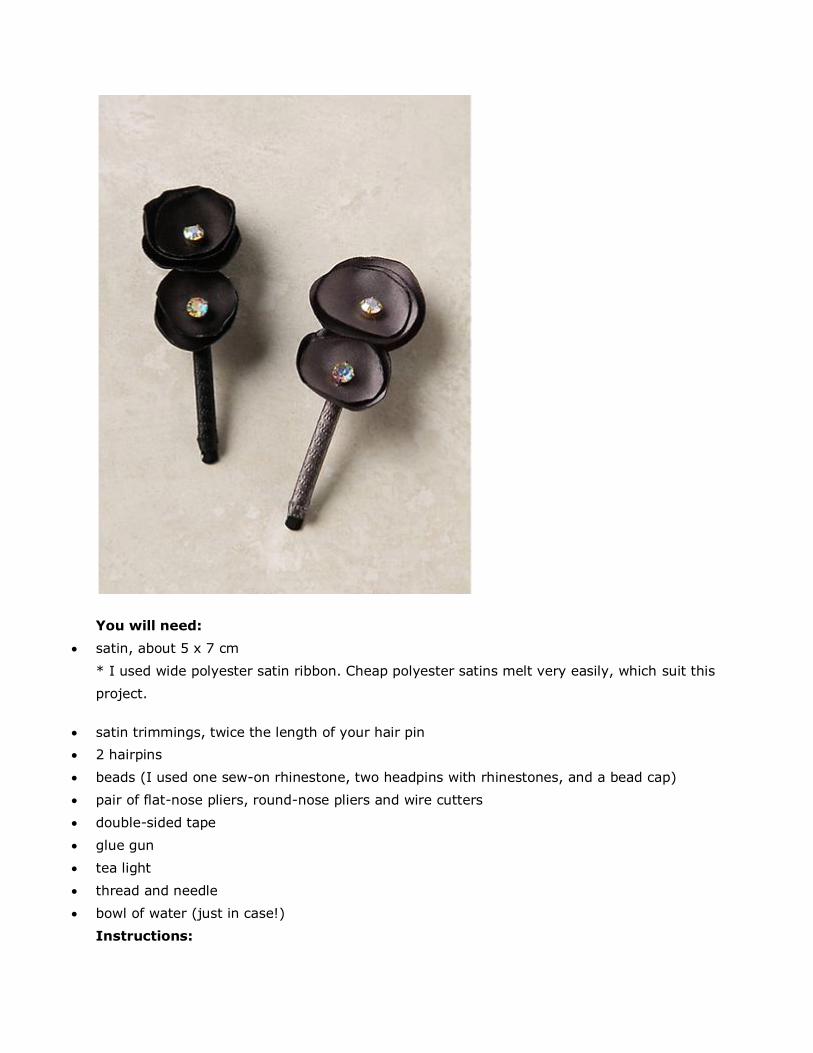
You will need:
satin, about 5 x 7 cm
* I used wide polyester satin ribbon. Cheap polyester satins melt very easily, which suit this
project.
satin trimmings, twice the length of your hair pin
2 hairpins
beads (I used one sew-on rhinestone, two headpins with rhinestones, and a bead cap)
pair of flat-nose pliers, round-nose pliers and wire cutters
double-sided tape
glue gun
tea light
thread and needle
bowl of water (just in case!)
Instructions:
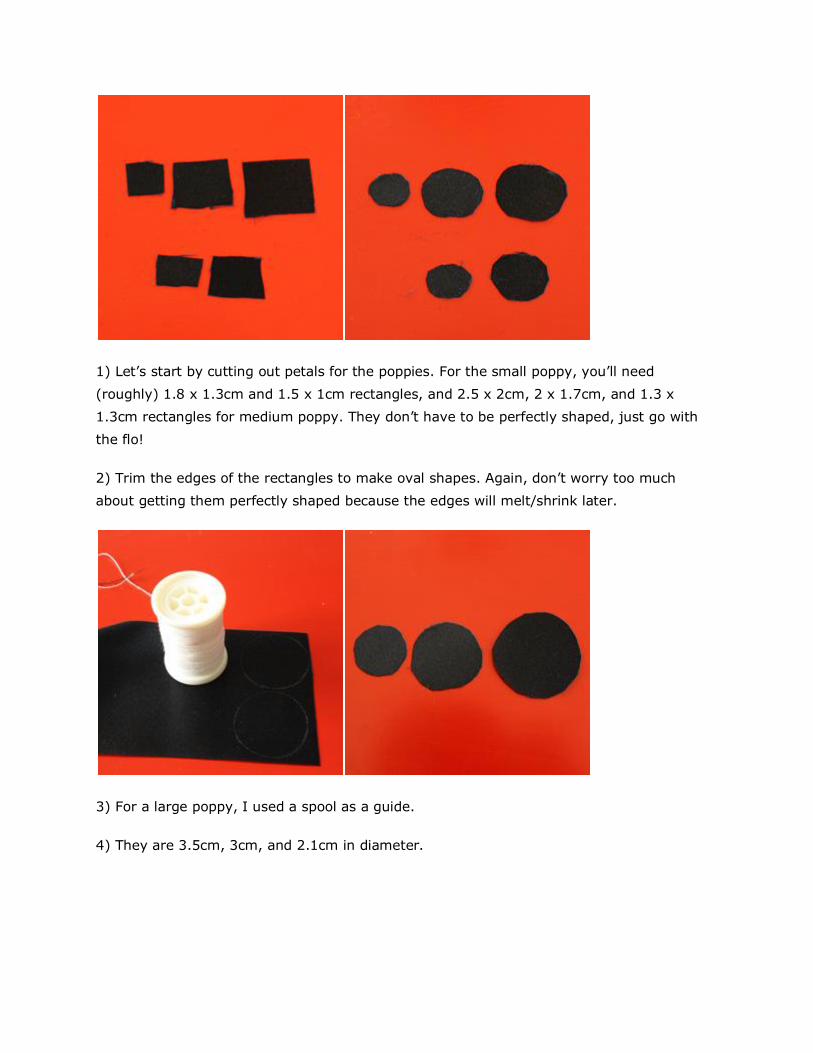
1) Let’s start by cutting out petals for the poppies. For the small poppy, you’ll need
(roughly) 1.8 x 1.3cm and 1.5 x 1cm rectangles, and 2.5 x 2cm, 2 x 1.7cm, and 1.3 x
1.3cm rectangles for medium poppy. They don’t have to be perfectly shaped, just go with
the flo!
2) Trim the edges of the rectangles to make oval shapes. Again, don’t worry too much
about getting them perfectly shaped because the edges will melt/shrink later.
3) For a large poppy, I used a spool as a guide.
4) They are 3.5cm, 3cm, and 2.1cm in diameter.
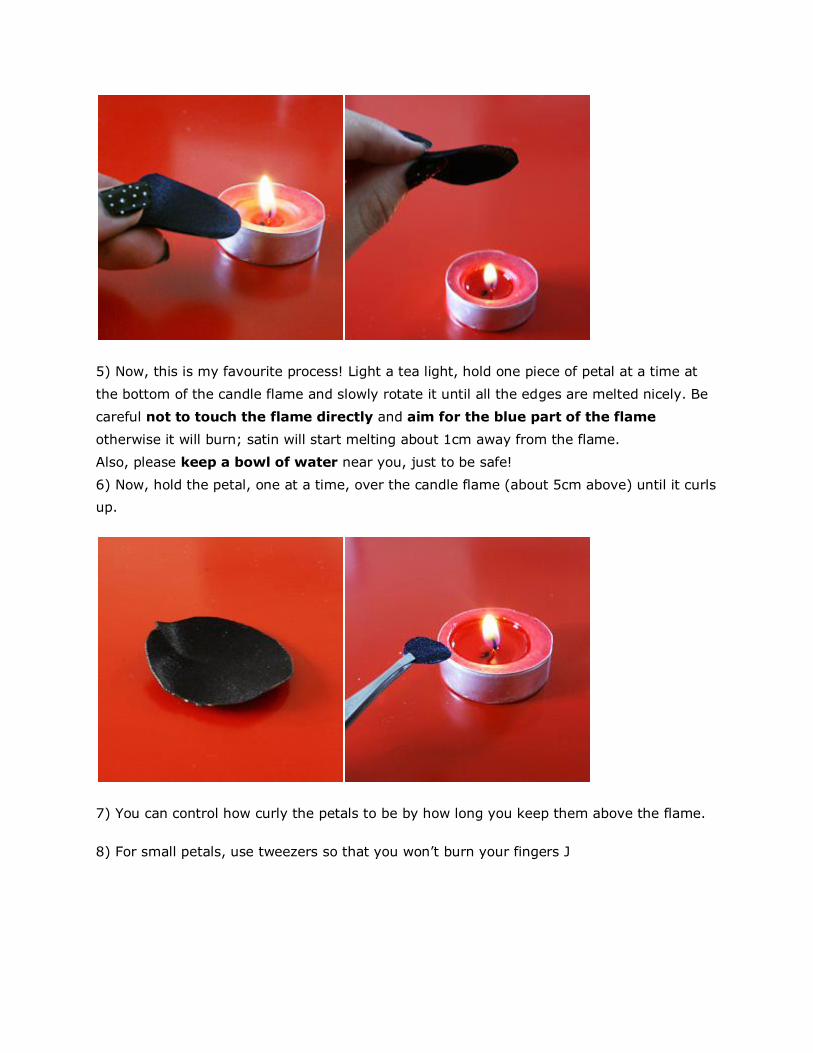
5) Now, this is my favourite process! Light a tea light, hold one piece of petal at a time at
the bottom of the candle flame and slowly rotate it until all the edges are melted nicely. Be
careful not to touch the flame directly and aim for the blue part of the flame
otherwise it will burn; satin will start melting about 1cm away from the flame.
Also, please keep a bowl of water near you, just to be safe!
6) Now, hold the petal, one at a time, over the candle flame (about 5cm above) until it curls
up.
7) You can control how curly the petals to be by how long you keep them above the flame.
8) For small petals, use tweezers so that you won’t burn your fingers J
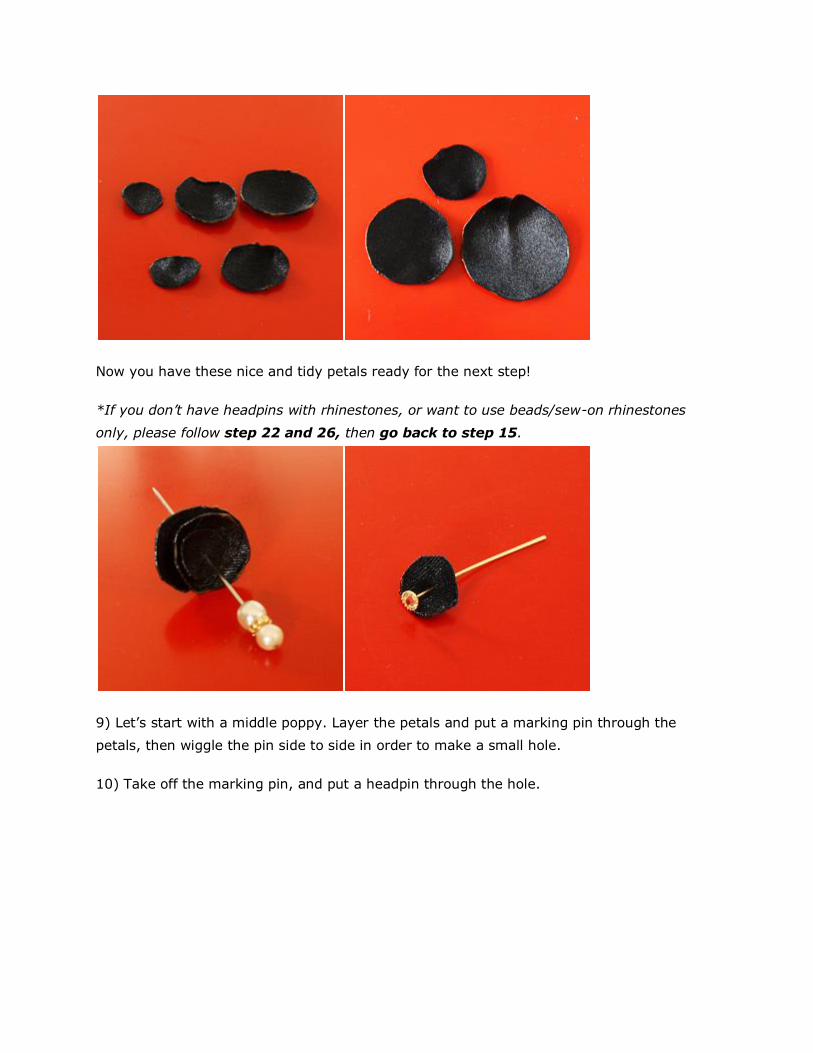
Now you have these nice and tidy petals ready for the next step!
*If you don’t have headpins with rhinestones, or want to use beads/sew-on rhinestones
only, please follow step 22 and 26, then go back to step 15.
9) Let’s start with a middle poppy. Layer the petals and put a marking pin through the
petals, then wiggle the pin side to side in order to make a small hole.
10) Take off the marking pin, and put a headpin through the hole.
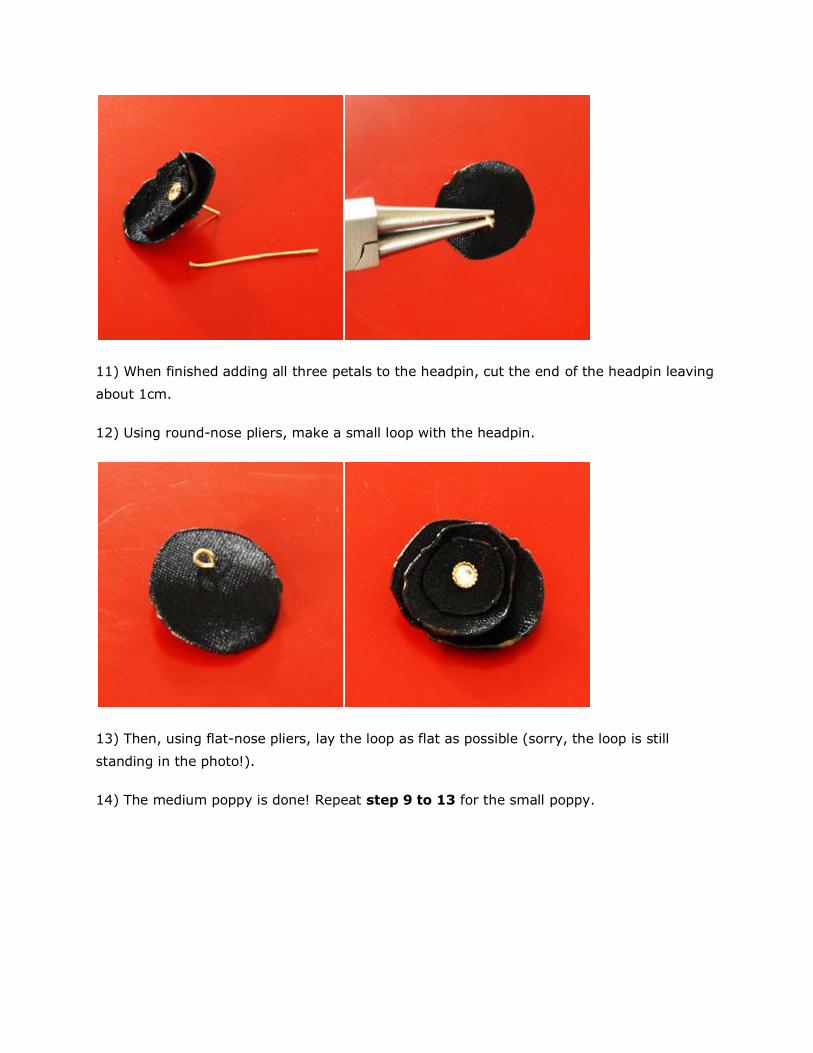
11) When finished adding all three petals to the headpin, cut the end of the headpin leaving
about 1cm.
12) Using round-nose pliers, make a small loop with the headpin.
13) Then, using flat-nose pliers, lay the loop as flat as possible (sorry, the loop is still
standing in the photo!).
14) The medium poppy is done! Repeat step 9 to 13 for the small poppy.
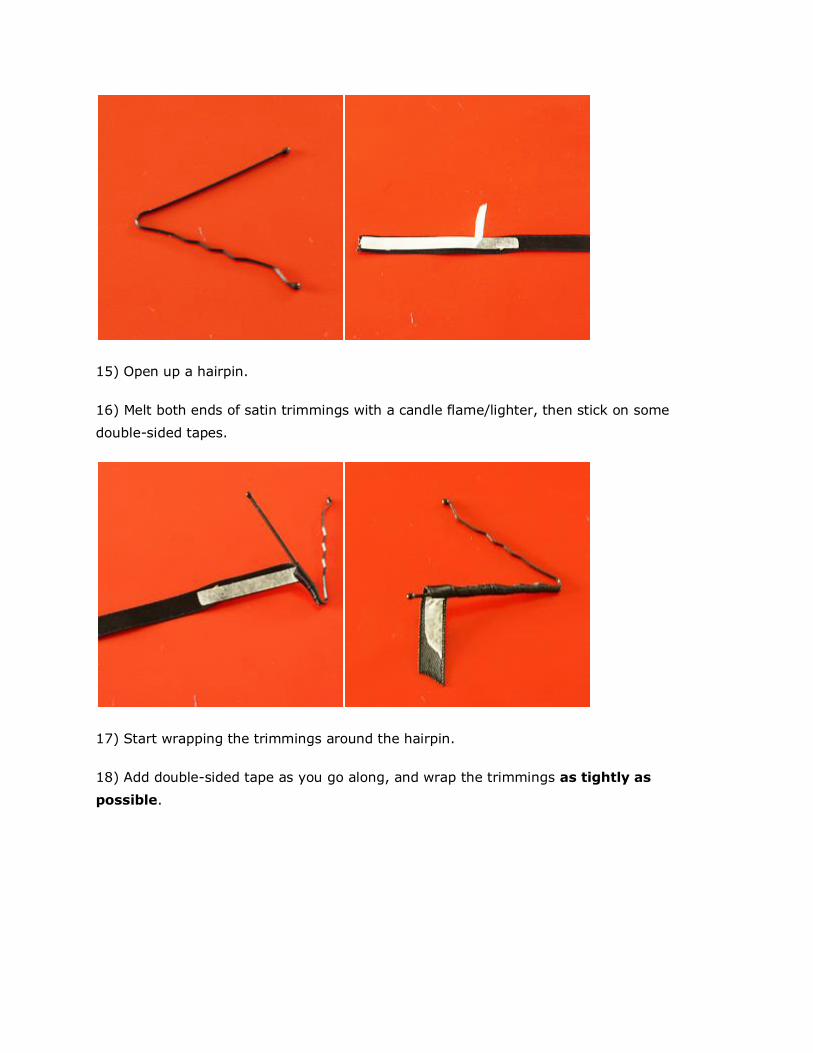
15) Open up a hairpin.
16) Melt both ends of satin trimmings with a candle flame/lighter, then stick on some
double-sided tapes.
17) Start wrapping the trimmings around the hairpin.
18) Add double-sided tape as you go along, and wrap the trimmings as tightly as
possible.
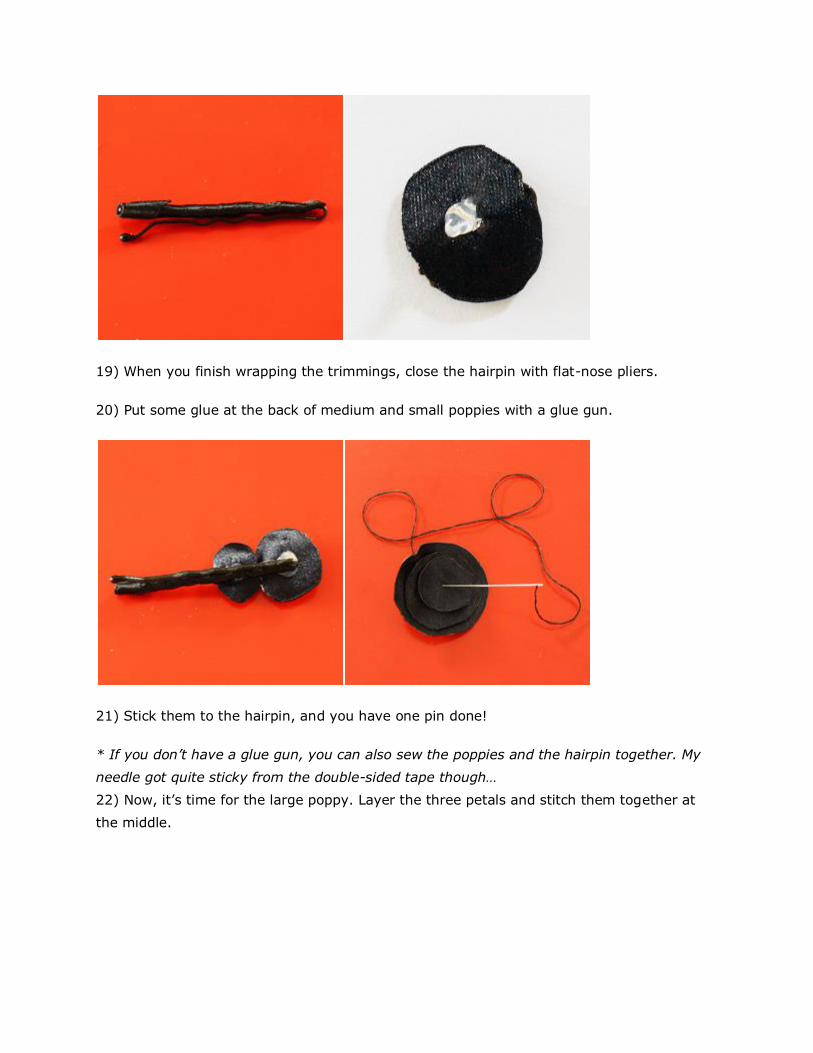
19) When you finish wrapping the trimmings, close the hairpin with flat-nose pliers.
20) Put some glue at the back of medium and small poppies with a glue gun.
21) Stick them to the hairpin, and you have one pin done!
* If you don’t have a glue gun, you can also sew the poppies and the hairpin together. My
needle got quite sticky from the double-sided tape though…
22) Now, it’s time for the large poppy. Layer the three petals and stitch them together at
the middle.
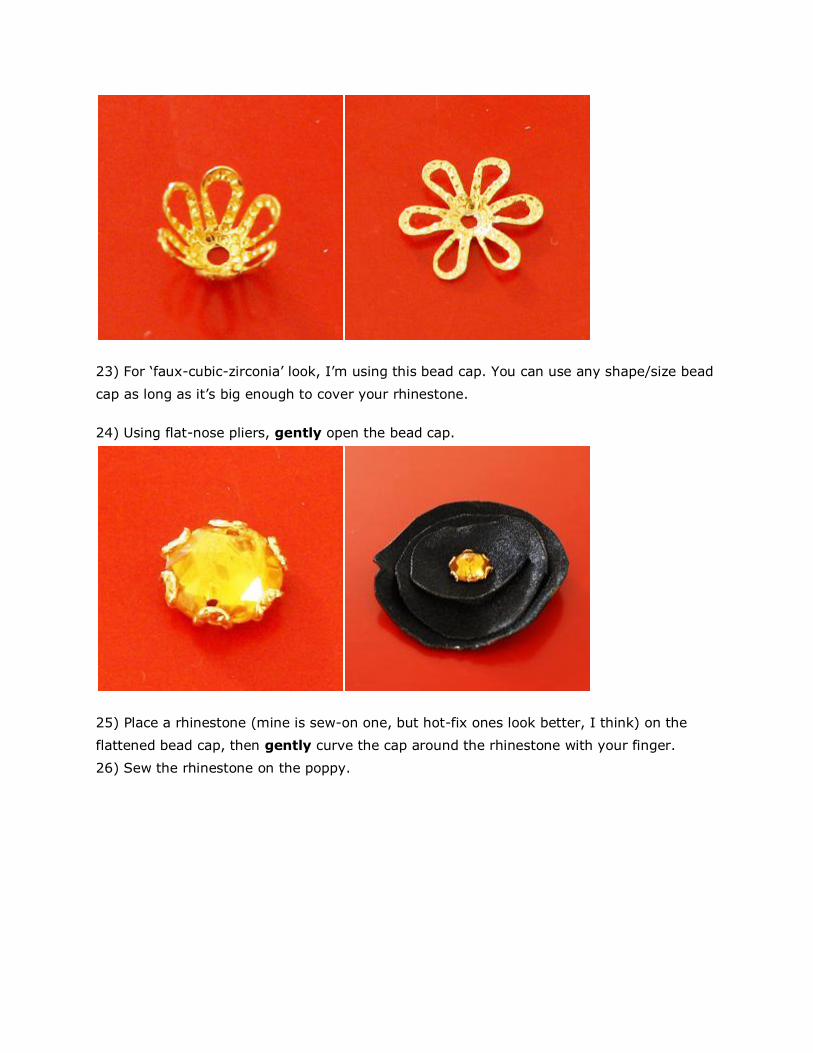
23) For ‘faux-cubic-zirconia’ look, I’m using this bead cap. You can use any shape/size bead
cap as long as it’s big enough to cover your rhinestone.
24) Using flat-nose pliers, gently open the bead cap.
25) Place a rhinestone (mine is sew-on one, but hot-fix ones look better, I think) on the
flattened bead cap, then gently curve the cap around the rhinestone with your finger.
26) Sew the rhinestone on the poppy.
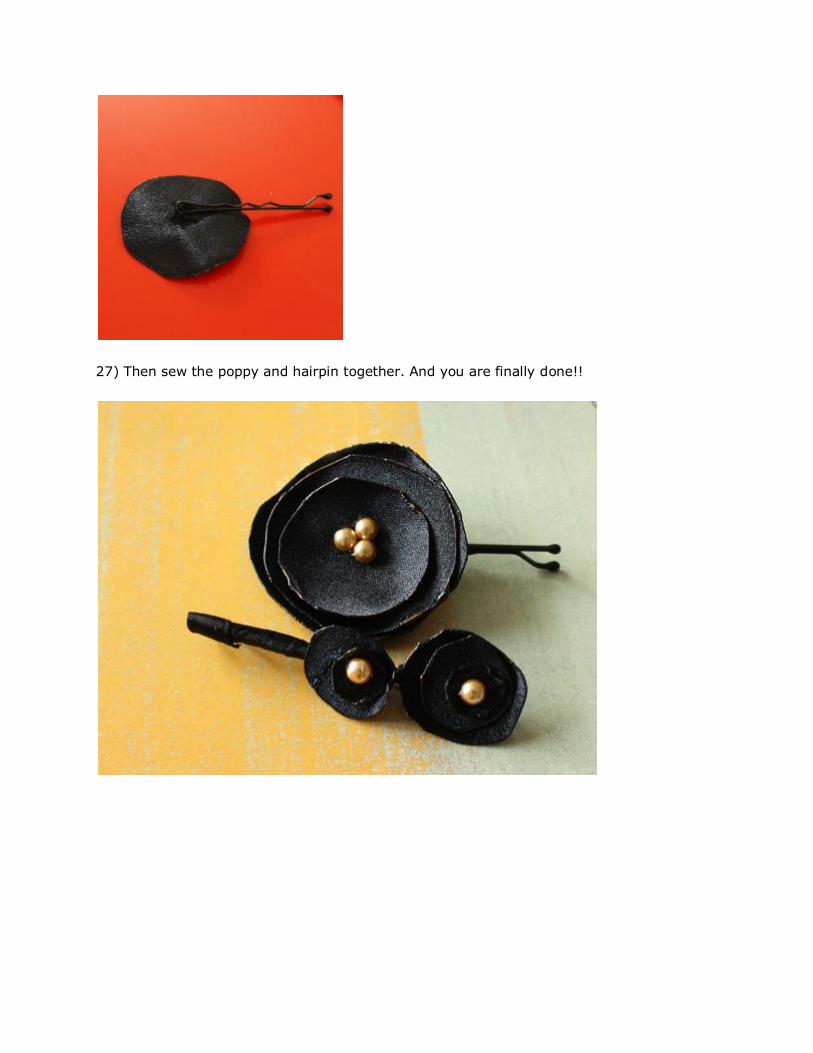
27) Then sew the poppy and hairpin together. And you are finally done!!
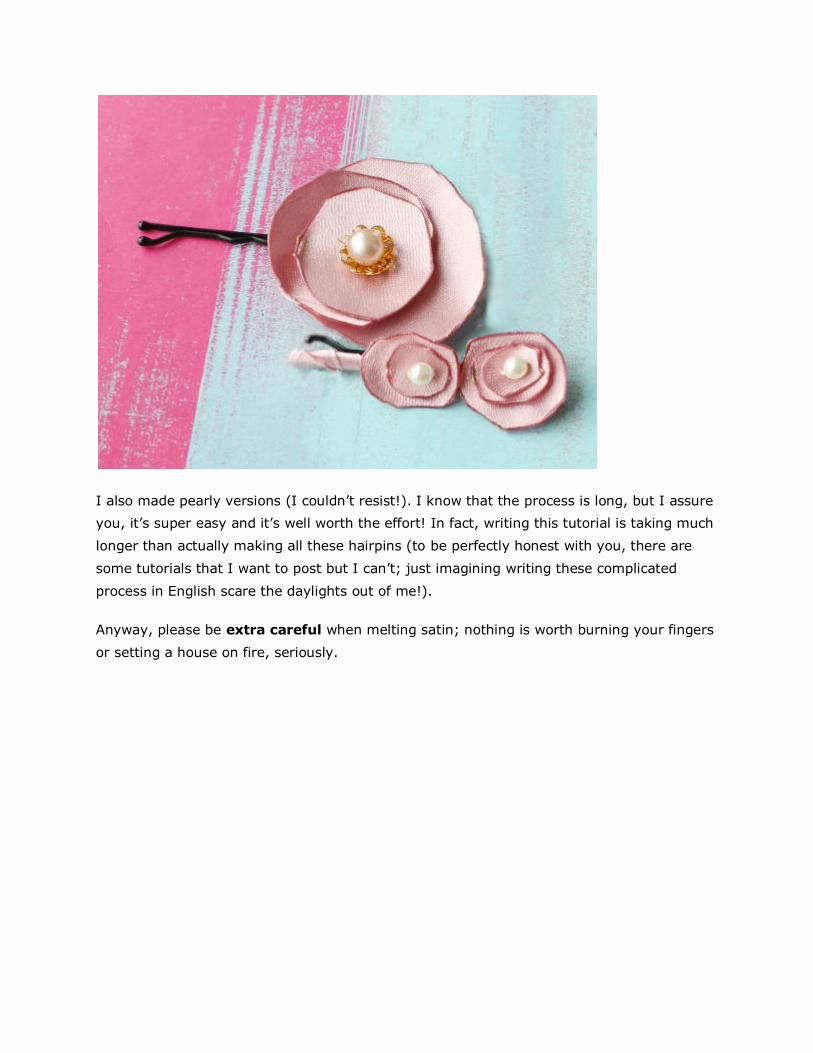
I also made pearly versions (I couldn’t resist!). I know that the process is long, but I assure
you, it’s super easy and it’s well worth the effort! In fact, writing this tutorial is taking much
longer than actually making all these hairpins (to be perfectly honest with you, there are
some tutorials that I want to post but I can’t; just imagining writing these complicated
process in English scare the daylights out of me!).
Anyway, please be extra careful when melting satin; nothing is worth burning your fingers
or setting a house on fire, seriously.
BEADED RING
Description
I loved making this ring. At the end, when you want to make a knot and tie everything together,
make sure you burn the endings which will make the knot smoother and therefore does not hurt
your finger. Then you can smooth out the knot with adding some additional transparent nail
polish. this will secure the knot and make it smoother. Hope you will enjoy! I will try to add the
"How to" soon so that you will have an idea of how to do this beautiful ring.
You Will Need
o Transparent Nail Polish(additional) o Small Pearl Beads o Nylon String(25mm thick)
Instructions
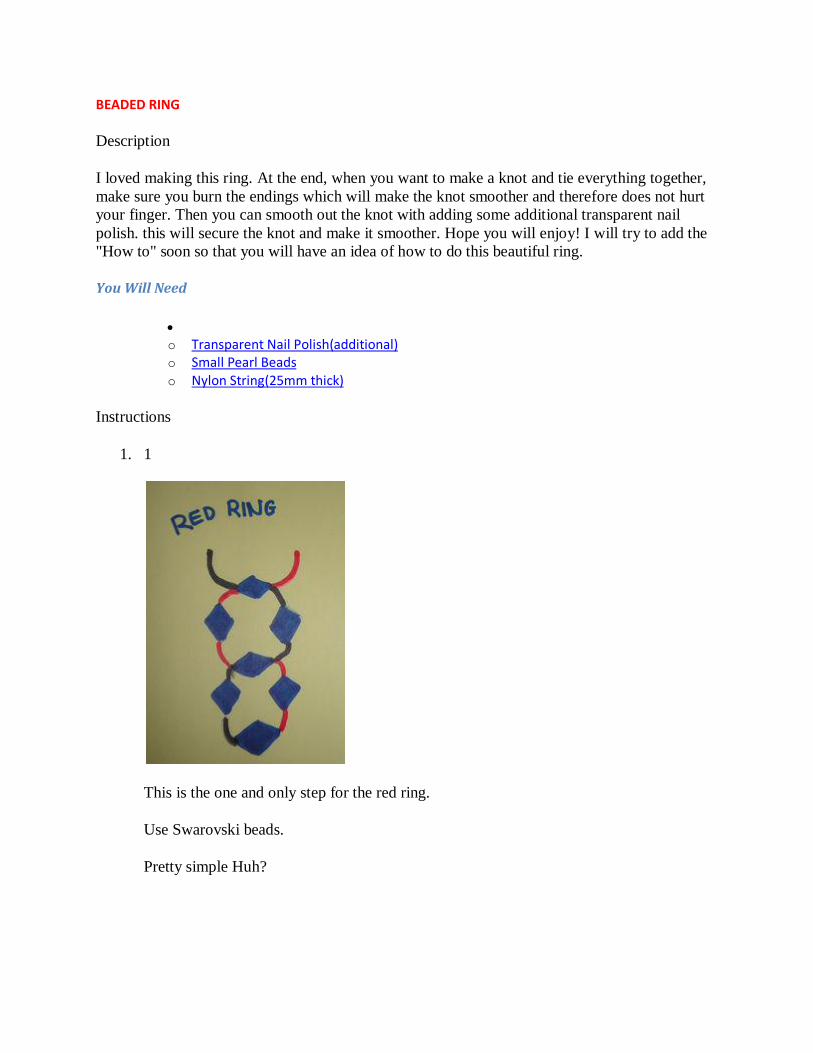
1. 1
This is the one and only step for the red ring.
Use Swarovski beads.
Pretty simple Huh?
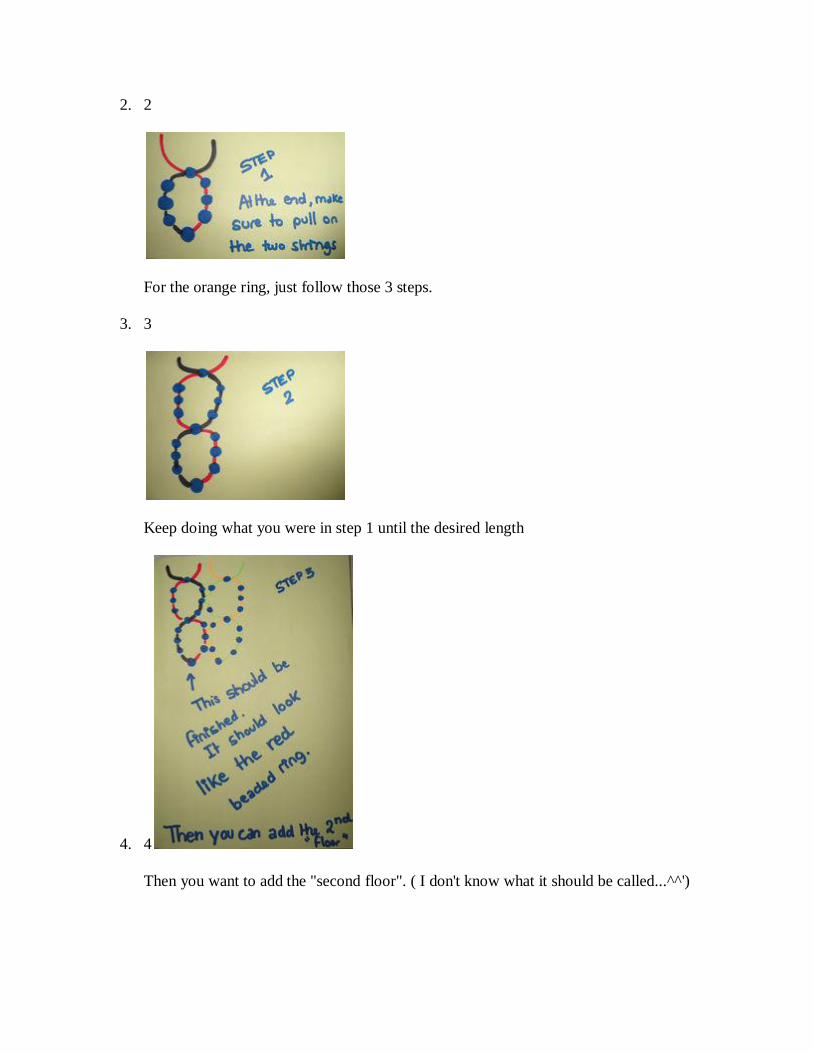
2. 2
For the orange ring, just follow those 3 steps.
3. 3
Keep doing what you were in step 1 until the desired length
4. 4
Then you want to add the "second floor". ( I don't know what it should be called...^^')
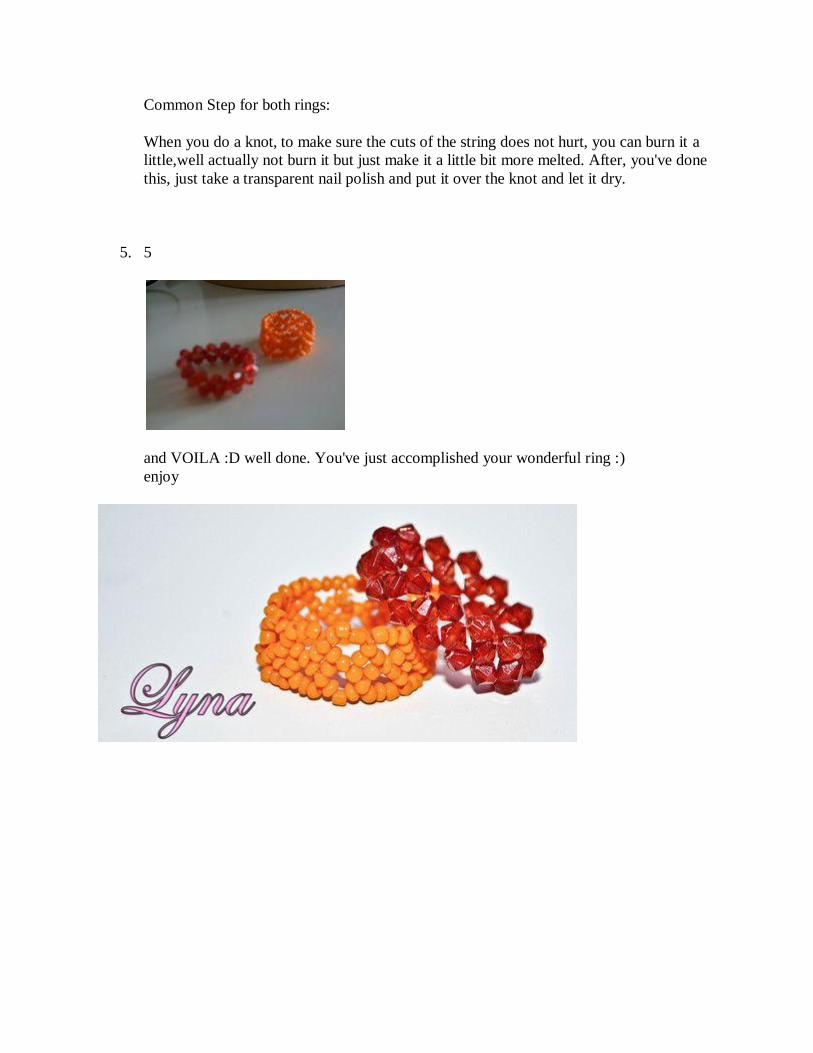
Common Step for both rings:
When you do a knot, to make sure the cuts of the string does not hurt, you can burn it a
little,well actually not burn it but just make it a little bit more melted. After, you've done
this, just take a transparent nail polish and put it over the knot and let it dry.
5. 5
and VOILA :D well done. You've just accomplished your wonderful ring :)
enjoy
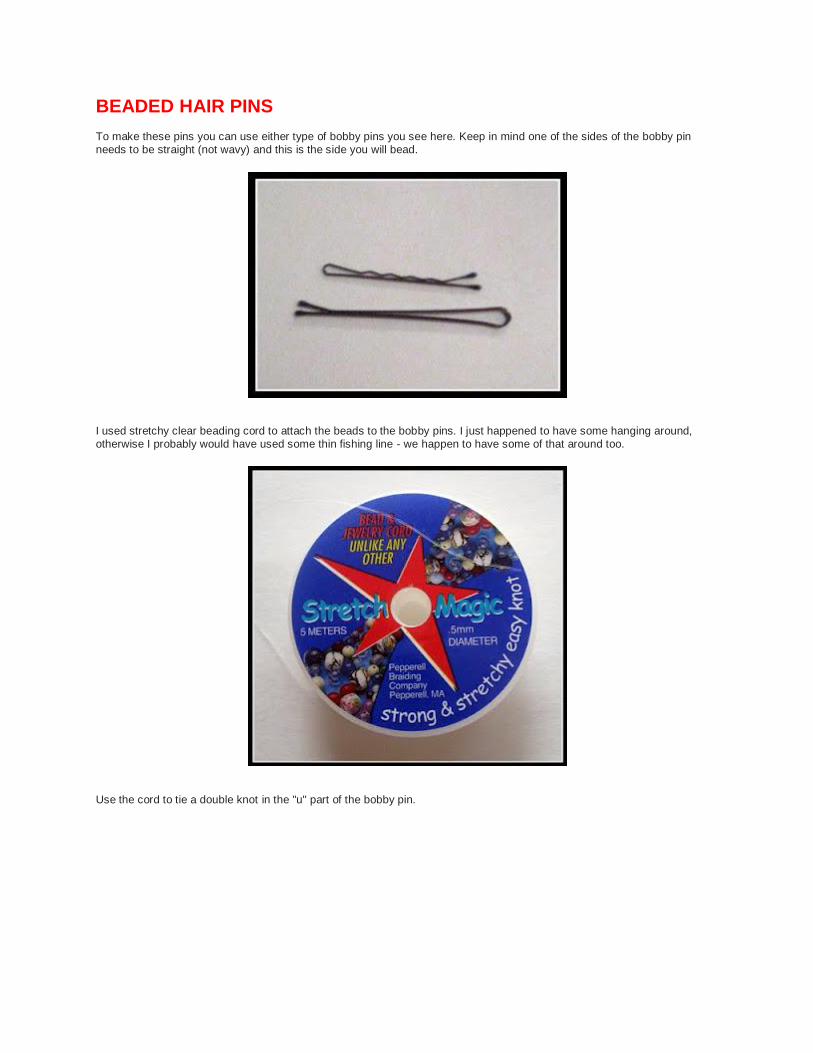
BEADED HAIR PINS To make these pins you can use either type of bobby pins you see here. Keep in mind one of the sides of the bobby pin needs to be straight (not wavy) and this is the side you will bead.
I used stretchy clear beading cord to attach the beads to the bobby pins. I just happened to have some hanging around, otherwise I probably would have used some thin fishing line - we happen to have some of that around too.
Use the cord to tie a double knot in the "u" part of the bobby pin.

Leave at least a 2-inch tail on the end of the cord. Then measure 2 1/2 times the length of your bobby pin on the other length of cord and cut. Wrap the long length of cord once around the long side of the pin and double knot.
Begin stringing your beads (I use glass beads because they catch the light so nicely). String the length of the long straight side of the pin then take two or three beads off. Wrap the cord once around the edge of the bobby pin where you want your beads. Tie a double knot.

Now you wind the cord around the closest bead and between the two prongs of the bobby pin. Do this between each bead until you reach the last bead back by the "u" portion of the bobby pin where you started. Make double knot. Wrap the cord back around the side of the bobby pin where you have beaded and double knot again. Do this one more time. Finally tie that end of cord to the other end of cord. Double knot. Now you can clip the extra cord making sure not to clip too close to the
knot. I left about 1/4" of cord.
Done.
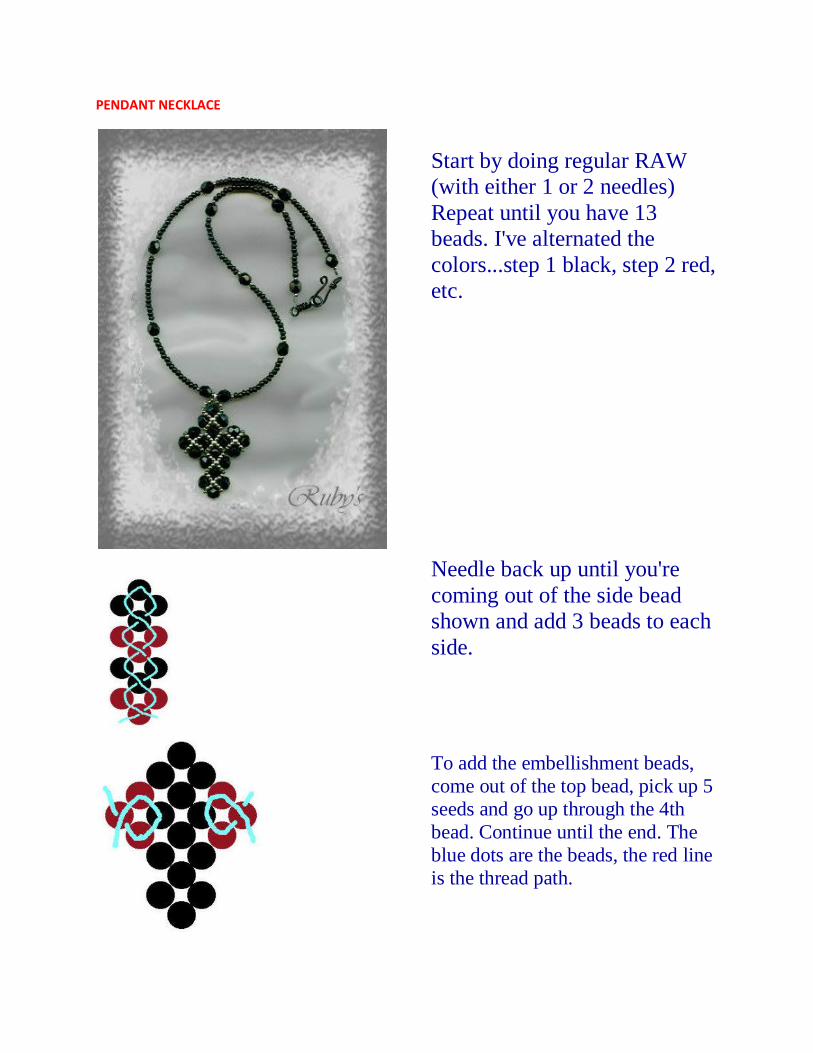
PENDANT NECKLACE
Start by doing regular RAW
(with either 1 or 2 needles)
Repeat until you have 13
beads. I've alternated the
colors...step 1 black, step 2 red,
etc.
Needle back up until you're
coming out of the side bead
shown and add 3 beads to each
side.
To add the embellishment beads,
come out of the top bead, pick up 5
seeds and go up through the 4th
bead. Continue until the end. The
blue dots are the beads, the red line
is the thread path.
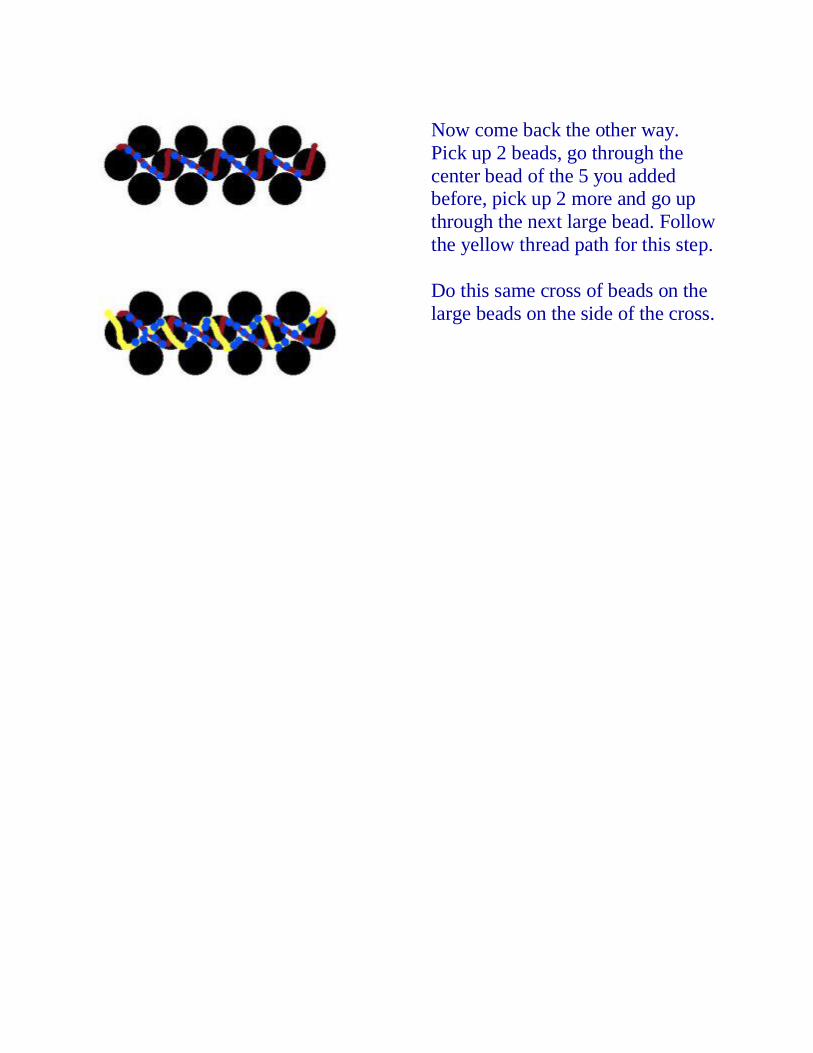
Now come back the other way.
Pick up 2 beads, go through the
center bead of the 5 you added before, pick up 2 more and go up
through the next large bead. Follow
the yellow thread path for this step.
Do this same cross of beads on the
large beads on the side of the cross.
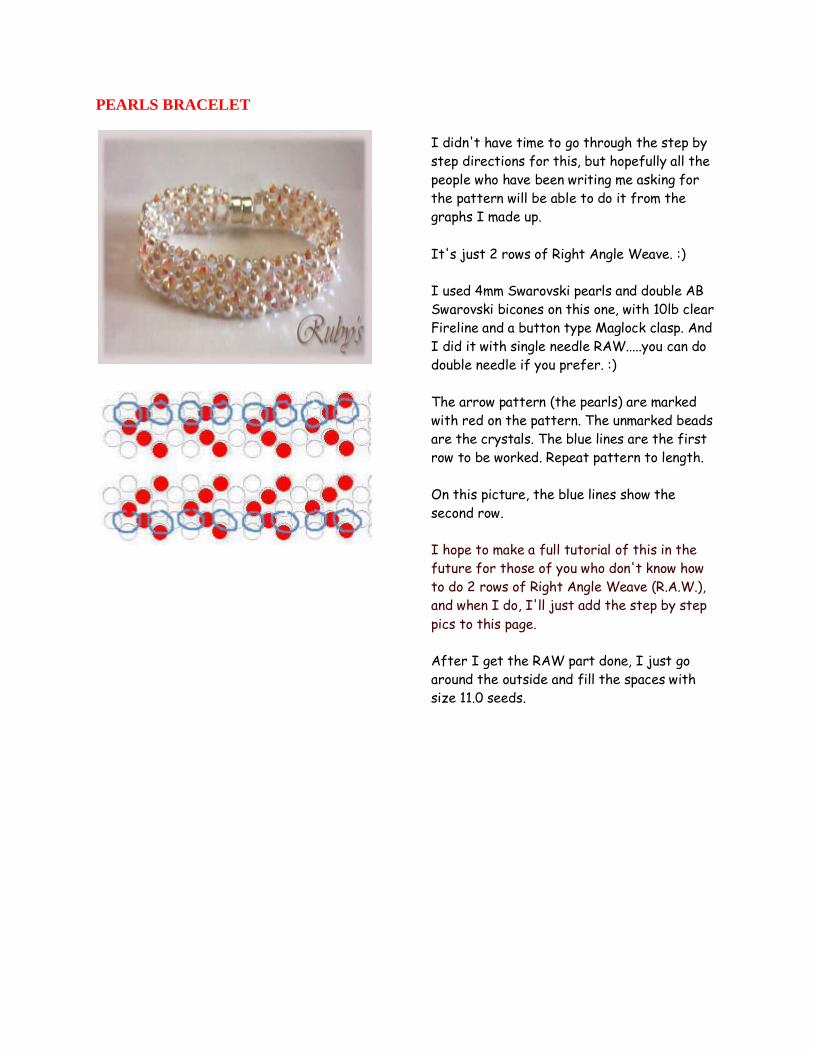
PEARLS BRACELET
I didn't have time to go through the step by
step directions for this, but hopefully all the
people who have been writing me asking for
the pattern will be able to do it from the
graphs I made up.
It's just 2 rows of Right Angle Weave. :)
I used 4mm Swarovski pearls and double AB
Swarovski bicones on this one, with 10lb clear
Fireline and a button type Maglock clasp. And
I did it with single needle RAW.....you can do
double needle if you prefer. :)
The arrow pattern (the pearls) are marked
with red on the pattern. The unmarked beads
are the crystals. The blue lines are the first
row to be worked. Repeat pattern to length.
On this picture, the blue lines show the
second row.
I hope to make a full tutorial of this in the
future for those of you who don't know how
to do 2 rows of Right Angle Weave (R.A.W.),
and when I do, I'll just add the step by step
pics to this page.
After I get the RAW part done, I just go
around the outside and fill the spaces with
size 11.0 seeds.

Here's some graph paper if you want to make some different double row RAW bracelets.

Crystal R.A.W. (Right
Angle Weave) Bracelet
This simple Right Angle Weave bracelet is completed in 3 passes. You can quit after you've made the base, or after the 2nd, or 3rd pass. Or you can add more rows to suit your fancy. :)
Materials: Size 11.0 seeds Size 8.0 seeds 4mm crystals Clasp of your choice Thread (I used 8lb Fireline) Size 12 needle Begin by threading your needle with as long a piece of thread as is comfortable for you to work with. This bracelet takes a lot of thread, so you may have to add more later. Step one: Pick up two 11s, one 8, one crystal, one 11, one crystal, one 8, two 11s and one 8. Tie in a circle. (Leave about 6" or so to attach your clasp later.) Then needle through until you're coming out of the seed bead between the crystals. Step 2: Pick up one crystal, one 8, two 11s, one 8, two 11s, one 8, and a crystal. Making a circle, go back through the seed your thread is coming out of in the last round. Needle through until you are coming out the size 8 seed in the center of this round.
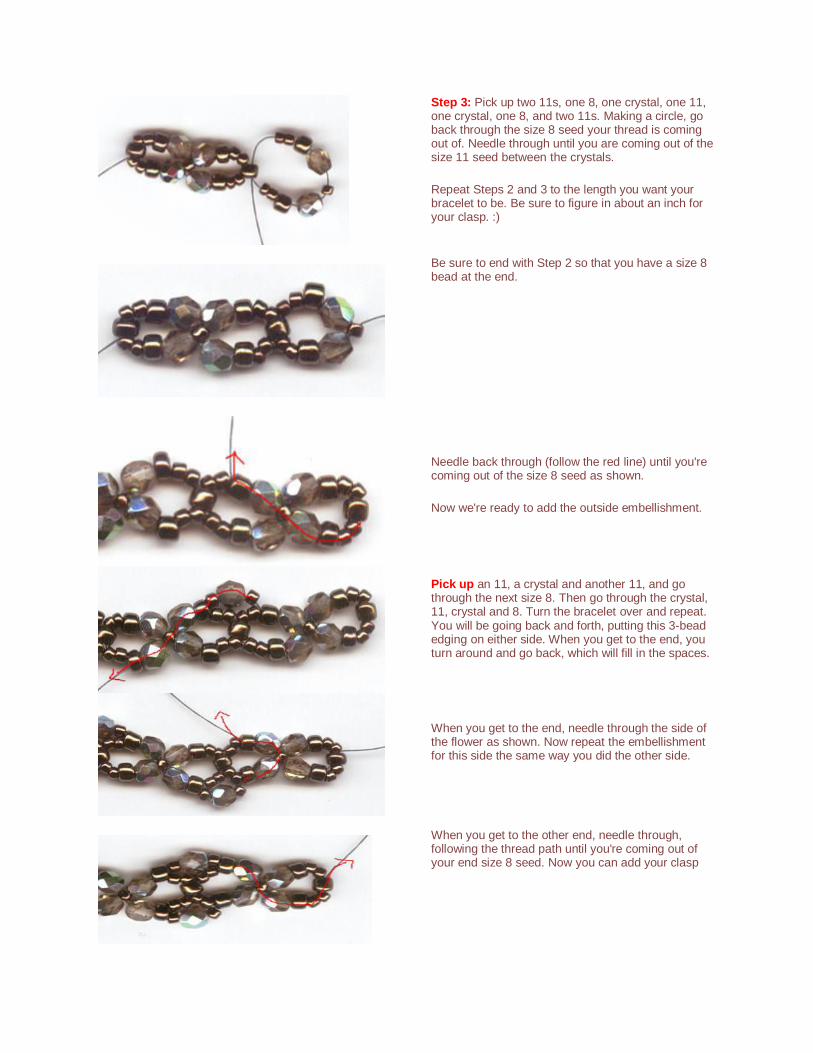
Step 3: Pick up two 11s, one 8, one crystal, one 11, one crystal, one 8, and two 11s. Making a circle, go back through the size 8 seed your thread is coming out of. Needle through until you are coming out of the size 11 seed between the crystals. Repeat Steps 2 and 3 to the length you want your bracelet to be. Be sure to figure in about an inch for your clasp. :) Be sure to end with Step 2 so that you have a size 8 bead at the end.
Needle back through (follow the red line) until you're coming out of the size 8 seed as shown. Now we're ready to add the outside embellishment.
Pick up an 11, a crystal and another 11, and go through the next size 8. Then go through the crystal, 11, crystal and 8. Turn the bracelet over and repeat. You will be going back and forth, putting this 3-bead edging on either side. When you get to the end, you turn around and go back, which will fill in the spaces.
When you get to the end, needle through the side of the flower as shown. Now repeat the embellishment for this side the same way you did the other side.
When you get to the other end, needle through, following the thread path until you're coming out of your end size 8 seed. Now you can add your clasp
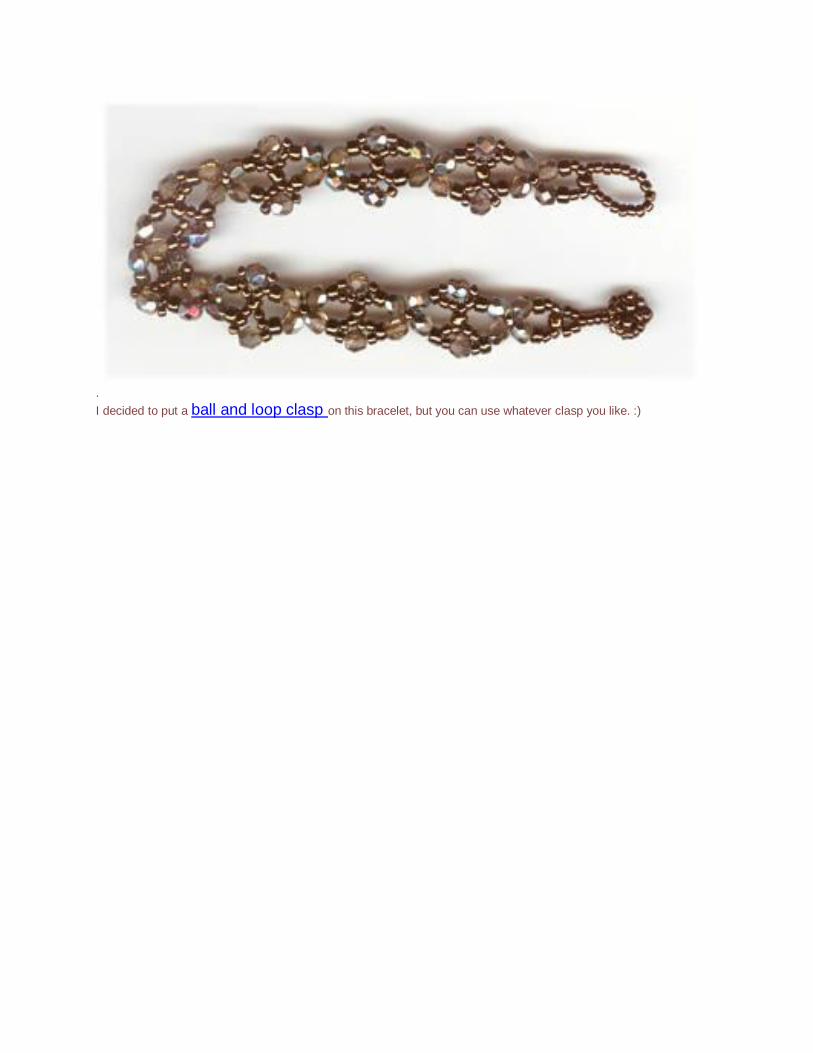
. I decided to put a ball and loop clasp on this bracelet, but you can use whatever clasp you like. :)
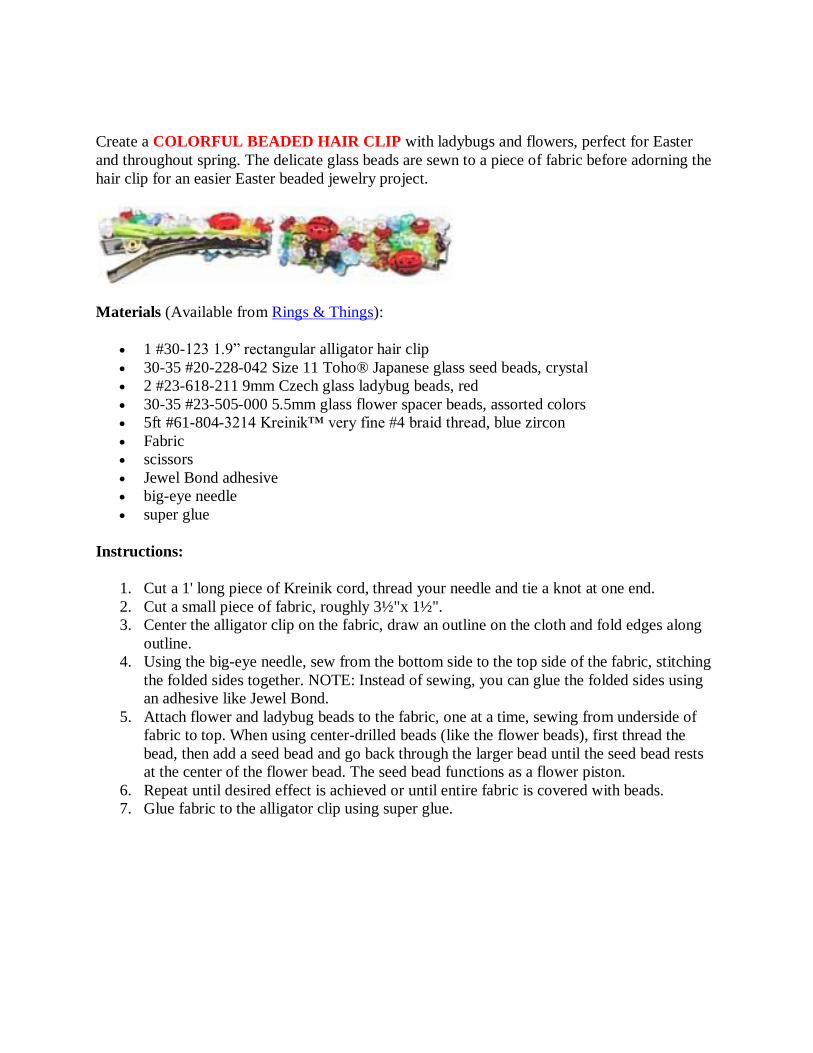
Create a COLORFUL BEADED HAIR CLIP with ladybugs and flowers, perfect for Easter
and throughout spring. The delicate glass beads are sewn to a piece of fabric before adorning the
hair clip for an easier Easter beaded jewelry project.
Materials (Available from Rings & Things):
1 #30-123 1.9” rectangular alligator hair clip
30-35 #20-228-042 Size 11 Toho® Japanese glass seed beads, crystal
2 #23-618-211 9mm Czech glass ladybug beads, red
30-35 #23-505-000 5.5mm glass flower spacer beads, assorted colors
5ft #61-804-3214 Kreinik™ very fine #4 braid thread, blue zircon
Fabric
scissors
Jewel Bond adhesive
big-eye needle
super glue
Instructions:
1. Cut a 1' long piece of Kreinik cord, thread your needle and tie a knot at one end.
2. Cut a small piece of fabric, roughly 3½"x 1½".
3. Center the alligator clip on the fabric, draw an outline on the cloth and fold edges along
outline.
4. Using the big-eye needle, sew from the bottom side to the top side of the fabric, stitching
the folded sides together. NOTE: Instead of sewing, you can glue the folded sides using
an adhesive like Jewel Bond.
5. Attach flower and ladybug beads to the fabric, one at a time, sewing from underside of
fabric to top. When using center-drilled beads (like the flower beads), first thread the
bead, then add a seed bead and go back through the larger bead until the seed bead rests
at the center of the flower bead. The seed bead functions as a flower piston.
6. Repeat until desired effect is achieved or until entire fabric is covered with beads.
7. Glue fabric to the alligator clip using super glue.
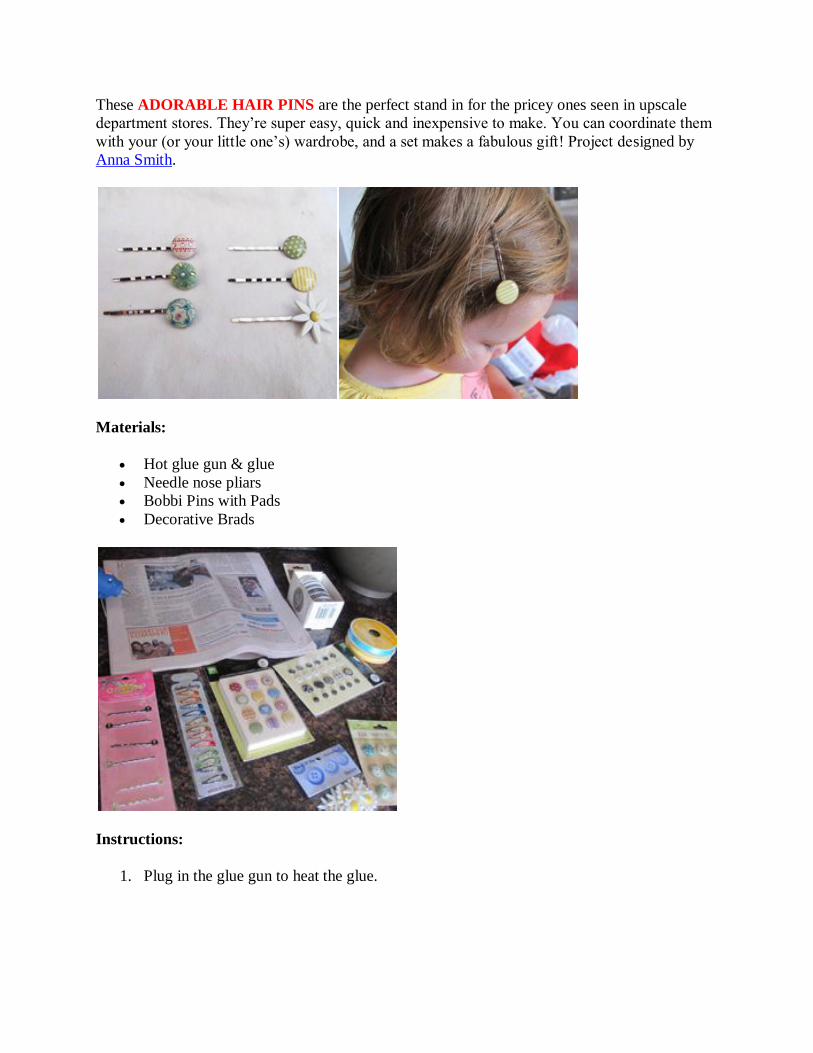
These ADORABLE HAIR PINS are the perfect stand in for the pricey ones seen in upscale
department stores. They’re super easy, quick and inexpensive to make. You can coordinate them
with your (or your little one’s) wardrobe, and a set makes a fabulous gift! Project designed by
Anna Smith.
Materials:
Hot glue gun & glue
Needle nose pliars
Bobbi Pins with Pads
Decorative Brads
Instructions:
1. Plug in the glue gun to heat the glue.
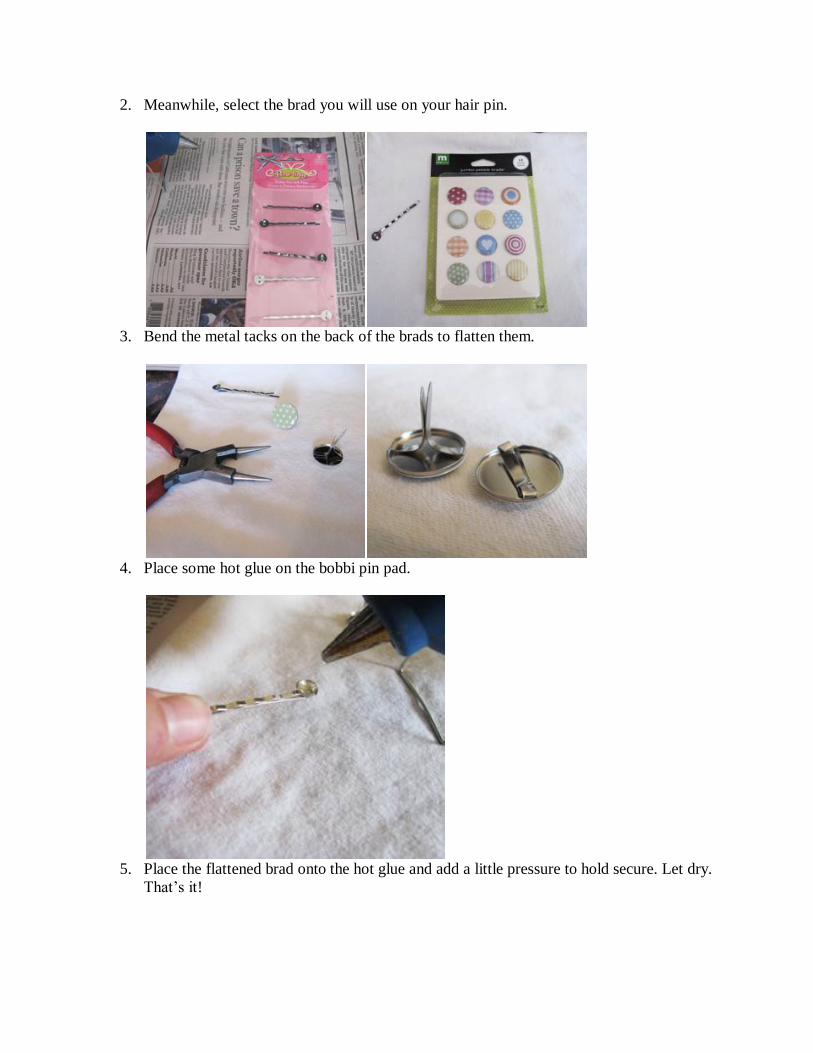
2. Meanwhile, select the brad you will use on your hair pin.
3. Bend the metal tacks on the back of the brads to flatten them.
4. Place some hot glue on the bobbi pin pad.
5. Place the flattened brad onto the hot glue and add a little pressure to hold secure. Let dry.
That’s it!

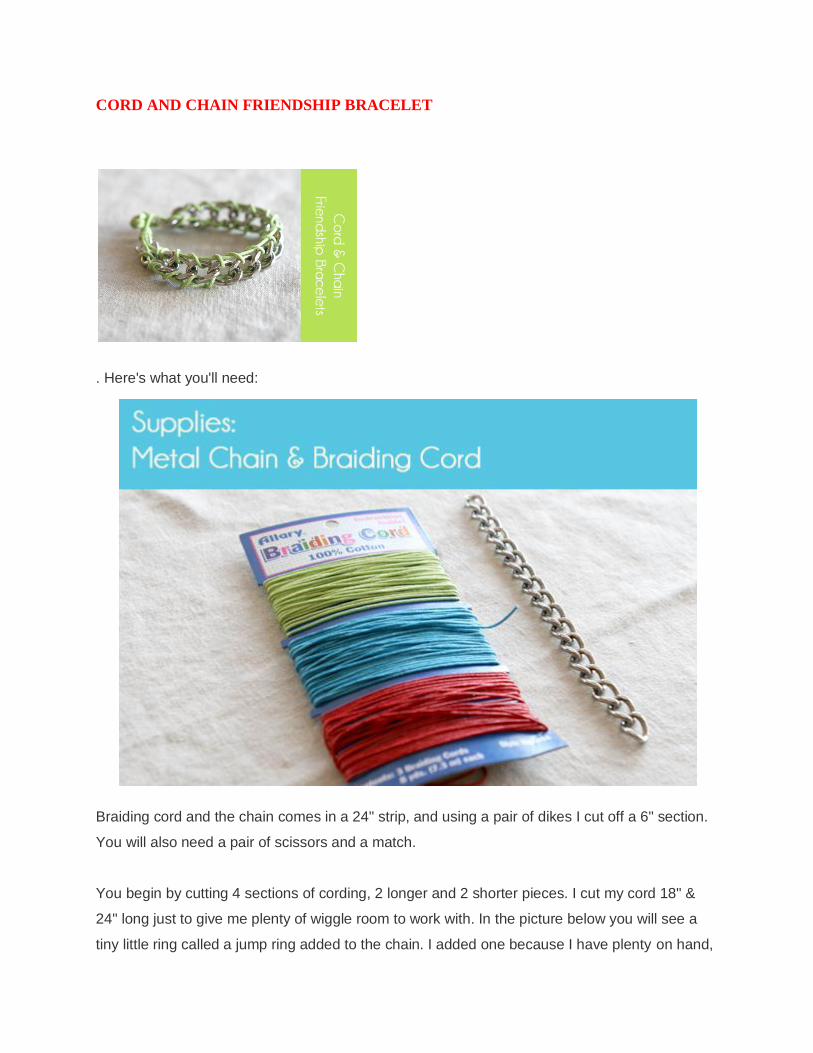
CORD AND CHAIN FRIENDSHIP BRACELET
. Here's what you'll need:
Braiding cord and the chain comes in a 24" strip, and using a pair of dikes I cut off a 6" section.
You will also need a pair of scissors and a match.
You begin by cutting 4 sections of cording, 2 longer and 2 shorter pieces. I cut my cord 18" &
24" long just to give me plenty of wiggle room to work with. In the picture below you will see a
tiny little ring called a jump ring added to the chain. I added one because I have plenty on hand,
and it just made it a bit more of a cleaner look, but this is not a necessary step. You could just
tie the knot directly onto the chain if you don't want to have to buy another supply. At any rate,
make a nice secure knot at the top of the chain, leaving at least 1.5"-2" of cording at the end.
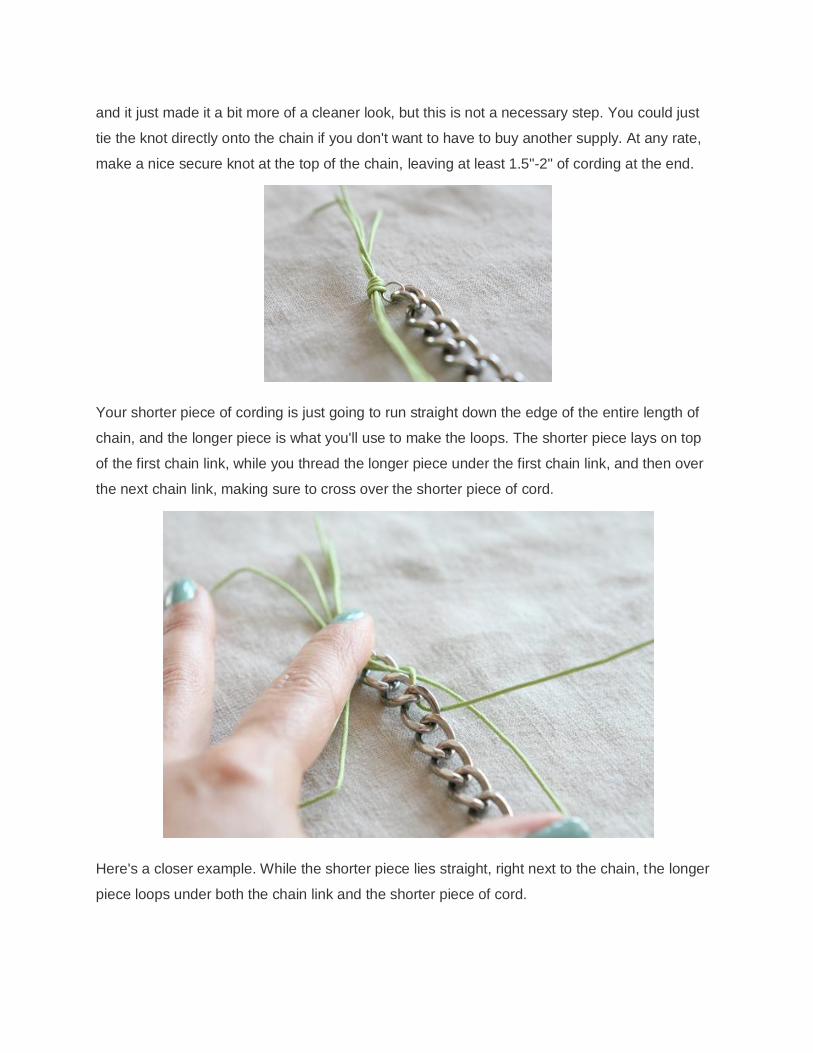
Your shorter piece of cording is just going to run straight down the edge of the entire length of
chain, and the longer piece is what you'll use to make the loops. The shorter piece lays on top
of the first chain link, while you thread the longer piece under the first chain link, and then over
the next chain link, making sure to cross over the shorter piece of cord.
Here's a closer example. While the shorter piece lies straight, right next to the chain, the longer
piece loops under both the chain link and the shorter piece of cord.
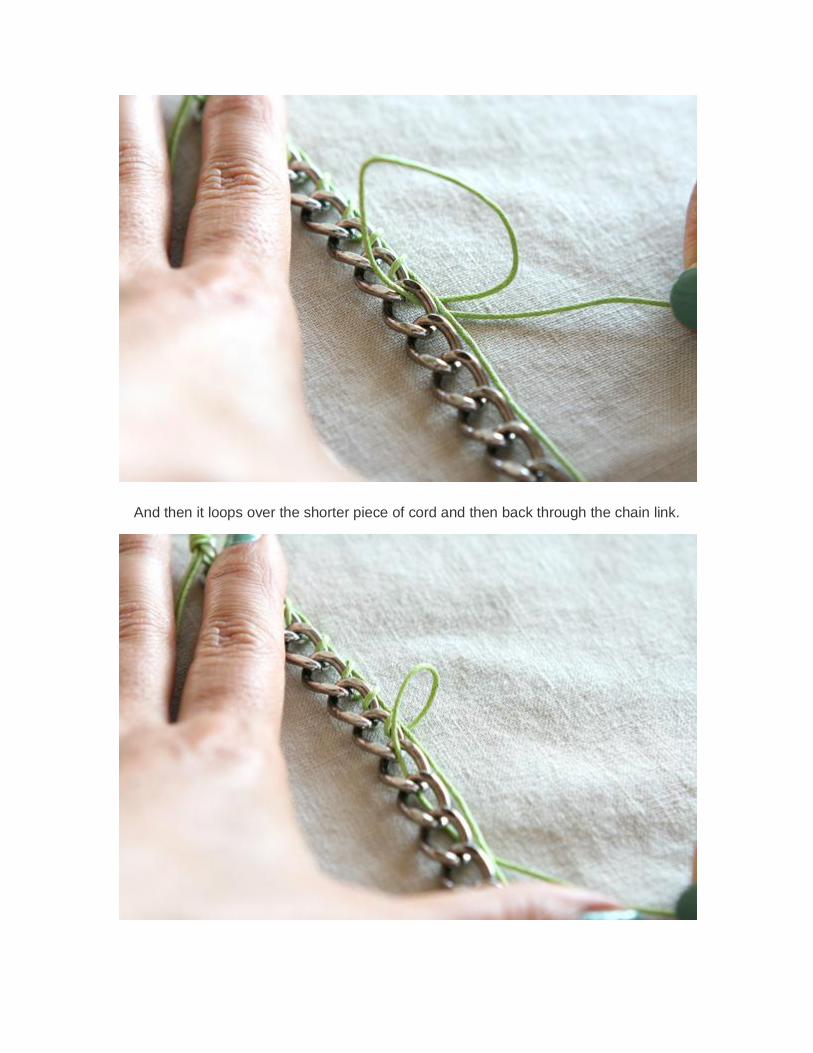
And then it loops over the shorter piece of cord and then back through the chain link.
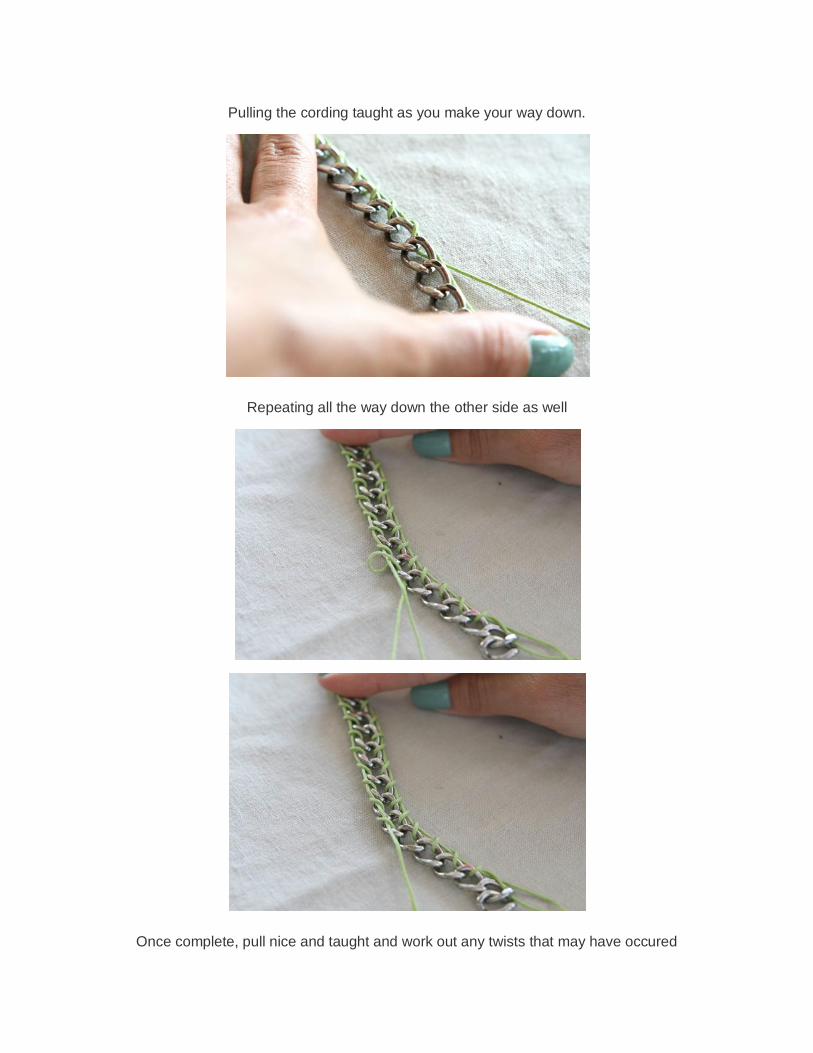
Pulling the cording taught as you make your way down.
Repeating all the way down the other side as well
Once complete, pull nice and taught and work out any twists that may have occured
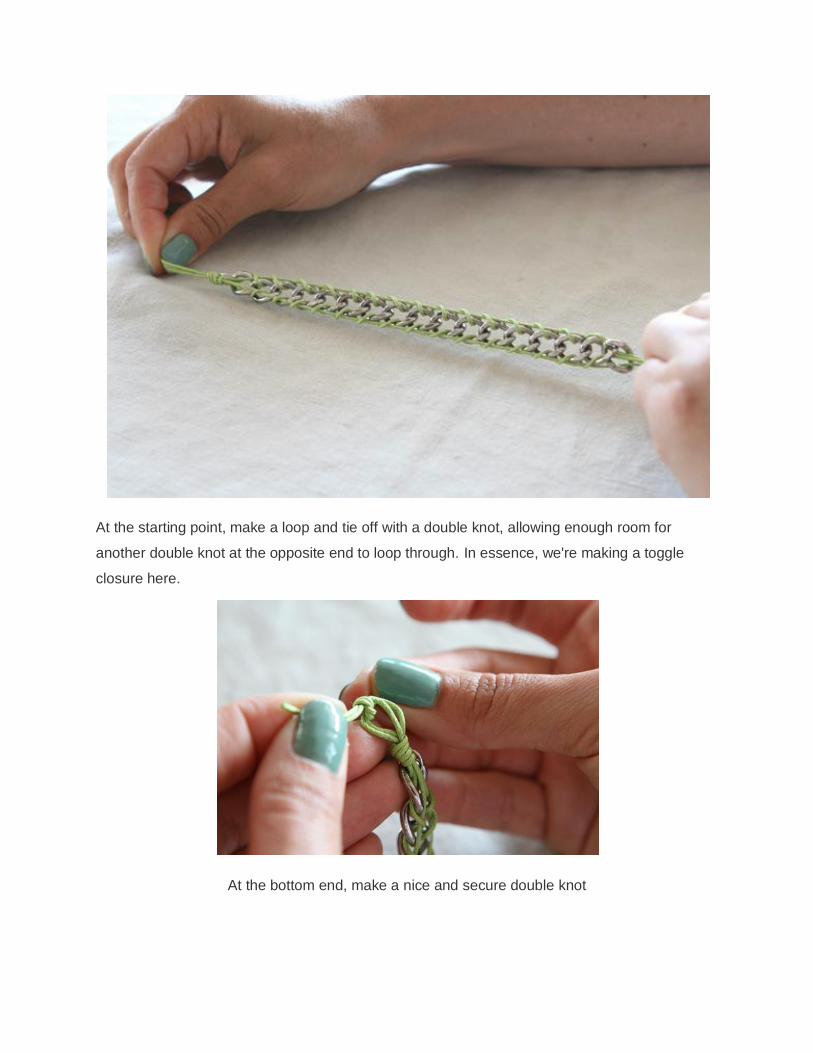
At the starting point, make a loop and tie off with a double knot, allowing enough room for
another double knot at the opposite end to loop through. In essence, we're making a toggle
closure here.
At the bottom end, make a nice and secure double knot
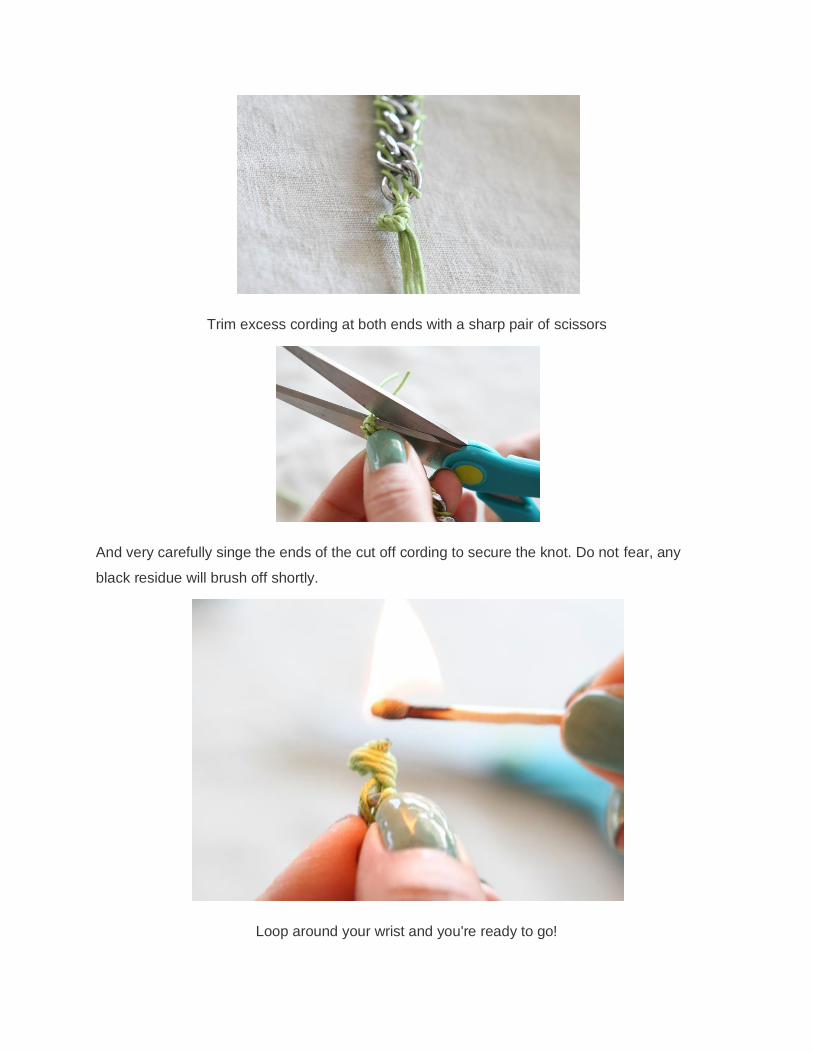
Trim excess cording at both ends with a sharp pair of scissors
And very carefully singe the ends of the cut off cording to secure the knot. Do not fear, any
black residue will brush off shortly.
Loop around your wrist and you're ready to go!

I love the stacked look, but it sure looks pretty sitting all by itself too :)
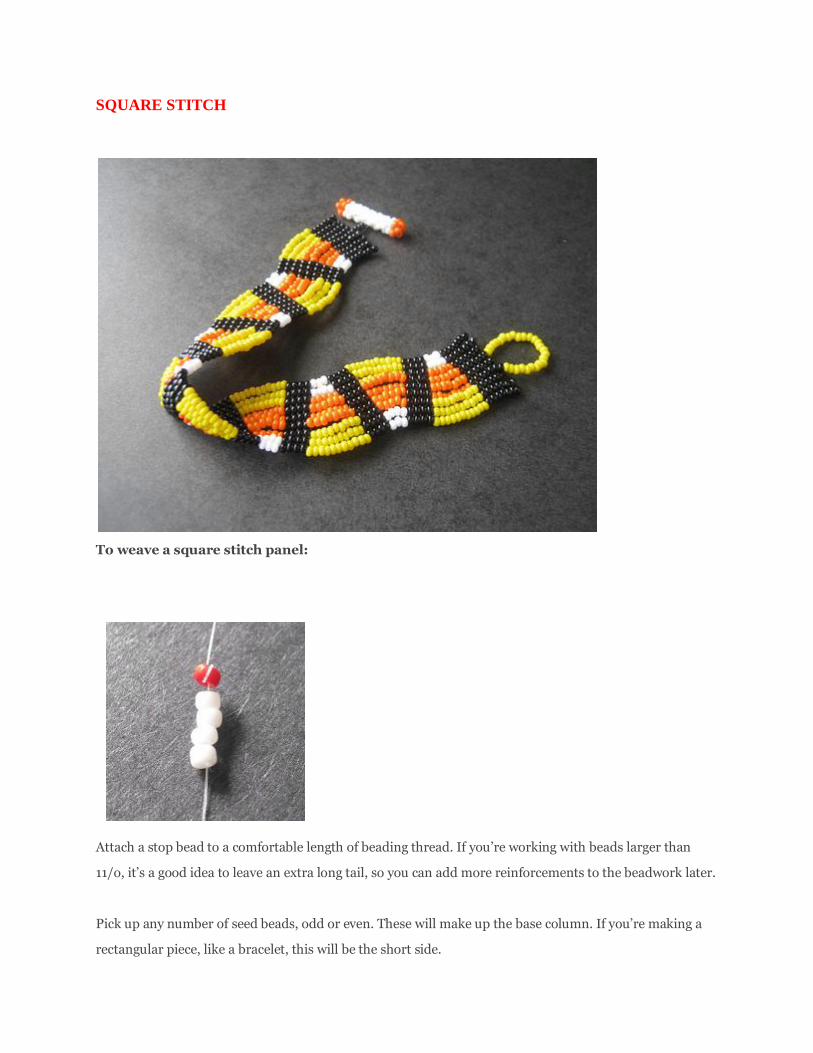
SQUARE STITCH
To weave a square stitch panel:
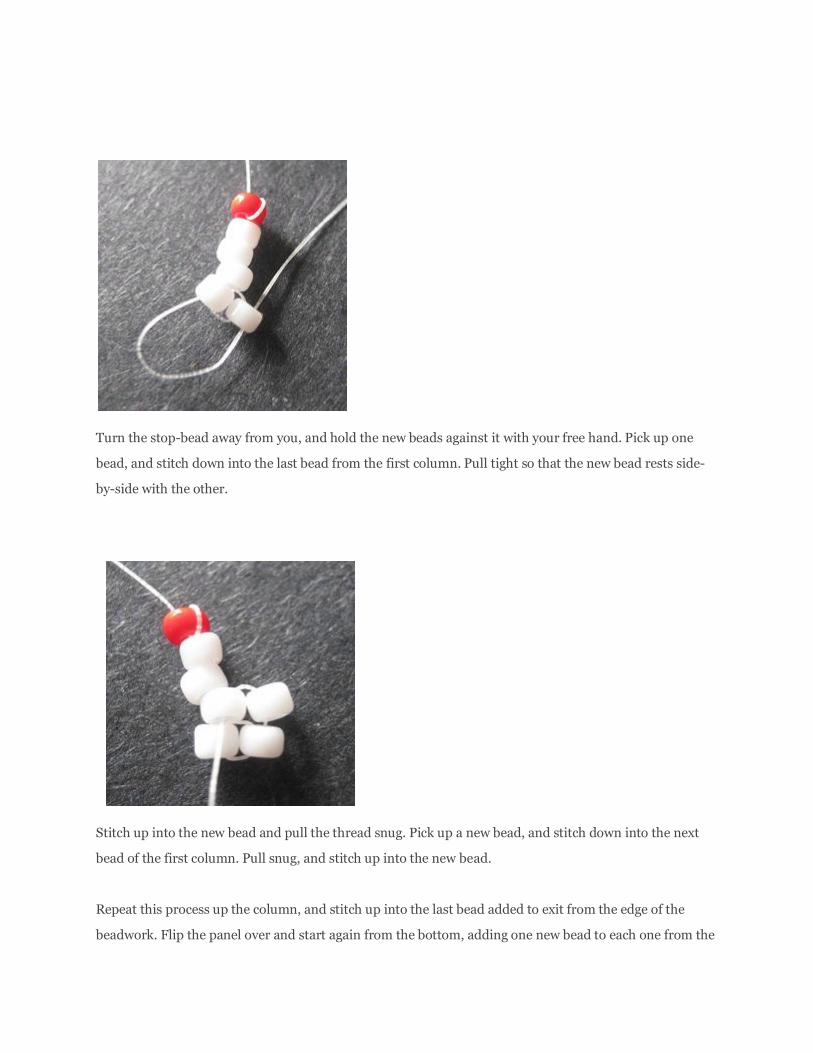
Attach a stop bead to a comfortable length of beading thread. If you’re working with beads larger than
11/o, it’s a good idea to leave an extra long tail, so you can add more reinforcements to the beadwork later.
Pick up any number of seed beads, odd or even. These will make up the base column. If you’re making a
rectangular piece, like a bracelet, this will be the short side.
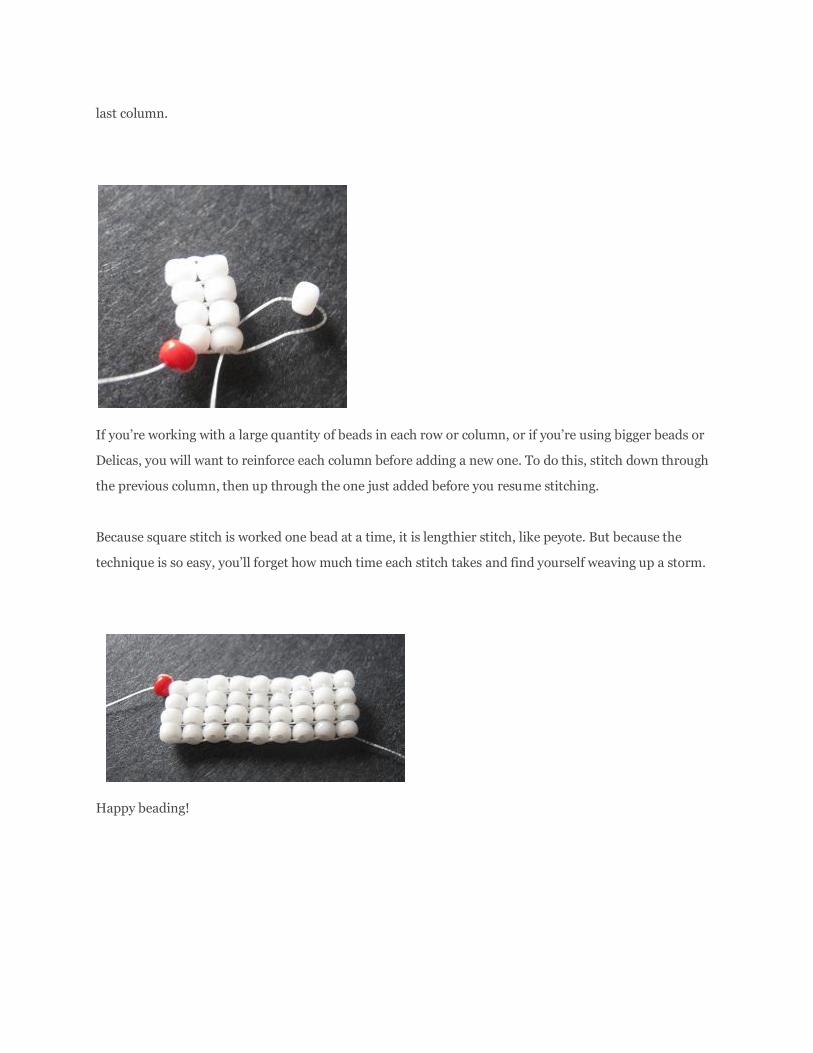
Turn the stop-bead away from you, and hold the new beads against it with your free hand. Pick up one
bead, and stitch down into the last bead from the first column. Pull tight so that the new bead rests side-
by-side with the other.
Stitch up into the new bead and pull the thread snug. Pick up a new bead, and stitch down into the next
bead of the first column. Pull snug, and stitch up into the new bead.
Repeat this process up the column, and stitch up into the last bead added to exit from the edge of the
beadwork. Flip the panel over and start again from the bottom, adding one new bead to each one from the
last column.
If you’re working with a large quantity of beads in each row or column, or if you’re using bigger beads or
Delicas, you will want to reinforce each column before adding a new one. To do this, stitch down through
the previous column, then up through the one just added before you resume stitching.
Because square stitch is worked one bead at a time, it is lengthier stitch, like peyote. But because the
technique is so easy, you’ll forget how much time each stitch takes and find yourself weaving up a storm.
Happy beading!
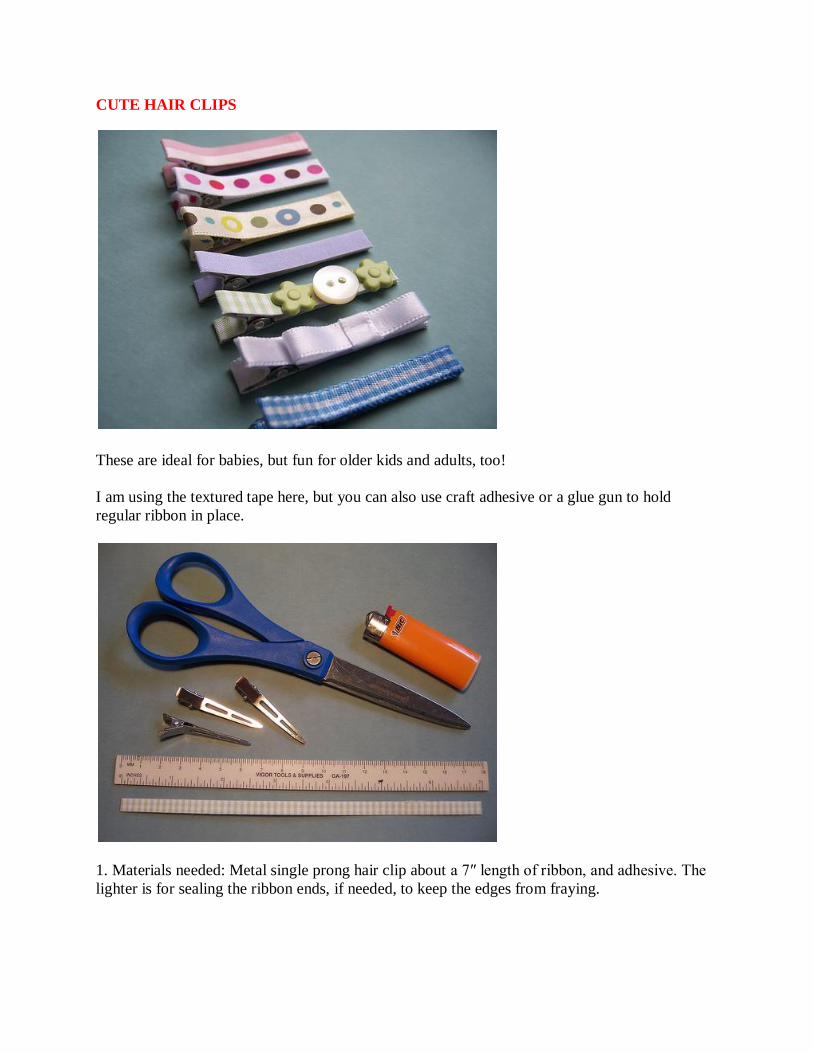
CUTE HAIR CLIPS
These are ideal for babies, but fun for older kids and adults, too!
I am using the textured tape here, but you can also use craft adhesive or a glue gun to hold
regular ribbon in place.
1. Materials needed: Metal single prong hair clip about a 7″ length of ribbon, and adhesive. The
lighter is for sealing the ribbon ends, if needed, to keep the edges from fraying.

2.Pinch the clip open and lay your ribbon beginning on the inside bottom, being careful to keep it
on straight.
3. Wrap the ribbon around and adhere it along the bottom of the clip, making a nice crease at the
tip.
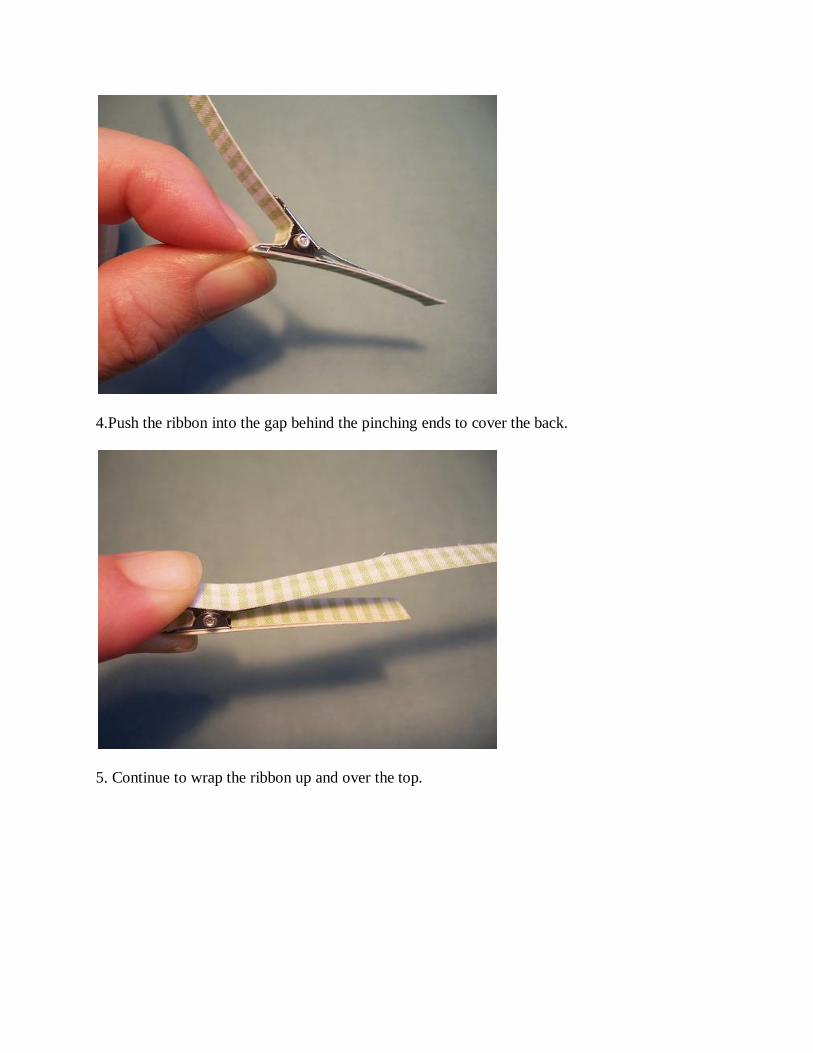
4.Push the ribbon into the gap behind the pinching ends to cover the back.
5. Continue to wrap the ribbon up and over the top.
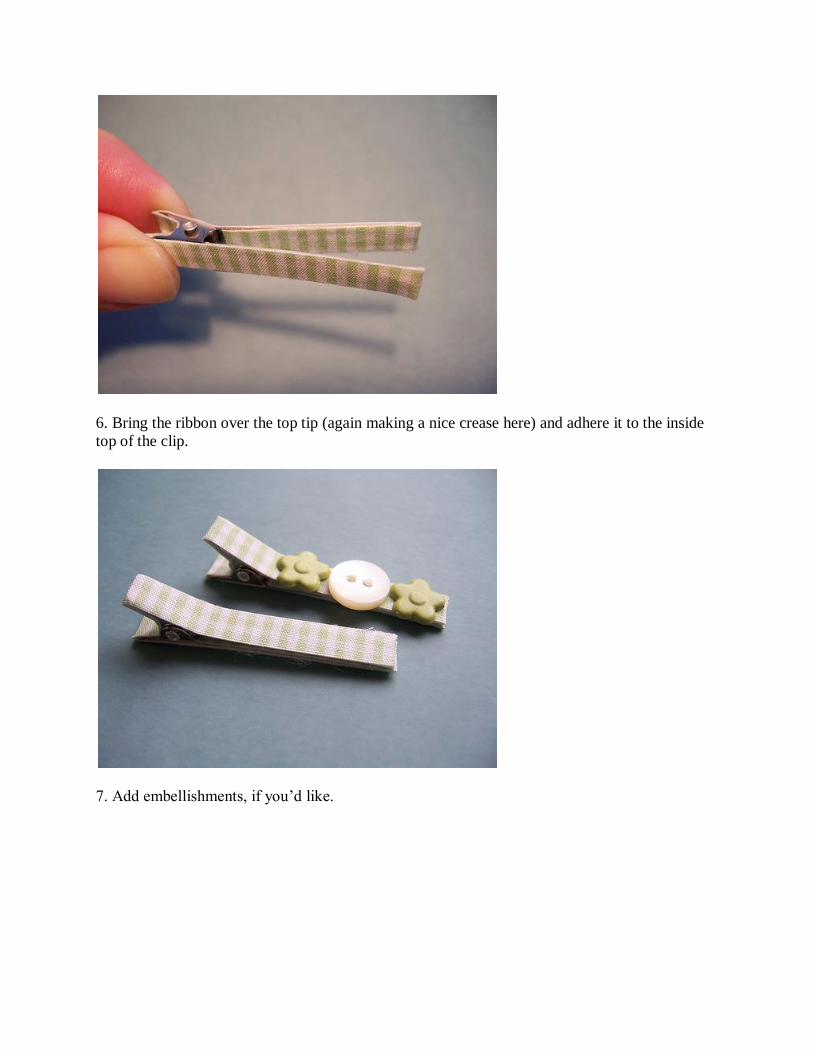
6. Bring the ribbon over the top tip (again making a nice crease here) and adhere it to the inside
top of the clip.
7. Add embellishments, if you’d like.
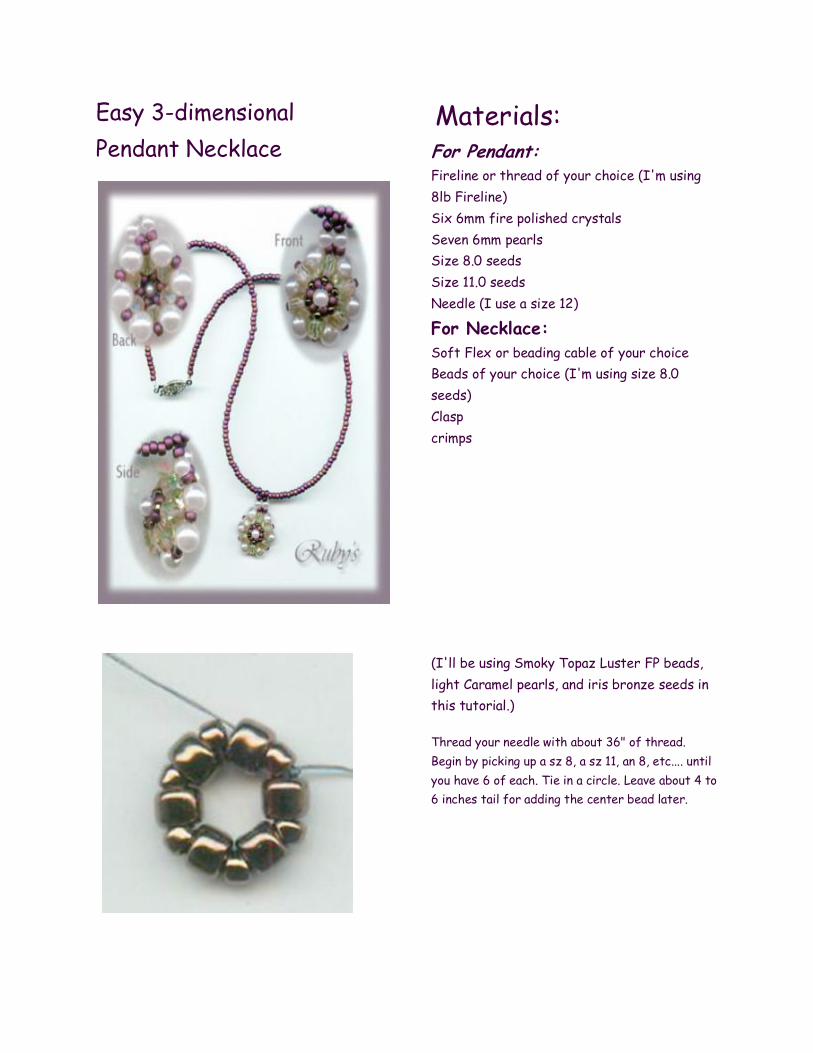
Easy 3-dimensional
Pendant Necklace
Materials:
For Pendant:
Fireline or thread of your choice (I'm using
8lb Fireline)
Six 6mm fire polished crystals
Seven 6mm pearls
Size 8.0 seeds
Size 11.0 seeds
Needle (I use a size 12)
For Necklace:
Soft Flex or beading cable of your choice
Beads of your choice (I'm using size 8.0
seeds)
Clasp
crimps
(I'll be using Smoky Topaz Luster FP beads,
light Caramel pearls, and iris bronze seeds in
this tutorial.)
Thread your needle with about 36" of thread.
Begin by picking up a sz 8, a sz 11, an 8, etc.... until
you have 6 of each. Tie in a circle. Leave about 4 to
6 inches tail for adding the center bead later.
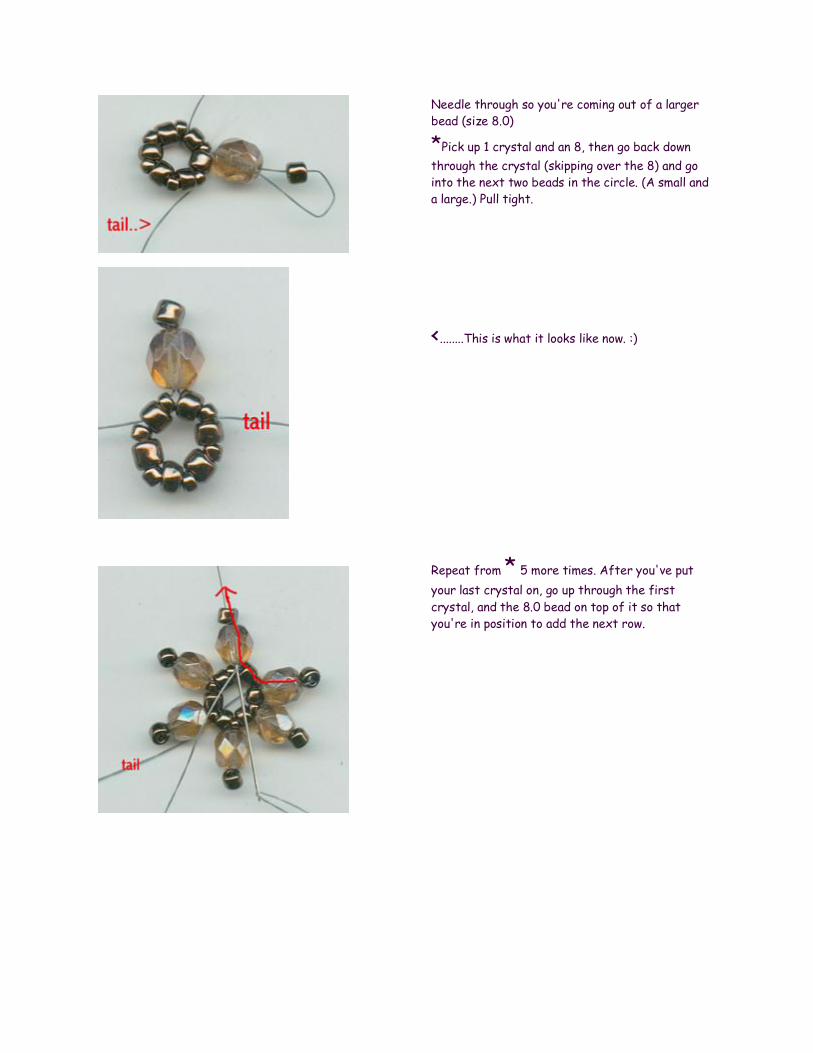
Needle through so you're coming out of a larger
bead (size 8.0)
*Pick up 1 crystal and an 8, then go back down
through the crystal (skipping over the 8) and go
into the next two beads in the circle. (A small and
a large.) Pull tight.
<........This is what it looks like now. :)
Repeat from * 5 more times. After you've put
your last crystal on, go up through the first
crystal, and the 8.0 bead on top of it so that
you're in position to add the next row.
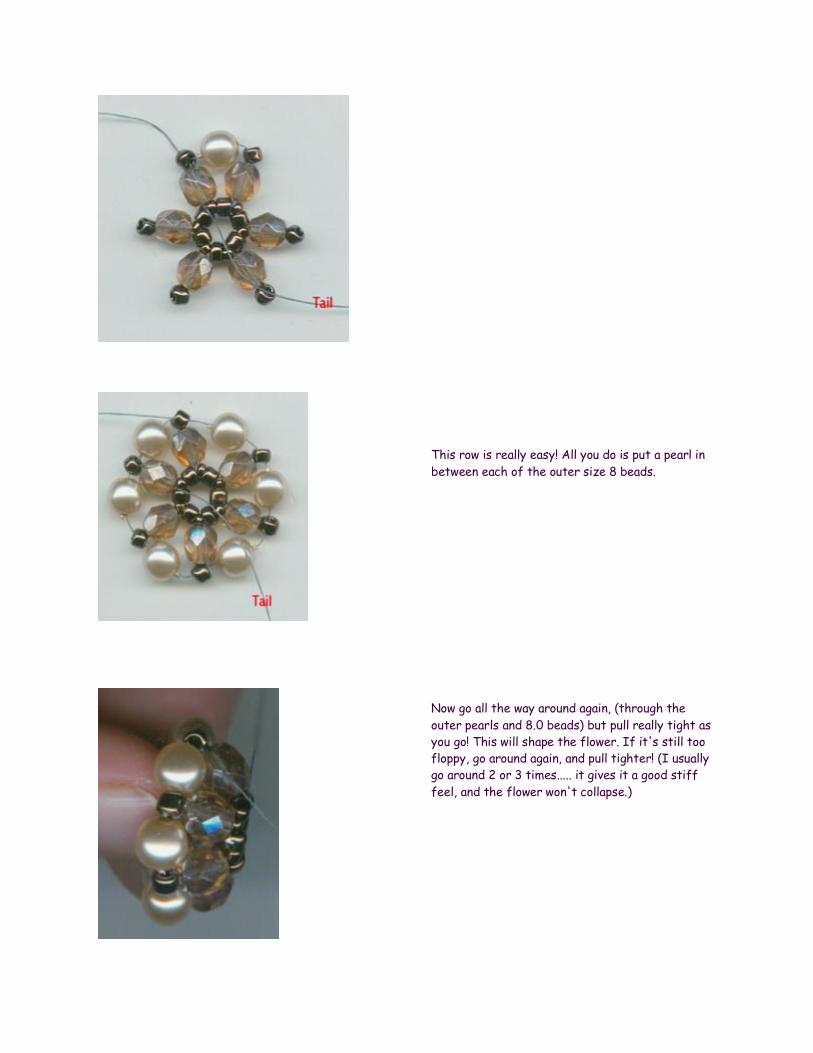
This row is really easy! All you do is put a pearl in
between each of the outer size 8 beads.
Now go all the way around again, (through the
outer pearls and 8.0 beads) but pull really tight as
you go! This will shape the flower. If it's still too
floppy, go around again, and pull tighter! (I usually
go around 2 or 3 times..... it gives it a good stiff
feel, and the flower won't collapse.)
Making the bail You can make your bail using any beads you'd like in
any pattern you'd like....this is just a suggestion. :)
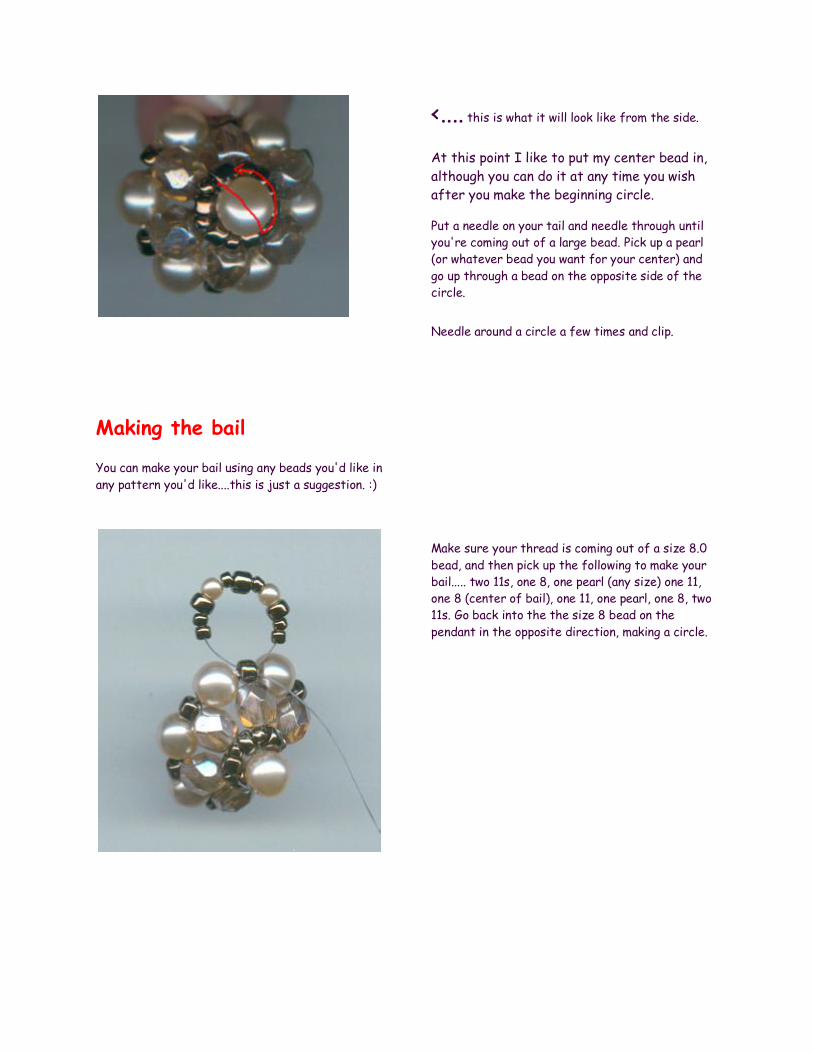
<.... this is what it will look like from the side.
At this point I like to put my center bead in,
although you can do it at any time you wish
after you make the beginning circle.
Put a needle on your tail and needle through until
you're coming out of a large bead. Pick up a pearl
(or whatever bead you want for your center) and
go up through a bead on the opposite side of the
circle. Needle around a circle a few times and clip.
Make sure your thread is coming out of a size 8.0
bead, and then pick up the following to make your
bail..... two 11s, one 8, one pearl (any size) one 11,
one 8 (center of bail), one 11, one pearl, one 8, two
11s. Go back into the the size 8 bead on the
pendant in the opposite direction, making a circle.
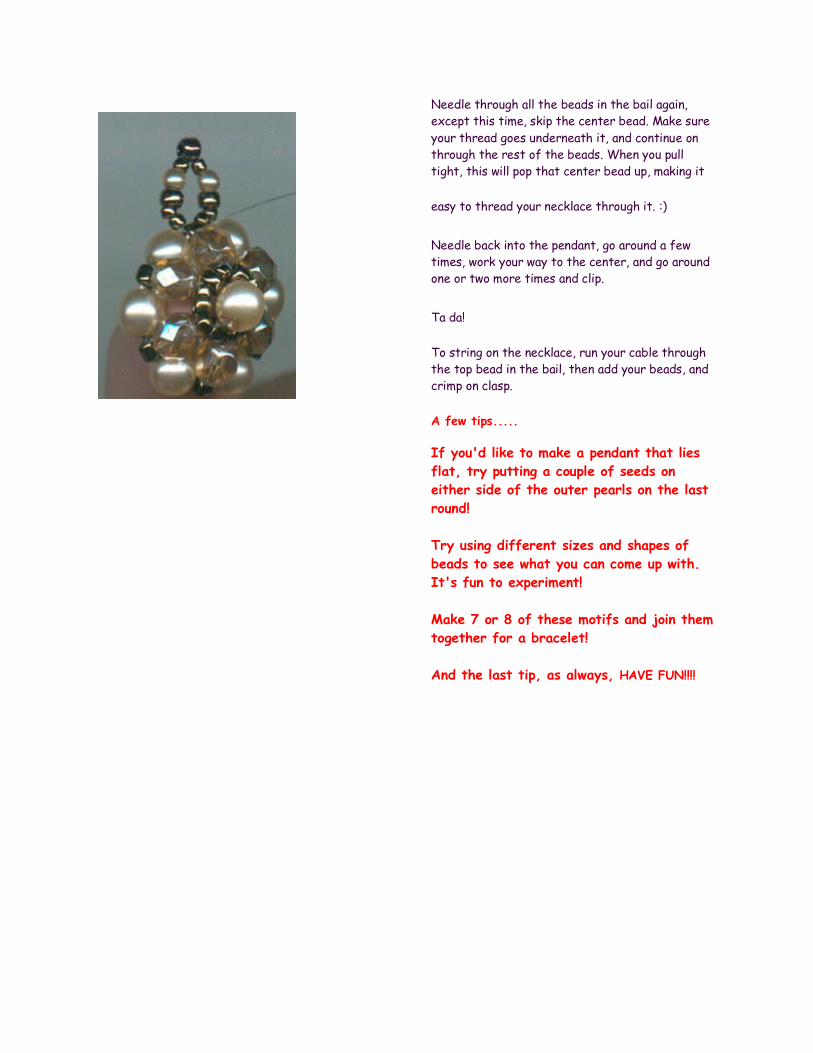
Needle through all the beads in the bail again,
except this time, skip the center bead. Make sure
your thread goes underneath it, and continue on
through the rest of the beads. When you pull
tight, this will pop that center bead up, making it easy to thread your necklace through it. :) Needle back into the pendant, go around a few
times, work your way to the center, and go around
one or two more times and clip. Ta da! To string on the necklace, run your cable through
the top bead in the bail, then add your beads, and
crimp on clasp.
A few tips.....
If you'd like to make a pendant that lies
flat, try putting a couple of seeds on
either side of the outer pearls on the last
round!
Try using different sizes and shapes of
beads to see what you can come up with.
It's fun to experiment!
Make 7 or 8 of these motifs and join them
together for a bracelet!
And the last tip, as always, HAVE FUN!!!!
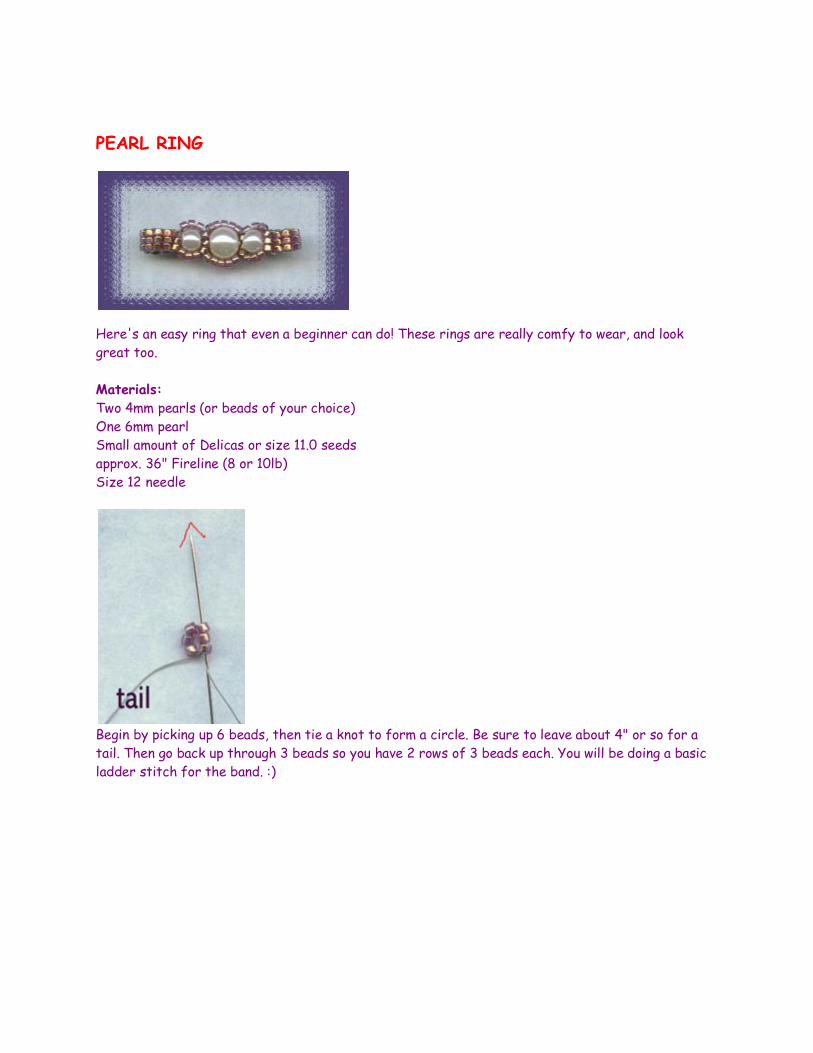
PEARL RING
Here's an easy ring that even a beginner can do! These rings are really comfy to wear, and look
great too.
Materials:
Two 4mm pearls (or beads of your choice)
One 6mm pearl
Small amount of Delicas or size 11.0 seeds
approx. 36" Fireline (8 or 10lb)
Size 12 needle
Begin by picking up 6 beads, then tie a knot to form a circle. Be sure to leave about 4" or so for a
tail. Then go back up through 3 beads so you have 2 rows of 3 beads each. You will be doing a basic
ladder stitch for the band. :)
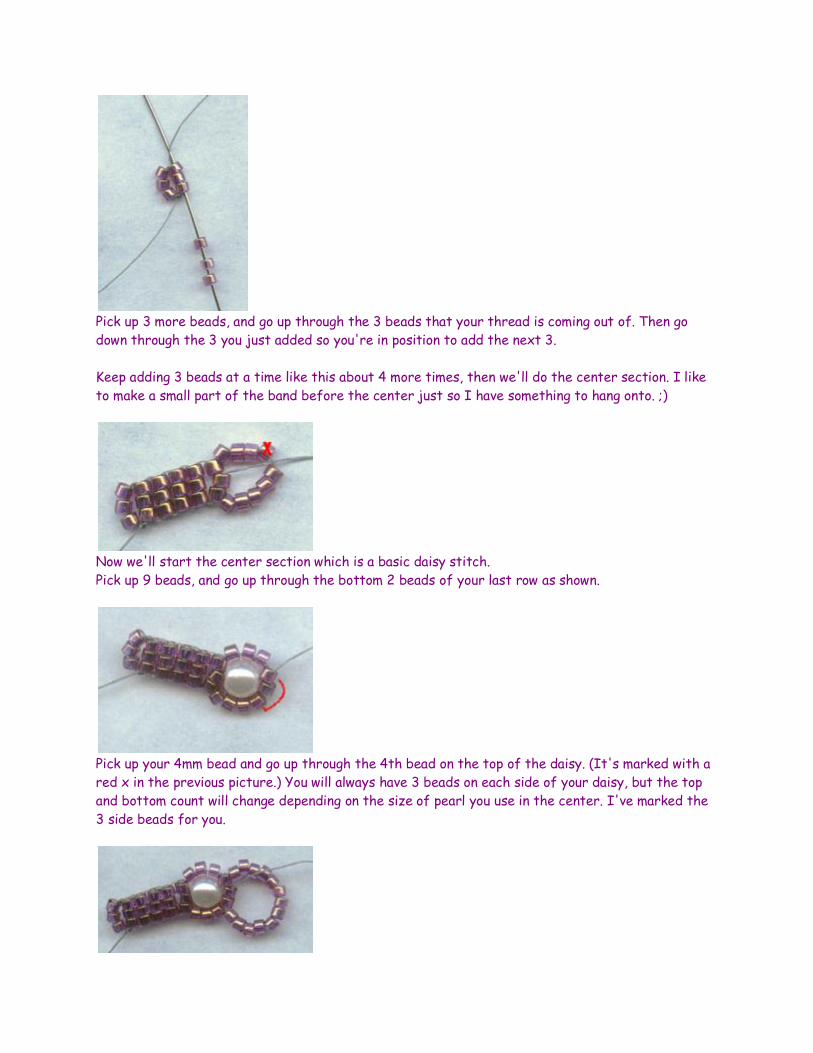
Pick up 3 more beads, and go up through the 3 beads that your thread is coming out of. Then go
down through the 3 you just added so you're in position to add the next 3.
Keep adding 3 beads at a time like this about 4 more times, then we'll do the center section. I like
to make a small part of the band before the center just so I have something to hang onto. ;)
Now we'll start the center section which is a basic daisy stitch.
Pick up 9 beads, and go up through the bottom 2 beads of your last row as shown.
Pick up your 4mm bead and go up through the 4th bead on the top of the daisy. (It's marked with a
red x in the previous picture.) You will always have 3 beads on each side of your daisy, but the top
and bottom count will change depending on the size of pearl you use in the center. I've marked the
3 side beads for you.
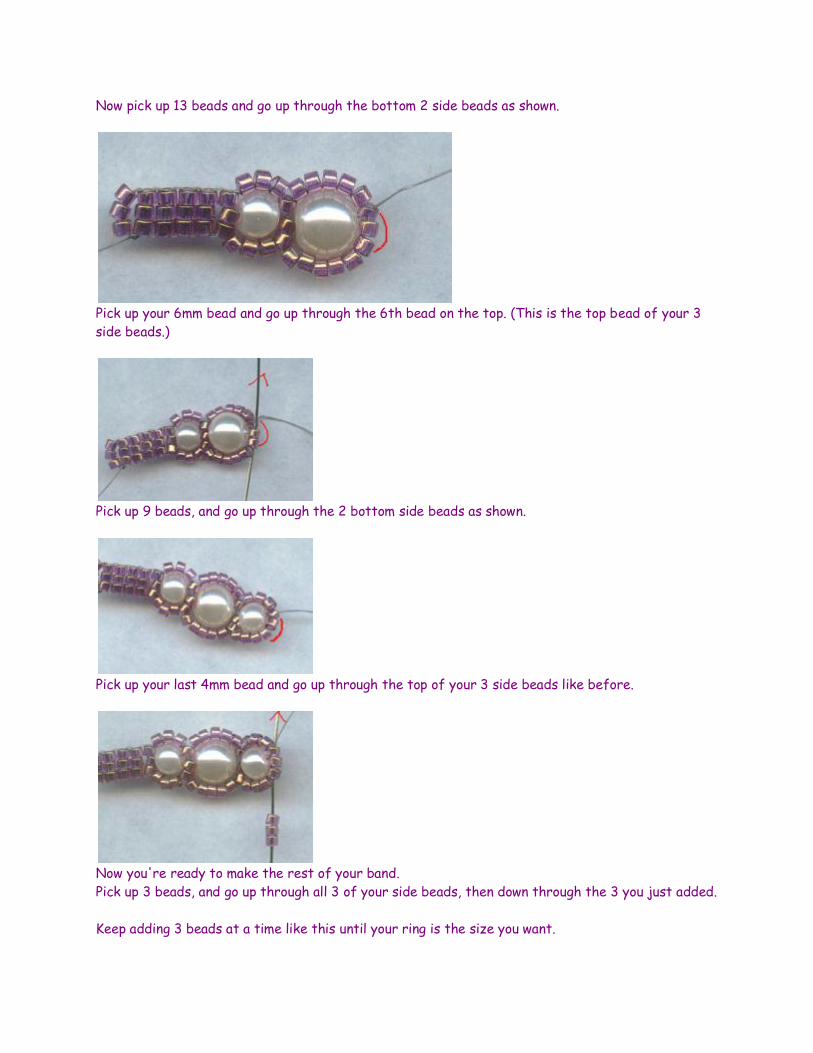
Now pick up 13 beads and go up through the bottom 2 side beads as shown.
Pick up your 6mm bead and go up through the 6th bead on the top. (This is the top bead of your 3
side beads.)
Pick up 9 beads, and go up through the 2 bottom side beads as shown.
Pick up your last 4mm bead and go up through the top of your 3 side beads like before.
Now you're ready to make the rest of your band.
Pick up 3 beads, and go up through all 3 of your side beads, then down through the 3 you just added.
Keep adding 3 beads at a time like this until your ring is the size you want.
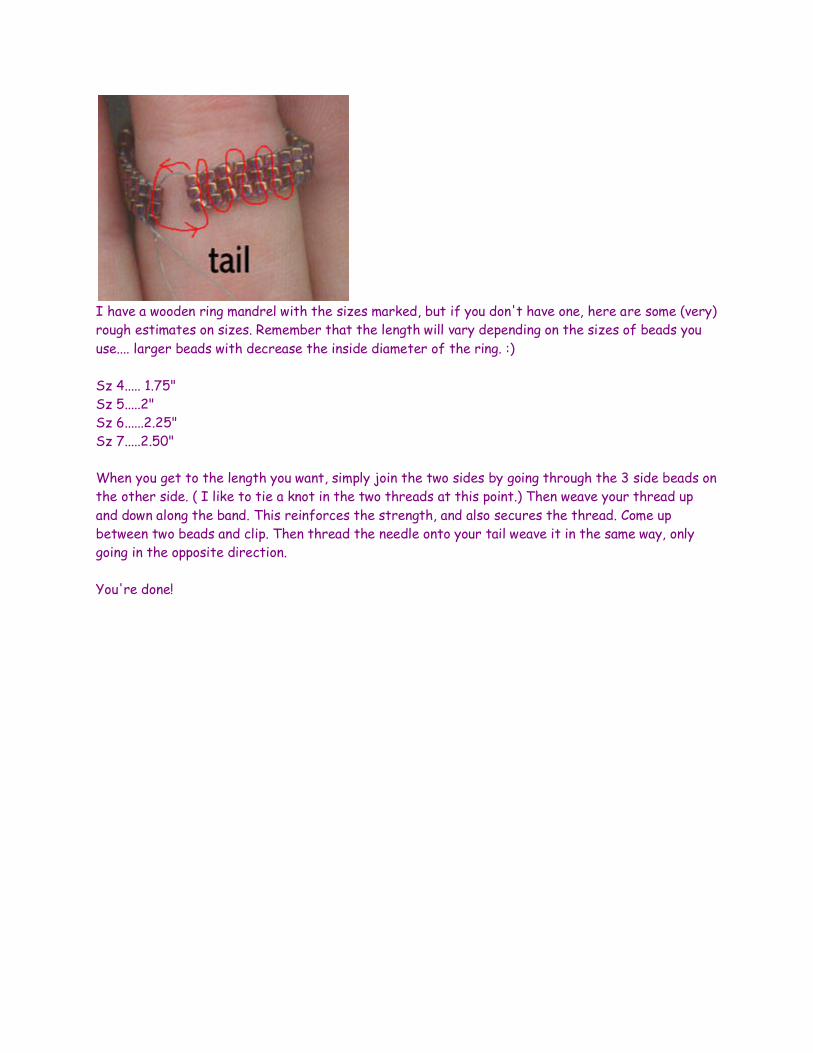
I have a wooden ring mandrel with the sizes marked, but if you don't have one, here are some (very)
rough estimates on sizes. Remember that the length will vary depending on the sizes of beads you
use.... larger beads with decrease the inside diameter of the ring. :)
Sz 4..... 1.75"
Sz 5.....2"
Sz 6......2.25"
Sz 7.....2.50"
When you get to the length you want, simply join the two sides by going through the 3 side beads on
the other side. ( I like to tie a knot in the two threads at this point.) Then weave your thread up
and down along the band. This reinforces the strength, and also secures the thread. Come up
between two beads and clip. Then thread the needle onto your tail weave it in the same way, only
going in the opposite direction.
You're done!

R.A.W. CHAIN
Making the R.A.W. chain/strap for the
necklace is really easy!
Begin on one side, and pick up five size 11s,
one 4mm, and five 11s.
Making a circle, go back up through 2 side
beads as shown.
Needle through the next 5 seeds and the
4mm. The 4mm bead will be your 'connecting'
bead. Now you're in position to start the next
round.
*Pick up five 11s, one 4mm, and five 11s.
Making a circle, go back up through the side
4mm from the last round, and needle through
the next five 11s until you're coming out of
the new 4mm you just added.
Repeat from * to the end.
Easy huh?
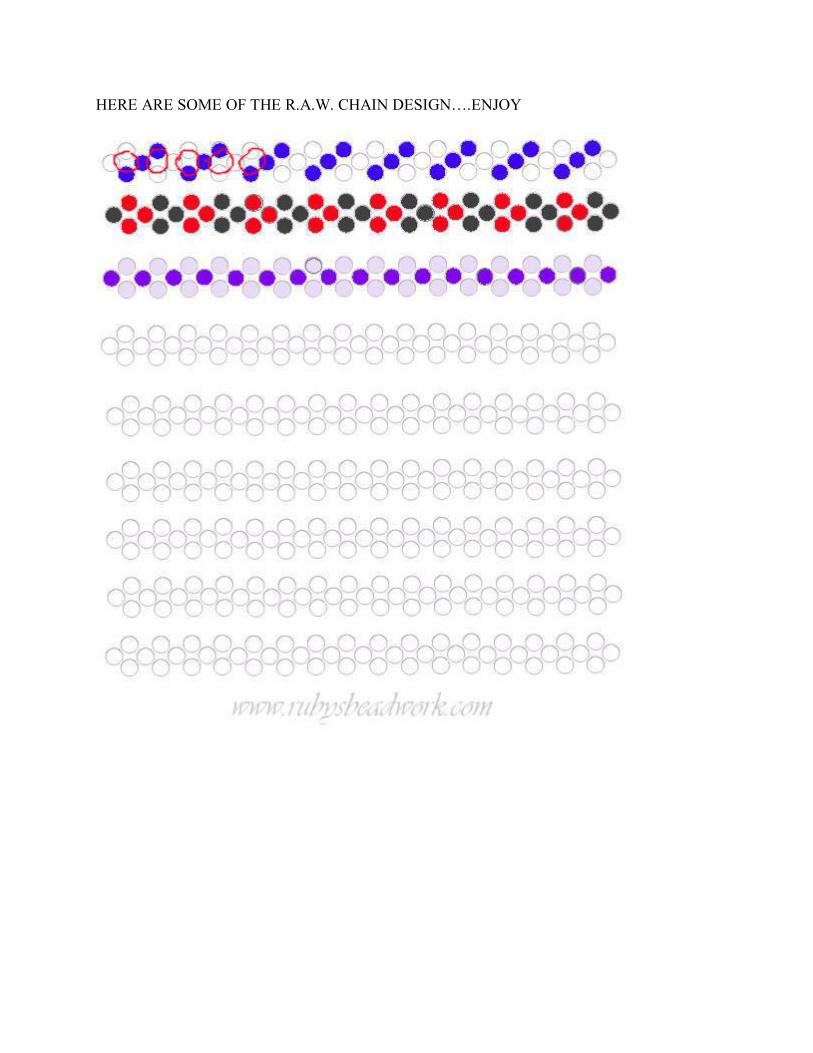
HERE ARE SOME OF THE R.A.W. CHAIN DESIGN….ENJOY
ROSE WIRE RING
You Will Need
o 2Bead(s) o Pliers o Jewelry Wire
Instructions
1. 1
1.2
2. 3
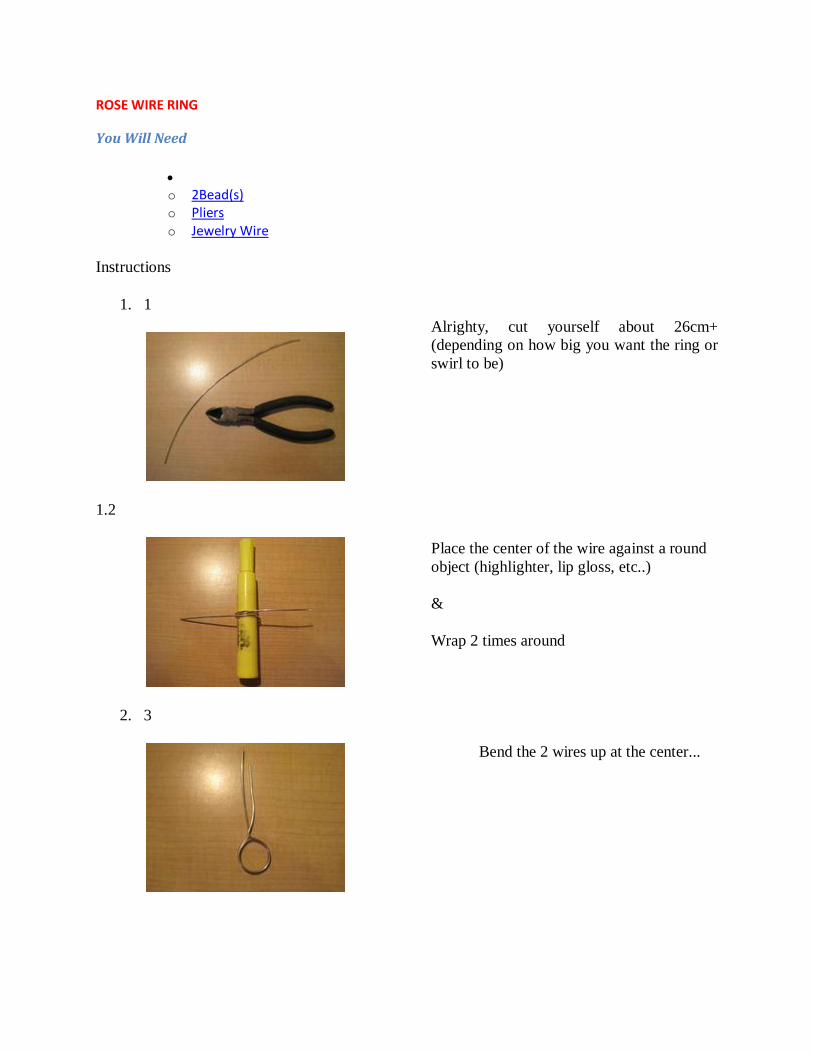
Alrighty, cut yourself about 26cm+
(depending on how big you want the ring or
swirl to be)
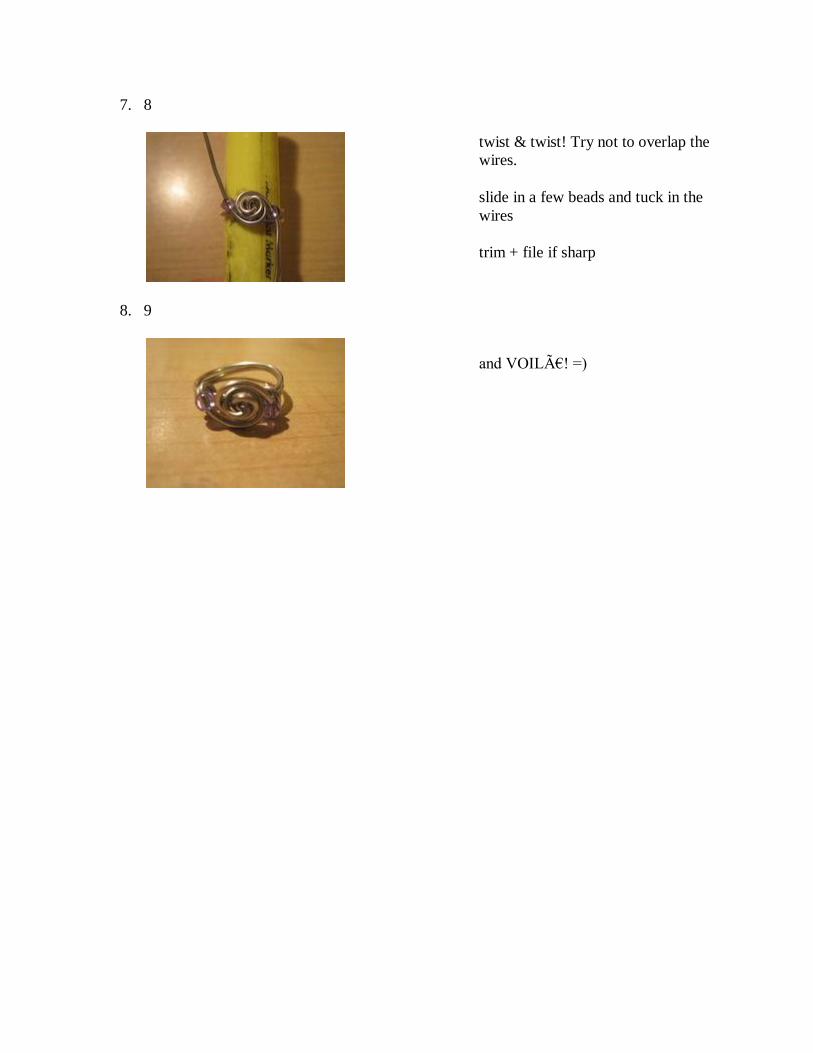
Place the center of the wire against a round
object (highlighter, lip gloss, etc..)
&
Wrap 2 times around
Bend the 2 wires up at the center...

3. 4
4. 5
5. 6
6. 7
Then down...
Twist the wires to its opposite side,
so that they interlock.
The first twist is the tricky part
because it determines how smooth
and compact the swirl will be..
I find that it helps to put your thumb
over the center for your first twist
(I forgot to do that here so that's why
it's loose)
If it's loose, use pliers to tighten it up
(remember to put wrap your pliers
with tape if it's sharp)
7. 8
8. 9
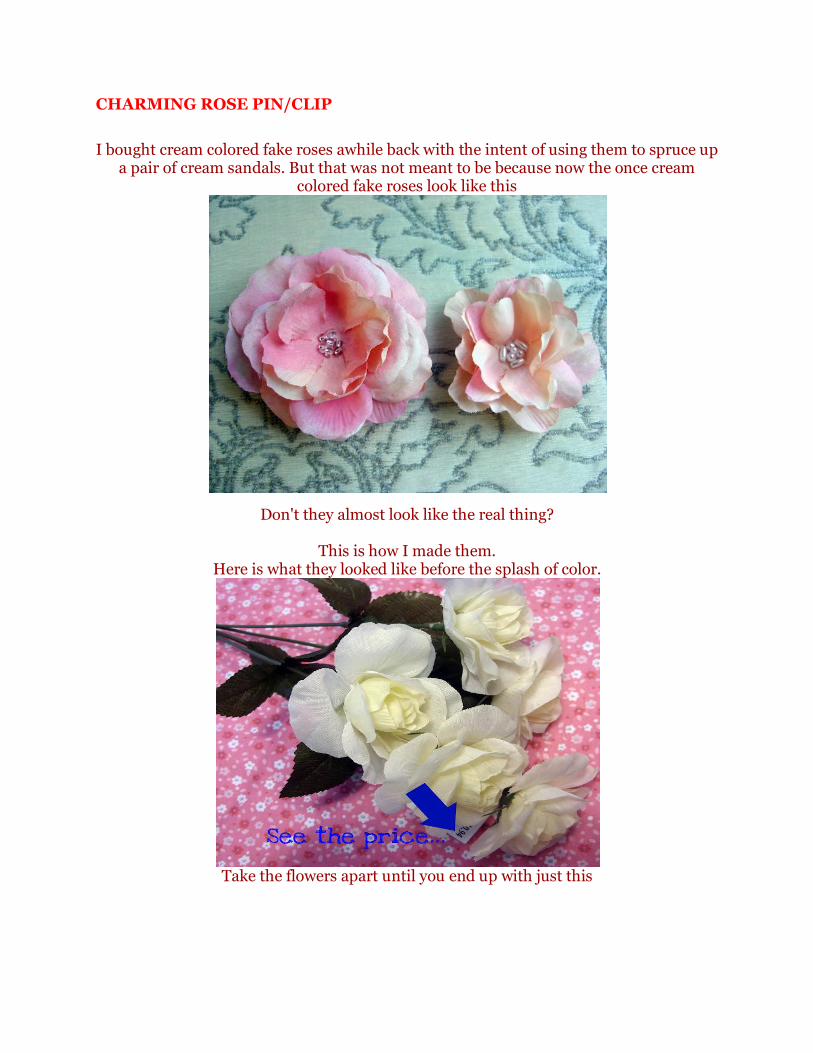
twist & twist! Try not to overlap the
wires.
slide in a few beads and tuck in the
wires
trim + file if sharp
and VOILÀ! =)
CHARMING ROSE PIN/CLIP
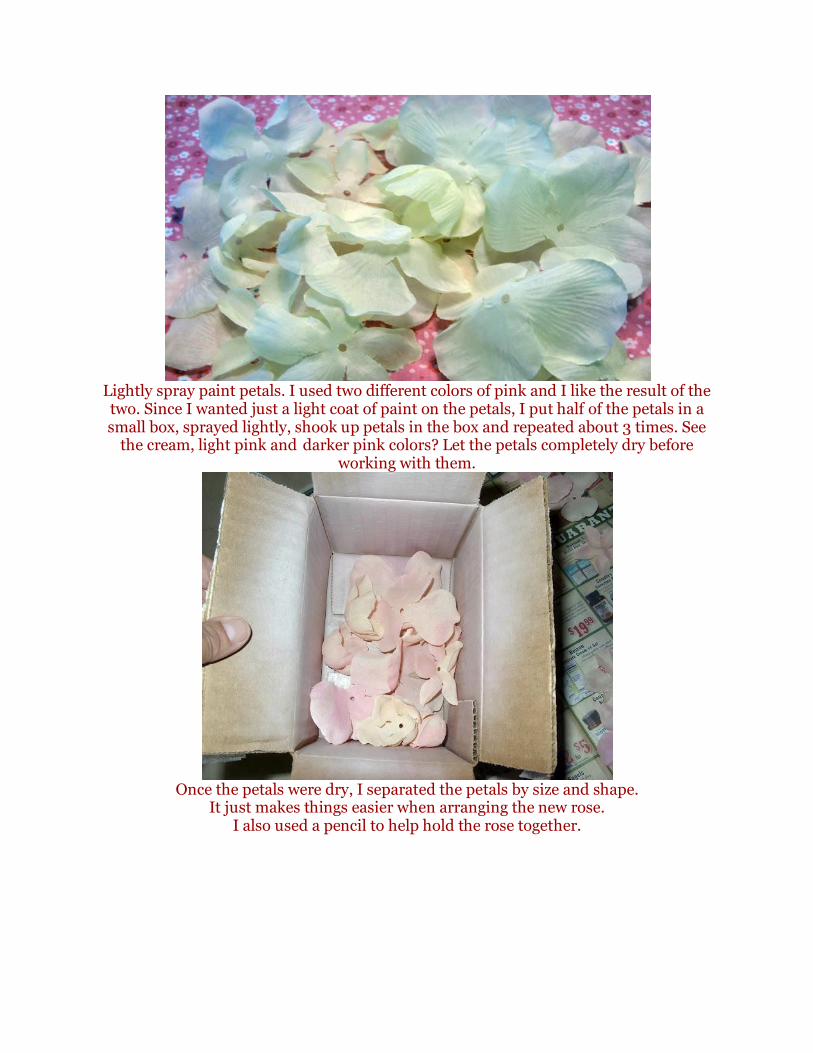
I bought cream colored fake roses awhile back with the intent of using them to spruce up
a pair of cream sandals. But that was not meant to be because now the once cream colored fake roses look like this
Don't they almost look like the real thing?
This is how I made them. Here is what they looked like before the splash of color.
Take the flowers apart until you end up with just this
Lightly spray paint petals. I used two different colors of pink and I like the result of the two. Since I wanted just a light coat of paint on the petals, I put half of the petals in a small box, sprayed lightly, shook up petals in the box and repeated about 3 times. See
the cream, light pink and darker pink colors? Let the petals completely dry before working with them.
Once the petals were dry, I separated the petals by size and shape.
It just makes things easier when arranging the new rose. I also used a pencil to help hold the rose together.
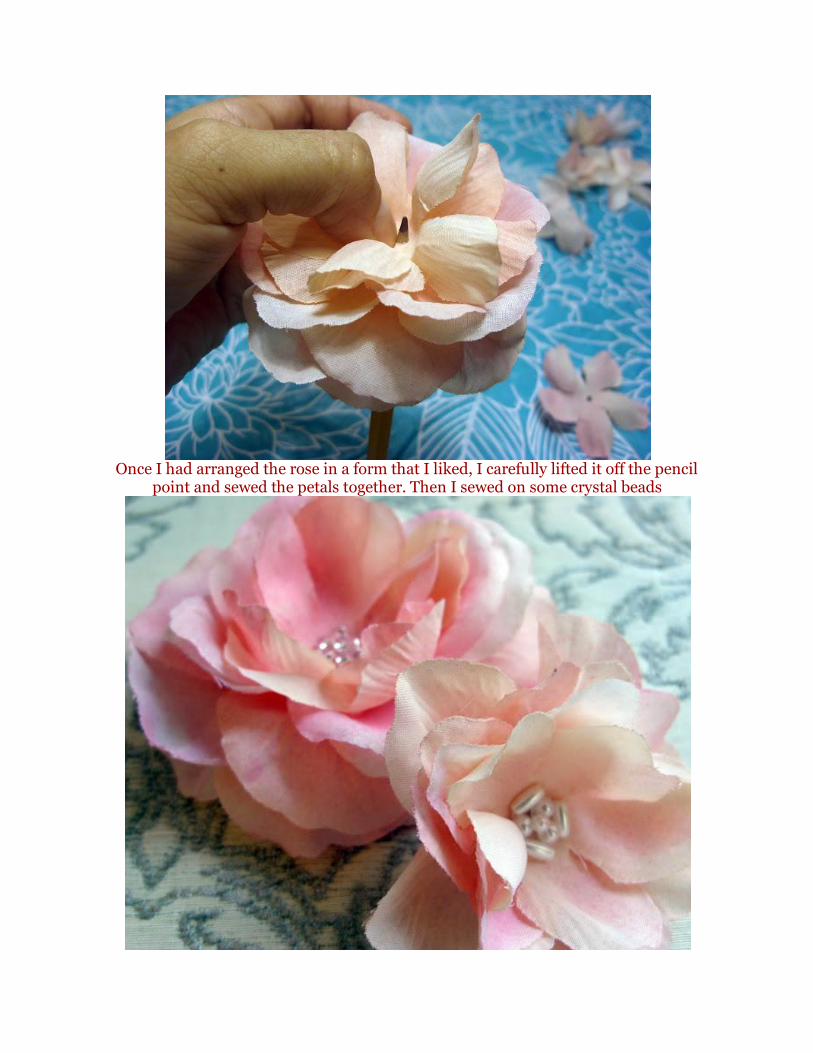
Once I had arranged the rose in a form that I liked, I carefully lifted it off the pencil
point and sewed the petals together. Then I sewed on some crystal beads
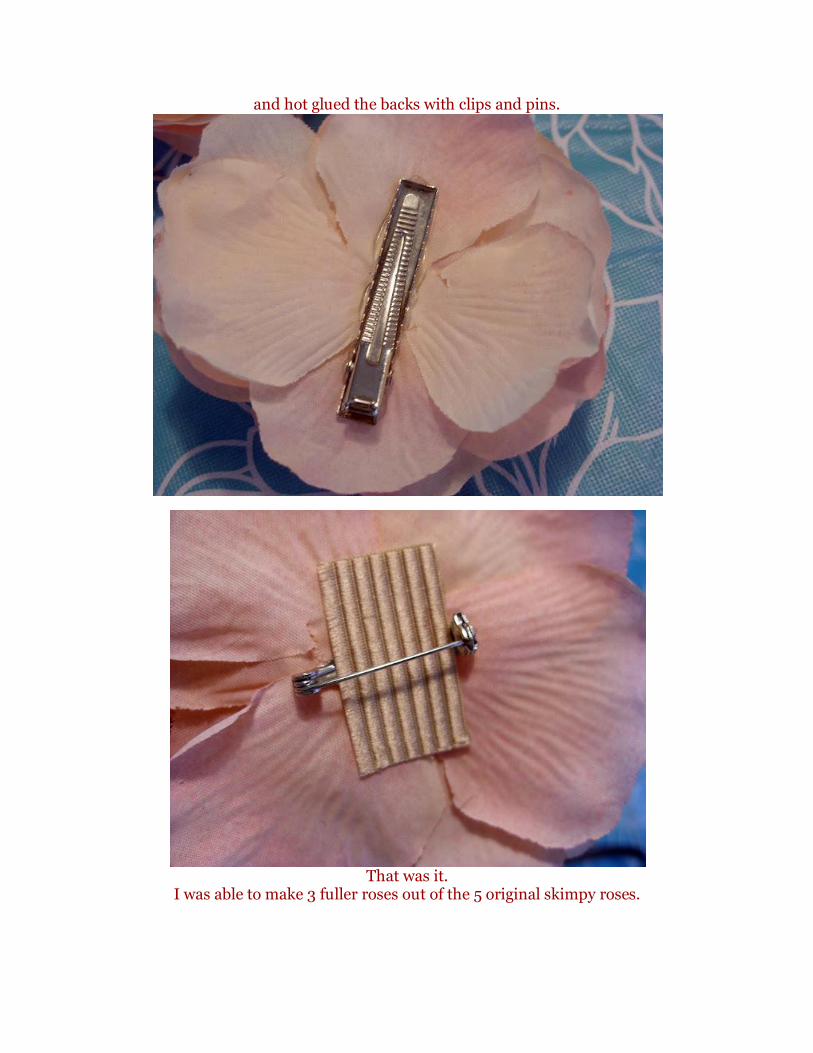
and hot glued the backs with clips and pins.
That was it.
I was able to make 3 fuller roses out of the 5 original skimpy roses.
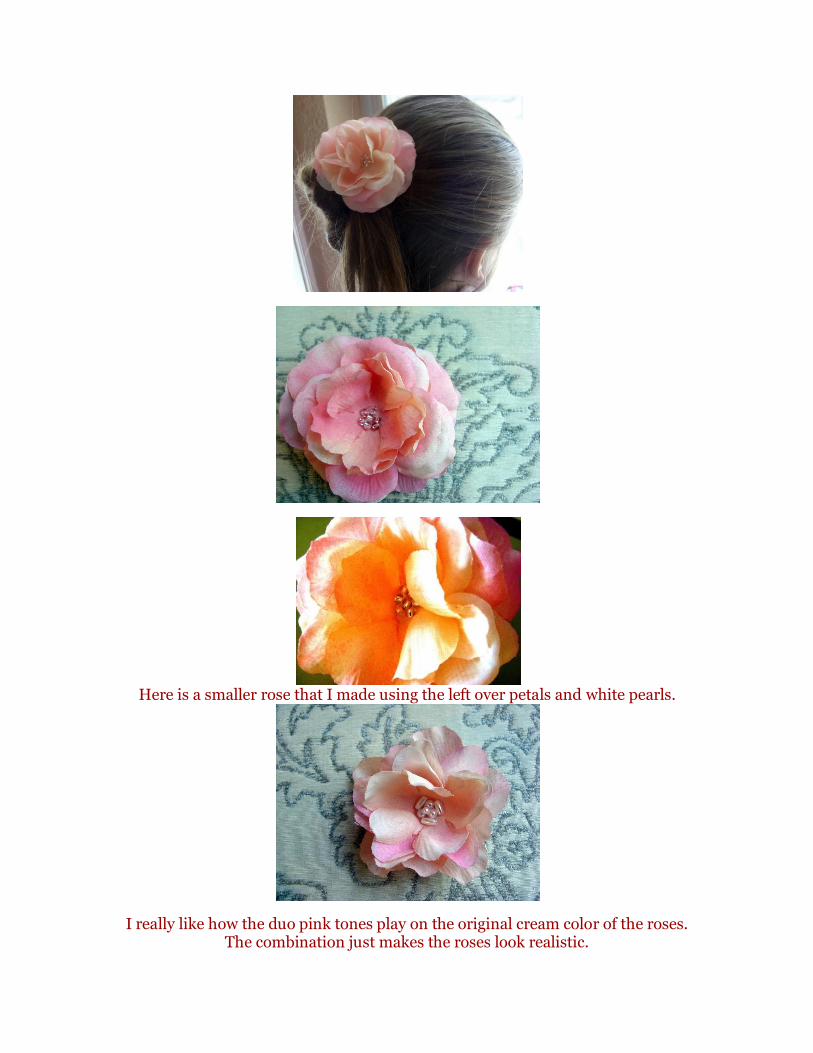
Here is a smaller rose that I made using the left over petals and white pearls.
I really like how the duo pink tones play on the original cream color of the roses. The combination just makes the roses look realistic.
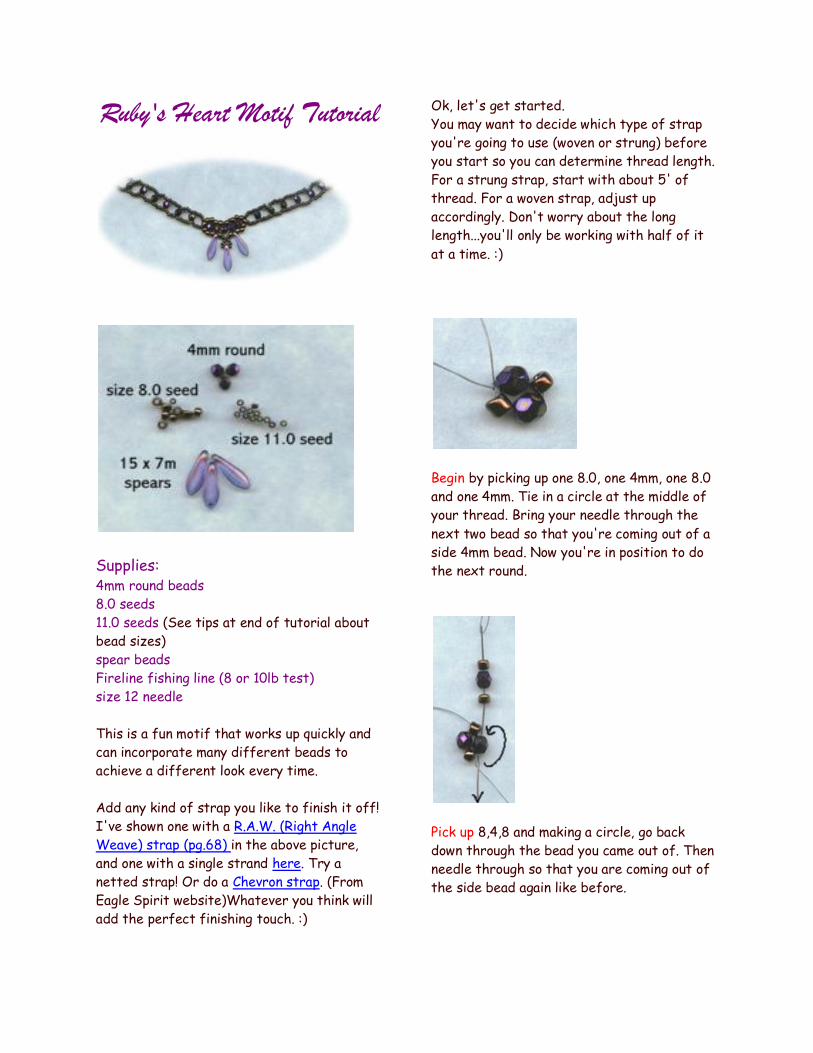
Ruby's Heart Motif Tutorial
Supplies: 4mm round beads
8.0 seeds
11.0 seeds (See tips at end of tutorial about
bead sizes)
spear beads
Fireline fishing line (8 or 10lb test)
size 12 needle
This is a fun motif that works up quickly and
can incorporate many different beads to
achieve a different look every time.
Add any kind of strap you like to finish it off!
I've shown one with a R.A.W. (Right Angle
Weave) strap (pg.68) in the above picture,
and one with a single strand here. Try a
netted strap! Or do a Chevron strap. (From
Eagle Spirit website)Whatever you think will
add the perfect finishing touch. :)
Ok, let's get started.
You may want to decide which type of strap
you're going to use (woven or strung) before
you start so you can determine thread length.
For a strung strap, start with about 5' of
thread. For a woven strap, adjust up
accordingly. Don't worry about the long
length...you'll only be working with half of it
at a time. :)
Begin by picking up one 8.0, one 4mm, one 8.0
and one 4mm. Tie in a circle at the middle of
your thread. Bring your needle through the
next two bead so that you're coming out of a
side 4mm bead. Now you're in position to do
the next round.
Pick up 8,4,8 and making a circle, go back
down through the bead you came out of. Then
needle through so that you are coming out of
the side bead again like before.
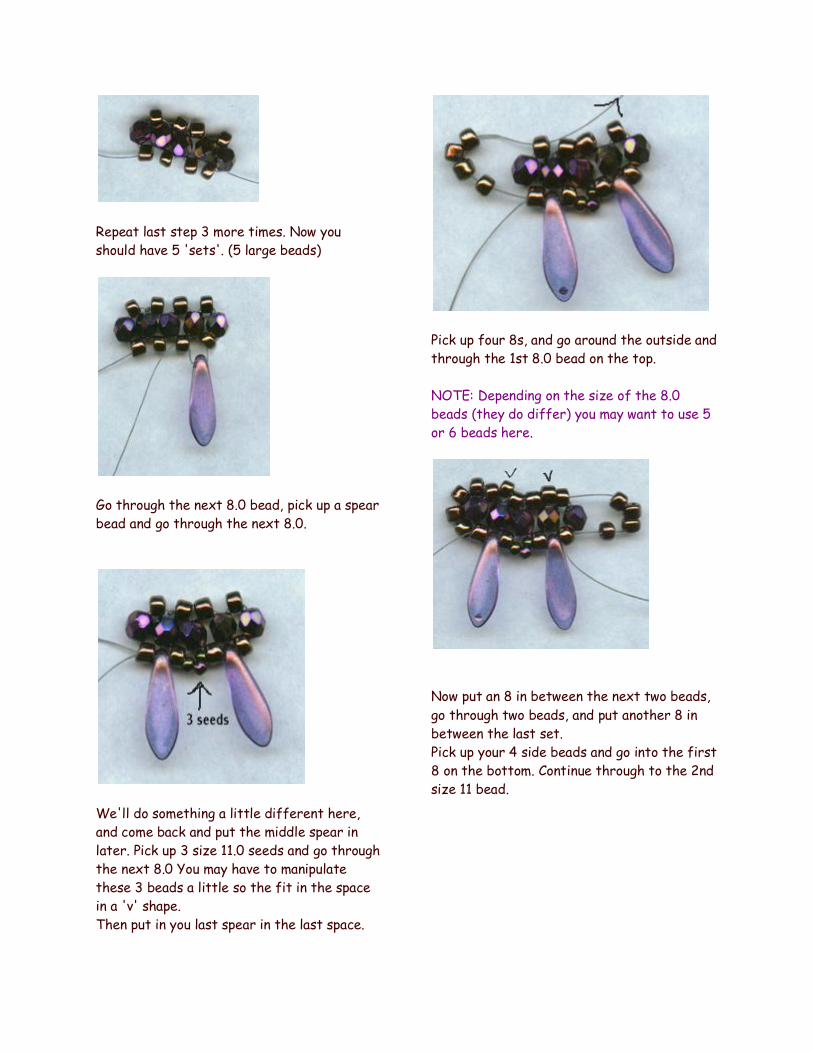
Repeat last step 3 more times. Now you
should have 5 'sets'. (5 large beads)
Go through the next 8.0 bead, pick up a spear
bead and go through the next 8.0.
We'll do something a little different here,
and come back and put the middle spear in
later. Pick up 3 size 11.0 seeds and go through
the next 8.0 You may have to manipulate
these 3 beads a little so the fit in the space
in a 'v' shape.
Then put in you last spear in the last space.
Pick up four 8s, and go around the outside and
through the 1st 8.0 bead on the top.
NOTE: Depending on the size of the 8.0
beads (they do differ) you may want to use 5
or 6 beads here.
Now put an 8 in between the next two beads,
go through two beads, and put another 8 in
between the last set.
Pick up your 4 side beads and go into the first
8 on the bottom. Continue through to the 2nd
size 11 bead.
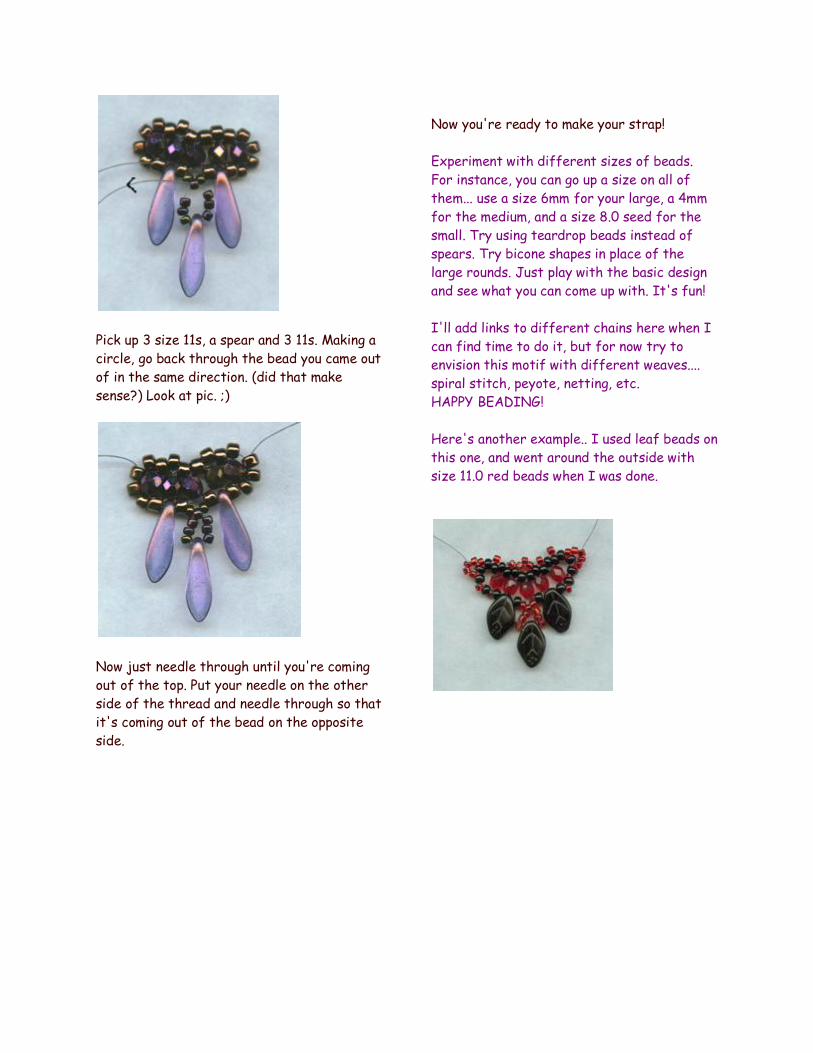
Pick up 3 size 11s, a spear and 3 11s. Making a
circle, go back through the bead you came out
of in the same direction. (did that make
sense?) Look at pic. ;)
Now just needle through until you're coming
out of the top. Put your needle on the other
side of the thread and needle through so that
it's coming out of the bead on the opposite
side.
Now you're ready to make your strap!
Experiment with different sizes of beads.
For instance, you can go up a size on all of
them... use a size 6mm for your large, a 4mm
for the medium, and a size 8.0 seed for the
small. Try using teardrop beads instead of
spears. Try bicone shapes in place of the
large rounds. Just play with the basic design
and see what you can come up with. It's fun!
I'll add links to different chains here when I
can find time to do it, but for now try to
envision this motif with different weaves....
spiral stitch, peyote, netting, etc.
HAPPY BEADING!
Here's another example.. I used leaf beads on
this one, and went around the outside with
size 11.0 red beads when I was done.
SPIRAL STITCH
The spiral stitch is one of the most versatile stitches I've
found. There are so many variations you can use that make
it look different every time! It's also a very easy stitch to
learn, and works up into a nice strong piece. Wear it plain,
or embellish to your heart's content! Check the links at the
bottom of the page to learn more, and to see some
wonderful examples of this nice stitch.
Thanks to Jenn to requesting this tutorial. :)
Materials:
Nymo size B or D (depending on the size bead you're
using. We'll be using size 8.0 beads with size D Nymo for
this bracelet)
Small needle (you will be going through each bead in the
core 4 times, so you need a nice small needle. A size 10
works good with size 8.0 beads, but you'll probably want a
size 12 needle if you're using anything smaller) 2 colors of size 8.0 beads Clasp of your choice.
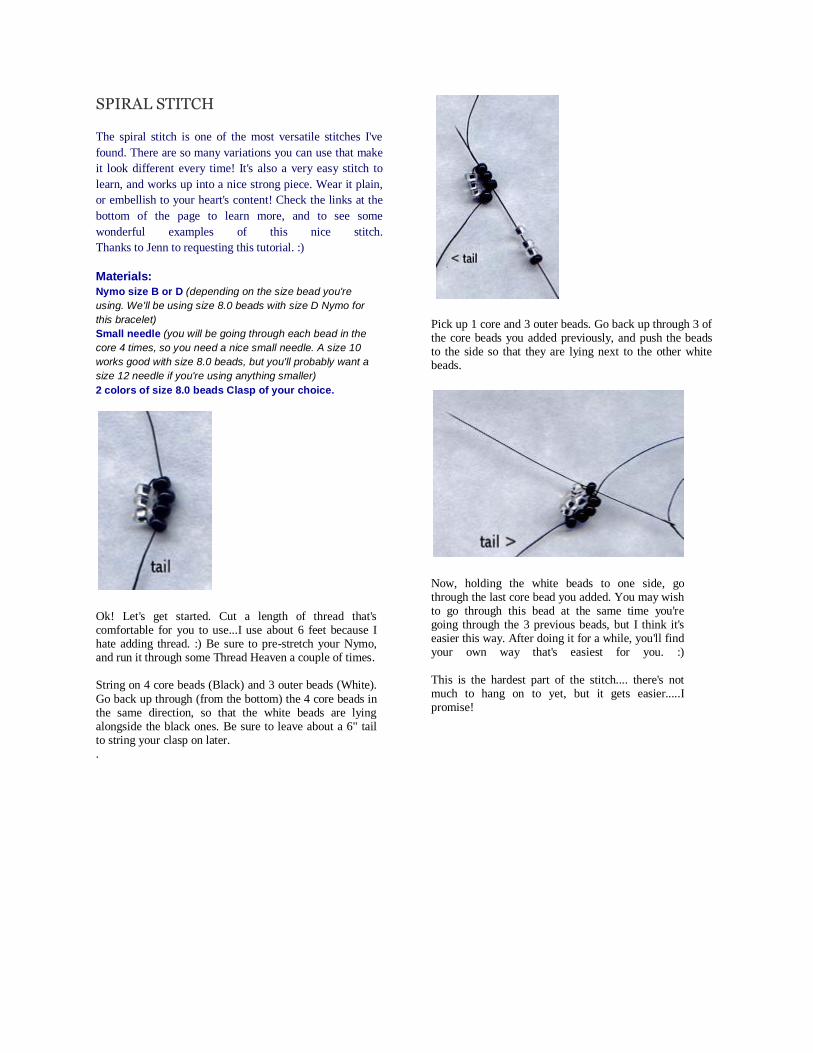
Ok! Let's get started. Cut a length of thread that's comfortable for you to use...I use about 6 feet because I hate adding thread. :) Be sure to pre-stretch your Nymo, and run it through some Thread Heaven a couple of times. String on 4 core beads (Black) and 3 outer beads (White).
Go back up through (from the bottom) the 4 core beads in the same direction, so that the white beads are lying alongside the black ones. Be sure to leave about a 6" tail to string your clasp on later. .
Pick up 1 core and 3 outer beads. Go back up through 3 of the core beads you added previously, and push the beads to the side so that they are lying next to the other white beads.
Now, holding the white beads to one side, go through the last core bead you added. You may wish to go through this bead at the same time you're going through the 3 previous beads, but I think it's easier this way. After doing it for a while, you'll find your own way that's easiest for you. :)
This is the hardest part of the stitch.... there's not much to hang on to yet, but it gets easier.....I promise!
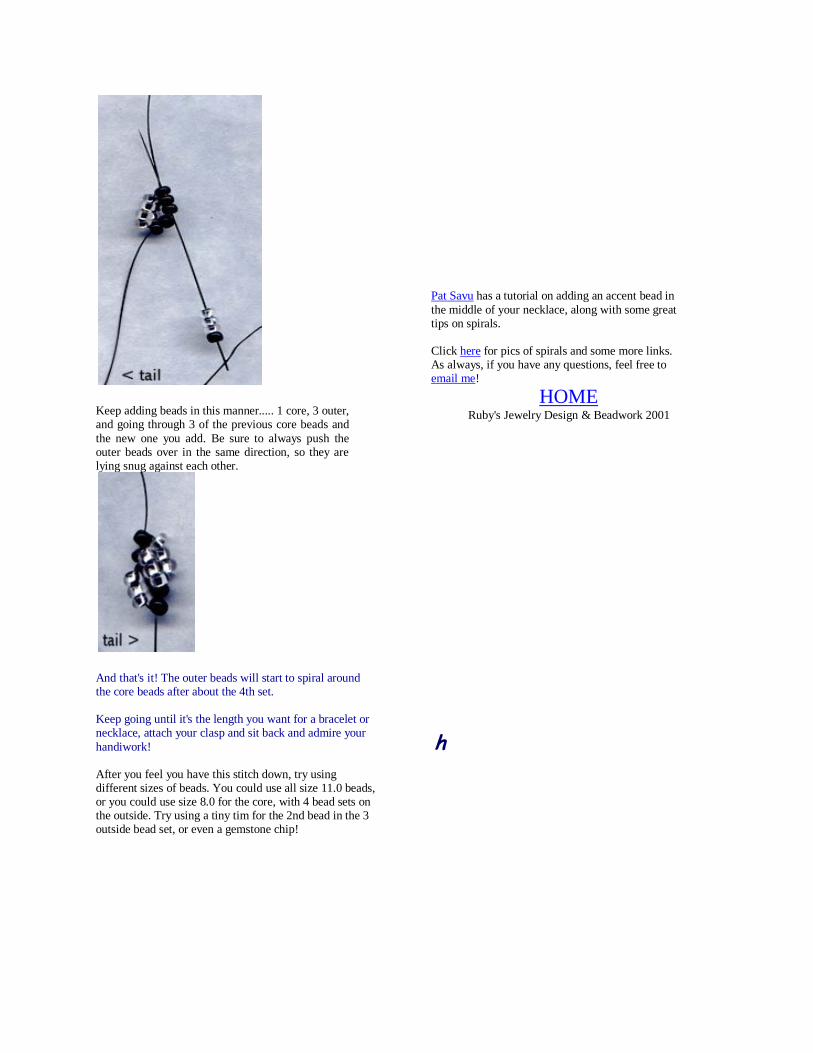
Keep adding beads in this manner..... 1 core, 3 outer, and going through 3 of the previous core beads and
the new one you add. Be sure to always push the outer beads over in the same direction, so they are lying snug against each other.
And that's it! The outer beads will start to spiral around the core beads after about the 4th set. Keep going until it's the length you want for a bracelet or necklace, attach your clasp and sit back and admire your
handiwork! After you feel you have this stitch down, try using different sizes of beads. You could use all size 11.0 beads, or you could use size 8.0 for the core, with 4 bead sets on the outside. Try using a tiny tim for the 2nd bead in the 3 outside bead set, or even a gemstone chip!
Pat Savu has a tutorial on adding an accent bead in
the middle of your necklace, along with some great tips on spirals. Click here for pics of spirals and some more links. As always, if you have any questions, feel free to email me!
HOME
Ruby's Jewelry Design & Beadwork 2001
h
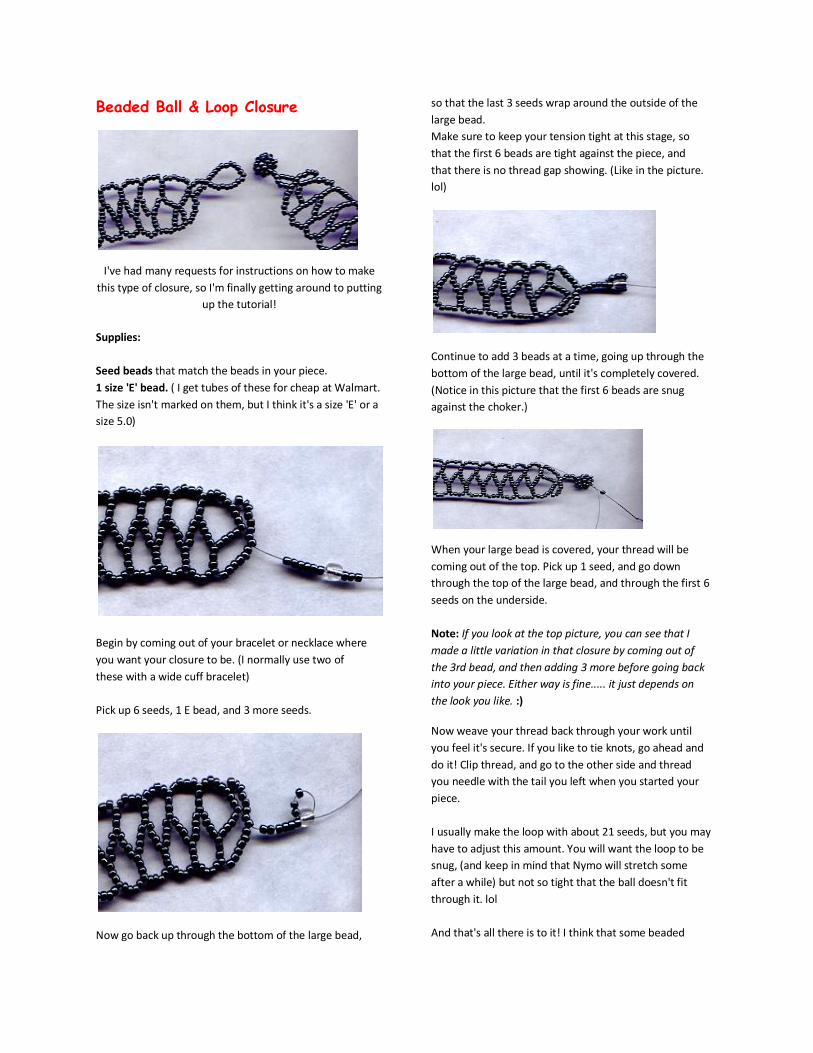
Beaded Ball & Loop Closure
I've had many requests for instructions on how to make
this type of closure, so I'm finally getting around to putting
up the tutorial!
Supplies:
Seed beads that match the beads in your piece.
1 size 'E' bead. ( I get tubes of these for cheap at Walmart.
The size isn't marked on them, but I think it's a size 'E' or a
size 5.0)
Begin by coming out of your bracelet or necklace where
you want your closure to be. (I normally use two of
these with a wide cuff bracelet)
Pick up 6 seeds, 1 E bead, and 3 more seeds.
Now go back up through the bottom of the large bead,
so that the last 3 seeds wrap around the outside of the
large bead.
Make sure to keep your tension tight at this stage, so
that the first 6 beads are tight against the piece, and
that there is no thread gap showing. (Like in the picture.
lol)
Continue to add 3 beads at a time, going up through the
bottom of the large bead, until it's completely covered.
(Notice in this picture that the first 6 beads are snug
against the choker.)
When your large bead is covered, your thread will be
coming out of the top. Pick up 1 seed, and go down
through the top of the large bead, and through the first 6
seeds on the underside.
Note: If you look at the top picture, you can see that I
made a little variation in that closure by coming out of
the 3rd bead, and then adding 3 more before going back
into your piece. Either way is fine..... it just depends on
the look you like. :)
Now weave your thread back through your work until
you feel it's secure. If you like to tie knots, go ahead and
do it! Clip thread, and go to the other side and thread
you needle with the tail you left when you started your
piece.
I usually make the loop with about 21 seeds, but you may
have to adjust this amount. You will want the loop to be
snug, (and keep in mind that Nymo will stretch some
after a while) but not so tight that the ball doesn't fit
through it. lol
And that's all there is to it! I think that some beaded

pieces look fabulous with a metal clasp, but there are
pieces that really look much better with a beaded ball
that matches. You're the designer....you be the judge of
what looks best with your work. :)
Happy Beading!
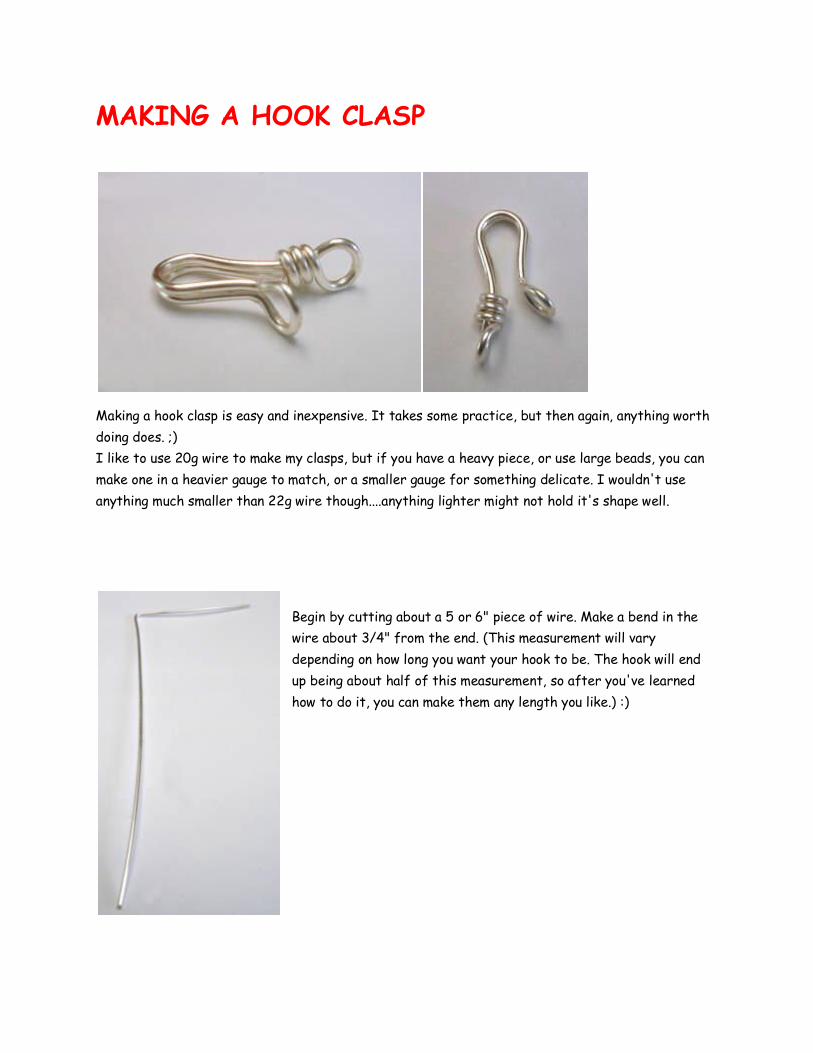
MAKING A HOOK CLASP
Making a hook clasp is easy and inexpensive. It takes some practice, but then again, anything worth
doing does. ;)
I like to use 20g wire to make my clasps, but if you have a heavy piece, or use large beads, you can
make one in a heavier gauge to match, or a smaller gauge for something delicate. I wouldn't use
anything much smaller than 22g wire though....anything lighter might not hold it's shape well.
Begin by cutting about a 5 or 6" piece of wire. Make a bend in the
wire about 3/4" from the end. (This measurement will vary
depending on how long you want your hook to be. The hook will end
up being about half of this measurement, so after you've learned
how to do it, you can make them any length you like.) :)
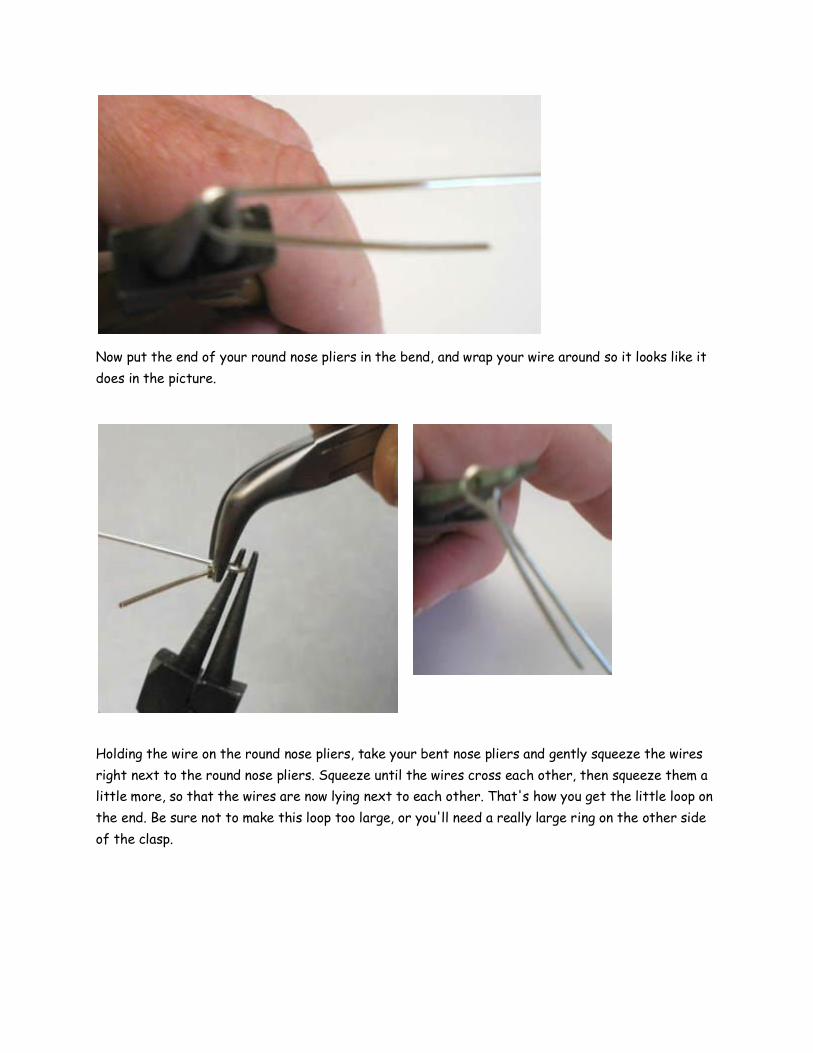
Now put the end of your round nose pliers in the bend, and wrap your wire around so it looks like it
does in the picture.
Holding the wire on the round nose pliers, take your bent nose pliers and gently squeeze the wires
right next to the round nose pliers. Squeeze until the wires cross each other, then squeeze them a
little more, so that the wires are now lying next to each other. That's how you get the little loop on
the end. Be sure not to make this loop too large, or you'll need a really large ring on the other side
of the clasp.
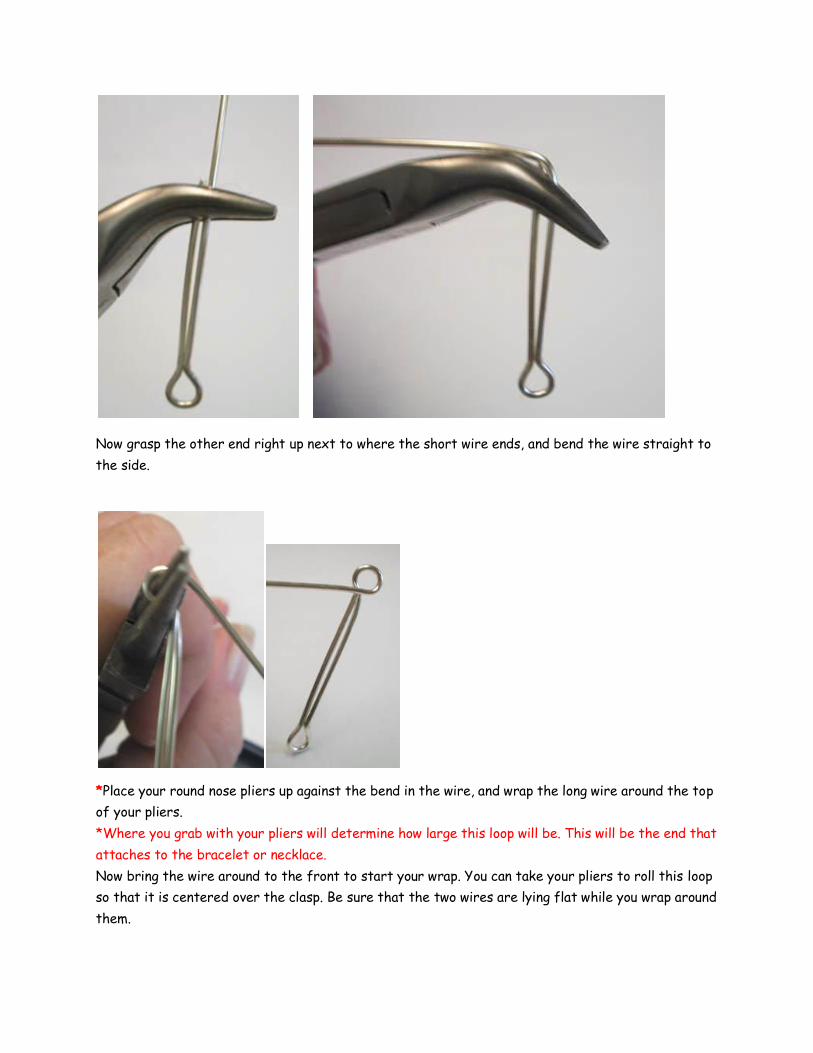
Now grasp the other end right up next to where the short wire ends, and bend the wire straight to
the side.
*Place your round nose pliers up against the bend in the wire, and wrap the long wire around the top
of your pliers.
*Where you grab with your pliers will determine how large this loop will be. This will be the end that
attaches to the bracelet or necklace.
Now bring the wire around to the front to start your wrap. You can take your pliers to roll this loop
so that it is centered over the clasp. Be sure that the two wires are lying flat while you wrap around
them.
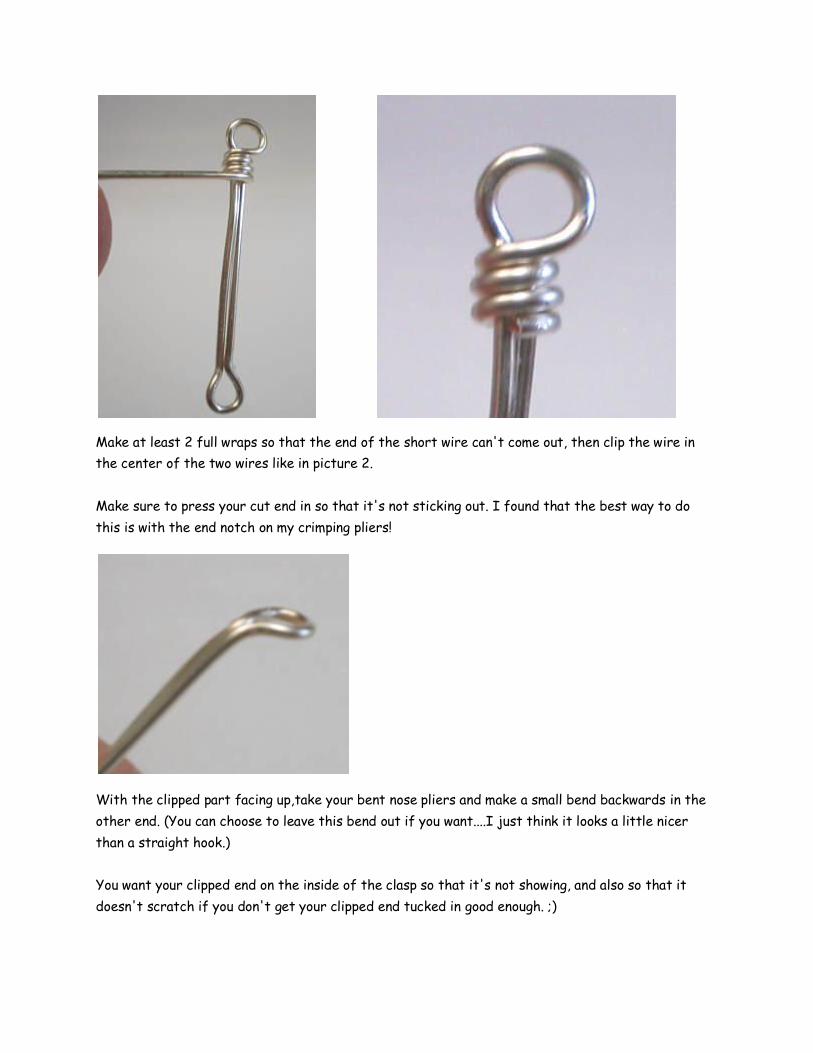
Make at least 2 full wraps so that the end of the short wire can't come out, then clip the wire in
the center of the two wires like in picture 2.
Make sure to press your cut end in so that it's not sticking out. I found that the best way to do
this is with the end notch on my crimping pliers!
With the clipped part facing up,take your bent nose pliers and make a small bend backwards in the
other end. (You can choose to leave this bend out if you want....I just think it looks a little nicer
than a straight hook.)
You want your clipped end on the inside of the clasp so that it's not showing, and also so that it
doesn't scratch if you don't get your clipped end tucked in good enough. ;)
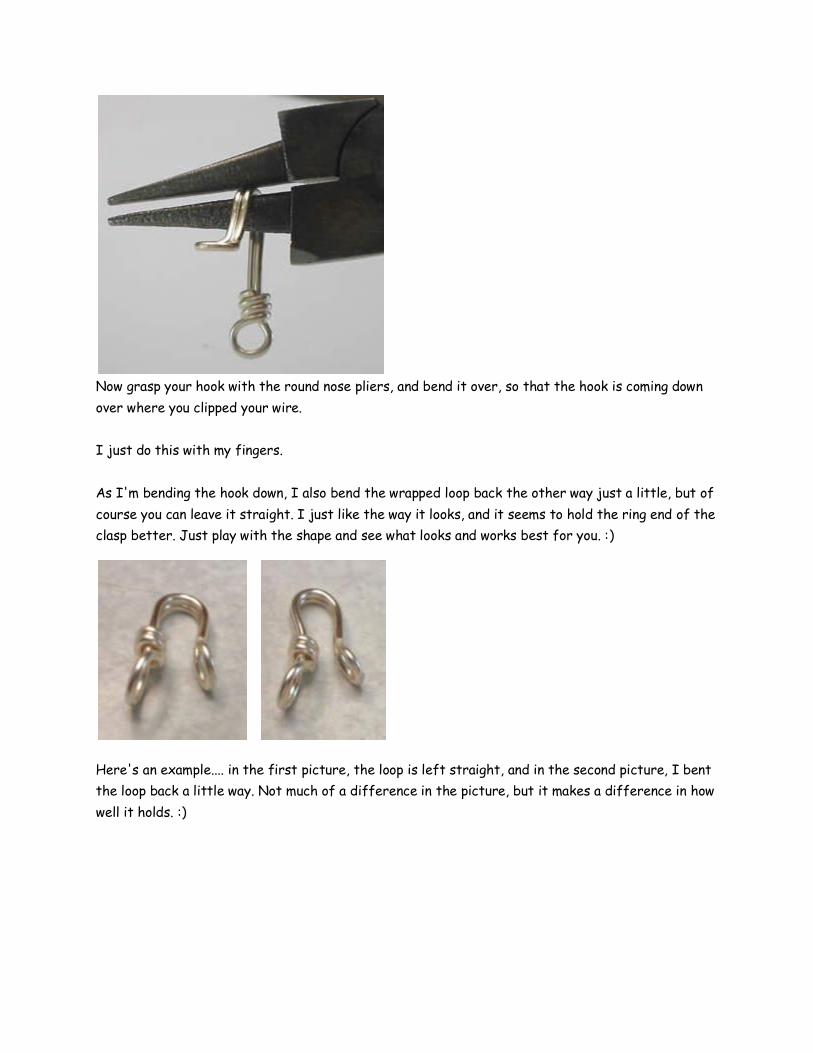
Now grasp your hook with the round nose pliers, and bend it over, so that the hook is coming down
over where you clipped your wire.
I just do this with my fingers.
As I'm bending the hook down, I also bend the wrapped loop back the other way just a little, but of
course you can leave it straight. I just like the way it looks, and it seems to hold the ring end of the
clasp better. Just play with the shape and see what looks and works best for you. :)
Here's an example.... in the first picture, the loop is left straight, and in the second picture, I bent
the loop back a little way. Not much of a difference in the picture, but it makes a difference in how
well it holds. :)
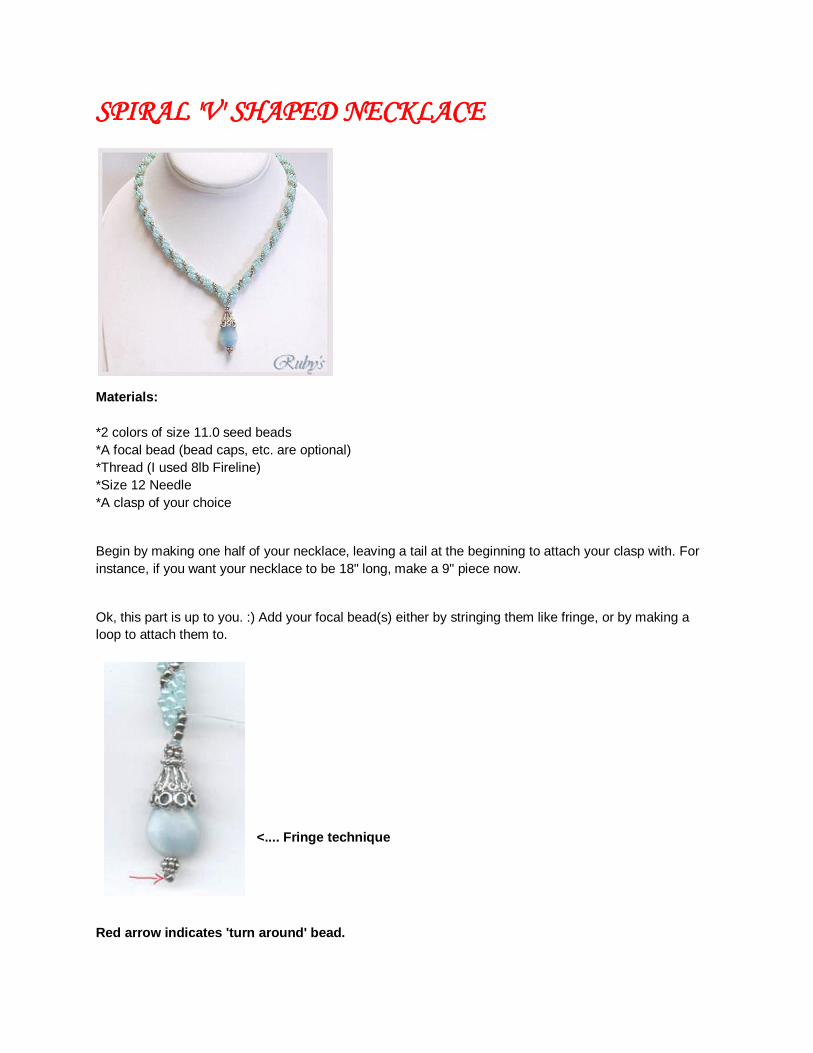
SPIRAL 'V' SHAPED NECKLACE
Materials:
*2 colors of size 11.0 seed beads
*A focal bead (bead caps, etc. are optional)
*Thread (I used 8lb Fireline)
*Size 12 Needle
*A clasp of your choice
Begin by making one half of your necklace, leaving a tail at the beginning to attach your clasp with. For
instance, if you want your necklace to be 18" long, make a 9" piece now.
Ok, this part is up to you. :) Add your focal bead(s) either by stringing them like fringe, or by making a
loop to attach them to.
<.... Fringe technique
Red arrow indicates 'turn around' bead.
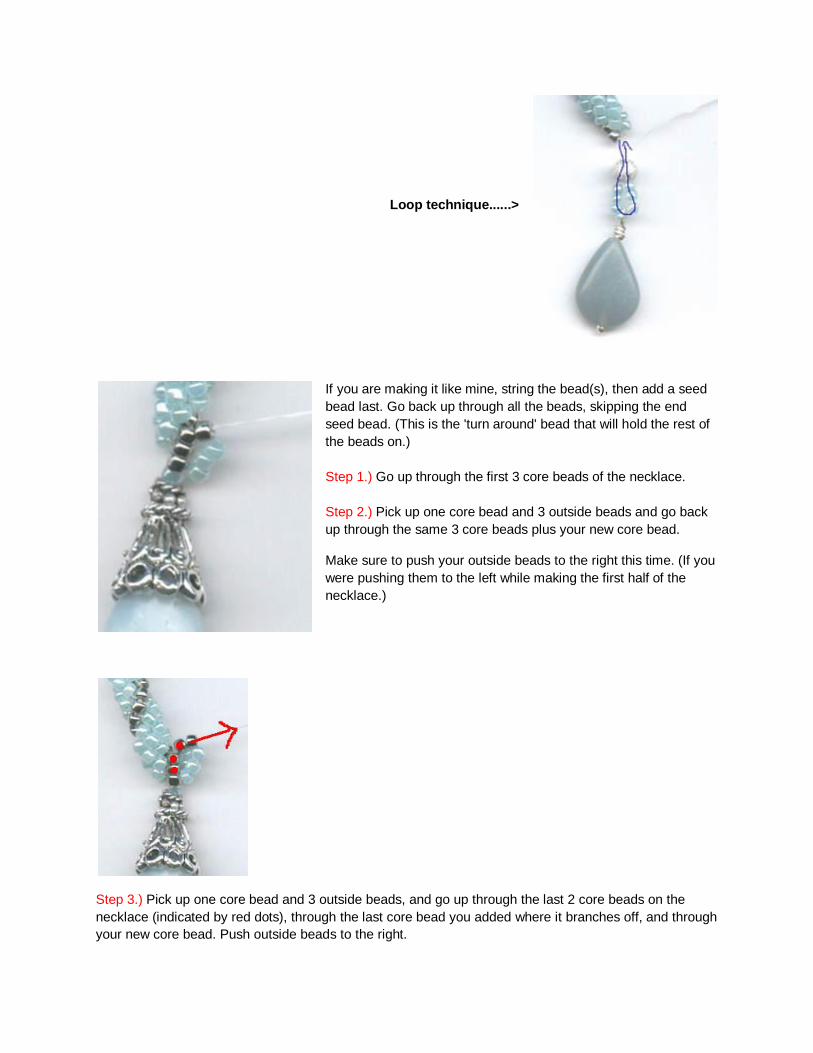
Loop technique......>
If you are making it like mine, string the bead(s), then add a seed
bead last. Go back up through all the beads, skipping the end
seed bead. (This is the 'turn around' bead that will hold the rest of
the beads on.)
Step 1.) Go up through the first 3 core beads of the necklace.
Step 2.) Pick up one core bead and 3 outside beads and go back
up through the same 3 core beads plus your new core bead.
Make sure to push your outside beads to the right this time. (If you
were pushing them to the left while making the first half of the
necklace.)
Step 3.) Pick up one core bead and 3 outside beads, and go up through the last 2 core beads on the
necklace (indicated by red dots), through the last core bead you added where it branches off, and through
your new core bead. Push outside beads to the right.
.
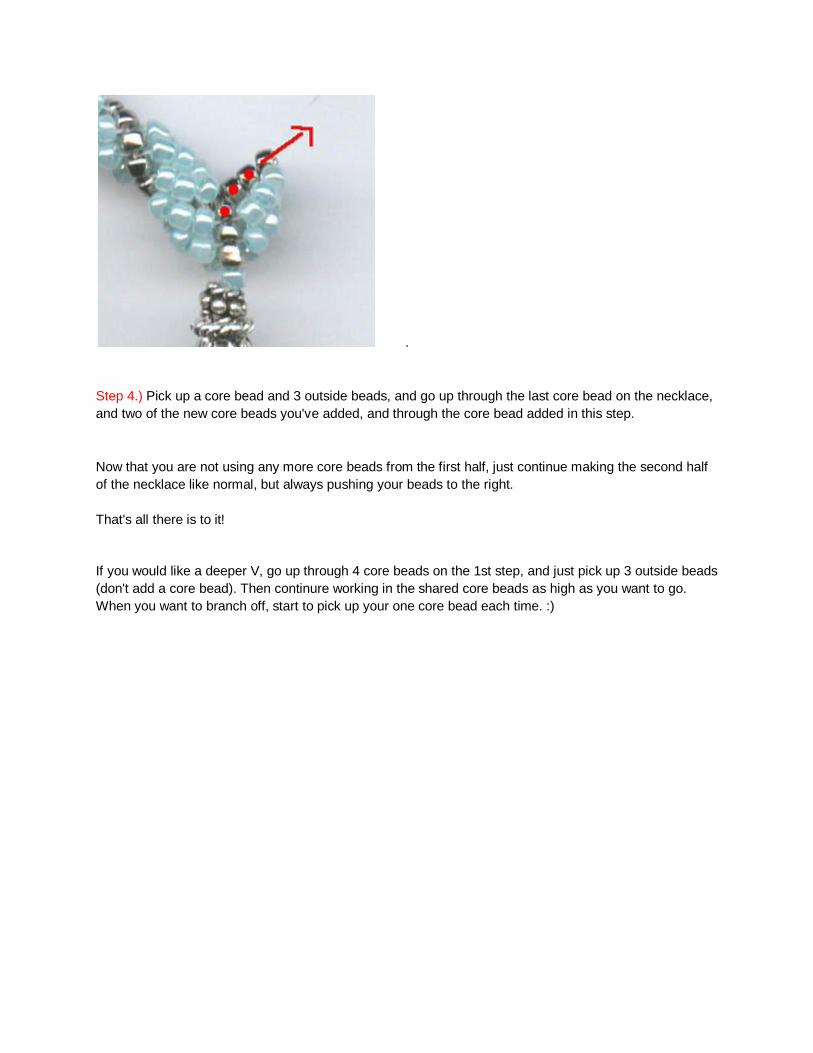
Step 4.) Pick up a core bead and 3 outside beads, and go up through the last core bead on the necklace,
and two of the new core beads you've added, and through the core bead added in this step.
Now that you are not using any more core beads from the first half, just continue making the second half
of the necklace like normal, but always pushing your beads to the right.
That's all there is to it!
If you would like a deeper V, go up through 4 core beads on the 1st step, and just pick up 3 outside beads
(don't add a core bead). Then continure working in the shared core beads as high as you want to go.
When you want to branch off, start to pick up your one core bead each time. :)
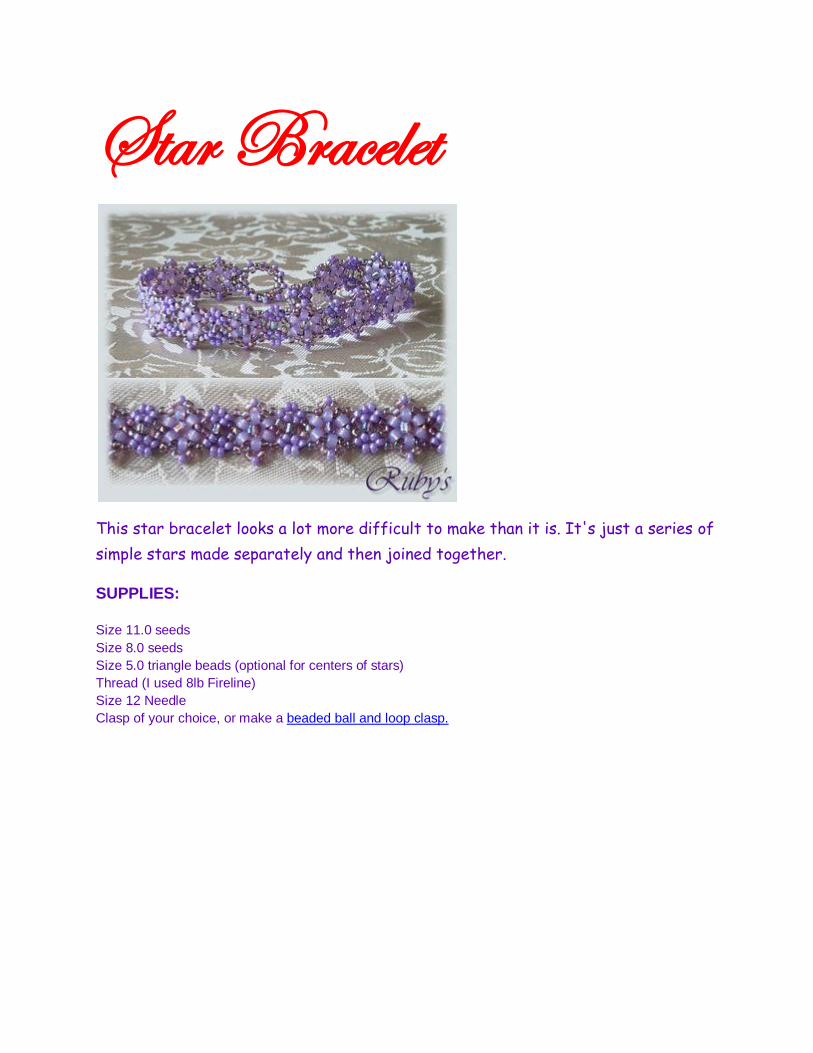
Star Bracelet
This star bracelet looks a lot more difficult to make than it is. It's just a series of
simple stars made separately and then joined together.
SUPPLIES:
Size 11.0 seeds
Size 8.0 seeds
Size 5.0 triangle beads (optional for centers of stars)
Thread (I used 8lb Fireline)
Size 12 Needle
Clasp of your choice, or make a beaded ball and loop clasp.
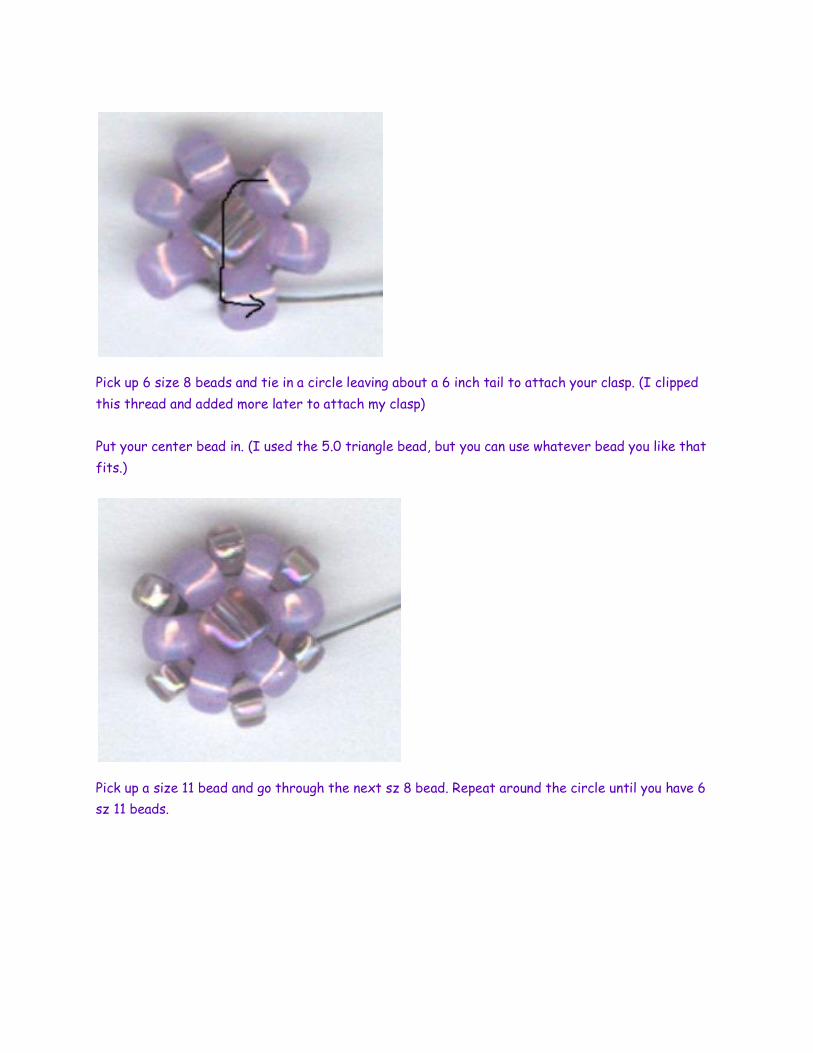
Pick up 6 size 8 beads and tie in a circle leaving about a 6 inch tail to attach your clasp. (I clipped
this thread and added more later to attach my clasp)
Put your center bead in. (I used the 5.0 triangle bead, but you can use whatever bead you like that
fits.)
Pick up a size 11 bead and go through the next sz 8 bead. Repeat around the circle until you have 6
sz 11 beads.
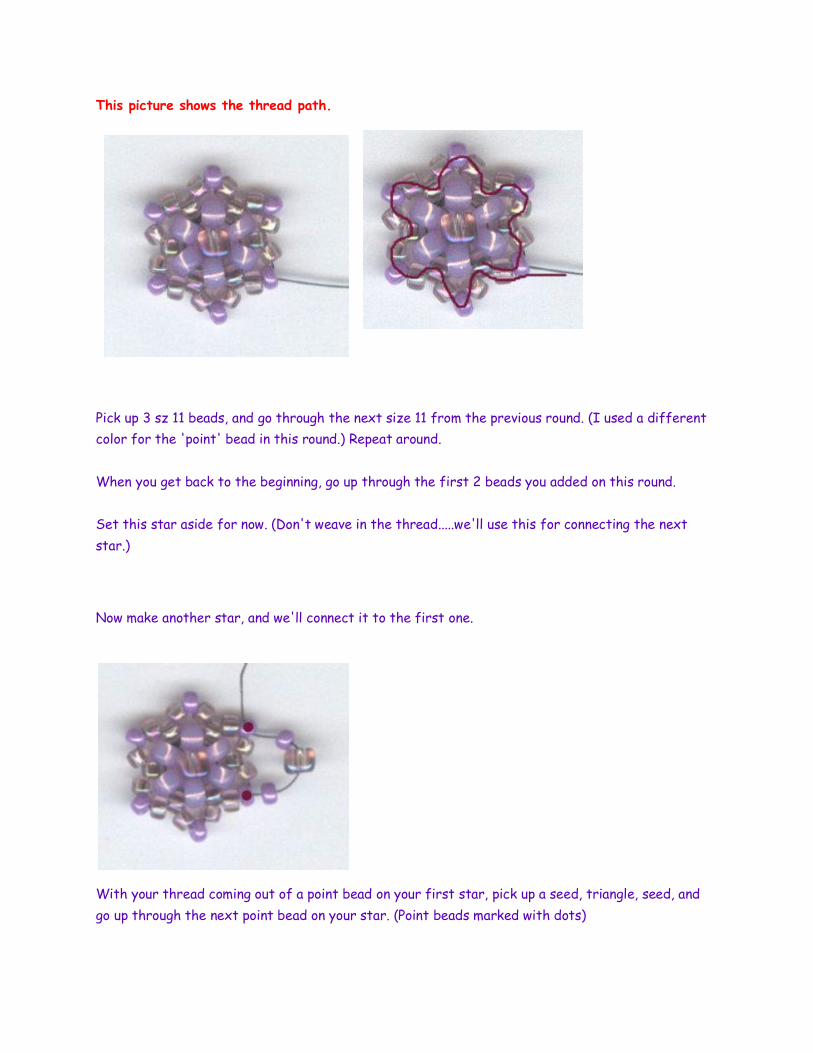
This picture shows the thread path.
Pick up 3 sz 11 beads, and go through the next size 11 from the previous round. (I used a different
color for the 'point' bead in this round.) Repeat around.
When you get back to the beginning, go up through the first 2 beads you added on this round.
Set this star aside for now. (Don't weave in the thread.....we'll use this for connecting the next
star.)
Now make another star, and we'll connect it to the first one.
With your thread coming out of a point bead on your first star, pick up a seed, triangle, seed, and
go up through the next point bead on your star. (Point beads marked with dots)
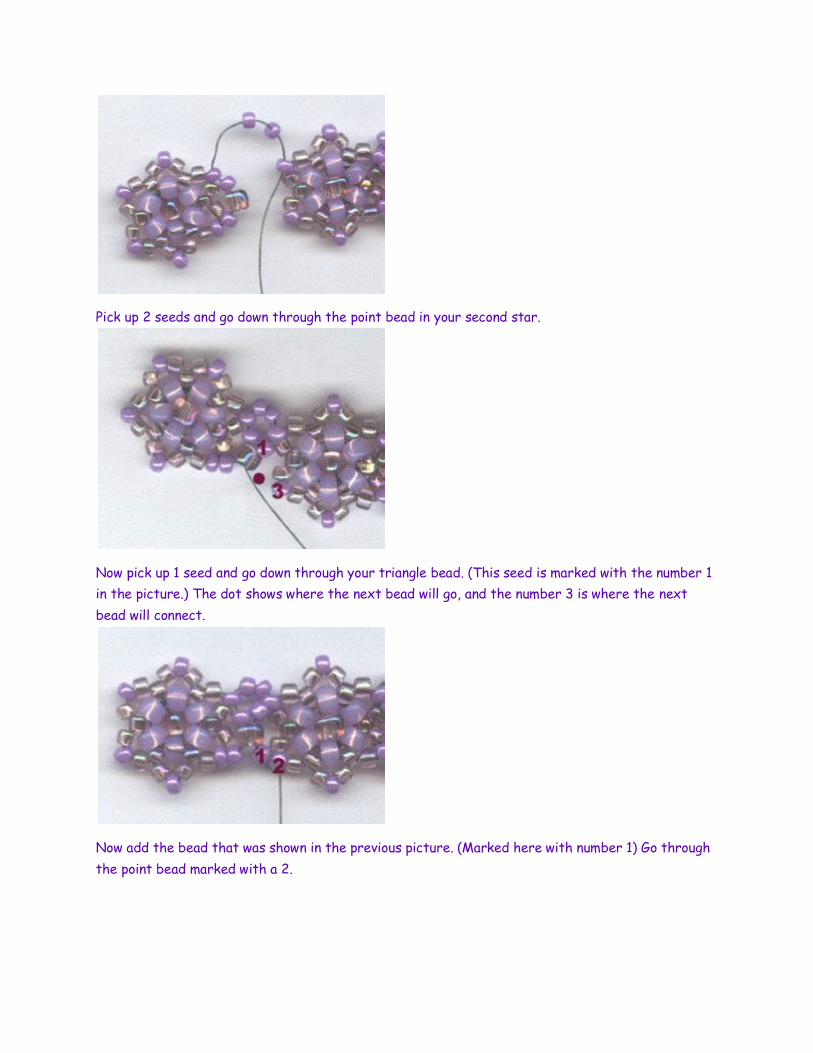
Pick up 2 seeds and go down through the point bead in your second star.
Now pick up 1 seed and go down through your triangle bead. (This seed is marked with the number 1
in the picture.) The dot shows where the next bead will go, and the number 3 is where the next
bead will connect.
Now add the bead that was shown in the previous picture. (Marked here with number 1) Go through
the point bead marked with a 2.
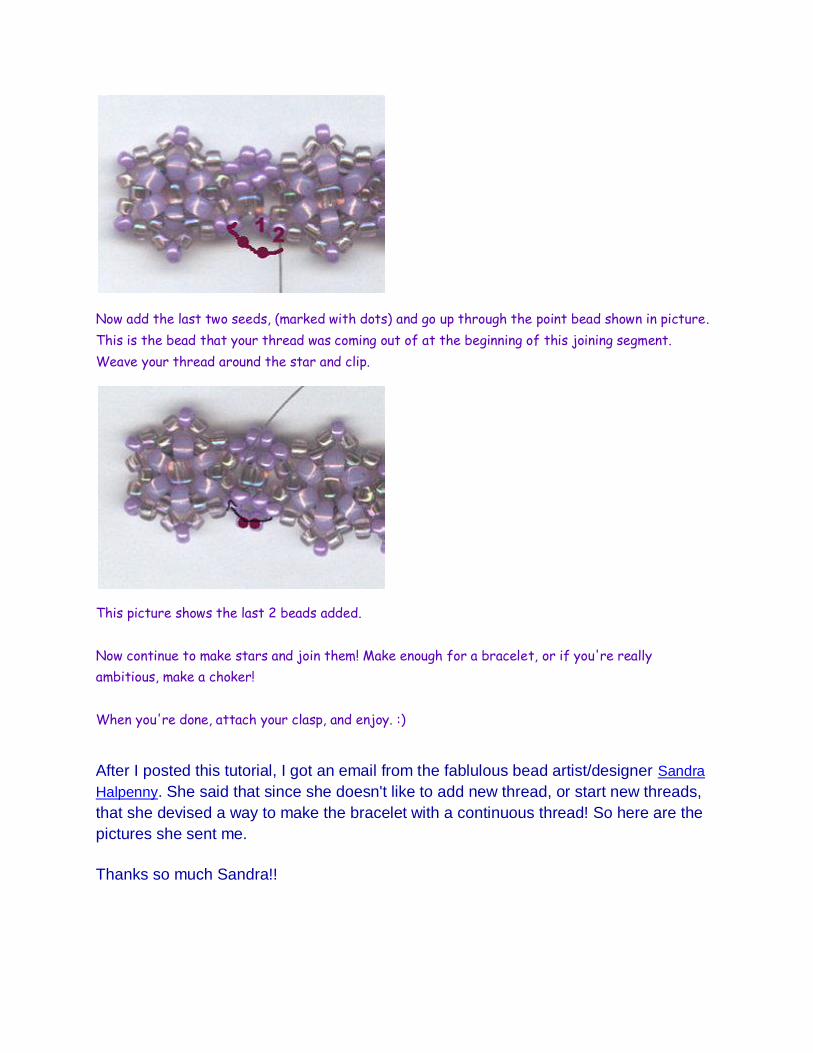
Now add the last two seeds, (marked with dots) and go up through the point bead shown in picture.
This is the bead that your thread was coming out of at the beginning of this joining segment.
Weave your thread around the star and clip.
This picture shows the last 2 beads added.
Now continue to make stars and join them! Make enough for a bracelet, or if you're really
ambitious, make a choker!
When you're done, attach your clasp, and enjoy. :)
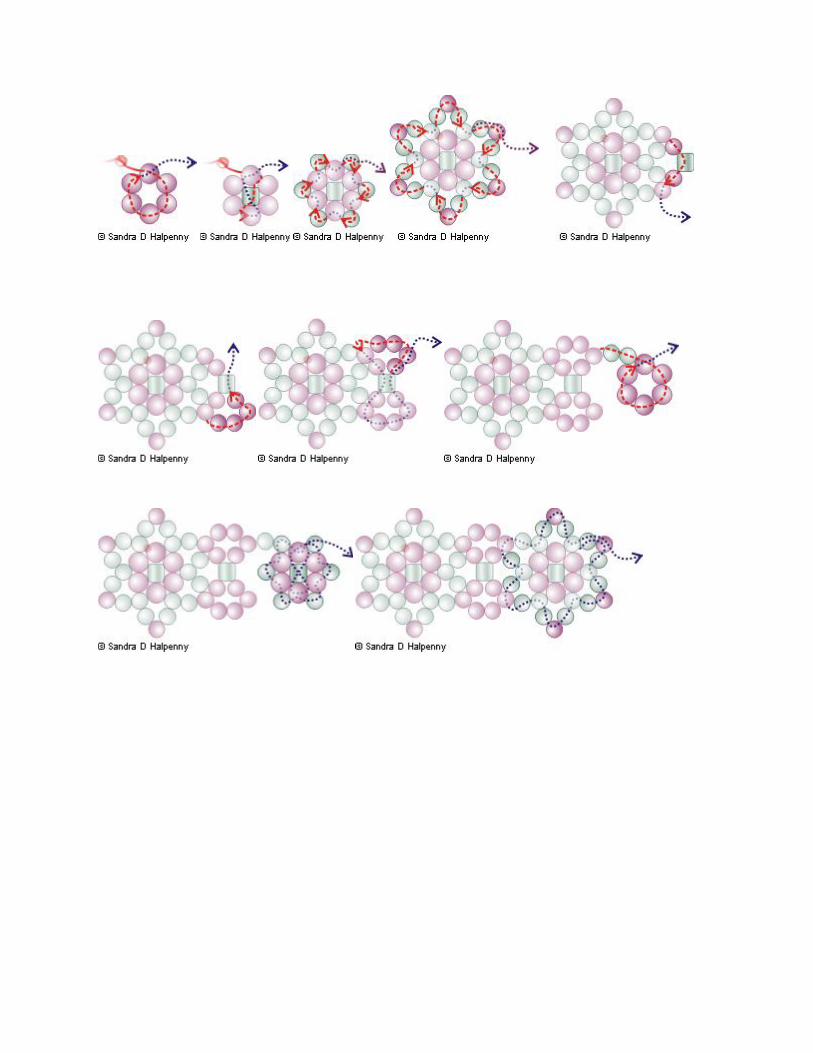
After I posted this tutorial, I got an email from the fablulous bead artist/designer Sandra
Halpenny. She said that since she doesn't like to add new thread, or start new threads,
that she devised a way to make the bracelet with a continuous thread! So here are the
pictures she sent me.
Thanks so much Sandra!!
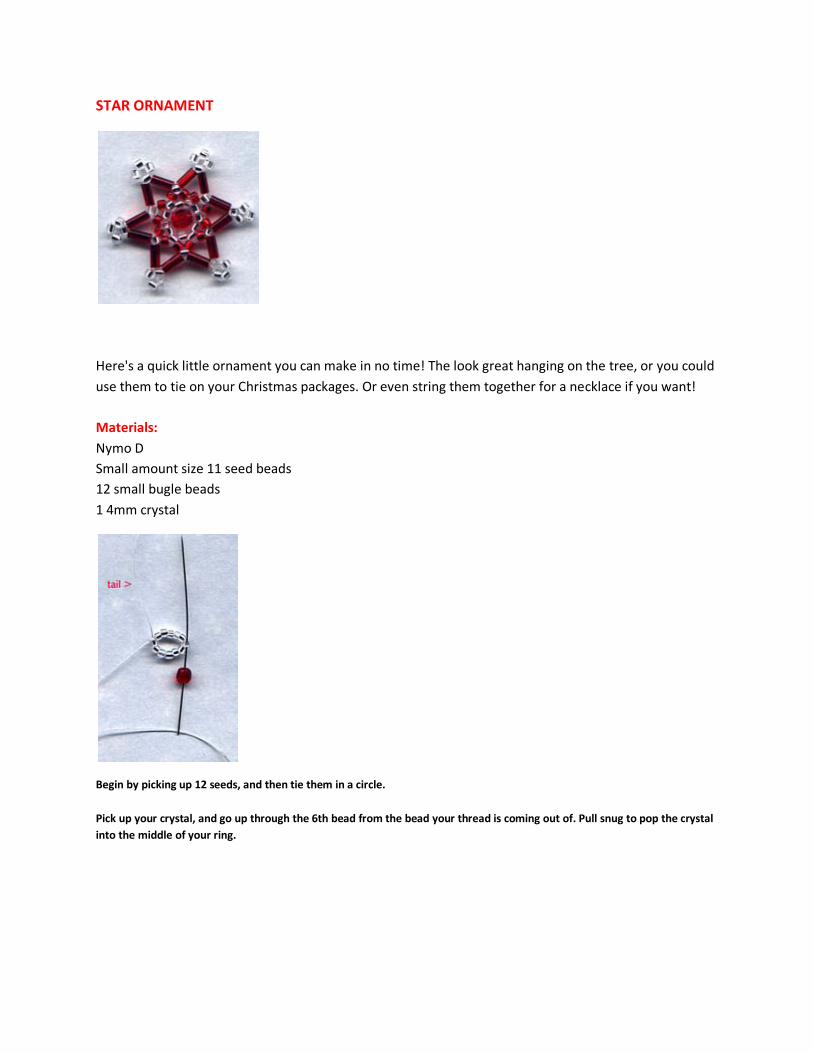
STAR ORNAMENT
Here's a quick little ornament you can make in no time! The look great hanging on the tree, or you could
use them to tie on your Christmas packages. Or even string them together for a necklace if you want!
Materials:
Nymo D
Small amount size 11 seed beads
12 small bugle beads
1 4mm crystal
Begin by picking up 12 seeds, and then tie them in a circle.
Pick up your crystal, and go up through the 6th bead from the bead your thread is coming out of. Pull snug to pop the crystal
into the middle of your ring.

*Pick up 1 red, 1 silver, 1 red. Skip one bead in ring, and go through the next one. (my picture is backwards....which works
good if you're a lefty!)
Continue from * all the way around until you have 5 points.
There is a 'step up' on the 6th point. see next.....>
Now you're going to step up to get your needle in position to do the next round.
Pick up your 3 beads, skip next bead in ring, and go through next like before, but then also go up through the first red and
silver bead from the last row, so that you are coming out of the 1st point you made.
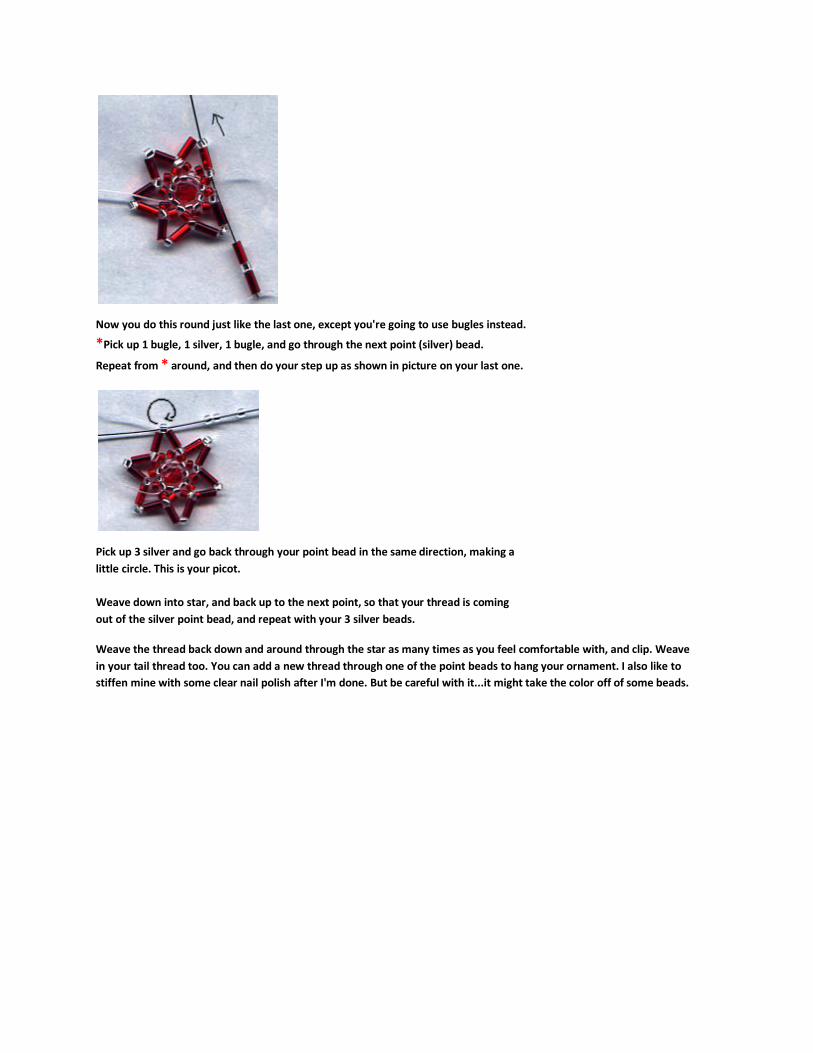
Pick up 3 silver and go back through your point bead in the same direction, making a
little circle. This is your picot.
Weave down into star, and back up to the next point, so that your thread is coming
out of the silver point bead, and repeat with your 3 silver beads.
Weave the thread back down and around through the star as many times as you feel comfortable with, and clip. Weave
in your tail thread too. You can add a new thread through one of the point beads to hang your ornament. I also like to
stiffen mine with some clear nail polish after I'm done. But be careful with it...it might take the color off of some beads.
Now you do this round just like the last one, except you're going to use bugles instead.
*Pick up 1 bugle, 1 silver, 1 bugle, and go through the next point (silver) bead.
Repeat from * around, and then do your step up as shown in picture on your last one.
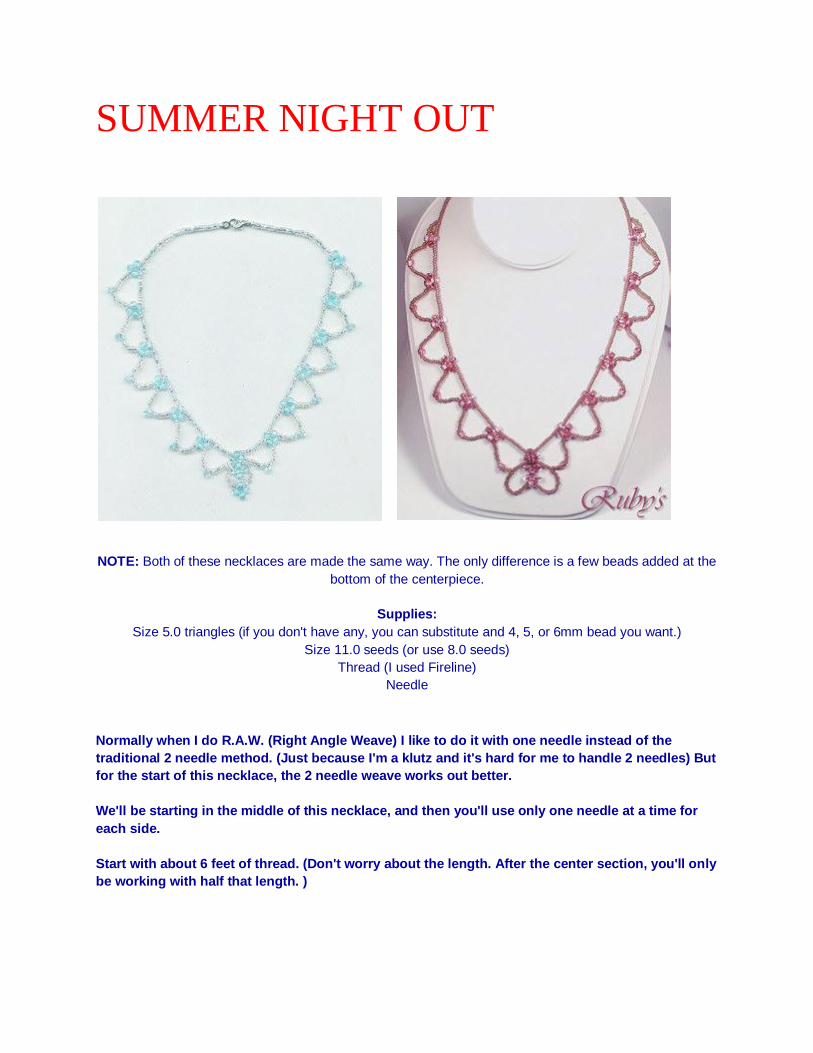
SUMMER NIGHT OUT
NOTE: Both of these necklaces are made the same way. The only difference is a few beads added at the
bottom of the centerpiece.
Supplies:
Size 5.0 triangles (if you don't have any, you can substitute and 4, 5, or 6mm bead you want.)
Size 11.0 seeds (or use 8.0 seeds)
Thread (I used Fireline)
Needle
Normally when I do R.A.W. (Right Angle Weave) I like to do it with one needle instead of the
traditional 2 needle method. (Just because I'm a klutz and it's hard for me to handle 2 needles) But
for the start of this necklace, the 2 needle weave works out better.
We'll be starting in the middle of this necklace, and then you'll use only one needle at a time for
each side.
Start with about 6 feet of thread. (Don't worry about the length. After the center section, you'll only
be working with half that length. )
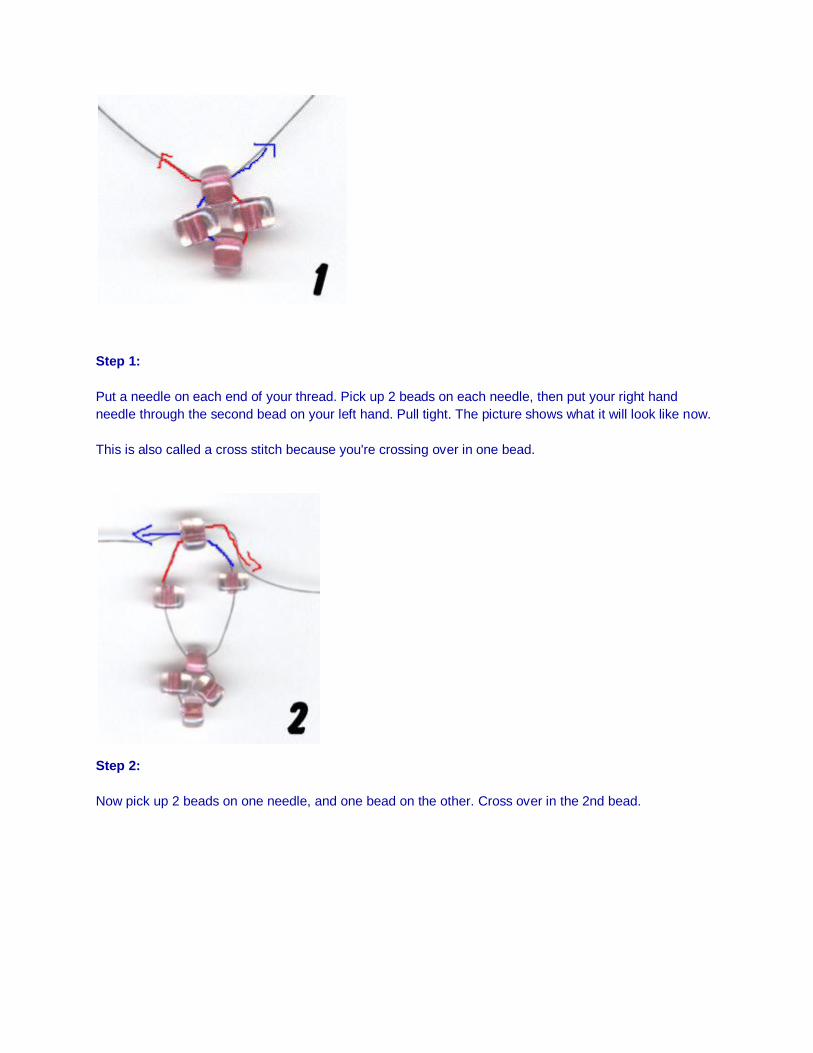
Step 1:
Put a needle on each end of your thread. Pick up 2 beads on each needle, then put your right hand
needle through the second bead on your left hand. Pull tight. The picture shows what it will look like now.
This is also called a cross stitch because you're crossing over in one bead.
Step 2:
Now pick up 2 beads on one needle, and one bead on the other. Cross over in the 2nd bead.
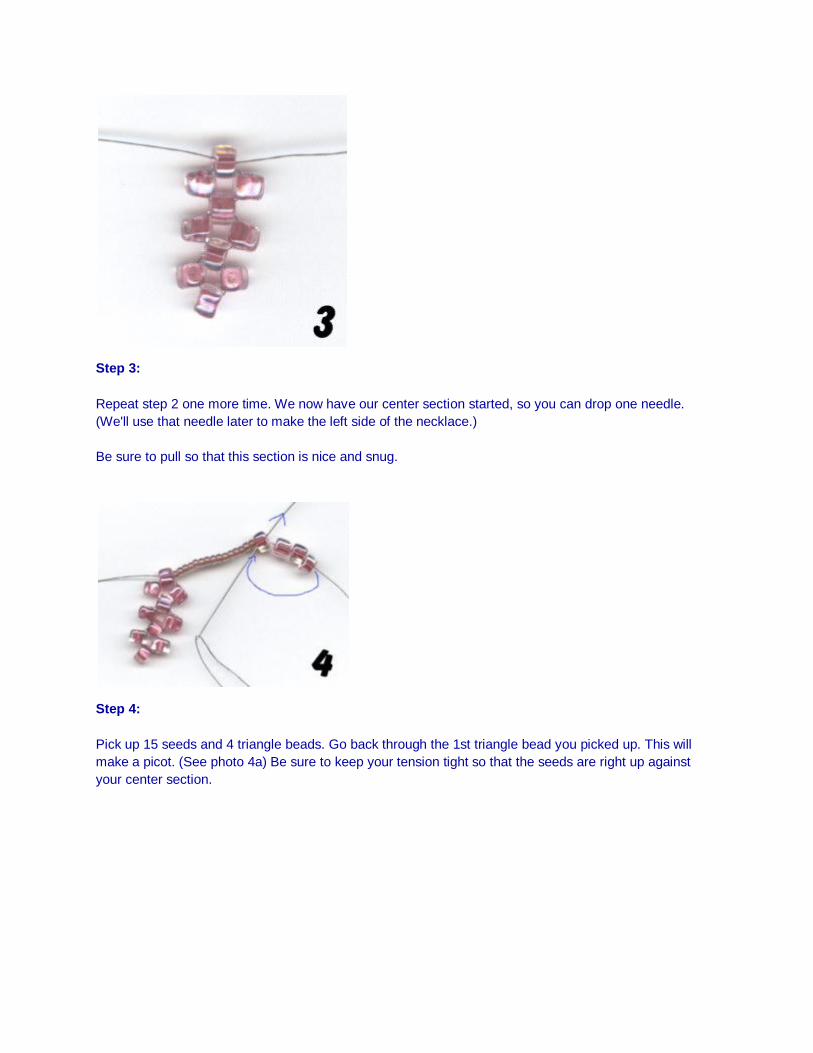
Step 3:
Repeat step 2 one more time. We now have our center section started, so you can drop one needle.
(We'll use that needle later to make the left side of the necklace.)
Be sure to pull so that this section is nice and snug.
Step 4:
Pick up 15 seeds and 4 triangle beads. Go back through the 1st triangle bead you picked up. This will
make a picot. (See photo 4a) Be sure to keep your tension tight so that the seeds are right up against
your center section.
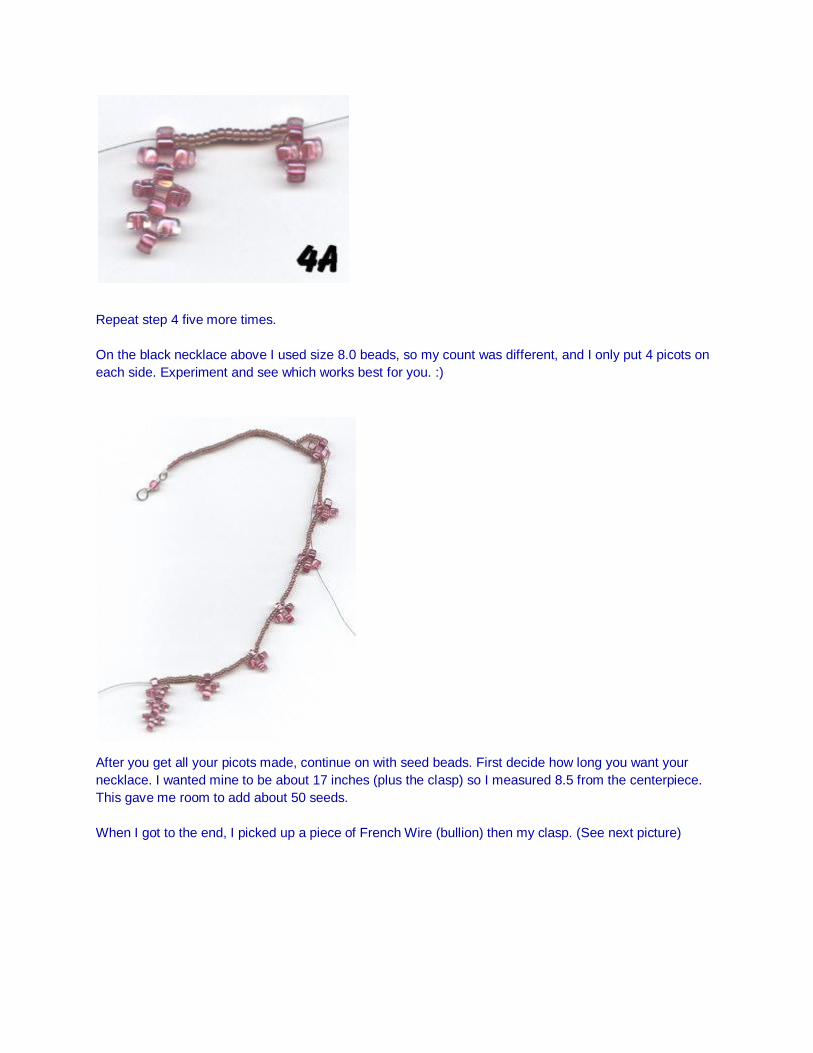
Repeat step 4 five more times.
On the black necklace above I used size 8.0 beads, so my count was different, and I only put 4 picots on
each side. Experiment and see which works best for you. :)
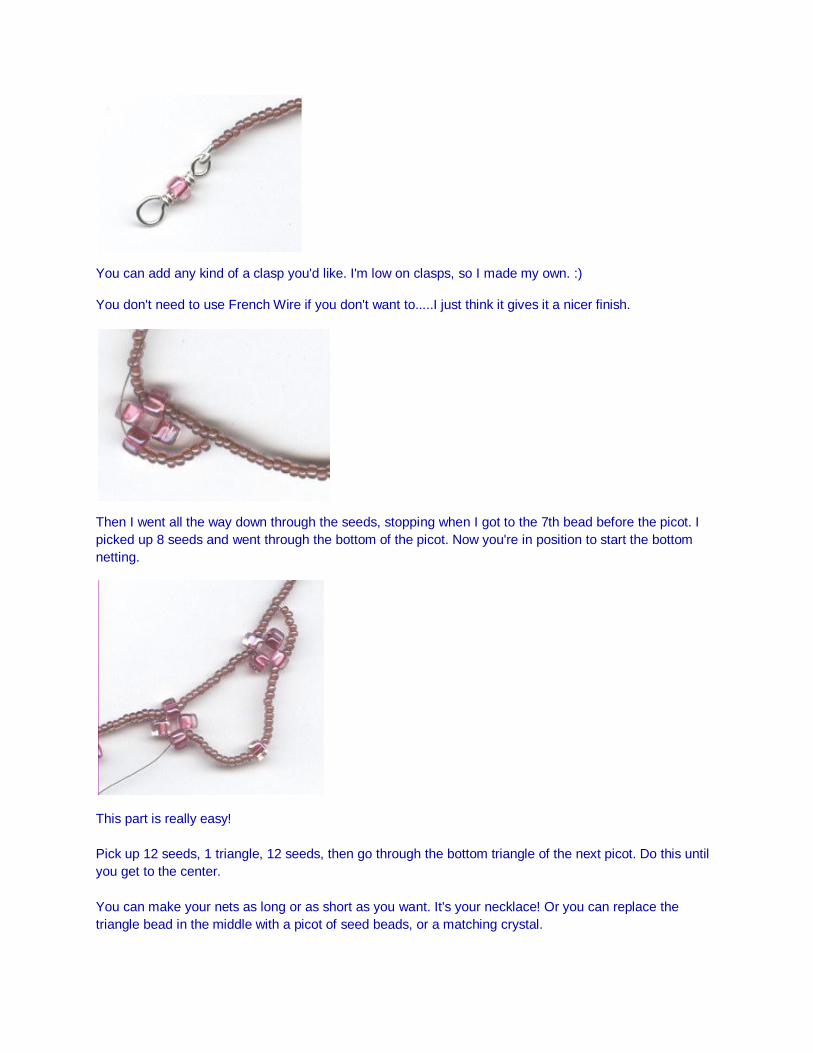
After you get all your picots made, continue on with seed beads. First decide how long you want your
necklace. I wanted mine to be about 17 inches (plus the clasp) so I measured 8.5 from the centerpiece.
This gave me room to add about 50 seeds.
When I got to the end, I picked up a piece of French Wire (bullion) then my clasp. (See next picture)
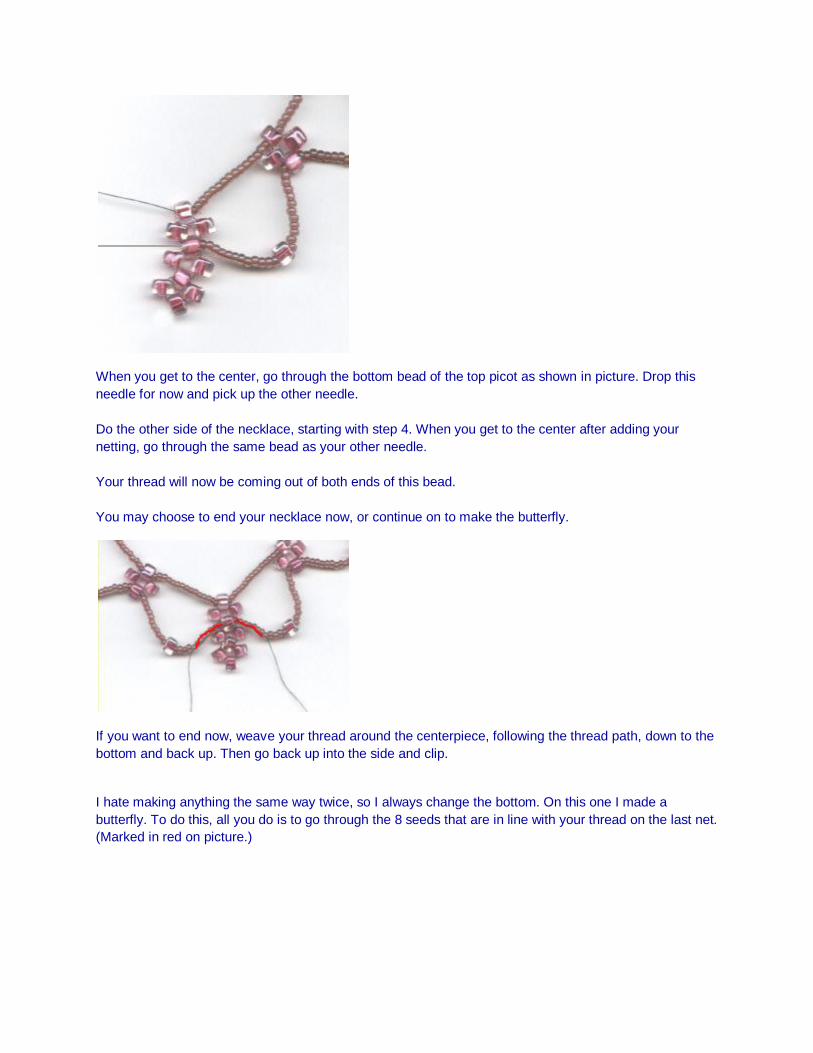
You can add any kind of a clasp you'd like. I'm low on clasps, so I made my own. :)
You don't need to use French Wire if you don't want to.....I just think it gives it a nicer finish.
Then I went all the way down through the seeds, stopping when I got to the 7th bead before the picot. I
picked up 8 seeds and went through the bottom of the picot. Now you're in position to start the bottom
netting.
This part is really easy!
Pick up 12 seeds, 1 triangle, 12 seeds, then go through the bottom triangle of the next picot. Do this until
you get to the center.
You can make your nets as long or as short as you want. It's your necklace! Or you can replace the
triangle bead in the middle with a picot of seed beads, or a matching crystal.
When you get to the center, go through the bottom bead of the top picot as shown in picture. Drop this
needle for now and pick up the other needle.
Do the other side of the necklace, starting with step 4. When you get to the center after adding your
netting, go through the same bead as your other needle.
Your thread will now be coming out of both ends of this bead.
You may choose to end your necklace now, or continue on to make the butterfly.
If you want to end now, weave your thread around the centerpiece, following the thread path, down to the
bottom and back up. Then go back up into the side and clip.
I hate making anything the same way twice, so I always change the bottom. On this one I made a
butterfly. To do this, all you do is to go through the 8 seeds that are in line with your thread on the last net.
(Marked in red on picture.)
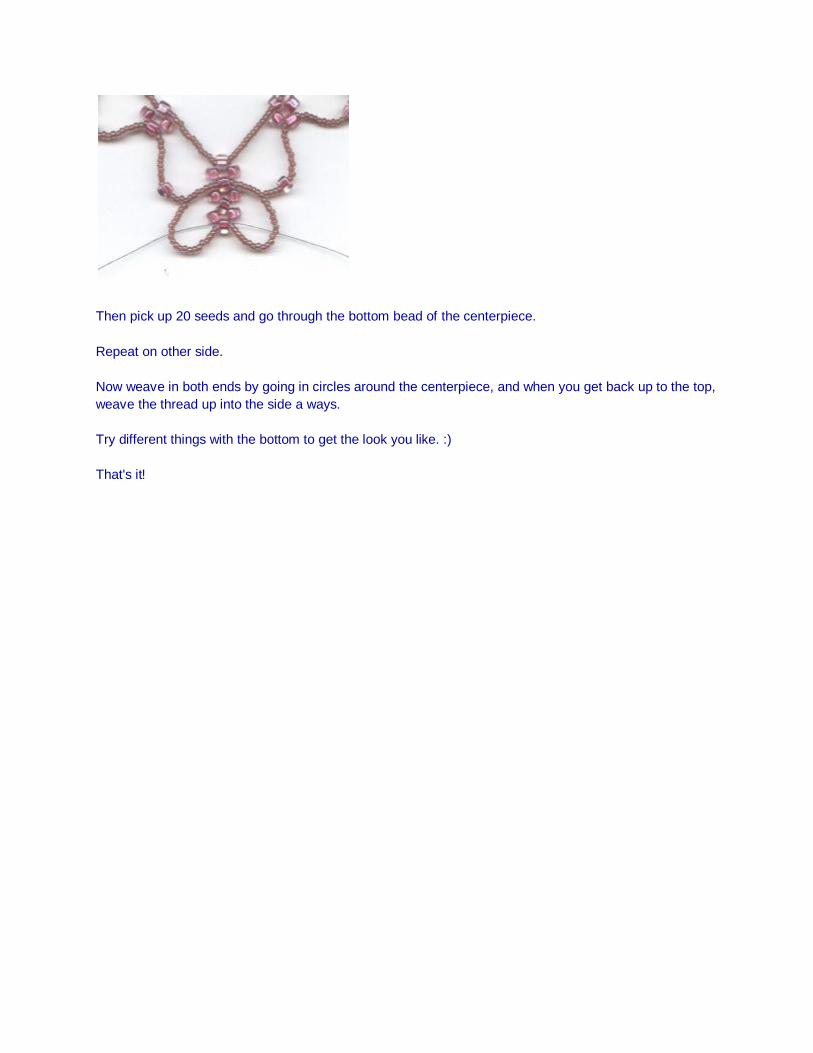
Then pick up 20 seeds and go through the bottom bead of the centerpiece.
Repeat on other side.
Now weave in both ends by going in circles around the centerpiece, and when you get back up to the top,
weave the thread up into the side a ways.
Try different things with the bottom to get the look you like. :)
That's it!
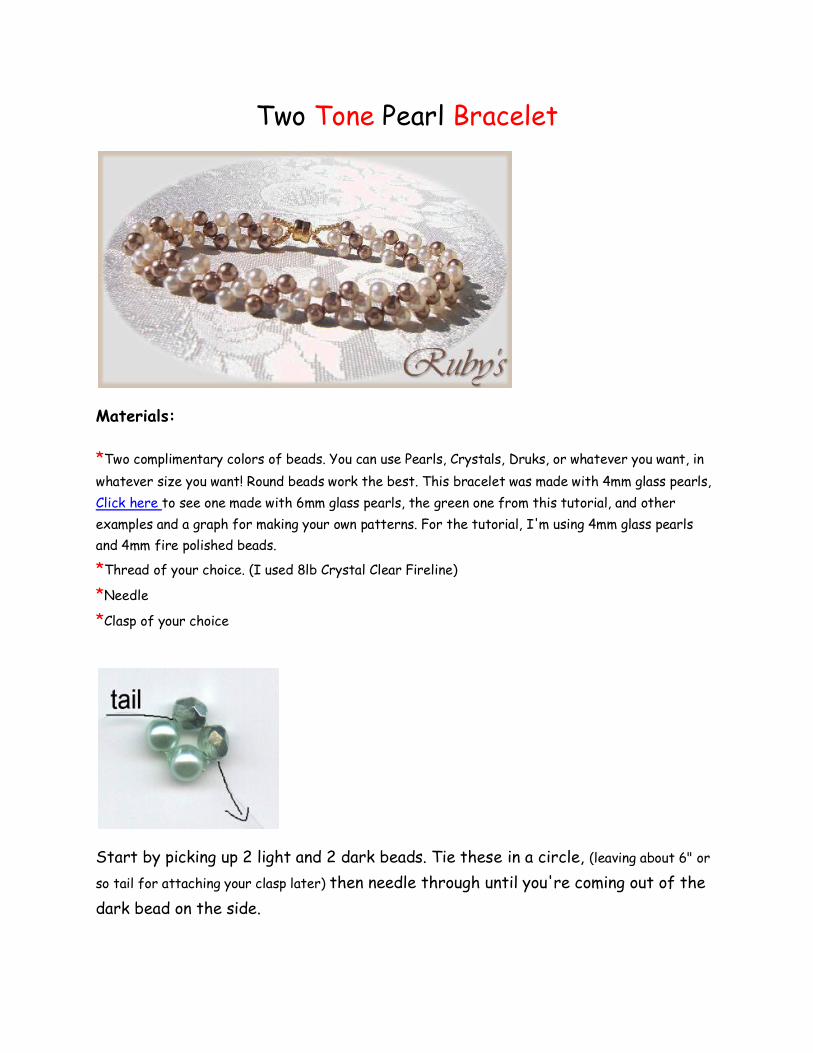
Two Tone Pearl Bracelet
Materials:
*Two complimentary colors of beads. You can use Pearls, Crystals, Druks, or whatever you want, in
whatever size you want! Round beads work the best. This bracelet was made with 4mm glass pearls,
Click here to see one made with 6mm glass pearls, the green one from this tutorial, and other
examples and a graph for making your own patterns. For the tutorial, I'm using 4mm glass pearls
and 4mm fire polished beads.
*Thread of your choice. (I used 8lb Crystal Clear Fireline)
*Needle
*Clasp of your choice
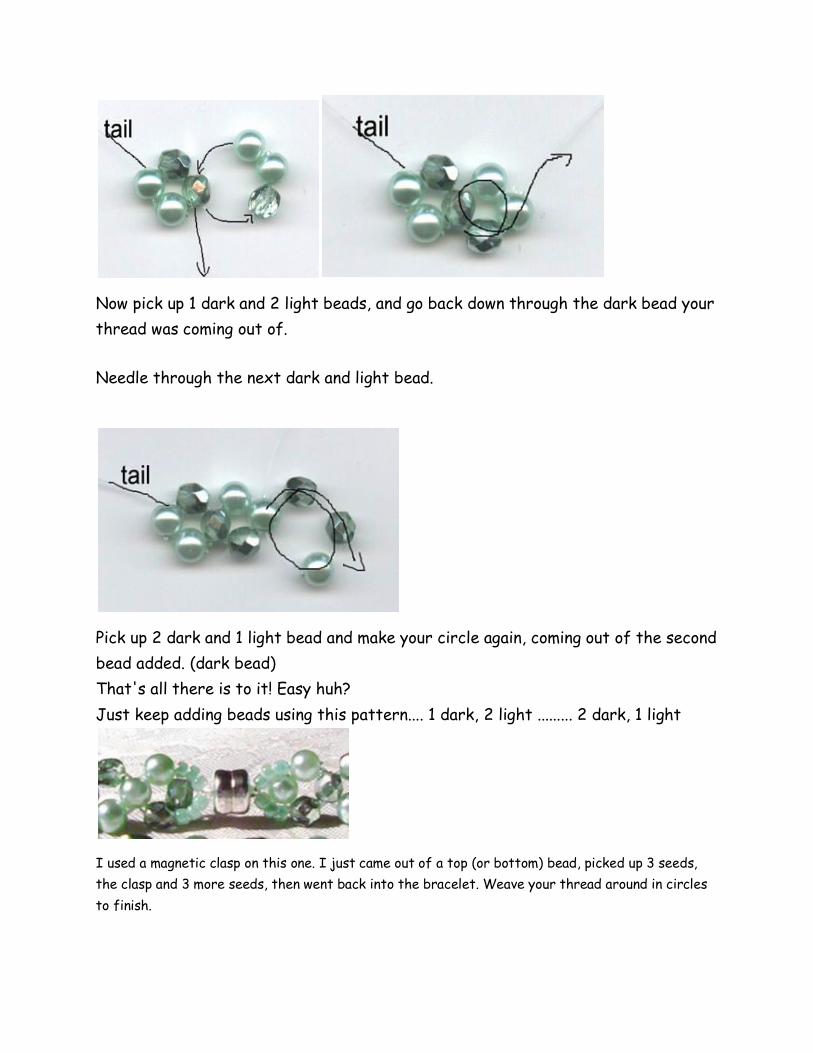
Start by picking up 2 light and 2 dark beads. Tie these in a circle, (leaving about 6" or
so tail for attaching your clasp later) then needle through until you're coming out of the
dark bead on the side.
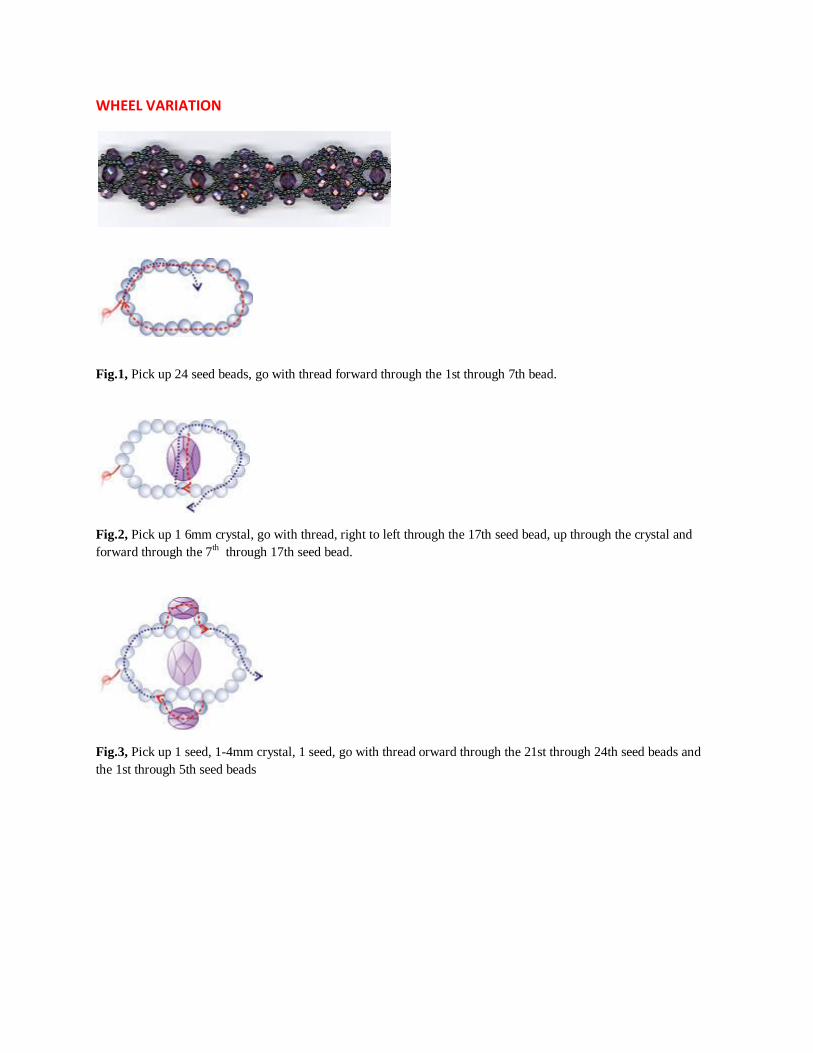
Now pick up 1 dark and 2 light beads, and go back down through the dark bead your
thread was coming out of.
Needle through the next dark and light bead.
Pick up 2 dark and 1 light bead and make your circle again, coming out of the second
bead added. (dark bead)
That's all there is to it! Easy huh?
Just keep adding beads using this pattern.... 1 dark, 2 light ......... 2 dark, 1 light
I used a magnetic clasp on this one. I just came out of a top (or bottom) bead, picked up 3 seeds,
the clasp and 3 more seeds, then went back into the bracelet. Weave your thread around in circles
to finish.
WHEEL VARIATION
Fig.1, Pick up 24 seed beads, go with thread forward through the 1st through 7th bead.
Fig.2, Pick up 1 6mm crystal, go with thread, right to left through the 17th seed bead, up through the crystal and
forward through the 7th through 17th seed bead.
Fig.3, Pick up 1 seed, 1-4mm crystal, 1 seed, go with thread orward through the 21st through 24th seed beads and
the 1st through 5th seed beads

Fig.4, Pick up 2 seeds, 1-4mm crystal, 1 seed, 1-4mm crystal, 2 seeds, go with thread up through the seed bead, the
thread is exiting and forward through 2 seeds, 1 crystal & 1 seed bead.
Fig.5, Pick up 1 seed, 1-4mm crystal, 5 seeds, go with thread down through the crystal added in the last step and
forward through 1 seed and the crystal just added. Repeat around, 3 more times.
Fig.6, Pick up 5 seed beads, go with thread down through the 1st crystal. Pick up 1 seed, go up through the ;ast
crystal in Fig. 5. Continue with working thread through as shown in Figure 6.
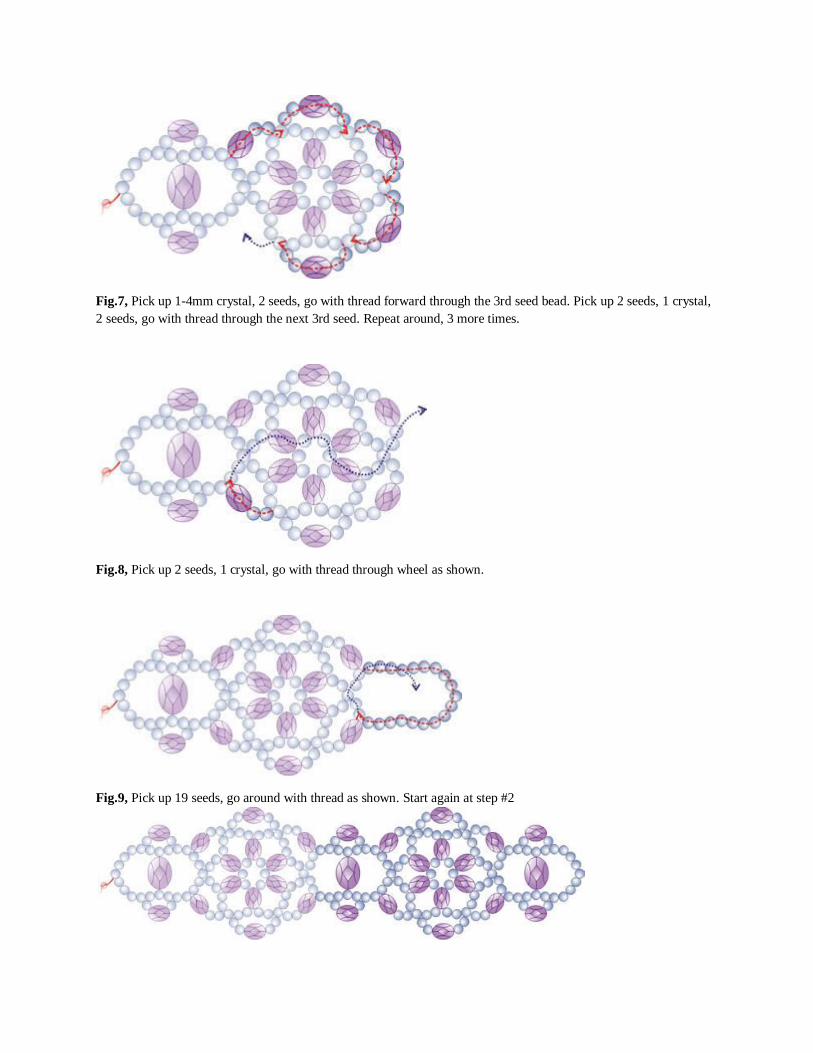
Fig.7, Pick up 1-4mm crystal, 2 seeds, go with thread forward through the 3rd seed bead. Pick up 2 seeds, 1 crystal,
2 seeds, go with thread through the next 3rd seed. Repeat around, 3 more times.
Fig.8, Pick up 2 seeds, 1 crystal, go with thread through wheel as shown.
Fig.9, Pick up 19 seeds, go around with thread as shown. Start again at step #2
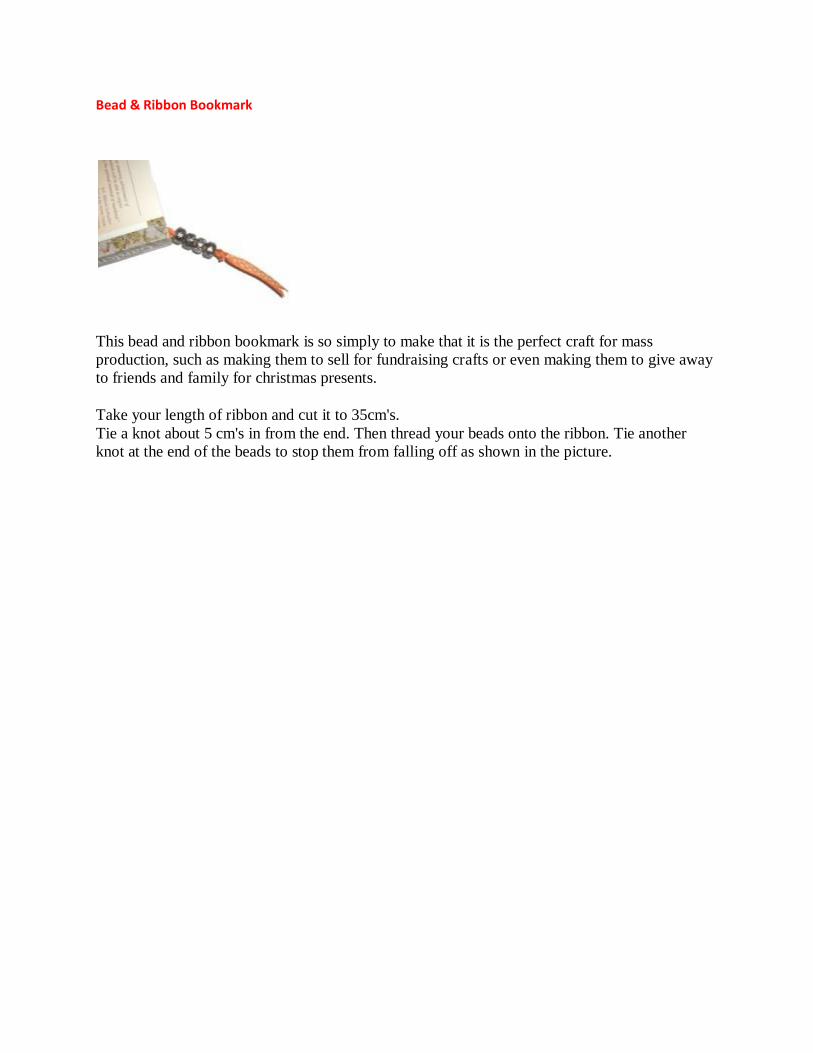
Bead & Ribbon Bookmark
This bead and ribbon bookmark is so simply to make that it is the perfect craft for mass
production, such as making them to sell for fundraising crafts or even making them to give away
to friends and family for christmas presents.
Take your length of ribbon and cut it to 35cm's.
Tie a knot about 5 cm's in from the end. Then thread your beads onto the ribbon. Tie another
knot at the end of the beads to stop them from falling off as shown in the picture.
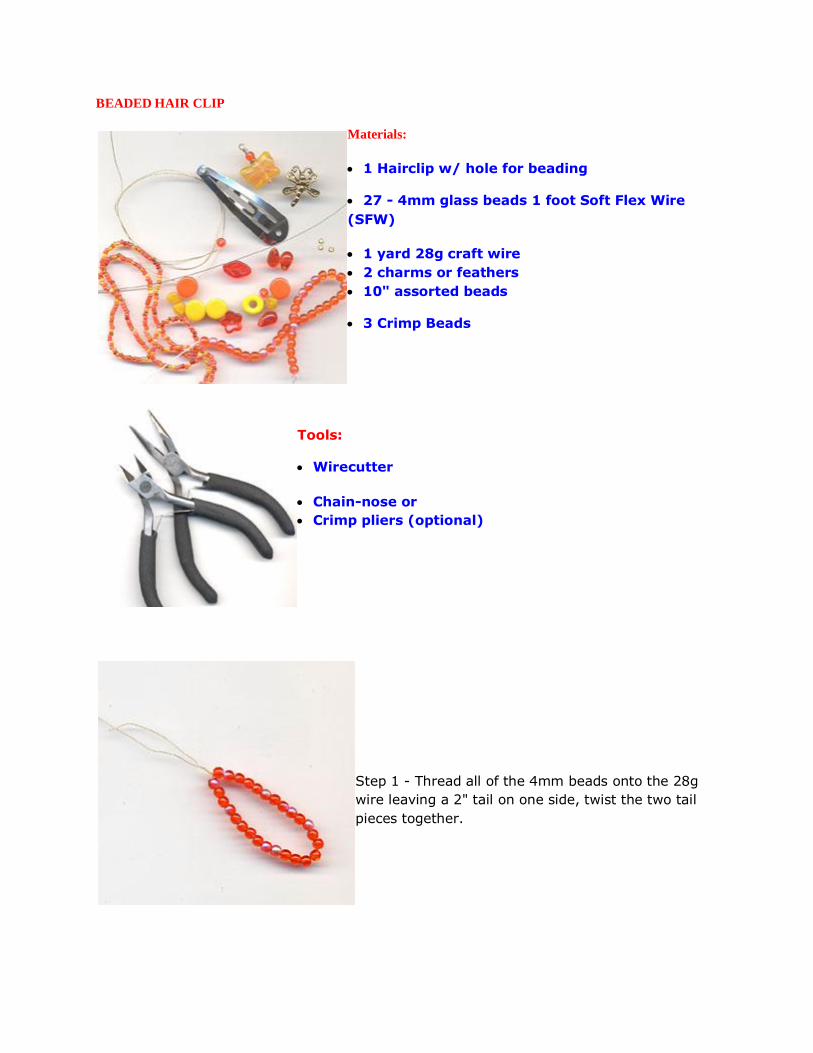
BEADED HAIR CLIP
Materials:
1 Hairclip w/ hole for beading
27 - 4mm glass beads 1 foot Soft Flex Wire
(SFW)
1 yard 28g craft wire
2 charms or feathers
10" assorted beads
3 Crimp Beads
Tools:
Wirecutter
Chain-nose or
Crimp pliers (optional)
Step 1 - Thread all of the 4mm beads onto the 28g
wire leaving a 2" tail on one side, twist the two tail
pieces together.
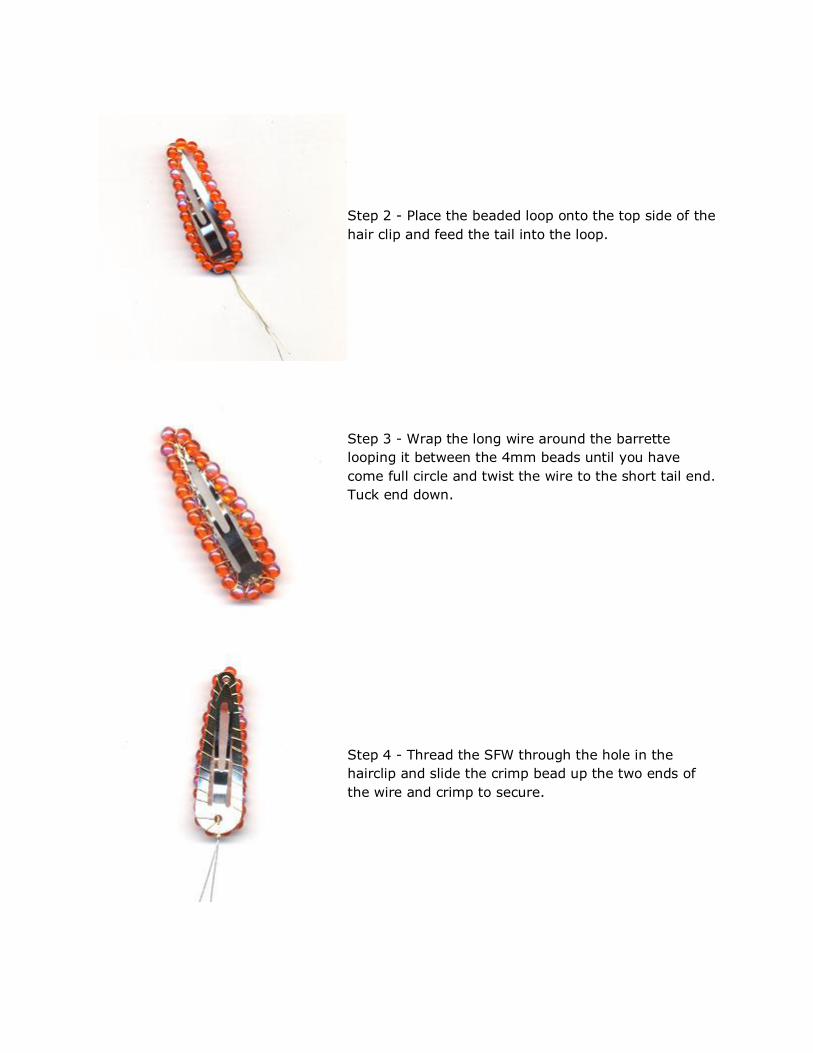
Step 2 - Place the beaded loop onto the top side of the
hair clip and feed the tail into the loop.
Step 3 - Wrap the long wire around the barrette
looping it between the 4mm beads until you have
come full circle and twist the wire to the short tail end.
Tuck end down.
Step 4 - Thread the SFW through the hole in the
hairclip and slide the crimp bead up the two ends of
the wire and crimp to secure.
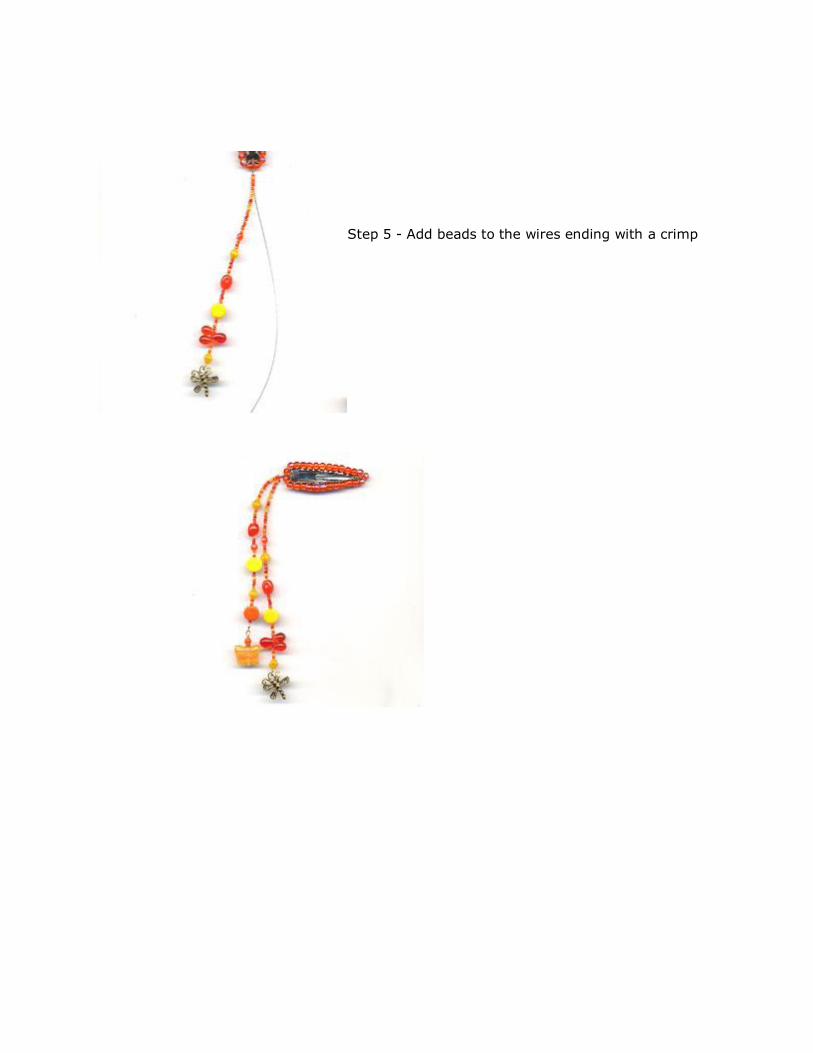
Step 5 - Add beads to the wires ending with a crimp
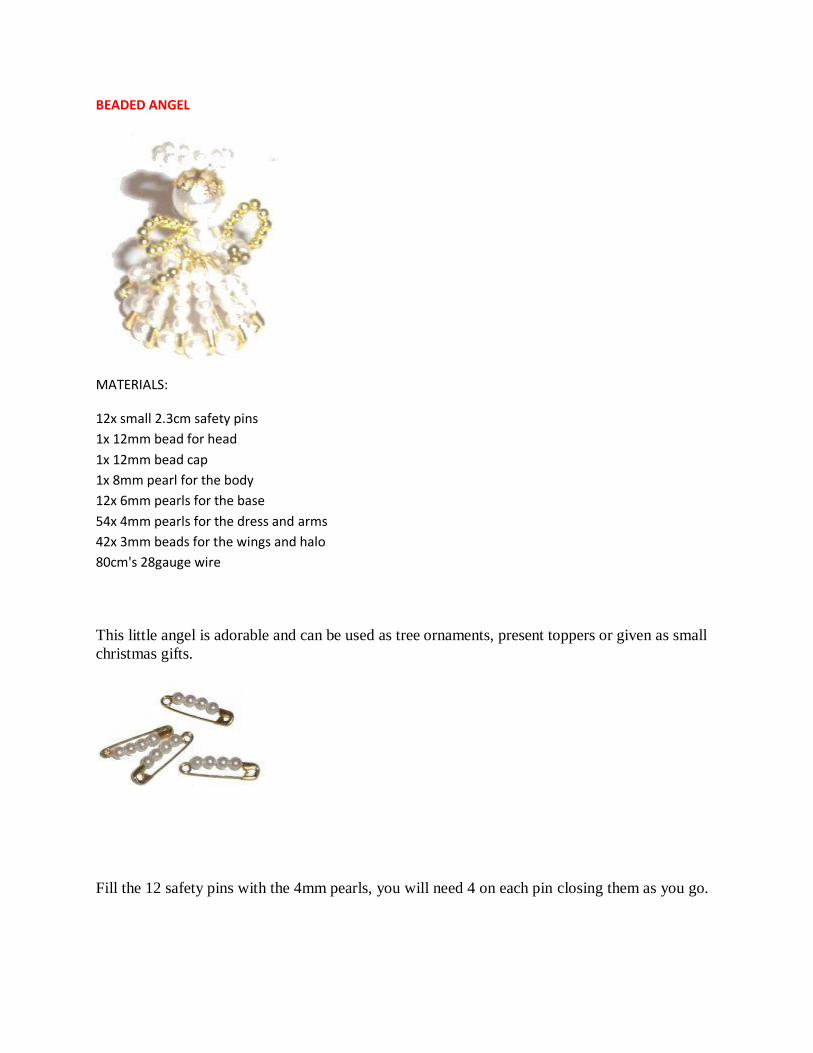
BEADED ANGEL
MATERIALS:
12x small 2.3cm safety pins
1x 12mm bead for head
1x 12mm bead cap
1x 8mm pearl for the body
12x 6mm pearls for the base
54x 4mm pearls for the dress and arms
42x 3mm beads for the wings and halo
80cm's 28gauge wire
This little angel is adorable and can be used as tree ornaments, present toppers or given as small
christmas gifts.
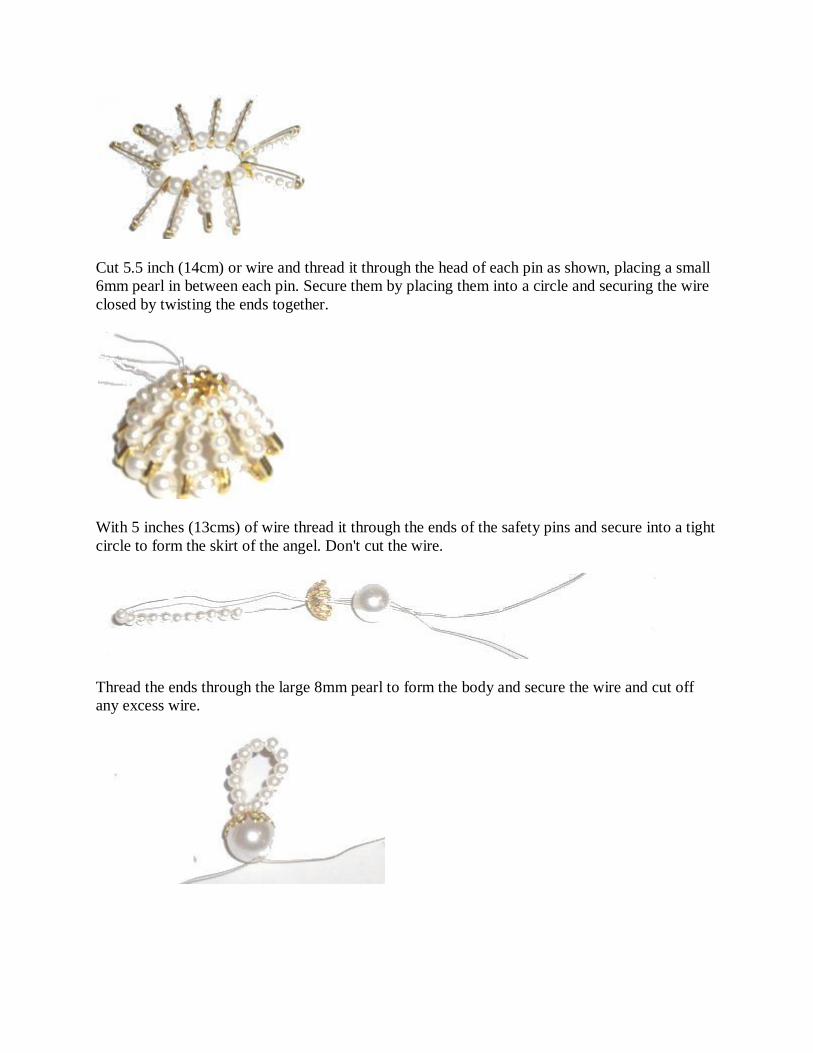
Fill the 12 safety pins with the 4mm pearls, you will need 4 on each pin closing them as you go.
Cut 5.5 inch (14cm) or wire and thread it through the head of each pin as shown, placing a small
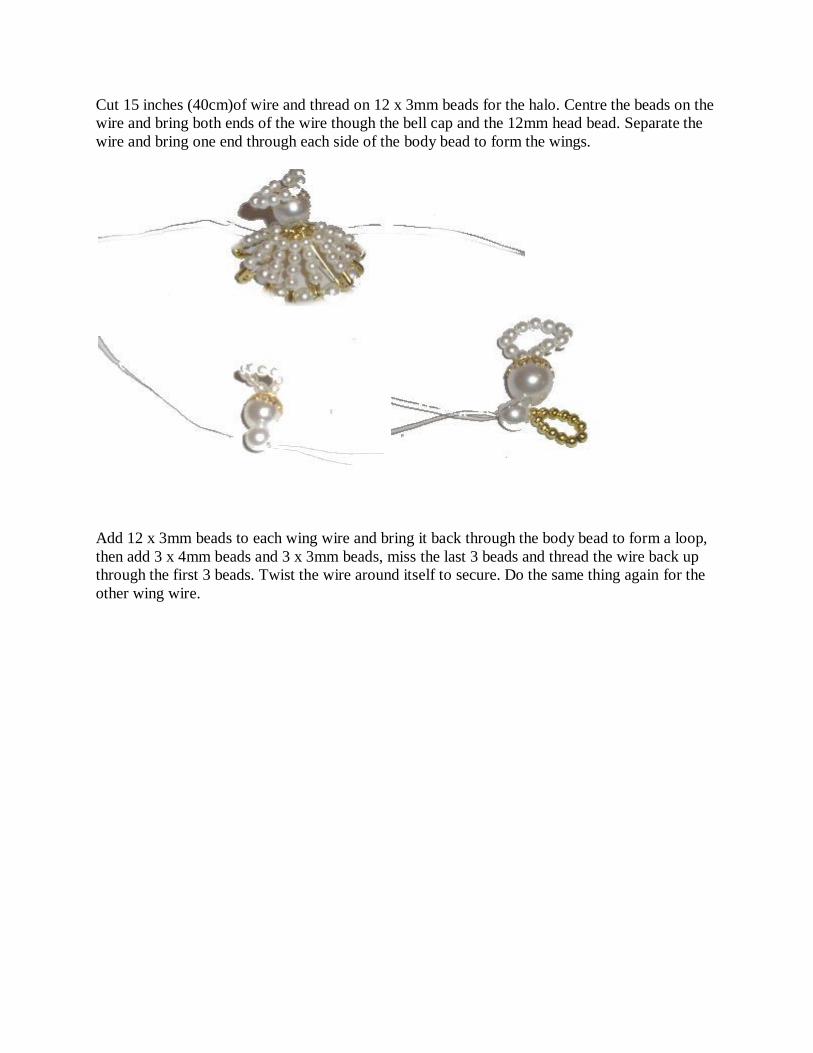
6mm pearl in between each pin. Secure them by placing them into a circle and securing the wire
closed by twisting the ends together.
With 5 inches (13cms) of wire thread it through the ends of the safety pins and secure into a tight
circle to form the skirt of the angel. Don't cut the wire.
Thread the ends through the large 8mm pearl to form the body and secure the wire and cut off
any excess wire.
Cut 15 inches (40cm)of wire and thread on 12 x 3mm beads for the halo. Centre the beads on the
wire and bring both ends of the wire though the bell cap and the 12mm head bead. Separate the
wire and bring one end through each side of the body bead to form the wings.
Add 12 x 3mm beads to each wing wire and bring it back through the body bead to form a loop,
then add 3 x 4mm beads and 3 x 3mm beads, miss the last 3 beads and thread the wire back up
through the first 3 beads. Twist the wire around itself to secure. Do the same thing again for the
other wing wire.
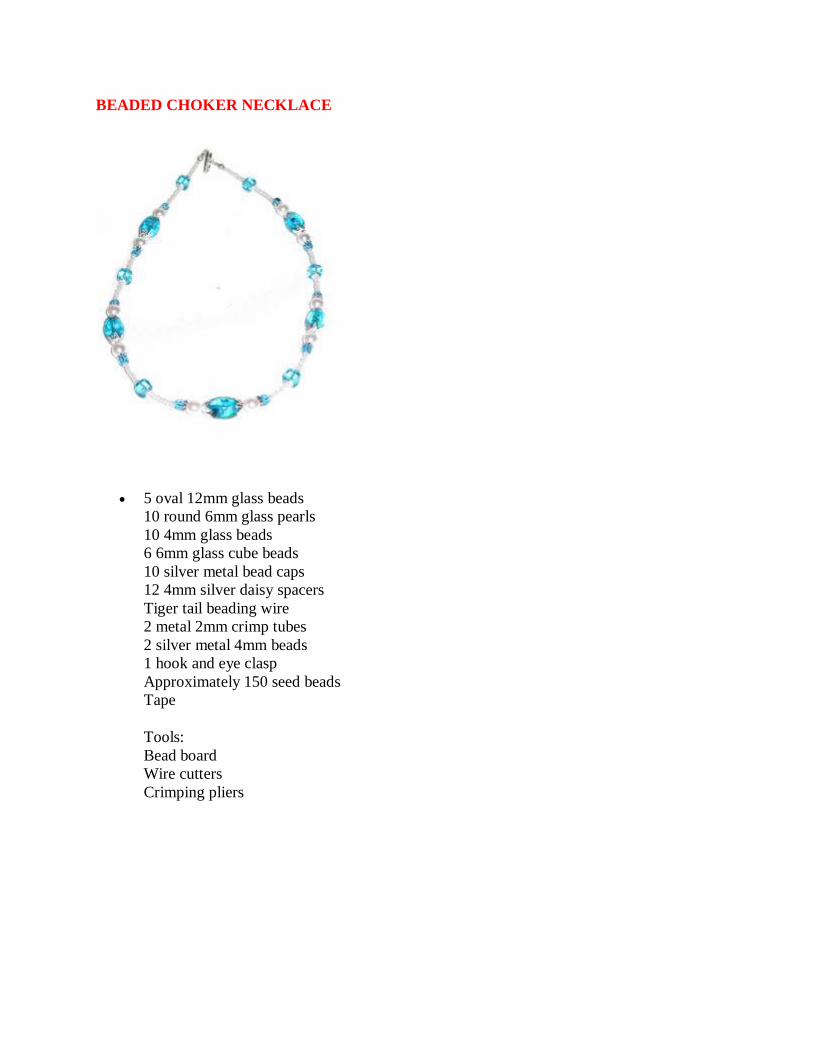
BEADED CHOKER NECKLACE
5 oval 12mm glass beads
10 round 6mm glass pearls
10 4mm glass beads
6 6mm glass cube beads
10 silver metal bead caps
12 4mm silver daisy spacers
Tiger tail beading wire
2 metal 2mm crimp tubes
2 silver metal 4mm beads
1 hook and eye clasp
Approximately 150 seed beads
Tape
Tools:
Bead board
Wire cutters
Crimping pliers
This pretty little necklace can be made with a variety of different beads and components. The
supplies I have listed are just suggestions. I encourage you to choose the colors and shapes that
express your own personal style.
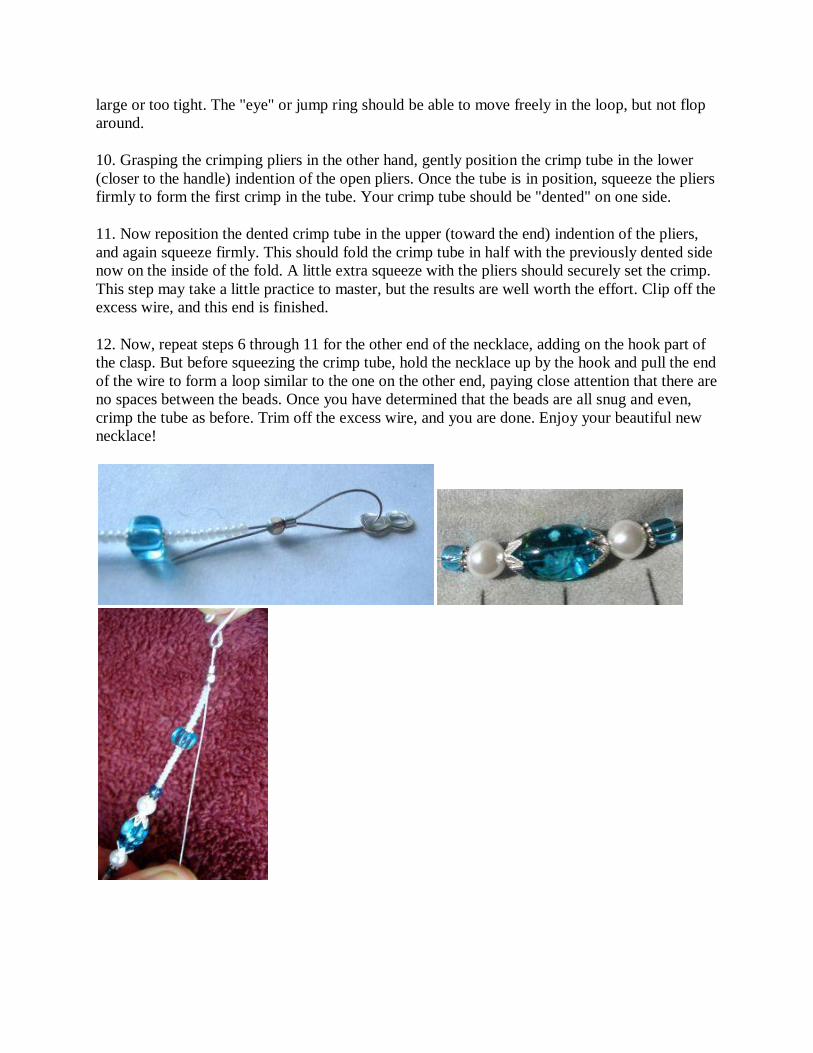
This necklace is crafted using "sets" of beads in the combination of your choice. In this piece, the
sets consist of an aqua oval focal bead with bead caps on either side followed by white glass
pearls, a daisy spacer and finally a 4mm aqua glass bead. There are 5 of these "sets" in this
necklace. The sets are separated by 8 to 10 seed beads, a 6mm aqua cube bead with tiny 4mm
bead caps on either side and another 8 to 10 seed beads.
This pattern of bead sets, seed beads, cubes, seed beads, and bead sets is repeated throughout the
necklace. To create a longer necklace, use more seed beads or add more sets, keeping the flow
and balance of the pattern intact.
1. Cut a length of beading wire to the desired size of your necklace, adding a few extra inches.
2. Fold a piece of scotch or other tape over one end of the wire to form a tab. This is to keep the
beads from sliding off the wire as you string them on. Lay the wire aside until you are ready to
string your necklace.
3. Lay out your beads in the groove of the bead board in your desired pattern, placing the center
set of the necklace at the zero. (If you don't have a bead board, a towel or some other surface that
will keep the beads from rolling will do.) Refer to the general instructions above to design your
"sets". You should now have the general design laid out before you on the bead board or your
chosen surface.
4. Now it is time to string the beads. Start stringing them on to the un-taped end of the wire,
letting the first bead rest against the tape. String the beads one by one starting at one side of the
bead board and working your way around to the other side until all beads are strung on the wire.
Now, add a piece of tape to the un-taped end to secure the beads until you get the clasp attached.
5. Gather the 2 metal beads, the crimp tubes, the hook and eye clasp and the crimping pliers.
6. Remove the tape from one end of the necklace, being careful not to let the beads slide off the
wire.
7. Holding the wire of the un-taped end securely, string on a 4mm silver metal bead, a crimp tube
and the "eye"
portion of the clasp. (a simple jump ring may be used for the "eye" if desired).
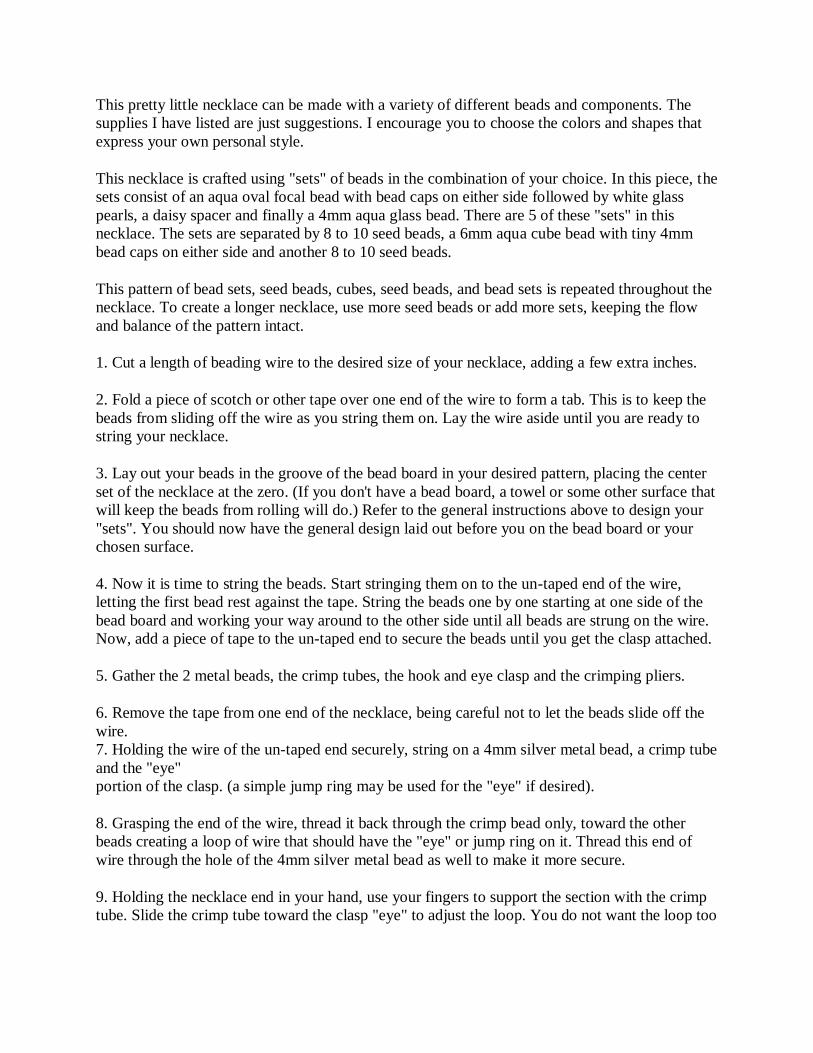
8. Grasping the end of the wire, thread it back through the crimp bead only, toward the other
beads creating a loop of wire that should have the "eye" or jump ring on it. Thread this end of
wire through the hole of the 4mm silver metal bead as well to make it more secure.
9. Holding the necklace end in your hand, use your fingers to support the section with the crimp
tube. Slide the crimp tube toward the clasp "eye" to adjust the loop. You do not want the loop too
large or too tight. The "eye" or jump ring should be able to move freely in the loop, but not flop
around.
10. Grasping the crimping pliers in the other hand, gently position the crimp tube in the lower
(closer to the handle) indention of the open pliers. Once the tube is in position, squeeze the pliers
firmly to form the first crimp in the tube. Your crimp tube should be "dented" on one side.
11. Now reposition the dented crimp tube in the upper (toward the end) indention of the pliers,
and again squeeze firmly. This should fold the crimp tube in half with the previously dented side
now on the inside of the fold. A little extra squeeze with the pliers should securely set the crimp.
This step may take a little practice to master, but the results are well worth the effort. Clip off the
excess wire, and this end is finished.
12. Now, repeat steps 6 through 11 for the other end of the necklace, adding on the hook part of
the clasp. But before squeezing the crimp tube, hold the necklace up by the hook and pull the end
of the wire to form a loop similar to the one on the other end, paying close attention that there are
no spaces between the beads. Once you have determined that the beads are all snug and even,
crimp the tube as before. Trim off the excess wire, and you are done. Enjoy your beautiful new
necklace!
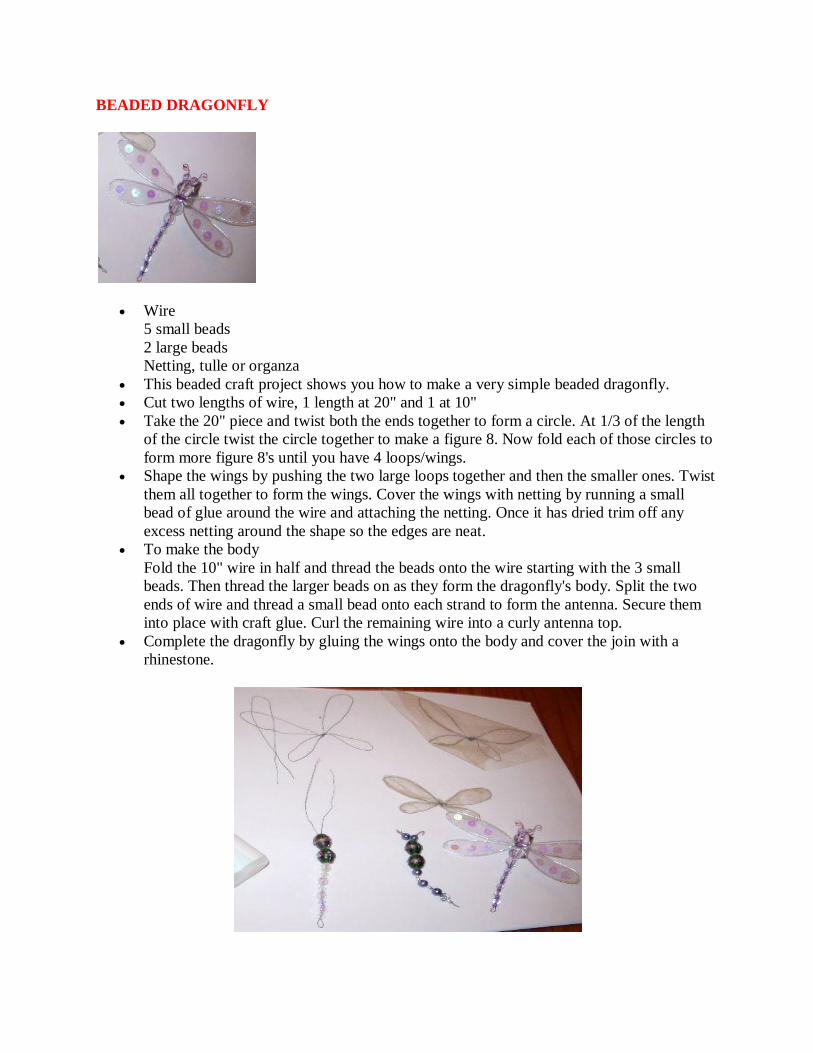
BEADED DRAGONFLY
Wire
5 small beads
2 large beads
Netting, tulle or organza
This beaded craft project shows you how to make a very simple beaded dragonfly.
Cut two lengths of wire, 1 length at 20" and 1 at 10"
Take the 20" piece and twist both the ends together to form a circle. At 1/3 of the length
of the circle twist the circle together to make a figure 8. Now fold each of those circles to
form more figure 8's until you have 4 loops/wings.
Shape the wings by pushing the two large loops together and then the smaller ones. Twist
them all together to form the wings. Cover the wings with netting by running a small
bead of glue around the wire and attaching the netting. Once it has dried trim off any
excess netting around the shape so the edges are neat.
To make the body
Fold the 10" wire in half and thread the beads onto the wire starting with the 3 small
beads. Then thread the larger beads on as they form the dragonfly's body. Split the two
ends of wire and thread a small bead onto each strand to form the antenna. Secure them
into place with craft glue. Curl the remaining wire into a curly antenna top.
Complete the dragonfly by gluing the wings onto the body and cover the join with a
rhinestone.

BEADED FLOWER BROOCH
Materials:
150cm fishing line,
100 gold size 8/0 hex beads (also known as 2 cut beads)
200 red size 8/0 seed beads
35 black size 8/0 seed beads
1 ivory 6mm imitation pearl
Techniques: Beadweaving, right angle weave
Difficulty: Medium, knowledge of right angle weave is required
Ball base: Start with 5 beads, crossover on the last one (bead 5)
Add beads 6, 7, 8 and 9 onto the blue thread. Cross through bead 9 with the green thread.
Add beads 10, 11 and 12 onto the green thread. Cross through bead 12 with the blue
thread.
Add beads 13, 14 and 15 onto the blue thread. Cross through bead 15 with the green
thread.
Add beads 16, 17 and 18 onto the green thread. Cross through bead 18 with the blue
thread.
Pass the green thread through beads 1 and 6.
Add beads 19 and 20 on the blue thread. Cross the green thread through bead 20.
Pass the blue thread through bead 7.
Add beads 21, 22 and 23 on the green thread. Cross the blue thread through bead 23
Pass the green thread through beads 8 and 10.
Add beads 24 and 25 to the blue thread. Cross the green thread through bead 25.
Pass the blue thread through beads 11 and 13.
Add beads 26 and 27 on the green thread. Cross the blue thread through bead 27
Pass the green thread through beads 14 and 16.
Add beads 28 and 29 to the blue thread. Cross the green thread through bead 29.
Pass the blue thread through beads 17, 19 and 21.
Add bead 30, and cross over.
Take the blue thread and pass through beads 28 and 26.
Take the green thread and pass through beads 22 and 24.
Tie off, but leave the thread. The base is done. It should look like a ball with lots of holes.
Now you will add the petals.
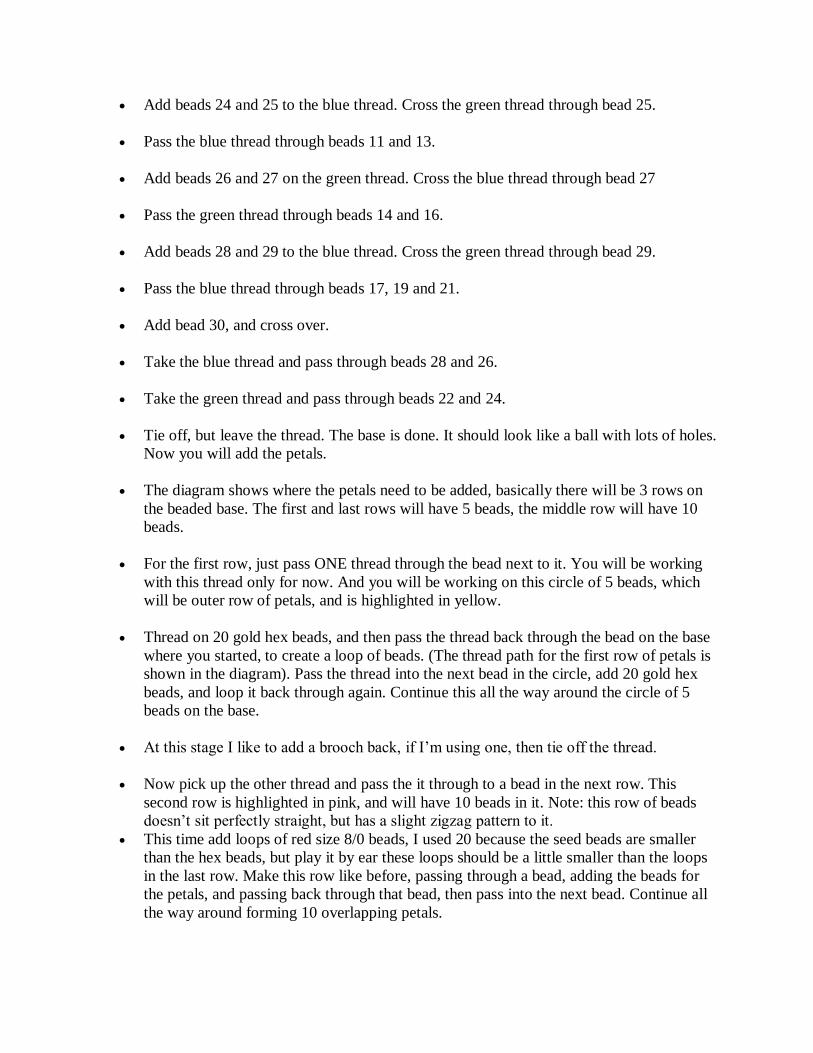
The diagram shows where the petals need to be added, basically there will be 3 rows on
the beaded base. The first and last rows will have 5 beads, the middle row will have 10
beads.
For the first row, just pass ONE thread through the bead next to it. You will be working
with this thread only for now. And you will be working on this circle of 5 beads, which
will be outer row of petals, and is highlighted in yellow.
Thread on 20 gold hex beads, and then pass the thread back through the bead on the base
where you started, to create a loop of beads. (The thread path for the first row of petals is
shown in the diagram). Pass the thread into the next bead in the circle, add 20 gold hex
beads, and loop it back through again. Continue this all the way around the circle of 5
beads on the base.
At this stage I like to add a brooch back, if I’m using one, then tie off the thread.
Now pick up the other thread and pass the it through to a bead in the next row. This
second row is highlighted in pink, and will have 10 beads in it. Note: this row of beads
doesn’t sit perfectly straight, but has a slight zigzag pattern to it.
This time add loops of red size 8/0 beads, I used 20 because the seed beads are smaller
than the hex beads, but play it by ear these loops should be a little smaller than the loops
in the last row. Make this row like before, passing through a bead, adding the beads for
the petals, and passing back through that bead, then pass into the next bead. Continue all
the way around forming 10 overlapping petals.
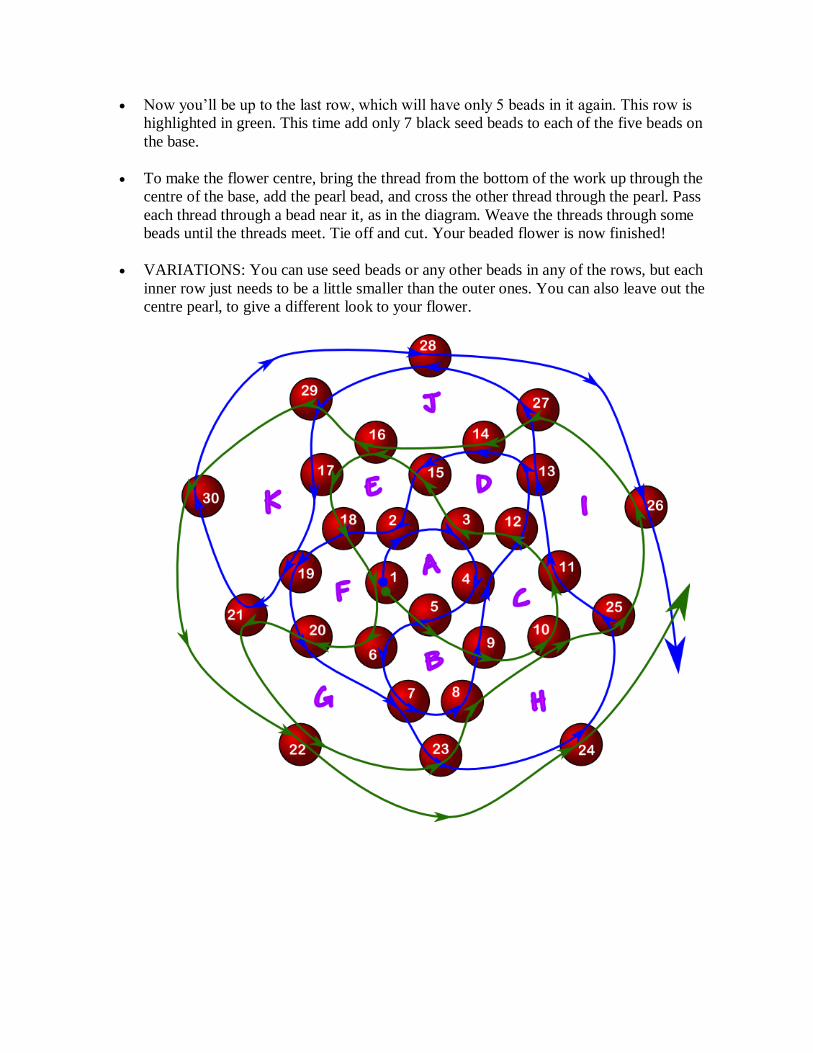
Now you’ll be up to the last row, which will have only 5 beads in it again. This row is
highlighted in green. This time add only 7 black seed beads to each of the five beads on
the base.
To make the flower centre, bring the thread from the bottom of the work up through the
centre of the base, add the pearl bead, and cross the other thread through the pearl. Pass
each thread through a bead near it, as in the diagram. Weave the threads through some
beads until the threads meet. Tie off and cut. Your beaded flower is now finished!
VARIATIONS: You can use seed beads or any other beads in any of the rows, but each
inner row just needs to be a little smaller than the outer ones. You can also leave out the
centre pearl, to give a different look to your flower.
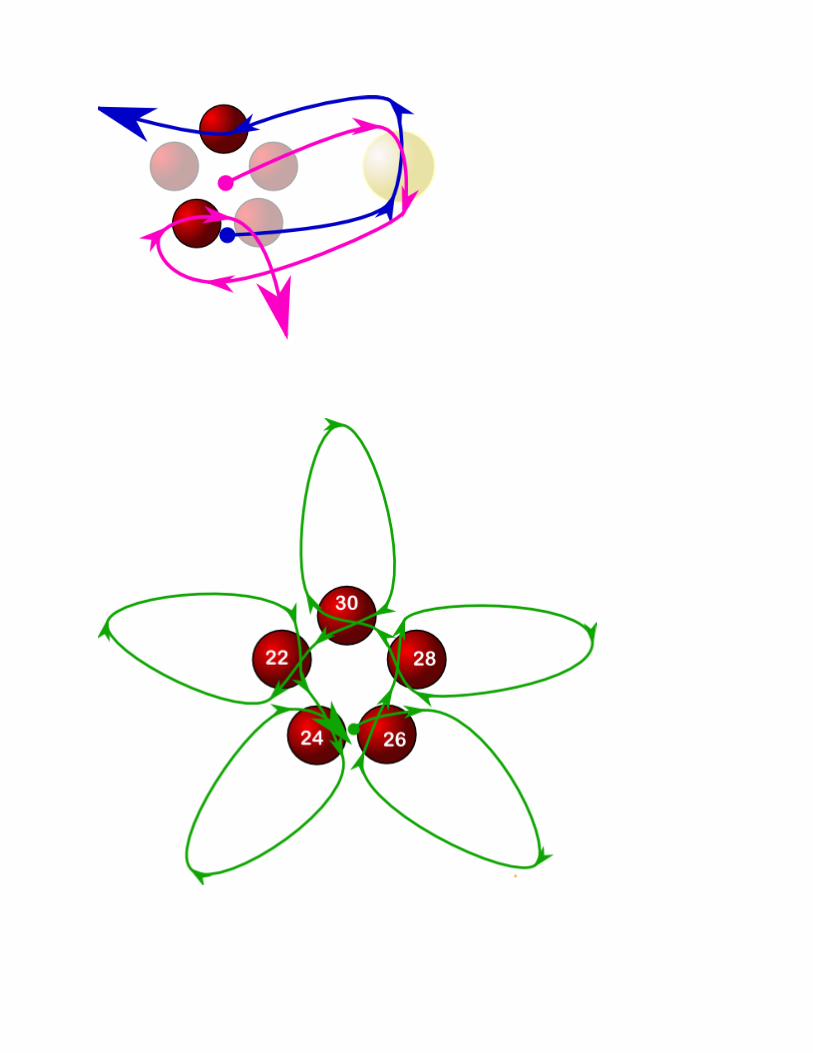

BEADED FLOWER VASE
Things you will need:
plastic beads. See if you can get some with big holes, as that could save some effort.
plastic thread. Find something strong and yet thin.
Directions:
Take a long piece of thread. First thread 18 beads on to your thread. Your aim is to make a
circular base. Once all the 18 beads are threaded, insert your thread again into the same circle
once more to make it stronger.
Once the circle is done, take 5 beads and thread them again in the same thread at the end of the
circle. Bring back the thread and loop it again to your circle two beads after where you started.
Confusing, is it?
Finish your first round, remember 7 beads per circle. At the end of this step, you have a sort of
bead flower in your hands. This is your consolation prize if you feel too fainthearted to go
forward. Going forward, I call this layer as layer 1.
The next step is slightly confusing to explain. You have to continue making circles in each layer.
Make a circle of 5 beads - 3 new, 2 from the previous layer. The 2 from the layer below should
ideally be the adjacent beads belonging to 2 different circles from layer 1. Got it? Finished your
first circle? Then, you have to again make another circle of 5 beads, now with 4 new and one
from the below layer circle (the center one of the 3 new beads that were used in layer 1 for a
circle). Again, another circle of 5 beads - 3 new & 2 old. Alternate these circles for your second
layer. You will understand it once you start making it.
Layer 3 - circles of 7 beads each - 4 new, 3 from below layer
Layer 4 - circles of 5 beads each - 3 new, 2 from below layer
Layer 5,6,7 - circles of 4 beads each - 3 new, 1 from below layer - This is the neck of the vase
Layer 8 - circle of 5 beads - 4 new, 1 from below layer
Remember that adjacent circles share 1 bead in all layers. So in the layer 3, after the first circle,
you need to take only 3 new beads, as one bead is shared from the previous circle in the same
layer.
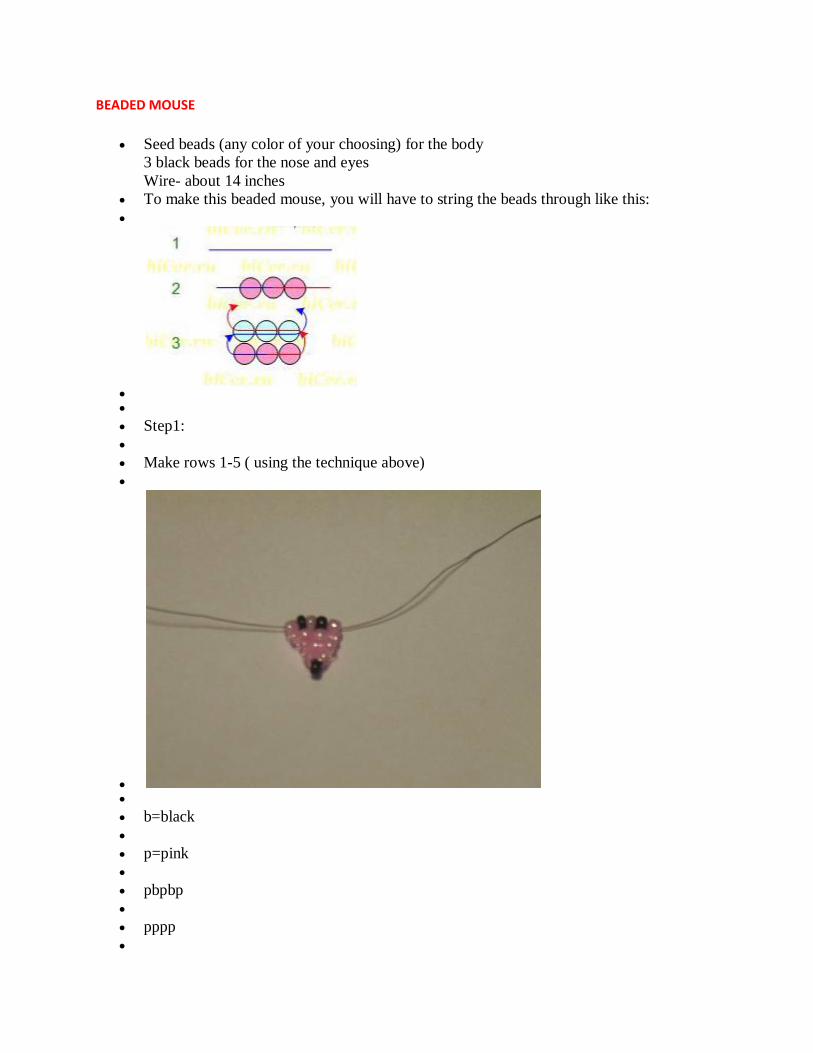
BEADED MOUSE
Seed beads (any color of your choosing) for the body
3 black beads for the nose and eyes
Wire- about 14 inches
To make this beaded mouse, you will have to string the beads through like this:
Step1:
Make rows 1-5 ( using the technique above)
b=black
p=pink
pbpbp
pppp
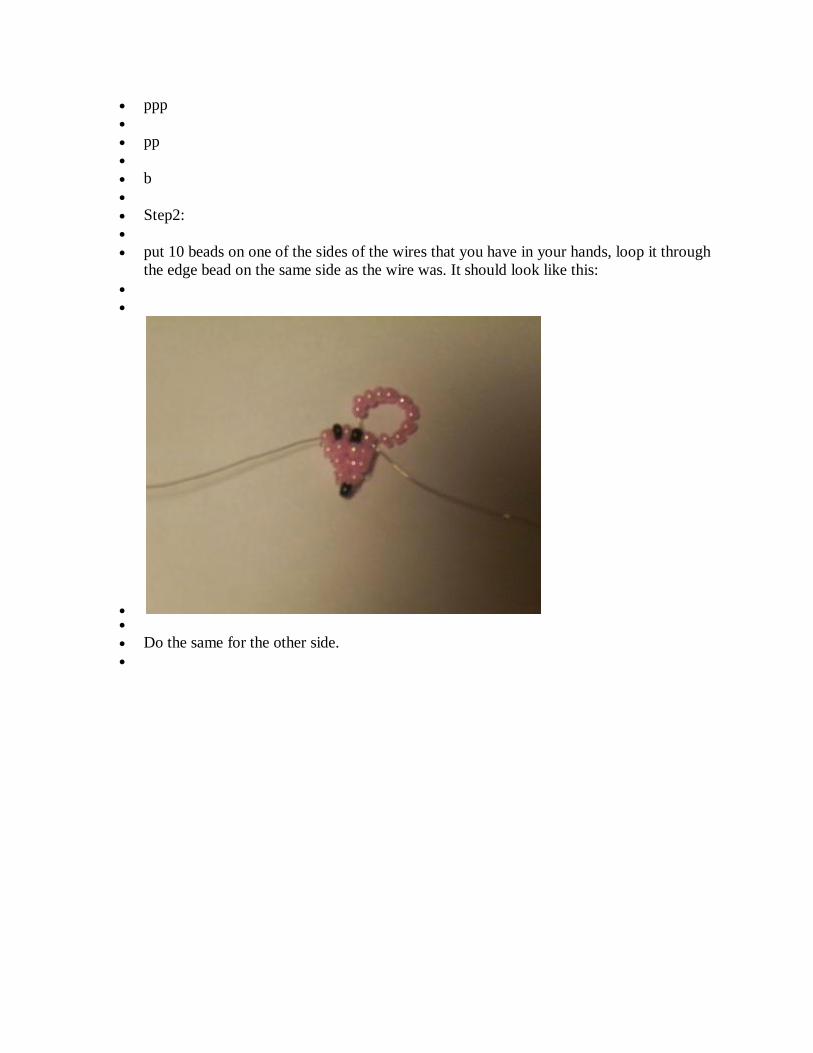
ppp
pp
b
Step2:
put 10 beads on one of the sides of the wires that you have in your hands, loop it through
the edge bead on the same side as the wire was. It should look like this:
Do the same for the other side.
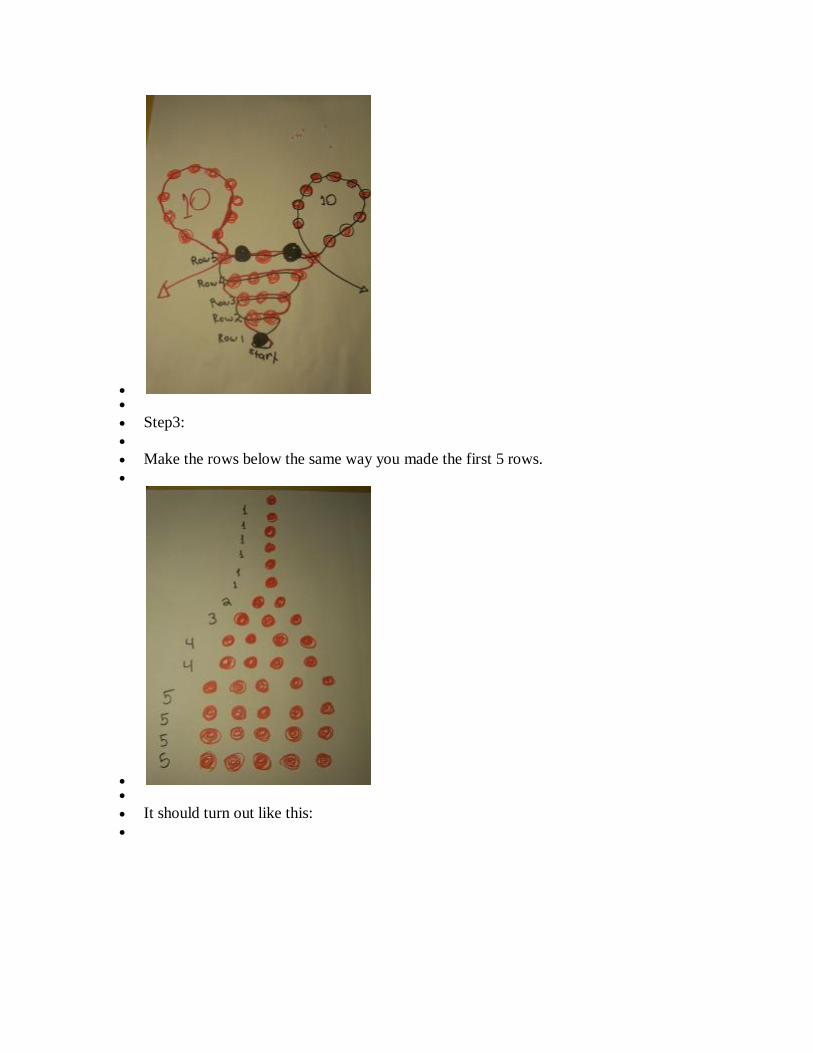
Step3:
Make the rows below the same way you made the first 5 rows.
It should turn out like this:
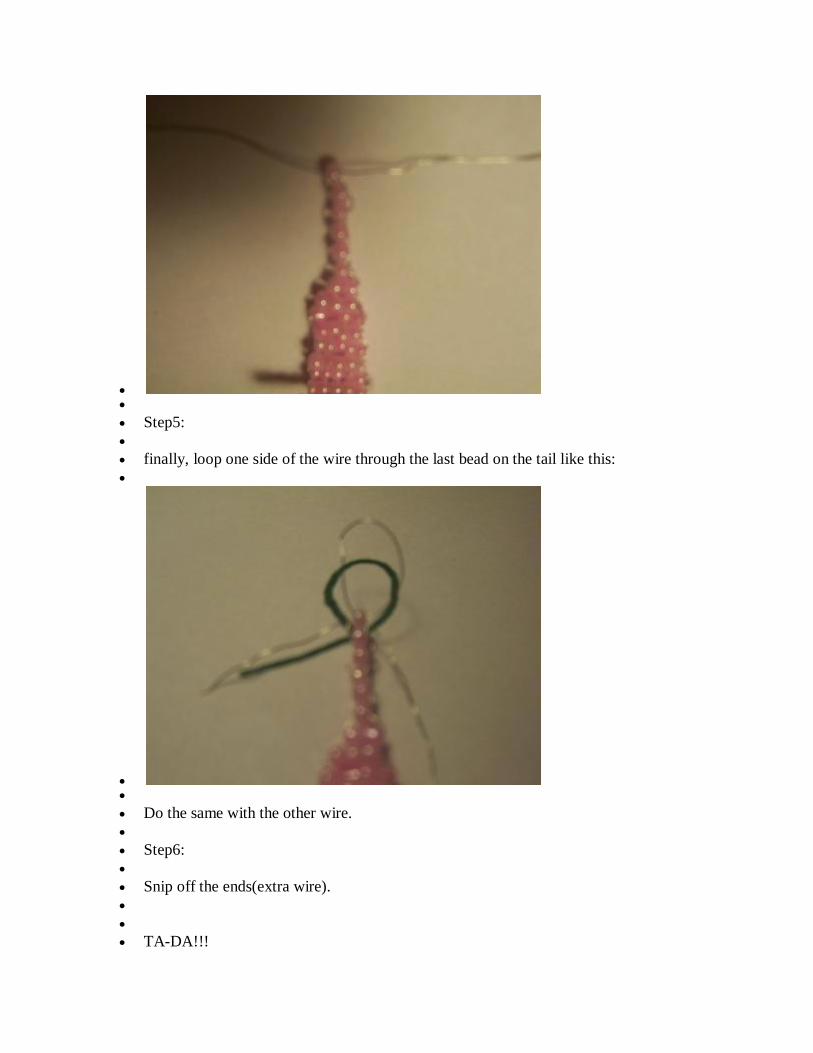
Step5:
finally, loop one side of the wire through the last bead on the tail like this:
Do the same with the other wire.
Step6:
Snip off the ends(extra wire).
TA-DA!!!
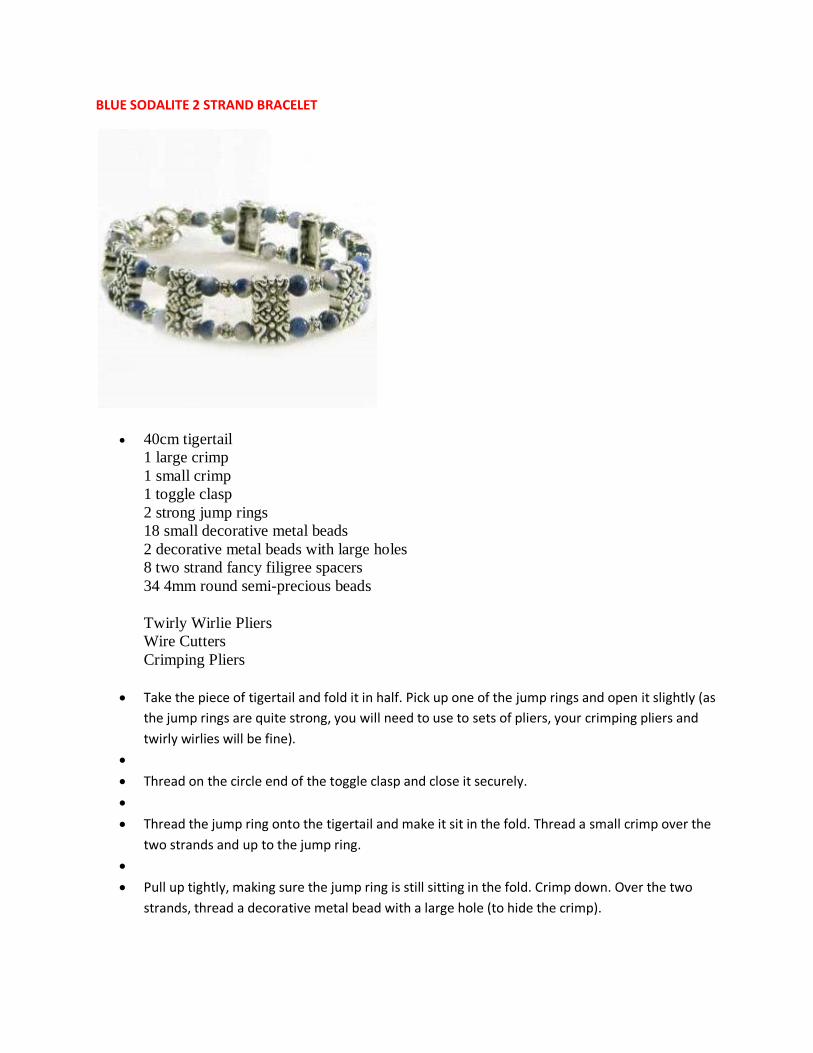
BLUE SODALITE 2 STRAND BRACELET
40cm tigertail
1 large crimp
1 small crimp
1 toggle clasp
2 strong jump rings
18 small decorative metal beads
2 decorative metal beads with large holes
8 two strand fancy filigree spacers
34 4mm round semi-precious beads
Twirly Wirlie Pliers
Wire Cutters
Crimping Pliers
Take the piece of tigertail and fold it in half. Pick up one of the jump rings and open it slightly (as
the jump rings are quite strong, you will need to use to sets of pliers, your crimping pliers and
twirly wirlies will be fine).
Thread on the circle end of the toggle clasp and close it securely.
Thread the jump ring onto the tigertail and make it sit in the fold. Thread a small crimp over the
two strands and up to the jump ring.
Pull up tightly, making sure the jump ring is still sitting in the fold. Crimp down. Over the two
strands, thread a decorative metal bead with a large hole (to hide the crimp).
Now thread a 4mm round semi-precious bead over the two strands. Split the strands up and
thread onto strand 1 (S1) a small decorative metal bead followed by a 4mm round semi-precious
bead. Thread onto strand 2 (S2) a small decorative metal bead followed by a 4mm round semi-
precious bead.
Now begin your pattern.
Thread the following onto their respective strands: S1: - right-hand side of the two strand fancy
filigree spacer - a 4mm round semi-precious bead - a small decorative metal bead - a 4mm
round semi-precious bead S2: - left-hand side of the two strand fancy filigree spacer - a 4mm
round semi-precious bead - a small decorative metal bead - a 4mm round semi-precious bead
Repeat another 6 times. Now thread on: S1: - a 4mm round semi-precious bead - a small
decorative metal bead S2: - a 4mm round semi-precious bead - a small decorative metal bead
Bring the two strands back together and thread a 4mm round semi-precious bead over the two
strands, followed by a decorative metal bead with a large hole and a large crimp.
Put your bracelet aside and pick up one of the jump rings and open it slightly. Thread on the bar
end of the toggle clasp and close it securely. Pick your bracelet back up and thread the jump ring
over the two strands.
Take the tail end of the tigertail and thread it over the top of the jump ring and through the
large crimp. Pull up tightly, crimp down and cut off any excess tigertail.
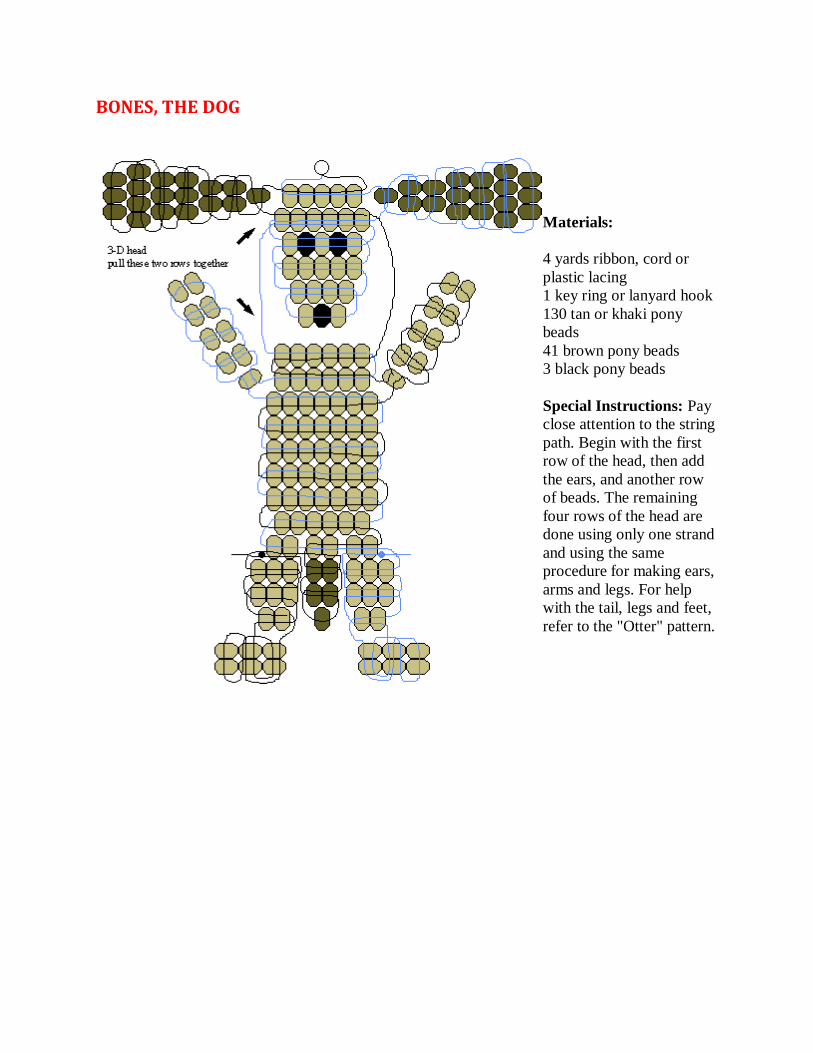
BONES, THE DOG
Materials:
4 yards ribbon, cord or
plastic lacing
1 key ring or lanyard hook
130 tan or khaki pony
beads
41 brown pony beads
3 black pony beads
Special Instructions: Pay
close attention to the string
path. Begin with the first
row of the head, then add
the ears, and another row
of beads. The remaining
four rows of the head are
done using only one strand
and using the same
procedure for making ears,
arms and legs. For help
with the tail, legs and feet,
refer to the "Otter" pattern.
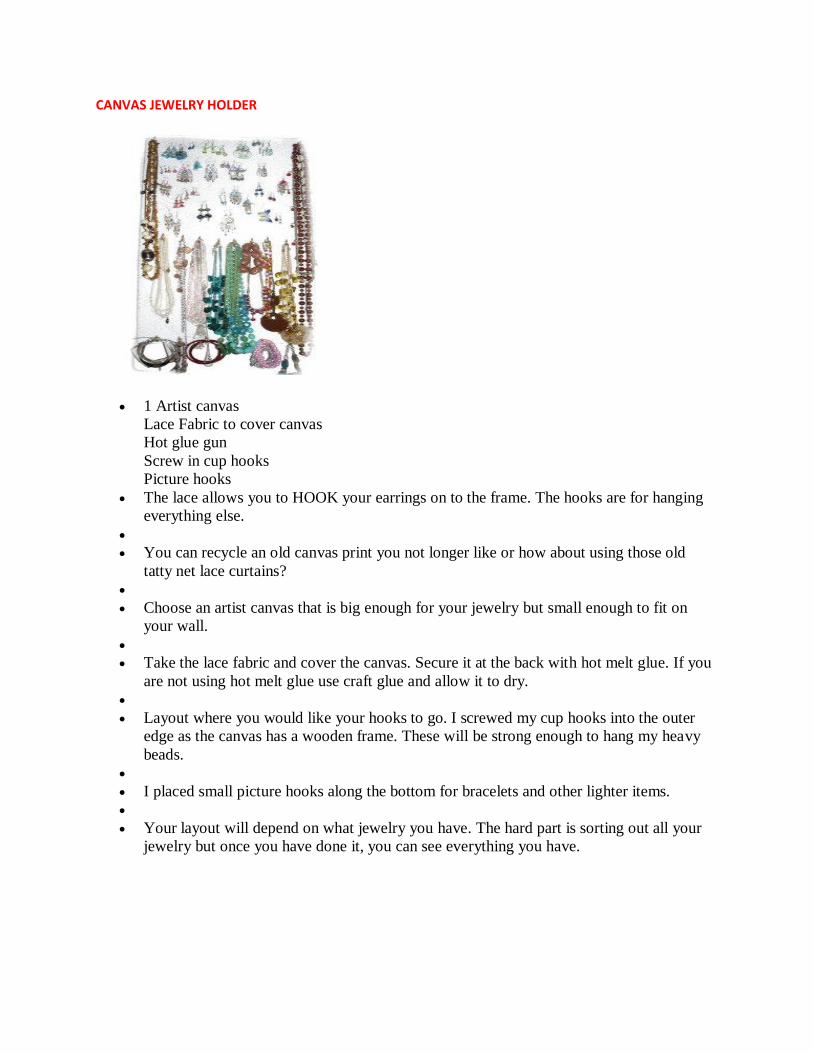
CANVAS JEWELRY HOLDER
1 Artist canvas
Lace Fabric to cover canvas
Hot glue gun
Screw in cup hooks
Picture hooks
The lace allows you to HOOK your earrings on to the frame. The hooks are for hanging
everything else.
You can recycle an old canvas print you not longer like or how about using those old
tatty net lace curtains?
Choose an artist canvas that is big enough for your jewelry but small enough to fit on
your wall.
Take the lace fabric and cover the canvas. Secure it at the back with hot melt glue. If you
are not using hot melt glue use craft glue and allow it to dry.
Layout where you would like your hooks to go. I screwed my cup hooks into the outer
edge as the canvas has a wooden frame. These will be strong enough to hang my heavy
beads.
I placed small picture hooks along the bottom for bracelets and other lighter items.
Your layout will depend on what jewelry you have. The hard part is sorting out all your
jewelry but once you have done it, you can see everything you have.
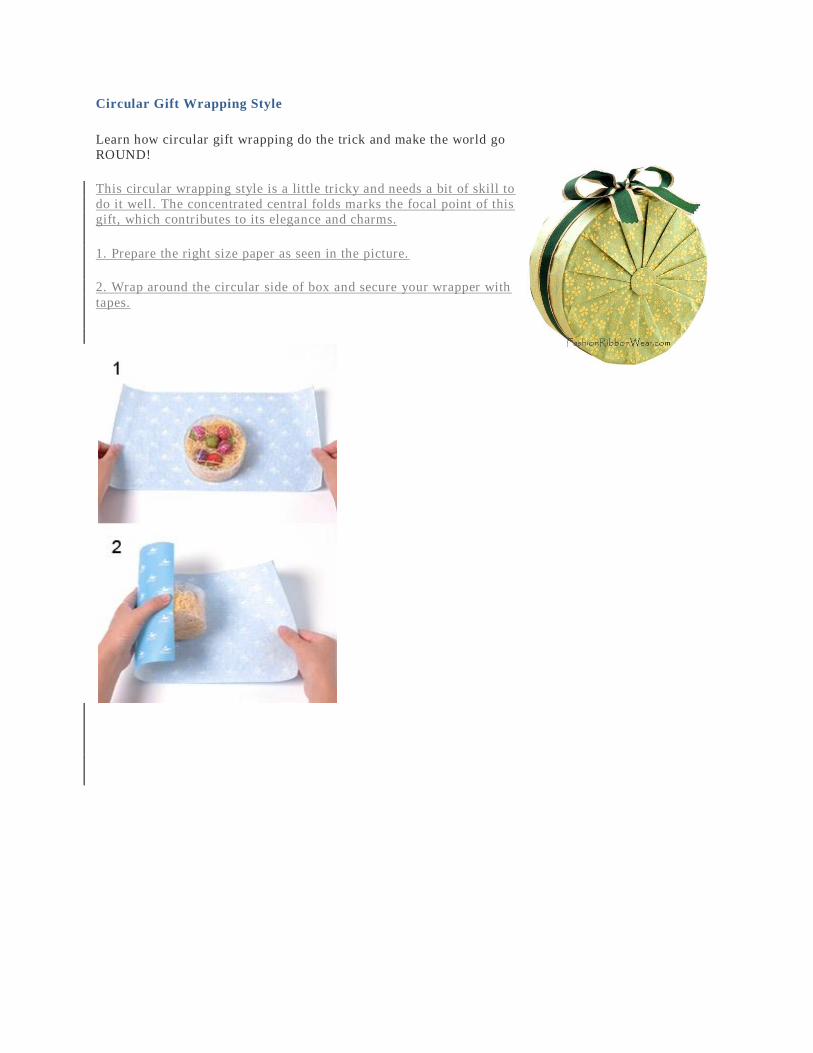
Circular Gift Wrapping Style
Learn how circular gift wrapping do the trick and make the world go
ROUND!
This circular wrapping style is a little tricky and needs a bit of skill to
do it well. The concentrated central folds marks the focal point of this
gift, which contributes to its elegance and charms.
1. Prepare the right size paper as seen in the picture.
2. Wrap around the circular side of box and secure your wrapper with
tapes.
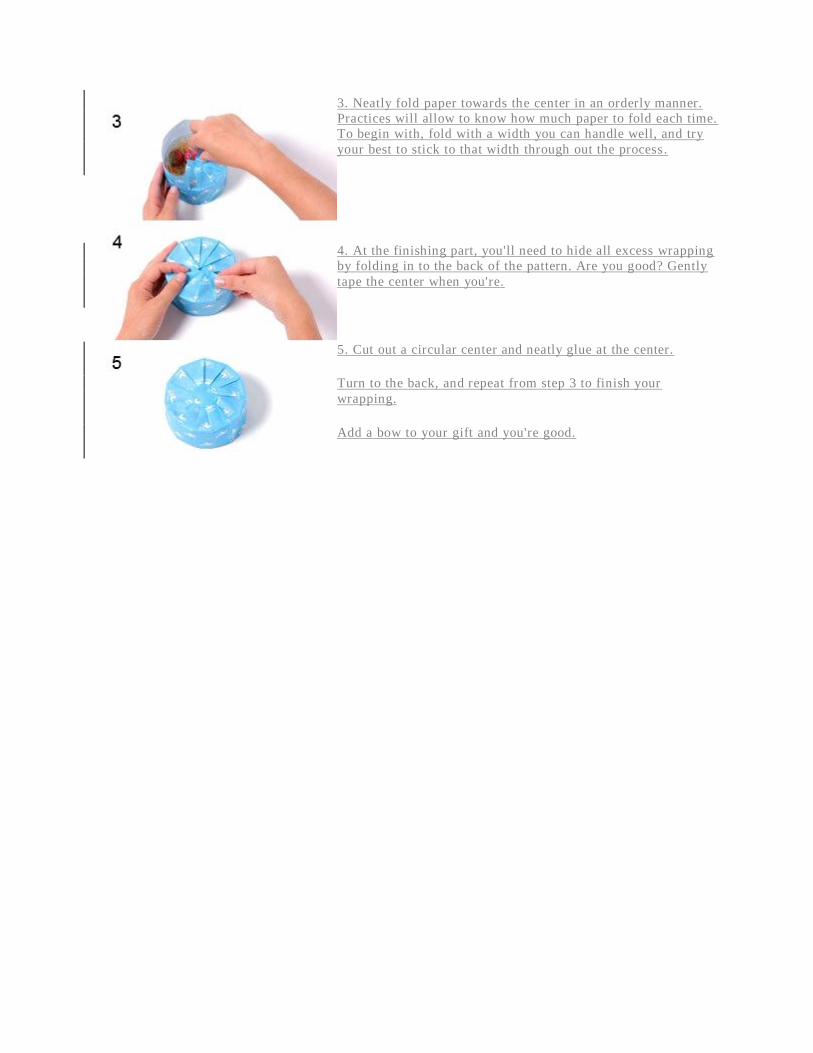
3. Neatly fold paper towards the center in an orderly manner.
Practices will allow to know how much paper to fold each time.
To begin with, fold with a width you can handle well, and try
your best to stick to that width through out the process.
4. At the finishing part, you'll need to hide all excess wrapping
by folding in to the back of the pattern. Are you good? Gently
tape the center when you're.
5. Cut out a circular center and neatly glue at the center.
Turn to the back, and repeat from step 3 to finish your
wrapping.
Add a bow to your gift and you're good.
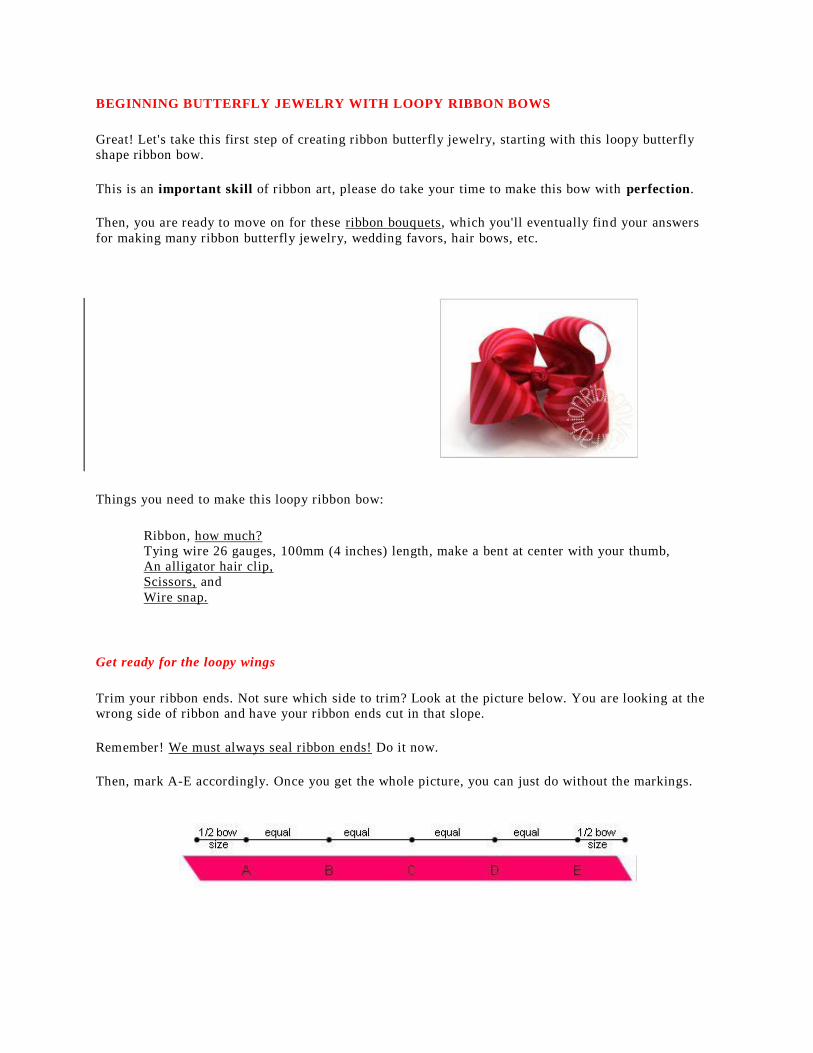
BEGINNING BUTTERFLY JEWELRY WITH LOOPY RIBBON BOWS
Great! Let's take this first step of creating ribbon butterfly jewelry, starting with this loopy butterfly
shape ribbon bow.
This is an important skill of ribbon art, please do take your time to make this bow with perfection.
Then, you are ready to move on for these ribbon bouquets, which you'll eventually find your answers
for making many ribbon butterfly jewelry, wedding favors, hair bows, etc.
Things you need to make this loopy ribbon bow:
Ribbon, how much?
Tying wire 26 gauges, 100mm (4 inches) length, make a bent at center with your thumb,
An alligator hair clip,
Scissors, and
Wire snap.
Get ready for the loopy wings
Trim your ribbon ends. Not sure which side to trim? Look at the picture below. You are looking at the
wrong side of ribbon and have your ribbon ends cut in that slope.
Remember! We must always seal ribbon ends! Do it now.
Then, mark A-E accordingly. Once you get the whole picture, you can just do without the markings.
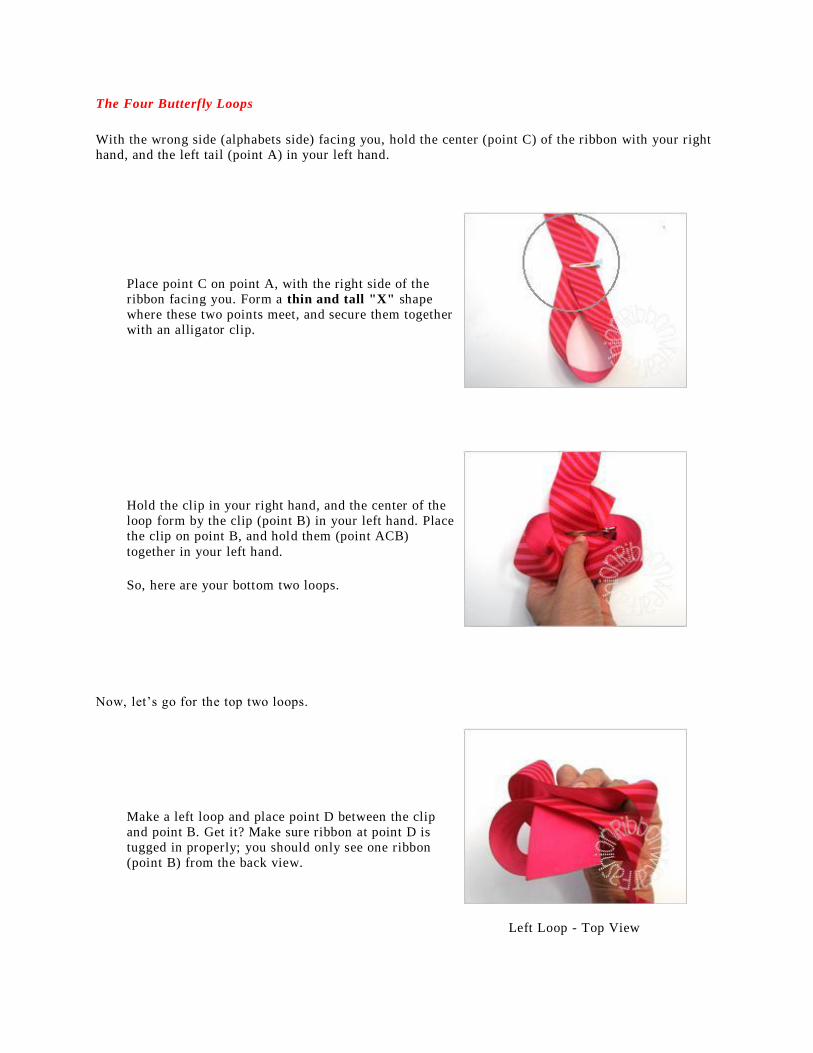
The Four Butterfly Loops
With the wrong side (alphabets side) facing you, hold the center (point C) of the ribbon with your right
hand, and the left tail (point A) in your left hand.
Place point C on point A, with the right side of the
ribbon facing you. Form a thin and tall "X" shape
where these two points meet, and secure them together
with an alligator clip.
Hold the clip in your right hand, and the center of the
loop form by the clip (point B) in your left hand. Place
the clip on point B, and hold them (point ACB)
together in your left hand.
So, here are your bottom two loops.
Now, let’s go for the top two loops.
Make a left loop and place point D between the clip
and point B. Get it? Make sure ribbon at point D is
tugged in properly; you should only see one ribbon
(point B) from the back view.
Left Loop - Top View
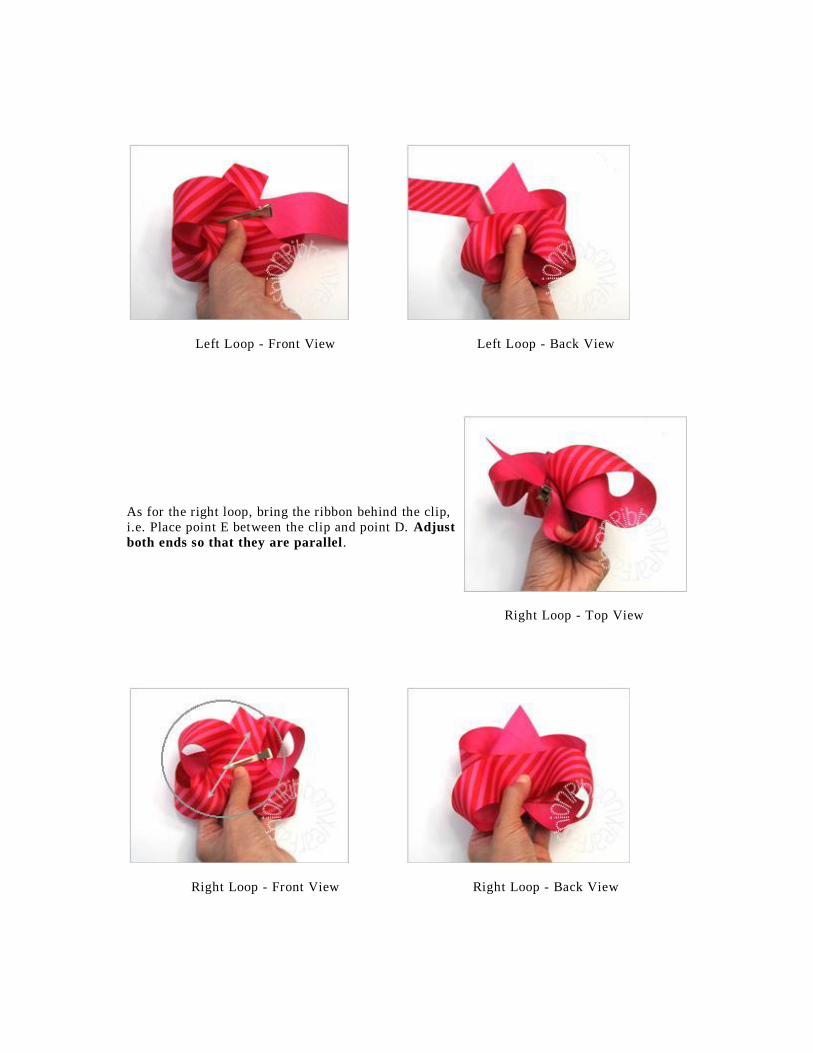
Left Loop - Front View
Left Loop - Back View
As for the right loop, bring the ribbon behind the clip,
i.e. Place point E between the clip and point D. Adjust
both ends so that they are parallel.
Right Loop - Top View
Right Loop - Front View
Right Loop - Back View
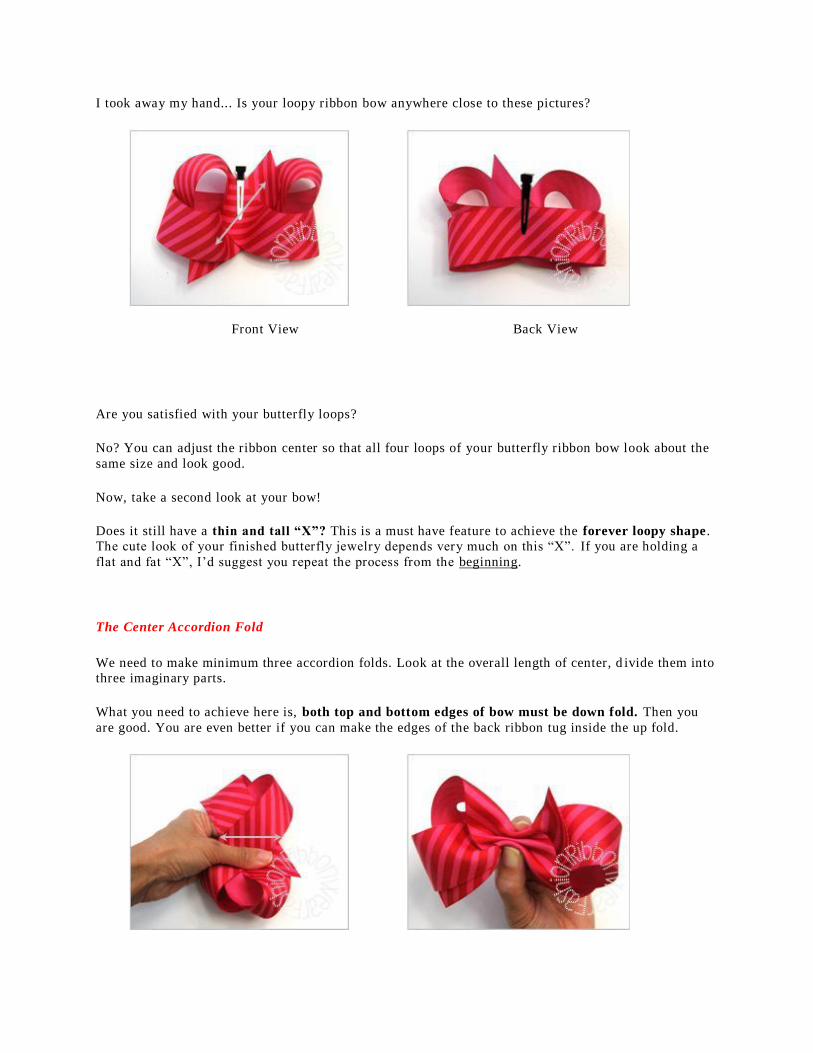
I took away my hand... Is your loopy ribbon bow anywhere close to these pictures?
Front View
Back View
Are you satisfied with your butterfly loops?
No? You can adjust the ribbon center so that all four loops of your butterfly ribbon bow look about the
same size and look good.
Now, take a second look at your bow!
Does it still have a thin and tall “X”? This is a must have feature to achieve the forever loopy shape .
The cute look of your finished butterfly jewelry depends very much on this “X”. If you are holding a
flat and fat “X”, I’d suggest you repeat the process from the beginning.
The Center Accordion Fold
We need to make minimum three accordion folds. Look at the overall length of center, d ivide them into
three imaginary parts.
What you need to achieve here is, both top and bottom edges of bow must be down fold. Then you
are good. You are even better if you can make the edges of the back ribbon tug inside the up fold.
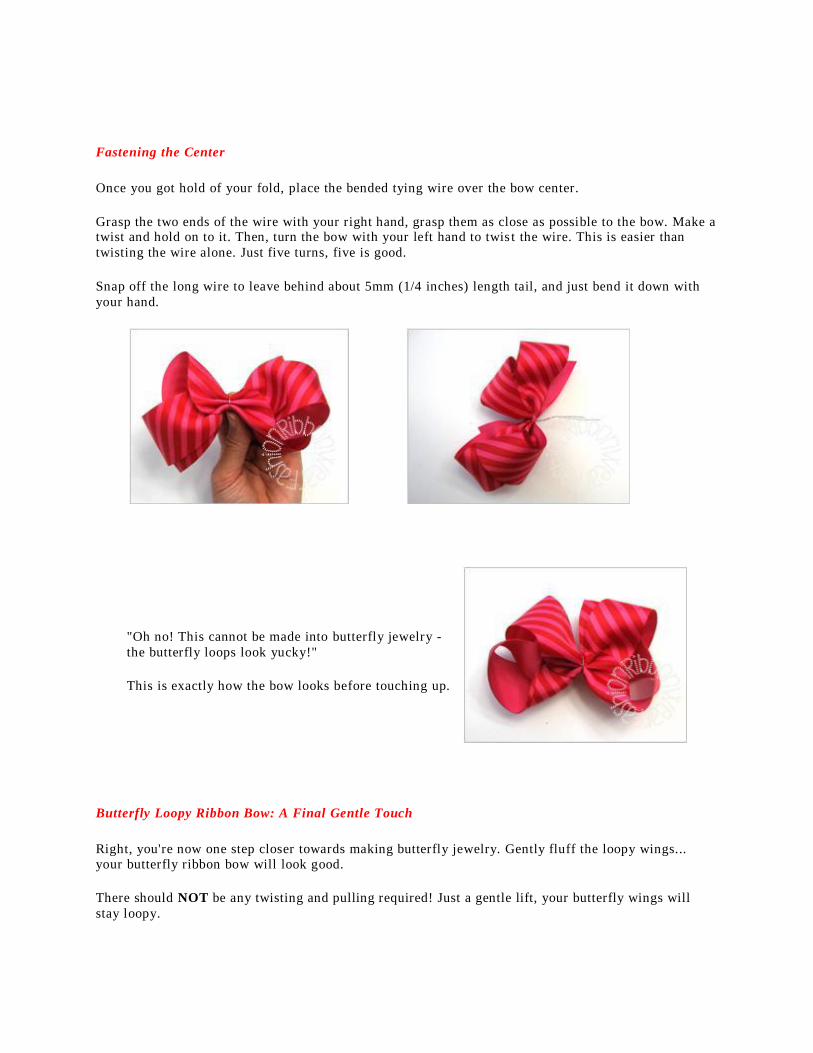
Fastening the Center
Once you got hold of your fold, place the bended tying wire over the bow center.
Grasp the two ends of the wire with your right hand, grasp them as close as possible to the bow. Make a twist and hold on to it. Then, turn the bow with your left hand to twis t the wire. This is easier than
twisting the wire alone. Just five turns, five is good.
Snap off the long wire to leave behind about 5mm (1/4 inches) length tail, and just bend it down with
your hand.
"Oh no! This cannot be made into butterfly jewelry -
the butterfly loops look yucky!"
This is exactly how the bow looks before touching up.
Butterfly Loopy Ribbon Bow: A Final Gentle Touch
Right, you're now one step closer towards making butterfly jewelry. Gently fluff the loopy wings...
your butterfly ribbon bow will look good.
There should NOT be any twisting and pulling required! Just a gentle lift, your butterfly wings will
stay loopy.
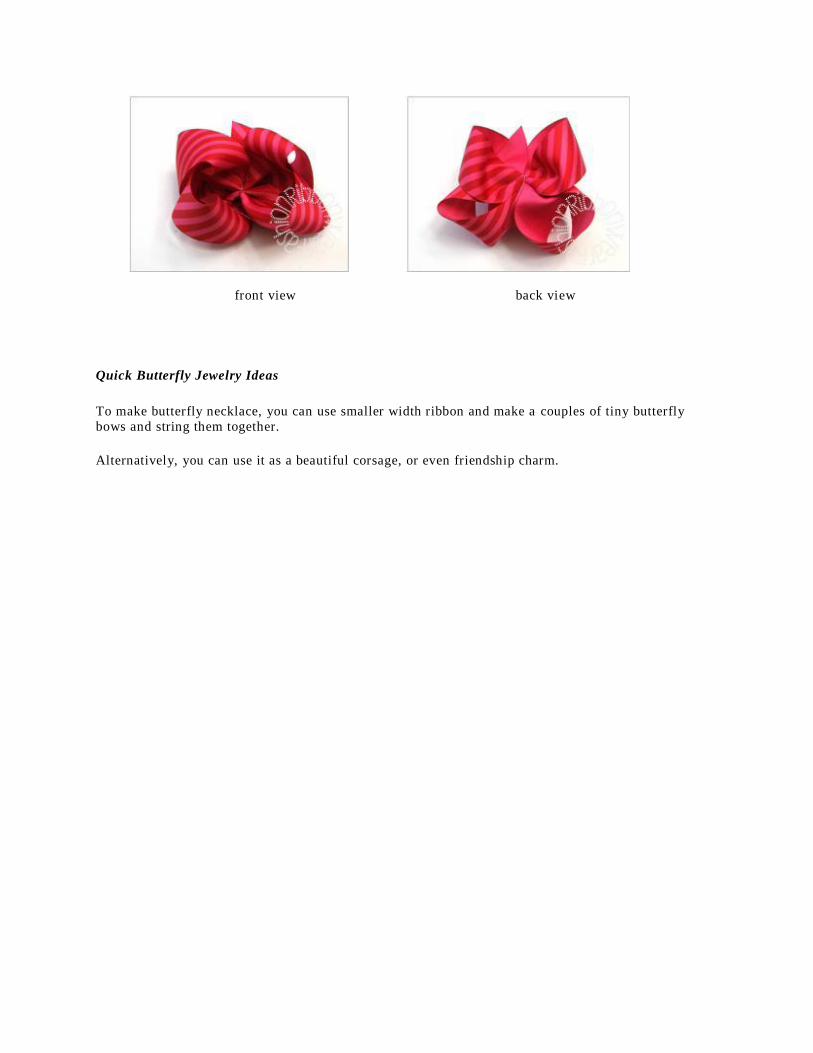
front view
back view
Quick Butterfly Jewelry Ideas
To make butterfly necklace, you can use smaller width ribbon and make a couples of tiny butterfly
bows and string them together.
Alternatively, you can use it as a beautiful corsage, or even friendship charm.

DIAGONAL GIFT WRAPPING STYLE
1. Prepare the right size paper. As seen in the picture, place the
box at an angle along the edge of the paper and make your first
fold. Note that the corner of the paper is folded to the top of
the box.
2. Now, fold the paper back to the front, make sure you cover
the entire box. If your paper cannot do this, you'll need a
bigger piece of paper.
3. You're good? Open back up your wrapping paper, follow pictures 3 and 4 to make your folds. Tidy each corner by neatly
fold up all extra paper in the way.
4. After you got to picture 4, you may tape your paper to
secure it. Then fold the back and lift the box up to get to
picture 5.
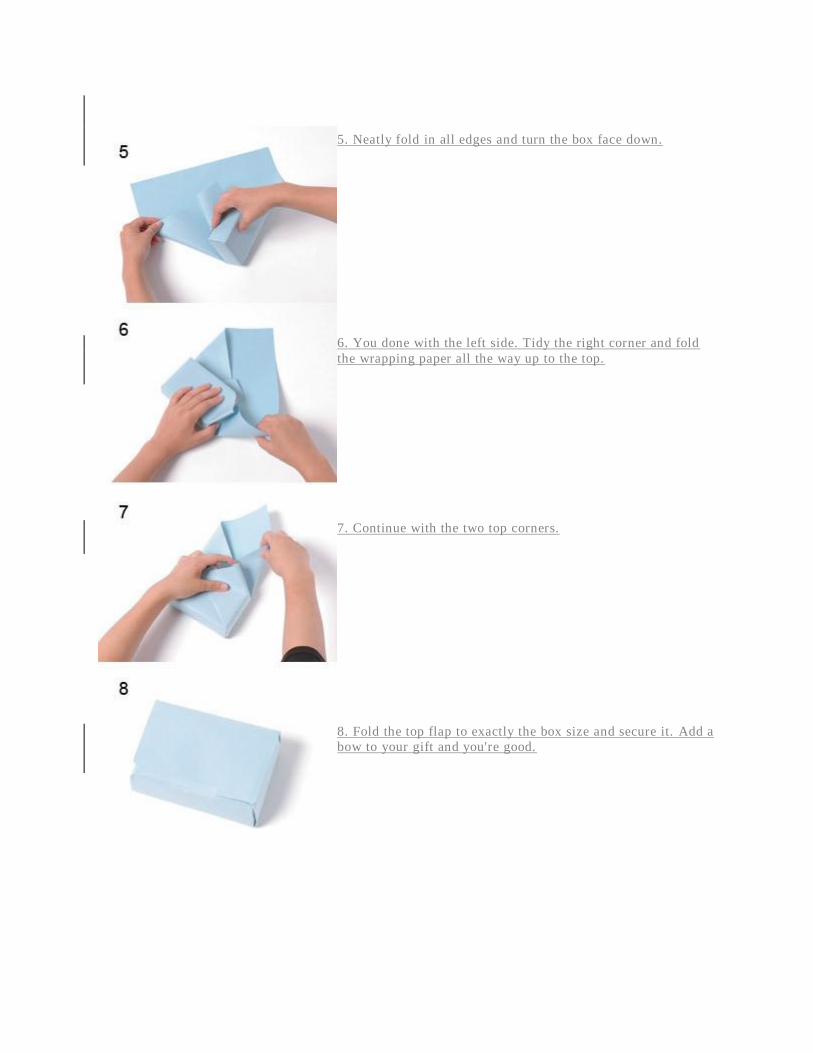
5. Neatly fold in all edges and turn the box face down.
6. You done with the left side. Tidy the right corner and fold
the wrapping paper all the way up to the top.
7. Continue with the two top corners.
8. Fold the top flap to exactly the box size and secure it. Add a
bow to your gift and you're good.
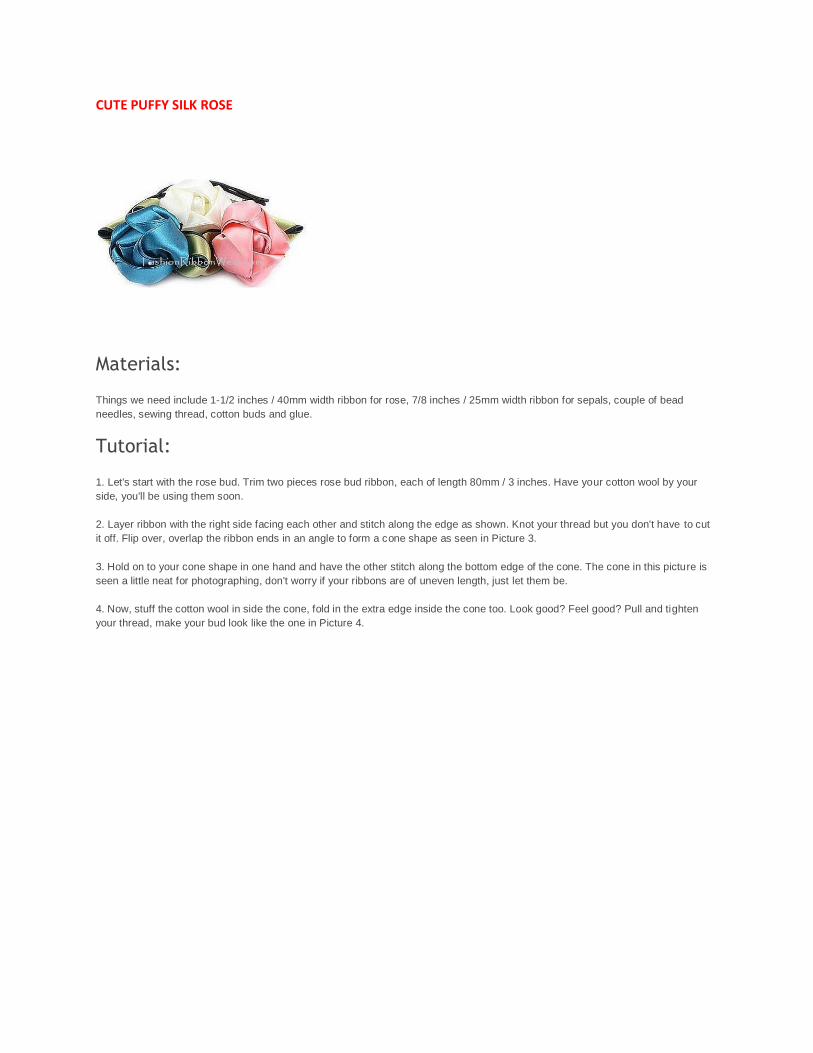
CUTE PUFFY SILK ROSE
Materials:
Things we need include 1-1/2 inches / 40mm width ribbon for rose, 7/8 inches / 25mm width ribbon for sepals, couple of bead
needles, sewing thread, cotton buds and glue.
Tutorial:
1. Let's start with the rose bud. Trim two pieces rose bud ribbon, each of length 80mm / 3 inches. Have your cotton wool by your
side, you'll be using them soon.
2. Layer ribbon with the right side facing each other and stitch along the edge as shown. Knot your thread but you don't have to cut
it off. Flip over, overlap the ribbon ends in an angle to form a cone shape as seen in Picture 3.
3. Hold on to your cone shape in one hand and have the other stitch along the bottom edge of the cone. The cone in this picture is
seen a little neat for photographing, don't worry if your ribbons are of uneven length, just let them be.
4. Now, stuff the cotton wool in side the cone, fold in the extra edge inside the cone too. Look good? Feel good? Pull and tighten
your thread, make your bud look like the one in Picture 4.

5. As for the petals, trim a 450mm / 18 inches length ribbon. With the ribbon's right side facing you, at about 100mm / 4 inches from
the left ribbon end, make you first fold by flipping your right ribbon end to the top to make a backward "L".
6. Then, Flip the top back down again and it will look like picture 6. Don't forget to pin as you fold.
7 & 8. Continue folding and pinning, till you get a square. Trim away the extra ribbons to make a perfect square.
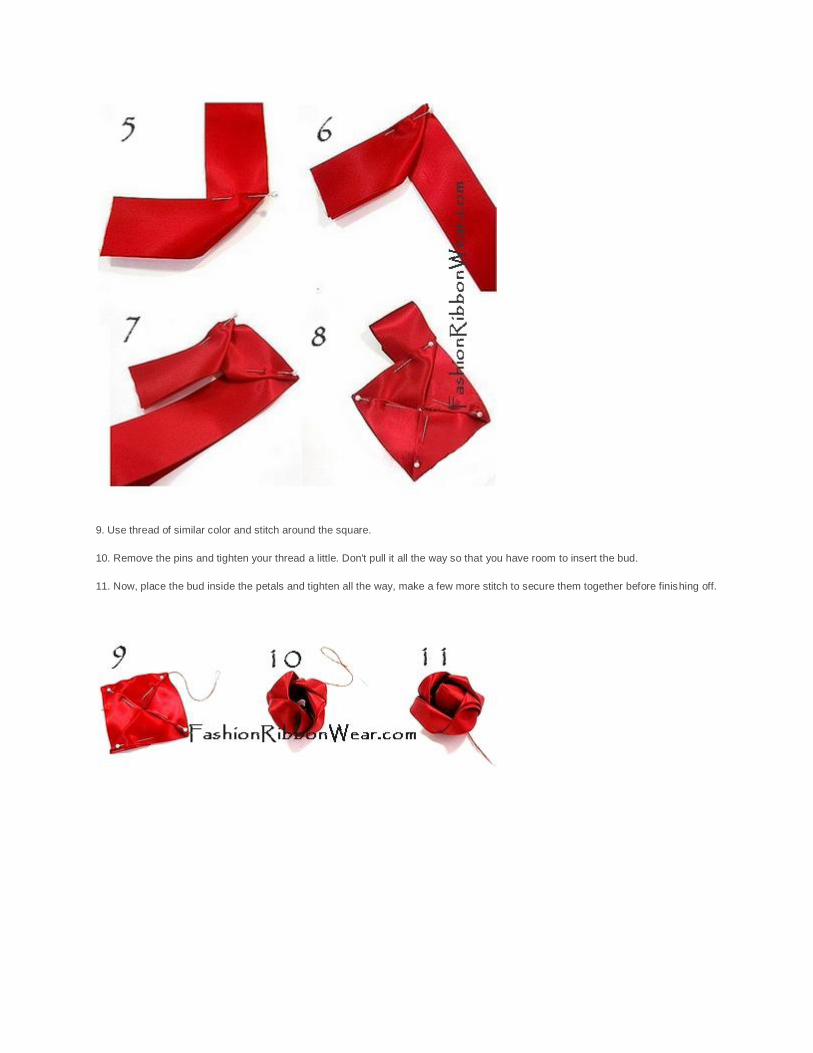
9. Use thread of similar color and stitch around the square.
10. Remove the pins and tighten your thread a little. Don't pull it all the way so that you have room to insert the bud.
11. Now, place the bud inside the petals and tighten all the way, make a few more stitch to secure them together before finishing off.
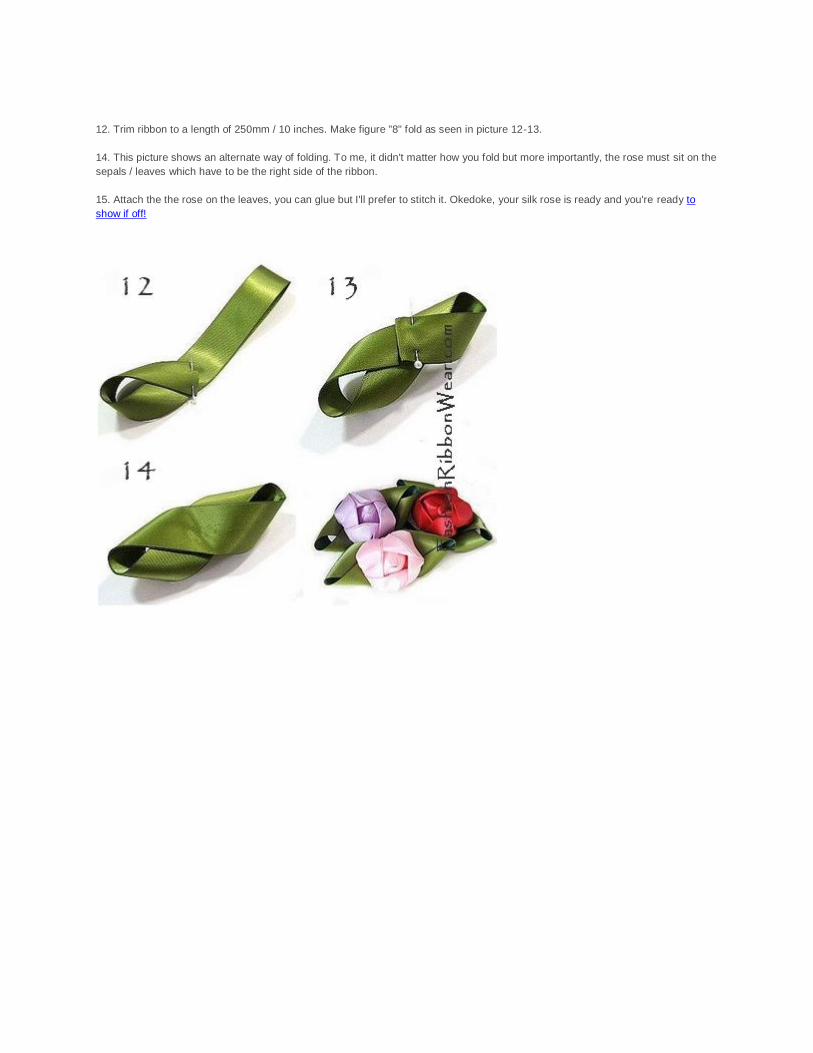
12. Trim ribbon to a length of 250mm / 10 inches. Make figure "8" fold as seen in picture 12-13.
14. This picture shows an alternate way of folding. To me, it didn't matter how you fold but more importantly, the rose must sit on the
sepals / leaves which have to be the right side of the ribbon.
15. Attach the the rose on the leaves, you can glue but I'll prefer to stitch it. Okedoke, your silk rose is ready and you're ready to
show if off!
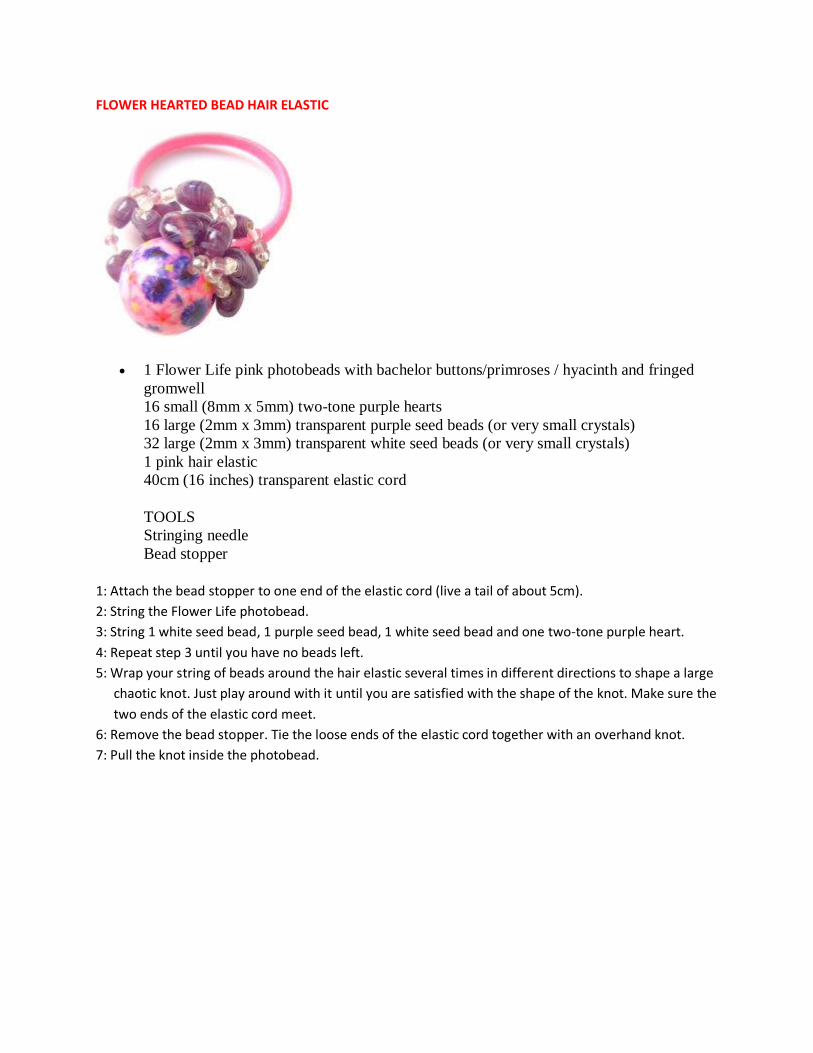
FLOWER HEARTED BEAD HAIR ELASTIC
1 Flower Life pink photobeads with bachelor buttons/primroses / hyacinth and fringed
gromwell
16 small (8mm x 5mm) two-tone purple hearts
16 large (2mm x 3mm) transparent purple seed beads (or very small crystals)
32 large (2mm x 3mm) transparent white seed beads (or very small crystals)
1 pink hair elastic
40cm (16 inches) transparent elastic cord
TOOLS
Stringing needle
Bead stopper
1: Attach the bead stopper to one end of the elastic cord (live a tail of about 5cm).
2: String the Flower Life photobead.
3: String 1 white seed bead, 1 purple seed bead, 1 white seed bead and one two-tone purple heart.
4: Repeat step 3 until you have no beads left.
5: Wrap your string of beads around the hair elastic several times in different directions to shape a large
chaotic knot. Just play around with it until you are satisfied with the shape of the knot. Make sure the
two ends of the elastic cord meet.
6: Remove the bead stopper. Tie the loose ends of the elastic cord together with an overhand knot.
7: Pull the knot inside the photobead.
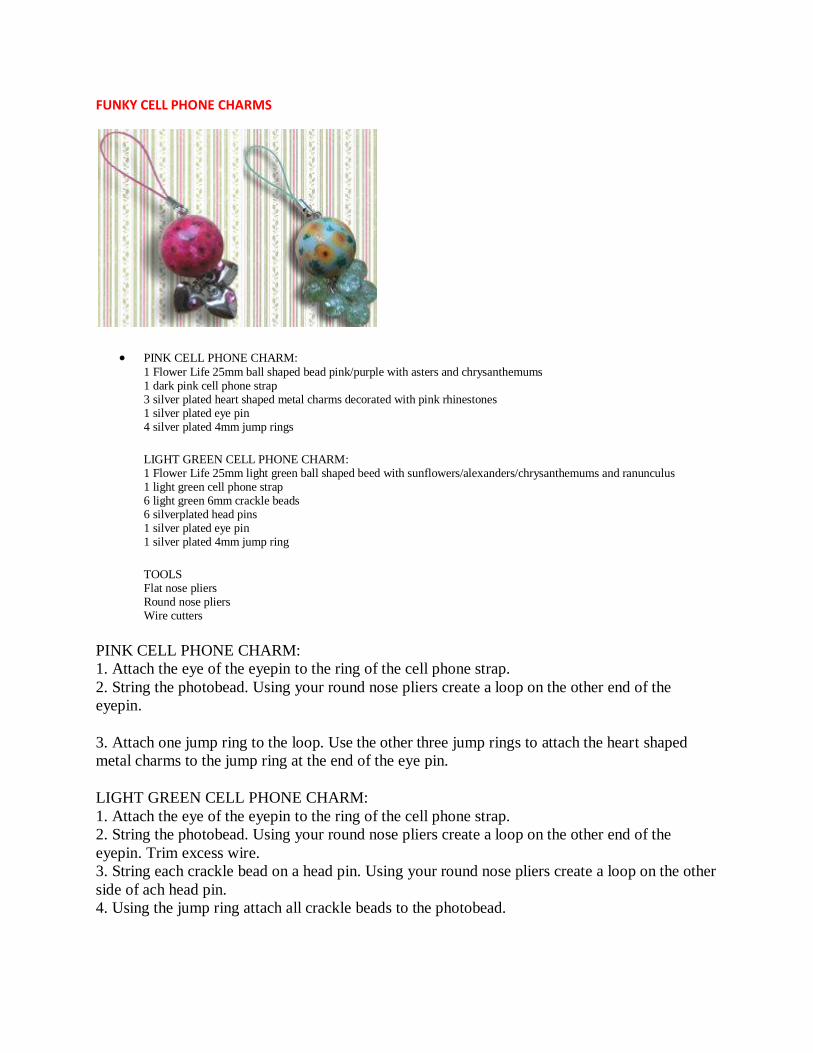
FUNKY CELL PHONE CHARMS
PINK CELL PHONE CHARM:
1 Flower Life 25mm ball shaped bead pink/purple with asters and chrysanthemums 1 dark pink cell phone strap 3 silver plated heart shaped metal charms decorated with pink rhinestones 1 silver plated eye pin 4 silver plated 4mm jump rings
LIGHT GREEN CELL PHONE CHARM: 1 Flower Life 25mm light green ball shaped beed with sunflowers/alexanders/chrysanthemums and ranunculus 1 light green cell phone strap 6 light green 6mm crackle beads 6 silverplated head pins 1 silver plated eye pin 1 silver plated 4mm jump ring
TOOLS Flat nose pliers Round nose pliers Wire cutters
PINK CELL PHONE CHARM:
1. Attach the eye of the eyepin to the ring of the cell phone strap.
2. String the photobead. Using your round nose pliers create a loop on the other end of the
eyepin.
3. Attach one jump ring to the loop. Use the other three jump rings to attach the heart shaped
metal charms to the jump ring at the end of the eye pin.
LIGHT GREEN CELL PHONE CHARM:
1. Attach the eye of the eyepin to the ring of the cell phone strap.
2. String the photobead. Using your round nose pliers create a loop on the other end of the
eyepin. Trim excess wire.
3. String each crackle bead on a head pin. Using your round nose pliers create a loop on the other
side of ach head pin.
4. Using the jump ring attach all crackle beads to the photobead.
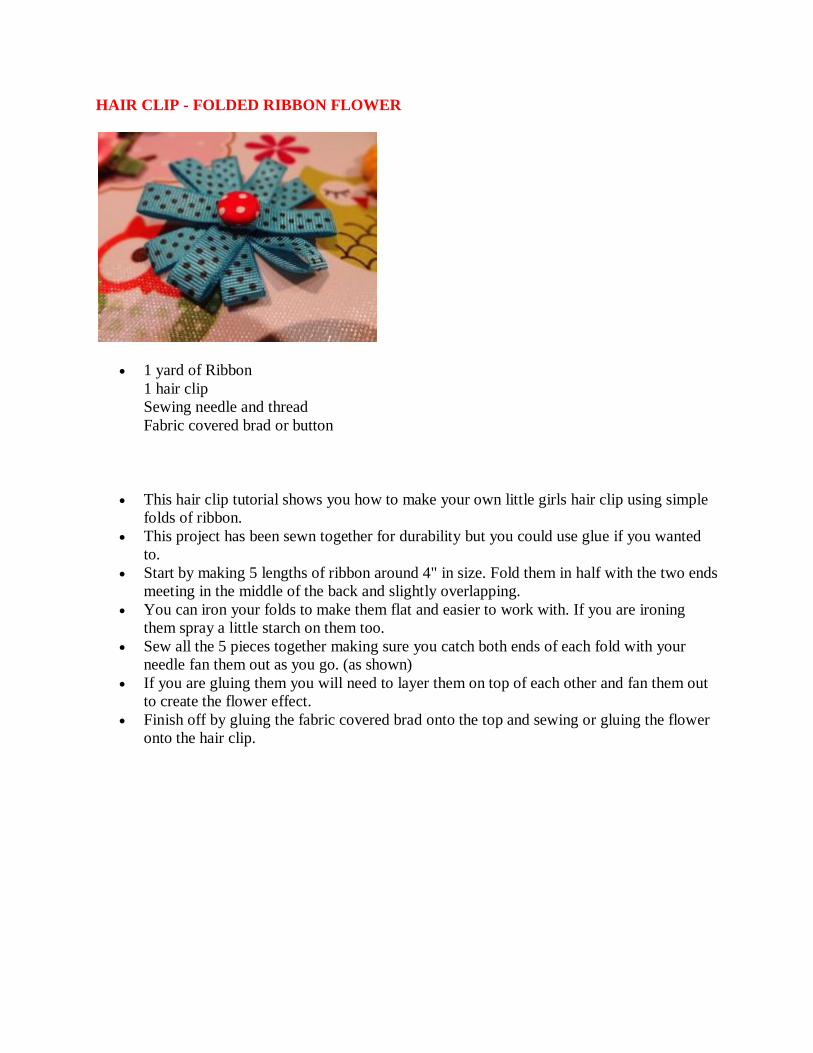
HAIR CLIP - FOLDED RIBBON FLOWER
1 yard of Ribbon
1 hair clip
Sewing needle and thread
Fabric covered brad or button
This hair clip tutorial shows you how to make your own little girls hair clip using simple
folds of ribbon.
This project has been sewn together for durability but you could use glue if you wanted
to.
Start by making 5 lengths of ribbon around 4" in size. Fold them in half with the two ends
meeting in the middle of the back and slightly overlapping.
You can iron your folds to make them flat and easier to work with. If you are ironing
them spray a little starch on them too.
Sew all the 5 pieces together making sure you catch both ends of each fold with your
needle fan them out as you go. (as shown)
If you are gluing them you will need to layer them on top of each other and fan them out
to create the flower effect.
Finish off by gluing the fabric covered brad onto the top and sewing or gluing the flower
onto the hair clip.
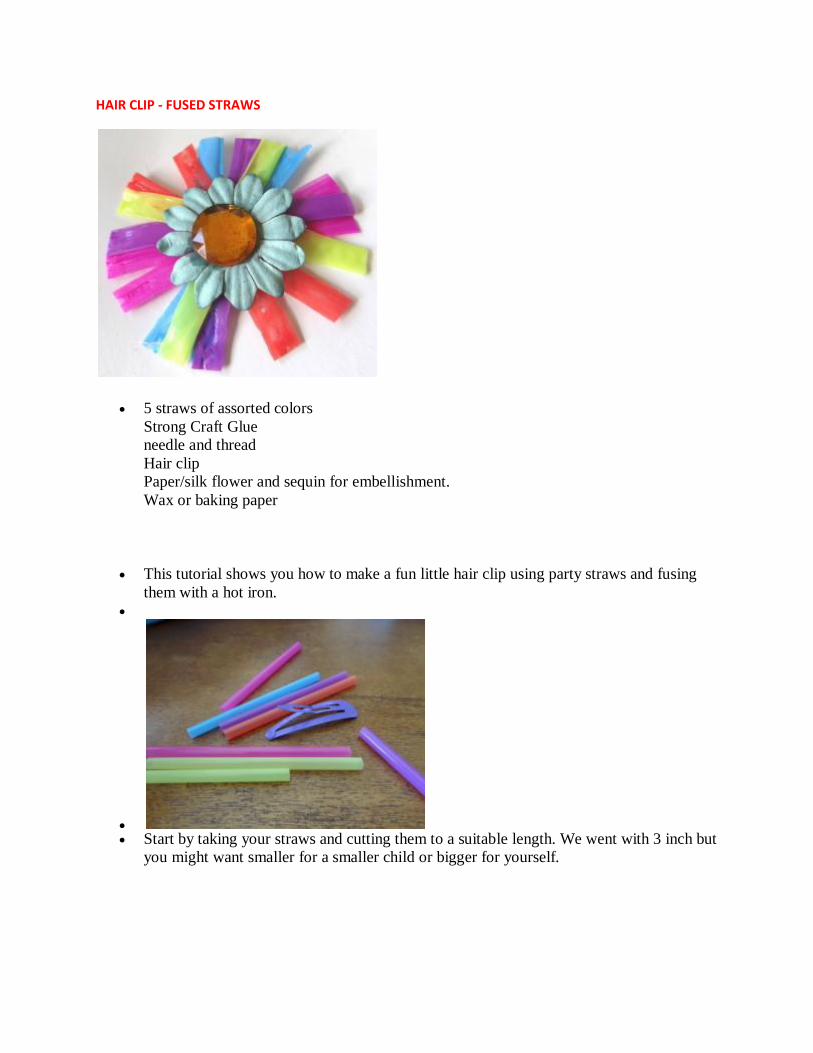
HAIR CLIP - FUSED STRAWS
5 straws of assorted colors
Strong Craft Glue
needle and thread
Hair clip
Paper/silk flower and sequin for embellishment.
Wax or baking paper
This tutorial shows you how to make a fun little hair clip using party straws and fusing
them with a hot iron.
Start by taking your straws and cutting them to a suitable length. We went with 3 inch but
you might want smaller for a smaller child or bigger for yourself.
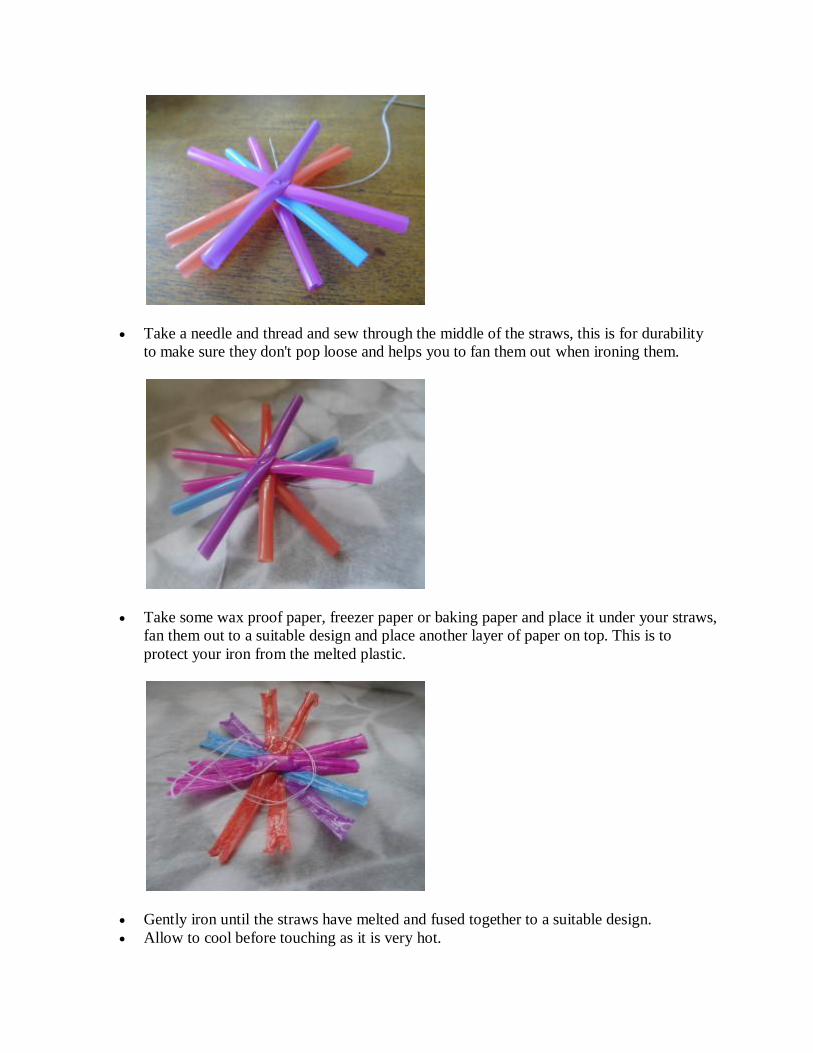
Take a needle and thread and sew through the middle of the straws, this is for durability
to make sure they don't pop loose and helps you to fan them out when ironing them.
Take some wax proof paper, freezer paper or baking paper and place it under your straws,
fan them out to a suitable design and place another layer of paper on top. This is to
protect your iron from the melted plastic.
Gently iron until the straws have melted and fused together to a suitable design.
Allow to cool before touching as it is very hot.
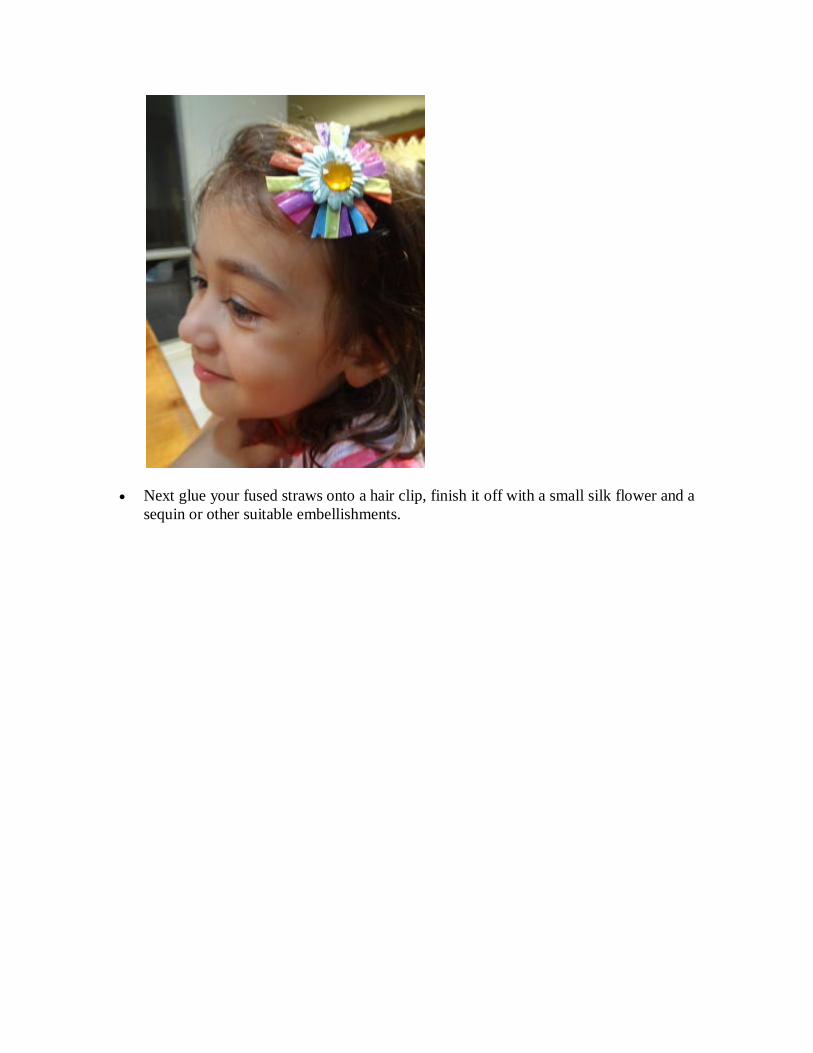
Next glue your fused straws onto a hair clip, finish it off with a small silk flower and a
sequin or other suitable embellishments.
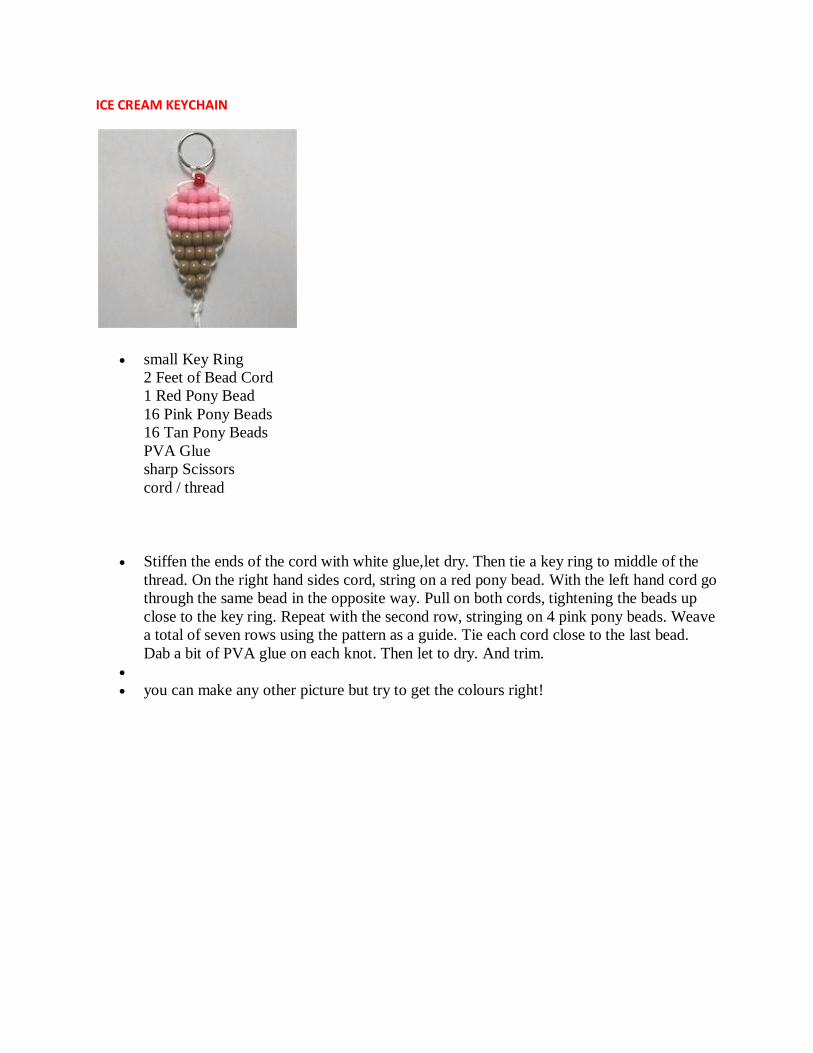
ICE CREAM KEYCHAIN
small Key Ring
2 Feet of Bead Cord
1 Red Pony Bead
16 Pink Pony Beads
16 Tan Pony Beads
PVA Glue
sharp Scissors
cord / thread
Stiffen the ends of the cord with white glue,let dry. Then tie a key ring to middle of the
thread. On the right hand sides cord, string on a red pony bead. With the left hand cord go
through the same bead in the opposite way. Pull on both cords, tightening the beads up
close to the key ring. Repeat with the second row, stringing on 4 pink pony beads. Weave
a total of seven rows using the pattern as a guide. Tie each cord close to the last bead.
Dab a bit of PVA glue on each knot. Then let to dry. And trim.
you can make any other picture but try to get the colours right!
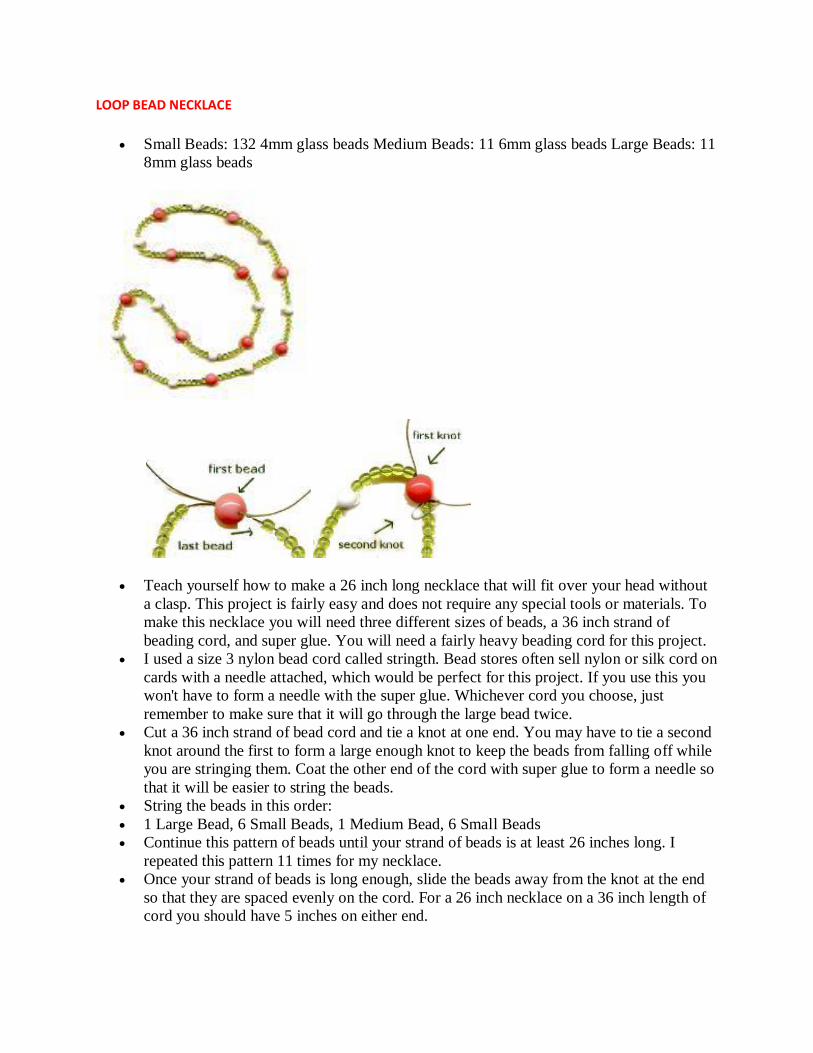
LOOP BEAD NECKLACE
Small Beads: 132 4mm glass beads Medium Beads: 11 6mm glass beads Large Beads: 11
8mm glass beads
Teach yourself how to make a 26 inch long necklace that will fit over your head without
a clasp. This project is fairly easy and does not require any special tools or materials. To
make this necklace you will need three different sizes of beads, a 36 inch strand of
beading cord, and super glue. You will need a fairly heavy beading cord for this project.
I used a size 3 nylon bead cord called stringth. Bead stores often sell nylon or silk cord on
cards with a needle attached, which would be perfect for this project. If you use this you
won't have to form a needle with the super glue. Whichever cord you choose, just
remember to make sure that it will go through the large bead twice.
Cut a 36 inch strand of bead cord and tie a knot at one end. You may have to tie a second
knot around the first to form a large enough knot to keep the beads from falling off while
you are stringing them. Coat the other end of the cord with super glue to form a needle so
that it will be easier to string the beads.
String the beads in this order:
1 Large Bead, 6 Small Beads, 1 Medium Bead, 6 Small Beads
Continue this pattern of beads until your strand of beads is at least 26 inches long. I
repeated this pattern 11 times for my necklace.
Once your strand of beads is long enough, slide the beads away from the knot at the end
so that they are spaced evenly on the cord. For a 26 inch necklace on a 36 inch length of
cord you should have 5 inches on either end.
Take the glued needle end of the cord and bring it around to the first bead and pass the
end through the first bead starting at the side where the 5 extra inches of cord is hanging.
The last bead should now be resting against the first bead.
Take the glued end of cord that is hanging at the end of the first bead and wrap it around
the cord between the first and second beads, forming an overhand knot around the cord.
Take your time to make sure that all the beads remain close together, with no gaps
between them, especially the last, first and second beads.
Now take the other end with the knot and wrap that around the cord between the first and
last beads, forming an overhand knot.
These two knots will hold your necklace together. Take the super glue and coat the knots
so that they can not unravel. Once the glue has dried cut the extra cord off, taking care
not to cut into the glued knots.
Drape your new necklace around your neck and stand in front of the mirror to admire
your handiwork. You will be so pleased with yourself that you won't even notice if you
are having a bad hair day.

Make an Adorable Pansy Bracelet
Free Bead Pattern created by Emily Hackbarth
Take a piece of thread twice the length of your arm, wax it. thread it, double it, and wax it again so that the two sides
stick together. Pick up your clasp, two stem beads (green in the example), two flower beads (purple), and two more
stem beads for a loop by tying a square knot. Leave a tail of several inches so you can weave it back in later.
Now thread your needle through the two stem beads that are on the same side as your
thread is now on. Continue on through the two flower beads. Pick up six flower beads, your center bead, and six more flower beads. Make a loop by going up through your original two flower beads. Continue around the loop until your thread is coming out of the third bead past the center bead.
Pick up eleven flower beads, form another loop by going up through the center bead and continue through the next three flower beads.
Pick up another eleven flower beads and go down through the center bead and the three flower beads next to it.
Pick up eight more flower beads and form the final loop by going down through the third bead up from the center bead.
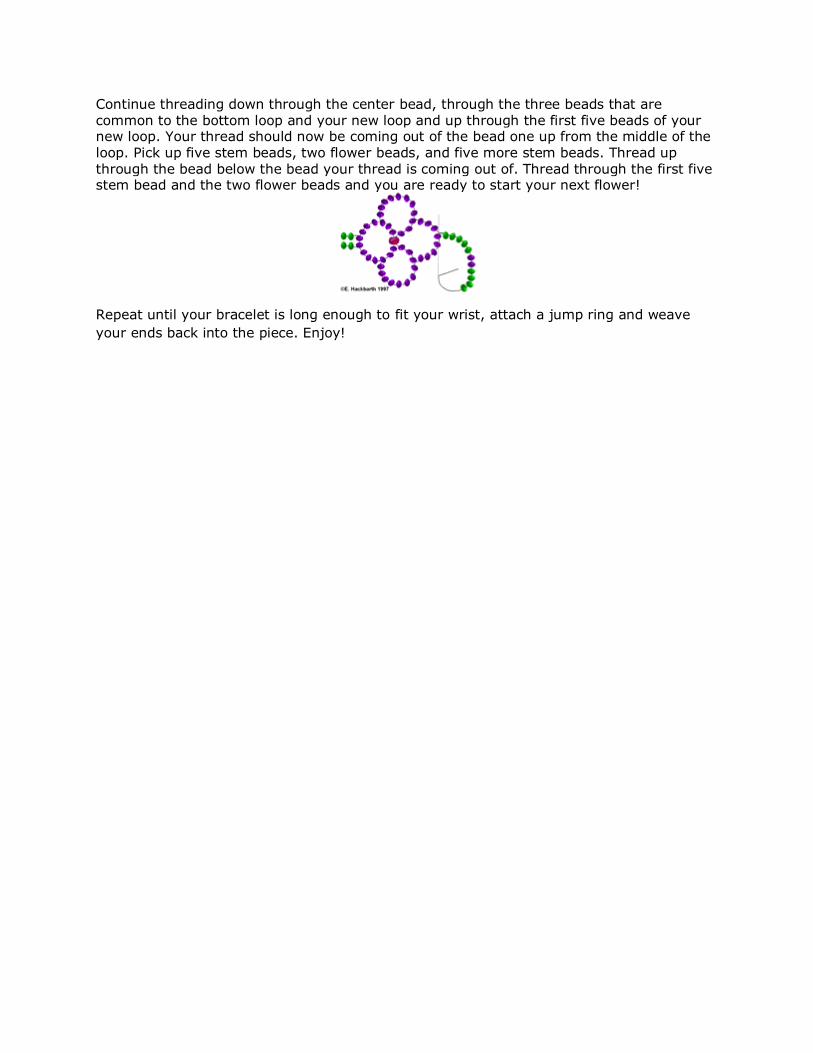
Continue threading down through the center bead, through the three beads that are common to the bottom loop and your new loop and up through the first five beads of your new loop. Your thread should now be coming out of the bead one up from the middle of the loop. Pick up five stem beads, two flower beads, and five more stem beads. Thread up
through the bead below the bead your thread is coming out of. Thread through the first five stem bead and the two flower beads and you are ready to start your next flower!
Repeat until your bracelet is long enough to fit your wrist, attach a jump ring and weave
your ends back into the piece. Enjoy!
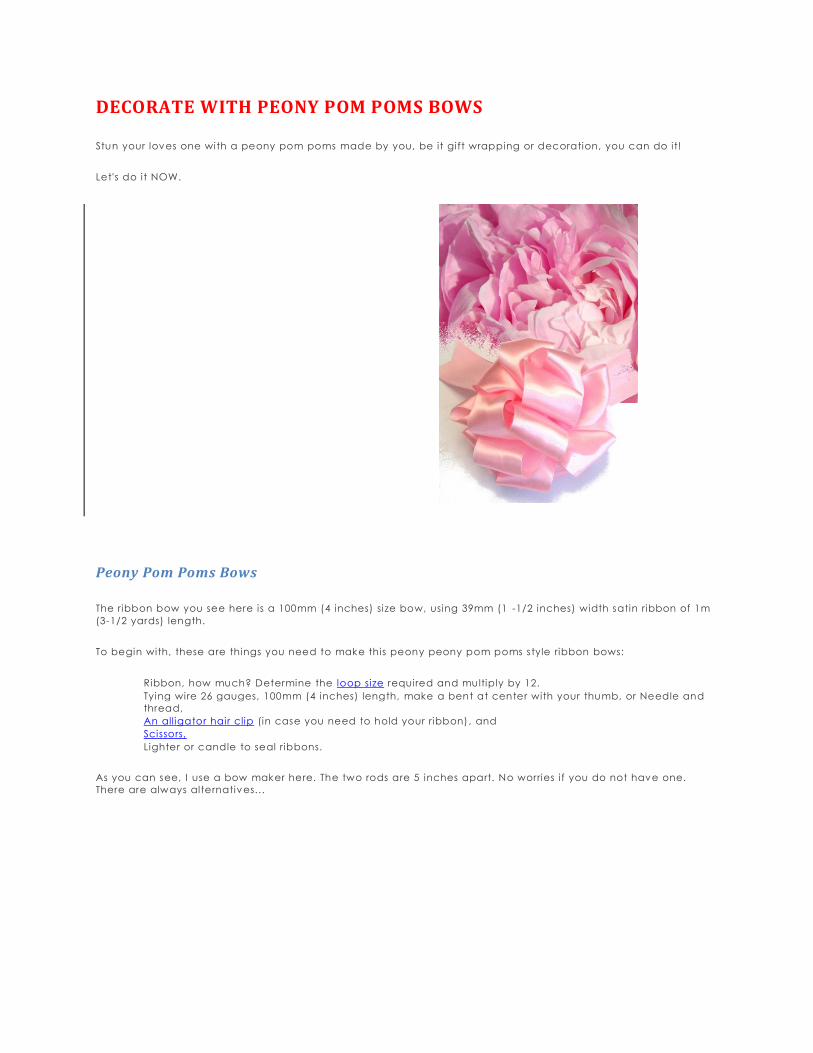
DECORATE WITH PEONY POM POMS BOWS
Stun your loves one with a peony pom poms made by you, be it gift wrapping or decoration, you can do it!
Let's do it NOW.
Peony Pom Poms Bows
The ribbon bow you see here is a 100mm (4 inches) size bow, using 39mm (1 -1/2 inches) width satin ribbon of 1m
(3-1/2 yards) length.
To begin with, these are things you need to make this peony peony pom poms style ribbon bows:
Ribbon, how much? Determine the loop size required and multiply by 12.
Tying wire 26 gauges, 100mm (4 inches) length, make a bent at center with your thumb, or Needle and
thread,
An alligator hair clip (in case you need to hold your ribbon), and
Scissors,
Lighter or candle to seal ribbons.
As you can see, I use a bow maker here. The two rods are 5 inches apart. No worries i f you do not have one.
There are always alternatives...
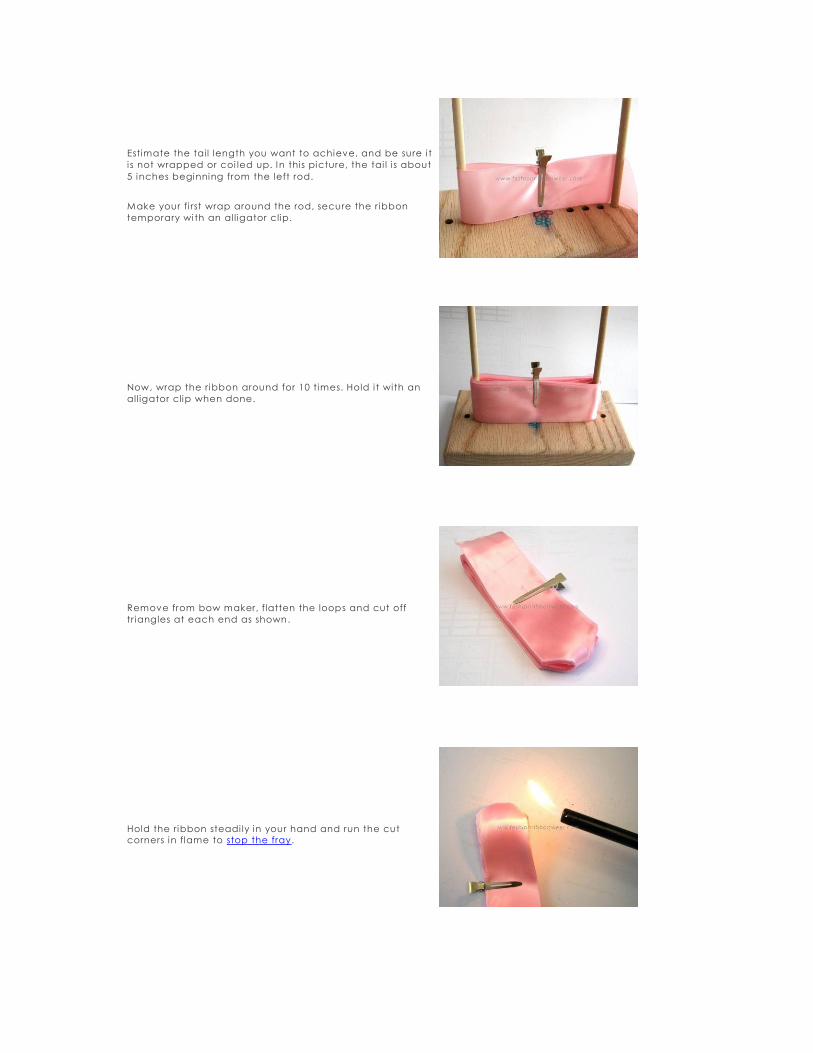
Estimate the tail length you want to achieve, and be sure i t
i s not wrapped or coi led up. In this picture, the tai l i s about
5 inches beginning from the left rod.
Make your fi rst wrap around the rod, secure the ribbon
temporary with an alligator clip.
Now, wrap the ribbon around for 10 times. Hold i t wi th an
all igator clip when done.
Remove from bow maker, flatten the loops and cut off
triangles at each end as shown.
Hold the ribbon steadi ly in your hand and run the cut
corners in flame to stop the fray.
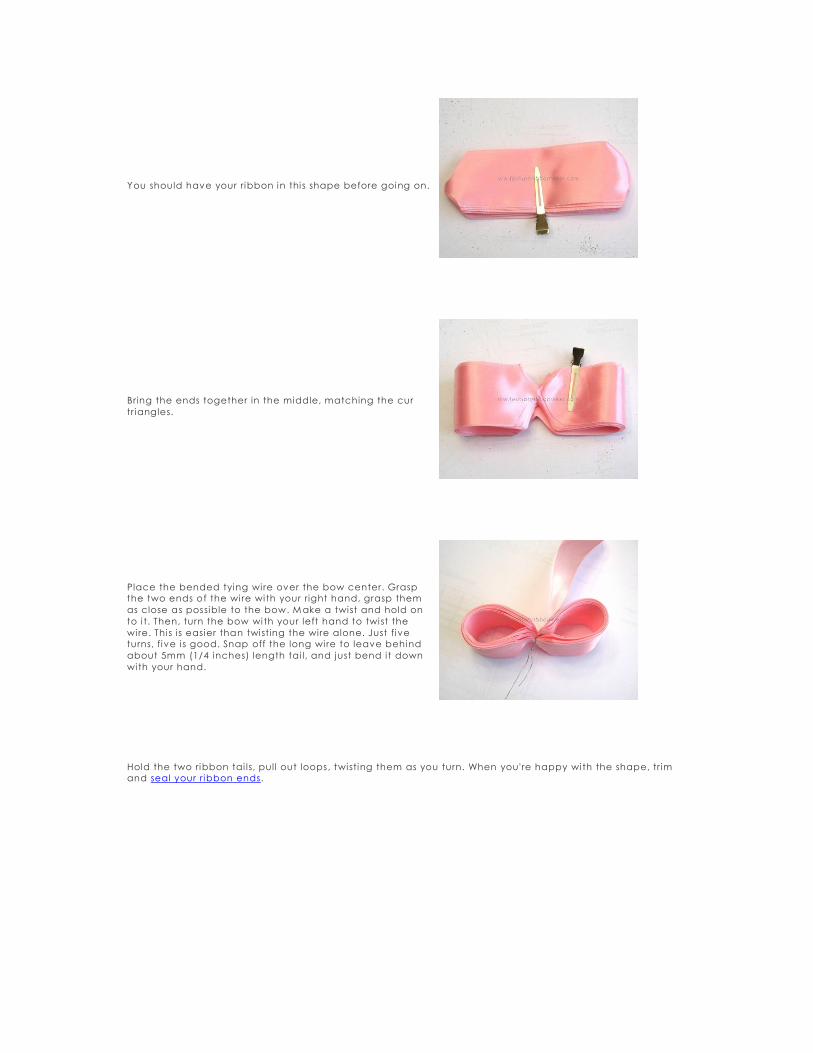
You should have your ribbon in this shape before going on.
Bring the ends together in the middle, matching the cur
triangles.
Place the bended tying wi re over the bow center. Grasp
the two ends of the wi re with your right hand, grasp them
as close as possible to the bow. M ake a twist and hold on
to i t. Then, turn the bow with your left hand to twist the
wi re. This i s easier than twisting the wire alone. Just five
turns, five i s good. Snap off the long wi re to leave behind
about 5mm (1/4 inches) length tai l, and just bend i t down
with your hand.
Hold the two ribbon tai ls, pull out loops, twisting them as you turn. When you're happy with the shape, trim
and seal your ribbon ends.
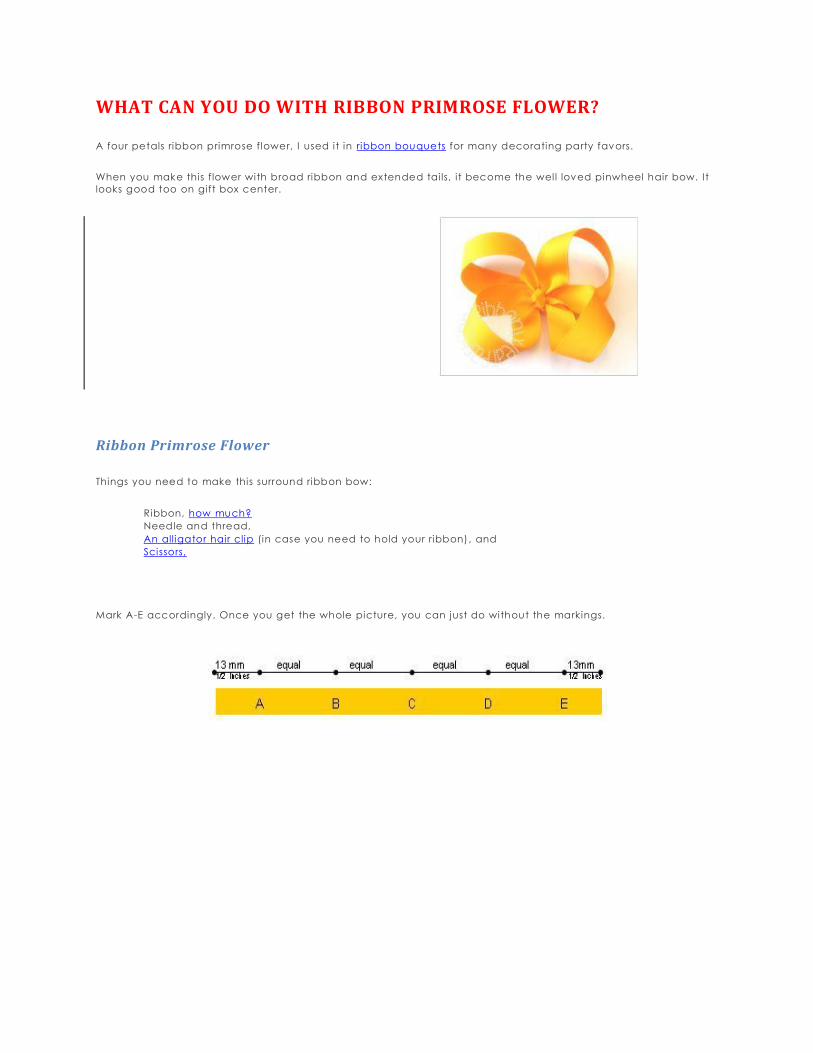
WHAT CAN YOU DO WITH RIBBON PRIMROSE FLOWER?
A four petals ribbon primrose flower, I used it in ribbon bouquets for many decorating party favors.
When you make this flower with broad ribbon and extended tai ls, i t become the well loved pinwheel hair bow. It
looks good too on gift box center.
Ribbon Primrose Flower
Things you need to make this surround ribbon bow:
Ribbon, how much?
Needle and thread,
An alligator hair clip (in case you need to hold your ribbon), and
Scissors,
Mark A-E accordingly. Once you get the whole picture, you can just do without the markings.
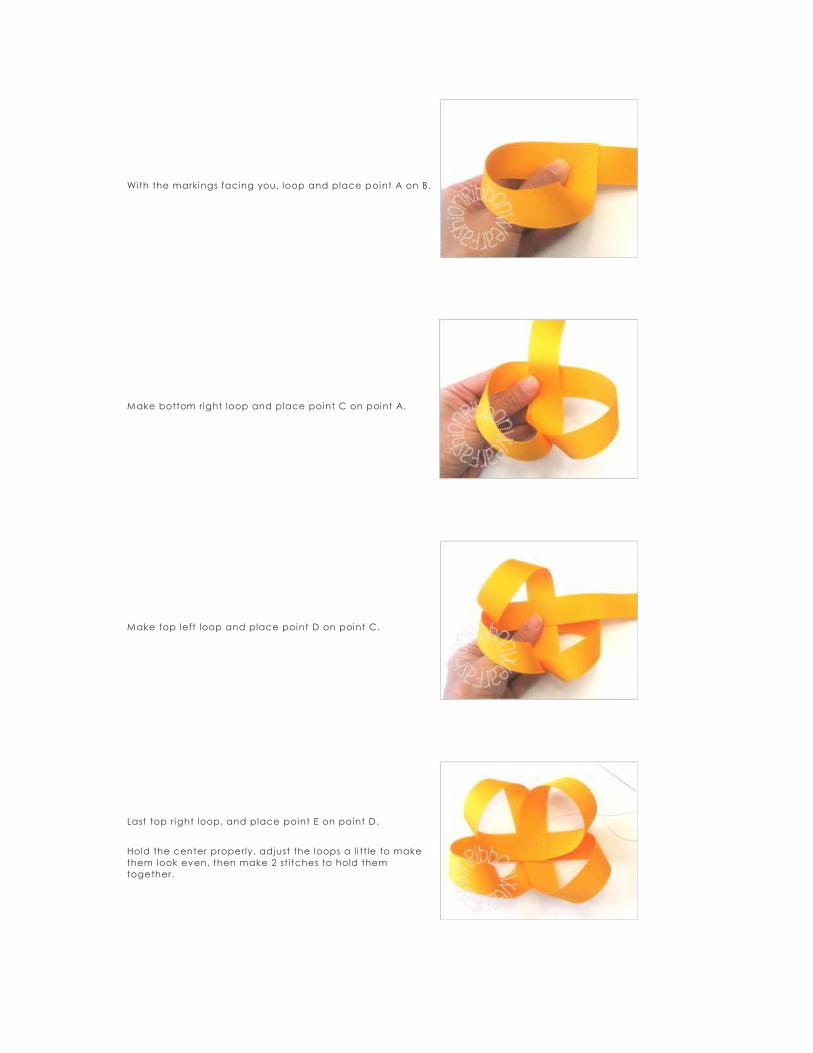
With the markings facing you, loop and place point A on B.
Make bottom right loop and place point C on point A.
Make top left loop and place point D on point C.
Last top right loop, and place point E on point D.
Hold the center properly, adjust the loops a li ttle to make
them look even, then make 2 sti tches to hold them
together.
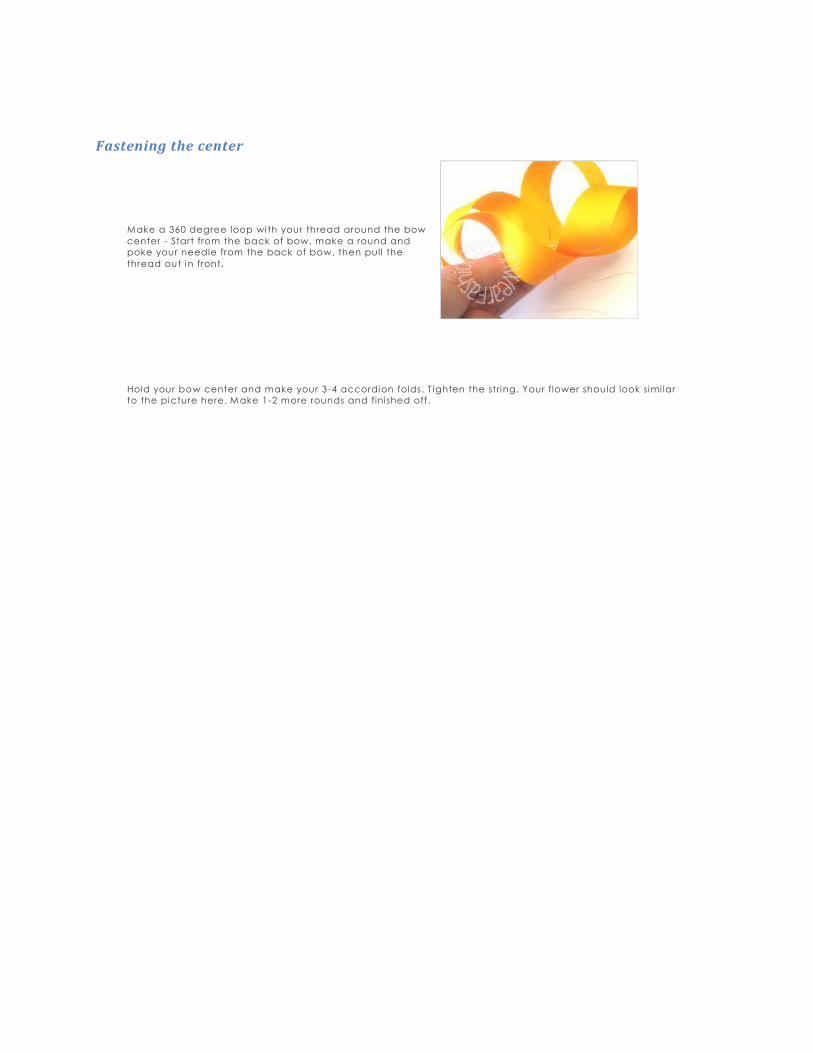
Fastening the center
Make a 360 degree loop with your thread around the bow
center - Start from the back of bow, make a round and
poke your needle from the back of bow, then pull the
thread out in front.
Hold your bow center and make your 3-4 accordion folds. T ighten the string. Your flower should look simi lar
to the picture here. M ake 1-2 more rounds and fini shed off .
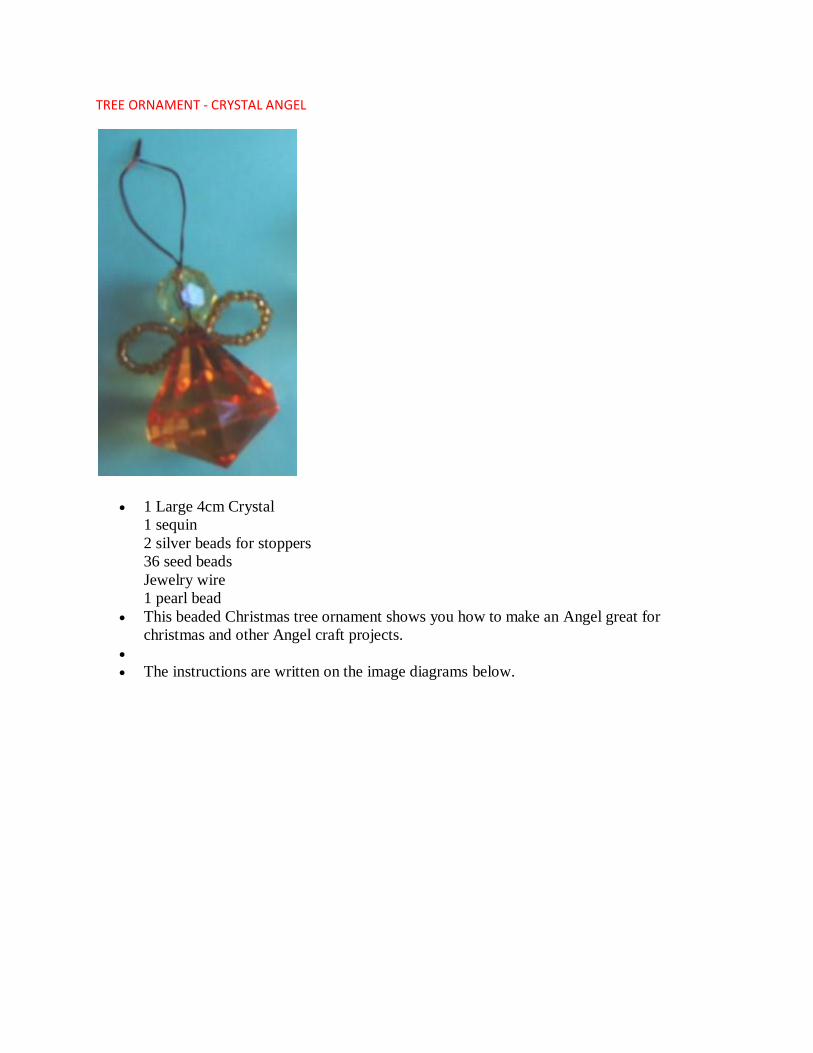
TREE ORNAMENT - CRYSTAL ANGEL
1 Large 4cm Crystal
1 sequin
2 silver beads for stoppers
36 seed beads
Jewelry wire
1 pearl bead
This beaded Christmas tree ornament shows you how to make an Angel great for
christmas and other Angel craft projects.
The instructions are written on the image diagrams below.
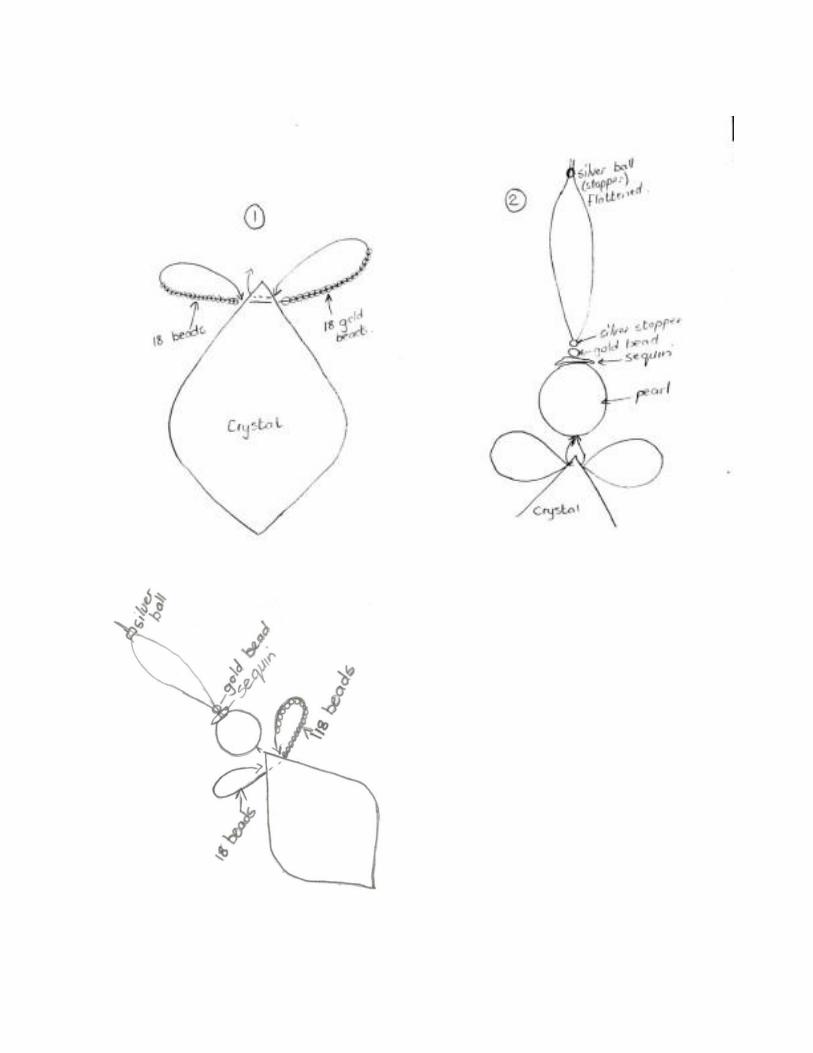
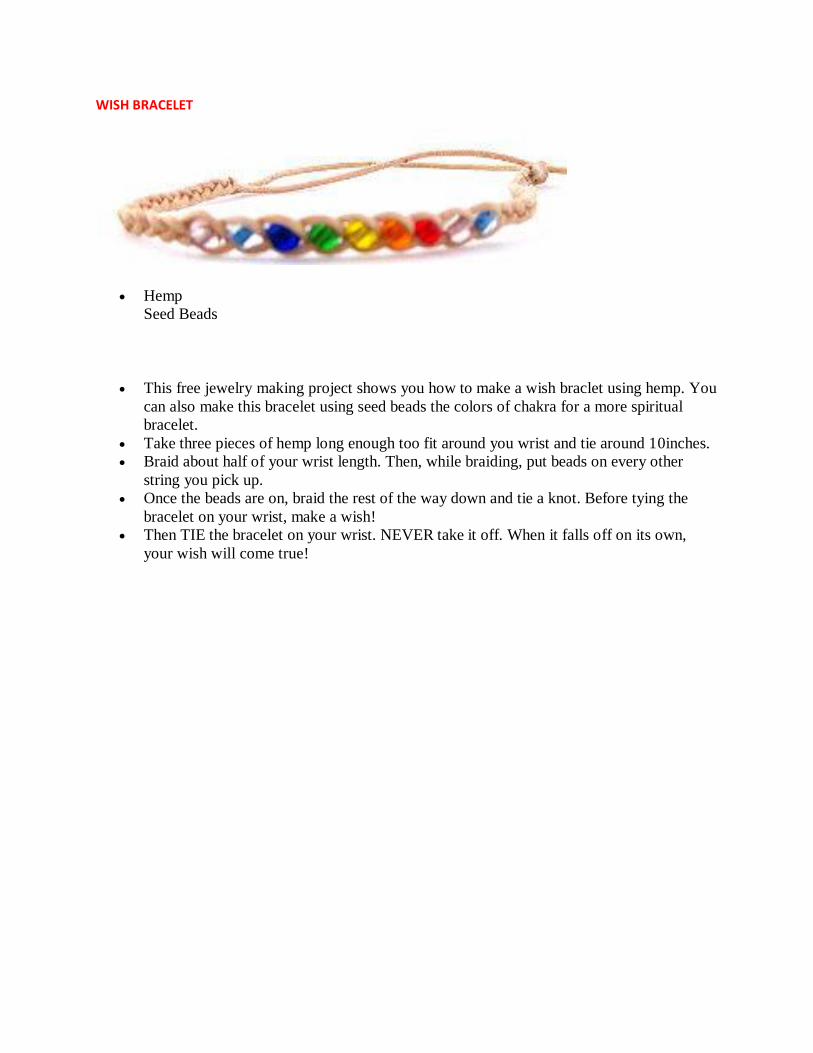
WISH BRACELET
Hemp
Seed Beads
This free jewelry making project shows you how to make a wish braclet using hemp. You
can also make this bracelet using seed beads the colors of chakra for a more spiritual
bracelet.
Take three pieces of hemp long enough too fit around you wrist and tie around 10inches.
Braid about half of your wrist length. Then, while braiding, put beads on every other
string you pick up.
Once the beads are on, braid the rest of the way down and tie a knot. Before tying the
bracelet on your wrist, make a wish!
Then TIE the bracelet on your wrist. NEVER take it off. When it falls off on its own,
your wish will come true!
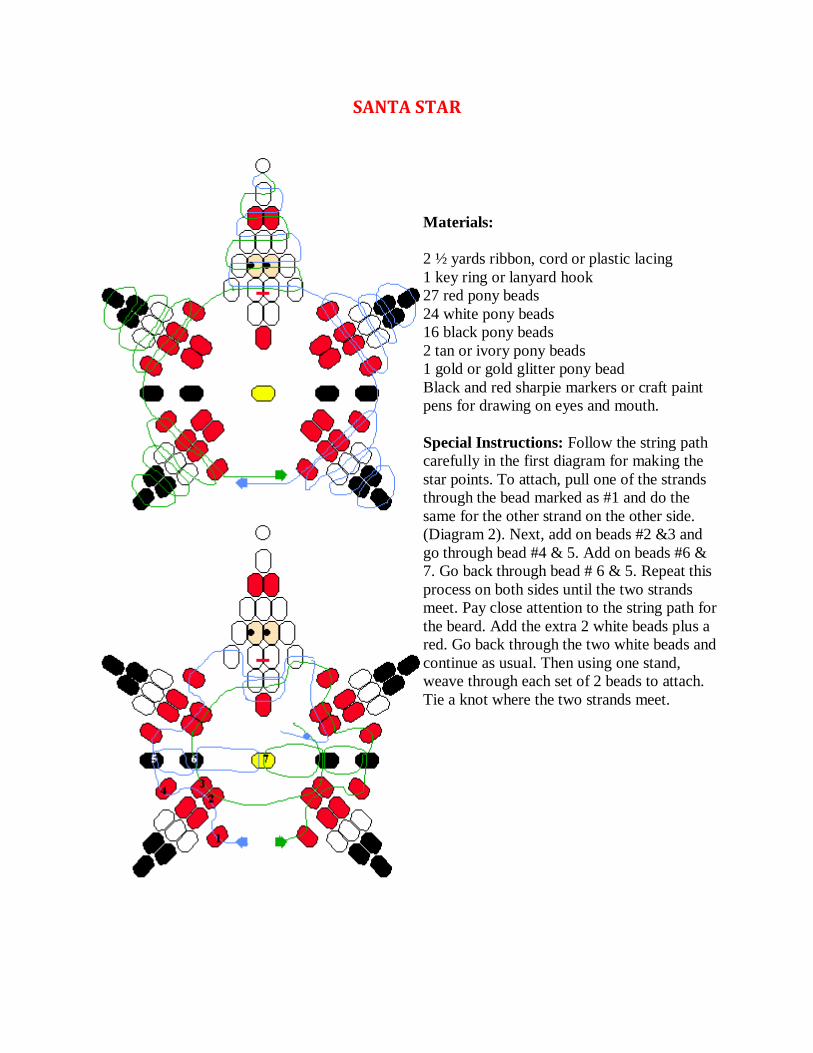
SANTA STAR
Materials:
2 ½ yards ribbon, cord or plastic lacing
1 key ring or lanyard hook
27 red pony beads
24 white pony beads
16 black pony beads
2 tan or ivory pony beads
1 gold or gold glitter pony bead
Black and red sharpie markers or craft paint
pens for drawing on eyes and mouth.
Special Instructions: Follow the string path
carefully in the first diagram for making the
star points. To attach, pull one of the strands
through the bead marked as #1 and do the
same for the other strand on the other side.
(Diagram 2). Next, add on beads #2 &3 and
go through bead #4 & 5. Add on beads #6 &
7. Go back through bead # 6 & 5. Repeat this
process on both sides until the two strands
meet. Pay close attention to the string path for
the beard. Add the extra 2 white beads plus a
red. Go back through the two white beads and
continue as usual. Then using one stand,
weave through each set of 2 beads to attach.
Tie a knot where the two strands meet.
Related Documents