Page 1- Bus & Cable Car Simulator - San Francisco Manual Bus & Cable Car Simulator – San Francisco Gameplay First of all, a few words on the gameplay. There are a number of ways to be successful in "Bus & Cable Car Simulator – San Francisco". You start the game living in a flat in "Nob Hill" - a suburb of San Francisco. You are not required to pay any rent for living in this flat - this may come as a surprise to you but you will soon see that no one would actually pay to live in this flat! One of the objectives in this game is for you to move out of the flat and into a much better apartment. There are some really nice apartments available in San Francisco, the trouble is they can be expensive. However if you work hard you'll soon be able to afford a new place to live and perhaps even a better car - your current one is not exactly the latest model. You are employed by the City of San Francisco public transport service as a bus driver. At the start you've got a choice of depot. San Francisco has three depots. One of them is located in the North, near the "Golden Gate Bridge" (a depot for all buses except trolleybuses).The second is located at "Fisherman‘s Wharf" (depot for cable cars, streetcars and all buses except trolleybuses) and the third is located in the South of the city - in "South of Market" (depot for streetcars and all buses). On arriving at the depot, you should park your car where it is not in the way. The depot office is located on the premises. There, in one of the rooms, you will find the bus service supervisor. Go seek him out and select your bus route/schedule for that day. Schedules/Routes There are 6 main types of schedule: City Route – this is a line that has a large number of stops with short distances between each stop. CrossTown – these lines go to rural areas. Express – these lines can be very long and mainly use large, wide roads. The distance between bus stops is sometimes quite large. Trolley – on this line the bus or trolley is powered via a trolley wire. Cable Car – in all there are three cable car lines. - "Powell Hyde" line: runs from the North to the South to "Market Street". The northern- most starting point is at "Fisherman‘s Wharf" - "Powell Mason" line: also leads to a destination in the South, "Powell Hyde". The starting point is also located in the North and is part of the "Fisherman‘s Wharf" region

Welcome message from author
This document is posted to help you gain knowledge. Please leave a comment to let me know what you think about it! Share it to your friends and learn new things together.
Transcript
Page 1- Bus & Cable Car Simulator - San Francisco
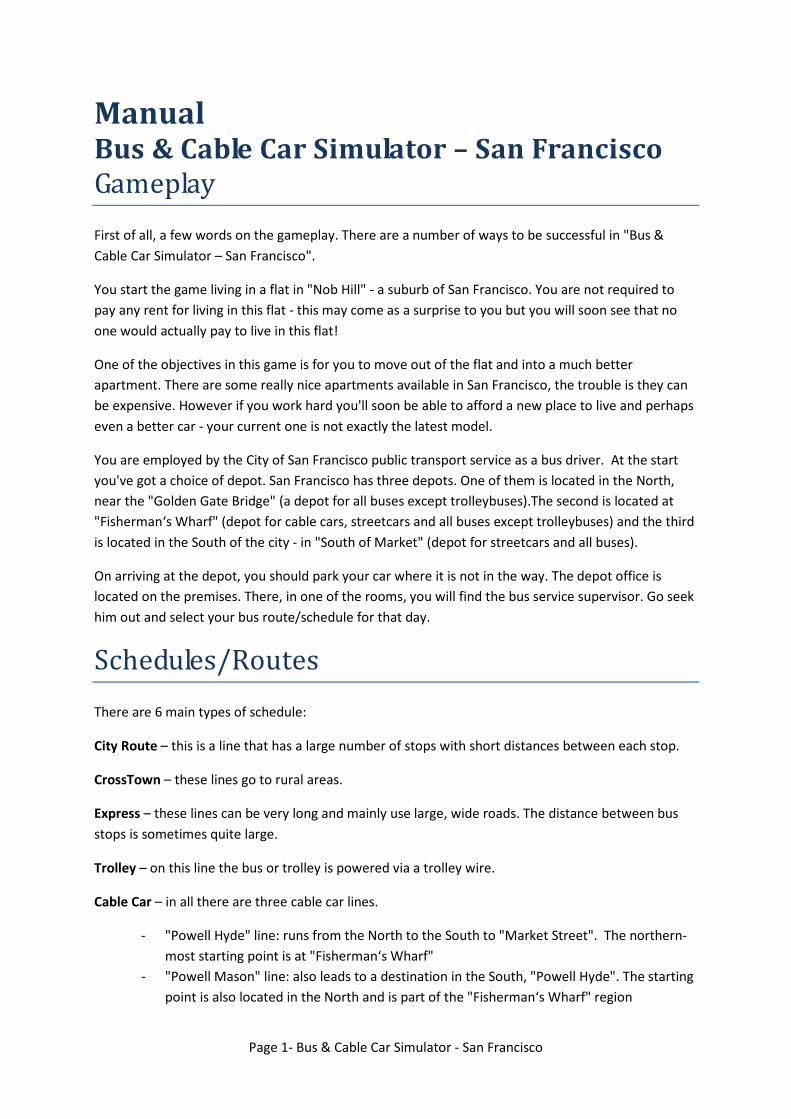
Manual
Bus & Cable Car Simulator – San Francisco
Gameplay
First of all, a few words on the gameplay. There are a number of ways to be successful in "Bus &
Cable Car Simulator – San Francisco".
You start the game living in a flat in "Nob Hill" - a suburb of San Francisco. You are not required to
pay any rent for living in this flat - this may come as a surprise to you but you will soon see that no
one would actually pay to live in this flat!
One of the objectives in this game is for you to move out of the flat and into a much better
apartment. There are some really nice apartments available in San Francisco, the trouble is they can
be expensive. However if you work hard you'll soon be able to afford a new place to live and perhaps
even a better car - your current one is not exactly the latest model.
You are employed by the City of San Francisco public transport service as a bus driver. At the start
you've got a choice of depot. San Francisco has three depots. One of them is located in the North,
near the "Golden Gate Bridge" (a depot for all buses except trolleybuses).The second is located at
"Fisherman‘s Wharf" (depot for cable cars, streetcars and all buses except trolleybuses) and the third
is located in the South of the city - in "South of Market" (depot for streetcars and all buses).
On arriving at the depot, you should park your car where it is not in the way. The depot office is
located on the premises. There, in one of the rooms, you will find the bus service supervisor. Go seek
him out and select your bus route/schedule for that day.
Schedules/Routes
There are 6 main types of schedule:
City Route – this is a line that has a large number of stops with short distances between each stop.
CrossTown – these lines go to rural areas.
Express – these lines can be very long and mainly use large, wide roads. The distance between bus
stops is sometimes quite large.
Trolley – on this line the bus or trolley is powered via a trolley wire.
Cable Car – in all there are three cable car lines.
- "Powell Hyde" line: runs from the North to the South to "Market Street". The northern-
most starting point is at "Fisherman‘s Wharf"
- "Powell Mason" line: also leads to a destination in the South, "Powell Hyde". The starting
point is also located in the North and is part of the "Fisherman‘s Wharf" region

Page 2- Bus & Cable Car Simulator - San Francisco
- "California Street" line: runs along the street with the same name. The starting point is in
the eastern "Financial District" of San Francisco.
Streetcar – also called the "Historical Line". It starts in the "Fisherman‘s Wharf" tourist area,
continues over the entire "Market Street" and ends in the South of San Francisco. A particular
feature of the line is that only historical streetcars are used.
Additionally, you should be aware that lines are further divided into subcategories. There are lines
that are only in service during the day, lines that are only in service during the night and finally, there
are lines that are in service 24-hours a day. You should pay attention to this when selecting a line. For
example, a line marked "Night" should not be selected early in the morning - otherwise the rest of
day would have to be spent doing something else. You could go home and take a nap until its time
for work - an alarm clock is available.
The Route Editor/"Schedule Wizzard"
The "Schedule Wizzard" supplied with the software gives you the opportunity to create your own
individual bus routes. You will find the "Schedule Wizzard" in the "Bin" folder located within the main
folder.
The corresponding manual can be downloaded from: www.buscablecarsimulator.com
Day and Night in San Francisco
The game uses its own time system. The time is displayed in yellow on the mini map. This indicates
the current time in the game. If you take a closer look, you will see that the minutes elapse faster
than normal. This allows you to enjoy the dynamic day and night system even more. By the way, the
dynamic weather system and traffic density in the city are also linked to this.
If you select and activate a schedule, accelerated time is stopped. A minute is then exactly 60
seconds. This means that the schedule is run in real-time. If the schedule is then deactivated, the
game reverts to time-lapse mode until the next schedule is selected.
There is also another way to influence time in San Francisco. You can go to the player’s apartment
and left click on the sofa. This indicates that you want to sleep for a few hours. You have to set when
you should be woken up. A window opens for this purpose. The current time in San Francisco is
displayed in the upper part of the window. The lower time is used to set the wakeup time. You need
to click on the corresponding numbers to set this. Each click increments the number by one step.
Keep on clicking until the desired time has been reached. Finally, the alarm clock needs to be
activated.
Page 3- Bus & Cable Car Simulator - San Francisco
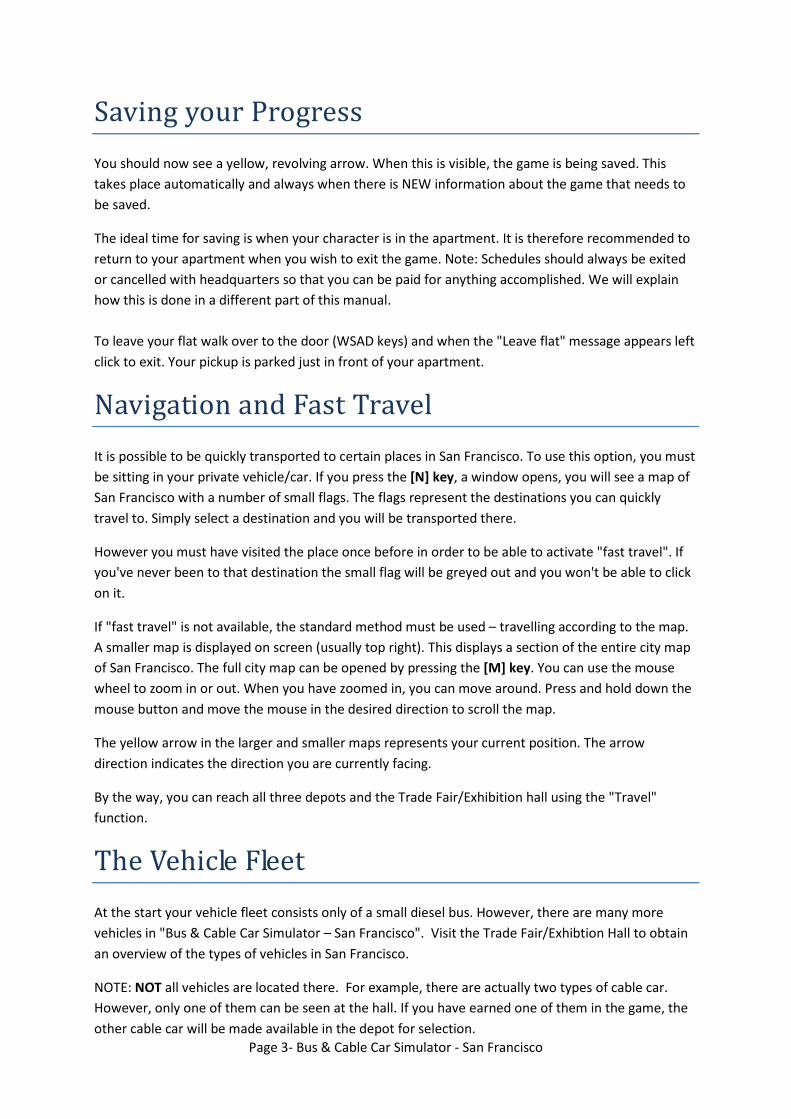
Saving your Progress
You should now see a yellow, revolving arrow. When this is visible, the game is being saved. This
takes place automatically and always when there is NEW information about the game that needs to
be saved.
The ideal time for saving is when your character is in the apartment. It is therefore recommended to
return to your apartment when you wish to exit the game. Note: Schedules should always be exited
or cancelled with headquarters so that you can be paid for anything accomplished. We will explain
how this is done in a different part of this manual.
To leave your flat walk over to the door (WSAD keys) and when the "Leave flat" message appears left
click to exit. Your pickup is parked just in front of your apartment.
Navigation and Fast Travel
It is possible to be quickly transported to certain places in San Francisco. To use this option, you must
be sitting in your private vehicle/car. If you press the [N] key, a window opens, you will see a map of
San Francisco with a number of small flags. The flags represent the destinations you can quickly
travel to. Simply select a destination and you will be transported there.
However you must have visited the place once before in order to be able to activate "fast travel". If
you've never been to that destination the small flag will be greyed out and you won't be able to click
on it.
If "fast travel" is not available, the standard method must be used – travelling according to the map.
A smaller map is displayed on screen (usually top right). This displays a section of the entire city map
of San Francisco. The full city map can be opened by pressing the [M] key. You can use the mouse
wheel to zoom in or out. When you have zoomed in, you can move around. Press and hold down the
mouse button and move the mouse in the desired direction to scroll the map.
The yellow arrow in the larger and smaller maps represents your current position. The arrow
direction indicates the direction you are currently facing.
By the way, you can reach all three depots and the Trade Fair/Exhibition hall using the "Travel"
function.
The Vehicle Fleet
At the start your vehicle fleet consists only of a small diesel bus. However, there are many more
vehicles in "Bus & Cable Car Simulator – San Francisco". Visit the Trade Fair/Exhibtion Hall to obtain
an overview of the types of vehicles in San Francisco.
NOTE: NOT all vehicles are located there. For example, there are actually two types of cable car.
However, only one of them can be seen at the hall. If you have earned one of them in the game, the
other cable car will be made available in the depot for selection.

Page 4- Bus & Cable Car Simulator - San Francisco
The same applies to streetcars. Only one of them is in the hall. If you have earned one, two additional
streetcars are available for selection.
How can you drive the vehicles shown in the hall? First of all, you must select one of the vehicles. A
light beam can be clearly seen in front of every vehicle. If you place your character into this light
beam, you can click the left mouse button to open a window.
This is divided into three parts. The selected vehicle is displayed in miniature on the upper left so that
you can always see which vehicle has been selected.
There are two sections in the middle window. The upper part shows the vehicle's price.
If you are not sure whether you have enough money, just take a look at the symbol on the left, next
to the amount. If it is "grey", you do not have enough money. If however, the symbol is coloured
"yellow", you have enough money to purchase the vehicle.
There is a second way to obtain the vehicle - by "REWARDS".
REWARDS
What is a "REWARD"? In San Francisco, there are numerous REWARDS. In most cases, these serve as
a reward for certain accomplishments, for example...
There is a REWARD called "How Nice". If you are generally friendly towards passengers and word
gets around that you are a friendly bus driver, you will be rewarded. The game is paused briefly and a
Page 5- Bus & Cable Car Simulator - San Francisco
window opens in which the REWARD is displayed. Some REWARDS also contain a BONUS in the form
of a specific sum of money!
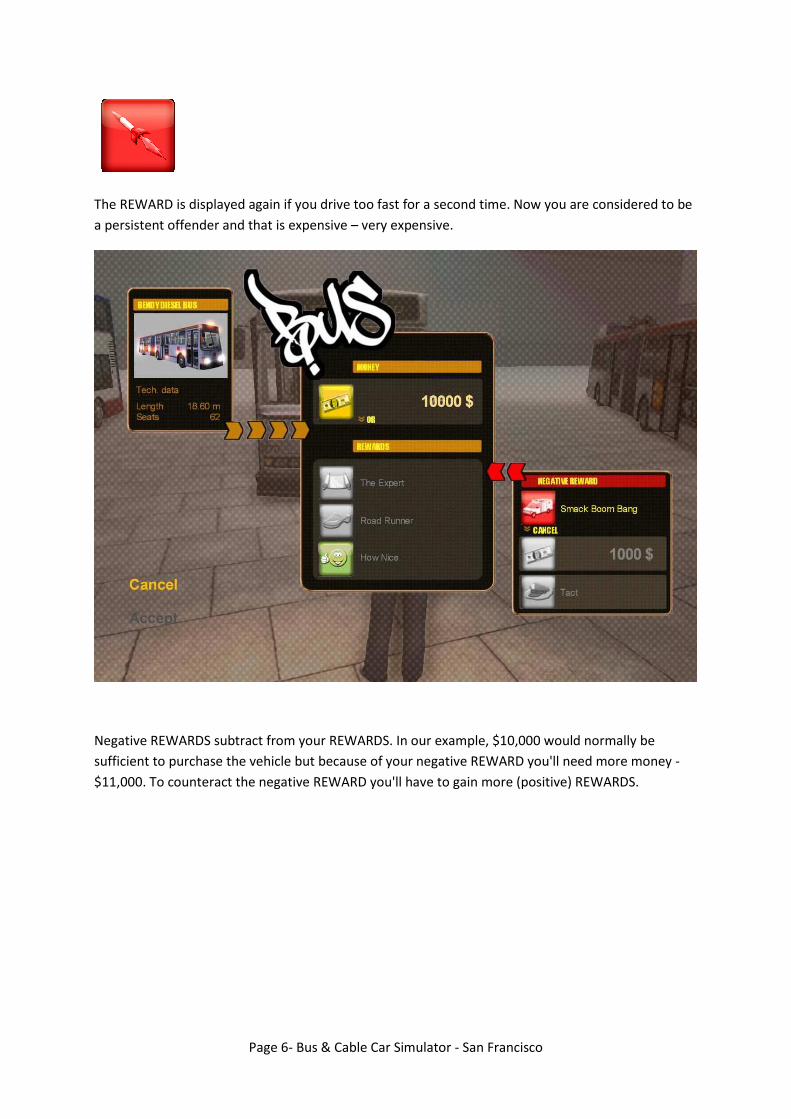
If you recieve the "How Nice" REWARD and went to the Trade Fair/Exhibition hall there would be two
grey and one green symbol in the "REWARD" category.
In order to obtain this vehicle using REWARDS you need to earn both of the other REWARDS.
Information on individual REWARDS can be found later in this manual.
Everything would be easier if there was not the third window - Negative REWARDS!
Negative REWARDS
Sometimes things do not always go the way you want them to. The world of San Francisco is full of
surprises and you can easily mess up. For example, you are driving too fast and suddenly you notice a
bright flash. Yes - you've been caught by a speed trap! This will earn you a Negative REWARD - note
the red colour.
Page 6- Bus & Cable Car Simulator - San Francisco
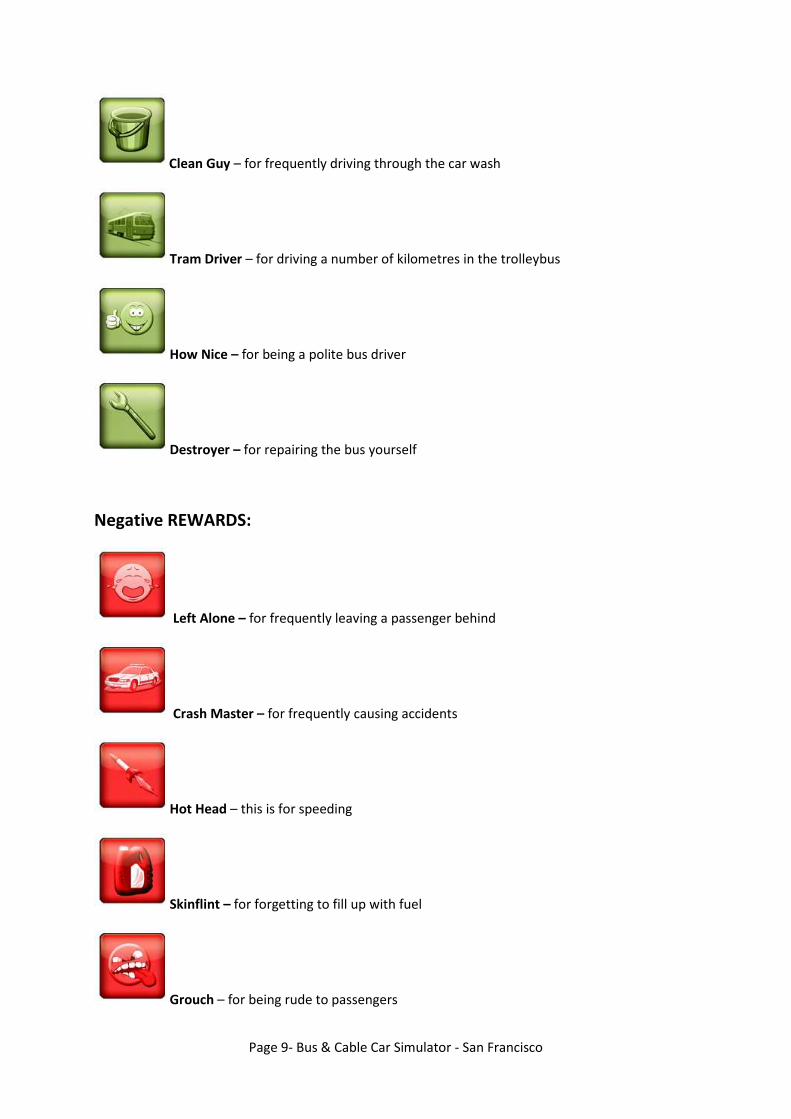
The REWARD is displayed again if you drive too fast for a second time. Now you are considered to be
a persistent offender and that is expensive – very expensive.
Negative REWARDS subtract from your REWARDS. In our example, $10,000 would normally be
sufficient to purchase the vehicle but because of your negative REWARD you'll need more money -
$11,000. To counteract the negative REWARD you'll have to gain more (positive) REWARDS.

Page 7- Bus & Cable Car Simulator - San Francisco
REWARDS - The List
All Roped Up – for driving many kilometres in the cable car
Ding Ding – awarded for driving many kilometres in the trolleybus
Accurate to the Minute – for being punctual (schedule)
The Expert – for crossing the "Golden Gate"and "Bay" bridges
Through the Wind – for driving many kilometres in bad weather
Thirsty – for keeping an eye on the fuel gauge and getting to the petrol station in time
Drive like a Maniac – for achieving a record number of kilometres
Tact – for driving through the toll station several times without causing any problems
Just be Seen – for finding all the places of interest

Page 8- Bus & Cable Car Simulator - San Francisco
I'm Alive – congratulations, you now live somewhere nice
Royal Taxi – for buying a nice car
Let the Diesel Smoke – for driving many kilometres in the diesel bus
The Marathon – a reward for frequently going on foot
Mass transport – for transporting a large number of passengers
Pick-me-up –for making sure you drink coffee at the right time
Nocturnal – for taking on more night shifts
Screw Loose – for finding a certain number of hub caps
Road Runner – for going across the "Golden Gate Bridge" on foot
Round Trip – for driving several very long trips over land
Page 9- Bus & Cable Car Simulator - San Francisco
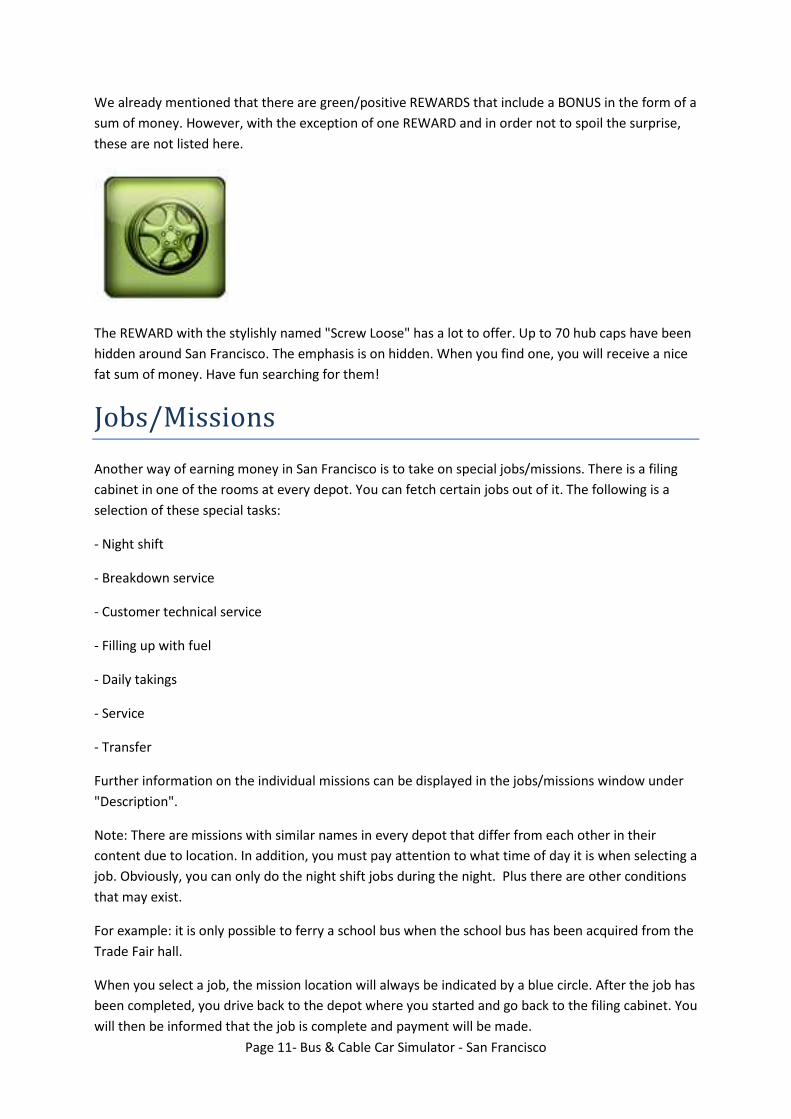
Clean Guy – for frequently driving through the car wash
Tram Driver – for driving a number of kilometres in the trolleybus
How Nice – for being a polite bus driver
Destroyer – for repairing the bus yourself
Negative REWARDS:
Left Alone – for frequently leaving a passenger behind
Crash Master – for frequently causing accidents
Hot Head – this is for speeding
Skinflint – for forgetting to fill up with fuel
Grouch – for being rude to passengers

Page 10- Bus & Cable Car Simulator - San Francisco
Smack Boom Bang – for causing accidents
Red Light – for failing to stop at red lights
Sleeping Tablet – for driving after too little sleep
Muckraker – for having a bus covered in dirt
Assessments and Earning Money
After each trip on an active route is completed you are assessed. This covers a number of things such
as punctuality, passengers transported and whether the correct fare was charged etc..
In addition, the number of kilometres driven per line is taken into consideration. If you select a short
route, you will receive a lower total compared to longer routes. The danger of longer routes is that
there are more chance for errors to occur which will negatively affect the assessment.
Finally, there is a percentage, which indicates how well you have driven the route. Your payment is
calculated from this.
In addition, the assessment also allows you to take the return trip immediately afterwards - if there is
one set-up for that route. Therefore, you can drive the route in one complete trip - until you reject a
following trip.
Note: It is possible that the starting point for the return trip is the same as the destination for the
outward trip. Please take a look at the mini map to check.
There are also other ways to earn money in San Francisco.
Page 11- Bus & Cable Car Simulator - San Francisco
We already mentioned that there are green/positive REWARDS that include a BONUS in the form of a
sum of money. However, with the exception of one REWARD and in order not to spoil the surprise,
these are not listed here.
The REWARD with the stylishly named "Screw Loose" has a lot to offer. Up to 70 hub caps have been
hidden around San Francisco. The emphasis is on hidden. When you find one, you will receive a nice
fat sum of money. Have fun searching for them!
Jobs/Missions
Another way of earning money in San Francisco is to take on special jobs/missions. There is a filing
cabinet in one of the rooms at every depot. You can fetch certain jobs out of it. The following is a
selection of these special tasks:
- Night shift
- Breakdown service
- Customer technical service
- Filling up with fuel
- Daily takings
- Service
- Transfer
Further information on the individual missions can be displayed in the jobs/missions window under
"Description".
Note: There are missions with similar names in every depot that differ from each other in their
content due to location. In addition, you must pay attention to what time of day it is when selecting a
job. Obviously, you can only do the night shift jobs during the night. Plus there are other conditions
that may exist.
For example: it is only possible to ferry a school bus when the school bus has been acquired from the
Trade Fair hall.
When you select a job, the mission location will always be indicated by a blue circle. After the job has
been completed, you drive back to the depot where you started and go back to the filing cabinet. You
will then be informed that the job is complete and payment will be made.
Page 12- Bus & Cable Car Simulator - San Francisco
Places of interest
While taking a closer look at the positive rewards, you may have noticed the "Just be Seen" reward.
You receive this when you have found all the places of interest.
These are locations in the game world that are also world-famous places of interest in San Francisco.
If you pass one of them in a vehicle or on foot, you will hear the noise of a camera and the name of
the place will be displayed at the lower edge of the screen.
The following locations are waiting to be discovered:
Fisherman’s Wharf
Golden Gate Bridge
Lombard Street
Plaza Farmers Market
Union Square
Cable Car Museum
Bay Bridge
Transamerica Pyramid
Coit Tower
Painted Ladies
Broadway Tunnel
Lighthouse (Treasure Island)
Additional Purchases
As has already been mentioned, you can use your money to buy a new vehicle from the fleet of
vehicles. There are a few other things you can buy. For example you can exchange your shabby flat
for a stylish apartment or purchase a great new car to drive around town in.
To find out what there is and where to purchase, you need to read the San Francisco newspaper.
There are certain newspaper vending machines that offer a copy free of charge. Look for one of
these vending machines and get reading.
There are also other things you can purchase. For example, coffee to take away or vehicle parts such
as fuses and fan belts
A selection of great fun sunglasses (much needed in sunny San Francisco) are available. There are 16
different models with 16 different effects. The best method is just to buy some sunglasses and put
them on. The rest is self explanatory. By the way, you can also take them off again. To do this, open
up the inventory.
Page 13- Bus & Cable Car Simulator - San Francisco
Inventory
In San Francisco, your inventory is not large and therefore easily manageable. Press the [J] key to
open the inventory. The game will then pause.
Items that you are currently carrying will be displayed. If you take a closer look, you will also see a
second number. This indicates the maximum possible number of that item that you are able to have.
For example, if 1/3 is next to coffee, this means that you have coffee in your inventory and are able
to purchase and carry a maximum of 3 coffees. If you now select the available coffees by clicking with
the mouse, you can then click the "Use" button. This causes the character to remove the coffee from
the inventory and drink it.
Tiredness
As a bus driver, you have an enormous responsibility not only to your company but also to your
passengers. Therefore, the first rule is to always be alert when you are driving through the streets of
San Francisco. That is easier said than done when your eyes get heavier after a long shift. Tiredness
is indicated by you momentarily nodding off. At this point, you should react and take steps against
this since momentary nodding off can soon become fully-fledged sleep! The probability of causing an
accident is then particularly high.
When tired you can stop and drink a coffee from your inventory. Another possibility is to return to
your flat and let your character get some sleep. However, if you are currently driving an active
schedule, you should notify headquarters that you now wish to cancel the trip.
Another possibility is to go to a petrol station or restaurant and drink some coffee there.
The Petrol Station
Diesel buses and other vehicles can be filled with fuel at the petrol station. To do this, you only need
to position the vehicle parallel to the pumps and switch off the engine. To fill the vehicle with fuel
you must get out of the vehicle and position the character between the pump and the vehicle. After
that, the "Fill up" option is displayed. The rest is self-explanatory.
In addition, there is a shop at the petrol station. You can purchase coffee and other items there. By
the way, occasionally there are also restaurants where you can purchase coffee.
Car Wash
There is not much to say about the car wash. It's free and is located at "Fisherman‘s Wharf".
To clean the bus, you drive into the car wash. You only have to make sure that you drive in properly.
The rest is self-explanatory and the washing process itself is automatic.
Page 14- Bus & Cable Car Simulator - San Francisco
Preparing Vehicles - Steering Wheel
Assignment
Many of the vehicles can be controlled using a steering wheel. The steering wheel assignment can be
set in the menu under "Settings" – "Control". You can set the desired slack under "Steering wheel".
The assignment of the functions can be found under "Vehicle". Click on "Assignment 1" and
"Assignment 2" will be displayed. Here you can set all desired functions for your steering wheel.
Tutorial – Your First Trip
During your first trip, text will be displayed that is designed to introduce you to the simulation. Here's
what the text will say...
Today is the first day in your job as a bus driver. Before you begin your first shift, let us get to know
San Francisco a little better. You are currently in your flat. Your progress is saved automatically here.
Left-clicking the sofa allows your character to take a rest so that he can regain strength. You can leap
forward in time by setting the alarm clock.
Your current car, a pickup is located here. You can drive it around San Francisco without restriction.
You will be warned if your fuel is running low so you can get to a petrol station.
Get into the driver's seat of your pickup and press the C key.
Look for the Trade Fair premises/Exhibition Hall on the map and drive there. You can open the map
by pressing the M key.
Go into the large Trade Fair building/Exhibition Hall.
Place yourself next to a vehicle of your choice and click with the left mouse button. This is how to
find out what you need to purchase the vehicle. You can purchase the vehicle or spend any earned
rewards here.
You can obtain vehicles in this showroom when you have enough money. Currently, you only own a
diesel bus.
Drive to the depot of your choice to start a shift.
Go to the bus service supervisor and select a schedule/timetable.
Go to the door at the front of your bus and push the door by pressing F5 several times. Then move
yourself next to the cockpit and press the C key.
Get your vehicle ready to go. First of all, press the T switch to turn on the on-board power.
Press E to start the engine and wait until enough air pressure has built up. This can take a few
minutes.
Page 15- Bus & Cable Car Simulator - San Francisco
Enter 'Not in Service' into the on-board computer (I key). Click on Route, enter the following code: 99
for "Not in Service" and click on the enter key on your on-board computer.
When enough air pressure has built up, set the automatic system to -Drive- by pressing the page-up
key and pressing TAB to release the parking brake. Don't forget that air pressure build up can take
some time.
Close the door at the front by pressing the F5 key. Please read the user manual and read the tutorial
text to find out more on the other controls.
Go to the first bus stop marked on the map. This is indicated by a yellow marker on the map. Note:
when approaching a stop you will see out of your driver's window a large yellow H marker - stop
there.
Shortly before arriving at the starting point, you can programme the displays into your on-board
computer. If you have forgotten your route, press the Q key.
A time is now highlighted above right, in red. This time indicates when you have to arrive at the next
bus stop. This is NOT your departure time. You can obtain this in the info window Q.
When charging passengers, ALWAYS check whether they are entitled to a reduction. This is indicated
in the cash register display (F key).
You can turn the HUD on or off by pressing the F1 key.
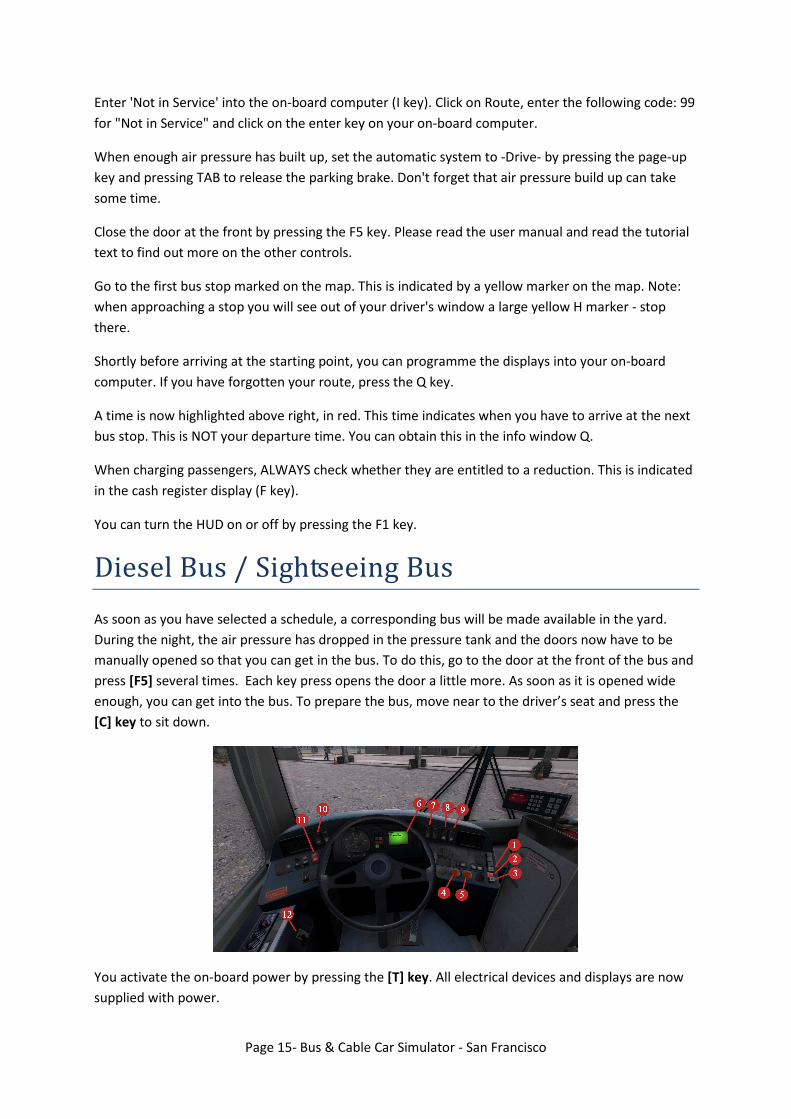
Diesel Bus / Sightseeing Bus
As soon as you have selected a schedule, a corresponding bus will be made available in the yard.
During the night, the air pressure has dropped in the pressure tank and the doors now have to be
manually opened so that you can get in the bus. To do this, go to the door at the front of the bus and
press [F5] several times. Each key press opens the door a little more. As soon as it is opened wide
enough, you can get into the bus. To prepare the bus, move near to the driver’s seat and press the
[C] key to sit down.
You activate the on-board power by pressing the [T] key. All electrical devices and displays are now
supplied with power.

Page 16- Bus & Cable Car Simulator - San Francisco
Start the engine by pressing the [E] key. The air pressure tank will now be filled but this can take
some time, depending on the bus model. The driver information display (6) flashes and alternately
displays the most important information on the status of the bus. The brakes are activated and are
indicated in the display by thick black wheels. When the brakes are released, the wheels are
displayed as an outline. NOTE: only release the brakes when a certain minimum pressure has been
reached.
Press the [TAB] key to release the hand brake. To engage a gear, press the [PAGE UP] key. Now
close the door at the front by pressing the [F5] key.
By the way: many important functions in the bus can also be activated with the mouse or are only
activated with the mouse.
To activate mouse control, press and hold down the [left SHIFT] key. Move the mouse over the
individual switches and knobs. The mouse pointer changes colour to red when a function can be
activated. Now click with the left mouse button to activate the function.
Overview of the Mouse Controls and Displays
Diesel Bus
(1) Automatic forward gear
(2) Automatic idle
(3) Automatic reverse gear
(4) Front door control (open/close door at the front)
(5) Rear door control (open/close rear door(s))

Page 17- Bus & Cable Car Simulator - San Francisco
(6) Driver information display (door status, air pressure, brakes, fuel quantity)
(7) Vehicle lighting
(8) Kneeling (lowering the bus)
(9) Lifting (raising the bus)
(10) Ventilation (air conditioner/heating/hot air blower)
(10) Warning lights
(12) Handbrake
Sightseeing Bus
(1) Automatic forward gear
(2) Automatic idle
(3) Automatic reverse gear
(4) Front door control (open/close door at the front)
(5) Rear door control (open/close rear door(s))
(6) Kneeling (lowering the bus)
(7) Vehicle lighting
(8) Lifting (raising the bus)
(9) Driver information display (door status, air pressure, brakes, fuel quantity)
Page 18- Bus & Cable Car Simulator - San Francisco
(10) Warning lights
(11) Handbrake
(12) Ventilation (air conditioner/heating/hot air blower)
(13) Driver cab lighting
Driving from the Depot
Your bus is now ready to go – well, almost!
You have a schedule, a starting point and a destination - where you will hopefully arrive on time.
Next, you set the display to your destination. Until you reach the start of the route you should set
"Not in Service" as the destination. This is set using the on-board computer.
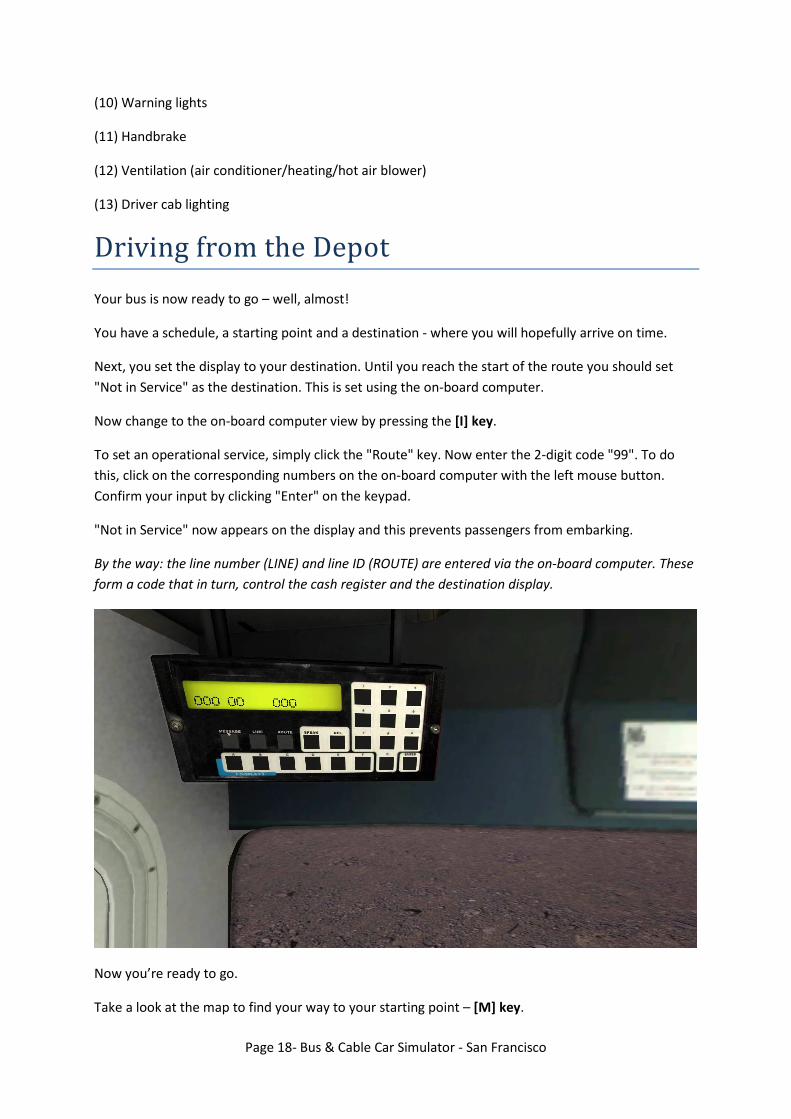
Now change to the on-board computer view by pressing the [I] key.
To set an operational service, simply click the "Route" key. Now enter the 2-digit code "99". To do
this, click on the corresponding numbers on the on-board computer with the left mouse button.
Confirm your input by clicking "Enter" on the keypad.
"Not in Service" now appears on the display and this prevents passengers from embarking.
By the way: the line number (LINE) and line ID (ROUTE) are entered via the on-board computer. These
form a code that in turn, control the cash register and the destination display.
Now you’re ready to go.
Take a look at the map to find your way to your starting point – [M] key.

Page 19- Bus & Cable Car Simulator - San Francisco
Arriving at the First Bus Stop
You have now coped with the first few metres of San Francisco traffic, the bus stop is in sight and
some passengers may be waiting for you. However, "Not in Service" is still being displayed and
obviously that needs to be changed. . You can do this either before you reach bus stop or while you
are in the bus stop zone.
When you collected your schedule at the depot, you were informed of your line number and route
ID. This information can be displayed at any time by pressing the [Q] key.
Now change to the on-board computer view by pressing the [I] key.
On-board Computer
The line and destination displays are set via the on-board computer. In addition, you also use the on-
board computer to communicate with headquarters. First of all, let’s concentrate on setting the
destination correctly. Click on "Line" with the left mouse button. The first three digits (000) in the
display start to flash. The on-board computer now expects a 3-digit code. That is the so-called line
number. This is now entered into the keypad using the mouse. Click "Enter" to confirm.
A line can consist of several routes or tours. That is the reason why you must also enter the route
after entering the line.
Click on the on the "Route" key with the left mouse button. Now the number pad, which consists of
two digits starts flashing (00). The on-board computer now expects a 2-digit code. This is entered
into the keypad using the mouse. Click "Enter" to confirm.
Passengers, who want to use this line/route, will then embark when the door at the front is opened.
In order to communicate with headquarters using the on-board computer, there are predefined
codes. To enter these, click on the "Message" key with the left mouse button. "Code :" then appears
in the display. The on-board computer now expects a 3-digit code. This is now entered into the
keypad using the mouse. Click "Enter" to confirm.
List of codes
100 Driving time is not possible due to traffic jam (+ 5 minutes)
101 Driving time is not possible due to traffic jam (+ 10 minutes)
102 Driving time is not possible due to traffic jam (+ 15 minutes)
103 Driving time is not possible due to traffic jam (+ 20 minutes)
104 Driving time is not possible due to traffic jam (+ 25 minutes)
105 Driving time is not possible due to traffic jam (+ 30 minutes)
106 Continued driving not possible due to traffic jam

Page 20- Bus & Cable Car Simulator - San Francisco
110 High traffic density
120 Connection required (connecting bus is informed by headquarters and waits)
200 Accident, will make a detour
201 Accident, continued driving not possible
202 Accident, involving myself
500 Ticket printer defective
501 Cash register defective
502 Tariff zone not being displayed
800 No fuel
802 Fan belt snapped
804 Fuse blown
806 Doors do not shut
808 Kneeling defective
901 Request service vehicle
977 Request cancellation of current trip
911 Call police (in the event of traffic chaos)
955 Request careful continuation of the trip due to defective traffic lights
Tip: try pressing the BACK key if you find yourself in a traffic jam.
Sometimes you hear an acoustic signal (beep). This indicates that headquarters have sent a message
to the driver. When this happens change to the on-board computer view [I] to read them.
Subsequently confirm by pressing the Enter key of the on-board computer.
The Red-Coloured Time Display
When you have arrived at your starting bus stop, a time is displayed in red on the mini map. This
time is not your departure time but indicates when you should arrive at the next bus stop. It is
recommended to make a note of this time. When you drive off, the time remains until you arrive at
the next bus stop. After arriving at this bus stop, the red-coloured time display changes to the arrival
time for the next bus stop. The previously marked red-coloured time display is now your departure
time.
Page 21- Bus & Cable Car Simulator - San Francisco
Cash Register
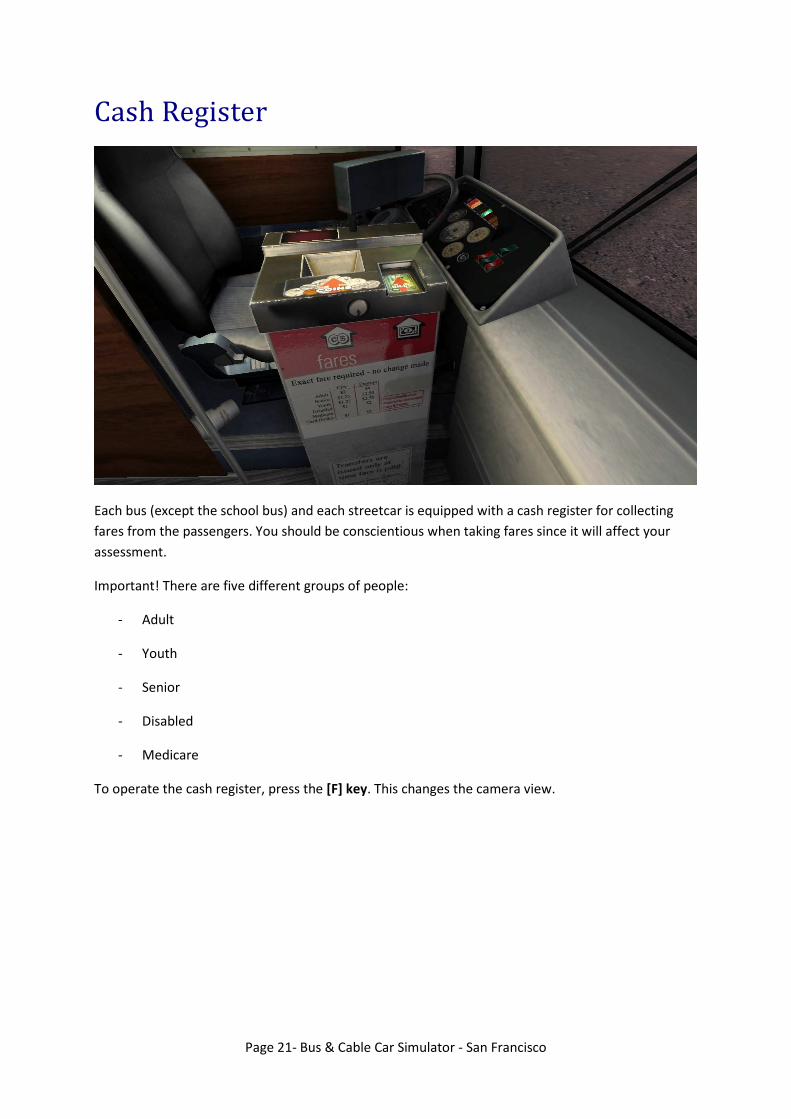
Each bus (except the school bus) and each streetcar is equipped with a cash register for collecting
fares from the passengers. You should be conscientious when taking fares since it will affect your
assessment.
Important! There are five different groups of people:
- Adult
- Youth
- Senior
- Disabled
- Medicare
To operate the cash register, press the [F] key. This changes the camera view.

Page 22- Bus & Cable Car Simulator - San Francisco
The cash register display shows which group of people applies to the passenger currently standing in
front of it (showing their bus pass).
The display also shows, which line type applies. Remember, there are 3 line types: City Route, Cross
Town and Express (see section "The Schedules").
To charge the fare, proceed as follows:
Passenger on the City Route
Adult = $ 2.00
Youth = $ 1.25
Senior = $ 1.25
Disabled = $ 1.00
Medicare = $ 1.00
The fare is entered via the keypad of the cash register. Confirm by clicking "#" with the mouse.
By the way: click the "F6" key on the keypad to display the total amount registered. Subsequently click
the "F6" key to return to input mode.
Express passenger
Adult = $ 4.00
Youth = $ 2.50
Senior = $ 2.50
Disabled = $ 2.00
Medicare = $ 2.00
Page 23- Bus & Cable Car Simulator - San Francisco
The fare is entered via the keypad of the cash register. Confirm by clicking "#" with the mouse.
By the way: click the "F6" key on the keypad to display the total amount registered. Subsequently click
the "F6" key to return to input mode.
Cross Town passenger
In contrast to the other lines, there is no flat rate fare on the Cross Town route. The fare is calculated
according to the distance to the destination. The further the destination is, the higher the fare to be
paid.
The current fare is calculated automatically by the cash register. The cash register only needs to
know which group of people applies. Click on the following key with the mouse:
Adult = F1
Youth = F2
Senior = F3
Disabled = F4
Medicare = F5
The current fare then appears in the display. Confirm by clicking "#" with the mouse.
By the way: click the "F6" key on the keypad to display the total amount registered. Subsequently click
the "F6" key to return to input mode.
If you enter the fare incorrectly and it has to be corrected, click the "*" key. The fare is reset to $
0.00.
Note: This will only work if the price was not confirmed. . If you have already confirmed, correction is
no longer possible. This will have a negative affect on your assessment.
Other Bus Functions - Braking, Kneeling,
Lifting, Kick-down, Lighting, Ventilation, driver
information display
Brakes
The diesel bus is equipped with four different types of brakes. The handbrake and the air-pressure
brakes (foot pedal) we know about. The other two are the bus stop brakes and the retarder brakes.
As the name suggests, the bus stop brake is activated at the bus stop by pressing the [Alt] key. This is
indicated on the driver information display by thick black wheels. The bus stop brakes must be
released after closing the door. Press the [Alt] key for this.

Page 24- Bus & Cable Car Simulator - San Francisco
The retarder brake is used for braking smoothly at higher speeds. In addition, the retarder brake is
used more often when the bus is driving downhill in order to reduce wear on the brakes. Important:
the retarder brake does not replace the air pressure brake (foot pedal). Also, it is not possible to
bring the bus to a complete stop with this brake.
Kneeling
Kneeling is used to lower the bus on one side. The purpose is to make it easier for passengers to get
on the bus. Press the [K] key for this.
Make sure that you raise the bus again before driving off. Press the [K] key again to do this.
Lifting
Lifting is basically the opposite of kneeling. You use this function to "pump up" the bus. This gives you
more ground clearance. This is often used on streets in San Francisco where there are steep slopes.
Press the [F4] key to pump up.
This is indicated by a control light. What is not shown but what every bus driver in San Francisco
would like to know, is when the bus is moving faster than the max. 15 MPH.
After the critical location has been negotiated, the bus lowers itself again. Press the [F4] key again for
this.
By the way: raising and lowering can take place wile the bus is moving.
Kick-down
Kick-down is activated by the [W] key.
In this case, the [W] key must remain pressed. As soon as you stop pressing the key, kick-down is no
longer active. The function is used when driving off is difficult, e.g., on steep slopes.
Driver cab lighting/passenger lighting/vehicle lighting
This lighting has two functions. In the first instance, it lights up the driver’s area. However, at night it
is also used for lighting the passenger embarkation area. For safety reasons, the front part of the bus
is not lit when the bus is moving. When the bus is at the bus stop, the driver switches on the cab
lighting manually by pressing the [Home] key.
Before the bus driver can drive away from the bus stop, the lighting must be switched off by pressing
the [Home] key again.
The passenger lighting lights up the rear part of the bus. This is switched on by pressing the [END]
key.
The parking light is switched on by pressing the [L] key. If you press the [L] key again, the dipped
headlights are switched on. This procedure can be reversed. If you press the [L] key a third time, the
dipped headlights will be switched off and the parking light remains on. If you press the [L] key a
fourth time, the parking light is switched off.

Page 25- Bus & Cable Car Simulator - San Francisco
The headlights are switched on by pressing the [O] key. Important note: the headlights only function
when the dipped headlights are switched on.
Ventilation
Various different weather conditions are possible in San Francisco. The windows in the bus will steam
up when the air humidity is high. The heating and hot air blower are used to keep the windows clear.
The ventilation (air conditioning/heating/hot air blower) is switched on by pressing the [Insert] key.
We would also like to mention the driver’s window can be opened and closed by pressing the [F2]
key.
Driver information display
When the bus is ready to go, a bus symbol appears in the driver information display. Opened doors
are indicated by a black rectangle. Thick black wheels indicate that the brakes are active. To obtain
further information, press the [D] key. If you cycle through the display, you will also see the fuel tank
stats and the air pressure.
Diesel Bus Malfunctions
The following malfunctions can occur: the fan belt can snap and the fuse can blow. Both reduce the
roadworthiness of the bus.
First of all, you must find out what the malfunction is. Get out of the bus and open the rear hatch of
the bus. The malfunction will then be displayed. You now have the option to request the repair
service. You do this via the on-board computer (see section "On-board computer"). However, that is
expensive!
Another considerably cheaper option is to carry out the repair yourself. You must have the
corresponding replacement part with you or be near a petrol station where you can purchase the
replacement part. To repair the bus, click the marked part of the engine area with the left mouse
button. A window opens.
Replacing the Fan Belt:
Page 26- Bus & Cable Car Simulator - San Francisco
Click on the bright fan belt with the left mouse button and keep the button pressed down. Draw over
the fan belt with the mouse pointer without touching the inside or outside edge.
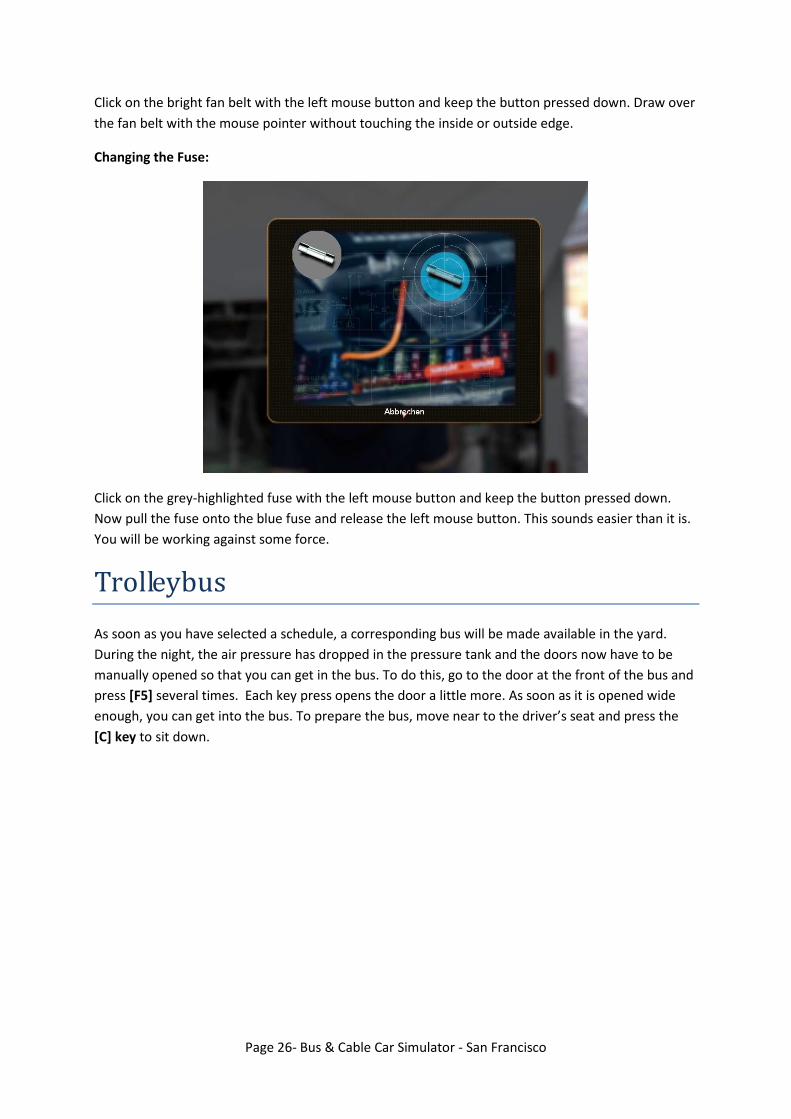
Changing the Fuse:
Click on the grey-highlighted fuse with the left mouse button and keep the button pressed down.
Now pull the fuse onto the blue fuse and release the left mouse button. This sounds easier than it is.
You will be working against some force.
Trolleybus
As soon as you have selected a schedule, a corresponding bus will be made available in the yard.
During the night, the air pressure has dropped in the pressure tank and the doors now have to be
manually opened so that you can get in the bus. To do this, go to the door at the front of the bus and
press [F5] several times. Each key press opens the door a little more. As soon as it is opened wide
enough, you can get into the bus. To prepare the bus, move near to the driver’s seat and press the
[C] key to sit down.
Page 27- Bus & Cable Car Simulator - San Francisco
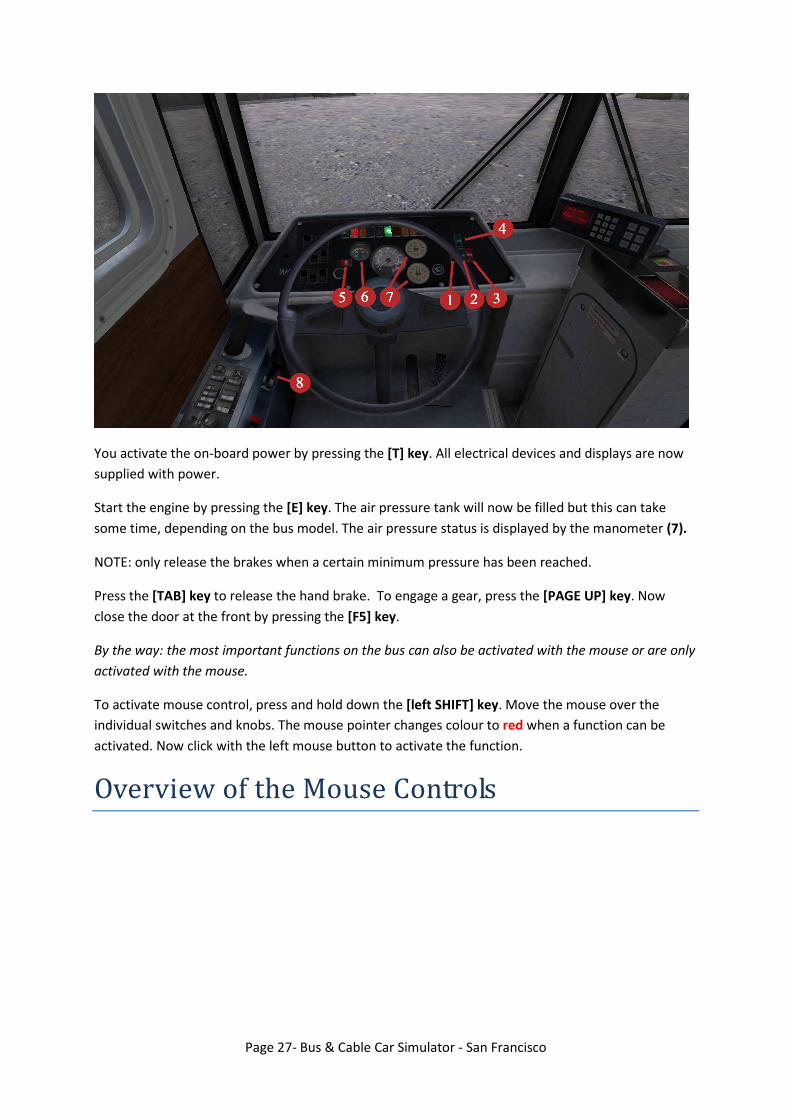
You activate the on-board power by pressing the [T] key. All electrical devices and displays are now
supplied with power.
Start the engine by pressing the [E] key. The air pressure tank will now be filled but this can take
some time, depending on the bus model. The air pressure status is displayed by the manometer (7).
NOTE: only release the brakes when a certain minimum pressure has been reached.
Press the [TAB] key to release the hand brake. To engage a gear, press the [PAGE UP] key. Now
close the door at the front by pressing the [F5] key.
By the way: the most important functions on the bus can also be activated with the mouse or are only
activated with the mouse.
To activate mouse control, press and hold down the [left SHIFT] key. Move the mouse over the
individual switches and knobs. The mouse pointer changes colour to red when a function can be
activated. Now click with the left mouse button to activate the function.
Overview of the Mouse Controls
Page 28- Bus & Cable Car Simulator - San Francisco
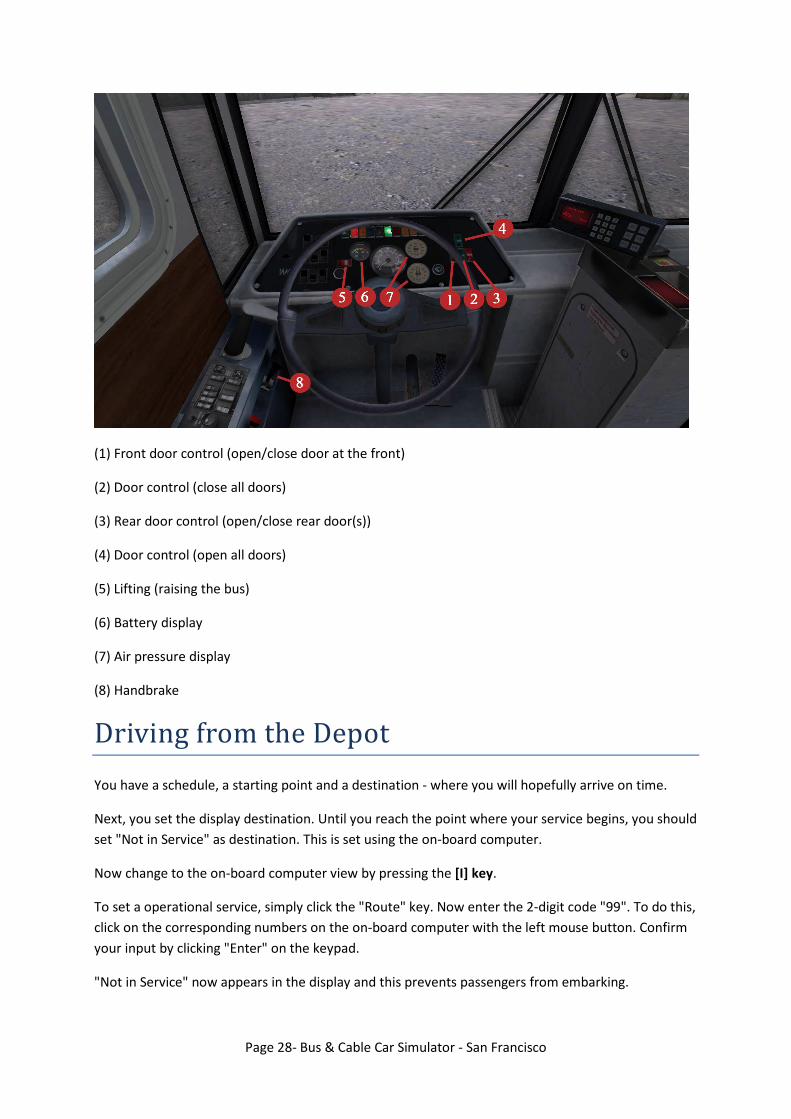
(1) Front door control (open/close door at the front)
(2) Door control (close all doors)
(3) Rear door control (open/close rear door(s))
(4) Door control (open all doors)
(5) Lifting (raising the bus)
(6) Battery display
(7) Air pressure display
(8) Handbrake
Driving from the Depot
You have a schedule, a starting point and a destination - where you will hopefully arrive on time.
Next, you set the display destination. Until you reach the point where your service begins, you should
set "Not in Service" as destination. This is set using the on-board computer.
Now change to the on-board computer view by pressing the [I] key.
To set a operational service, simply click the "Route" key. Now enter the 2-digit code "99". To do this,
click on the corresponding numbers on the on-board computer with the left mouse button. Confirm
your input by clicking "Enter" on the keypad.
"Not in Service" now appears in the display and this prevents passengers from embarking.
Page 29- Bus & Cable Car Simulator - San Francisco
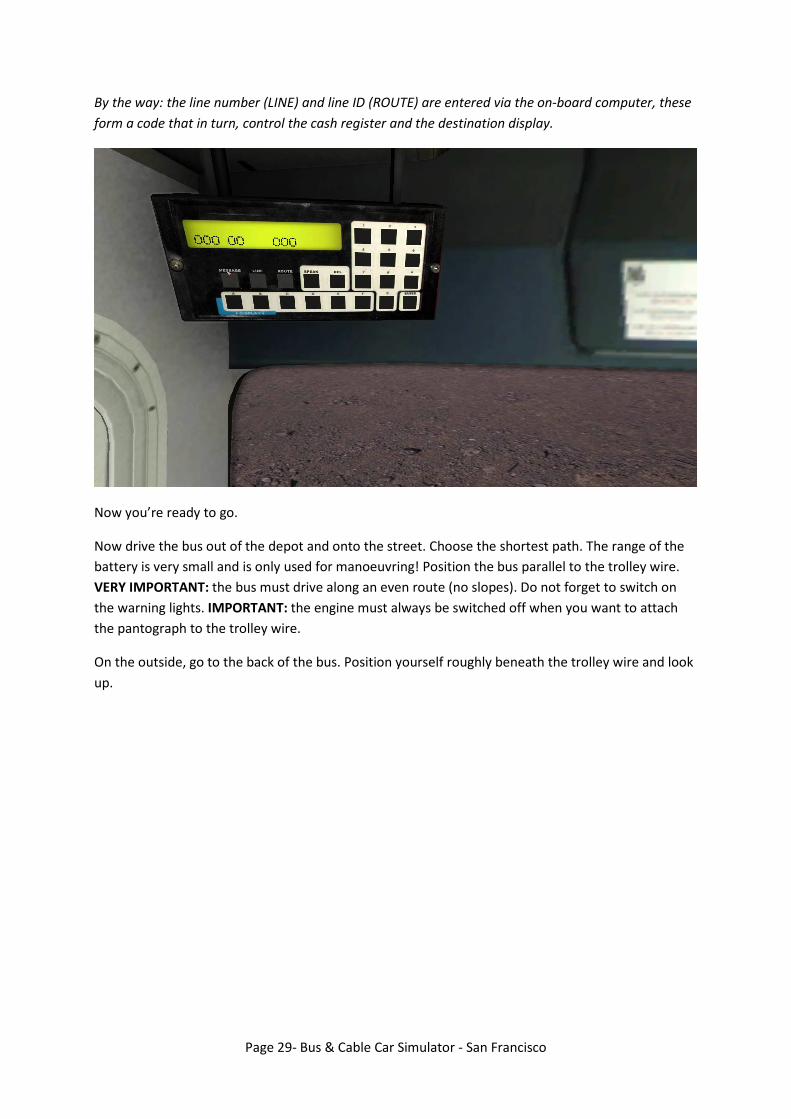
By the way: the line number (LINE) and line ID (ROUTE) are entered via the on-board computer, these
form a code that in turn, control the cash register and the destination display.
Now you’re ready to go.
Now drive the bus out of the depot and onto the street. Choose the shortest path. The range of the
battery is very small and is only used for manoeuvring! Position the bus parallel to the trolley wire.
VERY IMPORTANT: the bus must drive along an even route (no slopes). Do not forget to switch on
the warning lights. IMPORTANT: the engine must always be switched off when you want to attach
the pantograph to the trolley wire.
On the outside, go to the back of the bus. Position yourself roughly beneath the trolley wire and look
up.
Page 30- Bus & Cable Car Simulator - San Francisco
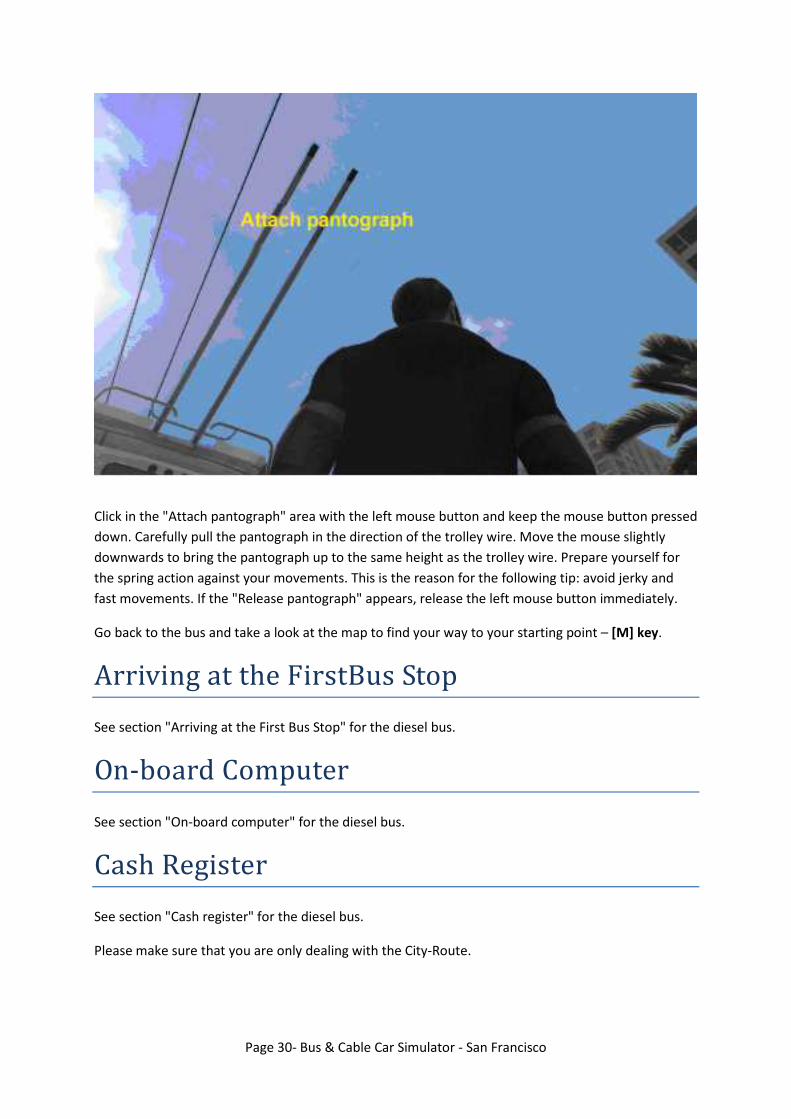
Click in the "Attach pantograph" area with the left mouse button and keep the mouse button pressed
down. Carefully pull the pantograph in the direction of the trolley wire. Move the mouse slightly
downwards to bring the pantograph up to the same height as the trolley wire. Prepare yourself for
the spring action against your movements. This is the reason for the following tip: avoid jerky and
fast movements. If the "Release pantograph" appears, release the left mouse button immediately.
Go back to the bus and take a look at the map to find your way to your starting point – [M] key.
Arriving at the FirstBus Stop
See section "Arriving at the First Bus Stop" for the diesel bus.
On-board Computer
See section "On-board computer" for the diesel bus.
Cash Register
See section "Cash register" for the diesel bus.
Please make sure that you are only dealing with the City-Route.
Page 31- Bus & Cable Car Simulator - San Francisco
Braking, Kneeling, Lifting, Kick-down, Lighting,
Ventilation, battery display
Brakes
The trolleybus is equipped with four different types of brakes. We are already familiar with two of
them. the handbrake and the air-pressure brakes (foot pedal). The other two are the bus stop brakes
and the electromagnetic brakes.
As the name suggests, the bus stop brake is activated at the bus stop by pressing the [Alt] key. The
bus stop brakes must be released after closing the door. Press the [Alt] key for this.
The electromagnetic brake is used for braking smoothly at higher speeds. Important: the
electromagnetic brake does not replace the air pressure brake (foot pedal). Also, it is not possible to
bring the bus to a complete stop with this brake.
Kneeling
Kneeling is used to lower the bus on one side. The purpose is to make it easier for passengers to get
on the bus. Press the [K] key for this.
Make sure that you raise the bus again before driving off. Press the [K] key again to do this.
Lifting
Lifting is basically the opposite of kneeling. You use this function to "pump up" the bus. This gives you
more ground clearance. This is often used on the streets in San Francisco with steep slopes. Press
the [F4] key to pump up.
After the critical location has been negotiated, the bus lowers itself again. Press the [F4] key for this.
By the way: raising and lowering can take place wile the bus is moving.
Driver cab lighting/passenger lighting/vehicle lighting
This lighting has two functions. In the first instance, it lights up the driver’s area. However, at night it
is also used for lighting the passenger embarkation area. For safety reasons, the front part of the bus
is not lit when the bus is moving. When the bus is at the bus stop, the driver switches on the cab
lighting manually by pressing the [Home] key.
Before the bus driver can drive away from the bus stop, the lighting must be switched off by pressing
the [Home] key again.
The passenger lighting lights up the rear part of the bus. This is switched on by pressing the [END]
key.
The parking light is switched on by pressing the [L] key. If you press the [L] key again, the dipped
headlights are switched on. This procedure can be reversed. If you press the [L] key a third time, the
Page 32- Bus & Cable Car Simulator - San Francisco
dipped headlights will be switched off and the parking light remains on. If you press the [L] key a
fourth time, the parking light is switched off.
The headlights are switched on by pressing the [O] key. Important note: the headlights only function
when the dipped headlights are switched on.
Ventilation
Various different weather conditions are possible in San Francisco. The windows in the bus will steam
up when the air humidity is high. The heating and hot air blower are used to keep the windows clear.
The ventilation (air conditioning/heating/hot air blower) is switched on by pressing the [Insert] key.
The driver’s window can be opened and closed by pressing the [F2] key.
Battery display (6)
When the trolleybus is connected to the trolley wire, the battery is charged automatically. If you do
not pay attention while driving, the pantograph can become detached from the trolley wire. When
that happens, the bus will automatically switch to battery operation. Now you have to watch out!
Stop as quickly as possible. Do not forget to switch off the engine by pressing the [E] key. The
pantograph must be reconnected. You are already familiar with this procedure.
When you have completed your schedule and have returned to the depot, you must disconnect the
pantograph before driving into the depot. The engine must also be switched off when you do this.
Get off and go the rear of the bus.
To disconnect, grab the pantograph by clicking and holding down the left mouse button, pull it away
and subsequently release the mouse button.
Trolleybus Malfunctions
The following malfunctions can occur: the compressor fan belt can snap and the fuse can blow. Both
reduce the roadworthiness of the bus.
First of all, you must find out what the malfunction is. Get out of the bus and open the rear hatch of
the bus. The malfunction will then be displayed. You now have the option to request the repair
service. You do this via the on-board computer (see section "On-board Computer"). However, that is
expensive!
Another considerably cheaper option is to carry out the repair yourself. You must have the
corresponding replacement part with you or be near a petrol station where you can purchase the
replacement part. To repair the bus, click the marked part of the engine area with the left mouse
button. A window opens.
Page 33- Bus & Cable Car Simulator - San Francisco
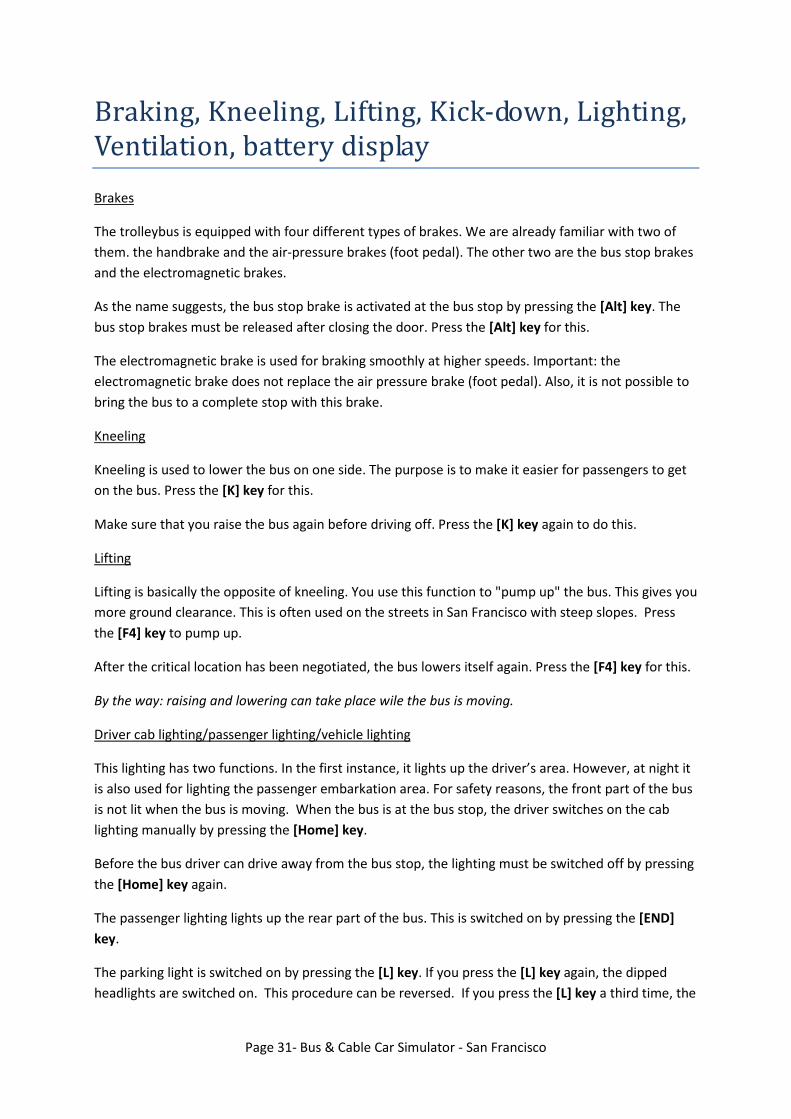
Replacing the Compressor Fan Belt:
Click on the fan belt with the left mouse button and keep the button pressed down. Draw over the
fan belt with the mouse pointer without touching the inside or outside edge.
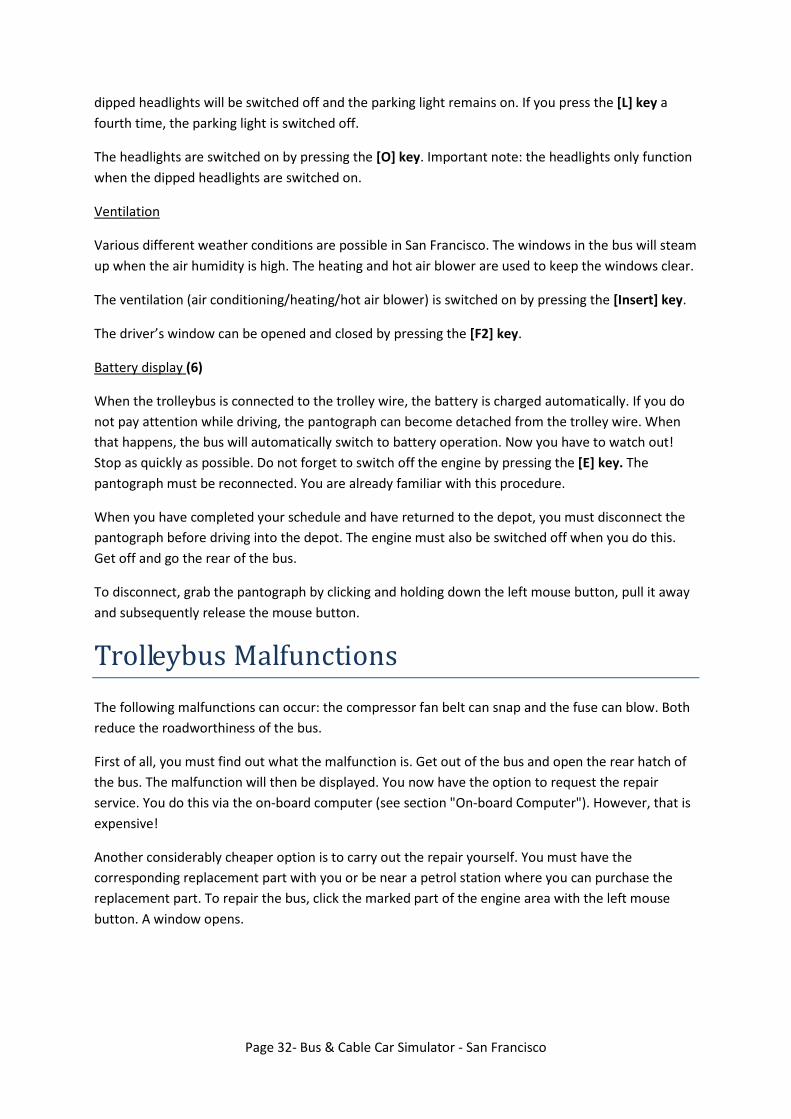
Changing the Fuse:
Click on the grey-highlighted fuse with the left mouse button and keep the button pressed down.
Now pull the fuse onto the blue fuse and release the left mouse button. This sounds easier than it is.
You will be working against some force.
Bonus: School Bus and Nova Bus
Both bonus buses are mainly controlled using the keyboard (see section "Diesel Bus").
Page 34- Bus & Cable Car Simulator - San Francisco
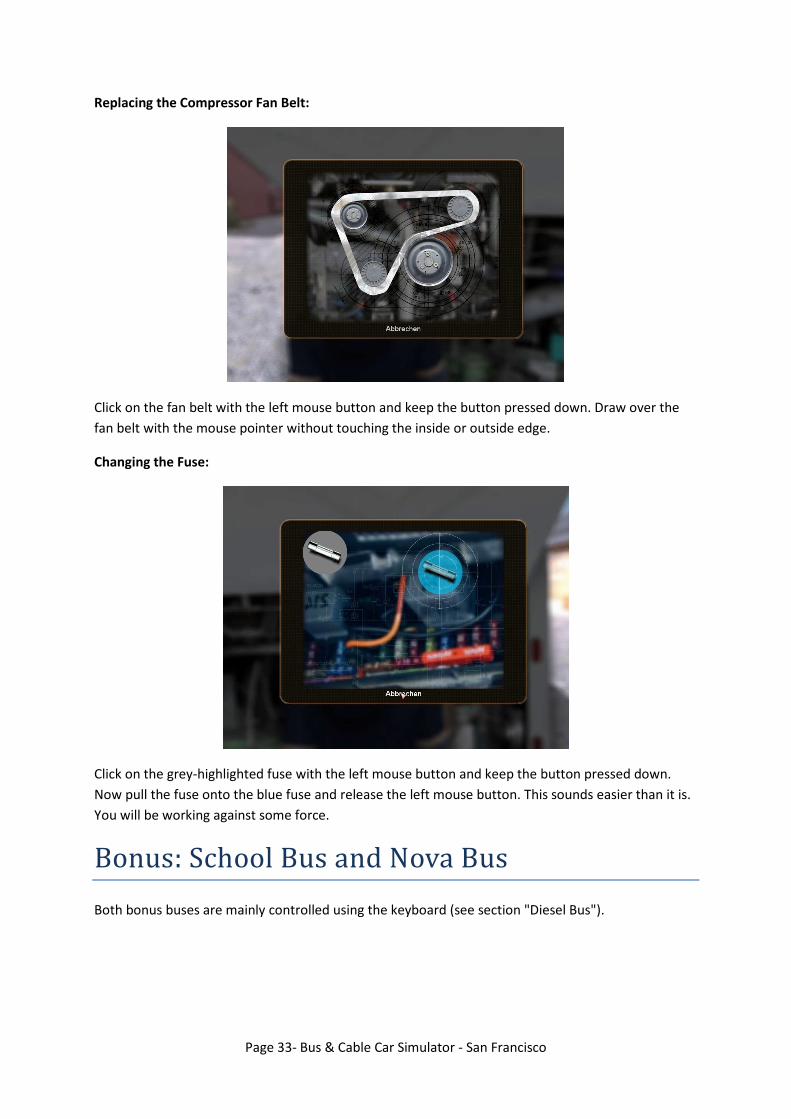
School Bus
Mouse control:
(1) Handbrake
(2) Front door control (open/close)
Cash Register
The school bus is not equipped with a cash register.
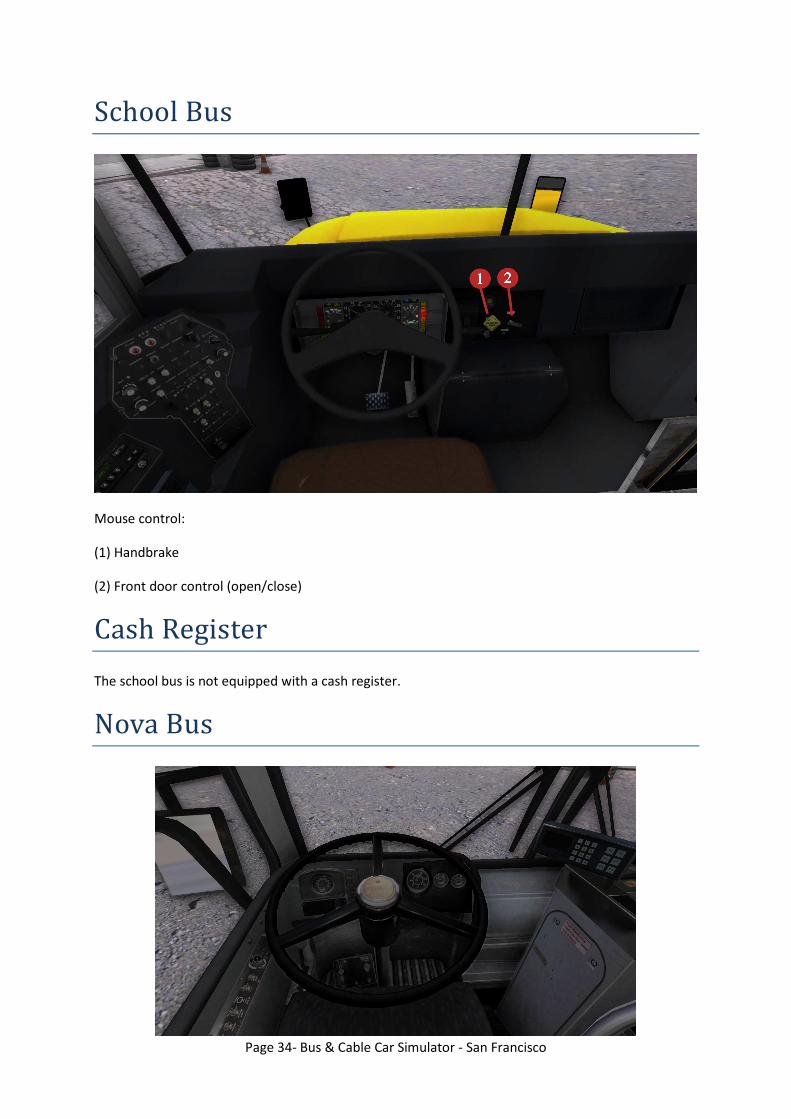
Nova Bus
Page 35- Bus & Cable Car Simulator - San Francisco
The Nova bus can only be controlled using the keyboard.
Cash Register
See section "Cash register" for the diesel bus.
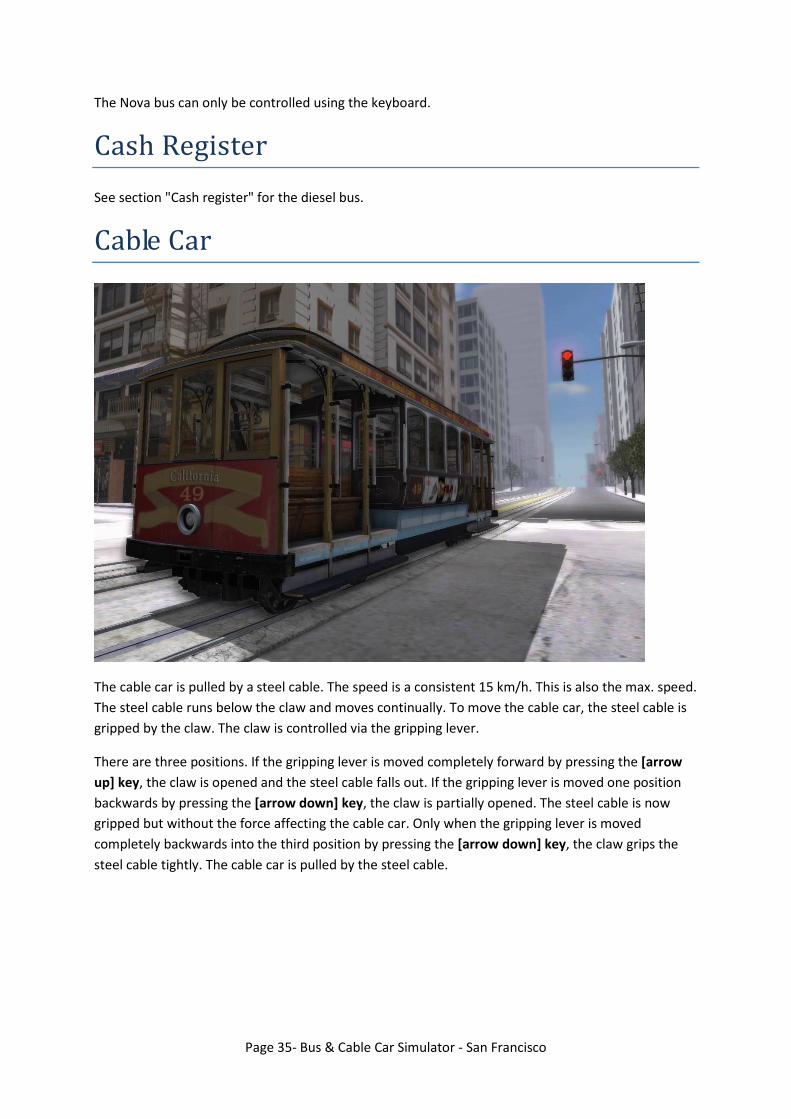
Cable Car
The cable car is pulled by a steel cable. The speed is a consistent 15 km/h. This is also the max. speed.
The steel cable runs below the claw and moves continually. To move the cable car, the steel cable is
gripped by the claw. The claw is controlled via the gripping lever.
There are three positions. If the gripping lever is moved completely forward by pressing the [arrow
up] key, the claw is opened and the steel cable falls out. If the gripping lever is moved one position
backwards by pressing the [arrow down] key, the claw is partially opened. The steel cable is now
gripped but without the force affecting the cable car. Only when the gripping lever is moved
completely backwards into the third position by pressing the [arrow down] key, the claw grips the
steel cable tightly. The cable car is pulled by the steel cable.

Page 36- Bus & Cable Car Simulator - San Francisco
To stop, the claw is opened with the help of the gripping lever and the brakes are applied at the same
time. The cable car is equipped with four brakes. A foot brake (brake pedal), a track brake, a slot
brake and a rear wheel brake.
The foot brake (brake pedal [SPACEBAR]) only affects the brake shoes on the front bogie. The rear
wheel brake ([arrow left] and [arrow right]) keys however, is only coupled with the brake shoes on
the rear bogie. The track brake ([page up] and [page down] keys) is a system that presses wooden
blocks onto the rails. The slot brake ([INSERT] and [DELETE] keys) is the emergency brake. If it is
activated, the cable car is brought to a complete stop within a few moments. In reality, the trip
would now be finished since a metal wedge is rammed onto the steel cable slot. This can only be
removed with the help of a cutting torch. In the game, the cable car is brought to complete stop
almost immediately but it is also possible to continue the trip afterwards.
The crew consists of two people. The driver is referred to as the grip man since he takes care of cable
car movement. The other person is responsible for braking and is also the bus conductor. It is his task
to operate the rear wheel brake.
In this simulation, you take on both tasks.
Normally, that would mean that the bell function is not needed since this is used for communication
between the grip man and brakeman. We would nevertheless like to provide this option. In reality,
there is a difference between the bell sounds from the brakeman to the grip man and vice versa. We
decided to use communication from the grip man to the brakeman.
Press the [1] key to ring once, which means "operate rear brake".
Press the [2] key to ring twice, which means "release rear brake".
Press the [3] key to ring three times, which means "full braking force to the rear brake".
Press the [4] key to ring 4 times, which means "reverse slowly".
Page 37- Bus & Cable Car Simulator - San Francisco
The uncoupling function of the claw from the steel cable allows the cable car to negotiate cornering,
points and crossings. These are also danger points.
The places are marked with "Let go" at the relevant places along the track and indicate that the steel
cable must be dropped. It is also possible that a striped road marking follows, which does not permit
gripping of the steel cable at that point. The cable can only be gripped again after "Take rope"
appears on the road or after you have crossed the striped area.
The difference between the California line and the other lines is that you are not required to turn
around on the California line. The California cable car has two driver cabs. The cable car is turned
around by means of a turntable on both the Powel & Mason and Powel & Hyde lines. The turntable is
operated purely by muscle power.
In this simulation, you drive the cable car onto the turntable. Instructions then appear on the screen.
Now you need your muscle power! Follow the instructions on the screen before you can start the
return trip.
NOTE: the cable car is only in service during the day.
Cash Register
The cable car is not equipped with a cash register.
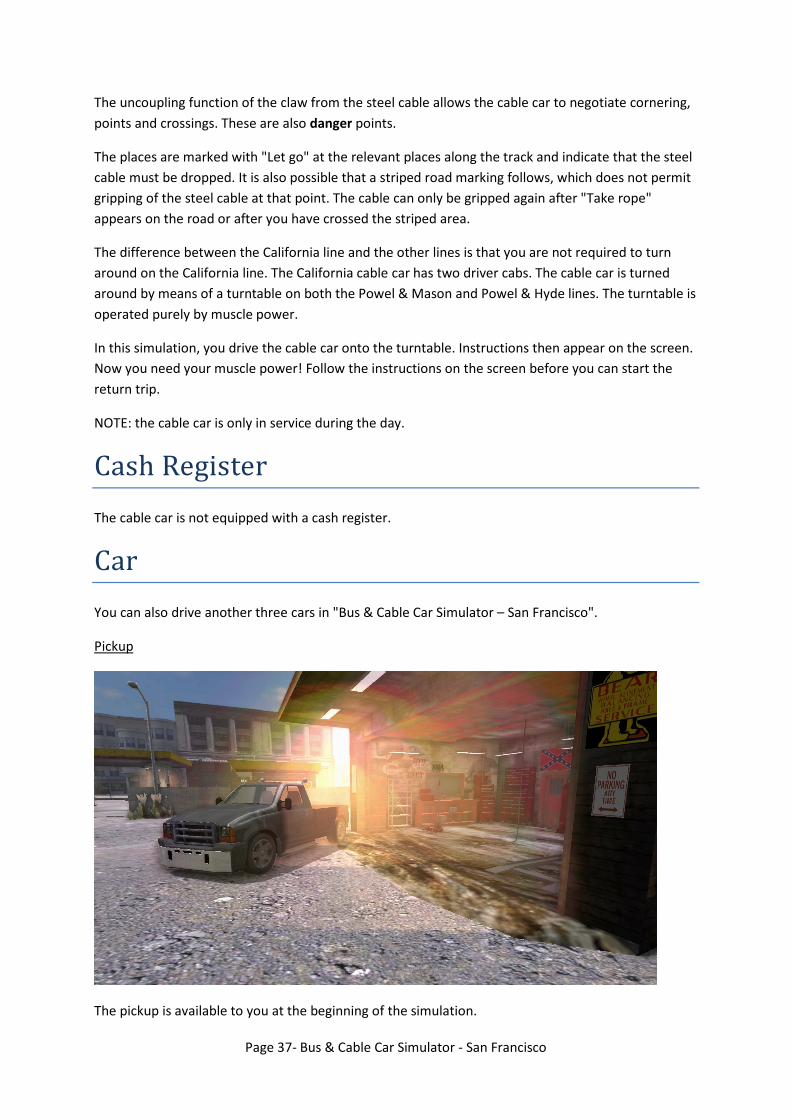
Car
You can also drive another three cars in "Bus & Cable Car Simulator – San Francisco".
Pickup
The pickup is available to you at the beginning of the simulation.

Page 38- Bus & Cable Car Simulator - San Francisco
Just place yourself next to the driver's door to get in. Then press the [C] key. Start the motor by
pressing the [E] key. To engage a gear, press the [PAGE UP] key.
In addition, the pickup even has interior lighting that can be switched on or off by pressing the
[Home] key.
The parking light is switched on by pressing the [L] key. If you press the [L] key again, the dipped
headlights are switched on. This procedure can be reversed. If you press the [L] key a third time, the
dipped headlights will be switched off and the parking light remains on. If you press the [L] key a
fourth time, the parking light is switched off.
The headlights are switched on by pressing the [O] key. Important note: the headlights only function
when the dipped headlights are switched on.
Sound the horn by pressing the [H] key.
Service Truck
The service truck is the company vehicle of the transport services and provides the same function as
the pickup. The only differences are the additional signal lights that are activated by pressing the [S]
key.

Page 39- Bus & Cable Car Simulator - San Francisco
Van
You can earn this vehicle. It is controlled in exactly the same way as the pickup. The only difference
is, it has a lot more power under the bonnet!
Bonus: Streetcar
All streetcars are bonus vehicles.
Place yourself next to the front door and press the [F5] key. To get into the cab, place yourself next
to the driver's position and press the [C] key. The streetcar is prepared for driving by pressing the [E]
key.
Then the direction switch is moved "forward" by pressing the [Page up] key. The streetcar then be
accelerated. Use the [arrow up] key for this purpose. The streetcar is also equipped with a simple
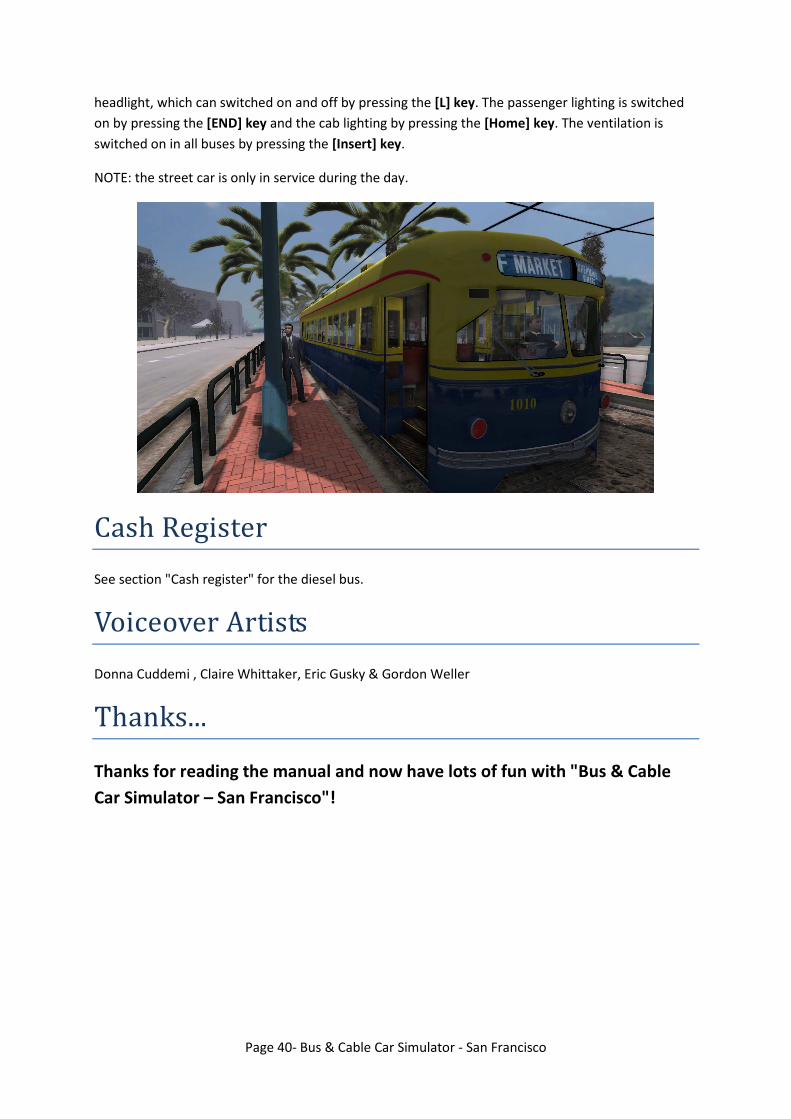
Page 40- Bus & Cable Car Simulator - San Francisco
headlight, which can switched on and off by pressing the [L] key. The passenger lighting is switched
on by pressing the [END] key and the cab lighting by pressing the [Home] key. The ventilation is
switched on in all buses by pressing the [Insert] key.
NOTE: the street car is only in service during the day.
Cash Register
See section "Cash register" for the diesel bus.
Voiceover Artists
Donna Cuddemi , Claire Whittaker, Eric Gusky & Gordon Weller
Thanks...
Thanks for reading the manual and now have lots of fun with "Bus & Cable
Car Simulator – San Francisco"!
Related Documents