Battle Staff Graphics and Overlays-Workbook 1 Battle Staff Graphics Workbook This workbook contains 36 pages of symbols to aid in your understanding of ADRP 1-02. 16 November 2015

Welcome message from author
This document is posted to help you gain knowledge. Please leave a comment to let me know what you think about it! Share it to your friends and learn new things together.
Transcript
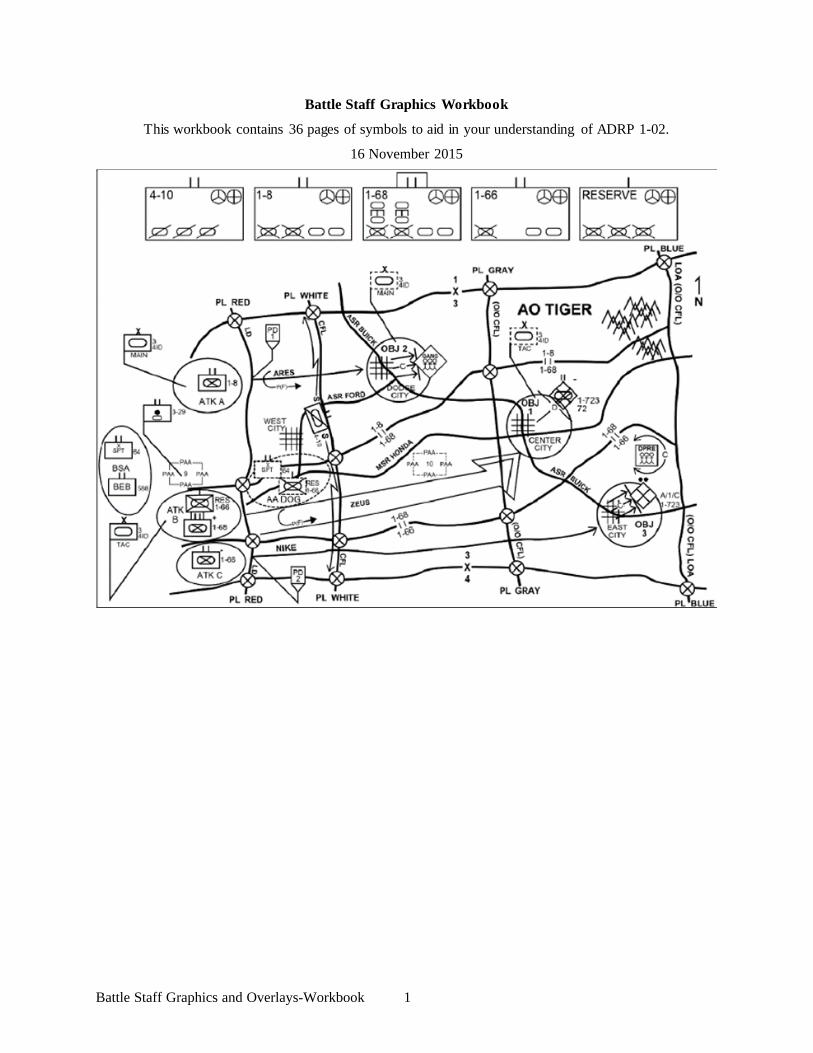
Battle Staff Graphics and Overlays-Workbook 1
Battle Staff Graphics Workbook
This workbook contains 36 pages of symbols to aid in your understanding of ADRP 1-02.
16 November 2015

Battle Staff Graphics and Overlays-Workbook 2
This workbook is based on ADRP 1-02, Terms and Military Symbols, dated Change 1 2 Feb 2015. It will provide you with a working knowledge to identify and construct operational symbols and graphics.
You must take your time to complete the workbook. Taking your time will increase your shared understanding as you enter the larger blocks of instruction in Graphics and Overlays, MDMP, and Staff Exercise.
Before beginning this workbook you must first become familiar with the ten chapters of ADRP 1-02. You should scan majority of the military terms and chapter 1, but you need to read the military terms associated with tactical mission tasks.
This workbook will be completed before the graphics and overlays lesson plan. Your facilitator will spot check your progress during the course.
This goal for this workbook is to accomplish the following objectives:
Provide a better understanding of ADRP 1-02. Increase your confidence in depicting and analyzing graphic symbols. Provide you a quick reference guide as you go back to your unit. Increase your cognitive learning ability.
Cognitive learning levels
Creating Putting elements together to form a coherent or functional whole; reorganizing elements into a new pattern or structure through generating, planning or producing.
Evaluating Making judgments based on criteria and standards through checking and critiquing.
Analysing Breaking material into constituent parts, determining how the parts relate to one another and to an overall structure or purpose through differentiating, organizing and attributing.
Applying Carrying out or using procedure through executing or implementing.
Understanding Constructing meaning from oral, written and graphics messages through interpreting, exemplifying, classifying, summarizing, inferring, comparing and explaining.
Remembering Retrieving, recognizing and recalling relevant knowledge from long-term memory.

Battle Staff Graphics and Overlays-Workbook 3
Chapter 3 Military Symbology Basics
Fill in the correct frame shapes for standard identities.
Battle Staff Graphics and Overlays-Workbook 4
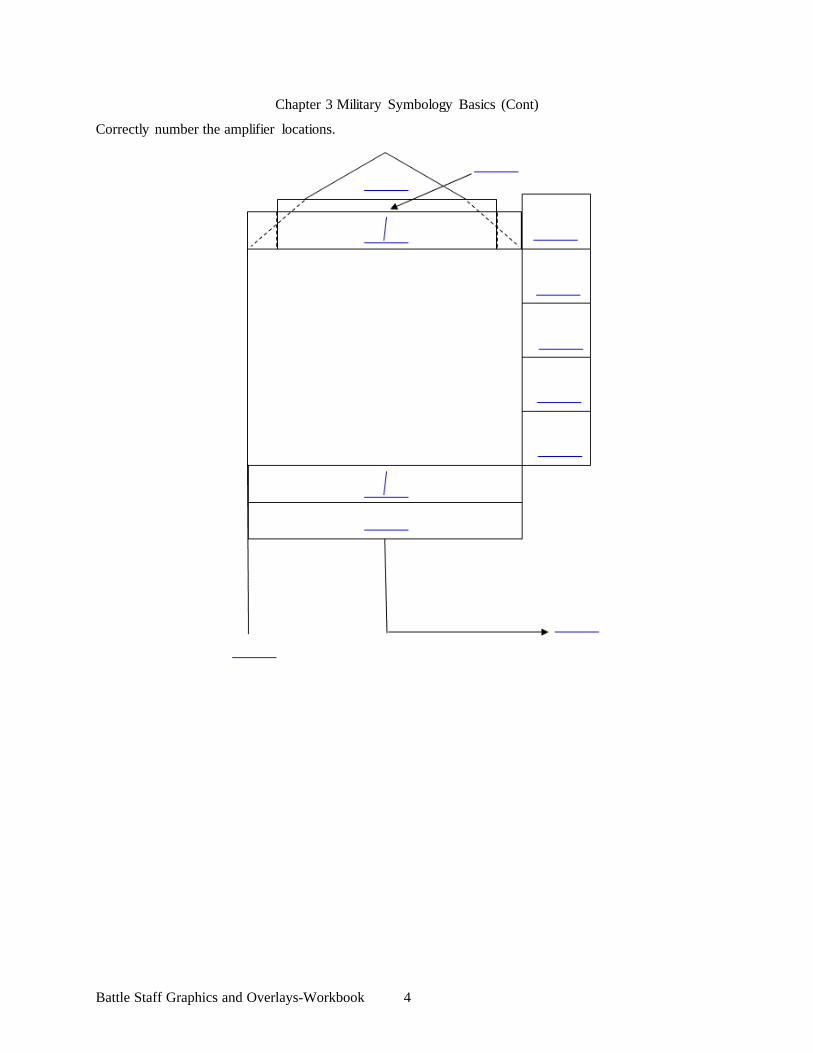
Chapter 3 Military Symbology Basics (Cont)
Correctly number the amplifier locations.

Battle Staff Graphics and Overlays-Workbook 5
Chapter 3 Military Symbology Basics (Cont)
Fill in the correct description of amplifier fields that relate to the amplifier locations on the previous page.
Field Description
Indicates whether the unit is reinforced, detached, or both.
2
A unique alpha numeric designation that identifies the unit being displayed. Note: When showing unique alphanumeric designations for combat arms regimental units (air defense artillery, armor, aviation, cavalry, field artillery, infantry, and special forces) the following rules apply: No regimental headquarters: A dash (-) will be used between the battalion and the regimental designation where there is no regimental headquarters. (Example: A/6-37 for A Battery, 6th Battalion, 37th Field Artillery) Regimental headquarters: A slash (/) will be used between the battalion and the regimental designation where there is a regimental headquarters of an active operational unit to show continuity of the units. (Example: F/2/11 for F Troop, 2d Squadron/11th Armored Cavalry Regiment)
4
5
Echelon indicator of symbol. (See table 4-5 on page 4-27).
Quantity that identifies the number of items present.
Task force amplifier placed over the echelon. (See table 4-6 on page 4-30).
10
11
Combat effectiveness of unit or equipment displayed. (See table 4-9 on page 4-36).
Mobility indicator of the equipment being displayed. (See figure 5-1 on page 5-15 and table 5-3 on page 5-13).
Indicates what type of headquarters element is being displayed. (See table 4-8 on page 4-35).

Battle Staff Graphics and Overlays-Workbook 6
Chapter 4 Units, Individuals and Organizations
Correctly identify main icons for units.
Correctly identify sector 1 modifiers for units.

Battle Staff Graphics and Overlays-Workbook 7
Chapter 4 Units, Individuals and Organizations (Cont)
Correctly identify sector 2 modifiers for units.
Correctly identify echelon amplifiers.

Battle Staff Graphics and Overlays-Workbook 8
Chapter 4 Units, Individuals and Organizations (Cont)
Correctly identify task force and team amplifiers; attached and detached amplifiers; command post and command group amplifiers; and combat effectiveness amplifiers

Battle Staff Graphics and Overlays-Workbook 9
Chapter 4 Units, Individuals and Organizations (Cont)
Correctly draw each unit unique designation description
Special troops battalion, 2d brigade combat team, 10th mountain division, III corps.
4th battalion, 23d infantry regiment (Stryker), 2d brigade, 7th infantry division.
Division artillery, 101st airborne division (air assault).
299 support battalion (brigade), 2d brigade, 7th infantry division.
4th platoon (mobile gun system), A company, 4th battalion, 23d infantry regiment (Stryker), 2d brigade, 7th infantry division.
6th battalion, 37th field artillery regiment, 2d infantry division.
C battery, 3d battalion, 319 field artillery (air assault).
III marine expeditionary force.
Battle Staff Graphics and Overlays-Workbook 10
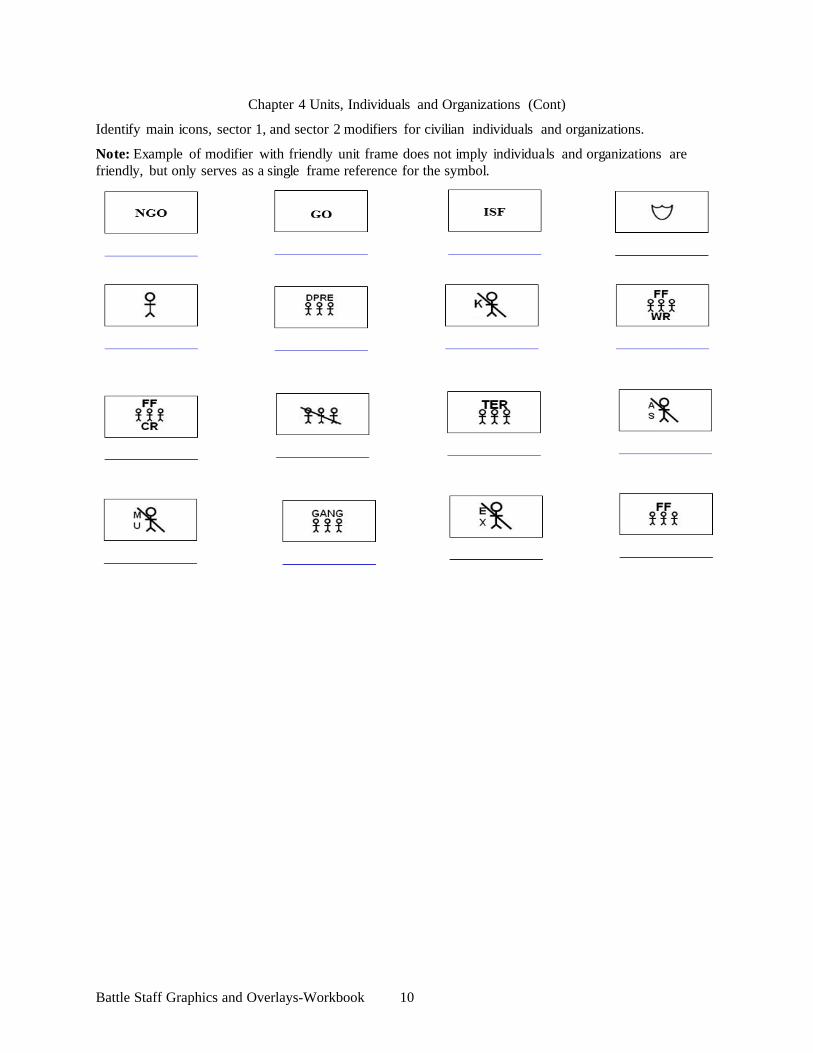
Chapter 4 Units, Individuals and Organizations (Cont)
Identify main icons, sector 1, and sector 2 modifiers for civilian individuals and organizations.
Note: Example of modifier with friendly unit frame does not imply individuals and organizations are friendly, but only serves as a single frame reference for the symbol.

Battle Staff Graphics and Overlays-Workbook 11
Chapter 5 Equipment
Identify main icons for civilian individuals and organizations.

Battle Staff Graphics and Overlays-Workbook 12
Chapter 6 Installations
Identify main icons, sector 1 and 2 modifiers for installations.

Battle Staff Graphics and Overlays-Workbook 13
Chapter 7 Activities
Identify main icons, sector 1 and 2 modifiers for installations.

Battle Staff Graphics and Overlays-Workbook 14
Chapter 8 Control Measure Symbols
Fill in the correct description of control measure symbol amplifier fields. You will have to refer back to Chapter 3.
Field Description
2
A unique alpha numeric designation that identifies the unit being displayed. Note: When showing unique alphanumeric designations for combat arms regimental units (air defense artillery, armor, aviation, cavalry, field artillery, infantry, and special forces) the following rules apply: No regimental headquarters: A dash (-) will be used between the battalion and the regimental designation where there is no regimental headquarters. (Example: A/6-37 for A Battery, 6th Battalion, 37th Field Artillery) Regimental headquarters: A slash (/) will be used between the battalion and the regimental designation where there is a regimental headquarters of an active operational unit to show continuity of the units. (Example: F/2/11 for F Troop, 2d Squadron/11th Armored Cavalry Regiment)
Free text staff comments for information required by the commander>
6
Quantity that identifies the number of items present. For a nuclear event, identifies the actual or estimated size of the nuclear weapon used in kilotons (KT) or megatons (MT).
11 The offset location indicator without the arrow is used to denote precise location of units or to declutter multiple unit locations, except for headquarters.
The offset location indicator without the arrow is used to denote precise location of units or to declutter multiple unit locations, except for headquarters. An alphanumeric designator for displaying a date-time group (for example, DDHHMMSSZMONYYYY) or “O/O” for on order.
16-1
17
18
19
20/20-1
21/21-1
22

Battle Staff Graphics and Overlays-Workbook 15
Chapter 8 Control Measure Symbols (Cont)
Correctly label the point symbol below.

Battle Staff Graphics and Overlays-Workbook 16
Chapter 8 Control Measure Symbols (Cont)
Correctly label the point symbol below.

Battle Staff Graphics and Overlays-Workbook 17
Chapter 8 Control Measure Symbols (Cont)
Correctly label the template below.
Correctly label the template below.

Battle Staff Graphics and Overlays-Workbook 18
Chapter 8 Control Measure Symbols (Cont)
Correctly label the template below.
Correctly label the template below.

Battle Staff Graphics and Overlays-Workbook 19
Chapter 8 Control Measure Symbols (Cont)
Correctly label the template below.
Battle Staff Graphics and Overlays-Workbook 20
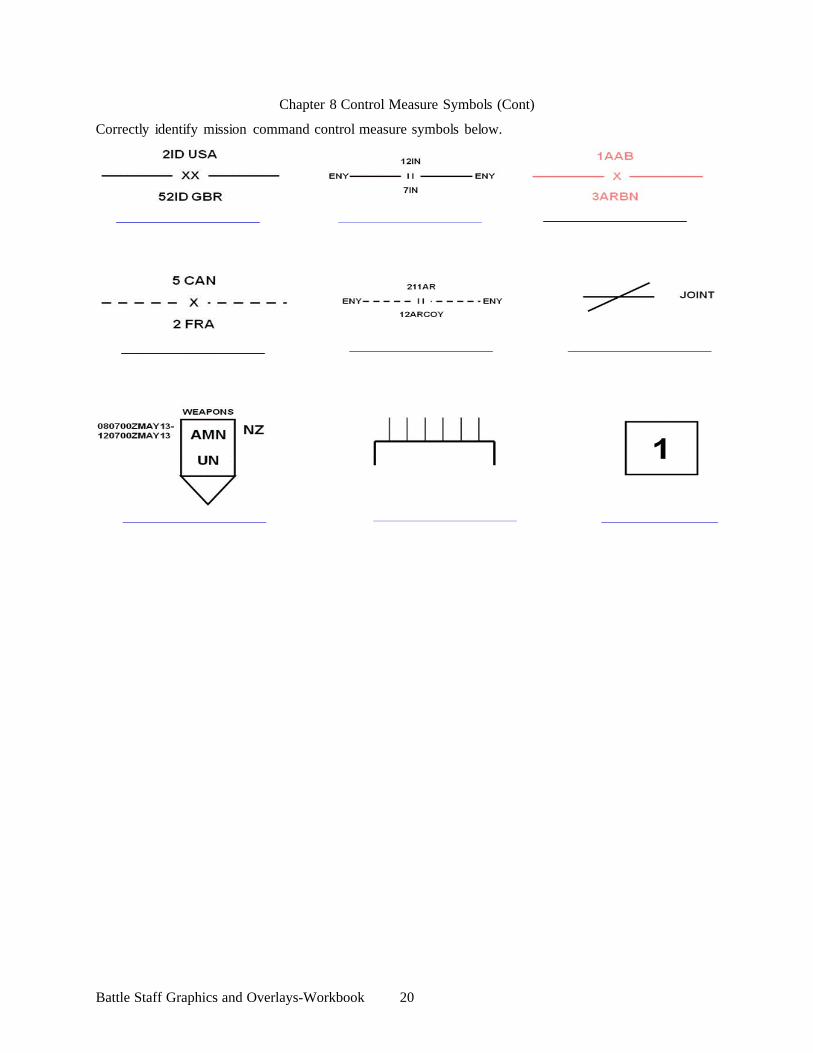
Chapter 8 Control Measure Symbols (Cont)
Correctly identify mission command control measure symbols below.

Battle Staff Graphics and Overlays-Workbook 21
Chapter 8 Control Measure Symbols (Cont)
Correctly identify mission command control measure symbols below.
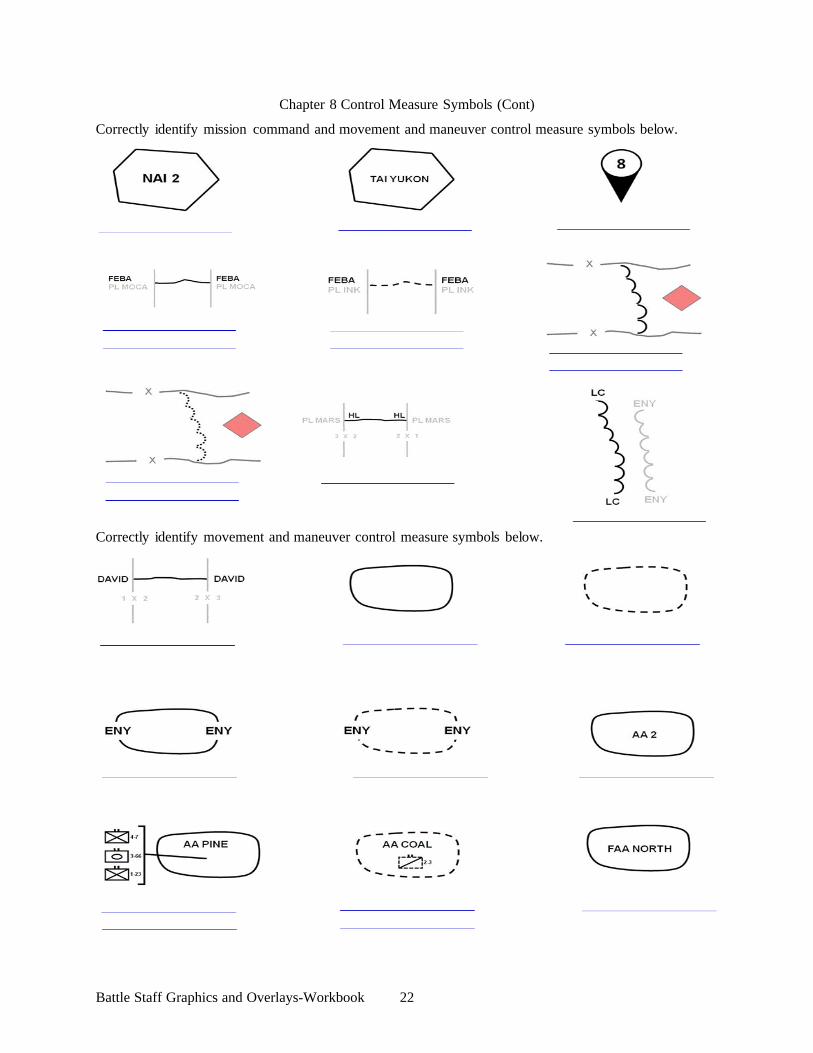
Battle Staff Graphics and Overlays-Workbook 22
Chapter 8 Control Measure Symbols (Cont)
Correctly identify mission command and movement and maneuver control measure symbols below.
Correctly identify movement and maneuver control measure symbols below.

Battle Staff Graphics and Overlays-Workbook 23
Chapter 8 Control Measure Symbols (Cont)
Correctly identify movement and maneuver control measure symbols below.

Battle Staff Graphics and Overlays-Workbook 24
Chapter 8 Control Measure Symbols (Cont)
Correctly identify movement and maneuver control measure symbols below.

Battle Staff Graphics and Overlays-Workbook 25
Chapter 8 Control Measure Symbols (Cont)
Correctly identify movement and maneuver control measure symbols below.
Correctly identify fires control measure symbols below.
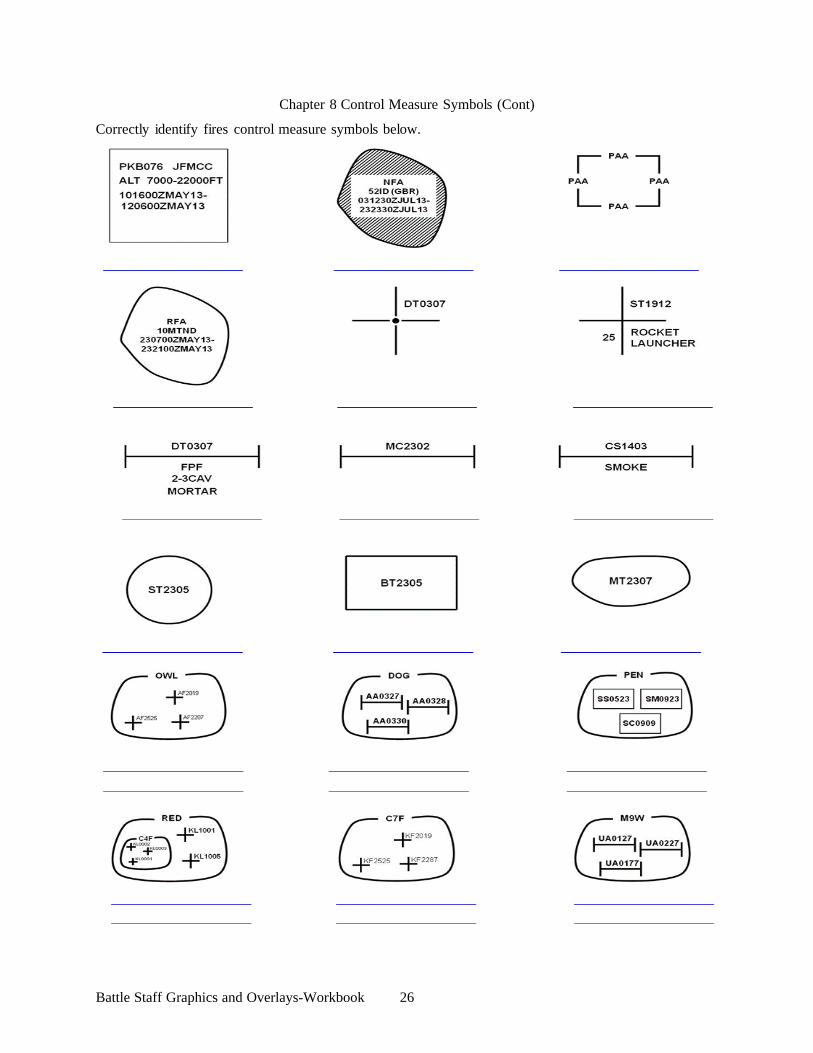
Battle Staff Graphics and Overlays-Workbook 26
Chapter 8 Control Measure Symbols (Cont)
Correctly identify fires control measure symbols below.

Battle Staff Graphics and Overlays-Workbook 27
Chapter 8 Control Measure Symbols (Cont)
Correctly identify fires control measure symbols below.
Correctly identify protection control measure symbols below.

Battle Staff Graphics and Overlays-Workbook 28
Chapter 8 Control Measure Symbols (Cont)
Correctly identify protection control measure symbols below.

Battle Staff Graphics and Overlays-Workbook 29
Chapter 8 Control Measure Symbols (Cont)
Correctly identify protection control measure symbols below.

Battle Staff Graphics and Overlays-Workbook 30
Chapter 8 Control Measure Symbols (Cont)
Correctly identify protection control measure symbols below.

Battle Staff Graphics and Overlays-Workbook 31
Chapter 8 Control Measure Symbols (Cont)
Correctly identify protection control measure symbols below.

Battle Staff Graphics and Overlays-Workbook 32
Chapter 8 Control Measure Symbols (Cont)
Correctly identify protection control measure symbols below.
Correctly identify sustainment control measure symbols below.

Battle Staff Graphics and Overlays-Workbook 33
Chapter 8 Control Measure Symbols (Cont)
Correctly identify sustainment control measure symbols below.

Battle Staff Graphics and Overlays-Workbook 34
Chapter 8 Control Measure Symbols (Cont)
Correctly identify sustainment and intelligence control measure symbols below.
Correctly identify airspace control measure symbols below.

Battle Staff Graphics and Overlays-Workbook 35
Chapter 8 Control Measure Symbols (Cont)
Correctly identify airspace control measure symbols below.

Battle Staff Graphics and Overlays-Workbook 36
Chapter 8 Control Measure Symbols (Cont)
Correctly identify airspace control measure symbols below.

Battle Staff Graphics and Overlays-Workbook 37
Chapter 9 Tactical Mission Tasks
Correctly identify tactical mission task symbols below.

Battle Staff Graphics and Overlays-Workbook 38
Chapter 9 Tactical Mission Tasks
Correctly identify tactical mission task symbols below.
Chapter 10 Course of Action Sketch
Correctly identify task organization icons and combat effectiveness icons below.
Related Documents


