Battery Backup Kit INSTALLATION INSTRUCTIONS | OWNERS COPY 2.3 Ah V-05 Installation Instructions Part # 13203 (Manual V 1.01)

Welcome message from author
This document is posted to help you gain knowledge. Please leave a comment to let me know what you think about it! Share it to your friends and learn new things together.
Transcript

Battery Backup Kit
INSTALLATION INSTRUCTIONS | OWNERS COPY
2.3 Ah V-05 Installation Instructions
Part # 13203 (Manual V 1.01)

2 Battery Backup Kit V-05 Owner Installation Instructions
Installation 3
GDO-6 Battery Backup Installation 3
GDO-9v2 Enduro™ Battery Backup Installation 5
GDO-9v3 Dynamo™ Battery Backup Installation 7
GDO-11 Ero™ Battery Backup Installation 9
Warranty 11
Battery Backup Kit V-05

Owner Installation Instructions Battery Backup Kit V-05 3
Note: Use Battery Pack #2 For GDO-6 Battery Backup Kit Installation
Step 1.1 - Connect the Battery Backup Kit
Disconnect power to the opener and disengage motor. Remove timing cover and light diffuser. Remove cable clamp and screw (Fig 01). Retain cable clamp for later use.
a.
Item Description Qty Order Code
1. Battery cover 1 164602.3.4.5.
Battery support Battery 12V sec 12-2.2 AGM type Battery coupling wire -ESV24Battery harness
1211
16480154701200515670
6. Pan head screw w/washer M4 x 8 2 103207. Cable clamp ACC-1.5(3/16”) 1 117508. SBY-3 Version 1.00 1 008529. SBY-3 ESV24 Charger harness 1 1411510. SBY-2 Battery harness 1 15660
11.12.13.
Battery Pack #2Taptite screw ‘P’ M4x8Taptite screw ‘P’ M4x10Cable clamp ACC-2.5 (5/16”)
421
105801057011760
Mount the Charger Board SBY-3 on base and secure with four (11) Taptite ‘P’ M4 x 8 screws.Secure lower left corner with cable clamp while holding brown transformer wires. Feed (9) Wire Harness around the timing assembly, through opening and plug into SBY-3 connector control board.Remove breakaway slot on timing cover and feed (10) wire battery harness through slot and replace timing cover. Secure in place with screws.Mount battery backup kit onto support chassis and secure right side screw fi rst (charger board side).Position (10) wire battery harness neatly and secure left side of battery kit with cable clamp.
WARNING: After Step 1.1(g) the opener may become active (even when power is off). This is a result of a residual charge in the batteries.
Connect battery harnesses 5 and 10 together.Reconnect power.
b.
c.
d.
e.
f.
g.h.
GDO-6 Battery Backup Kit
01fi g
Remove breakaway slot on timing cover and feed battery harness through the slot
Connect harness to SBY-3 connector on the control board
Timing Cover

4 Battery Backup Kit V-05 Owner Installation Instructions
GDO-6 Battery Backup Kit
Step 1.2 - Testing Battery BackupPress either the OSC button or transmitter to test the opener.Whilst door is in motion, disconnect mains power. The door should continue to operate as normal.
NOTE: Wait for the door to complete its travel.
Press the OSC button or transmitter to activate the door.Whilst door is in motion, reconnect the power. The door should complete the cycle as normal.
Step 1.3 - TroubleshootingIf the door stops or moves very slowly under battery power, the batteries may be weak or have no charge. Connect mains power and allow the batteries to charge. This may take 24 - 48 hours to reach maximum charge capacity.
a.
b.
c.
d.
02fi g
Owner Installation Instructions Battery Backup Kit V-05 5
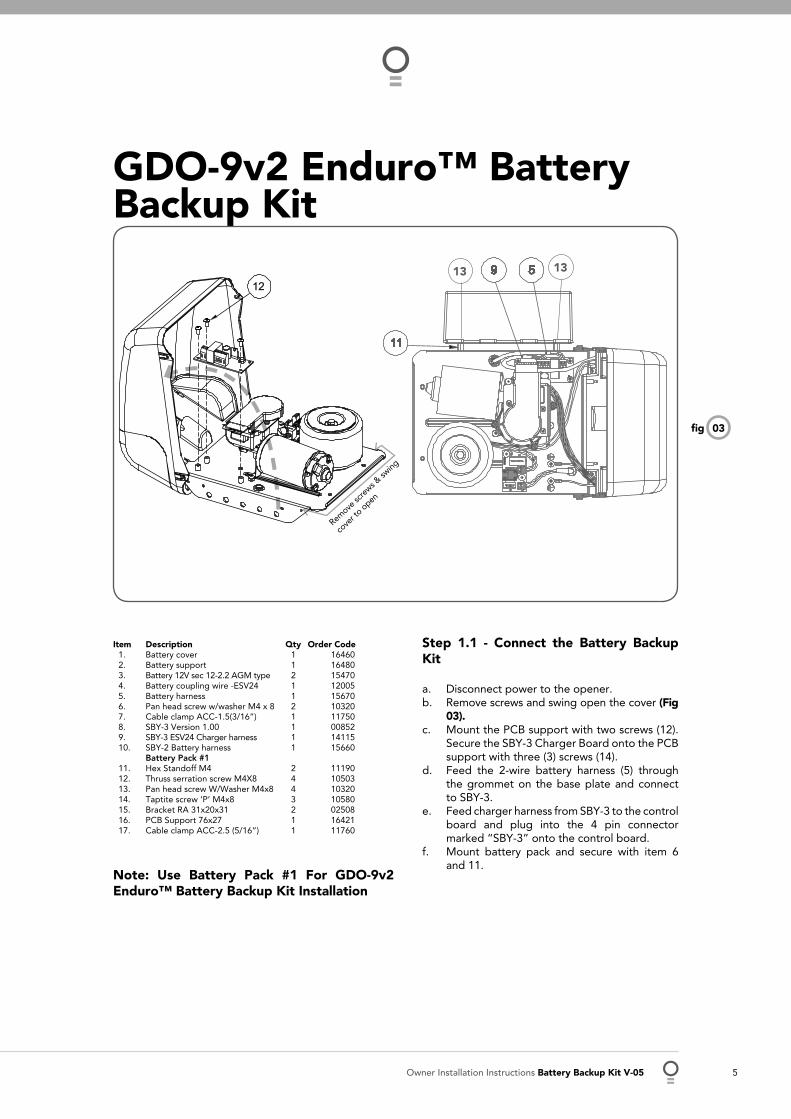
Step 1.1 - Connect the Battery Backup Kit
Disconnect power to the opener.Remove screws and swing open the cover (Fig 03).Mount the PCB support with two screws (12). Secure the SBY-3 Charger Board onto the PCB support with three (3) screws (14). Feed the 2-wire battery harness (5) through the grommet on the base plate and connect to SBY-3.Feed charger harness from SBY-3 to the control board and plug into the 4 pin connector marked “SBY-3” onto the control board.Mount battery pack and secure with item 6 and 11.
a.b.
c.
d.
e.
f.
Remove
scre
ws & sw
ing
cove
r to open
13 13
Note: Use Battery Pack #1 For GDO-9v2 Enduro™ Battery Backup Kit Installation
Item Description Qty Order Code1. Battery cover 1 164602.3.4.5.
Battery support Battery 12V sec 12-2.2 AGM type Battery coupling wire -ESV24Battery harness
1211
16480154701200515670
6. Pan head screw w/washer M4 x 8 2 103207. Cable clamp ACC-1.5(3/16”) 1 117508. SBY-3 Version 1.00 1 008529. SBY-3 ESV24 Charger harness 1 1411510. SBY-2 Battery harness 1 15660
11.12.13.14.15.16.17.
Battery Pack #1Hex Standoff M4Thruss serration screw M4X8Pan head screw W/Washer M4x8Taptite screw ‘P’ M4x8Bracket RA 31x20x31PCB Support 76x27Cable clamp ACC-2.5 (5/16”)
2443211
11190105031032010580025081642111760
GDO-9v2 Enduro™ Battery Backup Kit
03fi g

6 Battery Backup Kit V-05 Owner Installation Instructions
GDO-9v2 Enduro™ Battery Backup Kit
WARNING: After Step 1.1(g) the opener may become active (even when power is off). This is a result of a residual charge in the batteries.
Connect battery harnesses 5 and 10 together (Fig 04).Reconnect power.
Step 1.2 - Testing Battery BackupPress either the OPERATE button or transmitter to test the opener.Whilst door is in motion, disconnect mains power. The door should continue to operate as normal.
NOTE: Wait for the door to complete its travel.
Press the OPERATE button or transmitter to activate the door.Whilst door is in motion, reconnect power. The door should complete the cycle as normal.
g.
h.
a.
b.
c.
d.
Wiring diagram
Step 1.3 - TroubleshootingIf the door stops or moves very slowly under battery power, the batteries may be weak or have no charge. Connect mains power and allow the batteries to charge. This may take 24 - 48 hours to reach maximum charge capacity.
04fi g

Owner Installation Instructions Battery Backup Kit V-05 7
Step 1.1 - Connect the Battery Backup Kit
Disconnect power to the opener.Remove screws and swing open the cover (Fig 05).Mount the PCB support (16) with two screws (12). Secure the SBY-3 charger board on to PCB support with 3 screws (14).Feed the 2-wire battery harness (5) through the grommet on the base plate and connect to SBY-3.Feed charger harness from SBY-3 to the control board and plug into the 4 pin connector marked “SBY-3” onto the control board.Mount battery pack and secure with item 6 and 11.
a.b.c.
d.
e.
f.
Item Description Qty Order Code1. Battery cover 1 164602.3.4.5.
Battery support Battery 12V sec 12-2.2 AGM type Battery coupling wire -ESV24Battery harness
1211
16480154701200515670
6. Pan head screw w/washer M4 x 8 2 103207. Cable clamp ACC-1.5(3/16”) 1 117508. SBY-3 Version 1.00 1 008529. SBY-3 ESV24 Charger harness 1 1411510. SBY-2 Battery harness 1 15660
11.12.13.14.15.16.17.
Battery Pack #1Hex Standoff M4Thruss serration screw M4X8Pan head screw W/Washer M4x8Taptite screw ‘P’ M4x8Bracket RA 31x20x31PCB Support 76x27Cable clamp ACC-2.5 (5/16”)
2443211
11190105031032010580025081642111760
GDO-9v3 Dynamo™ Battery Backup Kit
Note: Use Battery Pack #1 For GDO-9v3 Dynamo™ Battery Backup Kit Installation
05fi g
Remove
scre
ws & sw
ing
cove
r to open
13 13

8 Battery Backup Kit V-05 Owner Installation Instructions
WARNING: After Step 1.1(g) the opener may become active (even when power is off). This is a result of a residual charge in the batteries.
Connect battery harnesses 5 and 10 together (Fig 06).Reconnect power.
Step 1.2 - Testing Battery BackupPress either the OPERATE button or transmitter to test the opener.Whilst door is in motion, disconnect mains power. The door should continue to operate as normal.
NOTE: Wait for the door to complete its travel.
Press the OPERATE button or transmitter to activate the door.Whilst door is in motion, reconnect power. The door should complete the cycle as normal.
g.
h.
a.
b.
c.
d.
Wiring diagram
GDO-9v3 Dynamo™ Battery Backup Kit
Step 1.3 - TroubleshootingIf the door stops or moves very slowly under battery power, the batteries may be weak or have no charge. Connect mains power and allow the batteries to charge. This may take 24 - 48 hours to reach maximum charge capacity.
06fi g

Owner Installation Instructions Battery Backup Kit V-05 9
GDO-11 Ero™ Battery Backup Kit
07fi g
SS

10 Battery Backup Kit V-05 Owner Installation Instructions
GDO-11 Ero™ Battery Backup Kit
Note: Use Battery Pack # 1 For GDO-11 Ero™ Battery Backup Kit Installation
Step 1.1 - Connect the Battery Backup Kit
Disconnect power to the opener.Swing open the light diffuser and controls cover. Remove screws marked “S” (Fig 07) and lift up the main cover.Feed the SBY-3 charger harness through the grommet on the metal plate and connect to SBY-3 as shown in wiring diagram.Mount the brackets RA (15) to battery pack with 13.Secure the battery pack to the GDO-11 with 2 screws (12).Feed the SBY-3 battery harness (3) through the grommet on the metal chassis and connect to SBY-3 as per diagram.Mount the PCB support (16) with two screws (12). Secure the SBY-3 charger board on to PCB support with 3 screws (14).Feed charger harness from SBY-3 to the control board and plug into the 4 pin connector marked “SBY-3” onto the control board.
a.b.
c.
d.
e.
f.
g.
h.
WARNING: After Step 1.1 (i) the opener may become active (even when power is off). This is a result of a residual charge in the batteries.
Connect battery harnesses 5 and 10 together (Fig 08).Reconnect the power.
Step 1.2 - Testing Battery BackupPress either the OPERATE button or transmitter to test the opener.Whilst door is in motion, disconnect mains power. The door should continue to operate as normal.
NOTE: Wait for the door to complete its travel.
Press the OPERATE button or transmitter to activate the door.Whilst door is in motion, reconnect power. The door should complete the cycle as normal.
Step 1.3 - TroubleshootingIf the door stops or moves very slowly under battery power, the batteries may be weak or have no charge. Connect mains power and allow the batteries to charge. This may take 24 - 48 hours to reach maximum charge capacity.
i.
j.
a.
b.
c.
d.
Item Description Qty Order Code1. Battery cover 1 164602.3.4.5.
Battery support Battery 12V sec 12-2.2 AGM type Battery coupling wire -ESV24Battery harness
1211
16480154701200515670
6. Pan head screw w/washer M4 x 8 2 103207. Cable clamp ACC-1.5(3/16”) 1 117508. SBY-3 Version 1.00 1 008529. SBY-3 ESV24 Charger harness 1 1411510. SBY-2 Battery harness 1 15660
11.12.13.14.15.16.17.
Battery Pack #1Hex Standoff M4Thruss serration screw M4X8Pan head screw W/Washer M4x8Taptite screw ‘P’ M4x8Bracket RA 31x20x31PCB Support 76x27Cable clamp ACC-2.5 (5/16”)
2443211
11190105031032010580025081642111760
08fi g

Owner Installation Instructions Battery Backup Kit V-05 11
Warranty and Exclusion of Liability1. This warranty is an addition to any non-excludable conditions or warranties that are implied into this contract
by relevant statute, including the Trade Practices Act 1974 (Cwth).2. Subject to all of the matters set out below, Automatic Technology Australia Pty Ltd (“ATA”) warrants:
(a) overhead door opener drive units for twenty four (24) months or 5000 cycles, whichever occurs fi rst; and (b) all components and accessories for twelve (12) months, from the date of purchase (specifi ed in the sales
docket receipt) as free of any defects in material and workmanship.3. This warranty applies only where the purchaser:
(a) immediately notifi es ATA or the retailer of the alleged defect; (b) returns the product to the retailer; and (c) presents the relevant sales docket and this warranty document to the retailer to confi rm the date
of purchase.4. Except for this warranty, ATA gives no warranties of any kind whatsoever (whether express or implied),
in relation to the product, and all warranties of whatsoever kind relating to the product are, to the extent permissible by statute, hereby excluded.
5. To the extent permissible by statute, ATA disclaims any liability of whatsoever nature in respect of any claim or demand for loss or damage which arises out of: (a) accidental damage to or normal wear and tear to the product or to the product’s components; (b) any cost relating to damage resulting from wear and tear; (c) blown fuses, loss or damage caused by electrical surges, power surges or power spikes; (d) loss or damage due to theft, fi re, fl ood, rain, water, lightning, storms or any other acts of God; (e) maximum continuous operating time exceeding one (1) minute in ten (10); (f) maximum operating force exceeding *20kg (200N) when moving the door manually to the open or
closed position; (g) door surface area and/or weight exceeding 16.5m2 and 100kg respectively; (h) door not in safe and correct working order and condition; (i) evidence of unauthorised repairs; (j) any cost relating to damage caused by misuse, negligence or failure to maintain the equipment in a
proper working order as per clauses (d) through (h); (k) installation, adjustment or use which is not in accordance with the instructions set out in installation
instruction manual (l) attempted or complete modifi cation or repairs to the product carried out by a person who is not
authorised or has not been trained by ATA to carry out such modifi cation or repairs; (m) faulty or unsuitable wiring of structure to which the product is fi xed or connected; (n) radio (including citizen band transmission) or any electrical interference; (o) damage caused by insects; (p) loss or damage to any property whatsoever or any loss or expense whatsoever resulting or arising there
from or any consequential loss; (q) any cost or expense arising due to manufacturer recall of any product; (r) any cost or expense due to negligence of the approved service provider; (s) installation of a residential garage door opener in a commercial or industrial situation or a non-single
residential dwelling.6. ATA’s liability under this warranty is limited, at ATA’s absolute option, to replacing or repairing the product
which ATA, in its unfettered opinion, considers to be defective either in material and/or workmanship or to credit the dealer with the price at which the product was purchased by the dealer.
7. This warranty does not extend to cover labour for installation. 8. This warranty is limited to Return-to-Base (RTB) repair and does not cover labour for on-site attendance. 9. This warranty is void if the Product is not returned to the manufacturer in original or suitably secure packaging. 10. This warranty is only applicable for repairs to the product carried out within Australia.11. This warranty does not cover consumable items including globes, batteries and fuses.12. This warranty is not transferable.13. Where the Product is retailed by any person other than ATA, except for the warranty set out above, such
person has no authority from ATA to give any warranty or guarantee on ATA’s behalf in addition to the warranty set out above.
NOTES:1. One (1) cycle = one (1) open and one (1) close action of the door or gate.2. This warranty is to be read in conjunction with the owner’s copy of the installation instruction manual.3 *The door should be balanced in such a way that the user manually is able to open or close the door without using
force not greater than 150N (15kg ) although a greater force may be required for the start of the movement.

GARAGE DOOR OPENERS | GATE OPENERS | REMOTE CONTROL ACCESS SOLUTIONS
© January 2009 Automatic Technology (Australia) Pty Ltd. All rights reserved. Enduro™, Dynamo™ and Ero™ are the trademarks of Automatic Technology (Australia) Pty Ltd. No part of this document may be reproduced without prior permission. In an
ongoing commitment to product quality we reserve the right to change specifi cation without notice. E&OE.
Automatic Technololgy (Australia) Pty LtdABN 11 007 125 368
6-8 Fiveways BoulevardKeysborough, Victoria, 3173, Australia
P 1300 133 944
+61 2 9722 5666 (International Enquiries Only)
www.ata-aust.com.au
Related Documents


