Introduction Setting Guide Basic Operation For detailed operations, refer to the "Basic Manual" application that can be used on the product. F Power button Power ON F(Long-touch at least 2 seconds) Displaying the Home Screen from the Start Screen Swipe (flick) " " to display the Home screen. Swiping (flicking) " " activates the camera. • If a description for the Home screen appears, read the information and tap "OK". 《Start screen》 Apps list Display the Apps list. Navigation bar C: Return to the previous screen. H: Display the Home screen. N: Display the recently-used applications. • Long-touch Hand drag to the Google icon that appears to activate Google Now. • To display the navigation bar if it is not displayed in a screen, tap the bottom of the screen. • May be displayed differently depending on function being used or usage conditions. Display (Touch panel) Operate directly touching with your finger. Tap Lightly touch a screen and then immediately release your finger. Long-touch Keep touching a screen. Flick (Swipe) Touch the screen and flick up/down/ left/right. Slide Slide your finger across the screen in a desired direction to view hidden content. ■ Character Entry Use the onscreen keyboard for entering characters. Tap the entry field in the character entry screen when registering a contact, creating mail, etc. to display the onscreen keyboard. Tap keys to enter characters. Onscreen Keyboard Switch between QWERTY and 10-key layouts. 《Character entry screen (QWERTY)》 《Character entry screen (10-key)》 Flick input Long-touch a key to display input candidates for flick input as right screen. Flick to the direction of character to enter. Character entry mode switch key Tap to switch character type. Initial Settings When you turn on the product for the first time, follow the onscreen instructions to set the language, functions, services, etc. ■ Setting Up a Google Account Set up Google account to use Google apps such as "Gmail", "Play Store", "Hangouts". Setting items are as below (besides the items below, register "First name", "Last name"). User name Register your Google account (user ID) and any character string for mail address. You can register a desired name, but a registered name by another user cannot be set. Password Register password for the Google account. Select language, [ ] Set up the Wi-Fi ® network to connect as required *1 [Or create a new account] *2 Enter "First name" and "Last name" → [NEXT] Enter a user name → [NEXT] Checking registration of username starts. Enter a password, and reenter the password for confirmation → [NEXT] Confirm/check country name, enter phone number → [NEXT] *1 → [VERIFY] A text message with a Google verification code is sent to the specified phone number. Enter the Google verification code → [NEXT] Check the contents, then [I AGREE] Check the contents, then [NEXT] Select whether to set payment information → [NEXT] Here, select "Remind me later" and go to next step. [SET SCREEN LOCK NOW] *1 → Follow the onscreen instructions Check the contents, then [NEXT] *1 If you do not set up, tap "SKIP". *2 If you already have a Google account, enter the e-mail address. au Easy Setting By setting au ID, you can use various services provided by au such as "au Simple Payment Service" which allows you to purchase applications from the auスマートパス (au Smart Pass) or Google Play. Main setting items as follows. au ID * Register your au phone number or any character string for au ID (user ID). au ID password Register password for using au ID. * "au ID" which is already used by another user cannot be set. • If you skip the operation of "au Easy Setting" when you purchased the product, you can set au ID later. To set later, from the Home screen → [Settings] → [au Settings Menu] → [au Easy Setting] or from the Apps list → [au ID Setting]. Welcome to au screen → [Next] [Register "au ID"] → [Next] [au IDの設定・保存 (Set/save au ID)] Enter the security code *1 → [OK] Enter a security password → [設定 (Settings)] [終了 (End)] [Update] → [Next] Check the terms and conditions (reading required), [Agree] → [Next] → [Agree] *2 Check the contents, [Turn Auto Backup on]/ [Turn Auto Backup off] *3 → [Next] To use the "Data Storage App" and automatically store photos and address book entries to the auス マートパス (au Smart Pass) server, select "Turn Auto Backup on". Select apps to install → [次へ (Next)] If there is an application that can be restored, a restore screen is displayed. Follow the onscreen instructions. Check the contents, [Activate]/[Skip activation] → [Next] To use au Basic Home, select "Activate". Select type of data to return *4 → [次へ (Next)] [Finish] *1 Default value is a four-digit number written at subscription. *2 Setting beforehand is completed for Lookout for au as soon as you tap "Agree". *3 When a screen different from that shown here appears, follow the onscreen instructions. *4 If no data is stored to auスマートパス (au Smart Pass), this screen is not displayed. E-mail To use E-mail (@ezweb.ne.jp), subscription to LTE NET is required. If you did not subscribe it when you purchased the product, contact an au shop or Customer Service Center. Your E-mail address is determined automatically after initial setting. You can change the E-mail address later. ■ Initial Settings Home screen → [E-mail] Check the contents, then [接続する (Connect)] Confirm e-mail address → [閉じる (Close)] Check the contents, [Agree]/[Disagree] → [Done] ■ Changing Your E-mail Address Home screen → [E-mail] [ ] → [E-mail settings] [Other settings] → [接続する (Connect)] [Eメールアドレスの変 更へ (To change E-mail address)] Enter the security code → [送信 (Send)] Check the contents, then [承諾する (I accept)] Enter E-mail address → [送信 (Send)] [OK] [閉じる (Close)] ■ Backing Up E-mail You can back up E-mail. Backed up data is saved on a microSD™ memory card (/storage/sdcard1/private/au/email/BU/) when a microSD™ memory card is attached. If a microSD™ memory card is not attached, data is saved on the internal storage (/storage/emulated/0/private/au/email/BU/). Home screen → [E-mail] [ ] → [E-mail settings] [Backup/Restore] [Mail Backup] → Confirm the notes and [OK] Select a character code to make backup data → [OK] Select a mail type to back up → [OK] Mail Settings Other Than E-mail You can use mail addresses except for E-mail (@ezweb.ne.jp). Use of other mail addresses requires accounts to be set. When using another mail address for the first time, set the address as follows. Apps list → [Gmail] → Follow onscreen instructions Thank you for buying the "Qua tab 01" (simply called the "product" from here on). In this guide, settings and precautions for using the product are described. For explanations of basic functions, refer to "Basic Manual". Company names and product names referred to in this manual are trademarks or registered trademarks of respective companies. The TM, ® marks may be omitted in this manual. Screen illustrations shown in this manual may look different from the actual screens. In some cases, minor details or a part of a screen may be omitted. June 2015, 1st Edition ■ Basic Operation Describes the basic operations. ■ Initial Settings Make initial settings when you turn the power on for the first time. ■ au Easy Setting Sets au ID. ■ E-mail Make initial settings for @ezweb.ne.jp etc. ■ Importing/Exporting Contacts Import/export contacts using a microSD™ or other memory card. ■ Saving Battery Power Describes settings to save battery consumption using "Battery saver". ■ Setting Wi-Fi ® Describes how to connect Wi-Fi ® network. ■ Viewing/Playing Data Describes how to view and play still image and video data. ■ How to Transfer Data with the au Settings Menu You can return or store data from a previously used au terminal to the product using a microSD™ memory card or auスマートパ ス (au Smart Pass) server. Sold by: KDDI CORPORATION, OKINAWA CELLULAR TELEPHONE COMPANY Manufactured by: KYOCERA Corporation

Welcome message from author
This document is posted to help you gain knowledge. Please leave a comment to let me know what you think about it! Share it to your friends and learn new things together.
Transcript

Introduction
Setting Guide
Basic Operation
For detailed operations, refer to the "Basic Manual" application that can be used on the product.
F Power button
Power ONF (Long-touch at least 2 seconds)
Displaying the Home Screen from the Start ScreenSwipe (flick) " " to display the Home screen.Swiping (flicking) " " activates the camera. • If a description for the Home screen appears, read
the information and tap "OK".
《Start screen》
Apps list
Display the Apps list.
Navigation bar
C : Return to the previous screen.H : Display the Home screen.N : Display the recently-used applications. • Long-touch H and drag to the Google icon that appears to activate Google Now. • To display the navigation bar if it is not displayed in a screen, tap the bottom of the
screen. • May be displayed differently depending on function being used or usage
conditions.
Display (Touch panel)
Operate directly touching with your finger.
TapLightly touch a screen and then immediately release your finger.
Long-touchKeep touching a screen.
Flick (Swipe)Touch the screen and flick up/down/left/right.
SlideSlide your finger across the screen in a desired direction to view hidden content.
■ Character EntryUse the onscreen keyboard for entering characters.Tap the entry field in the character entry screen when registering a contact, creating mail, etc. to display the onscreen keyboard.Tap keys to enter characters.
Onscreen KeyboardSwitch between QWERTY and 10-key layouts.
《Character entry screen (QWERTY)》
《Character entry screen (10-key)》
Flick inputLong-touch a key to display input candidates for flick input as right screen. Flick to the direction of character to enter. Character entry mode switch key
Tap to switch character type.
Initial Settings
When you turn on the product for the first time, follow the onscreen instructions to set the language, functions, services, etc.
■ Setting Up a Google AccountSet up Google account to use Google apps such as "Gmail", "Play Store", "Hangouts".Setting items are as below (besides the items below, register "First name", "Last name").
User nameRegister your Google account (user ID) and any character string for mail address. You can register a desired name, but a registered name by another user cannot be set.
Password Register password for the Google account.
Select language, [ ] Set up the Wi-Fi® network to connect as
required*1
[Or create a new account]*2
Enter "First name" and "Last name" → [NEXT]
Enter a user name → [NEXT]
Checking registration of username starts.
Enter a password, and reenter the password for confirmation → [NEXT]
Confirm/check country name, enter phone
number → [NEXT]*1 → [VERIFY]
A text message with a Google verification code is sent to the specified phone number.
Enter the Google verification code →
[NEXT]
Check the contents, then [I AGREE]
Check the contents, then [NEXT]
Select whether to set payment information →
[NEXT]Here, select "Remind me later" and go to next step.
[SET SCREEN LOCK NOW]*1 → Follow the onscreen instructions
Check the contents, then [NEXT]
*1 If you do not set up, tap "SKIP".*2 If you already have a Google account, enter the e-mail address.
au Easy Setting
By setting au ID, you can use various services provided by au such as "au Simple Payment Service" which allows you to purchase applications from the auスマートパス (au Smart Pass) or Google Play. Main setting items as follows.
au ID* Register your au phone number or any character string for au ID (user ID).
au ID password Register password for using au ID.
* "au ID" which is already used by another user cannot be set.
• If you skip the operation of "au Easy Setting" when you purchased the product, you can set au ID later. To set later, from the Home screen → [Settings] → [au Settings Menu] → [au Easy Setting] or from the Apps list → [au ID Setting].
Welcome to au screen → [Next]
[Register "au ID"] → [Next]
[au IDの設定・保存 (Set/save au ID)]
Enter the security code*1 → [OK]
Enter a security password →
[設定 (Settings)]
[終了 (End)] [Update] → [Next] Check the terms and conditions (reading
required), [Agree] → [Next] → [Agree]*2
Check the contents, [Turn Auto Backup on]/[Turn Auto Backup off]*3
→ [Next]To use the "Data Storage App" and automatically store photos and address book entries to the auスマートパス (au Smart Pass) server, select "Turn Auto Backup on".
Select apps to install → [次へ (Next)]
If there is an application that can be restored, a restore screen is displayed. Follow the onscreen instructions.
Check the contents, [Activate]/[Skip
activation] → [Next]To use au Basic Home, select "Activate".
Select type of data to return*4 → [次へ (Next)]
[Finish]
*1 Default value is a four-digit number written at subscription.*2 Setting beforehand is completed for Lookout for au as soon as you tap "Agree".*3 When a screen different from that shown here appears, follow the onscreen instructions.*4 If no data is stored to auスマートパス (au Smart Pass), this screen is not displayed.
To use E-mail (@ezweb.ne.jp), subscription to LTE NET is required.If you did not subscribe it when you purchased the product, contact an au shop or Customer Service Center.Your E-mail address is determined automatically after initial setting. You can change the E-mail address later.
■ Initial Settings
Home screen → [E-mail] Check the contents, then
[接続する (Connect)]
Confirm e-mail address → [閉じる (Close)]
Check the contents, [Agree]/[Disagree] →
[Done]
■ Changing Your E-mail Address
Home screen → [E-mail] [ ] → [E-mail settings] [Other settings] → [接続する (Connect)]
[Eメールアドレスの変更へ (To change E-mail
address)]
Enter the security code → [送信 (Send)]
Check the contents, then
[承諾する (I accept)]
Enter E-mail address → [送信 (Send)]
[OK] [閉じる (Close)]
■ Backing Up E-mailYou can back up E-mail.Backed up data is saved on a microSD™ memory card (/storage/sdcard1/private/au/email/BU/) when a microSD™ memory card is attached. If a microSD™ memory card is not attached, data is saved on the internal storage (/storage/emulated/0/private/au/email/BU/).
Home screen → [E-mail] [ ] → [E-mail settings] [Backup/Restore] [Mail Backup] → Confirm the notes and
[OK]
Select a character code to make backup data →
[OK]
Select a mail type to back up → [OK]
Mail Settings Other Than E-mailYou can use mail addresses except for E-mail (@ezweb.ne.jp).Use of other mail addresses requires accounts to be set. When using another mail address for the first time, set the address as follows.
Apps list → [Gmail] → Follow onscreen instructions
Thank you for buying the "Qua tab 01" (simply called the "product" from here on). In this guide, settings and precautions for using the product are described.For explanations of basic functions, refer to "Basic Manual".
Company names and product names referred to in this manual are trademarks or registered trademarks of respective companies.The TM, ® marks may be omitted in this manual.Screen illustrations shown in this manual may look different from the actual screens. In some cases, minor details or a part of a screen may be omitted.
June 2015, 1st Edition
■Basic OperationDescribes the basic operations.
■ Initial SettingsMake initial settings when you turn the power on for the first time.
■ au Easy SettingSets au ID.
■ E-mailMake initial settings for @ezweb.ne.jp etc.
■ Importing/Exporting ContactsImport/export contacts using a microSD™ or other memory card.
■ Saving Battery PowerDescribes settings to save battery consumption using "Battery saver".
■ Setting Wi-Fi®Describes how to connect Wi-Fi® network.
■ Viewing/Playing DataDescribes how to view and play still image and video data.
■How to Transfer Data with the au Settings MenuYou can return or store data from a previously used au terminal to the product using a microSD™ memory card or auスマートパス (au Smart Pass) server.
Sold by: KDDI CORPORATION, OKINAWA CELLULAR TELEPHONE COMPANY
Manufactured by: KYOCERA Corporation
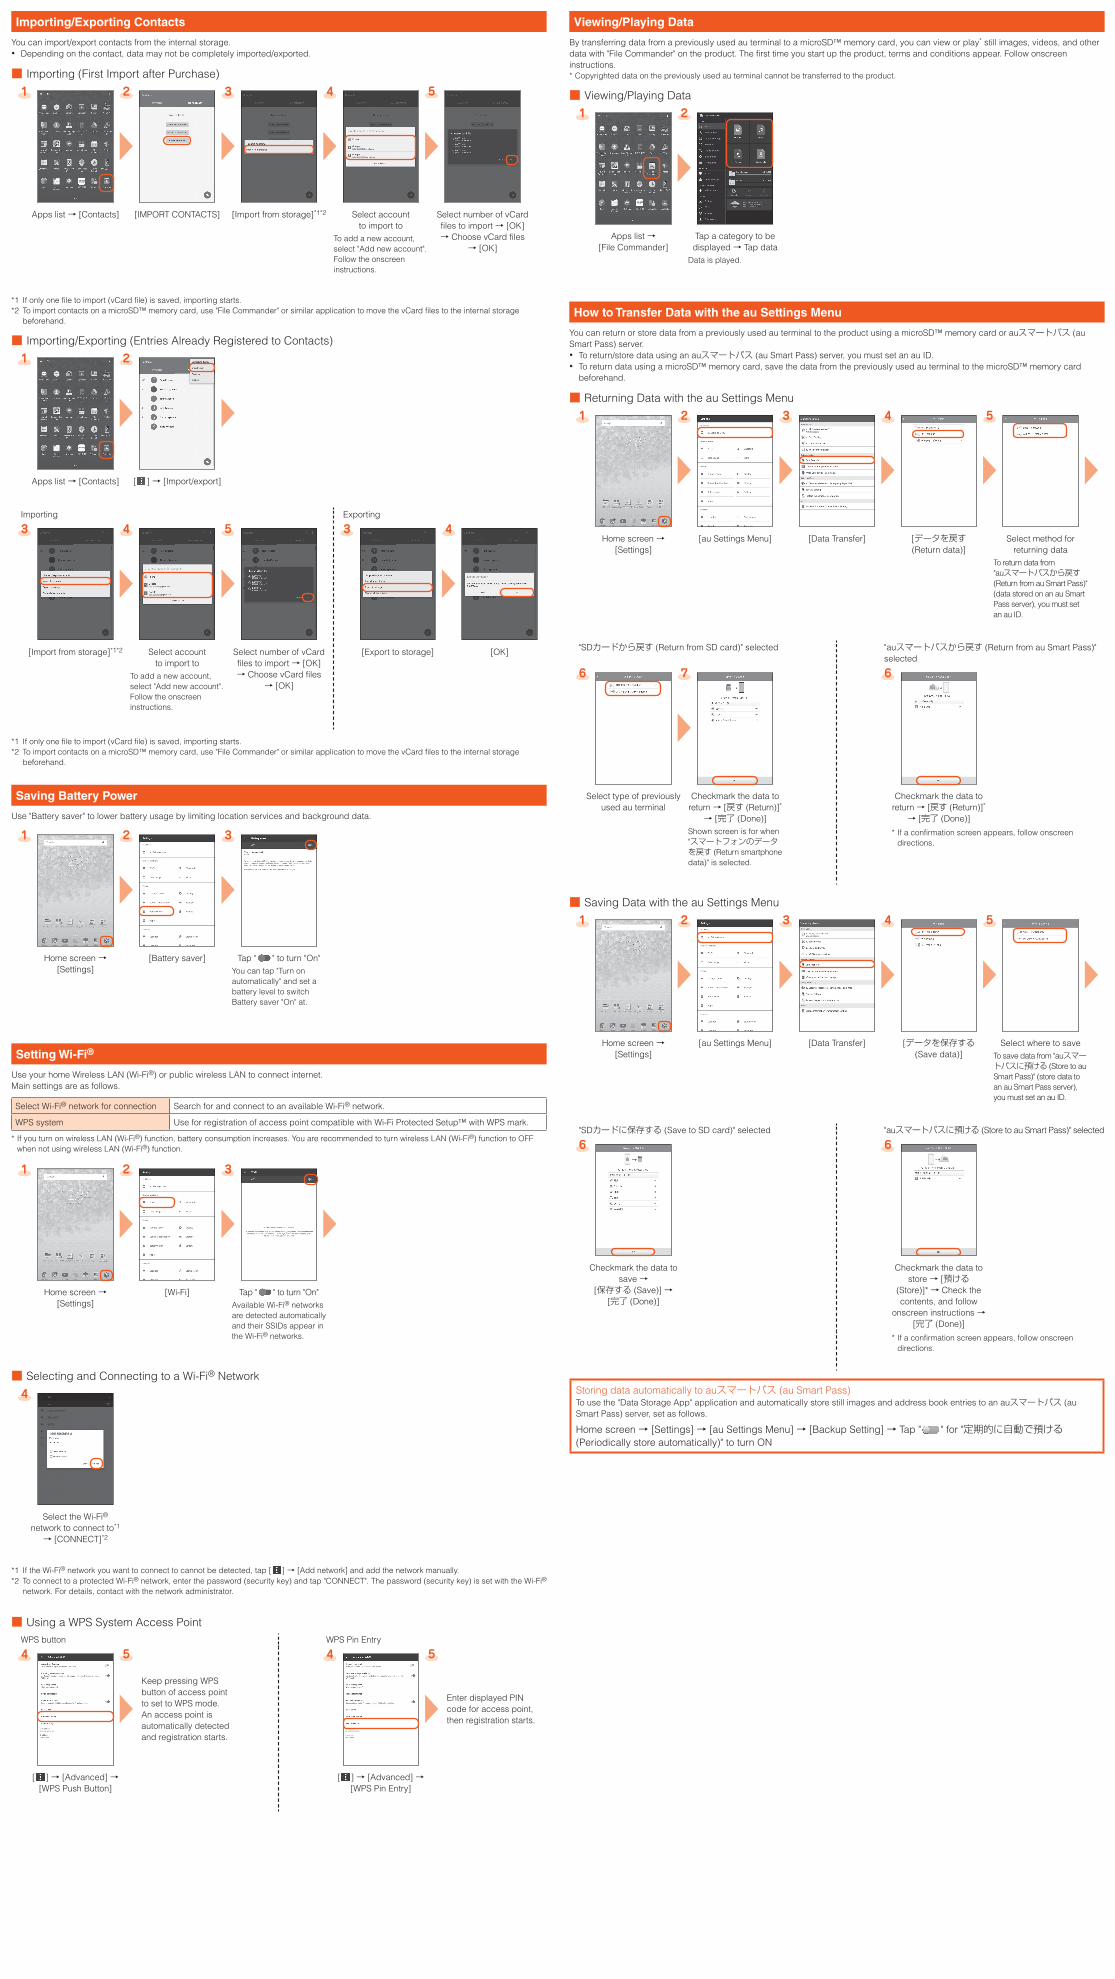
Importing/Exporting Contacts
You can import/export contacts from the internal storage. • Depending on the contact, data may not be completely imported/exported.
■ Importing (First Import after Purchase)
Apps list → [Contacts] [IMPORT CONTACTS] [Import from storage]*1*2 Select account to import to
To add a new account, select "Add new account". Follow the onscreen instructions.
Select number of vCard files to import → [OK] → Choose vCard files
→ [OK]
*1 If only one file to import (vCard file) is saved, importing starts.*2 To import contacts on a microSD™ memory card, use "File Commander" or similar application to move the vCard files to the internal storage
beforehand.
■ Importing/Exporting (Entries Already Registered to Contacts)
Apps list → [Contacts] [ ] → [Import/export]
Importing Exporting
[Import from storage]*1*2 Select account to import to
To add a new account, select "Add new account". Follow the onscreen instructions.
Select number of vCard files to import → [OK] → Choose vCard files
→ [OK]
[Export to storage] [OK]
*1 If only one file to import (vCard file) is saved, importing starts.*2 To import contacts on a microSD™ memory card, use "File Commander" or similar application to move the vCard files to the internal storage
beforehand.
Saving Battery Power
Use "Battery saver" to lower battery usage by limiting location services and background data.
Home screen → [Settings]
[Battery saver] Tap " " to turn "On"You can tap "Turn on automatically" and set a battery level to switch Battery saver "On" at.
Setting Wi-Fi®
Use your home Wireless LAN (Wi-Fi®) or public wireless LAN to connect internet.Main settings are as follows.
Select Wi-Fi® network for connection Search for and connect to an available Wi-Fi® network.
WPS system Use for registration of access point compatible with Wi-Fi Protected Setup™ with WPS mark.
* If you turn on wireless LAN (Wi-Fi®) function, battery consumption increases. You are recommended to turn wireless LAN (Wi-Fi®) function to OFF when not using wireless LAN (Wi-Fi®) function.
Home screen → [Settings]
[Wi-Fi] Tap " " to turn "On"Available Wi-Fi® networks are detected automatically and their SSIDs appear in the Wi-Fi® networks.
■ Selecting and Connecting to a Wi-Fi® Network
Select the Wi-Fi® network to connect to*1 → [CONNECT]*2
*1 If the Wi-Fi® network you want to connect to cannot be detected, tap [ ] → [Add network] and add the network manually.*2 To connect to a protected Wi-Fi® network, enter the password (security key) and tap "CONNECT". The password (security key) is set with the Wi-Fi®
network. For details, contact with the network administrator.
■ Using a WPS System Access PointWPS button WPS Pin Entry
[ ] → [Advanced] → [WPS Push Button]
Keep pressing WPS button of access point to set to WPS mode. An access point is automatically detected and registration starts.
[ ] → [Advanced] → [WPS Pin Entry]
Enter displayed PIN code for access point, then registration starts.
Viewing/Playing Data
By transferring data from a previously used au terminal to a microSD™ memory card, you can view or play* still images, videos, and other data with "File Commander" on the product. The first time you start up the product, terms and conditions appear. Follow onscreen instructions.* Copyrighted data on the previously used au terminal cannot be transferred to the product.
■ Viewing/Playing Data
Apps list → [File Commander]
Tap a category to be displayed → Tap data
Data is played.
How to Transfer Data with the au Settings Menu
You can return or store data from a previously used au terminal to the product using a microSD™ memory card or auスマートパス (au Smart Pass) server. • To return/store data using an auスマートパス (au Smart Pass) server, you must set an au ID. • To return data using a microSD™ memory card, save the data from the previously used au terminal to the microSD™ memory card
beforehand.
■ Returning Data with the au Settings Menu
Home screen → [Settings]
[au Settings Menu] [Data Transfer] [データを戻す (Return data)]
Select method for returning data
To return data from "auスマートパスから戻す (Return from au Smart Pass)" (data stored on an au Smart Pass server), you must set an au ID.
"SDカードから戻す (Return from SD card)" selected "auスマートパスから戻す (Return from au Smart Pass)" selected
Select type of previously used au terminal
Checkmark the data to return → [戻す (Return)]* → [完了 (Done)]
Shown screen is for when "スマートフォンのデータを戻す (Return smartphone data)" is selected.
Checkmark the data to return → [戻す (Return)]* → [完了 (Done)]
* If a confirmation screen appears, follow onscreen directions.
■ Saving Data with the au Settings Menu
Home screen → [Settings]
[au Settings Menu] [Data Transfer] [データを保存する (Save data)]
Select where to saveTo save data from "auスマートパスに預ける (Store to au Smart Pass)" (store data to an au Smart Pass server), you must set an au ID.
"SDカードに保存する (Save to SD card)" selected "auスマートパスに預ける (Store to au Smart Pass)" selected
Checkmark the data to save →
[保存する (Save)] → [完了 (Done)]
Checkmark the data to store → [預ける
(Store)]* → Check the contents, and follow
onscreen instructions → [完了 (Done)]
* If a confirmation screen appears, follow onscreen directions.
Storing data automatically to auスマートパス (au Smart Pass)To use the "Data Storage App" application and automatically store still images and address book entries to an auスマートパス (au Smart Pass) server, set as follows.
Home screen → [Settings] → [au Settings Menu] → [Backup Setting] → Tap " " for "定期的に自動で預ける (Periodically store automatically)" to turn ON
Related Documents