Backups User Guide for Webroot SecureAnywhere Essentials Webroot SecureAnywhere Complete Webroot Software, Inc. 385 Interlocken Crescent Suite 800 Broomfield, CO 80021 www.webroot.com Version 8.0.1

Welcome message from author
This document is posted to help you gain knowledge. Please leave a comment to let me know what you think about it! Share it to your friends and learn new things together.
Transcript

Backups User Guide
forWebroot SecureAnywhere EssentialsWebroot SecureAnywhere Complete
Webroot Software, Inc.385 Interlocken Crescent
Suite 800Broomfield, CO 80021
www.webroot.com
Version 8.0.1

Webroot SecureAnywhere Backups User Guide
Version 8.0.1; May, 2012
© 2012 Webroot Software, Inc. All rights reserved. Webroot is a registered trademark and SecureAnywhere is a trademark of Webroot Software, Inc.
All other product and company names mentioned may be trademarks or registered trademarks of their respective owners.
Contents iii
Contents
1: Getting Started with Backups . . . . . . . . . . . . . . . . . . . . . . . . . . . . . . . . . . . . . . . . .1Securing data with Backup & Sync . . . . . . . . . . . . . . . . . . . . . . . . . . . . . . . . . . . . . . . . . . . . . . . . . . . .2Configuring Backup & Sync . . . . . . . . . . . . . . . . . . . . . . . . . . . . . . . . . . . . . . . . . . . . . . . . . . . . . . . . . .3Accessing synchronized and archived files . . . . . . . . . . . . . . . . . . . . . . . . . . . . . . . . . . . . . . . . . . . . . .6
Accessing files from your Windows Desktop . . . . . . . . . . . . . . . . . . . . . . . . . . . . . . . . . . . . . . . . . .6Accessing files from the SecureAnywhere website . . . . . . . . . . . . . . . . . . . . . . . . . . . . . . . . . . . . .8Accessing files from a mobile device . . . . . . . . . . . . . . . . . . . . . . . . . . . . . . . . . . . . . . . . . . . . . . .10
2: Synchronizing Files . . . . . . . . . . . . . . . . . . . . . . . . . . . . . . . . . . . . . . . . . . . . . . . .13Adding synchronized folders . . . . . . . . . . . . . . . . . . . . . . . . . . . . . . . . . . . . . . . . . . . . . . . . . . . . . . . .14Synchronizing data between computers . . . . . . . . . . . . . . . . . . . . . . . . . . . . . . . . . . . . . . . . . . . . . . .15Synchronizing files in the Magic Briefcase . . . . . . . . . . . . . . . . . . . . . . . . . . . . . . . . . . . . . . . . . . . . . .17Removing folders from synchronization . . . . . . . . . . . . . . . . . . . . . . . . . . . . . . . . . . . . . . . . . . . . . . . .18
3: Archiving Files . . . . . . . . . . . . . . . . . . . . . . . . . . . . . . . . . . . . . . . . . . . . . . . . . . . .21Copying files to the Web Archive . . . . . . . . . . . . . . . . . . . . . . . . . . . . . . . . . . . . . . . . . . . . . . . . . . . . .22
Using the Webroot File Manager to copy files . . . . . . . . . . . . . . . . . . . . . . . . . . . . . . . . . . . . . . . .22Using the SecureAnywhere website to copy files . . . . . . . . . . . . . . . . . . . . . . . . . . . . . . . . . . . . .23
Accessing files in the Web Archive . . . . . . . . . . . . . . . . . . . . . . . . . . . . . . . . . . . . . . . . . . . . . . . . . . .24Accessing archives from your Windows Desktop . . . . . . . . . . . . . . . . . . . . . . . . . . . . . . . . . . . . .24Accessing archives from the website. . . . . . . . . . . . . . . . . . . . . . . . . . . . . . . . . . . . . . . . . . . . . . .24Accessing archives from an Android mobile device. . . . . . . . . . . . . . . . . . . . . . . . . . . . . . . . . . . .25Accessing archives from an Apple mobile device . . . . . . . . . . . . . . . . . . . . . . . . . . . . . . . . . . . . .26
4: Transferring Files . . . . . . . . . . . . . . . . . . . . . . . . . . . . . . . . . . . . . . . . . . . . . . . . . .27Downloading files . . . . . . . . . . . . . . . . . . . . . . . . . . . . . . . . . . . . . . . . . . . . . . . . . . . . . . . . . . . . . . . . .28
Downloading files from the SecureAnywhere website . . . . . . . . . . . . . . . . . . . . . . . . . . . . . . . . . .28Downloading files from your Windows Desktop. . . . . . . . . . . . . . . . . . . . . . . . . . . . . . . . . . . . . . .29Downloading files to an Android mobile device . . . . . . . . . . . . . . . . . . . . . . . . . . . . . . . . . . . . . . .30Downloading files to an Apple mobile device . . . . . . . . . . . . . . . . . . . . . . . . . . . . . . . . . . . . . . . .31
Downloading photo albums . . . . . . . . . . . . . . . . . . . . . . . . . . . . . . . . . . . . . . . . . . . . . . . . . . . . . . . . .32Editing files remotely . . . . . . . . . . . . . . . . . . . . . . . . . . . . . . . . . . . . . . . . . . . . . . . . . . . . . . . . . . . . . .33Uploading files to the cloud . . . . . . . . . . . . . . . . . . . . . . . . . . . . . . . . . . . . . . . . . . . . . . . . . . . . . . . . .34
Uploading files to the SecureAnywhere website . . . . . . . . . . . . . . . . . . . . . . . . . . . . . . . . . . . . . .34Uploading files from an Android device . . . . . . . . . . . . . . . . . . . . . . . . . . . . . . . . . . . . . . . . . . . . .35
Uploading photos from a mobile device . . . . . . . . . . . . . . . . . . . . . . . . . . . . . . . . . . . . . . . . . . . . . . . .36Using an Android mobile device to upload photos. . . . . . . . . . . . . . . . . . . . . . . . . . . . . . . . . . . . .36Using an Apple mobile device to upload photos . . . . . . . . . . . . . . . . . . . . . . . . . . . . . . . . . . . . . .37
5: Sharing Files and Photos . . . . . . . . . . . . . . . . . . . . . . . . . . . . . . . . . . . . . . . . . . . .39Sending files to others . . . . . . . . . . . . . . . . . . . . . . . . . . . . . . . . . . . . . . . . . . . . . . . . . . . . . . . . . . . . .40
Using the SecureAnywhere website to send files . . . . . . . . . . . . . . . . . . . . . . . . . . . . . . . . . . . . .40Sending files from an Android mobile device. . . . . . . . . . . . . . . . . . . . . . . . . . . . . . . . . . . . . . . . .42Sending files from an Apple mobile device . . . . . . . . . . . . . . . . . . . . . . . . . . . . . . . . . . . . . . . . . .43
Sharing photo albums with others . . . . . . . . . . . . . . . . . . . . . . . . . . . . . . . . . . . . . . . . . . . . . . . . . . . .44Publishing photo albums to Facebook . . . . . . . . . . . . . . . . . . . . . . . . . . . . . . . . . . . . . . . . . . . . . . . . .46
iv Contents
6: Restoring Files . . . . . . . . . . . . . . . . . . . . . . . . . . . . . . . . . . . . . . . . . . . . . . . . . . . .47Retrieving an older version of a file . . . . . . . . . . . . . . . . . . . . . . . . . . . . . . . . . . . . . . . . . . . . . . . . . . .48Retrieving files you accidentally deleted . . . . . . . . . . . . . . . . . . . . . . . . . . . . . . . . . . . . . . . . . . . . . . .49Restoring all data to a new computer. . . . . . . . . . . . . . . . . . . . . . . . . . . . . . . . . . . . . . . . . . . . . . . . . .50
7: Managing Storage and Speed . . . . . . . . . . . . . . . . . . . . . . . . . . . . . . . . . . . . . . . .51Adding more storage space . . . . . . . . . . . . . . . . . . . . . . . . . . . . . . . . . . . . . . . . . . . . . . . . . . . . . . . . .52Reclaiming storage. . . . . . . . . . . . . . . . . . . . . . . . . . . . . . . . . . . . . . . . . . . . . . . . . . . . . . . . . . . . . . . .53Freeing up storage space. . . . . . . . . . . . . . . . . . . . . . . . . . . . . . . . . . . . . . . . . . . . . . . . . . . . . . . . . . .53Setting the backup speed. . . . . . . . . . . . . . . . . . . . . . . . . . . . . . . . . . . . . . . . . . . . . . . . . . . . . . . . . . .54
Index . . . . . . . . . . . . . . . . . . . . . . . . . . . . . . . . . . . . . . . . . . . . . . . . . . . . . . . . . . . . . . 55

1: Getting Started with Backups 1
1: Getting Started with Backups
With your purchase of the Essentials or Complete editions of Webroot SecureAnywhere, you can use Webroot’s Backup & Sync manager to synchronize files to your computers, laptops, and mobile devices. Once files are uploaded to “the cloud,” you can access them remotely from any device with a Internet connection.
To get started with Backup & Sync, see the following topics:
Securing data with Backup & Sync . . . . . . . . . . . . . . . . . . . page 2
Configuring Backup & Sync . . . . . . . . . . . . . . . . . . . . . . . . page 3
Accessing synchronized and archived files . . . . . . . . . . . . . page 6
2 1: Getting Started with Backups
Securing data with Backup & SyncWith Backup & Sync, you can rest assured that your important files and photos are automatically copied to the cloud (an online repository of secure servers where your data is encrypted and stored). If your computer or mobile device is lost or stolen, you can instantly retrieve your data from any device with an Internet connection. You can also start editing a file on one device, then continue editing it on another.
There are several methods of securing your data:
• Synchronizing files and folders. First, locate the folders on your computer where you store important files, then designate them as sync folders. When you save files to sync folders, Backup & Sync immediately uploads them to the cloud and to any shared folders on other computers. You can access these synchronized files from your online SecureAnywhere account and from your mobile devices with the Webroot SecureSync app installed. (The SecureSync app is only available with the Complete edition.)
Backup & Sync constantly monitors the sync folders. If it detects a change (an edited file, a new file, or a deleted file), it immediately makes the same change to your online account and to shared folders on other computers. If you are working offline, Backup & Sync automatically picks up changes the next time you connect to the Internet.
If Backup & Sync detects an edited file, it does not overwrite the original version stored in the cloud. Instead, it uploads the latest version and makes a copy of the original file. If necessary, you can revert back to previous versions (up to five) from your online account. If you save changes a sixth time, your most recent version is saved and the oldest version is removed.
For instructions, see “Configuring Backup & Sync” on page 3 and “Adding synchronized folders” on page 14.
• Storing files in the Magic Briefcase. If you don’t want to configure your own sync folders, you can use the preconfigured folder called the Magic Briefcase. Any files you place in the Magic Briefcase are automatically synchronized in the cloud and to any other computers with SecureAnywhere installed.
The Magic Briefcase is ideal for remotely accessing a small number of files. Do not place a large number of files there if you are concerned about conserving space on your computers.
For instructions, see “Synchronizing files in the Magic Briefcase” on page 17.
• Copying files to the Web Archive. If you have important documents or photos that you want backed up, but not synchronized, you should upload them to the Web Archive. For example, you may want to back up tax returns, old photos, and a scanned copy of your passport. These types of documents won’t change and don’t need to be kept in synchronization with other computers.
The Web Archive folder does not reside on your home computer and you cannot view it from Windows Explorer. The contents of the Web Archive physically reside in the cloud. You can only access them from your online SecureAnywhere account.
For instructions, see “Copying files to the Web Archive” on page 22.
1: Getting Started with Backups 3
Configuring Backup & SyncAfter you install SecureAnywhere on your computers, configure Backup & Sync as follows:
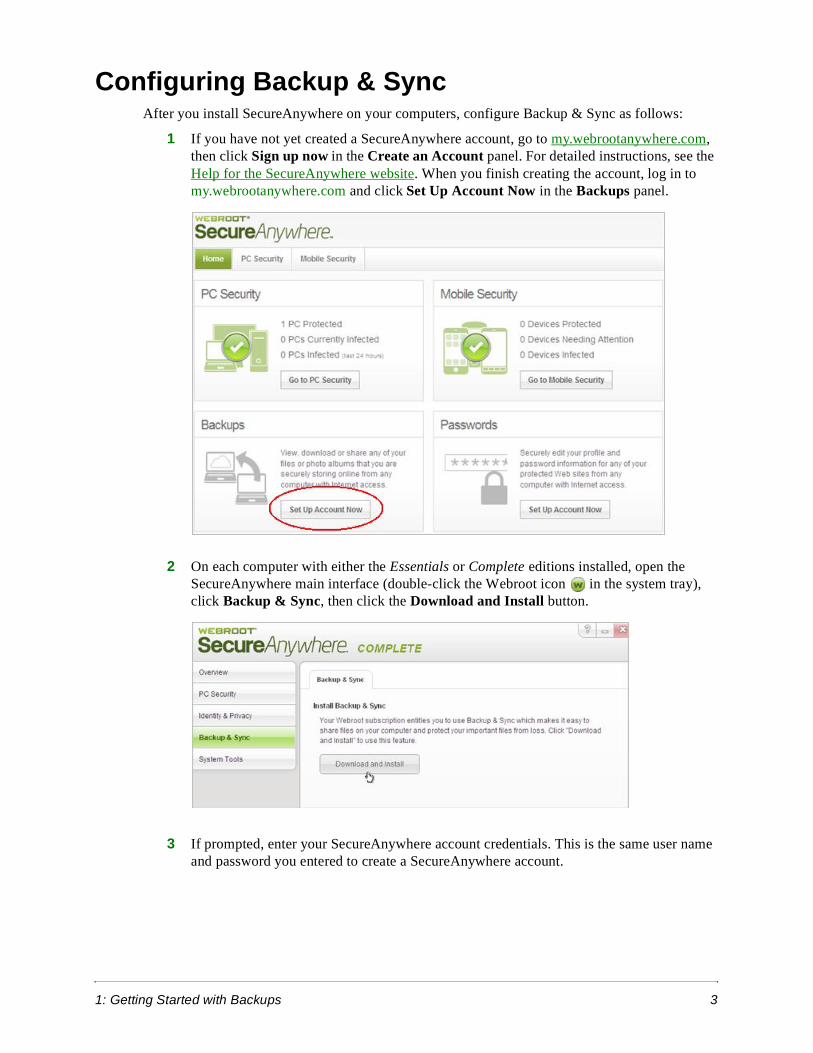
1 If you have not yet created a SecureAnywhere account, go to my.webrootanywhere.com, then click Sign up now in the Create an Account panel. For detailed instructions, see the Help for the SecureAnywhere website. When you finish creating the account, log in to my.webrootanywhere.com and click Set Up Account Now in the Backups panel.
2 On each computer with either the Essentials or Complete editions installed, open the SecureAnywhere main interface (double-click the Webroot icon in the system tray), click Backup & Sync, then click the Download and Install button.
3 If prompted, enter your SecureAnywhere account credentials. This is the same user name and password you entered to create a SecureAnywhere account.

4 1: Getting Started with Backups
When the download completes, the Backup & Sync panel opens.
4 If you want to synchronize data, you must designate folders on your computer that will automatically synchronize to your online SecureAnywhere account. To begin creating sync folders, click Open File Manager.
1: Getting Started with Backups 5
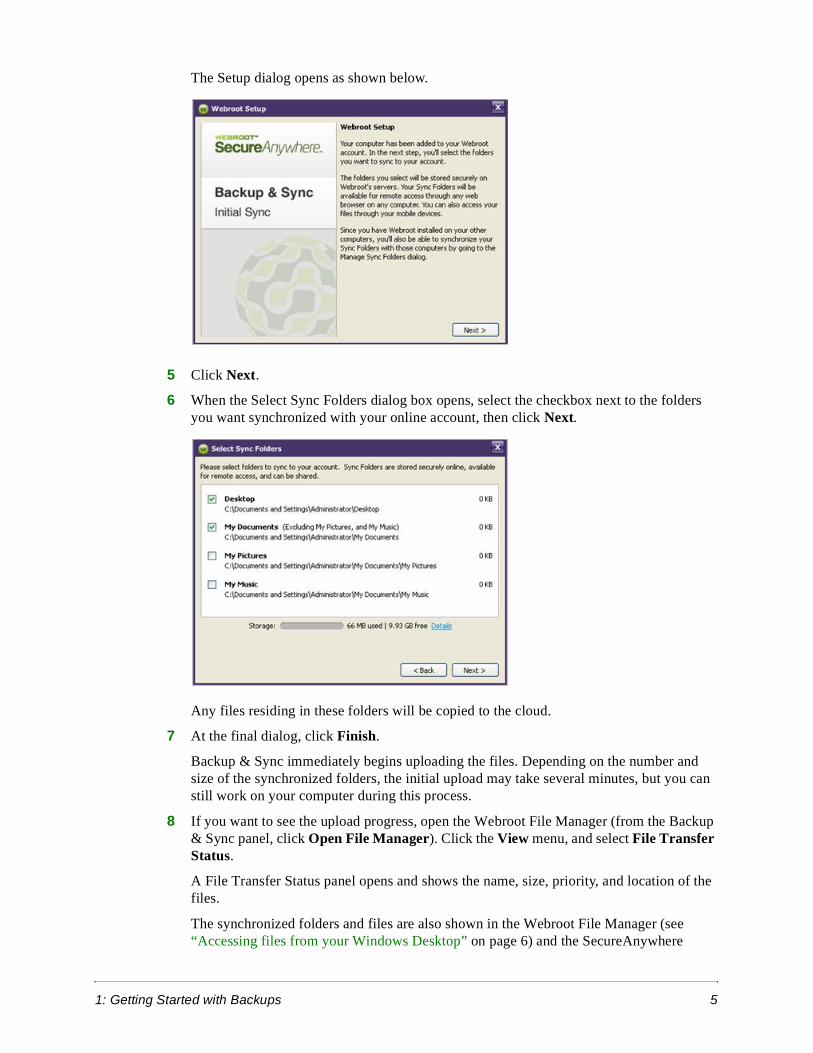
The Setup dialog opens as shown below.
5 Click Next.
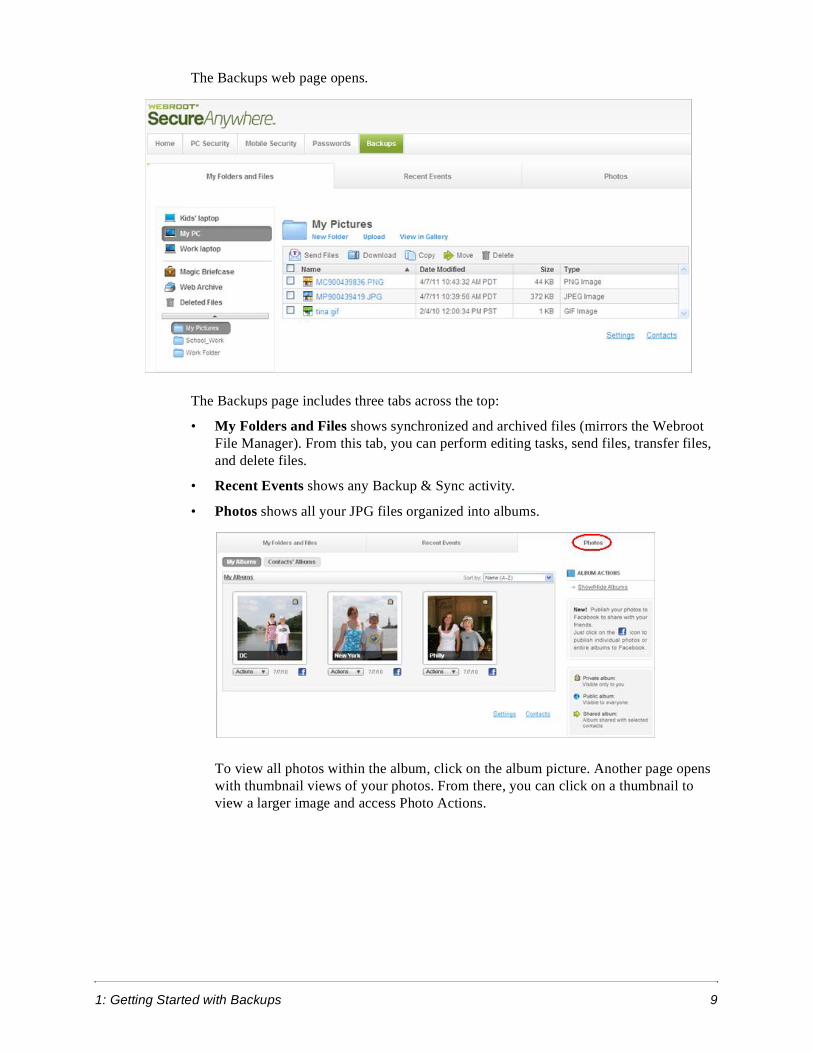
6 When the Select Sync Folders dialog box opens, select the checkbox next to the folders you want synchronized with your online account, then click Next.
Any files residing in these folders will be copied to the cloud.
7 At the final dialog, click Finish.
Backup & Sync immediately begins uploading the files. Depending on the number and size of the synchronized folders, the initial upload may take several minutes, but you can still work on your computer during this process.
8 If you want to see the upload progress, open the Webroot File Manager (from the Backup & Sync panel, click Open File Manager). Click the View menu, and select File Transfer Status.
A File Transfer Status panel opens and shows the name, size, priority, and location of the files.
The synchronized folders and files are also shown in the Webroot File Manager (see “Accessing files from your Windows Desktop” on page 6) and the SecureAnywhere

6 1: Getting Started with Backups
website (see “Accessing files from the SecureAnywhere website” on page 8).
9 If desired, you can create shared folders between other computers. For instructions, see “Synchronizing data between computers” on page 15.
10 If you have the Complete edition of SecureAnywhere, you can download the SecureSync app on up to three mobile devices (Android or Apple). Install the SecureSync app by following these instructions: Downloading SecureAnywhere Mobile Complete.
Accessing synchronized and archived filesYou can access synchronized and archived files from the Webroot File Manager on your Windows Desktop, from the SecureAnywhere website, and from the SecureSync app on a mobile device.
Note: Be aware that any changes, deletions, or additions you make in the synchronized folders are also propagated to your online SecureAnywhere account and to other synchronized folders on other computers. For example, if you delete a file in one synchronized folder, it will be deleted across all synchronized folders. You can retrieve any files you deleted from the Deleted Files folder in the SecureAnywhere website and in the Webroot File Manager.
Accessing files from your Windows DesktopFrom the Webroot File Manager on your Windows Desktop, you can open, copy, move, and delete synchronized files. The Webroot File Manager is an Explorer-type interface. You do not need to connect to the Internet to view the Webroot File Manager. However, when you are connected, you can manage files online and across all your computers that have SecureAnywhere installed. For example, if you want to access a document that resides on your computer at home and edit the document on your laptop while you’re traveling, you can use the Webroot File Manager to open and edit the file.
To open the Webroot File Manager:
1 Open the SecureAnywhere main interface (double-click the Webroot icon in the system tray).
2 From the Backup & Sync panel, click Open File Manager.

1: Getting Started with Backups 7
The Webroot File Manager opens. The left panel shows synchronized folders, the Magic Briefcase, the Web Archive, and the Deleted Files recycle bin. If you installed SecureAnywhere on multiple computers, the left panel lists each computer. The middle panel shows more detail about whatever you select on the left.
The Webroot File Manager includes the following:
• Menu bar and toolbar at the top. Provides access to commands for configuring synchronized folders, transferring files, managing files, and setting preferences.
• Folder tree. Provides access to synchronized folders on your own computer and other computers, the Magic Briefcase, the Web Archive, and the Deleted Files recycle bin. Select folders and files from the left to see more detail in the middle panel.

8 1: Getting Started with Backups
Tip: Backup & Sync assigns a default name to your computer. If you want to give it a different name, click on the computer name from the folder tree, go to the Tools menu, and select Rename Computer.
• Middle panel. Shows the contents of the folder selected in the left panel. You can click on a file to open it or right-click to open a pop-up menu of commands.
Tip: If a file appears grayed out, it was synchronized from another computer. You can access a synchronized file from another computer by double-clicking on it.
• Status bar at the bottom. Shows the amount of storage used and free, the status of synchronized files, a link to your personal account, and the connection status to the Internet.
The Webroot File Manager includes many commands, which are available from either the menu bar at the top of the panel or from a pop-up menu that opens when you right-click on an item. These commands allow you to perform editing tasks, similar to the Edit menu in Windows Explorer and other Windows programs.
Note: Deleted files are moved to the Deleted Files recycle bin, where you can permanently delete them or restore them.
Accessing files from the SecureAnywhere websiteYou can manage and access all your synchronized and archived files in the Backups page of the SecureAnywhere website. This Backups page allows you to open, copy, move, delete, and share files in your synchronized folders. You can access these files from any computer with an Internet connection or from a mobile device with the SecureSync app installed.
To access files from the Backups page:
1 Log in to my.webrootanywhere.com.
2 Click Go to Backups.
1: Getting Started with Backups 9
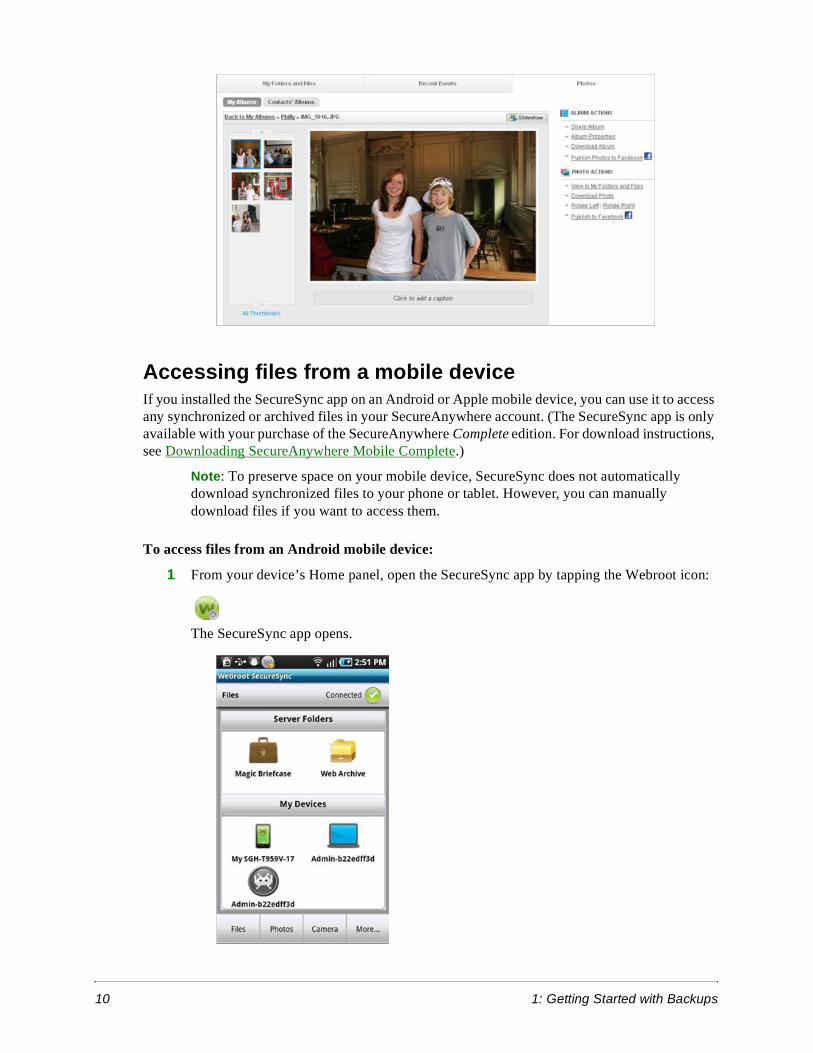
The Backups web page opens.
The Backups page includes three tabs across the top:
• My Folders and Files shows synchronized and archived files (mirrors the Webroot File Manager). From this tab, you can perform editing tasks, send files, transfer files, and delete files.
• Recent Events shows any Backup & Sync activity.
• Photos shows all your JPG files organized into albums.
To view all photos within the album, click on the album picture. Another page opens with thumbnail views of your photos. From there, you can click on a thumbnail to view a larger image and access Photo Actions.
10 1: Getting Started with Backups
Accessing files from a mobile deviceIf you installed the SecureSync app on an Android or Apple mobile device, you can use it to access any synchronized or archived files in your SecureAnywhere account. (The SecureSync app is only available with your purchase of the SecureAnywhere Complete edition. For download instructions, see Downloading SecureAnywhere Mobile Complete.)
Note: To preserve space on your mobile device, SecureSync does not automatically download synchronized files to your phone or tablet. However, you can manually download files if you want to access them.
To access files from an Android mobile device:
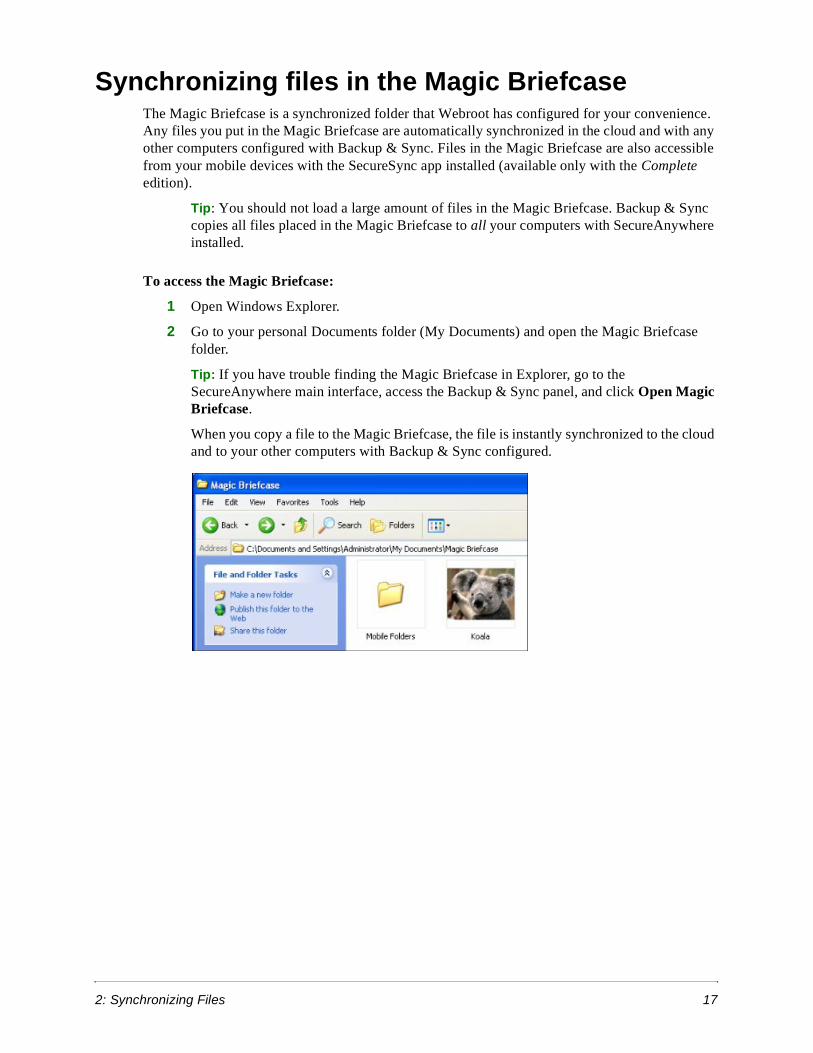
1 From your device’s Home panel, open the SecureSync app by tapping the Webroot icon:
The SecureSync app opens.

1: Getting Started with Backups 11
2 From the tab bar at the bottom of the panel, you can tap:
• Files. Accesses the Magic Briefcase, the Web Archive, and synchronized files from computers in your account. (This panel does not display other mobile devices in your account. To view all mobile devices, go to the SecureAnywhere website.)
• Photos. Accesses photos and albums you uploaded in your account.
• Camera. Allows you to take pictures and record video, then automatically upload those files to your account. The files are uploaded to Magic Briefcase/Mobile Folders/My DeviceName/Media Files.
To access files from an Apple mobile device:
1 From your device’s Home panel, open the SecureSync app by tapping the Webroot icon:
The SecureSync app opens.
2 From the tab bar at the bottom of the panel, you can tap:
• Files. Accesses the Magic Briefcase, the Web Archive, and synchronized files from computers in your account. (This panel does not display other mobile devices in your account. To view all mobile devices, go to the SecureAnywhere website.)
• Photos. Accesses photos and albums you uploaded in your account.
• Camera. Allows you to take pictures and record video, then automatically upload those files to your account. The files are uploaded to Magic Briefcase/Mobile Folders/My DeviceName/Media Files.
• Downloads. Shows the status of downloads to your mobile device.

12 1: Getting Started with Backups

2: Synchronizing Files 13
2: Synchronizing Files
After you configure sync folders (as described in “Configuring Backup & Sync” on page 3), you simply store important files in those folders. Backup & Sync immediately synchronizes the files without disrupting your work. Be aware that any changes, deletions, or additions you make in the synchronized folders are also propagated to your online SecureAnywhere account and to shared folders on other computers. For example, if you delete a file in one synchronized folder, it is deleted in your online account and across all computers that share that folder.
Note: If you have the SecureSync app installed on a mobile device (available with the SecureAnywhere Complete edition), you can access all files in those sync folders. However, to conserve space on your mobile device, SecureSync does not automatically download files to them. You must use the SecureSync app to manually download files you want. For more information, see “Downloading files” on page 28.
To perform additional synchronization tasks, see the following topics:
Adding synchronized folders . . . . . . . . . . . . . . . . . . . . . . . page 14
Synchronizing data between computers . . . . . . . . . . . . . . page 15
Synchronizing files in the Magic Briefcase . . . . . . . . . . . page 17
Removing folders from synchronization . . . . . . . . . . . . . . page 18

14 2: Synchronizing Files
Adding synchronized foldersYou can create as many sync folders as you like, as long as you keep within your storage space limit (2 gigabytes for Essentials and 10 gigabytes for Complete, unless you purchased more).
Note: To create shared folders across other computers, see “Synchronizing data between computers” on page 15.
To add synchronized folders:
1 From your computer, open the SecureAnywhere main interface (double-click the Webroot icon in the system tray).
2 Open the Webroot File Manager by clicking Backup & Sync, then clicking Open File Manager.
3 From the top of the Webroot File Manager, click Manage Sync Folders.
The Manage Sync Folders dialog opens. The computer you are currently using is shown under “This Computer.” If you configured Backup & Sync on additional computers, they appear under “Other Computers.”
4 From the Manage Sync Folders dialog, click Add Folders from this Computer.

2: Synchronizing Files 15
5 When the Select New Folders dialog opens, click in the box next to the folders you want included in synchronization, then click OK.
6 Click the OK button at the bottom of the Webroot Manage Folders dialog. You must click OK for the synchronization to begin.
Synchronizing data between computersIf you installed SecureAnywhere on multiple computers, you can create shared, synchronized folders between them. Whenever you update data in one of these shared folders (adding, editing, moving, or deleting files), Backup & Sync automatically makes the same changes in the cloud and to all shared folders. This automatic synchronization can be beneficial when you frequently use multiple computers and need access to the most recent files.
To synchronize data between computers:
1 From one of your computers, open the SecureAnywhere main interface (double-click the Webroot icon in the system tray).
2 Open the Webroot File Manager by clicking Backup & Sync, then clicking Open File Manager.
3 From the Webroot File Manager, click Manage Sync Folders.
The Manage Sync Folders dialog opens. The computer you are currently using is shown under “This Computer.” Your additional computers appear under “Other Computers.” (You must configure Backup & Sync on those computers for them to appear in this panel.)
4 Select a folder that you want to synchronize between the two computers. Click the Sync button under the folder name.

16 2: Synchronizing Files
5 In the dialog that opens, select the destination computer and click OK.
6 Click OK at the bottom to send the sync request to the other computer.
7 From the other computer, look for the Pending Sync Folder message in the system tray. Click on the message to accept the sync request. In the next dialog, click OK to accept the folder location or choose another location. Once you click OK, Backup and Sync copies the folder over to the other computer.
Note: If you select a folder with a name that is identical to a folder on the other computer, a dialog asks if you want to merge the two. During a merge, Backup & Sync copies the contents in each folder to the other, so they each contain the same files. If the folders contain files with identical names, Backup & Sync first determines if the contents of the files are identical or different. If the content is identical, it links the files and later synchronizes them when you make any changes. If the content is different, it keeps both versions and suffixes filenames with (from computer_name).
When the synchronization between the two folders is complete, the Manage Sync Folders dialog shows the folders with a gray background and a gray arrow between them.
2: Synchronizing Files 17
Synchronizing files in the Magic BriefcaseThe Magic Briefcase is a synchronized folder that Webroot has configured for your convenience. Any files you put in the Magic Briefcase are automatically synchronized in the cloud and with any other computers configured with Backup & Sync. Files in the Magic Briefcase are also accessible from your mobile devices with the SecureSync app installed (available only with the Complete edition).
Tip: You should not load a large amount of files in the Magic Briefcase. Backup & Sync copies all files placed in the Magic Briefcase to all your computers with SecureAnywhere installed.
To access the Magic Briefcase:
1 Open Windows Explorer.
2 Go to your personal Documents folder (My Documents) and open the Magic Briefcase folder.
Tip: If you have trouble finding the Magic Briefcase in Explorer, go to the SecureAnywhere main interface, access the Backup & Sync panel, and click Open Magic Briefcase.
When you copy a file to the Magic Briefcase, the file is instantly synchronized to the cloud and to your other computers with Backup & Sync configured.
18 2: Synchronizing Files
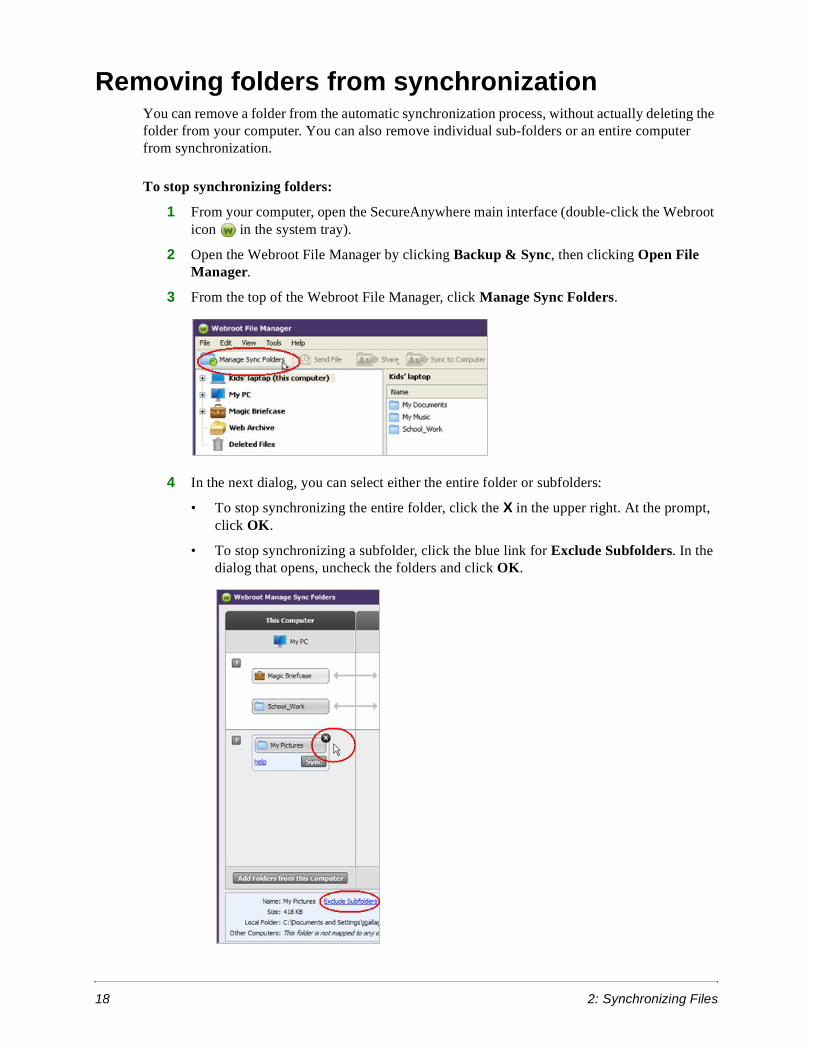
Removing folders from synchronizationYou can remove a folder from the automatic synchronization process, without actually deleting the folder from your computer. You can also remove individual sub-folders or an entire computer from synchronization.
To stop synchronizing folders:
1 From your computer, open the SecureAnywhere main interface (double-click the Webroot icon in the system tray).
2 Open the Webroot File Manager by clicking Backup & Sync, then clicking Open File Manager.
3 From the top of the Webroot File Manager, click Manage Sync Folders.
4 In the next dialog, you can select either the entire folder or subfolders:
• To stop synchronizing the entire folder, click the X in the upper right. At the prompt, click OK.
• To stop synchronizing a subfolder, click the blue link for Exclude Subfolders. In the dialog that opens, uncheck the folders and click OK.

2: Synchronizing Files 19
5 Click the OK button at the bottom of the Webroot Manage Sync Folders dialog. You must click OK for Backup & Sync to stop synchronizing the folder.
Backup & Sync does not delete the folder from your computer, but it does remove the folder from your online SecureAnywhere account.
To stop synchronizing all folders on a computer:
1 Log in to my.webrootanywhere.com and click Go to Backups.
2 Make sure the My Folders and Files tab is selected.
3 From the left panel, click on the computer you want removed, then click the Settings link.
4 In the Settings panel, click the Remove link.
Any files that were synchronized on this computer are moved from your online account to the Web Archive. If you don’t want the files stored there, go to the Web Archive and delete them.

20 2: Synchronizing Files

3: Archiving Files 21
3: Archiving Files
If you don’t want to synchronize certain files, but do want them securely backed up, you can copy the files to the Web Archive. You can also use the Web Archive to free up space on your hard drive by transferring files there. Remember that if you modify the original files, the changes are not automatically synchronized to the Web Archive. You will need to manually upload the updated files.
Tip: Use the Web Archive to store important files that do not change, such as a scanned copy of your passport or your tax returns.
Any files you store in the Web Archive are readily available. You can access them from any computer with an Internet connection or from your mobile device with the SecureSync app installed.
To use the Web Archive, see the following topics:
Copying files to the Web Archive . . . . . . . . . . . . . . . . . . . page 22
Accessing files in the Web Archive . . . . . . . . . . . . . . . . . page 24
22 3: Archiving Files
Copying files to the Web ArchiveYou can make copies of important files by importing them into the Web Archive, either from the Webroot File Manager or the SecureAnywhere website.
Note: Backup & Sync does not move the files, only copies them. Your files remain in their original location.
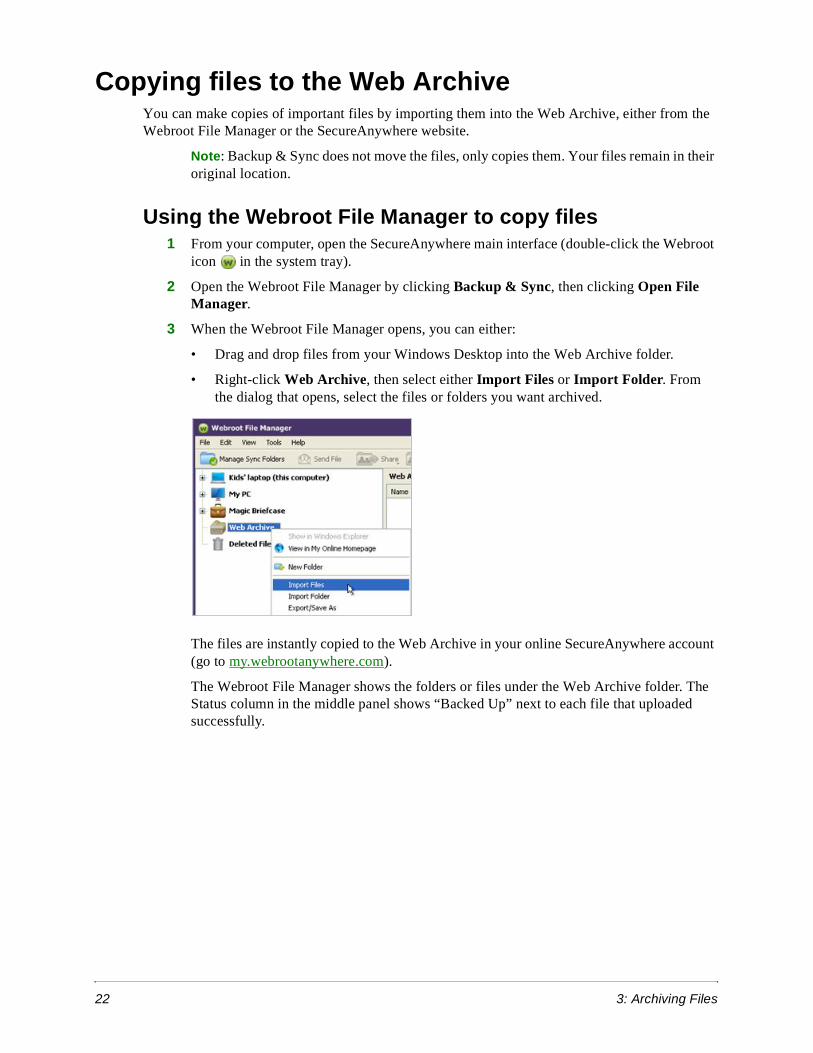
Using the Webroot File Manager to copy files1 From your computer, open the SecureAnywhere main interface (double-click the Webroot
icon in the system tray).
2 Open the Webroot File Manager by clicking Backup & Sync, then clicking Open File Manager.
3 When the Webroot File Manager opens, you can either:
• Drag and drop files from your Windows Desktop into the Web Archive folder.
• Right-click Web Archive, then select either Import Files or Import Folder. From the dialog that opens, select the files or folders you want archived.
The files are instantly copied to the Web Archive in your online SecureAnywhere account (go to my.webrootanywhere.com).
The Webroot File Manager shows the folders or files under the Web Archive folder. The Status column in the middle panel shows “Backed Up” next to each file that uploaded successfully.

3: Archiving Files 23
Using the SecureAnywhere website to copy files1 Log in to my.webrootanywhere.com and click Go to Backups.
2 Make sure the My Folders and Files tab is selected.
3 Select the Web Archive folder in the left panel.
Tip: You can first create a subfolder in the Web Archive by clicking New Folder.
4 Click Upload.
5 Follow the on-screen instructions to upload the file.
The uploaded files appear in the middle panel.
24 3: Archiving Files
Accessing files in the Web ArchiveYou can view and download files from the Web Archive by using the Webroot File Manager on your Windows Desktop, the SecureAnywhere website, or the SecureSync app from your mobile device. (The SecureSync app is only available with the Complete edition.)
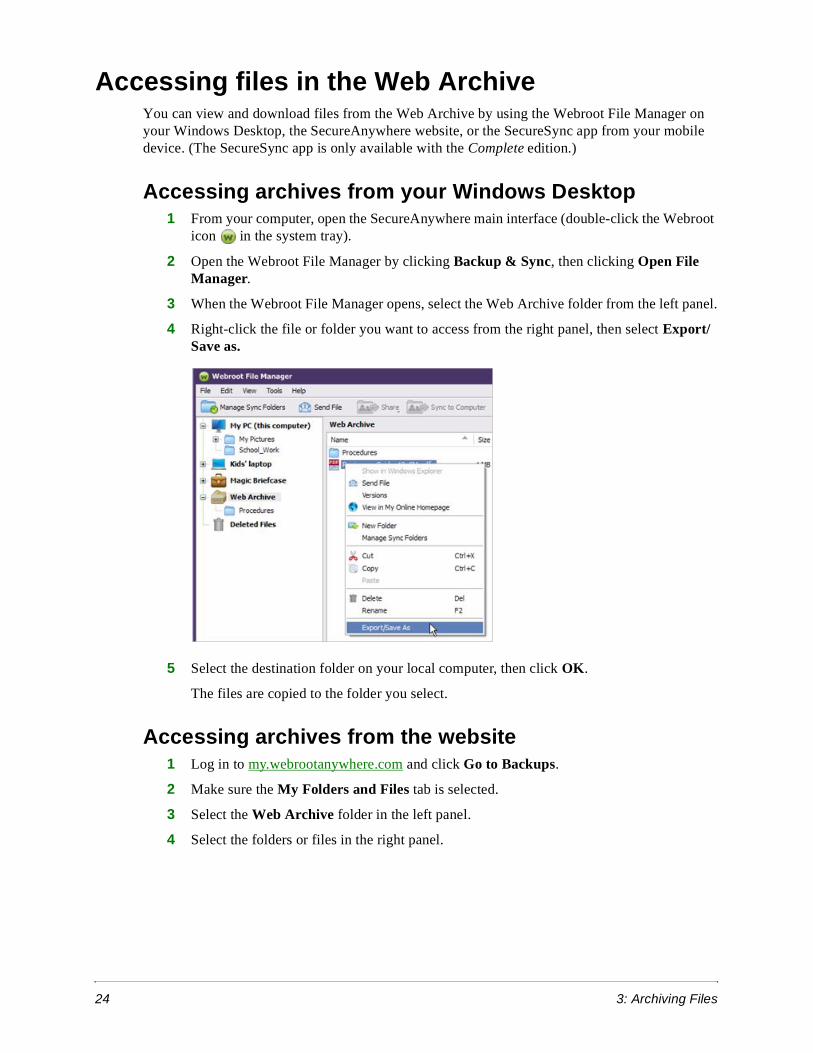
Accessing archives from your Windows Desktop1 From your computer, open the SecureAnywhere main interface (double-click the Webroot
icon in the system tray).
2 Open the Webroot File Manager by clicking Backup & Sync, then clicking Open File Manager.
3 When the Webroot File Manager opens, select the Web Archive folder from the left panel.
4 Right-click the file or folder you want to access from the right panel, then select Export/Save as.
5 Select the destination folder on your local computer, then click OK.
The files are copied to the folder you select.
Accessing archives from the website1 Log in to my.webrootanywhere.com and click Go to Backups.
2 Make sure the My Folders and Files tab is selected.
3 Select the Web Archive folder in the left panel.
4 Select the folders or files in the right panel.
3: Archiving Files 25
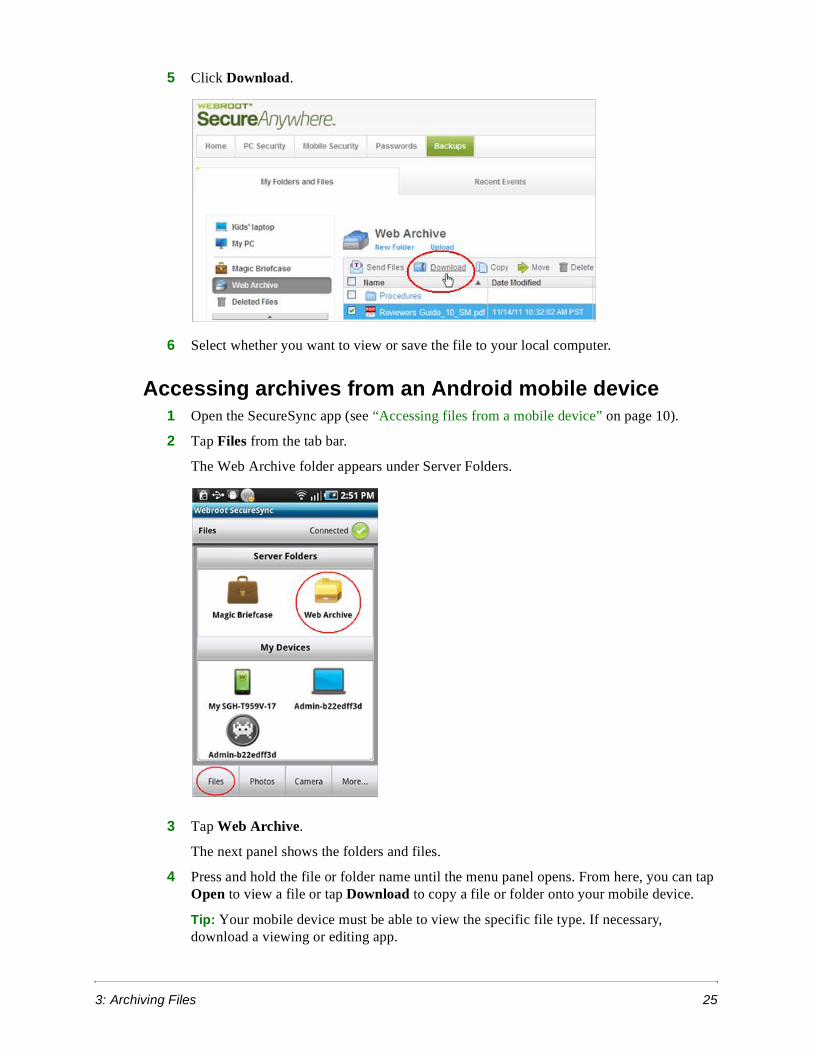
5 Click Download.
6 Select whether you want to view or save the file to your local computer.
Accessing archives from an Android mobile device1 Open the SecureSync app (see “Accessing files from a mobile device” on page 10).
2 Tap Files from the tab bar.
The Web Archive folder appears under Server Folders.
3 Tap Web Archive.
The next panel shows the folders and files.
4 Press and hold the file or folder name until the menu panel opens. From here, you can tap Open to view a file or tap Download to copy a file or folder onto your mobile device.
Tip: Your mobile device must be able to view the specific file type. If necessary, download a viewing or editing app.
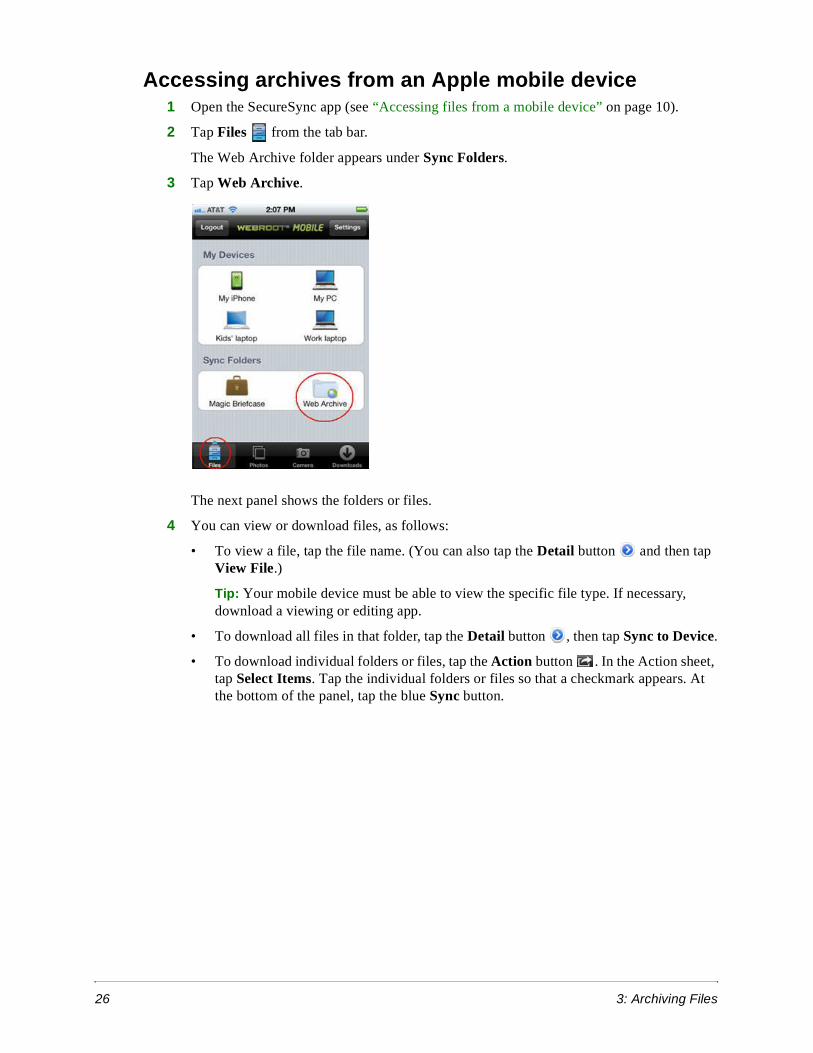
26 3: Archiving Files
Accessing archives from an Apple mobile device1 Open the SecureSync app (see “Accessing files from a mobile device” on page 10).
2 Tap Files from the tab bar.
The Web Archive folder appears under Sync Folders.
3 Tap Web Archive.
The next panel shows the folders or files.
4 You can view or download files, as follows:
• To view a file, tap the file name. (You can also tap the Detail button and then tap View File.)
Tip: Your mobile device must be able to view the specific file type. If necessary, download a viewing or editing app.
• To download all files in that folder, tap the Detail button , then tap Sync to Device.
• To download individual folders or files, tap the Action button . In the Action sheet, tap Select Items. Tap the individual folders or files so that a checkmark appears. At the bottom of the panel, tap the blue Sync button.
4: Transferring Files 27
4: Transferring Files
Using any device with an Internet connection, you can upload or download files residing in your synchronized folders, the Magic Briefcase, or the Web Archive. For example, if you are traveling and need access to a file located on your home computer, you can open a browser on another computer, log in to your SecureAnywhere account, and download the file. You can even work on the file remotely and save your changes back into the cloud.
If you have the SecureAnywhere Complete edition, you can also upload or download files from a mobile device with the SecureSync app installed.
To transfer files, see the following topics:
Downloading files . . . . . . . . . . . . . . . . . . . . . . . . . . . . . . . page 28
Downloading photo albums . . . . . . . . . . . . . . . . . . . . . . . . page 32
Editing files remotely . . . . . . . . . . . . . . . . . . . . . . . . . . . . page 33
Uploading files to the cloud . . . . . . . . . . . . . . . . . . . . . . . page 34
Uploading photos from a mobile device . . . . . . . . . . . . . . page 36
28 4: Transferring Files
Downloading filesYou can download synchronized files from the SecureAnywhere website, from the Windows Desktop, or from your mobile device with the SecureSync app installed.
Downloading files from the SecureAnywhere websiteIf you are working remotely and need access to synchronized files on a home or office computer, you can download them from any device with an Internet connection. Synchronized files reside in the cloud and are available at all times. (The computer where your original files are stored does not need to be turned on.)
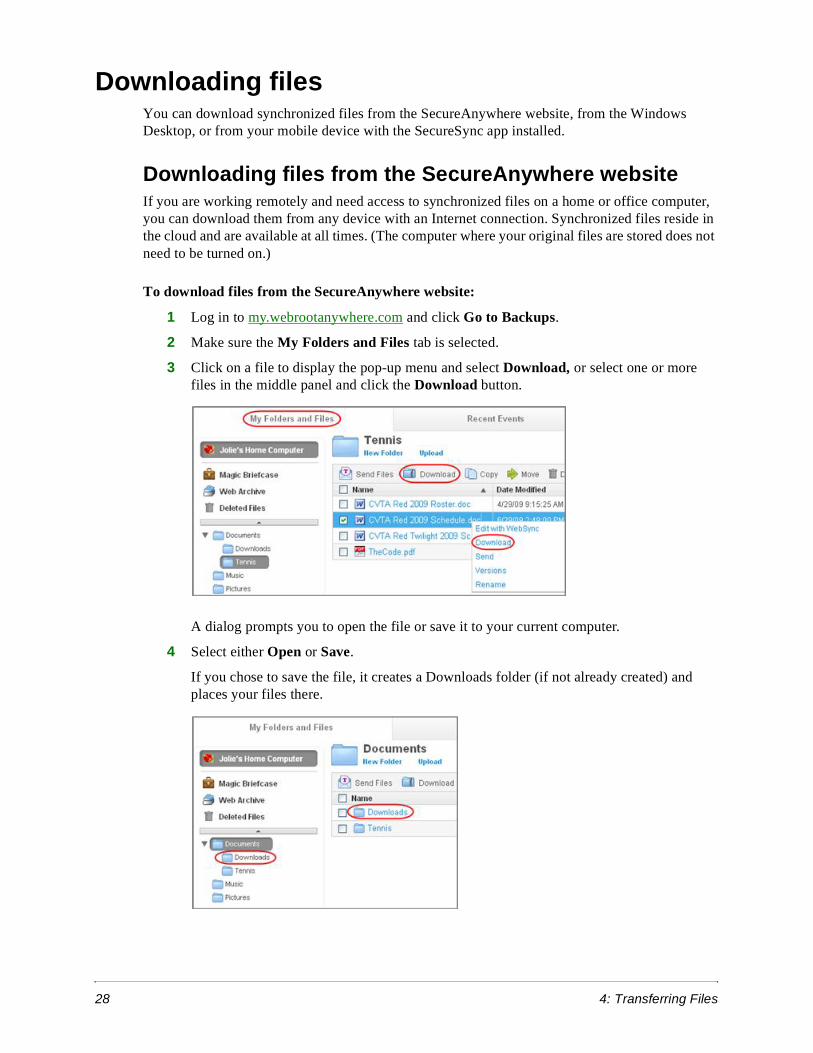
To download files from the SecureAnywhere website:
1 Log in to my.webrootanywhere.com and click Go to Backups.
2 Make sure the My Folders and Files tab is selected.
3 Click on a file to display the pop-up menu and select Download, or select one or more files in the middle panel and click the Download button.
A dialog prompts you to open the file or save it to your current computer.
4 Select either Open or Save.
If you chose to save the file, it creates a Downloads folder (if not already created) and places your files there.
4: Transferring Files 29
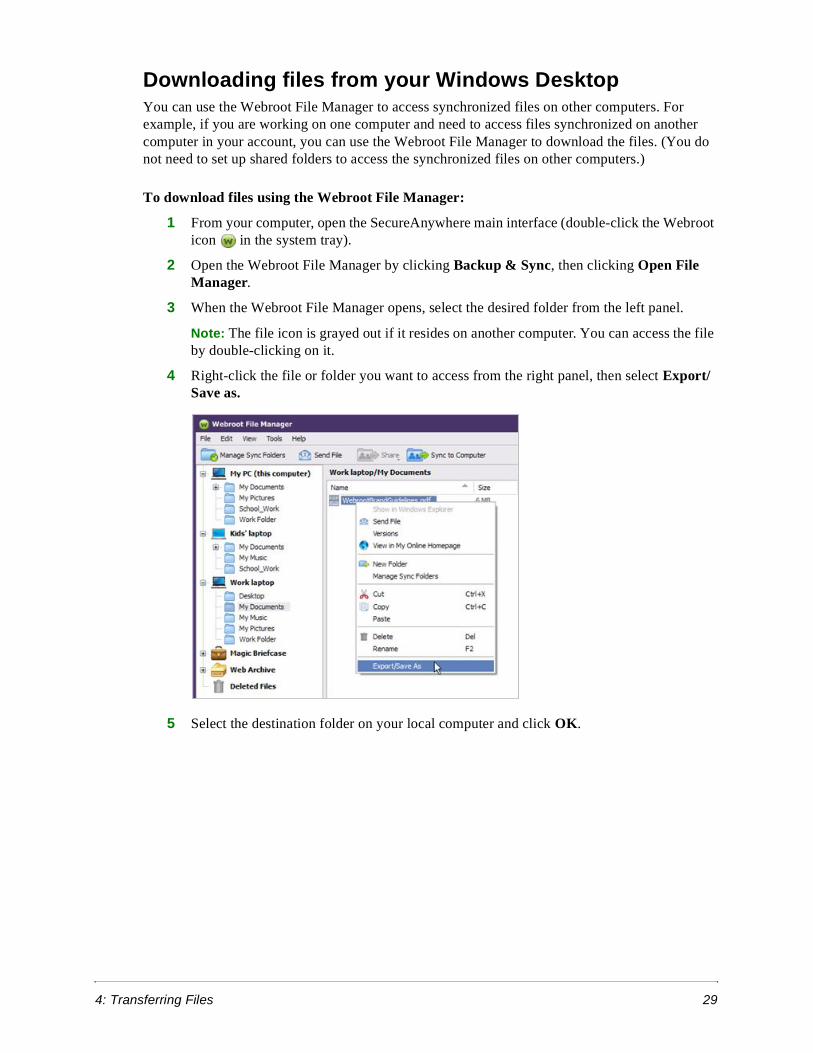
Downloading files from your Windows DesktopYou can use the Webroot File Manager to access synchronized files on other computers. For example, if you are working on one computer and need to access files synchronized on another computer in your account, you can use the Webroot File Manager to download the files. (You do not need to set up shared folders to access the synchronized files on other computers.)
To download files using the Webroot File Manager:
1 From your computer, open the SecureAnywhere main interface (double-click the Webroot icon in the system tray).
2 Open the Webroot File Manager by clicking Backup & Sync, then clicking Open File Manager.
3 When the Webroot File Manager opens, select the desired folder from the left panel.
Note: The file icon is grayed out if it resides on another computer. You can access the file by double-clicking on it.
4 Right-click the file or folder you want to access from the right panel, then select Export/Save as.
5 Select the destination folder on your local computer and click OK.

30 4: Transferring Files
Downloading files to an Android mobile deviceYou can use the SecureSync app to access synchronized files from other computers in your SecureAnywhere account. The SecureSync app is available with a SecureAnywhere Complete edition.
To download files to an Android mobile device:
1 Open the SecureSync app (see “Accessing files from a mobile device” on page 10).
2 Tap Files from the tab bar.
The computers in your SecureAnywhere account are listed under My Devices.
3 Tap the name of the device that you want to access.
The next panel shows the synchronized folders and files in your account.
4 Press and hold the file or folder name until the menu panel opens. From here, you can tap Open to view a file or tap Download to copy a file or folder onto your mobile device.
Tip: Your mobile device must be able to view the specific file type. If necessary, download a viewing or editing app.
4: Transferring Files 31
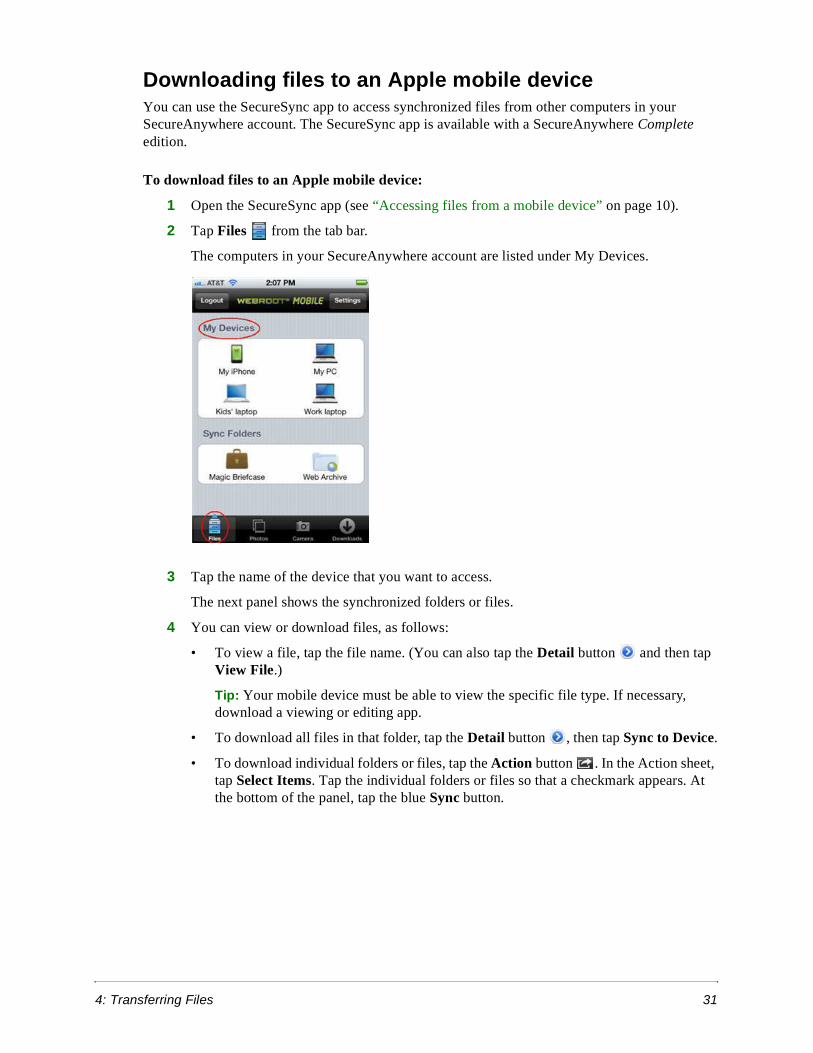
Downloading files to an Apple mobile deviceYou can use the SecureSync app to access synchronized files from other computers in your SecureAnywhere account. The SecureSync app is available with a SecureAnywhere Complete edition.
To download files to an Apple mobile device:
1 Open the SecureSync app (see “Accessing files from a mobile device” on page 10).
2 Tap Files from the tab bar.
The computers in your SecureAnywhere account are listed under My Devices.
3 Tap the name of the device that you want to access.
The next panel shows the synchronized folders or files.
4 You can view or download files, as follows:
• To view a file, tap the file name. (You can also tap the Detail button and then tap View File.)
Tip: Your mobile device must be able to view the specific file type. If necessary, download a viewing or editing app.
• To download all files in that folder, tap the Detail button , then tap Sync to Device.
• To download individual folders or files, tap the Action button . In the Action sheet, tap Select Items. Tap the individual folders or files so that a checkmark appears. At the bottom of the panel, tap the blue Sync button.
32 4: Transferring Files
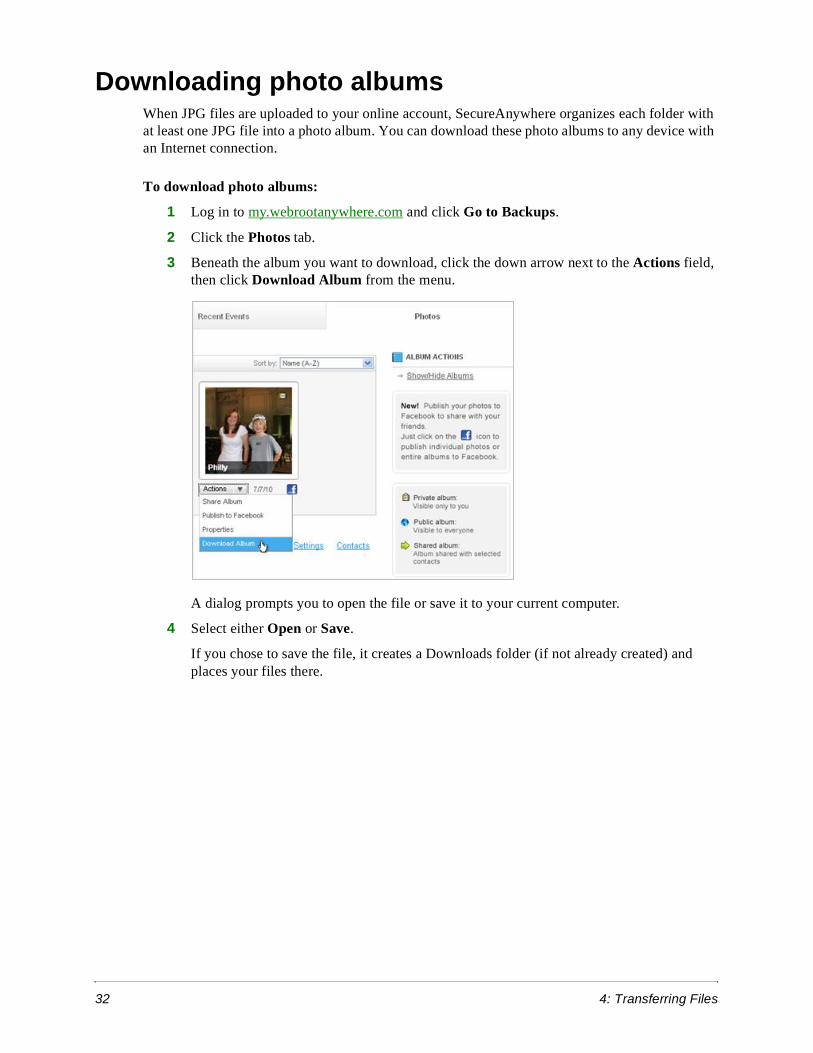
Downloading photo albumsWhen JPG files are uploaded to your online account, SecureAnywhere organizes each folder with at least one JPG file into a photo album. You can download these photo albums to any device with an Internet connection.
To download photo albums:
1 Log in to my.webrootanywhere.com and click Go to Backups.
2 Click the Photos tab.
3 Beneath the album you want to download, click the down arrow next to the Actions field, then click Download Album from the menu.
A dialog prompts you to open the file or save it to your current computer.
4 Select either Open or Save.
If you chose to save the file, it creates a Downloads folder (if not already created) and places your files there.

4: Transferring Files 33
Editing files remotelyUsing the Edit with WebSync function, you can open and edit files residing in any of your synchronized folders from any location. When you save the file, SecureAnywhere immediately synchronizes the changes.
To edit files remotely:
1 Log in to my.webrootanywhere.com and click Go to Backups.
2 Make sure the My Folders and Files tab is selected.
3 Click on a file to display the pop-up menu and select Edit with WebSync.
Note: If a dialog opens that instructs you to install Java, click on the install Java link and follow the on-screen instructions.
A dialog prompts you to open the file or save it to your current computer.
4 To edit your file, select Java Web Start Launcher.
Your document opens in Microsoft Word, along with a Webroot - WebSync dialog.
5 Edit your file, then click Done With All so your changes are immediately synchronized.

34 4: Transferring Files
Uploading files to the cloudYou can upload files to your SecureAnywhere account from any computer with an Internet connection or from the SecureSync app on your Android mobile device.
Note: Due to limitations in iOS devices, SecureSync cannot upload files from an Apple mobile device. However, it can upload photos.
Uploading files to the SecureAnywhere website1 Log in to my.webrootanywhere.com and click Go to Backups.
2 Make sure the My Folders and Files tab is selected.
3 Select the folder where you want to load files. If desired, you can create a subfolder by clicking New Folder.
4 Click Upload.
5 Follow the on-screen instructions to upload the files.

4: Transferring Files 35
Uploading files from an Android device1 Open the SecureSync app (see “Accessing files from a mobile device” on page 10).
2 Tap Files from the tab bar.
3 Tap the icon for your mobile device.
4 Tap the name of the folder that you want to access.
5 The next panel shows the folders and files on your device. Press and hold the folder or file name until the menu panel opens, then tap Upload to Server.
6 To check the status of the transfer, tap More from the tab bar, then tap Transfer Status.The files immediately synchronize to your computers in Magic Briefcase/Mobile Folders.

36 4: Transferring Files
Uploading photos from a mobile deviceBy using the SecureSync app to take pictures, your photo files will upload immediately to the cloud. You can also easily upload photos taken on your mobile device’s camera. (Photos taken from your device’s camera do not automatically upload to your Webroot account; you must upload them yourself.)
When you upload photos, the files immediately synchronize to your computers in Magic Briefcase/Mobile Folders. (The Mobile Folders subfolder does not appear until you upload a photo.)
Using an Android mobile device to upload photosYou can upload photos either by using the SecureSync camera (uploads as soon as you take the picture) or upload photos residing in the Gallery.
To take a picture and synchronize it immediately:
1 From the tab bar, tap Camera.
2 Tap either Take a Picture or Record Video.
To upload photos from the Gallery on your mobile device:
1 From the tab bar, tap Camera.
2 Tap Upload Current Media.
SecureSync locates the JPG files in your gallery and prompts you to start the upload.
3 Tap OK.
4: Transferring Files 37
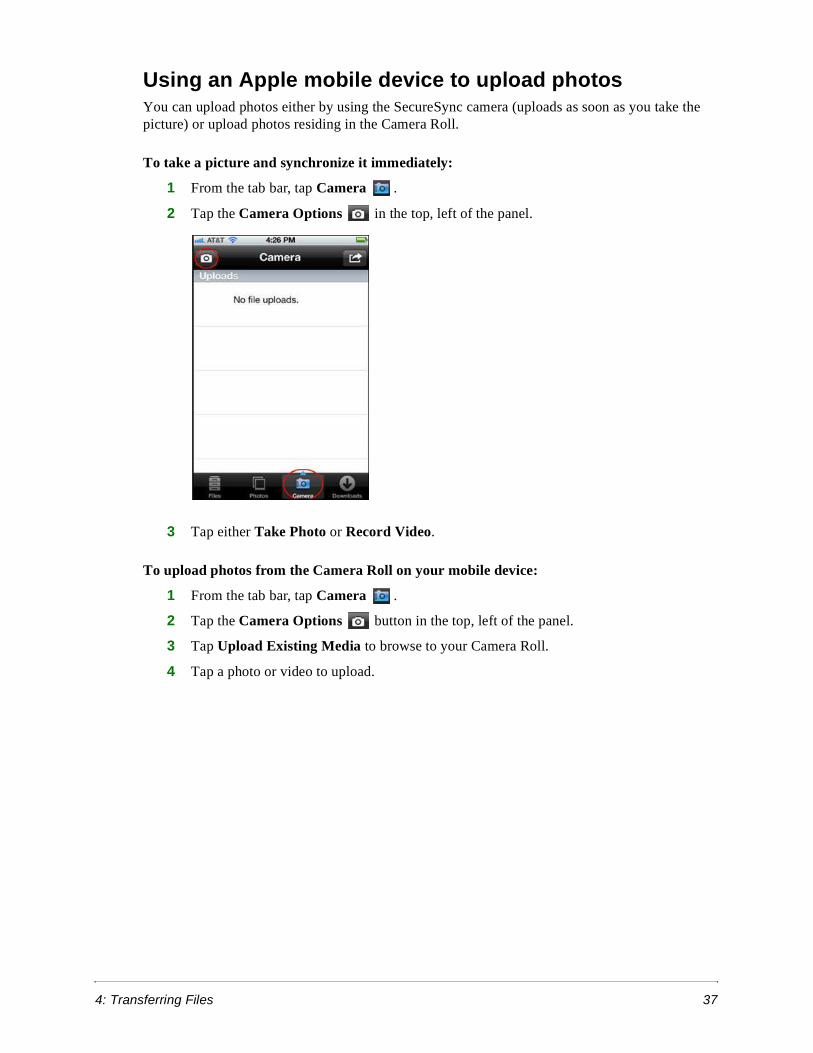
Using an Apple mobile device to upload photosYou can upload photos either by using the SecureSync camera (uploads as soon as you take the picture) or upload photos residing in the Camera Roll.
To take a picture and synchronize it immediately:
1 From the tab bar, tap Camera .
2 Tap the Camera Options in the top, left of the panel.
3 Tap either Take Photo or Record Video.
To upload photos from the Camera Roll on your mobile device:
1 From the tab bar, tap Camera .
2 Tap the Camera Options button in the top, left of the panel.
3 Tap Upload Existing Media to browse to your Camera Roll.
4 Tap a photo or video to upload.

38 4: Transferring Files

5: Sharing Files and Photos 39
5: Sharing Files and Photos
If you would like to share files or photos with friends and relatives, you can use Backup & Sync to send them an email that provides a link to copies stored in the cloud. This method of sharing files preserves space because you are not attaching files directly to an email. It also protects your original files because you are not providing other people with direct access. The recipients of your email do not need to have a SecureAnywhere account to access the files.
Recipients are given access to a copy of your files for 21 days. Be aware that since they do not have access to your original files, any future changes you make won’t be reflected in their copy.
To share files and photos, see the following topics:
Sending files to others . . . . . . . . . . . . . . . . . . . . . . . . . . . . page 40
Sharing photo albums with others . . . . . . . . . . . . . . . . . . . page 44
Publishing photo albums to Facebook . . . . . . . . . . . . . . . . page 46

40 5: Sharing Files and Photos
Sending files to othersYou can send a message to friends and relatives with a link to files in your online SecureAnywhere account. You can also send files from a mobile device with the SecureSync app installed.
Using the SecureAnywhere website to send files1 Log in to my.webrootanywhere.com and click Go to Backups.
2 Click the My Folders and Files tab.
3 Select a file by clicking on its checkbox, then click Send Files from the toolbar or Send from the right-click pop-up menu.
The Send Files dialog opens.
4 In the To: field, enter the email addresses of the recipients, separated by commas. In the Message: field, enter a short message for the invitation. Then click Send.
A status message opens when your file is sent.
5: Sharing Files and Photos 41
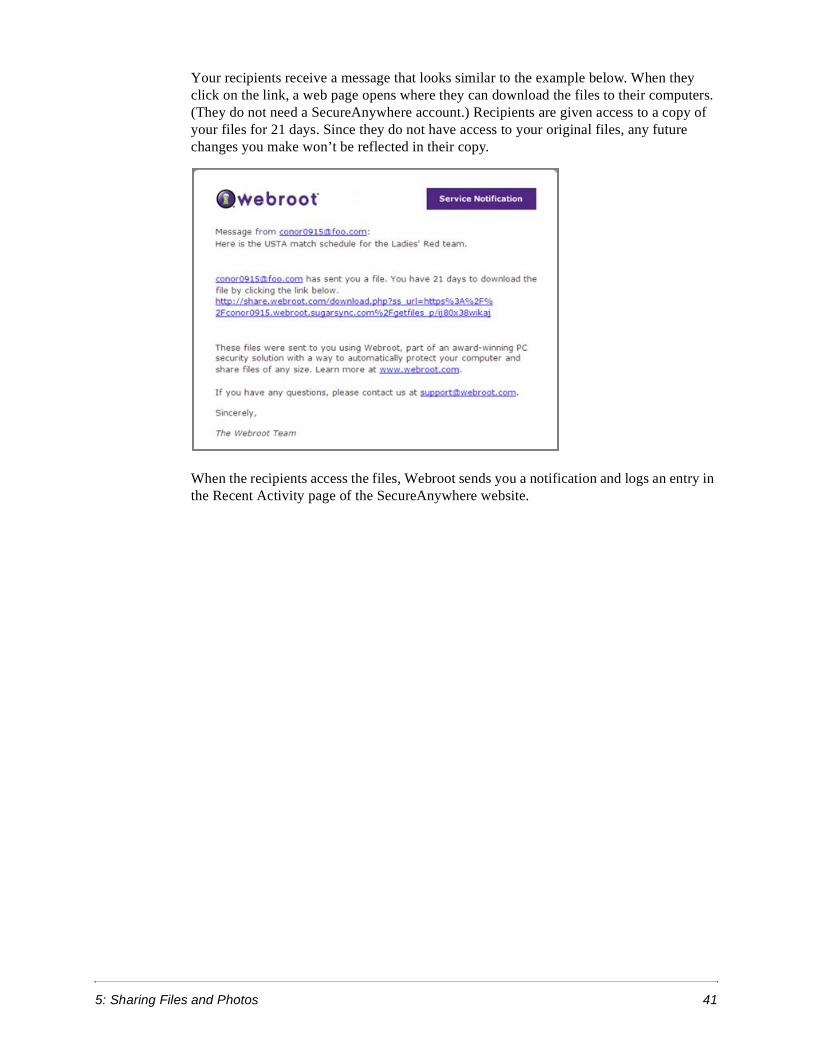
Your recipients receive a message that looks similar to the example below. When they click on the link, a web page opens where they can download the files to their computers. (They do not need a SecureAnywhere account.) Recipients are given access to a copy of your files for 21 days. Since they do not have access to your original files, any future changes you make won’t be reflected in their copy.
When the recipients access the files, Webroot sends you a notification and logs an entry in the Recent Activity page of the SecureAnywhere website.

42 5: Sharing Files and Photos
Sending files from an Android mobile device1 Open the SecureSync app (see “Accessing files from a mobile device” on page 10).
2 Tap Files from the tab bar.
3 Tap the name of the device or sync folder that you want to access.
4 To access files in a folder, tap the folder name. To access a single file, press and hold the file name until the menu panel opens, then tap Send.
5 Select the method for sending the file, such as email or text message. Your recipient can receive a link to the shared file through email, Bluetooth, Facebook, or text messaging.
The options that appear depend on how you set up your mobile device. For example, “Facebook” only appears if you installed the Facebook app.
6 Enter the contact information, along with a message to the recipient. Then tap Send.

5: Sharing Files and Photos 43
Sending files from an Apple mobile device1 Open the SecureSync app (see “Accessing files from a mobile device” on page 10).
2 Browse to the file or photo you want to share:
• Tap Files in the tab bar. Tap the name of the device or shared folder you want to access.
• To locate photos, tap Photos in the tab bar. Tap the Detail button next to Mobile Photos or My Albums.
3 To share a single file or folder:
• Tap the Detail button next to the file you want to share.
• Tap Share.
• Enter the email address of your contact, then tap Send.
4 To share multiple files:
• Tap the folder name.
• Tap the Action button .
• In the Action sheet, tap Select Items.
• Tap the individual files so that a checkmark appears.
• At the bottom of the panel, tap the blue Share button.
• Enter the email address of your contact, then tap Send.

44 5: Sharing Files and Photos
Sharing photo albums with othersYou can share photo albums with friends and family by using your SecureAnywhere online account. Backup & Sync creates an album for every folder that contains at least one JPG file and organizes them in the Photos tab.
To share your photo albums with others:
1 Log in to my.webrootanywhere.com and click Go to Backups.
2 Select the Photos tab.
3 Select the drop-down arrow next to Actions, then click Share Album.
The Share Album dialog opens.
5: Sharing Files and Photos 45
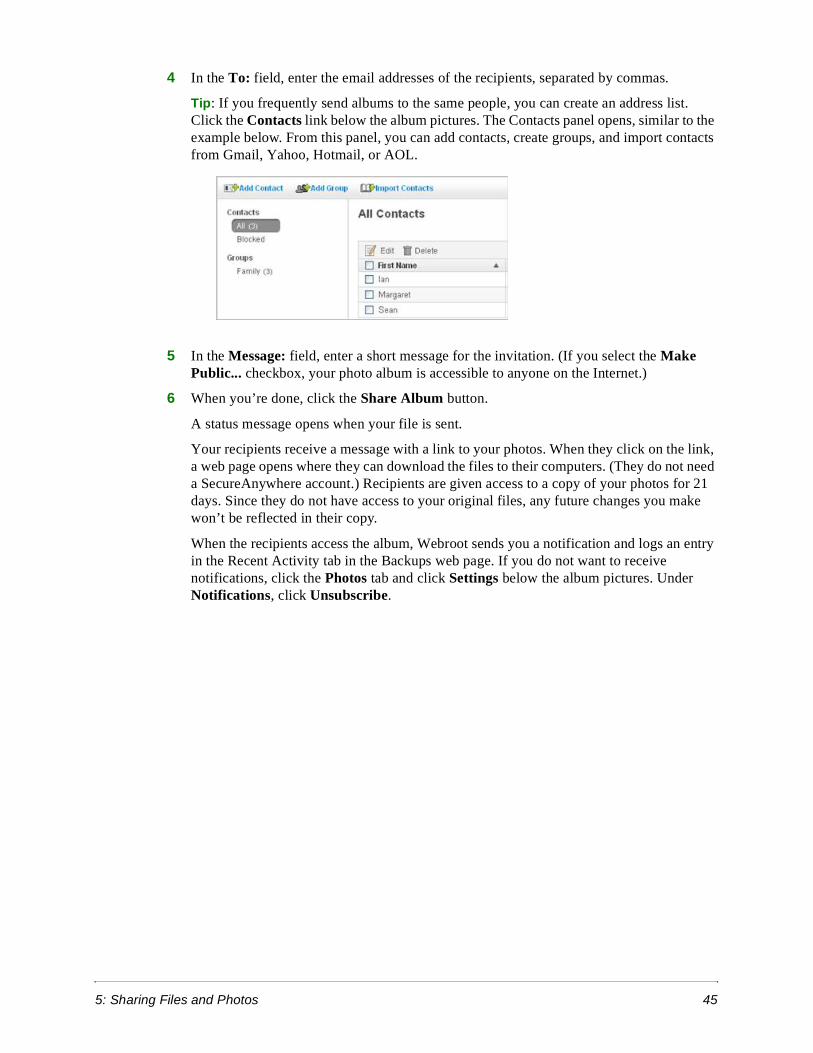
4 In the To: field, enter the email addresses of the recipients, separated by commas.
Tip: If you frequently send albums to the same people, you can create an address list. Click the Contacts link below the album pictures. The Contacts panel opens, similar to the example below. From this panel, you can add contacts, create groups, and import contacts from Gmail, Yahoo, Hotmail, or AOL.
5 In the Message: field, enter a short message for the invitation. (If you select the Make Public... checkbox, your photo album is accessible to anyone on the Internet.)
6 When you’re done, click the Share Album button.
A status message opens when your file is sent.
Your recipients receive a message with a link to your photos. When they click on the link, a web page opens where they can download the files to their computers. (They do not need a SecureAnywhere account.) Recipients are given access to a copy of your photos for 21 days. Since they do not have access to your original files, any future changes you make won’t be reflected in their copy.
When the recipients access the album, Webroot sends you a notification and logs an entry in the Recent Activity tab in the Backups web page. If you do not want to receive notifications, click the Photos tab and click Settings below the album pictures. Under Notifications, click Unsubscribe.

46 5: Sharing Files and Photos
Publishing photo albums to FacebookFrom the SecureAnywhere website, you can easily publish photo albums to Facebook.
To publish albums to Facebook:
1 Log in to my.webrootanywhere.com and click Go to Backups.
2 Select the Photos tab.
3 Click the Facebook icon below the album you want to publish.
4 When the next page opens, you can choose which photos you want published. Click Select All or click on each photo (use Ctrl and Shift), then click the Publish button.
5 In the Facebook dialog, enter your email address and password used for your Facebook account. If the Facebook Special Permissions dialog opens, select Allow Photo Uploads.
The following dialog opens:
6 Enter a name for the new album or click Existing Album and select one of your current Facebook albums to load the photos into an existing album. Click OK.
7 Open your Facebook account and check that your photos are posted on your profile.
6: Restoring Files 47
6: Restoring Files
You may need to restore data you accidentally deleted or restore all data to a new computer. No matter what the reason, restoring files with Backup & Sync is quick and easy. All your data is stored safely on our Webroot servers. We encrypt your files with 128-bit Advanced Encryption Standard (AES), the same level of hacker-proof protection used by major banks and the United States Government. We then back up your files in two locations for redundancy. When you retrieve files, we encrypt all data before it leaves our servers, ensuring that you are the only one who can download and access your files.
To restore files, see the following topics:
Retrieving an older version of a file . . . . . . . . . . . . . . . . . page 48
Retrieving files you accidentally deleted . . . . . . . . . . . . . page 49
Restoring all data to a new computer . . . . . . . . . . . . . . . . page 50
48 6: Restoring Files
Retrieving an older version of a fileYou can save up to five previous versions of a file and can restore any of those saved versions. (If you save changes a sixth time, your most recent versions are saved and the oldest version is removed.)
To retrieve an older version of a file:
1 Log in to my.webrootanywhere.com and click Go to Backups.
2 Make sure the My Folders and Files tab is selected.
3 Select the file you want restored from the middle panel (click in its checkbox).
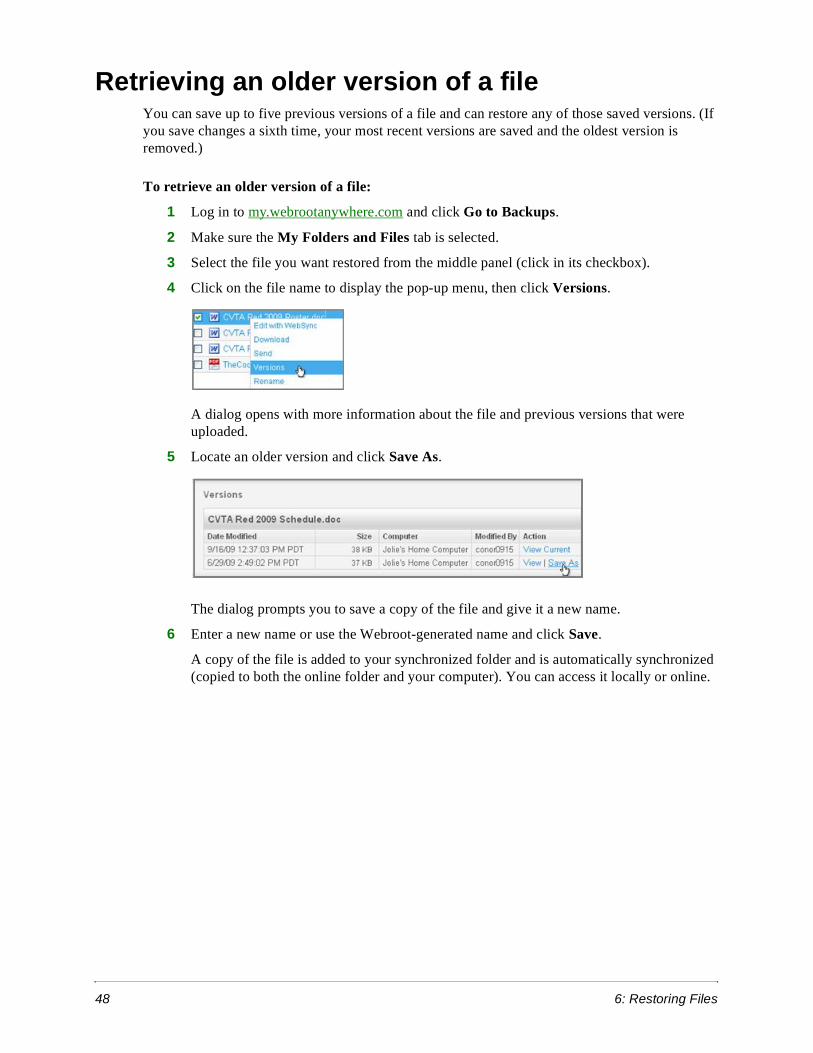
4 Click on the file name to display the pop-up menu, then click Versions.
A dialog opens with more information about the file and previous versions that were uploaded.
5 Locate an older version and click Save As.
The dialog prompts you to save a copy of the file and give it a new name.
6 Enter a new name or use the Webroot-generated name and click Save.
A copy of the file is added to your synchronized folder and is automatically synchronized (copied to both the online folder and your computer). You can access it locally or online.

6: Restoring Files 49
Retrieving files you accidentally deletedThe Deleted Files folder acts like a recycle bin for files you deleted from your account. As long as you did not select Permanently Delete from the Deleted Files folder, you can always restore files.
To retrieve a file or folder you accidentally deleted:
1 Log in to my.webrootanywhere.com and click Go to Backups.
2 Make sure the My Folders and Files tab is selected.
3 Click on the Deleted Files folder.
All previously deleted files or folders reside in the Deleted Files folder.
4 Select the file you want restored from the middle panel (click in its checkbox) and click Restore.
5 In the dialog that opens, select a destination and click Restore.
The file is moved to the selected folder and synchronized on your computer.

50 6: Restoring Files
Restoring all data to a new computerBackup & Sync safely stores your old computer’s files in the synchronized folders, no matter if your computer is lost or damaged.
Note: Thieves cannot access your online files because they do not have your account name and password to launch your SecureAnywhere account.
To fully restore all data to a new computer:
1 On the new computer, install the SecureAnywhere software and activate your account on that computer.
2 Open the Webroot File Manager. See “Accessing files from your Windows Desktop” on page 6.
3 Assign a new name and icon to the new computer by clicking on the Tools menu and selecting Rename this Computer. Assign a new icon and enter a unique name for your new computer, then click OK. The name must be different from your old computer.
4 Copy files from your old computer to your new computer by synchronizing each folder. Follow the instructions in “Synchronizing data between computers” on page 15.
Depending on the size and number of files, the synchronization may take awhile. When the process is complete, the status bar at the bottom of the Webroot File Manager shows “All files are backed up and in sync” and shows the synchronized folders under your new computer.
7: Managing Storage and Speed 51
7: Managing Storage and Speed
You can perform several management tasks to increase your storage space for files uploaded to the cloud and to increase the backup speed of uploads.
Note: Webroot only counts your current data in the cloud toward your allotted storage space. Synchronized data on other devices count only once toward your limit.
To perform management tasks, see the following topics:
Adding more storage space . . . . . . . . . . . . . . . . . . . . . . . . page 52
Reclaiming storage . . . . . . . . . . . . . . . . . . . . . . . . . . . . . . page 53
Freeing up storage space . . . . . . . . . . . . . . . . . . . . . . . . . . page 53
Setting the backup speed . . . . . . . . . . . . . . . . . . . . . . . . . . page 54
52 7: Managing Storage and Speed
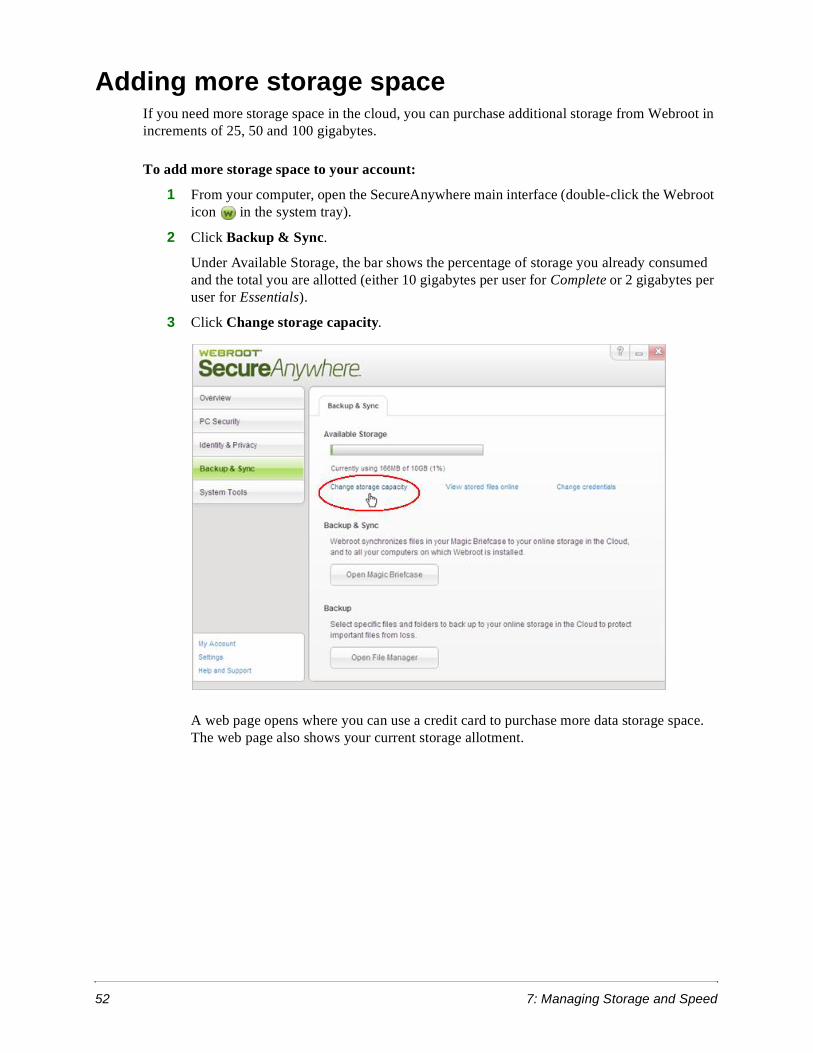
Adding more storage spaceIf you need more storage space in the cloud, you can purchase additional storage from Webroot in increments of 25, 50 and 100 gigabytes.
To add more storage space to your account:
1 From your computer, open the SecureAnywhere main interface (double-click the Webroot icon in the system tray).
2 Click Backup & Sync.
Under Available Storage, the bar shows the percentage of storage you already consumed and the total you are allotted (either 10 gigabytes per user for Complete or 2 gigabytes per user for Essentials).
3 Click Change storage capacity.
A web page opens where you can use a credit card to purchase more data storage space. The web page also shows your current storage allotment.

7: Managing Storage and Speed 53
Reclaiming storageIf you notice that the total size of the files in the Webroot File Manager does not match how much overall storage space you are using, you can use the Webroot File Manager to make sure all your files are properly accounted for.
To reclaim storage:
1 From your computer, open the SecureAnywhere main interface (double-click the Webroot icon in the system tray).
2 Open the Webroot File Manager by clicking Backup & Sync, then clicking Open File Manager.
3 Select the Tools menu and click Reclaim Storage.
Freeing up storage spaceIf you have exceeded your storage limit and need to free up space in the cloud, you can perform the following cleanup tasks:
• Stop synchronizing some folders or exclude some sub-folders. See “Removing folders from synchronization” on page 18.
• Move some large, non-essential files from your synchronization folders.
• Empty your Deleted Files folder. Files that reside in the Deleted Files folder still count toward your storage allotment. Be aware that once you permanently delete a file or folder, you cannot restore it.
From the Webroot Files Manager, you can empty the entire folder by right-clicking on the Deleted Files folder and selecting Empty Deleted Files.
If you want to select individual files to permanently delete, log in to my.webrootanywhere.com and click Go to Backups. Click on the Deleted Files folder, select individual files from the middle panel, then click Permanently Delete.
54 7: Managing Storage and Speed
Setting the backup speedIf you upload a large amount of data, the backup and synchronization may take a long time (the duration depends on your Internet connection). In the Webroot File Manager, you can increase the file upload speed.
To adjust the upload speed:
1 From your computer, open the SecureAnywhere main interface (double-click the Webroot icon in the system tray).
2 Open the Webroot File Manager by clicking Backup & Sync, then clicking Open File Manager.
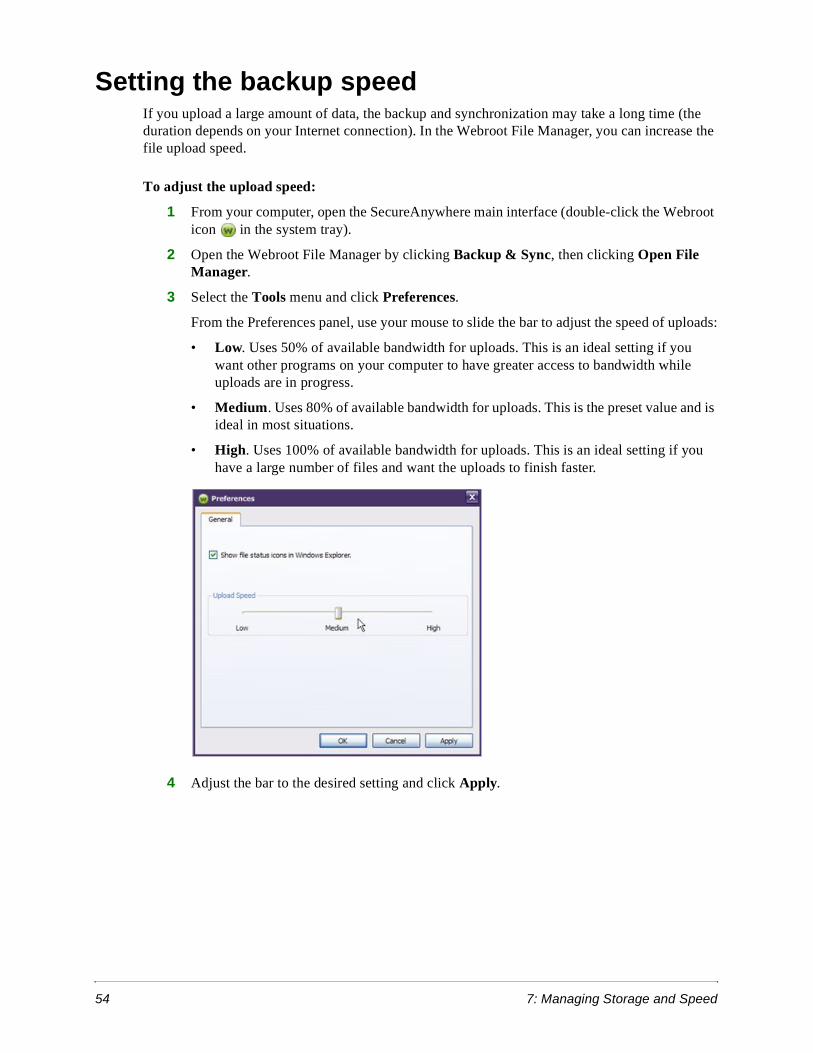
3 Select the Tools menu and click Preferences.
From the Preferences panel, use your mouse to slide the bar to adjust the speed of uploads:
• Low. Uses 50% of available bandwidth for uploads. This is an ideal setting if you want other programs on your computer to have greater access to bandwidth while uploads are in progress.
• Medium. Uses 80% of available bandwidth for uploads. This is the preset value and is ideal in most situations.
• High. Uses 100% of available bandwidth for uploads. This is an ideal setting if you have a large number of files and want the uploads to finish faster.
4 Adjust the bar to the desired setting and click Apply.
Index 55
Index
AAndroid mobile device
accessing files from 10accessing Web Archive 25downloading files to 30sending files from 42uploading files from 35uploading photos 36
Apple mobile deviceaccessing files from 11accessing Web Archive 26downloading files to 31sending files from 43uploading photos 37
archiving files 21
Bbackup speed, adjusting 54Backups page 8
See also SecureAnywhere website
Cchange storage capacity 52computer name, changing in Webroot File Manager 8configuring Backup & Sync 3copying files 21
DDeleted Files bin 49Download and Install 3downloading files 28
EEdit with WebSync 33Empty Deleted Files 53encryption method 47
Ffiles, accessing 6
IInitial Sync 5installing Backup & Sync 3
JJava Web Start Launcher 33
MMagic Briefcase
about 2accessing 17
mobile appSee SecureSync app
Oonline account, accessing 8
Pphoto albums
downloading 32sharing 44viewing 9
photos, uploading from mobile device 36Preferences 54
RReclaim Storage 53Recycle bin 49removing a computer from synchronization 19Rename Computer 8restoring files 47
SSecureAnywhere website
accessing files from 8accessing files in Web Archive 24downloading files from 28opening 3sending links to files from 40uploading files to 34uploading files to Web Archive 23
SecureSync appaccessing files from Android 10accessing files from Apple device 11downloading to a mobile device 6
sending files 40Set up Account Now 3sharing files and photos 39speed of backups, adjusting 54stopping the sync process 18storage
adding more space 52freeing up space 53reclaiming 53viewing amount used 8
56 Index
sync foldersabout 2accessing 6adding 14copying to a new computer 50editing files remotely 33excluding from synchronization 18initial sync 5merging with another computer 16removing an entire computer from
synchronization 19retrieving files from Deleted Files bin 49retrieving older versions of files 48sharing with other computers 15
sync speed, adjusting 54synchronizing files 13
Ttransferring files 27
Uuploading files 34
Vversions, retrieving old files 48
WWeb Archive
about 2accessing files from Android 25accessing files from Apple mobile device 26accessing files from Windows desktop 24copying files to 22
Webroot account, accessing 8Webroot File Manager
accessing Web Archive files 24copying files to Web Archive 22downloading files from 29opening 6renaming displayed computers 8
Webroot websiteSee SecureAnywhere website
Windows Explorerlocation of Magic Briefcase 17
Related Documents