PARAGON Software GmbH Heinrich-von-Stephan-Str. 5c 79100 Freiburg, Germany Tel. +49 (0) 761 59018201 Fax +49 (0) 761 59018130 Internet www.paragon-software.com Email [email protected] Copyright© 1994-2016 Paragon Software GmbH. All rights reserved. Backup to Cloud with Backup & Recovery 16 User Guide

Welcome message from author
This document is posted to help you gain knowledge. Please leave a comment to let me know what you think about it! Share it to your friends and learn new things together.
Transcript

PARAGON Software GmbH
Heinrich-von-Stephan-Str. 5c 79100 Freiburg, Germany
Tel. +49 (0) 761 59018201 Fax +49 (0) 761 59018130
Internet www.paragon-software.com Email [email protected]
Copyright© 1994-2016 Paragon Software GmbH. All rights reserved.
Backup to Cloud with Backup & Recovery 16
User Guide

2
Copyright© 1994-2016 Paragon Software GmbH. All rights reserved.
Table of Contents
Introduction .......................................................................................................................... 3
Connecting Cloud as Network Disk ........................................................................................ 4
If Your Cloud Support WebDAV ................................................................................................................... 4
If Your Cloud Doesn’t Support WebDAV ...................................................................................................... 6
Configuring BR16 to Use Cloud Storage ................................................................................. 9

3
Copyright© 1994-2016 Paragon Software GmbH. All rights reserved.
Introduction
As you know a solid backup strategy involves redundancy, which means you store backup data not only at your direct
disposal, e.g. on an external hard drive or USB flash stick, but also in an offsite location. Until appearance of cloud
storages that typically offer 5-15GB of free disk space in addition to many paid services, keeping backups at a remote
data center was quite expensive and only considered for critical data. Now anyone can afford this backup option at little
expenses or even for free, so even if your house burns down to pieces with all storage devices, your family albums and
other precious data can survive.
Despite the fact that a client application provided by the cloud service provider seems the right tool to transfer backup
data to / from the cloud, it’s not the best choice. Primarily designed to synchronize files between various devices, it
constantly sits in your RAM attempting to upload new or changed data to the remote server immediately that can
temporarily clog your Internet link. Worse still is that it transfers files unencrypted, thus you’re running the risk of a
third party gaining access to your personal data. Much better is to mount cloud storage as a network disk in the system
and then configure your backup utility to use it.
All you need is WebDAV (Web-based Distributed Authoring and Versioning), a communication protocol based on HTTP
1.1 that provides a framework for users to create, modify, and move files on a remote server. Comparing with other file-
sharing protocols, WebDAV supports processing multiple files at once and ensures data security by utilizing SSL (Secure
Sockets Layer).
In this guide you will learn how to connect popular cloud storages through the WebDAV protocol to utilize them as
backup destination in Paragon Backup & Recovery 16.

4
Copyright© 1994-2016 Paragon Software GmbH. All rights reserved.
Connecting Cloud as Network Disk
As you probably know not all cloud services natively support WebDAV. Among those that do are Box, CloudMe,
MagentaCLOUD, OpenDrive, OneDrive and Yandex.Disk. The popular Google Drive and DropBox don’t support it, but
there are third-party services that can help you with that naughty oversight.
If Your Cloud Support WebDAV
This is the easiest scenario as all you need to have is a special address and cloud access credentials.
1. Open Windows Explorer. Right click the ThisPC (MyComputer) button, then select Map network drive…
2. Choose a vacant drive letter, then type in a WebDAV server’s address of your cloud storage in the corresponding
field. Click Finish when ready.
https://box.net/dav for Box,
5
Copyright© 1994-2016 Paragon Software GmbH. All rights reserved.
https://webdav.cloudme.com for CloudMe,
https://webdav.magentacloud.de for MagentaCLOUD,
https://webdav.opendrive.com for OpenDrive,
https://webdav.yandex.com (https://webdav.yandex.ru) for Yandex.Disk,
If you’re going to use OneDrive, you should know your personal identifier (CID):
- Go to https://onedrive.live.com/about/en-us/ and sign in to your OneDrive account;
- Copy a letter-digit code after the equals sign in the address bar – this is your CID;
- Type in https://d.docs.live.net/”yourCID” to access OneDrive.
If you are going to use some other cloud service, first try to find its WebDAV server’s
address in the user documentation. If it doesn’t support the WebDAV protocol, please
consult the If Your Cloud Doesn’t Support WebDAV section.
3. Connection to the cloud storage requires some time. If a success, you will be prompted to provide access
credentials to your cloud storage account. Select Remember my credentials to let Windows automatically re-
establish the connection after restart.

6
Copyright© 1994-2016 Paragon Software GmbH. All rights reserved.
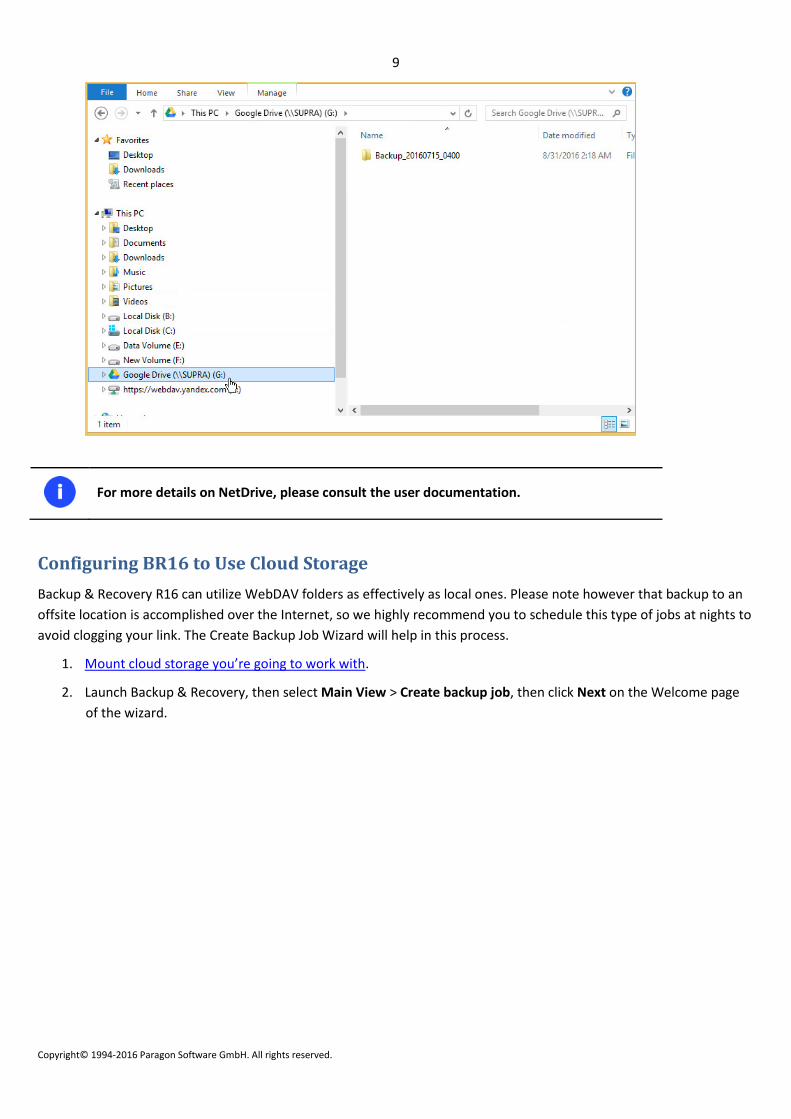
4. That’s it. As a result you should have a new network disk available in the system.
If Your Cloud Doesn’t Support WebDAV
As mentioned above, Google Drive doesn’t support the WebDAV protocol, but you can try a free bridge service called
DAV-pocket. Unfortunately, we have failed to sign up for it getting a 500 Internal Server Error. For Dropbox there’s a
commercial bridge DropDAV. A commercially distributed NetDrive from MacroData supports these two and several
more cloud services like Amazon S3 and openstack. The program can be used completely for free during a 30-day trial
period. Once it’s over you will endure limitations on some features.
1. Go to http://netdrive.net to download the latest distro.
2. Install the program and restart the computer to complete.
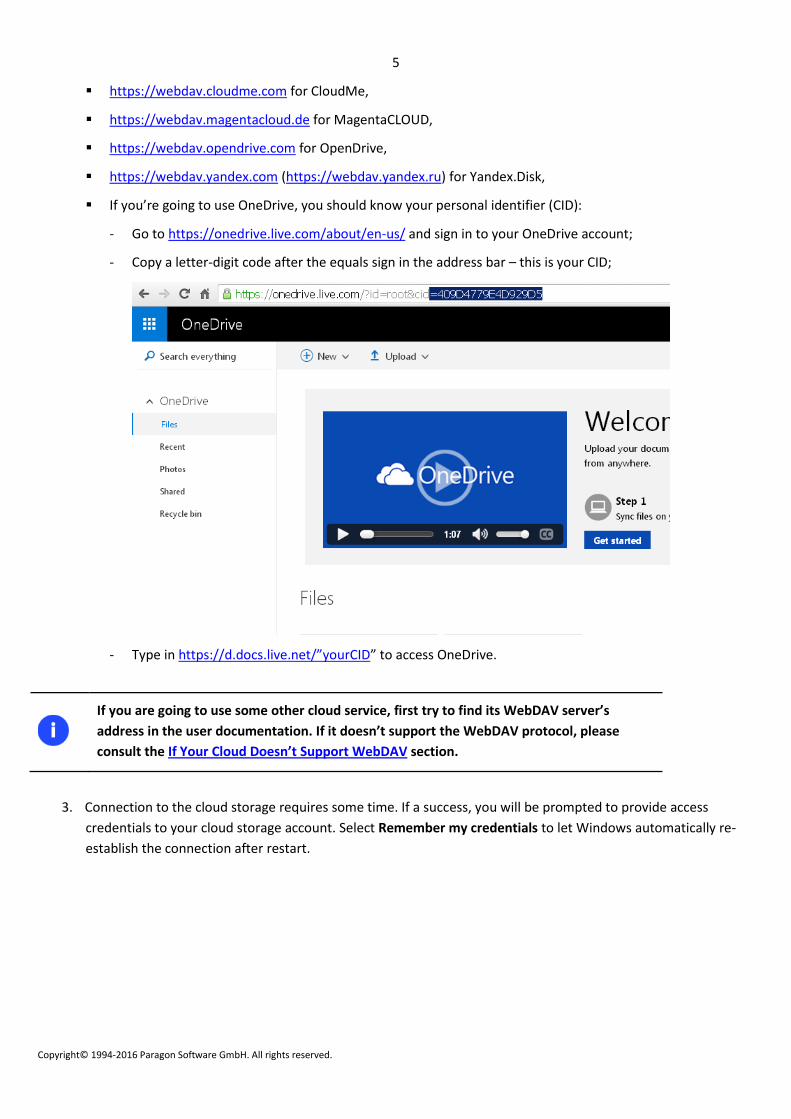
3. Open NetDrive, then click Connect opposite the required cloud service provider (Google Drive in our example).
7
Copyright© 1994-2016 Paragon Software GmbH. All rights reserved.
4. Default options will do in most cases, just click Save to proceed.
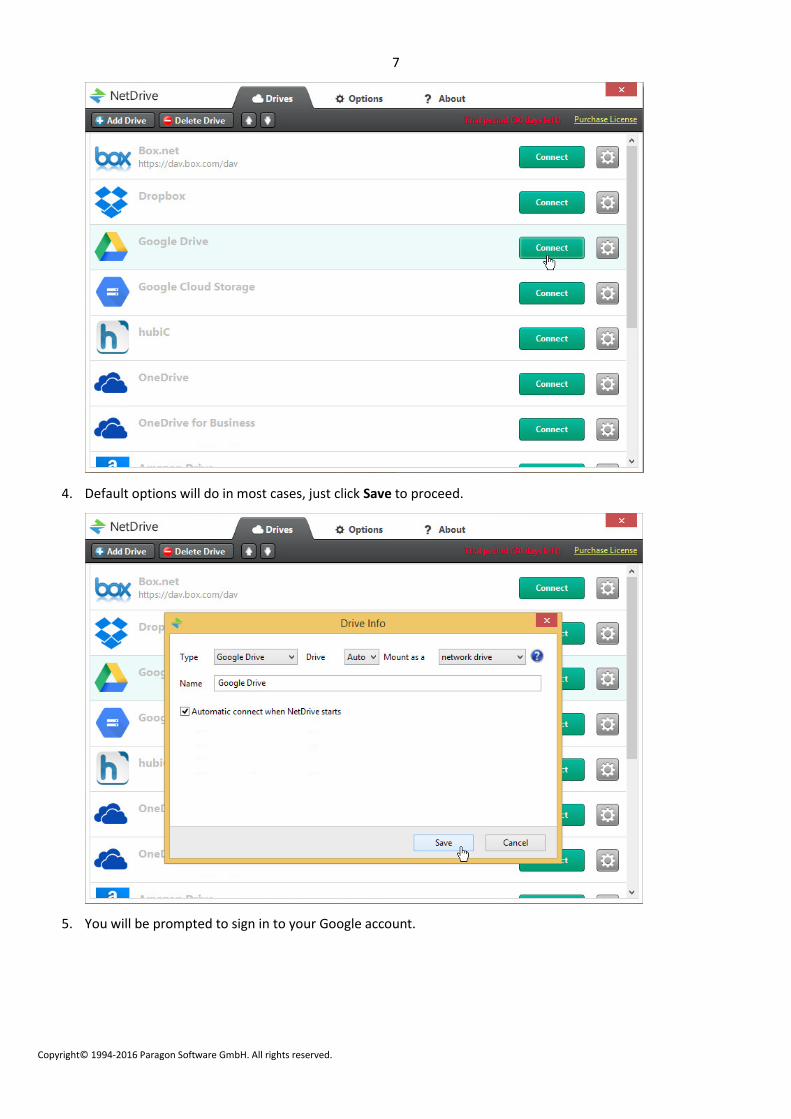
5. You will be prompted to sign in to your Google account.
8
Copyright© 1994-2016 Paragon Software GmbH. All rights reserved.
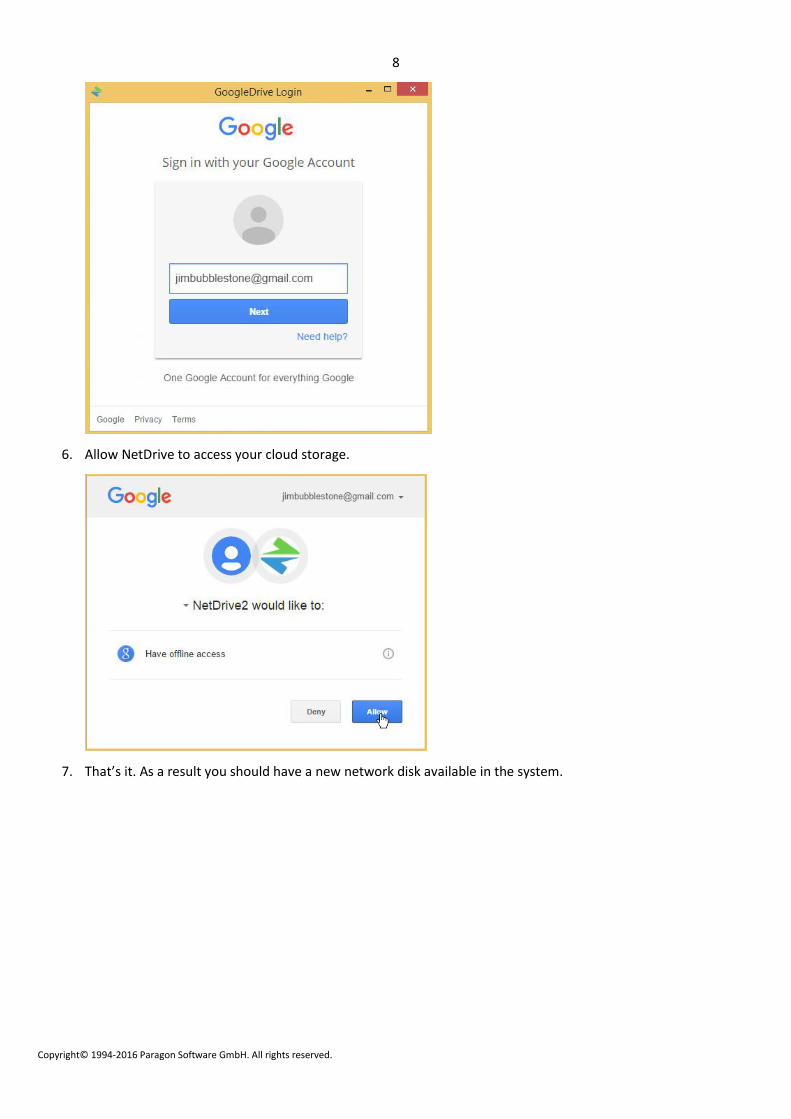
6. Allow NetDrive to access your cloud storage.
7. That’s it. As a result you should have a new network disk available in the system.
9
Copyright© 1994-2016 Paragon Software GmbH. All rights reserved.
For more details on NetDrive, please consult the user documentation.
Configuring BR16 to Use Cloud Storage
Backup & Recovery R16 can utilize WebDAV folders as effectively as local ones. Please note however that backup to an
offsite location is accomplished over the Internet, so we highly recommend you to schedule this type of jobs at nights to
avoid clogging your link. The Create Backup Job Wizard will help in this process.
1. Mount cloud storage you’re going to work with.
2. Launch Backup & Recovery, then select Main View > Create backup job, then click Next on the Welcome page
of the wizard.

10
Copyright© 1994-2016 Paragon Software GmbH. All rights reserved.
3. If necessary, edit the default backup name and description containing the current date and time.
4. Initially the wizard prompts you to back up all available storage devices. If you don’t need that, select the most suitable option on the left, then required objects.
5. Click on the Local volumes tab, then select the previously mounted cloud storage.

11
Copyright© 1994-2016 Paragon Software GmbH. All rights reserved.
6. Cloud backup is reasonable to accomplish on a weekly basis with full backup images followed by incremental updates of changed data since the last backup strengthened by data retention to keep your data precisely up to date with minimal effort and backup storage footprint. Click New strategy to specify:
Name / Description. Give a catchy name and description to your backup strategy to easily identify it from the others.
When. Backup runs can be scheduled from every hour till certain days of the month. Furthermore, you can choose a certain backup trigger event (system start or user logon). Select Weekly, then the required day of week.
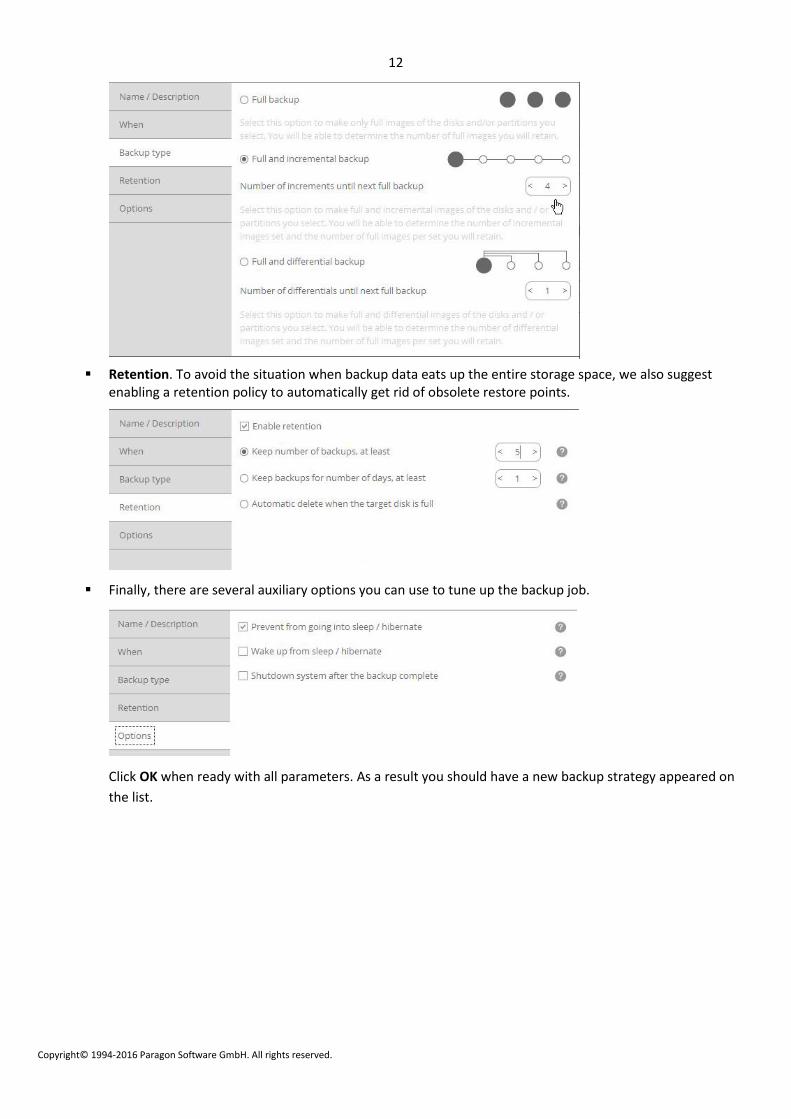
Backup Type. We recommend you to use a combination of full and incremental images to avoid backup data duplicates in the cloud storage while ensuring decent restore times.
12
Copyright© 1994-2016 Paragon Software GmbH. All rights reserved.
Retention. To avoid the situation when backup data eats up the entire storage space, we also suggest enabling a retention policy to automatically get rid of obsolete restore points.
Finally, there are several auxiliary options you can use to tune up the backup job.
Click OK when ready with all parameters. As a result you should have a new backup strategy appeared on
the list.

13
Copyright© 1994-2016 Paragon Software GmbH. All rights reserved.
7. If necessary, modify advanced backup settings. To make sure you’ve got a trustworthy fallback position, each backup image is verified for viability immediately after creation. Though it’s not recommended, unmark the corresponding option to skip this step and make the backup process a bit faster.
8. Review all parameters of the operation and modify them if necessary by going back to any of the previous steps. When ready, click Finish to complete the wizard.
If you’d like to force creation of the first backup image after completing the wizard, mark the Create initial backup now option.
To allow the scheduled backup tasks while a non-admin user is logged in, specify administrative credentials by marking the corresponding option.

14
Copyright© 1994-2016 Paragon Software GmbH. All rights reserved.
9. Depending on the amount of data to process and your Internet connection, the operation will take some time.
That’s it. As a result a new backup catalog should appear in the cloud storage.
Related Documents