NextGen® PM Background Business Processor (BBP) NEXTGEN Healthcare Information Systems, Inc. Implementation and Training © Copyright 1989-2012 All Rights Reserved Confidential and Proprietary DO NOT COPY V5.7 September 2012 Page 1 of 36 Background Business Processor Overview NextGen® BBP is an application that allows specific processes that are normally run by users within EPM to be automated. The following processes are available for automation: Account Collections Letters Appointment Reminders Batch Posting Batch Sliding Fee Adjustments Bill Encounters Budget Letters Budget Statements Claim Acknowledgement Import Claim Status Import Convert In-Progress to Unbilled Encounter Collection Letters ERA Directory Import Generate Electronic Claims File ICS Automated Directory Import ICS OCR Engine Memorized Reports NextGenEDI File Download NextMD Statements Person Merge Print Pending Paper Claims Recall Letters RTS Claim Status Requests RTS Eligibility Requests RTS Eligibility Responses SIM Pricing Template Statements Stored Procedure User-Specified Application

Welcome message from author
This document is posted to help you gain knowledge. Please leave a comment to let me know what you think about it! Share it to your friends and learn new things together.
Transcript
NextGen® PM Background Business Processor (BBP)
NEXTGEN Healthcare Information Systems, Inc. Implementation and Training © Copyright 1989-2012 All Rights Reserved Confidential and Proprietary DO NOT COPY
V5.7 September 2012 Page 1 of 36
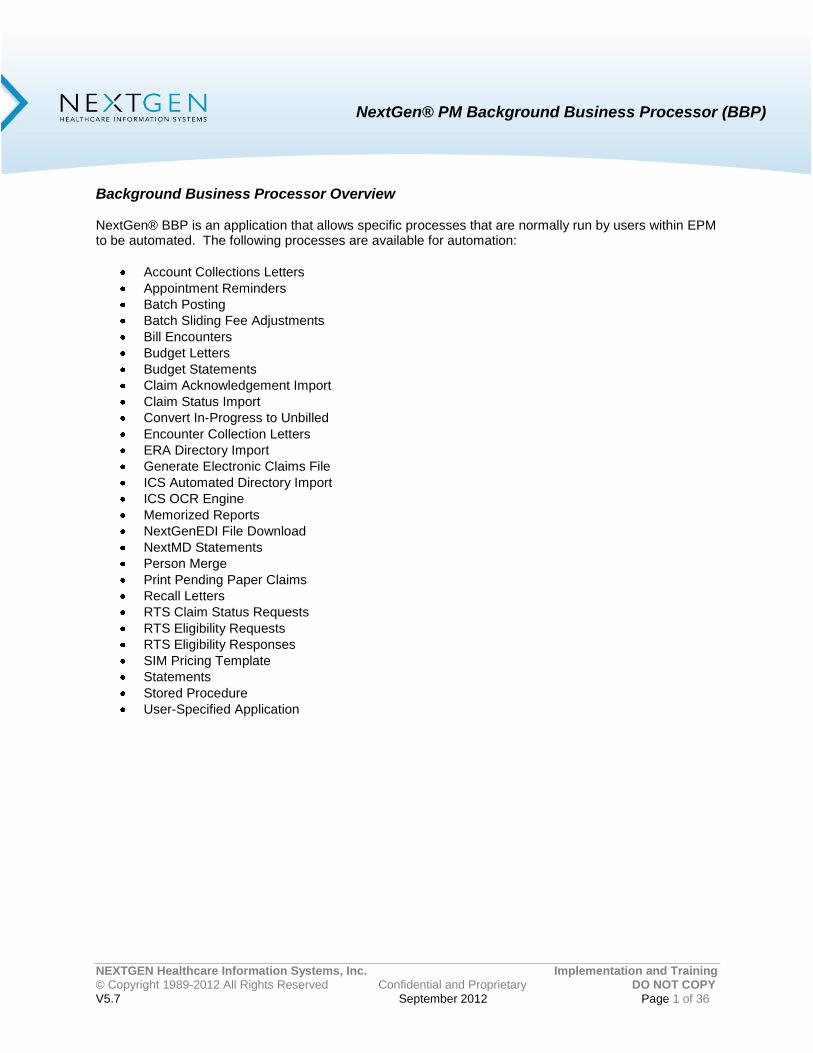
Background Business Processor Overview NextGen® BBP is an application that allows specific processes that are normally run by users within EPM to be automated. The following processes are available for automation:
Account Collections Letters
Appointment Reminders
Batch Posting
Batch Sliding Fee Adjustments
Bill Encounters
Budget Letters
Budget Statements
Claim Acknowledgement Import
Claim Status Import
Convert In-Progress to Unbilled
Encounter Collection Letters
ERA Directory Import
Generate Electronic Claims File
ICS Automated Directory Import
ICS OCR Engine
Memorized Reports
NextGenEDI File Download
NextMD Statements
Person Merge
Print Pending Paper Claims
Recall Letters
RTS Claim Status Requests
RTS Eligibility Requests
RTS Eligibility Responses
SIM Pricing Template
Statements
Stored Procedure
User-Specified Application

NextGen® PM Background Business Processor (BBP)
NEXTGEN Healthcare Information Systems, Inc. Implementation and Training © Copyright 1989-2012 All Rights Reserved Confidential and Proprietary DO NOT COPY
V5.7 September 2012 Page 2 of 36
Microsoft .NET Framework 2.0 Verify that Microsoft .NET Framework v2.0 (or higher) has been installed on the server/computer that will be used to run BBP packages/jobs.
Windows XP: Go to Start Control Panel Add or Remove Programs
Windows 7: Go to Start Control Panel Programs Programs and Features Verify that Microsoft .NET Framework 2.0 (or higher) is listed. If not listed, it can be downloaded and installed from the following URL:
http://www.microsoft.com/downloads/details.aspx?FamilyID=262d25e3-f589-4842-8157-034d1e7cf3a3&displaylang=en
BBP Engine Service
The BBP Engine Service is a Windows service that runs automatically in the background on the computer on which it is installed. This service queries once per minute for BBP packages that are scheduled to run on the computer. The computer running the BBP Engine Service must stay on 24 hours/day or at least during all times packages are scheduled to run.
NOTE: BBP Engine Service cannot be installed on a Terminal Server (thin client) workstation. It must be installed on a server or on a fat client workstation.
Install BBP Engine Service:
1. Login to the Background Business Processor application from the NextGen® Application Launcher window.
2. From the Engine menu, select the Install BBP Engine Service on <Domain\Server> menu option.

NextGen® PM Background Business Processor (BBP)
NEXTGEN Healthcare Information Systems, Inc. Implementation and Training © Copyright 1989-2012 All Rights Reserved Confidential and Proprietary DO NOT COPY
V5.7 September 2012 Page 3 of 36
3. Enter the following in the Service Account Information window:
Domain: <displayed>
Server: <displayed>
User Name: Windows/Network User Name for the displayed Domain\Server
Password: Windows/Network Password for the displayed Domain\Server
Confirm Password: Re-enter Windows/Network Password
Service Start Type: Select Automatic to ensure BBP Engine Service restarts automatically if the computer is shut down or rebooted
NOTES: o The server name displayed is for the workstation on which the BBP application was
launched. o Any workstation that has the BBP Engine Service installed is considered to be a
server even though technically, it is not. o The user’s Windows/network password is stored with the NextGen BBP Engine Service
within Windows.
4. Click OK to start the install.

NextGen® PM Background Business Processor (BBP)
NEXTGEN Healthcare Information Systems, Inc. Implementation and Training © Copyright 1989-2012 All Rights Reserved Confidential and Proprietary DO NOT COPY
V5.7 September 2012 Page 4 of 36
5. Once complete, the following message displays.
6. Click OK.
7. The status bar indicates BBP Engine is running on this machine and the server/workstation is displayed on the Server List tab.

NextGen® PM Background Business Processor (BBP)
NEXTGEN Healthcare Information Systems, Inc. Implementation and Training © Copyright 1989-2012 All Rights Reserved Confidential and Proprietary DO NOT COPY
V5.7 September 2012 Page 5 of 36
Servers Menu The following options are available from the Servers menu:
Open: Displays the Server Properties window for the selected server/workstation.
Make Available: The selected server/workstation becomes available for running BBP packages/jobs.
Make Unavailable: The selected server/workstation becomes unavailable for running BBP packages/jobs.
Delete: The selected server/workstation is deleted from BBP.

NextGen® PM Background Business Processor (BBP)
NEXTGEN Healthcare Information Systems, Inc. Implementation and Training © Copyright 1989-2012 All Rights Reserved Confidential and Proprietary DO NOT COPY
V5.7 September 2012 Page 6 of 36
Engine Menu The following options are available from the Engine menu:
Uninstall BBP Engine Service on <Domain\Server>: Select this option to uninstall the BBP Engine Service from the current server/workstation.
Start/Continue: If BBP Engine Service had been previously stopped or paused on the current server/workstation, select this option to start the engine service. Light = Green
Start/Continue (debug mode): If BBP Engine Service had been previously stopped or paused on the current server/workstation, select this option to start the engine service in “debug mode”. Light = Green
NOTE: This option should be selected only if instructed to do so by NextGen Support.
Pause: Select this option to pause the BBP Engine Service on the current server/workstation. Light = Yellow
Stop: Select this option to stop the BBP Engine Service on the current server/workstation. Light = Red
Restart: If BBP Engine Service had been previously paused on the current server/workstation, select this option to stop and then start the engine service. Light = Yellow Red Green
Restart (debug mode): If BBP Engine Service had been previously paused on the current server/workstation, select this option to stop and then start the engine service in “debug mode”. Light = Yellow Red Green
NOTE: This option should be selected only if instructed to do so by NextGen Support.

NextGen® PM Background Business Processor (BBP)
NEXTGEN Healthcare Information Systems, Inc. Implementation and Training © Copyright 1989-2012 All Rights Reserved Confidential and Proprietary DO NOT COPY
V5.7 September 2012 Page 7 of 36
Windows/Network Password Changes
If the user’s password for the server/workstation (<Domain\Server>) is changed, the password must also be changed for the NextGen BBP Engine Service in Windows. Otherwise, BBP will not run on that server/workstation. Change Password for BBP Engine Service:
1. Window XP: Go to Start Control Panel Administrative Tools Services NextGen BBP Engine Service Log On tab.
Window 7: Go to Start Control Panel System and Security Administrative Tools Services NextGen BBP Engine Service Log On tab.
2. Enter the new password in the Password and Confirm Password fields.
3. Click the Apply button.
NextGen® PM Background Business Processor (BBP)
NEXTGEN Healthcare Information Systems, Inc. Implementation and Training © Copyright 1989-2012 All Rights Reserved Confidential and Proprietary DO NOT COPY
V5.7 September 2012 Page 8 of 36
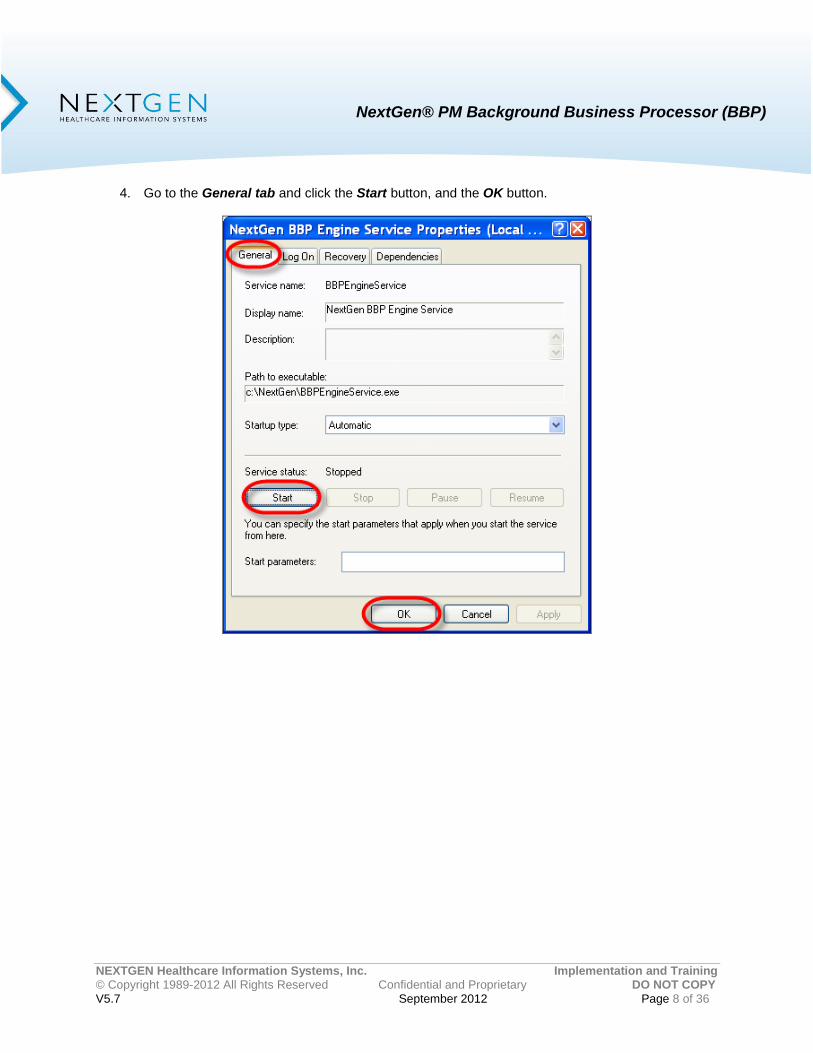
4. Go to the General tab and click the Start button, and the OK button.

NextGen® PM Background Business Processor (BBP)
NEXTGEN Healthcare Information Systems, Inc. Implementation and Training © Copyright 1989-2012 All Rights Reserved Confidential and Proprietary DO NOT COPY
V5.7 September 2012 Page 9 of 36
BBP Preferences The settings made in BBP Preferences will affect all practices. Select the File > Preferences menu option.
The BBP System Preferences window displays.

NextGen® PM Background Business Processor (BBP)
NEXTGEN Healthcare Information Systems, Inc. Implementation and Training © Copyright 1989-2012 All Rights Reserved Confidential and Proprietary DO NOT COPY
V5.7 September 2012 Page 10 of 36
Excel Export Process: Select one of the following:
Use standard Excel process (most common) This is the default and recommended setting.
Create locally, copy to destination (rarely used) This setting should be selected only when BBP is unable to export Excel files to a network location. Click on the information button for more details.
Default Values for Job Settings Printer: Select a printer to which the BBP Engine Service user has access. The selected printer will default to all jobs created within a package. The default printer can be changed if needed when a job is created.
Click the Ellipsis button to select a default printer
Click the Delete button to delete the displayed default printer
NOTE: Do not select a printer that is part of a Terminal Server (thin client) session. File Export Location: Select an export location for reports and files created through BBP. The selected export location will default to all jobs created within a package. The default location can be changed if needed when a job is created.
Click the Ellipsis button to select a default export location
Click the Delete button to delete the displayed default export location Export Overwrite Option: Select one of the following:
Use the specified file name (and overwrite the file if it exists) Select this option if a new Excel file created by a BBP job should overwrite an existing Excel file previously created by the same job.
Add a timestamp to the file name (filename_yyyymmddhhmmss.ext) Select this option if a new Excel file created by a BBP job should not overwrite an existing Excel file previously created by the same job, but should create an additional file with a date/time stamp in the file name. This is the recommended setting.

NextGen® PM Background Business Processor (BBP)
NEXTGEN Healthcare Information Systems, Inc. Implementation and Training © Copyright 1989-2012 All Rights Reserved Confidential and Proprietary DO NOT COPY
V5.7 September 2012 Page 11 of 36
‘Run Using’ Setting: Select one of the following. The selection will default to all Memorized Reports jobs created within a BBP package. The default can be changed if needed when a job is created.
EPM/EHR Select this option if most Memorized Reports jobs in BBP will be run from the NextGen® EPM/EHR database server on the network.
Reports Server Select this option if most Memorized Reports jobs in BBP will be run from the Reports Server on the network.
Database Blackout Periods for <Database> This section defines the days and times that BBP will run.
To select blackout days/times: Highlight a green section of the grid and click the Selected Hours button under the Set Blackout For heading. The selected section now displays in red.
To clear blackout days/times: Highlight a red section of the grid and click Selected Hours button under the Clear Blackout For heading. The selected section now displays in green.
NOTES: o If a BBP package is scheduled to run during the blackout period, the package will not run. o In the example below, BBP will not run Monday through Friday from 8:00AM until 6:00PM.

NextGen® PM Background Business Processor (BBP)
NEXTGEN Healthcare Information Systems, Inc. Implementation and Training © Copyright 1989-2012 All Rights Reserved Confidential and Proprietary DO NOT COPY
V5.7 September 2012 Page 12 of 36
If the current system date/time falls within the defined blackout days/times, an In Blackout Period indicator displays at the bottom of the screen.
Package Queue Setting Set the number of minutes a Queued Package should wait on a currently running Package on the same Server:
Minutes: Select the number of minutes a queued package should wait before starting, for another package to complete that is currently running on the same server.

NextGen® PM Background Business Processor (BBP)
NEXTGEN Healthcare Information Systems, Inc. Implementation and Training © Copyright 1989-2012 All Rights Reserved Confidential and Proprietary DO NOT COPY
V5.7 September 2012 Page 13 of 36
File Menu The following other options are available from the File menu:
Refresh: Select this option to refresh the information displayed on the Package List, History List and Server List tabs. This can also be done by pressing the F5 key on the keyboard or by selecting an option from the Refresh List field in the lower left-hand corner of the window.

NextGen® PM Background Business Processor (BBP)
NEXTGEN Healthcare Information Systems, Inc. Implementation and Training © Copyright 1989-2012 All Rights Reserved Confidential and Proprietary DO NOT COPY
V5.7 September 2012 Page 14 of 36
Change Practice: Select this option to access BBP within another enterprise/practice.
E-mail Settings: The following information is required if e-mail notifications are to be sent to one or more users upon the completion of BBP packages.
Notification ‘From’ Address: E-mail notifications upon package completion will come from this address. This can be a dummy e-mail address such as [email protected].
Default Notification ‘To’ Address(es):
E-mail notifications upon package completion will be sent to one or more e-mail addresses defined here. The defined e-mail addresses will default to all packages created. The default addresses can be changed if needed when a package is created.

NextGen® PM Background Business Processor (BBP)
NEXTGEN Healthcare Information Systems, Inc. Implementation and Training © Copyright 1989-2012 All Rights Reserved Confidential and Proprietary DO NOT COPY
V5.7 September 2012 Page 15 of 36
SMTP Server Name: Enter the name of the internal e-mail server on the client’s local network. OR
Enter the name of the external Internet Service Provider’s (ISP) e-mail server. The name or address can be obtained by contacting the ISP directly or possibly by browsing the ISP’s Help pages. Example: smtp.comcast.net
SMTP Authentication Type: Select one of the following:
o Anonymous Authentication:
Select this option if e-mail service is hosted internally and the e-mail server is part of the client’s local network.
o Basic Authentication:
Select this option if e-mail service is hosted externally and the e-mail server is not part of the client’s local network. For example, e-mail service is provided by an Internet Service Provider (ISP) such as Comcast or Verizon.
User name:
Enter a valid ISP username. Example: [email protected]
Password: Enter a valid password for the ISP username entered above.
Test E-mail button: Click this button to verify the setup of the BBP E-mail Settings. A test e-mail will be sent to the defined e-mail addresses.
Log All SQL: Select this option to write all executed SQL statements to the AllSQL.txt file in the main NextGen folder on the computer where the BBP Engine Service runs. This can be useful when troubleshooting issues related to the BBP application.
NOTE: This option should be selected only if instructed to do so by NextGen Support. The log can be viewed by clicking on the Help > About Background Business Processor menu option and then click the All SQL Log link.
Exit: Select this option to close and exit the BBP application.
NextGen® PM Background Business Processor (BBP)
NEXTGEN Healthcare Information Systems, Inc. Implementation and Training © Copyright 1989-2012 All Rights Reserved Confidential and Proprietary DO NOT COPY
V5.7 September 2012 Page 16 of 36
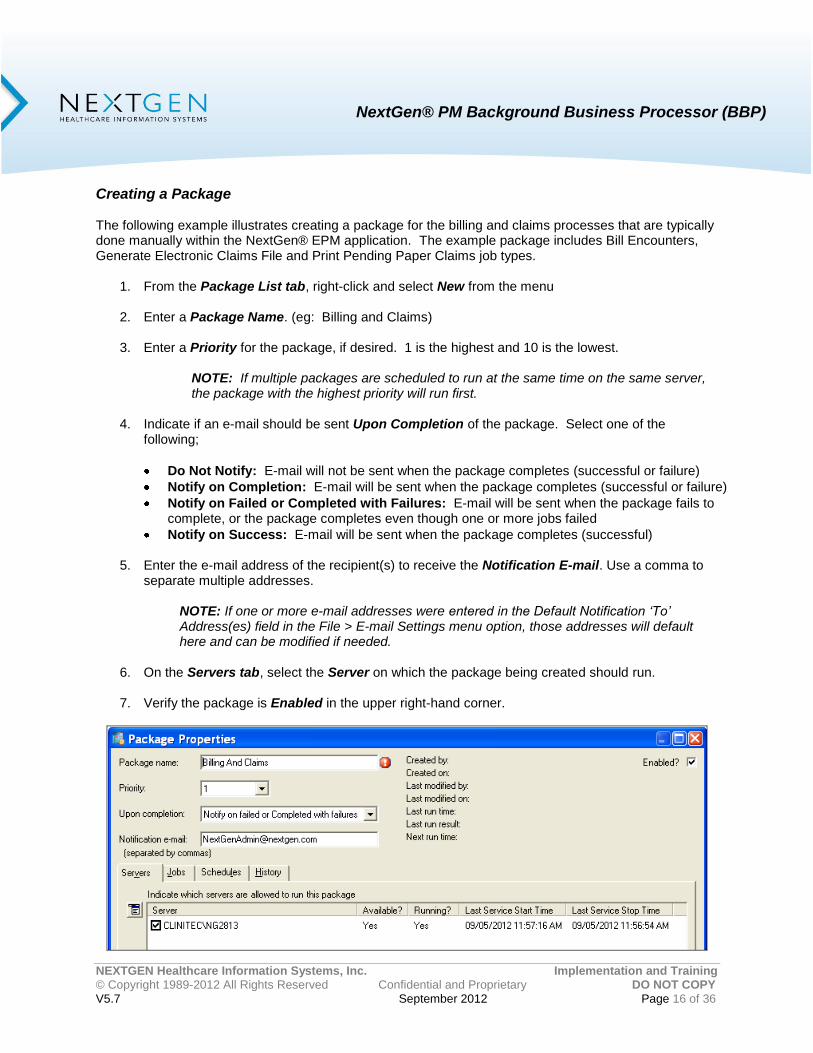
Creating a Package The following example illustrates creating a package for the billing and claims processes that are typically done manually within the NextGen® EPM application. The example package includes Bill Encounters, Generate Electronic Claims File and Print Pending Paper Claims job types.
1. From the Package List tab, right-click and select New from the menu 2. Enter a Package Name. (eg: Billing and Claims)
3. Enter a Priority for the package, if desired. 1 is the highest and 10 is the lowest.
NOTE: If multiple packages are scheduled to run at the same time on the same server, the package with the highest priority will run first.
4. Indicate if an e-mail should be sent Upon Completion of the package. Select one of the
following;
Do Not Notify: E-mail will not be sent when the package completes (successful or failure)
Notify on Completion: E-mail will be sent when the package completes (successful or failure)
Notify on Failed or Completed with Failures: E-mail will be sent when the package fails to complete, or the package completes even though one or more jobs failed
Notify on Success: E-mail will be sent when the package completes (successful)
5. Enter the e-mail address of the recipient(s) to receive the Notification E-mail. Use a comma to separate multiple addresses.
NOTE: If one or more e-mail addresses were entered in the Default Notification ‘To’ Address(es) field in the File > E-mail Settings menu option, those addresses will default here and can be modified if needed.
6. On the Servers tab, select the Server on which the package being created should run.
7. Verify the package is Enabled in the upper right-hand corner.
NextGen® PM Background Business Processor (BBP)
NEXTGEN Healthcare Information Systems, Inc. Implementation and Training © Copyright 1989-2012 All Rights Reserved Confidential and Proprietary DO NOT COPY
V5.7 September 2012 Page 17 of 36
Creating Jobs within a Package
1. From the Jobs tab, click the Open Menu button and select New
2. Enter a Job Name (e.g.: Bill Encounters)
3. Select one of the following Job Types:
Account Collections Letters
Appointment Reminders
Batch Posting
Batch Sliding Fee Adjustments
Bill Encounters
Budget Letters
Budget Statements
Claim Acknowledgement Import
Claim Status Import
Convert ‘In-Progress’ to Unbilled
Encounter Collection Letters
ERA Directory Import
Generate Electronic Claims File
ICS Automated Directory Import
ICS OCR Engine
Memorized Reports
NextGenEDI File Download
NextMD Statements
Person Merge
Print Pending Paper Claims
Recall Letters
RTS Claim Status Requests
RTS Eligibility Requests
RTS Eligibility Responses
SIM Pricing Template
Statements
Stored Procedure
User-Specified Application
4. Select a practice in the Run as Practice field. The practice in which the user is currently logged in will default. Because practice specific Settings can be defined for the job, only one practice can be selected at a time.
5. Select the desired On Success/Failure Flow options. In this “Billing Process” example, if the Bill
Encounters job succeeds, then the package should “Go to the next job”. If the Bill Encounters job fails, then the package should “Quit package as failure”.

NextGen® PM Background Business Processor (BBP)
NEXTGEN Healthcare Information Systems, Inc. Implementation and Training © Copyright 1989-2012 All Rights Reserved Confidential and Proprietary DO NOT COPY
V5.7 September 2012 Page 18 of 36
6. On the Settings tab, select the desired Values for each of the Setting Names. The names and values displayed will vary based on the Job Type selected above. To enter values, click in the Value field to the right of the Setting Name and use the Ellipsis button to select the desired option(s).
7. Make sure the job is Enabled in the upper right-hand corner.
8. Click the OK Button.
9. Repeat steps 1 – 8 until all jobs needed within the package have been created.

NextGen® PM Background Business Processor (BBP)
NEXTGEN Healthcare Information Systems, Inc. Implementation and Training © Copyright 1989-2012 All Rights Reserved Confidential and Proprietary DO NOT COPY
V5.7 September 2012 Page 19 of 36
Job Notes:
Jobs can be re-ordered within a package by use of the blue up/down arrows.
Most job types can include only a single practice. Multiple jobs can be created within the package to include each practice. Jobs can be copied to facilitate this.
Budget Statements, Generate Electronic Claims File, NextMD Statements, Print Pending Paper Claims, and Statements job types can include multiple practices. Practices can be added or removed on the Practices tab within the job setup.
If multiple clearinghouses (Submitter Profiles) are used and/or multiple claim form types are to be printed, additional jobs must be set up within the package.

NextGen® PM Background Business Processor (BBP)
NEXTGEN Healthcare Information Systems, Inc. Implementation and Training © Copyright 1989-2012 All Rights Reserved Confidential and Proprietary DO NOT COPY
V5.7 September 2012 Page 20 of 36
Creating the Schedule for a Package
1. From the Schedules tab, click the Open Menu button and select New
2. Enter a Schedule Name. (e.g.: Billing and Claims Schedule)
3. Select one of the following as the Schedule Type:
One-time: To run the package only once on the specified Date/Time.
Occurs every nn day(s) / week(s) / month(s): To run the package on a recurring basis. Examples:
o Every 2 days o Every 3 weeks on Friday o Every 4 months on the 15
th
o Every 5 months on the 2nd
Monday
4. Specify whether or not the package should Run on Holidays? Holidays are defined in Practice Preferences > Holidays tab.
5. Select one of the following for On the Days this Schedule Occurs:
Run at this Specific Time
Run every nn minutes/hours between 12:00AM and 11:59PM
6. Select a Recurring Schedule Active Period, if desired. This allows a recurring schedule to start and end on the specified dates.
7. Make sure the schedule is Enabled in the upper right-hand corner.
8. Click the OK button.
NextGen® PM Background Business Processor (BBP)
NEXTGEN Healthcare Information Systems, Inc. Implementation and Training © Copyright 1989-2012 All Rights Reserved Confidential and Proprietary DO NOT COPY
V5.7 September 2012 Page 21 of 36
Working with Packages / Jobs / Schedules Modify:
A package / job / schedule can be modified by opening it with right-click > Open from the menu. Once opened, modify as needed. Click OK to save the changes.
Copy:
A package / job / schedule can be copied by right-click > Copy from the menu. Once copied, rename and modify as needed. Click OK to save the changes.
Delete:
A package / job / schedule can be deleted by right-click > Delete from the menu. Enable/Disable:
A package / job / schedule can be Enabled or Disabled by right-click > select the desired option from the menu. Or by opening the package / job / schedule and selecting/deselecting the “Enabled?” checkbox.
Queue Now:
An entire package, including all jobs, can be queued to run immediately by right-click > Queue Now from the menu. A partial package, including specific jobs only, can be queued to run immediately by selecting the Run Once check-box for the desired jobs first, then right-click > Queue Now from the menu.
Kill: A package that is currently running can be stopped by right-click > Kill from the menu.
History:
History for all packages and jobs can be viewed on the History List tab. History for an individual package can be viewed by opening the package and clicking on the History tab.
Duplicate Run Dates:
Duplicate run dates can be viewed on the Schedules tab within a package by entering a selection in the “Show duplicate run dates within the next nn days” field. This will identify if the package is scheduled to run more than once on the same date. Click on Show to display duplicate run dates. Click on Hide to hide the duplicate run dates.
Export File Names: The name for an exported file can be customized using a File Name Token Reference appended to the end of the file name. Examples can be viewed by selecting the Help > “File Name Token Reference” menu option.

NextGen® PM Background Business Processor (BBP)
NEXTGEN Healthcare Information Systems, Inc. Implementation and Training © Copyright 1989-2012 All Rights Reserved Confidential and Proprietary DO NOT COPY
V5.7 September 2012 Page 22 of 36
Job Type Notes Account Collection Letters:
This job type replaces the manual process of printing letters from the File > Print Forms > Letters > Account Collection Letters menu in EPM.
Only one practice can be included in a single job. Additional jobs can be created within the same package to accommodate multiple practices.
Only one letter can be included in a single job. Additional jobs can be created within the same package to accommodate multiple letters.
Job Properties include: o Collection Letter Action: Letters can be printed or exported. Letter export files can be e-
mailed. o Update “Collection Letter Sent” Date?: Determines whether or not the Last Letter Print Date
on the Account Profile > Properties tab is updated. o Upload Export File to NextGenEDI: Determines whether or not the letter export file is
automatically sent to NextGenEDI for processing. Appointment Reminders:
This job type replaces the manual process of printing letters from the File > Print Forms > Letters > Appointment Reminders menu in EPM.
Only one practice can be included in a single job. Additional jobs can be created within the same package to accommodate multiple practices.
Only one letter can be included in a single job. Additional jobs can be created within the same package to accommodate multiple letters.
Job Properties include: o The same options available from the Appointment Reminders window in EPM. o Appointment Reminder Action: Letters can be printed or exported. Letter export files can be
e-mailed. o Update “Last Reminder Printed” Date?: Determines whether or not the Last Letter Date on
the Chart > Patient Information tab > Chart Details sub-tab is updated. o Upload Export File to NextGenEDI: Determines whether or not the letter export file is
automatically sent to NextGenEDI for processing. Batch Posting:
This job type replaces the manual process of posting transaction batches from the Posting icon in EPM.
The BBP Batch check-box must be selected on the Batch Maintenance/Header window when the batch is created in EPM.
The batch must be balanced in EPM.
Only one practice can be included in a single job. Additional jobs can be created within the same package to accommodate multiple practices.
Job Properties include: o Batch Posting Report: Can be printed and/or exported. The exported report can be e-
mailed.

NextGen® PM Background Business Processor (BBP)
NEXTGEN Healthcare Information Systems, Inc. Implementation and Training © Copyright 1989-2012 All Rights Reserved Confidential and Proprietary DO NOT COPY
V5.7 September 2012 Page 23 of 36
Job Type Notes (continued) Batch Sliding Fee Adjustments
This job type replaces the manual process of applying sliding fee adjustments to encounters in batch mode from the File > Process > Sliding Fee Batch Adjustment menu in EPM.
Only one practice can be included in a single job. Additional jobs can be created within the same package to accommodate multiple practices.
Job Properties include: o The same options available from the Sliding Fee Batch Adjustment window in EPM. o Batch Posting Report: Can be printed and/or exported. The exported report can be e-
mailed. Bill Encounters:
This job type replaces the manual process of billing encounters from the Encounter icon in EPM.
Only one practice can be included in a single job. Additional jobs can be created within the same package to accommodate multiple practices.
Job Properties include: o The same options available from the Encounter Lookup window in EPM. o Itemized Bills: Can be printed. o Claim Production Status Report: Can be printed and/or exported. The exported report can
be e-mailed. Budget Letters:
This job type replaces the manual process of printing letters from the File > Print Forms > Letters > Budget Letters menu in EPM.
Only one practice can be included in a single job. Additional jobs can be created within the same package to accommodate multiple practices.
Job Properties include: o The same options available from the Budget Letters window in EPM. o Budget Letter Action: Letters can be printed or exported. Letter export files can be e-mailed. o Budget Letters Report: Can be printed and/or exported. The exported report can be e-
mailed. Budget Statements:
This job type replaces the manual process of printing statements from the File > Print Forms > Budget Statements menu in EPM.
Multiple practices can be included in a single job.
Job Properties include: o The same options available from the Budget Statement Generation window in EPM. o Statement Action: Statements can be printed or exported. Statement export files can be e-
mailed. o Statement Run Report: Can be printed and/or exported. The exported report can be e-
mailed.

NextGen® PM Background Business Processor (BBP)
NEXTGEN Healthcare Information Systems, Inc. Implementation and Training © Copyright 1989-2012 All Rights Reserved Confidential and Proprietary DO NOT COPY
V5.7 September 2012 Page 24 of 36
Job Type Notes (continued) Claim Acknowledgement Import:
This job type replaces the manual process of importing files from the File > Processes > Claim Acknowledgement Import menu in EPM.
Claim Acknowledgements are 997 transactions.
Some clearinghouses, not all, may send these transactions back as an initial response when electronic claims are received.
This job type can be used to import claim acknowledgement files into EPM after the client has downloaded them from the clearinghouse/payer and saved them to their network.
Job Properties include: o The same options available from the Import Claim Acknowledgement window in EPM. o Source Directory: The network folder to which the original file from the clearinghouse was
downloaded and saved. o Update Claim Request Acknowledgement Status?: Select “No” to import the file into EPM for
display purposes only. The file can be displayed from the Tasks > Lookup > Files menu option in EPM. Select “Yes” to import each claim acknowledgement to the corresponding claim request within each patient’s chart.
o Claim Acknowledgement Report: Can be printed and/or exported. The exported report can be e-mailed.
Claim Status Import:
This job type replaces the manual process of importing files from the File > Processes > Claim Status Import menu in EPM.
Claim Status Responses are 277u (unsolicited) transactions.
Some clearinghouses, not all, may send these transactions back as an initial response when electronic claims are received.
This job type can be used to import unsolicited claim status response files into EPM after the client has downloaded them from the clearinghouse/payer and saved them to their network.
Job Properties include: o The same options available from the Import Claim Status window in EPM. o Source Directory: The network folder to which the original file from the clearinghouse was
downloaded and saved. o Display Only: Select “Yes” to import the file into EPM for display purposes only. The file can
be displayed from the Tasks > Lookup > Files menu option in EPM. Select “No” to import each claim response to the corresponding claim request within each patient’s chart.
o Claim Status Report: Can be printed and/or exported. The exported report can be e-mailed.

NextGen® PM Background Business Processor (BBP)
NEXTGEN Healthcare Information Systems, Inc. Implementation and Training © Copyright 1989-2012 All Rights Reserved Confidential and Proprietary DO NOT COPY
V5.7 September 2012 Page 25 of 36
Job Type Notes (continued) Convert ‘In Progress’ to Unbilled:
‘In Progress’ billing is enabled in Practice Preferences > Encounters tab.
IMPORTANT NOTE: This option should not be enabled without fully understanding all functionality related to ‘In Progress’ encounters. Once enabled, it cannot be disabled.
This job type replaces the manual process of converting encounters from ‘In Progress’ status to ‘Unbilled’ status from the Encounter icon in EPM.
Only one practice can be included in a single job. Additional jobs can be created within the same package to accommodate multiple practices.
Job Properties include: o The same options available from the Encounter Lookup window in EPM. o Conversion Report: Can be printed and/or exported. The exported report can be e-mailed.
Encounter Collection Letters:
This job type replaces the manual process of printing letters from the File > Print Forms > Letters > Encounter Collection Letters menu in EPM.
Only one practice can be included in a single job. Additional jobs can be created within the same package to accommodate multiple practices.
Only one letter can be included in a single job. Additional jobs can be created within the same package to accommodate multiple letters.
Job Properties include: o Collection Letter Action: Letters can be printed or exported. Letter export files can be e-
mailed. o Update “Collection Letter Sent” Date?: Determines whether or not the Last Letter Date on
the Chart > Patient Information tab > Chart Details sub-tab is updated. o Upload Export File to NextGenEDI: Determines whether or not the letter export file is
automatically sent to NextGenEDI for processing. ERA Directory Import:
This job type replaces the manual process of importing 835 ERA files from the File > Process > ERA Posting menu in EPM.
This job type can be used to import ERA files into EPM after the client has downloaded them from the clearinghouse/payer and saved them to their network.
Only one practice can be included in a single job. Additional jobs can be created within the same package to accommodate multiple practices.
Job Properties include: o Source Directory: The network folder to which the original file from the clearinghouse/payer
was downloaded and saved. o Import Posting Report: Can be printed and/or exported. The exported report can be e-
mailed.

NextGen® PM Background Business Processor (BBP)
NEXTGEN Healthcare Information Systems, Inc. Implementation and Training © Copyright 1989-2012 All Rights Reserved Confidential and Proprietary DO NOT COPY
V5.7 September 2012 Page 26 of 36
Job Type Notes (continued) Generate Electronic Claims File:
This job type replaces the manual process of creating 837 electronic claim files from the EDI File icon in EPM.
This job type can be used to create 837 claim files to be sent to clearinghouses/payers after encounters have been billed and electronic claims have been created in EPM.
Multiple practices can be included in a single job.
Only one submitter profile can be included in a single job. Additional jobs can be created within the same package to accommodate multiple submitter profiles.
Only one claim form can be included in a single job (1500, UB92, ADA). Additional jobs can be created within the same package to accommodate multiple claim forms.
Job Properties include: o The same options available from the 837 Electronic File Creation window in EPM. o Electronic Send Report: Can be printed and/or exported. The exported report can be e-
mailed. ICS Automated Directory Import:
This job type replaces the manual process of importing files from the File > Processes > Auto Import menu in ICS.
NOTE: Training on BBP jobs related to ICS will be covered during a separate ICS training
session. ICS OCR Engine:
This job type replaces the manual process of processing documents in the OCR Engine from the File > Processes > OCR Engine menu in ICS.
NOTE: Training on BBP jobs related to ICS will be covered during a separate ICS training
session. Memorized Reports:
This job type replaces the manual process of running memorized reports from the Reports icon in EPM.
Only one practice can be included in a single job. Additional jobs can be created within the same package to accommodate multiple practices.
Only one report can be included in a single job. Additional jobs can be created within the same package to accommodate multiple reports.
Job Properties include: o The same reports available from the Reports icon in EPM. o Run Using: Reports can be run from the NextGen® EPM/EHR database server or from the
Reports Server. o Tasks can be created from a memorized report and assigned to the appropriate user(s) o Memorized Report: Can be printed and/or exported. The exported report can be e-mailed.

NextGen® PM Background Business Processor (BBP)
NEXTGEN Healthcare Information Systems, Inc. Implementation and Training © Copyright 1989-2012 All Rights Reserved Confidential and Proprietary DO NOT COPY
V5.7 September 2012 Page 27 of 36
Job Type Notes (continued) NextGen EDI File Download:
This job type replaces the manual process of downloading NextGenEDI files from the File > Process > Download NextGen EDI Files menu in EPM.
The following files can be downloaded from NextGen EDI: o Direct Deposit Files o Address Update Files o Statement Sample Files o Eligibility Files o Voice Reminder Sample Files o Statement/Letters process Confirmation Files o Statement/Letters Print Confirmation Files
Job Properties include: o Destination Directory: The network folder to which the file from NextGen EDI is to be
downloaded and saved. o Archive Files?: Select “Yes” to archive the file in EPM for display purposes. The file can be
displayed from the Tasks > Lookup > Files menu option in EPM. Select “No” to not archive the file in EPM.
NextMD Statements:
This job type is used in conjunction with the Payment Processing module within NextGen® Patient Portal (NextMD).
When patients that are enrolled in NextMD remit payments from the patient portal, this job type will send updated copies of statements back to the patient portal. The updated statement can then be viewed by the patient from the portal and it will reflect their recent payment.
Multiple practices can be included in a single job.
Job Properties include: o The same options available from the Statement Options window in EPM. o Statement Run Report: Can be printed and/or exported. The exported report can be e-
mailed.

NextGen® PM Background Business Processor (BBP)
NEXTGEN Healthcare Information Systems, Inc. Implementation and Training © Copyright 1989-2012 All Rights Reserved Confidential and Proprietary DO NOT COPY
V5.7 September 2012 Page 28 of 36
Job Type Notes (continued) Person Merge:
This job type replaces the manual process of merging duplicate person/patient records from the File > Process > Person Merge menu in EPM.
Only one practice can be included in a single job. Additional jobs cannot be created within the same package to accommodate multiple practices. A separate package must be created for each practice.
Required Steps: o Create a BBP package to include only the Person Merge job type. This job type creates a
"container" to hold person/patient merge pairs that are sent from EPM. No specific settings can be made for this job type.
o Run the File > Processes > Person Merge process in EPM. o Select one or more person/patient pairs to be merged and click the Send to BBP button. o Select the BBP package to which the person/patient pair should be sent and click OK.
Once person/patient pairs are sent to BBP, they will no longer be found in EPM from the Person Merge process.
A separate job is created within the package for each person/patient pair sent to BBP.
Each job name reflects the date/time and user that sent the person/patient pair to BBP.
Multiple merge jobs within the package can be reordered by use of the blue up/down arrows.
Individual merge jobs can be deleted from the package. Once deleted, the person/patient pair can again be found in EPM from the Person Merge process.
The “If job fails, then” option automatically defaults to “Go to the next job” for each person/pair in the package.
Person/patient pairs that fail to complete when the package is run can again be found in EPM from the Person Merge process.
Print Pending Paper Claims:
This job type replaces the manual process of printing paper claims from the Claims icon in EPM.
Multiple practices can be included in a single job.
Only one claim form can be included in a single job (ADA02/06, CMS1500, UB04, 1500, UB92, ADA). Additional jobs can be created within the same package to accommodate multiple claim forms.
Job Properties include: o The same options available from the Claim Request Lookup window in EPM. o Claim Print Action: Claims can be printed and/or exported. The exported claim file can be e-mailed.

NextGen® PM Background Business Processor (BBP)
NEXTGEN Healthcare Information Systems, Inc. Implementation and Training © Copyright 1989-2012 All Rights Reserved Confidential and Proprietary DO NOT COPY
V5.7 September 2012 Page 29 of 36
Job Type Notes (continued) Recall Letters:
This job type replaces the manual process of printing letters from the File > Print Forms > Letters > Recall Letters menu in EPM.
Only one practice can be included in a single job. Additional jobs can be created within the same package to accommodate multiple practices.
Only one letter can be included in a single job. Additional jobs can be created within the same package to accommodate multiple letters.
Job Properties include: o Recall Letter Action: Letters can be printed or exported. Letter export files can be e-mailed. o Update “Last Mailing” Date?: Determines whether or not the 1
st, 2
nd, 3
rd Mailing Date is
updated for each patient’s recall. o Upload Export File to NextGenEDI: Determines whether or not the letter export file is
automatically sent to NextGen EDI for processing. RTS Claim Status Requests:
This job type replaces the manual process of submitting RTS claim status requests from the Claims icon in EPM.
The manual process is done as follows: click the Claims icon > select Request Status = Archived > select additional search criteria as desired > click the Find button > select desired claims > right-click > Claim Status Request.
Only one practice can be included in a single job. Additional jobs can be created within the same package to accommodate multiple practices.
Job Properties include: o The same options available from the Claim Request Lookup window in EPM. o Claim Status Report: Can be printed and/or exported. The exported report can be e-mailed.
RTS Eligibility Requests:
This job type replaces the manual process of submitting RTS eligibility requests from the Appt List icon in EPM.
The manual process is done as follows: click the Appt List icon > select Status = Expected > select additional search criteria as desired > click the Find button > select desired appointments > right-click > Eligibility Inquiry.
Only one practice can be included in a single job. Additional jobs can be created within the same package to accommodate multiple practices.
Job Properties include: o Future Appointment Date, Financial Class, and Service Location o Eligibility Request Report: Can be printed and/or exported. The exported report can be e-
mailed.

NextGen® PM Background Business Processor (BBP)
NEXTGEN Healthcare Information Systems, Inc. Implementation and Training © Copyright 1989-2012 All Rights Reserved Confidential and Proprietary DO NOT COPY
V5.7 September 2012 Page 30 of 36
Job Type Notes (continued) RTS Eligibility Responses:
This job type will print/export an Eligibility Response Report that is received after RTS eligibility requests are submitted.
Only one practice can be included. Multiple practices can be accommodated by creating multiple jobs within the package, one for each practice.
Job Properties include: o Eligibility Response Report: Can be printed and/or exported. The exported report can be e-
mailed. SIM Pricing Template:
‘Advanced Service Item Library Mode’ is enabled in Enterprise Preferences > Libraries tab.
IMPORTANT NOTE: This option should not be enabled without fully understanding all functionality related to Advanced SIM Library Mode. Once enabled, it cannot be disabled.
This job type replaces the manual process of reporting and/or launching SIM library price updates from File Maintenance > Libraries > SIM Pricing Templates.
Job Properties include: o SIM Library Update Report: Can be printed and/or exported for the selected SIM Pricing
Templates. The exported report can be e-mailed. o SIM Pricing Templates: One or more SIM Pricing Templates can be selected. The pricing
configuration(s) created within each template can update the corresponding SIM Libraries. Statements:
This job type replaces the manual process of generating statements from the File > Print Forms > Statements menu in EPM.
Multiple practices can be included in a single job.
Job Properties include: o The same options available from the Statement Options window in EPM. o Statements: Can be printed and/or exported. The exported statement file can be e-mailed. o Statement Run Report: Can be printed and/or exported. The exported report can be e-
mailed. o Statement Exception Report: Can be printed and/or exported. The exported report can be e-
mailed. o Statement Late Fee Report: Can be printed and/or exported. The exported report can be e-
mailed.

NextGen® PM Background Business Processor (BBP)
NEXTGEN Healthcare Information Systems, Inc. Implementation and Training © Copyright 1989-2012 All Rights Reserved Confidential and Proprietary DO NOT COPY
V5.7 September 2012 Page 31 of 36
Job Type Notes (continued) Stored Procedure:
NOTE: This job type requires high level technical skills.
A Stored Procedure is a custom program that can be run to perform a task that is otherwise not available within the standard EPM functionality.
o Example: NextGen provides a stored procedure for clients in California where a Provider Public Partners (PPP) relationship exists between Community Health Providers and the Los Angeles County Department of Health to provide outpatient services to low income, uninsured children and adults. The stored procedure takes the Language, Ethnicity and Homeless Status information from patient demographics and converts it to a specific format required on electronic claims filed to a PPP payer. The stored procedure would be scheduled to run prior to billing and creating claims for PPP payers.
Only one practice can be included in a single job. Additional jobs can be created within the same package to accommodate multiple practices.
Only one stored procedure can be included in a single job. Additional jobs can be created within the same package to accommodate multiple stored procedures.
Job Properties include: o Stored Procedure Name: Free text entry (e.g.: “NYHCRA Surcharge”) o Stored Procedure Parameters: Entered by parameter name and parameter value.
User-Specified Application:
NOTE: This job type requires high level technical skills.
This job type has three intended uses: o To facilitate the starting/stopping of Windows services. o To allow batch files to be run such as automatic batch file transfers via FTP. o To allow NextGen to write applications which incorporate some of the BBP functionality to
make "smarter" applications that could be launched by the BBP.
Only one practice can be included in a single job. Additional jobs can be created within the same package to accommodate multiple practices.
Only one user-specified application can be included in a single job. Additional jobs can be created within the same package to accommodate multiple applications.
Job Properties include: o User Specified Application: Enter the path name for the application to be run.
Example: C:\temp\xxx.bat o Command Line Arguments: Enter any command line arguments that are to be applied to the
application. Command line arguments are parameters that control how the application executes.
o Use Database for Exit Code: Determines whether or not the application writes an exit code to the NextGen database to indicate that it ran successfully. NOTE: This should be set to “No” unless the specified application has been customized with NextGen’s assistance.

NextGen® PM Background Business Processor (BBP)
NEXTGEN Healthcare Information Systems, Inc. Implementation and Training © Copyright 1989-2012 All Rights Reserved Confidential and Proprietary DO NOT COPY
V5.7 September 2012 Page 32 of 36
Troubleshooting Notes Error Logs:
Job success is logged on the History tab within a package.
Job failure (with error number and message) is logged on the History tab within a package.
Database errors are written to the NextGen ODBCError.log file.
BBP Engine Service informational messages and errors are written to the Windows Event Log o Windows Event Log can be viewed as follows:
Start Control Panel Administrative Tools Event Viewer Application Look for entries with a Source of NextGen.BBP.Engine or BBPEngineService.
Debug Mode:
BBP Engine Service can be run in Debug Mode by selecting the Engine > Start/Continue (debug mode) menu option or the Engine > Restart (debug mode) menu option.
A job within a package can also be run in Debug Mode by selecting the Run this job in debug mode (EPM related jobs only) checkbox found in the lower left hand corner of the Job Properties window.
Running Debug Mode will cause debug messages related to BBP to be written to the NextGenDebugLog.txt file in the main NextGen folder on the machine where the BBP Engine Service resides.
Debug messages contain information regarding the execution path within NextGen® EPM. These messages may be helpful to Support in diagnosing a problem related to BBP.
The debug log can be viewed from the Help > About BBP menu option > Debug Log link.
All SQL Log:
The All SQL Log is activated by selecting File > Log All SQL menu within BBP.
A job within a package can also be run with All SQL Logging by selecting the Run all SQL for this job (EPM related jobs only) checkbox in the lower left hand corner of the Job Properties window. This logs all SQL for the job spawned by the BBP Engine Service.
EPM will write all executed SQL statements related to BBP to the AllSQL.log file in the main NextGen folder on the machine where the BBP Engine Service resides.
SQL statements may be helpful to Support in diagnosing a problem related to BBP.
The All SQL Log can be viewed from the Help > About BBP menu option > All SQL Log link.
NextGen® PM Background Business Processor (BBP)
NEXTGEN Healthcare Information Systems, Inc. Implementation and Training © Copyright 1989-2012 All Rights Reserved Confidential and Proprietary DO NOT COPY
V5.7 September 2012 Page 33 of 36
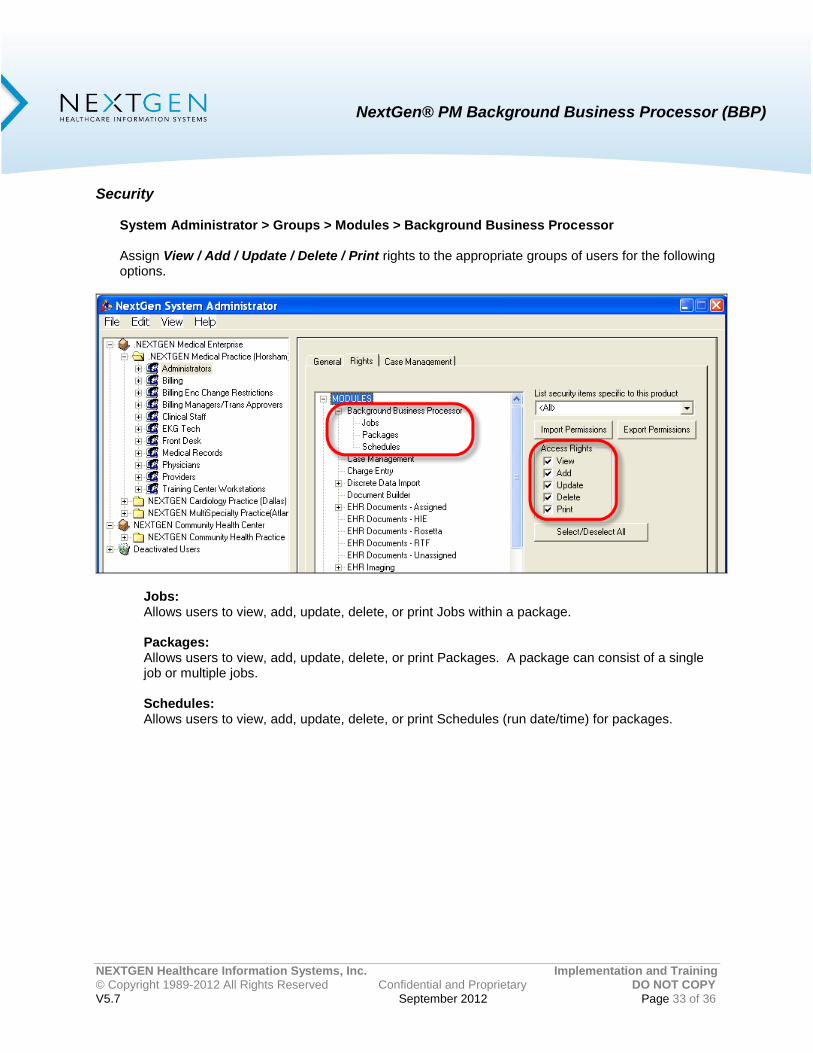
Security
System Administrator > Groups > Modules > Background Business Processor
Assign View / Add / Update / Delete / Print rights to the appropriate groups of users for the following options.
Jobs: Allows users to view, add, update, delete, or print Jobs within a package. Packages: Allows users to view, add, update, delete, or print Packages. A package can consist of a single job or multiple jobs. Schedules: Allows users to view, add, update, delete, or print Schedules (run date/time) for packages.

NextGen® PM Background Business Processor (BBP)
NEXTGEN Healthcare Information Systems, Inc. Implementation and Training © Copyright 1989-2012 All Rights Reserved Confidential and Proprietary DO NOT COPY
V5.7 September 2012 Page 34 of 36
System Administrator > Group Rights > Operations Assign Yes / No rights to the appropriate groups of users for the following options.
Background Business Processor: Change Preferences: Allows users to modify the BBP preferences settings from the File > Preferences menu option Change Server Availability: Allows users to make BBP servers available/unavailable from the Server List tab Delete Package History:
Allows users to delete history information for BBP packages from the History List tab or from the History tab within a package. Package history information includes Job Name, Job Number, Last Run Date/Time, Result, and Run Duration.
Install BBP Engine Service: Allows users to install/uninstall BBP Engine Service from the Engine menu Kill Running Package:
Allows users to kill (stop) a package that is currently running from the Packages menu or from the Package List tab

NextGen® PM Background Business Processor (BBP)
NEXTGEN Healthcare Information Systems, Inc. Implementation and Training © Copyright 1989-2012 All Rights Reserved Confidential and Proprietary DO NOT COPY
V5.7 September 2012 Page 35 of 36
System Administrator > Group Rights > Operations (continued)
Launch the BBP Manager: Allows users to open the BBP application from the NextGen® Application Launcher window
NOTE: This does not control the display of the BBP icon on the Application Launcher but only the ability to open it.
Queue Package: Allows users to queue a package to run immediately from the Packages menu or from the Package List tab
Run Stored Procedures:
Allows users to create and modify packages that include the Stored Procedure job type Run User-Specified Applications:
Allows users to create and modify packages that include the User-Specified Application job type Start/Stop BBP Engine Service:
Allows users to start, pause, stop and restart BBP Engine Service from the Engine menu View Package History:
Allows users to view the history details for a package from the History List tab or from the History menu
View Packages for All Practices:
Allows users to view packages and package history for individual practices or for all practices from the main toolbar within BBP
Other Related Securities:
Assign Yes / No rights to the appropriate groups of users for the following options that are related to BBP Job Types.
BBP Job Type: System Admin > Group Rights > Operations:
Account Collection Letters Letters/Statements > Print Letters Appointment Reminders Letters/Statements > Print Letters
Bill Encounters Encounters > Demand Bill Budget Letters Letters/Statements > Print Letters Budget Statements Letters/Statements > Print Statements Encounter Collection Letters Letters/Statements > Print Letters Generate Electronic Claims File Claims > Electronic Claims Send
NextGen EDI File Download NextGen EDI > Download Available Files Person Merge Person Merge Print Pending Paper Claims Claims > Electronic Claims Printing Recall Letters Letters/Statements > Print Letters Memorized Reports Reports > Memorized Report Run Statements Letters/Statements > Print Statements

NextGen® PM Background Business Processor (BBP)
NEXTGEN Healthcare Information Systems, Inc. Implementation and Training © Copyright 1989-2012 All Rights Reserved Confidential and Proprietary DO NOT COPY
V5.7 September 2012 Page 36 of 36
System Administrator > User > App Launcher Application Access Assign access to BBP from the Application Launcher window for the appropriate users.
Related Documents