AVS for Winamp: Tutorial Written by Pierre Charpenay © 2004 [email protected] Version 2.0 SUMMARY Presentation.......................................................... 2 Warnings ........................................................... 2 The main window ................................................. 3 The editor ............................................................. 4 The popup menu of AVS.................................... 4 The editor window ............................................. 4 The list of the effects .......................................... 5 The menu bar ..................................................... 6 The buttons ........................................................ 8 First items of the effect menu................................ 9 Presets ............................................................... 9 Render APE....................................................... 9 Misc ................................................................ 10 Buffer Save ................................................... 10 Comment ...................................................... 11 Custom BPM ................................................ 11 Set render mode ............................................ 12 Effect list ...................................................... 13 The 'Render' item of the effect menu ................... 16 AVI ................................................................. 17 Bass Spin......................................................... 18 Clear screen ..................................................... 19 Dot Fountain.................................................... 20 Dot Grid .......................................................... 21 Dot Plane......................................................... 22 Moving Particle ............................................... 23 OnBeat Clear ................................................... 24 Oscilloscope Star ............................................. 24 Picture ............................................................. 25 Ring ................................................................ 26 Rotating Stars .................................................. 27 SVP Loader ..................................................... 28 Simple ............................................................. 28 Starfield........................................................... 29 SuperScope ...................................................... 30 Text ................................................................. 32 Timescope ....................................................... 35 The 'Trans' item of the effect menu ..................... 36 Blitter Feedback............................................... 37 Blur ................................................................. 38 Brightness........................................................ 39 Bump .............................................................. 40 Channel Shift .................................................. 42 Color Clip ....................................................... 42 Color Modifier ................................................ 43 Color Reduction .............................................. 45 Colorfade ........................................................ 45 Dynamic Distance Modifier ............................. 46 Dynamic Movement ........................................ 48 Dynamic Shift ................................................. 50 Fadeout ........................................................... 51 Fast Brightness ................................................ 52 Grain............................................................... 52 Interferences ................................................... 53 Interleave ........................................................ 54 Invert .............................................................. 55 Mirror ............................................................. 56 Mosaic ............................................................ 57 Movement ....................................................... 58 Multi Delay..................................................... 60 Multiplier ........................................................ 61 Roto Blitter ..................................................... 62 Scatter............................................................. 63 Unique tone..................................................... 63 Video Delay .................................................... 64 Water .............................................................. 64 Water Bump.................................................... 65 Expression help.................................................. 66 Presentation .................................................... 66 Variables......................................................... 66 Constants ........................................................ 67 Comments ....................................................... 67 Assignments.................................................... 67 Tables ............................................................. 68 Arithmetic operations ...................................... 69 Binary operations ............................................ 69 Modulo operation ............................................ 70 Trigonometric functions .................................. 70 Conditional functions ...................................... 73 Sound functions .............................................. 75 Interface functions........................................... 76 Other functions................................................ 77

Welcome message from author
This document is posted to help you gain knowledge. Please leave a comment to let me know what you think about it! Share it to your friends and learn new things together.
Transcript
AVS for Winamp: Tutorial Written by Pierre Charpenay © 2004
Version 2.0
SUMMARY Presentation..........................................................2
Warnings ...........................................................2 The main window.................................................3 The editor.............................................................4
The popup menu of AVS....................................4 The editor window.............................................4 The list of the effects..........................................5 The menu bar.....................................................6 The buttons........................................................8
First items of the effect menu................................9 Presets ...............................................................9 Render APE.......................................................9 Misc ................................................................10
Buffer Save...................................................10 Comment ......................................................11 Custom BPM ................................................11 Set render mode ............................................12 Effect list ......................................................13
The 'Render' item of the effect menu...................16 AVI .................................................................17 Bass Spin.........................................................18 Clear screen .....................................................19 Dot Fountain....................................................20 Dot Grid ..........................................................21 Dot Plane.........................................................22 Moving Particle ...............................................23 OnBeat Clear ...................................................24 Oscilloscope Star .............................................24 Picture .............................................................25 Ring ................................................................26 Rotating Stars ..................................................27 SVP Loader .....................................................28 Simple .............................................................28 Starfield...........................................................29 SuperScope......................................................30 Text.................................................................32 Timescope .......................................................35
The 'Trans' item of the effect menu .....................36 Blitter Feedback...............................................37 Blur .................................................................38 Brightness........................................................39
Bump.............................................................. 40 Channel Shift .................................................. 42 Color Clip ....................................................... 42 Color Modifier ................................................ 43 Color Reduction .............................................. 45 Colorfade ........................................................ 45 Dynamic Distance Modifier............................. 46 Dynamic Movement ........................................ 48 Dynamic Shift ................................................. 50 Fadeout ........................................................... 51 Fast Brightness................................................ 52 Grain............................................................... 52 Interferences ................................................... 53 Interleave ........................................................ 54 Invert .............................................................. 55 Mirror ............................................................. 56 Mosaic ............................................................ 57 Movement....................................................... 58 Multi Delay..................................................... 60 Multiplier........................................................ 61 Roto Blitter ..................................................... 62 Scatter............................................................. 63 Unique tone..................................................... 63 Video Delay.................................................... 64 Water.............................................................. 64 Water Bump.................................................... 65
Expression help.................................................. 66 Presentation .................................................... 66 Variables......................................................... 66 Constants ........................................................ 67 Comments....................................................... 67 Assignments.................................................... 67 Tables ............................................................. 68 Arithmetic operations ...................................... 69 Binary operations ............................................ 69 Modulo operation............................................ 70 Trigonometric functions .................................. 70 Conditional functions ...................................... 73 Sound functions .............................................. 75 Interface functions........................................... 76 Other functions................................................ 77
AVS tutorial v. 2.0
Page 2 on 78
Presentation AVS 2.81 is now provided with a little bit more help, but it is only available for dynamic effects, and there is still nothing for the other effects. Therefore, as I have done for the previous version, this is a special new tutorial for this new version.
Warnings Please read this carefully:
1) This is still an unofficial version. It has nothing to do with the authors of AVS.
2) Even though no special background knowledge is required, some effects of AVS, in order to be well used, need a minimal level background in mathematics. For these effects, this tutorial assumes that the reader has a minimal knowledge in this domain (in other words, you will not find any help in mathematics).
3) Once again, this tutorial was first written in French and I have published it on my personal web site. In order to satisfy non-French speaking users, I have decided to translate it into English. I hope this translation will satisfy you (I would thank again Tuggummi, Anubis and UnConeD for their precious help on the first version).
4) Many times, in this tutorial, I will use the expression AVS folder. Each time you see these words, you must know I am talking about a folder and its subfolders of the installation folder of Winamp:
C:\Progam Files\Winamp\Plugins\avs (all versions but 2.51)
or
C:\Progam Files\Winamp\Wacs\data\avs (version 2.51 with Winamp 3)
This tutorial and the screenshots are based on version 2.81 of AVS (from Winamp 5.01). Users of previous versions can also used it, but they must take care of the 2.8 icon used to mark up what is new in this version. Anyway, it is strongly recommended to use this wonderful last version!

AVS tutorial v. 2.0
Page 3 on 78
The main window When you launch the Visualization Studio (using Ctrl+Shift+K in Winamp), a window appears somewhere on your screen that looks like one of these 2.8 :
(1) Attached to Winamp
(2) Detached from Winamp
The functionality of each button is given below : 1) Open the popup menu of Winamp. 2) Close the visualization window. 3) Open the popup menu of AVS (see the next paragraph). 4) Alter display in fullscreen mode (use a single click to go back in the previous mode). 5) Load the next preset from the AVS folder. 6) Load the previous preset from the AVS folder. 7) Automatically load a random preset chosen in the AVS folder. 8) Attach or detach the visualization window to/from Winamp.
1
2 8
6
5
4
7
3
1 2
8
6 7
3
4
5
AVS tutorial v. 2.0
Page 4 on 78
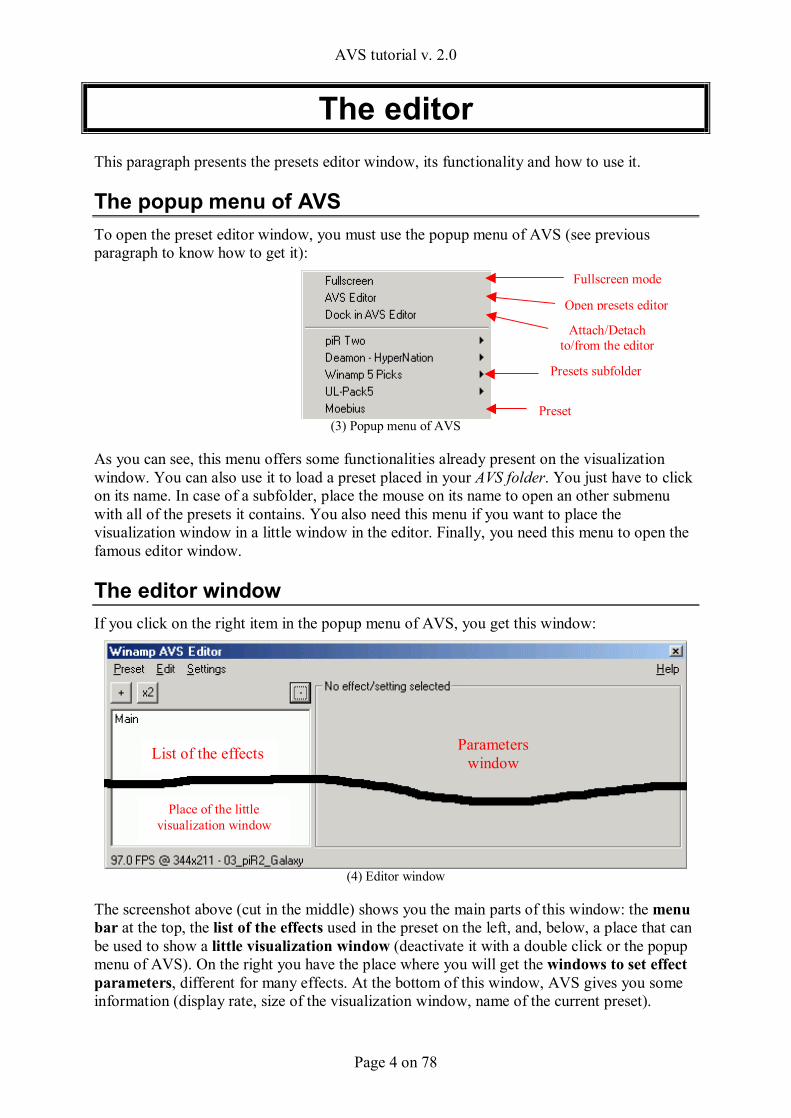
The editor This paragraph presents the presets editor window, its functionality and how to use it.
The popup menu of AVS To open the preset editor window, you must use the popup menu of AVS (see previous paragraph to know how to get it):
(3) Popup menu of AVS
As you can see, this menu offers some functionalities already present on the visualization window. You can also use it to load a preset placed in your AVS folder. You just have to click on its name. In case of a subfolder, place the mouse on its name to open an other submenu with all of the presets it contains. You also need this menu if you want to place the visualization window in a little window in the editor. Finally, you need this menu to open the famous editor window.
The editor window If you click on the right item in the popup menu of AVS, you get this window:
(4) Editor window
The screenshot above (cut in the middle) shows you the main parts of this window: the menu bar at the top, the list of the effects used in the preset on the left, and, below, a place that can be used to show a little visualization window (deactivate it with a double click or the popup menu of AVS). On the right you have the place where you will get the windows to set effect parameters, different for many effects. At the bottom of this window, AVS gives you some information (display rate, size of the visualization window, name of the current preset).
Fullscreen mode
Presets subfolder
Open presets editor
Attach/Detach to/from the editor
Preset
List of the effects Parameters window
Place of the little visualization window
AVS tutorial v. 2.0
Page 5 on 78
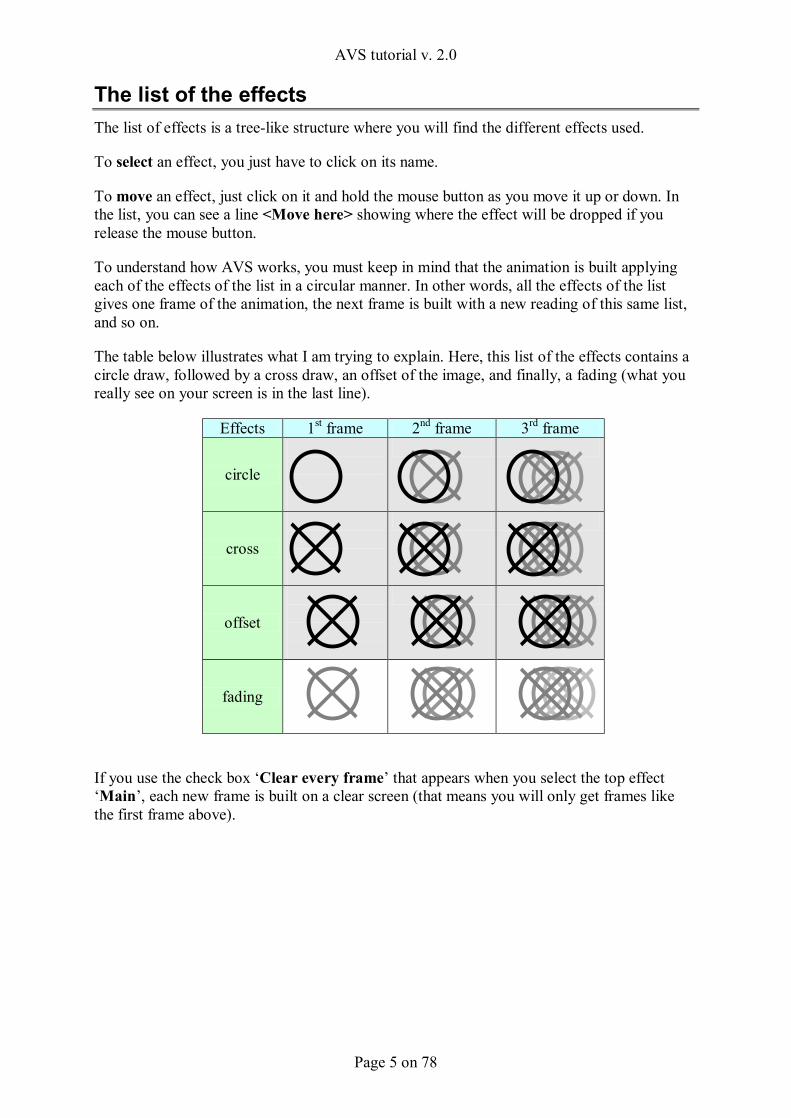
The list of the effects The list of effects is a tree-like structure where you will find the different effects used.
To select an effect, you just have to click on its name.
To move an effect, just click on it and hold the mouse button as you move it up or down. In the list, you can see a line <Move here> showing where the effect will be dropped if you release the mouse button.
To understand how AVS works, you must keep in mind that the animation is built applying each of the effects of the list in a circular manner. In other words, all the effects of the list gives one frame of the animation, the next frame is built with a new reading of this same list, and so on.
The table below illustrates what I am trying to explain. Here, this list of the effects contains a circle draw, followed by a cross draw, an offset of the image, and finally, a fading (what you really see on your screen is in the last line).
Effects 1st frame 2nd frame 3rd frame
circle
cross
offset
fading
If you use the check box ‘Clear every frame’ that appears when you select the top effect ‘Main’, each new frame is built on a clear screen (that means you will only get frames like the first frame above).
AVS tutorial v. 2.0
Page 6 on 78
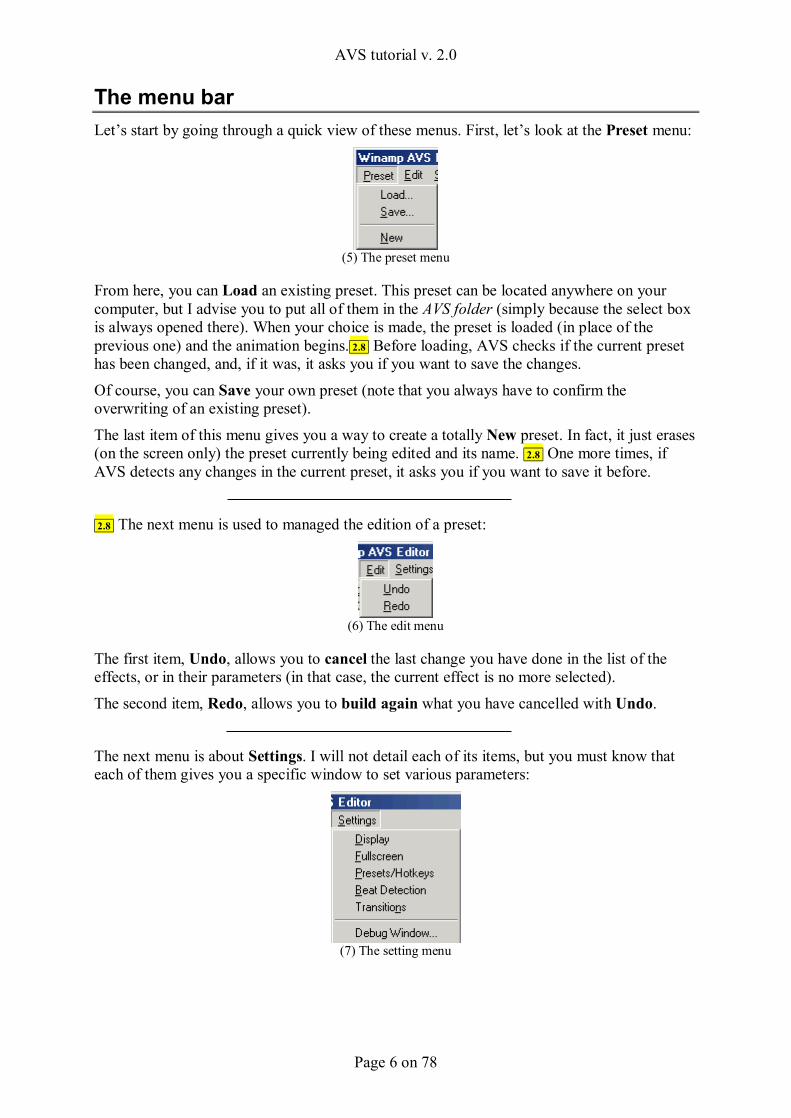
The menu bar Let’s start by going through a quick view of these menus. First, let’s look at the Preset menu:
(5) The preset menu
From here, you can Load an existing preset. This preset can be located anywhere on your computer, but I advise you to put all of them in the AVS folder (simply because the select box is always opened there). When your choice is made, the preset is loaded (in place of the previous one) and the animation begins. 2.8 Before loading, AVS checks if the current preset has been changed, and, if it was, it asks you if you want to save the changes.
Of course, you can Save your own preset (note that you always have to confirm the overwriting of an existing preset).
The last item of this menu gives you a way to create a totally New preset. In fact, it just erases (on the screen only) the preset currently being edited and its name. 2.8 One more times, if AVS detects any changes in the current preset, it asks you if you want to save it before.
2.8 The next menu is used to managed the edition of a preset:
(6) The edit menu
The first item, Undo, allows you to cancel the last change you have done in the list of the effects, or in their parameters (in that case, the current effect is no more selected).
The second item, Redo, allows you to build again what you have cancelled with Undo.
The next menu is about Settings. I will not detail each of its items, but you must know that each of them gives you a specific window to set various parameters:
(7) The setting menu
AVS tutorial v. 2.0
Page 7 on 78
The Display item gives you access to parameters for the display of the animation in the window (except from the transparency and the priority which are applicable in fullscreen mode).
The Fullscreen item allows you to set similar parameters, but for the fullscreen display mode instead.
The Presets/Hotkeys item allows you to define hotkeys to load defined presets, or to activate the automatic loading of random presets, and, if needed, to set the delay between each preset.
The Beat Detection item allows you to set rules of beat detection for the music you are listening to.
The Transitions item gives you a choice of 15 transition modes (visual effects applied when AVS transition from one preset to the next one).
2.8 Finally, the Debug Window item opens a new window that gives you information on data used in the dynamic effects of the current preset:
- The current value of 8 of the global variables (from reg00 to reg99), - the last errors encountered, - statistics on the code.
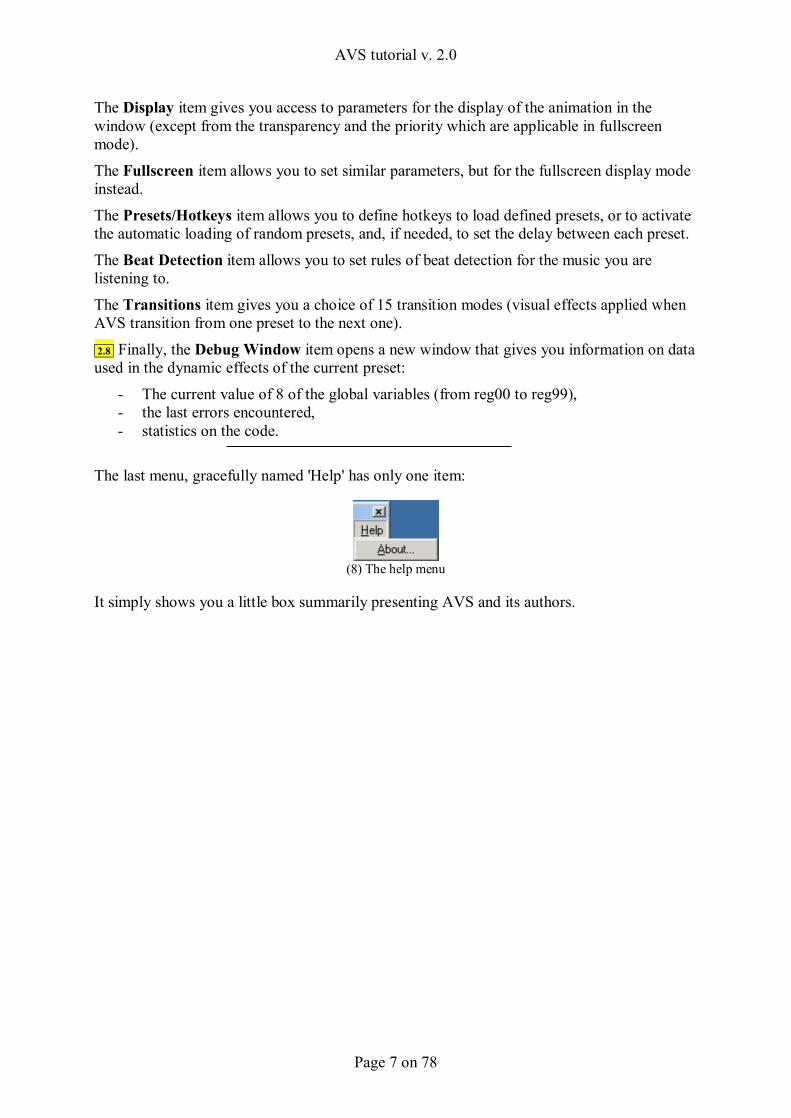
The last menu, gracefully named 'Help' has only one item:
(8) The help menu
It simply shows you a little box summarily presenting AVS and its authors.
AVS tutorial v. 2.0
Page 8 on 78
The buttons Below the menu bar, you have probably noticed the presence of three buttons. These are very important as they will allow you to manage the list of the effects of your preset.
(9) The buttons
Let’s start with the last one.
The '-' button is used to remove a selected effect. If this effect is an Effect list, it will also removed all of the effects it contains (in the same way, applied on 'Main', it will remove all off the effects in the preset!).
The ‘x2’ button is used to simply make a copy of the effect (or Effect list) selected. The copy is placed directly below the original (all off the settings are also copied).
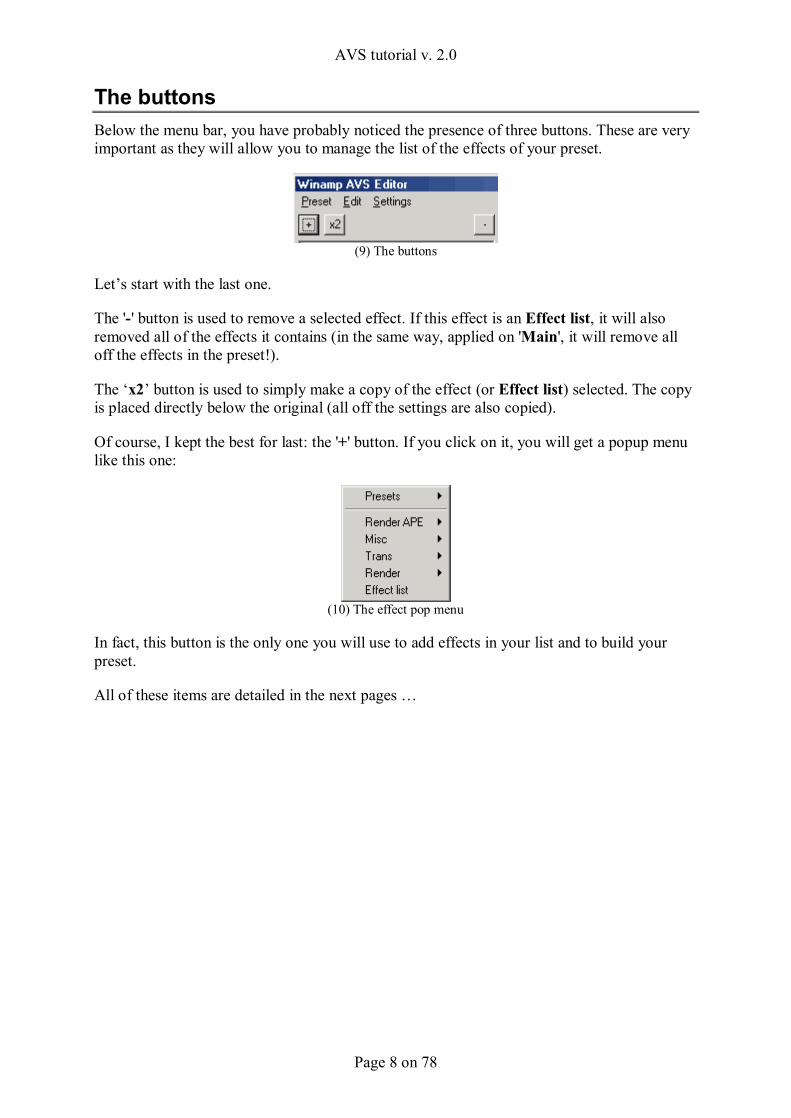
Of course, I kept the best for last: the '+' button. If you click on it, you will get a popup menu like this one:
(10) The effect pop menu
In fact, this button is the only one you will use to add effects in your list and to build your preset.
All of these items are detailed in the next pages …
AVS tutorial v. 2.0
Page 9 on 78
First items of the effect menu Despite of the title of this chapter, I will not explain these items in the order of their appearance, but rather in the order of complexity. However, since there aren’t many, I don’t think it will be a problem for you.
Presets If you place the mouse on this item, you will get almost the same popup menu that you would if you made a right click in the visualization window. It contains all of the presets present in the AVS folder.
By clicking on one of these, the entire preset will be added to your preset, in a new Effect List.
Render APE The submenu, which appears when you put the mouse over this item, contains APEs (AVS Plug-in Effect) present in the AVS folder.
These are small files (.ape files) that add new visual effects to your preset.
In fact, there are three sort of APE : - those which draw something and can appear in the Render submenu,
- those which alter the current image and can appear in the Trans submenu, - and all the others which effect can be widely different and can appear in this Render
APE submenu (or even in a new specific submenu).
AVS provided six APE :
- FyrewurX which adds some fireworks on the screen (in Render APE), - Color Map which allows you to change colors depending on the intensities of the
original image (in Trans) - Convolution Filter which can be used to create different sort of blur, or border effects,
and so on (in Trans) - Multi Filter which apply a chromatic filter on your image (in Trans)
- Texer which can be used to replace single dots by a small picture (in Trans) - Texer II which can dynamically place a small picture on the screen (in Render)
There are many other APEs, but, generally, AVS’s artists use to join them with their presets when needed. In other words, the more you get presets (especially AVS packs), the more you have chances to get new APEs.
AVS tutorial v. 2.0
Page 10 on 78
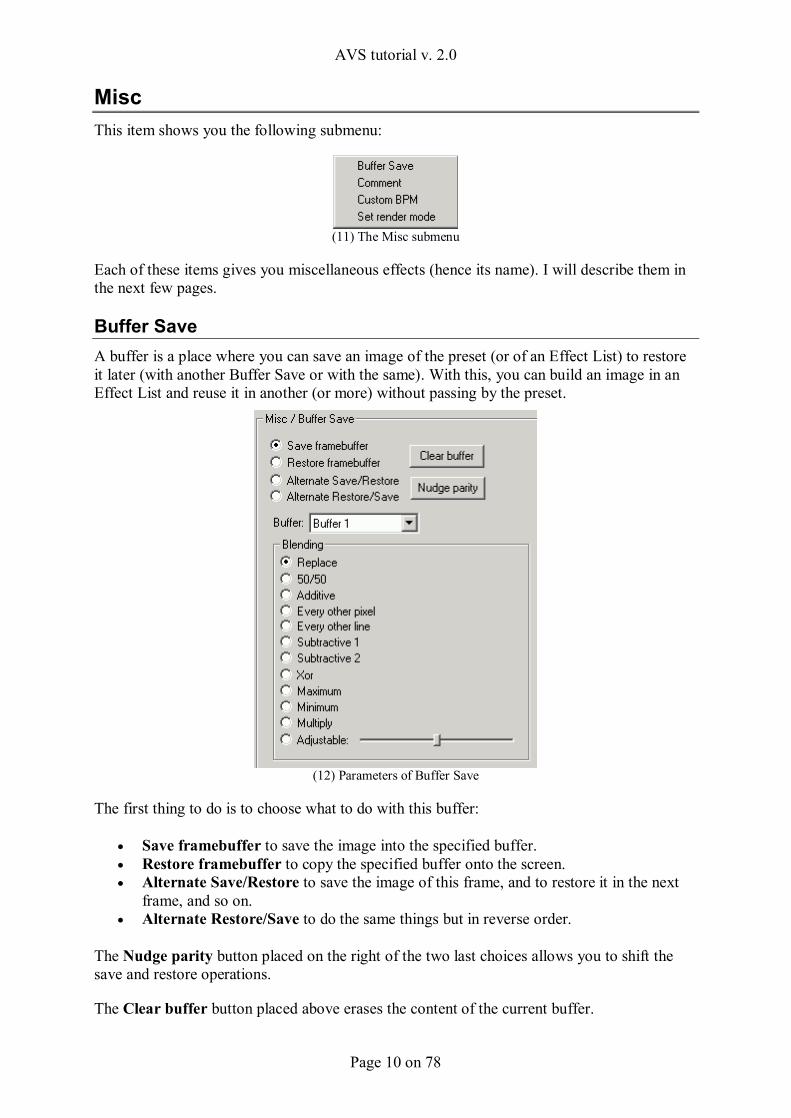
Misc This item shows you the following submenu:
(11) The Misc submenu
Each of these items gives you miscellaneous effects (hence its name). I will describe them in the next few pages.
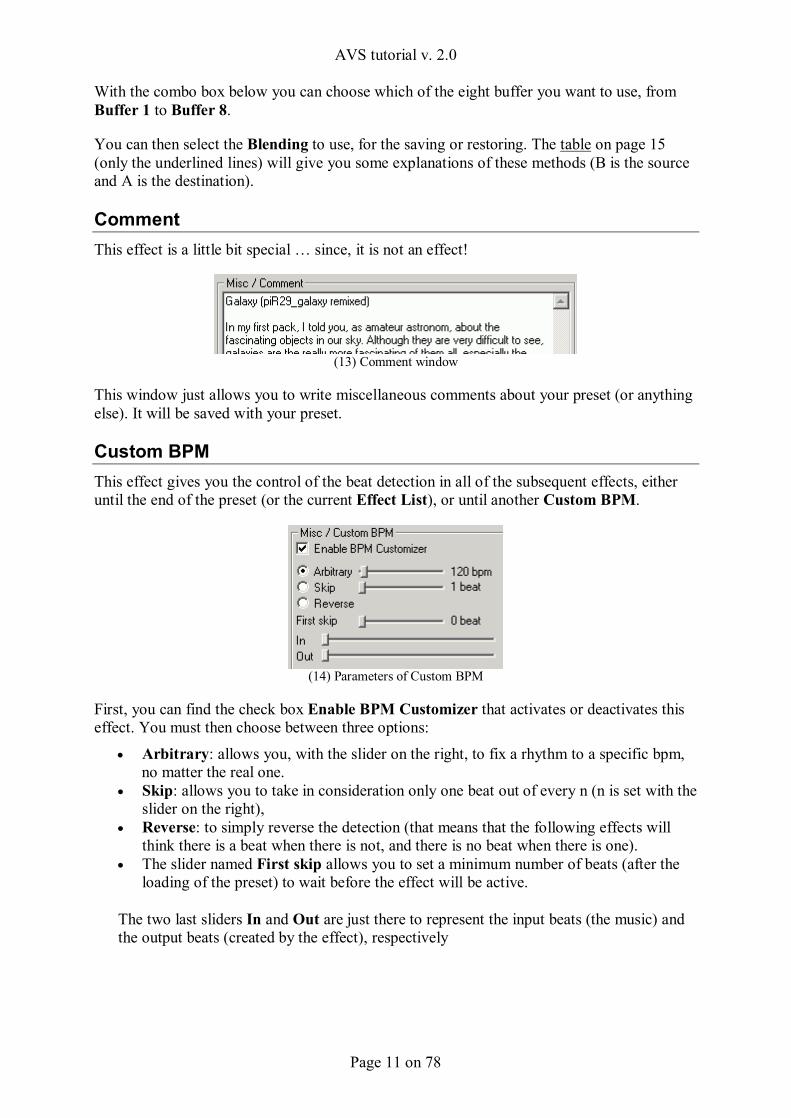
Buffer Save A buffer is a place where you can save an image of the preset (or of an Effect List) to restore it later (with another Buffer Save or with the same). With this, you can build an image in an Effect List and reuse it in another (or more) without passing by the preset.
(12) Parameters of Buffer Save
The first thing to do is to choose what to do with this buffer:
• Save framebuffer to save the image into the specified buffer. • Restore framebuffer to copy the specified buffer onto the screen. • Alternate Save/Restore to save the image of this frame, and to restore it in the next
frame, and so on. • Alternate Restore/Save to do the same things but in reverse order.
The Nudge parity button placed on the right of the two last choices allows you to shift the save and restore operations.
The Clear buffer button placed above erases the content of the current buffer.
AVS tutorial v. 2.0
Page 11 on 78
With the combo box below you can choose which of the eight buffer you want to use, from Buffer 1 to Buffer 8.
You can then select the Blending to use, for the saving or restoring. The table on page 15 (only the underlined lines) will give you some explanations of these methods (B is the source and A is the destination).
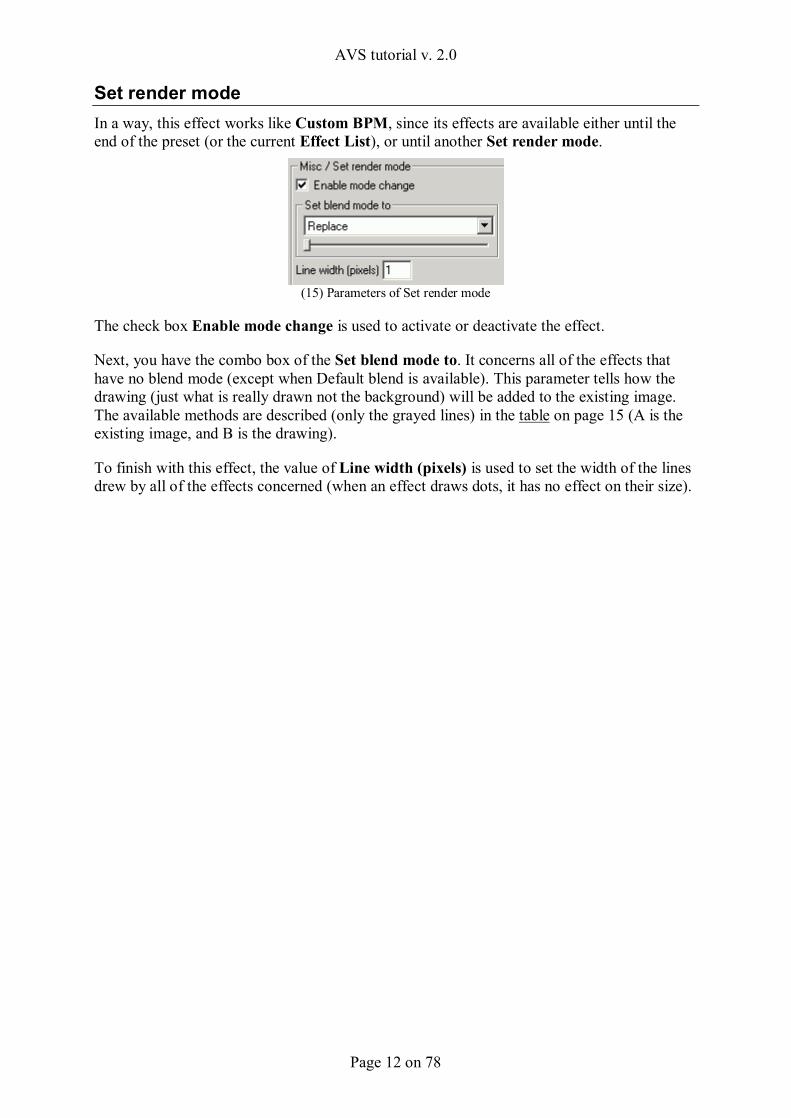
Comment This effect is a little bit special … since, it is not an effect!
(13) Comment window
This window just allows you to write miscellaneous comments about your preset (or anything else). It will be saved with your preset.
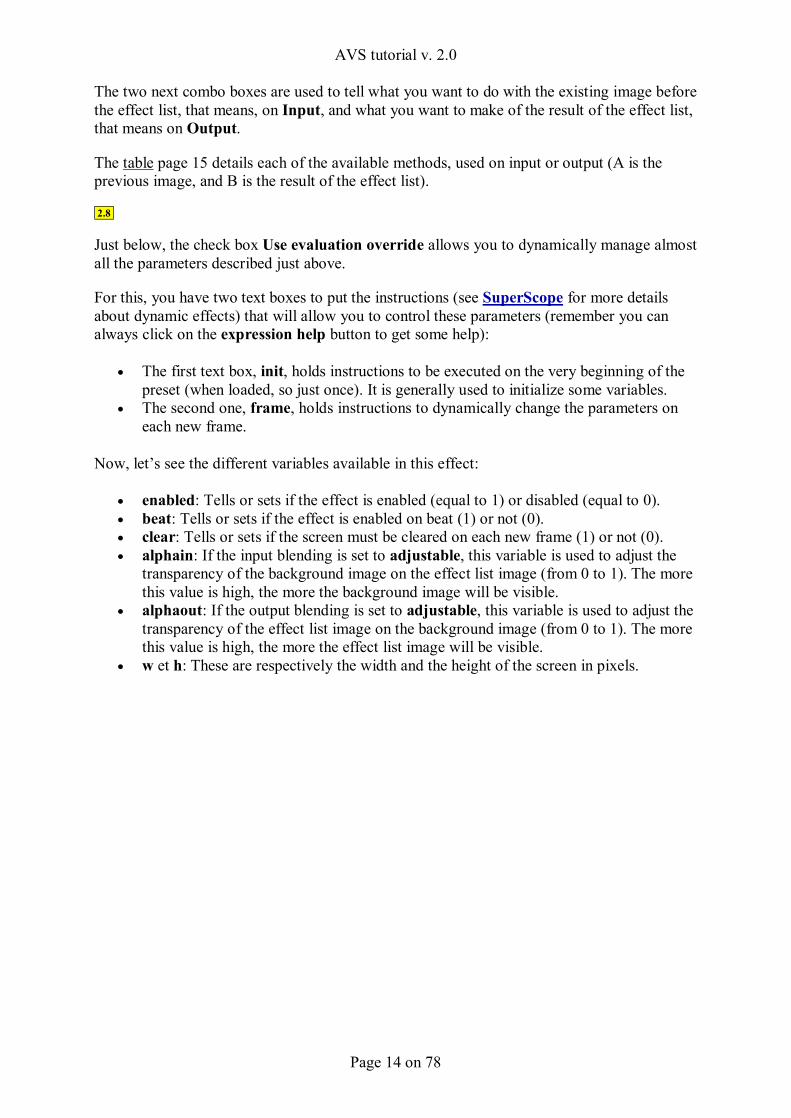
Custom BPM This effect gives you the control of the beat detection in all of the subsequent effects, either until the end of the preset (or the current Effect List), or until another Custom BPM.
(14) Parameters of Custom BPM
First, you can find the check box Enable BPM Customizer that activates or deactivates this effect. You must then choose between three options:
• Arbitrary: allows you, with the slider on the right, to fix a rhythm to a specific bpm, no matter the real one.
• Skip: allows you to take in consideration only one beat out of every n (n is set with the slider on the right),
• Reverse: to simply reverse the detection (that means that the following effects will think there is a beat when there is not, and there is no beat when there is one).
• The slider named First skip allows you to set a minimum number of beats (after the loading of the preset) to wait before the effect will be active.
The two last sliders In and Out are just there to represent the input beats (the music) and the output beats (created by the effect), respectively
AVS tutorial v. 2.0
Page 12 on 78
Set render mode In a way, this effect works like Custom BPM, since its effects are available either until the end of the preset (or the current Effect List), or until another Set render mode.
(15) Parameters of Set render mode
The check box Enable mode change is used to activate or deactivate the effect.
Next, you have the combo box of the Set blend mode to. It concerns all of the effects that have no blend mode (except when Default blend is available). This parameter tells how the drawing (just what is really drawn not the background) will be added to the existing image. The available methods are described (only the grayed lines) in the table on page 15 (A is the existing image, and B is the drawing).
To finish with this effect, the value of Line width (pixels) is used to set the width of the lines drew by all of the effects concerned (when an effect draws dots, it has no effect on their size).

AVS tutorial v. 2.0
Page 13 on 78
Effect list To simplify, we can say that an Effect list is a list of effects in the list of the effects. In fact, it allows you to give many effects independently of the remainder of the main list of effect.
Background Effect list
Image A
input
Image B
output
Image A + B
Of course, an effect list can also have its own effect lists, and so on.
(16) Parameters of Effect list
First of all, you can activate or deactivate the effect by using the check box Enabled. If it is checked, the effect list is activated. If it is not … it depends on the check box Enabled OnBeat. Actually, if it is not checked too, the effect is really deactivated, but if it is checked, this effect list will be activated on each beat detected, for the number of frames given in the field for … frames below.
As an effect list can be considered as a full preset, you naturally dispose of the check box Clear every frame (also present in the ‘Main’ as unique parameter). If you check it, all of the effects of the list are applied on a cleaned screen on each frame. If you do not, the remainder of the last frames is kept.
AVS tutorial v. 2.0
Page 14 on 78
The two next combo boxes are used to tell what you want to do with the existing image before the effect list, that means, on Input, and what you want to make of the result of the effect list, that means on Output.
The table page 15 details each of the available methods, used on input or output (A is the previous image, and B is the result of the effect list).
2.8
Just below, the check box Use evaluation override allows you to dynamically manage almost all the parameters described just above.
For this, you have two text boxes to put the instructions (see SuperScope for more details about dynamic effects) that will allow you to control these parameters (remember you can always click on the expression help button to get some help):
• The first text box, init, holds instructions to be executed on the very beginning of the preset (when loaded, so just once). It is generally used to initialize some variables.
• The second one, frame, holds instructions to dynamically change the parameters on each new frame.
Now, let’s see the different variables available in this effect:
• enabled: Tells or sets if the effect is enabled (equal to 1) or disabled (equal to 0). • beat: Tells or sets if the effect is enabled on beat (1) or not (0). • clear: Tells or sets if the screen must be cleared on each new frame (1) or not (0). • alphain: If the input blending is set to adjustable, this variable is used to adjust the
transparency of the background image on the effect list image (from 0 to 1). The more this value is high, the more the background image will be visible.
• alphaout: If the output blending is set to adjustable, this variable is used to adjust the transparency of the effect list image on the background image (from 0 to 1). The more this value is high, the more the effect list image will be visible.
• w et h: These are respectively the width and the height of the screen in pixels.
AVS tutorial v. 2.0
Page 15 on 78
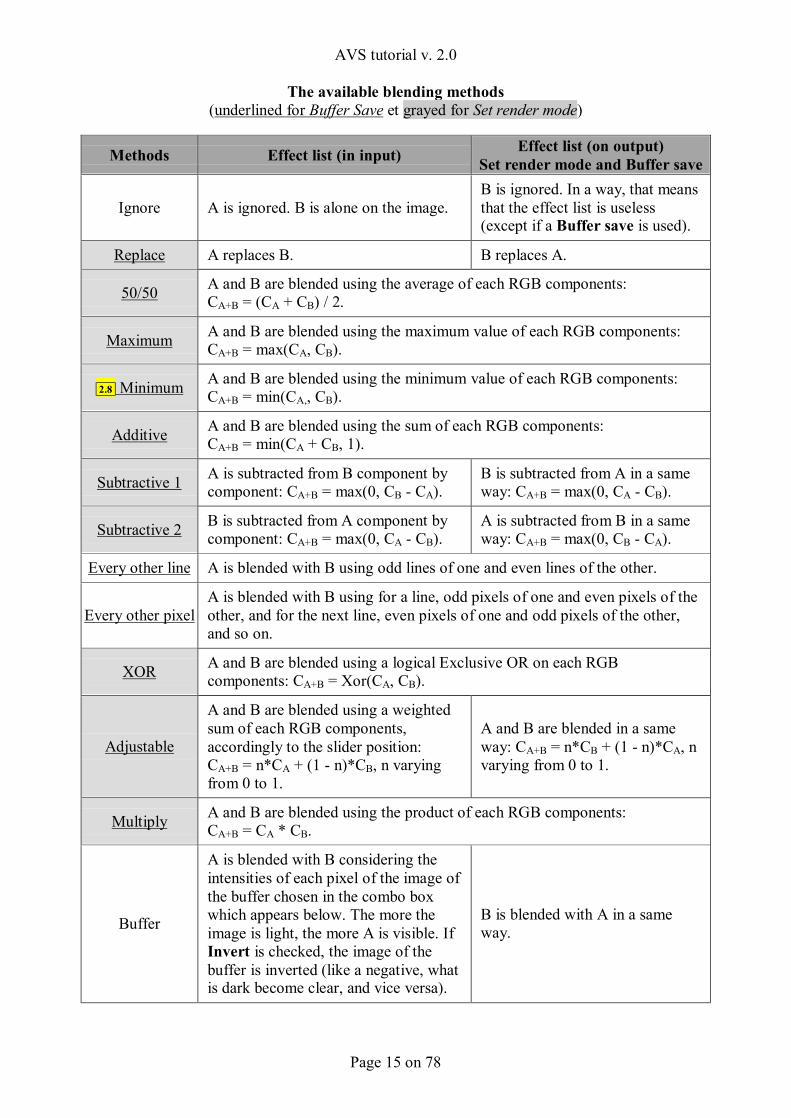
The available blending methods (underlined for Buffer Save et grayed for Set render mode)
Methods Effect list (in input) Effect list (on output) Set render mode and Buffer save
Ignore A is ignored. B is alone on the image. B is ignored. In a way, that means that the effect list is useless (except if a Buffer save is used).
Replace A replaces B. B replaces A.
50/50 A and B are blended using the average of each RGB components: CA+B = (CA + CB) / 2.
Maximum A and B are blended using the maximum value of each RGB components: CA+B = max(CA, CB).
2.8 Minimum A and B are blended using the minimum value of each RGB components: CA+B = min(CA,, CB).
Additive A and B are blended using the sum of each RGB components: CA+B = min(CA + CB, 1).
Subtractive 1 A is subtracted from B component by component: CA+B = max(0, CB - CA).
B is subtracted from A in a same way: CA+B = max(0, CA - CB).
Subtractive 2 B is subtracted from A component by component: CA+B = max(0, CA - CB).
A is subtracted from B in a same way: CA+B = max(0, CB - CA).
Every other line A is blended with B using odd lines of one and even lines of the other.
Every other pixel A is blended with B using for a line, odd pixels of one and even pixels of the other, and for the next line, even pixels of one and odd pixels of the other, and so on.
XOR A and B are blended using a logical Exclusive OR on each RGB components: CA+B = Xor(CA, CB).
Adjustable
A and B are blended using a weighted sum of each RGB components, accordingly to the slider position: CA+B = n*CA + (1 - n)*CB, n varying from 0 to 1.
A and B are blended in a same way: CA+B = n*CB + (1 - n)*CA, n varying from 0 to 1.
Multiply A and B are blended using the product of each RGB components: CA+B = CA * CB.
Buffer
A is blended with B considering the intensities of each pixel of the image of the buffer chosen in the combo box which appears below. The more the image is light, the more A is visible. If Invert is checked, the image of the buffer is inverted (like a negative, what is dark become clear, and vice versa).
B is blended with A in a same way.
AVS tutorial v. 2.0
Page 16 on 78
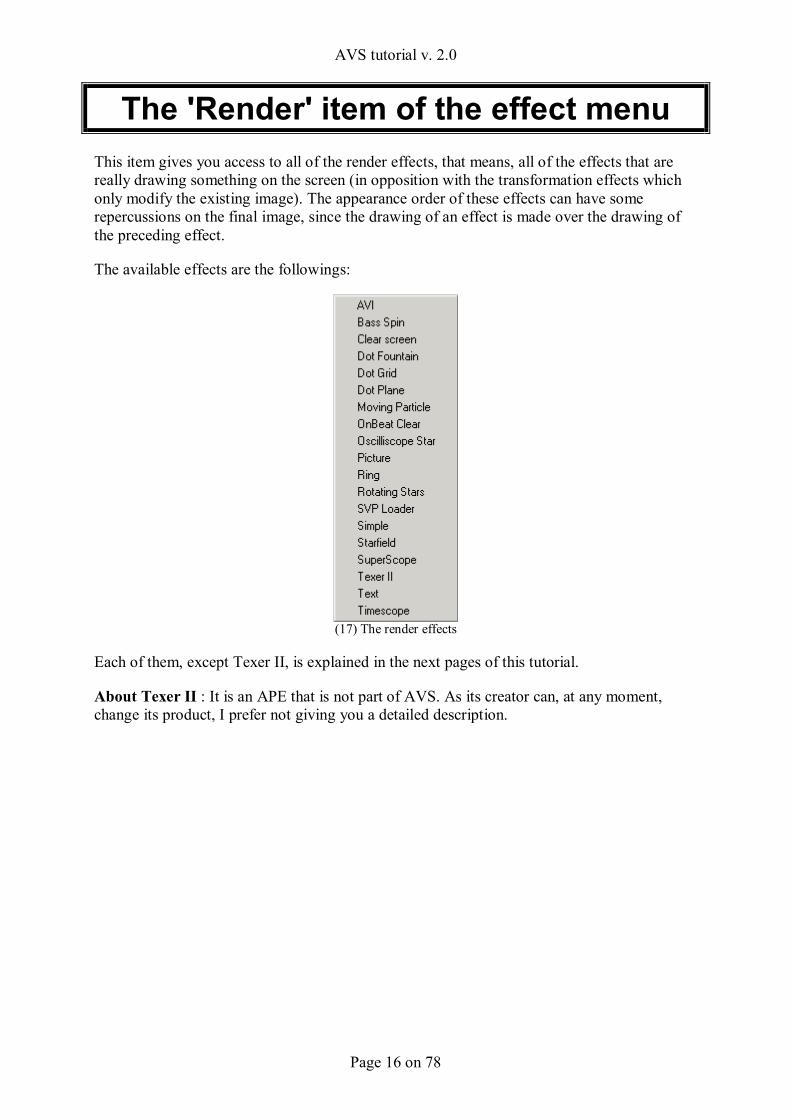
The 'Render' item of the effect menu This item gives you access to all of the render effects, that means, all of the effects that are really drawing something on the screen (in opposition with the transformation effects which only modify the existing image). The appearance order of these effects can have some repercussions on the final image, since the drawing of an effect is made over the drawing of the preceding effect.
The available effects are the followings:
(17) The render effects
Each of them, except Texer II, is explained in the next pages of this tutorial.
About Texer II : It is an APE that is not part of AVS. As its creator can, at any moment, change its product, I prefer not giving you a detailed description.
AVS tutorial v. 2.0
Page 17 on 78
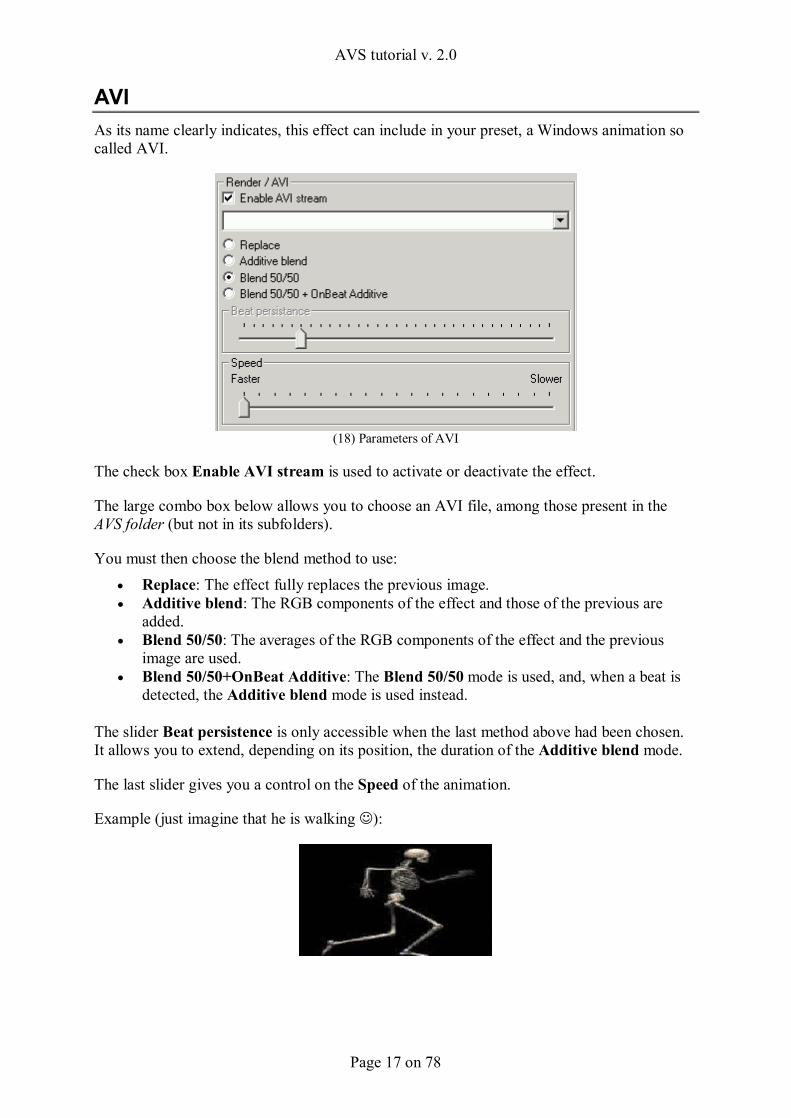
AVI As its name clearly indicates, this effect can include in your preset, a Windows animation so called AVI.
(18) Parameters of AVI
The check box Enable AVI stream is used to activate or deactivate the effect.
The large combo box below allows you to choose an AVI file, among those present in the AVS folder (but not in its subfolders).
You must then choose the blend method to use: • Replace: The effect fully replaces the previous image. • Additive blend: The RGB components of the effect and those of the previous are
added. • Blend 50/50: The averages of the RGB components of the effect and the previous
image are used. • Blend 50/50+OnBeat Additive: The Blend 50/50 mode is used, and, when a beat is
detected, the Additive blend mode is used instead.
The slider Beat persistence is only accessible when the last method above had been chosen. It allows you to extend, depending on its position, the duration of the Additive blend mode.
The last slider gives you a control on the Speed of the animation.
Example (just imagine that he is walking ☺):
AVS tutorial v. 2.0
Page 18 on 78
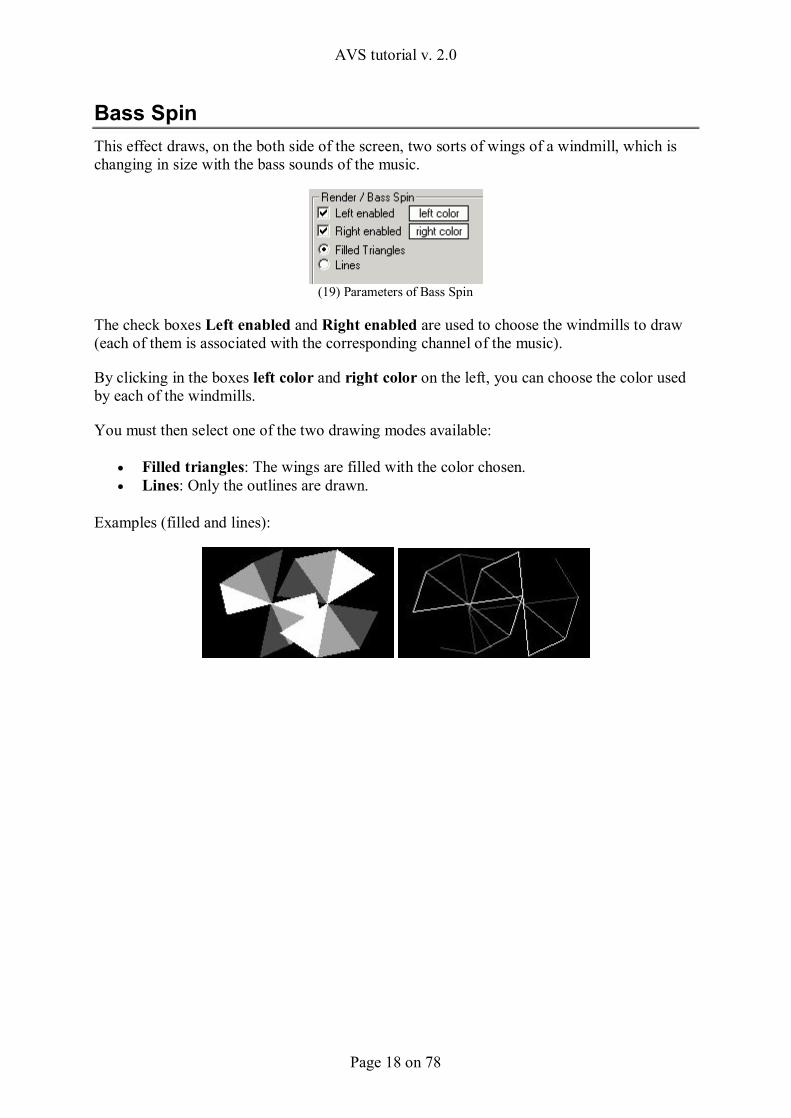
Bass Spin This effect draws, on the both side of the screen, two sorts of wings of a windmill, which is changing in size with the bass sounds of the music.
(19) Parameters of Bass Spin
The check boxes Left enabled and Right enabled are used to choose the windmills to draw (each of them is associated with the corresponding channel of the music).
By clicking in the boxes left color and right color on the left, you can choose the color used by each of the windmills.
You must then select one of the two drawing modes available:
• Filled triangles: The wings are filled with the color chosen. • Lines: Only the outlines are drawn.
Examples (filled and lines):
AVS tutorial v. 2.0
Page 19 on 78
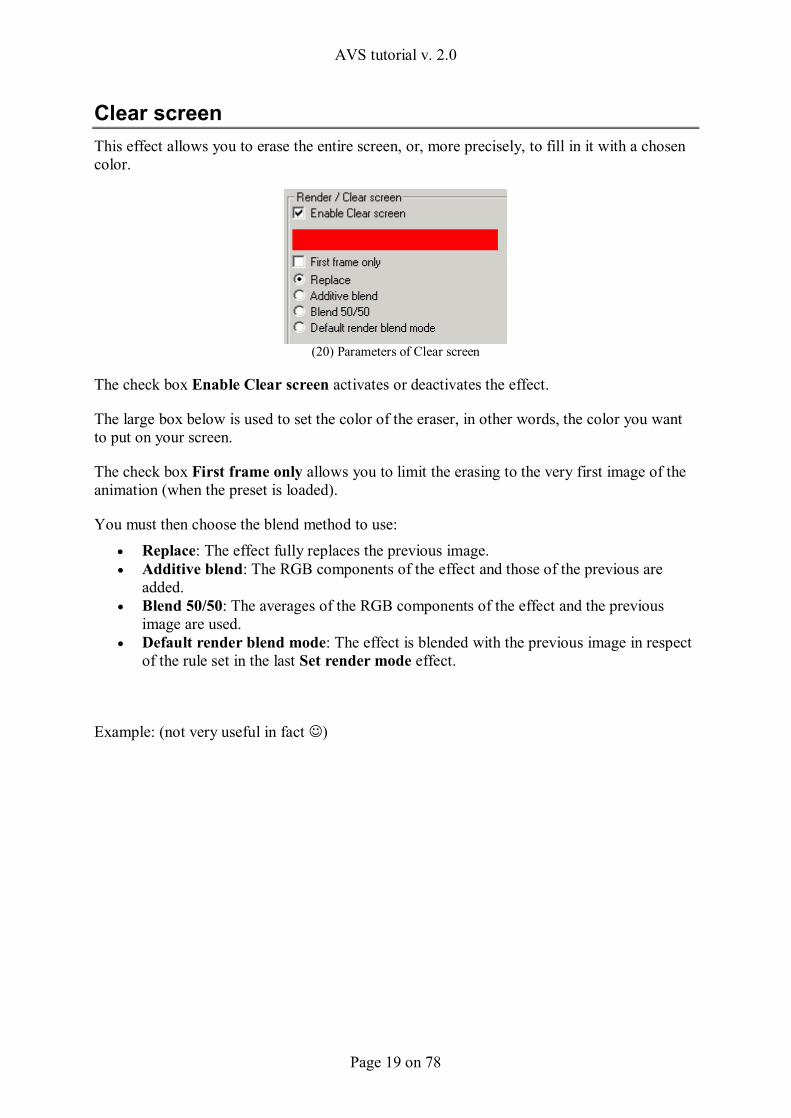
Clear screen This effect allows you to erase the entire screen, or, more precisely, to fill in it with a chosen color.
(20) Parameters of Clear screen
The check box Enable Clear screen activates or deactivates the effect.
The large box below is used to set the color of the eraser, in other words, the color you want to put on your screen.
The check box First frame only allows you to limit the erasing to the very first image of the animation (when the preset is loaded).
You must then choose the blend method to use: • Replace: The effect fully replaces the previous image. • Additive blend: The RGB components of the effect and those of the previous are
added. • Blend 50/50: The averages of the RGB components of the effect and the previous
image are used. • Default render blend mode: The effect is blended with the previous image in respect
of the rule set in the last Set render mode effect.
Example: (not very useful in fact ☺)
AVS tutorial v. 2.0
Page 20 on 78
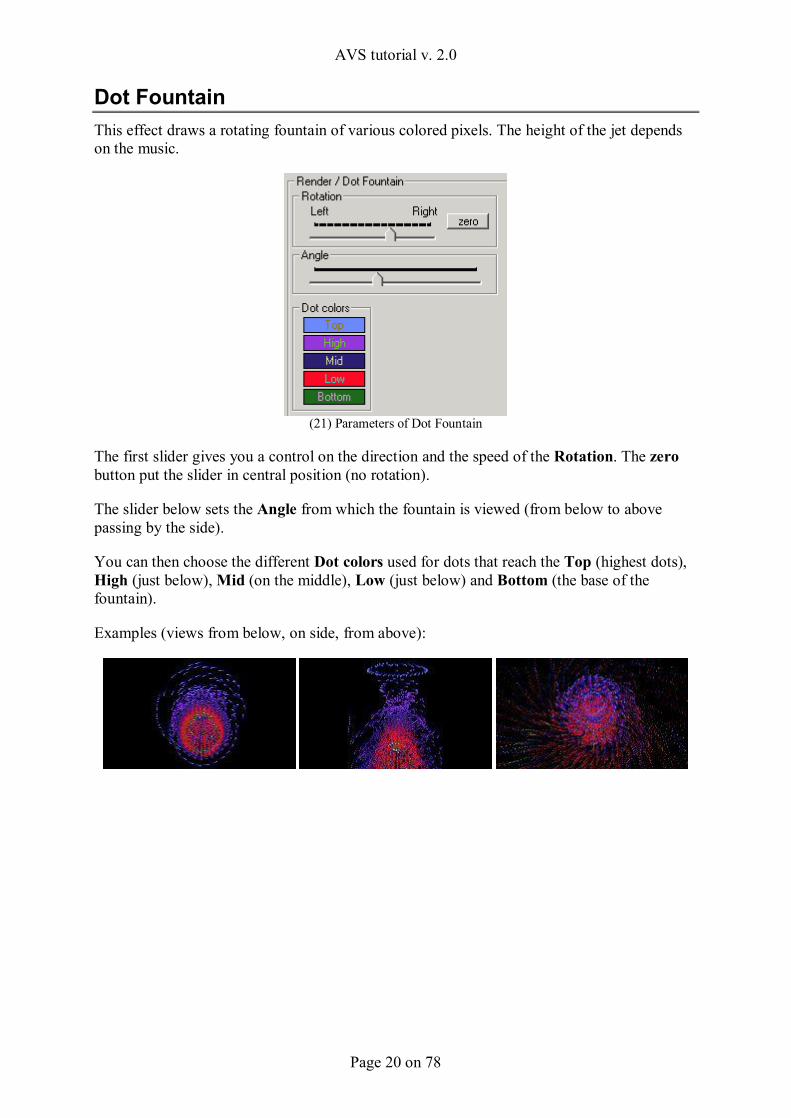
Dot Fountain This effect draws a rotating fountain of various colored pixels. The height of the jet depends on the music.
(21) Parameters of Dot Fountain
The first slider gives you a control on the direction and the speed of the Rotation. The zero button put the slider in central position (no rotation).
The slider below sets the Angle from which the fountain is viewed (from below to above passing by the side).
You can then choose the different Dot colors used for dots that reach the Top (highest dots), High (just below), Mid (on the middle), Low (just below) and Bottom (the base of the fountain).
Examples (views from below, on side, from above):
AVS tutorial v. 2.0
Page 21 on 78
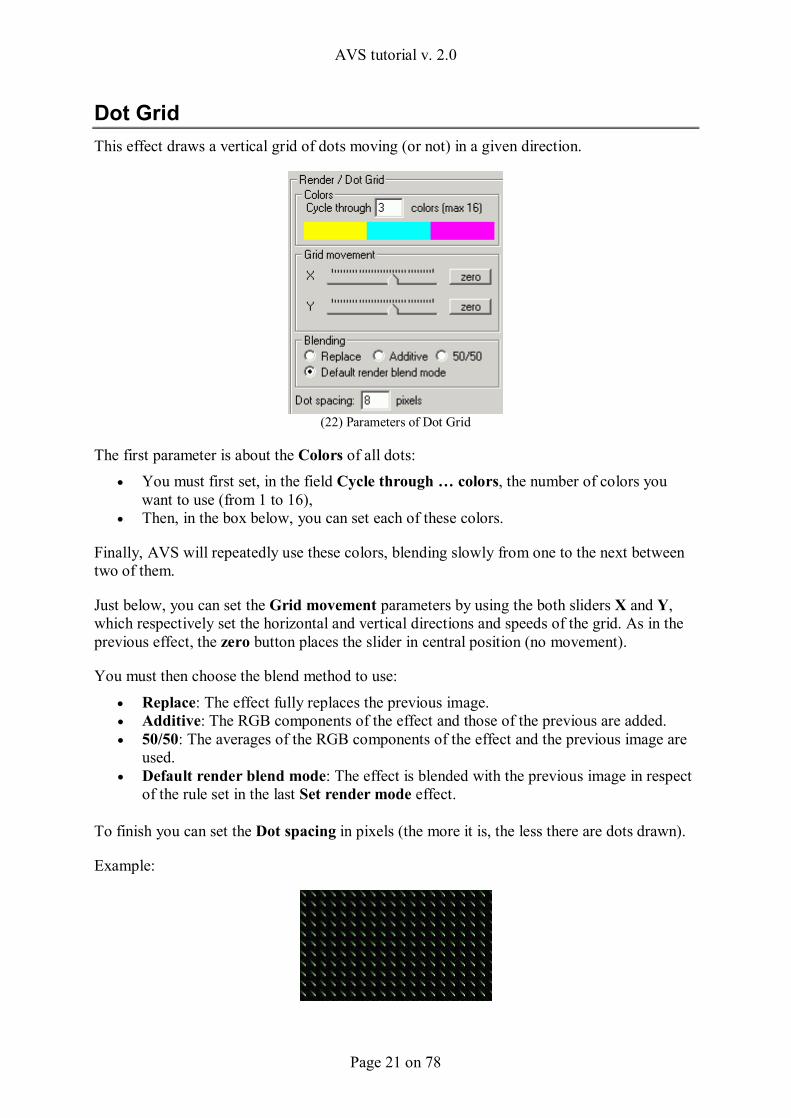
Dot Grid This effect draws a vertical grid of dots moving (or not) in a given direction.
(22) Parameters of Dot Grid
The first parameter is about the Colors of all dots: • You must first set, in the field Cycle through … colors, the number of colors you
want to use (from 1 to 16), • Then, in the box below, you can set each of these colors.
Finally, AVS will repeatedly use these colors, blending slowly from one to the next between two of them.
Just below, you can set the Grid movement parameters by using the both sliders X and Y, which respectively set the horizontal and vertical directions and speeds of the grid. As in the previous effect, the zero button places the slider in central position (no movement).
You must then choose the blend method to use:
• Replace: The effect fully replaces the previous image. • Additive: The RGB components of the effect and those of the previous are added. • 50/50: The averages of the RGB components of the effect and the previous image are
used. • Default render blend mode: The effect is blended with the previous image in respect
of the rule set in the last Set render mode effect.
To finish you can set the Dot spacing in pixels (the more it is, the less there are dots drawn).
Example:
AVS tutorial v. 2.0
Page 22 on 78
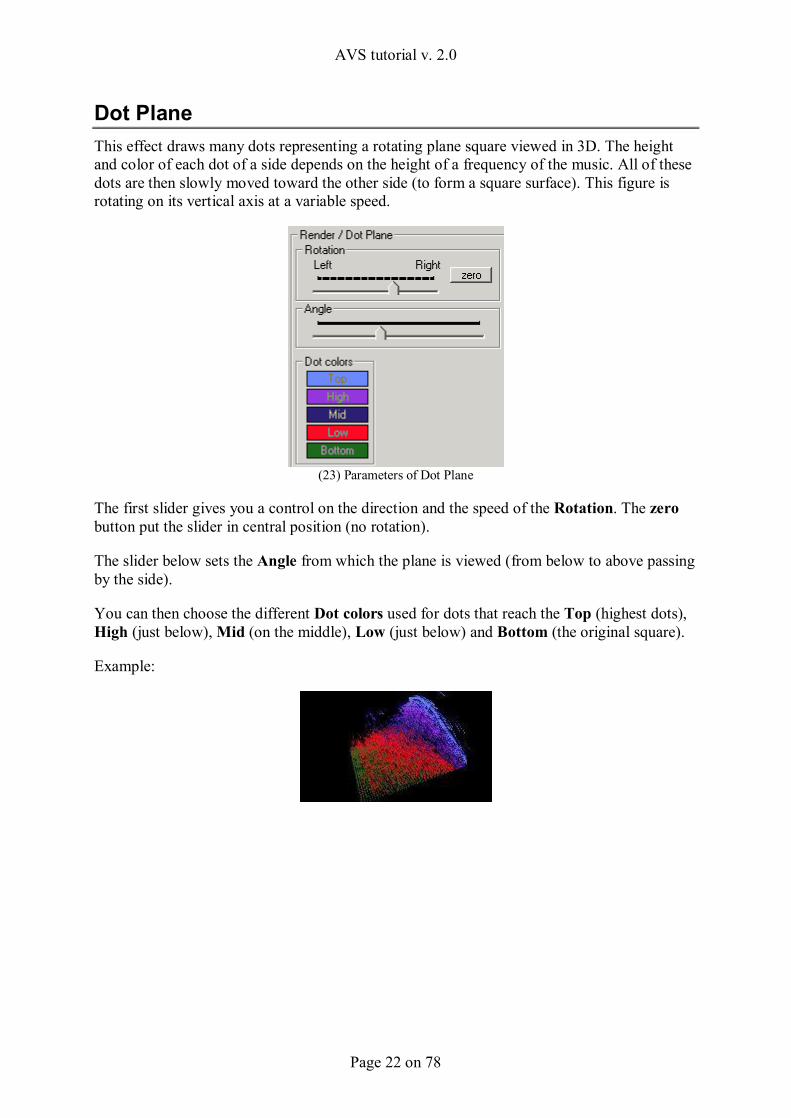
Dot Plane This effect draws many dots representing a rotating plane square viewed in 3D. The height and color of each dot of a side depends on the height of a frequency of the music. All of these dots are then slowly moved toward the other side (to form a square surface). This figure is rotating on its vertical axis at a variable speed.
(23) Parameters of Dot Plane
The first slider gives you a control on the direction and the speed of the Rotation. The zero button put the slider in central position (no rotation).
The slider below sets the Angle from which the plane is viewed (from below to above passing by the side).
You can then choose the different Dot colors used for dots that reach the Top (highest dots), High (just below), Mid (on the middle), Low (just below) and Bottom (the original square).
Example:
AVS tutorial v. 2.0
Page 23 on 78
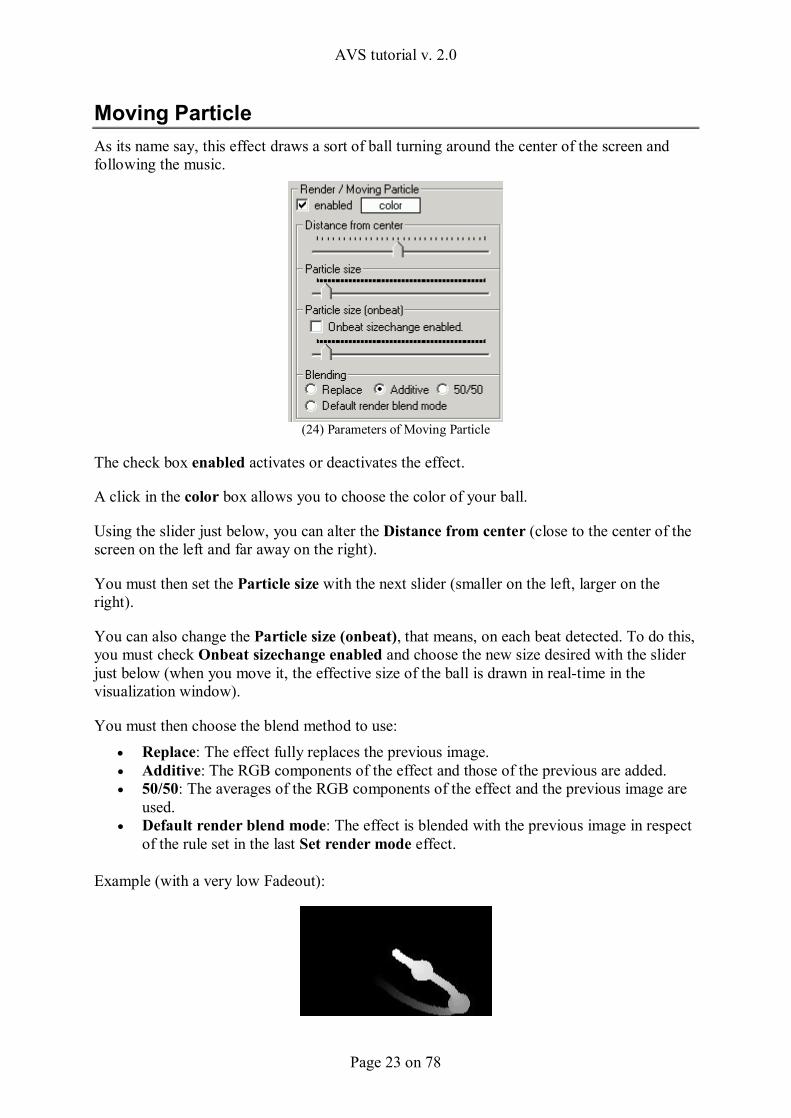
Moving Particle As its name say, this effect draws a sort of ball turning around the center of the screen and following the music.
(24) Parameters of Moving Particle
The check box enabled activates or deactivates the effect.
A click in the color box allows you to choose the color of your ball.
Using the slider just below, you can alter the Distance from center (close to the center of the screen on the left and far away on the right).
You must then set the Particle size with the next slider (smaller on the left, larger on the right).
You can also change the Particle size (onbeat), that means, on each beat detected. To do this, you must check Onbeat sizechange enabled and choose the new size desired with the slider just below (when you move it, the effective size of the ball is drawn in real-time in the visualization window).
You must then choose the blend method to use: • Replace: The effect fully replaces the previous image. • Additive: The RGB components of the effect and those of the previous are added. • 50/50: The averages of the RGB components of the effect and the previous image are
used. • Default render blend mode: The effect is blended with the previous image in respect
of the rule set in the last Set render mode effect.
Example (with a very low Fadeout):
AVS tutorial v. 2.0
Page 24 on 78
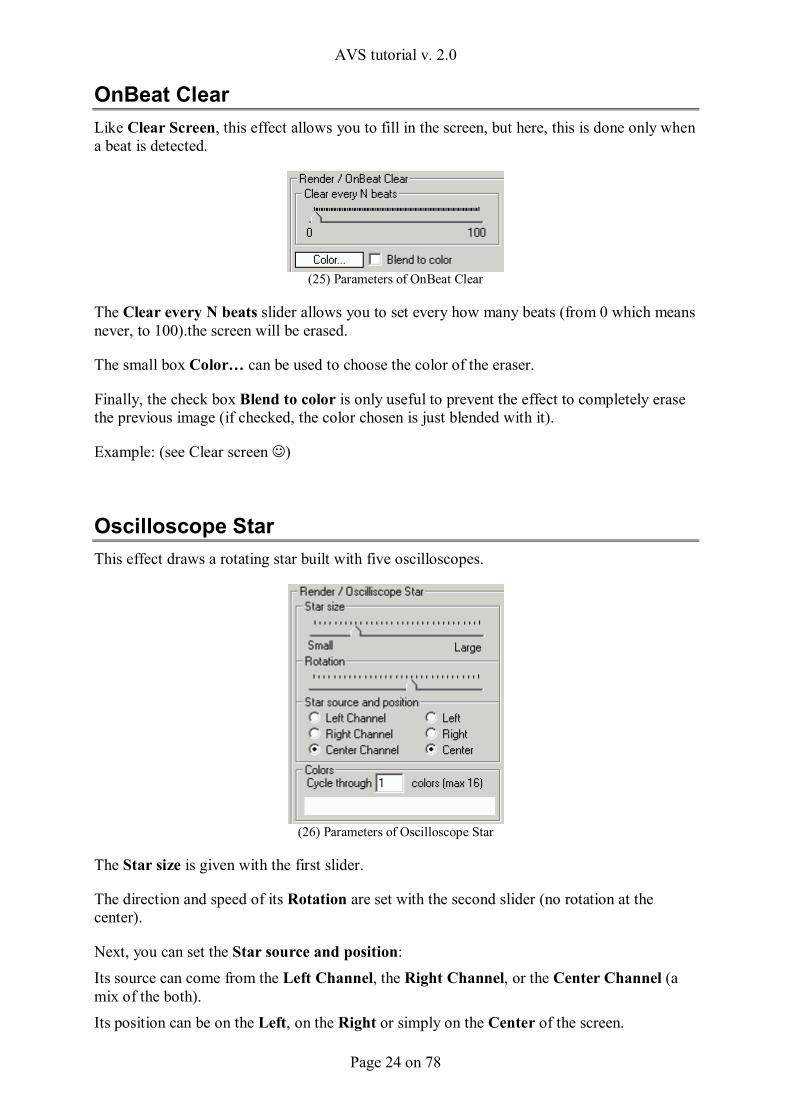
OnBeat Clear Like Clear Screen, this effect allows you to fill in the screen, but here, this is done only when a beat is detected.
(25) Parameters of OnBeat Clear
The Clear every N beats slider allows you to set every how many beats (from 0 which means never, to 100).the screen will be erased.
The small box Color… can be used to choose the color of the eraser.
Finally, the check box Blend to color is only useful to prevent the effect to completely erase the previous image (if checked, the color chosen is just blended with it).
Example: (see Clear screen ☺)
Oscilloscope Star This effect draws a rotating star built with five oscilloscopes.
(26) Parameters of Oscilloscope Star
The Star size is given with the first slider.
The direction and speed of its Rotation are set with the second slider (no rotation at the center).
Next, you can set the Star source and position: Its source can come from the Left Channel, the Right Channel, or the Center Channel (a mix of the both). Its position can be on the Left, on the Right or simply on the Center of the screen.
AVS tutorial v. 2.0
Page 25 on 78
The last parameter is about the Colors of the star:
• You must first set, in the field Cycle through … colors, the number of colors you want to use (from 1 to 16),
• Then, in the box below, you can set each of these colors.
Finally, AVS will repeatedly use these colors, blending slowly from one to the next between two of them. Example:
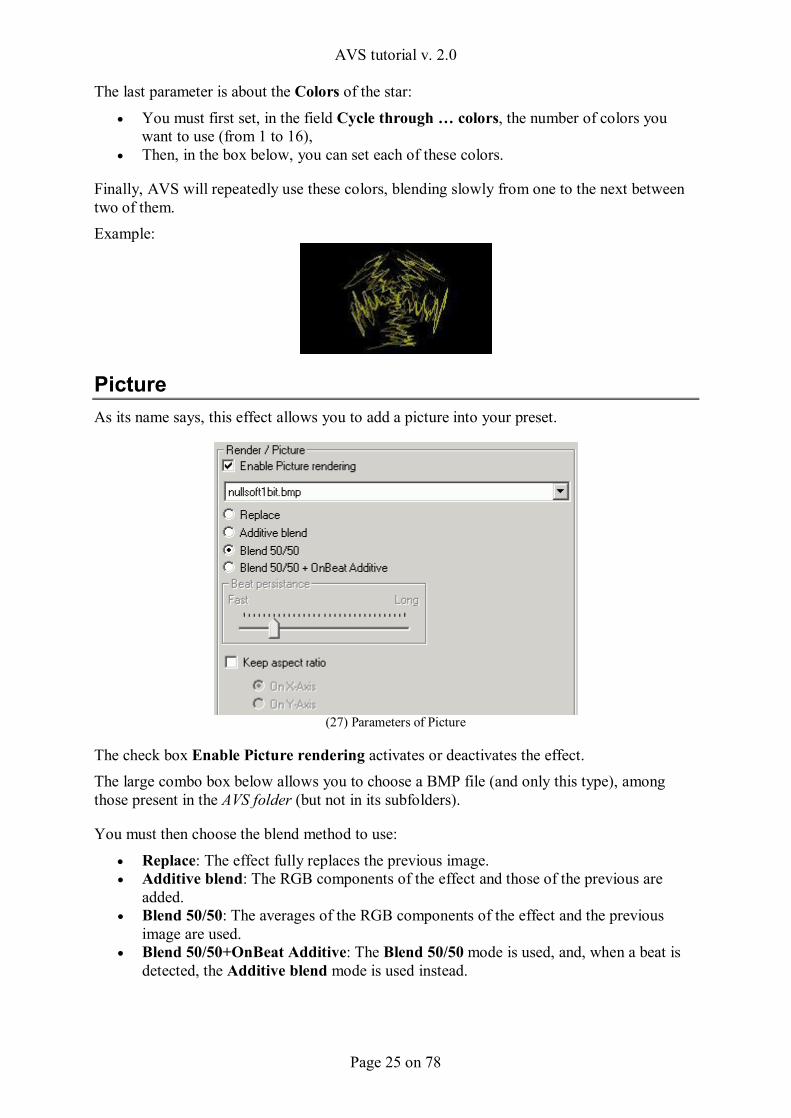
Picture As its name says, this effect allows you to add a picture into your preset.
(27) Parameters of Picture
The check box Enable Picture rendering activates or deactivates the effect. The large combo box below allows you to choose a BMP file (and only this type), among those present in the AVS folder (but not in its subfolders).
You must then choose the blend method to use:
• Replace: The effect fully replaces the previous image. • Additive blend: The RGB components of the effect and those of the previous are
added. • Blend 50/50: The averages of the RGB components of the effect and the previous
image are used. • Blend 50/50+OnBeat Additive: The Blend 50/50 mode is used, and, when a beat is
detected, the Additive blend mode is used instead.
AVS tutorial v. 2.0
Page 26 on 78
The Beat persistence is only accessible when the last method above had been chosen. It allows you to extend, depending on the slider position, the duration of the Additive blend mode.
The check box Keep aspect ratio is used to indicate to AVS that it must keep the original ratio of the picture. If it is not checked, the picture will be stretch to fill the screen. If it is checked, you must then choose the rule to apply:
• On X-axis: The width of the picture is adjusted to the screen (if the resized picture is too big to enter in the screen, bottom and top are cut off).
• On Y-axis: The height of the picture is adjusted to the screen (if the resized picture is too big to enter in the screen, right and left are cut off).
Example (it’s stupid, I know, but I could not resist):
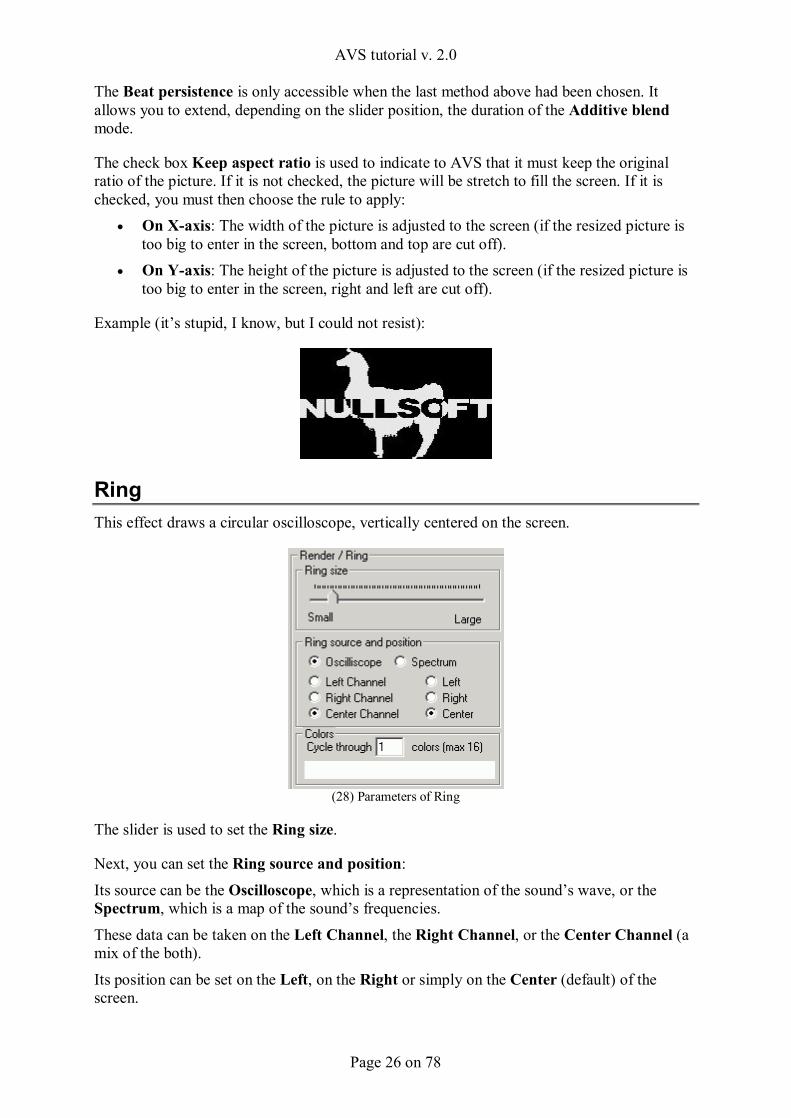
Ring This effect draws a circular oscilloscope, vertically centered on the screen.
(28) Parameters of Ring
The slider is used to set the Ring size.
Next, you can set the Ring source and position:
Its source can be the Oscilloscope, which is a representation of the sound’s wave, or the Spectrum, which is a map of the sound’s frequencies.
These data can be taken on the Left Channel, the Right Channel, or the Center Channel (a mix of the both).
Its position can be set on the Left, on the Right or simply on the Center (default) of the screen.
AVS tutorial v. 2.0
Page 27 on 78
The last parameter is about the Colors of the ring:
• You must first set, in the field Cycle through … colors, the number of colors you want to use (from 1 to 16),
• Then, in the box below, you can set each of these colors.
Finally, AVS will repeatedly use these colors, blending slowly from one to the next between two of them.
Example:
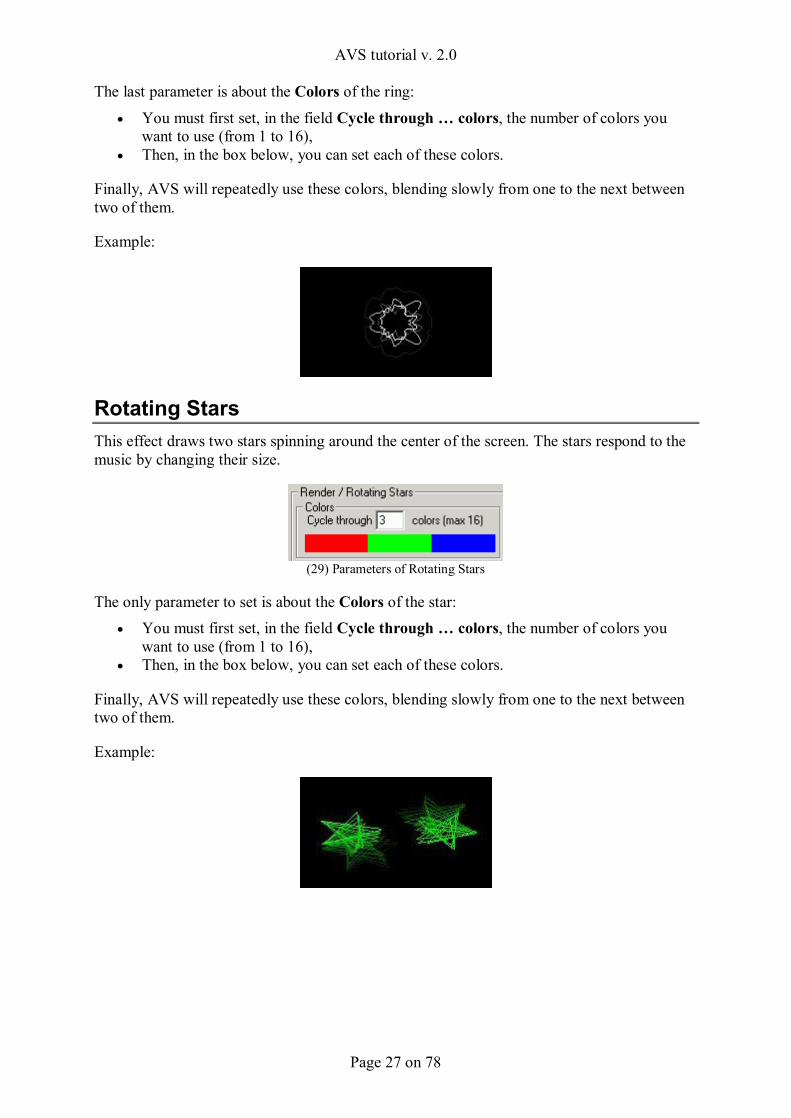
Rotating Stars This effect draws two stars spinning around the center of the screen. The stars respond to the music by changing their size.
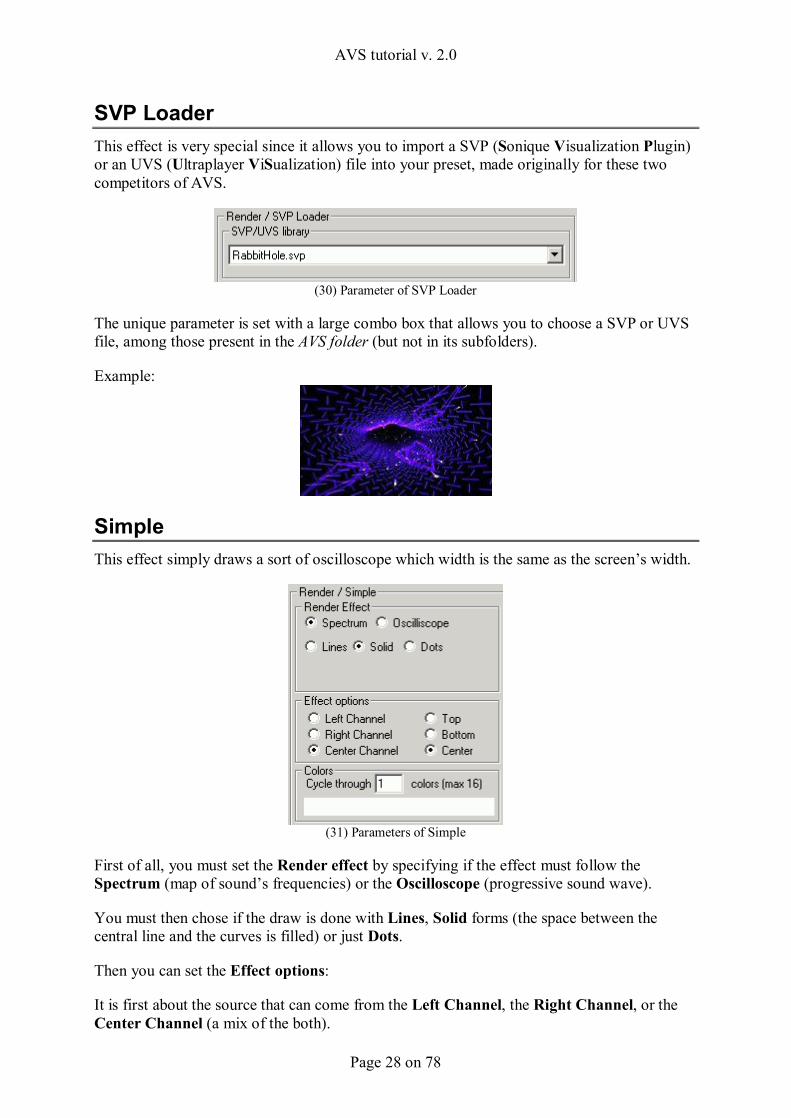
(29) Parameters of Rotating Stars
The only parameter to set is about the Colors of the star: • You must first set, in the field Cycle through … colors, the number of colors you
want to use (from 1 to 16), • Then, in the box below, you can set each of these colors.
Finally, AVS will repeatedly use these colors, blending slowly from one to the next between two of them.
Example:
AVS tutorial v. 2.0
Page 28 on 78
SVP Loader This effect is very special since it allows you to import a SVP (Sonique Visualization Plugin) or an UVS (Ultraplayer ViSualization) file into your preset, made originally for these two competitors of AVS.
(30) Parameter of SVP Loader
The unique parameter is set with a large combo box that allows you to choose a SVP or UVS file, among those present in the AVS folder (but not in its subfolders).
Example:
Simple This effect simply draws a sort of oscilloscope which width is the same as the screen’s width.
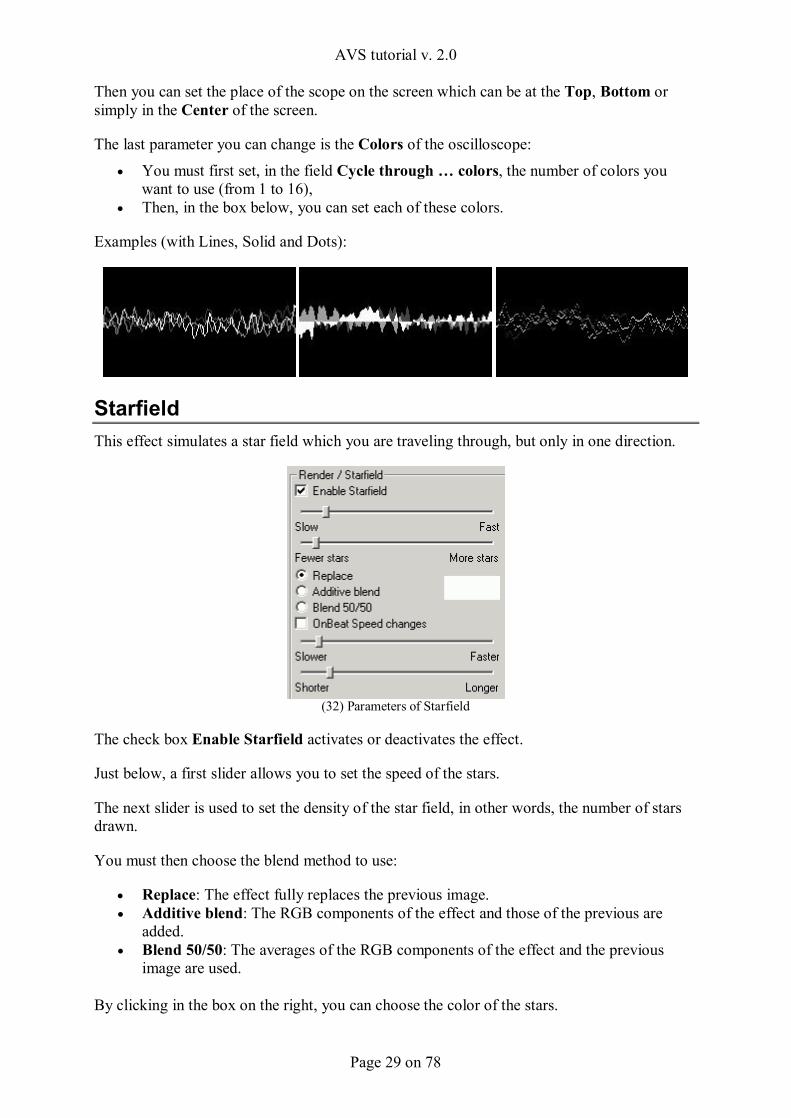
(31) Parameters of Simple
First of all, you must set the Render effect by specifying if the effect must follow the Spectrum (map of sound’s frequencies) or the Oscilloscope (progressive sound wave).
You must then chose if the draw is done with Lines, Solid forms (the space between the central line and the curves is filled) or just Dots.
Then you can set the Effect options:
It is first about the source that can come from the Left Channel, the Right Channel, or the Center Channel (a mix of the both).
AVS tutorial v. 2.0
Page 29 on 78
Then you can set the place of the scope on the screen which can be at the Top, Bottom or simply in the Center of the screen.
The last parameter you can change is the Colors of the oscilloscope:
• You must first set, in the field Cycle through … colors, the number of colors you want to use (from 1 to 16),
• Then, in the box below, you can set each of these colors.
Examples (with Lines, Solid and Dots):
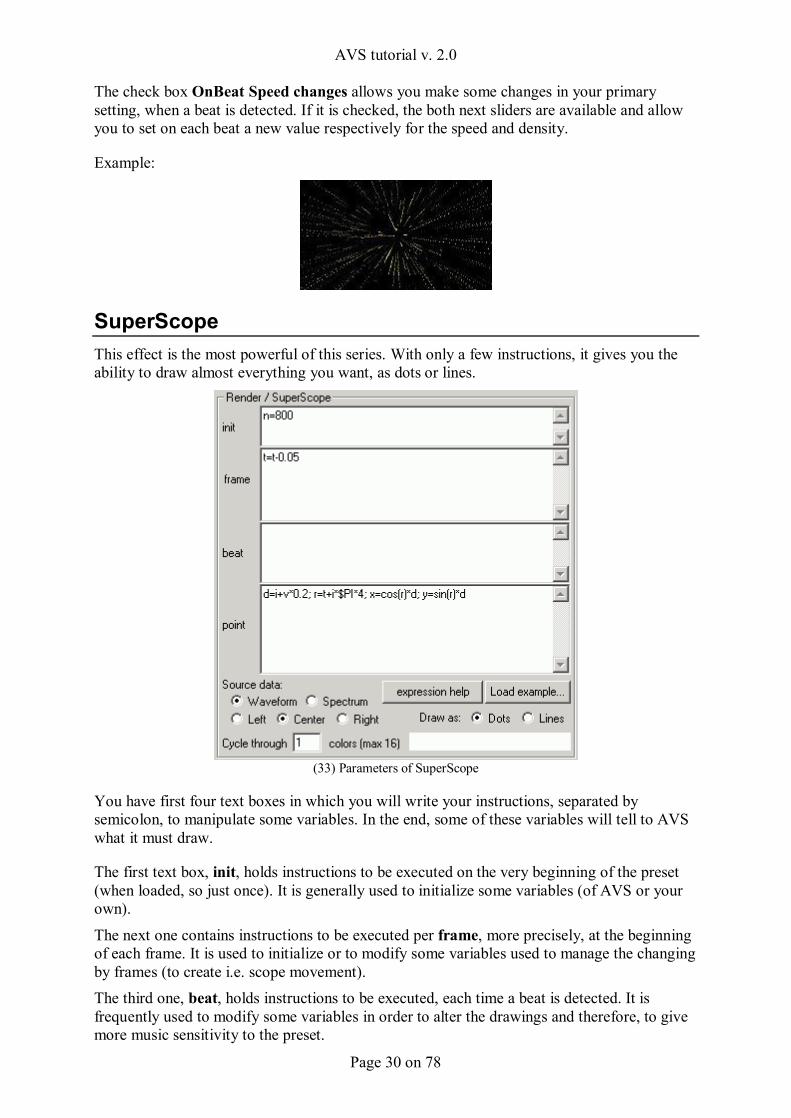
Starfield This effect simulates a star field which you are traveling through, but only in one direction.
(32) Parameters of Starfield
The check box Enable Starfield activates or deactivates the effect.
Just below, a first slider allows you to set the speed of the stars.
The next slider is used to set the density of the star field, in other words, the number of stars drawn.
You must then choose the blend method to use:
• Replace: The effect fully replaces the previous image. • Additive blend: The RGB components of the effect and those of the previous are
added. • Blend 50/50: The averages of the RGB components of the effect and the previous
image are used.
By clicking in the box on the right, you can choose the color of the stars.
AVS tutorial v. 2.0
Page 30 on 78
The check box OnBeat Speed changes allows you make some changes in your primary setting, when a beat is detected. If it is checked, the both next sliders are available and allow you to set on each beat a new value respectively for the speed and density.
Example:
SuperScope This effect is the most powerful of this series. With only a few instructions, it gives you the ability to draw almost everything you want, as dots or lines.
(33) Parameters of SuperScope
You have first four text boxes in which you will write your instructions, separated by semicolon, to manipulate some variables. In the end, some of these variables will tell to AVS what it must draw.
The first text box, init, holds instructions to be executed on the very beginning of the preset (when loaded, so just once). It is generally used to initialize some variables (of AVS or your own).
The next one contains instructions to be executed per frame, more precisely, at the beginning of each frame. It is used to initialize or to modify some variables used to manage the changing by frames (to create i.e. scope movement). The third one, beat, holds instructions to be executed, each time a beat is detected. It is frequently used to modify some variables in order to alter the drawings and therefore, to give more music sensitivity to the preset.
AVS tutorial v. 2.0
Page 31 on 78
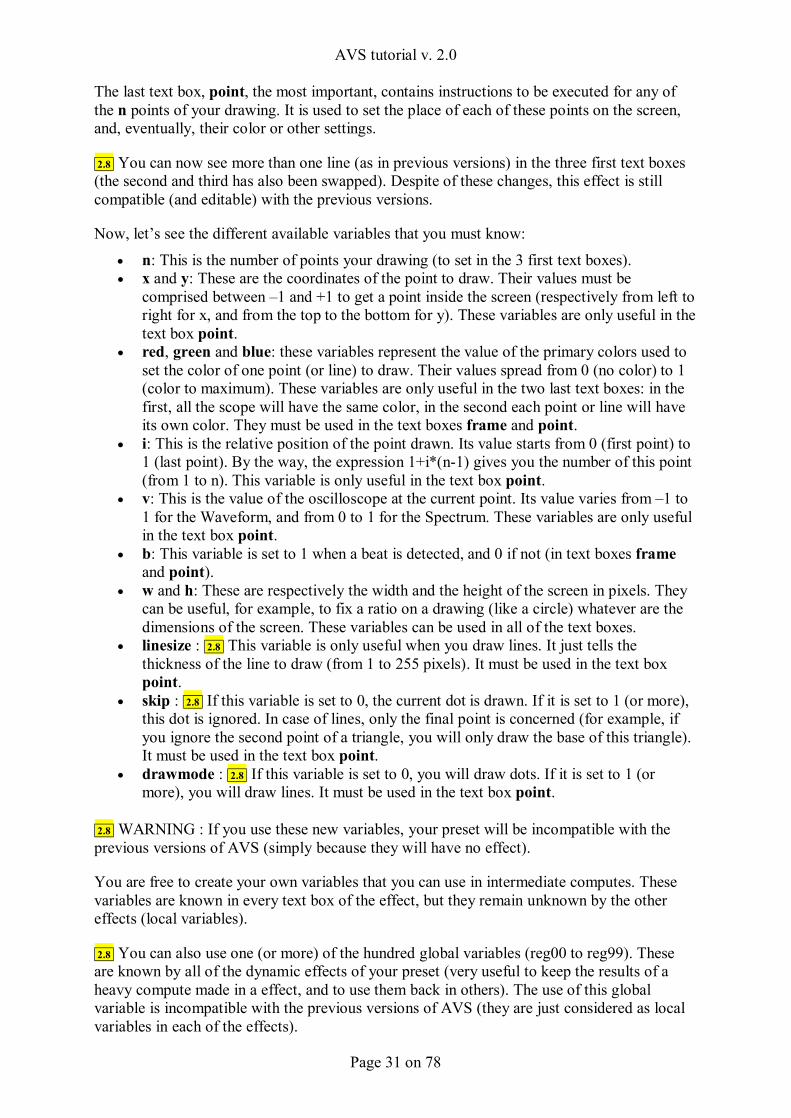
The last text box, point, the most important, contains instructions to be executed for any of the n points of your drawing. It is used to set the place of each of these points on the screen, and, eventually, their color or other settings.
2.8 You can now see more than one line (as in previous versions) in the three first text boxes (the second and third has also been swapped). Despite of these changes, this effect is still compatible (and editable) with the previous versions.
Now, let’s see the different available variables that you must know:
• n: This is the number of points your drawing (to set in the 3 first text boxes). • x and y: These are the coordinates of the point to draw. Their values must be
comprised between –1 and +1 to get a point inside the screen (respectively from left to right for x, and from the top to the bottom for y). These variables are only useful in the text box point.
• red, green and blue: these variables represent the value of the primary colors used to set the color of one point (or line) to draw. Their values spread from 0 (no color) to 1 (color to maximum). These variables are only useful in the two last text boxes: in the first, all the scope will have the same color, in the second each point or line will have its own color. They must be used in the text boxes frame and point.
• i: This is the relative position of the point drawn. Its value starts from 0 (first point) to 1 (last point). By the way, the expression 1+i*(n-1) gives you the number of this point (from 1 to n). This variable is only useful in the text box point.
• v: This is the value of the oscilloscope at the current point. Its value varies from –1 to 1 for the Waveform, and from 0 to 1 for the Spectrum. These variables are only useful in the text box point.
• b: This variable is set to 1 when a beat is detected, and 0 if not (in text boxes frame and point).
• w and h: These are respectively the width and the height of the screen in pixels. They can be useful, for example, to fix a ratio on a drawing (like a circle) whatever are the dimensions of the screen. These variables can be used in all of the text boxes.
• linesize : 2.8 This variable is only useful when you draw lines. It just tells the thickness of the line to draw (from 1 to 255 pixels). It must be used in the text box point.
• skip : 2.8 If this variable is set to 0, the current dot is drawn. If it is set to 1 (or more), this dot is ignored. In case of lines, only the final point is concerned (for example, if you ignore the second point of a triangle, you will only draw the base of this triangle). It must be used in the text box point.
• drawmode : 2.8 If this variable is set to 0, you will draw dots. If it is set to 1 (or more), you will draw lines. It must be used in the text box point.
2.8 WARNING : If you use these new variables, your preset will be incompatible with the previous versions of AVS (simply because they will have no effect).
You are free to create your own variables that you can use in intermediate computes. These variables are known in every text box of the effect, but they remain unknown by the other effects (local variables).
2.8 You can also use one (or more) of the hundred global variables (reg00 to reg99). These are known by all of the dynamic effects of your preset (very useful to keep the results of a heavy compute made in a effect, and to use them back in others). The use of this global variable is incompatible with the previous versions of AVS (they are just considered as local variables in each of the effects).

AVS tutorial v. 2.0
Page 32 on 78
Before starting to write your instructions, I advise you to have a look in the window opened when you click on the expression help button, to try to understand each of the available functions. You can also, and it is probably better, have a look in my own more detailed version in the last chapter of this document (p. 66 et following).
The Load example … button will show you the following popup menu:
(34) SuperScope examples
If you click on the name of one of these fourteen examples ( 2.8 only the seven first in the previous versions), the corresponding instructions will be written in the text boxes (without changing any other setting). One more time, try to understand how these examples work. Then, it will be your turn … Although it is not mandatory, it is better to choose the Source data: in first place. It can be the Waveform, which is a representation of the sound’s wave, or the Spectrum, which is a map of the sound’s frequencies. These data can come from the Left, the Right, or the Center channel (a mix of the both). Then, in the Draw as section, you must choose how AVS will draw your points. It can be Dots or Lines (in that case, the color used to draw a line between two points is the color set for the second one).
If you have not used the red, green and blue variables, you can choose the color for all dots or lines. For this, you must:
• set, in the field Cycle through … colors, the number of colors you want to use (from 1 to 16),
• in the box below, set each of these colors. Finally, AVS will repeatedly use these colors, blending slowly from one to the next between two of them.
Examples:
Text
AVS tutorial v. 2.0
Page 33 on 78
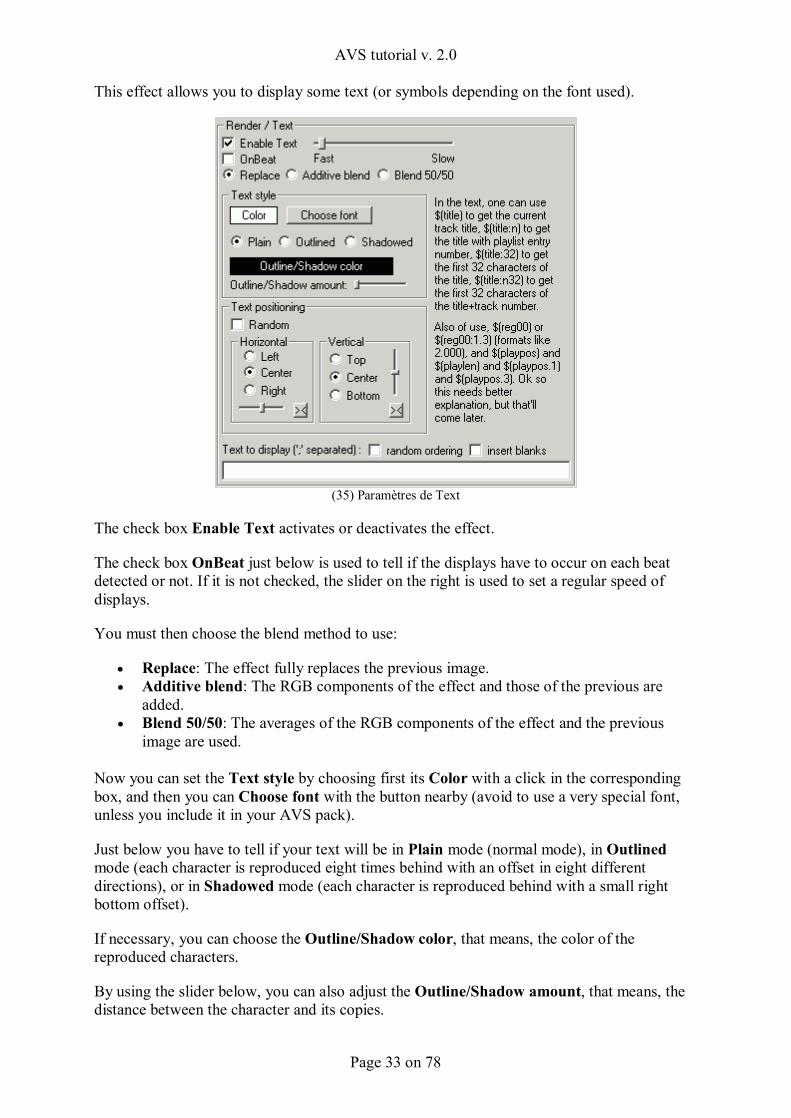
This effect allows you to display some text (or symbols depending on the font used).
(35) Paramètres de Text
The check box Enable Text activates or deactivates the effect.
The check box OnBeat just below is used to tell if the displays have to occur on each beat detected or not. If it is not checked, the slider on the right is used to set a regular speed of displays.
You must then choose the blend method to use:
• Replace: The effect fully replaces the previous image. • Additive blend: The RGB components of the effect and those of the previous are
added. • Blend 50/50: The averages of the RGB components of the effect and the previous
image are used.
Now you can set the Text style by choosing first its Color with a click in the corresponding box, and then you can Choose font with the button nearby (avoid to use a very special font, unless you include it in your AVS pack).
Just below you have to tell if your text will be in Plain mode (normal mode), in Outlined mode (each character is reproduced eight times behind with an offset in eight different directions), or in Shadowed mode (each character is reproduced behind with a small right bottom offset).
If necessary, you can choose the Outline/Shadow color, that means, the color of the reproduced characters.
By using the slider below, you can also adjust the Outline/Shadow amount, that means, the distance between the character and its copies.
AVS tutorial v. 2.0
Page 34 on 78
Now, you have to set the Text positioning. This can be simply Random, in that case, it will appear each time on a different place on the screen. Or you can fix its Horizontal position: on the Left, in the Center or on the Right, and adjust it with the little slider below (the ‘><’ button replaces it back at the original chosen position). And do the same with its Vertical position: at the Top, in the Center or at the Bottom, and adjust it with the little slider on the right (the ‘><’ button replaces it back at the original chosen position).
The check box random ordering tells to AVS to randomly display the pieces of your text (see below) rather than the order you typed it.
The check box insert blanks is used to add "space" between each new display. In other words, once on two, no text is displayed.
You finally have to write the Text to display. If you want the text appears piece-by-piece, just add semicolon between each piece you want.
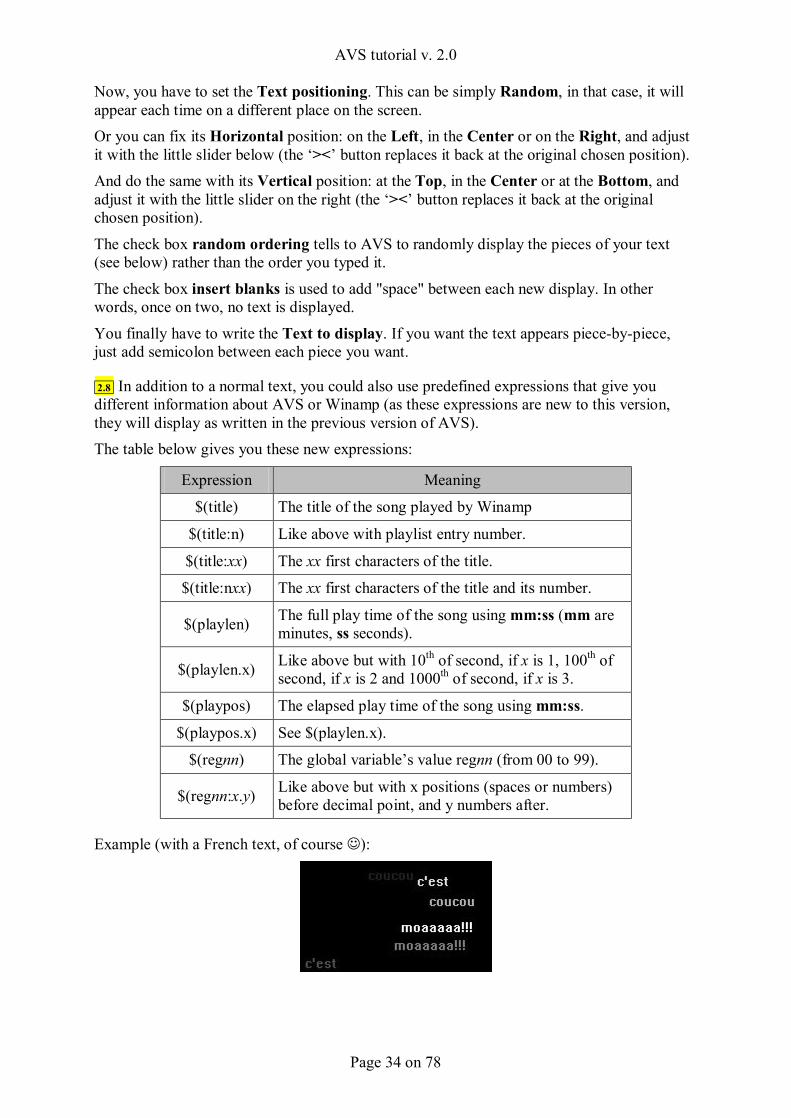
2.8 In addition to a normal text, you could also use predefined expressions that give you different information about AVS or Winamp (as these expressions are new to this version, they will display as written in the previous version of AVS). The table below gives you these new expressions:
Expression Meaning
$(title) The title of the song played by Winamp
$(title:n) Like above with playlist entry number.
$(title:xx) The xx first characters of the title.
$(title:nxx) The xx first characters of the title and its number.
$(playlen) The full play time of the song using mm:ss (mm are minutes, ss seconds).
$(playlen.x) Like above but with 10th of second, if x is 1, 100th of second, if x is 2 and 1000th of second, if x is 3.
$(playpos) The elapsed play time of the song using mm:ss.
$(playpos.x) See $(playlen.x).
$(regnn) The global variable’s value regnn (from 00 to 99).
$(regnn:x.y) Like above but with x positions (spaces or numbers) before decimal point, and y numbers after.
Example (with a French text, of course ☺):
AVS tutorial v. 2.0
Page 35 on 78
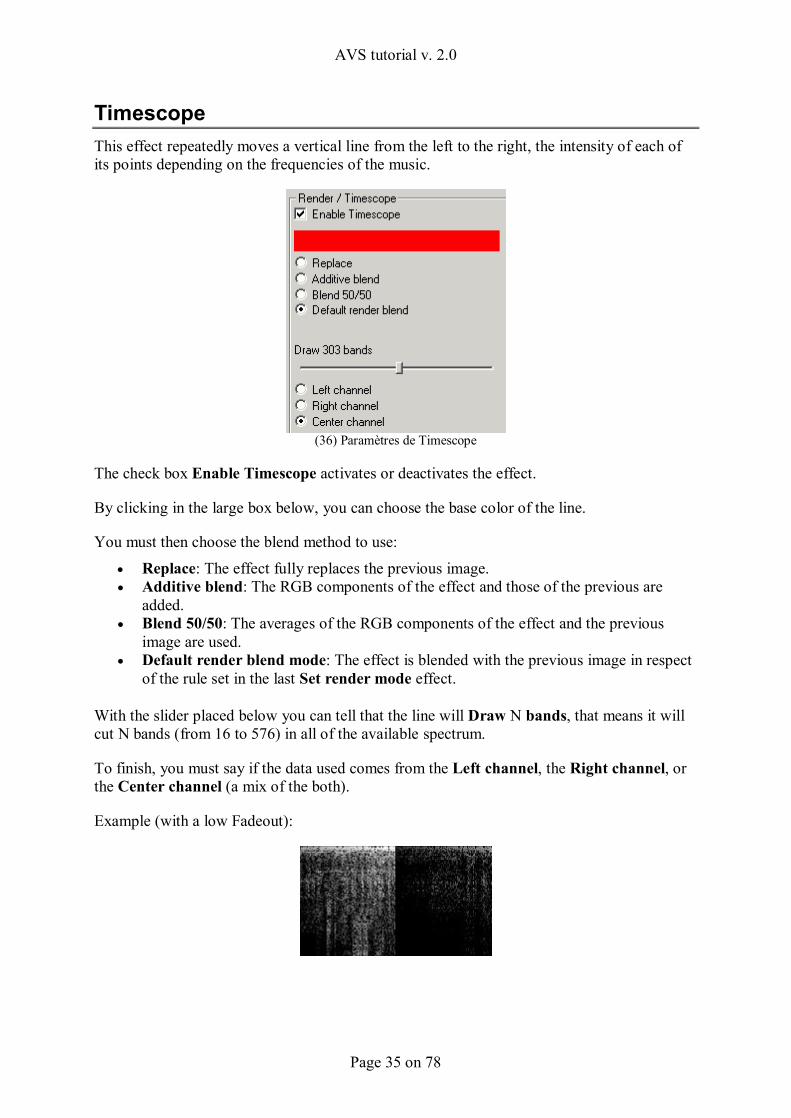
Timescope This effect repeatedly moves a vertical line from the left to the right, the intensity of each of its points depending on the frequencies of the music.
(36) Paramètres de Timescope
The check box Enable Timescope activates or deactivates the effect.
By clicking in the large box below, you can choose the base color of the line.
You must then choose the blend method to use:
• Replace: The effect fully replaces the previous image. • Additive blend: The RGB components of the effect and those of the previous are
added. • Blend 50/50: The averages of the RGB components of the effect and the previous
image are used. • Default render blend mode: The effect is blended with the previous image in respect
of the rule set in the last Set render mode effect.
With the slider placed below you can tell that the line will Draw N bands, that means it will cut N bands (from 16 to 576) in all of the available spectrum.
To finish, you must say if the data used comes from the Left channel, the Right channel, or the Center channel (a mix of the both).
Example (with a low Fadeout):
AVS tutorial v. 2.0
Page 36 on 78
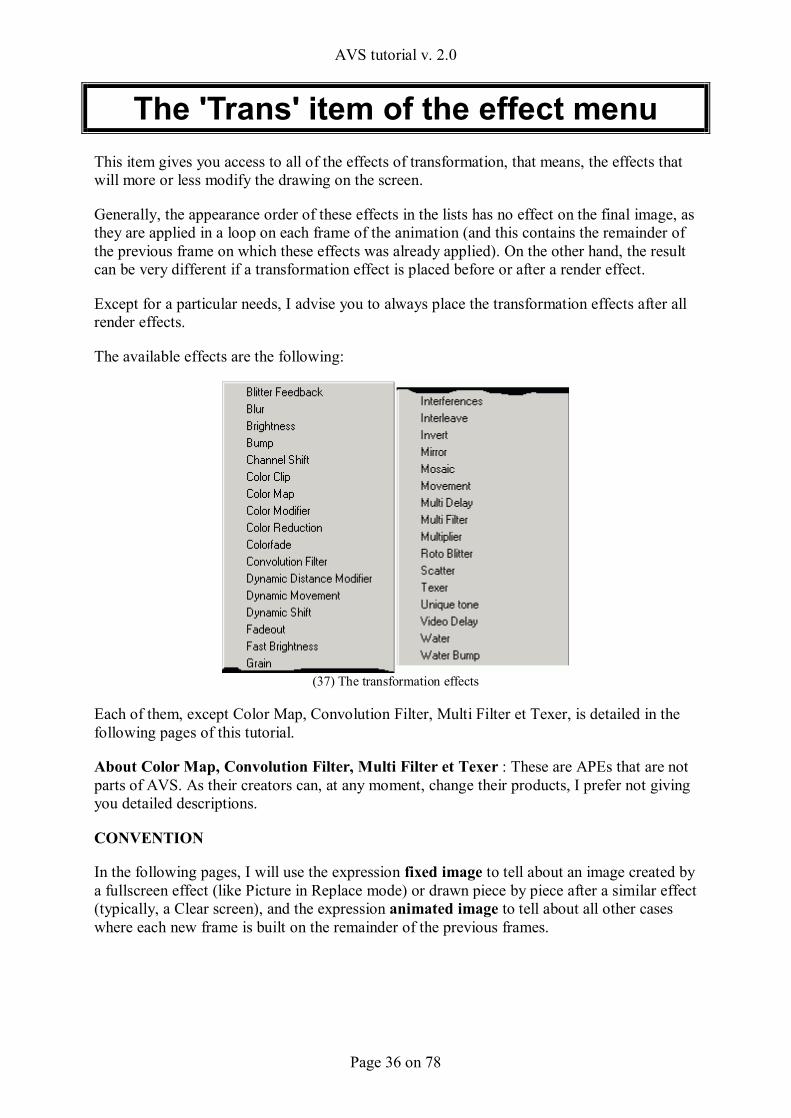
The 'Trans' item of the effect menu This item gives you access to all of the effects of transformation, that means, the effects that will more or less modify the drawing on the screen.
Generally, the appearance order of these effects in the lists has no effect on the final image, as they are applied in a loop on each frame of the animation (and this contains the remainder of the previous frame on which these effects was already applied). On the other hand, the result can be very different if a transformation effect is placed before or after a render effect.
Except for a particular needs, I advise you to always place the transformation effects after all render effects.
The available effects are the following:
(37) The transformation effects
Each of them, except Color Map, Convolution Filter, Multi Filter et Texer, is detailed in the following pages of this tutorial.
About Color Map, Convolution Filter, Multi Filter et Texer : These are APEs that are not parts of AVS. As their creators can, at any moment, change their products, I prefer not giving you detailed descriptions.
CONVENTION
In the following pages, I will use the expression fixed image to tell about an image created by a fullscreen effect (like Picture in Replace mode) or drawn piece by piece after a similar effect (typically, a Clear screen), and the expression animated image to tell about all other cases where each new frame is built on the remainder of the previous frames.

AVS tutorial v. 2.0
Page 37 on 78
Blitter Feedback This effect creates a copy of the current image and resizes it. Applied to a fixed image, it is like a simple zoom. With an animated image, it gives you the sensation of moving forward or backward.
(38) Paramètres de Blitter Feedback
The first slider Blitter direction allows you to make a Zooming in or a Zooming out.
The Blitter direction (onbeat) is activated with the check box Enable on-beat changes and allows you to change the power of the zoom to the new value set with the slider below on each beat detected.
The check box Blend blitter is used to blend the resulting image, instead of replacing the existing image.
Finally, the check box Bilinear filtering can be used to smooth the image (otherwise the effect will look pixellated).
Example on a animated image (without and with the effect):
Example on a fixed image (without and with the effect):
AVS tutorial v. 2.0
Page 38 on 78
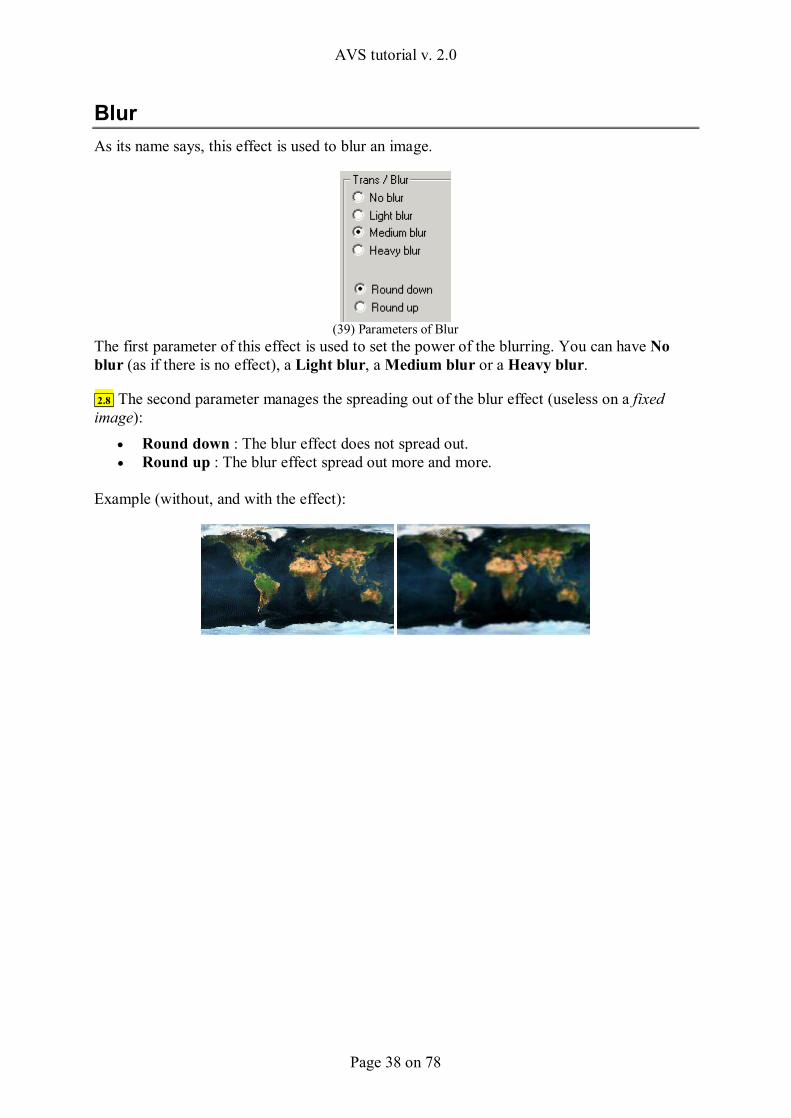
Blur As its name says, this effect is used to blur an image.
(39) Parameters of Blur
The first parameter of this effect is used to set the power of the blurring. You can have No blur (as if there is no effect), a Light blur, a Medium blur or a Heavy blur.
2.8 The second parameter manages the spreading out of the blur effect (useless on a fixed image):
• Round down : The blur effect does not spread out. • Round up : The blur effect spread out more and more.
Example (without, and with the effect):
AVS tutorial v. 2.0
Page 39 on 78
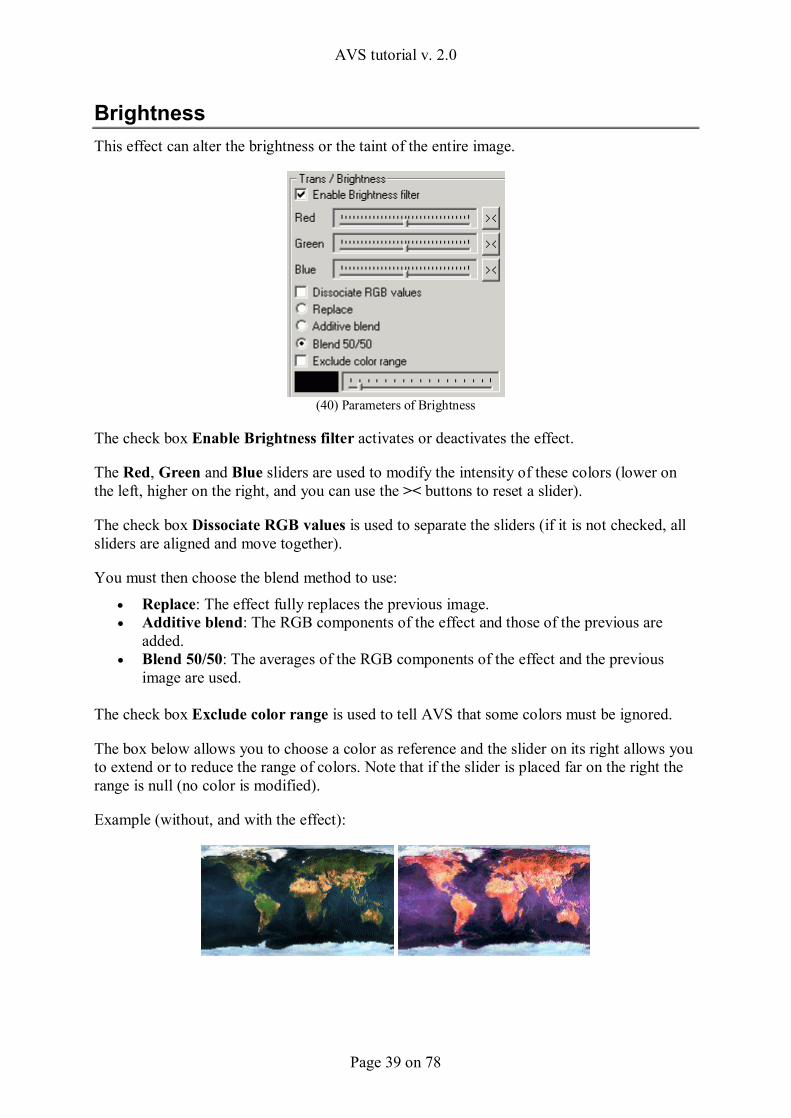
Brightness This effect can alter the brightness or the taint of the entire image.
(40) Parameters of Brightness
The check box Enable Brightness filter activates or deactivates the effect.
The Red, Green and Blue sliders are used to modify the intensity of these colors (lower on the left, higher on the right, and you can use the >< buttons to reset a slider).
The check box Dissociate RGB values is used to separate the sliders (if it is not checked, all sliders are aligned and move together).
You must then choose the blend method to use:
• Replace: The effect fully replaces the previous image. • Additive blend: The RGB components of the effect and those of the previous are
added. • Blend 50/50: The averages of the RGB components of the effect and the previous
image are used.
The check box Exclude color range is used to tell AVS that some colors must be ignored.
The box below allows you to choose a color as reference and the slider on its right allows you to extend or to reduce the range of colors. Note that if the slider is placed far on the right the range is null (no color is modified).
Example (without, and with the effect):
AVS tutorial v. 2.0
Page 40 on 78
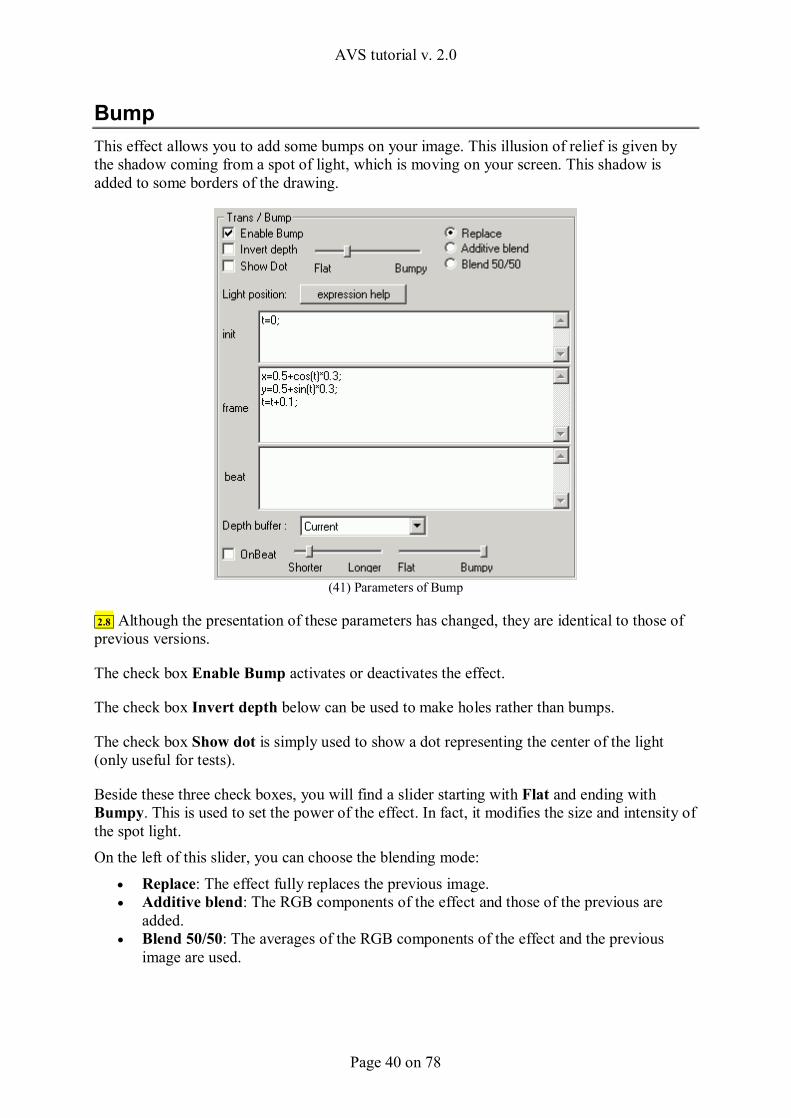
Bump This effect allows you to add some bumps on your image. This illusion of relief is given by the shadow coming from a spot of light, which is moving on your screen. This shadow is added to some borders of the drawing.
(41) Parameters of Bump
2.8 Although the presentation of these parameters has changed, they are identical to those of previous versions.
The check box Enable Bump activates or deactivates the effect.
The check box Invert depth below can be used to make holes rather than bumps.
The check box Show dot is simply used to show a dot representing the center of the light (only useful for tests).
Beside these three check boxes, you will find a slider starting with Flat and ending with Bumpy. This is used to set the power of the effect. In fact, it modifies the size and intensity of the spot light. On the left of this slider, you can choose the blending mode:
• Replace: The effect fully replaces the previous image. • Additive blend: The RGB components of the effect and those of the previous are
added. • Blend 50/50: The averages of the RGB components of the effect and the previous
image are used.
AVS tutorial v. 2.0
Page 41 on 78
Just below, you can set the Light position. For that, you have three text boxes in which you can write your instructions to manage the moves of the spot of light (see SuperScope for more information). You can also click on the expression help button to have an overview on the available functions:
• The first text box, init, holds instructions to be executed on the beginning of the animation. It is generally used to initialize some variables.
• The next one, frame, contains instructions to be executed on each frame. It is used to manage the position of the light in each frame.
• The last one, beat, holds instructions to be executed on each beat detected. It is frequently used to modify some variables in order to alter the moves.
Now, let’s see the available variables you have to know:
• x and y: These are the coordinates of the center of the spot light. You must give them a value to place the light. This value goes from 0 (on the left for x, and at the top for y), to 1 (on the right for x and at the bottom for y).
• bi: This variable is used to manage the height of the bumps. Its value must be between 0 (flat) to 1 (height set with the slider above).
• isBeat: This variable is only needed to know if a beat has been detected (equals to –1) or not (equals to 1).
• isLBeat: This variable works like the previous, but only when the check box OnBeat is checked (in fact, it just tells when a persistent beat is detected).
The combo box Depth buffer allows you to choose the origin of the image used to control the effect. This image can be the Current or one present in Buffer 1 to Buffer 8.
The check box OnBeat allows you to modify the length of a beat detected (its persistence in time) by using the slider from Shorter to Longer, and the height of the bumps during this time by using the slider from Flat to Bumpy.
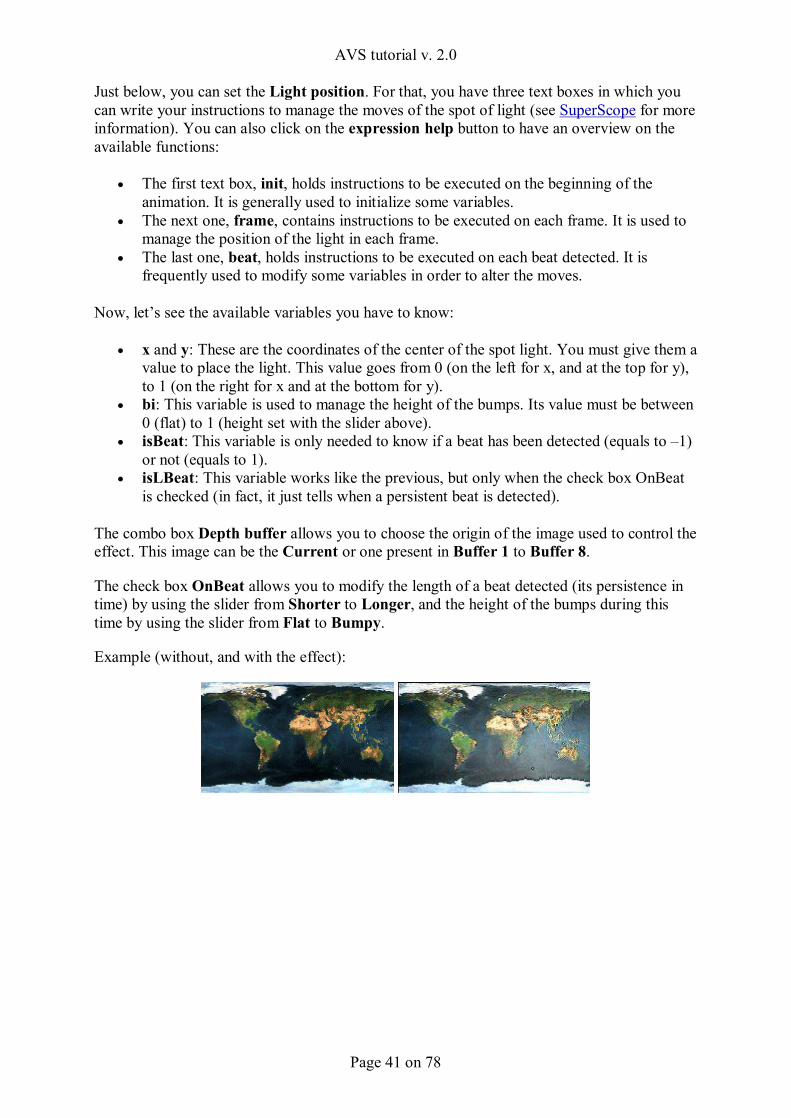
Example (without, and with the effect):
AVS tutorial v. 2.0
Page 42 on 78
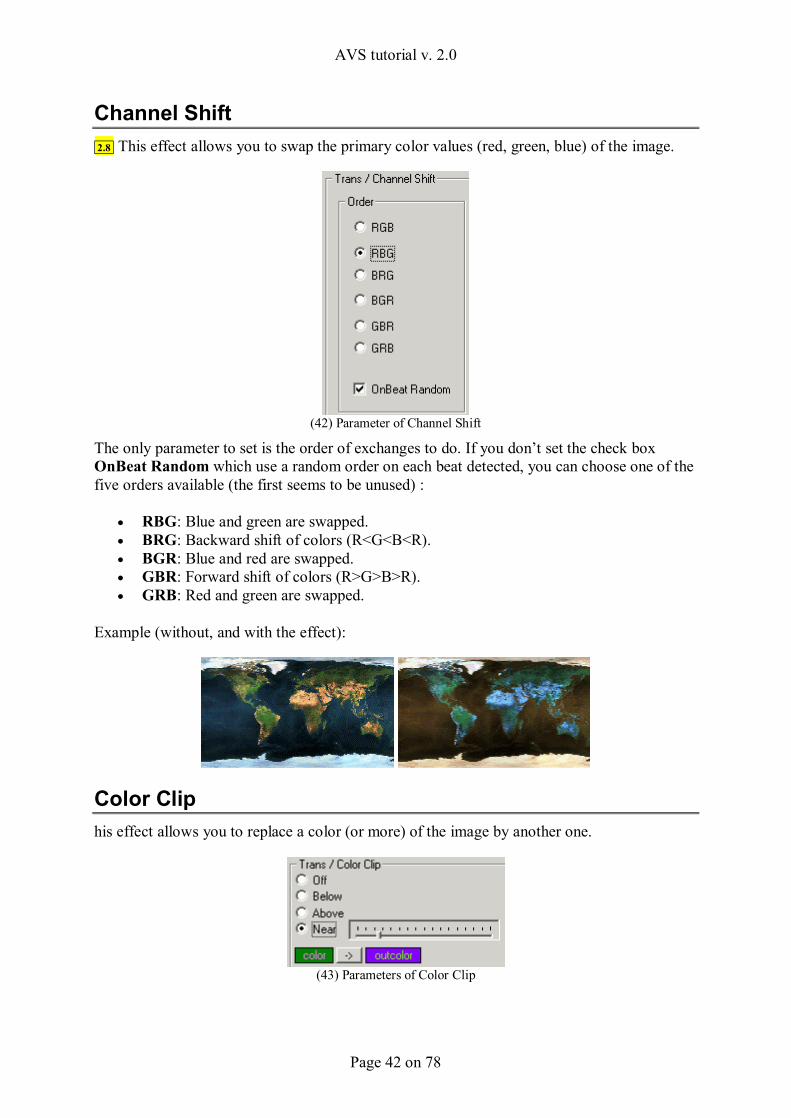
Channel Shift 2.8 This effect allows you to swap the primary color values (red, green, blue) of the image.
(42) Parameter of Channel Shift
The only parameter to set is the order of exchanges to do. If you don’t set the check box OnBeat Random which use a random order on each beat detected, you can choose one of the five orders available (the first seems to be unused) :
• RBG: Blue and green are swapped. • BRG: Backward shift of colors (R<G<B<R). • BGR: Blue and red are swapped. • GBR: Forward shift of colors (R>G>B>R). • GRB: Red and green are swapped.
Example (without, and with the effect):
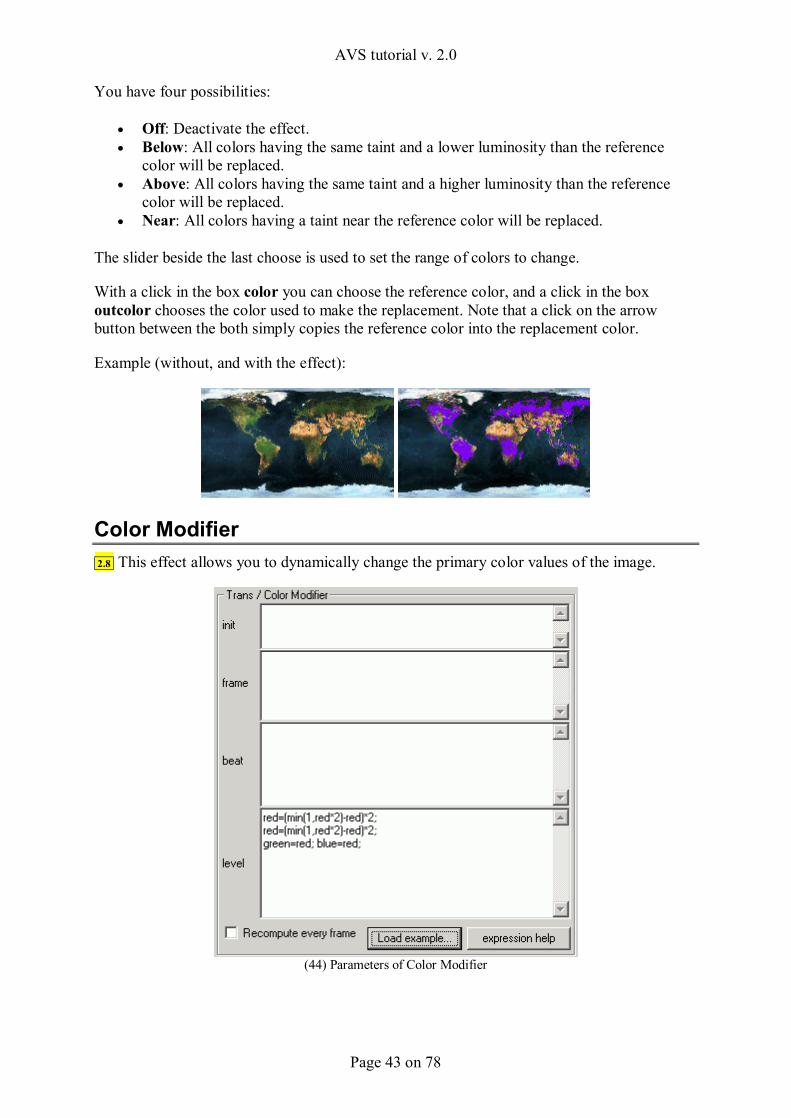
Color Clip his effect allows you to replace a color (or more) of the image by another one.
(43) Parameters of Color Clip
AVS tutorial v. 2.0
Page 43 on 78
You have four possibilities:
• Off: Deactivate the effect. • Below: All colors having the same taint and a lower luminosity than the reference
color will be replaced. • Above: All colors having the same taint and a higher luminosity than the reference
color will be replaced. • Near: All colors having a taint near the reference color will be replaced.
The slider beside the last choose is used to set the range of colors to change.
With a click in the box color you can choose the reference color, and a click in the box outcolor chooses the color used to make the replacement. Note that a click on the arrow button between the both simply copies the reference color into the replacement color.
Example (without, and with the effect):
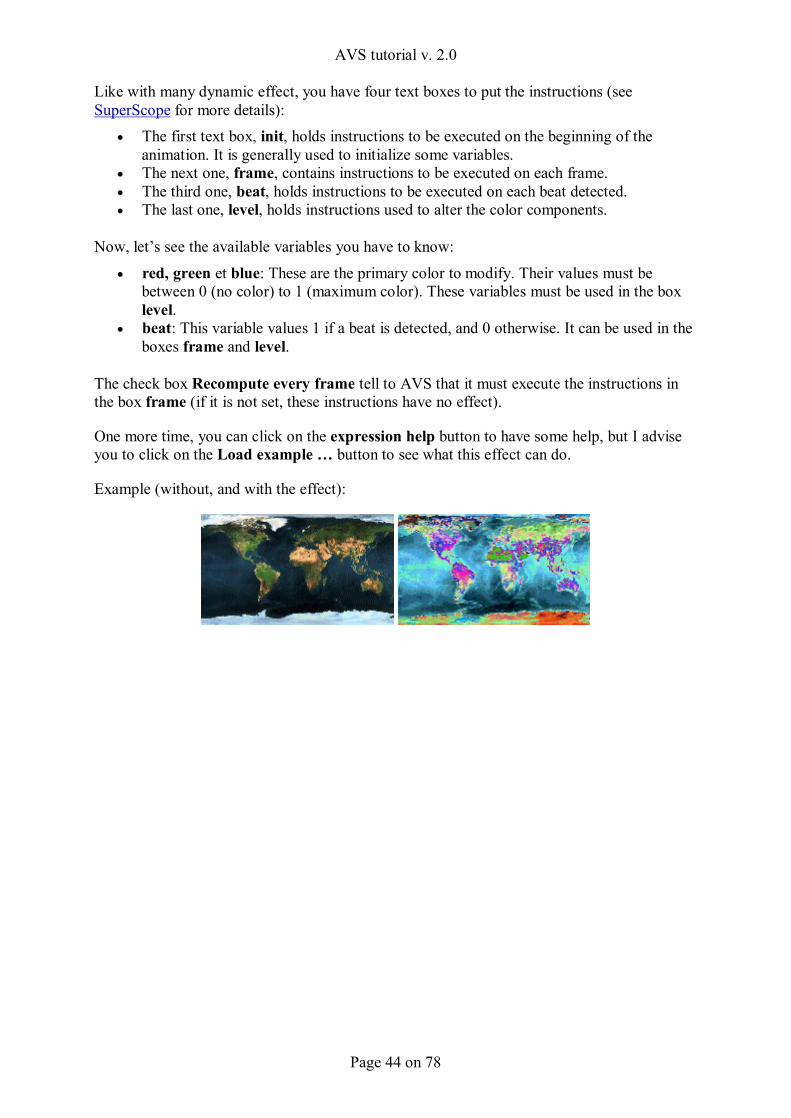
Color Modifier 2.8 This effect allows you to dynamically change the primary color values of the image.
(44) Parameters of Color Modifier
AVS tutorial v. 2.0
Page 44 on 78
Like with many dynamic effect, you have four text boxes to put the instructions (see SuperScope for more details):
• The first text box, init, holds instructions to be executed on the beginning of the animation. It is generally used to initialize some variables.
• The next one, frame, contains instructions to be executed on each frame. • The third one, beat, holds instructions to be executed on each beat detected. • The last one, level, holds instructions used to alter the color components.
Now, let’s see the available variables you have to know:
• red, green et blue: These are the primary color to modify. Their values must be between 0 (no color) to 1 (maximum color). These variables must be used in the box level.
• beat: This variable values 1 if a beat is detected, and 0 otherwise. It can be used in the boxes frame and level.
The check box Recompute every frame tell to AVS that it must execute the instructions in the box frame (if it is not set, these instructions have no effect).
One more time, you can click on the expression help button to have some help, but I advise you to click on the Load example … button to see what this effect can do.
Example (without, and with the effect):
AVS tutorial v. 2.0
Page 45 on 78
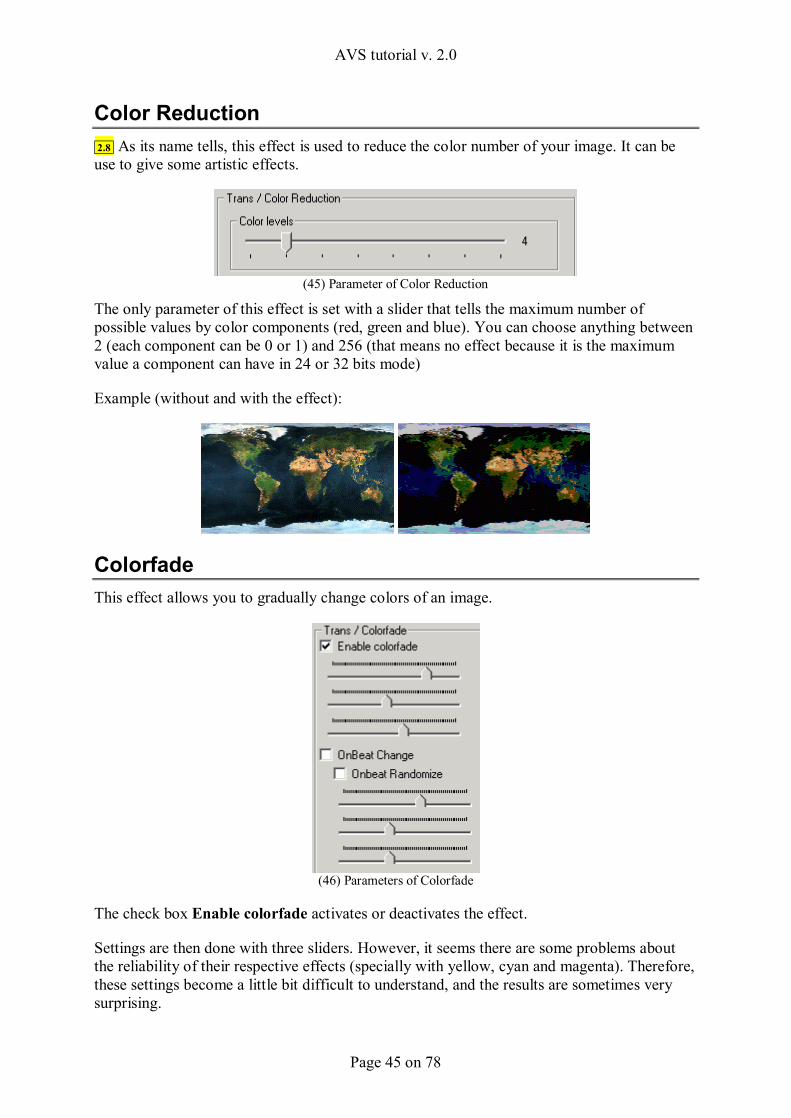
Color Reduction 2.8 As its name tells, this effect is used to reduce the color number of your image. It can be use to give some artistic effects.
(45) Parameter of Color Reduction
The only parameter of this effect is set with a slider that tells the maximum number of possible values by color components (red, green and blue). You can choose anything between 2 (each component can be 0 or 1) and 256 (that means no effect because it is the maximum value a component can have in 24 or 32 bits mode)
Example (without and with the effect):
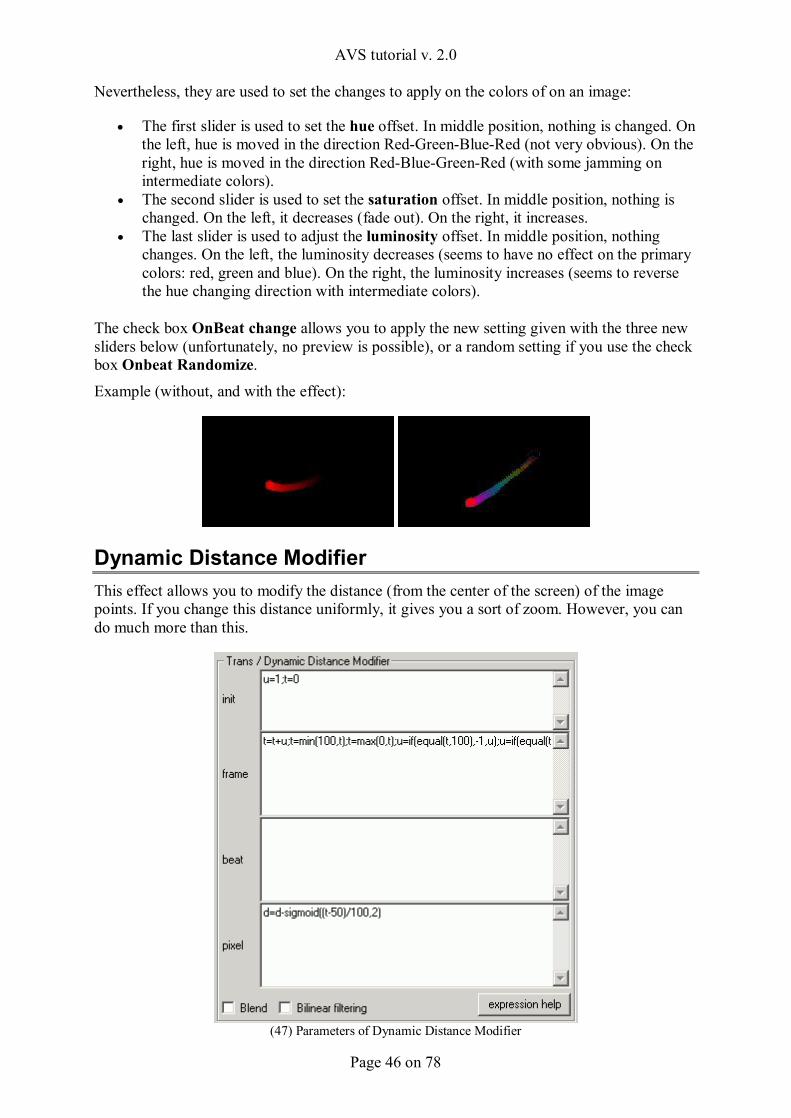
Colorfade This effect allows you to gradually change colors of an image.
(46) Parameters of Colorfade
The check box Enable colorfade activates or deactivates the effect.
Settings are then done with three sliders. However, it seems there are some problems about the reliability of their respective effects (specially with yellow, cyan and magenta). Therefore, these settings become a little bit difficult to understand, and the results are sometimes very surprising.
AVS tutorial v. 2.0
Page 46 on 78
Nevertheless, they are used to set the changes to apply on the colors of on an image:
• The first slider is used to set the hue offset. In middle position, nothing is changed. On the left, hue is moved in the direction Red-Green-Blue-Red (not very obvious). On the right, hue is moved in the direction Red-Blue-Green-Red (with some jamming on intermediate colors).
• The second slider is used to set the saturation offset. In middle position, nothing is changed. On the left, it decreases (fade out). On the right, it increases.
• The last slider is used to adjust the luminosity offset. In middle position, nothing changes. On the left, the luminosity decreases (seems to have no effect on the primary colors: red, green and blue). On the right, the luminosity increases (seems to reverse the hue changing direction with intermediate colors).
The check box OnBeat change allows you to apply the new setting given with the three new sliders below (unfortunately, no preview is possible), or a random setting if you use the check box Onbeat Randomize.
Example (without, and with the effect):
Dynamic Distance Modifier This effect allows you to modify the distance (from the center of the screen) of the image points. If you change this distance uniformly, it gives you a sort of zoom. However, you can do much more than this.
(47) Parameters of Dynamic Distance Modifier

AVS tutorial v. 2.0
Page 47 on 78
You have first four text boxes in which you will write your instructions (see SuperScope for more information) with which you will control the distance as you want.
The first text box init holds instructions to be executed on the very beginning of the preset (when loaded, so just once). It is generally used to initialize some variables.
The next one contains instructions to be executed per frame, that means on the beginning of each frame. It is used to initialize or to modify some variables to manage the changing by frames (to create the ‘animation’).
The third holds instructions to be executed on beat, that means, each time a beat is detected. It is frequently used to modify some variables in order to alter the drawings.
The last text box, the most important, contains instructions to be executed per pixel circle, that means for any sets of pixels placed at the same distance from the center.
Now, let’s see the different available variables that you must know:
• d: It is the only variable that manages all the effect. It is used to tell at which distance must be taken the points that will be placed at the current distance. Note that if this distance is negative, the points will be taken on the opposite side (by the way, d=-d simply reverse the image. This variable is only useable in the last text box.
• b: This variable is set to 1 when a beat is detected, and 0 if not.
You can still use the expression help button to have a review of the available functions.
The check box Blend can be used to blend the result with the original image (rather than replace it).
Finally, the check box Bilinear filtering can be used to smooth the image (otherwise the effect will look pixellated).
Example (without, and with the effect):
AVS tutorial v. 2.0
Page 48 on 78
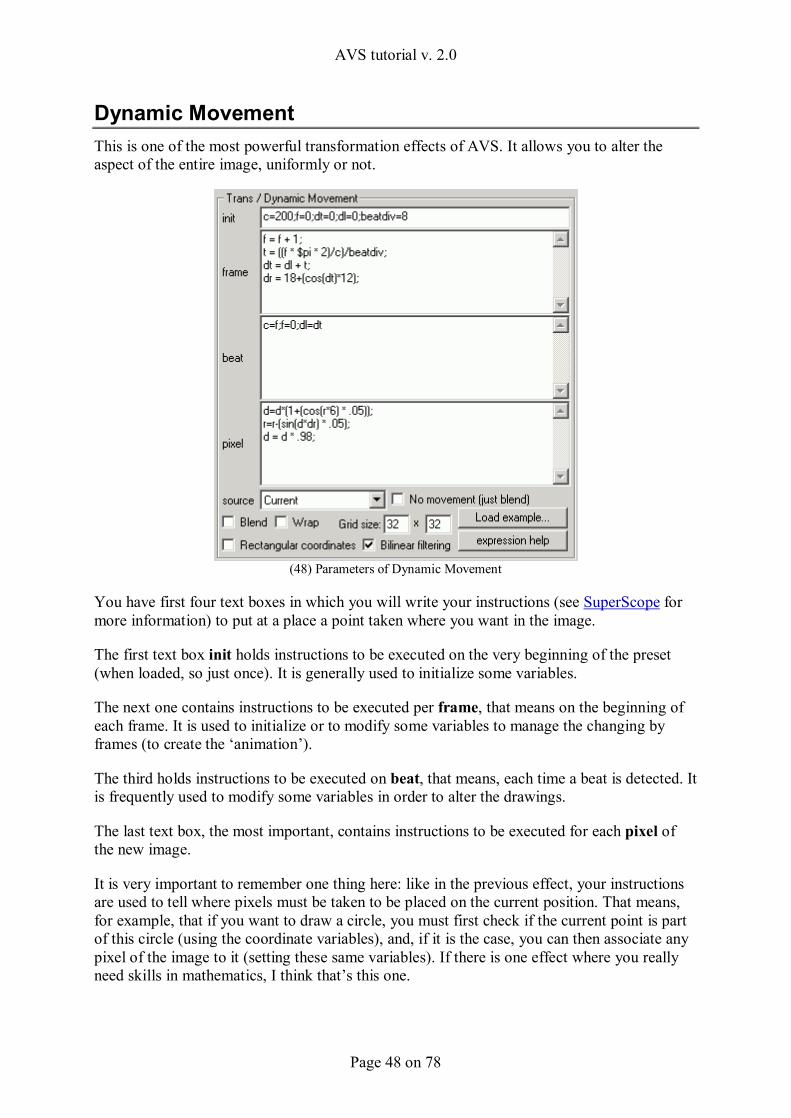
Dynamic Movement This is one of the most powerful transformation effects of AVS. It allows you to alter the aspect of the entire image, uniformly or not.
(48) Parameters of Dynamic Movement
You have first four text boxes in which you will write your instructions (see SuperScope for more information) to put at a place a point taken where you want in the image.
The first text box init holds instructions to be executed on the very beginning of the preset (when loaded, so just once). It is generally used to initialize some variables.
The next one contains instructions to be executed per frame, that means on the beginning of each frame. It is used to initialize or to modify some variables to manage the changing by frames (to create the ‘animation’).
The third holds instructions to be executed on beat, that means, each time a beat is detected. It is frequently used to modify some variables in order to alter the drawings.
The last text box, the most important, contains instructions to be executed for each pixel of the new image.
It is very important to remember one thing here: like in the previous effect, your instructions are used to tell where pixels must be taken to be placed on the current position. That means, for example, that if you want to draw a circle, you must first check if the current point is part of this circle (using the coordinate variables), and, if it is the case, you can then associate any pixel of the image to it (setting these same variables). If there is one effect where you really need skills in mathematics, I think that’s this one.
AVS tutorial v. 2.0
Page 49 on 78
Now, let’s see the different available variables that you must know:
• d and r: These are the polar coordinates (see below) of the current pixel (on reading) or of the pixel to copy (on writing). Respectively, distance from the center ranging from 0 to 1, and rotation angle ranging from 0 to 2*Pi.
• x and y: These are the rectangular coordinates (see below) of the current pixel (on reading) or of the pixel to copy (on writing). Respectively, horizontal and vertical, both ranging from –1 to 1.
• w and h: These are respectively the width and the height of the screen in pixels. They can be useful, for example, to fix a ratio on a transformation whatever are the dimensions of the screen.
• alpha: This variable allows you to control the intensity of the resulting image when the blending is activated. Its value goes from 0 (fully transparent, the image is invisible) to 1 (the image erase the previous one).
• b: This variable is set to 1 when a beat is detected, and 0 if not.
You can still use the expression help button to have a review of the available functions (and only the functions because there is still no explanation on the effect itself).
2.8 A very good way to learn more on this effect, is given with the Load example … button. If you click on it, AVS will give you some good examples.
The combo box source allows you to choose the origin of the image used to realize the effect. This image can be the Current or one present in Buffer 1 to Buffer 8.
The check box No movement (just blend) can be used if you only want to blend the source image (playing with alpha variable for example).
The check box Blend allows you to blend the resulting image with the previous image (rather than replace it).
The check box Wrap is used to copy the source image in all directions. This allows you to give coordinates out of the original screen and to take a point in a copy of the original (without this option, the nearest pixel to the border is used).
The both fields of the Grid Size are used to set the dimension of the interpolation grid. In order to improve speed, AVS does not make the computes you give for all of the pixels of the image. Instead, it applies them only to the pixels on the interpolation grid, and then interpolates the others. To get best results, the size of this grid must be about 10% of the image size (for 640x400 you must give 64x40). By changing these values, you can get very surprising but interesting effects. In some very special case, a 1x1 grid can be used (for example, if you just want to fill up the entire screen with the color of one given pixel no matter the current pixel position).
AVS tutorial v. 2.0
Page 50 on 78
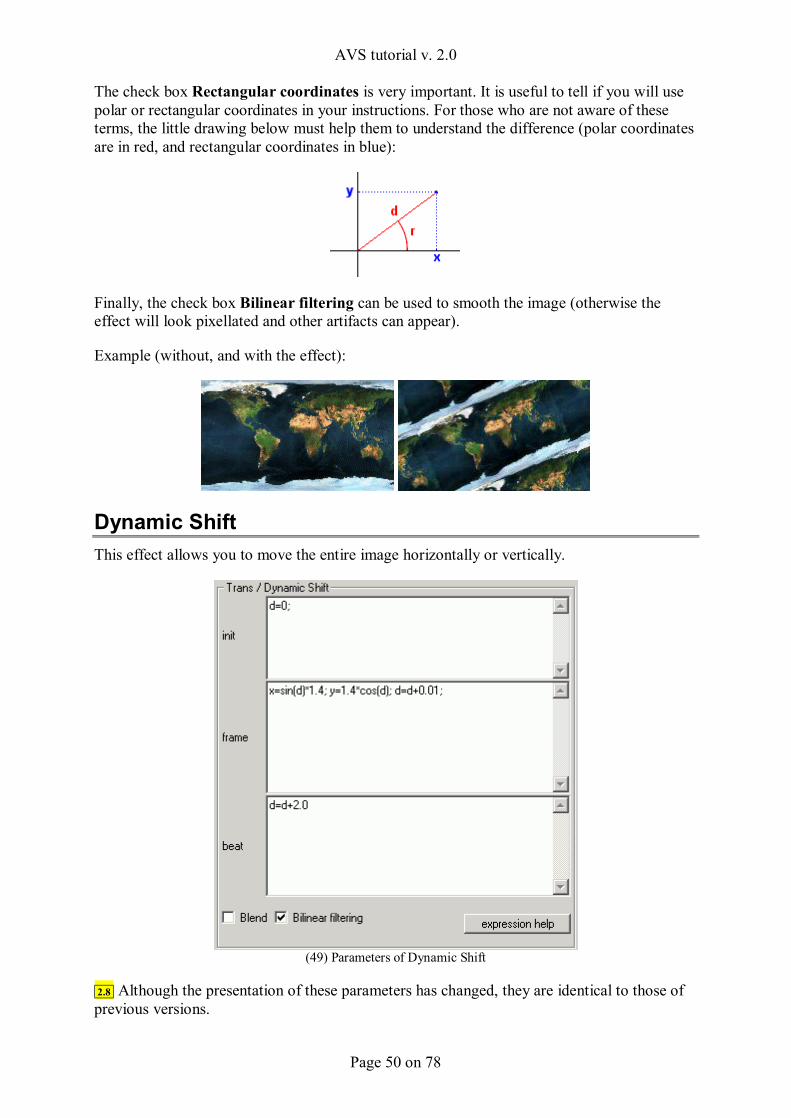
The check box Rectangular coordinates is very important. It is useful to tell if you will use polar or rectangular coordinates in your instructions. For those who are not aware of these terms, the little drawing below must help them to understand the difference (polar coordinates are in red, and rectangular coordinates in blue):
Finally, the check box Bilinear filtering can be used to smooth the image (otherwise the effect will look pixellated and other artifacts can appear).
Example (without, and with the effect):
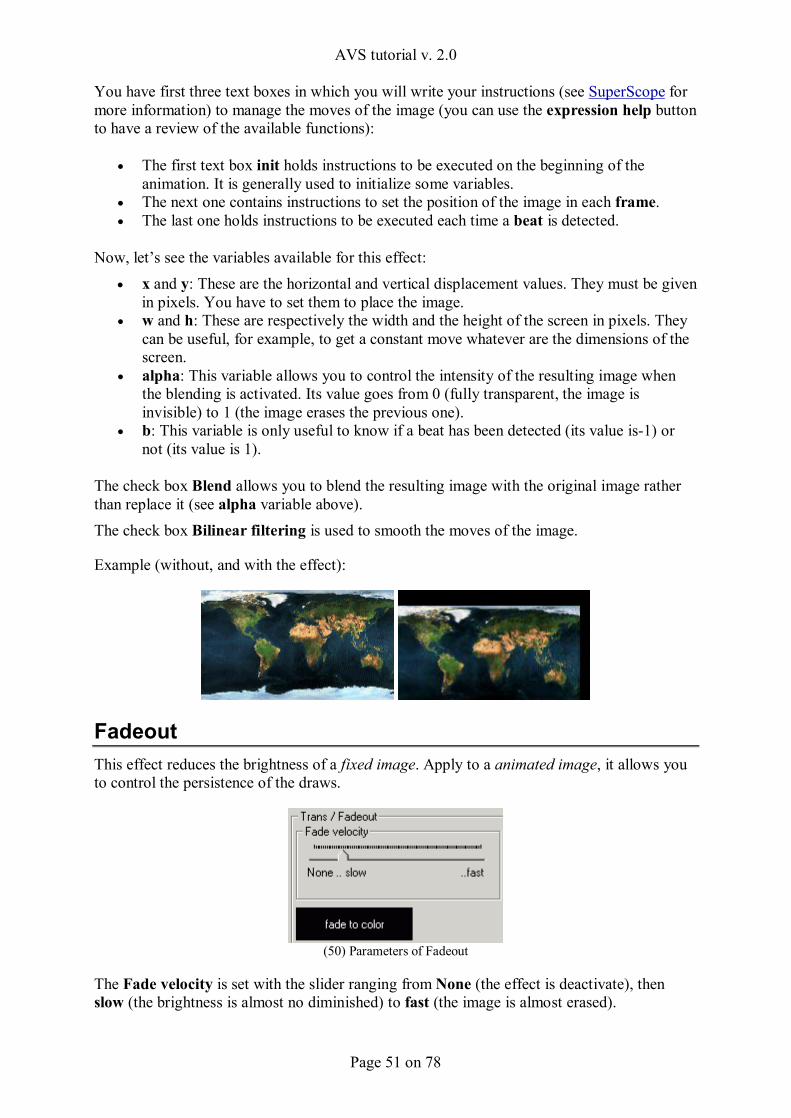
Dynamic Shift This effect allows you to move the entire image horizontally or vertically.
(49) Parameters of Dynamic Shift
2.8 Although the presentation of these parameters has changed, they are identical to those of previous versions.
AVS tutorial v. 2.0
Page 51 on 78
You have first three text boxes in which you will write your instructions (see SuperScope for more information) to manage the moves of the image (you can use the expression help button to have a review of the available functions):
• The first text box init holds instructions to be executed on the beginning of the animation. It is generally used to initialize some variables.
• The next one contains instructions to set the position of the image in each frame. • The last one holds instructions to be executed each time a beat is detected.
Now, let’s see the variables available for this effect: • x and y: These are the horizontal and vertical displacement values. They must be given
in pixels. You have to set them to place the image. • w and h: These are respectively the width and the height of the screen in pixels. They
can be useful, for example, to get a constant move whatever are the dimensions of the screen.
• alpha: This variable allows you to control the intensity of the resulting image when the blending is activated. Its value goes from 0 (fully transparent, the image is invisible) to 1 (the image erases the previous one).
• b: This variable is only useful to know if a beat has been detected (its value is-1) or not (its value is 1).
The check box Blend allows you to blend the resulting image with the original image rather than replace it (see alpha variable above). The check box Bilinear filtering is used to smooth the moves of the image.
Example (without, and with the effect):
Fadeout This effect reduces the brightness of a fixed image. Apply to a animated image, it allows you to control the persistence of the draws.
(50) Parameters of Fadeout
The Fade velocity is set with the slider ranging from None (the effect is deactivate), then slow (the brightness is almost no diminished) to fast (the image is almost erased).
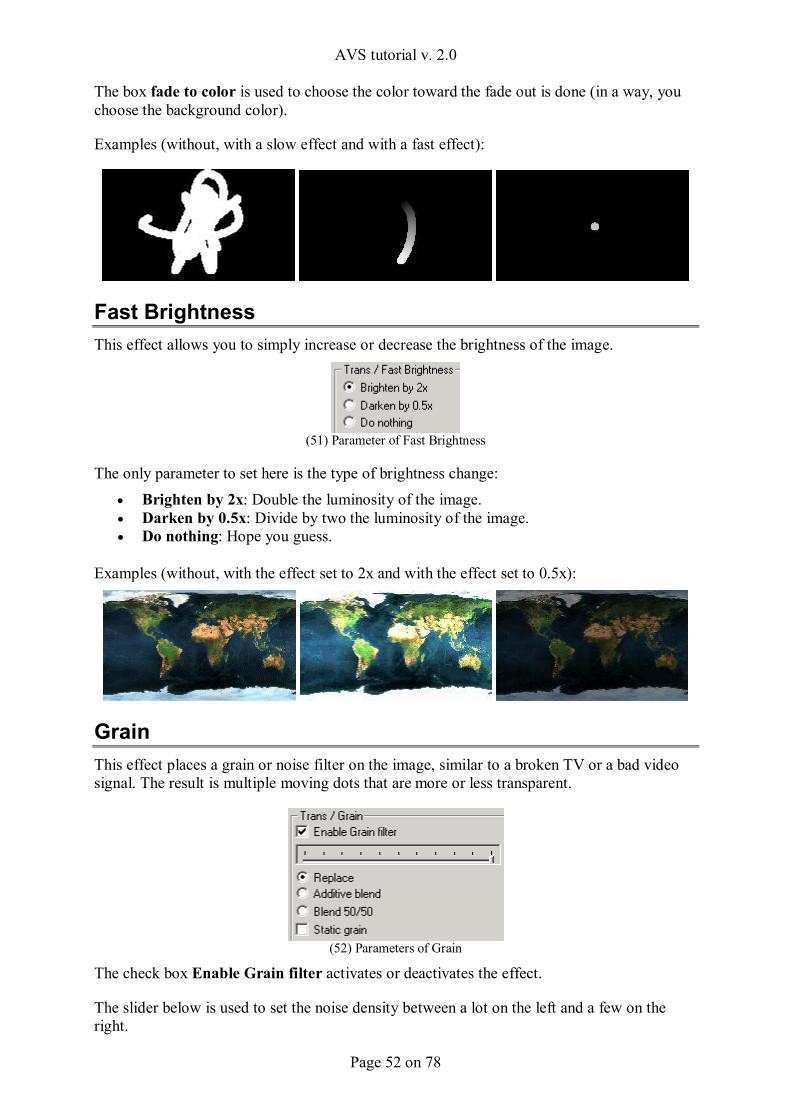
AVS tutorial v. 2.0
Page 52 on 78
The box fade to color is used to choose the color toward the fade out is done (in a way, you choose the background color).
Examples (without, with a slow effect and with a fast effect):
Fast Brightness This effect allows you to simply increase or decrease the brightness of the image.
(51) Parameter of Fast Brightness
The only parameter to set here is the type of brightness change: • Brighten by 2x: Double the luminosity of the image. • Darken by 0.5x: Divide by two the luminosity of the image. • Do nothing: Hope you guess.
Examples (without, with the effect set to 2x and with the effect set to 0.5x):
Grain This effect places a grain or noise filter on the image, similar to a broken TV or a bad video signal. The result is multiple moving dots that are more or less transparent.
(52) Parameters of Grain
The check box Enable Grain filter activates or deactivates the effect.
The slider below is used to set the noise density between a lot on the left and a few on the right.
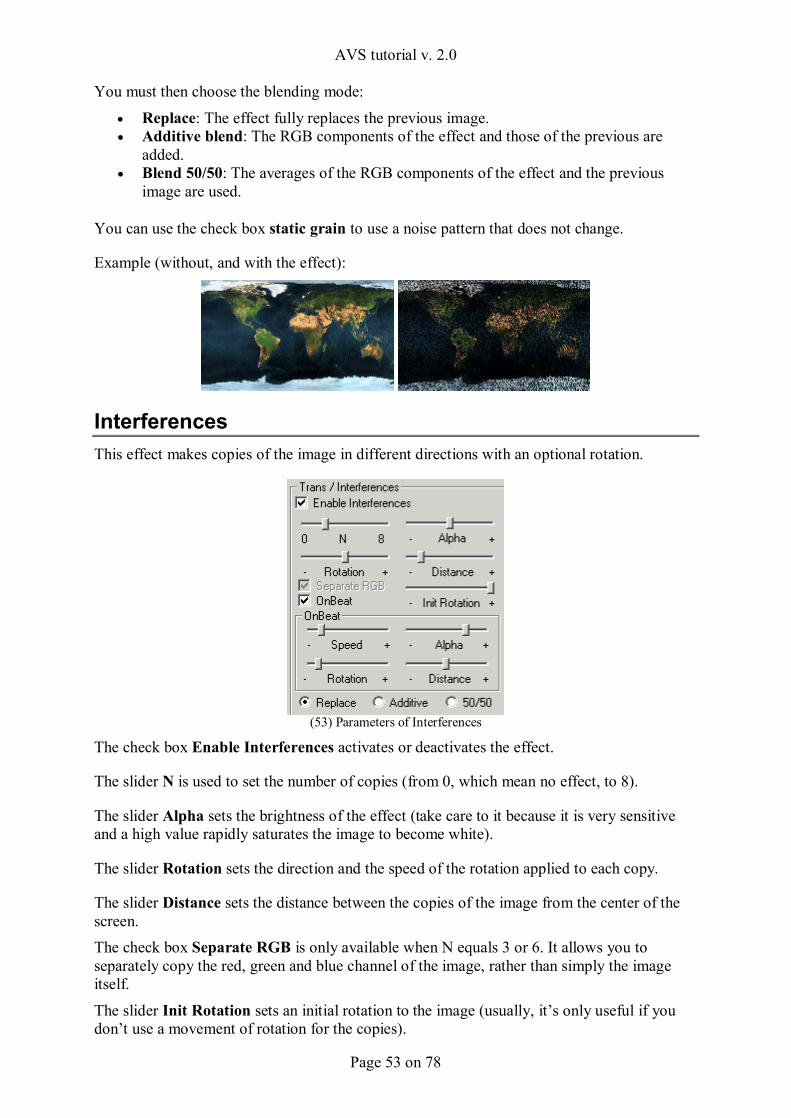
AVS tutorial v. 2.0
Page 53 on 78
You must then choose the blending mode:
• Replace: The effect fully replaces the previous image. • Additive blend: The RGB components of the effect and those of the previous are
added. • Blend 50/50: The averages of the RGB components of the effect and the previous
image are used.
You can use the check box static grain to use a noise pattern that does not change.
Example (without, and with the effect):
Interferences This effect makes copies of the image in different directions with an optional rotation.
(53) Parameters of Interferences
The check box Enable Interferences activates or deactivates the effect.
The slider N is used to set the number of copies (from 0, which mean no effect, to 8).
The slider Alpha sets the brightness of the effect (take care to it because it is very sensitive and a high value rapidly saturates the image to become white).
The slider Rotation sets the direction and the speed of the rotation applied to each copy.
The slider Distance sets the distance between the copies of the image from the center of the screen. The check box Separate RGB is only available when N equals 3 or 6. It allows you to separately copy the red, green and blue channel of the image, rather than simply the image itself.
The slider Init Rotation sets an initial rotation to the image (usually, it’s only useful if you don’t use a movement of rotation for the copies).
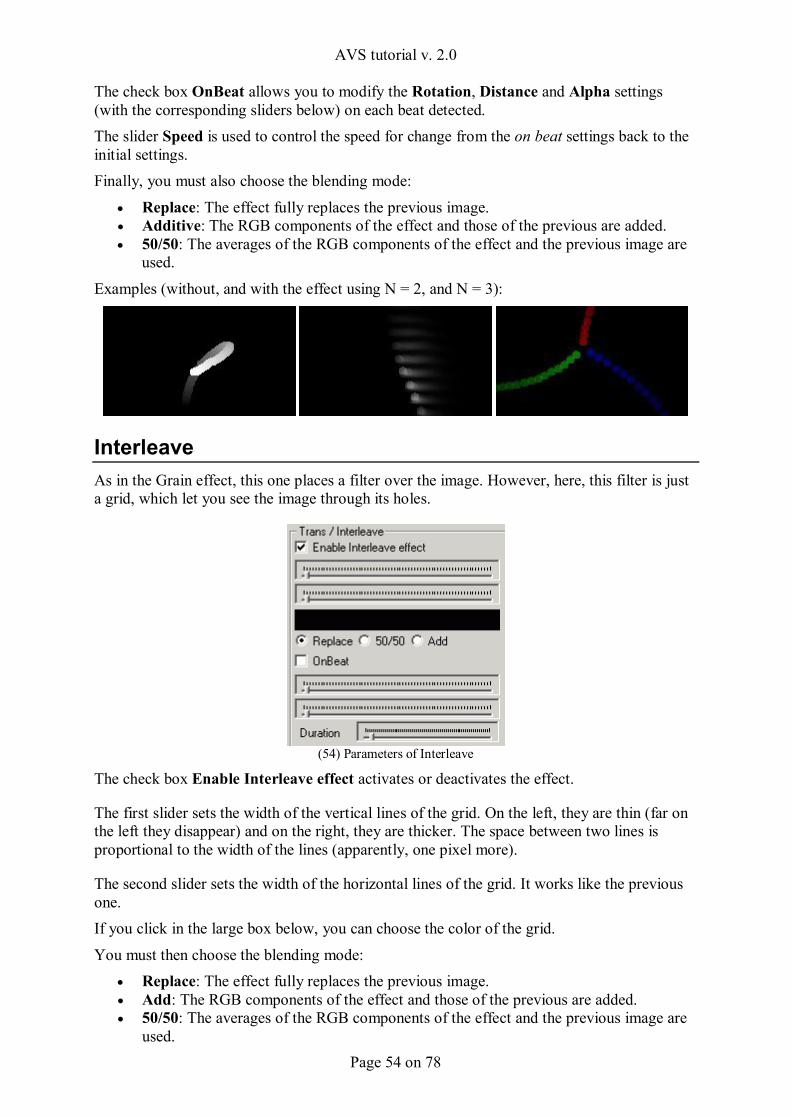
AVS tutorial v. 2.0
Page 54 on 78
The check box OnBeat allows you to modify the Rotation, Distance and Alpha settings (with the corresponding sliders below) on each beat detected. The slider Speed is used to control the speed for change from the on beat settings back to the initial settings. Finally, you must also choose the blending mode:
• Replace: The effect fully replaces the previous image. • Additive: The RGB components of the effect and those of the previous are added. • 50/50: The averages of the RGB components of the effect and the previous image are
used.
Examples (without, and with the effect using N = 2, and N = 3):
Interleave As in the Grain effect, this one places a filter over the image. However, here, this filter is just a grid, which let you see the image through its holes.
(54) Parameters of Interleave
The check box Enable Interleave effect activates or deactivates the effect.
The first slider sets the width of the vertical lines of the grid. On the left, they are thin (far on the left they disappear) and on the right, they are thicker. The space between two lines is proportional to the width of the lines (apparently, one pixel more).
The second slider sets the width of the horizontal lines of the grid. It works like the previous one. If you click in the large box below, you can choose the color of the grid.
You must then choose the blending mode: • Replace: The effect fully replaces the previous image. • Add: The RGB components of the effect and those of the previous are added. • 50/50: The averages of the RGB components of the effect and the previous image are
used.
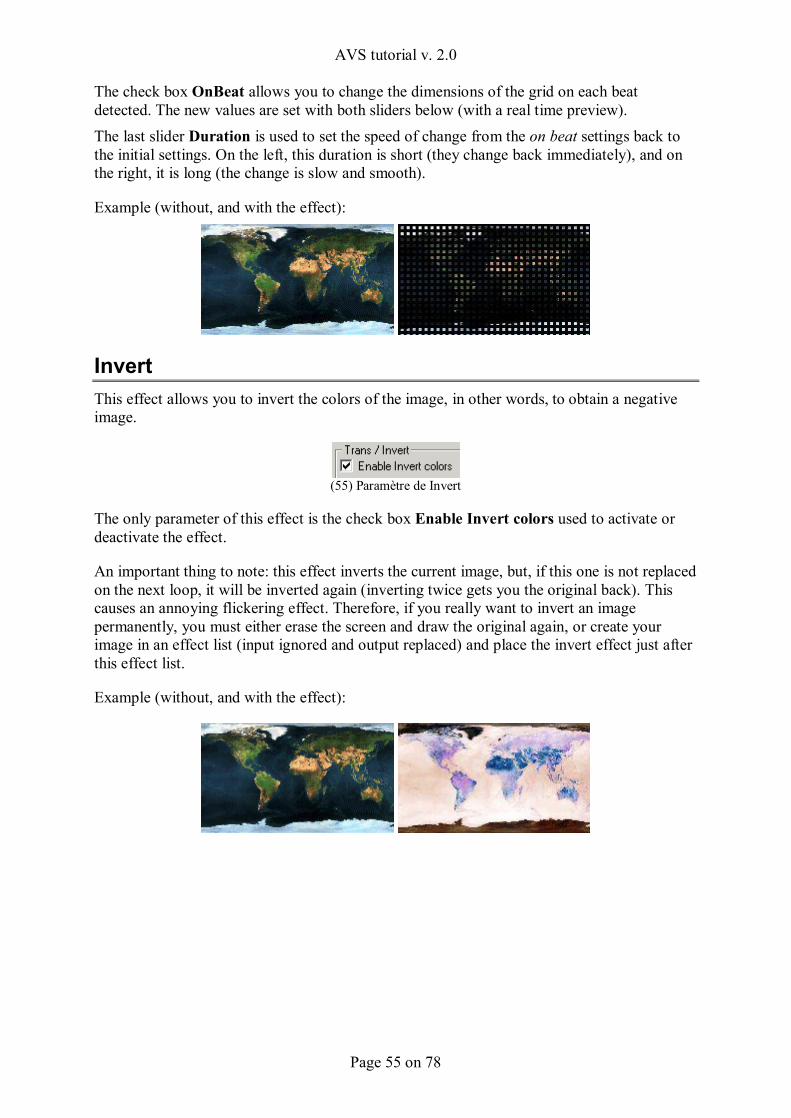
AVS tutorial v. 2.0
Page 55 on 78
The check box OnBeat allows you to change the dimensions of the grid on each beat detected. The new values are set with both sliders below (with a real time preview). The last slider Duration is used to set the speed of change from the on beat settings back to the initial settings. On the left, this duration is short (they change back immediately), and on the right, it is long (the change is slow and smooth).
Example (without, and with the effect):
Invert This effect allows you to invert the colors of the image, in other words, to obtain a negative image.
(55) Paramètre de Invert
The only parameter of this effect is the check box Enable Invert colors used to activate or deactivate the effect.
An important thing to note: this effect inverts the current image, but, if this one is not replaced on the next loop, it will be inverted again (inverting twice gets you the original back). This causes an annoying flickering effect. Therefore, if you really want to invert an image permanently, you must either erase the screen and draw the original again, or create your image in an effect list (input ignored and output replaced) and place the invert effect just after this effect list.
Example (without, and with the effect):
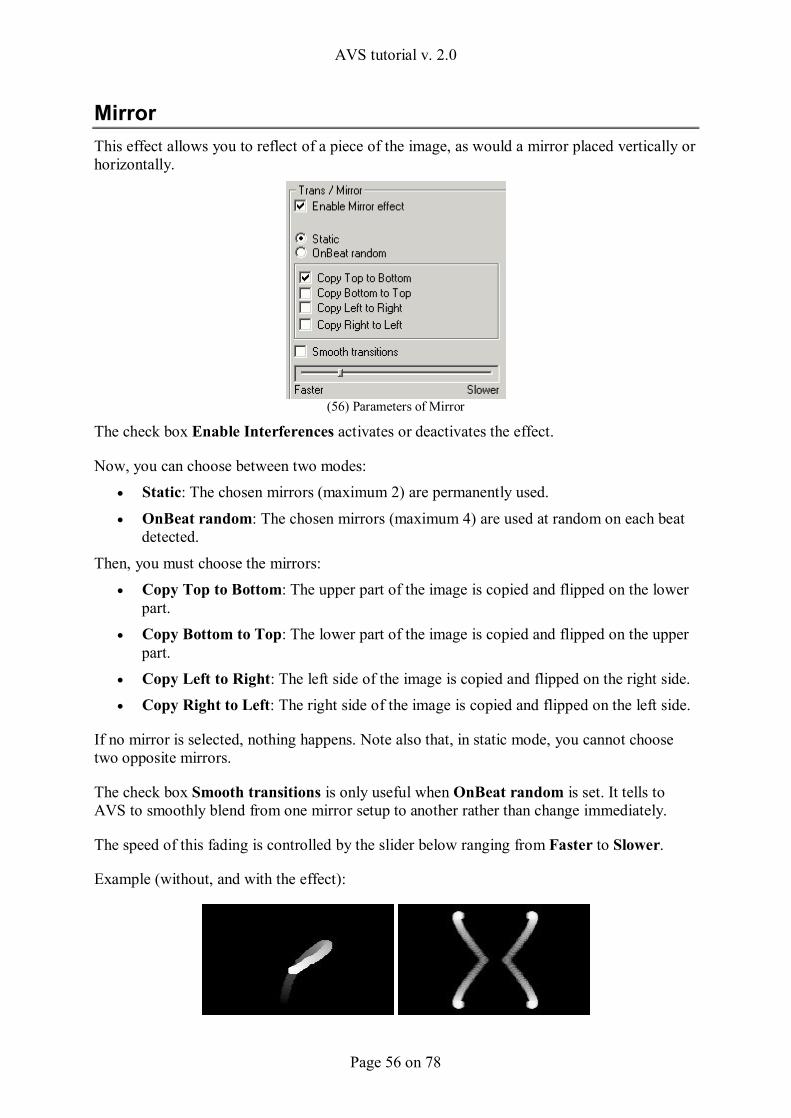
AVS tutorial v. 2.0
Page 56 on 78
Mirror This effect allows you to reflect of a piece of the image, as would a mirror placed vertically or horizontally.
(56) Parameters of Mirror
The check box Enable Interferences activates or deactivates the effect.
Now, you can choose between two modes: • Static: The chosen mirrors (maximum 2) are permanently used.
• OnBeat random: The chosen mirrors (maximum 4) are used at random on each beat detected.
Then, you must choose the mirrors: • Copy Top to Bottom: The upper part of the image is copied and flipped on the lower
part. • Copy Bottom to Top: The lower part of the image is copied and flipped on the upper
part. • Copy Left to Right: The left side of the image is copied and flipped on the right side. • Copy Right to Left: The right side of the image is copied and flipped on the left side.
If no mirror is selected, nothing happens. Note also that, in static mode, you cannot choose two opposite mirrors.
The check box Smooth transitions is only useful when OnBeat random is set. It tells to AVS to smoothly blend from one mirror setup to another rather than change immediately.
The speed of this fading is controlled by the slider below ranging from Faster to Slower.
Example (without, and with the effect):
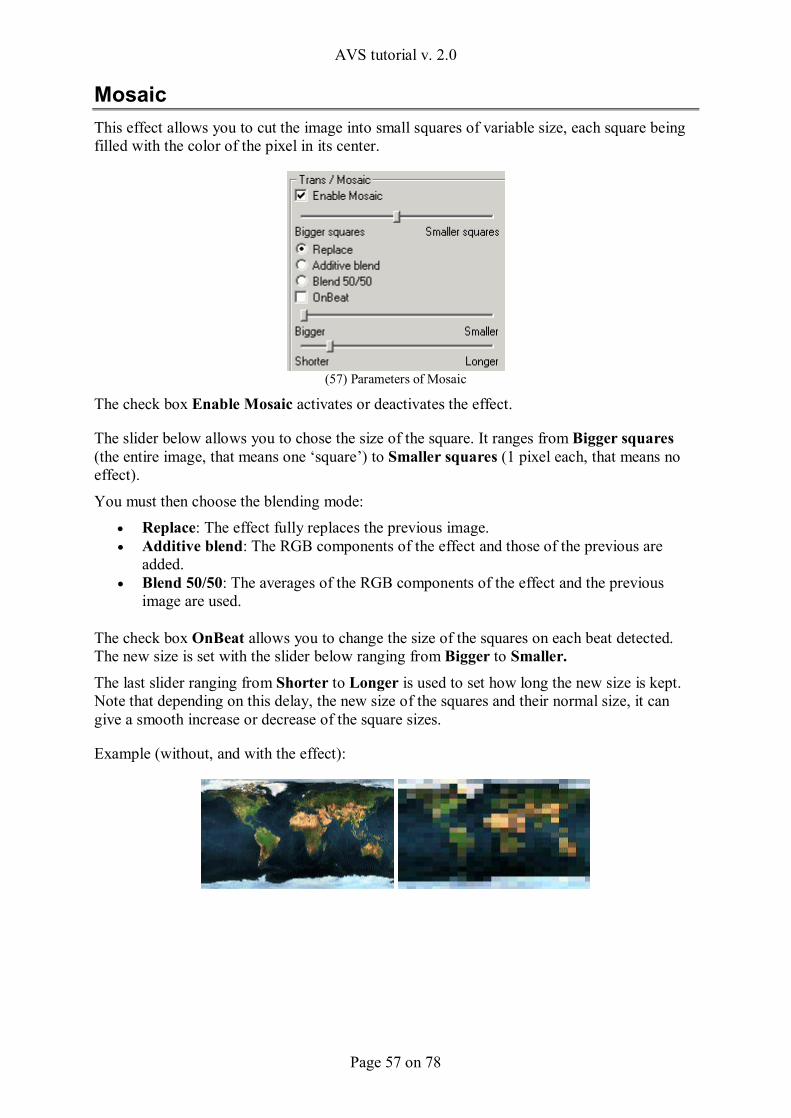
AVS tutorial v. 2.0
Page 57 on 78
Mosaic This effect allows you to cut the image into small squares of variable size, each square being filled with the color of the pixel in its center.
(57) Parameters of Mosaic
The check box Enable Mosaic activates or deactivates the effect.
The slider below allows you to chose the size of the square. It ranges from Bigger squares (the entire image, that means one ‘square’) to Smaller squares (1 pixel each, that means no effect).
You must then choose the blending mode: • Replace: The effect fully replaces the previous image. • Additive blend: The RGB components of the effect and those of the previous are
added. • Blend 50/50: The averages of the RGB components of the effect and the previous
image are used.
The check box OnBeat allows you to change the size of the squares on each beat detected. The new size is set with the slider below ranging from Bigger to Smaller. The last slider ranging from Shorter to Longer is used to set how long the new size is kept. Note that depending on this delay, the new size of the squares and their normal size, it can give a smooth increase or decrease of the square sizes.
Example (without, and with the effect):
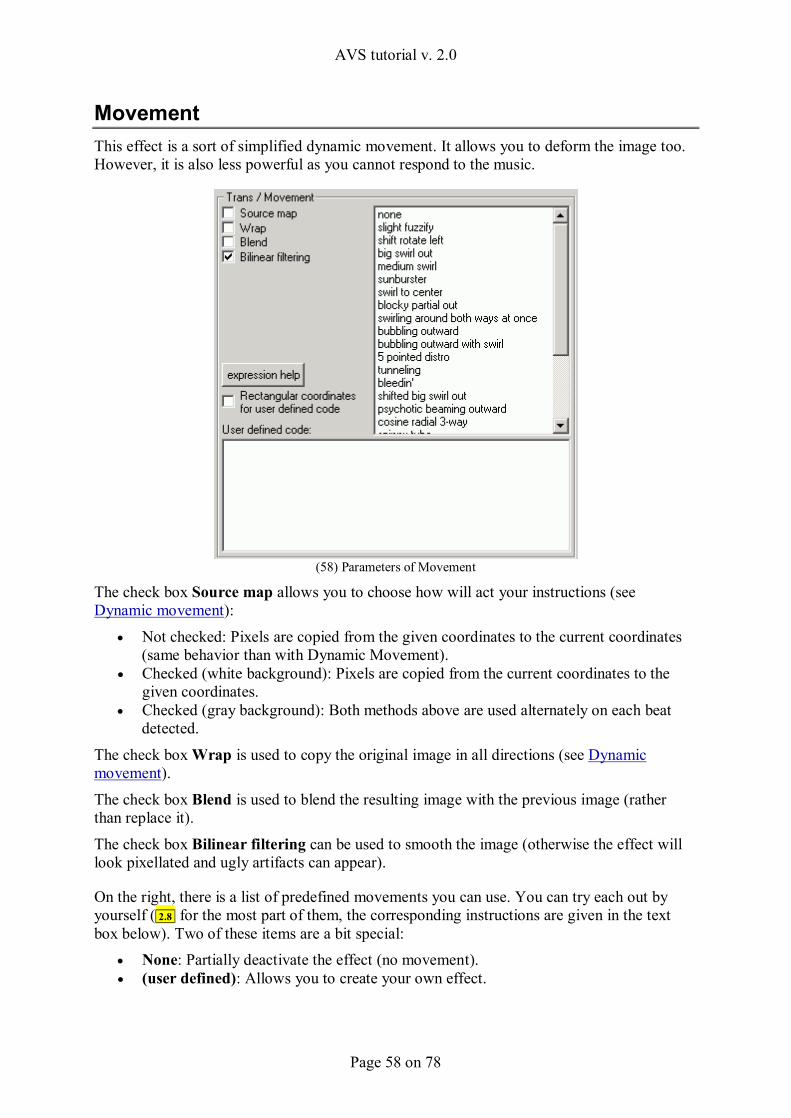
AVS tutorial v. 2.0
Page 58 on 78
Movement This effect is a sort of simplified dynamic movement. It allows you to deform the image too. However, it is also less powerful as you cannot respond to the music.
(58) Parameters of Movement
The check box Source map allows you to choose how will act your instructions (see Dynamic movement):
• Not checked: Pixels are copied from the given coordinates to the current coordinates (same behavior than with Dynamic Movement).
• Checked (white background): Pixels are copied from the current coordinates to the given coordinates.
• Checked (gray background): Both methods above are used alternately on each beat detected.
The check box Wrap is used to copy the original image in all directions (see Dynamic movement).
The check box Blend is used to blend the resulting image with the previous image (rather than replace it).
The check box Bilinear filtering can be used to smooth the image (otherwise the effect will look pixellated and ugly artifacts can appear).
On the right, there is a list of predefined movements you can use. You can try each out by yourself ( 2.8 for the most part of them, the corresponding instructions are given in the text box below). Two of these items are a bit special:
• None: Partially deactivate the effect (no movement). • (user defined): Allows you to create your own effect.
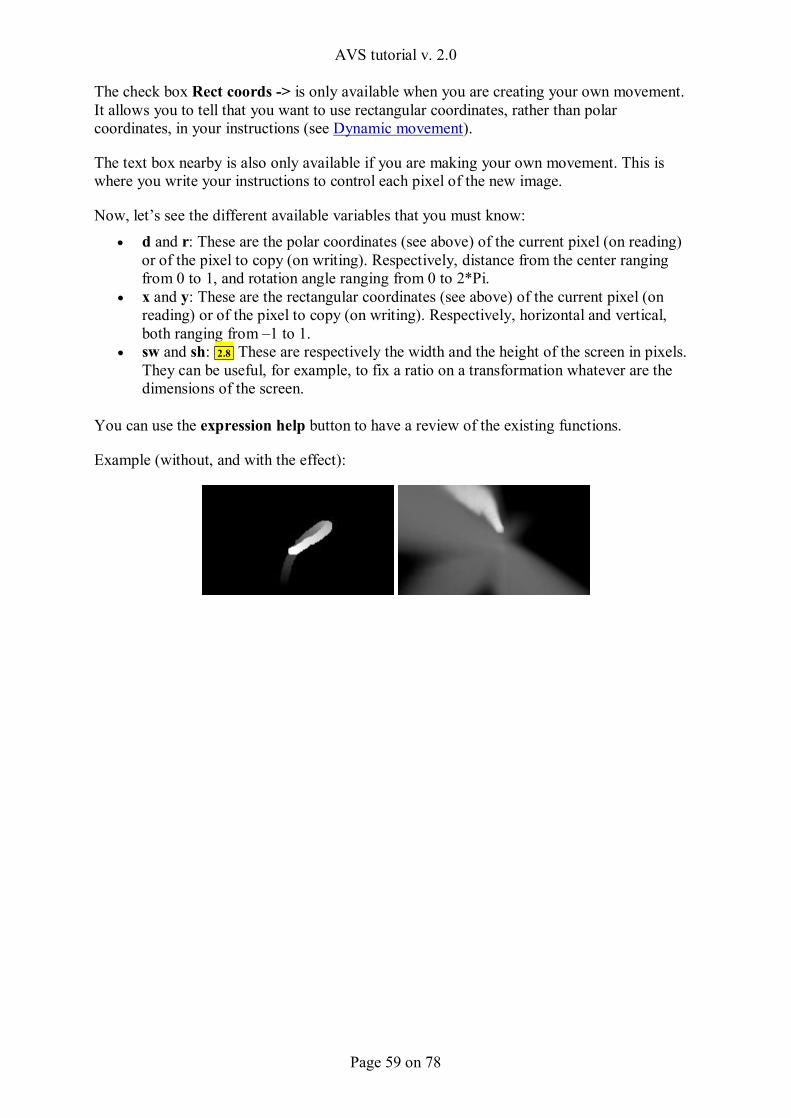
AVS tutorial v. 2.0
Page 59 on 78
The check box Rect coords -> is only available when you are creating your own movement. It allows you to tell that you want to use rectangular coordinates, rather than polar coordinates, in your instructions (see Dynamic movement).
The text box nearby is also only available if you are making your own movement. This is where you write your instructions to control each pixel of the new image.
Now, let’s see the different available variables that you must know: • d and r: These are the polar coordinates (see above) of the current pixel (on reading)
or of the pixel to copy (on writing). Respectively, distance from the center ranging from 0 to 1, and rotation angle ranging from 0 to 2*Pi.
• x and y: These are the rectangular coordinates (see above) of the current pixel (on reading) or of the pixel to copy (on writing). Respectively, horizontal and vertical, both ranging from –1 to 1.
• sw and sh: 2.8 These are respectively the width and the height of the screen in pixels. They can be useful, for example, to fix a ratio on a transformation whatever are the dimensions of the screen.
You can use the expression help button to have a review of the existing functions.
Example (without, and with the effect):
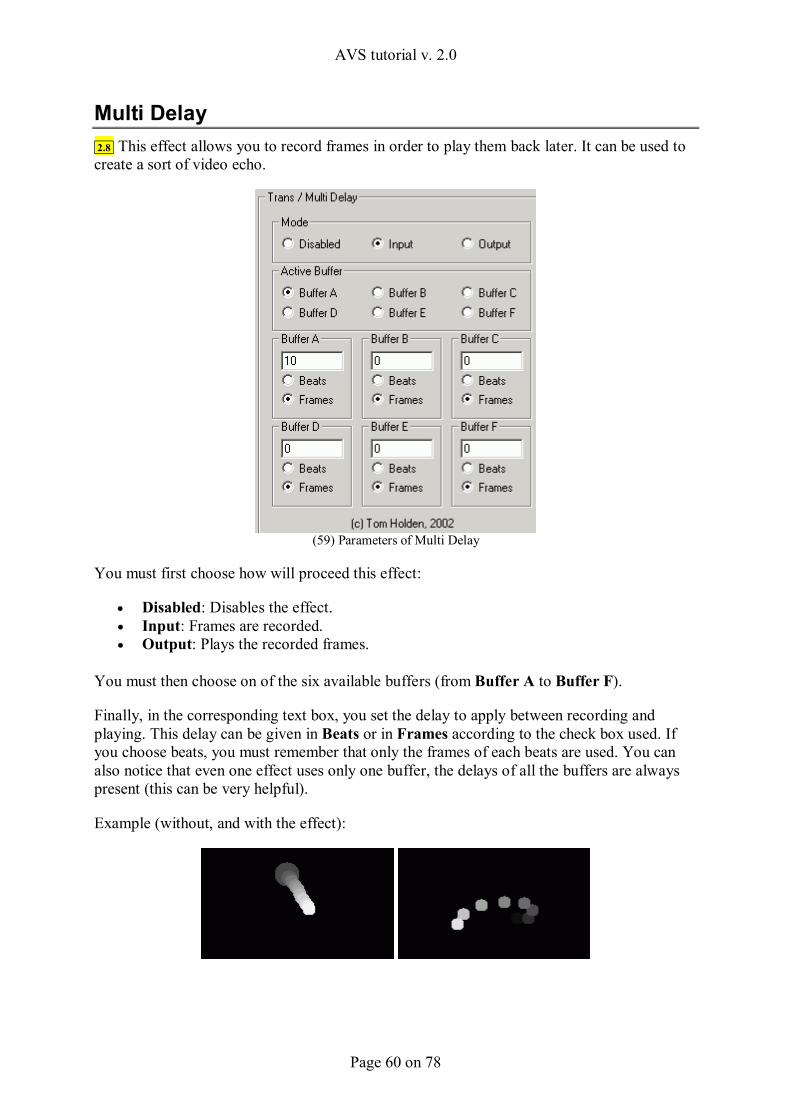
AVS tutorial v. 2.0
Page 60 on 78
Multi Delay 2.8 This effect allows you to record frames in order to play them back later. It can be used to create a sort of video echo.
(59) Parameters of Multi Delay
You must first choose how will proceed this effect:
• Disabled: Disables the effect. • Input: Frames are recorded. • Output: Plays the recorded frames.
You must then choose on of the six available buffers (from Buffer A to Buffer F).
Finally, in the corresponding text box, you set the delay to apply between recording and playing. This delay can be given in Beats or in Frames according to the check box used. If you choose beats, you must remember that only the frames of each beats are used. You can also notice that even one effect uses only one buffer, the delays of all the buffers are always present (this can be very helpful).
Example (without, and with the effect):
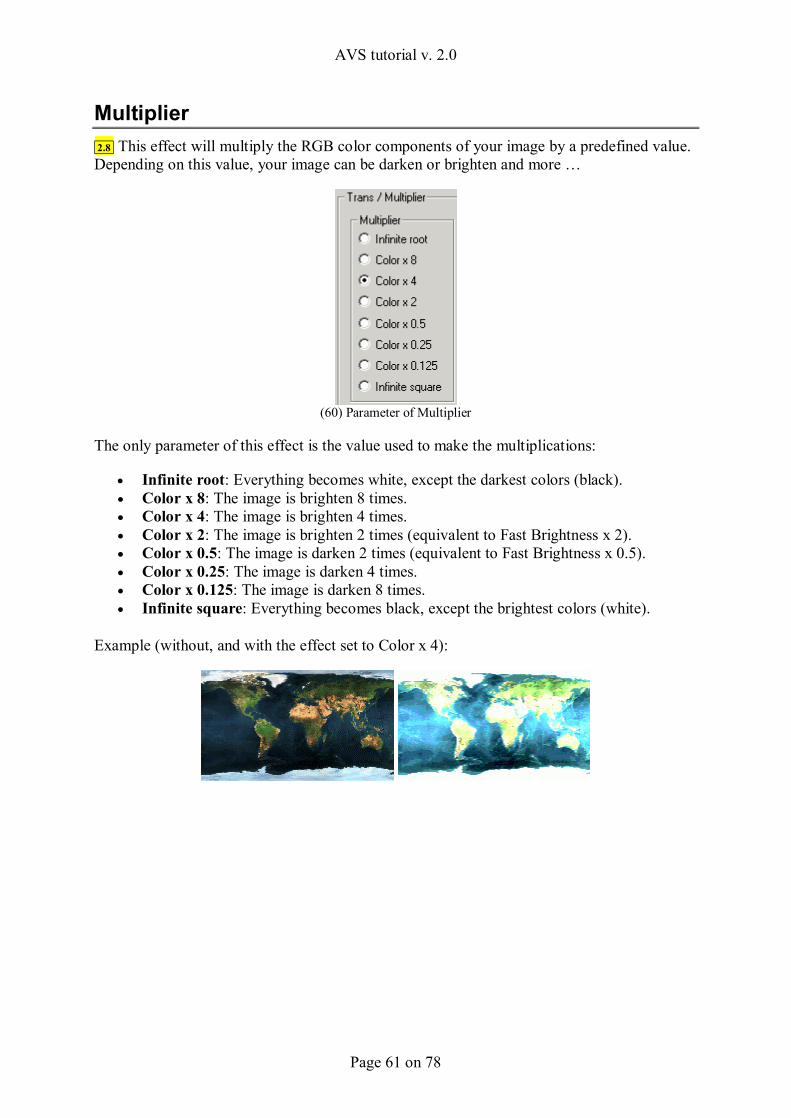
AVS tutorial v. 2.0
Page 61 on 78
Multiplier 2.8 This effect will multiply the RGB color components of your image by a predefined value. Depending on this value, your image can be darken or brighten and more …
(60) Parameter of Multiplier
The only parameter of this effect is the value used to make the multiplications:
• Infinite root: Everything becomes white, except the darkest colors (black). • Color x 8: The image is brighten 8 times. • Color x 4: The image is brighten 4 times. • Color x 2: The image is brighten 2 times (equivalent to Fast Brightness x 2). • Color x 0.5: The image is darken 2 times (equivalent to Fast Brightness x 0.5). • Color x 0.25: The image is darken 4 times. • Color x 0.125: The image is darken 8 times. • Infinite square: Everything becomes black, except the brightest colors (white).
Example (without, and with the effect set to Color x 4):
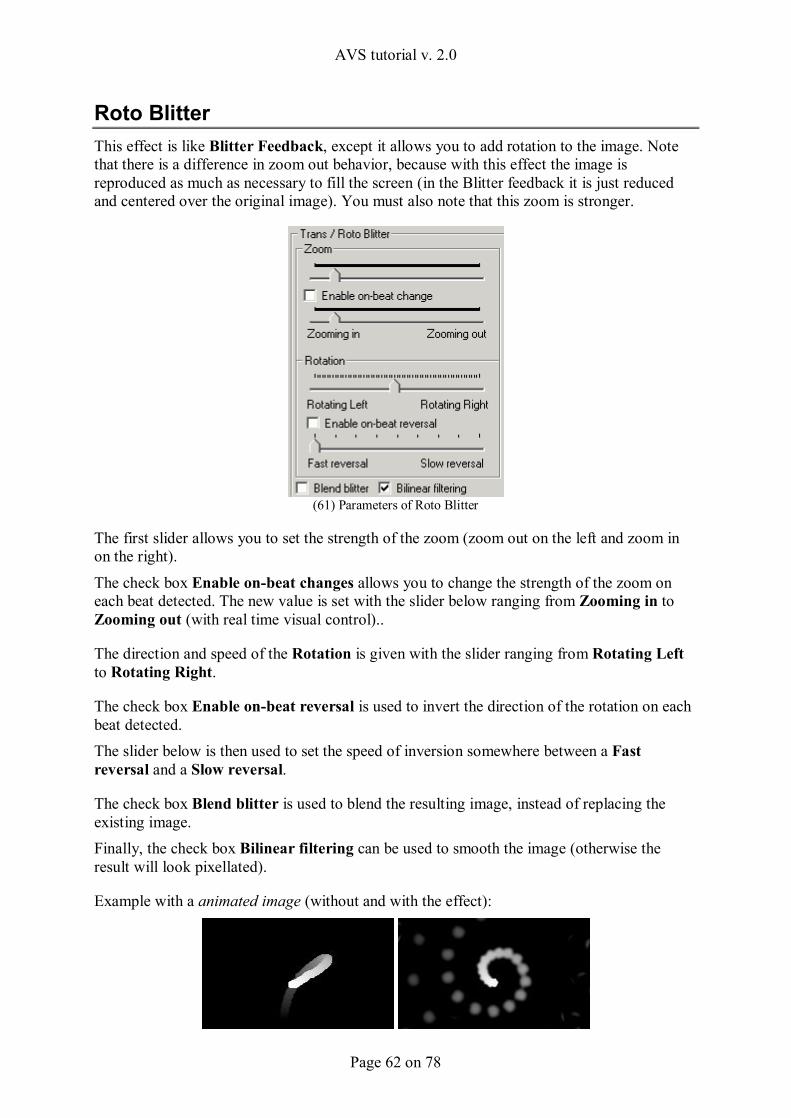
AVS tutorial v. 2.0
Page 62 on 78
Roto Blitter This effect is like Blitter Feedback, except it allows you to add rotation to the image. Note that there is a difference in zoom out behavior, because with this effect the image is reproduced as much as necessary to fill the screen (in the Blitter feedback it is just reduced and centered over the original image). You must also note that this zoom is stronger.
(61) Parameters of Roto Blitter
The first slider allows you to set the strength of the zoom (zoom out on the left and zoom in on the right).
The check box Enable on-beat changes allows you to change the strength of the zoom on each beat detected. The new value is set with the slider below ranging from Zooming in to Zooming out (with real time visual control)..
The direction and speed of the Rotation is given with the slider ranging from Rotating Left to Rotating Right.
The check box Enable on-beat reversal is used to invert the direction of the rotation on each beat detected. The slider below is then used to set the speed of inversion somewhere between a Fast reversal and a Slow reversal.
The check box Blend blitter is used to blend the resulting image, instead of replacing the existing image. Finally, the check box Bilinear filtering can be used to smooth the image (otherwise the result will look pixellated).
Example with a animated image (without and with the effect):
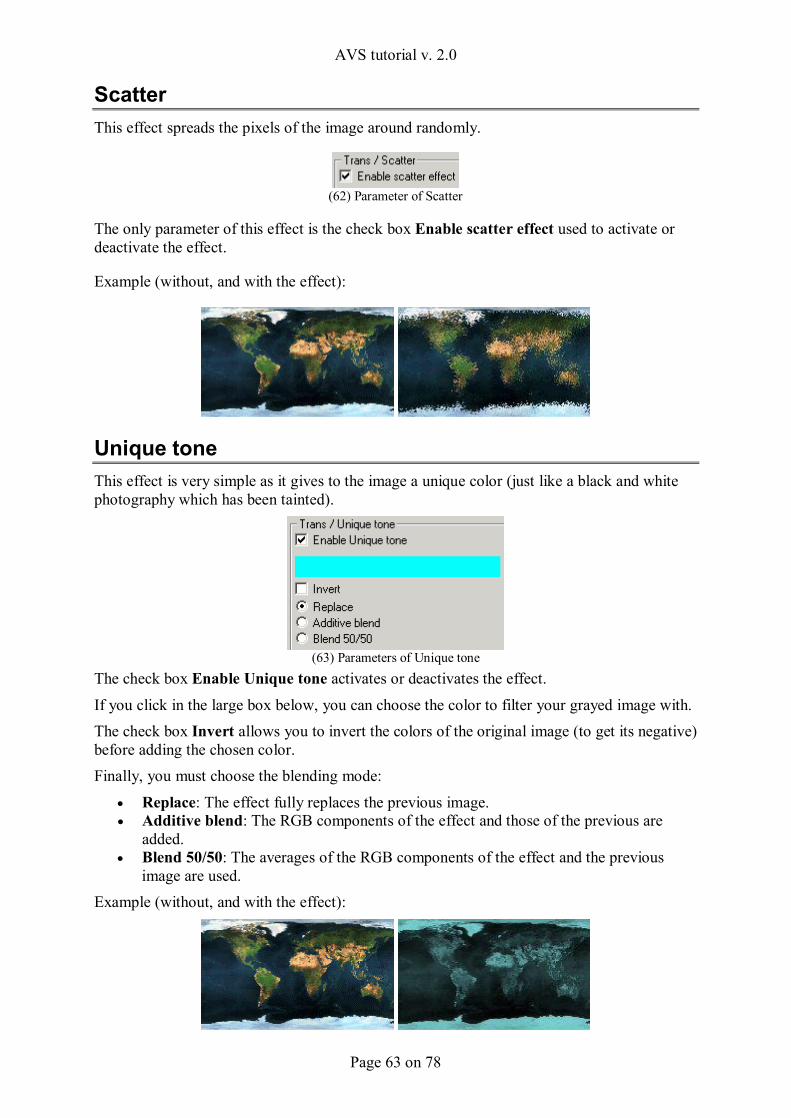
AVS tutorial v. 2.0
Page 63 on 78
Scatter This effect spreads the pixels of the image around randomly.
(62) Parameter of Scatter
The only parameter of this effect is the check box Enable scatter effect used to activate or deactivate the effect.
Example (without, and with the effect):
Unique tone This effect is very simple as it gives to the image a unique color (just like a black and white photography which has been tainted).
(63) Parameters of Unique tone
The check box Enable Unique tone activates or deactivates the effect.
If you click in the large box below, you can choose the color to filter your grayed image with. The check box Invert allows you to invert the colors of the original image (to get its negative) before adding the chosen color. Finally, you must choose the blending mode:
• Replace: The effect fully replaces the previous image. • Additive blend: The RGB components of the effect and those of the previous are
added. • Blend 50/50: The averages of the RGB components of the effect and the previous
image are used. Example (without, and with the effect):
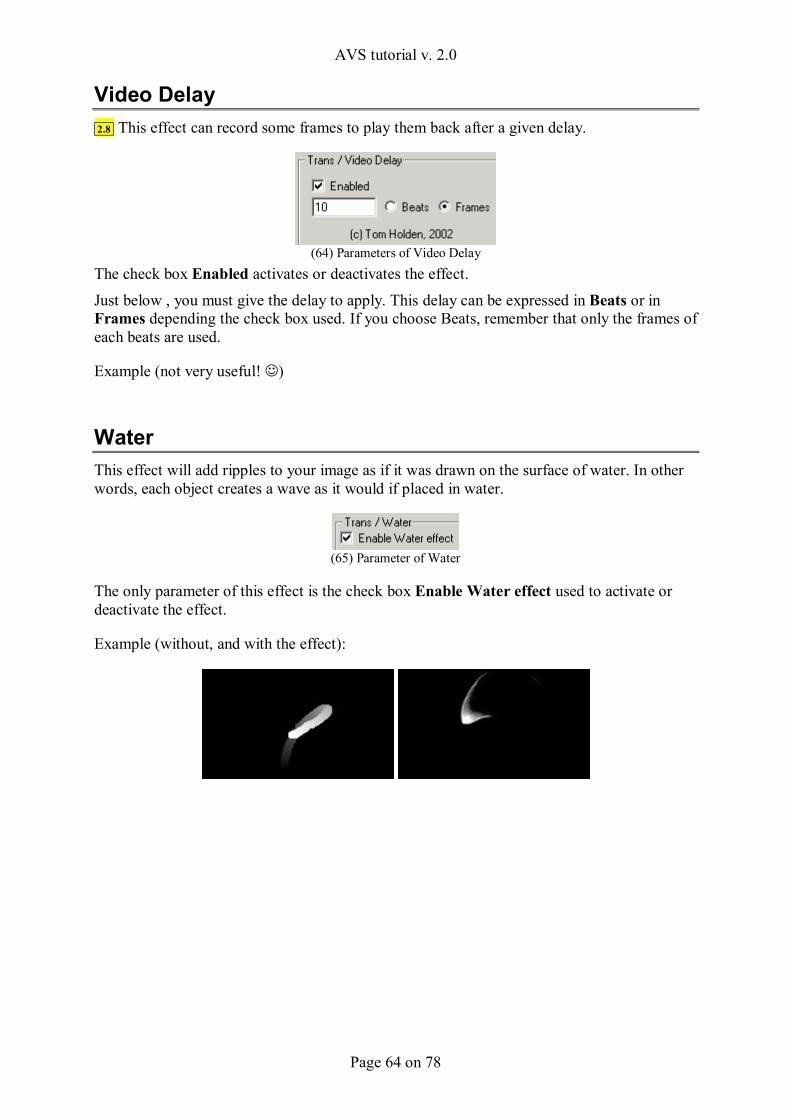
AVS tutorial v. 2.0
Page 64 on 78
Video Delay 2.8 This effect can record some frames to play them back after a given delay.
(64) Parameters of Video Delay
The check box Enabled activates or deactivates the effect.
Just below , you must give the delay to apply. This delay can be expressed in Beats or in Frames depending the check box used. If you choose Beats, remember that only the frames of each beats are used.
Example (not very useful! ☺)
Water This effect will add ripples to your image as if it was drawn on the surface of water. In other words, each object creates a wave as it would if placed in water.
(65) Parameter of Water
The only parameter of this effect is the check box Enable Water effect used to activate or deactivate the effect.
Example (without, and with the effect):
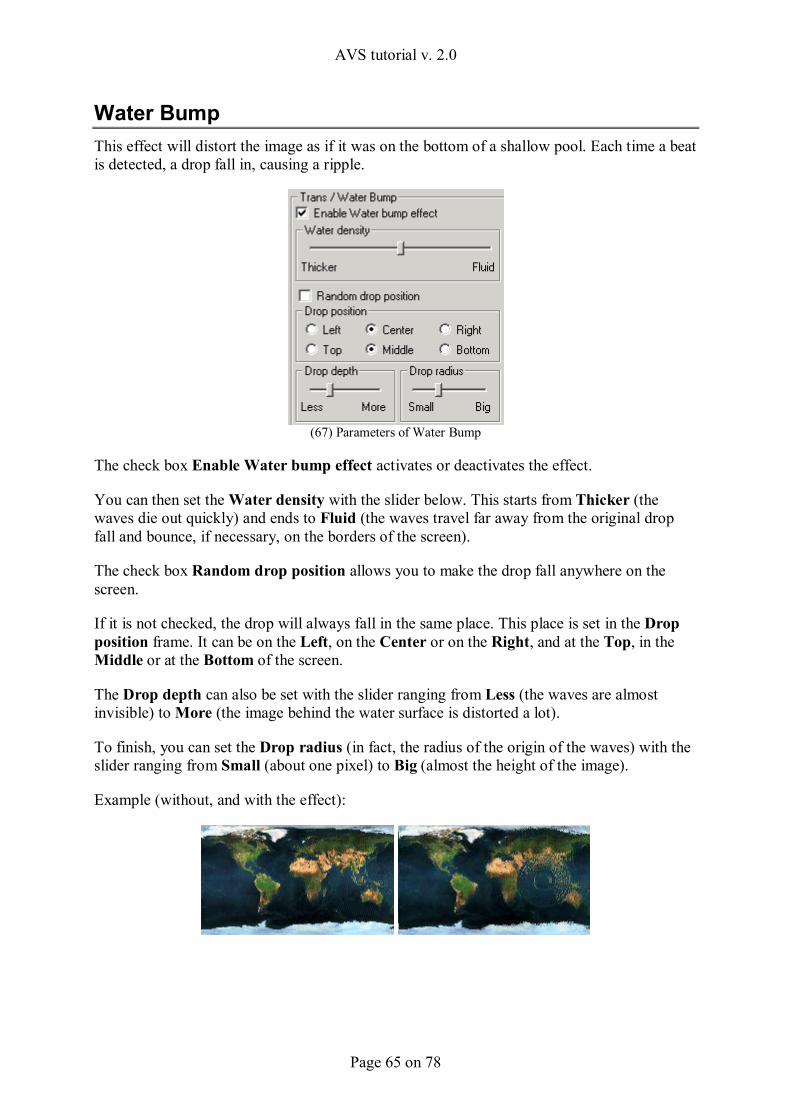
AVS tutorial v. 2.0
Page 65 on 78
Water Bump This effect will distort the image as if it was on the bottom of a shallow pool. Each time a beat is detected, a drop fall in, causing a ripple.
(67) Parameters of Water Bump
The check box Enable Water bump effect activates or deactivates the effect.
You can then set the Water density with the slider below. This starts from Thicker (the waves die out quickly) and ends to Fluid (the waves travel far away from the original drop fall and bounce, if necessary, on the borders of the screen).
The check box Random drop position allows you to make the drop fall anywhere on the screen.
If it is not checked, the drop will always fall in the same place. This place is set in the Drop position frame. It can be on the Left, on the Center or on the Right, and at the Top, in the Middle or at the Bottom of the screen.
The Drop depth can also be set with the slider ranging from Less (the waves are almost invisible) to More (the image behind the water surface is distorted a lot).
To finish, you can set the Drop radius (in fact, the radius of the origin of the waves) with the slider ranging from Small (about one pixel) to Big (almost the height of the image).
Example (without, and with the effect):
AVS tutorial v. 2.0
Page 66 on 78
Expression help Presentation These next pages are an extended version of the expression help of AVS. Here you will find all of its contents, but with more detailed explanations. You will find also some examples and graphic representations.
Sometimes, this help can get very mathematical. To be understand, the reader must have some acknowledge in that domain (algebra and trigonometry). If it is not the case, you should still read this and try to understand as much as possible…
Variables In a programming language, a variable is a memory location where you can put data to be used by software. In the majority of programming languages, this location is referenced through a simple name: the name of the variable. This rule is also applied in the dynamic effects of AVS.
An AVS variable name must start by a letter, followed by as many letters, numbers and underscores (‘_’ character) as you want.
An AVS variable can only contain a number, more precisely, a real (or floating point) number like 0.5, -2.781 or 10.0 (can be also noted 10).
Examples: a my_variable x1
Note that some variable names are reserved, that means they are used by AVS for a particular purpose. These variables can changed from effect to effect and are documented in each of them.
Generally, when a variable is placed on the left side of an assignment (see next page), it means you wish to write its value. When it appears on the right side (or in the parameter list of a function), it means you wish to read its value.
A variable is only known into the instructions of an effect. In other words, the variable A of an effect and the variable A of an other effect has nothing to do each other (despite the same name).
2.8 However, you can use one of the 100 variables named reg00, reg01, reg02, …, reg99, which are global to a preset. For example, reg00 can be set in a dynamic effect, and be used in another. These global variables (or registers) are very useful to synchronize effects. You can notice that their values can easily be shown in the Debug Window accessed by the Settings menu.
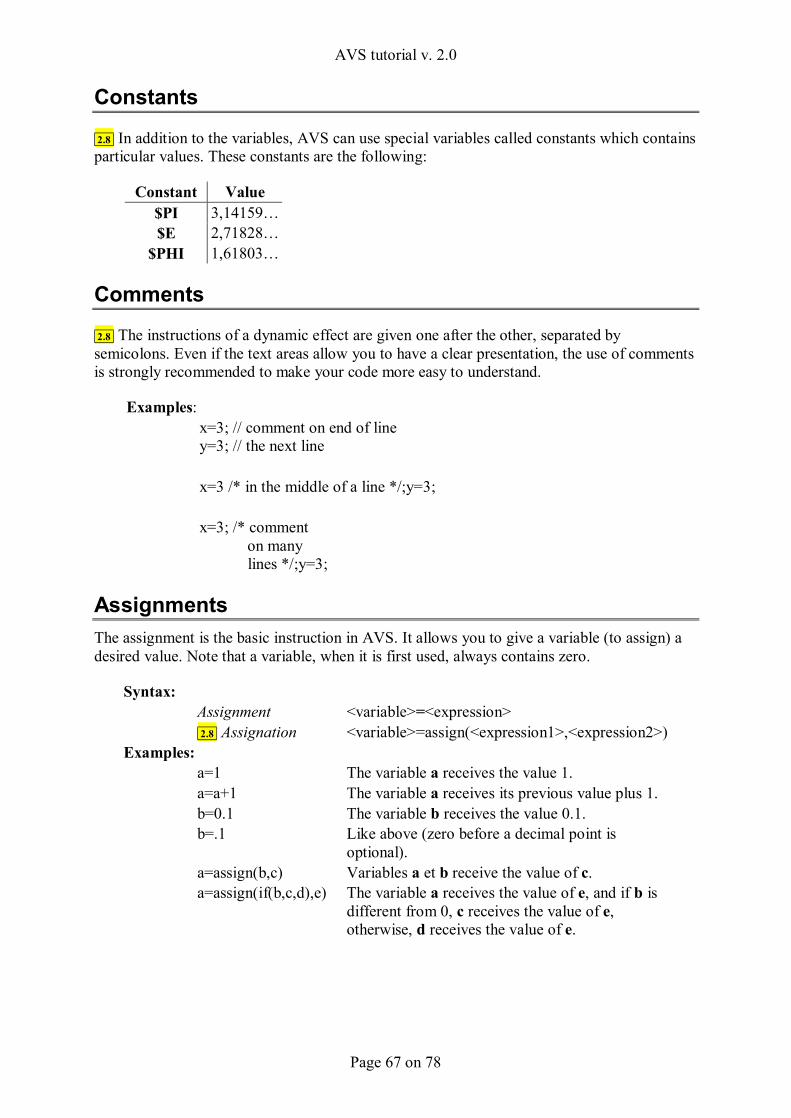
AVS tutorial v. 2.0
Page 67 on 78
Constants
2.8 In addition to the variables, AVS can use special variables called constants which contains particular values. These constants are the following:
Constant Value $PI 3,14159… $E 2,71828…
$PHI 1,61803…
Comments
2.8 The instructions of a dynamic effect are given one after the other, separated by semicolons. Even if the text areas allow you to have a clear presentation, the use of comments is strongly recommended to make your code more easy to understand.
Examples:
x=3; // comment on end of line y=3; // the next line
x=3 /* in the middle of a line */;y=3;
x=3; /* comment on many lines */;y=3;
Assignments The assignment is the basic instruction in AVS. It allows you to give a variable (to assign) a desired value. Note that a variable, when it is first used, always contains zero.
Syntax: Assignment <variable>=<expression> 2.8 Assignation <variable>=assign(<expression1>,<expression2>) Examples: a=1 The variable a receives the value 1. a=a+1 The variable a receives its previous value plus 1. b=0.1 The variable b receives the value 0.1.
b=.1 Like above (zero before a decimal point is optional).
a=assign(b,c) Variables a et b receive the value of c.
a=assign(if(b,c,d),e) The variable a receives the value of e, and if b is
different from 0, c receives the value of e, otherwise, d receives the value of e.
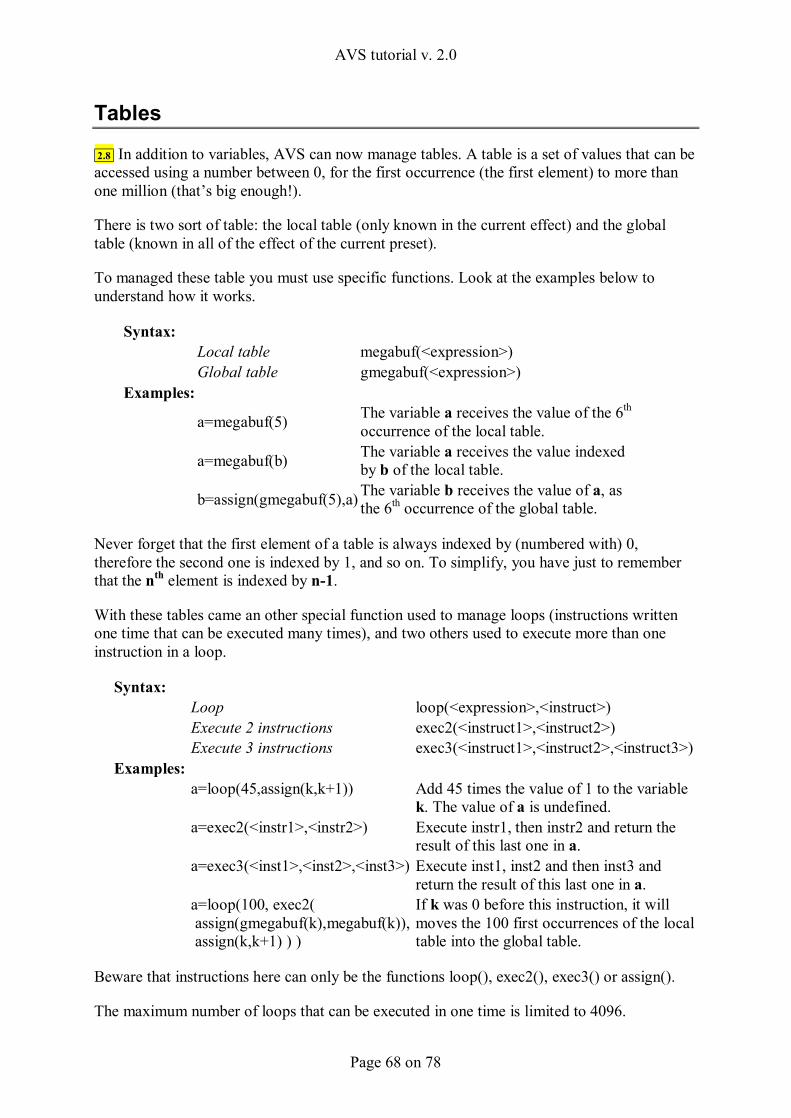
AVS tutorial v. 2.0
Page 68 on 78
Tables
2.8 In addition to variables, AVS can now manage tables. A table is a set of values that can be accessed using a number between 0, for the first occurrence (the first element) to more than one million (that’s big enough!).
There is two sort of table: the local table (only known in the current effect) and the global table (known in all of the effect of the current preset).
To managed these table you must use specific functions. Look at the examples below to understand how it works.
Syntax: Local table megabuf(<expression>) Global table gmegabuf(<expression>) Examples:
a=megabuf(5) The variable a receives the value of the 6th occurrence of the local table.
a=megabuf(b) The variable a receives the value indexed by b of the local table.
b=assign(gmegabuf(5),a) The variable b receives the value of a, as the 6th occurrence of the global table.
Never forget that the first element of a table is always indexed by (numbered with) 0, therefore the second one is indexed by 1, and so on. To simplify, you have just to remember that the nth element is indexed by n-1.
With these tables came an other special function used to manage loops (instructions written one time that can be executed many times), and two others used to execute more than one instruction in a loop.
Syntax: Loop loop(<expression>,<instruct>) Execute 2 instructions exec2(<instruct1>,<instruct2>) Execute 3 instructions exec3(<instruct1>,<instruct2>,<instruct3>) Examples:
a=loop(45,assign(k,k+1)) Add 45 times the value of 1 to the variable k. The value of a is undefined.
a=exec2(<instr1>,<instr2>) Execute instr1, then instr2 and return the result of this last one in a.
a=exec3(<inst1>,<inst2>,<inst3>) Execute inst1, inst2 and then inst3 and return the result of this last one in a.
a=loop(100, exec2( assign(gmegabuf(k),megabuf(k)), assign(k,k+1) ) )
If k was 0 before this instruction, it will moves the 100 first occurrences of the local table into the global table.
Beware that instructions here can only be the functions loop(), exec2(), exec3() or assign().
The maximum number of loops that can be executed in one time is limited to 4096.
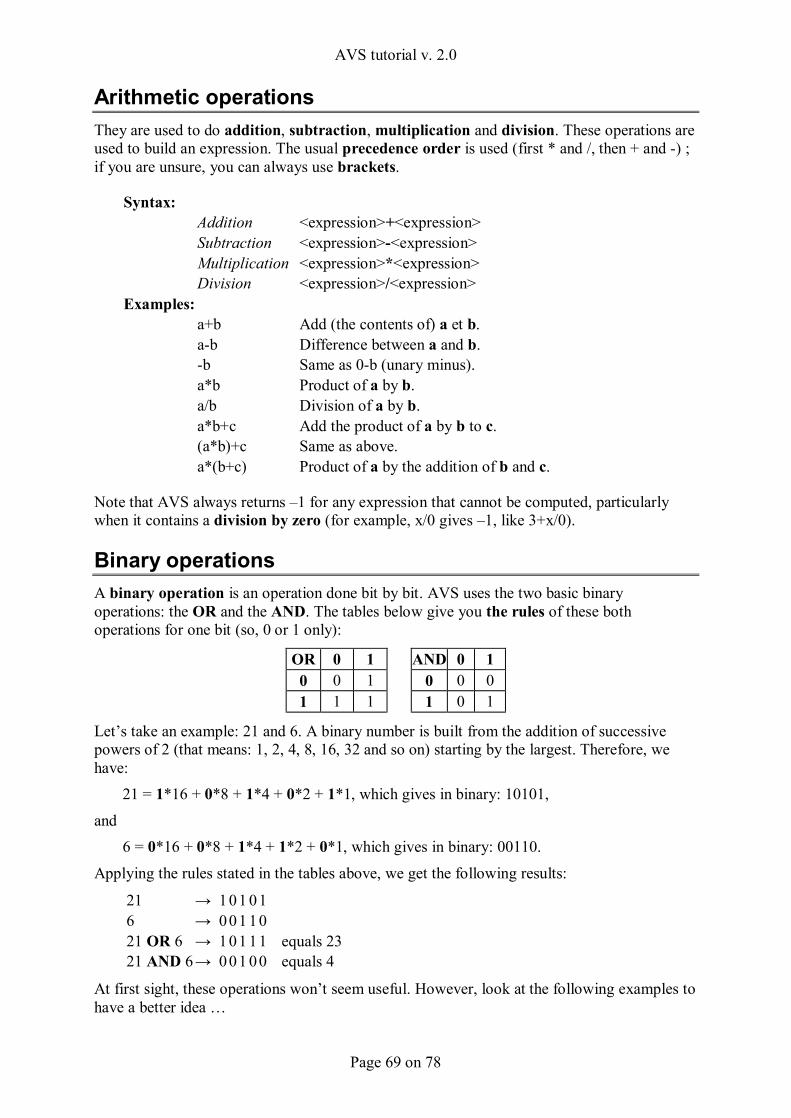
AVS tutorial v. 2.0
Page 69 on 78
Arithmetic operations They are used to do addition, subtraction, multiplication and division. These operations are used to build an expression. The usual precedence order is used (first * and /, then + and -) ; if you are unsure, you can always use brackets.
Syntax: Addition <expression>+<expression> Subtraction <expression>-<expression> Multiplication <expression>*<expression> Division <expression>/<expression> Examples: a+b Add (the contents of) a et b. a-b Difference between a and b. -b Same as 0-b (unary minus). a*b Product of a by b. a/b Division of a by b. a*b+c Add the product of a by b to c. (a*b)+c Same as above. a*(b+c) Product of a by the addition of b and c.
Note that AVS always returns –1 for any expression that cannot be computed, particularly when it contains a division by zero (for example, x/0 gives –1, like 3+x/0).
Binary operations A binary operation is an operation done bit by bit. AVS uses the two basic binary operations: the OR and the AND. The tables below give you the rules of these both operations for one bit (so, 0 or 1 only):
OR 0 1 0 0 1 1 1 1
AND 0 1
0 0 0 1 0 1
Let’s take an example: 21 and 6. A binary number is built from the addition of successive powers of 2 (that means: 1, 2, 4, 8, 16, 32 and so on) starting by the largest. Therefore, we have:
21 = 1*16 + 0*8 + 1*4 + 0*2 + 1*1, which gives in binary: 10101,
and 6 = 0*16 + 0*8 + 1*4 + 1*2 + 0*1, which gives in binary: 00110.
Applying the rules stated in the tables above, we get the following results:
21 → 1 0 1 0 1 6 → 0 0 1 1 0 21 OR 6 → 1 0 1 1 1 equals 23 21 AND 6 → 0 0 1 0 0 equals 4
At first sight, these operations won’t seem useful. However, look at the following examples to have a better idea …
AVS tutorial v. 2.0
Page 70 on 78
Syntax: OR <expression>|<expression> AND <expression>&<expression> Examples : a&0 Always returns 0. a&1 Returns 1 if a is odd, 0 if it is even. a&2 Values 2 if a is 2, 3, 6, 7, 10, etc. and 0 if a is 0, 1, 4, 5, 8, 9, etc. a&7 Is the remainder of the division of a by 8. a|0 Returns a rounded to the nearest integer. a|1 Returns a if a is odd and a+1 otherwise.
a|2 Returns a if a is 2, 3, 6, 7, 10, etc. and a+2 if a is 0, 1, 4, 5, 8, 9, etc.
Note that binary operations can only be done with integers (no decimals). Therefore, AVS always performs a rounding to the nearest integer of any numbers before proceeding with the binary operation.
Modulo operation The modulo operation allows you to obtain the remainder of a division.
Syntax: Modulo <expression>%<expression> Examples: a%2 Returns 1 if a is odd and 0 if it is even. a%9 Is the remainder of the division of a by 9.
Note that this operation can only be done with integers (no decimals). Therefore, AVS always performs a rounding to the nearest integer of any numbers before computing the modulo.
Trigonometric functions The trigonometric functions are used to transform angles into numbers. Usually, an angle is expressed in degrees and ranges between 0 (no angle) and 360 degrees (a full circle). With AVS, an angle must be expressed in radians and ranges, in the same way, from 0 to 2π radians. The symbol π is read as ‘pi’ and is approximately 3.14159. To improve the speed of the calculations, I advise you to always use angles expressed in radians. In spite of this, here is the method of conversion from degrees to radians and vice versa:
π * deg 180 * rad rad = --------- deg = ------------ 180 π
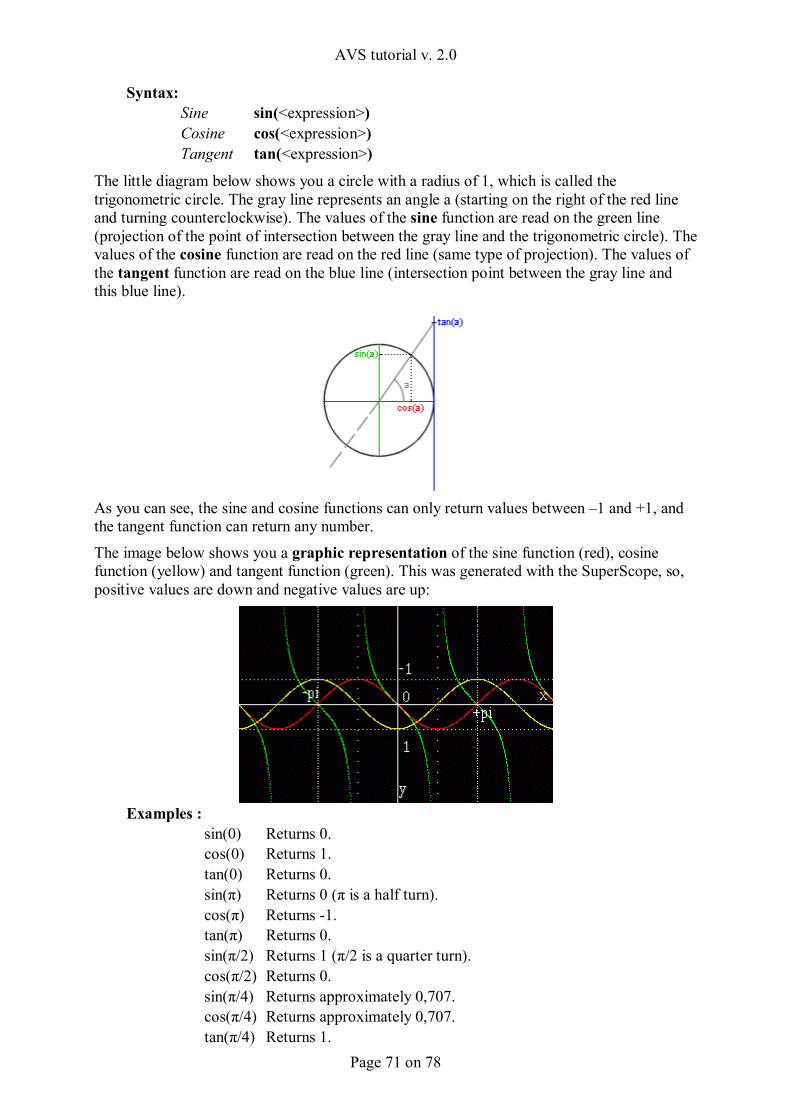
AVS tutorial v. 2.0
Page 71 on 78
Syntax: Sine sin(<expression>) Cosine cos(<expression>) Tangent tan(<expression>)
The little diagram below shows you a circle with a radius of 1, which is called the trigonometric circle. The gray line represents an angle a (starting on the right of the red line and turning counterclockwise). The values of the sine function are read on the green line (projection of the point of intersection between the gray line and the trigonometric circle). The values of the cosine function are read on the red line (same type of projection). The values of the tangent function are read on the blue line (intersection point between the gray line and this blue line).
As you can see, the sine and cosine functions can only return values between –1 and +1, and the tangent function can return any number.
The image below shows you a graphic representation of the sine function (red), cosine function (yellow) and tangent function (green). This was generated with the SuperScope, so, positive values are down and negative values are up:
Examples : sin(0) Returns 0. cos(0) Returns 1. tan(0) Returns 0. sin(π) Returns 0 (π is a half turn). cos(π) Returns -1. tan(π) Returns 0. sin(π/2) Returns 1 (π/2 is a quarter turn). cos(π/2) Returns 0. sin(π/4) Returns approximately 0,707. cos(π/4) Returns approximately 0,707. tan(π/4) Returns 1.
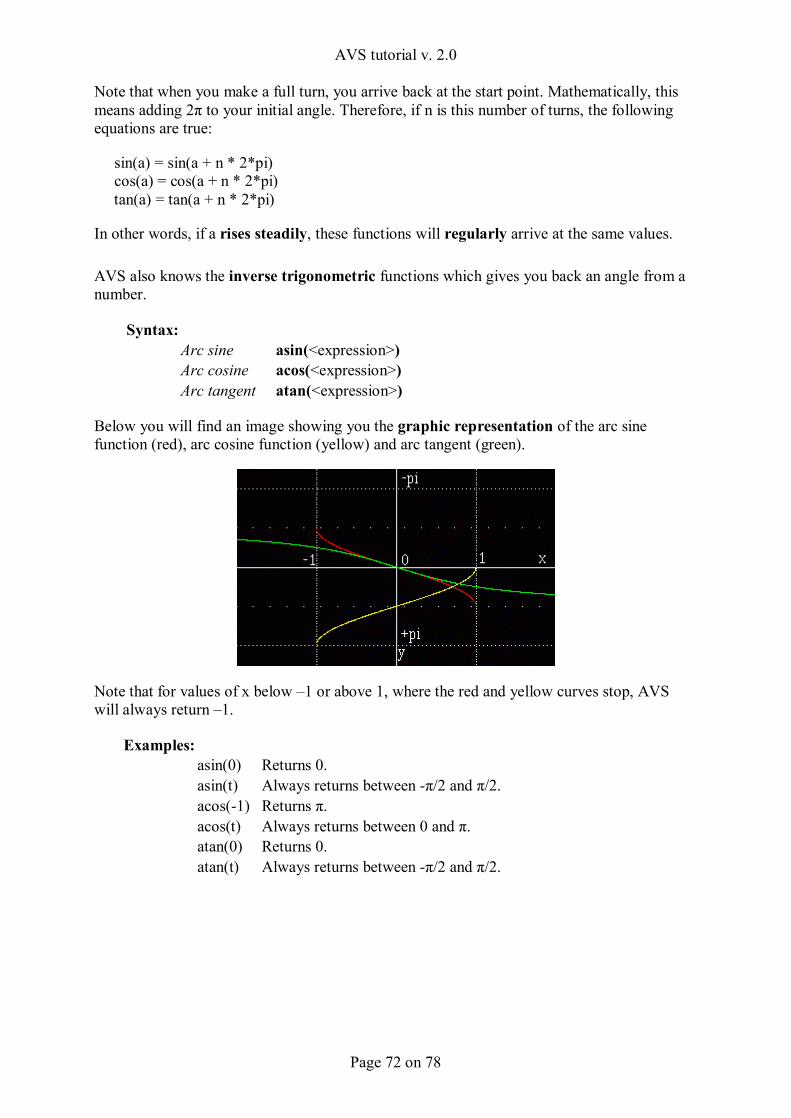
AVS tutorial v. 2.0
Page 72 on 78
Note that when you make a full turn, you arrive back at the start point. Mathematically, this means adding 2π to your initial angle. Therefore, if n is this number of turns, the following equations are true:
sin(a) = sin(a + n * 2*pi) cos(a) = cos(a + n * 2*pi) tan(a) = tan(a + n * 2*pi)
In other words, if a rises steadily, these functions will regularly arrive at the same values.
AVS also knows the inverse trigonometric functions which gives you back an angle from a number.
Syntax: Arc sine asin(<expression>) Arc cosine acos(<expression>) Arc tangent atan(<expression>)
Below you will find an image showing you the graphic representation of the arc sine function (red), arc cosine function (yellow) and arc tangent (green).
Note that for values of x below –1 or above 1, where the red and yellow curves stop, AVS will always return –1.
Examples: asin(0) Returns 0. asin(t) Always returns between -π/2 and π/2. acos(-1) Returns π. acos(t) Always returns between 0 and π. atan(0) Returns 0. atan(t) Always returns between -π/2 and π/2.
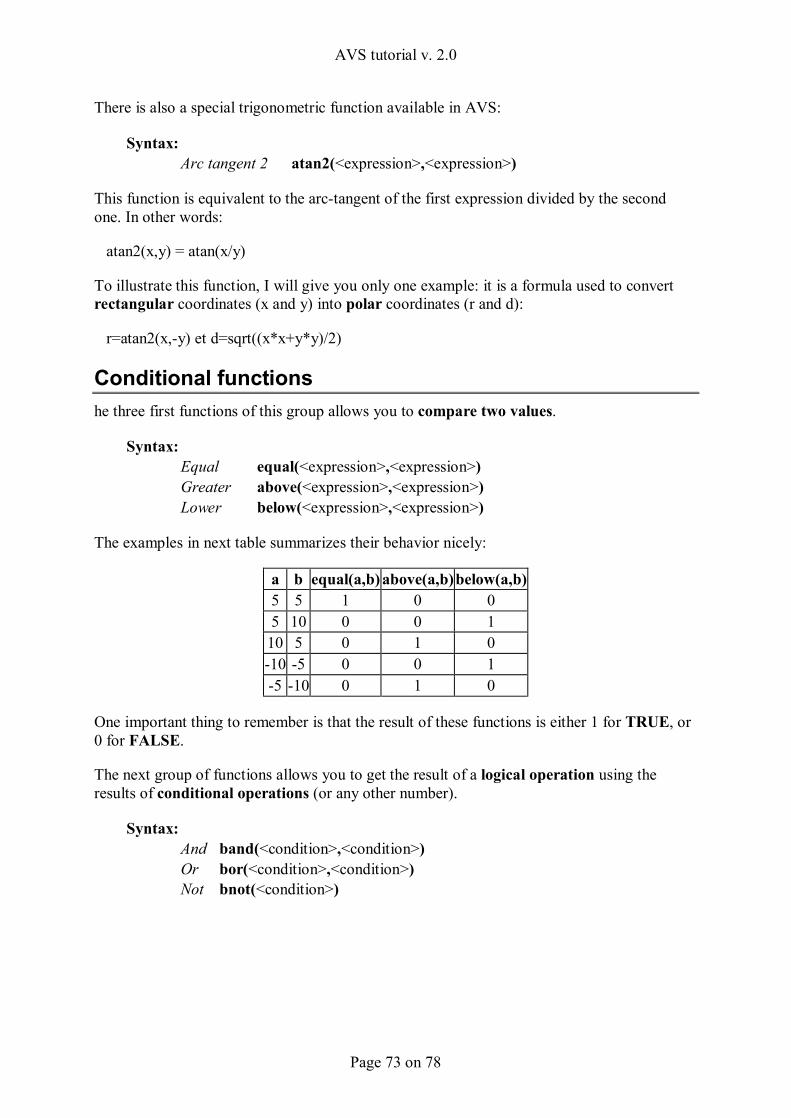
AVS tutorial v. 2.0
Page 73 on 78
There is also a special trigonometric function available in AVS:
Syntax: Arc tangent 2 atan2(<expression>,<expression>)
This function is equivalent to the arc-tangent of the first expression divided by the second one. In other words:
atan2(x,y) = atan(x/y)
To illustrate this function, I will give you only one example: it is a formula used to convert rectangular coordinates (x and y) into polar coordinates (r and d):
r=atan2(x,-y) et d=sqrt((x*x+y*y)/2)
Conditional functions he three first functions of this group allows you to compare two values.
Syntax: Equal equal(<expression>,<expression>) Greater above(<expression>,<expression>) Lower below(<expression>,<expression>)
The examples in next table summarizes their behavior nicely:
a b equal(a,b) above(a,b) below(a,b) 5 5 1 0 0 5 10 0 0 1
10 5 0 1 0 -10 -5 0 0 1 -5 -10 0 1 0
One important thing to remember is that the result of these functions is either 1 for TRUE, or 0 for FALSE.
The next group of functions allows you to get the result of a logical operation using the results of conditional operations (or any other number).
Syntax: And band(<condition>,<condition>) Or bor(<condition>,<condition>) Not bnot(<condition>)
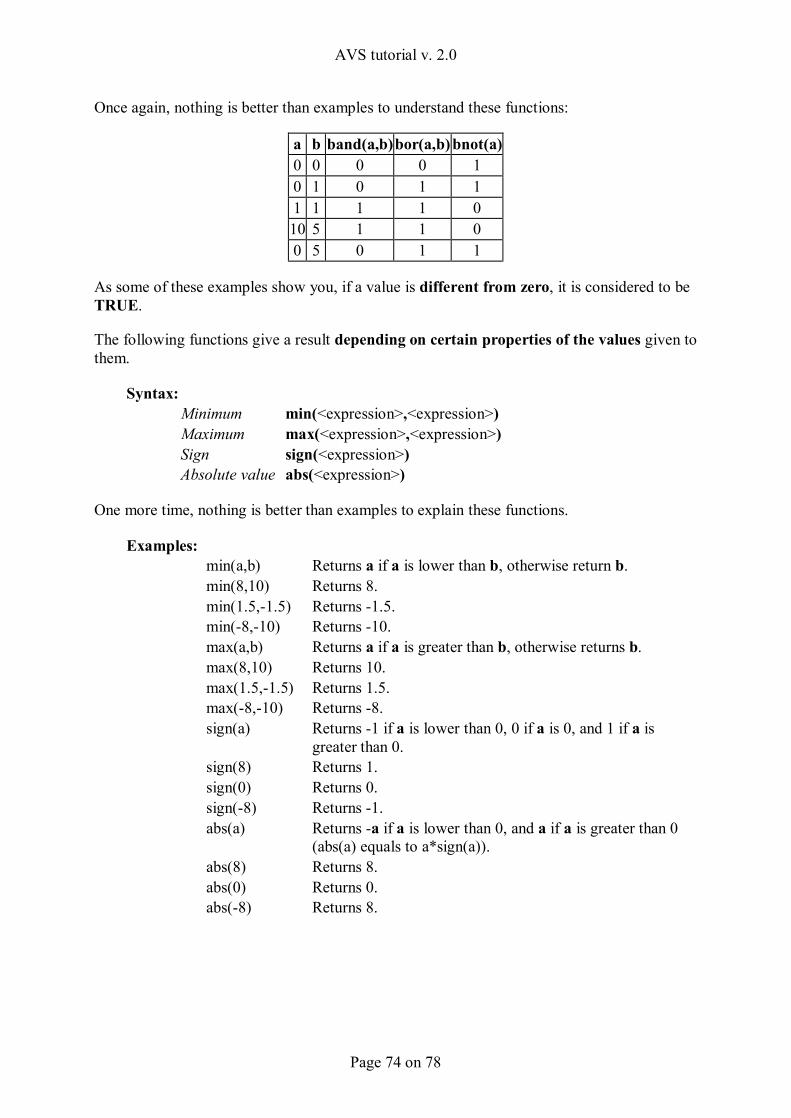
AVS tutorial v. 2.0
Page 74 on 78
Once again, nothing is better than examples to understand these functions:
a b band(a,b) bor(a,b) bnot(a) 0 0 0 0 1 0 1 0 1 1 1 1 1 1 0 10 5 1 1 0 0 5 0 1 1
As some of these examples show you, if a value is different from zero, it is considered to be TRUE.
The following functions give a result depending on certain properties of the values given to them.
Syntax: Minimum min(<expression>,<expression>) Maximum max(<expression>,<expression>) Sign sign(<expression>) Absolute value abs(<expression>)
One more time, nothing is better than examples to explain these functions.
Examples: min(a,b) Returns a if a is lower than b, otherwise return b. min(8,10) Returns 8. min(1.5,-1.5) Returns -1.5. min(-8,-10) Returns -10. max(a,b) Returns a if a is greater than b, otherwise returns b. max(8,10) Returns 10. max(1.5,-1.5) Returns 1.5. max(-8,-10) Returns -8.
sign(a) Returns -1 if a is lower than 0, 0 if a is 0, and 1 if a is greater than 0.
sign(8) Returns 1. sign(0) Returns 0. sign(-8) Returns -1.
abs(a) Returns -a if a is lower than 0, and a if a is greater than 0 (abs(a) equals to a*sign(a)).
abs(8) Returns 8. abs(0) Returns 0. abs(-8) Returns 8.
AVS tutorial v. 2.0
Page 75 on 78
The next function gives a different result according to the condition given is true or false.
Syntax: If ... then ... else if(<condition>,<expression>,<expression>) Examples: if(c,a,b) Returns a if c is TRUE, and b if c is FALSE. if(1,10,20) Returns 10. if(0,10,20) Returns 20. if(above(a,b),-1,1) Returns -1 if a is greater than b, and 1 otherwise. if(a,0,1) Returns 0 if a is not 0, and 1 otherwise.
Sound functions Don’t worry … the next functions are not generating sounds, they rather use the characteristics of the sound coming from Winamp.
Syntax: Oscilloscope getosc(<expression 1>,<expression 2>,<expression 3>) Spectrum getspec(<expression 1>,<expression 2>,<expression 3>)
In both functions above:
expression 1 is a value between 0 and 1, which set the value around which the requested data are centered. expression 2 is also a value between 0 and 1, which set the width of the interval (around the centered value of expression 1) of the requested data. expression 3 tells from which channel these data are taken: 1 for the left channel, 2 for the right channel, and 0 for an average of the both.
Note that these functions, when they use the same parameters, always return the same value in one frame (even in different effects). Therefore, they are very useful to synchronize different dynamic effects.
As it is rather difficult to give you significant examples for these functions, I will simply explain what a sound is and how these functions apply to it.
First of all, a sound is nothing more than air vibrations.
The louder the sound is, the larger the vibrations are. In physic, this is called the amplitude of the sound.
The sharper the sound is, the faster the vibrations are. In physic, this is called the frequency of the sound.
The function getosc() allows you to get the amplitude of the sound at a given time. As it is a vibration, this amplitude can vary from –1 to 1 if the sound is loud, and stay near 0 if the sound is low.
About the function getspec(), it is a little bit more complicated. It will not give you the frequency of the sound, simply because a sound always contains many frequencies. In fact, it can give you a sort of amplitude for the frequencies given. Therefore, the value returned can vary from 0 (frequencies not used) to 1 (frequencies are loud).
AVS tutorial v. 2.0
Page 76 on 78
Interface functions 2.8 These functions are useful to get miscellaneous data from your system.
Syntax: System time gettime(<expression>) Keyboard-Mouse getkbmouse(<expression>) Examples:
gettime(a) Time elapsed, in seconds (with decimals), since a, result itself of a previous gettime(). Very useful to perfectly synchronize effects.
gettime(0) Time elapsed since your system boot. Essential to start the above synchronization.
gettime(-1) Time elapsed since the song’s beginning. gettime(-2) Time length of the current song.
getkbmouse(1) Return the horizontal position (x) of the mouse (0 is
the center of the visualization window, –1 and 1 its left and right borders).
getkbmouse(2) Return the vertical position (y) of the mouse (0 is the
middle of the visualization window, –1 and 1 its up and down borders).
getkbmouse(3) Return the state of the left mouse button (0 released, 1 pressed).
getkbmouse(4) Return the state of the right mouse button (0 released, 1 pressed).
getkbmouse(5) Return the state of the middle mouse button (0 released, 1 pressed).
getkbmouse(n) Return the state of the keyboard key which code n is given (see below).
As we saw in the last example, you can get the state of a given key of your keyboard. In order to get this result, you need to give the code of this particular key. Instead giving you a long table with all codes, here is a simple preset that can be more useful:
• Text that displays $(reg00:3.0)
• SuperScope with init: n=247, frame: k=8, and point: reg00=if(getkbmouse(k),k,reg00);k=k+1.
Once this preset is loaded, you have just to press the key you want to see its code in the visualization window.
AVS tutorial v. 2.0
Page 77 on 78
Other functions The remaining functions will be described summarily in this last paragraph.
rand(a) This function returns a random integer value between 0 and a-1.
floor(a) 2.8 This function returns the first integer value just below a.
ceil(a) 2.8 This function returns the first integer value just above a.
pow(a,p) Using mathematics notation, this function is written: ap
It must be read as: a to the power p. When p is an integer, it is like multiplying a by itself p times. For example:
pow(6,4) = 64 = 6 * 6 * 6 * 6 = 1296
sqr(a) This function returns the square of a, that means, a multiplied by itself. It is equivalent to pow(a,2), but faster.
sqrt(a) This function returns the square root of a, that means a value which, when multiplied by itself, gives a. For example, 2 is the square root of 4 because 2 * 2 = 4. This function is normally only meaningful if a is positive (greater than zero). Nevertheless, as AVS automatically uses the absolute value of the parameter, negative values are accepted. You can also note that this function is equivalent to pow(a,0.5), but faster.
invsqrt(a) 2.8 This function returns the inverse of the square root of a. It is equivalent to 1/sqrt(a), but faster. This function is only meaningful if a is strictly positive, otherwise it will return -1.
exp(a) This function, even if it does not appear in the expression help of AVS, is available with AVS. It returns e at power a. e is called the Euler constant and is approximately 2.718 (see also below).
log(a) This function returns the natural logarithm of a, also called logarithm base e. It returns the value p so that e to the power p equals a. This can be also written as:
log(a) = p <=> ep = a This function is only meaningful if a is positive, otherwise it will always return -1.
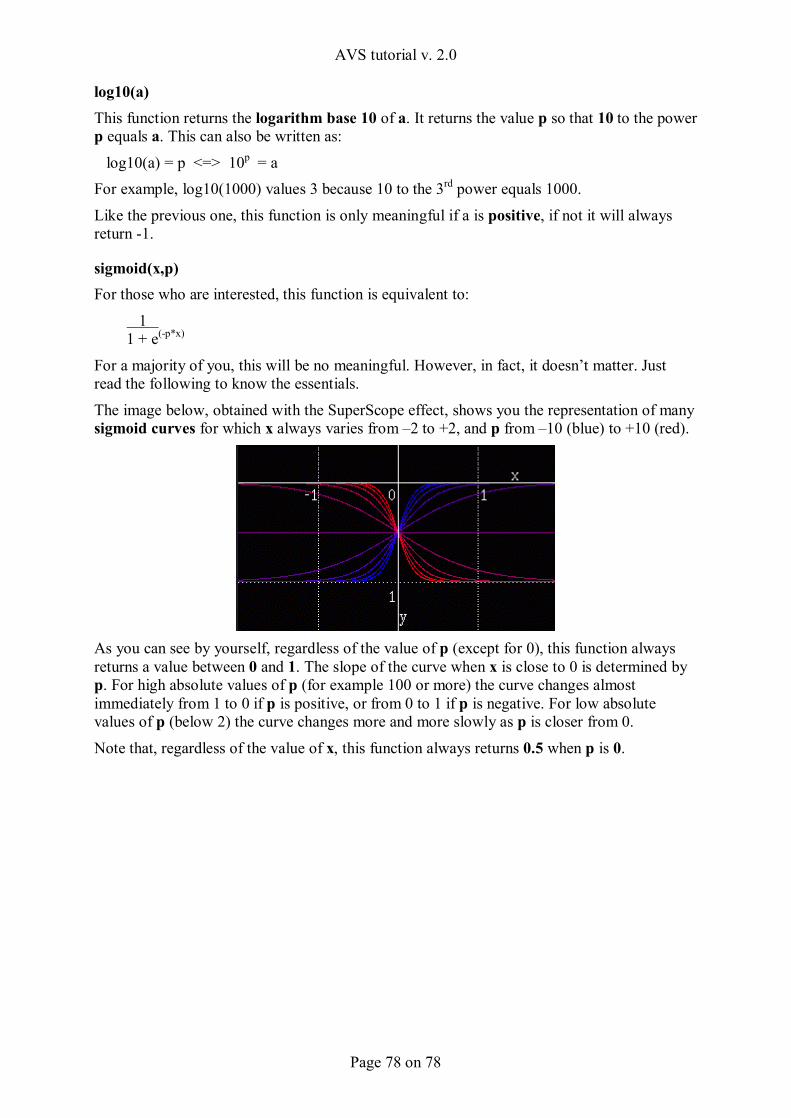
AVS tutorial v. 2.0
Page 78 on 78
log10(a) This function returns the logarithm base 10 of a. It returns the value p so that 10 to the power p equals a. This can also be written as:
log10(a) = p <=> 10p = a For example, log10(1000) values 3 because 10 to the 3rd power equals 1000.
Like the previous one, this function is only meaningful if a is positive, if not it will always return -1.
sigmoid(x,p) For those who are interested, this function is equivalent to:
1 1 + e(-p*x)
For a majority of you, this will be no meaningful. However, in fact, it doesn’t matter. Just read the following to know the essentials.
The image below, obtained with the SuperScope effect, shows you the representation of many sigmoid curves for which x always varies from –2 to +2, and p from –10 (blue) to +10 (red).
As you can see by yourself, regardless of the value of p (except for 0), this function always returns a value between 0 and 1. The slope of the curve when x is close to 0 is determined by p. For high absolute values of p (for example 100 or more) the curve changes almost immediately from 1 to 0 if p is positive, or from 0 to 1 if p is negative. For low absolute values of p (below 2) the curve changes more and more slowly as p is closer from 0.
Note that, regardless of the value of x, this function always returns 0.5 when p is 0.
Related Documents


