Avaya Call Management System Software Installation, Maintenance, and Troubleshooting for Linux® Release 18.0.1 June 2017

Welcome message from author
This document is posted to help you gain knowledge. Please leave a comment to let me know what you think about it! Share it to your friends and learn new things together.
Transcript

Avaya Call Management SystemSoftware Installation, Maintenance, and Troubleshooting for Linux®
Release 18.0.1June 2017
© 2017 Avaya Inc. All Rights Reserved.
NoticeWhile reasonable efforts have been made to ensure that the information in this document is complete and accurate at the time of printing, Avaya assumes no liability for any errors. Avaya reserves the right to make changes and corrections to the information in this document without the obligation to notify any person or organization of such changes.
Documentation disclaimer"Documentation" means information published in varying mediums which may include product information, operating instructions and performance specifications that are generally made available to users of products. Documentation does not include marketing materials. Avaya shall not be responsible for any modifications, additions, or deletions to the original published version of Documentation unless such modifications, additions, or deletions were performed by or on the express behalf of Avaya. End User agrees to indemnify and hold harmless Avaya, Avaya's agents, servants and employees against all claims, lawsuits, demands and judgments arising out of, or in connection with, subsequent modifications, additions or deletions to this documentation, to the extent made by End User.
Link disclaimerAvaya is not responsible for the contents or reliability of any linked websites referenced within this site or Documentation provided by Avaya. Avaya is not responsible for the accuracy of any information, statement or content provided on these sites and does not necessarily endorse the products, services, or information described or offered within them. Avaya does not guarantee that these links will work all the time and has no control over the availability of the linked pages.
WarrantyAvaya provides a limited warranty on Avaya hardware and software. Refer to your sales agreement to establish the terms of the limited warranty. In addition, Avaya's standard warranty language, as well as information regarding support for this product while under warranty is available to Avaya customers and other parties through the Avaya Support website: https://support.avaya.com/helpcenter/getGenericDetails?detailId=C20091120112456651010 under the link "Warranty & Product Lifecycle" or such successor site as designated by Avaya. Please note that if You acquired the product(s) from an authorized Avaya Channel Partner outside of the United States and Canada, the warranty is provided to You by said Avaya Channel Partner and not by Avaya. "Hosted Service" means an Avaya hosted service subscription that You acquire from either Avaya or an authorized Avaya Channel Partner (as applicable) and which is described further in Hosted SAS or other service description documentation regarding the applicable hosted service. If You purchase a Hosted Service subscription, the foregoing limited warranty may not apply but You may be entitled to support services in connection with the Hosted Service as described further in your service description documents for the applicable Hosted Service. Contact Avaya or Avaya Channel Partner (as applicable) for more information.
Hosted ServiceTHE FOLLOWING APPLIES ONLY IF YOU PURCHASE AN AVAYA HOSTED SERVICE SUBSCRIPTION FROM AVAYA OR AN AVAYA CHANNEL PARTNER (AS APPLICABLE), THE TERMS OF USE FOR HOSTED SERVICES ARE AVAILABLE ON THE AVAYA WEBSITE, HTTPS://SUPPORT.AVAYA.COM/LICENSEINFO UNDER THE LINK "Avaya Terms of Use for Hosted Services" OR SUCH SUCCESSOR SITE AS DESIGNATED BY AVAYA, AND ARE APPLICABLE TO ANYONE WHO ACCESSES OR USES THE HOSTED SERVICE. BY ACCESSING OR USING THE HOSTED SERVICE, OR AUTHORIZING OTHERS TO DO SO, YOU, ON BEHALF OF YOURSELF AND THE ENTITY FOR WHOM YOU ARE DOING SO (HEREINAFTER REFERRED TO INTERCHANGEABLY AS "YOU" AND "END USER"), AGREE TO THE TERMS OF USE. IF YOU ARE ACCEPTING THE TERMS OF USE ON BEHALF A COMPANY OR OTHER LEGAL ENTITY, YOU REPRESENT THAT YOU HAVE THE AUTHORITY TO BIND SUCH ENTITY TO THESE TERMS OF USE. IF YOU DO NOT HAVE SUCH AUTHORITY, OR IF YOU DO NOT WISH TO ACCEPT THESE TERMS OF USE, YOU MUST NOT ACCESS OR USE THE HOSTED SERVICE OR AUTHORIZE ANYONE TO ACCESS OR USE THE HOSTED SERVICE.
LicensesTHE SOFTWARE LICENSE TERMS AVAILABLEON THE AVAYA WEBSITE, HTTPS://SUPPORT.AVAYA.COM/LICENSEINFO, UNDER THE LINK "AVAYA SOFTWARE LICENSE TERMS (Avaya Products)" OR SUCH SUCCESSOR SITE AS DESIGNATED BY AVAYA, ARE APPLICABLE TO ANYONE WHO DOWNLOADS, USES AND/OR INSTALLS AVAYA SOFTWARE, PURCHASED FROM AVAYA INC., ANY AVAYA AFFILIATE, OR AN AVAYA CHANNEL PARTNER (AS APPLICABLE) UNDER A COMMERCIAL AGREEMENT WITH AVAYA OR AN AVAYA CHANNEL PARTNER. UNLESS OTHERWISE AGREED TO BY AVAYA IN WRITING, AVAYA DOES NOT EXTEND THIS LICENSE IF THE SOFTWARE WAS OBTAINED FROM ANYONE OTHER THAN AVAYA, AN AVAYA AFFILIATE OR AN AVAYA
CHANNEL PARTNER; AVAYA RESERVES THE RIGHT TO TAKE LEGAL ACTION AGAINST YOU AND ANYONE ELSE USING OR SELLING THE SOFTWARE WITHOUT A LICENSE. BY INSTALLING, DOWNLOADING OR USING THE SOFTWARE, OR AUTHORIZING OTHERS TO DO SO, YOU, ON BEHALF OF YOURSELF AND THE ENTITY FOR WHOM YOU ARE INSTALLING, DOWNLOADING OR USING THE SOFTWARE (HEREINAFTER REFERRED TO INTERCHANGEABLY AS "YOU" AND "END USER"), AGREE TO THESE TERMS AND CONDITIONS AND CREATE A BINDING CONTRACT BETWEEN YOU AND AVAYA INC. OR THE APPLICABLE AVAYA AFFILIATE ("AVAYA").Avaya grants You a license within the scope of the license types described below, with the exception of Heritage Nortel Software, for which the scope of the license is detailed below. Where the order documentation does not expressly identify a license type, the applicable license will be a Designated System License. The applicable number of licenses and units of capacity for which the license is granted will be one (1), unless a different number of licenses or units of capacity is specified in the documentation or other materials available to You. " Software" means computer programs in object code, provided by Avaya or an Avaya Channel Partner, whether as stand-alone products, pre-installed on hardware products, and any upgrades, updates, patches, bug fixes, or modified versions thereto. "Designated Processor" means a single stand-alone computing device. "Server" means a Designated Processor that hosts a software application to be accessed by multiple users. "Instance" means a single copy of the Software executing at a particular time: (i) on one physical machine; or (ii) on one deployed software virtual machine ("VM") or similar deployment.
License type(s)Designated System(s) License (DS). End User may install and use each copy or an Instance of the Software only on a number of Designated Processors up to the number indicated in the order. Avaya may require the Designated Processor(s) to be identified in the order by type, serial number, feature key, Instance, location or other specific designation, or to be provided by End User to Avaya through electronic means established by Avaya specifically for this purpose. Concurrent User License (CU). End User may install and use the Software on multiple Designated Processors or one or more Servers, so long as only the licensed number of Units are accessing and using the Software at any given time. A "Unit" means the unit on which Avaya, at its sole discretion, bases the pricing of its licenses and can be, without limitation, an agent, port or user, an e-mail or voice mail account in the name of a person or corporate function (e.g., webmaster or helpdesk), or a directory entry in the administrative database utilized by the Software that permits one user to interface with the Software. Units may be linked to a specific, identified Server or an Instance of the Software.Named User License (NU). You may: (i) install and use each copy or Instance of the Software on a single Designated Processor or Server per authorized Named User (defined below); or (ii) install and use each copy or Instance of the Software on a Server so long as only authorized Named Users access and use the Software. "Named User," means a user or device that has been expressly authorized by Avaya to access and use the Software. At Avaya's sole discretion, a "Named User" may be, without limitation, designated by name, corporate function (e.g., webmaster or helpdesk), an e-mail or voice mail account in the name of a person or corporate function, or a directory entry in the administrative database utilized by the Software that permits one user to interface with the Software.Shrinkwrap License (SR). You may install and use the Software in accordance with the terms and conditions of the applicable license agreements, such as "shrinkwrap" or "clickthrough" license accompanying or applicable to the Software ("Shrinkwrap License").
Heritage Nortel Software
"Heritage Nortel Software" means the software that was acquired by Avaya as part of its purchase of the Nortel Enterprise Solutions Business in December 2009. The Heritage Nortel Software is the software contained within the list of Heritage Nortel Products located at https://support.avaya.com/LicenseInfo/ under the link "Heritage Nortel Products," or such successor site as designated by Avaya. For Heritage Nortel Software, Avaya grants Customer a license to use Heritage Nortel Software provided hereunder solely to the extent of the authorized activation or authorized usage level, solely for the purpose specified in the Documentation, and solely as embedded in, for execution on, or for communication with Avaya equipment. Charges for Heritage Nortel Software may be based on extent of activation or use authorized as specified in an order or invoice.
Copyright Except where expressly stated otherwise, no use should be made of materials on this site, the Documentation, Software, Hosted Service, or hardware provided by Avaya. All content on this site, the documentation, Hosted Service, and the product provided by Avaya including the selection, arrangement and design of the content is owned either by Avaya or its licensors and is protected by copyright and other intellectual property laws including the sui generis rights relating to the protection of databases. You may not modify, copy, reproduce, republish, upload, post, transmit or distribute in any way any content, in whole
or in part, including any code and software unless expressly authorized by Avaya. Unauthorized reproduction, transmission, dissemination, storage, and or use without the express written consent of Avaya can be a criminal, as well as a civil offense under the applicable law.
VirtualizationThe following applies if the product is deployed on a virtual machine. Each product has its own ordering code and license types. Note that each Instance of a product must be separately licensed and ordered. For example, if the end user customer or Avaya Channel Partner would like to install two Instances of the same type of products, then two products of that type must be ordered.
Third party components"Third Party Components" mean certain software programs or portions thereof included in the Software or Hosted Service may contain software (including open source software) distributed under third party agreements ("Third Party Components"), which contain terms regarding the rights to use certain portions of the Software ("Third Party Terms"). As required, information regarding distributed Linux OS source code (for those products that have distributed Linux OS source code) and identifying the copyright holders of the Third Party Components and the Third Party Terms that apply is available in the products, Documentation or on Avaya's website at:https://support.avaya.com/Copyright or such successor site as designated by Avaya. The open source software license terms provided as Third Party Terms are consistent with the license rights granted in these Software License Terms, and may contain additional rights benefiting You, such as modification and distribution of the open source software. The Third Party Terms shall take precedence over these Software License Terms, solely with respect to the applicable Third Party Components, to the extent that these Software License Terms impose greater restrictions on You than the applicable Third Party Terms.The following applies if the H.264 (AVC) codec is distributed with the product. THIS PRODUCT IS LICENSED UNDER THE AVC PATENT PORTFOLIO LICENSE FOR THE PERSONAL USE OF A CONSUMER OR OTHER USES IN WHICH IT DOES NOT RECEIVE REMUNERATION TO (i) ENCODE VIDEO IN COMPLIANCE WITH THE AVC STANDARD ("AVC VIDEO") AND/OR (ii) DECODE AVC VIDEO THAT WAS ENCODED BY A CONSUMER ENGAGED IN A PERSONAL ACTIVITY AND/OR WAS OBTAINED FROM A VIDEO PROVIDER LICENSED TO PROVIDE AVC VIDEO. NO LICENSE IS GRANTED OR SHALL BE IMPLIED FOR ANY OTHER USE. ADDITIONAL INFORMATION MAY BE OBTAINED FROM MPEG LA, L.L.C. SEE HTTP://WWW.MPEGLA.COM.
Service ProviderTHE FOLLOWING APPLIES TO AVAYA CHANNEL PARTNER'S HOSTING OF AVAYA PRODUCTS OR SERVICES. THE PRODUCT OR HOSTED SERVICE MAY USE THIRD PARTY COMPONENTS SUBJECT TO THIRD PARTY TERMS AND REQUIRE A SERVICE PROVIDER TO BE INDEPENDENTLY LICENSED DIRECTLY FROM THE THIRD PARTY SUPPLIER. AN AVAYA CHANNEL PARTNER'S HOSTING OF AVAYA PRODUCTS MUST BE AUTHORIZED IN WRITING BY AVAYA AND IF THOSE HOSTED PRODUCTS USE OR EMBED CERTAIN THIRD PARTY SOFTWARE, INCLUDING BUT NOT LIMITED TO MICROSOFT SOFTWARE OR CODECS, THE AVAYA CHANNEL PARTNER IS REQUIRED TO INDEPENDENTLY OBTAIN ANY APPLICABLE LICENSE AGREEMENTS, AT THE AVAYA CHANNEL PARTNER'S EXPENSE, DIRECTLY FROM THE APPLICABLE THIRD PARTY SUPPLIER.WITH RESPECT TO CODECS, IF THE AVAYA CHANNEL PARTNER IS HOSTING ANY PRODUCTS THAT USE OR EMBED THE G.729 CODEC, H.264 CODEC, OR H.265 CODEC, THE AVAYA CHANNEL PARTNER ACKNOWLEDGES AND AGREES THE AVAYA CHANNEL PARTNER IS RESPONSIBLE FOR ANY AND ALL RELATED FEES AND/OR ROYALTIES. THE G.729 CODEC IS LICENSED BY SIPRO LAB TELECOM INC. SEE WWW.SIPRO.COM/CONTACT.HTML. THE H.264 (AVC) CODEC IS LICENSED UNDER THE AVC PATENT PORTFOLIO LICENSE FOR THE PERSONAL USE OF A CONSUMER OR OTHER USES IN WHICH IT DOES NOT RECEIVE REMUNERATION TO: (I) ENCODE VIDEO IN COMPLIANCE WITH THE AVC STANDARD ("AVC VIDEO") AND/OR (II) DECODE AVC VIDEO THAT WAS ENCODED BY A CONSUMER ENGAGED IN A PERSONAL ACTIVITY AND/OR WAS OBTAINED FROM A VIDEO PROVIDER LICENSED TO PROVIDE AVC VIDEO. NO LICENSE IS GRANTED OR SHALL BE IMPLIED FOR ANY OTHER USE. ADDITIONAL INFORMATION FOR H.264 (AVC) AND H.265 (HEVC) CODECS MAY BE OBTAINED FROM MPEG LA, L.L.C. SEE HTTP://WWW.MPEGLA.COM.
Compliance with Laws
You acknowledge and agree that it is Your responsibility for complying with any applicable laws and regulations, including, but not limited to laws and regulations related to call recording, data privacy, intellectual property, trade secret, fraud, and music performance rights, in the country or territory where
the Avaya product is used.
Preventing Toll Fraud"Toll Fraud" is the unauthorized use of your telecommunications system by an unauthorized party (for example, a person who is not a corporate employee, agent, subcontractor, or is not working on your company's behalf). Be aware that there can be a risk of Toll Fraud associated with your system and that, if Toll Fraud occurs, it can result in substantial additional charges for your telecommunications services.
Avaya Toll Fraud interventionIf You suspect that You are being victimized by Toll Fraud and You need technical assistance or support, call Technical Service Center Toll Fraud Intervention Hotline at +1-800-643-2353 for the United States and Canada. For additional support telephone numbers, see the Avaya Support website: https://support.avaya.com , or such successor site as designated by Avaya.
Security VulnerabilitiesInformation about Avaya's security support policies can be found in the Security Policies and Support section of https://support.avaya.com/securitySuspected Avaya product security vulnerabilities are handled per the Avaya Product Security Support Flow (https://support.avaya.com/css/P8/documents/100161515).
TrademarksThe trademarks, logos and service marks ("Marks") displayed in this site, the Documentation, Hosted Service(s), and product(s) provided by Avaya are the registered or unregistered Marks of Avaya, its affiliates, its licensors, its suppliers, or other third parties. Users are not permitted to use such Marks without prior written consent from Avaya or such third party which may own the Mark. Nothing contained in this site, the Documentation, Hosted Service(s) and product(s) should be construed as granting, by implication, estoppel, or otherwise, any license or right in and to the Marks without the express written permission of Avaya or the applicable third party.Avaya is a registered trademark of Avaya Inc.All non-Avaya trademarks are the property of their respective owners.Linux® is the registered trademark of Linus Torvalds in the U.S. and other countries.
Downloading DocumentationFor the most current versions of Documentation, see the Avaya Support website: https://support.avaya.com , or such successor site as designated by Avaya.
Contact Avaya SupportSee the Avaya Support website: https://support.avaya.com for product or Hosted Service notices and articles, or to report a problem with your Avaya product or Hosted Service. For a list of support telephone numbers and contact addresses, go to the Avaya Support website: https://support.avaya.com (or such successor site as designated by Avaya), scroll to the bottom of the page, and select Contact Avaya Support.

CMS R18 Software Installation, Maintenance, and Troubleshooting for Linux June 2017 5
Chapter 1: Introduction . . . . . . . . . . . . . . . . . . . . . . . . . . . . . . . . . . 11Purpose. . . . . . . . . . . . . . . . . . . . . . . . . . . . . . . . . . . . . . . . . 11Intended audience . . . . . . . . . . . . . . . . . . . . . . . . . . . . . . . . . . . 11Document changes since last issue . . . . . . . . . . . . . . . . . . . . . . . . . 11Related resources . . . . . . . . . . . . . . . . . . . . . . . . . . . . . . . . . . . 12
Documentation. . . . . . . . . . . . . . . . . . . . . . . . . . . . . . . . . . . 12Avaya Mentor videos . . . . . . . . . . . . . . . . . . . . . . . . . . . . . . . 13
Documentation websites . . . . . . . . . . . . . . . . . . . . . . . . . . . . . . . 13Support . . . . . . . . . . . . . . . . . . . . . . . . . . . . . . . . . . . . . . . . . 14
Chapter 2: Supported platforms and packages . . . . . . . . . . . . . . . . . . . . 15Prerequisites . . . . . . . . . . . . . . . . . . . . . . . . . . . . . . . . . . . . . . 15Supported hardware platforms . . . . . . . . . . . . . . . . . . . . . . . . . . . . 15Supported software packages . . . . . . . . . . . . . . . . . . . . . . . . . . . . 16
Chapter 3: Installing the RHEL operating system . . . . . . . . . . . . . . . . . . . . 17Required hardware . . . . . . . . . . . . . . . . . . . . . . . . . . . . . . . . . . 17Prerequisites . . . . . . . . . . . . . . . . . . . . . . . . . . . . . . . . . . . . . . 18Installing RHEL . . . . . . . . . . . . . . . . . . . . . . . . . . . . . . . . . . . . 18
Booting a Dell or HP system to the Avaya RHEL disc . . . . . . . . . . . . . 18Setting the RHEL boot priority . . . . . . . . . . . . . . . . . . . . . . . . 19Installing the RHEL software . . . . . . . . . . . . . . . . . . . . . . . . . 21
Chapter 4: Configuring the RHEL operating system . . . . . . . . . . . . . . . . . . 27Prerequisites . . . . . . . . . . . . . . . . . . . . . . . . . . . . . . . . . . . . . . 27Using the nohup command . . . . . . . . . . . . . . . . . . . . . . . . . . . . . . 27Opening a virtual console window . . . . . . . . . . . . . . . . . . . . . . . . . . 28Configuring the system network . . . . . . . . . . . . . . . . . . . . . . . . . . . 28Assigning a root password . . . . . . . . . . . . . . . . . . . . . . . . . . . . . . 33Verifying the disk partitioning for Dell or HP platforms . . . . . . . . . . . . . . . 34Initializing the CMS database . . . . . . . . . . . . . . . . . . . . . . . . . . . . . 38Verifying the system activity accounting tool . . . . . . . . . . . . . . . . . . . . 38Installing RHEL (Linux®) rpms . . . . . . . . . . . . . . . . . . . . . . . . . . . . 40
Chapter 5: Installing CMS and supporting software . . . . . . . . . . . . . . . . . . 45Installation rules . . . . . . . . . . . . . . . . . . . . . . . . . . . . . . . . . . . . 46Installing the CMS packages . . . . . . . . . . . . . . . . . . . . . . . . . . . . . 46
Prerequisites . . . . . . . . . . . . . . . . . . . . . . . . . . . . . . . . . . . . 46Assigning the CMS login passwords. . . . . . . . . . . . . . . . . . . . . . . 47
Contents

Contents
CMS R18 Software Installation, Maintenance, and Troubleshooting for Linux June 2017 6
Configuring CMS authorizations . . . . . . . . . . . . . . . . . . . . . . . . . 48Storage requirement for CMS . . . . . . . . . . . . . . . . . . . . . . . . . . . 52
Dataspace required for the CMS full maintenance backup . . . . . . . . . 52Dataspace required for the CMSADM backup . . . . . . . . . . . . . . . . 54
Configuring the ODBC and JDBC server software . . . . . . . . . . . . . . . . . 56Setting up CMS data storage parameters . . . . . . . . . . . . . . . . . . . . . . 56Setting up LAN connections . . . . . . . . . . . . . . . . . . . . . . . . . . . . . 59
Prerequisites . . . . . . . . . . . . . . . . . . . . . . . . . . . . . . . . . . . . 59Editing the /etc/hosts file . . . . . . . . . . . . . . . . . . . . . . . . . . . . . 59
IPv6 Support on RHEL. . . . . . . . . . . . . . . . . . . . . . . . . . . . . . . . . 61Configuring the CMS software . . . . . . . . . . . . . . . . . . . . . . . . . . . . 62
Prerequisites . . . . . . . . . . . . . . . . . . . . . . . . . . . . . . . . . . . . 63About the configuration methods . . . . . . . . . . . . . . . . . . . . . . . . 63Configuring CMS interactively . . . . . . . . . . . . . . . . . . . . . . . . . . 63Configuring CMS using a flat file . . . . . . . . . . . . . . . . . . . . . . . . . 72
Creating the flat file . . . . . . . . . . . . . . . . . . . . . . . . . . . . . . 73Example of a flat file . . . . . . . . . . . . . . . . . . . . . . . . . . . . . . 73Using the flat file . . . . . . . . . . . . . . . . . . . . . . . . . . . . . . . . 76
Installing feature packages . . . . . . . . . . . . . . . . . . . . . . . . . . . . . . 78Prerequisites . . . . . . . . . . . . . . . . . . . . . . . . . . . . . . . . . . . . 78Installing the Forecasting package . . . . . . . . . . . . . . . . . . . . . . . 79Installing the External Call History package . . . . . . . . . . . . . . . . . . 81Installing the Multi-tenancy package . . . . . . . . . . . . . . . . . . . . . . . 83Installing the Dual IP feature . . . . . . . . . . . . . . . . . . . . . . . . . . . 85Adding a secondary IP address to an existing ACD . . . . . . . . . . . . . . 85
Secondary connection configuration. . . . . . . . . . . . . . . . . . . . . 86Installing CMS Supervisor Web. . . . . . . . . . . . . . . . . . . . . . . . . . 86
Certificate Management . . . . . . . . . . . . . . . . . . . . . . . . . . . . 88Generating and installing a customer certificate for the cmsweb server . 88
Remote consoles . . . . . . . . . . . . . . . . . . . . . . . . . . . . . . . . . . . 91Setting up the Alarm Origination Manager . . . . . . . . . . . . . . . . . . . . . 91
Prerequisites . . . . . . . . . . . . . . . . . . . . . . . . . . . . . . . . . . . . 91Setting up AOM configuration for SNMP alarming . . . . . . . . . . . . . . . 92
Configuring AOM . . . . . . . . . . . . . . . . . . . . . . . . . . . . . . . 92Configuring an Alarm Destination . . . . . . . . . . . . . . . . . . . . . . 92Configuring an SNMP User . . . . . . . . . . . . . . . . . . . . . . . . . . 96Configuring an Alarm ID. . . . . . . . . . . . . . . . . . . . . . . . . . . . 100Configuring a Customer ID . . . . . . . . . . . . . . . . . . . . . . . . . . 101Sending an AOM Test Alarm . . . . . . . . . . . . . . . . . . . . . . . . . 102Clearing SNMP Alarms . . . . . . . . . . . . . . . . . . . . . . . . . . . . 103

Contents
CMS R18 Software Installation, Maintenance, and Troubleshooting for Linux June 2017 7
CMS SNMP alarm information . . . . . . . . . . . . . . . . . . . . . . . . . . 104Locating the CMS-MIB.txt file . . . . . . . . . . . . . . . . . . . . . . . . . . . 106Setting up AOM configuration for alarming using Socket/SAL. . . . . . . . . 107
Configuring AOM . . . . . . . . . . . . . . . . . . . . . . . . . . . . . . . 107Configuring an Alarm Destination . . . . . . . . . . . . . . . . . . . . . . 107Configuring an Alarm ID. . . . . . . . . . . . . . . . . . . . . . . . . . . . 110Sending an AOM Test Alarm . . . . . . . . . . . . . . . . . . . . . . . . . 111
Setting the Informix configuration parameters for CMS . . . . . . . . . . . . . . 111Installing Access Security Gateway and the CMS Authentication File . . . . . . 112Removing Access Security Gateway. . . . . . . . . . . . . . . . . . . . . . . . . 113
Chapter 6: Turning the system over to the customer . . . . . . . . . . . . . . . . . . 115Prerequisites . . . . . . . . . . . . . . . . . . . . . . . . . . . . . . . . . . . . . . 115Verifying the system date and time. . . . . . . . . . . . . . . . . . . . . . . . . . 116Forwarding CMS warning messages . . . . . . . . . . . . . . . . . . . . . . . . . 116Checking free space allocation . . . . . . . . . . . . . . . . . . . . . . . . . . . . 117Testing the ACD link . . . . . . . . . . . . . . . . . . . . . . . . . . . . . . . . . . 118Assigning customer passwords . . . . . . . . . . . . . . . . . . . . . . . . . . . 119Testing the CMS software . . . . . . . . . . . . . . . . . . . . . . . . . . . . . . 120Finalizing the on-site installation . . . . . . . . . . . . . . . . . . . . . . . . . . . 123
Chapter 7: Maintaining the CMS software . . . . . . . . . . . . . . . . . . . . . . . . 125Using the CMSADM menu. . . . . . . . . . . . . . . . . . . . . . . . . . . . . . . 125
CMSADM menu functions . . . . . . . . . . . . . . . . . . . . . . . . . . . . . 126Accessing the CMSADM menu . . . . . . . . . . . . . . . . . . . . . . . . . . 126Using acd_create . . . . . . . . . . . . . . . . . . . . . . . . . . . . . . . . . 127Using acd_remove . . . . . . . . . . . . . . . . . . . . . . . . . . . . . . . . . 129Using backup . . . . . . . . . . . . . . . . . . . . . . . . . . . . . . . . . . . 130Using pkg_install . . . . . . . . . . . . . . . . . . . . . . . . . . . . . . . . . 130Using pkg_remove. . . . . . . . . . . . . . . . . . . . . . . . . . . . . . . . . 131Using run_pkg . . . . . . . . . . . . . . . . . . . . . . . . . . . . . . . . . . . 132Using run_ids . . . . . . . . . . . . . . . . . . . . . . . . . . . . . . . . . . . 132Using run_cms . . . . . . . . . . . . . . . . . . . . . . . . . . . . . . . . . . . 132Using passwd_age. . . . . . . . . . . . . . . . . . . . . . . . . . . . . . . . . 133Using dbaccess . . . . . . . . . . . . . . . . . . . . . . . . . . . . . . . . . . 134
Using the CMSSVC menu . . . . . . . . . . . . . . . . . . . . . . . . . . . . . . . 137CMSSVC menu functions . . . . . . . . . . . . . . . . . . . . . . . . . . . . . 138Accessing the CMSSVC menu . . . . . . . . . . . . . . . . . . . . . . . . . . 138Using auth_display . . . . . . . . . . . . . . . . . . . . . . . . . . . . . . . . 139Using auth_set . . . . . . . . . . . . . . . . . . . . . . . . . . . . . . . . . . . 139

Contents
CMS R18 Software Installation, Maintenance, and Troubleshooting for Linux June 2017 8
Using run_ids . . . . . . . . . . . . . . . . . . . . . . . . . . . . . . . . . . . 140Using run_cms . . . . . . . . . . . . . . . . . . . . . . . . . . . . . . . . . . . 140Using setup . . . . . . . . . . . . . . . . . . . . . . . . . . . . . . . . . . . . 140Using swinfo . . . . . . . . . . . . . . . . . . . . . . . . . . . . . . . . . . . . 141Using swsetup . . . . . . . . . . . . . . . . . . . . . . . . . . . . . . . . . . . 141Using uninstall . . . . . . . . . . . . . . . . . . . . . . . . . . . . . . . . . . . 142
CMS backups . . . . . . . . . . . . . . . . . . . . . . . . . . . . . . . . . . . . . 143CMSADM backup . . . . . . . . . . . . . . . . . . . . . . . . . . . . . . . . . . . 144
When to perform a CMSADM backup . . . . . . . . . . . . . . . . . . . . . . 144Backing up CMS . . . . . . . . . . . . . . . . . . . . . . . . . . . . . . . . . . . . 146
Backing up CMS to tape. . . . . . . . . . . . . . . . . . . . . . . . . . . . . . 146Supported tape drives and cartridges . . . . . . . . . . . . . . . . . . . . 146Performing a CMSADM backup to tape . . . . . . . . . . . . . . . . . . . 147Checking the contents of the CMSADM backup tape . . . . . . . . . . . . 149
Backing up CMS to a USB storage device . . . . . . . . . . . . . . . . . . . . 150Configuring and Connecting a USB storage device. . . . . . . . . . . . . 151Verifying the USB storage device is recognized by the CMS server . . . . 151Mounting a USB storage device . . . . . . . . . . . . . . . . . . . . . . . 154Unmounting a USB storage device . . . . . . . . . . . . . . . . . . . . . . 155Administering a Backup/Restore Device for a USB storage device . . . . 155Performing a CMSADM backup to a USB storage device . . . . . . . . . . 155Performing a CMS Maintenance Back Up of data to a USB storage device 157Checking the contents of the CMSADM backup to USB . . . . . . . . . . 157
Backing up CMS to a network mount point . . . . . . . . . . . . . . . . . . . 158Configuring and Connecting to a network mount point. . . . . . . . . . . 158Configuring an NFS server . . . . . . . . . . . . . . . . . . . . . . . . . . 159Configuring a mount point on a Solaris 10 NFS server . . . . . . . . . . . 160Configuring a mount point on a Linux NFS server . . . . . . . . . . . . . 163Configuring a mount point to a VMware datastore . . . . . . . . . . . . . 166Administering a Backup/Restore Device for a network mount point. . . . 170Performing a CMSADM backup to a network mount point . . . . . . . . . 171Performing a CMS Maintenance Back Up of data to a network mount point 172Checking the contents of the CMSADM backup to a network mount point 173
Changing the system date and time . . . . . . . . . . . . . . . . . . . . . . . . . 174Checking the RHEL system date and time . . . . . . . . . . . . . . . . . . . . 174Setting the system date and time. . . . . . . . . . . . . . . . . . . . . . . . . 174Setting the system country and time zones . . . . . . . . . . . . . . . . . . . 175Changing the time zone . . . . . . . . . . . . . . . . . . . . . . . . . . . . . . 175
Working with RHEL rpms . . . . . . . . . . . . . . . . . . . . . . . . . . . . . . . 176Installing RHEL rpms . . . . . . . . . . . . . . . . . . . . . . . . . . . . . . . 176
Contents
CMS R18 Software Installation, Maintenance, and Troubleshooting for Linux June 2017 9
Checking installed RHEL rpms . . . . . . . . . . . . . . . . . . . . . . . . . . 177Removing a RHEL rpm . . . . . . . . . . . . . . . . . . . . . . . . . . . . . . 177
Working with CMS patches . . . . . . . . . . . . . . . . . . . . . . . . . . . . . . 177CMS patch requirements . . . . . . . . . . . . . . . . . . . . . . . . . . . . . 177Installing CMS patches . . . . . . . . . . . . . . . . . . . . . . . . . . . . . . 178Removing CMS patches . . . . . . . . . . . . . . . . . . . . . . . . . . . . . 179
Adding and removing users from password aging . . . . . . . . . . . . . . . . . 180Determining if a password is aged . . . . . . . . . . . . . . . . . . . . . . . . 180Excluding users from password aging. . . . . . . . . . . . . . . . . . . . . . 181Removing users from the password aging exclude file. . . . . . . . . . . . . 182Aging specific passwords at different rates . . . . . . . . . . . . . . . . . . . 182
Maintaining the chkDisks crontab . . . . . . . . . . . . . . . . . . . . . . . . . . 183Verifying chkDisks. . . . . . . . . . . . . . . . . . . . . . . . . . . . . . . . . 183Changing the chkDisks run time . . . . . . . . . . . . . . . . . . . . . . . . . 184Canceling chkDisks . . . . . . . . . . . . . . . . . . . . . . . . . . . . . . . . 184
Report Query Status . . . . . . . . . . . . . . . . . . . . . . . . . . . . . . . . . . 184Information about query logs . . . . . . . . . . . . . . . . . . . . . . . . . . . 184
About the Archiving process . . . . . . . . . . . . . . . . . . . . . . . . . . . . . 186About time zone archiving with additional time zones . . . . . . . . . . . . . . . 187
Chapter 8: Recovering a CMS server. . . . . . . . . . . . . . . . . . . . . . . . . . . 189Using the nohup command . . . . . . . . . . . . . . . . . . . . . . . . . . . . . . 189Performing a CMS maintenance restore . . . . . . . . . . . . . . . . . . . . . . . 190
Data restore requirements . . . . . . . . . . . . . . . . . . . . . . . . . . . . 190Restoring data from a full maintenance backup. . . . . . . . . . . . . . . . . 191Restoring data from a full and incremental maintenance backup . . . . . . . 192Restoring data using a binary backup . . . . . . . . . . . . . . . . . . . . . . 194
Restore database using a binary backup from tape. . . . . . . . . . . . . 195Restore database using a binary backup from a mount point . . . . . . . 195
Using tapeless migration . . . . . . . . . . . . . . . . . . . . . . . . . . . . . 196Recovering a mirrored system after disk failure . . . . . . . . . . . . . . . . . . 196
Prerequisites . . . . . . . . . . . . . . . . . . . . . . . . . . . . . . . . . . . . 197Recovering a system after a single disk fails . . . . . . . . . . . . . . . . . . 197Determining which disks have failed . . . . . . . . . . . . . . . . . . . . . . . 197Recovering a system after a pair of mirrored disks fail . . . . . . . . . . . . . 198
Performing a CMSADM restore of a system . . . . . . . . . . . . . . . . . . . . . 200Prerequisites . . . . . . . . . . . . . . . . . . . . . . . . . . . . . . . . . . . . 200Restoring a system from a CMSADM backup . . . . . . . . . . . . . . . . . . 200
Restoring a system without a CMSADM or system backup . . . . . . . . . . . . 217

Contents
CMS R18 Software Installation, Maintenance, and Troubleshooting for Linux June 2017 10
Installing Access Security Gateway and the CMS Authentication File . . . . 217Restoring specific files from the CMSADM backup tape . . . . . . . . . . . . . . 219
Chapter 9: Troubleshooting . . . . . . . . . . . . . . . . . . . . . . . . . . . . . . . 221Determining your CMS version . . . . . . . . . . . . . . . . . . . . . . . . . . . . 222Recognizing new hardware devices . . . . . . . . . . . . . . . . . . . . . . . . . 222Troubleshooting password aging . . . . . . . . . . . . . . . . . . . . . . . . . . 222
Tracking changes to password aging . . . . . . . . . . . . . . . . . . . . . . 223Passwords of excluded users age . . . . . . . . . . . . . . . . . . . . . . . . 223
CMS error logs . . . . . . . . . . . . . . . . . . . . . . . . . . . . . . . . . . . . 223Checking installed software packages . . . . . . . . . . . . . . . . . . . . . . . 224Diagnosing a machine panic . . . . . . . . . . . . . . . . . . . . . . . . . . . . . 224Common problems using the disc drive . . . . . . . . . . . . . . . . . . . . . . 226
Verifying that the system can read a disc . . . . . . . . . . . . . . . . . . . . 226Disc drive fails to open . . . . . . . . . . . . . . . . . . . . . . . . . . . . . . 226
Removing the CMS package fails . . . . . . . . . . . . . . . . . . . . . . . . . . 226CMS installation fails . . . . . . . . . . . . . . . . . . . . . . . . . . . . . . . . . 227CMSADM backup problems. . . . . . . . . . . . . . . . . . . . . . . . . . . . . . 227System messages . . . . . . . . . . . . . . . . . . . . . . . . . . . . . . . . . . . 228About RAID for CMS. . . . . . . . . . . . . . . . . . . . . . . . . . . . . . . . . . 229Troubleshooting problems with disk drives . . . . . . . . . . . . . . . . . . . . . 229Common error messages . . . . . . . . . . . . . . . . . . . . . . . . . . . . . . . 230Report Query Status . . . . . . . . . . . . . . . . . . . . . . . . . . . . . . . . . . 232
Information about query logs . . . . . . . . . . . . . . . . . . . . . . . . . . . 232Troubleshooting an empty or incomplete report . . . . . . . . . . . . . . . . . . 233How to determine whether the archiver has run. . . . . . . . . . . . . . . . . . . 235Troubleshooting Visual Basic Errors. . . . . . . . . . . . . . . . . . . . . . . . . 238
Glossary . . . . . . . . . . . . . . . . . . . . . . . . . . . . . . . . . . . . . . . . 245
Index . . . . . . . . . . . . . . . . . . . . . . . . . . . . . . . . . . . . . . . . 251

CMS R18 Software Installation, Maintenance, and Troubleshooting for Linux June 2017 11
Chapter 1: Introduction
PurposeThe document describes how to install, configure, and maintain Avaya Call Management System (CMS).
Intended audienceThis document is intended for:
● Avaya support personnel
● Avaya factory personnel
● Contact center administrators
Users of this document must be familiar with CMS and the Red Hat® Enterprise Linux® (RHEL) operating system.
Document changes since last issueThe following changes have been made to this document to support CMS R18:
● Added information about the Multi-tenancy feature.
● Added information about the Data Summarization Time Zones feature.
● Updated which Linux platforms support CMS R18.
● Updated the split/skills capacity table.
● Removed support for Avaya Aura Communication Manager systems older than R5.2.
● Added support for Communication Manager 7.x.
● Updated the list of supported tape drives and hardware platforms.
● Added a requirement that the customer must provide a keyboard, mouse, and monitor for the system when an Avaya or Business Partner tech must do work on-site.

Chapter 1: Introduction
CMS R18 Software Installation, Maintenance, and Troubleshooting for Linux June 2017 12
● Added information about the Dual IP feature.
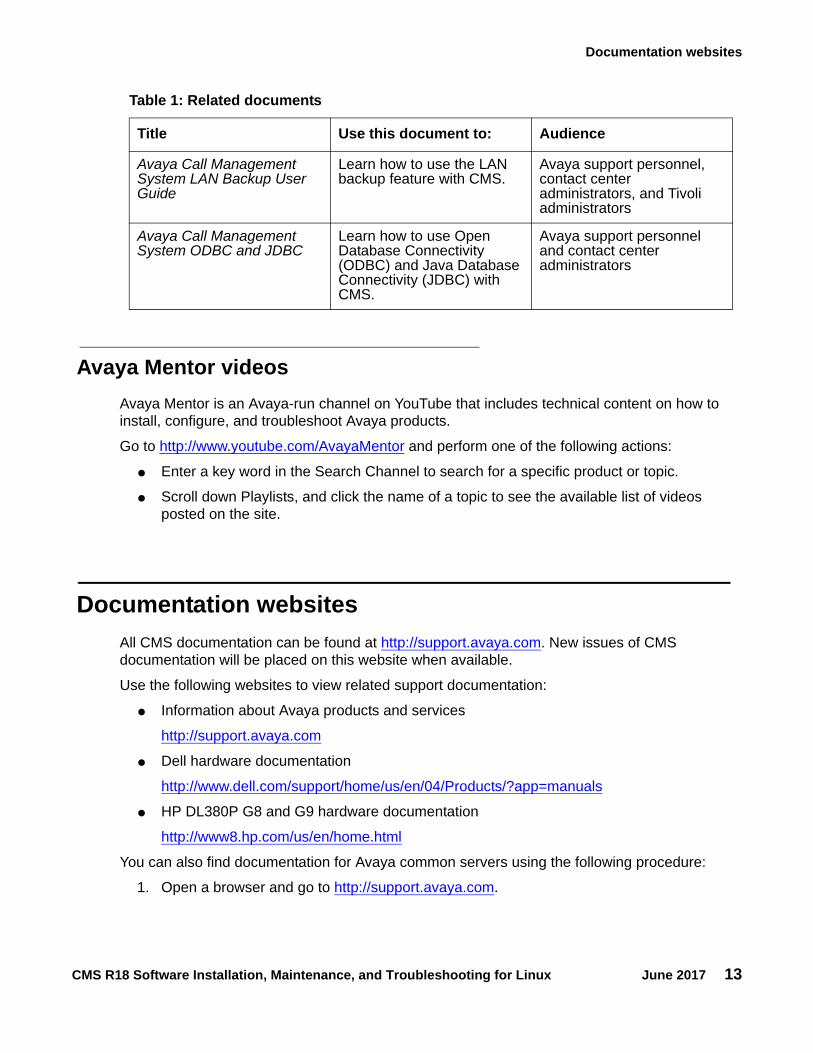
Related resources
DocumentationSee the following documents.
Table 1: Related documents
Title Use this document to: Audience
Implementing
Avaya CMS Upgrade Express to Release 18
Upgrade to a new hardware platform and to migrate data.
Implementation engineers and system administrators
Avaya Call Management System Dell PowerEdge™ R220, R630, and R730 Hardware Installation, Maintenance, and Troubleshooting
Install, maintain, and troubleshoot Dell R220, R630, and R730 systems.
Implementation engineers and system administrators
Avaya Call Management System Dell PowerEdge™ R720 and R620 Hardware Installation, Maintenance, and Troubleshooting
Install, maintain, and troubleshoot Dell R720 and R620 systems.
Implementation engineers and system administrators
Avaya Call Management System HP DL380P G8 and G9 Hardware Installation, Maintenance, and Troubleshooting
Install, maintain, and troubleshoot HP DL380P G8 and G9 systems.
Implementation engineers and system administrators
Using
Documentation websites
CMS R18 Software Installation, Maintenance, and Troubleshooting for Linux June 2017 13
Avaya Mentor videosAvaya Mentor is an Avaya-run channel on YouTube that includes technical content on how to install, configure, and troubleshoot Avaya products.
Go to http://www.youtube.com/AvayaMentor and perform one of the following actions:
● Enter a key word in the Search Channel to search for a specific product or topic.
● Scroll down Playlists, and click the name of a topic to see the available list of videos posted on the site.
Documentation websitesAll CMS documentation can be found at http://support.avaya.com. New issues of CMS documentation will be placed on this website when available.
Use the following websites to view related support documentation:
● Information about Avaya products and services
http://support.avaya.com
● Dell hardware documentation
http://www.dell.com/support/home/us/en/04/Products/?app=manuals
● HP DL380P G8 and G9 hardware documentation
http://www8.hp.com/us/en/home.html
You can also find documentation for Avaya common servers using the following procedure:
1. Open a browser and go to http://support.avaya.com.
Avaya Call Management System LAN Backup User Guide
Learn how to use the LAN backup feature with CMS.
Avaya support personnel, contact center administrators, and Tivoli administrators
Avaya Call Management System ODBC and JDBC
Learn how to use Open Database Connectivity (ODBC) and Java Database Connectivity (JDBC) with CMS.
Avaya support personnel and contact center administrators
Table 1: Related documents
Title Use this document to: Audience
Chapter 1: Introduction
CMS R18 Software Installation, Maintenance, and Troubleshooting for Linux June 2017 14
2. Click Documents from the menu at the top.
3. Enter Common Servers in the Enter Your Product Here field, and select 2.0.x or 3.0.x from the release dropdown.
4. Select the Installation, Upgrades & Config option, and click Enter.5. Download the documents that you need.
SupportVisit the Avaya website at http://support.avaya.com for the most up-to-date documentation, product notices, and knowledge articles. You can also search for release notes, downloads, and resolutions to issues. Use the online service request system to create a service request. Chat with live agents to get answers to questions, or request an agent to connect you to a support team if an issue requires additional expertise.

CMS R18 Software Installation, Maintenance, and Troubleshooting for Linux June 2017 15
Chapter 2: Supported platforms and packages
This chapter lists the hardware platforms and software that is supported by Avaya Call Management System (CMS) Release 18 (R18).
This section includes the following topics:
● Prerequisites on page 15
● Supported hardware platforms on page 15
● Supported software packages on page 16
PrerequisitesBefore you use any procedures in this document, perform the following tasks:
● Review the file called cms.readme on the CMS software disc. Avaya recommends you review this file for any changes that might impact the procedures in this document.
● Contact Provisioning by calling 1-800-242-2121. The CMS provisioners must be scheduled in advance for all work. Provisioning is required to authorize the following features on CMS:
- CMS Agent licenses.- CMS Supervisor licenses.- Call History Interface- ACDs.- Report Designer.- Provisioning will also work with your on-site team to insure connectivity and data
collection.
Supported hardware platformsCMS is supported on the following Linux platforms:

Chapter 2: Supported platforms and packages
CMS R18 Software Installation, Maintenance, and Troubleshooting for Linux June 2017 16
● Dell PowerEdge R220
● Dell PowerEdge R620
● Dell PowerEdge R720
● Dell PowerEdge R630
● Dell PowerEdge R730
● HP DL380P G8
● HP DL380P G9
Note:Note: Unless specified otherwise, all information and procedures in this document apply
to the supported CMS hardware platforms running Red Hat Enterprise Linux® (RHEL). For more information regarding installation, maintenance and troubleshooting of the above platform, refer to the respective Hardware Installation, Maintenance and Troubleshooting documents.
HP DL 380 G9 End of Sale: http://support.avaya.com/css/P8/documents/101013438
Dell R220 Low End Server was end of sale: http://support.avaya.com/css/P8/documents/101020897
Supported software packagesCMS utilizes the following software packages:
● Informix
● CMS R18, which also contains:
- RHEL rpms- CMS patches- CMS security script
CMS R18 Software Installation, Maintenance, and Troubleshooting for Linux June 2017 17
Chapter 3: Installing the RHEL operating system
This chapter contains procedures to guide you step-by-step through the Red Hat Enterprise Linux® (RHEL) 6.6 software installation. The RHEL installation process is automated.
! Important:Important: If the software was installed at the factory, proceed to Installing CMS and
supporting software on page 45.
To bring the Avaya Call Management System (CMS) up to factory standards after a system re-configuration or repair, use the procedures in this chapter and Installing CMS and supporting software on page 45.
This section includes the following topics:
● Required hardware on page 17
● Prerequisites on page 18
● Installing RHEL on page 18
Required hardwareCMS uses RAID to mirror the disks on the Dell and HP platforms. CMS uses mirroring to create two complete sets of data on separate disk drives. This data redundancy greatly reduces the risk of data loss in the event of a disk drive failure or a system crash. The Dell R620 LOW system includes a unused RAID controller to make upgrades to the R620 MID easier. The R220 does not include any RAID options.
! Important:Important: If you configure RAID on a system, all data on the system is lost. Use the
CMSADM or LAN restore procedure to restore the system after you configure mirroring.
The customer must provide a keyboard, mouse, and monitor for the system when an Avaya or Business Partner tech must do work on-site.

Chapter 3: Installing the RHEL operating system
CMS R18 Software Installation, Maintenance, and Troubleshooting for Linux June 2017 18
Prerequisites● Obtain the correct number of disk drives to mirror a system. All disks must be of the same
size.
● Obtain the Avaya RHEL 6.6 Kickstart disc.
● Identify the host name of the system from Avaya Services.
● Identify the IP address of the system. This address can be the factory default or an address in a customer network.
● Identify the default router for the system. This router can be the factory default or an address in a customer network.
● Identify the subnet mask for the system. This subnet mask can be the factory default or an address in a customer network.
● Identify the number and size of disk drives on the system.
● Verify that you correctly connected the power cords to all hardware devices and supplied power to all hardware devices.
● Identify the backup devices on the system.
● Verify that you correctly installed all hardware components of the system, including port cards and tape drives.
Installing RHELThis section describes the booting procedure for RHEL systems.
Booting a Dell or HP system to the Avaya RHEL disc
! Important:Important: Use this procedure for the Dell or HP platforms only. Do not use this procedure on
VMware deployments.
Use this procedure to install and configure RHEL on the Dell or HP system using the Avaya RHEL software disc from the local console. Prior to installing RHEL on the Dell or HP system, you must set the boot priority.

Installing RHEL
CMS R18 Software Installation, Maintenance, and Troubleshooting for Linux June 2017 19
Setting the RHEL boot priority
Note:Note: If you have already set the boot priority of the system, continue with Installing the
RHEL software on page 21.
1. Verify that the system has disks installed in the correct slots.
● If the system is a Dell R220 platform, 1 disk must be installed in slot 0.
● If the system is a Dell R620 LOW platform, 1 disk must be installed in slot 0.
● If the system is a Dell R620 MID platform, 4 disks must be installed in slots 0-3.
● If the system is a Dell R630 platform, 4 disks must be installed in slots 0-3.
● If the system is a Dell R720 platform, 12 disks must be installed in slots 0-11.
● If the system is a Dell R730 platform, 12 disks must be installed in slots 0-11.
● If the system is a HP DL380P G8 platform, 8 disks must be installed in slots 1-8.
● If the system is a HP DL380P G9 platform, 12 disks must be installed in slots 1-12
! Important:Important: Remove all USB storage devices. If any USB storage devices are connected to
the system, the build process uses the USB storage device for the boot hard drive and the system fails to boot after the build process completes.
2. Disconnect all USB storage devices.
3. Turn on the power to all the external devices, such as tape drives.
4. Turn on the monitor.
! Important:Important: If the system prompts about a change in configuration while powering up, press F
to accept the current configuration.
5. Turn on the power to the CMS server.
6. Insert the Avaya RHEL 6.6 Kickstart disc.
● If your platform is Dell, the system displays several F key options on the screen including F2 or System Setup.
● If your platform is HP, the system displays several F key options on the screen including F9 or Setup.
7. Perform Step 8 to Step 18 if your platform is Dell. Perform Step 19 to Step 24 if your platform is HP.
8. Press F2 to enter System Setup.
The system displays the System Setup screen after displaying some more messages.

Chapter 3: Installing the RHEL operating system
CMS R18 Software Installation, Maintenance, and Troubleshooting for Linux June 2017 20
9. Select the System BIOS option, and press Enter.The system displays the System BIOS screen.
10. Select the Boot Settings option, and press Enter.
Note:Note: Use the up and down arrow keys to highlight the appropriate option.
The system displays the Boot Settings screen.
11. Select the BIOS Boot Settings option, and press Enter.The system displays the Boot Sequence options.
12. Select the Boot Sequence option, and press Enter.The system displays the Change Order screen with a list of bootable devices. Arrange the devices in the following boot sequence:
13. Click OK > Back to exit the Boot Sequence screen.
14. Click Back to exit the BIOS Boot Setting screen.
15. Click Finish.The system displays a Warning screen to save the changes.
16. Click Yes to save the changes.
The system displays a Success screen.
17. Click OK, and click Finish.The system displays a Confirm Exit screen.
18. Click Yes and go to Step 25.
19. Press F9 to enter Setup.
The system displays the Setup screen.
20. Select the Standard Boot Order (IPL) option, and press Enter.
Note:Note: Use the up and down arrow keys to highlight the appropriate option.
The system displays the IPL Boot Order screen with a list of bootable devices.
21. Arrange the devices in the following boot sequence:
● CD_ROM
● Floppy Drive
● USB DriveKey
Embedded SATA Port Optical DriveHard DriveIntegrated NIC 1 Port 1 Partition 1
Installing RHEL
CMS R18 Software Installation, Maintenance, and Troubleshooting for Linux June 2017 21
● Hard Drive
● PCI Embedded HP Ethernet 1Gb 4-port 331FLR Adapter Port 1
Note:Note: Press Enter on an item to select a new order position for that item.
22. Press ESC to return to the main Setup screen.
23. Press ESC to return to exit from Setup screen.
24. Press F10 to confirm exit from the Setup screen.
25. Continue with step 5 of Installing the RHEL software on page 21.
Note:Note: The system can take up to 5 minutes to boot up.
Installing the RHEL software
1. Verify that disks are installed in the correct slots.
● If the system is a Dell R220 platform, 1 disk must be installed in slot 0.
● If the system is a Dell R620 LOW platform, 1 disk must be installed in slot 0.
● If the system is a Dell R620 MID platform, 4 disks must be installed in slots 0-3.
● If the system is a Dell R630 platform, 4 disks must be installed in slots 0-3.
● If the system is a Dell R720 platform, 12 disks must be installed in slots 0-11.
● If the system is a Dell R730 platform, 12 disks must be installed in slots 0-11.
● If the system is a HP DL380P G8 platform, 8 disks must be installed in slots 1-8.
● If the system is a HP DL380P G9 platform, 12 disks must be installed in slots 1-12
2. Disconnect all USB storage devices.
3. Turn on the power to all of the external devices such as tape drives.
4. Turn on the monitor.
! Important:Important: If the system prompts about a change in configuration while powering up, press F
to accept the current configuration.
5. Turn on the power to the CMS server.
6. Ensure that the Avaya RHEL software disc is inserted into the disc drive.

Chapter 3: Installing the RHEL operating system
CMS R18 Software Installation, Maintenance, and Troubleshooting for Linux June 2017 22
7. The system boots to the Avaya RHEL software disc and displays the following messages as the system boots:
The system displays a list of following Usage options after the system boots to the Avaya RHEL software disc:
8. Enter ks at the boot: prompt and press Enter.
.
.
.Initializing Firmware Interfaces…Initialization Complete.Lifecycle Controller: Collecting System Inventory…
Scanning for devices…..
.
############################## IMPORTANT!! ######################### ## PROCEEDING WILL INSTALL A NEW OPERATING SYSTEM. ## ## ALL DATA WILL BE LOST!! PROCEED WITH CAUTION. ## #####################################################################
USAGE: Type “ks” then press <enter> to install preconfigured Linux and copy CMS software to the disk. Type “rs” then press <enter> to install preconfigured Linux and make the system ready to restore from a CMSADM backup. Type “rescue” then press <enter> to rescue installed system boot:
Installing RHEL
CMS R18 Software Installation, Maintenance, and Troubleshooting for Linux June 2017 23
Note:Note: During the installation of the various packages, the system displays the message:
Welcome to Red Hat Enterprise Linux for x86_64.
The system displays the following messages as the RHEL operating system is installed:
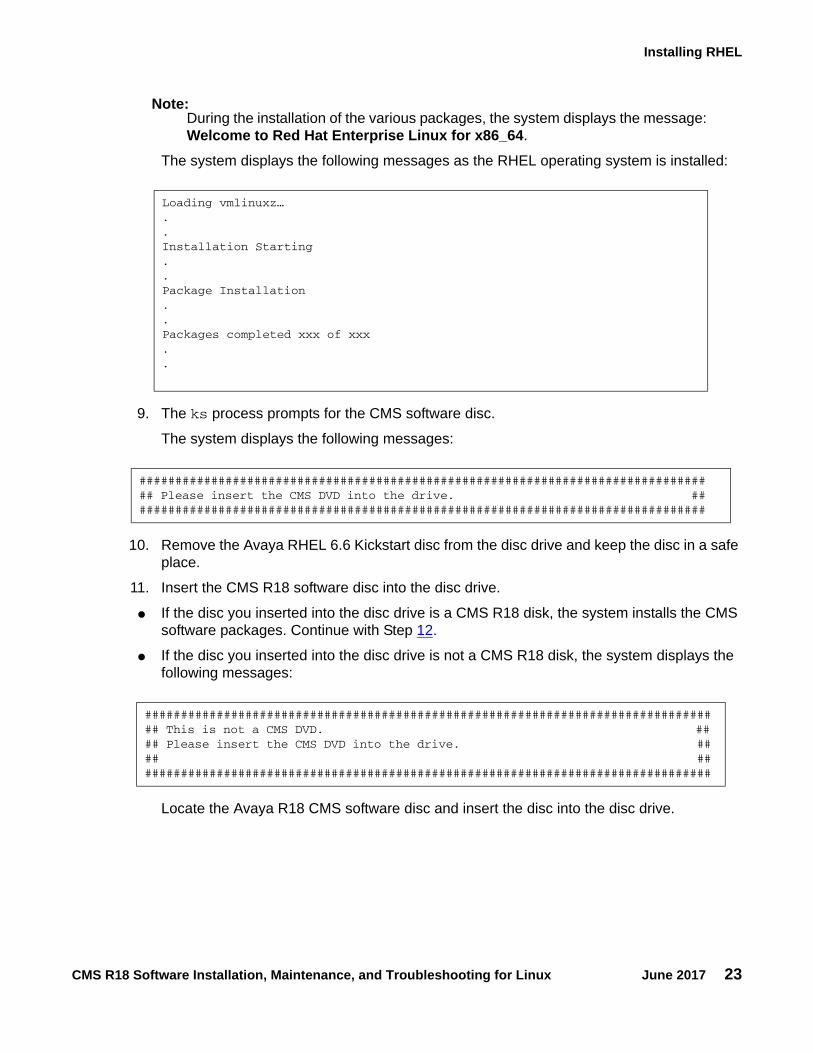
9. The ks process prompts for the CMS software disc.
The system displays the following messages:
10. Remove the Avaya RHEL 6.6 Kickstart disc from the disc drive and keep the disc in a safe place.
11. Insert the CMS R18 software disc into the disc drive.
● If the disc you inserted into the disc drive is a CMS R18 disk, the system installs the CMS software packages. Continue with Step 12.
● If the disc you inserted into the disc drive is not a CMS R18 disk, the system displays the following messages:
Locate the Avaya R18 CMS software disc and insert the disc into the disc drive.
Loading vmlinuxz…..Installation Starting..Package Installation..Packages completed xxx of xxx..
################################################################################# Please insert the CMS DVD into the drive. #################################################################################
################################################################################# This is not a CMS DVD. ## ## Please insert the CMS DVD into the drive. #### #################################################################################
Chapter 3: Installing the RHEL operating system
CMS R18 Software Installation, Maintenance, and Troubleshooting for Linux June 2017 24
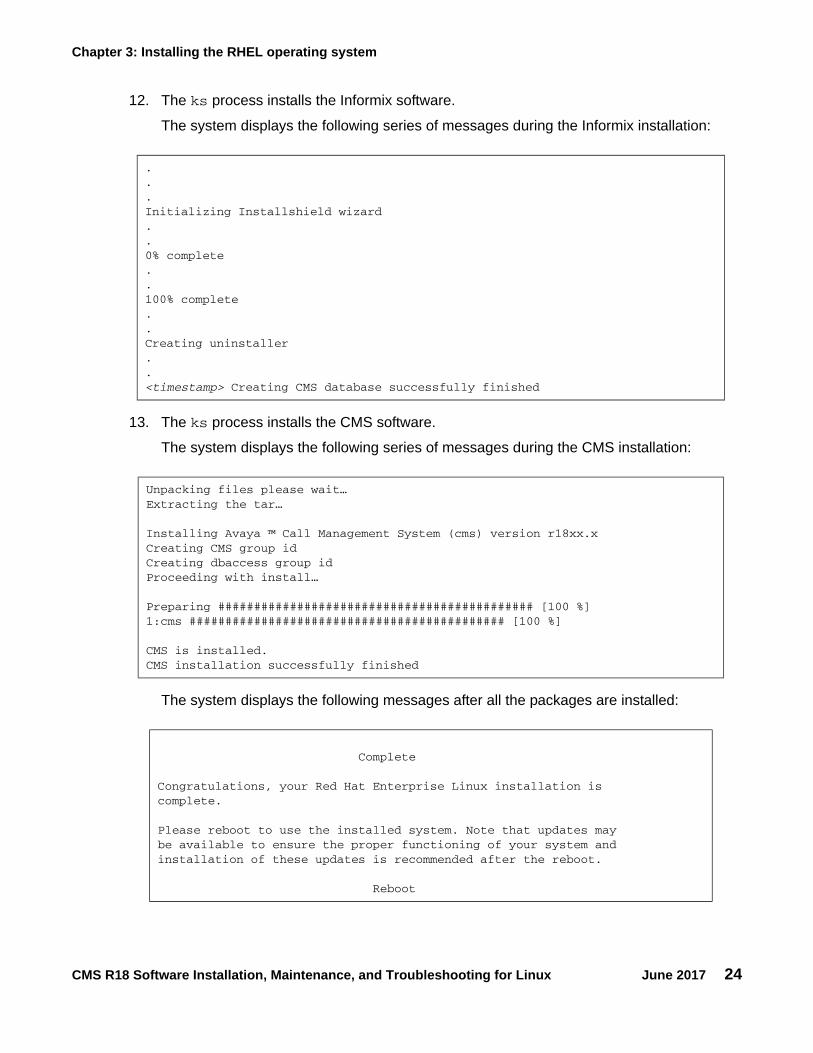
12. The ks process installs the Informix software.
The system displays the following series of messages during the Informix installation:
13. The ks process installs the CMS software.
The system displays the following series of messages during the CMS installation:
The system displays the following messages after all the packages are installed:
.
.
.Initializing Installshield wizard..0% complete..100% complete..Creating uninstaller..<timestamp> Creating CMS database successfully finished
Unpacking files please wait…Extracting the tar…
Installing Avaya ™ Call Management System (cms) version r18xx.xCreating CMS group idCreating dbaccess group idProceeding with install…
Preparing ############################################ [100 %]1:cms ############################################ [100 %]
CMS is installed.CMS installation successfully finished
Complete
Congratulations, your Red Hat Enterprise Linux installation iscomplete.
Please reboot to use the installed system. Note that updates maybe available to ensure the proper functioning of your system andinstallation of these updates is recommended after the reboot.
Reboot

Installing RHEL
CMS R18 Software Installation, Maintenance, and Troubleshooting for Linux June 2017 25
Note:Note: This entire procedure can take up to 15 minutes.
14. Remove the CMS software disc from the disc drive and keep the disc in a safe place.
15. Press Enter to reboot.
16. The system reboots and the system displays the RHEL login screen.
17. Log in to the system as root. The root password is blank.
Press Enter for the password.
18. If the system displays a Removed Sound Devices screen, perform the following steps:
a. Select the Do not ask again for these devices box.
b. Click the Yes button.
19. Continue with Configuring the RHEL operating system on page 27.
Chapter 3: Installing the RHEL operating system
CMS R18 Software Installation, Maintenance, and Troubleshooting for Linux June 2017 26
CMS R18 Software Installation, Maintenance, and Troubleshooting for Linux June 2017 27
Chapter 4: Configuring the RHEL operating system
This chapter contains the procedures used to configure the Red Hat Enterprise Linux® (RHEL) 6.6 operating system software on your CMS hardware platform.
This section includes the following topics:
● Prerequisites on page 27
● Using the nohup command on page 27
● Opening a virtual console window on page 28
● Configuring the system network on page 28
● Assigning a root password on page 33
● Verifying the disk partitioning for Dell or HP platforms on page 34
● Initializing the CMS database on page 38
● Installing RHEL (Linux®) rpms on page 40
Prerequisites● Verify that you installed the RHEL operating system.
● Verify that you correctly installed all hardware components of the system, including port cards, external disk drives, and tape drives. Otherwise, the system does not recognize the system hardware.
● Verify that you are logged in as root.
Using the nohup commandWhen you run commands that take a long time to complete, such as cpio commands, use the nohup command to ensure that the command runs without interruption even if the data line disconnects.

Chapter 4: Configuring the RHEL operating system
CMS R18 Software Installation, Maintenance, and Troubleshooting for Linux June 2017 28
The following is an example of the nohup command:
nohup cpio -icmudf -C 10240 -I <backup_media_path> “cms” | tee
When you reboot your system, verify that your terminal type is set correctly after the reboot.
Opening a virtual console window You must open a virtual console window to enter keyboard commands at the system prompt. You can open up to six virtual console windows.
1. Enter the following to open a virtual console window:
Alt+F12. To open additional virtual console windows, use any of the follow commands:
Alt+F2, Alt+F3, Alt+F4, Alt+F5, Alt+F6
Configuring the system network1. To configure the system network, place the cursor in the console window and enter:
/cms/toolsbin/netconfig
2. The system displays the following prompt:
3. Accept the default value eth0 and press Enter.
4. Enter y, then press Enter.5. The system displays the following prompt:
Enter the network interface name from following name(s): eth0 eth1 eth2 eth3 (default eth0)
ENTER>
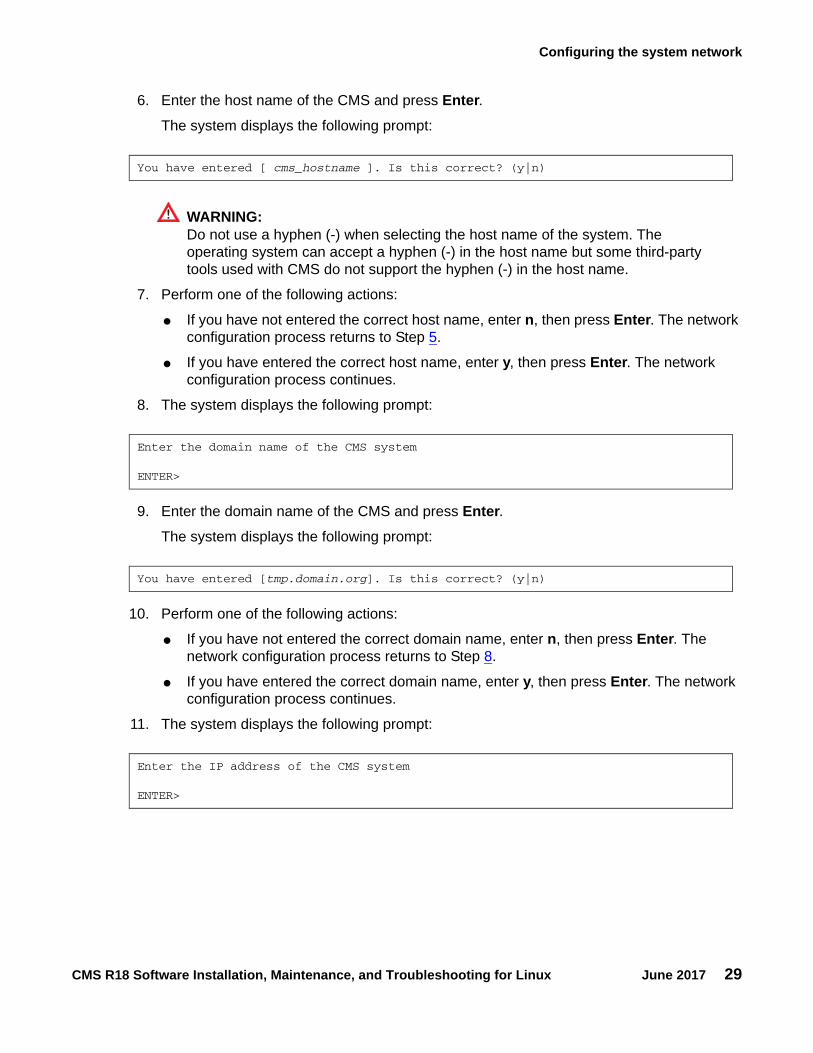
You have entered [ eth0 ]. Is this correct? (y|n)
Enter the host name of the CMS system
ENTER>
Configuring the system network
CMS R18 Software Installation, Maintenance, and Troubleshooting for Linux June 2017 29
6. Enter the host name of the CMS and press Enter.The system displays the following prompt:
! WARNING:!
WARNING: Do not use a hyphen (-) when selecting the host name of the system. The operating system can accept a hyphen (-) in the host name but some third-party tools used with CMS do not support the hyphen (-) in the host name.
7. Perform one of the following actions:
● If you have not entered the correct host name, enter n, then press Enter. The network configuration process returns to Step 5.
● If you have entered the correct host name, enter y, then press Enter. The network configuration process continues.
8. The system displays the following prompt:
9. Enter the domain name of the CMS and press Enter.The system displays the following prompt:
10. Perform one of the following actions:
● If you have not entered the correct domain name, enter n, then press Enter. The network configuration process returns to Step 8.
● If you have entered the correct domain name, enter y, then press Enter. The network configuration process continues.
11. The system displays the following prompt:
You have entered [ cms_hostname ]. Is this correct? (y|n)
Enter the domain name of the CMS system
ENTER>
You have entered [tmp.domain.org]. Is this correct? (y|n)
Enter the IP address of the CMS system
ENTER>
Chapter 4: Configuring the RHEL operating system
CMS R18 Software Installation, Maintenance, and Troubleshooting for Linux June 2017 30
12. Enter the IP address of the CMS and press Enter.The system displays the following prompt:
13. Perform one of the following actions:
● If you have not entered the correct IP address, enter n, then press Enter. The network configuration process returns to Step 11.
● If you entered the correct IP address, enter y, then press Enter. The network configuration process continues.
14. The system displays the following prompt:
15. Enter the netmask of the CMS and press Enter.The system displays the following prompt:
16. Perform one of the following actions:
● If you have not entered the correct netmask, enter n, then press Enter. The network configuration process returns to Step 14.
● If you entered the correct netmask, enter y, then press Enter. The network configuration process continues.
17. The system displays the following prompt:
18. Enter the default gateway of the CMS and press Enter.The system displays the following prompt:
19. Perform one of the following actions:
● If you have not entered the correct default gateway, enter n, then press Enter. The network configuration process returns to Step 17.
You have entered [IP_address]. Is this correct? (y|n)
Enter the netmask of the CMS system
ENTER>
You have entered [ xxx.xxx.xxx.xxx ]. Is this correct? (y|n)
Enter the default gateway of the CMS system
ENTER>
You have entered [xxx.xxx.xxx.xxx]. Is this correct? (y|n)

Configuring the system network
CMS R18 Software Installation, Maintenance, and Troubleshooting for Linux June 2017 31
● If you entered the correct default gateway, enter y, then press Enter. The network configuration process continues.
20. The system displays the following prompt:
21. Enter the DNS server(s) of the CMS and press Enter.The system displays the following prompt:
22. Perform one of the following actions:
● If you have not entered the correct DNS server(s), enter n, then press Enter. The network configuration process returns to Step 20.
● If you entered the correct DNS server(s), enter y, then press Enter. The network configuration process continues.
23. The system displays the following prompt:
24. Enter the search domain(s) of the CMS and press Enter.The system displays the following prompt:
25. Perform one of the following actions:
● If you have not entered the correct search domains, enter n, then press Enter. The network configuration process returns to Step 23.
Enter the DNS server(s) seperated by space (up to three servers)
ENTER>
You have entered [ xxx.xxx.xxx.xxx yyy.yyy.yyy.yyy ]. Is this correct? (y|n)
Enter the search domains separated by space (tmp.domain.org tmp2.domain.org)
ENTER>
You have entered [tmp.domain1.org tmp.domain2.org]. Is this correct? (y|n)

Chapter 4: Configuring the RHEL operating system
CMS R18 Software Installation, Maintenance, and Troubleshooting for Linux June 2017 32
● If you entered the correct search domains, enter y, then press Enter. The network configuration process continues.
The system displays the network configuration accepted by the user.
26. Perform one of the following actions:
● If any of the network configuration entries are not correct, enter n, then press Enter. The network configuration process returns to Step 2.
● If the network configuration entries are correct, enter y, then press Enter. The network configuration process continues.
The system attempts to bring up the network and if successful, displays a successfully finished message.
27. Perform one of the following actions:
● If the network configuration was successful, continue with Step 28.
● If the network configuration was not successful, troubleshoot the network for outages and repeat this procedure. If the network configuration fails again, escalate through normal channels.
Test your network settings to ensure that the network settings are working properly.
28. Reboot the system. Enter:
shutdown -r now
As the system boots, the system displays a series of messages. The display stops at the RHEL Welcome screen.
29. Log in to the system as root. The root password is blank at this time.
Press Enter for the password.
Interface: eth0 CMS Hostname: cms_hostname Domainname: tmp.domain.org CMS IP address: IP_address Netmask: xxx.xxx.xxx.xxx Gateway: xxx.xxx.xxx.xxx DNS Server1: xxx.xxx.xxx.xxx DNS Server2: yyy.yyy.yyy.yyy DNS Server3: Search domains: tmp.domain1.org tmp.domain2.org
Are the above inputs correct? (Y|N)
Bring the network up. Please wait...
<timestamp> /cms/toolsbin/netconfig successfully finished

Assigning a root password
CMS R18 Software Installation, Maintenance, and Troubleshooting for Linux June 2017 33
30. Open a virtual console window.
Test your network settings to ensure that the network settings are working properly.
31. Enter:
ifconfig eth0
32. Enter:
ping {system on your local network}
Press Control+C to exit the ping command.
Note:Note: If the network does not respond, enter ifup eth0. If the network still does not
respond, repeat this procedure and verify that the values entered are correct.
33. Continue with Assigning a root password on page 33.
Assigning a root password1. Assign a password to root. Enter:
passwd
The system displays the following message:
2. Enter the password for root.
The system displays the following message:
3. Re-enter the password for root.
The system displays the following message:
4. Continue with Verifying the disk partitioning for Dell or HP platforms on page 34.
New password:
Re-enter new password:
passwd: password successfully changed for root

Chapter 4: Configuring the RHEL operating system
CMS R18 Software Installation, Maintenance, and Troubleshooting for Linux June 2017 34
Verifying the disk partitioning for Dell or HP platformsTo verify that the disks are correctly partitioned:
1. Enter:
sfdisk -lq
The system displays output similar to the following for the different platforms:
Device information for Dell R220 systems
Disk /dev/sda: 60801 cylinders, 255 heads, 63 sectors/trackWarning: extended partition does not start at a cylinder boundary.DOS and Linux will interpret the contents differently.Units = cylinders of 8225280 bytes, blocks of 1024 bytes, counting from 0
Device Boot Start End #cyls #blocks Id System/dev/sda1 * 0+ 72- 73- 583676+ 83 Linux/dev/sda2 72+ 1378- 1306- 10485756+ 83 Linux/dev/sda3 1378+ 2683- 1306- 10485756+ 83 Linux/dev/sda4 2683+ 60801- 58118- 466830360 f W95 Ext'd (LBA)/dev/sda5 2683+ 3728- 1045- 8388604+ 82 Linux swap / Solaris/dev/sda6 3728+ 5002- 1275- 10239996+ 83 Linux/dev/sda7 5002+ 9180- 4178- 33554428+ 83 Linux/dev/sda8 9180+ 12574- 3395- 27262972+ 83 Linux/dev/sda9 12574+ 14662- 2089- 16777212+ 83 Linux/dev/sda10 14662+ 16221- 1559- 12517372+ 83 Linux/dev/sda11 16221+ 60801- 44580- 358088728 83 Linux
Device information for Dell R620 LOW systems
Disk /dev/sda: 36404 cylinders, 255 heads, 63 sectors/trackWarning: extended partition does not start at a cylinder boundary.DOS and Linux will interpret the contents differently.Units = cylinders of 8225280 bytes, blocks of 1024 bytes, counting from 0
Device Boot Start End #cyls Blocks Id System/dev/sda1 * 0+ 72 73- 586341 83 Linux/dev/sda2 73 1317- 1245- 9999565+ 83 Linux/dev/sda3 1317+ 2562- 1245- 10000000 83 Linux/dev/sda4 2562+ 72809- 70247- 564257326 f W95 Ext'd (LBA)/dev/sda5 2562+ 3558- 996- 7999999+ 82 Linux swap / Solaris/dev/sda6 3558+ 13284- 9727- 78124999+ 83 Linux/dev/sda7 13284+ 17268- 3984- 31999999+ 83 Linux/dev/sda8 17268+ 20505- 3237- 25999999+ 83 Linux/dev/sda9 20505+ 22497- 1992- 15999999+ 83 Linux/dev/sda10 22497+ 23983- 1487- 11937499+ 83 Linux/dev/sda11 23983+ 36404- 12422- 99773193+ 83 Linux

Verifying the disk partitioning for Dell or HP platforms
CMS R18 Software Installation, Maintenance, and Troubleshooting for Linux June 2017 35
Device information for Dell R620 MID systems
Disk /dev/sda: 72809 cylinders, 255 heads, 63 sectors/trackWarning: extended partition does not start at a cylinder boundary.DOS and Linux will interpret the contents differently.Units = cylinders of 8225280 bytes, blocks of 1024 bytes, counting from 0
Device Boot Start End #cyls Blocks Id System/dev/sda1 * 0+ 72 73- 586341 83 Linux/dev/sda2 73 1317- 1245- 9999565+ 83 Linux/dev/sda3 1317+ 2562- 1245- 10000000 83 Linux/dev/sda4 2562+ 72809- 70247- 564257326 f W95 Ext'd (LBA)/dev/sda5 2562+ 3558- 996- 7999999+ 82 Linux swap / Solaris/dev/sda6 3558+ 26658- 23100- 185546874+ 83 Linux/dev/sda7 26658+ 30642- 3984- 31999999+ 83 Linux/dev/sda8 30642+ 33878- 3237- 25999999+ 83 Linux/dev/sda9 33878+ 35870- 1992- 15999999+ 83 Linux/dev/sda10 35870+ 37357- 1487- 11937499+ 82 Linux/dev/sda11 37357+ 72809- 35453- 284772950+ 83 Linux
Device information for Dell R630 systems
Disk /dev/sda: 72809 cylinders, 255 heads, 63 sectors/trackWarning: extended partition does not start at a cylinder boundary.DOS and Linux will interpret the contents differently.Units = cylinders of 8225280 bytes, blocks of 1024 bytes, counting from 0
Device Boot Start End #cyls #blocks Id System/dev/sda1 * 0+ 72- 73- 583676+ 83 Linux/dev/sda2 72+ 1378- 1306- 10485756+ 83 Linux/dev/sda3 1378+ 2683- 1306- 10485756+ 83 Linux/dev/sda4 2683+ 72809- 70126- 563287040 f W95 Ext'd (LBA)/dev/sda5 2683+ 3728- 1045- 8388604+ 82 Linux swap / Solaris/dev/sda6 3728+ 27949- 24222- 194559996+ 83 Linux/dev/sda7 27949+ 32127- 4178- 33554428+ 83 Linux/dev/sda8 32127+ 35521- 3395- 27262972+ 83 Linux/dev/sda9 35521+ 37609- 2089- 16777212+ 83 Linux/dev/sda10 37609+ 39168- 1559- 12517372+ 83 Linux/dev/sda11 39168+ 72809- 33642- 270225408 83 Linux
Chapter 4: Configuring the RHEL operating system
CMS R18 Software Installation, Maintenance, and Troubleshooting for Linux June 2017 36
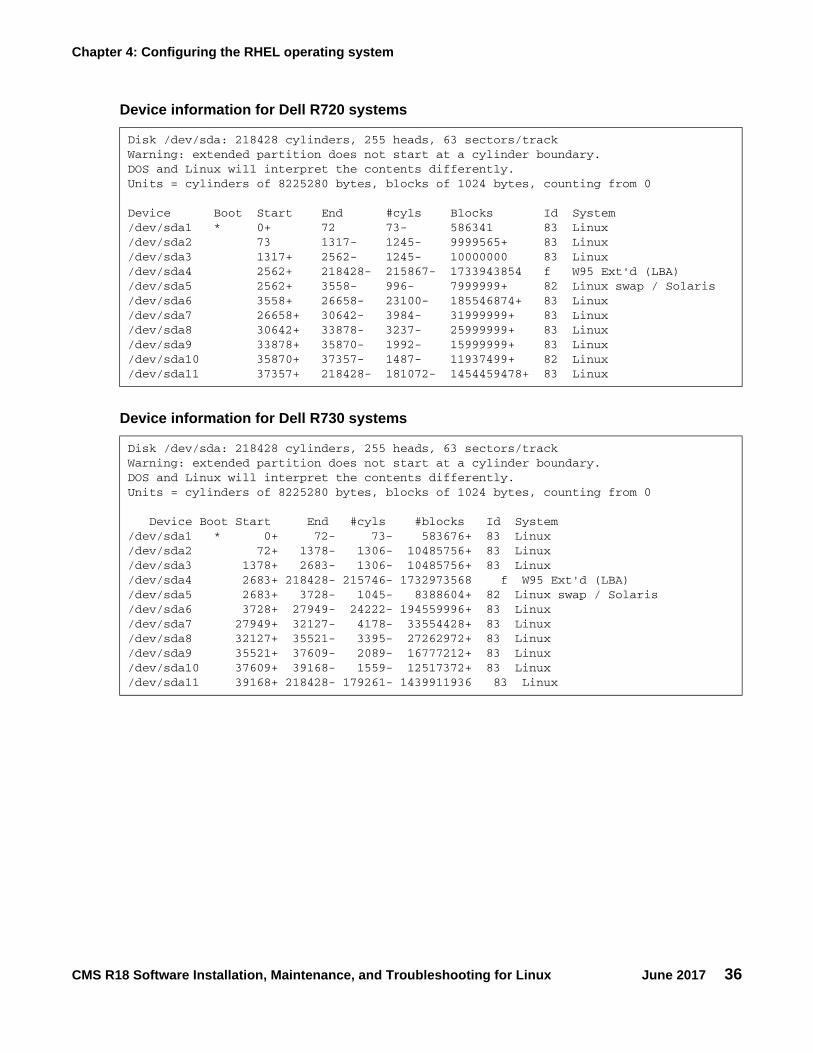
Device information for Dell R720 systems
Disk /dev/sda: 218428 cylinders, 255 heads, 63 sectors/trackWarning: extended partition does not start at a cylinder boundary.DOS and Linux will interpret the contents differently.Units = cylinders of 8225280 bytes, blocks of 1024 bytes, counting from 0
Device Boot Start End #cyls Blocks Id System/dev/sda1 * 0+ 72 73- 586341 83 Linux/dev/sda2 73 1317- 1245- 9999565+ 83 Linux/dev/sda3 1317+ 2562- 1245- 10000000 83 Linux/dev/sda4 2562+ 218428- 215867- 1733943854 f W95 Ext'd (LBA)/dev/sda5 2562+ 3558- 996- 7999999+ 82 Linux swap / Solaris/dev/sda6 3558+ 26658- 23100- 185546874+ 83 Linux/dev/sda7 26658+ 30642- 3984- 31999999+ 83 Linux/dev/sda8 30642+ 33878- 3237- 25999999+ 83 Linux/dev/sda9 33878+ 35870- 1992- 15999999+ 83 Linux/dev/sda10 35870+ 37357- 1487- 11937499+ 82 Linux/dev/sda11 37357+ 218428- 181072- 1454459478+ 83 Linux
Device information for Dell R730 systems
Disk /dev/sda: 218428 cylinders, 255 heads, 63 sectors/trackWarning: extended partition does not start at a cylinder boundary.DOS and Linux will interpret the contents differently.Units = cylinders of 8225280 bytes, blocks of 1024 bytes, counting from 0
Device Boot Start End #cyls #blocks Id System/dev/sda1 * 0+ 72- 73- 583676+ 83 Linux/dev/sda2 72+ 1378- 1306- 10485756+ 83 Linux/dev/sda3 1378+ 2683- 1306- 10485756+ 83 Linux/dev/sda4 2683+ 218428- 215746- 1732973568 f W95 Ext'd (LBA)/dev/sda5 2683+ 3728- 1045- 8388604+ 82 Linux swap / Solaris/dev/sda6 3728+ 27949- 24222- 194559996+ 83 Linux/dev/sda7 27949+ 32127- 4178- 33554428+ 83 Linux/dev/sda8 32127+ 35521- 3395- 27262972+ 83 Linux/dev/sda9 35521+ 37609- 2089- 16777212+ 83 Linux/dev/sda10 37609+ 39168- 1559- 12517372+ 83 Linux/dev/sda11 39168+ 218428- 179261- 1439911936 83 Linux

Verifying the disk partitioning for Dell or HP platforms
CMS R18 Software Installation, Maintenance, and Troubleshooting for Linux June 2017 37
2. Compare the output of the sfdisk command to the RHEL device tables. If the device information does not match, escalate through normal channels.
Device information for HP DL380P G8 systems
Disk /dev/sda: 145875 cylinders, 255 heads, 63 sectors/trackWarning: extended partition does not start at a cylinder boundary.DOS and Linux will interpret the contents differently.Units = cylinders of 8225280 bytes, blocks of 1024 bytes, counting from 0
Device Boot Start End #cyls #blocks Id System/dev/sda1 * 0+ 72- 73- 583676+ 83 Linux/dev/sda2 72+ 1378- 1306- 10485756+ 83 Linux/dev/sda3 1378+ 2683- 1306- 10485756+ 83 Linux/dev/sda4 2683+ 145875- 143192- 1150186798 f W95 Ext'd (LBA)/dev/sda5 2683+ 3728- 1045- 8388604+ 82 Linux swap / Solaris/dev/sda6 3728+ 27949- 24222- 194559996+ 83 Linux/dev/sda7 27949+ 32127- 4178- 33554428+ 83 Linux/dev/sda8 32127+ 35521- 3395- 27262972+ 83 Linux/dev/sda9 35521+ 37609- 2089- 16777212+ 83 Linux/dev/sda10 37609+ 39168- 1559- 12517372+ 83 Linux/dev/sda11 39168+ 145875- 106708- 857125166 83 Linux
Device information for HP DL380P G9 systems
Disk /dev/sda: 218428 cylinders, 255 heads, 63 sectors/trackWarning: extended partition does not start at a cylinder boundary.DOS and Linux will interpret the contents differently.Units = cylinders of 8225280 bytes, blocks of 1024 bytes, counting from 0
Device Boot Start End #cyls #blocks Id System/dev/sda1 * 0+ 72- 73- 583676+ 83 Linux/dev/sda2 72+ 1378- 1306- 10485756+ 83 Linux/dev/sda3 1378+ 2683- 1306- 10485756+ 83 Linux/dev/sda4 2683+ 218428- 215746- 1732973568 f W95 Ext'd (LBA)/dev/sda5 2683+ 3728- 1045- 8388604+ 82 Linux swap / Solaris/dev/sda6 3728+ 27949- 24222- 194559996+ 83 Linux/dev/sda7 27949+ 32127- 4178- 33554428+ 83 Linux/dev/sda8 32127+ 35521- 3395- 27262972+ 83 Linux/dev/sda9 35521+ 37609- 2089- 16777212+ 83 Linux/dev/sda10 37609+ 39168- 1559- 12517372+ 83 Linux/dev/sda11 39168+ 218428- 179261- 1439911936 83 Linux

Chapter 4: Configuring the RHEL operating system
CMS R18 Software Installation, Maintenance, and Troubleshooting for Linux June 2017 38
3. Enter:
df -Th | grep sda
The system displays the following output:
4. Compare the Filesystem, Type, Size, and Mounted on values from the df command to this Dell or HP RHEL partition table. If the field information does not match, escalate through normal channels.
5. Continue with Initializing the CMS database on page 38.
Initializing the CMS database1. Set the Informix environment. Enter:
. /opt/informix/bin/setenv
2. Initialize the database. Enter:
/opt/informix/bin/dbinit.sh
Enter y.
3. Continue with Verifying the system activity accounting tool on page 38.
Verifying the system activity accounting toolVerify that the system activity accounting tool, sysstat, is installed.
Partition information for Dell or HP RHEL systems with 300-GB disks
/dev/sda2 ext4 9.4G 2.3G 6.7G 26% //dev/sda1 ext4 564M 43M 493M 8% /boot/dev/sda3 ext4 9.4G 409M 8.6G 5% /cms/dev/sda7 ext4 31G 176M 29G 1% /export/home/dev/sda10 ext4 12G 640M 11G 6% /opt/dev/sda6 ext4 175G 898M 165G 1% /storage/dev/sda9 ext4 16G 167M 15G 2% /tmp/dev/sda8 ext4 25G 235M 23G 1% /var
Verifying the system activity accounting tool
CMS R18 Software Installation, Maintenance, and Troubleshooting for Linux June 2017 39
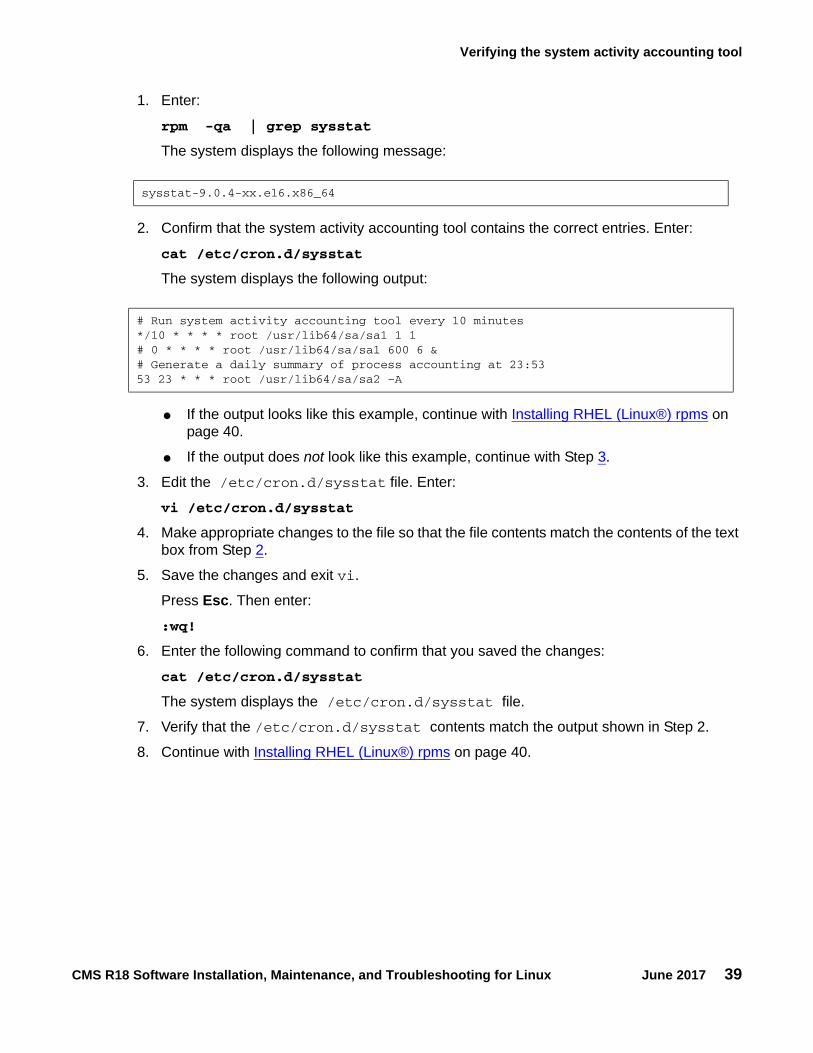
1. Enter:
rpm -qa | grep sysstat
The system displays the following message:
2. Confirm that the system activity accounting tool contains the correct entries. Enter:
cat /etc/cron.d/sysstat
The system displays the following output:
● If the output looks like this example, continue with Installing RHEL (Linux®) rpms on page 40.
● If the output does not look like this example, continue with Step 3.
3. Edit the /etc/cron.d/sysstat file. Enter:
vi /etc/cron.d/sysstat
4. Make appropriate changes to the file so that the file contents match the contents of the text box from Step 2.
5. Save the changes and exit vi.
Press Esc. Then enter:
:wq!
6. Enter the following command to confirm that you saved the changes:
cat /etc/cron.d/sysstat
The system displays the /etc/cron.d/sysstat file.
7. Verify that the /etc/cron.d/sysstat contents match the output shown in Step 2.
8. Continue with Installing RHEL (Linux®) rpms on page 40.
sysstat-9.0.4-xx.el6.x86_64
# Run system activity accounting tool every 10 minutes*/10 * * * * root /usr/lib64/sa/sa1 1 1# 0 * * * * root /usr/lib64/sa/sa1 600 6 &# Generate a daily summary of process accounting at 23:5353 23 * * * root /usr/lib64/sa/sa2 –A

Chapter 4: Configuring the RHEL operating system
CMS R18 Software Installation, Maintenance, and Troubleshooting for Linux June 2017 40
Installing RHEL (Linux®) rpms 1. Load the Avaya Call Management System software disc into the disc drive.
2. Change to the root directory, enter:
cd /
3. Mount the disc drive. Enter:
mount /dev/dvd /mnt
The system displays the following message:
CAUTION:!
CAUTION: You must turn off CMS in order to install the RHEL Linux® rpms.
4. Enter:
cmssvc
The system displays the Avaya Call Management System Services Menu or CMSSVC Menu.
5. Enter the number associated with the run_cms option.
6. Enter the number associated with the Turn off both CMS and IDS option.
The system returns to the command prompt.
7. Run the rpm update script. Enter:
/mnt/rpm_update
The system displays one of the following messages:
mount: block device /dev/sr0 is write-protected, mounting read-only

Installing RHEL (Linux®) rpms
CMS R18 Software Installation, Maintenance, and Troubleshooting for Linux June 2017 41
● If there are Linux® rpms to install, the system displays the following messages:
Note:Note: This message contains an estimate of the amount of time needed to install the
RHEL (Linux®) rpms. Ignore messages associated with the /var/cms/spatches/yum.log file as this file is created during the initial rpm installation.
! Important:Important: You need to monitor the system during the rpm installation process to ensure that
the installation of the rpms does not halt. When the rpm installation process completes, the system automatically reboots into multiuser mode and displays a login prompt.
● If there are no RHEL (Linux®) rpms to install, the system displays the following message:
8. If there are no Linux® rpms to install, continue with Step 12.
RPM updates started: <timestamp>RPM Updates for CMS R18 created <date>
Loaded plugins: securitycms_approved | 1.3 kB 00:00 ...cms_approved/primary | 718 kB 00:00 ...cms_approved 1102/1102
NetworkManager.x86_64 1:0.8.1-34.el6_3 cms_approvedNetworkManager-glib.x86_64 1:0.8.1-34.el6_3 cms_approvedNetworkManager-gnome.x86_64 1:0.8.1-34.el6_3 cms_approved...yum-rhn-plugin.noarch 0.9.1-49.el6 cms_approved 79 kThere are XXX rpm packages to update. Update process will take approximately YY Minutes to complete
The above shows the rpms that will be updated. This process will apply the updates then reboot the system to assure sanity. WARNING: Not applying these updates could cause issues with running the newer CMS load. Do you want to continue? [y/n]
RPM updates started: <timestamp> RPM Updates for CMS R18 created <date>
Loaded plugins: securitycms_approved | 1.3 kB 00:00 ... No rpm updates are required. Quitting rpm_update.

Chapter 4: Configuring the RHEL operating system
CMS R18 Software Installation, Maintenance, and Troubleshooting for Linux June 2017 42
CAUTION:!
CAUTION: If you cancel the installation of RHEL (Linux®) rpms, you must install them before upgrading CMS. To cancel installation of the RHEL (Linux®) rpms, enter n.
9. To install the RHEL (Linux®) rpms, enter y.
The system displays the following messages:
Note:Note: The rpm installation takes at least the amount of time that was estimated earlier in
the procedure. After the rpms are installed, the system reboots into multi-user mode and displays a login prompt.
! Important:Important: Do not halt the system.
10. Log in to the system as root.11. Verify that all the Linux® rpms are installed. Enter:
tail -10 /var/cms/spatches/yum.log
Verify that the system displays the following message:
Loaded plugins: securitySetting up Update ProcessResolving Dependencies--> Running transaction check---> Package NetworkManager.x86_64 1:0.8.1-33.el6 will be updated---> Package NetworkManager.x86_64 1:0.8.1-34.el6_3 will be an update...Transaction Summary================================================================================Install 1 Package(s)Upgrade 129 Package(s)
Total download size: 166 MDownloading Packages:...Complete! All RPM updates applied successfullyStopping sshd: [ OK ]Starting sshd: [ OK ] post-update changes for SAL/ASG support completed. Rebooting the system now.
All RPM updates applied successfully
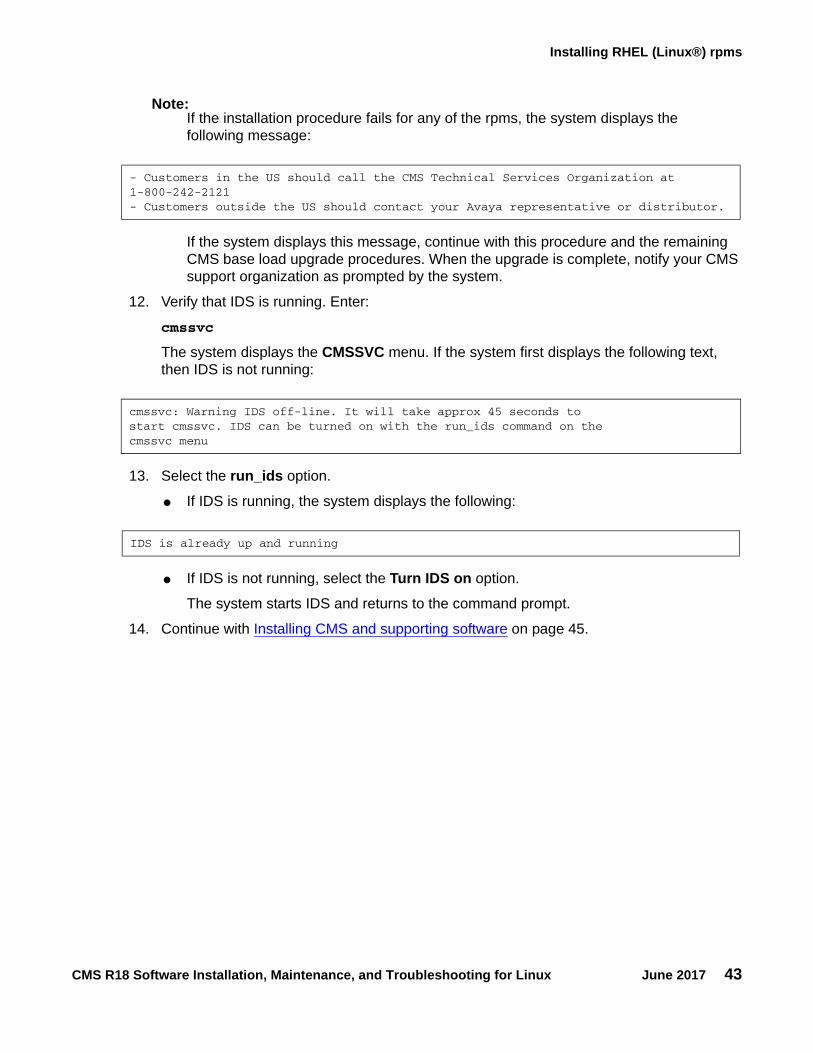
Installing RHEL (Linux®) rpms
CMS R18 Software Installation, Maintenance, and Troubleshooting for Linux June 2017 43
Note:Note: If the installation procedure fails for any of the rpms, the system displays the
following message:
If the system displays this message, continue with this procedure and the remaining CMS base load upgrade procedures. When the upgrade is complete, notify your CMS support organization as prompted by the system.
12. Verify that IDS is running. Enter:
cmssvc
The system displays the CMSSVC menu. If the system first displays the following text, then IDS is not running:
13. Select the run_ids option.
● If IDS is running, the system displays the following:
● If IDS is not running, select the Turn IDS on option.
The system starts IDS and returns to the command prompt.
14. Continue with Installing CMS and supporting software on page 45.
- Customers in the US should call the CMS Technical Services Organization at 1-800-242-2121- Customers outside the US should contact your Avaya representative or distributor.
cmssvc: Warning IDS off-line. It will take approx 45 seconds tostart cmssvc. IDS can be turned on with the run_ids command on the cmssvc menu
IDS is already up and running
Chapter 4: Configuring the RHEL operating system
CMS R18 Software Installation, Maintenance, and Troubleshooting for Linux June 2017 44

CMS R18 Software Installation, Maintenance, and Troubleshooting for Linux June 2017 45
Chapter 5: Installing CMS and supporting software
This section contains the procedures used to install and set up the Avaya Call Management System (CMS) software and other supporting software.
This section includes the following topics:
● Installation rules on page 46
● Installing the CMS packages on page 46
● Configuring the ODBC and JDBC server software on page 56
● Setting up CMS data storage parameters on page 56
● Setting up LAN connections on page 59
● IPv6 Support on RHEL on page 61
● Configuring the CMS software on page 62
● Installing feature packages on page 78
● Installing CMS Supervisor Web on page 86
● Setting up the Alarm Origination Manager on page 91
● Setting the Informix configuration parameters for CMS on page 111
● Installing Access Security Gateway and the CMS Authentication File on page 112
● Removing Access Security Gateway on page 113

Chapter 5: Installing CMS and supporting software
CMS R18 Software Installation, Maintenance, and Troubleshooting for Linux June 2017 46
Installation rulesIf the software was installed at the factory, the only procedures required at the customer site are:
● Configuring CMS authorizations on page 48
● Installing feature packages on page 78
If the CMS software was not installed at the factory, use the procedures in Installing the RHEL operating system on page 17, Configuring the RHEL operating system on page 27, and this chapter to bring the CMS server up to factory standards after a system re-configuration or repair.
Installing the CMS packagesThis section contains procedures for the installation and configuration of the CMS software.
This section includes the following topics:
● Prerequisites on page 46
● Assigning the CMS login passwords on page 47
● Configuring CMS authorizations on page 48
● Storage requirement for CMS on page 52
PrerequisitesBefore you install any of the CMS packages, perform the following tasks:
● Verify that you are logged in as root at the console.
● Obtain the CMS R18 Software Installation disc.
● Obtain the current CMSSVC password.
! Important:Important: The CMSSVC login is used only by Avaya services personnel. Do not give out the
CMSSVC password.

Installing the CMS packages
CMS R18 Software Installation, Maintenance, and Troubleshooting for Linux June 2017 47
Assigning the CMS login passwords1. Enter:
passwd cms
The system displays the following message:
2. Enter the password for the Avaya cms login.
The system displays the following message:
3. Re-enter the password for the Avaya cms login.
The system displays the following message:
4. Assign a password for the Avaya cmssvc login, enter:
passwd cmssvc
The system displays the following message:
5. Enter the password for the Avaya cmssvc login.
The system displays the following message:
6. Re-enter the password for the Avaya cmssvc login.
The system displays the following message:
7. Continue with Configuring CMS authorizations on page 48.
Note:Note: If you have problems installing the CMS software, see CMS installation fails on
page 227.
New password:
Re-enter new password:
passwd: password successfully changed for cms
New password:
Re-enter new password:
passwd: password successfully changed for cmssvc
Chapter 5: Installing CMS and supporting software
CMS R18 Software Installation, Maintenance, and Troubleshooting for Linux June 2017 48
Configuring CMS authorizations This section describes how Avaya Services personnel set authorizations for CMS features that are purchased by the customer. Authorizations apply to all ACDs that are administered. You can use the auth_set option in the Avaya Call Management System Services Menu to:
● Authorize packages and features
● Change the number of agents, ACDs, or Supervisor logins
To set authorizations for CMS features:
1. Avaya Services personnel must verify that the on-site technicians have completed the following tasks:
● Connected the physical console to the CMS server.
● Connected the CMS server to the Remote Maintenance Center of Avaya Services with access through network (SAL).
● Connected the link between the CMS server and the switch.
Note:Note: If the hardware link or the Automatic Call Distribution (ACD) feature and CMS is
not properly administered, the CMS software cannot communicate with the switch. For switch administration procedures, see Avaya Call Management System Switch Connections, Administration, and Troubleshooting.
2. Enter:
cmssvc
The system displays the Avaya Call Management System Services menu.
3. Enter the number associated with the auth_set option.
The system displays the following message:
4. Enter the appropriate password.
Select a command from the list below.1) auth_display Display feature authorizations2) auth_set Authorize capabilities/capacities3) run_ids Turn Informix Database on or off4) run_cms Turn Avaya CMS on or off5) setup Set up the initial configuration6) swinfo Display switch information7) swsetup Change switch information8) uninstall Remove the CMS rpm from the machineEnter choice (1-8) or q to quit:
Password:

Installing the CMS packages
CMS R18 Software Installation, Maintenance, and Troubleshooting for Linux June 2017 49
! Important:Important: The auth_set password is available only to authorized Avaya personnel.
Note:Note: Some of the following questions are not displayed if the authorization cannot be
changed at this time.
The system displays the following message:
5. Enter: y
The system displays the following message:
6. Enter: y
The system displays the following message:
7. Enter: y
The system displays the following message:
8. Enter: y
The system displays the following message:
9. Enter: y
The program responds (if the vectoring package is authorized):
10. Enter: y
The system displays the following message:
11. Perform one of the following actions:
● If the customer purchased the external application feature, enter: y
Authorize installation of CMS hardware? (y/n):(default: n)
Authorize installation of forecasting package? (y/n):(default: n)
Authorize installation of vectoring package? (y/n):(default: n)
Authorize use of graphics feature? (y/n): (default: n)
Authorize use of external call history feature? (y/n): (default: n)
Authorize use of expert agent selection feature? (y/n): (default: n)
Authorize use of external application feature? (y/n):(default: n)
Chapter 5: Installing CMS and supporting software
CMS R18 Software Installation, Maintenance, and Troubleshooting for Linux June 2017 50
● If the customer did not purchase the external application feature, enter: n
The system displays the following message:
12. Enter: y
The system displays the following message:
13. Enter the number of simultaneous logins purchased by the customer.
The system displays the following message:
14. Enter: y
The system displays the following message:
“Split or skill members” are defined as the number of CMS-measured agent-split and agent-skill combinations that are logged in at the same time. Each split that an agent logs into is an agent-split combination. Each skill that is assigned to an agent while the agent is logged in is an agent-skill combination.
The minimum size configuration for CMS is 20. The maximum number of split skill members across all ACDs is documented in the Avaya Aura™ Communication Manager System Capacities Table. Your platform configuration and switch interval could change the number of split skill members you can have on your system.
You can limit the split or skill random access memory (RAM) allocation to the size that is actually needed for the current configuration of agents and splits or skills. This is accomplished by the total split/skill members summed over all splits/skills fields, which is accessed through the setup option of the cmssvc command.
The recommended numbers for Expert Agent Selection (EAS) and non-EAS systems are shown in the following table.
Authorize use of global dictionary/ACD groups feature? (y/n): (default: n)
Enter the number of simultaneous Avaya CMS Supervisor logins the customer has purchased (2-maximum): (default: 2)
Has the customer purchased Avaya Report Designer? (y/n): (default: n)
Enter the maximum number of split/skill members that can be administered (1-maximum):
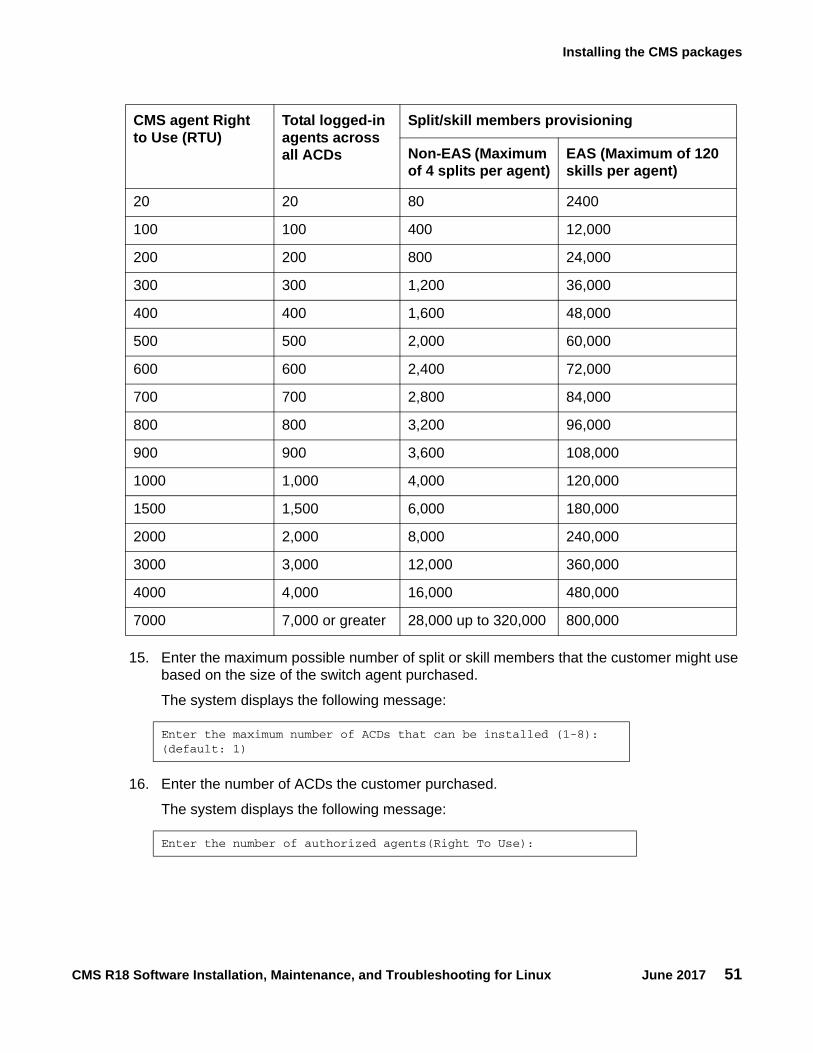
Installing the CMS packages
CMS R18 Software Installation, Maintenance, and Troubleshooting for Linux June 2017 51
15. Enter the maximum possible number of split or skill members that the customer might use based on the size of the switch agent purchased.
The system displays the following message:
16. Enter the number of ACDs the customer purchased.
The system displays the following message:
CMS agent Right to Use (RTU)
Total logged-in agents across all ACDs
Split/skill members provisioning
Non-EAS (Maximum of 4 splits per agent)
EAS (Maximum of 120 skills per agent)
20 20 80 2400
100 100 400 12,000
200 200 800 24,000
300 300 1,200 36,000
400 400 1,600 48,000
500 500 2,000 60,000
600 600 2,400 72,000
700 700 2,800 84,000
800 800 3,200 96,000
900 900 3,600 108,000
1000 1,000 4,000 120,000
1500 1,500 6,000 180,000
2000 2,000 8,000 240,000
3000 3,000 12,000 360,000
4000 4,000 16,000 480,000
7000 7,000 or greater 28,000 up to 320,000 800,000
Enter the maximum number of ACDs that can be installed (1-8): (default: 1)
Enter the number of authorized agents(Right To Use):

Chapter 5: Installing CMS and supporting software
CMS R18 Software Installation, Maintenance, and Troubleshooting for Linux June 2017 52
Note:Note: RTU is the number of agents paid for on the CMS. This number is on the CMS
order paperwork.
17. Enter the number of authorized agents.
The system displays the following message:
18. Perform one of the following actions:
● If the customer purchased ODBC connections, enter the number of ODBC connections authorized.
● If the customer did not purchase any ODBC connections, press Enter, the default is zero ODBC connections.
The system displays the command prompt after all authorizations have been set.
19. Verify authorizations are correctly set by entering:
cmssvc
The system then displays the Avaya Call Management System Services menu.
20. Enter the number associated with the auth_display option.
21. Verify that the administration completed successfully by entering:
tail /cms/install/logdir/admin.log
The system displays the admin.log file. The admin.log file contains information related to CMS administration procedures.
Storage requirement for CMS
Dataspace required for the CMS full maintenance backup
1. Set the Informix environment. Enter:
# . /opt/informix/bin/setenv
Enter the number of authorized ODBC connection (0-10): (default: 0)
Authorization command started Mon Aug 31 12:25:05 EDT 2015Multi-tenancy automatically authorized.Capabilities/capacities authorized Mon Aug 31 12:25:28 EDT 2015

Installing the CMS packages
CMS R18 Software Installation, Maintenance, and Troubleshooting for Linux June 2017 53
2. Enter:
# onstat -d
The system displays the current usage information for the Informix database. Use the output generated from running this command and the formulas at the bottom of the tables to calculate how much database space is required for a CMS full maintenance backup. The data in this table is dynamic and changes as database space is used.
Bytes to GB conversion factor = 1,073,741,824
Full Maintenance Backup compression ratio = 30 (approximation)
Table 2: Current usage information for the Informix database
Platform/ cmsdbs Dbspace
pgsize Full disk size of cmsdbs Dbspace
Total Disk cmsdbs Dbspace (Bytes)
Total Disk cmsdbs Dbspace
(rounded in GB)
Total Full Maintenance
Backup space
Required if cmsdbs
Dbspace is full (GB)1
1. If ontape is being used for binary backups this value must be multiplied by 30 since ontape does not compress data.
Dell R220 8,192 43,844,355 359,172,956,160 334.5 11.15
Dell R620 LOW
8,192 11,554,913 94,657,847,296 88.16 2.94
Dell R620 MID
8,192 34,679,882 284,098,000,000 264.59 8.82
Dell R630 8,192 32,861,440 269,200,916,480 250.71 8.36
Dell R720 8,192 180,890,698 1,481,860,000,000 1,380.09 46.00
Dell R730 8,192 179,072,256 1,466,959,921,152 1,366.21 45.54
HP DL380P G8
8,192 108,042,352 885,082,947,584 824.30 27.48
HP DL380P G9
8,192 179,072,256 1,466,959,921,152 1,366.21 45.54

Chapter 5: Installing CMS and supporting software
CMS R18 Software Installation, Maintenance, and Troubleshooting for Linux June 2017 54
Dell R620 (300 GB) example:
Full Dbspace size of cmsdbs = ((8,192 * 34,679,882) / 1,073,741,824) = 264.59 GB
Full Dbspace size of cmsdbs available for Full maintenance backups =
(((8192 * 34,679,882) / 1,073,741,824) / 30) = 8.82 GB
Space required for backup = (((8,192 * (34,679,882 - 29,584,364)) / 1,073,741,824) / 30) = 14.01 GB
Dataspace required for the CMSADM backup
1. Run the following command:
# df -h
Dbs
pace
sad
dres
s
num
bers
flags
fchu
nk
nchu
nks
pgsi
ze
flags
owne
r
nam
e
c64a5358 5 0x60001 5 1 8192 N B informix cmsdbs
Chu
nks
addr
ess
chun
k
dbs
offs
et
size
free
bpag
es
flags
path
nam
e
c64a
5ac0
5 5 31,4
26,5
6
34,6
79,8
82
29,5
84,3
64
PO
-B-
/cm
sdis
k
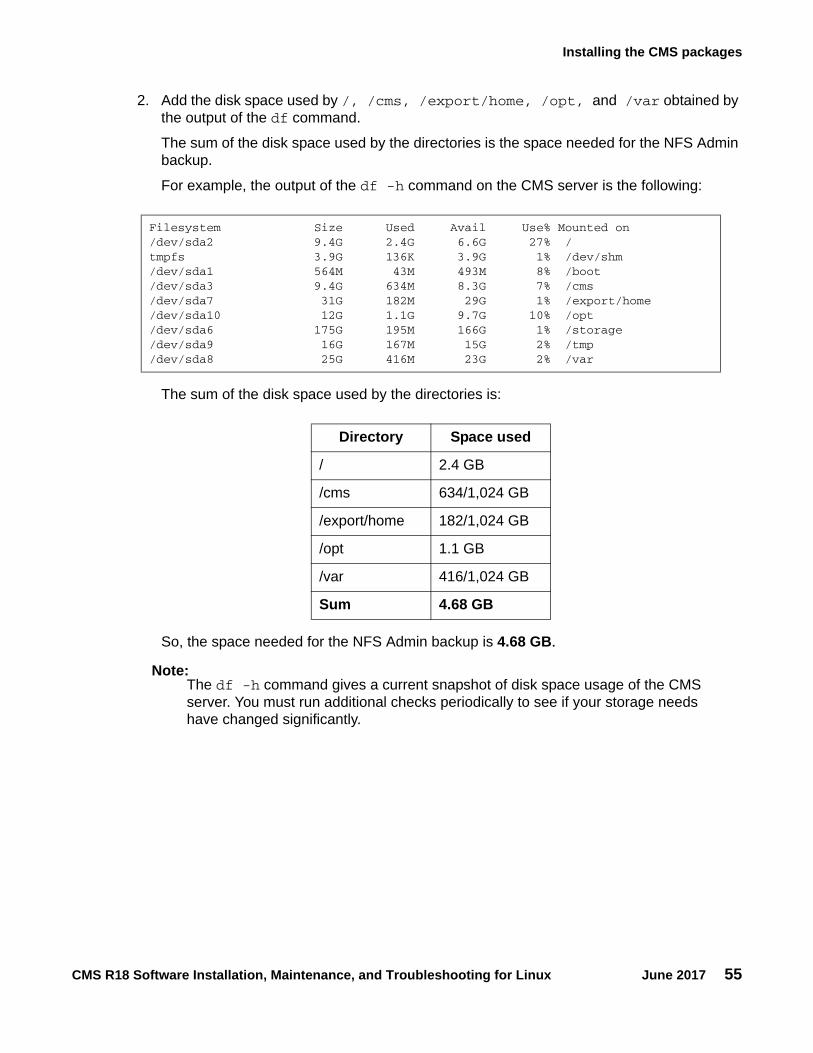
Installing the CMS packages
CMS R18 Software Installation, Maintenance, and Troubleshooting for Linux June 2017 55
2. Add the disk space used by /, /cms, /export/home, /opt, and /var obtained by the output of the df command.
The sum of the disk space used by the directories is the space needed for the NFS Admin backup.
For example, the output of the df -h command on the CMS server is the following:
The sum of the disk space used by the directories is:
So, the space needed for the NFS Admin backup is 4.68 GB.
Note:Note: The df -h command gives a current snapshot of disk space usage of the CMS
server. You must run additional checks periodically to see if your storage needs have changed significantly.
Filesystem Size Used Avail Use% Mounted on/dev/sda2 9.4G 2.4G 6.6G 27% /tmpfs 3.9G 136K 3.9G 1% /dev/shm/dev/sda1 564M 43M 493M 8% /boot/dev/sda3 9.4G 634M 8.3G 7% /cms/dev/sda7 31G 182M 29G 1% /export/home/dev/sda10 12G 1.1G 9.7G 10% /opt/dev/sda6 175G 195M 166G 1% /storage/dev/sda9 16G 167M 15G 2% /tmp/dev/sda8 25G 416M 23G 2% /var
Directory Space used
/ 2.4 GB
/cms 634/1,024 GB
/export/home 182/1,024 GB
/opt 1.1 GB
/var 416/1,024 GB
Sum 4.68 GB

Chapter 5: Installing CMS and supporting software
CMS R18 Software Installation, Maintenance, and Troubleshooting for Linux June 2017 56
Configuring the ODBC and JDBC server software Open Database Connectivity (ODBC) and Java Database Connectivity (JDBC) allows you to access data in the CMS database for use in other software applications such as spreadsheet programs. With ODBC and JDBC, you can access the CMS data directly from your application without needing to understand database connectivity or format. ODBC and JDBC allows access to data at multiple sites for reports. The following procedures allow you to install or upgrade your ODBC and JDBC software. For more information about the ODBC and JDBC client software, see Avaya Call Management System ODBC and JDBC.
Setting up CMS data storage parameters This section describes how Avaya Services personnel modify specific data storage parameters on the CMS server. These storage parameters affect the operation of the CMS software.
! Important:Important: Throughout the setup, you are prompted to enter values that are specific to the
system being installed. These values differ between switch releases. For each question, an appropriate range of values is displayed. These values represent the limits of each range.
To modify CMS data storage parameters:
1. Change to the CMS installation directory by entering:
cd /cms/install/cms_install
2. Enter:
vi storage.def

Setting up CMS data storage parameters
CMS R18 Software Installation, Maintenance, and Troubleshooting for Linux June 2017 57
Note:Note: The storage.def file contains the data storage parameters. CMS is installed with
a set of standard default values. If you delete or damage the storage.def file, you can find a copy of this file (storage.skl) in the same directory.
The default storage parameters are listed in the Default CMS data storage parameters table on page 57 in the order in which they appear in the storage.def file. The data storage parameters are documented in the Avaya Aura™ Communication Manager System Capacities Table.
Default CMS data storage parameters table
Parameter Default
Intrahour interval (15, 30, 60 minutes): 30
Week start day (Sunday, Monday, Tuesday, Wednesday, Thursday, Friday, Saturday):
Sunday
Week end day (Sunday, Monday, Tuesday, Wednesday, Thursday, Friday, Saturday):
Saturday
Daily start time (regular time): 12:00 AM
Daily stop time (data will be collected for seconds of last minute): 11:59 PM
Number of agent login/logout records: 10,000
Number of agent trace records: 10,000
Number of call records: 0
Number of exceptions records: 250
# Days of intrahour for splits (1-62): 31
# Days of daily splits (1-1825): 387
# Weeks of weekly splits (1-520): 53
# Months of monthly splits (1-120): 13
# Days of intrahour for agents (1-62): 31
# Days of daily agents (1-1825): 387
# Weeks of weekly agents (1-520): 53
# Months of monthly agents (1-120): 13
# Days of intrahour for trunk groups (1-62): 31
# Days of daily trunk groups (1-1825): 387
# Weeks of weekly trunk groups (1-520): 53

Chapter 5: Installing CMS and supporting software
CMS R18 Software Installation, Maintenance, and Troubleshooting for Linux June 2017 58
3. Review the default data storage values for each authorized ACD. The default values are found on the line immediately below each storage parameter.
4. Enter the values determined by the account executive, system consultant, and design center. These values are based on the customer configuration.
5. Press Esc. Then enter:
:wq!
The system saves and closes the file.
# Months of monthly trunk groups (1-120): 13
# Days of intrahour for trunks (1-62): 31
# Days of daily trunks (1-1825): 387
# Weeks of weekly trunks (1-520): 53
# Months of monthly trunks (1-120): 13
# Days of intrahour for call work codes (1-62): 0
# Days of daily call work codes (1-1825): 0
# Weeks of weekly call work codes (1-520): 0
# Months of monthly call work codes (1-120): 0
# Days of intrahour for vectors (1-62): 31
# Days of daily vectors (1-1825): 387
# Weeks of weekly vectors (1-520): 53
# Months of monthly vectors (1-120): 13
# Days of intrahour for VDNs (1-62): 31
# Days of daily VDNs (1-1825): 387
# Weeks of weekly VDNs (1-520): 53
# Months of monthly VDNs (1-120): 13
Default CMS data storage parameters table
Parameter Default

Setting up LAN connections
CMS R18 Software Installation, Maintenance, and Troubleshooting for Linux June 2017 59
Note:Note: After the CMS software is running, the system administrator can change the data
storage parameters using the Data Storage Allocation window and the Storage Intervals window. Both windows are accessed from the CMS System Setup menu.
For more information about changing CMS data storage parameters, see Avaya Call Management System Administration.
Setting up LAN connectionsThis section describes how to set up a network connection to a LAN-enabled switch and other CMS server peripherals. For more information about LAN switch configurations, see Avaya Call Management System Switch Connections, Administration, and Troubleshooting.
This section includes the following topics:
● Prerequisites on page 59
● Editing the /etc/hosts file on page 59
● IPv6 Support on RHEL on page 61
● IPv6 Support on RHEL on page 61
PrerequisitesBefore you begin setting up the network for LAN connections, perform the following tasks:
● Verify that you are logged in as root.● Verify that the CMS software is turned off and the IDS software is on.
● Verify that all file systems are mounted.
● Verify that Avaya Communication Manager 5.2 or later are installed.
Editing the /etc/hosts fileTo edit the /etc/hosts file:
1. Enter:
vi /etc/hosts

Chapter 5: Installing CMS and supporting software
CMS R18 Software Installation, Maintenance, and Troubleshooting for Linux June 2017 60
! Important:Important: The items in this file must be separated by tabs, not spaces, and any comments
must begin with a #. The entry for localhost must remain on line four and the entry for loghost must remain on line five.
The loghost line should contain the CMS server’s:
- IP address
- Host name
- Hostname.fully qualified domain name
- loghost
The fully qualified domain name is either the customer domain name or the default entry tempdomain.net
Example:
2. Add a new line to this file for each ethernet card that is installed in this computer using TCP/IP. You must enter the IP address and the host name.
This example shows the recommended default IP addressing scheme for a closed network.
Note:Note: Only the primary network card needs the fully qualified domain name.
3. Press Esc. Then enter:
:wq!
The system saves and closes the file.
## Internet host table#127.0.0.1 localhost192.168.2.1 cms cms.tempdomain.net loghost
## Internet host table#127.0.0.1 localhost192.168.2.1 cms cms.tempdomain.net loghost192.168.2.2 switch192.168.2.103 router
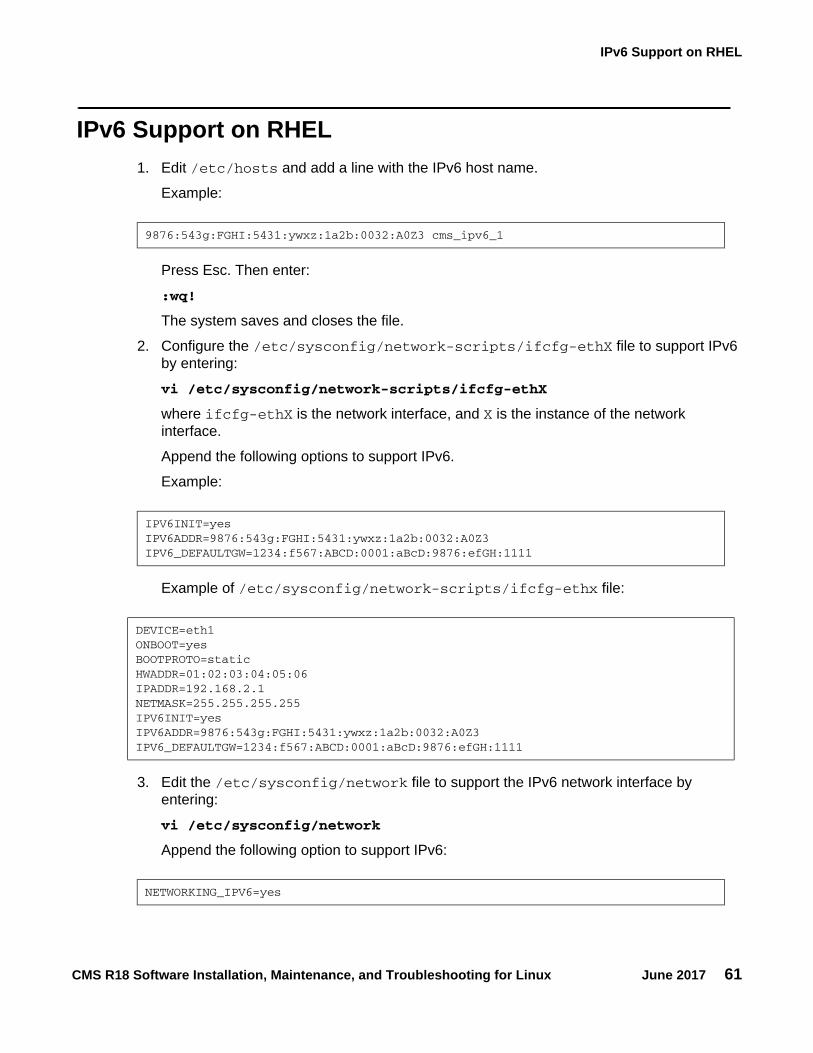
IPv6 Support on RHEL
CMS R18 Software Installation, Maintenance, and Troubleshooting for Linux June 2017 61
IPv6 Support on RHEL1. Edit /etc/hosts and add a line with the IPv6 host name.
Example:
Press Esc. Then enter:
:wq!
The system saves and closes the file.
2. Configure the /etc/sysconfig/network-scripts/ifcfg-ethX file to support IPv6 by entering:
vi /etc/sysconfig/network-scripts/ifcfg-ethX
where ifcfg-ethX is the network interface, and X is the instance of the network interface.
Append the following options to support IPv6.
Example:
Example of /etc/sysconfig/network-scripts/ifcfg-ethx file:
3. Edit the /etc/sysconfig/network file to support the IPv6 network interface by entering:
vi /etc/sysconfig/network
Append the following option to support IPv6:
9876:543g:FGHI:5431:ywxz:1a2b:0032:A0Z3 cms_ipv6_1
IPV6INIT=yesIPV6ADDR=9876:543g:FGHI:5431:ywxz:1a2b:0032:A0Z3IPV6_DEFAULTGW=1234:f567:ABCD:0001:aBcD:9876:efGH:1111
DEVICE=eth1ONBOOT=yesBOOTPROTO=staticHWADDR=01:02:03:04:05:06IPADDR=192.168.2.1NETMASK=255.255.255.255IPV6INIT=yesIPV6ADDR=9876:543g:FGHI:5431:ywxz:1a2b:0032:A0Z3IPV6_DEFAULTGW=1234:f567:ABCD:0001:aBcD:9876:efGH:1111
NETWORKING_IPV6=yes

Chapter 5: Installing CMS and supporting software
CMS R18 Software Installation, Maintenance, and Troubleshooting for Linux June 2017 62
4. Configure the /etc/sysconfig/network file with the IPv6 host name you added to the /etc/hosts file. Enter the appropriate information for each item.
Example of /etc/sysconfig/network file:
5. Press Escape. Then enter:
:wq!
The system saves and closes the file.
6. Edit the /etc/sysconfig/network-scripts/route6-ethx to define static IPv6 routes.
vi /etc/sysconfig/network-scripts/route6-ethx
Enter the IPv6 route information.
Example:
7. Press Escape. Then enter:
:wq!
The system saves and closes the file.
Configuring the CMS software The CMS software provides monitoring and recording of ACD calls and agents handling these calls, and the use of Vector Directory Numbers (VDNs) for these calls to measure call center performance.
This section includes the following topics:
● Prerequisites on page 63
● About the configuration methods on page 63
● Configuring CMS interactively on page 63
● Configuring CMS using a flat file on page 72
NETWORKING=yesHOSTNAME=cms_ipv6_1GATEWAY=192.168.2.254NETWORKING_IPV6=yes
::/32 via defd:ebne:ADJL:wxyz dev ethx

Configuring the CMS software
CMS R18 Software Installation, Maintenance, and Troubleshooting for Linux June 2017 63
PrerequisitesBefore you configure the CMS software, perform the following tasks:
● Verify that you are logged in as root.● Verify that if TCP/IP is being used to connect to an ACD, the switch/LAN setup is done.
● Verify that all file systems are mounted.
About the configuration methodsYou can choose either of the following ways to configure the CMS software:
● If you use the interactive option, the program automatically prompts you for the necessary information to configure the CMS software. For more information, see Configuring CMS interactively on page 63.
● If you use the flat file option, you edit a UNIX system flat file that contains the necessary information to set up the CMS software. When you execute the install program, the program runs in the background and uses the flat file data to configure CMS. For more information, see Configuring CMS using a flat file on page 72.
Configuring CMS interactivelyTo configure CMS interactively:
1. Enter:
cmssvc
The system displays the Avaya Call Management System Services Menu.
2. Enter the number associated with the setup option.
a. If CMS is turned on, the system displays the following message and returns to the command prompt.
Turn off cms and continue with step 3.
b. If CMS is turned off, the system displays options for the set up type.
CMS needs to be turned off before invoking this command.

Chapter 5: Installing CMS and supporting software
CMS R18 Software Installation, Maintenance, and Troubleshooting for Linux June 2017 64
3. Select the option for the terminal.
The system displays the following message:
Note:Note: When the cmssvc setup command is running, no other CMSADM or cmssvc
commands are allowed. Any attempt to run other CMSADM or cmssvc commands will be rejected, and the system will display the error message “Please try later, setup is active”.
Note:Note: If system setup has already been done, the program responds:
If the warning message is displayed, perform one of the following actions:
- Enter n to exit the setup.
- Enter y to continue with the setup.
4. Enter the number for the language to be used on this system.
5. The system displays the following options:
Enter the appropriate choice.
Select the language for this server:
All languages are ISO Latin except Japanese. Selection of theserver language assumes that existing customer data is compatible. (Upgrade from any ISO Latin language to any ISO Latin language or from Japanese to Japanese is supported).
1) English2) Dutch3) French4) German5) Italian6) Portuguese7) Spanish8) JapaneseEnter choice (1-8): (default: 1)
Warning!!! Setup has already been performed.Running this command will remove all CMS data in the database.Do you wish to proceed and re-configure CMS? (y/n): (default: n)
The input will be read from 1) The terminal 2) a flat fileEnter choice 1 or 2:

Configuring the CMS software
CMS R18 Software Installation, Maintenance, and Troubleshooting for Linux June 2017 65
a. If choice 2 is selected, the system displays the following message and returns to the command prompt.
b. If choice 1 is selected, the system initializes the customer CMS data. This can take up to 15 minutes. When finished, the system displays the following message:
6. Enter the host name of the computer.
This name was assigned during the factory installation procedures and is used by Avaya Services to maintain and identify this specific system.
The system displays the following message:
The following table lists the supported models of backup devices:
*** The rest of this command is running in the background ***
## Initializing Customer CMS data . . ..........................Customer CMS data successfully initialized.Creating database tables.......Enter a name for this UNIX system (up to 256 characters): (default: cms3)
Select the type of backup device you are using 1) Tape 2) OtherEnter choice (1-2):
Backup device Description Platforms supported
DAT 160 DDS compliant 150 meter 160/320-GB DAT cartridge
Dell R620Dell R630Dell R720Dell R730HP DL380P G8HP DL380P G9
DAT 320 DDS compliant 150 meter 320-GB DAT cartridge
Dell R620Dell R630Dell R720Dell R730HP DL380P G8HP DL380P G9

Chapter 5: Installing CMS and supporting software
CMS R18 Software Installation, Maintenance, and Troubleshooting for Linux June 2017 66
7. The system displays the following message:
● If the tape option is selected, use the following steps to determine the device path of the tape drive:
a. Insert a tape into the tape drive.
b. In another xterm window, enter the following commands:
mt -f /dev/st0 status
mt -f /dev/st1 status
The system displays the following message for the DAT 320 tape drive:
! WARNING:!
WARNING: You cannot perform backups to /dev/null. The /dev/null device path allows customers who do not have a backup device to continue configuring CMS.
The /dev/null device path is not an option if type “Other” is selected. The CMS administrator needs to provide the path used for type “Other”.
LTO-4 820 meter 800-GB 12.65 mm cartridge
Dell R620Dell R630Dell R720Dell R730HP DL380P G8HP DL380P G9
LTO-5 820 meter 800-GB 12.65 mm cartridge846 meter 1.5-TB 12.65 mm cartridge
Dell R620Dell R630Dell R720Dell R730HP DL380P G8HP DL380P G9
Enter the default backup device path: (default: /dev/null)
SCSI 2 tape drive:File number=-1, block number=-1, partition=0.Tape block size 0 bytes. Density code 0x4d (no translation).Soft error count since last status=0General status bits on (1010000):ONLINE IM_REP_EN
Backup device Description Platforms supported

Configuring the CMS software
CMS R18 Software Installation, Maintenance, and Troubleshooting for Linux June 2017 67
8. Enter the default backup device path.
The system displays the following message:
9. Enter the number of ACDs to be administered. This number may be less than the number of ACDs authorized.
The system displays the following message:
10. Enter the name for the switch that is associated with ACD 1.
The system displays a list of switch models.
11. Enter the number that represents the switch model that is associated with the ACD.
Use the following table to determine the correct switch model. See Avaya Call Management System Switch Connections, Administration, and Troubleshooting for additional information.
If the switch supports vectoring and vectoring is authorized, the following message appears; otherwise, go to Step 14.
12. Perform one of the following actions:
● If vectoring is enabled on this switch, enter: y
● If vectoring is not enabled on this switch, enter: n
The following message appears if vectoring is enabled, the switch supports EAS, and EAS is authorized. If the message does not appear, go to Step 14.
Enter number of ACDs being administered (1-8): (default: 2)
Information for ACD 1
Enter switch name (up to 20 characters):
Switch model table
If the switch release is: Then enter this switch model choice:
Release 5.2 Communication Mgr 5.2
Release 6.x Communication Mgr 6.x
Release 7.x Communication Mgr 7.x
Is Vectoring enabled on the switch? (y/n):
Is Expert Agent Selection enabled on the switch? (y/n):

Chapter 5: Installing CMS and supporting software
CMS R18 Software Installation, Maintenance, and Troubleshooting for Linux June 2017 68
13. Perform one of the following actions:
● If EAS is enabled on this switch, enter: y
● If EAS is not enabled on this switch, enter: n
The system displays the following message:
14. Perform one of the following actions:
● If the Central Office has disconnect supervision, enter: y
● If the Central Office does not have disconnect supervision, enter: n
The system displays the following message:
15. Enter the Phantom Abandon Call Timer value.
The system displays the following message:
Note:Note: The standard CMS provisioning procedure is to set the local and remote port
assignments equal to the switch processor channel assignment. For example, for switch processor channel 2, the remote and local port assignments would both be set to a value of 2.
16. Enter the local port or channel number on the switch.
The system displays the following message:
17. Enter the remote port or channel number on the switch.
You must now select how the CMS platform transports messages to the switch.
The system displays the following message:
Does the Central Office have disconnect supervision? (y/n): (default: y)
If the Central Office has disconnect supervision, enter 0. Otherwise,ACD calls shorter than the Phantom Abandon Call Timervalue will be counted as abandoned.Enter the Phantom Abandon Call Timer value in seconds (0-10):
Enter the local port assigned to switch. (1-64):
Enter the remote port assigned to switch (1-64):
Select the transport to the switch1) TCP/IPEnter choice (1-1):

Configuring the CMS software
CMS R18 Software Installation, Maintenance, and Troubleshooting for Linux June 2017 69
18. Select TCP/IP.
The system displays the following message:
19. Enter the host name or IP address of the switch that is connected to this ACD.
Note:Note: If you enter a host name that has not been added to the computer’s /etc/hosts
file, the system displays the following message:
See Editing the /etc/hosts file on page 59 for more information about setting up the hosts file.
The system displays the following message:
20. Press Enter to use the default TCP port number.
Note:Note: This number must match the port number administered on the switch.
The system displays the following message:
21. Enter the number of splits/skills in this ACD.
The system displays the following message:
22. Enter the maximum number of split/skill members that will be logged into this ACD simultaneously, considering shift overlap.
● For non-EAS, sum all agent-split combinations, counting each split an agent will log into (maximum is 4) as a split member.
Enter switch host name or IP Address:
Switch_name has not been administered in a DNS or/etc/hosts file. The DNS or /etc/hosts file must becorrected or the link to the switch will not work.
Enter switch TCP port number (minimum-maximum):(default: 5001)
Number of splits/skills (0-Maximum): (default: 350)
Total split/skill members, summed over all splits/skills(0-Maximum):(default 3500)
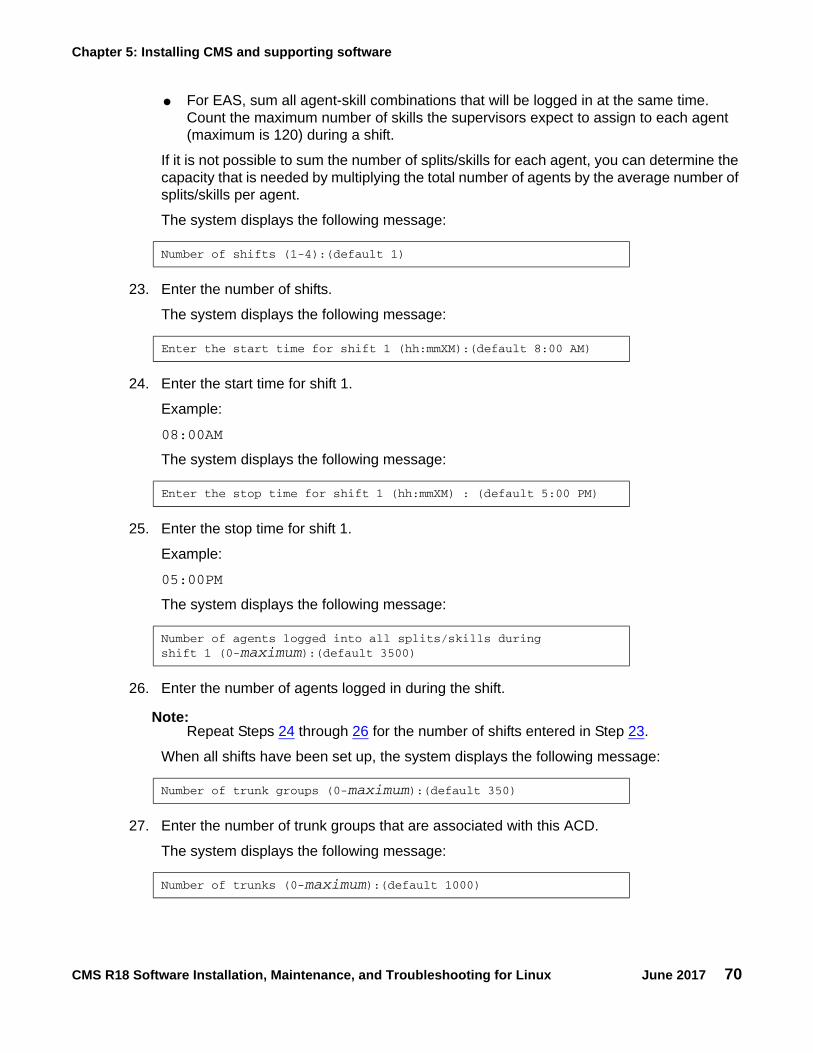
Chapter 5: Installing CMS and supporting software
CMS R18 Software Installation, Maintenance, and Troubleshooting for Linux June 2017 70
● For EAS, sum all agent-skill combinations that will be logged in at the same time. Count the maximum number of skills the supervisors expect to assign to each agent (maximum is 120) during a shift.
If it is not possible to sum the number of splits/skills for each agent, you can determine the capacity that is needed by multiplying the total number of agents by the average number of splits/skills per agent.
The system displays the following message:
23. Enter the number of shifts.
The system displays the following message:
24. Enter the start time for shift 1.
Example:
08:00AM
The system displays the following message:
25. Enter the stop time for shift 1.
Example:
05:00PM
The system displays the following message:
26. Enter the number of agents logged in during the shift.
Note:Note: Repeat Steps 24 through 26 for the number of shifts entered in Step 23.
When all shifts have been set up, the system displays the following message:
27. Enter the number of trunk groups that are associated with this ACD.
The system displays the following message:
Number of shifts (1-4):(default 1)
Enter the start time for shift 1 (hh:mmXM):(default 8:00 AM)
Enter the stop time for shift 1 (hh:mmXM) : (default 5:00 PM)
Number of agents logged into all splits/skills duringshift 1 (0-maximum):(default 3500)
Number of trunk groups (0-maximum):(default 350)
Number of trunks (0-maximum):(default 1000)

Configuring the CMS software
CMS R18 Software Installation, Maintenance, and Troubleshooting for Linux June 2017 71
28. Enter the number of trunks associated with this ACD.
The system displays the following message:
29. Enter the number of unmeasured trunk facilities that are associated with this ACD.
Note:Note: The recommended assignment per ACD for unmeasured facilities is 50% of the
measured trunks.
If the switch supports call work codes, the system displays the following message:
30. Enter the number of call work codes.
If vectoring is enabled on the switch, that is if a y was entered in Step 12, the system displays the following message:
31. Enter the number of vectors.
The system displays the following message:
32. Enter the number of VDNs.
The program repeats Steps 10 through 31 for each ACD that you entered in Step 9.
After you define the last ACD, the system displays the following message:
Number of unmeasured facilities (0-maximum):(default: 500)
Number of call work codes (minumum-maximum):(default 750)
Enter number of vectors (0-maximum):(default 350)
Enter number of VDNs (0-maximum):(default 2000)
Updating database.
Creating database tables.......
Computing space requirements and file system spaceavailability.
Setup completed successfully.

Chapter 5: Installing CMS and supporting software
CMS R18 Software Installation, Maintenance, and Troubleshooting for Linux June 2017 72
Note:Note: If the setup determines that you do not have enough file space, the system
displays the following warning message:
33. To verify that the installation completed successfully, enter:
tail /cms/install/logdir/admin.log
All failure messages are logged in this file. The CMS software is successfully set up when the system displays a message similar to the following:
You may edit this file and add comments about the packages that were installed or authorized.
34. Perform one of the following actions:
● If you need to install additional CMS-related feature packages such as Forecasting or External Call History, go to Installing feature packages on page 78.
● If you are not installing any other feature packages, perform the following procedure:
a. Enter:
cmssvc
The system displays the Avaya Call Management System Services Menu.
b. Enter the number associated with the run_cms option.
c. Enter the number associated with the Turn on CMS option.
Configuring CMS using a flat fileTo configure CMS using a flat file, you must edit a copy of the cms.inst.skl file and start the install program.
! Important:Important: This procedure is not necessary if you already configured CMS interactively.
This section includes the following topics:
Failed to find sufficient file space for CMS data.
WARNING: You do not currently have sufficient file space for your existing CMS data. At this point you should turn on CMS, go to the “Data Storage Allocation” screen, verify/modify the administration, and go to the “Free Space Allocation” screen and verify your available free space.
Setup completed with warnings.
Setup completed successfully <data/time>

Configuring the CMS software
CMS R18 Software Installation, Maintenance, and Troubleshooting for Linux June 2017 73
● Creating the flat file on page 73
● Example of a flat file on page 73
● Using the flat file on page 76
Creating the flat file
To configure CMS with a flat file:
1. Change to the CMS installation directory by entering:
cd /cms/install/cms_install
2. Make a copy of the CMS installation file by entering:
cp cms.inst.skl cms.install
3. Change permissions on the copied CMS installation file by entering:
chmod 644 cms.install
4. Edit the copied CMS installation file by entering:
vi cms.install
The file contains a series of questions and value ranges for the ACD configuration.
Note:Note: When selecting a switch model in the file, refer to the Switch model table on
page 67.
5. Enter the appropriate values for your configuration. The entries must be added on the blank lines after each question. For more information, see Example of a flat file on page 73.
CAUTION:!
CAUTION: Use the computer’s host name for the UNIX system name. The computer’s host name was assigned during the factory installation.
6. Press Esc.
7. Enter:
:wq!
The system saves and closes the file.
Example of a flat file
The following display shows an example of a flat file for one ACD. The file repeats the preceding statements for ACDs 2 through 8. Enter data for only the required number of ACDs.# Enter a name for this UNIX system (up to 64 characters):CMSName# Select the type of backup device you are using
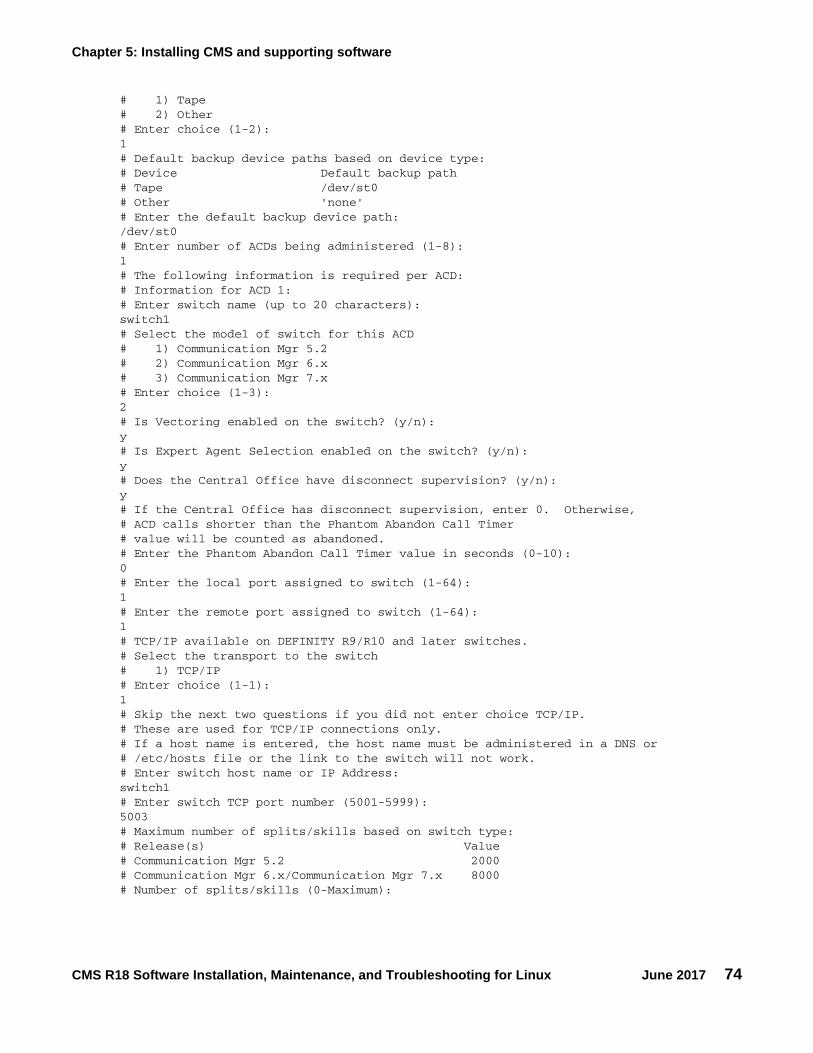
Chapter 5: Installing CMS and supporting software
CMS R18 Software Installation, Maintenance, and Troubleshooting for Linux June 2017 74
# 1) Tape # 2) Other # Enter choice (1-2):1# Default backup device paths based on device type:# Device Default backup path# Tape /dev/st0# Other 'none'# Enter the default backup device path:/dev/st0# Enter number of ACDs being administered (1-8):1# The following information is required per ACD:# Information for ACD 1:# Enter switch name (up to 20 characters):switch1# Select the model of switch for this ACD# 1) Communication Mgr 5.2# 2) Communication Mgr 6.x# 3) Communication Mgr 7.x# Enter choice (1-3):2# Is Vectoring enabled on the switch? (y/n):y# Is Expert Agent Selection enabled on the switch? (y/n):y# Does the Central Office have disconnect supervision? (y/n):y# If the Central Office has disconnect supervision, enter 0. Otherwise,# ACD calls shorter than the Phantom Abandon Call Timer# value will be counted as abandoned.# Enter the Phantom Abandon Call Timer value in seconds (0-10):0# Enter the local port assigned to switch (1-64):1# Enter the remote port assigned to switch (1-64):1# TCP/IP available on DEFINITY R9/R10 and later switches.# Select the transport to the switch# 1) TCP/IP# Enter choice (1-1):1# Skip the next two questions if you did not enter choice TCP/IP.# These are used for TCP/IP connections only.# If a host name is entered, the host name must be administered in a DNS or# /etc/hosts file or the link to the switch will not work.# Enter switch host name or IP Address:switch1# Enter switch TCP port number (5001-5999):5003# Maximum number of splits/skills based on switch type:# Release(s) Value# Communication Mgr 5.2 2000# Communication Mgr 6.x/Communication Mgr 7.x 8000# Number of splits/skills (0-Maximum):

Configuring the CMS software
CMS R18 Software Installation, Maintenance, and Troubleshooting for Linux June 2017 75
4000# Maximum number of split/skill members based on switch type:# Release(s) Value# Communication Mgr 5.2/Communication Mgr 6.x 100000# Communication Mgr 7.x 360000# Total split/skill members, summed over all splits/skills (0-Maximum):10000# Number of shifts (1-4):1# Enter the start time for shift 1 (hh:mmXM):08:00AM# Enter the stop time for shift 1 (hh:mmXM):05:00PM# Number of agents logged into all splits/skills during shift 1 (1-Maximum):1000# Enter the start time for shift 2 (hh:mmXM):
# Enter the stop time for shift 2 (hh:mmXM):
# Number of agents logged into all splits/skills during shift 2 (1-Maximum):
# Enter the start time for shift 3 (hh:mmXM):
# Enter the stop time for shift 3 (hh:mmXM):
# Number of agents logged into all splits/skills during shift 3 (1-Maximum):
# Enter the start time for shift 4 (hh:mmXM):
# Enter the stop time for shift 4 (hh:mmXM):
# Number of agents logged into all splits/skills during shift 4 (1-Maximum):
# Maximum number of trunk groups based on switch type:# Release(s) Value# Communication Mgr 5.2/Communication Mgr 6.x 2000# Communication Mgr 7.x 2000# Number of trunk groups (0-Maximum):200# Maximum number of trunks based on switch type:# Release(s) Value# Communication Mgr 5.2/Communication Mgr 6.x 12000# Communication Mgr 7.x 24000# Number of trunks (0-Maximum):1000# Maximum number of unmeasured trunks:# Release(s) Value# Communication Mgr 5.2/Communication Mgr 6.x 6000# Communication Mgr 7.x 12000# Number of unmeasured facilities (0-Maximum):200# Minimum number of call work codes based on switch type:# Release(s) Value# Communication Mgr 5.2/Communication Mgr 6.x 1# Communication Mgr 7.x 1

Chapter 5: Installing CMS and supporting software
CMS R18 Software Installation, Maintenance, and Troubleshooting for Linux June 2017 76
# Maximum number of call work codes based on switch type:
# Maximum number of call work codes based on switch type:# Release(s) Value# Communication Mgr 5.2/Communication Mgr 6.x 1999# Communication Mgr 7.x 1999# Number of call work codes (0-Maximum):20# Maximum number of vectors based on switch type:# Release(s) Value# Communication Mgr 5.2 2000# Communication Mgr 6.x/Communication Mgr 7.x 8000# Enter number of vectors (0-Maximum):50# Maximum number of VDNs based on switch type:# Release(s) Value# Communication Mgr 5.2 20000# Communication Mgr 6.x/Communication Mgr 7.x 30000# Enter number of VDNs (0-Maximum):200
Using the flat file
To use the flat file to configure CMS:
1. Enter cd / to change to the root directory.
2. Enter:
cmssvc
The system displays the Avaya Call Management System Services Menu.
3. Enter the number associated with the setup option.
If setup has been done previously, the system displays the following message:
Warning!!! Setup has already been performed.Running this command will remove all CMS data in the database.Do you wish to proceed and re-configure CMS? (y/n): (default: n)

Configuring the CMS software
CMS R18 Software Installation, Maintenance, and Troubleshooting for Linux June 2017 77
4. Enter: y
The system displays the following message:
5. Enter the number associated with the language that is used on the system.
The system displays the following message:
6. Enter the number associated with the flat file option.
The system displays the following message:
7. Verify that the installation completed successfully by entering:
tail -f /cms/install/logdir/admin.log
The -f option in the tail command updates the console as messages are written to the admin.log file. All failure messages are logged in this file. The CMS software is successfully set up when you see a message similar to the following:
You can edit this file and add comments about the packages that were installed or authorized.
8. Press Delete to exit the tail -f command.
9. Choose one of the following:
Select the language for this server:
All languages are ISO Latin except Japanese. Selection of theserver language assumes that existing customer data is compatible. (Upgrade from any ISO Latin language to any ISO Latin language or from Japanese to Japanese is supported).
1) English2) Dutch3) French4) German5) Italian6) Portuguese7) Spanish8) JapaneseEnter choice (1-8): (default: 1)
The input will be read from 1) the terminal 2) a flat fileEnter choice (1-2):
*** The rest of this command is running in the background ***
Setup completed successfully <date/time>

Chapter 5: Installing CMS and supporting software
CMS R18 Software Installation, Maintenance, and Troubleshooting for Linux June 2017 78
● If you need to install additional CMS-related feature packages (Forecasting or External Call History), go to Installing feature packages on page 78.
● If you are not installing any other feature packages, do the following to turn on the CMS software:
a. Enter:
cmssvc
The system displays the Avaya Call Management System Services Menu.
b. Enter the number associated with the run_cms option.
c. Enter the number associated with the Turn on CMS option.
! Important:Important: If no additional configuration of the CMS software is needed, see Setting the
Informix configuration parameters for CMS on page 111.
Installing feature packages Customers can install CMS feature packages if the packages have been authorized during CMS setup. You can contact the National Customer Care Center (1-800-242-2121), or consult with your product distributor or representative to additional feature packages, see Configuring CMS authorizations on page 48 for additional information.
This section includes the following topics:
● Prerequisites on page 78
● Installing the Forecasting package on page 79
● Installing the External Call History package on page 81
● Installing the Multi-tenancy package on page 83
● Installing CMS Supervisor Web on page 86
PrerequisitesBefore you begin the installation procedures, perform the following tasks:
● Verify that you are logged in as root.● Verify that all file systems are mounted.

Installing feature packages
CMS R18 Software Installation, Maintenance, and Troubleshooting for Linux June 2017 79
Installing the Forecasting package To install the Forecasting package:
1. Enter:
cmssvc
The system displays the Avaya Call Management System Services Menu.
2. Enter the number associated with the auth_display option.
The system lists the current authorizations.
3. Verify that the system is authorized to install the Forecasting package.
Note:Note: If Forecasting is not authorized but should be, see Configuring CMS
authorizations on page 48.
4. Enter:
cmsadm
The system displays the Avaya Call Management System Administration Menu.
Note:Note: Different options may be displayed in the Avaya Call Management System
Administration Menu depending on the current version of CMS on your system.
5. Enter the number associated with the pkg_install option.
The system displays the following message:
Note:Note: The pkg_install option menu displays only those feature packages that are
authorized but not yet installed. The Forecasting package does not require the CMS software to be off during the installation. If Forecasting is added at a later date, the CMS software can be left on.
The CMS features that can be installed are 1) forecasting 2) external call history 3) multi-tenancyEnter choice (1-3) or q to quit:

Chapter 5: Installing CMS and supporting software
CMS R18 Software Installation, Maintenance, and Troubleshooting for Linux June 2017 80
6. Enter the number that corresponds to the forecasting package.
The system displays the following message:
If the installation fails, the system displays the following message:
7. If you are not installing any other feature packages, do the following to turn on the CMS software:
a. Enter: cmssvc
The system displays the Avaya Call Management System Services Menu.
b. Enter the number associated with the run_cms option.
c. Enter the number associated with the Turn on CMS option.
8. Go to the Free Space Allocation window that is located in the CMS System Setup subsystem, verify that there is enough space for Forecasting on each ACD, and make any necessary modifications.
For more information about Free Space Allocation, see Avaya Call Management System Administration.
9. Verify that the installation completed successfully by entering:
tail /cms/install/logdir/admin.log
If the Forecasting package was successfully installed, the system displays the following message:
You can edit this file in order to add comments about the packages that were installed or authorized.
Installation was successful
Forecasting package installed.
At this point you should go to the “Free Space Allocation Screen” and verify that you have enough space for Forecasting on each ACD. If there is not enough space allocated, then modify your existing free space.
Forecasting package installation failed.
. .Forecasting package installed (date/time)

Installing feature packages
CMS R18 Software Installation, Maintenance, and Troubleshooting for Linux June 2017 81
Installing the External Call History package To install the External Call History (ECHI) package:
! Important:Important: Once the External Call History package is installed, you can no longer access any
call record data directly from the CMS software. For more information, see Avaya Call Management System Call History Interface.
1. Verify that:
● A separate computer is available for the storage and reporting of call records.
● The CMS software is off and the IDS software is on.
2. Enter:
cmssvc
The system displays the Avaya Call Management System Services Menu.
3. Enter the number associated with the auth_display option.
The system displays the current authorizations. The system can display different authorizations depending on the version of CMS on your system.
4. Verify that the system is authorized for the ECHI package. If ECHI is not authorized but should be, see Configuring CMS authorizations on page 48.
5. Enter:
cmsadm
The system displays the Avaya Call Management System Administration Menu.
6. Enter the number associated with the pkg_install option.
The system displays the following message:
Note:Note: The system displays only feature packages that are authorized but not yet
installed.
The CMS features that can be installed are 1) forecasting 2) external call history 3) multi-tenancyEnter choice (1-3) or q to quit:

Chapter 5: Installing CMS and supporting software
CMS R18 Software Installation, Maintenance, and Troubleshooting for Linux June 2017 82
7. Enter the number that corresponds to the ECHI package (in this example, 2).
The system displays the following message:
8. Press Enter.The system displays the following message:
9. Press Enter. The system displays the following message:
10. Enter the number of call records to be held in the buffer if the Call History machine cannot accept the data. Repeat this step for each administered ACD.
The system displays the following message:
11. Select whether ECHI will start in the on or off state (default is off). If the receiving system has not yet been set up, the recommended state is off. ECHI can be turned on at a later date with the run_pkg option in the Avaya Call Management System Administration Menu.
If the setup determines that you do not have enough file space, you get the following warning message:
Enter full path of the program to transmit the external callhistory files: (default: /cms/dc/chr/no_op.sh)
Enter full path of the program to check the external call historyfile transmission: (default: /cms/dc/chr/no_op.sh)
Number of call segments to buffer for ACD xxxxx (0-99999):
Start ECH in the on or off state: (default off)
Failed to find sufficient file space for CMS data.
WARNING: You do not currently have sufficient file space for your existing CMS data. At this point you should turn on CMS, go to the “Data Storage Allocation” screen, and verify/modify the administration, or go to the “Free Allocation” screen and verify/ modify your existing free space.
External call history package installed with warnings.

Installing feature packages
CMS R18 Software Installation, Maintenance, and Troubleshooting for Linux June 2017 83
12. Verify that the installation completed successfully by entering:
tail /cms/install/logdir/admin.log
If the ECHI package was installed successfully, the system displays the following message:
You can edit this file in order to add comments about the packages that were installed or authorized.
13. If you are not installing any other feature packages, do the following to turn on the CMS software:
a. Enter:
cmssvc
The system displays the Avaya Call Management System Services Menu.
b. Enter the number associated with the run_cms option.
c. Enter the number associated with the Turn on CMS option.
For more information about the ECHI feature, see Avaya Call Management System Call History Interface.
Installing the Multi-tenancy packageMulti-tenancy package is always authorized. To install the Multi-tenancy package:
1. Enter:
cmssvc
The system displays the Avaya Call Management System Services Menu.
2. Enter the number associated with the auth_display option.
The system lists the current authorizations.
3. Enter:
cmsadm
The system displays the Avaya Call Management System Administration Menu.
Note:Note: The system can display different options in the Avaya Call Management
System Administration Menu depending on the current version of Avaya CMS on your system.
External Call History package installed (date/time)

Chapter 5: Installing CMS and supporting software
CMS R18 Software Installation, Maintenance, and Troubleshooting for Linux June 2017 84
4. Enter the number associated with the pkg_install option.
The system displays the following message:
Note:Note: The pkg_install option menu displays only those feature packages that are
authorized but not yet installed. The Multi-tenancy package does not require the Avaya CMS software to be off during the installation. If Multi-tenancy is added at a later date, the Avaya CMS software can be left on.
5. Enter the number that corresponds to the multi-tenancy package.
The system displays the following message:
If the installation fails, the system displays the following message:
6. If you are not installing any other feature packages, do the following to turn on the Avaya CMS software:
a. Enter: cmssvc
The system displays the Avaya Call Management System Services Menu.
b. Enter the number associated with the run_cms option.
c. Enter the number associated with the Turn on CMS option.
7. Go to the Free Space Allocation window that is located in the Avaya CMS System Setup subsystem. Verify that there is enough space for Multi-tenancy and Data Summarization Time Zones on each ACD. Make any necessary modifications.
For more information about Multi-tenancy and Data Summarization Time Zones, see Avaya Call Management System Administration.
The CMS features that can be installed are 1) forecasting 2) external call history 3) multi-tenancyEnter choice (1-3) or q to quit:
Installation was successful
Multi-tenancy package installed.
Multi-tenancy package installation failed.
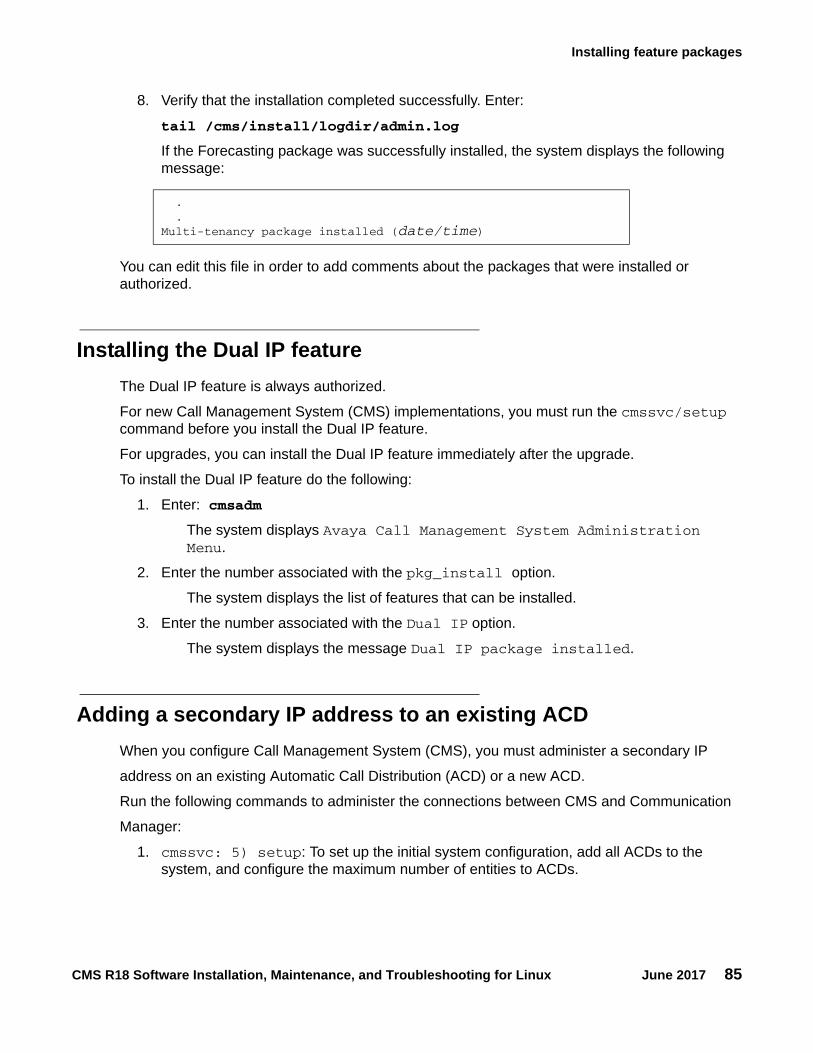
Installing feature packages
CMS R18 Software Installation, Maintenance, and Troubleshooting for Linux June 2017 85
8. Verify that the installation completed successfully. Enter:
tail /cms/install/logdir/admin.log
If the Forecasting package was successfully installed, the system displays the following message:
You can edit this file in order to add comments about the packages that were installed or authorized.
Installing the Dual IP featureThe Dual IP feature is always authorized.
For new Call Management System (CMS) implementations, you must run the cmssvc/setup command before you install the Dual IP feature.
For upgrades, you can install the Dual IP feature immediately after the upgrade.
To install the Dual IP feature do the following:
1. Enter: cmsadm
The system displays Avaya Call Management System Administration Menu.
2. Enter the number associated with the pkg_install option.
The system displays the list of features that can be installed.
3. Enter the number associated with the Dual IP option.
The system displays the message Dual IP package installed.
Adding a secondary IP address to an existing ACDWhen you configure Call Management System (CMS), you must administer a secondary IP
address on an existing Automatic Call Distribution (ACD) or a new ACD.
Run the following commands to administer the connections between CMS and Communication
Manager:
1. cmssvc: 5) setup: To set up the initial system configuration, add all ACDs to the system, and configure the maximum number of entities to ACDs.
. .Multi-tenancy package installed (date/time)
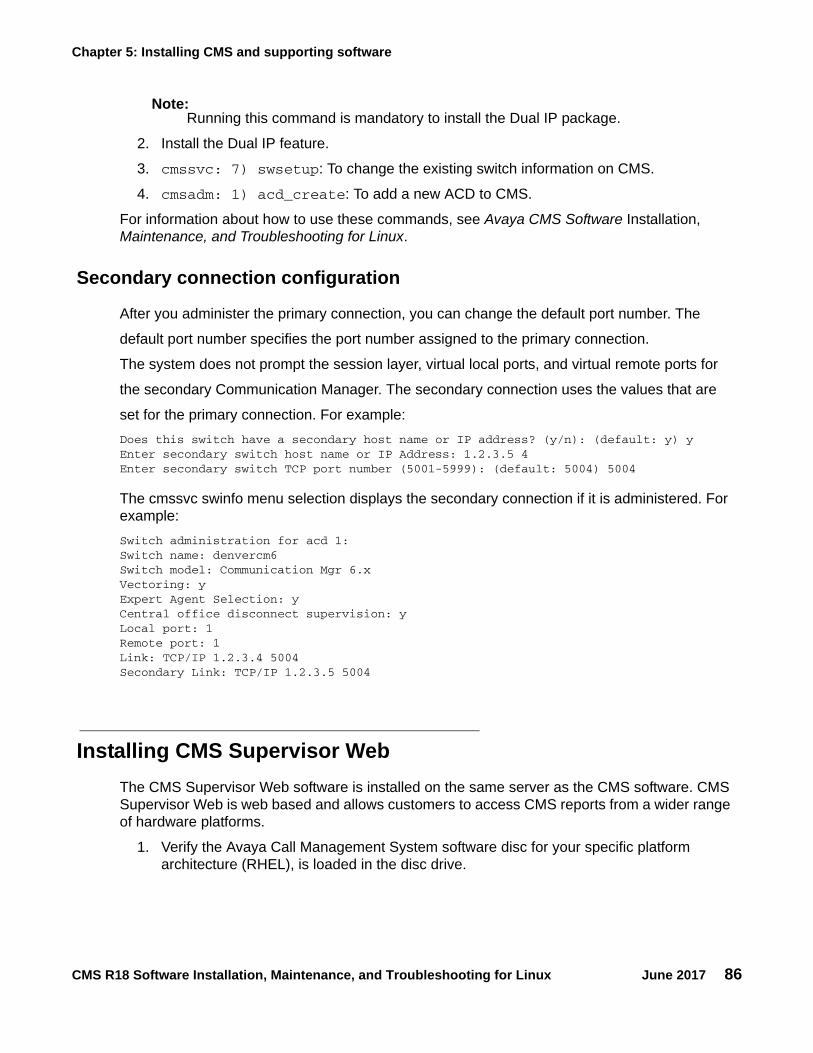
Chapter 5: Installing CMS and supporting software
CMS R18 Software Installation, Maintenance, and Troubleshooting for Linux June 2017 86
Note:Note: Running this command is mandatory to install the Dual IP package.
2. Install the Dual IP feature.
3. cmssvc: 7) swsetup: To change the existing switch information on CMS.
4. cmsadm: 1) acd_create: To add a new ACD to CMS.
For information about how to use these commands, see Avaya CMS Software Installation, Maintenance, and Troubleshooting for Linux.
Secondary connection configuration
After you administer the primary connection, you can change the default port number. The
default port number specifies the port number assigned to the primary connection.
The system does not prompt the session layer, virtual local ports, and virtual remote ports for
the secondary Communication Manager. The secondary connection uses the values that are
set for the primary connection. For example:Does this switch have a secondary host name or IP address? (y/n): (default: y) y Enter secondary switch host name or IP Address: 1.2.3.5 4Enter secondary switch TCP port number (5001-5999): (default: 5004) 5004
The cmssvc swinfo menu selection displays the secondary connection if it is administered. For example:Switch administration for acd 1:Switch name: denvercm6Switch model: Communication Mgr 6.xVectoring: yExpert Agent Selection: y Central office disconnect supervision: y Local port: 1 Remote port: 1 Link: TCP/IP 1.2.3.4 5004 Secondary Link: TCP/IP 1.2.3.5 5004
Installing CMS Supervisor WebThe CMS Supervisor Web software is installed on the same server as the CMS software. CMS Supervisor Web is web based and allows customers to access CMS reports from a wider range of hardware platforms.
1. Verify the Avaya Call Management System software disc for your specific platform architecture (RHEL), is loaded in the disc drive.

Installing feature packages
CMS R18 Software Installation, Maintenance, and Troubleshooting for Linux June 2017 87
2. To install the CMS Supervisor Web package, enter:
mount /dev/dvd /mnt
/mnt/cmsweb.bin
Note:Note: If the system has a version of CMS Supervisor Web currently installed, it will be
removed before the version on the Avaya Call Management System software disc is installed.
The system displays the following messages:
The system installs the CMS Supervisor Web package.
! Important:Important: Do not start CMS Supervisor Web if the customer does not plan on using CMS
Supervisor Web to access CMS reports. Starting CMS Supervisor Web opens ports that the customer may not want opened.
3. To start the CMS Supervisor Web, enter:
cmsweb start
The system displays the following messages:
CMS Supervisor Web is automatically started.
4. To find out the version of installed CMS Supervisor Web, enter:
rpm -qa cmsweb
The system displays the installed version of CMS Supervisor Web.
Unpacking files please wait...Extracting the rpm....
Installing (cmsweb) versionProceeding with install...
Preparing... ########################################### [100%] 1:cmsweb ########################################### [100%]
starting cmsweb...Starting Tomcat service: Using CATALINA_BASE: /opt/cmsweb/tomcat6Using CATALINA_HOME: /opt/cmsweb/tomcat6Using CATALINA_TMPDIR: /opt/cmsweb/tomcat6/tempUsing JRE_HOME: /usrUsing CLASSPATH: /opt/cmsweb/tomcat6/bin/bootstrap.jar
cmsweb-R18-web18xx.x.x86_64

Chapter 5: Installing CMS and supporting software
CMS R18 Software Installation, Maintenance, and Troubleshooting for Linux June 2017 88
Certificate Management
A security certificate is needed to encrypt communication between browsers and CMS Supervisor Web server. Upon first installation of the cmsweb package, a self-signed certificate is automatically generated by the installation process based on the host name and domain name of the host server. You can view the URL/Common Name used in this certificate by the following command:
# /opt/cmsweb/bin/showcrt.sh
The URL/Common Name should be used to access the CMS Supervisor Web GUI from the browser. If the URL does not appear correct due to the network and host setup, use the following command to change it:
# /opt/cmsweb/bin/chgcrt.sh
The above command prompts for the new URL. The default value for this command is your host name and domain name (if the domain name is configured on your host). Press Enter to accept the default or type in your preferred URL.
If the CMS Supervisor Web certificate changes, then you must restart CMS Supervisor Web to accept the changes. To restart cmsweb, enter:
cmsweb stop
cmsweb start
Generating and installing a customer certificate for the cmsweb server
1. Generate a new key store and a new key.
a. Create a new custom directory for the certificate on CMS.
# mkdir /opt/cmsweb/cert/custom
b. Change the current directory to the newly created directory.
# cd /opt/cmsweb/cert/custom

Installing feature packages
CMS R18 Software Installation, Maintenance, and Troubleshooting for Linux June 2017 89
c. Generate a new key and key store.
# keytool -genkey -alias cmsweb -keyalg RSA -keysize 2048 -keystore cmsweb.jks
This command prompts for a password and other information. The password must be cmsweb. The first and last name must be the domain name of the CMS server.
For example:
# keytool -genkey -alias cmsweb -keyalg RSA -keysize 2048 -keystore cmsweb.jks
The system output and the user entries for the questions are as follows:
2. Generate a certificate request.
# keytool -certreq -keyalg RSA -alias cmsweb -file certreq.csr -keystore cmsweb.jks
The system output and user entry are as follows:
3. Use the certificate request in file certreq.csr to get a certificate from the certificate authority (CA) of your choice.
4. Install the root certificate from the CA.
a. Copy and paste the CA root certificate into a file, for example, root.cert.
Enter keystore password: cmswebRe-enter new password: cmswebWhat is your first and last name? [Unknown]: tweety.dr.avaya.comWhat is the name of your organizational unit? [Unknown]: CMSWhat is the name of your organization? [Unknown]: AvayaWhat is the name of your City or Locality? [Unknown]: WestminsterWhat is the name of your State or Province? [Unknown]: ColoradoWhat is the two-letter country code for this unit? [Unknown]: USIs CN=tweety.dr.avaya.com, OU=CMS, O=Avaya, L=Westminster, ST=Colorado, C=US correct? Y
Enter key password for <cmsweb> (RETURN if same as keystore password): <ret>
Enter keystore password: cmsweb

Chapter 5: Installing CMS and supporting software
CMS R18 Software Installation, Maintenance, and Troubleshooting for Linux June 2017 90
b. Import the root certificate.
# keytool -import -alias root -keystore cmsweb.jks -trustcacerts -file root.cert
The system output and user entry are as follows:
Sometimes the CA also issues an intermediate CA certificate. If the CA issues an intermediate certificate, import the intermediate CA certificate also.
c. Copy and paste the intermediate certificate into a file, for example, intermediate.cert.
d. Import the intermediate certificate.
# keytool -import -alias intermediate -keystore cmsweb.jks -trustcacerts -file intermediate.cert
The system output and user entry are as follows:
5. Install the new certificate.
a. Copy and paste the new certificate into a file, for example, cmsweb.cert.
b. Import the certificate.
# keytool -import -alias cmsweb -keystore cmsweb.jks -trustcacerts -file cmsweb.cert
The system output and user entry are as follows:
6. Stop the cmsweb server.
# cmsweb stop
7. Copy the key store in the correct location.
# cp /opt/cmsweb/cert/custom/cmsweb.jks /opt/cmsweb/cert
8. Start the cmsweb server.
# cmsweb start
Enter keystore password: cmsweb
Enter keystore password: cmsweb
Enter keystore password: cmsweb
Remote consoles
CMS R18 Software Installation, Maintenance, and Troubleshooting for Linux June 2017 91
Remote consolesThe Dell and HP platforms do not support modems. You must use SAL to access the system remotely.
Setting up the Alarm Origination Manager Use this section to set up the Alarm Origination Manager (AOM) on the CMS server. You can use the AOM feature to enable alarming to Avaya and this capability is available only for CMS servers with a current maintenance agreement in effect. You can optionally use AOM to send SNMP alarms to customer provided Network Management Systems (NMS). You can enable SNMP alarms to a customer provided NMS even if a current Avaya maintenance agreement is not in effect.
This section includes the following topics:
● Prerequisites on page 91
● Setting up AOM configuration for SNMP alarming on page 92
● CMS SNMP alarm information on page 104
● Locating the CMS-MIB.txt file on page 106
● Setting up AOM configuration for alarming using Socket/SAL on page 107
PrerequisitesBefore you set up AOM, perform the following tasks:
● Obtain an Alarm ID number and Sold To Functional Location (FL) number. You can obtain an Alarm ID by registering the CMS server. You can register a CMS server using the Avaya Global Registration Tool (GRT) tool at https://support.avaya.com/grt. If you cannot register the system using the GRT tool, call 1800-242-2121, extension 15265, for assistance. If the system does not have an Avaya maintenance agreement in effect and you are going to configure optional SNMP alarming in a customer NMS, accept the default values that are pre-populated.
Note:Note: During AOM configuration, use the Alarm ID referred to here as the Alarm ID and
use the Sold To Functional Location (FL) number as the Customer ID.
● Log in as root.
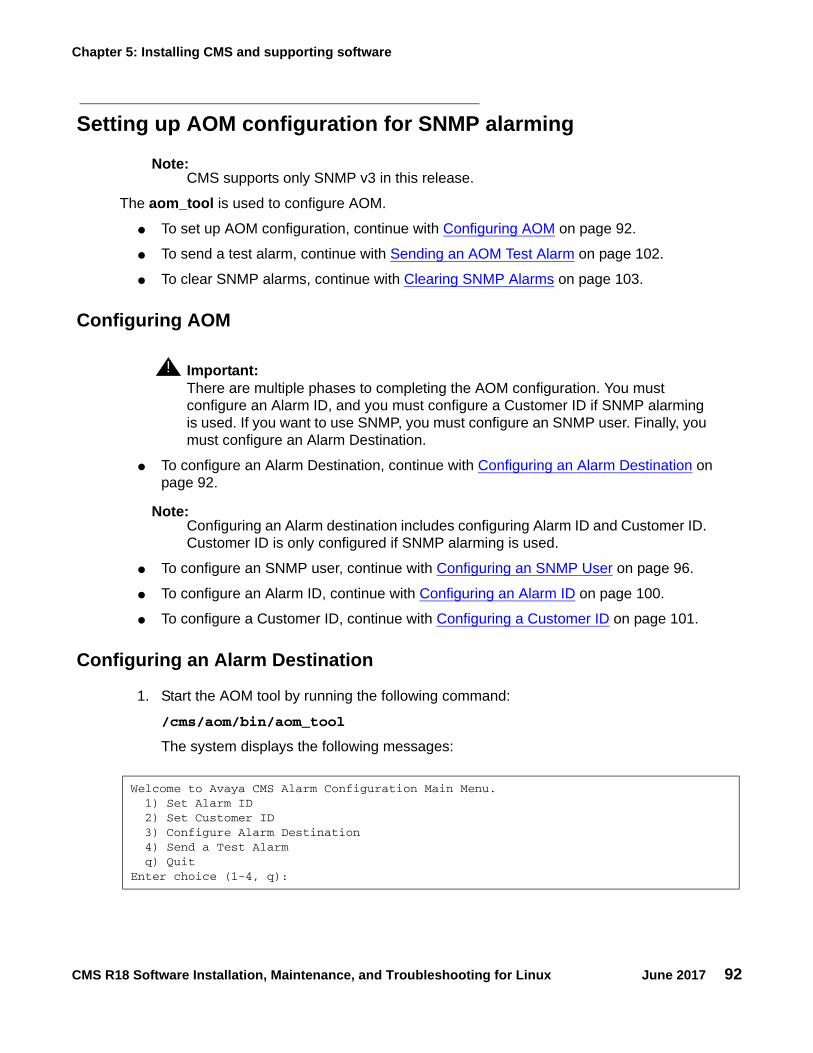
Chapter 5: Installing CMS and supporting software
CMS R18 Software Installation, Maintenance, and Troubleshooting for Linux June 2017 92
Setting up AOM configuration for SNMP alarming
Note:Note: CMS supports only SNMP v3 in this release.
The aom_tool is used to configure AOM.
● To set up AOM configuration, continue with Configuring AOM on page 92.
● To send a test alarm, continue with Sending an AOM Test Alarm on page 102.
● To clear SNMP alarms, continue with Clearing SNMP Alarms on page 103.
Configuring AOM
! Important:Important: There are multiple phases to completing the AOM configuration. You must
configure an Alarm ID, and you must configure a Customer ID if SNMP alarming is used. If you want to use SNMP, you must configure an SNMP user. Finally, you must configure an Alarm Destination.
● To configure an Alarm Destination, continue with Configuring an Alarm Destination on page 92.
Note:Note: Configuring an Alarm destination includes configuring Alarm ID and Customer ID.
Customer ID is only configured if SNMP alarming is used.
● To configure an SNMP user, continue with Configuring an SNMP User on page 96.
● To configure an Alarm ID, continue with Configuring an Alarm ID on page 100.
● To configure a Customer ID, continue with Configuring a Customer ID on page 101.
Configuring an Alarm Destination
1. Start the AOM tool by running the following command:
/cms/aom/bin/aom_tool
The system displays the following messages:
Welcome to Avaya CMS Alarm Configuration Main Menu. 1) Set Alarm ID 2) Set Customer ID 3) Configure Alarm Destination 4) Send a Test Alarm q) QuitEnter choice (1-4, q):

Setting up the Alarm Origination Manager
CMS R18 Software Installation, Maintenance, and Troubleshooting for Linux June 2017 93
2. Enter the number associated with the Configure the Alarm Destination option, and press Enter. The system displays the following message:
Note:Note: Avaya recommends using SNMP/SAL for alarming.
3. Enter the number associated with the SNMP/SAL option, and press Enter. The system displays a list of SNMP configuration options:
4. Enter the number associated with the Add an SNMP connection option, and press Enter.The system displays the Adding an SNMP connection option followed by an input prompt for destination type:
5. Enter the number associated with SAL or NMS, and press Enter.The system displays the input prompt for the destination IP address:
Welcome to Avaya CMS Alarm Origination main menu. 1) SNMP/SAL 2) Socket/SAL q) QuitEnter choice (1-2, q):
Do you want to 1) Add an SNMP Connection 2) Delete an SNMP Connection 3) Modify an SNMP Connection 4) Add an SNMP User 5) Delete an SNMP User 6) Modify an SNMP User 7) Clear SNMP Alarms q) QuitEnter choice (1-7, q):
Adding an SNMP connection
Select a destination type: 1) SAL 2) NMSEnter choice (1-2):
What is the destination IP address?
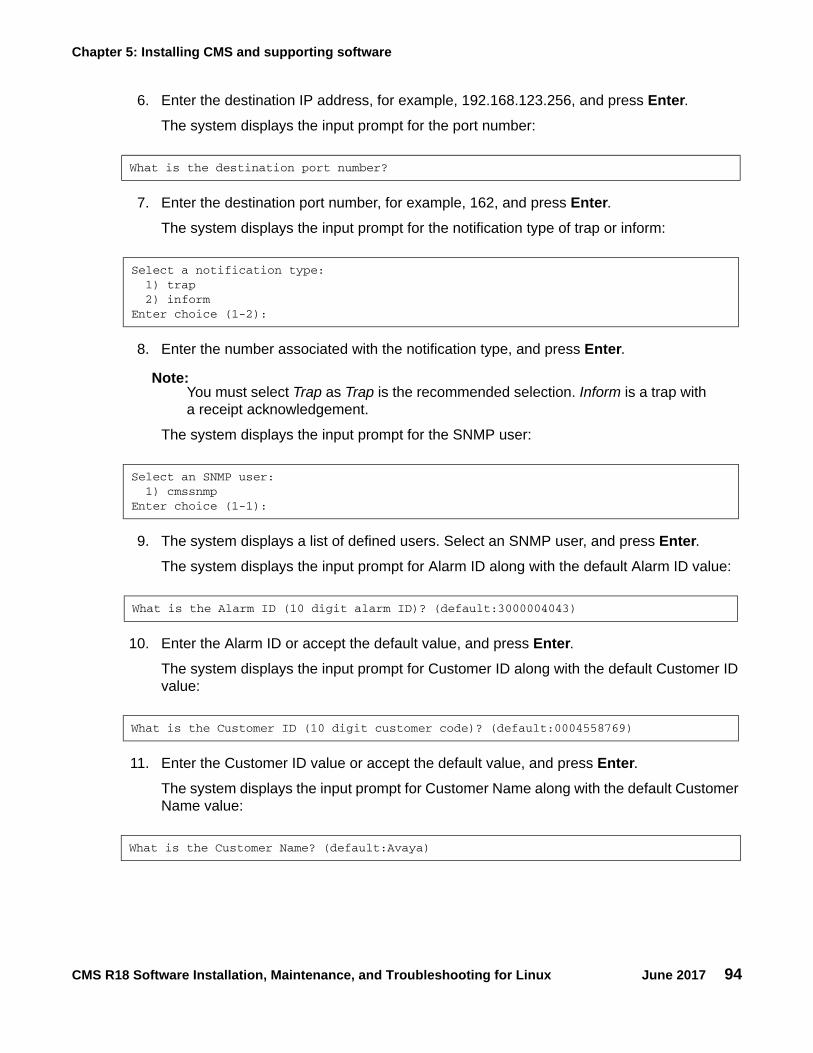
Chapter 5: Installing CMS and supporting software
CMS R18 Software Installation, Maintenance, and Troubleshooting for Linux June 2017 94
6. Enter the destination IP address, for example, 192.168.123.256, and press Enter.The system displays the input prompt for the port number:
7. Enter the destination port number, for example, 162, and press Enter.The system displays the input prompt for the notification type of trap or inform:
8. Enter the number associated with the notification type, and press Enter.
Note:Note: You must select Trap as Trap is the recommended selection. Inform is a trap with
a receipt acknowledgement.
The system displays the input prompt for the SNMP user:
9. The system displays a list of defined users. Select an SNMP user, and press Enter.The system displays the input prompt for Alarm ID along with the default Alarm ID value:
10. Enter the Alarm ID or accept the default value, and press Enter.The system displays the input prompt for Customer ID along with the default Customer ID value:
11. Enter the Customer ID value or accept the default value, and press Enter.The system displays the input prompt for Customer Name along with the default Customer Name value:
What is the destination port number?
Select a notification type: 1) trap 2) informEnter choice (1-2):
Select an SNMP user: 1) cmssnmpEnter choice (1-1):
What is the Alarm ID (10 digit alarm ID)? (default:3000004043)
What is the Customer ID (10 digit customer code)? (default:0004558769)
What is the Customer Name? (default:Avaya)

Setting up the Alarm Origination Manager
CMS R18 Software Installation, Maintenance, and Troubleshooting for Linux June 2017 95
12. Enter the Customer Name or accept the default value, and press Enter.The system displays the input prompt for running a test alarm:
13. Enter y or n, and press Enter.The system displays the following messages:
Note:Note: The SAL SNMP option requires a Notification Type of inform and notify in
the dest.cfg file.
Run a test alarm when done?(y/n)
You have selected to configure AOM using SNMP.
Add an SNMP Connection
Destination Type: SALDestination IP: 198.1.1.2Destination port: 162Notification Type: informUser Name: salcmsuser
Alarm ID: 3000004043
Customer ID: 0004558769
Customer NAME: Avaya
A test alarm will be sent at the end.
Press [Enter] to continue or [q] to quit

Chapter 5: Installing CMS and supporting software
CMS R18 Software Installation, Maintenance, and Troubleshooting for Linux June 2017 96
14. Press Enter.The system displays the following messages:
15. Enter q to quit, and press Enter.The system displays the following message:
Configuring an SNMP User
1. Start the AOM tool by running the following command:
/cms/aom/bin/aom_tool
The system displays the following messages:
Configuring dest.cfg [started]done reset AOM [started]done Clearing all current alarms. [started]done Sending test alarm. [started]done done
Do you want to 1) Add an SNMP Connection 2) Delete an SNMP Connection 3) Modify an SNMP Connection 4) Add an SNMP User 5) Delete an SNMP User 6) Modify an SNMP User 7) Clear SNMP Alarms q) QuitEnter choice (1-7, q): q
Quitting…
Welcome to Avaya CMS Alarm Configuration Main Menu. 1) Set Alarm ID 2) Set Customer ID 3) Configure Alarm Destination 4) Send a Test Alarm q) QuitEnter choice (1-4, q):

Setting up the Alarm Origination Manager
CMS R18 Software Installation, Maintenance, and Troubleshooting for Linux June 2017 97
2. Enter the number associated with the Configure the Alarm Destination option, and press Enter.The system displays the Welcome to Avaya CMS Alarm Origination main menu options:
Note:Note: Avaya recommends using SNMP/SAL for alarming.
3. Enter the number associated with the SNMP/SAL option, and press Enter.The system displays the list of SNMP configuration options:
4. Enter the number associated with the Add an SNMP User option, and press Enter.The system displays the input prompt for SNMP user name:
5. Enter the SNMP user name, and press Enter.The system displays the Select the SNMP version option:
Welcome to Avaya CMS Alarm Origination main menu. 1) SNMP/SAL 2) Socket/SAL q) QuitEnter choice (1-2, q):
Do you want to 1) Add an SNMP Connection 2) Delete an SNMP Connection 3) Modify an SNMP Connection 4) Add an SNMP User 5) Delete an SNMP User 6) Modify an SNMP User 7) Clear SNMP Alarms q) QuitEnter choice (1-7, q):
Adding an SNMP user
What is the SNMP user name?
Select the SNMP version: 1) v3Enter choice (1-1):
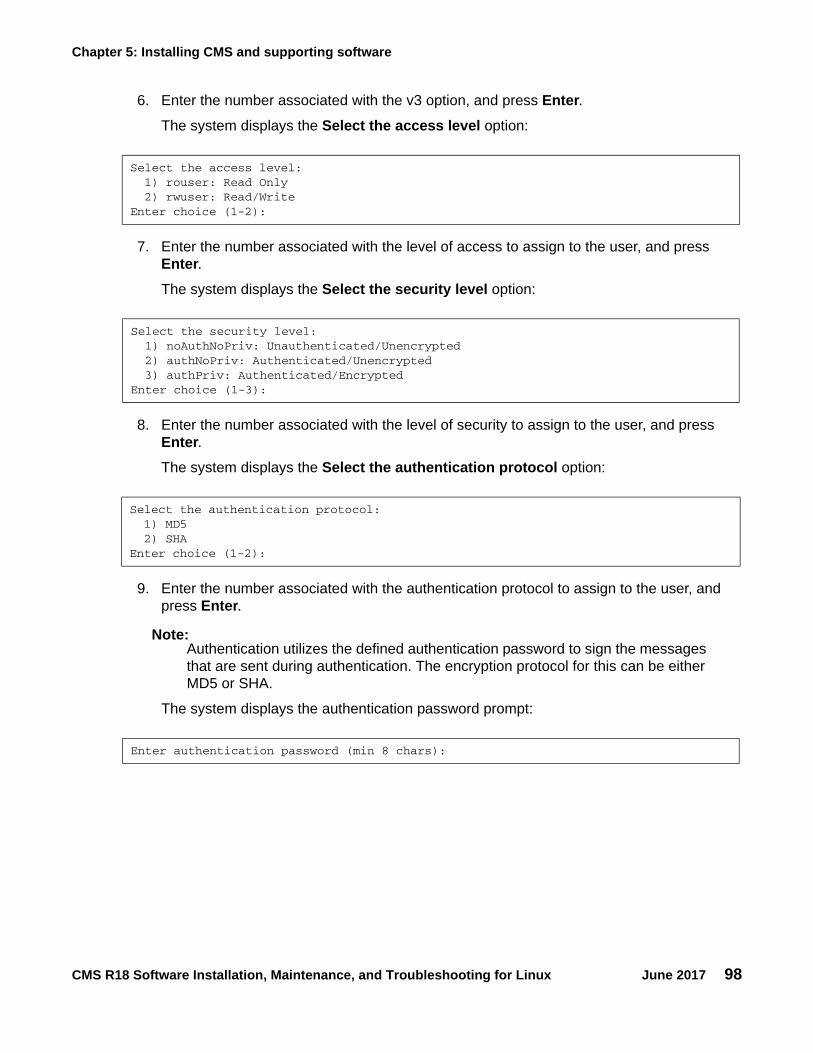
Chapter 5: Installing CMS and supporting software
CMS R18 Software Installation, Maintenance, and Troubleshooting for Linux June 2017 98
6. Enter the number associated with the v3 option, and press Enter.The system displays the Select the access level option:
7. Enter the number associated with the level of access to assign to the user, and press Enter.The system displays the Select the security level option:
8. Enter the number associated with the level of security to assign to the user, and press Enter.The system displays the Select the authentication protocol option:
9. Enter the number associated with the authentication protocol to assign to the user, and press Enter.
Note:Note: Authentication utilizes the defined authentication password to sign the messages
that are sent during authentication. The encryption protocol for this can be either MD5 or SHA.
The system displays the authentication password prompt:
Select the access level: 1) rouser: Read Only 2) rwuser: Read/WriteEnter choice (1-2):
Select the security level: 1) noAuthNoPriv: Unauthenticated/Unencrypted 2) authNoPriv: Authenticated/Unencrypted 3) authPriv: Authenticated/EncryptedEnter choice (1-3):
Select the authentication protocol: 1) MD5 2) SHAEnter choice (1-2):
Enter authentication password (min 8 chars):

Setting up the Alarm Origination Manager
CMS R18 Software Installation, Maintenance, and Troubleshooting for Linux June 2017 99
10. Enter the authentication password to assign to the user, and press Enter.The system displays the Select the encryption protocol option:
11. Enter the number associated with the encryption protocol to assign to the user, and press Enter.
Note:Note: Authentication utilizes the defined encryption password to encrypt the data
portion of the SNMP messages. The encryption protocol for this may be either AES or DES.
The system displays the encryption password prompt:
12. Enter the encryption password to assign to the user, and press Enter.The system displays information about the choices entered:
13. Press Enter to save the choices displayed, or press q to quit.
Select the encryption protocol: 1) AES 2) DESEnter choice (1-2):
Enter encryption password (min 8 chars):
CMS was last rebooted 11 day(s) ago.
You have selected to configure AOM using SNMP.
Add an SNMP User
User Name: TestSNMPSNMP version: v3SNMP Access Level: rouserSNMP Security Level: authPrivSNMP authentication protocol: MD5SNMP authentication password: ******SNMP encryption protocol: AESSNMP encryption password: ******
Press [Enter] to continue or [q] to quit

Chapter 5: Installing CMS and supporting software
CMS R18 Software Installation, Maintenance, and Troubleshooting for Linux June 2017 100
14. If you press Enter, the system saves the choices and displays the following messages:
● To add another user, repeat Steps 3-13.
● To modify a user, enter the number associated with the Modify an SNMP User, and press Enter. Make any desired changes to the configuration of the user.
● Press q to quit.
Configuring an Alarm ID
1. Start the AOM tool by running the following command:
/cms/aom/bin/aom_tool
The system displays the following messages:
2. Enter the number associated with the Set Alarm ID option, and press Enter.The system displays the Alarm ID prompt:
3. Enter the Alarm ID that was obtained from either the Avaya GRT or Automatic Registration Tool (ART) tool, and press Enter.
Configuring /cms/aom/data/admin/user.cfg [started]Done
Do you want to 1) Add an SNMP Connection 2) Delete an SNMP Connection 3) Modify an SNMP Connection 4) Add an SNMP User 5) Delete an SNMP User 6) Modify an SNMP User 7) Clear SNMP Alarms q) QuitEnter choice (1-7, q):
Welcome to Avaya CMS Alarm Configuration Main Menu. 1) Set Alarm ID 2) Set Customer ID 3) Configure Alarm Destination 4) Send a Test Alarm q) QuitEnter choice (1-4, q):
What is the Alarm ID (10 digit alarm ID)? (default:3000004043)
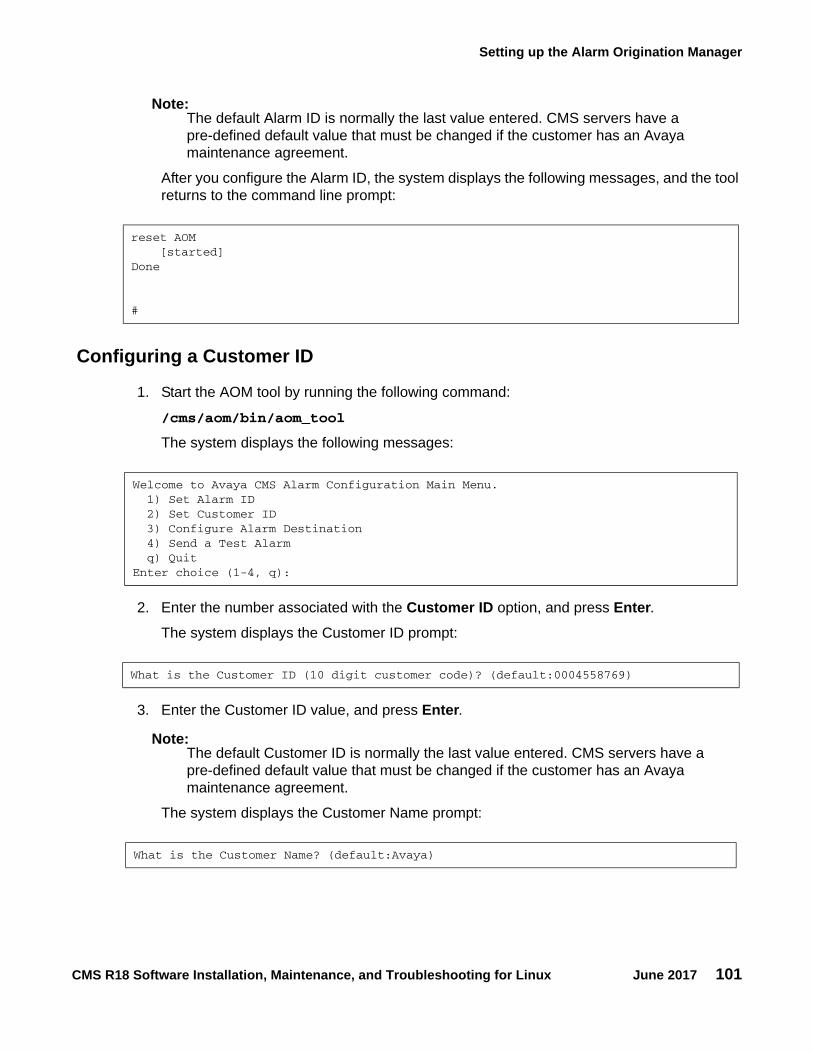
Setting up the Alarm Origination Manager
CMS R18 Software Installation, Maintenance, and Troubleshooting for Linux June 2017 101
Note:Note: The default Alarm ID is normally the last value entered. CMS servers have a
pre-defined default value that must be changed if the customer has an Avaya maintenance agreement.
After you configure the Alarm ID, the system displays the following messages, and the tool returns to the command line prompt:
Configuring a Customer ID
1. Start the AOM tool by running the following command:
/cms/aom/bin/aom_tool
The system displays the following messages:
2. Enter the number associated with the Customer ID option, and press Enter.The system displays the Customer ID prompt:
3. Enter the Customer ID value, and press Enter.
Note:Note: The default Customer ID is normally the last value entered. CMS servers have a
pre-defined default value that must be changed if the customer has an Avaya maintenance agreement.
The system displays the Customer Name prompt:
reset AOM [started]Done
#
Welcome to Avaya CMS Alarm Configuration Main Menu. 1) Set Alarm ID 2) Set Customer ID 3) Configure Alarm Destination 4) Send a Test Alarm q) QuitEnter choice (1-4, q):
What is the Customer ID (10 digit customer code)? (default:0004558769)
What is the Customer Name? (default:Avaya)

Chapter 5: Installing CMS and supporting software
CMS R18 Software Installation, Maintenance, and Troubleshooting for Linux June 2017 102
4. Enter the Customer Name, and press Enter.After you have configured the Customer name, the system displays the following messages, and the tool returns to the command line prompt:
Sending an AOM Test Alarm
1. Start the AOM tool by running the following command:
/cms/aom/bin/aom_tool
The system displays the following messages:
2. Enter the number associated with the Send a Test Alarm option, and press Enter. The system clears the current alarms and then sends the test alarm. The system displays the following messages, and the tool returns to the command line prompt.
reset AOM [started]Done
#
Welcome to Avaya CMS Alarm Configuration Main Menu. 1) Set Alarm ID 2) Set Customer ID 3) Configure Alarm Destination 4) Send a Test Alarm q) QuitEnter choice (1-4, q):
Clearing all current alarms. [started]doneSending test alarm. [started]done
#
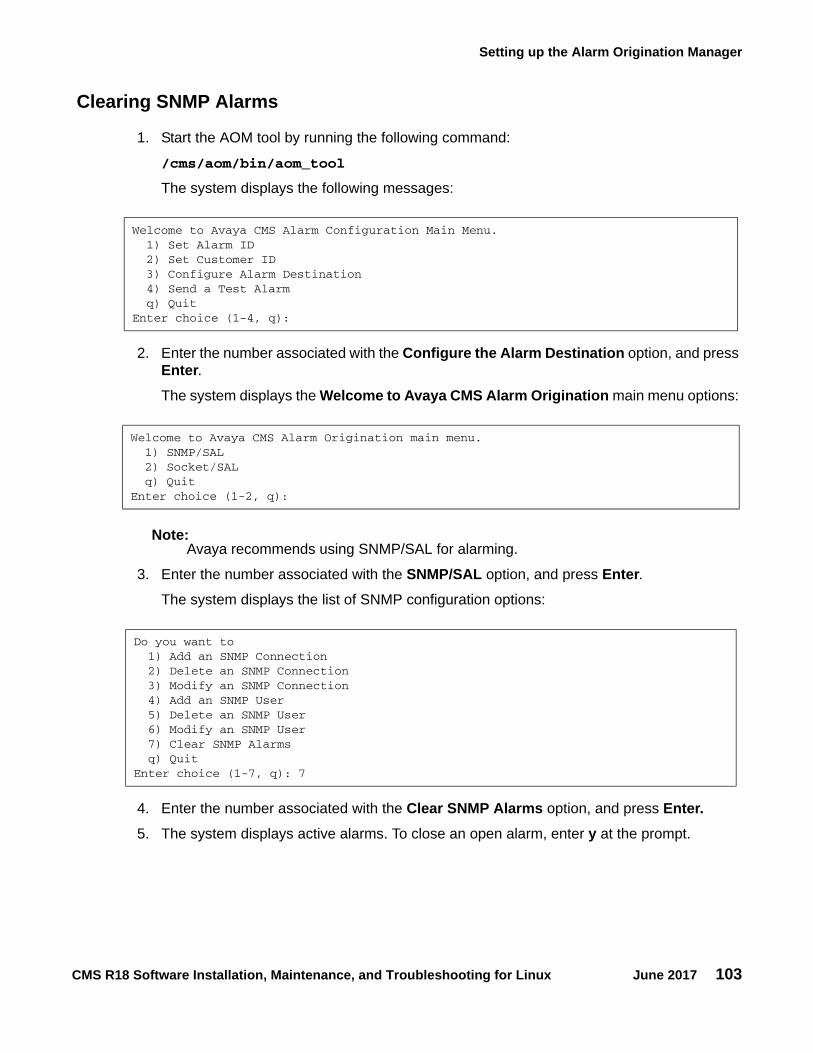
Setting up the Alarm Origination Manager
CMS R18 Software Installation, Maintenance, and Troubleshooting for Linux June 2017 103
Clearing SNMP Alarms
1. Start the AOM tool by running the following command:
/cms/aom/bin/aom_tool
The system displays the following messages:
2. Enter the number associated with the Configure the Alarm Destination option, and press Enter.The system displays the Welcome to Avaya CMS Alarm Origination main menu options:
Note:Note: Avaya recommends using SNMP/SAL for alarming.
3. Enter the number associated with the SNMP/SAL option, and press Enter. The system displays the list of SNMP configuration options:
4. Enter the number associated with the Clear SNMP Alarms option, and press Enter.5. The system displays active alarms. To close an open alarm, enter y at the prompt.
Welcome to Avaya CMS Alarm Configuration Main Menu. 1) Set Alarm ID 2) Set Customer ID 3) Configure Alarm Destination 4) Send a Test Alarm q) QuitEnter choice (1-4, q):
Welcome to Avaya CMS Alarm Origination main menu. 1) SNMP/SAL 2) Socket/SAL q) QuitEnter choice (1-2, q):
Do you want to 1) Add an SNMP Connection 2) Delete an SNMP Connection 3) Modify an SNMP Connection 4) Add an SNMP User 5) Delete an SNMP User 6) Modify an SNMP User 7) Clear SNMP Alarms q) QuitEnter choice (1-7, q): 7

Chapter 5: Installing CMS and supporting software
CMS R18 Software Installation, Maintenance, and Troubleshooting for Linux June 2017 104
CMS SNMP alarm information
Alarm Type Alarm Name SNMP Object Identifier
Test Alarm TEST_ALARM .1.3.6.1.4.1.6889.2.72.0.1
Description: This Test alarm is generated to verify that CMS alarming is functional. Since this is a test alarm, this alarm does not cause a new alarm ticket to be created with Avaya.
Test Alarm Clear TEST_ALARM_CLR .1.3.6.1.4.1.6889.2.72.0.2
Description: This Test alarm clear is generated to verify that CMS alarming is functional. Since this is a test alarm clear, this alarm does not close all alarm tickets with Avaya.
Expert System Alarm ES_ALARM .1.3.6.1.4.1.6889.2.72.0.3
Description: Avaya Expert System alarm.
Expert System Alarm Clear ES_ALARM_CLR .1.3.6.1.4.1.6889.2.72.0.4
Description: Avaya Expert System alarm clear.
ACD Link Alarm ACDLINK[1-8] .1.3.6.1.4.1.6889.2.72.0.5
Description: This ACD Link Alarm is generated if any CMS ACD link experiences trouble.
ACD Link Alarm Clear ACDLINK[1-8]_CLR .1.3.6.1.4.1.6889.2.72.0.6
Description: This ACD Link Alarm Clear is generated when an existing ACD Link alarm is cleared.
Archiving Alarm [H]*ARCH .1.3.6.1.4.1.6889.2.72.0.7
Description: This Archiving Alarm is generated when the CMS interval, daily, weekly, or monthly data archiver experiences trouble.
Archiving Alarm Clear [H]*ARCH_CLR .1.3.6.1.4.1.6889.2.72.0.8
Description: This Archiving Alarm Clear is generated when an existing data archiver alarm is cleared.
Disk Error DISK _ERR .1.3.6.1.4.1.6889.2.72.0.9
Description: This disk error alarm is generated when a disk failure occurs.
Disk Error Clear DISK_ERR_CLR .1.3.6.1.4.1.6889.2.72.0.10
Description: This disk error clear alarm is generated when an existing DISK _ERR alarm is cleared.
Disk Warning DISK_WRN .1.3.6.1.4.1.6889.2.72.0.17

Setting up the Alarm Origination Manager
CMS R18 Software Installation, Maintenance, and Troubleshooting for Linux June 2017 105
Description: This disk warning alarm is generated when a disk warning occurs. A disk warning indicates a disk failure condition that can exist in the near future.
Disk Warning Clear DISK_WRN_CLR .1.3.6.1.4.1.6889.2.72.0.18
Description: This disk warning clear alarm is generated when an existing DISK_WRN alarm is cleared.
Battery Error BATTERY_ERR .1.3.6.1.4.1.6889.2.72.0.19
Description: This battery error alarm is generated when a RAID battery failure occurs.
Battery Error Clear BATTERY_ERR_CLR .1.3.6.1.4.1.6889.2.72.0.20
Description: This battery error clear alarm is generated when an existing BATTERY_ERR alarm is cleared.
Battery warning BATTERY_WRN .1.3.6.1.4.1.6889.2.72.0.21
Description: This battery warning alarm is generated when a RAID battery warning occurs. A battery warning indicates a RAID battery failure condition that can exist in the near future.
Battery Warning Clear BATTERY_WRN_CLR .1.3.6.1.4.1.6889.2.72.0.22
Description: This battery warning clear alarm is generated when an existing BATTERY_WRN alarm is cleared.
RAID Error RAID_ERR .1.3.6.1.4.1.6889.2.72.0.23
Description: This RAID error alarm is generated when a RAID enclosure failure occurs.
RAID Error Clear RAID_ERR_CLR .1.3.6.1.4.1.6889.2.72.0.24
Description: This RAID error clear alarm is generated when an existing RAID_ERR alarm is cleared.
RAID Warning RAID_WRN .1.3.6.1.4.1.6889.2.72.0.25
Description: This RAID warning alarm is generated when a RAID enclosure warning occurs. A RAID warning indicates a RAID enclosure failure condition that can exist in the near future.
RAID Warning Clear RAID_WRN_CLR .1.3.6.1.4.1.6889.2.72.0.26
Description: This RAID warning clear alarm is generated when an existing RAID_WRN alarm is cleared.
Backup Warning BACKUP_WRN .1.3.6.1.4.1.6889.2.72.0.27
Description: This backup warning alarm is generated when a CMS maintenance backup warning occurs. A backup warning indicates that a CMS maintenance backup was not successful.
Backup Warning Clear BACKUP_WRN_CLR .1.3.6.1.4.1.6889.2.72.0.28
Alarm Type Alarm Name SNMP Object Identifier
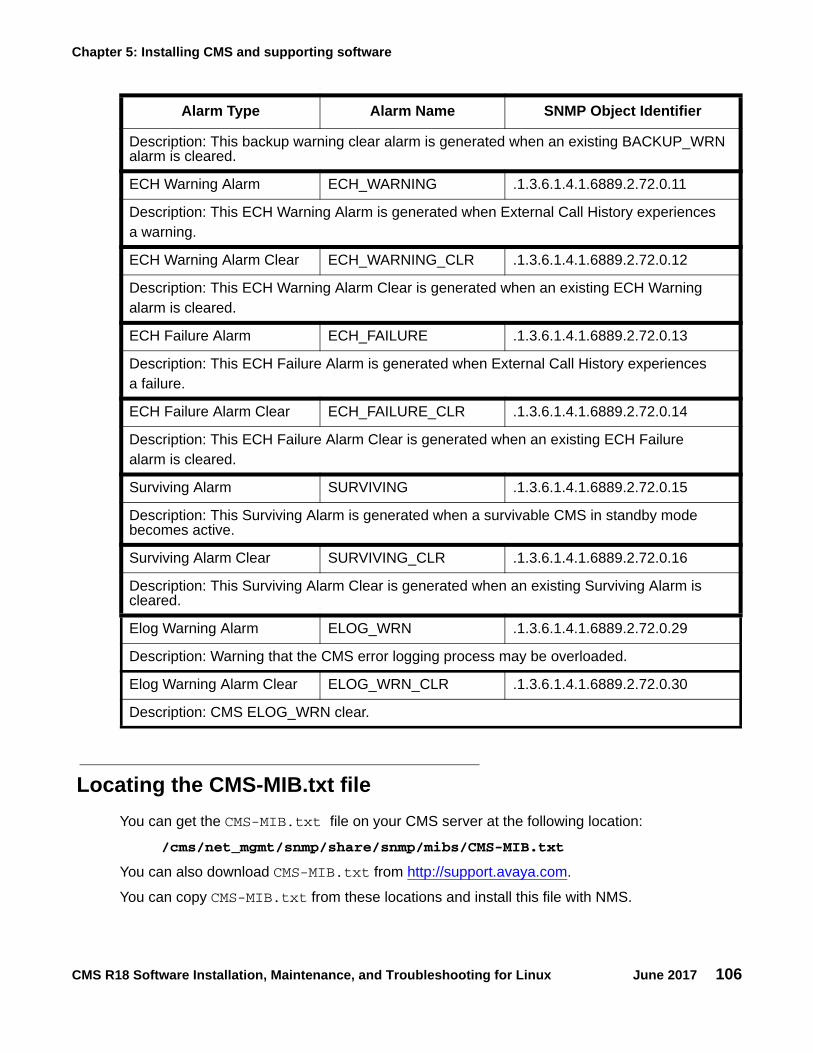
Chapter 5: Installing CMS and supporting software
CMS R18 Software Installation, Maintenance, and Troubleshooting for Linux June 2017 106
Locating the CMS-MIB.txt fileYou can get the CMS-MIB.txt file on your CMS server at the following location:
/cms/net_mgmt/snmp/share/snmp/mibs/CMS-MIB.txt
You can also download CMS-MIB.txt from http://support.avaya.com.
You can copy CMS-MIB.txt from these locations and install this file with NMS.
Description: This backup warning clear alarm is generated when an existing BACKUP_WRN alarm is cleared.
ECH Warning Alarm ECH_WARNING .1.3.6.1.4.1.6889.2.72.0.11
Description: This ECH Warning Alarm is generated when External Call History experiences a warning.
ECH Warning Alarm Clear ECH_WARNING_CLR .1.3.6.1.4.1.6889.2.72.0.12
Description: This ECH Warning Alarm Clear is generated when an existing ECH Warningalarm is cleared.
ECH Failure Alarm ECH_FAILURE .1.3.6.1.4.1.6889.2.72.0.13
Description: This ECH Failure Alarm is generated when External Call History experiences a failure.
ECH Failure Alarm Clear ECH_FAILURE_CLR .1.3.6.1.4.1.6889.2.72.0.14
Description: This ECH Failure Alarm Clear is generated when an existing ECH Failurealarm is cleared.
Surviving Alarm SURVIVING .1.3.6.1.4.1.6889.2.72.0.15
Description: This Surviving Alarm is generated when a survivable CMS in standby mode becomes active.
Surviving Alarm Clear SURVIVING_CLR .1.3.6.1.4.1.6889.2.72.0.16
Description: This Surviving Alarm Clear is generated when an existing Surviving Alarm is cleared.
Elog Warning Alarm ELOG_WRN .1.3.6.1.4.1.6889.2.72.0.29
Description: Warning that the CMS error logging process may be overloaded.
Elog Warning Alarm Clear ELOG_WRN_CLR .1.3.6.1.4.1.6889.2.72.0.30
Description: CMS ELOG_WRN clear.
Alarm Type Alarm Name SNMP Object Identifier
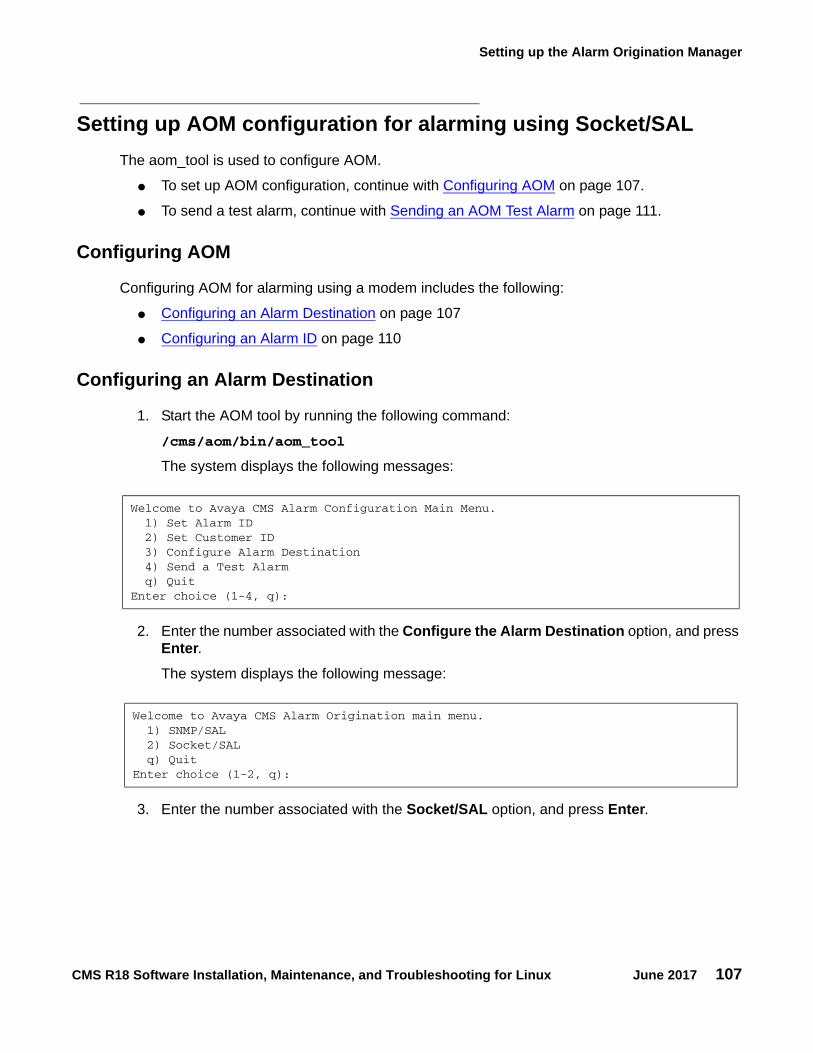
Setting up the Alarm Origination Manager
CMS R18 Software Installation, Maintenance, and Troubleshooting for Linux June 2017 107
Setting up AOM configuration for alarming using Socket/SALThe aom_tool is used to configure AOM.
● To set up AOM configuration, continue with Configuring AOM on page 107.
● To send a test alarm, continue with Sending an AOM Test Alarm on page 111.
Configuring AOM
Configuring AOM for alarming using a modem includes the following:
● Configuring an Alarm Destination on page 107
● Configuring an Alarm ID on page 110
Configuring an Alarm Destination
1. Start the AOM tool by running the following command:
/cms/aom/bin/aom_tool
The system displays the following messages:
2. Enter the number associated with the Configure the Alarm Destination option, and press Enter. The system displays the following message:
3. Enter the number associated with the Socket/SAL option, and press Enter.
Welcome to Avaya CMS Alarm Configuration Main Menu. 1) Set Alarm ID 2) Set Customer ID 3) Configure Alarm Destination 4) Send a Test Alarm q) QuitEnter choice (1-4, q):
Welcome to Avaya CMS Alarm Origination main menu. 1) SNMP/SAL 2) Socket/SAL q) QuitEnter choice (1-2, q):
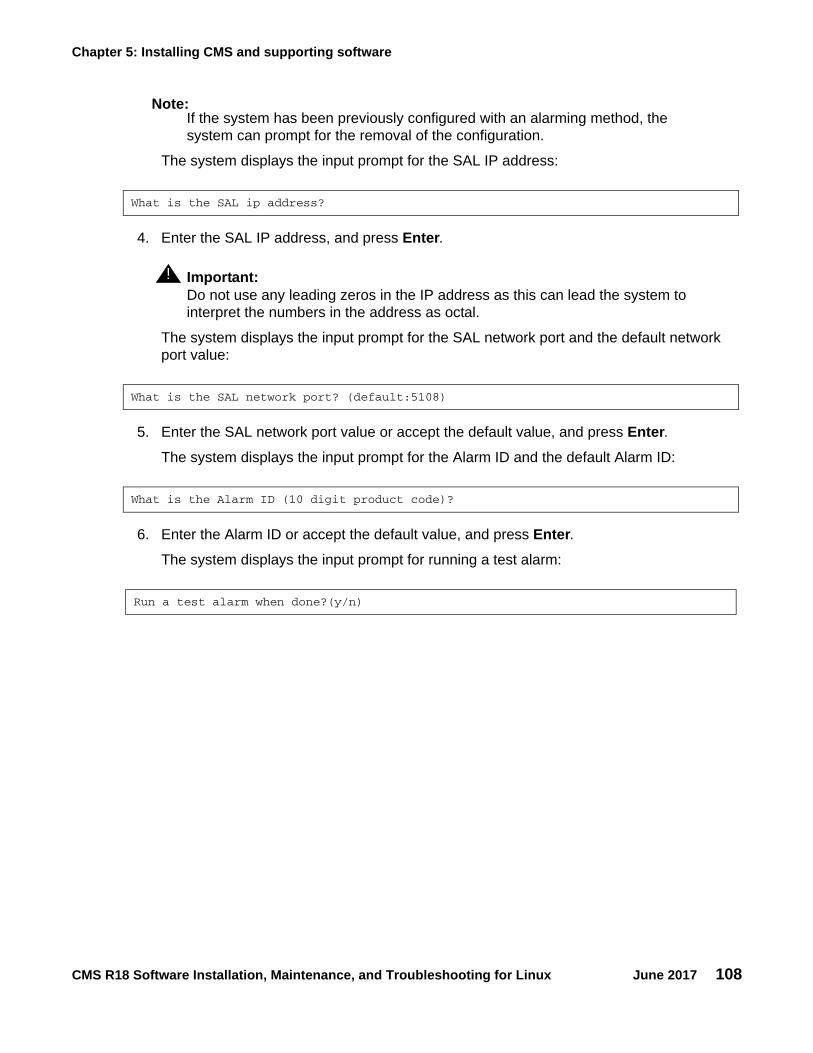
Chapter 5: Installing CMS and supporting software
CMS R18 Software Installation, Maintenance, and Troubleshooting for Linux June 2017 108
Note:Note: If the system has been previously configured with an alarming method, the
system can prompt for the removal of the configuration.
The system displays the input prompt for the SAL IP address:
4. Enter the SAL IP address, and press Enter.
! Important:Important: Do not use any leading zeros in the IP address as this can lead the system to
interpret the numbers in the address as octal.
The system displays the input prompt for the SAL network port and the default network port value:
5. Enter the SAL network port value or accept the default value, and press Enter.The system displays the input prompt for the Alarm ID and the default Alarm ID:
6. Enter the Alarm ID or accept the default value, and press Enter.The system displays the input prompt for running a test alarm:
What is the SAL ip address?
What is the SAL network port? (default:5108)
What is the Alarm ID (10 digit product code)?
Run a test alarm when done?(y/n)

Setting up the Alarm Origination Manager
CMS R18 Software Installation, Maintenance, and Troubleshooting for Linux June 2017 109
7. Enter y or n, and press Enter.The system displays the following messages:
8. Press Enter.The system displays the following messages, and the tool returns to the command line prompt:
CMS was last rebooted 1 day(s) ago.
You have selected to configure AOM using SAL via Socket/Virtual NIU.
Removing existing socket configurationSAL IP Address:SAL network port number: 5108
Alarm ID: 3000004043
A test alarm will be sent at the end.
Press [Enter] to continue or [q] to quit
Configuring dest.cfg [started]donereset AOM [started]doneClearing all current alarms. [started]doneSending test alarm. [started]donedone#
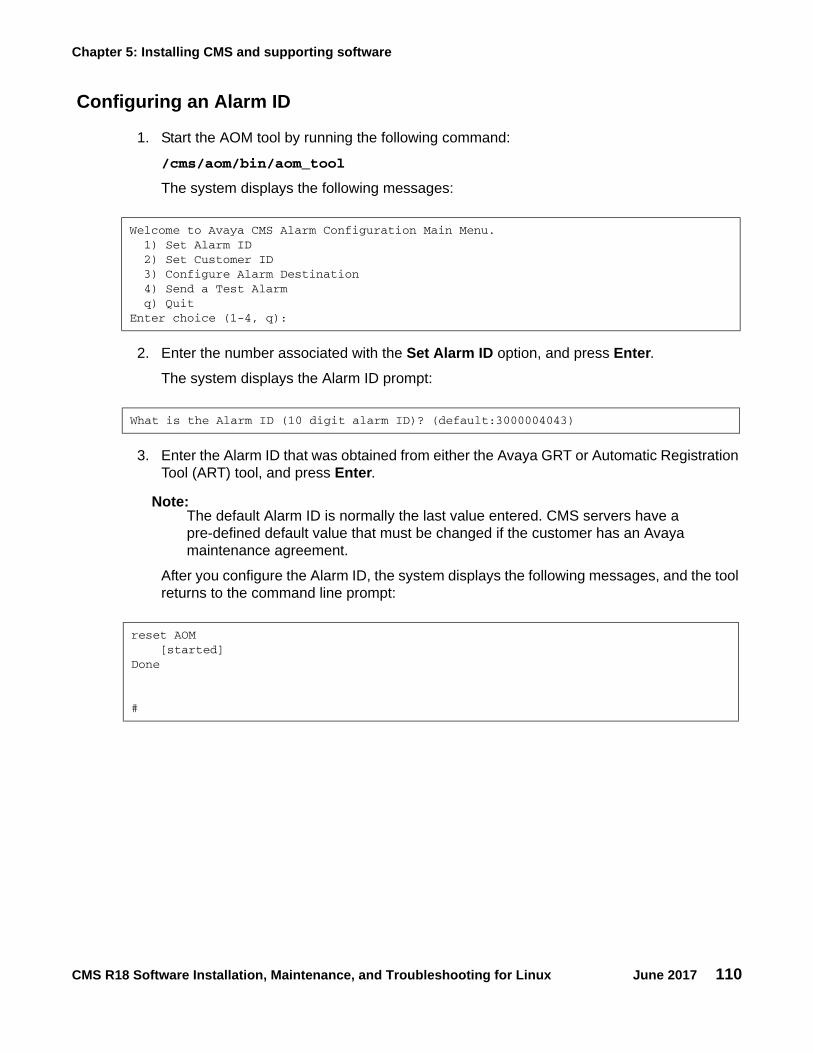
Chapter 5: Installing CMS and supporting software
CMS R18 Software Installation, Maintenance, and Troubleshooting for Linux June 2017 110
Configuring an Alarm ID
1. Start the AOM tool by running the following command:
/cms/aom/bin/aom_tool
The system displays the following messages:
2. Enter the number associated with the Set Alarm ID option, and press Enter.The system displays the Alarm ID prompt:
3. Enter the Alarm ID that was obtained from either the Avaya GRT or Automatic Registration Tool (ART) tool, and press Enter.
Note:Note: The default Alarm ID is normally the last value entered. CMS servers have a
pre-defined default value that must be changed if the customer has an Avaya maintenance agreement.
After you configure the Alarm ID, the system displays the following messages, and the tool returns to the command line prompt:
Welcome to Avaya CMS Alarm Configuration Main Menu. 1) Set Alarm ID 2) Set Customer ID 3) Configure Alarm Destination 4) Send a Test Alarm q) QuitEnter choice (1-4, q):
What is the Alarm ID (10 digit alarm ID)? (default:3000004043)
reset AOM [started]Done
#

Setting the Informix configuration parameters for CMS
CMS R18 Software Installation, Maintenance, and Troubleshooting for Linux June 2017 111
Sending an AOM Test Alarm
1. Start the AOM tool by running the following command:
/cms/aom/bin/aom_tool
The system displays the following messages:
2. Enter the number associated with the Send a Test Alarm option, and press Enter. The system clears the current alarms and then sends the test alarm. The system displays the following messages, and the tool returns to the command line prompt.
Setting the Informix configuration parameters for CMSThe IDS configuration parameters for CMS are automatically optimized for system performance during the installation of Informix.
Welcome to Avaya CMS Alarm Configuration Main Menu. 1) Set Alarm ID 2) Set Customer ID 3) Configure Alarm Destination 4) Send a Test Alarm q) QuitEnter choice (1-4, q):
Clearing all current alarms. [started]doneSending test alarm. [started]done
#
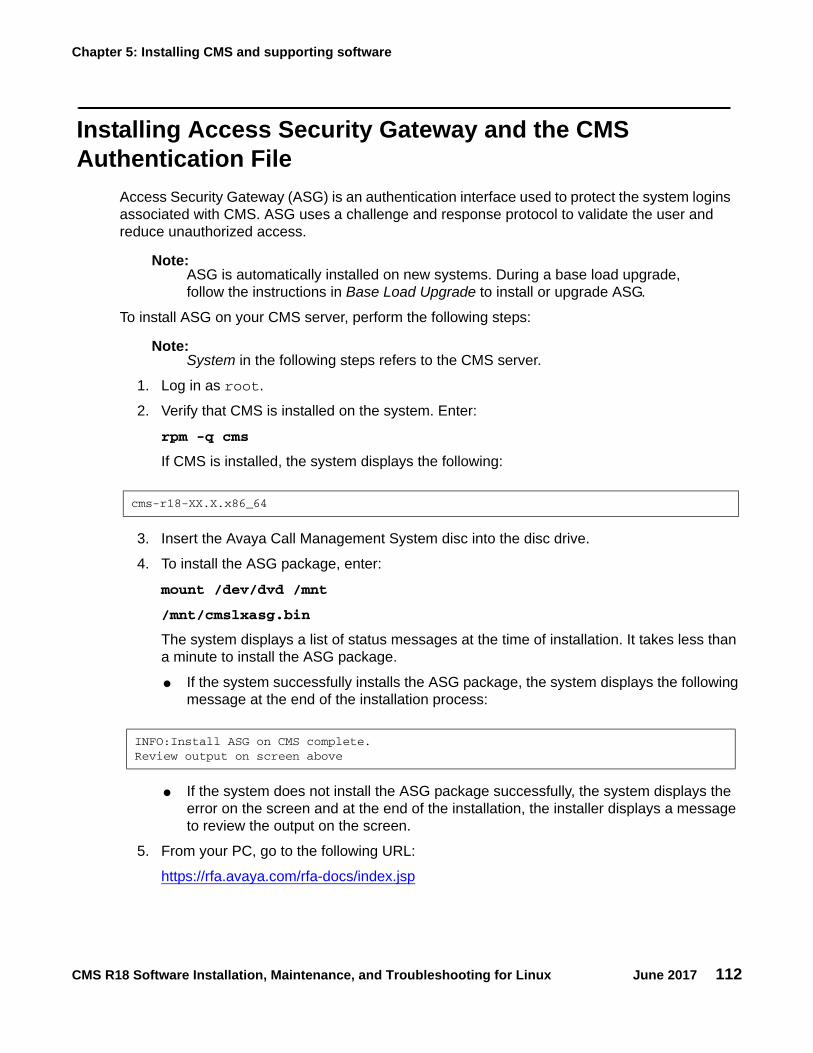
Chapter 5: Installing CMS and supporting software
CMS R18 Software Installation, Maintenance, and Troubleshooting for Linux June 2017 112
Installing Access Security Gateway and the CMS Authentication File
Access Security Gateway (ASG) is an authentication interface used to protect the system logins associated with CMS. ASG uses a challenge and response protocol to validate the user and reduce unauthorized access.
Note:Note: ASG is automatically installed on new systems. During a base load upgrade,
follow the instructions in Base Load Upgrade to install or upgrade ASG.
To install ASG on your CMS server, perform the following steps:
Note:Note: System in the following steps refers to the CMS server.
1. Log in as root.
2. Verify that CMS is installed on the system. Enter:
rpm -q cms
If CMS is installed, the system displays the following:
3. Insert the Avaya Call Management System disc into the disc drive.
4. To install the ASG package, enter:
mount /dev/dvd /mnt
/mnt/cmslxasg.bin
The system displays a list of status messages at the time of installation. It takes less than a minute to install the ASG package.
● If the system successfully installs the ASG package, the system displays the following message at the end of the installation process:
● If the system does not install the ASG package successfully, the system displays the error on the screen and at the end of the installation, the installer displays a message to review the output on the screen.
5. From your PC, go to the following URL:
https://rfa.avaya.com/rfa-docs/index.jsp
cms-r18-XX.X.x86_64
INFO:Install ASG on CMS complete.Review output on screen above

Removing Access Security Gateway
CMS R18 Software Installation, Maintenance, and Troubleshooting for Linux June 2017 113
6. Click Start the AFS Application to access the Authentication File System (AFS) application.
7. Click I agree.
8. Select Avaya CMS as the product and then select the appropriate release from the drop-down list. Click Next.
9. Click New System - Product after ensuring that the system is displaying the correct product and release. Click Next.
10. Download the CMS Authentication File (AF) file to your PC.
Note:Note: You can download the AF file to your PC prior to CMS installation.
11. After the download completes, make a note of the Avaya Authentication File ID.
! Important:Important: The Avaya Authentication File ID is essential for future upgrades and
Authentication File Deliveries.
12. Transfer the AF file from your PC to the CMS server.
13. Install the AF file. If you transferred the AF file from your PC to the /tmp directory of the CMS server, run the following command to install the AF file:
/opt/cmsasg/usr/local/bin/loadauth -af -l /tmp/AF-7000009669-11.xml
Note:Note: Replace /tmp in this example with the actual location of the AF file. Replace the
AF file name in this example with the name that corresponds to the AF file that was transferred to the CMS server. Each AF file has a unique name.The -l option in the loadauth command is a lower case L.
Removing Access Security GatewayTo remove Access Security Gateway (ASG) from your CMS server, run the following command as root:
/etc/asg/uninstall_asglinux.sh

Chapter 5: Installing CMS and supporting software
CMS R18 Software Installation, Maintenance, and Troubleshooting for Linux June 2017 114

CMS R18 Software Installation, Maintenance, and Troubleshooting for Linux June 2017 115
Chapter 6: Turning the system over to the customer
This section describes how to test the Avaya Call Management System (CMS) software to ensure that the application is working properly before the system is turned over to the customer.
Perform these procedures after:
● Completing the initial computer installation and CMS setup
● Completing a CMS software package upgrade
This section includes the following topics:
● Prerequisites on page 115
● Verifying the system date and time on page 116
● Forwarding CMS warning messages on page 116
● Checking free space allocation on page 117
● Testing the ACD link on page 118
● Assigning customer passwords on page 119
● Repeat this procedure for each customer login. on page 120
● Testing the CMS software on page 120
● Finalizing the on-site installation on page 123
PrerequisitesBefore you begin the procedures in this section, the technicians must:
● Locate the backup tapes (the set created by provisioning during installation) and set these tapes to write-protect mode if using tape drives for backups
● Connect the CMS server to the switch
● Translate the switch with the CMS feature enabled
● Connect the switch to an active link
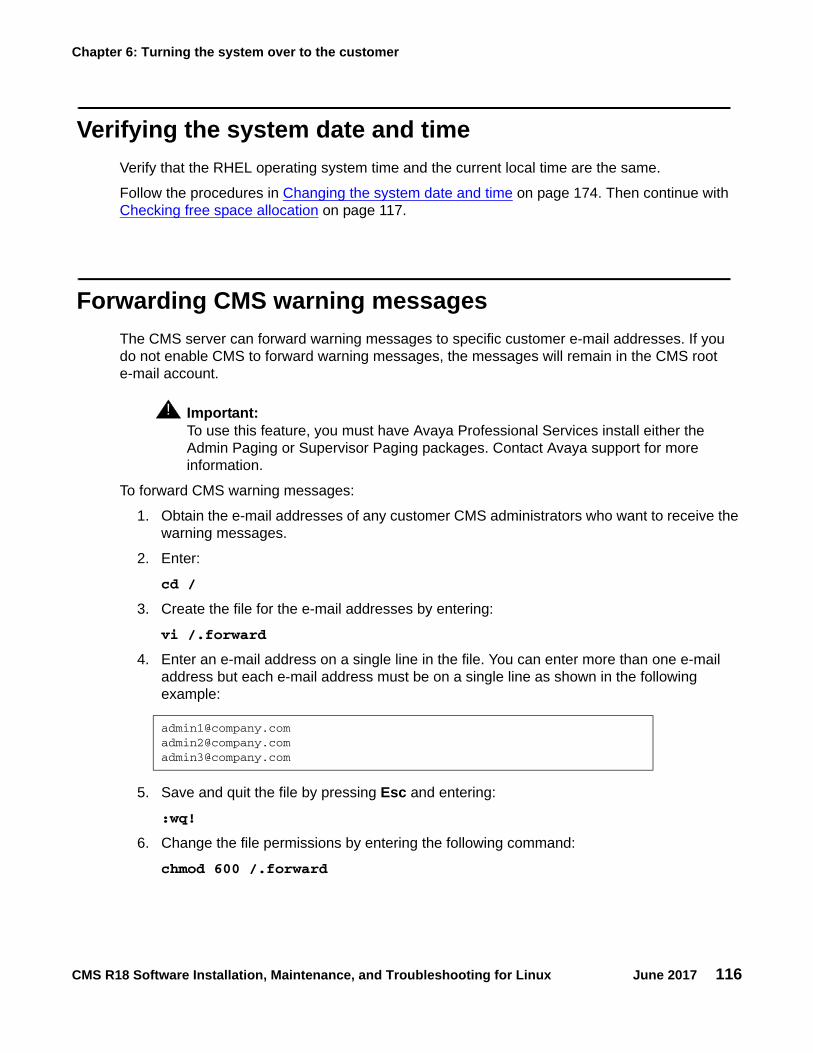
Chapter 6: Turning the system over to the customer
CMS R18 Software Installation, Maintenance, and Troubleshooting for Linux June 2017 116
Verifying the system date and timeVerify that the RHEL operating system time and the current local time are the same.
Follow the procedures in Changing the system date and time on page 174. Then continue with Checking free space allocation on page 117.
Forwarding CMS warning messagesThe CMS server can forward warning messages to specific customer e-mail addresses. If you do not enable CMS to forward warning messages, the messages will remain in the CMS root e-mail account.
! Important:Important: To use this feature, you must have Avaya Professional Services install either the
Admin Paging or Supervisor Paging packages. Contact Avaya support for more information.
To forward CMS warning messages:
1. Obtain the e-mail addresses of any customer CMS administrators who want to receive the warning messages.
2. Enter:
cd /
3. Create the file for the e-mail addresses by entering:
vi /.forward
4. Enter an e-mail address on a single line in the file. You can enter more than one e-mail address but each e-mail address must be on a single line as shown in the following example:
5. Save and quit the file by pressing Esc and entering:
:wq!
6. Change the file permissions by entering the following command:
chmod 600 /.forward

Checking free space allocation
CMS R18 Software Installation, Maintenance, and Troubleshooting for Linux June 2017 117
Checking free space allocationNote:
Note: The steps in this section are performed using the CMS Supervisor client.
To check free space allocation:
1. Go to the Free Space Allocation window that is located in the CMS System Setup subsystem.
2. Enter an ACD number (1-8).

Chapter 6: Turning the system over to the customer
CMS R18 Software Installation, Maintenance, and Troubleshooting for Linux June 2017 118
3. Click on the Get Contents icon.
The system displays the Get Contents screen showing the amount of dbspace allocated for each CMS item for the ACD selected.
For more information about free space allocation, see Avaya Call Management System Administration.
If the Total Free Space field shows that there is not enough space available then you must modify data storage allocation.
Testing the ACD linkAfter the CMS software has been installed or upgraded, the on-site technician must test the link from the CMS server to the switch that is using the Automatic Call Distribution (ACD) feature.

Assigning customer passwords
CMS R18 Software Installation, Maintenance, and Troubleshooting for Linux June 2017 119
To test the ACD link:
1. Verify that:
● A virtual console window is open
● CMS is on.
2. In a virtual console window, log into the system by using a CMS administrator’s login ID by entering:
su - cms
Enter the correct password if prompted.
3. Enter:
cms
4. Enter the correct terminal type.
The CMS Main Menu is displayed.
The CMS Main Menu has indicators that show whether the link to the ACD is active. The link indicator consists of the carets (\/ and /\) at the right side of the banner line. There should be one caret for each ACD, and all should be pointed up (^).
Example:
If you have four ACDs, the link indicator should look like this: ^^^^, which means that all four ACDs are up and operating.
5. Select Maintenance from the CMS Main Menu.
The system displays the Maintenance menu.
6. Select Connection Status from the Maintenance menu.
The Connection Status window displays the following information:
● The name of the ACD
● Whether the application is in data transfer
● Whether the session is in data transfer
● Whether the connection is operational
● The date, time, and any errors
7. Press the F5 key to exit the screen.
Assigning customer passwordsThis section describes how the customer assigns passwords to each of its logins on the CMS server. The customer must assign passwords to each of the following logins:

Chapter 6: Turning the system over to the customer
CMS R18 Software Installation, Maintenance, and Troubleshooting for Linux June 2017 120
● root
● cms
● Any other administration logins that have been added for the customer
To assign a password to a customer login:
1. Log in as root.2. At the system prompt, have the customer enter:
passwd login
where login is root, cms, and so on.
The system displays the following message:
3. Have the customer enter the new password.
The system displays the following message:
4. Have the customer enter the password again.
Note:Note: The technician should not know these passwords.
5. Repeat this procedure for each customer login.
Testing the CMS software After the CMS software has been installed or upgraded, the on-site technician must test the CMS software to verify its sanity.
To test the CMS software:
1. Verify that:
● The virtual console is active
● CMS is on.
2. Test the Real-Time Reports subsystem.
a. Enter
CMS
The system displays the CMS Main Menu.
New password:
Re-enter new password:

Testing the CMS software
CMS R18 Software Installation, Maintenance, and Troubleshooting for Linux June 2017 121
b. Select Reports.
c. Select Real-time.
d. Select Split/Skill. e. Select Split Status or Skill Status.
f. Verify that the Split/Skill Status Report input window is displayed.
g. Enter a valid split number in the Split: or Skill: field.
h. Select the Run action list item, and run the report.
i. Verify that the system displays the Split or Skill Status Report window.
j. If the switch link is not operating, the report fields are blank and the status line reads Switch link down.
k. Press the F3 key to access the Print window screen.
l. Select Print window to send the report to the printer.
m. Look at the message line near the bottom of the window, and verify that there is a confirmation message about sending the report to the printer.
n. Verify that the report was printed by checking the printer for the report.
o. Return to the CMS Main Menu screen by pressing the F5 key twice.
3. Test the Historical Reports subsystem.
a. On the CMS Main Menu, select Reports.
b. Select Historical.c. Select Split/Skill. d. Select Status.
e. Verify that the Split/Skill Status Report Input window is displayed.
f. Enter a valid split number in the Split/Skill: field.
g. Enter -1 in the Date: field.
h. Select the Run action list item, and run the report.
i. Verify that the report window is displayed and that the information is displayed in the appropriate fields.
Note:Note: If no historical data exists, the fields in the report window are blank.
j. Return to the CMS Main Menu by pressing the F5 key twice.
4. Test the Dictionary subsystem by doing the following from the CMS Main Menu.
a. On the CMS Main Menu select Dictionary.
b. Select Login Identifications.

Chapter 6: Turning the system over to the customer
CMS R18 Software Installation, Maintenance, and Troubleshooting for Linux June 2017 122
c. Enter an asterisk (*) in the Login ID: field.
d. Select the List all action list item. The system lists all the login IDs.
e. Verify that the logins are displayed.
Note:Note: On a new system, the fields are blank.
f. Return to the CMS Main Menu by pressing the F5 key twice.
5. Test the Exceptions subsystem.
a. On the CMS Main Menu select Exceptions.
b. Select Real-time Exception Log.
c. Verify that the window is displayed.
Note:Note: For a new installation, this window may be blank.
d. Return to the CMS Main Menu by pressing the F5 key once.
6. Test the Call Center Administration subsystem.
a. On the CMS Main Menu select Call Center Administration.
b. Select the Call Work Codes option.
c. Press Enter.d. Select the List all action list item, and list all the call work codes currently defined.
e. Verify that the displayed information is correct.
Note:Note: On a new system, the fields may be blank.
f. Return to the CMS Main Menu by pressing the F5 key twice.
7. Test the Custom Reports subsystem.
a. On the CMS Main Menu select Custom Reports.
b. Select Real-time. The system lists the names of the custom reports.
c. Verify that the names of existing custom reports are listed. If there are no reports, you receive a message saying the submenu is empty.
d. Return to the CMS Main Menu by pressing the F5 key once.
8. Test the User Permissions subsystem.
a. On the CMS Main Menu select User Permissions.
b. Select User Data.
c. Verify that the User Data Input window is displayed.
d. Return to the CMS Main Menu by pressing the F5 key once.

Finalizing the on-site installation
CMS R18 Software Installation, Maintenance, and Troubleshooting for Linux June 2017 123
9. Test the System Setup subsystem.
a. On the CMS Main Menu select System Setup.
b. Select CMS state.
c. Verify that CMS is operating in the Multi-user mode.
d. Return to the CMS Main Menu by pressing the F5 key once.
10. Test the Maintenance subsystem.
a. On the CMS Main Menu select Maintenance.
b. Select the Printer Administration option.
c. Enter a valid printer name in the CMS printer name: field.
d. Select the List all action list item. The system lists the printer parameters.
e. Verify that the printer has been administered correctly.
f. Return to the CMS Main Menu by pressing the F5 key twice.
11. If the Graphics feature package has been enabled, test the Graphics subsystem.
a. On the CMS Main Menu select Graphics.
b. Verify that a Real-time Graphics screen can be accessed.
c. Return to the CMS Main Menu by pressing the F5 key once.
d. At each CMS terminal, log in as cms and enter the correct terminal type to verify that the terminals are working properly. To log off, select the Logout option from the CMS Main Menu.
If any of the steps in this test fail, see CMS error logs on page 223, Common error messages on page 230, or Recognizing new hardware devices on page 222. If you encounter a problem that you cannot solve, escalate the problem through normal procedures.
Finalizing the on-site installationThis section contains the final steps that the on-site technician must perform before turning the system over to the customer.
Before turning the system over to the customer, perform the following steps:
1. Back up the system. Follow the procedures outlined in CMSADM backup on page 144.
Chapter 6: Turning the system over to the customer
CMS R18 Software Installation, Maintenance, and Troubleshooting for Linux June 2017 124
CAUTION:!
CAUTION: Use a new set of backup tapes for this CMSADM file system backup. Do NOT use the original set of factory backup tapes or provisioning backup tapes. Make sure that the customer has enough tapes for the new backup.
2. Back up the customer’s historical data by doing a full maintenance backup. You can do these backups within CMS using the Maintenance: Back Up Data window.
For more information about maintenance backups, see Avaya Call Management System Administration.
3. Set up alarming. For more information about the AOM tool, see Setting up the Alarm Origination Manager on page 91.
4. Give the customer all of the CMS documentation, the software discs, and the tape backups (including the original set from the factory, and the set created by provisioning).
5. Have the customer record their logins and passwords. The technician should NOT know these login passwords.
6. Give the passwords, backup tapes, and software to the customer’s CMS administrator.
CAUTION:!
CAUTION: For system security and recovery, the CMS administrator should store passwords, Informix serial numbers, key license information, and the tape backups in a secure location.

CMS R18 Software Installation, Maintenance, and Troubleshooting for Linux June 2017 125
Chapter 7: Maintaining the CMS software
This section provides the procedures for maintaining the Avaya Call Management System (CMS) software.
This section includes the following topics:
● Using the CMSADM menu on page 125
● Using the CMSSVC menu on page 137
● CMS backups on page 143
● CMSADM backup on page 144
● Backing up CMS on page 146
● Changing the system date and time on page 174
● Working with RHEL rpms on page 176
● Working with CMS patches on page 177
● Adding and removing users from password aging on page 180
● Maintaining the chkDisks crontab on page 183
● Report Query Status on page 184
● About the Archiving process on page 186
● About time zone archiving with additional time zones on page 187
Using the CMSADM menuThis section describes how to use the options in the Avaya Call Management System Administration Menu (CMSADM menu). The CMSADM menu is intended for use by the CMS administrator.
This section includes the following topics:
● CMSADM menu functions on page 126
● Accessing the CMSADM menu on page 126
● Using acd_create on page 127
● Using acd_remove on page 129
● Using backup on page 130

Chapter 7: Maintaining the CMS software
CMS R18 Software Installation, Maintenance, and Troubleshooting for Linux June 2017 126
● Using pkg_install on page 130
● Using pkg_remove on page 131
● Using run_pkg on page 132
● Using run_ids on page 132
● Using run_cms on page 132
● Using passwd_age on page 133
● Using dbaccess on page 134
CMSADM menu functionsThe following list shows the tasks that the CMS administrator can perform from the CMSADM menu:
● Define a new Automatic Call Distribution (ACD)
● Remove an ACD
● Back up the file systems to tape
● Install or remove a feature package
● Turn a feature package on or off
● Turn the IDS software on or off
● Turn the CMS software on or off
● Turn password aging on or off
● Change Informix DB access permissions
Accessing the CMSADM menuTo access the CMSADM menu:
1. Log in as root.

Using the CMSADM menu
CMS R18 Software Installation, Maintenance, and Troubleshooting for Linux June 2017 127
2. Enter cmsadm.
The system displays the CMSADM menu.
Note:Note: Your system may display different options in the CMSADM Menu depending on
the version of CMS you installed.
! Important:Important: When the cmssvc setup command runs on your system, it rejects all attempts to
run other cmsadm or cmssvc commands and displays the error message “Please try later, setup is active”.
Using acd_createEnter the acd_create option to define a new ACD. The information you enter here for each ACD is the same as the setup option of the CMSSVC menu. When you add an ACD, the system automatically grants permission to the ACD for administrator and normal users, but not to tenant users. You must manually give permission to the ACD for tenant users.
Note:Note: You must purchase and authorize the ACD before you add it to CMS. If you wish
to administer a secondary hostname or IP address, you must install the Dual IP feature package before running acd_create.
1. Before you define a new ACD, you must turn off the CMS software:
a. Enter cmsadm.
The system displays the CMSADM menu.
b. Enter the number associated with the run_cms option.
c. Enter the number to turn off the CMS software but leave the IDS software on.
2. Enter cmsadm.
The system displays the CMSADM menu.
Select a command from the list below. 1) acd_create Define a new ACD 2) acd_remove Remove all administration and data for an ACD 3) backup Filesystem backup 4) pkg_install Install a feature package 5) pkg_remove Remove a feature package 6) run_pkg Turn a feature package on or off 7) run_ids Turn Informix Database on or off 8) run_cms Turn Avaya CMS on or off 9) passwd_age Set password aging options 10) dbaccess Change Informix DB access permissionsEnter choice (1-10) or q to quit:

Chapter 7: Maintaining the CMS software
CMS R18 Software Installation, Maintenance, and Troubleshooting for Linux June 2017 128
3. Enter the number associated with the acd_create option.
The system selects the next available ACD for creation. For example, if two ACDs are already active, the system selects ACD 3.
4. At the prompts, enter the following information for the new ACD:
● Switch name
● Switch model (release)
● Vectoring enabled on the switch (if authorized): y or n
● Expert Agent Selection (EAS) enabled on the switch (if authorized): y or n
● Central Office has disconnect supervision: y or n
● Local port assigned to the switch
● Remote port assigned to the switch
● Transport method used to connect to the switch (TCP/IP)
● The hostname or IP address and TCP port
● The optional secondary hostname or IP address and TCP port if the Dual IP feature has been installed
● Number of splits/skills
● Total split/skill members, summed over all splits/skills
● Number of shifts
● Start and stop times of all shifts
● Number of agents logged in to all splits/skills across all shifts
● Number of trunk groups
● Number of trunks
● Number of unmeasured (trunk) facilities
● Number of call work codes
● Number of vectors if vectoring is enabled on the switch
● Number of Vector Directory Numbers (VDNs), if Vectoring is enabled on the switch
After you enter the required information, the program displays the following message:
5. To turn on the CMS software:
Updating database.
Computing space requirements and file system space availability.
ACD <name> (X) created successfully.

Using the CMSADM menu
CMS R18 Software Installation, Maintenance, and Troubleshooting for Linux June 2017 129
a. Enter cmsadm.
The system displays the CMSADM menu.
b. Enter the number associated with the run_cms option.
c. Enter the option to turn on the CMS software.
Using acd_removeUse the acd_remove option to remove an existing ACD. When you remove an ACD, the system reassigns all users from the removed ACD to the master ACD. Tenant users assigned to only the removed ACD will not be able to access CMS until they are reassigned to a new ACD.
Note:Note: Before you remove the master ACD, you must designate another ACD as the
master.
To designate a different ACD as the master:
1. On the main CMS menu, select System Setup - CMS State.
2. Use the Tab key to go to the Master ACD field and enter a new name.
3. Press Enter to go to the action list and select Modify.
4. Return to the main menu and select Logout.
To remove an ACD:
1. Verify that data collection is off for all ACDs.
2. Turn off the CMS software:
a. Enter cmsadm.
The system displays the CMSADM menu.
b. Enter the number associated with the run_cms option.
c. Enter the option to turn off the CMS software but leave the IDS software on.
3. Enter cmsadm.
The system displays the CMSADM menu.
4. Enter the number associated with the acd_remove option.
Note:Note: The ACD assigned as the Master ACD does not appear in the list of ACDs that
can be removed. If you want to remove an ACD that is currently assigned as the Master ACD, you must first assign another ACD as the Master ACD. The Master ACD can be changed using the System Setup | CMS State option from the CMS main menu.

Chapter 7: Maintaining the CMS software
CMS R18 Software Installation, Maintenance, and Troubleshooting for Linux June 2017 130
5. Enter the number (1-7) that corresponds with the ACD that you want to remove.
The system displays the following message:
6. Enter: y
The system displays the following message:
7. Since the ACD is removed in the background, you can turn the CMS software on before the removal is complete. To turn the CMS software on, perform the following procedure:
a. Enter cmsadm.
The system displays the CMSADM menu.
b. Enter the number associated with the run_cms option.
c. Enter the option to turn on the CMS software.
Using backupUse the backup option to back up your file system. This option does not back up CMS data.
Note:Note: To back up CMS data, you must perform a full maintenance backup in addition to
the CMSADM backup. Refer to Avaya CMS Administration for more information on performing a full maintenance backup and CMSADM backup.
Using pkg_installUse the pkg_install option to install a feature package.
1. Enter cmsadm.
The system displays the CMSADM menu.
All administration and historical data for this ACD will be DELETED.Do you want to continue and delete all data for this ACD? (y/n):
Removal of data for this ACD started in the background.A completion message will be logged in /cms/install/logdir/admin.log.

Using the CMSADM menu
CMS R18 Software Installation, Maintenance, and Troubleshooting for Linux June 2017 131
2. Enter the number associated with the pkg_install option.
The system displays the following message:
Note:Note: The system only displays authorized feature packages that are yet to be installed.
3. Enter the number associated with the feature package that you want to install.
Using pkg_removeUse the pkg_remove option to remove a feature package. This procedure removes all files and database items associated with the feature package.
CAUTION:!
CAUTION: Be careful when removing a package. All features and data associated with that package are also removed.
1. Enter cmsadm.
The system displays the CMSADM menu.
Note:Note: CMS must be turned off before packages can be removed.
2. Enter the number associated with the pkg_remove option.
The system displays a list of CMS features that can be removed.
3. Enter the number associated with the feature package that you want to remove.
The system displays a message indicating the feature is removed. For the Multi-tenancy feature package, the system displays a menu where you can choose to delete all tenant users or change the tenant users to normal users:
The CMS features that can be installed are 1) forecasting 2) external call history 3) multi-tenancy 4) Dual IPEnter choice (1-4) or q to quit:
Should tenant users be1) deleted2) changed to normal usersEnter choice (1-2) or q to quit:

Chapter 7: Maintaining the CMS software
CMS R18 Software Installation, Maintenance, and Troubleshooting for Linux June 2017 132
Using run_pkgUse the run_pkg option to turn a feature package on or off.
1. Enter cmsadm.
The system displays the CMSADM menu.
2. Enter the number associated with the run_pkg option.
The system displays a list of CMS features.
3. Enter the number associated with the feature package that you want to turn on or off.
The system displays the status of the feature.
Using run_idsUse the run_ids option to turn IDS on or off.
1. Enter cmsadm.
The system displays the CMSADM menu.
2. Enter the number associated with the run_ids option.
3. Perform one of the following actions:
● To turn on IDS, enter: 1
● To turn off IDS, enter: 2
Using run_cmsUse the run_cms option to turn the CMS software on or off.
1. Enter cmsadm.
The system displays the CMSADM menu.
2. Enter the number associated with the run_cms option.
3. Perform one of the following actions:
● To turn the CMS software on, enter: 1
● To turn the CMS software off, but leave IDS running, enter: 2
● To turn both the CMS software and IDS software off, enter: 3

Using the CMSADM menu
CMS R18 Software Installation, Maintenance, and Troubleshooting for Linux June 2017 133
Using passwd_ageUse the passwd_age option to turn password aging on or off. If password aging is on, the system prompts the user to enter a new password after a predetermined time interval has passed. Password aging is off by default.
CAUTION:!
CAUTION: If you have any third party software or Avaya Professional Services Organization (PSO) offers, do not turn on password aging. Contact the National Customer Care Center at 1-800-242-2121, or consult your product distributor or representative to ensure that password aging does not disrupt any additional applications.
The passwd_age option effects the passwords of all CMS users and regular UNIX users. When password aging is on, the system modifies the RHEL policy file /etc/passwd. The passwords of all CMS users that use the /usr/bin/cms shell and all UNIX users start aging. If password aging is on when a new user is added, the user’s password begins to age as soon as a password is entered for that account.
Avaya recommends that you exclude specific users before turning password aging on in order to avoid additional password administration. If you need to prevent the aging of a specific user’s password, see Adding and removing users from password aging on page 180 and Troubleshooting password aging on page 222.
! Important:Important: Non-CMS users such as root, root2, or informix do not age.
Password aging does not function on a CMS that uses a NIS, NIS+, or LDAP directory service. Avaya does not support use of NIS, NIS+, or LDAP with CMS. If you are using NIS, NIS+, or LDAP under permissive use, contact your network administrator. The passwords need to be aged from the server running the directory service.
To use the passwd_age option:
1. Enter cmsadm.
The system displays the CMSADM menu.
2. Enter the number associated with the passwd_age option.
The system displays the following message:
1) Turn on password aging2) Turn off password aging3) Change password aging interval or q to quit: (default 1)
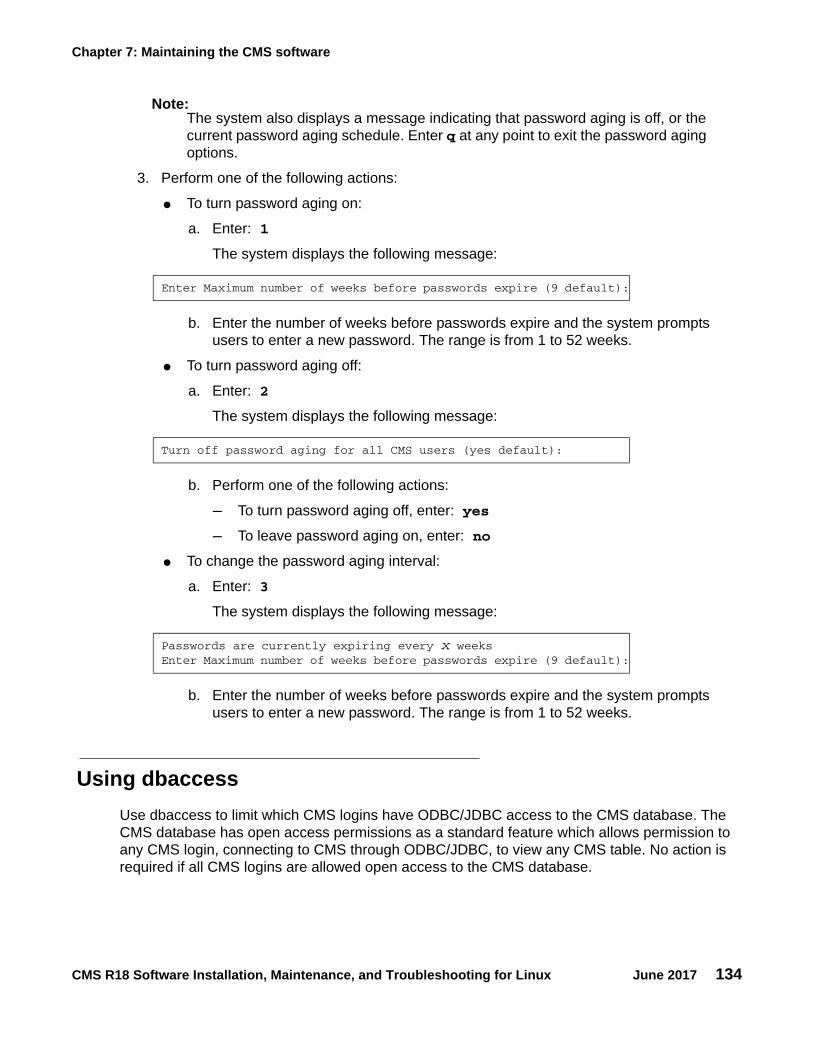
Chapter 7: Maintaining the CMS software
CMS R18 Software Installation, Maintenance, and Troubleshooting for Linux June 2017 134
Note:Note: The system also displays a message indicating that password aging is off, or the
current password aging schedule. Enter q at any point to exit the password aging options.
3. Perform one of the following actions:
● To turn password aging on:
a. Enter: 1
The system displays the following message:
b. Enter the number of weeks before passwords expire and the system prompts users to enter a new password. The range is from 1 to 52 weeks.
● To turn password aging off:
a. Enter: 2
The system displays the following message:
b. Perform one of the following actions:
- To turn password aging off, enter: yes
- To leave password aging on, enter: no
● To change the password aging interval:
a. Enter: 3
The system displays the following message:
b. Enter the number of weeks before passwords expire and the system prompts users to enter a new password. The range is from 1 to 52 weeks.
Using dbaccessUse dbaccess to limit which CMS logins have ODBC/JDBC access to the CMS database. The CMS database has open access permissions as a standard feature which allows permission to any CMS login, connecting to CMS through ODBC/JDBC, to view any CMS table. No action is required if all CMS logins are allowed open access to the CMS database.
Enter Maximum number of weeks before passwords expire (9 default):
Turn off password aging for all CMS users (yes default):
Passwords are currently expiring every x weeks Enter Maximum number of weeks before passwords expire (9 default):
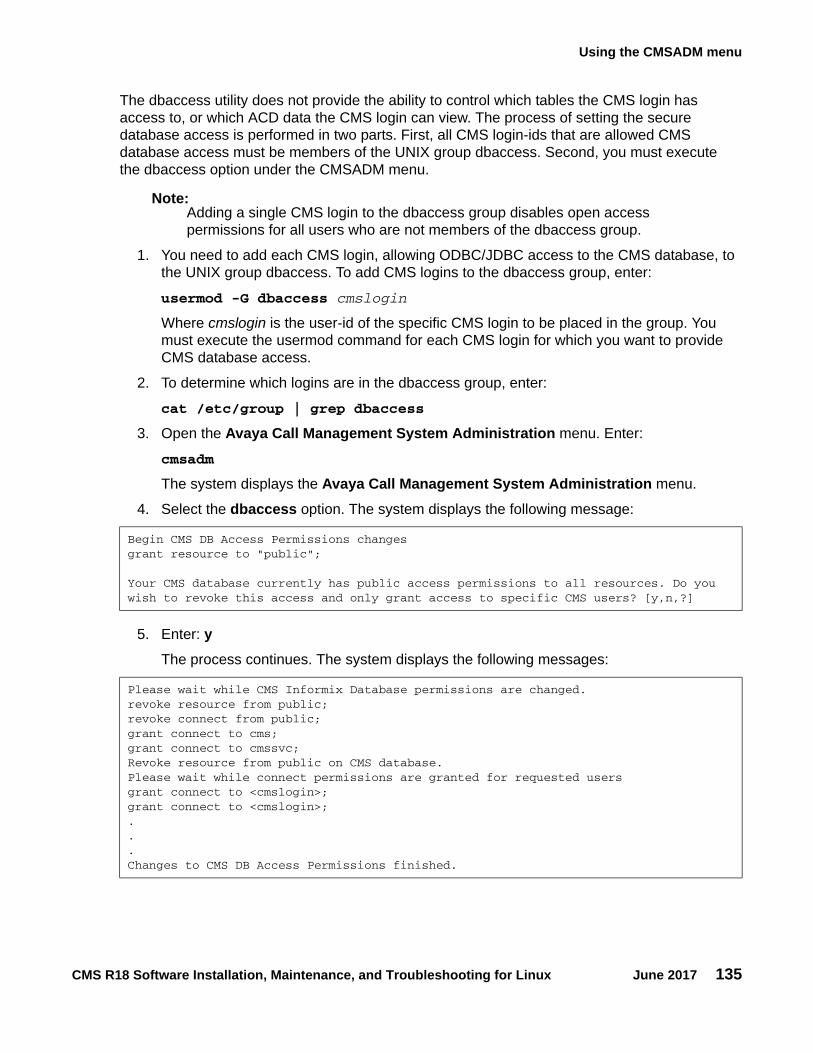
Using the CMSADM menu
CMS R18 Software Installation, Maintenance, and Troubleshooting for Linux June 2017 135
The dbaccess utility does not provide the ability to control which tables the CMS login has access to, or which ACD data the CMS login can view. The process of setting the secure database access is performed in two parts. First, all CMS login-ids that are allowed CMS database access must be members of the UNIX group dbaccess. Second, you must execute the dbaccess option under the CMSADM menu.
Note:Note: Adding a single CMS login to the dbaccess group disables open access
permissions for all users who are not members of the dbaccess group.
1. You need to add each CMS login, allowing ODBC/JDBC access to the CMS database, to the UNIX group dbaccess. To add CMS logins to the dbaccess group, enter:
usermod -G dbaccess cmslogin
Where cmslogin is the user-id of the specific CMS login to be placed in the group. You must execute the usermod command for each CMS login for which you want to provide CMS database access.
2. To determine which logins are in the dbaccess group, enter:
cat /etc/group | grep dbaccess
3. Open the Avaya Call Management System Administration menu. Enter:
cmsadm
The system displays the Avaya Call Management System Administration menu.
4. Select the dbaccess option. The system displays the following message:
5. Enter: yThe process continues. The system displays the following messages:
Begin CMS DB Access Permissions changesgrant resource to "public";
Your CMS database currently has public access permissions to all resources. Do you wish to revoke this access and only grant access to specific CMS users? [y,n,?]
Please wait while CMS Informix Database permissions are changed.revoke resource from public;revoke connect from public;grant connect to cms;grant connect to cmssvc;Revoke resource from public on CMS database.Please wait while connect permissions are granted for requested usersgrant connect to <cmslogin>; grant connect to <cmslogin>; ...Changes to CMS DB Access Permissions finished.

Chapter 7: Maintaining the CMS software
CMS R18 Software Installation, Maintenance, and Troubleshooting for Linux June 2017 136
Note:Note: The output always displays one grant connect message per CMS login, including
logins already in the dbaccess group with connect permissions.
After the changes are complete, you may use the CMS logins to run ODBC/JDBC clients and access the CMS database.
To remove ODBC/JDBC access permissions for CMS logins, first remove them from the UNIX dbaccess group then run dbaccess from the Avaya Call Management System Administration menu.
6. Remove ODBC/JDBC access permissions for CMS logins from the UNIX dbaccess group. Enter:
usermod –G “” cmslogin
7. Open the Avaya Call Management System Administration menu. Enter:
cmsadm
The system displays the Avaya Call Management System Administration menu.
8. Select the dbaccess option. The system displays the following message:
The UNIX dbaccess group information is reset to only provide access permissions to members remaining in the UNIX dbaccess group.
Perform the Steps 9 through 11 to remove all the CMS logins from the UNIX dbaccess group and restore “open access” permissions to all the CMS logins.
9. Run the usermod command for each CMS login in the dbaccess group. Enter:
usermod –G “” cmslogin1
usermod –G “” cmslogin2
usermod –G “” cmslogin3
10. Open the Avaya Call Management System Administration Menu. Enter:
cmsadm
The system displays the Avaya Call Management System Administration menu.
Begin CMS DB Access Permissions changesPlease wait while connect permissions are granted for requested usersgrant connect to <cmslogin>;...Changes to CMS DB Access Permissions finished.

Using the CMSSVC menu
CMS R18 Software Installation, Maintenance, and Troubleshooting for Linux June 2017 137
11. Select the dbaccess option. The system displays the following message:
12. Enter: yThe process restores public permissions to the CMS database. The system displays messages similar to the following:
Using the CMSSVC menuThis section describes how to use the options of the Avaya Call Management System Services Menu (CMSSVC menu). The CMSSVC menu is for use primarily by Avaya authorized services personnel.
This section includes the following topics:
● CMSSVC menu functions on page 138
● Accessing the CMSSVC menu on page 138
● Using auth_display on page 139
● Using auth_set on page 139
● Using run_ids on page 140
● Using run_cms on page 140
● Using setup on page 140
● Using swinfo on page 141
● Using swsetup on page 141
● Using uninstall on page 142
● CMS backups on page 143
Begin CMS DB Access Permissions changes
No CMS user ids are in UNIX group dbaccess.If you proceed, the CMS database willbe set to public permissions access for all resources.Do you really want to do this? [y,n,?]
Please wait while CMS Informix Database permissions are set to public.grant resource to public;revoke connect from cms;revoke connect from cmssvc;Grant resource to public on CMS database.Changes to CMS DB Access Permissions finished.

Chapter 7: Maintaining the CMS software
CMS R18 Software Installation, Maintenance, and Troubleshooting for Linux June 2017 138
CMSSVC menu functionsAvaya authorized services personnel can perform the following tasks from the CMSSVC menu:
● Display CMS authorizations
● Authorize CMS feature packages and capacities
● Turn the IDS software on or off
● Turn the CMS software on or off
● Set up the initial CMS configuration
● Display switch information
● Change switch information
● Remove the CMS RPM
Accessing the CMSSVC menu1. Log in as root.2. Enter cmssvc.
The system displays the CMSSVC menu.
Note:Note: When the CMSSVC setup command is running, any attempt to run other
cmsadm or cmssvc commands will be rejected, and the system will display the error message:
Note:Note: Different options may be displayed in the CMSSVC Menu depending on the
current version of CMS on your system.
Select a command from the list below. 1) auth_display Display feature authorizations 2) auth_set Authorize capabilities/capacities 3) run_ids Turn Informix Database on or off 4) run_cms Turn Avaya CMS on or off 5) setup Set up the initial configuration 6) swinfo Display switch information 7) swsetup Change switch information 8) uninstall Remove the CMS rpm from the machineEnter choice (1-8) or q to quit:
Please try later, setup is active

Using the CMSSVC menu
CMS R18 Software Installation, Maintenance, and Troubleshooting for Linux June 2017 139
Using auth_displayTo use the auth_display option to display CMS authorizations:
1. Enter cmssvc.
The system displays the CMSSVC menu.
2. Enter 1 to select auth_display.
The system displays the current authorization status of the CMS features and capacities.
Note:Note: The system can display different authorizations depending on the current version
of CMS and the packages you installed.
Using auth_setTo use the auth_set option to authorize CMS features and capacities:
1. Enter cmssvc.
The system displays the CMSSVC menu.
2. Enter 2 to select auth_set.
The system displays the following message:
Capability/Capacity Authorization ------------------- ------------- CMS hardware authorized vectoring authorized forecasting authorized graphics authorized external call history installed/off expert agent selection authorized external application authorized global dictionary/ACD groups authorized multi-tenancy installed Dual IP authorized Avaya CMS Supervisor authorized Avaya Report Designer authorized Maximum number of split/skill members 800000 Maximum number of ACDs 8 Simultaneous Avaya CMS Supervisor logins 1600 Number of authorized agents (RTU) 100000 Number of authorized ODBC connections 10
Password:

Chapter 7: Maintaining the CMS software
CMS R18 Software Installation, Maintenance, and Troubleshooting for Linux June 2017 140
3. Enter the appropriate password. See Configuring CMS authorizations on page 48 for more information.
This password is available only to authorized personnel.
Using run_idsTo use the run_ids option to turn IDS on and off:
1. Enter cmssvc.
The system displays the CMSSVC menu.
2. Enter 3 to select run_ids.
3. Perform one of the following actions:
● To turn on IDS, enter: 1
● To turn off IDS, enter: 2
Using run_cmsTo use the run_cms option to turn the CMS software on and off:
1. Enter cmssvc.
The system displays the CMSSVC menu.
2. Enter 4 to select run_cms.
3. Perform one of the following actions:
● To turn on the CMS software, enter: 1
● To turn off the CMS software, but leave the IDS software on, enter: 2
● To turn off both the CMS software and the IDS software, enter: 3
Using setupUse the setup option to set up the initial CMS configuration. When the cmssvc setup command is running, any attempt to run other cmsadm or cmssvc commands will be rejected, and the system will display the error message Please try later, setup is active.
Do not confuse this option with the swsetup option, which is used to change the switch information.

Using the CMSSVC menu
CMS R18 Software Installation, Maintenance, and Troubleshooting for Linux June 2017 141
CAUTION:!
CAUTION: Do not run setup on a system that is in service or you may lose all the customer data.
Using swinfoUse the swinfo option to display the switch options that are currently assigned for each ACD.
1. Enter cmssvc.
The system displays the CMSSVC menu.
2. Enter 6 to select swinfo.
The system displays a list of ACDs.
3. Select the ACD for which you want to display the switch options.
The system displays the following information:
● Switch name
● Switch model (release)
● If Vectoring is enabled
● If Expert Agent Selection is enabled
● If the Central Office has disconnect supervision
● Local port
● Remote port
● Link transport method (TCP/IP)
Using swsetupUse the swsetup option to change the switch options for each ACD. Do not confuse this option with the setup option, which is used for setting up CMS.
When you change switch parameters, you should also check the parameters in the CMS System Setup: Data Storage Allocation window. If you enable Vectoring, you need to allocate space for VDNs and vectors. Changing the switch release may change the number of measured entities allowed and also impact the storage allocation for each entity.:
1. Turn the CMS software off:
a. Enter cmssvc.
The system displays the CMSSVC menu.
Chapter 7: Maintaining the CMS software
CMS R18 Software Installation, Maintenance, and Troubleshooting for Linux June 2017 142
b. Enter 4 to select run_cms.
c. Enter 2 to turn off the CMS software, but leave the IDS software on.
2. Enter cmssvc.
The system displays the CMSSVC menu.
3. Enter 7 to select swsetup.
The system displays a list of ACDs.
4. Select the ACD that you want to change.
5. At the prompts, provide the following information:
● Switch name
● Switch model (release)
● Is Vectoring enabled on the switch (if authorized)?
● Is Expert Agent Selection (EAS) enabled on the switch (if authorized)?
● Does the Central Office have disconnect supervision?
● Local port assigned to the switch (Avaya recommends that you use 1)
● Remote port assigned to the switch (Avaya recommends that you use 1)
● Transport method used to connect to the switch (TCP/IP)
● Enter the host name or IP address and TCP port
● The optional secondary hostname or IP address and TCP port if the Dual IP feature has been installed
The system displays all the information. The system then asks if the switch administration is correct.
6. If the switch information is correct, enter: y
7. Turn on the CMS software:
a. Enter cmssvc.
The system displays the CMSSVC menu.
b. Enter 4 to select run_cms.
c. Enter 1 to turn on the CMS software.
Using uninstallUse the uninstall option to uninstall the CMS rpm from the system.

CMS backups
CMS R18 Software Installation, Maintenance, and Troubleshooting for Linux June 2017 143
Note:Note: The uninstall option can only remove CMS if CMS is off. Refer to the readme file
on the CMS software disc to determine the state of CMS before uninstalling the application.
1. Enter cmssvc.
The system displays the CMSSVC menu.2. Enter 8 to select uninstall.
The system displays messages similar to the following:
3. Enter y to uninstall CMS.
4. Accept the default value of y for each prompt.
The CMS software is removed.
CMS backupsCMS supports CMS backups to multiple backup devices. Using CMS, you cannot run simultaneous backups of any type, even if multiple backup device types are administered.
CMS maintenance backups only save CMS data (administration and historical) and the CMS data for each Automatic Call Distribution (ACD). You must perform CMSADM backups to save CMS data, such as OS.
● After the CMS is provisioned
● After the CMS software is upgraded
● On a daily basis.
You can perform these backups within the CMS software. For more information, see Avaya Call Management System Administration.
Note:Note: If you use the CMS LAN backup feature, back up your CMS data according to
Avaya Call Management System LAN Backup User Guide. That document provides information about using the CMS LAN backup feature, hardware requirements, software requirements, and support guidelines.
The following package is currently installed:
cms-r18-XX.X.x86_64
Do you want to remove this package? [y,n,?] ?

Chapter 7: Maintaining the CMS software
CMS R18 Software Installation, Maintenance, and Troubleshooting for Linux June 2017 144
CMSADM backup The CMSADM file system backup saves all local file systems on the computer onto a backup device, including:
● System files and programs
● CMS programs
! Important:Important: The CMSADM backup does not save CMS data tables. During the CMSADM
backup no users, other than those logged in before the CMSADM backup was started, are allowed to log into CMS.
This section includes the following topic:
● When to perform a CMSADM backup on page 144
Note:Note: If you use the CMS LAN backup feature, back up your system data according to
Avaya Call Management System LAN Backup User Guide. This document provides information about using the CMS LAN backup feature, hardware requirements, software requirements, and support guidelines.
When to perform a CMSADM backupPerform the CMSADM file system backup at the following times:
● After the CMS is provisioned to backup the RHEL system files, system programs and CMS configuration data placed on the computer by Avaya Services provisioning personnel. These CMSADM backups can be to tape, a USB storage device or a network mount point and should also be saved and not reused or overwritten.
! Important:Important: CMS R16.2 or later supports CMS backups to multiple backup devices. Avaya is
no longer providing CMS backup tapes with CMS servers. If a customer chooses to use tape drives to back up the customer’s CMS data then the customer is responsible for purchasing the tape drive and any supplies needed to operate the tape drive. The customer is responsible for backing up CMS after the system has been provisioned. The customer must store the CMSADM backup in a safe place in case the system needs to be restored.

CMSADM backup
CMS R18 Software Installation, Maintenance, and Troubleshooting for Linux June 2017 145
● After the CMS server is provisioned
This backup contains the RHEL system files and programs and CMS configuration data placed on the computer by Avaya Services provisioning personnel. These tapes should also be saved and not reused.
In addition, field technicians should perform a CMS full maintenance backup before they turn a new system over to the customer. For more information, see Avaya Call Management System Administration.
● Before and after the CMS software is upgraded (usually performed by a field technician)
● Once a month (performed by the customer).
! Important:Important: You must document the CMS load number and backup/restore device information
to aid in disaster recovery of CMS.
To determine the CMS load number, enter:
rpm -q cms
Below are examples of the type of information that needs to be saved:
CMS Hostname CMS Load Number
digger cms-r18-X.X.X.x86_64
Your CMS server
CMS Hostname
Backup/Restore Device Type (Tape/USB/Network)
Backup/Restore Device Path
Backup/Restore Device Name
Description
digger USB /CMS_Backup USB_ digger USB backup for digger
Your CMS server
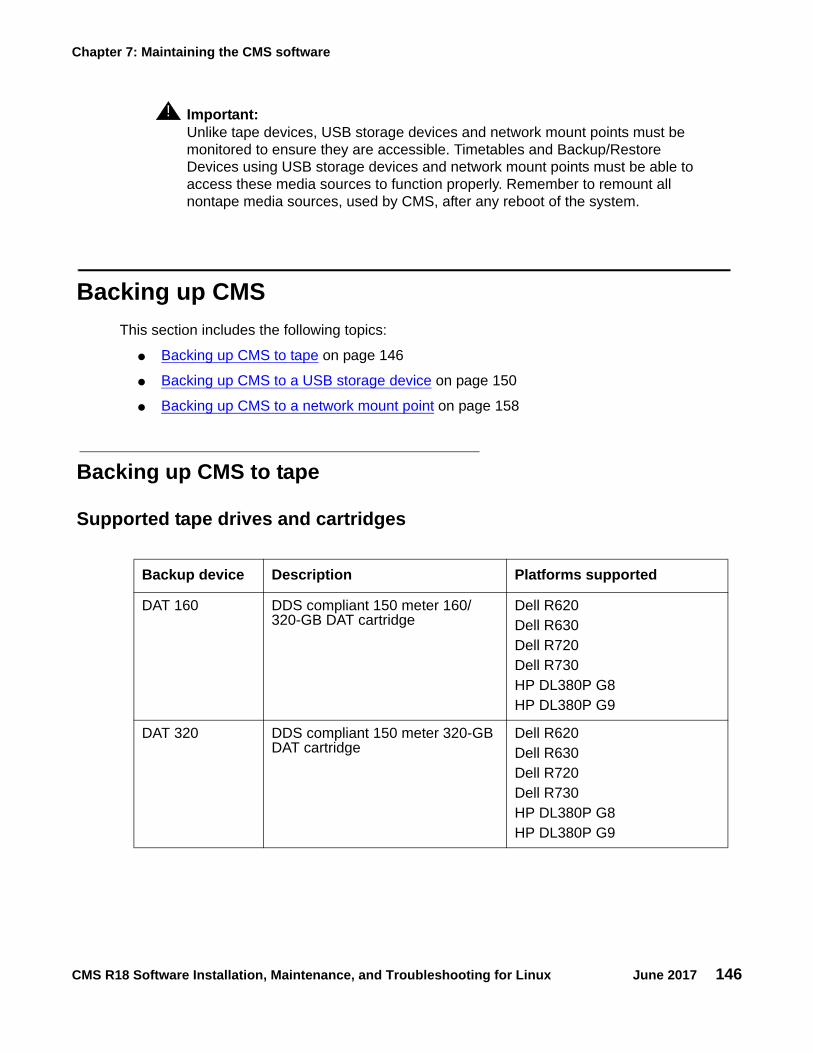
Chapter 7: Maintaining the CMS software
CMS R18 Software Installation, Maintenance, and Troubleshooting for Linux June 2017 146
! Important:Important: Unlike tape devices, USB storage devices and network mount points must be
monitored to ensure they are accessible. Timetables and Backup/Restore Devices using USB storage devices and network mount points must be able to access these media sources to function properly. Remember to remount all nontape media sources, used by CMS, after any reboot of the system.
Backing up CMS This section includes the following topics:
● Backing up CMS to tape on page 146
● Backing up CMS to a USB storage device on page 150
● Backing up CMS to a network mount point on page 158
Backing up CMS to tape
Supported tape drives and cartridges
Backup device Description Platforms supported
DAT 160 DDS compliant 150 meter 160/320-GB DAT cartridge
Dell R620Dell R630Dell R720Dell R730HP DL380P G8HP DL380P G9
DAT 320 DDS compliant 150 meter 320-GB DAT cartridge
Dell R620Dell R630Dell R720Dell R730HP DL380P G8HP DL380P G9

Backing up CMS
CMS R18 Software Installation, Maintenance, and Troubleshooting for Linux June 2017 147
! WARNING:!
WARNING: CMS R18 only supports SaS tape drives.
! WARNING:!
WARNING: Verify that you are using the correct tape for the tape drive on your system. Many of the tape cartridges look alike, and using the wrong tape can damage the tape drive mechanism and tape heads.
Performing a CMSADM backup to tape
1. Verify that:
● The computer is in a RHEL multi-user state 3. To check whether the computer is in the multi-user state, enter:
who -r
● You are using the correct tape for the tape drive on your system.
CAUTION:!
CAUTION: Use a new set of backup tapes for this CMSADM file system backup. Do NOT use the original set of factory backup tapes or provisioning backup tapes. Make sure that there are enough tapes for the new backup.
2. Log in as root.3. Enter:
cmsadm
The system displays the Avaya Call Management System Administration Menu.
LTO-4 820 meter 800-GB 12.65 mm cartridge
Dell R620Dell R630Dell R720Dell R730HP DL380P G8HP DL380P G9
LTO-5 820 meter 800-GB 12.65 mm cartridge846 meter 1.5-TB 12.65 mm cartridge
Dell R620Dell R630Dell R720Dell R730HP DL380P G8HP DL380P G9
Backup device Description Platforms supported

Chapter 7: Maintaining the CMS software
CMS R18 Software Installation, Maintenance, and Troubleshooting for Linux June 2017 148
4. Enter the number associated with the backup option.
Depending on the configuration of your system, the system displays one of the following options:
● If only one tape drive is available on the system, go to Step 5.
● If more than one tape drive is available for use by the system, the system displays a list of tape devices. Enter a tape drive selection from the displayed list.
The system displays the following message:
5. Press Enter. The backup process begins. If more than one tape is required, the system displays the following message:
6. If the system displays the message in Step 5, insert the next tape and allow it to rewind. When it is properly positioned, press Enter.
7. When the backup is completed, the system displays information according to the number of tapes that are required for the backup:
● If the number of tapes required is one, go to Step 10.
The system displays the following message:
● If the number of tapes required is more than one, the system displays the following message:
8. Insert the first tape to be used in the backup and press Enter. Wait for the LED on the tape drive to stop blinking before you remove the tape.
Please insert the first cartridge tape into <device name>.Press ENTER when ready or Del to quit:^?
End of medium on "output".Please remove the current tape, number it, insert tape number x, and press Enter
xxxxxxx blocksBackup Verification
xxxxxxx blocks
Please label the backup tape(s) with the date and the current CMS version (rxxxxx.x)
xxxxxxx blocksBackup VerificationInsert the first tapePress Return to proceed :

Backing up CMS
CMS R18 Software Installation, Maintenance, and Troubleshooting for Linux June 2017 149
9. When prompted, repeat Step 8 for any additional tapes generated by the backup process. When the final tape is verified, the program displays the following message:
10. Label all tapes with the:
● Tape number
● Date of backup
● Current version of CMS
11. Set the tape write-protect switch to read-only and put the tapes in a safe location.
If you have problems performing a CMSADM backup, see CMSADM backup problems on page 227.
Checking the contents of the CMSADM backup tape
The system lists the files on the backup tape so you can determine if the backup has saved the correct information or verify that a particular file has been saved.
Note:Note: It can take a long time to display the file names on the backup tape.
1. Insert the first backup tape.
2. To list the files on the tape, enter the following command on a single line:
nohup cpio -ivct -C 10240 -I /dev/st# -M “Insert tape %d and press Enter” | tee
where st# is the device name.
The system displays a list of files.
xxxxxxx blocksBackup Verification
xxxxxxx blocks
Please label the backup tape(s) with the date and the current CMS version (rxxxxx.x)

Chapter 7: Maintaining the CMS software
CMS R18 Software Installation, Maintenance, and Troubleshooting for Linux June 2017 150
3. If you are not sure of the device path, enter:
mt -f /dev/st# status
where # is the device name.
The device name is usually /dev/st0. However, the device name used depends on the drive’s SCSI ID. Possible device names are:
The following output is from a DAT 320 tape drive with the write-protect switch set to read-write:
The following output is from a DAT 160 tape drive with the write-protect switch set to read-only:
4. After you have seen the files you are looking for or have confirmed that data on the tape is accurate, press Delete to stop the display.
Backing up CMS to a USB storage deviceThis section contains the following topics:
● Configuring and Connecting a USB storage device on page 151
● Verifying the USB storage device is recognized by the CMS server on page 151
● Mounting a USB storage device on page 154
● Unmounting a USB storage device on page 155
/dev/st0 Indicates the first noncompressing tape drive with the lowest target address
/dev/st1 Indicates the second noncompressing tape drive with the second lowest target address
SCSI 2 tape drive:File number=0, block number=0, partition=0.Tape block size 0 bytes. Density code 0x4d (no translation).Soft error count since last status=0General status bits on (41010000): BOT ONLINE IM_REP_EN
SCSI 2 tape drive:File number=-1, block number=-1, partition=0.Tape block size 0 bytes. Density code 0x0 (default).Soft error count since last status=0General status bits on (4050000): WR_PROT DR_OPEN IM_REP_EN
Backing up CMS
CMS R18 Software Installation, Maintenance, and Troubleshooting for Linux June 2017 151
● Administering a Backup/Restore Device for a USB storage device on page 155
● Performing a CMSADM backup to a USB storage device on page 155
● Performing a CMS Maintenance Back Up of data to a USB storage device on page 157
● Checking the contents of the CMSADM backup to USB on page 157
Configuring and Connecting a USB storage device
The customer is responsible for the proper configuration of the USB storage device and connectivity to the CMS server. CMS servers running RHEL only support USB Removable Mass Storage devices formatted using the ext4 file system. RHEL can detect USB storage devices formatted with other file system types but CMS only supports the ext4 file system. If your USB storage device is formatted with any file system type other than ext4, you need to reformat the device using ext4. You must format the USB storage device as RHEL does not support an unformatted USB storage device to be mounted.
Note:Note: You cannot use CMS to manage the filesystem on the USB device or NFS
mounts. CMS will continue to write backups to the device until all space is used up. The customer is responsible for taking care of all file rotation activities. In this manner, a customer with an extra large NFS area could save 20 copies of the CMSADM backup for their system, whereas a customer with a small USB stick might only want to keep 2 copies on that device.
! Important:Important: Avaya recommends that customers with large CMS configurations such as Dell
R720, Dell R730, HP DL380P G8, and HP DL380P G9 do not use USB Storage devices for data backups. It is the responsibility of the customer to ensure that the CMS server detects the USB storage device and users can perform read and write operations to and from the USB storage device. This document provides information as a reference to aid in troubleshooting USB storage device recognition issues but you should not contact Avaya to resolve any issues with your USB storage devices. Instead, contact your system administrator to resolve any USB storage device issues. Ensure you can write to and read from the installed USB storage devices before performing any Maintenance or CMSADM backups.
Verifying the USB storage device is recognized by the CMS server
Output from the fdisk command provides information that is needed to mount the USB storage device.
1. Insert the USB storage device.

Chapter 7: Maintaining the CMS software
CMS R18 Software Installation, Maintenance, and Troubleshooting for Linux June 2017 152
2. Enter: fdisk -l
The output of the fdisk command is similar to the following:
Note:Note: On Linux® systems, the USB disk path is similar to /dev/sdx as shown in this
output.
3. Determine the size and available disk space of a USB storage device. Refer to Avaya CMS Administration for information on how to determine the amount of space needed for a maintenance backup of data.
Disk /dev/sda: 598.9 GB, 598879502336 bytes255 heads, 63 sectors/track, 72809 cylindersUnits = cylinders of 16065 * 512 = 8225280 bytesSector size (logical/physical): 512 bytes / 512 bytesI/O size (minimum/optimal): 512 bytes / 512 bytesDisk identifier: 0x0002a1a9
Device Boot Start End Blocks Id System/dev/sda1 * 1 73 586341 83 Linux/dev/sda2 74 1318 9999565+ 83 Linux/dev/sda3 1318 2563 10000000 83 Linux/dev/sda4 2563 72810 564257326 f W95 Ext'd (LBA)/dev/sda5 2563 3559 7999999+ 82 Linux swap / Solaris/dev/sda6 3559 26659 185546874+ 83 Linux/dev/sda7 26659 30643 31999999+ 83 Linux/dev/sda8 30643 33879 25999999+ 83 Linux/dev/sda9 33879 35871 15999999+ 83 Linux/dev/sda10 35871 37358 11937499+ 83 Linux/dev/sda11 37358 72810 284772950+ 83 Linux
Disk /dev/sdb: 64.7 GB, 64692944896 bytes64 heads, 32 sectors/track, 61696 cylindersUnits = cylinders of 2048 * 512 = 1048576 bytesSector size (logical/physical): 512 bytes / 512 bytesI/O size (minimum/optimal): 512 bytes / 512 bytesDisk identifier: 0x00000000

Backing up CMS
CMS R18 Software Installation, Maintenance, and Troubleshooting for Linux June 2017 153
Note:Note: Do not run this command if a backup is running since the device is already under
heavy use.
Enter: df -kl
The output of the df -kl command is the following:
Note:Note: If multiple USB storage devices are installed but the system does not display
some devices with the df -kl command, then the USB storage device is probably not formatted properly. Contact your system administrator to correctly configure the USB storage device. The information below is for reference only and should only be performed by experienced personnel.
CAUTION:!
CAUTION: Formatting a USB storage device will overwrite all data on the USB storage device and all data will be lost. Be sure you are certain you want to remove all data on the USB storage device. If you do not want to remove the data on the USB storage device, replace the USB storage device with a different USB device that can be formatted, and restart this procedure from Step 2.
a. To change to the root directory, enter:
cd /
b. To create the ext4 filesystem on the USB storage device, enter:
mkfs -t ext4 /dev/sdx
where
/dev/sdx is the disk path found with the fdisk command.
Example:
mkfs -t ext4 /dev/sdb
Filesystem 1K-blocks Used Available Use% Mounted on/dev/sda2 9842412 2389400 6953036 26% /tmpfs 8142556 204 8142352 1% /dev/shm/dev/sda1 577096 43340 504440 8% /boot/dev/sda3 9842848 472048 8870800 6% /cms/dev/sda7 31497112 181064 29716052 1% /export/home/dev/sda10 11750104 725392 10427840 7% /opt/dev/sda6 182634796 846752 172510704 1% /storage/dev/sda9 15748504 178188 14770320 2% /tmp/dev/sda8 25591516 284664 24006856 2% /var/dev/sdb 62185452 3819768 55206852 7% /CMS_Backup
Chapter 7: Maintaining the CMS software
CMS R18 Software Installation, Maintenance, and Troubleshooting for Linux June 2017 154
! WARNING:!
WARNING: No warnings are given about overwriting old data. Do not run this command unless you are sure you do not want any data from the USB stick.
4. Mount the USB storage device by performing the following steps:
a. Create the mount point if the mount point does not exist, enter:
mkdir /{mount_point}
Example: mkdir /CMS_Backup
b. To mount the USB storage device, enter:
mount /dev/sdx /{mount_point}
where /dev/sdx is the disk path.
Example: mount /dev/sdb /CMS_Backup
c. To verify the USB storage device is mounted, enter:
ls -l /{mount_point}
Example: ls -l /CMS_Backup
The USB storage device directory should display the following message:
5. Verify files can be written to and read from the USB storage device by creating a file on the USB storage device and accessing the file from the USB storage device.
Note:Note: You need to update read and write permissions for the backup directories just
created so that system and data backups can be performed by any user authorized to run these backups.
Mounting a USB storage device
1. Insert the USB storage device.
2. To mount the USB storage device, enter:
mount {mount_point}
Example:
mount /CMS_Backup
Note:Note: Avaya recommends that you create the USB mount points in the root directory to
prevent problems due to administrators misplacing or forgetting mount point information.
drwx------. 2 root root 16384 <timestamp> lost+found

Backing up CMS
CMS R18 Software Installation, Maintenance, and Troubleshooting for Linux June 2017 155
Unmounting a USB storage device
1. To unmount the USB storage device, enter:
Enter: umount /CMS_Backup
Note:Note: USB storage devices used by timetables and backups must be mounted for them
to function properly. Remember to remount all non-tape Backup/Restore Devices after any reboot of the system.
Administering a Backup/Restore Device for a USB storage device
A Backup/Restore Device must be administered before a CMSADM or Maintenance backup to a USB storage device can be performed.
Note:Note: The Backup/Restore Devices screen limits the length of the path name that can
be entered so keep the directory names as short as possible.
1. Open the CMS main menu and select Maintenance > Backup/Restore Devices. The Maintenance Backup/Restore Devices screen is displayed.
a. Enter a Device name.
b. Enter the Path of the USB storage device.
Example: /CMS_Backup
c. Enter a Description.
d. Select the Device Type Other.e. Select Add.
If the USB storage device path entered does not exist, a message similar to the following will be displayed:
To resolve this issue, be sure the USB storage device is accessible and the directory path exists.
f. To view the administered backup devices, select List devices.
Performing a CMSADM backup to a USB storage device
1. Verify that:
Path not valid for type “Other”.Press return to continue:

Chapter 7: Maintaining the CMS software
CMS R18 Software Installation, Maintenance, and Troubleshooting for Linux June 2017 156
● The computer is in a multi-user state (2 or 3). To check whether you are in the multi-user state, enter:
who -r
● The USB storage device is installed and configured.
● To determine the size and available disk space of the USB storage device, enter:
df -kl
CAUTION:!
CAUTION: Ensure the USB storage device has enough space for this CMSADM system backup.
2. Log in as root.
3. Enter:
cmsadm
The system displays the Avaya Call Management System Administration Menu.
4. Enter the number associated with the backup option.
Depending on the configuration of your system, the system displays the following options:
5. Select the number for the Other option.
6. Enter the Path of the USB storage device (the path must not be located on the CMS disk).
Example: /CMS_Backup
7. The CMSADM back up begins. To monitor the progress of the CMSADM backup, enter:
tail -f /cms/install/logdir/backup.log
When the backup is completed, the system displays messages similar to the following:
8. Avaya recommends that CMSADM backup files written to USB storage devices be saved to another location for disaster recovery.
Choose a backup device: 1) Tape 2) OtherEnter choice (1-2) or q to quit:
9399920 blocksBackup Verification9399920 blocks
Backup file is located at /CMS_Backup/CMSADM-rxxxx.x-120330010438-trex

Backing up CMS
CMS R18 Software Installation, Maintenance, and Troubleshooting for Linux June 2017 157
Performing a CMS Maintenance Back Up of data to a USB storage device
1. From the CMS main menu select Maintenance > Back Up Data.The Maintenance Backup Data screen is displayed.
2. Select List devices to view the available backup devices.
3. Press F5 to close the list of devices window.
4. Enter the USB storage Device name.
5. Select Run to perform the Maintenance Back Up of Data.
If the Verification field is set to y, the system displays the following message:
6. Select y to continue.
7. The Maintenance back up of data begins. You can monitor the progress of the data backup by entering:
tail -f /cms/maint/backup/back.log
Messages similar to the following will be written to the /cms/maint/backup/back.log when the backup successfully completes.
8. Avaya recommends that CMS Full Maintenance backup files written to USB storage devices be saved to another location for disaster recovery.
Checking the contents of the CMSADM backup to USB
The system lists the files on the USB storage device so you can determine if the backup has saved the correct information or verify that a particular file has been saved.
Note:Note: It can take a long time to display the file names on the USB storage device.
To check the contents of the CMSADM backup to a USB storage device:
WARNING: Your named device "{mount_point}" is not a tape storageDevice and you have requested a tape verification. Ifyou choose to continue, the verify request willbe ignored.Enter yes to continue or no to cancel.Enter y or Y for yes, n or N for no:
state: 1/cms/install/bin/compress_backup successfully finished: <Day>,<timestamp> error:status: Last backup finished >, <timestamp>.state: 0

Chapter 7: Maintaining the CMS software
CMS R18 Software Installation, Maintenance, and Troubleshooting for Linux June 2017 158
1. Insert the USB storage device.
2. To list the files on the USB storage device, enter:
ls –l /{mount_point}
Example: ls -l /CMS_Backup
3. To list the individual CMSADM files on the USB storage device, enter the following command on a single line:
cpio -ivct -C 10240 -I /{mount_point}/<CMSADM_filename> | more
where <CMSADM_filename> is the filename of the CMSADM backup file of interest.
Example: cpio -ivct -C 10240 -I /CMS_Backup/CMSADM-r18ab.t-121116151708-digger | more
Note: The name of the CMSADM backup file identifies the following:
Type of backup: CMSADM
CMS version at the time of the backup: r18ab.t
Date of the backup: 121116(yymmdd)
Unique identifier of the backup: 151708
CMS hostname: digger
4. After you have seen the files you are looking for or have confirmed that data on the USB storage device is accurate, press Delete to stop the display.
Backing up CMS to a network mount pointThis section contains the following topics:
● Configuring and Connecting to a network mount point on page 158
● Administering a Backup/Restore Device for a network mount point on page 170
● Performing a CMSADM backup to a network mount point on page 171
● Performing a CMS Maintenance Back Up of data to a network mount point on page 172
● Checking the contents of the CMSADM backup to a network mount point on page 173
Configuring and Connecting to a network mount point
The customer is responsible for the proper configuration of network mount points and connectivity to CMS.

Backing up CMS
CMS R18 Software Installation, Maintenance, and Troubleshooting for Linux June 2017 159
! Important:Important: Contact your system administrator before creating any shared mount points or
network mount points. It is the responsibility of the customer to determine if any security violations will be made by creating share points and allowing other systems on the network to access the share points. Creating and sharing mount points should only be performed by experienced personnel.
It is the responsibility of the customer to ensure that CMS detects the network mount point and users can perform read and write operations to and from the network mount point. This document provides information as a reference to aid in troubleshooting network mount point recognition issues but you should NOT contact Avaya to resolve any issues with your network mount points. Instead, contact your system administrator to resolve any network mount point issues. Be sure you can write to and read from network mount points before performing any Maintenance or CMSADM backups.
Configuring an NFS server
The customer is responsible for the proper configuration and connectivity between the NFS server and CMS server. The CMS server does not permit a CMSADM backup and a Maintenance backup to be performed simultaneously, even if multiple backup device types are administered. The following points must be kept in mind while using NFS mounted directories:
● The NFS mount point must be accessible from the CMS server.
● The NFS server must have enough disk space for the backup of data.
● The directory path used when administering an NFS Back Up Device must exist on the NFS server.
The following procedures will provide basic information about configuring a NFS server and CMS server to support NFS backups and restores:
● If the network server is Solaris, continue with Configuring a mount point on a Solaris 10 NFS server on page 160.
● If the network server is RHEL, continue with Configuring a mount point on a Linux NFS server on page 163.
● If the network server is on a VMware deployment, continue with Configuring a mount point to a VMware datastore on page 166.
Note:Note: You cannot use CMS to manage the filesystem on the USB device or NFS
mounts. CMS will continue to write backups to the device until all space is used up. The customer is responsible for taking care of all file rotation activities. In this manner, a customer with an extra large NFS area could save 20 copies of the CMSADM backup for their system, whereas a customer with a small USB stick might only want to keep 2 copies on that device.

Chapter 7: Maintaining the CMS software
CMS R18 Software Installation, Maintenance, and Troubleshooting for Linux June 2017 160
Configuring a mount point on a Solaris 10 NFS server
Perform the following steps on the Solaris network server.
Note:Note: These steps are not performed on the CMS server itself. They are performed on
the NFS server which must be a separate, non CMS, customer provided Solaris computer.
The following table shows variables used in these procedures and the definition of those variables.
1. To create the network mount point, enter:
mkdir /network_server_mt_pt_dir
Example:
mkdir /store
2. Set the permissions for the network_server_mt_pt_dir, enter:
chmod 755 /network_server_mt_pt_dir
chown nobody:nobody /network_server_mt_pt_dir
Note:Note: Later, if you are unable to write to the network mount point on the CMS server
indicated by a “Permission denied” message on the CMS server, you will need to set the owner and group to nfsnobody. Enter:
chown nfsnobody:nfsnobody /network_server_mt_pt_dir
3. To share the Solaris network server, edit /etc/dfs/dfstab and add a line with the Solaris network server directory that will be shared:
a. Enter:
vi /etc/dfs/dfstab
b. Append the Solaris network mount point information to the bottom of the file:
share -F nfs -o rw=CMS_FQDN /network_server_mt_pt_dir
Example:
share -F nfs -o rw=lucy.acme.avaya.com /store
c. Write and save the file.
Variable Definition
network_server_mt_pt_dir Network server directory that will be mounted from the CMS server as an NFS mount point
CMS_FQDN Fully qualified domain name of the CMS server

Backing up CMS
CMS R18 Software Installation, Maintenance, and Troubleshooting for Linux June 2017 161
4. Enable NFS network server:
svcadm -v enable -r network/nfs/server
5. To verify the network service is online, enter:
svcs | grep nfs
6. Restart NFS to activate the share, enter:
svcadm restart network/nfs/server
7. To share all administered mount points, enter:
shareall
8. To see what mount points are being shared, enter:
share
9. To unshare a single mount point, enter:
unshare /network_server_mt_pt_dir
10. To unshare all administered mount points, enter:
unshareall
Perform the following steps on the CMS server.
Note:Note: The Backup/Restore Devices screen limits the length of the path name that can
be entered so keep the directory names as short as possible.
The following table shows variables used in these procedures and the definition of those variables.
1. To create the network mount point directory, enter:
mkdir /NS_backup_dir
Example:
mkdir /nfsbu
2. To add the Solaris network mount point to /etc/fstab, do the following steps:
a. Enter:
vi /etc/fstab
Variable Definition
network_server_mt_pt_dir Network server directory where the CMS server will write and read backup data
NS_backup_dir CMS directory for mounting the Network server directory

Chapter 7: Maintaining the CMS software
CMS R18 Software Installation, Maintenance, and Troubleshooting for Linux June 2017 162
! WARNING:!
WARNING: Be very careful when you make changes to the /etc/fstab file. You must not change existing entries in this file as the system can fail to boot properly as a result of the changes you make.
b. Append the Solaris network mount point information to the bottom of the file.
network_server:/network_server_mt_pt_dir /NS_backup_dir nfs rw,bg,soft,intr,nosuid 0 0
Example:
cms-store:/store /nfsbu nfs rw,bg,soft,intr,nosuid 0 0
c. Write and save the file.
3. To mount the network server mount point directory, enter:
mount /NS_backup_dir
4. To change to the network server mount point directory, enter:
cd /NS_backup_dir
5. To list the contents of the network server mount point directory, enter:
ls -l
Note:Note: The contents of this directory should be the same as that of the directory contents
of the actual network server mount point directory.
6. To determine the size and available disk space of the network server mount point directory, enter:
df -k
Note:Note: There should be adequate space to backup the data. The data compression rate
is very high on most systems. Refer to Avaya CMS Administration for information on how to determine the amount of space needed for a maintenance backup of data.
7. To unmount a network server mount point directory, enter:
umount /NS_backup_dir
Note:Note: Network server mount points used by timetables and backups must be mounted
for them to function properly. Remember to remount all non-tape Backup/Restore devices after unmounting.
8. Continue with Administering a Backup/Restore Device for a network mount point on page 170.

Backing up CMS
CMS R18 Software Installation, Maintenance, and Troubleshooting for Linux June 2017 163
Configuring a mount point on a Linux NFS server
Perform the following steps on the Linux network server.
Note:Note: These steps are not performed on the CMS server itself. They are performed on
the NFS server which must be a separate, non CMS, customer provided Linux computer.
The following table shows variables used in these procedures and the definition of those variables.
Note:Note: These steps are not performed on the CMS server itself. They are performed on
the NFS server which must be a separate, non-CMS, customer-provided RHEL computer.
1. To create the network mount point, enter:
mkdir /network_server_mt_pt_dir
Example:
mkdir /store
2. Set the permissions for the network_server_mt_pt_dir, enter:
chmod 755 /network_server_mt_pt_dir
chown nobody:nobody /network_server_mt_pt_dir
Note:Note: Later, if you are unable to write to the network mount point on the CMS server
indicated by a “Permission denied” message on the CMS server, you will need to set the owner and group to nfsnobody. Enter:
chown nfsnobody:nfsnobody /network_server_mt_pt_dir
3. To allow other systems to access the network mount point, do the following steps:
a. Enter:
vi /etc/exports
Variable Definition
network_server_mt_pt_dir Network server directory that will be mounted from the CMS server as an NFS mount point
CMS_FQDN Fully qualified domain name of the CMS server

Chapter 7: Maintaining the CMS software
CMS R18 Software Installation, Maintenance, and Troubleshooting for Linux June 2017 164
b. Append the RHEL network mount point information to the bottom of the file:
/network_server_mt_pt_dir CMS_FQDN(rw,sync)
Example:
/store lucy.dr.avaya.com(rw,sync)
c. Write and save the file.
4. To configure NFS and portmap to start on reboot:
a. Log in as root.
b. Enter:
ntsysv
c. A GUI interface is started. Scroll through the list provided and verify that the nfs and portmap options are selected. These two options should be marked with an x.
d. Enter TAB to highlight OK.
e. Click OK.
5. Starting the NFS service:
Note:Note: When the /etc/exports file is changed, it is necessary to stop and start the
NFS server.
a. If the NFS service is not running, enter:
/etc/init.d/nfs start
b. If the NFS service is running, enter:
/etc/init.d/nfs restart
6. To verify the network service is running, enter:
service nfs status
Perform the following steps on the CMS server.
Note:Note: The Backup/Restore Devices screen limits the length of the path name that can
be entered so keep the directory names as short as possible.
The following table shows variables used in these procedures and the definition of those variables.
Variable Definition
network_server_mt_pt_dir Network server directory where the CMS server will write and read backup data
NS_backup_dir CMS directory for mounting the Network server directory

Backing up CMS
CMS R18 Software Installation, Maintenance, and Troubleshooting for Linux June 2017 165
Note:Note: The Backup/Restore Devices screen limits the length of the path name that can
be entered so keep the directory names as short as possible.
1. To create the network mount point directory, enter:
cd /
mkdir /NS_backup_dir
Example:
mkdir /nfsbu
2. To add the RHEL network mount point to /etc/fstab, perform the following steps:
a. Enter:
vi /etc/fstab
! WARNING:!
WARNING: Be very careful when you make changes to the /etc/fstab file. You must not change existing entries in this file as the system can fail to boot properly as a result of the changes you make.
b. Append the network mount point information to the bottom of the file:
network_server:/network_server_mt_pt_dir /NS_backup_dir nfs rw,bg,soft,intr,nosuid 0 0
Example:
cms-store:/store /nfsbu nfs rw,bg,soft,intr,nosuid 0 0
c. Write and save the file.
3. To mount the network server mount point directory, enter:
mount /NS_backup_dir
4. To change to the network server mount point directory, enter:
cd /NS_backup_dir
5. To list the contents of the network server mount point directory, enter:
ls -l
Note:Note: The contents of this directory should be the same as that of the directory contents
of the actual network server mount point directory.
6. To determine the size and available disk space of the network server mount point directory, enter:
df -k

Chapter 7: Maintaining the CMS software
CMS R18 Software Installation, Maintenance, and Troubleshooting for Linux June 2017 166
Note:Note: There should be adequate space to backup the data. The data compression rate
is very high on most systems. Refer to Avaya CMS Administration for information on how to determine the amount of space needed for a maintenance backup of data.
7. To unmount a network server mount point directory, enter:
umount /NS_backup_dir
Note:Note: Network server mount points used by timetables and backups must be mounted
for them to function properly. Remember to remount all non-tape Backup/Restore devices after unmounting.
Configuring a mount point to a VMware datastore
You can configure a mount point on a VMware deployment to do CMSADM and maintenance backups to a VMware datastore. Avaya recommends that you create a datastore dedicated to CMS backups and label it for CMS backups so it can be easily found if you have to do a restore.
CAUTION:!
CAUTION: To create a mount point on a VMware deployment, you cannot create the mount point on the same datastore that the CMS software and database are installed. If the CMS datastore and the backups are on the same datastore and that datastore fails, you cannot restore the system.
Adding a hard disk to use as the backup datastore1. Start the vSphere client software on your PC.
2. Log on to the vSphere client software.
3. Select Getting Started > Edit virtual machine settings.
The system displays the Virtual Machine Properties screen.
4. Select Add.
The system displays the Add Hardware screen.
5. On the Device Type page, select Hard Disk and click Next.6. On the Select a Disk page, select Create a new virtual disk and click Next.7. On the Create a Disk page, set the following options:
● For the Disk Size option, decide on how much data you have to back up and set the disk size to that amount. 200 GB is a good starting point.
● Select Thin Provision.
● Select Specify a datastore or datastore cluster.

Backing up CMS
CMS R18 Software Installation, Maintenance, and Troubleshooting for Linux June 2017 167
8. Select Browse to display the available datastores or datastore clusters.
9. Select the datastore or datastore cluster created for CMS backups.
CAUTION:!
CAUTION: Do not select the same datastore that the CMS software and database are installed. If the CMS datastore and the backups are on the same datastore and that datastore fails, you cannot restore the system.
10. Click OK.
The system displays the selected datastore or datastore cluster.
11. Click Next.12. On the Advanced Options page, select Independent and Persistent.13. Click Next.14. On the Ready to Complete page, verify that the settings are correct.
15. Click Finish.
The new virtual hard disk is displayed on the Virtual Machine Properties screen.
16. Write down the name of the disk as shown in the Disk File field. This information is used when creating a mount point and when restoring the system. For example:
[backup-datastore] Call Management System R18/Call Management R18.vmdk
Configuring the mount point for a VMware virtual disk1. Open a console terminal window.
2. Log on to the console.
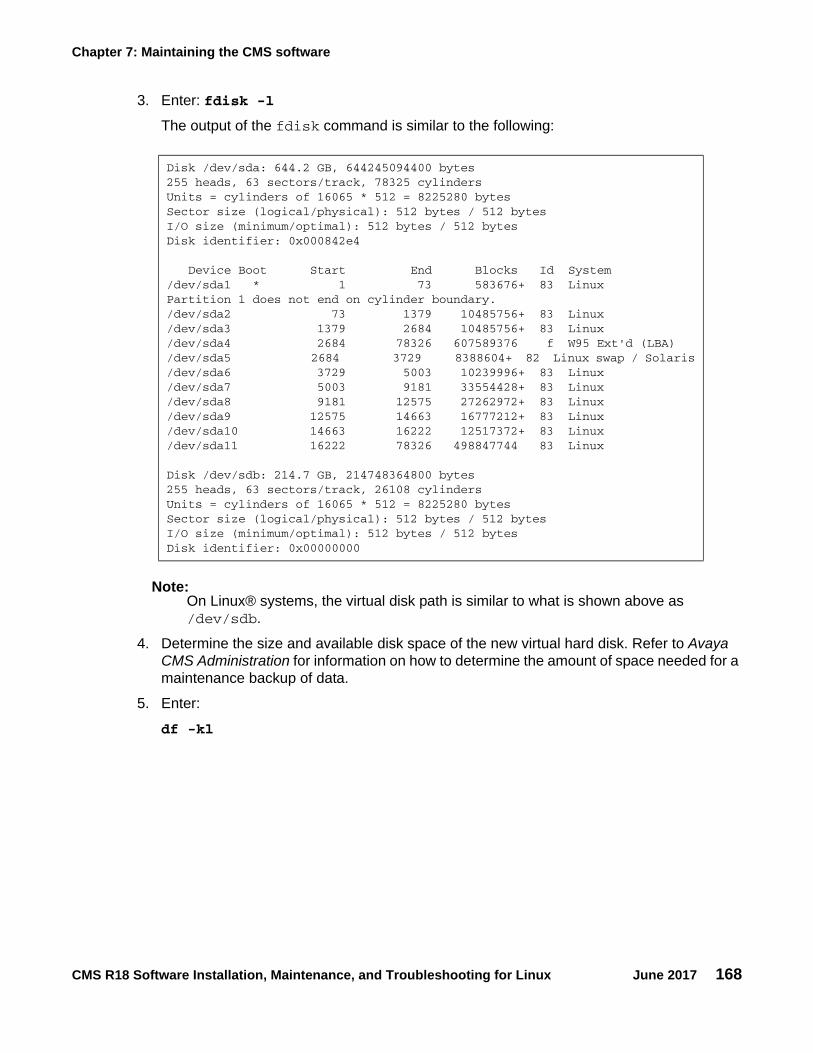
Chapter 7: Maintaining the CMS software
CMS R18 Software Installation, Maintenance, and Troubleshooting for Linux June 2017 168
3. Enter: fdisk -l
The output of the fdisk command is similar to the following:
Note:Note: On Linux® systems, the virtual disk path is similar to what is shown above as
/dev/sdb.
4. Determine the size and available disk space of the new virtual hard disk. Refer to Avaya CMS Administration for information on how to determine the amount of space needed for a maintenance backup of data.
5. Enter:
df -kl
Disk /dev/sda: 644.2 GB, 644245094400 bytes255 heads, 63 sectors/track, 78325 cylindersUnits = cylinders of 16065 * 512 = 8225280 bytesSector size (logical/physical): 512 bytes / 512 bytesI/O size (minimum/optimal): 512 bytes / 512 bytesDisk identifier: 0x000842e4
Device Boot Start End Blocks Id System/dev/sda1 * 1 73 583676+ 83 LinuxPartition 1 does not end on cylinder boundary./dev/sda2 73 1379 10485756+ 83 Linux/dev/sda3 1379 2684 10485756+ 83 Linux/dev/sda4 2684 78326 607589376 f W95 Ext'd (LBA)/dev/sda5 2684 3729 8388604+ 82 Linux swap / Solaris/dev/sda6 3729 5003 10239996+ 83 Linux/dev/sda7 5003 9181 33554428+ 83 Linux/dev/sda8 9181 12575 27262972+ 83 Linux/dev/sda9 12575 14663 16777212+ 83 Linux/dev/sda10 14663 16222 12517372+ 83 Linux/dev/sda11 16222 78326 498847744 83 Linux
Disk /dev/sdb: 214.7 GB, 214748364800 bytes255 heads, 63 sectors/track, 26108 cylindersUnits = cylinders of 16065 * 512 = 8225280 bytesSector size (logical/physical): 512 bytes / 512 bytesI/O size (minimum/optimal): 512 bytes / 512 bytesDisk identifier: 0x00000000

Backing up CMS
CMS R18 Software Installation, Maintenance, and Troubleshooting for Linux June 2017 169
Note:Note: Do not run this command if a backup is running since the virtual hard disk is
already under heavy use.
The output of the df -kl command is similar to the following:
6. Mount the virtual hard disk by performing the following steps:
a. Create the mount point if the mount point does not exist. Enter:
mkdir /MountPoint
Example: mkdir /CMS_Backup
b. To mount the virtual hard disk, enter:
mount /dev/sdX /MountPoint
where /dev/sdX is the path for the virtual hard disk.
Example: mount /dev/sdb /CMS_Backup
c. Enter the following commands to create the file system:
cd /
mkfs -t ext4 /dev/sdX
where /dev/sdX is the path for the virtual hard disk.
Example: mkfs -t ext4 /dev/sdb
d. To verify the USB storage device is mounted, enter:
ls -l /MountPoint
Example: ls -l /CMS_Backup
The virtual hard disk directory should display the following message:
Filesystem 1K-blocks Used Available Use% Mounted on/dev/sda2 10190132 1280808 8385040 14% /tmpfs 8166828 0 8166828 0% /dev/shm/dev/sda1 558108 30884 498044 6% /boot/dev/sda3 10190132 327684 9338164 4% /cms/dev/sda7 32896876 49332 31169824 1% /export/home/dev/sda10 12189612 995764 10567980 9% /opt/dev/sda6 9948008 2924396 6511616 31% /storage/dev/sda9 16382884 61776 15482248 1% /tmp/dev/sda8 26704120 101176 25239796 1% /var
drwx------. 2 root root 16384 <timestamp> lost+found

Chapter 7: Maintaining the CMS software
CMS R18 Software Installation, Maintenance, and Troubleshooting for Linux June 2017 170
e. Enter the following command after you have mounted the file system to confirm it is set up properly:
df -kl
The output of the df -kl command is similar to the following:
7. Verify that files can be written to and read from the virtual hard disk by creating a file on the virtual hard disk and accessing the file from the virtual hard disk.
Note:Note: You need to update read and write permissions for the backup directories just
created so that system and data backups can be performed by any user authorized to run these backups.
8. Enter the following command to automatically reset the mount point if the system reboots:
/dev/sdX ext4 defaults 1 2
Administering a Backup/Restore Device for a network mount point
The user must administer a Backup/Restore device before a CMSADM or Maintenance backup to a network mount point can be performed.
Note:Note: The Backup/Restore Devices screen limits the length of the path name that can
be entered so keep the directory names as short as possible.
1. Open the CMS main menu and select Maintenance > Backup/Restore Devices. The Maintenance Backup/Restore Devices screen will be displayed.
a. Enter a Device name.
b. Enter the Path of the network mount point.
/NS_backup_dir/CMS_hostname
Example: /nfsbu/digger
Note:Note: The /NS_backup_dir/CMS_hostname directory must exist on the network
server.
Filesystem 1K-blocks Used Available Use% Mounted on/dev/sda2 10190132 1280812 8385036 14% /tmpfs 8166828 0 8166828 0% /dev/shm/dev/sda1 558108 30884 498044 6% /boot/dev/sda3 10190132 327688 9338160 4% /cms/dev/sda7 32896876 49332 31169824 1% /export/home/dev/sda10 12189612 995764 10567980 9% /opt/dev/sda6 9948008 2924396 6511616 31% /storage/dev/sda9 16382884 61776 15482248 1% /tmp/dev/sda8 26704120 101180 25239792 1% /var/dev/sdb 206293688 60684 195747244 1% /CMS_Backup

Backing up CMS
CMS R18 Software Installation, Maintenance, and Troubleshooting for Linux June 2017 171
c. Enter a Description.
d. Select the Device Type Other.e. Select Add.
If the directory does not exist on the network server a message similar to the following will be displayed:
To resolve this issue be sure the network server is mounted and the directory exists on the network server.
f. To view the administered backup devices, select List devices.
Performing a CMSADM backup to a network mount point
1. Verify that:
● The computer is in multi-user state (2 or 3). To check whether you are in the multi-user state, enter:
who -r
● The network directory is installed and configured.
● To determine the size and available disk space of the network mount point, enter:
df -k
CAUTION:!
CAUTION: Ensure the network mount point has enough space for this CMSADM system backup.
2. Log in as root.
3. Enter:
cmsadm
The system displays the Avaya Call Management System Administration Menu.
4. Enter the number associated with the backup option.
Depending on the configuration of your system, the system displays the following options:
5. Enter the number associated with the backup option.
Path not valid for type “Other”.Press return to continue:
Choose a backup device: 1) Tape 2) OtherEnter choice (1-2) or q to quit:

Chapter 7: Maintaining the CMS software
CMS R18 Software Installation, Maintenance, and Troubleshooting for Linux June 2017 172
6. Select the number for the Other option.
7. Enter the path of the mounted CMS (the path must not be located on the CMS disk).
/NS_backup_dir/CMS_hostname
Example: /nfsbu/digger
8. The CMSADM back up begins. To monitor the progress of the CMSADM backup, enter:
tail -f /cms/install/logdir/backup.log
When the backup is completed, the system displays messages similar to the following:
9. Avaya recommends that you save CMSADM backup files written to network directories to another location for disaster recovery.
Performing a CMS Maintenance Back Up of data to a network mount point
1. From the CMS main menu select Maintenance > Back Up DataThe Maintenance Backup Data screen is displayed.
2. Select List devices to view the available backup devices.
3. Press F5 to close the list of devices window.
4. Enter the network directory name.
5. Select Run to perform the Maintenance Back Up of Data.
If the Verification field is set to y the system displays the following message:
6. Select y to continue.
===== Begin backup <timestamp>
Converter started <timestamp>Converter completed successfully <timestamp>xxxxxx blocks
===== Finished backup <timestamp>
WARNING: Your named device "/CMS_Backup/CMS_hostname" is not a tape storageDevice and you have requested a tape verification. Ifyou choose to continue, the verify request willbe ignored.Enter yes to continue or no to cancel.Enter y or Y for yes, n or N for no:

Backing up CMS
CMS R18 Software Installation, Maintenance, and Troubleshooting for Linux June 2017 173
7. The Maintenance back up of data begins. You can monitor the progress of the data backup by entering:
tail -f /cms/maint/backup/back.log
The system writes messages similar to the following to the /cms/maint/backup/back.log when the backup successfully completes:
Checking the contents of the CMSADM backup to a network mount point
The system lists the files on the network mount point so you can determine if the backup has saved the correct information or verify that a particular file has been saved.
Note:Note: It can take a long time to display the file names on a network mount point.
To check the contents of the CMSADM backup to a network mount point:
1. To list the files on the network mount point, enter:
ls –l /NS_backup_dir/CMS_hostname
2. To list the individual CMSADM files on the network mount point, enter the following command on a single line:
cpio -ivct -C 10240 -I /NS_backup_dir/CMS_hostname/<CMSADM_filename> | more
where <CMSADM_filename> is the filename of the CMSADM backup file of interest.
Example: cpio -ivct -C 10240 -I /nfsbu/digger/ CMSADM-r18aa.w-120717150230-digger | more
where the name of the CMSADM backup file identifies the following:
Type of backup: CMSADM
CMS version at the time of the backup: r18aa.w
Date of the backup: 120717(yymmdd)
Unique identifier of the backup: 150230
CMS hostname: digger
The system displays a list of files.
3. After you have seen the files you are looking for or have confirmed that data on the network mount point is accurate, press Delete to stop the display.
status: Updating backup history ...state: 1/cms/install/bin/compress_backup successfully finished: <timestamp>error:status: Last backup finished <timestamp>.state: 0

Chapter 7: Maintaining the CMS software
CMS R18 Software Installation, Maintenance, and Troubleshooting for Linux June 2017 174
Changing the system date and time This section describes how to change the UNIX system date and time. For example, a change due to daylight savings time.
This section includes the following topics:
● Checking the RHEL system date and time on page 174
● Setting the system date and time on page 174
● Setting the system country and time zones on page 175
Checking the RHEL system date and timeTo verify that the system time is correct:
1. Enter:
date
2. If the system time is correct there is no need to proceed further with this procedure. If the system time is not correct, continue with Setting the system date and time on page 174.
Setting the system date and timeDo the following steps to change the Linux system time:
1. Turn off the CMS software.
2. Log in as root.3. Enter the root password.
4. Set the time and date by entering:
date mmddHHMM[yyyy]
Example:
● mm (month): Enter the month (numeric). Range: 1-12 (1=January, 2=February, and so on).
● dd (day): Enter the day of the month. Range: 1-31
● HH (hour): Enter the hour of day, military time. Range: 00-23.
● MM (minute): Enter the minute of the hour. Range: 00-59.
● [yyyy] (year): Entering the year is optional. Enter the year, with all four digits (for example, 2000).

Changing the system date and time
CMS R18 Software Installation, Maintenance, and Troubleshooting for Linux June 2017 175
5. Continue with Setting the system country and time zones on page 175.
6. Turn on the CMS software.
Setting the system country and time zonesTo set the country and time zones:
1. Log in as root and enter the root password.
2. Enter:
vi /etc/sysconfig/clock
3. Edit the /etc/sysconfig/clock file and set the ZONE variable to equal the appropriate value.
For example:
Modify the file by entering ZONE=”America/Denver”.
Note:Note: For more information on time zones, see Changing the time zone on page 175.
4. Save and quit the file by pressing Esc and entering:
:wq!
5. Reboot the machine by entering:
/usr/sbin/shutdown -r now
Changing the time zone1. Log in to the system as root.
2. Check which time zone your machine is currently using. Enter:
date
The output of the date command is shown in the following example:
In this example, the current time zone of the system is PST.
ZONE="America/Denver"
Mon 17 Jan 2005 12:15:08 PM PST
Chapter 7: Maintaining the CMS software
CMS R18 Software Installation, Maintenance, and Troubleshooting for Linux June 2017 176
3. Change to the directory /usr/share/zoneinfo. There is a list of time zone regions in this directory. Choose the most appropriate region. if you live in Canada or United States of America, this directory is the America directory.
4. Back up the previous time zone configuration by copying it to a different location. Enter:
mv /etc/localtime /etc/localtime-old
5. Create a symbolic link to the appropriate time zone from /etc/localtime. For example:
ln -sf /usr/share/zoneinfo/Europe/Amsterdam /etc/localtime
6. If you have the rdate utility, update the current system time. For example:
/usr/bin/rdate -s time-a.nist.gov
7. Set the ZONE entry in the file /etc/sysconfig/clock file.
For example: America/Los_Angeles8. Set the hardware clock. Enter:
/sbin/hwclock --systohc
Working with RHEL rpmsWhen you upgrade your CMS software, or administer a new CMS installation, you may need to:
● Verify what RHEL rpms are currently installed
● Install a RHEL rpm
● Remove one or more RHEL rpms
This section includes the following topics:
● Installing RHEL rpms on page 176
● Checking installed RHEL rpms on page 177
● Removing a RHEL rpm on page 177
Installing RHEL rpmsThe initial release of R18 CMS running on RHEL (Linux®) does not require any rpm updates. This section will be updated when rpm updates are available for installation.
Working with CMS patches
CMS R18 Software Installation, Maintenance, and Troubleshooting for Linux June 2017 177
Checking installed RHEL rpmsTo check the RHEL rpms:
1. Enter:
rpm -qa
The system displays a list of installed RPMs.
Removing a RHEL rpmTo remove a RHEL rpm:
CAUTION:!
CAUTION: Remove a RHEL rpm only when instructed by Avaya Services or by a release letter.
1. Enter:
rpm -e package_name
The package_name is identified by Avaya Services or in the release letter.
2. If Avaya Services notes or personnel state a reboot is required, enter:
shutdown -r now
The system reboots.
Working with CMS patchesThis section provides procedures for maintaining patches for CMS.
This section includes the following topics:
● CMS patch requirements on page 177
● Installing CMS patches on page 178
● Removing CMS patches on page 179
CMS patch requirements The three occasions when you may have to install CMS patches are:

Chapter 7: Maintaining the CMS software
CMS R18 Software Installation, Maintenance, and Troubleshooting for Linux June 2017 178
● During a factory installation
● Immediately after upgrading the CMS software
● In the field on an existing system to correct a problem with the original software.
Loading patches after an upgrade:If you are loading patches immediately after upgrading your system, it is best to turn off the CMS software until you have the patches installed. The patches have different prerequisites for installation. Some require that the CMS software be turned off, others require that data collection be turned off, and still others require the CMS software to be in single-user mode. To be absolutely safe, and to help the upgrade proceed as quickly as possible, turn off the CMS software.
Loading patches as a bug fix:If you are loading patches as part of a factory installation or on an existing system in the field without upgrading your base load, you can install the patches without turning the CMS software off. The system will display a message if you need to do anything special to accomplish the load.
The CMS patch readme file lists the run-level requirements for each patch.
Note:Note: The auth_set tool must have been run sometime in the past before you can
install patches. Call the National Customer Care Center or your product distributor to have authorizations installed.
Installation of all available patches is recommended. If you believe that you should not be installing a particular patch, call the National Customer Care Center or consult with your product distributor before deciding to omit installation of a patch.
Installing CMS patchesCustomers should contact their Avaya support organization or business partner regarding the installation of patches.
In the filenames shown in the procedure:
● Replace the xx.y string with the load name for the patch, for example, fa.b.
● Replace the {n} with the patch number for that load, for example, 3.
For Linux systems:
1. Download r18xx.y_cmsp{n}-l.bin to /tmp on the CMS server.
2. Download r18xx.y_cmsp{n}-l.md5 to / (the root directory) on the CMS server.

Working with CMS patches
CMS R18 Software Installation, Maintenance, and Troubleshooting for Linux June 2017 179
3. Enter the following commands to check the md5 sum of the downloaded file:
cd /
md5sum r18xx.y_cmsp{n}-l.bin
4. Verify that the md5 sum matches what was downloaded in the .md5 file.
5. Turn off CMS.
6. Enter the following command to install the patch:
./r18xx.y_cmsp{n}-l.bin
Follow the prompts to install the patch.
7. Turn on CMS.
Removing CMS patches To remove CMS patches:
1. Log in as root.2. Enter:
cmssvc
The system displays the CMSSVC menu.
3. Enter the number associated with the patch_rmv option.
The system lists the patches that are installed on the system and prompts you to select a patch.
4. Type the name of the patch that you want to remove exactly as it is displayed in the list, and press Enter.The system asks you to verify the removal.
5. Enter: y
The system displays messages similar to the following example for each patch that is removed:
@(#) backout patch 1.0 96/08/02
Removing patch package for cmspx-s:. . . ..
Making package database consistent with restored files:Patch x has been backed out.

Chapter 7: Maintaining the CMS software
CMS R18 Software Installation, Maintenance, and Troubleshooting for Linux June 2017 180
Adding and removing users from password agingIf a password is aged, the user will be forced to change their password after a specified amount of time. All CMS and UNIX users are effected by the passwd_age option in the CMSADM menu unless they are added to the password aging exclude file. For more information about using the passwd_age option in the CMSADM menu, see Using passwd_age on page 133.
CAUTION:!
CAUTION: Do not manually edit password files. Modify the password files using the procedures in this section. Incorrectly editing password files can result in the system having to be rebuilt back to factory standards.
This section includes the following topics:
● Determining if a password is aged on page 180
● Excluding users from password aging on page 181
● Removing users from the password aging exclude file on page 182
● Aging specific passwords at different rates on page 182
Determining if a password is agedTo determine if a password is being aged:
1. Enter:
passwd -S user_name
where user_name is the name of the user.
The system will display one of the following messages:
● If a new user has not created their password, the system displays the following message:
Note:Note: The user’s password will not age unless it is created.
● If the user’s password is not aged, the system displays the following message:
user1 LK <timestamp> 0 99999 7 -1 (Password locked.)
user1 PS <timestamp> 0 99999 7 -1 (Password set, SHA512 crypt.)

Adding and removing users from password aging
CMS R18 Software Installation, Maintenance, and Troubleshooting for Linux June 2017 181
● If the user’s password is being aged, the system displays the following message:
Note:Note: The message includes the user name, the password status, the date the
password was last changed, the minimum numbers of days required between password changes, the maximum number of days the password is valid, and the number of days the user will be warned before the password expires.
● If the user’s password is locked, the system displays the following message:
Excluding users from password agingIt is recommended that you exclude specific users before turning password aging on in order to avoid additional password administration. You may need to exclude specific CMS or UNIX users from password aging. Some custom applications use CMS logins.
To exclude a specific password from being aged:
1. Log in to the system as root.2. Determine the password status of the user by entering:
passwd -S user_name
where user_name is the name of the user. For more information, see Determining if a password is aged on page 180.
3. Enter:
cd /cms/db
4. Enter:
vi age_pw_exclude
5. Add the user name you want to exclude from password aging.
6. Save and close the file by pressing Esc. Then enter:
:wq!
7. If password aging was previously in effect for the user, enter:
passwd -x -1 user_name
where user_name is the name of the user, and
where 1 is the number one.
user1 PS <timestamp> 0 14 7 -1 (Password set, SHA512 crypt.)
user1 LK <timestamp> x xxxxx x xx (Password locked.)

Chapter 7: Maintaining the CMS software
CMS R18 Software Installation, Maintenance, and Troubleshooting for Linux June 2017 182
Removing users from the password aging exclude fileUsers that have been added to the exclude file will not age.You can remove a specific user from the password aging exclude file. Users that are removed from the exclude file will age normally.
To remove a specific user from the exclude file:
1. Log in to the system as root.2. Determine the password status of the user by entering:
passwd -S user_name
where user_name is the name of the user. For more information, see Determining if a password is aged on page 180.
3. Enter:
cd /cms/db
4. Enter:
vi age_pw_exclude
5. Remove the user name for the password you want to age.
6. Save and close the file by pressing Esc. Then enter:
:wq!
7. Enter:
passwd -x maxdays -w 7 user_name
where maxdays is the number of days before the password expires, and
where user_name is the name of the user you want to age.
Aging specific passwords at different ratesThe password aging option in the CMSADM menu globally effects users. Individual users can have their passwords aged at different rates.
To age a specific user:
1. Log in to the system as root.2. Determine the password status of the user by entering:
passwd -S user_name
where user_name is the name of the user. For more information, see Determining if a password is aged on page 180.

Maintaining the chkDisks crontab
CMS R18 Software Installation, Maintenance, and Troubleshooting for Linux June 2017 183
3. Enter:
passwd -x maxdays -w warning user_name
where maxdays is the number of days before the password expires, and
where warning is the number of days a password aging warning is displayed before the password expires, and
where user_name is the name of the user you want to age.
Note:Note: The system will not display a password aging warning for users who only access
CMS through Supervisor. Supervisor users will be prompted to enter a new password when their current password expires. Only users who access CMS through the command line will receive a warning message before their password expires.
Maintaining the chkDisks crontab The chkDisks crontab runs each night and checks to see whether any potential or actual drive problems have been logged. For example, loss of the primary boot drive. The results of the search are mailed to the root user.
This section includes the following topics:
● Verifying chkDisks on page 183
● Changing the chkDisks run time on page 184
● Canceling chkDisks on page 184
Verifying chkDisksTo verify that cron is running:
1. Enter at the # prompt:
crontab -l
2. Check the listing to see that there is an entry for chkDisks.

Chapter 7: Maintaining the CMS software
CMS R18 Software Installation, Maintenance, and Troubleshooting for Linux June 2017 184
Changing the chkDisks run timeThe line tells the system to run chkDisks every day at 0 minutes past hour zero (12:00 AM). You can change that schedule by changing the first five fields as necessary. The fields, in order of appearance, are: minute, hour, day of the month, month of the year, and day of the week. An asterisk means “all legal values.” The /olds/chkDisks line in the cron file is generally in the following format:
0 * * * * /olds/chkDisks > /dev/null 2>&1
For more information, see the manual (man) page for the crontab command.
Canceling chkDisksTo stop cron from running:
1. Enter at the # prompt:
crontab -e
2. With the file loaded in the editor, comment out the entry for chkDisks and write and quit the file.
Report Query StatusCMS R16.2 or later have added two types of report query logs. These logs track the queries made by historical reports and they show the queries that have completed and the queries that are currently being run. This information can be used to determine who is running what reports and if those report queries are affecting system performance.
Information about query logs● Types of report query logs:
- qlog: a log where entries are made upon query completion- idbm log: a log showing the query that is currently running
● These logs are always in operation implying that they do not need to be turned off/on
● Comparison between the report query logs
- qlog has more detail, but is only updated after the report query has completed
Report Query Status
CMS R18 Software Installation, Maintenance, and Troubleshooting for Linux June 2017 185
- idbm log shows currently running queries and is updated at completion of the query to add completion status
● Uses of report query logs
- qlog can show past report execution to determine who ran queries and how long the queries took
- idbm log can be used to determine what queries are running currently. This can be used to determine if a particular query is taking a long time and thus negatively impacting system performance.
- Log information in either logs cannot be used to kill a particular report; it is debug information only
● qlog features
- Entries are made upon query/report completion- Applies to historical report queries only- Log entries have information about start time, user, run time, completion status, task ID
and query text- qlogs are stored in directory /cms/db/log as qlog, qlog.01, qlog.02, etc.- CMS administers the size and number of qlog files in the file /cms/db/LogAdmin/
qlog on the server- Example entry:
● idbm log features
- The system makes entries for currently running queries.- Applies to historical report queries only. - IDBM stands for Informix Database Manager. These are the processes that interface
with the historical database.- Log entries contain information about start time, user and query text. - The idbm logs are kept in the server in directory /cms/db/log as idbm.’process ID’.
For example: idbm.17, idbm.1001, idbm.13027, etc.- Example entry:
- If no query is running in that idbm process, the log will show the last query run along with its status.
<timestamp> USER=dsb123TIME=00:00 STATUS=0TASK=13018QUERY=select vdn, starttime, intrvl, acdcalls, acdtime, abncalls, busycalls,disccalls,incalls,othercalls from hvdn where row_date = 40432 and acd = 1order by vdn, starttime
<timestamp> dsb123 select value, item_name from synonyms where item_type='split' and acd_no=1

Chapter 7: Maintaining the CMS software
CMS R18 Software Installation, Maintenance, and Troubleshooting for Linux June 2017 186
- Example status entry:
About the Archiving processThe System Setup: Storage Intervals window contains the information on when archiving takes place. See the following example:
In this example, the ACD default time zone is Eastern Standard Time. The daily archiver runs at 12:35 am Eastern Standard Time each day.
Archiving for all administered time zones for all tenants and ACDs runs at this same time each day.
The weekly archive runs two hours after the daily archive on Sunday each week. Sunday is the day after the weekly stop day of Saturday.
The monthly archive runs four hours after the daily archive on the first day of each month and creates the monthly archive for the previous month.
<timestamp> STATUS=0

About time zone archiving with additional time zones
CMS R18 Software Installation, Maintenance, and Troubleshooting for Linux June 2017 187
About time zone archiving with additional time zonesFor daily archive to complete, a full 24 hours of interval data must be available for the ACD time zone and any other additional time zone. If a full 24 hours of interval data is not available for a particular time zone, the daily archiver will use the next oldest relevant range of interval data for the daily archive.
For example, the archiver is administered to run at 12:35 am Eastern Standard Time (EST). If a tenant is administered with the Pacific Standard Time (PST) zone, the actual time in PST is 8:35 am the previous day when the archiver runs at 12:35 am EST. This time is 4 hours earlier and implies that the previous day is not yet complete in PST.
Therefore, when the daily archive runs at 12:35 am Eastern Standard Time on a Sunday, the full 24 hours for Saturday has not yet completed in the Pacific Standard Time Zone. The daily archive will complete for the 24 hour period of Saturday in Eastern Standard Time, but the daily archiver cannot complete archiving for the Pacific Standard Time zone since 24 hours of data does not yet exist for Saturday.
The daily archiver will use the next oldest 24 hour period for the Pacific Standard Time zone and create a daily archive for Friday. The result is that the daily archives of some time zones will lag behind the default time zone depending on the actual time differences that exist. See the following diagram:
The weekly archiver is run the day after the administered Week Stop Day and will run two hours after the daily archive on that day.
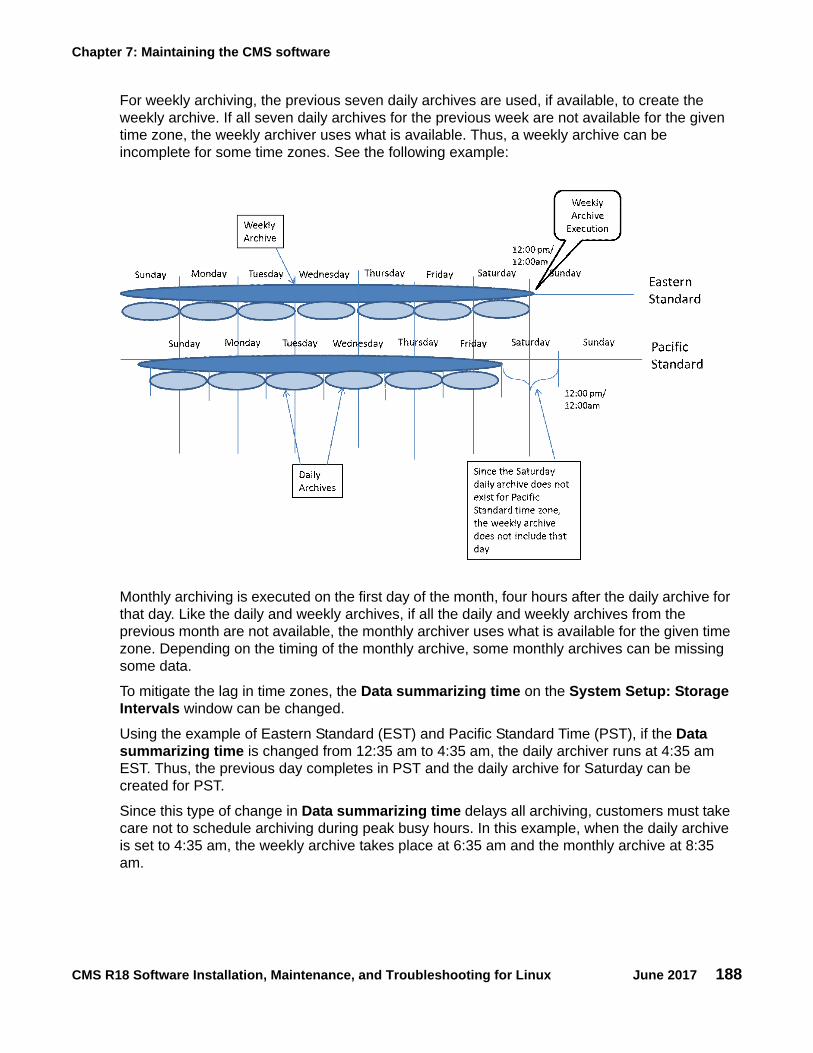
Chapter 7: Maintaining the CMS software
CMS R18 Software Installation, Maintenance, and Troubleshooting for Linux June 2017 188
For weekly archiving, the previous seven daily archives are used, if available, to create the weekly archive. If all seven daily archives for the previous week are not available for the given time zone, the weekly archiver uses what is available. Thus, a weekly archive can be incomplete for some time zones. See the following example:
Monthly archiving is executed on the first day of the month, four hours after the daily archive for that day. Like the daily and weekly archives, if all the daily and weekly archives from the previous month are not available, the monthly archiver uses what is available for the given time zone. Depending on the timing of the monthly archive, some monthly archives can be missing some data.
To mitigate the lag in time zones, the Data summarizing time on the System Setup: Storage Intervals window can be changed.
Using the example of Eastern Standard (EST) and Pacific Standard Time (PST), if the Data summarizing time is changed from 12:35 am to 4:35 am, the daily archiver runs at 4:35 am EST. Thus, the previous day completes in PST and the daily archive for Saturday can be created for PST.
Since this type of change in Data summarizing time delays all archiving, customers must take care not to schedule archiving during peak busy hours. In this example, when the daily archive is set to 4:35 am, the weekly archive takes place at 6:35 am and the monthly archive at 8:35 am.
CMS R18 Software Installation, Maintenance, and Troubleshooting for Linux June 2017 189
Chapter 8: Recovering a CMS server
This section provides the procedures for recovering data on a Call Management System (CMS) that has non-functioning hardware or software corruption. Personnel at the Avaya Services will need assistance from an on-site technician or the site’s CMS administrator in order to perform most of the procedures in this chapter.
This section includes the following topics:
● Using the nohup command on page 189
● Performing a CMS maintenance restore on page 190
● Recovering a mirrored system after disk failure on page 196
● Performing a CMSADM restore of a system on page 200
● Restoring a system without a CMSADM or system backup on page 217
● Restoring specific files from the CMSADM backup tape on page 219
Using the nohup commandWhen executing commands that take a long time to complete, such as cpio commands, use the nohup command to ensure that the command completes without interruption if the data line disconnects.
An example of the nohup command is:
nohup cpio -icmudf -C 10240 -I <backup_media_path> “cms” | tee
where backup_media_path depends on the media type.
Examples:
When system reboots are required, verify that your terminal type is set correctly after the reboot.
Tape /dev/st0
USB storage device /CMS_Backup/<CMSADM_filename>
Network mount point /NS_backup_dir/<CMSADM_filename>
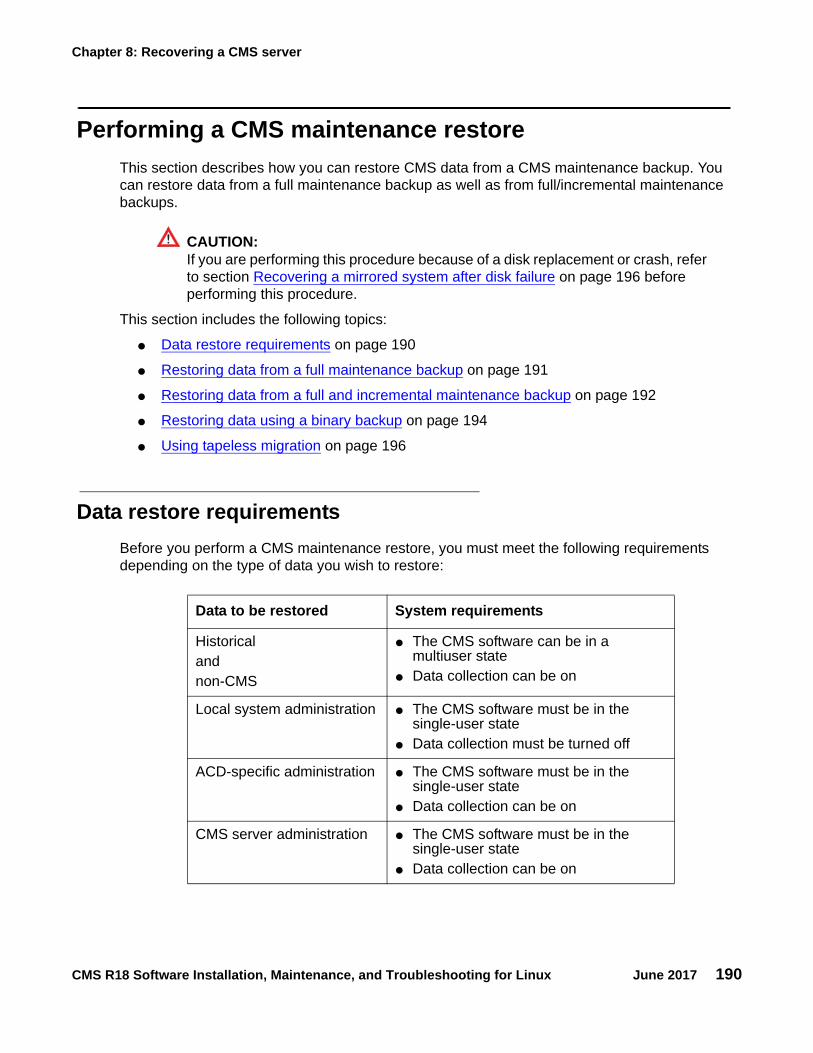
Chapter 8: Recovering a CMS server
CMS R18 Software Installation, Maintenance, and Troubleshooting for Linux June 2017 190
Performing a CMS maintenance restore This section describes how you can restore CMS data from a CMS maintenance backup. You can restore data from a full maintenance backup as well as from full/incremental maintenance backups.
CAUTION:!
CAUTION: If you are performing this procedure because of a disk replacement or crash, refer to section Recovering a mirrored system after disk failure on page 196 before performing this procedure.
This section includes the following topics:
● Data restore requirements on page 190
● Restoring data from a full maintenance backup on page 191
● Restoring data from a full and incremental maintenance backup on page 192
● Restoring data using a binary backup on page 194
● Using tapeless migration on page 196
Data restore requirementsBefore you perform a CMS maintenance restore, you must meet the following requirements depending on the type of data you wish to restore:
Data to be restored System requirements
Historicalandnon-CMS
● The CMS software can be in a multiuser state
● Data collection can be on
Local system administration ● The CMS software must be in the single-user state
● Data collection must be turned off
ACD-specific administration ● The CMS software must be in the single-user state
● Data collection can be on
CMS server administration ● The CMS software must be in the single-user state
● Data collection can be on

Performing a CMS maintenance restore
CMS R18 Software Installation, Maintenance, and Troubleshooting for Linux June 2017 191
Restoring data from a full maintenance backup
CAUTION:!
CAUTION: Perform this procedure when only the full CMS maintenance backups are available. If an incremental maintenance backup is also available, see Restoring data from a full and incremental maintenance backup on page 192.
1. Load, install, or mount the most recent full maintenance backup media.
Note:Note: At this point the system will not contain any customer defined Backup/Restore
Devices for USB storage devices or network mount points. If the backup media is on a USB storage device or network mount point you will need to create a Backup/Restore Device, using the CMS menu options Maintenance | Backup/Restore Devices, before the data can be restored. If the backup media is on a USB storage device refer to the section Administering a Backup/Restore Device for a USB storage device on page 155. If the backup media is on a network mount point refer to the section Administering a Backup/Restore Device for a network mount point on page 170.
2. From one of the windows at a console, log in to the system by using a CMS administrator login ID, for example, su - cms. Enter the correct password if prompted.
3. Enter cms
A series of prompts about system status may appear before the system displays the CMS main menu.
4. Enter the correct terminal type.
● If the CMS version on the backup media is the same CMS version installed on the system then the data can be restored, continue with Step 5.
● If the CMS version on the backup media is the not the same CMS version installed on the system then the data needs to be migrated, continue with Step 7.
5. Select the Maintenance option.
6. Select the Restore Data option.
In the Restore from last backup (y/n) field, enter: n
Continue with Step 9.
7. Select the System Setup option.
8. Select the R3 Migrate Data option.
Continue with Step 9.
9. Enter the Device name that you want to restore/migrate data from. This can be the name of the tape device, the NFS mount point or the USB storage device. You can get the device names by pressing Enter, selecting List devices and pressing Enter again.

Chapter 8: Recovering a CMS server
CMS R18 Software Installation, Maintenance, and Troubleshooting for Linux June 2017 192
10. For the remaining options, do not make any changes.
11. Press Enter, select Run and press Enter again.
Note:Note: To execute a Restore/Migrate operation, CMS has to be in single user mode and
data collection for the switch has to be turned off.
12. The system restores/migrates the system administration data, ACD-specific data, historical data, and non-CMS data.
Note:Note: If the restore/migrate action fails, select Maintenance > Error Log Report to
analyze the cause of failure.
13. Go to the Free Space Allocation window that is located in the CMS System Setup subsystem and verify that no adjustments need to be made. For more information about Free Space Allocation, see Avaya Call Management System Administration.
Restoring data from a full and incremental maintenance backup
CAUTION:!
CAUTION: Perform this procedure only if both full and incremental CMS maintenance backups are available. If only a full maintenance backup is available, see Restoring data from a full maintenance backup on page 191.
1. Load, install, or mount the most recent full maintenance backup media.
2. From one of the windows at a console, log in to the system by using a CMS administrator login ID, for example su - cms. Enter the correct password if prompted.
3. Enter cms.
A series of prompts about system status may appear before the system displays the CMS main menu.
4. Enter the correct terminal type.
5. Depending on the type of data to be restored, it may not be necessary to perform Steps a or b. See the table in Data restore requirements on page 190 to determine which steps to perform.
a. To change the CMS software to single user mode:
1. Select System Setup - CMS State.
The system displays the CMS State window.
2. Enter an x in the Single-user mode field and press Enter twice.
3. Press F5 to return to the main menu.
b. Turn off data collection:

Performing a CMS maintenance restore
CMS R18 Software Installation, Maintenance, and Troubleshooting for Linux June 2017 193
1. Select System Setup - Data Collection.
The system displays the Data Collection window.
2. Enter the name of the ACD.
3. Use Tab to move the Off field and enter: x
4. Press Enter, select Modify, and press Enter again.
5. Repeat Steps 1 through 4 for each ACD.
6. Press F5.
The system displays the CMS main menu.
6. Select Maintenance - Restore Data.
7. In the Restore Data window, select the following options:
8. Press Enter, select Run, and press Enter again.
9. When the full maintenance restore is finished:
a. Remove the full backup media and insert the most current incremental backup media.
b. Repeat Steps 7 and 8 as needed.
c. Continue with Step 10.
10. After the incremental restore is finished, press F5.
The system displays the CMS main menu.
Item Values specified or selected
Device name Tape Device name
USB storage device name
Network Device name
Restore from last backup?
n
Restore historical data from
(leave blank)
ACDs to restore All ACDs
Data to restore Local System Administration data
ACD-specific administration data
Historical data
Non-CMS data

Chapter 8: Recovering a CMS server
CMS R18 Software Installation, Maintenance, and Troubleshooting for Linux June 2017 194
11. Depending on the type of data to be restored, it may not be necessary to perform Steps a or b. See the table in Data restore requirements on page 190 to determine which steps to perform.
a. Turn data collection on:
1. Select System Setup - Data Collection.
The system displays the Data Collection window.
2. Enter the name of the ACD.
3. Use the Tab key to move to the On field and enter: x
4. Press Enter, select Modify, and press Enter again.
5. Repeat Steps 1 through 4 for each ACD.
6. Press F5.
The system displays the CMS main menu.
b. Take the CMS software out of single user mode:
1. Select System Setup - CMS State.
The CMS State window displays.
2. Enter an x in the Multi-user mode field and press Enter twice.
3. Press F5.
The system displays the CMS main menu.
12. Select Logout and press Enter.13. Go to the Free Space Allocation window that is located in the CMS System Setup
subsystem and verify that no adjustments need to be made.
For more information about Free Space Allocation, see Avaya Call Management System Administration.
Restoring data using a binary backupThe binary restore procedure restores the entire database from the binary backup file. This procedure does not allow system data, call center administration data, or historical data to be restored individually which is similar to the LAN backup and restore process.
The binary backup file is used to restore the CMS database after a CMSADM restore has been performed which means that the binary backup file and CMSADM backup must have been created with the same version of CMS.
You can restore binary data from a tape, a USB storage device, or from a network mount point.
Performing a CMS maintenance restore
CMS R18 Software Installation, Maintenance, and Troubleshooting for Linux June 2017 195
Restore database using a binary backup from tape
1. Log in to CMS as root.
2. Do one of the following:
● If a CMSADM restore was performed to recover the system due to system failures, disk crashes, or power outages, continue with Step 3.
● If a CMSADM restore was not performed to recover the system, continue with Step 6.
3. Insert the CMSADM backup tape into the tape drive.
4. Change to the root directory:
cd /
5. To restore custom reports, enter:
cpio -imudv -C 10240 -I /dev/st0 "cms/db/gem/c_custom/*" "cms/db/gem/h_custom/*" "cms/db/gem/r_custom/*"
6. Insert the binary backup tape into the tape drive.
7. To restore the database enter:
/cms/install/bin/db_restore <tape_device>
If a <tape_device> is not entered, the default device will be /dev/st0.
Restore database using a binary backup from a mount point
To restore a binary backup from a USB storage device or a network mount point, perform the following steps:
1. Log in to CMS as root
2. Do one of the following:
● If you performed a CMSADM restore to recover the system due to system failures, disk crashes, or power outages, continue with Step 3.
● If you performed a CMSADM restore to recover the system, continue with Step 6.
3. Mount the backup device containing the CMSADM backup.
4. Change to the root directory:
cd /

Chapter 8: Recovering a CMS server
CMS R18 Software Installation, Maintenance, and Troubleshooting for Linux June 2017 196
5. To restore custom reports, which are backed up as part of the CMSADM backup, enter the following command on a single line:
cpio -imudv -C 10240 -I {mount_point/CMSADM_filename} "cms/db/gem/c_custom/*" "cms/db/gem/h_custom/*" "cms/db/gem/r_custom/*"
where backup_media_path is dependent on the media type.
Example of backup_media_paths:
6. If the mount point to the binary backup file does not exist, remount the mount point and verify it is accessible.
Note:Note: If a mount point does not exist perform one of the following steps to create the
mount point:
● If the binary backup file is on a USB storage device refer to Configuring and Connecting a USB storage device on page 151.
● If the binary backup file is on a network server refer to Configuring and Connecting to a network mount point on page 158.
7. Execute the restore script:
/cms/install/bin/db_restore /<mount_point/<binary_backup_filename>
Using tapeless migrationTapeless migration is necessary when upgrading from a system that has a tape drive to a new CMS R18 system that does not. In this case, the Remote Tape Migration (RTM) tool, which is available from downloads on the support site, is used to copy the CMS maintenance backup tape on the existing system to a file on the new system. Once this file is created, you can migrate data from that file. The use of the RTM tool is only performed once and when the migration is completed, the customer should perform backups using one of the supported tapeless backup options for the new system. For more on tape and non-tape device compatibility, see section “Tape Compatibility” in Avaya CMS Upgrade Express.
Recovering a mirrored system after disk failureThis section contains procedures for the recovery of a mirrored system after disk drive failure.
USB storage device /CMS_Backup/<CMSADM_filename>
Network mount point /NS_backup_dir/<CMSADM_filename>

Recovering a mirrored system after disk failure
CMS R18 Software Installation, Maintenance, and Troubleshooting for Linux June 2017 197
! Important:Important: The system will need to be rebuilt to factory standards and any data will need to
be restored if both disks in a matched pair fail. If this condition is met, see Performing a CMSADM restore of a system on page 200.
This section includes the following topics:
● Prerequisites on page 197
● Recovering a system after a single disk fails on page 197
● Recovering a system after a pair of mirrored disks fail on page 198
PrerequisitesBefore you recover a mirrored system, perform the following tasks:
● Verify that the alternate boot device is set up.
● Search the output for Failed or Degraded device(s).
● Identify the faulty disk or disks. See Determining which disks have failed on page 197 for more information.
● The system must boot off of a functioning boot disk.
Recovering a system after a single disk failsUse this procedure to recover a system after a single disk failure. The Dell and HP disks are hot-swappable.
1. Determine which disk should be replaced.
See Determining which disks have failed on page 197.
2. Attach an ESD wrist strap to the metal chassis of the computer and to your wrist.
3. Remove the faulty disk and replace it with a new disk.
The new disk will automatically synchronize.
4. Monitor the progress of the disk rebuilding by entering:
/olds/olds -synch_stat
Determining which disks have failedUse this procedure to determine which disks have failed.

Chapter 8: Recovering a CMS server
CMS R18 Software Installation, Maintenance, and Troubleshooting for Linux June 2017 198
1. Enter the following command:
/olds/chkDisks
If no disks have failed, no results are displayed. If there are failures, you will see results similar to the following examples:
2. Check the log file to determine which disks have failed.
Recovering a system after a pair of mirrored disks failUse this procedure to recover a system after a pair of mirrored disks fail. Refer to the table below to determine if a pair of mirrored disks have failed. The Dell and HP disks are hot-swappable.
SEVERE ERROR: Enclosure 32, RAID Drive Slot 0 is in state FailedPossible Disk Errors! Please check /olds/log/err.log for details
RAID Drive state: missing harddrive(s)SEVERE ERROR: The logical device is degradedPossible Disk Errors! Please check /olds/log/err.log for details
Table 3: Dell R220 and R620 LOW mirrored disk pairs
Primary disk Mirrored disk
slot 0 Unpaired
Table 4: Dell R620 MID and R630 mirrored disk pairs
Primary disk Mirrored disk
slot 0 slot 1
slot 2 slot 3
Table 5: Dell R720 and R730 mirrored disk pairs
Primary disk Mirrored disk
slot 0 slot 1
slot 2 slot 3
slot 4 slot 5
slot 6 slot 7

Recovering a mirrored system after disk failure
CMS R18 Software Installation, Maintenance, and Troubleshooting for Linux June 2017 199
Determine which disks should be replaced. For more information on determining which disks should be replaced, see Determining which disks have failed on page 197.
If a mirrored pair of disks have failed on the Dell or HP platforms then the system has to be completely restored. Continue with Performing a CMSADM restore of a system on page 200 or Performing a LAN restore.
An example of a mirror pair disk failure on a Dell R620/R720 is that disks in slot 0 and slot 1 fail. Since disks in slot 0 and slot 1 are a pair of mirrored disks and a failure implies that a complete system restore is needed, you must continue with Performing a CMSADM restore of a system on page 200 or Performing a LAN restore. If disks in slot 0 and slot 2 fail then each disk is considered a single disk failure and can be replaced using the process defined under Recovering a system after a single disk failure.
slot 8 slot9
slot 10 slot 11
Table 6: HP DL380P G8 mirrored disk pairs
Primary disk Mirrored disk
slot 1 slot 5
slot 2 slot 6
slot 3 slot 7
slot 4 slot 8
Table 7: HP DL380P G9 mirrored disk pairs
Primary disk Mirrored disk
slot 1 slot 7
slot 2 slot 8
slot 3 slot 9
slot 4 slot 10
slot 5 slot 11
slot 6 slot 12
Table 5: Dell R720 and R730 mirrored disk pairs
Primary disk Mirrored disk

Chapter 8: Recovering a CMS server
CMS R18 Software Installation, Maintenance, and Troubleshooting for Linux June 2017 200
Performing a CMSADM restore of a systemThis section describes how to restore an entire system. You must re-enable the system to boot. Then restore the system software from the CMSADM backup tape. You will have to restore the system if a mirror pair of disks fail.
This section includes the following topics:
● Prerequisites on page 200
● Restoring a system from a CMSADM backup on page 200
PrerequisitesBefore you begin restoring the system, perform the following tasks:
● Obtain the CMSADM file system backup tapes.
● Obtain the most recent maintenance backup tapes.
● Replace any defective hardware.
Restoring a system from a CMSADM backupThis section provides the procedures for restoring a system from a CMSADM backup.
! Important:Important: The software disc must be listed as the first boot device in the BIOS settings on
the Dell or HP system. If it is not, you can use BIOS settings to configure the software disc as the first boot device.
Read the following Important message if any of the following are true:
● You have changed the motherboard of the CMS server since the last cmsadm backup was run.
● The system is a Virtual CMS.

Performing a CMSADM restore of a system
CMS R18 Software Installation, Maintenance, and Troubleshooting for Linux June 2017 201
! Important:Important: For security purposes, R18 CMS includes a CMS hardware authorization feature.
During the initial CMS feature authorization process, the system preserves a snapshot of the configuration of the CMS server and hardware. The cmsadm backup process preserves CMS hardware information. If hardware changes are detected during the restore process, the CMS hardware feature is reset to not authorized. To authorize the new CMS hardware configuration, Avaya provisioning is required to re-run the auth_set command because the auth_set command requires a password that is only available to authorized Avaya provisioning. The restore process will display a message if the auth_set command needs to be run. To minimize downtime, prior to restoring the system, the customer must make arrangements with Avaya provisioning to run the auth_set command as part of the restore process. Once Avaya provisioning has run the auth_set command, the system preserves the new CMS hardware information.
1. Verify that disks are installed in slots 0, 1, 2 and 3.
2. Disconnect all USB storage devices and put them in a safe place.
! Important:Important: Remove all USB storage devices. If any USB storage devices are connected to
the system, the restore process uses the USB storage device for the boot hard drive and the system fails to boot after the restore process completes.
3. Turn on power to all the external devices, such as tape drives.
4. Turn on the monitor.
! Important:Important: If the system prompts about a change in configuration while powering up, press F
to accept the current configuration.
5. Power on the system.
6. Insert the Avaya RHEL software disc into the disc drive.
Make sure that the first boot device on the Dell or HP system is the CD or DVD-ROM. You can use BIOS settings to configure the CD or DVD-ROM as the first boot device.
7. The system should boot from the DVD and display startup messages.

Chapter 8: Recovering a CMS server
CMS R18 Software Installation, Maintenance, and Troubleshooting for Linux June 2017 202
Note:Note: If the system does not boot from the DVD you will need to reboot the system
using the shutdown -r now command
The system displays the following messages as the system boots:
The system can display the following message:
8. If the systems displays this message, press Enter.The system displays a list of Usage options once the system boots to the Avaya RHEL software disc.
9. Enter rs at the boot: prompt. Press Enter.
Note:Note: The system displays blue Welcome to Red Hat Enterprise Linux for x86_64
screens as the various packages get installed.
.
.
.Initializing Firmware Interfaces…Initialization Complete.Lifecycle Controller: Collecting System Inventory…Scanning for devices…..
Press any key to continue.
########################## IMPORTANT!! ############################## ## PROCEEDING WILL INSTALL A NEW OPERATING SYSTEM. ## ## ALL DATA WILL BE LOST!! PROCEED WITH CAUTION. ## #####################################################################
USAGE: Type “ks” then press <enter> to install preconfigured Linux and copy CMS software to the disk. Type “rs” then press <enter> to install preconfigured Linux and make the system ready to restore from a CMSADM backup. Type “rescue” then press <enter> to rescue installed system
boot:

Performing a CMSADM restore of a system
CMS R18 Software Installation, Maintenance, and Troubleshooting for Linux June 2017 203
! Important:Important: Do not leave the system unattended before configuring the network device as this
can result in the screen becoming blank. If the screen becomes blank, and the user returns and presses the Enter key to activate the screen, the system can interpret the entry as accepting eth0 as the ethernet port to configure. The Dell R620/R720 systems do not boot properly if the ethernet port is configured as eth0.
10. The system displays the following messages as the Linux® operating system is installed:
11. The system displays the Networking Device screen.
Note:Note: Use the arrow keys to toggle between the options.
12. For a Dell R620/R720 system, highlight eth2. For an HP DL380P G8 system, highlight eth0.
Press Enter.The system displays a Configure TCP/IP screen.
13. By default, the system selects both the IPv4 and IPv6 network options. Use the space bar to select and deselect options.
! Important:Important: You must select the Manual Configuration option under the IPv4 option.
● If the customer is not using IPv4, clear IPv4.
● If the customer is using IPv4, select Manual Configuration under the IPv4 options.
● If the customer is not using IPv6, clear IPv6.
● If the customer is using IPv6, select the appropriate item from the IPv6 options that meets the requirements of the customer.
14. Use the right arrow key to highlight the OK button. Press Enter.The system displays the Manual TCP/IP Configuration screen. Use the down arrow key to move through the input fields.
Loading vmlinuxz…..
IPv4 Address/Netmask 198.1.1.1/255.255.255.0
Gateway 198.1.1.254
Name Server 198.1.1.10

Chapter 8: Recovering a CMS server
CMS R18 Software Installation, Maintenance, and Troubleshooting for Linux June 2017 204
Note:Note: The values in the above TCP/IP Configuration box are examples only.
15. Use the down arrow key to highlight the OK button. Press Enter.The system completes the configuration with the options selected and installs the Linux® packages.
Once the system configuration is complete, the system displays a Reboot message.
16. Press Enter to reboot.
The system reboots and displays the RHEL login screen.
Note:Note: If the system fails to boot and displays Hard Disk Error messages, ensure that
no USB storage devices are inserted into any USB slots of the system. If the system has any USB storage devices inserted, remove the USB storage device and repeat the entire restore procedure.
17. Log in to the system as root. The root password is blank.
Press Enter for the password.
18. To configure the system network, place the cursor in the console window and enter:
/cms/toolsbin/netconfig
Formatting..Installation Starting..Package Installation..Packages completed xxx of xxx..
Complete
Congratulations, your Red Hat Enterprise Linux installation iscomplete.
Please reboot to use the installed system. Note that updates maybe available to ensure the proper functioning of your system andinstallation of these updates is recommended after the reboot.
Reboot
Performing a CMSADM restore of a system
CMS R18 Software Installation, Maintenance, and Troubleshooting for Linux June 2017 205
19. The system displays the following prompt:
20. Accept the default value eth0 and press Enter.
21. Enter y, then press Enter.22. The system displays the following prompt:
23. Enter the host name of the CMS and press Enter.The system displays the following prompt:
! WARNING:!
WARNING: Do not use a hyphen (-) when selecting the host name of the system. The operating system can accept a hyphen (-) in the host name but some third-party tools used with CMS do not support the hyphen (-) in the host name.
24. Perform one of the following actions:
● If you have not entered the correct host name, enter n, then press Enter. The network configuration process returns to Step 22.
● If you have entered the correct host name, enter y, then press Enter. The network configuration process continues.
25. The system displays the following prompt:
Enter the network interface name from following name(s): eth0 eth1 eth2 eth3 (default eth0)
ENTER>
You have entered [ eth0 ]. Is this correct? (y|n)
Enter the host name of the CMS system
ENTER>
You have entered [ cms_hostname ]. Is this correct? (y|n)
Enter the domain name of the CMS system
ENTER>

Chapter 8: Recovering a CMS server
CMS R18 Software Installation, Maintenance, and Troubleshooting for Linux June 2017 206
26. Enter the domain name of the CMS and press Enter.The system displays the following prompt:
27. Perform one of the following actions:
● If you have not entered the correct domain name, enter n, then press Enter. The network configuration process returns to Step 25.
● If you have entered the correct domain name, enter y, then press Enter. The network configuration process continues.
28. The system displays the following prompt:
29. Enter the IP address of the CMS and press Enter.The system displays the following prompt:
30. Perform one of the following actions:
● If you have not entered the correct IP address, enter n, then press Enter. The network configuration process returns to Step 28.
● If you entered the correct IP address, enter y, then press Enter. The network configuration process continues.
31. The system displays the following prompt:
32. Enter the netmask of the CMS and press Enter.The system displays the following prompt:
33. Perform one of the following actions:
● If you have not entered the correct netmask, enter n, then press Enter. The network configuration process returns to Step 31.
You have entered [tmp.domain.org]. Is this correct? (y|n)
Enter the IP address of the CMS system
ENTER>
You have entered [IP_address]. Is this correct? (y|n)
Enter the netmask of the CMS system
ENTER>
You have entered [ xxx.xxx.xxx.xxx ]. Is this correct? (y|n)

Performing a CMSADM restore of a system
CMS R18 Software Installation, Maintenance, and Troubleshooting for Linux June 2017 207
● If you entered the correct netmask, enter y, then press Enter. The network configuration process continues.
34. The system displays the following prompt:
35. Enter the default gateway of the CMS and press Enter.The system displays the following prompt:
36. Perform one of the following actions:
● If you have not entered the correct default gateway, enter n, then press Enter. The network configuration process returns to Step 34.
● If you entered the correct default gateway, enter y, then press Enter. The network configuration process continues.
37. The system displays the following prompt:
38. Enter the DNS server(s) of the CMS and press Enter.The system displays the following prompt:
39. Perform one of the following actions:
● If you have not entered the correct DNS server(s), enter n, then press Enter. The network configuration process returns to Step 37.
● If you entered the correct DNS server(s), enter y, then press Enter. The network configuration process continues.
40. The system displays the following prompt:
Enter the default gateway of the CMS system
ENTER>
You have entered [xxx.xxx.xxx.xxx]. Is this correct? (y|n)
Enter the DNS server(s) seperated by space (up to three servers)
ENTER>
You have entered [ xxx.xxx.xxx.xxx yyy.yyy.yyy.yyy ]. Is this correct? (y|n)
Enter the search domains separated by space (tmp.domain.org tmp2.domain.org)
ENTER>
Chapter 8: Recovering a CMS server
CMS R18 Software Installation, Maintenance, and Troubleshooting for Linux June 2017 208
41. Enter the search domain(s) of the CMS and press Enter.The system displays the following prompt:
42. Perform one of the following actions:
● If you have not entered the correct search domains, enter n, then press Enter. The network configuration process returns to Step 40.
● If you entered the correct search domains, enter y, then press Enter. The network configuration process continues.
The system displays the network configuration accepted by the user.
43. Perform one of the following actions:
● If any of the network configuration entries are not correct, enter n, then press Enter. The network configuration process returns to Step 19.
● If the network configuration entries are correct, enter y, then press Enter. The network configuration process continues.
The system attempts to bring up the network and if successful, displays a successfully finished message.
44. Perform one of the following actions:
● If the network configuration was successful, continue with Step 45.
● If the network configuration was not successful, troubleshoot the network for outages and repeat this procedure. If the network configuration fails again, escalate through normal channels.
Test your network settings to ensure that the network settings are working properly.
You have entered [tmp.domain1.org tmp.domain2.org]. Is this correct? (y|n)
Interface: eth0 CMS Hostname: cms_hostname Domainname: tmp.domain.org CMS IP address: IP_address Netmask: xxx.xxx.xxx.xxx Gateway: xxx.xxx.xxx.xxx DNS Server1: xxx.xxx.xxx.xxx DNS Server2: yyy.yyy.yyy.yyy DNS Server3: Search domains: tmp.domain1.org tmp.domain2.org
Are the above inputs correct? (Y|N)
Bring the network up. Please wait...
<timestamp> /cms/toolsbin/netconfig successfully finished
Performing a CMSADM restore of a system
CMS R18 Software Installation, Maintenance, and Troubleshooting for Linux June 2017 209
45. Reboot the system. Enter:
shutdown -r now
As the system boots, the system displays a series of messages. The display stops at the RHEL Welcome screen.
46. Log in to the system as root. The root password is blank at this time.
Press Enter for the password.
47. Open a virtual console window.
Test your network settings to ensure that the network settings are working properly.
48. Enter:
ifconfig eth0
49. Enter:
ping {system on your local network}
Press Control+C to exit the ping command.
Note:Note: If the network does not respond, enter ifup eth0. If the network still does not
respond, repeat this procedure and verify that the values entered are correct.
The system provides the following options for accessing the CMSADM backup media:
CAUTION:!
CAUTION: The CMSADM backup does not preserve mount point directories. If the default backup device is a mount point then the restore process can fail during CMS setup if the mount point path does not exist. If this occurs, create the mount point path and rerun CMS setup from a flat file. Look for the default backup device path in the /cms/install/cms_install/cms.install file for the mount point path that needs to be created. Refer to section Using the flat file on page 76 for instructions on how to run CMS setup from a flat file.
● If the CMSADM backup is on tape, continue with step 50.
● If the CMSADM backup is on a USB device, continue with step 51.
● If the CMSADM backup is on a network mount point, continue with step 52.
50. To access the CMSADM backup from tape:
a. Insert the CMSADM backup tape into the tape drive.
b. Change to the /tmp directory. Enter:
cd /tmp
c. Enter the following command on a single line:
cpio -icmudv -C 10240 -I /dev/st# "cms/install/bin/restore"
where st# is replaced with the tape device name.

Chapter 8: Recovering a CMS server
CMS R18 Software Installation, Maintenance, and Troubleshooting for Linux June 2017 210
d. Press Ctrl+C.
The system stops searching the CMSADM backup media device.
Note:Note: If you do not press Ctrl+C, the system continues to search the entire backup
media device. This search could take several hours to complete.
e. Verify that the restore script has the correct permissions by entering:
chmod +x cms/install/bin/restore
The system sets the correct permissions to execute the script. If the permissions for the script are not correct, the restore fails.
f. Restore the system from the media device. Enter:
cms/install/bin/restore /dev/st#
g. Continue with step 53.
51. To access the CMSADM backup from a USB storage device:
a. Insert the CMSADM backup USB storage device.
b. Determine the device number associated with the USB storage device using the following steps:
1. Enter:
fdisk -l
The output of the fdisk command looks as follows:
2. Make a note of the USB_Device_Name for the USB storage device, such as sdb.
3. Create a mount point for the USB storage device. Enter:
mkdir {mountpoint}
Example:
mkdir /a
4. Mount the USB storage device.
mount /dev/{USB_Device_Name} {mountpoint}
Example:
mount /dev/sdb /a
Disk /dev/sdb: 64.7 GB, 64692944896 bytes64 heads, 32 sectors/track, 61696 cylindersUnits = cylinders of 2048 * 512 = 1048576 bytesSector size (logical/physical): 512 bytes / 512 bytesI/O size (minimum/optimal): 512 bytes / 512 bytesDisk identifier: 0x00000000

Performing a CMSADM restore of a system
CMS R18 Software Installation, Maintenance, and Troubleshooting for Linux June 2017 211
5. Verify the backup files are on the USB storage device. Enter:
ls -al /a
c. Change to the /tmp directory. Enter:
cd /tmp
d. Enter the following command on a single line:
cpio -icmudv -C 10240 -I /{mountpoint}/<CMSADM_filename> "cms/install/bin/restore"
where CMSADM_filename is the CMSADM system backup file of interest. The CMSADM filename must be entered exactly like the path on the media device.
Example:
cpio -icmudv -C 10240 -I /a/CMSADM-r18ab.t-121116151708-trex “cms/install/bin/restore”
where the name of the CMSADM backup file identifies the following:
Type of backup: CMSADM
CMS version at the time of the backup: r18ab.t
Date of the backup: 121116 (yymmdd)
Unique identifier of the backup: 151708
CMS hostname: trex
e. Press Ctrl+C.
The system stops searching the CMSADM backup media device.
Note:Note: If you do not press Ctrl+C, the system continues to search the entire backup
media device. This search could take several hours to complete.
f. Verify that the restore script has the correct permissions by entering:
chmod +x cms/install/bin/restore
The system sets the correct permissions to execute the script. If the permissions for the script are not correct, the restore fails.
The system displays the following message:
g. Enter y.
Warning: The CMS database needs to be initialized and the CMSData needs to be manually restored from a CMS maintenance backup.This requires CMS and IDS to be shutdown!!!
Do you want to continue? (y or n) :
Chapter 8: Recovering a CMS server
CMS R18 Software Installation, Maintenance, and Troubleshooting for Linux June 2017 212
h. Restore the system from the media device. Enter:
cms/install/bin/restore /{mountpoint}/<CMSADM_filename>}
i. Continue with Step 53.
52. To access the CMSADM backup from a NFS mount point, enter:
mkdir {NFS_Mount_point}
mount {NFS server}:{NFS directory} {NFS_Mount_point}
a. Verify the backup files are on the NFS mounted directory.
ls -al {NFS_Mount_point}
b. Change to the /tmp directory, enter:
cd /tmp
c. Enter the following command on a single line:
cpio -icumdv -C 10240 -I {NFS_Mount_point}/{CMSADM_filename} "cms/install/bin/restore"
where CMSADM_filename is the CMSADM system backup file of interest. The CMSADM file name must be entered exactly like the path on the media device.
Example:
cpio -icmudv -C 10240 -I /a/CMSADM-r18ab.t-121116151708-trex “cms/install/bin/restore”
where the name of the CMSADM backup file identifies the following:
Type of backup: CMSADM
CMS version at the time of the backup: r18ab.t
Date of the backup: 121116 (yymmdd)
Unique identifier of the backup: 151708
CMS hostname: trex
d. Press Ctrl+C.
The system stops searching the CMSADM backup media device.
Note:Note: If you do not press Ctrl+C, the system continues to search the entire backup
media device. This search could take several hours to complete.
e. Verify that the restore script has the correct permissions by entering:
chmod +x cms/install/bin/restore
The system sets the correct permissions to execute the script. If the permissions for the script are not correct, the restore fails.

Performing a CMSADM restore of a system
CMS R18 Software Installation, Maintenance, and Troubleshooting for Linux June 2017 213
f. Restore the system from the media device. Enter:
cms/install/bin/restore {NFS_Mount_point}/{CMSADM_filename}
g. Continue with Step 53.
53. The system restores the files on the backup media. The system automatically reboots after all the files on the media device have been transferred.
Note:Note: If a problem occurs during the restore process, the system displays prompts
indicating a problem. Follow the instructions displayed by the system.
54. Log in to the system as root.
! Important:Important: The system can reboot several times during the restore process. The reboots can
occur at random intervals throughout the restore process. You may have to repeat this step several times.
55. The restore process can be monitored by opening a virtual console window and entering:
tail -f /cms/install/logdir/restore/restorecms.log
Note:Note: In order to monitor the restore progress, you must open a virtual console window
and enter this command each time the system reboots.
When the restore process is complete, the system displays the following message at the end of restorecms.log:
● If the CMS restore completes successfully, continue with Step 63.
● If the CMS restore fails, continue with Step 56.
56. The restore process can fail during the CMS setup for the following reasons:
a. The backup device in the /cms/install/cms_install/cms.install file is a USB storage device or a network server mount point and the path does not exist or is not accessible.
b. The system detected changes to the CMS hardware due to either a motherboard replacement, MAC address change, or IP address change.
● If the system displays messages about the auth_set command, then the CMS hardware has changed and you must run the auth_set command. Continue with Step 57.
● If the restore process fails but the system does not display any resolution messages, check the admin log for failure messages. Continue with Step 59.
CMS Restore Completed Successfully

Chapter 8: Recovering a CMS server
CMS R18 Software Installation, Maintenance, and Troubleshooting for Linux June 2017 214
57. If the system detects a change in the motherboard, MAC address, or IP address of the CMS server during the restore process, the system resets the CMS hardware feature to not authorized. The CMS server can display either of the following messages:
or
58. Check the CMS authorizations to see whether or not the CMS hardware feature is authorized. Enter:
a. cmssvc
Current CMS hardware does not match the authorized hardware.Please run cmssvc option 2 (auth_set) to correct.
The system has detected changes to the CMS hardware or IP address.
Avaya Services personnel must run the auth_set command for the CMS system to accept the new CMS hardware configuration.
The auth_set command is password protected. The password isonly available to authorized Avaya personnel.
- Customers in the US should call the CMS Technical Services Organization at 1-800-242-2121- Customers outside the US should contact your Avaya representative or distributor.
To complete CMS Setup after the CMS hardware configuration has been authorized run the command:
/cms/install/bin/restore database
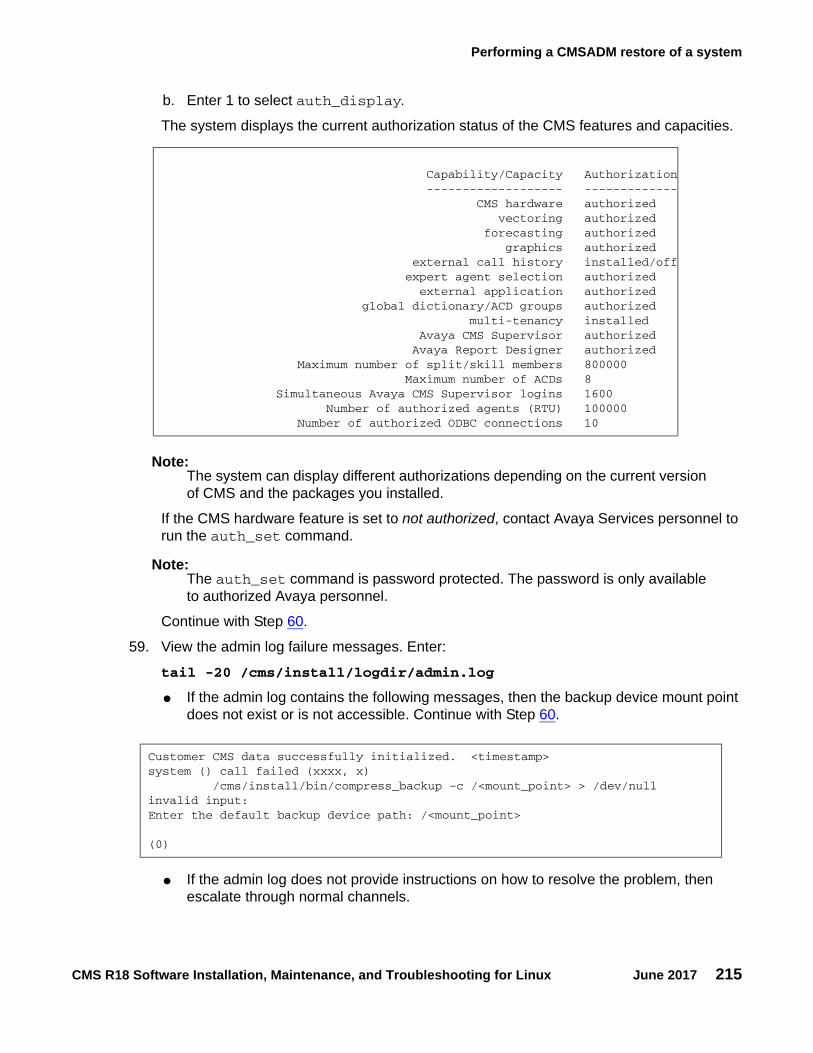
Performing a CMSADM restore of a system
CMS R18 Software Installation, Maintenance, and Troubleshooting for Linux June 2017 215
b. Enter 1 to select auth_display.
The system displays the current authorization status of the CMS features and capacities.
Note:Note: The system can display different authorizations depending on the current version
of CMS and the packages you installed.
If the CMS hardware feature is set to not authorized, contact Avaya Services personnel to run the auth_set command.
Note:Note: The auth_set command is password protected. The password is only available
to authorized Avaya personnel.
Continue with Step 60.
59. View the admin log failure messages. Enter:
tail -20 /cms/install/logdir/admin.log
● If the admin log contains the following messages, then the backup device mount point does not exist or is not accessible. Continue with Step 60.
● If the admin log does not provide instructions on how to resolve the problem, then escalate through normal channels.
Capability/Capacity Authorization ------------------- ------------- CMS hardware authorized vectoring authorized forecasting authorized graphics authorized external call history installed/off expert agent selection authorized external application authorized global dictionary/ACD groups authorized multi-tenancy installed Avaya CMS Supervisor authorized Avaya Report Designer authorized Maximum number of split/skill members 800000 Maximum number of ACDs 8 Simultaneous Avaya CMS Supervisor logins 1600 Number of authorized agents (RTU) 100000 Number of authorized ODBC connections 10
Customer CMS data successfully initialized. <timestamp>system () call failed (xxxx, x) /cms/install/bin/compress_backup –c /<mount_point> > /dev/nullinvalid input:Enter the default backup device path: /<mount_point>
(0)

Chapter 8: Recovering a CMS server
CMS R18 Software Installation, Maintenance, and Troubleshooting for Linux June 2017 216
60. Verify that the default backup device path exists and is accessible:
a. View the /cms/install/cms_install/cms.install file and note the default backup device path currently defined.
b. Create the default backup path, if it does not exist.
c. Mount the default backup path and verify that the mount point is accessible.
61. Complete the CMS setup by entering:
/cms/install/bin/restore database
62. You can monitor the restore process by opening a virtual console window and entering:
tail -f /cms/install/logdir/restore/restorecms.log
When the restore process is complete, the system displays the following message at the end of restorecms.log:
If the restore fails again, escalate through normal channels.
63. After the restore has completed successfully, power the system off and back on.
shutdown -h 0
Wait 15-30 seconds and then press the power button to power the system back on. During the boot up process, the system can perform some relabeling of the disks which is acceptable.
The system boots and displays the RHEL Welcome screen.
CAUTION:!
CAUTION: CMS does not automatically restart during the boot up process when the system is powered off using the shutdown -h 0 command or if the CMS server experiences any power failures. In either of these instances, you need to manually turn on CMS using the appropriate option from the CMSSVC menu once the system is powered back on.
64. Log in to the system as root.
Note:Note: At this point the root password is no longer blank.
65. The system can display a Removed Sound Devices screen. If the system displays this screen, perform the following steps:
a. Check the Do not ask again for these devices box.
b. Click the Yes button.
66. Open a virtual console window.
CMS Restore Completed Successfully

Restoring a system without a CMSADM or system backup
CMS R18 Software Installation, Maintenance, and Troubleshooting for Linux June 2017 217
67. Verify the network settings after the system has rebooted.
ifconfig -a | more
eth0 should now be setup as the port in use, instead of eth2.
ping {system on local network}
68. Verify that CMS is running and ACD links are active after the reboot.
Restoring a system without a CMSADM or system backup If a CMSADM backup or system backup is not available, the system must be reinstalled with all software back to the original factory configuration.
To restore a system without a CMSADM backup or system backup:
1. Re-install the entire operating system according to Installing the RHEL operating system on page 17.
2. Configure the entire operating system according to Configuring the RHEL operating system on page 27.
3. Re-install CMS and supporting software according to Installing CMS and supporting software on page 45.
4. Restore any available CMS data from the most recent CMS maintenance backup.
5. Contact the Avaya Professional Services Organization (PSO) for any previously installed customization.
Installing Access Security Gateway and the CMS Authentication File
Access Security Gateway (ASG) is an authentication interface used to protect the system logins associated with CMS. ASG uses a challenge and response protocol to validate the user and reduce unauthorized access.
Note:Note: ASG is automatically installed on new systems. During a base load upgrade,
follow the instructions in Base Load Upgrade to install or upgrade ASG.
To install ASG on your CMS server, perform the following steps:
Note:Note: System in the following steps refers to the CMS server.
1. Log in as root.
Chapter 8: Recovering a CMS server
CMS R18 Software Installation, Maintenance, and Troubleshooting for Linux June 2017 218
2. Verify that CMS is installed on the system. Enter:
rpm -q cms
If CMS is installed, the system displays the following:
3. Insert the Avaya Call Management System disc into the disc drive.
4. To install the ASG package, enter:
mount /dev/dvd /mnt
/mnt/cmslxasg.bin
The system displays a list of status messages at the time of installation. It takes less than a minute to install the ASG package.
● If the system successfully installs the ASG package, the system displays the following message at the end of the installation process:
● If the system does not install the ASG package successfully, the system displays the error on the screen and at the end of the installation, the installer displays a message to review the output on the screen.
5. From your PC, go to the following URL:
https://rfa.avaya.com/rfa-docs/index.jsp
6. Click on the Start the AFS Application button to access the Authentication File System (AFS) application.
7. Select Avaya CMS as the product and then select the appropriate release from the drop down list.
8. Navigate to the download page by following the instructions in the intermediate pages and pressing Next.
9. Download the CMS Authentication File (AF) file to your PC.
Note:Note: You can download the AF file to your PC prior to CMS installation.
10. Transfer the AF file from your PC to the CMS server.
11. Install the AF file. If you transferred the AF file from your PC to the /tmp directory of the CMS server, run the following command to install the AF file:
/opt/cmsasg/usr/local/bin/loadauth -af -l /tmp/AF-7000009669-11.xml
cms-r18-XX.X.x86_64
INFO:Install ASG on CMS complete.Review output on screen above
Restoring specific files from the CMSADM backup tape
CMS R18 Software Installation, Maintenance, and Troubleshooting for Linux June 2017 219
Note:Note: Replace /tmp in this example with the actual location of the AF file. Replace the
AF file name in this example with the name that corresponds to the AF file that was transferred to the CMS server. Each AF file has a unique name.The -l option in the loadauth command is a lower case L.
Restoring specific files from the CMSADM backup tape Sometimes only specific files on a system become corrupted. Use this procedure if only specific files need to be restored from a CMSADM backup tape.
Note:Note: If you use the CMS LAN backup feature, see Avaya Call Management System
LAN Backup User Guide. This document provides information about using the CMS LAN backup feature, hardware requirements, software requirements, and support guidelines.
To restore specific files from a CMSADM backup:
1. Enter:
cd /
2. Enter the following command on a single line at the command prompt:
● If the CMSADM backup is on tape, continue with step a.
● If the CMSADM backup is on a USB storage device, continue with step b.
● If the CMSADM backup is on a network mount point, continue with step c.
a. Enter:
cpio -icmudv -C 10240 -I /dev/st# -M "Please remove the current tape, insert tape number %d,and press ENTER" "full_path_name"
where # is replaced with the device name and full_path_name is replaced with the path of the files to be restored.
Example:
cpio -icmudv -C 10240 -I /dev/st0 -M "Please remove the current tape, insert tape number %d,and press ENTER" "cms/install/cms_install/cms.install"

Chapter 8: Recovering a CMS server
CMS R18 Software Installation, Maintenance, and Troubleshooting for Linux June 2017 220
b. Enter:
cpio -icmudv -C 10240 -I /{mount_point}/<CMSADM_filename> "full_path_name"
where mount_point is the directory on the USB storage device containing the CMSADM backup file, CMSADM_filename is replaced with the CMSADM backup filename and full_path_name is replaced with the path of the files to be restored.
Example:
cpio -icmudv -C 10240 -I /CMS_Backup/CMSADM-r18aa.w-120717150230-digger "cms/install/cms_install/cms.install"
c. Enter:
cpio -icmudv -C 10240 -I /NS_backup_dir/<CMSADM_filename> "full_path_name"
where /NS_backup_dir is the network mount point path containing the CMSADM backup file, CMSADM_filename is replaced with the CMSADM backup filename and full_path_name is replaced with the path of the files to be restored.
Example:
cpio -icmudv -C 10240 -I /nfsbu/CMSADM-r18aa.w-120717150230-digger "cms/install/cms_install/cms.install"

CMS R18 Software Installation, Maintenance, and Troubleshooting for Linux June 2017 221
Chapter 9: Troubleshooting
This section provides solutions for common software or hardware problems. Use these procedures to troubleshoot the Avaya Call Management System (CMS) software.
This section includes the following topics:
● Determining your CMS version on page 222
● Recognizing new hardware devices on page 222
● Troubleshooting password aging on page 222
● CMS error logs on page 223
● Checking installed software packages on page 224
● Diagnosing a machine panic on page 224
● Common problems using the disc drive on page 226
● Removing the CMS package fails on page 226
● CMS installation fails on page 227
● CMSADM backup problems on page 227
● System messages on page 228
● About RAID for CMS on page 229
● Troubleshooting problems with disk drives on page 229
● Common error messages on page 230
● Report Query Status on page 232
● Troubleshooting an empty or incomplete report on page 233
● How to determine whether the archiver has run on page 235
● Troubleshooting Visual Basic Errors on page 238
Note:Note: When executing commands that take a long time to complete (such as cpio
commands), use the nohup command to ensure that the command will complete without interruption if the data line disconnects. An example of the nohup command is shown below:
nohup cpio -icmudf -C 10240 -I <backup_media_path> “cms” | tee
When system reboots are required, verify that your terminal type is set correctly after the reboot.

Chapter 9: Troubleshooting
CMS R18 Software Installation, Maintenance, and Troubleshooting for Linux June 2017 222
Determining your CMS versionTo determine the version of CMS installed on your system:
1. Enter:
rpm -qa cms
The system displays the CMS version.
Recognizing new hardware devices Use this procedure if externally powered devices, such as disk drives and tape drives, are not recognized during a RHEL installation. This problem might occur if:
● The devices are not connected to power
● The devices are not turned on
● If you add a new port board to the computer as part of an upgrade or addition
If you discover that a hardware device is not being recognized try rebooting the system. If the hardware device is still not being recognized try rebooting from the software disc and reinstalling RHEL.
1. Reboot the system by entering:
shutdown -r now
The system reboots.
2. Log in as root.
Troubleshooting password agingThis section provides options to help solve password aging problems.
This section includes the following topics:
● Tracking changes to password aging on page 223
● Passwords of excluded users age on page 223

CMS error logs
CMS R18 Software Installation, Maintenance, and Troubleshooting for Linux June 2017 223
Tracking changes to password agingThe admin log keeps a record of any administrative changes made to password aging. The system updates the admin log when the aging interval is changed or if password aging is turned on or off. The admin log can be found at /cms/install/logdir/admin.log
Passwords of excluded users ageIf a user was added to the password aging exclude list and their password is continuing to age or has begun to age:
1. Log into the system as root.2. Enter:
passwd -x -1 user_name
where user_name is the name of the user, and
where 1 is the number one.
CMS error logs The administrative data for each error log file contains specific information about itself, including defaults, administration information, a description of the contents, and general information about how to interpret the contents of the logs. The log provides:
● Default location
The file name of the primary file where log information can be found if no administrative changes have been made.
● Default maximum file size
The approximate size of each of the log files (primary and historical) that will be saved if no administrative changes have been made.
● Default number of older files retained
The number of historical files that are kept, in addition to the primary file, if no administrative changes have been made.
● Administration file
If the log is controlled by the general purpose file wrapping technique, the location of the file where administrative changes can be made affecting the location of the log file, the size of the logs, and/or the number of historical log files.

Chapter 9: Troubleshooting
CMS R18 Software Installation, Maintenance, and Troubleshooting for Linux June 2017 224
● Starting/stopping
Describes the conditions necessary for the log to be running, including any appropriate commands.
● Writing process
Indicates all processes that write to the log.
● Intended audience
Customer (for log information that is useful to the customer, easy to read, and documented) or services (for log information that is intended to aid troubleshooting). Almost all error logs are used exclusively by services personnel.
● First implemented in load
Indicates the first load when the log is available. The system uses an internal load numbering (such as 3.1z).
Checking installed software packages Use this procedure to check for previously installed software packages. The rules for specifying package names are as follows:
● You can omit the pkgname variable from the command. The command then lists the name, description, and version number of every software package installed on the system.
● If you list only one package name, the command lists the name, description, and version number of only that software package.
● You can list several package names separated by spaces. The command then lists the name, description, and version number of every software package you name.
To check what software packages are installed on your system:
1. From the root prompt, enter:
rpm -qa pkgname
where pkgname is the name of the software package you are checking for.
Diagnosing a machine panic If a machine panic is detected on your system, you must call the Avaya Services (domestic) or remote (international) support personnel. Avaya Services can request that you deliver the following information:

Diagnosing a machine panic
CMS R18 Software Installation, Maintenance, and Troubleshooting for Linux June 2017 225
● Crash dump from /var/crash/hostname/vmcore.n● Namelist from /var/crash/hostname/unix.n● Output of the rpm -qa command. For details, see the hardware installation document for
your platform.
● Possibly output from the /var/log/messages file.
To gather all the files for Avaya Services, perform the following procedures:
1. Log in as root.2. Enter:
cd /var/crash/hostname
The system changes to the dump directory.
3. Verify that unix.n and vmcore.n are present and match the date for the crash in question.
4. Enter:
rpm -qa > rpm_list.out
The system retrieves the output from the rpm -qa command.
5. Enter:
dmesg > dmesg.out
The system creates a dmesg.out file.
6. Enter:
cp /var/log/messages messages
The system copies the output from the /var/log/messages file.
7. Enter the following command on a single line at the command prompt:
tar cvf /storage/cms_crashfiles.tar unix.X vmcore.X dmesg.out rpm_list.out messages
where the letter X represents the number of the crashdump.
The system displays a list of all of the files.
8. Enter the following command on a single line at the command prompt:
rm unix.X vmcore.X dmesg.out rpm_list.out messages
where the letter X represents the number of the crashdump.
The system removes the temporary files.
9. Log out of the system.
10. Notify Avaya Services that the file is ready for download.

Chapter 9: Troubleshooting
CMS R18 Software Installation, Maintenance, and Troubleshooting for Linux June 2017 226
Common problems using the disc drive Use the following procedures if you experience problems with the disc drive.
This section includes the following topics:
● Verifying that the system can read a disc on page 226
● Disc drive fails to open on page 226
● Disc drive fails to open on page 226
Verifying that the system can read a discTo verify that the system can read a disc:
● Enter:
mount
The system displays a list of devices and file systems currently mounted. The last line displayed must show the disc drive and the disc name.
An example of /dev/dvd mounted on /mnt message is:
Disc drive fails to open If the disc drive fails to open when you press the eject button, enter the following commands:
umount /mnt
eject /dev/dvd
Removing the CMS package fails
Problem:If you exited the system when removing a CMS package (cms or /cms.2), you might have:
● Logged in as cmssvc● Switched users - su’d to root or root2
/dev/sr0 on /mnt type iso9660 (ro)

CMS installation fails
CMS R18 Software Installation, Maintenance, and Troubleshooting for Linux June 2017 227
● Run cmssvc
Solution:1. Log in directly as root or root22. Remove package(s) as instructed by the system.
CMS installation fails If the CMS installation fails and the system displays the cannot add another instance of CMS message, either the CMS package was not removed or the removal was not completely successful.
To continue with the installation:
1. Enter:
cd /
2. Enter:
cmssvc
3. Select option to Turn Avaya CMS on or off.4. Enter:
cmssvc
5. Select the number associated with uninstall.6. Restart the CMS installation.
CMSADM backup problemsIf you receive an error message during a backup or recovery, refer to Common error messages on page 230.
As the backup progresses, the program displays a series of dots, one dot per file, to indicate it is writing files to tape. You may have a problem if you notice one of the following:
● Dots are not displaying (wait 10 minutes or longer to make certain the software is not just copying a very large file).
● The tape is not spinning.

Chapter 9: Troubleshooting
CMS R18 Software Installation, Maintenance, and Troubleshooting for Linux June 2017 228
● The system has not displayed messages prompting you to change tapes or informing you that the backup has completed.
Perform the following
● Clean the tape drive with the appropriate cleaning tape. It may be necessary to repeat this process several times.
● If the tape drive is new, clean the drive several times with the appropriate cleaning tape before use.
If you still encounter problems, call the National Customer Care Center or your product representative.
System messages System messages can alert you to system problems, such as a device that is about to fail. By default, many of the messages are displayed on the system console and are stored in /var/log.
To display system messages:
1. Enter:
dmesg | more
The system displays the most recent messages as shown in the following example:
Initializing cgroup subsys cpusetInitializing cgroup subsys cpuLinux version 2.6.32-279.el6.x86_64 ([email protected]) (gcc version 4.4.6 20120305 (Red Hat 4.4.6-4) (GCC) ) #1 SMP Wed Jun 13 18:24:36 EDT 2012Command line: ro root=UUID=3b8fa701-8689-4e03-b022-869d34fbc0be rd_NO_LUKS KEYBOARDTYPE=pc KEYTABLE=us LANG=en_US.UTF-8 rd_NO_MD SYSFONT=latarcyrheb-sun16 crashkernel=auto rd_NO_LVM biosdevname=0 rd_NO_DM rhgb quietKERNEL supported cpus: Intel GenuineIntel AMD AuthenticAMD Centaur CentaurHaulsBIOS-provided physical RAM map: BIOS-e820: 0000000000000000 - 000000000009c000 (usable) BIOS-e820: 0000000000100000 - 00000000cd2f0000 (usable) BIOS-e820: 00000000cd2f0000 - 00000000cd31c000 (reserved) BIOS-e820: 00000000cd31c000 - 00000000cd35b000 (ACPI data) BIOS-e820: 00000000cd35b000 - 00000000d0000000 (reserved) BIOS-e820: 00000000e0000000 - 00000000f0000000 (reserved) BIOS-e820: 00000000fe000000 - 0000000100000000 (reserved) BIOS-e820: 0000000100000000 - 0000000230000000 (usable)DMI 2.7 present.SMBIOS version 2.7 @ 0xFD050

About RAID for CMS
CMS R18 Software Installation, Maintenance, and Troubleshooting for Linux June 2017 229
The /var/log directory contains several message files. The most recent messages are in /var/log/messages. Previous system messages are organized into weekly message files and are identified by the date that is appended to the messages file.
The message files may contain not only system messages, but also crash dumps and other data, which can cause /var/log to grow quite large. To keep the directory to a reasonable size and ensure that future crash dumps can be saved, you should remove unneeded files periodically. You can automate the task by using crontab. See your RHEL system documentation for information on crontab.
About RAID for CMSCMS allows you to build a system with RAID 10 performance and redundancy. Having such redundancy greatly reduces the risk of data loss should a disk drive fail or your system crash.
While RAID 10 (Dell R620/R630/R720/R730 and HP DL380P G8/G9 systems only) greatly reduces the risk of losing data, it is not meant to be a substitute for regular backups. Data can still become corrupt, and the corruption is then duplicated on the mirror.
In addition, RAID 10 (Dell R620/R630/R720/R730 and HP DL380P G8/G9 systems only) allows for better performance by writing data across multiple disks. CMS RAID support is enabled through an internal RAID controller. The RAID controller is then set up to use RAID 10 across the disks for the Dell R620/R630/R720R730 platforms.
Troubleshooting problems with disk drivesUse the procedures and tips in this section to help you identify and resolve problems with:
● Physical disks
● RAID volumes
● /cms file system
Check the system console and the /var/log/messages log for messages that indicate problems with a specific hard disk.
If a disk is generating errors, it may need to be replaced. For procedures related to recovering from disk crashes and replacing hard disk drives, see the following documents:
● Avaya CMS Dell PowerEdge™ R720 and R620 Computer Hardware Installation, Maintenance, and Troubleshooting
● Avaya CMS Dell PowerEdge™ R220, R630, and R730 Computer Hardware Installation, Maintenance, and Troubleshooting

Chapter 9: Troubleshooting
CMS R18 Software Installation, Maintenance, and Troubleshooting for Linux June 2017 230
● Avaya CMS HP DL380P G8 and G9 Computer Hardware Installation, Maintenance, and Troubleshooting
Common error messages This section lists, in alphabetical order, common error messages you might encounter on a CMS server. Each message is accompanied by its probable cause and the likely solution.
● Error in creating UNIX login for user ’username’. The user may have already had UNIX log...
- Cause - The user already has a UNIX system login in CMS.- Resolution - If the user username already has a UNIX system login, ignore this
message. Otherwise, verify that this user can log on and report any problems to Services.
● ERROR: Password aging cannot be implemented on systems using NIS, NIS+ or LDAP.
- Cause - The system is using either NIS, NIS+ or LDAP.- Resolution - Contact your network administrator. The passwords will have to be aged
from the server running the directory service.
● Insufficient number of free blocks (#-of-blocks) in system name for temporary database tables.
- Cause - The file system does not contain enough free blocks for CMS to create the temporary tables needed for the migration.
- Resolution - Call services to resolve this situation.
● *** INTERNAL ERROR: contact services (error#, timestamp) ***
- Cause - An internal error occurred during processing of the table listed above this message.
- Resolution - Contact services immediately. Do not remove the log file. Services needs the errornum and time stamp to find more information in their error log.
● Request failed. See /cms/install/logdir/backup.log for more information.
- Cause - The tape is improperly seated in the drive, or was removed from the drive during the backup, or is write protected, or the medium is corrupted.

Common error messages
CMS R18 Software Installation, Maintenance, and Troubleshooting for Linux June 2017 231
- Resolution - Check the console terminal. If you see a message like WARNING: ST01: HA 0 TC 3 LU 0: Err 60503005 CMD 0000000A Sense Key 00000004 Ext Sense 00000000, the tape is corrupted. Discard it and replace it with a new tape.
Otherwise, remove the tape from the drive and make sure it is not write protected (the black arrow in the upper left corner should be pointing away from “safe”).
Finally, reinsert the tape into the drive, making certain it is properly seated, and restart the backup.
● UNRECOVERABLE ERROR READING TAPE, errno= Failed to open tape: no entry in the device directory. Make sure the Maintenance: Backup/Restore Devices screen has the correct Path.
- Cause - The program could not open the tape drive to read the CMS data.- Resolution - Check that the specified tape drive is set up with the correct path in the
Maintenance: Backup/Restore Devices window. If you cannot resolve this problem, contact services for additional help. You may have a tape drive hardware problem or need a corrected tape device path.
● ** WARNING:** Only one user may run age_pw at one time.
- Cause - More than one person is attempting to use the passwd_age option in the CMSADM menu.
- Resolution - Attempt to run the command after a few minutes have passed. If you still receive the warning message, contact Avaya Services.
● You must be root in order to run this command.
- Cause - Superuser privileges are necessary to run this script because most of the commands are related to system administration.
- Resolution - Log in as the root user and rerun the command.
● stale databases
- Cause - The state database contains old information.- Resolution - Recreate the database.
● syntax error
- Cause - The syntax and usage of the command may be incorrect.- Resolution - Reenter the command, correcting syntax errors you have made.
● The /cms filesystem needs to be mounted
- Cause - /cms must be mounted for the command to work.- Resolution - Mount /cms with the command:
mount /cms
● touch: /cms/db/unix_start cannot create
- Cause - A CMSADM backup was done when CMS was still running. An attempt is made to restart CMS, but CMS files are not yet available.

Chapter 9: Troubleshooting
CMS R18 Software Installation, Maintenance, and Troubleshooting for Linux June 2017 232
- Resolution - No response required. The message will disappear after you have restored and migrated CMS.
● Warning: inode blocks/cyl group (230 >= data blocks (135) in lost cylinder group. This implies 2160 sector(s) cannot be allocated.
- Resolution - Some sectors will not be used by the filesystem. This is just a warning; the filesystem should be fine.
● logtime[xxx]: Failed to list SAVECORE dir contents. ERROR 0
- Resolution – No action required, this is an informational message only indicating that no coredump files currently exist.
Report Query StatusTwo types of report query logs are being added with release R16.2. These logs track the queries made by historical reports and they show the queries that have completed and the queries that are currently being run. This information can be used to determine who is running what reports and if those report queries are affecting system performance.
Information about query logs● Types of report query logs:
- qlog: a log where entries are made upon query completion- idbm log: a log showing the query that is currently running
● These logs are always in operation implying that they do not need to be turned off/on
● Comparison between the report query logs
- qlog has more detail, but is only updated after the report query has completed- idbm log shows currently running queries and is updated at completion of the query to
add completion status
● Uses of report query logs
- qlog can show past report execution to determine who ran queries and how long the queries took
- idbm log can be used to determine what queries are running currently. This can be used to determine if a particular query is taking a long time and thus negatively impacting system performance.
- Log information in either logs cannot be used to kill a particular report; it is debug information only
Troubleshooting an empty or incomplete report
CMS R18 Software Installation, Maintenance, and Troubleshooting for Linux June 2017 233
● qlog features
- Entries are made upon query/report completion- Applies to historical report queries only- Log entries have information about start time, user, run time, completion status, task
ID and query text- qlogs are store in directory /cms/db/log as qlog, qlog.01, qlog.02, etc.- The size and number of qlog files are administered in the file /cms/db/LogAdmin/
qlog on the server- Example entry:
● idbm log features
- Entries are made for currently running queries.- Applies to historical report queries only. - IDBM stands for Informix Database Manager. These are the processes that interface
with the historical database.- log entries contain information about start time, user and query text. - The idbm logs are kept in the server in directory /cms/db/log as idbm.’process ID’.
For example: idbm.17, idbm.1001, idbm.13027, etc.- Example entry:
- If no query is running in that idbm process, the log will show the last query run along with its status.
- Example status entry:
Troubleshooting an empty or incomplete report1. Check the user permissions:
<timestamp> USER=dsb123 TIME=00:00 STATUS=0 TASK=13018 QUERY=select vdn, starttime, intrvl, acdcalls, acdtime, abncalls, busycalls,disccalls,incalls,othercalls from hvdn where row_date = 40432 and acd = 1 order by vdn, starttime
<timestamp> dsb123 select value, item_name from synonyms where item_type='split' and acd_no=1
<timestamp> STATUS=0

Chapter 9: Troubleshooting
CMS R18 Software Installation, Maintenance, and Troubleshooting for Linux June 2017 234
● Does the user have permission to view the skills, trunks, VDNs, and other entities they are trying to use as report input?
● Have proper permissions been granted to the user for the resources or tenant access?
● Are the missing resources like agent, VDN, and skills assigned to the tenant?
2. Check the time zone archiving Information
● Does the tenant have a time zone administered?
Note:Note: If you do not administer the time zone, the archiver will not run for that time zone.
No daily, weekly, or monthly data will be available for the time zone.
● Has the archive run for the desired time zone?
3. See About the Archiving process on page 186 for detailed debugging information. If the archive data is not available, the report is empty for daily, weekly and monthly data.
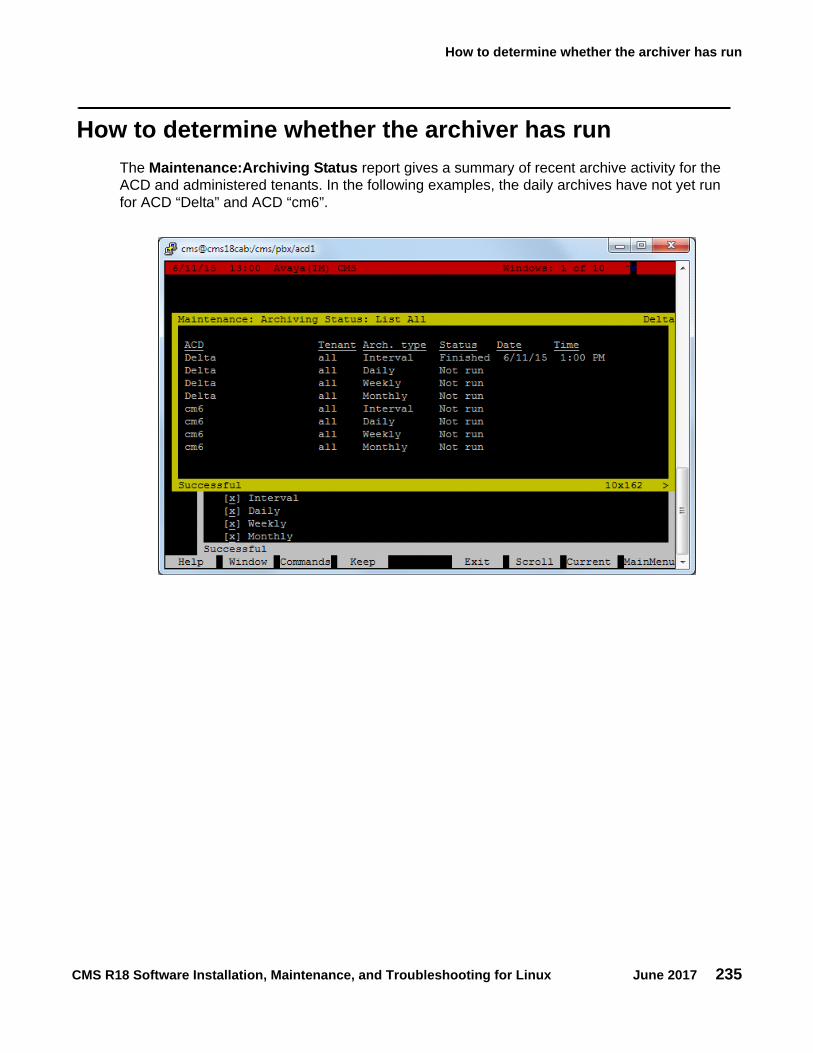
How to determine whether the archiver has run
CMS R18 Software Installation, Maintenance, and Troubleshooting for Linux June 2017 235
How to determine whether the archiver has run The Maintenance:Archiving Status report gives a summary of recent archive activity for the ACD and administered tenants. In the following examples, the daily archives have not yet run for ACD “Delta” and ACD “cm6”.

Chapter 9: Troubleshooting
CMS R18 Software Installation, Maintenance, and Troubleshooting for Linux June 2017 236
Messages are also stored in the arch.log file that provides details on archive execution. The arch.log file indicates successful archive activity and provides details about failed archive execution. If the Maintenance:Archiving Status report indicates failure, you can view arch.log for further details. See the following example:
Archiver Started: Mon Jun 15 07:01:04 2015Weekly Archive (input date: (Sun) Jun. 14, 2015) Cannot archive a partial weeks data.STATUS: Failure Mon Jun 15 07:03:04 2015Archiver Completed: Mon Jun 15 07:05:08 2015 acd: 1
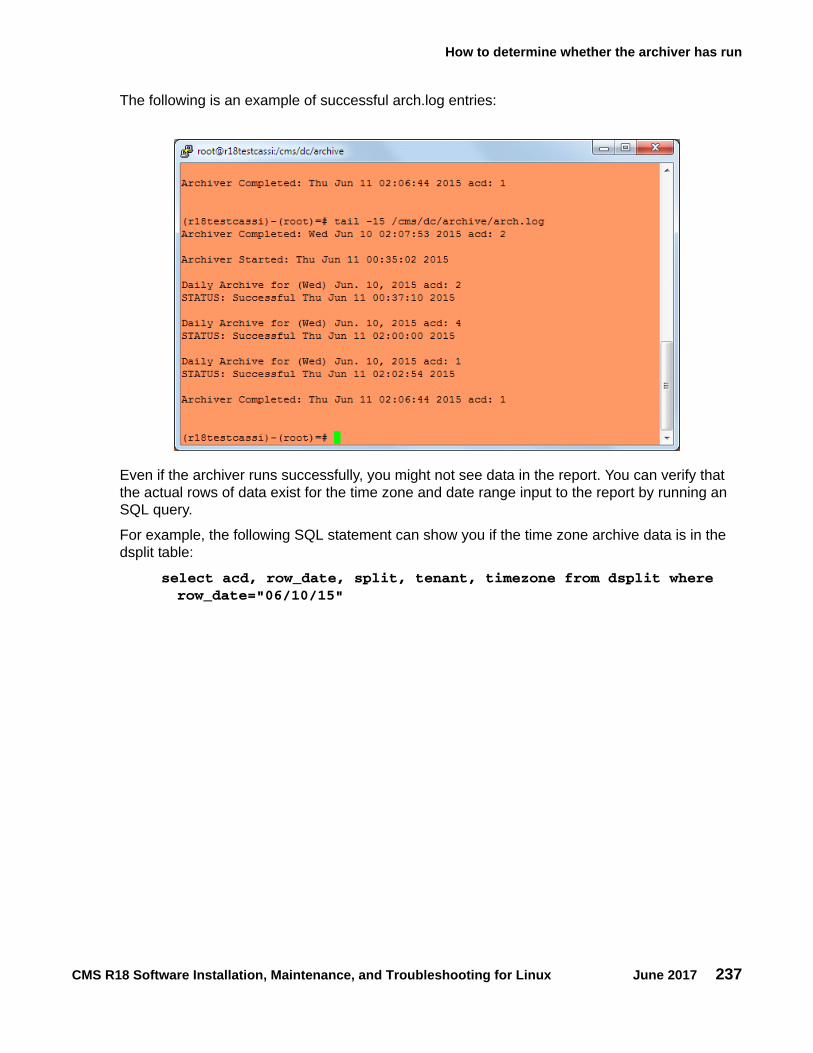
How to determine whether the archiver has run
CMS R18 Software Installation, Maintenance, and Troubleshooting for Linux June 2017 237
The following is an example of successful arch.log entries:
Even if the archiver runs successfully, you might not see data in the report. You can verify that the actual rows of data exist for the time zone and date range input to the report by running an SQL query.
For example, the following SQL statement can show you if the time zone archive data is in the dsplit table:
select acd, row_date, split, tenant, timezone from dsplit where row_date="06/10/15"
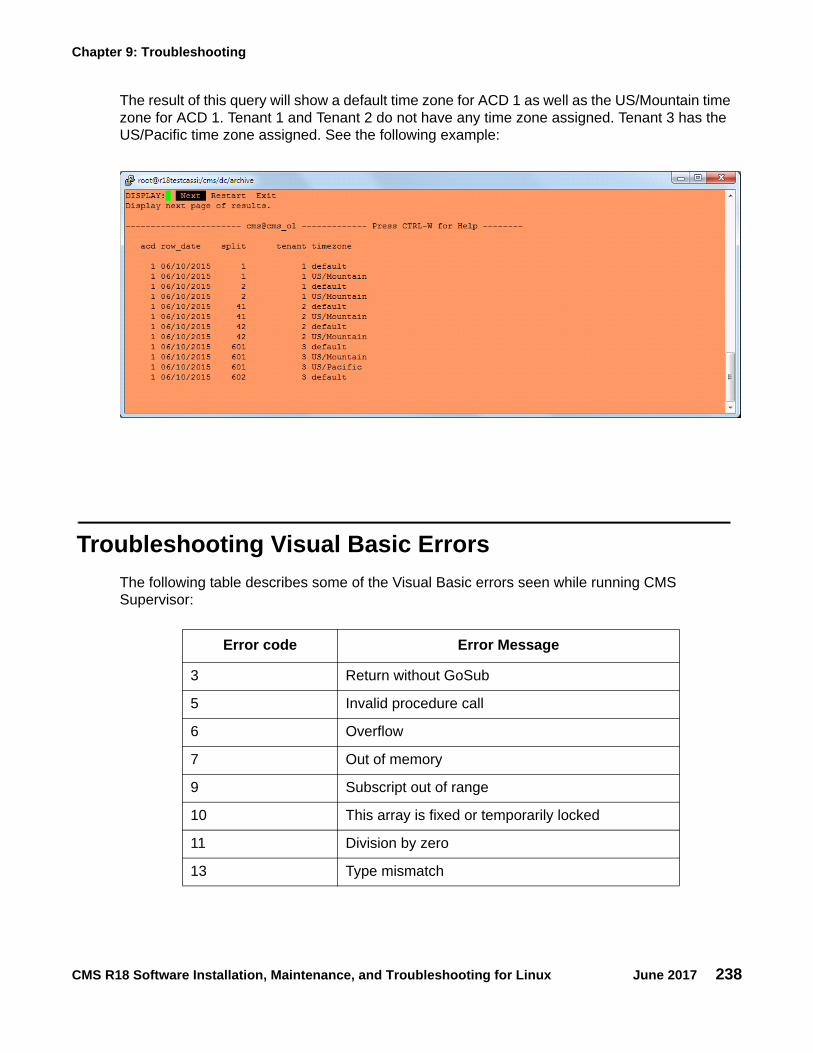
Chapter 9: Troubleshooting
CMS R18 Software Installation, Maintenance, and Troubleshooting for Linux June 2017 238
The result of this query will show a default time zone for ACD 1 as well as the US/Mountain time zone for ACD 1. Tenant 1 and Tenant 2 do not have any time zone assigned. Tenant 3 has the US/Pacific time zone assigned. See the following example:
Troubleshooting Visual Basic ErrorsThe following table describes some of the Visual Basic errors seen while running CMS Supervisor:
Error code Error Message
3 Return without GoSub
5 Invalid procedure call
6 Overflow
7 Out of memory
9 Subscript out of range
10 This array is fixed or temporarily locked
11 Division by zero
13 Type mismatch

Troubleshooting Visual Basic Errors
CMS R18 Software Installation, Maintenance, and Troubleshooting for Linux June 2017 239
14 Out of string space
16 Expression too complex
17 Can't perform requested operation
18 User interrupt occurred
20 Resume without error
28 Out of stack space
35 Sub, function, or property not defined
47 Too many DLL application clients
48 Error in loading DLL
49 Bad DLL calling convention
51 Internal error
52 Bad file name or number
53 File not found
54 Bad file mode
55 File already open
57 Device I/O error
58 File already exists
59 Bad record length
61 Disk full
62 Input past end of line
63 Bad record number
67 Too many files
68 Device unavailable
70 Permission denied
71 Disk not ready
74 Can't rename with different drive
75 Path/File access error
Error code Error Message

Chapter 9: Troubleshooting
CMS R18 Software Installation, Maintenance, and Troubleshooting for Linux June 2017 240
76 Path not found
91 Object variable or With block variable not set
92 For Loop not initialized
93 Invalid pattern string
94 Invalid use of Null
298 System DLL could not be loaded
320 Can't use character device names in specified file names
321 Invalid file format
322 Can't create necessary temporary file
325 Invalid format in resource file
327 Data value named was not found
328 Illegal parameter; can't write arrays
335 Could not access system registry
336 ActiveX component not correctly registered
337 ActiveX component not found
338 ActiveX component did not correctly run
360 Object already loaded
361 Can't load or unload this object
363 Specified ActiveX control not found
364 Object was unloaded
365 Unable to unload within this context
368 The specified file is out of date. This program requires a newer version
371 The specified object can't be used as an owner form for Show
380 Invalid property value
381 Invalid property-array index
382 Property Set can't be executed at run time
Error code Error Message

Troubleshooting Visual Basic Errors
CMS R18 Software Installation, Maintenance, and Troubleshooting for Linux June 2017 241
383 Property Set can't be used with a read-only property
385 Need property-array index
387 Property Set not permitted
393 Property Get can't be executed at run time
394 Property Get can't be executed on write-only property
400 Form already displayed; can't show modally
402 Code must close topmost modal form first
419 Permission to use object denied
422 Property not found
423 Property or method not found
424 Object required
425 Invalid object use
429 ActiveX component can't create object or return reference to this object
430 Class doesn't support OLE Automation
430 Class doesn't support Automation
432 File name or class name not found during Automation operation
438 Object doesn't support this property or method
440 OLE Automation error
440 Automation error
442 Connection to type library or object library for remote process has been lost
443 Automation object doesn't have a default value
445 Object doesn't support this action
446 Object doesn't support named arguments
447 Object doesn't support current locale settings
448 Named argument not found
Error code Error Message

Chapter 9: Troubleshooting
CMS R18 Software Installation, Maintenance, and Troubleshooting for Linux June 2017 242
449 Argument not optional or invalid property assignment
450 Wrong number of arguments or invalid property assignment
451 Object not a collection
452 Invalid ordinal
453 Specified DLL function not found
454 Code resource not found
455 Code resource lock error
457 This key is already associated with an element of this collection
458 Variable uses a type not supported in Visual Basic
459 This component doesn't support events
460 Invalid Cipboard format
461 Specified format doesn't match format of data
480 Can't create AutoRedraw image
481 Invalid picture
482 Printer error
483 Printer driver does not support specified property
484 Problem getting printer information from the system. Is printer is set up correctly?
485 Invalid picture type
486 Can't print form image to this type of printer
735 Can't save file to Temp directory
744 Search text not found
746 Replacements too long
31001 Out of memory
31004 No object
31018 Class is not set
Error code Error Message
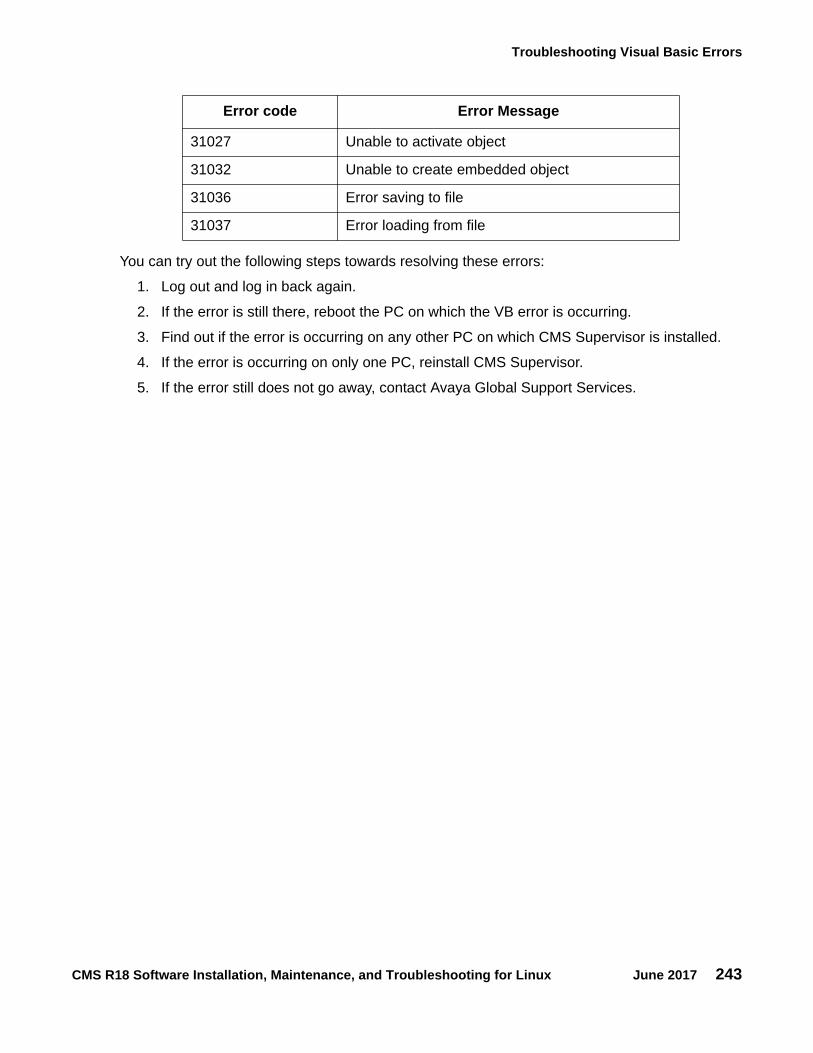
Troubleshooting Visual Basic Errors
CMS R18 Software Installation, Maintenance, and Troubleshooting for Linux June 2017 243
You can try out the following steps towards resolving these errors:
1. Log out and log in back again.
2. If the error is still there, reboot the PC on which the VB error is occurring.
3. Find out if the error is occurring on any other PC on which CMS Supervisor is installed.
4. If the error is occurring on only one PC, reinstall CMS Supervisor.
5. If the error still does not go away, contact Avaya Global Support Services.
31027 Unable to activate object
31032 Unable to create embedded object
31036 Error saving to file
31037 Error loading from file
Error code Error Message
Chapter 9: Troubleshooting
CMS R18 Software Installation, Maintenance, and Troubleshooting for Linux June 2017 244
CMS R18 Software Installation, Maintenance, and Troubleshooting for Linux June 2017 245
Glossary
ACD See Automatic call distribution (ACD) on page 245.Agent A person who answers calls to an extension in an ACD split. This person is
known to CMS by a login identification keyed into a voice terminal.Agent skill The different types of calls a particular agent can handle. An agent can be
assigned up to four skills. These skills are assigned as either primary or secondary skills. For more information, see Primary skill on page 248 or Secondary skill on page 248.
Agent state A feature of agent call handling that allows agents to change their availability to the system (for example, ACW, AVAIL, ACD).
Automatic call distribution (ACD)
A switch feature. ACD is software that channels high-volume incoming call traffic to agent groups (splits or skills).Also an agent state where the extension is engaged in an ACD call (with the agent either talking to the caller or the call waiting on hold).
Avaya Call Management System (CMS)
A software product used by business customers that have a Lucent Technologies telecommunications switch and receive a large volume of telephone calls that are processed through the ACD feature of the switch.
Boot To load the system software into memory and start it running.Call Vectoring A highly flexible method for processing ACD calls using Vector Directory
Numbers (VDNs) and vectors as processing points between trunk groups and splits or skills. Call vectoring permits treatment of calls that is independent of splits or skills.
CMS Call Management System. See Avaya Call Management System (CMS) on page 245.
CMSADM menu The Call Management System Administration (CMSADM) menu allows a user to administer features of CMS.
CMSADM file system backup
A backup that saves all the file systems on the machine which includes the RHEL operating system and programs, CMS programs and data, and non-CMS data you place on the computer in addition to the CMS data.
CMSSVC menu The Call Management System Services (CMSSVC) menu allows support personnel to manage CMS services.
Configuration Configuration is the way that the computer is set up to allow for particular uses or situations.
Custom reports Real-time or historical reports that have been customized from standard reports or created from original design.

Data collection off
CMS R18 Software Installation, Maintenance, and Troubleshooting for Linux June 2017 246
Data collection off CMS is not collecting ACD data. If you turn off data collection, CMS will not collect data on current call activity.
Data backup The backup that uses ON-Bar to backup the CMS Informix data. This is used with the CMS LAN backup feature.
Database A group of files that store ACD data according to a specific time frame: current and previous intrahour real-time data and intrahour, daily, weekly, and monthly historical data.
Database item A name for a specific type of data stored in one of the CMS databases. A database item may store ACD identifiers (split numbers or names, login IDs, VDNs, and so on) or statistical data on ACD performance (number of ACD calls, wait time for calls in queue, current states of individual agents, and so on).
Database tables Tables that CMS uses to collect, store, and retrieve ACD data. Standard CMS items (database items) are names of columns in the CMS database tables.
Device The term used to refer to the peripheral itself; for example, a hard disk or a tape drive. A peripheral is sometimes referred to as a subdevice or an Logical Unit (LU).
EAD See Expert Agent Distribution (EAD) on page 246.EAS See Expert Agent Selection (EAS) on page 246.Error message An error message is a response from a program indicating that a problem has
arisen or something unexpected has happened, requiring your attention.Ethernet A type of network hardware that allows communication between systems
connected directly together by transceiver taps, transceiver cables, and a coaxial cable. Also implemented using twisted-pair telecommunications wire and cable.
Ethernet address A unique number assigned to each system when it is manufactured. The Ethernet address of your system is displayed on the banner screen that appears when you power on your system.
Exception A type of activity on the ACD which falls outside of the limits the customer has defined. An exceptional condition is defined in the CMS Exceptions subsystem, and usually indicates abnormal or unacceptable performance on the ACD (by agents, splits or skills, VDNs, vectors, trunks, or trunk groups).
Expert Agent Distribution (EAD)
A call queued for a skill will go to the most idle agent (primary skill agent). Agents who are idle and have secondary agent skills will receive the call queued for a skill if there are no primary agents available.
Expert Agent Selection (EAS)
An optional feature that bases call distribution on agent skill (such as language capability). EAS matches the skills required to handle a call to an agent who has at least one of the skills required.
Forecast reports These reports display expected call traffic and agent or trunk group requirements for the customer’s call center for a particular day or period in the future.
Port (I/O port)
CMS R18 Software Installation, Maintenance, and Troubleshooting for Linux June 2017 247
Historical database Contains intrahour records for up to 62 days in the past, daily records for up to 5 years in the past, and weekly or monthly records for up to 10 years for each CMS-measured agent, split or skill, trunk, trunk group, vector, and VDN.
Historical reports Reports that display past ACD data for various agent, split or skill, trunk, trunk group, vector, or VDN activities.
Host computer A computer that is attached to a network and provides services other than simply acting as a store-and-forward processor or communication switch.
Host name A name that you (or your system administrator) assign to your system unit to uniquely identify it to the RHEL operating system (and also to the network).
IDS See Informix Dynamic Server (IDS) on page 247.Informix Dynamic Server (IDS)
A relational database management system used to organize CMS data. An add-on software package needed by CMS.
Interface A common boundary between two systems or pieces of equipment.Link A transmitter-receiver channel or system that connects two locations.Linux® Linux® is a free Open Source Operating System based on Unix.Log in The process of gaining access to a system by entering a user name and,
optionally, a password.Log out The process of exiting from a system.Measured A term that means an ACD element (agent, split or skill, trunk, trunk group,
vector, VDN) has been identified to CMS for collection of data.Multi-user mode A mode of CMS in which any administered CMS user can log into CMS. Data
continues to be collected if data collection is “on.”Network address A unique number assigned to each system on a network, consisting of the
network number and the system number. Also known as Internet Address or Internet Protocol (IP) address.
Non-volatile random access memory (NVRAM)
A random access memory (RAM) system that holds its contents when external power is lost.
NVRAM See Non-volatile random access memory (NVRAM) on page 247.Operating system (OS)
The software that controls and allocates the resources, such as memory, disk storage, and the screen display for the computer.
Partitions Sections of the hard disk that are used to store an operating system and data files or programs. By dividing the disk into partitions, you can use the space allocated in a more efficient and organized manner.
Password A character string that is associated with a user name. Provides security for a user account. Desktop computers require you to type a password when you log into the system, so that no unauthorized person can use your system.
Port (I/O port) A designation of the location of a circuit that provides an interface between the system and lines and/or trunks.
Primary skill
CMS R18 Software Installation, Maintenance, and Troubleshooting for Linux June 2017 248
Primary skill An agent will handle calls to many skills before calls to secondary skills.RHEL Red Hat Enterprise Linux® (RHEL) is a distribution of the Linux® operating
system developed for the business market.RPM RPM Package ManagerScreen labeled key (SLK)
The first eight function keys at the top of the keyboard that correspond to the screen labels at the bottom of the terminal screen. The screen labels indicate the function each key performs.
SCSI See Small computer system interface (SCSI) on page 248.Secondary skill An agent will handle secondary skill calls after primary skill calls. Serial asynchronous interface/PCI
A card that provides access to eight serial ports by connecting to an eight-port patch panel.
Single-user mode A CMS mode in which only one person can log into CMS. Data collection continues if data collection is “on.” This mode is required to change some CMS administration.
Skill In relationship to the call center, think of skill as a specific customer need or requirement, or perhaps a business need of the call center.
SQL See Structured Query Language (SQL) on page 248.Slot An electronic connection designed to receive a module or a printed circuit
board (such as a Single In-line Memory Module [SIMM] or a frame buffer board).
Small computer system interface (SCSI)
A hardware interface that allows the connection of peripheral devices (such as hard disks, tape drives and disc drives) to a computer system.
Split A group of extensions that receive special-purpose calls in an efficient, cost-effective manner. Normally, calls to a split arrive over one or a few trunk groups.
Storage device A hardware device that can receive data and retain it for subsequent retrieval. Such devices cover a wide range of capacities and speeds of access.
Structured Query Language (SQL)
A language used to interrogate and process data in a relational database. SQL commands can be used to interactively work with a database or can be embedded within a programming language to interface to a database.
Super-user A user with full access privileges on a system, unlike a regular user whose access to files and accounts is limited.
Switch A private switch system providing voice-only or voice and data communications services (including access to public and private networks) for a group of terminals within a customer’s premises.
Syntax The format of a command line.System A general term for a computer and its software and data.

Vector directory number (VDN)
CMS R18 Software Installation, Maintenance, and Troubleshooting for Linux June 2017 249
System backup The backup that uses a storage manager to backup the UNIX files. This is used with the CMS LAN backup feature.
Tape cartridge A magnetic piece of hardware that is used as a storage unit for data. TCP/IP See Transmission control protocol/internet protocol (TCP/IP) on page 249.Transmission control protocol/internet protocol (TCP/IP)
A communications protocol that provides interworking between dissimilar systems.
Trunk A telephone line that carries calls between two switches, between a Central Office (CO) and a switch, or between a CO and a phone.
Trunk group A group of trunks that are assigned the same dialing digits - either a phone number or a Direct Inward Dialing (DID) prefix.
UNIX system The operating system on the computer on which CMS runs. RHEL is the UNIX operating system running on some Dell machines.
User ID The login ID for a CMS user.User name A combination of letters, and possibly numbers, that identifies a user to the
system.VDN See Vector directory number (VDN) on page 249.Vector A list of steps that process calls in a user-defined manner. The steps in a vector
can send calls to splits, play announcements and/or music, disconnect calls, give calls a busy signal, or route calls to other destinations. Calls enter vector processing by way of VDNs, which may have received calls from assigned trunk groups, from other vectors, or from extensions connected to the switch.
Vector directory number (VDN)
An extension number that is used in ACD software to permit calls to connect to a vector for processing. A VDN is not assigned an equipment location; it is assigned to a vector. A VDN can connect calls to a vector when the calls arrive over an assigned automatic-in trunk group or when calls arrive over a dial-repeating (DID) trunk group, and the final digits match the VDN. The VDN by itself may be dialed to access the vector from any extension connected to the switch.
Vector directory number (VDN)
CMS R18 Software Installation, Maintenance, and Troubleshooting for Linux June 2017 250
CMS R18 Software Installation, Maintenance, and Troubleshooting for Linux June 2017 251
Index
Index
AACD
creating . . . . . . . . . . . . . . . . . . . . 127removing . . . . . . . . . . . . . . . . . . . . 129testing link . . . . . . . . . . . . . . . . . . . 118
acd_create . . . . . . . . . . . . . . . . . . . . 127acd_remove . . . . . . . . . . . . . . . . . . . . 129administer
switch LAN . . . . . . . . . . . . . . . . . . . 59TCP/IP. . . . . . . . . . . . . . . . . . . . . 59
administration log . . . . . . . . . . . . . . . . . 52Alarm Origination Manager
config file set up . . . . . . . . . . . . . . . . 92set up . . . . . . . . . . . . . . . . . . . .91, 92
Alarm Originatorset up . . . . . . . . . . . . . . . . . . . . . 91
AOM . . . . . . . . . . . . . . . . . . . . . . . 91Assigning a root password . . . . . . . . . . . . . 33assigning customer passwords . . . . . . . . . . . 119auth_display . . . . . . . . . . . . . . . . . . . . 139auth_set. . . . . . . . . . . . . . . . . . . . . . 139authorizations
CMS . . . . . . . . . . . . . . . . . . . . . . 48displaying . . . . . . . . . . . . . . . . . . . 139EAS . . . . . . . . . . . . . . . . . . . . . . 48External Call History . . . . . . . . . . . . . . 48Feature Packages . . . . . . . . . . . . . . . 48graphics . . . . . . . . . . . . . . . . . . . . 48setting . . . . . . . . . . . . . . . . . . . . . 139
Bbacking out . . . . . . . . . . . . . . . . . . . . 177backing out a RHEL patch . . . . . . . . . . . . . 177backup . . . . . . . . . . . . . . . . . . . . . . 130
CMS maintenance backup . . . . . . . . . . . 143CMSADM . . . . . . . . . . . . . . . . . . . 144CMSADM checking . . . . . . . . . . . . . . . 149CMSADM troubleshooting . . . . . . . . . . . . 227
backup restoring without . . . . . . . . . . . . . . 217
Cchanging
date or time . . . . . . . . . . . . . . . . . . 174
checkingCMSADM backup . . . . . . . . . . . . . . . 149installed RHEL patches . . . . . . . . . . . . 177installed software packages . . . . . . . . . . 224
chkDisks . . . . . . . . . . . . . . . . . . . . . 183CMS
administration menu . . . . . . . . . . . . . . 125authorizations . . . . . . . . . . . . . . . . . . 48checking installed RHEL patches . . . . . . . . 177configuration . . . . . . . . . . . . . . . . . 140data storage parameters . . . . . . . . . . . . . 56error logs . . . . . . . . . . . . . . . . . . . 223installation fails . . . . . . . . . . . . . . . . 227login passwords . . . . . . . . . . . . . . . . . 47maintenance backup . . . . . . . . . . . . . 143passwords . . . . . . . . . . . . . . . . . . .119patches, removing. . . . . . . . . . . . . . . 179removal fails . . . . . . . . . . . . . . . . . 226required software . . . . . . . . . . . . . . . . 16services menu . . . . . . . . . . . . . . . . 137set up . . . . . . . . . . . . . . . . . 62, 63, 72Supplemental Services . . . . . . . . . . . . . 46testing . . . . . . . . . . . . . . . . . . . . 120turning on and off . . . . . . . . . . . . . 132, 140
CMS patchesinstalling . . . . . . . . . . . . . . . . . . . 178requirements . . . . . . . . . . . . . . . . . 177
CMS setup methodsfrom a terminal . . . . . . . . . . . . . . . . . 63using a UNIX system flat file . . . . . . . . . 72, 76
CMSADMacd_create . . . . . . . . . . . . . . . . . . 127acd_remove. . . . . . . . . . . . . . . . . . 129backup . . . . . . . . . . . . . . . . . . 130, 144checking backup . . . . . . . . . . . . . . . 149creating ACDs . . . . . . . . . . . . . . . . 127file system backup. . . . . . . . . . . . . . . 130installing packages . . . . . . . . . . . . . . 130menu . . . . . . . . . . . . . . . . . . . . . 125passwd_age . . . . . . . . . . . . . . . . . 133pkg_install . . . . . . . . . . . . . . . . . . 130pkg_remove. . . . . . . . . . . . . . . . 131, 132removing ACDs . . . . . . . . . . . . . . . . 129removing packages . . . . . . . . . . . . 131, 132restoring from full and incremental backup . . . 192restoring specific files . . . . . . . . . . . . . 219run_cms . . . . . . . . . . . . . . . . . . . 132run_ids . . . . . . . . . . . . . . . . . . . . 132troubleshooting . . . . . . . . . . . . . . . . 227

CMS R18 Software Installation, Maintenance, and Troubleshooting for Linux June 2017 252
Index
CMSADM restore . . . . . . . . . . . . . . . . . 200CMSSVC
auth_display . . . . . . . . . . . . . . . . . . 139auth_set . . . . . . . . . . . . . . . . . . . . 139changing switch options . . . . . . . . . . . . . 141CMS
turning on and off . . . . . . . . . . . . . . 140displaying authorizations . . . . . . . . . . . . 139displaying switch options . . . . . . . . . . . . 141IDS
turning on and off . . . . . . . . . . . . . . 140menu . . . . . . . . . . . . . . . . . . . . . 137run_cms . . . . . . . . . . . . . . . . . . . . 140run_ids. . . . . . . . . . . . . . . . . . . . . 140setting authorizations . . . . . . . . . . . . . . 139setup . . . . . . . . . . . . . . . . . . . . . 140swinfo . . . . . . . . . . . . . . . . . . . . . 141swsetup . . . . . . . . . . . . . . . . . . . . 141
configure, CMS . . . . . . . . . . . . . . . . . . 140Configuring AOM . . . . . . . . . . . . . . . . . 107Configuring the system network. . . . . . . . . . . 28creating
ACDs . . . . . . . . . . . . . . . . . . . . . 127customer acceptance
procedures . . . . . . . . . . . . . . . . . . . 123customer passwords . . . . . . . . . . . . . . . . 119
Ddata storage parameters
storage.def file . . . . . . . . . . . . . . . . . 56vector.def file . . . . . . . . . . . . . . . . . . 56
date and timechecking . . . . . . . . . . . . . . . . . . . . 116
determiningCMS version . . . . . . . . . . . . . . . . . . 222
devices, not recognized . . . . . . . . . . . . . . 222disc
drive does not mount . . . . . . . . . . . . . . 226drive fails to open . . . . . . . . . . . . . . . . 226ejecting . . . . . . . . . . . . . . . . . . . . 226
diskI/O problems . . . . . . . . . . . . . . . . . . 229
disk failurerecovery . . . . . . . . . . . . . . . . . . . . 196
displayingswitch options . . . . . . . . . . . . . . . . . 141
EEAS . . . . . . . . . . . . . . . . . . . . . . . . 48editing /etc/hosts file . . . . . . . . . . . . . . . . 59error logs . . . . . . . . . . . . . . . . . . . . 223error messages. . . . . . . . . . . . . . . . . . 230External Call History
authorize . . . . . . . . . . . . . . . . . . . . 48installing . . . . . . . . . . . . . . . . . . . . 81
FFeature Packages . . . . . . . . . . . . . . . . . 81
External Call History . . . . . . . . . . . . . . . 81Forecasting . . . . . . . . . . . . . . . . . . . 79installing . . . . . . . . . . . . . . . . . . . . 78set authorizations . . . . . . . . . . . . . . . . 48
file system backup . . . . . . . . . . . . . . . . 130flat file
CMS setup . . . . . . . . . . . . . . . . . . . 72Forecasting
authorize . . . . . . . . . . . . . . . . . . . . 48installing . . . . . . . . . . . . . . . . . . . . 79
GGlossary . . . . . . . . . . . . . . . . . . . . . 245graphics . . . . . . . . . . . . . . . . . . . . . . 48
Hhelplines . . . . . . . . . . . . . . . . . . . . . . 14hosts file . . . . . . . . . . . . . . . . . . . . . . 59
IIDS
turning on and off . . . . . . . . . . . . . 132, 140Informix
tunables . . . . . . . . . . . . . . . . . . . .111installation related problems. . . . . . . . . . . . 221
checking installed RHEL patches . . . . . . . . 177installing
External Call History . . . . . . . . . . . . . . . 81Feature Packages . . . . . . . . . . . . . . . . 81Forecasting . . . . . . . . . . . . . . . . . . . 79
CMS R18 Software Installation, Maintenance, and Troubleshooting for Linux June 2017 253
Index
Installing RHEL 6.6 . . . . . . . . . . . . . . . . 18Installing the Access Security Gateway (ASG) interface112Installing the RHEL operating system . . . . . . . . 17
LLAN. . . . . . . . . . . . . . . . . . . . . . . . 59link . . . . . . . . . . . . . . . . . . . . . . . . 118
Mmachine panics . . . . . . . . . . . . . . . . . . 224maintenance
backup. . . . . . . . . . . . . . . . . . . . . 143restore . . . . . . . . . . . . . . . . . . . . . 190
missing devices . . . . . . . . . . . . . . . . . . 222
Nnohup command . . . . . . . . . . . . . . . . . . 27
OODBC installation . . . . . . . . . . . . . . . . . 56Open Database Connectivity . . . . . . . . . . . . 56
Ppasswd_age . . . . . . . . . . . . . . . . . . . . 133password
CMS . . . . . . . . . . . . . . . . . . . . . . 119customer . . . . . . . . . . . . . . . . . . . . 119
password aging . . . . . . . . . . . . . . . . . . 133exclude file . . . . . . . . . . . . . . . . . . . 180
patchesinstalling CMS . . . . . . . . . . . . . . . . . 178removing CMS . . . . . . . . . . . . . . . . . 179requirements for CMS. . . . . . . . . . . . . . 177RHEL . . . . . . . . . . . . . . . . . . . . . 176RHEL . . . . . . . . . . . . . . . . . . . . . 40
pkg_install . . . . . . . . . . . . . . . . . . . . . 130pkg_remove . . . . . . . . . . . . . . . . . 131, 132
Rrecognizing new hardware devices . . . . . . . . . 222recovering a system . . . . . . . . . . . . . . . . 196related documents . . . . . . . . . . . . . . . . . 12removing
ACDs . . . . . . . . . . . . . . . . . . . . . 129CMS package fails . . . . . . . . . . . . . . . 226feature packages . . . . . . . . . . . . . 131, 132
Removing Access Security Gateway . . . . . . . . .113restoring a system . . . . . . . . . . . . . . . . 200restoring data
disk failure . . . . . . . . . . . . . . . . . . 196disk replacement . . . . . . . . . . . . . . . 196full and incremental backup . . . . . . . . . . 192maintenance backup . . . . . . . . . . . . . 190specific files. . . . . . . . . . . . . . . . . . 219without backup . . . . . . . . . . . . . . . . 217
RHELbacking out a patch . . . . . . . . . . . . . . 177checking installed patches . . . . . . . . . . . 177opening a virtual console window. . . . . . . . . 28patches . . . . . . . . . . . . . . . . . . .40, 176
run_cms . . . . . . . . . . . . . . . . . . . 132, 140run_ids . . . . . . . . . . . . . . . . . . . 132, 140
Sset up
Alarm Origination Manager. . . . . . . . . . 91, 92Alarm Originator. . . . . . . . . . . . . . . . . 91CMS . . . . . . . . . . . . . . . . . . 62, 63, 72CMS authorizations . . . . . . . . . . . . . . . 48data storage parameters . . . . . . . . . . . . . 56LAN for switch connections . . . . . . . . . . . 59networking . . . . . . . . . . . . . . . . . . . 59TCP/IP . . . . . . . . . . . . . . . . . . . . . 59
Setting up AOM configuration for alarming using Socket/SAL107
software installationAlarm Originator. . . . . . . . . . . . . . . . . 91CMS . . . . . . . . . . . . . . . . . . . . . . 45CMS login passwords . . . . . . . . . . . . . . 47CMS patches . . . . . . . . . . . . . . . . . 178CMS Supplemental Services . . . . . . . . . . . 46Feature Packages . . . . . . . . . . . . . . . . 78ODBC . . . . . . . . . . . . . . . . . . . . . 56RHEL. . . . . . . . . . . . . . . . . . . . . . 17RHEL patches . . . . . . . . . . . . . . .40, 176
software maintenance . . . . . . . . . . . . . . 125starting CMS . . . . . . . . . . . . . . . . . 132, 140starting IDS . . . . . . . . . . . . . . . . . 132, 140stopping CMS . . . . . . . . . . . . . . . . 132, 140stopping IDS . . . . . . . . . . . . . . . . . 132, 140Supplemental Services installation. . . . . . . . . . 46swinfo . . . . . . . . . . . . . . . . . . . . . . 141switch
link . . . . . . . . . . . . . . . . . . . . . 59, 118options . . . . . . . . . . . . . . . . . . . . 141setup . . . . . . . . . . . . . . . . . . . . . 141TCP/IP . . . . . . . . . . . . . . . . . . . . . 59
swsetup . . . . . . . . . . . . . . . . . . . . . 141system
checking date and time . . . . . . . . . . . . 174

CMS R18 Software Installation, Maintenance, and Troubleshooting for Linux June 2017 254
Index
country and time zones . . . . . . . . . . . . . 175date and time. . . . . . . . . . . . . . . 116, 174messages . . . . . . . . . . . . . . . . . . . 228restoring specific files . . . . . . . . . . . . . . 219restoring without backup . . . . . . . . . . . . 217
system recovery . . . . . . . . . . . . . . . . . . 189
Ttape drives and cartridges . . . . . . . . . . . . . 146TCP/IP . . . . . . . . . . . . . . . . . . . . . . 59testing
ACD link . . . . . . . . . . . . . . . . . . . . 118CMS software . . . . . . . . . . . . . . . . . 120
time zones . . . . . . . . . . . . . . . . . . . . 175troubleshooting . . . . . . . . . . . . . . . . . . 221
checking installed software packages . . . . . . 224CMS installation fails . . . . . . . . . . . . . . 227CMSADM . . . . . . . . . . . . . . . . . . . 227common error messages . . . . . . . . . . . . 230disc drive. . . . . . . . . . . . . . . . . . . . 226disk drives . . . . . . . . . . . . . . . . . . . 229disk I/O problems . . . . . . . . . . . . . . . . 229error logs. . . . . . . . . . . . . . . . . . . . 223machine panics. . . . . . . . . . . . . . . . . 224no power on peripherals. . . . . . . . . . . . . 222password aging. . . . . . . . . . . . . . . . . 222recognizing new hardware. . . . . . . . . . . . 222
turnover system to customer . . . . . . . . . . . . 115
Vverifying system date and time . . . . . . . . . . . 116Verifying the disk partitioning for Dell R720 platforms. 34videos. . . . . . . . . . . . . . . . . . . . . . . 13
Related Documents


