AutoCAD Civil 3D 2011 Installation April 2010

Welcome message from author
This document is posted to help you gain knowledge. Please leave a comment to let me know what you think about it! Share it to your friends and learn new things together.
Transcript

AutoCAD Civil 3D 2011
Installation
April 2010

© 2010 Autodesk, Inc. All Rights Reserved. Except as otherwise permitted by Autodesk, Inc., this publication, or parts thereof, may not bereproduced in any form, by any method, for any purpose. Certain materials included in this publication are reprinted with the permission of the copyright holder. TrademarksThe following are registered trademarks or trademarks of Autodesk, Inc., and/or its subsidiaries and/or affiliates in the USA and other countries:3DEC (design/logo), 3December, 3December.com, 3ds Max, Algor, Alias, Alias (swirl design/logo), AliasStudio, Alias|Wavefront (design/logo),ATC, AUGI, AutoCAD, AutoCAD Learning Assistance, AutoCAD LT, AutoCAD Simulator, AutoCAD SQL Extension, AutoCAD SQL Interface,Autodesk, Autodesk Envision, Autodesk Intent, Autodesk Inventor, Autodesk Map, Autodesk MapGuide, Autodesk Streamline, AutoLISP, AutoSnap,AutoSketch, AutoTrack, Backburner, Backdraft, Built with ObjectARX (logo), Burn, Buzzsaw, CAiCE, Civil 3D, Cleaner, Cleaner Central, ClearScale,Colour Warper, Combustion, Communication Specification, Constructware, Content Explorer, Dancing Baby (image), DesignCenter, DesignDoctor, Designer's Toolkit, DesignKids, DesignProf, DesignServer, DesignStudio, Design Web Format, Discreet, DWF, DWG, DWG (logo), DWGExtreme, DWG TrueConvert, DWG TrueView, DXF, Ecotect, Exposure, Extending the Design Team, Face Robot, FBX, Fempro, Fire, Flame, Flare,Flint, FMDesktop, Freewheel, GDX Driver, Green Building Studio, Heads-up Design, Heidi, HumanIK, IDEA Server, i-drop, ImageModeler, iMOUT,Incinerator, Inferno, Inventor, Inventor LT, Kaydara, Kaydara (design/logo), Kynapse, Kynogon, LandXplorer, Lustre, MatchMover, Maya,Mechanical Desktop, Moldflow, Moonbox, MotionBuilder, Movimento, MPA, MPA (design/logo), Moldflow Plastics Advisers, MPI, MoldflowPlastics Insight, MPX, MPX (design/logo), Moldflow Plastics Xpert, Mudbox, Multi-Master Editing, Navisworks, ObjectARX, ObjectDBX, OpenReality, Opticore, Opticore Opus, Pipeplus, PolarSnap, PortfolioWall, Powered with Autodesk Technology, Productstream, ProjectPoint, ProMaterials,RasterDWG, RealDWG, Real-time Roto, Recognize, Render Queue, Retimer,Reveal, Revit, Showcase, ShowMotion, SketchBook, Smoke, Softimage,Softimage|XSI (design/logo), Sparks, SteeringWheels, Stitcher, Stone, StudioTools, ToolClip, Topobase, Toxik, TrustedDWG, ViewCube, Visual,Visual LISP, Volo, Vtour, Wire, Wiretap, WiretapCentral, XSI, and XSI (design/logo). All other brand names, product names or trademarks belong to their respective holders. DisclaimerTHIS PUBLICATION AND THE INFORMATION CONTAINED HEREIN IS MADE AVAILABLE BY AUTODESK, INC. "AS IS." AUTODESK, INC. DISCLAIMSALL WARRANTIES, EITHER EXPRESS OR IMPLIED, INCLUDING BUT NOT LIMITED TO ANY IMPLIED WARRANTIES OF MERCHANTABILITY ORFITNESS FOR A PARTICULAR PURPOSE REGARDING THESE MATERIALS. Published by:Autodesk, Inc.111 McInnis ParkwaySan Rafael, CA 94903, USA

Contents
Chapter 1 Stand-Alone Installation . . . . . . . . . . . . . . . . . . . . . . 1Preparing for Installation . . . . . . . . . . . . . . . . . . . . . . . . . . 1
Before You Begin Installation . . . . . . . . . . . . . . . . . . . . . 1System Requirements . . . . . . . . . . . . . . . . . . . . . . . . . 1Administrative Permission Requirements . . . . . . . . . . . . . . 4Locating Your Serial Number and Product Key . . . . . . . . . . . 4Minimize the Chances of Installation Failure . . . . . . . . . . . . 5Migrating Custom Settings . . . . . . . . . . . . . . . . . . . . . . 6
Installing and Running the Product . . . . . . . . . . . . . . . . . . . . 6Installing AutoCAD Civil 3D . . . . . . . . . . . . . . . . . . . . . 6Register and Activate AutoCAD Civil 3D . . . . . . . . . . . . . . 10Launch AutoCAD Civil 3D . . . . . . . . . . . . . . . . . . . . . 11Add or Remove Features . . . . . . . . . . . . . . . . . . . . . . . 12Reinstall or Repair AutoCAD Civil 3D . . . . . . . . . . . . . . . 13Uninstall AutoCAD Civil 3D . . . . . . . . . . . . . . . . . . . . 14What are Hydraflow Extensions? . . . . . . . . . . . . . . . . . . 15What is Survey Data Collection Link Extension? . . . . . . . . . . 16Installing Autodesk Vault . . . . . . . . . . . . . . . . . . . . . . 17Installing Design Review . . . . . . . . . . . . . . . . . . . . . . 17What are Content Packs? . . . . . . . . . . . . . . . . . . . . . . 18What are Configurable Folders? . . . . . . . . . . . . . . . . . . 19
Chapter 2 Migrating and Customizing . . . . . . . . . . . . . . . . . . . . 23
iii

Migrating Data . . . . . . . . . . . . . . . . . . . . . . . . . . . . . . 23Migrating Customized Files . . . . . . . . . . . . . . . . . . . . . . . . 24
Chapter 3 Network Administration and Deployment . . . . . . . . . . . . 29Preparing a Deployment . . . . . . . . . . . . . . . . . . . . . . . . . 29
System Requirements for Administrative Image . . . . . . . . . . 29Plan an Installation Type . . . . . . . . . . . . . . . . . . . . . . 30Plan for a License Server Model . . . . . . . . . . . . . . . . . . . 31Create a Network Share . . . . . . . . . . . . . . . . . . . . . . . 31Network Tools and Your License Server . . . . . . . . . . . . . . . 32
Setting Up and Creating a Deployment . . . . . . . . . . . . . . . . . . 33Preliminary Tasks for a Network Deployment . . . . . . . . . . . 33Deployment Best Practices . . . . . . . . . . . . . . . . . . . . . 35Configure Button . . . . . . . . . . . . . . . . . . . . . . . . . . 35Your Deployment Choices . . . . . . . . . . . . . . . . . . . . . 36
Enter User and Product Information . . . . . . . . . . . . . 36Specify Log File Locations . . . . . . . . . . . . . . . . . . . 37What Is Silent Mode? . . . . . . . . . . . . . . . . . . . . . 38Select a License Type (optional) . . . . . . . . . . . . . . . . 39Select the Installation Type (optional) . . . . . . . . . . . . 41Configure Content Packs . . . . . . . . . . . . . . . . . . . 44Configurable Folders . . . . . . . . . . . . . . . . . . . . . 44Include Service Packs (optional) . . . . . . . . . . . . . . . 44Configure InfoCenter Communication Center
(optional) . . . . . . . . . . . . . . . . . . . . . . . . . . 46Allow Users to Access Online Resources (optional) . . . . . . 49
Creating a Default Deployment . . . . . . . . . . . . . . . . . . . 51Creating a Configured or Customized Deployment . . . . . . . . 53Final Review and Complete Setup . . . . . . . . . . . . . . . . . 57Modify a Deployment (optional) . . . . . . . . . . . . . . . . . . 57Point Users to the Administrative Image . . . . . . . . . . . . . . 58
Chapter 4 Distributing an Autodesk Program . . . . . . . . . . . . . . . . 59Use Group Policies to Run a Deployment . . . . . . . . . . . . . . . . 59
Use Group Policies to Assign a Deployment to Computers . . . . 61Verify a Group Policy Deployment . . . . . . . . . . . . . . . . . 67
Use Microsoft System Center Configuration Manager to Install aDeployment . . . . . . . . . . . . . . . . . . . . . . . . . . . . . . . 67
Introduction . . . . . . . . . . . . . . . . . . . . . . . . . . . . . 67Tasks for Deploying Autodesk Software with SCCM . . . . . . . . 68Set Up a Source Directory Using the Deployment Wizard . . . . . 68Create the SCCM Software Installation Package . . . . . . . . . . 69
Distribute the Product Using Imaging Software . . . . . . . . . . . . . 71Use a Master Image to Distribute Multi-Seat Stand-Alone
Products to Multiple Systems . . . . . . . . . . . . . . . . . . . 72
iv | Contents

Use a Master Image to Distribute Network Licensed Products toMultiple Systems . . . . . . . . . . . . . . . . . . . . . . . . . 73
Restore the Master Image . . . . . . . . . . . . . . . . . . . . . . 73Clean a Master System and Restore the Operating System . . . . . 74
Chapter 5 Installation Troubleshooting . . . . . . . . . . . . . . . . . . . 75General Installation Issues . . . . . . . . . . . . . . . . . . . . . . . . 75
How can I check my graphics card driver to see if it needs to beupdated? . . . . . . . . . . . . . . . . . . . . . . . . . . . . . . 75
What is the text editor used for? . . . . . . . . . . . . . . . . . . 76What is the difference between a stand-alone license and a
network license? . . . . . . . . . . . . . . . . . . . . . . . . . . 76What is the benefit of using a network licensed version of the
software? . . . . . . . . . . . . . . . . . . . . . . . . . . . . . . 76What features get installed during a Typical or Custom
installation? . . . . . . . . . . . . . . . . . . . . . . . . . . . . 77How do I access my documentation? . . . . . . . . . . . . . . . . 78What is SAMreport-Lite? . . . . . . . . . . . . . . . . . . . . . . 78
Deployment Issues . . . . . . . . . . . . . . . . . . . . . . . . . . . . 78Is there a checklist I can refer to when performing a
deployment? . . . . . . . . . . . . . . . . . . . . . . . . . . . . 79Where should deployments be located? . . . . . . . . . . . . . . 79Where can I check if service packs are available for my
software? . . . . . . . . . . . . . . . . . . . . . . . . . . . . . . 79How do I extract an MSP file? . . . . . . . . . . . . . . . . . . . . 79Can Online Resource settings be modified later? . . . . . . . . . . 80Where can I learn about InfoCenter? . . . . . . . . . . . . . . . . 80What are information channels? . . . . . . . . . . . . . . . . . . 80What are the benefits to enabling CAD Manager
Channels? . . . . . . . . . . . . . . . . . . . . . . . . . . . . . 80What are RSS feeds and how do they benefit my
installation? . . . . . . . . . . . . . . . . . . . . . . . . . . . . 81Where can I learn about InfoCenter search locations? . . . . . . . 81How do I set or customize search locations? . . . . . . . . . . . . 81
Networking Issues . . . . . . . . . . . . . . . . . . . . . . . . . . . . . 81When installing tools and utilities, which selections are
applicable for a multi-seat stand-alone installation? . . . . . . . 81When installing tools and utilities, which selections are
applicable for a stand-alone installation? . . . . . . . . . . . . . 82Where do I find my server name? . . . . . . . . . . . . . . . . . 82When specifying user workstation settings, I am given the
option to specify a profile. What are profiles? . . . . . . . . . . 82Can I create custom desktop shortcuts? . . . . . . . . . . . . . . 82What happens when you choose to append or merge service
packs? . . . . . . . . . . . . . . . . . . . . . . . . . . . . . . . 83What is an administrative image (MSI) file? . . . . . . . . . . . . 83
Contents | v

What is the impact of selecting all products for theadministrative image, and can I add products later? . . . . . . . 83
Uninstall and Maintenance Issues . . . . . . . . . . . . . . . . . . . . 84When adding or removing features, how can I tell what features
get installed by default? . . . . . . . . . . . . . . . . . . . . . . 84Is it possible to change the installation folder when adding or
removing features? . . . . . . . . . . . . . . . . . . . . . . . . 85When should I reinstall the product instead of a repair? . . . . . . 85Do I need my original disc to reinstall my software? . . . . . . . . 86When I uninstall my software, what files are left on my
system? . . . . . . . . . . . . . . . . . . . . . . . . . . . . . . 86
Chapter 6 Glossary . . . . . . . . . . . . . . . . . . . . . . . . . . . . . . 87
Index . . . . . . . . . . . . . . . . . . . . . . . . . . . . . . . . 91
vi | Contents

Stand-Alone Installation
The AutoCAD Civil 3D Installation guide provides instructions about how to prepare, and theninstall AutoCAD Civil 3D 2011. If you have never installed the product before, you shouldfamiliarize yourself with the entire installation process and options before beginning.
If you have a previous release installed, you should review the Migrating and Customizing(page 23) section, so you can take full advantage of your custom settings.
For information about network-licensed versions of the program, see Plan an InstallationType (page 30).
Preparing for Installation
Before You Begin Installation■ Review the system requirements (page 1).
■ Understand administrative permission requirements (page 4).
■ Locate your AutoCAD Civil 3D serial number and product key (page 4).
■ Close all running applications.
System RequirementsThe first task you need to complete is to make sure that your computer meetsthe minimum system requirements. If your system does not meet theserequirements, problems can occur, both within AutoCAD Civil 3D and at theoperating system level.
1
1

Ensure you use the appropriate AutoCAD Civil 3D 2011 DVD, depending onwhether your Windows operating system is the 32-bit or the 64-bit version.A 64-bit version of AutoCAD Civil 3D cannot be installed on a 32-bit systemand vice-versa.
See the following table for hardware and software requirements.
32-bit Hardware and Software Requirements
Microsoft® Windows® XP Home andProfessional Edition SP3;
Operating systems ■ For more information on Win-dows Vista versions see ht-tp://www.microsoft.com/windowsv-ista/versions/
Microsoft Windows Vista® EnterpriseSP1 or SP2;Microsoft Windows 7 including the fol-lowing editions:
■ For more information on Win-dows 7 see http://www.mi-crosoft.com/windows7■ Enterprise
■ Ultimate
■ Professional
■ Home Premium
Microsoft Windows 7 is recommended.
Internet Explorer® 7.0 or laterBrowser
Intel® Pentium® 4 or AMD Athlon™, 3.0GHz or higher, or Intel Pentium or AMD
CPU type
Athlon Dual Core processor, 2.0 GHZ orhigher
4 GB minimum recommendedMemory
1280 x 1024 (1600 x 1200 recommen-ded) with True Color, 128 MB or great-
Display resolution ■ For graphic cards that supportHardware Acceleration, DirectX9.0c or later must be installed.er, Pixel Shader 3.0 or later, Direct 3D®
- capable, workstation-class graphicscard. For more information about tested
and certified graphics cards, visit ht-tp://autodesk.com/graphicscard/
Multiple monitors are supported.
A 32-bit AutoCAD Civil 3D cannotbe installed on a 64-bit Windowsoperating system and vice-versa.
7 GB for installation2 GB available after installation
Hard disk
2 | Chapter 1 Stand-Alone Installation

32-bit Hardware and Software Requirements
Microsoft mouse compliantPointing device
64-bit Hardware and Software Requirements
Microsoft Windows XP Professional x64Edition SP2;
Operating systems ■ For more information on Win-dows Vista versions see ht-tp://www.microsoft.com/win-dowsvista/versions/
Microsoft Windows Vista Enterprise, Busi-ness, or Ultimate 64 bit;Microsoft Windows 7 including the follow-ing 64-bit editions:
■ For more information on Win-dows 7 see http://www.mi-crosoft.com/windows7■ Enterprise
■ Business
■ Ultimate
■ Professional
■ Home Premium
Microsoft Windows 7 is recommended.
Internet Explorer 7.0 or laterBrowser
AMD Athlon 64CPU type
AMD Opteron™
Intel Xeon with Intel EM64T supportIntel Pentium 4 with Intel EM64T support
4 GB minimum; 8 GB minimum recommen-ded
Memory
1280 x 1024 (1600 x 1200 recommended)with True Color, 128 MB or greater, Pixel
Display resolution ■ For graphic cards that supportHardware Acceleration, DirectX9.0c or later must be installed.Shader 3.0 or later, Direct 3D® - capable,
workstation-class graphics card.Multiple monitors are supported. For more information about tested
and certified graphics cards, visit ht-tp://autodesk.com/graphicscard/
A 64-bit AutoCAD Civil 3D cannotbe installed on a 32-bit Windowsoperating system and vice-versa.
7 GB for installation2 GB available after installation
Hard disk
System Requirements | 3

64-bit Hardware and Software Requirements
MS-Mouse compliantPointing device
3D Modeling Addi-tional Require-ments
■ Intel Pentium 4 or AMD Athlon pro-cessor, 3.0 GHz or higher; or Intel orAMD Dual Core processor, 2.0 GHz orhigher
■ 2 GB RAM or greater
■ 2 GB free hard disk space available notincluding installation
■ 1280 x 1024 32-bit color video displayadapter (True Color) 128 MB or
greater, Direct3D® capable worksta-tion class graphics card
NOTE Adobe Flash Player is not installed by default. If a version of Flash is notcurrently installed on your system, a message is displayed requesting that youinstall it. Flash Player can be installed from the product media or Adobe’s website- www.adobe.com.
Administrative Permission RequirementsTo install AutoCAD Civil 3D, you must have administrator permissions. Youdo not need to have domain administrative permissions. See your systemadministrator for information about administrative permissions.
You do not need administrator permissions to run AutoCAD Civil 3D. Youcan run the program as a limited user.
Locating Your Serial Number and Product KeyWhen you install AutoCAD Civil 3D, you are prompted for your serial numberand product key in the Product and User Information page, or the option ofinstalling the product in trial mode. You may enter your product informationat any time during your trial mode period if you opt to install the product inthat mode.
The serial number and product key are located on the outside of the productpackaging, or in the Autodesk Upgrade and Licensing Information email. Make
4 | Chapter 1 Stand-Alone Installation

sure to have these available before you install the program so that you don'thave to stop in the middle of the installation.
The serial number must contain a three-digit prefix followed by an eight-digitnumber. The product key consists of five characters.
The information you enter is permanently retained with the product. Becauseyou can't change this information later without uninstalling, take care whenentering the information. To review this product information later, on theInfoCenter toolbar, click the drop-down arrow next to the Help button (thequestion mark). Then click About.
NOTE If you have lost your serial number or product key, contact the AutodeskBusiness Center (ABC) at 800-538-6401 for assistance.
Minimize the Chances of Installation FailureThe AutoCAD Civil 3D installation process may stop if some applications suchas Microsoft® Outlook® or virus-checking programs are running. Close allrunning applications to avoid possible installation problems and data loss.
Minimize the Chances of Installation Failure | 5

Migrating Custom SettingsYou can migrate your custom settings and files from previous releases ofAutoCAD Civil 3D (AutoCAD Civil 3D 2005 through AutoCAD Civil 3D 2011). Itis recommended that you migrate custom settings from a previous releaseright away. This prevents you from overwriting files or having to keep trackof any custom settings you may make in the new release. Migrating settingsoverwrites any new settings.
For more details regarding migration, see Migrating and Customizing (page23).
Installing and Running the ProductTo use the product, you must install the product, register and activate it, andthen launch it. You must have administrative permissions to install AutoCADCivil 3D.
This section provides instructions for installing and activating AutoCAD Civil3D for an individual user on a stand-alone computer. For information aboutinstalling network-licensed or multi-seat stand-alone versions of the program,see Network Administration and Deployment (page 29).
Installing AutoCAD Civil 3DThe AutoCAD Civil 3D installation wizard contains all installation-relatedmaterial in one place. From the installation wizard, you can access userdocumentation, install supplemental tools, and add online support services.
■ Review the installation documentation. It is recommended that you takethe time to familiarize yourself with the complete installation processbefore you install AutoCAD Civil 3D. You can access information oninstallation from the installation wizard by selecting the Read thisDocumentation option, the Documentation and information links, or throughthe Help system.For late-breaking information, it is also recommended that you review theproduct Readme.
6 | Chapter 1 Stand-Alone Installation

To install AutoCAD Civil 3D using default values on a stand-alone computer
This is the fastest means of installing AutoCAD Civil 3D on a single,stand-alone system. The installation performs the following:
■ Uses a Typical installation, which installs the most common applicationfeatures.
■ Includes the Express Tools library. The library provides additionalproductivity tools.
■ Installs AutoCAD Civil 3D to the default install path of C:\ProgramFiles\Autodesk\<AutoCAD Civil 3D>.
To install the product using default values
1 Select the product(s) and click Next.
NOTE Autodesk Design Review 2011 is required by AutoCAD Civil 3D andAutodesk Vault and is installed by default. For more information, see InstallingDesign Review (page 17) and Installing Autodesk Vault (page 17).
2 Review the Autodesk software license agreement. Click I Accept, and thenclick Next.
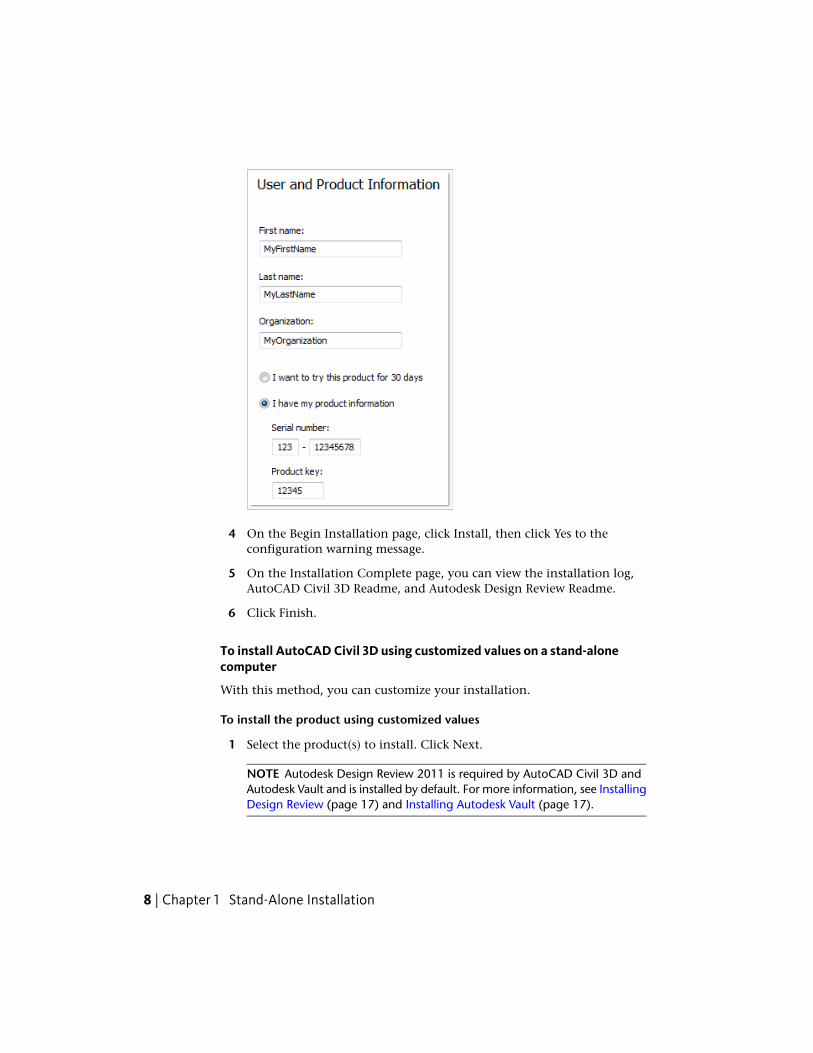
3 On the User and Product Information page, enter your user information,serial number, and product key. Click Next.
Installing AutoCAD Civil 3D | 7
4 On the Begin Installation page, click Install, then click Yes to theconfiguration warning message.
5 On the Installation Complete page, you can view the installation log,AutoCAD Civil 3D Readme, and Autodesk Design Review Readme.
6 Click Finish.
To install AutoCAD Civil 3D using customized values on a stand-alonecomputer
With this method, you can customize your installation.
To install the product using customized values
1 Select the product(s) to install. Click Next.
NOTE Autodesk Design Review 2011 is required by AutoCAD Civil 3D andAutodesk Vault and is installed by default. For more information, see InstallingDesign Review (page 17) and Installing Autodesk Vault (page 17).
8 | Chapter 1 Stand-Alone Installation

2 Review the Autodesk software license agreement. Click I Accept, and thenclick Next.
3 On the User and Product Information page, enter your user information,serial number, and product key. Click Next.
NOTE After you click Next, you cannot change the information entered onthis page unless you uninstall the product. Make sure you enter theinformation correctly.
4 On the Begin Installation page, click Configure.
5 On the Select the License Type page, select the license type - Stand-aloneor Network. Click Next.
6 On the Select the Installation Type page, make one of the followingconfiguration changes, and then click Next.
■ Typical - Installs the most common application features.
■ Custom - Installs only the application features that you select fromthe Select Features to Install list.
■ Product Install Path - Specifies the drive and location where AutoCADCivil 3D will be installed.
7 On the Configure Content Packs page, select the required content packsand specify whether to create a desktop shortcut.
8 On the Configurable Folders page, review the paths to the configurablecontent.
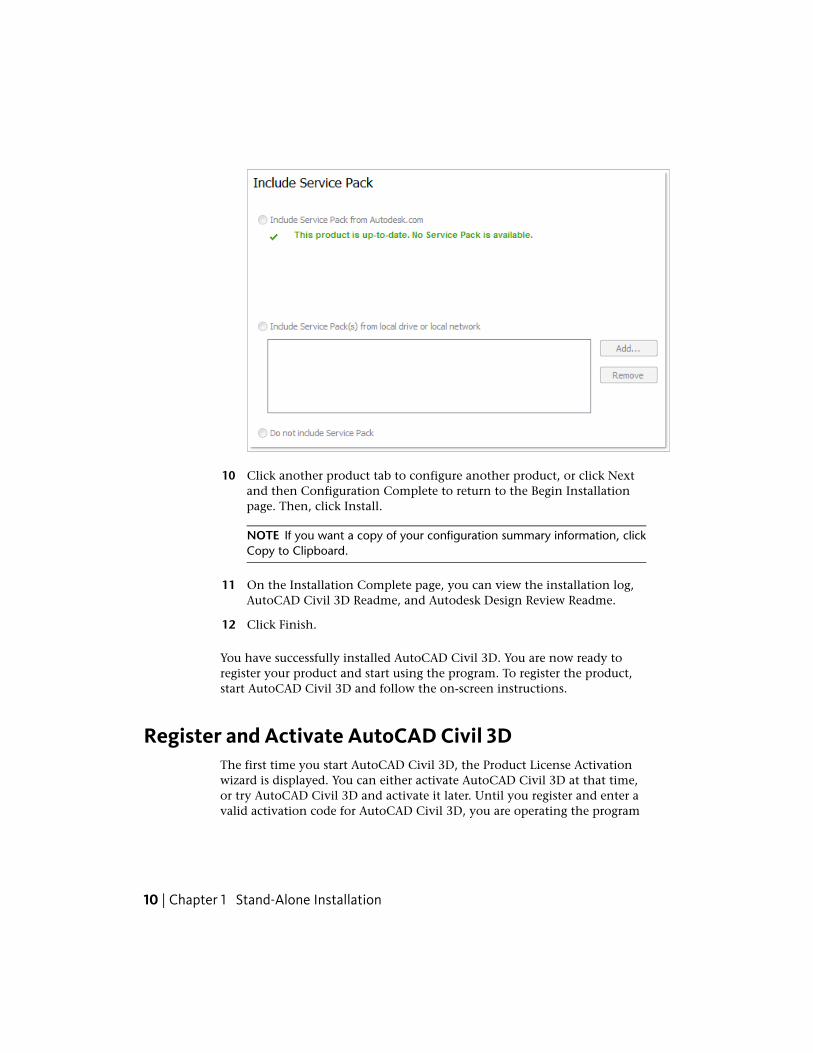
9 On the Include Service Pack page, select to include available service packs.The installer automatically checks autodesk.com for available updates.
Installing AutoCAD Civil 3D | 9
10 Click another product tab to configure another product, or click Nextand then Configuration Complete to return to the Begin Installationpage. Then, click Install.
NOTE If you want a copy of your configuration summary information, clickCopy to Clipboard.
11 On the Installation Complete page, you can view the installation log,AutoCAD Civil 3D Readme, and Autodesk Design Review Readme.
12 Click Finish.
You have successfully installed AutoCAD Civil 3D. You are now ready toregister your product and start using the program. To register the product,start AutoCAD Civil 3D and follow the on-screen instructions.
Register and Activate AutoCAD Civil 3DThe first time you start AutoCAD Civil 3D, the Product License Activationwizard is displayed. You can either activate AutoCAD Civil 3D at that time,or try AutoCAD Civil 3D and activate it later. Until you register and enter avalid activation code for AutoCAD Civil 3D, you are operating the program
10 | Chapter 1 Stand-Alone Installation

in trial mode and the Product License Activation wizard is displayed for 30 daysfrom the first time that you run the program.
If after 30 days of running AutoCAD Civil 3D in trial mode you have notregistered and provided a valid activation code, your only option is to registerand activate AutoCAD Civil 3D. You will not be able to run in trial mode afterthe 30 days expires. Once you register and activate AutoCAD Civil 3D, theProduct License Activation wizard is no longer displayed.
The fastest and most reliable way to register and activate your product is byusing the Internet. Simply enter your registration information and send it toAutodesk over the Internet. Once you submit your information, registrationand activation occur quickly.
To register and activate AutoCAD Civil 3D
1 Do one of the following:
■ (Windows XP) Click Start menu ➤ Programs ➤ Autodesk ➤ <AutoCADCivil 3D> ➤ <AutoCAD Civil 3D>.
■ (Windows Vista) Click Start menu ➤ AllPrograms ➤ Autodesk ➤ <AutoCAD Civil 3D> ➤ <AutoCAD Civil 3D>.
2 In the AutoCAD Civil 3D Product License Activation wizard, selectActivate, and then click Next.
This starts the activation process.
3 Click Register and Activate (Get an Activation Code).
4 Click Next and follow the on-screen instructions.
If you do not have Internet access, or if you want to use another methodof registration, you can register and activate AutoCAD Civil 3D in oneof the following ways:
Email Create an email message with your registration information andsend it to Autodesk.
Fax or Post/Mail Enter your registration information, and fax or mailthe information to Autodesk.
Launch AutoCAD Civil 3DAssuming that you followed all of the previous steps outlined in thisinstallation section, you can launch AutoCAD Civil 3D and start taking
Launch AutoCAD Civil 3D | 11

advantage of its new and updated features. For more detailed informationabout the new features, learning videos, online Help, or AutoCAD Civil 3Dservices and support, see the Welcome screen after you launch the product.
You can start AutoCAD Civil 3D in the following ways:
■ Desktop shortcut icon. When you install AutoCAD Civil 3D, an AutoCADCivil 3D shortcut icon is placed on your desktop unless you cleared thatoption during installation. Double-click the AutoCAD Civil 3D shortcuticon to start the program.
■ Start menu. On the Start menu (Windows XP), click Programs or (WindowsVista) All Programs ➤ Autodesk ➤ <AutoCAD Civil 3D> ➤ <AutoCAD Civil 3D>.
■ Location where the AutoCAD Civil 3D is installed. If you have administrativepermissions, you can run AutoCAD Civil 3D in the location where youinstalled it. If you are a limited-rights user, you must run AutoCAD Civil3D from the Start menu or from the desktop shortcut icon. If you want tocreate a custom shortcut, make sure that the Start In directory for theshortcut points to a directory where you have write permissions.
Add or Remove FeaturesYou can add or remove AutoCAD Civil 3D features at any time. For example,you may have chosen a Custom installation option when you first installedAutoCAD Civil 3D, but now you want to add features that you did not installoriginally. Or you may no longer need to use all of the features that wereinstalled originally. You can add or remove features by using the Add orRemove Programs dialog box.
To add or remove features
1 Do one of the following:
■ (Windows XP) Click Start menu ➤ Settings ➤ Control Panel ➤ Addor Remove Programs.
■ (Windows Vista) Click Start menu ➤ Control Panel ➤ Programs andFeatures ➤ Uninstall/Change.
2 In the Add or Remove Programs (XP) or Uninstall or Change a Program(Vista) dialog box, click AutoCAD Civil 3D, and then clickChange/Remove.
The AutoCAD Civil 3D installation wizard re-opens in Maintenance mode.
12 | Chapter 1 Stand-Alone Installation
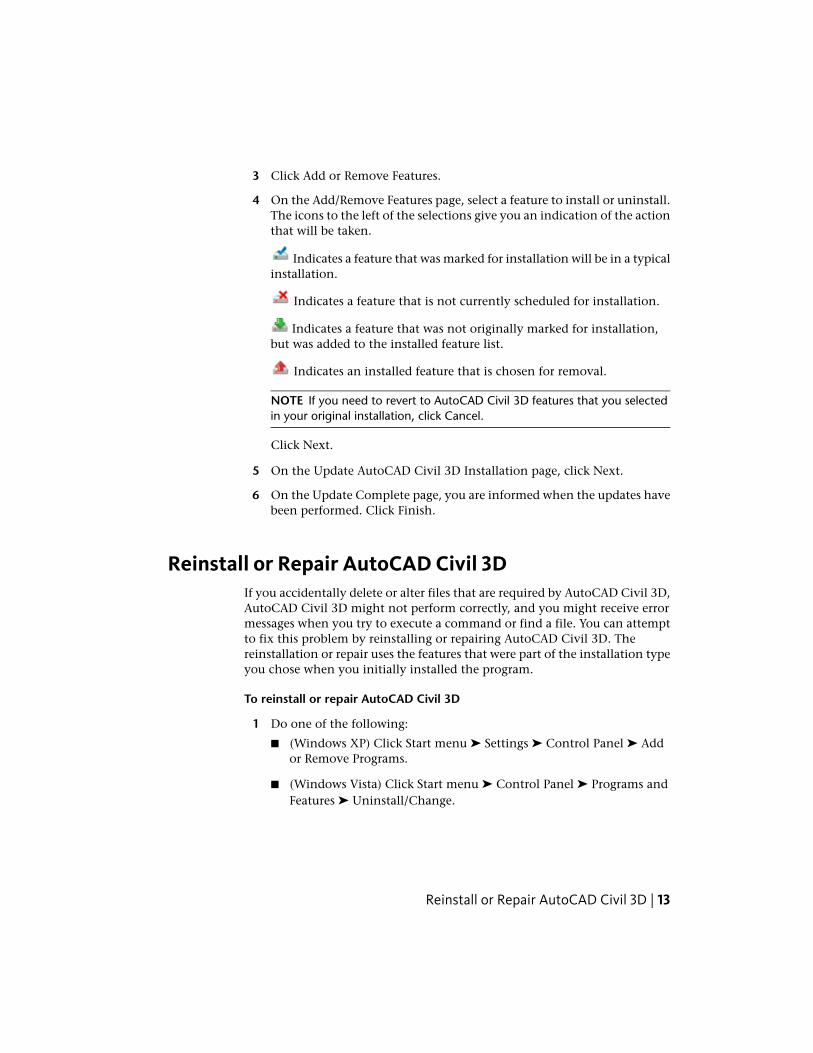
3 Click Add or Remove Features.
4 On the Add/Remove Features page, select a feature to install or uninstall.The icons to the left of the selections give you an indication of the actionthat will be taken.
Indicates a feature that was marked for installation will be in a typicalinstallation.
Indicates a feature that is not currently scheduled for installation.
Indicates a feature that was not originally marked for installation,but was added to the installed feature list.
Indicates an installed feature that is chosen for removal.
NOTE If you need to revert to AutoCAD Civil 3D features that you selectedin your original installation, click Cancel.
Click Next.
5 On the Update AutoCAD Civil 3D Installation page, click Next.
6 On the Update Complete page, you are informed when the updates havebeen performed. Click Finish.
Reinstall or Repair AutoCAD Civil 3DIf you accidentally delete or alter files that are required by AutoCAD Civil 3D,AutoCAD Civil 3D might not perform correctly, and you might receive errormessages when you try to execute a command or find a file. You can attemptto fix this problem by reinstalling or repairing AutoCAD Civil 3D. Thereinstallation or repair uses the features that were part of the installation typeyou chose when you initially installed the program.
To reinstall or repair AutoCAD Civil 3D
1 Do one of the following:
■ (Windows XP) Click Start menu ➤ Settings ➤ Control Panel ➤ Addor Remove Programs.
■ (Windows Vista) Click Start menu ➤ Control Panel ➤ Programs andFeatures ➤ Uninstall/Change.
Reinstall or Repair AutoCAD Civil 3D | 13

2 Then, do one of the following:
■ (Windows XP) In the Add or Remove Programs window, selectAutoCAD Civil 3D, then click Change/Remove.
■ (Windows Vista) In the Uninstall or Change a Program, selectAutoCAD Civil 3D, then click Uninstall/Change.
The AutoCAD Civil 3D installation wizard re-opens in Maintenance mode.
3 Select Repair or Reinstall. On the Select Repair or Reinstall page, selectone of the following options, and then click Next to start the process.
■ Repair My <AutoCAD Civil 3D> Installation. This option replaces allregistry entries that AutoCAD Civil 3D initially installed and restoresAutoCAD Civil 3D to its default state.
■ Reinstall My <AutoCAD Civil 3D> Installation. This option repairs theregistry and reinstalls all files from the original installation. Use thisoption if the Repair My <AutoCAD Civil 3D> Installation option doesnot solve the problem.
4 On the Repair Complete page, click Finish.
Uninstall AutoCAD Civil 3DWhen you uninstall AutoCAD Civil 3D, all Civil 3D components are removed.Additional components, such as Autodesk Vault are retained. This means thateven if you've previously added or removed components, or if you've reinstalledor repaired AutoCAD Civil 3D, the uninstall removes all AutoCAD Civil 3Dinstallation files from your system.
To uninstall AutoCAD Civil 3D
1 Do one of the following:
■ (Windows XP) Click Start menu ➤ Settings ➤ Control Panel ➤ Addor Remove Programs.
■ (Windows Vista) Click Start menu ➤ Control Panel ➤ Programs andFeatures ➤ Uninstall/Change.
2 Then, do one of the following:
■ (Windows XP) In the Add or Remove Programs window, selectAutoCAD Civil 3D, then click Change/Remove.
14 | Chapter 1 Stand-Alone Installation

■ (Windows Vista) In the Uninstall or Change a Program window, selectAutoCAD Civil 3D, then click Uninstall/Change.
The AutoCAD Civil 3D installation wizard re-opens in Maintenance mode.
3 Click Uninstall.
4 On the Uninstall <AutoCAD Civil 3D> page, click Next to remove AutoCADCivil 3D from the system.
5 When informed that the product has been successfully uninstalled, clickFinish.
NOTE Even though AutoCAD Civil 3D is removed from your system, the softwarelicense remains. If you reinstall AutoCAD Civil 3D at some future time, you willnot have to register and re-activate the program.
What are Hydraflow Extensions?The Hydraflow extensions are comprised of the following applications:
■ Hydraflow Storm Sewers ExtensionHydraflow Storm Sewers Extension for AutoCAD Civil 3D is a full-featuredapplication for urban hydrosystems engineering. It is designed primarilyfor hydrologic and hydraulic analysis of simple and complex storm sewernetworks. It can be used as a basic tool for determining the hydraulic gradeline in an existing system or planning and designing new systems.
■ Hydraflow Hydrographs ExtensionHydraflow Hydrographs Extension for AutoCAD Civil 3D is an applicationfor urban hydrosystems engineering. It is designed primarily for hydrologicanalysis of both simple and complex drainage basins. It can be used as abasic tool for determining runoff from various historical and syntheticstorms, and in planning or modeling flood control measures, such asdetention ponds.
■ Hydraflow Express ExtensionHydraflow Express Extension for AutoCAD Civil 3D is an application forperforming everyday hydraulics and hydrology tasks, such as designingculverts, open channels, inlets, and weirs. Hydraflow Express Extensionenables you to quickly generate informative graphs, rating curves, andon-screen reports as well as formal printed reports.
What are Hydraflow Extensions? | 15
To install Hydraflow Extensions, ensure that the corresponding option isselected. It is selected by default in Typical installation.
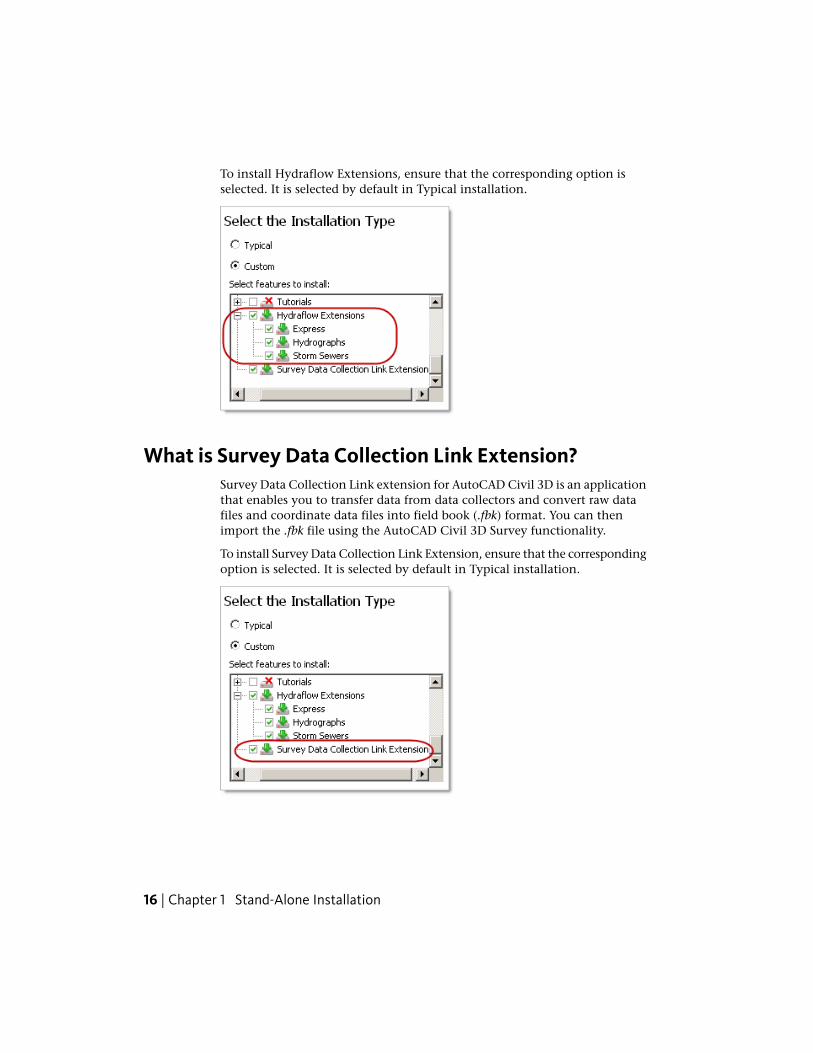
What is Survey Data Collection Link Extension?Survey Data Collection Link extension for AutoCAD Civil 3D is an applicationthat enables you to transfer data from data collectors and convert raw datafiles and coordinate data files into field book (.fbk) format. You can thenimport the .fbk file using the AutoCAD Civil 3D Survey functionality.
To install Survey Data Collection Link Extension, ensure that the correspondingoption is selected. It is selected by default in Typical installation.
16 | Chapter 1 Stand-Alone Installation

Installing Autodesk VaultAutodesk Vault is a project management solution that can be used withAutoCAD Civil 3D in a collaborative environment involving multiple designteams. Based on the client-server networking model, the main Vault databaseresides on a designated server and can be accessed from client computers ofproject participants. Vault allows you to share and manage not only DWGfiles, but all of your engineering and related data, such as hydraulic designs,analyses, and data generated from Microsoft Office applications or other designsoftware.
You can install Autodesk Vault during the AutoCAD Civil 3D installation.Select the corresponding option on the Select the Products to Install page ofthe Installation wizard.
For more information on Autodesk Vault, click the Documentation link fromthe AutoCAD Civil 3D 2011 Installation wizard.
Installing Design ReviewAutodesk Design Review 2011 is required for AutoCAD Civil 3D and AutodeskVault and is installed by default when you install AutoCAD Civil 3D. AutodeskDesign Review is useful if you need to view DWF or DWFx files.
NOTE If you use Windows Vista, you can use the Microsoft XPS Viewer to viewand print DWFx files.
Autodesk Design Review is a free program used for creating and reviewingDWF or DWFx files. An open, published, and secure file format developed by
Installing Autodesk Vault | 17

Autodesk, DWF enables you to combine and publish rich 2D- and 3D-designdata, and share it with others.
The following commands create DWF or DWFx files.
■ PUBLISH
■ PLOT
■ 3DDWF
■ PUBLISH TO WEB
■ EXPORT
■ AUTOPUBLISH
■ SSM
What are Content Packs?Content packs are collections of locale- and discipline-specific files to installwith AutoCAD Civil 3D. The available content packs allow you to work onUS or international projects and always reference the appropriate standardsfor each geographical region.
Files contained in content packs can include the following data:
■ Layer standard files
■ Standard blocks of various types
■ Border sheets for plotting
■ Civil drawing templates
■ Symbol drawings
■ Superelevation standards
■ Reporting style sheets
■ Pipe catalogs
■ Corridor catalogs
■ Tool Palettes for subassemblies, material styles, and landscape symbols
■ API Samples
18 | Chapter 1 Stand-Alone Installation

■ Reports
You can select content packs on the Configure Content Packs page of theinstallation wizard. You can select the AutoCAD-only profile, Autodesk Metricor Imperial profiles, or any available country profile. By default, there is onlyone shortcut icon created on the desktop. You can specify whether to displayadditional desktop shortcuts for each of the installed profiles. You can alsospecify a new location for the Content Browser Library file.
Each content pack is installed in a separate program group, which allows youto create a content pack shortcut that was not created using the installationwizard. You must install at least one content pack.
You can add or remove content packs using the AutoCAD Civil 3D 2011 Addor Remove Features utility.
To add or remove content packs
1 On the Windows Control Panel, click Add or Remove Programs.
2 Select AutoCAD Civil 3D from the Currently Installed Programs list, andclick Change/Remove.
3 In the AutoCAD Civil 3D installation wizard, click Add or RemoveFeatures. Click Next.
4 On the Configure Content Packs page, select the content packs to addor remove, and then click Next.
5 Click Next to update your program installation.
What are Configurable Folders?On the Configurable Folders page, you can specify custom locations for folderswith specific content. Content folders are devided into two groups: Supportand Survey.
What are Configurable Folders? | 19

The Support content folder group includes the following folders:
ContainsFolder name
Local copies of files for all the projects stored in the Vaultdatabase.
Working Projects
Items, such as preview drawings, quantities reports stylesheets, and layer and corridor standards.
Data
A predetermined folder structure that can be used foryour new projects. When a new project is created, you
Content Root
can specify to use a project template, and the new projectwill inherit a folder structure defined in the Content Rootsfolder.
Corridor model and pipe network support files.Corridor Model
The Survey content folder group includes the following folders:
ContainsFolder name
Survey Equipment database files. For example, eachdatabase can contain a library of equipment bymanufacturer.
Survey Equipment Database
Survey Figure Prefix database files. Each figure prefixdatabase contains line feature naming conventionspertaining to company or third-party standards.
Survey Figure Database
SDB_SET files containing settings for the creation ofnew survey databases. Each file can be a surveydatabase settings template.
Survey Database Settings
SDX_DEF (extended properties schema) files, as wellas LandXML and user-defined extended propertyschema files.
Survey Extended Property Defin-itions
User-defined linework coding definitions (or conven-tions), each set pertaining either to company orthird-party standards.
Survey Linework Code Sets
20 | Chapter 1 Stand-Alone Installation

Specify one of the following configurable folder modes for your content
■ DefaultDefault content files are installed in the default location in the Documentand Settings folder in Windows XP and Program Data folder in WindowsVista. When you uninstall the program, default content files are alsouninstalled.
■ LocalLocal content files are installed in non-standard locations. You can installa content group to a location other than the default folder. When youuninstall the program, local content files are also uninstalled.
■ SharedShared content files are installed in a shared location, enabling multipleusers to access the same copy of AutoCAD Civil 3D content. If you specifythe same location for a subsequent installation, you will be prompted tooverwrite the existing shared content files. When you uninstall theprogram, shared content files are not uninstalled.
What are Configurable Folders? | 21

22

Migrating and Customizing
If you have a previous version of AutoCAD Civil 3D installed on your system, you can installa newer version of AutoCAD Civil 3D and keep other versions of the program on the samesystem. This is called a side-by-side installation. If you have purchased an upgrade version ofAutoCAD Civil 3D, you are required to uninstall the previous version within 120 days ofinstalling your newer product. See your license agreement for more information.
In this section, you learn about migrating from previous releases and using customized filesfrom previous releases.
Migrating DataThe complexity of migrating data from release to release depends on yourcustomization of AutoCAD Civil 3D. There are multiple steps and approaches,depending on how much of the customization you want to migrate.
An important decision to make is whether to bring ‘enterprise wide’customization forward and ignore ‘user-based’ customization.
Recommended Process
When you deploy the software on many computers, using either the stand-aloneor network deployment, do the following:
1 Install AutoCAD Civil 3D on one computer. See Installing and Runningthe Product (page 6).
2 Complete all the migration steps to verify all the files have correctlymigrated. See Migrating Data (page 23).
3 Deploy the software on all other computers. See Setting Up and Creatinga Deployment (page 33).
4 Use a script to copy custom files.
2
23
Best Practices
Follow these rules:
■ Keep a record of files that are customized or added to the defaultinstallation.
■ Store customization files separately from the default files (for example,palettes, labels, pipe parts, and toolbox).
■ For LISP routines, always use International (English) with an underscore“ _” sign for command and parameter names.
■ Do not change the original CUIs (Acad.cuix, Civil.cuix).
■ Create a partial CUI for all your customization, except for the Workspaces.Keep customization in a partial CUI to avoid altering the original CUIs.Write-protect the partial CUI by setting the file to Read Only in Windows.
■ Place customized files, such as LSPs, ARXs, and CUIs in individual folders.In some situations, you can place the files on a shared network drive, whichhelps avoid issues associated with having multiple copies of the same file.
■ Place custom icons in a separate folder.
Migrating Customized FilesCustomize and Migrate CUIs
For company-wide customization of menus, create a partial menu. This helpsavoid working inside the CUI file and manually transfer menus and toolbars.Create a partial menu from the CUI Transfer tab by creating a new .CUI. SeeControl User Interface Elements in the CUI Editor in the AutoCADCustomization Guide.
Add your partial menu to the list of menus to load. The drop-down menu isdisplayed automatically after the AutoCAD Civil 3D menus, and the toolbarsbecome available.
If you have defined custom icons, place them in a separate folder. You needto make them available when you load the CUI file. If necessary, you cancreate the corresponding .MNR file.
During migration, specify the default location for custom icons in the projectfiles search path. If AutoCAD Civil 3D cannot find the custom icons a question
24 | Chapter 2 Migrating and Customizing

mark symbol is displayed. AutoCAD Civil 3D does not look at the .MNR filewhen loading a partial .CUI file.
Customize and Migrate Tool Palettes
When you create a new palette, an .ATC file is created that stores all thedefinitions of the tools in the palette. An image subfolder is also created thatstores the PNG files displayed in the palette.
Assign palette and tool names that are unique and easy to identify. Inpreparation for migration, copy all .ATC files and PNG subfolders to a sharednetwork folder. After upgrading, specify the path for tool palettes file locationsto the folder on the network.
Customize and Migrate the Toolbox
To customize the Toolbox, copy and rename the original ToolBoxCfg.xml filein the All Users applications folder at ...\Autodesk\C3D<version>\enu\Data\ToolBox.
Use an XML editor to remove all entries except the RootCategory and specifya name. Restart AutoCAD Civil 3D and use the Toolbox Editor to add newcategories and tools. Save the new file in the Toolbox Editor Panorama.
When migrating, copy the custom .xml file located in the All Users applicationsfolder at ...\Autodesk\C3D <version>\enu\Data\ToolBox
The Report Settings file stores the Client and Owner data, and the units andprecision that are used for LandXML reports. If the path for custom reportsdid not change, you do not need to do anything with this file.
RepGenSettings.xml is located in C:\Documents and Settings\username\LocalSettings\Application Data\Autodesk\LandXML Reporting
There is no need to copy this file. The new product release locates and readsthis file.
Migrate Custom Subassemblies
Autodesk provides updated libraries for each AutoCAD Civil 3D release. Whenmigrating custom subassemblies, references to these libraries must be updatedin VBA or .NET custom subassembly projects.
In VBA, check the new available References and update your code. You mustupdate the following line:
Public Const g_AeccXModVersion As String = "7.0"
(to convert Civil 3D 2010 to Civil 3D 2011, replace "7.0" with "8.0")
Migrating Customized Files | 25

In .NET, make sure the path to the reference libraries points to the installationdirectory for the correct version of AutoCAD Civil 3D. For more information,see the chapters on developing custom subassemblies in the AutoCAD Civil3D Developer's Guide located in the installation folder or directly from theAutoCAD Civil 3D Help.
NOTE VBA custom subassemblies should be ported to .NET. See the AutoCAD Civil3D 2011 Developer's Guide for information about porting VBA subassemblies to.NET.
Migrate Custom Pipe Catalogs
Migrate only the parts you have created. Do not copy the whole catalog becauseadditional content may be included with the new release.
Each time you create new custom pipes or structures in a catalog, additionalfiles are created in the following locations:
■ New Chapters in the Pipe catalog create new folders in in the All Usersapplications folder at ...\Autodesk\C3D <vesion>\enu\Pipes Catalog
■ Each new part you create adds a .DWG, a .BMP, and an .XML file to thefolder.
To migrate custom pipes and structures:
■ Copy these "additional" folders and files into a new pipe catalog folder.
■ Start AutoCAD Civil 3D and run the PIPECATALOGREGEN command torebuild the new pipe catalog.
■ Using the Pipe Catalog, open each new part in Part Builder and save it.
Migrate Survey Files
Migrate the following AutoCAD Civil 3D Survey files:
■ Survey user settings.
■ Survey databases.
■ Survey equipment databases.
■ Figure prefix databases.
■ Linework code sets databases.
26 | Chapter 2 Migrating and Customizing

Survey User Settings
This file defines where the survey database, the survey equipment database,the figure prefix database, and other survey specific settings are stored. Youcan export the Survey User Settings to a .USR_SET file and then re-import thefile into the new release.
In Toolspace, on the Survey tab, click in the upper left corner to open theSurvey User Settings dialog box where you can specify the Import/Exportoptions.
IMPORTANT Due to the requirement to support a 64-bit operating system, inAutoCAD Civil 3D survey database, equipment database, and figure prefix databasefiles must be migrated to Microsoft SQL Server Compact format from MicrosoftAccess Database format. On the Survey tab in Toolspace, a database item thatrequires migration will display the "out-of-date" icon to provide a visual cue thatit requires migration. To complete the migration, right-click the item and selectthe migration command.
Survey Databases
The survey database consists of two parts, the SDB and SDX files which arestored in the project folder. Specify the path or re-import the Survey UserSettings to point to the location of your survey database. After you migratethe survey database to Microsoft SQL Server Compact format the file extensionswill be SDBX and SDXX.
Survey Database Settings
The survey databases settings are stored in an .SDB_SET file. This file can beexported or imported by right-clicking on a survey database, and choosingthe Edit Survey Database settings. This operation is not part of migrating fromone release to the next but can be used in a situation where you need to havea survey database match an older one.
Survey Equipment Databases
The survey Equipment databases are stored in an .EDB file. The default locationis C:\Documents and Settings\All Users\Application Data\Autodesk\C3D<version>\enu\Survey . Specify the path or reimport the Survey User Settingsto point to the location of your survey database. After you migrate theequipment database to Microsoft SQL Server Compact format the file extensionwill be EDB_XDEF.
Figure Prefix Database
Migrating Customized Files | 27

The Figure Prefix databases are stored in an .FDB file in the project folder.Specify the path or reimport the Survey User Settings and make sure to pointto the location of your survey database. After you migrate the figure prefixdatabase to Microsoft SQL Server Compact format the file extension will beFDB_XDEF.
Linework Code Sets Database
The Linework Code Sets database stored in an .F2F_xdef file in the projectfolder. Specify the path or reimport the Survey User Settings and make sureto point to the location of your survey database.
28 | Chapter 2 Migrating and Customizing

Network Administrationand Deployment
Network administration and deployment requires careful planning and execution. This sectiongives you information about how to prepare for deployment, set up and customize adeployment, and distribute the program.
Preparing a DeploymentTo prepare for a deployment, you should take the time to review the followingrequirements and options.
System Requirements for Administrative ImageThis section contains the system requirements for the location of theadministrative image.
Before you begin installing the program on a network, make sure that yourservers and client workstations meet the minimum recommended hardwareand software requirements for a deployment. For complete system requirements,see System Requirements (page 1).
Ensure you use the appropriate AutoCAD Civil 3D 2011 DVD, depending onwhether your Windows operating system is the 32-bit or the 64-bit version. A64-bit version of AutoCAD Civil 3D cannot be installed on a 32-bit system andvice-versa.
3
29

See the following tables for administrative image system requirements.
Hardware and Software Requirements - Administrative Image Location
The location where you create the adminis-trative image must be a shared location so
2 GB or above (recommended)Hard disk
that users can access the administrativeimage.
Plan an Installation TypeWhen you set up your deployment, you need to choose the type of installationto deploy. In the AutoCAD Civil 3D deployment wizard, you specify one ofthe following installation types:
Stand-Alone installation (Stand-Alone option) Choose this type ofinstallation for stand-alone installations where a single serial number andproduct key are used for a single seat. Like a multi-seat stand-alone installation,you do not use the Network License Manager to manage product licensing,but installation, registration, and activation occurs on each workstation.
Multi-Seat Stand-Alone installation (Stand-Alone option) Choose this typeof installation for stand-alone installations where a single serial number andproduct key are used for multiple seats. Multi-seat stand-alone installationsdo not rely upon the Network License Manager to manage product licenses;however, you can still use the AutoCAD Civil 3D deployment wizard to createadministrative images and deployments. Registration and activation is moreautomated for multi-seat stand-alone installations. After the first activationusing the multi-seat stand-alone serial number and product key, activationoccurs automatically for all workstations based on this deployment, as longas your systems are connected to the Internet.
Network License installation With this type of installation, you install theprogram to workstations with the files and registry entries that allow theprogram to communicate with the Network License Manager. You also definethe configuration of the Network License Manager so that the licenses can beaccessed. Workstations running the program based on a network installationdo not require individual activation. Licensing of this program is managedby at least one license server.
The main advantage is that you can install AutoCAD Civil 3D on more systemsthan the number of licenses you have purchased (for example, purchasing 25licenses but installing on 40 workstations). At any one time, AutoCAD Civil
30 | Chapter 3 Network Administration and Deployment

3D runs on the maximum number of systems for which you have licenses.This means you get a true floating license.
Plan for a License Server ModelIf you chose the Network License option, you need to decide which licenseserver model to use to distribute the product licenses.
TIP If you are deploying a stand-alone or multi-seat stand-alone installation type,you do not use a license server model.
For the network installation, use one of the following license server models:
■ Single license server model. The Network License Manager is installed ona single server, so license management and activity is restricted to thisserver. A single license file represents the total number of licenses availableon the server.
■ Distributed license server model. Licenses are distributed across more thanone server. A unique license file is required for each server. To create adistributed license server, you must run the Network License Manager oneach server that is part of the distributed server pool.
■ Redundant license server model. You use three servers to authenticate asingle license file. One server acts as the master, while the other two providebackup if the master server fails. With this configuration, licenses continueto be monitored and issued as long as at least two servers are still functional.The license file on all three servers is the same. You must install theNetwork License Manager on each server.
Each of these license server models is described in detail in the Autodesk Licensingguide. It is strongly recommended that you also read that guide before youdeploy the program. You can find Autodesk Licensing guide by clicking the Readthe Documentation selection, the Documentation link at the lower-left corner ofthe deployment wizard, or in the Help system.
Create a Network ShareOnce you have fully prepared for creating a deployment, you are ready to setup and distribute AutoCAD Civil 3D by creating a network share location(folder). A network share is an installation folder that you make available to
Plan for a License Server Model | 31

users' computers on a network. You point users to this location to install theprogram.
A network, shared folder is required for network license and multi-seatstand-alone methods of installation. Any subfolders that are placed inside anetwork shared folder are automatically shared.
NOTE You must have Full Control permissions set for your shared folder whenyou are creating your deployment images. Read permissions are necessary toaccess the network share and administrative permissions on the workstation wherethe program is deployed.
To create a network share folder
1 On your network server’s desktop, create a folder named Deployments.
2 Right-click the Deployments folder and click Share and Security (or Sharing).
3 In the <folder name> Properties dialog box, Sharing tab, select Share ThisFolder.
4 Specify a Share Name, such as Deployments, if necessary.
5 Click the Permissions button. In the Permissions dialog box, enter yourgroup or user names, and make sure Full Control is selected. Click OK.
In Vista, right-click the Deployments folder and then click Share. In theFile Sharing dialog box type in or browse to the name of the group oruser you want to share the folder with. Click Add, and then click Share.
6 For each product you plan to install, create a subfolder in the Deploymentsfolder. Name each folder with the pertinent product name.
Network Tools and Your License ServerIf users are running the program using network licenses, you need to use theNetwork License Manager. The Network License Manager helps you configureand manage license servers. For information about installing and setting upthe Network License Manager and licensing tools, see the Autodesk Licensingguide.
32 | Chapter 3 Network Administration and Deployment

Setting Up and Creating a DeploymentThe deployment process provides you with numerous options for creating,and customizing your deployments, so you should set aside ample time tocomplete the process in one sitting. To be successful it is recommended thatyour review the following checklist and information before you begin. Thedeployment process is initiated from the Installation wizard’s CreateDeployments selection. Once a deployment is created, users then access thedeployment to install products to their computers.
Preliminary Tasks for a Network DeploymentThe deployment checklist gives you a quick summary of the type ofinformation you should be familiar with before begin. When you havecompleted these tasks, you are ready to create a deployment.
Deployment Checklist
You have reviewed the system requirements. Make sure that your network,servers, and client workstations meet the system requirements.
You understand the type of license you’ve purchased. If you plan a network li-cense deployment, you should also be familiar with the type of license servermodel you want to use and the license server name(s).
You have installed and activated any supporting tools and utilities.
You have located your product serial number and product key. The serial numberand product key are located on the outside of the product packaging, or in theAutodesk Upgrade and Licensing Information email.
You know how you’re going to personalize the program(s) during registration.Using consistent registration data is very important.
You have identified the location, and created a shared folder where deploymentswill reside for each program you plan to deploy.
You have closed all other programs and disabled anti-virus software.
Setting Up and Creating a Deployment | 33

You have decided what language(s) you will include in your administrative image,and what language(s) you will use for your deployment package.
NOTE Language packs can only be included in an administrative image duringthe creation of the deployment and not during modification.
You have determined if your deployment plan involves using imaging softwareto distribute your program(s) to client workstations.
You have specified whether you want to create log files that contain deploymentand installation data, and run silent mode.
NOTE When the product is installed from a deployment using silent mode,users’ systems will reboot automatically and without warning when the installationis complete.
You know which type of installation you want—typical or custom, and you havedecided if you want Express Tools installed (if applicable).
You have chosen the installation folder option, and locations for your supportfile content.
You have determined your defined search paths and file locations.
You have decided if you want to include additional files with your deploymentsuch as drawing files, AutoLISP routines, or script files.
You have specified user preferences—displaying the Welcome Screen, requiringInternet Explorer for installation, setting the default publishing format, and cre-ating a desktop shortcut.
You have checked for service packs that might be available for your product.
You have configured access to Communication Center. Live Update notificationslet you know when product updates are posted and configuring CommunicationCenter lets users access technical information.
You have set up access to online resources such as DesignCenter, SubscriptionCenter, online Help, Customer Error Reporting, and InfoCenter search settings.
34 | Chapter 3 Network Administration and Deployment

Deployment Best PracticesA properly executed installation or deployment of your product is important,as it affects the performance of AutoCAD Civil 3D. To speed up the processand ensure a successful installation of AutoCAD Civil 3D, the followingpractices are recommended:
■ Close all running applications, such as Microsoft® Outlook, and disableany antivirus utilities.
■ Copy the AutoCAD Civil 3D DVD media contents to your hard drive andinitiate the deployment or installation procedure locally.
■ Run the AutoCAD Civil 3D deployment wizard from a client workstation,rather than from a server. This can reduce the strain on the workstationsystem resources and save you some time.
■ Do not perform a deployment over a WAN or using a VPN connection.These connections can be slow and can cause installation errors.
See also:
■ Preliminary Tasks for a Network Deployment (page 33)
Configure ButtonDuring the deployment process, you can create a deployment that uses thedefault settings, or you can create a customized deployment. To customize,on the Create Deployment page, select the appropriate product and clickConfigure.
The following options are available after you click the Configure button. SeeYour Deployment Choices (page 36)for more details about deployment options.
■ Select the License Type - Stand-alone or Network license
■ Select the Installation Type - Typical or Custom
■ Install Express Tools
Deployment Best Practices | 35

■ Configure content packs
■ Modify configurable folders
■ Include Service Packs
■ Configure InfoCenter Communication Center
■ Configure Access to Online Resources
When you finish selecting options for your customization, click theConfiguration Complete button. The Create Deployment dialog box isdisplayed again, and you can review your selections. Once you have confirmedyour selections, click Create Deployment.
NOTE To get a copy of your settings, select the Copy to Clipboard button.
If you do not wish to make configuration changes on the Create Deploymentpage, click Create Deployment. Then click Yes, to continue creating yourdeployment using the default configuration.
Your Deployment ChoicesWhen you create a deployment, you will make several choices during theprocess to create various client deployment images and deployment types.The following sections outline your choices in more detail.
Enter User and Product InformationThe User and Product Information page is used to personalize the programfor your environment. The information you enter is permanently retainedwith the product and is displayed in the Help menu on all workstations.Because you can't change this information later without uninstalling, takecare when entering the information.
36 | Chapter 3 Network Administration and Deployment

You must also enter the product serial number and product key in order torun the product. The serial number and product key are located on the outsideof the product packaging, or in the Autodesk Upgrade and LicensingInformation email. The serial number must contain a three-digit prefix followedby an eight-digit number. The product key consists of five characters.
Your clients can review this product information later, on the InfoCentertoolbar, click the drop-down arrow next to the Help button (the questionmark). Then click About.
Specify Log File LocationsFrom the General Deployment Settings dialog, you can setup two types of logfiles with which you can monitor information about deployments andinstallations.
■ Create network log The network log file keeps a record of all workstationsthat run the deployment. On the General Deployment Settings page, youchoose whether or not to create a network log file. The log lists the username, workstation name, and the status of the installation. Refer to this
Your Deployment Choices | 37

file for status information and details about problems that usersencountered during installation (for example, low disc space or inadequatepermissions).The network log is named with the same name you chose for yourdeployment. You can specify where the log file is created by entering eithera valid UNC (universal naming convention) path or hard-coded path onyour network, for example \\MyComputer\Autodesk\<Autodesk product>.Users should use their actual computer name in place of MyComputer.
NOTE The folder where the network log resides must be a shared folder whereusers who install the program have Change permissions. Otherwise, successesor failures for user installations cannot be written to the log file.
■ Create client log The client log contains detailed installation informationfor each workstation. This information may be useful in diagnosinginstallation problems. The client log is located in the %Temp% directoryof each client workstation.
What Is Silent Mode?When silent mode is active and a user initiates the deployment, the installationproceeds without any explicit user input. Users cannot change any of yourinstallation settings. No dialog boxes are presented that require interactionfrom the user.
38 | Chapter 3 Network Administration and Deployment
WARNING When the product is installed from a deployment using silent mode,users’ systems will reboot automatically and without warning when the installationis complete.
Select a License Type (optional)When you set up your deployment, you choose the type of installation todeploy based on the type of software license you purchased: stand-alone ornetwork. You also select the network license server model you want to use todistribute product licenses.
NOTE Depending on the type of option you choose on the configuration page,stand-alone or network license, note that you must use the same type of installationfor all those products in your deployment session. If you select products that donot support the type of license you purchased, you will not be able to activatethose products.
Specify the license type to use during deploymentStand-alone license (a single serial number for a single seat) For astand-alone license, you install, register, and activate the program on eachworkstation.
Network license With this type of installation, you install the program toworkstations with the files and registry entries that allow the program tocommunicate with the Network License Manager. You also define theconfiguration of the Network License Manager so that the licenses can beaccessed. Workstations running the program based on a network installationdo not require individual activation. Licensing of this program is managedby at least one license server.
To deploy a stand-alone license
1 While creating a deployment, on the Select the License Type page, selectStand-alone License.
2 Click Next.
Specify the license server model during deployment
If you choose the Network License option, you need to decide which licenseserver model to use to distribute your product licenses - single, distributed orredundant license server model. For more information about license servermodels, see Plan for a License Server Model (page 31).
Your Deployment Choices | 39

If you are deploying a stand-alone or multi-seat stand-alone installation type,you do not use a license server model.
To deploy a network license using a single license server model
1 While creating a deployment, on the Select the License Type page, selectthe Network license option.
2 Select Single License Server as the license server model you want to usewith the Network License Manager.
If you have already used the Network License Manager to create a licenseserver model, you must select the same license server model in this step.If you have not yet used the Network License Manager to create a licenseserver model, make sure that you select the same settings in the NetworkLicense Manager that you choose here.
3 Enter the server name of the server that will run the Network LicenseManager, or click the Browse button to locate the server. Click Next.
For more information about license server models and setting up your licenseserver, see Plan Your Network Licensing in Autodesk Licensing.
To deploy a network license using a distributed license server model
1 While creating a deployment, on the Select the License Type page, selectthe Network license option.
2 Select Distributed License Server as the license server model you want touse with the Network License Manager.
If you have already used the Network License Manager to create a licenseserver model, you must select the same license server model in this step.
40 | Chapter 3 Network Administration and Deployment

If you have not yet used the Network License Manager to create a licenseserver model, make sure that you select the same settings in the NetworkLicense Manager that you choose here.
3 Enter the name of one of the servers that will run the Network LicenseManager, or click the Browse button to locate the server. Click Add toadd the server to the Server Pool. Once all the servers are added to theServer Pool list, use the Move Up and Move Down buttons to arrange theservers in the order you want them to be searched by a user's workstation.You must enter at least two servers. Click Next.
For more information about license server models and setting up your licenseserver, see Plan Your Network Licensing in Autodesk Licensing.
To deploy a network license using a redundant license server model
1 While creating a deployment, on the Select the License Type page, selectthe Network License option.
2 Select Redundant License Server as the license server model you want touse with the Network License Manager.
If you have already used the Network License Manager to create a licenseserver model, you must select the same license server model in this step.If you have not yet used the Network License Manager to create a licenseserver model, make sure that you select the same settings in the NetworkLicense Manager that you choose here.
3 In the First Server Name field, enter a server name of one server that willrun the Network License Manager, or click the Browse button to locatethe server. Enter the server names for the remaining two servers that youwill use in the redundant server pool. Click Next.
For more information about license server models and setting up your licenseserver, see Plan Your Network Licensing in Autodesk Licensing.
Select the Installation Type (optional)As part of making your deployment choices, you select the type of installationthat users receive when they install the program, choose which optional toolsor features are included, and specify where the product is installed on eachworkstation.
Your Deployment Choices | 41

You choose the location where program files are installed on the clientworkstation in the Product Install Path. To help decide where the product isinstalled, a chart of drives and disc space is provided.
To deploy a typical installation, choose optional tools, and specify a productlocation
1 During the deployment, on the Select the Installation Type page, selectTypical as the type of installation that you want.
2 Enter the path on the client workstation where you want to install theprogram, for example C:\Program Files\Autodesk\<Autodesk product>.
The Disc Space Requirements chart lets you review available drives anddisc space.
3 Click Next.
42 | Chapter 3 Network Administration and Deployment

To deploy a custom installation, choose optional tools, and specify a productlocation
1 During the deployment, on the Select the Installation Type page, selectthe Custom option as the type of installation that you want.
2 From the Select Features to install list, select the features that you wantto install.
If, after making feature changes, you decide you want the originalselections, click the Restore Defaults button on the Select the InstallationType page.
3 Enter the path on the client workstation where you want to install theprogram, for example C:\Program Files\Autodesk\<Autodesk product>.
The Disc Space Requirements chart lets you review available drives anddisc space.
4 Click Next.
Your Deployment Choices | 43

Configure Content PacksSelect at least one content pack and click Next.
See What are Content Packs? (page 18)
Configurable FoldersSpecify custom locations for content group file folders. Click Append to adda default folder name to a content group path. Click Next.
See What are Configurable Folders? (page 19)
Include Service Packs (optional)You have the option to include service packs for your product. You can selectto download and apply a service pack from autodesk.com, or choose to use alocally stored (local hard drive or local network) service pack. In either case,the service pack will be applied only after the installation of the main productis completed.
If you select the Install Service Pack from autodesk.com button, the service packwill be automatically downloaded and you will not need to extract the MSPfile.
If you choose to include a service pack from a local or network drive, you willneed to plan how you want the service pack handled from the two optionsbelow. You will also need to complete the following steps.
NOTE If the deployment process for the main product is canceled or fails, theservice pack installation will automatically be canceled.
44 | Chapter 3 Network Administration and Deployment

■ Append the Service Packs onto the Deployment. When you append aservice pack, the service pack is applied to the current deployment only.Multiple service packs may be appended to a deployment. The service packfile is included in the deployment and the service pack is applied after theproduct is deployed.
■ Merge the Service Packs into the Administrative Image MSI File. Whenyou merge a service pack, the service pack is merged into the administrativeimage. Once merged, a service pack may not be removed from theadministrative image. Multiple service packs may be included in a singleadministrative image.
To extract a Microsoft Installer Patch (MSP) file from a service pack
1 Download the service pack from the AutoCAD Civil 3D support site.
2 Review the service pack Readme file for information about patch usage.
Your Deployment Choices | 45

3 Open a Windows command prompt and enter the patch file namefollowed by the /e switch and a target file name, such as:
ProductSP1.exe /e ./ProductSP1.msp
where <ProductSP1.exe> is the name of the downloaded patch and<ProductSP1.msp> is the name of the extracted file. Using ‘./’ in front ofthe extraction file name places the extracted file in the same folder asthe original executable. The “e” command line switch extracts the MSPfile from the executable.
To include a service pack with the deployment
To include a service pack with a deployment, an MSP file must be extractedfrom the downloaded service pack executable.
1 On the Include Service Packs page, click the Browse button.
2 In the Open dialog box, locate the service pack you want to include withthe deployment.
3 Select the MSP file and click Open.
4 Specify whether you want to append the service pack to the deploymentor merge the service pack into the administrative image.
5 Click Next.
Configure InfoCenter Communication Center (optional)The Communications Center is accessed through InfoCenter. Products areupdated with Live Update, which downloads patches to your product usingCommunication Center. Beyond Live Update, other information channelsand feeds can be displayed by the Communication Center.
46 | Chapter 3 Network Administration and Deployment
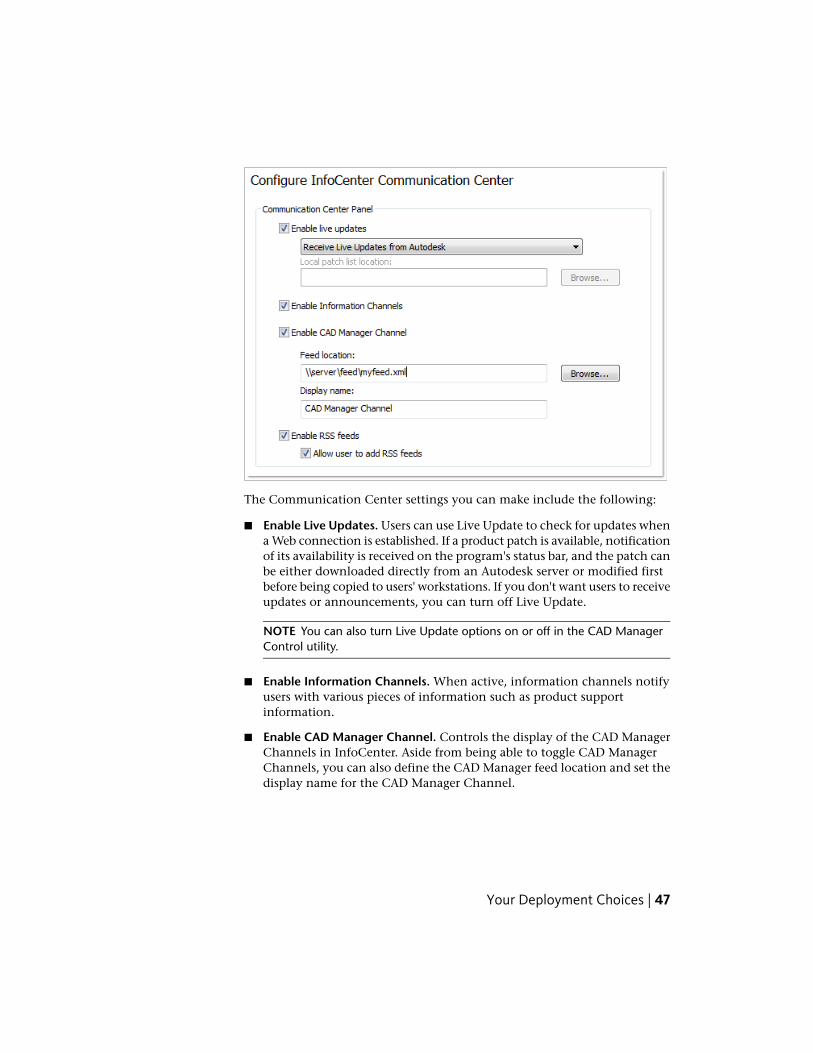
The Communication Center settings you can make include the following:
■ Enable Live Updates. Users can use Live Update to check for updates whena Web connection is established. If a product patch is available, notificationof its availability is received on the program's status bar, and the patch canbe either downloaded directly from an Autodesk server or modified firstbefore being copied to users' workstations. If you don't want users to receiveupdates or announcements, you can turn off Live Update.
NOTE You can also turn Live Update options on or off in the CAD ManagerControl utility.
■ Enable Information Channels. When active, information channels notifyusers with various pieces of information such as product supportinformation.
■ Enable CAD Manager Channel. Controls the display of the CAD ManagerChannels in InfoCenter. Aside from being able to toggle CAD ManagerChannels, you can also define the CAD Manager feed location and set thedisplay name for the CAD Manager Channel.
Your Deployment Choices | 47

■ Enable RSS Feeds. Users can subscribe to any number of RSS feeds. Eachfeed is contained within a discrete InfoCenter category. Additionally, youcan specify whether users can add RSS feeds.
To configure Communication Center
1 When creating a deployment, on the Configure InfoCenterCommunication Center page, make the following Live Update settings:
■ Enable Live Updates. Users can receive product updates or supportannouncements from Autodesk servers.
■ Receive Live Updates from Autodesk. Users can receive product updatesand support announcements from Autodesk servers with Live Update.
■ Receive Live Updates from Local Server. You can maintain a patchlist on a local server. A patch list is an XML file that specifies a list ofpatches available for installation on your computer.If you select this option, the Local Patch List Location box is available.Use the Browse button to locate the path to a server location whereyou want a patch list. More information about how to use a localpatch list is available by installing Autodesk CAD Manager Tools,running the CAD Manager Control utility, and then clicking Help inthe CAD Manager Control utility window.
NOTE You can name a file to use for patch information. By naming a fileand using an .npl extension now, you are creating a placeholder file, notcreating the file itself. In the location that you specify in the Local PatchList Location box, you must create a text file with the same name youspecify here.
2 Specify whether Information channels should be enabled.
3 Specify whether CAD Manager channels should be enabled. When active,you can make the following settings:
■ Feed Location. Defines the location of the CAD Manager channel RSSfeed. RSS feeds are in XML format.
■ Display Name. Sets the display name of the CAD Manager channel.
4 Specify whether RSS Feeds are enabled and if users are allowed to addfeeds.
5 Click Next.
48 | Chapter 3 Network Administration and Deployment
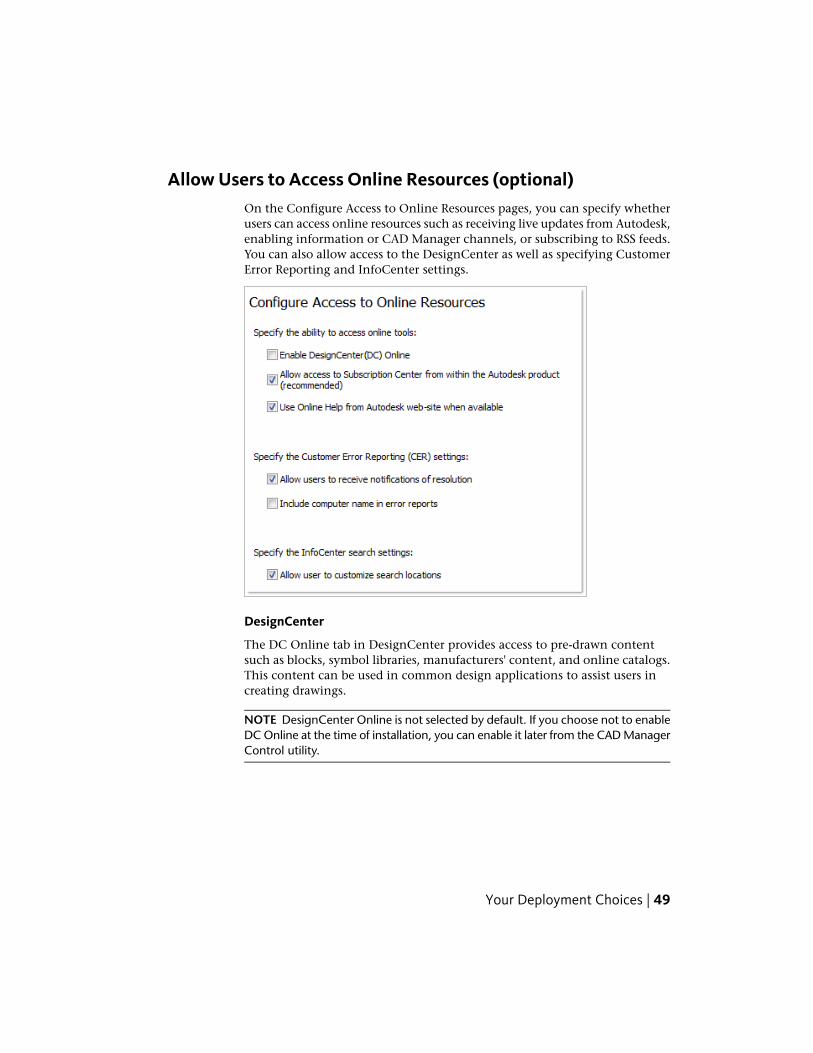
Allow Users to Access Online Resources (optional)On the Configure Access to Online Resources pages, you can specify whetherusers can access online resources such as receiving live updates from Autodesk,enabling information or CAD Manager channels, or subscribing to RSS feeds.You can also allow access to the DesignCenter as well as specifying CustomerError Reporting and InfoCenter settings.
DesignCenter
The DC Online tab in DesignCenter provides access to pre-drawn contentsuch as blocks, symbol libraries, manufacturers' content, and online catalogs.This content can be used in common design applications to assist users increating drawings.
NOTE DesignCenter Online is not selected by default. If you choose not to enableDC Online at the time of installation, you can enable it later from the CAD ManagerControl utility.
Your Deployment Choices | 49

Subscription Center
With Autodesk Subscription, users receive the following:
■ Software upgrades and exclusive product downloads
■ Access to training and learning materials
■ One-on-one product support
■ Exclusive license terms on any Autodesk products under contract
■ Access to Autodesk Knowledge Base
Online Help
The Help documentation includes a product Readme that containslate-breaking information on your product. The Readme is also available fromthe Installation Complete page.
Customer Error Reporting (CER)
If your Autodesk product closes unexpectedly, users have the opportunity tosend an error report directly to Autodesk, which helps Autodesk to determineand resolve the error. You can determine whether users can also receivenotification from Autodesk when their reported errors are resolved.
NOTE You can also turn Customer Error Reporting notification on or off in theCAD Manager Control utility.
Specify InfoCenter Search Settings
The Search Results tab of InfoCenter can be configured to display contentfrom various sources, such as the product Help system, CAD ManagerChannels, or the Internet.
50 | Chapter 3 Network Administration and Deployment
You can specify whether users who install from the deployment can customizeaccess to their InfoCenter search locations.
To configure access to online resources
1 While creating a deployment, on the Configure Access to Online Resourcespage, do the following to configure DesignCenter Online:
■ To enable DesignCenter Online, select the check box next to EnableDC Online.
2 If you want to receive notification of problem resolutions, do thefollowing:
■ Select the check box next to Allow Users to Receive Notification ofResolution so that users are made aware of resolutions to issues andcan download applicable updates provided by Autodesk. This optionis enabled by default.
NOTE Users must have administrative permissions to install an updateprovided by Autodesk.
■ Select the check box next to Include Computer Name to include theuser’s computer name in error reports. The computer name is includedin notifications to the user and in reports available to subscriptionadministrators. This option is disabled by default.
3 Specify whether users have the option to customize their InfoCentersearch locations. This option is enabled by default.
4 Click Configuration Complete.
Creating a Default DeploymentIf you do not plan on customizing your deployment, you can create a defaultdeployment.
This procedure details a single-server network deployment with a Typical clientsetup type and no customizations. For information about setting up a configuredor customized deployment, see Creating a Configured or CustomizedDeployment (page 53).
To create a deployment using default values
1 In the AutoCAD Civil 3D installation wizard, click Create Deployments.
Creating a Default Deployment | 51

2 On the Begin Deployment page, specify the following:
■ In the administrative image field, enter the path to your existingshared network location, or use the Browse button to navigate to thatlocation. This area is where you create and store your administrativeimage. Users install the program from this location.
NOTE If you do not know how to create a network share, see Create aNetwork Share (page 31).
■ In the deployment name field, enter the new deployment's name.The name you enter here is the name of the shortcut users will accessto install the product.
Click Next.
3 On the Select the Products to Include in the Deployment page, select theproducts you want to include, and the language(s) to include in youradministrative image and your deployment. Click Next.
NOTE Autodesk Design Review 2011 is required by AutoCAD Civil 3D andAutodesk Vault and is installed by default. For more information, see InstallingDesign Review (page 17) and Installing Autodesk Vault (page 17).
4 Review the Autodesk software license agreement. Click I Accept, and thenclick Next.
5 On the User and Product Information page, enter your user information,serial number, and product key, and then click Next.
6 On the General Deployment Settings page you select the following:
■ Creation of a network log file. You also have to specify where the logfile is created by entering either a valid UNC (universal namingconvention) path or hard-coded path on your network. The networklog file is optional.
NOTE The folder where the network log resides must be a shared folderwhere users who install the program have Change permissions. Otherwise,successes or failures for user installations cannot be written to the log file.
■ Whether you want a client log file created.
■ Prevent users from changing installation settings when they installby selecting Silent mode.
52 | Chapter 3 Network Administration and Deployment

For more information regarding log files, refer to Specify Log File Locations(page 37). For more information on silent mode, see What Is Silent Mode?(page 38).
Click Next.
7 On the Create Deployment page, click Create Deployment, then selectYes to continue creating the deployment using the default configuration.
An administrative image is created in your shared folder using thedeployment options listed in the Current Settings fields. If you wouldlike a summary of your deployment settings, click the Copy to Clipboardbutton.
8 On the Deployment Complete page, click Finish.
Creating a Configured or Customized DeploymentIf you plan on altering your deployment by removing features or restrictingaccess to online resources you can create a configured or customizeddeployment.
To create a deployment using configured or customized values
1 In the AutoCAD Civil 3D installation wizard, select a language for theinstall instructions. Click Create Deployments.
2 On the Begin Deployment page, specify the following:
■ In the administrative image field, enter the path to your existingshared network location, or use the Browse button to navigate to thatlocation. This area is where you create and store your administrativeimage. Users install the program from this location.
NOTE If you do not know how to create a network share, see Create aNetwork Share (page 31).
■ In the deployment name field, enter the new deployment's name.The name you enter here is the name of the shortcut users will accessto install the product.
Click Next.
3 On the Select the Products to Include in the Deployment page, select theproducts you want to include, and the language(s) to include in youradministrative image and your deployment. Click Next.
Creating a Configured or Customized Deployment | 53

NOTE Autodesk Design Review 2011 is required by AutoCAD Civil 3D andAutodesk Vault and is installed by default. For more information, see InstallingDesign Review (page 17) and Installing Autodesk Vault (page 17).
4 Review the Autodesk software license agreement. Click I Accept, and thenclick Next.
5 On the User and Product Information page, enter your user information,serial number, and product key, and then click Next.
6 On the General Deployment Settings page you select the following:
■ Creation of a network log file. You also have to specify where the logfile is created by entering either a valid UNC (universal namingconvention) path or hard-coded path on your network. The networklog file is optional.
NOTE The folder where the network log resides must be a shared folderwhere users who install the program have Change permissions. Otherwise,successes or failures for user installations cannot be written to the log file.
■ Whether you want a client log file created.
■ Prevent users from changing installation settings when they installby selecting Silent mode.
For more information regarding log files, refer to Specify Log File Locations(page 37). For more information on silent mode, see What Is Silent Mode?(page 38)
Click Next.
7 On the Create Deployments page, click the Configure button to makechanges to the administrative image.
8 On the Select the License Type page, select a Stand-alone or Networklicense installation, and then click Next.
9 On the Select the Installation Type page, you can choose to make thefollowing configuration changes:
■ Typical - Installs the most common application features.
■ Custom - Installs only the application features that you select fromthe Select Features To Install list
Contains tools for reviewing design files for compliance withyour standards.
CAD Standards
54 | Chapter 3 Network Administration and Deployment

Contains database access tools.Database
Contains multi-language dictionaries.Dictionaries
Allows you to use the Security Options dialog box to protecta drawing with a password.
Drawing Encryption
Contains AutoCAD Civil 3D support tools and utilities (notsupported by Autodesk).
Express Tools
Contains AutoCAD Civil 3D fonts and TrueType fonts.Fonts
Autodesk Seek.
NOTE Autodesk Seek is installed only with the Englishversion of AutoCAD Civil 3D.
Autodesk Seek
Contains over 300 professionally built materials to apply toyour model.
Material Library
Contains learning resources to help discover the product.Welcome Screen
Allows users to transfer an Autodesk product license betweencomputers.
License Transfer Utility
Allows users to set up their initial configuration of AutoCADCivil 3D (online content, workspaces) based on their unitssystem, industry, and commonly used task-based tools.
Initial Setup
Allows users to view and edit the paths of externally referencedfiles associated with a drawing.
Reference Manager
Contains various feature sample files.Samples
Contains product tutorials.Tutorials
Contain hydraulics and hydrology applications, including Hy-draflow Storm Sewers, Hydraflow Hydrographs, and HydraflowExpress.
Hydraflow Extensions
Creating a Configured or Customized Deployment | 55

The Survey Data Collection Link Extension allows to transferdata from survey data collectors and convert raw data files andcoordinate data files into field book (.fbk) format.
Survey Data CollectionLink Extension
■ Install Optional Tools - AutoCAD Civil 3D Express Tools Volumes 1-9contain a library of productivity tools designed to help you extendthe power of AutoCAD Civil 3D.
■ Product Install Path - Specifies the drive and location where Autodeskproduct will be installed.
Click Next to proceed with the configuration process.
10 On the Configure Content Packs page, select at least one content packand click Next. See What are Content Packs? (page 18)
11 On the Configurable Folders page, review the paths to custom locationsfor content group file folders. Click Append to add a default folder nameto a content group path. Click Next. See What are Configurable Folders?(page 19)
12 If service packs are available, you can select to include them on theInclude Service Packs page. The installer automatically checks autodesk.comfor available updates.
13 On the Configure InfoCenter Communications Center page, you chooseto allow users access to the latest information and product discussionsby enabling live updates from Autodesk, Information and CAD Managerchannels, and RSS feeds. After making your choices, click Next.
14 On the Configure Access to Online Resources page, you set up access toonline tools like DesignCenter, Subscription Center, and Online Help.You also specify Customer Error Reporting settings, and allow users tocustomize InfoCenter searches. Click Next.
15 On the Configuration Complete page, you select a product tab toconfigure another product, or click Configuration Complete to reviewyour choices.
16 On the Create Deployment page, click Create Deployment. If you wanta summary of your deployment settings, click Copy to Clipboard.
17 On the Deployment Complete page, click Finish.
56 | Chapter 3 Network Administration and Deployment

Final Review and Complete SetupTo complete your deployment setup, confirm the settings you selected.
To complete your deployment setup
1 On the Create Deployments page, scroll the list of current settings andverify your deployment selections.
2 Click the Configure button if you need to change any selections.
3 Click the Copy to Clipboard button if you want a copy of the deploymentinformation.
4 Click Create Deployment.
5 On the Deployment Complete page, click Finish.
You have created an Autodesk product deployment with precise options thatare specific to your group of users. You can now use this deployment to installthe program.
Modify a Deployment (optional)After a deployment is created, it may be necessary to modify the deploymentfor some client workstations. You can apply a patch or select various customfiles that are not part of the base administrative image. You can also performmodifications such as changing the installation directory from drive C to driveD.
To modify a deployment
1 Open the shared network folder where you originally chose to place yourproduct deployment.
2 In the Tools folder, double-click the Create & Modify a Deploymentshortcut.
This re-opens the deployment wizard.
3 Click through the deployment pages and make the necessary changes.
4 After all the modifications have been made, click Create Deployment.
Final Review and Complete Setup | 57

Point Users to the Administrative ImageWhen you have completed the deployment process, you are ready to haveusers install the newly created or modified deployment. You need to notifyyour users of the shortcut that was created in the administrative image. Theshortcut is the same name that you chose in Creating a Default Deployment(page 51).
To point users to the administrative image
■ The simplest method of notifying users how to install the deployment isto email them with instructions about using the shortcut. At a minimum,the instructions need to include the location of the deployment andinstructions about double-clicking the shortcut to the deployment.
58 | Chapter 3 Network Administration and Deployment

Distributing an AutodeskProgram
You can choose from several methods of distributing an Autodesk program. Network sharingis the default method.
■ Network Share. Users launch the program with the shortcut icon that you created withthe deployment wizard. The program is installed on users' local computers, and a producticon appears on their desktop.
NOTE Users must have Read permissions to access the network share and administrativepermissions on the workstation where this program is installed.
■ Group Policy Objects (GPOs). See Use Group Policies to Run a Deployment (page 59).
■ Microsoft System Center Configuration Manager (SCCM). See Use Microsoft System CenterConfiguration Manager to Install a Deployment (page 67).
■ Imaging Software. See Distribute the Product Using Imaging Software (page 71).
Use Group Policies to Run a DeploymentWith group policies, you can advertise and install a program by assigning adeployment to computers. A deployment that is assigned to a computer can beused by any user of that computer. Generally, you would assign the deploymentto a computer that is used by a large number of users.
NOTE Autodesk products are designed to be installed on a computer so that anyuser who logs on to the computer can run the software. If you assign a deploymentto a specific user rather than a computer, you may encounter problems when asecond specified user tries to install or uninstall a copy of the program.
4
59

The following outlines the advantages and disadvantages of using grouppolicies.
Advantages
■ Works well with deployment functionality.
■ Allows you to add custom files through the deployment wizard.
■ Allows deployment to workstations.
Disadvantages
■ Prohibits the passing of command-line parameters to an MSI executable.
■ Prohibits customization of application settings, other than what is setwhile creating a deployment.
In order for AutoCAD Civil 3D to run properly, the following software mustbe installed on the computer where the program is being installed:
Available on the product disc
Microsoft .NET 3.5 SP1
DirectX 9.0C
VC++ 2008 SP1 and VC++2005 SP1 runtimes for x86 operating systems; VC++2008 SP1and VC++2005 SP1 runtimes for x64 for 64-bit operating systems
Microsoft National Language Support Downlevel APIs
FARO LS
Autodesk Design Review 2011
Macromedia Flash Player 9.0 or later (Not installed by default)
Autodesk Material Library 2011 Base Image Library (ILL)
Other
Microsoft Internet Explorer version 7.0 Service Pack 1 or later. You can download Mi-crosoft Internet Explorer from the Microsoft website by visiting www.microsoft.com.
60 | Chapter 4 Distributing an Autodesk Program

Microsoft Installer Package (MSI) 4.5
Microsoft Windows Media Format 9.5 (prerequisite for 64-bit)
SQL Server Express (32 bit or 64 bit)
VB PowerPacks
There are three main steps to distributing this program through group policies.
■ Create an application distribution share point. The application distributionshare point is created using the deployment wizard. See Creating a DefaultDeployment or Creating a Configured or Customized Deployment to create adeployment.
■ Assign the deployment to a computer. See Use Group Policies to Assign aDeployment to Computers (page 61).
■ Verify the installation. Confirm that the program has been correctlyinstalled. See Verify a Group Policy Deployment (page 67).
Use Group Policies to Assign a Deployment toComputers
Perform the following procedures from a Windows XP workstation or aWindows 2000 or 2003 server that has Group Policy Management Consoleinstalled, and has access to the Active Directory server.
NOTE For more information about Group Policy Management, seehttp://technet.microsoft.com/en-us/windowsserver/grouppolicy.
To assign a deployment to a computer
1 Start the Group Policy Management Console (gpmc.msc).
2 Right-click the organizational unit where you want to create the grouppolicy object. Then select Create and Link a GPO Here and name theGroup Policy.
3 Edit the policy.
4 In the Group Policy Object Editor dialog box, under Software Settings,right-click Software Installation, and click New ➤ Package.
Use Group Policies to Assign a Deployment to Computers | 61

5 In the Open dialog box, navigate to the administrative image’s locationthat you specified in the deployment wizard. Navigate toAdminImage\<processor type>\<product name folder>. The processor type iseither x86 or x64, depending on the processor type for which you createdyour deployment.
Examples
For x86 deployments:\\server123\Deployment\AdminImage\x86\acad
For x64 deployments:\\server123\Deployment\AdminImage\x64\acad
6 Select the Windows Installer Packages file called acad-<deploymentname>-for-GPO.msi. Click Open.
If the deployment was called “AutoCAD Civil 3D 2011 32 bit,” then thedeployment’s the MSI file would be acad-AutoCAD Civil 3D 2011 32bit-for-GPO.msi.
7 In the Deploy Software dialog box, select Advanced and click OK.
62 | Chapter 4 Distributing an Autodesk Program
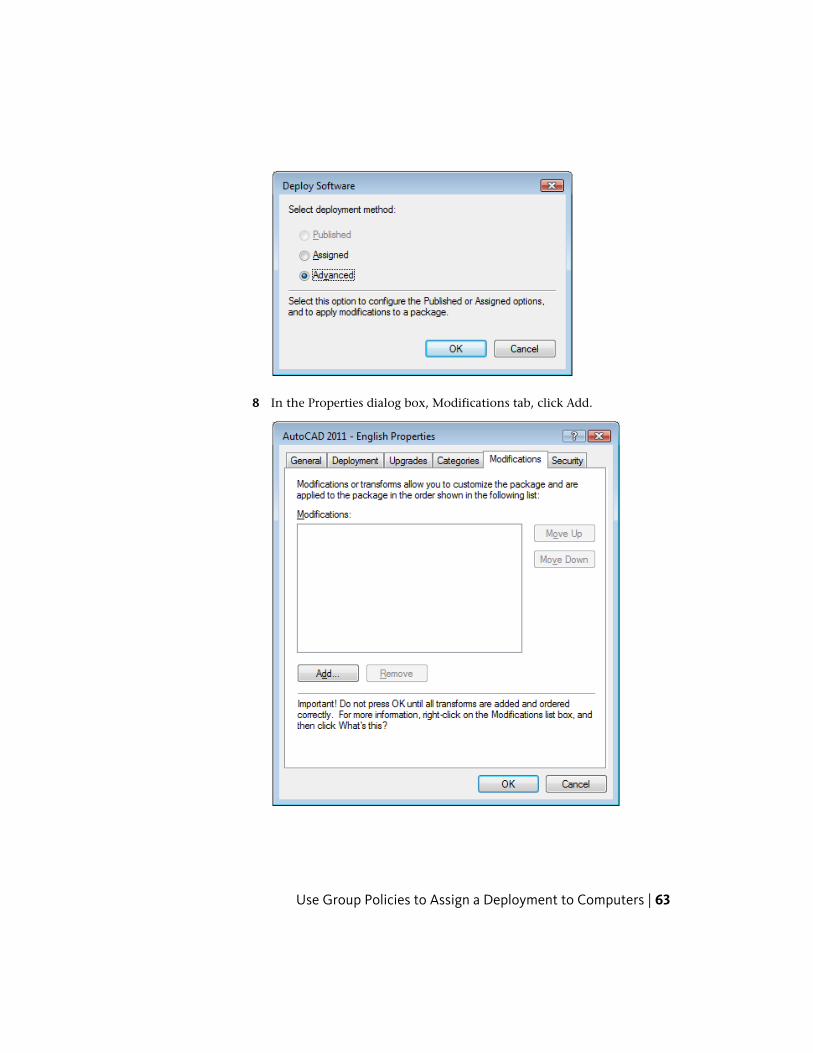
8 In the Properties dialog box, Modifications tab, click Add.
Use Group Policies to Assign a Deployment to Computers | 63

9 In the Open dialog box, select the Transform Package file calledacad-<deployment name>.mst). Click Open.
10 In the Properties dialog box, Modifications tab, click Add.
11 In the Open dialog box, navigate to <deployment location>\Tools and selectthe Transform Package file called gpo.mst.
After clicking Open, the Properties dialog should look like the following:
64 | Chapter 4 Distributing an Autodesk Program

12 Click OK to complete the package.
Adding a Language Pack
Next, you will need add a language pack to your package.
To add a language pack
1 In the Group Policy Object Editor dialog box, under Software Settings,right-click Software Installation for the same object, and then click New ➤ Package.
2 In the Open dialog box, navigate to the administrative image’s locationyou specified in the deployment wizard. Navigate to AdminImage\<processortype>\<locale>\acad. Click Open.
Use Group Policies to Assign a Deployment to Computers | 65

The <locale> used in the examples is en-us for US English.
Examples
For x86 deployments: \\server123\Deployment\AdminImage\x86\en-us\acad
For x64 deployments: \\server123\Deployment\AdminImage\x64\en-us\acad
3 In the Deploy Software dialog box select Advanced and click OK.
4 In the <product name> Properties dialog box, Modifications tab, click Add.
5 In the Open dialog box, select the Transform Package file calledacad-<deployment name>.mst located at AdminImage\<processor type>\acad.Click Open.
6 In the <product name> Properties dialog box, Modifications tab, click Add.
7 In the Open dialog box, navigate to <deployment location>\Tools and selectthe Transform Package file called gpo.mst.
8 Click OK to complete the package.
Your final group policy object should resemble the following:
66 | Chapter 4 Distributing an Autodesk Program

The group policy object is now assigned to all computers that are membersof the organizational unit for which the group policy object has been created.The next time a computer in the organizational unit is restarted, the programwill be installed and will be available for all users of the computer. See Verifya Group Policy Deployment (page 67) to confirm that the group policy hasbeen created correctly.
Verify a Group Policy DeploymentTo verify that this deployment has been correctly assigned to a computer,restart a computer that is in the organizational unit for which the group policywas created. The program installation begins before the login prompt isdisplayed. The operating system displays group policy messages, including amessage indicating the installation of any managed software.
After logging in, double-click the program icon on the desktop to completethe installation and start the program.
NOTE If problems arise, an entry is logged in the system's Event Viewer underApplications.
Use Microsoft System Center ConfigurationManager to Install a Deployment
The following information provides details for deploying Autodesk softwareusing Microsoft® System Center Configuration Manager (SCCM). SCCM allowsyou to manage software distribution to selected target systems through aremote process.
IntroductionTo deploy Autodesk software, you should be familiar with the SCCM/SMSsoftware distribution process. For more information about this topic, consultyour Microsoft SCCM documentation and support resources.
Verify a Group Policy Deployment | 67
Tasks for Deploying Autodesk Software with SCCMTo deploy Autodesk software with SCCM, it is recommended that you completethe following:
■ Identify or create a collection of target systems to receive the softwarepackage
■ Create a source directory using the Deployment wizard
■ Create a SCCM package to deploy to your target systems
■ Provide the path for the source files
■ Distribute the SCCM package to the distribution points
■ Create an advertisement to notify users of the availability of the softwarepackage
Set Up a Source Directory Using the Deployment WizardWhen you use SCCM to deploy Autodesk software, you set up the sourcedirectory using the Deployment wizard.
The Deployment wizard creates an administrative image that is used by SCCMto distribute the Autodesk software to the target systems. The location whereyou perform the administrative installation becomes the location of thepackage source directory.
To learn more about deployments and setting up the source directory forAutodesk software, see the following topics:
■ Preparing a Deployment (page 29)
■ Preliminary Tasks for a Network Deployment (page 33)
■ Creating a Default Deployment (page 51)
■ Creating a Configured or Customized Deployment (page 53)
■ Modify a Deployment (optional) (page 57)
NOTE It is recommended that you test the deployment created by the Deploymentwizard before trying to configure SCCM to deploy the program to ensure thatthere are no problems with the administrative image and deployment.
68 | Chapter 4 Distributing an Autodesk Program
To test the Deployment wizard deployment
1 Log on to a Windows workstation as a user who has administrativeprivileges.
2 Navigate to the source directory where your deployment was created.
3 Double-click the deployment shortcut created by the Deployment wizard.
The program will either be installed or error information will be writtento the log file at %temp%.
Create the SCCM Software Installation PackageAfter creating the source directory using the Deployment wizard, you createthe SCCM software installation package. An SCCM package contains the filesand instructions that SCCM uses to distribute the software and advertise thepackage. The Deployment wizard creates the files and instructions, but SCCMmust be configured to use these files.
To create a software installation package using SCCM
1 Do one of the following:
■ (Windows XP or Windows Vista) Click Start menu ➤ All Programs ➤ Microsoft System Center ➤ Configuration Manager 2007 ➤
ConfigMgr Console.
2 In the Configuration Manager Console window, expand SoftwareDistribution.
3 Right-click Packages ➤ Distribute ➤ Software.
4 In the Distribute Software wizard, click Next.
5 In the Package dialog box, select Create a New Package and Programwithout a Definition File. Click Next.
6 In the Package Identification dialog box, enter the information for Name,Version, Publisher, Language and any comments. Click Next.
7 In the Source Files dialog box, make selections to where SCCM retrievesthe files and how it manages them. Click Next.
NOTE In this procedure, “Always Obtain Files from a Source Directory” wasselected.
Create the SCCM Software Installation Package | 69

8 In the Source Directory dialog box, specify the directory where the sourcefiles are stored. Click Next.
9 In the Distribution Points dialog box, select the distribution point(s).This is the location from which the software package will be deployed tothe target systems. Click Next.
10 In the Program Identification dialog box, enter the name of your program.This is the name that displays in Add or Remove Programs in the ControlPanel. In the Command Line field, enter AdminImage\setup.exe /W /Q/I AdminImage\<deployment name>.ini /Lang en-US. In this case, ourdeployment is named AutoCAD Civil 3D 2011, so you would enterAdminImage\setup.exe /W /Q /I AdminImage\AutoCAD Civil 3D 2011.ini/Lang en-US. Click Next.
NOTE The example above assumes the language pack you wish to install isUS English. /W is the flag for SMS and SCCM, /Q is the silent install, /Iindicates this is a deployment installation.
11 In the Program Properties dialog box, Program Can Run drop-down list,select how you want your program to install. Your choices are:
■ Only When a User is Logged On
■ Whether or Not a User is Logged On
■ Only When No User is Logged On
12 In the After Running drop-down list, select an action to take after theprogram has deployed. Your choices are
■ No Action Required
■ Program Restarts Computer
■ ConfigMgr Restarts Computer
■ ConfigMgr Logs User Off
NOTE AutoCAD Civil 3D requires you to restart your system after installation.
Click Next.
13 In the Advertise Program dialog box, select Yes to advertise the program.Click Next.
14 In the Select a Program to Advertise dialog box, select the package youwant to advertise. Click Next.
70 | Chapter 4 Distributing an Autodesk Program

15 In the Select Program ➤ Advertisement Target dialog box, select thecollection to which you want to advertise, or create a new collection.
16 In the Select Program ➤ Advertisement Name dialog box, enter or changethe name of your advertisement. Add any comments to further describethe advertisement. Click Next.
17 In the Select Program ➤ Advertisement Subcollection dialog box, selectone of the following options:
■ Advertise this Program to an Existing Collection
■ Create a New Collection and Advertise this Program to It
18 Click Next.
19 In the Select Program ➤ Advertisement Schedule dialog box, if desired,set options to advertise your program at a specific date and time, or setan expiration date. Click Next.
20 In the Select Program ➤ Assign Program dialog box, select one of thefollowing options:
■ If the installation process is mandatory, select Yes, Assign the Program.
■ If the installation process is optional, select No, Do Not Assign theProgram.
Click Next.
21 In the Summary dialog box, verify your advertisement information. Usethe back buttons to make any changes. To finish, click Next.
Distribute the Product Using Imaging SoftwareThe following information is provided for those who use imaging software,such as Norton Ghost, to create a master image to distribute Autodesk products.Once created, the master image is then replicated to other computersthroughout your facility.
NOTE Autodesk does not recommend or support the distribution of AutoCADCivil 3D using imaging software. However, if you plan to use this method ofdistribution, please review the following instructions carefully.
Distribute the Product Using Imaging Software | 71

Care needs to be taken since the use of imaging software can result in thefollowing situations:
■ Conflicts with the product licensing
■ Incomplete installations and problems with activation
NOTE If you are experiencing licensing instability in a SATA RAID environment,using imaging software to distribute Autodesk products can cause productactivation problems, such as “Activation code limit exceeded” when you attemptto activate.
Use a Master Image to Distribute Multi-Seat Stand-AloneProducts to Multiple Systems
You can distribute the product using a master image for a multi-seatstand-alone product.
NOTE When using Norton Ghost, you must use the -ib switch to include the bootsector in your master image. Consult your imaging software for more details onincluding the boot sector as part of the master image.
Master images should not be created if you’ve previously run Autodesk productson the master computer. Cleaning the system may be necessary.
To distribute a multi-seat stand-alone product to multiple computers usinga master image
1 Create a network deployment for a multi-seat stand-alone product. Formore information, see Creating a Configured or Customized Deployment.
2 Install AutoCAD Civil 3D from the deployment onto the master computer.
3 Do one of the following on the master computer:
■ Create a master image, including the boot sector. Test the product ona machine other than the master computer before distributing theproduct. Launch the product on the other machine, and register andactivate it. Users have a 30-day grace period to register and activatethe product on their machines.
■ Launch and customize the product as necessary. Create a master imageand distribute it to users. If users’ computers are connected to theInternet, the product is automatically activated. Users whose
72 | Chapter 4 Distributing an Autodesk Program

computers are not connected to the Internet have a 7-day grace periodto register and activate the product.
4 Apply the master image to the target computers.
Use a Master Image to Distribute Network LicensedProducts to Multiple Systems
You can distribute the product using a master image for a network licensedproduct.
To distribute a network licensed product to multiple computers using a masterimage
1 Create a network deployment for a network licensed product. For moreinformation, see Creating a Configured or Customized Deployment.
2 Install AutoCAD Civil 3D from the deployment onto the master computer.
NOTE A license server must be running, and each computer must beconnected to the network in order for the product to obtain a license.
3 After AutoCAD Civil 3D has been installed, use imaging software to createa master image of the system's hard drive.
4 Apply the master image to the target computers.
Restore the Master ImageThe following procedure assumes that you have saved a copy of eachworkstation’s AdLM folder (and Product Licenses folder, if present) to eitheranother workstation or a disc before you reformat the workstation.
To restore a product using a master image
1 Exit the application. Do not run the application again until after youhave completed this procedure.
2 In Windows Explorer, copy the AdLM folder from the appropriate pathshown below to a location other than the disc that will be restored.
C:\Documents and Settings\All Users\Application Data\FLEXnet
Use a Master Image to Distribute Network Licensed Products to Multiple Systems | 73

3 Reformat the workstation and restore the master image.
NOTE Do not perform a low-level format of the hard drive.
4 Copy the AdLM folder that you created in step 2 to its original workstationand location on that workstation.
NOTE When you restore the disc image, any files that were altered are put backin their original state and ready to use again. The license files are preserved, andno reactivation of products is necessary.
Clean a Master System and Restore the OperatingSystem
If you have already run AutoCAD Civil 3D on the master computer, the mastercomputer should be properly cleaned first.
To clean a master computer and restore the operating system
1 Clean the hard drive, including the boot sector.
For example, if you use Norton’s GDISK utility, use the followingcommand:
gdisk 1 /diskwipe
Where 1 is the hard disk that is being wiped.
NOTE If you use a utility other than Norton Ghost, make sure that it cleansthe boot sector; otherwise, you will not be able to activate Autodesk products.
2 Create a new partition and use the restore disc or product disc to installthe operating system.
74 | Chapter 4 Distributing an Autodesk Program

InstallationTroubleshooting
This section provides solutions to installation issues and answers to commonly asked questionsthat may arise while installing your product(s). Additional troubleshooting information andsupport is also available at http://autodesk.com/servicesandsupport
General Installation IssuesThis section outlines common issues and their solutions that may arise whileperforming a general install of your product(s).
How can I check my graphics card driver to see if it needsto be updated?
It is recommended that you verify and update your graphics card driver tooptimize your program. Use the following procedure to identify your currentgraphics card driver.
To identify your graphics card driver
1 Start AutoCAD Civil 3D.
2 At the command line, enter 3dconfig.
3 In the Adaptive Degradation and Performance Tuning dialog box, clickView Tune Log.
4 Review the 3D Device section for information about your system's graphicscard driver and driver version.
5
75

TIP Many newer graphic cards offer tabbed pages where you can learn moreprecise information about your specific graphic card. If specific tab pages arepresent, refer to them instead of the Adapter tab.
What is the text editor used for?The text editor you designate during installation is used for editing text filessuch as PGP and CUS dictionary files while you are running your product.
What is the difference between a stand-alone licenseand a network license?
Stand-alone licensed products are registered and activated to an individualworkstation. While the software can be installed on multiple systems in yourfacility, the license only allows one system to be operational. If you need torun more systems, you need to purchase more stand-alone licensed products,or consider converting to network licenses.
Network licensed products rely on the Network License Manager to keep trackof software licenses. The software can be installed and run on multiple systems,up to the maximum number of licenses you’ve purchased. The Network LicenseManager “checks out” licenses until they are all in use. No further systemscan run the program until a license is “checked in.” If you need to run moresystems, you can purchase additional licenses for the Network License Managerto maintain.
What is the benefit of using a network licensed versionof the software?
Network licensed products are recommended for large drafting/design facilities,classrooms, and lab environments. The main advantage is that you can installproducts on more systems than the number of licenses you have purchased(for example, purchasing 25 licenses but installing on 40 workstations). Atany one time, products will run on the maximum number of systems forwhich you have licenses. This means you get a true floating license. If softwareneeds to be run on more systems, additional licenses can be purchased.
76 | Chapter 5 Installation Troubleshooting

What features get installed during a Typical or Custominstallation?
A Typical installation includes all of the following features. If you choose todo a Custom installation, you can pick and choose from the feature list below.
A Typical installation also includes the Express Tools library. The libraryprovides additional productivity tools.
Contains tools for reviewing design files for compliance withyour standards.
CAD Standards
Contains database access tools.Database
Contains multi-language dictionaries.Dictionaries
Allows you to use the Security Options dialog box to protecta drawing with a password.
Drawing Encryption
Contains AutoCAD Civil 3D support tools and utilities (notsupported by Autodesk).
Express Tools
Contains AutoCAD Civil 3D fonts and TrueType fonts.Fonts
Autodesk Seek.
NOTE Autodesk Seek is installed only with the English versionof AutoCAD Civil 3D.
Autodesk Seek
Contains over 300 professionally built materials to apply toyour model.
Material Library
Contains learning resources to help discover the product.Welcome Screen
Allows users to transfer an Autodesk product license betweencomputers.
License Transfer Utility
Allows users to set up their initial configuration of AutoCADCivil 3D (online content, workspaces) based on their unitssystem, industry, and commonly used task-based tools.
Initial Setup
Allows users to view and edit the paths of externally referencedfiles associated with a drawing.
Reference Manager
What features get installed during a Typical or Custom installation? | 77

Contains various feature sample files.Samples
Contains product tutorials.Tutorials
Contain hydraulics and hydrology applications, including Hy-draflow Storm Sewers, Hydraflow Hydrographs, and HydraflowExpress.
Hydraflow Extensions
The Survey Data Collection Link Extension allows to transferdata from survey data collectors and convert raw data files andcoordinate data files into field book (.fbk) format.
Survey Data CollectionLink Extension
How do I access my documentation?A Help file is available on the product media. The complete Help system isinstalled during the product installation. During the installation process, youcan access specific installation and licensing topics by clicking the informationlinks in the left panel of the installation wizard, or by clicking Read theDocumentation on the first page of the wizard or Documentation in the lowerleft corner of the wizard pages.
For late-breaking information see the product Readme file available on theDocumentation page. The Readme is also available from the InstallationComplete page, or through the Help system.
What is SAMreport-Lite?SAMreport-Lite is a report generator that helps you monitor the usage ofapplications that use FLEXnet™. SAMreport-Lite complements FLEXnet byproviding a graphical user interface (GUI) from which to run usage reports.SAMreport-Lite can help you make better decisions about your software assets.For more information, see the SAMreport-Lite User’s Guide in Help.
Deployment IssuesThis section outlines common issues and their solutions with regards tosoftware deployments.
78 | Chapter 5 Installation Troubleshooting
Is there a checklist I can refer to when performing adeployment?
The AutoCAD Civil 3D Installation guide contains a checlist that describespreliminary actions of the deployment process. See Preparing a Deployment(page 29).
Where should deployments be located?Shared folders are required for both network license and multi-seat stand-alonemethods of installation. The shared folder (network share) is created before yourun the installation wizard and is where product deployments are stored.
It is recommended that you name the network share folder Deployments onthe desktop of the system where you want deployments stored. You can thenadd subfolders inside the shared Deployments folder that clearly convey thenames of products you plan to deploy. For example, any subfolders that areplaced inside a shared folder are automatically shared.
TIP You must have Full Control permissions set for your shared folder when youare creating your deployment images. Read permissions are necessary to accessthe network share and administrative permissions on the workstation where theprogram is deployed.
Where can I check if service packs are available for mysoftware?
To find out if a patch or Service Pack is available for your product, visitAutoCAD Civil 3D Support page at http://autodesk.com/servicesandsupport.
How do I extract an MSP file?A Microsoft Patch (MSP) file is usually contained in a Service Pack executablethat you download from AutoCAD Civil 3D Support website. To extract theMSP file from the executable, run the patch program from the Windowscommand prompt using the /e switch.
Pay particular attention to the location where the files are extracted. For detailsabout using the patch file, review the Readme file for that patch.
Is there a checklist I can refer to when performing a deployment? | 79

Can Online Resource settings be modified later?Yes. If you want to change the state of online resources after a product isinstalled, you can do that from the CAD Manager Control utility. The CADManager Control utility is installed separately from AutoCAD Civil 3D.
From the installation wizard, select Install Tools and Utilities and then selectthe CAD Manager Control utility. After installation is complete, you can openthe utility from the Start menu. Do one of the following:
■ (Windows XP or Windows Vista) click All Programs ➤ Autodesk ➤ CADManager Tools ➤ CAD Manager Control Utility.
Where can I learn about InfoCenter?You can use InfoCenter to enter a question for help, display theCommunication Center panel for product updates and announcements, ordisplay the Favorites panel to access saved topics. For more information, seeConfigure InfoCenter Communication Center (optional) (page 46).
What are information channels?The Communication Center component of InfoCenter allows you to receiveannouncements from various information channels. Through informationchannels, you can receive the following:
■ Product Support information, including maintenance patch notifications.
■ Subscription Center announcements and subscription program news, aswell as links to e-Learning Lessons, if you are an Autodesk subscriptionmember.
■ Notifications of new articles and tips posted on Autodesk websites.
What are the benefits to enabling CAD ManagerChannels?
CAD Manager Channels allow access to Internet-based content and informationfeeds from a specified feed location.
80 | Chapter 5 Installation Troubleshooting

What are RSS feeds and how do they benefit myinstallation?
An RSS feed is a live link you initiate by subscribing to someone’s website.Once subscribed, the primary benefit is a constantly updating stream of contentthat is delivered to your system in the form of summarized articles, forumthreads, blog posts, and so on. RSS stands for Rich Site Summary (or ReallySimple Syndication).
Where can I learn about InfoCenter search locations?You can use InfoCenter to search multiple sources (for example, Help andspecified files) at one time, or choose to search a single file or location.
For more information, see Configure InfoCenter Communication Center(optional) (page 46).
How do I set or customize search locations?InfoCenter Search and Communication Center settings can be set in theInfoCenter Settings dialog box or in the CAD Manager Control utility. Youmust use the CAD Manager Control utility to specify CAD Manager Channelsettings.
See Configure InfoCenter Communication Center (optional) (page 46) formore information regarding the settings you can configure.
Networking IssuesThis section outlines common issues and their solutions with regards toperforming a network installation or configuring your network license server(s).
When installing tools and utilities, which selections areapplicable for a multi-seat stand-alone installation?
Since a multi-seat stand-alone licensed product does not rely upon a licenseserver to manage or activate the license, the only tool that is beneficial is theAutodesk CAD Manager tool.
What are RSS feeds and how do they benefit my installation? | 81

You need the CAD Manager tool if you want to make changes to CAD ManagerChannels.
When installing tools and utilities, which selections areapplicable for a stand-alone installation?
The Autodesk CAD Manager tool is the only tool that is beneficial to astand-alone licensed product. With the CAD Manager tool, you can modifyCAD Manager Channels.
Where do I find my server name?When installing a network licensed product, you must specify the name ofthe server that will run the Network License Manager. If you don’t know theserver name, you can quickly find it by opening a Windows command prompton the system that will be the Network License Manager. At the prompt, enteripconfig /all and note the Host Name entry.
When specifying user workstation settings, I am giventhe option to specify a profile. What are profiles?
Profiles are created on the Profiles tab of the Options dialog box. Profiles cancontain configuration settings for just about anything that is not a drawingbased system variable. For example, a profile can contain things like supportpaths, grip settings, and plot settings.
When you specify a profile on the Specify User Preferences page during thedeployment process, it ensures that all workstations that use that deploymentto install the product will be configured the same way.
Can I create custom desktop shortcuts?You can choose to create custom desktop shortcuts that use command lineswitches to specify several options when you start the program. For example,command line switches can be set to run a script during program launch,create a drawing based on a template or prototype drawing, or designate aworkspace that should be restored on startup.
For more information, see Customize Startup in the AutoCAD User’s Guide.
82 | Chapter 5 Installation Troubleshooting

What happens when you choose to append or mergeservice packs?
When you append a service pack, the service pack is applied to the currentdeployment only. Multiple service packs may be appended to a deployment.The service pack file is included in the deployment and the service pack isapplied after the product is deployed.
When you merge a service pack, the service pack is merged into theadministrative image. Once merged, a service pack may not be removed fromthe administrative image. Multiple service packs may be included in a singleadministrative image.
You can choose to append or merge service packs from the Include ServicePacks page when creating a deployment.
What is an administrative image (MSI) file?An administrative image is a collection of shared file resources created duringthe deployment process and is used by deployments to install the program tonetworked workstations. Service packs (patches) can be applied to anadministrative image when you create the deployment. An .msi file is aMicrosoft Installer file.
What is the impact of selecting all products for theadministrative image, and can I add products later?
If you elect to include all products in your deployment, the administrativeimage will be larger. You should select all products only when you createmultiple deployments from this image and prefer not to use the installationdisc. If there are products you rarely or never use, and you do not expect tocreate additional deployments, you should only select a subset of products.
You can still create a deployment at a later date, and include additionalproducts, but you need to create a new administrative image. You need theinstallation disc to do so.
What happens when you choose to append or merge service packs? | 83

Uninstall and Maintenance IssuesThis section outlines common issues and their solutions with regards to addingand removing features, reinstalling or repairing your installation, anduninstalling products.
When adding or removing features, how can I tell whatfeatures get installed by default?
To quickly see what gets installed during a Typical, default installation, clickthe Restore Defaults button on the Add/Remove Features page.
Contains tools for reviewing design files for compliance withyour standards.
CAD Standards
Contains database access tools.Database
Contains multi-language dictionaries.Dictionaries
Allows you to use the Security Options dialog box to protecta drawing with a password.
Drawing Encryption
Contains AutoCAD Civil 3D support tools and utilities (notsupported by Autodesk).
Express Tools
Contains AutoCAD Civil 3D fonts and TrueType fonts.Fonts
Autodesk Seek.
NOTE Autodesk Seek is installed only with the English versionof AutoCAD Civil 3D.
Autodesk Seek
Contains over 300 professionally built materials to apply toyour model.
Material Library
Contains learning resources to help discover the product.Welcome Screen
Allows users to transfer an Autodesk product license betweencomputers.
License Transfer Utility
84 | Chapter 5 Installation Troubleshooting

Allows users to set up their initial configuration of AutoCADCivil 3D (online content, workspaces) based on their unitssystem, industry, and commonly used task-based tools.
Initial Setup
Allows users to view and edit the paths of externally referencedfiles associated with a drawing.
Reference Manager
Contains various feature sample files.Samples
Contains product tutorials.Tutorials
Contain hydraulics and hydrology applications, including Hy-draflow Storm Sewers, Hydraflow Hydrographs, and HydraflowExpress.
Hydraflow Extensions
The Survey Data Collection Link Extension allows to transferdata from survey data collectors and convert raw data files andcoordinate data files into field book (.fbk) format.
Survey Data CollectionLink Extension
Is it possible to change the installation folder whenadding or removing features?
Once your product is installed, you cannot change the installation path fromthe Add/Remove Features page. Changing the path while adding featuresresults in program corruption, so it is not an option.
When should I reinstall the product instead of a repair?You should reinstall your product if you accidentally delete or alter files thatare required by the program. Missing or altered files adversely affect theperformance of your product and cause error messages when you try to executea command or find a file.
If an attempt to repair an installation fails, reinstalling is the next best option.
Is it possible to change the installation folder when adding or removing features? | 85

Do I need my original disc to reinstall my software?When performing a reinstall of the product, you are prompted to load youroriginal disc(s). Installation data is cached locally on your drive and that datais reused when reinstalling.
When I uninstall my software, what files are left on mysystem?
If you uninstall the product, some files remain on your system such as filesyou created or edited (drawings or custom menus).
Your license file also stays on your workstation when you uninstall yourproduct. If you reinstall on the same workstation, the license informationremains valid and you do not have to reactivate the product.
86 | Chapter 5 Installation Troubleshooting

Glossary
activate Part of the Autodesk software registration process, it allows you to run a product incompliance with the product's end-user license agreement.
Active Directory A directory service from Microsoft that is part of Windows 2000 and Windows2003 Server that manages the identities and relationships that make up network environments.
administrative image A collection of shared file resources created by the deployment wizardand used by deployments to install the program to network workstations.
advertising A pull technology that notifies users of an updated software product that isavailable for installation. Users typically double-click a shortcut (or do a similar operation)to complete the installation of the advertised product.
deploy The process of installing an Autodesk product to one or more computers on a network.
deployment A link to a unique MST (Microsoft Transform) file that serves as a basis for aninstallation. Using the deployment wizard, administrators can create multiple deploymentsthat result in different types of installations for users.
directory service A network service that identifies all resources on a network and makes themaccessible to users and applications. Resources include email addresses, computers, andperipheral devices such as printers. Ideally, the directory service should make the physicalnetwork topology and protocols transparent so that a user on a network can access any resourcewithout knowing where or how it is physically connected. Virtually all directory services arebased on the X.500 ITU standard.
FLEXnet License management technology from Acresso™ Software, Inc.. FLEXnet providesadministrative tools that help to simplify management of network licenses. FLEXnet can beused to monitor network license status, reset licenses lost to a system failure, troubleshootlicense servers, and update existing license files.
group policy Microsoft server technology that provides a way to do push installations andadvertising-based installations using standard Microsoft 2000 Server administrationcomponents.
6
87

installation image A deployment that consists of an MSI file, any associated transforms,additional user-specified custom files, and profile and registry settings.
language pack A set of installed files that enable the user to work in the application in thelanguage specified by the Language Pack.
language family A set of languages (core product, plus language packs) that are distributedtogether, typically based on a geographic grouping.
License Transfer utility Allows you to use an Autodesk product on more than one computerwithout purchasing a separate license for each computer.
MSI Microsoft installer that supports a variety of parameters that can be scripted.
MSP Microsoft patch file (see patch).
MST Microsoft transform file. Modifies the components installed by the MSI file. For example,the deployment wizard creates an MST file with the settings that you specify. The deploymentcreated by the deployment wizard uses the MST file in conjunction with the MSI file andMSIEXEC to install the program on local workstations.
multi-seat stand-alone installation A type of installation where multiple stand-alone seatsof the program are installed using a single serial number.
network license installation A type of installation where you install the program toworkstations with the files and registry entries that allow the program to communicate withthe Network License Manager.
partial profile A profile that contains partial registry information corresponding to a subsetof the options available from the Files tab of the Options dialog box.
patch A software update to an application.
power user A user with rights to access and write to the Program Files folder and theHKEY_Local_Machine folder of the registry.
pull technology An installation technology that requires user interaction to complete theinstallation.
push technology An installation technology that installs files to a remote desktop withoutany user interaction.
scripting The process of using scripting languages such as VB Script to facilitate thedeployment of software packages.
service pack Autodesk terminology for an application patch.
88 | Chapter 6 Glossary

silent mode An installation that proceeds without any explicit user input. No dialog boxesare presented that require interaction from the user.
SCCM Microsoft System Center Configuration Manager. A tool that helps administernetworked machines by allowing remote configuration, push deployments, and useradministration. SCCM is an expensive technology that must be purchased as an additionalserver.
transform See MST.
| 89

90

Index
A
activating programs 10administrative images
shortcuts to 58system requirements 29
administrator permission requirementsstand-alone installation 4
Adobe Flash Player 4advertising deployments 59anti-virus programs 35anti-virus software 5applications
anti-virus software 5closing during installation 5
assigning deployments 59, 61Autodesk Channels 47Autodesk Design Review
installing 17viewing DWFs 17
Autodesk productsversions of 23
B
best practices, installation anddeployment 35
browsers 1–2
C
CAD Manager Channel 47CER (Customer Error Reporting) 50cleaning
hard drives 74client log files 38client workstations
assigning deployments 59, 61imaging software deployments 71repairing installations 73system requirements 29
verifying deployments 67communication protocols 30computers 29configurable folders, about 19Configure button 35configured deployments 53content packs, about 18content roots, location 20corridor models, support file location 20custom settings
migrating from previous releases 6Customer Error Reporting (CER) 50customized deployments 35, 53customizing
installation 12
D
data loss 5DC Online 49default deployments 51Deployment wizard 51, 68deployments
about 33assigning 59, 61checklist 33choices 36Configure button 35customized 35, 53Deployment wizard 51distributing 61, 71group policies 59imaging software 71Installation wizard 53issues 78methods 59Microsoft System Center
Configuration Manager 67modifying 57system requirements 29verifying installation 67
91 | Index

Design Reviewinstalling 17viewing DWFs 17
DesignCenter Online 49distributed license server model 31distributing
deployments 61, 71Microsoft System Center
Configuration Manager 67DWF files
Design Review 17DWFx files
Design Review 17
F
faxing registration information 11Flash Player 4
G
glossary 89group policies
advantages and disadvantages 60advertising deployments 59distributing deployments 61verifying deployments 67
H
hard diskscleaning 74system requirements 1, 30
hardwareinstallation requirements 1network system requirements 29
I
imaging software deployments 71InfoCenter Communication Center 46installation
adding or removing features 12advertising deployments 59Autodesk Design Review 17
Configure button 35customizing 35group policies 59imaging software 71Installation wizard 6network deployment 33, 36networking issues 81preparing for 1registration and activation 10repairing damaged installations 13,
73restoring operating systems 74serial numbers 4service packs 44side-by-side 23software deployments 33, 36, 78stand-alone installation 1, 6–7starting 11system requirements 1troubleshooting 75types of 30, 41typical 77uninstalling 14, 84verifying deployments 67
Installation wizard 6, 53Internet
program registration andactivation 10
Internet Explorer (Microsoft) 2
L
license serversconfiguring 32specifying 39system requirements 29types of 31
licenseslicense servers 31license types 39
limited user rights 12Live Updates 47log files 37
92 | Index

M
mailing registration information 11master images 71, 73master systems 74memory (RAM)
system requirements 1Microsoft Installer Patch files 44Microsoft Internet Explorer 2Microsoft System System Center
Configuration Manager 67Microsoft Windows operating
systems 29migrating
custom settings from previousreleases 6
migrating datacutomized files 24pipe catalogs 26subassemblies 25survey files 26tool palettes 25toolbox 25
Migrating databest practices 24
monitors 2MSP files 44multi-seat stand-alone installations 1,
30, 72
N
network adapters 30network administration
about 29group policies 59license servers 32
network installationsConfigure button 35deployment 33, 36group policies 59imaging software deployments 73issues 81system requirements 29types of 30
network license installationsimaging software deployments 73selecting 30
network log files 37network shares
creating 31deploying products with 59
Norton Ghost 71
O
online resources 49operating systems
restoring 74system requirements 1, 29
P
pointing devicessystem requirements 1
previous releasesmigrating custom settings from 6
processors 1, 29Product Activation wizard 10product information 36product keys 10product manuals 78
R
RAMsystem requirements 1
redundant license server modelselecting 31
regional settings, selecting 18reinstalling programs 13removing
uninstalling programs 14repairing
damaged installations 13, 73restoring
damaged installations 73operating systems 74
RSS feeds 48
Index | 93

S
SAMreport-Lite 78SATA RAID environments 72SCCM (System Center Configuration
Manager) 67Search settings 50serial numbers
stand-alone installation 4service packs 1, 44shortcuts
administrative images 58creating 12
side-by-side installation 23silent mode 38single license server model 31software deployments 78software installation requirements 1, 29stand-alone installations
imaging software and 72process 7program registration and
activation 10Quick Start 1selecting 30
survey equipment databases, filelocation 20
survey figure prefix databases, filelocation 20
survey linework code sets, filelocation 20
system requirementsnetwork deployments 29stand-alone installations 1
T
trial mode 10troubleshooting installation 75
U
uninstalling programs 84upgrade installations 23upgrading
installing newer releases 6user information 36
V
verifying group policy deployments 67video cards 1video monitors 1–2virus checking programs 35virus software 5
W
web browsers 1–2Windows operating systems
system requirements 29working projects, location 20workstations
assigning deployments 59, 61imaging software deployments 71repairing installations 73restoring master systems 74system requirements 29verifying deployments 67
94 | Index
Related Documents