1 e eyes of your Bebop! A new and immersive flying exp User guide

Welcome message from author
This document is posted to help you gain knowledge. Please leave a comment to let me know what you think about it! Share it to your friends and learn new things together.
Transcript
1
e eyes of your Bebop! A new and immersive flying exp
User guide

2 Table of Contents
Table of Contents ............................................................................................................... 2
About this manual ............................................................................................................. 6
Overview ............................................................................................................................ 7
Main features ..................................................................................................................... 8
DISPLAY INFORMATION ............................................................................................... 8
COMPATIBILITY ............................................................................................................. 9
Auriga Anafi home page ................................................................................................ 10
Run Auriga Anafi ....................................................................................................... 10
Connection ............................................................................................................... 10
Calibrations ................................................................................................................ 11
Photos and Videos gallery ....................................................................................... 11
Photos and Videos manager. .................................................................................. 12
User Guide ................................................................................................................. 12
Flight data .................................................................................................................. 12
Flight buttons ............................................................................................................. 13
Main Menu ....................................................................................................................... 14
Main settings .................................................................................................................... 15
Return to home (RTH)................................................................................................ 16
Return delay time ...................................................................................................... 16
Minimun altitude ....................................................................................................... 16
End behavior ............................................................................................................. 16
Hovering altitude ....................................................................................................... 16
Return position ........................................................................................................... 16
RTH for low battery .................................................................................................... 16
LOW BATTERY WARNING ........................................................................................... 16
Warning threshold ..................................................................................................... 16
UNITS ........................................................................................................................... 16

3
AUDIO MESSAGES ..................................................................................................... 16
GIMBAL RESET ANGLE ............................................................................................... 16
PRECISE HOME ........................................................................................................... 16
HAND LAUNCH .......................................................................................................... 16
Display settings ................................................................................................................ 17
Warnings .................................................................................................................... 17
HUD ............................................................................................................................. 17
HUD 3D depth ............................................................................................................ 17
HUD color ................................................................................................................... 17
Opacity ...................................................................................................................... 17
GRID ........................................................................................................................... 17
Profile settings .................................................................................................................. 18
GIMBAL ....................................................................................................................... 19
Horizon ........................................................................................................................ 19
Camera tilt speed ..................................................................................................... 19
SAFETY ........................................................................................................................ 19
FLIGHT ......................................................................................................................... 19
DEFAULT ...................................................................................................................... 20
Horizon ........................................................................................................................ 20
Camera tilt speed ..................................................................................................... 20
Banked turn ............................................................................................................... 20
Inclination................................................................................................................... 20
Vertical speed ........................................................................................................... 20
Rotation speed .......................................................................................................... 20
WiFi settings ...................................................................................................................... 21
Mode .......................................................................................................................... 21
WiFi Band ................................................................................................................... 21
Location ..................................................................................................................... 21
WiFi Channel .............................................................................................................. 21
Photo & video settings ..................................................................................................... 23
PHOTO ........................................................................................................................ 23
4
Single .......................................................................................................................... 23
Pano ........................................................................................................................... 23
Selecting the “Bracketing” mode opens three options: ....................................... 23
360°° ..................................................................................................................... 23
180°H .................................................................................................................... 23
180°V .................................................................................................................... 23
Burst ............................................................................................................................ 23
Bracket ....................................................................................................................... 23
Timelapse ................................................................................................................... 24
GPS Lapse .................................................................................................................. 24
VIDEO ......................................................................................................................... 24
Standard .................................................................................................................... 24
Cinema ...................................................................................................................... 24
HyperLps ..................................................................................................................... 24
Slow- Mot ................................................................................................................... 24
High-FR ....................................................................................................................... 25
Framerate .................................................................................................................. 25
Auto record ............................................................................................................... 25
PRO IMAGING SETTING ............................................................................................. 25
Shutter ........................................................................................................................ 25
ISO ............................................................................................................................... 25
HDR ............................................................................................................................. 25
CAMERA ..................................................................................................................... 26
Lossless zoom only ..................................................................................................... 26
STYLE ........................................................................................................................... 26
Natural ........................................................................................................................ 26
P-Log ........................................................................................................................... 26
Pastel .......................................................................................................................... 26
Intense ........................................................................................................................ 26
Anti-flickering ............................................................................................................. 26
SKY3 settings .................................................................................................................... 27
R1 BUTTON .................................................................................................................. 27
L1 BUTTON .................................................................................................................. 27
R1+L1 BUTTONS .......................................................................................................... 28

5
STICK MODES ............................................................................................................. 29
Diagnostic ........................................................................................................................ 30
BATTERY ...................................................................................................................... 31
MOTORS ..................................................................................................................... 31
GIMBAL ....................................................................................................................... 31
Calibration error. ....................................................................................................... 31
Communication error. .............................................................................................. 31
Overload error. .......................................................................................................... 31
Critical error. .............................................................................................................. 32
Single View Interface ...................................................................................................... 33
HUD FULL .................................................................................................................... 33
.................................................................................................................................... 33
HUD display ................................................................................................................ 34
HUD Minimal .............................................................................................................. 35
HUD None .................................................................................................................. 35
Options menu .................................................................................................................. 36
FPV interface .................................................................................................................... 37
Headtracking mode ........................................................................................................ 38
3D HUD effect ............................................................................................................ 38
Option Menu ............................................................................................................. 38
VR view calibration ................................................................................................... 40
Image resizing ............................................................................................................ 40
Vertical position ......................................................................................................... 40
Eye spacing ............................................................................................................... 40
Recommendations .......................................................................................................... 41
6 About this manual Read entirely at least once: it answers most questions that most users
encounter when they user the Auriga Anafi software application.
Refer to the Parrot user manual for more information regarding the use of
the Parrot devices and about features details.
Although every effort has been made to ensure the information and data
contained in these User Instructions is correct, no rights can be derived from the
contents.
Auriga Software disclaim all warranties with regard to the information provided
in these instructions.
In no event shall Auriga Software be liable for any special, indirect or
consequential damages whatsoever resulting from loss of use, data or profits,
whether in action of contract, negligence or other tortious action, arising out of
or in connection with the use of the information provided in these User
Instructions.

7 Overview
The Auriga Anafi applications is a first person viewer software
designed for Parrot Anafi drones.
Auriga Anafi app allows you an addictive and enjoyable
flying experience placing yourself in the "pilot’s seat" of your
drone.
By Auriga interface you will be able to control all the flight
parameters through an innovative HUD display and a more immersive feeling
through the FPV camera Head Tracking feature.

8 Main features On Screen Display.
3D HUD display (FPV headset mode only).
FPV Headset view for VR goggles.
Camera Head Tracking features (FPV headset mode only)
Audio warning messages.
Flight Data.
Display settings.
Profile settings.
WiFi settings – FCC feature
Photo/video settings.
Skycontroller3 buttons and modes configuration.
Precise Home.
Hand Launch.
Photos and Videos Gallery
Diagnostic
Return to Home features
Low battery warning threshold
PRO imaging setting
Camera setting
P-Log
Framing grid
DISPLAY INFORMATION
Full/Minimal/none views.
Map view.
Anafi drone Battery Status by circular progress bar.
Skycontroller 3 Battery Status by circular progress bar.
Wifi Signal Strength by circular progress bar.
SD Memory Storage by circular progress bar.
HUD display for:
- Speed slide bar.
- Altitude slide bar.
- Antenna pointer indicator.
- Camera indicator.
- Artificial Gyroscope Horizon.
- Drone directional icon.
- Flight Time.
- Zoom status.

9
- Altitude Above Sea Level.
- Satellites indicator.
COMPATIBILITY
Auriga ANAFI software is compatible with the following Parrot devices:
Skycontroller 3 (MFi compliant)
Parrot Anafi
Parrot Anafi FPV
Parrot Anafi Extended
Not all the features described in this manual are yet available for the iOS version.
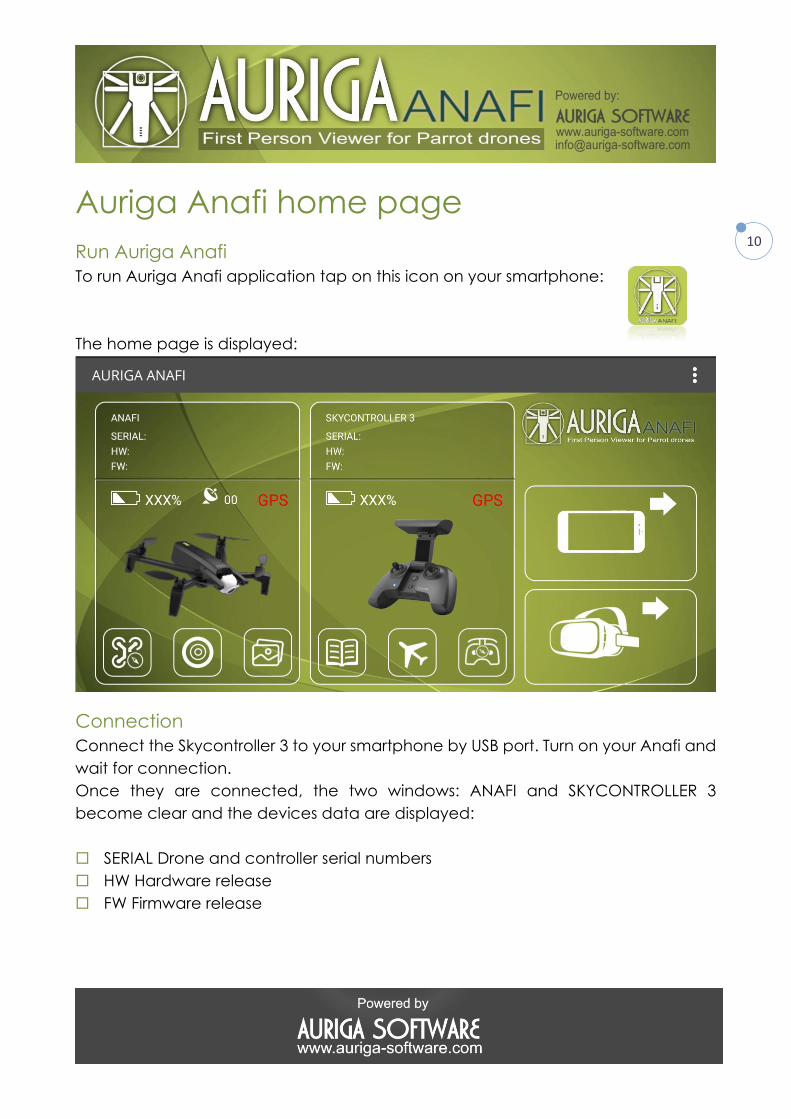
10 Auriga Anafi home page
Run Auriga Anafi
To run Auriga Anafi application tap on this icon on your smartphone:
The home page is displayed:
Connection
Connect the Skycontroller 3 to your smartphone by USB port. Turn on your Anafi and
wait for connection.
Once they are connected, the two windows: ANAFI and SKYCONTROLLER 3
become clear and the devices data are displayed:
SERIAL Drone and controller serial numbers
HW Hardware release
FW Firmware release

11
Calibrations On the home page there are 3 buttons for the following calibration features:
Tap on the proper device icon to calibrate the device and follow the instructions.
If the calibration becomes needed for these devices, the proper icon turns red.
Photos and Videos gallery
Tap on this icon to enter in the Photos and Videos gallery (Android version)
Select by the two switches to show Video or Photo miniatures:
and tap on video or photo miniature to preview.
Anafi drone magnetometer calibration.
Camera gimbal calibration.
Skycontroller 3 calibration.
Videos
Photos

12
Photos and Videos manager.
Tap on this icon to enter in the Photos and Videos manager.
User Guide
Tap on this icon to download the User Guide of the application (needs an
internet connection).
Flight data
Tap on this icon to enter in the Flight data report.
Back
k Select all
Download
Delete
Select the photos or videos to delete from drone or to download in your phone.
The files will be saved in the DCIM/AurigAnafi folder of your phone.

13
This report page shows the main data of your flights for:
Last flight;
Absolute;
Totals.
On this page there is also the map with the waypoint of your last flight position.
Flight buttons
On the right of the home page there are the two buttons to select the flight mode
interfaces:
Tap on this button to select the single mode flight interface.
Tap on this button to select the FPV mode flight interface for
VR headset.

14 Main Menu
(iOS version)
(Android version)
You can set your preferences for the following settings:
Main settings;
Display settings;
Profile settings;
WiFi settings;
Photo video settings;
SKY3 settings.
Diagnostic. (Android only)

15 Main settings The Main Settings menu is shown below:
16
Return to home (RTH)
By this option you can set:
Return delay time
Set the waiting time before automatic RTH for loss signal connection.
Minimun altitude
Set the minimal altitude for RTH.
End behavior
Set the RTH end behavior: Hovering or landing.
Hovering altitude
Set the altitude for RTH hovering behavior.
Return position
Set the Return to Home position: Take-off or Pilot (Skycontroller) point.
RTH for low battery
Enable this option for the automatic Return to Home in case of low battery. (low
battery’s threshold to be set as below).
LOW BATTERY WARNING
By this option you can set the threshold for low battery warning and for automatic
return to home in case of this condition.
Warning threshold
Set the warning threshold from 10% to 40% for low battery warning and for automatic
return to home in case of this condition.
UNITS
Select the preferred navigation system units: metric (Km/h,– mt) or imperial (mph,ft).
AUDIO MESSAGES
Enable/disable the audio warning messages.
GIMBAL RESET ANGLE
Set the angle of camera’s gimbal for “optic reset” command on skycontroller3.
PRECISE HOME
Enable/disable Precise Home feature.
HAND LAUNCH
Enable/disable hand launch feature.
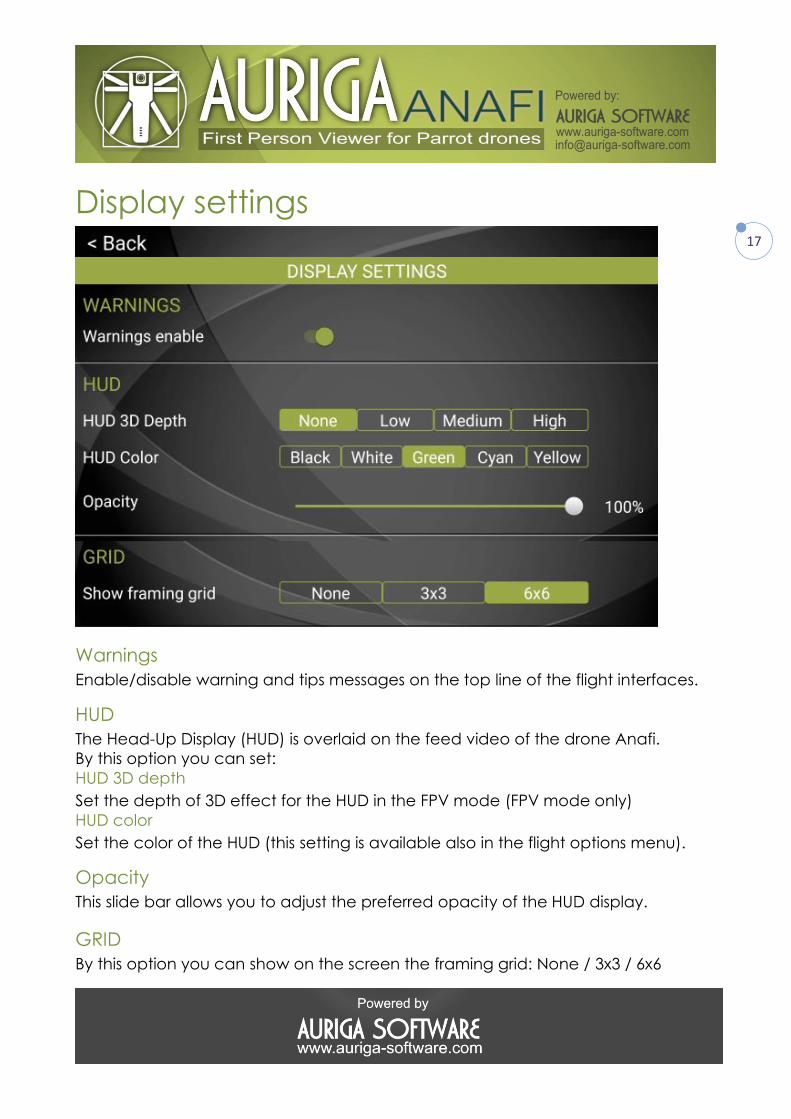
17 Display settings
Warnings
Enable/disable warning and tips messages on the top line of the flight interfaces.
HUD
The Head-Up Display (HUD) is overlaid on the feed video of the drone Anafi.
By this option you can set:
HUD 3D depth
Set the depth of 3D effect for the HUD in the FPV mode (FPV mode only)
HUD color
Set the color of the HUD (this setting is available also in the flight options menu).
Opacity
This slide bar allows you to adjust the preferred opacity of the HUD display.
GRID
By this option you can show on the screen the framing grid: None / 3x3 / 6x6

18 Profile settings Profile settings allows you to define, and save, four different flight setting profiles:

19
All these profiles have pre-set settings, you can change them as you prefer.
For each profile you can pre-set the following features:
GIMBAL
SAFETY
FLIGHT
GIMBAL
By this pre-set you can set the camera gimbal features as:
Horizon
Fixed or Dynamic
Camera tilt speed
By this slide bar you set the vertical speed of the gimbal camera.
SAFETY
By this pre-set you can set the Geofence safety features:
Geofence: Enable/disable
When the Geofence is activated, Anafi will automatically stop when it reaches
the maximum altitude or the maximum distance you have selected.
FLIGHT
By this pre-set you can set the flight pre-sets as:

20
Banked turn: Enable/disable
Vertical speed
By this slide bar you set the vertical speed of the drone.
Rotation speed
By this slide bar you set the rotation speed of the drone.
Inclination
By this slide bar you set the inclination (speed) of the drone.
DEFAULT
Tap on “DEFAULT” button to reset all preferences as default:
Horizon
FIXED / DYNAMIC (DV: FIXED for FILM & SPORT; DYNAMIC for CINEMATIC & RACING)
Camera tilt speed
2°/s to 180°/s (DV: 10°/s for FILM & CINEMATIC; 20°/s for SPORT & RACING)
Banked turn
NO / YES (DV: YES for FILM, CINEMATIC & RACING; NO for SPORT)
Inclination
1°/s to 40°/s (DV: 10°/s for FILM; 20°/s for CINEMATIC; 25°/s for SPORT & RACING)
Vertical speed
0.1m/s to 4m/s (DV: 1m/s for FILM; 2m/s for SPORT; 2.5m/s for CINEMATIC; 3m/s for
RACING)
Rotation speed
3°/s to 200°/s (DV: 10°/s for FILM; 20°/s for SPORT & CINEMATIC; 40°/s for RACING),
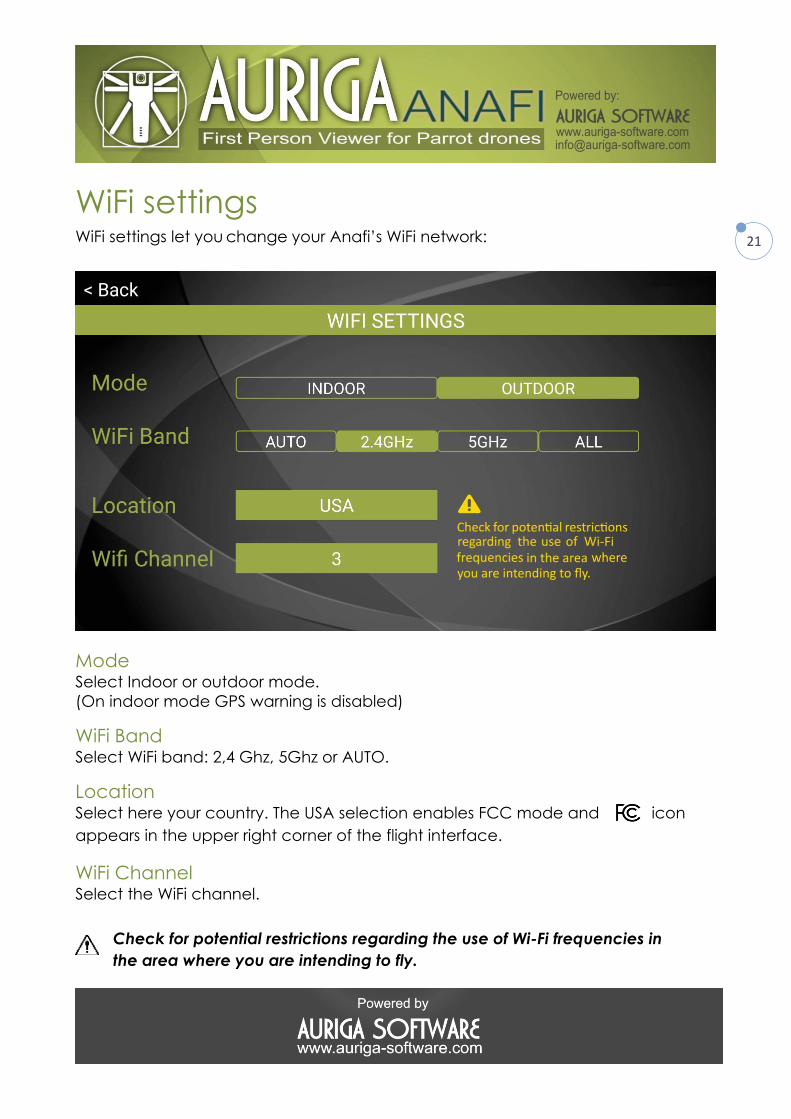
21 WiFi settings WiFi settings let you change your Anafi’s WiFi network:
Mode Select Indoor or outdoor mode.
(On indoor mode GPS warning is disabled)
WiFi Band Select WiFi band: 2,4 Ghz, 5Ghz or AUTO.
Location Select here your country. The USA selection enables FCC mode and icon
appears in the upper right corner of the flight interface.
WiFi Channel Select the WiFi channel.
Check for potential restrictions regarding the use of Wi-Fi frequencies in
the area where you are intending to fly.

22
23 Photo & video settings Photo & video settings allows you to set photo and video features.
PHOTO
In this section you can set the Photo modes: Single, Pano, Burst, Timelapse, GPS
Lapse.
Single
When in photo mode the “Single” is selected the shutter button of the HUD appears
as a full white circle.
When this option has been selected, on the shutter button of the HUD is displayed
“Single”.
Pano
Selecting the “Panorama” mode opens three options:
360°°
180°H
180°V
The generation of a panorama, regardless of its format, implies three phases:
- collecting the pictures, in flight;
- downloading the pictures from to your device;
- stitching the pictures together to create the panorama, on your device,
through the gallery of FreeFlight 6 or for a Panorama image generation
software.
Burst
In “Burst” mode, the screen flashes white then freezes briefly in black and white to
confirm 14 pictures have been taken in the span of 1 second. The number to the left
of the soft shutter button of the HUD is increased by 14.
Bracket
Selecting the “Bracketing” mode opens three options:
3 photos (-1 EV, +0.0 EV, +1 EV),
5 photos (-2 EV to +2 EV)
7 photos (-3 EV to +3 EV).

24
When this option has been selected, on the shutter button of the HUD is displayed
“Bracket”.
Timelapse
Select the "Time Lapse" mode and adjust by the slide bar "Timelapse interval" the
preferred time between each photo shots.
When this option has been selected, on the shutter button of the HUD is displayed
“T Lapse”.
GPS Lapse
Select the "GPS Lapse" mode and adjust by the slide bar "GPSlapse interval" the
preferred distance between each photo shots.
When this option has been selected, on the shutter button of the HUD is displayed
“GPS Lps”.
VIDEO
In this section you can set the recording modes: Standard, Cinema, Hyperlapse,
slow motion, High frame.
Standard
When this option has been selected, on the record button of the HUD the time is
displayed as “S 00:00”.
Cinema
Spectacular 4K cinema filming, at 24fps.
HyperLps
Select “Hyperlapse” mode and select by “Hyperlapse value” the preferred speed
factor (x15, x30, x60, x120, x240).
When this option has been selected, on the record button of the HUD the time is
displayed as “H 00:00”.
Slow- Mot
Slow-Motion 1080p:
filming at 48, 50 or 60fps, automatically slowed down by a factor of 2 (x0.5) and
exported at 24, 25 or 30fps.

25
Slow-Motion 720p:
filming at 96, 100 or 120fps, automatically slowed down by a factor of 4 (x0.25) and
exported at 24, 25 or 30fps.
High-FR
High-Framerate: 1080p filming at 48, 50 or 60fps (ideal for post-processing) and
720p filming at 96, 100 or 120fps.
Framerate
select the preferred framerate (fps – frames per second) values:
24 – 25 - 30 fps.
Auto record
Enable/disable auto record for Anafi’s take-off.
PRO IMAGING SETTING
This section is designed to help you exploit manual settings and develop your filming
and photography styles.
Shutter
Shutter speed (s)
The “s” value refers to the time, in fraction of second, when the shutter stays open
to capture a still picture: it is called exposure time.
In Auto mode, selects the best shutter speed and ISO value couple, in real time,
depending on the scene and available light. In consequence, selecting a shutter
speed also deactivates the Auto ISO mode.
ISO
The ISO value refers to the sensitivity of the sensor. As we have seen, it is linked to the
shutter speed value: both sliders activate when you deactivate the “Auto” mode
and set a value for one, or for the other.
HDR
Enable/disable HDR.
When this option has been selected, on the HUD is displayed HDR logo. HDR is
available for 4K UHD, 2.7K and 1080p videos and JPEG photos only.

26
CAMERA
Lossless zoom only
NO / YES (selecting “YES” blocks zoom in JPEG RECT).
STYLE
Selecting the “Style” mode opens four options:
Natural
P-Log
Pastel
Intense
Natural
The Natural Style is the default Style: it respects nature’s colors and tones.
P-Log
One alternative Style to Natural looking images (default value) can be selected for
both in the video mode, and in the photo mode. This alternative Style is called “P-
LOG”. It makes images a little less contrasted: P-LOG style is ideal for videos you want
to edit and process using professional grading tools and filters.
Pastel
Another alternative Style to Natural looking images (default value) can be selected
for both in the video mode, and in the photo mode. It is called “Pastel”. It makes
images less saturated, but it brings out their warmest tones
Intense
Another alternative Style to Natural looking images (default value) can be selected
for both in the video mode, and in the photo mode. It is called “Intense”. It makes
images more saturated and contrasted.
Anti-flickering
Anti-flickering: this setting and the associated technology aim at eliminating the
flicker effect which can arise due to some artificial lights. The “AUTO” option should
work for most users, but depending on your country, you can try other settings if you
feel bothered by a flicker effect on your device’s screen, your artificial light videos,
or both.
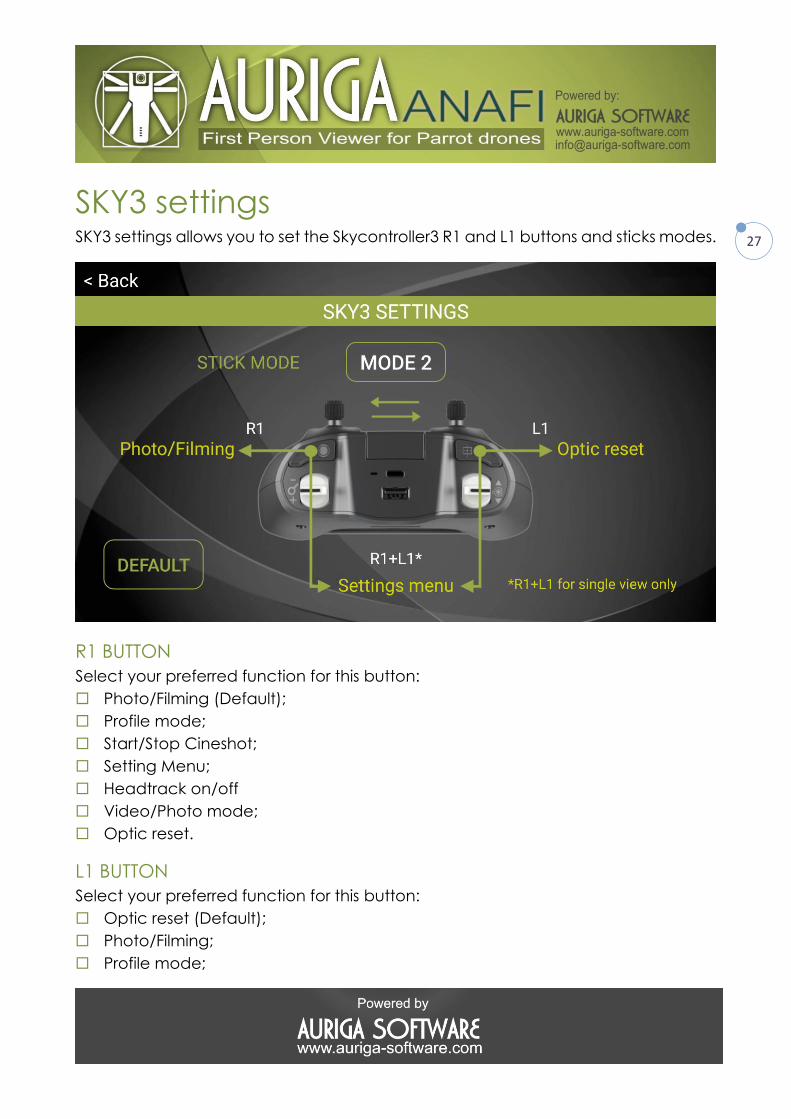
27 SKY3 settings SKY3 settings allows you to set the Skycontroller3 R1 and L1 buttons and sticks modes.
R1 BUTTON
Select your preferred function for this button:
Photo/Filming (Default);
Profile mode;
Start/Stop Cineshot;
Setting Menu;
Headtrack on/off
Video/Photo mode;
Optic reset.
L1 BUTTON
Select your preferred function for this button:
Optic reset (Default);
Photo/Filming;
Profile mode;
28
Start/Stop Cineshot;
Setting Menu;
Headtrack on/off
Video/Photo mode.
R1+L1 BUTTONS
Set a function for single view mode only, for the button combination R1 + L1:
Setting Menu(Default);
Headtrack on/off;
Video/Photo mode;
Optic reset;
Photo/Filming;
Profile mode;
Start/Stop Cineshot.
In FPV mode the buttons combination R1 + L1 is set just as default (Setting Menu).
29
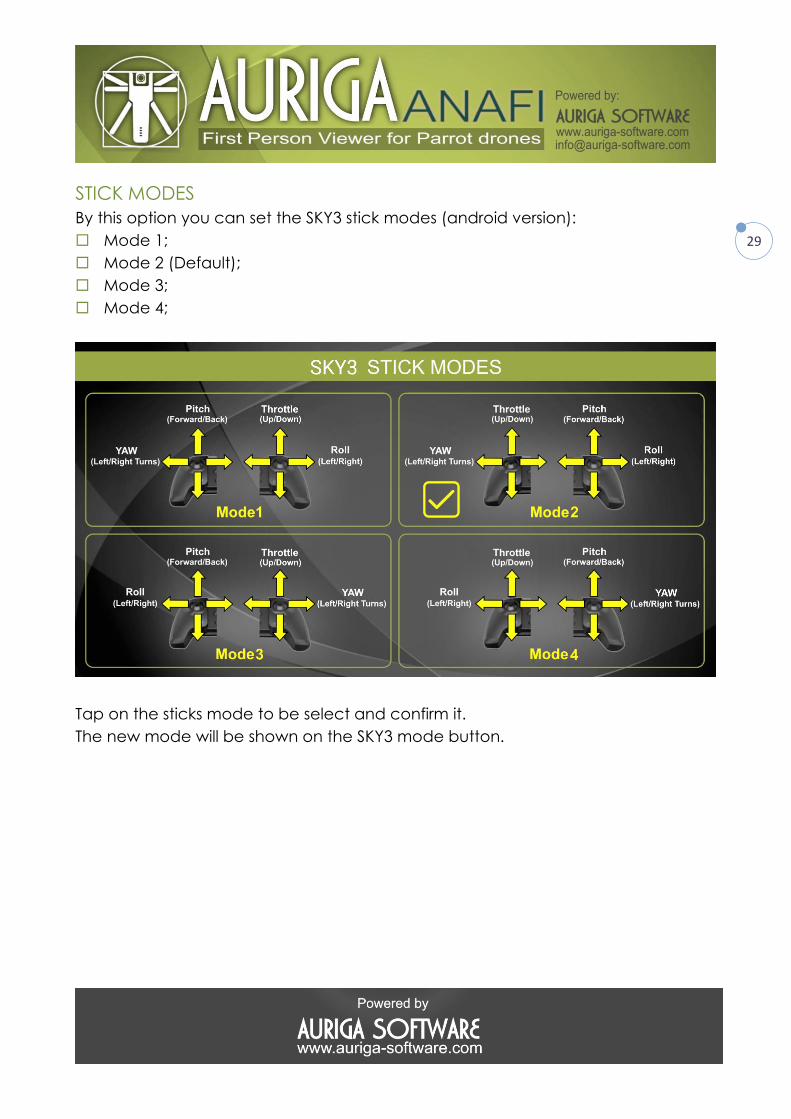
STICK MODES
By this option you can set the SKY3 stick modes (android version):
Mode 1;
Mode 2 (Default);
Mode 3;
Mode 4;
Tap on the sticks mode to be select and confirm it.
The new mode will be shown on the SKY3 mode button.

30 Diagnostic This section shows the diagnostic data of the following drone’s devices:
Battery;
Motors;
Gimbal;
Connect the drone to show the diagnostic data.

31
BATTERY
This section shows the battery data as:
Battery Serial Number
Current battery charge level
Current battery cycle count
Current battery state of health
MOTORS
This section shows an error that can occur on a motor.
GIMBAL
This section shows the Gimbal status for:
Calibration
Communication
Critical error
Overload
Calibration error.
May happen during manual or automatic calibration.
It means that the gimbal is currently inoperable and suggest to verify that nothing
currently hinders proper gimbal movement.
The device will retry calibration regularly; after several failed attempts, it will escalate
the current error to critical level, at which point the gimbal becomes inoperable until
both the issue is fixed and the device is restarted.
Communication error.
Communication with the gimbal is broken due to some unknown software and/or
hardware issue.
It means that the gimbal is currently inoperable.
The device will retry stabilization regularly; after several failed attempts, it will
escalate the current error to critical level, at which point the gimbal becomes
inoperable until both the issue is fixed and the device is restarted.
Overload error.
May happen during normal operation of the gimbal.

32
It means that the gimbal is currently inoperable and suggest to verify that nothing
currently hinders proper gimbal movement.
The device will retry stabilization regularly; after several failed attempts, it will
escalate the current error to critical level, at which point the gimbal becomes
inoperable until both the issue is fixed and the device is restarted.
Critical error.
May occur at any time; in particular, occurs when any of the other errors persists
after multiple retries from the device.
It means that the gimbal has become completely inoperable until both the issue is
fixed and the device is restarted, as well as suggest to verify that nothing currently
hinders proper gimbal movement and that the gimbal is not damaged in any way.

33 Single View Interface
The single view interface is displayed:
HUD FULL
1. Head-up display HUD;
2. Anafi drone Battery Status by circular progress bar;
3. Skycontroller 3 Battery Status by circular progress bar;
4. Wifi Signal Strength by circular progress bar;
5. SD Memory Storage by circular progress bar;
6. Map view button;
7. Cineshots button.
8. Photo/Video mode button;
9. Photo shutter/Start-stop video recording button;
10. Back button;
11. Options menu button.
12. Warning messages.
On the homepage tap on this button to select the single mode
flight interface.

34
HUD display
1. Speed slide bar.
2. Altitude slide bar.
3. Antenna pointer indicator.
4. Distance.
5. Camera Gimbal indicator.
6. Artificial Gyroscope Horizon.
7. Drone directional icon.
8. Flight Time.
9. Zoom status.
10. Altitude Above Sea Level.
11.Satellites indicator.
Note:
The pointer antenna indicator allows you to keep the antenna of the controller
properly pointed towards the drone. For this purpose keep the triangle as much as
possible in the middle of arc.

35
HUD Minimal
The HUD minimal shall be selected in the option menu.
It allows you to view only the essential flight parameters.
In this view also warning messages are available.
HUD None
In this view just feed video and warning messages are available.

36 Options menu
Tap on options menu icon to display it:
1. HUD colors: Black/White/Green/Cyan/Yellow;
2. View interface mode: Full/Minimal/None;
3 Profile mode: Cinematic/Film/Rancing/Sport;
4. Cineshot mode: 360°L/360°R/Epic30/Epic60/Reveal30/Reveal60/Spiral30/Spiral60
5. Banked turn: ON/OFF
6. Adjusting of the selected imaging setting mode.
7. Imaging setting mode
8. White balance: AWB Auto/Sunny/Cloudy/Incandescent/Fluto/Shaded
9. Video/Photo mode
10. Video formats:1080p/2,7K/4K/4K DCI
Tap on the proper button to select your preferred option.
Tap on the back button to esc.

37 FPV interface FPV interface allows you an addictive and enjoyable flying experience in first person
viewer (FPV).
On FPV Headset mode are available the camera Head Tracking features (you are
able to move the drone’s camera by your head movements) and HUD display with
3D effect for an even more immersive feeling.
The VR headset interface is displayed:
The FPV headset flight interface is like the single one with the exception of:
In the left menu the MAP icon has been replaced by Profile mode icon and
Cineshots by RTH icon.
In the right menu the Photo/Video mode icon has been replaced by
headtracking icon:
On the homepage tap on this button to select the FPV mode
flight interface.
Headtracking mode disabled.
Headtracking mode enabled.

38 Headtracking mode Enabling the headtracking ON function allows the movement of the gimbal of the
Anafi camera through the vertical movement of your head.
Note:
In the profile settings page set the proper camera tilt speed for the best head
movement.
3D HUD effect
In the Display setting menu you can set the depth of 3D effect:
None (no 3D effect).
Low;
Medium;
High.
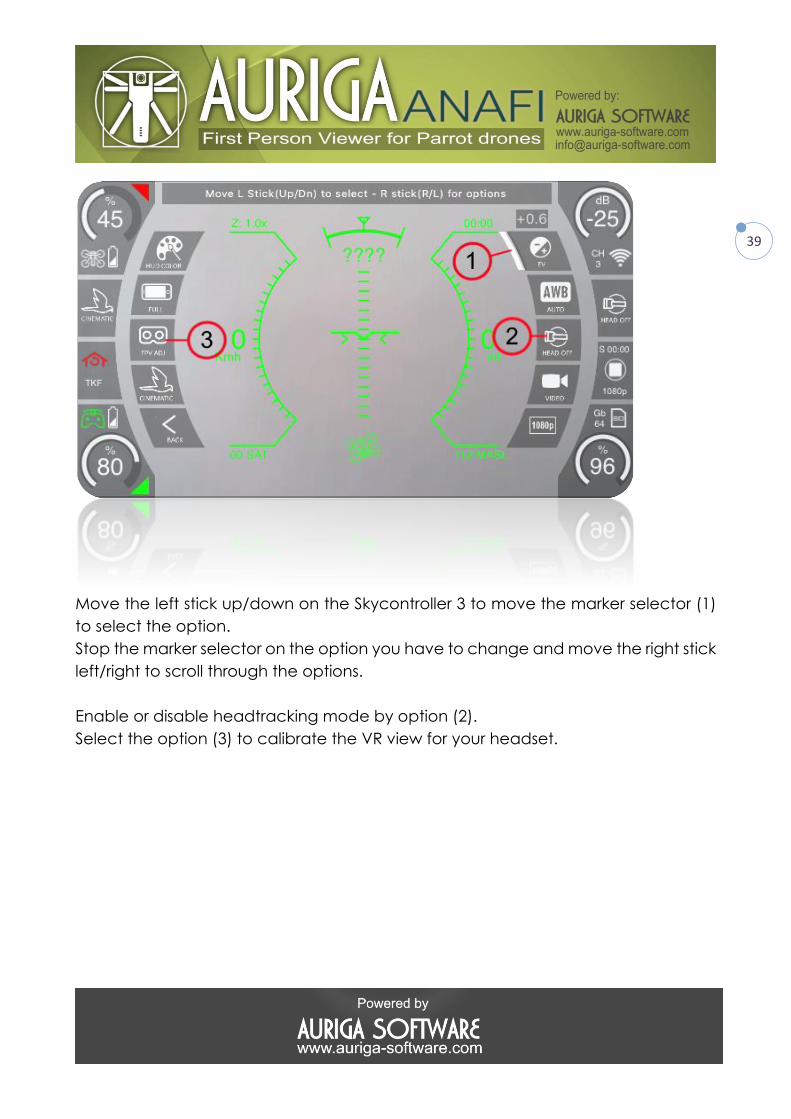
Option Menu
Press simultaneously the R1 and L1 buttons on the Skycontroller 3 to set the options
menu. The options menu appears:
39
Move the left stick up/down on the Skycontroller 3 to move the marker selector (1)
to select the option.
Stop the marker selector on the option you have to change and move the right stick
left/right to scroll through the options.
Enable or disable headtracking mode by option (2).
Select the option (3) to calibrate the VR view for your headset.
40
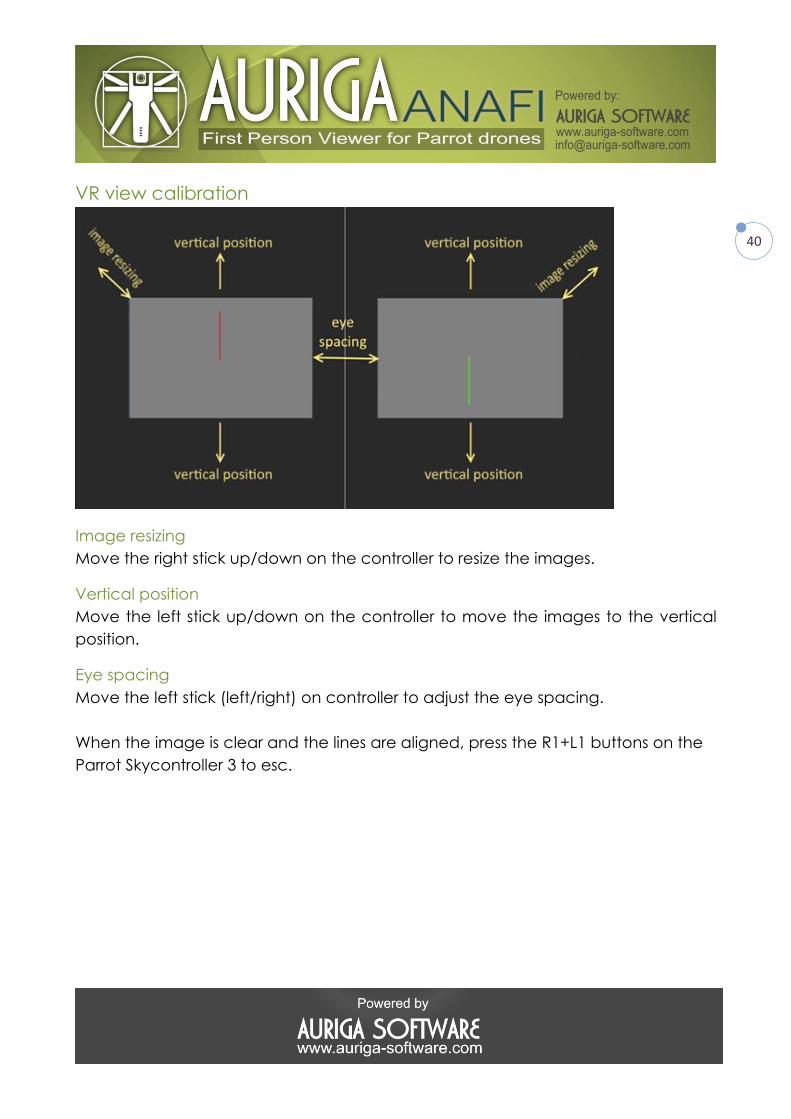
VR view calibration
Image resizing
Move the right stick up/down on the controller to resize the images.
Vertical position
Move the left stick up/down on the controller to move the images to the vertical
position.
Eye spacing
Move the left stick (left/right) on controller to adjust the eye spacing.
When the image is clear and the lines are aligned, press the R1+L1 buttons on the
Parrot Skycontroller 3 to esc.
41 Recommendations Before flying your Parrot Anafi Drone by Auriga Anafi application software, check
and fly in accordance with your local civil aerial regulation.
Make sure that the use of your Parrot Anafi drone is allowed where you are going to
fly. Check the restrictions regarding the use of Wi-Fi frequencies in the place where
you are going to fly.
Check the regulations on the use of FPV goggles when flying a drone where you are
going to fly.
Related Documents