Audit TM Audit Security Component Software Version: 13 Updated: August 18, 2016

Welcome message from author
This document is posted to help you gain knowledge. Please leave a comment to let me know what you think about it! Share it to your friends and learn new things together.
Transcript
Audit TM
Audit Security Component
Software Version: 13 Updated: August 18, 2016

Audit 13.21 User Manual i About This Manual
Product Documentation Raz-Lee takes customer satisfaction seriously. Our products are designed for ease of use by personnel at all skill levels, especially those with minimal IBM i experience. The documentation package includes a variety of materials to get you up to speed with this software quickly and effectively. We hope you find this user manual informative; your feedback is important to us. Please send your comments about this user manual to [email protected].
Copyright Notice
© Copyright Raz-Lee Security Inc. All rights reserved.
This document is provided by Raz-Lee Security for information purposes only.
Raz-Lee Security© is a registered trademark of Raz-Lee Security Inc. Action, System Control, User Management, Assessment, Firewall, Screen, Password, Audit, Capture, View, Visualizer, FileScope, Anti-Virus, AP-Journal © are trademarks of Raz-Lee Security Inc. Other brand and product names are trademarks or registered trademarks of the respective holders. Microsoft Windows© is a registered trademark of the Microsoft Corporation. Adobe Acrobat© is a registered trademark of Adobe Systems Incorporated. Information in this document is subject to change without any prior notice.
The software described in this document is provided under Raz-Lee’s license agreement.
This document may be used only in accordance with the terms of the license agreement. The software may be used only with accordance with the license agreement purchased by the user. No part of this document may be reproduced or retransmitted in any form or by any means, whether electronically or mechanically, including, but not limited to: photocopying, recording, or information recording and retrieval systems, without written permission given by Raz-Lee Security Inc.
Visit our website at http://www.razlee.com .
Record your Product Author ization Code Here:
Computer Model:
Serial Number:
Authorization Code
Audit 13.21 User Manual ii About This Manual
About This Manual Intended Readers This user guide is intended for system administrators and security administrators responsible for the implementation and management of security on IBM i1 systems. However, any user with a basic knowledge of IBM i operations will be able to make full use of this product after reading this book.
Audit Manual Overview This manual contains concise explanations of the various product features as well as systematic instructions for using and configuring the product.
This user guide is the only printed documentation necessary for understanding Audit. It is available in user-friendly PDF format and can be displayed or printed using Adobe Acrobat Reader version 6.0 or higher. If you do not have Acrobat Reader, you can download it from the Adobe website: http://www.adobe.com/.
The Audit Manual includes the following topics:
§ Chapter 1: IBM i Auditing Introduction
§ Chapter 2: Audit Overview
§ Chapter 3: Getting Started
§ Chapter 4: IBMi (OS/400) Audit Settings
§ Chapter 5: Real-Time Auditing
§ Chapter 6: Queries and Reports
§ Chapter 7: User Management
§ Chapter 8: Working with Native Object Security
§ Chapter 9: Replication
§ Chapter 10: Configuration and Maintenance
§ Appendix A: Raz-Lee Entry Types
Typography Conventions § Menu options, field names, and function key names are written in
Sans-Serif Bold. § References to chapters or sections are written in Italic. § IBMi (OS/400) commands and system messages are written in Bold Italic. § Key combinations are separated by a dash, for example: Shift-Tab. § Emphasis is written in Times New Roman bold.
1IBM i platform is otherwise known as the iSeries, Power i or AS/400.
Audit 13.21 User Manual iii New Features and Functionality
New Features and Functionality Version 13.21 (04/2016)
1. The ZIP parameter has been added to the report generator command. It can be secured by using a password. When using the Report Scheduler, it is possible to specify ZIP in the group definition. Doing so will ZIP all following report output to a single ZIP file.
2. “No Data” Notification Added to Email Subject of Empty Reports - As security is based on exception identification, this addition saves time as there is no need to open empty reports.
3. In Syslog definitions (STRAUD > 81 > 32/33/34), the SYSLOG message is now enabled for multiple SIEM messages and message structures using built-in as well as mixed variables and constants. The feature enables adjustable Port, Severity, Facility and Length while offering UDP, TCP and TLS (encrypted) support in CEF and LEEF and user editable modes, using filters for relevant fields.
4. Processing of SIEM is done on a separate job per SIEM. A buffer exists to allow intermediate communication problems, or SIEM downtime. Once this buffer is full, the processing is delayed. A message is then sent to QSYSOPR, and an attempt is reconstructed while communication is made periodically and consistently. Note: Such problems might cause a loss of a number of messages.
5. In Global Installation Defaults (STRAUD > 89 > 59), a SYLOG source Port/IP field has been added (UDP only).
6. LEEF - a standard used by IBM QRadar, as well as CEF - a standard used by HP ArcSight and others- are now supported. Both offer the sending of data in Field Mode by pairs of Field name and Field value.
7. iSecurity supports all QAUDJRN messages and all Firewall (network security) messages. Formatting is by Audit Type and Sub type or by Firewall server. In this way, for audit types that represent different activities, e.g. Type OM with sub types: M-Move and R-Rename, only relevant fields will be sent.
8. QHST, QSYSOPR and any other Message Queue are supported in LEEF and CEF field mode.
9. Standard message support, i.e. message edited with its replacement values is preserved. This enables sending information in any free format as well as LEEF and CEF.
10. OS400 Messages are defined as text with “Replacement Variables”: &1, &2… iSecurity has the capability of extracting the “Replacement Variables” and placing them as proper pairs of Field name and Field value, when LEEF or CEF mode is defined. Currently the product supports several hundreds of most popular messages.
For example, let us take message CPF1164 with the following text:
Audit 13.21 User Manual iv New Features and Functionality
“Job 654242/QSYSOPR/BACKUP ended on 7/03/16 at 01:00:06; 1.267 seconds used; end code 50”.
NOTE: not all fields appear in this example.
The information in yellow represents the extraction of replacement variables from the message. This has very important implications as it provides a standard access to all the message data fields. This is an iSecurity unique feature that is new to the market. Presently iSecurity/Audit supports several hundreds of these messages, a number that will grow.
11. In Work with Queries (STRAUD > 41 > 1), the following new report types have been added:
$H File members This type provides reporting of large file members, file members that require reorganization, obtain source members names that were used to create the objects, and more. $H can be run if 1=Fast mode (takes minutes for the entire system), or 2=Standard mode (takes much more). Choose according to your OS level and the type of information you require, as the Standard mode includes more fields.
$X Library information [run RTVDSKINF first]
Field name Field value
Msg_ID CPF1164
Msg_file QCPFMSG
Msg_Queue QHST
Msg Job 654242/QSYSOPR/BACKUP ended on 7/03/16 at 01:00:06; 1.267 seconds used; end code 50
Job_name BACKUP
Job_user QSYSOPR
Job_number 654242
Ended_on 7/03/16
At 01:00:06
CPU_seconds_used 1.267
End_severity 50
Audit 13.21 User Manual v New Features and Functionality
Library information, including size and % of disk space is included. The execution of a report of this type requires a pre-run of the standard Retrieve Disk Information (RTVDSKINF) Command. Information is then taken from this run.
$@ History log
Reports information from the QHST log
$9 Interface to any spool file query
12. Intercept any number of spool files that are created by execution of a command or a program. The spool files are assembled into free format text that is handled by the report generator. Using this $9 type the full range of the report generator capabilities are opened for use, including HTML, PDF output. Running on multiple systems, sending by Email and more.
13. The Work with Queries (STRAUD 41 > 1) enables exporting selective queries. To do so select X=Export for one or many queries, in one or more instances. When F3=Exit is pressed, a screen appears allowing the user to specify the target system or systems group (Multi System must be available). Alternatively, *NONE can be entered. *NONE will display the name of the *SAVF that is created, and the Import command parameters that are required on the report system to load the exported reports. With *NONE it is the customer’s responsibility to transfer the *SAVF to the target systems.
14. A new function (STRAUD 82 > 93) enables technicians to load a full set of reports (i.e. files AUSELQP and AUSELCP from SMZ4DTA) to a user defined library and select which reports to copy from it. Once selected, the user has to select the from and to libraries, and after pressing Enter, the list of reports in the From library appears. This option may be important, for example, when some reports have been accidentally deleted, and there is a need to load them from a backup.
15. The Query Generator has been enhanced to support sorting and layout of sorted data: -Break after change of a specified number of key fields will cause a subtitle to appear when a change is encountered. Fields that appear on the subtitle will be omitted from detail lines. -Sort order can be defined as A=Ascending D=Descending. -Records to include can be 1=All 2= One record per key (This existing item is mentioned for completeness purpose). When a query is run on multiple systems, the System field containing the system name will be implicitly added to the printed fields, if it is not there.
16. Some new queries were added to include the Definitions in the Query Generator:
o Z$9_AUDFN $9 Audit definitions o Z$9_FWDFN $9 Firewall definitions o A wide set of object related reports. To view them, subset by
“classification=Q”. Note that most reports default to QGPL information, in order to prevent unintentional run of such a query for the entire system – a long process.
Audit 13.21 User Manual vi New Features and Functionality
The following is a list of some of the added reports:
Z$I_CHG $I Objects changed (QGPL), Exc. PF
Z$I_DMGED $I Damaged objects (QGPL)
Z$I_MISS $I Objects which their sources are missing (QGPL)
Z$I_OBJC $I Objects by creator (QGPL)
Z$I_OWN $I Objects by owner (QGPL)
Z$I_SCOFR $I Objects owned by QSECOFR (QGPL)
Z$I_SIZE $I Largest objects (QGPL, Above 100MB)
Z$I_SRC $I Objects source (QGPL)
Z$I_SYS $I Objects by system (QGPL)
Z$I_UNSVD $I Unsaved objects (QGPL)
Z$I_USE $I Objects by Usage Date (QGPL)
Z$J_OBJ $J Object authority (QGPL), by object
Z$J_USR $J Object authority (QGPL), by user
Z$K_ALL $K User profile job descriptions with high authority
Z$Q_SCOFR $Q Programs that adopt QSECOFR authority
Z$U_ALLUSR $U All Authorization Lists Users
ZCO_ALL CO All Created Objects
ZOR_ALL OR All Restored Objects
17. A new function (STRAUD 82 > 93) enables technicians to move a full set of reports (i.e. files AUSELQP and AUSELCP from SMZ4DTA) to a user defined library and select which reports to move. Once selected, the user has to select the From and To libraries, and after pressing Enter, the list of reports in the From library appears. This option may be important, for example, when some reports have been accidentally deleted, and there is a need to load them from a backup.
18. Some Network Attributes were added, among which: DTACPR, DTACPRINM, and ALRHLDCNT. This might affect Set Audit Compliance Base-Line (STRAUD > 41 > 62), as well as relevant reports.
19. A new function of Auto-Delete of Unused Disabled User Profiles (STRAUD > 62 > 21-22), has been added. This functionality (available from Release 6.1 and up) will delete users who have been in *DISABLED state for a long period as stated by their Last used date, Create date, Sign on date. User Profiles which are Group Profiles will never be deleted.
20. An Exception list which accepts generic* names can be used to exclude certain user profiles.
Audit 13.21 User Manual vii New Features and Functionality
21. User profiles which have already been excluded from Auto Disable (STRAUD > 62 > 11-12) are considered as excluded in this functionality, even if found *DISABLED.
22. Some reports accompany the Auto-Delete function:
· ZDO_INADLT DO Users that were DELETED due to inactivity. This is a standard report
· Z$@_INADLT $@ Log of Auto-Delete activity. This includes information both on users that could be deleted and those which for some reason could not be deleted. This is a textual report that includes two (2) types of messages:
1. Auto-Delete: User XXXX could not be deleted: MsgId + MsgText of the reason. 2. Auto-Delete: User XXXX inactive since YYYY-MM-DD deleted.
During Auto-Deletion, these messages are also sent to QSYSOPR.
23. Global Installation Defaults has been enhanced and reshaped. Among the enhancements:
· Product-Admin Email
· Add SYSTEM to query mail subject
24. Email now contain an address book for names and lists of Emails (STRFW 89 > 1). Usage of names is allowed in all places where Email addresses can be entered.
25. Definition of Email has been unified for most products (STRFW 89 > 2).
26. The Email configuration screen (STRAUD > 89 > 2) now supports F10=Verify E-mail configuration. Selecting this option will result in sending a mail to the Product-Admin Email that is defined in Global Installation Defaults (STRAUD > 89 > 59).
27. IBM has repaired its definition requirements for DDM Data Queues. See http://www-01.ibm.com/support/docview.wss?uid=nas8N1020951. Accordingly, a new parameter was added for the system definition (STRAUD > 83 > 1). Entry of this parameter is recommended in all cases, and is required based on the PTF level of the system.
28. The DDM Data Queues are re-building automatically by option STRAUD > 83 > 2. This program also handles the TCP/IP Host Table Entry and performs ADDTCPHTE or CHGTCPHTE to apply the definition automatically.
29. User Absence Security (STRAUD > 62 > 41) and current implementation and displays, are available for all releases of OS/400.
Version 13.15 (01/2016) 1. In Work with Queries (STRAUD > 41 > 1), two $9 predefined reports are now
available which include configuration definitions for Audit and Firewall. The new reports copy all spool file information used previously. $9 reports enable users to intercept any number of spool files that are created during a command /program run and incorporate them into free format text that is handled by the report generator,
Audit 13.21 User Manual viii New Features and Functionality
converting the information in Multi System environments to HTML or PDF, and sending the report by Email.
2. During Audit installation, a repository of all user profiles and their parameters is built to support the C@ audit type that shows the changes in the user profile parameters in the format of Parameter: New-value (old-value). In installations with a large number of user profiles this meant that the installation process was significantly extended. This process is now run in a separate job, considerably shortening the installation process.
3. Audit Export/Import now handles groups.
4. In Syslog definitions (STRAUD > 81 > 32/33/34), the SYSLOG message is now enabled for multiple SIEM messages and message structures using built-in as well as mixed variables and constants. The feature enables adjustable Port, Severity, Facility and Length while offering UDP, TCP and TLS (encrypted) support in CEF and LEEF and user editable modes, using filters for relevant fields.
5. When the result of a query is an IFS file, the date is now included in the object name.
6. Changes have been made in the JS Audit type to clarify the report information.
Version 13.10 (11/2015) 1. Audit now has an option in the User Management menu to delete inactive, disabled
users.
2. Audit has two new Audit types:
· $H - PF Members by size
· $X - Libraries
3. Audit has the following new reports:
· Z$E_ISEC - $E - All the scheduled jobs used by iSecurity modules.
· Z$H_SIZE - $H - PF Members by size (Library QGPL)
· Z$X_SIZ - $X - Libraries (by size) [run RTVDSKINF first]
· ZCP_INADIS - CP - Users that were DISABLED due to inactivity
· ZDO_INADLT - DO - Users that were DELETED due to inactivity
4. Query sorts can now be defined as both ascending and descending. Query filter fields can now be compared to values with decimal places. Query definitions can now be exported to other computers in the network.
Version 13.06 (10/2015) 1. A new BASE support menu (STRAUD > 89) has been added to all products. Many
of the options from the Maintenance Menu have been moved to the BASE support

Audit 13.21 User Manual ix New Features and Functionality
menu. The email options from the Configuration Menu have also been moved to the BASE support menu.
2. Audit now supports using TLS (Transport Layer Security) to transport Syslog messages.
3. You can now monitor QHST in the same manner as any other message queue.
4. You can now define a sign on schedule using the User management module of Audit.
5. You can now define break fields when you sort a Query.
Version 12.70 (03/2015) 1. When defining Real Time Detection Rules, you can now define an action to be
performed if the event being audited happens more than a given number of times within a defined period of time. Also, you can now continue with the rest of the rule after performing the action.
2. Changes have been made to the IFS auditing authorization checks. If you are installing this version, you should re-install Audit as a new installation, including the /iSecurity directory.
3. STRAUD > 83 > 52 Sending PTFs in your network is now restricted to iSecurity products only. If you need to send PTFs for other products, please contact RazLee Support.
4. Various updates have been made to Queries:
When selecting fields for output and for sorting, you can now search for specific fields, instead of having to scroll through all the fields in the file.
The $S and $P Queries now correctly display the new system values.
You can now run queries on commands that were run from AOD that did not originate in any program.
The Query Report layouts have been updated.
5. The main iSecurity menu, accessed by the STRSEC command, has been changed to allow direct access to all iSecurity products.
6. You can now add iSecurity Authorization for newly installed products before configuring those products, using STRAUD > 82 > 12.
7. In the Maintenance Menu, the Uninstall option is now 98 and new options have been added to define Global Installation Defaults and to set STRSEC as in the *BASE installation.
Version 12.60 (01/2015) 1. You can now display the authorization status of all iSecurity products on a specific
system, using STRAUD > 82 > 13. Products with upcoming expiry dates are emphasized. See Display Authorization Status, on page 243.

Audit 13.21 User Manual x New Features and Functionality
2. You can now check authorization status across your network and send messages to the system operator about upcoming problems, using STRAUD > 83 > 59 (see Check Network Authority Status, on page 235).
3. You can now run remote commands from the local system either from a file with a list of commands or from commands sent to the command as parameters, using STRAUD > 83 > 51 (see Run Network Scripts, on page 231).
4. You can now set the Global Installation Default parameters that iSecurity uses to control the Installation and upgrade processes, using STRAUD > 82 > 91.
Audit 13.21 User Manual xi New Features and Functionality
TOC
Table of Contents About This Manual ....................................................................................................... ii
Intended Readers .................................................................................................................. ii Audit Manual Overview ................................................................................................................ ii Typography Conventions ............................................................................................................. ii
New Features and Functionality ..................................................................................iii Version 13.21 (04/2016) ............................................................................................................... iii Version 13.15 (01/2016) .............................................................................................................. vii Version 13.10 (11/2015) ............................................................................................................. viii Version 13.06 (10/2015) ............................................................................................................. viii Version 12.70 (03/2015) .............................................................................................................. ix Version 12.60 (01/2015) .............................................................................................................. ix
Chapter 1: IBM i Auditing Introduction ....................................................................... 1 Taking Security Auditing Seriously ............................................................................................... 1 IBMi (OS/400) Auditing Features ................................................................................................. 2
User Activity Auditing ............................................................................................................. 2 Object Access Auditing .......................................................................................................... 2 Security Audit Journal ............................................................................................................ 2 Limitations of IBMi (OS/400) Auditing .................................................................................... 2
The Audit Solution ........................................................................................................................ 3 Real-Time Detection .............................................................................................................. 3 Human Engineering for the Real World ................................................................................. 4 Reports and Queries .............................................................................................................. 4 GUI ......................................................................................................................................... 4
Chapter 2: Audit Overview ........................................................................................... 5 Product Overview ......................................................................................................................... 5 Native IBMi (OS/400) User Interface ............................................................................................ 6
Menus .................................................................................................................................... 6 Commands ............................................................................................................................. 6 Data Entry Screens ................................................................................................................ 6 Function Keys ........................................................................................................................ 7
IBMi (OS/400) Audit Settings Made Easy .................................................................................... 7 Real-Time Detection .............................................................................................................. 7 Rules ...................................................................................................................................... 8 Actions ................................................................................................................................... 8 The History Log ...................................................................................................................... 8 Queries and Reports .............................................................................................................. 9 IBM and Raz-Lee Entry Types ............................................................................................... 9 Other Related Modules ........................................................................................................ 10
Chapter 3: Getting Started ..........................................................................................11 Starting Audit for the First Time .................................................................................................. 11 System Configuration ................................................................................................................. 12

Audit 13.21 User Manual xii New Features and Functionality
Step 1: Setting General Definitions ...................................................................................... 12 Step 2: Setting Log and Journal Retention Parameters ...................................................... 13 Step 3: Setting Action General Definitions .......................................................................... 15 Step 4: Language Support ................................................................................................... 16 Step 5: Activating Real Time Detection ............................................................................... 17
Detailed Change User Profile Audit Type .................................................................................. 18 Modifying Operators’ Authorities ................................................................................................ 18 Initial IBMi (OS/400) Audit Settings ............................................................................................ 21
Working with Current Setting ............................................................................................... 21 Working with User Activity Auditing ..................................................................................... 22 Working with Object Auditing ............................................................................................... 25
Analyzing QAUDJRN on Other Systems ................................................................................... 26 Preparing the Systems for Remote Auditing ....................................................................... 26 Activation of Remote Auditing .............................................................................................. 28
Chapter 4: IBMi (OS/400) Audit Settings ....................................................................32 Working with the Current Settings .............................................................................................. 32
Current Setting Strategies ................................................................................................... 34 Predefined Audit Settings ........................................................................................................... 35
Creating and Modifying Predefined Audit Settings .............................................................. 35 Activating a Predefined Setting ............................................................................................ 35 Example: Three Shift Production Scenario .......................................................................... 36
Using the Audit Scheduler .......................................................................................................... 37 Setting up the Audit Scheduler ............................................................................................ 37 Example: Three-Shift Production Environment ................................................................... 39
User Activity Auditing ................................................................................................................. 41 Creating and Modifying User Activity Audit Rules ............................................................... 41 User Activity Audit Strategies .............................................................................................. 44 Examples of User Activity Auditing ...................................................................................... 44
Object Access Auditing .............................................................................................................. 46 Creating and Modifying Object Access Audit Rules ............................................................ 46 Object Audit Strategies ........................................................................................................ 48 Defaults for Object Creation ................................................................................................ 49
Chapter 5: Real-Time Auditing ...................................................................................51 Overview ..................................................................................................................................... 51 Conceptual Framework .............................................................................................................. 51
Real-Time Detection ............................................................................................................ 51 Integration with Action ......................................................................................................... 52 Rules and Actions ................................................................................................................ 52
Working with Real-Time Detection Rules ................................................................................... 52 Overview .............................................................................................................................. 53 Creating and Modifying Rules .............................................................................................. 54 Firewall/Screen .................................................................................................................... 60 Working with Status and Active Job Rules .......................................................................... 63
Working with Message Queues .................................................................................................. 66 Create Message Queue Audit Rules ................................................................................... 67 Define a Message Queue Rule ............................................................................................ 69 Activate Message Queue Detection .................................................................................... 70 Deactivate Message Queue Detection ................................................................................ 72 Build Rules for Displayed Messages ................................................................................... 73
Audit 13.21 User Manual xiii New Features and Functionality
Display Message History Log .............................................................................................. 74 Working with Time Groups ......................................................................................................... 75
Time Groups ........................................................................................................................ 75 Copy Time Groups ............................................................................................................... 76
Working with Actions .................................................................................................................. 77 Defining Alert Messages ...................................................................................................... 77 Predefined Messages .......................................................................................................... 79 Defining Command Scripts .................................................................................................. 82
Testing and Debugging Rules .................................................................................................... 84
Chapter 6: Queries and Reports .................................................................................85 Overview ..................................................................................................................................... 85 General Groups .......................................................................................................................... 86 Using Time Groups .................................................................................................................... 89 iSecurity Multi System Support .................................................................................................. 89
Discussion ............................................................................................................................ 90 Getting Started with Queries ...................................................................................................... 90
Defining Queries - The Query Wizard.................................................................................. 91 Filter Criteria – Working with Data Subsets ............................................................................... 94
Selecting Data Fields for Output .......................................................................................... 96 Sorting Records .......................................................................................................................... 98
Exit Query Definition .......................................................................................................... 100 Running Queries....................................................................................................................... 100
Print Query to Output File and Send Via Email ................................................................. 104 Displaying the History Log ................................................................................................. 106
Using the Report Scheduler ..................................................................................................... 110 The Definition Process: An Overview ................................................................................ 111 Working with Report Groups .............................................................................................. 111
Working with Individual Reports ............................................................................................... 117 Running Reports ................................................................................................................ 118
Baseline Setup ......................................................................................................................... 118 System Values ................................................................................................................... 118 Network Attributes.............................................................................................................. 119
Network Reporting .................................................................................................................... 120 Network Description ........................................................................................................... 120 Current Job CntAdm Messages ......................................................................................... 121 All Jobs CntAdm Messages ............................................................................................... 121
Chapter 7: User Management ................................................................................... 122 Overview ................................................................................................................................... 122 Working with Users .................................................................................................................. 123
Overview ............................................................................................................................ 123 Using the Work with Users Wizard .................................................................................... 123 Screen 1: Work with User Status - Basic ........................................................................... 124 Screen 2: Work with User Status - Signon ........................................................................ 126 Screen 3: Work with User Status - Password .................................................................... 127
Disabling Inactive Users ........................................................................................................... 128 Work with Auto-Disable ..................................................................................................... 129 Disable Exceptions ............................................................................................................ 130
Deleting/Reviving Users ........................................................................................................... 130
Audit 13.21 User Manual xiv New Features and Functionality
Deleting Unused Disabled Users ....................................................................................... 131 Deleting Exceptions ........................................................................................................... 132 Reviving Deleted Users ..................................................................................................... 133
Authorizing Signon Times ........................................................................................................ 133 Working with Signon Schedule .......................................................................................... 134 Display Signon Schedule ................................................................................................... 135
User Absence Security ............................................................................................................. 136 Working with Absence Schedule ....................................................................................... 136 Display Absence Schedule ................................................................................................ 139
User and Password Reporting ................................................................................................. 139 Analyze Default Passwords ............................................................................................... 139 Print Password Info ............................................................................................................ 140 Print Special Authorities ..................................................................................................... 143 Print Programs and Queues .............................................................................................. 145
Chapter 8: Working with Native Object Security ..................................................... 147 Overview ................................................................................................................................... 147 Working with Native Object Security ........................................................................................ 148
Creating Native Object Security Planning ......................................................................... 148 Copying Native Object Security Template ......................................................................... 151 Changing Native Object Security Templates ..................................................................... 152
Compare Current Security to Planned ..................................................................................... 153 Display and Update Security Settings ............................................................................... 153
Check/Set By Commands ........................................................................................................ 157 Print Security Settings ....................................................................................................... 159 Send Security Settings to an Outfile .................................................................................. 159 Send Security Settings in an Email as a PDF or an HTML file .......................................... 160 Enforce Security ................................................................................................................. 162
Rules Wizard ............................................................................................................................ 162 Error Log ................................................................................................................................... 164
Chapter 9: Replication .............................................................................................. 166 Overview ................................................................................................................................... 166 Activation .................................................................................................................................. 167 Network Definitions .................................................................................................................. 168 System Values.......................................................................................................................... 169
Set System Values as a Baseline ...................................................................................... 170 Set Baseline Values to be System Values ........................................................................ 170 Replicate System Values to Another System .................................................................... 171 Test RDB Connection ........................................................................................................ 172
User/Password ......................................................................................................................... 173 Replication Rules ............................................................................................................... 173 Replicate Users .................................................................................................................. 176 Program Exceptions for Replication .................................................................................. 184 Revive Deleted Users ........................................................................................................ 185
Replication Log ......................................................................................................................... 186
Chapter 10: Configuration and Maintenance ........................................................... 189 System Configuration ............................................................................................................... 189
Audit Configuration ............................................................................................................ 189 Action Definitions ............................................................................................................... 194
Audit 13.21 User Manual xv New Features and Functionality
Security Event Manager .................................................................................................... 197 SIEM Support ..................................................................................................................... 200
Maintenance Menu ................................................................................................................... 210 Export / Import Definitions ................................................................................................. 210 Audit Maintenance ............................................................................................................. 215 Journal Product Definitions ................................................................................................ 219 Other Maintenance Options ............................................................................................... 221
Central Administration .............................................................................................................. 222 Definitions .......................................................................................................................... 222 Log Copy ............................................................................................................................ 224 Transfer Log Copy ............................................................................................................. 225 Transfer Definitions ............................................................................................................ 229 Network Support ................................................................................................................ 231 Communication Log ........................................................................................................... 236
BASE Support .......................................................................................................................... 236 Other .................................................................................................................................. 237 Operators and Authority Codes ......................................................................................... 240 General .............................................................................................................................. 243 Network Support ................................................................................................................ 251
Compliance Evaluator .............................................................................................................. 258 Compliance Queries .......................................................................................................... 259 Collect Compliance Data ................................................................................................... 261 Communication Log ........................................................................................................... 263
Additional Settings .................................................................................................................... 263 Audit for Cross Platform ..................................................................................................... 263
Appendix A: Raz-Lee Entry Types ........................................................................... 266
Comments .................................................................................................................. 269
Audit 13.21 User Manual 1 Chapter 1: IBM i Auditing Introduction
1 Chapter 1: IBM i Auditing Introduction The purpose of this Chapter is to provide information on IBM i Auditing, and includes the following sections:
Ø Taking Security Auditing Seriously
Ø IBMi (OS/400) Auditing Features
Ø The Audit Solution
Taking Security Auditing Seriously In today’s increasingly complex business environment, security auditing is a key component of an organizational IT security program. Simply creating a security policy and purchasing security software tools is not enough. Management should ensure that security policies and procedures are properly implemented and enforced. In addition, managers must be able to evaluate and test the effectiveness of these policies on a continuing basis.
External auditing firms, as well as internal audit departments, routinely perform extensive reviews of data systems. Such audit programs typically involve:
§ Transaction testing, including accuracy review
§ Verification that transactions are initiated and approved only by authorized personnel
§ Ensuring prompt detection and correction of errors with appropriate traceability
§ Ensuring adequacy of the audit trail
§ Implementing and testing the adequacy of IT security policy
Powerful and flexible auditing tools are required to meet these requirements.
Traditionally, IBM i systems have offered the strongest security features in the industry. These features, however, are effective only for stand-alone, terminal based computing environments that have all but passed from the scene. The contemporary environment is highly interconnected, based on multiple computing platforms, and incorporates a high degree of data sharing.
Auditors, managers and even many system administrators are less likely to be familiar with the complex, arcane nature of the IBMi (OS/400) operating system and its tools. They need intuitive and user-friendly tools that provide solutions quickly and efficiently.
Over the past several years, IBM has begun to take IBM i security auditing seriously. The current version of the IBMi operating IBM includes over seventy different audit types and a large number of sub-classifications. Each individual audit type covers a particular event or transaction, and specific information relating to that event is stored in an audit database (QAUDJRN, also called the security audit journal by IBM). As well as objects, user profiles and security, many of these new audit types relate to connectivity, communication protocols, and distributed database issues.
This security audit journal is difficult and inefficient to use without assistance. Audit allows you to use this information efficiently.

Audit 13.21 User Manual 2 Chapter 1: IBM i Auditing Introduction
IBMi (OS/400) Auditing Features This section presents a brief summary of IBM i (AS/400) auditing concepts and features. Please refer to the Auditing chapter in the IBM Security Reference manual for more detailed information. The IBMi (OS/400) operating system tracks two interrelated event categories: user activities and object access attempts.
User Activity Auditing User activity auditing refers to tracking events initiated by a specific user or by a program run by that user. Administrators can choose to audit certain critical user activities globally for all users and audit other user activities only for specific users. They can also audit object access attempts by specific users.
For example, it is best to audit unsuccessful sign-on attempts, program failures and attempts to use system management tasks globally for all users. Other events such as creating/deleting objects, command execution, or save/restore operations are better audited only for specific users.
Object Access Auditing IBMi (OS/400) enables auditing of all attempts to access certain critical objects, such as database files, source code files or key libraries. Administrators can choose to audit entire libraries or specific object types within libraries, such as data files, job queues or program source files. You can define auditing for all access attempts, changes only, or as specified in the user profile.
For example, you can choose to audit all attempts to modify program sources by users not defined as programmers in their user profile.
Security Audit Journal The security audit journal is the repository of historical security data on IBM i systems. The operating system reviews each event and determines whether to track it for audit. If so, the operating system records an entry in the security audit journal. The specific data recorded in the journal depends on the audit type assigned to that event.
IBMi (OS/400) uses several system values, user profile parameters and object parameters to determine which events will be audited and recorded in the journal. The system administrator works with these parameters by using several different, and often unrelated, commands.
To print and analyze the data collected in the security audit journal, you must use the Display Journal (DSPJRN) command. This command enables the operator to view an unformatted display of data or to export the data to an external database file. The operator then uses a query tool, such as Raz-Lee’s FileScope, to query the data, analyze information and print reports. This is not an easy or intuitive process, and certainly is not appropriate for users lacking extensive IBM i experience.
Limitations of IBMi (OS/400) Auditing IBMi (OS/400) is capable of tracking a wide variety of events and retains an extensive volume of data in its journal database, but provides only basic tools that allow operators to access, manage, and analyze this data.
Audit 13.21 User Manual 3 Chapter 1: IBM i Auditing Introduction
Among the limitations of IBMi auditing is:
§ IBMi lacks a query facility. You are limited to a primitive, unformatted data display of the journal log with minimal data filtering.
§ You can work with only one audit type at a time, using the DSPAUDJRNE command. You must repeat the entire time consuming process for each of the 73 audit types that you wish to audit.
§ IBMi provides no audit reports. You must manually export journal data to an external file and then use Query, DFU or a third party query tool, such as FileScope, to create reports.
§ Audit journal data is not available in real-time. Critical security feedback occurs only after performing the above-mentioned manual steps.
§ Audit setting maintenance is not user friendly. Security audit parameters are located in several different locations, each of which is accessible only via the command line interface.
§ Journal management is a difficult task. Unnecessary data in the security audit journal can adversely affect system performance and waste valuable disk space.
The Audit Solution Most third party audit solutions are simply collections of predefined reports that extract information from the IBMi security audit journal. Audit is a comprehensive auditing solution that offers much more than predefined reports. This section highlights some of these unique features.
Real-Time Detection Real-time auditing is what sets Audit apart from other security audit products. Audit detects security related events as they occur and records these events in a history log. This log enables you to exploit the powerful query and reporting features that are included with the product.
For each system from which data was collected, the job that collects data from the QAUDJRN is named as per the system. In the past, this used to be the function of the job AUREALTIME, which was referring only to the current system.
These jobs read the QAUDJRN without issuing a WAIT. To consume as few resources as possible, Audit combines the data blocks and sends them to output.
More importantly, Audit works together with Action, an optional companion product, to send immediate alert messages to key personnel and/or run predefined command scripts. You use Audit to create real-time detection rules based on IBMi (OS/400) audit types and filter criteria associated with that audit type. Action then performs designated Actions based on these rules.
For example, you could use Audit to create a rule that detects attempts by a suspicious user to modify a critical database file in real-time. Action automatically notifies the security officer and runs a command script to signoff this user and disable his user profile. In another scenario, you could define a rule that automatically notifies the lead programmer whenever the user interface designer modifies menus and data entry screens.

Audit 13.21 User Manual 4 Chapter 1: IBM i Auditing Introduction
Human Engineering for the Real World Audit allows you to work with IBMi (OS/400) audit related system values and parameters by using a logical, intuitive human interface that is a pleasure to use. This greatly simplifies the process of implementing an audit policy, not only for system administrators, but also for auditors, managers and other security personnel who are not IBMi (OS/400) gurus.
All of the relevant system values, user profile parameters, object parameters, and so on are available from a single easy-to-use menu. The data entry screens for all of these parameters are especially designed for busy auditors and security personnel. All of the settings, options, parameters, audit types, and so on are accompanied by full text explanations, available at the press of a key. You no longer have to wade through reams of IBM documentation to figure out what all those arcane codes and terms really mean.
Audit allows you to create and save predefined collections of settings for later use. You can manually apply these settings or use the audit scheduler to apply them automatically on specific days and at specific times.
Reports and Queries Audit comes with more than 200 ready to run queries and reports. This, however, is only the beginning. This product also includes a full-featured Query Wizard, which allows you to design exactly the report or query that you need quickly, efficiently and without programming. The Query Wizard is designed specifically for use by auditors and security personnel with minimal technical knowledge of IBMi (OS/400).
The Query Wizard allows you to select exactly those records that you need through a powerful criteria filter that supports Boolean operators. You can select exactly which fields you wish to appear in the report and in which order. You can sort the data by any field or combination of fields.
The Report Scheduler allows you to schedule time-consuming queries and reports at off peak hours. You can take a quick look at the history log by using the Display Log feature, which allows you to view selected data from the log in a matter of seconds. The unique “Backward Glance” feature lets you see exactly what happened to your IBM in the last few minutes simply by typing the number of minutes and pressing Enter.
GUI You are no longer limited to text based “green screen” output. A stand-alone Java based GUI version of Audit was released with the Firewall as iSecurity 2.
Audit 13.21 User Manual 5 Chapter 2: Audit Overview
2
Chapter 2: Audit Overview The purpose of this Chapter is to introduce the subject of auditing as it is implemented at Razlee, and includes the following sections:
Ø Product Overview
Ø Native IBMi (OS/400) User Interface
Ø IBMi (OS/400) Audit Settings Made Easy
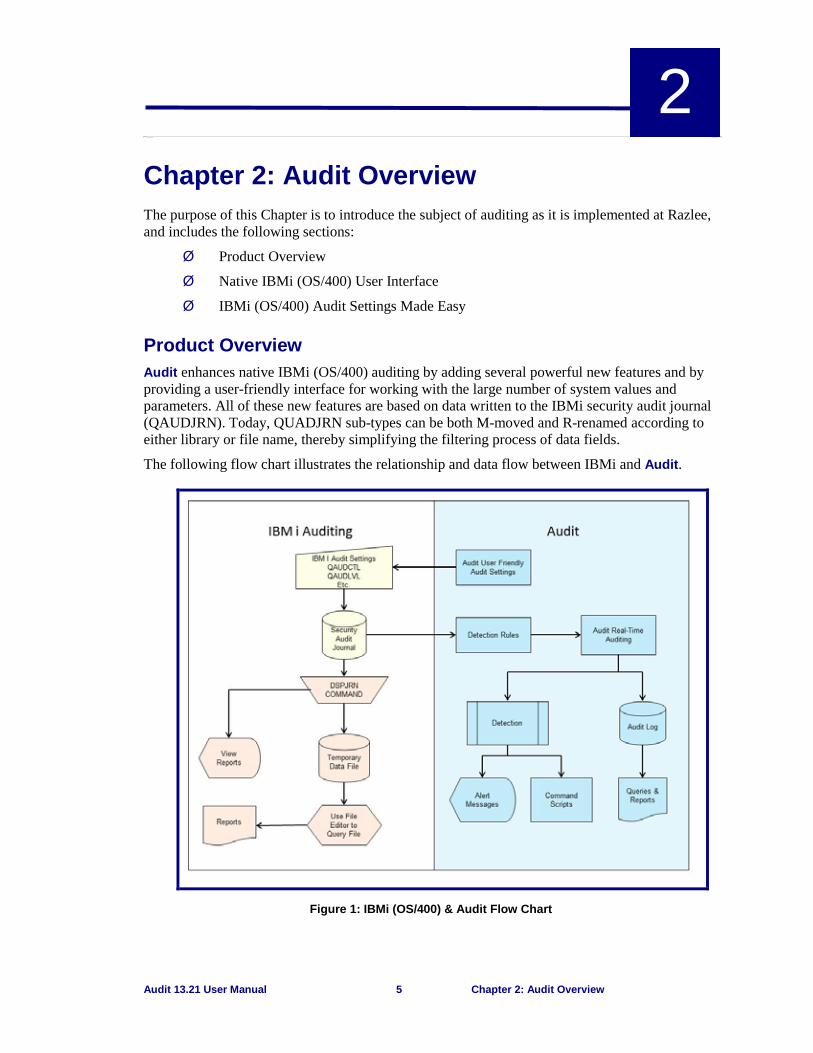
Product Overview Audit enhances native IBMi (OS/400) auditing by adding several powerful new features and by providing a user-friendly interface for working with the large number of system values and parameters. All of these new features are based on data written to the IBMi security audit journal (QAUDJRN). Today, QUADJRN sub-types can be both M-moved and R-renamed according to either library or file name, thereby simplifying the filtering process of data fields.
The following flow chart illustrates the relationship and data flow between IBMi and Audit.
Figure 1: IBMi (OS/400) & Audit Flow Chart
Audit 13.21 User Manual 6 Chapter 2: Audit Overview
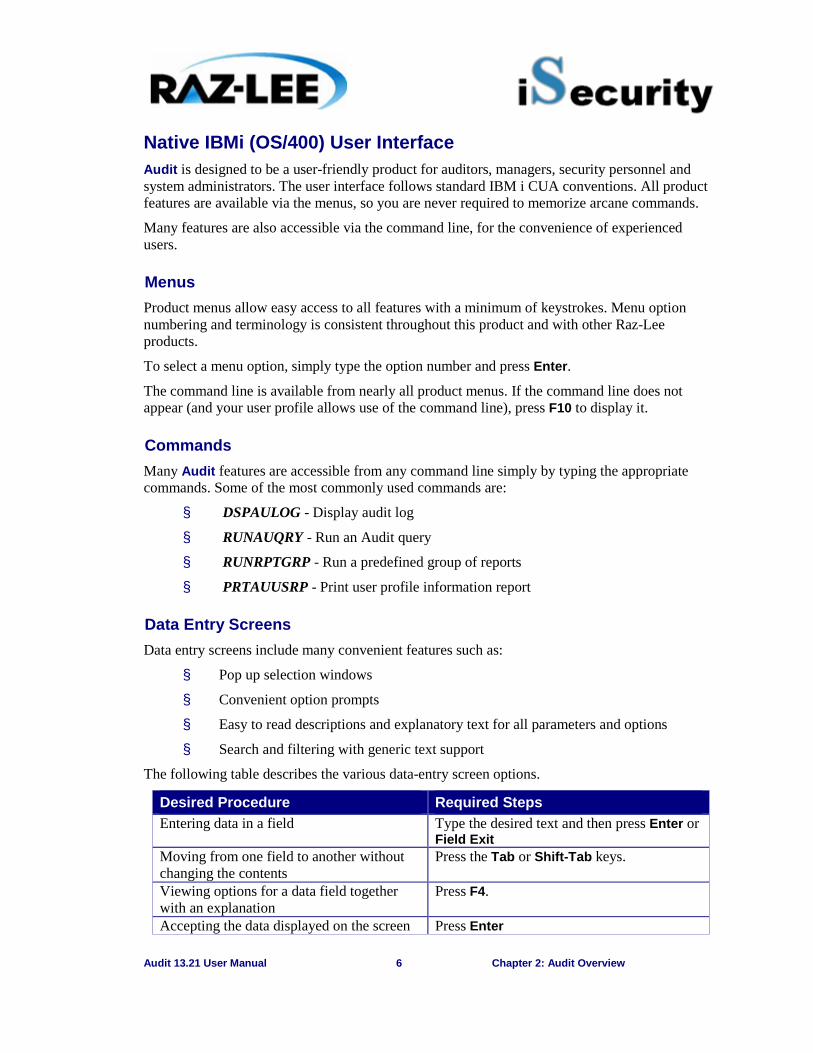
Native IBMi (OS/400) User Interface Audit is designed to be a user-friendly product for auditors, managers, security personnel and system administrators. The user interface follows standard IBM i CUA conventions. All product features are available via the menus, so you are never required to memorize arcane commands.
Many features are also accessible via the command line, for the convenience of experienced users.
Menus Product menus allow easy access to all features with a minimum of keystrokes. Menu option numbering and terminology is consistent throughout this product and with other Raz-Lee products.
To select a menu option, simply type the option number and press Enter.
The command line is available from nearly all product menus. If the command line does not appear (and your user profile allows use of the command line), press F10 to display it.
Commands Many Audit features are accessible from any command line simply by typing the appropriate commands. Some of the most commonly used commands are:
§ DSPAULOG - Display audit log
§ RUNAUQRY - Run an Audit query
§ RUNRPTGRP - Run a predefined group of reports
§ PRTAUUSRP - Print user profile information report
Data Entry Screens Data entry screens include many convenient features such as:
§ Pop up selection windows
§ Convenient option prompts
§ Easy to read descriptions and explanatory text for all parameters and options
§ Search and filtering with generic text support
The following table describes the various data-entry screen options.
Desired Procedure Required Steps Entering data in a field Type the desired text and then press Enter or
Field Exit Moving from one field to another without changing the contents
Press the Tab or Shift-Tab keys.
Viewing options for a data field together with an explanation
Press F4.
Accepting the data displayed on the screen Press Enter
Audit 13.21 User Manual 7 Chapter 2: Audit Overview
and continue
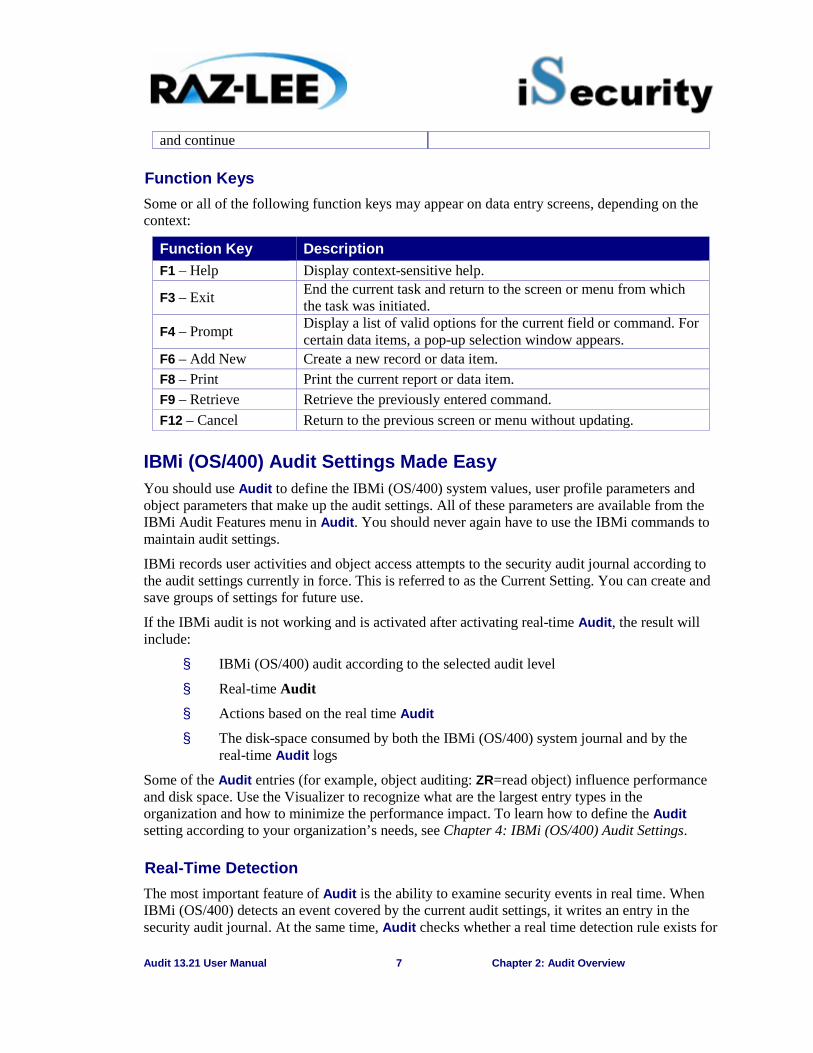
Function Keys Some or all of the following function keys may appear on data entry screens, depending on the context:
Function Key Description F1 – Help Display context-sensitive help.
F3 – Exit End the current task and return to the screen or menu from which the task was initiated.
F4 – Prompt Display a list of valid options for the current field or command. For certain data items, a pop-up selection window appears.
F6 – Add New Create a new record or data item. F8 – Print Print the current report or data item. F9 – Retrieve Retrieve the previously entered command. F12 – Cancel Return to the previous screen or menu without updating.
IBMi (OS/400) Audit Settings Made Easy You should use Audit to define the IBMi (OS/400) system values, user profile parameters and object parameters that make up the audit settings. All of these parameters are available from the IBMi Audit Features menu in Audit. You should never again have to use the IBMi commands to maintain audit settings.
IBMi records user activities and object access attempts to the security audit journal according to the audit settings currently in force. This is referred to as the Current Setting. You can create and save groups of settings for future use.
If the IBMi audit is not working and is activated after activating real-time Audit, the result will include:
§ IBMi (OS/400) audit according to the selected audit level
§ Real-time Audit
§ Actions based on the real time Audit
§ The disk-space consumed by both the IBMi (OS/400) system journal and by the real-time Audit logs
Some of the Audit entries (for example, object auditing: ZR=read object) influence performance and disk space. Use the Visualizer to recognize what are the largest entry types in the organization and how to minimize the performance impact. To learn how to define the Audit setting according to your organization’s needs, see Chapter 4: IBMi (OS/400) Audit Settings.
Real-Time Detection The most important feature of Audit is the ability to examine security events in real time. When IBMi (OS/400) detects an event covered by the current audit settings, it writes an entry in the security audit journal. At the same time, Audit checks whether a real time detection rule exists for

Audit 13.21 User Manual 8 Chapter 2: Audit Overview
this event. If such a rule exists, the system may then record the event in the Audit history log and/or trigger an action as specified by the rule definition. Responsive actions are performed by Action, a companion product that is sold separately.
A series of user-defined rules and actions govern real-time detection. Rules identify which specific events trigger actions and under what conditions the response should occur. Actions define those specific responsive actions that take place whenever rule conditions are met.
Rules Rules determine which conditions trigger an action and/or are recorded in the history log. For example, you can create a rule that triggers a message whenever a specific user modifies any *FILE object, located in the ACCOUNTING folder, on or after 05-January-2012.
Conditions are based on a variety of criteria such as, “equal to/not equal to”, “greater/less than”, “included/not included in list”, “like” and “starts with”. In addition, multiple conditions may be combined using Boolean “and/or” conditions.
Audit incorporates a Rule Wizard to assist users in defining complex conditions.
Actions An action may be an alert message sent to designated personnel or a predefined command script that runs automatically. You can configure Audit to send alert messages as email, IBMi (OS/400) system messages, network messages, SMS messages to cellular telephones, or beeper (pager) messages.
Action command scripts may include multiple statements that execute IBMi (OS/400) commands or run programs. Conditional branching on error conditions is fully supported.
The History Log Audit maintains a separate history log in addition to the security audit journal. The primary purpose of the log is to facilitate the powerful query and reporting features without the need to extract data from the security audit journal.
Audit records event data in the history log, only when instructed to do so by real-time detection rules. Therefore, the log typically contains only a subset of the events recorded in the security audit journal. You should create rules only for those events that you wish to track using the query and reporting features.
There is an option that allows you to copy all events to the log, unless a rule specifically excludes it. However, we do not recommend this feature because of performance degradation and disk space requirements.
§ QSECOFR as well as any other user CANNOT update or delete records from the file that contains the log. This is true even when using the SQL, DFU, CHGFC or other commands.
§ Users authorized as Administrators for the Work with Operators option in the BASE Support menu (89 > 11) can setup the number of days that data is kept online.

Audit 13.21 User Manual 9 Chapter 2: Audit Overview
§ Users authorized as Administrators for the Work with Operators option in the BASE Support menu (89 > 11) can use the Work with Collected Data option in the BASE Support menu (89 > 51) to remove data of full days.
§ To know what user QSECOFR has done in the product log files (for example, RMVM or CLRPFM), use the Add Journal option in the Maintenance Menu (STRAUD > 82 > 71). Every operation with the definition file is recorded. To control the logs, use the STRJRNPF command for files SMZ4DTA/AUXX, SMZ4DTA/AUCC, and SMZTMPA/GSCALP. NOTE: this will extend the data space requirements.
§ QSECOFR as well as any other authorized user can use the Real Time Auditing option (11 in the Audit main menu) to change the logging option per any audit type or the combination of field values in audit type.
Queries and Reports Despite the fact that Audit comes with many predefined queries and reports, you can also use the powerful Query Wizard to modify these queries or create your own. The Query Wizard is especially designed to make this process simple and fast for auditors, managers and security personnel. No programming or technical knowledge is required. The Query Wizard also allows you to output a file for PC use and or to send a file by email.
You can run your queries and reports at any time, or you can use the convenient Report Scheduler to run your queries and reports automatically at designated times. The Report Scheduler can even print user profiles and run other user reports.
The Display Log option allows you to view history log contents quickly without defining queries. This feature is most useful when you wish to view a few entries quickly but do not require complex filter criteria. For example, you can:
§ Audit events that occurred over the past-specified number of minutes (Backward Glance).
§ Audit events occurring on specific days and times.
IBM and Raz-Lee Entry Types IBM I Entry Types The OS/400 System Journal (QAUDJRN) logs all system activities involving Jobs, Objects, User Profiles, Authorities and much more. The activities are classified as “entry types”, many of which have associated subtypes in order to differentiate between different occurrences of the entry type; as an example, entry type JS which records actions relating to jobs, has eight (8) subtypes, two (2) of which differentiate between batch and interactive jobs. IBM entry types are associated with “audit types” which are simply IBM-defined auditing categories. A comprehensive table listing all Audit Types, their corresponding Entry Types and all Subtypes, including a description for each category, can be found in STRAUD > 1 > 9.
Audit 13.21 User Manual 10 Chapter 2: Audit Overview
Set which IBM entry types are to be logged: · To the QAUDJRN using STRAUD > 1 > 1. · To the iSecurity Audit log file using STRAUD > 11.
See Working with Current Setting and Setting up the Audit Scheduler; and see Working with Status and Active Job Rules.
For more information regarding QAUDJRN and the IBM-supplied Entry Types, see https://www.ibm.com/support/knowledgecenter/ssw_ibm_i_73/rzarl/rzarlf04.htm .
Other Related Modules Audit is a comprehensive product that controls the configuration and management of newer iSecurity products designed to meet specific auditing and tracking needs. Access these products and supplementary Audit modules directly from Audit by selecting 69. Other Related Modules in the Main menu. This opens the following Related Modules screen.
In addition, the following options have their own chapters within this manual:
§ Chapter 8: Working with Native Object Security
§ Chapter 9: Replication

Audit 13.21 User Manual 11 Chapter 3: Getting Started
3
Chapter 3: Getting Started This chapter guides you through the steps necessary to begin using Audit for the first time. Also covered in this chapter are the basic procedures for configuring the product for day-to-day use, it includes the following sections:
Ø Starting Audit for the First Time
Ø System Configuration
Ø Detailed Change User Profile Audit Type
Ø Modifying Operators’ Authorities
Ø Initial IBMi (OS/400) Audit Settings
Ø Analyzing QAUDJRN on Other Systems
Starting Audit for the First Time To use this product, the user must have *AUDIT special authority. An additional product password may also be required to access certain functions. The default product password is QSECOFR. We recommend that you change this password as soon as possible.
To start Audit:
1. In the command line, type STRAUD. The Main menu appears.
Figure 2: Audit Main Menu Screen
Audit 13.21 User Manual 12 Chapter 3: Getting Started
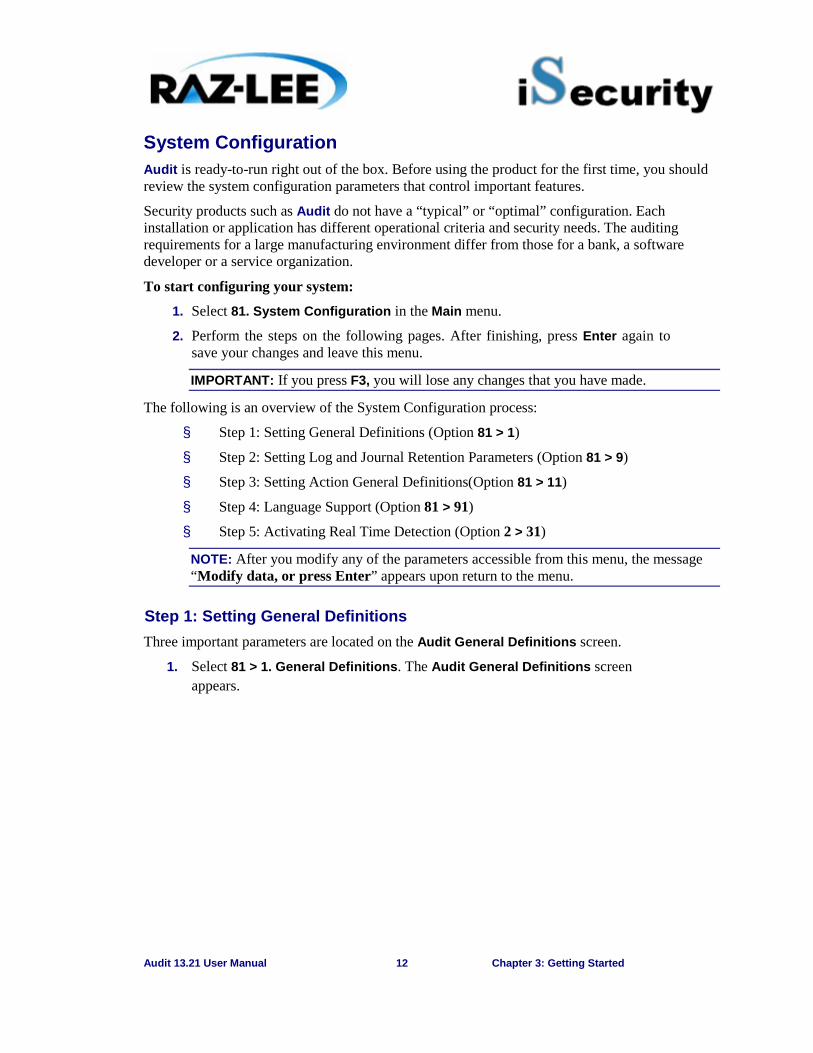
System Configuration Audit is ready-to-run right out of the box. Before using the product for the first time, you should review the system configuration parameters that control important features.
Security products such as Audit do not have a “typical” or “optimal” configuration. Each installation or application has different operational criteria and security needs. The auditing requirements for a large manufacturing environment differ from those for a bank, a software developer or a service organization.
To start configuring your system: 1. Select 81. System Configuration in the Main menu.
2. Perform the steps on the following pages. After finishing, press Enter again to save your changes and leave this menu.
IMPORTANT: If you press F3, you will lose any changes that you have made.
The following is an overview of the System Configuration process:
§ Step 1: Setting General Definitions (Option 81 > 1)
§ Step 2: Setting Log and Journal Retention Parameters (Option 81 > 9)
§ Step 3: Setting Action General Definitions(Option 81 > 11)
§ Step 4: Language Support (Option 81 > 91)
§ Step 5: Activating Real Time Detection (Option 2 > 31)
NOTE: After you modify any of the parameters accessible from this menu, the message “Modify data, or press Enter” appears upon return to the menu.
Step 1: Setting General Definitions Three important parameters are located on the Audit General Definitions screen.
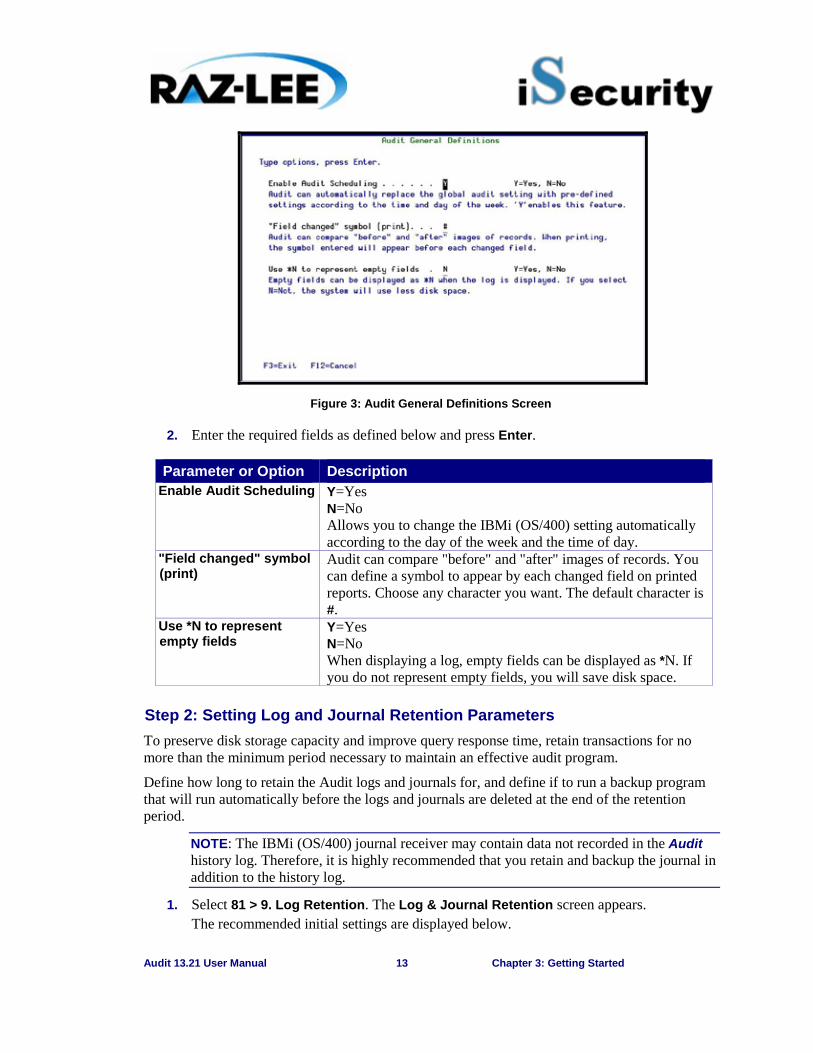
1. Select 81 > 1. General Definitions. The Audit General Definitions screen appears.
Audit 13.21 User Manual 13 Chapter 3: Getting Started
Figure 3: Audit General Definitions Screen
2. Enter the required fields as defined below and press Enter.
Parameter or Option Description Enable Audit Scheduling Y=Yes
N=No Allows you to change the IBMi (OS/400) setting automatically according to the day of the week and the time of day.
"Field changed" symbol (print)
Audit can compare "before" and "after" images of records. You can define a symbol to appear by each changed field on printed reports. Choose any character you want. The default character is #.
Use *N to represent empty fields
Y=Yes N=No When displaying a log, empty fields can be displayed as *N. If you do not represent empty fields, you will save disk space.
Step 2: Setting Log and Journal Retention Parameters To preserve disk storage capacity and improve query response time, retain transactions for no more than the minimum period necessary to maintain an effective audit program.
Define how long to retain the Audit logs and journals for, and define if to run a backup program that will run automatically before the logs and journals are deleted at the end of the retention period.
NOTE: The IBMi (OS/400) journal receiver may contain data not recorded in the Audit history log. Therefore, it is highly recommended that you retain and backup the journal in addition to the history log.
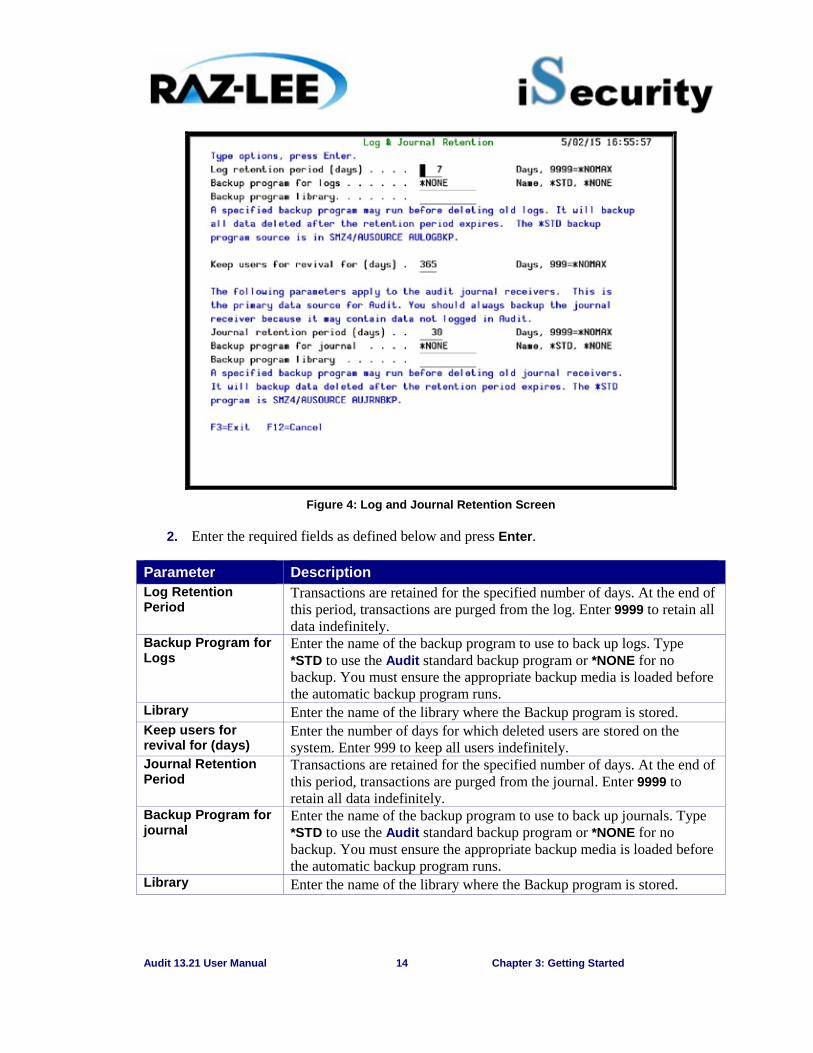
1. Select 81 > 9. Log Retention. The Log & Journal Retention screen appears. The recommended initial settings are displayed below.
Audit 13.21 User Manual 14 Chapter 3: Getting Started
Figure 4: Log and Journal Retention Screen
2. Enter the required fields as defined below and press Enter.
Parameter Description Log Retention Period
Transactions are retained for the specified number of days. At the end of this period, transactions are purged from the log. Enter 9999 to retain all data indefinitely.
Backup Program for Logs
Enter the name of the backup program to use to back up logs. Type *STD to use the Audit standard backup program or *NONE for no backup. You must ensure the appropriate backup media is loaded before the automatic backup program runs.
Library Enter the name of the library where the Backup program is stored. Keep users for revival for (days)
Enter the number of days for which deleted users are stored on the system. Enter 999 to keep all users indefinitely.
Journal Retention Period
Transactions are retained for the specified number of days. At the end of this period, transactions are purged from the journal. Enter 9999 to retain all data indefinitely.
Backup Program for journal
Enter the name of the backup program to use to back up journals. Type *STD to use the Audit standard backup program or *NONE for no backup. You must ensure the appropriate backup media is loaded before the automatic backup program runs.
Library Enter the name of the library where the Backup program is stored.
Audit 13.21 User Manual 15 Chapter 3: Getting Started
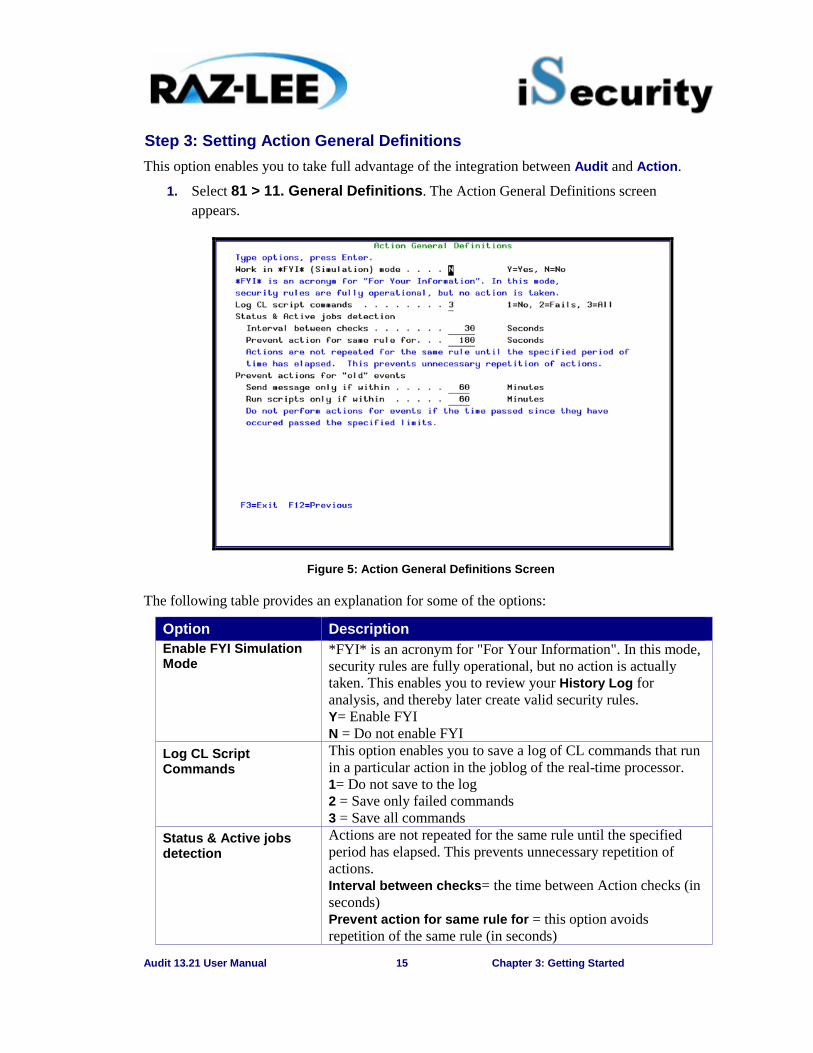
Step 3: Setting Action General Definitions This option enables you to take full advantage of the integration between Audit and Action.
1. Select 81 > 11. General Definitions. The Action General Definitions screen appears.
Figure 5: Action General Definitions Screen
The following table provides an explanation for some of the options:
Option Description Enable FYI Simulation Mode
*FYI* is an acronym for "For Your Information". In this mode, security rules are fully operational, but no action is actually taken. This enables you to review your History Log for analysis, and thereby later create valid security rules. Y= Enable FYI N = Do not enable FYI
Log CL Script Commands
This option enables you to save a log of CL commands that run in a particular action in the joblog of the real-time processor. 1= Do not save to the log 2 = Save only failed commands 3 = Save all commands
Status & Active jobs detection
Actions are not repeated for the same rule until the specified period has elapsed. This prevents unnecessary repetition of actions. Interval between checks= the time between Action checks (in seconds) Prevent action for same rule for = this option avoids repetition of the same rule (in seconds)
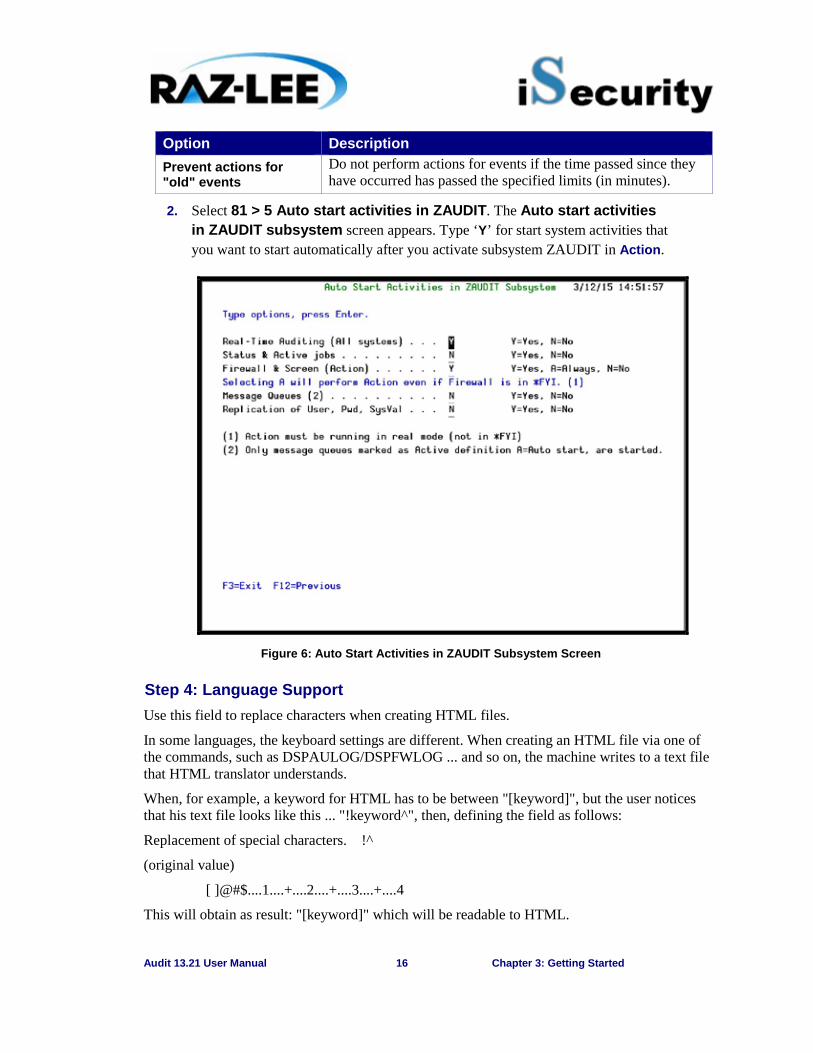
Audit 13.21 User Manual 16 Chapter 3: Getting Started
Option Description Prevent actions for "old" events
Do not perform actions for events if the time passed since they have occurred has passed the specified limits (in minutes).
2. Select 81 > 5 Auto start activities in ZAUDIT. The Auto start activities in ZAUDIT subsystem screen appears. Type ‘Y’ for start system activities that you want to start automatically after you activate subsystem ZAUDIT in Action.
Figure 6: Auto Start Activities in ZAUDIT Subsystem Screen
Step 4: Language Support Use this field to replace characters when creating HTML files.
In some languages, the keyboard settings are different. When creating an HTML file via one of the commands, such as DSPAULOG/DSPFWLOG ... and so on, the machine writes to a text file that HTML translator understands.
When, for example, a keyword for HTML has to be between "[keyword]", but the user notices that his text file looks like this ... "!keyword^", then, defining the field as follows:
Replacement of special characters. !^
(original value)
[ ]@#$....1....+....2....+....3....+....4
This will obtain as result: "[keyword]" which will be readable to HTML.
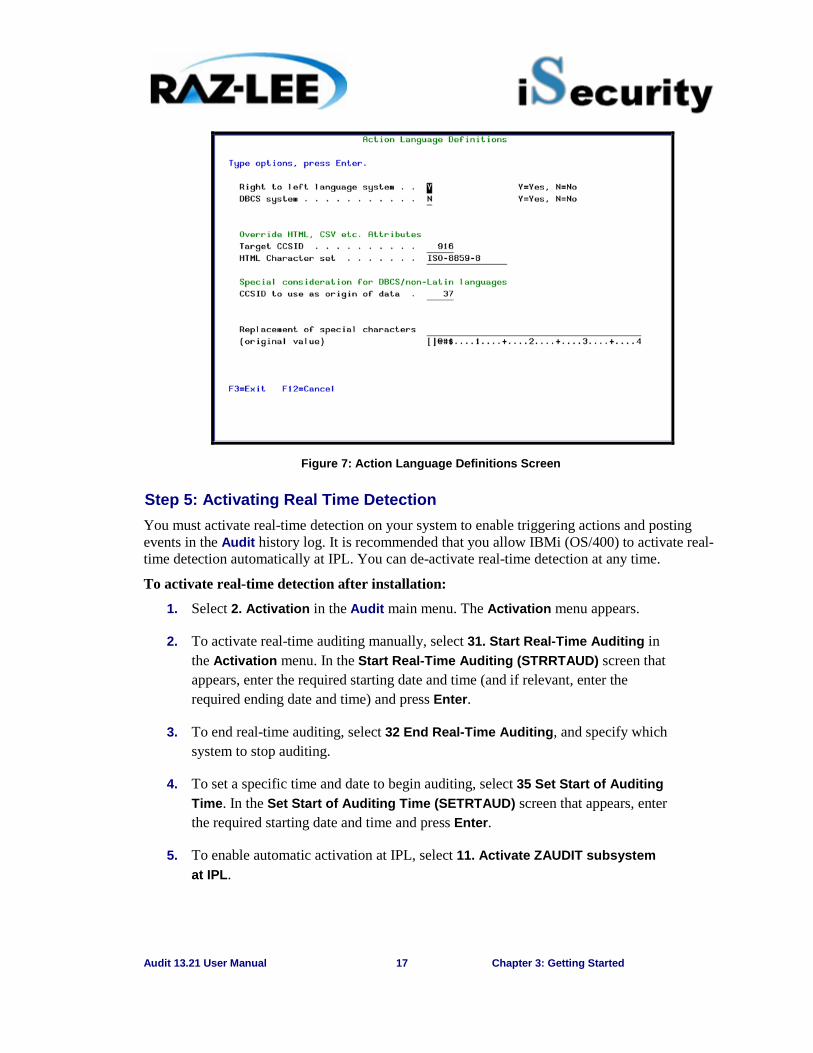
Audit 13.21 User Manual 17 Chapter 3: Getting Started
Figure 7: Action Language Definitions Screen
Step 5: Activating Real Time Detection You must activate real-time detection on your system to enable triggering actions and posting events in the Audit history log. It is recommended that you allow IBMi (OS/400) to activate real-time detection automatically at IPL. You can de-activate real-time detection at any time.
To activate real-time detection after installation:
1. Select 2. Activation in the Audit main menu. The Activation menu appears.
2. To activate real-time auditing manually, select 31. Start Real-Time Auditing in the Activation menu. In the Start Real-Time Auditing (STRRTAUD) screen that appears, enter the required starting date and time (and if relevant, enter the required ending date and time) and press Enter.
3. To end real-time auditing, select 32 End Real-Time Auditing, and specify which system to stop auditing.
4. To set a specific time and date to begin auditing, select 35 Set Start of Auditing Time. In the Set Start of Auditing Time (SETRTAUD) screen that appears, enter the required starting date and time and press Enter.
5. To enable automatic activation at IPL, select 11. Activate ZAUDIT subsystem at IPL.
Audit 13.21 User Manual 18 Chapter 3: Getting Started
6. To manually activate or add additional message queue detection, selecting 14. Message Queue (SysCtl), in the Audit main menu and then select 21. Activate in the Message Queue menu.
Detailed Change User Profile Audit Type Audit presents a new unique solution in auditing User Profile changes. This solution allows you to receive detailed information on any changes made on the IBM i user profiles:
§ Exact user attributes that were changed
§ Their former value
§ Their current value
To reach this detailed information, Audit uses a special artificial audit type, C@ - Change User Profile. This unique-to-iSecurity audit type, writes to the Audit log file when user profiles change and contains before and after user profile data.
This audit type can be used both for real-time detection and for queries/reports. The queries from this audit-type show the “before and after” values only of the fields changed.
Modifying Operators’ Authorities The Operators' authority management is now maintained from one place for the entire iSecurity on all its modules.
There are three default groups:
§ *AUD#SECAD- All users with both *AUDIT and *SECADM special authorities. By default, this group has full access (Read and Write) to all iSecurity components.
§ *AUDIT - All users with *AUDIT special authority. By default, this group has only Read authority to Audit.
§ *SECADM- All users with *SECADM special authority- By default, this group has only Read authority to Firewall.
iSecurity related objects are secured automatically by product authorization lists (named security1P). This strengthens the internal security of the product. It is essential that you use Work with Operators to define all users who have *SECADM, *AUDIT or *AUD#SECAD privileges, but do not have all object authority. The Work with Operators screen has Usr (user management) and Adm for all activities related to starting, stopping subsystems, jobs, import/export and so on. iSecurity automatically adds all users listed in Work with Operators to the appropriate product authorization list.
Users may add more operators, delete them, and give them authorities and passwords according to their own judgment. Users can even make the new operators’ definitions apply to all their systems; therefore, upon import, they will work on every system.
Password = *BLANK for the default entries. Use DSPPGM GSIPWDR to verify. The default for other users can be controlled as well.
If your organization wants the default to be *BLANK, then the following command must be used: CRTDTAARA SMZTMPC/DFTPWD *char 10
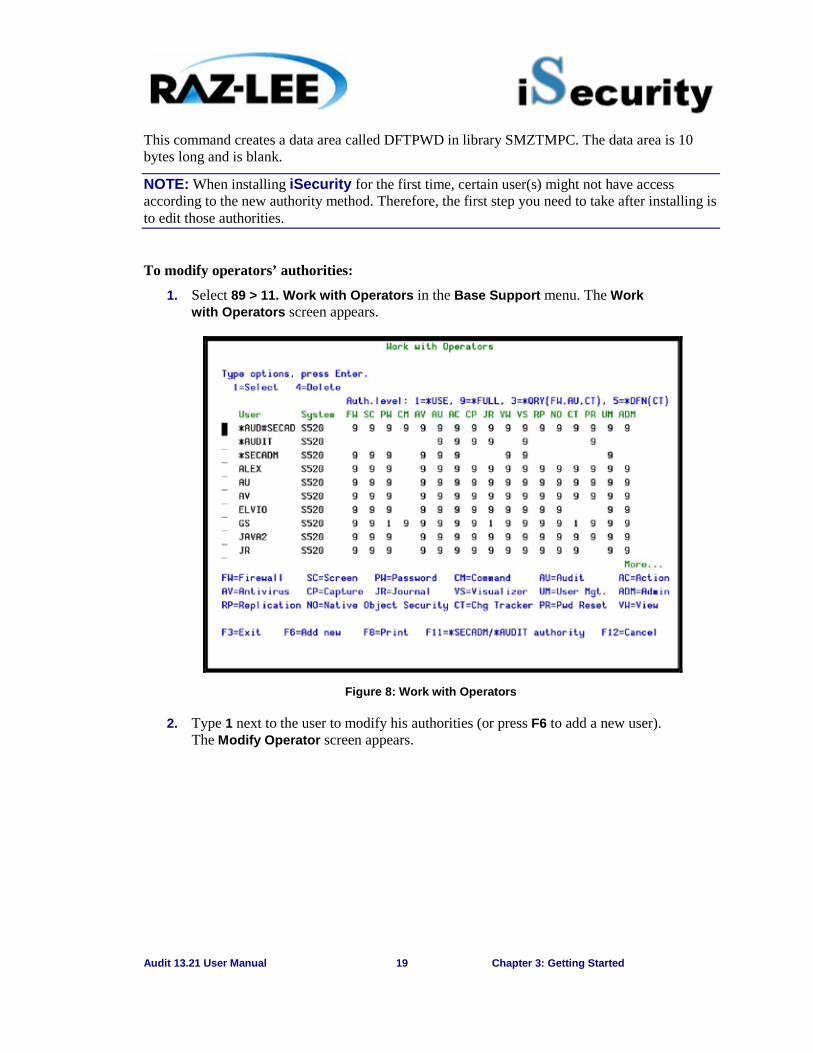
Audit 13.21 User Manual 19 Chapter 3: Getting Started
This command creates a data area called DFTPWD in library SMZTMPC. The data area is 10 bytes long and is blank.
NOTE: When installing iSecurity for the first time, certain user(s) might not have access according to the new authority method. Therefore, the first step you need to take after installing is to edit those authorities.
To modify operators’ authorities:
1. Select 89 > 11. Work with Operators in the Base Support menu. The Work with Operators screen appears.
Figure 8: Work with Operators
2. Type 1 next to the user to modify his authorities (or press F6 to add a new user). The Modify Operator screen appears.
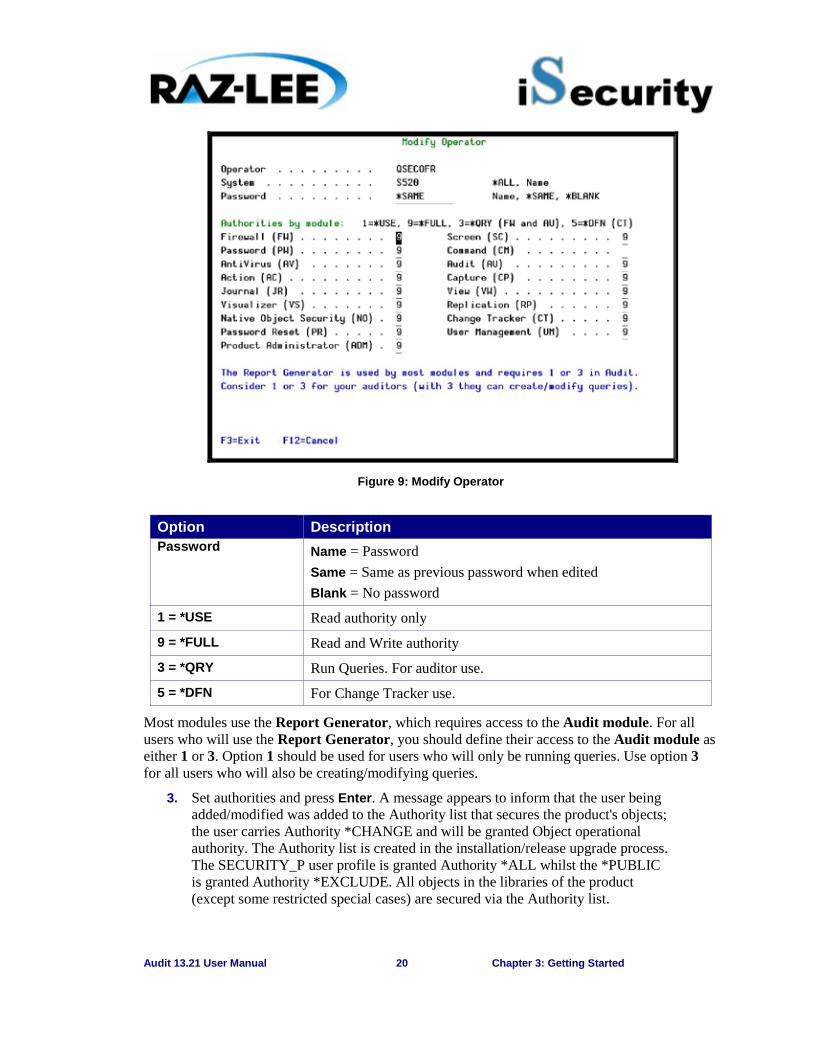
Audit 13.21 User Manual 20 Chapter 3: Getting Started
Figure 9: Modify Operator
Most modules use the Report Generator, which requires access to the Audit module. For all users who will use the Report Generator, you should define their access to the Audit module as either 1 or 3. Option 1 should be used for users who will only be running queries. Use option 3 for all users who will also be creating/modifying queries.
3. Set authorities and press Enter. A message appears to inform that the user being added/modified was added to the Authority list that secures the product's objects; the user carries Authority *CHANGE and will be granted Object operational authority. The Authority list is created in the installation/release upgrade process. The SECURITY_P user profile is granted Authority *ALL whilst the *PUBLIC is granted Authority *EXCLUDE. All objects in the libraries of the product (except some restricted special cases) are secured via the Authority list.
Option Description Password Name = Password
Same = Same as previous password when edited Blank = No password
1 = *USE Read authority only
9 = *FULL Read and Write authority 3 = *QRY Run Queries. For auditor use. 5 = *DFN For Change Tracker use.
Audit 13.21 User Manual 21 Chapter 3: Getting Started
Initial IBMi (OS/400) Audit Settings Effective security auditing demands a balance between preserving historical data and system performance. The process of capturing events and recording them in both the IBM-provided security audit journal and the Audit history log can consume system resources and large amounts disk space. Performance degradation can result when you capture and record too many events.
Which specific events you choose to track is a function of your organization’s overall security objectives and potential exposures. When working with Audit for the first time, we recommend certain all-purpose settings that will allow you to examine security exposures and to develop historical data that will be useful when creating real-time detection rules.
In the following section, several generic setting scenarios help get you started with security data collection, while minimizing performance burden and disk space. Modify these settings as soon as possible, in accordance with your organizational and system requirements. In any case, you should carefully monitor system performance and disk space.
After analyzing audit data generated by this initial process, you will be able to narrow your audit scope and use real-time detection rules to build a more efficient audit program.
However, for your initial settings, we recommend that you follow these procedures as described. For the step-by-step tutorials, together with detailed explanations for the parameter settings, see Chapter 4: IBMi (OS/400) Audit Settings.
To begin working with IBMi audit settings:
1. Select 1. OS/400 Audit Features in the Audit main menu. The OS/400 Audit Features menu appears.
2. Perform the following procedures:
§ Working with Current Setting
§ Working with User Activity Auditing
Ø A. Security Officer (QSECOFR)
Ø B. System Operator (QSYSOPR)
Ø C. Users
§ Working with Object Auditing
Working with Current Setting The current audit setting determines which events you track for all users on a global basis and whether object auditing is active for all users.
1. Select 1 > 1. Work with Current Setting in the OS/400 Audit Features menu. The Work with Current Setting screen appears.
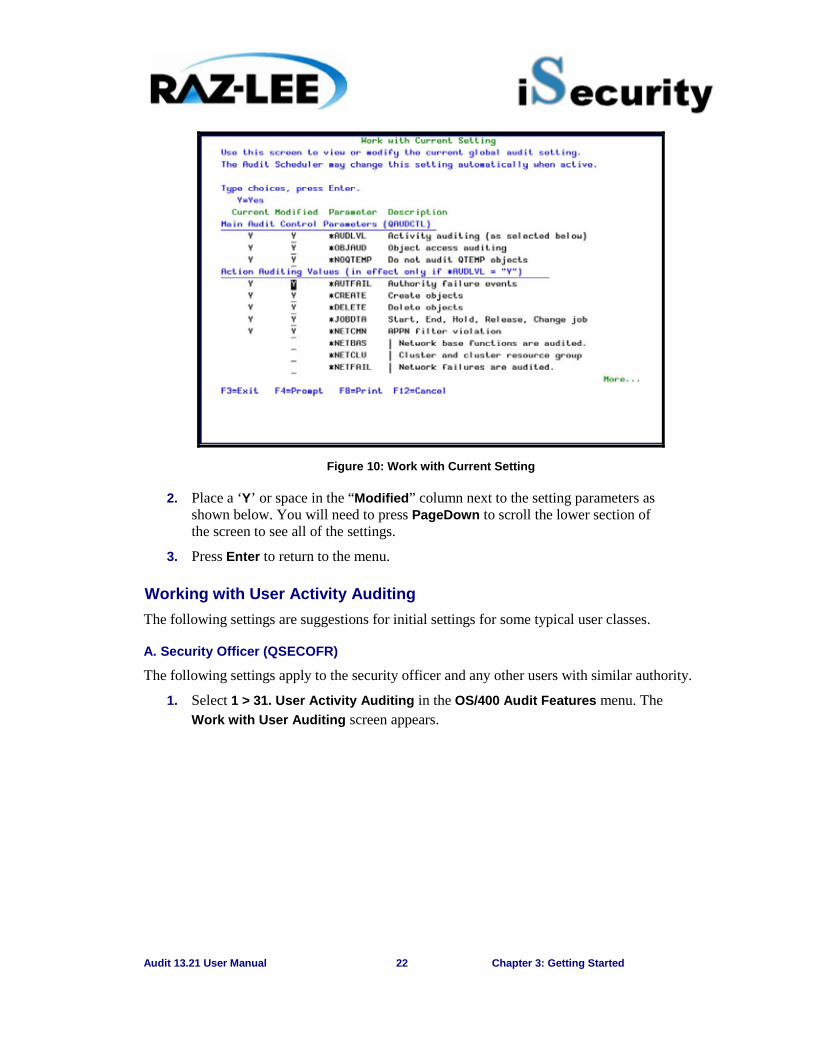
Audit 13.21 User Manual 22 Chapter 3: Getting Started
Figure 10: Work with Current Setting
2. Place a ‘Y’ or space in the “Modified” column next to the setting parameters as shown below. You will need to press PageDown to scroll the lower section of the screen to see all of the settings.
3. Press Enter to return to the menu.
Working with User Activity Auditing The following settings are suggestions for initial settings for some typical user classes.
A. Security Officer (QSECOFR)
The following settings apply to the security officer and any other users with similar authority.
1. Select 1 > 31. User Activity Auditing in the OS/400 Audit Features menu. The Work with User Auditing screen appears.
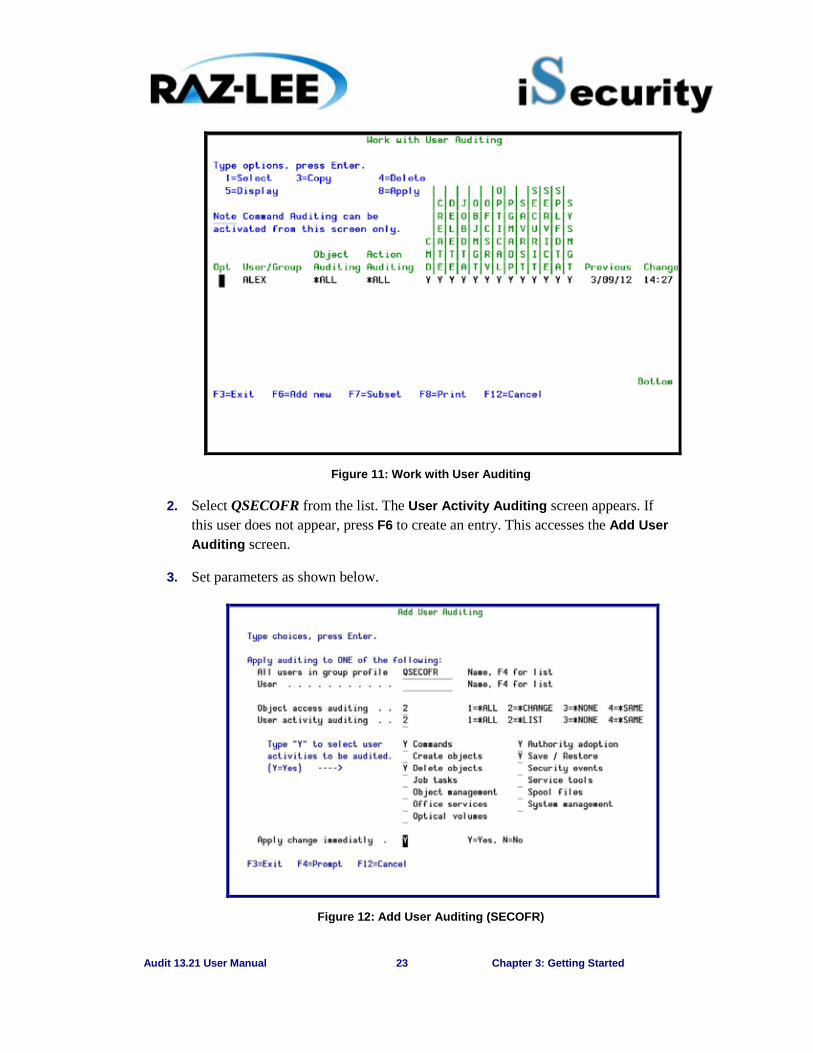
Audit 13.21 User Manual 23 Chapter 3: Getting Started
Figure 11: Work with User Auditing
2. Select QSECOFR from the list. The User Activity Auditing screen appears. If this user does not appear, press F6 to create an entry. This accesses the Add User Auditing screen.
3. Set parameters as shown below.
Figure 12: Add User Auditing (SECOFR)
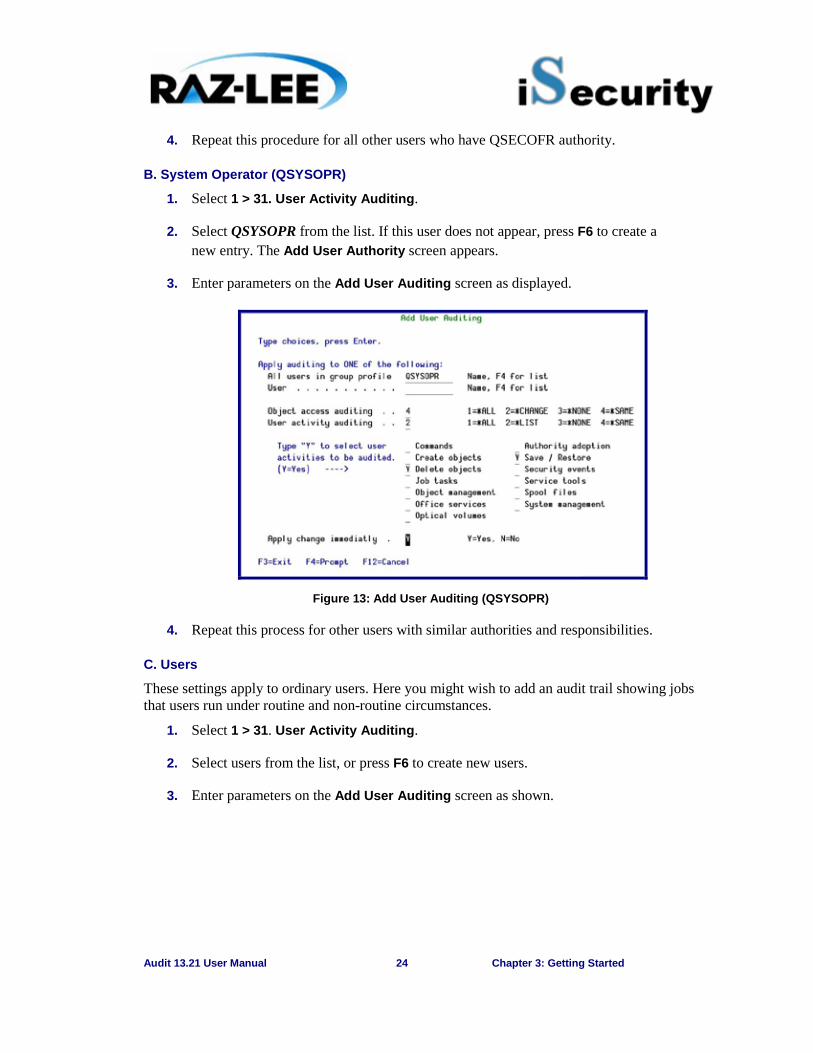
Audit 13.21 User Manual 24 Chapter 3: Getting Started
4. Repeat this procedure for all other users who have QSECOFR authority.
B. System Operator (QSYSOPR)
1. Select 1 > 31. User Activity Auditing.
2. Select QSYSOPR from the list. If this user does not appear, press F6 to create a new entry. The Add User Authority screen appears.
3. Enter parameters on the Add User Auditing screen as displayed.
Figure 13: Add User Auditing (QSYSOPR)
4. Repeat this process for other users with similar authorities and responsibilities.
C. Users
These settings apply to ordinary users. Here you might wish to add an audit trail showing jobs that users run under routine and non-routine circumstances.
1. Select 1 > 31. User Activity Auditing.
2. Select users from the list, or press F6 to create new users.
3. Enter parameters on the Add User Auditing screen as shown.
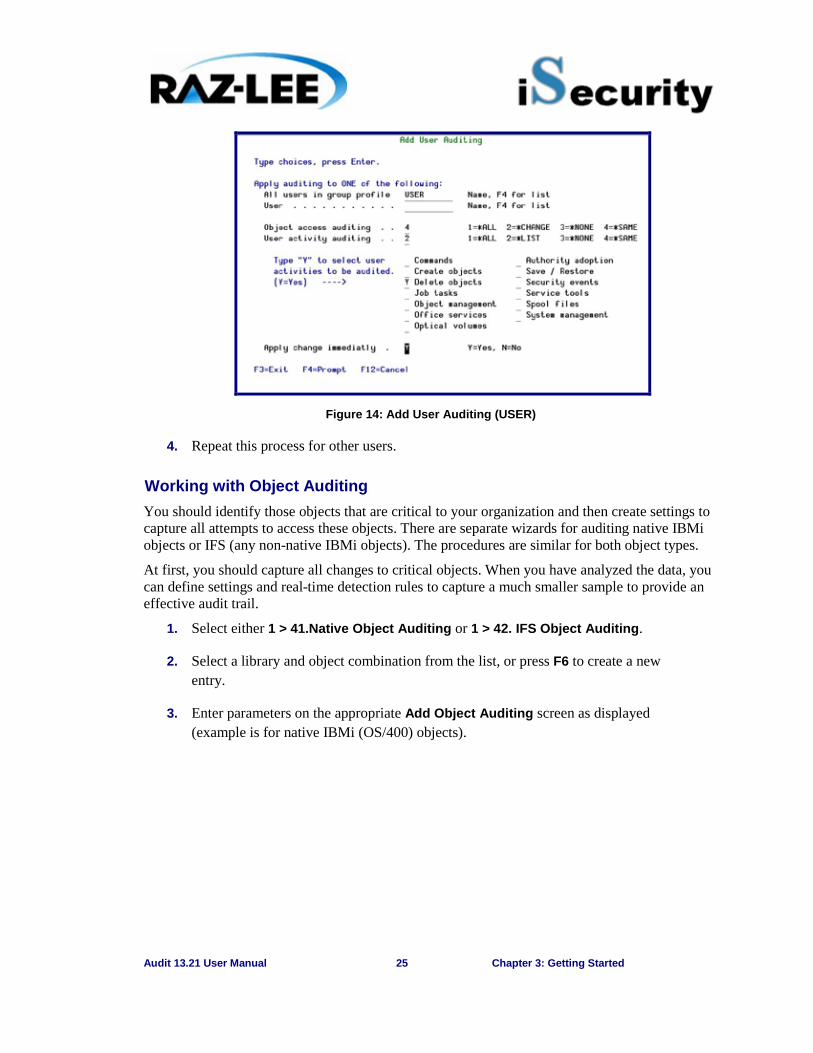
Audit 13.21 User Manual 25 Chapter 3: Getting Started
Figure 14: Add User Auditing (USER)
4. Repeat this process for other users.
Working with Object Auditing You should identify those objects that are critical to your organization and then create settings to capture all attempts to access these objects. There are separate wizards for auditing native IBMi objects or IFS (any non-native IBMi objects). The procedures are similar for both object types.
At first, you should capture all changes to critical objects. When you have analyzed the data, you can define settings and real-time detection rules to capture a much smaller sample to provide an effective audit trail.
1. Select either 1 > 41.Native Object Auditing or 1 > 42. IFS Object Auditing.
2. Select a library and object combination from the list, or press F6 to create a new entry.
3. Enter parameters on the appropriate Add Object Auditing screen as displayed (example is for native IBMi (OS/400) objects).
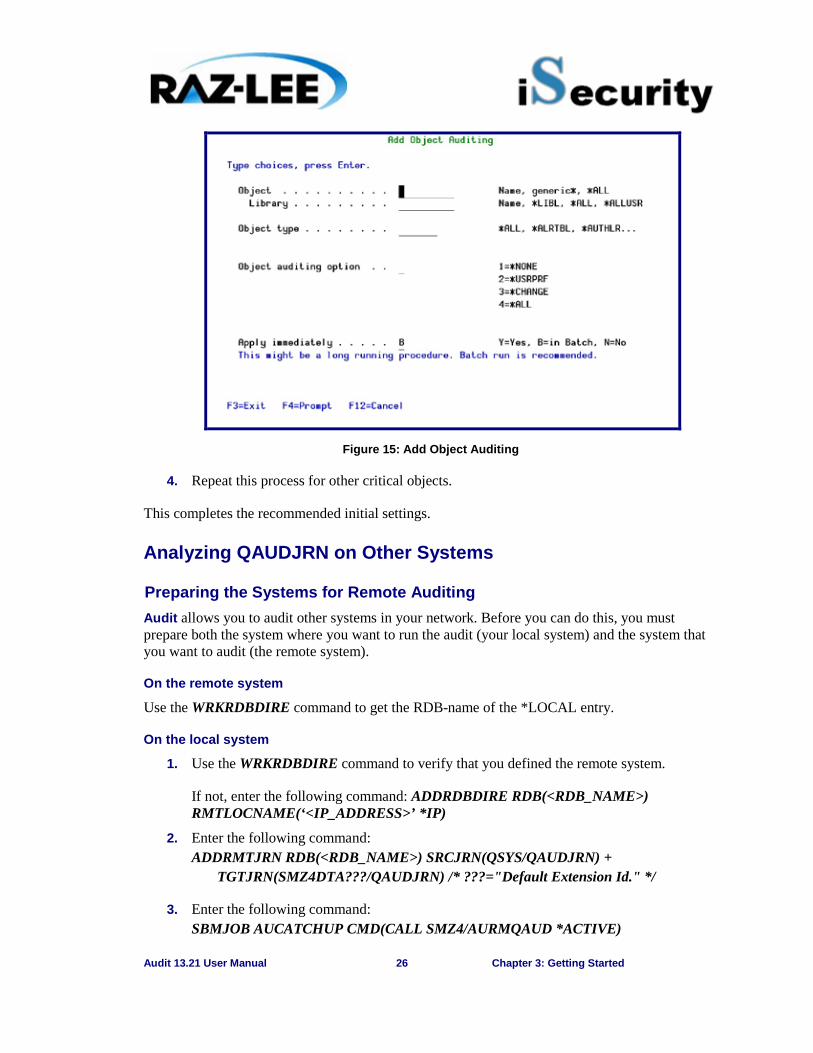
Audit 13.21 User Manual 26 Chapter 3: Getting Started
Figure 15: Add Object Auditing
4. Repeat this process for other critical objects.
This completes the recommended initial settings.
Analyzing QAUDJRN on Other Systems
Preparing the Systems for Remote Auditing Audit allows you to audit other systems in your network. Before you can do this, you must prepare both the system where you want to run the audit (your local system) and the system that you want to audit (the remote system).
On the remote system
Use the WRKRDBDIRE command to get the RDB-name of the *LOCAL entry.
On the local system
1. Use the WRKRDBDIRE command to verify that you defined the remote system.
If not, enter the following command: ADDRDBDIRE RDB(<RDB_NAME>) RMTLOCNAME(‘<IP_ADDRESS>’ *IP)
2. Enter the following command: ADDRMTJRN RDB(<RDB_NAME>) SRCJRN(QSYS/QAUDJRN) + TGTJRN(SMZ4DTA???/QAUDJRN) /* ???="Default Extension Id." */
3. Enter the following command: SBMJOB AUCATCHUP CMD(CALL SMZ4/AURMQAUD *ACTIVE)
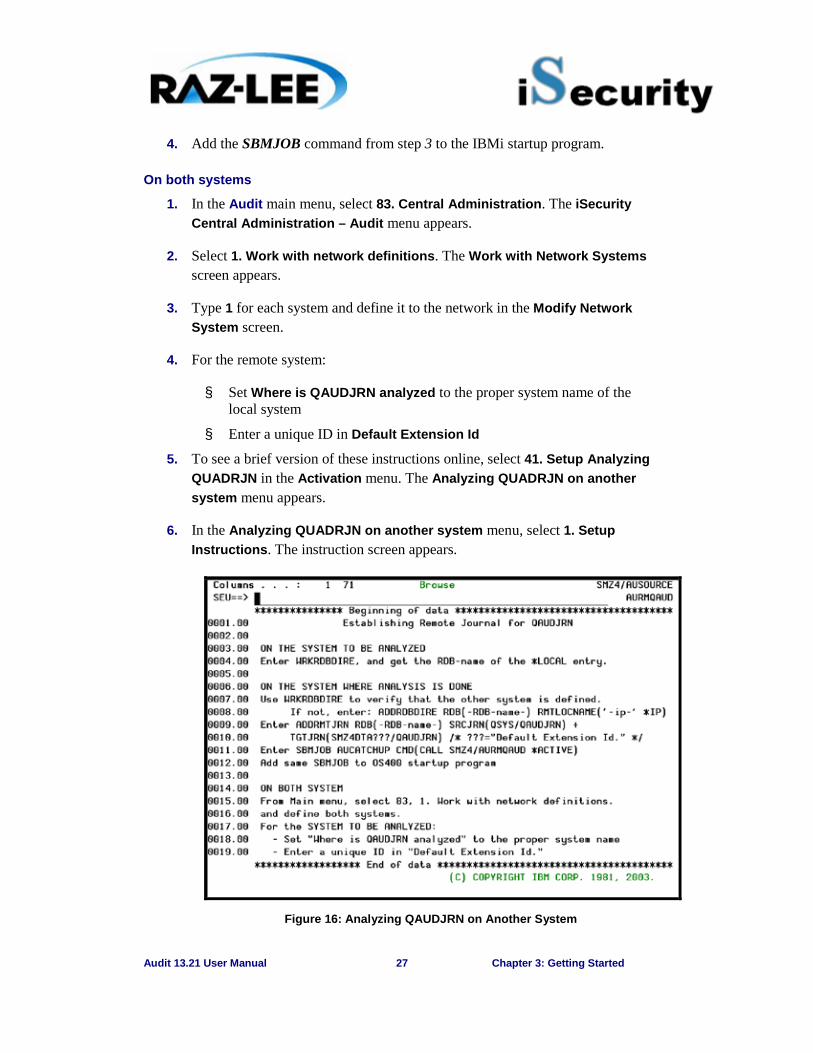
Audit 13.21 User Manual 27 Chapter 3: Getting Started
4. Add the SBMJOB command from step 3 to the IBMi startup program.
On both systems
1. In the Audit main menu, select 83. Central Administration. The iSecurity Central Administration – Audit menu appears.
2. Select 1. Work with network definitions. The Work with Network Systems screen appears.
3. Type 1 for each system and define it to the network in the Modify Network System screen.
4. For the remote system:
§ Set Where is QAUDJRN analyzed to the proper system name of the local system
§ Enter a unique ID in Default Extension Id
5. To see a brief version of these instructions online, select 41. Setup Analyzing QUADRJN in the Activation menu. The Analyzing QUADRJN on another system menu appears.
6. In the Analyzing QUADRJN on another system menu, select 1. Setup Instructions. The instruction screen appears.
Figure 16: Analyzing QAUDJRN on Another System
Audit 13.21 User Manual 28 Chapter 3: Getting Started
Activation of Remote Auditing
For the Remote System (The System being Analyzed)
When you have finished preparing both systems, you can activate the collection of data either on the remote system or on the local system.
To start data collection directly on the remote system:
1. Select 2. in the main Audit menu. The Activation menu appears.
2. Select 41. Setup Analyzing QAUDRN in the Activation menu. The Analyzing QAUDRJN on another system menu appears.
3. Select 51. Activate in the Analyzing QAUDRJN on another system menu. The system sends a command to the remote system to activate audit real-time detection.
To stop data collection directly on the remote system:
1. Select 2. Activation in the main Audit menu. The Activation menu appears.
2. Select 41. Setup Analyzing QAUDRN in the Activation menu. The Analyzing QAUDRJN on another system menu appears.
3. Select 52. Deactivate in the Analyzing QAUDRJN on another system menu. The local system sends a command to the remote system to stop audit real-time detection.
To work with journal attributes:
1. Select 2. Activation in the main Audit menu. The Activation menu appears.
2. Select 41. Setup Analyzing QAUDRN in the Activation menu. The Analyzing QAUDRJN on another system menu appears.
3. Select 55. Work with journal status in the Analyzing QAUDRJN on another system menu. The Work with Journal Attributes screen appears. Verify that the Journal Type is set to *REMOTE.
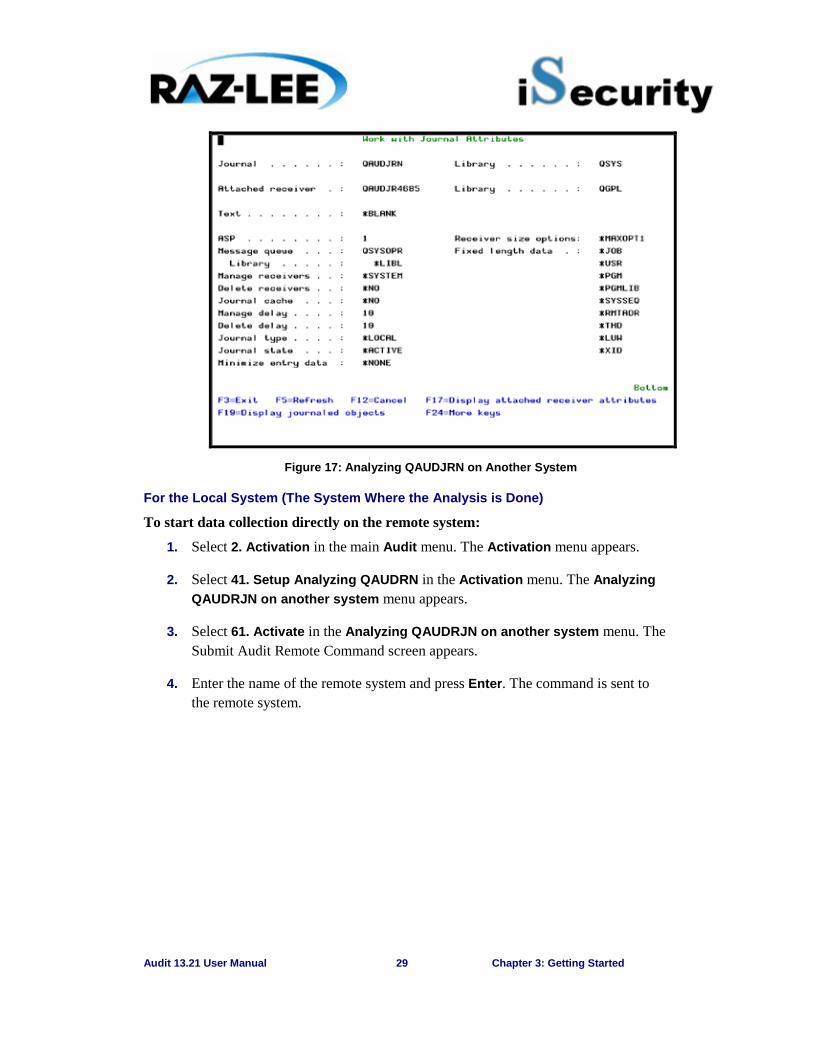
Audit 13.21 User Manual 29 Chapter 3: Getting Started
Figure 17: Analyzing QAUDJRN on Another System
For the Local System (The System Where the Analysis is Done)
To start data collection directly on the remote system:
1. Select 2. Activation in the main Audit menu. The Activation menu appears.
2. Select 41. Setup Analyzing QAUDRN in the Activation menu. The Analyzing QAUDRJN on another system menu appears.
3. Select 61. Activate in the Analyzing QAUDRJN on another system menu. The Submit Audit Remote Command screen appears.
4. Enter the name of the remote system and press Enter. The command is sent to the remote system.
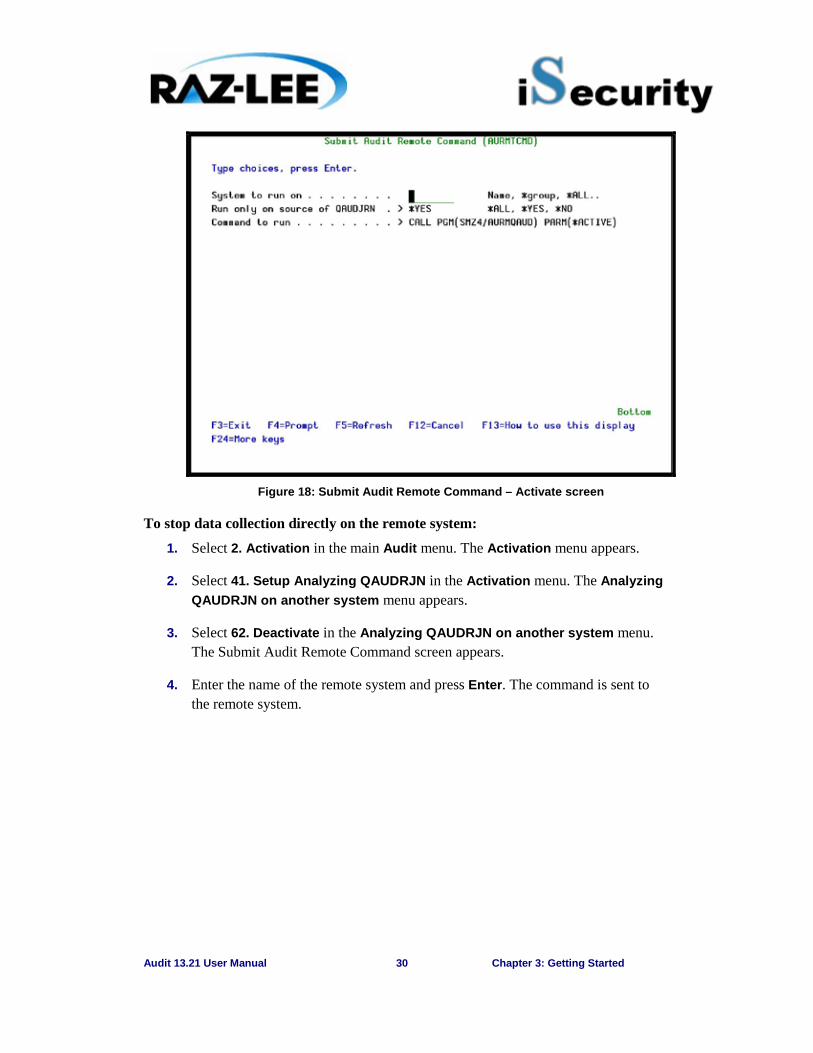
Audit 13.21 User Manual 30 Chapter 3: Getting Started
Figure 18: Submit Audit Remote Command – Activate screen
To stop data collection directly on the remote system:
1. Select 2. Activation in the main Audit menu. The Activation menu appears.
2. Select 41. Setup Analyzing QAUDRJN in the Activation menu. The Analyzing QAUDRJN on another system menu appears.
3. Select 62. Deactivate in the Analyzing QAUDRJN on another system menu. The Submit Audit Remote Command screen appears.
4. Enter the name of the remote system and press Enter. The command is sent to the remote system.
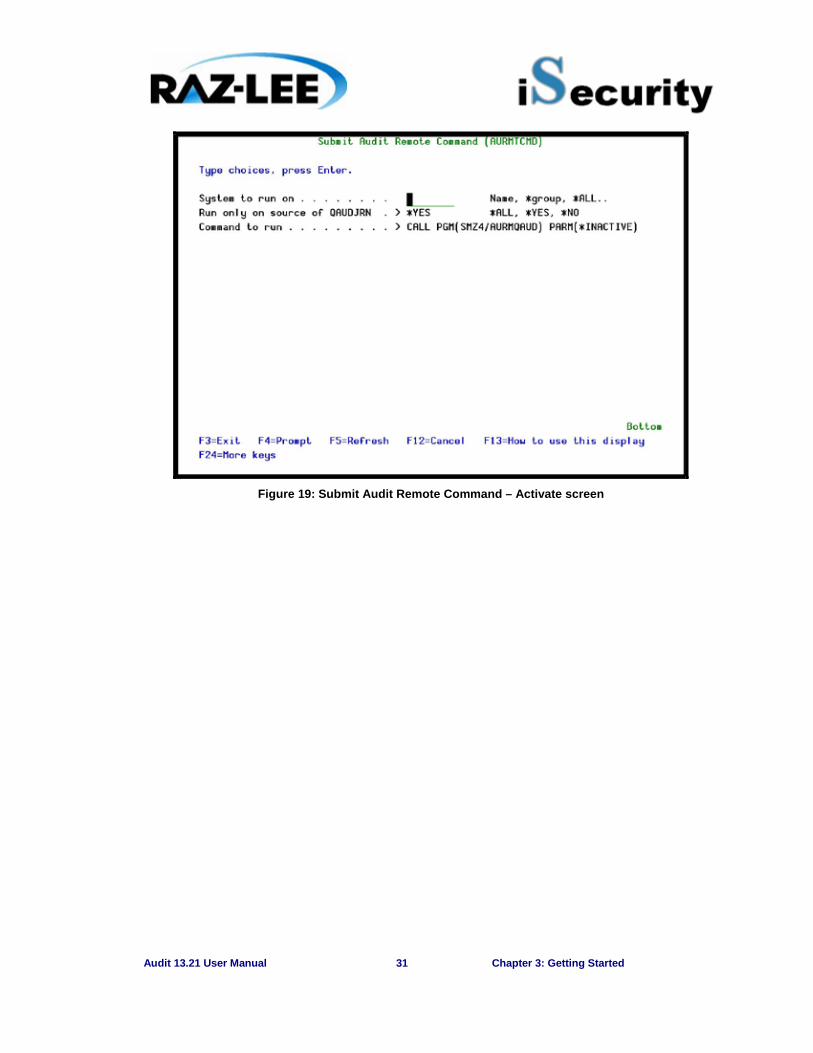
Audit 13.21 User Manual 31 Chapter 3: Getting Started
Figure 19: Submit Audit Remote Command – Activate screen
Audit 13.21 User Manual 32 Chapter 4: IBMi (OS/400) Audit Settings
4
Chapter 4: IBMi (OS/400) Audit Settings This Chapter discusses the concepts and procedures for working with the IBMi (OS/400) auditing features using Audit. The topics in this chapter cover the most commonly used audit features and parameters, it included the following sections:
Ø Working with the Current Settings
Ø Predefined Audit Settings
Ø Using the Audit Scheduler
Ø User Activity Auditing
Ø Object Access Auditing
Working with the Current Settings The term Current Setting refers to those parameters governing events, which are currently in effect and will be recorded in the IBM i security audit journal for all users on a global basis. Two separate audit modes comprise the current setting, user activity auditing and object access auditing
You can enable or disable either of these modes and specify which types of user activities are audited for all users. You use the User Audit Settings and Object Audit Settings to record specific user activities and object access events for audit in addition to those specified in the current setting.
Audit includes several features that make working with the IBMi (OS/400) current setting more efficient:
§ Current Setting Screen – This screen allows you to quickly review the current setting parameters and make changes on the fly. You no longer have to worry about all those system values and other parameters.
§ Predefined Settings – You can create and store groups of current setting parameters for future use. This allows you to change the settings quickly with only a few keystrokes.
§ Audit Scheduler – This feature allows you to change the current setting automatically according to the time of day and the day of the week.
All of these features involved in Current Settings are accessible in the OS/400 Audit Features menu.
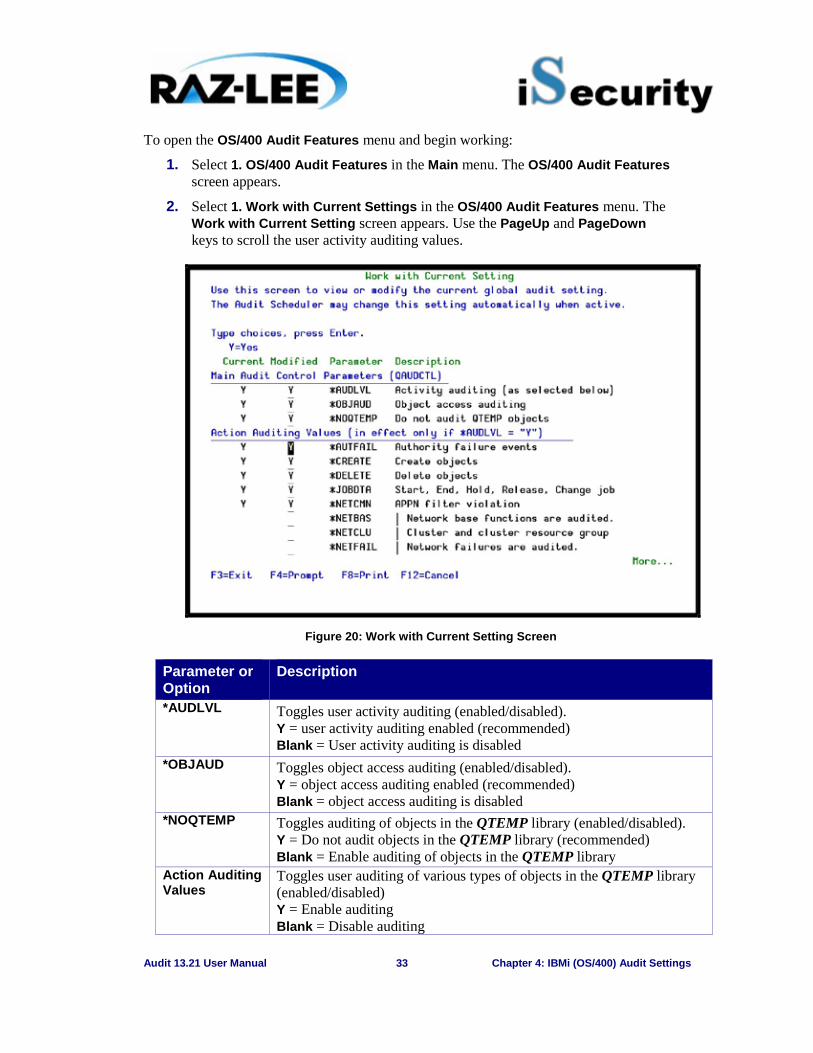
Audit 13.21 User Manual 33 Chapter 4: IBMi (OS/400) Audit Settings
To open the OS/400 Audit Features menu and begin working:
1. Select 1. OS/400 Audit Features in the Main menu. The OS/400 Audit Features screen appears.
2. Select 1. Work with Current Settings in the OS/400 Audit Features menu. The Work with Current Setting screen appears. Use the PageUp and PageDown keys to scroll the user activity auditing values.
Figure 20: Work with Current Setting Screen
Parameter or Option
Description
*AUDLVL Toggles user activity auditing (enabled/disabled). Y = user activity auditing enabled (recommended) Blank = User activity auditing is disabled
*OBJAUD Toggles object access auditing (enabled/disabled). Y = object access auditing enabled (recommended) Blank = object access auditing is disabled
*NOQTEMP Toggles auditing of objects in the QTEMP library (enabled/disabled). Y = Do not audit objects in the QTEMP library (recommended) Blank = Enable auditing of objects in the QTEMP library
Action Auditing Values
Toggles user auditing of various types of objects in the QTEMP library (enabled/disabled) Y = Enable auditing Blank = Disable auditing
Audit 13.21 User Manual 34 Chapter 4: IBMi (OS/400) Audit Settings
3. Press Enter to accept changes and return to the menu. Changes are effective immediately.
Current Setting Strategies In general, you should try to minimize the number of records posted to the security audit journal to preserve disk space and lessen the impact on system performance. Since the current setting applies globally to all users, it is best to avoid capturing routine user activity that will create many entries. The current setting is best employed to capture exceptional occurrences, such as serious errors, program failures, changes to security definitions and changes to important system parameters.
You can also use the current setting to track routine activity for very limited periods to analyze user activities, assess security risks, and evaluate system performance.
Current Setting Suggestions
§ Always enable the “Do not audit QTEMP objects” option. Many objects are located in this library and they are rarely important.
§ Enable user activity auditing, but only include extraordinary activity in the current setting such as:
Ø Authority failures (*AUTFAIL)
Ø Program failures (*PGMFAIL)
Ø Security definitions (*SECURITY)
Ø System service operations (*SERVICE)
§ Use the User Activity and Object Access features to audit routine activities for specific users and objects.
Example: Typical Production System
The following example illustrates the procedure for defining the global audit setting for a typical production environment.
1. Select 1. OS/400 Audit Features in the Main menu. The OS/400 Audit Features menu appears.
2. Select 1. Work with Current Settings in the OS/400 Audit Features menu. The Work with Current Setting screen appears.
3. Type Y to the left of the following options:
§ User activity auditing (*AUDLVL)
§ Object access auditing (*OBJAUD)
§ Do not audit QTEMP objects (*NOQTEMP)
§ Authority failures (*AUTFAIL)
§ Violations detected by the APPN filter (*NETCMN)
§ Security definitions (*SECURITY)
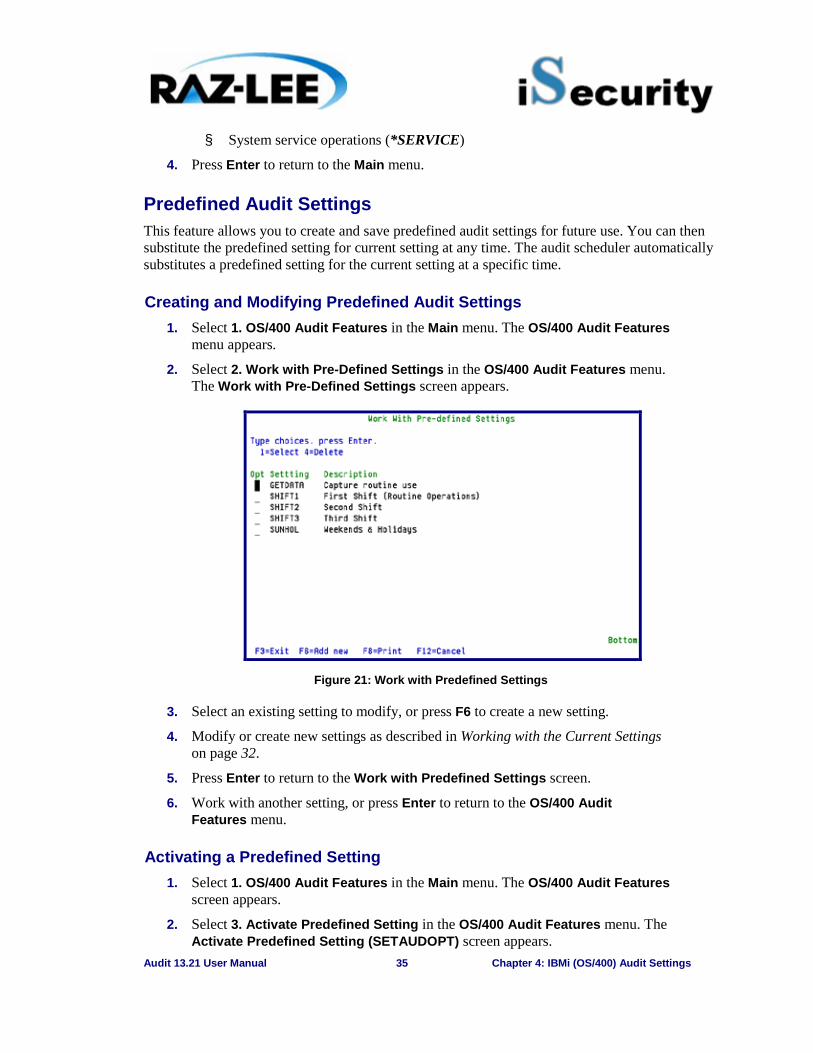
Audit 13.21 User Manual 35 Chapter 4: IBMi (OS/400) Audit Settings
§ System service operations (*SERVICE)
4. Press Enter to return to the Main menu.
Predefined Audit Settings This feature allows you to create and save predefined audit settings for future use. You can then substitute the predefined setting for current setting at any time. The audit scheduler automatically substitutes a predefined setting for the current setting at a specific time.
Creating and Modifying Predefined Audit Settings 1. Select 1. OS/400 Audit Features in the Main menu. The OS/400 Audit Features
menu appears.
2. Select 2. Work with Pre-Defined Settings in the OS/400 Audit Features menu. The Work with Pre-Defined Settings screen appears.
Figure 21: Work with Predefined Settings
3. Select an existing setting to modify, or press F6 to create a new setting.
4. Modify or create new settings as described in Working with the Current Settings on page 32.
5. Press Enter to return to the Work with Predefined Settings screen.
6. Work with another setting, or press Enter to return to the OS/400 Audit Features menu.
Activating a Predefined Setting 1. Select 1. OS/400 Audit Features in the Main menu. The OS/400 Audit Features
screen appears.
2. Select 3. Activate Predefined Setting in the OS/400 Audit Features menu. The Activate Predefined Setting (SETAUDOPT) screen appears.
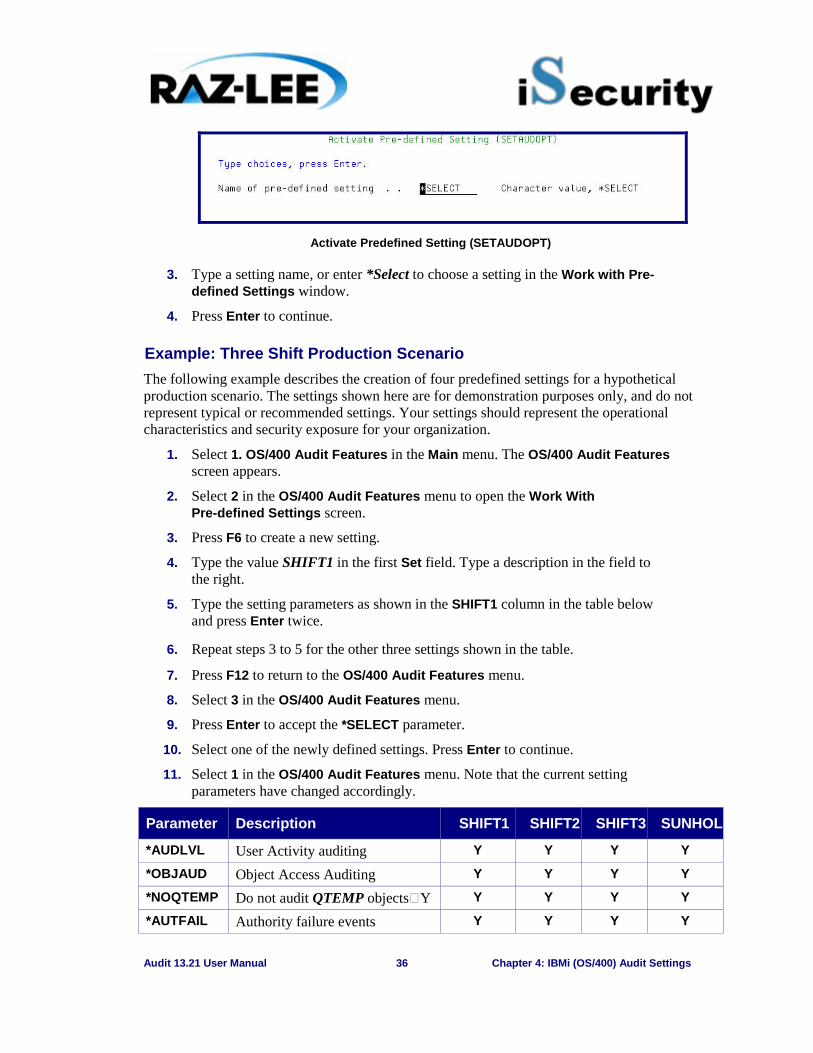
Audit 13.21 User Manual 36 Chapter 4: IBMi (OS/400) Audit Settings
Activate Predefined Setting (SETAUDOPT)
3. Type a setting name, or enter *Select to choose a setting in the Work with Pre-defined Settings window.
4. Press Enter to continue.
Example: Three Shift Production Scenario The following example describes the creation of four predefined settings for a hypothetical production scenario. The settings shown here are for demonstration purposes only, and do not represent typical or recommended settings. Your settings should represent the operational characteristics and security exposure for your organization.
1. Select 1. OS/400 Audit Features in the Main menu. The OS/400 Audit Features screen appears.
2. Select 2 in the OS/400 Audit Features menu to open the Work With Pre-defined Settings screen.
3. Press F6 to create a new setting.
4. Type the value SHIFT1 in the first Set field. Type a description in the field to the right.
5. Type the setting parameters as shown in the SHIFT1 column in the table below and press Enter twice.
6. Repeat steps 3 to 5 for the other three settings shown in the table.
7. Press F12 to return to the OS/400 Audit Features menu.
8. Select 3 in the OS/400 Audit Features menu.
9. Press Enter to accept the *SELECT parameter.
10. Select one of the newly defined settings. Press Enter to continue.
11. Select 1 in the OS/400 Audit Features menu. Note that the current setting parameters have changed accordingly.
Parameter Description SHIFT1 SHIFT2 SHIFT3 SUNHOL
*AUDLVL User Activity auditing Y Y Y Y
*OBJAUD Object Access Auditing Y Y Y Y
*NOQTEMP Do not audit QTEMP objects Y Y Y Y Y
*AUTFAIL Authority failure events Y Y Y Y
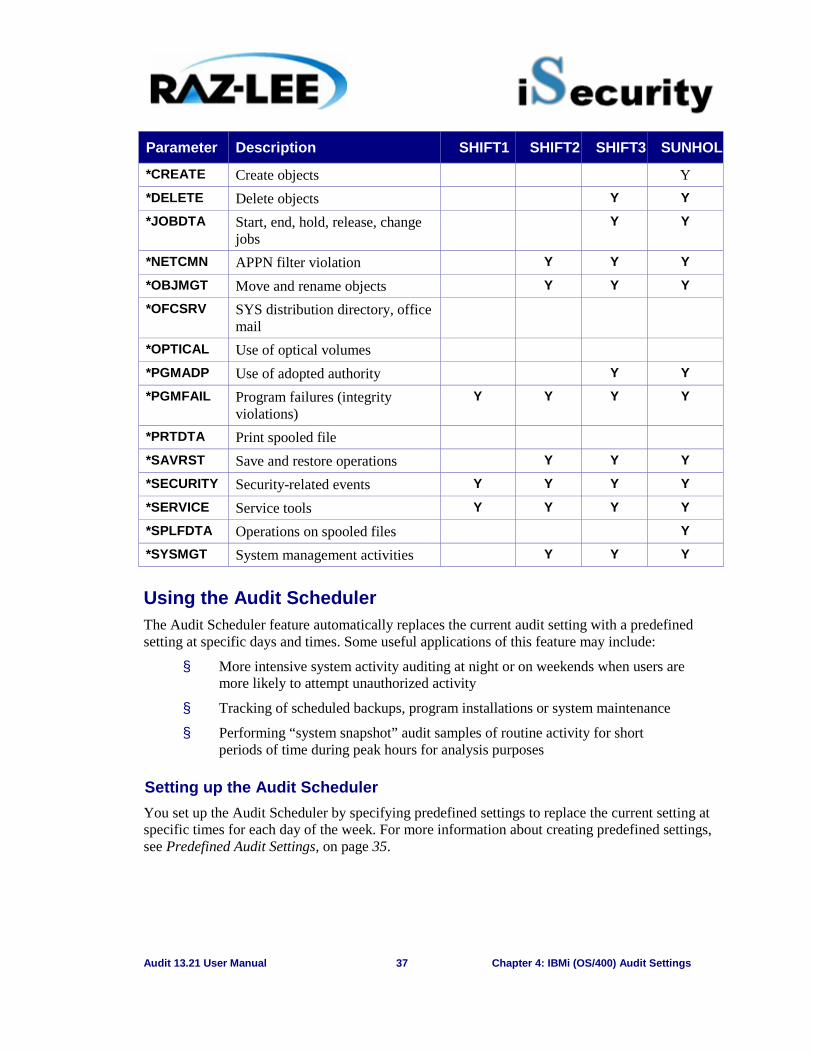
Audit 13.21 User Manual 37 Chapter 4: IBMi (OS/400) Audit Settings
Parameter Description SHIFT1 SHIFT2 SHIFT3 SUNHOL
*CREATE Create objects Y *DELETE Delete objects Y Y
*JOBDTA Start, end, hold, release, change jobs
Y Y
*NETCMN APPN filter violation Y Y Y
*OBJMGT Move and rename objects Y Y Y
*OFCSRV SYS distribution directory, office mail
*OPTICAL Use of optical volumes
*PGMADP Use of adopted authority Y Y
*PGMFAIL Program failures (integrity violations)
Y Y Y Y
*PRTDTA Print spooled file
*SAVRST Save and restore operations Y Y Y
*SECURITY Security-related events Y Y Y Y
*SERVICE Service tools Y Y Y Y
*SPLFDTA Operations on spooled files Y
*SYSMGT System management activities Y Y Y
Using the Audit Scheduler The Audit Scheduler feature automatically replaces the current audit setting with a predefined setting at specific days and times. Some useful applications of this feature may include:
§ More intensive system activity auditing at night or on weekends when users are more likely to attempt unauthorized activity
§ Tracking of scheduled backups, program installations or system maintenance
§ Performing “system snapshot” audit samples of routine activity for short periods of time during peak hours for analysis purposes
Setting up the Audit Scheduler You set up the Audit Scheduler by specifying predefined settings to replace the current setting at specific times for each day of the week. For more information about creating predefined settings, see Predefined Audit Settings, on page 35.

Audit 13.21 User Manual 38 Chapter 4: IBMi (OS/400) Audit Settings
1. Select 1. OS/400 Audit Features in the Main menu. The OS/400 Audit Features menu appears.
2. Select 11. Work with Audit Scheduler in the OS/400 Audit Features menu. The Work with Audit Scheduler screen appears.
Figure 22: Work with Audit Scheduler
3. Ensure the Activate Audit Scheduler field is set to Y.
4. Type the times for settings to change in the Time fields. You can specify up to six setting changes per day. Type the time using 24-hour notation (HHMM without the : separator)
5. Enter the name of the predefined setting that you wish to activate in the Setting field beneath each time change setting that you entered in step 4. Press F4 in any setting field to choose from a list of available predefined settings.
6. Continue this process for each day of the week. Use F13 to copy the schedule of one day to another day or days. For more details, see Copying a Daily Audit Schedule, on page 38.
7. When you are finished, press Enter to return to the OS/400 Audit Features menu. The current setting changes to the appropriate scheduled setting.
Copying a Daily Audit Schedule
When working with the Audit Scheduler, you can save time by copying a given day’s schedule to another day or days.
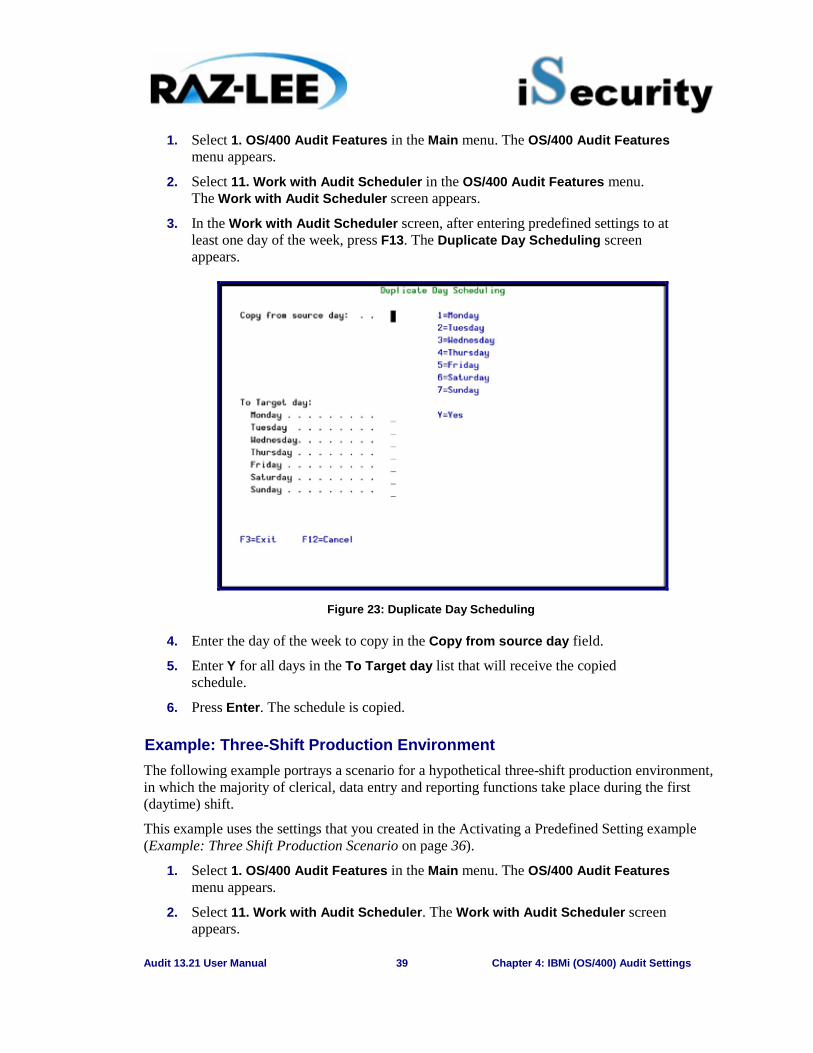
Audit 13.21 User Manual 39 Chapter 4: IBMi (OS/400) Audit Settings
1. Select 1. OS/400 Audit Features in the Main menu. The OS/400 Audit Features menu appears.
2. Select 11. Work with Audit Scheduler in the OS/400 Audit Features menu. The Work with Audit Scheduler screen appears.
3. In the Work with Audit Scheduler screen, after entering predefined settings to at least one day of the week, press F13. The Duplicate Day Scheduling screen appears.
Figure 23: Duplicate Day Scheduling
4. Enter the day of the week to copy in the Copy from source day field.
5. Enter Y for all days in the To Target day list that will receive the copied schedule.
6. Press Enter. The schedule is copied.
Example: Three-Shift Production Environment The following example portrays a scenario for a hypothetical three-shift production environment, in which the majority of clerical, data entry and reporting functions take place during the first (daytime) shift.
This example uses the settings that you created in the Activating a Predefined Setting example (Example: Three Shift Production Scenario on page 36).
1. Select 1. OS/400 Audit Features in the Main menu. The OS/400 Audit Features menu appears.
2. Select 11. Work with Audit Scheduler. The Work with Audit Scheduler screen appears.
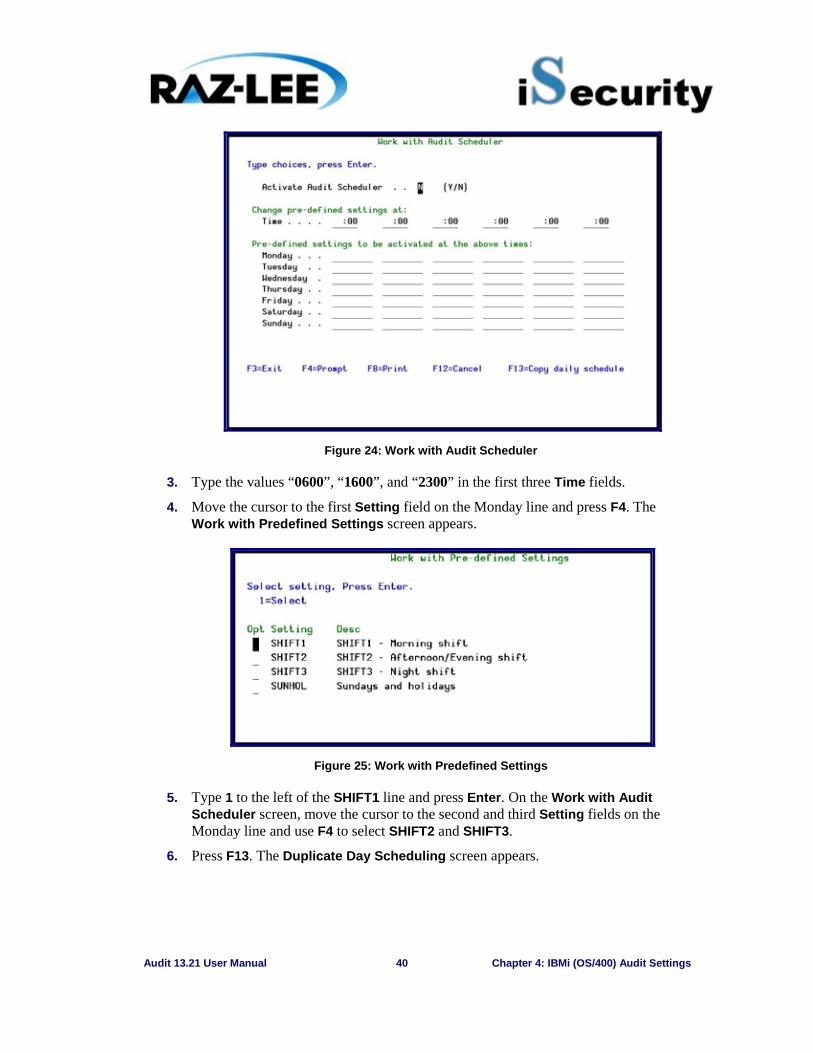
Audit 13.21 User Manual 40 Chapter 4: IBMi (OS/400) Audit Settings
Figure 24: Work with Audit Scheduler
3. Type the values “0600”, “1600”, and “2300” in the first three Time fields.
4. Move the cursor to the first Setting field on the Monday line and press F4. The Work with Predefined Settings screen appears.
Figure 25: Work with Predefined Settings
5. Type 1 to the left of the SHIFT1 line and press Enter. On the Work with Audit Scheduler screen, move the cursor to the second and third Setting fields on the Monday line and use F4 to select SHIFT2 and SHIFT3.
6. Press F13. The Duplicate Day Scheduling screen appears.
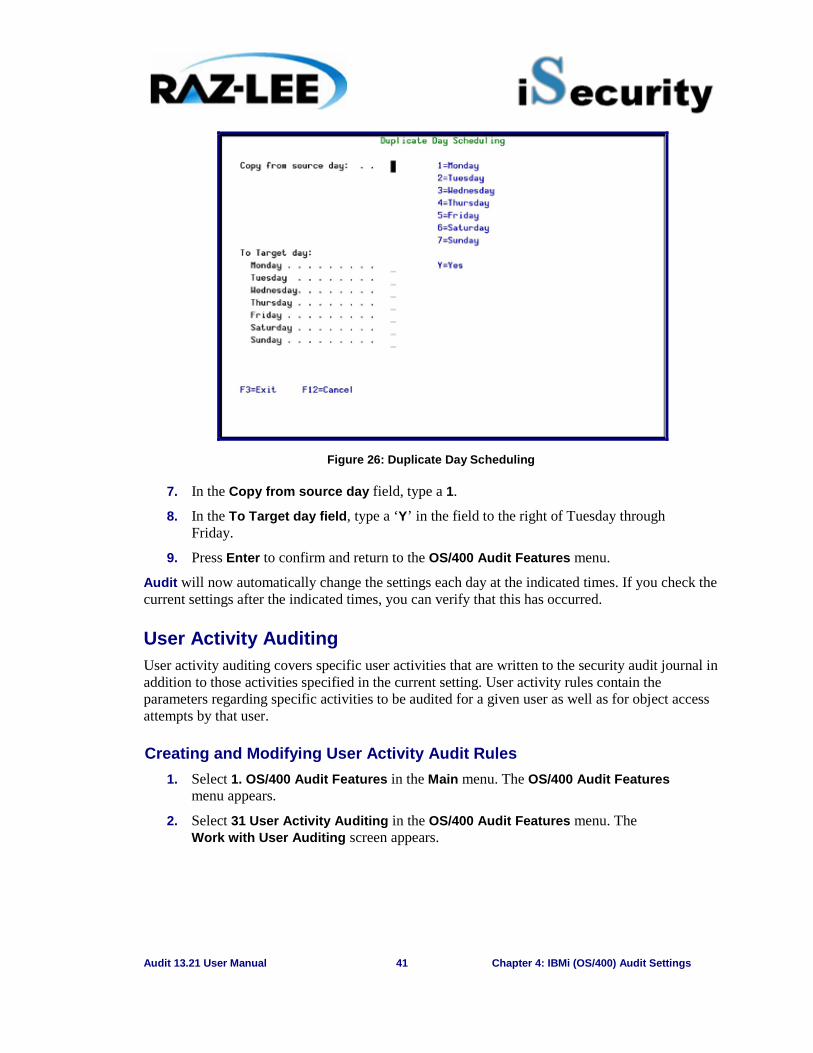
Audit 13.21 User Manual 41 Chapter 4: IBMi (OS/400) Audit Settings
Figure 26: Duplicate Day Scheduling
7. In the Copy from source day field, type a 1.
8. In the To Target day field, type a ‘Y’ in the field to the right of Tuesday through Friday.
9. Press Enter to confirm and return to the OS/400 Audit Features menu.
Audit will now automatically change the settings each day at the indicated times. If you check the current settings after the indicated times, you can verify that this has occurred.
User Activity Auditing User activity auditing covers specific user activities that are written to the security audit journal in addition to those activities specified in the current setting. User activity rules contain the parameters regarding specific activities to be audited for a given user as well as for object access attempts by that user.
Creating and Modifying User Activity Audit Rules 1. Select 1. OS/400 Audit Features in the Main menu. The OS/400 Audit Features
menu appears.
2. Select 31 User Activity Auditing in the OS/400 Audit Features menu. The Work with User Auditing screen appears.
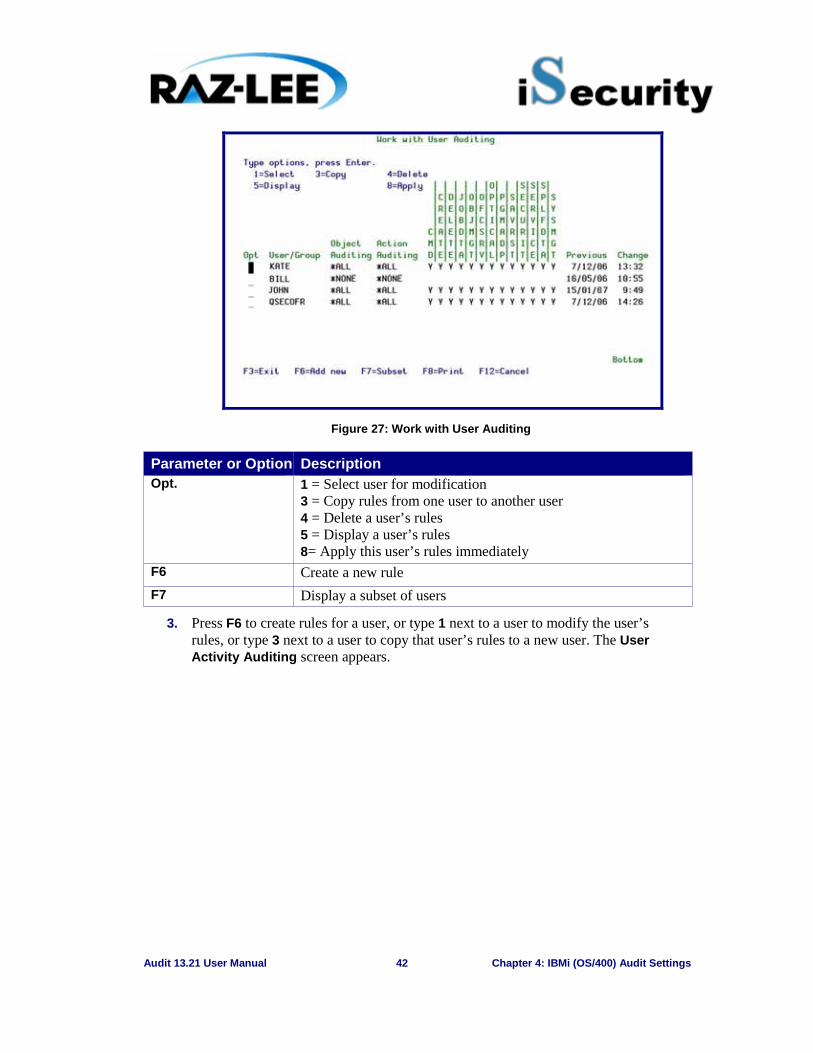
Audit 13.21 User Manual 42 Chapter 4: IBMi (OS/400) Audit Settings
Figure 27: Work with User Auditing
Parameter or Option Description Opt. 1 = Select user for modification
3 = Copy rules from one user to another user 4 = Delete a user’s rules 5 = Display a user’s rules 8= Apply this user’s rules immediately
F6 Create a new rule F7 Display a subset of users
3. Press F6 to create rules for a user, or type 1 next to a user to modify the user’s rules, or type 3 next to a user to copy that user’s rules to a new user. The User Activity Auditing screen appears.
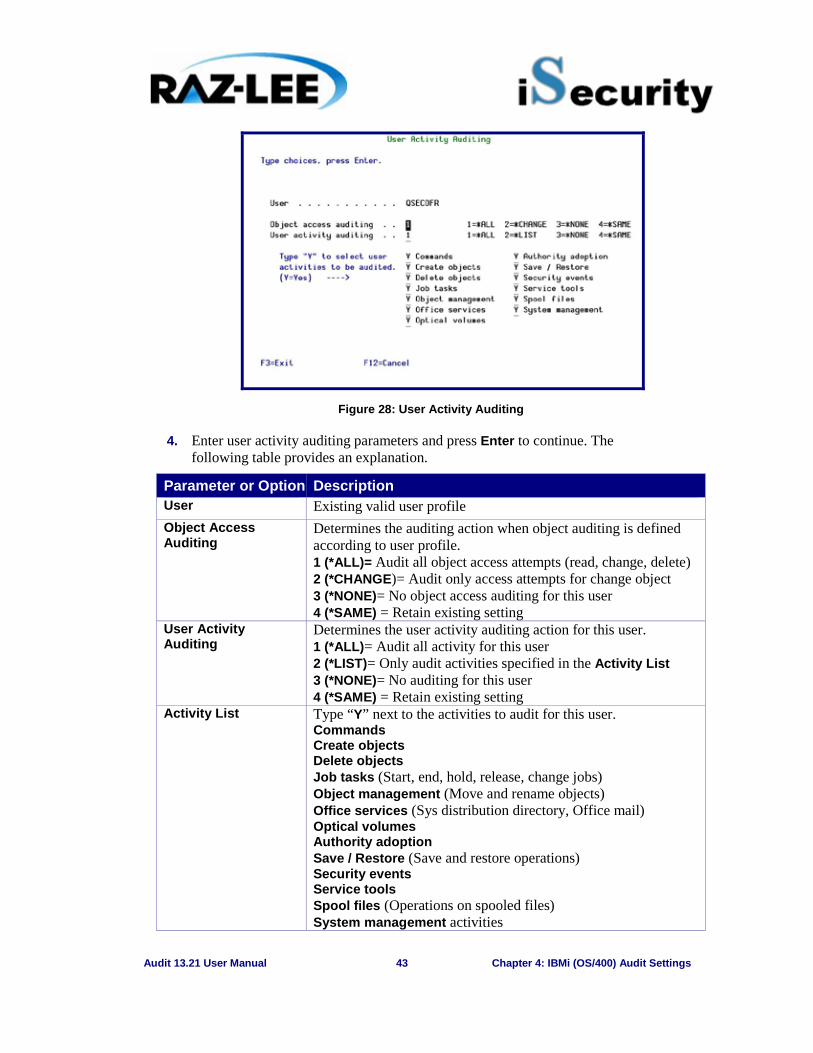
Audit 13.21 User Manual 43 Chapter 4: IBMi (OS/400) Audit Settings
Figure 28: User Activity Auditing
4. Enter user activity auditing parameters and press Enter to continue. The following table provides an explanation.
Parameter or Option Description User Existing valid user profile Object Access Auditing
Determines the auditing action when object auditing is defined according to user profile. 1 (*ALL)= Audit all object access attempts (read, change, delete) 2 (*CHANGE)= Audit only access attempts for change object 3 (*NONE)= No object access auditing for this user 4 (*SAME) = Retain existing setting
User Activity Auditing
Determines the user activity auditing action for this user. 1 (*ALL)= Audit all activity for this user 2 (*LIST)= Only audit activities specified in the Activity List 3 (*NONE)= No auditing for this user 4 (*SAME) = Retain existing setting
Activity List Type “Y” next to the activities to audit for this user. Commands Create objects Delete objects Job tasks (Start, end, hold, release, change jobs) Object management (Move and rename objects) Office services (Sys distribution directory, Office mail) Optical volumes Authority adoption Save / Restore (Save and restore operations) Security events Service tools Spool files (Operations on spooled files) System management activities
Audit 13.21 User Manual 44 Chapter 4: IBMi (OS/400) Audit Settings
User Activity Audit Strategies The following best practices will help you balance the need to capture sufficient historical data without generating an excessive amount of raw data.
§ Create a unique user profile for each individual user; do not use generic departmental user profiles. Define rules for all active users.
§ Avoid defining rules using the *ALL parameter for object access and user activity auditing. This will only generate a large volume of irrelevant journal entries. These options should be used only to trace suspicious activity or troubleshooting system problems.
§ Avoid continuous auditing of routine activities for high volume users, such as data entry clerks and programmers. The following activities will likely generate an enormous quantity of journal entries for this type of user.
§ Commands (*CMD)
§ Create objects (*CREATE)
§ Delete objects (*DELETE)
§ Spool files (*SPLFDTA)
As an alternative, you can choose to audit these activities for short time periods on a random basis.
§ Audit the Commands (*CMD) activity sparingly. Programs typically generate numerous other programs, commands and batch jobs. Each of these is a separate activity, generating its own audit journal entries. Consequently, a single job can create hundreds of journal entries, most of which are irrelevant for effective security auditing.
§ Do not audit IBMi internal user profiles (such as QSYS, QUSER, QTCP, and so on) regularly. They generate a large volume of journal entries that are of little value for security auditing. Never allow users to sign-on using these profiles.
§ Use object access auditing instead of the Create Objects and Delete Objects user audit activities. This greatly reduces the volume of journal entries by allowing you to audit only specific user accesses to specific objects.
§ Use the *CHANGE object access audit parameter instead of *ALL. You rarely need to audit who reads or uses an object.
Examples of User Activity Auditing This section presents examples of user activity auditing settings for several user types. Please note that the settings shown here are for demonstration purposes only, and do not represent “typical” or “recommended” settings. Your settings should represent the operational characteristics and security exposure for your organization.
These examples also illustrate the Subset and Copy features provided by the user interface.
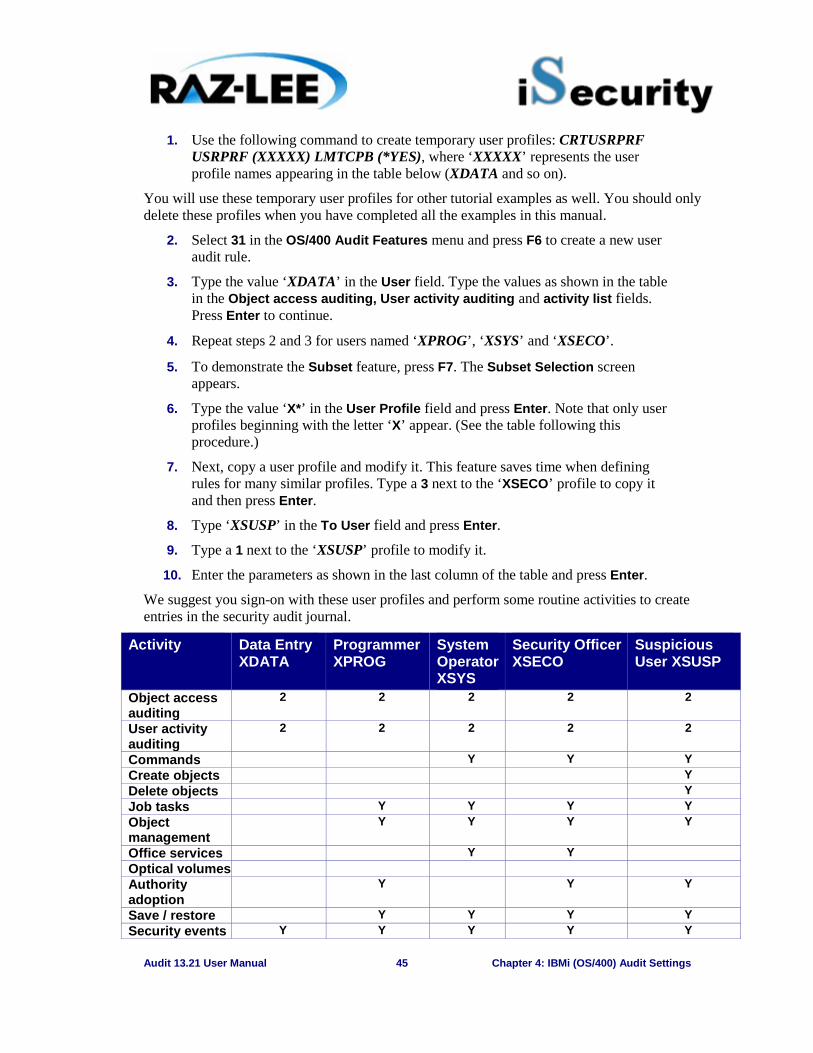
Audit 13.21 User Manual 45 Chapter 4: IBMi (OS/400) Audit Settings
1. Use the following command to create temporary user profiles: CRTUSRPRF USRPRF (XXXXX) LMTCPB (*YES), where ‘XXXXX’ represents the user profile names appearing in the table below (XDATA and so on).
You will use these temporary user profiles for other tutorial examples as well. You should only delete these profiles when you have completed all the examples in this manual.
2. Select 31 in the OS/400 Audit Features menu and press F6 to create a new user audit rule.
3. Type the value ‘XDATA’ in the User field. Type the values as shown in the table in the Object access auditing, User activity auditing and activity list fields. Press Enter to continue.
4. Repeat steps 2 and 3 for users named ‘XPROG’, ‘XSYS’ and ‘XSECO’.
5. To demonstrate the Subset feature, press F7. The Subset Selection screen appears.
6. Type the value ‘X*’ in the User Profile field and press Enter. Note that only user profiles beginning with the letter ‘X’ appear. (See the table following this procedure.)
7. Next, copy a user profile and modify it. This feature saves time when defining rules for many similar profiles. Type a 3 next to the ‘XSECO’ profile to copy it and then press Enter.
8. Type ‘XSUSP’ in the To User field and press Enter.
9. Type a 1 next to the ‘XSUSP’ profile to modify it.
10. Enter the parameters as shown in the last column of the table and press Enter.
We suggest you sign-on with these user profiles and perform some routine activities to create entries in the security audit journal.
Activity Data Entry XDATA
Programmer XPROG
System Operator XSYS
Security Officer XSECO
Suspicious User XSUSP
Object access auditing
2 2 2 2 2
User activity auditing
2 2 2 2 2
Commands Y Y Y Create objects Y Delete objects Y Job tasks Y Y Y Y Object management
Y Y Y Y
Office services Y Y Optical volumes Authority adoption
Y Y Y
Save / restore Y Y Y Y Security events Y Y Y Y Y
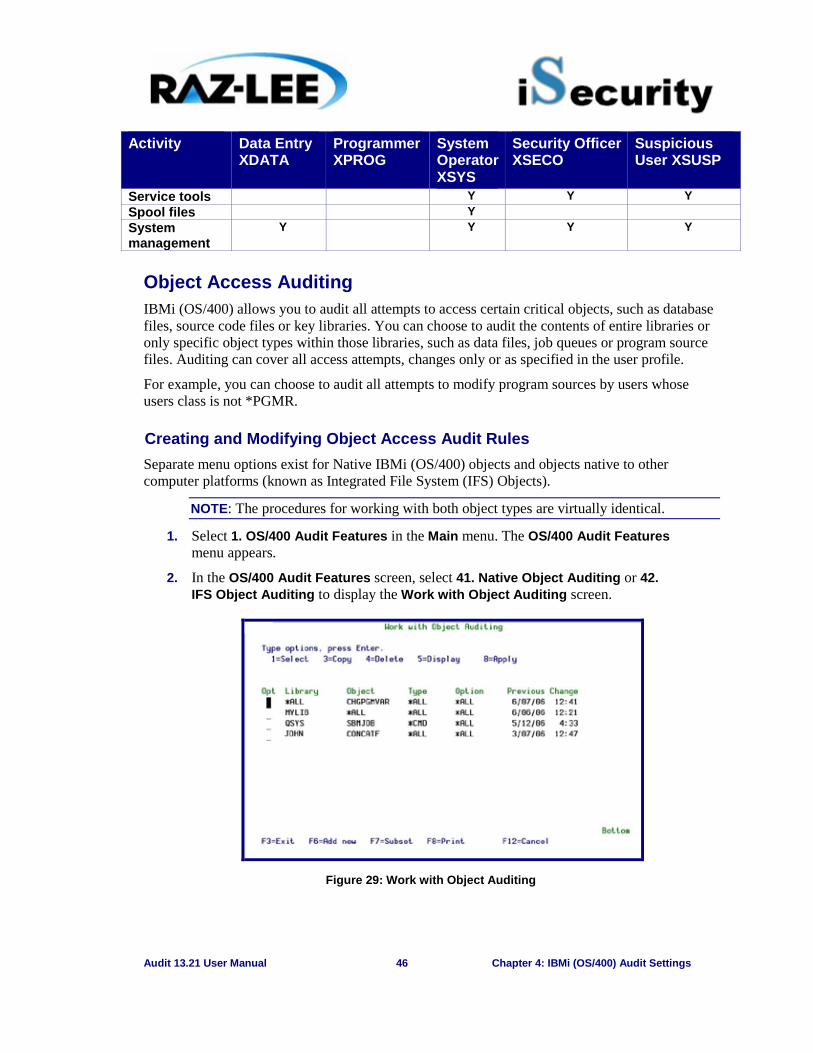
Audit 13.21 User Manual 46 Chapter 4: IBMi (OS/400) Audit Settings
Activity Data Entry XDATA
Programmer XPROG
System Operator XSYS
Security Officer XSECO
Suspicious User XSUSP
Service tools Y Y Y Spool files Y System management
Y Y Y Y
Object Access Auditing IBMi (OS/400) allows you to audit all attempts to access certain critical objects, such as database files, source code files or key libraries. You can choose to audit the contents of entire libraries or only specific object types within those libraries, such as data files, job queues or program source files. Auditing can cover all access attempts, changes only or as specified in the user profile.
For example, you can choose to audit all attempts to modify program sources by users whose users class is not *PGMR.
Creating and Modifying Object Access Audit Rules Separate menu options exist for Native IBMi (OS/400) objects and objects native to other computer platforms (known as Integrated File System (IFS) Objects).
NOTE: The procedures for working with both object types are virtually identical.
1. Select 1. OS/400 Audit Features in the Main menu. The OS/400 Audit Features menu appears.
2. In the OS/400 Audit Features screen, select 41. Native Object Auditing or 42. IFS Object Auditing to display the Work with Object Auditing screen.
Figure 29: Work with Object Auditing

Audit 13.21 User Manual 47 Chapter 4: IBMi (OS/400) Audit Settings
Parameter or Option Description Rule List Options 1 = Select object rule to modify
3 = Copy object rule to another user profile (Native objects only) 4 = Delete object rule 5 = Display object rule 8 = Apply this object rule immediately
F6 Create a new rule F7 Display a subset of rules
You can filter the subset by one or more of Object Name/Library, Object Type, Object auditing option, and Audit rule status.
3. Press F6 to create rules for a new user, or type 1 next to a user to modify it, or type 3 next to a user to copy that user’s rules to a new user. The Apply Object Auditing screen appears.
4. Enter object activity auditing parameters and press Enter to continue.
Figure 30: Apply Native Object Auditing
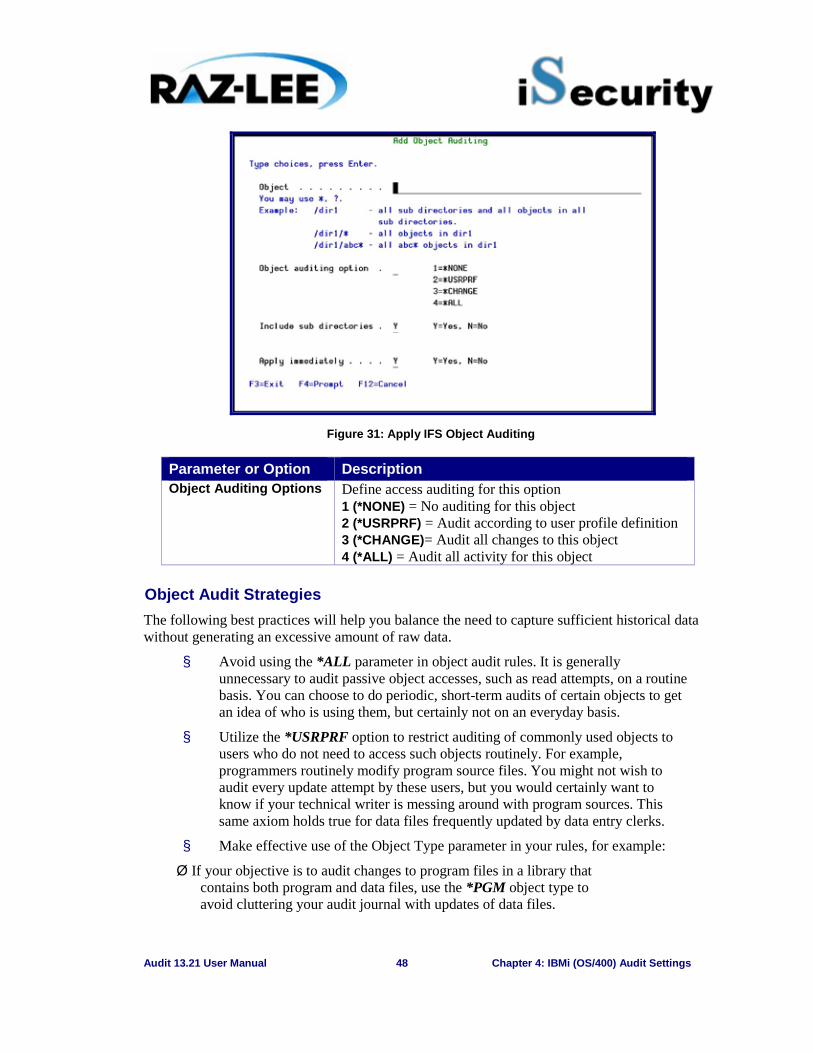
Audit 13.21 User Manual 48 Chapter 4: IBMi (OS/400) Audit Settings
Figure 31: Apply IFS Object Auditing
Parameter or Option Description Object Auditing Options Define access auditing for this option
1 (*NONE) = No auditing for this object 2 (*USRPRF) = Audit according to user profile definition 3 (*CHANGE)= Audit all changes to this object 4 (*ALL) = Audit all activity for this object
Object Audit Strategies The following best practices will help you balance the need to capture sufficient historical data without generating an excessive amount of raw data.
§ Avoid using the *ALL parameter in object audit rules. It is generally unnecessary to audit passive object accesses, such as read attempts, on a routine basis. You can choose to do periodic, short-term audits of certain objects to get an idea of who is using them, but certainly not on an everyday basis.
§ Utilize the *USRPRF option to restrict auditing of commonly used objects to users who do not need to access such objects routinely. For example, programmers routinely modify program source files. You might not wish to audit every update attempt by these users, but you would certainly want to know if your technical writer is messing around with program sources. This same axiom holds true for data files frequently updated by data entry clerks.
§ Make effective use of the Object Type parameter in your rules, for example:
Ø If your objective is to audit changes to program files in a library that contains both program and data files, use the *PGM object type to avoid cluttering your audit journal with updates of data files.
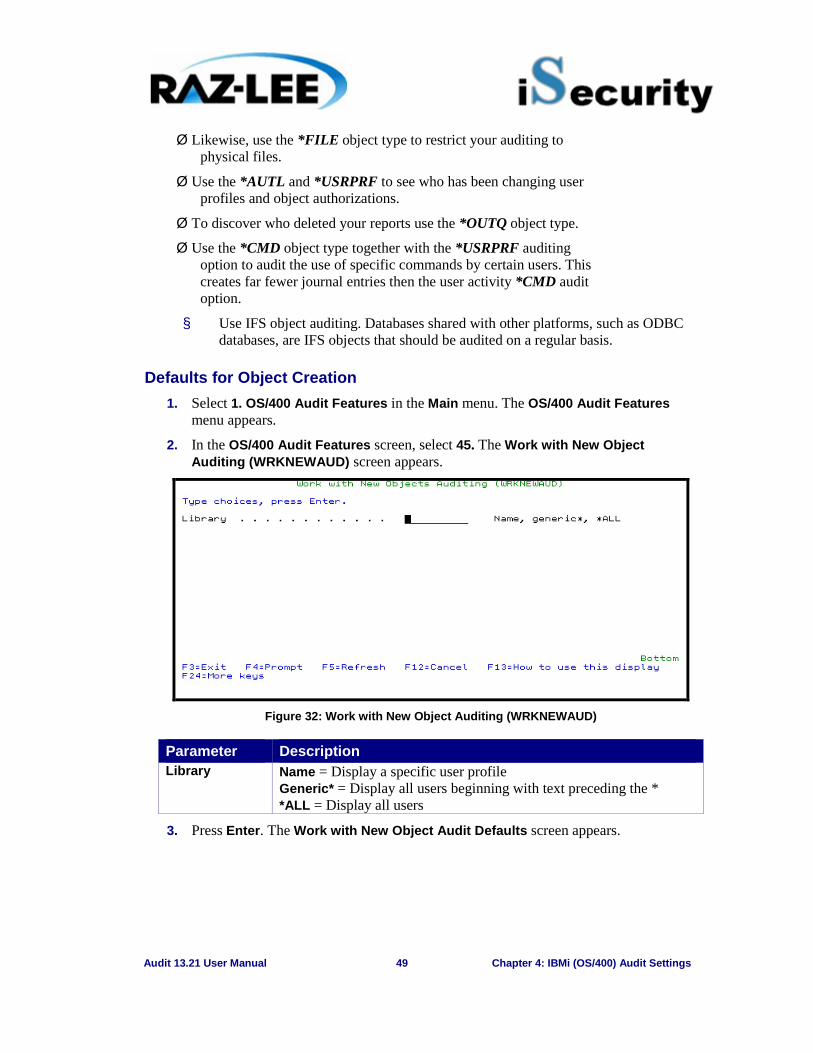
Audit 13.21 User Manual 49 Chapter 4: IBMi (OS/400) Audit Settings
Ø Likewise, use the *FILE object type to restrict your auditing to physical files.
Ø Use the *AUTL and *USRPRF to see who has been changing user profiles and object authorizations.
Ø To discover who deleted your reports use the *OUTQ object type.
Ø Use the *CMD object type together with the *USRPRF auditing option to audit the use of specific commands by certain users. This creates far fewer journal entries then the user activity *CMD audit option.
§ Use IFS object auditing. Databases shared with other platforms, such as ODBC databases, are IFS objects that should be audited on a regular basis.
Defaults for Object Creation 1. Select 1. OS/400 Audit Features in the Main menu. The OS/400 Audit Features
menu appears.
2. In the OS/400 Audit Features screen, select 45. The Work with New Object Auditing (WRKNEWAUD) screen appears.
Figure 32: Work with New Object Auditing (WRKNEWAUD)
Parameter Description Library Name = Display a specific user profile
Generic* = Display all users beginning with text preceding the * *ALL = Display all users
3. Press Enter. The Work with New Object Audit Defaults screen appears.
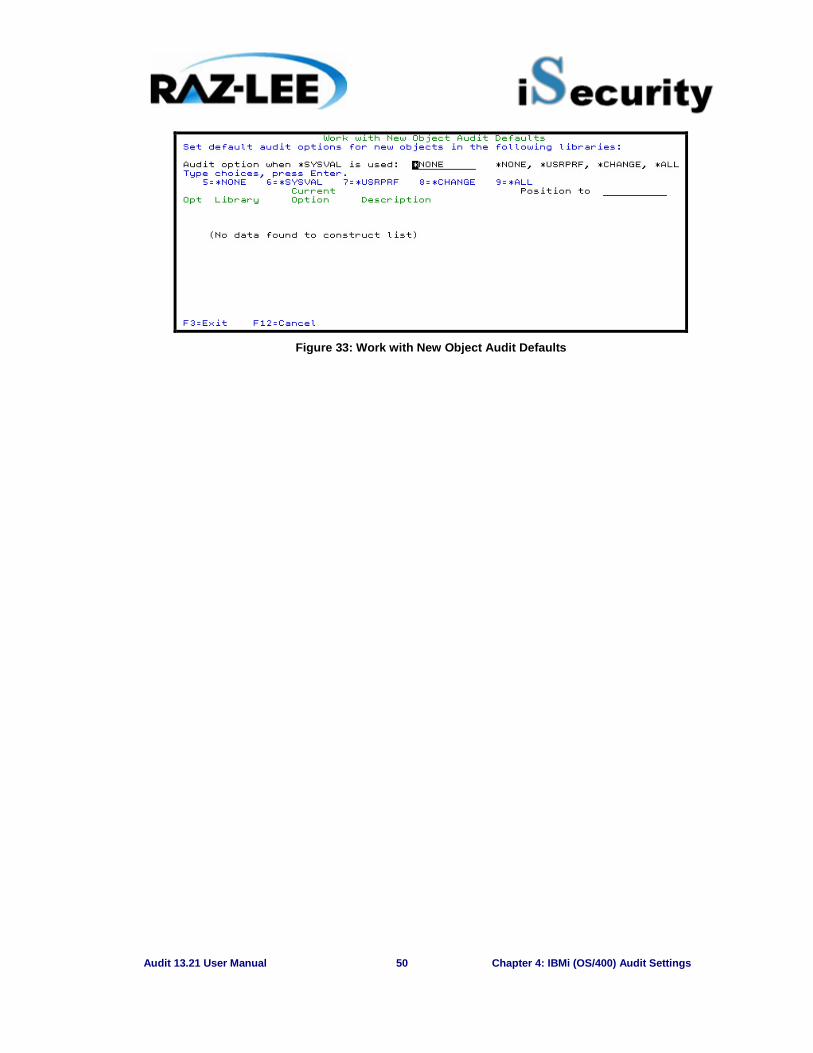
Audit 13.21 User Manual 50 Chapter 4: IBMi (OS/400) Audit Settings
Figure 33: Work with New Object Audit Defaults

Audit 13.21 User Manual 51 Chapter 5: Real-Time Auditing
5
Chapter 5: Real-Time Auditing The purpose of this Chapter is to provide information about real-time auditing, and includes the following sections:
Ø Overview
Ø Conceptual Framework
Ø Working with Real-Time Detection Rules
Ø Working with Message Queues
Ø Working with Time Groups
Ø Working with Actions
Overview This chapter presents a detailed discussion of the real-time auditing features. The discussion begins with a conceptual introduction and continues with the most commonly used features and parameters. Practical examples are presented together with detailed procedures.
Conceptual Framework
Real-Time Detection The principle feature of Audit is its ability to examine and respond to security related events in real time. When the IBMi (OS/400) current audit settings detect an event, an entry is recorded in the security audit journal. At the same time, Audit looks for a real time detection rule for this event.
If such a rule exists, Audit records the event in a history log and optionally triggers an alert message or command script as specified by the rule definition. Action (sold as a separate product) performs these responsive actions.
The powerful query and reporting features of Audit use the contents of the history log. You must define real time detection rules to capture and record events in the history log, even if no responsive action is necessary. In fact, you will likely create most of your real time detection rules solely for the purpose of recording events in the history log for subsequent audit and analysis.
It is important to note that an event must first be detected by the current IBMi (OS/400) audit settings in order for real-time detection to capture and record it in the history log and/or trigger an action.
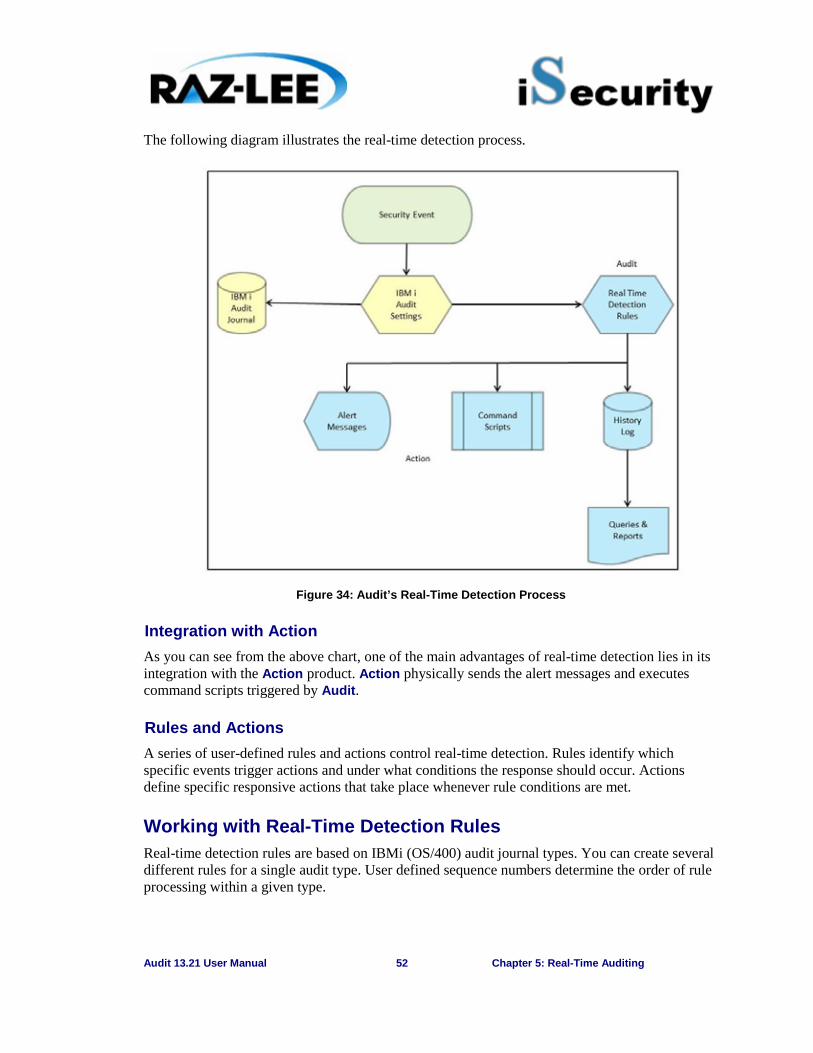
Audit 13.21 User Manual 52 Chapter 5: Real-Time Auditing
The following diagram illustrates the real-time detection process.
Figure 34: Audit’s Real-Time Detection Process
Integration with Action As you can see from the above chart, one of the main advantages of real-time detection lies in its integration with the Action product. Action physically sends the alert messages and executes command scripts triggered by Audit.
Rules and Actions A series of user-defined rules and actions control real-time detection. Rules identify which specific events trigger actions and under what conditions the response should occur. Actions define specific responsive actions that take place whenever rule conditions are met.
Working with Real-Time Detection Rules Real-time detection rules are based on IBMi (OS/400) audit journal types. You can create several different rules for a single audit type. User defined sequence numbers determine the order of rule processing within a given type.
Audit 13.21 User Manual 53 Chapter 5: Real-Time Auditing
Overview The procedure for defining a real-time detection rule may seem a bit complex at first, but in fact, it is both easy and intuitive. There are seven basic steps for creating rules.
NOTE: The first two steps and the final step are required; the rest are optional.
1. Ensure that the IBMi (OS/400) audit settings are properly defined to capture events covered by the rule.
2. Create a new real-time detection rule or select an existing rule for modification.
3. Set basic rule parameters using the Selection Rule screen.
4. Define filter conditions limiting application of the rule to specific conditions.
5. Define alert message actions as necessary.
6. Define command script actions as necessary.
7. Test and debug your rule.
Audit provides you with a suite of powerful but easy-to-use tools to help you create rules that precisely define the circumstances governing the recording of an event in the history log and/or performing a responsive action. Concise explanations for data elements and options as well as pop-up selection windows are only a key press away.
§ You can copy existing rules, making minor changes to save definition effort.
§ You can use existing action definitions with any number of rules.
§ You can apply precise filter criteria to any or all fields in the history log records using powerful criteria selection operators. A single, user-friendly screen supports this process.
§ The unique Time Group feature allows you to apply rules only during (or outside of) predefined periods.
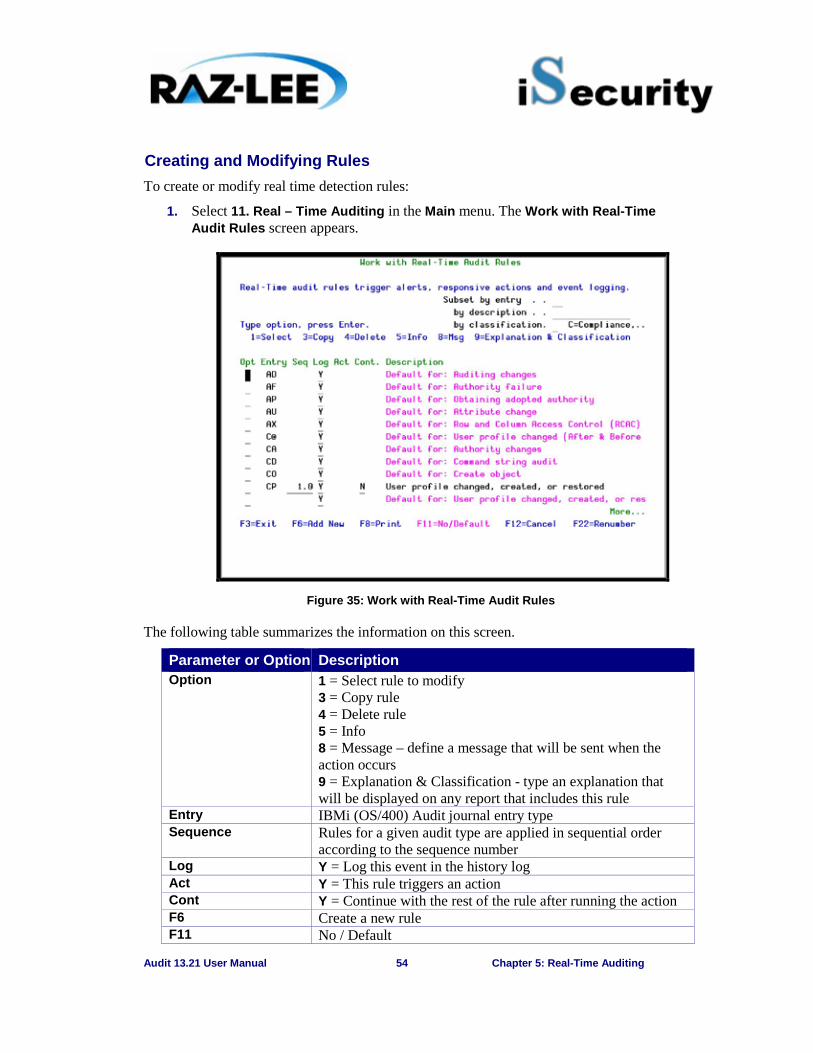
Audit 13.21 User Manual 54 Chapter 5: Real-Time Auditing
Creating and Modifying Rules To create or modify real time detection rules:
1. Select 11. Real – Time Auditing in the Main menu. The Work with Real-Time Audit Rules screen appears.
Figure 35: Work with Real-Time Audit Rules
The following table summarizes the information on this screen.
Parameter or Option Description Option 1 = Select rule to modify
3 = Copy rule 4 = Delete rule 5 = Info 8 = Message – define a message that will be sent when the action occurs 9 = Explanation & Classification - type an explanation that will be displayed on any report that includes this rule
Entry IBMi (OS/400) Audit journal entry type Sequence Rules for a given audit type are applied in sequential order
according to the sequence number Log Y = Log this event in the history log Act Y = This rule triggers an action Cont Y = Continue with the rest of the rule after running the action F6 Create a new rule F11 No / Default

Audit 13.21 User Manual 55 Chapter 5: Real-Time Auditing
Parameter or Option Description F22 Recalculate rule sequence numbers
2. Select a rule from the list (option 1) or press F6 to create a new rule.
3. The Add Selection Rule or Modify Selection Rule screen appears, enabling you to set basic rule parameters (each screen contains the same parameters).
Figure 36: Modify Selection Rule
Parameter or Option Description Audit Type IBMi (OS/400) Audit journal entry type
F4 = Choose from a list of available types Sequence Enter a sequence number or accept the default as presented.
The sequence number determines the order of rule processing when there is more than one rule for a given audit type.
Description Enter a meaningful description of the rule. Sub-Type list You can restrict this rule to one or more sub-types only:
Sub-Type = One character sub-type code F4 = Choose a sub-type from the list List = Enter several sub-type codes separated by a space *ALL = All sub-types within this entry type
Audit 13.21 User Manual 56 Chapter 5: Real-Time Auditing
Parameter or Option Description Time Group – Not You can optionally limit this group only to a specific Time
Group. Blank = Apply rule only to events occurring during time group N = Apply rule only to events occurring outside the times defined in the time group
Time Group – Group Name
Name = Time Group name F4 = Choose Time Group name from list Blank = Do NOT use Time Group name for rule selection
Log Y= Record this event in the history log N = Do NOT Record this event in the history log
Perform Action Y= Perform this action according to the rule N = Do NOT perform this action
Action Optionally trigger an action (the Action module must be installed) Name = Name of the action to trigger by this rule F4 = Select an action from list Add = Define a new action for this rule *NONE = No actions are triggered by this rule
If event rate exceeds Only perform the action if the event occurs more than a given number of times in a given time period. For example, 5 times in every 10 seconds. If you want to run the action always, enter 1/1.
Run action once per The number of seconds between each performance of the action.
Continue to rule seq Y= After performing the actions, continue to the rule sequence.
4. Enter parameters and data as described in the table. Press Enter when finished to define filters. The Filter Conditions screen appears. Filter criteria allow you to limit the application of real-time detection rules to certain specific conditions.
Defining Filter Conditions
Each filter condition consists of a comparison test applied against one of the fields in the journal record.
Below are the Filter Conditions screens and a table of explanation.
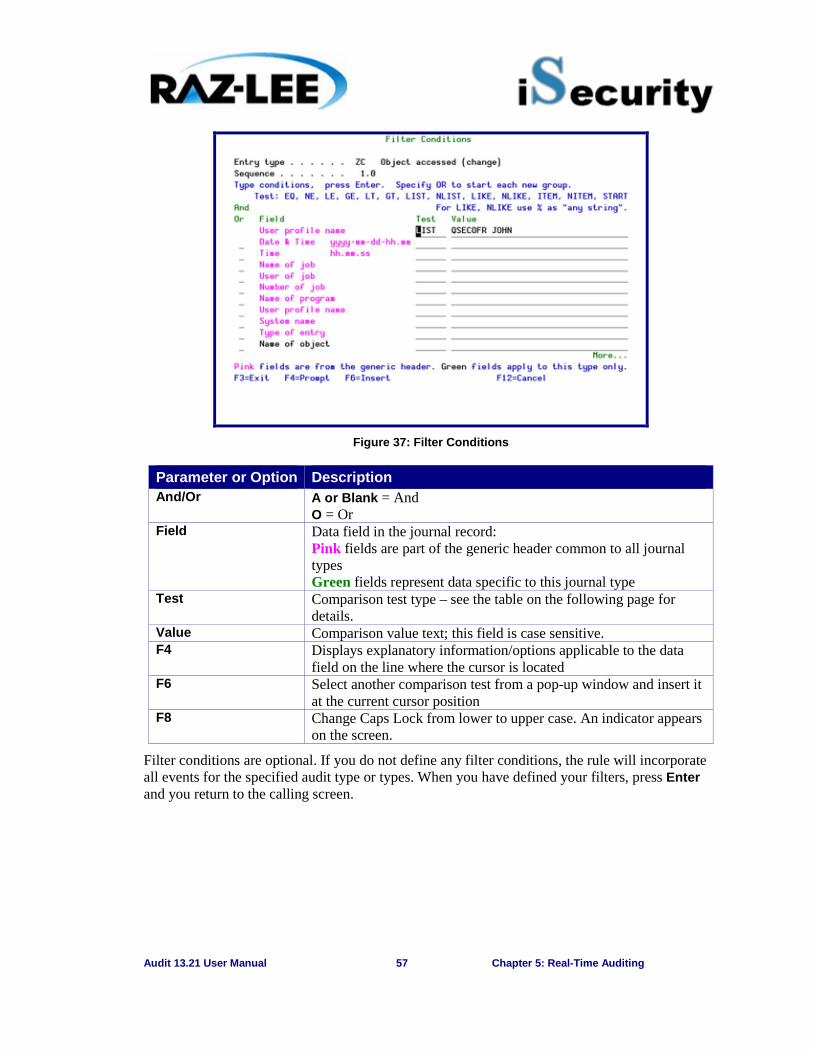
Audit 13.21 User Manual 57 Chapter 5: Real-Time Auditing
Figure 37: Filter Conditions
Parameter or Option Description And/Or A or Blank = And
O = Or Field Data field in the journal record:
Pink fields are part of the generic header common to all journal types Green fields represent data specific to this journal type
Test Comparison test type – see the table on the following page for details.
Value Comparison value text; this field is case sensitive. F4 Displays explanatory information/options applicable to the data
field on the line where the cursor is located F6 Select another comparison test from a pop-up window and insert it
at the current cursor position F8 Change Caps Lock from lower to upper case. An indicator appears
on the screen.
Filter conditions are optional. If you do not define any filter conditions, the rule will incorporate all events for the specified audit type or types. When you have defined your filters, press Enter and you return to the calling screen.
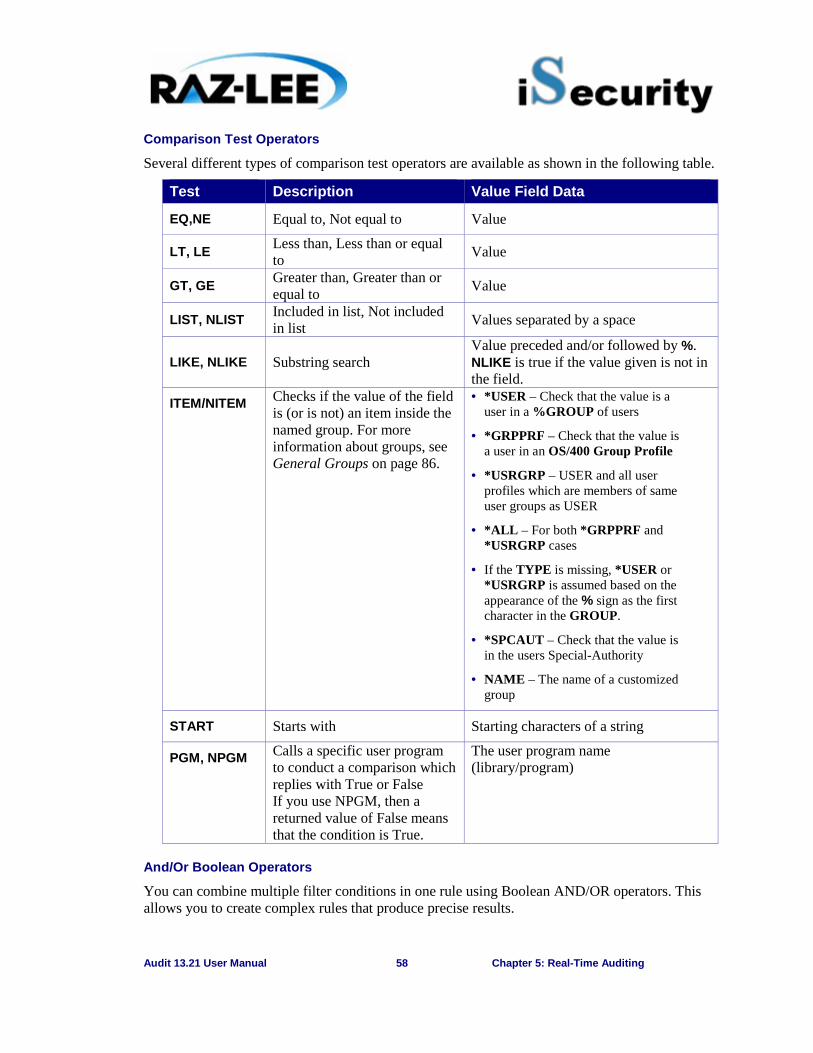
Audit 13.21 User Manual 58 Chapter 5: Real-Time Auditing
Comparison Test Operators
Several different types of comparison test operators are available as shown in the following table.
Test Description Value Field Data
EQ,NE Equal to, Not equal to Value
LT, LE Less than, Less than or equal to Value
GT, GE Greater than, Greater than or equal to Value
LIST, NLIST Included in list, Not included in list Values separated by a space
LIKE, NLIKE Substring search Value preceded and/or followed by %. NLIKE is true if the value given is not in the field.
ITEM/NITEM Checks if the value of the field is (or is not) an item inside the named group. For more information about groups, see General Groups on page 86.
· *USER – Check that the value is a user in a %GROUP of users
· *GRPPRF – Check that the value is a user in an OS/400 Group Profile
· *USRGRP – USER and all user profiles which are members of same user groups as USER
· *ALL – For both *GRPPRF and *USRGRP cases
· If the TYPE is missing, *USER or *USRGRP is assumed based on the appearance of the % sign as the first character in the GROUP.
· *SPCAUT – Check that the value is in the users Special-Authority
· NAME – The name of a customized group
START Starts with Starting characters of a string
PGM, NPGM Calls a specific user program to conduct a comparison which replies with True or False If you use NPGM, then a returned value of False means that the condition is True.
The user program name (library/program)
And/Or Boolean Operators
You can combine multiple filter conditions in one rule using Boolean AND/OR operators. This allows you to create complex rules that produce precise results.
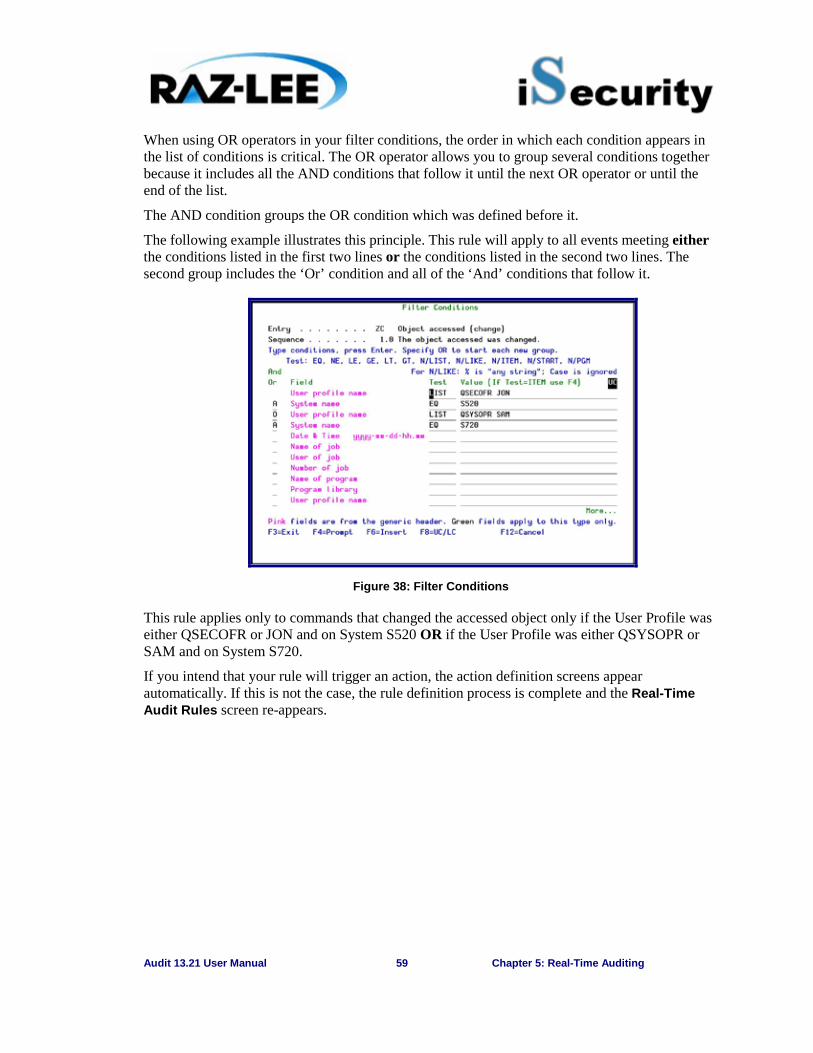
Audit 13.21 User Manual 59 Chapter 5: Real-Time Auditing
When using OR operators in your filter conditions, the order in which each condition appears in the list of conditions is critical. The OR operator allows you to group several conditions together because it includes all the AND conditions that follow it until the next OR operator or until the end of the list.
The AND condition groups the OR condition which was defined before it.
The following example illustrates this principle. This rule will apply to all events meeting either the conditions listed in the first two lines or the conditions listed in the second two lines. The second group includes the ‘Or’ condition and all of the ‘And’ conditions that follow it.
Figure 38: Filter Conditions
This rule applies only to commands that changed the accessed object only if the User Profile was either QSECOFR or JON and on System S520 OR if the User Profile was either QSYSOPR or SAM and on System S720.
If you intend that your rule will trigger an action, the action definition screens appear automatically. If this is not the case, the rule definition process is complete and the Real-Time Audit Rules screen re-appears.
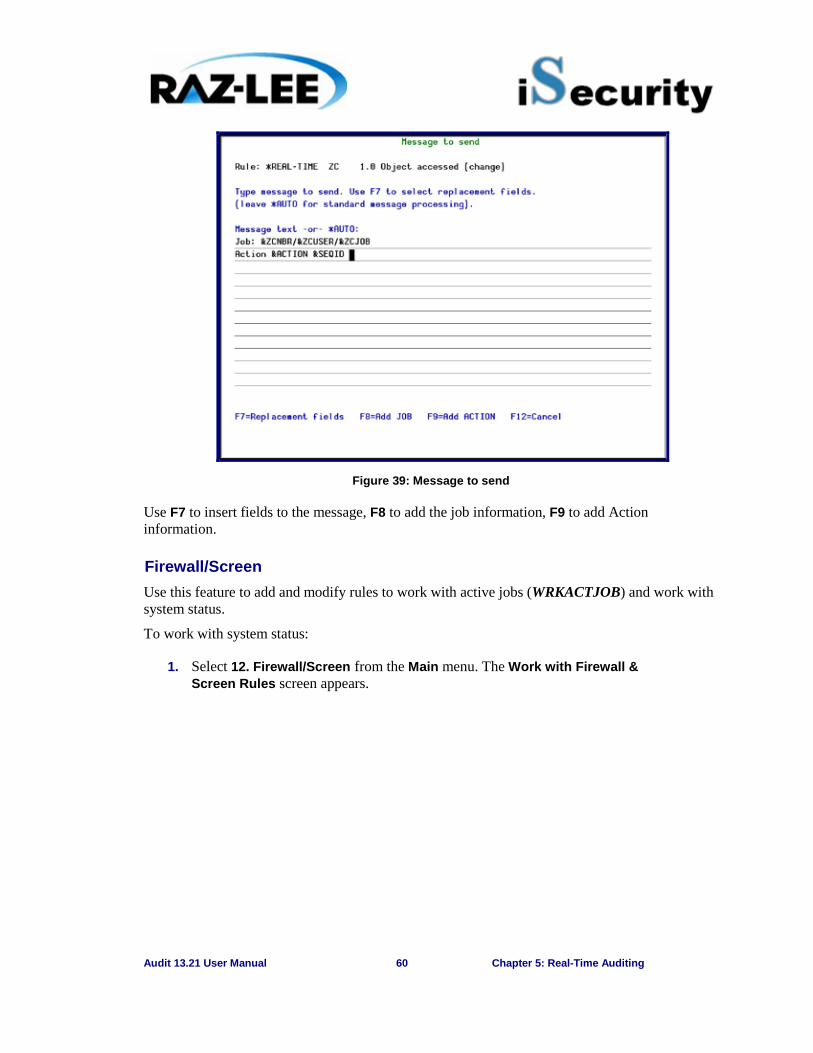
Audit 13.21 User Manual 60 Chapter 5: Real-Time Auditing
Figure 39: Message to send
Use F7 to insert fields to the message, F8 to add the job information, F9 to add Action information.
Firewall/Screen Use this feature to add and modify rules to work with active jobs (WRKACTJOB) and work with system status.
To work with system status:
1. Select 12. Firewall/Screen from the Main menu. The Work with Firewall & Screen Rules screen appears.
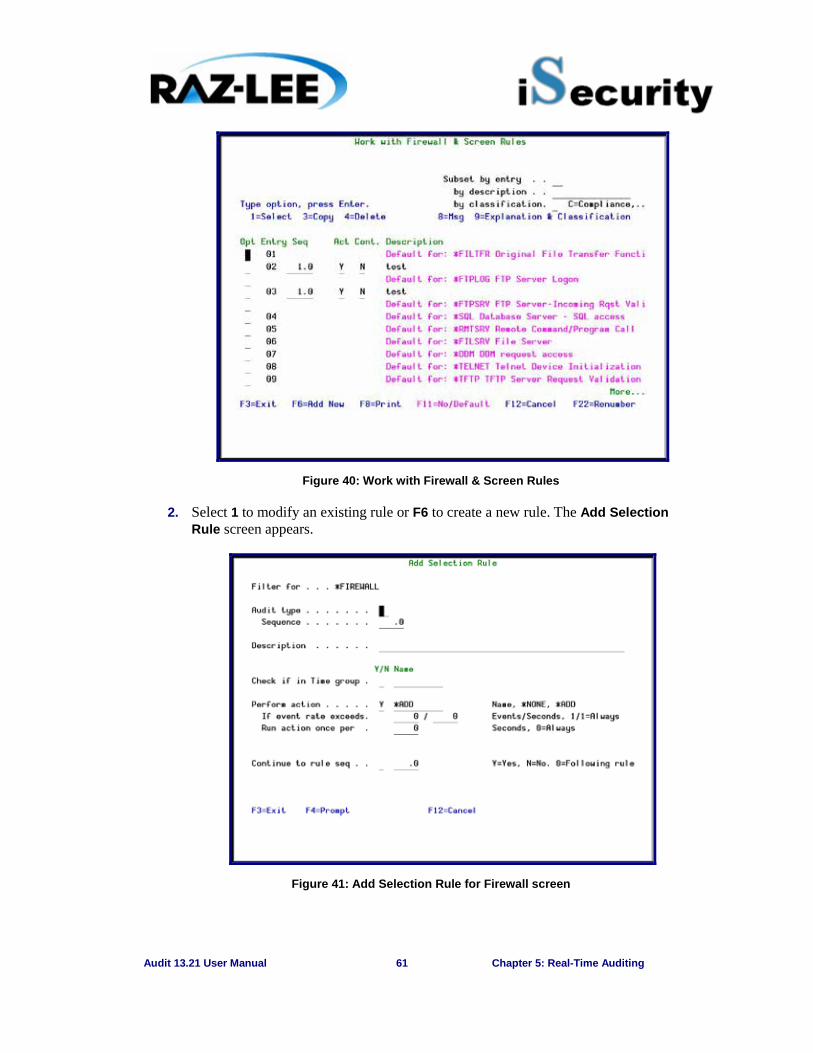
Audit 13.21 User Manual 61 Chapter 5: Real-Time Auditing
Figure 40: Work with Firewall & Screen Rules
2. Select 1 to modify an existing rule or F6 to create a new rule. The Add Selection Rule screen appears.
Figure 41: Add Selection Rule for Firewall screen
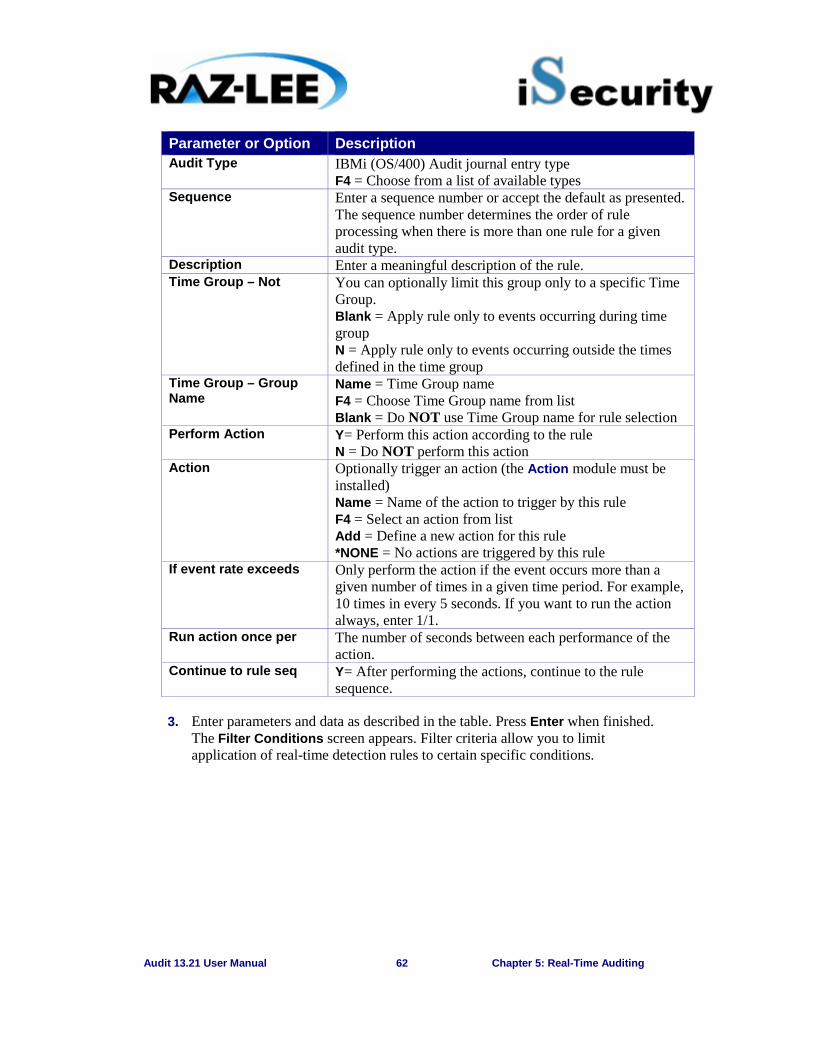
Audit 13.21 User Manual 62 Chapter 5: Real-Time Auditing
Parameter or Option Description Audit Type IBMi (OS/400) Audit journal entry type
F4 = Choose from a list of available types Sequence Enter a sequence number or accept the default as presented.
The sequence number determines the order of rule processing when there is more than one rule for a given audit type.
Description Enter a meaningful description of the rule. Time Group – Not You can optionally limit this group only to a specific Time
Group. Blank = Apply rule only to events occurring during time group N = Apply rule only to events occurring outside the times defined in the time group
Time Group – Group Name
Name = Time Group name F4 = Choose Time Group name from list Blank = Do NOT use Time Group name for rule selection
Perform Action Y= Perform this action according to the rule N = Do NOT perform this action
Action Optionally trigger an action (the Action module must be installed) Name = Name of the action to trigger by this rule F4 = Select an action from list Add = Define a new action for this rule *NONE = No actions are triggered by this rule
If event rate exceeds Only perform the action if the event occurs more than a given number of times in a given time period. For example, 10 times in every 5 seconds. If you want to run the action always, enter 1/1.
Run action once per The number of seconds between each performance of the action.
Continue to rule seq Y= After performing the actions, continue to the rule sequence.
3. Enter parameters and data as described in the table. Press Enter when finished. The Filter Conditions screen appears. Filter criteria allow you to limit application of real-time detection rules to certain specific conditions.
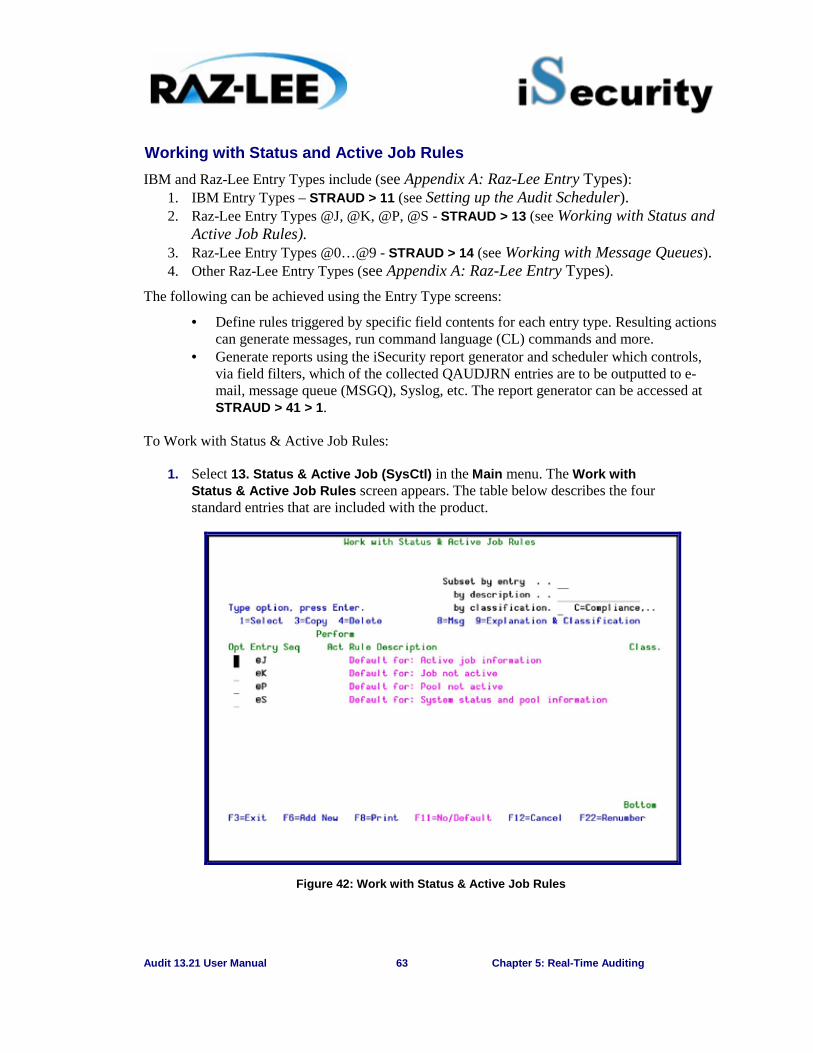
Audit 13.21 User Manual 63 Chapter 5: Real-Time Auditing
Working with Status and Active Job Rules IBM and Raz-Lee Entry Types include (see Appendix A: Raz-Lee Entry Types):
1. IBM Entry Types – STRAUD > 11 (see Setting up the Audit Scheduler). 2. Raz-Lee Entry Types @J, @K, @P, @S - STRAUD > 13 (see Working with Status and
Active Job Rules). 3. Raz-Lee Entry Types @0…@9 - STRAUD > 14 (see Working with Message Queues). 4. Other Raz-Lee Entry Types (see Appendix A: Raz-Lee Entry Types).
The following can be achieved using the Entry Type screens:
· Define rules triggered by specific field contents for each entry type. Resulting actions can generate messages, run command language (CL) commands and more.
· Generate reports using the iSecurity report generator and scheduler which controls, via field filters, which of the collected QAUDJRN entries are to be outputted to e-mail, message queue (MSGQ), Syslog, etc. The report generator can be accessed at STRAUD > 41 > 1.
To Work with Status & Active Job Rules:
1. Select 13. Status & Active Job (SysCtl) in the Main menu. The Work with Status & Active Job Rules screen appears. The table below describes the four standard entries that are included with the product.
Figure 42: Work with Status & Active Job Rules
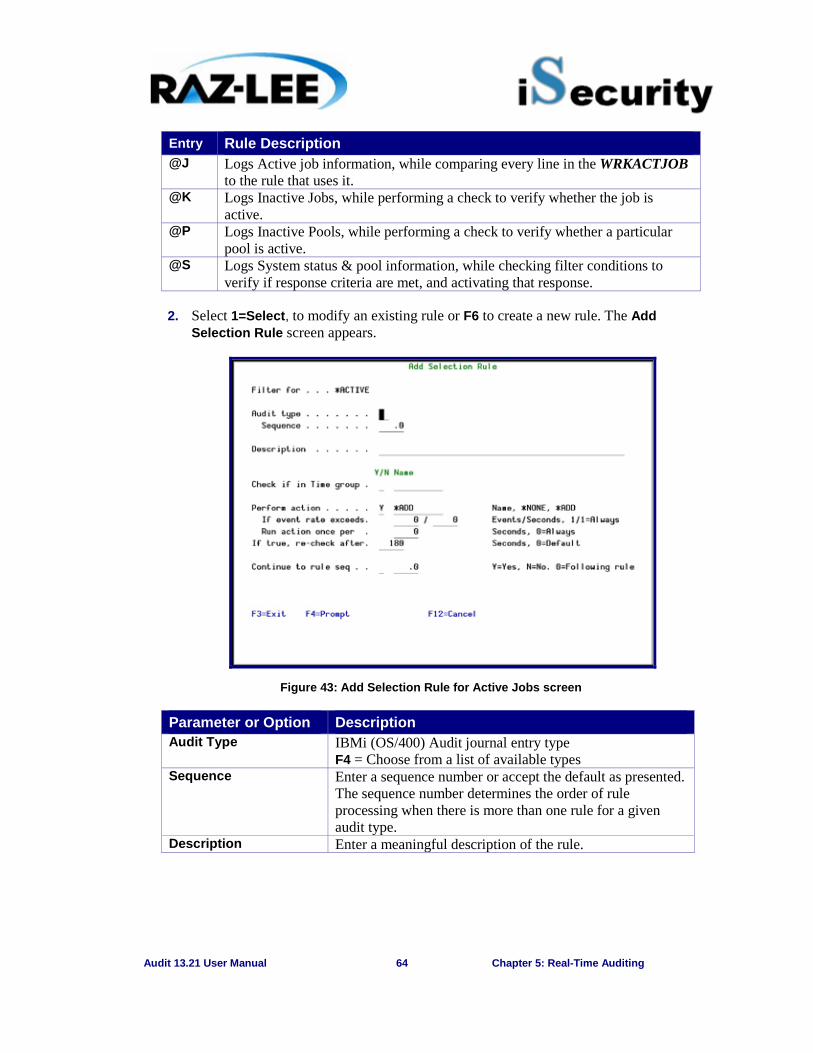
Audit 13.21 User Manual 64 Chapter 5: Real-Time Auditing
Entry Rule Description @J Logs Active job information, while comparing every line in the WRKACTJOB
to the rule that uses it. @K Logs Inactive Jobs, while performing a check to verify whether the job is
active. @P Logs Inactive Pools, while performing a check to verify whether a particular
pool is active. @S Logs System status & pool information, while checking filter conditions to
verify if response criteria are met, and activating that response.
2. Select 1=Select, to modify an existing rule or F6 to create a new rule. The Add Selection Rule screen appears.
Figure 43: Add Selection Rule for Active Jobs screen
Parameter or Option Description Audit Type IBMi (OS/400) Audit journal entry type
F4 = Choose from a list of available types Sequence Enter a sequence number or accept the default as presented.
The sequence number determines the order of rule processing when there is more than one rule for a given audit type.
Description Enter a meaningful description of the rule.
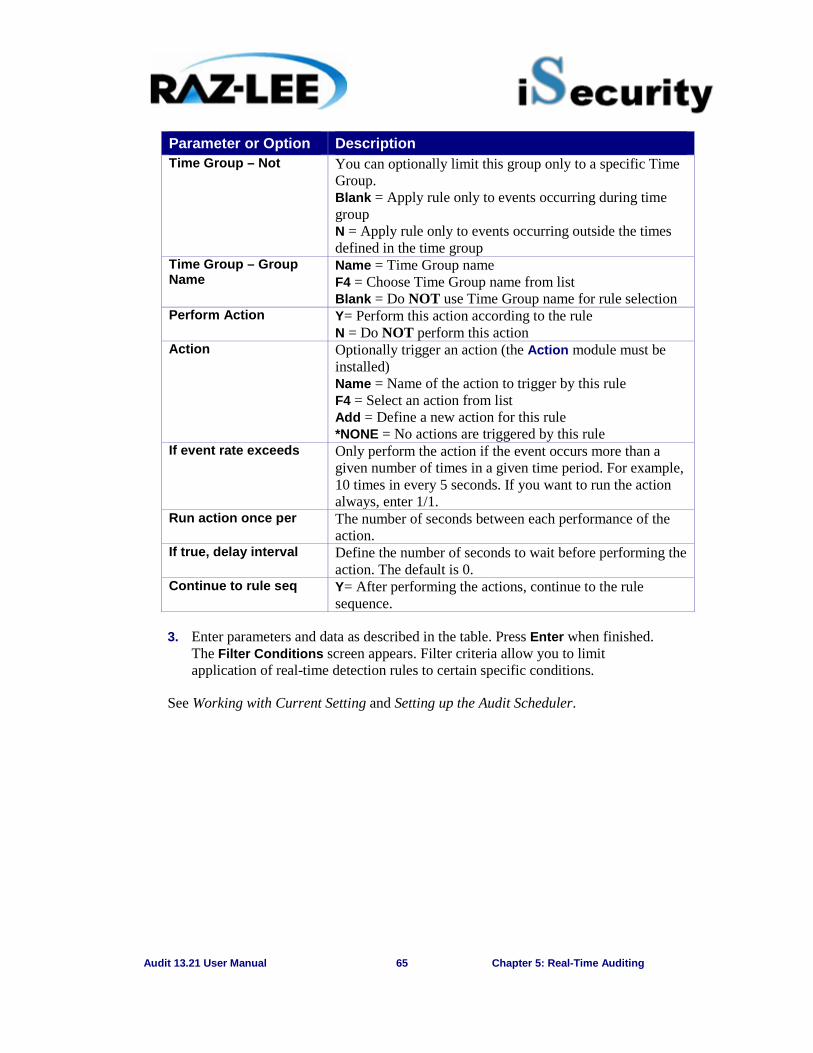
Audit 13.21 User Manual 65 Chapter 5: Real-Time Auditing
Parameter or Option Description Time Group – Not You can optionally limit this group only to a specific Time
Group. Blank = Apply rule only to events occurring during time group N = Apply rule only to events occurring outside the times defined in the time group
Time Group – Group Name
Name = Time Group name F4 = Choose Time Group name from list Blank = Do NOT use Time Group name for rule selection
Perform Action Y= Perform this action according to the rule N = Do NOT perform this action
Action Optionally trigger an action (the Action module must be installed) Name = Name of the action to trigger by this rule F4 = Select an action from list Add = Define a new action for this rule *NONE = No actions are triggered by this rule
If event rate exceeds Only perform the action if the event occurs more than a given number of times in a given time period. For example, 10 times in every 5 seconds. If you want to run the action always, enter 1/1.
Run action once per The number of seconds between each performance of the action.
If true, delay interval Define the number of seconds to wait before performing the action. The default is 0.
Continue to rule seq Y= After performing the actions, continue to the rule sequence.
3. Enter parameters and data as described in the table. Press Enter when finished. The Filter Conditions screen appears. Filter criteria allow you to limit application of real-time detection rules to certain specific conditions.
See Working with Current Setting and Setting up the Audit Scheduler.
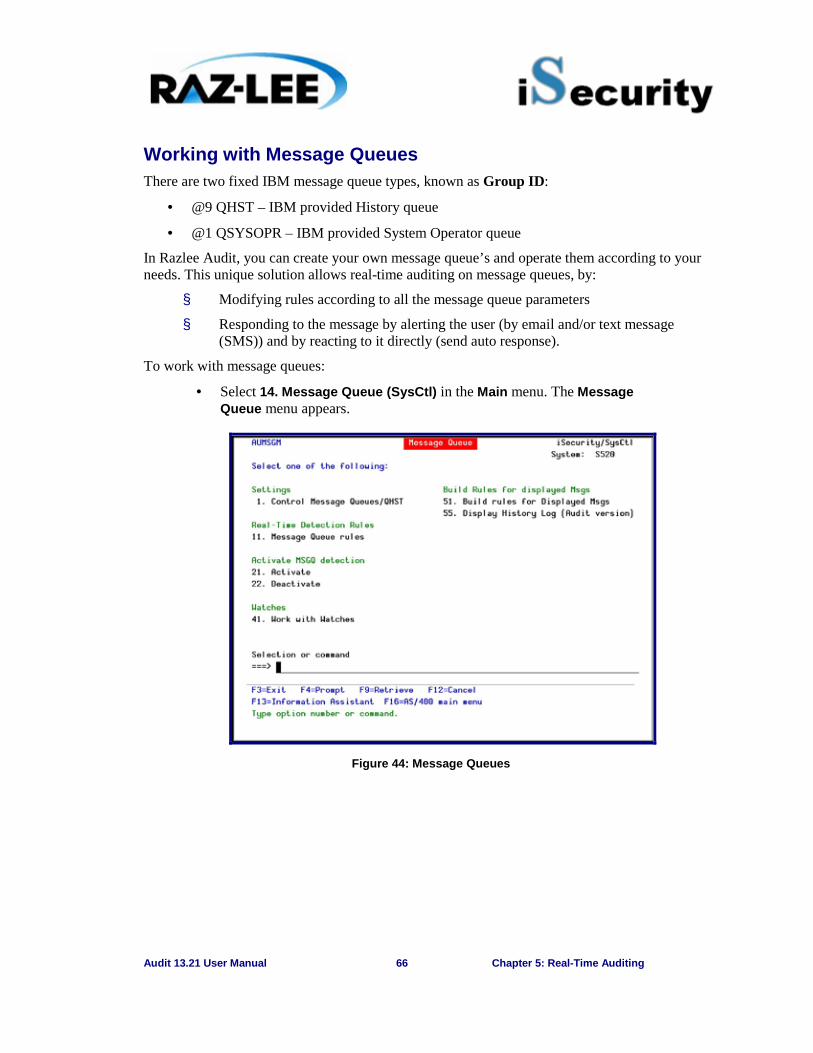
Audit 13.21 User Manual 66 Chapter 5: Real-Time Auditing
Working with Message Queues There are two fixed IBM message queue types, known as Group ID:
· @9 QHST – IBM provided History queue
· @1 QSYSOPR – IBM provided System Operator queue
In Razlee Audit, you can create your own message queue’s and operate them according to your needs. This unique solution allows real-time auditing on message queues, by:
§ Modifying rules according to all the message queue parameters
§ Responding to the message by alerting the user (by email and/or text message (SMS)) and by reacting to it directly (send auto response).
To work with message queues:
· Select 14. Message Queue (SysCtl) in the Main menu. The Message Queue menu appears.
Figure 44: Message Queues
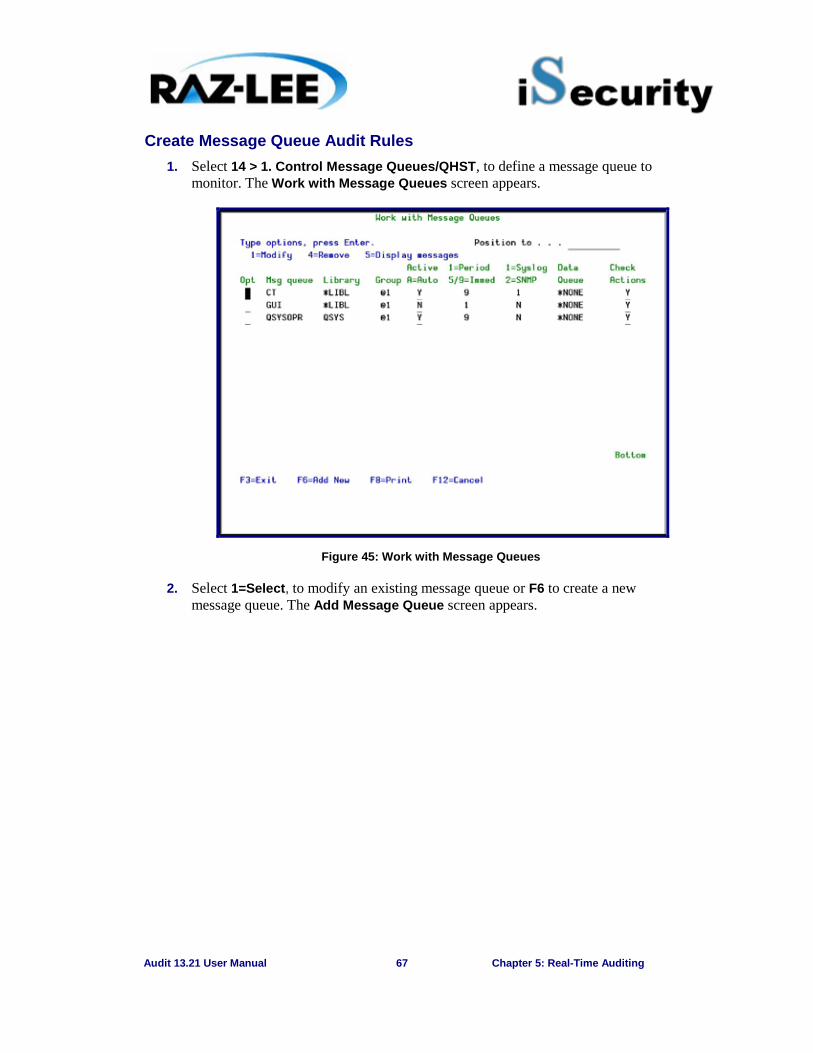
Audit 13.21 User Manual 67 Chapter 5: Real-Time Auditing
Create Message Queue Audit Rules 1. Select 14 > 1. Control Message Queues/QHST, to define a message queue to
monitor. The Work with Message Queues screen appears.
Figure 45: Work with Message Queues
2. Select 1=Select, to modify an existing message queue or F6 to create a new message queue. The Add Message Queue screen appears.
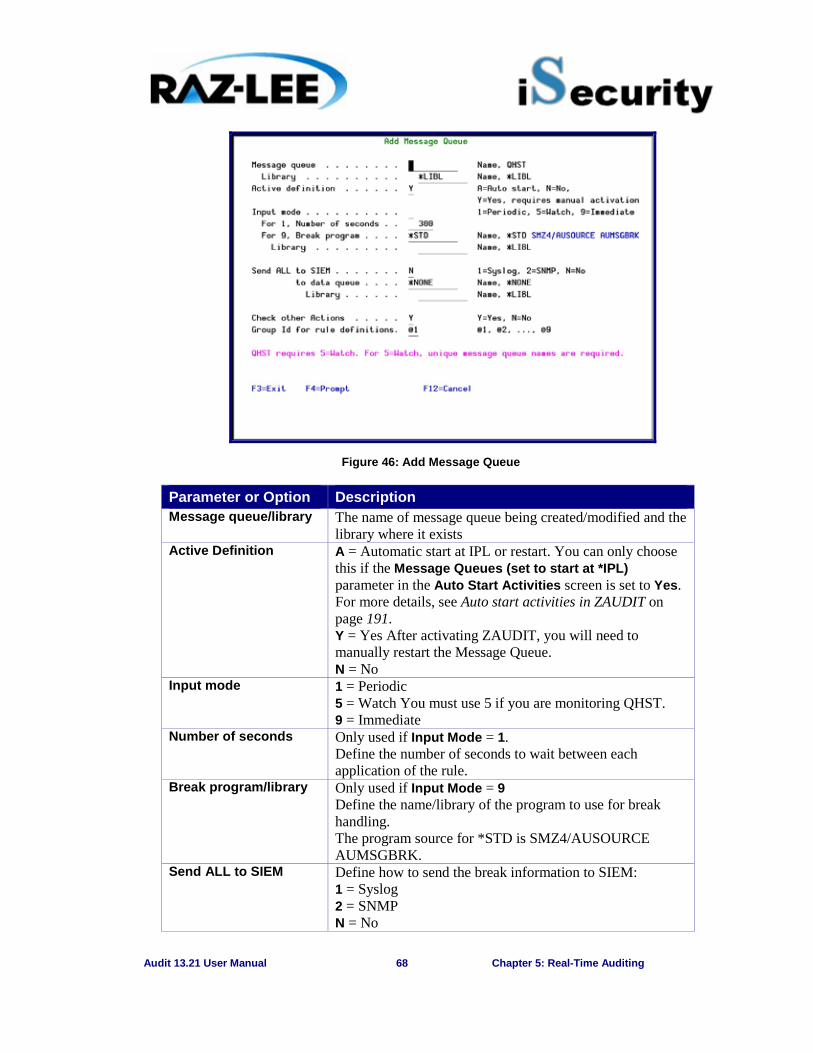
Audit 13.21 User Manual 68 Chapter 5: Real-Time Auditing
Figure 46: Add Message Queue
Parameter or Option Description Message queue/library The name of message queue being created/modified and the
library where it exists Active Definition A = Automatic start at IPL or restart. You can only choose
this if the Message Queues (set to start at *IPL) parameter in the Auto Start Activities screen is set to Yes. For more details, see Auto start activities in ZAUDIT on page 191. Y = Yes After activating ZAUDIT, you will need to manually restart the Message Queue. N = No
Input mode 1 = Periodic 5 = Watch You must use 5 if you are monitoring QHST. 9 = Immediate
Number of seconds Only used if Input Mode = 1. Define the number of seconds to wait between each application of the rule.
Break program/library Only used if Input Mode = 9 Define the name/library of the program to use for break handling. The program source for *STD is SMZ4/AUSOURCE AUMSGBRK.
Send ALL to SIEM Define how to send the break information to SIEM: 1 = Syslog 2 = SNMP N = No
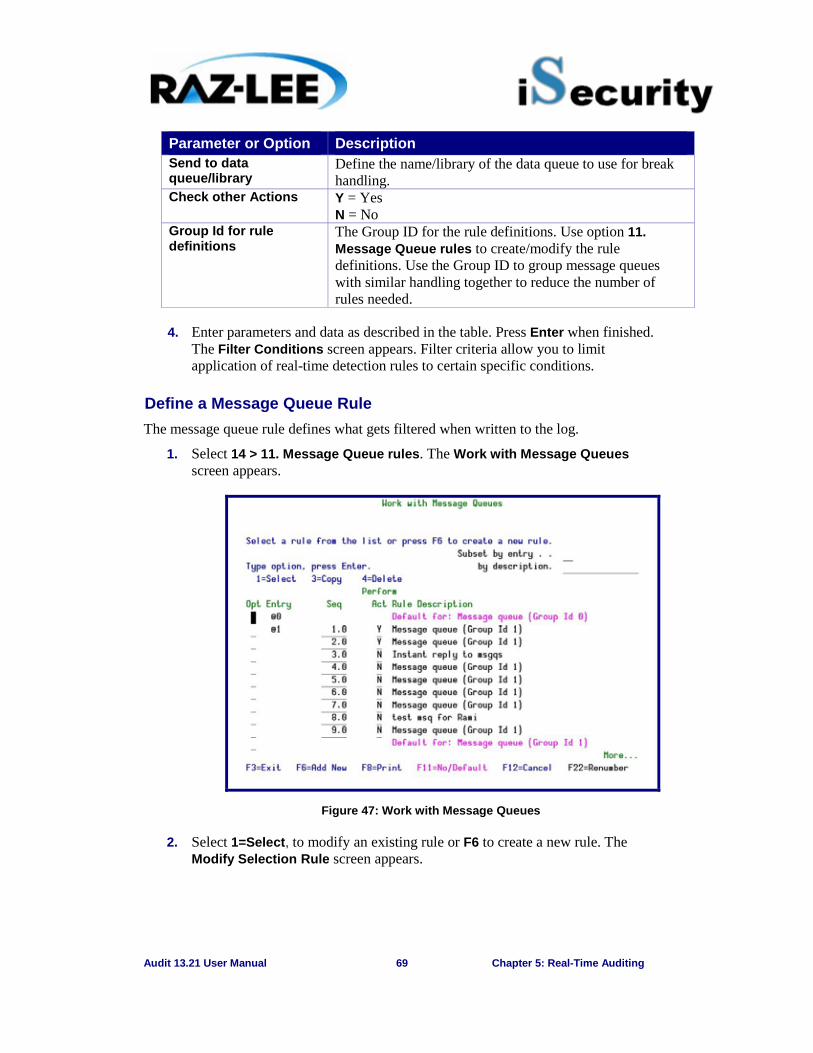
Audit 13.21 User Manual 69 Chapter 5: Real-Time Auditing
Parameter or Option Description Send to data queue/library
Define the name/library of the data queue to use for break handling.
Check other Actions Y = Yes N = No
Group Id for rule definitions
The Group ID for the rule definitions. Use option 11. Message Queue rules to create/modify the rule definitions. Use the Group ID to group message queues with similar handling together to reduce the number of rules needed.
4. Enter parameters and data as described in the table. Press Enter when finished. The Filter Conditions screen appears. Filter criteria allow you to limit application of real-time detection rules to certain specific conditions.
Define a Message Queue Rule The message queue rule defines what gets filtered when written to the log.
1. Select 14 > 11. Message Queue rules. The Work with Message Queues screen appears.
Figure 47: Work with Message Queues
2. Select 1=Select, to modify an existing rule or F6 to create a new rule. The Modify Selection Rule screen appears.

Audit 13.21 User Manual 70 Chapter 5: Real-Time Auditing
Figure 48: Modify Selection Rule
Option Description Audit Type Audit types are the entries @1-@9. All choices have the same
parameters. These are the rule identifiers you use when setting rules. F4 = Choose from a list of available types
Seq (Sequence) Enter a sequence number or accept the default as presented. The sequence number determines the order of rule processing when there is more than one rule for a given audit type.
Description Enter a meaningful description of the rule. Time Group Find time group Perform Action Y = Perform this action according to rule
N = Do not perform this action Action Optionally trigger this action
Name = name of action to trigger by this rule *NONE = No actions are triggered by this rule *ADD = Define a new action for this rule F4 = Select an action from the list
3. Enter parameters and data as described in the table. Press Enter when finished. The Filter Conditions screen appears. Filter criteria allow you to limit application of real-time detection rules to certain specific conditions.
Activate Message Queue Detection 1. Select 14 > 21. Activate. The Activate Audit Message Queue (ACTAUMSGQ)
screen appears.
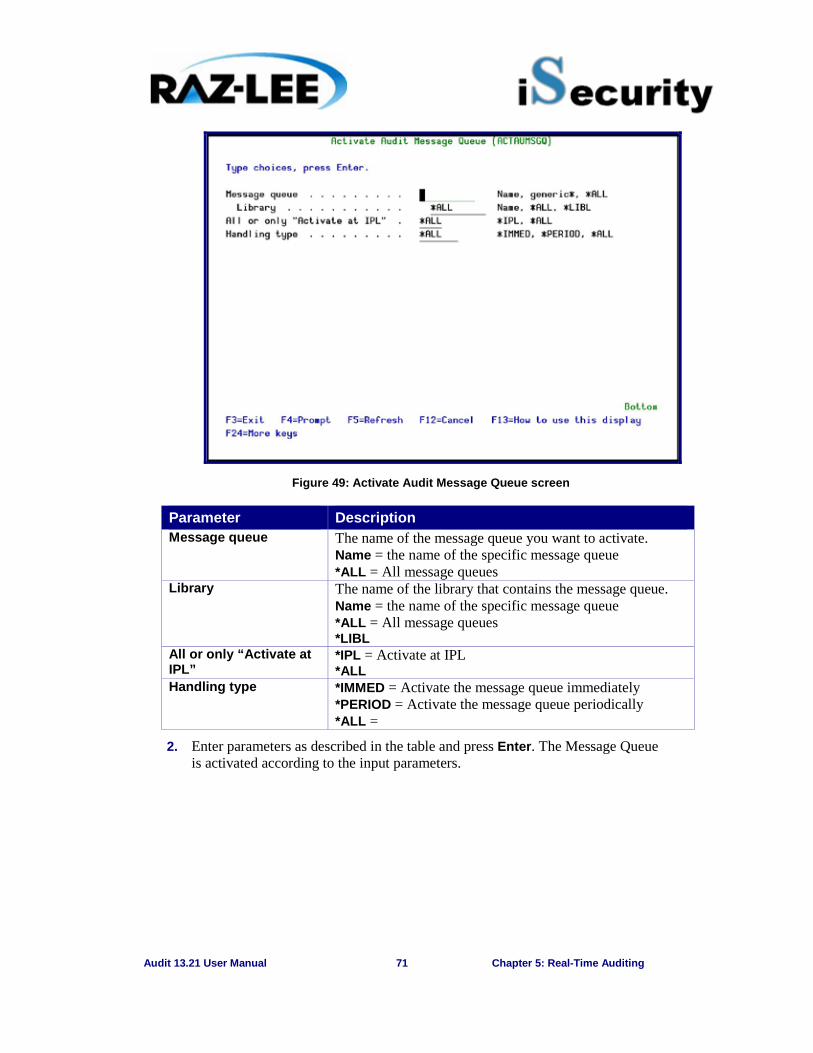
Audit 13.21 User Manual 71 Chapter 5: Real-Time Auditing
Figure 49: Activate Audit Message Queue screen
Parameter Description Message queue The name of the message queue you want to activate.
Name = the name of the specific message queue *ALL = All message queues
Library The name of the library that contains the message queue. Name = the name of the specific message queue *ALL = All message queues *LIBL
All or only “Activate at IPL”
*IPL = Activate at IPL *ALL
Handling type *IMMED = Activate the message queue immediately *PERIOD = Activate the message queue periodically *ALL =
2. Enter parameters as described in the table and press Enter. The Message Queue is activated according to the input parameters.
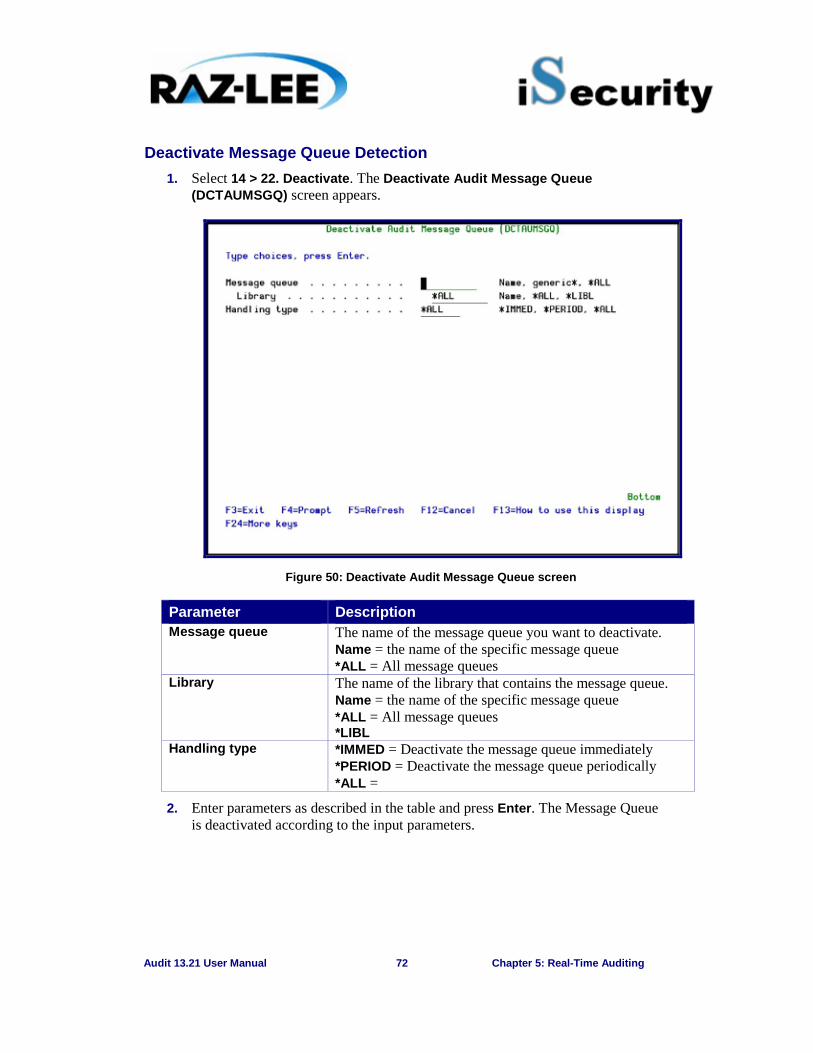
Audit 13.21 User Manual 72 Chapter 5: Real-Time Auditing
Deactivate Message Queue Detection 1. Select 14 > 22. Deactivate. The Deactivate Audit Message Queue
(DCTAUMSGQ) screen appears.
Figure 50: Deactivate Audit Message Queue screen
Parameter Description Message queue The name of the message queue you want to deactivate.
Name = the name of the specific message queue *ALL = All message queues
Library The name of the library that contains the message queue. Name = the name of the specific message queue *ALL = All message queues *LIBL
Handling type *IMMED = Deactivate the message queue immediately *PERIOD = Deactivate the message queue periodically *ALL =
2. Enter parameters as described in the table and press Enter. The Message Queue is deactivated according to the input parameters.
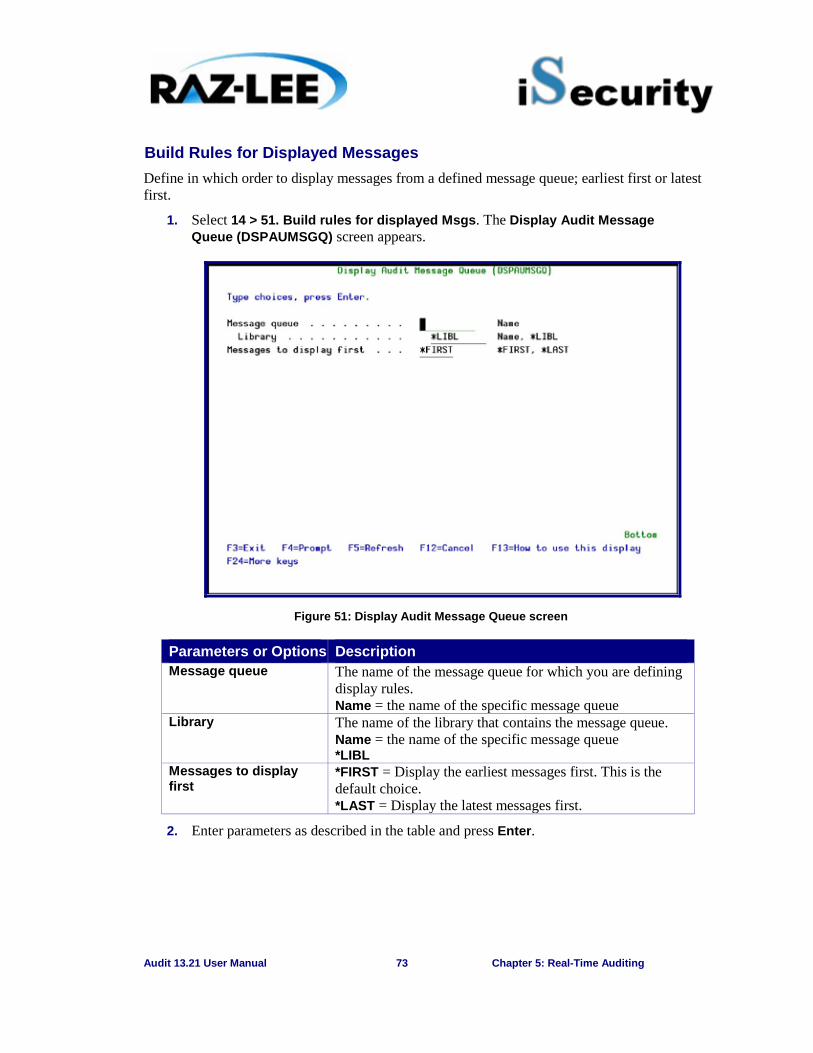
Audit 13.21 User Manual 73 Chapter 5: Real-Time Auditing
Build Rules for Displayed Messages Define in which order to display messages from a defined message queue; earliest first or latest first.
1. Select 14 > 51. Build rules for displayed Msgs. The Display Audit Message Queue (DSPAUMSGQ) screen appears.
Figure 51: Display Audit Message Queue screen
Parameters or Options Description Message queue The name of the message queue for which you are defining
display rules. Name = the name of the specific message queue
Library The name of the library that contains the message queue. Name = the name of the specific message queue *LIBL
Messages to display first
*FIRST = Display the earliest messages first. This is the default choice. *LAST = Display the latest messages first.
2. Enter parameters as described in the table and press Enter.
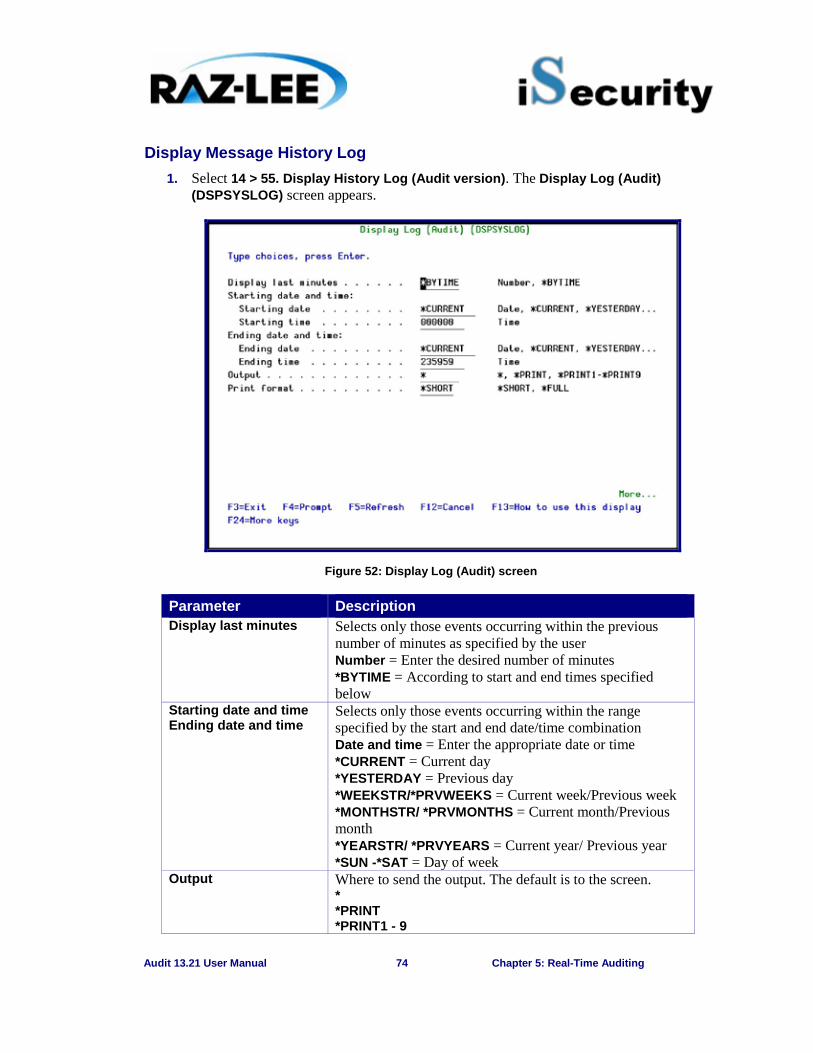
Audit 13.21 User Manual 74 Chapter 5: Real-Time Auditing
Display Message History Log 1. Select 14 > 55. Display History Log (Audit version). The Display Log (Audit)
(DSPSYSLOG) screen appears.
Figure 52: Display Log (Audit) screen
Parameter Description Display last minutes Selects only those events occurring within the previous
number of minutes as specified by the user Number = Enter the desired number of minutes *BYTIME = According to start and end times specified below
Starting date and time Ending date and time
Selects only those events occurring within the range specified by the start and end date/time combination Date and time = Enter the appropriate date or time *CURRENT = Current day *YESTERDAY = Previous day *WEEKSTR/*PRVWEEKS = Current week/Previous week *MONTHSTR/ *PRVMONTHS = Current month/Previous month *YEARSTR/ *PRVYEARS = Current year/ Previous year *SUN -*SAT = Day of week
Output Where to send the output. The default is to the screen. * *PRINT *PRINT1 - 9
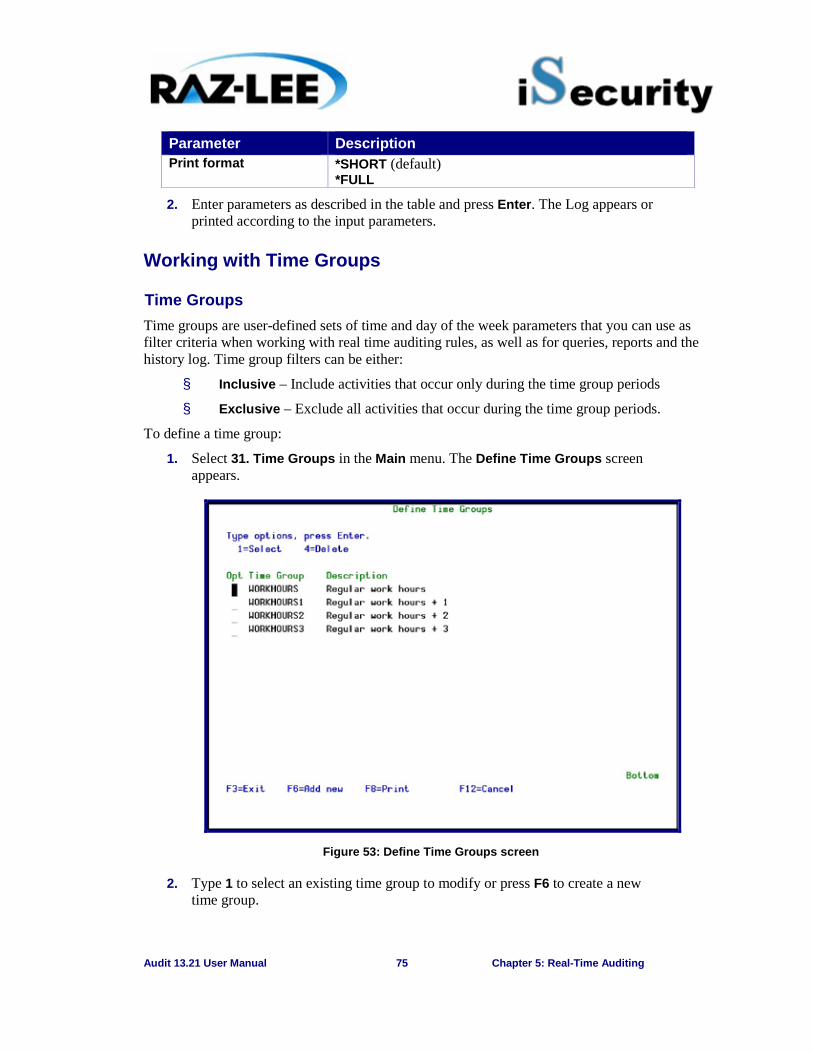
Audit 13.21 User Manual 75 Chapter 5: Real-Time Auditing
Parameter Description Print format *SHORT (default)
*FULL
2. Enter parameters as described in the table and press Enter. The Log appears or printed according to the input parameters.
Working with Time Groups
Time Groups Time groups are user-defined sets of time and day of the week parameters that you can use as filter criteria when working with real time auditing rules, as well as for queries, reports and the history log. Time group filters can be either:
§ Inclusive – Include activities that occur only during the time group periods
§ Exclusive – Exclude all activities that occur during the time group periods.
To define a time group:
1. Select 31. Time Groups in the Main menu. The Define Time Groups screen appears.
Figure 53: Define Time Groups screen
2. Type 1 to select an existing time group to modify or press F6 to create a new time group.
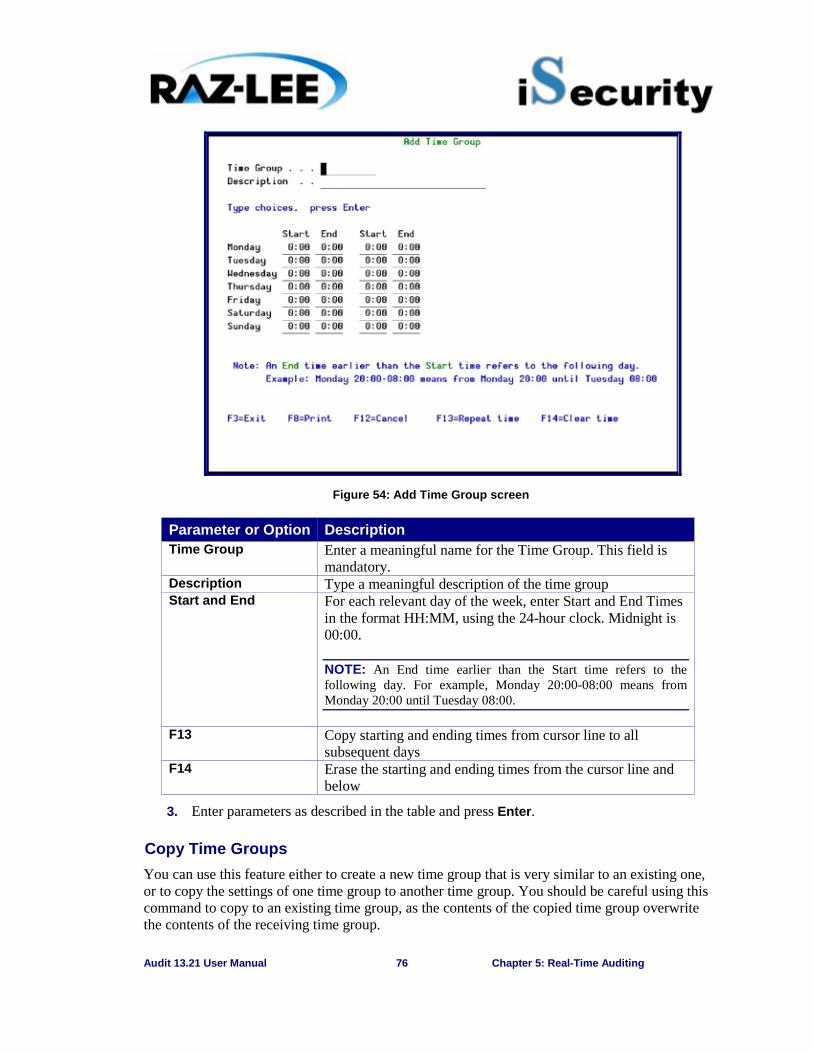
Audit 13.21 User Manual 76 Chapter 5: Real-Time Auditing
Figure 54: Add Time Group screen
Parameter or Option Description Time Group Enter a meaningful name for the Time Group. This field is
mandatory. Description Type a meaningful description of the time group Start and End For each relevant day of the week, enter Start and End Times
in the format HH:MM, using the 24-hour clock. Midnight is 00:00.
NOTE: An End time earlier than the Start time refers to the following day. For example, Monday 20:00-08:00 means from Monday 20:00 until Tuesday 08:00.
F13 Copy starting and ending times from cursor line to all subsequent days
F14 Erase the starting and ending times from the cursor line and below
3. Enter parameters as described in the table and press Enter.
Copy Time Groups You can use this feature either to create a new time group that is very similar to an existing one, or to copy the settings of one time group to another time group. You should be careful using this command to copy to an existing time group, as the contents of the copied time group overwrite the contents of the receiving time group.
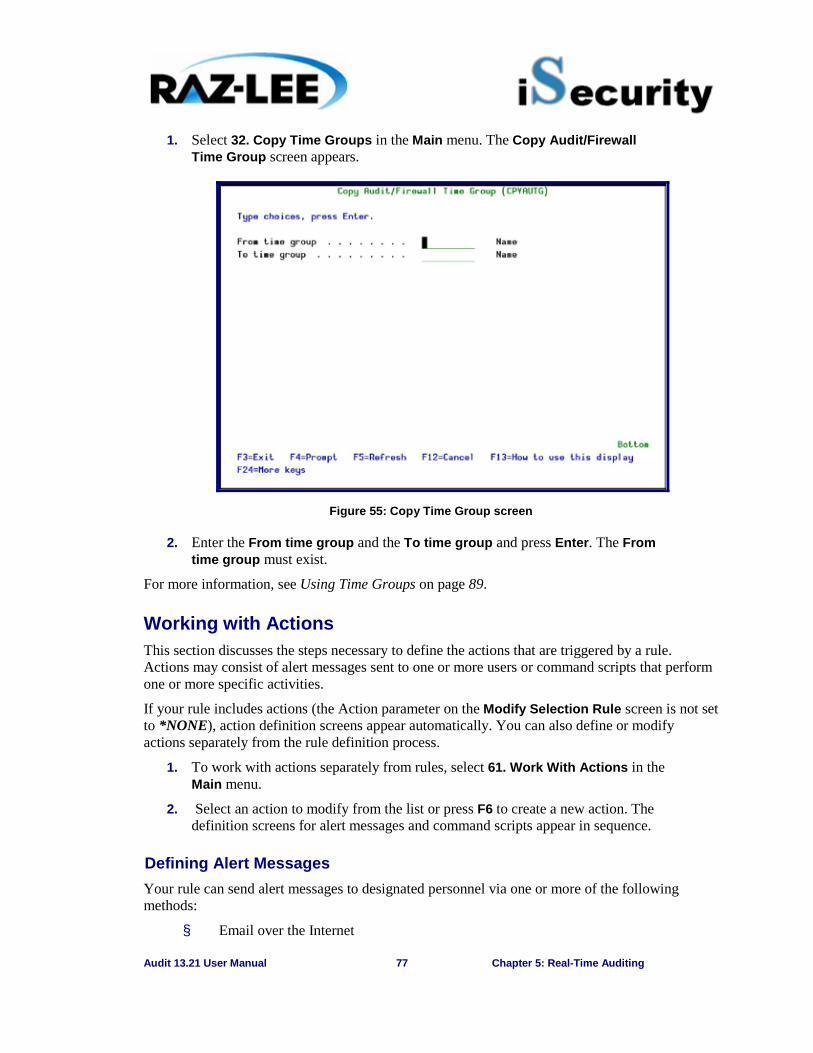
Audit 13.21 User Manual 77 Chapter 5: Real-Time Auditing
1. Select 32. Copy Time Groups in the Main menu. The Copy Audit/Firewall Time Group screen appears.
Figure 55: Copy Time Group screen
2. Enter the From time group and the To time group and press Enter. The From time group must exist.
For more information, see Using Time Groups on page 89.
Working with Actions This section discusses the steps necessary to define the actions that are triggered by a rule. Actions may consist of alert messages sent to one or more users or command scripts that perform one or more specific activities.
If your rule includes actions (the Action parameter on the Modify Selection Rule screen is not set to *NONE), action definition screens appear automatically. You can also define or modify actions separately from the rule definition process.
1. To work with actions separately from rules, select 61. Work With Actions in the Main menu.
2. Select an action to modify from the list or press F6 to create a new action. The definition screens for alert messages and command scripts appear in sequence.
Defining Alert Messages Your rule can send alert messages to designated personnel via one or more of the following methods:
§ Email over the Internet
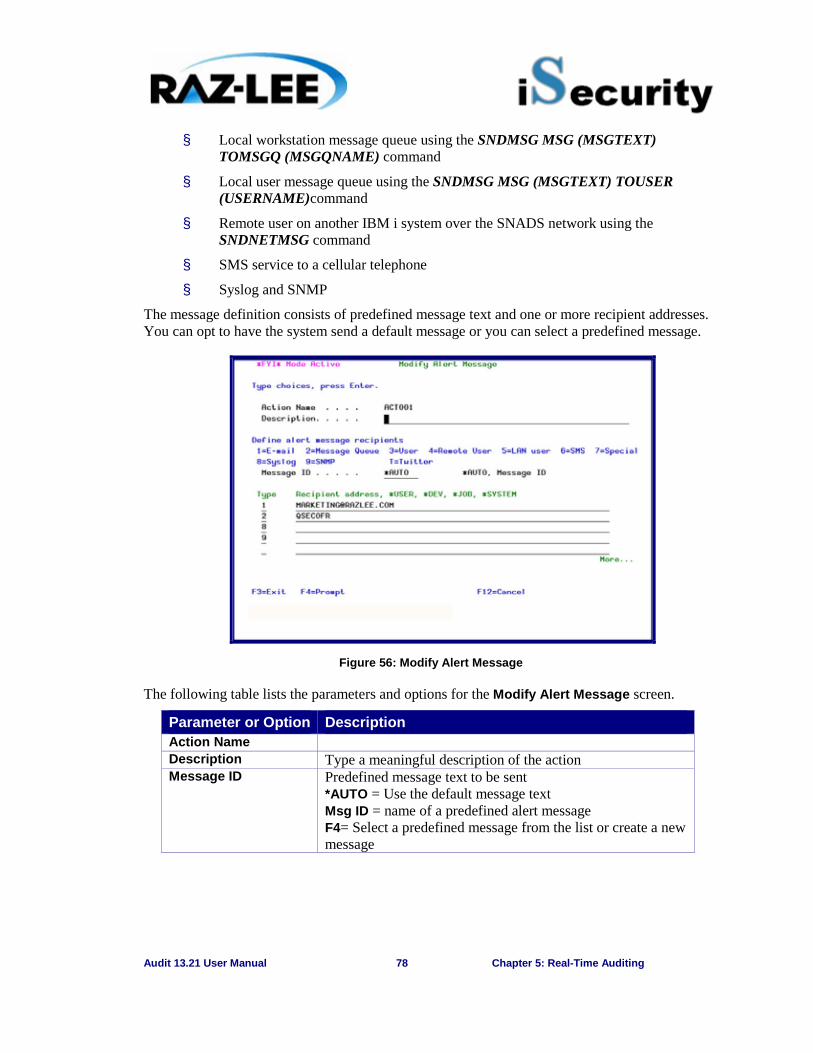
Audit 13.21 User Manual 78 Chapter 5: Real-Time Auditing
§ Local workstation message queue using the SNDMSG MSG (MSGTEXT) TOMSGQ (MSGQNAME) command
§ Local user message queue using the SNDMSG MSG (MSGTEXT) TOUSER (USERNAME)command
§ Remote user on another IBM i system over the SNADS network using the SNDNETMSG command
§ SMS service to a cellular telephone
§ Syslog and SNMP
The message definition consists of predefined message text and one or more recipient addresses. You can opt to have the system send a default message or you can select a predefined message.
Figure 56: Modify Alert Message
The following table lists the parameters and options for the Modify Alert Message screen.
Parameter or Option Description Action Name Description Type a meaningful description of the action Message ID Predefined message text to be sent
*AUTO = Use the default message text Msg ID = name of a predefined alert message F4= Select a predefined message from the list or create a new message
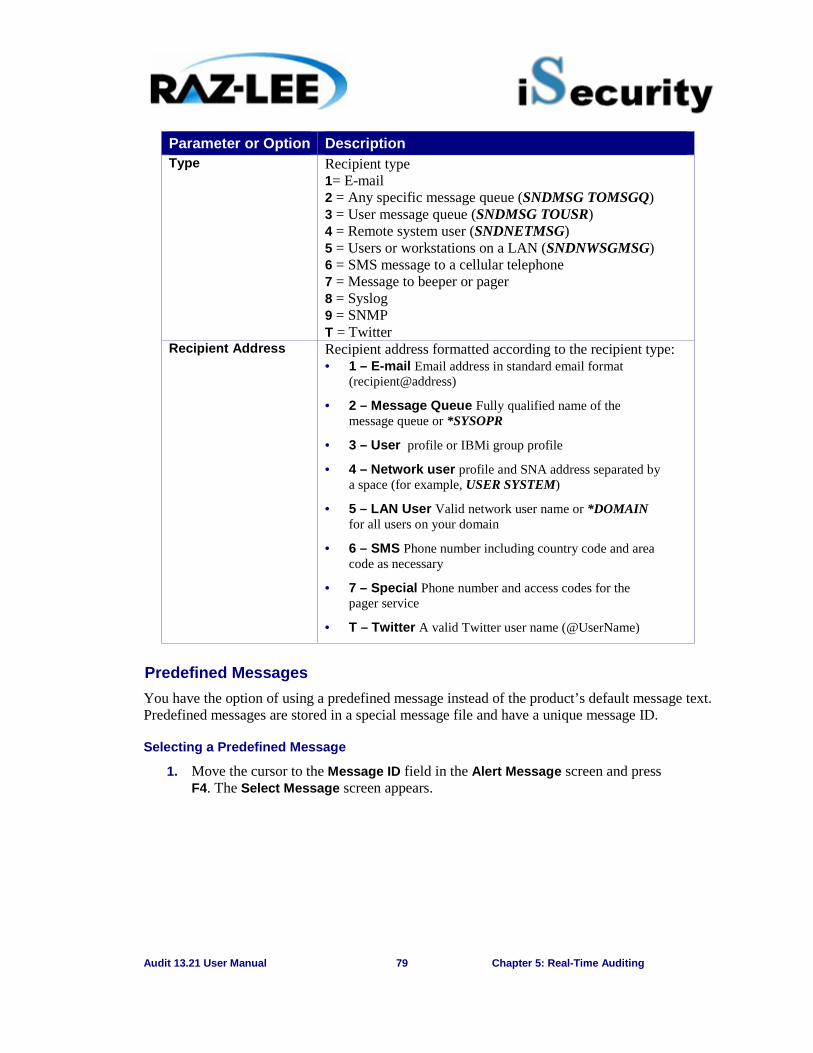
Audit 13.21 User Manual 79 Chapter 5: Real-Time Auditing
Parameter or Option Description Type Recipient type
1= E-mail 2 = Any specific message queue (SNDMSG TOMSGQ) 3 = User message queue (SNDMSG TOUSR) 4 = Remote system user (SNDNETMSG) 5 = Users or workstations on a LAN (SNDNWSGMSG) 6 = SMS message to a cellular telephone 7 = Message to beeper or pager 8 = Syslog 9 = SNMP T = Twitter
Recipient Address Recipient address formatted according to the recipient type: · 1 – E-mail Email address in standard email format
(recipient@address)
· 2 – Message Queue Fully qualified name of the message queue or *SYSOPR
· 3 – User profile or IBMi group profile
· 4 – Network user profile and SNA address separated by a space (for example, USER SYSTEM)
· 5 – LAN User Valid network user name or *DOMAIN for all users on your domain
· 6 – SMS Phone number including country code and area code as necessary
· 7 – Special Phone number and access codes for the pager service
· T – Twitter A valid Twitter user name (@UserName)
Predefined Messages You have the option of using a predefined message instead of the product’s default message text. Predefined messages are stored in a special message file and have a unique message ID.
Selecting a Predefined Message
1. Move the cursor to the Message ID field in the Alert Message screen and press F4. The Select Message screen appears.
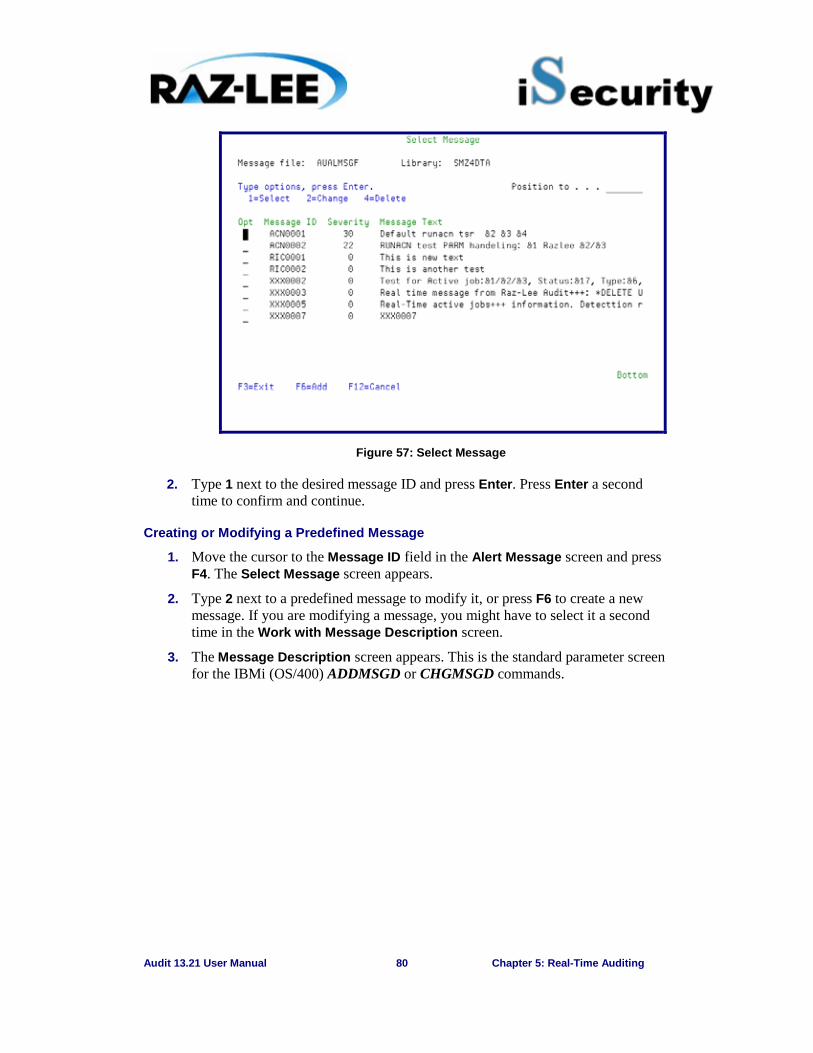
Audit 13.21 User Manual 80 Chapter 5: Real-Time Auditing
Figure 57: Select Message
2. Type 1 next to the desired message ID and press Enter. Press Enter a second time to confirm and continue.
Creating or Modifying a Predefined Message
1. Move the cursor to the Message ID field in the Alert Message screen and press F4. The Select Message screen appears.
2. Type 2 next to a predefined message to modify it, or press F6 to create a new message. If you are modifying a message, you might have to select it a second time in the Work with Message Description screen.
3. The Message Description screen appears. This is the standard parameter screen for the IBMi (OS/400) ADDMSGD or CHGMSGD commands.
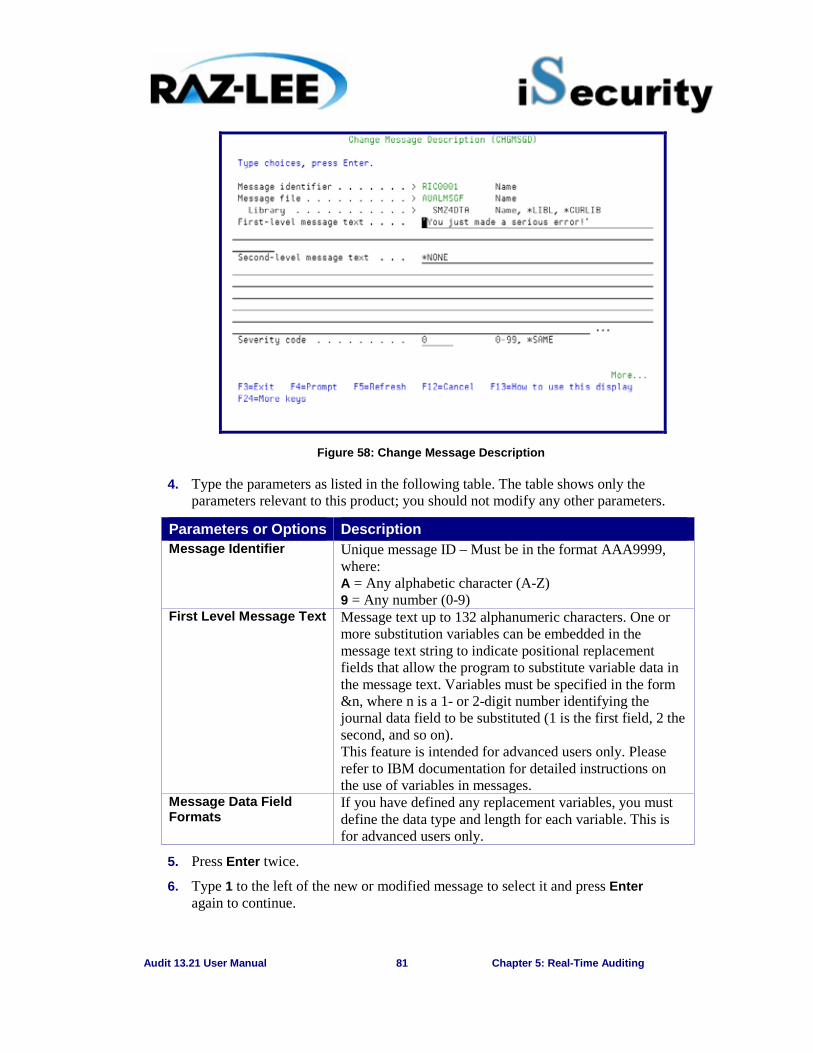
Audit 13.21 User Manual 81 Chapter 5: Real-Time Auditing
Figure 58: Change Message Description
4. Type the parameters as listed in the following table. The table shows only the parameters relevant to this product; you should not modify any other parameters.
Parameters or Options Description Message Identifier Unique message ID – Must be in the format AAA9999,
where: A = Any alphabetic character (A-Z) 9 = Any number (0-9)
First Level Message Text Message text up to 132 alphanumeric characters. One or more substitution variables can be embedded in the message text string to indicate positional replacement fields that allow the program to substitute variable data in the message text. Variables must be specified in the form &n, where n is a 1- or 2-digit number identifying the journal data field to be substituted (1 is the first field, 2 the second, and so on). This feature is intended for advanced users only. Please refer to IBM documentation for detailed instructions on the use of variables in messages.
Message Data Field Formats
If you have defined any replacement variables, you must define the data type and length for each variable. This is for advanced users only.
5. Press Enter twice.
6. Type 1 to the left of the new or modified message to select it and press Enter again to continue.

Audit 13.21 User Manual 82 Chapter 5: Real-Time Auditing
Defining Command Scripts When you have finished defining alert messages, the Action Script screen appears automatically. Use this screen to define one or more command scripts to run whenever the rule conditions are met.
Commands execute sequentially according to a user-defined order. Commands may include replacement variables that extract data from the history log record and insert it as command parameters. Action also supports conditional branching in the event that an error occurs during script execution.
Figure 59: Edit Action Script
The following table summarizes the options and parameters contained in the Action Script screen.
Parameters or Options Description Order The order to execute the commands Label Optional alphanumeric label for the current line; used for
the On Error, Go To feature. Command Command text including all parameters On Error, Go to Label Conditional branch to the line indicated by the label in the
event a script error results from the command on the current line
F4 Open a prompt window for command parameters and options
F7 Select a variable from pop-up window and insert it at the current cursor position. Variables insert contents of journal entry data-fields as command parameters.
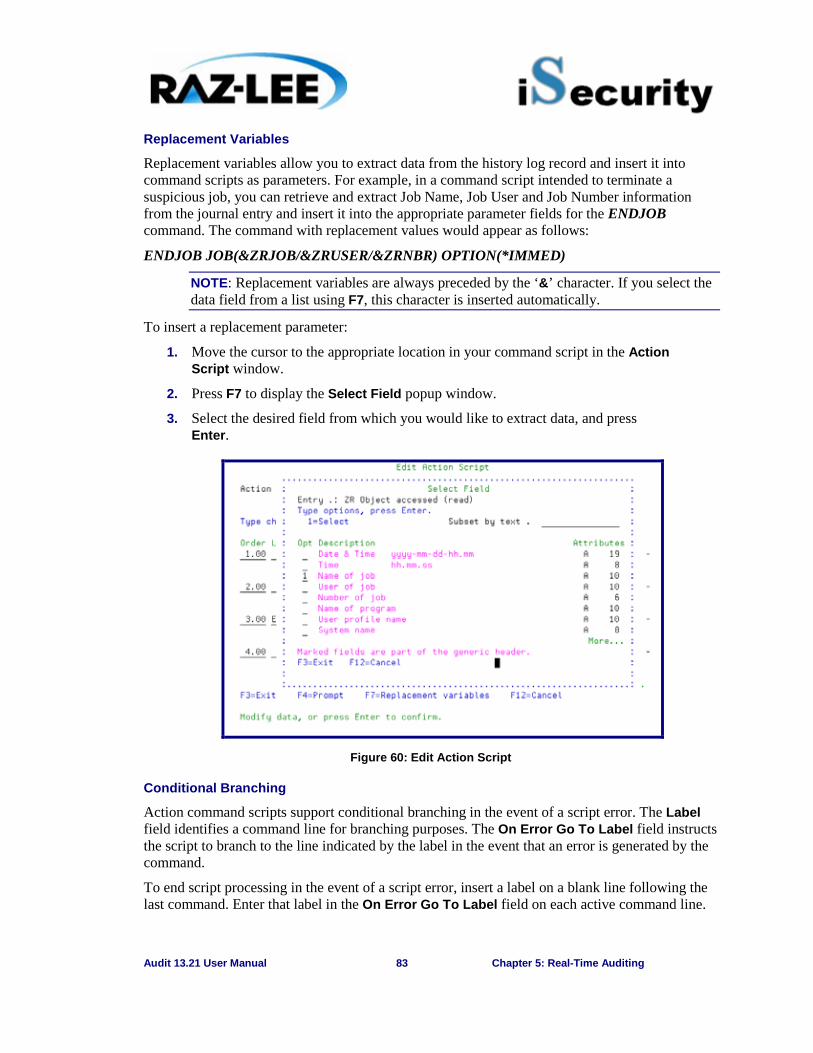
Audit 13.21 User Manual 83 Chapter 5: Real-Time Auditing
Replacement Variables
Replacement variables allow you to extract data from the history log record and insert it into command scripts as parameters. For example, in a command script intended to terminate a suspicious job, you can retrieve and extract Job Name, Job User and Job Number information from the journal entry and insert it into the appropriate parameter fields for the ENDJOB command. The command with replacement values would appear as follows:
ENDJOB JOB(&ZRJOB/&ZRUSER/&ZRNBR) OPTION(*IMMED)
NOTE: Replacement variables are always preceded by the ‘&’ character. If you select the data field from a list using F7, this character is inserted automatically.
To insert a replacement parameter:
1. Move the cursor to the appropriate location in your command script in the Action Script window.
2. Press F7 to display the Select Field popup window.
3. Select the desired field from which you would like to extract data, and press Enter.
Figure 60: Edit Action Script
Conditional Branching
Action command scripts support conditional branching in the event of a script error. The Label field identifies a command line for branching purposes. The On Error Go To Label field instructs the script to branch to the line indicated by the label in the event that an error is generated by the command.
To end script processing in the event of a script error, insert a label on a blank line following the last command. Enter that label in the On Error Go To Label field on each active command line.
Audit 13.21 User Manual 84 Chapter 5: Real-Time Auditing
Testing and Debugging Rules Real-time detection rules are, in fact, small programs. They require testing, debugging and maintenance to ensure they work properly. The following suggestions will help you with this process.
§ Make sure that the all actions and events you want to include in your rule are captured by the IBMi (OS/400) audit settings (current setting, user activity auditing, and object auditing). If you create a real-time detection rule for an event that is not captured by the IBMi (OS/400) audit settings, it will not function.
§ Enable logging for all real-time rules. The history log provides you with a complete audit trail for your rules. This information is invaluable when testing and debugging complex rules.
§ Test the filter conditions in your rules before adding actions (alert messages and command scripts). Use the Query and/or Display Audit Log features to examine the history log entries. Verify that the log contains all the events that you wish to capture and only those events that you wish to capture.
§ Create and test your actions before including them in a rule. Use the Execute Selected Action feature (41 on the Action main menu) to perform the test.
Temporarily disable any other rules that include the same events or otherwise conflict with the rule that you are testing. Set the Log parameter to ‘N’ and the Action parameter to ‘*NONE’ to accomplish this.
NOTE: Do not forget to re-activate your rules after you finish testing.
Audit 13.21 User Manual 85 Chapter 6: Queries and Reports
6
Chapter 6: Queries and Reports The purpose of this Chapter is to provide information about the queries and reports of the system, and includes the following sections:
Ø Overview
Ø General Groups
Ø Using Time Groups
Ø iSecurity Multi System Support
Ø Getting Started with Queries
Ø Filter Criteria – Working with Data Subsets
Ø Sorting Records
Ø Running Queries
Ø Using the Report Scheduler
Ø Working with Individual Reports
Ø Baseline Setup
Ø Network Reporting
Overview This chapter presents Audit’s built-in reporting features. An effective security audit policy relies on queries and reports to provide traceability for system activity. All Audit queries and reports work with data contained in the history log.
You can use several powerful and user-friendly tools to create output containing only the data that you need to see, and in a format that is useful to you. The super-advanced report generator provides time groups, filtering criteria, sorting and more. You can accomplish all of this without programming, by using the following tools:
§ Query Wizard - Select the events that you need to audit using powerful filter criteria and create screen-based or printed reports that present the data in a customized format.
§ Display Log - Display the contents of the history log quickly and easily in a standard format using basic filter criteria.
§ Report Scheduler - Automatically run queries and reports at user-specified times.
Two users cannot run the same report simultaneously. To do so, Audit locks an object of type *DTAARA (data area); when the report is completed, Audit unlocks the object. That way, when two users want to run a report, the first user who allocates the data area runs the report, and the second user must wait until the data area is released.
Audit 13.21 User Manual 86 Chapter 6: Queries and Reports
General Groups Define assorted groups of reports in line with your requirements, to schedule a particular group of reports to run as one unit sometime in the future.
The %GROUP is used for defining a group of user-profiles that all share the same authorities.
This solution enables defining GROUPS by GROUP-TYPES. These GROUP-TYPES can be any system entity such as files, libraries, applications, identification numbers, and so on
For each GROUP-TYPE, you can define an unlimited number of GROUPS and within the GROUPS, any number of items can be defined. For example, you can define all identification numbers of the PCs in the organization as one group in the GROUP-TYPE defined as MACHINE_ADDRESS. Another group in MACHINE_ADDRESS may contain all the identification numbers of the PCs in a sister organization.
In all comparison tables, for defining rules, for generating and selecting queries, or for defining the items in reports, you can use the ITEM GROUP-TYPE/GROUP syntax to include only those transactions that contain the GROUP-TYPE/GROUP specified. Likewise, you can use the NITEM GROUP-TYPE/GROUP to include only those transactions that do not contain the GROUP-TYPE/GROUP defined.
In addition, there are special GROUPS available to you, such as groups of users already defined on the system, all of which have a common identifying characteristic. For example, the group profile of the system, group profiles defined in Firewall, and virtual groups of users named *SECADM, *SAVESYS, and so on, which are the users who have this particular privilege defined in their special authority.
1. To define Groups and Items, select 35. General Groups in the Main menu. The Work with Classes of Groups screen appears.
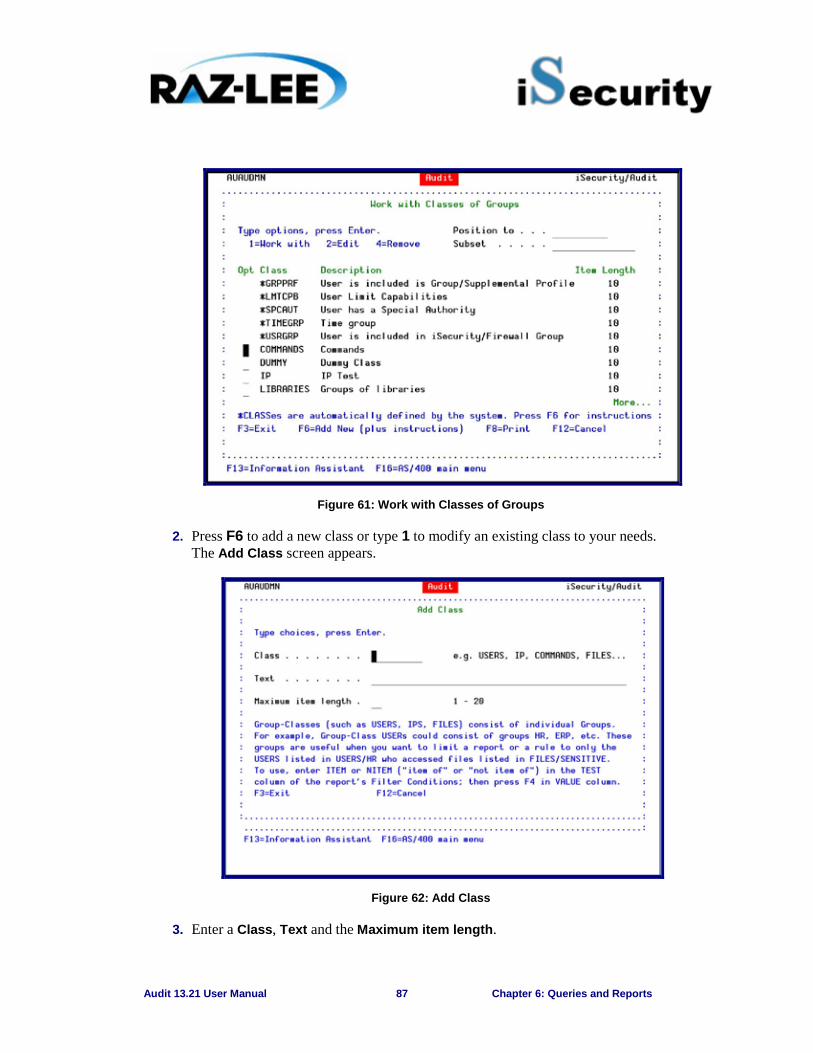
Audit 13.21 User Manual 87 Chapter 6: Queries and Reports
Figure 61: Work with Classes of Groups
2. Press F6 to add a new class or type 1 to modify an existing class to your needs. The Add Class screen appears.
Figure 62: Add Class
3. Enter a Class, Text and the Maximum item length.
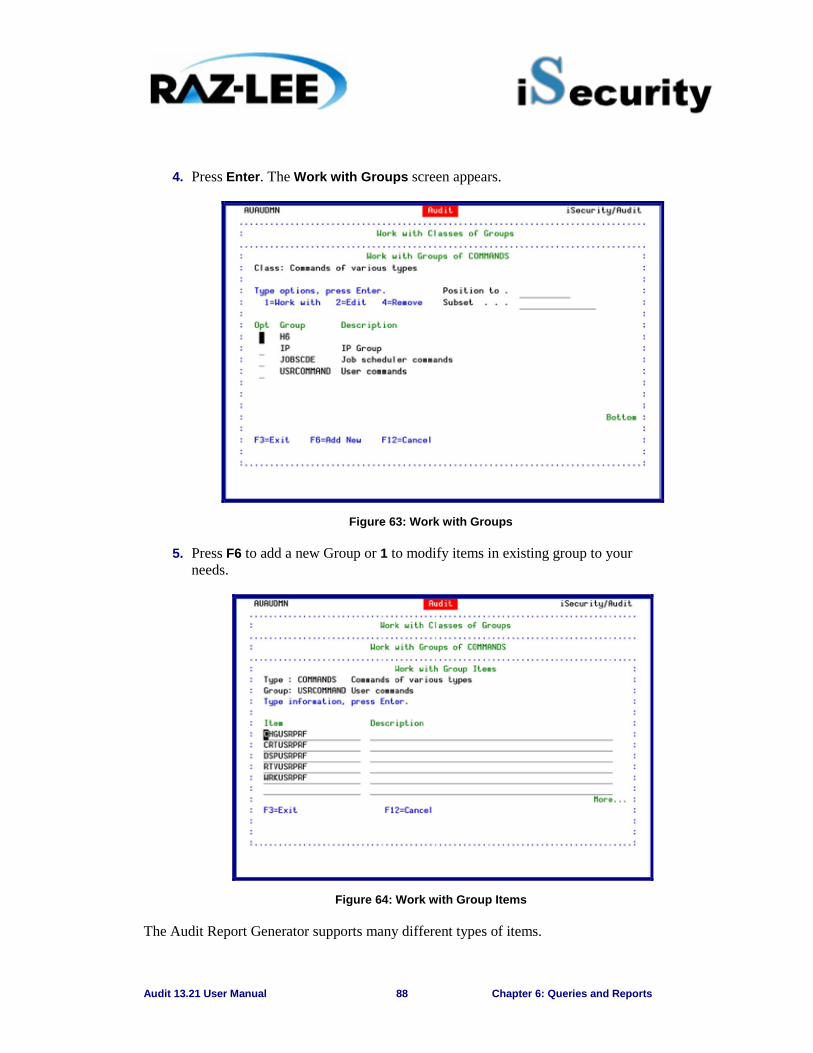
Audit 13.21 User Manual 88 Chapter 6: Queries and Reports
4. Press Enter. The Work with Groups screen appears.
Figure 63: Work with Groups
5. Press F6 to add a new Group or 1 to modify items in existing group to your needs.
Figure 64: Work with Group Items
The Audit Report Generator supports many different types of items.
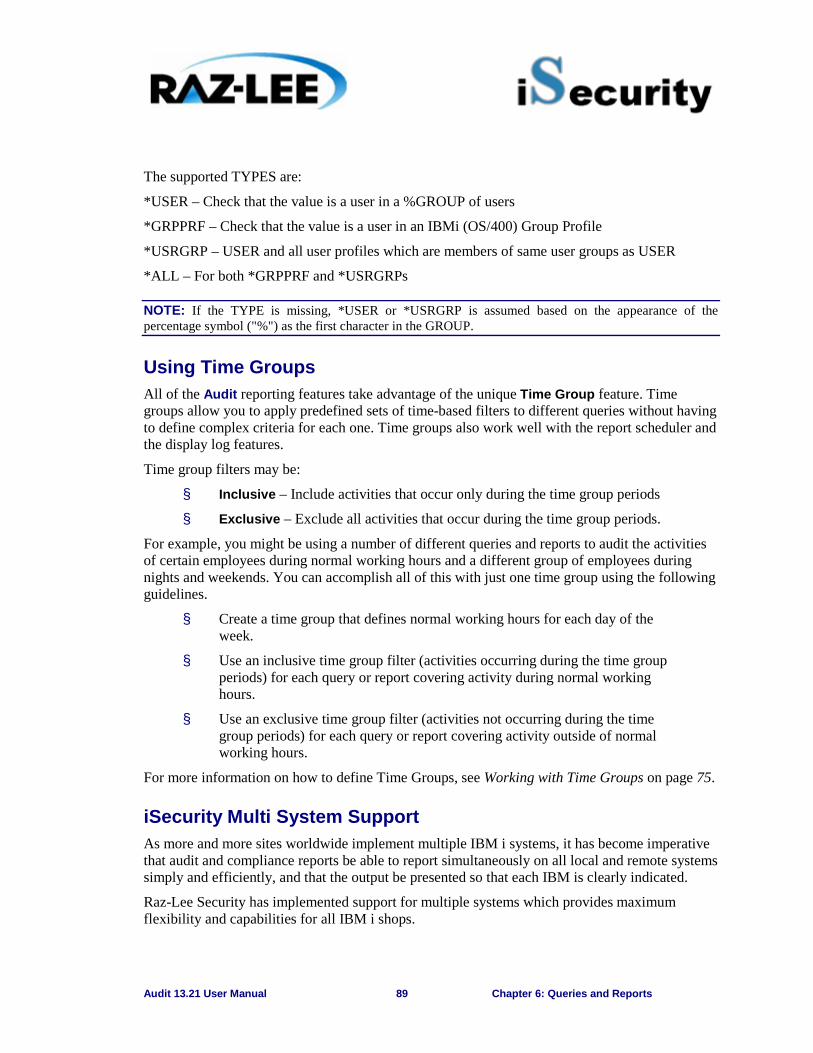
Audit 13.21 User Manual 89 Chapter 6: Queries and Reports
The supported TYPES are:
*USER – Check that the value is a user in a %GROUP of users
*GRPPRF – Check that the value is a user in an IBMi (OS/400) Group Profile
*USRGRP – USER and all user profiles which are members of same user groups as USER
*ALL – For both *GRPPRF and *USRGRPs
NOTE: If the TYPE is missing, *USER or *USRGRP is assumed based on the appearance of the percentage symbol ("%") as the first character in the GROUP.
Using Time Groups All of the Audit reporting features take advantage of the unique Time Group feature. Time groups allow you to apply predefined sets of time-based filters to different queries without having to define complex criteria for each one. Time groups also work well with the report scheduler and the display log features.
Time group filters may be:
§ Inclusive – Include activities that occur only during the time group periods
§ Exclusive – Exclude all activities that occur during the time group periods.
For example, you might be using a number of different queries and reports to audit the activities of certain employees during normal working hours and a different group of employees during nights and weekends. You can accomplish all of this with just one time group using the following guidelines.
§ Create a time group that defines normal working hours for each day of the week.
§ Use an inclusive time group filter (activities occurring during the time group periods) for each query or report covering activity during normal working hours.
§ Use an exclusive time group filter (activities not occurring during the time group periods) for each query or report covering activity outside of normal working hours.
For more information on how to define Time Groups, see Working with Time Groups on page 75.
iSecurity Multi System Support As more and more sites worldwide implement multiple IBM i systems, it has become imperative that audit and compliance reports be able to report simultaneously on all local and remote systems simply and efficiently, and that the output be presented so that each IBM is clearly indicated.
Raz-Lee Security has implemented support for multiple systems which provides maximum flexibility and capabilities for all IBM i shops.
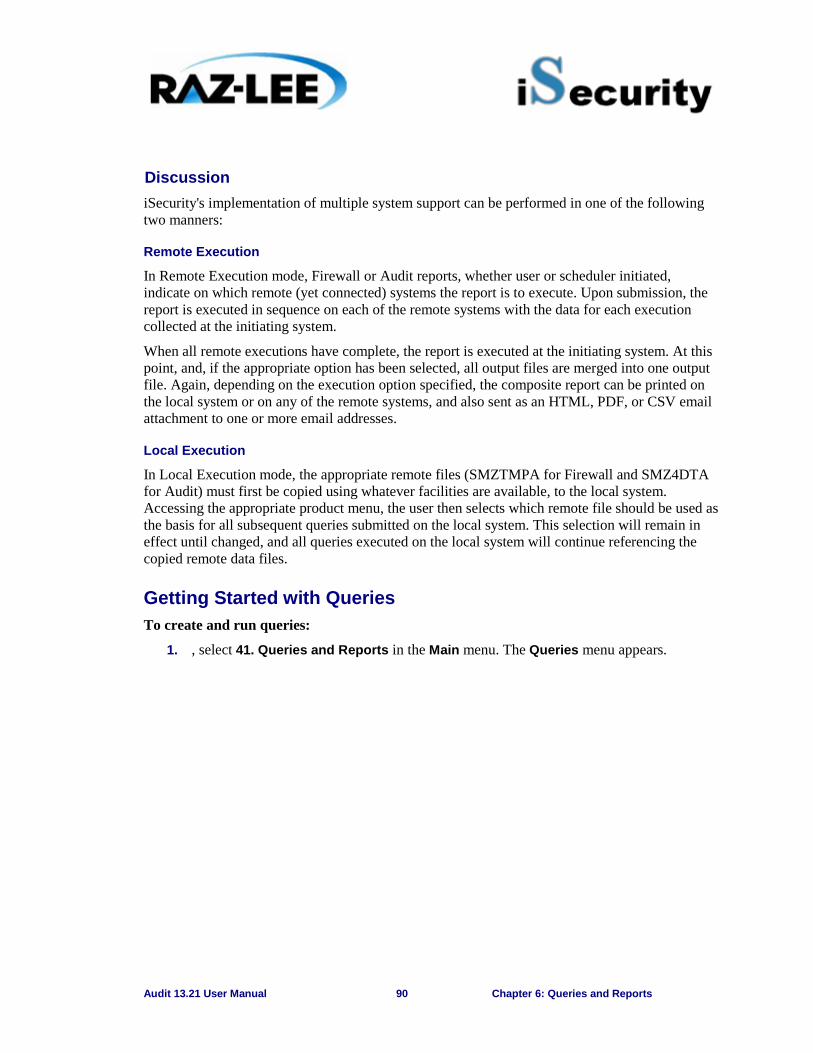
Audit 13.21 User Manual 90 Chapter 6: Queries and Reports
Discussion iSecurity's implementation of multiple system support can be performed in one of the following two manners:
Remote Execution
In Remote Execution mode, Firewall or Audit reports, whether user or scheduler initiated, indicate on which remote (yet connected) systems the report is to execute. Upon submission, the report is executed in sequence on each of the remote systems with the data for each execution collected at the initiating system.
When all remote executions have complete, the report is executed at the initiating system. At this point, and, if the appropriate option has been selected, all output files are merged into one output file. Again, depending on the execution option specified, the composite report can be printed on the local system or on any of the remote systems, and also sent as an HTML, PDF, or CSV email attachment to one or more email addresses.
Local Execution
In Local Execution mode, the appropriate remote files (SMZTMPA for Firewall and SMZ4DTA for Audit) must first be copied using whatever facilities are available, to the local system. Accessing the appropriate product menu, the user then selects which remote file should be used as the basis for all subsequent queries submitted on the local system. This selection will remain in effect until changed, and all queries executed on the local system will continue referencing the copied remote data files.
Getting Started with Queries To create and run queries:
1. , select 41. Queries and Reports in the Main menu. The Queries menu appears.
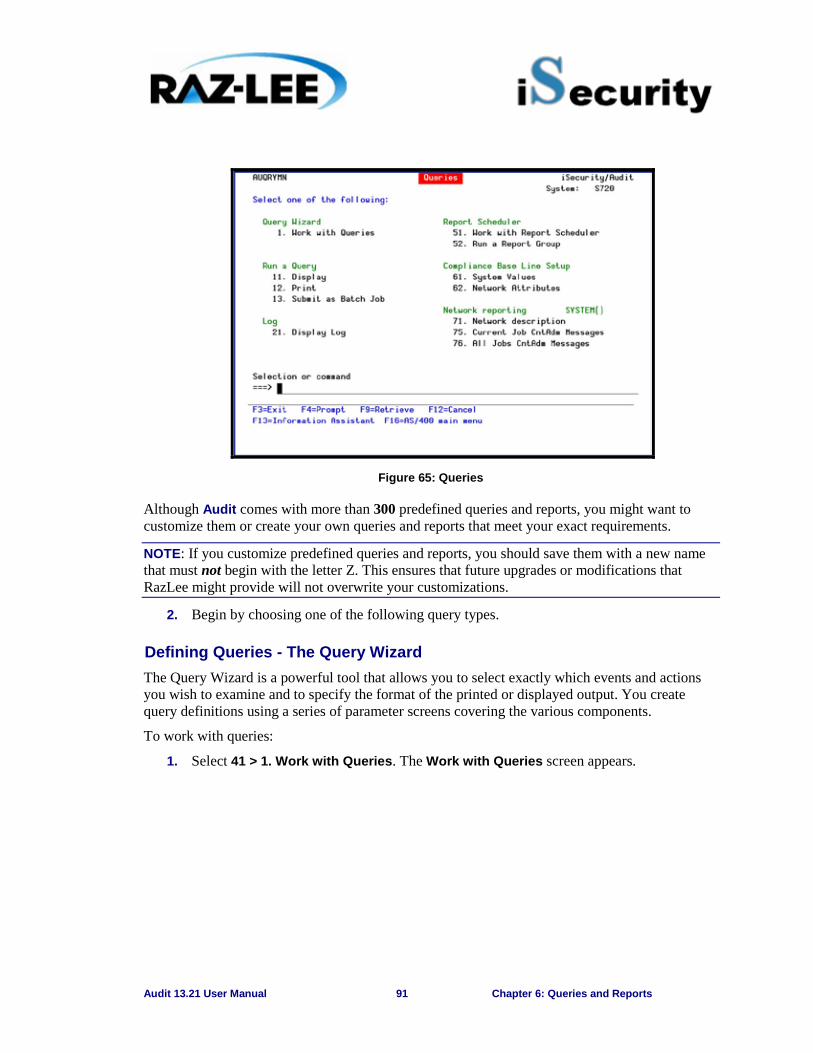
Audit 13.21 User Manual 91 Chapter 6: Queries and Reports
Figure 65: Queries
Although Audit comes with more than 300 predefined queries and reports, you might want to customize them or create your own queries and reports that meet your exact requirements.
NOTE: If you customize predefined queries and reports, you should save them with a new name that must not begin with the letter Z. This ensures that future upgrades or modifications that RazLee might provide will not overwrite your customizations.
2. Begin by choosing one of the following query types.
Defining Queries - The Query Wizard The Query Wizard is a powerful tool that allows you to select exactly which events and actions you wish to examine and to specify the format of the printed or displayed output. You create query definitions using a series of parameter screens covering the various components.
To work with queries:
1. Select 41 > 1. Work with Queries. The Work with Queries screen appears.
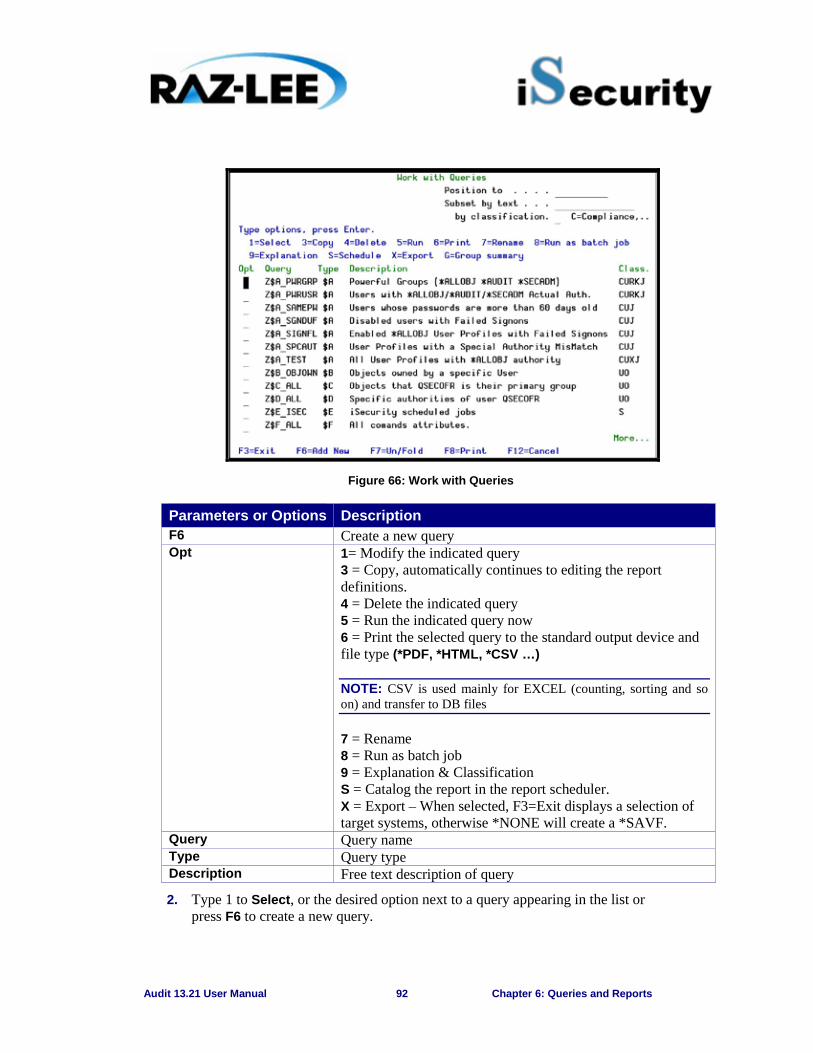
Audit 13.21 User Manual 92 Chapter 6: Queries and Reports
Figure 66: Work with Queries
Parameters or Options Description F6 Create a new query Opt 1= Modify the indicated query
3 = Copy, automatically continues to editing the report definitions. 4 = Delete the indicated query 5 = Run the indicated query now 6 = Print the selected query to the standard output device and file type (*PDF, *HTML, *CSV …)
NOTE: CSV is used mainly for EXCEL (counting, sorting and so on) and transfer to DB files
7 = Rename 8 = Run as batch job 9 = Explanation & Classification S = Catalog the report in the report scheduler. X = Export – When selected, F3=Exit displays a selection of target systems, otherwise *NONE will create a *SAVF.
Query Query name Type Query type Description Free text description of query
2. Type 1 to Select, or the desired option next to a query appearing in the list or press F6 to create a new query.
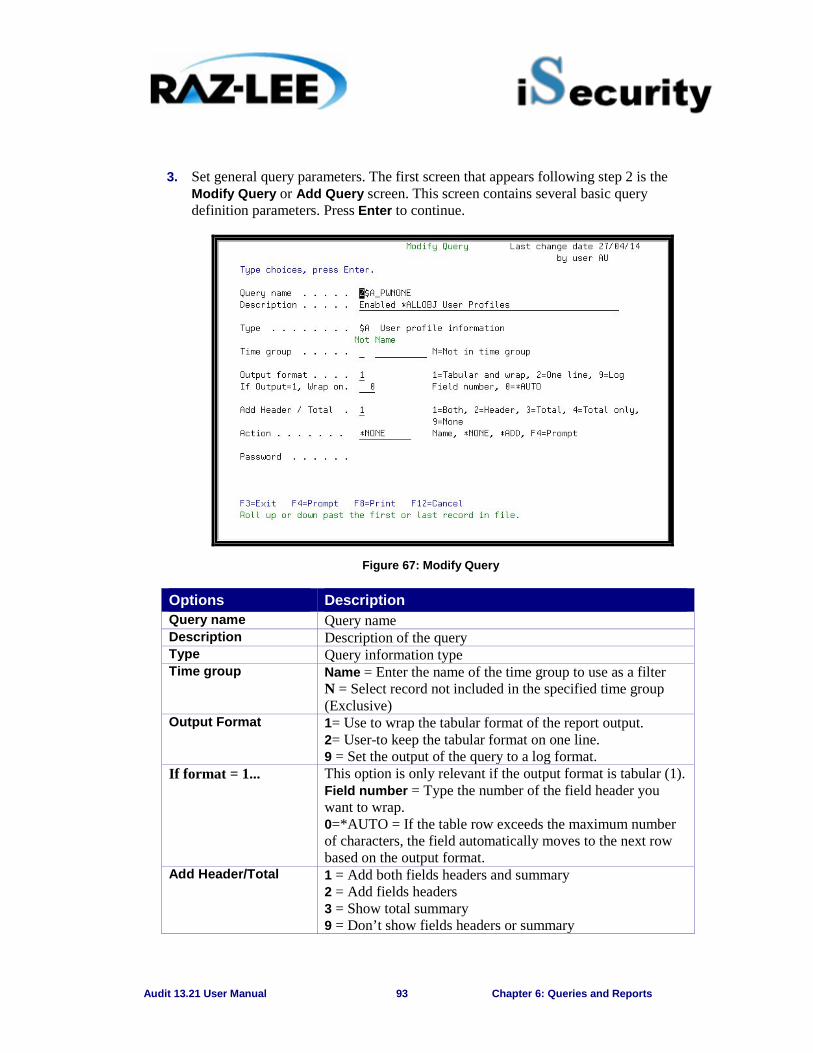
Audit 13.21 User Manual 93 Chapter 6: Queries and Reports
3. Set general query parameters. The first screen that appears following step 2 is the Modify Query or Add Query screen. This screen contains several basic query definition parameters. Press Enter to continue.
Figure 67: Modify Query
Options Description Query name Query name Description Description of the query Type Query information type Time group Name = Enter the name of the time group to use as a filter
N = Select record not included in the specified time group (Exclusive)
Output Format 1= Use to wrap the tabular format of the report output. 2= User-to keep the tabular format on one line. 9 = Set the output of the query to a log format.
If format = 1... This option is only relevant if the output format is tabular (1). Field number = Type the number of the field header you want to wrap. 0=*AUTO = If the table row exceeds the maximum number of characters, the field automatically moves to the next row based on the output format.
Add Header/Total 1 = Add both fields headers and summary 2 = Add fields headers 3 = Show total summary 9 = Don’t show fields headers or summary
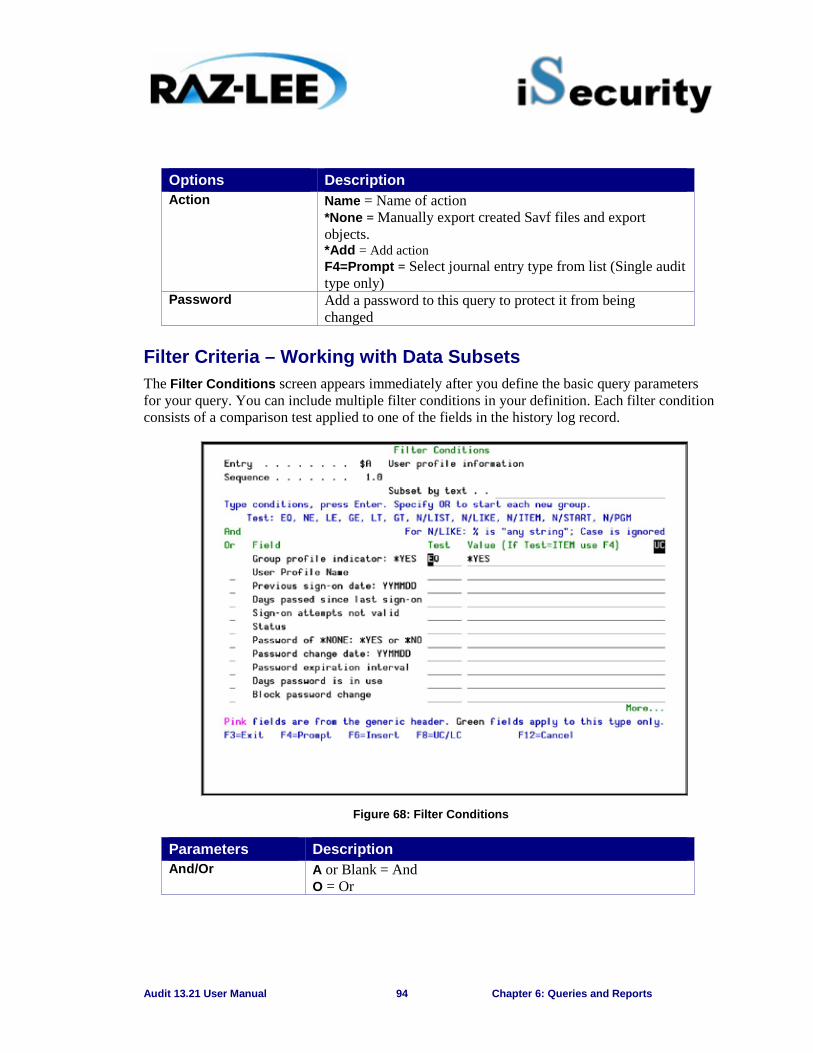
Audit 13.21 User Manual 94 Chapter 6: Queries and Reports
Options Description Action Name = Name of action
*None = Manually export created Savf files and export objects. *Add = Add action F4=Prompt = Select journal entry type from list (Single audit type only)
Password Add a password to this query to protect it from being changed
Filter Criteria – Working with Data Subsets The Filter Conditions screen appears immediately after you define the basic query parameters for your query. You can include multiple filter conditions in your definition. Each filter condition consists of a comparison test applied to one of the fields in the history log record.
Figure 68: Filter Conditions
Parameters Description And/Or A or Blank = And
O = Or
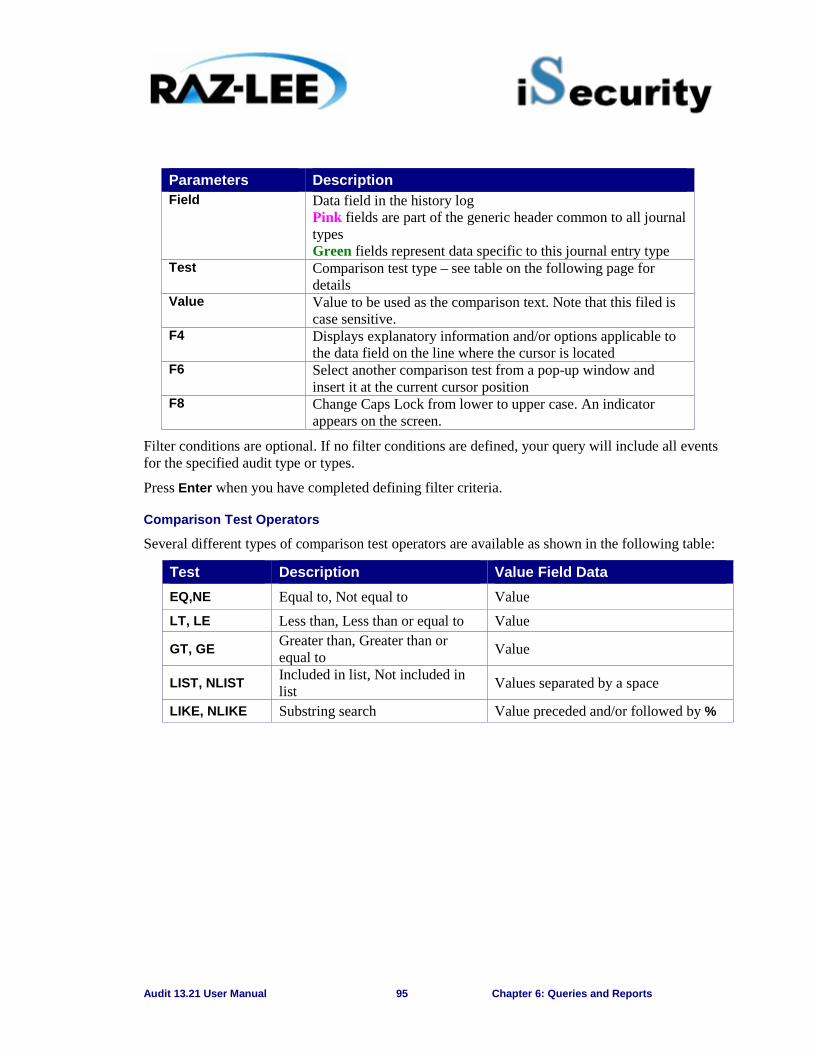
Audit 13.21 User Manual 95 Chapter 6: Queries and Reports
Parameters Description Field Data field in the history log
Pink fields are part of the generic header common to all journal types Green fields represent data specific to this journal entry type
Test Comparison test type – see table on the following page for details
Value Value to be used as the comparison text. Note that this filed is case sensitive.
F4 Displays explanatory information and/or options applicable to the data field on the line where the cursor is located
F6 Select another comparison test from a pop-up window and insert it at the current cursor position
F8 Change Caps Lock from lower to upper case. An indicator appears on the screen.
Filter conditions are optional. If no filter conditions are defined, your query will include all events for the specified audit type or types.
Press Enter when you have completed defining filter criteria.
Comparison Test Operators
Several different types of comparison test operators are available as shown in the following table:
Test Description Value Field Data EQ,NE Equal to, Not equal to Value
LT, LE Less than, Less than or equal to Value
GT, GE Greater than, Greater than or equal to Value
LIST, NLIST Included in list, Not included in list Values separated by a space
LIKE, NLIKE Substring search Value preceded and/or followed by %
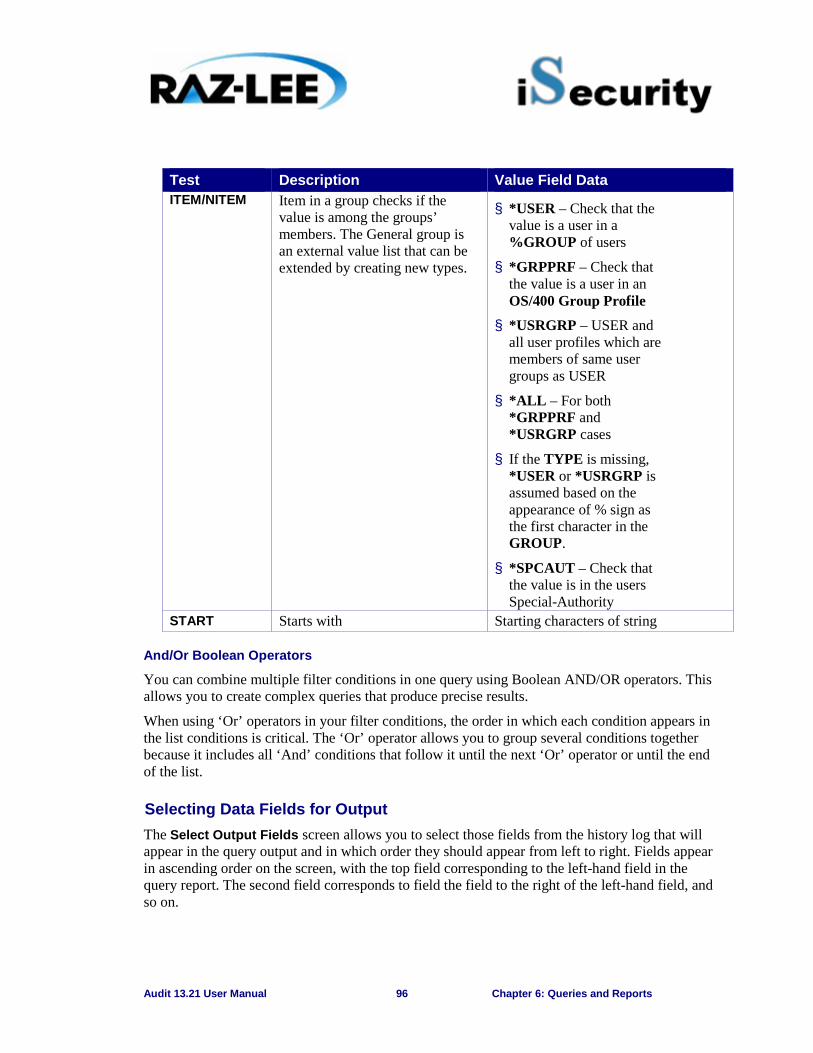
Audit 13.21 User Manual 96 Chapter 6: Queries and Reports
Test Description Value Field Data ITEM/NITEM Item in a group checks if the
value is among the groups’ members. The General group is an external value list that can be extended by creating new types.
§ *USER – Check that the value is a user in a %GROUP of users
§ *GRPPRF – Check that the value is a user in an OS/400 Group Profile
§ *USRGRP – USER and all user profiles which are members of same user groups as USER
§ *ALL – For both *GRPPRF and *USRGRP cases
§ If the TYPE is missing, *USER or *USRGRP is assumed based on the appearance of % sign as the first character in the GROUP.
§ *SPCAUT – Check that the value is in the users Special-Authority
START Starts with Starting characters of string
And/Or Boolean Operators
You can combine multiple filter conditions in one query using Boolean AND/OR operators. This allows you to create complex queries that produce precise results.
When using ‘Or’ operators in your filter conditions, the order in which each condition appears in the list conditions is critical. The ‘Or’ operator allows you to group several conditions together because it includes all ‘And’ conditions that follow it until the next ‘Or’ operator or until the end of the list.
Selecting Data Fields for Output The Select Output Fields screen allows you to select those fields from the history log that will appear in the query output and in which order they should appear from left to right. Fields appear in ascending order on the screen, with the top field corresponding to the left-hand field in the query report. The second field corresponds to field the field to the right of the left-hand field, and so on.
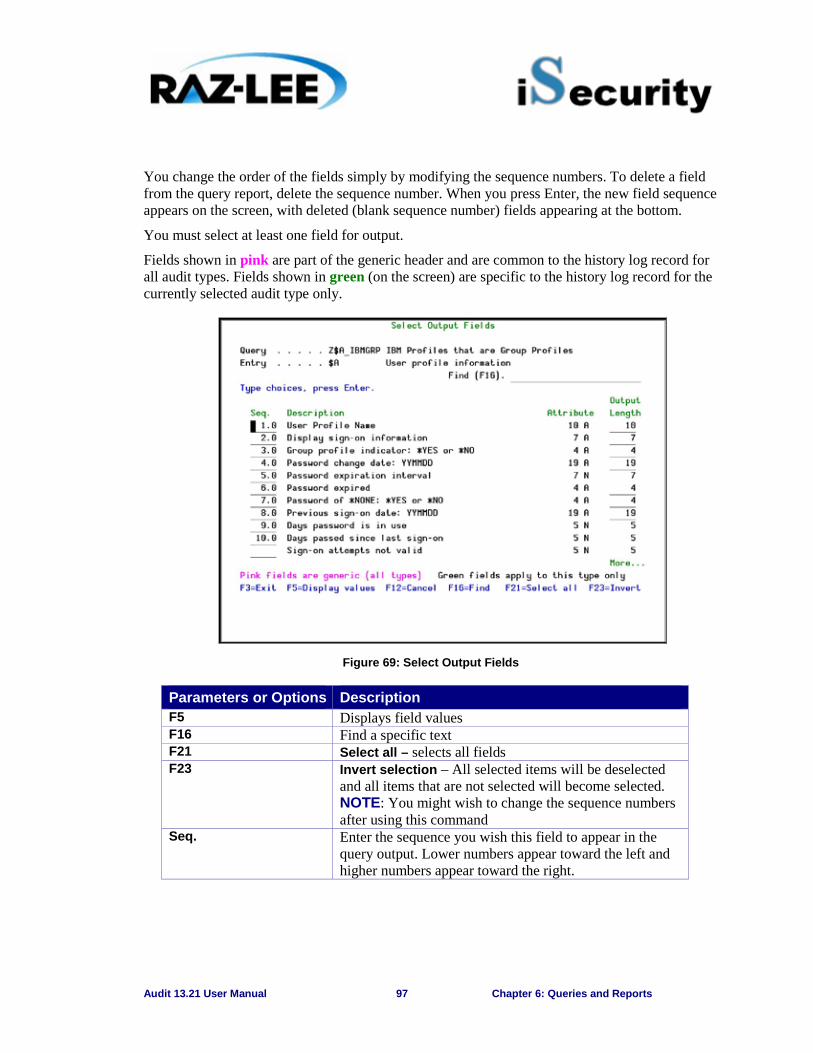
Audit 13.21 User Manual 97 Chapter 6: Queries and Reports
You change the order of the fields simply by modifying the sequence numbers. To delete a field from the query report, delete the sequence number. When you press Enter, the new field sequence appears on the screen, with deleted (blank sequence number) fields appearing at the bottom.
You must select at least one field for output.
Fields shown in pink are part of the generic header and are common to the history log record for all audit types. Fields shown in green (on the screen) are specific to the history log record for the currently selected audit type only.
Figure 69: Select Output Fields
Parameters or Options Description F5 Displays field values F16 Find a specific text F21 Select all – selects all fields F23 Invert selection – All selected items will be deselected
and all items that are not selected will become selected. NOTE: You might wish to change the sequence numbers after using this command
Seq. Enter the sequence you wish this field to appear in the query output. Lower numbers appear toward the left and higher numbers appear toward the right.
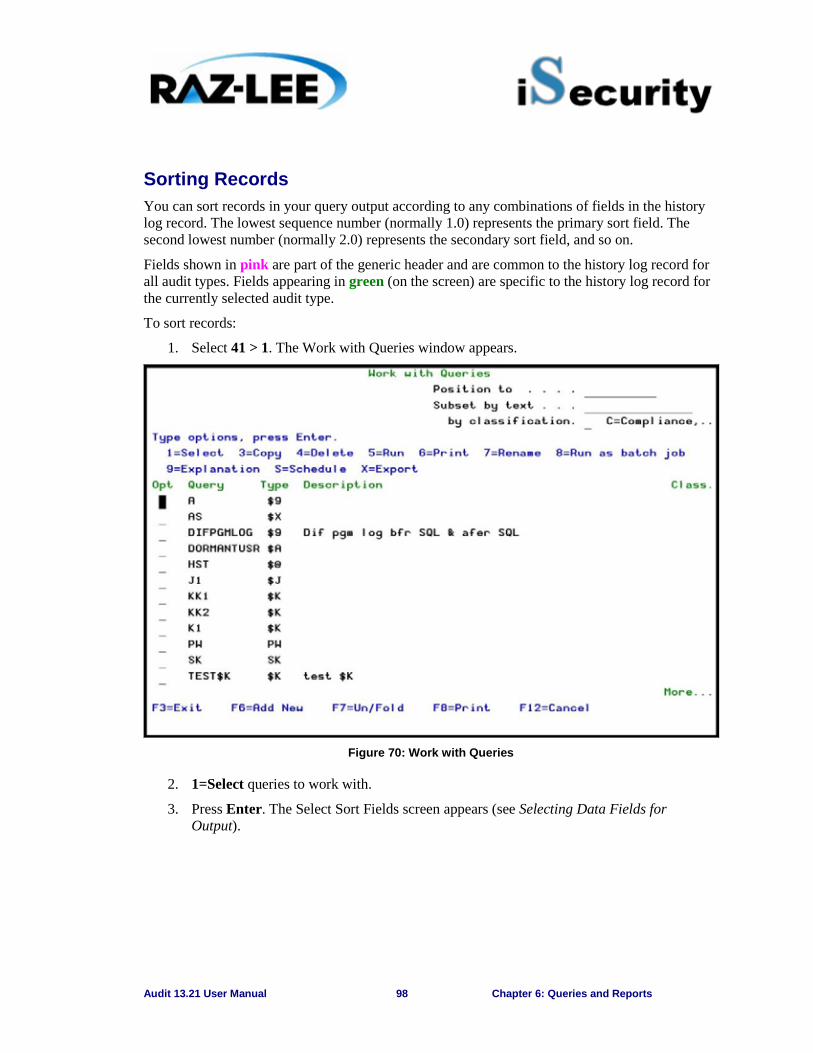
Audit 13.21 User Manual 98 Chapter 6: Queries and Reports
Sorting Records You can sort records in your query output according to any combinations of fields in the history log record. The lowest sequence number (normally 1.0) represents the primary sort field. The second lowest number (normally 2.0) represents the secondary sort field, and so on.
Fields shown in pink are part of the generic header and are common to the history log record for all audit types. Fields appearing in green (on the screen) are specific to the history log record for the currently selected audit type.
To sort records:
1. Select 41 > 1. The Work with Queries window appears.
Figure 70: Work with Queries
2. 1=Select queries to work with.
3. Press Enter. The Select Sort Fields screen appears (see Selecting Data Fields for Output).
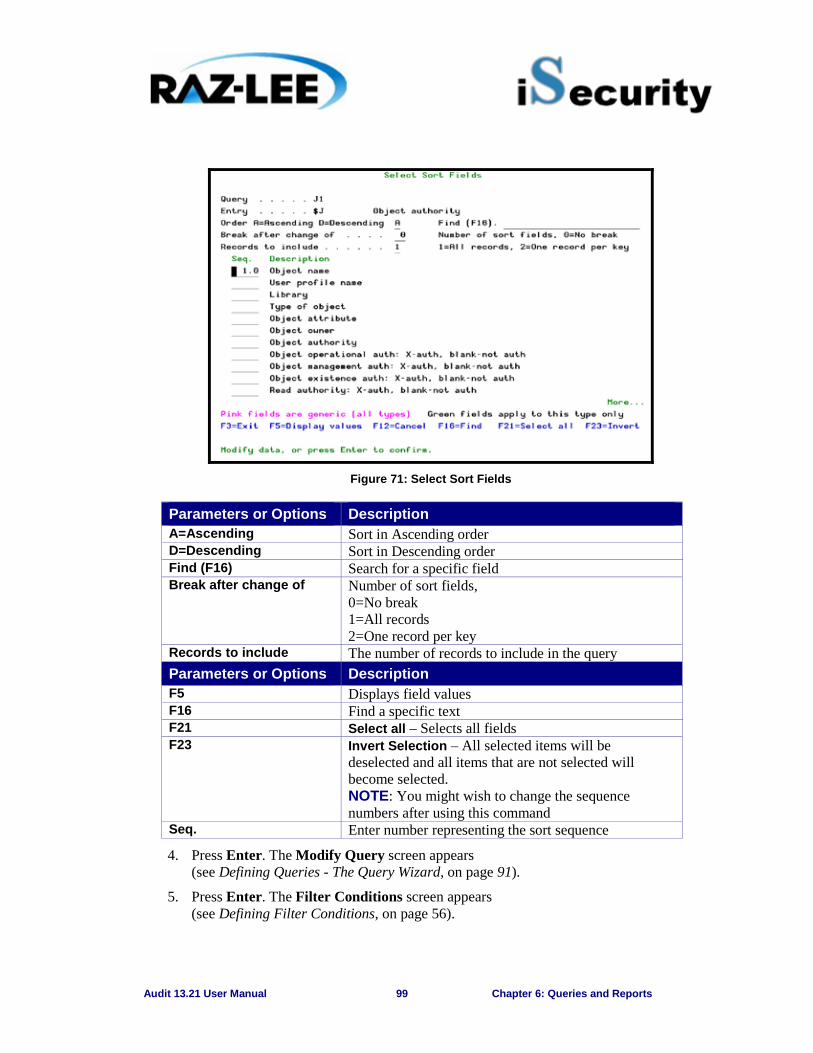
Audit 13.21 User Manual 99 Chapter 6: Queries and Reports
Figure 71: Select Sort Fields
Parameters or Options Description A=Ascending Sort in Ascending order D=Descending Sort in Descending order Find (F16) Search for a specific field Break after change of Number of sort fields,
0=No break 1=All records 2=One record per key
Records to include The number of records to include in the query Parameters or Options Description F5 Displays field values F16 Find a specific text F21 Select all – Selects all fields F23 Invert Selection – All selected items will be
deselected and all items that are not selected will become selected. NOTE: You might wish to change the sequence numbers after using this command
Seq. Enter number representing the sort sequence
4. Press Enter. The Modify Query screen appears (see Defining Queries - The Query Wizard, on page 91).
5. Press Enter. The Filter Conditions screen appears (see Defining Filter Conditions, on page 56).
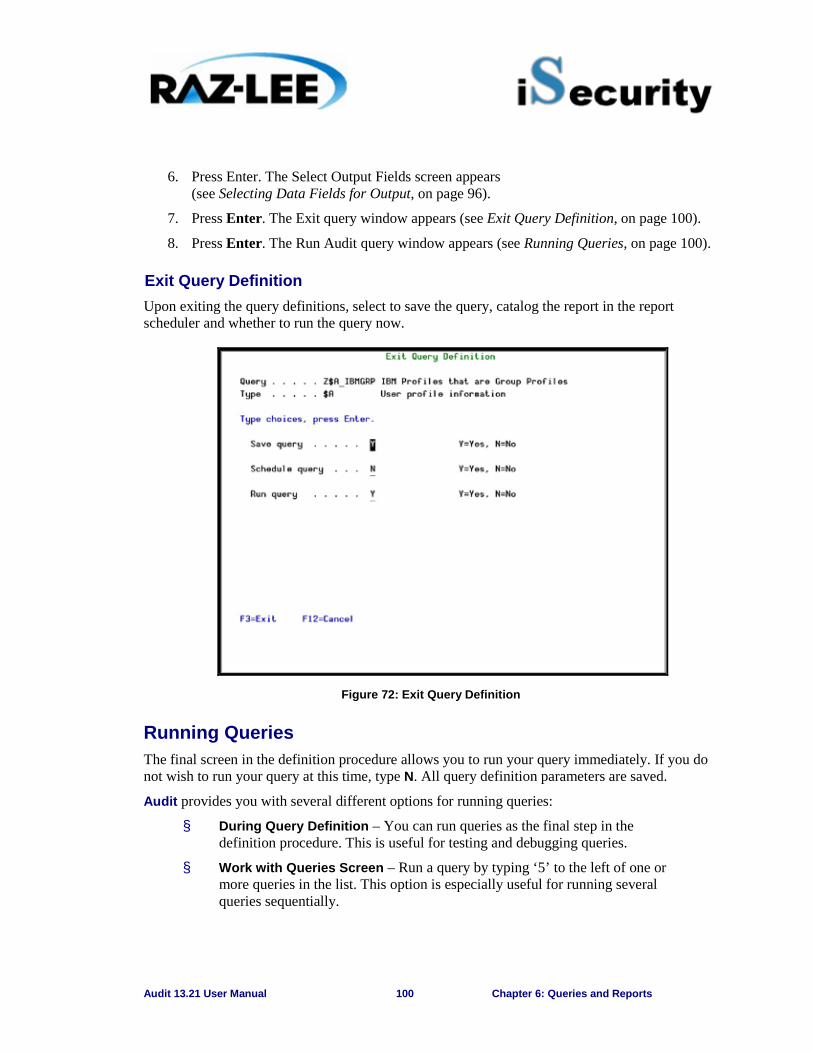
Audit 13.21 User Manual 100 Chapter 6: Queries and Reports
6. Press Enter. The Select Output Fields screen appears (see Selecting Data Fields for Output, on page 96).
7. Press Enter. The Exit query window appears (see Exit Query Definition, on page 100).
8. Press Enter. The Run Audit query window appears (see Running Queries, on page 100).
Exit Query Definition Upon exiting the query definitions, select to save the query, catalog the report in the report scheduler and whether to run the query now.
Figure 72: Exit Query Definition
Running Queries The final screen in the definition procedure allows you to run your query immediately. If you do not wish to run your query at this time, type N. All query definition parameters are saved.
Audit provides you with several different options for running queries:
§ During Query Definition – You can run queries as the final step in the definition procedure. This is useful for testing and debugging queries.
§ Work with Queries Screen – Run a query by typing ‘5’ to the left of one or more queries in the list. This option is especially useful for running several queries sequentially.
Audit 13.21 User Manual 101 Chapter 6: Queries and Reports
§ Report Scheduler – This powerful feature automatically runs queries according to a predefined schedule. This option is typically used for generating periodic audit reports.
§ Queries Menu – Select one of the following options from the Queries menu:
§ 11. Display – Display query results on the screen
§ 12. Print – Print a hard copy of the query as an interactive job
§ 13. Submit as Batch Job – Submit the query as a batch job. This is recommended for large, resource intensive queries.
§ Command Line – Enter the Run Audit Query command (RUNAUQRY) from any command line. This allows you to run a query at any time, even if you are working on other tasks.
§ 21. Display Log – Queries can also be used to filter data when viewing history log data. This is useful for applying sophisticated filter criteria that are unavailable with the display log command.
You can specify run-time filter criteria that apply only to the current instance of the query. Run-time filter criteria allow you to display or print only a subset of the data extracted by the query definition. For example, if your query definition does not filter records according to user profile, you can specify run-time criteria that will display activity only for specific user.
However, run-time filter criteria will not return data excluded from the actual query definition. For example, if your query definition includes filter criteria only for user profile JOHN, and you enter run-time criteria for user profile SALLY, no events will be displayed.
The procedure for running queries is virtually identical for all of the above options. Each method involves entering several run-time parameters on the Run Audit Query screen.
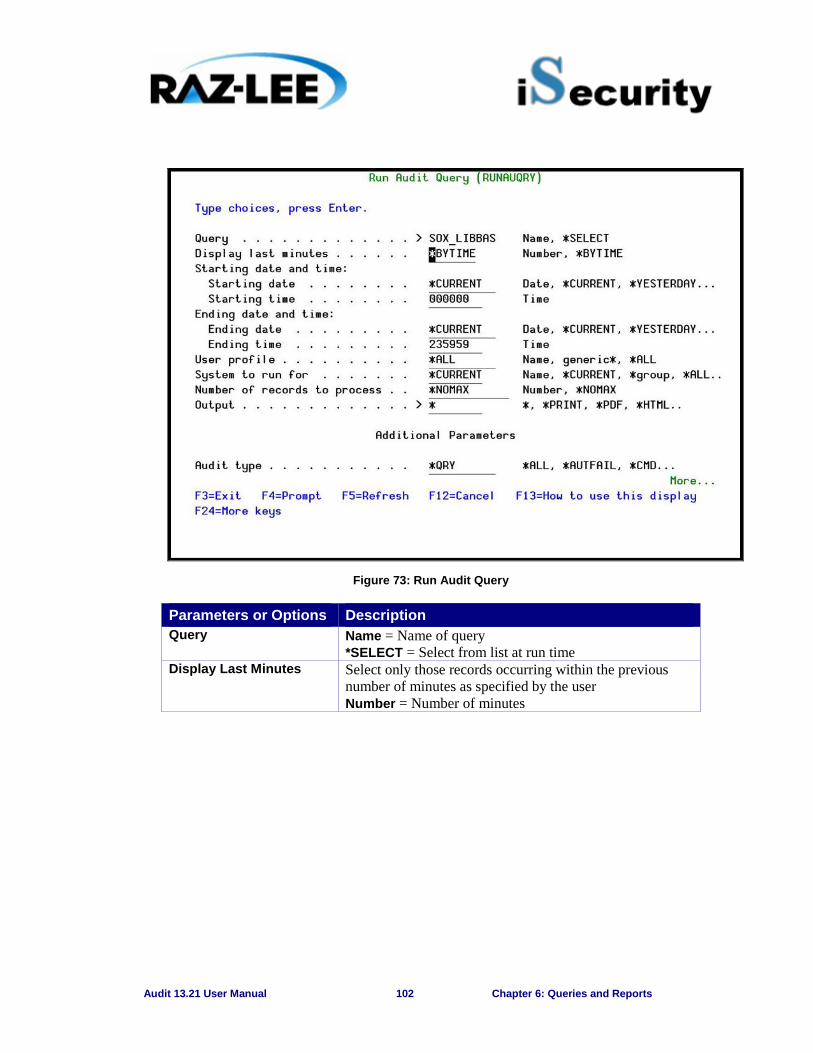
Audit 13.21 User Manual 102 Chapter 6: Queries and Reports
Figure 73: Run Audit Query
Parameters or Options Description Query Name = Name of query
*SELECT = Select from list at run time Display Last Minutes Select only those records occurring within the previous
number of minutes as specified by the user Number = Number of minutes
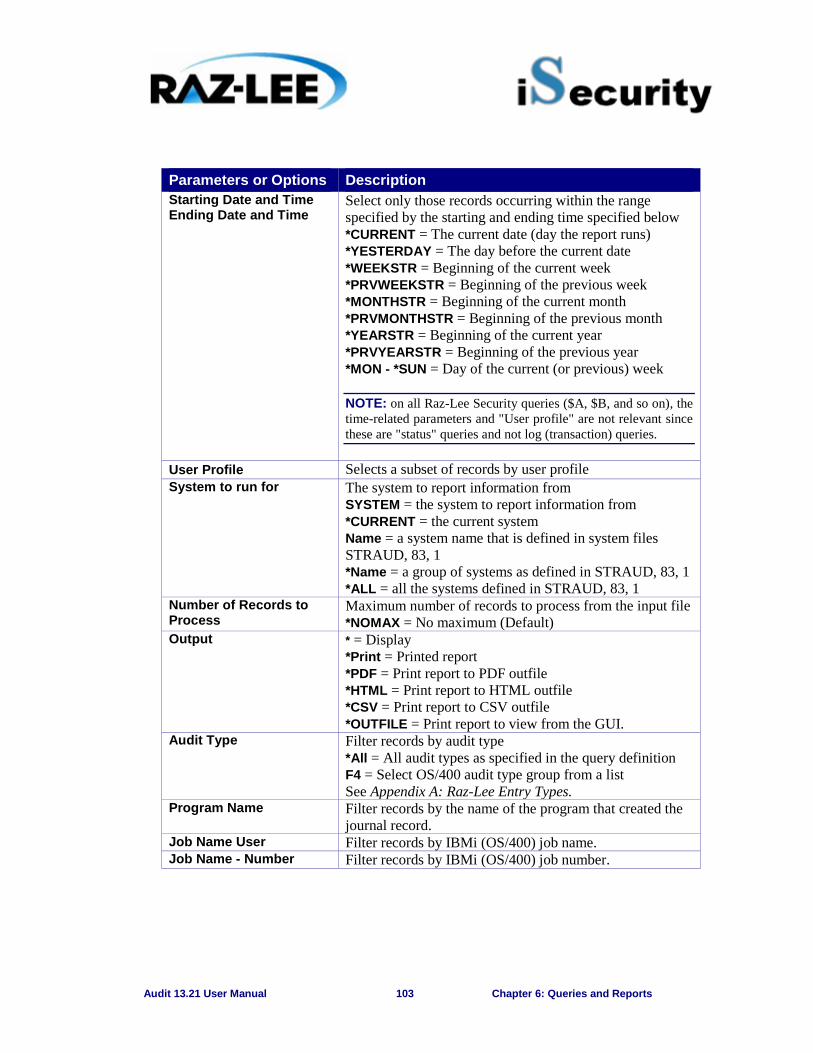
Audit 13.21 User Manual 103 Chapter 6: Queries and Reports
Parameters or Options Description Starting Date and Time Ending Date and Time
Select only those records occurring within the range specified by the starting and ending time specified below *CURRENT = The current date (day the report runs) *YESTERDAY = The day before the current date *WEEKSTR = Beginning of the current week *PRVWEEKSTR = Beginning of the previous week *MONTHSTR = Beginning of the current month *PRVMONTHSTR = Beginning of the previous month *YEARSTR = Beginning of the current year *PRVYEARSTR = Beginning of the previous year *MON - *SUN = Day of the current (or previous) week
NOTE: on all Raz-Lee Security queries ($A, $B, and so on), the time-related parameters and "User profile" are not relevant since these are "status" queries and not log (transaction) queries.
User Profile Selects a subset of records by user profile System to run for The system to report information from
SYSTEM = the system to report information from *CURRENT = the current system Name = a system name that is defined in system files STRAUD, 83, 1 *Name = a group of systems as defined in STRAUD, 83, 1 *ALL = all the systems defined in STRAUD, 83, 1
Number of Records to Process
Maximum number of records to process from the input file *NOMAX = No maximum (Default)
Output * = Display *Print = Printed report *PDF = Print report to PDF outfile *HTML = Print report to HTML outfile *CSV = Print report to CSV outfile *OUTFILE = Print report to view from the GUI.
Audit Type Filter records by audit type *All = All audit types as specified in the query definition F4 = Select OS/400 audit type group from a list See Appendix A: Raz-Lee Entry Types.
Program Name Filter records by the name of the program that created the journal record.
Job Name User Filter records by IBMi (OS/400) job name. Job Name - Number Filter records by IBMi (OS/400) job number.
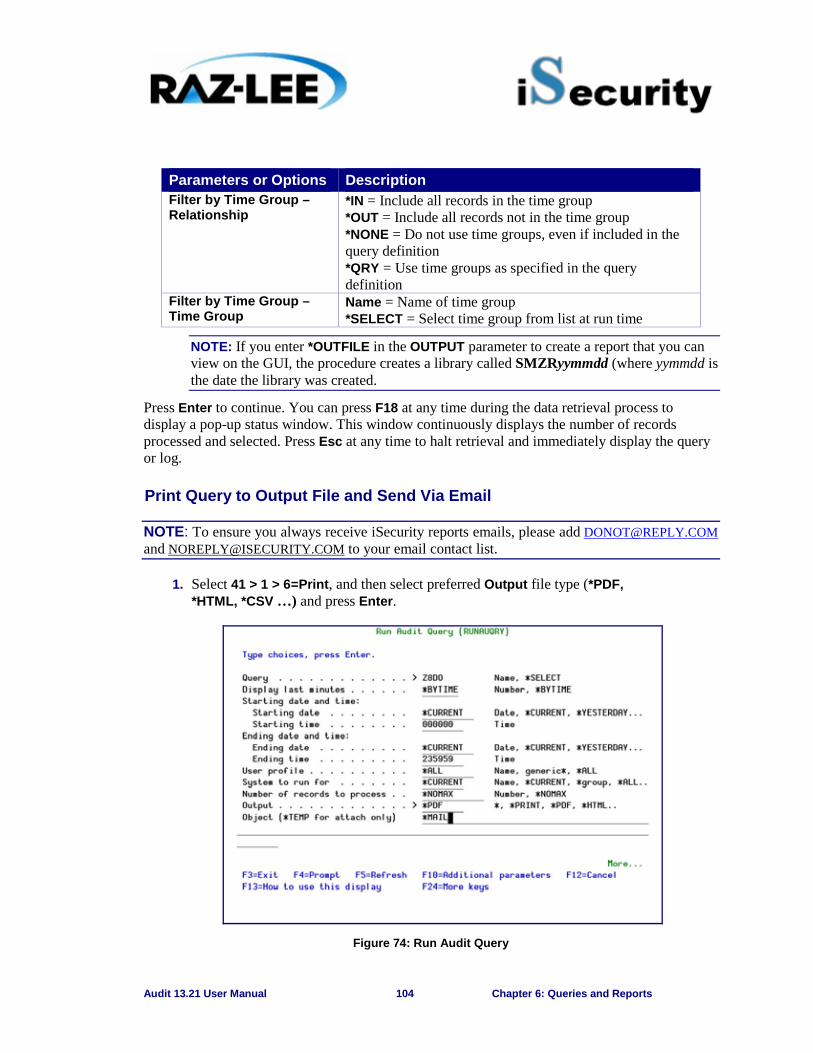
Audit 13.21 User Manual 104 Chapter 6: Queries and Reports
Parameters or Options Description Filter by Time Group – Relationship
*IN = Include all records in the time group *OUT = Include all records not in the time group *NONE = Do not use time groups, even if included in the query definition *QRY = Use time groups as specified in the query definition
Filter by Time Group – Time Group
Name = Name of time group *SELECT = Select time group from list at run time
NOTE: If you enter *OUTFILE in the OUTPUT parameter to create a report that you can view on the GUI, the procedure creates a library called SMZRyymmdd (where yymmdd is the date the library was created.
Press Enter to continue. You can press F18 at any time during the data retrieval process to display a pop-up status window. This window continuously displays the number of records processed and selected. Press Esc at any time to halt retrieval and immediately display the query or log.
Print Query to Output File and Send Via Email
NOTE: To ensure you always receive iSecurity reports emails, please add [email protected] and [email protected] to your email contact list.
1. Select 41 > 1 > 6=Print, and then select preferred Output file type (*PDF, *HTML, *CSV …) and press Enter.
Figure 74: Run Audit Query
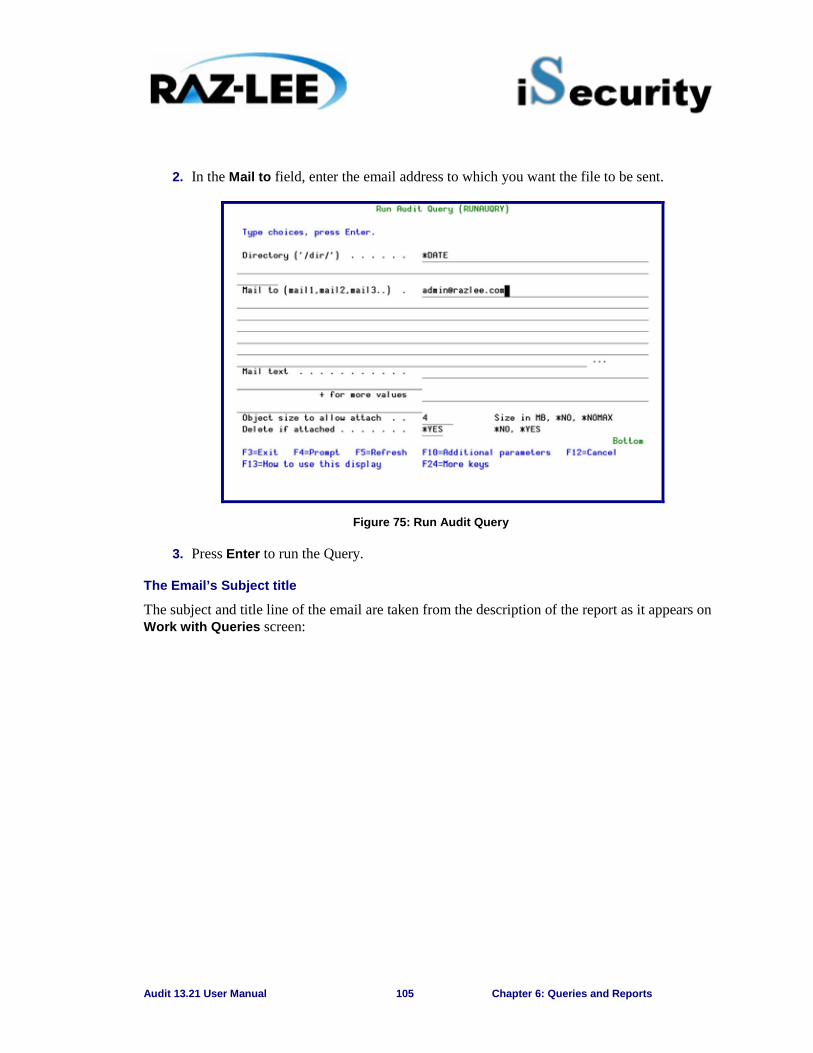
Audit 13.21 User Manual 105 Chapter 6: Queries and Reports
2. In the Mail to field, enter the email address to which you want the file to be sent.
Figure 75: Run Audit Query
3. Press Enter to run the Query.
The Email’s Subject title
The subject and title line of the email are taken from the description of the report as it appears on Work with Queries screen:
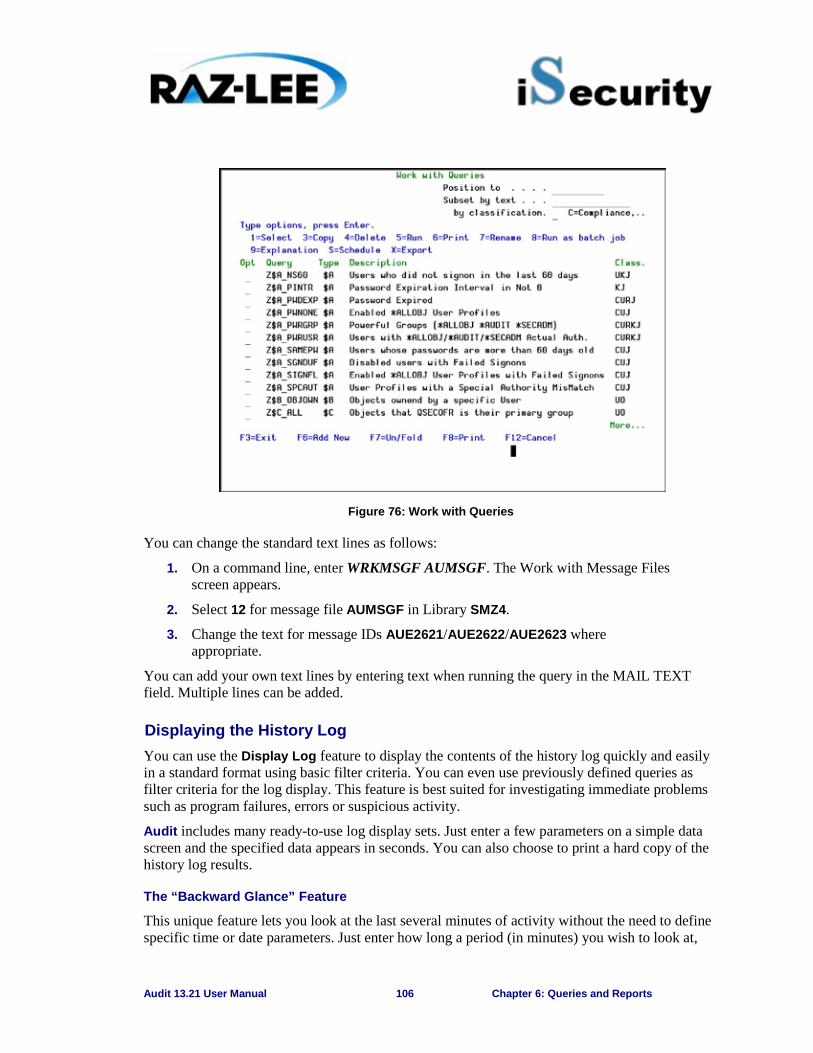
Audit 13.21 User Manual 106 Chapter 6: Queries and Reports
Figure 76: Work with Queries
You can change the standard text lines as follows:
1. On a command line, enter WRKMSGF AUMSGF. The Work with Message Files screen appears.
2. Select 12 for message file AUMSGF in Library SMZ4.
3. Change the text for message IDs AUE2621/AUE2622/AUE2623 where appropriate.
You can add your own text lines by entering text when running the query in the MAIL TEXT field. Multiple lines can be added.
Displaying the History Log You can use the Display Log feature to display the contents of the history log quickly and easily in a standard format using basic filter criteria. You can even use previously defined queries as filter criteria for the log display. This feature is best suited for investigating immediate problems such as program failures, errors or suspicious activity.
Audit includes many ready-to-use log display sets. Just enter a few parameters on a simple data screen and the specified data appears in seconds. You can also choose to print a hard copy of the history log results.
The “Backward Glance” Feature
This unique feature lets you look at the last several minutes of activity without the need to define specific time or date parameters. Just enter how long a period (in minutes) you wish to look at,
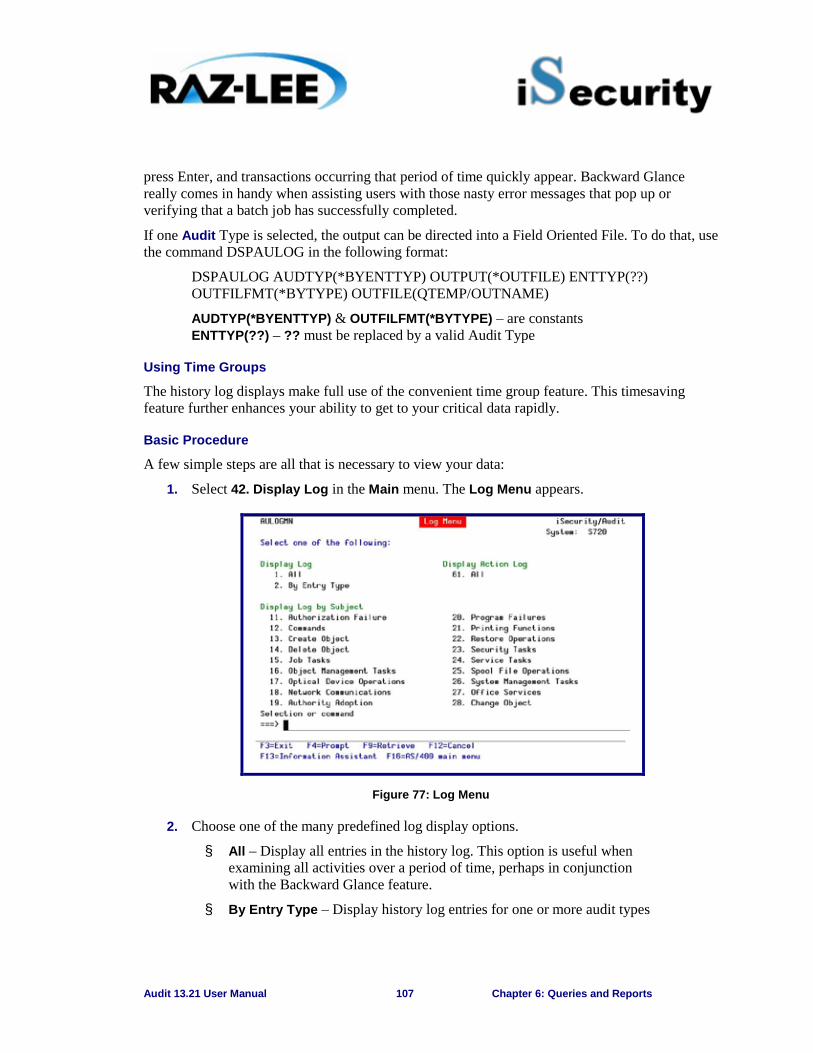
Audit 13.21 User Manual 107 Chapter 6: Queries and Reports
press Enter, and transactions occurring that period of time quickly appear. Backward Glance really comes in handy when assisting users with those nasty error messages that pop up or verifying that a batch job has successfully completed.
If one Audit Type is selected, the output can be directed into a Field Oriented File. To do that, use the command DSPAULOG in the following format:
DSPAULOG AUDTYP(*BYENTTYP) OUTPUT(*OUTFILE) ENTTYP(??) OUTFILFMT(*BYTYPE) OUTFILE(QTEMP/OUTNAME)
AUDTYP(*BYENTTYP) & OUTFILFMT(*BYTYPE) – are constants ENTTYP(??) – ?? must be replaced by a valid Audit Type
Using Time Groups
The history log displays make full use of the convenient time group feature. This timesaving feature further enhances your ability to get to your critical data rapidly.
Basic Procedure
A few simple steps are all that is necessary to view your data:
1. Select 42. Display Log in the Main menu. The Log Menu appears.
Figure 77: Log Menu
2. Choose one of the many predefined log display options.
§ All – Display all entries in the history log. This option is useful when examining all activities over a period of time, perhaps in conjunction with the Backward Glance feature.
§ By Entry Type – Display history log entries for one or more audit types
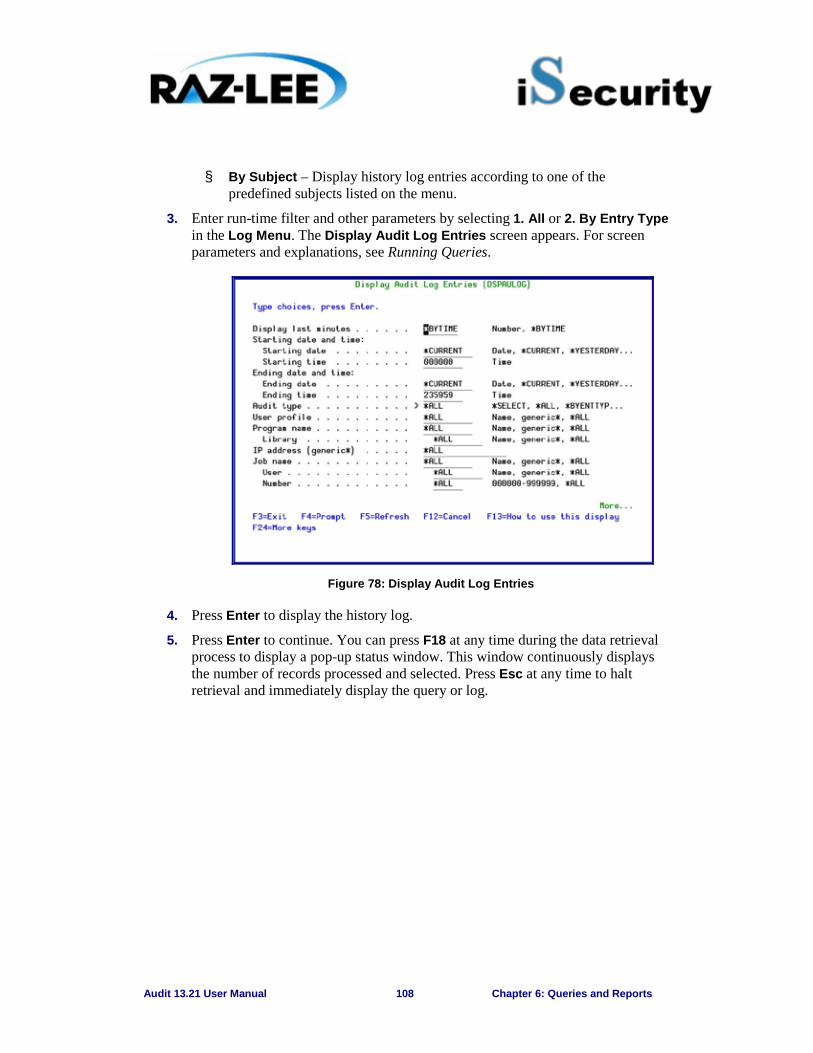
Audit 13.21 User Manual 108 Chapter 6: Queries and Reports
§ By Subject – Display history log entries according to one of the predefined subjects listed on the menu.
3. Enter run-time filter and other parameters by selecting 1. All or 2. By Entry Type in the Log Menu. The Display Audit Log Entries screen appears. For screen parameters and explanations, see Running Queries.
Figure 78: Display Audit Log Entries
4. Press Enter to display the history log.
5. Press Enter to continue. You can press F18 at any time during the data retrieval process to display a pop-up status window. This window continuously displays the number of records processed and selected. Press Esc at any time to halt retrieval and immediately display the query or log.
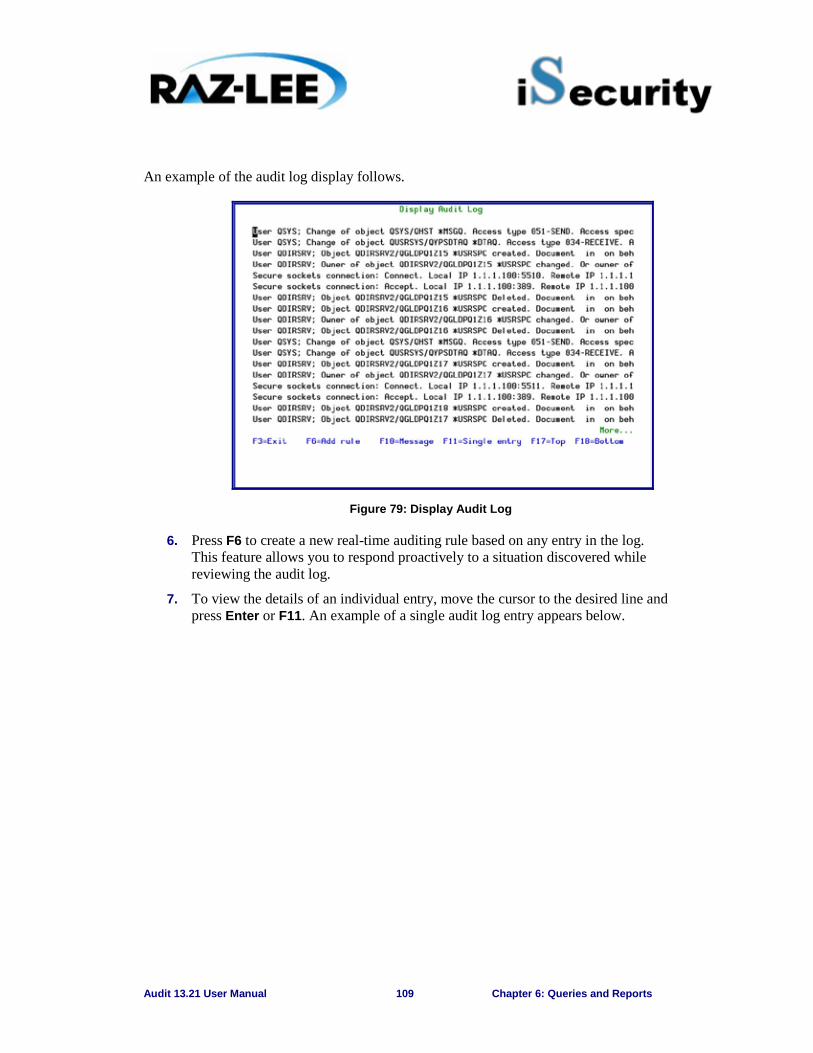
Audit 13.21 User Manual 109 Chapter 6: Queries and Reports
An example of the audit log display follows.
Figure 79: Display Audit Log
6. Press F6 to create a new real-time auditing rule based on any entry in the log. This feature allows you to respond proactively to a situation discovered while reviewing the audit log.
7. To view the details of an individual entry, move the cursor to the desired line and press Enter or F11. An example of a single audit log entry appears below.
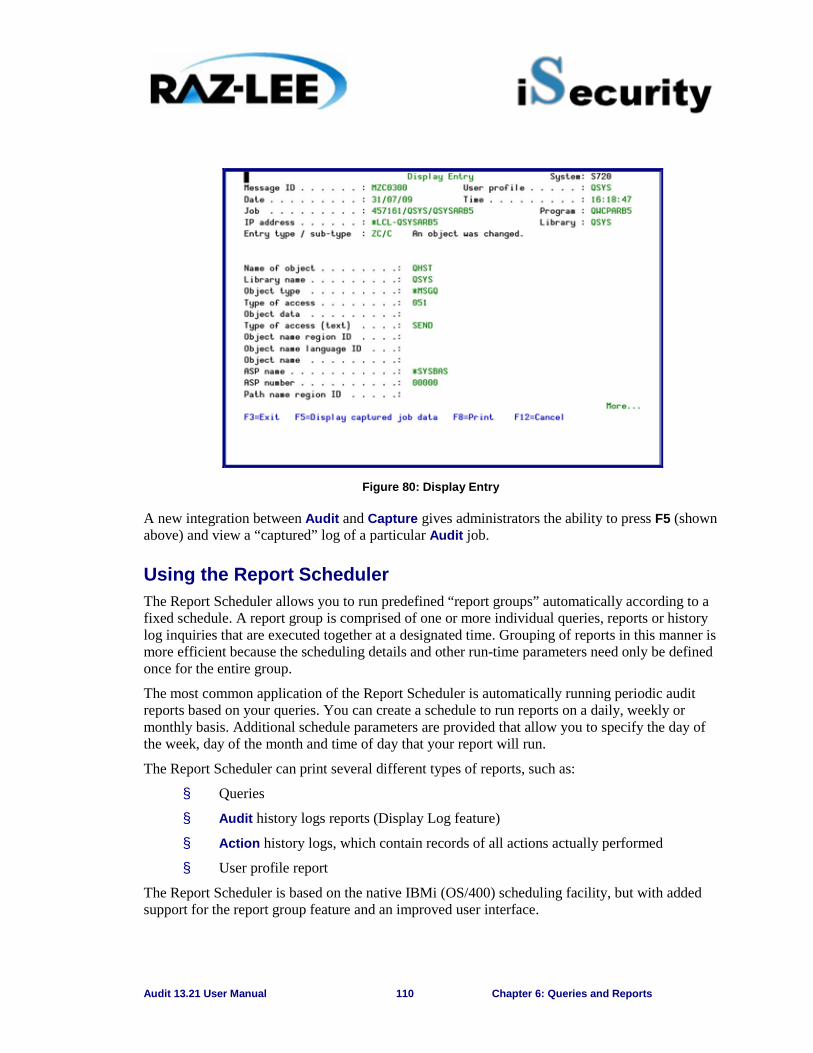
Audit 13.21 User Manual 110 Chapter 6: Queries and Reports
Figure 80: Display Entry
A new integration between Audit and Capture gives administrators the ability to press F5 (shown above) and view a “captured” log of a particular Audit job.
Using the Report Scheduler The Report Scheduler allows you to run predefined “report groups” automatically according to a fixed schedule. A report group is comprised of one or more individual queries, reports or history log inquiries that are executed together at a designated time. Grouping of reports in this manner is more efficient because the scheduling details and other run-time parameters need only be defined once for the entire group.
The most common application of the Report Scheduler is automatically running periodic audit reports based on your queries. You can create a schedule to run reports on a daily, weekly or monthly basis. Additional schedule parameters are provided that allow you to specify the day of the week, day of the month and time of day that your report will run.
The Report Scheduler can print several different types of reports, such as:
§ Queries
§ Audit history logs reports (Display Log feature)
§ Action history logs, which contain records of all actions actually performed
§ User profile report
The Report Scheduler is based on the native IBMi (OS/400) scheduling facility, but with added support for the report group feature and an improved user interface.
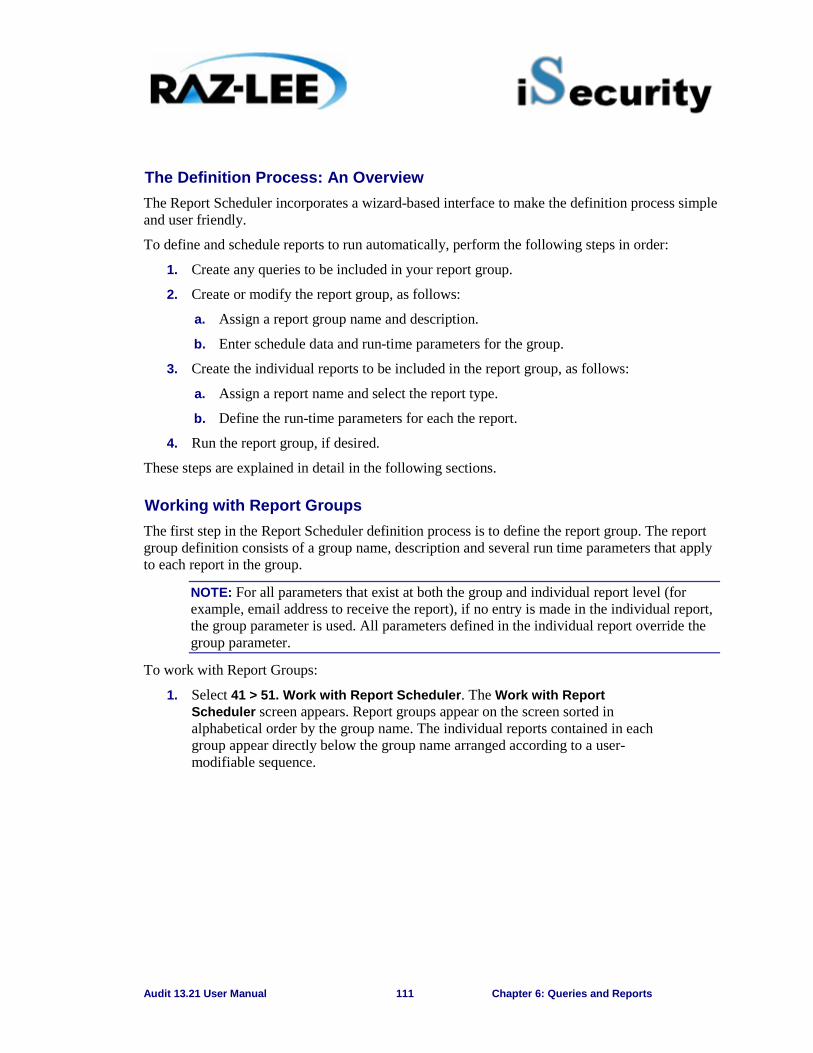
Audit 13.21 User Manual 111 Chapter 6: Queries and Reports
The Definition Process: An Overview The Report Scheduler incorporates a wizard-based interface to make the definition process simple and user friendly.
To define and schedule reports to run automatically, perform the following steps in order:
1. Create any queries to be included in your report group.
2. Create or modify the report group, as follows:
a. Assign a report group name and description.
b. Enter schedule data and run-time parameters for the group.
3. Create the individual reports to be included in the report group, as follows:
a. Assign a report name and select the report type.
b. Define the run-time parameters for each the report.
4. Run the report group, if desired.
These steps are explained in detail in the following sections.
Working with Report Groups The first step in the Report Scheduler definition process is to define the report group. The report group definition consists of a group name, description and several run time parameters that apply to each report in the group.
NOTE: For all parameters that exist at both the group and individual report level (for example, email address to receive the report), if no entry is made in the individual report, the group parameter is used. All parameters defined in the individual report override the group parameter.
To work with Report Groups:
1. Select 41 > 51. Work with Report Scheduler. The Work with Report Scheduler screen appears. Report groups appear on the screen sorted in alphabetical order by the group name. The individual reports contained in each group appear directly below the group name arranged according to a user-modifiable sequence.
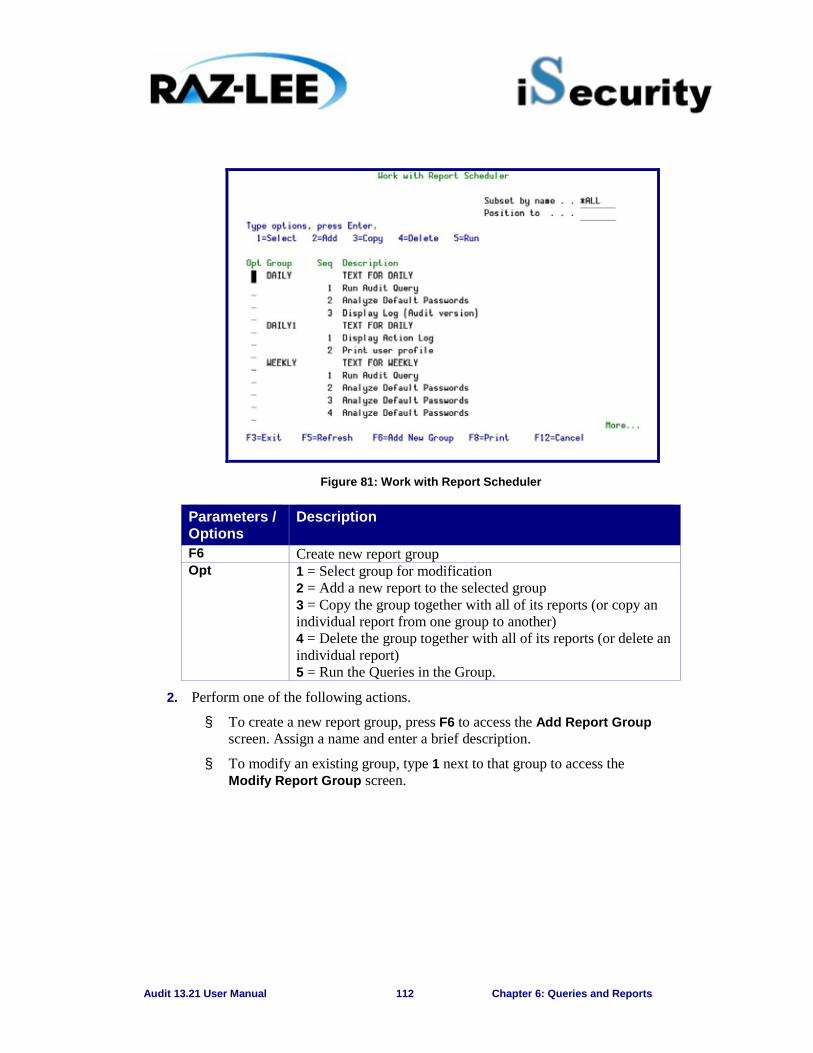
Audit 13.21 User Manual 112 Chapter 6: Queries and Reports
Figure 81: Work with Report Scheduler
Parameters / Options
Description
F6 Create new report group Opt 1 = Select group for modification
2 = Add a new report to the selected group 3 = Copy the group together with all of its reports (or copy an individual report from one group to another) 4 = Delete the group together with all of its reports (or delete an individual report) 5 = Run the Queries in the Group.
2. Perform one of the following actions.
§ To create a new report group, press F6 to access the Add Report Group screen. Assign a name and enter a brief description.
§ To modify an existing group, type 1 next to that group to access the Modify Report Group screen.

Audit 13.21 User Manual 113 Chapter 6: Queries and Reports
Figure 82: Modify Report Group
Parameters or Options Description Report Group Name Enter a name with a maximum of 7 alphanumeric
characters. The name must begin with a letter. Description Free text description of the report group Group Parameters Command string automatically generated by Audit based
on run-time parameters specified for the report group
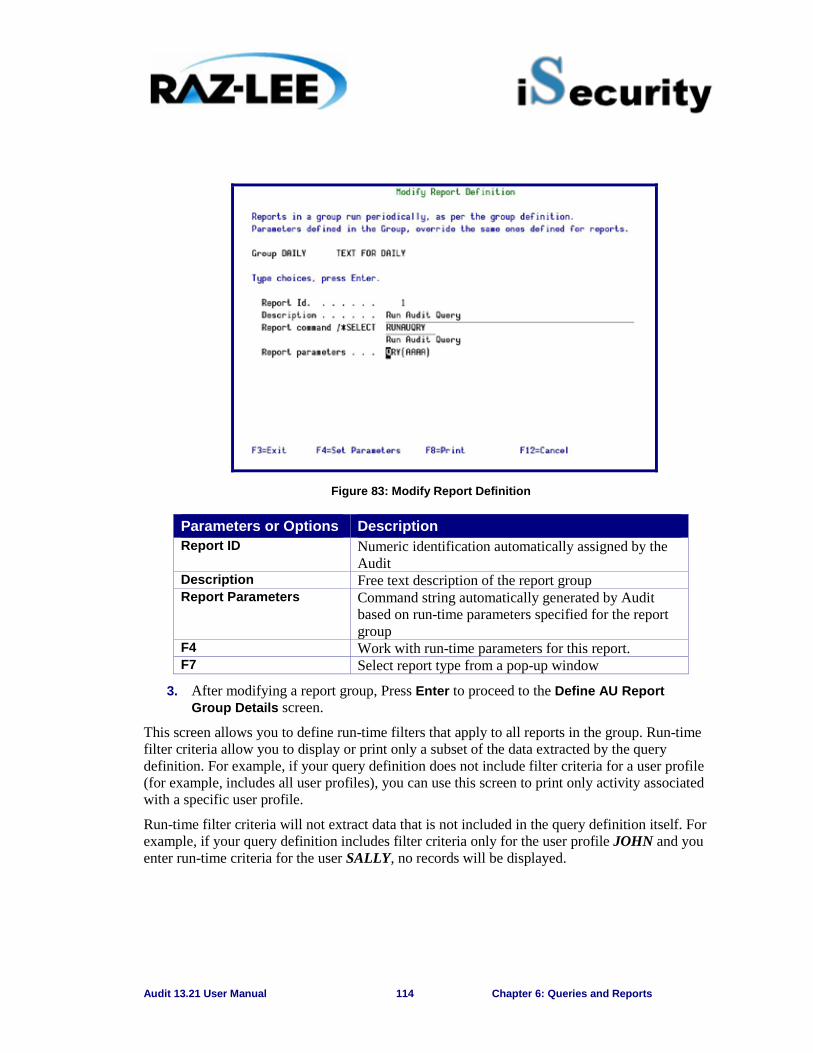
Audit 13.21 User Manual 114 Chapter 6: Queries and Reports
Figure 83: Modify Report Definition
Parameters or Options Description Report ID Numeric identification automatically assigned by the
Audit Description Free text description of the report group Report Parameters Command string automatically generated by Audit
based on run-time parameters specified for the report group
F4 Work with run-time parameters for this report. F7 Select report type from a pop-up window
3. After modifying a report group, Press Enter to proceed to the Define AU Report Group Details screen.
This screen allows you to define run-time filters that apply to all reports in the group. Run-time filter criteria allow you to display or print only a subset of the data extracted by the query definition. For example, if your query definition does not include filter criteria for a user profile (for example, includes all user profiles), you can use this screen to print only activity associated with a specific user profile.
Run-time filter criteria will not extract data that is not included in the query definition itself. For example, if your query definition includes filter criteria only for the user profile JOHN and you enter run-time criteria for the user SALLY, no records will be displayed.
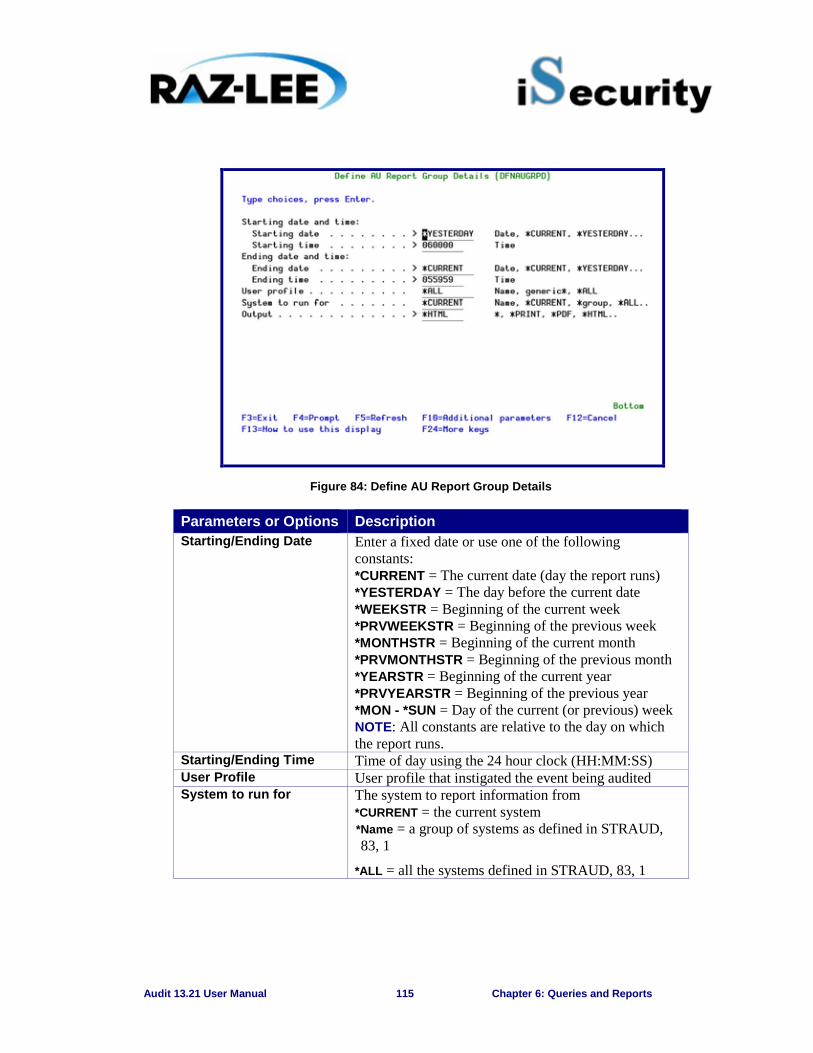
Audit 13.21 User Manual 115 Chapter 6: Queries and Reports
Figure 84: Define AU Report Group Details
Parameters or Options Description Starting/Ending Date Enter a fixed date or use one of the following
constants: *CURRENT = The current date (day the report runs) *YESTERDAY = The day before the current date *WEEKSTR = Beginning of the current week *PRVWEEKSTR = Beginning of the previous week *MONTHSTR = Beginning of the current month *PRVMONTHSTR = Beginning of the previous month *YEARSTR = Beginning of the current year *PRVYEARSTR = Beginning of the previous year *MON - *SUN = Day of the current (or previous) week NOTE: All constants are relative to the day on which the report runs.
Starting/Ending Time Time of day using the 24 hour clock (HH:MM:SS) User Profile User profile that instigated the event being audited System to run for The system to report information from
*CURRENT = the current system *Name = a group of systems as defined in STRAUD, 83, 1
*ALL = all the systems defined in STRAUD, 83, 1

Audit 13.21 User Manual 116 Chapter 6: Queries and Reports
Parameters or Options Description Output * = Display
*Print = Printed report (see Chapter 6: Queries and Reports) *PDF = Print report to PDF outfile *HTML = Print report to HTML outfile *CSV = Print report to CSV outfile *Outfile = Print report to view from the GUI select print option
Compress outputs together
*YES = Send all reports produced from the group (up to 15) in a single email *NO = Send each report produced from the group in a separate email
4. Press Enter to continue to the Job Schedule Entry screen.
Figure 85: Change Job Schedule Entry
Options Description Frequency *SAME = Value does not change
*ONCE = Run the report group once only *WEEKLY = Run on the same day or days of each week *MONTHLY = Run on the same day or days of each month

Audit 13.21 User Manual 117 Chapter 6: Queries and Reports
Options Description Schedule Date Date = The specific day on which the report will run
*SAME = Value does not change *CURRENT = The current date (day the report runs) *MONTHSTR = First day of the next month *MONTHEND = Last day of the current month *NONE = Use day of week value in the Schedule Day field below
Schedule Day *MON *TUE *WED *THU *FRI *SAT *SUN
*ALL = Run every day (Overrides frequency parameter) *NONE = Use day of week value in the Schedule Date field above.
Schedule Time Time of day using the 24 hour clock (HH:MM:SS)
The Schedule Date and Schedule Day fields are mutually exclusive. If you use one, you must set the other to the value ‘*NONE’. Other fields may appear on this screen, which is associated with the IBMi (OS/400) CHGJOBSCDE command. These fields are not relevant under most circumstances.
5. Press Enter to complete the definition and return to the Work with Report Scheduler screen.
Working with Individual Reports The next step in the definition process is to define the individual reports that are contained in the report group.
1. To add a new report to a group, type 2 next to the group name, or type 2 next an individual report to modify it. The Report Definition screen appears. For information, see Working with Report Groups, on page 111.
2. Define run time parameters for this report. The actual parameters available are specific to the report type.
§ For details regarding query parameters, see Running Queries, on page 100.
§ For details regarding display log parameters, see Basic Procedure, on page 107.
3. Press Enter to finish the definition and return to the Work with Report Scheduler screen.
NOTE: For all parameters that exist at both the group and individual report level (for example, email address to receive the report), if no entry is made in the individual report, the group parameter is used. All parameters defined in the individual report override the group parameter.
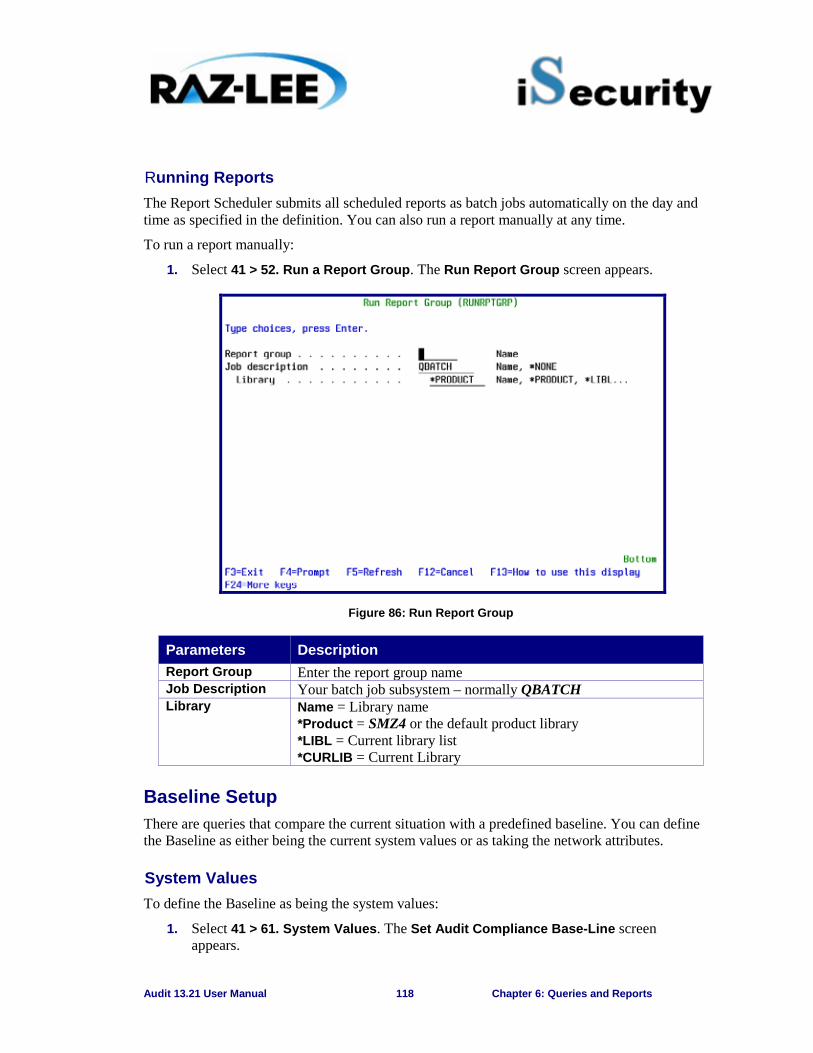
Audit 13.21 User Manual 118 Chapter 6: Queries and Reports
Running Reports The Report Scheduler submits all scheduled reports as batch jobs automatically on the day and time as specified in the definition. You can also run a report manually at any time.
To run a report manually:
1. Select 41 > 52. Run a Report Group. The Run Report Group screen appears.
Figure 86: Run Report Group
Parameters Description
Report Group Enter the report group name Job Description Your batch job subsystem – normally QBATCH Library Name = Library name
*Product = SMZ4 or the default product library *LIBL = Current library list *CURLIB = Current Library
Baseline Setup There are queries that compare the current situation with a predefined baseline. You can define the Baseline as either being the current system values or as taking the network attributes.
System Values To define the Baseline as being the system values:
1. Select 41 > 61. System Values. The Set Audit Compliance Base-Line screen appears.
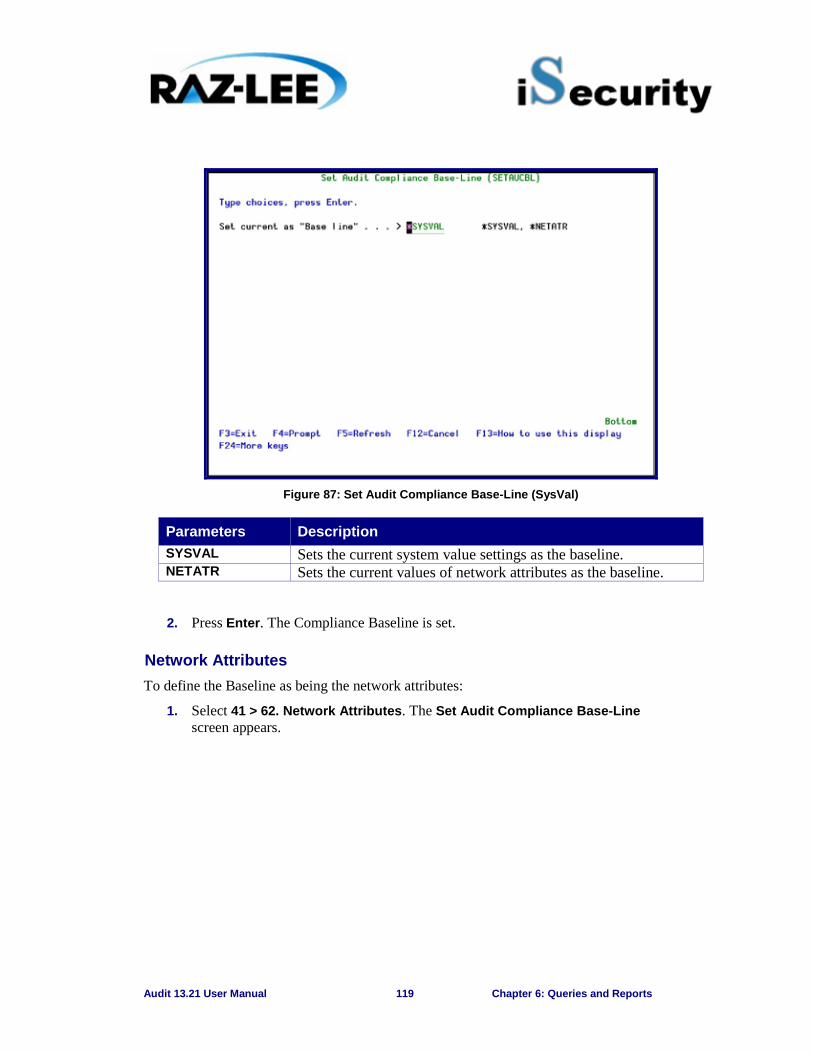
Audit 13.21 User Manual 119 Chapter 6: Queries and Reports
Figure 87: Set Audit Compliance Base-Line (SysVal)
Parameters Description
SYSVAL Sets the current system value settings as the baseline. NETATR Sets the current values of network attributes as the baseline.
2. Press Enter. The Compliance Baseline is set.
Network Attributes To define the Baseline as being the network attributes:
1. Select 41 > 62. Network Attributes. The Set Audit Compliance Base-Line screen appears.
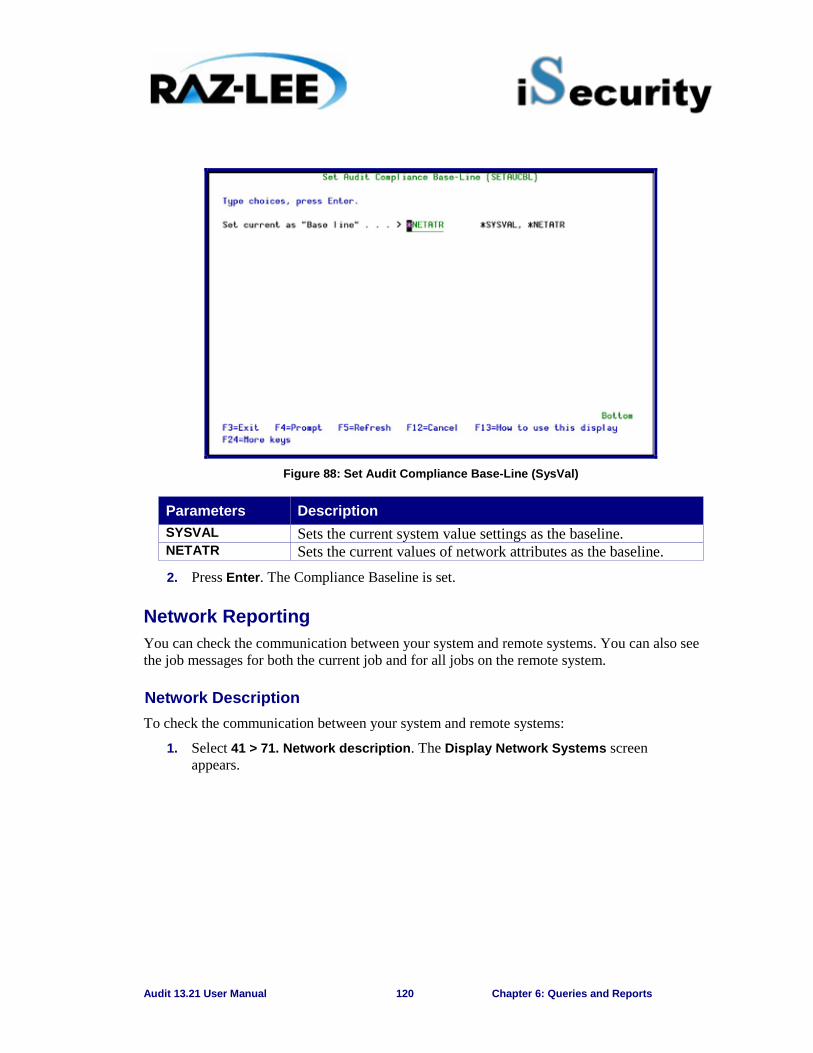
Audit 13.21 User Manual 120 Chapter 6: Queries and Reports
Figure 88: Set Audit Compliance Base-Line (SysVal)
Parameters Description
SYSVAL Sets the current system value settings as the baseline. NETATR Sets the current values of network attributes as the baseline. 2. Press Enter. The Compliance Baseline is set.
Network Reporting You can check the communication between your system and remote systems. You can also see the job messages for both the current job and for all jobs on the remote system.
Network Description To check the communication between your system and remote systems:
1. Select 41 > 71. Network description. The Display Network Systems screen appears.
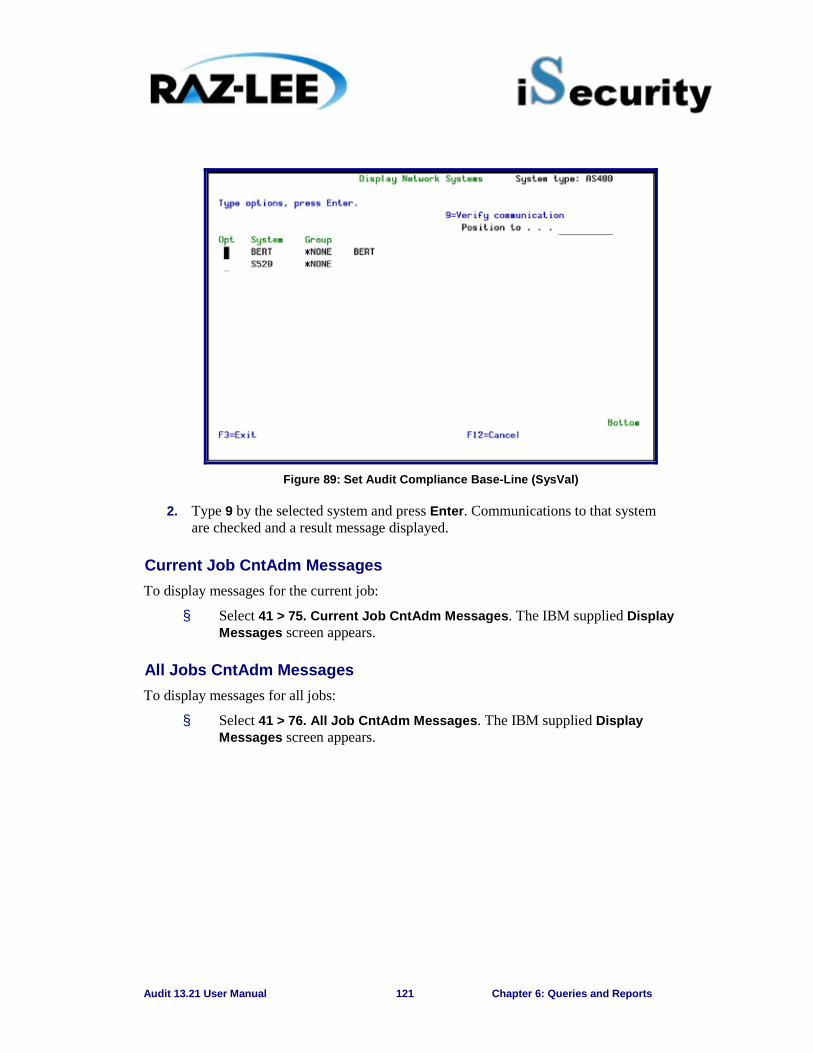
Audit 13.21 User Manual 121 Chapter 6: Queries and Reports
Figure 89: Set Audit Compliance Base-Line (SysVal)
2. Type 9 by the selected system and press Enter. Communications to that system are checked and a result message displayed.
Current Job CntAdm Messages To display messages for the current job:
§ Select 41 > 75. Current Job CntAdm Messages. The IBM supplied Display Messages screen appears.
All Jobs CntAdm Messages To display messages for all jobs:
§ Select 41 > 76. All Job CntAdm Messages. The IBM supplied Display Messages screen appears.
Audit 13.21 User Manual 122 Chapter 7: User Management
7 Chapter 7: User Management The purpose of this Chapter is to provide information about user management and authorization management, and includes the following sections:
Ø Overview
Ø Working with Users
Ø Disabling Inactive Users
Ø Deleting/Reviving Users
Ø Authorizing Signon Times
Ø User Absence Security
Ø User and Password Reporting
Overview This chapter presents several powerful security tools that control the ability of users to signon to the system. These tools enhance active system security by allowing you to perform the following tasks:
· View and modify security parameters in user profiles using a convenient wizard interface
· Automatically disable inactive users
· Restrict user signon to specific hours and days
· Prevent user signon during planned absences or following termination
· Analyze default passwords for effectiveness
These options are accessed directly from Audit by selecting 62. User Management in the Main menu. The User Management menu appears.
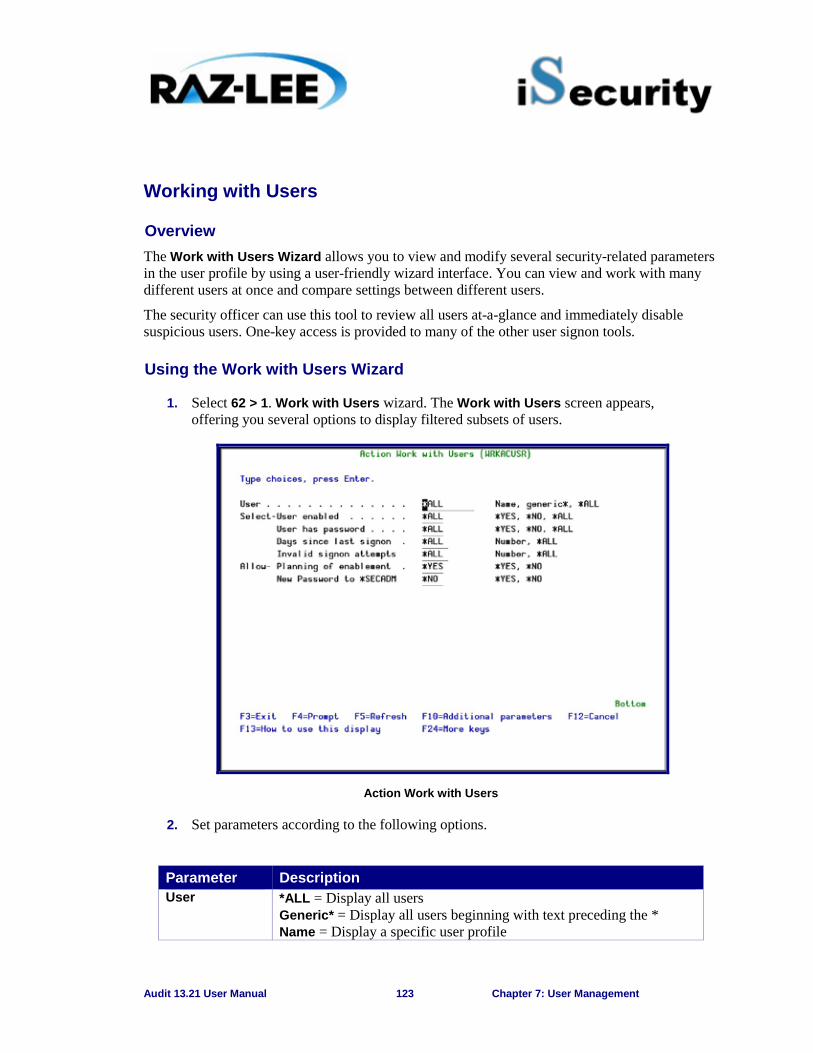
Audit 13.21 User Manual 123 Chapter 7: User Management
Working with Users
Overview The Work with Users Wizard allows you to view and modify several security-related parameters in the user profile by using a user-friendly wizard interface. You can view and work with many different users at once and compare settings between different users.
The security officer can use this tool to review all users at-a-glance and immediately disable suspicious users. One-key access is provided to many of the other user signon tools.
Using the Work with Users Wizard
1. Select 62 > 1. Work with Users wizard. The Work with Users screen appears, offering you several options to display filtered subsets of users.
Action Work with Users
2. Set parameters according to the following options.
Parameter Description User *ALL = Display all users
Generic* = Display all users beginning with text preceding the * Name = Display a specific user profile
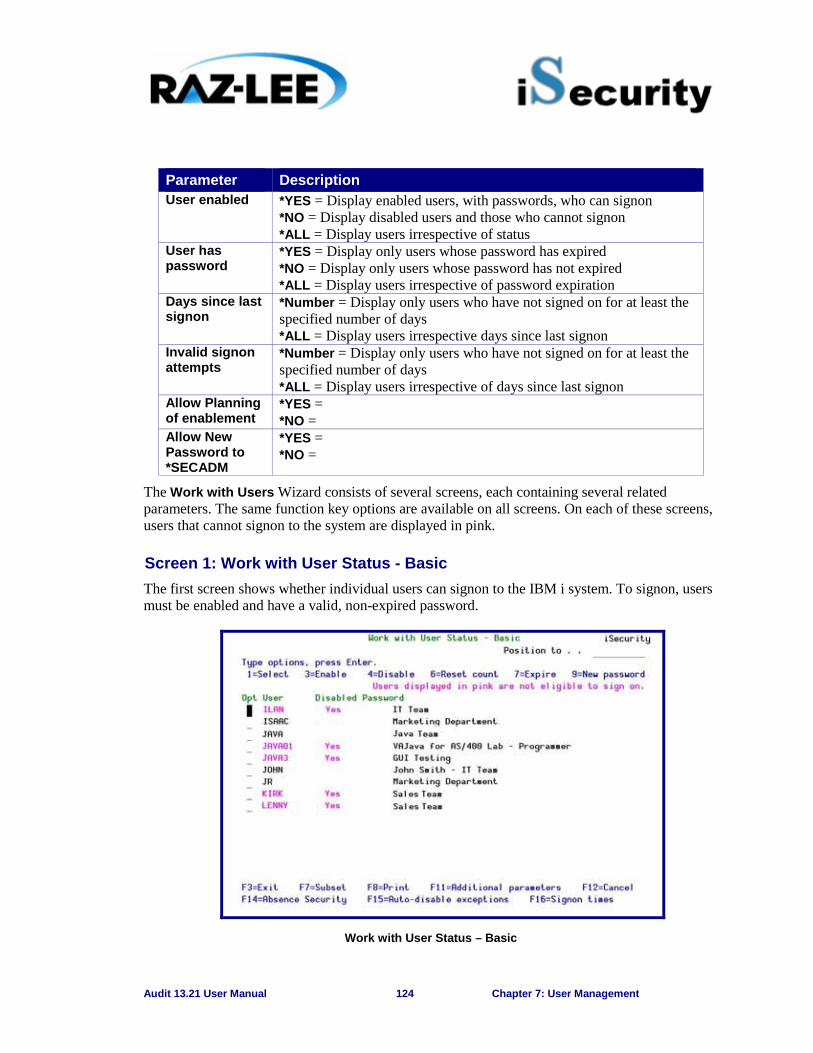
Audit 13.21 User Manual 124 Chapter 7: User Management
Parameter Description User enabled *YES = Display enabled users, with passwords, who can signon
*NO = Display disabled users and those who cannot signon *ALL = Display users irrespective of status
User has password
*YES = Display only users whose password has expired *NO = Display only users whose password has not expired *ALL = Display users irrespective of password expiration
Days since last signon
*Number = Display only users who have not signed on for at least the specified number of days *ALL = Display users irrespective days since last signon
Invalid signon attempts
*Number = Display only users who have not signed on for at least the specified number of days *ALL = Display users irrespective of days since last signon
Allow Planning of enablement
*YES = *NO =
Allow New Password to *SECADM
*YES = *NO =
The Work with Users Wizard consists of several screens, each containing several related parameters. The same function key options are available on all screens. On each of these screens, users that cannot signon to the system are displayed in pink.
Screen 1: Work with User Status - Basic The first screen shows whether individual users can signon to the IBM i system. To signon, users must be enabled and have a valid, non-expired password.
Work with User Status – Basic
Audit 13.21 User Manual 125 Chapter 7: User Management
Parameter Description Opt 1 = Display all parameters for the selected user profile (see below)
3 = Enable user profile 4 = Disable user profile 6 = Reset invalid signon attempt counter – prevents automatic disabling of this user due to excessive signon errors 7 = Set password to ‘expired’ – this user must change password at next signon
Enabled Blank = User profile is enabled No = User profile is disabled
Password Blank = User profile has a valid password and can signon None = No password is associated with this user profile and he cannot signon
F7 Display a subset of user profiles filtered according to status parameters (available on all screens)
F11 Display the next of the three parameter screens for the currently displayed user profiles
F14 Temporarily disable users during planned absences (for example, vacation, sick, leave of absence), or permanently delete users leaving the organization
F15 Specify users that should never be disabled automatically, even if they have not signed on for a long period of time (inactive user)
F16 Restrict user signon to predefined working hours
To display all parameters for a single user, type 1 in the Opt field for the required user. The Work with User Status – Details screen appears. Use the function keys to modify parameters as described in the table.
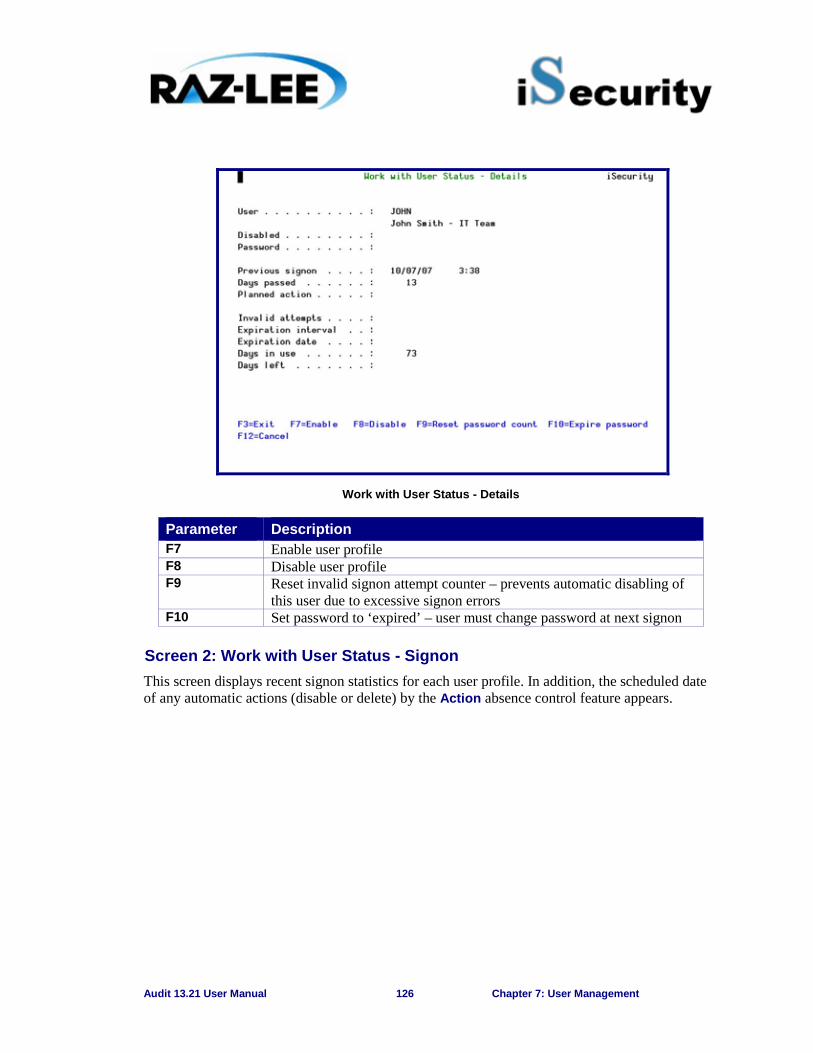
Audit 13.21 User Manual 126 Chapter 7: User Management
Work with User Status - Details
Parameter Description F7 Enable user profile F8 Disable user profile F9 Reset invalid signon attempt counter – prevents automatic disabling of
this user due to excessive signon errors F10 Set password to ‘expired’ – user must change password at next signon
Screen 2: Work with User Status - Signon This screen displays recent signon statistics for each user profile. In addition, the scheduled date of any automatic actions (disable or delete) by the Action absence control feature appears.
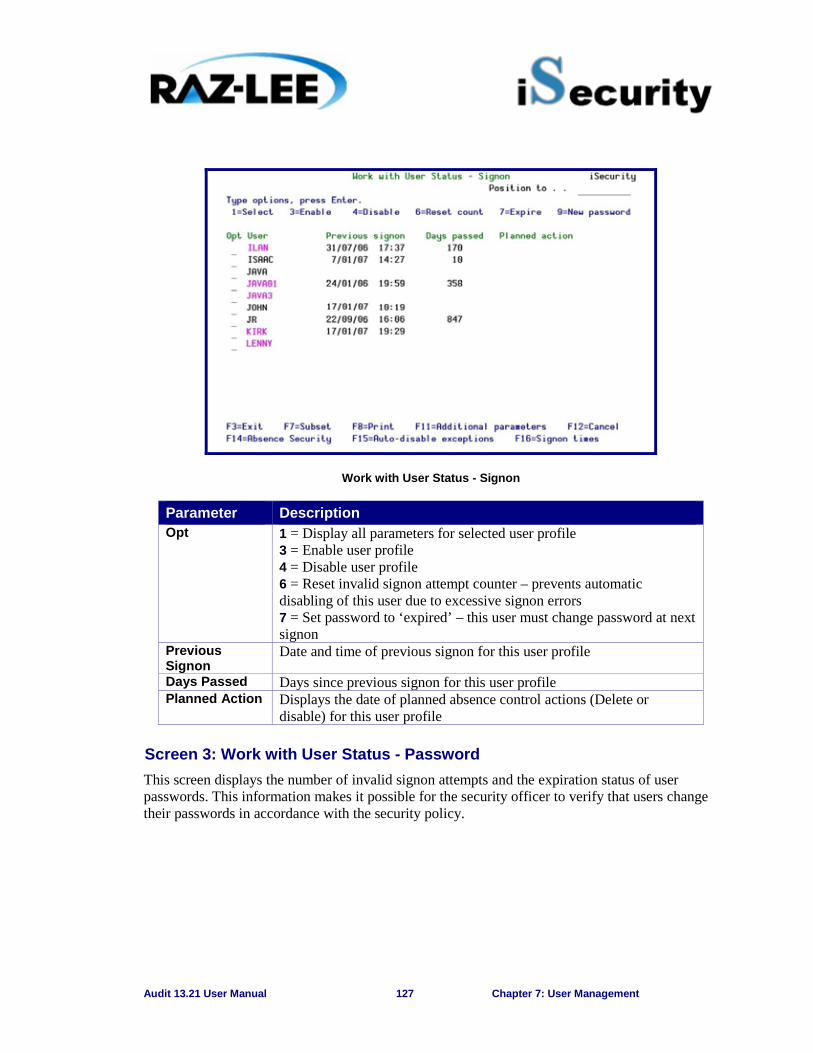
Audit 13.21 User Manual 127 Chapter 7: User Management
Work with User Status - Signon
Parameter Description Opt 1 = Display all parameters for selected user profile
3 = Enable user profile 4 = Disable user profile 6 = Reset invalid signon attempt counter – prevents automatic disabling of this user due to excessive signon errors 7 = Set password to ‘expired’ – this user must change password at next signon
Previous Signon
Date and time of previous signon for this user profile
Days Passed Days since previous signon for this user profile Planned Action Displays the date of planned absence control actions (Delete or
disable) for this user profile
Screen 3: Work with User Status - Password This screen displays the number of invalid signon attempts and the expiration status of user passwords. This information makes it possible for the security officer to verify that users change their passwords in accordance with the security policy.
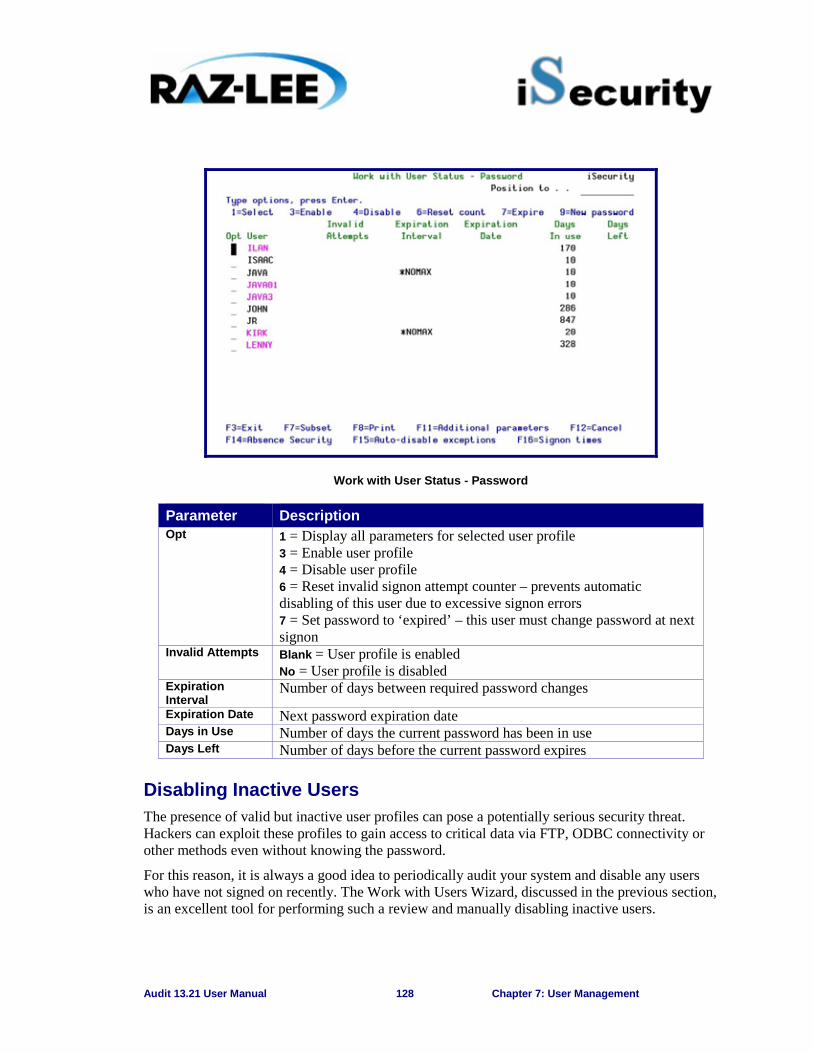
Audit 13.21 User Manual 128 Chapter 7: User Management
Work with User Status - Password
Parameter Description Opt 1 = Display all parameters for selected user profile
3 = Enable user profile 4 = Disable user profile 6 = Reset invalid signon attempt counter – prevents automatic disabling of this user due to excessive signon errors 7 = Set password to ‘expired’ – this user must change password at next signon
Invalid Attempts Blank = User profile is enabled No = User profile is disabled
Expiration Interval
Number of days between required password changes
Expiration Date Next password expiration date Days in Use Number of days the current password has been in use Days Left Number of days before the current password expires
Disabling Inactive Users The presence of valid but inactive user profiles can pose a potentially serious security threat. Hackers can exploit these profiles to gain access to critical data via FTP, ODBC connectivity or other methods even without knowing the password.
For this reason, it is always a good idea to periodically audit your system and disable any users who have not signed on recently. The Work with Users Wizard, discussed in the previous section, is an excellent tool for performing such a review and manually disabling inactive users.
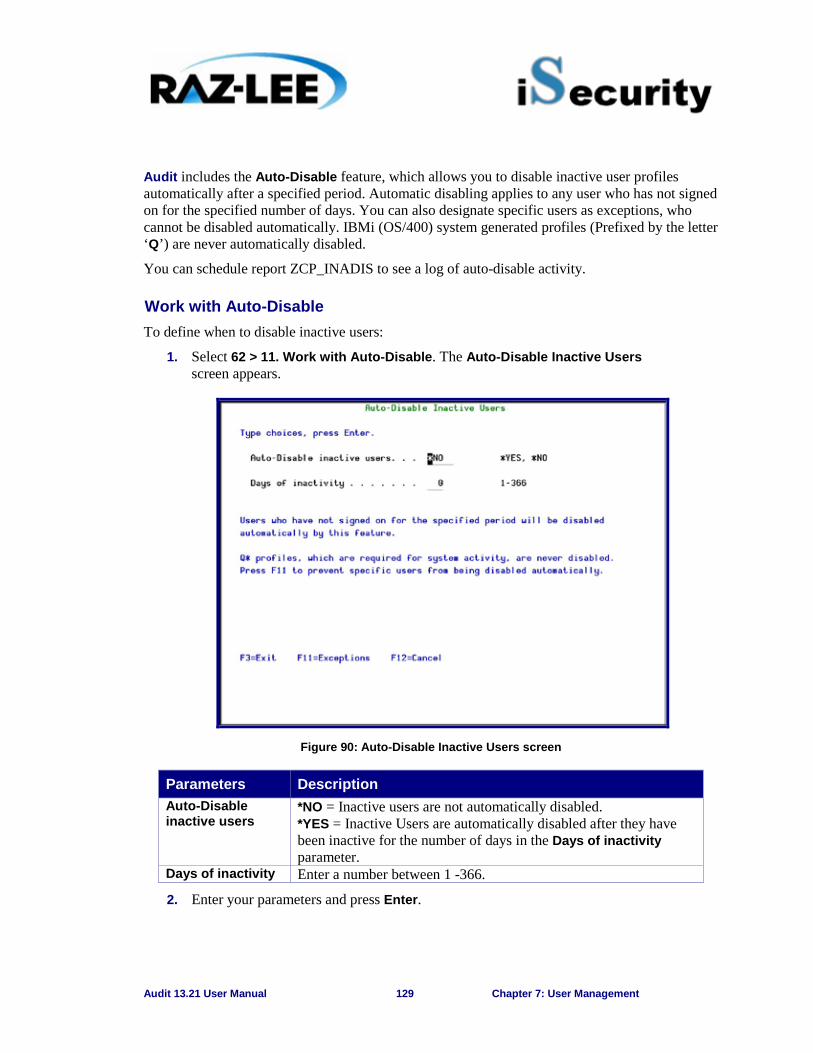
Audit 13.21 User Manual 129 Chapter 7: User Management
Audit includes the Auto-Disable feature, which allows you to disable inactive user profiles automatically after a specified period. Automatic disabling applies to any user who has not signed on for the specified number of days. You can also designate specific users as exceptions, who cannot be disabled automatically. IBMi (OS/400) system generated profiles (Prefixed by the letter ‘Q’) are never automatically disabled.
You can schedule report ZCP_INADIS to see a log of auto-disable activity.
Work with Auto-Disable To define when to disable inactive users:
1. Select 62 > 11. Work with Auto-Disable. The Auto-Disable Inactive Users screen appears.
Figure 90: Auto-Disable Inactive Users screen
Parameters Description
Auto-Disable inactive users
*NO = Inactive users are not automatically disabled. *YES = Inactive Users are automatically disabled after they have been inactive for the number of days in the Days of inactivity parameter.
Days of inactivity Enter a number between 1 -366.
2. Enter your parameters and press Enter.
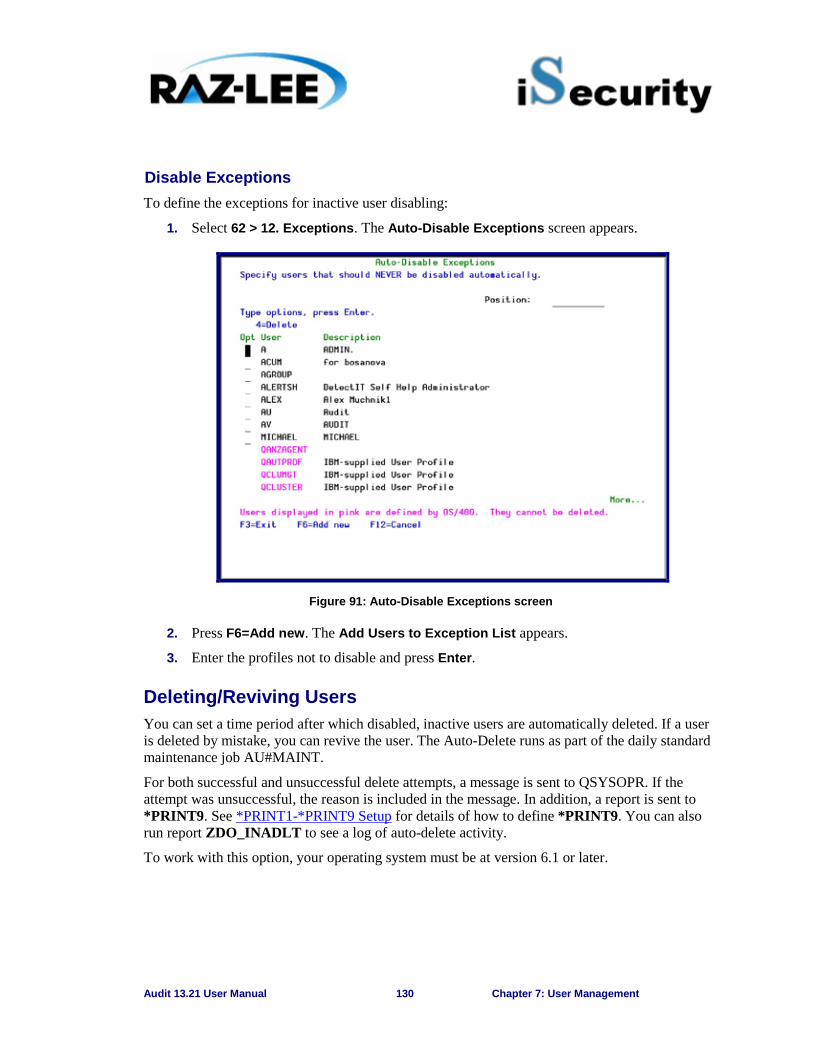
Audit 13.21 User Manual 130 Chapter 7: User Management
Disable Exceptions To define the exceptions for inactive user disabling:
1. Select 62 > 12. Exceptions. The Auto-Disable Exceptions screen appears.
Figure 91: Auto-Disable Exceptions screen
2. Press F6=Add new. The Add Users to Exception List appears.
3. Enter the profiles not to disable and press Enter.
Deleting/Reviving Users You can set a time period after which disabled, inactive users are automatically deleted. If a user is deleted by mistake, you can revive the user. The Auto-Delete runs as part of the daily standard maintenance job AU#MAINT.
For both successful and unsuccessful delete attempts, a message is sent to QSYSOPR. If the attempt was unsuccessful, the reason is included in the message. In addition, a report is sent to *PRINT9. See *PRINT1-*PRINT9 Setup for details of how to define *PRINT9. You can also run report ZDO_INADLT to see a log of auto-delete activity.
To work with this option, your operating system must be at version 6.1 or later.
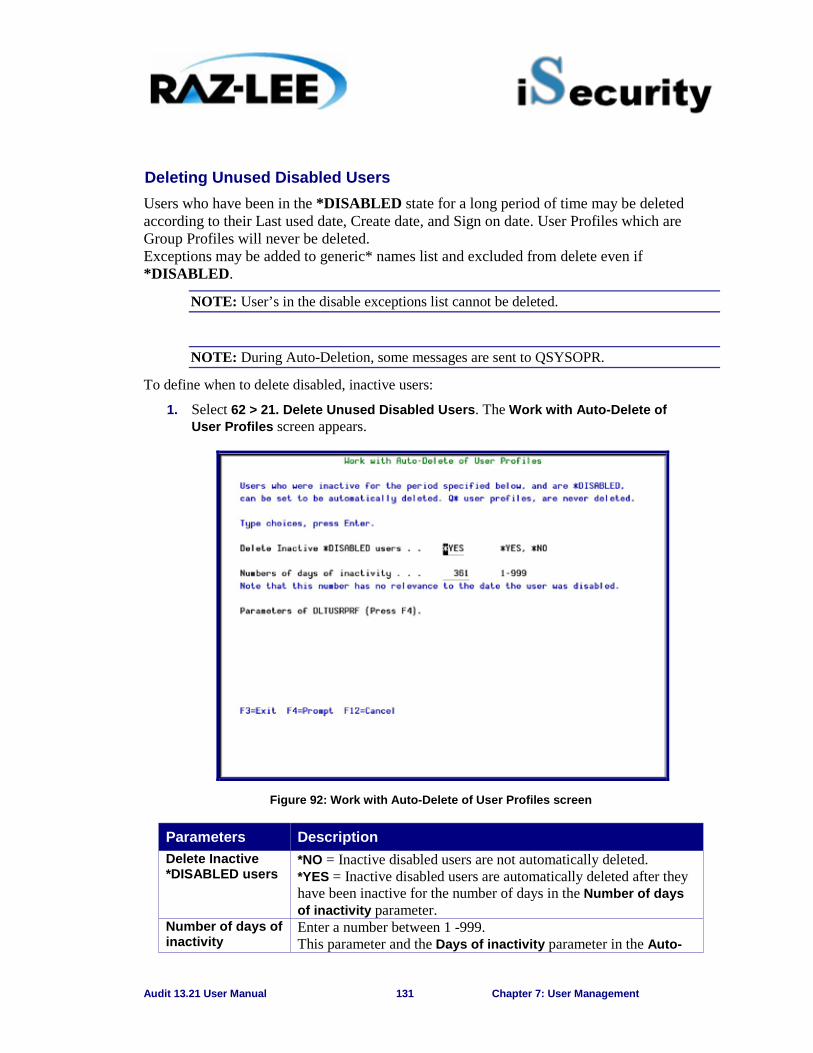
Audit 13.21 User Manual 131 Chapter 7: User Management
Deleting Unused Disabled Users Users who have been in the *DISABLED state for a long period of time may be deleted according to their Last used date, Create date, and Sign on date. User Profiles which are Group Profiles will never be deleted. Exceptions may be added to generic* names list and excluded from delete even if *DISABLED.
NOTE: User’s in the disable exceptions list cannot be deleted.
NOTE: During Auto-Deletion, some messages are sent to QSYSOPR.
To define when to delete disabled, inactive users:
1. Select 62 > 21. Delete Unused Disabled Users. The Work with Auto-Delete of User Profiles screen appears.
Figure 92: Work with Auto-Delete of User Profiles screen
Parameters Description
Delete Inactive *DISABLED users
*NO = Inactive disabled users are not automatically deleted. *YES = Inactive disabled users are automatically deleted after they have been inactive for the number of days in the Number of days of inactivity parameter.
Number of days of inactivity
Enter a number between 1 -999. This parameter and the Days of inactivity parameter in the Auto-
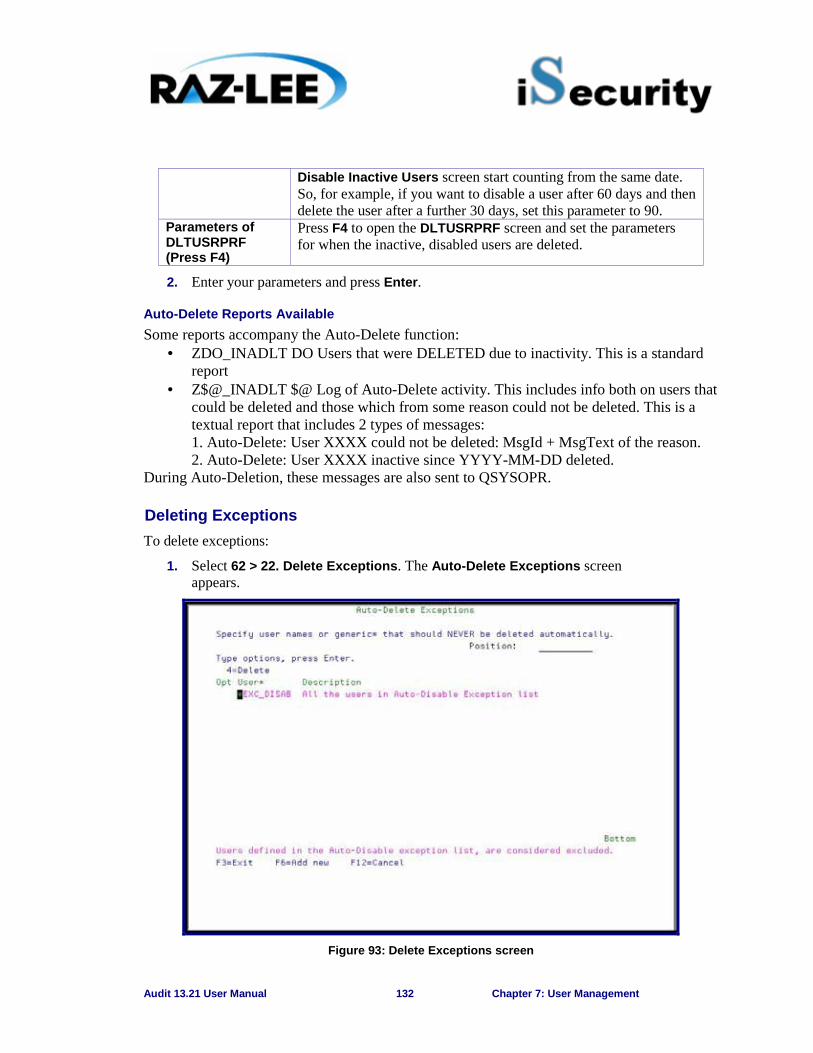
Audit 13.21 User Manual 132 Chapter 7: User Management
Disable Inactive Users screen start counting from the same date. So, for example, if you want to disable a user after 60 days and then delete the user after a further 30 days, set this parameter to 90.
Parameters of DLTUSRPRF (Press F4)
Press F4 to open the DLTUSRPRF screen and set the parameters for when the inactive, disabled users are deleted.
2. Enter your parameters and press Enter.
Auto-Delete Reports Available Some reports accompany the Auto-Delete function:
· ZDO_INADLT DO Users that were DELETED due to inactivity. This is a standard report
· Z$@_INADLT $@ Log of Auto-Delete activity. This includes info both on users that could be deleted and those which from some reason could not be deleted. This is a textual report that includes 2 types of messages: 1. Auto-Delete: User XXXX could not be deleted: MsgId + MsgText of the reason. 2. Auto-Delete: User XXXX inactive since YYYY-MM-DD deleted.
During Auto-Deletion, these messages are also sent to QSYSOPR.
Deleting Exceptions To delete exceptions:
1. Select 62 > 22. Delete Exceptions. The Auto-Delete Exceptions screen appears.
Figure 93: Delete Exceptions screen
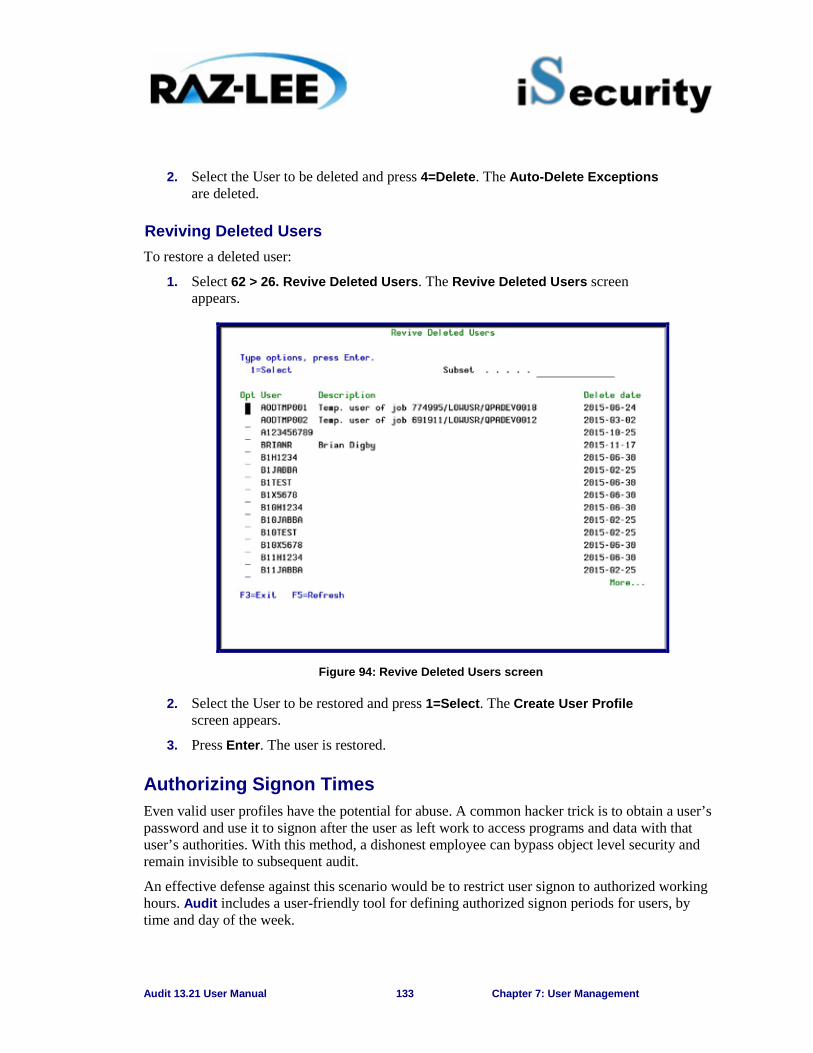
Audit 13.21 User Manual 133 Chapter 7: User Management
2. Select the User to be deleted and press 4=Delete. The Auto-Delete Exceptions are deleted.
Reviving Deleted Users To restore a deleted user:
1. Select 62 > 26. Revive Deleted Users. The Revive Deleted Users screen appears.
Figure 94: Revive Deleted Users screen
2. Select the User to be restored and press 1=Select. The Create User Profile screen appears.
3. Press Enter. The user is restored.
Authorizing Signon Times Even valid user profiles have the potential for abuse. A common hacker trick is to obtain a user’s password and use it to signon after the user as left work to access programs and data with that user’s authorities. With this method, a dishonest employee can bypass object level security and remain invisible to subsequent audit.
An effective defense against this scenario would be to restrict user signon to authorized working hours. Audit includes a user-friendly tool for defining authorized signon periods for users, by time and day of the week.
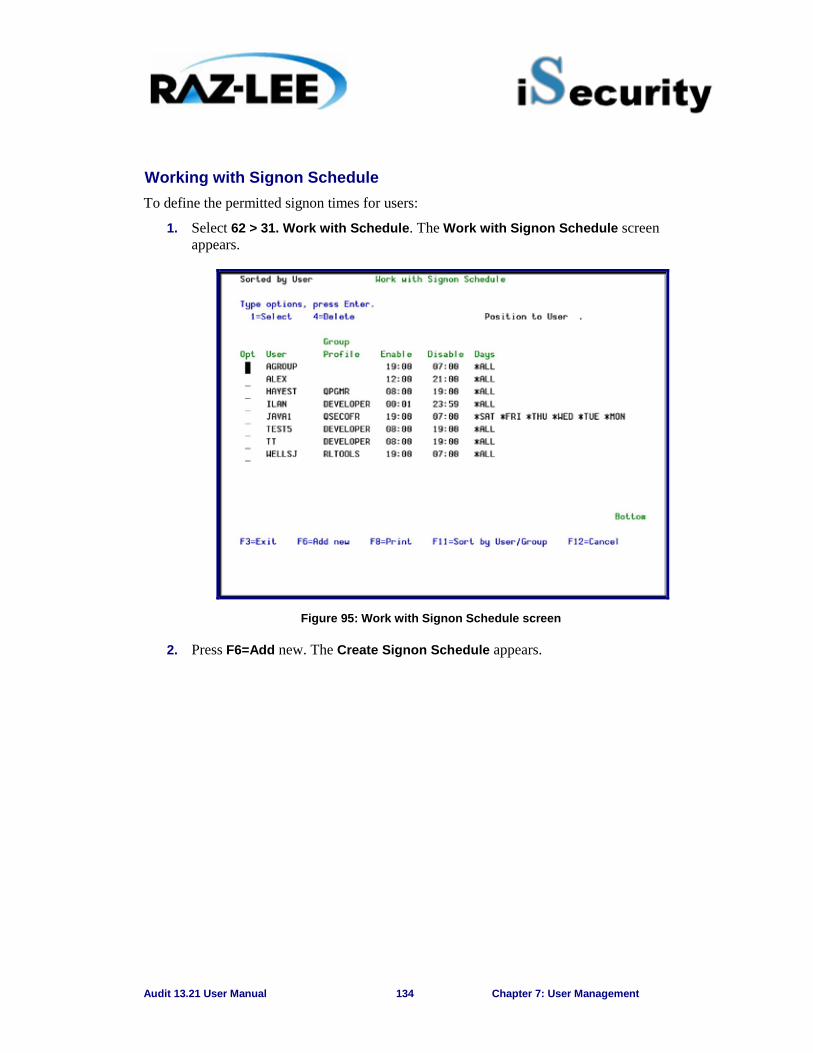
Audit 13.21 User Manual 134 Chapter 7: User Management
Working with Signon Schedule To define the permitted signon times for users:
1. Select 62 > 31. Work with Schedule. The Work with Signon Schedule screen appears.
Figure 95: Work with Signon Schedule screen
2. Press F6=Add new. The Create Signon Schedule appears.
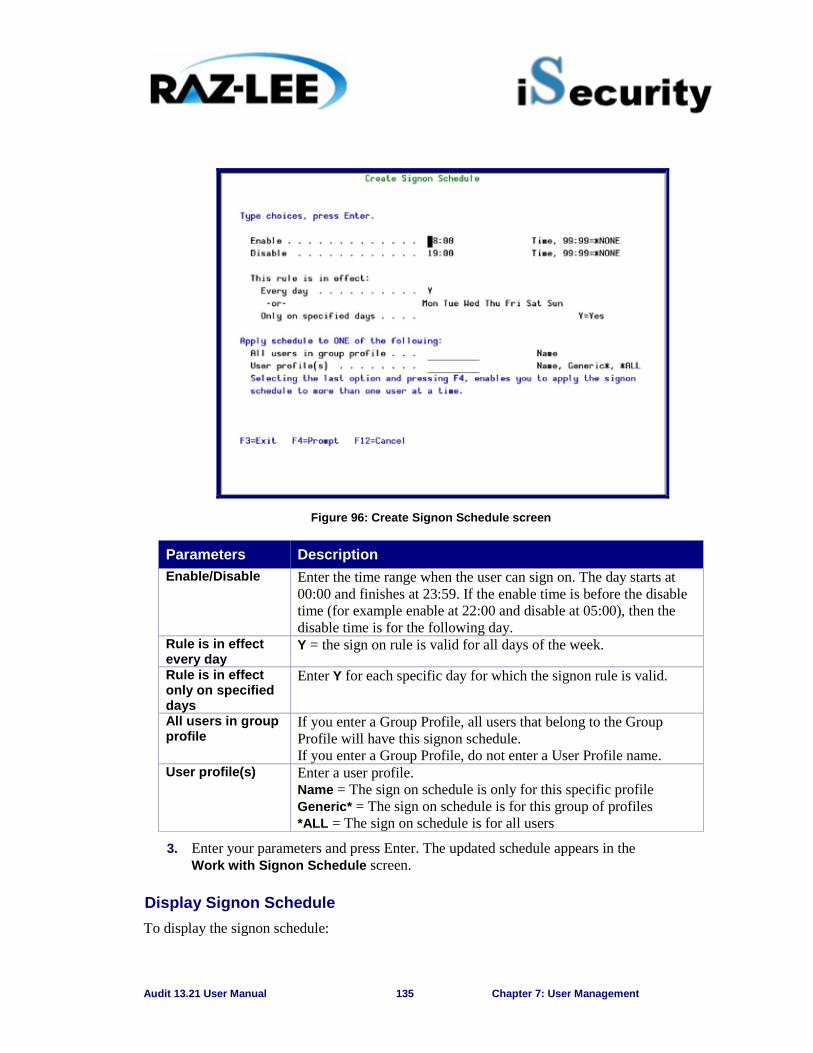
Audit 13.21 User Manual 135 Chapter 7: User Management
Figure 96: Create Signon Schedule screen
Parameters Description
Enable/Disable Enter the time range when the user can sign on. The day starts at 00:00 and finishes at 23:59. If the enable time is before the disable time (for example enable at 22:00 and disable at 05:00), then the disable time is for the following day.
Rule is in effect every day
Y = the sign on rule is valid for all days of the week.
Rule is in effect only on specified days
Enter Y for each specific day for which the signon rule is valid.
All users in group profile
If you enter a Group Profile, all users that belong to the Group Profile will have this signon schedule. If you enter a Group Profile, do not enter a User Profile name.
User profile(s) Enter a user profile. Name = The sign on schedule is only for this specific profile Generic* = The sign on schedule is for this group of profiles *ALL = The sign on schedule is for all users
3. Enter your parameters and press Enter. The updated schedule appears in the Work with Signon Schedule screen.
Display Signon Schedule To display the signon schedule:
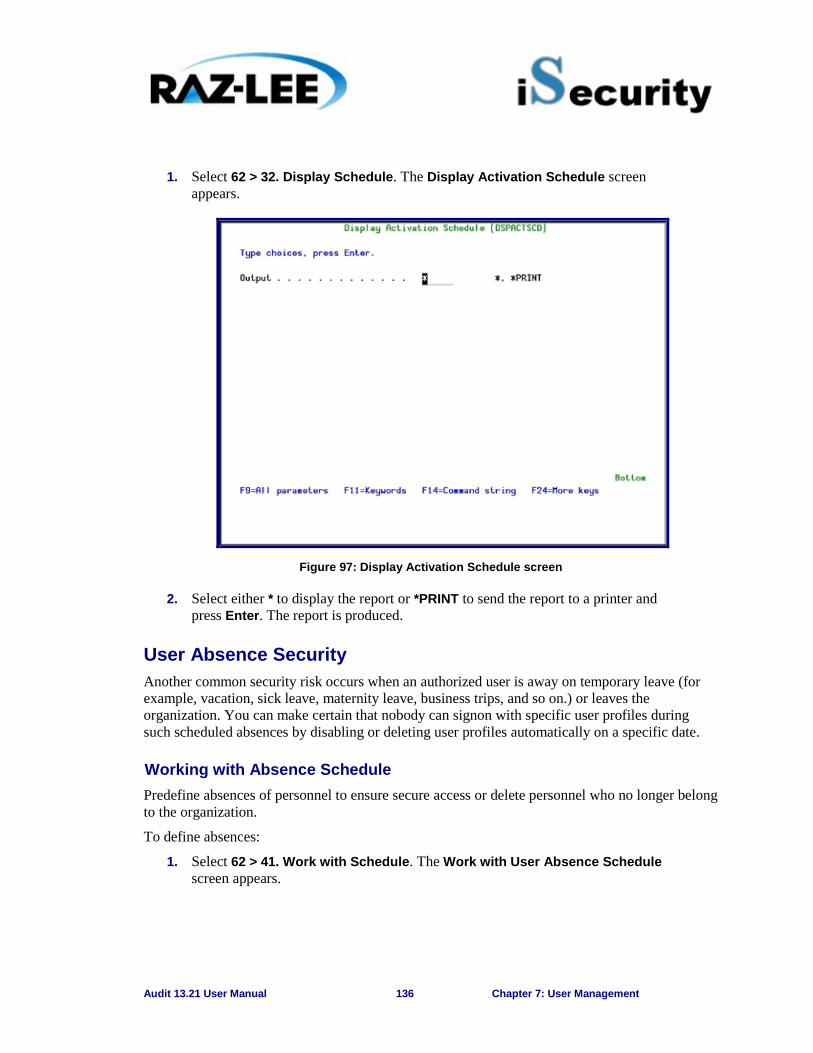
Audit 13.21 User Manual 136 Chapter 7: User Management
1. Select 62 > 32. Display Schedule. The Display Activation Schedule screen appears.
Figure 97: Display Activation Schedule screen
2. Select either * to display the report or *PRINT to send the report to a printer and press Enter. The report is produced.
User Absence Security Another common security risk occurs when an authorized user is away on temporary leave (for example, vacation, sick leave, maternity leave, business trips, and so on.) or leaves the organization. You can make certain that nobody can signon with specific user profiles during such scheduled absences by disabling or deleting user profiles automatically on a specific date.
Working with Absence Schedule Predefine absences of personnel to ensure secure access or delete personnel who no longer belong to the organization.
To define absences:
1. Select 62 > 41. Work with Schedule. The Work with User Absence Schedule screen appears.
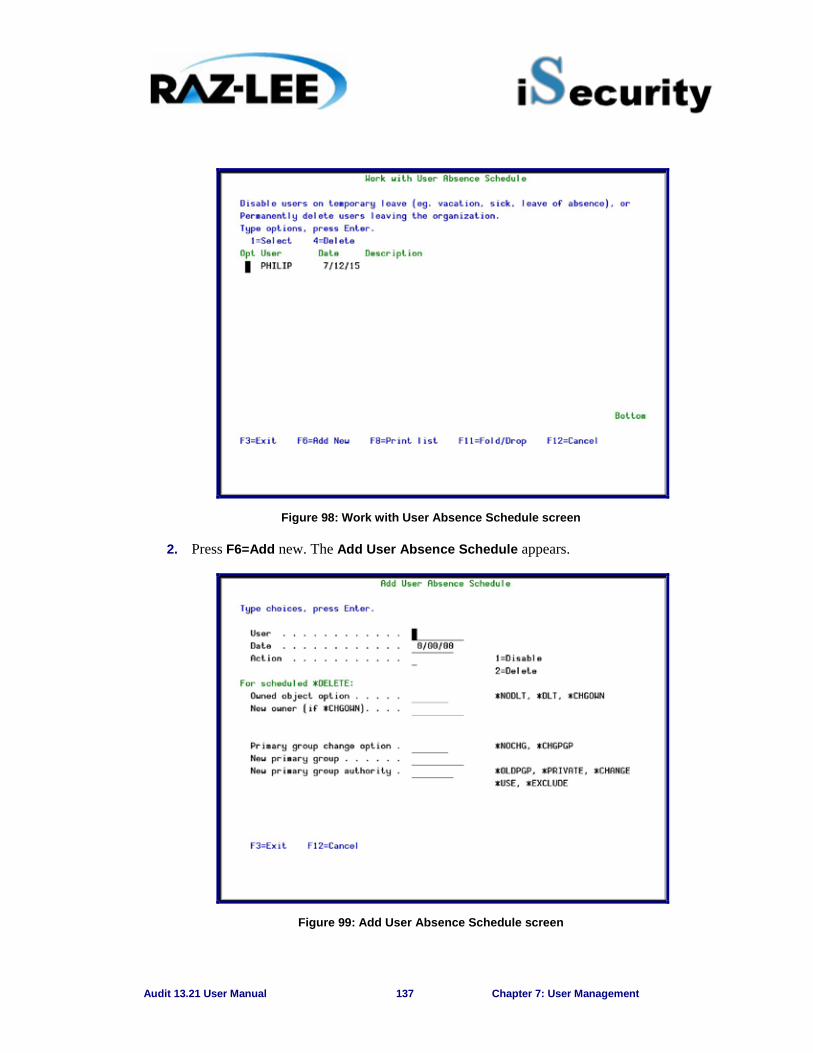
Audit 13.21 User Manual 137 Chapter 7: User Management
Figure 98: Work with User Absence Schedule screen
2. Press F6=Add new. The Add User Absence Schedule appears.
Figure 99: Add User Absence Schedule screen
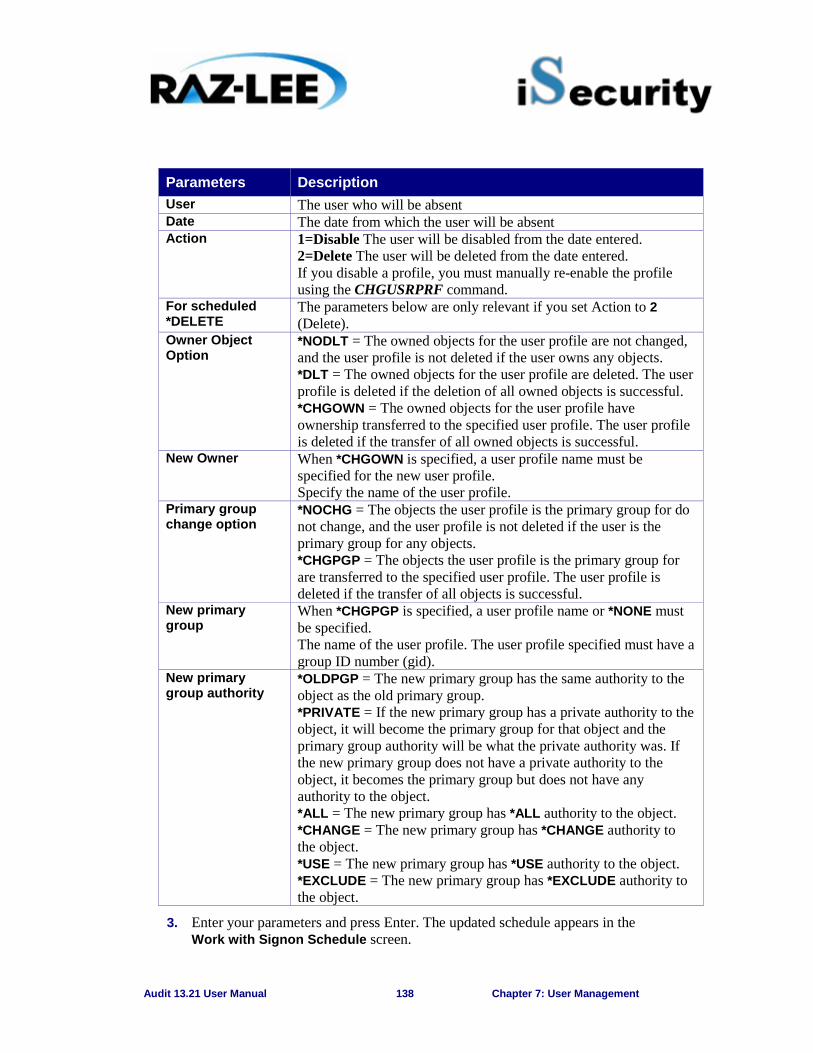
Audit 13.21 User Manual 138 Chapter 7: User Management
Parameters Description
User The user who will be absent Date The date from which the user will be absent Action 1=Disable The user will be disabled from the date entered.
2=Delete The user will be deleted from the date entered. If you disable a profile, you must manually re-enable the profile using the CHGUSRPRF command.
For scheduled *DELETE
The parameters below are only relevant if you set Action to 2 (Delete).
Owner Object Option
*NODLT = The owned objects for the user profile are not changed, and the user profile is not deleted if the user owns any objects. *DLT = The owned objects for the user profile are deleted. The user profile is deleted if the deletion of all owned objects is successful. *CHGOWN = The owned objects for the user profile have ownership transferred to the specified user profile. The user profile is deleted if the transfer of all owned objects is successful.
New Owner When *CHGOWN is specified, a user profile name must be specified for the new user profile. Specify the name of the user profile.
Primary group change option
*NOCHG = The objects the user profile is the primary group for do not change, and the user profile is not deleted if the user is the primary group for any objects. *CHGPGP = The objects the user profile is the primary group for are transferred to the specified user profile. The user profile is deleted if the transfer of all objects is successful.
New primary group
When *CHGPGP is specified, a user profile name or *NONE must be specified. The name of the user profile. The user profile specified must have a group ID number (gid).
New primary group authority
*OLDPGP = The new primary group has the same authority to the object as the old primary group. *PRIVATE = If the new primary group has a private authority to the object, it will become the primary group for that object and the primary group authority will be what the private authority was. If the new primary group does not have a private authority to the object, it becomes the primary group but does not have any authority to the object. *ALL = The new primary group has *ALL authority to the object. *CHANGE = The new primary group has *CHANGE authority to the object. *USE = The new primary group has *USE authority to the object. *EXCLUDE = The new primary group has *EXCLUDE authority to the object.
3. Enter your parameters and press Enter. The updated schedule appears in the Work with Signon Schedule screen.

Audit 13.21 User Manual 139 Chapter 7: User Management
NOTE: Refer to IBM documentation for a complete discussion regarding the concepts of object ownership and primary groups.
Display Absence Schedule To display the absence schedule:
1. Select 62 > 42. Display Schedule. The Display Expiration Schedule screen appears.
Figure 100: Display Expiration Schedule screen
2. Select either * to display the report or *PRINT to send the report to a printer and press Enter. The report is produced.
User and Password Reporting User management has a group of reports that allows you to analyze password usage.
Analyze Default Passwords A profile is said to have a default password whenever the password is the same as the profile name. Obviously, this is dangerous because it is so easy to guess. This feature allows you to print a report of all the user profiles on the system that have a default password, and optionally disable those profiles or expire their passwords.
To analyze default passwords:
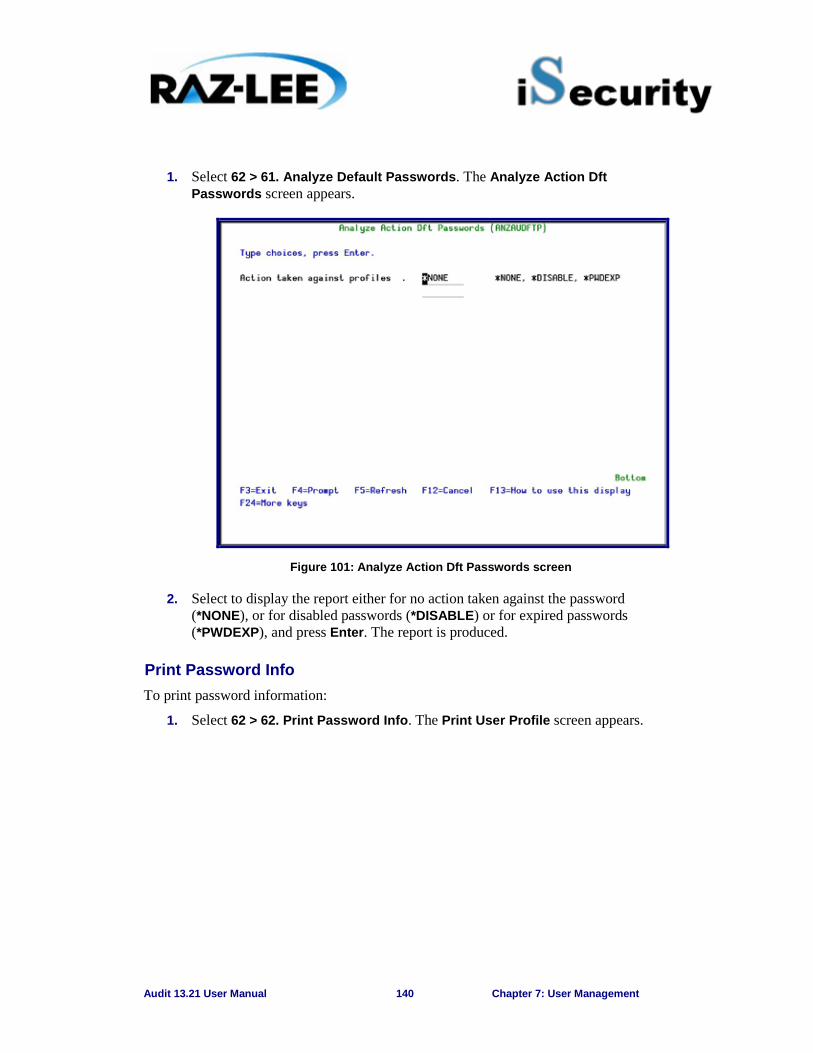
Audit 13.21 User Manual 140 Chapter 7: User Management
1. Select 62 > 61. Analyze Default Passwords. The Analyze Action Dft Passwords screen appears.
Figure 101: Analyze Action Dft Passwords screen
2. Select to display the report either for no action taken against the password (*NONE), or for disabled passwords (*DISABLE) or for expired passwords (*PWDEXP), and press Enter. The report is produced.
Print Password Info To print password information:
1. Select 62 > 62. Print Password Info. The Print User Profile screen appears.
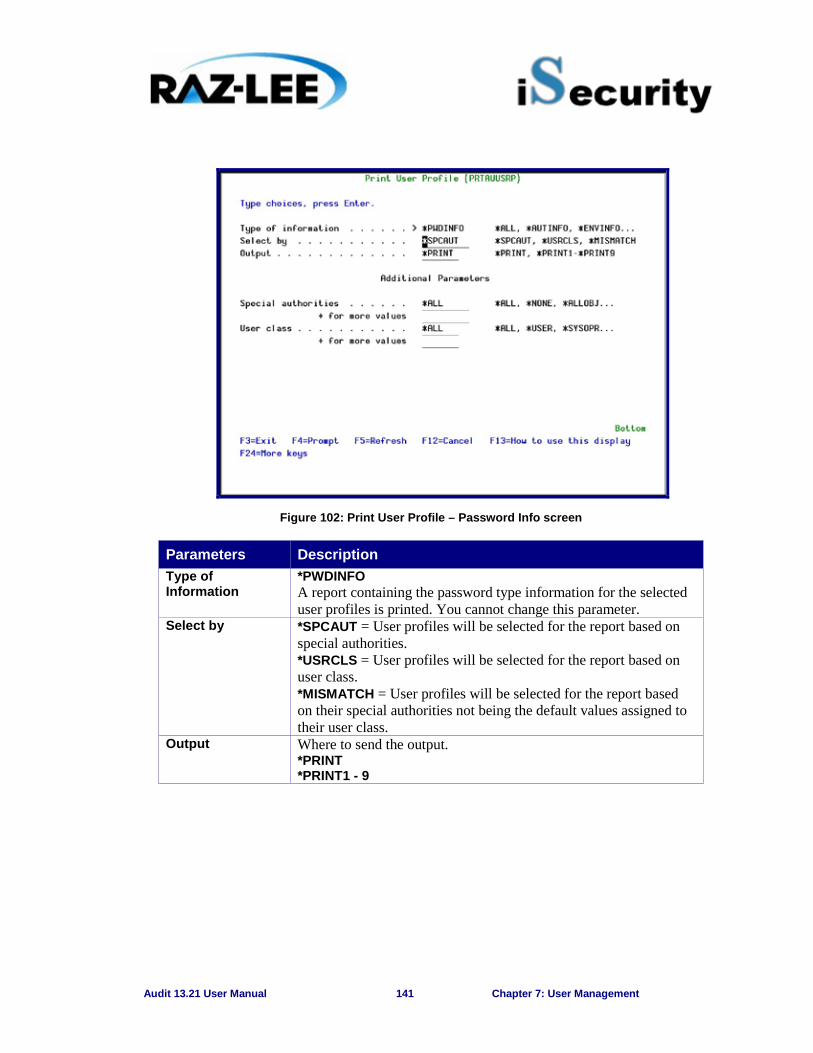
Audit 13.21 User Manual 141 Chapter 7: User Management
Figure 102: Print User Profile – Password Info screen
Parameters Description
Type of Information
*PWDINFO A report containing the password type information for the selected user profiles is printed. You cannot change this parameter.
Select by *SPCAUT = User profiles will be selected for the report based on special authorities. *USRCLS = User profiles will be selected for the report based on user class. *MISMATCH = User profiles will be selected for the report based on their special authorities not being the default values assigned to their user class.
Output Where to send the output. *PRINT *PRINT1 - 9

Audit 13.21 User Manual 142 Chapter 7: User Management
Parameters Description
Special Authorities
If *SPCAUT was specified for the Select by prompt (SELECT parameter), it specifies which special authorities should be used to select users. User profiles with any of the special authorities specified for this parameter will be included in the report. A maximum of 9 special authorities can be specified. *ALL = All user profiles will be included in the report. Alternatively you can select up to 9 of the following *ALLOBJ = User profiles with *ALLOBJ special authority will be included in the report. *AUDIT = User profiles with *AUDIT special authority will be included in the report. *JOBCTL = User profiles with *JOBCTL special authority will be included in the report. *IOSYSCFG = User profiles with *IOSYSCFG special authority will be included in the report. *SAVSYS = User profiles with *SAVSYS special authority will be included in the report. *SECADM = User profiles with *SECADM special authority will be included in the report. *SERVICE = User profiles with *SERVICE special authority will be included in the report. *SPLCTL = User profiles with *SPLCTL special authority will be included in the report. *NONE = User profiles with no special authorities will be included in the report.
User Class If *USRCLS was specified for the Select by prompt (SELECT parameter), it specifies that user classes should be used to select users. User profiles with a user class that is specified for this parameter will be included in the report. A maximum of 5 user classes can be specified. *ALL = All user profiles will be included in the report. *USER = User profiles with *USER user class will be included in the report. *SYSOPR = User profiles with *SYSOPR user class will be included in the report. *PGMR = User profiles with *PGMR user class will be included in the report. *SECADM = User profiles with *SECADM user class will be included in the report. *SECOFR = User profiles with *SECOFR user class will be included in the report.
2. Enter the required parameters and press Enter. The report is produced.
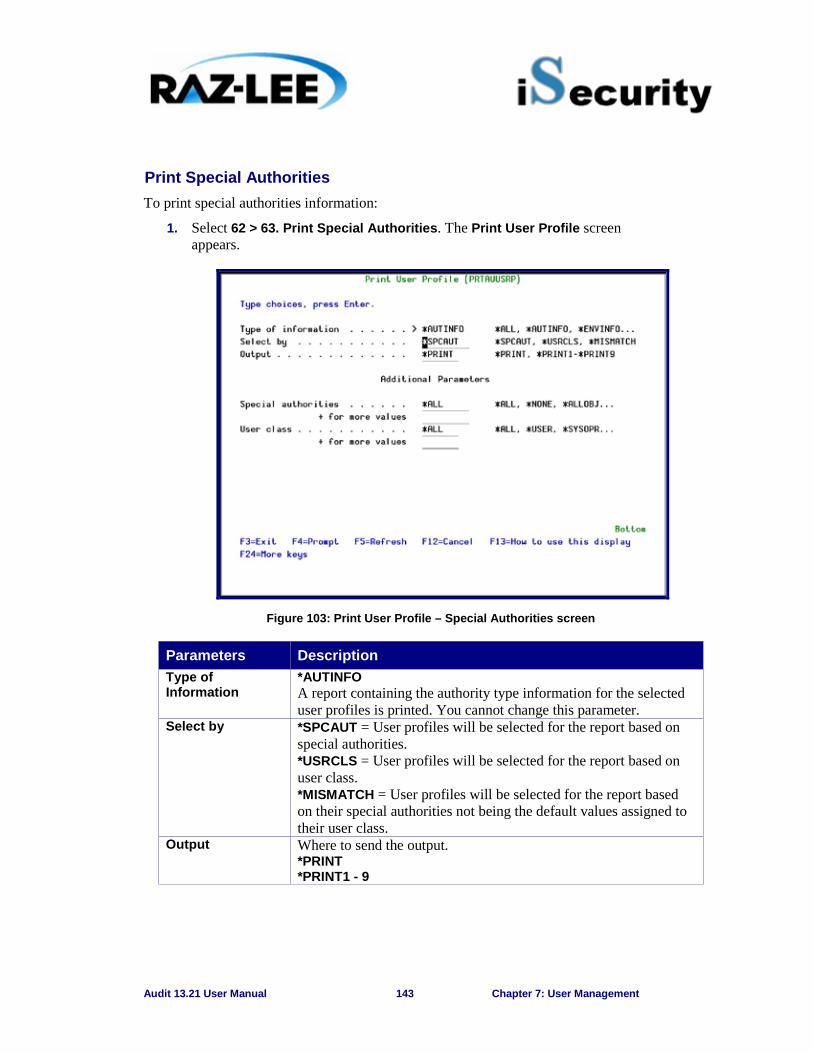
Audit 13.21 User Manual 143 Chapter 7: User Management
Print Special Authorities To print special authorities information:
1. Select 62 > 63. Print Special Authorities. The Print User Profile screen appears.
Figure 103: Print User Profile – Special Authorities screen
Parameters Description
Type of Information
*AUTINFO A report containing the authority type information for the selected user profiles is printed. You cannot change this parameter.
Select by *SPCAUT = User profiles will be selected for the report based on special authorities. *USRCLS = User profiles will be selected for the report based on user class. *MISMATCH = User profiles will be selected for the report based on their special authorities not being the default values assigned to their user class.
Output Where to send the output. *PRINT *PRINT1 - 9

Audit 13.21 User Manual 144 Chapter 7: User Management
Parameters Description
Special Authorities
If *SPCAUT was specified for the Select by prompt (SELECT parameter), it specifies which special authorities should be used to select users. User profiles with any of the special authorities specified for this parameter will be included in the report. A maximum of 9 special authorities can be specified. *ALL = All user profiles will be included in the report. Alternatively you can select up to 9 of the following *ALLOBJ = User profiles with *ALLOBJ special authority will be included in the report. *AUDIT = User profiles with *AUDIT special authority will be included in the report. *JOBCTL = User profiles with *JOBCTL special authority will be included in the report. *IOSYSCFG = User profiles with *IOSYSCFG special authority will be included in the report. *SAVSYS = User profiles with *SAVSYS special authority will be included in the report. *SECADM = User profiles with *SECADM special authority will be included in the report. *SERVICE = User profiles with *SERVICE special authority will be included in the report. *SPLCTL = User profiles with *SPLCTL special authority will be included in the report. *NONE = User profiles with no special authorities will be included in the report.
User Class If *USRCLS was specified for the Select by prompt (SELECT parameter), it specifies that user classes should be used to select users. User profiles with a user class that is specified for this parameter will be included in the report. A maximum of 5 user classes can be specified. *ALL = All user profiles will be included in the report. *USER = User profiles with *USER class will be included in the report. *SYSOPR = User profiles with *SYSOPR user class will be included in the report. *PGMR = User profiles with *PGMR user class will be included in the report. *SECADM = User profiles with *SECADM user class will be included in the report. *SECOFR = User profiles with *SECOFR user class will be included in the report.
2. Enter the required parameters and press Enter. The report is produced.

Audit 13.21 User Manual 145 Chapter 7: User Management
Print Programs and Queues To print environment information:
1. Select 62 > 63. Print Program and Queues. The Print User Profile screen appears.
Figure 104: Print User Profile – Program and Queues screen
Parameters Description
Type of Information
*ENVINFO A report containing the environment type information for the selected user profiles is printed. You cannot change this parameter.
Select by *SPCAUT = User profiles will be selected for the report based on special authorities. *USRCLS = User profiles will be selected for the report based on user class. *MISMATCH = User profiles will be selected for the report based on their special authorities not being the default values assigned to their user class.
Output Where to send the output. *PRINT *PRINT1 - 9
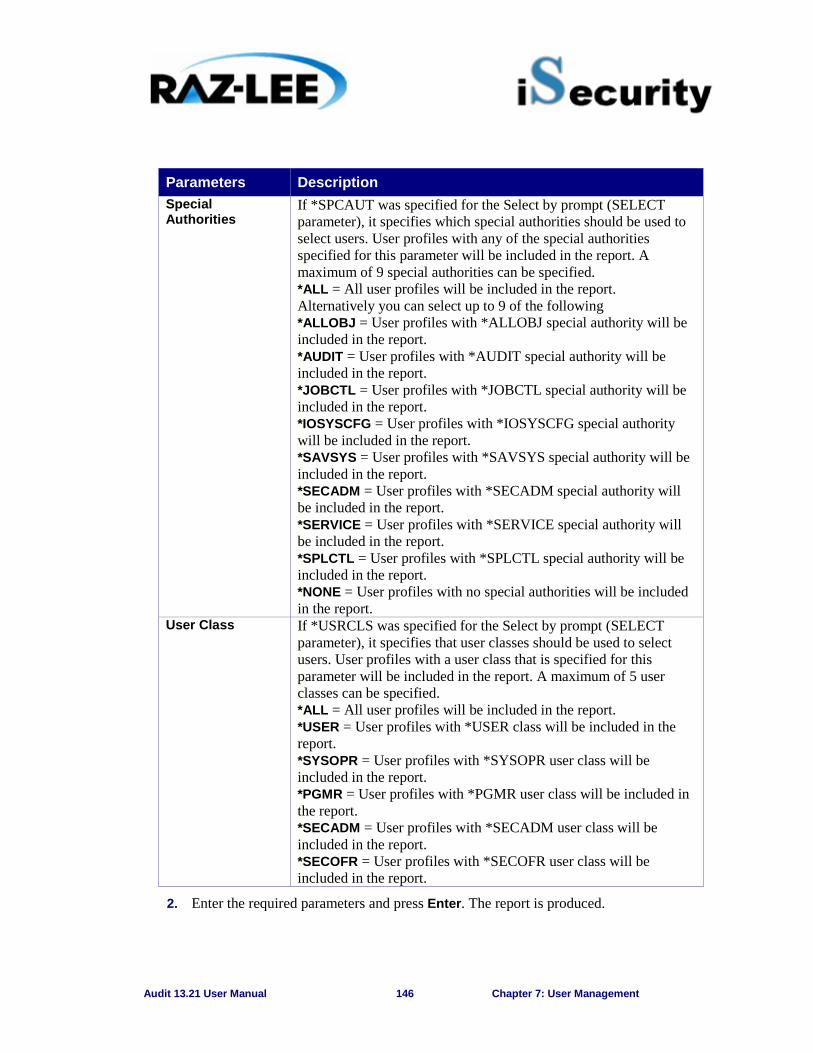
Audit 13.21 User Manual 146 Chapter 7: User Management
Parameters Description
Special Authorities
If *SPCAUT was specified for the Select by prompt (SELECT parameter), it specifies which special authorities should be used to select users. User profiles with any of the special authorities specified for this parameter will be included in the report. A maximum of 9 special authorities can be specified. *ALL = All user profiles will be included in the report. Alternatively you can select up to 9 of the following *ALLOBJ = User profiles with *ALLOBJ special authority will be included in the report. *AUDIT = User profiles with *AUDIT special authority will be included in the report. *JOBCTL = User profiles with *JOBCTL special authority will be included in the report. *IOSYSCFG = User profiles with *IOSYSCFG special authority will be included in the report. *SAVSYS = User profiles with *SAVSYS special authority will be included in the report. *SECADM = User profiles with *SECADM special authority will be included in the report. *SERVICE = User profiles with *SERVICE special authority will be included in the report. *SPLCTL = User profiles with *SPLCTL special authority will be included in the report. *NONE = User profiles with no special authorities will be included in the report.
User Class If *USRCLS was specified for the Select by prompt (SELECT parameter), it specifies that user classes should be used to select users. User profiles with a user class that is specified for this parameter will be included in the report. A maximum of 5 user classes can be specified. *ALL = All user profiles will be included in the report. *USER = User profiles with *USER class will be included in the report. *SYSOPR = User profiles with *SYSOPR user class will be included in the report. *PGMR = User profiles with *PGMR user class will be included in the report. *SECADM = User profiles with *SECADM user class will be included in the report. *SECOFR = User profiles with *SECOFR user class will be included in the report.
2. Enter the required parameters and press Enter. The report is produced.
Audit 13.21 User Manual 147 Chapter 8: Working with Native Object Security
8 Chapter 8: Working with Native Object Security The purpose of this Chapter is to provide the means to create settings for Native Object Security, and includes the following sections:
Ø Overview
Ø Working with Native Object Security
Ø Compare Current Security to Planned
Ø Check/Set By Commands
Ø Rules Wizard
Ø Error Log
Overview Defining security rights for native objects is the basis for all IBMi security. However, these activities are work-intensive and therefore very susceptible to errors and oversights.
Native Object Security capabilities enable system administrators to easily define target security levels per object and object type, and to check for inconsistencies between actual and planned object security settings. They also enable using generic object names, and include full reporting features.
Native Object Security capabilities include:
§ Setting up multiple object security rules simultaneously, using generic naming capabilities
§ Checking target (planned) settings with the current object security status, and showing inconsistencies
§ Setting the current security status to the planned status
§ Defining Object Owner, Authorization List, Primary Group, and specific user authorities (Add/Replace)
§ Setting Audit value and Reset usage count
§ Full reporting capabilities including OUTFILE
In the IBMi (OS/400), the user must define the following manually for every object:
Object Authority GRT/RVK/DSPOBJAUT or WRKOBJ and select 2=Edit authority
Object Owner CHG/DSPOBJOWN
Object Primary Group CHG/DSP/WRKOBJPGP
Object Auditing CHGOBJAUD DSPOBJD
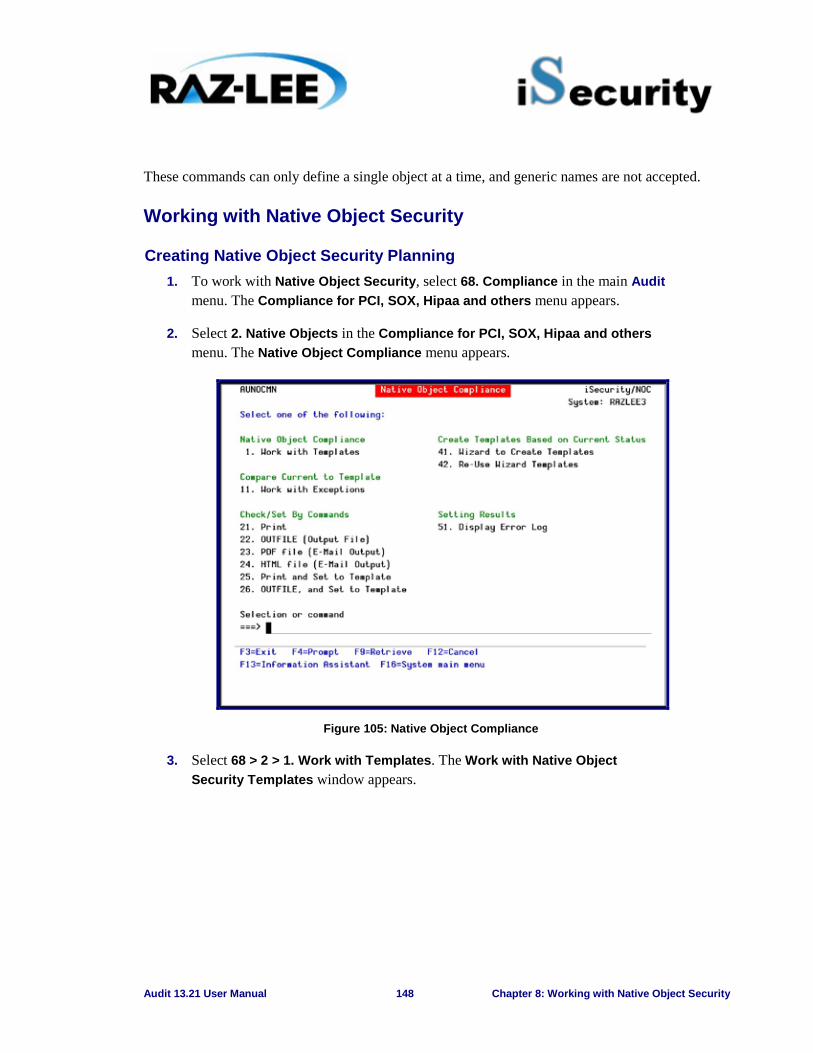
Audit 13.21 User Manual 148 Chapter 8: Working with Native Object Security
These commands can only define a single object at a time, and generic names are not accepted.
Working with Native Object Security
Creating Native Object Security Planning 1. To work with Native Object Security, select 68. Compliance in the main Audit
menu. The Compliance for PCI, SOX, Hipaa and others menu appears.
2. Select 2. Native Objects in the Compliance for PCI, SOX, Hipaa and others menu. The Native Object Compliance menu appears.
Figure 105: Native Object Compliance
3. Select 68 > 2 > 1. Work with Templates. The Work with Native Object Security Templates window appears.
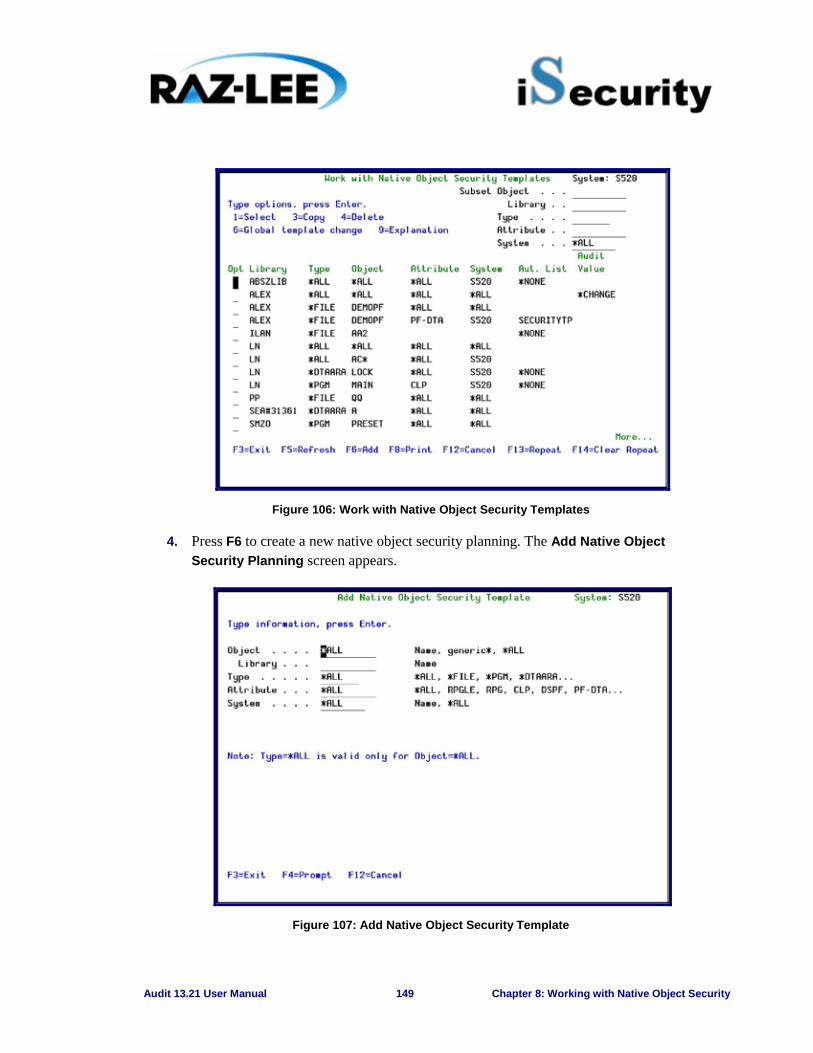
Audit 13.21 User Manual 149 Chapter 8: Working with Native Object Security
Figure 106: Work with Native Object Security Templates
4. Press F6 to create a new native object security planning. The Add Native Object Security Planning screen appears.
Figure 107: Add Native Object Security Template
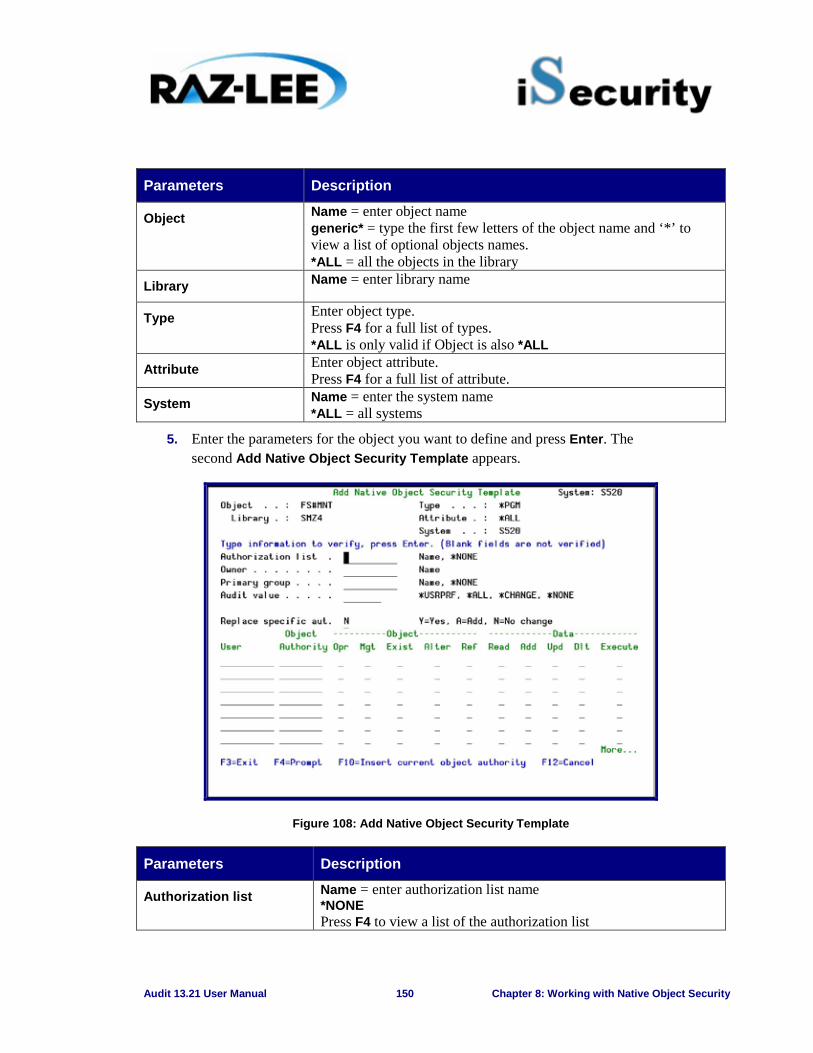
Audit 13.21 User Manual 150 Chapter 8: Working with Native Object Security
Parameters Description
Object Name = enter object name generic* = type the first few letters of the object name and ‘*’ to view a list of optional objects names. *ALL = all the objects in the library
Library Name = enter library name
Type Enter object type. Press F4 for a full list of types. *ALL is only valid if Object is also *ALL
Attribute Enter object attribute. Press F4 for a full list of attribute.
System Name = enter the system name *ALL = all systems
5. Enter the parameters for the object you want to define and press Enter. The second Add Native Object Security Template appears.
Figure 108: Add Native Object Security Template
Parameters Description
Authorization list Name = enter authorization list name *NONE Press F4 to view a list of the authorization list
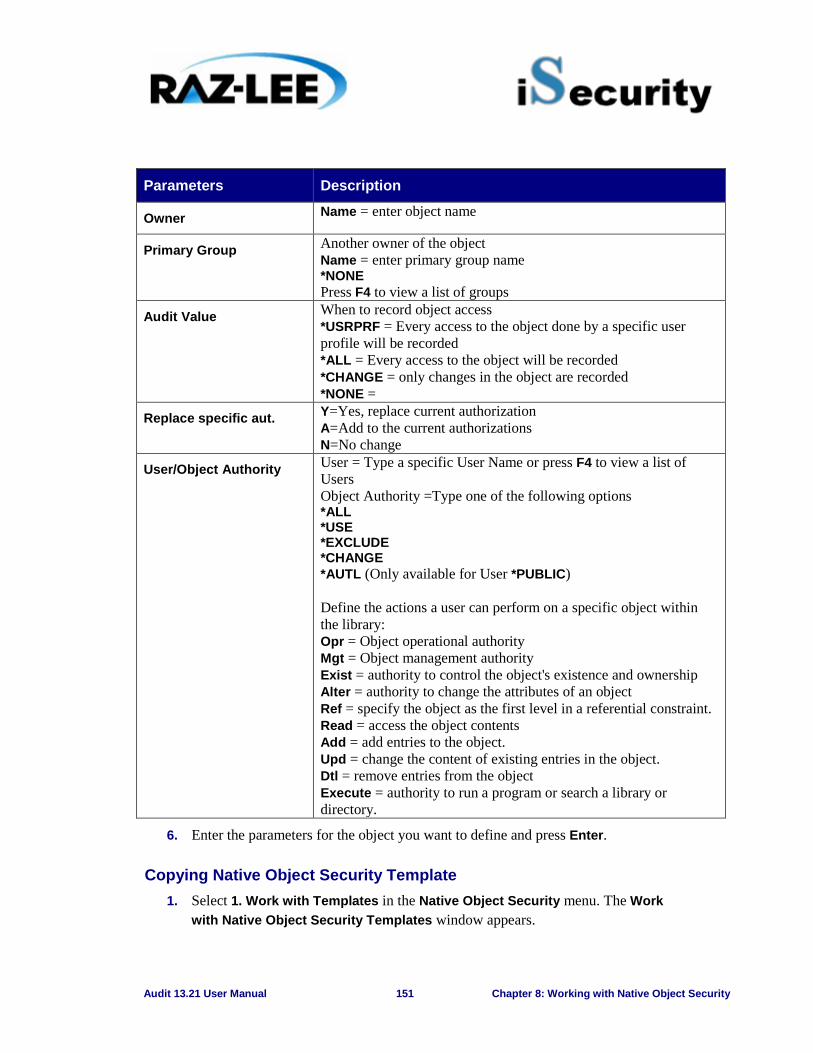
Audit 13.21 User Manual 151 Chapter 8: Working with Native Object Security
Parameters Description
Owner Name = enter object name
Primary Group Another owner of the object Name = enter primary group name *NONE Press F4 to view a list of groups
Audit Value When to record object access *USRPRF = Every access to the object done by a specific user profile will be recorded *ALL = Every access to the object will be recorded *CHANGE = only changes in the object are recorded *NONE =
Replace specific aut. Y=Yes, replace current authorization A=Add to the current authorizations N=No change
User/Object Authority User = Type a specific User Name or press F4 to view a list of Users Object Authority =Type one of the following options *ALL *USE *EXCLUDE *CHANGE *AUTL (Only available for User *PUBLIC) Define the actions a user can perform on a specific object within the library: Opr = Object operational authority Mgt = Object management authority Exist = authority to control the object's existence and ownership Alter = authority to change the attributes of an object Ref = specify the object as the first level in a referential constraint. Read = access the object contents Add = add entries to the object. Upd = change the content of existing entries in the object. Dtl = remove entries from the object Execute = authority to run a program or search a library or directory.
6. Enter the parameters for the object you want to define and press Enter.
Copying Native Object Security Template 1. Select 1. Work with Templates in the Native Object Security menu. The Work
with Native Object Security Templates window appears.
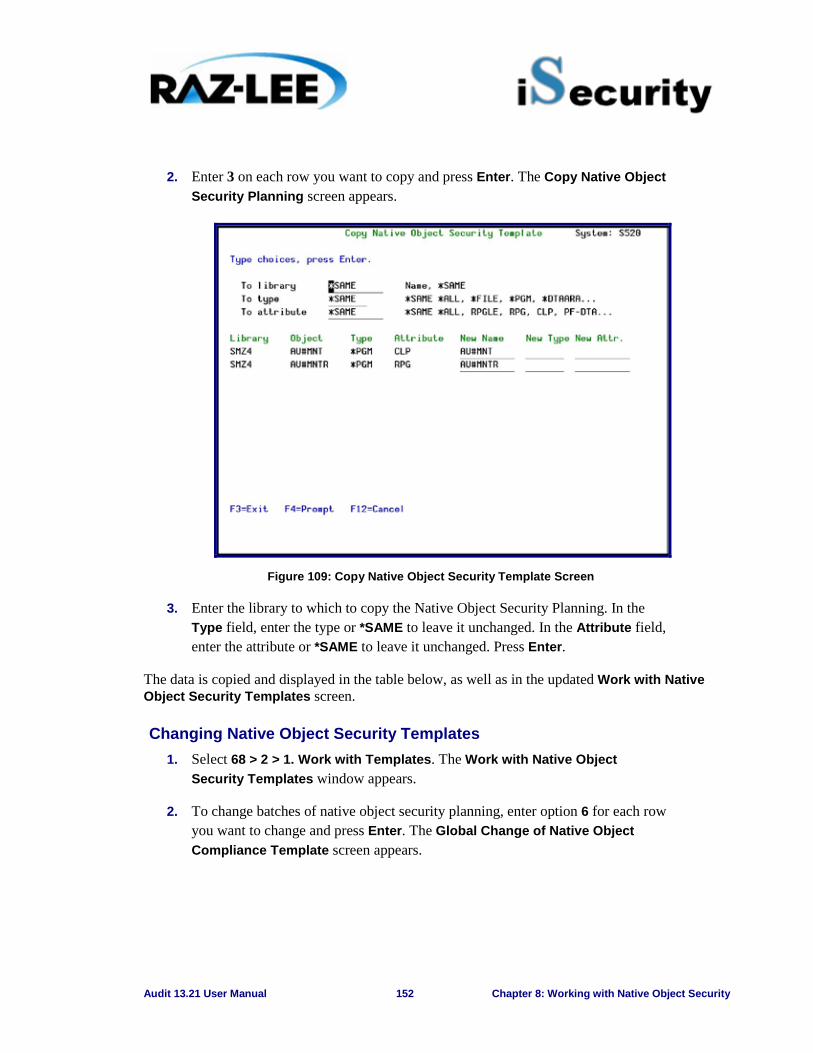
Audit 13.21 User Manual 152 Chapter 8: Working with Native Object Security
2. Enter 3 on each row you want to copy and press Enter. The Copy Native Object Security Planning screen appears.
Figure 109: Copy Native Object Security Template Screen
3. Enter the library to which to copy the Native Object Security Planning. In the Type field, enter the type or *SAME to leave it unchanged. In the Attribute field, enter the attribute or *SAME to leave it unchanged. Press Enter.
The data is copied and displayed in the table below, as well as in the updated Work with Native Object Security Templates screen.
Changing Native Object Security Templates 1. Select 68 > 2 > 1. Work with Templates. The Work with Native Object
Security Templates window appears.
2. To change batches of native object security planning, enter option 6 for each row you want to change and press Enter. The Global Change of Native Object Compliance Template screen appears.
Audit 13.21 User Manual 153 Chapter 8: Working with Native Object Security
Figure 110: Global Change of Native Object Compliance Template Screen
3. For the Authorization list, Owner, Primary group and Audit value, enter the specific changes to make and press Enter.
The data is changed and displayed in the screen, as well as in the updated Work with Native Object Security Templates screen.
Compare Current Security to Planned Because you sometimes change security settings due to changing circumstances, it is important to verify regularly that the current security settings match the planned security settings. You can view the settings online, print out a report, or send them to an OUTFILE which you can analyze later.
Display and Update Security Settings 1. Select 68 > 2 > 11. Work with Exceptions. The Check Current Object
Security to Planned window appears.
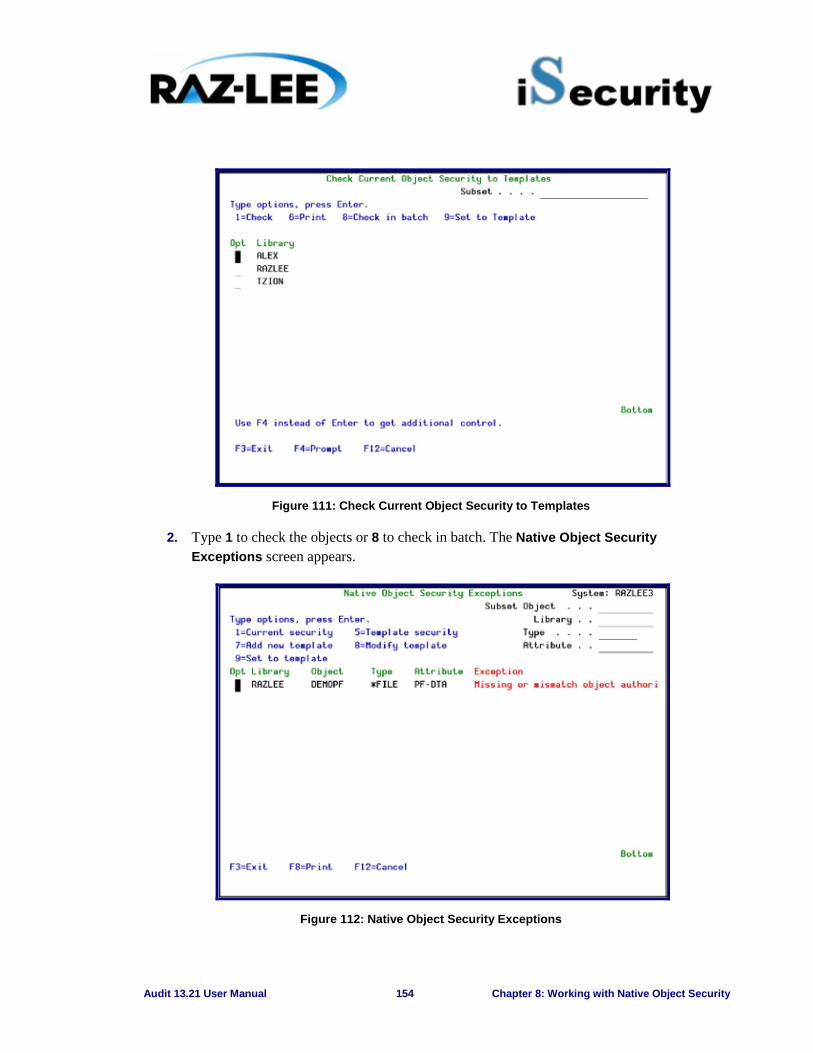
Audit 13.21 User Manual 154 Chapter 8: Working with Native Object Security
Figure 111: Check Current Object Security to Templates
2. Type 1 to check the objects or 8 to check in batch. The Native Object Security Exceptions screen appears.
Figure 112: Native Object Security Exceptions
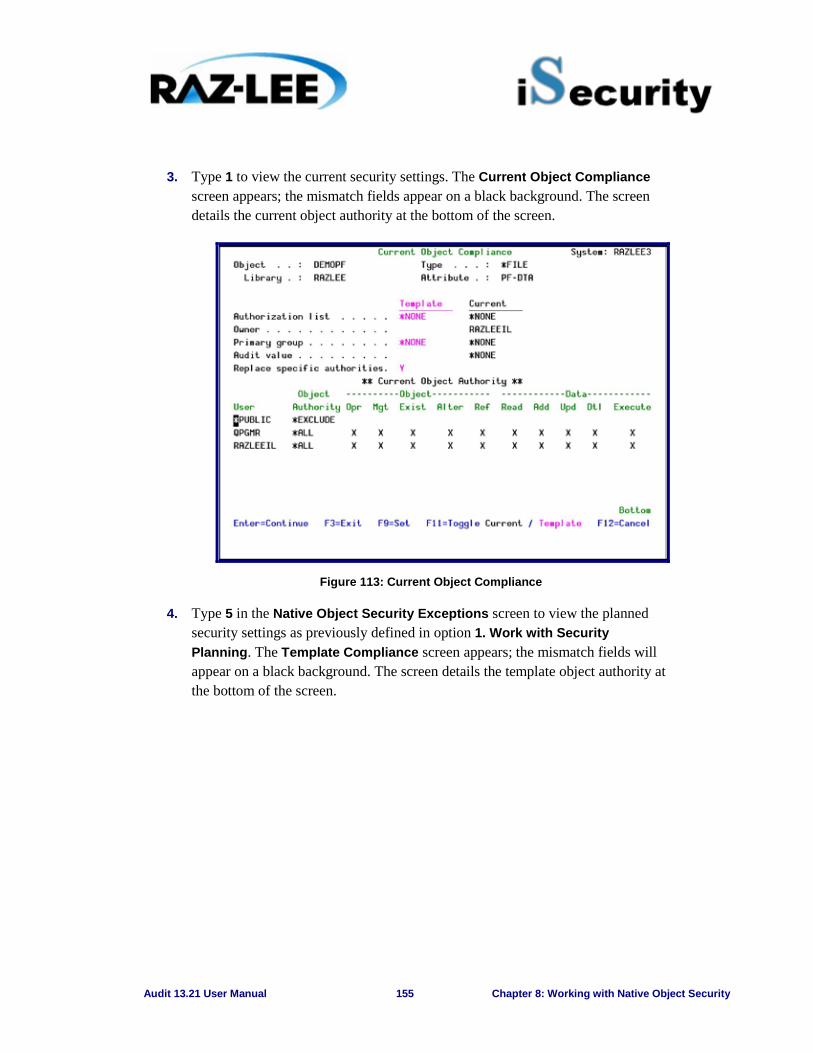
Audit 13.21 User Manual 155 Chapter 8: Working with Native Object Security
3. Type 1 to view the current security settings. The Current Object Compliance screen appears; the mismatch fields appear on a black background. The screen details the current object authority at the bottom of the screen.
Figure 113: Current Object Compliance
4. Type 5 in the Native Object Security Exceptions screen to view the planned security settings as previously defined in option 1. Work with Security Planning. The Template Compliance screen appears; the mismatch fields will appear on a black background. The screen details the template object authority at the bottom of the screen.
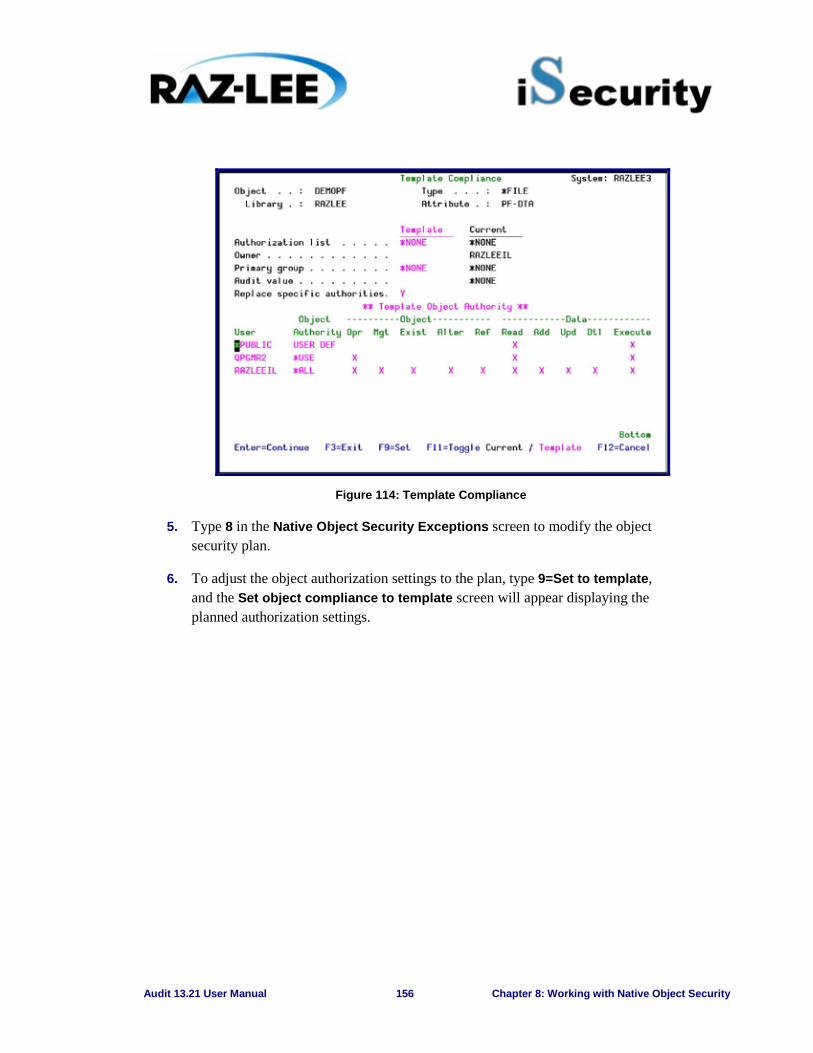
Audit 13.21 User Manual 156 Chapter 8: Working with Native Object Security
Figure 114: Template Compliance
5. Type 8 in the Native Object Security Exceptions screen to modify the object security plan.
6. To adjust the object authorization settings to the plan, type 9=Set to template, and the Set object compliance to template screen will appear displaying the planned authorization settings.
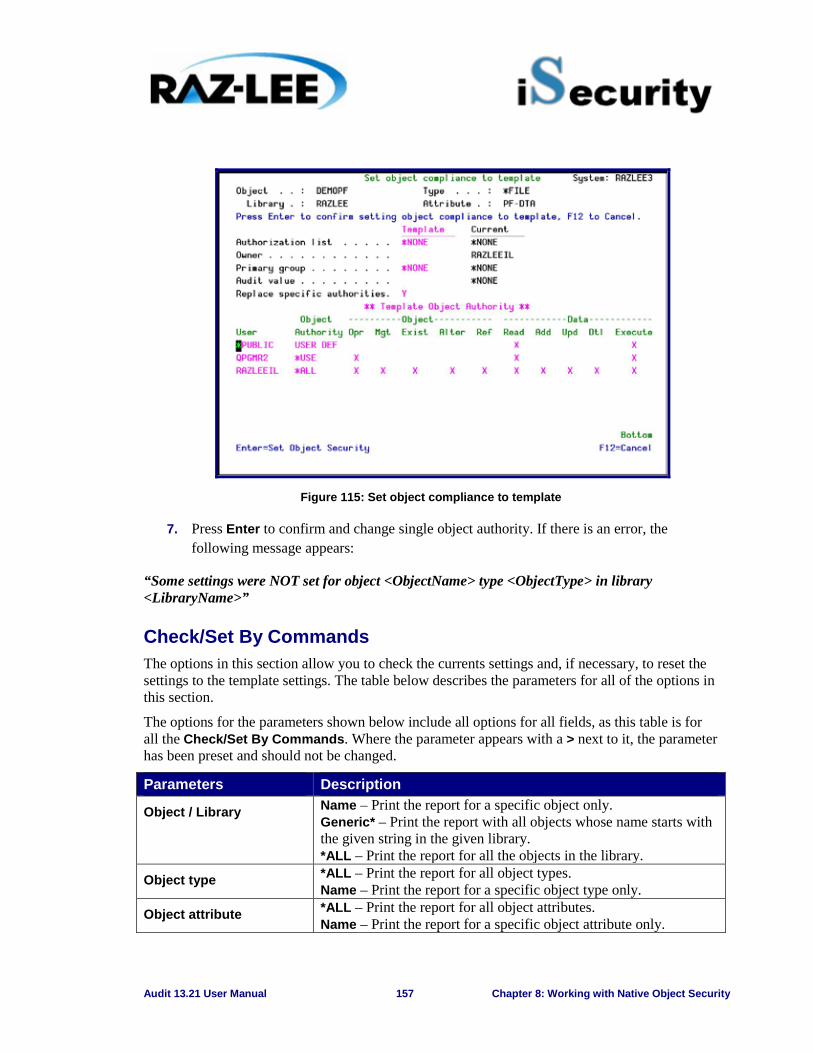
Audit 13.21 User Manual 157 Chapter 8: Working with Native Object Security
Figure 115: Set object compliance to template
7. Press Enter to confirm and change single object authority. If there is an error, the following message appears:
“Some settings were NOT set for object <ObjectName> type <ObjectType> in library <LibraryName>”
Check/Set By Commands The options in this section allow you to check the currents settings and, if necessary, to reset the settings to the template settings. The table below describes the parameters for all of the options in this section.
The options for the parameters shown below include all options for all fields, as this table is for all the Check/Set By Commands. Where the parameter appears with a > next to it, the parameter has been preset and should not be changed.
Parameters Description
Object / Library Name – Print the report for a specific object only. Generic* – Print the report with all objects whose name starts with the given string in the given library. *ALL – Print the report for all the objects in the library.
Object type *ALL – Print the report for all object types. Name – Print the report for a specific object type only.
Object attribute *ALL – Print the report for all object attributes. Name – Print the report for a specific object attribute only.
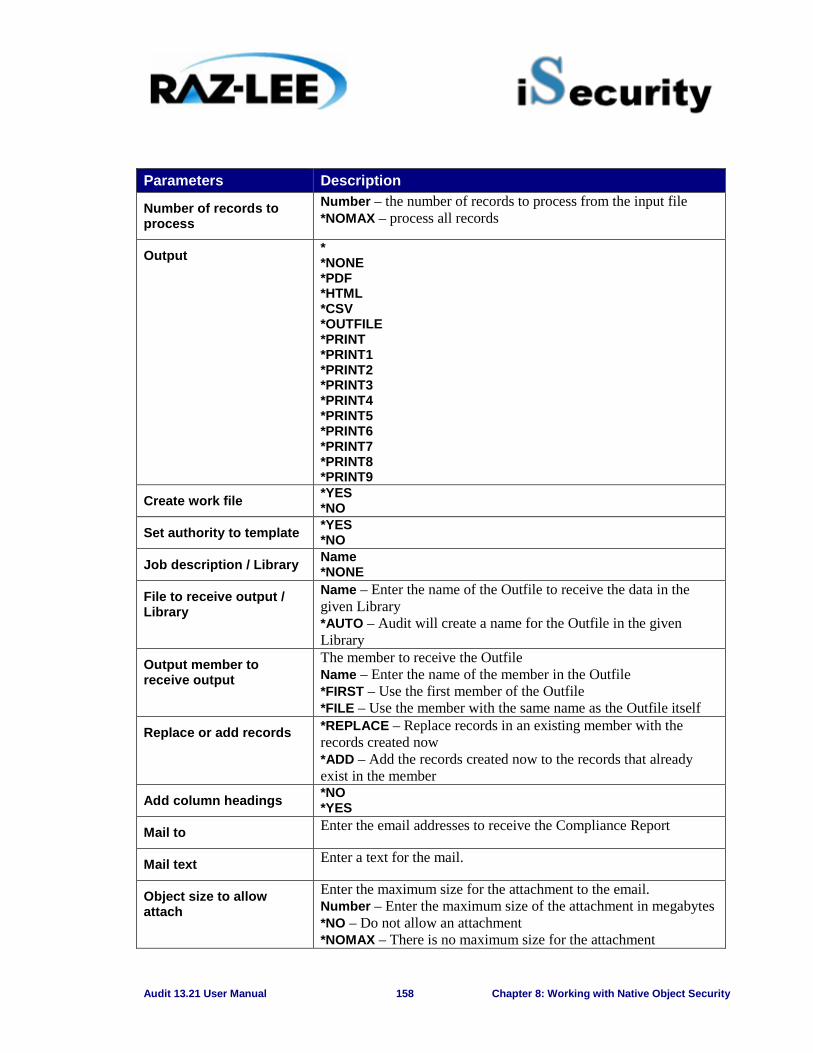
Audit 13.21 User Manual 158 Chapter 8: Working with Native Object Security
Parameters Description
Number of records to process
Number – the number of records to process from the input file *NOMAX – process all records
Output * *NONE *PDF *HTML *CSV *OUTFILE *PRINT *PRINT1 *PRINT2 *PRINT3 *PRINT4 *PRINT5 *PRINT6 *PRINT7 *PRINT8 *PRINT9
Create work file *YES *NO
Set authority to template *YES *NO
Job description / Library Name *NONE
File to receive output / Library
Name – Enter the name of the Outfile to receive the data in the given Library *AUTO – Audit will create a name for the Outfile in the given Library
Output member to receive output
The member to receive the Outfile Name – Enter the name of the member in the Outfile *FIRST – Use the first member of the Outfile *FILE – Use the member with the same name as the Outfile itself
Replace or add records *REPLACE – Replace records in an existing member with the records created now *ADD – Add the records created now to the records that already exist in the member
Add column headings *NO *YES
Mail to Enter the email addresses to receive the Compliance Report
Mail text Enter a text for the mail.
Object size to allow attach
Enter the maximum size for the attachment to the email. Number – Enter the maximum size of the attachment in megabytes *NO – Do not allow an attachment *NOMAX – There is no maximum size for the attachment

Audit 13.21 User Manual 159 Chapter 8: Working with Native Object Security
Parameters Description
Delete if attached *NO – Do not delete the original file if attaching it to an email *YES – Delete the original file if attaching it to an email
Object Name – Enter the name of the object *AUTO – Audit will create a name for the object
Directory /iSecurity/NOC – *DATE –
User defined data Internal use only
Print Security Settings 1. Select 68 > 21. Print. The Native Object Compliance screen appears.
Figure 116: Native Object Compliance - Print (WRKNOC)
2. Enter the parameters for report you need and press Enter.
Send Security Settings to an Outfile 1. Select 68 > 22. OUTFILE (Output File). The Native Object Compliance
window appears.
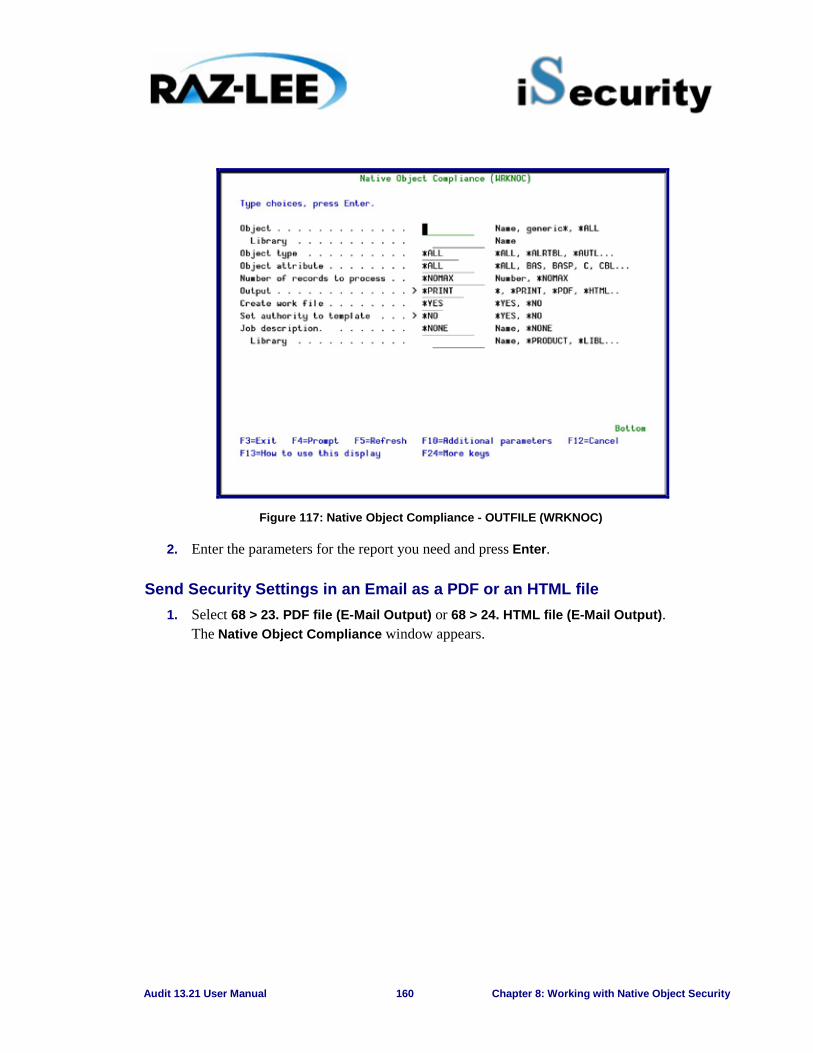
Audit 13.21 User Manual 160 Chapter 8: Working with Native Object Security
Figure 117: Native Object Compliance - OUTFILE (WRKNOC)
2. Enter the parameters for the report you need and press Enter.
Send Security Settings in an Email as a PDF or an HTML file 1. Select 68 > 23. PDF file (E-Mail Output) or 68 > 24. HTML file (E-Mail Output).
The Native Object Compliance window appears.
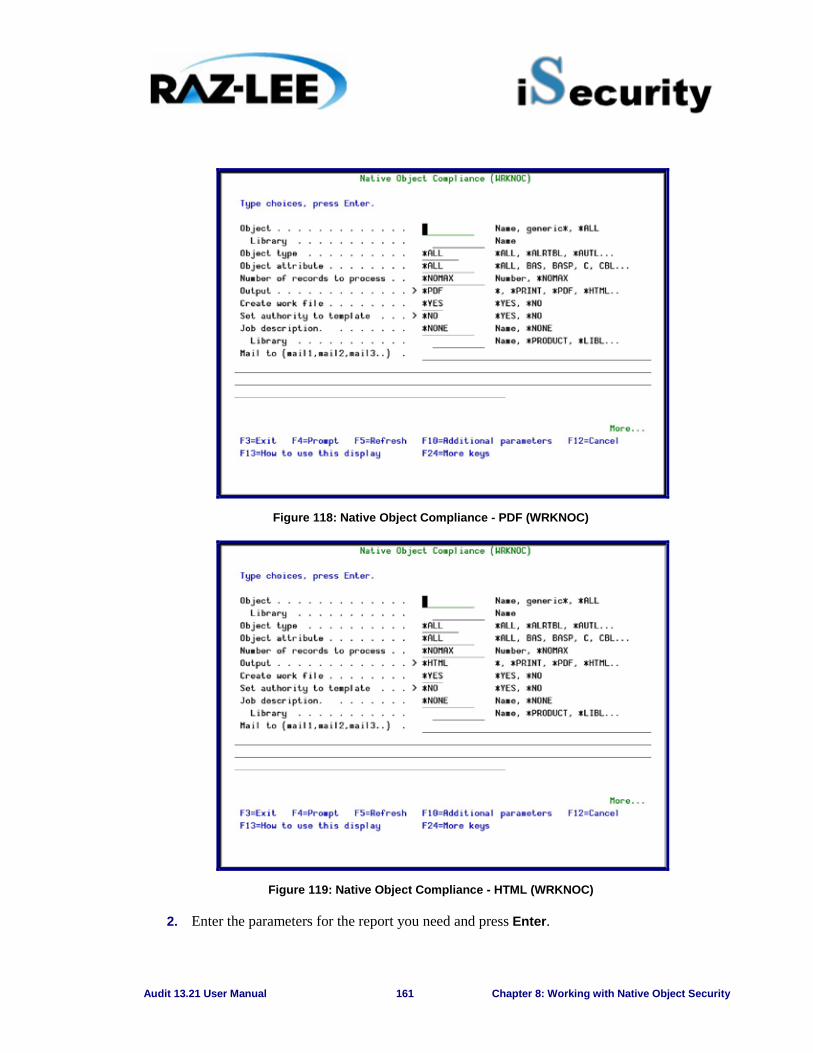
Audit 13.21 User Manual 161 Chapter 8: Working with Native Object Security
Figure 118: Native Object Compliance - PDF (WRKNOC)
Figure 119: Native Object Compliance - HTML (WRKNOC)
2. Enter the parameters for the report you need and press Enter.
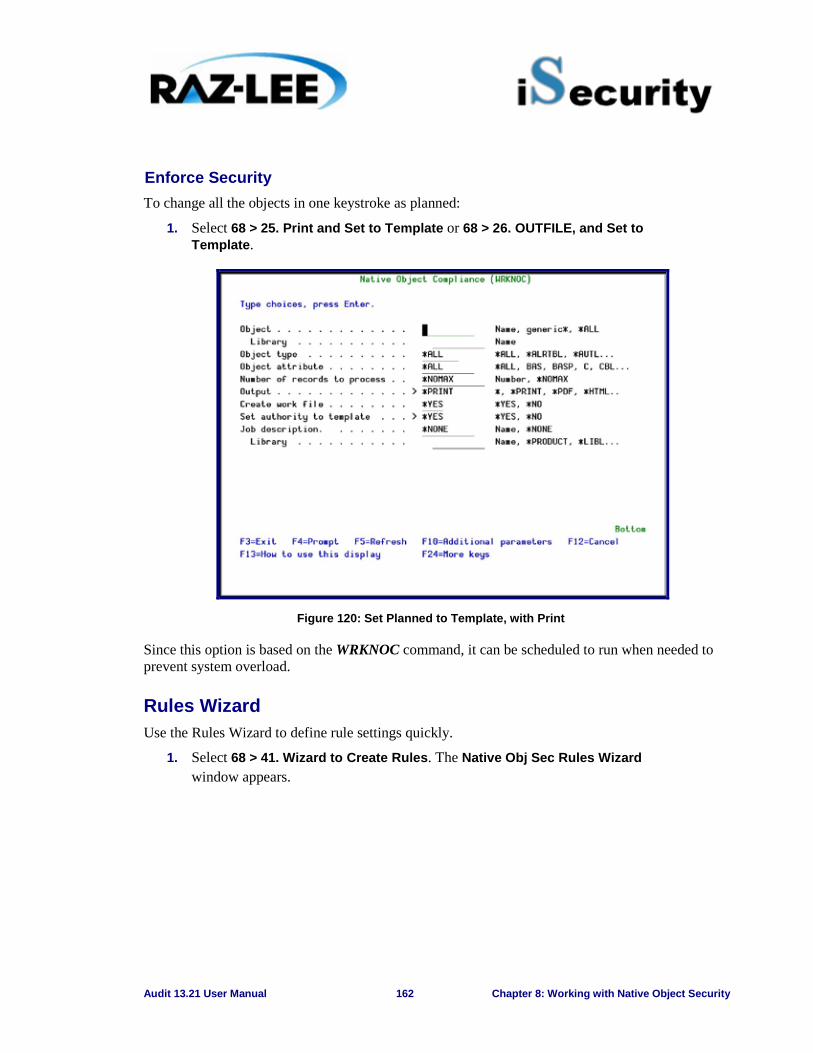
Audit 13.21 User Manual 162 Chapter 8: Working with Native Object Security
Enforce Security To change all the objects in one keystroke as planned:
1. Select 68 > 25. Print and Set to Template or 68 > 26. OUTFILE, and Set to Template.
Figure 120: Set Planned to Template, with Print
Since this option is based on the WRKNOC command, it can be scheduled to run when needed to prevent system overload.
Rules Wizard Use the Rules Wizard to define rule settings quickly.
1. Select 68 > 41. Wizard to Create Rules. The Native Obj Sec Rules Wizard window appears.
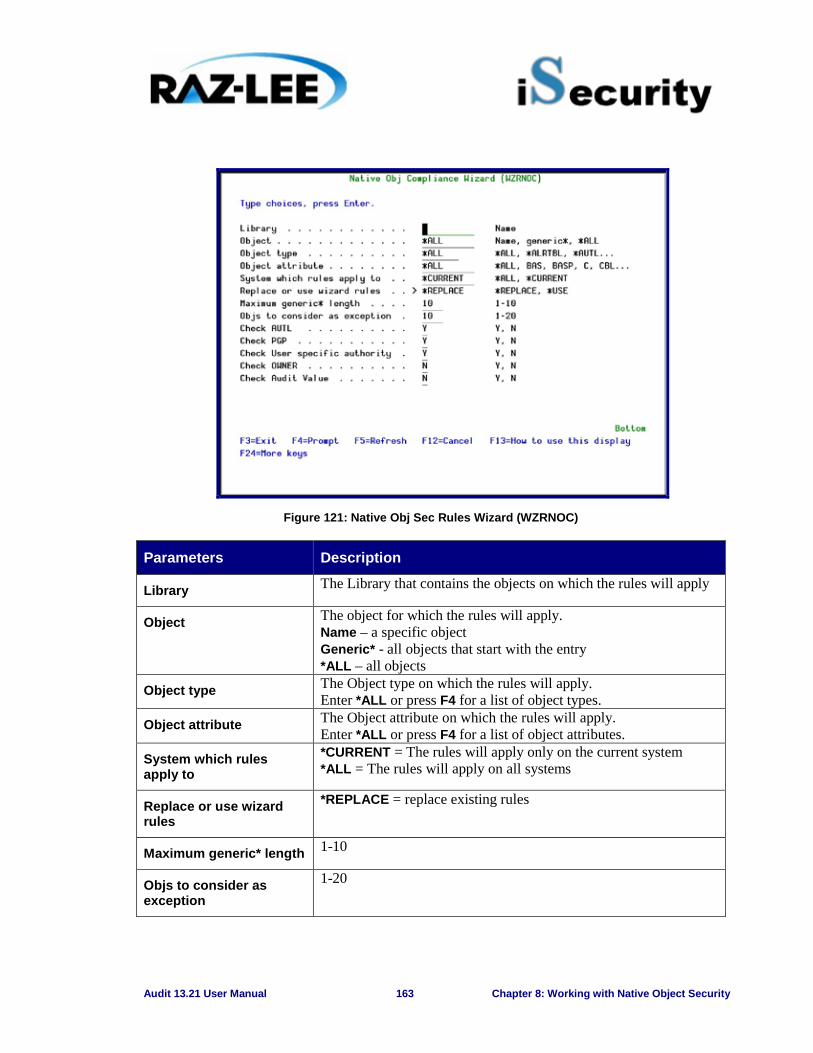
Audit 13.21 User Manual 163 Chapter 8: Working with Native Object Security
Figure 121: Native Obj Sec Rules Wizard (WZRNOC)
Parameters Description
Library The Library that contains the objects on which the rules will apply
Object The object for which the rules will apply. Name – a specific object Generic* - all objects that start with the entry *ALL – all objects
Object type The Object type on which the rules will apply. Enter *ALL or press F4 for a list of object types.
Object attribute The Object attribute on which the rules will apply. Enter *ALL or press F4 for a list of object attributes.
System which rules apply to
*CURRENT = The rules will apply only on the current system *ALL = The rules will apply on all systems
Replace or use wizard rules
*REPLACE = replace existing rules
Maximum generic* length 1-10
Objs to consider as exception
1-20
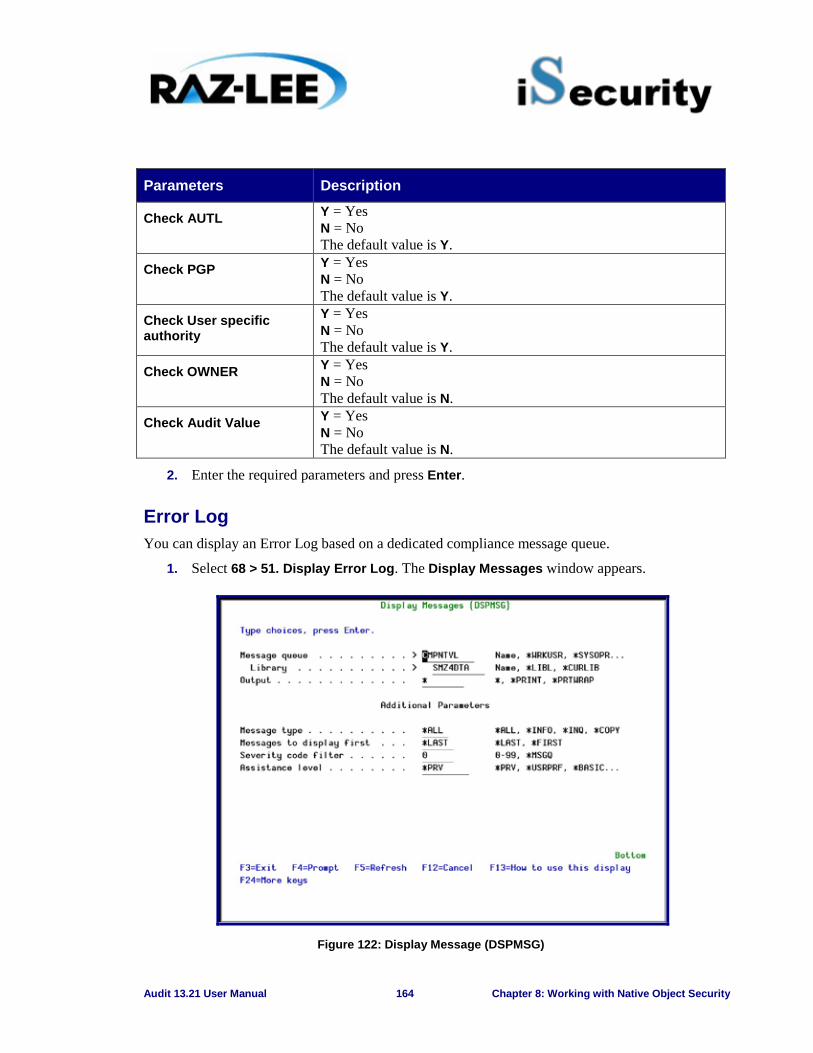
Audit 13.21 User Manual 164 Chapter 8: Working with Native Object Security
Parameters Description
Check AUTL Y = Yes N = No The default value is Y.
Check PGP Y = Yes N = No The default value is Y.
Check User specific authority
Y = Yes N = No The default value is Y.
Check OWNER Y = Yes N = No The default value is N.
Check Audit Value Y = Yes N = No The default value is N.
2. Enter the required parameters and press Enter.
Error Log You can display an Error Log based on a dedicated compliance message queue.
1. Select 68 > 51. Display Error Log. The Display Messages window appears.
Figure 122: Display Message (DSPMSG)
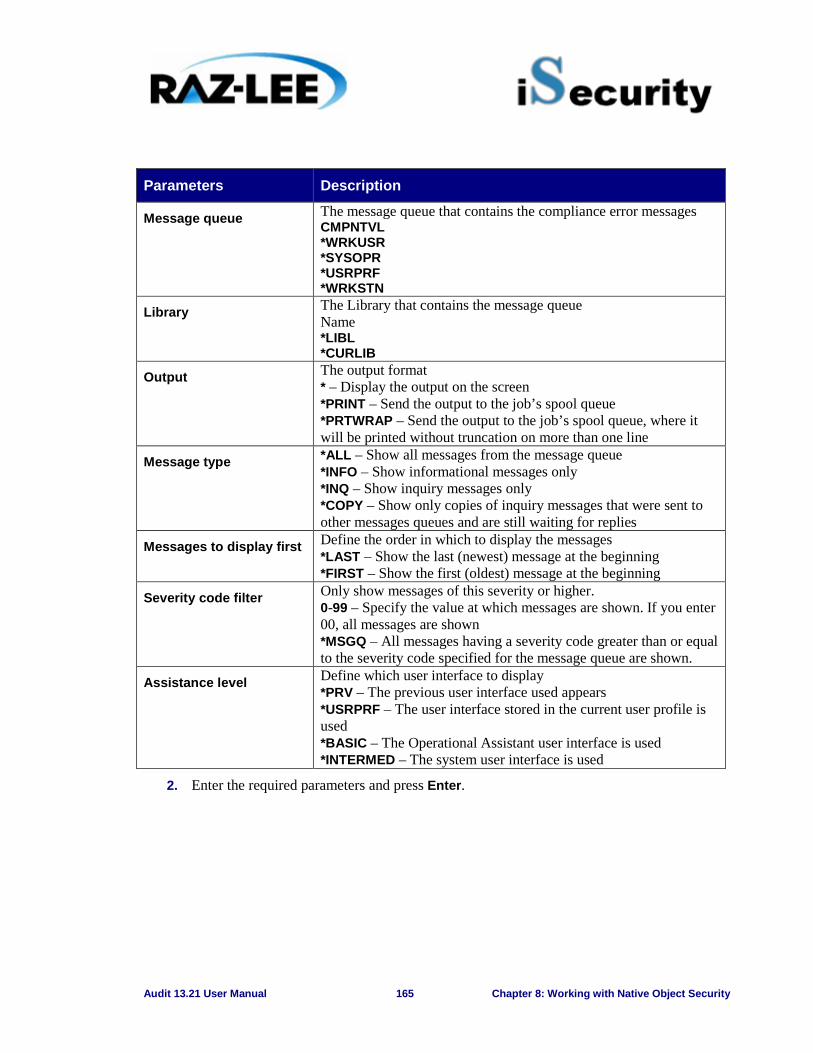
Audit 13.21 User Manual 165 Chapter 8: Working with Native Object Security
Parameters Description
Message queue The message queue that contains the compliance error messages CMPNTVL *WRKUSR *SYSOPR *USRPRF *WRKSTN
Library The Library that contains the message queue Name *LIBL *CURLIB
Output The output format * – Display the output on the screen *PRINT – Send the output to the job’s spool queue *PRTWRAP – Send the output to the job’s spool queue, where it will be printed without truncation on more than one line
Message type *ALL – Show all messages from the message queue *INFO – Show informational messages only *INQ – Show inquiry messages only *COPY – Show only copies of inquiry messages that were sent to other messages queues and are still waiting for replies
Messages to display first Define the order in which to display the messages *LAST – Show the last (newest) message at the beginning *FIRST – Show the first (oldest) message at the beginning
Severity code filter Only show messages of this severity or higher. 0-99 – Specify the value at which messages are shown. If you enter 00, all messages are shown *MSGQ – All messages having a severity code greater than or equal to the severity code specified for the message queue are shown.
Assistance level Define which user interface to display *PRV – The previous user interface used appears *USRPRF – The user interface stored in the current user profile is used *BASIC – The Operational Assistant user interface is used *INTERMED – The system user interface is used
2. Enter the required parameters and press Enter.
Audit 13.21 User Manual 166 Chapter 9: Replication
9
Chapter 9: Replication The purpose of this Chapter is to provide information on Replication settings and properties, and includes the following sections:
Ø Overview
Ø Activation
Ø Network Definitions
Ø System Values
Ø User/Password
Ø Replication Log
Overview The recent trend of consolidating servers has led to the increasing prevalence of multi-system and multi-LPAR shops. Companies have found it mandatory that system administrators and users alike synchronize user profile definitions, user passwords and system values between the different systems, allowing for exceptions as needed in Production, Test or Development systems. Such synchronization should be accomplished with minimum overhead to both the actual systems and the personnel mandated with managing user profile information.
Because of the growing demand for data synchronization, Raz-Lee created User and System Value Replication, allowing the user to replicate security settings such as user profile definitions, user passwords and system values across multiple servers or LPARs, allowing for the exceptions needed in Production, Test or Development systems.
Replication includes the following features:
§ Flexible user-defined replication rules defining user profiles, passwords and parameters to be replicated
§ Definition of destination systems for replication
§ Bulk updates of user profiles
§ Setting of System Values to optimal value or site-defined baseline values
§ Replication of all, group or individual system values
§ Collection and display of network-wide replication results
§ Revival of deleted users, with an option to modify parameters
§ Can be initiated from any IBM in the environment and does not require special commands
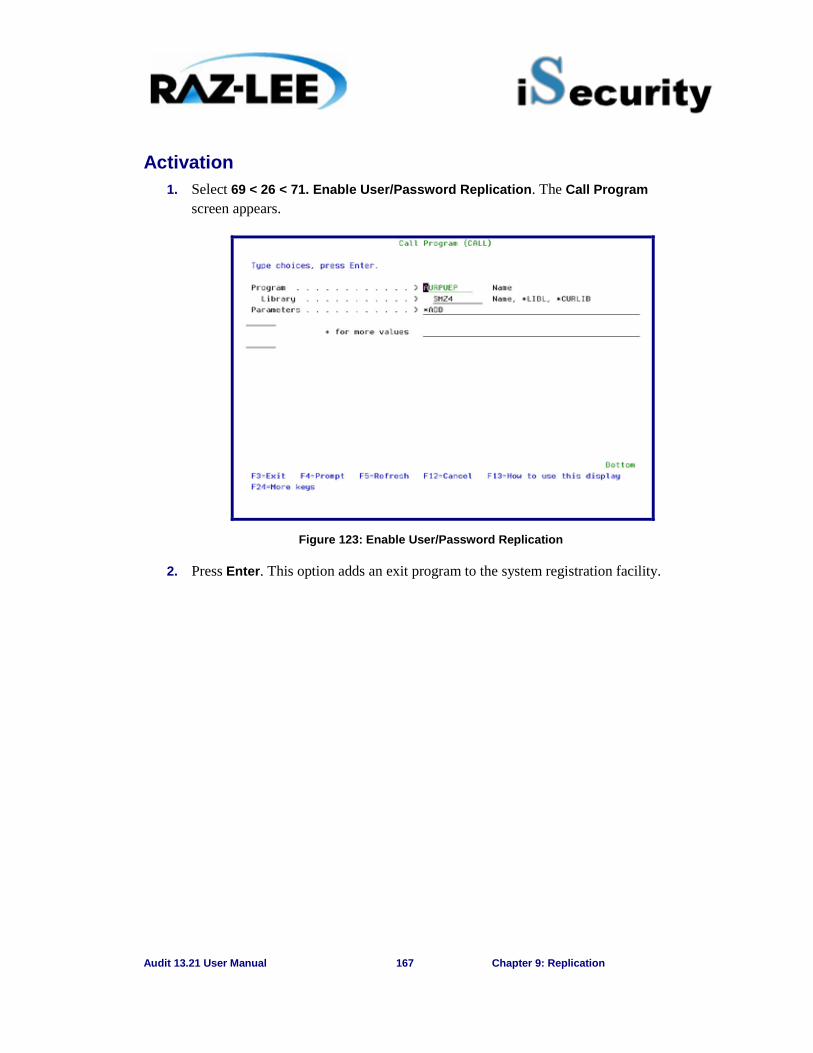
Audit 13.21 User Manual 167 Chapter 9: Replication
Activation 1. Select 69 < 26 < 71. Enable User/Password Replication. The Call Program
screen appears.
Figure 123: Enable User/Password Replication
2. Press Enter. This option adds an exit program to the system registration facility.
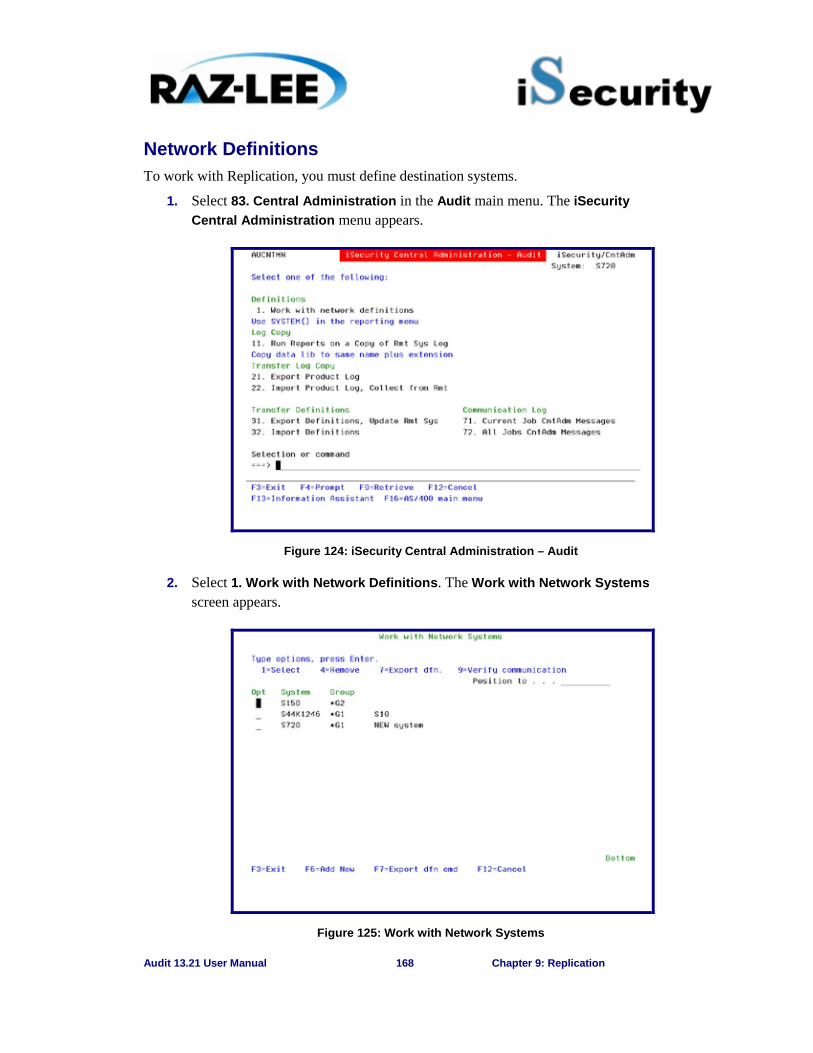
Audit 13.21 User Manual 168 Chapter 9: Replication
Network Definitions To work with Replication, you must define destination systems.
1. Select 83. Central Administration in the Audit main menu. The iSecurity Central Administration menu appears.
Figure 124: iSecurity Central Administration – Audit
2. Select 1. Work with Network Definitions. The Work with Network Systems screen appears.
Figure 125: Work with Network Systems

Audit 13.21 User Manual 169 Chapter 9: Replication
3. Press F6 to add a new system to the list or type 1 to modify an existing system. The Modify Network System screen appears.
Figure 126: Modify Network System
Parameters Description
System The name of the system you are defining.
Description Enter a meaningful description.
Group where included You can create groups of system. The group name must begin with an asterisk (*).
Default extension
Type *SNA or *IP
IP or remote name If type = *SNA, enter the name of the remote system. If Type = *IP, enter the IP address of the remote system.
4. Type the appropriate parameters and press Enter.
NOTE: When you define both source and target systems, you must define the systems on both the systems. In addition, both systems must have the same version of Audit installed.
System Values You can replicate the System Values from this system to another system, you can set the current system values and network attributes as a baseline, and you can set a baseline to be the current system values.
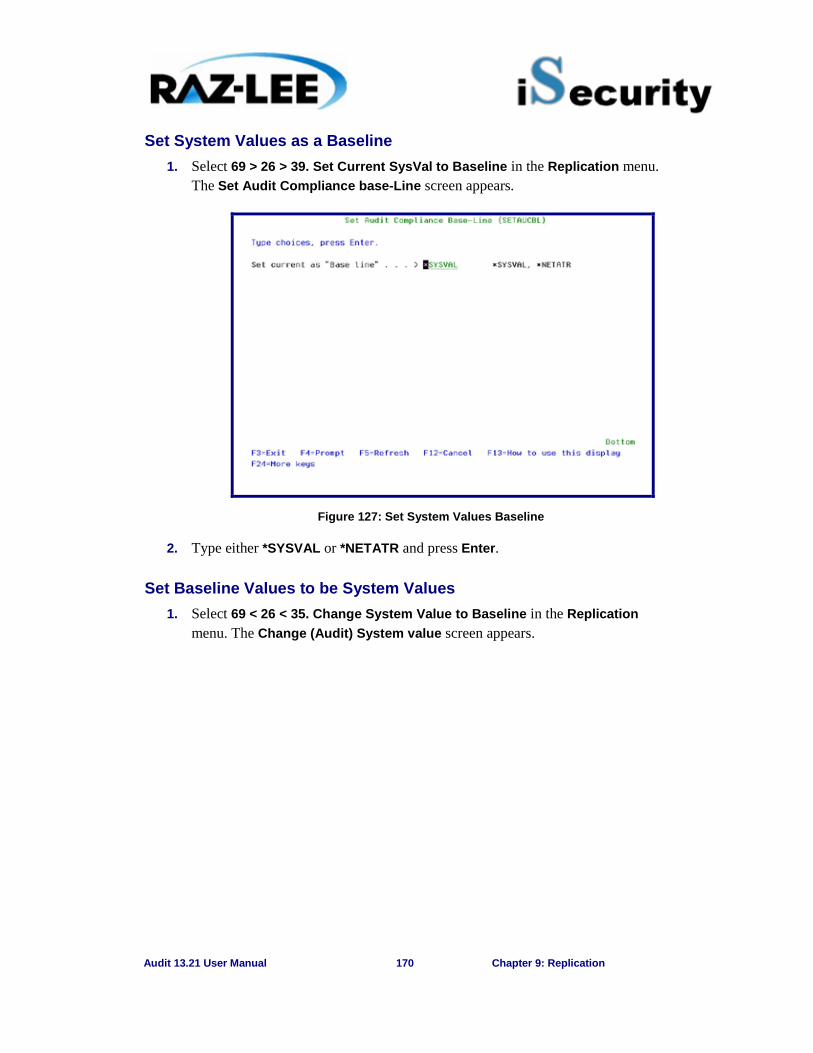
Audit 13.21 User Manual 170 Chapter 9: Replication
Set System Values as a Baseline 1. Select 69 > 26 > 39. Set Current SysVal to Baseline in the Replication menu.
The Set Audit Compliance base-Line screen appears.
Figure 127: Set System Values Baseline
2. Type either *SYSVAL or *NETATR and press Enter.
Set Baseline Values to be System Values 1. Select 69 < 26 < 35. Change System Value to Baseline in the Replication
menu. The Change (Audit) System value screen appears.
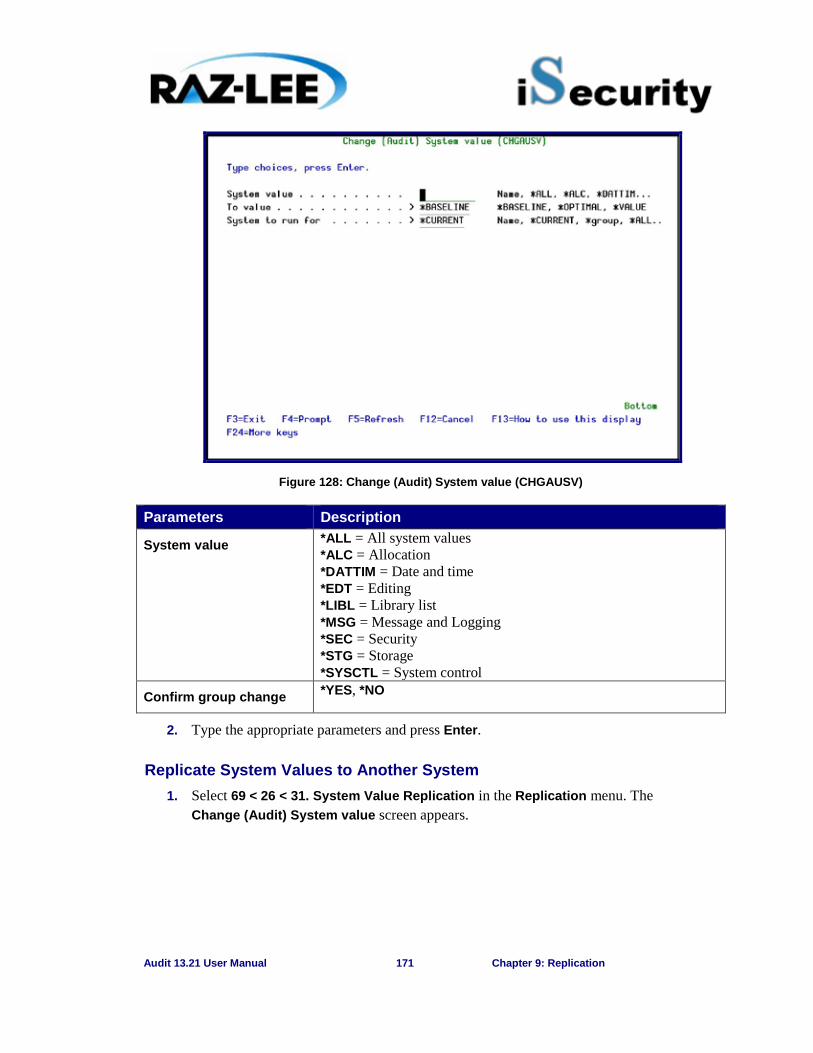
Audit 13.21 User Manual 171 Chapter 9: Replication
Figure 128: Change (Audit) System value (CHGAUSV)
Parameters Description
System value *ALL = All system values *ALC = Allocation *DATTIM = Date and time *EDT = Editing *LIBL = Library list *MSG = Message and Logging *SEC = Security *STG = Storage *SYSCTL = System control
Confirm group change *YES, *NO
2. Type the appropriate parameters and press Enter.
Replicate System Values to Another System 1. Select 69 < 26 < 31. System Value Replication in the Replication menu. The
Change (Audit) System value screen appears.
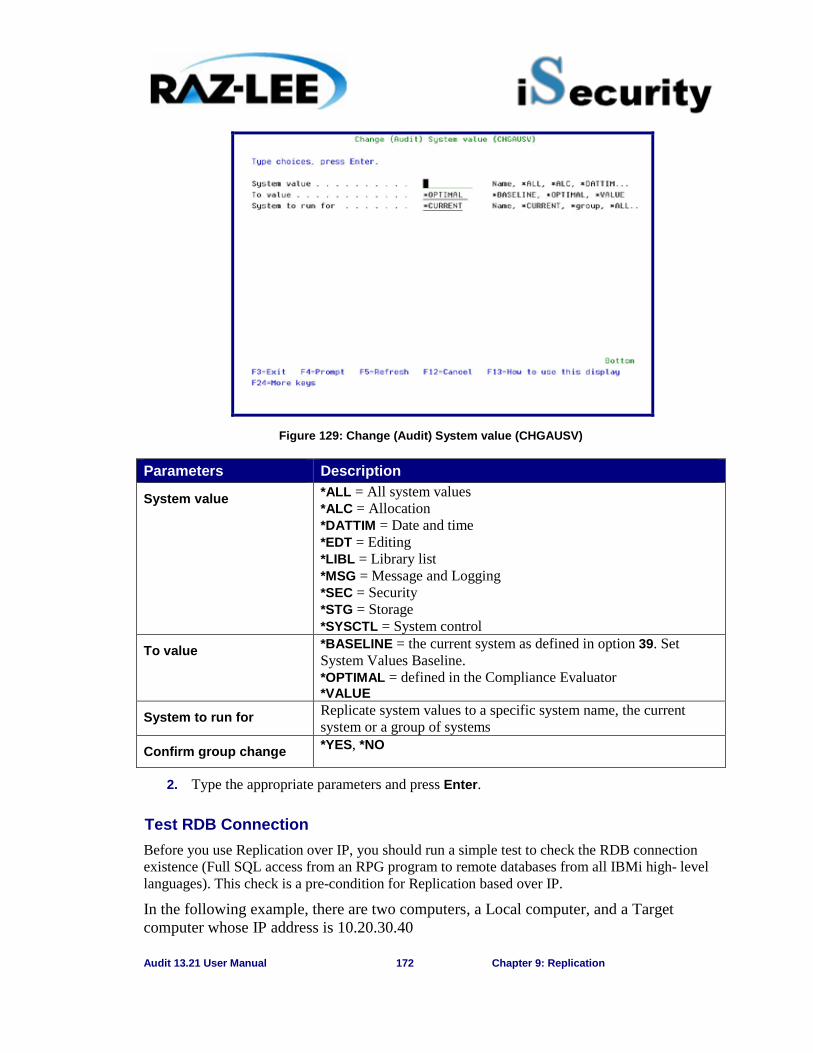
Audit 13.21 User Manual 172 Chapter 9: Replication
Figure 129: Change (Audit) System value (CHGAUSV)
Parameters Description
System value *ALL = All system values *ALC = Allocation *DATTIM = Date and time *EDT = Editing *LIBL = Library list *MSG = Message and Logging *SEC = Security *STG = Storage *SYSCTL = System control
To value *BASELINE = the current system as defined in option 39. Set System Values Baseline. *OPTIMAL = defined in the Compliance Evaluator *VALUE
System to run for Replicate system values to a specific system name, the current system or a group of systems
Confirm group change *YES, *NO
2. Type the appropriate parameters and press Enter.
Test RDB Connection Before you use Replication over IP, you should run a simple test to check the RDB connection existence (Full SQL access from an RPG program to remote databases from all IBMi high- level languages). This check is a pre-condition for Replication based over IP.
In the following example, there are two computers, a Local computer, and a Target computer whose IP address is 10.20.30.40
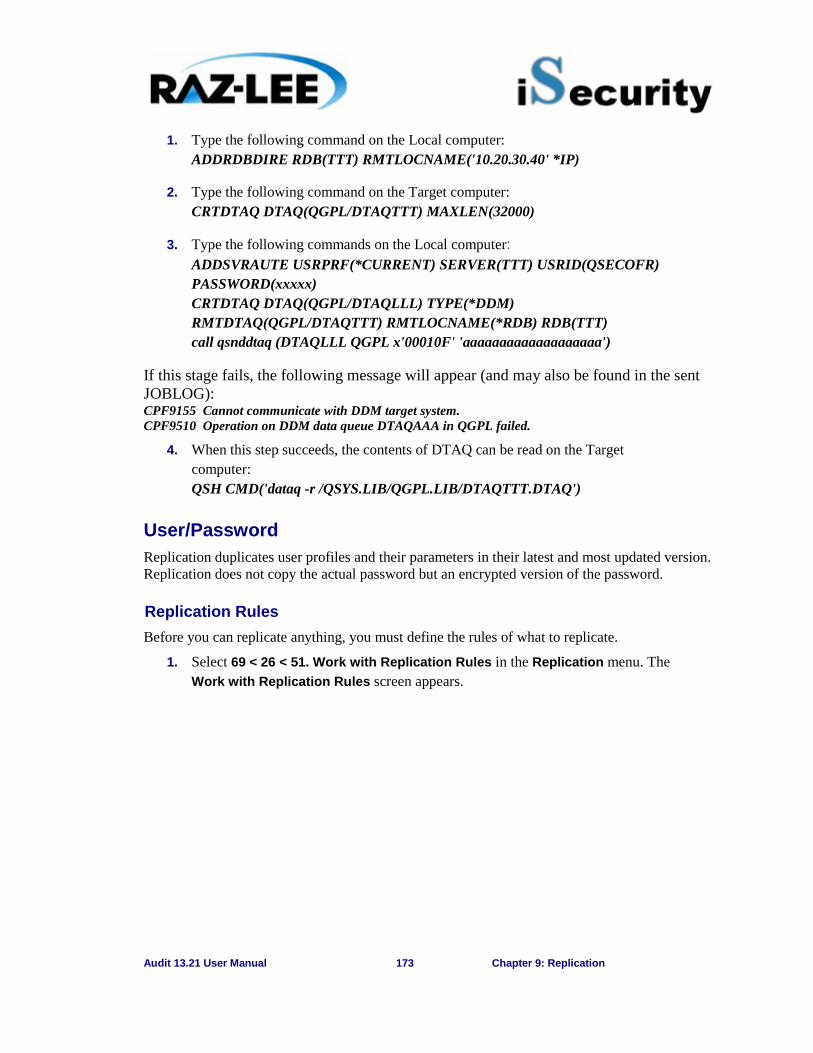
Audit 13.21 User Manual 173 Chapter 9: Replication
1. Type the following command on the Local computer: ADDRDBDIRE RDB(TTT) RMTLOCNAME('10.20.30.40' *IP)
2. Type the following command on the Target computer: CRTDTAQ DTAQ(QGPL/DTAQTTT) MAXLEN(32000)
3. Type the following commands on the Local computer: ADDSVRAUTE USRPRF(*CURRENT) SERVER(TTT) USRID(QSECOFR) PASSWORD(xxxxx) CRTDTAQ DTAQ(QGPL/DTAQLLL) TYPE(*DDM) RMTDTAQ(QGPL/DTAQTTT) RMTLOCNAME(*RDB) RDB(TTT) call qsnddtaq (DTAQLLL QGPL x'00010F' 'aaaaaaaaaaaaaaaaaaa')
If this stage fails, the following message will appear (and may also be found in the sent JOBLOG): CPF9155 Cannot communicate with DDM target system. CPF9510 Operation on DDM data queue DTAQAAA in QGPL failed.
4. When this step succeeds, the contents of DTAQ can be read on the Target computer: QSH CMD('dataq -r /QSYS.LIB/QGPL.LIB/DTAQTTT.DTAQ')
User/Password Replication duplicates user profiles and their parameters in their latest and most updated version. Replication does not copy the actual password but an encrypted version of the password.
Replication Rules Before you can replicate anything, you must define the rules of what to replicate.
1. Select 69 < 26 < 51. Work with Replication Rules in the Replication menu. The Work with Replication Rules screen appears.

Audit 13.21 User Manual 174 Chapter 9: Replication
Figure 130: Work with Replication Rules
2. Press F6 to add a new rule or type 1 to modify an existing rule. The Modify Replication Rules 1/2 screen appears.
Figure 131: Modify Replication Rules

Audit 13.21 User Manual 175 Chapter 9: Replication
Parameters Description
User Enter the name of the User Profile to replicate. Name = Enter the name of a specific profile to replicate Generic* = Use a generic name to copy a group of profiles *ALL = Replicate all profiles
System combination From system = Type the source system name or select *ALL systems Replicate to system= Type the target system name, a group of systems or select *ALL systems
Operations to Replicate Define how to replicate common operations. Set to blanks for no replication. Create user: · Y = Yes – On the target computer, create all users that
meet the rule definition and exist on the source computer, and do not exist on the target computer.
· A= Yes / Change if the User profile already exists On the target computer, create all users that meet the rule definition and exist on the source computer, and do not exist on the target computer. Users that meet the rule definition on the source computer and already exist on the target computer are changed on the target computer to be identical to the user on the source computer.
Change user: · Y = Yes – All users that meet the rule definition on the
source computer and also exist on the target computer are changed on the target computer to be identical to the user on the source computer.
· A= Yes / Create if the User profile does not exist All users that meet the rule definition and also exist on the target computer are changed to be identical to the user on the source computer. Users that only exist on the source computer are created on the target computer.
Delete user: Y = Yes – All users that meet the rule definition are deleted from the source computer. If they also exist on the target computer, they are deleted also from the target computer.
Common attributes to replicate Select what common attributes to replicate. Set to blanks for no replication. User disabled: Y = Yes User enabled: Y = Yes Password changes: Y = Yes
3. Type the appropriate parameters and press Enter. The Modify Replication Rules 2/2 screen appears.
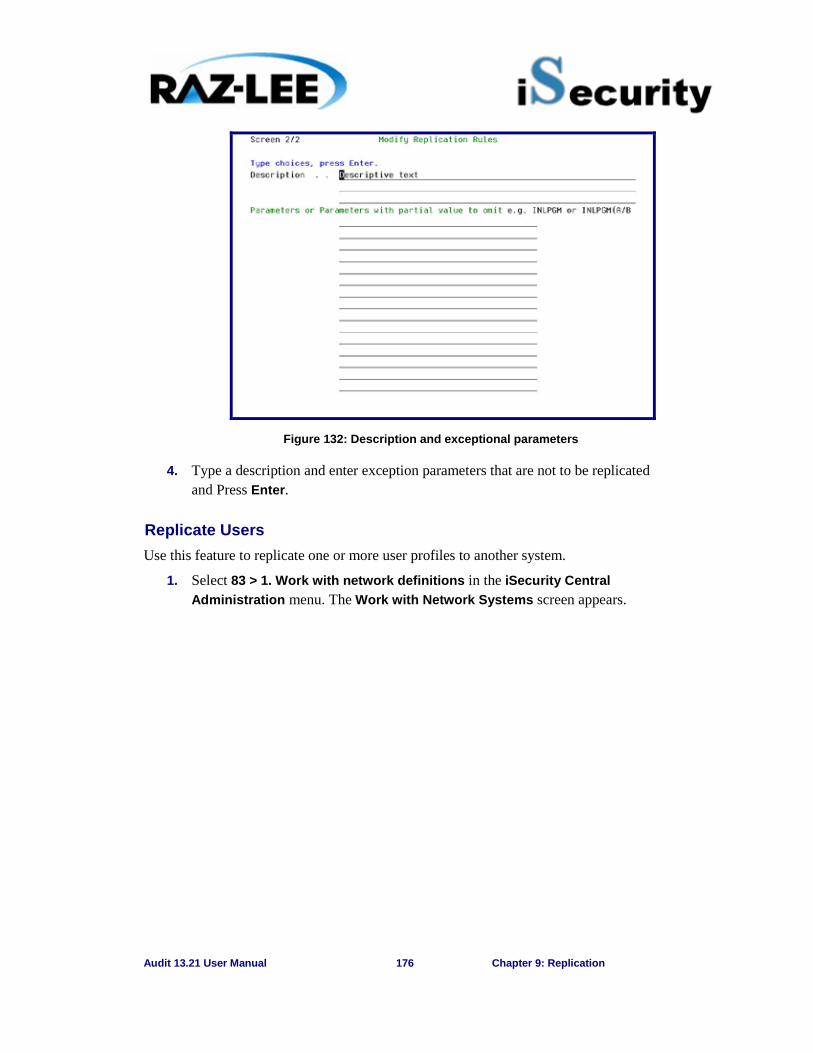
Audit 13.21 User Manual 176 Chapter 9: Replication
Figure 132: Description and exceptional parameters
4. Type a description and enter exception parameters that are not to be replicated and Press Enter.
Replicate Users Use this feature to replicate one or more user profiles to another system.
1. Select 83 > 1. Work with network definitions in the iSecurity Central Administration menu. The Work with Network Systems screen appears.
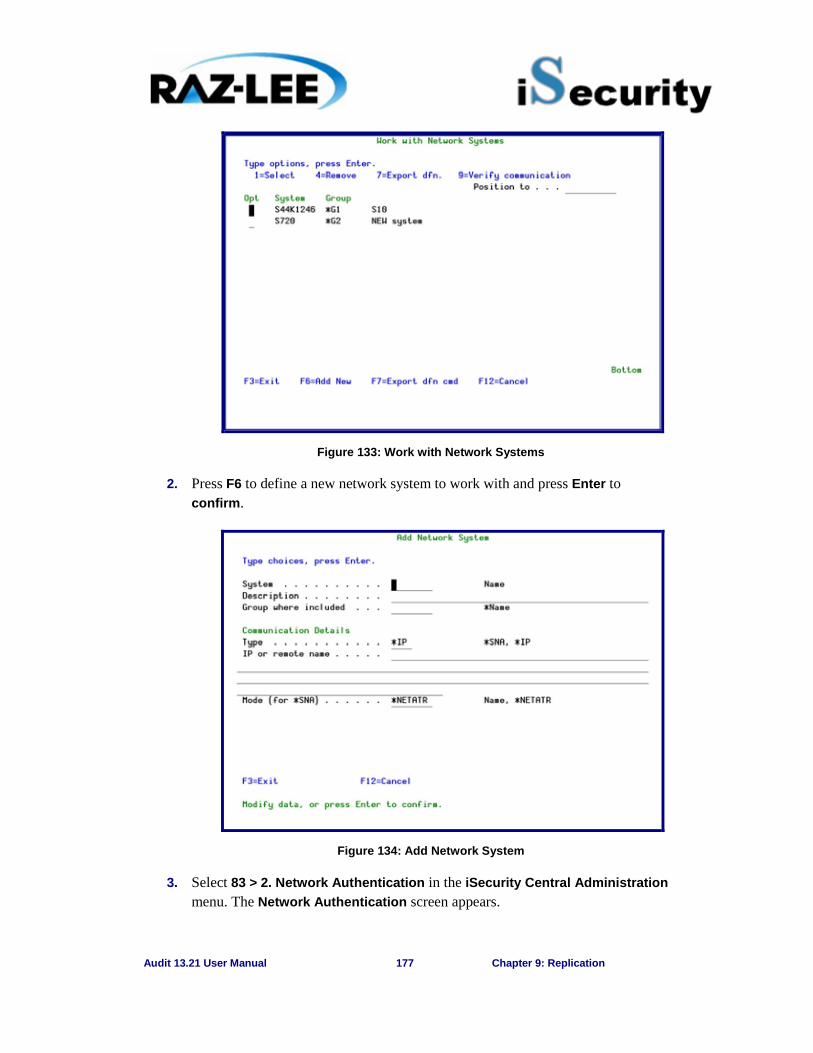
Audit 13.21 User Manual 177 Chapter 9: Replication
Figure 133: Work with Network Systems
2. Press F6 to define a new network system to work with and press Enter to confirm.
Figure 134: Add Network System
3. Select 83 > 2. Network Authentication in the iSecurity Central Administration menu. The Network Authentication screen appears.
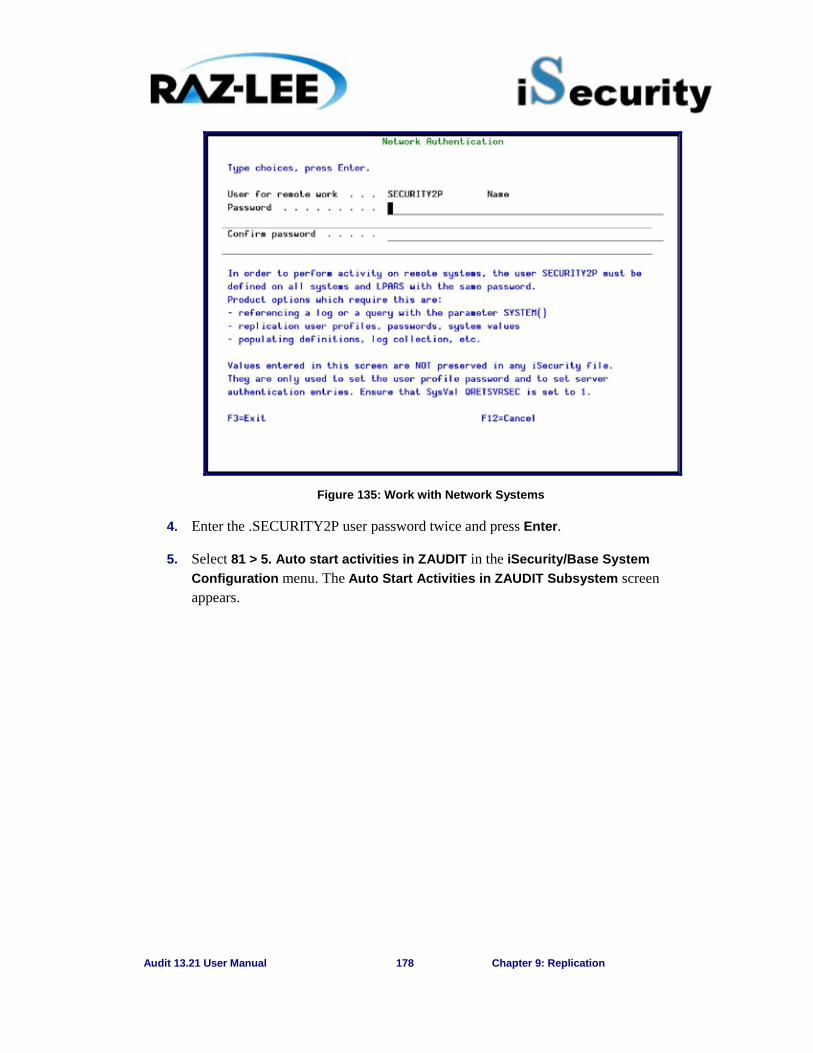
Audit 13.21 User Manual 178 Chapter 9: Replication
Figure 135: Work with Network Systems
4. Enter the .SECURITY2P user password twice and press Enter.
5. Select 81 > 5. Auto start activities in ZAUDIT in the iSecurity/Base System Configuration menu. The Auto Start Activities in ZAUDIT Subsystem screen appears.
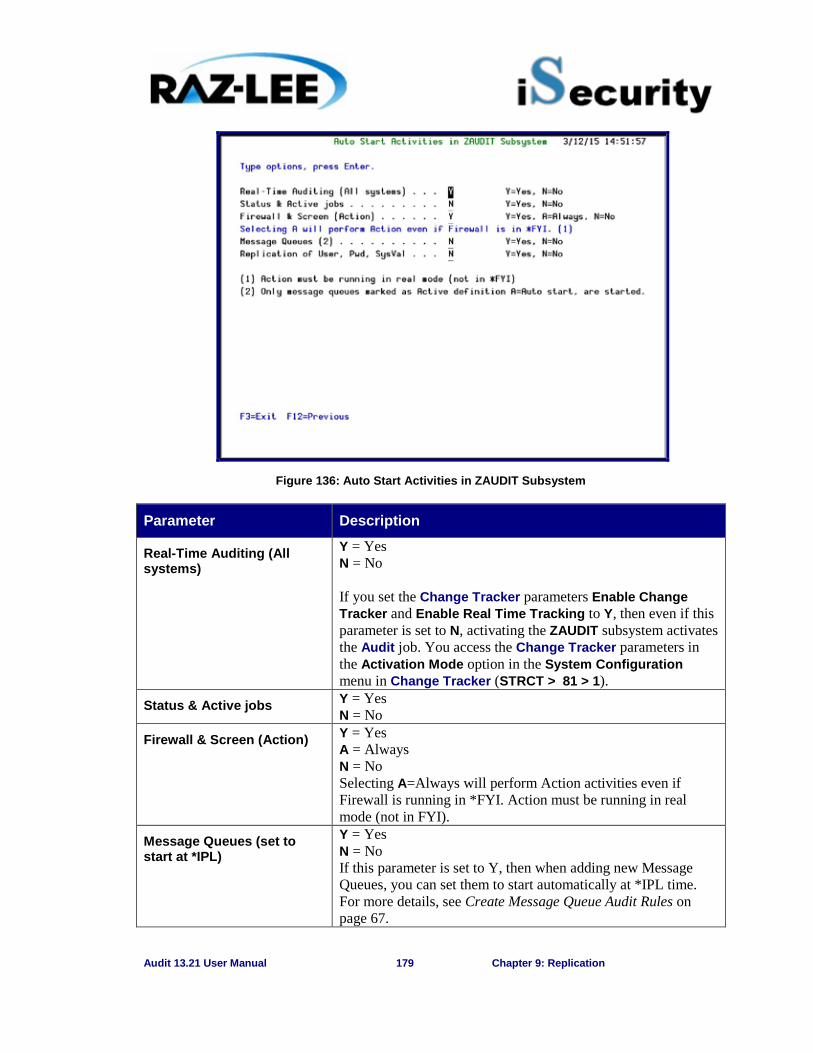
Audit 13.21 User Manual 179 Chapter 9: Replication
Figure 136: Auto Start Activities in ZAUDIT Subsystem
Parameter Description
Real-Time Auditing (All systems)
Y = Yes N = No If you set the Change Tracker parameters Enable Change Tracker and Enable Real Time Tracking to Y, then even if this parameter is set to N, activating the ZAUDIT subsystem activates the Audit job. You access the Change Tracker parameters in the Activation Mode option in the System Configuration menu in Change Tracker (STRCT > 81 > 1).
Status & Active jobs Y = Yes N = No
Firewall & Screen (Action) Y = Yes A = Always N = No Selecting A=Always will perform Action activities even if Firewall is running in *FYI. Action must be running in real mode (not in FYI).
Message Queues (set to start at *IPL)
Y = Yes N = No If this parameter is set to Y, then when adding new Message Queues, you can set them to start automatically at *IPL time. For more details, see Create Message Queue Audit Rules on page 67.

Audit 13.21 User Manual 180 Chapter 9: Replication
Parameter Description
Replication of User, Pwd, SysVal
Y = Yes N = No
6. Enter the required parameters and press Enter.
7. In the Source system only, run 71. Enable User/Password Replication. The Call Program (CALL) screen appears.
Figure 137: Call Program (CALL)
8. Display active jobs in the Target Machine.
9. Select 51. Work with Replication Rules.
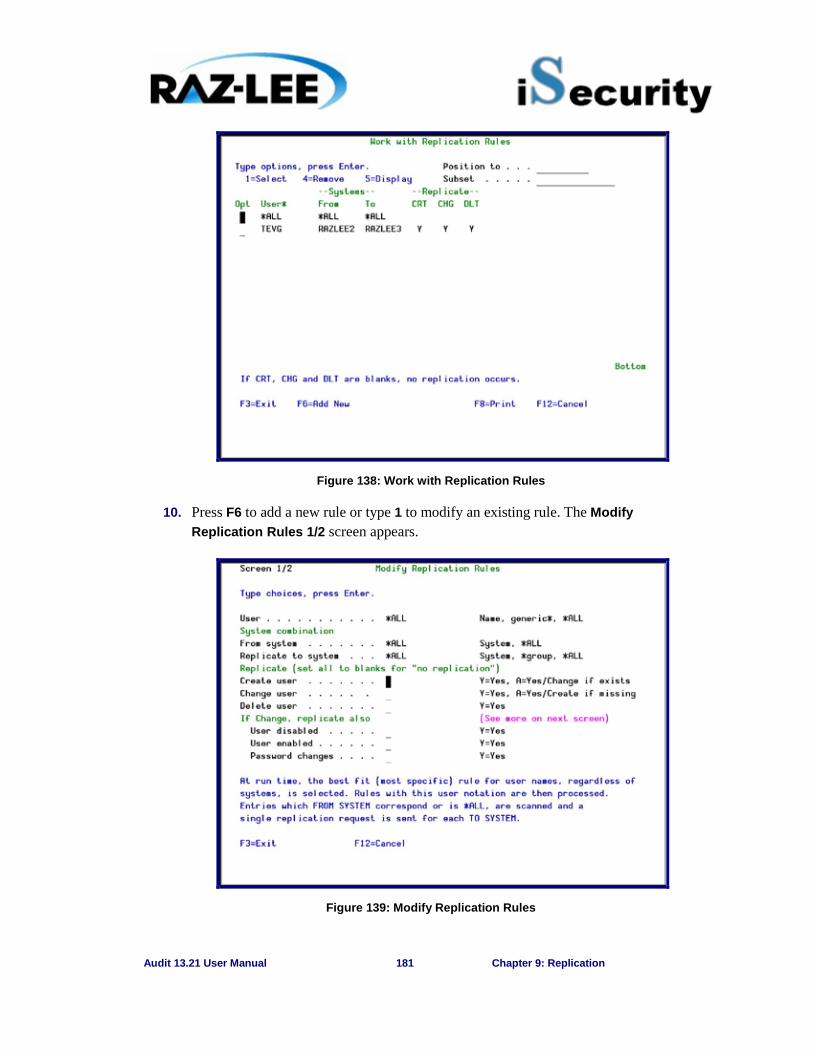
Audit 13.21 User Manual 181 Chapter 9: Replication
Figure 138: Work with Replication Rules
10. Press F6 to add a new rule or type 1 to modify an existing rule. The Modify Replication Rules 1/2 screen appears.
Figure 139: Modify Replication Rules
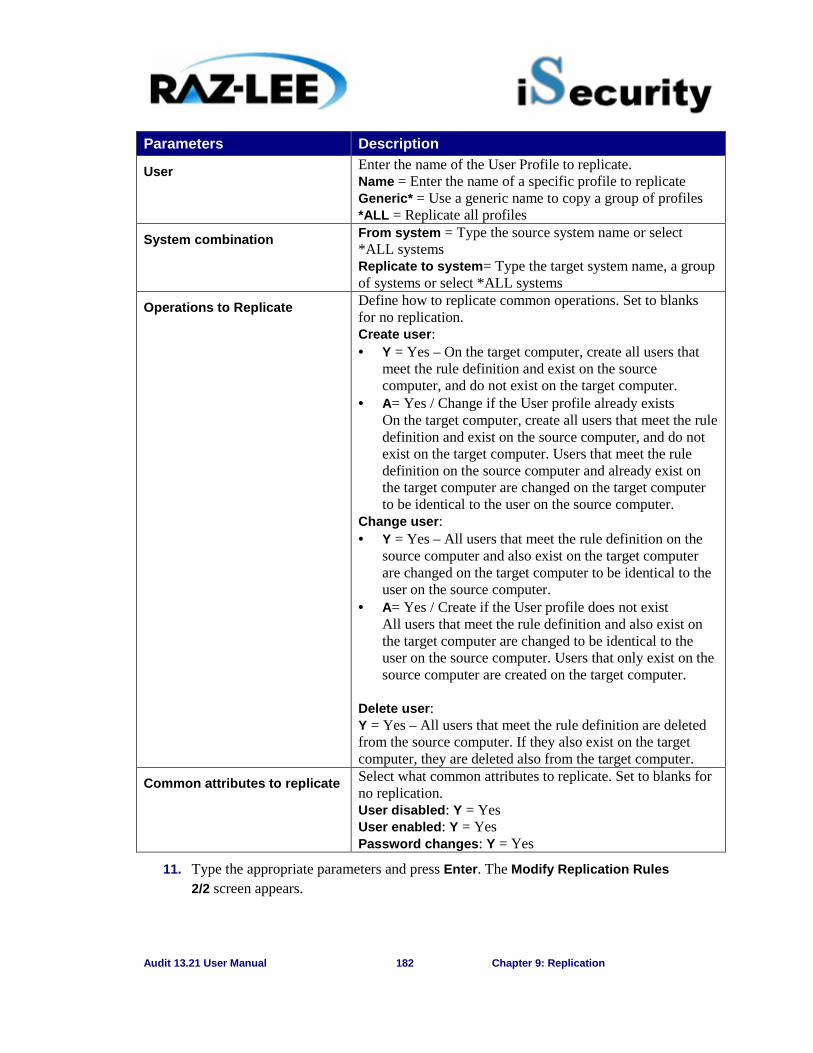
Audit 13.21 User Manual 182 Chapter 9: Replication
Parameters Description
User Enter the name of the User Profile to replicate. Name = Enter the name of a specific profile to replicate Generic* = Use a generic name to copy a group of profiles *ALL = Replicate all profiles
System combination From system = Type the source system name or select *ALL systems Replicate to system= Type the target system name, a group of systems or select *ALL systems
Operations to Replicate Define how to replicate common operations. Set to blanks for no replication. Create user: · Y = Yes – On the target computer, create all users that
meet the rule definition and exist on the source computer, and do not exist on the target computer.
· A= Yes / Change if the User profile already exists On the target computer, create all users that meet the rule definition and exist on the source computer, and do not exist on the target computer. Users that meet the rule definition on the source computer and already exist on the target computer are changed on the target computer to be identical to the user on the source computer.
Change user: · Y = Yes – All users that meet the rule definition on the
source computer and also exist on the target computer are changed on the target computer to be identical to the user on the source computer.
· A= Yes / Create if the User profile does not exist All users that meet the rule definition and also exist on the target computer are changed to be identical to the user on the source computer. Users that only exist on the source computer are created on the target computer.
Delete user: Y = Yes – All users that meet the rule definition are deleted from the source computer. If they also exist on the target computer, they are deleted also from the target computer.
Common attributes to replicate Select what common attributes to replicate. Set to blanks for no replication. User disabled: Y = Yes User enabled: Y = Yes Password changes: Y = Yes
11. Type the appropriate parameters and press Enter. The Modify Replication Rules 2/2 screen appears.
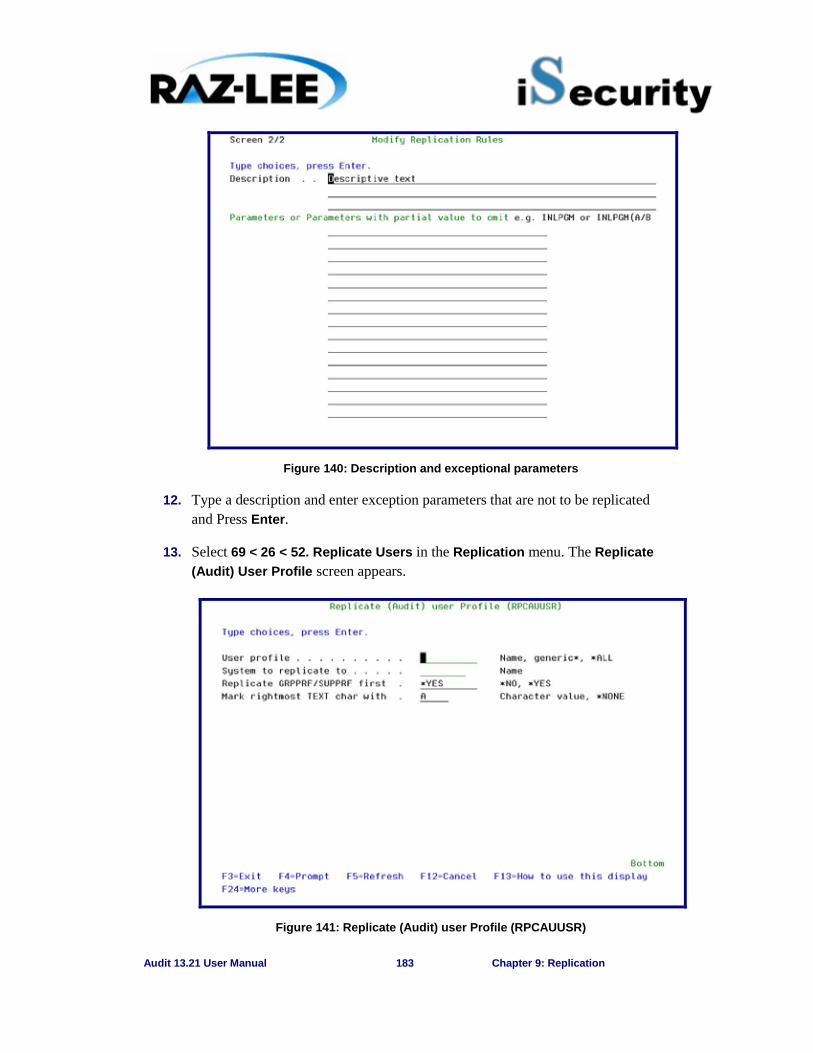
Audit 13.21 User Manual 183 Chapter 9: Replication
Figure 140: Description and exceptional parameters
12. Type a description and enter exception parameters that are not to be replicated and Press Enter.
13. Select 69 < 26 < 52. Replicate Users in the Replication menu. The Replicate (Audit) User Profile screen appears.
Figure 141: Replicate (Audit) user Profile (RPCAUUSR)
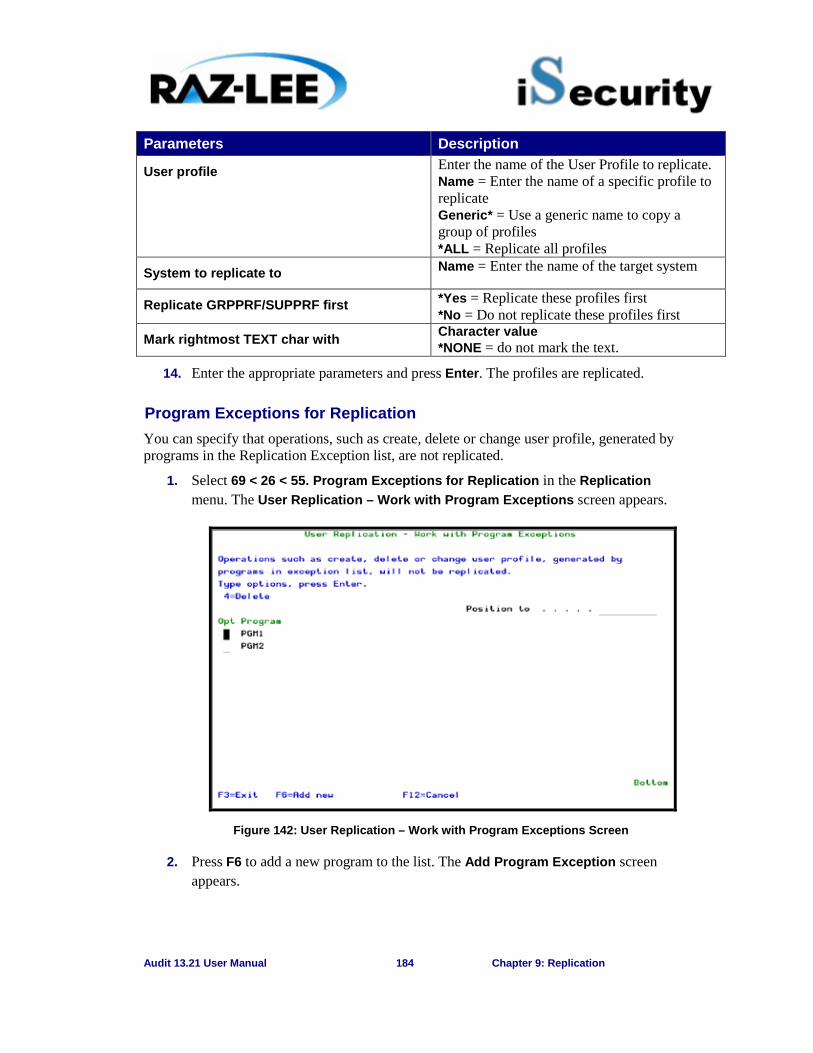
Audit 13.21 User Manual 184 Chapter 9: Replication
Parameters Description
User profile Enter the name of the User Profile to replicate. Name = Enter the name of a specific profile to replicate Generic* = Use a generic name to copy a group of profiles *ALL = Replicate all profiles
System to replicate to Name = Enter the name of the target system
Replicate GRPPRF/SUPPRF first *Yes = Replicate these profiles first *No = Do not replicate these profiles first
Mark rightmost TEXT char with Character value *NONE = do not mark the text.
14. Enter the appropriate parameters and press Enter. The profiles are replicated.
Program Exceptions for Replication You can specify that operations, such as create, delete or change user profile, generated by programs in the Replication Exception list, are not replicated.
1. Select 69 < 26 < 55. Program Exceptions for Replication in the Replication menu. The User Replication – Work with Program Exceptions screen appears.
Figure 142: User Replication – Work with Program Exceptions Screen
2. Press F6 to add a new program to the list. The Add Program Exception screen appears.
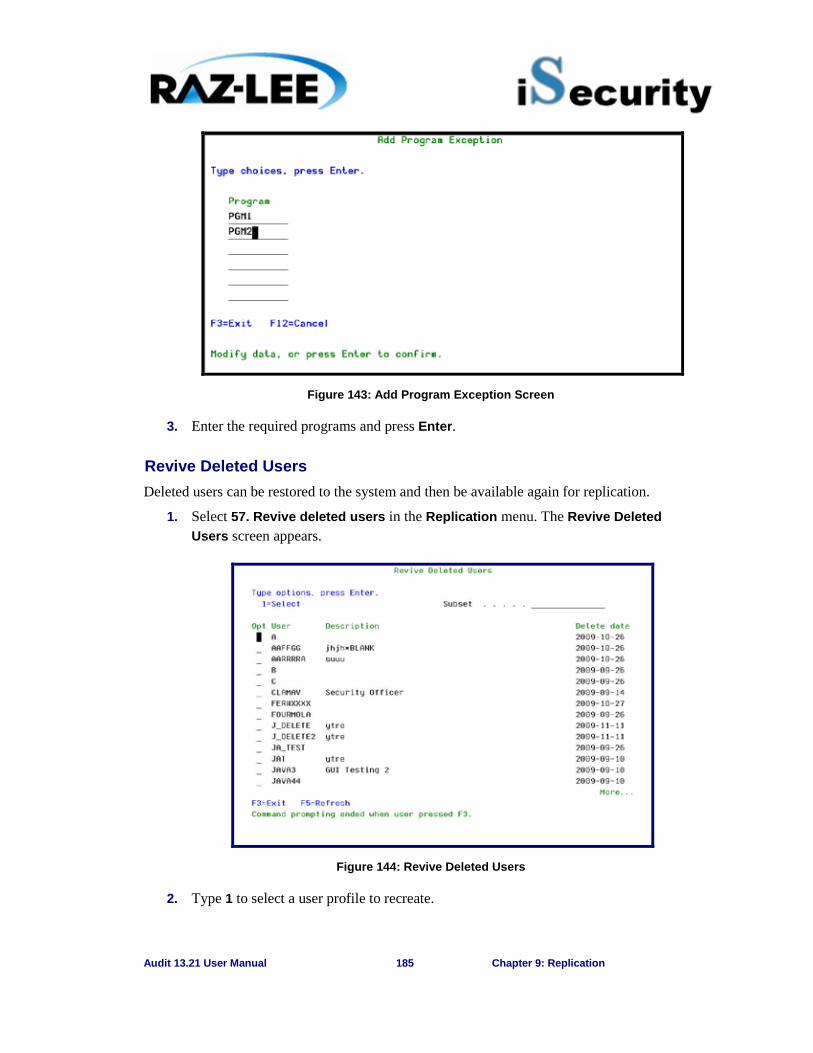
Audit 13.21 User Manual 185 Chapter 9: Replication
Figure 143: Add Program Exception Screen
3. Enter the required programs and press Enter.
Revive Deleted Users Deleted users can be restored to the system and then be available again for replication.
1. Select 57. Revive deleted users in the Replication menu. The Revive Deleted Users screen appears.
Figure 144: Revive Deleted Users
2. Type 1 to select a user profile to recreate.
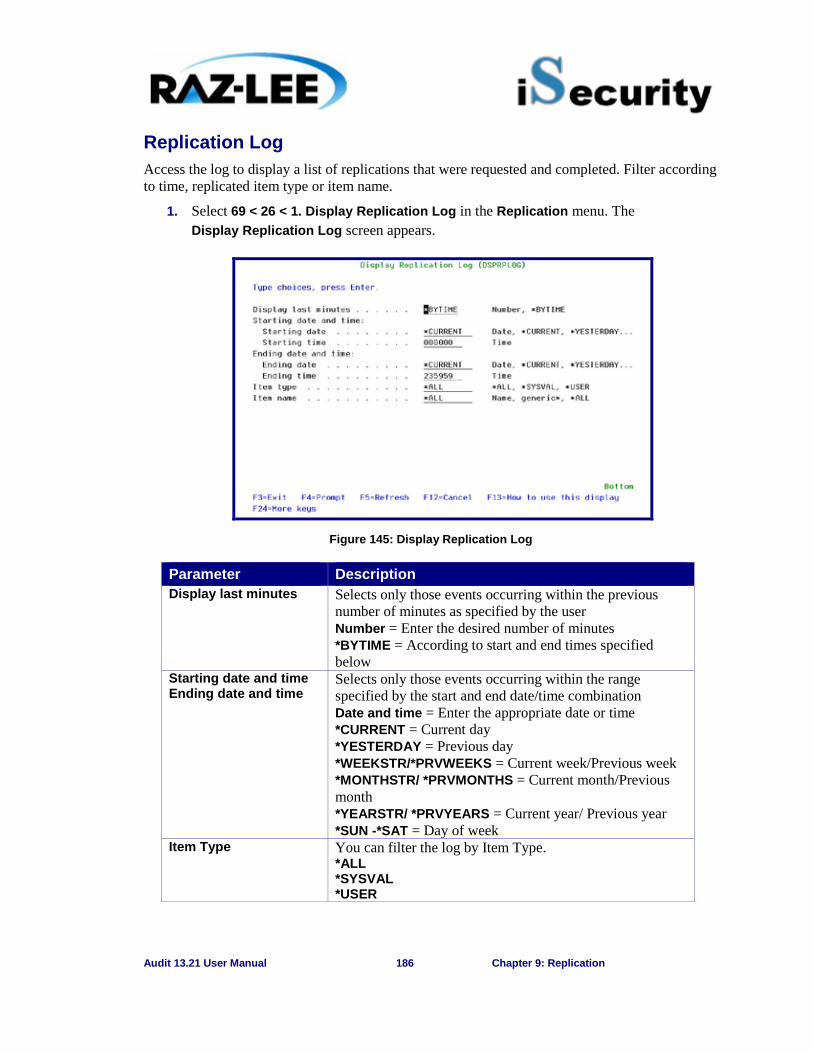
Audit 13.21 User Manual 186 Chapter 9: Replication
Replication Log Access the log to display a list of replications that were requested and completed. Filter according to time, replicated item type or item name.
1. Select 69 < 26 < 1. Display Replication Log in the Replication menu. The Display Replication Log screen appears.
Figure 145: Display Replication Log
Parameter Description Display last minutes Selects only those events occurring within the previous
number of minutes as specified by the user Number = Enter the desired number of minutes *BYTIME = According to start and end times specified below
Starting date and time Ending date and time
Selects only those events occurring within the range specified by the start and end date/time combination Date and time = Enter the appropriate date or time *CURRENT = Current day *YESTERDAY = Previous day *WEEKSTR/*PRVWEEKS = Current week/Previous week *MONTHSTR/ *PRVMONTHS = Current month/Previous month *YEARSTR/ *PRVYEARS = Current year/ Previous year *SUN -*SAT = Day of week
Item Type You can filter the log by Item Type. *ALL *SYSVAL *USER
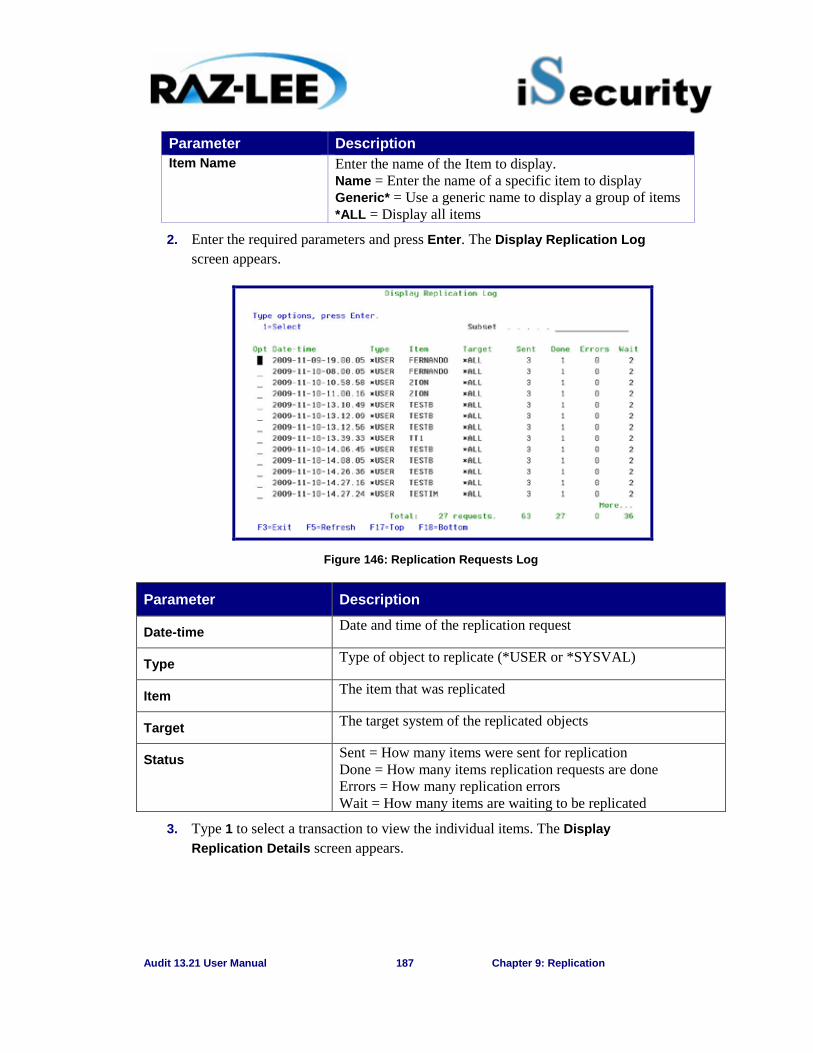
Audit 13.21 User Manual 187 Chapter 9: Replication
Parameter Description Item Name Enter the name of the Item to display.
Name = Enter the name of a specific item to display Generic* = Use a generic name to display a group of items *ALL = Display all items
2. Enter the required parameters and press Enter. The Display Replication Log screen appears.
Figure 146: Replication Requests Log
Parameter Description
Date-time Date and time of the replication request
Type Type of object to replicate (*USER or *SYSVAL)
Item The item that was replicated
Target The target system of the replicated objects
Status Sent = How many items were sent for replication Done = How many items replication requests are done Errors = How many replication errors Wait = How many items are waiting to be replicated
3. Type 1 to select a transaction to view the individual items. The Display Replication Details screen appears.
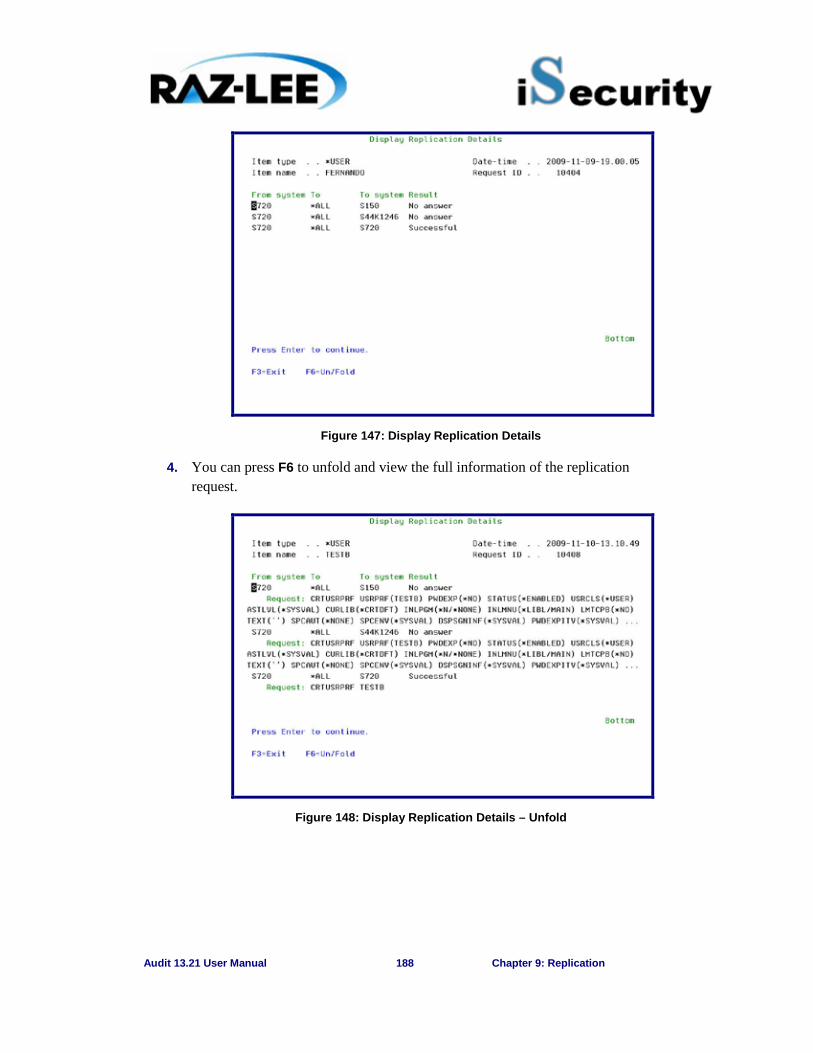
Audit 13.21 User Manual 188 Chapter 9: Replication
Figure 147: Display Replication Details
4. You can press F6 to unfold and view the full information of the replication request.
Figure 148: Display Replication Details – Unfold
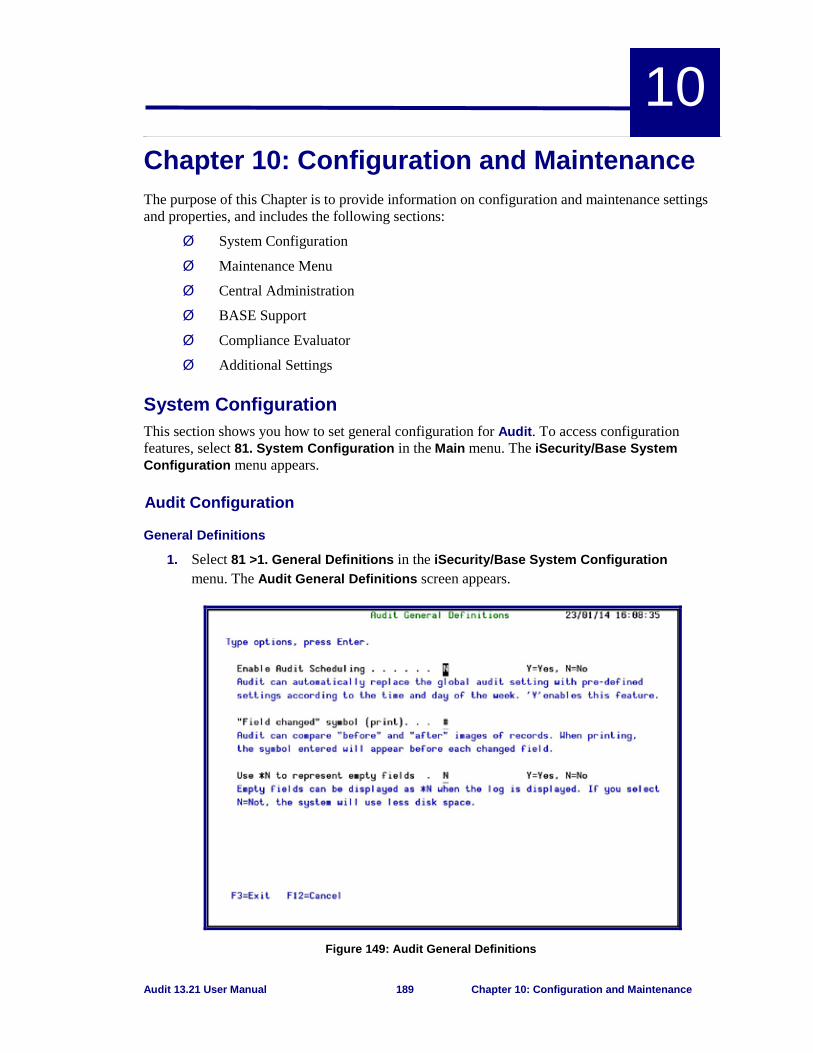
Audit 13.21 User Manual 189 Chapter 10: Configuration and Maintenance
10
Chapter 10: Configuration and Maintenance The purpose of this Chapter is to provide information on configuration and maintenance settings and properties, and includes the following sections:
Ø System Configuration
Ø Maintenance Menu
Ø Central Administration
Ø BASE Support
Ø Compliance Evaluator
Ø Additional Settings
System Configuration This section shows you how to set general configuration for Audit. To access configuration features, select 81. System Configuration in the Main menu. The iSecurity/Base System Configuration menu appears.
Audit Configuration
General Definitions
1. Select 81 >1. General Definitions in the iSecurity/Base System Configuration menu. The Audit General Definitions screen appears.
Figure 149: Audit General Definitions
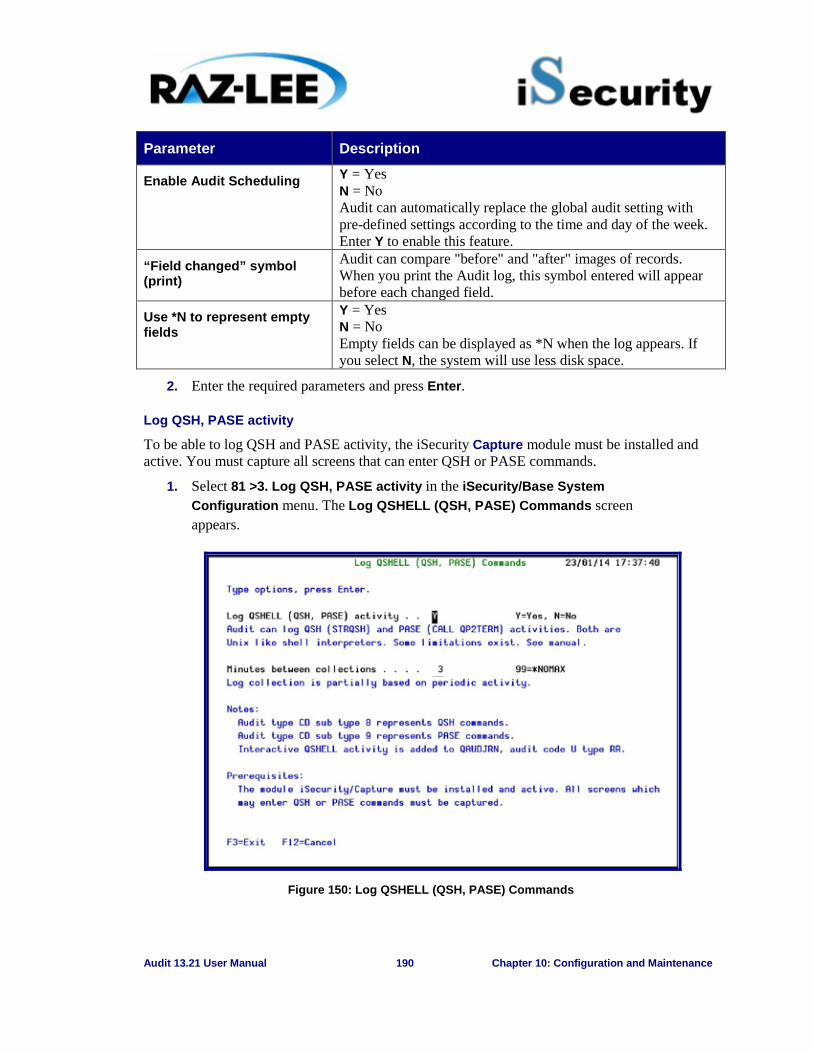
Audit 13.21 User Manual 190 Chapter 10: Configuration and Maintenance
Parameter Description
Enable Audit Scheduling Y = Yes N = No Audit can automatically replace the global audit setting with pre-defined settings according to the time and day of the week. Enter Y to enable this feature.
“Field changed” symbol (print)
Audit can compare "before" and "after" images of records. When you print the Audit log, this symbol entered will appear before each changed field.
Use *N to represent empty fields
Y = Yes N = No Empty fields can be displayed as *N when the log appears. If you select N, the system will use less disk space.
2. Enter the required parameters and press Enter.
Log QSH, PASE activity
To be able to log QSH and PASE activity, the iSecurity Capture module must be installed and active. You must capture all screens that can enter QSH or PASE commands.
1. Select 81 >3. Log QSH, PASE activity in the iSecurity/Base System Configuration menu. The Log QSHELL (QSH, PASE) Commands screen appears.
Figure 150: Log QSHELL (QSH, PASE) Commands
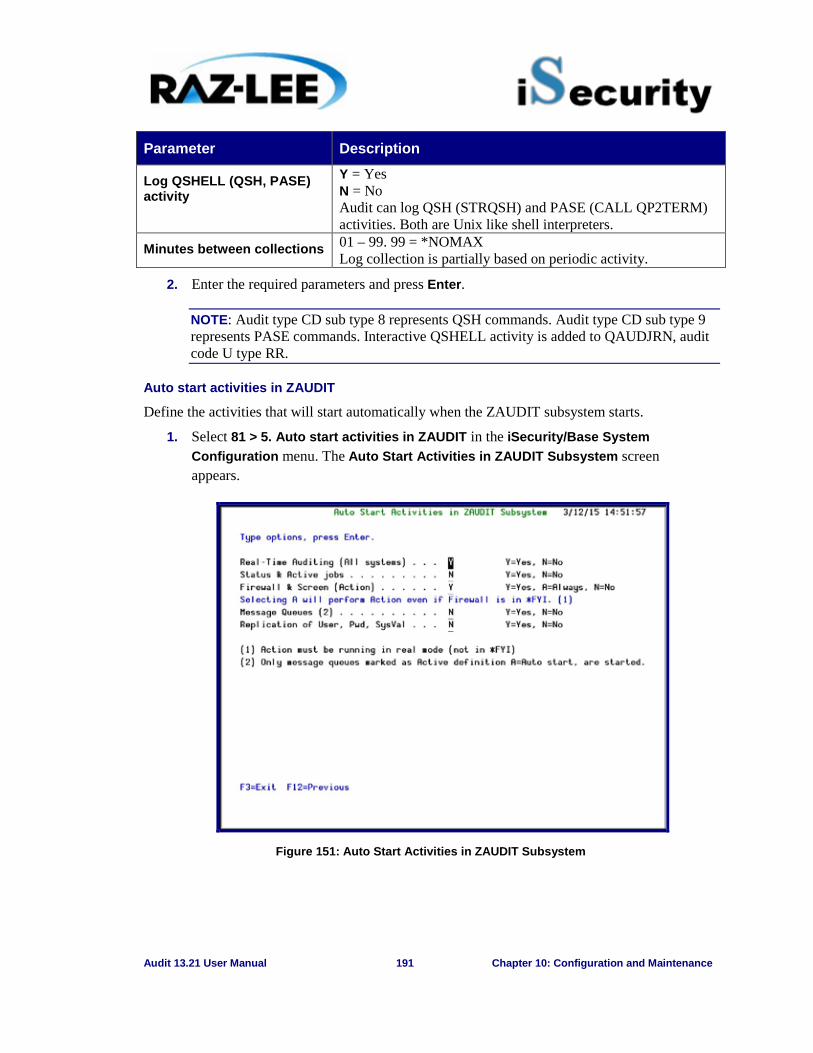
Audit 13.21 User Manual 191 Chapter 10: Configuration and Maintenance
Parameter Description
Log QSHELL (QSH, PASE) activity
Y = Yes N = No Audit can log QSH (STRQSH) and PASE (CALL QP2TERM) activities. Both are Unix like shell interpreters.
Minutes between collections 01 – 99. 99 = *NOMAX Log collection is partially based on periodic activity.
2. Enter the required parameters and press Enter.
NOTE: Audit type CD sub type 8 represents QSH commands. Audit type CD sub type 9 represents PASE commands. Interactive QSHELL activity is added to QAUDJRN, audit code U type RR.
Auto start activities in ZAUDIT
Define the activities that will start automatically when the ZAUDIT subsystem starts.
1. Select 81 > 5. Auto start activities in ZAUDIT in the iSecurity/Base System Configuration menu. The Auto Start Activities in ZAUDIT Subsystem screen appears.
Figure 151: Auto Start Activities in ZAUDIT Subsystem
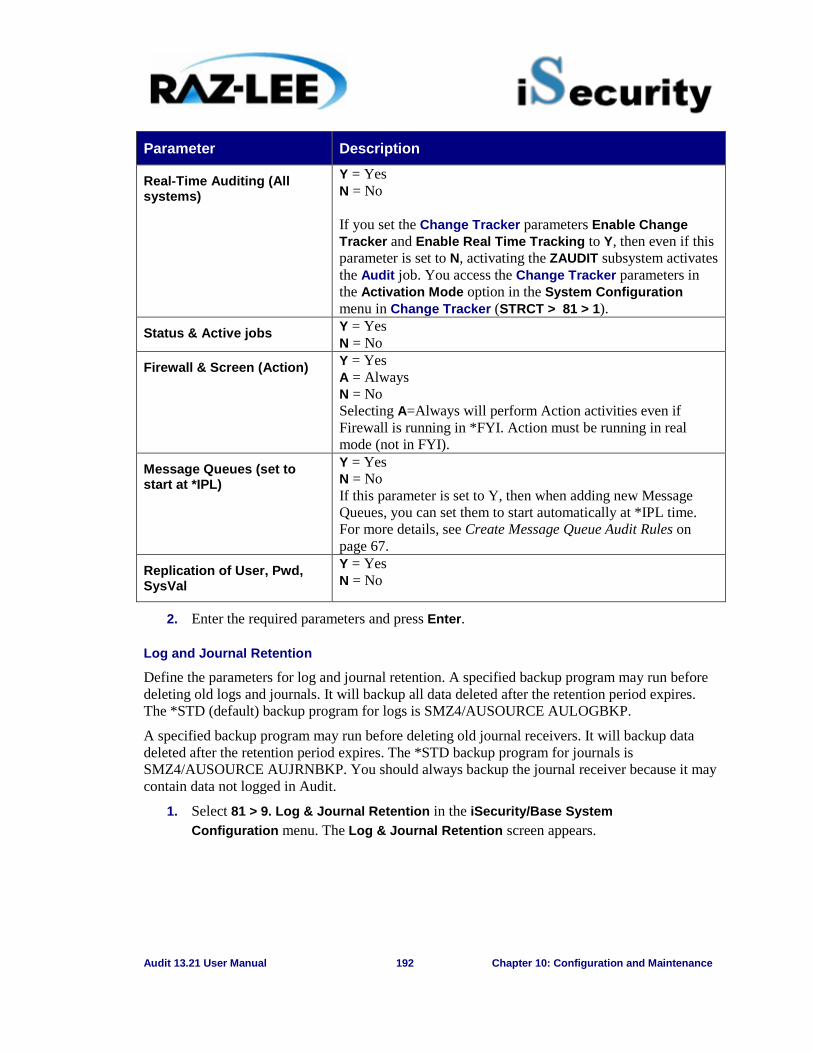
Audit 13.21 User Manual 192 Chapter 10: Configuration and Maintenance
Parameter Description
Real-Time Auditing (All systems)
Y = Yes N = No If you set the Change Tracker parameters Enable Change Tracker and Enable Real Time Tracking to Y, then even if this parameter is set to N, activating the ZAUDIT subsystem activates the Audit job. You access the Change Tracker parameters in the Activation Mode option in the System Configuration menu in Change Tracker (STRCT > 81 > 1).
Status & Active jobs Y = Yes N = No
Firewall & Screen (Action) Y = Yes A = Always N = No Selecting A=Always will perform Action activities even if Firewall is running in *FYI. Action must be running in real mode (not in FYI).
Message Queues (set to start at *IPL)
Y = Yes N = No If this parameter is set to Y, then when adding new Message Queues, you can set them to start automatically at *IPL time. For more details, see Create Message Queue Audit Rules on page 67.
Replication of User, Pwd, SysVal
Y = Yes N = No
2. Enter the required parameters and press Enter.
Log and Journal Retention
Define the parameters for log and journal retention. A specified backup program may run before deleting old logs and journals. It will backup all data deleted after the retention period expires. The *STD (default) backup program for logs is SMZ4/AUSOURCE AULOGBKP.
A specified backup program may run before deleting old journal receivers. It will backup data deleted after the retention period expires. The *STD backup program for journals is SMZ4/AUSOURCE AUJRNBKP. You should always backup the journal receiver because it may contain data not logged in Audit.
1. Select 81 > 9. Log & Journal Retention in the iSecurity/Base System Configuration menu. The Log & Journal Retention screen appears.
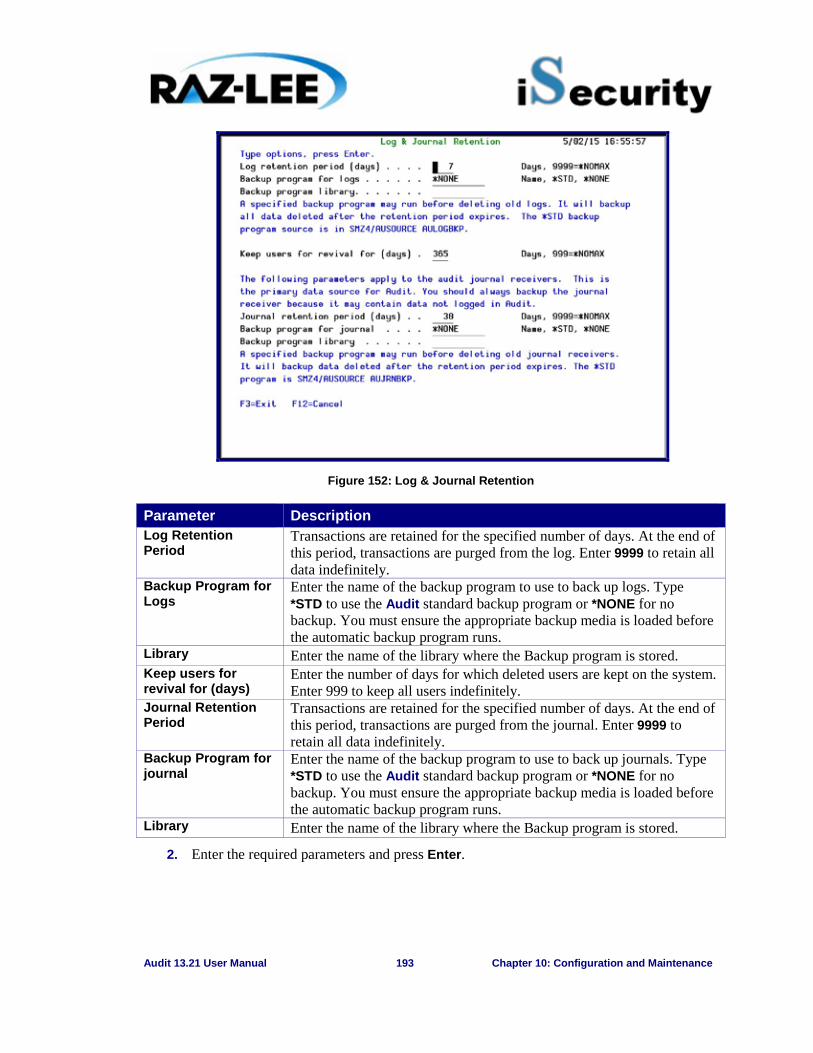
Audit 13.21 User Manual 193 Chapter 10: Configuration and Maintenance
Figure 152: Log & Journal Retention
Parameter Description Log Retention Period
Transactions are retained for the specified number of days. At the end of this period, transactions are purged from the log. Enter 9999 to retain all data indefinitely.
Backup Program for Logs
Enter the name of the backup program to use to back up logs. Type *STD to use the Audit standard backup program or *NONE for no backup. You must ensure the appropriate backup media is loaded before the automatic backup program runs.
Library Enter the name of the library where the Backup program is stored. Keep users for revival for (days)
Enter the number of days for which deleted users are kept on the system. Enter 999 to keep all users indefinitely.
Journal Retention Period
Transactions are retained for the specified number of days. At the end of this period, transactions are purged from the journal. Enter 9999 to retain all data indefinitely.
Backup Program for journal
Enter the name of the backup program to use to back up journals. Type *STD to use the Audit standard backup program or *NONE for no backup. You must ensure the appropriate backup media is loaded before the automatic backup program runs.
Library Enter the name of the library where the Backup program is stored.
2. Enter the required parameters and press Enter.
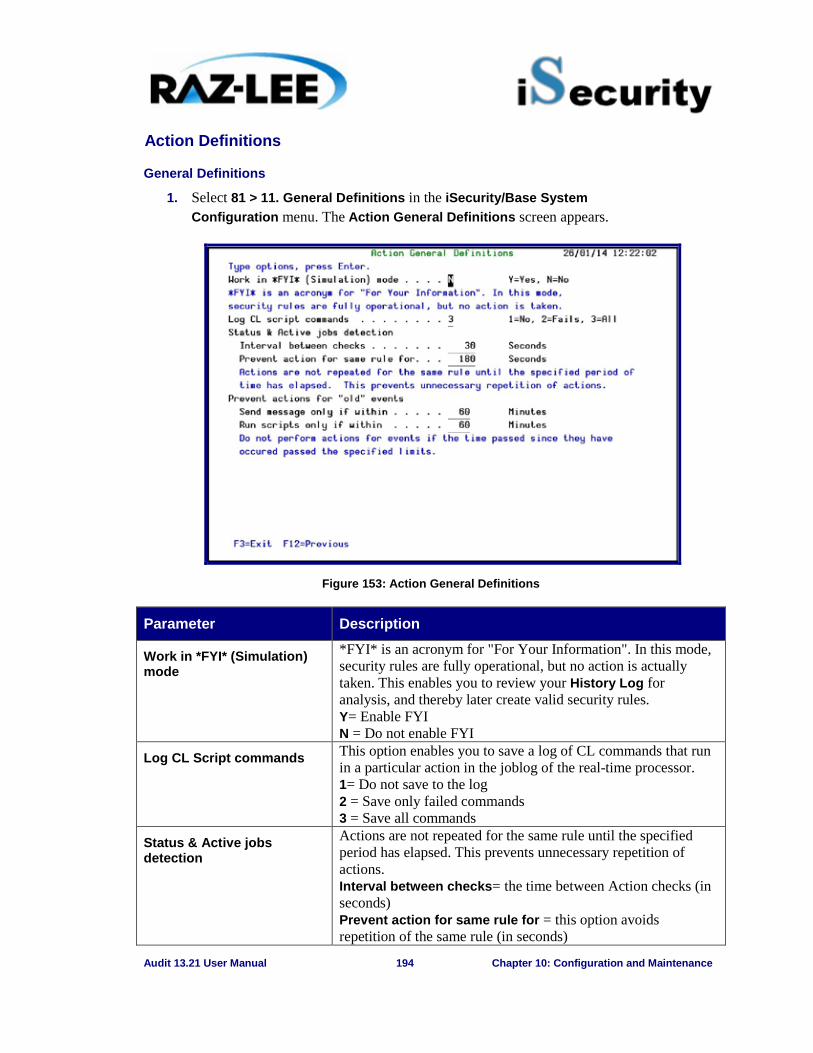
Audit 13.21 User Manual 194 Chapter 10: Configuration and Maintenance
Action Definitions
General Definitions
1. Select 81 > 11. General Definitions in the iSecurity/Base System Configuration menu. The Action General Definitions screen appears.
Figure 153: Action General Definitions
Parameter Description
Work in *FYI* (Simulation) mode
*FYI* is an acronym for "For Your Information". In this mode, security rules are fully operational, but no action is actually taken. This enables you to review your History Log for analysis, and thereby later create valid security rules. Y= Enable FYI N = Do not enable FYI
Log CL Script commands This option enables you to save a log of CL commands that run in a particular action in the joblog of the real-time processor. 1= Do not save to the log 2 = Save only failed commands 3 = Save all commands
Status & Active jobs detection
Actions are not repeated for the same rule until the specified period has elapsed. This prevents unnecessary repetition of actions. Interval between checks= the time between Action checks (in seconds) Prevent action for same rule for = this option avoids repetition of the same rule (in seconds)
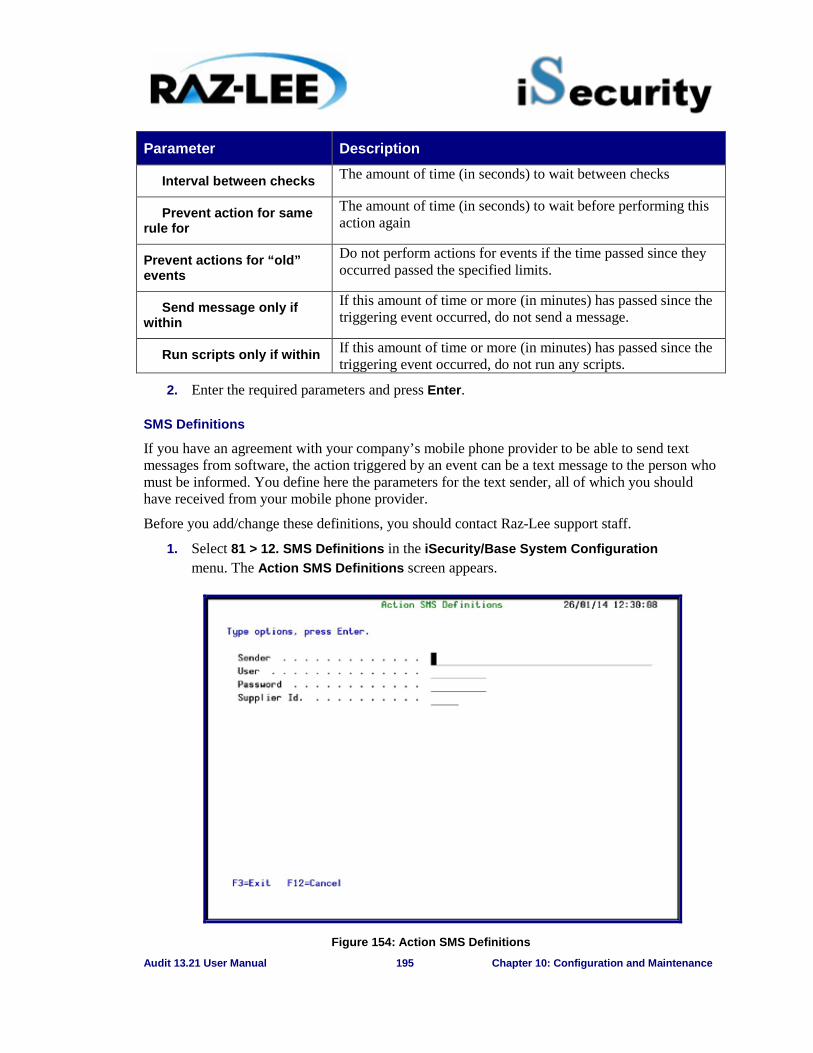
Audit 13.21 User Manual 195 Chapter 10: Configuration and Maintenance
Parameter Description
Interval between checks The amount of time (in seconds) to wait between checks
Prevent action for same rule for
The amount of time (in seconds) to wait before performing this action again
Prevent actions for “old” events
Do not perform actions for events if the time passed since they occurred passed the specified limits.
Send message only if within
If this amount of time or more (in minutes) has passed since the triggering event occurred, do not send a message.
Run scripts only if within If this amount of time or more (in minutes) has passed since the triggering event occurred, do not run any scripts.
2. Enter the required parameters and press Enter.
SMS Definitions
If you have an agreement with your company’s mobile phone provider to be able to send text messages from software, the action triggered by an event can be a text message to the person who must be informed. You define here the parameters for the text sender, all of which you should have received from your mobile phone provider.
Before you add/change these definitions, you should contact Raz-Lee support staff.
1. Select 81 > 12. SMS Definitions in the iSecurity/Base System Configuration menu. The Action SMS Definitions screen appears.
Figure 154: Action SMS Definitions
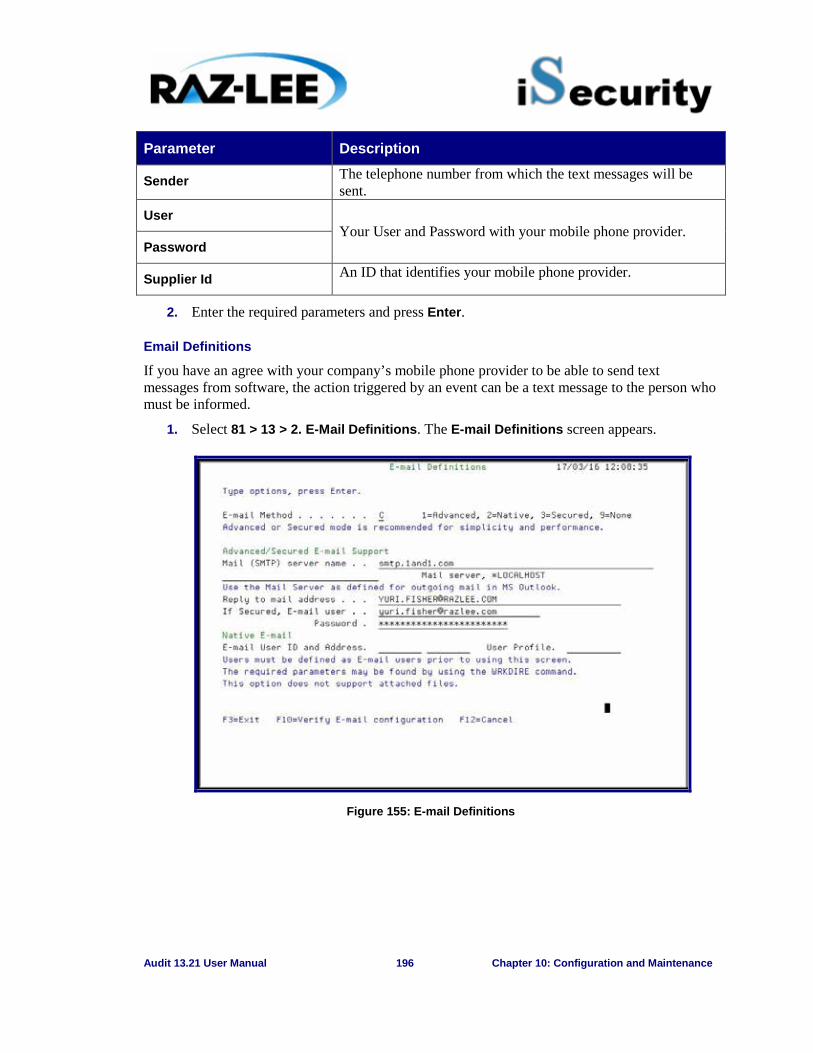
Audit 13.21 User Manual 196 Chapter 10: Configuration and Maintenance
Parameter Description
Sender The telephone number from which the text messages will be sent.
User Your User and Password with your mobile phone provider.
Password
Supplier Id An ID that identifies your mobile phone provider.
2. Enter the required parameters and press Enter.
Email Definitions
If you have an agree with your company’s mobile phone provider to be able to send text messages from software, the action triggered by an event can be a text message to the person who must be informed.
1. Select 81 > 13 > 2. E-Mail Definitions. The E-mail Definitions screen appears.
Figure 155: E-mail Definitions

Audit 13.21 User Manual 197 Chapter 10: Configuration and Maintenance
Parameter Description E-mail Method 1=Advanced
2=Native 3=Secured 9=None Advanced or Secured mode is recommended for simplicity and performance.
Note: If using 2=native, Users must be defined as E-mail users prior to using this screen. The required parameters may be found by using the WRKDIRE command. This option does not support attached files.
Advanced/Secured E-mail Support:
Mail (SMTP) server name
The name of the STMP server or *LOCALHOST
Reply to mail address
The e-mail address to receive tests.
If secured, E-mail user and Password
If you chose 1 = Advanced or 3=Secured for the E-mail method, enter the email user that will be used to send the emails and the password of that user
Native E-mail: E-mail User ID and Address
If you chose 2=Native for the E-mail method, enter the user ID and address that will be used to send the emails.
User Profile If you chose 2=Native for the E-mail method, enter the user profile that will be used to send the emails.
2. Enter the required parameters and press Enter.
Security Event Manager
QSYSOPR and other message queues
You can monitor QSYSOPR and other message queues:
1. Select the Message Queue (SysCtl).
2. Select the Message Queues to control.
3. Add all the Message Queues, joining each of them to group @1, with input every 10 seconds.
4. Select Message Queue rules.
5. Add a rule for group @1 specifying the preferred method of sending the information. You might wish to specify filters.
6. Select Activate at IPL (or add SMZ4/ACTAUMSGQ to the startup program).
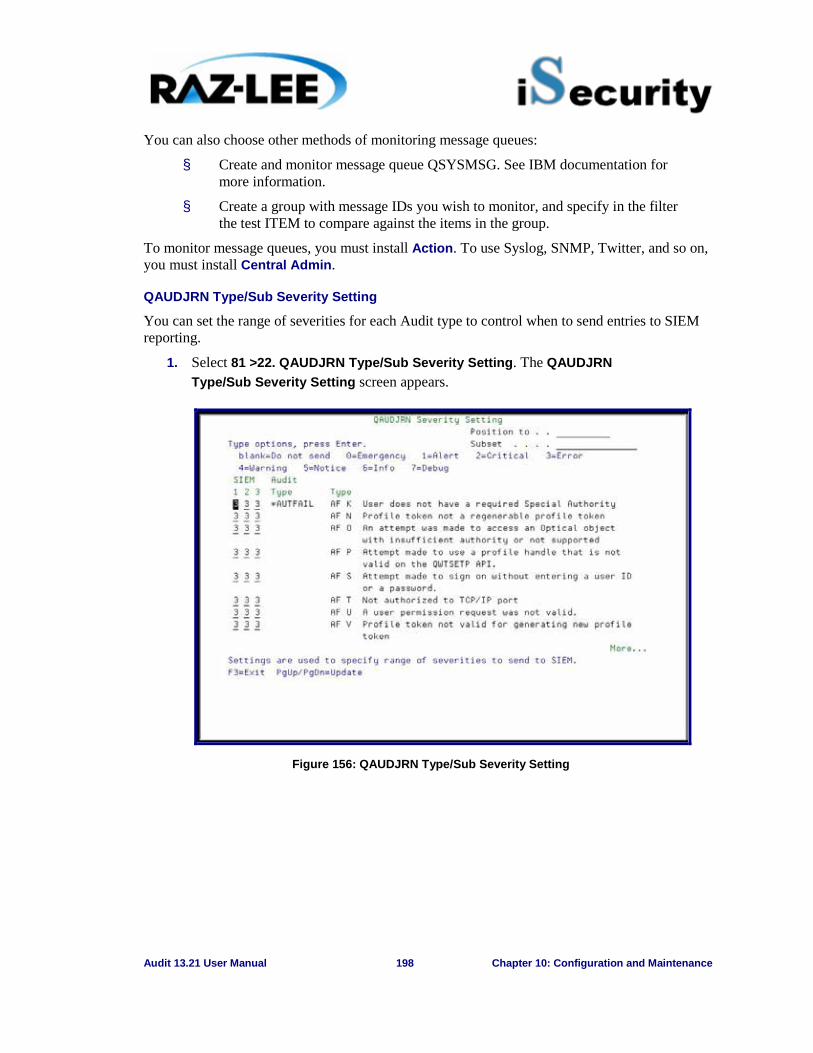
Audit 13.21 User Manual 198 Chapter 10: Configuration and Maintenance
You can also choose other methods of monitoring message queues:
§ Create and monitor message queue QSYSMSG. See IBM documentation for more information.
§ Create a group with message IDs you wish to monitor, and specify in the filter the test ITEM to compare against the items in the group.
To monitor message queues, you must install Action. To use Syslog, SNMP, Twitter, and so on, you must install Central Admin.
QAUDJRN Type/Sub Severity Setting
You can set the range of severities for each Audit type to control when to send entries to SIEM reporting.
1. Select 81 >22. QAUDJRN Type/Sub Severity Setting. The QAUDJRN Type/Sub Severity Setting screen appears.
Figure 156: QAUDJRN Type/Sub Severity Setting
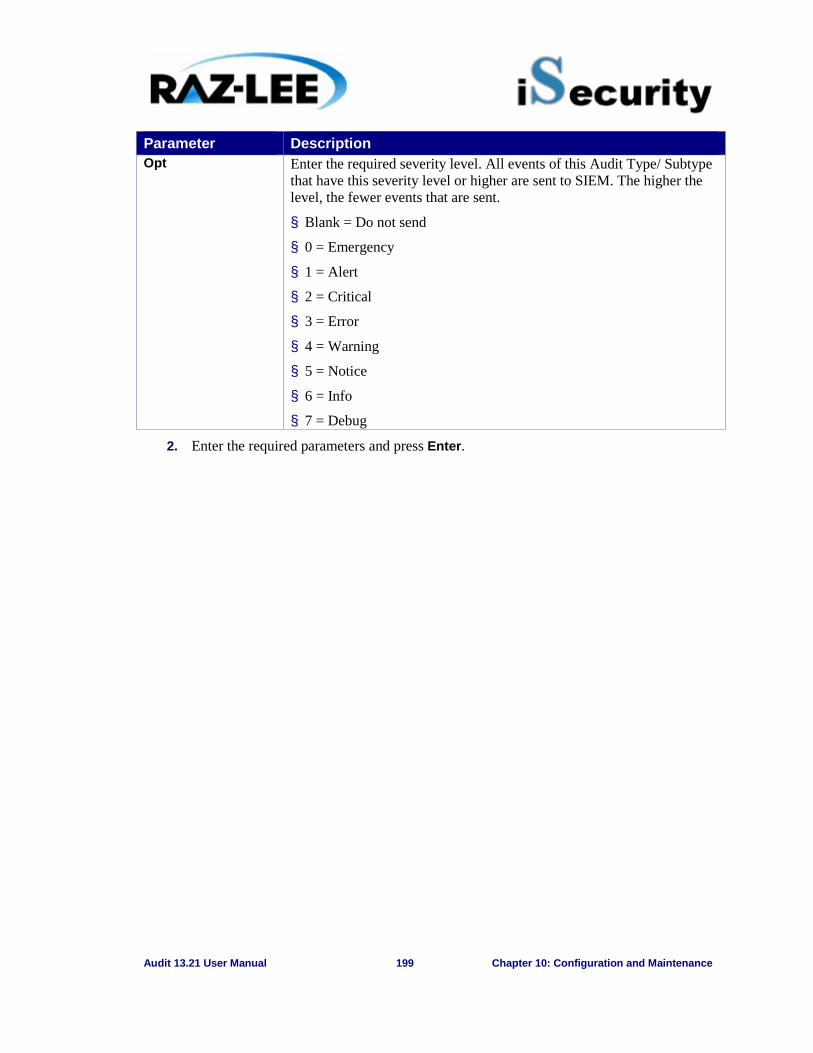
Audit 13.21 User Manual 199 Chapter 10: Configuration and Maintenance
Parameter Description Opt Enter the required severity level. All events of this Audit Type/ Subtype
that have this severity level or higher are sent to SIEM. The higher the level, the fewer events that are sent.
§ Blank = Do not send
§ 0 = Emergency
§ 1 = Alert
§ 2 = Critical
§ 3 = Error
§ 4 = Warning
§ 5 = Notice
§ 6 = Info
§ 7 = Debug
2. Enter the required parameters and press Enter.
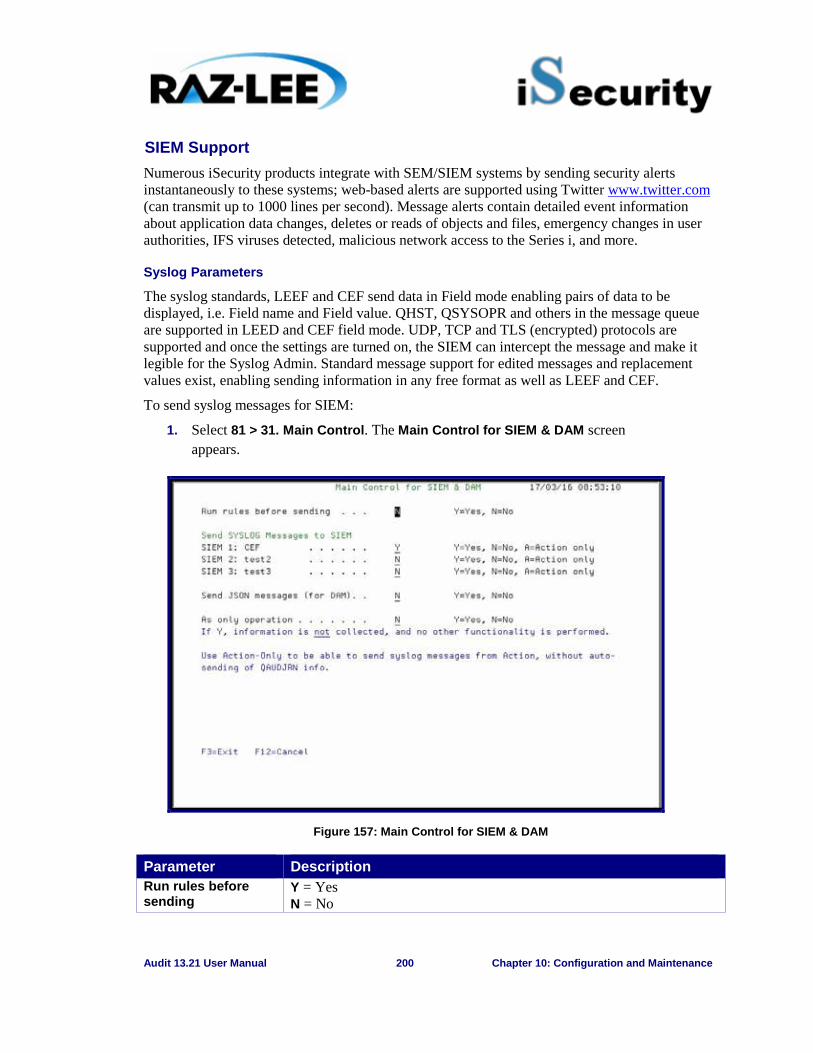
Audit 13.21 User Manual 200 Chapter 10: Configuration and Maintenance
SIEM Support Numerous iSecurity products integrate with SEM/SIEM systems by sending security alerts instantaneously to these systems; web-based alerts are supported using Twitter www.twitter.com (can transmit up to 1000 lines per second). Message alerts contain detailed event information about application data changes, deletes or reads of objects and files, emergency changes in user authorities, IFS viruses detected, malicious network access to the Series i, and more.
Syslog Parameters
The syslog standards, LEEF and CEF send data in Field mode enabling pairs of data to be displayed, i.e. Field name and Field value. QHST, QSYSOPR and others in the message queue are supported in LEED and CEF field mode. UDP, TCP and TLS (encrypted) protocols are supported and once the settings are turned on, the SIEM can intercept the message and make it legible for the Syslog Admin. Standard message support for edited messages and replacement values exist, enabling sending information in any free format as well as LEEF and CEF.
To send syslog messages for SIEM:
1. Select 81 > 31. Main Control. The Main Control for SIEM & DAM screen appears.
Figure 157: Main Control for SIEM & DAM
Parameter Description Run rules before sending
Y = Yes N = No
Audit 13.21 User Manual 201 Chapter 10: Configuration and Maintenance
Parameter Description Send SYSLOG messages to SIEM
Y = Yes N = No A = Action only
Send JSON messages (for DAM)
Y = Yes N = No
As only operation Y = Yes N = No
2. Enter the required parameters and press Enter.
Triple Syslog Definitions (#1-#3)
Events from IBMi, and different Audit entry types are sent to a remote SYSLOG server according to range of severities such as emergency, alert, critical, error, warning and more. When Send SYSLOG messages (for SIEM) is set to Yes in the Main Control for SIEM & DAM definitions, the product will automatically send all events according to the Severity range to auto send (list below) for the message structure selected, as described in the table below.
The option to use more than one SIEM is implemented on a separate job per SIEM. This is enabled by an intermediate buffer which assists SIEM to overcome communication problems or SIEM downtime, while sending a message to QSYSOPR when the buffer is full or processes are delayed. For this purpose Triple Syslog definitions are required, which are described in this section.
To configure SIEM message structure:
1. Select 81 > 32/33/34. SIEM 1, SIEM 2, SIEM 3 in the iSecurity/Base System Configuration menu. The selected SIEM Definitions screen appears.
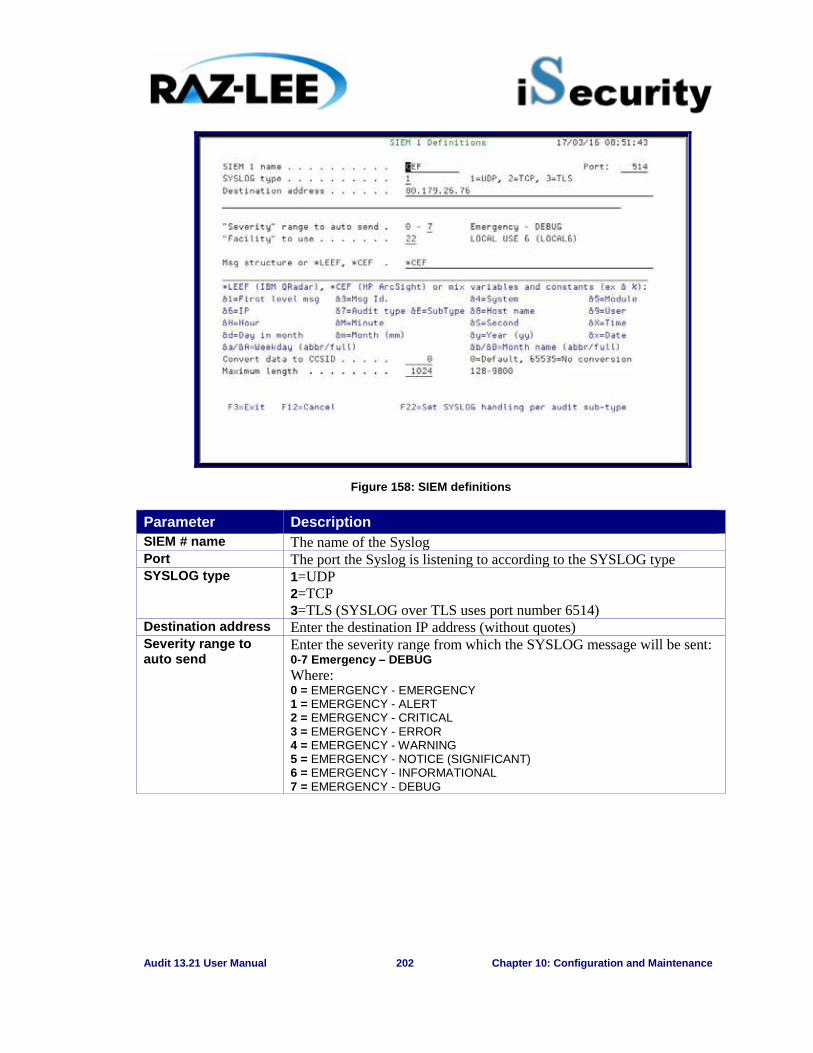
Audit 13.21 User Manual 202 Chapter 10: Configuration and Maintenance
Figure 158: SIEM definitions
Parameter Description SIEM # name The name of the Syslog Port The port the Syslog is listening to according to the SYSLOG type SYSLOG type 1=UDP
2=TCP 3=TLS (SYSLOG over TLS uses port number 6514)
Destination address Enter the destination IP address (without quotes) Severity range to auto send
Enter the severity range from which the SYSLOG message will be sent: 0-7 Emergency – DEBUG Where: 0 = EMERGENCY - EMERGENCY 1 = EMERGENCY - ALERT 2 = EMERGENCY - CRITICAL 3 = EMERGENCY - ERROR 4 = EMERGENCY - WARNING 5 = EMERGENCY - NOTICE (SIGNIFICANT) 6 = EMERGENCY - INFORMATIONAL 7 = EMERGENCY - DEBUG
Audit 13.21 User Manual 203 Chapter 10: Configuration and Maintenance
Parameter Description Facility to use Enter the facility from which the SYSLOG message will be sent
Where: 1 = USER-LEVEL MESSAGES 2 = MAIL SYSTEM 3 = SYSTEM DAEMONS 4 = SECURITY/AUTHORIZATION MESSAGES 5 = SYSLOGD INTERNAL 6 = LINE PRINTER SUBSYSTEM 7 = NETWORK NEWS SUBSYSTEM 8 = UUCP SUBSYSTEM 9 = CLOCK DAEMON 10 = SECURITY/AUTHORIZATION MESSAGES 11 = FTP DAEMON 12 = NTP SUBSYSTEM 13 = LOG AUDIT 14 = LOG ALERT 15 = CLOCK DAEMON 16 = LOCAL USE 0 (LOCAL0) 17 = LOCAL USE 1 (LOCAL1) 18 = LOCAL USE 2 (LOCAL2) 19 = LOCAL USE 3 (LOCAL3) 20 = LOCAL USE 4 (LOCAL4) 21 = LOCAL USE 5 (LOCAL5) 22 = LOCAL USE 6 (LOCAL6) 23 = LOCAL USE 7 (LOCAL7)
Message Structure Two built-in message structures are available which send data in Field Mode by pairs of Field name and Field value: *LEEF = Log Event Extended Format *CEF = Common Event Format -Or- Use mixed variables and constants (ex & %). A full description of the available variables is in the table below. (For more information on LEEF/CEF, see Version 13.21 (04/2016)).
Convert data to CCSID
0 = Default 65535 = No conversion
Maximum length 128 - 9800
Variable Description &a Abbreviated name of the day of the week (Sun, Mon, and so on). &A Full name of the day of the week (Sunday, Monday, and so on). &b Abbreviated month name (Jan, Feb, and so on). &B Full month name (January, February, and so on). &c Date/Time in the format of the locale. &C Century number [00-99], the year divided by 100 and truncated to an
integer.
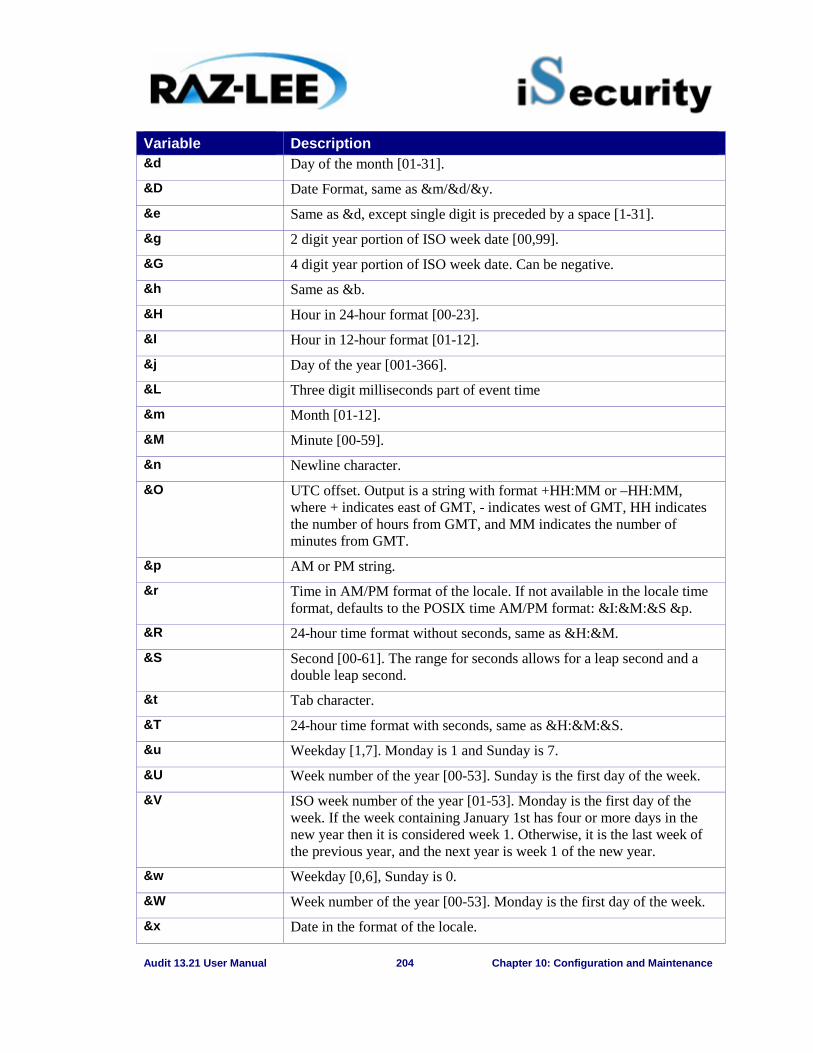
Audit 13.21 User Manual 204 Chapter 10: Configuration and Maintenance
Variable Description &d Day of the month [01-31]. &D Date Format, same as &m/&d/&y. &e Same as &d, except single digit is preceded by a space [1-31]. &g 2 digit year portion of ISO week date [00,99]. &G 4 digit year portion of ISO week date. Can be negative. &h Same as &b. &H Hour in 24-hour format [00-23]. &I Hour in 12-hour format [01-12]. &j Day of the year [001-366]. &L Three digit milliseconds part of event time &m Month [01-12]. &M Minute [00-59]. &n Newline character. &O UTC offset. Output is a string with format +HH:MM or –HH:MM,
where + indicates east of GMT, - indicates west of GMT, HH indicates the number of hours from GMT, and MM indicates the number of minutes from GMT.
&p AM or PM string. &r Time in AM/PM format of the locale. If not available in the locale time
format, defaults to the POSIX time AM/PM format: &I:&M:&S &p. &R 24-hour time format without seconds, same as &H:&M. &S Second [00-61]. The range for seconds allows for a leap second and a
double leap second. &t Tab character. &T 24-hour time format with seconds, same as &H:&M:&S. &u Weekday [1,7]. Monday is 1 and Sunday is 7. &U Week number of the year [00-53]. Sunday is the first day of the week. &V ISO week number of the year [01-53]. Monday is the first day of the
week. If the week containing January 1st has four or more days in the new year then it is considered week 1. Otherwise, it is the last week of the previous year, and the next year is week 1 of the new year.
&w Weekday [0,6], Sunday is 0. &W Week number of the year [00-53]. Monday is the first day of the week. &x Date in the format of the locale.
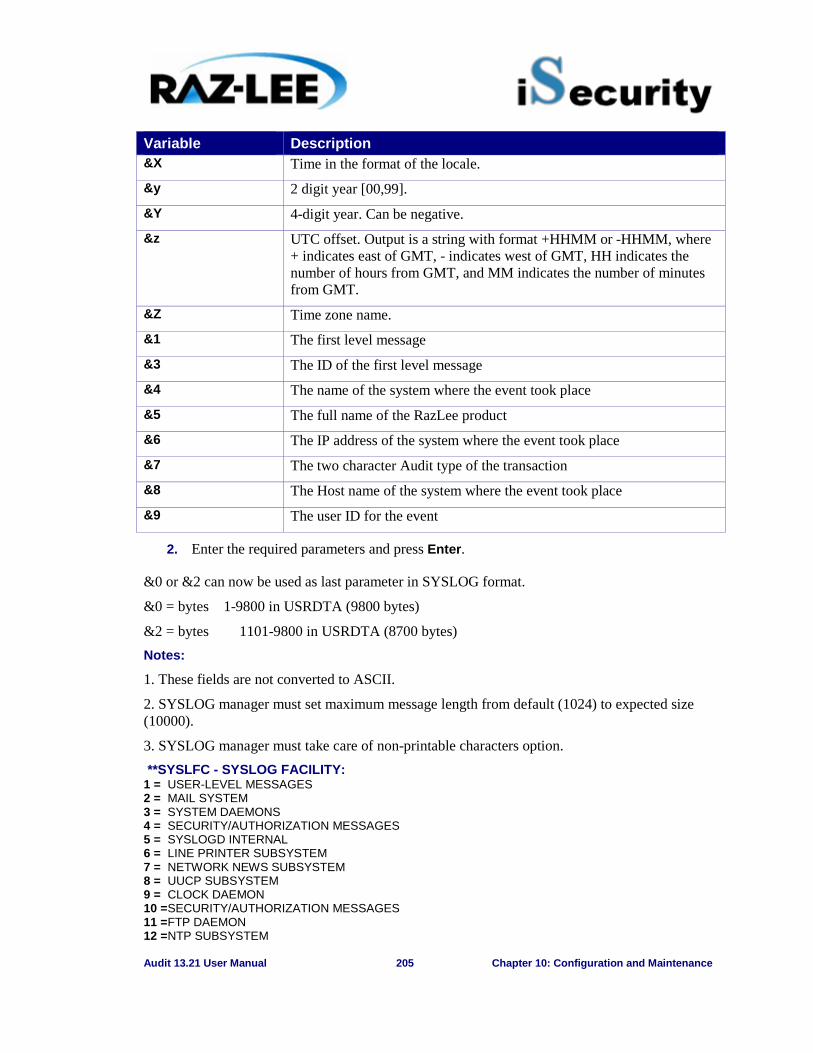
Audit 13.21 User Manual 205 Chapter 10: Configuration and Maintenance
Variable Description &X Time in the format of the locale. &y 2 digit year [00,99]. &Y 4-digit year. Can be negative. &z UTC offset. Output is a string with format +HHMM or -HHMM, where
+ indicates east of GMT, - indicates west of GMT, HH indicates the number of hours from GMT, and MM indicates the number of minutes from GMT.
&Z Time zone name. &1 The first level message &3 The ID of the first level message &4 The name of the system where the event took place &5 The full name of the RazLee product &6 The IP address of the system where the event took place &7 The two character Audit type of the transaction &8 The Host name of the system where the event took place &9 The user ID for the event
2. Enter the required parameters and press Enter.
&0 or &2 can now be used as last parameter in SYSLOG format.
&0 = bytes 1-9800 in USRDTA (9800 bytes)
&2 = bytes 1101-9800 in USRDTA (8700 bytes) Notes:
1. These fields are not converted to ASCII.
2. SYSLOG manager must set maximum message length from default (1024) to expected size (10000).
3. SYSLOG manager must take care of non-printable characters option. **SYSLFC - SYSLOG FACILITY: 1 = USER-LEVEL MESSAGES 2 = MAIL SYSTEM 3 = SYSTEM DAEMONS 4 = SECURITY/AUTHORIZATION MESSAGES 5 = SYSLOGD INTERNAL 6 = LINE PRINTER SUBSYSTEM 7 = NETWORK NEWS SUBSYSTEM 8 = UUCP SUBSYSTEM 9 = CLOCK DAEMON 10 = SECURITY/AUTHORIZATION MESSAGES 11 = FTP DAEMON 12 = NTP SUBSYSTEM
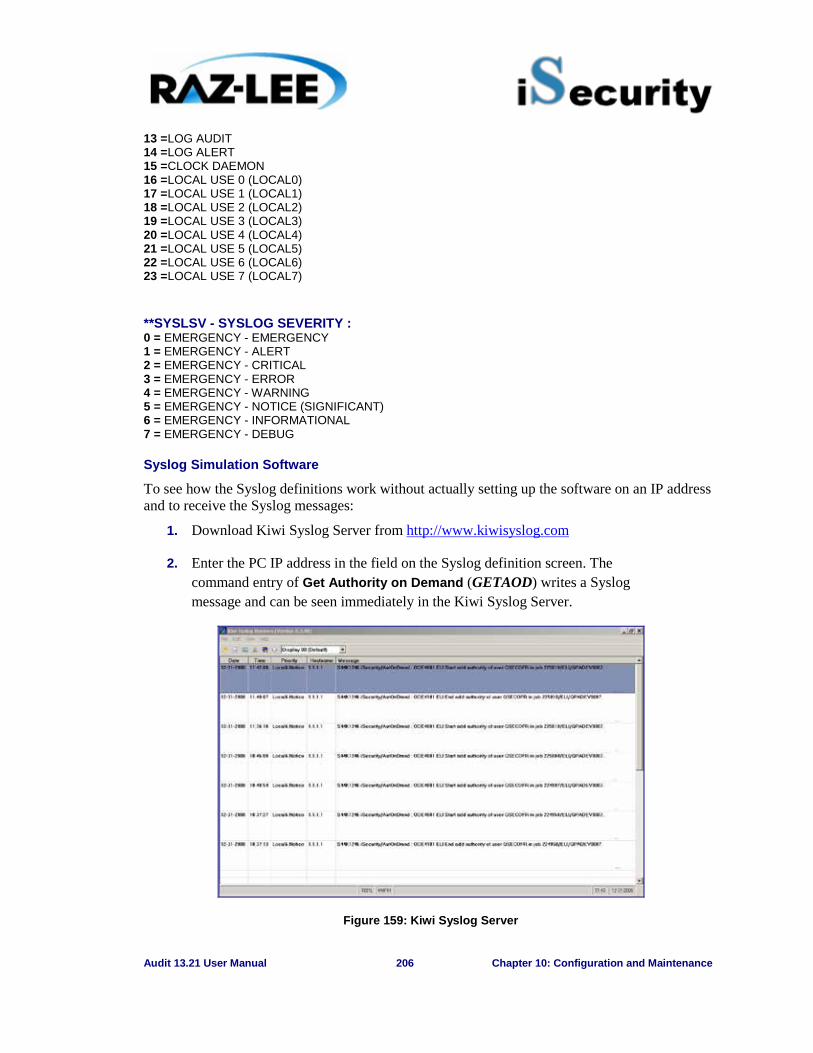
Audit 13.21 User Manual 206 Chapter 10: Configuration and Maintenance
13 = LOG AUDIT 14 = LOG ALERT 15 = CLOCK DAEMON 16 = LOCAL USE 0 (LOCAL0) 17 = LOCAL USE 1 (LOCAL1) 18 = LOCAL USE 2 (LOCAL2) 19 = LOCAL USE 3 (LOCAL3) 20 = LOCAL USE 4 (LOCAL4) 21 = LOCAL USE 5 (LOCAL5) 22 = LOCAL USE 6 (LOCAL6) 23 = LOCAL USE 7 (LOCAL7)
**SYSLSV - SYSLOG SEVERITY : 0 = EMERGENCY - EMERGENCY 1 = EMERGENCY - ALERT 2 = EMERGENCY - CRITICAL 3 = EMERGENCY - ERROR 4 = EMERGENCY - WARNING 5 = EMERGENCY - NOTICE (SIGNIFICANT) 6 = EMERGENCY - INFORMATIONAL 7 = EMERGENCY - DEBUG
Syslog Simulation Software
To see how the Syslog definitions work without actually setting up the software on an IP address and to receive the Syslog messages:
1. Download Kiwi Syslog Server from http://www.kiwisyslog.com
2. Enter the PC IP address in the field on the Syslog definition screen. The command entry of Get Authority on Demand (GETAOD) writes a Syslog message and can be seen immediately in the Kiwi Syslog Server.
Figure 159: Kiwi Syslog Server
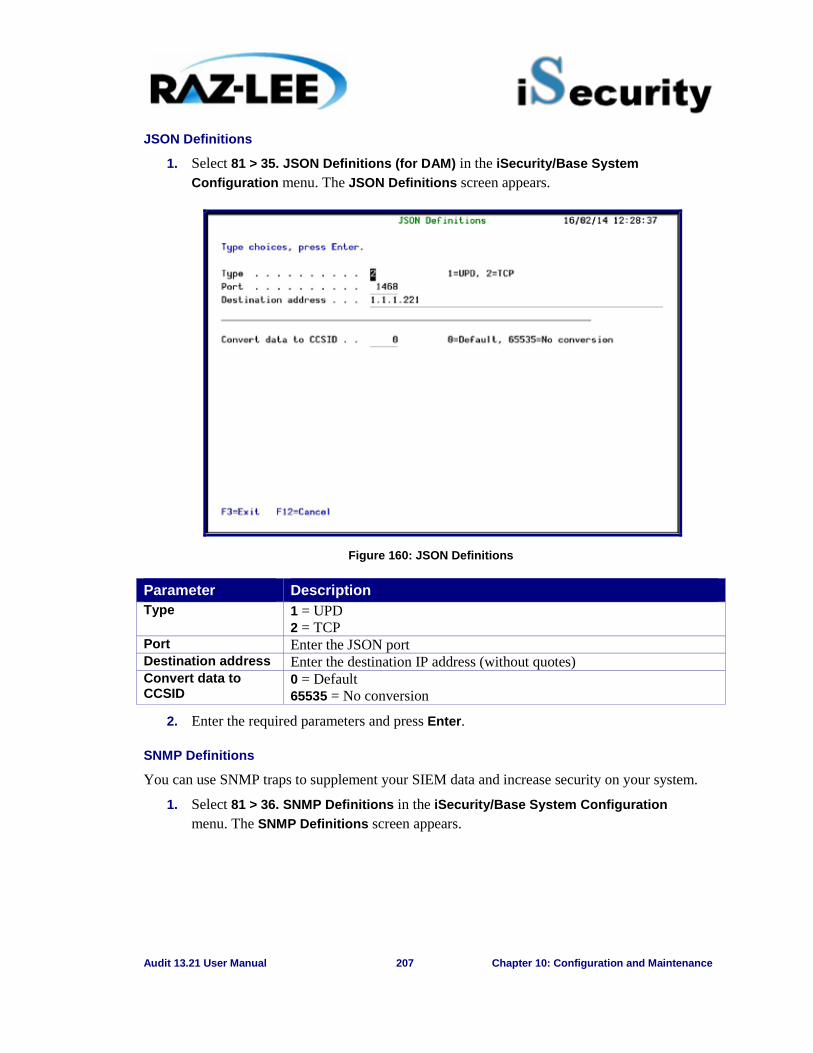
Audit 13.21 User Manual 207 Chapter 10: Configuration and Maintenance
JSON Definitions
1. Select 81 > 35. JSON Definitions (for DAM) in the iSecurity/Base System Configuration menu. The JSON Definitions screen appears.
Figure 160: JSON Definitions
Parameter Description Type 1 = UPD
2 = TCP Port Enter the JSON port Destination address Enter the destination IP address (without quotes) Convert data to CCSID
0 = Default 65535 = No conversion
2. Enter the required parameters and press Enter.
SNMP Definitions
You can use SNMP traps to supplement your SIEM data and increase security on your system.
1. Select 81 > 36. SNMP Definitions in the iSecurity/Base System Configuration menu. The SNMP Definitions screen appears.
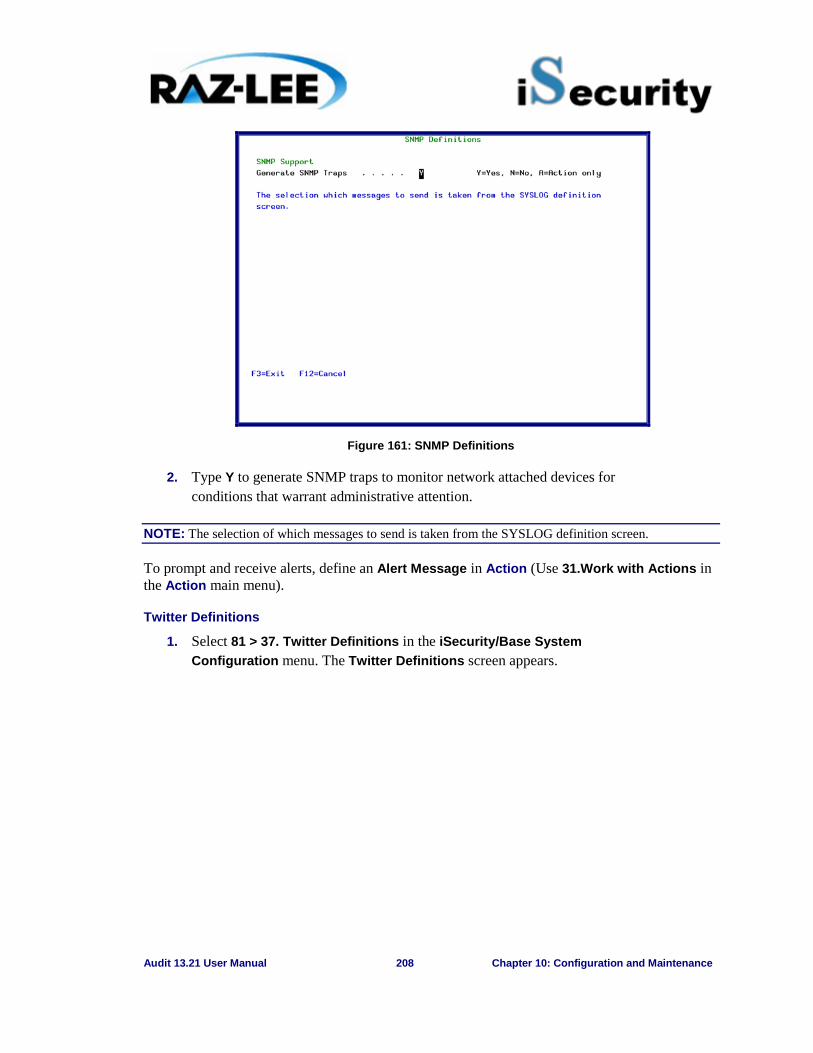
Audit 13.21 User Manual 208 Chapter 10: Configuration and Maintenance
Figure 161: SNMP Definitions
2. Type Y to generate SNMP traps to monitor network attached devices for conditions that warrant administrative attention.
NOTE: The selection of which messages to send is taken from the SYSLOG definition screen.
To prompt and receive alerts, define an Alert Message in Action (Use 31.Work with Actions in the Action main menu).
Twitter Definitions
1. Select 81 > 37. Twitter Definitions in the iSecurity/Base System Configuration menu. The Twitter Definitions screen appears.
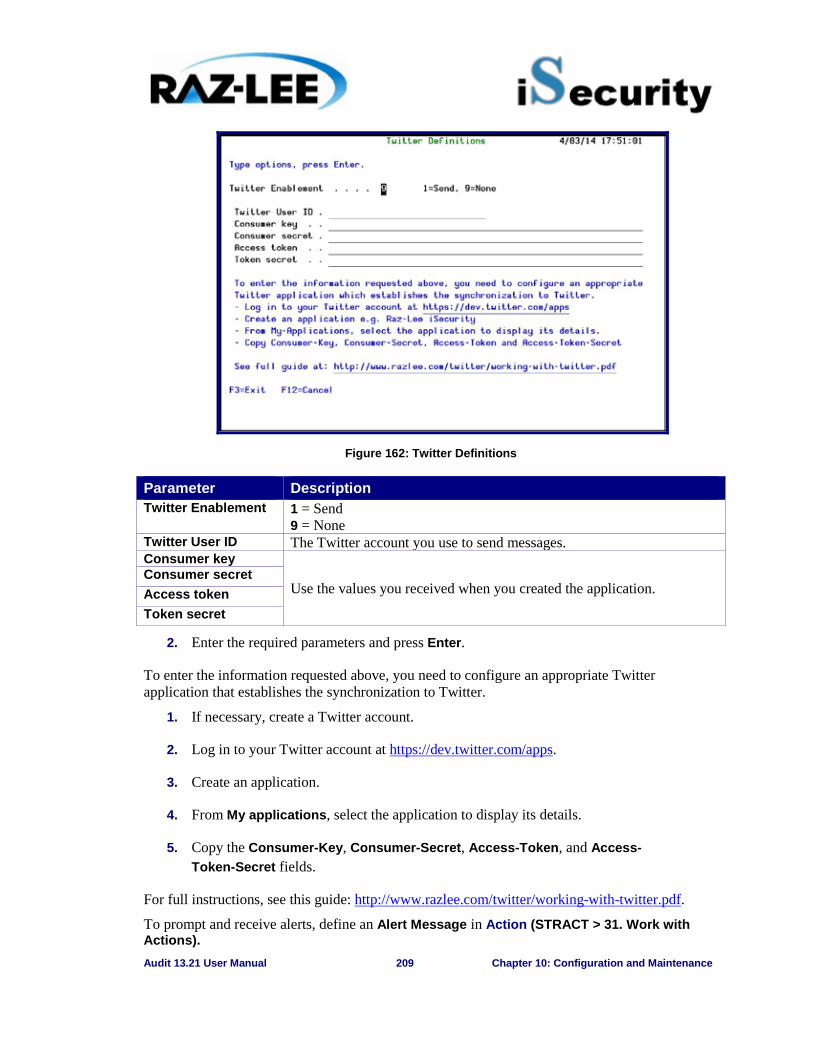
Audit 13.21 User Manual 209 Chapter 10: Configuration and Maintenance
Figure 162: Twitter Definitions
Parameter Description Twitter Enablement 1 = Send
9 = None Twitter User ID The Twitter account you use to send messages. Consumer key
Use the values you received when you created the application. Consumer secret Access token Token secret
2. Enter the required parameters and press Enter.
To enter the information requested above, you need to configure an appropriate Twitter application that establishes the synchronization to Twitter.
1. If necessary, create a Twitter account.
2. Log in to your Twitter account at https://dev.twitter.com/apps.
3. Create an application.
4. From My applications, select the application to display its details.
5. Copy the Consumer-Key, Consumer-Secret, Access-Token, and Access-Token-Secret fields.
For full instructions, see this guide: http://www.razlee.com/twitter/working-with-twitter.pdf.
To prompt and receive alerts, define an Alert Message in Action (STRACT > 31. Work with Actions).
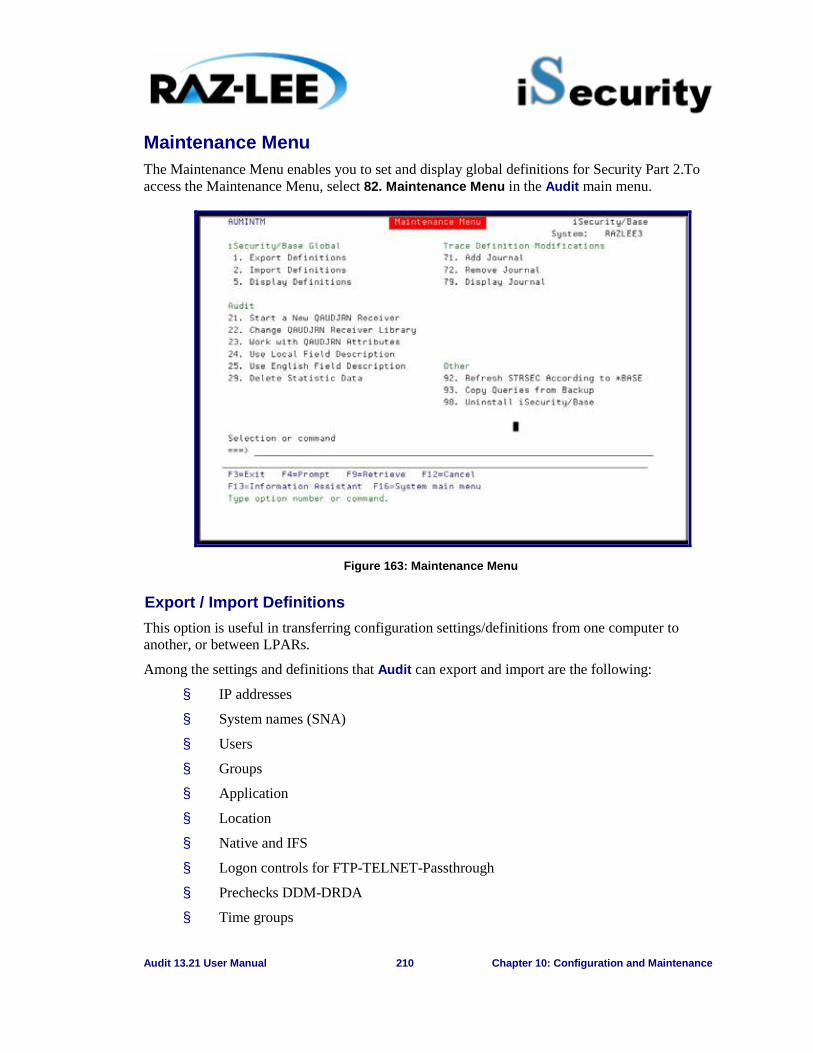
Audit 13.21 User Manual 210 Chapter 10: Configuration and Maintenance
Maintenance Menu The Maintenance Menu enables you to set and display global definitions for Security Part 2.To access the Maintenance Menu, select 82. Maintenance Menu in the Audit main menu.
Figure 163: Maintenance Menu
Export / Import Definitions This option is useful in transferring configuration settings/definitions from one computer to another, or between LPARs.
Among the settings and definitions that Audit can export and import are the following:
§ IP addresses
§ System names (SNA)
§ Users
§ Groups
§ Application
§ Location
§ Native and IFS
§ Logon controls for FTP-TELNET-Passthrough
§ Prechecks DDM-DRDA
§ Time groups
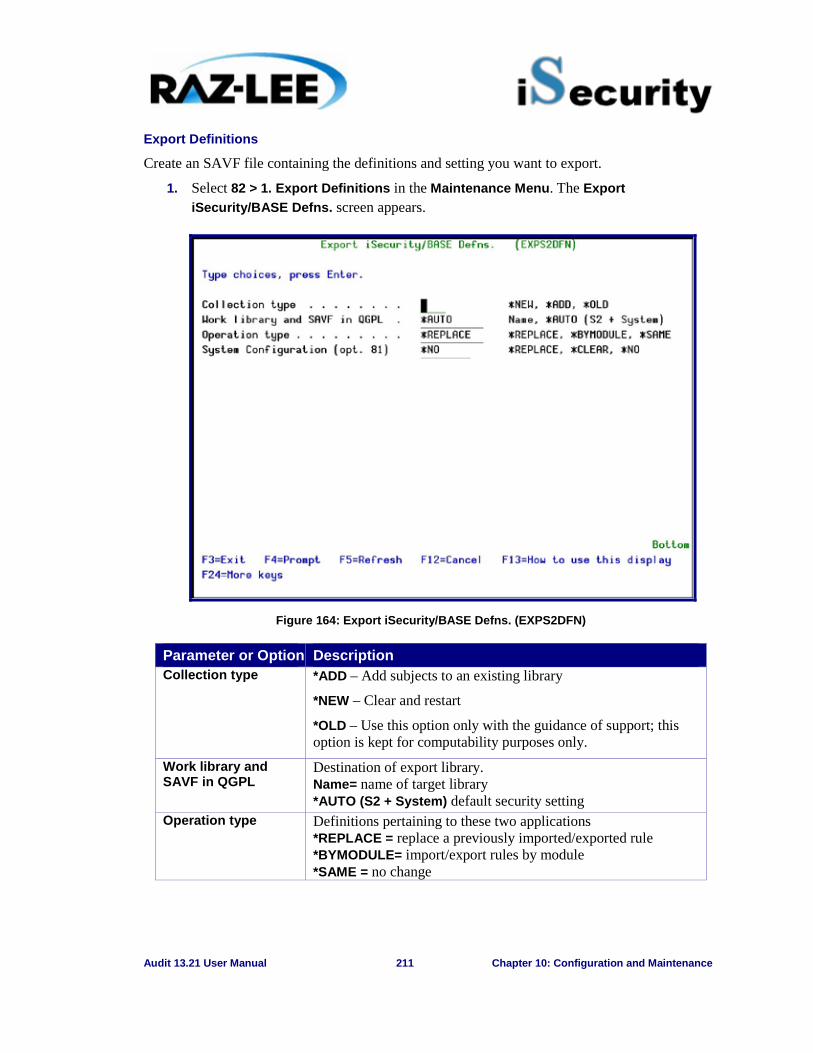
Audit 13.21 User Manual 211 Chapter 10: Configuration and Maintenance
Export Definitions
Create an SAVF file containing the definitions and setting you want to export.
1. Select 82 > 1. Export Definitions in the Maintenance Menu. The Export iSecurity/BASE Defns. screen appears.
Figure 164: Export iSecurity/BASE Defns. (EXPS2DFN)
Parameter or Option Description Collection type *ADD – Add subjects to an existing library
*NEW – Clear and restart
*OLD – Use this option only with the guidance of support; this option is kept for computability purposes only.
Work library and SAVF in QGPL
Destination of export library. Name= name of target library *AUTO (S2 + System) default security setting
Operation type Definitions pertaining to these two applications *REPLACE = replace a previously imported/exported rule *BYMODULE= import/export rules by module *SAME = no change

Audit 13.21 User Manual 212 Chapter 10: Configuration and Maintenance
Parameter or Option Description System Configuration (opt. 81)
Systems to update= When exporting Firewall definitions, the user can choose to export and import immediately by preparing the definitions in a SAVF and send it to a remote system or several remote systems, and automatically import them into it. Update type
*REPLACE = replace the definition file and copy the new *CLEAR = replace the definition file and copy the new *NO = no update to files can be exported as is
2. Enter the required parameters and press Enter.
Figure 165: Export iSecurity/BASE Defns. (EXPS2DFN) – Update remote systems
Parameter or Option Description Update remote systems
Systems to update Name = Name of the system *group = Name of the group *ALL = All systems *NONE = No systems
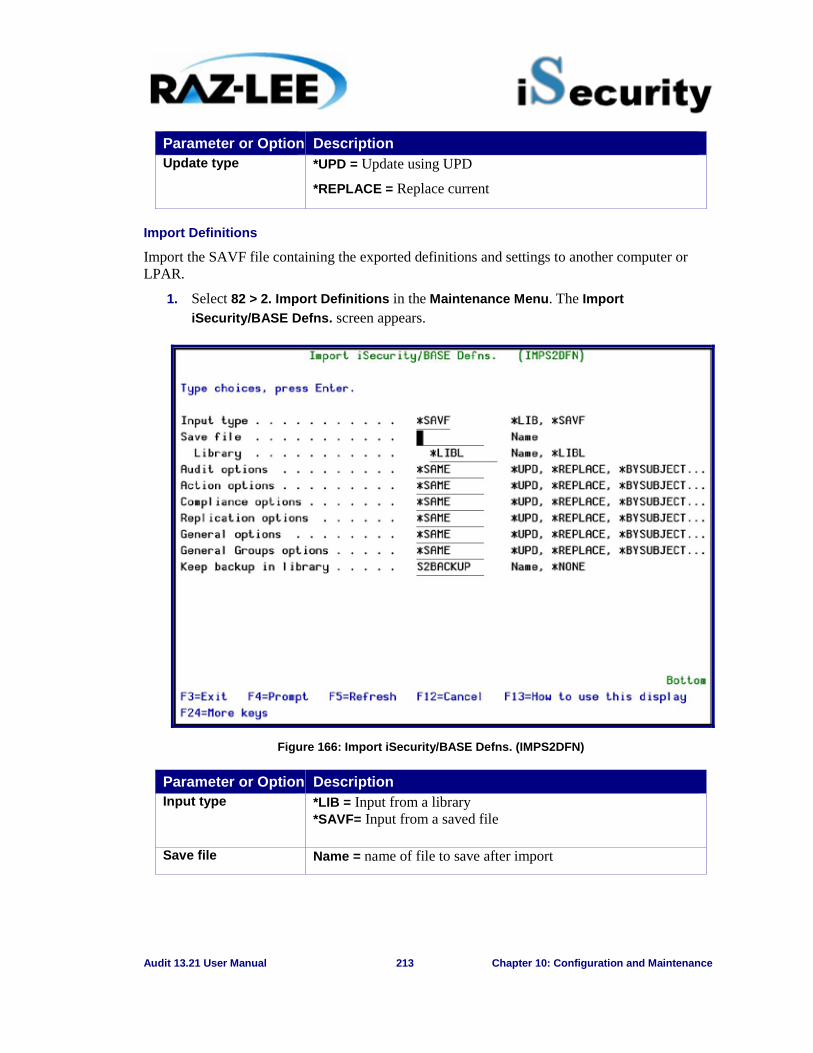
Audit 13.21 User Manual 213 Chapter 10: Configuration and Maintenance
Parameter or Option Description Update type *UPD = Update using UPD
*REPLACE = Replace current
Import Definitions
Import the SAVF file containing the exported definitions and settings to another computer or LPAR.
1. Select 82 > 2. Import Definitions in the Maintenance Menu. The Import iSecurity/BASE Defns. screen appears.
Figure 166: Import iSecurity/BASE Defns. (IMPS2DFN)
Parameter or Option Description Input type *LIB = Input from a library
*SAVF= Input from a saved file
Save file Name = name of file to save after import
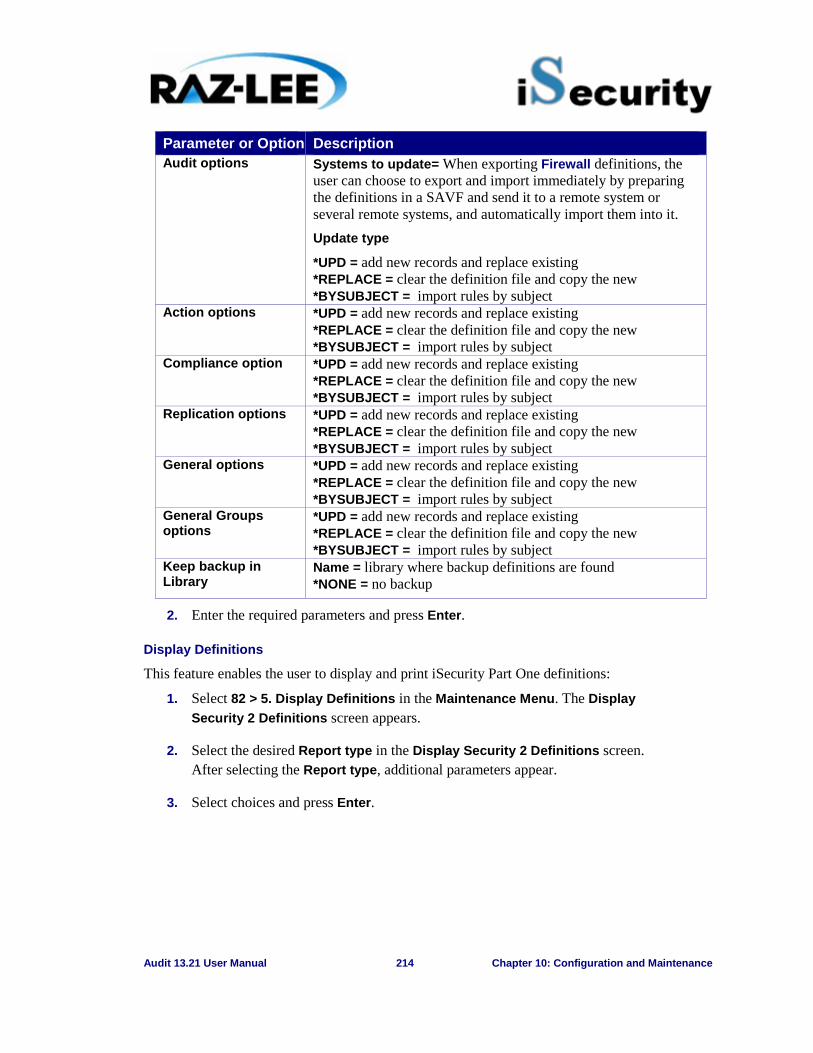
Audit 13.21 User Manual 214 Chapter 10: Configuration and Maintenance
Parameter or Option Description Audit options Systems to update= When exporting Firewall definitions, the
user can choose to export and import immediately by preparing the definitions in a SAVF and send it to a remote system or several remote systems, and automatically import them into it. Update type
*UPD = add new records and replace existing *REPLACE = clear the definition file and copy the new *BYSUBJECT = import rules by subject
Action options *UPD = add new records and replace existing *REPLACE = clear the definition file and copy the new *BYSUBJECT = import rules by subject
Compliance option *UPD = add new records and replace existing *REPLACE = clear the definition file and copy the new *BYSUBJECT = import rules by subject
Replication options *UPD = add new records and replace existing *REPLACE = clear the definition file and copy the new *BYSUBJECT = import rules by subject
General options *UPD = add new records and replace existing *REPLACE = clear the definition file and copy the new *BYSUBJECT = import rules by subject
General Groups options
*UPD = add new records and replace existing *REPLACE = clear the definition file and copy the new *BYSUBJECT = import rules by subject
Keep backup in Library
Name = library where backup definitions are found *NONE = no backup
2. Enter the required parameters and press Enter.
Display Definitions
This feature enables the user to display and print iSecurity Part One definitions:
1. Select 82 > 5. Display Definitions in the Maintenance Menu. The Display Security 2 Definitions screen appears.
2. Select the desired Report type in the Display Security 2 Definitions screen. After selecting the Report type, additional parameters appear.
3. Select choices and press Enter.
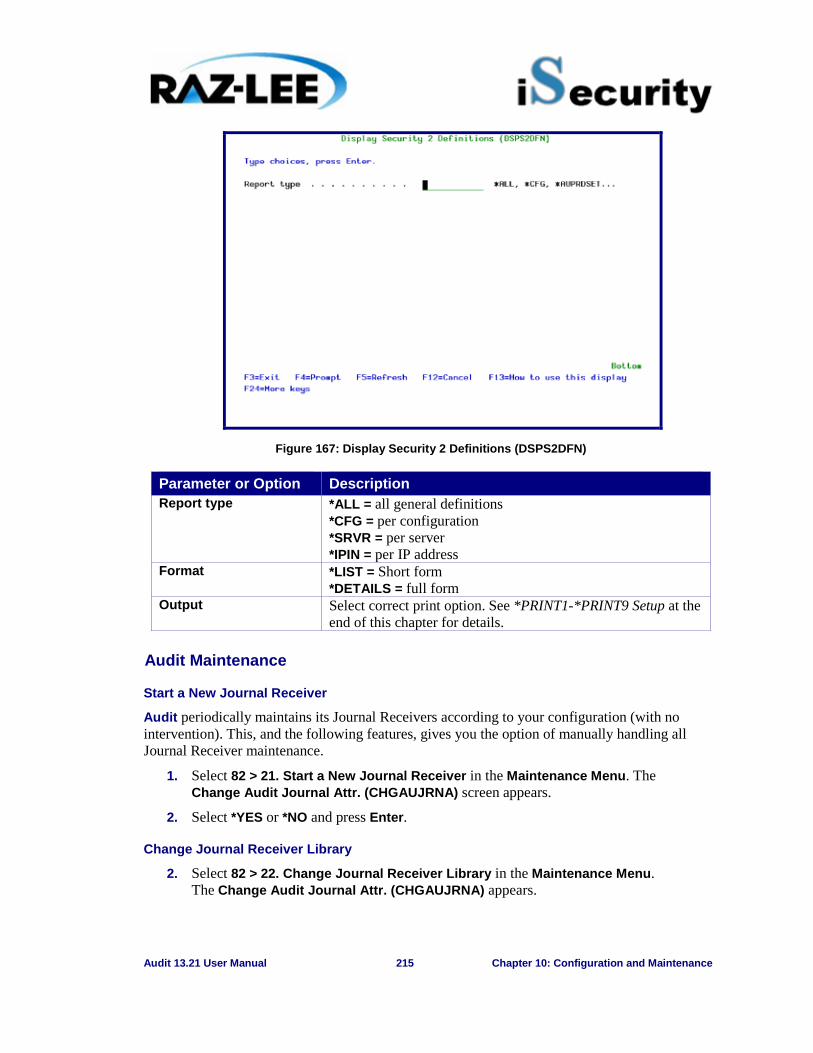
Audit 13.21 User Manual 215 Chapter 10: Configuration and Maintenance
Figure 167: Display Security 2 Definitions (DSPS2DFN)
Parameter or Option Description Report type *ALL = all general definitions
*CFG = per configuration *SRVR = per server *IPIN = per IP address
Format *LIST = Short form *DETAILS = full form
Output Select correct print option. See *PRINT1-*PRINT9 Setup at the end of this chapter for details.
Audit Maintenance
Start a New Journal Receiver
Audit periodically maintains its Journal Receivers according to your configuration (with no intervention). This, and the following features, gives you the option of manually handling all Journal Receiver maintenance.
1. Select 82 > 21. Start a New Journal Receiver in the Maintenance Menu. The Change Audit Journal Attr. (CHGAUJRNA) screen appears.
2. Select *YES or *NO and press Enter.
Change Journal Receiver Library
2. Select 82 > 22. Change Journal Receiver Library in the Maintenance Menu. The Change Audit Journal Attr. (CHGAUJRNA) appears.
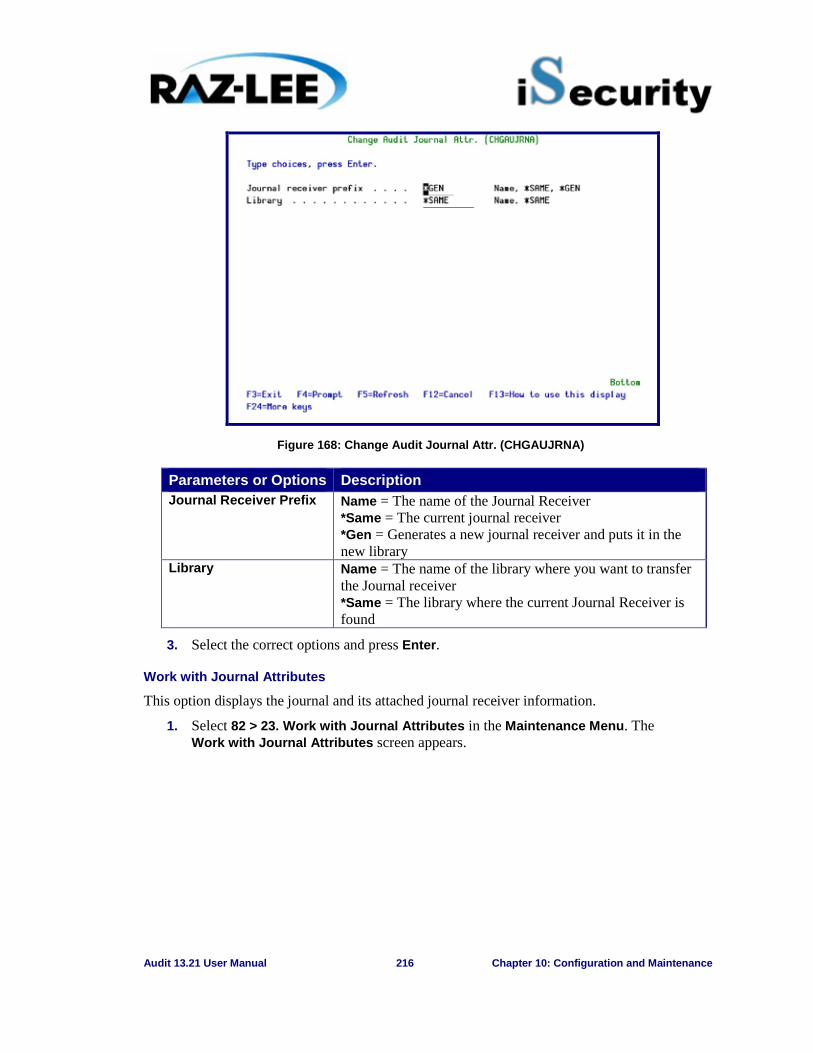
Audit 13.21 User Manual 216 Chapter 10: Configuration and Maintenance
Figure 168: Change Audit Journal Attr. (CHGAUJRNA)
Parameters or Options Description Journal Receiver Prefix Name = The name of the Journal Receiver
*Same = The current journal receiver *Gen = Generates a new journal receiver and puts it in the new library
Library Name = The name of the library where you want to transfer the Journal receiver *Same = The library where the current Journal Receiver is found
3. Select the correct options and press Enter.
Work with Journal Attributes
This option displays the journal and its attached journal receiver information.
1. Select 82 > 23. Work with Journal Attributes in the Maintenance Menu. The Work with Journal Attributes screen appears.
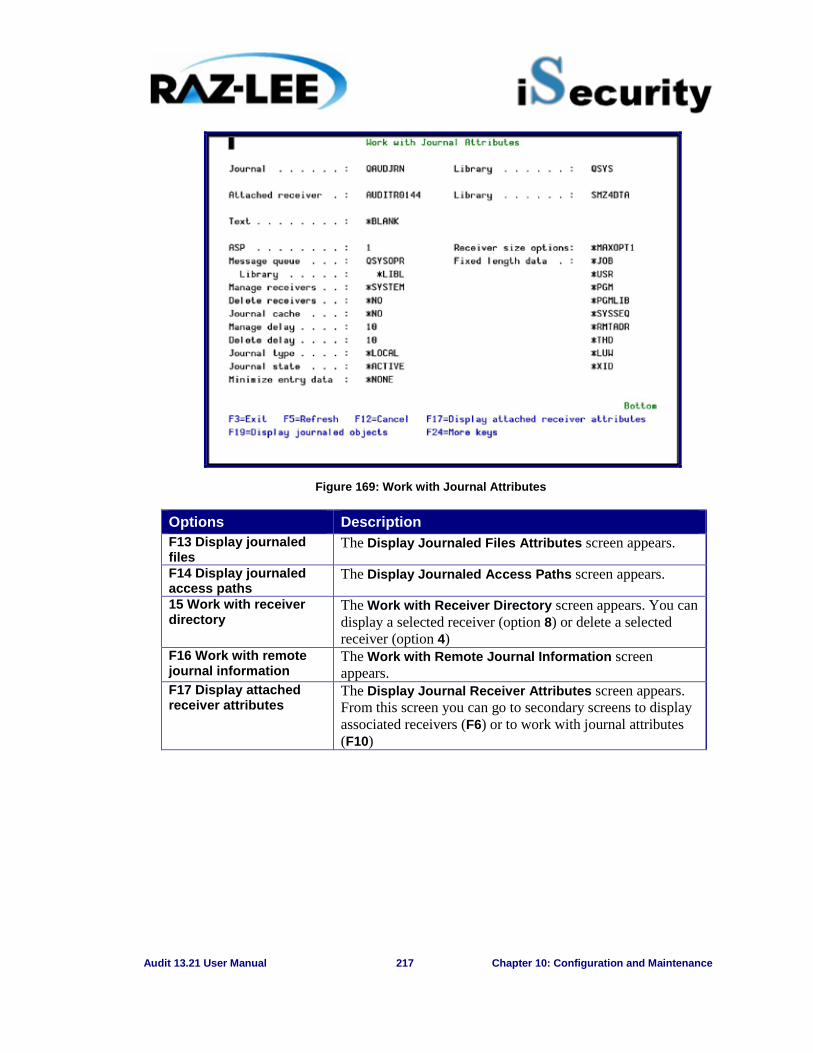
Audit 13.21 User Manual 217 Chapter 10: Configuration and Maintenance
Figure 169: Work with Journal Attributes
Options Description F13 Display journaled files
The Display Journaled Files Attributes screen appears.
F14 Display journaled access paths
The Display Journaled Access Paths screen appears.
15 Work with receiver directory
The Work with Receiver Directory screen appears. You can display a selected receiver (option 8) or delete a selected receiver (option 4)
F16 Work with remote journal information
The Work with Remote Journal Information screen appears.
F17 Display attached receiver attributes
The Display Journal Receiver Attributes screen appears. From this screen you can go to secondary screens to display associated receivers (F6) or to work with journal attributes (F10)
Audit 13.21 User Manual 218 Chapter 10: Configuration and Maintenance
Options Description F19 Display journaled objects
The Display Journaled Objects screen appears. Choose the type of object to display:
§ 1 = Files: Displays the physical database files being journaled.
§ 2 = Access Paths: Displays the access paths being journaled
§ 3 = Data Areas: Displays the data areas being journaled
§ 4 = Data Queues: Displays the data queues being journaled
§ 5 = Integrated File System objects: Displays the integrated file system objects being journaled. This includes *STMF, *DIR and *SYMLNK objects that are in the Root ('/'), QOpensys, and User-defined file systems.
§ 6 = Commitment Definitions: Displays the commitment definitions being journaled
2. Select options you want to work with.
Automatic Translation
IBM has translated the audit types into several languages; this feature uses the IBM template to translate automatically the audit type fields into your language.
Select 24. Auto-Translate Field Descriptions in the Maintenance Menu. The translation is generated automatically.
Use English File Descriptions
Select 25. Use English File Descriptions in the Maintenance Menu.
Delete Statistic Data
You can delete the statistical data used in the GUI version of the product.
1. Select 82 > 29. Delete Statistic Data in the Maintenance Menu. The Delete Audit Statistic Data screen appears.
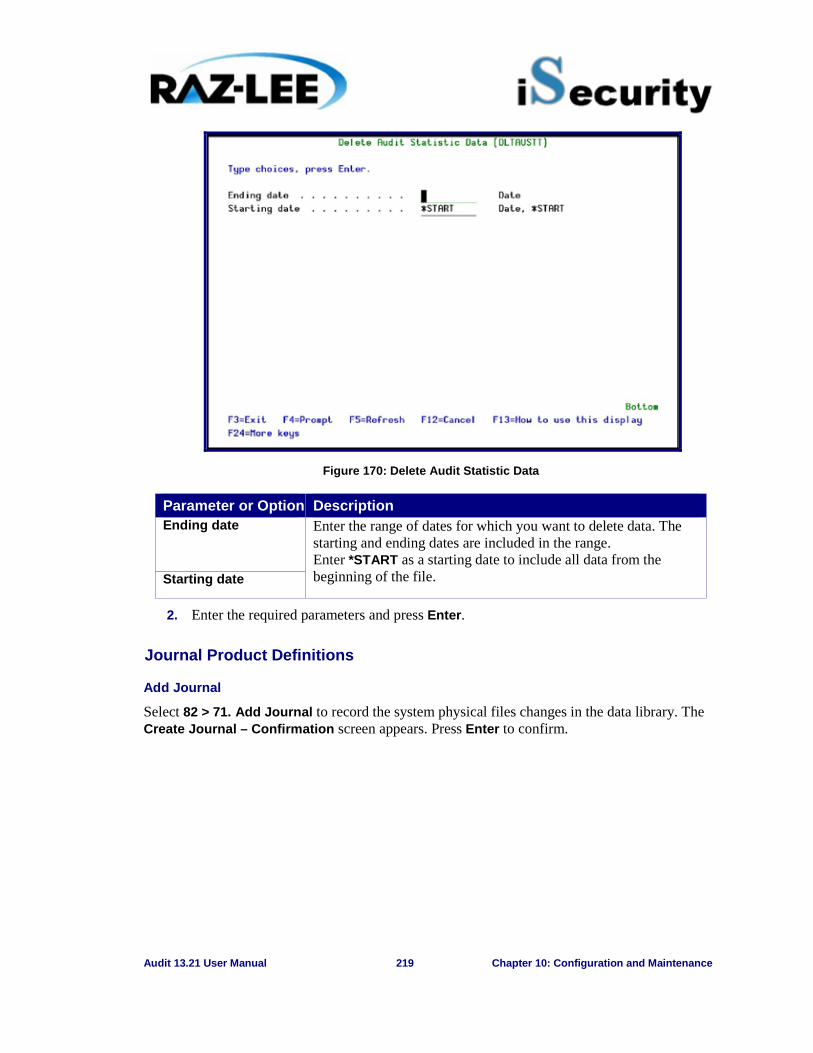
Audit 13.21 User Manual 219 Chapter 10: Configuration and Maintenance
Figure 170: Delete Audit Statistic Data
Parameter or Option Description Ending date Enter the range of dates for which you want to delete data. The
starting and ending dates are included in the range. Enter *START as a starting date to include all data from the beginning of the file. Starting date
2. Enter the required parameters and press Enter.
Journal Product Definitions
Add Journal
Select 82 > 71. Add Journal to record the system physical files changes in the data library. The Create Journal – Confirmation screen appears. Press Enter to confirm.
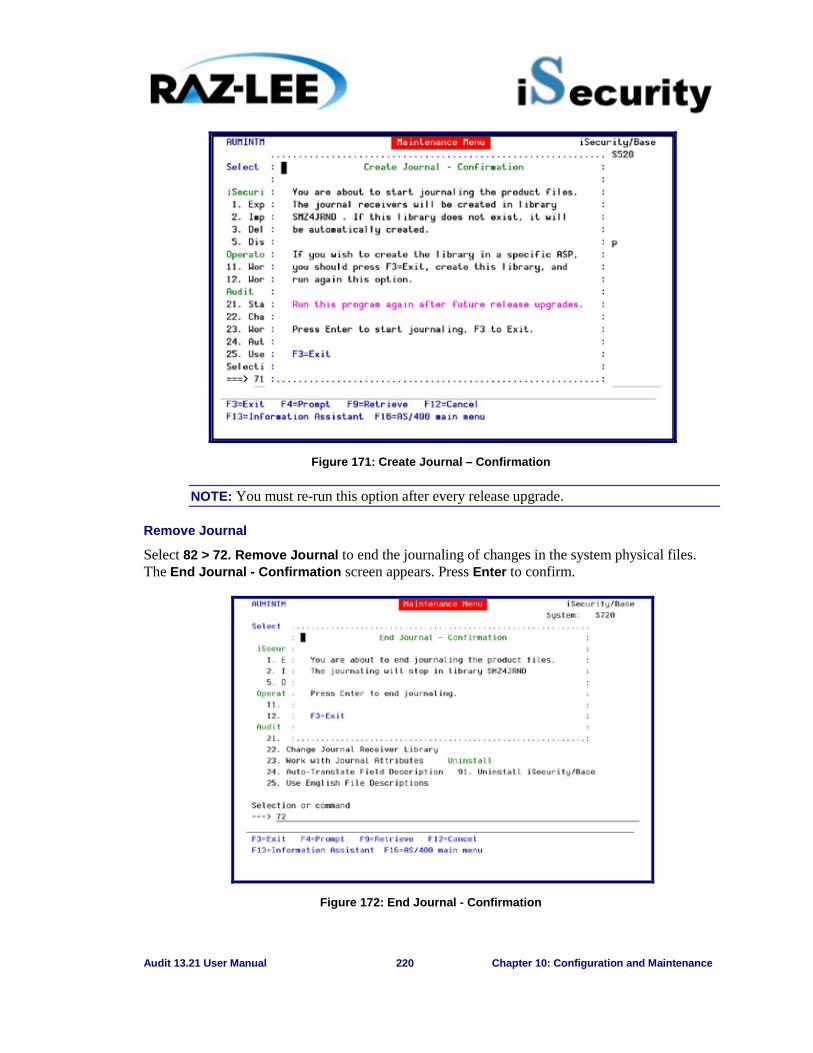
Audit 13.21 User Manual 220 Chapter 10: Configuration and Maintenance
Figure 171: Create Journal – Confirmation
NOTE: You must re-run this option after every release upgrade.
Remove Journal
Select 82 > 72. Remove Journal to end the journaling of changes in the system physical files. The End Journal - Confirmation screen appears. Press Enter to confirm.
Figure 172: End Journal - Confirmation
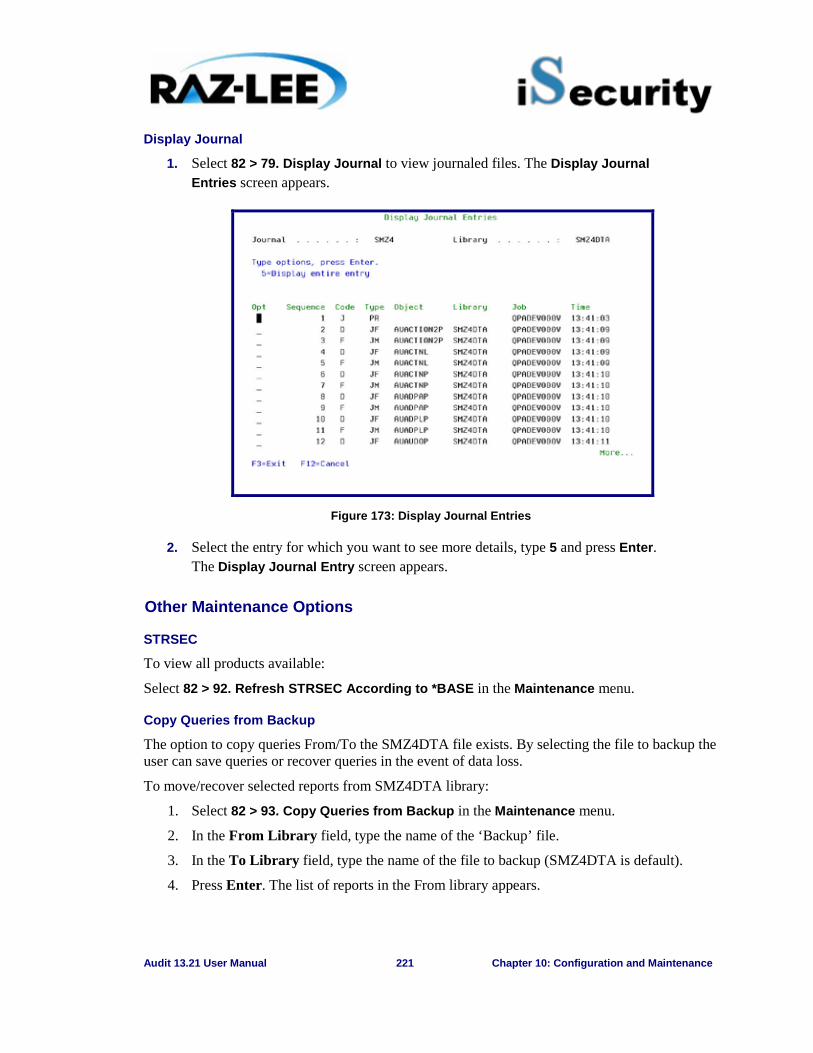
Audit 13.21 User Manual 221 Chapter 10: Configuration and Maintenance
Display Journal
1. Select 82 > 79. Display Journal to view journaled files. The Display Journal Entries screen appears.
Figure 173: Display Journal Entries
2. Select the entry for which you want to see more details, type 5 and press Enter. The Display Journal Entry screen appears.
Other Maintenance Options
STRSEC
To view all products available:
Select 82 > 92. Refresh STRSEC According to *BASE in the Maintenance menu.
Copy Queries from Backup
The option to copy queries From/To the SMZ4DTA file exists. By selecting the file to backup the user can save queries or recover queries in the event of data loss.
To move/recover selected reports from SMZ4DTA library:
1. Select 82 > 93. Copy Queries from Backup in the Maintenance menu.
2. In the From Library field, type the name of the ‘Backup’ file.
3. In the To Library field, type the name of the file to backup (SMZ4DTA is default).
4. Press Enter. The list of reports in the From library appears.
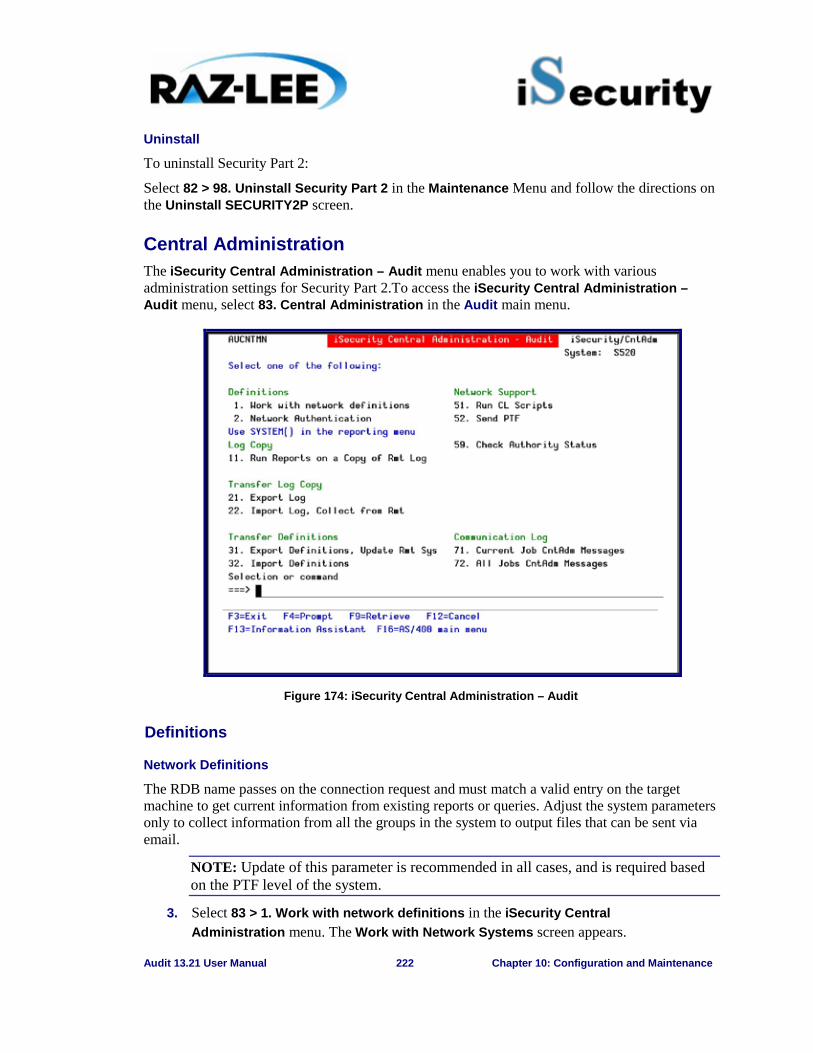
Audit 13.21 User Manual 222 Chapter 10: Configuration and Maintenance
Uninstall
To uninstall Security Part 2:
Select 82 > 98. Uninstall Security Part 2 in the Maintenance Menu and follow the directions on the Uninstall SECURITY2P screen.
Central Administration The iSecurity Central Administration – Audit menu enables you to work with various administration settings for Security Part 2.To access the iSecurity Central Administration – Audit menu, select 83. Central Administration in the Audit main menu.
Figure 174: iSecurity Central Administration – Audit
Definitions
Network Definitions
The RDB name passes on the connection request and must match a valid entry on the target machine to get current information from existing reports or queries. Adjust the system parameters only to collect information from all the groups in the system to output files that can be sent via email.
NOTE: Update of this parameter is recommended in all cases, and is required based on the PTF level of the system.
3. Select 83 > 1. Work with network definitions in the iSecurity Central Administration menu. The Work with Network Systems screen appears.
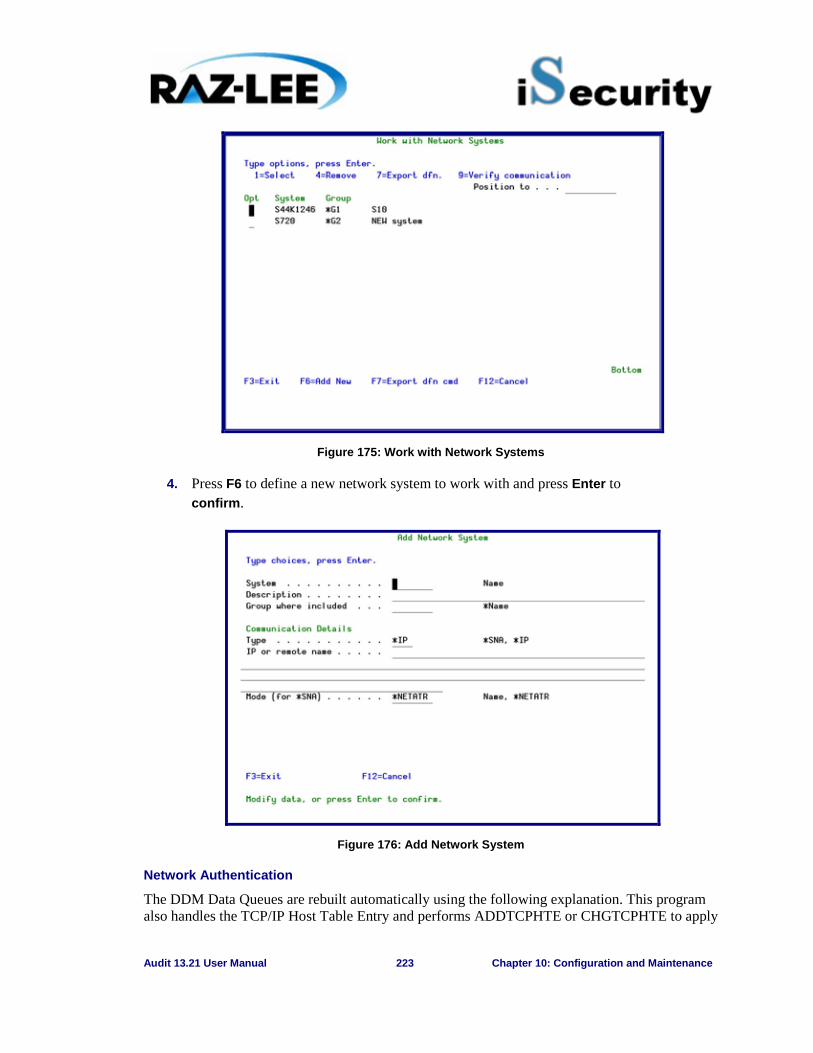
Audit 13.21 User Manual 223 Chapter 10: Configuration and Maintenance
Figure 175: Work with Network Systems
4. Press F6 to define a new network system to work with and press Enter to confirm.
Figure 176: Add Network System
Network Authentication
The DDM Data Queues are rebuilt automatically using the following explanation. This program also handles the TCP/IP Host Table Entry and performs ADDTCPHTE or CHGTCPHTE to apply

Audit 13.21 User Manual 224 Chapter 10: Configuration and Maintenance
the definition automatically. To perform the activity on remote systems, you must define the user SECURITY2P with the same password on all systems and LPARS with the same password.
5. Select 83 > 2. Network Authentication in the iSecurity Central Administration menu. The Network Authentication screen appears.
Figure 177: Work with Network Systems
6. Enter the .SECURITY2P user password twice and press Enter.
Log Copy
Run Reports on a Copy of a Remote System Log
To run the reports on a copy of data library of a remote system
1. Select 83 > 11. Run Reports on a Copy of Rmt Sys Log in the iSecurity Central Administration menu. The Running Locally on a Copy of a Remote System screen appears.

Audit 13.21 User Manual 225 Chapter 10: Configuration and Maintenance
Figure 178: Running Locally on a Copy of a Remote System
2. Select the remote system on whose data you want to run reports.
NOTE: Running on multiple systems with either of the following:
● Merge data to a single output . MRGDTA(*NO),
● Place output on . . . . . . . . OUTON(*SYSTEM)
valid for *, *PRINT-*PRINT9 only.
Selecting other output types such as *HTML, *PDF… may result in unexpected results.
Transfer Log Copy
Export Product Log
You can export a product log to another library. You can filter by date the portion of the log to send.
1. Select 83 > 21. Export Product Log in the iSecurity Central Administration menu. The Export iSecurity/BASE Log (EXPS2LOG) screen appears.

Audit 13.21 User Manual 226 Chapter 10: Configuration and Maintenance
Figure 179: Export iSecurity/BASE Log (EXPS2LOG)
Parameter Description To library Type the name of the library to receive the log. Starting date Type the starting date of the range to extract from, or choose
one of the following: *CURRENT *YESTERDAY *WEEKSTR *PRVWEEKS *MONTHSTR *PRVMONTHS *YEARSTR *PRVYEARS *MON *TUE *WED *THU *FRI *SAT *SUN
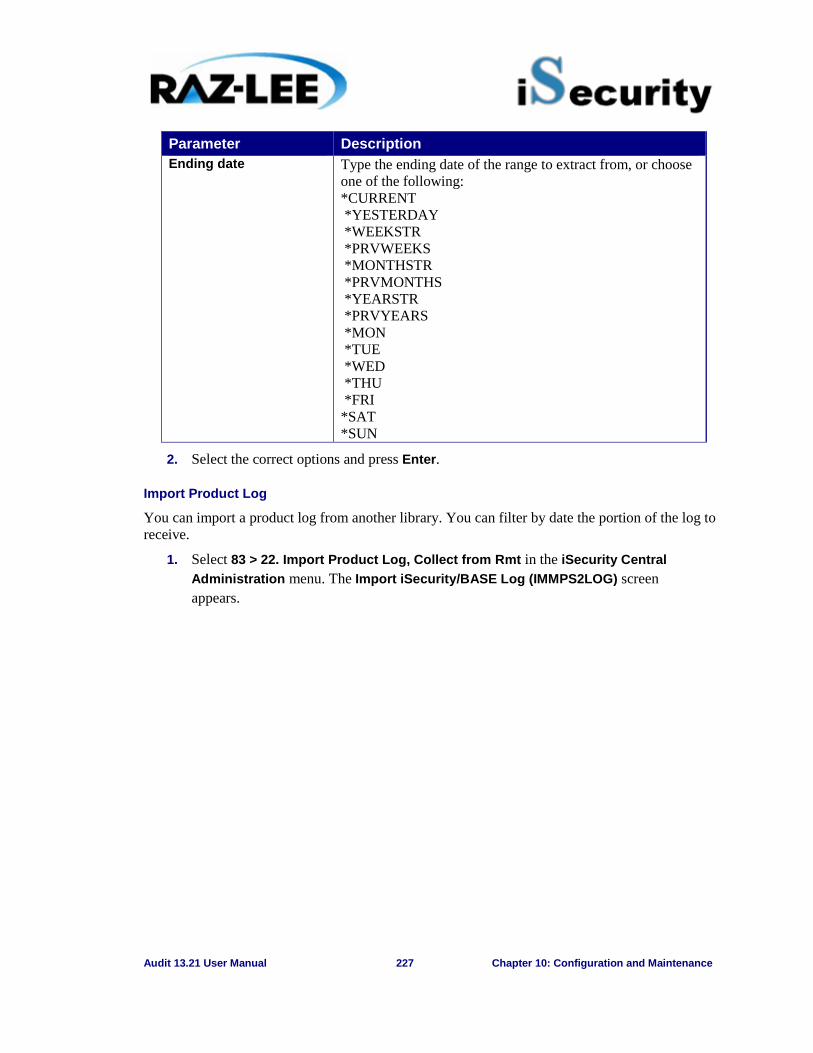
Audit 13.21 User Manual 227 Chapter 10: Configuration and Maintenance
Parameter Description Ending date Type the ending date of the range to extract from, or choose
one of the following: *CURRENT *YESTERDAY *WEEKSTR *PRVWEEKS *MONTHSTR *PRVMONTHS *YEARSTR *PRVYEARS *MON *TUE *WED *THU *FRI *SAT *SUN
2. Select the correct options and press Enter.
Import Product Log
You can import a product log from another library. You can filter by date the portion of the log to receive.
1. Select 83 > 22. Import Product Log, Collect from Rmt in the iSecurity Central Administration menu. The Import iSecurity/BASE Log (IMMPS2LOG) screen appears.

Audit 13.21 User Manual 228 Chapter 10: Configuration and Maintenance
Figure 180: Import iSecurity/BASE Log (IMPS2LOG)
Parameter Description From input type *LIB
*SAVF *NET
System to import from Only if the input type is *NET Type the name of the system to import from *ALL
Work library Only if the input type is *LIB Type the name of the Library to import from
From save file Only if the input type is *SAVF Type the name of the SAVF to import from
From library Only if the input type is * SAVF Type the name of the library that contains the SAVF *LIBL
To data library extension *SYSTEM

Audit 13.21 User Manual 229 Chapter 10: Configuration and Maintenance
Parameter Description Starting date Type the starting date of the range to receive from, or choose
one of the following: *CURRENT *YESTERDAY *WEEKSTR *PRVWEEKS *MONTHSTR *PRVMONTHS *YEARSTR *PRVYEARS *MON *TUE *WED *THU *FRI *SAT *SUN
Ending date Type the ending date of the range to receive from, or choose one of the following: *CURRENT *YESTERDAY *WEEKSTR *PRVWEEKS *MONTHSTR *PRVMONTHS *YEARSTR *PRVYEARS *MON *TUE *WED *THU *FRI *SAT *SUN
2. Select the correct options and press Enter.
Transfer Definitions
Export Definitions
You can export your Audit definitions to another computer.
1. Select 83 > 31. Export Definitions, Update Rmt Sys in the iSecurity Central Administration menu. The Export iSecurity/BASE Defns. (EXPS2DFN) screen appears.
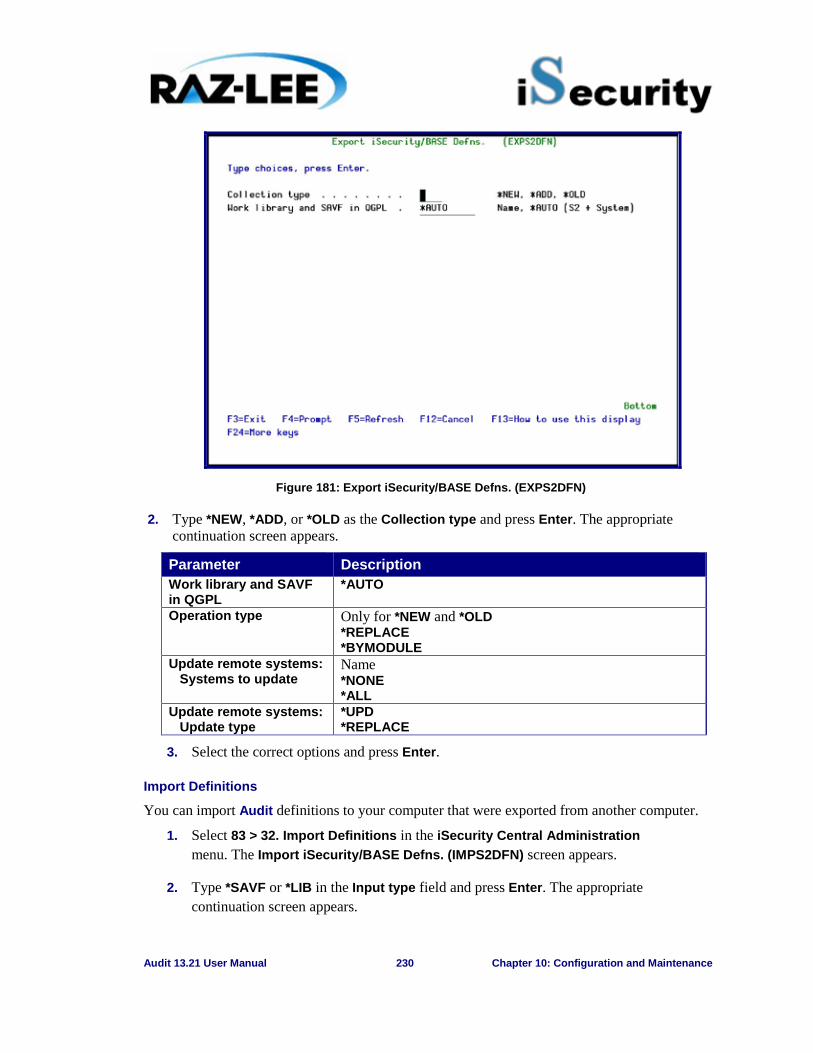
Audit 13.21 User Manual 230 Chapter 10: Configuration and Maintenance
Figure 181: Export iSecurity/BASE Defns. (EXPS2DFN)
2. Type *NEW, *ADD, or *OLD as the Collection type and press Enter. The appropriate continuation screen appears.
Parameter Description Work library and SAVF in QGPL
*AUTO
Operation type Only for *NEW and *OLD *REPLACE *BYMODULE
Update remote systems: Systems to update
Name *NONE *ALL
Update remote systems: Update type
*UPD *REPLACE
3. Select the correct options and press Enter.
Import Definitions
You can import Audit definitions to your computer that were exported from another computer.
1. Select 83 > 32. Import Definitions in the iSecurity Central Administration menu. The Import iSecurity/BASE Defns. (IMPS2DFN) screen appears.
2. Type *SAVF or *LIB in the Input type field and press Enter. The appropriate continuation screen appears.
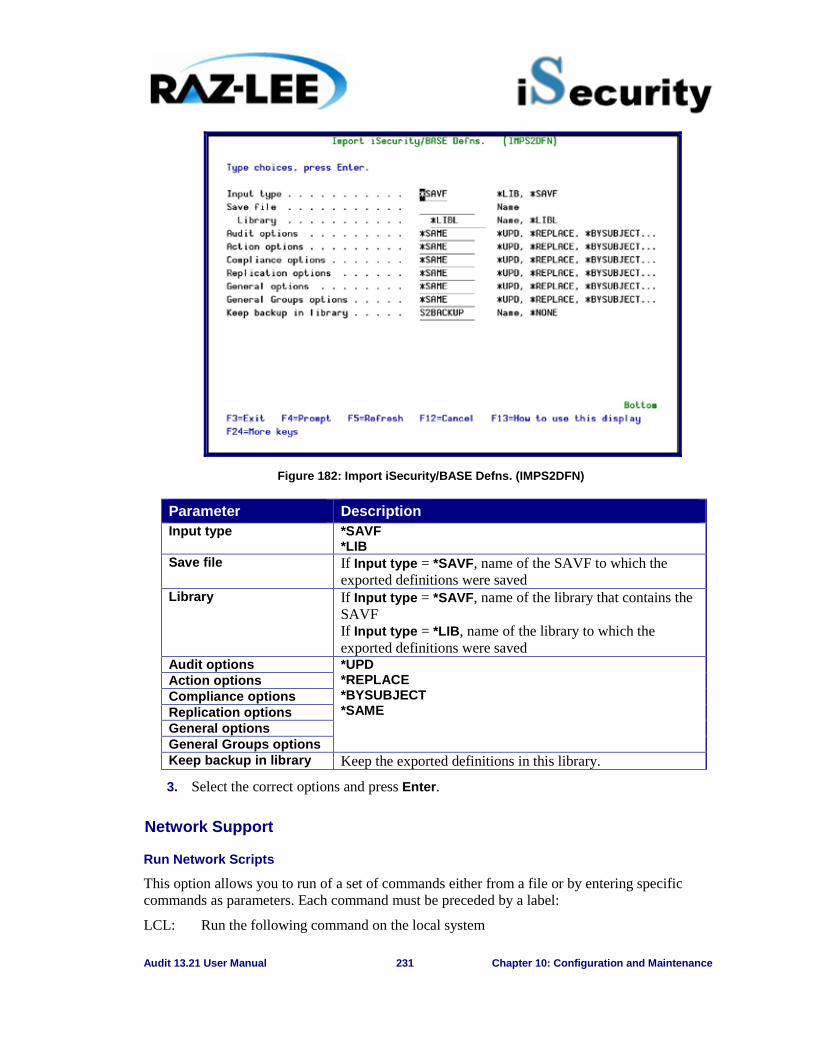
Audit 13.21 User Manual 231 Chapter 10: Configuration and Maintenance
Figure 182: Import iSecurity/BASE Defns. (IMPS2DFN)
Parameter Description Input type *SAVF
*LIB Save file If Input type = *SAVF, name of the SAVF to which the
exported definitions were saved Library If Input type = *SAVF, name of the library that contains the
SAVF If Input type = *LIB, name of the library to which the exported definitions were saved
Audit options *UPD *REPLACE *BYSUBJECT *SAME
Action options Compliance options Replication options General options General Groups options Keep backup in library Keep the exported definitions in this library.
3. Select the correct options and press Enter.
Network Support
Run Network Scripts
This option allows you to run of a set of commands either from a file or by entering specific commands as parameters. Each command must be preceded by a label:
LCL: Run the following command on the local system
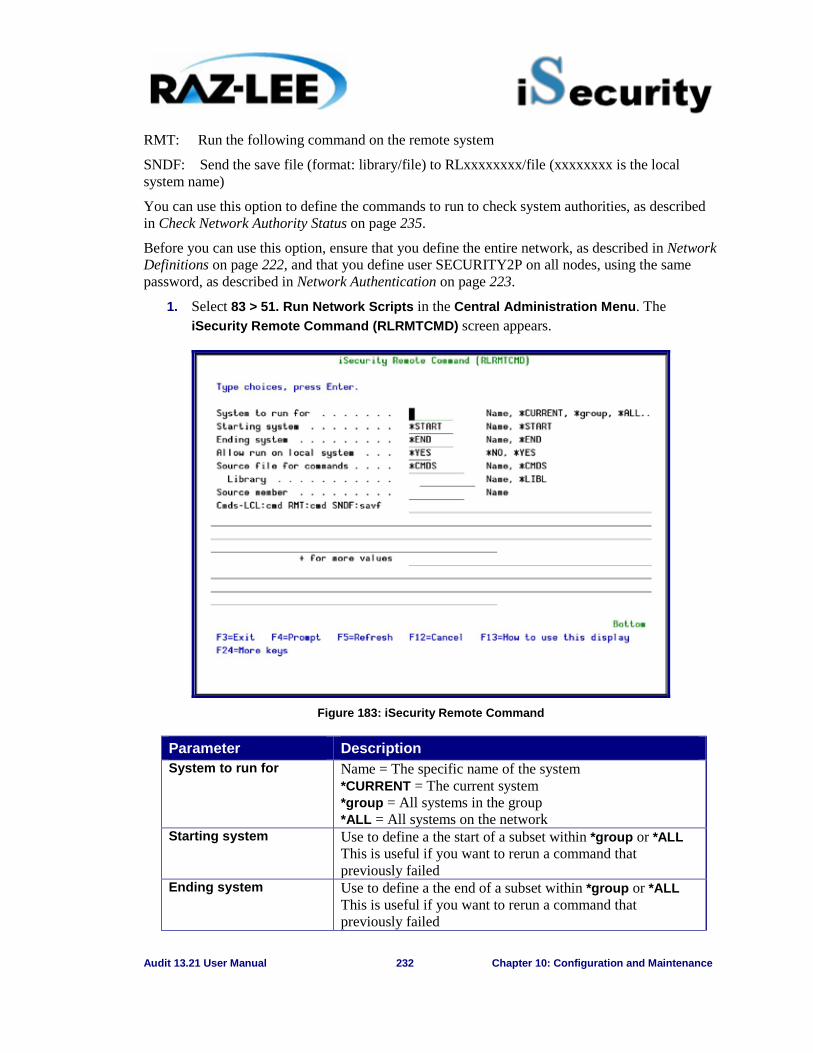
Audit 13.21 User Manual 232 Chapter 10: Configuration and Maintenance
RMT: Run the following command on the remote system
SNDF: Send the save file (format: library/file) to RLxxxxxxxx/file (xxxxxxxx is the local system name)
You can use this option to define the commands to run to check system authorities, as described in Check Network Authority Status on page 235.
Before you can use this option, ensure that you define the entire network, as described in Network Definitions on page 222, and that you define user SECURITY2P on all nodes, using the same password, as described in Network Authentication on page 223.
1. Select 83 > 51. Run Network Scripts in the Central Administration Menu. The iSecurity Remote Command (RLRMTCMD) screen appears.
Figure 183: iSecurity Remote Command
Parameter Description System to run for Name = The specific name of the system
*CURRENT = The current system *group = All systems in the group *ALL = All systems on the network
Starting system Use to define a the start of a subset within *group or *ALL This is useful if you want to rerun a command that previously failed
Ending system Use to define a the end of a subset within *group or *ALL This is useful if you want to rerun a command that previously failed
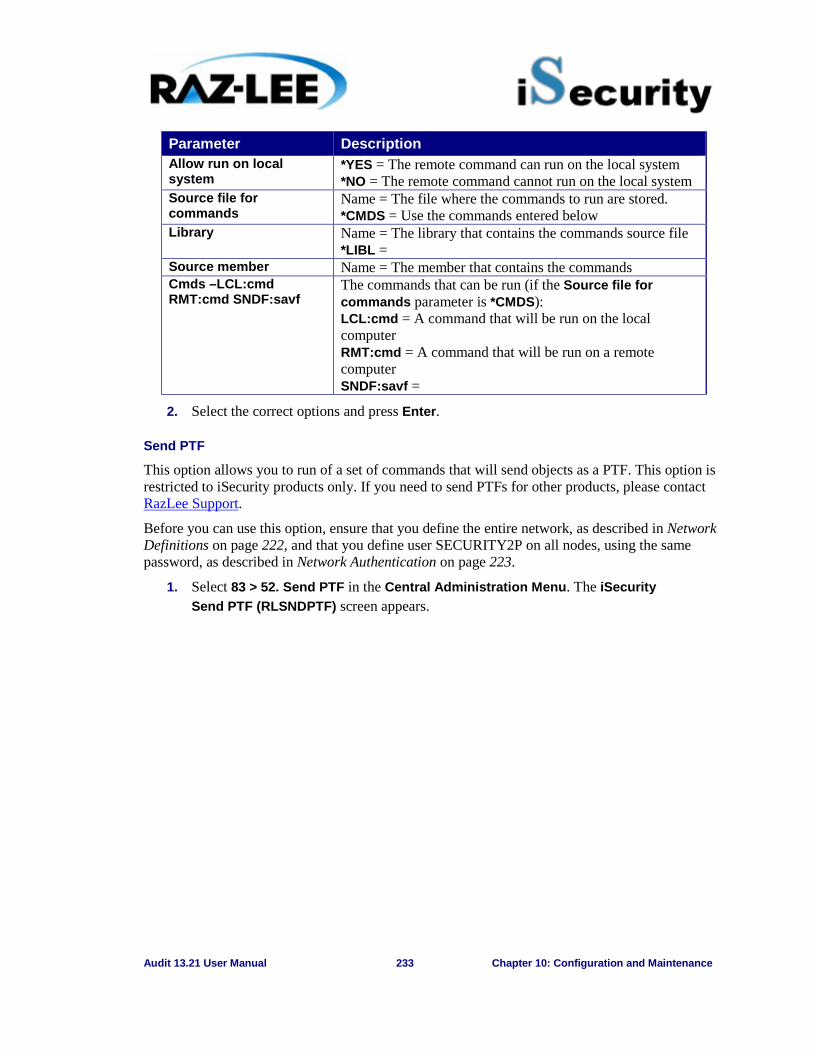
Audit 13.21 User Manual 233 Chapter 10: Configuration and Maintenance
Parameter Description Allow run on local system
*YES = The remote command can run on the local system *NO = The remote command cannot run on the local system
Source file for commands
Name = The file where the commands to run are stored. *CMDS = Use the commands entered below
Library Name = The library that contains the commands source file *LIBL =
Source member Name = The member that contains the commands Cmds –LCL:cmd RMT:cmd SNDF:savf
The commands that can be run (if the Source file for commands parameter is *CMDS): LCL:cmd = A command that will be run on the local computer RMT:cmd = A command that will be run on a remote computer SNDF:savf =
2. Select the correct options and press Enter.
Send PTF
This option allows you to run of a set of commands that will send objects as a PTF. This option is restricted to iSecurity products only. If you need to send PTFs for other products, please contact RazLee Support.
Before you can use this option, ensure that you define the entire network, as described in Network Definitions on page 222, and that you define user SECURITY2P on all nodes, using the same password, as described in Network Authentication on page 223.
1. Select 83 > 52. Send PTF in the Central Administration Menu. The iSecurity Send PTF (RLSNDPTF) screen appears.
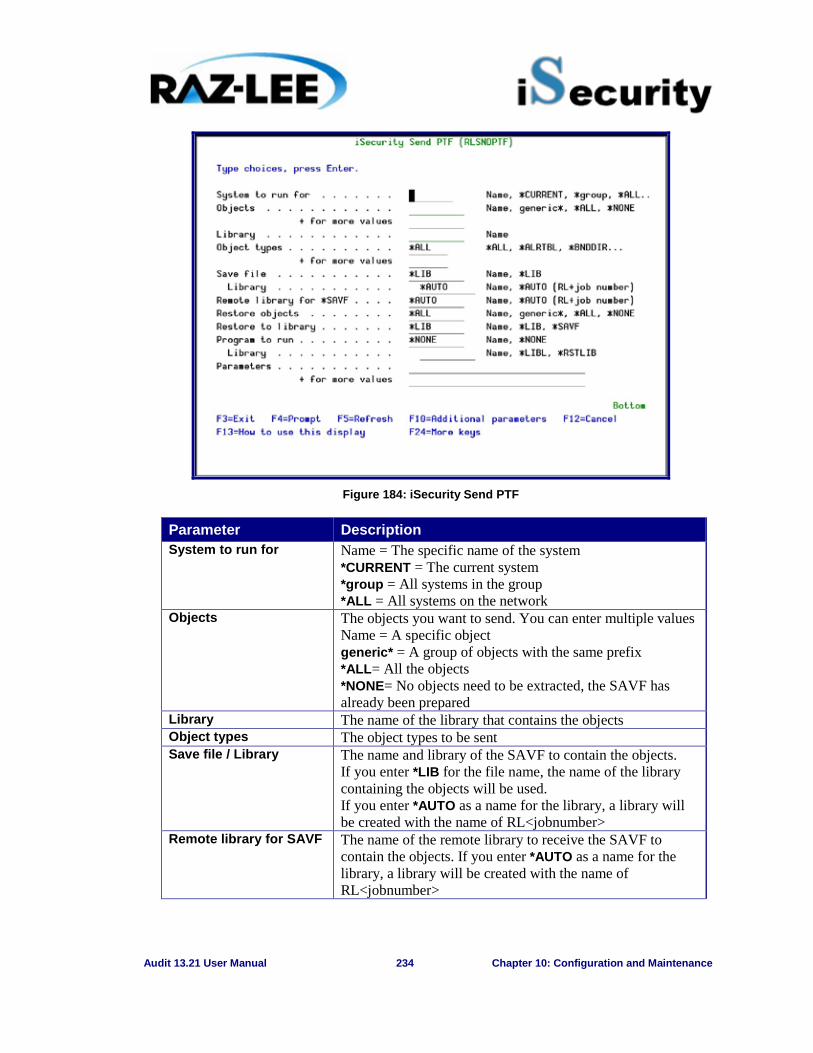
Audit 13.21 User Manual 234 Chapter 10: Configuration and Maintenance
Figure 184: iSecurity Send PTF
Parameter Description System to run for Name = The specific name of the system
*CURRENT = The current system *group = All systems in the group *ALL = All systems on the network
Objects The objects you want to send. You can enter multiple values Name = A specific object generic* = A group of objects with the same prefix *ALL= All the objects *NONE= No objects need to be extracted, the SAVF has already been prepared
Library The name of the library that contains the objects Object types The object types to be sent Save file / Library The name and library of the SAVF to contain the objects.
If you enter *LIB for the file name, the name of the library containing the objects will be used. If you enter *AUTO as a name for the library, a library will be created with the name of RL<jobnumber>
Remote library for SAVF The name of the remote library to receive the SAVF to contain the objects. If you enter *AUTO as a name for the library, a library will be created with the name of RL<jobnumber>

Audit 13.21 User Manual 235 Chapter 10: Configuration and Maintenance
Parameter Description Restore objects The objects to be restored
Name = A specific object generic* = A group of objects with the same prefix *ALL= Restore all objects *NONE= Do not restore any objects
Restore to library The name of the library to receive the restored objects Name = A specific library *LIB = the name of the original library containing the objects will be used. *SAVF= the same name as the SAVF
Program to run / Library The name and library of a program to run after the objects have been restored.
Parameters The parameters for the program that runs after the restore.
2. Select the correct options and press Enter.
Check Network Authority Status
You can set up the system so that the local *SYSOPR will get messages for all network wide authority problems.
Before you run this command, you must allow the system to run network commands and scripts. For more details, see Run Network Scripts on page 231.
3. Select 83 > 59. Check Network Authority Status in the Central Administration Menu. The Check Razlee Authorization screen appears.
Figure 185: Check Razlee Authorization
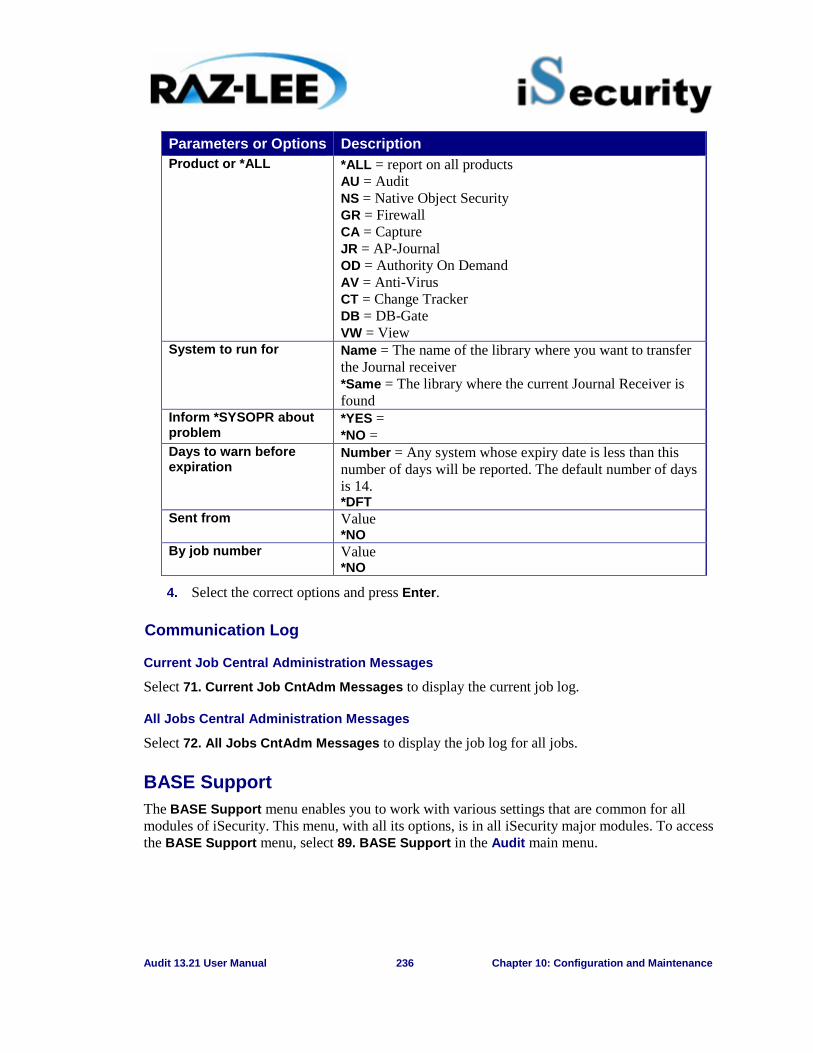
Audit 13.21 User Manual 236 Chapter 10: Configuration and Maintenance
Parameters or Options Description Product or *ALL *ALL = report on all products
AU = Audit NS = Native Object Security GR = Firewall CA = Capture JR = AP-Journal OD = Authority On Demand AV = Anti-Virus CT = Change Tracker DB = DB-Gate VW = View
System to run for Name = The name of the library where you want to transfer the Journal receiver *Same = The library where the current Journal Receiver is found
Inform *SYSOPR about problem
*YES = *NO =
Days to warn before expiration
Number = Any system whose expiry date is less than this number of days will be reported. The default number of days is 14. *DFT
Sent from Value *NO
By job number Value *NO
4. Select the correct options and press Enter.
Communication Log
Current Job Central Administration Messages
Select 71. Current Job CntAdm Messages to display the current job log.
All Jobs Central Administration Messages
Select 72. All Jobs CntAdm Messages to display the job log for all jobs.
BASE Support The BASE Support menu enables you to work with various settings that are common for all modules of iSecurity. This menu, with all its options, is in all iSecurity major modules. To access the BASE Support menu, select 89. BASE Support in the Audit main menu.
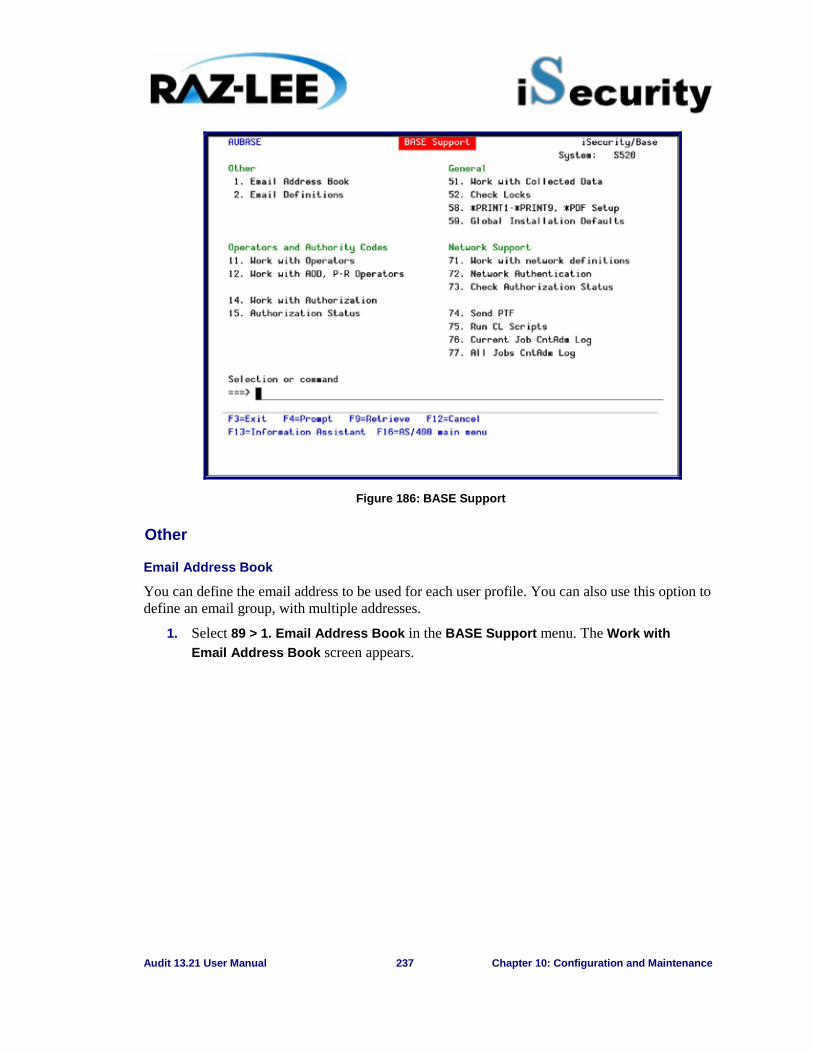
Audit 13.21 User Manual 237 Chapter 10: Configuration and Maintenance
Figure 186: BASE Support
Other
Email Address Book
You can define the email address to be used for each user profile. You can also use this option to define an email group, with multiple addresses.
1. Select 89 > 1. Email Address Book in the BASE Support menu. The Work with Email Address Book screen appears.
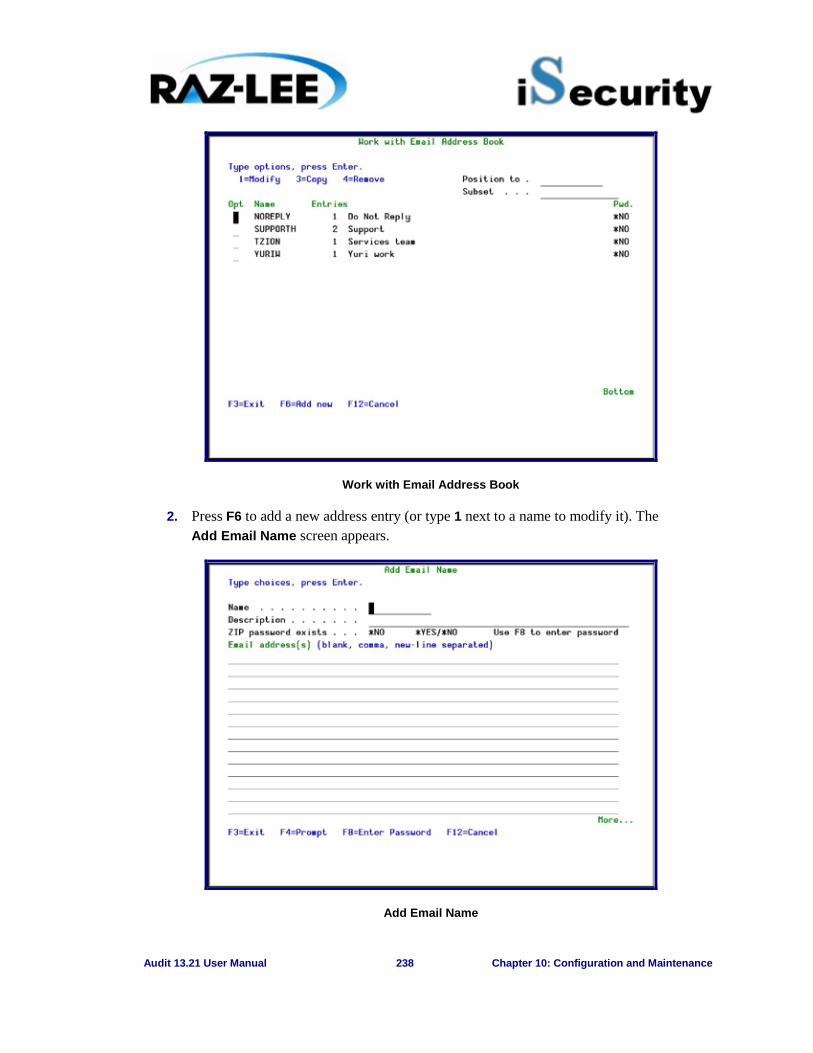
Audit 13.21 User Manual 238 Chapter 10: Configuration and Maintenance
Work with Email Address Book
2. Press F6 to add a new address entry (or type 1 next to a name to modify it). The Add Email Name screen appears.
Add Email Name
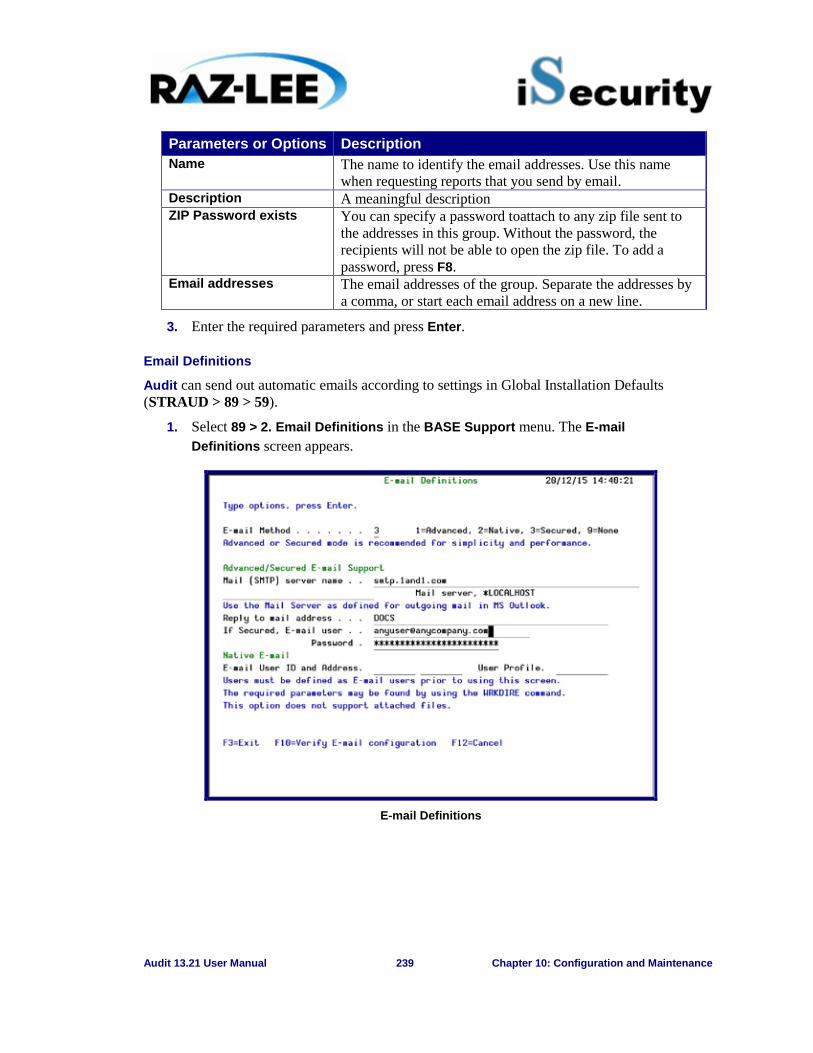
Audit 13.21 User Manual 239 Chapter 10: Configuration and Maintenance
Parameters or Options Description Name The name to identify the email addresses. Use this name
when requesting reports that you send by email. Description A meaningful description ZIP Password exists You can specify a password toattach to any zip file sent to
the addresses in this group. Without the password, the recipients will not be able to open the zip file. To add a password, press F8.
Email addresses The email addresses of the group. Separate the addresses by a comma, or start each email address on a new line.
3. Enter the required parameters and press Enter.
Email Definitions
Audit can send out automatic emails according to settings in Global Installation Defaults (STRAUD > 89 > 59).
1. Select 89 > 2. Email Definitions in the BASE Support menu. The E-mail Definitions screen appears.
E-mail Definitions
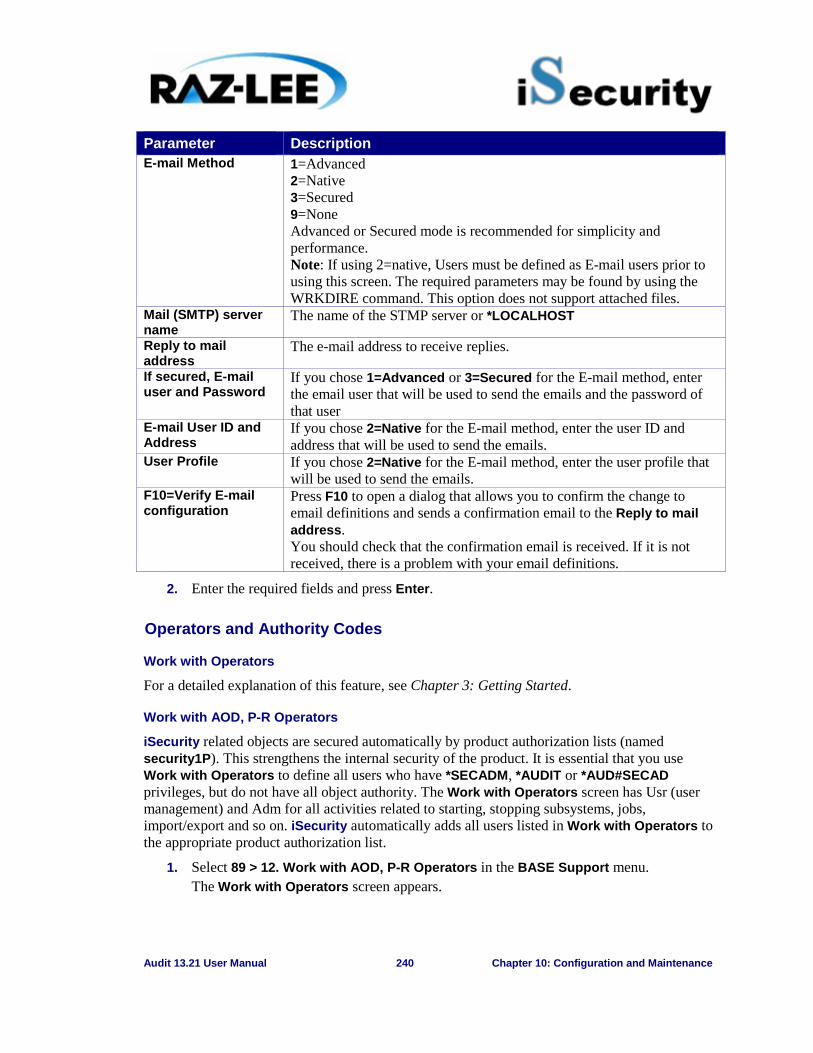
Audit 13.21 User Manual 240 Chapter 10: Configuration and Maintenance
Parameter Description E-mail Method 1=Advanced
2=Native 3=Secured 9=None Advanced or Secured mode is recommended for simplicity and performance. Note: If using 2=native, Users must be defined as E-mail users prior to using this screen. The required parameters may be found by using the WRKDIRE command. This option does not support attached files.
Mail (SMTP) server name
The name of the STMP server or *LOCALHOST
Reply to mail address
The e-mail address to receive replies.
If secured, E-mail user and Password
If you chose 1=Advanced or 3=Secured for the E-mail method, enter the email user that will be used to send the emails and the password of that user
E-mail User ID and Address
If you chose 2=Native for the E-mail method, enter the user ID and address that will be used to send the emails.
User Profile If you chose 2=Native for the E-mail method, enter the user profile that will be used to send the emails.
F10=Verify E-mail configuration
Press F10 to open a dialog that allows you to confirm the change to email definitions and sends a confirmation email to the Reply to mail address. You should check that the confirmation email is received. If it is not received, there is a problem with your email definitions.
2. Enter the required fields and press Enter.
Operators and Authority Codes
Work with Operators
For a detailed explanation of this feature, see Chapter 3: Getting Started.
Work with AOD, P-R Operators
iSecurity related objects are secured automatically by product authorization lists (named security1P). This strengthens the internal security of the product. It is essential that you use Work with Operators to define all users who have *SECADM, *AUDIT or *AUD#SECAD privileges, but do not have all object authority. The Work with Operators screen has Usr (user management) and Adm for all activities related to starting, stopping subsystems, jobs, import/export and so on. iSecurity automatically adds all users listed in Work with Operators to the appropriate product authorization list.
1. Select 89 > 12. Work with AOD, P-R Operators in the BASE Support menu. The Work with Operators screen appears.
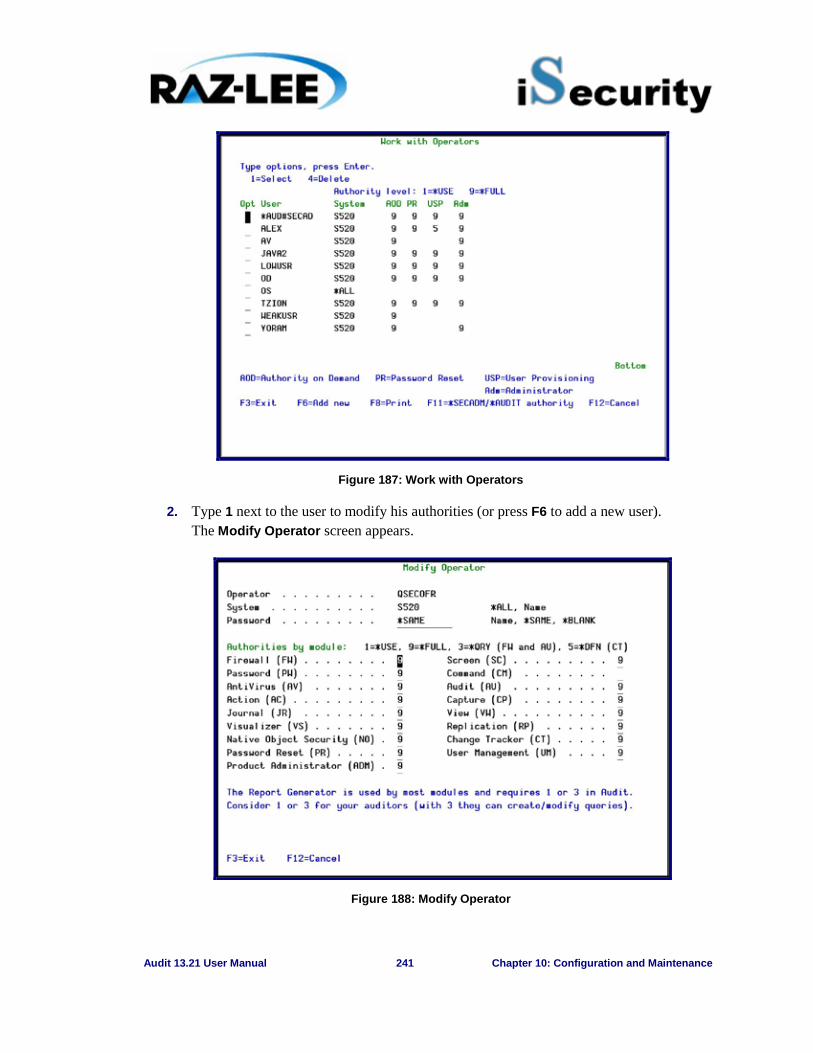
Audit 13.21 User Manual 241 Chapter 10: Configuration and Maintenance
Figure 187: Work with Operators
2. Type 1 next to the user to modify his authorities (or press F6 to add a new user). The Modify Operator screen appears.
Figure 188: Modify Operator
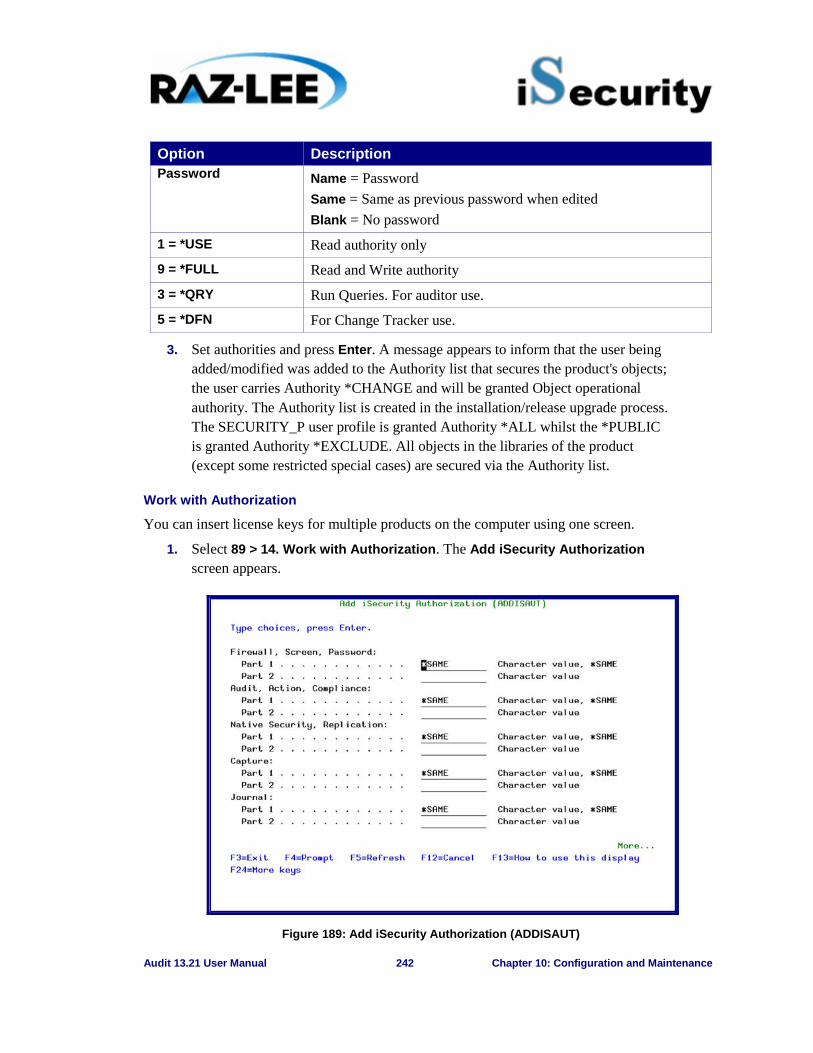
Audit 13.21 User Manual 242 Chapter 10: Configuration and Maintenance
3. Set authorities and press Enter. A message appears to inform that the user being added/modified was added to the Authority list that secures the product's objects; the user carries Authority *CHANGE and will be granted Object operational authority. The Authority list is created in the installation/release upgrade process. The SECURITY_P user profile is granted Authority *ALL whilst the *PUBLIC is granted Authority *EXCLUDE. All objects in the libraries of the product (except some restricted special cases) are secured via the Authority list.
Work with Authorization
You can insert license keys for multiple products on the computer using one screen.
1. Select 89 > 14. Work with Authorization. The Add iSecurity Authorization screen appears.
Figure 189: Add iSecurity Authorization (ADDISAUT)
Option Description Password Name = Password
Same = Same as previous password when edited Blank = No password
1 = *USE Read authority only
9 = *FULL Read and Write authority 3 = *QRY Run Queries. For auditor use. 5 = *DFN For Change Tracker use.

Audit 13.21 User Manual 243 Chapter 10: Configuration and Maintenance
2. Enter the required parameters and press Enter.
Display Authorization Status
You can display the current authorization status of all installed iSecurity products on the local system.
1. Select 89 > 15. Authorization Status. The Status of iSecurity Authorization screen appears.
Figure 190: Status of iSecurity Authority Codes
2. Select a specific line and type 1 in the Opt field to see the authority details of one specific product.
NOTE: Codes that will expire in less than 14 days appear in pink Permanent codes have deliberately been hidden in this screenshot.
General
Work with Collected Data
Administrators can view summaries of Audit, Firewall, and Action journal contents by day, showing the number of entries for each day together with the amount of disk space occupied. Administrators can optionally delete individual days to conserve disk space.
1. Select 89 > 51. Work with Collected Data. The Work with Collected Data screen appears.
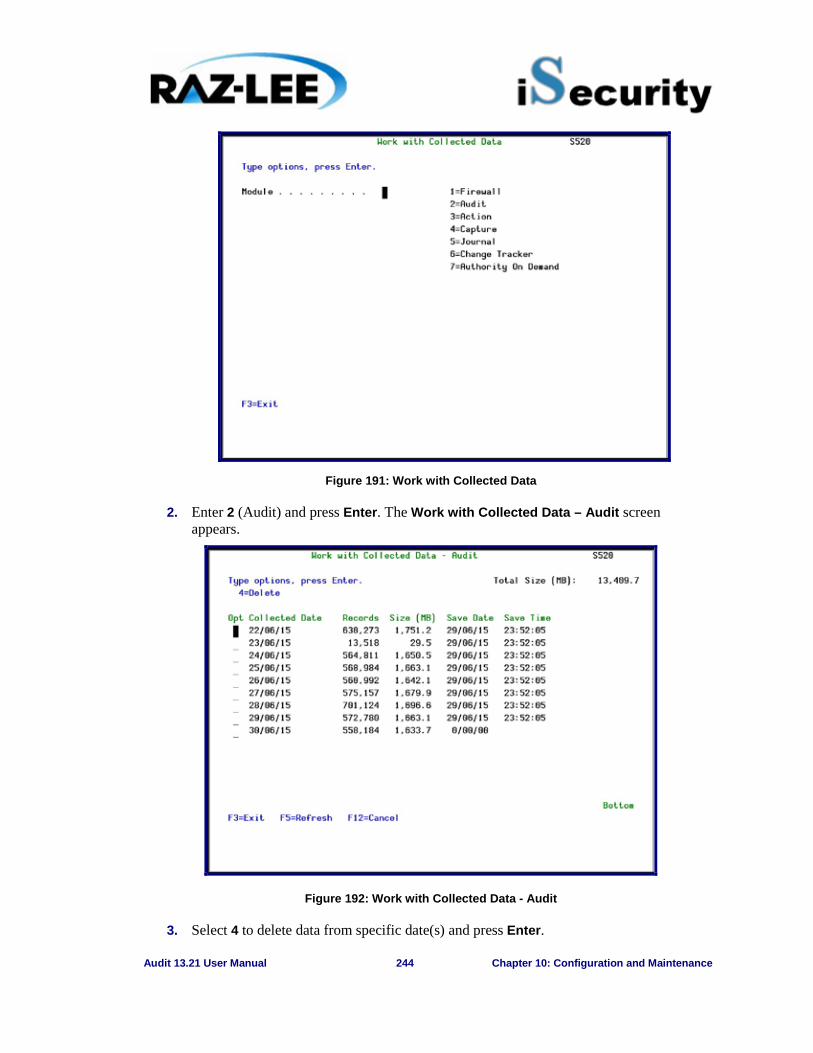
Audit 13.21 User Manual 244 Chapter 10: Configuration and Maintenance
Figure 191: Work with Collected Data
2. Enter 2 (Audit) and press Enter. The Work with Collected Data – Audit screen appears.
Figure 192: Work with Collected Data - Audit
3. Select 4 to delete data from specific date(s) and press Enter.
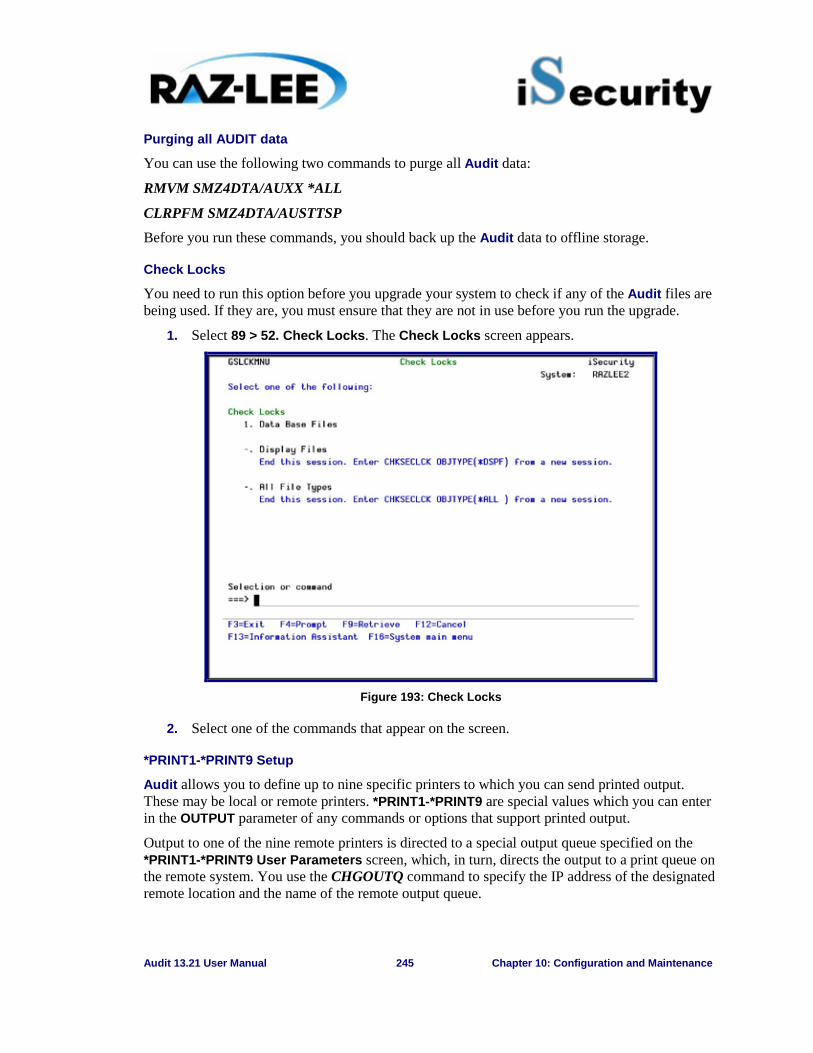
Audit 13.21 User Manual 245 Chapter 10: Configuration and Maintenance
Purging all AUDIT data
You can use the following two commands to purge all Audit data:
RMVM SMZ4DTA/AUXX *ALL
CLRPFM SMZ4DTA/AUSTTSP
Before you run these commands, you should back up the Audit data to offline storage.
Check Locks
You need to run this option before you upgrade your system to check if any of the Audit files are being used. If they are, you must ensure that they are not in use before you run the upgrade.
1. Select 89 > 52. Check Locks. The Check Locks screen appears.
Figure 193: Check Locks
2. Select one of the commands that appear on the screen.
*PRINT1-*PRINT9 Setup
Audit allows you to define up to nine specific printers to which you can send printed output. These may be local or remote printers. *PRINT1-*PRINT9 are special values which you can enter in the OUTPUT parameter of any commands or options that support printed output.
Output to one of the nine remote printers is directed to a special output queue specified on the *PRINT1-*PRINT9 User Parameters screen, which, in turn, directs the output to a print queue on the remote system. You use the CHGOUTQ command to specify the IP address of the designated remote location and the name of the remote output queue.
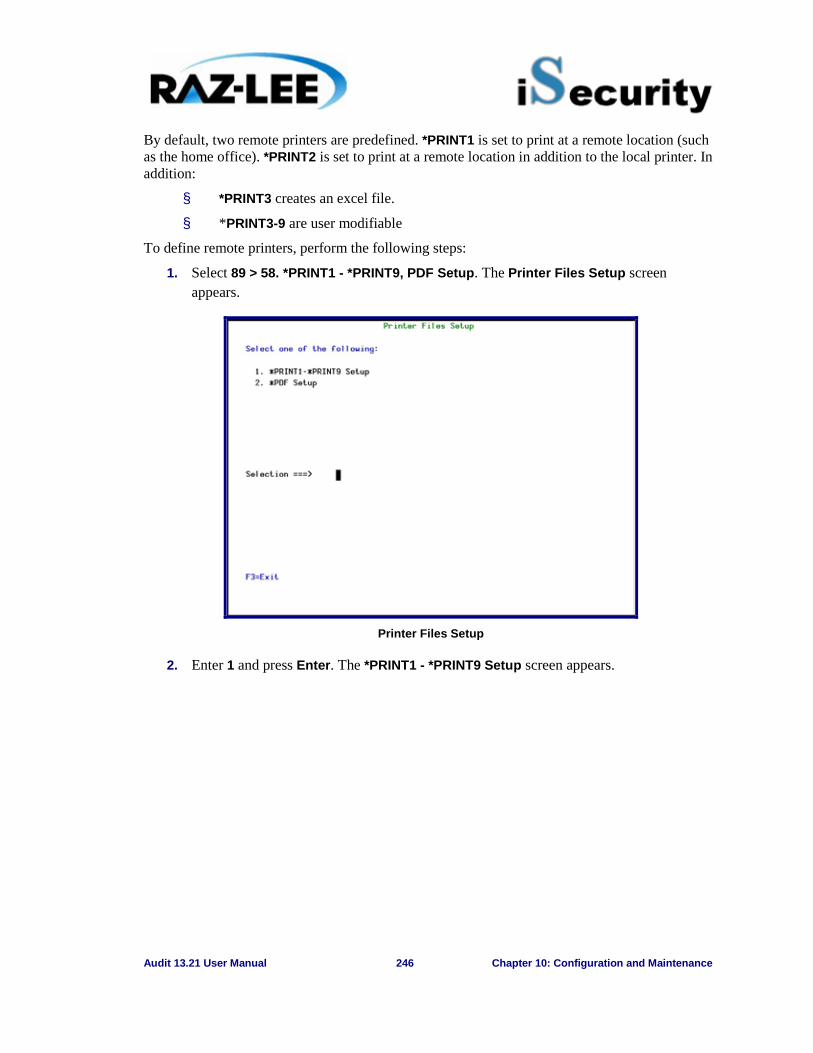
Audit 13.21 User Manual 246 Chapter 10: Configuration and Maintenance
By default, two remote printers are predefined. *PRINT1 is set to print at a remote location (such as the home office). *PRINT2 is set to print at a remote location in addition to the local printer. In addition:
§ *PRINT3 creates an excel file.
§ *PRINT3-9 are user modifiable
To define remote printers, perform the following steps:
1. Select 89 > 58. *PRINT1 - *PRINT9, PDF Setup. The Printer Files Setup screen appears.
Printer Files Setup
2. Enter 1 and press Enter. The *PRINT1 - *PRINT9 Setup screen appears.
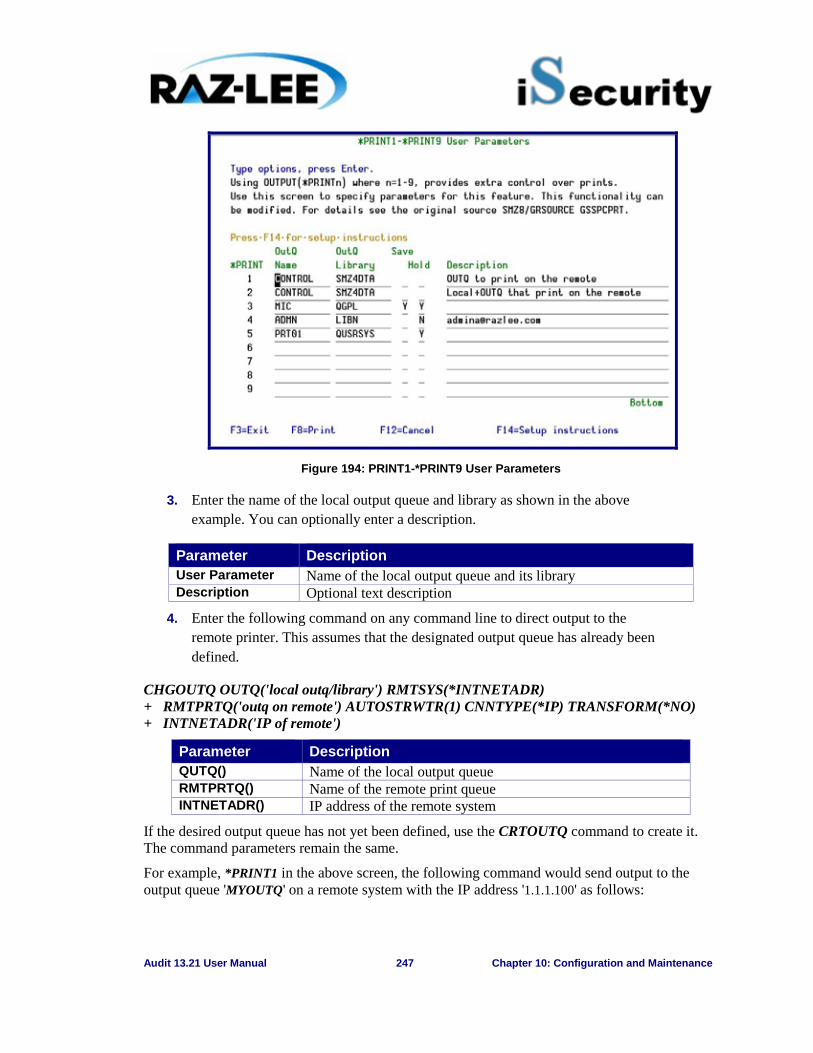
Audit 13.21 User Manual 247 Chapter 10: Configuration and Maintenance
Figure 194: PRINT1-*PRINT9 User Parameters
3. Enter the name of the local output queue and library as shown in the above example. You can optionally enter a description.
Parameter Description User Parameter Name of the local output queue and its library Description Optional text description
4. Enter the following command on any command line to direct output to the remote printer. This assumes that the designated output queue has already been defined.
CHGOUTQ OUTQ('local outq/library') RMTSYS(*INTNETADR) + RMTPRTQ('outq on remote') AUTOSTRWTR(1) CNNTYPE(*IP) TRANSFORM(*NO) + INTNETADR('IP of remote')
Parameter Description QUTQ() Name of the local output queue RMTPRTQ() Name of the remote print queue INTNETADR() IP address of the remote system
If the desired output queue has not yet been defined, use the CRTOUTQ command to create it. The command parameters remain the same.
For example, *PRINT1 in the above screen, the following command would send output to the output queue 'MYOUTQ' on a remote system with the IP address '1.1.1.100' as follows:
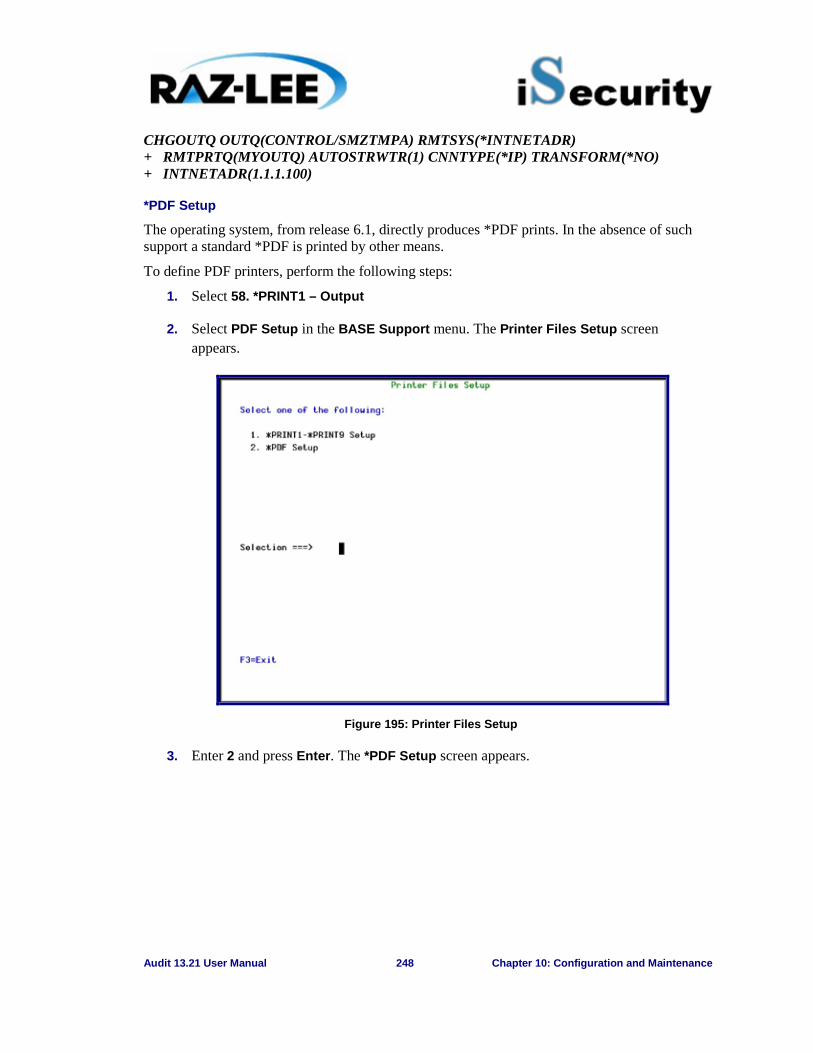
Audit 13.21 User Manual 248 Chapter 10: Configuration and Maintenance
CHGOUTQ OUTQ(CONTROL/SMZTMPA) RMTSYS(*INTNETADR) + RMTPRTQ(MYOUTQ) AUTOSTRWTR(1) CNNTYPE(*IP) TRANSFORM(*NO) + INTNETADR(1.1.1.100)
*PDF Setup
The operating system, from release 6.1, directly produces *PDF prints. In the absence of such support a standard *PDF is printed by other means.
To define PDF printers, perform the following steps:
1. Select 58. *PRINT1 – Output
2. Select PDF Setup in the BASE Support menu. The Printer Files Setup screen appears.
Figure 195: Printer Files Setup
3. Enter 2 and press Enter. The *PDF Setup screen appears.
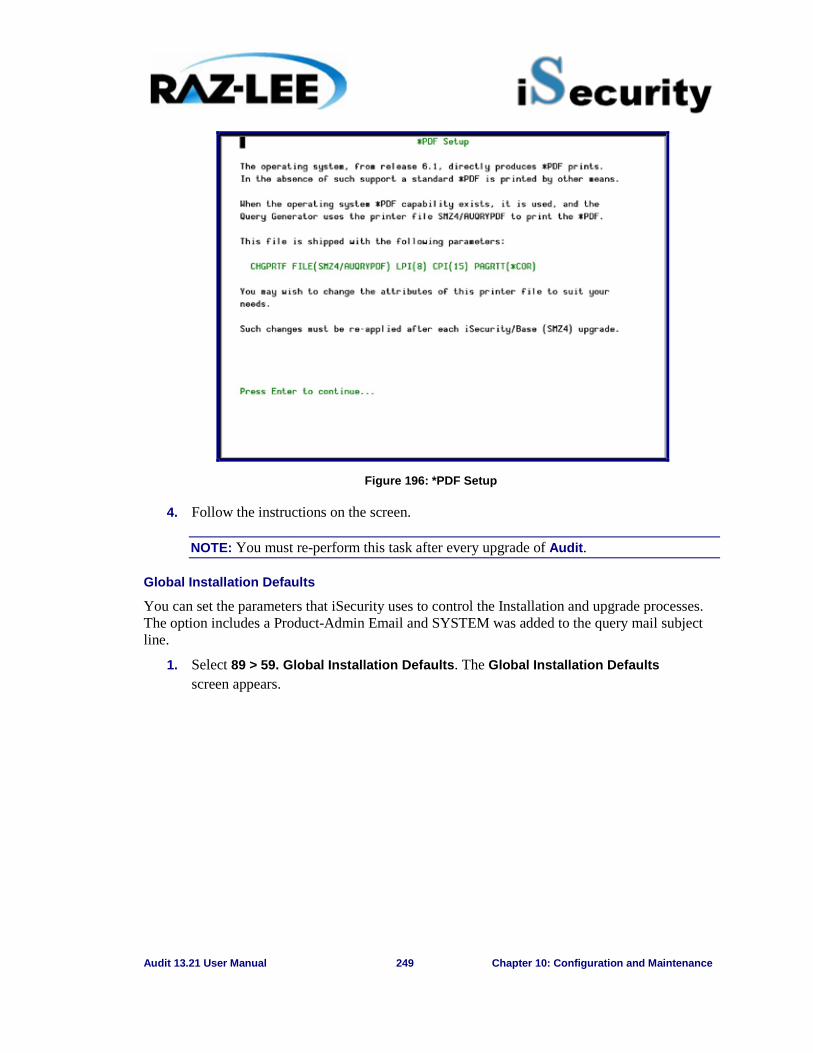
Audit 13.21 User Manual 249 Chapter 10: Configuration and Maintenance
Figure 196: *PDF Setup
4. Follow the instructions on the screen.
NOTE: You must re-perform this task after every upgrade of Audit.
Global Installation Defaults
You can set the parameters that iSecurity uses to control the Installation and upgrade processes. The option includes a Product-Admin Email and SYSTEM was added to the query mail subject line.
1. Select 89 > 59. Global Installation Defaults. The Global Installation Defaults screen appears.
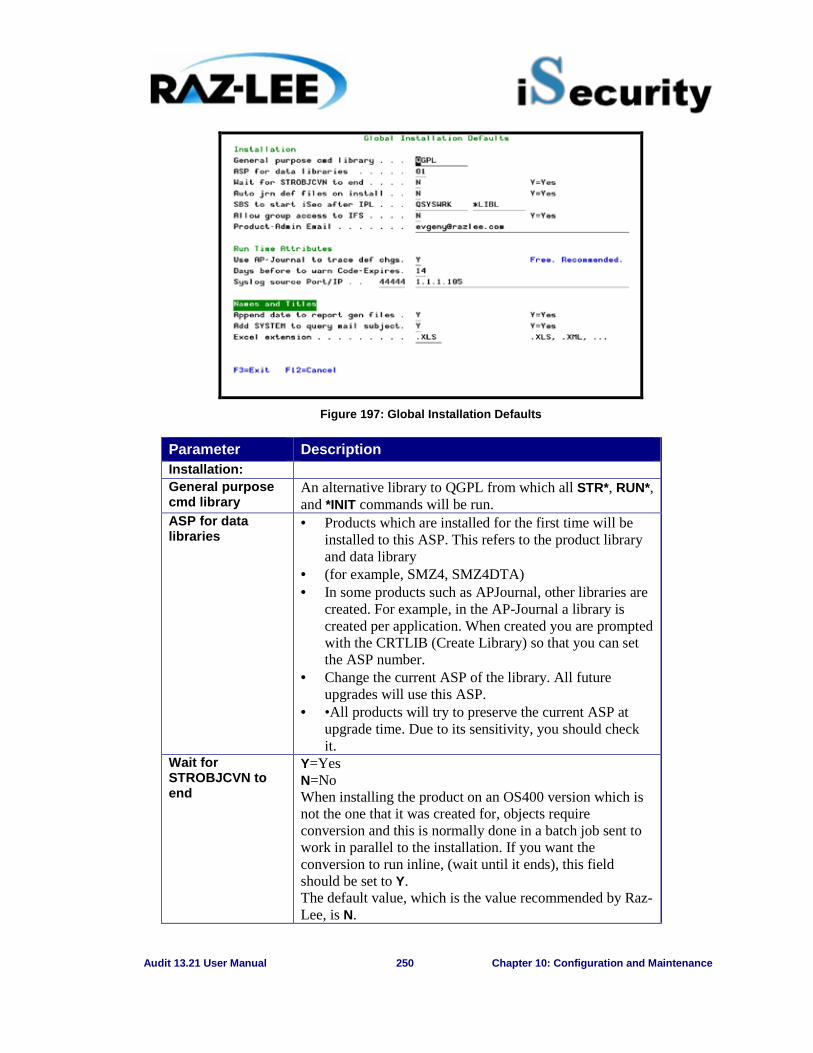
Audit 13.21 User Manual 250 Chapter 10: Configuration and Maintenance
Figure 197: Global Installation Defaults
Parameter Description Installation: General purpose cmd library
An alternative library to QGPL from which all STR*, RUN*, and *INIT commands will be run.
ASP for data libraries
· Products which are installed for the first time will be installed to this ASP. This refers to the product library and data library
· (for example, SMZ4, SMZ4DTA) · In some products such as APJournal, other libraries are
created. For example, in the AP-Journal a library is created per application. When created you are prompted with the CRTLIB (Create Library) so that you can set the ASP number.
· Change the current ASP of the library. All future upgrades will use this ASP.
· •All products will try to preserve the current ASP at upgrade time. Due to its sensitivity, you should check it.
Wait for STROBJCVN to end
Y=Yes N=No When installing the product on an OS400 version which is not the one that it was created for, objects require conversion and this is normally done in a batch job sent to work in parallel to the installation. If you want the conversion to run inline, (wait until it ends), this field should be set to Y. The default value, which is the value recommended by Raz-Lee, is N.
Audit 13.21 User Manual 251 Chapter 10: Configuration and Maintenance
Parameter Description Auto jrn def files on install
Y=Yes N=No
SBS to start iSec after IPL
The Subsystem name and library to use for the Autostart Job.
Allow group access to IFS
Y=Yes N=No Allow access to IFS from group profiles.
Product-Admin Email
The email of the product admin to send automated messages to.
Run Time Attributes:
Use AP-Journal to trace def changes
Y=Yes N=No
Days before code expir. to warn
All products whose authorization expires in less than this number of days are reported as an exception. Enter a number between 01 and 99. The default is 14 days.
Syslog Source Port/IP
The source port for Syslog UDP.
Name and Titles: Append date to report gen files
Y=Yes N=No
Add SYSTEM to query mail subject
Y=Yes N=No
Excel extension The extension to be used when creating Excel files
2. Enter your required parameters and press Enter.
NOTE: You should not change any of the values in this screen without first consulting with Raz-Lee support staff at [email protected].
Network Support
Work with network definitions
To get current information from existing report or query. Adjusting the system parameters only, to collect information from all the groups in the system to output files that can be sent via email.
1. Select 89 > 71. Work with network definitions. The Work with Network Systems screen appears.
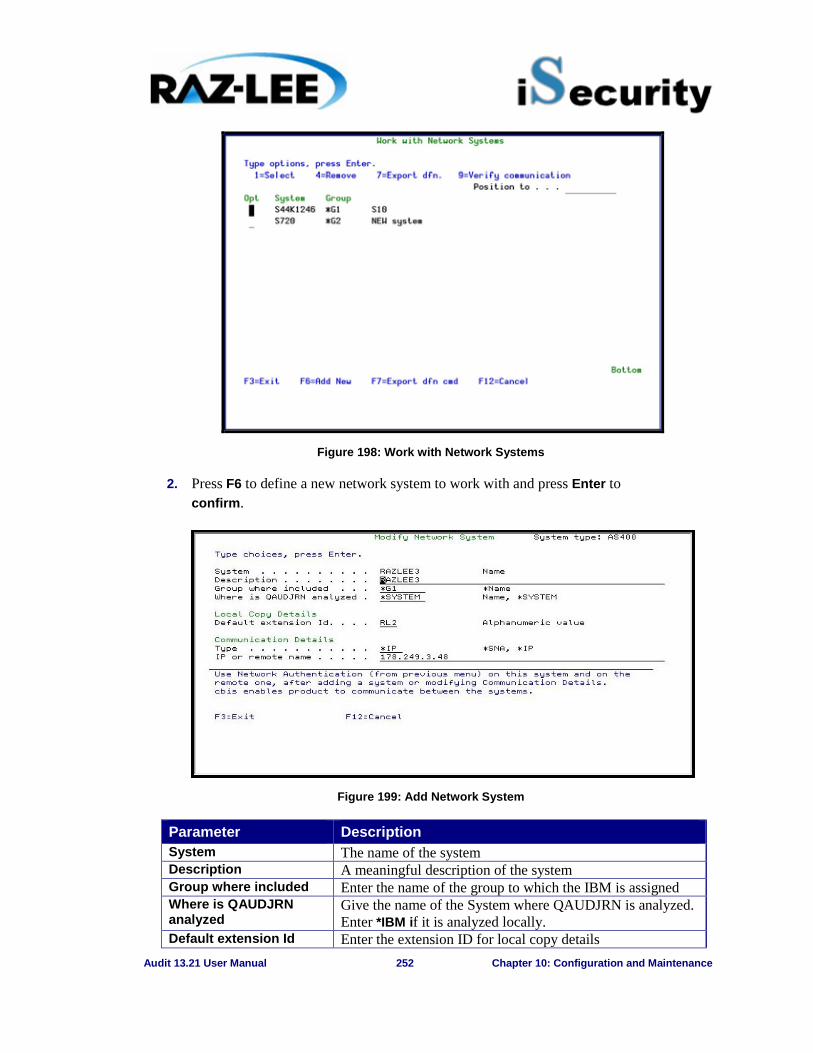
Audit 13.21 User Manual 252 Chapter 10: Configuration and Maintenance
Figure 198: Work with Network Systems
2. Press F6 to define a new network system to work with and press Enter to confirm.
Figure 199: Add Network System
Parameter Description System The name of the system Description A meaningful description of the system Group where included Enter the name of the group to which the IBM is assigned Where is QAUDJRN analyzed
Give the name of the System where QAUDJRN is analyzed. Enter *IBM if it is analyzed locally.
Default extension Id Enter the extension ID for local copy details
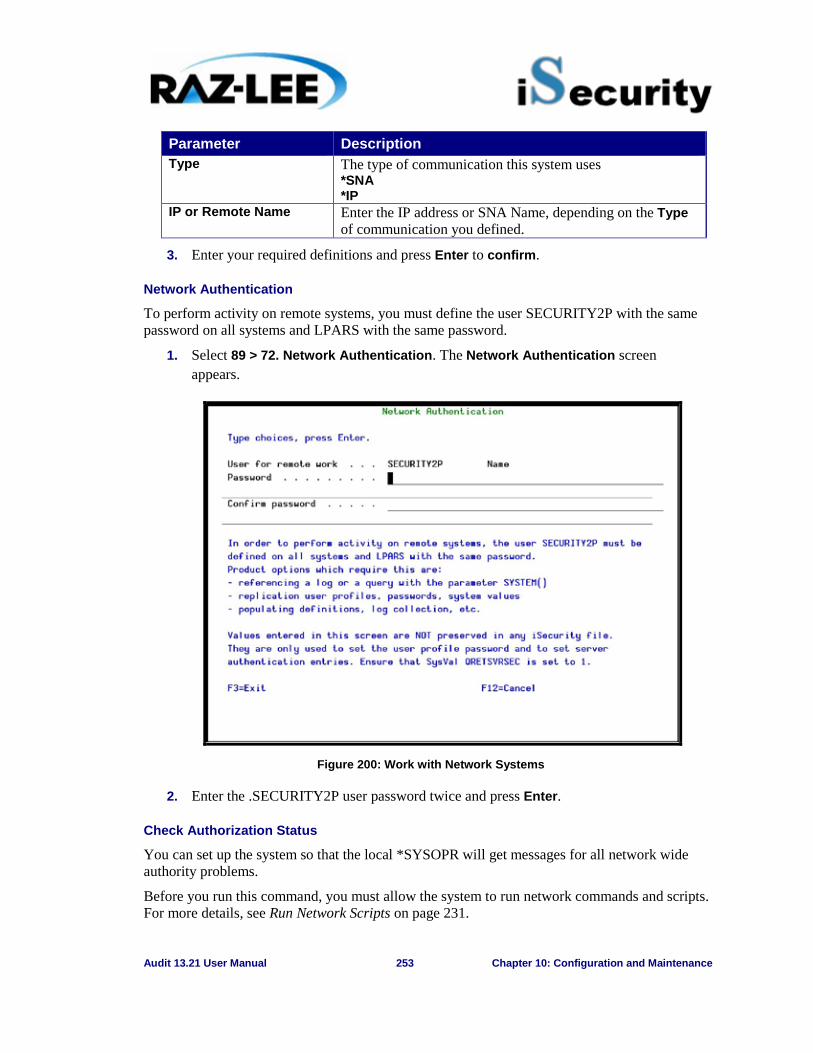
Audit 13.21 User Manual 253 Chapter 10: Configuration and Maintenance
Parameter Description Type The type of communication this system uses
*SNA *IP
IP or Remote Name Enter the IP address or SNA Name, depending on the Type of communication you defined.
3. Enter your required definitions and press Enter to confirm.
Network Authentication
To perform activity on remote systems, you must define the user SECURITY2P with the same password on all systems and LPARS with the same password.
1. Select 89 > 72. Network Authentication. The Network Authentication screen appears.
Figure 200: Work with Network Systems
2. Enter the .SECURITY2P user password twice and press Enter.
Check Authorization Status
You can set up the system so that the local *SYSOPR will get messages for all network wide authority problems.
Before you run this command, you must allow the system to run network commands and scripts. For more details, see Run Network Scripts on page 231.
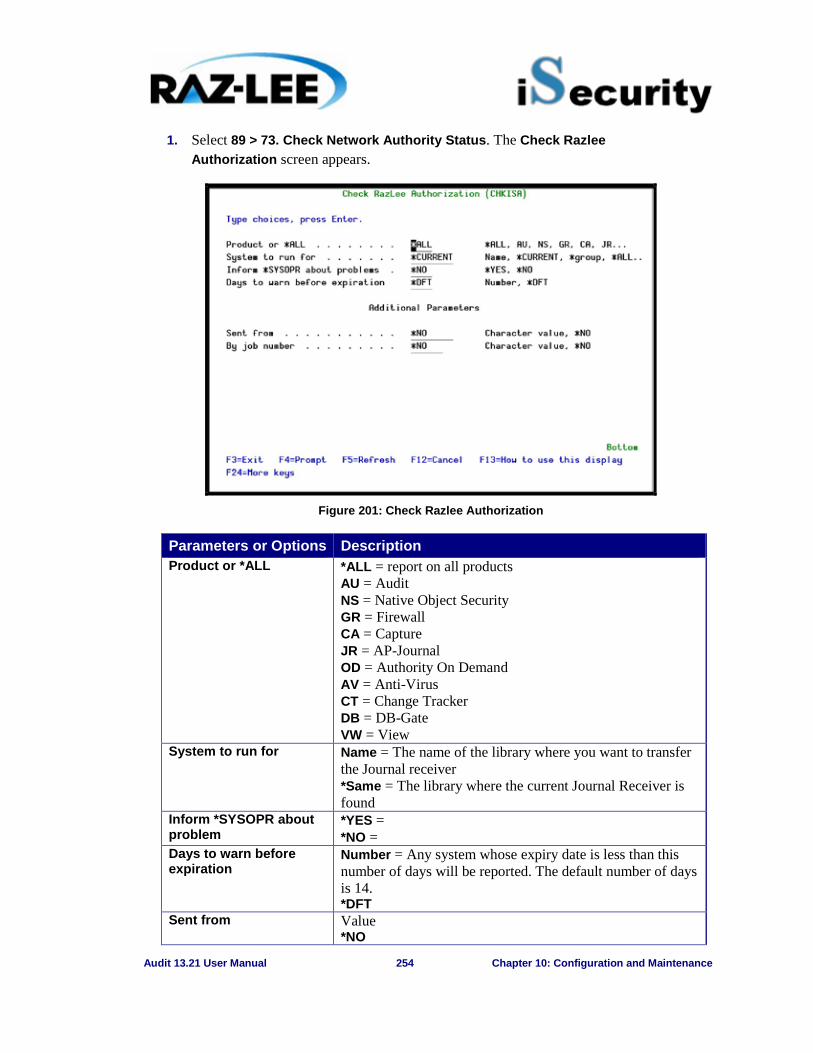
Audit 13.21 User Manual 254 Chapter 10: Configuration and Maintenance
1. Select 89 > 73. Check Network Authority Status. The Check Razlee Authorization screen appears.
Figure 201: Check Razlee Authorization
Parameters or Options Description Product or *ALL *ALL = report on all products
AU = Audit NS = Native Object Security GR = Firewall CA = Capture JR = AP-Journal OD = Authority On Demand AV = Anti-Virus CT = Change Tracker DB = DB-Gate VW = View
System to run for Name = The name of the library where you want to transfer the Journal receiver *Same = The library where the current Journal Receiver is found
Inform *SYSOPR about problem
*YES = *NO =
Days to warn before expiration
Number = Any system whose expiry date is less than this number of days will be reported. The default number of days is 14. *DFT
Sent from Value *NO
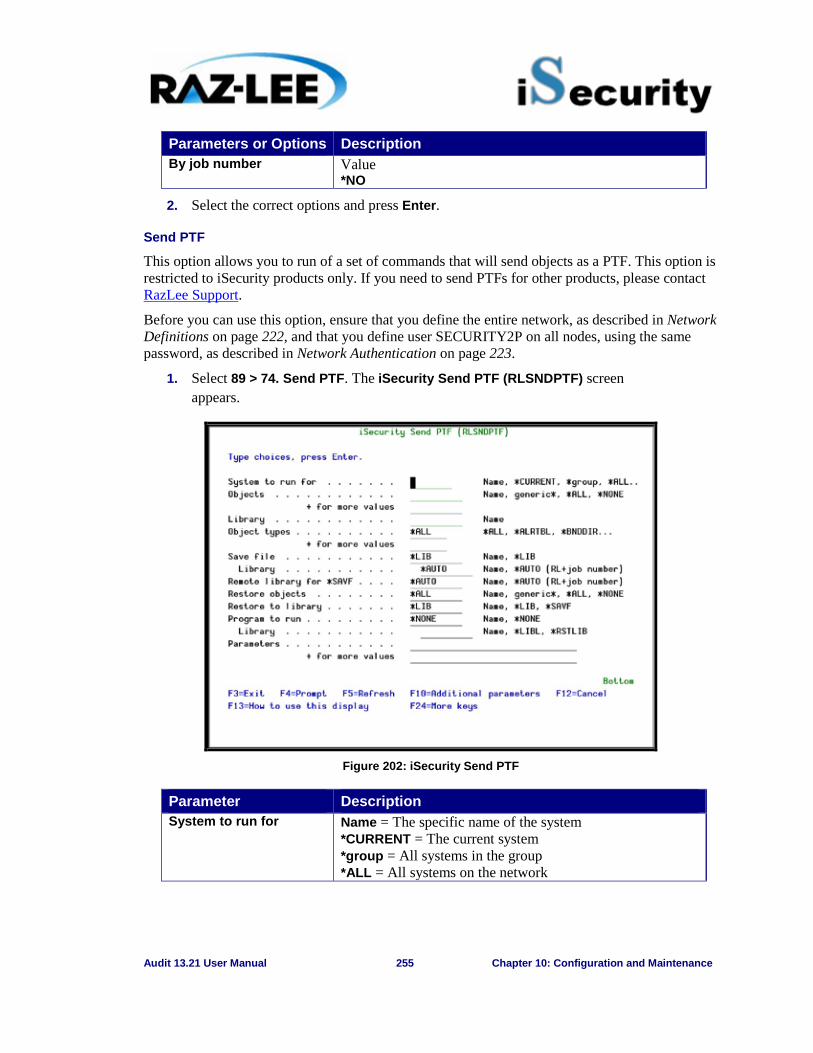
Audit 13.21 User Manual 255 Chapter 10: Configuration and Maintenance
Parameters or Options Description By job number Value
*NO
2. Select the correct options and press Enter.
Send PTF
This option allows you to run of a set of commands that will send objects as a PTF. This option is restricted to iSecurity products only. If you need to send PTFs for other products, please contact RazLee Support.
Before you can use this option, ensure that you define the entire network, as described in Network Definitions on page 222, and that you define user SECURITY2P on all nodes, using the same password, as described in Network Authentication on page 223.
1. Select 89 > 74. Send PTF. The iSecurity Send PTF (RLSNDPTF) screen appears.
Figure 202: iSecurity Send PTF
Parameter Description System to run for Name = The specific name of the system
*CURRENT = The current system *group = All systems in the group *ALL = All systems on the network
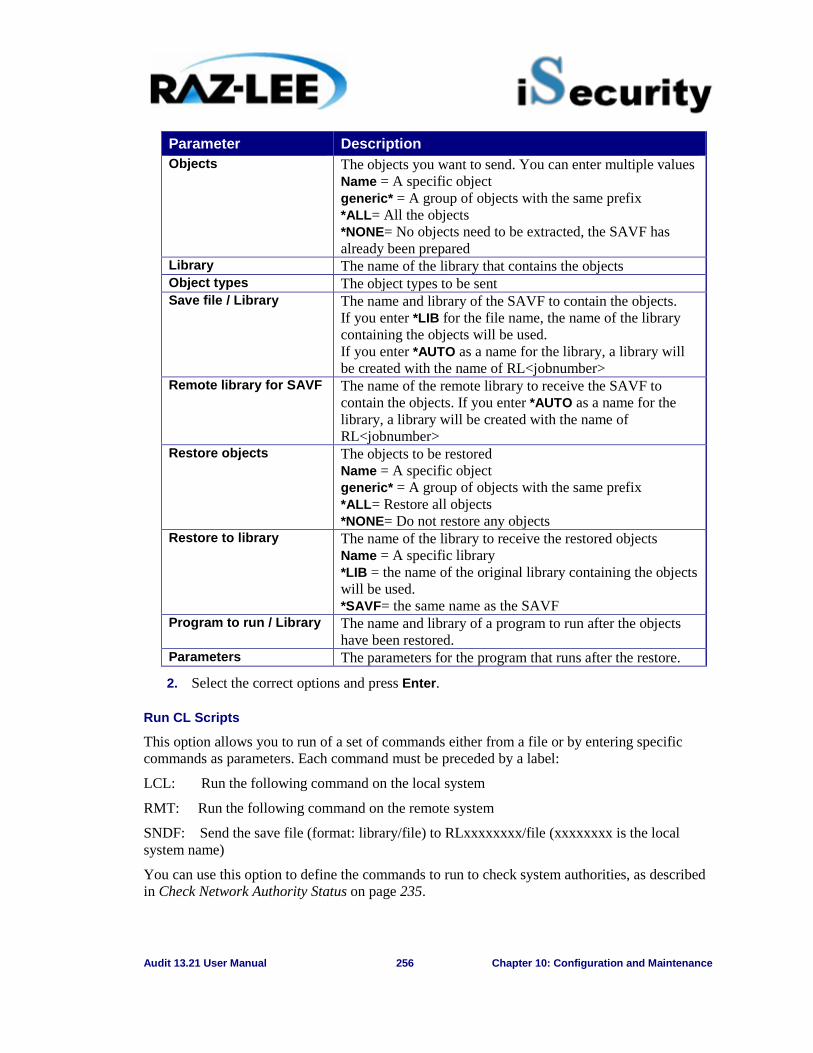
Audit 13.21 User Manual 256 Chapter 10: Configuration and Maintenance
Parameter Description Objects The objects you want to send. You can enter multiple values
Name = A specific object generic* = A group of objects with the same prefix *ALL= All the objects *NONE= No objects need to be extracted, the SAVF has already been prepared
Library The name of the library that contains the objects Object types The object types to be sent Save file / Library The name and library of the SAVF to contain the objects.
If you enter *LIB for the file name, the name of the library containing the objects will be used. If you enter *AUTO as a name for the library, a library will be created with the name of RL<jobnumber>
Remote library for SAVF The name of the remote library to receive the SAVF to contain the objects. If you enter *AUTO as a name for the library, a library will be created with the name of RL<jobnumber>
Restore objects The objects to be restored Name = A specific object generic* = A group of objects with the same prefix *ALL= Restore all objects *NONE= Do not restore any objects
Restore to library The name of the library to receive the restored objects Name = A specific library *LIB = the name of the original library containing the objects will be used. *SAVF= the same name as the SAVF
Program to run / Library The name and library of a program to run after the objects have been restored.
Parameters The parameters for the program that runs after the restore.
2. Select the correct options and press Enter.
Run CL Scripts
This option allows you to run of a set of commands either from a file or by entering specific commands as parameters. Each command must be preceded by a label:
LCL: Run the following command on the local system
RMT: Run the following command on the remote system
SNDF: Send the save file (format: library/file) to RLxxxxxxxx/file (xxxxxxxx is the local system name)
You can use this option to define the commands to run to check system authorities, as described in Check Network Authority Status on page 235.
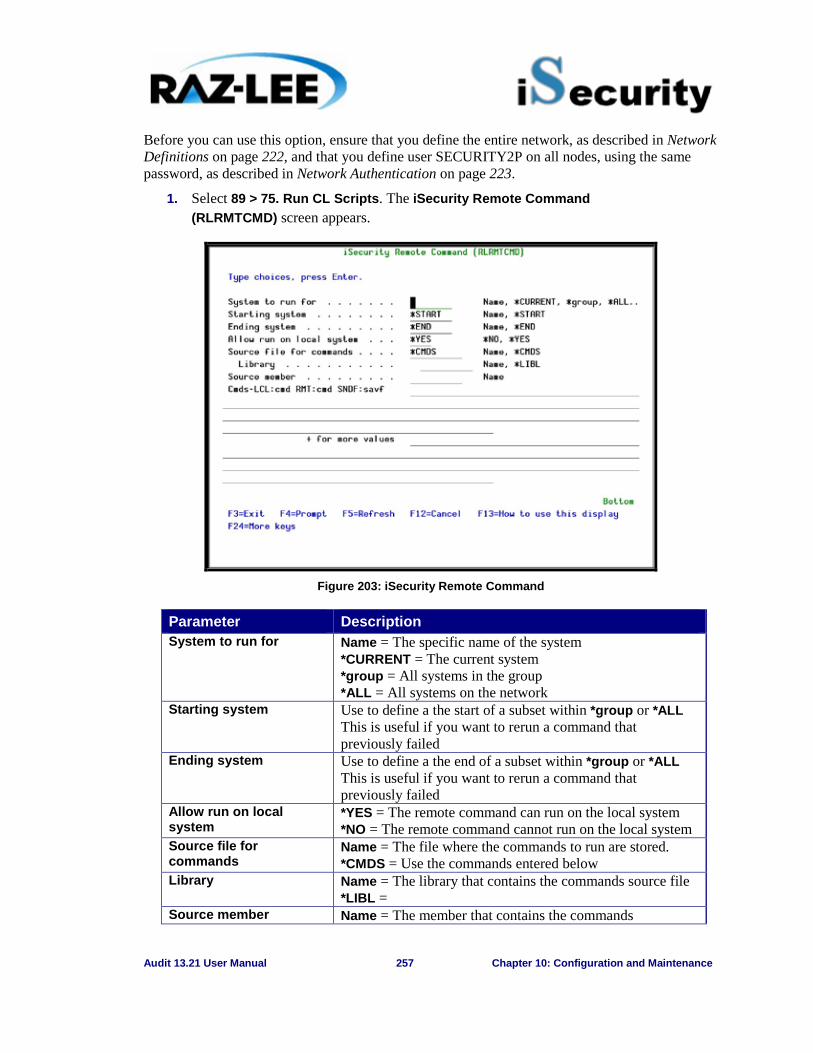
Audit 13.21 User Manual 257 Chapter 10: Configuration and Maintenance
Before you can use this option, ensure that you define the entire network, as described in Network Definitions on page 222, and that you define user SECURITY2P on all nodes, using the same password, as described in Network Authentication on page 223.
1. Select 89 > 75. Run CL Scripts. The iSecurity Remote Command (RLRMTCMD) screen appears.
Figure 203: iSecurity Remote Command
Parameter Description System to run for Name = The specific name of the system
*CURRENT = The current system *group = All systems in the group *ALL = All systems on the network
Starting system Use to define a the start of a subset within *group or *ALL This is useful if you want to rerun a command that previously failed
Ending system Use to define a the end of a subset within *group or *ALL This is useful if you want to rerun a command that previously failed
Allow run on local system
*YES = The remote command can run on the local system *NO = The remote command cannot run on the local system
Source file for commands
Name = The file where the commands to run are stored. *CMDS = Use the commands entered below
Library Name = The library that contains the commands source file *LIBL =
Source member Name = The member that contains the commands
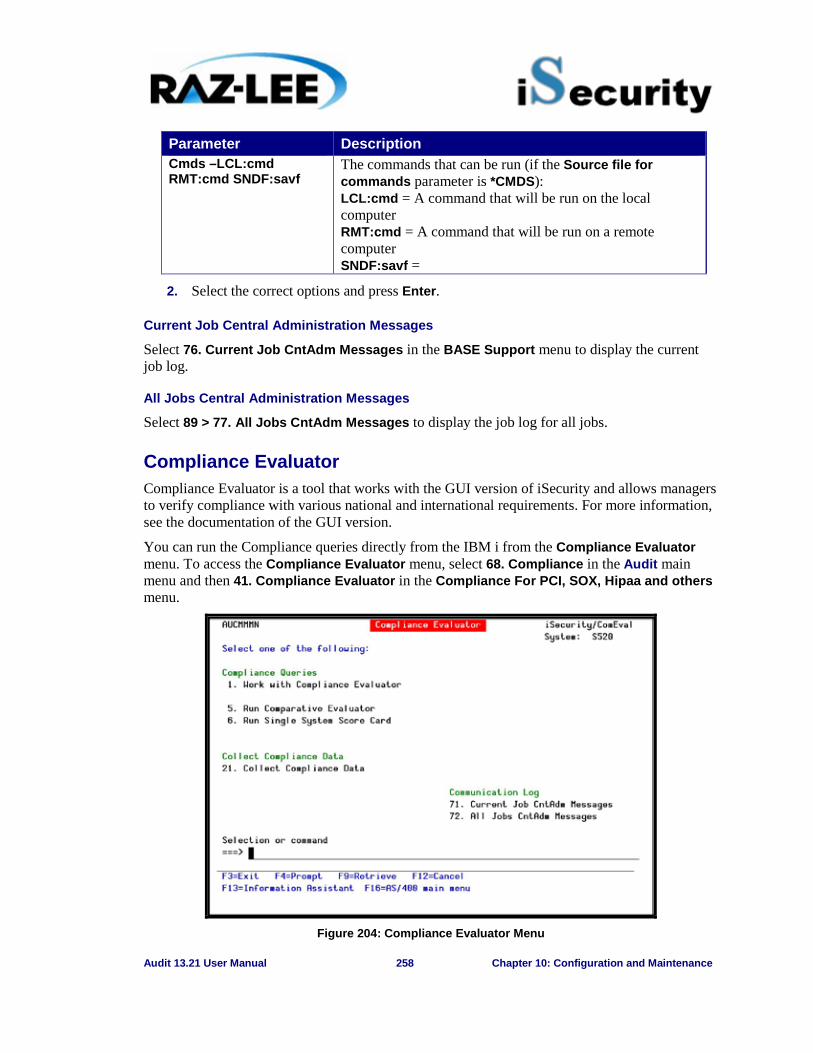
Audit 13.21 User Manual 258 Chapter 10: Configuration and Maintenance
Parameter Description Cmds –LCL:cmd RMT:cmd SNDF:savf
The commands that can be run (if the Source file for commands parameter is *CMDS): LCL:cmd = A command that will be run on the local computer RMT:cmd = A command that will be run on a remote computer SNDF:savf =
2. Select the correct options and press Enter.
Current Job Central Administration Messages
Select 76. Current Job CntAdm Messages in the BASE Support menu to display the current job log.
All Jobs Central Administration Messages
Select 89 > 77. All Jobs CntAdm Messages to display the job log for all jobs.
Compliance Evaluator Compliance Evaluator is a tool that works with the GUI version of iSecurity and allows managers to verify compliance with various national and international requirements. For more information, see the documentation of the GUI version.
You can run the Compliance queries directly from the IBM i from the Compliance Evaluator menu. To access the Compliance Evaluator menu, select 68. Compliance in the Audit main menu and then 41. Compliance Evaluator in the Compliance For PCI, SOX, Hipaa and others menu.
Figure 204: Compliance Evaluator Menu
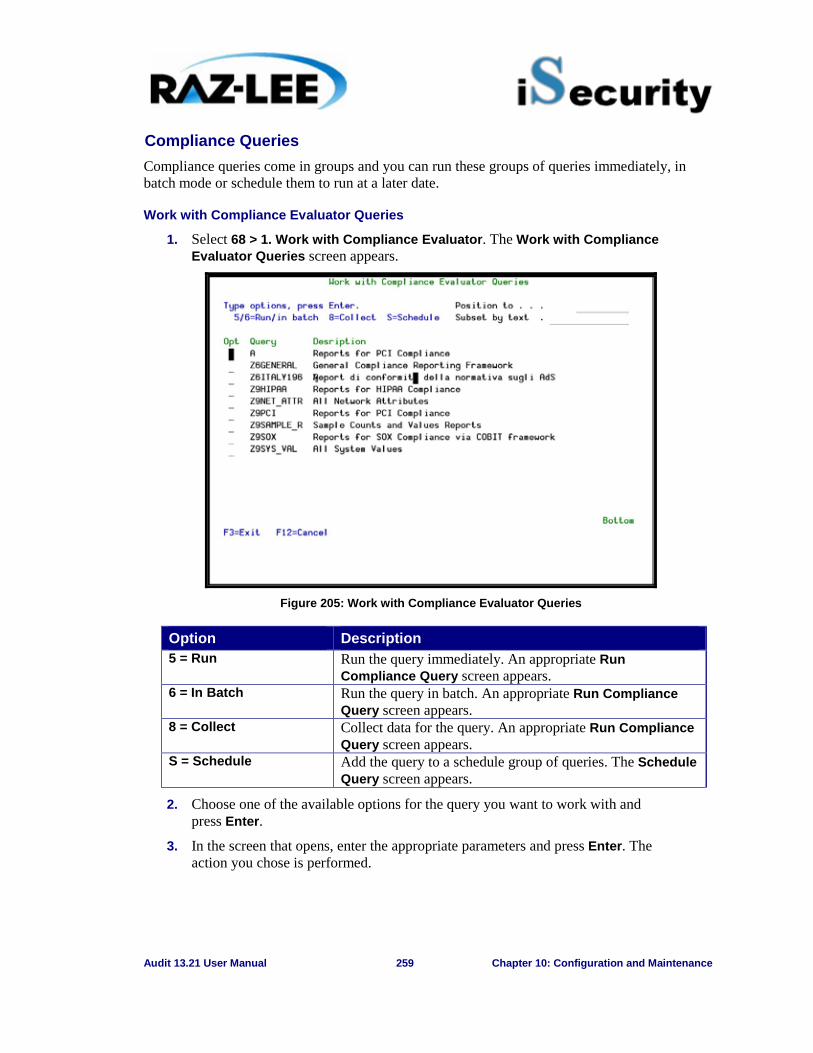
Audit 13.21 User Manual 259 Chapter 10: Configuration and Maintenance
Compliance Queries Compliance queries come in groups and you can run these groups of queries immediately, in batch mode or schedule them to run at a later date.
Work with Compliance Evaluator Queries
1. Select 68 > 1. Work with Compliance Evaluator. The Work with Compliance Evaluator Queries screen appears.
Figure 205: Work with Compliance Evaluator Queries
Option Description 5 = Run Run the query immediately. An appropriate Run
Compliance Query screen appears. 6 = In Batch Run the query in batch. An appropriate Run Compliance
Query screen appears. 8 = Collect Collect data for the query. An appropriate Run Compliance
Query screen appears. S = Schedule Add the query to a schedule group of queries. The Schedule
Query screen appears.
2. Choose one of the available options for the query you want to work with and press Enter.
3. In the screen that opens, enter the appropriate parameters and press Enter. The action you chose is performed.
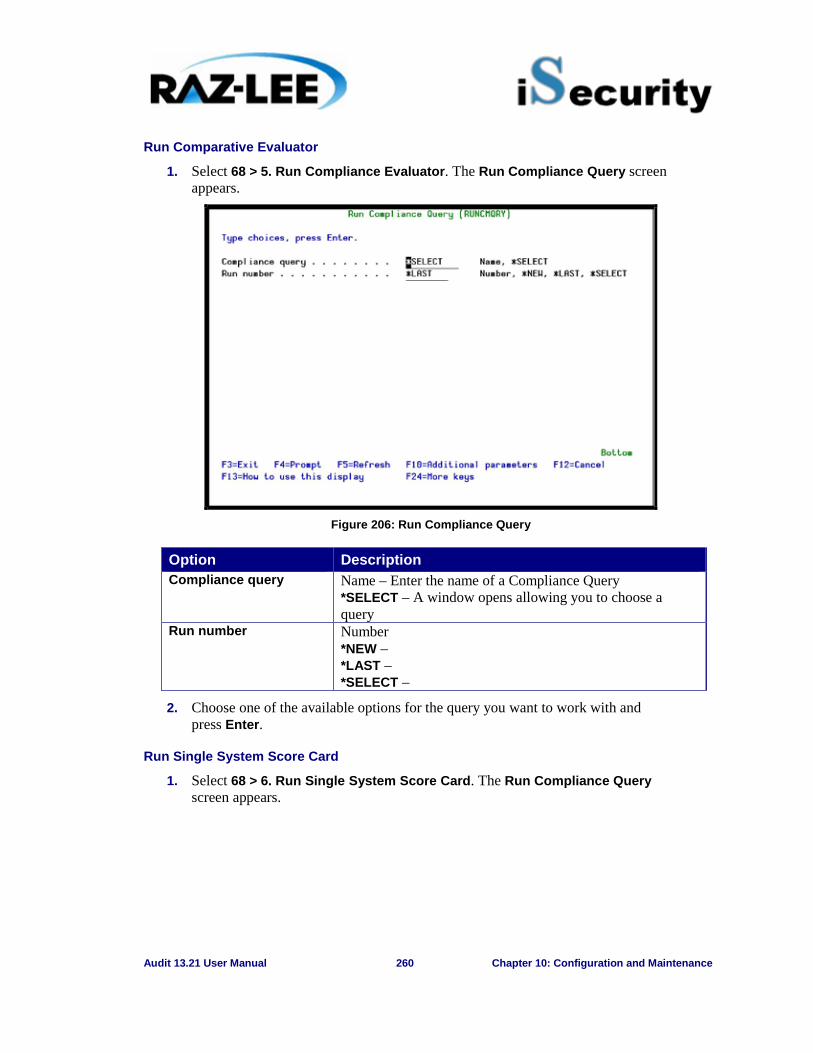
Audit 13.21 User Manual 260 Chapter 10: Configuration and Maintenance
Run Comparative Evaluator
1. Select 68 > 5. Run Compliance Evaluator. The Run Compliance Query screen appears.
Figure 206: Run Compliance Query
Option Description Compliance query Name – Enter the name of a Compliance Query
*SELECT – A window opens allowing you to choose a query
Run number Number *NEW – *LAST – *SELECT –
2. Choose one of the available options for the query you want to work with and press Enter.
Run Single System Score Card
1. Select 68 > 6. Run Single System Score Card. The Run Compliance Query screen appears.
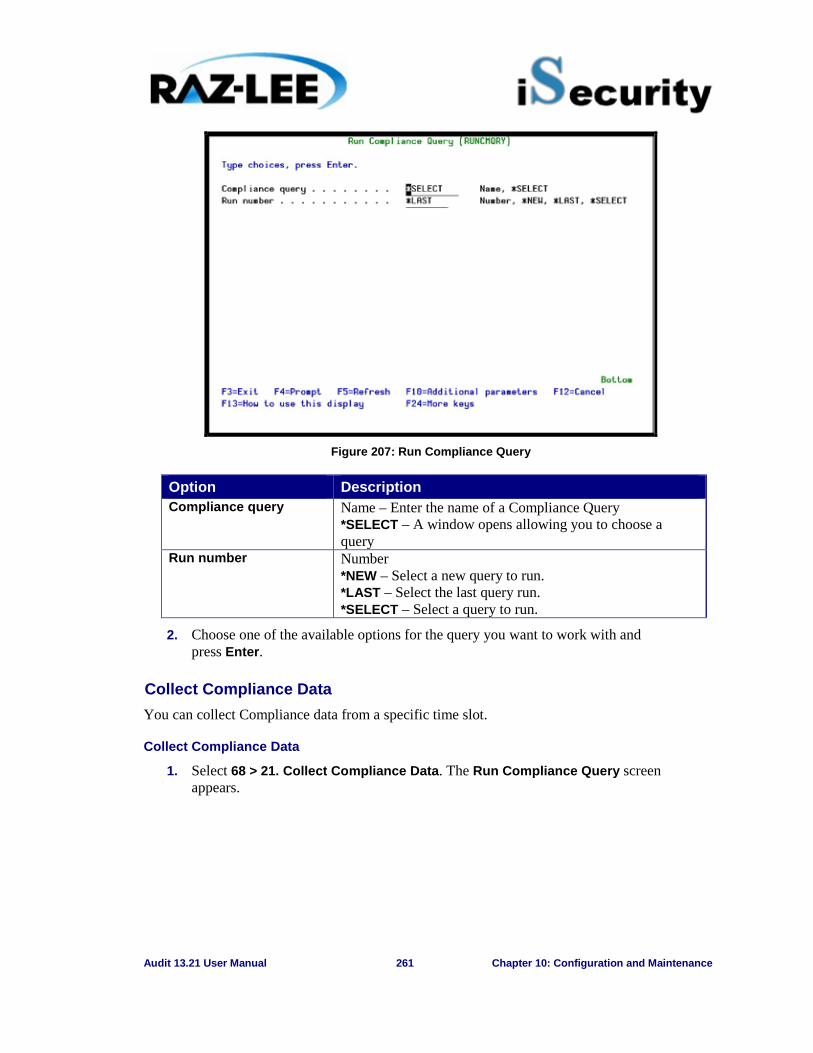
Audit 13.21 User Manual 261 Chapter 10: Configuration and Maintenance
Figure 207: Run Compliance Query
Option Description Compliance query Name – Enter the name of a Compliance Query
*SELECT – A window opens allowing you to choose a query
Run number Number *NEW – Select a new query to run. *LAST – Select the last query run. *SELECT – Select a query to run.
2. Choose one of the available options for the query you want to work with and press Enter.
Collect Compliance Data You can collect Compliance data from a specific time slot.
Collect Compliance Data
1. Select 68 > 21. Collect Compliance Data. The Run Compliance Query screen appears.
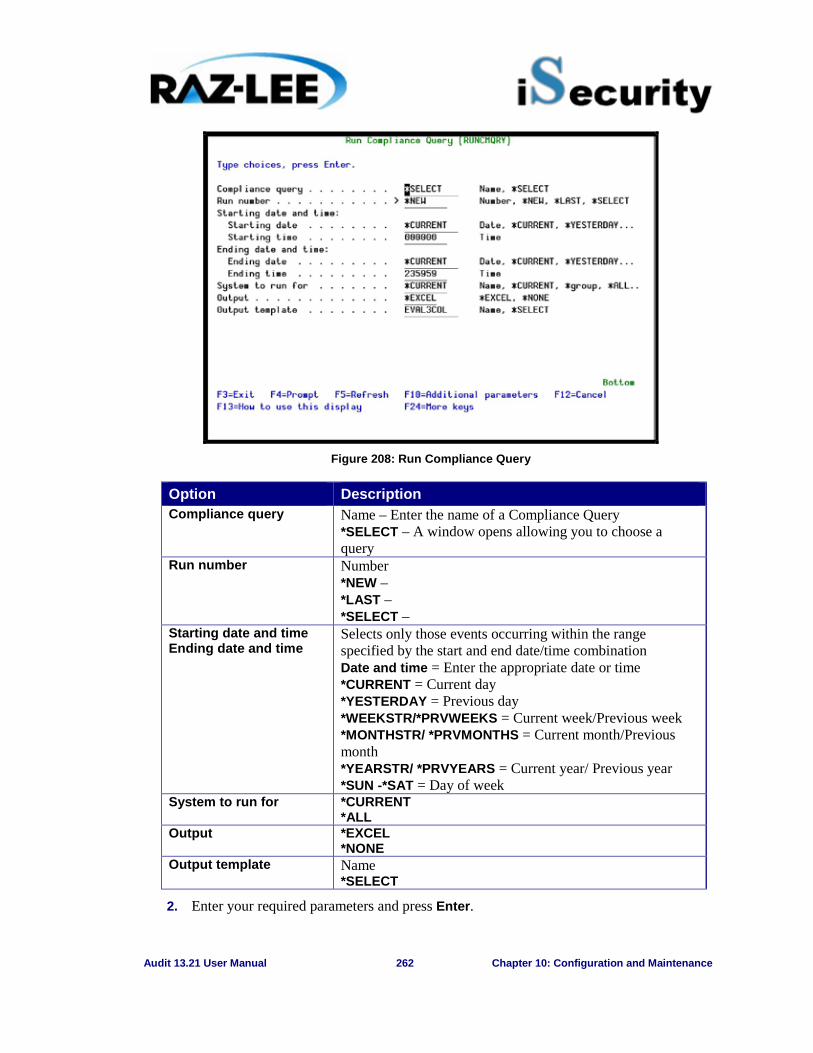
Audit 13.21 User Manual 262 Chapter 10: Configuration and Maintenance
Figure 208: Run Compliance Query
Option Description Compliance query Name – Enter the name of a Compliance Query
*SELECT – A window opens allowing you to choose a query
Run number Number *NEW – *LAST – *SELECT –
Starting date and time Ending date and time
Selects only those events occurring within the range specified by the start and end date/time combination Date and time = Enter the appropriate date or time *CURRENT = Current day *YESTERDAY = Previous day *WEEKSTR/*PRVWEEKS = Current week/Previous week *MONTHSTR/ *PRVMONTHS = Current month/Previous month *YEARSTR/ *PRVYEARS = Current year/ Previous year *SUN -*SAT = Day of week
System to run for *CURRENT *ALL
Output *EXCEL *NONE
Output template Name *SELECT
2. Enter your required parameters and press Enter.
Audit 13.21 User Manual 263 Chapter 10: Configuration and Maintenance
Communication Log
Current Job CntAdm Messages
To display messages for the current job:
§ Select 68 > 71. Current Job CntAdm Messages. The IBM supplied Display Messages screen appears.
All Jobs CntAdm Messages
To display messages for all jobs:
§ Select 68 > 72. All Job CntAdm Messages. The IBM supplied Display Messages screen appears.
Additional Settings
Audit for Cross Platform Anyone reading the professional, not-necessarily IBMi trade press has noticed the number of articles and discussions centering on the benefits and challenges to companies needing to audit their multi-platform environments and evaluate their compliance level on each of these environments.
Multi-Platform Audit feature offers IBMi centric sites the ability to:
§ Use a common GUI and green-screen based report generator to easily execute, schedule, generate and distribute audit reports (in emails with HTML, CSV, PDF attachments) covering all environments
§ Use an advanced business intelligence product to investigate and isolate potential security breaches based upon the unique audit logs of each of the individual environments
§ Obtain multi-platform compliance scores in both summary and detailed format, which display and compare the relative compliance ratings (based upon PCI, SOX, HIPAA or site-defined standards) of the individual systems
Multi-Platform Audit currently supports the IBMi, UNIX, Linux, AIX and in the future other operating systems, Oracle applications, ERP and other types of software applications, and so on.
The overriding advantage of Raz-Lee’s Multi-Platform Audit product is that it collects all Audit data from predefined external systems into the IBMi, and then uses the extremely user-friendly and field-proven iSecurity platform to provide benefit to users. As such, there is no need to process the audit data in external systems; rather the IBMi and the iSecurity software is utilized to provide a simple, consolidated interface to audit data originating from multiple platforms.
1. Select 69. Other Related Modules in the main Audit menu. The Related Modules menu appears.
2. Select 9. Audit Linux/AIX in the Related Modules menu. The Start UNIX Audit screen appears.
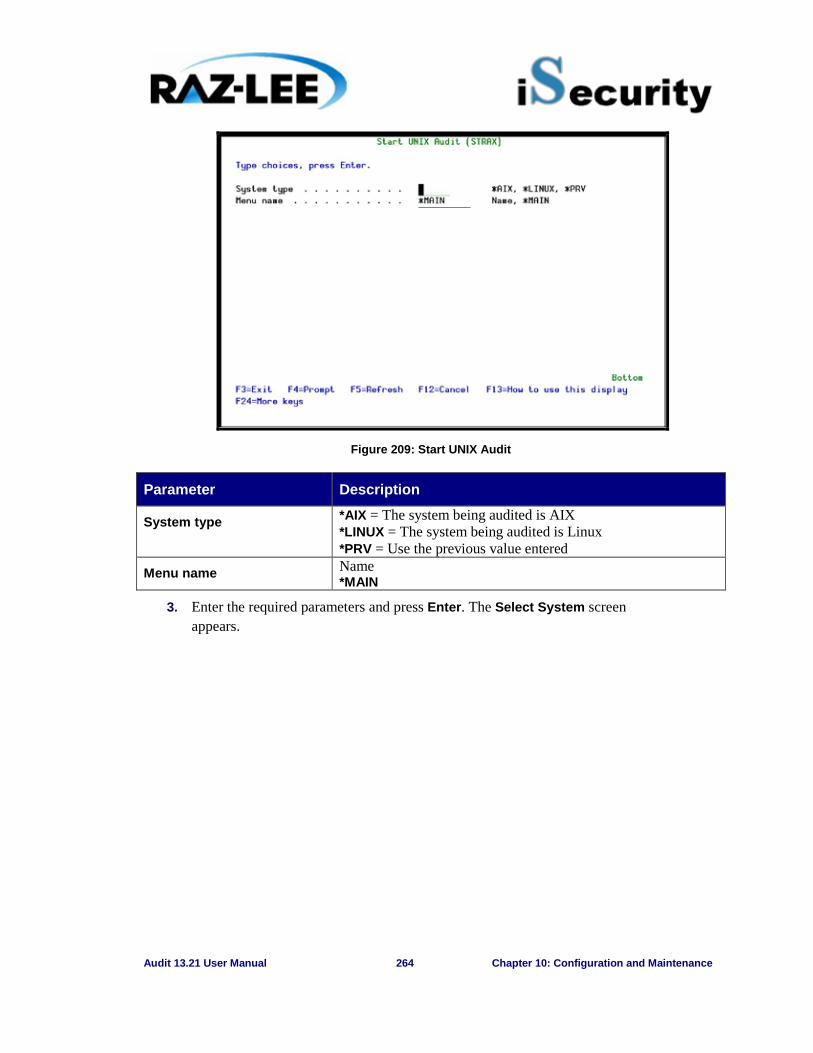
Audit 13.21 User Manual 264 Chapter 10: Configuration and Maintenance
Figure 209: Start UNIX Audit
Parameter Description
System type *AIX = The system being audited is AIX *LINUX = The system being audited is Linux *PRV = Use the previous value entered
Menu name Name *MAIN
3. Enter the required parameters and press Enter. The Select System screen appears.
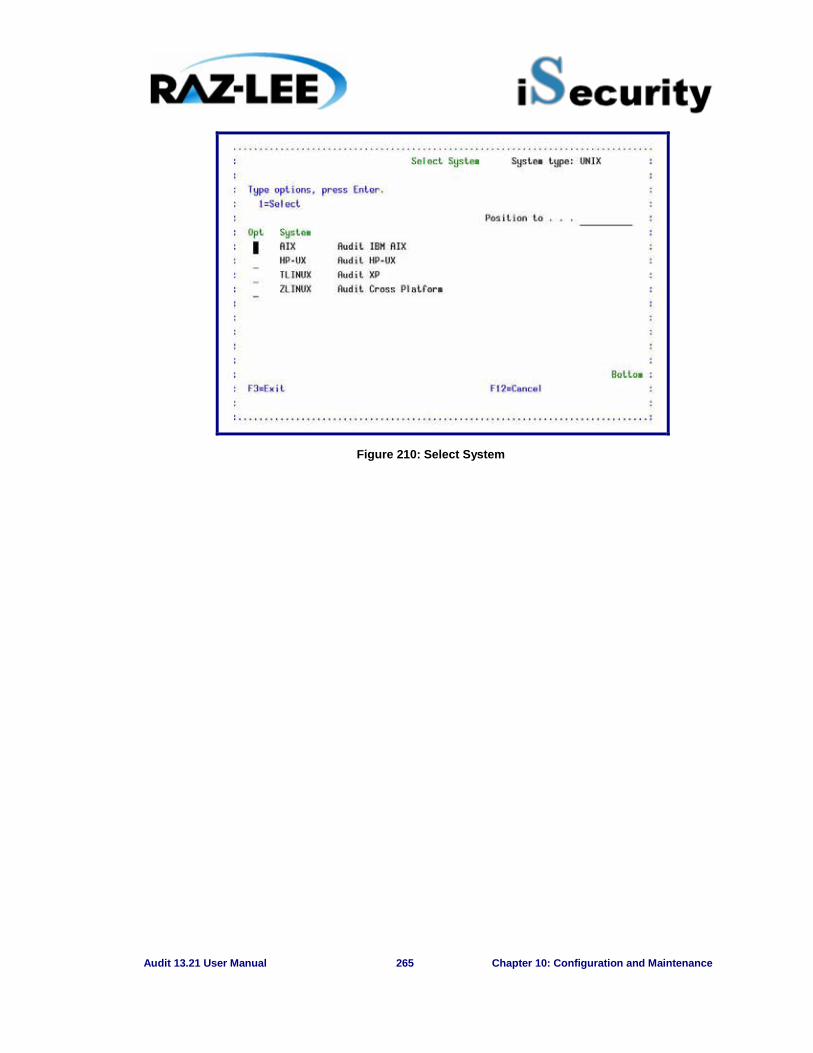
Audit 13.21 User Manual 265 Chapter 10: Configuration and Maintenance
Figure 210: Select System
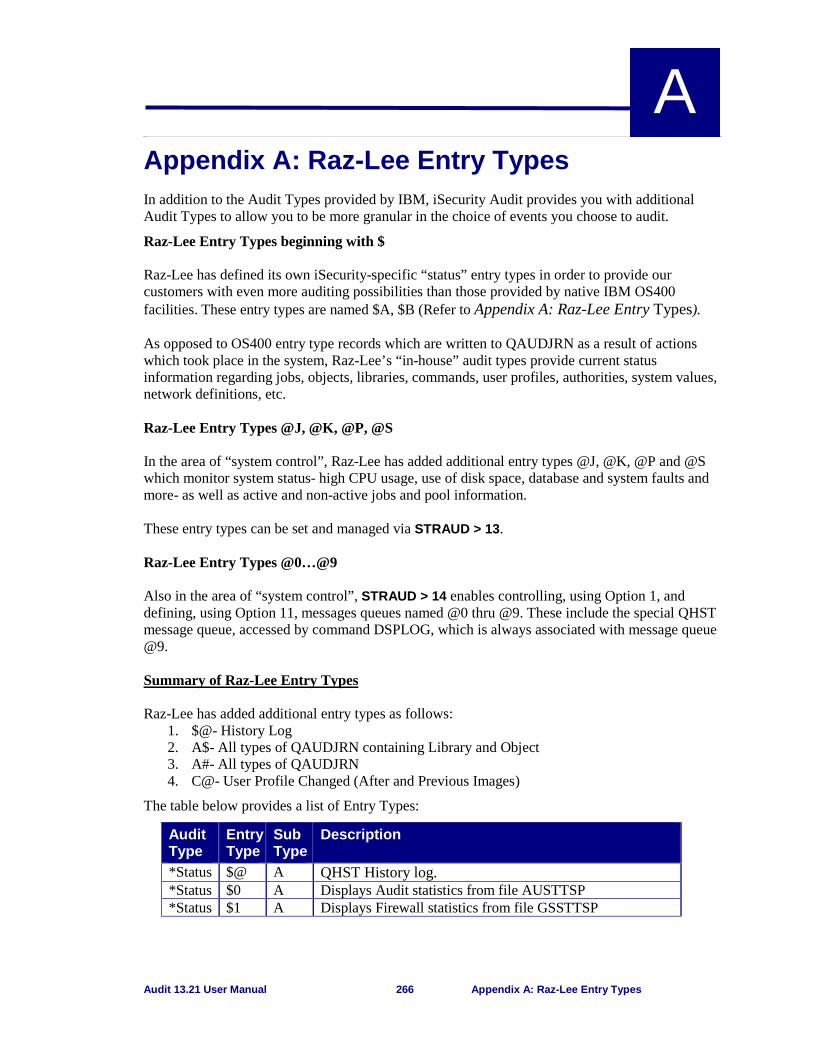
Audit 13.21 User Manual 266 Appendix A: Raz-Lee Entry Types
A
Appendix A: Raz-Lee Entry Types In addition to the Audit Types provided by IBM, iSecurity Audit provides you with additional Audit Types to allow you to be more granular in the choice of events you choose to audit.
Raz-Lee Entry Types beginning with $ Raz-Lee has defined its own iSecurity-specific “status” entry types in order to provide our customers with even more auditing possibilities than those provided by native IBM OS400 facilities. These entry types are named $A, $B (Refer to Appendix A: Raz-Lee Entry Types). As opposed to OS400 entry type records which are written to QAUDJRN as a result of actions which took place in the system, Raz-Lee’s “in-house” audit types provide current status information regarding jobs, objects, libraries, commands, user profiles, authorities, system values, network definitions, etc. Raz-Lee Entry Types @J, @K, @P, @S In the area of “system control”, Raz-Lee has added additional entry types @J, @K, @P and @S which monitor system status- high CPU usage, use of disk space, database and system faults and more- as well as active and non-active jobs and pool information. These entry types can be set and managed via STRAUD > 13. Raz-Lee Entry Types @0…@9 Also in the area of “system control”, STRAUD > 14 enables controlling, using Option 1, and defining, using Option 11, messages queues named @0 thru @9. These include the special QHST message queue, accessed by command DSPLOG, which is always associated with message queue @9. Summary of Raz-Lee Entry Types Raz-Lee has added additional entry types as follows:
1. $@- History Log 2. A$- All types of QAUDJRN containing Library and Object 3. A#- All types of QAUDJRN 4. C@- User Profile Changed (After and Previous Images)
The table below provides a list of Entry Types:
Audit Type
Entry Type
Sub Type
Description
*Status $@ A QHST History log. *Status $0 A Displays Audit statistics from file AUSTTSP *Status $1 A Displays Firewall statistics from file GSSTTSP
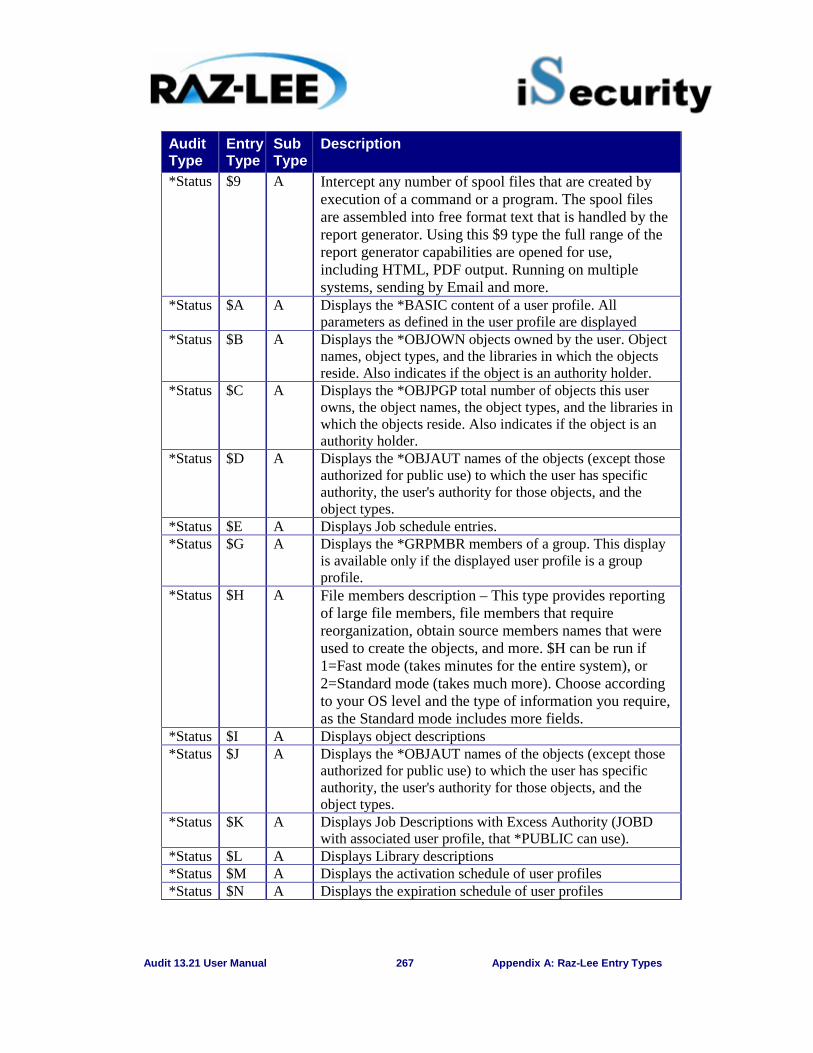
Audit 13.21 User Manual 267 Appendix A: Raz-Lee Entry Types
Audit Type
Entry Type
Sub Type
Description
*Status $9 A Intercept any number of spool files that are created by execution of a command or a program. The spool files are assembled into free format text that is handled by the report generator. Using this $9 type the full range of the report generator capabilities are opened for use, including HTML, PDF output. Running on multiple systems, sending by Email and more.
*Status $A A Displays the *BASIC content of a user profile. All parameters as defined in the user profile are displayed
*Status $B A Displays the *OBJOWN objects owned by the user. Object names, object types, and the libraries in which the objects reside. Also indicates if the object is an authority holder.
*Status $C A Displays the *OBJPGP total number of objects this user owns, the object names, the object types, and the libraries in which the objects reside. Also indicates if the object is an authority holder.
*Status $D A Displays the *OBJAUT names of the objects (except those authorized for public use) to which the user has specific authority, the user's authority for those objects, and the object types.
*Status $E A Displays Job schedule entries. *Status $G A Displays the *GRPMBR members of a group. This display
is available only if the displayed user profile is a group profile.
*Status $H A File members description – This type provides reporting of large file members, file members that require reorganization, obtain source members names that were used to create the objects, and more. $H can be run if 1=Fast mode (takes minutes for the entire system), or 2=Standard mode (takes much more). Choose according to your OS level and the type of information you require, as the Standard mode includes more fields.
*Status $I A Displays object descriptions *Status $J A Displays the *OBJAUT names of the objects (except those
authorized for public use) to which the user has specific authority, the user's authority for those objects, and the object types.
*Status $K A Displays Job Descriptions with Excess Authority (JOBD with associated user profile, that *PUBLIC can use).
*Status $L A Displays Library descriptions *Status $M A Displays the activation schedule of user profiles *Status $N A Displays the expiration schedule of user profiles
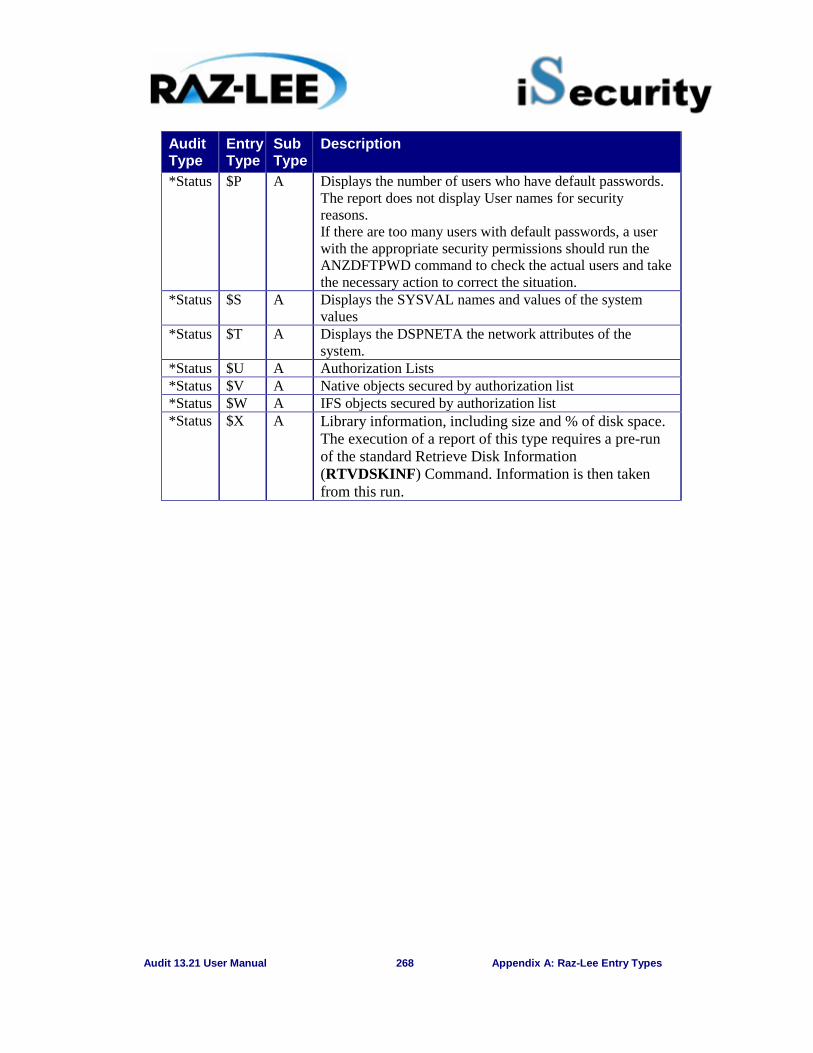
Audit 13.21 User Manual 268 Appendix A: Raz-Lee Entry Types
Audit Type
Entry Type
Sub Type
Description
*Status $P A Displays the number of users who have default passwords. The report does not display User names for security reasons. If there are too many users with default passwords, a user with the appropriate security permissions should run the ANZDFTPWD command to check the actual users and take the necessary action to correct the situation.
*Status $S A Displays the SYSVAL names and values of the system values
*Status $T A Displays the DSPNETA the network attributes of the system.
*Status $U A Authorization Lists *Status $V A Native objects secured by authorization list *Status $W A IFS objects secured by authorization list *Status $X A Library information, including size and % of disk space.
The execution of a report of this type requires a pre-run of the standard Retrieve Disk Information (RTVDSKINF) Command. Information is then taken from this run.
Audit 13.21 User Manual 269 Comments
Comments We hope you found this user manual informative; your comments are important to us!
Raz-Lee Security wants its user manuals to be as helpful as possible; please send your comments about this user manual to [email protected].
Related Documents