Audio System Upgrade Package 2005-2006 Jeep Grand Cherokee 2005-2006 Jeep Commander 2004-2006 Dodge Durango 2005-2006 Dodge Dakota 2005-2006 Jeep Liberty 2006 PT Cruiser 2007 Dodge Nitro 2007 Jeep Wrangler 2 Door/4 Door Installation Instructions 77KICK10 4/6/07 Page 1 of 23 © 2004, DaimlerChrysler Motors Company, LLC. Mopar is a registered trademark of DaimlerChrysler Motors Company. LLC. All rights reserved. Fig. 1 Fig. 2 TOOLS REQUIRED: *Phillips Screwdriver *Panel Removal Tool Jeep Grand Cherokee Rear Door Installation 1. Remove the screw in the armrest pocket. Fig. 1 2. Remove the screw behind the door release lever. Fig. 2 2EA. 6.5” TWO WAY SPEAKER P/N RW06DCX65C 1EA. INSTRUCTIONS P/N RBI77KICK10 CONTENTS:

Welcome message from author
This document is posted to help you gain knowledge. Please leave a comment to let me know what you think about it! Share it to your friends and learn new things together.
Transcript

Audio System Upgrade Package 2005-2006 Jeep Grand Cherokee 2005-2006 Jeep Commander 2004-2006 Dodge Durango 2005-2006 Dodge Dakota 2005-2006 Jeep Liberty 2006 PT Cruiser 2007 Dodge Nitro 2007 Jeep Wrangler 2 Door/4 Door Installation Instructions
77KICK10 4/6/07 Page 1 of 23
© 2004, DaimlerChrysler Motors Company, LLC. Mopar is a registered trademark of DaimlerChrysler Motors Company. LLC. All rights reserved.
Fig. 1 Fig. 2
TOOLS REQUIRED: *Phillips Screwdriver *Panel Removal Tool
Jeep Grand Cherokee Rear Door Installation
1. Remove the screw in the armrest pocket. Fig. 1 2. Remove the screw behind the door release lever. Fig. 2
2EA. 6.5” TWO WAY SPEAKER P/N RW06DCX65C 1EA. INSTRUCTIONS P/N RBI77KICK10
CONTENTS:

Audio System Upgrade Package 2005-2006 Jeep Grand Cherokee 2005-2006 Jeep Commander 2004-2006 Dodge Durango 2005-2006 Dodge Dakota 2005-2006 Jeep Liberty 2006 PT Cruiser 2007 Dodge Nitro 2007 Jeep Wrangler 2 Door/4 Door Installation Instructions
77KICK10 4/6/07 Page 2 of 23
© 2004, DaimlerChrysler Motors Company, LLC. Mopar is a registered trademark of DaimlerChrysler Motors Company. LLC. All rights reserved.
Fig. 5
Fig. 3 Fig. 4
Fig. 5
Jeep Grand Cherokee Rear Door Installation continued
3. Using a panel removal tool gently pry the door panel away from the door. Fig. 3 4. Disconnect the door handle linkage by rotating the blue plastic latch and pulling the linkage rod
loose. Fig. 4 5. Disconnect door wiring and set door panel aside. 6. Remove the screws securing the speaker, disconnect wiring and remove speaker. Fig. 5 7. Connect speaker wiring and install the upgrade speaker making sure the longest speaker tab is in
the location designated by arrow in picture. Replace screws and tighten. Fig. 6
8. Replace all previously removed parts in reverse order 9. Repeat for other side of vehicle.
Fig. 6
Long Tab
Audio System Upgrade Package 2005-2006 Jeep Grand Cherokee 2005-2006 Jeep Commander 2004-2006 Dodge Durango 2005-2006 Dodge Dakota 2005-2006 Jeep Liberty 2006 PT Cruiser 2007 Dodge Nitro 2007 Jeep Wrangler 2 Door/4 Door Installation Instructions
77KICK10 4/6/07 Page 3 of 23
© 2004, DaimlerChrysler Motors Company, LLC. Mopar is a registered trademark of DaimlerChrysler Motors Company. LLC. All rights reserved.
Fig. 7 Fig. 8
Fig. 9 Fig. 10
TOOLS REQUIRED: *Phillips Screwdriver *Panel Removal Tool *Pick Tool
Rear Door Installations for Jeep Commander
1. Using a pick tool pry open the screw covers behind the interior door release lever and remove the
screw. Fig. 7 2. Remove the screw behind the armrest handle Fig. 8 3. Using a panel removal tool gently pry the door panel out to release the plastic fasteners. Fig. 9 4. Disconnect the door handle linkage by rotating the yellow plastic latch and pulling the linkage rod
loose. Fig. 10 5. Disconnect door wiring and set door panel aside.
Audio System Upgrade Package 2005-2006 Jeep Grand Cherokee 2005-2006 Jeep Commander 2004-2006 Dodge Durango 2005-2006 Dodge Dakota 2005-2006 Jeep Liberty 2006 PT Cruiser 2007 Dodge Nitro 2007 Jeep Wrangler 2 Door/4 Door Installation Instructions
77KICK10 4/6/07 Page 4 of 23
© 2004, DaimlerChrysler Motors Company, LLC. Mopar is a registered trademark of DaimlerChrysler Motors Company. LLC. All rights reserved.
Fig. 11
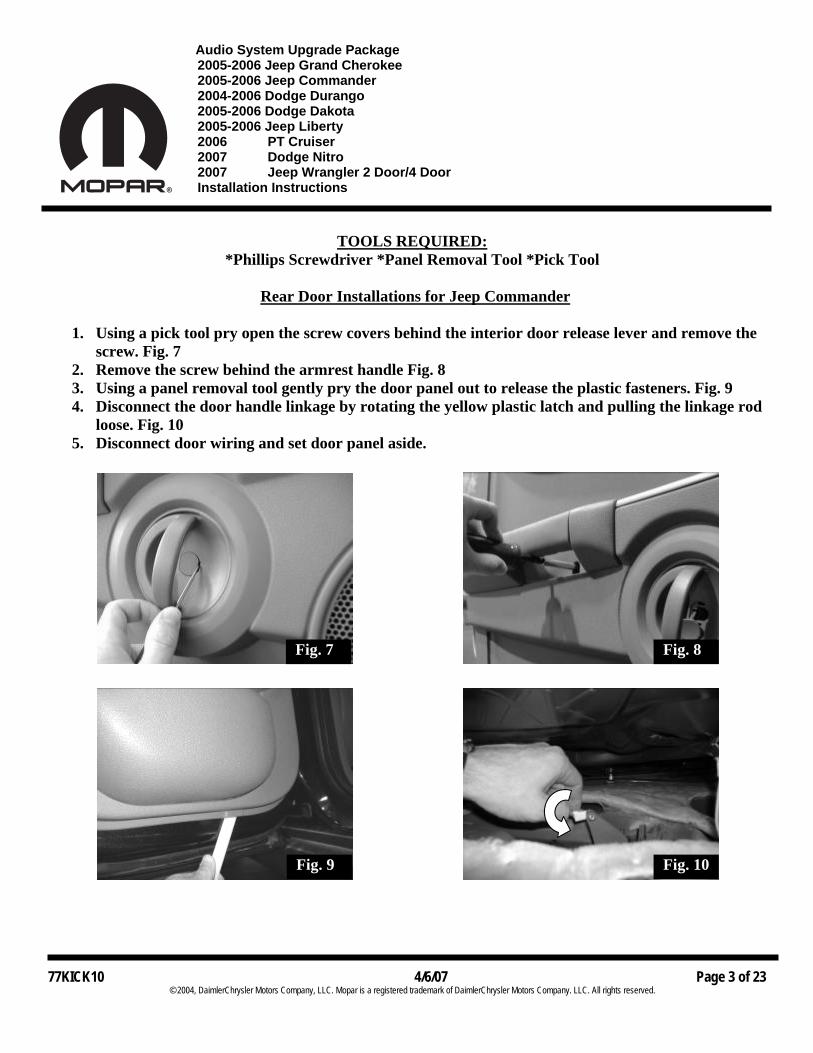
Rear Door Installations for Jeep Commander continued
6. Remove the screws securing the speaker, disconnect wiring and remove speaker. Fig. 11 7. Connect speaker wiring and install the upgrade speaker making sure the longest speaker tab is in
the location designated by arrow in picture. Replace screws and tighten. Fig. 12 8. Reinstall all previously removed parts in reverse order. 9. Repeat for other side of vehicle.
Fig. 12
Long Tab
Audio System Upgrade Package 2005-2006 Jeep Grand Cherokee 2005-2006 Jeep Commander 2004-2006 Dodge Durango 2005-2006 Dodge Dakota 2005-2006 Jeep Liberty 2006 PT Cruiser 2007 Dodge Nitro 2007 Jeep Wrangler 2 Door/4 Door Installation Instructions
77KICK10 4/6/07 Page 5 of 23
© 2004, DaimlerChrysler Motors Company, LLC. Mopar is a registered trademark of DaimlerChrysler Motors Company. LLC. All rights reserved.
Fig. 15 Long Tab
Fig. 16
Fig. 13 Fig. 14
TOOLS REQUIRED: *Phillips Screwdriver *Panel Removal Tool *Pick Tool
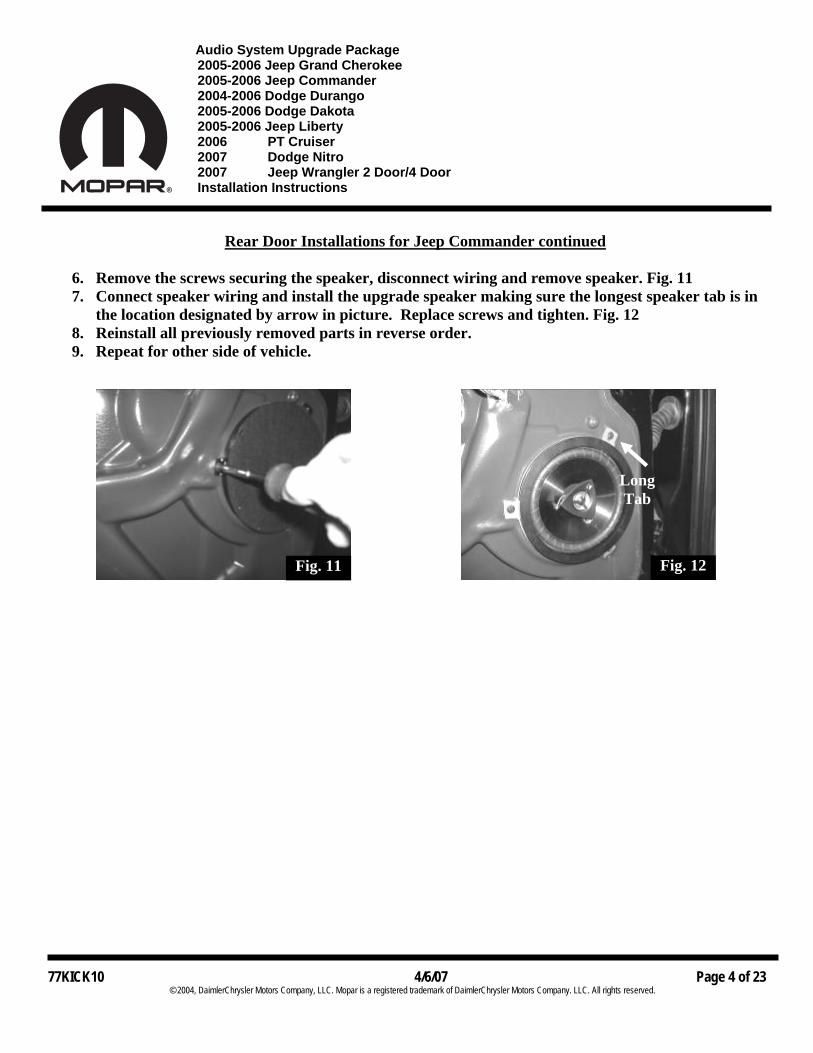
Front Door Installation for Dodge Durango
1. Using a pick tool remove the plastic cover to reveal the screw behind the interior door handle
release lever and remove the screw. Fig. 13 2. Remove the two screws at the bottom of the door panel. Fig. 14 3. Lift door panel up and outward to separate from door.
4. Disconnect the door handle linkage by rotating the white plastic latch and pulling the linkage rod loose. Fig. 15
5. Disconnect door wiring and set panel aside. 6. Remove the screws securing the speaker to the plastic adapter that is mounted to the door.
Disconnect wiring and remove speaker. 7. Connect speaker wiring and install the upgrade speaker making sure the longest speaker tab is in
the location designated by arrow in picture. Replace screws and tighten. Fig. 16
Audio System Upgrade Package 2005-2006 Jeep Grand Cherokee 2005-2006 Jeep Commander 2004-2006 Dodge Durango 2005-2006 Dodge Dakota 2005-2006 Jeep Liberty 2006 PT Cruiser 2007 Dodge Nitro 2007 Jeep Wrangler 2 Door/4 Door Installation Instructions
77KICK10 4/6/07 Page 6 of 23
© 2004, DaimlerChrysler Motors Company, LLC. Mopar is a registered trademark of DaimlerChrysler Motors Company. LLC. All rights reserved.
Fig. 17 Fig. 18
Front Door Installation for Dodge Durango continued
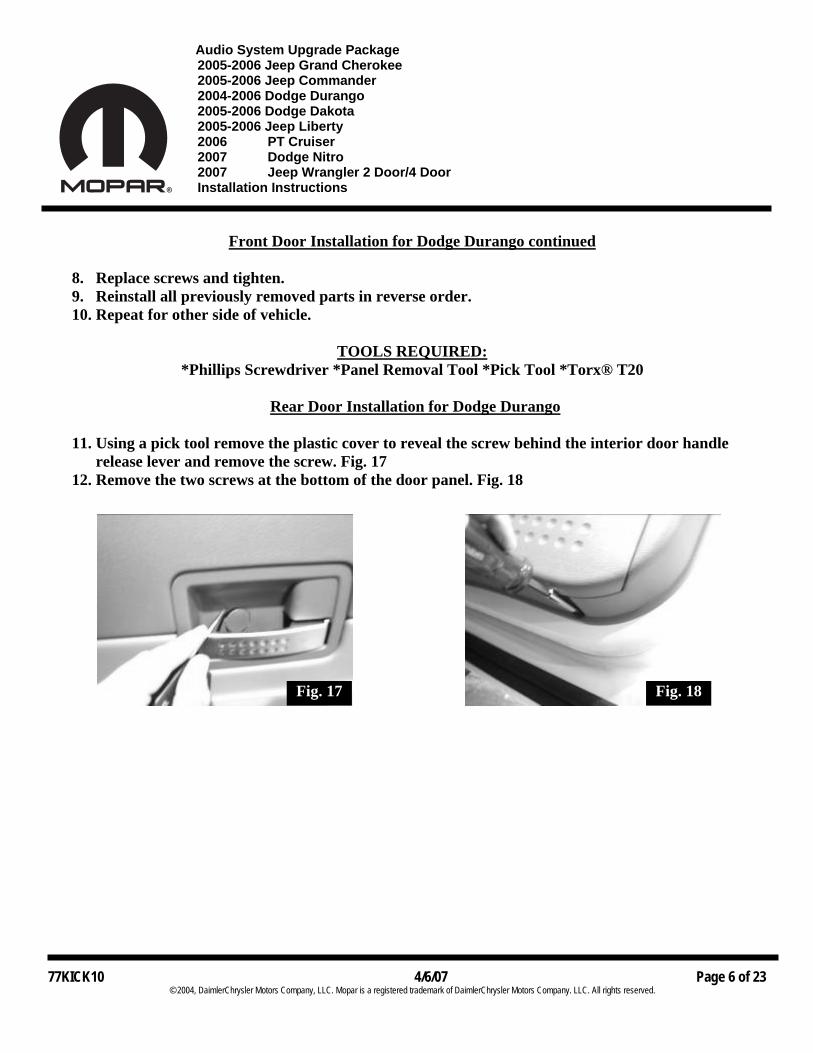
8. Replace screws and tighten. 9. Reinstall all previously removed parts in reverse order. 10. Repeat for other side of vehicle.
TOOLS REQUIRED:
*Phillips Screwdriver *Panel Removal Tool *Pick Tool *Torx® T20
Rear Door Installation for Dodge Durango
11. Using a pick tool remove the plastic cover to reveal the screw behind the interior door handle release lever and remove the screw. Fig. 17
12. Remove the two screws at the bottom of the door panel. Fig. 18

Audio System Upgrade Package 2005-2006 Jeep Grand Cherokee 2005-2006 Jeep Commander 2004-2006 Dodge Durango 2005-2006 Dodge Dakota 2005-2006 Jeep Liberty 2006 PT Cruiser 2007 Dodge Nitro 2007 Jeep Wrangler 2 Door/4 Door Installation Instructions
77KICK10 4/6/07 Page 7 of 23
© 2004, DaimlerChrysler Motors Company, LLC. Mopar is a registered trademark of DaimlerChrysler Motors Company. LLC. All rights reserved.
Fig. 19
Long Tab
Fig. 20
Rear Door Installation for Dodge Durango continued
13. Lift door panel up and outward to separate from door. 14. Disconnect the door handle linkage by rotating the plastic latch and pulling the linkage rod loose.
Fig. 19 15. Disconnect door wiring and set panel aside. 16. Remove the screws securing the speaker to the plastic adapter that is mounted to the door.
Disconnect wiring and remove speaker. 17. Connect speaker wiring and install the upgrade speaker making sure the longest speaker tab is in
the location designated by arrow in picture. Replace screws and tighten. Fig. 20
18. Reinstall all previously removed parts in reverse order. 19. Repeat for other side of vehicle.
Audio System Upgrade Package 2005-2006 Jeep Grand Cherokee 2005-2006 Jeep Commander 2004-2006 Dodge Durango 2005-2006 Dodge Dakota 2005-2006 Jeep Liberty 2006 PT Cruiser 2007 Dodge Nitro 2007 Jeep Wrangler 2 Door/4 Door Installation Instructions
77KICK10 4/6/07 Page 8 of 23
© 2004, DaimlerChrysler Motors Company, LLC. Mopar is a registered trademark of DaimlerChrysler Motors Company. LLC. All rights reserved.
Fig. 21 Fig. 22
Fig. 23 Fig. 24
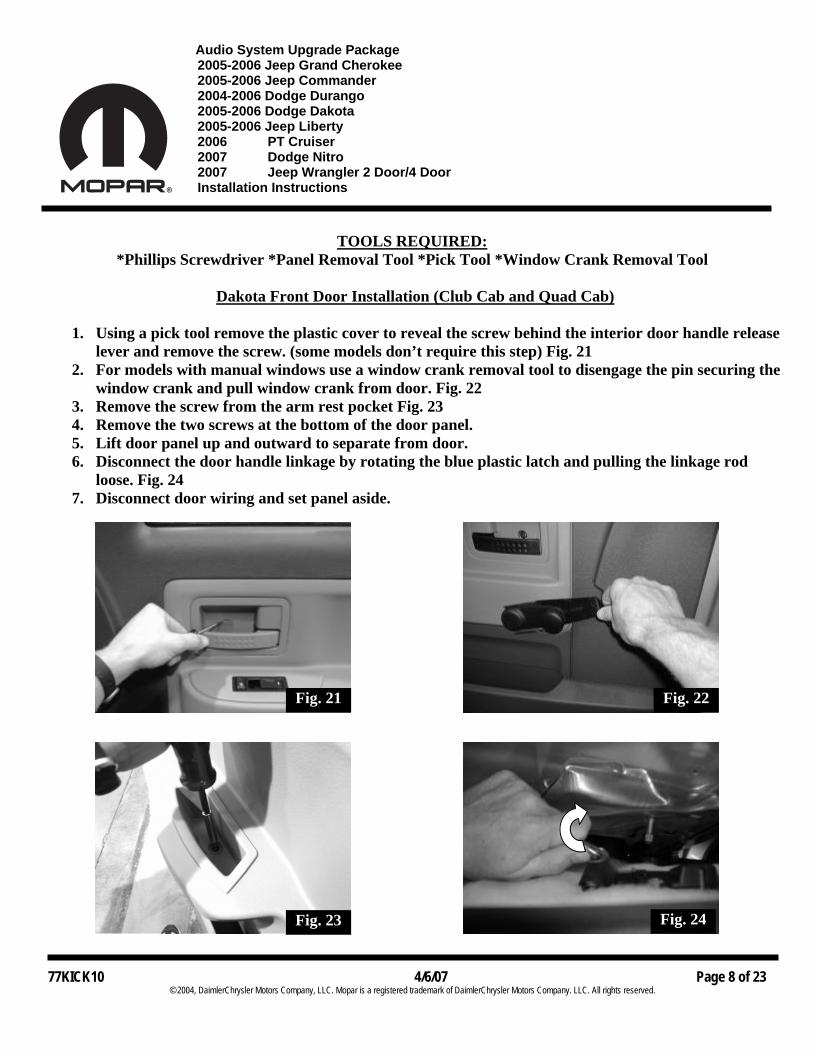
TOOLS REQUIRED: *Phillips Screwdriver *Panel Removal Tool *Pick Tool *Window Crank Removal Tool
Dakota Front Door Installation (Club Cab and Quad Cab)
1. Using a pick tool remove the plastic cover to reveal the screw behind the interior door handle release
lever and remove the screw. (some models don’t require this step) Fig. 21 2. For models with manual windows use a window crank removal tool to disengage the pin securing the
window crank and pull window crank from door. Fig. 22 3. Remove the screw from the arm rest pocket Fig. 23 4. Remove the two screws at the bottom of the door panel. 5. Lift door panel up and outward to separate from door. 6. Disconnect the door handle linkage by rotating the blue plastic latch and pulling the linkage rod
loose. Fig. 24 7. Disconnect door wiring and set panel aside.

Audio System Upgrade Package 2005-2006 Jeep Grand Cherokee 2005-2006 Jeep Commander 2004-2006 Dodge Durango 2005-2006 Dodge Dakota 2005-2006 Jeep Liberty 2006 PT Cruiser 2007 Dodge Nitro 2007 Jeep Wrangler 2 Door/4 Door Installation Instructions
77KICK10 4/6/07 Page 9 of 23
© 2004, DaimlerChrysler Motors Company, LLC. Mopar is a registered trademark of DaimlerChrysler Motors Company. LLC. All rights reserved.
Fig. 25
Fig. 27 Fig. 28
Dakota Front Door Installation (Club Cab and Quad Cab) continued
8. Remove the screws securing the speaker to the plastic adapter that is mounted to the door. Disconnect wiring and remove speaker. Fig. 25
9. Connect speaker wiring and install the upgrade speaker making sure the longest speaker tab is in the location designated by arrow in picture. Replace screws and tighten. Fig. 26
10. Reinstall all previously removed parts in reverse order. 11. Repeat for other side of vehicle.
TOOLS REQUIRED: *Phillips Screwdriver *Panel Removal Tool *Ratchet *Torx® T50 *8mm Nut Driver
Dodge Dakota Club Cab Rear Speaker Installation
1. Pull the rubber door molding away from door openings to reveal the edges of the plastic post covers. 2. Gently pull the upper seatbelt bolt cover loose.
Fig. 26
Long Tab

Audio System Upgrade Package 2005-2006 Jeep Grand Cherokee 2005-2006 Jeep Commander 2004-2006 Dodge Durango 2005-2006 Dodge Dakota 2005-2006 Jeep Liberty 2006 PT Cruiser 2007 Dodge Nitro 2007 Jeep Wrangler 2 Door/4 Door Installation Instructions
77KICK10 4/6/07 Page 10 of 23
© 2004, DaimlerChrysler Motors Company, LLC. Mopar is a registered trademark of DaimlerChrysler Motors Company. LLC. All rights reserved.
Fig. 29 Fig. 30
Fig. 31 Fig. 32
Dodge Dakota Club Cab Rear Speaker Installation continued
3. Using a Torx® T50 driver remove the upper seatbelt bolt. Fig. 29 4. Gently pull the bottom of the upper plastic cover away from the post to release retainers. Fig. 30 5. Gently pull up on the threshold panel along the bottom of the door opening to release the fasteners.
The panel does not need to be completely removed just loose toward the back edge. Fig. 31 6. Gently pull the bottom plastic cover away from the post to release retainers. Fig. 32
Audio System Upgrade Package 2005-2006 Jeep Grand Cherokee 2005-2006 Jeep Commander 2004-2006 Dodge Durango 2005-2006 Dodge Dakota 2005-2006 Jeep Liberty 2006 PT Cruiser 2007 Dodge Nitro 2007 Jeep Wrangler 2 Door/4 Door Installation Instructions
77KICK10 4/6/07 Page 11 of 23
© 2004, DaimlerChrysler Motors Company, LLC. Mopar is a registered trademark of DaimlerChrysler Motors Company. LLC. All rights reserved.
Fig. 36
Fig. 34 Fig. 33
Fig. 35
Dodge Dakota Club Cab Rear Speaker Installation continued
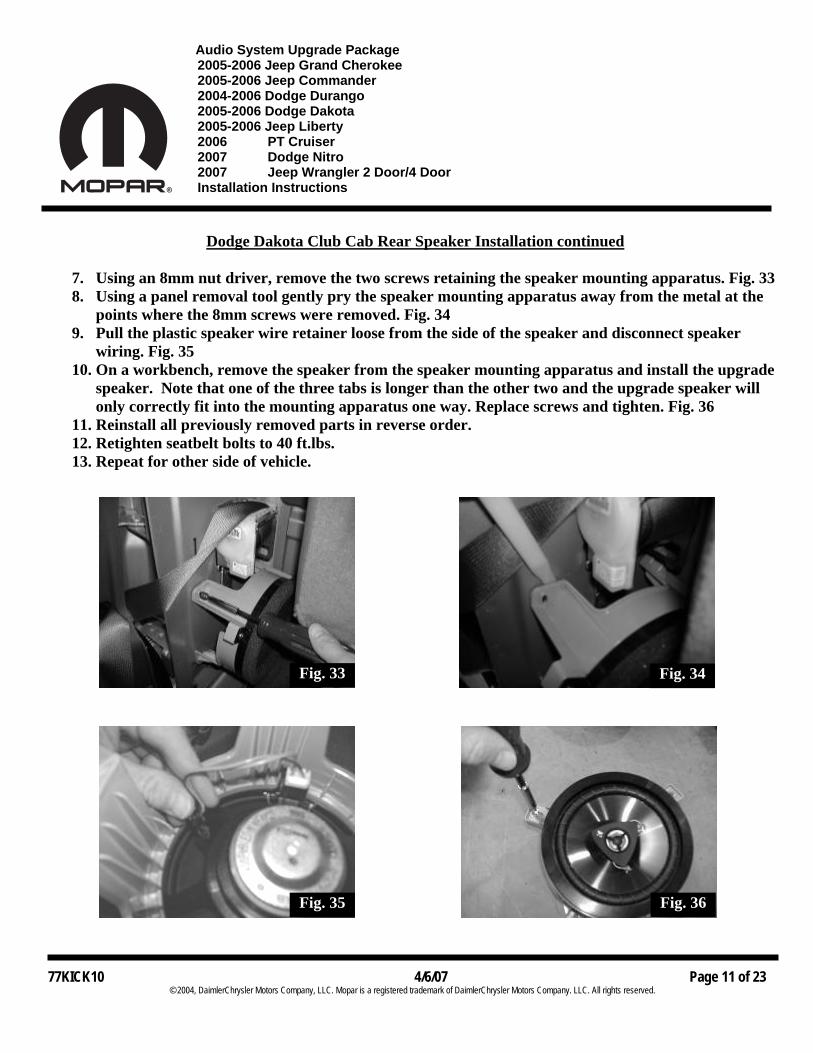
7. Using an 8mm nut driver, remove the two screws retaining the speaker mounting apparatus. Fig. 33 8. Using a panel removal tool gently pry the speaker mounting apparatus away from the metal at the
points where the 8mm screws were removed. Fig. 34 9. Pull the plastic speaker wire retainer loose from the side of the speaker and disconnect speaker
wiring. Fig. 35 10. On a workbench, remove the speaker from the speaker mounting apparatus and install the upgrade
speaker. Note that one of the three tabs is longer than the other two and the upgrade speaker will only correctly fit into the mounting apparatus one way. Replace screws and tighten. Fig. 36
11. Reinstall all previously removed parts in reverse order. 12. Retighten seatbelt bolts to 40 ft.lbs. 13. Repeat for other side of vehicle.

Audio System Upgrade Package 2005-2006 Jeep Grand Cherokee 2005-2006 Jeep Commander 2004-2006 Dodge Durango 2005-2006 Dodge Dakota 2005-2006 Jeep Liberty 2006 PT Cruiser 2007 Dodge Nitro 2007 Jeep Wrangler 2 Door/4 Door Installation Instructions
77KICK10 4/6/07 Page 12 of 23
© 2004, DaimlerChrysler Motors Company, LLC. Mopar is a registered trademark of DaimlerChrysler Motors Company. LLC. All rights reserved.
Fig. 37 Fig. 38
Fig. 39 Fig. 40
TOOLS REQUIRED: *Phillips Screwdriver *Panel Removal Tool *Pick Tool *Window Crank Removal Tool
Dodge Dakota Quad Cab Rear Door Installation
1. Using a pick tool remove the plastic cover to reveal the screw behind the interior door handle release
lever and remove the screw. (some models don’t require this step) Fig. 37 2. For models with manual windows use a window crank removal tool to disengage the pin securing the
window crank and pull window crank from door. Fig. 38 3. Remove the screw from the arm rest pocket. Fig. 39 4. Remove the two screws at the bottom of the door panel. Fig. 40 5. Using a panel removal tool gently pry the plastic trim panel along the side of the window frame away
to release the metal fasteners. 6. Lift door panel up and outward to separate from door. 7. Disconnect the door handle linkage by rotating the plastic latch and pulling the linkage rod loose. 8. Disconnect door wiring and set panel aside.

Audio System Upgrade Package 2005-2006 Jeep Grand Cherokee 2005-2006 Jeep Commander 2004-2006 Dodge Durango 2005-2006 Dodge Dakota 2005-2006 Jeep Liberty 2006 PT Cruiser 2007 Dodge Nitro 2007 Jeep Wrangler 2 Door/4 Door Installation Instructions
77KICK10 4/6/07 Page 13 of 23
© 2004, DaimlerChrysler Motors Company, LLC. Mopar is a registered trademark of DaimlerChrysler Motors Company. LLC. All rights reserved.
Fig. 41
Long Tab
Fig. 44 Fig. 43
Fig. 42
Dodge Dakota Quad Cab Rear Door Installation continued
9. Using a panel removal tool gently pry the plastic trim panel along the side of the window frame away to release the metal fasteners. Fig. 41
10. Lift door panel up and outward to separate from door. 11. Disconnect the door handle linkage by rotating the blue plastic latch and pulling the linkage rod
loose. Fig. 42 12. Disconnect door wiring and set panel aside.
13. Remove the screws securing the speaker to the plastic adapter that is mounted to the door.
Disconnect wiring and remove speaker. Fig. 43 14. Connect speaker wiring and install the upgrade speaker making sure the longest speaker tab is in
the location designated by arrow in picture. Replace screws and tighten. Fig. 44 15. Reinstall all previously removed parts in reverse order. 16. Repeat for other side of vehicle.
Audio System Upgrade Package 2005-2006 Jeep Grand Cherokee 2005-2006 Jeep Commander 2004-2006 Dodge Durango 2005-2006 Dodge Dakota 2005-2006 Jeep Liberty 2006 PT Cruiser 2007 Dodge Nitro 2007 Jeep Wrangler 2 Door/4 Door Installation Instructions
77KICK10 4/6/07 Page 14 of 23
© 2004, DaimlerChrysler Motors Company, LLC. Mopar is a registered trademark of DaimlerChrysler Motors Company. LLC. All rights reserved.
Fig. 45
Fig. 47
Fig. 46
Fig. 48
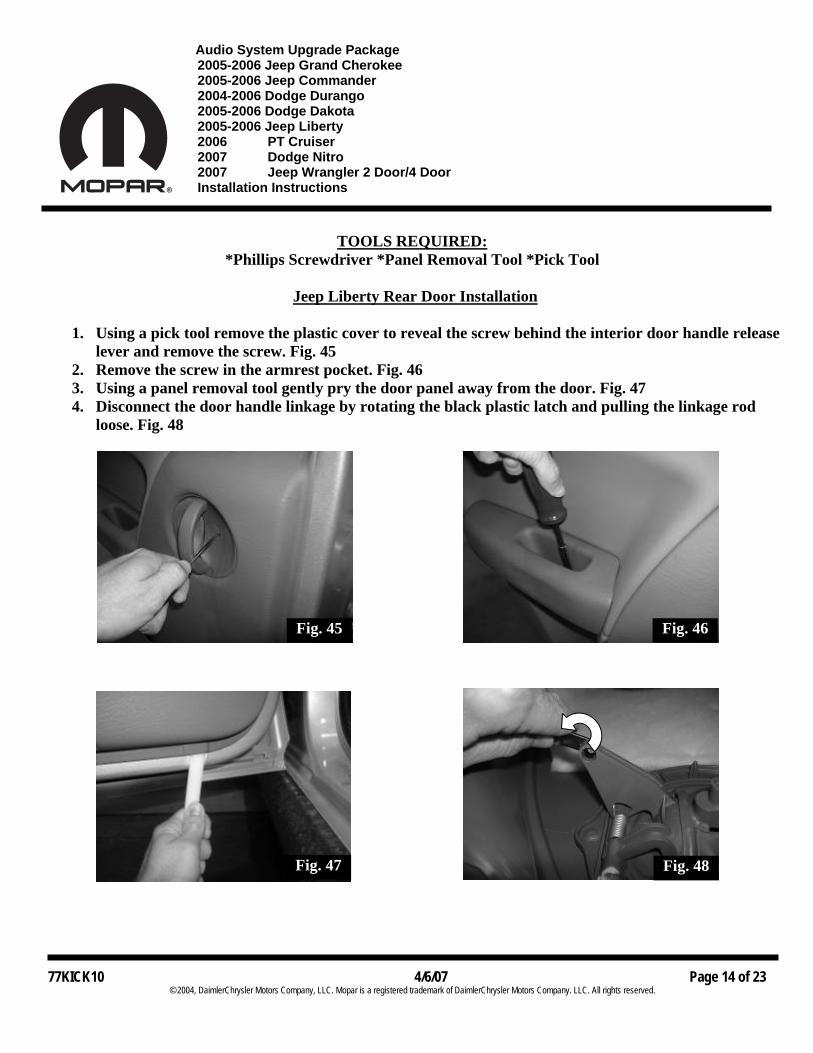
TOOLS REQUIRED: *Phillips Screwdriver *Panel Removal Tool *Pick Tool
Jeep Liberty Rear Door Installation
1. Using a pick tool remove the plastic cover to reveal the screw behind the interior door handle release
lever and remove the screw. Fig. 45 2. Remove the screw in the armrest pocket. Fig. 46 3. Using a panel removal tool gently pry the door panel away from the door. Fig. 47 4. Disconnect the door handle linkage by rotating the black plastic latch and pulling the linkage rod
loose. Fig. 48

Audio System Upgrade Package 2005-2006 Jeep Grand Cherokee 2005-2006 Jeep Commander 2004-2006 Dodge Durango 2005-2006 Dodge Dakota 2005-2006 Jeep Liberty 2006 PT Cruiser 2007 Dodge Nitro 2007 Jeep Wrangler 2 Door/4 Door Installation Instructions
77KICK10 4/6/07 Page 15 of 23
© 2004, DaimlerChrysler Motors Company, LLC. Mopar is a registered trademark of DaimlerChrysler Motors Company. LLC. All rights reserved.
Fig. 49
Long Tab
Fig. 50
Jeep Liberty Rear Door Installation continued
5. Disconnect door wiring and set door panel aside. 6. Remove the screws securing the speaker, disconnect wiring and remove speaker. Fig. 49 7. Connect speaker wiring and install the upgrade speaker making sure the longest speaker tab is in
the location designated by arrow in picture. Replace screws and tighten. Fig. 50 8. Reinstall all previously removed parts in reverse order. 9. Repeat for other side of vehicle.
Audio System Upgrade Package 2005-2006 Jeep Grand Cherokee 2005-2006 Jeep Commander 2004-2006 Dodge Durango 2005-2006 Dodge Dakota 2005-2006 Jeep Liberty 2006 PT Cruiser 2007 Dodge Nitro 2007 Jeep Wrangler 2 Door/4 Door Installation Instructions
77KICK10 4/6/07 Page 16 of 23
© 2004, DaimlerChrysler Motors Company, LLC. Mopar is a registered trademark of DaimlerChrysler Motors Company. LLC. All rights reserved.
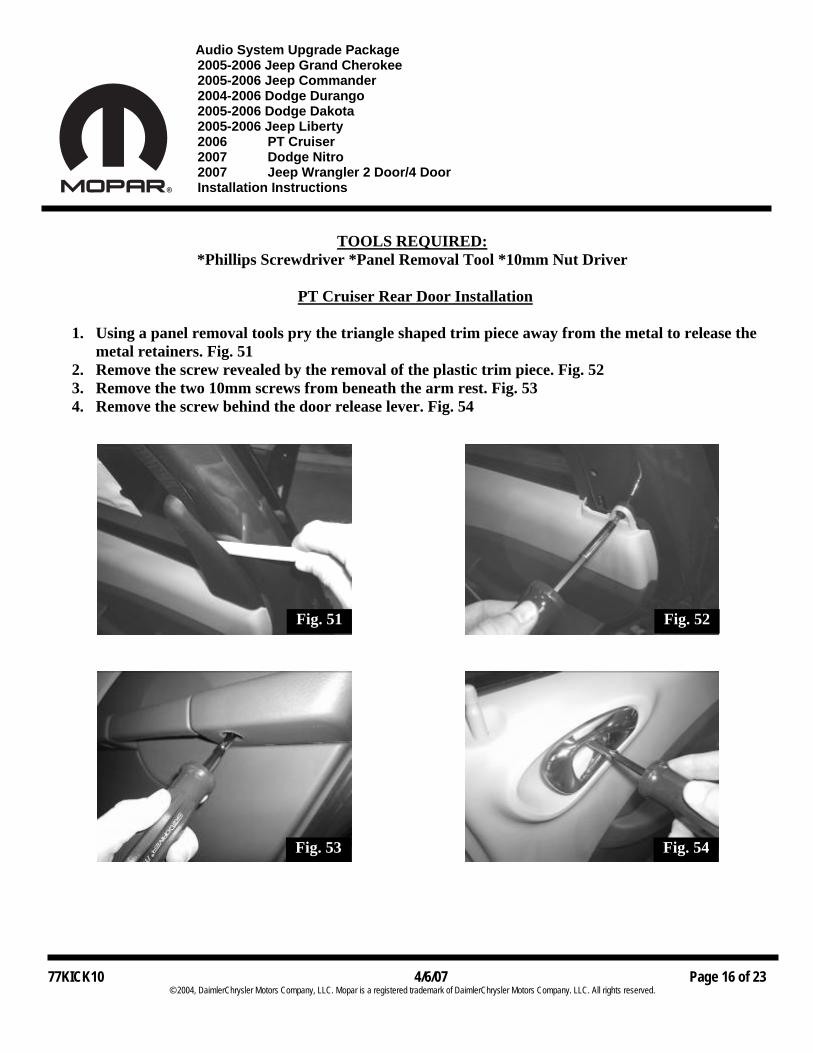
Fig. 51 Fig. 52
Fig. 53 Fig. 54
TOOLS REQUIRED: *Phillips Screwdriver *Panel Removal Tool *10mm Nut Driver
PT Cruiser Rear Door Installation
1. Using a panel removal tools pry the triangle shaped trim piece away from the metal to release the
metal retainers. Fig. 51 2. Remove the screw revealed by the removal of the plastic trim piece. Fig. 52 3. Remove the two 10mm screws from beneath the arm rest. Fig. 53 4. Remove the screw behind the door release lever. Fig. 54

Audio System Upgrade Package 2005-2006 Jeep Grand Cherokee 2005-2006 Jeep Commander 2004-2006 Dodge Durango 2005-2006 Dodge Dakota 2005-2006 Jeep Liberty 2006 PT Cruiser 2007 Dodge Nitro 2007 Jeep Wrangler 2 Door/4 Door Installation Instructions
77KICK10 4/6/07 Page 17 of 23
© 2004, DaimlerChrysler Motors Company, LLC. Mopar is a registered trademark of DaimlerChrysler Motors Company. LLC. All rights reserved.
Fig. 55
Fig. 57
Long Tab
Fig. 58
Fig. 56
PT Cruiser Rear Door Installation continued
5. Using a panel removal tool gently pry the door panel away from the door. Fig. 55 6. Disconnect the door handle linkage by rotating the white plastic latch and pulling the linkage rod
loose. Fig. 56 7. Remove the screws securing the speaker, disconnect wiring and remove speaker. Fig. 57 8. Connect speaker wiring and install the upgrade speaker making sure the longest speaker tab is in
the location designated by arrow in picture. Replace screws and tighten. Fig. 58 9. Reinstall all previously removed parts in reverse order. 10. Repeat for other side of vehicle.
Audio System Upgrade Package 2005-2006 Jeep Grand Cherokee 2005-2006 Jeep Commander 2004-2006 Dodge Durango 2005-2006 Dodge Dakota 2005-2006 Jeep Liberty 2006 PT Cruiser 2007 Dodge Nitro 2007 Jeep Wrangler 2 Door/4 Door Installation Instructions
77KICK10 4/6/07 Page 18 of 23
© 2004, DaimlerChrysler Motors Company, LLC. Mopar is a registered trademark of DaimlerChrysler Motors Company. LLC. All rights reserved.
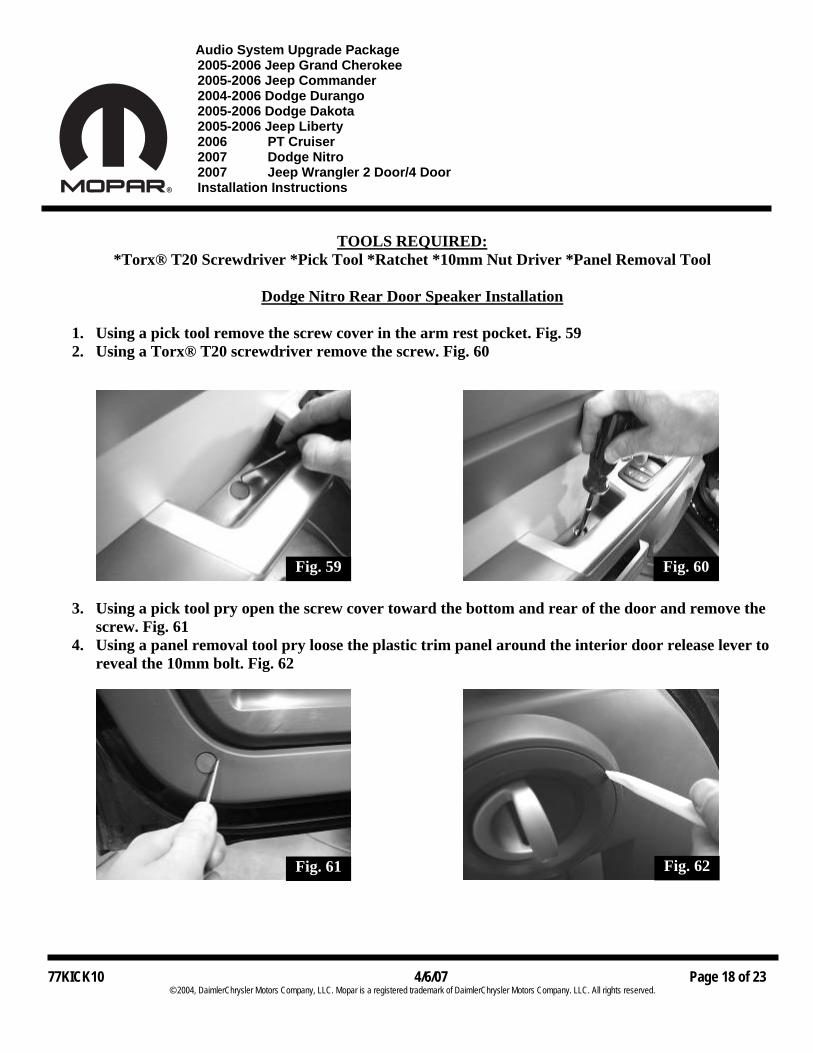
Fig. 59 Fig. 60
Fig. 61 Fig. 62
TOOLS REQUIRED: *Torx® T20 Screwdriver *Pick Tool *Ratchet *10mm Nut Driver *Panel Removal Tool
Dodge Nitro Rear Door Speaker Installation
1. Using a pick tool remove the screw cover in the arm rest pocket. Fig. 59 2. Using a Torx® T20 screwdriver remove the screw. Fig. 60
3. Using a pick tool pry open the screw cover toward the bottom and rear of the door and remove the screw. Fig. 61
4. Using a panel removal tool pry loose the plastic trim panel around the interior door release lever to reveal the 10mm bolt. Fig. 62

Audio System Upgrade Package 2005-2006 Jeep Grand Cherokee 2005-2006 Jeep Commander 2004-2006 Dodge Durango 2005-2006 Dodge Dakota 2005-2006 Jeep Liberty 2006 PT Cruiser 2007 Dodge Nitro 2007 Jeep Wrangler 2 Door/4 Door Installation Instructions
77KICK10 4/6/07 Page 19 of 23
© 2004, DaimlerChrysler Motors Company, LLC. Mopar is a registered trademark of DaimlerChrysler Motors Company. LLC. All rights reserved.
Fig. 64 Fig. 63
Fig. 65 Fig. 66
Dodge Nitro Rear Door Speaker Installation continued
5. Using a 10mm nut driver remove the bolt securing the door panel. Fig. 63 6. Using a panel removal tool gently pry up on the door switch plate, and disconnect wiring and
remove door panel. Fig. 64
7. Using a Torx® T20 screwdriver remove the three screws securing the existing speaker. Remove and disconnect wiring. Fig. 65
8. Connect the speaker wiring and install the upgrade speaker. Fig. 66
9. Reinstall all previously removed parts in reverse order.
Audio System Upgrade Package 2005-2006 Jeep Grand Cherokee 2005-2006 Jeep Commander 2004-2006 Dodge Durango 2005-2006 Dodge Dakota 2005-2006 Jeep Liberty 2006 PT Cruiser 2007 Dodge Nitro 2007 Jeep Wrangler 2 Door/4 Door Installation Instructions
77KICK10 4/6/07 Page 20 of 23
© 2004, DaimlerChrysler Motors Company, LLC. Mopar is a registered trademark of DaimlerChrysler Motors Company. LLC. All rights reserved.
Fig. 70
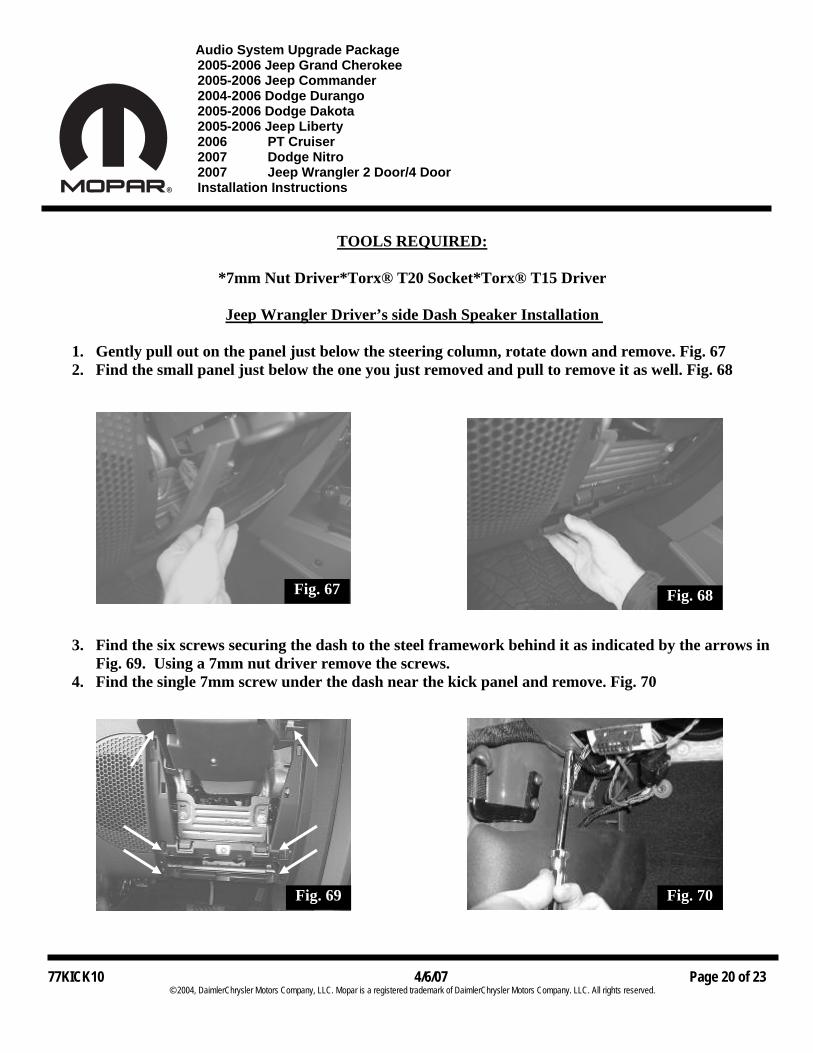
Fig. 68 Fig. 67
TOOLS REQUIRED:
*7mm Nut Driver*Torx® T20 Socket*Torx® T15 Driver
Jeep Wrangler Driver’s side Dash Speaker Installation
1. Gently pull out on the panel just below the steering column, rotate down and remove. Fig. 67 2. Find the small panel just below the one you just removed and pull to remove it as well. Fig. 68
3. Find the six screws securing the dash to the steel framework behind it as indicated by the arrows in Fig. 69. Using a 7mm nut driver remove the screws.
4. Find the single 7mm screw under the dash near the kick panel and remove. Fig. 70
Fig. 69

Audio System Upgrade Package 2005-2006 Jeep Grand Cherokee 2005-2006 Jeep Commander 2004-2006 Dodge Durango 2005-2006 Dodge Dakota 2005-2006 Jeep Liberty 2006 PT Cruiser 2007 Dodge Nitro 2007 Jeep Wrangler 2 Door/4 Door Installation Instructions
77KICK10 4/6/07 Page 21 of 23
© 2004, DaimlerChrysler Motors Company, LLC. Mopar is a registered trademark of DaimlerChrysler Motors Company. LLC. All rights reserved.
Fig. 73
Fig. 72 Fig. 71
Jeep Wrangler Driver’s side Dash Speaker Installation continued
5. Remove the dash end panel by prying loose with a panel removal tool. Fig. 71 6. Carefully pull the dash panel outward until there is sufficient room to allow access to the three
screws retaining the speaker. Fig. 72
7. Using a small ratchet and a Torx® T20 socket, remove the three screws. Fig. 73 8. Disconnect wiring and remove speaker. Fig. 74 9. Connect speaker wiring and install the upgrade speaker making sure the longest speaker tab is at
the top (twelve o’clock position). Replace screws and tighten. 10. Replace all previously removed parts in reverse order
Fig. 74
Audio System Upgrade Package 2005-2006 Jeep Grand Cherokee 2005-2006 Jeep Commander 2004-2006 Dodge Durango 2005-2006 Dodge Dakota 2005-2006 Jeep Liberty 2006 PT Cruiser 2007 Dodge Nitro 2007 Jeep Wrangler 2 Door/4 Door Installation Instructions
77KICK10 4/6/07 Page 22 of 23
© 2004, DaimlerChrysler Motors Company, LLC. Mopar is a registered trademark of DaimlerChrysler Motors Company. LLC. All rights reserved.
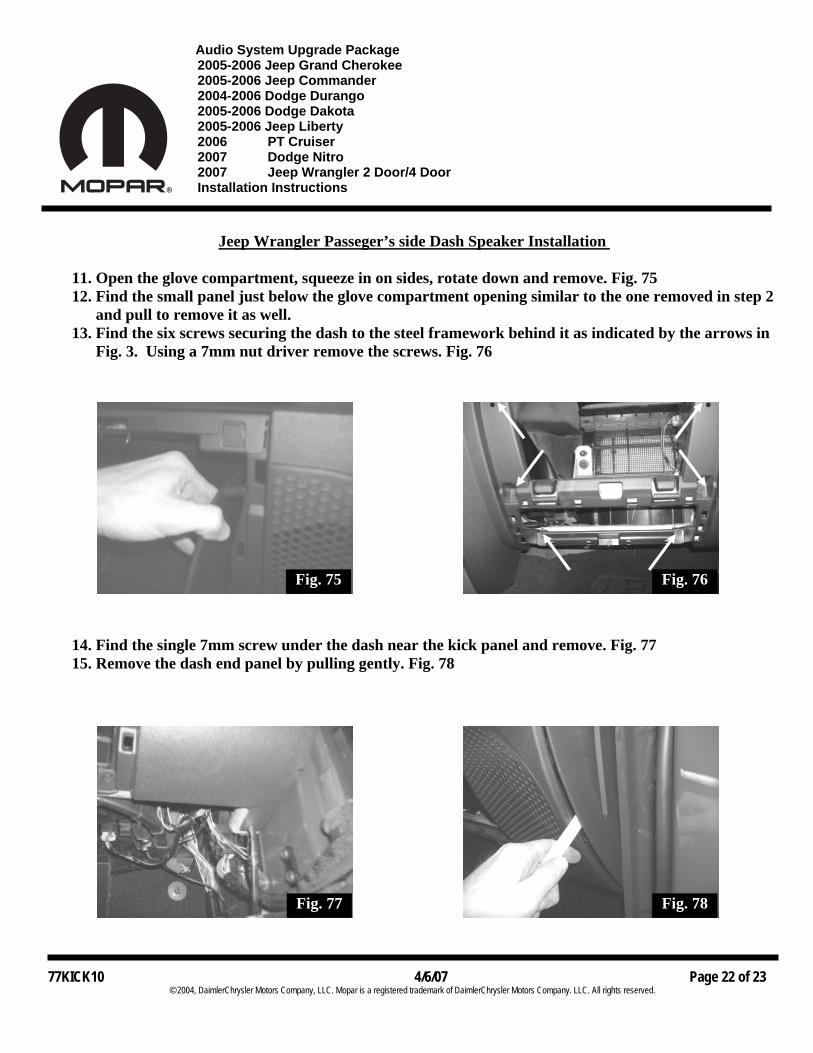
Jeep Wrangler Passeger’s side Dash Speaker Installation
11. Open the glove compartment, squeeze in on sides, rotate down and remove. Fig. 75 12. Find the small panel just below the glove compartment opening similar to the one removed in step 2
and pull to remove it as well. 13. Find the six screws securing the dash to the steel framework behind it as indicated by the arrows in
Fig. 3. Using a 7mm nut driver remove the screws. Fig. 76
14. Find the single 7mm screw under the dash near the kick panel and remove. Fig. 77 15. Remove the dash end panel by pulling gently. Fig. 78
Fig. 75 Fig. 76
Fig. 77 Fig. 78

Audio System Upgrade Package 2005-2006 Jeep Grand Cherokee 2005-2006 Jeep Commander 2004-2006 Dodge Durango 2005-2006 Dodge Dakota 2005-2006 Jeep Liberty 2006 PT Cruiser 2007 Dodge Nitro 2007 Jeep Wrangler 2 Door/4 Door Installation Instructions
77KICK10 4/6/07 Page 23 of 23
© 2004, DaimlerChrysler Motors Company, LLC. Mopar is a registered trademark of DaimlerChrysler Motors Company. LLC. All rights reserved.
Jeep Wrangler Passeger’s side Dash Speaker Installation continued
16. Carefully pull the dash panel outward until there is sufficient room to allow access to the three screws retaining the speaker. Fig. 79
17. Using a small ratchet and a Torx® T20 socket, remove the three screws. 18. Disconnect wiring and remove speaker. Fig. 80 19. Connect speaker wiring and install the upgrade speaker making sure the longest speaker tab is at
the top (twelve o’clock position). Replace screws and tighten. 20. Replace all previously removed parts in reverse order
Jeep Wrangler Sound Bar Speaker Installation
21. Using a Torx® T15 remove the three screws retaining the speaker. Fig. 81 22. Disconnect wiring and remove speaker. 23. Connect speaker wiring and install the upgrade speaker and speaker grill. Replace screws and
tighten. Fig. 82
Fig. 80 Fig. 79
Fig. 81 Fig. 82
Related Documents