Operation / Installation Manual 操作 / 安装说明 Petunjuk Pemakaian / Pemasangan Hoạt động / Hướng dẫn lắp đặt คู ่มือการติดตั ้ง/การใช ้งาน Microwave Oven 微波炉 Oven Gelombang Mikro Lò Vi Sóng เตาอบไมโครเวฟ RO-M2561-SM Rinnai Corporation English 中文 Bahasa Indonesia Tiếng Việt ภาษาไทย

Welcome message from author
This document is posted to help you gain knowledge. Please leave a comment to let me know what you think about it! Share it to your friends and learn new things together.
Transcript

Operation / Installation Manual
操作 / 安装说明
Petunjuk Pemakaian / Pemasangan
Hoạt động / Hướng dẫn lắp đặt
คมอการตดตง/การใชงาน
Microwave Oven
微波炉
Oven Gelombang Mikro
Lò Vi Sóng
เตาอบไมโครเวฟ
RO-M2561-SM
Rinnai Corporation
En
gli
sh
中文
Ba
ha
sa I
nd
on
esi
a
Tiế
ng
Việ
t ภาษาไทย

English Page 1 - 15
中文 16 - 30 页
Bahasa Indonesia Hal. 31 - 45
Tiếng Việt Trang 46 - 60
ภาษาไทย หนา 61 - 75
TABLE OF CONTENTS

1
Safety warnings --------------------------------------------------------------------------------------------------------------------------2
Appliance specifications ---------------------------------------------------------------------------------------------------------------6
Control panel -----------------------------------------------------------------------------------------------------------------------------6
Guide to the appliance -----------------------------------------------------------------------------------------------------------------7
Microwave functions --------------------------------------------------------------------------------------------------------------------8
Using for the first time ------------------------------------------------------------------------------------------------------------------8
Operation ----------------------------------------------------------------------------------------------------------------------------------9
Maintenance and Care------------------------------------------------------------------------------------------------------------------12
Troubleshoot ------------------------------------------------------------------------------------------------------------------------------13
Installation ---------------------------------------------------------------------------------------------------------------------------------14
Version: 2013 03
CONTENTS
IMPORTANT
To register your product warranty, please paste the serial numbers stickers enclosed with the packaging on your warranty card.
Please contact your local Rinnai Customer Care Centre should you require further assistance.
En
gli
sh

2
Unpacking
• Do not use the appliance if there are obvious signs of transportation damage.
• If the power supply cord is damaged, it must be replaced by the manufacturer, its service agent or qualified technician to avoid hazard.
• Ensure that young children do not play with plastic bag packaging.
For the user
• This appliance is for home food preparation only and should be used only for heating, cooking and defrosting food and beverage. It is not suitable for commercial, laboratory use or heating therapeutic devices.
• This appliance is not intended for use by young children.
• Older children or infirm persons may use the appliance without supervision when adequate instructions are given and they are able to use the microwave in a safe way and understand the hazards of improper use.
• The door safety lock prevents the microwave oven from operating when the door is open. Do not tamper with them, or operate this appliance with the door open as this can result in microwave leakage and cause hazard to the user.
• It is particularly important that the oven door closes properly. Do not operate the microwave if
a) door is warped
b) door hinges and latches are loose or broken
c) door seals and oven cavity are buckled or deformed
d) holes and cracks are visible in the door or oven interior walls
Warning: Operating the appliance with this type of damage will result in microwave leakage and present a hazard to user.
• Always open the microwave oven door carefully as hot steam may escape.
• Accessible surfaces may become hot when in grill mode with or without microwave function. Cookware, grilling rack and turntable may become hot during use. Always use heat-resistant oven gloves to avoid burns.
• Be careful when removing a lid or cover from cookware to avoid steam burns.
• Do not use full power to warm empty cookware.
• Do not force the turntable to rotate by hand. This may cause malfunctioning.
• Do not use the oven cavity for storage purposes.
• Do not obstruct air vents located on the ovens.
• Never use a high pressure cleaner or steam cleaner to clean the appliance. The steam could reach the electrical components and result in a short circuit.
• To reduce the risk of fire in the oven cavity:
a) Do not overcook food.
b) Do not heat oil or fat for deep frying. Do not leave the food unattended when cooking with oils as these can be a fire hazard if overheat.
c) Do not leave the oven unattended when reheating or cooking food in disposable containers made of plastic, paper or other combustible materials.
d) Remove wire twist-ties from paper or plastic bags before placing bag in the oven.
e) Do not heat undiluted alcohol in the microwave oven as this can easily ignite.
f) If smoke or ignition is observed inside the cooking compartment, keep oven door closed. Switch off and unplug the appliance immediately. Do not open the door until the smoke has dispersed.
g) Always keep the inside of the oven clean. Build-up grease may overheat and cause smoke or ignite.
SAFETY WARNINGS
Please read this user manual thoroughly before attempting to use appliance for the first time. This manual contains important information on safe installation, use and care of the appliance. Do keep these instructions for reference and pass them on to future user.
En
gli
sh

3
Technical safety
• Before setting up the appliance, check it for external visible damage. Do not install or attempt to use a damaged appliance.
• Do not operate the microwave if the door, hinges or door seals are damaged. Operating the appliance will result in microwave energy leakage and may cause hazard to the user.
• Ensure that the power supply cord does not run under the oven and is free from heat source or sharp objects.
• The appliance is a high voltage appliance. Never remove the casing as this will result in microwave energy leakage and may cause hazard to the user.
• Before connecting the appliance to the power mains, make sure that the voltage and frequency corresponds to the rating as shown on the rating plate attached to the appliance.
• The electrical safety of this appliance can only be guaranteed if the appliance is correctly earthed. Use an electrical connector with earth that is correct for your location. The electrical connection of this appliance must be connected to earth (where applicable): Green & Yellow=EARTH; Blue=NEUTRAL; Brown=LIVE. The basic safety requirement should be tested and inspected by qualified technician. The manufacturer cannot be held liable for any damages due to inadequate earthing system.
• Installation and repair should only be attempted by qualified technician.
• It is dangerous to modify any part of this appliance. Tampering with electrical connections or mechanical parts can cause operation faults and may put the user at risk.
• Multiple plugs and extension cables must not be used. Overloading is dangerous and may cause a fire hazard.
• Always disconnect the power supply cord before carrying out any cleaning or maintenance work on the appliance.
Disposal
• This appliance and its packaging are environmentally friendly and recyclable. Please help us to care for the environment by disposing the packaging in a proper manner and recycling any old appliances.
• Before disposing an old appliance, disconnect it from the power supply and cut the power supply cord to prevent hazards.
Microwave Cooking Advice
GENERAL NOTES DO NOT DO
Eggs • Do not cook eggs in shells, hard or soft-boiled eggs in the microwave oven as they may explode.
• Puncture the egg yolks before cooking, cover and allow standing time of at least one minute before removing utensil cover.
Foods with peel or skin • Foods with peel or skins such as potatoes, tomatoes, sausages, apples may burst during cooking.
• Pierce skins before cooking. This will allow steam to escape and prevent the food from bursting.
Baby food • Do not heat baby food in original jars.
• Do not overheat baby bottles. Only heat till warm.
• Transfer baby food to small dish and heat carefully, stirring often.
• Remove the screw cap and teat before warming the baby bottles. After warming, shake bottle thoroughly.
• Do check the temperature before serving to prevent burns.
The manufacturer will not be held liable for any damages resulting from improper installation nor failure to adopt proper safety measures during installation and operational use of the appliance.
En
gli
sh

4
Canned foods • Do not cook or heat up food and liquids in sealed containers/cans as pressure can build up and they may explode posing a severe risk of injury.
• Remove food from sealed containers/cans. Transfer to suitable utensil/dish.
Popcorn • Do not use regular brown bags, plastic bags or glass bowl to pop popcorn.
• Do not exceed the maximum time indicated on popcorn package.
• Use specially bagged popcorn for the microwave oven.
Liquids and beverages • Do not heat longer than the recommended time.
• Microwave heating of liquids such as soups, beverages, sauces etc can result in delayed eruptive boiling. The boiling point of the liquid may be reached without evident production of bubbles. The liquid does not boil evenly throughout. “Boiling delay” can cause a sudden build-up of bubbles when the container is removed from the microwave or shaken. This could lead to sudden boil over of the hot liquid resulting in danger of burning.
• Select the appropriate cooking time and power level. If you are unsure, begin with low power level and cooking time, slowly increase the setting until the food is sufficiently heated throughout.
• Stir the liquid before and during cooking.
• After heating, allow to stand in the oven for a short time.
• Exercise caution when handling the container.
Turntable • Do not operate the microwave oven without the turntable in place.
• Do not cook, reheat or defrost food directly on the turntable for cooking.
• Always place food in suitable utensil/dish.
• Check that the utensil/dish is not larger in size than the turntable.
Utensils • Do not use containers made from metal, aluminium foil, lead crystal glassware or bowls with metallic trim. These items could be damaged or cause a fire hazard.
• Avoid using containers with restrictive openings (narrow necks).
• Check that utensils are suitable for microwave cooking before using them.
Aluminium foil • Do not use too much aluminium foil or sparkling may occur.
• Narrow strips of aluminum foil may be used to shield food from overheating. Keep to smaller pieces of aluminium foil.
• Keep aluminium foil clear of cavity walls (minimum 1” between foil and cavity to avoid sparks.
En
gli
sh

5
Suitable cooking utensils for microwave ovens
• To cook or defrost food in a microwave oven, the microwave energy must be able to pass through the cooking utensils to penetrate the food.
• The material and shape of containers affect cooking results and durations. Heat distribution is more even in round/oval shaped containers than in square/oblong containers as the food in the corners tend to overcook.
• Below is a general guide to selecting suitable utensil:
Utensil Microwave Grill Combination
Heat–Resistant Glass Yes Yes Yes
Non Heat–Resistant Glass No No No
Heat–Resistant Ceramics Yes Yes Yes
Microwave–Safe Plastic Dish Yes No No
Kitchen Paper Yes No No
Metal Tray No Yes No
Metal Rack No Yes No
Aluminum Foil & Foil Container No Yes No
Note: Always check manufacturer’s instructions on utensils/cookware before using them.
Microwave cooking tips
• Place the thickest parts of food towards the outside of the dish.
• Use a microwave-safe lid or microwave-safe cling wrap to cover the food during cooking. Covering the food speeds up the cooking process and prevents food from drying out. Note: Do not use a cover if cooking food coated with breadcrumbs, or cooking food with a crisp finish.
• It is advisable to turn, rearrange or stir food during cooking to ensure even heating. Always stir or turn food from the outside towards the middle, as food heats more quickly from the outside.
• Food with thick peel or skin must be pierced before cooking to allow steam to escape and prevent the food from bursting.
• Standing time is necessary after cooking to enable the heat to disperse evenly throughout the food.
• Chilled food will take longer to cook than food at room temperature. Always ensure that food is sufficiently cooked or reheated. If in doubt that a sufficiently high temperature has been reached, continue reheating for a little longer.
• The cooking time must be increased with increased amount of food placed. Example, four sausages will take longer to cook than two.
Defrosting
• Remove the food from its packaging and place in a microwave-safe utensil/dish. Do not cover the food.
• To defrost meat, unpack the frozen food and place it on an upturned utensil/dish so that the meat juice can run off and be collected. Turn halfway through defrosting.
• Fish does not need to be fully defrosted before cooking. Defrost so that the surface is sufficiently soft to take herbs and seasoning.
En
gli
sh

6
Voltage and frequency of power supply 220V – 240V / 50Hz
Fuse 13A
Power consumption (Microwave) 1400W
Power consumption (Grill) 1000W
Microwave Power output 900W
Operation Frequency 2450MHz
Appliance dimension W595 X D395 X H390 mm
Volume 25 litres
Weight Approx. 14.5 kg
APPLIANCE SPECIFICATIONS
CONTROL PANEL
Display Screen Electronic cooking time, power level and time of day display Power Press to select microwave power level Grill Press to set a grill cooking program Combi. Press to select one of two combination cooking settings Wei. Def. Press to select defrost program by the weight Clock/Kitchen Timer Press to set the clock or to set the kitchen timer Wei. Adj. Press to set the weight of defrost and auto cooking program Time/Menu Rotary selector to enter cooking time or select auto-menu Stop/Cancel Press to stop cooking program or clear current settings before next program Start/Quick Start Press to start cooking program or set quick start cooking program Door Release Press to open the door
En
gli
sh
Door Release

7
GUIDE TO THE APPLIANCE
① Door safety lock ② Oven window ③ Turntable support / roller ring ④ Shaft for turntable ⑤ Door button ⑥ Control panel ⑦ Waveguide cover (Warning: Do not remove) ⑧ Glass turntable ⑨ Grill element ⑩ Grilling rack
Accessories provided: • Glass turntable (one pc) • Turntable support (one pc) • Grilling rack (one pc)
Fixing the turntable
Turntable
Turntable support / roller ring
Turntable shaft
1. Place the turntable support on the cavity bottom. 2. Place the turntable on the turntable support.
Check that the turntable hub is well secured in the turntable shaft (see arrow).
Notes:
• Do not place the turntable upside down. • Do not turn the turntable manually as this could
damage the drive motor. • Both turntable and turntable support must be
used during cooking. Utensils and dishes must be placed on this turntable during cooking.
En
gli
sh

8
Microwave solo mode
Suitable for defrosting, reheating and cooking.
Grill mode
Suitable for grilling thin cuts of meat.
Combination mode (Microwave & Grill)
Suitable for browning dishes with toppings. The microwave cooks the food, the grill browns it.
Remove packaging material
Ensure that all packaging material is removed before using the appliance for the first time.
Pre-cleaning the oven cavity and accessories
Clean the oven cavity and supplied accessories thoroughly before use.
Check the appliance for externally visible damage
Do not operate the microwave oven if
a) door is warped
b) door hinges and latches are loose or broken
c) door seals and oven cavity are buckled or deformed
d) holes and cracks are visible in the door or oven interior walls
Warning: Operating the appliance with this type of damage will result in microwave leakage and present a hazard to user.
USING FOR THE FIRST TIME
MICROWAVE FUNCTIONS
When the microwave oven with grill function is
first used, it may produce slight burning smell.
This is a normal phenomenon.
We recommend you to operate the grill without
food for 20 minutes when using the oven for
the first time. This phenomenon will disappear
after a period of using.
En
gli
sh

9
Setting the clock
This oven can be set in a 12 hour or 24 hour mode.
• Press and hold CLOCK/KITCHEN TIMER for approximately 3 seconds to set 12 hour mode. “Hr12” is displayed on the screen.
• Press CLOCK/KITCHEN TIMER again to set 24 hour mode. “Hr24” is displayed on the screen.
• Rotate TIME/MENU selector to set present hour. Press Clock/Kitchen Timer to enter.
• Rotate TIME/MENU selector to set present minute. Press CLOCK/KITCHEN TIMER to enter.
Opening and closing the door
Precaution: When the microwave door is lightly pressed, the oven turntable and oven light will turn on but microwave power will not work.
• To open the door, press the door button fully.
• To close the door, push the door firmly.
If the microwave oven is in operation, opening the door will disrupt the cooking programme.
Microwave solo mode
Microwave cooking allows you to customize cooking power and time. Select a power level by pressing the POWER button. See the table below.
The maximum cooking time is 95 minutes.
Suppose you want to cook at 80% Power Level for 5 minutes.
• Open the door and place the utensil/dish on the turntable. Close the door.
• Press POWER to set the desired power level (80% is displayed in the window)
Press
Power button Power level
Level
1 time 100%(P100) High
2 times 80%(P-80) Med-High
3 times 60%(P-60) Medium
4 times 40%(P-40) Low-Med
5 times 20%(P-20) Low
6 times 0%(P-00) Nil
• Set the cooking time using the TIME/MENU selector (05 :00 is displayed in the window)
• Press START/QUICK START to start operation.
• After the cooking time ends, beep signal sounds and ‘End’ is displayed.
Note :
• Press POWER button to check power level during cooking.
• Press STOP/CANCEL to stop programme during operation. Press START/QUICK START to resume.
• Clear the display setting before starting a new programme. Press STOP/CANCEL to reset current setting.
Grill mode
Grill cooking is suitable for thin slices of meat, steaks, chops, kebabs, sausages and small pieces of chicken. It is also suitable for sandwiches and au gratin dishes. The maximum cooking time is 95 minutes.
Suppose you want to program grill cooking for 12 minutes.
• Open the door and place the food onto the Grill rack. Close the door.
• Press GRILL button.
• Rotate TIME/MENU selector to set the cooking time.(12 :00 is displayed in the window)
• Press START/QUICK START to start operation.
• After the cooking time ends, beep signal sounds and ‘End’ is displayed.
Note :
• Press STOP/CANCEL to stop programme during operation. Press START/QUICK START to resume.
• Clear the display setting before starting a new programme. Press STOP/CANCEL to reset current setting.
Tip :
When using the grill solo mode, you may preheat the grill before use.
OPERATION
En
gli
sh

10
Combination mode (Microwave and Grill)
This program uses a combination of grill power and microwave power. The maximum cooking time is 95 minutes.
Suppose you want to set combination cooking for 15 minutes.
• Open the door and place food onto the Grill rack. Close the door.
• Press COMBI button to select desired combination programme.
• Rotate TIME/MENU selector to set the cooking time.(15 :00 is displayed in the window)
• Press START/QUICK START to start operation.
• After the cooking time ends, beep signal sounds and ‘End’ is displayed.
Note: • Press STOP/CANCEL to stop programme during
operation. Press START/QUICK START to resume.
• Clear the display setting before starting a new programme. Press STOP/CANCEL to reset current setting.
• Do not preheat the grill during Microwave and Grill cooking.
Press button Combi
Cooking period Suitable dishes
Micro Grill
1 time Co-1 30% 70%
fish, potatoes or au gratin
2 times Co-2 55% 45% pudding, omelettes, baked potatoes, poultry
Quick start
This programme starts the oven at full power. Cooking time can be increased during cooking. The maximum time setting is 10 minutes.
• Open the door and place the utensil/dish on the turntable. Close the door.
• Press START/QUICK START to set the cooking time. Each press increases the cooking time by 30 seconds.
• The oven auto-start at full power.
Note: • Clear the display setting before starting a new
programme. Press STOP/CANCEL to reset current setting.
Kitchen timer
The timer operates independently. The maximum time setting is 95 minutes.
Suppose you want to set the kitchen timer for 30 minutes :
• Press CLOCK/KITCHEN TIMER button.
• Set the desired time using the TIME/MENU selector (30 :00 is displayed in the window).
• Press START/QUICK START to enter.
• After the timer ends, beep signal sounds.
.
Note:
• You can press CLOCK/KITCHEN TIMER to view the countdown when the timer is activated.
• To cancel, press STOP/CANCEL within 5 seconds.
Menu cook
You can choose from 8 preset programmes. These programmes are weight dependent. You enter the weight or quantity of the food, and the cooking duration is automatically calculated.
• Open the door and place the utensil/dish on the turntable. Close the door.
• Rotate the TIME/MENU selector in anti-clockwise direction. Turn it again to select the food code.
• Press WEI. ADJ. to enter weight. Check the display screen for number of servings or preset weights, which should match weight of food you have placed in the oven.
• Press START/QUICK START to start operation.
Food Code
Menu Cooking mode
A-1 Popcorn (99g) Microwave
A-2 Coffee (200ml/cup) Microwave
A-3 Fresh Vegetables (g) Microwave
A-4 Potato (230g/unit) Microwave
A-5 Pizza (g) Microwave
A-6 Reheat (g) Microwave
A-7 Grilled Chicken (g) Combination
A-8 Grilled Steaks (g) Combination
Note :
• During A-7 (Grilled Chicken) and A-8 (Grilled Steak) cooking mode, the oven pauses and produces reminder alerts to turn food over.
• Press START/QUICK START to resume.
En
gli
sh

11
Weight defrost
This programme defrosts food according to the weight entered. The weight range is 100g to 1800g.
Suppose you want to set the oven to Weight Defrost for 200g food.
• Open the door and place the utensil/dish on the turntable. Close the door.
• Press WEI. DEF.
• Press the WEI. ADJ. to enter weight.
• Press START/QUICK START to start operation.
Note:
• During defrosting process, the oven pauses and produces reminder alerts to turn food over.
• Press START/QUICK START to resume.
Multi-stage cooking
Your oven can be programmed up to 3 stages using combinations of Microwave mode, Grill mode or Combination mode (Microwave and Grill).
Suppose you want to set the following cooking program.
Microwave cooking (60%) Grill cooking
• Open the door and place the utensil/dish on the turntable. Close the door.
• Press POWER to power 60%.
• Rotate TIME/MENU selector to set cooking time.
• Press GRILL button.
• Rotate TIME/MENU selector to set cooking time.
• Press START/QUICK START to start operation.
• After the cooking time ends, beep signal sounds and ‘End’ is displayed.
Note:
Weight Defrost, Menu Cook and Quick Start cannot be set in Multi-stage cooking program.
Child lock
The child lock can be activated to prevent the oven being switched off unintentionally by young children. All buttons are disabled when the child lock is activated.
• To activate the child lock, press and hold Stop/Cancel button for approximately 3 seconds. The oven beeps and the child lock symbol appears.
• To deactivate the child lock, press and hold Stop/Cancel button for 3 seconds. The oven beeps and the child lock symbol goes off.
To stop the oven during operation
i) Press STOP/CANCEL
• You can restart the oven by pressing START/QUICK START .
• To reset the current programme, press STOP/CANCEL.
ii) Open the door
• You can restart the oven by closing the door and pressing START/QUICK START .
• To reset the current programme, press STOP/CANCEL.
En
gli
sh

12
Cleaning the Oven Interior
• Keep the oven cavity, door and door seal surfaces clean. Food residues, spill overs and grease splatters stained on the oven walls, door seal and door surface reduce the efficiency of the oven and may cause hazards to user.
• The oven interior and door can be cleaned using a damp cloth. Mild detergent may be used if the oven gets very dirty. Avoid the use of abrasive cleaners as they may stain, streak or dull the oven interior and door surface.
• To loosen stubborn deposits, boil a cup of water in the microwave oven for 2 – 3 minutes.
• To remove odors from the oven interior, boil a cup of water with a few spoonful of lemon juice for 5 minutes.
• The door should be kept clean at all times and checked regularly for any damage.
• Avoid water or small particles penetration into small vents in the appliance.
Cleaning the Oven Exterior
• The outside can be easily cleaned with mild detergent and warm water. Wipe dry with a lint-free cloth. Avoid using corrosive or abrasive products that could damage the surface.
• For stainless steel surfaces, always wipe in the direction of the grain so as not to scratch the surface. For tougher stains, use a specific non-abrasive product (please observe the manufacturer’s instructions).
• Open the door before cleaning to deactivate the control panel. Keep the control panel dry. Wipe dry with a soft, damp cloth. Avoid using excessive amount of water.
• Keep the ventilation openings free from water seepage and small particles.
Oven light
Do not attempt to replace the oven light by a non-qualified technician. Please contact your local Rinnai Customer Care Service for service.
Cleaning the Accessories
Turntable and support
• Always keep the roller ring clean so that the turntable can turn smoothly and avoid excessive noise.
• Wash with mild soapy water and dry thoroughly.
• Fit the turntable in proper position after cleaning. See “Fixing the Turntable” in this manual.
To avoid the turntable from breaking:
• Before cleaning the turntable with water, leave the turntable to cool.
• Do not place anything hot on a cold turntable.
• Do not place anything cold on a hot turntable.
Grilling rack
• Wash and dry the grilling rack after each use. It can be washed by hand or dishwasher. Soak in hot soapy water to remove stubborn grease. Clean with a brush or sponge.
Disconnect the power supply cord before carrying out any cleaning or maintenance activities.
Warning: Do not remove the waveguide cover inside the oven cavity. Never use a high pressure cleaner or steam cleaner to clean the appliance. The steam could reach the electrical components and result in a short circuit.
MAINTENANCE AND CARE
The oven interior can get hot during use. Ensure that the oven has sufficiently cooled down before carrying out cleaning activities.
For purchase of spare parts, please check with your local Rinnai Customer Care Centre.
En
gli
sh

13
In case of minor faults or problems with the appliance operation, please check the following instructions and see if you could resolve the problem before calling for technician service.
The oven does not work
• Check that the main switch is turned on and the plug is properly inserted in the electrical outlet.
• Check if the circuit breaker is in working order.
• Check that the appliance door is closed properly.
• Check that the START/QUICK START key has been pressed.
The display does not light up
• Check that the control panel is programmed correctly.
The turntable does not turn smoothly
• Check that the contact area between the turntable and the turntable support are clean.
Food is not properly cooked, heated or defrosted
• Check if the correct power level was correctly selected.
• Check if the programme was interrupted and was not completed.
Microwave oven switches off during a programme
• Check if the ventilation openings are blocked. Remove any objects if necessary.
Oven light is not working
• Do not attempt to replace the oven light by a non-qualified technician. Please contact your local Rinnai Customer Care Service for service.
Condensation build-up on oven door
• Steam or water droplets may form on the door during the cooking cycle. This is due to condensation from the heat of the food. This is not a problem or fault with your oven and does not affect the safety of the appliance.
TROUBLESHOOT
If the problem persists despite observing the above checks, please contact your local Rinnai Customer Care Centre for assistance. For service calls under warranty, please note that it is necessary to product your proof of purchase and valid warranty card.
En
gli
sh

14
Remove all packing materials and accessories supplied.
Check that the appliance is free from damage. Do not operate the microwave oven if:-
a) door is warped
b) door hinges and latches are loose or broken
c) door seals and oven cavity are buckled or deformed
d) holes and cracks are visible in the door or oven interior walls
If there is any damage, do not operate the appliance. Please contact your local Rinnai Customer Service for assistance.
Fit the appliance in appropriate cabinet
• This appliance is designed to be built into a column unit.
• Ensure that the air vents are not obstructed or blocked by objects. If air vents are blocked during operation, the oven may overheat and this may lead to malfunctioning.
• The oven should be installed on a flat, level surface able to withstand the weight of the appliance and its contents. The oven must be in a stable position to avoid the possibility of causing noise vibration.
• The panels of the adjacent cabinets must be made of heat-resistant material.
• Keep the oven away from heat and water source. Exposure to heat and water can lower the oven efficiency and lead to malfunctioning.
• Operation of the oven may cause interference to your radio, TV or similar equipment. Place the oven as far away possible from these electronic equipment.
• The column unit must have the following cut-out dimension:
Ventilation
To ensure adequate ventilation, a minimum ventilation gap of 45mm is required from back of appliance to cabinet wall.
INSTALLATION
Installation must be performed by qualified personnel only. The manufacturer declines all responsibility for improper installation and does not accept responsibility for appliance warranty in the event of damage caused by incorrect installation. E
ng
lish

15
Built-in kit
① Metal Plate 1 pc
A Screw 3x20 4 pcs
B Screw 4x8 2 pcs
Securing the appliance
• Fix the metal plate (windshield) and secure using 2(two) 4x8mm screws provided.
• Fit the appliance into column unit until the front frame of the oven is aligned to the cupboard opening. Ensure the appliance is stable and not leaning. Do not crush the power supply cord.
• Fix the oven in position with 4(four) 3 x 20mm screws provided. The fixing points are located on the top and bottom corners of the oven. Do not over tighten screws.
• Check that it is correctly aligned.
• Connect the power supply cord.
• Turn on the power mains. The appliance must only be operated when it has been built in to avoid electric shock hazard.
Connecting the supply cable to the power mains
• Install a standardized plug corresponding to the load indicated on the rating label attached to the appliance.
• If the appliance is being directly connected to the power mains supply, an omnipolar circuit breaker must be installed with a minimum gap of 3mm between the contacts, suitable for the load indicated and complying with current electrical regulations (the earthing wire must not be interrupted by the circuit breaker). The supply cable must not come into contact with surfaces with temperatures higher than 500C.
• The installer must ensure that the correct electrical connection has been made and that it is compliant with local safety regulations.
Before connecting to the power supply, ensure that:
• The appliance is correctly and efficiently earthed.
• The socket can withstand the maximum power of the appliance, and voltage within the value range indicated on the rating label attached to the appliance.
• The basic safety requirement should be tested by a qualified technician. Multiple plugs and extension cables must not be used. Overloading is dangerous and may cause a fire hazard.
• Once the appliance has been installed, the power supply and electrical socket must be easily accessible.
The installer must ensure that the correct electrical connection has been made and that it is compliant with local safety regulations.
The manufacturer declines any liability should these safety measures not be observed.
①
En
gli
sh

16
安全警告 ----------------------------------------------------------------------------------------17
产品规格-----------------------------------------------------------------------------------------21
控制面板 ----------------------------------------------------------------------------------------21
产品指南-----------------------------------------------------------------------------------------22
微波功能 ----------------------------------------------------------------------------------------23
初次使用 ----------------------------------------------------------------------------------------23
操作 --------------------------------------------------------------------------------------------24
维修与保养---------------------------------------------------------------------------------------27
常见故障的识别与处理-----------------------------------------------------------------------------28
安装---------------------------------------------------------------------------------------------29
重要提示
要注册您的产品保修,需要把序列号贴纸贴到随
机器包装的保用证上。
请联系当地的林内客户售后服务中心咨询更新信
息。
Version: 2013 02
中文
目录

17
开箱
• 如有明显的运输过程造成的损伤,请不要使用该
器具
• 如果电源线破损,则必须由生产商,服务代理或
者合格的技术人员进行更换,防止伤害风险。
• 请确保孩童远离塑料包装。
给用户
本产品只适用于烹煮家庭食物,并应只使用于加热,
烹煮,解冻食物与饮料。本产品不适用于商用,实验
或者加热治疗设备。
• 不推荐让幼童使用本产品。
• 大点的孩童或体弱者可以在无监督情况下使用本
产品,但必须已有充足的指导,以及他们有能力
安全使用本器具,并懂得不正当使用而导致的危
险。
• 门锁防止微波炉门打开时启动。请勿纂改,因为
炉门开着时启动本产品会导致微波泄漏辐射,对
用户造成危险。
• 炉门的紧闭是非常重要的。请不要在下述情形下
使用微波炉:
a) 门是扭曲的
b) 门的铰链和插销是松动或破损的。
c) 门封与炉体是弯曲的或者是变形的。
d) 可看到门上或炉壁上有洞或裂痕的。
警告: 在此有破损的情况下操作器具会导致微波
泄漏,对用户造成危险。
• 请小心关闭炉门,否则热蒸汽会溢出来。
• 烧烤模式时,即使有微波或无微波功能,表面也会
变热,餐具,烧烤网与转盘都会在使用时变热。请
使用防热微波炉用手套以防止烫伤。
• 请在移开餐具的盖子时注意避开喷出的热蒸汽。.
• 请勿使用满负荷来加热空餐具。
• 请勿用手翻转转盘,这会导致故障。
• 请勿使用炉体作储存用途。
• 请勿堵塞炉上的通风口。
• 请勿使用高压清洁器或蒸汽清洁器来清洁本器具。
热蒸汽会触到电热元件并导致短路。
• 减少炉体着火的风险:
a) 请勿过度烹煮。
b) 请勿加热油或脂肪来油炸。在使用油烹煮时请
勿离开,因为不注意而造成过热会引发火灾。
c) 在用一次性容器例如塑料,纸质或其他可燃材
料来装盛食物进行预热或烹煮时,请勿远离。
d) 请移走绑在纸袋或塑料袋上的绳之后再放进微
波炉内。
e) 请勿用微波炉加热不稀释的酒精,否则会很容
易点燃。
f) 如果发现烹饪炉内冒烟或着火,请勿开门。马
上关闭并拔出电源插头。等待烟消散之后再打
开炉门。
g) 请保持炉内清洁。积聚的油脂会容易过热而造
成冒烟或着火。
安全警告
在使用本器具前,请仔细阅读本使用手册。本手册包括重要的涉及人身安全以及器具使用和保养方面的信息。
请务必参考说明书,并把其交给以后的使用者。
中文

18
技术安全
• 在启动本器具前,请确认外部有无可见的损伤。
请不要安装或使用一个破损的器具。.
• 如炉门,铰链,门封有损伤,请勿使用本器具。
若使用有损坏的器具,则容易导致微波泄漏,对
用户造成危险。
• 确保电源线没有压在器具底部,并检查周围有无
热源或锋利的物体。
• 本器具是高压器具。请勿移动箱体,否则会引起
微波泄漏,对用户造成危险。
• 在连接电源之前,请确保电压与频率跟贴在器具
的铭牌上所示一致。
• 本器具的安全保证只在正确接地的情况下有用。
使用电插头接地是符合当地规定的。本器具必须
接地(合适的地方): 绿 & 黄=接地; 蓝=零线;
褐色=相线. 基本的安全要求需要由合格的技术
人员测试与检查。生厂商不对由于不正确的接地
系统导致的损坏承担责任。
• 安装与维修只可以由有资质的技术员进行。
• 任意修改器具是很危险的。纂改电连接或机器元件
可能会导致机器故障并致用户于危险。
• 不能使用多用插头以及延长电线。满负荷运作很危
险,并会引发火灾。
• 请在移动器具或清洁或保养维修前切断器具的电
源。
处理
• 此器具与其包装都是环保及可循环再用的。请帮助
我们爱护环境,用合适的方法处理包装与旧器具。
• 在处置旧器具前,请切断电源移走电源线以防危险
发生。
微波烹煮建议
种类 不要 要
鸡蛋 不要烹饪带壳的鸡蛋,或水煮蛋,
因为这会引起鸡蛋爆裂。
• 要在烹煮前刺穿蛋黄,盖上盖子,并
在取走餐具盖子前等待至少一分钟。
有皮的食物 • 有皮的食物,例如马铃薯,西红
柿,香肠,苹果等会在烹煮时迸裂
在烹煮之前刺穿皮,这能使蒸汽流走
并防止食物迸裂。
婴儿食物 • 请不要在原装罐上加热婴儿食物。
• 不要过度加热婴儿用瓶,加热到温
暖即可。
• 把婴儿食物转到小碟子上,并小心加
热,均匀搅拌
• 在加热婴儿奶瓶之前移走盖子与奶
嘴。加热之后,彻底摇动瓶身。
务必在喂食前确认温度以防止烫伤。
罐头食物 请不要直接烹煮或加热密封罐头内的
食物或液体,因为气压会膨胀并造成
爆炸而导致人身伤害
• 请把罐头内的食物移到可使用微波炉
专用的餐具上。
爆米花 • 请不要使用普通的褐色袋子,塑料
袋或者玻璃碗来制造爆米花.
• 不要超过爆米花的包装袋上显示的
最后时间。
• 请使用微波炉专用的袋装爆米花。
生产商不会对由于任何安装或者通过非正当的方式
安装与运行产生的损坏负责。
中文

19
液体和饮料 • 请不要加热过长时间
• 微波加热液体例如汤,饮料,汁
液,等会导致延迟沸腾。这些液体
可能会毫无征兆地不出现任何气泡
地达到沸点。液体也并不均匀地彻
底沸腾。“沸腾延迟”会在餐具从
炉内移出时或受到震荡时导致气泡
突然积聚。这会造成液体突然沸
腾,从而引致烫伤。
• 选择合适的烹煮时间与功率。如果您
不确定,那么先从低功率与短时间开
始,缓慢增加设定,直到食物充分彻
底加热。
• 烹煮前或烹煮时搅拌液体。.
• 加热完后,请放在炉内稍等一会儿。
• 拿起餐具时请小心。
转盘 • 转盘不在炉内的时候,请不要开启
微波炉。
• 请不要直接在转盘上烹煮,加热或
者解冻食物。
• 请把食物放在合适的餐具上。.
• 确认餐具的大小不超过转盘。
餐具 • 请不要使用金属类,铝箔,铅晶质
玻璃器皿或者有金属饰物的碗具。
这些物体会被损坏或者引发火
灾。.
• 请避免使用有限制性开口的容器
(瓶颈很窄).
• 请烹煮前确认使用的器皿是否适合微
波炉。.
铝箔 • 请不要使用过多的铝箔否则会出现
火花。
• 小条形铝箔是用于防止食物过热的,
请保留小型铝箔片。
请让铝箔远离炉壁 (铝箔与炉壁之间
最少保持 1 寸的距离,以防止火花。
中文

20
适用于微波炉的餐具
• 在微波炉进行烹煮或解冻食物时,要让微波炉中的微波透过餐具穿透食物。
• 餐具的材料与形状都会对烹煮效果与时间造成影响。圆形的食具比其他方形或长方形的食具能让热量散布得均
匀,因为非圆形的食具角落里的食物会更容易过度烹煮。
• 下述是餐具选择的大概指南:
餐具 微波炉 烧烤 组合
防热玻璃 Yes Yes Yes
非防热玻璃 No No No
防热陶瓷 Yes Yes Yes
可微波塑料碟 Yes No No
厨房用纸 Yes No No
金属盘 No Yes No
金属架 No Yes No
铝箔或铝箔餐具 No Yes No
注意: 请在使用前时刻确认餐具/食具的生产厂商指示说明.
微波烹煮小提示
• 把食物最厚实的部分放在碟子边缘。
• 烹煮时使用可微波的盖子或可微波的保鲜纸来盖住食物。盖住食物能加快烹煮速度,并防止食物变干。 注意:
如果食物上撒有面包屑,或者要烘脆食物的话请不要盖上盖子。
• 建议在煮食过程中转动,重新摆放或者搅拌食物来让热量更加均匀。请时刻把食物从里到外搅拌或翻转,由此
热量能更快地从外部传入。
• 如果食物有皮,请必须先刺破皮,才能让蒸汽从里面逸出,也防止食物爆破。
• 在烹煮之后稍等片刻是必须的,这样热量能更均匀地散布到食物里。
• 烹煮冷冻食物将比室温下的食物需要更长的时间。要确认食物是否充分烹煮或加热。如果不确保食物已经到达
足够高的温度,请再继续加热一下。
• 烹煮时间须随食物量的增多而加长。例如,四条香肠要比两条香肠需要的时间长。
解冻
• 解去食物的包装,把食物放到可微波的餐具上,不要盖着食物。
• 要解冻肉类,解开冷冻食物的包装,将其放在一个上翘的餐具/器皿上,从而能让流出的肉汁聚集在餐具上。解
冻时中途翻转食物。
• 烹煮之前,鱼类不需要完全解冻。解冻直到表面已柔软,放进香草及调味料。
中文

21
电压与频率 220V – 240V / 50Hz
保险丝 13A
消耗功率 (微波) 1400W
消耗功率 (烧烤) 1000W
微波输出功率 900W
微波频率 2450MHz
产品 W595 X D395 X H390 mm
容量 25 升
重量 大约. 14.5 kg
产品规格
控制面板
显示屏 电子烹煮时间,功率与实时显示。 功率 按下选择微波的功率 烧烤 按下设置烧烤烹煮程序。 组合. 按下来选择两种组合烹煮设置其中一种 量.解冻. 按下选择根据量多少的解冻程序 时钟/厨房计时器 按下来设置时钟或者厨房计时器 量. 调整. 按下设置根据量多少而解冻和自动烹煮程序。 时间/菜单 旋转选择钮,输入烹煮时间或选择自动菜单。 停止/退出 按下停止烹煮程序或在下一程序前清除当前设置 开启/快速启动 按下开始烹煮程序或设置快速启动烹煮程序 开门 按下打开炉门。
中文
开门

22
产品指南
①炉门安全锁 ②微波炉窗 ③ 转盘架 / 旋转环 ④旋转轴 ⑤ 门开关 ⑥ 控制面板 ⑦ 波导盖 (注意: 不要移动) ⑧ 玻璃转盘 ⑨ 烧烤发热丝 ⑩ 烧烤架
提供附件:
• 玻璃转盘 (1 件)
• 转盘架 (1 件)
• 烧烤架 (1 件)
安装转盘
转盘
转盘架 / 旋转环
旋转轴
1. 把转盘架放在炉内底部
2. 把转盘放在转盘架上面。确认转盘中心是否对着
旋转轴 (看箭头) 注意:
• 请不要把转盘朝下放。.
• 请不要手动转动转盘,否则将会损坏驱动马达。
• 烹煮时转盘与转盘架必须一起使用。餐具与餐碟
必须在烹煮时放在转盘上。
中文

23
微波炉单一模式
适合解冻,加热和烹煮.
烧烤模式
适合薄肉片烧烤.
组合模式 (微波与烧烤)
适用于着色的配料菜肴. 微波烹煮食物,烧烤着色。
移走包装
初次使用时,请首先确保所有包装都被移走
预热器具内部与部件。
在使用前请彻底清洗炉内与附带零部件。
请确认器具有无可见的永久损伤。
如发生下述情况,请不要运作微波炉。
a) 门有裂痕
b) 门铰链与锁存器松或损坏。
c) 门封胶与炉内是弯曲的或变形的。
d) 在门上或炉内壁上能看到洞或裂痕的。
警告: 有上述情形时开启器具会造成微波泄漏并对客
户造成伤害。
初次使用
微波炉功能
当初次使用是用烧烤功能时,会有轻微的燃烧
气味,这是正常的。
我们建议初次使用时,先不把食物放进炉内,
而进行空烧烤 20 分钟左右。燃烧气味的现象就
会在使用一段时间后消失了。
中文

24
设置时钟
本产品可设置 12 小时或 24 小时制。.
• 长按 时钟/厨房计时器大约 3 秒钟来设置 12 小时
制时间。 “Hr12”就会显示正在显示屏上。
• 再按 时钟/厨房计时器来设置 24 小时制时间。
“Hr24”就会显示在显示屏上。.
• 旋转 时间/菜单 旋钮来设置当前钟点。按下 时
钟/厨房计时器来输入。.
• 旋转时间/菜单旋钮来设置分钟. 按下时钟/厨房
计时器来输入。.
开门与关门
预防措施: 当轻轻关上门后,炉内的转盘与灯都会开
起来,但是功率还没有启动。.
• 要打开门,需要完全按下门的按键。
• 要关上门,需要稳固地推上门.
如果微波炉在工作时,强硬开门会破坏烹煮程序。
微波炉单一模式
微波烹煮允许自定义烹饪功率与时间。按能力按钮选
择一个功率。请参照下表。
最大的烹煮时间是 95 分钟。
假设您想用 80%功率烹煮 5 分钟.
• 打开门,把餐具/器皿放进转盘上。关上门。.
• 按下功率设置希望的功率能力 (80%会在窗口上显示)
按下功率键 功率能力 级别
1 次 100%(P100) 高火
2 次 80%(P-80) 中高火
3 次 60%(P-60) 中火
4 次 40%(P-40) 中低火
5 次 20%(P-20) 低火
6 次 0%(P-00) 零
• 使用时间/菜单按钮来设置烹煮时间 (05 :00 会出现在窗口上) 。
• 按下开始/快速启动来开始工作。
• 烹煮时间结束后,会出现哔哔声,“结束”会显
示。
注意 :
• 在烹煮时按下功率按键来确认功率能量级别。
• 按下 停止/退出来终止程序。按下开始/快速启动
来再启动。
• 在开始一个新的程序之前先消除显示设置。按下停
止/退出键来重设当前设置。
烧烤模式
烧烤模式适用于薄肉片,牛扒,羊扒,烤羊肉串,香肠
与小块鸡肉。也适用于三文治与焗菜。最大烹饪时间是
95 分钟。
假如你要进行 12 分钟的烧烤。
• 打开门,把食物放置在烧烤架上,关上门。
• 按下烧烤按键。
• 旋转时间/菜单旋钮设置烹饪时间(12 :00 就会显示在窗口上)
• 按下开始/快速启动键来开始运行。
• 烹饪时间结束时,哔声响起,“结束”会显示。
注意 :
• 按下停止/退出来终止程序。按下开始/快速启动来
再启动。
• 在开始一个新的程序之前先消除显示设置。按下停
止/退出键来重设当前设置。
小提示 :
当使用烧烤单一模式时,在使用前需要预热。
操作
中文

25
组合模式 (微波与烧烤)
此程序综合使用烧烤与微波功率。最大烹煮时间是 95
分钟。
假设你想设置组合模式烹煮 15 分钟。
• 打开门,把食物放在烤架上。关上门。
• 按下 组合键选择希望的组合程序.
• 旋转 时间/菜单旋钮设置烹煮时间。(15 :00 会显示在窗口上)
• 按下开始/快速启动键开始运作。.
• 烹饪时间结束时,哔声响起,“结束”会显示。
Note:
• 按下停止/退出来终止程序。按下开始/快速启动
来再启动。
• 在开始一个新的程序之前先消除显示设置。按下
停止/退出键来重设当前设置。
• 在微波与烧烤模式下,不要预热.
按下按
键
组合
按键
烹煮期间
适用餐碟 微波
烧
烤
1 次 Co-1 30% 70% 鱼,土豆或焗菜
2 次 Co-2 55% 45% 布丁,煎蛋,烤
土豆,家禽
快速启动
本程序以全功率启动炉具。烹煮过程中烹煮时间可以
增加,最大设置时间可以为 10 分钟。.
• 打开门,把餐具/器皿放在转盘上。关上门。
• 按下开始/快速启动键设置烹煮时间。每一次按键
将增加 30 秒钟。.
• 微波炉以全功率自动启动。
注意:
• 在开始一个新的程序之前先消除显示设置。按下
停止/退出键来重设当前设置。
厨房计时器
计时器独自运行。最大时间设置为95分钟。
假如你想把厨房计时器设置为30分钟。 :
• 按下时钟/厨房计时器按键。
• 按时间/菜单旋钮设置希望的时间 (30 :00就会显示在窗口上。).
• 按下开始/快速启动键来输入。
• 时间结束后,哔声想起。
.
注意:
• 当时钟被激活后,可以按时钟/厨房计时器键来进
行倒计时。
• 要消除, 长按停止/退出键5秒钟。
菜单烹煮
您可以选择8种预设的程序。这些程序根据食物重量运
作。您可以输入食物的重量或数量,然后烹饪过程就会
自动计算。
• 打开门,把餐具/餐碟放到转盘上。关上门。
• 逆时针旋转时间/菜单旋钮。再转一次以选择食物
代码。
• 按下量.调整键来输入重量。确认显示屏上输入的
数字与放进微波炉里的食物重量一致。
• 按下开始/快速启动键开始运作。
食物代
码
菜单 烹煮模式
A-1 爆米花 (99g) 微波
A-2 咖啡(200ml/cup) 微波
A-3 新鲜蔬菜 (g) 微波
A-4 马铃薯 (230g/unit) 微波
A-5 比萨 (g) 微波
A-6 预热 (g) 微波
A-7 烤鸡 (g) 组合
A-8 烤牛排 (g) 组合
注意 :
• A-7 (烤鸡)和A-8 (烤牛排)的烹饪模式中,微波炉
暂时停止并发出警报声是提示要翻转食物。
• 按下开始/快速启动键重启。
中文

26
量解冻
此程序根据输入的重量来进行食物的解冻。重量范围
是从 100g 到 1800g。
假如您想设置微波炉的量解冻程序来解冻 200g 食物。.
• 打开门,把餐具/器皿放在转盘上。关上门。
• 按下量.解冻按钮
• 按下量.解冻按钮,输入重量。
• 按下开始/快速启动键开始运作。
注意:
• 在解冻时,微波炉暂时停止和发出警报声是提示
要翻转食物。.
• 按下开始/快速启动来重启.
多步骤烹饪
微波炉可以使用微波模式,烧烤模式或组合模式(微
波与烧烤)来编程 3 步骤进行烹饪。.
假设你想设置下述的烹饪程序。.
微波炉烹饪 (60%) 烧烤烹饪
• 打开门,把餐具/器皿放在转盘上。关上门。.
• 按下功率键到60%功率
• 旋转时间/菜单旋钮来设置烹饪时间.
• 按下烧烤键.
• 旋转时间/菜单旋钮来设定烹饪时间。
• 按下开始/快速启动键开始运作。
• 烹饪时间结束后,哔声响起,“结束”会显示。
注意:
量解冻, 菜单烹饪与快速启动不能在多步骤烹饪程序
里使用。
孩童安全锁
孩童安全锁启动时,能防止幼童不小心关闭微波炉。当
孩童安全锁激活时,所有按键都失效。
• 要激活孩童安全锁,长按停止/退出键大约3秒钟。
微波炉发出哔声,孩童安全锁的图标会出现。
• 要关闭孩童安全锁功能,长按停止/退出键3,秒,
微波炉发出哔声,孩童安全锁关闭。
在运行中要停止微波炉
i) 按停止/退出键
• 按下开始/快速启动键来重新启动微波炉。 .
• 要重设当前的程序,按暂停/退出。
ii) 打开门
• 可以关上门和按下开始/快速启动键来重新启动微
波炉。.
• 按下停止/退出键重设当前程序。.
中文

27
清洁微波炉内部
• 保持微波炉内部,门,门封表面清洁。食物残
渣,飞溅的油脂会黏在炉内壁,门,门封,这样
会降低微波炉的效率,甚至给用户带来危险。
• 烤箱内部和门可以用湿布清洁。如果烤箱非常
脏,可使用温和的清洁剂。避免使用腐蚀性的清
洁剂,因为它们可能会留下污点,刮纹或使门的
表面变暗淡。
• 要除掉顽固污渍,在微波炉里烧一杯水 2-3 分
钟。
• 要清除炉内的气味,把一勺子柠檬水倒进一杯水
里,放在炉里烧 5 分钟。
• 门要时常保持清洁,并时刻确认有无任何损
伤。.
• 避免水或小型物件进入器具的间隙。
清洁微波炉外部
• 外部可以用温和的清洁剂与温水进行清洁。用不
起毛的布擦干。避免使用腐蚀性和磨蚀性的产
品,因为可能会损坏表面。
• 不锈钢表面,要顺着擦子的方向擦,以不会刮花
表面。对付更顽固的污渍,使用特定的非研磨性
的产品(请遵守制造商的说明)。
• 在清洁之前,关闭控制面板,打开门。控制面板
保持干燥。用一个柔软的湿布擦干。避免使用过
量的水。
• 保持通风口干燥并远离小颗粒。
烤箱灯
不要擅自让无资质人员更换烤箱灯。请联系当地的
林内售后服务中心。
清洁附属品
转盘与架子
• 请时刻保持滚轴清洁,以保证转盘能转得顺并避
免摩擦时发出的噪音。
• 请用温和肥皂水清洁,并彻底晾干。.
• 清洗完之后,在适当的位置装上转盘,请参阅本
手册的固定转盘。
为了避免打破转盘:
• 在用水清洗转盘之前,将转盘冷却。
• 不要将任何热的物体放在冷的转盘。
• 不要将任何冷的物体放在热的转盘。
烧烤架
• 烧烤架在每次使用后要洗净并擦干。可以手洗或
洗碗机洗涤。先在热肥皂水中浸泡,以去除顽固
的油脂。再用刷子或海绵进行清洁。
在进行清洁或保养之前先切断电源。
警告: 不要移开炉内的波导盖子. 切勿使用高压清洁剂或蒸汽清洗机来清洗设备。蒸
汽可以到达电气元件而造成短路。
维修与保养
在使用时候微波炉内部会变热。确保在清洗之前微
波炉已经完全冷却。
要购买零部件,请联系当地的林内售后服务中心。
中文

28
如在操作上遇到小错误或小问题,请先确认下述问题
说明,在联系技术服务之前先看看能否自行解决。
微波炉不启动
• 确认主开关是否已打开,插头是否正确地插进电源
插座。
• 确认断路器是否正常工作。.
• 确认器具门是否关闭严实。
• 确认开始/快速启动按键是否被按过。
显示屏不亮
• 确认控制面板是否编程正确。
转盘转得不顺
• 确认转盘与转盘架的接触区域是否干净。
食物不能完全烹煮,加热或解冻。
• 确认是否选择了需要的火力。.
• 确认程序是否被打断或者没有完成。.
微波炉在运作时突然关闭
• 确认通风口有无被堵塞。如果必要请移走所有物
体。.
烤箱灯不亮
不要擅自让无资质技术人员更换灯泡。请联系当地的
林内售后服务中心。.
门上有冷凝水积聚
• 在烹调时,水蒸汽或水的液滴会在门上形成。这
是从食物的热量凝华而来。这不是烤箱的问题或
故障,不会影响到设备的安全。
常见故障的识别与处理
如果确认上述之后,问题还不能得到解决,请联
系当地林内售后服务中心寻求帮助。 如果是在保修期间,请注意提供购买证明以及保
修卡。
中文

29
移走所有包装材料和附带部件。
确认器具没有任何损伤。如遇下述情况,请不要启动
器具。:-
a) 门是变形的。
b) 门铰链和门闩松掉或有损坏。
c) 门封弯曲与烤箱变形。
d) 可看见门或内壁有洞或裂痕。
如有任何损伤,请不要操作器具。请联系当地的林内
售后服务中心寻求帮助。
把器具安装在合适的橱柜里。
• 本器具是专为安装在柱状型橱柜里设计的。
• 确保空气流通口没有被物体堵塞。如果通气口被
堵塞,在运作时微波炉可能会过热并导致故障发
生。
• 微波炉要安装在一个水平的平面上,并能盛载器
具的重量的。微波炉必须在平整的地方,以防止
可能出现的机体振动与噪音
• 旁边的橱柜表面必须是防热材料制造的。
• 请让微波炉远离水或热源。热源和水都能使微波
炉的工作效率下降并导致故障。
• 微波炉运作时会对收音机,电视或相似设备有干
扰。请把微波炉放在远离这些电子设备的地方。
• 柱形柜必须有下述开孔尺寸。
通风
要保证足够的通风,最少的通风间距为从器具背部到
橱柜墙壁有 45mm 以上。
安装
安装必须由有资质人员进行。生产商不会对任何不正确安装负任何责任,也不会对由于不正安装造成器具损伤
负任何保修责任。
中文

30
嵌入式套件
① 金属盘 1 pc
A 螺丝 3x20 4 pcs
B 螺丝 4x8 2 pcs
固定器具
• 用提供的 2(个) 4x8mm 螺丝把金属盘 (挡风) 固
定.
• 把器具放进橱柜直到烤箱的前沿与开孔的位置刚
好对齐。确保器具平稳不倾斜。不要挤压电源
线。
• 用提供的 4(个) 3 x 20mm 的螺丝把烤箱固定。
固定点在上部与底部的四角. 请不要把螺丝拧得
过紧。.
• 确认刚好对齐。
• 连接电源线。
• 打开主电源。器具必须在安装好之后才能开启,
以防止电击。
连接电源
• 安装器具铭牌上所示的负荷的标准插头。
• 当器具直接连接到主电源上,全极性断电器必须安
装在间隙至少为 3mm 以上的触头,符合负载,并适
用于当地电气规定 (接地线必须不能让断电器中
断). 供电电缆不能接触表面温度高于 50℃的物
体。
• 安装人员必须确认电连接正确,并符合当地安全规
定。
连接电源之前, 确保:
• 器具正确并有效接地.
• 插座能盛载器具的最大功率,器具铭牌上所示电压
值范围也适用于当地电压。
• 基本的安全要求要让有资质人员进行测试。不得使
用多用插头与延长电缆。过负荷很危险,会引致火
灾。
• 当器具安装之后,电源与电源插座都是接近的。
安装人员必须确保电源连接正确,并符合当地安全
规定。
生产商不负任何责任,因这些安全措施无法观察。
①
中文

Peringatan keselamatan -----------------------------------------------------------------------------------------------------------------32
Spesifikasi oven ----------------------------------------------------------------------------------------------------------------------------36
Panel kontrol --------------------------------------------------------------------------------------------------------------------------------36
Petunjuk oven -------------------------------------------------------------------------------------------------------------------------------37
Fungsi microwave --------------------------------------------------------------------------------------------------------------------------38
Pemakaian pertama -----------------------------------------------------------------------------------------------------------------------38
Pengoperasian ------------------------------------------------------------------------------------------------------------------------------39
Pemeliharaan dan perawatan------------------------------------------------------------------------------------------------------------42
Pemecahan masalah ----------------------------------------------------------------------------------------------------------------------43
Pemasangan --------------------------------------------------------------------------------------------------------------------------------44
DAFTAR ISI
PENTING
Untuk meregistrasi garansi produk Anda, silakan menyalin nomer seri pada stiker yang ada pada kemasan kartu garansi Anda.
Silakan hubungi Layanan Purna Jual RINNAI di kota Anda jika Anda memerlukan bantuan lebih lanjut.
Versi: 2013 03
Ba
ha
sa I
nd
on
esi
a
31

Membuka kemasan
• Jangan gunakan oven ini jika terdapat kerusakan saat proses pengangkutan.
• Jika kabel listrik rusak, harus diganti oleh pihak perusahaan, agen servis resmi atau teknisi yang berpengalaman untuk menghindari kerusakan.
• Pastikan bahwa anak kecil tidak bermain dengan bekas kemasan plastik ini.
Untuk pengguna
• Oven ini hanya untuk penggunaan rumah tangga saja dan hanya digunakan untuk memanaskan, memasak dan mencairkan makanan dan minuman. Dan tidak cocok digunakan untuk kepentingan komersial, penggunaan laboratorium atau alat terapi yang menggunakan pemanasan.
• Oven ini tidak boleh digunakan oleh anak kecil.
• Orang lanjut usia atau orang sakit bisa menggunakan oven tanpa pengawasan jika telah mendapatkan petunjuk yang benar dan mereka dapat menggunakannya dengan cara yang benar dan memahami bahaya dari kesalahan penggunaan.
• Kunci pengaman pada pintu mencegah oven microwave dari pengoperasian ketika pintu terbuka. Jangan merusak pintu, atau mengoperasikan oven dalam keadaan pintu terbuka, karena dapat menyebabkan kebocoran dan membahayakan pengguna.
• Hal ini penting terutama ketika pintu oven tertutup dengan baik. Jangan operasikan microwave ketika :
a) Pintu melengkung
b) Engsel pintu dan grendelnya longgar atau rusak
c) Segel pintu dan rongga oven melengkung atau berubah bentuk
d) Berlubang dan terlihat retak pada pintu atau dinding bagian dalam oven
Peringatan: Pengoperasian oven dengan berbagai jenis kerusakan ini dapat menyebabkan kebocoran pada microwave dan membahayakan pengguna.
• Selalu buka pintu oven dengan hati-hati karena uap panas dapat keluar.
• Permukaan yang dilalui dapat menjadi panas ketika menggunakan mode pemanggang atau tanpa fungsi microwave. Peralatan masak, rak pemanggang dan piring putar dapat menjadi panas selama digunakan. Selalu gunakan sarung tangan tahan-panas untuk mencegah luka bakar.
• Hati-hati saat melepaskan tutup peralatan masak untuk mencegah uap terbakar.
• Jangan gunakan power maksimal untuk menghangatkan peralatan masak yang kosong.
• Jangan memaksa memutar piring putar dengan tangan. Hal ini dapat menyebabkan kegagalan dalam pemakaian.
• Jangan gunakan rongga oven sebagai tempat penyimpanan.
• Jangan halangi lubang udara pada oven.
• Jangan pernah gunakan pembersih bertekanan tinggi atau pembersih uap untuk membersihkan oven. Uap dapat menjangkau komponen listrik dan dapat menyebabkan hubungan pendek.
• Untuk mengurangi resiko terbakar di rongga oven :
a) Jangan memasak terlalu lama.
b) Jangan memanaskan minyak atau lemak saat menggoreng secara terus menerus. Jangan biarkan makanan tanpa diawasi saat memasak dengan minyak karena dapat menyebabkan bahaya kebakaran jika terlalu panas.
c) Jangan biarkan oven tanpa diawasi saat memanaskan kembali atau memasak makanan di dalam wadah yang terbuat dari plastik, kertas atau bahan yang mudah terbakar.
d) Lepaskan tali kawat pada kantong kertas atau kantong plastik sebelum meletakkan kantong di dalam oven.
e) Jangan memanaskan alkohol pekat di dalam oven microwave karena mudah terbakar.
f) Jika ada asap atau penyalaan di dalam ruang masak, maka pintu oven harus selalu tertutup. Matikan dan lepas steker oven segera. Jangan buka pintu sampai asap menyebar.
g) Bagian dalam oven harus selalu dalam keadaan bersih. Endapan minyak bisa menjadi terlalu panas dan menyebabkan asap atau terbakar.
PERINGATAN KESELAMATAN
Silakan baca buku petunjuk ini secara seksama sebelum Anda menggunakan oven ini untuk pertama kalinya. Buku petunjuk ini berisi informasi penting tentang pemasangan yang aman, cara penggunaan dan perawatan oven ini. Simpan buku petunjuk ini sebagai referensi di masa yang akan datang.
Ba
ha
sa I
nd
on
esi
a
32

Keamanan teknis
• Sebelum memasang oven ini, periksa dulu kerusakan eksternal yang terlihat. Jangan memasang atau mencoba menggunakan oven yang rusak.
• Jangan mengoperasikan microwave jika pintu, engsel atau segel pintu rusak. Pengoperasian oven akan menyebabkan berkurangnya kerja microwave dan membahayakan pengguna.
• Pastikan bahwa sambungan listrik tidak mengalir di bawah oven dan bebas dari sumber panas atau benda tajam.
• Oven ini adalah alat bertegangan tinggi. Jangan melepaskan casing karena akan menyebabkan berkurangnya kerja dari microwave dan dapat membahayakan pengguna.
• Sebelum menghubungkan oven ke sambungan utama, pastikan bahwa tegangan dan frekuensi sesuai dengan nilai yang ditunjukkan pada data plate yang menempel pada oven.
• Keamanan listrik dari oven ini hanya dapat dijamin jika oven terhubung ke tanah (ground) dengan benar. Gunakan sambungan listrik ke tanah (ground) yang sesuai dengan lokasi anda. Sambungan listrik dari oven ini harus terhubung ke tanah (yang dapat dipakai): Hijau & Kuning=TANAH (GROUND); Biru=NETRAL; Cokelat=FASE. Syarat keselamatan dasar sebaiknya diuji dan diperiksa oleh teknisi yang berpengalaman. RINNAI tidak akan bertanggung jawab atas segala kerusakan yang berkaitan dengan sistem sambungan listrik ke tanah (ground) yang tidak sesuai.
• Pemasangan dan perbaikan sebaiknya hanya dilakukan oleh teknisi yang berpengalaman.
• Sangat berbahaya untuk memodifikasi berbagai bagian dari oven ini. Merusak sambungan listrik atau bagian mekanik bisa menyebabkan kesalahan penggunaan dan mungkin menyebabkan pengguna dalam bahaya.
• Steker ganda dan sambungan kabel tidak boleh digunakan. Muatan berlebih sangat berbahaya dan bisa menyebabkan bahaya kebakaran.
• Selalu putuskan sambungan listrik oven ini sebelum membersihkan atau melakukan tindakan perawatan pada oven ini.
Pembuangan
• Oven ini dan kemasannya sangat ramah lingkungan dan bisa didaur ulang. Harap bantu kami untuk menjaga lingkungan dengan membuang kemasan pada tempat yang sesuai dan mendaur ulang oven yang sudah lama.
• Sebelum membuang oven yang lama, putuskan dari sumber arus dan putuskan kabel sambungan untuk menghindari kerusakan.
Tips memasak dengan microwave
CATATAN UMUM LARANGAN ANJURAN
Telur • Jangan memasak telur dalam cangkangnya, telur matang atau telur setengah matang karena dapat meledak.
• Tusuk kuning telur sebelum memasak, tutup dan biarkan minimal satu menit sebelum membuka tutup oven.
Makanan berkulit • Makanan berkulit seperti kentang, tomat, sosis, apel dapat meletup selama dimasak.
• Lubangi kulitnya sebelum dimasak. Hal ini dapat memungkinkan uap hilang dan mencegah makanan dari letupan.
Makanan bayi • Jangan memanaskan makanan bayi di dalam botol.
• Jangan memanaskan botol bayi terlalu lama. Panaskan sampai hangat saja.
• Pindahkan makanan bayi ke piring kecil dan panaskan dengan hati-hati, aduk terus.
• Lepaskan tutup botol dan dot sebelum menghangatkan botol bayi. Setelah dihangatkan, kocok botol secara merata.
• Periksa suhu sebelum memasak untuk mencegah kebakaran.
RINNAI tidak bertanggung jawab atas kerusakan akibat pemasangan yang tidak benar atau kegagalan karena mengambil tindakan-tindakan keselamatan yang tidak tepat selama pemasangan dan penggunaan oven ini.
Ba
ha
sa I
nd
on
esi
a
33

Makanan kaleng • Jangan memasak atau memanaskan makanan dan minuman dalam wadah/kaleng tertutup karena dapat menyebabkan tekanan meningkat dan dapat meledak yang dapat mengakibatkan resiko cedera.
• Keluarkan makanan dari wadah tertutup. Pindahkan ke piring yang sesuai.
Popcorn • Jangan gunakan kantong coklat biasa, kantong plastik atau mangkuk kaca sebagai wadah popcorn.
• Jangan melebihi waktu maksimum yang tertera pada kemasan popcorn.
• Gunakan kantong popcorn yang khusus digunakan untuk oven microwave.
Cairan dan minuman • Jangan memanaskan lebih dari waktu yang direkomendasikan.
• Pada pemanasan microwave dari cairan seperti sup, minuman, saus, dan lain-lain dapat memperlambat terjadinya letusan didihan. Titik didih dari cairan ini dapat dicapai tanpa munculnya gelembung. Cairan tidak mendidih secara merata. “Pendidihan lambat” bisa menyebabkan timbunan gelembung secara tiba-tiba ketika wadah dilepas dari microwave atau bergoyang. Hal ini mendorong terjadinya pendidihan secara tiba-tiba dari cairan panas yang mengakibatkan bahaya kebakaran.
• Pilih waktu memasak dan level power yang sesuai. Jika Anda tidak yakin, mulai dengan level rendah dan waktu yang singkat, lalu pelan-pelan naikkan hingga makanan panas merata.
• Aduk cairan sebelum dan selama memasak.
• Setelah pemanasan, biarkan di dalam oven selama beberapa saat.
• Hati-hati saat memegang wadah.
Piring putar • Jangan operasikan oven microwave tanpa piring putar pada tempatnya.
• Jangan memasak, memanaskan kembali atau mencairkan makanan secara langsung di piring putar.
• Selalu letakkan makanan pada piring yang tepat.
• Cek apakah piring makanan tidak boleh lebih besar dari piring putarnya.
Peralatan • Jangan gunakan wadah terbuat dari logam, kertas aluminium, barang pecah belah dari kristal timah atau mangkuk dengan hiasan dari logam. Bahan ini dapat merusak atau menyebabkan bahaya kebakaran.
• Hindari menggunakan wadah dengan lubang yang sempit (leher yang lebar).
• Cek apakah peralatan cocok untuk microwave sebelum menggunakannya.
Kertas aluminium • Jangan gunakan terlalu banyak kertas aluminium atau akan terjadi kilauan.
• Potongan kecil dari kertas aluminium dapat digunakan untuk melindungi makanan dari pemanasan berlebih. Begitu juga pada potongan kertas aluminium yang lebih kecil.
• Kertas aluminium bebas dari lubang dinding (jarak antara kertas dan lubang minimal 1” untuk mencegah adanya kilauan).
Ba
ha
sa I
nd
on
esi
a
34

Peralatan memasak yang sesuai untuk oven microwave
• Untuk memasak atau mencairkan makanan di dalam oven microwave, energi microwave mengalir melewati peralatan masak untuk menetrasi makanan.
• Bahan dan bentuk wadah mempengaruhi hasil dan lamanya masakan. Distribusi panas lebih banyak terjadi dalam wadah berukuran bulat/oval daripada wadah berbentuk persegi/persegi panjang karena makanan di daerah tepi cenderung terlalu lama dimasak.
• Di bawah ini petunjuk umum untuk memilih peralatan yang sesuai:
Peralatan Microwave Pemanggang Kombinasi
Kaca tahan-panas Ya Ya Ya Kaca tidak tahan-panas Tidak Tidak Tidak Keramik tahan-panas Ya Ya Ya Piring plastik aman-microwave Ya Tidak Tidak Kertas dapur Ya Tidak Tidak Baki dari logam Tidak Ya Tidak Rak dari logam Tidak Ya Tidak
Kertas aluminum & wadah dari timah Tidak Ya Tidak
Catatan: Perhatikan petunjuk kami pada peralatan masak sebelum menggunakannya. Tips memasak dengan microwave • Letakkan bagian paling tebal dari makanan melebihi bagian luar piring. • Gunakan penutup microwave yang aman atau kertas pembungkus yang rekat dan tahan-microwave untuk
menutup makanan selama dimasak. Menutup makanan mempercepat proses masak dan mencegah makanan menjadi kering. Catatan: Jangan gunakan tutup jika memasak makanan yang dilapisi serpihan roti, atau menginginkan masakan dengan hasil garing.
• Disarankan untuk memutar, menyusun ulang atau mengaduk makanan selama memasak untuk menyempurnakan pemanasan. Selalu aduk atau putar makanan dari bagian luar menuju bagian tengah, karena panas makanan lebih cepat menyebar dari bagian luar.
• Makanan berkulit tebal harus ditusuk sebelum dimasak agar memungkinkan uap makanan dapat hilang dan mencegah makanan meletup.
• Waktu yang stabil dibutuhkan setelah memasak untuk memungkinkan panas menyebar merata ke seluruh makanan.
• Makanan dingin akan memakan waktu masak yang lebih lama daripada makanan pada suhu ruangan. Selalu pastikan makanan cukup dimasak atau dipanaskan kembali. Jika ragu suhu tinggi yang cukup telah dicapai, maka lanjutkan memanaskan lagi selama beberapa waktu.
• Waktu memasak harus ditambah tergantung banyaknya jumlah makanan yang diletakkan. Contohnya, empat sosis akan memakan waktu masak yang lebih lama dibandingkan dengan dua sosis.
Penghilangan bekuan es • Buka makanan dari kemasannya dan letakkan ke dalam piring tahan-microwave. Jangan tutup makanan. • Untuk menghilangkan bekuan es dari daging, buka kemasan makanan beku dan letakkan pada piring menghadap
ke atas sehingga lemak daging dapat hilang dan menyebar. Lalu putar separuh bagiannya melalui proses penghilangan bekuan es.
• Pada ikan tidak membutuhkan waktu lama untuk menghilangkan bekuan es sebelum dimasak. Penghilangan bekuan es ini bertujuan agar pada permukaan yang cukup lunak, dapat mudah menyerap rempah-rempah dan bumbu.
Ba
ha
sa I
nd
on
esi
a
35

Tegangan dan frekuensi dari sumber arus 220V – 240V / 50Hz
Sekering 13A
Konsumsi daya (Microwave) 1400W
Konsumsi daya (Pemanggang) 1000W
Daya keluaran Microwave 900W
Frekuensi pengoperasian 2450MHz
Dimensi oven W595 X D395 X H390 mm
Volume 25 liter
Berat Kira-kira 14.5 kg
SPESIFIKASI OVEN
PANEL KONTROL
Display Screen Waktu masak, power level dan hari akan muncul di layar Power Tekan untuk memilih power level dari microwave Grill Tekan untuk mengatur program masak pemanggang Combi. Tekan untuk memilih satu atau dua mode kombinasi pengaturan masak Wei. Def. Tekan untuk memilih program pencairan berdasarkan berat Clock/Kitchen Timer Tekan untuk mengatur jam atau pengatur waktu masak Wei. Adj. Tekan untuk mengatur berat dari lelehan makanan dan program masak secara otomatis Time/Menu Putar pemilih untuk memasukkan waktu masak atau pilih menu otomatis Stop/Cancel Tekan untuk menghentikan program masak atau menghapus pengaturan awal sebelum mulai program selanjutnya Start/Quick Start Tekan untuk memulai program masak atau atur program masak secara cepat Door Release Tekan untuk membuka pintu
Ba
ha
sa I
nd
on
esi
a
Door Release
36

PETUNJUK OVEN
1 Kunci pengaman pintu
2 Jendela oven
3 Penyangga piring putar / cincin penggulung
4 Poros piring putar
5 Tombol pintu
6 Panel kontrol
7 Penutup pandu-gelombang (Peringatan: Jangan
dilepas)
8 Kaca piring putar
9 Elemen pemanggang
10 Rak pemanggang
Aksesoris yang tersedia:
• Kaca piring putar (satu buah) • Penyangga piring putar (satu buah) • Rak pemanggang (satu buah)
Pemasangan piring putar
Piring putar
Penyangga piring putar /cincin penggulung
Poros piring putar
1. Letakkan penyangga piring putar pada dasar lubang. 2. Letakkan piring putar pada penyangga piring. Cek
apakah pusat piring putar terpasang tepat pada porosnya (lihat tanda panah).
Catatan:
• Jangan memasang piring putar dalam keadaan terbalik. • Jangan memutar piring putar secara manual karena
dapat merusak motor. • Baik piring putar dan penyangganya harus digunakan
selama memasak. Peralatan dan piringnya harus diletakkan pada piring putar selama memasak.
Ba
ha
sa I
nd
on
esi
a
37

Mode microwave tunggal
Cocok untuk menghilangkan bekuan es, memanaskan kembali dan memasak.
Mode pemanggang
Cocok untuk memanggang irisan daging tipis.
Mode Kombinasi (Microwave & pemanggang)
Cocok untuk mematangkan hidangan dengan lapisan di atasnya. Microwave memasak makanannya, dan pemanggang mematangkannya.
Membuka bahan kemasan
Pastikan semua bahan kemasan dibuka sebelum menggunakan oven untuk pertama kali.
Membersihkan kembali rongga oven dan aksesorisnya
Bersihkan rongga oven dan aksesoris yang tersedia secara menyeluruh sebelum digunakan.
Periksa oven untuk kerusakan eksternal yang terlihat
Jangan operasikan oven microwave jika :
a) Pintu melengkung
b) Engsel pintu dan grendelnya longgar atau rusak
c) Segel pintu dan rongga oven melengkung atau berubah bentuk
d) Berlubang dan terdapat keretakan yang terlihat pada pintu atau dinding bagian dalam oven
Peringatan: Pengoperasian oven dengan jenis kerusakan ini akan menyebabkan kebocoran microwave dan membahayakan pengguna.
PEMAKAIAN PERTAMA
FUNGSI MICROWAVE
Ketika oven microwave dengan fungsi
pemanggang pertama kali digunakan, dapat
menghasilkan sedikit bau terbakar. Hal ini
adalah kejadian biasa.
Kami sarankan Anda untuk mengoperasikan
pemanggang tanpa makanan selama 20 menit
ketika menggunakan oven untuk pertama kali.
Kejadian ini akan hilang setelah beberapa
lama digunakan.
Ba
ha
sa I
nd
on
esi
a
38

Pengaturan jam
Oven ini dapat diatur dalam mode 12 jam atau 24 jam.
• Tekan dan tahan CLOCK/KITCHEN TIMER selama kira-kira 3 detik untuk mengatur mode 12 jam. “Hr12” akan tampil di layar.
• Tekan CLOCK/KITCHEN TIMER lagi untuk mengatur mode 24 jam. “Hr24” akan tampil di layar.
• Putar penunjuk TIME/MENU untuk mengatur jam. Tekan Clock/Kitchen Timer untuk masuk.
• Putar penunjuk TIME/MENU untuk mengatur menit. Tekan Clock/Kitchen Timer untuk masuk.
Membuka dan menutup pintu
Perhatian: ketika pintu oven microwave sedikit ditekan, piring putar oven dan lampu oven akan menyala tetapi power microwave tidak bekerja.
• Untuk membuka pintu, tekan tombol pintu secara penuh.
• Untuk menutup pintu, dorong pintu dengan kencang.
Jika oven microwave sedang bekerja, membuka pintu akan mengganggu program masak.
Mode microwave tunggal
Memasak dengan microwave ini memungkinkan Anda untuk menyesuaikan power masak dan waktu. Pilih power level dengan menekan tombol POWER. Lihat tabel di bawah.
Waktu masak maksimal adalah 95 menit.
Seandainya Anda ingin memasak pada level power 80% selama 5 menit.
• Buka pintu dan letakkan piring di piring putar. Tutup pintu.
• Tekan POWER untuk mengatur power level yang diinginkan. (80% akan muncul di layar)
Tekan
Tombol Power Power level
Level
1 kali 100%(P100) Tinggi
2 kali 80%(P-80) Sedang-Tinggi
3 kali 60%(P-60) Sedang
4 kali 40%(P-40) Rendah-Sedang
5 kali 20%(P-20) Rendah
6 kali 0%(P-00) Nol
• Atur waktu masak menggunakan pemilih TIME/MENU (05 :00 muncul di layar)
• Tekan START/QUICK START untuk mulai operasi.
• Setelah waktu masak berakhir, bunyi sinyal akan terdengar dan tanda ‘End’ akan muncul.
Catatan :
• Tekan tombol POWER untuk memeriksa power level selama memasak.
• Tekan STOP/CANCEL untuk menghentikan program selama operasi. Tekan START/QUICK START untuk mulai lagi.
• Hapus tampilan layar sebelum mulai program baru. Tekan STOP/CANCEL untuk mengubah pengaturan awal.
Mode pemanggang
Mode pemanggang ini cocok untuk memanggang irisan tipis daging, steak, kebab, sosis dan potongan ayam. Mode ini juga cocok untuk roti lapis dan hidangan keju parut. Waktu masak maksimal adalah 95 menit.
Jika Anda menginginkan memanggang selama 12 menit
• Buka pintu dan letakkan makanan ke dalam rak panggang. Tutup pintu.
• Tekan tombol GRILL.
• Putar pemilih TIME/MENU untuk mengatur waktu masak. (12 :00 muncul di layar)
• Tekan START/QUICK START untuk mulai operasi.
• Setelah waktu masak berakhir, bunyi sinyal akan terdengar dan tanda ‘End’ muncul.
Catatan :
• Tekan STOP/CANCEL untuk menghentikan program selama operasi. Tekan START/QUICK START untuk mulai lagi.
• Hapus tampilan layar sebelum mulai program baru. Tekan STOP/CANCEL untuk mengubah pengaturan awal.
Saran :
Ketika menggunakan mode pemanggang saja, Anda dapat memanaskan pemanggang terlebih dulu sebelum digunakan.
PENGOPERASIAN
Ba
ha
sa I
nd
on
esi
a
39

Mode Kombinasi (Microwave dan pemanggang)
Program ini menggunakan kombinasi dari tenaga pemanggang dan tenaga microwave. Waktu masak maksimal adalah 95 menit.
Seandainya Anda ingin mengatur kombinasi masak selama 15 menit.
• Buka pintu dan letakkan makanan ke dalam rak panggang. Tutup pintu.
• Tekan tombol COMBI untuk memilih program kombinasi yang diinginkan.
• Putar penunjuk TIME/MENU untuk mengatur waktu masak. (15 :00 akan muncul di layar)
• Tekan START/QUICK START untuk memulai operasi.
• Setelah waktu masak berakhir, bunyi sinyal akan terdengar dan muncul tanda ‘End’.
Catatan: • Tekan STOP/CANCEL untuk menghentikan
program selama operasi. Tekan START/QUICK START untuk memulai lagi.
• Hapus pengaturan awal sebelum mulai program baru. Tekan STOP/CANCEL untuk mengubah pengaturan awal.
• Jangan memanaskan pemanggang selama menggunakan mode microwave dan pemanggang.
Tekan tombol Combi
Waktu masak Hidangan yang sesuai Micro Panggang
1 kali Co-1 30% 70%
ikan, kentang atau keju parut
2 kali Co-2 55% 45% puding, telur dadar, kentang bakar, unggas
Quick Start
Program ini mulai bekerja pada power penuh. Waktu masak akan naik selama memasak. Waktu maksimal adalah 10 menit.
• Buka pintu dan letakkan piring pada piring putar. Tutup pintu.
• Tekan START/QUICK START untuk mengatur waktu masak. Tiap kali tombol ini ditekan maka akan menambah waktu masak selama 30 detik.
• Oven akan otomatis mulai pada power maksimal.
Catatan: • Hapus pengaturan awal sebelum mulai program
baru. Tekan STOP/CANCEL untuk mengubah pengaturan awal.
Pengatur waktu masak
Secara bebas, kita bisa menentukan pengatur waktu. Pengaturan waktu maksimum adalah 95 menit.
Jika Anda ingin mengatur waktu masak selama 30 menit :
• Tekan tombol CLOCK/KITCHEN TIMER.
• Atur waktu yang diinginkan menggunakan pemilih TIME/MENU (30 :00 akan muncul di layar).
• Tekan START/QUICK START untuk masuk.
• Setelah waktu berakhir, bunyi sinyal akan terdengar.
Catatan:
• Anda dapat menekan CLOCK/KITCHEN TIMER untuk melihat hitung mundur ketika pengatur waktu dihidupkan.
• Untuk membatalkan, tekan BERHENTI/BATAL dalam 5 detik.
Menu masak
Anda bisa memilih dari 8 program yang tersedia. Program ini tergantung dari beratnya. Anda dapat memasukkan berat atau banyaknya makanan, dan durasi memasak akan secara otomatis terhitung.
• Buka pintu dan letakkan piring pada piring putar. Tutup pintu.
• Putar pemilih TIME/MENU berlawanan arah jarum jam. Putar lagi untuk memilih kode masakan.
• Tekan WEI. ADJ. untuk memasukkan berat. Cek tampilan layar untuk jumlah porsi atau berat, apakah sesuai dengan berat masakan yang Anda letakkan di dalam oven.
• Tekan START/QUICK START untuk mulai operasi.
Kode Makanan
Menu Mode masak
A-1 Popcorn (99g) Microwave
A-2 Kopi (200ml/cangkir) Microwave
A-3 Sayuran segar (g) Microwave
A-4 Kentang (230g/unit) Microwave
A-5 Pizza (g) Microwave
A-6 Pemanasan ulang (g) Microwave
A-7 Ayam panggang (g) Kombinasi
A-8 Daging panggang (g) Kombinasi
Catatan :
• Selama masak dengan A-7 (Ayam panggang) dan A-8 (Daging panggang), oven berhenti sebentar dan muncul tanda pengingat untuk membalik makanan.
• Tekan START/QUICK START untuk mulai lagi.
Ba
ha
sa I
nd
on
esi
a
40

Weight defrost
Program penghilangan bekuan es pada makanan tergantung dari berat yang dimasukkan. Beratnya berkisar antara 100g sampai 1800g.
Jika Anda ingin mengatur oven ke Weight Defrost untuk makanan seberat 200g.
• Buka pintu dan letakkan piring ke piring putar. Tutup pintu.
• Tekan WEI. DEF.
• Tekan WEI. ADJ. untuk memasukkan berat.
• Tekan START/QUICK START untuk memulai operasi.
Catatan :
• Selama proses penghilangan bekuan es, oven berhenti sebentar dan muncul tanda pengingat untuk membalik masakan.
• Tekan START/QUICK START untuk mulai lagi.
Masak bertahap ganda
Oven Anda dapat diprogram sampai ke 3 tahap dengan menggunakan kombinasi dari mode microwave, mode pemanggang atau mode kombinasi (microwave dan pemanggang).
Jika Anda ingin mengatur program masak berikut. Masak dengan Microwave (60%) pemanggang
• Buka pintu dan letakkan piring ke piring putar. Tutup pintu.
• Tekan POWER ke power 60%.
• Putar pemilih TIME/MENU untuk mengatur waktu masak.
• Tekan tombol GRILL.
• Putar pemilih TIME/MENU untuk mengatur waktu masak.
• Tekan START/QUICK START untuk mulai operasi.
• Setelah waktu masak berakhir, bunyi sinyal akan terdengar dan muncul tanda ‘End’.
Catatan:
Weight Defrost, Menu Cook dan Quick Start tidak dapat diatur dalam program masak bertahap ganda.
Kunci pengaman
Kunci pengaman dapat diaktifkan untuk mencegah oven mati yang secara tidak sengaja dilakukan oleh anak kecil. Semua tombol tidak aktif ketika kunci pengaman diaktifkan.
• Untuk mengaktifkan kunci pengaman, tekan dan tahan tombol Stop/Cancel kira-kira 3 detik. Oven berbunyi dan simbol kunci pengaman muncul.
• Untuk menonaktifkan kunci pengaman, tekan dan tahan tombol Stop/Cancel kira-kira 3 detik. Oven berbunyi dan simbol kunci pengaman hilang.
Untuk menghentikan oven selama beroperasi
i) Tekan STOP/BATAL
• Anda dapat menyalakan oven lagi dengan menekan START/QUICK START.
• Untuk memasang program awal lagi, tekan STOP/CANCEL.
ii) Buka pintu
• Anda dapat menyalakan oven lagi dengan menutup pintu dan menekan START/QUICK START.
• Untuk memasang program awal lagi, tekan STOP/BATAL.
Ba
ha
sa I
nd
on
esi
a
41

Membersihkan bagian dalam oven
• Permukaan rongga oven, pintu, dan segel pintu harus selalu dalam keadaan bersih. Sisa makanan, tumpahan dan percikan minyak yang mengotori dinding oven, segel pintu dan permukaan pintu dapat mengurangi efisiensi oven dan membahayakan pengguna.
• Bagian dalam oven dan pintu bisa dibersihkan dengan kain lap basah. Deterjen yang lembut dapat digunakan jika oven sangat kotor. Hindari menggunakan pembersih yang abrasif karena dapat mengotori, menggores atau menumpulkan permukaan pintu.
• Untuk menghilangkan noda bandel, didihkan segelas air dalam oven microwave selama 2 – 3 menit.
• Untuk menghilangkan bau dari bagian dalam oven, didihkan segelas air dengan beberapa sendok penuh air jeruk selama 5 menit.
• Pintu sebaiknya selalu dalam keadaan bersih pada setiap saat dan periksa secara teratur berbagai kerusakan.
• Hindari air atau partikel penetrasi kecil masuk ke dalam lubang kecil pada oven.
Membersihkan Bagian Luar Oven
• Bagian luar dapat mudah dibersihkan dengan deterjen lembut dan air hangat. Lap sampai kering dengan kain bebas kasa. Hindari menggunakan produk korosif atau abrasif yang dapat merusak permukaan.
• Untuk permukaan baja stainless, lap dengan menggunakan kain berserat, sehingga tidak menggores permukaan. Untuk noda bandel, gunakan produk tidak abrasif yang khusus (perhatikan petunjuk dari RINNAI).
• Buka pintu sebelum membersihkan untuk menon-aktifkan panel kontrol. Panel kontrol harus selalu dalam keadaan bersih. Lap sampai kering dengan lap basah yang lembut. Hindari menggunakan air berlebihan.
• Lubang ventilasi harus terbebas dari air rembesan dan partikel kecil.
Lampu Oven
Jangan coba memasang lampu oven oleh teknisi yang tidak berpengalaman. Hubungi Pusat Layanan Purna Jual RINNAI di kota Anda.
Membersihkan Aksesoris
Piring putar dan penyangga
• Cincin penggulung harus selalu dalam keadaan bersih sehingga piring putar dapat berputar lancar dan mencegah suara bising.
• Cuci dengan air sabun yang lembut dan keringkan semua.
• Pasang piring putar pada tempatnya setelah dibersihkan. Lihat “Cara pemasangan piring putar” di buku petunjuk ini.
Untuk mencegah piring putar pecah:
• Sebelum membersihkan piring putar dengan air, biarkan piring putar dingin.
• Jangan letakkan barang panas pada piring putar yang dingin.
• Jangan letakkan barang dingin pada piring putar yang panas.
Rak pemanggang
• Cuci dan keringkan rak pemanggang setiap setelah digunakan. Rak ini dapat dicuci dengan tangan atau mesin pencuci piring. Rendam dalam air sabun panas untuk menghilangkan noda bandel. Bersihkan dengan sikat atau spon.
Putuskan kawat sambungan sebelum melakukan kegiatan pembersihan atau pemeliharaan.
Peringatan: Jangan lepaskan penutup pandu-gelombang di dalam rongga oven. Jangan pernah gunakan pembersih bertekanan tinggi atau pembersih uap untuk membersihkan oven. Uap dapat menyentuh komponen listrik dan menyebabkan hubungan pendek (listrik).
PEMELIHARAAN DAN PERAWATAN
Bagian dalam oven dapat menjadi panas selama digunakan. Pastikan oven cukup dingin sebelum membersihkan.
Untuk pembelian suku cadang, hubungi Pusat Layanan Purna Jual RINNAI di kota Anda.
Ba
ha
sa I
nd
on
esi
a
42

Dalam kasus kesalahan kecil atau masalah dengan pengoperasian oven microwave, periksa petunjuk berikut dan amati apakah Anda bisa menyelesaikan masalah sebelum memanggil teknisi untuk layanan.
Oven tidak bekerja
• Periksa apakah saklar utama menyala dan steker terpasang dengan benar pada peralatan listrik.
• Periksa apakah pemutus kontak bekerja baik.
• Periksa apakah pintu oven ditutup dengan benar.
• Periksa apakah tombol START/QUICK START telah ditekan.
Layar tidak menyala
• Periksa apakah panel kontrol terprogram dengan benar.
Piring putar tidak berputar lancar
• Periksa apakah kontak permukaan antara piring putar dan penyangganya bersih.
Makanan tidak dimasak, dipanaskan atau dicairkan dengan benar
• Periksa apakah power level yang tepat telah dipilih dengan benar.
• Periksa apakah program mengganggu dan tidak selesai.
Oven microwave mati selama pengoperasian
• Periksa apakah lubang ventilasi dihalangi. Pindahkan benda yang menghalangi tersebut jika diperlukan.
Lampu oven tidak bekerja
• Jangan coba untuk memasang lampu oven oleh teknisi yang tidak berpengalaman. Hubungi Layanan Purna Jual RINNAI untuk bantuan lebih lanjut.
Endapan embun pada pintu oven
• Uap atau tetesan air dapat terbentuk pada pintu selama siklus masak. Hal ini akibat dari pengembunan dari panas makanan. Hal ini bukan suatu masalah atau terdapat kesalahan pada oven Anda dan tidak berpengaruh pada keselamatan oven ini.
PEMECAHAN MASALAH
Jika masalah terus berlanjut setelah mengikuti petunjuk di atas, silakan hubungi Pusat Layanan Purna Jual RINNAI di kota Anda untuk bantuan lebih lanjut. Untuk panggilan servis bergaransi, perlu diketahui bahwa Anda harus mempunyai bukti pembelian dan kartu garansi yang masih berlaku.
Ba
ha
sa I
nd
on
esi
a
43

Lepas semua bahan kemasan dan aksesoris yang tersedia.
Periksa oven agar bebas dari kerusakan.
Jangan mengoperasikan oven jika:-
a) pintunya melengkung
b) engsel pintu dan grendelnya rusak
c) segel pintu dan rongga oven melengkung atau berubah bentuk
d) berlubang dan terdapat keretakan yang terlihat pada pintu atau dinding bagian dalam oven.
Jika terdapat berbagai kerusakan, jangan operasikan oven. Hubungi Pusat Layanan Purna Jual RINNAI di kota Anda untuk bantuan lebih lanjut.
Pasang oven di dalam lemari kabinet yang benar
• Oven ini didesain untuk dipasang ke dalam unit kolom.
• Pastikan bahwa lubang udara tidak terhalang oleh benda apapun. Jika terhalang selama pengoperasian, oven dapat menjadi terlalu panas dan menjadi gagal pakai.
• Oven sebaiknya dipasang pada permukaan datar, permukaan dapat menahan berat oven dan isinya. Oven harus berada pada posisi stabil untuk mencegah kemungkinan terjadinya getaran yang bising.
• Panel dari kabinet yang berdekatan harus terbuat dari bahan tahan-panas.
• Jauhkan oven dari panas dan sumber air. Pancaran panas dan air dapat menurunkan efisiensi oven dan dapat menyebabkan kegagalan pemakaian.
• Pengoperasion oven dapat menyebabkan gangguan pada radio Anda, TV atau peralatan yang serupa. Letakkan oven sejauh mungkin dari peralatan elektronik ini.
• Unit kolom harus memiliki ukuran lubang berikut:
Ventilasi
Untuk mendapatkan ventilasi yang cukup, maka diperlukan jarak minimum 45mm dari bagian belakang oven sampai dinding lemari.
PEMASANGAN
Pemasangan harus dilakukan oleh teknisi yang berpengalaman. RINNAI tidak bertanggung jawab terhadap instalasi yang tidak tepat dan tidak bertanggung jawab atas garansi alat jika terjadi kerusakan yang diakibatkan oleh instalasi pemasangan yang salah.
Ba
ha
sa I
nd
on
esi
a
44

Built-in kit
① Piring logam 1 bh
A Baut 3x20 4 bh
B Baut 4x8 2 bh
Pengencangan oven
• Paskan piring logam (dengan kaca depan) dan kencangkan menggunakan 2(dua) baut 4x8mm yang tersedia.
• Paskan oven ke dalam unit kolom sampai rangka depan oven sejajar dengan pintu lemari. Pastikan oven pada posisi stabil dan tidak miring. Jangan sampai menghalangi aliran sambungan kabel.
• Paskan oven pada posisinya dengan menggunakan 4(empat) baut 3 x 20mm yang tersedia. Titik pemasangan terletak pada tepi atas dan tepi bawah dari oven. Jangan terlalu mengencangkan baut.
• Cek apakah oven benar-benar sejajar.
• Hubungkan dengan kabel sambungan.
• Nyalakan power utama. Oven ini hanya dioperasikan ketika dipasang untuk mencegah bahaya sengatan listrik.
Hubungkan sambungan kabel ke power utama
• Pasang steker standar yang terhubung ke muatan yang ditunjukkan pada data plate yang menempel pada oven.
• Jika oven sedang terhubung secara langsung ke power utama, saklar pemutus omnipolar harus dipasang dengan jarak minimum 3mm di antara kontak, cocok untuk beban yang ditunjukkan dan sesuai dengan aturan listrik dasar (sambungan kabel ke tanah atau ground tidak boleh diputus oleh saklar pemutus). Kabel sambungan tidak boleh mendekati kontak permukaan dengan suhu lebih tinggi dari 500C.
• Teknisi yang memasang oven ini harus memastikan bahwa sambungan listrik yang dibuat sudah benar dan harus sesuai dengan peraturan keselamatan setempat.
Sebelum terhubung ke sambungan power, pastikan :
• Oven ini terhubung ke tanah dengan benar dan efisien.
• Stop kontak bisa menahan power maksimum dari oven, dan tegangan dalam kisaran nilai yang ditunjukkan pada data plate yang menempel pada oven.
• Persyaratan keselamatan dasar sebaiknya diuji oleh teknisi yang berpengalaman. Steker ganda dan kabel sambungan tidak boleh digunakan. Muatan berlebih sangat berbahaya dan bisa menyebabkan bahaya kebakaran.
• Ketika oven telah terpasang, aliran power dan stop kontak listrik harus dapat diakses dengan mudah.
Teknisi yang memasang oven ini harus memastikan bahwa sambungan listrik yang dipasang sudah benar dan sudah sesuai dengan aturan keselamatan setempat.
RINNAI tidak bertanggung jawab atas kesalahan dari pemasangan instalasi yang tidak benar.
①
Ba
ha
sa I
nd
on
esi
a
45

Khuyến cáo an toàn ----------------------------------------------------------------------------------------------------------------------47
Thông số kỹ thuật -------------------------------------------------------------------------------------------------------------------------51
Bảng điều khiển ---------------------------------------------------------------------------------------------------------------------------51
Chi tiết linh kiện ---------------------------------------------------------------------------------------------------------------------------52
Chức năng ----------------------------------------------------------------------------------------------------------------------------------53
Sử dụng cho lần tiên ---------------------------------------------------------------------------------------------------------------------53
Vận hành ------------------------------------------------------------------------------------------------------------------------------------54
Vệ sinh bảo quản -------------------------------------------------------------------------------------------------------------------------57
Sự cố và cách xử lý ----------------------------------------------------------------------------------------------------------------------58
Lắp đặt --------------------------------------------------------------------------------------------------------------------------------------59
NỘI DUNG CẦN BIẾT
LƯU Ý
Để đăng ký bảo hành hợp lệ, hãy dán số seri đính kèm theo sản phẩm lên phiếu bảo hành.
Vui lòng liên hệ Trung tâm DVCSKH Rinnai hoặc Trạm bảo hành được ủy quyền để được hướng dẫn hay yêu cầu.
Phiên bản : 2013.03
Tiế
ng
Việ
t
46

Khui thùng (bao bì)
• Không sử dụng sản phẩm nếu phát hiện hư hại trong quá trình vận chuyển.
• Nếu dây nguồn bị hỏng, nó phải được thay thế bởi Nhà sản xuất, Trung tâm DVCSKH Rinnai hay trạm bảo hành được ủy quyền để tránh nguy hiểm.
• Hãy đảm bảo không để trẻ em đùa nghịch với bao bì hay nilon kèm sản phẩm.
Đối với người sử dụng
• Sản phẩm này được thiết kế để sử dụng cho mục đích nấu, rã đông… theo đúng chức năng biểu thị trên sản phẩm. Không dùng trong cho phòng thí nghiệm hay làm nóng các thiết bị điều trị…
• Không được để cho trẻ em hay người cao tuổi sử dụng.
• Người sử dụng phải hiểu rõ sản phẩm, các tính năng an toàn để tránh các nguy hiểm gây ra bởi việc sử dụng không đúng cách.
• Cửa lò có chức năng khóa an toàn khi mở ra. Vì vậy không để cửa lò mở khi vận hành sản phẩm bằng cách cố tình thay đổi chi tiết nào đó, nếu không sẽ rất nguy hiểm do rò rỉ vi sóng.
• Điều quan trọng là cửa lò phải được đóng đúng. Không vận hành lò nếu:
a) Cửa lò bị biến dạng.
b) Bản lề cửa bị bị lỏng hay đứt
c) Khoang lò bị vênh hay biến dạng.
d) Các vết nứt có thể nhìn thấy bên trong cửa lò.
Cảnh báo: Những thiệt hại này có thể gây rò rỉ vi sóng và gây nguy hiểm cho người sử dụng.
• Luôn mở cửa lò một cách cẩn thận để tránh hơi nóng từ khoang lò.
• Bề mặt lò có thể nóng khi sử dụng chế độ nướng. Bàn xoay và vỉ nướng sẽ nóng lên trong quá trình sử dụng. Luôn sử dụng găng tay bảo vệ để tránh bị bỏng.
• Cẩn thận khi loại bỏ nắp đậy hay các phần thừa thực phẩm để tránh bỏng do hơi nóng.
• Không làm ấm lò với công suất lớn.
• Không cố ép bàn xoay bằng tay vì có thể gây ra hư hỏng.
• Không sử dụng khoang lò cho mục đích lưu trữ.
• Không để các vật chắn các lô thông hơi của lò.
• Không sử dụng các nguồn hơi áp suất cao hay nước để làm sạch lò. Hơi nước có thể gây ra hiện tượng đoản mạch.
• Để tránh nguy cơ cháy trong khoang lò:
• Không nấu hay nước quá chín thực phẩm.
• Không làm nóng dầu hay chất béo để dùng cho múc đích khác, sẽ rất nguy hiểm nếu như quá nóng.
• Không để lò hoạt động mà không giám sát khi hâm nóng hoặc nấu thực phẩm được đựng bằng giấy, nhựa hoặc vật liệu dễ cháy khác.
• Tháo bỏ các dây xoắn (buộc) bằng giấy hoặc nhựa trước khi đặt túi (hộp) vào lò.
• Không làm nóng rượu nguyên chất.
• Nếu thấy khói hoặc lửa bên trong khoang lò, hãy cứ để cửa lò nóng lại, sau đó tắt và rút phích cắm ra ngay. Không mở cửa lò cho đến khi khói đã được phân tán.
• Luôn giữ khoang lò sạch sẽ, dầu mỡ tích tụ lâu ngày sẽ gây cháy do bị quá nóng.
KHUYẾN CÁO AN TOÀN
Vui lòng đọc kỹ quyển hướng dẫn sử dụng thật kỹ trước khi sử dụng sản phẩm. Quyển hướng dẫn này bao gồm những
thông tin liên quan đến lắp đặt, cách sử dụng, khuyến cáo an toàn và vệ sinh – bảo quản sản phẩm. Hãy ghi nhớ và
chuyển đến cho người sử dụng khác.
Tiế
ng
Việ
t
47

An toàn kỹ thuật
• Trước khi cài đặt sản phẩm, kiểm tra xem có bị hư hỏng (quan sát từ bên ngoài). Không cài đặt hoặc cố gắng sử dụng sản phẩm hư hỏng.
• Không vận hành lò nếu cửa bản lề có dấu hiệu hư hỏng. Nếu vận hành sẽ dẫn đến hiện tượng rò rỉ năng lượng và có thể gây nguy hiểm cho người sử dụng.
• Không để dây nguồn nằm bên dưới hay chạy theo thân lò
• Lò vi sóng là thiết bị có điện áp cao, không bao giờ được tháo bỏ vỏ bọc vì sẽ dẫn đến hiện tượng rò rỉ gây nguy hiểm.
• Trước khi kết nối sản phẩm với nguồn điện, phải chắc chắn rằng thông số về nguồn điện phải tương đương với thông số ghi trên tem sản phẩm.
• Để đảm bảo tính an toàn, sản phẩm cần phải được nối đất một cách chính xác. Dây màu vàng – xanh là dây nối đất, dây màu xanh là dây trung tính, dây màu nâu là dây nóng. Việc thực hiện phải do người có trình độ an toàn về điện thực hiện. Nhà cung cấp hay nhà sản xuất không chịu trách nhiệm cho bất kì thiệt hại nào do việc nối nối đất không đúng.
• Cài đặt và sửa chữa chỉ nên thực hiện bởi kỹ thuật viên có trình độ chuyên môn.
• Không tự ý thay đổi hay sửa chữa bất kỳ chi tiết nào của sản phẩm. Việc tác động không đúng sẽ gây lỗi hoạt động cho sản phẩm hoặc gây nguy hiểm cho người sử dụng.
• Không nên sử dụng nhiều sản phẩm cho một ổ cắm điện vì dễ dẫn đến hiện tượng quá tải gây hỏa hoạn.
• Luôn ngắt kết nối nguồn trước khi tiến hành về sinh – bảo trì sản phẩm.
Xử lý bao bì, thiết bị cũ
• Sản phẩm và bao bì của sản phẩm là vật liệu thân thiện với môi trường và tái chế. Xin vui lòng giúp chúng tôi để chăm sóc cho môi trường bằng cách xử lý bao bì một cách hợp lý và tái chế bất kỳ thiết bị cũ.
• Trước khi xử lý thiết bị cũ, hãy ngắt kết nối nguồn điện để tránh nguy hiểm.
Tư vấn sử dụng lò vi sóng
NỘI DUNG KHÔNG NÊN NÊN
Thực phẩm là trứng • Không nấu trứng còn vỏ (cứng hoặc mềm) vì có thể gây hiện tượng nổ vỏ trứng
• Đâm thủng lòng đỏ trước khi nấu
Các loại thực phẩm có vỏ hay da
• Các loại thực phẩm như cà chua, khoai tây, xúc xích, táo có thể bị vỡ khi nấu.
• Đâm thủng da hay vỏ trước khi nấu, việc này tạo điều kiện cho hơi nước thoát ra tránh bị vỡ (nổ).
Thực phẩm cho trẻ em • Không để thực phẩm trong lọ đựng.
• Không làm quá nóng đối với sữa trong bình. Chỉ tạo nhiệt cho đủ ấm.
• Chia phần thực phẩm và chọn nhiệt độ phù hợp, khuấy đều thường xuyên
• Tháo nắp và núm của bình sữa trước khi nấu (hâm). Sau khi làm ấm, lắc đều bình.
• Kiểm tra nhiệt độ phù hợp trước khi cho trẻ em dùng.
Nhà sản xuất hay Nhà cung cấp sẽ không chịu trách nhiệm cho bất kỳ thiệt hại nào liên quan đến lắp đặt, sử dụng và vệ sinh - bảo quản không tuân thủ đúng theo khuyến cáo.
Tiế
ng
Việ
t
48

NỘI DUNG KHÔNG NÊN NÊN
Thực phẩm đóng hộp • Không nấu hoặc hâm nóng thức ăn và các chất lỏng được đựng trong hộp kín hoặc lon, khi nhiệt độ tăng sẽ làm áp suất bên trong hợp gia tăng dẫn đến hiện tượng nổ, dễ gây tai nạn.
• Lấy thực phẩm ra khỏi hộp hoặc lon và để vào vật dụng khác phù hợp.
Bắp rang • Không sử dụng thường xuyên các túi nhựa hoặc bát thủy tinh bỏng ngô
• Không nấu quá giới hạn thời gian được ghi trên gói ngô.
• Sử dụng gói đựng đặc biệt dùng cho việc bỏng ngô.
Chất lỏng và đồ uống • Không làm nóng vượt mức thời gian khuyến cáo.
• Dùng lò vi sóng làm nóng các chất lỏng như súp, đồ uống, nước sốt…rất dễ dẫn đến hiện tượng sôi trào. Nhiệt độ sôi của chất lỏng đạt rất nhanh nhưng không có thể hiện của bọt khí. Nếu để thời gian sôi quá lâu có thể dẫn đến hiện tượng cháy bề mặt
• Chọn thời gian và mức dộ nhiệt phù hợp. Nếu không chắc, hãy bắt đều với mức công suất thấp và gia nhiệt từ từ cho đến khi chất lỏng trong thực phẩm đạt nhiệt đầy đủ.
• Khuấy đều chất lỏng trước và trong khi nấu.
• Sau khi đươc làm nóng, hãy để thực phẩm trong lò một lúc.
• Xư lý cẩn hận các hộp đựng.
Bàn (đế) xoay • Không vận hành lò mà không có bàn xoay (đĩa và đế xoay).
• Không nấu, hâm nóng hay rã đông thực phẩm trực tiếp trên bàn xoay
• Luôn để thức ăn vào vật dụng đựng phù hợp.
• Kiểm tra vật dụng đựng thực phẩm không được lớn hơn so với bàn xoay.
Dụng cụ nấu • Không sử dụng các bình làm bằng kim loại, nhôm lá mỏng, thủy tinh mỏng hoặc bát có viền kim loại. Các vật liệu này có hể bị hỏng hoặc gây cháy.
• Không sử dụng các hộp đựng có miệng mở hẹp.
• Kiểm tra các vật dụng thích hợp để nấu bằng lò vi sóng.
Nhôm lá mỏng, giấy bạc • Không sử dụng lá nhôm để gói kín thực phẩm khi nấu vì có thể gây cháy hoặc không chín hoàn toàn vì nó làm lệch hướng sóng.
• Tốt nhất không sử dụng giấy bạc trong lò vi sóng
• Nên giữ lá nhôm cách xa các mặt bên trong của thành lò tối thiểu 2.5cm để tránh bị cháy.
Tiế
ng
Việ
t
49

Vật dụng nấu thích hợp cho lò vi sóng
• Để nấu hoặc rã đông thực phẩm trong lò vi sóng, vật dụng đựng thực phẩm phải là vật liệu mà sóng có thể xuyên qua.
• Vật liệu và hình dạng vật đựng thực phẩm có ảnh hưởng đến hiệu quả và thời gian nấu. Vật dụng có dạng hình tròn hay bầu dục sẽ tốt hơn vật dụng có dạng hình góc cạnh.
• Bảng hướng dẫn lựa chọn vật dụng phù hợp theo chế độ:
Dụng cụ - Vật dụng Sóng vi ba Nướng Kết hợp
Kính chịu nhiệt Được Được Được
Kính không chịu nhiệt Không Không Không
Gốm chịu nhiệt Được Được Được
Nhựa Được Không Không
Các loại giấy dùng trong nhà bếp Được Không Không
Khay kim loại Không Được Không
Vỉ kim loại Không Được Không
Nhôm lá - Hộp nhôm Không Được Không
Lưu ý: luôn đối chiếu hướng dẫn của Nhà sản xuất về vật dụng trước khi nấu, nướng.
Một số lời khuyên khi nấu bằng vi sóng
• Đặt phần dày nhất của thực phẩm ở vòng ngoài.
• Sử dụng nắp đậy phù hợp với lò vi sóng khi đun nước hay thực phẩm nhiều nước.
• Luôn luôn khuấy hoặc luân chuyển thức ăn lớp ngoài vào trong để thực phẩm nóng nhanh hơn.
• Thực phẩm với lớp vỏ (da) dày cần phải đâm thủng để hơi nước thoát ra trong quá trình nấu, tránh bị nổ thực phẩm.
• Theo dõi và xoay trở trong quá trình nấu là cần thiết để nhiệt phân bố đều trong thực phẩm.
• Thực phẩm lạnh sẽ mất nhiều thời gian nấu hơn thực phẩm ở nhiệt độ thường. Luôn chắc rằng thực phẩm cần được nấu chín hoặc hâm lại, nếu cho rằng nhiệt độ chưa đủ cao hãy cho hâm nóng lâu hơn một chút
• Thời gian nấu phải được tăng lên theo khối lượng tăng của thực phẩm cần nấu. Ví dụ, bốn xúc xích cần thời gian nấu nhiều hơn hai xúc xích.
Rã đông
• Loại bỏ bao bì hay hộp đựng thực phẩm và thay bằng vât dụng đựng phù hợp.
• Trong quá trình rã đông nước sẽ đươc sinh ra, đặt thực phẩm sao cho có thể thu hồi nước và trở mặt thực phẩm sau khoảng nữa thời gian.
• Cá không cần phải rã đông trước khi nấu, chỉ cần xả đá cho mềm bề mặt là được.
Tiế
ng
Việ
t
50

Điện nguồn 220V – 240V / 50Hz
Cầu chì 13A
Công suất (Sóng) 1400W
Công suất (Điện trở nhiệt) 1000W
Công suất đầu ra 900W
Tần số hoạt động 2450MHz
Kích thước sản phẩm W595 X D395 X H390 mm
Dung tích 25 lit
Trọng lượng 14.5 kg
THÔNG SỐ KỸ THUẬT
BẢNG ĐIỀU KHIỂN
Display Green - Màn hình hiển thị Thời gian nấu, công suất (mức nhiệt) và thời gian của ngày hiện hành. Power – Công suất Nhấn để chọn công suất phù hợp. Grill – Nướng Nhấn để chọn chế độ nướng. Combi – Kết hợp nấu vi sóng và nướng. Nhấn để chọn cài đặt kết hợp. Wei. Def. – Rã đông Nhấn để chọn rã đông theo khối lượng thực phẩm. Clock/Kitchen Timer – Cài đặt thời gian Nhấn để cài đặt thời gian nấu, nướng hoặc thiết lập giờ hiện hành theo ngày. Wei. Adj. – Rã đông và nấu Nhấn để chọn rã đông theo khối lượng và nấu. Time/Menu – Chọn thời gian / Thực đơn nấu Xoay để chọn thời gian nấu hoặc nếu heo thực đơn có sẵn. Stop/Cancel – Ngừng / Hủy bỏ trình cài đặt Nhấn để ngừng chương trình nấu hoặc xóa bỏ cài đặt hiện hành để cài đặt chương trình khác. Start/Quick Start – Bắt đầu nấu / Nấu nhanh Nhấn để bắt đầu nấu hoặc tiến hành nấu nhanh. Door Release – Chốt cửa Nhấn để mở cửa.
Door Release
Tiế
ng
Việ
t
51

CHI TIẾT LINH KIỆN
① Khóa cửa an toàn ② Cửa lò ③ Bàn xoay / đế xoay ④ Trục bàn xoay ⑤ Chốt cửa ⑥ Bảng điều khiển ⑦ Ống dẫn sóng (Lưu ý: Không được tháo) ⑧ Đĩa xoay (kính) ⑨ Điện trở nhiệt (nướng) ⑩ Vỉ nướng
Phụ kiện kèm theo: • Đĩa xoay (một cái). • Bàn xoay / đế xoay (một cái). • Vỉ nướng (một cái).
Lắp bàn xoay
Đĩa xoay
Bàn xoay
Trục xoay
1. Đặt bàn xoay vào bên dưới khoang lò. 2. Đặt đĩa xoay lên trên bàn xoay. Kiểm tra và đảm
bảo trung tâm của bàn xoay nàm trong trục xoay Lưu ý:
• Khôn đặt ngược bàn xoay. • Không cố xoay bàn xoay bằng tay vì có thể làm
hỏng bộ truyền động của motor. • Cả bàn xoay và đĩa xoay phải được đặt xuyên
suốt trong quá trình nấu. Thực phẩm và vật dụng đựng thực phẩm phải được đặt trên đĩa xoay.
Tiế
ng
Việ
t
52

Nấu vi sóng
Thích hợp cho nấu hoặc hâm, rã đông.
Nướng
Thích họp cho nướng thịt với lát cắt mỏng.
Kết hợp (Nấu vi sóng & Nướng)
Thích hợp cho các món ăn cần nướng vàng bề mặt. Làm chín bằng vi sóng và làm vàng mặt bằng điện trở (nướng).
Tháo bỏ bao bì đóng gói sản phẩm
Chắn chắc rằng tất cả bao bì liên quan đến sản phẩm phải được lấy ra trước khi sử dụng.
Làm sạch khoang lò và các phụ kiện
Làm sạch khoang lò và các phụ kiện kèm theo để loại bỏ hoàn toàn các tạp chất hay dầu mỡ trong quá trình sản xuất.
Kiểm tra các hư hỏng từ bên ngoài
Không vận hành lò nếu:
a) Cửa lò bị biến dạng.
b) Bản lề cửa bị bị lỏng hay đứt
c) Khoang lò bị vênh hay biến dạng.
d) Các vết nứt có thể nhìn thấy bên trong cửa lò.
Cảnh báo: Những thiệt hại này có thể gây rò rỉ vi sóng và gây nguy hiểm cho người sử dụng.
SỬ DỤNG LẦN ĐẦU TIÊN
CHỨC NĂNG
Với lò vi sóng có chế độ nướng, khi sử dụng
lần đầu tiên sẽ có mùi khét nhẹ do dầu mỡ
trong quá trình sản xuất, đây là hiện tượng
bình thường.
Nên cho lò vận hành chế độ nướng nhưng
không có thực phẩm trong khoảng 20 phút khi
sử dụng lần đầu tiên . Hiện tượng này sẽ mất
sau một thời gian sử dụng.
Tiế
ng
Việ
t
53

Cài đặt thời gian
Lò vi sóng này có thể được thiết lập chế độ 12 giờ hoặc 24 giờ .
• Nhấn và giữ phím ”CLOCK/KITCHEN TIMER” khoảng 3 giây để thiết lập chế độ 12 giờ. Màn hình sẽ hiển thị “Hr12”.
• Nhấn phím ”CLOCK/KITCHEN TIMER” lần nữa, màn hình hiển thị “Hr24”.
• Xoay nút ”TIME/MENU” để chọn giờ hiện hành. Nhấn ”Clock/Kitchen Timer” để xác nhập.
• Xoay nút ”TIME/MENU” để chọn phút hiện hành. Nhấn ”Clock/Kitchen Timer” để xác nhập .
Mở và đóng cửa lò
Thận trọng: Khi cửa lò được ép nhẹ, đèn chiếu sáng và bàn xoay được bật nhưng không phát vi (công suất).
• Để mở cửa, ấn chốt cửa sâu vào bên trong.
• Để đóng cửa, đẩy mạnh cửa vào một cách từ từ.
Nếu lò đang hoạt động, mở cửa sẽ làm chương trình nấu gián đoạn (tạm ngưng). Hoạt động theo chế độ tùy chọn
Lò vi sóng cho phép tùy chỉnh công suất và thời gian nấu. Chọn mức công suất bằng cách nhấn phím ”POWER”. Xem bảng chi tiết dưới đây
Thời gian nấu tối đa là 95 phút. Giả sử muốn nấu tại mức công suất là 80% với thời ian là 5 phút.
• Mở cửa và đặt thực phẩm lên bàn xoay. Đóng cửa lại.
• Nhấn phím ”POWER” để chọn mức công suất mong nuốn (80% được hiển thị trên màn hình).
Nhấn phím
”POWER” Mức công
suất Cấp độ
Lần 1 100%(P100) Cao
Lần 2 80%(P-80) Trung binh cao
Lần 3 60%(P-60) Trung bình
Lần 4 40%(P-40) Trung bình thấp
Lần 5 20%(P-20) Thấp
Lần 6 0%(P-00) Không
• Cài đặt thời gian nấu bằng cách sử dụng ”TIME/MENU” (chỉ số 05 :00 hiển thị trên màn hình).
• Nhấn ”START/QUICK START” để lò bắt đầu vận hành.
• Khi hết thời gian nấu sẽ có âm thanh phát ra và trên màn hình xuất hiện chữ ”End”.
Lưu ý:
• Nhấn phím ”POWER” để kiểm tra mức công suất trong quá trình nấu.
• Nhấn phím ”STOP/CANCEL” để lò tạm ngưng chương trình đang hoạt động. Nhấn phím ”START/QUICK START” để chương trình hoạt động tiếp.
• Nhấn phím ”STOP/CANCEL” để xóa thiết lập của lần hoạt động trước và cài đặt lại chương trình mới.
Chế độ nướng
Chế độ nướng phù hợp với các loại thực phẩm cắt lát mỏng, sườn, xúc xích hay các miếng kích cỡ nhỏ, ngoài ra cũng phù hợp với một số loại bánh mì. Thời gian tối đa là 95 phút. Giả sử muốn nướng trong 15 phút.
• Mở cửa và đặt thực phẩm lên vỉ nướng. Đóng cửa lại.
• Nhấn phím ”GRILL” .
• Xoay nút ”TIME/MENU” để chọn thời gian nướng mong muốn.(chỉ số 12 :00 được hiển thị trên màn hình)
• Nhấn ”START/QUICK START” để lò bắt đầu vận hành
• Khi hết thời gian sẽ có âm thanh phát ra và trên màn hình xuất hiện chữ ”End”.
Lưu ý :
• Nhấn phím ”STOP/CANCEL” để lò tạm ngưng chương trình đang hoạt động. Nhấn phím ”START/QUICK START” để chương trình hoạt động tiếp.
• Nhấn phím ”STOP/CANCEL” để xóa thiết lập của lần hoạt động trước và cài đặt lại chương trình mới.
Mẹo sử dụng :
Khi sử dụng chế độ nướng, có thể làm nóng lò trước khi để thực phẩm vào.
VẬN HÀNH
Tiế
ng
Việ
t
54

Kết hợp (Nấu vi sóng & Nướng)
Chế độ này cho phép kết hợp giữa sóng vi ba và điện trở nhiệt. Thời gian tối đa là 95 phút. Giả sử muốn sử dụng chế độ kết hợp trong 15 phút .
• Mở cửa và đặt thực phẩm lên vỉ nướng. Đóng cửa lại.
• Nhấn phím ”COMBI” để chọn chế độ kết hợp mong muốn.
• Xoay nút ”TIME/MENU” để chọn thời gian mong muốn.(chỉ số 15 :00 được hiển thị trên màn hình).
• Nhấn ”START/QUICK START” để lò bắt đầu vận hành
• Khi hết thời gian sẽ có âm thanh phát ra và trên màn hình xuất hiện chữ ”End”.
Lưu ý: • Nhấn phím ”STOP/CANCEL” để lò tạm ngưng
chương trình đang hoạt động. Nhấn phím ”START/QUICK START” để chương trình hoạt động tiếp.
• Nhấn phím ”STOP/CANCEL” để xóa thiết lập của lần hoạt động trước và cài đặt lại chương trình mới.
• Không làm nóng trước lò với chế độ này .
Số lần nhấn
Kết hợp
Tỉ lệ hoạt động Các món ăn phù
hợp Sóng Điện trở
Lần 1 Combi1 30% 70%
Cá, rau củ, bánh mì
Lần 2 Combi2 55% 45% Trứng , khoay tây
nướng, thịt gia cầm
Nấu nhanh
Chế độ này hoạt động ở công suất tối đa. Thời gian cài đặt tối đa là 10 phút, có thể cài thêm trong quá trình nấu.
• Mở cửa và đặt thực phẩm lên bàn xoay. Đóng cửa lại.
• Nhấn phím ”START/QUICK START” để cài đặt thời gian nấu. Mỗi lần nhấn sẽ tăng thêm 30 giây.
• Lò bắt đầu hoạt động với công suất lớn nhất.
Lưu ý: • Nhấn phím ”STOP/CANCEL” để xóa thiết lập
của lần hoạt động trước và cài đặt lại chương trình mới.
Cài đặt bộ đếm thời gian.
Bộ đếm thời gian hoạt động độc lập. Thời gian tối đa là 95 phút.
Giả sử muốn thiết lập bộ đếm thời gian trong 30 phút :
• Nhấn phím ”CLOCK/KITCHEN TIMER”.
• Xoay nút ”TIME/MENU” để thiết lập bộ đếm thời gian mong muốn (30 :00 được hiển thị trên màn hình ).
• Nhấn phím ”START/QUICK START” để xác nhập.
• Khi bộ đếm thời gian kết thúc sẽ có âm hanh phát ra.
Lưu ý:
• Nhấn phím ”CLOCK/KITCHEN TIMER” để xem đếm ngược khi đã kích hoạt hẹn giờ.
• Để bỏ bộ đếm, nhấn ”STOP/CANCEL” khoảng 5 giây.
Nấu theo thực đơn
Có thể tùy chọn theo 8 chương trình nấu đã được cài đặt sẵn. Các chương trình này phụ thuộc vào khối lượng thực phẩm. Chỉ cần nhập vào số khối lượng thực phẩm, thời gian nấu sẽ được lò tự động tính.
• Mở cửa và đặt thực phẩm lên bàn xoay. Đóng cửa lại.
• Xoay nút ”TIME/MENU” ngược chiều kim đồng hồ . Xoay lần nữa để chọn khối lượng thực phẩm.
• Nhấn phím ”WEI. ADJ.” để nhập chỉ số khối lượng. Kiểm tra màn hình xem chỉ số có tương ứng với khối lượng thực phẩm thực tế đã đặt trong lò không.
• Nhấn ”START/QUICK START” để lò bắt đầu vận hành.
Chỉ số Thực đơn Chế độ
A-1 Bắp ngô (99g) Sóng vi ba
A-2 Cà phê (200ml/cup) Sóng vi ba
A-3 Rau quả (g) Sóng vi ba
A-4 Khoay tây (230g/unit) Sóng vi ba
A-5 Bánh Pizza (g) Sóng vi ba
A-6 Hâm nóng (g) Sóng vi ba
A-7 Gà nướng (g) Kết hợp
A-8 Thịt lát mỏng (g) Kết hợp
Lưu ý:
• Chương trình nấu A-7 và A-8, trong quá trình nấu lò sẽ báo ngừng và nhắc nhở tùy chỉnh (đổi bề) đối với thực phẩm.
• Nhấn ”START/QUICK START” để trở lại.
Tiế
ng
Việ
t
55

Rã đông theo khối lượng
Chế độ này cho phép rã động thực phẩm theo khối lượng được nhập vào. Trong phạm vi 100g đến 1800g.
Giả sử muốn thiết lập chế độ rã đông cho 200g thực phẩm.
• Mở cửa và đặt thực phẩm lên bàn xoay. Đóng cửa lại.
• Nhấn phím ”WEI. DEF.”
• Nhấn phím ”WEI. ADJ.” để nhập khối lượng.
• Nhấn ”START/QUICK START” để lò bắt đầu vận hành.
Lưu ý:
• Trong quá trình nấu lò sẽ báo ngừng và nhắc nhở tùy chỉnh (đổi bề) đối với thực phẩm.
• Nhấn ”START/QUICK START” để trở lại.
Các giai đoạn nấu
Lò vi ba được lập trình đến ba giai đoạn nấu bằng cách sử dụng chế độ nấu vi ba, nướng hoặc kết hợp (sóng vi ba và điện trở nhiệt).
Giả sử muốn thiết lập chương trình nấu ăn sau: Nấu sóng vi ba (60%) Nướng
• Mở cửa và đặt thực phẩm lên bàn xoay. Đóng cửa lại.
• Nhấn phím “POWER” để chọn công suất 60%.
• Xoay nút “TIME/MENU“ chọn thời gian nấu.
• Nhấn phím “GRILL“ để chọn chế độ nướng.
• Xoay nút “TIME/MENU“ chọn thời gian nấu.
• Nhấn ”START/QUICK START” để lò bắt đầu vận hành.
• Khi hết thời gian sẽ có âm thanh phát ra và trên màn hình xuất hiện chữ ”End”.
Lưu ý:
Rã động, nấu nhanh và nấu theo thực đơn không được thiết lập các giai đoạn như trên.
Khóa an toàn trẻ em
Khóa trẻ em có thể được kích hoạt để ngăn chặn việc lò được tắt vô ý của trẻ nhỏ. Tất cả các phím đều bị vô hiệu hóa khi chức năng này được kích hoạt.
• Để kích hoạt, nhấn và giữ phím ”STOP/CANCEL” khoảng 3 giây. Âm thanh báo phát ra và có biểu tượng khóa trẻ em trên màn hình.
• Để tắt kích hoạt, nhấn và giữ phím ”STOP/CANCEL” khoảng 3 giây . Âm thanh báo phát ra và biểu tượng khóa trẻ em trên màn hình mất đi.
•
Ngừng lò trong quá trình hoạt động
i) Nhấn phím ”STOP/CANCEL”
• Có thể khởi động lại lò bằng cách nhấn phím “START/QUICK START”. .
• Để khởi động lại chương trình đang hoạt động, nhấn phím “STOP/CANCEL”.
ii) Mở cửa lò
• Có thể khởi động lại lò bằng cách đóng cửa lò rồi nhấn phím ”START/QUICK START”.
• Để khởi động lại chương trình đang hoạt động, nhấn phím ”STOP/CANCEL”.
Tiế
ng
Việ
t
56

Vệ sinh bên trong lò
• Giữ sạch các bề mặt khoang lò, cửa lò, ống dẫn sóng. Thức ăn thừa, nước tràn, dầu mỡ bám sẽ làm giảm hiệu quả hoạt động của lò và có thể gây nguy hiểm cho người sử dụng.
• Có thể làm sạch bên trong bằng cách dùng một miếng vải mềm nhúng ẩm với chất tẩy rửa nhẹ. Không sử dụng vật cứng và chất tẩy rửa có nồng nộ mạnh vì có thể làm hao mòn, hỏng lớp bảo vệ.
• Để làm mềm một số thực phẩm bám dính, để một cốc nước vào lò và đun sôi khoảng 2-3 phút.
• Để làm mất mùi hôi của thực phẩm, đun sôi một cốc nước với vài muỗng nước cốt chanh hay vỏ khoảng 5 phút.
• Cửa lò phải luôn được giữ sạch sẽ và phải kiểm tra trường xuyên để phát hiện bất cứ thiệt hại nào.
• Không để nước hay hơi nước thâm nhập vào các lỗ thông hơi của lò.
Vệ sinh bên ngoài lò
• Bên ngoài lò có thể làm sạch với chất tẩy nhẹ và nước ấm, lau khô bằng vải mềm. Không sử dụng vật cứng và chất tẩy rửa có nồng nộ mạnh vì có thể làm hao mòn, hỏng lớp bảo vệ.
• Đối với vỏ ngoài bằng thép không gỉ, nêu lao theo chiều xuôi để tránh trầy xước bề mặt. Đối với các vết bẩn khó lau, sử dụng chất tẩy không gây mài mòn (vui lòng tuân thủ theo hướng dẫn của Nhà sản xuất).
• Mở cửa để tắt bảng điều khiển trước khi làm sạch. Giữ bàn điều khiển khô và lau khô bằng vải mềm ẩm, không sử dụng nước nhiều.
• Giữ không cho nước hay hơi nước bám vào các lỗ thông hơi.
Đèn chiếu sáng
Chỉ được thay thế đèn chiếu sáng bởi một kỹ thuật viên có đủ trình độ chuyên môn. Vui lòng liên hệ Trung tâm DVCSKH Rinnai để được hỗ trợ
Vệ sinh các phụ kiện
Bàn xoay
• Luôn giữ con lăn (bánh xe) bàn xoay sạch để hoạt động được êm và ổn định.
• Rửa bằng xà phòng pha loãng và lau thật khô.
• Lắp bàn xoay vào đúng vị trí.
Tránh làm hỏng bàn xoay bằng những cách sau:
• Để bàn xoay nguội trước khi rửa bằng nước.
• Không để vật nóng trên bàn xoay đang lạnh.
• Không để vật lạnh trên bàn xoay đang nóng.
Vỉ nướng
• Rửa sạch và lau khô sau mỗi lần sử dụng. Có thể rửa sạch bằng tay hoặc máy rửa chén. Ngâm trong nước xà phòng pha ấm để dễ dàng loại bỏ các chất bẩn khó rửa. Làm sạch bằng bàn chải hoặc bọt biển.
Phải ngắt kết nối nguồn điện trước khi tiến hành các hoạt động vệ sinh hay bảo trì
Cảnh báo: Không tháo ống dẫn sóng bên trong khoang lò. Không sử dụng vòi hơi, hơi nước với áp suất cao để vệ sinh. Hơi nước có thể làm đoản mạch và gây hỏng thiết bị.
VỆ SINH BẢO QUẢN
Khoang lò bị nóng trong quá trình sử dụng. Chắc rằng lò đủ nguội trước khi vệ sinh.
Để mua linh kiện thay thế, vui lòng liên hệ Trung tâm DVCSKH Rinnai.
Tiế
ng
Việ
t
57

Trong trường hợp các lỗi nhỏ liên quan đến hoạt động sản phẩm, vui lòng kiểm tra theo các hướng dẫn sau đây để giải quyết trước khi liên hệ trung tâm DVCSKH Rinnai.
Lò không hoạt động
• Kiểm tra công tắc chính có được bật và phích cắm có kết nối tốt với nguồn.
• Kiểm tra cầu dao điện nguồn có hoạt động tốt.
• Kiểm tra cửa lò có được đóng đúng cách.
• Kiểm tra phím “START/QUICK START” đã được nhấn.
Màn hình hiển thị không sáng
• Kiểm tra bảng điều khiển được lập trình chính xác.
Bàn xoay không hoạt động đều
• Kiểm tra con lăn (bánh xe) và phần đế có được vệ sinh sạch.
Thực phẩm không được nấu chín, hâm nóng, rã đông.
• Kiểm tra mức công suất có được điều chỉnh như mong muốn.
• Kiểm tra chương trình vận hành có bị gián đoạn hoặc không được vận hành.
Lò tự tắt một chương trình cài đặt
• Kiểm tra các lỗ thông hơi có bị kín. Hủy bỏ chương trình nếu cần thiết.
Đèn chiếu sáng không hoạt động
• Không nên tự ý thay thế bằng bóng đèn khác bởi một người không đủ chuyên môn kỹ thuật. Hãy liên hệ trung tâm DVCSKH Rinnai.
Hiện tượng ngưng tụ trên cửa lò
• Hơi nước hoặc nước sẽ đọng trên cửa lò trong quá trình nấu, nguyên nhân là do hơi đóng từ thực phẩm tạo ra. Đây không phải là sự cố và không ảnh hưởng đến hoạt động, an toàn sản phẩm.
SỰ CỐ VÀ CÁCH XỬ LÝ
Nếu các trường hợp trên vẫn còn sau khi kiểm tra theo hướng dẫn, hãy gọi Trung tâm DVCSKH Rinnai để được hỗ trợ. Đối với sản phẩm còn trong thời hạn bảo hành, Khách hàng vui lòng chứng minh bằng phiếu mua hàng và phiếu bảo hành hợp lệ (phiếu bảo hành được cấp kèm theo sản phẩm khi mua) .
Tiế
ng
Việ
t
58

Lấy bao bì và phụ kiện kèm theo khỏi sản phẩm
Kiểm tra các hư hỏng từ bên ngoài
Không vận hành lò nếu:
a) Cửa lò bị biến dạng.
b) Bản lề cửa bị bị lỏng hay đứt
c) Khoang lò bị vênh hay biến dạng.
d) Các vết nứt có thể nhìn thấy bên trong cửa lò.
Nếu phát hiện bất kỳ thiệt hại nào, không nên sử dụng. Vui lòng liên hệ trung tâm DVCSKH Rinnai để được hỗ trợ.
Sản phẩm này phù hợp cho việc lắp đặt theo kệ
• Sản phẩm được thiết kế để lắp theo kệ.
• Đảm bảo điều kiện thông hơi cho lò. Nếu lỗ thông hơi bị chặn trong quá trình hoạt động, lò sẽ bị nóng và có thể dẫn đến hư hỏng.
• Sản phẩm phải được đặt trên mặt phẳng và vững chắc (có thể chịu được trọng lượng của lò và thực phẩm bên trong nó). Mặt phẳng ổn định sẽ tránh bị rung và tiếng ồn trong quá trình hoạt động.
• Các mặt của kệ tủ liền kề phải làm bằng vật liệu chịu nhiệt.
• Sản phẩm được đặt tránh xa nguồn nước và nguồn nhiệt. Tiếp xúc với nhiệt và nước sẽ làm giảm hiệu quả hoạt động và dẫn đến hư hại.
• Sản phẩm hoạt động sẽ gây nhiễu cho một số thiết bị truyền thanh, truyền hình... Hãy đặt xa các thiết bị điện tử.
• Kích thước cắt kệ phải theo thông số sau:
Thông gió
Để đảm bảo thông gió đầy đủ, khoảng cách từ mặt vách đến mặt sau của sản phẩm tối thiểu là 45mm.
LẮP ĐẶT
Viêc lắp đặt phải được thực hiện bởi một kỹ thuật viên đủ trình độ chuyên môn. Nhà cung cấp hay Nhà sản xuất sẽ từ chối trách nhiệm về an toàn, thiệt hại liên quan đến lắp đặt không đúng.
Tiế
ng
Việ
t
59

Phụ kiện lắp đặt
① Chắn kim loại 1 cái
A Vít 3x20 4 cái
B Vít 4x8 2 cái
An toàn sản phẩm
• Chỉnh sửa và bảo vệ tấm chắn gió bằng hai vít 4x8mm.
• Canh chỉnh khung kệ sao cho thuận lợi cho việc đóng mở cửa lò. Đảm bảo sản phẩm ổn định và không bị nghiêng, không cấn dây nguồn.
• Cố định lò bằng bốn vít 3 x 20mm tại các vị trí góc trên và dưới. Đừng xiết vít quá chặt.
• Kiểm tra lại xem có chính xác và phù hợp.
• Kết nối nguồn điện.
• Bật điện nguồn. Sản phẩm chỉ hoạt động khi đã được lắp đặt hoàn chỉnh để tránh nguy cơ rò rỉ điện.
Kết nối với nguồn điện
• Sử dụng ổ cắm có chỉ số truyền tải tương ứng với thông số ghi trên tem sản phẩm.
• Nếu sản phẩm được kết nối với nguồn thông qua cầu dao điện thì cũng phải đảm bảo thông số về tải điện và tuân thủ các quy định an toàn về điện (bao gồm cả dây nối đất). Dây nguồn không tiếp xúc với bề mặt có nhiệt độ trên 50oC.
• Kết nối phải đảm bảo chính xác và đúng theo quy định an toàn về điện.
Trước khi kết nối với nguồn, cần phải đảm bảo rằng:
• Sản phẩm đã được nối đất chính xác và hiệu quả.
• Ổ cắm phải đáp ứng chỉ số truyền tải và điện điện áp trong khu vực phù hợp với điện áp ghi trên tem sản phẩm.
• Việc thực hiện phải do kỹ thuật viên có đủ trình độ. Không sử dụng phích cắm cho nhiều sản phẩm hay các ổ cắm nối tiếp mở rộng. Quá tải sẽ gây sự cố hỏa hoạn.
• Ổ cắm hay nguồn phải lắp ở vị trí dễ dàng tiếp cận khi có sự cố.
Việc lắp đặt phải đảm bảo chính xác kết nối và
phải tuân thủ các quy định an toàn về điện.
Nhà sản xuất hay Nhà cung cấp không chịu bất cứ trách nhiệm pháp lý nào liên quan đến sai phạm an toàn về điện.
①
Tiế
ng
Việ
t
60

คาแนะนาเพอความปลอดภย------------------------------------------------------------------------------------------------------62
คณสมบตผลตภณฑ --------------------------------------------------------------------------------------------------------------66
แผงควบคมการทางาน------------------------------------------------------------------------------------------------------------66
สวนประกอบผลตภณฑ----------------------------------------------------------------------------------------------------------- -67
รปแบบการทางานของเตาไมโครเวฟ---------------------------------------------------------------------------------------------68
สาหรบการใชงานครงแรก---------------------------------------------------------------------------------------------------------68
การทางานของเตาอบไมโครเวฟ--------------------------------------------------------------------------------------------------69
การดแลและการบารงรกษา-------------------------------------------------------------------------------------------------------72
การแกไขปญหาเบองตน----------------------------------------------------------------------------------------------------------73
วธการตดตง-----------------------------------------------------------------------------------------------------------------------74
vve
สารบญ
ขอสาคญ
คณสามารถลงทะเบยนรบการประกนสนคาไดโดยนา
สตกเกอรหมายเลขเครองของผลตภณฑทใหมาตดลงบนใบรบ ประกนสนคา
ในกรณทตองการความชวยเหลอใดๆ กรณาตดตอศนยบรการรนไนใกลบานทาน
Version: 2013 05
ภาษ
าไท
ย
61

การแกะกลองบรรจและอปกรณหอหม
• อยานาเตาอบไปใชงานหากพบวามความเสยหายทเกดจาก การขนสงอยางชดเจน
• ถาหากสายไฟชารด ทางผผลตตองเปลยนใหใหมโดยชางผชานาญเปนผดาเนนการใหเพอหลกเลยงอนตราย
• เพอความปลอดภย หามไมใหเดกๆนาพลาสตกทใชหออปกรณใดๆของเตาอบ ไมโครเวฟไปเลน
คาแนะนาสาหรบผใช
• เตาอบนใชสาหรบการเตรยมอาหารในครวเรอนเทานน และควรใชสาหรบอนอาหาร ปรงอาหารและละลายอาหารแชแขงและเครองดมเทานน ไมเหมาะทจะใชในเชงพานชย, ใชทาการทดลองหรอใชเปนทเกบความรอน
• ไมประสงคใหเดกเลกใชงาน
• สาหรบเดกทโตกวาหรอคนทไมแขงแรงทอาจใชเครองโดยลาพงไดดวยการนาคาแนะนาการใชงานนมาประยกตใช จะทางานสามารถใชงานไดอยางเขาใจและปลอดภย
• ประตเปนระบบนรภยปองกนไมใหเตาอบไมโครเวฟทางาน ขณะทประตเปดอย อยาละเลยปลอยใหเตาอบทางานขณะทประตยงเปดอยจะทาใหคลนแมเหลกความถสงกระจายออกมาและเปนสาเหต ใหเกดอนตรายกบผใชงาน
• การปดประตเตาอบใหถกวธเปนสงสาคญอยางยง เปนอยางยงการปดประตเตาอบใหสนทเปนเรองจาเปนและสาคญ อยาใชงานเตาอบไมโครเวฟในกรณท:
ก ประตเตาอบโคงงอ
ข บานพบประตกบสลกประตหลวมหรอหก
ค ขอบยางประตกบชองเตาอบโคงงอหรอบบ
ง มองเหนรอยบบรอยแตกดานในเตาอบหรอทผนงเตาอบ ดานใน
คาเตอน: การใชงานในขณะทผลตภณฑชารดอาจทาให ไมโครเวฟรวและเปนอนตรายตอผใชงาน
• ใหทาการเปดประตเตาอบอยางระมดระวงเสมอเพราะไอความรอนอาจหลดลอดออกมาได
• ใหใชถงมอทนความรอนทใชกบเตาอบ เพอหลกเลยงการเผาไหมเมอทาอาหารแบบยางหรอแบบไม ใชคลนไมโครเวฟ ภาชนะทใชทาอาหาร ตะแกรงยางและจานหมนอาจเกดความรอนระหวางการใชงาน
• ใหระวงในขณะเปดฝาปดหรอฝาครอบภาชนะทใชประกอบ อาหารเพอหลกเลยงจากไอนารอนลวก
• อยาตงคาการประกอบอาหารเพออนภาชนะเปลา
• อยาหมนจานรองภาชนะในเตาอบดวยมอ เพราะจะทาใหระบบการทางานผดปกตได
• อยาใชเตาอบเปนทเกบของ
• อยาใหมส งกดขวางการระบายอากาศของเตาอบ
• ไมใชวธการทาความสะอาดเตาอบดวยเครองทาความสะอาด แบบแรงดนสงหรอแบบไอนา เพราะไอนาอาจเขาไปในสวนประกอบทใชไฟฟาทาใหเกดไฟฟาลดวงจรได
• เพอหลกเลยงความเสยงทจะทาใหเกดไฟไหมในเตาอบ:
ก ไมใชเวลาในการทาอาหารนานเกนไป ข ไมใชไขมนหรอนามนทรอนจดทอดอาหาร
อยาปลอยใหอาหารททาดวยนามนทางานในเตาอบโดย ไมมคนคอยดเพราะถาเกดความรอนมากเกนไป สงเหลานนสามารถเปนอนตรายเพราะไฟไหมได
ค อยาละเลยการดแลการทางานของเตาอบ หากทาการอนอาหารหรอทาอาหารดวยภาชนะทใชแลวทง อาท ภาชนะพลาสตก, กระดาษหรอวสดทตดไฟงาย
ง ใหนาสายรดปากกระดาษหรอถงพลาสตกออกกอนจะวางถงนนในเตาอบ
จ อยาใชเตาไมโครเวฟอนเครองดมทมแอลกอฮอรเจอปน เพราะเปนสงททาใหตดไฟงาย
ฉ ถามควนหรอประกายไฟเกดขนในเตาอบใหปดประตเตา อบ ปดการทางานและถอดปลกออก อยาเปดประตจนกวาควนจะหายไปจากเตาอบ
ช ตองดและรกษาใหภายในเตาอบสะอาดอยเสมอ การสะสมของไขมนอาจเปนเหตใหรอนมากเกนไปทาให เกดควนหรอประกายไฟได
คาแนะนาเพอความปลอดภย
กรณาอานคมอการใชงานอยางละเอยดและปฏบตตามคาแนะนาวธการใชงานทงหมดสาหรบใชงานครงแรก เพราะคมอนมขอมลสาคญสาหรบวธการตดตง, วธการใชงานและการดแลผลตภณฑอยางปลอดภย และกรณาเกบคมอการใชงานเลมนไวใหสาหรบผใชงานใชอางองในอนาคตตอไป
ภาษ
าไท
ย
62

ความปลอดภยทางเทคนค
• ใหตรวจสอบดมความเสยหายทมองเหนไดจากภายนอกหรอไม อยาทาการตดตงหรอพยายามใชเครองใชทชารด
• อยาใชไมโครเวฟถาหากประตบานพบหรอขอบยางประต ชารด การใชงานจะสงผลใหคลนไมโครเวฟรวออกมาภายนอกซง จะทาใหเกดอนตรายกบผใชงานได
• ตรวจดวาสายไฟไมไดอยใกลของมคมหรอตวทาความรอน ใดๆและหรอไมไดใหเครองใชทางานขณะสายไฟถกทบอย ใตเครองใชน
• เครองใชนเปนเครองใชไฟฟาแรงสง อยาเอากลองทครอบหรอหมอยขางในออกเพราะจะทาให รงสไมโครเวฟรวออกและอาจทาใหเกดอนตรายตอผใชงานได
• ใหตรวจสอบความสอดคลองของกาลงไฟฟาของเตาไมโคร เวฟกบกาลงไฟบานกอนทจะทาการตอสายไฟเขากบปลก ไฟเพอใชงาน
• เราสามารถรบประกนความปลอดภยดานไฟฟาของเตา ไมโครเวฟนไดหากตดตงสายดนอยางถกวธดวยการตอขว ไฟฟา เขากบสายดนตามขอกาหนดในทองททคณอาศยอย ซ งสายสเขยวเหลองเปนสายดน สายสนาเงนเปนนวตรอน สายสนาตาลเปนสายไฟ ซงควรไดรบการตรวจสอบความปลอดภยเบองตนจาก เจาหนาทผชานาญงาน
• การตดตงและการซอมแซมเตาไมโครเวฟ ควรใหชางผชานาญงานเปนคนดาเนนการ
• การดดแปลงสวนตางๆของเตาไมโครเวฟนเปนทอนตราย การเขาไปดดแปลงสวนทเชอมตอเขากบกระแสไฟฟาหรอชนสวนทเปนเครองจกรนนอาจทาใหเตาอบไมโครเวฟทางานผดพลาด ทาใหผใชงานมความเสยงอนตรายขณะใชงาน
• ไมใชปลกไฟรวมกบเครองใชประเภทอนๆมากเกนไป เพราะอาจทาใหเกดอนตรายจากไฟไหม
• กอนการทาความสะอาดหรอการบารงรกษาเตาอบหรออปกรณตางๆของเตาอบ ตองดงสายไฟของเตาอบออกจากปลกไฟกอนทกครง
การกาจดทง (Disposal)
• บรรจภณฑและเตาไมโครเวฟนนเปนมตรกบสงแวดลอมและนากลบมาใชใหมได โปรดชวยกนรกษาสงแวดลอมดวยวธการทงอยางเหมาะสม และหรอนาเครองเกามาใชใหม
• กอนการนาเครองเกาไปทง ใหถอดปลกและตดสายไฟออกจากตวเครองฯเพอหลกเลยง ไมใหเกดอนตราย
ผผลตจะไมรบผดชอบในความเสยหายใดๆทเกดจากการตดตงทไมเหมาะสมหรอเกดจากความลมเหลวทจะนามาตรการความ ปลอดภยทเหมาะสมมาใชระหวางการดาเนนการตดตงและ ระหวางการใชงาน
ภาษ
าไท
ย
63

ขอแนะนาเกยวกบการประกอบอาหารดวยไมโครเวฟ
ขอแนะนา ท วไป
ขอหาม ขอควรทา
อาหาร ประเภทไข
• อยานาไขทงเปลอกมาประกอบเปนอาหารดวยเตาไมโครเวฟเพราะ จะทาใหเกดการระเบดได
• ใหเจาะไขแดงใหเปนรกอนการปรงอาหาร แลวใชฝาครอบไวอยางนอยนาทแลวจง เปดฝาออก
อาหารทม เปลอกหรอผว
• อาหารทมเปลอกหรอผว เชน มนฝรง มะเขอเทศ ไสกรอก แอปเปล อาจมการระเบดระหวางการปรงอาหาร
• เจาะรทเปลอกหรอผวกอนนามาปรงอาหาร จะทาใหไอนาระบายออกเพอไมใหเกดการระเบด
อาหาร สาหรบเดก
• ไมอนอาหารสาหรบทารกกบภาชนะทใสมา
• ไมใชเตาอบไมโครเวฟอนขวดนมจนรอนเกนไป ใหพออนๆเทานน
• นาอาหารออกมาใสจานเลกและทาการอนอยางระมดระวงโดยใชชอนคนอาหารให บอย
• เชควาอาหารรอนอยหรอไมกอนการนาไป ใหเดกรบประทานเพอปองกนปากพอง
อาหาร กระปอง
• ไมทาอาหารหรออนอาหารประเภทของเหลวทบรรจในหอหรอใน กระปอง เพราะแรงดนอากาศอาจเปนเหตใหเกดการระเบดซงเปนความ เสยงทาใหเกดการบาดเจบได
• ใหนาอาหารออกจากหอหรอกระปองมาใสภาชนะหรอจานทเหมาะสม
ขาวโพดคว
• หามใชถงสนาตาลทวไป, ถงพลาสตกหรอถวยแกวทาขาวโพดคว
• ไมใชเวลาทาขาวโพดควนานเกนกวาทระบไวขางซองขาวโพด
• ใชถงสาหรบการทาขาวโพดควทใชกบ ไมโครเวฟโดยเฉพาะ
เครองดม หร ออาหารเหลว
• ไมใหใชความรอนนานเกนกวาทกาหนดไว
• การทาของเหลวใหรอนดวยไมโครเวฟ เชน ปรงนาซป เครองดม ปรงซอสฯลฯ นน คลนไมโครเวฟสามารถสงผลใหเกดฟองเดอดชา กลาวคอเมอของเหลวนนถงจดเดอดจะไมแสดงอาการใหเหนเชน ไมมฟองเดอดปรากฏ และการแสดงความเดอดลาชาอาจทาใหเกดฟองเดอดอยางกะทนหนเมอคณนาภาชนะทปรงอาหารออกจากเตาไมโครเวฟหรอเขยาภาชนะ ซงความรอนทเกดจากอาหารหรอของเหลวทาใหเกดอนตราย จาารลวกได
• เลอกเวลาและระดบการทางานในการปรง อาหารทเหมาะสม ถาคณไมแนใจใหเรมจากระดบการทางานและเวลานอยๆกอน แลวคอยๆเพมระดบและเวลาจนกระทง อาหารนนไดรบความรอนหรอสกจนเปนทพอใจ
• คนของเหลวใหเขากนกอนทาการปรง อาหาร
• หลงจากรอนไดทแลว ใหทงอาหารไวในเตาอบสกคร
• ใชมอจบภาชนะใสอาหารในเตาอบอยาง ระวง
ทรองจาน หมน
• อยาใชงานเตาไมโครเวฟโดยไมมทรองจานหมน
• อยาทาการประกอบอาหาร อนอาหารหรอละลายนาแขงดวยการวางอาหารบนจานหมนโดย ตรง
• ใหใชภาชนะทเหมาะกบการปรงอาหาร เสมอ
• ตรวจดวาภาชนะทใชไมใหญกวาจานหมน
ภาชนะ
• อยาใชภาชนะททาจากโลหะ, อลมเนยม ฟอยล, แกวครสตลหรอชามทประดบดวยโลหะ สงเหลานจะทาความเสยหายหรอทาใหเกดไฟไหมและเปน อนตรายได
• หลกเลยงการใชภาชนะทมรปทรงเปนคอขวด
• กอนใชภาชนะทาอาหารใดๆ ใหตรวจดภาชนะทใชวาเหมาะสาหรบใช งานกบเตาไมโครเวฟ
แผนอลมเนยมฟอยล
• อยาใชแผนอลมเนยมฟอยลมากเกนไป เพราะอลมเนยมฟอยลอาจทาใหไฟลกได
• แถบของอลมเนยมฟอยลอาจทาใหกน ความรอนมากเกนไป จงใหใชแตจานวนนอย
• ใหรกษาระยะหางระหวางอลมเนยมฟอยลกบผนงดานในเตาอบ (อยางนอย 1” เพอหลกเลยงการสปารคของไฟฟา)
ภาษ
าไท
ย
64

ภาชนะทสามารถใชกบเตาอบไมโครเวฟ
• ในการประกอบอาหารหรอการละลายอาหารแชแขงในเตาอบไมโครเวฟนน คลนไมโครเวฟจะตองสามารถทะลผานภาชนะเพอจะเขาไปถงอาหารได
• วสดและรปรางของภาชนะมผลตอเวลาและการสกของอาหารททา มการกระจายความรอนผานภาชนะทรงกลมและทรงรมากกวาภาชนะรปสเหลยมจตรสหรอผนผา
• เลอกใชภาชนะทเหมาะสมไดดงตอไปน:
แกวทนความรอน ใชได ใชได ใชได
แกวไมทนความรอน ใชไมได ใชไมได ใชไมได
เซรามกทนความรอน ใชได ใชได ใชได
จานพลาสตกใชกบไมโครเวฟ ใชได ใชไมได ใชไมได
ภาชนะกระดาษ ใชได ใชไมได ใชไมได
ถาดโลหะ ใชไมได ใชได ใชไมได
ตะแกรงโลหะ ใชไมได ใชได ใชไมได
แผนอลมเนยมฟอยลและฟอยลใชหออาหารสาหรบอบ
ใชไมได ใชได ใชไมได
หมายเหต: โปรดดคาแนะนาของผผลตเครองใชบนภาชะกอนนามาใชกบเครองใชนเสมอ
เคลดลบในการประกอบอาหารดวยไมโครเวฟ (Microwave cooking tips)
• ใหวางอาหารชนทหนาทสดไวดานนอกของภาชนะ
• ใชฝาครอบอาหารสาหรบไมโครเวฟหรอพลาสตกสาหรบใชกบไมโครเวฟปดลงบนอาหารในขณะปรงอาหาร ฝาครอบจะเรงกระบวนการทางานใหเรวขนและปองกนไมใหอาหารแหง หมายเหต: อยาใชฝาครอบภาชนะ ถาหากอาหารทจากขนมปงปนหรอมนฝรง
• แนะนาใหกลบดาน, ยายทหรอคนอาหารระหวางการทาอาหารเพอใหความรอนเขาไปอยางทวถง ใหกลบดานหรอคนอาหารจากรอบนอกเขาไปตรงกลางภาชนะอยเสมอ จะทาใหเกดความรอนจากดานนอกรอนเรวขน
• ตองทาการเจาะอาหารทมเปลอกหนาหรอมผวใหเปนรกอนใชประกอบอาหารเพอใหไอนาออกไปได เปนปองกนการระเบด
• การตงคาเวลาเปนสงทจาเปนหลงจากประกอบอาหารเพอใหความรอนกระจายไปยงอาหารอยางทวถง
• อาหารแชเยนจะใชเวลาในการทาอาหารนานกวาปกต ตองใหมนใจอยเสมอวาอาหารสกหรอรอนเพยงพอแลว หากไมแนใจ กใหใชเวลาอนนานกวาเดมเลกนอย
• เวลาในการปรงอาหารตองเพมขนตามปรมาณของอาหารทมากขน ตวอยางเชน การทาไสกรอก 4 ชนจะใชเวลานานกวา 2 ชน
การละลายอาหารแชแขง
• นาอาหารออกจากหอใสในภาชนะทใชสาหรบเตาไมโครเวฟ นาเขาโหมดละลายอาหารแชแขงโดยไมตองใชฝาครอบอาหาร
• การละลายอาหารแชแขงประเภทเนอสตว ใหนาอาหารวางในภาชนะในลกษณะทหงายขนจะทาใหนาในเนอสตวไหลออกมากองรวมกน หลงจากนนใหกลบอกดานขนเพอใหผานกระบวนการเดยวกน
• อาหารประเภทปลานน ไมจาเปนตองละลายใหนาแขงหมดไปกอนการนามาประกอบอาหาร ควรใหละลายจนเนอปลามความนมเพยงพอทจะรบสมนไพรหรอเครองปรงรสใหเขาไปในเนอปลาได
ภาชนะ การประกอบอาหาร
แบบใชคลนความรอน การประกอบ
อาหารแบบยาง การประกอบ
อาหารแบบผสม
ภาษ
าไท
ย
65

แรงดนไฟฟา 220 โวลท – 240 โวลท / 50 เฮรทซ
ฟวส 13 แอมป
กาลงไฟฟาเขา (ระบบไมโครแวฟ) 1400 วตต
กาลงไฟฟาเขา (ระบบยาง) 1000 วตต
กาลงไฟฟาออก 900 วตต
ความถคลนไมโครเฟ 2450 เมกะเฮรทช
ขนาด กวาง 595 มม. X ลก 395 มม. X สง 395 มม.
ความจ 25 ลตร
นาหนก ประมาณ 14.5 กก.
คณสมบตผลตภณฑ
แผงควบคม
จอแสดงผล แสดงเวลาทาอาหาร, ระดบพลงงาน และแสดงวนเวลาปจจบน ป ม Power เพอกดเลอกระดบการทางานของไมโครเวฟ แบบยาง ใชตงคาโปรแกรมการยางอาหาร แบบผสม Combi. ใชตงคาการประกอบอาหารแบบผสม ละลายนาแขง Wei. Def. ใชตงคาโปรแกรมละลายนาแขงจากนาหนก ต งเวลาการทาอาหาร Clock/Kitchen Timer เพอใชตงเวลาปจจบนและหรอเวลาทาอาหาร ป มปรบนาหนก Wei. Adj. กดป มหาคานาหนกของทจะทาการละลาย แลวตงโปรแกรมการทาอาหาร ป ม Time/Menu เลอกเวลาทจะประกอบอาหารหรอเลอกเมนอตโนมต หยด/ยกเลก Stop/Cancel กดป มนเพอหยดการทางานหรอลางการตงคาปจจบนกอนการตงคาโปรแกรมทจะใชใหม ป ม Start/Quick Start กดป มนเพมเรมการทาอาหารหรอตงคาการทาอาหารแบบรวดเรว Door Release กดเพอเปดประต
ภาษ
าไท
ย
Door Release
66

สวนประกอบผลตภณฑ
① ตวลอคนรภย ② ประตเตาอบ ③ แทนรองหมนจาน / หวงลกกลง ④ เพลาทหมนจาน ⑤ ป มเปดประต ⑥ แผงควบคม ⑦ ฝาครอบตวนาคลนไมโครเวฟ (คาเตอน: หามเอาออก) ⑧ จานหมนแกว ⑨ ตะแกรงนาความรอน ⑩ ตะแกรงยาง
อปกรณทมให : • จานหมนแกว (1 ชน)
• แทนรองจานหมน (1 ชน)
• ตะแกรงยาง (1 ชน)
การตดจานหมน
จานหมน
ทรองจานหมน/ หวงมลอ
แกน/เพลาหมน
1. วางทรองจานหมนตรงกลางเตาอบ ดงในภาพ
2. วางจานหมนบนทรอง ตรวจดวากนจานหมนลงชองของแกน/เพลาหมนดแลว (ดตามลกศร)
หมายเหต
• อยาวางจานหมนควาลง
• อยาหมนจานหมนดวยมอเพราะจะทาใหทาใหมอเตอรหมนชารด
• จานหมนและทรองตองใชสาหรบการทาอาหาร ตองใชงานโดยมภาชนะหรอจานทมอาหารวางอยบนจานหมนเทานน
ภาษ
าไท
ย
67

การทางานดวยคลนไมโครเวฟเพยงอยางเดยว
เหมาะสาหรบการละลายอาหารแชแขง การอนอาหารและการประกอบอาหาร
การทางานแบบยาง
เหมาะสาหรบการยางเนอหนบาง
การทางานแบบผสม (คลนไมโครเวฟ & ยาง)
เหมาะสาหรบอาหารทตองการใหมสนาตาลดานบนเพอความสวยงาม โดยใชคลนไมโครเวฟปรงอาหารและทาใหเปนสนาตาลดวยการยาง
การแกะบรรจภณฑ
ตรวจสอบใหแนใจวาไดถอดวสดบรรจภณฑทหอหมทงหมดออก จากเตาอบไมโครเวฟหมดแลวกอนทจะเรมใชงานครงแรก
ทาความสะอาดภายในเตาอบและอปกรณกอนการใชงาน
ทาความสะอาดภายในเตาอบและอปกรณทใชสาหรบเตาอบให สะอาดกอนใชงาน
ตรวจดวาเครองใชมความเสยหายหรอไม
ไมใหใชงานเตาอบไมโครเวฟ ในกรณท
ก ประตเตาอบมรปทรงบดเบยวหรอโคงงอ
ข บานพบประตกบสลกประตหลวมหรอหก
ค ขอบยางประตกบชองเตาอบโคงงอ บบ เสยรปทรง
ง มองเหนรอยบบรอยแตกทประตหรอผนงดานในเตาอบ
คาเตอน: การใชงานเครองใชไฟฟาทชารดจะมผลทาใหคลนไมโครเวฟรว ออกมาและจะนาอนตรายมาสผใชงาน
สาหรบการใชเตาอบไมโครเวฟครงแรก
การทางานของไมโครเวฟ
เมอเตาอบไมโครเวฟตวใหมถกใชงานครงแรกดวย
หมวดการยาง
เตาอบอาจผลตกลนการเผาไหมออกมาเลกนอย
ซงเปนเรองปกต
เราขอแนะนาใหคณเปดเตาอบใหทางานแบบยาง
โดยไมตองใสอาหารเขาไป
โดยใหเตาอบทางานแบบนนสก 20 นาท
กลนทเกดจากการใชระบบยางจะไมเกดขนอกเลย
ภาษ
าไท
ย
68

การต งเวลา
เตาอบนสามารถตงคาไดทงแบบ 12 หรอ 24 ชวโมง
กดท CLOCK/KITCHEN TIMER คางไปไวประมาณ 3 วนาท เพอตงคานาฬกาแบบ 12 ชวโมง โดย “Hr12” จะปรากฏบนหนาจอแสดงผลตามทเราตงคา (แบบ 12 ชวโมงหรอ 24 ชวโมง)
• กดป ม CLOCK/KITCHEN TIMER อกครงเพอตงคาเปน 24 ชวโมง สญญลกษณ “Hr24” จะปรากฏบนหนาจอ
• หมนเลอก TIME/MENU เพอตงคาเวลาปจจบน โดยกดป ม Clock/Kitchen Timer เพอใสเวลา
• หมนเลอก TIME/MENU เพอตงคาเวลาปจจบน กดป ม CLOCK/KITCHEN TIMER เพอตงคา
การเปดและการปดประต
ขอควรระวง: เมอกดประตไมโครเวฟเบาๆ ไฟเตาอบและจานหมนจะทางานแตไมโครเวฟจะยงไมทางาน
• เปดประตดวยการกดป มเปดประต
• ปดประตโดยการผลกประตปดเขาไปใหสนท
การเปดประตเตาอบขณะเครองกาลงทางานจะทาใหการทาอาหารถกขดจงหวะและอาหารไมสก
ระบบไมโครเวฟอยางเดยว
การปรงอาหารดวยไมโครเวฟนน สามารถตงคาการทาอาหารและตงเวลาการทางานไดดวยการกด ป ม POWER ดไดจากตารางขางลาง
เวลาสงสดทสามารถตงคาไดคอ 95 นาท
สมมตวาคณตองการทจะปรงอาหารทระดบพลงงาน 80% เปนเวลา 5 นาท
• เปดประตเตาอบแลววางภาชนะใสอาหารลงบนจานหมน ปดประต
• กดป ม POWER เพอตงคาทตองการ(คา 80% ปรากฎทหนาจอ)
การกดป ม Power ระดบกาลงงาน ระดบการทางาน
1 ครง 100% (P100) สง
2 ครง 80% (P-80) กลาง-สง
3 ครง 60% (-60) กลาง
4 ครง 40% (P-4) ตา-กลาง
5 ครง 20(P-20) ตา
6 ครง 0% (P-00) ไมม
• ตงเวลาปรงอาหาร โดยเลอกท TIME/MENU (05 :00 จะแสดงบนหนาจอ)
• กดป ม START/QUICK START เพอเรมทางาน
• หลงจากสนสดเวลาการทาอาหาร จะมเสยงสญญานเตอนและจะปรากฎคาวา ‘End’ บนหนาจอ
หมายเหต :
• กดป ม POWER เพอเชคระดบกาลงงานทใชระหวางการทาอาหาร
• กดป ม STOP/CANCEL เพอหยดโปรแกรมขณะเครองกาลงทางาน กดป ม START/QUICK START เพอเรมทางานใหม
• ลางการตงคาบนหนาจอกอนทจะเรมโปรแกรมใหม กดป ม STOP/CANCEL เพอการตงคาปจจบน
การยาง
การทาอาหารแบบยางเหมาะสาหรบชนเนอทหนสไลดบาง การทาเสตก เนอหมก (kebabs) ไสกรอกและไกช นเลกๆ มนเหมาะสาหรบการทาแซนวชและการทาขนมปงอบเนยอกดวย สามารถเวลาในการทาอาหารไดนานสดถง 95 นาท
สมมตวาคณตองการตงโปรแกรมการยางท 12 นาท
• เปดประตเตาอบแลววางอาหารบนตะแกรงยาง ปดประต
• กดป ม GRILL
• หมน TIME/MENU เพอเลอกเวลาทจะตงคาการทาอาหาร (12 :00 จะปรากฏบนหนาจอ)
• กดป ม START/QUICK START เพอเรมการทางานตามโปรแกรม
• หลงสนสดเวลาการทาอาหาร จะมสญญานเตอนและปรากฏ ‘End’ ทหนาจอ
หมายเหต :
• กดป ม STOP/CANCEL เพอหยดโปรแกรมขณะเครองกาลงทางาน กดป ม START/QUICK START เพอใหเครองทางานตอ
• ลางการตงคาแสดงผลกอนทจะเรมโปรแกรมใหม ดวยการกดป ม STOP/CANCEL เพอตงคาการทางานทตองการ
เกรดความร :
ขณะทใชการยางแบบเดยวนน คณอาจทาการอนตะแกรงยางใหรอนกอนทาการยาง
คาแนะนาการทางาน
ภาษ
าไท
ย
69

โหมดผสม (ไมโครเวฟและยาง)
โปรแกรมนทาอาหารดวยคลนไมโครเวฟและยาง เวลาสงสดทใชในการประกอบอาหารคอ 95 นาท
สมมตวาตองการทาอาหารดวยวธน 15 นาท
• เปดประต นาอาหารวางบนตะแกรงยาง ปดประต
• กดป ม COMBI เพอเลอกโปรแกรมการทางานโหมดผสม
• หมนป ม TIME/MENU เพอตงคาเวลาทใชประกอบอาหาร(คาเวลา 15 :00 นาทจะปรากฏทหนาตาง)
• กดป ม START/QUICK START เพอเรมใหเรมทางาน
• หลงจากสนสดเวลาการปรงอาหาร จะมเสยงสญญาณเตอนและมตว ‘End’ ปรากฏทหนาจอ
หมายเหต: • กดป ม STOP/CANCEL
เพอหยดการทางานขณะทเครองใชกาลงทางาน และกดป ม START/QUICK START เพอใหเครองใชเรมทางานตอไป
• ลางการตงคาบนหนาจอกอนการตงคาใหมไดดวยการกด STOP/CANCEL เพอตงคาการทางานปจจบนใหม
• ไมตองทาการอนตะแกรงสาหรบการปรงอาหารโหมดผสม
กดป ม Cobi
ระยะเวลา
ภาชนะทเหมาะสม ไมโครเวฟ
ยาง
1 ครง Co-1 30% 70%
ปลา, มนฝรง หรอ เนยแขงโรยขนมปง ปน
2 ครง Co-2 55% 45%
พดดง,ไขเจยว,มน ฝรงอบไก
ทางานแบบรวดเรว (Quick start)
โปรแกรมนเตาอบจะเรมทางานเตมท สามารถเพมเวลาการทางานไดในขณะกาลงปรงอาหาร ตงเวลาสงสดได10 นาท
• เปดประตแลววางภาชนะหรอจานอาหารบนจานหมน ปดประต
• กด START/QUICK START เพอตงเวลา กด 1 ครง เวลาในการปรงอาหารจะเพมขน 30 วนาท
• เตาอบเรมทางานอตโนมต
หมายเหต: • ลางคาหนาจอกอนการเรมคาทางานใหมดวยการกด
STOP/CANCEL เพอตงคาใหม
การต งเวลาทาอาหาร (Kitchen timer)
คณสามารถตงเวลาไดตามใจชอบ สามารถตงเวลาทาอาหารไดนาน 95 นาท
สมมตวาคณตองการตงเวลาทาอาหารท 30 นาท :
• กดป ม CLOCK/KITCHEN TIMER
• ตงเวลาตามทตองการใชดวยป มเลอก TIME/MENU (จนหนาจอปรากฏตวเลข 30 :00)
• กด START/QUICK START เพอตงคา
• จะมเสยงเตอนหลงจากหมดเวลา
.
หมายเหต:
• คณสามารถกดปม CLOCK/KITCHEN TIMER เพอนบถอยหลงไดเมอเรมเวลาการทาอาหาร
• การยกเลก ใหกด STOP/CANCEL ภายใน 5 วนาท
เมนการสาหรบใชประกอบอาหาร
คณสามารถเลอกโปรแกรมการทาอาหารจาก 8 โปรแกรมทตงคามาให โปรแกรมเหลานข นอยกบนาหนกของอาหาร โดยใหใสนาหนกหรอปรมาณของอาหารแลว ระบบจะคานวณเวลาการปรงอาหารโดยอตโนมต
• เปดประตเตาอบแลววางภาชนะหรอจานทใสอาหารลงบน จานหมน ปดประต
• หมน TIME/MENU ทวนเขมนาฬกา หมนอกครงเพอเลอกรหสการทาอาหาร
• กดป ม WEI . ADJ. เพอใสนาหนก หนาจอแสดงผลจะปรากฏรหสการทาอาหารหรอนาหนกของอาหารทตงคาไวในเครอง ไวแลว ซงจะสมพนธกบนาหนกของอาหารทคณใสไวในเตา ไมโครเวฟ
• กดป ม START/QUICK START เพอเรมการทาอาหาร
รหสอาหาร
รายการอาหาร โหมดการทาอาหาร
A-1 ขาวโพดคว (99 กรม) ไมโครเวฟ
A-2 กาแฟ (200 มล/ถวย) ไมโครเวฟ
A-3 ผกสด (กรม) ไมโครเวฟ
A-4 มนฝรง (230 กรม/หนวย) ไมโครเวฟ
A-5 พซซา (กรม) ไมโครเวฟ
A-6 อนอาหาร (กรม) ไมโครเวฟ
A-7 ไกยาง (กรม) ผสม (Combi)
A-8 ยางสเตก (กรม) ผสม (Combi)
หมายเหต:
• ระหวางการทาอาหารในโหมด A-7 (ไกยาง) และโหมด A-8 (ยางสเตก) นน เตาอบจะหยดทางานและมเสยงเตอนใหเปดอาหารด
• กด START/QUICK START เพอทางานตอไป
ภาษ
าไท
ย
70

การละลายตามนาหนก
โปรแกรมนจะละลายอาหารแชแขงตามขอมลนาหนกทใสเขาไป ในเครอง โดยจะมนาหนกอยท 100 กรม ถง 1800 กรม
สมมตวาคณตองการตงคาการทางานของเตาอบทนาหนกอาหาร 200 กรม
• เปดประตวางภาชนะหรอจานอาหารลงบนจานหมน ปดประต
• กด WEI. DEF.
• กด WEI . ADJ. เพอใสนาหนก
• กด START/QUICK START เพอใหเรมการทาอาหาร
หมายเหต:
• ในระหวางการละลายนาแขง เตาอบจะหยดทางานและมเสยงเตอนใหพลกอกดานขน
• กด START/QUICK START เพอใหทางานตอไป
การทาอาหารแบบหลายขนตอน (Multi-stage cooking)
เตาอบของคณสามารถตงโปรแกรมไดถง 3 ขนตอน โดยใชโหมดไมโครเวฟ โหมดยาง หรอโหมดผสม Microwave and Grill).
สมมตวาคณตองการตงคาเพอทาอาหารดงตอไปน
ทาอาหารดวยไมโครเวฟ (60% ) การยาง
• เปดประตวางภาชนะ/จานอาหารบนจานหมน ปดประต
• กดท POWER ใหอยท 60%
• หมน TIME/MENU เพอเลอกเวลาการทางานและตงคา
• กดป ม GRILL
• หมน TIME/MENU เลอกเวลาการทาอาหารและตงคา
• กดป ม START/QUICK START เพอเรมทาการปรงอาหาร
• หลงจากเวลาสนสดลง จะมสญญานเตอนและหนาจอจะปรากฎคาวา ‘End’
หมายเหต:
การละลายนาแขงตามนาหนกนน เมนหรอการทาอาหารยางรวดเรวไมสามารถใชโปรแกรมการทา อาหารแบบหลายขนตอนได
ระบบลอคปองกนเดก ระบบปองกนเดกสามารถเปดใชงานเพอปองกนไมใหเดกเลก เผลอปดการทางานของเตาอบโดยไมตงใจ โดยทป มทงหมดจะใชงานไดแมจะเปดระบบลอกนไว
• ใชงานระบบลอกโดยการกดป ม”stop/cancel’ คางไวประมาณ 3 วนาท จะมเสยงบบและสญญลกษณการลอกจะปรกฎขนทหนาจอ
• ยกเลกการลอกโดยกดป ม”stop/ cancel” คางไว 3 วนาท จนมเสยงบบดงขนและสญญลกษณการลอกกจะดบลง
เตาอบหยดทางานระหวางทาการปรงอาหาร
1) กดป ม STOP/ CANCEL
• คณสามารถใหเตาอบเรมการทางานใหมดวยการกดป ม START/QUICK START
• ตงคากลบไปยงโปรแกรมปจจบนไดดวยการกดป ม STOP/CANCEL
2) เมอเปดประต
• คณสามารถตงคาการทางานเตาอบใหมดวยการปดประตและกดป ม START/QUICK START
• ตงคาโปรแกรมปจจบนดวยการกดป ม STOP/CANCEL.
ภาษ
าไท
ย
71

การทาความสะอาดภายในเตาอบ
• รกษาความสะอาดภายในชองอบ ทประตและยางขอบประตใหสะอาดอยเสมอ เศษอาหาร, การหกลน และเศษนามนทกระเซนตดทผนง ทประตและทยางขอบประตของเตาอบ ทาใหประสทธภาพในการทางานของเตาอบลดลง และอาจทาใหเกดอนตรายตอผใชงานได
• สามารถทาความสะอาดบรเวณภายในและทประตของเตาอบดวยผาชบนาพอหมาดๆเชดทาความสะอาด หรออาจใชนายาทาความสะอาดออนๆในกรณทสกปรกมากๆ โดยใหหลกเลยงการใชนายาทาความสะอาดทมฤทธกด กรอนเพราะจะทาใหเกดรวรอย หรอทาใหประตมวได
• สามารถกาจดสงสกปรกทลางออกยากดวยการใชนา 1 แกวหรอ 1 ถวยตมดวยไมโครเวฟประมาณ 2-3 นาท
• การกาจดกลนภายในเตาอบทาไดโดยการใชนามะนาว 1 ชอนผสมนา 1 แกวหรอ 1 ถวย ตมทงไวในเตาไมโครเวฟประมาณ 5 นาท
• ควรดแลรกษาใหประตสะอาดอยเสมอและตรวจดทกระยะวาประตชารดหรอไม
• หลกเลยงไมใหนาหรอเศษขยะเขาไปตดในชองเลกๆของ เครองใชน
การทาความสะอาดภายนอกเตาอบ
• การทาความสะอาดดานนอกสามารถทาไดงายๆดวยการใช นายาทาความสะอาดออนๆผสมนาอนลางทาความสะอาด แลวลางออก ใชผาเนอนมเชดใหแหง หลกเลยงการใชนายาทาความสะอาดทมฤทธทาลายพนผว เตาอบ
• สาหรบการทาความสะอาดพนผวทเปนสแตนเลส ใหเชดไปในทศทางเดยวกบลายนนๆเสมอเพอไมใหเกดรว รอย สาหรบคราบเหนยว ใหใชนายาทไมกดกรอนทาความสะอาด (โปรดปฏบตตามคาแนะนาของผผลต)
• เปดประตเตาอบเพอยกเลกการทางานบนแผงควบคมกอนทาความสะอาด โดยใชผานมชบนาหมาดๆเชดทาความสะอาด ใหหลกเลยงการใชนาทาความสะอาดในปรมาณทมากเกน ไปปองกนไมใหแผงควบคมเปยกนา
• รกษาไมใหชองระบายอากาศมเศษขยะหรอมนาซมเขาไป ได
ไฟแสงสวางในเตาอบ
อยาทาการเปลยนหลอดไฟแสงสวางในเตาอบดวยตวเอง กรณาตดตอศนยบรการลกคารนไนใกลบานทานเพอใหสงชางผ ชานาญมาดาเนนการให
การทาความสะอาดอปกรณตางๆ
จานหมนและทรอง
• รกษาวงกลมทใชรองจานหมนใหสะอาดอยเสมอเพอใหจานหมนหมนไดสะดวกและหลกเลยงการเกดเสยงดง
• ลางดวยนายาทาความสะอาดออนๆ ลางออกดวยนาสะอาดแลวเชดใหแหง
• หลงจากทาความสะอาดจานหมนแลว ใหนาจานหมนใสเขาไปใหถกตอง โดยดวธการตดตงจานหมนในคมอน
การหลกเลยงไมใหจานหมนแตกชารด:
• ตองรอใหจานหมนเยนกอนจงจะลางนาทาความสะอาด
• อยาวางของรอนลงบนจานหมนทเยน
• อยาวางของเยนบนจานหมนทกาลงรอน
ตะแกรงยาง
• ลางทาความสะอาดตะแกรงยางแลวทาใหแหงทกครงหลง การใชงาน โดยใหแชในนาสบรอนๆเพอลางเอาคราบไขมนทลางออก ยากออกดวยการใชฟองนาหรอแปรงทาความสะอาด และคณสามารถลางทาความสะอาดดวยมอหรอเครองลาง จานกได
กรณาถอดปลกไฟออกกอนการถอดทาความ
สะอาดหรอการบารงรกษาใดๆ
คาเตอน: หามถอดฝาครอบตวนาคลนไมโครเวฟภายในเตาอบออก โดยเดดขาด
การดและบารงรกษา
ภายในเตาอบจะเกดความรอนระหวางการใชงาน กอนทจะทาความสะอาดตองดใหดวาเตาอบไมมความ รอนแลว
สาหรบการซออปกรณอะไหล กรณาตดตอศนยบรการลกคาใกลบานทาน
ภาษ
าไท
ย
72

ในกรณมปญหาเกยวกบการใชงานหรอมความผดพลาดของการทางานเพยง เลกนอย กอนจะเรยกชางฯจากศนยบรการ กรณาดคาแนะนาเบองตนทอาจชวยใหคณแกไขปญหาไดดวยตว เอง
เตาอบใมทางาน
• ดวาไดเปดสวทชไฟฟาและไดเสยบปลกไฟเรยบรอยแลว
• ตรวจดเบรกเกอรวาทางานเปนปกตหรอไม
• ตราจดวาไดปดประตเตาอบถกตองแลว
• ตรวจดวาไดกดป ม START/QUICK START ไวหรอไม
ไมมไฟแสงสวางหนาจอ
• ตรวจดวาแผงควบคมไดถกตงโปรแกรมไวถกตองแลว
จานรองหมนหมนไมดหรอไมสมาเสมอ
• ตรวจดวาบรเวณระหวางทรองจานหมนกบจานหมนนนสะอาดดหรอไม
อาหารไมสก, ไมรอนหรอไมละลายเทาทควร
• ตรวจดวาไดตงคาการทางานถกตองแลว
• ตรวจดวาโปรแกรมการทางานถกขดจงหวะทาใหการทางาน ไมเสรจ สมบรณตามโปรแกรมทตงคาไว
กรณทเตาอบไมโครเวฟหยดทางานในขณะกาลงประกอบ
อาหาร
• ตรวจดวามส งของหรอวตถตดอยทชองระบายอากาศหรอไม หากมใหนาออกไป
ไฟแสงสวางของเตาอบไมทางาน
• อยาพยายามเปลยนหลอดไฟดวยตวเอง ใหตดตอศนยบรการลกคารนไนใกลบานทานเพอให ชาง ผชานาญดาเนนการให
การเกดการควบแนนบรเวณประตเตาอบ
• อาจมไอนาหรอหยดนาเกาะทประตขณะประกอบ อาหาร เพราะมการควบแนนจากความรอนของอาหาร ซงไมไดมผลกระทบหรอเปนสงทผดปกตแตอยางใด
การแกปญหาเบองตน
ถายงมปญหาการใชงานหลงจากแกไขเบองตนแลว กรณาตดตอขอรบความชวยเหลอจากศนยบรการลกคาฯใกล บานทาน สาหรบการขอรบบรการภายใตเงอนไขการรบประกนสนคานน ทานจาเปนตองแสดงหลกฐานการซอสนคาและแสดงใบรบ ประกนสนคาทยงไมหมดอายการประกน
ภาษ
าไท
ย
73

นาอปกรณท งหมดออกจากกลอง
ตรวจดความเสยหาย อยานาเตาอบไมโครเวฟนไปใชงาน ในกรณท: -
ก ประตเตาอบมรปทรงบดเบยวหรอโคงงอ
ข บานพบประตกบสลกประตหลวมหรอหก
ค ขอบยางประตกบชองเตาอบโคงงอ บบ เสยรปทรง
ง มองเหนรอยบบรอยแตกทผนงเตาอบดานในไดจากดานนอก
อยาใชงานเตาอบไมโครเวฟนหากเหนวาเสยชารดเสยหาย กรณาตดตอศนยบรการลกคาของรนไนใกลบานทาน
วธการใสเตาอบไมโครเวฟเขากบตท ถกตอง
• ผลตภณฑนถกออกแบบใหตดเขาไปในต
• ตรวจดวาไมมวสดแปลกเขาไปกดขวาหรอปดกนทชอง ระบายอากาศ ถาชองระบายอากาศถกปดกนขณะทเตาอบกาลงรอนมาก เกนไปขณะทางานจะทาใหเตาอบชารดได
• ควรตดตงเตาอบบนพนราบในระดบทสามารถรบนาหนกของ เครองใชนได โดยตองตดตงในททเหมาะสม เพอหลกเลยงการกอใหเกดเสยงสนสะเทอน
• ผนงตทตดเตาอบตองทาจากวสดทนความรอน
• ใหเตาอบอยหางจากแหลงความรอนและนา ถาเตาอบโดนความรอนหรอนาจะทาใหประสทธภาพในการทางานลดลงและทาใหเตาอบชารดได
• การทางานของเตาอบอาจจะรบกวนคลนวทย สญญานโทรทศนหรออปกรณทคลายกนน จงใหตดตงเตาอบในระยะททางจากเครองใชหรออปกรณ อเลกทรอนกสเหลานนพอสมควร
• แตละชนตองตดใหมขนาดเทากบรปขางลางน:
การระบายอากาศ
เพอใหแนใจวามการระบายอากาศเพยงพอ ชองวางสาหรบการระบายอากาศจากผนงตกบดานหลงเตาอบตอง เปน 45 มม. เปนอยางนอย
คาแนะนาการตดต ง
การตดตงตองทาโดยผชานาญเทานน ผผลตปฏเสธความรบผดชอบสาหรบการตดตงทไมเหมาะสมและไมรบผดชอบสาหรบการรบประกนเครองใชในกรณทมความเสยหายเกด ขนจากการตดตงทไมถกตอง
ภาษ
าไท
ย
74
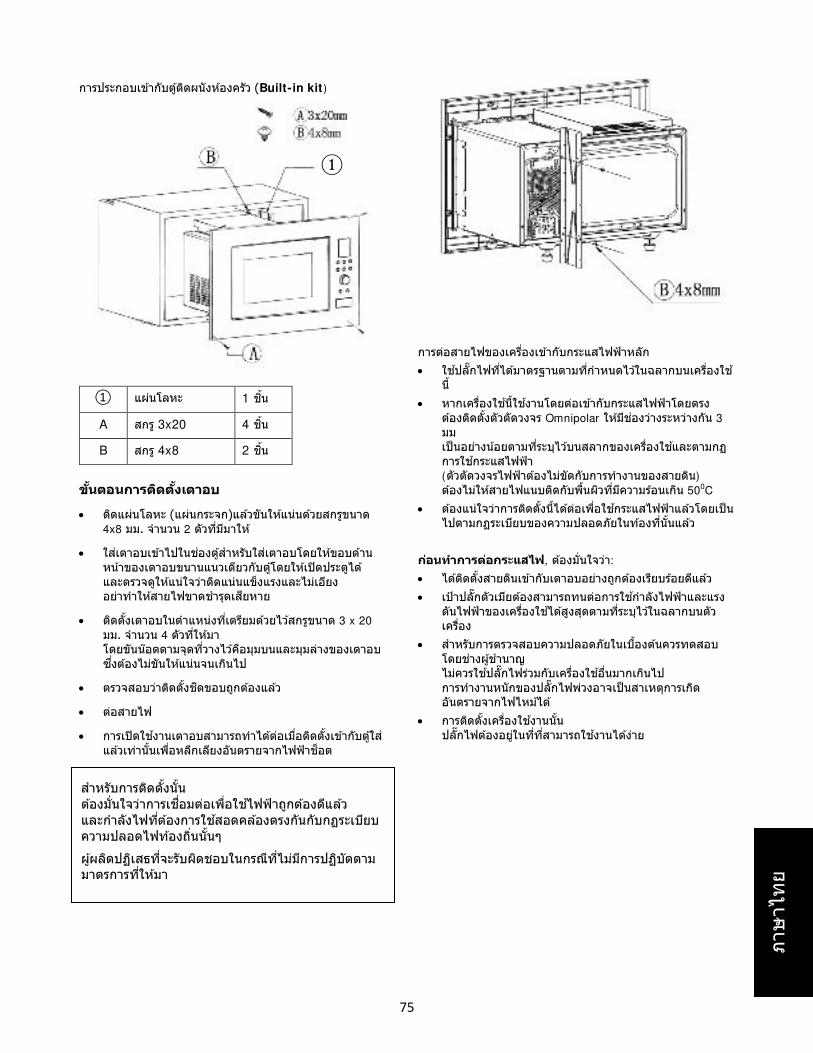
การประกอบเขากบตตดผนงหองครว (Built- in kit)
① แผนโลหะ 1 ชน
A สกร 3x20 4 ชน
B สกร 4x8 2 ชน
Securing the appliance
① แผนโลหะ 1 ชน
A สกร 3x20 4 ชน
B สกร 4x8 2 ชน
ข นตอนการตดต งเตาอบ
• ตดแผนโลหะ (แผนกระจก)แลวขนใหแนนดวยสกรขนาด 4x8 มม. จานวน 2 ตวทมมาให
• ใสเตาอบเขาไปในชองตสาหรบใสเตาอบโดยใหขอบดาน หนาของเตาอบขนานแนวเดยวกบตโดยใหเปดประตได และตรวจดใหแนใจวาตดแนนแขงแรงและไมเอยง อยาทาใหสายไฟขาดชารดเสยหาย
• ตดตงเตาอบในตาแหนงทเตรยมดวยไวสกรขนาด 3 x 20 มม. จานวน 4 ตวทใหมา โดยขนนอตตามจดทวางไวคอมมบนและมมลางของเตาอบ ซงตองไมขนใหแนนจนเกนไป
• ตรวจสอบวาตดตงชดขอบถกตองแลว
• ตอสายไฟ
• การเปดใชงานเตาอบสามารถทาไดตอเมอตดตงเขากบตใสแลวเทานนเพอหลกเลยงอนตรายจากไฟฟาชอต
การตอสายไฟของเครองเขากบกระแสไฟฟาหลก
• ใชปลกไฟทไดมาตรฐานตามทกาหนดไวในฉลากบนเครองใช น
• หากเครองใชนใชงานโดยตอเขากบกระแสไฟฟาโดยตรง ตองตดตงตวตดวงจร Omnipolar ใหมชองวางระหวางกน 3 มม เปนอยางนอยตามทระบไวบนสลากของเครองใชและตามกฏ การใชกระแสไฟฟา (ตวตดวงจรไฟฟาตองไมขดกบการทางานของสายดน) ตองไมใหสายไฟแนบตดกบพนผวทมความรอนเกน 500C
• ตองแนใจวาการตดตงนไดตอเพอใชกระแสไฟฟาแลวโดยเปนไปตามกฏระเบยบของความปลอดภยในทองทนนแลว
กอนทาการตอกระแสไฟ, ตองมนใจวา:
• ไดตดตงสายดนเขากบเตาอบอยางถกตองเรยบรอยดแลว
• เปาปลกตวเมยตองสามารถทนตอการใชกาลงไฟฟาและแรง ดนไฟฟาของเครองใชไดสงสดตามทระบไวในฉลากบนตว เครอง
• สาหรบการตรวจสอบความปลอดภยในเบองตนควรทดสอบ โดยชางผชานาญ ไมควรใชปลกไฟรวมกบเครองใชอนมากเกนไป การทางานหนกของปลกไฟพวงอาจเปนสาเหตการเกด อนตรายจากไฟไหมได
• การตดตงเครองใชงานนน ปลกไฟตองอยในททสามารถใชงานไดงาย
สาหรบการตดตงนน ตองมนใจวาการเชอมตอเพอใชไฟฟาถกตองดแลว และกาลงไฟทตองการใชสอดคลองตรงกนกบกฏระเบยบความปลอดไฟทองถนนนๆ
ผผลตปฏเสธทจะรบผดชอบในกรณทไมมการปฏบตตาม มาตรการทใหมา
①
ภาษ
าไท
ย
75

Rinnai Customer Care Centres
China |中国
Guangzhou Rinnai Gas & Electric
Room 2805, No.31 Jianghe Building,
Tianshou Road, Guangzhou, China
广州林内燃具电器有限公
中国广州天河区天寿路 31 江河大厦 2805室
Tel 电话 : (86) 20 3821 7976
Email 邮箱 : [email protected]
URL 网址 : www.gzrinnai.com.cn
Philippines
Mitsui Industia Corporation
10 Buenaventura St., Cor MacArthur
Highway, Dalandan Valenzuela City,
Philippines
Tel : (63) 2 292 9177 / 292 9179
Fax : (63) 2 292 8187
Indonesia
Customer Care of PT. Rinnai Indonesia
Jl. Raya Pejuangan No.21,
Komp. Ruko Sastra Graha No.11 -13
Jakarta 11530
Tel : (62) 0800 1 889 889 (toll free) /
0815 112 99999 (SMS Center)
Email : [email protected]
URL : www.rinnai.co.id
Singapore
Rinnai Holdings (Pacific) Pte Ltd
47 Tannery Lane #05-01/02,
Elite Industrial Building II, Singapore 347794
Tel : (65) 6748 9478
Fax : (65) 6745 9240
Email : [email protected]
URL : www.rinnai.sg
Macau |澳門
Fu Lei (Leong Si) Trading Limited
Avenida do Almirante Lacerda No. 14-14C,
Edf. Industrial Iao Son 11-And-A, Macau
冨利 粱氏 貿易有限公
澳門提督馬路 14-14C,祐順工業大厦 11樓 A
Tel 电话 : (853) 2822 0889
Fax 传真 : (853) 2822 2733
URL 网址 : www.rinnai.com.hk/mo
Thailand | ประเทศไทย
Rinnai (Thailand) Co., Ltd.
61/1 Soi Kingkaew 9, Kingkaew Rd.
Racha Thewa, Bangphli, Samutprakarn 10540, Thailand
บรษท รนไน (ประเทศไทย) จ ำกด
เลขท / ซอยกงแกว 9 ถนนกงแกว ต ำบลรำชำเทวะ อ ำเภอบำงพล จงหวดสมทรปรำกำร
ประเทศไทย Tel : 66 -
Email : [email protected]
URL : www.luckyflame.co.th
Malaysia
Rinnai (M) Sdn Bhd
D2-3-G & D2-3-1, Block D2, Pusat Perdagangan Dana 1,
Jalan PJU 1A/46, 47301 Petaling Jaya,
Selangor Darul Ehsan, Malaysia
Tel : (60) 3 7832 0037 / 7832 0038 / 7832 0039
Fax : (60) 3 7832 0036
URL : www.rinnai.com.my
Vietnam | Việt Nam
Rong Viet Commerce Company Limited
120 3/2 Street, Ward 12, District 10,
Ho Chi Minh City, Vietnam
Công Ty TNHH Thương Mại Rồng Việt
Đường / , Phường 12, Quận 10,
TP. Hồ Chí Minh, Việt Nam
Tel : (84) 8 3862 3409
Fax : (84) 8 5404 1964
Email : [email protected]
URL : www. rongviet-rinnai.com
Myanmar | းမနမဪ
Myanmar Kowa International Co., Ltd
No.199, Ground Floor, 34th Street (Upper Block),
Kyauktada Township, Yangon, Myanmar
အမတ (၁၄၄)၅ ဿ လမ ( )၊ ေကဪကတတဪၿမါ႕နယ၅ ရနကနၿမါ႕၆ Tel ဖန : (95-1) 245925 / 246304 / (95-9) 7300 7773
Fax ဖက(စ) : (95-1) 245925
Email အာေမလ : [email protected]
Related Documents